

Page 1
Z41TL001813 1A
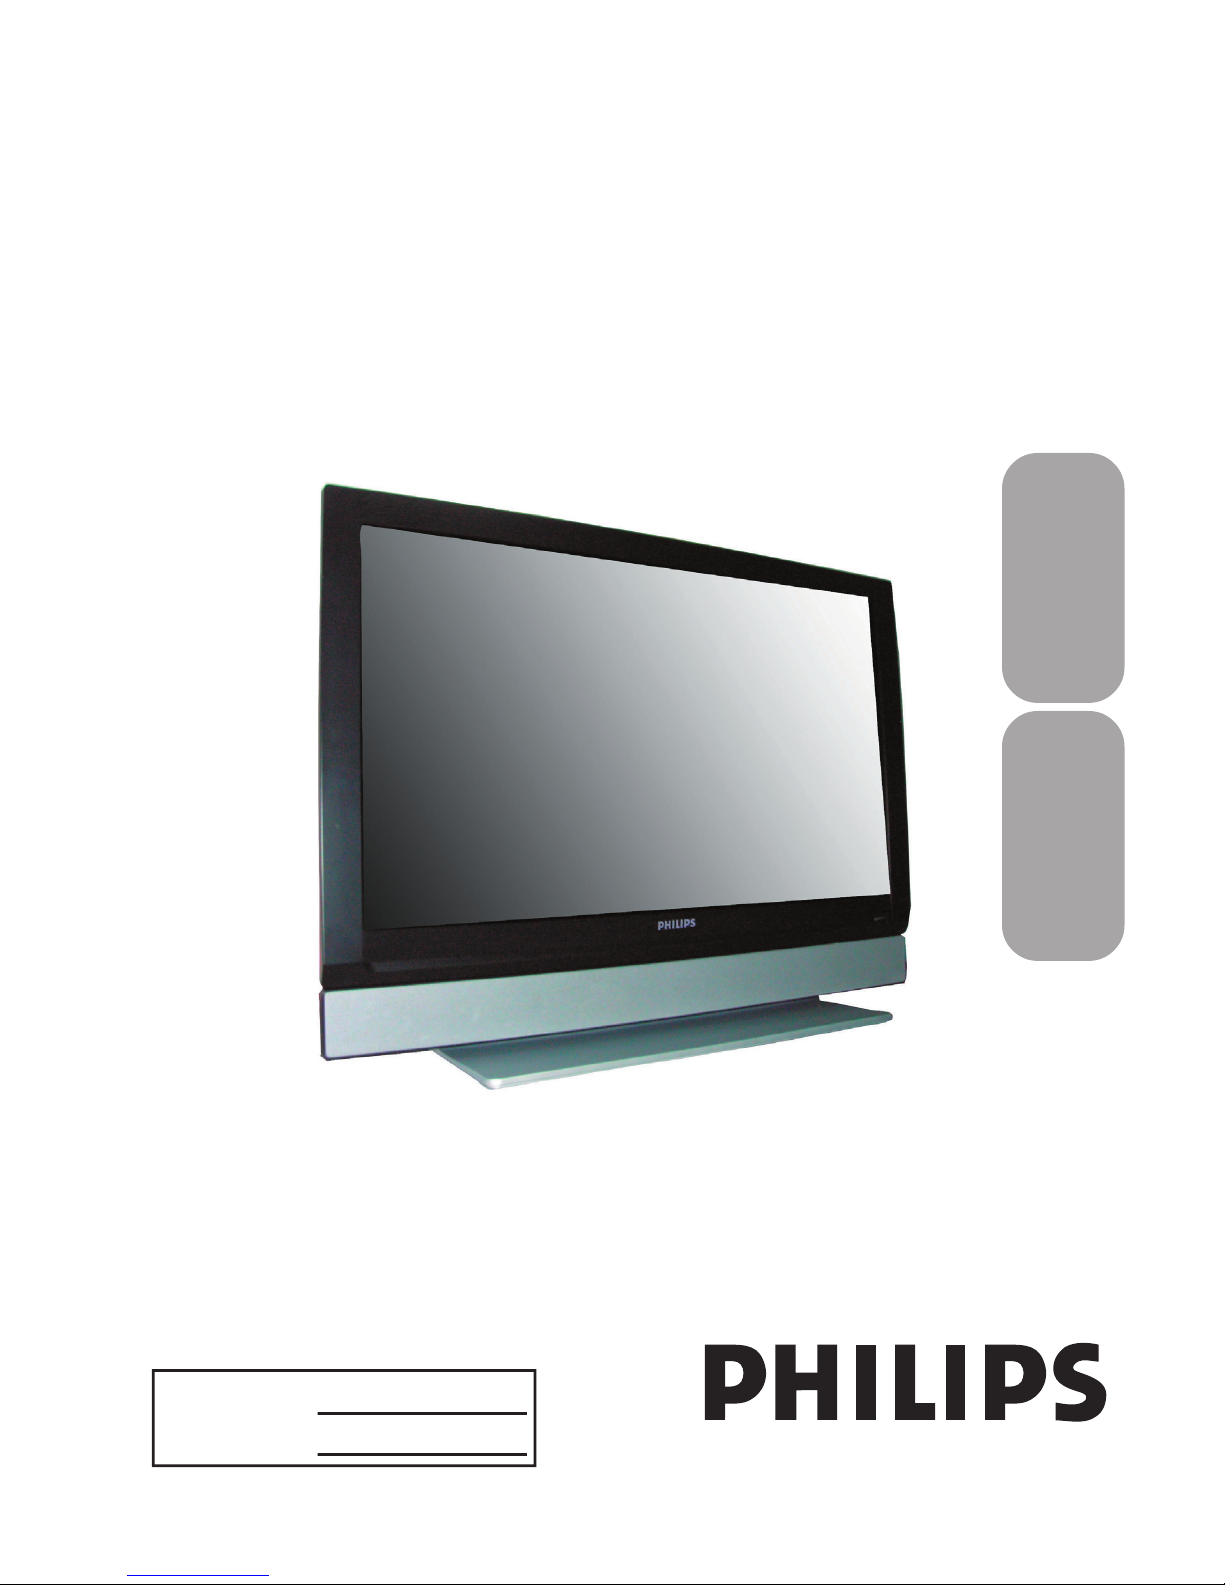
TA2000
EnglishArabic
中文
Page 2
safety
symbols
This “bolt of lightning” indicates
safety of everyone in your household, please do
The “exclamation point” calls attention
to features for which you should read
the enclosed literature closely to
WARNING
: To reduce the risk of fi re or
electric shock, this apparatus should not be
exposed to rain or moisture and objects fi lled
with liquids, such as vases, should not be placed
on this apparatus.
CAUTION
: To prevent electric shock, match
wide blade of plug to wide slot, fully insert.
on the rear of the cabinet. Retain this
Serial No. ___ ____ _ ____ ____ __ ____ _
2
RETURN YOUR PRODUCT REGISTRATION CARD TODAY
TO
GET THE VERY MOST FROM YOUR PURCHASE.
guarantees that your date of purchase
will be on fi le, so no additional
work will be required from you to
obtain
warranty service.
- directly from the
the rare case of a
safety defect.
*Additional Benefi ts of
that you’ll receive all of the privileges to
which you’re entitled, including
special
and welcome to the “family!”
Thank you for your confi dence in PHILIPS. You’ve selected
one of the best-built, best-backed products available today.
We’ll do everything in our power to keep you happy with
your purchase for many years to come.
Visit our World Wide Web Site at http://www.usasupport.philips.com
Page 3

Clean only with a dry cloth.
amplifi ers) that produce heat.
grounding-type plug. A polarized plug has two blades with
one wider than the other. A grounding type plug has two
for replacement of the obsolete outlet .
Only use attachments/accessories specifi ed by the
table specifi ed by the manufacturer, or sold with
the apparatus. When a cart is used, use caution
when moving the cart/apparatus combination to avoid
way, such as power-supply cord or plug is damaged, liquid
apparatus has been exposed to rain or moisture, does not
operate normally, or has been dropped.
- The appliance should be
serviced by qualifi ed service personnel when:
A. The power supply cord or the plug has been damaged;
appliance;
C. The appliance has been exposed to rain
exhibits a marked change in performance;
damaged.
Tilt /Stability
- All televisions must comply with
and stability properties of its cabinet design.
• Do not compromise these design standards by applying
excessive pull force to the front, or top, of the cabinet
which could ultimately overturn the product.
• Also, do not endanger yourself, or children, by placing
electronic equipment/toys on the top of the cabinet. Such
cause product damage and /or personal injury.
Wall or Ceiling Mounting
- The appliance should be
- An outdoor antenna should be located
away from power lines.
Outdoor Antenna
Grounding
- If an outside antenna is
connected to the receiver, be sure the antenna system is
grounded so as to provide some protection against voltage
surges and built up static charges.
Object and Liquid Entry
- Care should be taken so
that objects do not fall and liquids are not spilled into the
enclosure through openings.
- To prevent battery leakage
that may result in bodily injury, property damage, or
damage to the unit:
• Install all batteries correctly, with + and - aligned as
• Do not mix batteries (old and new or carbon and
alkaline, etc.).
• Remove batteries when the unit is not used for a long
time.
2.
4.
5.
6.
7.
8.
9.
20.
21.
Page 4

ADDITIONAL SAFETY PRECAUTIONS
screw of the stand to the set. Improper tightening of screw may render the set unsafe.
installation may render the set unsafe.
— cleaning the TV screen, never use abrasive cleaning agents.
— there is a lightning storm.
— the set is left unat tended for a prolonged period of time.
material like chamois. DO NOT USE acetone, toluene or alcohol to clean the sur face of the screen. These chemicals
will cause damage to the surface.
screen when left exposed for some time.
and elec trically parts. After condensation fades, spots or blemishes will be present on the LCD screen.
the VESA cover.
POSITIONING THE LCD TELEVISON
LCD TV.
RECYCLING PROCEDURE/ END OF LIFE DISPOSAL
cadmium. If possible, when disposing of batteries, use recycling means available in your area.
area for companies that will recover used televisions for dismantling and collection of reusable materials, or contact
your dealer for TV recycling tips.
PRECAUTION
Page 5
CONTENTS
NOTE: This manual covers different versions
and models. Not all features described in this
manual will match those of your LCD TV. This
is normal and does not require you contacting
your dealer or requesting service.
Your new LCD TV and its packaging contain materials
that can be recycled and reused. Specialized companies
can recycle your product to increase the amount of
to be properly disposed.
Your product also uses batteries that should not be
thrown away when depleted, but should be handed in
and disposed off as small chemical waste.
When you replace your existing equipment, please fi nd
out about the local regulations regarding disposal of your
old television, batteries, and packing materials.
END-OF-LIFE DISPOSAL
Welcome/Registration of Your TV
TIONS
Table of
t
s
6
Auto Store (Setting Up Channels)
. .
8
Setting
. . . .
9
0
13
Timer Menu Controls
TV Picture Menu Controls
TV
Sound Menu Controls
6
Smart
Control
Smart
Sound Control
. . . . . . . . . . . . . . . . . . . . . . . . . . . .
Auto Lock
9
Auto Lock Access Code
Auto Lock Program
20
21
2
2
23
PC PIP (Picture In Picture)
Setting Up The PC Mode
General Information
Trouble Shooting Tips
6
8
TV.
Audio/Video In Jacks
: Use to quickly connect other
equipment to your
LCD TV.
Automatic Channel Storing
Auto Store):
Quick and easy setup of available channels.
On-screen Menus
: Helpful messages
Simplifi ed Chinese) for setting TV controls.
: Works your LCD TV features.
Sleep Timer
: Turns off the LCD TV within an amount
of time you specify (0-180 minutes from the current
time).
AutoLock
: Lets you block viewing of certain TV
channels if you do not want your children viewing
Standard broadcast
(VHF/UHF) or
Cable TV
channel
capability.
Stereo capability
: Includes a built-in amplifi er and
twin-speaker system, allowing reception of TV programs
Treble,
: Enhance the LCD TV’s
sound.
Page 6
6
HELPFUL H
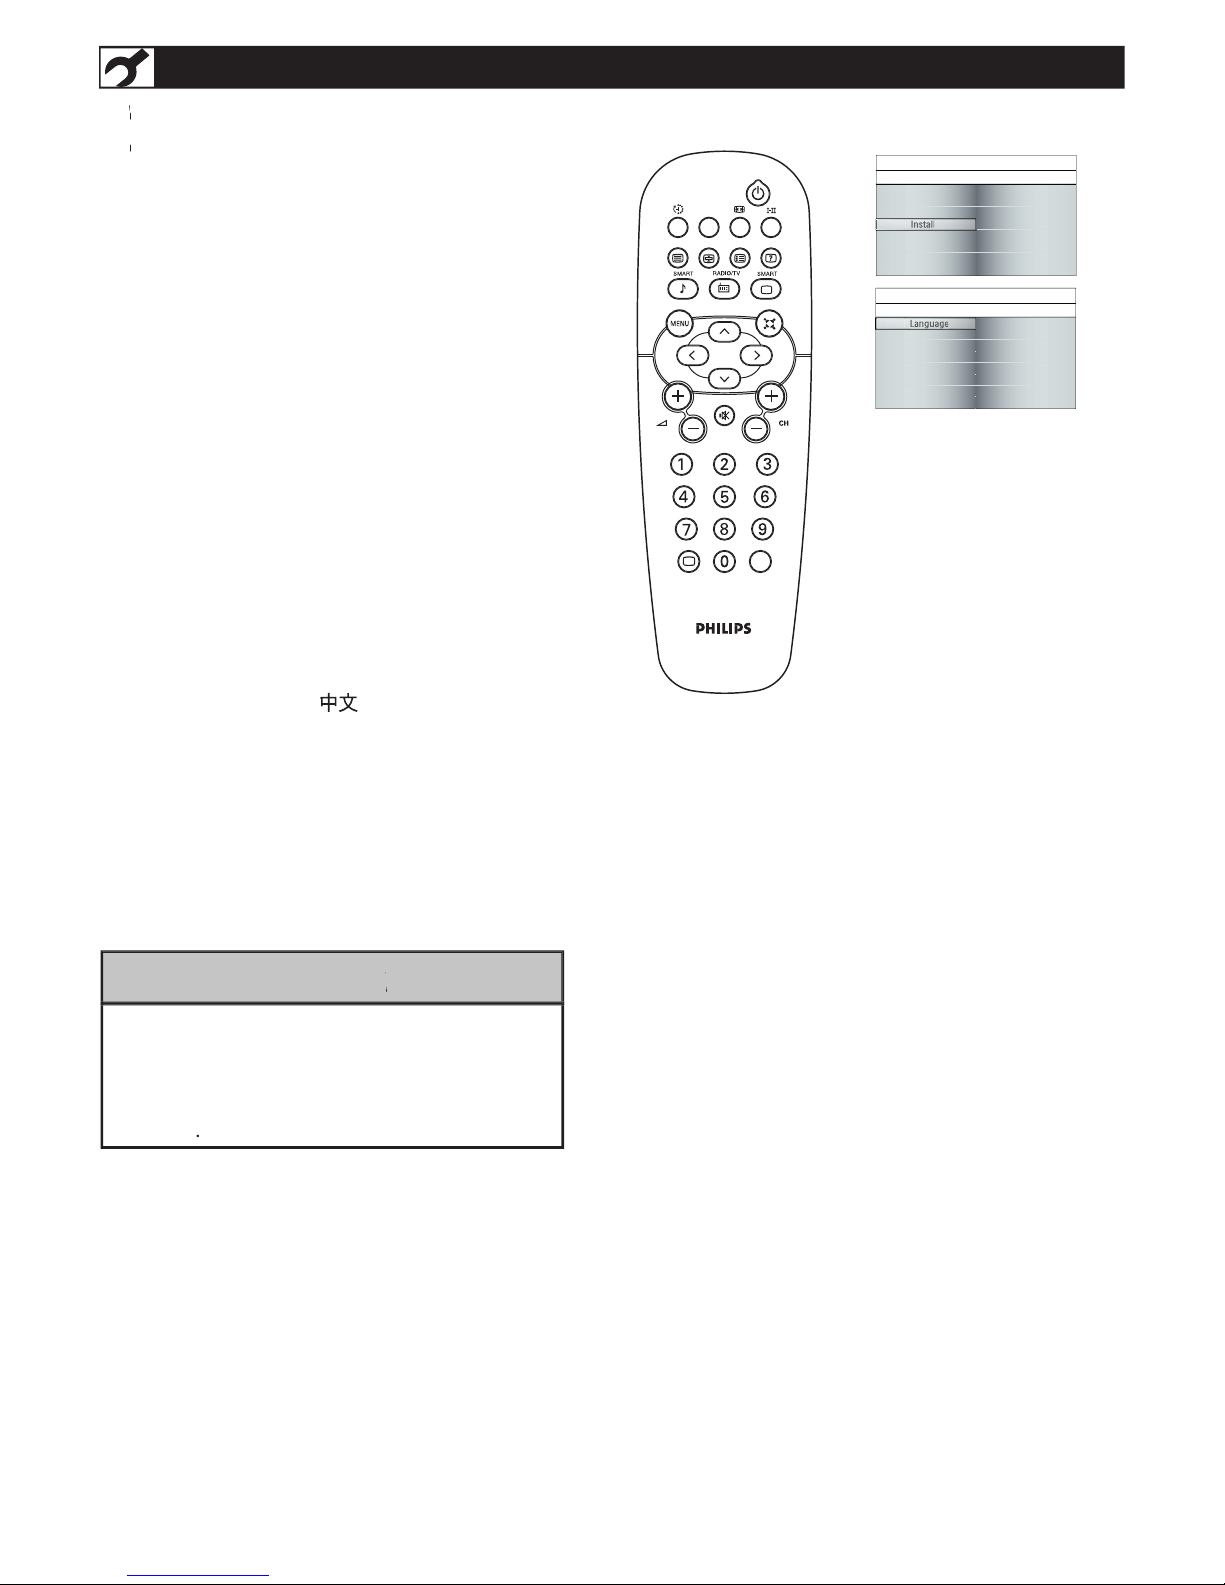
to open the onscreen menu.
Simplifi ed Chinese
)
, then press CURSOR
1
2
3
4
5
only the TV’s onscreen MENU items
appear in English
or Simplifi ed Chinese text.
features
A/CH
AV
i
+
Picture
Sound
Features
Install
Language
Auto store
Manual store
Channel setting
Factory reset
Install
Main Controls Install
Language
Auto store
Manual store
Channel setting
Factory reset
Language
Language
Language
Main Controls
Install
Language
English
中文
LANGUAGE SETTINGS
or English, Simplified Chinese -speaking TV
or English, Simplified Chinese -speaking TV
owners, an onscreen L ANGUAGE option is
present. The LANGUAGE control enables you to set
the T V ’s onscreen menu to be shown in English or
Page 7
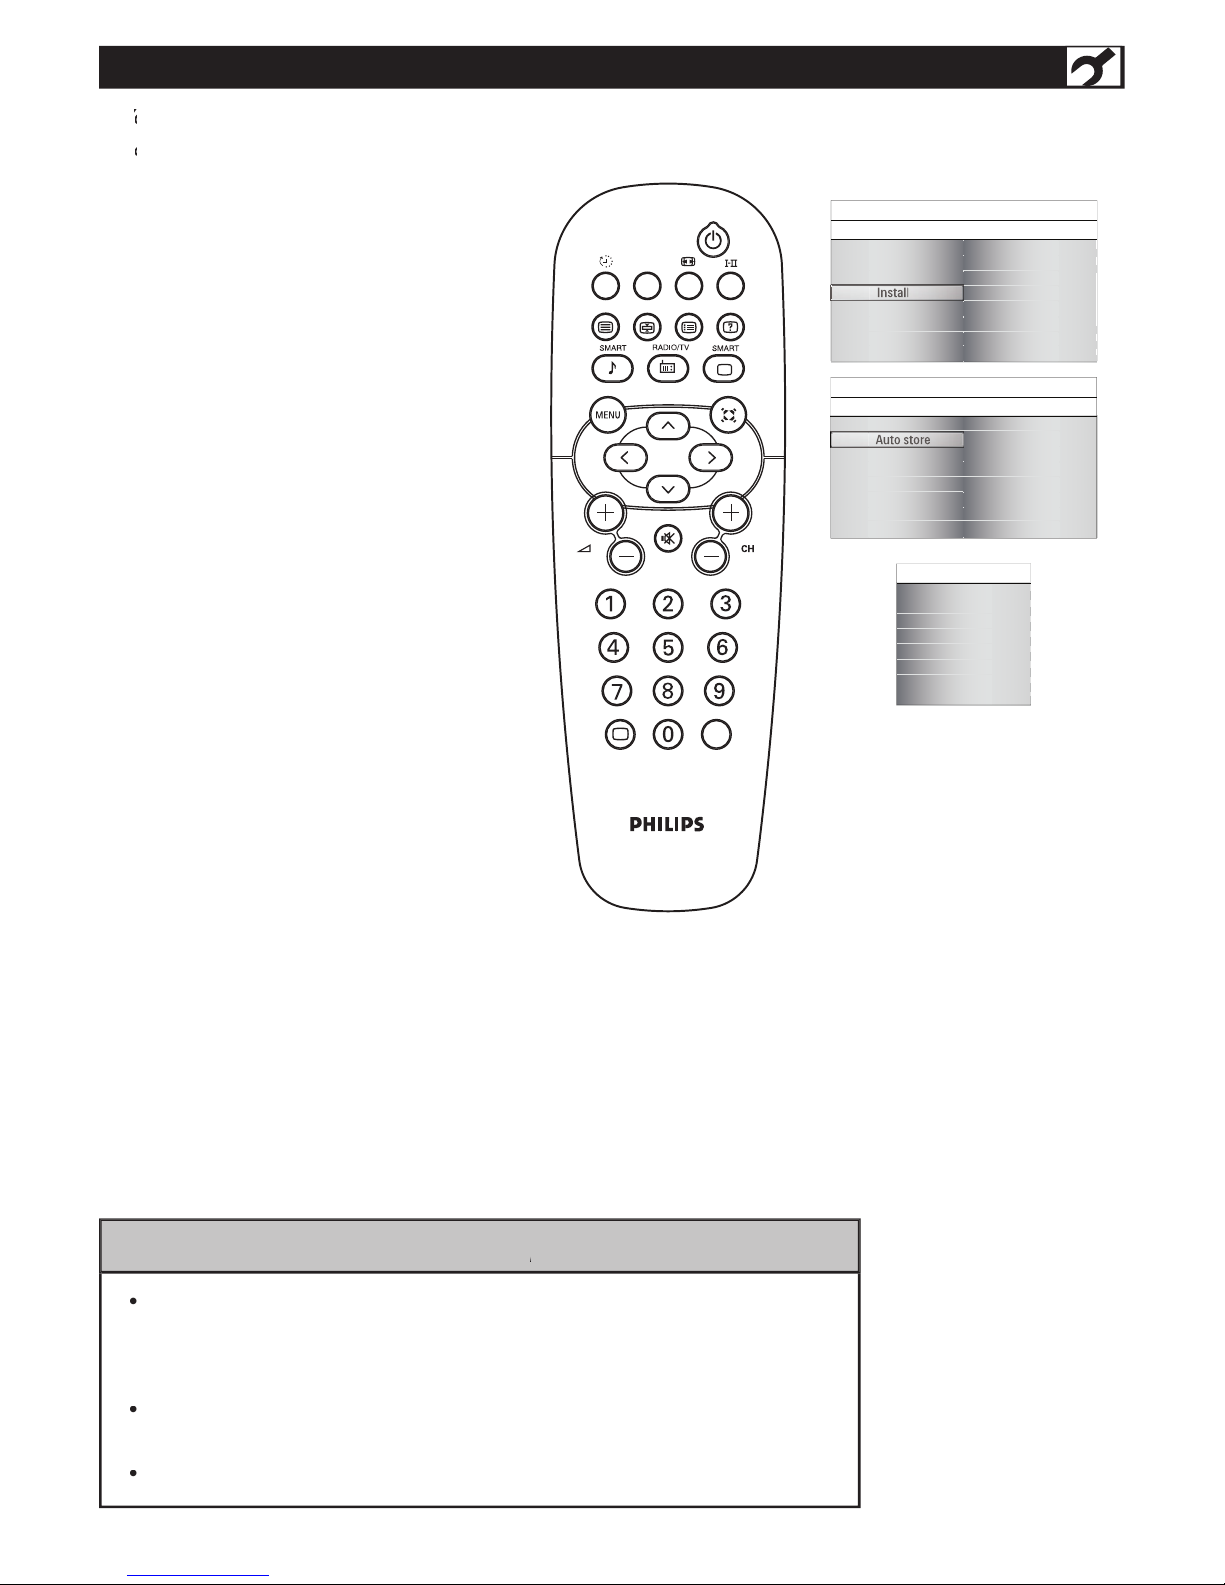
AUTO STORE (SETTING UP CHANNELS)
our LCD TV can automatically
our LCD TV can automatically
set itself for local
area (or cable TV) channels. This makes it easy
for you to select only the T V stations in your
area by
pressing the CH (+) or CH (-) button.
control to show the onscreen menu.
AUTO STORE control.
to enter AUTO
STORE, then press CURSOR RIGHT to
start scanning of channels.
clear the menu from the screen, after
AUTO STORE has fi nished.
1
2
3
4
5
6
A/CH
AV
i
+
Picture
Sound
Features
Install
Language
Auto store
Manual store
Channel setting
Factory reset
Main Controls Install
Language
Auto store
Manual store
Channel setting
Factory reset
Auto store
Main Controls
Install
Auto store
Start?
Please wait
Prog. found
Frequency
Auto store
0
MHz
store function to set up the TV for the broadcast or cable channels available in
your area. If you do not run the auto store function to set up the channels ,
your television may not operate properly.
After you’ve run
Auto Store, check out the results. Press the CH (+) or the CH (-)
button and see which channels you can select.
HELPFUL H
Page 8
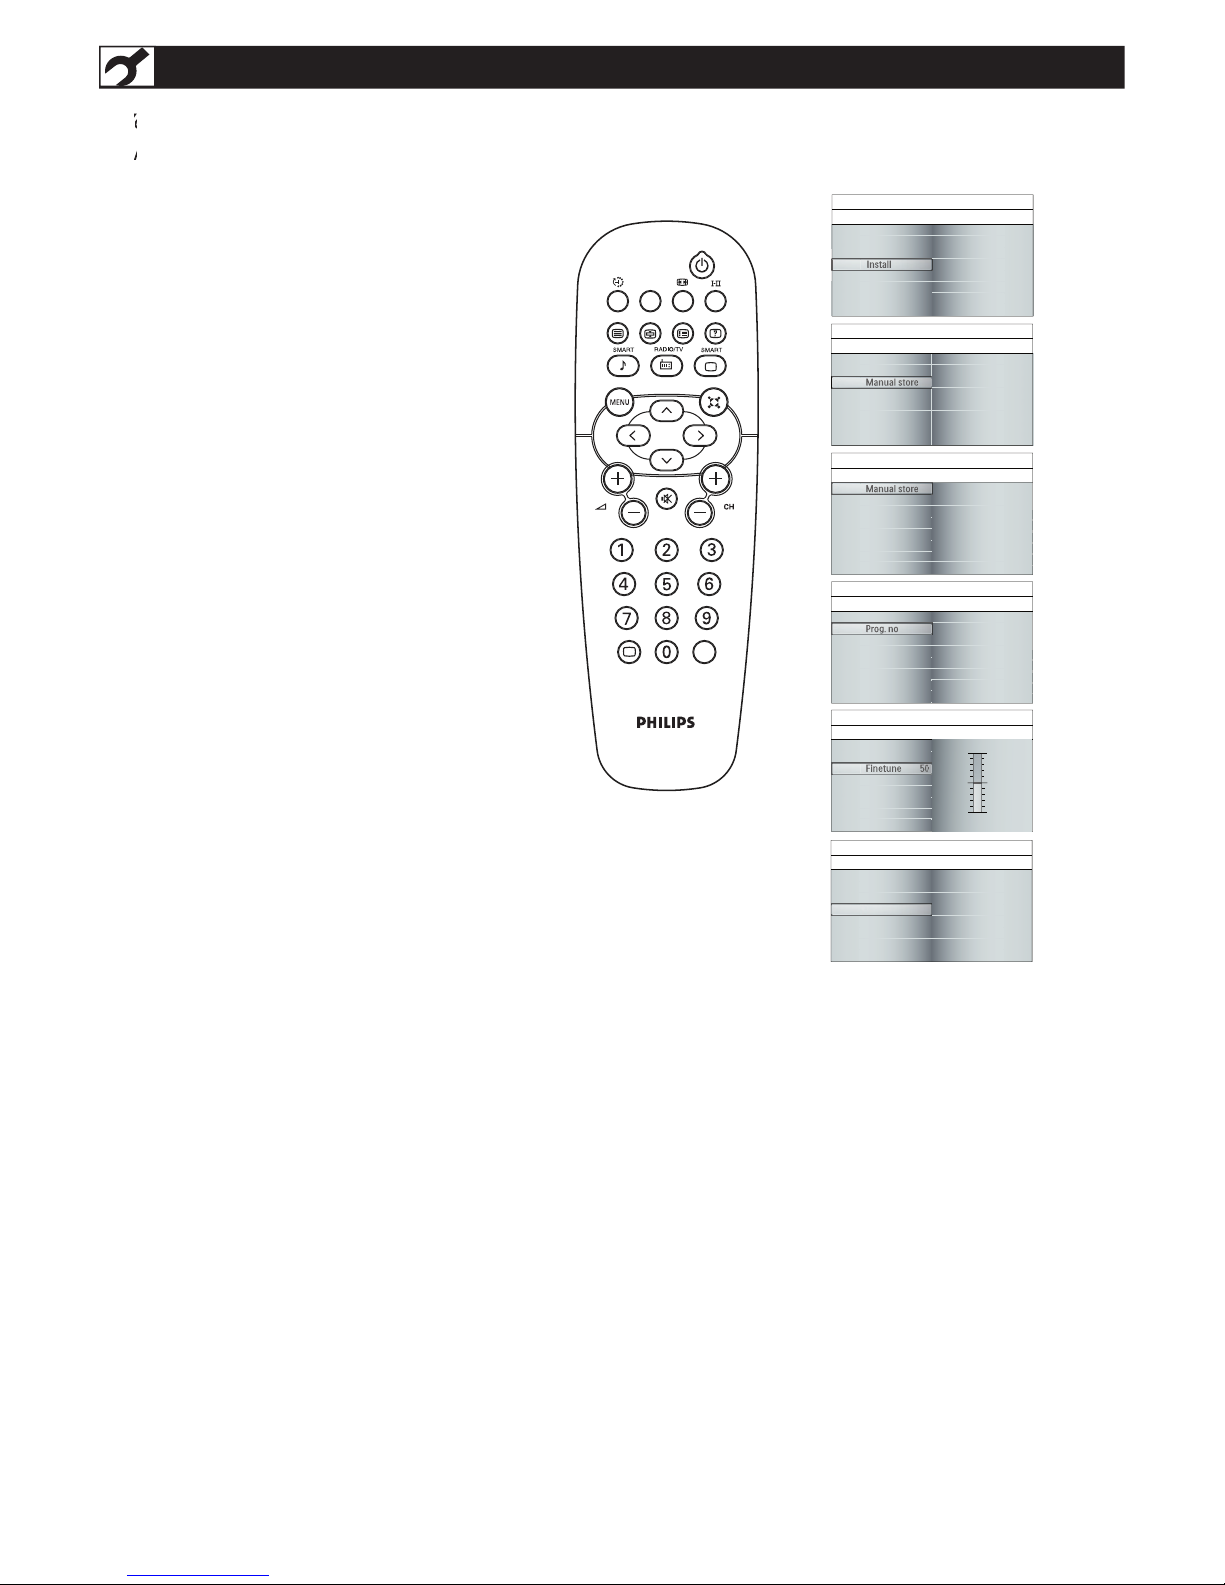
8
MANUAL STORE OF TV CHANNEL
ou can also choose to tune your TV channels.
ou can also choose to tune your TV channels.
Manual tuning allows you to store each
programme manually.
control to show the onscreen menu.
to enter.
Select the MANUAL STORE, then press
channel frequence or press number buttons
to show your desired channel frequence, then
After the channel frequence is confi rmed,
selec
t
and press CURSOR RIGHT to enter.
channel number and press CURSOR RIGHT/
to
enter it, then press CURSOR UP/DOWN
to adjust, press CURSOR RIGHT/LEFT to
confi rm.
function and press CURSOR RIGHT to enter.
clear the menu from the screen.
1
2
3
4
6
7
5
8
A/CH
AV
i
+
Picture
Sound
Features
Install
Language
Auto store
Manual store
Channel setting
Factory reset
Install
Main Controls Install
Language
Auto store
Manual store
Channel setting
Factory reset
Manual store
Main Controls
Install
Manual store
Manual store
Prog. no
Finetune
Store
Manual store
Prog. no
Finetune
Store
Main Controls
I Install
Manual store Manual store
Start?
xxx.xx MHz
Manual store
Manual store
Prog. no
Finetune
Store
Main Controls
I Install
Manual store Prog. no
2
Prog. no
Manual store
Prog. no
Finetune 50
Main Controls
I Install
Manual store
Finetune 50
Store
Finetune
Manual store
Prog. no
Finetune
Main Controls
I Install
Manual store
Store
Store
Store?
Page 9
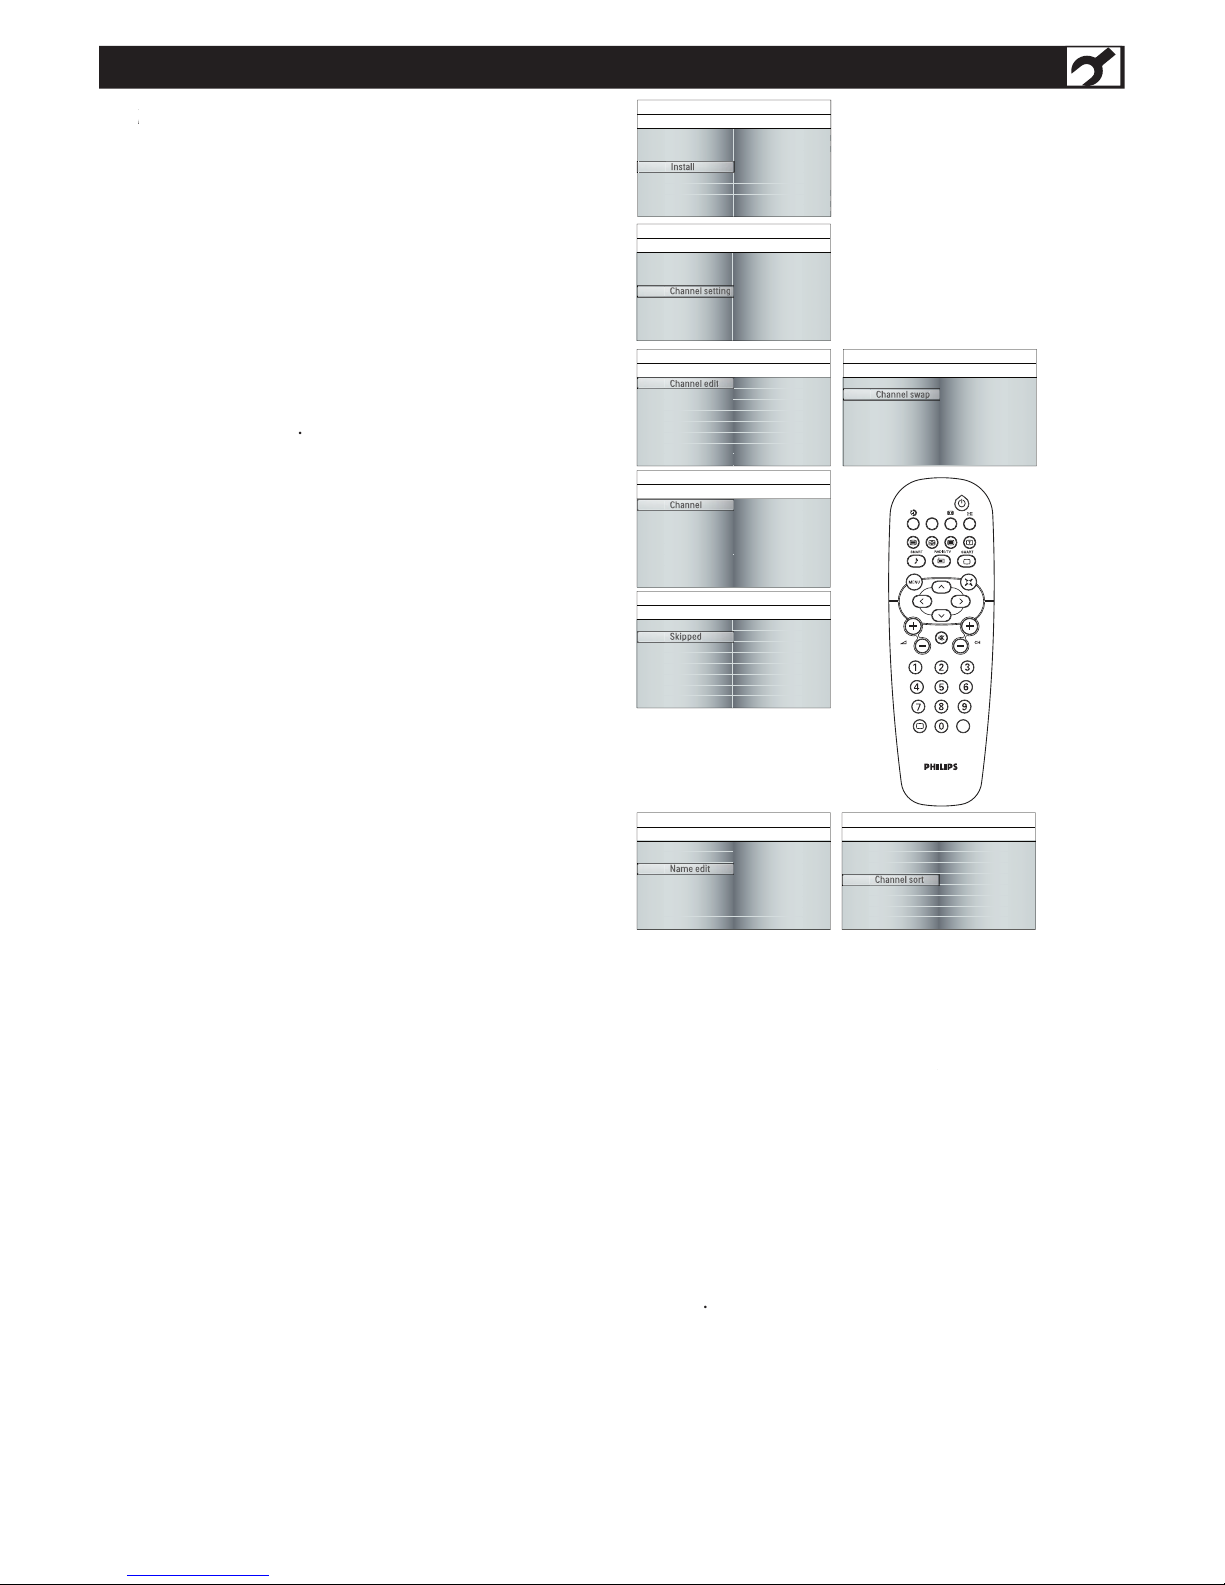
CHANNEL SETTING
A/CH
AV
i
+
Picture
Sound
Features
Install
Language
Auto store
Manual store
Channel setting
Factory reset
Install
Main Controls Install
Language
Auto store
Manual store
Channel setting
Factory reset
Channel setting
Main Controls
Install
Channel setting
Channel edit
Channel swap
Name edit
Channel sort
Channel edit
Channel swap
Name edit
Channel sort
Channel edit
Main Controls I Install
Channel setting
Channel edit
Channel
Skipped
Channel
Skipped
Channel
Main Controls I Install I Channel setting
Channel edit
Channel
2
Channel
Skipped
Skipped
Main Controls I Install I Channel setting
Channel edit
Skipped
Active
Skipped
Channel edit
Channel swap
Name edit
Channel sort
Channel swap
Channel swap
Main Controls I Install
Channel setting
Channel swap
From
To
Exchange
Channel edit
Channel swap
Name edit
Channel sort
Name edit
Main Controls I Install
Channel setting
Name edit
Channel 0
. . . . . .
Channel edit
Channel swap
Name edit
Channel sort
Channel sort
Main Controls I Install
Channel setting
Channel sort
Sort?
A
B
C
D
hannel setting to set all channel related
hannel setting to set all channel related
functions.
1
2
3
4
A
5
B
D
C
onscreen menu.
to highlight
UP/ DOWN to
toggle
among CHANNEL EDIT, CHANNEL
SWAP,
NAME EDIT, or CHANNEL SORT.
selection.
C
CURSOR RIGHT to enter channel
column
, press CURSOR UP/DOWN to
select the channel that you want to add or
confi rm.
CURSOR RIGHT to enter
skipped
column, press CURSOR UP/DOWN to
select ACTIVE (to add) or SKIPPED (to
delect) t
selected, then press CURSOR RIGHT/
C
and press CURSOR UP/DOWN to adjust
the channel, then press CURSOR RIGHT/
to enter it. Press CURSOR RIGHT to
activate EXCHANGE or press CURSOR
AME EDIT
to enter NAME EDIT.
CURSOR RIGHT to enter
name column,
move to the next character.
At the fi rst character, press
CURSOR LEFT
to
confi rm the name and at the last character, press
C
to
enter CHANNEL
SORT
and
Page 10
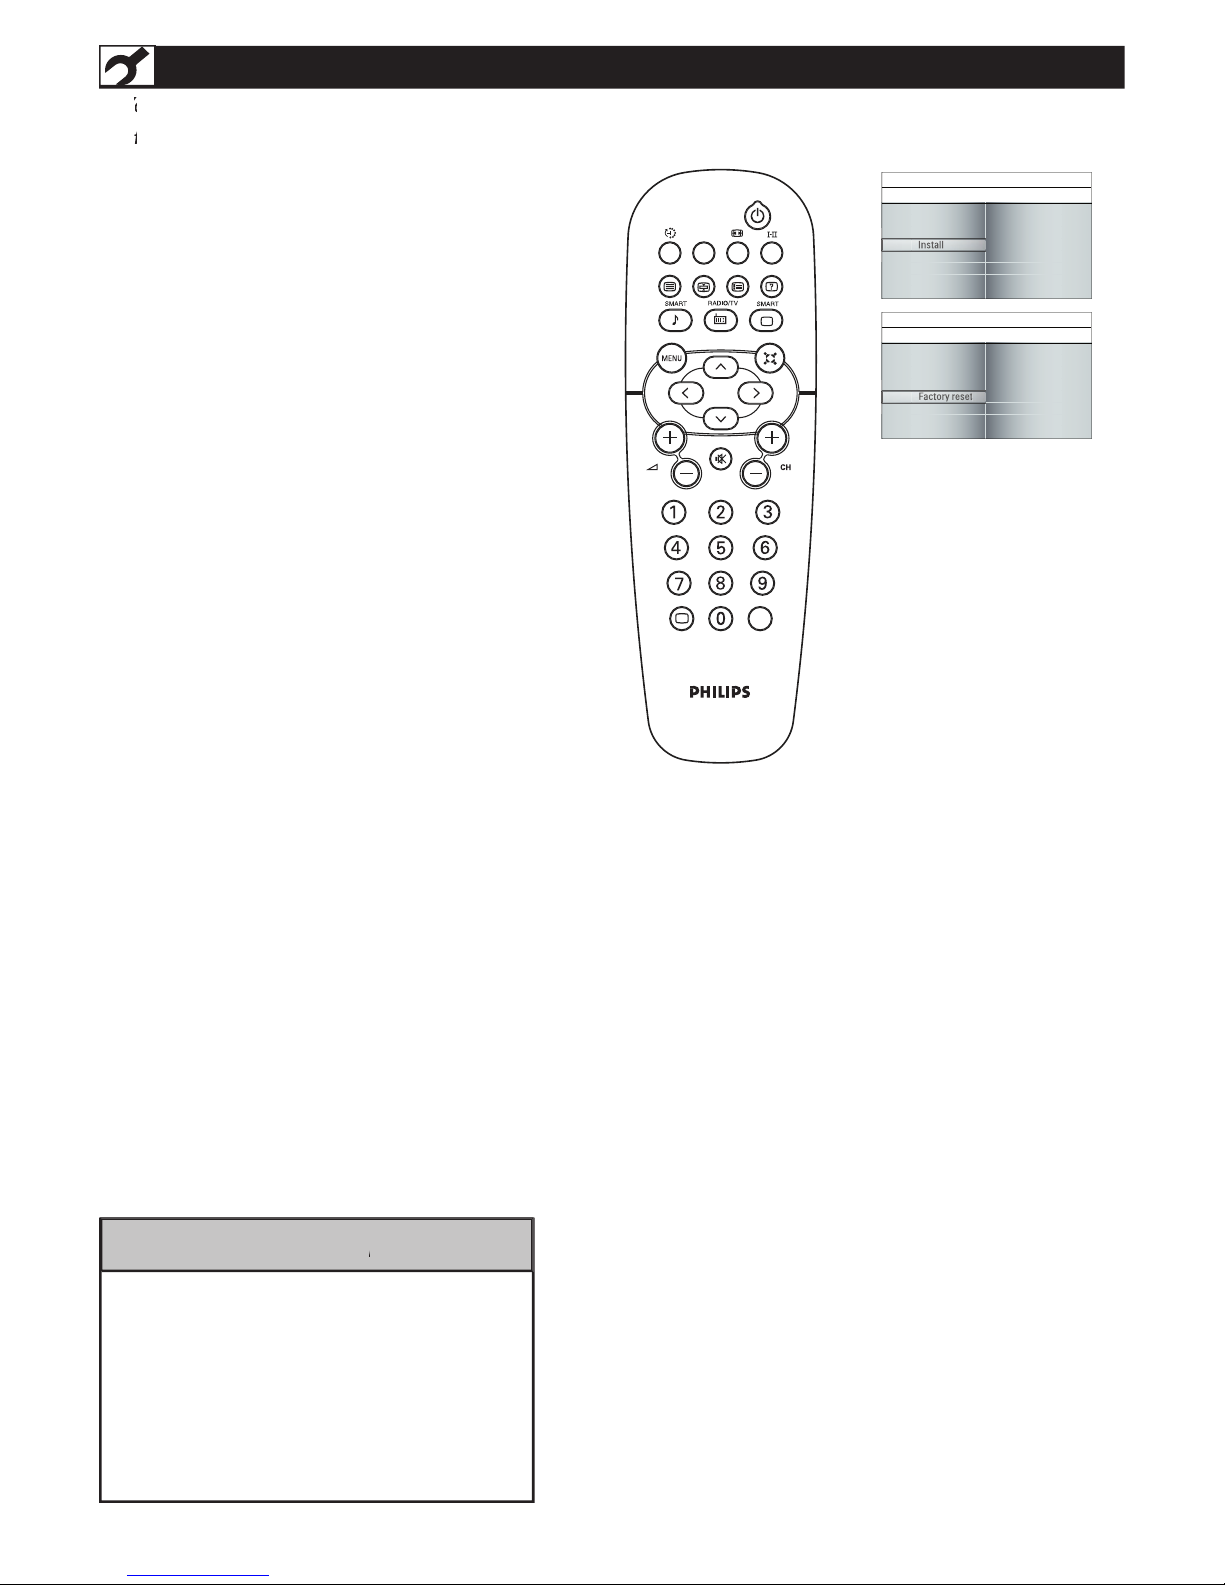
FACTORY RESET
our TV can be reset to the original
our TV can be reset to the original
fac tor y settings
by performing the
following steps.
to
and press CURSOR RIGHT to enter it for
the menu from the screen.
1
2
3
4
5
A/CH
AV
i
+
Picture
Sound
Features
Install
Language
Auto store
Manual store
Channel setting
Factory reset
Install
Main Controls Install
Language
Auto store
Manual store
Channel setting
No
Yes
Install Factory reset
Factory reset
Factory reset
Main Controls
settings,
all your present setting on picture, sound,
and other feature settings will be erased
and replaced by the manufacture’s default
settings. However, your AutoLock access
code will not be erased. Please refer to page
HELPFUL H
Page 11
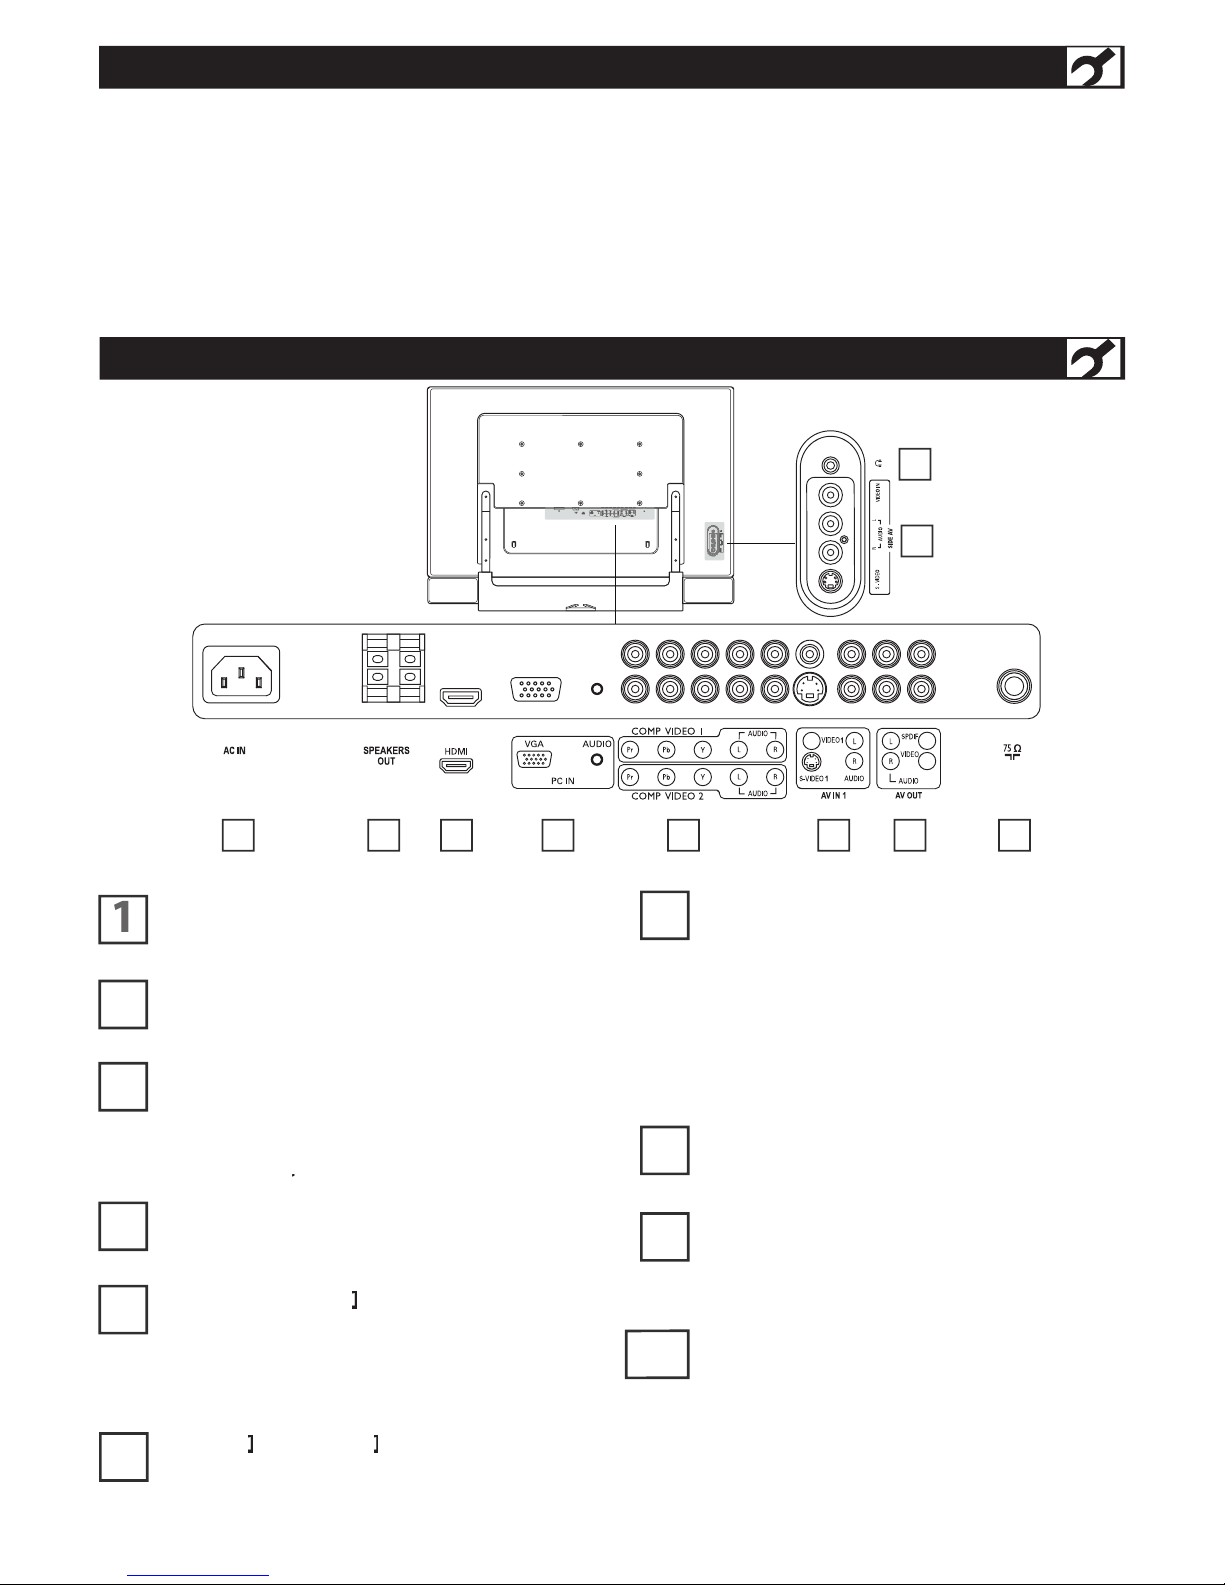
P
RESENTATION
OF THE LCD TV
1 6 8
9
542 3 7
10
IDENTIFYING ALL CONNECTOR (BACKSIDE)
ositioning the LCD T V.
P
lace the LCD TV on a solid, stable surface. Be sure the
surface is strong enough to handle the weight of the LCD
LCD
Do not place the LCD TV near a radiator or other
source of
heat.
Do not place the LCD TV where it can be exposed to
rain or
excessive moisture.
AC IN
or DVD player
/COMP VIDEO 2
video equipments that supports YPbPr HD (High
AV IN
/ S-video
video equipment.
AV OUT/SPDIF OUT
audio equipment. Video output through AV
OUT jacks is available only when your LCD TV is
displaying TV, AV1, AV2.
When your LCD TV is SPDIF out, which is for
digital audio output, digital receiver, or amplifi er.
VHF/UHF
AV IN 2
tput jacks of your VCR or
other video equipment.
Note: The SPDIF out supports PCM (pluse width modulate)
format and stereo mode only when the HDMI input source is
selected.
Page 12
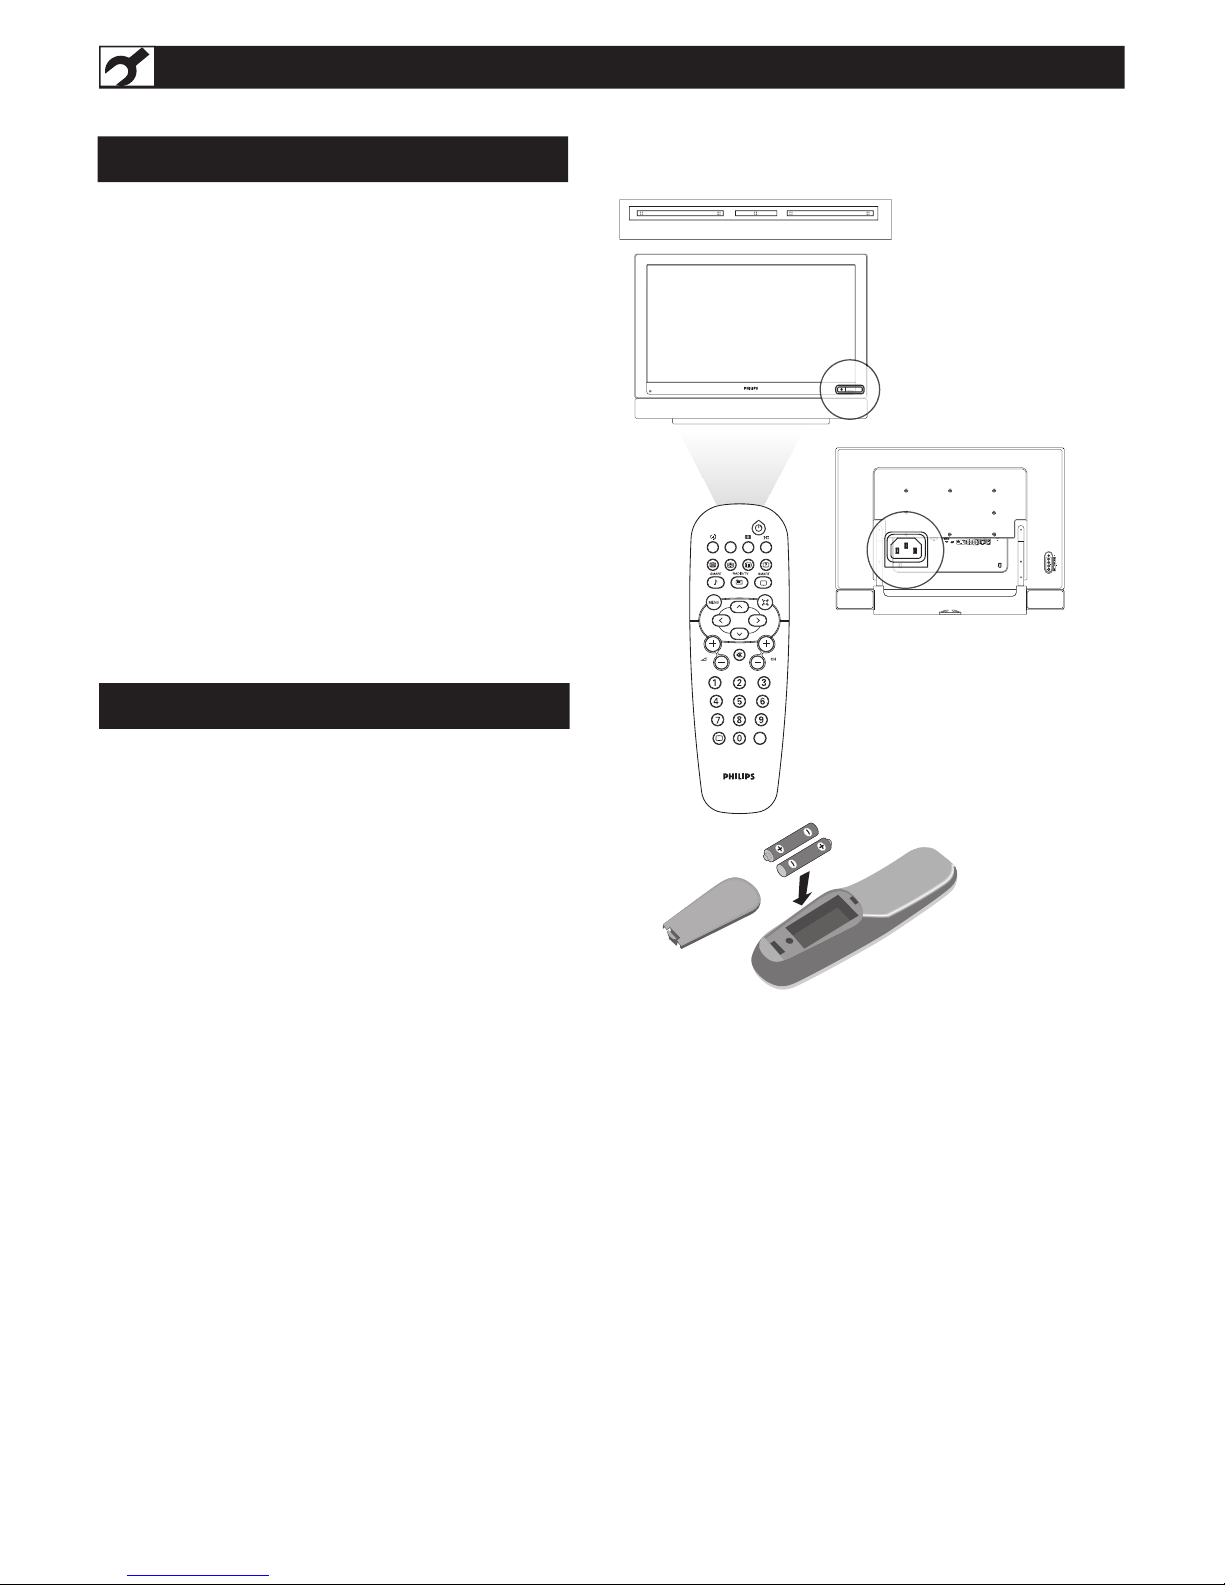
- Vo l um e + - Ch an n el +
M e n u
A/CH
AV
i
+
outlet and switch TV set on.
– to decrease the sound level.
to select channels.
the
the remote control.
the (+) and (-) ends of the batteries line up as
BASIC TV AND REMOTE CONTROL OPERATIONS
BATTERY INSTALLATION
TELEVISION AND REMOTE CONTROL
1
2
3
4
6
7
8
5
Page 13
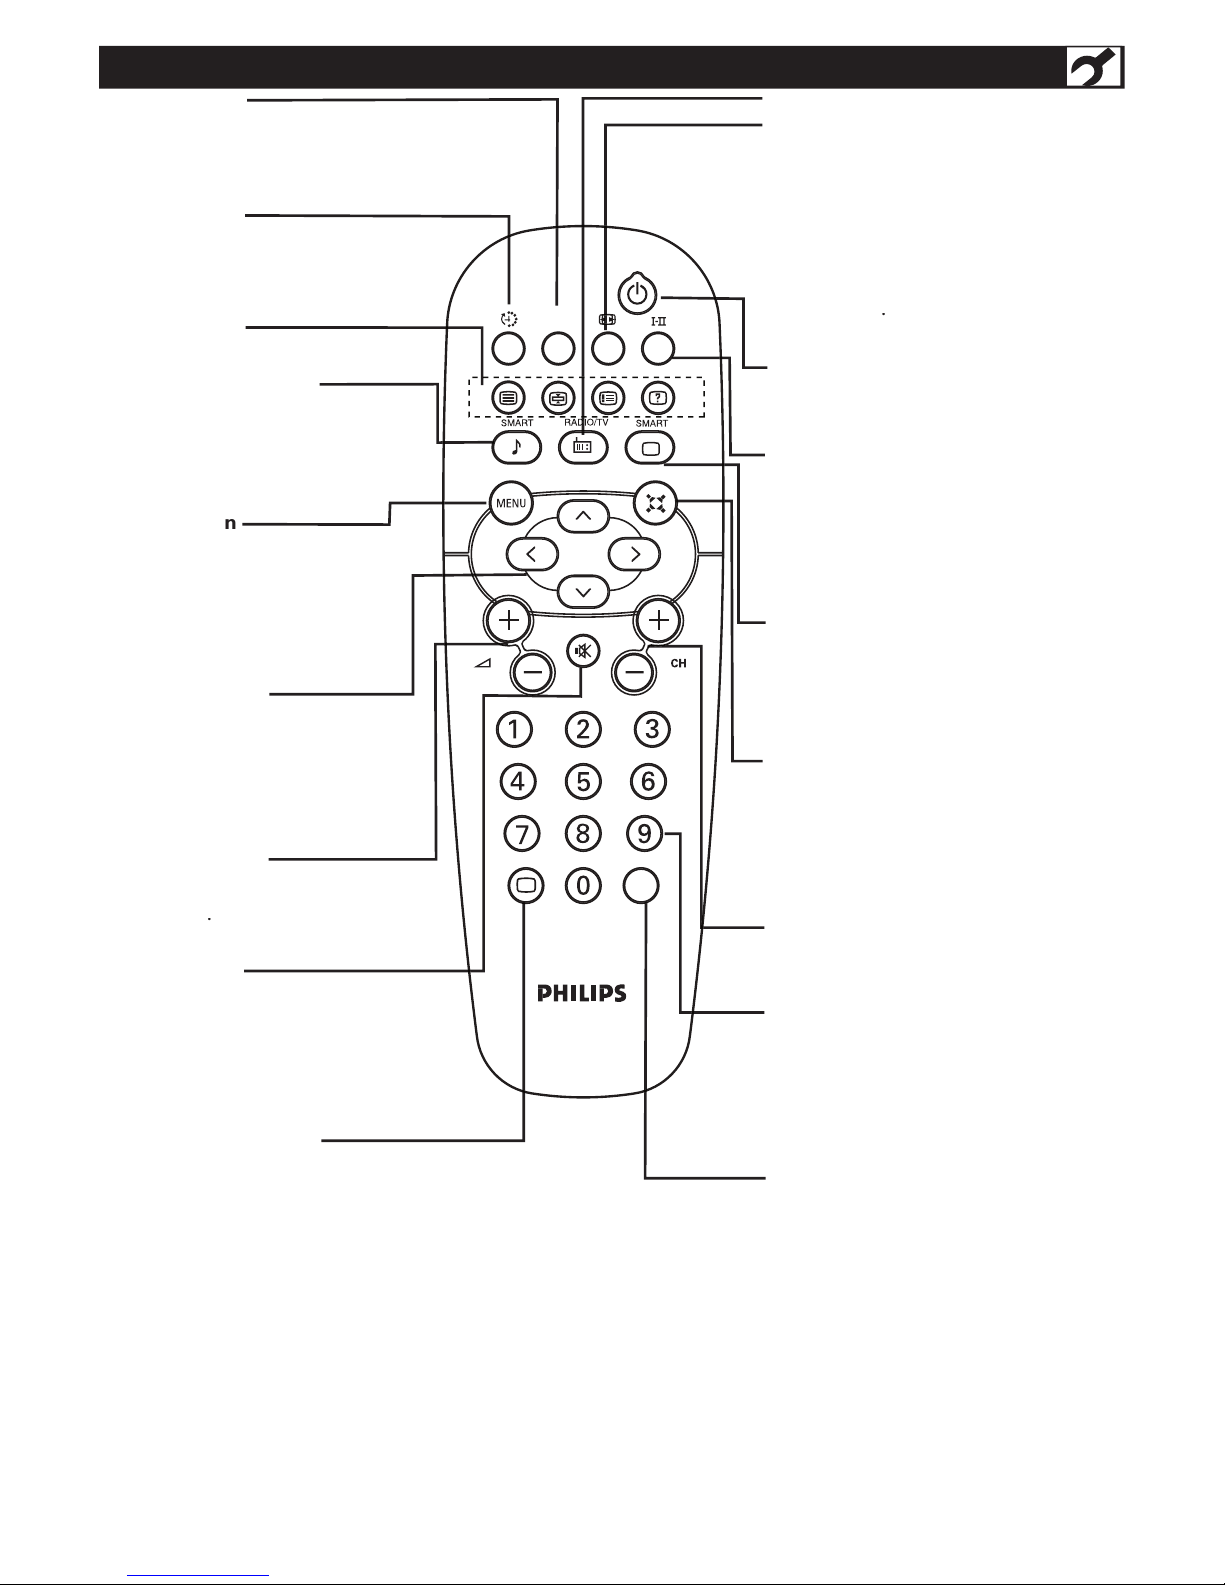
REMOTE CONTROL
A/CH
AV
i
+
A/CH
channel.
Sleep button
Smart
Sound button
the 5 settings; Personal, Speech,
Cursor Buttons
(Left, Right, Up, Down)
select, return, and adjust items on
the TV’s on screen menu.
Volume button
sound level
on the screen when the sound is
Button
to toggle among the six screen format
sizes;
Super zoom, 4:3, Movie expand 14:9,
Widescreen
button /
Sound mode
Mono,
Stereo,
, N
Smart
Picture button
Virtual Surround button
Adds greater depth and dimension to
TV sound.
Select from Virtual Surround ON or
Virtual Surround
OFF.
Channel button
access to the TV channels.
channel, enter the 2nd digit after enter
AV
button
TV, HDMI,
, COMP
VIDEO 2, S
-video1, S
-video 2
,
AV1, AV2 (Side), PC.
Page 14
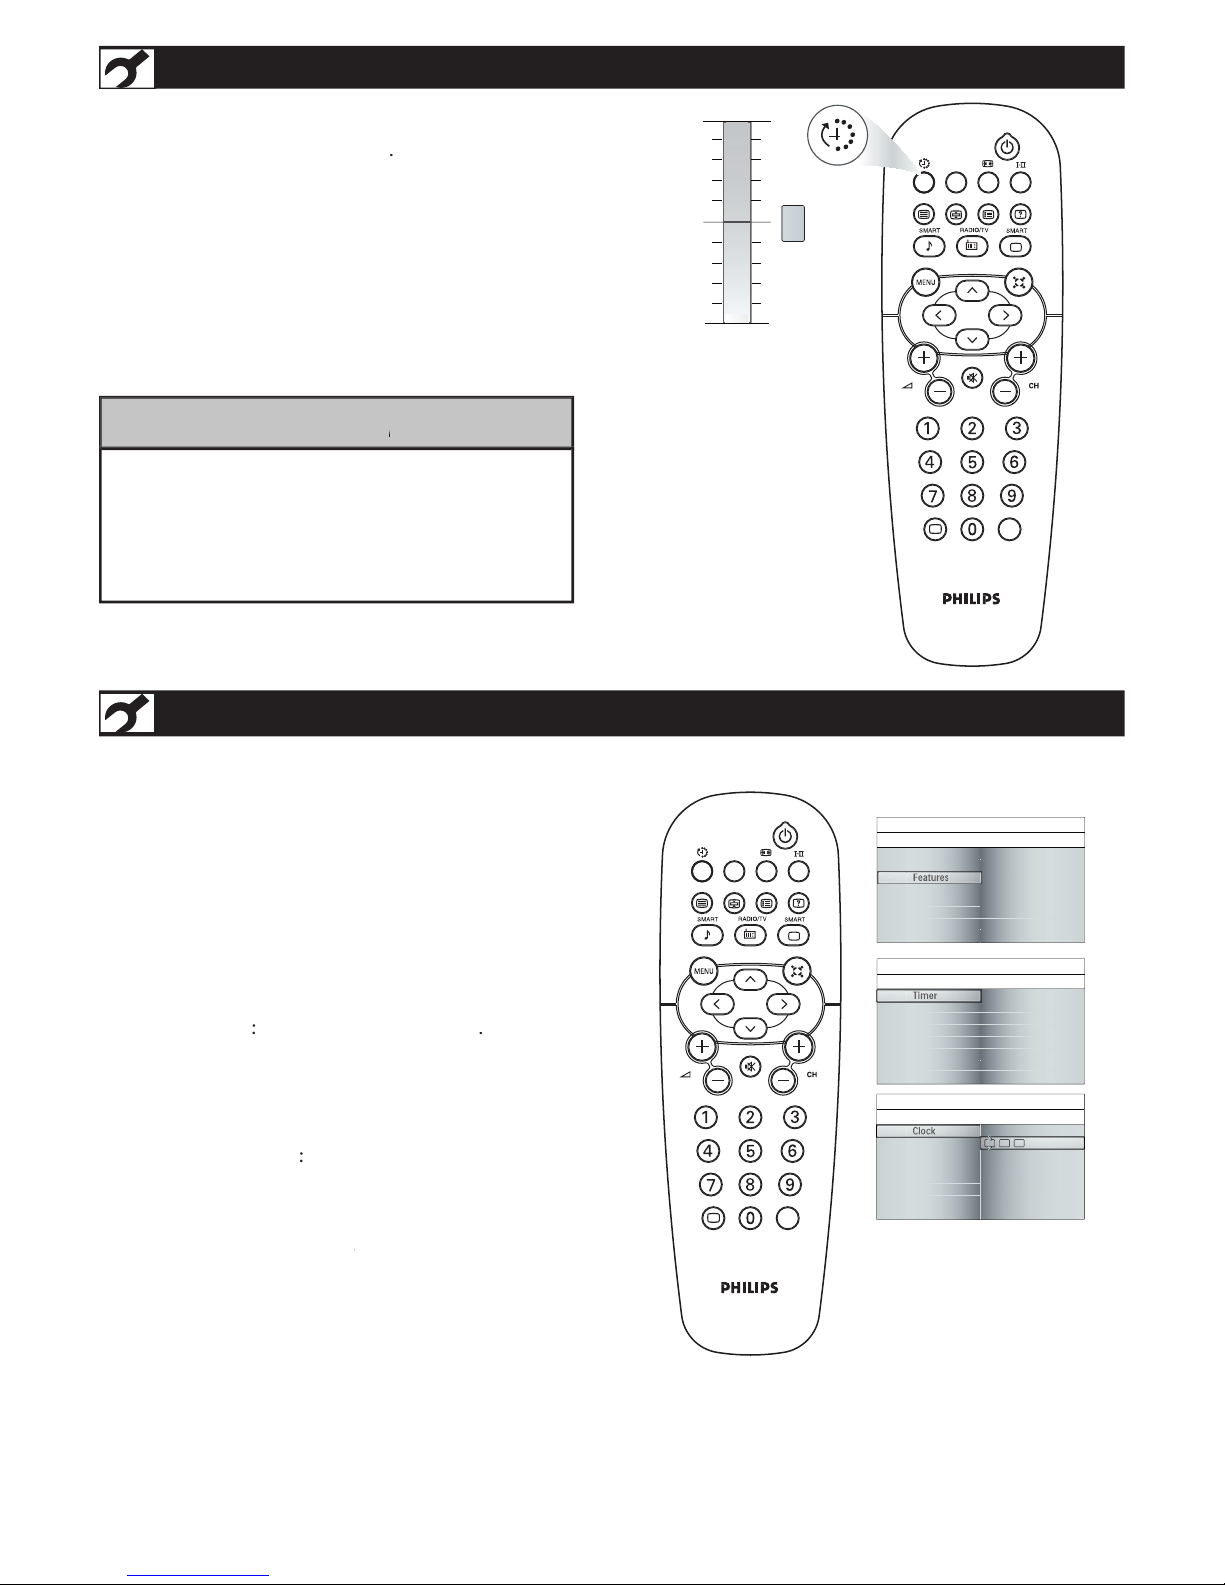
TIMER MENU CONTROLS
on the remote control
to show the onscreen menu
the SLEE
or CURSOR UP
and press CURSOR DOWN to decrease.
1
2
A/CH
AV
i
+
0
turned off. Once the set is turned off, the Timer
HELPFUL H
TIMER MENU CONTROLS ON THE SCREEN
screen menu.
want to adjust and press CURSOR RIGHT to enter
TIMER.
adjust the time, press CURSOR RIGHT to move to
the ne
xt character, then press CURSOR RIGHT to
confi rm.
C
:
Allow you to set the time
Start T
: Allow you to set the time for
turning on the TV automatically.
Stop Time
:
Allow you to set the time for
turning off the TV automatically.
Sleep Timer
: Allow you to set the time period
,
after which the TV
will turn to standby mode
automatically.
This list will have values from 0 to 180.
1
2
3
4
A/CH
AV
i
+
Picture
Sound
Features
Install
Timer
NR
Auto lock
Source list
Features
Main Controls Features
Timer
NR
Auto lock
Source list
Clock
Start time
Stop time
Sleep timer
Timer
Features
Main Controls
Timer
Clock
Start time
Stop time
Sleep timer
Clock
Timer
Main Controls
I Features
Clock
00 00
AM
:
Page 15
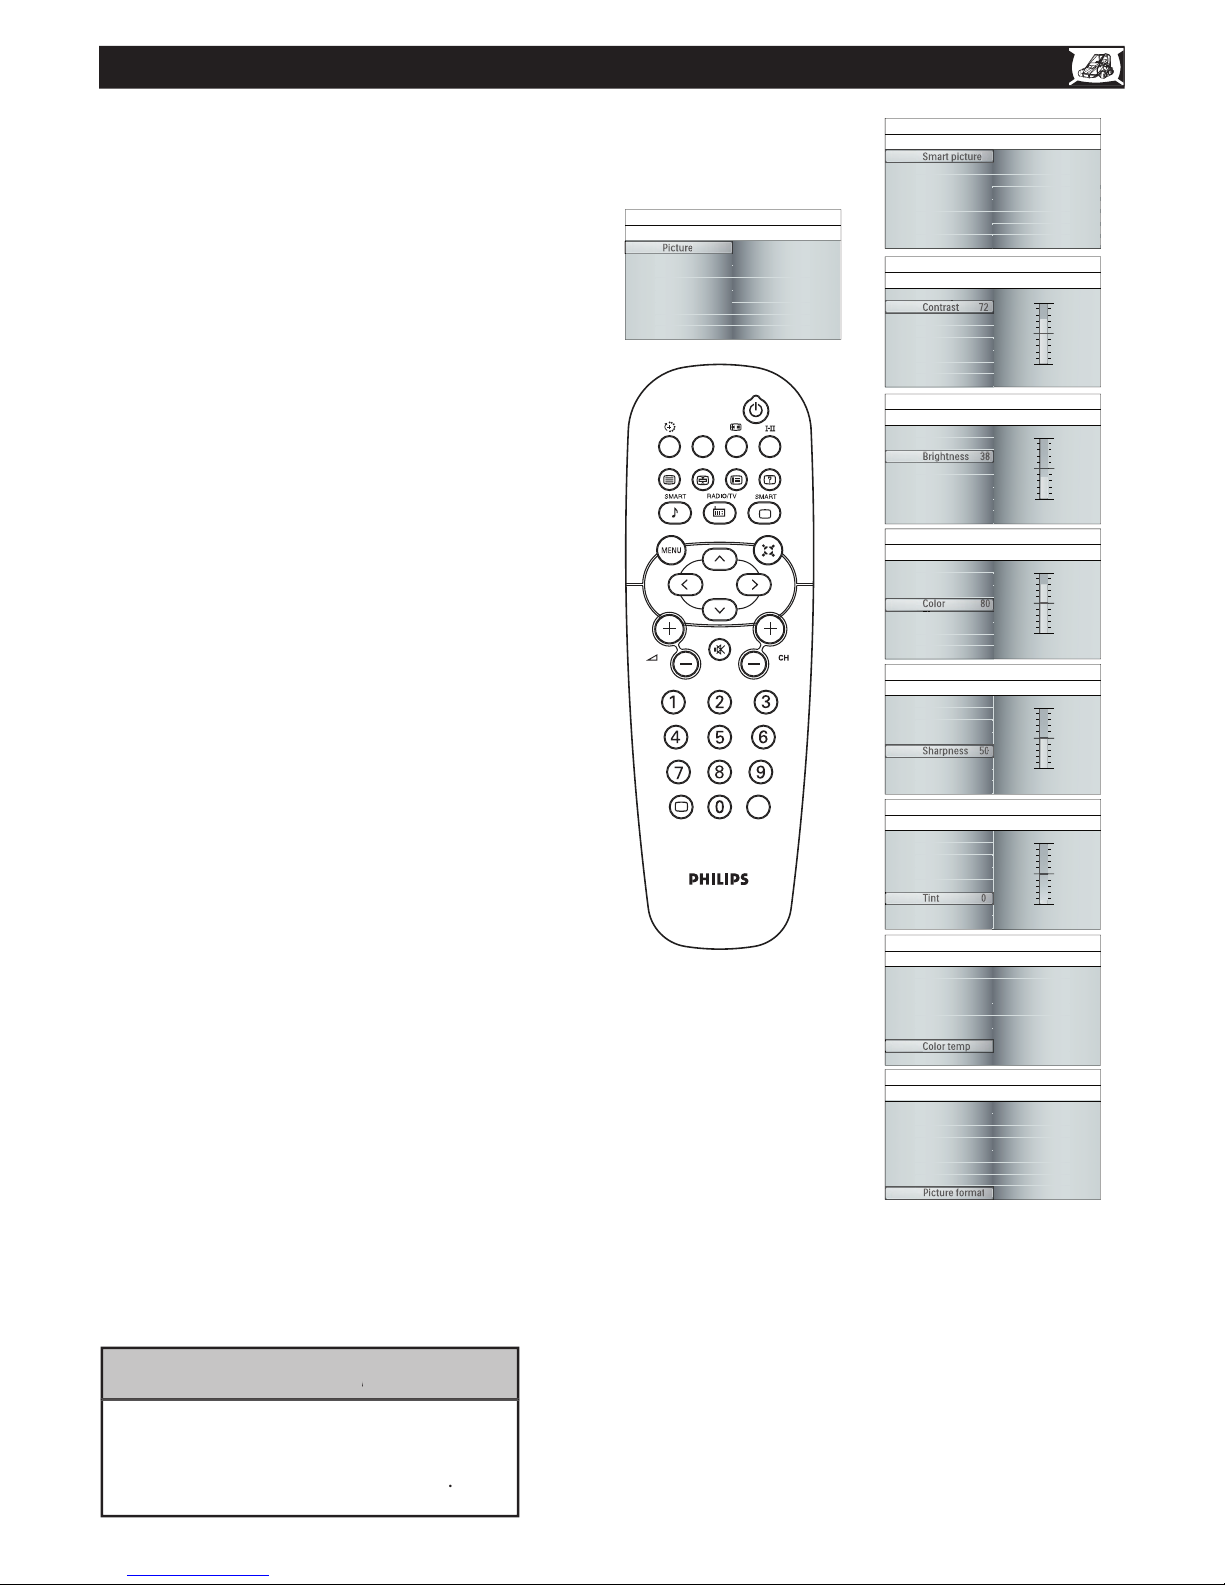
onscreen menu.
W
to choose the
Smart Picture,
the item.
the menu from the screen.
:
: Adjust to “sharpen” the
the picture become richer in
darkness
and the white become brighter.
: Adjust to brighten the
dark parts of the picture. This appears
to add white to the color.
: Adjust to add or reduce color.
: Adjust to improve detail.
Tint:
Adjust to tinge the picture’s color
decrease the color tempature. Select
from Normal, Warm, or Cool.
Adjust to change
the screen format to match the type of
to page 20 for detail.
TV PICTURE MENU CONTROLS
o adjust your LCD TV picture, selec t
a channel and follow these steps.
1
2
3
4
5
6
A/CH
AV
i
+
Picture
Sound
Features
Install
Smart picture
Contrast
Brightness
Color
Sharpness
Picture
Main Controls Picture
Tint
Picture format
Color temp
Picture format
Smart picture
Contrast
Brightness
Color
Sharpness
Smart picture
Smart picture
Main Controls
Picture
Smart picture
Tint
Color temp
Personal
Rich
Nature
Soft
Multimedia
Smart picture
Contrast 72
Brightness
Color
Sharpness
Smart picture
Contrast 72
Main Controls
Picture
Contrast
Tint
Picture format
Color temp
Smart picture
Contrast
Brightness 38
Color
Sharpness
Brightness 38
Main Controls
Picture
Brightness
Tint
Picture format
Color temp
Smart picture
Contrast
Brightness
Color 80
Sharpness
Color 80
Main Controls
Picture
Color
Tint
Picture format
Color temp
Smart picture
Contrast
Brightness
Color
Sharpness 50
Sharpness 50
Main Controls
Picture
Sharpness
Tint
Picture format
Color temp
Smart picture
Contrast
Brightness
Color
Sharpness
Main Controls
Picture
Tint
Tint 0
Picture format
Color temp
Tint 0
Smart picture
Contrast
Brightness
Color
Sharpness
Main Controls
Picture
Color temp
Tint
Picture format
Color temp
Color temp
Color temp
Normal
Warm
Cool
Smart picture
Contrast
Brightness
Color
Sharpness
Main Controls
Picture
Picture format
Tint
Picture format
Color temp
Picture format
Super zoom
4:3
Movie expand 14:9
Movie expand 16:9
16:9 subtitle
Widescreen
HELPFUL H
Any adjustment of Brightness, Color,
Page 16
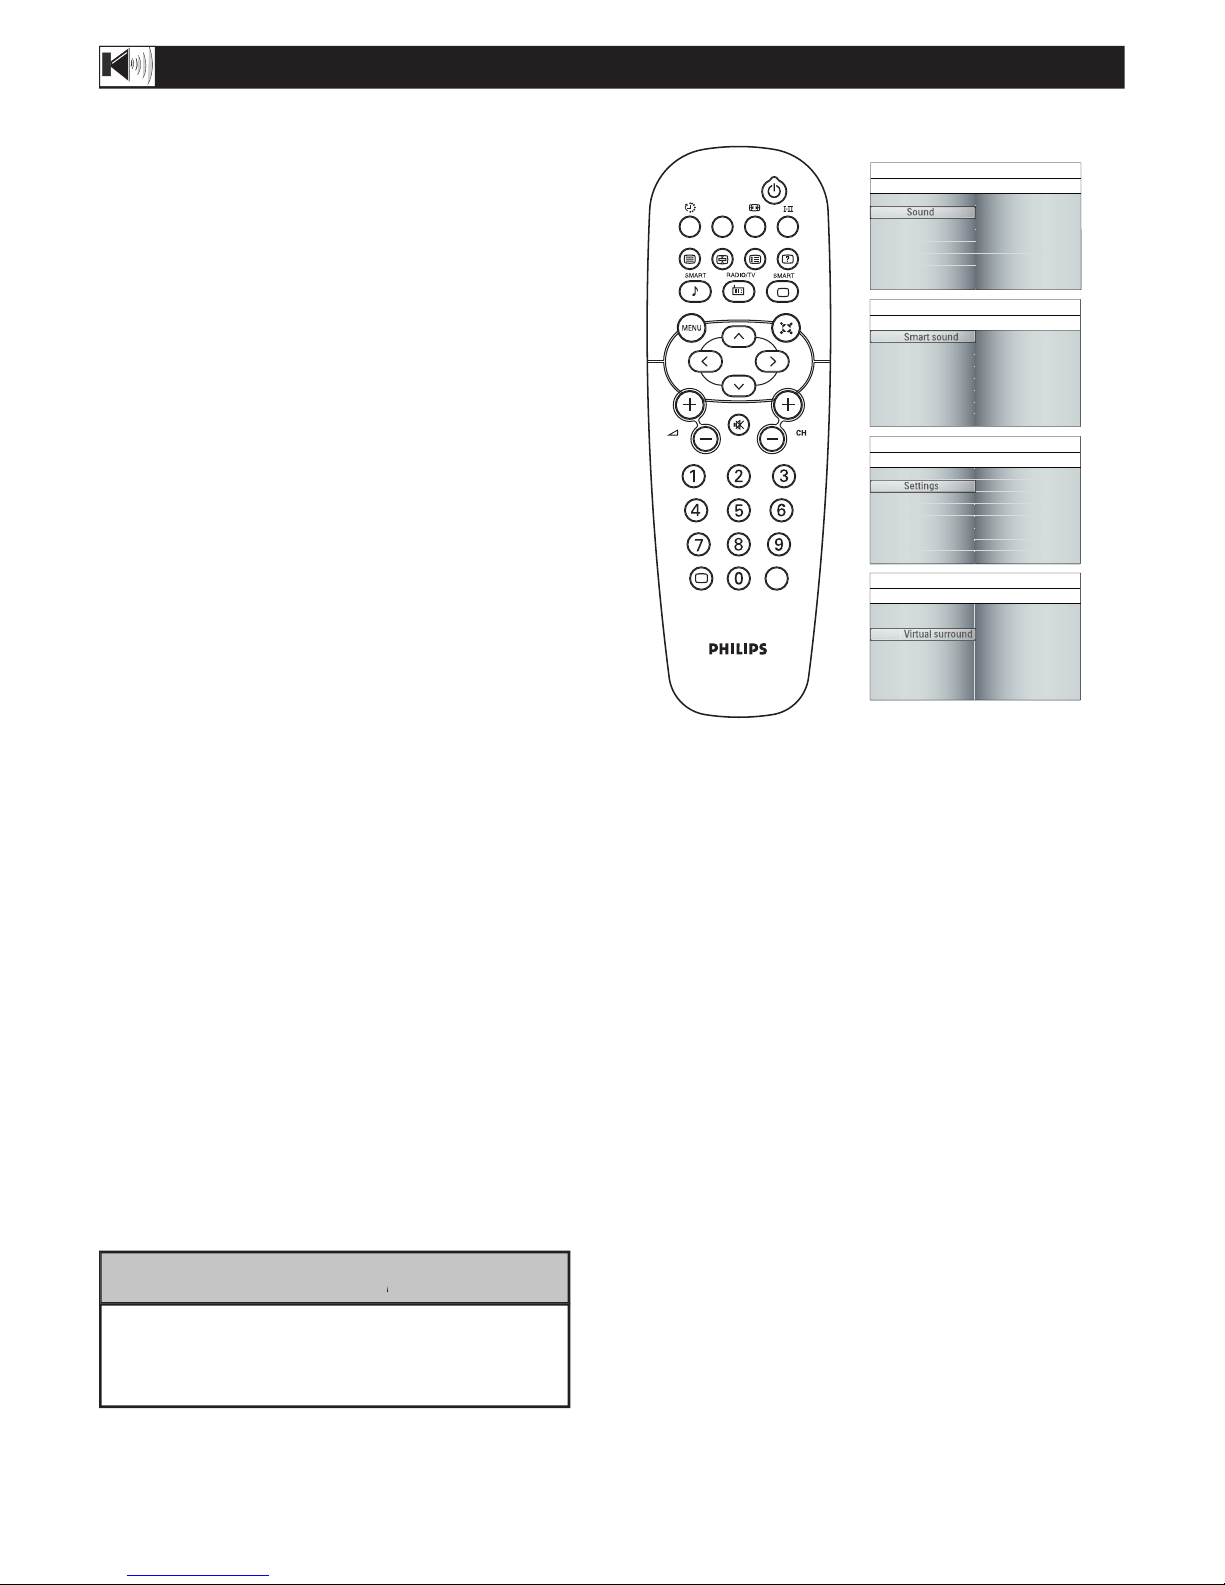
TV SOUND MENU CONTROLS
o adjust your LCD TV
select a channel and
follow these steps.
SOUND menu.
you want to
adjust and pre
ss CURSOR RIGHT
to enter
: Smart
Sound,
Settings, or Virtual
Surround.
Smart
Sound
:
details on Smart
Sound Settings.
Settings
: Allows you to adjust
Treble,
and
Virtual Su
: Adds greater depth and
dimension to TV sound. Select from ON or
OFF.
controls.
the menu from the screen.
1
2
3
4
5
6
7
Any adjustment of Treble and Bass will
A/CH
AV
i
+
Picture
Sound
Features
Install
Smart sound
Settings
Virtual surround
Sound
Main Controls Sound
Smart sound
Settings
Virtual surround
Personal
Speech
Music
Movie
Multimedia
Smart sound
Sound
Main Controls
Smart sound
Smart sound
Settings
Virtual surround
Treble
Bass
Balance
Settings
Sound
Main Controls
Settings
Smart sound
Settings
Virtual surround
On
Off
Virtual surround
Sound
Main Controls
Virtual surround
HELPFUL H
Page 17
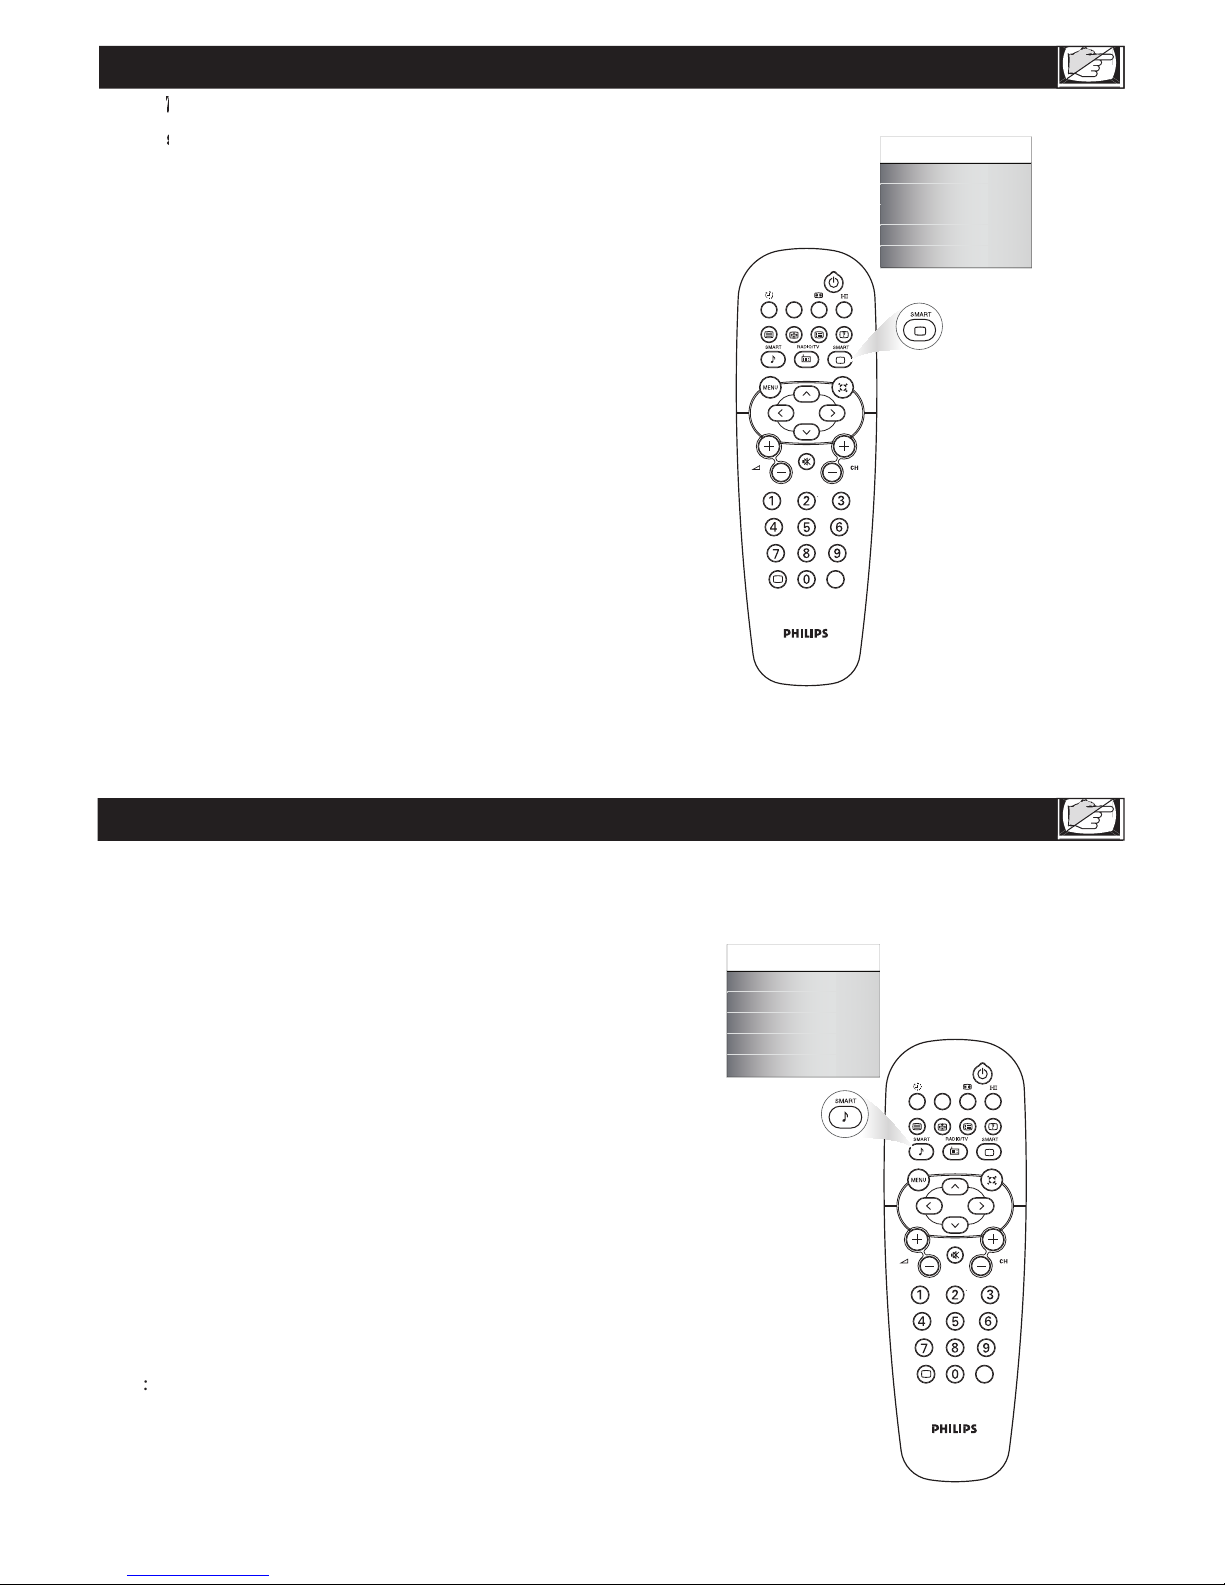
control. The current Smart Picture setting will appear
on the screen.
SMART PICTURE CONTROL
hether you’re watching a movie or a video
hether you’re watching a movie or a video
game, your LCD TV has video control preset
that will match with your current program source or
content. Smart Picture quickly resets your TV’s video
controls for a number of different types of programs
and
viewing conditions
that you may have in your
home. The Personal, Rich, Nature, Soft, Multimedia,
and Smart Picture
controls have been preset at the
factory to easily adjust the TV’s brightness, color,
picture,
sharpness, and color temperature levels. In
the Personal smart picture mode you can
create your own preferred video settings.
The settings of the Personal smart picture mode
can be adjusted in picture options within the onscreen
can be adjusted by the user via the onscreen picture
control menu.
mar t
presets and a personal mode that you set
according to your own
preferences through the
onscreen
Personal, Speech, Music, Movie, and Multimedia)
enable you to tailor the TV sound so as to enhance
the particular
program you are watching. Following
these steps to select any of the options.
1
2
e
:
The settings of the Personal smart sound mode can
be adjusted in sound control within the onscreen
menu. The Personal mode is the only mode which
can be adjusted by the user via the onscreen sound
control menu.
A/CH
AV
i
+
Personal
Rich
Nature
Soft
Multimedia
Smart picture
A/CH
AV
i
+
Personal
Speech
Music
Movie
Multimedia
Smart sound
SMART SOUND
control. The current Smart
Sound setting will
appears on the screen.
SMART SOUND
button repeatedly or
fi ve setting:
SMART SOUND CONTROL
1
2
Page 18
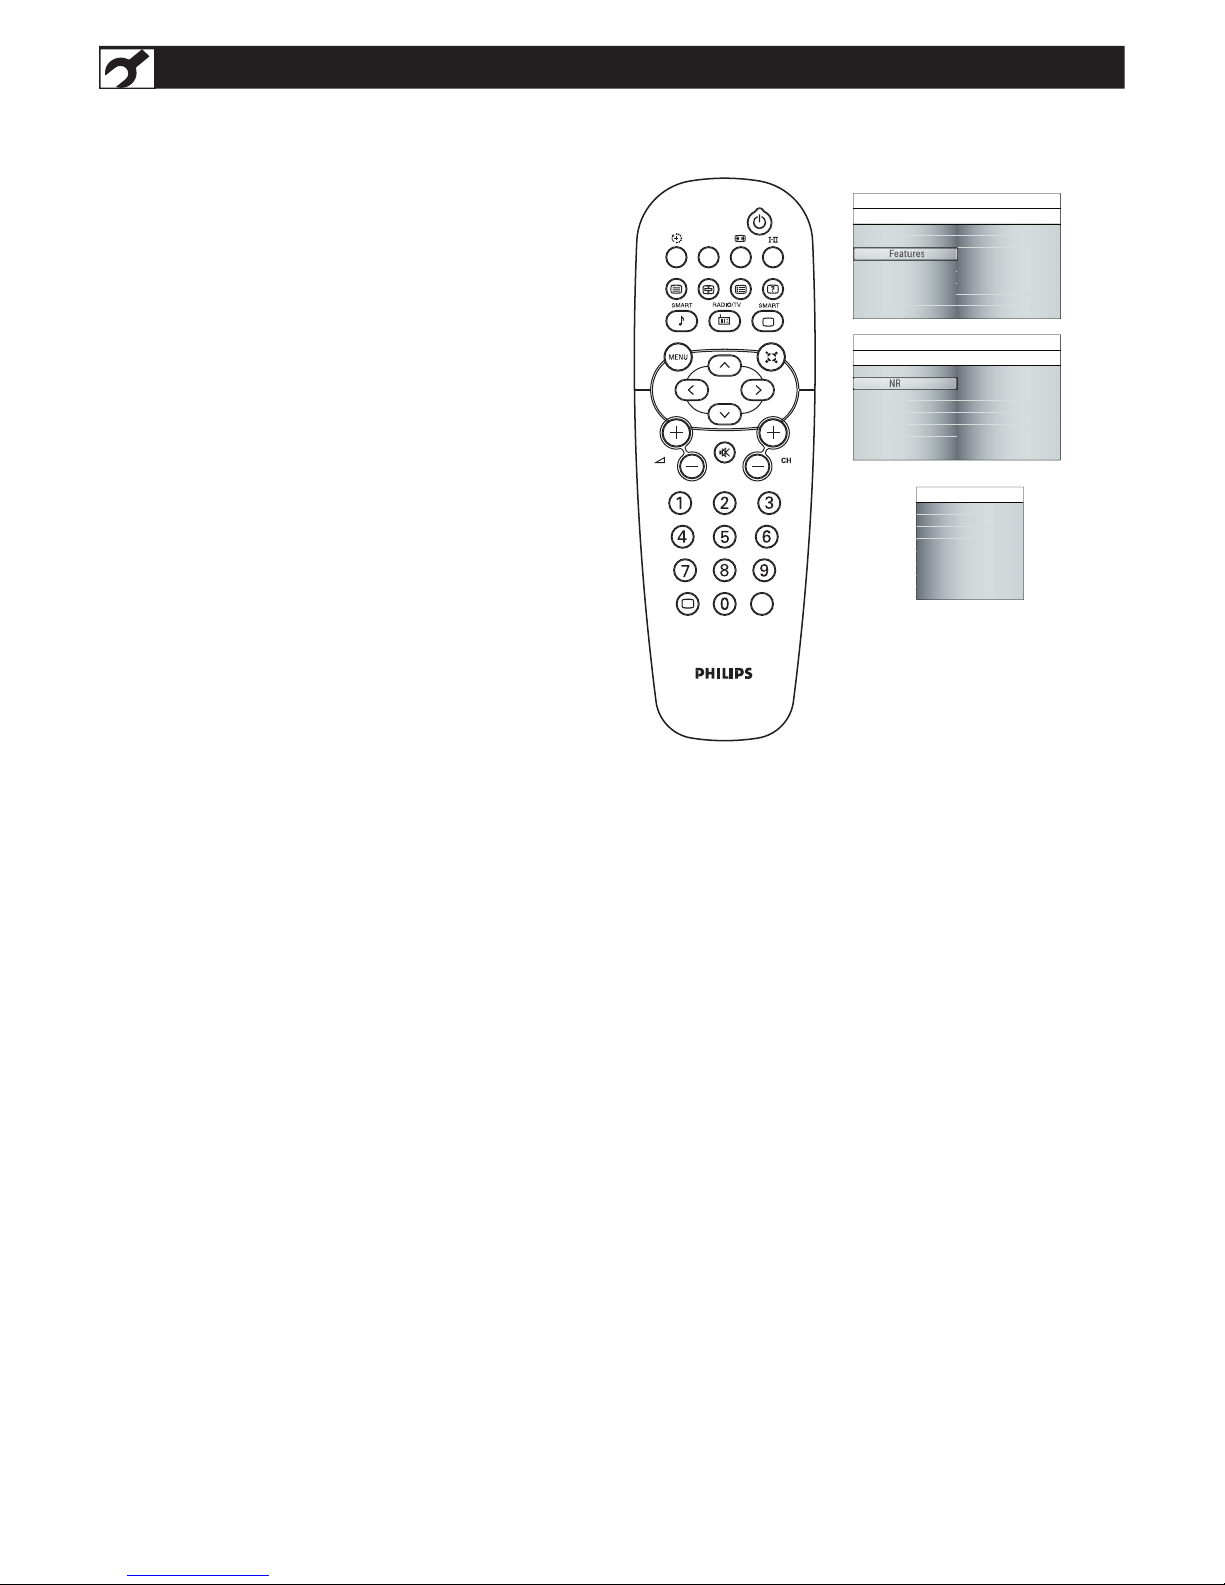
NR (NOISE REDUCTION)
onscreen menu.
to enter it.
function and press CURSOR RIGHT to
enter it.
or OFF and press CURSOR RIGHT to
activate or inactivate noise reduction .
utomatically filters out and reduces the image noise
and improves picture quality when receiving weak
video signals.
1
2
3
4
A/CH
AV
i
+
Picture
Sound
Features
Install
Timer
NR
Auto lock
Source list
Features
Main Controls Features
Timer
NR
Auto lock
Source list
On
Off
Features
Main Controls
NR
On
Off
NR
Page 19
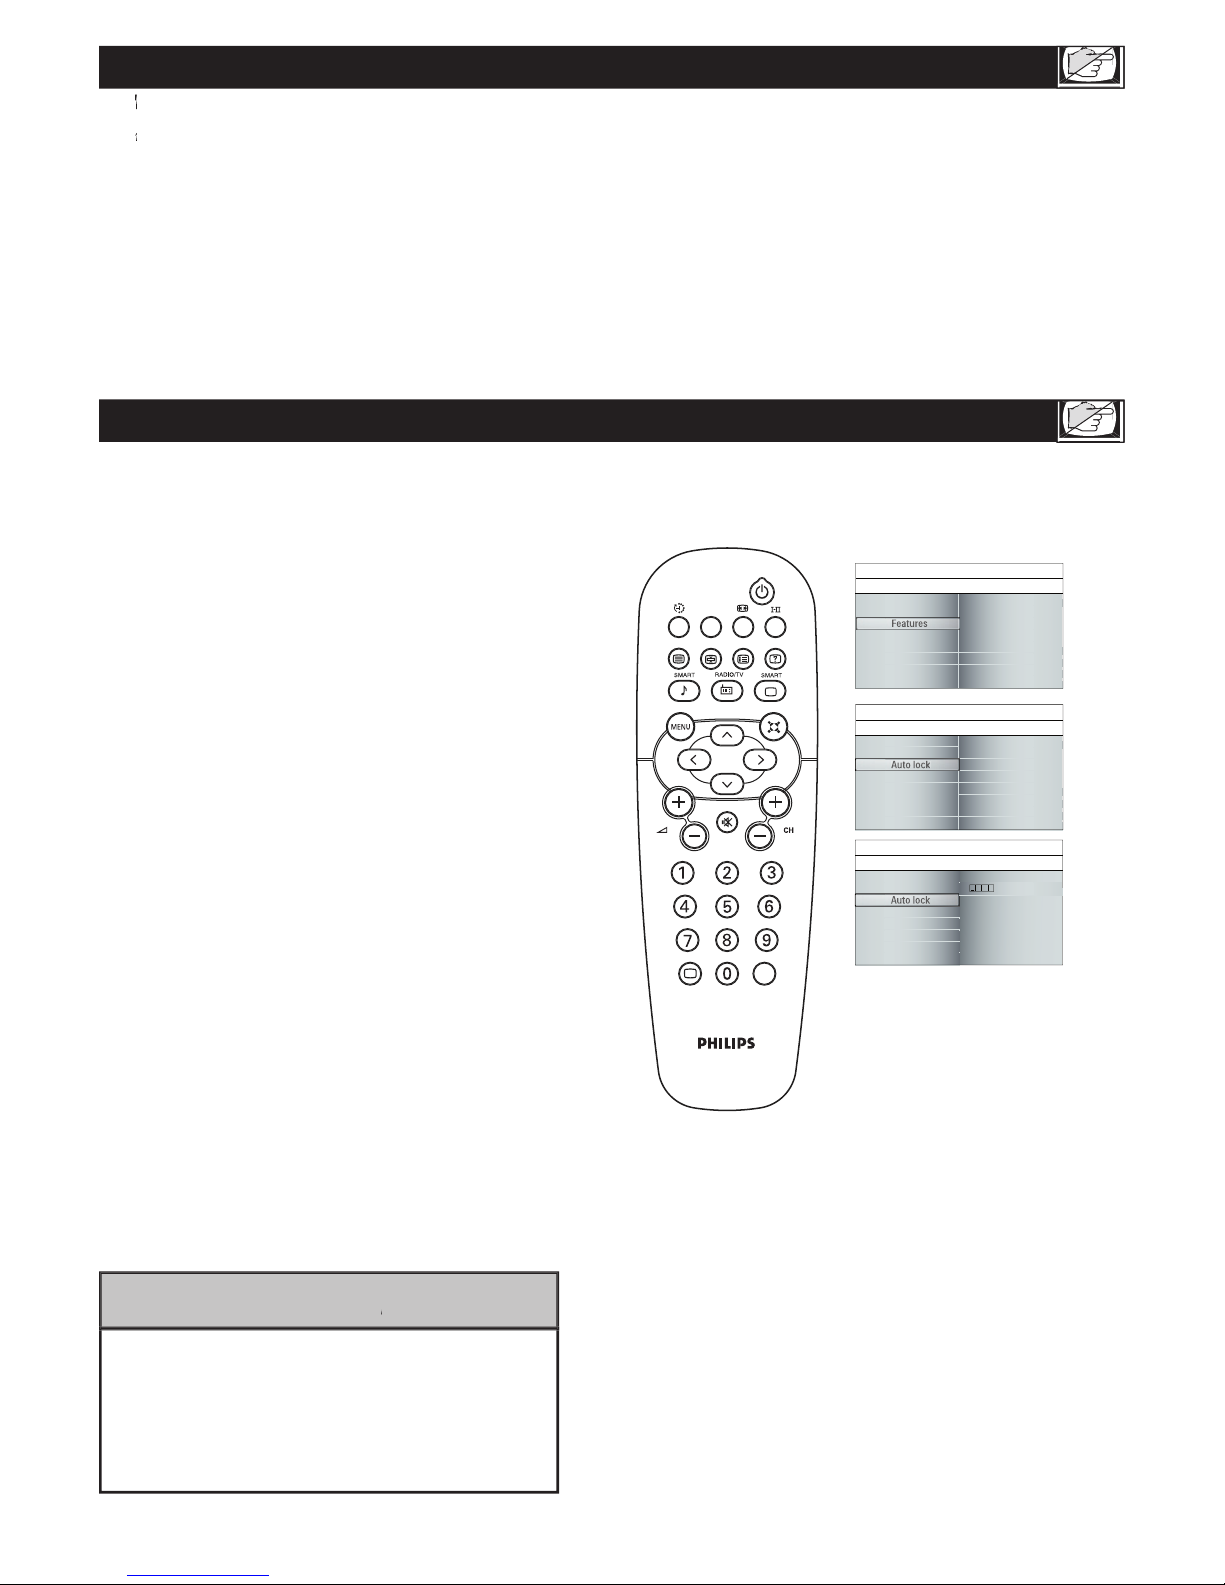
AUTO LOCK ACCESS CODE
AUTO LOCK
he AUTO Lock feature allow you to lock channels, and prevent your children from watching unsuitable content of
he AUTO Lock feature allow you to lock channels, and prevent your children from watching unsuitable content of
programmes.
code. If your access code has been changed by
someone other than you (a child, for example)
or you have forgotten the code, you can always
get in by inputting the default code.
HELPFUL H
ver the next few pages you’ll learn how
to block programs and understand the rating
terms for certain broadcasts. First, set an access code.
onscreen menu.
, then press
to enter.
and press CURSOR RIGHT to enter.
ACCESS CODE will appear on the screen.
the menu from the screen.
1
2
3
4
5
6
A/CH
AV
i
+
Picture
Sound
Features
Install
Timer
NR
Auto lock
Source list
Features
Main Controls Features
Timer
NR
Auto lock
Source list
Lock program
Change code
Clear all
Auto lock
Features
Main Controls
Auto lock
Timer
NR
Auto lock
Source list
Auto lock
Features
Main Controls
Auto lock
Access code
AUTO Lock offers various BLOCKING controls from which to choose:
Access Code
- An Access Code must be set to prevent children from unblocking questionable or censored programming set by
their parents.
- Select the TV channel you want to lock.
Change
Code
- To change your access code or overwriting.
Clear All
To unlock all locked channels and programming.
Page 20
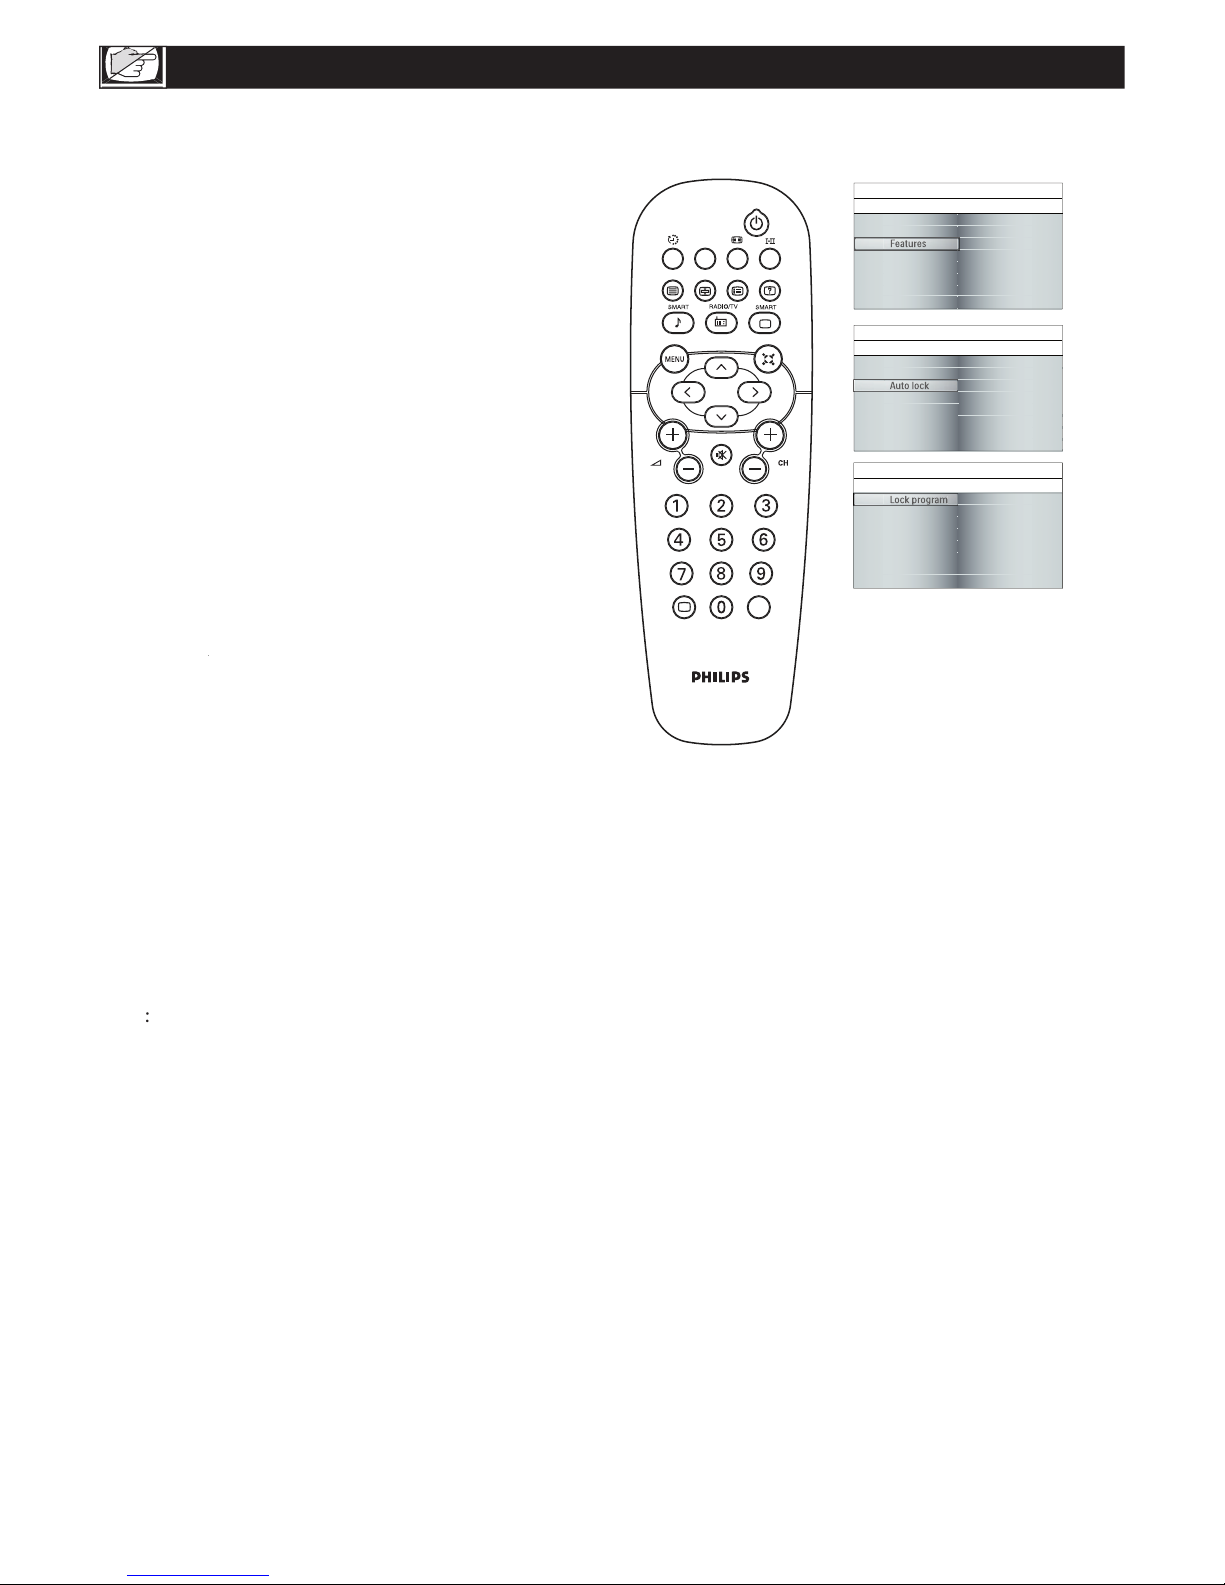
AUTO LOCK PROGRAM
A
fter your personal access code has been
set (see the previous page), you are ready to
select the channels or inputs you want to block out
or censor.
onscreen menu.
to enter.
AUTO LOCK, then press CURSOR RIGHT to
enter (please refer to page 19 for detail).
PROGRAM. Use the
Number buttons to
enter the channel which you are going to block.
current channel.
from the screen.
1
2
3
4
5
6
:
You can block additional channels by using
Number buttons to jump to another channel.
A/CH
AV
i
+
Picture
Sound
Features
Install
Timer
NR
Auto lock
Source list
Features
Main Controls Features
Timer
NR
Auto lock
Source list
Lock program
Change code
Clear all
Auto lock
Features
Main Controls
Auto lock
Lock program
Change code
Clear all
18
Lock program
Lock program
Lock program
Auto lock
Main Controls
I Features
Lock program
Page 21
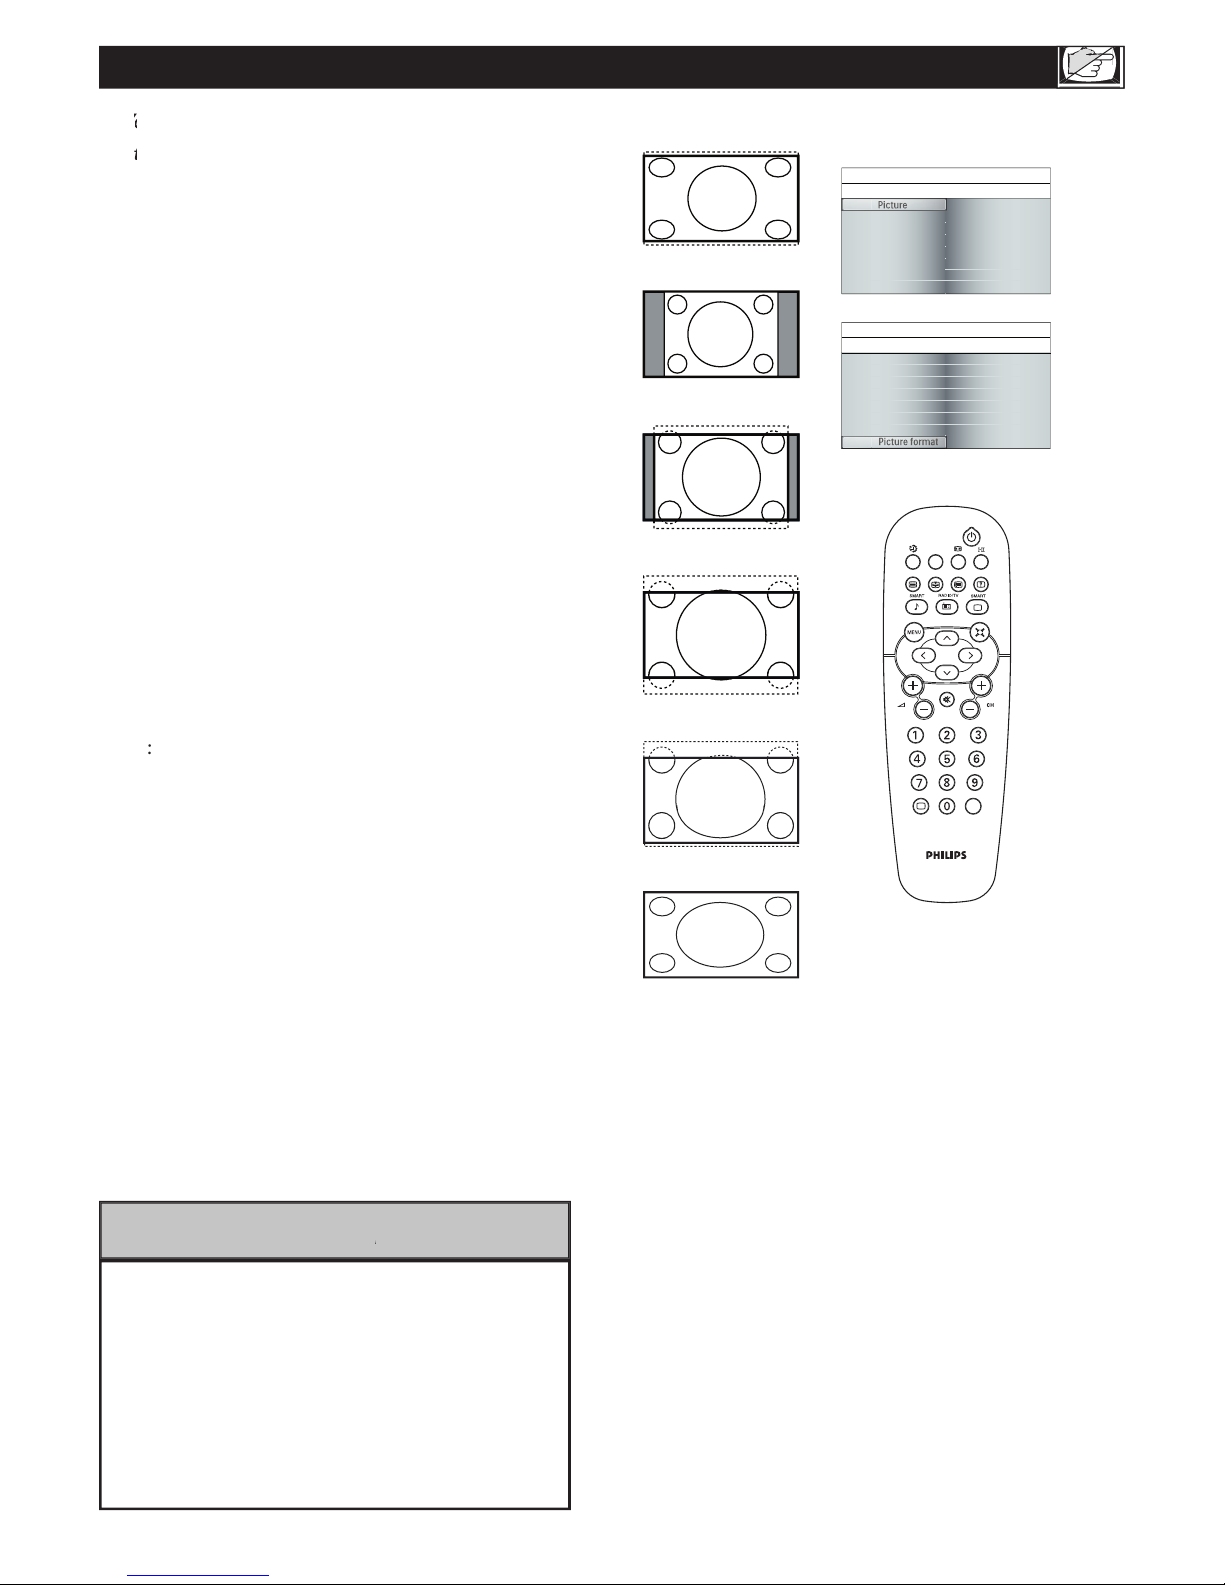
ou can change the picture format size to match
ou can change the picture format size to match
the type of program you are watching.
normal
14:9, Movie
expand 16:9, 16:9 subtitle, or Widescree
aspect
ratios.
USING THE PICTURE FORMAT
Movie expand 16:9
Movie expand 14:9
4:3
A/CH
AV
i
+
Picture
Sound
Features
Install
Smart picture
Contrast
Brightness
Color
Sharpness
Picture
Main Controls Picture
Tint
Picture format
Color temp
Smart picture
Contrast
Brightness
Color
Sharpness
Main Controls
Picture
Picture format
Tint
Picture format
Color temp
Picture format
Super zoom
4:3
Movie expand 14:9
Movie expand 16:9
16:9 subtitle
Widescreen
Super zoom
Widescreen
16:9 subtitle
be WIDESCREEN at HD and DVI modes. And
the picture format function will not be
accessible.
2. For 576i/576p, the picture format function is
accessible at HD and DVI modes.
be FULLSCREEN and picture format function
can be accessible.
HELPFUL H
onscreen menu.
When PICTURE menu is highlighted, press
Super zoom, 4:3, Movie expand
Widescreen
formats
, then press CURSOR RIGHT to enter.
1
2
3
4
5
:
to toggle among the six screen format
sizes;
14:9,
Movie expand 16:9, 16:9 subtitle, or
Wide
screen.
Page 22
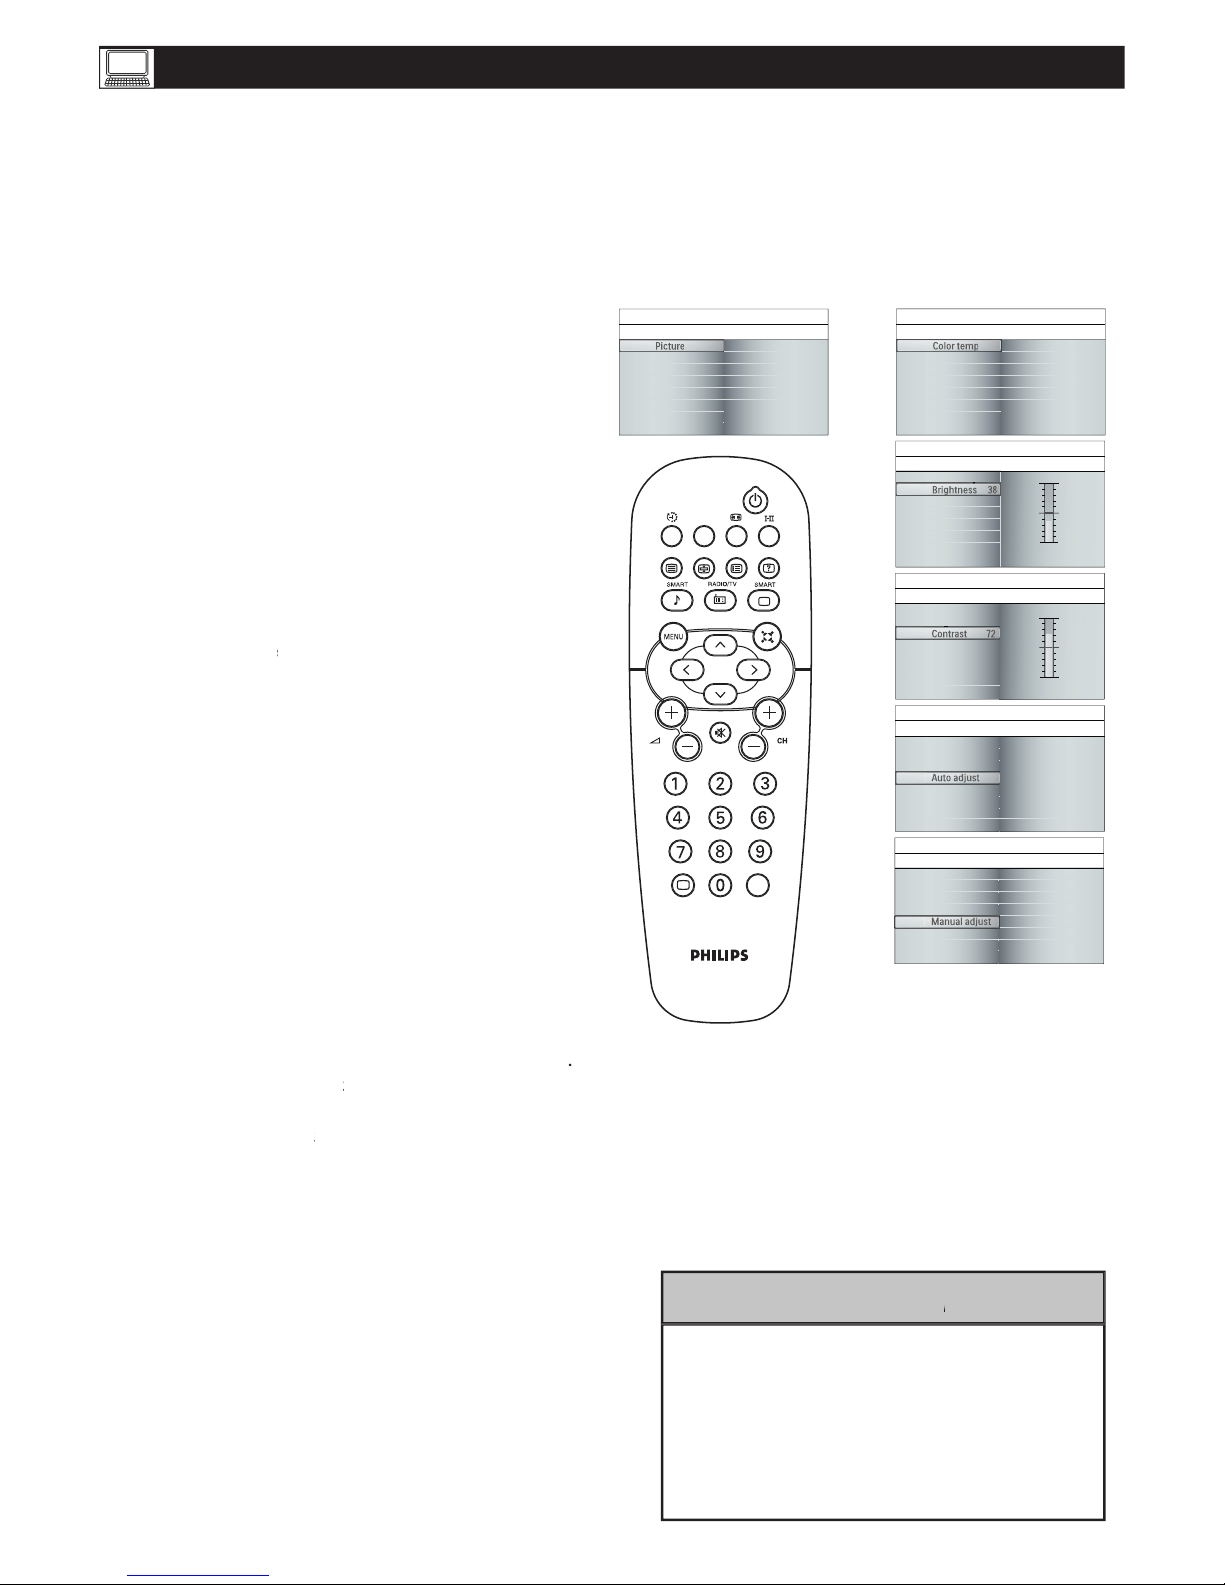
PC PICTURE CONTROLS
his T V can also be used as a PC Monitor. A
PC video signal must be present or the T V will go
into standby mode. The PC Picture controls allow you
to adjust the picture.
control to see the onscreen menu.
W
that you would like to adjust and press CURSOR
C
olor
Temp
: Adjust the color
temperature
of the picture. Select from
: Adjust to brighten the darkest
Contrast
: Adjust to “sharpen” the Picture
quality. The black portions of the picture
Auto Adjust
: The LCD Monitor will
automatically adjust to the best image
: The Manual Adjust control
allow you to manually fi ne tune the image as it
appears on the screen.
eliminates
the horizontal
Clock-
eliminates
the vertical interfering
adjust
the horizontal
Vertical-
adjust
the vertical place
the menu from the screen.
1
2
3
4
5
A/CH
AV
i
+
Picture
Sound
Features
Install
Color temp
Brightness
Contrast
Auto adjust
Manual adjust
Picture
Main Controls Picture
Color temp
Brightness
Contrast
Auto adjust
Manual adjust
Main Controls
Picture
Color temp
Color temp
Color temp
Normal
Warm
Cool
Color temp
Brightness 38
Contrast
Auto adjust
Manual adjust
Main Controls
Picture
Brightness
Color temp
Brightness 38
Brightness 38
Color temp
Brightness
Contrast 72
Auto adjust
Manual adjust
Main Controls
Picture
Contrast
Brightness
Contrast 72
Color temp
Yes
Brightness
Contrast
Auto adjust
Manual adjust
Main Controls
Picture
Auto adjust
Auto adjust
Color temp
Phase
Clock
Horizontal
Vertical
Brightness
Contrast
Auto adjust
Manual adjust
Main Controls
Picture
Manual adjust
Manual adjust
To adjust other items repeat steps 3 and 4.
2. Color Temp can also be activated by pressing
Smart Picture button on your Remote Control.
original value, please enter to Factory Reset in
HELPFUL H
Page 23
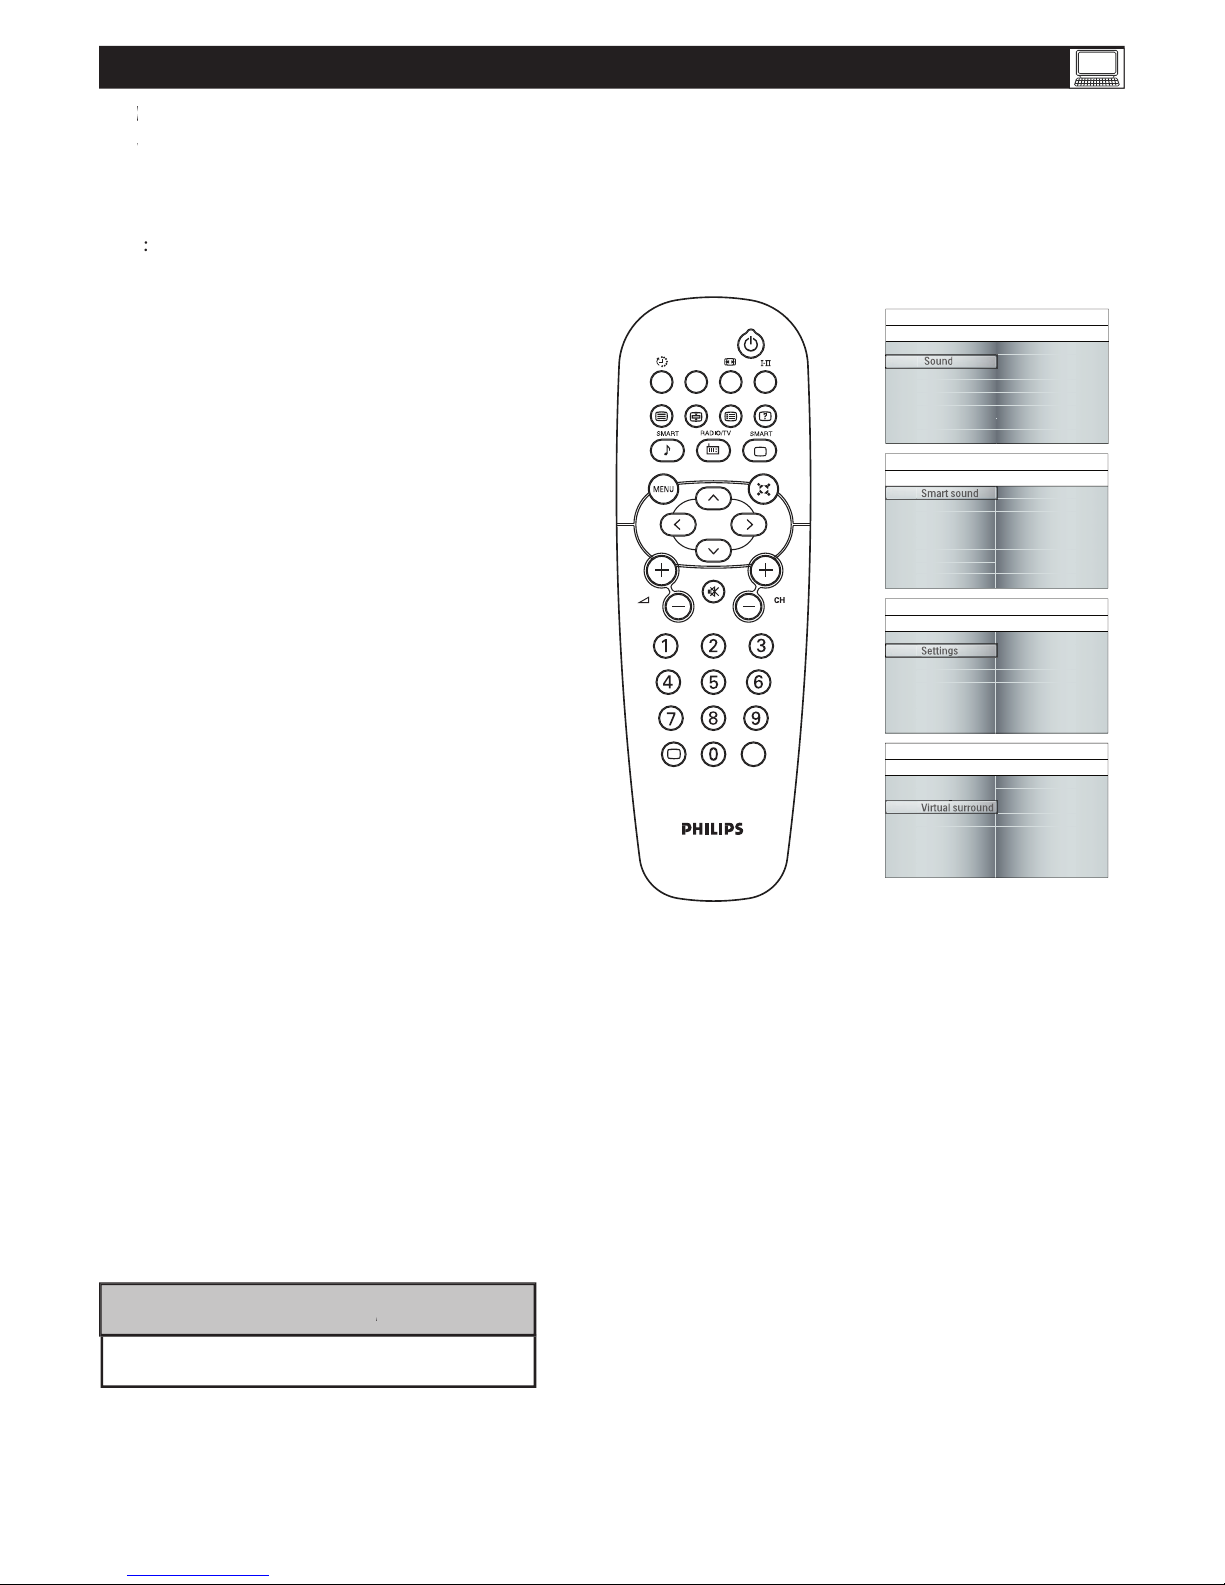
PC AUDIO CONTROLS
his T V can also be used as a PC Monitor. A
his T V can also be used as a PC Monitor. A
PC
video signal must be present or the TV
will go
into standby mode. The AUDIO controls allow you
to adjust the sound.
onscreen menu.
SOUND menu, then press CURSOR RIGHT
to enter.
Smart
Sound
: Allows you to select from 4
factory-set controls and a personal control.
The 5 factory-set controls
(Personal,
Speech, Music, Movie, and Multimedia)
enhance the particular program you are
watching.
Settings
: Allows you to adjust
Treble,
and
Sound.
Virtual
Sound
: Adds greater depth and
dimension to PC sound.
you would like to adjust.
1
2
3
4
5
6
A/CH
AV
i
+
Picture
Sound
Features
Install
Smart sound
Settings
Virtual surround
Sound
Main Controls Sound
Smart sound
Settings
Virtual surround
Personal
Speech
Music
Movie
Multimedia
Smart sound
Sound
Main Controls
Smart sound
Smart sound
Settings
Virtual surround
Treble
Bass
Balance
Settings
Settings
Sound
Main Controls
Settings
Smart sound
Settings
Virtual surround
On
Off
Settings
Virtual surround
Sound
Main Controls
Virtual surround
To adjust other items repeat
steps 4 and 5.
:
HELPFUL H
Page 24
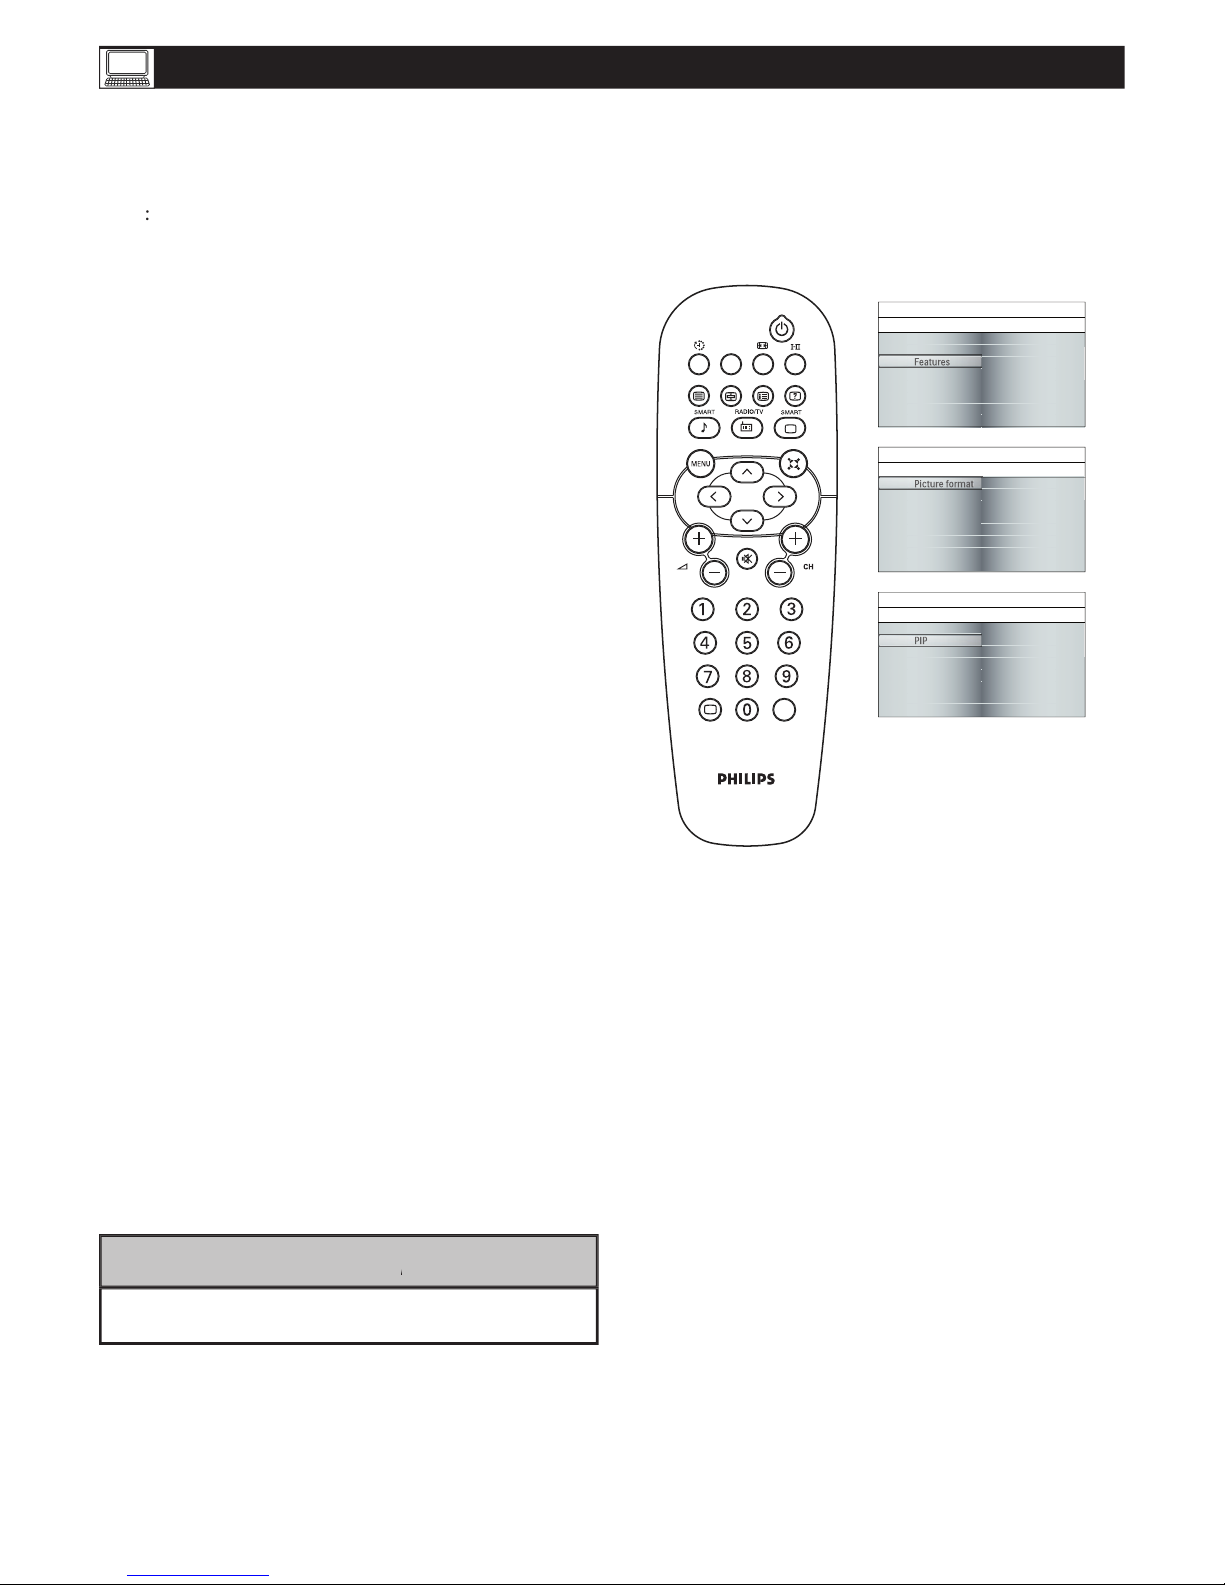
USING PC PIP (PICTURE IN PICTURE) FEATURE
IP (Picture- in-Picture) feature allows you to call
up a subscreen when you are using your TV as a
monitor.
onscreen menu.
that you would like to adjust.
SIZE
: Turn off and set the size of PIP. You
can choose your preferred size of small,
large, or PBP (Picture Beside Picture).
: Select video source of PIP from TV,
AV1, AV2(Side).
: Select which corner of the
position of PIP.
Sound
: Select audio source of PIP or PC.
1
2
3
4
5
A/CH
AV
i
+
Picture
Sound
Features
Install
Picture format
PIP
Features
Main Controls Features
Picture format
PIP
Main Controls
Features
PIP
Size
Input
Position
Sound
Picture format
PIP
Main Controls
Features
Picture format
Picture format
Full screen
4:3
only supports TV, AV1, and AV2(Side).
:
HELPFUL H
Page 25
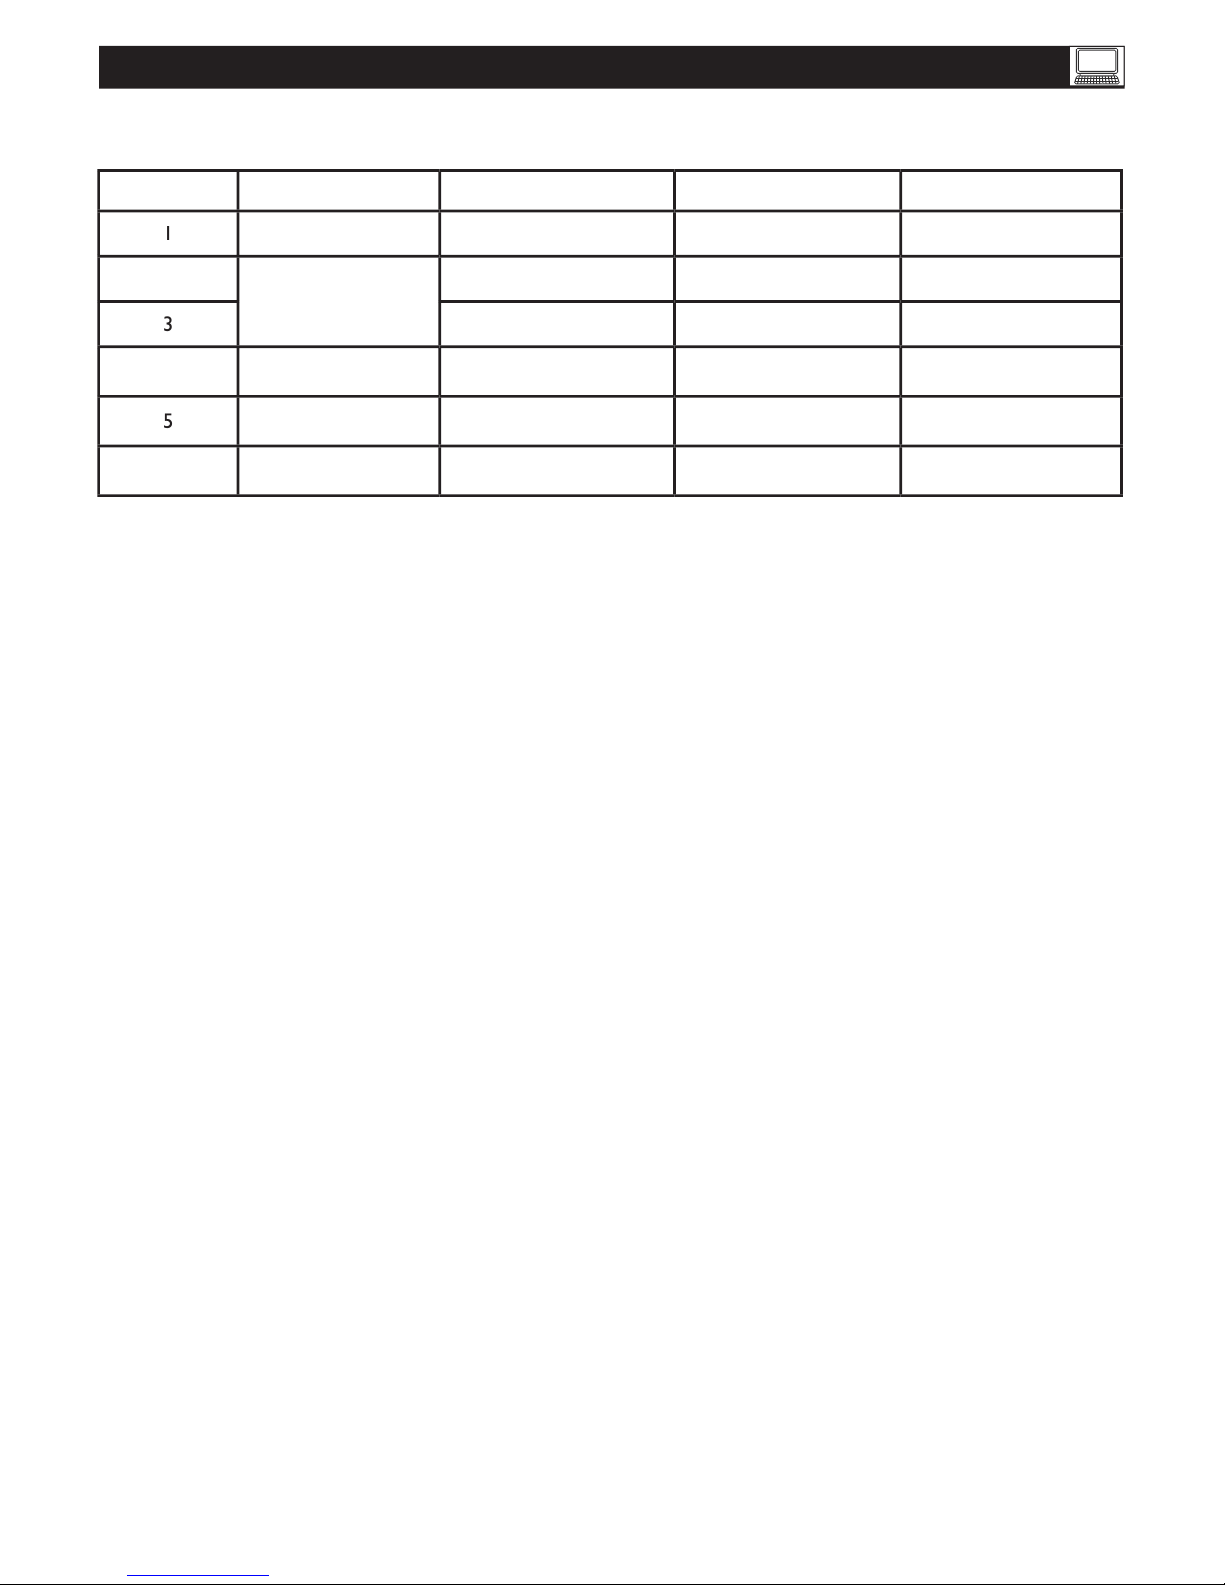
TA2000 /42TA2000 (37”/42” LCD TV)
SETTING UP THE PC MODE (PERSONAL COMPUTER MONITOR)
V. Frequency (Hz)
640 x 480
VGA VESA 60
80 0 x 600
SVGA VESA 56
SVGA VESA 60
60.317
XGA VESA 60
60.0 04
48.363
20
VESA CVT
44.772
6
VESA CVT
60.0 0 0
47.700
* Recommended Resolution
Page 26

TROUBLE SHOOTING TIPS
seconds, then reinsert the plug into the outlet and
push the
button again.
strip, if one is being used.
secured to the TV’s ANT75Ω plug?
available channels.
AV
button on the remote to make
sure the correct signal source is selected.
functioning properly.
present or
the TV will turn off.
VOLUME
buttons.
button on the remote control.
equipment, check the audio jack connections.
simultaneously.
the S-Video
socket of the TV
carefully
to the VCR
socket.
TV Only Produces MONO Sound
the signal coming from the cable box will be
produced in
only.
Stereo.
remote. Be sure the (+) and (-) ends of the batteries
line up as marked inside the battery compartment.
sensor window on the TV.
seconds,then reinsert the plug into the outlet and
push the
button again.
strip, if one is being used.
switch.
mode.
Sensor Window on the TV. See page 2 of the Quick
Use Guidefor details.
TV Displays Wrong Channel or No Channels
Above 13
control) into the TV’s memory.
channels.
Page 27

CARE AND CLEANING
WARNING
concerning stationary images on the TV
Screen: Do not leave fi xed images on the screen for extended periods of time. This can cause uneven aging of the LCD
subtle “ghost” images can be left on the LCD screen. Sources of stationary images may be Laser discs, video games,
TV with
standard (4:3) aspect ratio. This is available with some DVDs.
less likely to damage the picture tube.
These are usually in the same location on the TV screen.
TV Location
where temperatures
can become excessively hot (for example, in direct sunlight or near a heating appliance).
anything abrasive.
Use even, easy, vertical strokes when cleaning.
permanently.
Page 28

INDEX
Auto
S
tore
. . . . . . . . . . . . . . . . . . . . . . . . . . . . . . .
,
2
. . . . . . . . . . . . . . . . . . . . . . . . . .
6
,
. . . . . . . . . . . . . . . . . . . . . . .
.
16, 2
. . . . . . . . . . . . . . . . . . . . . . . . . . . . . . . . .
2
6
. . . . . . . . . . . . . . . . . . . . . . .
. . . . . . . . . . . . . . . . . . . . . . . . . . . . .
2
S
etting
. . . . . . . . . . . . . . . . . . . . . . . . . . . . .
9
. . . . . . . . . . . . . . . . . . . . . . . . .
.15, 17, 22, 2
eset
. . . . . . . . . . . . . . . . . . . . . . . . . . . . . . . . .
10
. . . . . . . . . . . . . . . . . . . . . . . . . . . . . . . . . . . . . . .
8
. . . . . . . . . . . . . . . . . . . . . . . . . . . . . . . .
. 6 . . . . . . . . . . . . . . . . . . . . . . . . . . . .
2
6
8
Sound
. . . . . . . . . . . . . . . . . . . . . . . .
, , ,
6
Sound Mode
. . . . . . . . . . .
. . . . . . . .
. . . . . . . . . . . . . .
, 1
Stereo
. . . . .
. . . . . . .
. . . . . . . . . . . . . . . . . . . .
6
,
2
6
Table of Contents
. . . . . . . . . . . . . . . . . . . . . . . . . . . . . . . .
Tint
. . . . . . . . . . . . . . . . . . . . . . . . . . . . . . . . . . . . . . . . .
Treble
. . . . . . . . . . . . . . . . . . . . . . .
. . . . . . . . . . . . . .
Troubleshooting
. . . . . . . . . . . . . . . . . . . . . . . . . . . . . . . .
.26
TV Operation (Basic)
. . . . . . . . . . . . . . . . . . . . . . . .
. .
2
W
Welcome
. . . . . . . . . . . . . . . . . . . . . . . . . . . . . . . . . . . . . . .
2
 Loading...