

Page 1

Register your product and get support at
www.philips.com/welcome
Flat TV
42PFL7803D
52PFL7803D
User Manual
Page 2
Page 3

2007 © Koninklijke Philips
Electronics N.V. All rights
reserved. Specifi cations are
subject to change without notice.
Trademarks are the property of
Koninklijke Philips Electronics N.V.
or their respective owners.
Philips reserves the right to
change products at any time
without being obliged to adjust
earlier supplies accordingly.
The material in this manual
is believed adequate for the
intended use of the system. If
the product, or its individual
modules or procedures, are used
for purposes other than those
specifi ed herein, confi rmation of
their validity and suitability must
be obtained. Philips warrants
that the material itself does not
infringe any United States patents.
No further warranty is expressed
or implied.
Warranty
No components are userserviceable. Do not open or
remove covers to the inside
of the product. Repairs may
only be done by Philips Service
Centers and offi cial repair shops.
Failure to do so shall void any
warranty, stated or implied. Any
operation expressly prohibited
in this manual, any adjustments,
or assembly procedures not
recommended or authorized
in this manual shall void the
warranty.
Pixel characteristics
This LCD product has a high
number of color pixels. Although
it has effective pixels of 99,999%
or more, black dots or bright
points of light (red, green or
blue) may appear constantly on
the screen. This is a structural
property of the display (within
common industry standards) and
is not a malfunction.
Compliance with EMF
Koninklijke Philips Electronics
N.V. manufactures and sells
many products targeted at
consumers, which, like any
electronic apparatus, in general
have the ability to emit and
receive electromagnetic signals.
One of Philips’ leading
Business Principles is to take
all necessary health and safety
measures for our products,
to comply with all applicable
legal requirements and to stay
well within the EMF standards
applicable at the time of
producing the products.
Philips is committed to develop,
produce and market products
that cause no adverse health
effects.
Philips confi rms that if its
products are handled properly
for their intended use, they
are safe to use according to
scientifi c evidence available
today.
Philips plays an active role in the
development of international
EMF and safety standards,
enabling Philips to anticipate
further developments in
standardization for early
integration in its products.
Copyright
VESA, FDMI and the
VESA Mounting Compliant
logo are trademarks of the
Video Electronics Standards
Association.
Manufactured under license
from BBE Sound, Inc. Licensed
by BBE, Inc under one or more
of the following US patents:
5510752,5736897. BBE and
BBE symbol are registered
trademarks of BBE Sound Inc.
(Available on selected models).
® Kensington and Micro Saver
are registered US trademarks of
ACCO World Corporation with
issued registrations and pending
applications in other countries
throughout the world. All other
registered and unregistered
trademarks are the property of
their respective owners.
Page 4

Contents
Important1. . . . . . . . . . . . . . . . . . . . . . 5
Overview of television controls and 2.
connectors. . . . . . . . . . . . . . . . . . . . . . . . . . 7
Side controls . . . . . . . . . . . . . . . . . . . . .7
Side connectors . . . . . . . . . . . . . . . . . . .7
Rear connectors. . . . . . . . . . . . . . . . . . .7
Position the TV . . . . . . . . . . . . . . . . . . . .8
Install the remote control batteries . . .8
Use the Source List . . . . . . . . . . . . . . . .8
Wall-mount the TV . . . . . . . . . . . . . . . .9
Overview of remote control keys and 3.
functions . . . . . . . . . . . . . . . . . . . . . . . . . . 11
Use your TV in digital mode4. . . . . . . 13
Get Started . . . . . . . . . . . . . . . . . . . . .13
Switch on the TV for the first time . . .13
Understand the information banner . .14
Install channels . . . . . . . . . . . . . . . . . .14
Set your preferences . . . . . . . . . . . . . .17
Restoring to default settings . . . . . . . .18
Control access to digital channels. . . .19
Setup your favorite channels . . . . . . . .21
Update your TV . . . . . . . . . . . . . . . . . .22
Get program listings. . . . . . . . . . . . . . .23
Use your TV 7. . . . . . . . . . . . . . . . . . . 28
Adjust TV settings . . . . . . . . . . . . . . . .28
Change your picture format . . . . . . . .29
Use Smart Mode settings. . . . . . . . . . .30
Use the Surf feature. . . . . . . . . . . . . . .31
Use more of your TV8. . . . . . . . . . . . 32
Use the Advance Picture features . . . .32
Use the Timer . . . . . . . . . . . . . . . . . . .33
Child-lock the TV. . . . . . . . . . . . . . . . .34
Control access to TV channels . . . . . .35
Control access to TV programs. . . . . .37
Turn on closed captions. . . . . . . . . . . .39
Use the Demo modes . . . . . . . . . . . . .40
Use Ambilight. . . . . . . . . . . . . . . . . . . .40
Use your TV as a computer monitor9.
. . . . . . . . . . . . . . . . . . . . . . . . . . . . . . . . . . 43
Picture settings (VGA mode). . . . . . . .43
Feature settings (VGA mode) . . . . . . .43
Use your TV in High Definition mode10.
. . . . . . . . . . . . . . . . . . . . . . . . . . . . . . . . . . 44
Connect the HD equipment . . . . . . . .44
Control the TV settings in HD mode .44
Use Mode Selection . . . . . . . . . . . . . .44
Use Native 1080 mode . . . . . . . . . . . .45
Use Philips EasyLink . . . . . . . . . . . . . . .45
Use your TV in analog mode5. . . . . . 24
Select your location . . . . . . . . . . . . . . .24
Install channels6. . . . . . . . . . . . . . . . . 25
Automatically install channels . . . . . . .25
Manually install channels . . . . . . . . . . .25
Manage channels. . . . . . . . . . . . . . . . . .26
Troubleshooting11. . . . . . . . . . . . . . . . . 46
Specifications12. . . . . . . . . . . . . . . . . . . 48
Connect devices13. . . . . . . . . . . . . . . . 49
Connection overview. . . . . . . . . . . . . .49
Select connection quality . . . . . . . . . . .49
Page 5
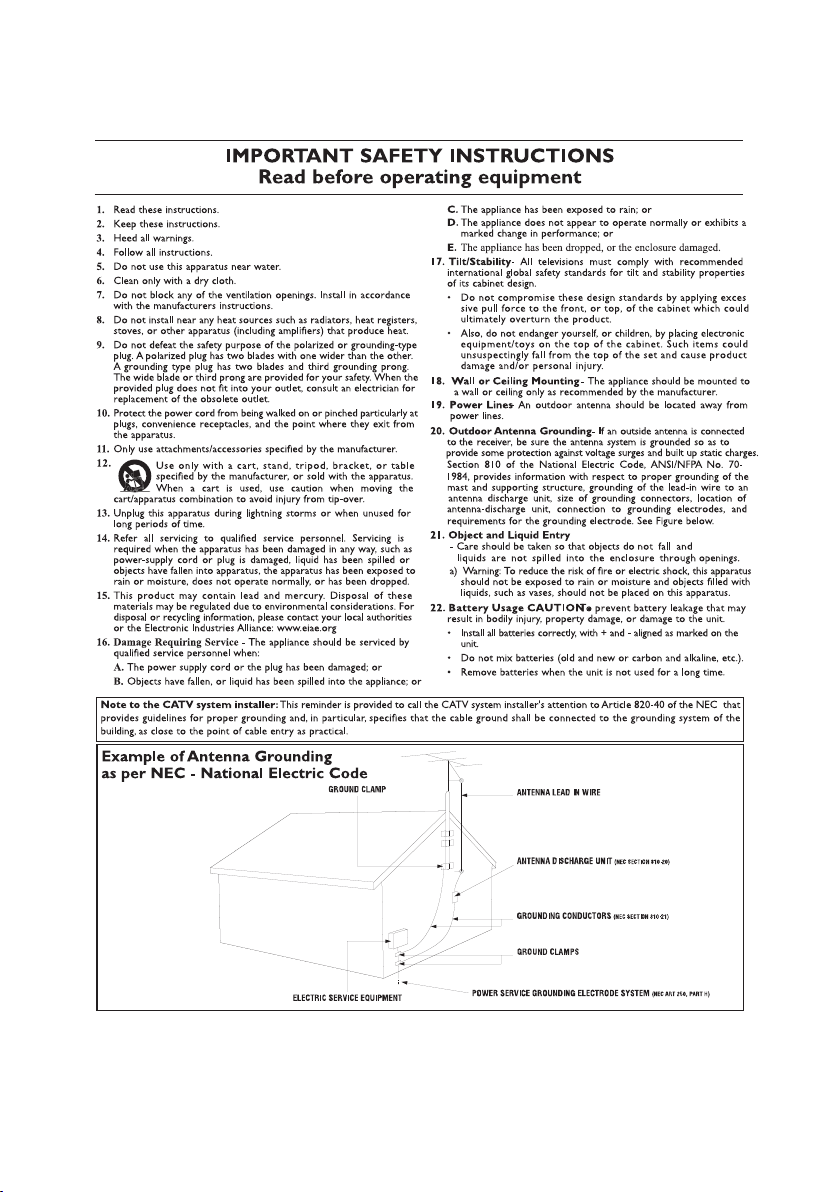
Important1.
Congratulations on your purchase and
welcome to Philips! To fully benefit from
the support that Philips offers, register your
product at www.philips.com/welcome.
Read this user manual before you start to
use this product.
In particular, pay close attention to this
section and follow the safety and screen care
instructions. The product warranty does not
apply if damage is caused by failing to follow
these instructions.
Safety1.1
Two people are required to lift and carry •
a TV that weighs more than 25 kilos
(55lb). Improper handling of the TV can
result in serious injury.
To avoid short circuit, do not expose the •
TV, remote control or remote control
batteries to rain or water.
To avoid risk of fire or electric shock, •
do not place the TV, remote control or
remote control batteries near naked
flame sources (for example, lighted
candles) and other heat sources including
direct sunlight.
Do not touch any part of the TV, power •
connector or antenna cable during
lightning storms.
Do not install the TV in a confined space •
such as a bookcase. Leave a space of at
least 10cm (four inches) around the TV
for ventilation. Be sure air flow is not
obstructed.
If mounting the TV on a flat surface, be •
sure to use only the supplied stand and
to mount the TV on a level, solid surface.
Do not move the TV if the stand is not
properly screwed to the TV.
Wall mounting of the TV should only be •
performed by qualified personnel. The TV
must only be mounted on an appropriate
wall bracket and on a wall that can safely
hold the weight of the TV. Improper wall
mounting can result in severe injury or
damage. Do not attempt to wall mount
the TV yourself.
If the TV is mounted on a swivel base or •
swivel arm, ensure no strain is placed on
the power cord when the TV is swivelled.
Strain on the power cord can loosen
connections and cause arcing or fire.
Do not place the TV on the cord or •
anything else that can pinch the cord or
loosen the mains plug. An improperly
connected mains plug or damaged mains
cord can cause arcing, fire or electric
shock.
Be sure that you have full access to the •
mains cord for easy disconnection of the
TV from the mains.
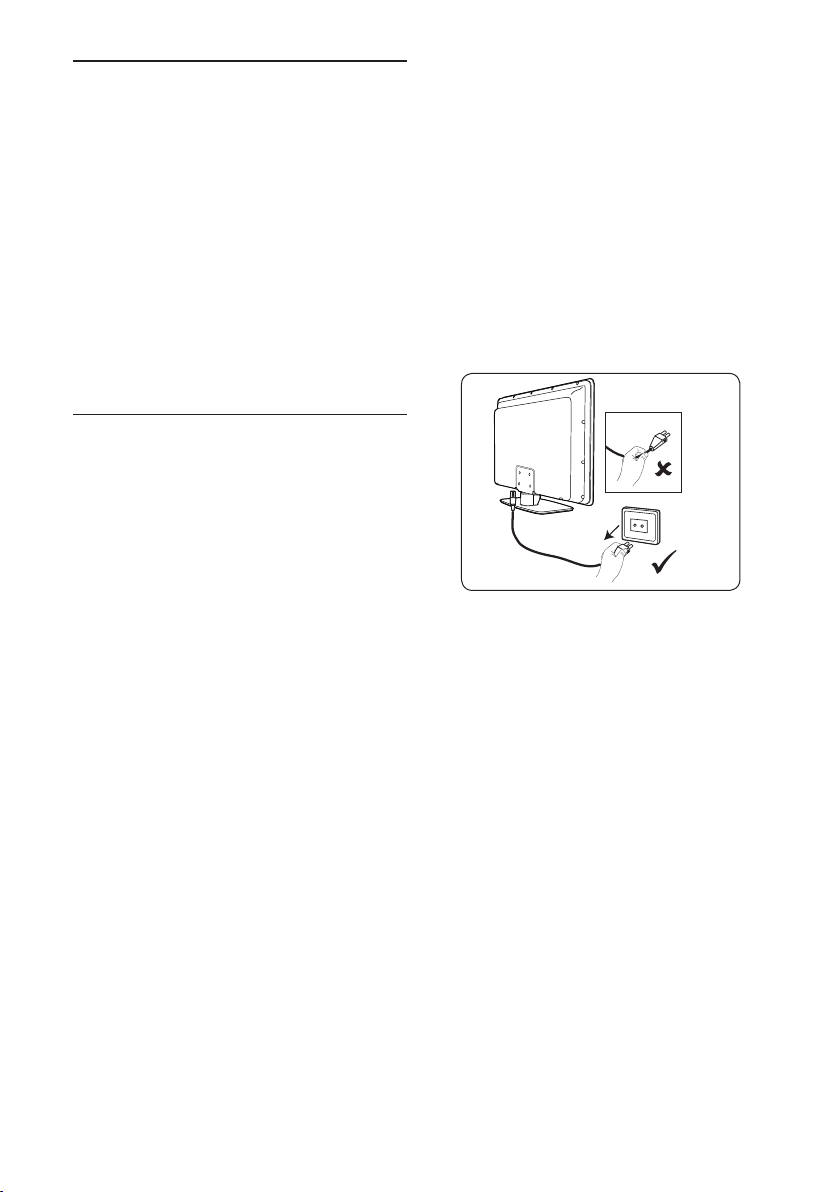
When disconnecting the TV from the •
mains, be sure to:
Turn off the TV, then the mains power •
(if available).
Unplug the mains cord from the mains •
socket outlet.
Unplug the mains cord from the •
power connector at the back of the
TV. Always pull the mains cord by the
plug. Do not pull the mains cord.
EN-5
Page 6
Permanent hearing loss may occur if you •
use earphones or headphones at high
volumes. Though high volume may sound
normal over time, it can damage your
hearing. To protect your hearing, limit the
amount of time you use earphones or
headphones at high volume.
Although your TV consumes very little •
power when in standby, energy continues
to be consumed as long as the mains
remain connected and powered. When
not in use for extended periods of time,
switch off and disconnect the TV from
the mains.
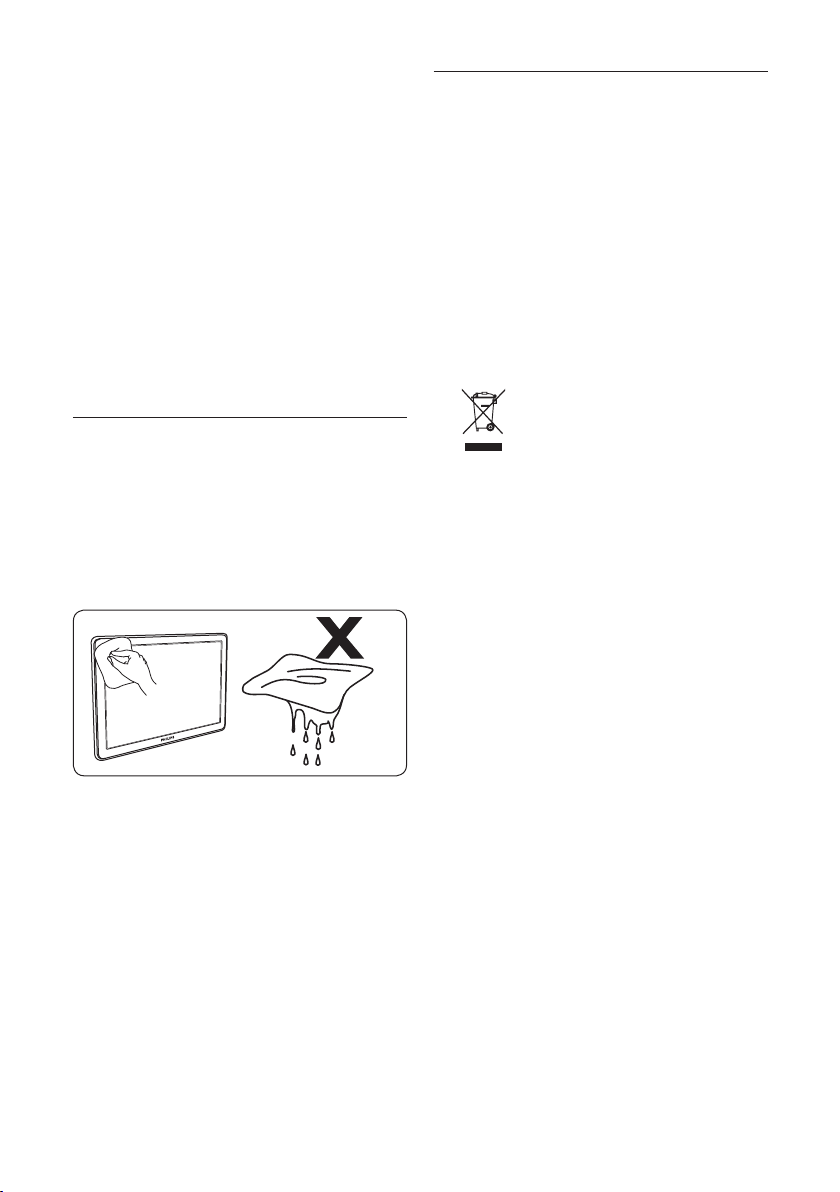
Screen care1.2
Turn off and unplug the mains cord •
before cleaning the screen.
Clean the screen with a soft, dry •
cloth. Do not use substances such as
household cleaning agents as these may
damage the screen.
Environmental care1.3
This product is designed and •
manufactured for material recycling.
Recycle the product packaging at your •
local recycling center and dispose of used
batteries according to local regulations.
Do not dispose the product with •
household waste. Ask your dealer for
information on how to safely dispose of
the product. Uncontrolled waste disposal
harms both the environment and human
health (EEC 2002/96/EC).
• This TV consumes minimal energy in
standby mode to minimize environmental
impact. Active power consumption is
displayed at the back of the TV.
Caution: This is Class 1 apparatus. It C
must be connected to a mains socket
out with a protective earthing connection.
To avoid deformations or color fading, •
wipe off water droplets as soon as
possible.
Do not touch, push, rub or strike the •
screen with hard objects as this may
damage the screen permanently.
Where possible, avoid stationary images •
that remain on-screen for extended
periods of time. Examples include screen
menus, teletext pages, black bars or stock
market tickers. If you must use stationary
images, reduce the screen contrast and
brightness to avoid screen damage.
EN-6
Page 7
Overview of 2.
HDMI 2
AV1 IN
RL
AUDIO IN VGASPDIF OUT
L
R
VIDEO
HDMI 1
CVI-1
L
Pr
Pb
Y
R
CVI-2
L
Pr
Pb
Y
R
SERV. CPBS SX
TV ANTENNA
75X
television controls and
connectors
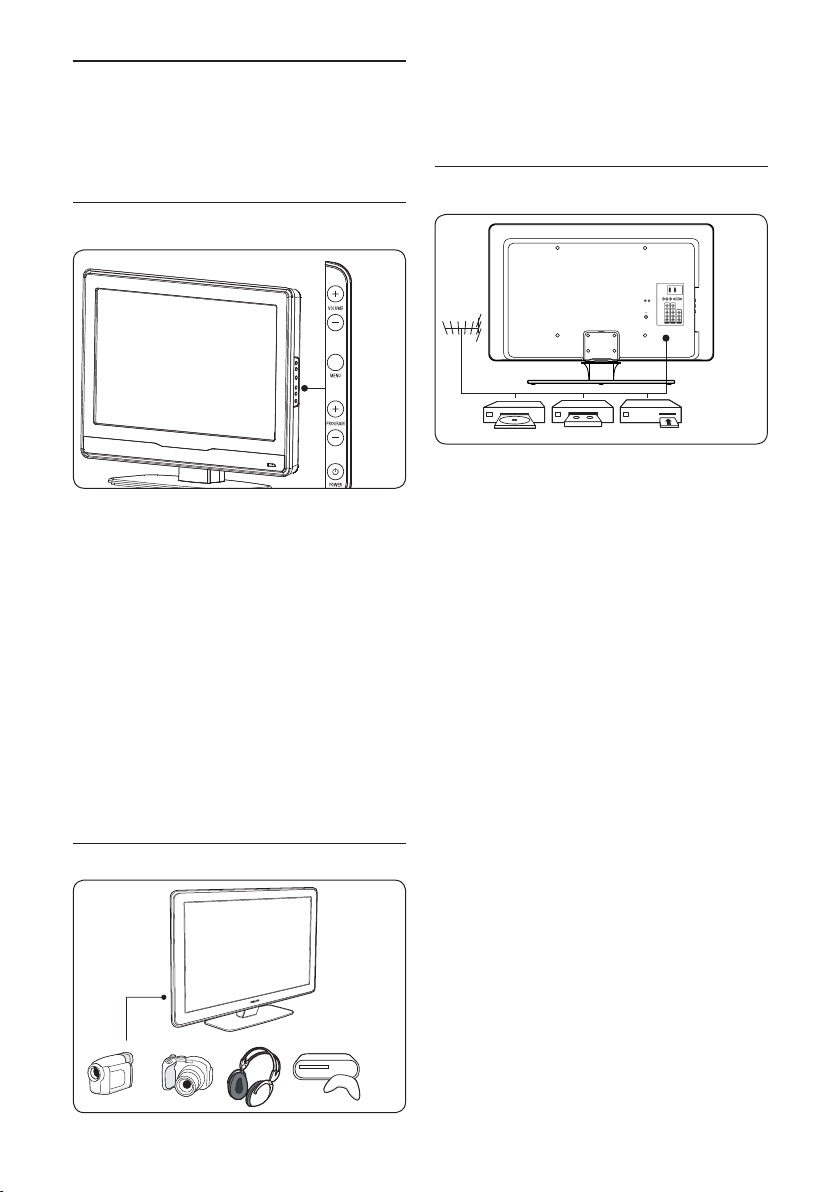
Side controls2.1
VOLUME + / -1.
To increase or decrease volume.
MENU2.
To display the on-screen menus or to
exit from the on-screen menus.
The CH + /- buttons can be used to
navigate the menu items.
The VOLUME + / - buttons can be
used to select the menu items.
CHANNEL + / -3.
To select the TV channel.
POWER 4. .
To turn off or turn on the TV.
Use the side connectors for mobile devices
such as a digital camera or game console. You
can also connect a pair of headphones.
Rear connectors2.3
Use the rear connectors for antenna and
permanent devices such as a high-definition
disc player, DVD player or VCR.
Note: D For more information about TV
connections, refer to the Quick Start
Guide.
Side connectors2.2
EN-7
Page 8
If necessary, refer to the Quick Start Guide for
Source List
stand mounting instructions.
Position the TV2.4
Consider the following before positioning
your TV:
The ideal viewing distance for watching •
TV is three times its screen size.
Position the TV where light does not fall •
directly on the screen.
Connect your devices before you •
position your TV.
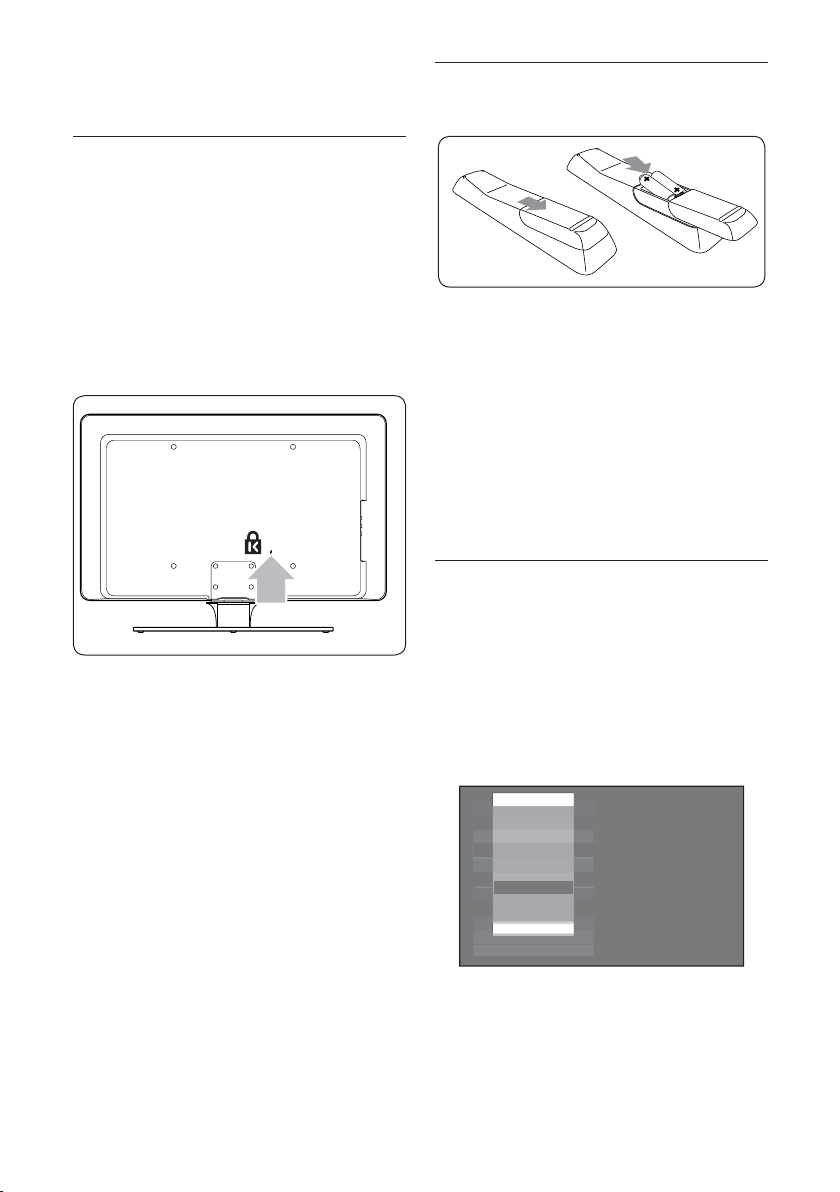
Your TV is equipped with a Kensington •
Security Slot at the back of the TV.
If connecting an anti-theft Kensington
lock (not supplied), position the TV
within reach of a permanent object (such
as a table) that can be easily attached to
the lock.
For the best Ambilight effect, position the •
TV 10cm (four inches) to 20cm (eight
inches) away from the wall. Ambilight also
works best in a room with dim lighting.
Install the remote control 2.5
batteries
Slide the battery cover off the back of 1.
the remote control.
Insert the two supplied batteries. Be sure 2.
the + and - ends of the batteries line up
with the markings inside the case.
Slide the cover back into position.3.
Note: D Remove the batteries if not using
the remote control for an extended
period of time.
Use the Source List2.6
The source list lets you select the audio and
video source that your device is connected
to.
Press 1. SOURCE to display the audio and
video source list.
Press 2. ï or Î to highlight your AV
source and press OK to select.
Source List
TV
AV
SIDE AV
CVI 1
CVI 2
VGA
HDMI 1
HDMI 2
Source List:
TV• : Normal TV broadcast via the
75-ohm antenna connector.
AV• : Composite video and audio output.
EN-8
Page 9
SIDE AV• : Headphone jack, Composite
video and audio, and S-Video input.
CVI 1• : Component video (Y Pb Pr) with
Component audio input.
CVI 2• : Component video (Y Pb Pr) with
Component audio input.
VGA• : Video Graphics Array with audio
input.
HDMI 1• : High Definition Multimedia
Interface input.
HDMI 2• : High Definition Multimedia
Interface input.
Side HDMI: • High Definition Multimedia
Interface input.
Refer to Quick Start Guide for connection
instructions.
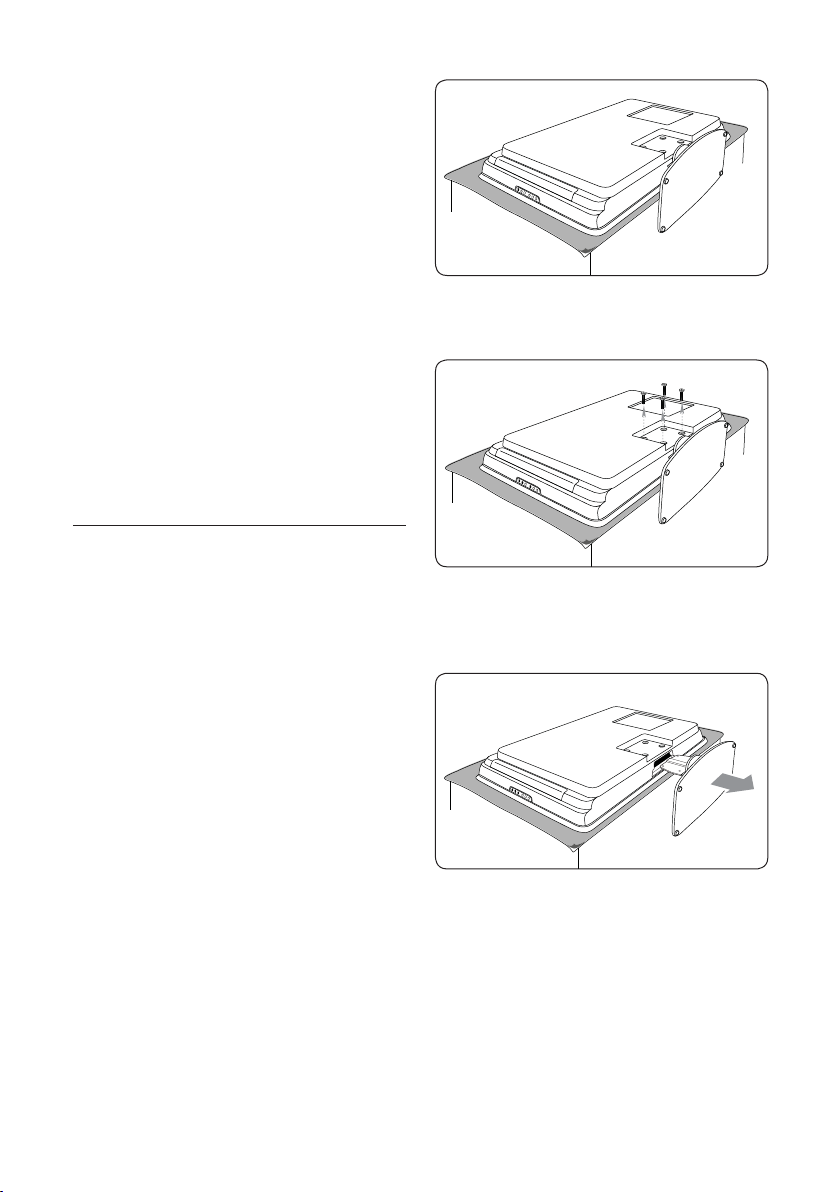
Wall-mount the TV2.7
Using a cross-head screwdriver (not 3.
supplied), unscrew the four screws that
secure the stand to the TV.
WARNING: B
Wall mounting the TV should only be
performed by qualifi ed installers. Konin-
klijke Philips Electronics N.V. bears no
responsibility for improper mounting
that results in accident or injury.
Use VESA-compatible bracket
Purchase a VESA-compatible wall bracket1.
Depending on the size of your TV screen,
purchase one of the following wall
brackets:
Remove the TV stand.2.
Note: D
These instructions are only applicable
to TV models with mounted stands. If
your TV stand is not mounted, see Secure
the VESA-compatible wall bracket to the
TV on this page . Carefully place the TV
face down on a flat, stable surface that is
covered by soft cloth. The cloth should be
thick enough to protect your screen.
Firmly pull the stand from the bottom 4.
of the TV. Place both the stand and
screws in a secure location for future
reinstallation.
Secure the VESA-compatible wall
bracket to the TV
Connect the antenna cable, mains cord and
all other devices to the back of the TV as
described in the Quick Start Guide.
Locate the four mounting nuts at the 1.
back of the TV.
EN-9
Page 10
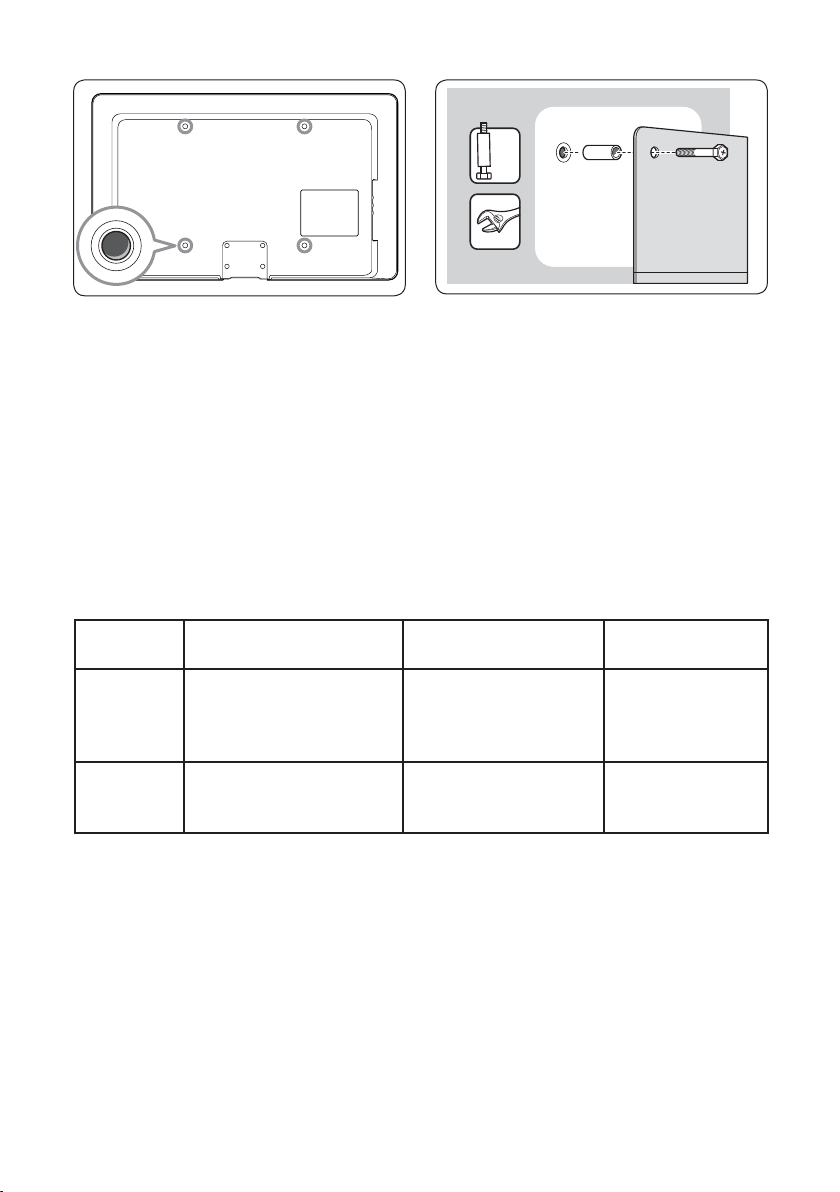
Align the plate/bracket to the four 2.
x4
mounting nuts, placing the spacers (not
supplied) between the plate/bracket and
the mounting nuts.
Using a spanner, insert the bolts through
the plate/bracket and spacers, tightly
securing the bolts to the mounting nuts.
Continue with the instructions provided 3.
with your VESA-compatible wall bracket.
WARNING: B
Use the correct bolts and spacers (see
table) to secure the VESA-compatible
wall bracket to your TV.
Note D : Depending on your VESA-
compatible wall bracket, you may need
to separate the mounting plate from the
wall bracket for easier installation. Refer
to your VESA-compatible wall bracket
documentation for instructions.
TV screen
size (in /cm)
32” / 82cm Adjustable 300 x 300. 4 of M6 x 10mm steel
42” / 107cm
or larger
VESA-compatible wall
bracket (mm)
Fixed 400 x 400. 4 of M8 x 15mm steel bolt
Bolt and spacer type Special instructions
bolt or
4 of M6 x 50mm steel bolt
with 40mm spacer.
or 4 of M8 x 55mm steel
bolt with 40mm spacer.
EN-10
Adjust bracket to
200 x 300
before securing to
the TV.
None.
Page 11
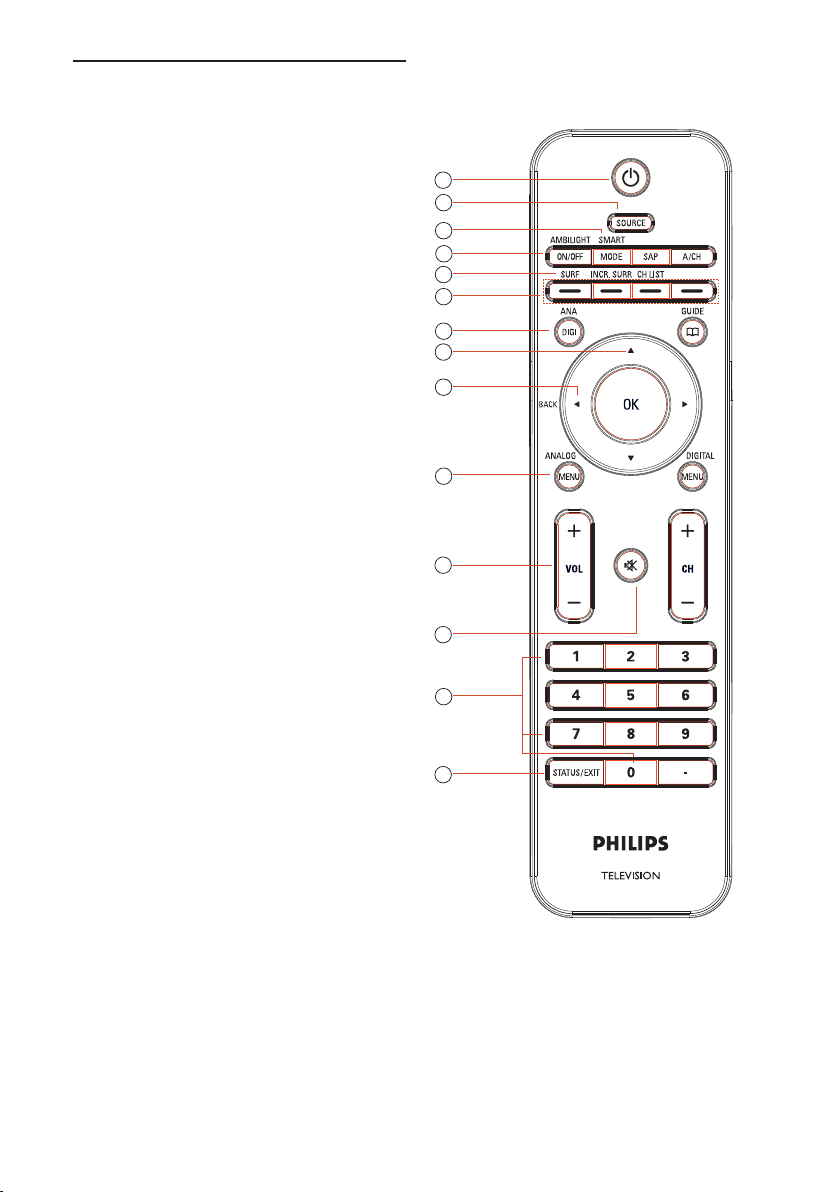
Overview of 3.
remote control keys and
functions
POWER1. .
To switch the TV to standby mode if it
is already turned on. Or to turn on TV
when it is in standby mode.
SOURCE2.
To display the input source list or to
cycle through list of input sources by
repeatedly pressing button.
SMART MODE3.
To select or cycle through predefined
picture and sound settings
AMBILIGHT ON/OFF4.
To turn on or turn off Ambilight.
SURF5.
To channel surf up to 8 channels.
Color buttons (Digital mode only)6.
To use preset functions on the on-screen
display.
ANA / DIGI 7.
To toggle between analog and digital
modes.
CURSOR8.
To navigate and select menu items and
adjust individual settings
BACK9.
To return to the previous menu.
ANALOG MENU10.
To switch the menu on or off in analog
mode.
VOL11. (Volume + / -)
To turn up or turn down the sound level.
MUTE12.
To turn the speaker sound on or off.
1
2
3
4
5
6
7
8
9
10
11
12
13
14
Numeric (0-9)13.
To enter channel number, set time or
timer.
STATUS / EXIT14.
To display information on the current
channel or to exit on-screen menus.
EN-11
Page 12

SAP15.
To select SAP, Stereo or Forced
Mono.
A/CH16. (Alternate Channel)
To display the last viewed channel and
the current channel.
INCR. SURR17.
To enable Incredible Surround in stereo
mode and Spatial in mono mode.
CHANNEL LIST18.
To display the list of available channels.
GUIDE (Digital mode only)19.
Electronic Program Guide button
To get program listings and information.
OK20.
To select menu items or confirm a
selection.
DIGITAL MENU21.
To switch the menu on or off in digital
mode.
CH22. (Channel + / -)
To switch to the next or previous
channel.
Dot23. (Digital mode only)
To enter values for minor channels
(example: 36.5).
15
16
17
18
19
20
21
22
Tip E : Press OK or press Æ to select menu
items or confi rm your selection.
EN-12
23
Page 13
Use your TV in 4.
p
p
p
R
Tes
t receptio
est ecepto
digital mode
Get Started4.1
When the TV is powered-on for the •
first time you are prompted to run auto
install to receive the channels that are
broadcasted locally.
Auto installation takes 20 to 40 minutes •
depending on the number of channels
that are transmitted by the cable
provider or broadcaster.
When the TV is not receiving any •
signal from the antenna or cable, NO
SIGNAL appears on the TV screen. This
can be caused by the antenna or cable
not being plugged in correctly or when
the wrong tuner mode is selected.
When no transmission is received from •
the broadcaster, NO PROGRAM
appears on the TV screen.
You cannot receive pay channels when •
using direct antenna / cable connection
to the television.
When the set-top box is connected to •
the television using coaxial cable, autoprogram the television for the set-top
box source channel and change the
channels at the set-top box to view the
program.
When the set-top box is connected to •
the television using AV connection, select
the television input source for the settop box to view the program. Change
the channels at the set-top box to view
the program.
Switch on the TV for the 4.2
fi rst time
When you turn on TV for the first time,
the TV is in digital mode. You must set the
language and add new services.
Setup your language and services
Press 1. Æ to enter Language and Î or ï
to select your preferred language.
Press 2. OK to confirm.
SetupSetu
n
Language
Add new services
Select system menu language.
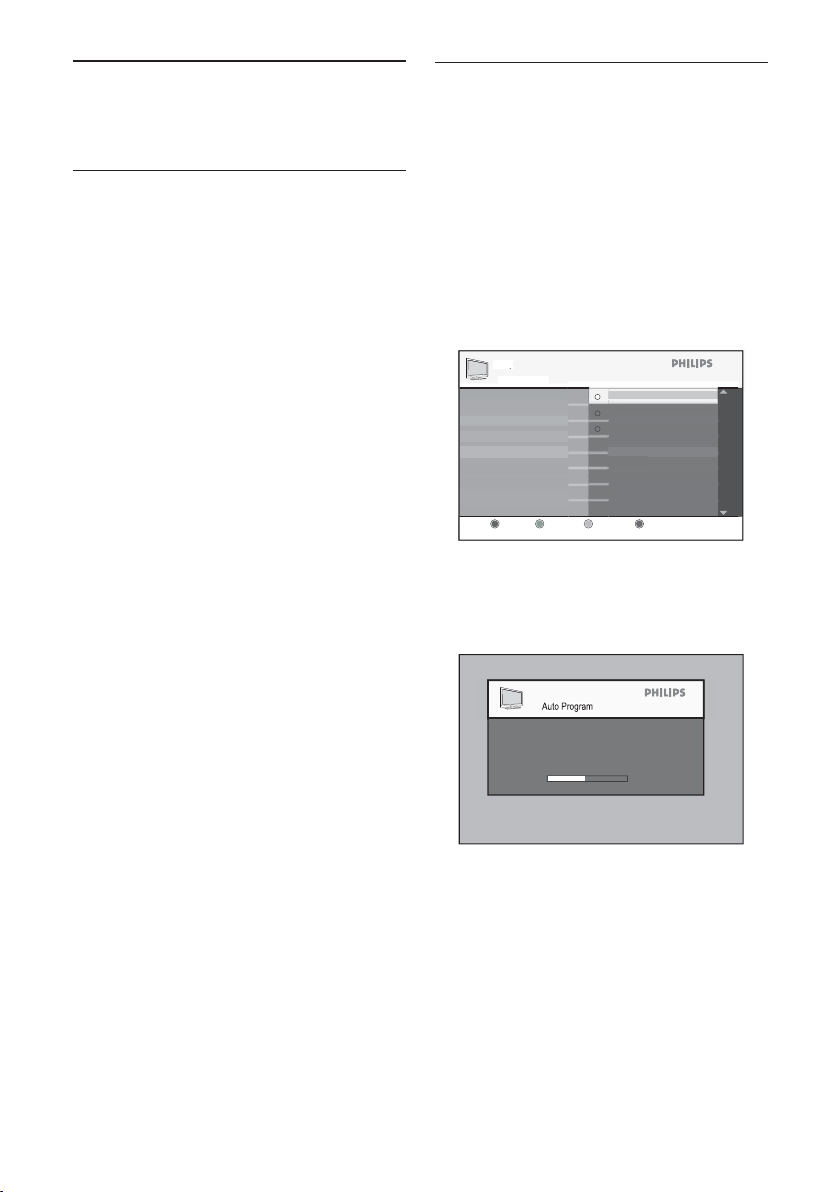
Press 3. ï to select Add new services.
Press 4. OK to start the installation.
The TV searches for the available analog
and digital channels.
Auto Program
Channel 32
TV 579 MHz
When scanning has completed, a popup window displays information on the
number of analog and digital services
found.
Language
English
Portuguese
Spanish
+
Close
EN-13
Page 14

Setup | Installation
Access restriction
s
4
5
6
8
Information
Analog TV services: 1
Analog Radio services: 1
Digital TV services: 1
Digital Radion services: 0
Yes
A service scan is in progress, please press OK to stop.
Total 1 Channels Found
Current Scanning 69/69
Scan percentage
Close
If no digital channels are detected, press 5.
ANA/DIGI to switch to analog mode.
Channel name4.
Program title5.
Program start time6.
Program time progress bar syalpsiD: .7
time left indicator bar.
Program end time8.
Clock :Current time.
.9
Install channels 4.4
Understand the 4.3
information banner
When you select a digital program, an
information banner is displayed at the top of
the screen. The banner disappears after a few
seconds.
You can also press STATUS/EXIT to
display the information banner. When you
press STATUS/EXIT twice in succession,
the TV displays the program description
The information banner provides useful
information about the current program such
as channel name, program title, start time of
program, and so on.
16:35 16:50 16:48The Fairly Odd ParentsTV GloboHD000.00001080p
1 2 3 4 5 6 8 97
Resolution1. : lndicates resolution type,
for example: 1080p.
Favorite list indication yb detacidnI : .2
a tick if you have added this program to
your favorite list setting.
Channel number 3. :In the format:
000:0000
Check for new TV channels
Check the availability of TV channels that
have been launched by the broadcaster after
you have installed the TV.
.1 sserP SOURCE and Î or ï to select
Digital TV from the source list.
.2 sserP DIGITAL MENU to display the
on-screen menu.
Setup
Favorites
Preferences
Access Restrictions
Installation
System
Service List
Service Setup
Restore Default
.3 tceleS Installation > Service List and
press Æ.
Setup | Installation
etu
Installation
Service List Rearrange Services
Rearrange Services
View new TV Channels
Uninstall services
Move services
Close
.4 sserP Î or ï to select View new TV
EN-14
Page 15

Channels.
|
|
t
Access restriction
s
Access restriction
s
_45
6
_
8
|
|
s
Access restriction
s
Test Reception
GLOBO M
_
8
A
If new services are available, press5. Æ
button to enter into the list of services,
and press Î or ï to move through the
list.
Setup | Installation | Service List
etu Installation
View TV Channels
05.1 - TV GloboHD
05.3 - TV GLOBO M
Select the service(s) to change channel.
Service Lis
Signal Strength:
Signal Quality:
Close
For information about how to add new
services to your list of favorite channels,
see Add new channels to your list on this
page .
Press the 6. Í to return to the previous
menu or press DIGITAL MENU to
exit.
Tip: E Press ANA/DIGI to switch be-
tween the digital and analog modes.
Add new channels to your list
Search for new TV channels that have been
launched by the broadcaster after the initial
installation.
Press 1. SOURCE and press Î or ï to
select Digital TV from the source list.
Press 2. DIGITAL MENU to display the
on-screen menu.
Select 3. Installation > Service Setup
and press Æ.
Setup | Installation
etu Installation
Service Setup Add newServices
Add newServices
Reinstall services
Manual install services
Add new services
Close
Press 4. Æ to Add new services and
press OK
to activate the installation.
A search begins. Any new channels are
added to the channel list menu. The
percentage of the installation completed
and the number of channels found are
displayed.
When the search is complete, press 5. OK
to accept the new services.
Press 6. Í to return to the previous menu
or press DIGITAL MENU to exit.
Tip: E Press ANA/DIGI to switch be-
tween the digital and analog modes.
Reinstall all channels
This option lets you reinstall all the digital TV
channels.
Press 1. SOURCE and Î or ï to select
Digital TV from the source list.
Press 2. DIGITAL MENU to display the
on-screen menu.
Select 3. Installation > Service Setup >
Reinstall services and press Æ
Setup | Installation | Reinstall services
etu Installation
05.1 - TV GloboHD
-05.3 TV
Reinstall service
uto Scan Total 1 channels found
Scan status 8/68
Scan percentage
A service scan is in progress, please press OK to stop.
Close
EN-15
Page 16
Caution: Reinstalling services C
|
|
Access restrictions
Test Reception
0
5
T
V
Globo
D
0
5.3
T
V
GBO
A
ccess
r
est
c
8 _
Access restriction
s
ste
n t
o new R
a
dio Sta
tions
2
overwrites all your previously stored
channels.
Press 4. OK to start the installation.
A search is for digital services is started.
The services are stored automatically.
When the search is complete, the menu
indicates the number of digital services
found.
When searching is complete, a list of
stored channels is displayed.
Press 5. OK to store the services.
Press 6. Í to return to the previous menu
or press DIGITAL MENU to exit.
Tip: E Press ANA/DIGI to switch be-
tween the digital and analog modes.
Install digital channels manually
Manually scan services by entering the
frequency of your target channel.
Press 1. SOURCE and Î or ï to select
Digital TV from the source list.
Press 2. DIGITAL MENU to display the
on-screen menu.
Select 3. Installation > Service Setup >
Manual install services and press Æ.
Setup | Installation | Service SetupSetu Installation
Manual install services
.
Channel No. 2
-
Frequency
Start Scan
Signal Strength:
Signal Quality:
Service Setu
57143
nstallation
_
Close
Press 7. Í to return to the previous menu
or press DIGITAL MENU to exit.
Tip: E Press ANA/DIGI to switch be-
tween the digital and analog modes.
Change the order of stored channels
Change the order of the digital channels that
you have stored.
Press 1. SOURCE and Î or ï to select
Digital TV from the source list.
Press 2. DIGITAL MENU to display the
on-screen menu.
Select 3. Installation > Service List >
Rearrange Services and press Æ.
Setup | Installation
Rearrange Uninstall Services
Uninstall services
Move services
GloboHD
GLOBO M
Close
Press 4. Æ to select Uninstall services
and press Î or ï to select the program
to uninstall.
Press 5. Æ to return to the previous menu
and ï to select Move services.
Setup | Installation
etu Installation
Rearrange Move Services
Uninstall services
Move services
GloboHD
GLOBO M
Press 4. Í and Æ to select the channel
number, and ï to select Start Scan.
Press 5. OK to start the search.
When the search is complete, press 6. OK
to accept the new service.
EN-16
Close
Press 6. Î or ï to highlight the program,
and press OK to select.
Press 7. Î or ï move the program to
the order you want, and press OK to
confirm.
Page 17

Repeat the above steps to move other 8.
s
p
R
Caption
s
p
R
)
G
TimeBroadcasted Time
channels.
Press 9. Í to return to the previous menu
or press DIGITAL MENU to exit.
Tip: E Press ANA/DIGI to switch be-
tween the digital and analog modes.
Set your preferences4.5
Set your language
Select your preferred language, time zone,
and digital audio output.
Press 1. SOURCE and Î or ï to select
Digital TV from the source list.
Press 2. DIGITAL MENU to display the
on-screen menu.
Select 3. Preferences > Language and
press Æ.
Setup | Preferences
etu Preference
Language Audio
Audio
System
English
Portuguese
Spanish
+
tween the digital and analog modes.
Set your time zone
Press 1. SOURCE and Î or ï to select
Digital TV from the source list.
Press 2. DIGITAL MENU to display the
on-screen menu.
Select 3. Preferences > Time Zone and
press Æ.
Press4. Î or ï to select the time zone
and press OK.
Press 5. Í to return to the previous menu
or press DIGITAL MENU to exit.
Setup | Preferences
etu Preference
Preferences Time zone
Language
Time Zone
Digital Audio Output
Transparency
Select time zone in your location
Broadcasted Time (-3h)
Broadcasted Time (-2h)
Broadcasted Time (-1h)
Broadcasted Time
Broadcasted Time (+1h)
+
Broadcasted Time (+2h)
Broadcasted Time (+3h)
Close
Tip: E Press ANA/DIGI to switch be-
tween the digital and analog modes.
Select audio preference language.
Close
Press4. Î or ï to select Audio or
System and press OK.
Press5. Î or ï to select the language and
press OK to confirm.
Press 6. Í to return to the previous menu
or press DIGITAL MENU to exit.
Set your digital audio output
Press 1. SOURCE and Î or ï to select
Digital TV from the source list.
Press 2. DIGITAL MENU to display the
on-screen menu.
Select 3. Preferences > Digital Audio
Output and press Æ.
Press4. Î or ï to select AAC or PCM
Menu options for language
output.
Audio• : To select the audio sound
language.
System• : To select the menu language.
Tip: E Press ANA/DIGI to switch be-
EN-17
Page 18

Setup | Preferences
s
p
R
Manaus
G
Acre
G
s
R
p
p
n
p
R
etu Preference
Preferences Digital Audio Output
Language
Time Zone
Digital Audio Output
Transparency
AAC
PCM
-
+
Setup | Preferences
etu Preference
Preferences Transparency
Language
Time Zone
Digital Audio Output
Transparency
0%
20%
40%
60%
80%
+
Select AAC for 5.1 system.
Close
Press 5. Í to return to the previous menu
or press DIGITAL MENU to exit.
Digital Audio Output
AAC• : Advanced Audio Coding (AAC) is
a very high quality audio encoding and
noise reduction system. It is the audio
system you hear in High Definition
Television (HDTV) and digital broadcast
TV (DTV).
PCM• : Pulse Code Modulation (PCM) is a
way of transmitting uncompressed digital
audio. PCM is used by Audio CDs.
Tip: E Press ANA/DIGI to switch be-
tween the digital and analog modes.
Set your menu transparency
Change your menu display from the default
opaque to different levels of transparency.
Press 1. SOURCE and Î or ï to select
Digital TV from the source list.
Press 2. DIGITAL MENU to display the
on-screen menu.
Select 3. Preferences > Transparency
and press Æ.
Close
Press the 4. Î or ï button to select the
level of transparency.
Press 5. Í to return to the previous menu
or press DIGITAL MENU to exit.
Restoring to default 4.6
settings
Press 1. SOURCE and Î or ï to select
Digital TV from the source list.
Press 2. DIGITAL MENU to display the
on-screen menu.
Select 3. Installation > Restore Default
and press Æ.
Setup | Installation
etu
Installatio
Installation Restore Default
Service List Restore Default
Service Setup
Restore Default
+
Close
Highlight 4. Ye s to confirm restoring the
settings to default.
Settings restored to default
Stored channels: • Cleared.
Program list: • Cleared.
Favorite list: • List names set back to
default names.
Locked TV channels: • Cleared.
Maturity rating: • Blocking cleared.
EN-18
Page 19

Audio language: • Set to Brazilian
p
R
pin code
et Pin Protec
tio
n
etotect
o
Stations
p
pin code
et Pin Protec
tio
n
etotect
o
Stations
Portuguese.
Menu language: • Set to Brazilian
Portuguese.
Digital audio output: • Set to PCM.
Time zone: • Set to Broadcasted time.
Pin Code: • Reset to “1234”.
Control access to digital 4.7
channels
Restrict access to the digital channels by
blocking them with an access PIN code.
Turn on Set PIN Protection
Press 1. SOURCE and Î or ï to select
Digital TV from the source list.
Press 2. DIGITAL MENU to display the
on-screen menu.
Select 3. Access Restrictions and press
Æ.
You are prompted for the PIN code.
Please enter your pin code
The menu is protected.
Please enter your system pin code.
Cancel
____
Enter the default PIN code “4. 1234” with
the numeric buttons (0-9).
You can access the menu now using the
default PIN code.
Press the 5. Î or ï button to highlight
On, and press OK to turn on PIN code
protection.
NOTE: D
You cannot navigate the Access
Restrictions menu items when Set Pin
Protection is set to Off.
Set Pin Protection must be set to
On for program, content or channel
restrictions to be activated.
Change your PIN code
Enter the 1. Access Restrictions menu as
described in Turn on Set PIN Protection on
this page .
Press the 2. ï to select Change Pin
Code and press OK.
Enter your PIN code using the numeric 3.
buttons (0-9) on the remote control.
Enter your new PIN code.4.
Setup | Access restrictions
etu Access restrictions
Change PIN Code
Enter your system PIN
New system PIN
Re-enter system PIN
New system PIN.
____
+
Close
Enter the new code again to confirm.5.
Setup | Access restrictions
etu Access restrictions
Change PIN Code
Enter your system PIN
New system PIN
Re-enter system PIN
Re-enter system PIN.
____
+
Close
Press 6. Í to return to the previous menu
or press DIGITAL MENU to exit.
Tip: E If you have forgotten your PIN code,
reset the code by pressing “0711” followed by “0711” to enter a new code.
Reset your PIN code
If you have forgotten your system PIN code,
you can reset it to the default PIN code.
Enter “7. 0711” with the numeric buttons
(0-9) when prompted for the PIN code.
EN-19
Page 20

The TV displays Incorrect Pin and
p
R
p
R
prompts you to enter the PIN code
again.
Please enter your pin code
Incorrect Pin
Cancel
****
Enter “8. 0711”.
The PIN code is reset to the default 9.
factory setting of “1234”.
Please enter your pin code
The default pin code is set.
Please change it to your own system pin code
Please enter your system pin code to change setting.
____
Cancel
Enter “10. 1234” with the numeric buttons
(0-9).
You can continue using this default
PIN code or change the PIN code by
selecting Change Pin Code in the
Access Restrictions menu.
Restrict access to programs with
Maturity rating
Restrict access to the digital programs (that
are rated by the broadcaster) using the
Maturity rating.
Enter the 1. Access restrictions menu as
described in Turn on Set PIN Protection on
the previous page .
Press 2. ï to select Maturity Rating and
press OK to see the list of ratings.
Setup | Access restrictions
etu Access restrictions
Access restrictions Maturity Rating
Maturity Rating
Block Content
TV Channels
Set Pin Protection
Change Pin Code
No maturity blocking
Block any rated content
Block above 10 years
Block above 12 years
Block above 14 years
+
Block above 16 years
Close
Press 3. Î or ï to select the rating and
press OK to confirm.
Note: D You are prompted to enter the
PIN code if the TV program is blocked
by the Maturity Rating fi lter. Enter
the PIN code to temporarily access the
program.
Restrict access to TV programs with
Block Content
Enter the 1. Access restrictions menu as
described in Turn on Set PIN Protection on
the previous page .
Press 2. ï to select Block Content and
press OK.
Press the 3. Î or ï buttons to select the
type of content to be blocked from
access. and press OK
Setup | Access restrictions
etu Access restrictions
Access restrictions Block Content
Maturity Rating
Block Content
TV Channels
Set Pin Protection
Change Pin Code
.
No Block
Block Drugs
Block Violence
Block Sex
Block Violence, drugs
+
Block Sex, drugs
Block Violence, sex
Block All
Close
Note: D A pop-up window prompts you
to enter the PIN code if the TV program
is blocked by the Block Content fi lter.
Enter the PIN code to temporarily access
the program.
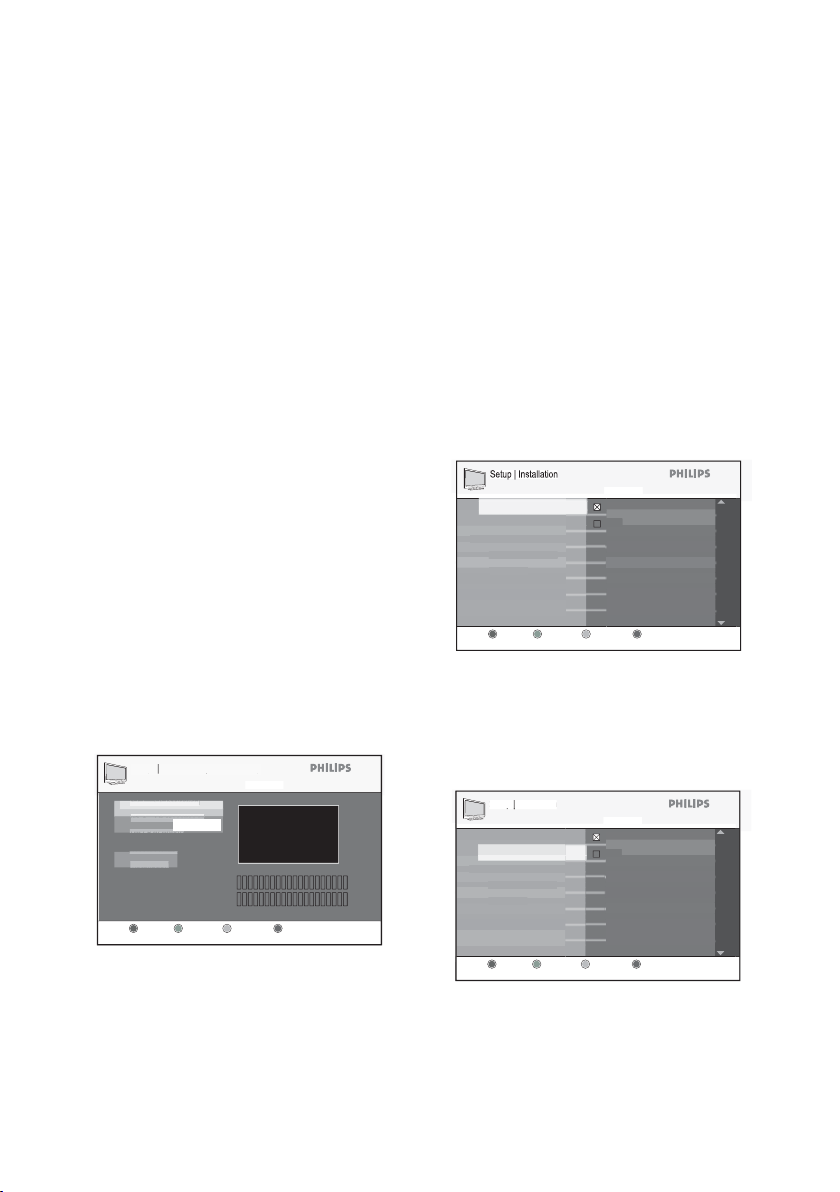
Restrict access to TV channels
Enter the 1. Access restrictions menu as
described in Turn on Set PIN Protection on
the previous page .
Press 2. Î to select TV Channels and
press the Æ button.
Press 3. Î or ï buttons to highlight the TV
channel to restrict.
Press 4. OK to restrict the TV channel.
An ‘X’ marks the check box to indicate
the channel is locked.
EN-20
Page 21

Setup | Access restrictions
p
1
Favorite List
Fist 2
st
s
t 3 4
p
1
Favorite List
F
2
st
s
t 3
1
Favorite List
F
F
2
st
s
t 3 4
p
R
etu Access restrictions
Access restrictions Block Content
Maturity Rating
Block Content
TV Channels
Set Pin Protection
Change Pin Code
TV GloboHD
Globo M
Setup | Favorites
etu Favorites
List 1 Favorite List 1
Name
Select TV channels
Add all services
Remove all services
+
Favorite List 1
+
Select the TV channels you want to lock
Close
Note: D
To unlock the TV channel, highlight the
TV channel and press OK to uncheck
the box.
Setup your favorite 4.8
channels
Create a list of up to four of your favorite
TV channels.
Press 1. SOURCE and Î or ï to select
Digital TV from the source list.
Press 2. DIGITAL MENU to display the
on-screen menu.
Select 3. Favorites > list number (List 1
to List 4) and press OK.
Press the 4. Æ button to enter the
Favorites setting options.
Change the Favorite List name
Press 1. Í or Æ to move the cursor over
the character of the name list, and press
Î or ï buttons to scroll through the
character list.
Press 2. OK to confirm.
Enter the name for the list.
Close
Select 3. Yes and press OK to confirm
changing the list name.
Setup | Favorites
etu Favorites
List 1 Favorite List 1
Name
Select TV channels
Add all services
Rename list
Remove all services
Do you really want to change name for list?
Yes No
Enter the name for the list
Favorite List 1
ist
Close
Select the TV channels
Press 1. Í or Æ to navigate the list of
channels to select.
Press 2. OK to select. An ‘X’ marks the
check box to indicate the channel or
station is selected.
Setup | Favorites
etu Favorites
List 1 Favorite List 1
Name
Select TV channels
Add all services
Remove all services
Select TV channels for the list.
GloboHD
ist
GLOBO M
+
Close
Add all services to the favorite list
Press 1. OK to add all the services to the
favorite list.
EN-21
Page 22

Setup | Favorites
1
Favorite List
F
s
t 3 4
p
R
t
[]
1
Favorite List
F
s
t 3 4
etu Favorites
List 1 Favorite List 1
Name
Select TV channels
Add all services
Remove all services
Add all services
Press 2. DIGITAL MENU to display the
on-screen menu.
Select 3. System > Current Software
Version, and press OK.
The software version is displayed.
+
Press [OK] to add all services to the favorites lis
Close
Select 2. Yes and press OK to confirm
adding all the services.
Setup | Favorites
etu Favorites
List 1 Favorite List 1
Name
Select TV channels
Add all services
Add all services
Remove all services
Do you really want to add all services?
Yes No
Press [OK] to add all services to the favorites list.
Add all services
Close
Press 3. Í to return to the previous menu
or press DIGITAL MENU to exit.
Remove all services to the favorite list
Press the 1. OK button to remove all the
services from the favorite list.
Select 2. Yes and press OK to confirm
removing all the services.
Press 3. Í to return to the previous menu
or press DIGITAL MENU to exit.
Tip: E Press ANA/DIGI to switch be-
tween the digital and analog modes.
System Information
H/W Version: ZDT620 ISDTV V0.1
S/W Version: LC07B-DTM V0.13+
Release Time: Aug-27-2007 02:10PM
Note: D Screen information may differ
depending on your software version.
Installing new software
Switch off the TV set from the wall 1.
socket mains. Insert your USB device to
the USB port at the rear panel of the TV
set and switch on the set.
Press 2. SOURCE and Î or ï to select
Digital TV from the source list.
Press 3. DIGITAL MENU to display the
on-screen menu.
Select 4. System > New Software, and
press OK
Press 5. OK to select the USB disk and
press OK again to select the filename.
Setup | Information | New Software
Select USB disk
USB disk1
Select file
upgrade.zim
Update your TV4.9
View the current version information of the
TV software or install new versions when
they are available.
Viewing the current software version
Press 1. SOURCE and Î or ï to select
Digital TV from the source list.
EN-22
Select file to upgrade.
Close
Select 6. Yes and press OK to confirm.
Page 23

Setup | Information | New Software
Select USB disk
USB disk1
Confirmation
Do you really want to update?
Yes No
Select file to upgrade.
Select file
upgrade.zim
Close
A pop-up window displays an indicator
bar while the update is in progress.
Setup | Information | New Software
Select USB disk
USB disk1
Updating
Programming flash
Select file to upgrade.
Select file
upgrade.zim
Close
When the update completes, the screen
goes blank momentarily.
Switch off the TV set from the wall 7.
socket mains for one to two seconds.
Switch on the TV set again. The new 8.
software is installed.
Get program listings4.10
Access the Electronic Program Guide which
provides detailed information about the
digital programs.
Press 1. SOURCE and Î or ï to select
Digital TV from the source list.
Press 2. GUIDE on the remote control.
A list of digital programs in the selected
favourites list is displayed.
Press 3. Æ to access the Now list, and
press Î or ï to select a program.
Television | TV guide Thu 19 Jul
16:24
00.1 BBC One
00.1 BBC Two
00.1 BBC Three
00.1 BBC Four
00.1 France
16:35 The fairly odd parents 15 miins
00.1 CBeebles
Genre name - Sub genre name
00.1 BBC 7
Welcome to the show that literally turns hidden treasures into cash
00.1 BBC 8
and dreams into realities, BBC America’s latest U.S. premiere
addition to the channel’s hugely successful living line-up.
16:35 The fairly odd parents 15 miins
Now Next
16:35 The fairly odd... 16:50 The fairly odd...
16:30 Ready Steady 17:15 The weakest lin
12:50 This is BBC Thr 18:58 Welcome to BB
12:50 This is BBC Fou 18:58 This is BBC Fou
16:10 Newsround sho 16:45 Tracy Beaker
16:20 Step inside 16:30 Koala Brothers
19:00 BBC News 19:30 Tales from the
18:45 Rock from the 19:45 Dark Angel
More infoRecord Prev day Next day
More infoRecord Prev day Next day Function
Press 4. Í to return to the previous screen
and press Æ to access the Next list.
Press 5. Î or ï select the date and press
the OK.
Television | TV guide Thu 19 Jul
16:24
00.1 BBC One
00.1 BBC Two
00.1 BBC Three
00.1 BBC Four
00.1 France
00.1 CBeebles
00.1 BBC 7
00.1 BBC 8
16:35 The fairly odd parents 15 miins
Press OK to view this channel
Now Next
16:35 The fairly odd... 16:50 The fairly odd...
16:30 Ready Steady 17:15 The weakest lin
12:50 This is BBC Thr 18:58 Welcome to BB
12:50 This is BBC Fou 18:58 This is BBC Fou
16:10 Newsround sho 16:45 Tracy Beaker
16:20 Step inside 16:30 Koala Brothers
19:00 BBC News 19:30 Tales from the
18:45 Rock from the 19:45 Dark Angel
Mon 31-10
Tue 01-11
Wed 02-11
Thur 03-11
Fri 04-11
Sat 05-11
Sun 06-11
Today
More infoRecord Prev day Next day
Jump to
Press the colour buttons to activate 6.
the TV guide. The TV guide features are
displayed at the bottom of the screen.
When you have finished, press 7. GUIDE
to exit.
Note: D Sample screens only. The
Electronic Program Guide may differ
from your TV set.
EN-23
Page 24

Use your TV in 5.
analog mode
Select your location5.1
Set the location to suit a shop floor or home
environment.
Press 1. SOURCE and Î or ï to select
TV from the source list.
Press 2. ANALOG MENU to display the
on-screen menu.
Select 3. Location and press OK.
Press 4. ï or Î to select the location and
press OK to confirm.
Main
Picture Setting
Advance Picture
Sound
Ambilight
Features
Install
Location
Home
Shop
Note: D To select your menu language,
refer to Set your language on page 17 .
EN-24
Page 25

Install channels6.
Automatically install 6.1
channels
Press 1. SOURCE and Î or ï to select
TV from the source list.
Press 2. ANALOG MENU to display the
on-screen menu.
Select 3. Install > Auto Program and
press OK.
on-screen menu.
Select 3. Install > Tuner Mode and press
OK.
Press 4. ï or Î to select Auto, Antenna
or Cable, and press OK to select.
Install
Tuner Mode
Auto Program
Manual
Name
Fav. Program
Auto
Antenna
Cable
Auto Program
Program 3
TV 196 MHz
Auto Program starts scanning for
channels automatically. When scanning
is complete, the first installed channel is
displayed.
Press 4. Í to return to the previous menu
or press ANALOG MENU to exit.
Tip E : To cancel or interrupt auto search-
ing, press ANALOG MENU. Only channels found before interruption are stored.
Manually install channels6.2
Manually set the TV tuner and system and
fine tune the channels.
Change the Tuner Mode
Manually set the tuner system if you have
problems using Auto Program to search
for channels.
Press 1. SOURCE and Î or ï to select
TV from the source list.
Press 2. ANALOG MENU to display the
Press 5. Í to return to the previous menu
or press ANALOG MENU to exit.
Tuner Modes
Auto• : Automatically detects if the cable
signal input is present.
Antenna• : Detects antenna signals and
searches for all antenna TV channels
available in your local area.
Cable• : Detects cable signals and
searches for all cable TV channels
available in your local area.
Change the TV System
Press 1. SOURCE and Î or ï to select
TV from the source list.
Press 2. ANALOG MENU to display the
on-screen menu.
Select 3. Install > Manual > System, and
press OK.
Press 4. ï or Î to select Auto, NTSC,
PAL-M or PAL-N, and press OK to
select.
EN-25
Page 26

Manual
System
Fine Tune
Auto
NTSC
PAL-M
PAL-N
Press 5. Í to return to the previous menu
or press ANALOG MENU to exit.
TV Systems
Auto• : Detects the tuner system
automatically.
NTSC• : For North American and some
South American countries.
PAL-M• : For Brazil.
PAL-N• : For Argentina, Uruguay and
Paraguay.
Fine tune your channels
Fine tune the channels after searching them
automatically by using Fine Tune.
Switch to the channel number to fine 1.
tune.
Press 2. SOURCE and Î or ï to select
TV from the source list.
Press 3. ANALOG MENU to display the
on-screen menu.
Select 4. Install > Manual > Fine Tune
and, press OK.
Manual
System
Fine Tune
Press 5. ï or Î to manually fine tune the
EN-26
channel reception.
Press 6. Í to return to the previous menu
or press ANALOG MENU to exit.
Manage channels6.3
Name your channels
Assign a short name for your channels with
the Name. This is available in TV mode only.
Press 1. SOURCE and Î or ï to select
TV from the source list.
Press 2. ANALOG MENU to display the
on-screen menu.
Select 3. Install > Manual > Name, and
press OK.
Install
Tuner Mode
Auto Program
Manual
Name
Fav. Program
Press 4. OK to select the first channel
number on the list.
Press 5. OK to start naming the channel.
Press 6. Æ until a rectangular block cursor
appears next to the channel number.
Press 7. ï or Î to cycle through the list
(A-Z, 0-9) to select the characters or
numbers to use for the channel name.
Press 8. OK to move the cursor to
the second space and assign the next
character or number.
You can use up to 5 characters or
numbers to name your channels.
Press 9. OK to store the name of the
channel.
The channel number and name are
001
002
003
004
005 SPORT
006
007
008
Page 27

displayed on the top left of the screen.
Press 10. Í to return to the previous menu
or press ANALOG MENU to exit.
Store your favorite channels
Fav. Program lets you store only the
channels you want on a favorite list.
Press 1. SOURCE and Î or ï to select
TV from the source list.
Press 2. ANALOG MENU to display the
on-screen menu.
Select 3. Install > Fav. Program and
press OK.
The list of channel numbers is displayed 4.
on the right panel. All channel numbers
with a tick ($) are marked as favorite
channels.
Install
Tuner Mode
Auto Program
Manual
Name
Fav. Program
001
002
003
004
005
006
007
008
Install
Tuner Mode
Auto Program
Manual
Name
Fav. Program
001
002
003
004
005
006
007
008
Press 7. Í to return to the previous menu
or press ANALOG MENU to exit.
Tip E : Press the numeric (0-9) to access
channels not on the favorite list.
Press 5. OK to select the first channel
number on the list, or press ï to move
down the list.
Press 6. OK to remove the tick or add the
tick to the corresponding number.
Only channel numbers with the tick are
added to your favorite list. When you
use the CH + / - buttons on the remote
control, only your favorite channels are
accessible.
EN-27
Page 28

Use your TV 7.
Adjust TV settings7.1
Adjust your picture settings
Press 1. SOURCE and Î or ï to select
TV from the source list.
Press 2. ANALOG MENU to display the
on-screen menu.
Select 3. Picture Setting and press OK.
Press 4. ï or Î to highlight the menu
items and press OK to select.
Picture Setting
Brightness
Color
Contrast
Sharpness
Tint
Color Temp
Press 5. ï or Î to adjust the settings of
the menu items.
Some items have the level indicator bar
while some have discreet settings such as
Cool, Normal and Warm.
Picture Setting
Brightness
Color
Contrast
Sharpness
Tint
Color Temp
Press 6. Í to return to the previous menu
or press ANALOG MENU to exit.
Picture settings:
Brightness• : Adjusts the brightness.
Color• : Adjusts color saturation.
Cool
Normal
Warm
Contrast• : Adjusts the contrast.
Sharpness• : Adjusts the detail level of
the picture.
Tint: • Adjusts the detail of the skin tones
of the picture (TV or AV modes only).
Color Temp• : Sets the color to Cool
(more blue), Normal (balanced) or
Warm (more red).
Adjust your sound settings
Press 1. SOURCE and Î or ï to select
TV from the source list.
Press 2. ANALOG MENU to display the
on-screen menu.
Select 3. Sound and press OK.
Sound
Equalizer
Balance
Auto Vol. Leveler
Incr. Surround
BBE
SAP
Forced Mono
120 HZ
200 HZ
500 HZ
1200 HZ
3000 HZ
7500 HZ
12000 HZ
Press 4. ï or Î to highlight the menu
items and press OK to select.
Press 5. ï or Î to adjust the settings of
the menu items.
Equalizer
120Hz
200Hz
500Hz
1200Hz
3000Hz
7500Hz
12000Hz
Some items have the level indicator
bar, some have discreet settings such as
Mono, Spatial, or On and Off.
EN-28
Page 29

Sound
Equaliser
Balance
Auto Vol. Leveler
Incr. Surround
BBE
SAP
Forced Mono
Sound
Equaliser
Balance
Auto Vol. Leveler
Incr. Surround
BBE
SAP
Forced Mono
Off
On
Mono
Spatial
Press 6. Í to return to the previous menu
or press ANALOG MENU to exit.
Sound settings:
Equalizer• : Adjusts each individual
frequency (tone).
Balance• : Adjusts the left and right
speaker sound level.
Auto Vol. Leveler• : Controls sudden
sound level increase when changing
channels or during advertisement slots.
Incr. Surround• : Enhances stereo effect.
Select Incr. Surround or Stereo (when
in stereo mode) or Mono or Spatial
(when in mono mode).
BBE• : Restores clarity and presence for
better speech intelligibility and musical
realism.
SAP• : (Secondary Audio Programming):
Activates alternative languages or
commentary.
Forced Mono• : Select Off to leave
broadcast signal as is. Select On to force
the signal to mono.
Note: D Select Stereo or Incr. Surround
modes when the TV broadcast is in
stereo. Press INCR. SURR to toggle
with the sound modes.
Change your picture 7.2
format
Select various screen formats to suit the
type of programs you watch.
Press 1. Í or Æ repeatedly to cycle
through the available picture formats.
Picture Formats:
4• :3: The entire picture is reproduced on
the screen with black bands on the left
and right of the screen.
Movie Expand 14:9: The picture is
enlarged to fit horizontally, with black bands
visible at the sides of the screen.
Movie Expand 16• :9: The picture is
enlarged to fill up the screen. The top
and bottom of the picture is cropped.
Subtitle Zoom• : The 4:3 format
program is displayed on the entire screen
EN-29
Page 30

leaving the subtitles area visible. The top
of the picture is cropped.
Superzoom• : Removes black bands on
the sides of the screen of 4:3 format
programs.
Widescreen• : The picture is displayed in
its original proportions.
Use Smart Mode settings7.3
Smart modes are preset settings to
match the different viewing and listening
environment.
Press 1. SMART MODE repeatedly to
cycle through the available settings.
The settings are displayed at the bottom
of the screen.
Power
100%
10%
0%
Pers on al
Power
100%
Personal
10%
0%
Smart Mode settings:
Personal• : Based on the settings you
customized in the Picture Setting
menu.
Sports• : Vivid picture settings and clear
sound for high action.
Standard• : For normal TV viewing.
Movie• : Brilliant picture settings for a
cinematic experience.
Game• : Optimized for PCs and game
consoles.
Power Saver• : Eco-friendly settings to
reduce power consumption.
Note: D The Power meter indicates the
power consumption for each mode. For
example, 10% means this mode uses 10%
of the TV’s total power consumption.
EN-30
Page 31

Use the Surf feature7.4
Sur
f
03705
0
003
012
020
015
024
Sur
f
03705
0
012
020
015
024
Store up to 8 of your favorite channels in the
Surf list.
Add channels to your Surf list
Press the numeric (1. 0-9) buttons or CH
+ / - to switch to your favorite channel.
Press 2. SURF to display the Surf list.
Only one channel number is displayed on
the list. This is the same channel number
currently selected.
Surf
002
Press 3. OK to add the channel to the Surf
list.
A tick ($) is displayed beside the channel
number to indicate that it is stored in the
Surf list.
Surf
002
003
channels while the Surf list is currently
displayed.
Repeat the above steps to add more 4.
channels to the Surf list.
Remove channels from Surf list
Press 1. SURF to display the Surf list.
Press 2. ï or Î to highlight the channel
number and press OK to remove the
channel from the Surf list.
Repeat the above steps to remove more 3.
EN-31
Page 32

Use more of your TV8.
On + Light Sensor, and press OK to
select.
Use the Advance Picture 8.1
features
Use Contrast +
Contrast + optimizes the contrast for
overall picture quality.
Press 1. SOURCE and Î or ï to select
TV from the source list.
Press 2. ANALOG MENU to display the
on-screen menu.
Select 3. Advance Picture > Contrast +
and press OK.
Press 4. ï or Î to highlight Off or On,
and press OK to select.
Advance Picture
Contrast +
Active Control
Artifacts Reduction*
Dig. Natural Motion*
Press 5. Í to return to the previous menu
or press ANALOG MENU to exit.
Use Active Control
Active Control optimizes picture quality by
measuring and analyzing the incoming signal
to automatically adjust the picture quality
settings.
Press 1. SOURCE and Î or ï to select
TV from the source list.
Press 2. ANALOG MENU to display the
on-screen menu.
Select 3. Advance Picture > Active
Control and press OK.
Press 4. ï or Î to highlight Off, On or
EN-32
Off
On
Advance Picture
Contrast +
Active Control
Artifacts Reduction*
Dig. Natural Motion*
Off
On
On + Light Sensor
Press 5. Í to return to the previous menu
or press ANALOG MENU to exit.
Active Control settings
Off• : Turns off Active Control.
On• : Turns on Active Control.
On + Light Sensor• : Uses a sensor to
adjust the picture brightness depending
on the room light conditions.
Use Artifacts Reduction and Dig.
Natural Motion
Artifacts Reduction smoothens the
transitions on digital pictures.
Dig. Natural Motion reduces the field
and line flicker and reproduces smooth
movement especially in movies.
Press 1. SOURCE and Î or ï to select
TV from the source list.
Press 2. ANALOG MENU to display the
on-screen menu.
Select 3. Advance Picture > Artifacts
Reduction or Dig. Natural Motion,
and press OK.
Press 4. ï or Î to highlight Off or On,
and press OK to select.
Page 33

Advance Picture
Contrast +
Active Control
Artifacts Reduction*
Dig. Natural Motion*
Off
On
Press 5. Í to return to the previous menu
or press ANALOG MENU to exit.
Use the Timer8.2
To switch the TV to standby mode or to a
specified channel at a specified time from
standby mode or while the TV is switched
on.
Set the sleep timer
Press 1. SOURCE and Î or ï to select
TV from the source list.
Press 2. ANALOG MENU to display the
on-screen menu.
Sselect 3. Features > Timer > Sleep, and
press OK.
Timer
Sleep
Time
Start Time
Stop Time
Channel No.
Activate
Press 4. ï or Î to select the number
of minutes remaining before the TV
automatically switches to standby mode
and press OK to select.
Press 5. Í to return to the previous menu
or press ANALOG MENU to exit.
Off
15
30
45
60
90
120
180
if the sleep timer is enabled or time
remaining for the TV to switch to standby
mode.
To cancel the sleep timer, select Off in
the Sleep menu.
Set the TV time
Press 1. SOURCE and Î or ï to select
TV from the source list.
Press 2. ANALOG MENU to display the
on-screen menu.
Select 3. Features > Timer > Time, and
press OK.
Timer
Sleep
Time
Start Time
Stop Time
Channel No.
Activate
10 : 45
Press the numeric (4. 0-9) buttons of the
remote control to enter the time in the
24-hour format. For example, 13:00 (for
1.00 p.m).
Press 5. Í to return to the previous menu
or press ANALOG MENU to exit.
Set the TV timer
Press 1. SOURCE and Î or ï to select
TV from the source list.
Press 2. ANALOG MENU to display the
on-screen menu.
Select 3. Features > Timer > Start
Time, and press OK.
Tip E : Press STATUS / EXIT to check
EN-33
Page 34

Timer
Sleep
Time
Start Time
Stop Time
Channel No.
Activate
20 : 00
Timer
Sleep
Time
Start Time
Stop Time
Channel No.
Activate
Off
Once
Daily
Press the numeric (4. 0-9) buttons of the
remote control to enter the time in the
24-hour format. For example, 13:00 (for
1.00 p.m).
Press 5. Í to return to the previous menu
and select Stop Time, and press OK.
Timer
Sleep
Time
Start Time
Stop Time
Channel No.
Activate
21 : 40
Press the numeric (6. 0-9) to enter the
time.
Press 7. Í to return to the previous menu
and select Channel No., and press OK.
Timer
Sleep
Time
Start Time
Stop Time
Channel No.
Activate
2
Press 8. ï or Î to select the channel
number to be activated at the specified
time.
Press 9. Í to return to the previous menu
and select Activate, and press OK.
Press 10. ï or Î to select Off, Once or
Daily, and press OK to select.
Press 11. ANALOG MENU to exit.
Press 12. . to switch the TV to standby
mode.
Activate settings:
Off• : Cancels the TV timer.
Once• : Activates TV timer once only.
Daily• : Activates TV timer everyday at
this time.
Note: D If the TV is switched on when
the timer activates, the TV switches to
the channel specifi ed in the TV timer. TV
timer settings are lost once the TV is
switched off via the POWER button on
the TV.
Child-lock the TV8.3
Prevent children from accessing the TV
without adult supervision.
Enable Child Lock
Press 1. SOURCE and Î or ï to select
TV from the source list.
Press 2. ANALOG MENU to display the
on-screen menu.
Select 3. Features > Child Lock > and
press OK.
EN-34
Page 35

Features
Timer
Child Lock
Parental Lock
Closed Caption
Demo*
Off
On
Press 4. ï or Î to highlight On and press
OK.
Switch off the TV or put it on standby 5.
mode.
Note: D Once Child Lock is enabled,
you cannot access any TV channels with
the CH + / - buttons on the TV panel
or operate any of its buttons except the
POWER button.
The TV displays “Locked” on the bottom
of the screen.
Keep the remote control away from
children to prevent access to the Child
Lock menu.
Disable Child Lock
Repeat the above as described in 1. Enable
Child Lock on the previous page .
Press 2. ï or Î to highlight Off and press
OK.
Control access to TV 8.4
channels
Parental Lock lets you control the type of
TV programs that can be accessed, according
to program ratings based on age and content.
Access Parental Lock
Press 1. SOURCE and Î or ï to select
TV from the source list.
Press 2. ANALOG MENU to display the
on-screen menu.
Select 3. Features > Parental Lock and
press OK.
When using 4. Parental Lock for the
first time, enter the factory default code,
0711 with the numeric (0-9) buttons.
When 5. Incorrect is displayed, enter
0711 again.
Features
Timer
Child Lock
Parental Lock
Closed Caption
Demo*
Enter your own four digit code.6.
****
Incorrect
Features
Timer
Child Lock
Parental Lock
Closed Caption
Demo*
Features
Off
On
Timer
Child Lock
Parental Lock
Closed Caption
Demo*
New Code
Enter your new code again to confirm.7.
EN-35
Page 36

Features
Timer
Child Lock
Parental Lock
Closed Caption
Demo*
****
Confirmed
You can access the Parental Lock menu
now.
Change Access Code
Access the 1. Parental Lock menu as
described in Access Parental Lock on the
previous page .
Press 2. ï to highlight Change Code and
press OK to select.
Enter your new four-digit access code 3.
with the numeric (0-9) buttons.
Parental Lock.
Lock channels
Access the 1. Parental Lock menu as
described in Access Parental Lock on the
previous page .
Press 2. OK to select Lock Channel and
press ï or Î to highlight the channel
number.
Press 3. OK to lock the channel.
A padlock symbol + is displayed beside
the channel number.
Parental Lock
Lock Channel
Change Code
Clear All
Lock All
Movie Rating
TV Rating
Block Options
002
003
004
005 +
006
007
008
009
Parental Lock
Lock Channel
Change Code
Clear All
Lock All
Movie Rating
TV Rating
Block Options
----
New Code
Re-enter your new access code.4.
Confirmed is displayed.
Parental Lock
Lock Channel
Change Code
Clear All
Lock All
Movie Rating
TV Rating
Block Options
****
Confirmed
Tip E : If you forget your access code,
repeat all the steps as described in Access
EN-36
Lock all channels
Access 1. Parental Lock menu as
described in Access Parental Lock on the
previous page .
Press 2. ï to highlight Lock All and press
OK to select.
Parental Lock
Lock Channel
Change Code
Clear All
Lock All
Movie Rating
TV Rating
Block Options
Yes
Locked
Press 3. OK to select Ye s .
Unlock all channels
Access 1. Parental Lock menu as
described in Access Parental Lock on the
previous page .
Page 37

Press 2. ï to highlight Clear All and press
Rat
Rating
OK to select.
Parental Lock
Lock Channel
Change Code
Clear All
Lock All
Movie Rating
TV Rating
Block Options
Yes
Cleared
Press 3. OK to select Ye s .
Note: D A message is displayed to inform
you that the channel is blocked when you
try to access it. You can choose to enter
the Parental Lock access code to view
the program.
Channel 2
Blocked By
Channel Blocking
Access Code : ----
A tick ($) appears beside the rating label
to indicate the rating lock is enabled.
Press 4. Í to return to the previous menu
or press ANALOG MENU to exit.
Parental Lock
Lock Channel
Change Code
Clear All
Lock All
Movie Rating
TV Rating
Block Options
G
PG
PG-13
R
NC-17
X
Note: D Movies are blocked if they fall
under the movie rating category that
you enabled. A message is displayed to
inform you that the program is blocked
by the movie rating. Programs remain
locked even after the TV is switched off.
Enter the Parental Lock access code to
view the program. Subsequently, all other
locked programs are viewable.
Tip: D Press STATUS / EXIT twice to
check which TV or movie ratings are
enabled.
Control access to TV 8.5
programs
Use the movie rating lock (for certain
regions only)
Control access to movies based on their
content as defined by the Motion Picture
Association of America (MPAA).
Settings apply to the TV and AV inputs only.
Access 1. Parental Lock menu as
described in Access Parental Lock on page
35 .
Press 2. ï until Movie Rating is
highlighted, and press OK to select.
Press 3. Î or ï to highlight your choice of
movie rating label, and press OK.
Movie Rating
G
PG
PG - 13
R
NC - 17
X
TV RatingTV
TV - Y
TV - Y7
TV - G
TV - PG
TV - 14
TV - MA
Unrated
No Rating
Movie Rating:
G• : Suitable for all ages.
PG• : Some material may not be suitable
for children.
PG-13• : Some material may not be
suitable for children under 13 years of
age.
EN-37
Page 38

R• : Material not suitable for children
under 17 years of age. Requires parental
guidance.
NC-17• : Not suitable for children under
17 years of age. Has excessive violence,
sex or offensive language.
X• : Not suitable for children under 17
years of age. Content is pornographic.
based ratings, highlight only those and
press OK.
TV Rating
TV-Y
TV-Y7
TV-G
TV-PG
TV-14
TV-MA
Lock All
V
S
L
D
Use the TV Rating lock (For certain
regions only)
Block content based on TV ratings defined
by your broadcaster. TV ratings are based on
age and content.
Age-based rating Content-based rating
TV-Y None
TV-Y7 FV (Fantasy Violence)
TV-G None
TV-PG V (Violence)
S (Sex)
L (Strong Language)
D (Sexual Dialog)
TV-14 V (Violence)
S (Sex)
L (Strong Language)
D (Sexual Dialog)
TV-MA V (Violence)
S (Sex)
L (Strong Language)
Access 1. Parental Lock menu as
described in Access Parental Lock on page
35 .
Press 2. ï until TV Rating is highlighted,
and press OK to select.
Press 3. ï or Î to highlight the TV rating
label, and press OK to select.
Press 4. ï or Î to highlight Lock All and
press OK to select.
TV-Y: Suitable for all children. Programs are
not expected to frighten children.
TV-Y7: For children 7 years or older who
can tell make-believe from reality. Some
mild fantasy violence or comedic violence.
Programs may frighten younger children
under 7 years of age.
TV-Y7 FV: Fantasy violence more intense or
combative than those in TV-Y7 category.
TV-G: Suitable for all children but not
designed specifically for children.
TV-PG: Parental guidance needed. Some
violence, strong language, sexual situations or
suggestive dialog. Parents should watch these
programs with their children.
TV-14: Not suitable for children under 14
years of age. Content has violence, strong
language, sexual situations or suggestive
dialog.
TV-MA: For adult viewing. Not suitable for
children under 17 years of age.
Note: D The screen displays a message
that the program is blocked when
your programs fall under the TV rating
category that you enabled. Programs
remain locked even if you turn off and
turn on the TV again. Enter your access
code to view the program.
Tip E : To enable one or more content-
EN-38
Page 39

Channel 5
Blocked By
TV - 14
Access Code : ----
Block Options
Unrated
No Rating
Blocking
Off
On
Unblock programs
Access 1. Parental Lock menu as
described in Access Parental Lock on page
35 .
Press 2. ï to select Block Options and
press OK to select.
Press 3. ï or Î to highlight Off and press
OK.
Block Options
Unrated
No Rating
Blocking
Off
On
Block other programs
Block programs that are unrated, such as
documentaries, “director’s cut” edition or
programs that have no advisory data (No
Rating).
Access 1. Parental Lock menu as
described in Access Parental Lock on page
35 .
Press 2. ï to select Block Options and
press OK to select.
Press 3. ï or Î to highlight Unrated or
No Rating, and press OK to select.
Press 4. OK to select On.
Note: D Programs with no rating or
unrated are blocked.
Channel 5
Blocked By
No rating
Access Code : ----
Turn on closed captions8.6
Closed captions (CC) are subtitles hidden
in the video signals which you can turn on
or off unlike the normal subtitles in movies
which cannot be turned off. Closed captions
are subtitles for dialog and descriptions for
the hearing-impaired.
Press 1. SOURCE and Î or ï to select
TV from the source list.
Press 2. ANALOG MENU to display the
on-screen menu.
Select 3. Features > Closed Caption and
press OK.
Features
Timer
Child Lock
Parental Lock
Closed Caption
Demo*
CC Off
CC1
CC2
CC Mute
Press 4. ï or Î to highlight CC Off, CC1,
EN-39
Page 40

CC2 or CC Mute, and press OK to
select.
Press 5. Í to return to the previous menu
or press ANALOG MENU to exit.
Closed Caption choices:
CC Off• : Turn off closed captioning.
CC1• : Most channels transmit closed
captions in CC1 mode. Closed captions
can be in Spanish, Portuguese or English.
CC2• : Broadcasters may transmit closed
captions in CC2 mode. CC2 is rarely
used.
CC Mute• : Closed captions in CC1
mode is displayed only when the sound is
turned off via m.
Use the Demo modes8.7
The Demo mode lets you see the benefits
of the new features of your TV.
Press 1. SOURCE and Î or ï to select
TV from the source list.
Press 2. ANALOG MENU to display the
on-screen menu.
Select 3. Features > Demo and press
OK.
Press 4. ï or Î to highlight Pixel Plus
HD, Pixel Plus 2HD, Dig. Natural
Motion, or 100Hz, and press OK to
select.
Demo
Pixel Plus HD*
Pixel Plus 2HD*
Dig. Natural Motion*
100Hz*
Off
On
When Demo modes are used, the TV
displays a vertical split screen showing
the new features enabled on one half and
the other half without the features.
Press 6. Í to return to the previous menu
or press ANALOG MENU to exit.
Demo modes
Pixel Plus 2HD• : Like Pixel Plus HD, but
able to detect and reduce artifacts and
noise in your HD content for cleaner
and sharper pictures.
Pixel Plus HD• : Every pixel is improved
to match surrounding pixels for a more
natural picture. Sharpness, depth and
vivid colors are achieved from multiple
sources like HD and DVD content.
Dig. Natural Motion• : Reduces the field
and line flicker and reproduces smooth
movement especially in movies. Set the
level to Maximum, Minimum or Off.
100 Hz• : Transmitted information is
stored on a memory chip to produce
flicker-free images.
Features
Timer
Child Lock
Parental Lock
Closed Caption
Demo*
Pixel Plus HD*
Pixel Plus 2HD*
Dig. Natural Motion*
100Hz*
Press 5. ï or Î to highlight On and press
OK to select.
EN-40
Use Ambilight8.8
Watch programs in a unique ambience by
producing a soft, light glow from the sides of
the TV. Ambient lighting from the TV provides
a more relaxed viewing experience. The
Ambilight colors changes automatically to
match the TV images.
Page 41

Turn on Ambilight
Press 1. SOURCE and Î or ï to select
TV from the source list.
Press 2. ANALOG MENU to display the
on-screen menu.
Select 3. Ambilight > On.
Ambilight
Ambilight
Brightness
Mode
Balance
Off
On
Press 4. Í to return to the previous menu
or press ANALOG MENU to exit.
Turn off Ambilight
Press 1. SOURCE and Î or ï to select
TV from the source list.
Press 2. ANALOG MENU to display the
on-screen menu.
Select 3. Ambilight > Off.
Press 4. Í to return to the previous menu
or press ANALOG MENU to exit.
Ambilight
Ambilight
Brightness
Mode
Balance
Press 4. Í to return to the previous menu
or press ANALOG MENU to exit.
Select Ambilight modes
Turn on 1. Ambilight as described in Tur n
on Ambilight on this page .
Press 2. ï until Mode is highlighted and
press OK to select.
Press 3. ï or Î to highlight the mode and
press OK to select.
Ambilight
Ambilight
Brightness
Mode
Balance
Color
Relaxed
Moderate
Dynamic
Adjust brightness
Turn on 1. Ambilight as described in Tur n
on Ambilight on this page .
Press 2. ï until Brightness is highlighted
and press OK to select.
Press 3. ï or Î to adjust the ambient
brightness level.
Press 4. Í to return to the previous menu
or press ANALOG MENU to exit.
Ambilight modes
Color• : Produces constant lighting
according to the settings in the Color
menu.
Relaxed• : Reduces brightness and
color to give a more relaxed viewing
experience.
Moderate• : Uses the factory-defined
brightness and color settings.
Dynamic• : The brightness and color
changes according to the picture state.
EN-41
Page 42

Select Ambilight color
Turn on 1. Ambilight as described in Tur n
on Ambilight on the previous page .
Press 2. ï until Mode is highlighted and
press OK to select.
Press 3. ï until Color is highlighted and
press OK to select.
Press 4. ï or Î to highlight the color.
Ambilight
Ambilight
Brightness
Mode
Color
Custom Color
Balance
Warm White
Cool White
Blue
Red
Green
Yellow
Magenta
Custom
Custom Color
Palette
Saturation
Press 6. Í to return to the previous menu
or press ANALOG MENU to exit.
Ambilight Custom colors
Palette: • Adjusts the color mix.
Saturation• : Adjusts the color intensity
of light output.
50
Press 5. Í to return to the previous menu
or press ANALOG MENU to exit.
Use Custom color
Turn on 1. Ambilight as described in Tur n
on Ambilight on the previous page .
Press 2. ï until Custom is highlighted and
press OK to enable the Custom Color
menu.
Press 3. Í to highlight Color and press ï
to highlight Custom Color.
Ambilight
Ambilight
Brightness
Mode
Color
Custom Color
Balance
Palette
Saturation
Press 4. ï or Î to highlight Palette or
Saturation, and press OK to select.
Press 5. ï or Î to adjust the settings.
Set Ambilight balance
Adjust the Ambilight intensity on both
sides of the TV.
Turn on 1. Ambilight as described in Tur n
on Ambilight on the previous page .
Press 2. ï until Balance is highlighted and
press OK to select.
Press 3. ï or Î to adjust the Balance.
Ambilight
Ambilight
Brightness
Mode
Color
Custom Color
Balance
50
Press 4. Í to return to the previous menu
or press ANALOG MENU to exit.
EN-42
Page 43

Use your TV as a 9.
List
computer monitor
Connect the TV to a computer via the VGA
port to use your TV as a computer monitor.
Note: D Refer to the Quick Start Guide for
connecting the computer to your TV.
Connect your computer to the TV via 1.
the VGA cable (not supplied).
Press 2. SOURCE to display the audio and
video source list.
Source List
TV
AV
SIDE AV
CVI 1
CVI 2
VGA
HDMI 1
HDMI 2
Press 3. ï or Î until VGA is highlighted
and press OK to select.
You should see your computer display on
the TV screen.
Feature settings (VGA 9.2
mode)
Phase / Clock• : Fine tunes your TV to
match the computer’s display settings.
Auto Adjust• : Synchronizes the TV
and computer’s Phase/Clock rate
automatically.
Reset• : Overrides with the factory
default settings.
Main
Picture Setting
Sound
Features
Location
Note: D For supported resolutions, refer
to Specifi cations..
Timer
Child Lock
Parental Lock
Phase
Clock
Auto Adjust
Reset
Picture settings (VGA 9.1
mode)
Horizontal• : Adjusts the picture to the
left or right.
Vertical• : Adjusts the picture upwards or
downwards.
Main
Picture Setting
Sound
Features
Location
Brightness
Contrast
Horizontal
Vertical
Color Temp
EN-43
Page 44

Use your TV in High 10.
List
Definition mode
High Definition (HD) mode lets you enjoy
clearer and sharper pictures using HD
equipment.
Connect the HD 10.1
equipment
Connect the HDMI or DVI output from 1.
your HD equipment to the HDMI 1,
HDMI 2 or Side HDMI socket of the
TV.
Use a DVI-to-HDMI cable if DVI output
is connected.
Connect the audio cable to the 2. L /
R audio jacks (AV) of the TV if you
are using DVI output from your HD
equipment to connect to the TV.
Press 3. AV to display the Source List and
the Î or ï to select HDMI 1, HDMI 2
or Side HDMI.
Source List
Side AV
CVI 1
CVI 2
VGA
HDMI 1
HDMI 2
Side HDMI
D i g i t a l TV
Press 4. Í to return to the previous menu
or press ANALOG MENU to exit.
and Í or Æ to adjust the settings.
Press 4. Í to return to the previous menu.
Press 5. Í to return to the previous menu
or press ANALOG MENU to exit.
Picture menu
The • Picture menu options are:
Brightness, Color, Contrast,
Sharpness, Horizontal, Vertical and
Color Temp.
All the options work the same way as •
the ones in Picture menu except for
Horizontal and Vertical.
Horizontal • lets you adjust the
horizontal position of the image.
Vertical • lets you adjust the vertical
position of the image.
Sound menu
The • Sound menu options are
Equalizer, Balance, AV L and Incr.
Surround. All the options work the
same way as the ones in the TV Sound
menu.
Features menu
The • Features menu options are Timer,
Child Lock, Parental Lock and Active
Control. All the options work the same
way as the ones in the TV Features
menu except for Mode Selection.
Control the TV settings in 10.2
HD mode
Press 1. SOURCE and Î or ï to select
TV from the source list.
Press 2. Î or ï to select Picture, Sound
or Features, and press OK to select.
Press 3. Î or ï to highlight the settings
EN-44
Use Mode Selection 10.3
Mode Selection options are available in
the Features menu when you connect HD
equipment via HDMI supporting resolutions
of 480p, 720p or 1080p.
You can select PC or HD mode.
Press 1. SOURCE and Î or ï to select
TV from the source list.
Page 45

Press 2. ANALOG MENU to display the
on-screen menu.
Select 3. Features > Mode Selection >
PC or HD, and press OK.
Features
Timer
Child Lock
Parental Lock
Mode Selection
Closed Caption
Display
Demo*
PC
HD
Press 4. Í to return to the previous menu
or press ANALOG MENU to exit.
1080p models
HD
480p 576p 720p 1080p 1080i
format
SD
480i 576i
format
Note: Your Philips TV is HDMI compliant.
If you do not get a good picture, it is not a
defect of your TV set.
Please change the video format on your
device (DVD player, cable set top box, etc) to
a standard format.
For example, you should select 480p, 576p,
720p, 1080i or 1080p for DVD players.
Use Native 1080 mode10.4
The Native 1080 option in the Display
menu is available when you connect HD
equipment via HDMI or Y Pb Pr supporting
resolution of 1080i. Watch the original HD
format in true resolution from the input
signals.
Press 1. SOURCE and Î or ï to select
TV from the source list.
Press 2. ANALOG MENU to display the
on-screen menu.
Select 3. Features > Display > On
watch your programs in the original HD
format (1080p).
Features
Timer
Child Lock
Parental Lock
Mode Selection
Close Caption
Display
Demo*
Native 1080
Press 4. Í to return to the previous menu
or press ANALOG MENU to exit.
to
Use Philips EasyLink10.5
Your TV is enabled for HDMI-CEC
connections with other devices. The following
features apply to devices that are CECcompliant and connected to your TV through
an HDMI cable.
One-touch play
You can control your TV and the devices
with one remote control when you connect
your TV to devices that support One-touch
play. For example, when you press the play
button on your DVD remote control, your
Philips TV automatically switches to the
correct channel to display the DVD content.
One-touch Standby
You can use your TV’s remote control to put
the devices into standby when you connect
your TV to devices that support One-touch
standby. Press and hold the . on the TV’s
remote control for 3-4 seconds.
EN-45
Page 46

Troubleshooting11.
Note: D Before calling Customer Service,
refer to the troubleshooting topic below
which may help address and resolve your
problem.
Symptoms Possible cause What should you do
No power or
indicator light.
Error message on
the screen with
HDMI connection.
No sound is
detected from the
PC.
TV does not
respond to the
remote control.
The picture is
distorted. It is
stretched out, has
short, fat, black bars
on the side or top.
The TV is not
connected to the
power.
High-Bandwidth
Digital Content
Protection (HDCP)
authentication fail.
Incorrect HDMI
port is connected.
Audio cable is not
connected.
Batteries are
installed incorrectly,
or low battery
power.
Broadcast video
format.
1. Press . at the right side of the TV, or press . on the
remote control.
2. Ensure the power cord is connected tightly to the TV
power connector and to the mains socket outlet.
3. Connect the TV to a different mains socket outlet.
1. Ensure that your HDMI cable is certified.
2. Press SOURCE on the remote control to switch to
another source and then switch back to the HDMI source.
3. Reset the accessory device and the TV.
Turn on the TV
Select the HDMI channel
Turn on the accessory device
1. Connect a DVI-HDMI cable to the correct HDMI port
on the TV.
2. Connect an audio cable to the DVI AUDIO IN port on
the TV.
3. Press SOURCE on the remote control, and select any
one of the HDMI sources.
1. Ensure the indicator light on the TV blinks when the
remote control buttons are pressed.
2. Ensure that you are using the remote control supplied
with the TV.
3. Ensure that the batteries of the remote control are
inserted according to the illustration on the remote
control and that the batteries are new.
1. Press Í or Æ on the remote control to select the best
picture format.
2. For certain accessory devices, the picture format has to
be set in the accessory device itself.
EN-46
Page 47

The picture is
mostly red and
green, or the
picture is missing
red when the TV
is connected to an
accessory device via
component cables.
No sound on the
TV loudspeaker.
Bad picture quality
with a coaxial
connection.
No picture or
sound.
Cannot control
your TV and
connected devices
with one remote
control.
Insecure/incorrect
connection.
Volume level is set
to zero.
Sound is muted.
Headphones are
connected.
Audio cable is not
connected.
Accessory device
audio output
setting is incorrect.
Standard definition
channels are not
as clear as high
definition channels.
Incorrect channel 1. Ensure you have selected the correct channel.
Incomplete channel
installation.
1. Ensure all the connections are made according to the
color code.
2. Push the component cables all the way into the YPbPr
sockets on the TV.
1. Increase the volume.
2. Press m on the remote control.
3. Ensure the headphones are not plugged into the TV.
4. For AV connection, ensure that the Audio L/R cable is
connected. If you are using a component cable, ensure that
you have not crossed the red audio cable with the red
video cable.
5. For HDMI connections, certain accessory devices have
an HDMI audio output setting that must be turned on for
HDMI to HDMI connections.
1. Connect the devices via component or HDMI cables.
1. If the TV receives channels via an AV connection, set
the TV to the correct source input and perform auto
installation again.
2. If the TV is connected directly to the wall via a coaxial
connection, perform auto-installation again.
1. Confirm that the connected devices are EasyLink
compliant and are connected to your TV via an HDMI
cable. Not all brands of devices such as DVD players use
the same system as Philips EasyLink. Other brands might
not work with Philips EasyLink.
EN-47
Page 48

Specifications12.
Model no. 42PFL7803D 52PFL7803D
PICTURE ENHANCEMENT
Type 1080p 120 Hz
Aspect Ratio 16:9
Advance Picture Contrast +, Active Control, Dig. Natural Motion, Artifacts Reduction
Ambilight Yes
SOUND ENHANCEMENT
Mono/Stereo/BBE Mono, Stereo, Incredible Surround, BBE, wOOx
Power output (RMS Watts) 2 x 15 W
EASE OF USE
Video modes Automatic, 4:3, Movie Expand 14:9, Movie Expand 16:9, Subtitle
Zoom, Super Zoom, Wide Screen
PC input via HDMI, VGA
CONNECTIONS
CVI In with Audio L/R 2, supporting 480i/p, 576i/p, 720p, 1080i, 1080p @24Hz-60Hz
CVBS In with audio L/R, S-Video 2 X
HDMI 3 ver1.3a HDMI supporting video: 480i/p, 576i/p, 720p, 1080i, 1080p
@24Hz-60Hz, PC-input: up to WUXGA
Digital audio out Yes, supporting AC-3 & PCM
Headphone 1 X (Side)
MISCELLANEOUS
Operating power consumption
Standby power [Watt] ~ typ 0.165W
Accessories
Set weight (kg) 20.5 39
Set weight with stand (kg) 26 47
Set dimensions
(W x H x D) mm
Set dimensions with stand
(W x H x D) mm
Power cord, Quick Start Guide, User Manual, Remote
DIMENSIONS
1046 x 645 x 108 1,301 x 798 x 141
1046 x 716 x 262 1,301 x 875 x 325
100-240 V, 50/60 Hz
control, AAA batteries x2
Note: D Specifi cations subject to change without notice.
EN-48
Page 49

Connect devices13.
R
A
HDMI1
CVI-1
Pb
C
P
TV
A
5X
Connection overview13.1
75X
TV ANTENNA
7
6
SERV. CPBS SX
5
AUDIO IN VGASPDIF OUT
RL
Y
Pb
Pr
L
R
CVI-1
8 9
HDMI 1
Y
Pb
Pr
L
R
HDMI 2
10
VIDEO
L
R
AV1 IN
CVI-2
21 3 4
Antenna input1.
CVI-12. : Component video input. Y Pb
Pr and Audio L/R connectors for DVD,
digital receiver or game console, etc.
CVI-23. : Second component video input.
AVI IN4. : Composite video input to be
used together with Audio L/R connectors
for camcorder, game console, etc.
SPDIF Out5. : Digital audio out.
Audio IN for VGA6. .
Service ports7. (For service personnel)
HDMI 1 In8. : HDMI in connector for Blu-
ray Disc player, HD digital receiver or
game console, etc.
HDMI 2 In9. : Second HDMI in connector.
VGA10. : Video Graphics connector for
personal computers.
HDMI In (Side)11. : See HDMI 1 In
description.
11
HDMI 1
AUDIO INSPDIF OUT
UDIO INSPDIF OUT
SERV. CPBS SX
SERV.
BS SX
R
Y
Pb
Pr
Pr
75X
7
TV ANTENNA
ANTENN
L
R
CVI-1
12
13
14
Headphones12. (Side): Stereo Mini Jack.
Video (Side)13. : Video input connector
to be used together with Audio L/R
connectors for camcorder, game console,
etc.
S-Video (Side)14. : S-Video input
connector to be used together with
Audio L/R connectors for camcorder,
game console, etc.
Select connection quality13.2
You can enhance your audio visual
experience by connecting your devices with
the best possible connectors.
After connecting your devices, be sure to
enable them as described in the Quick Start
Guide.
EN-49
Page 50

HDMI - Highest quality
HDMI produces the best audio visual quality
possible. Both audio and video signals are
combined in one HDMI cable, providing an
uncompressed, digital interface between
your TV and HDMI devices. Use HDMI to
experience full high-definition video.
Tip E : If your device only has a DVI con-
nector, use a DVI-HDMI adaptor to connect your device to a HDMI connector
on the TV. As such a connection does
not support sound, you must connect a
separate audio cable from the device to
the Audio L/R input at the AUDIO IN
connectors on the TV.
Not E e: Philips HDMI supports HDCP
(High-bandwidth Digital Contents Protection). HDCP is a form of Digital Rights
Management that protects high defi nition
content in DVD or Blu-ray Discs.
Component video cable - Red, Green, Blue
Audio L/R cable - Red, White
S-Video - Good quality
S-Video provides better picture quality than
that of composite video. When connecting
your device with S-Video, plug the S-Video
cable to the S-Video connector on the side
of the TV. You must connect a separate Audio
L/R cable from the device to the red and
white Audio L/R input connectors on the
side of the TV.
Component (YPbPr) - Higher quality
Component (Y Pb Pr) video provides better
picture quality than S-Video or composite
video connections. Although component
video supports high-definition signals, the
picture quality is analog and lower than that
of HDMI.
When connecting a component video
cable, match the cable colours to the CVI
connectors on the back of the TV. Also,
connect a Audio L/R cable to the red and
white Audio L/R input connectors at CVI.
EN-50
S-Video cable
Page 51

Composite - Basic quality
Composite video provides basic analogue
connectivity, usually combining a (yellow)
video cinch cable with (red and white) Audio
L/R cinch cable. Match the cable colors when
connecting to the composite Video and
Audio L/R input connectors on the side of
the TV.
Audio L/R cable - Red, White
Composite audio/video cable- Yellow, red
and white
Note: D For various device connections to
your TV, please refer to the Quick Start
Guide for detailed instructions.
EN-51
Page 52

3139 125 39891
 Loading...