


at
Register your product and get
support
www.philips.com/welcome
46PFL5505/V7
42PFL5505/V7
32PFL5505/V7
EN User manual

Contents
1 Notice 2
2 Important
3 Your TV
Side Panel Buttons
Sockets
Remote Control Functions
4 Use your TV
Switching on
Switching off
Automatic Channel Set-up
Intelligent Channel Set-up
Manual Channel Set-up
Fine Tuning a Channel
Setting the Sound System
Programme Edit
3
5
5
5
7
8
8
8
9
Multimedia
9
9
Power
9
10
10
Geometry Settings
USB Functions
6 FAQ
Attention:
Frequently Asked Question
7 Other Information
Troubleshooting
8
Product information
Supported display resolutions
Tuner/Reception/Transm ission
Remote control
Supported TV mounts
Product specifi cation
15
15
15
16
16
17
17
17
17
17
17
18
18
13
14
5 Use more of your TV
Adjusting the Picture
Adjusting the Sound
Function Settings
Selecting a Signal Source or
Look over the Layout of Terminals
11
11
11
12
13
EN 1

1 Notice
Pixel characteristics
This LCD/LED product has a high number of
colour pixels. Although it has effective pixels of
99.999% or more, black dots or bright points of
light (red, green or blue) may appear constantly
on the screen. This is a structural property of
the display (within common industry standards)
and is not a malfunction.
Warranty
No components are user serviceable. Do not
open or remove covers to the inside of the
product. Repairs may only be done by Philips
Service Centres and official repair shops. Failure
to do so shall void any warranty, stated or
implied.
Any operation expressly prohibited in
this manual, any adjustments, or assembly
procedures not recommended or authorised in
this manual, shall void the warranty.
2 EN

2 Important
Read and understand all instructions before you
use your TV. If damage is caused by failure to
follow instructions, the warranty does not apply.
Safety
Risk of electric shock or fire !
Never expose the TV to rain or water.
Never place liquid containers, such as
vases, near the TV. If liquids are spilt on
or into the TV, disconnect the TV from
the power outlet immediately. Contact
Philips Consumer Care to have the TV
checked before use.
Never place the TV, remote control or .
batteries near naked flames or other heat
sources, including direct sunlight.
To prevent th e spread of fire,keep
candles or other flames away from the
TV, remote control and batteries at all
times.
Never insert objec ts into the ventilation
slots or other openings on the TV.
When the TV is swiveled ensure that
no strain is exerted on the power cord.
Strain on the power cord can loosen
connections and cause arcing.
Risk of electric shock or fire !
Never expose the remote control or
batteries to rain, water or excessive heat.
Avoid force coming on to power plugs.
Loose power plugs can cause arcing or
fire.
Risk of injury or damage to the TV !
Two people are required to lift and carry
a TV that weights more than 25 kg.
When stand mounting the TV, use only
the supplied stand. Secure the stand to
the TV tightly. Place the TV on a
surface that can support the combined
weight of the TV and the stand.
When wall mounting the TV, use only a
wall mount that can support the weight of
the TV. Secure the wall mount to a wall
that can support the combined weight of
the TV and wall mount.
no responsibility
that result in
Risk of injury to children!
Follow these precautions to prevent the
TV from toppling over and causing injury to
children:
Never place the TV on a surface covered
by a cloth or other material that can be
pulled away.
Ensure that no part of the TV hangs over
the edge of the surface.
Never place the TV on tall furniture (such
as a bookcase) without anchoring both
the furniture and TV to the wall or a
suitable support.
Educate children about the dangers of
climbing on furniture to reach the T V.
Risk of overheating!
Never install the TV in a space.
Always leave a space of at least 4 inches
or 10 cm around the TV for ventilation.
Ensure curtains or other objec ts never
cover the ventilation slots on the TV.
Risk of damage to the TV!
Before you connect the TV to the power
outlet, ensure that the power voltage
matches the value printed on the back
of the TV. Never connect the TV to the
power outlet if the voltage is different.
Risk of injury, or power cord damage!
Never place the TV or any objects on the
power cord.
To disconnect the TV power cord easily
from the power outlet, ensure that you
have full access to the power cord at all
times.
accident, injury or damage .
fire
PE Electronics bears
for improper wall mounting
confined
flat
, level
EN 3

When you disconnect the power cord,
always pull the plug, never the cable.
Disconnect the TV from the power
outlet and antenna before lightning
storms. Dur ing lightning storms, never
touch any par t of the TV, power cord or
antenna cable.
Risk of hearing damage!
Avoid using earphones or headphones at
high volumes or for prolonged periods of
time.
Low temperatures
If the TV is transpor ted in temperatures
below 5
until the TV temperature matches room
temperature before connecting the TV to
the power outlet.
C, unpack the TV and wait
Screen care
Avoid stationary images as much as
possible. Stationary images ar e images
that remain on-screen for extended
periods of time. Examples include:
on-screen menus, black bars and time
displays. If you must use stationar y
images, reduce screen contrast and
brightness to avoid screen damage.
Unplug the TV before cleaning.
Clean the TV and frame with a soft,
damp cloth. Never use substances such as
alcohol, chemicals or household cleaners
on the TV.
Risk of damage to the TV screen! Never
touch, push, rub or strike the screen with
any object.
To avoid deformations and colour fading,
wipe off water drops as soon as possible.
Disposal of your old product and
batteries
Your product is designed and manufactured
with high quality materials and components,
which can be recycled and reused.
4 EN
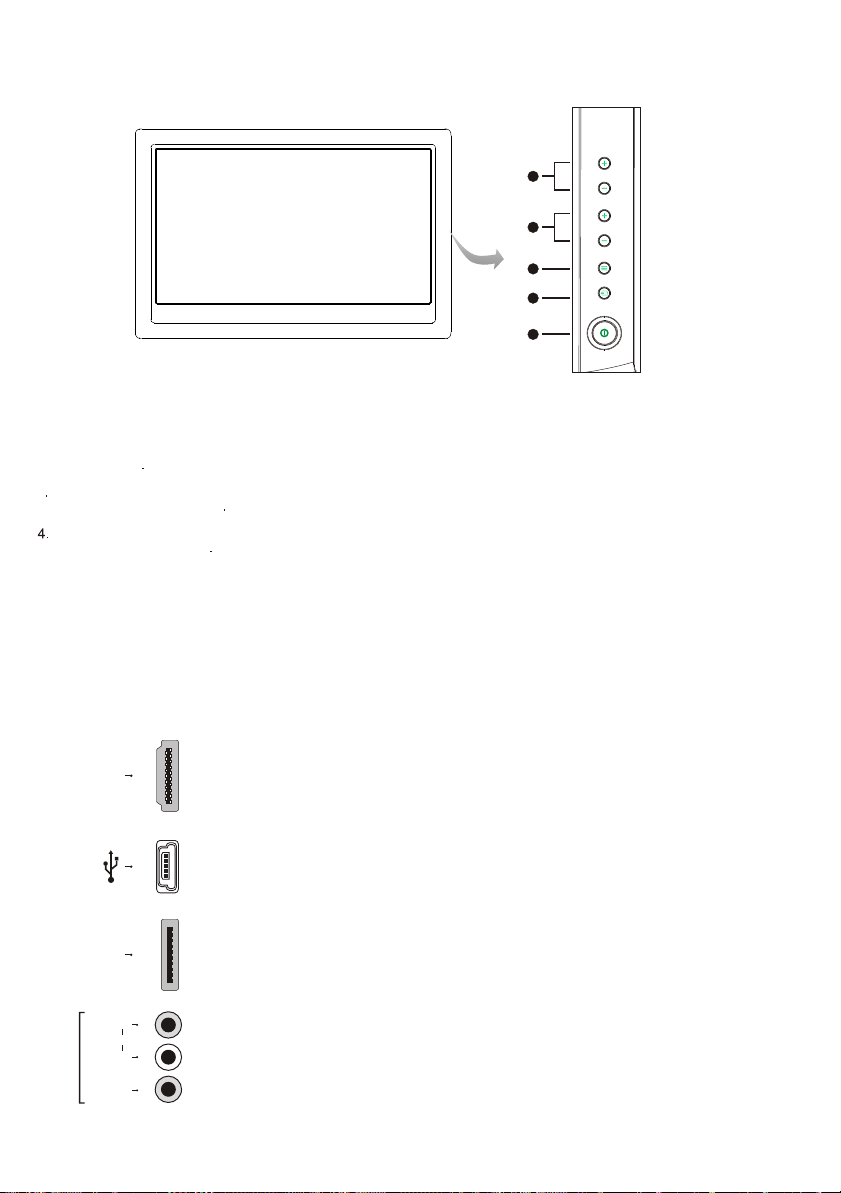
3 Your TV
Side Panel Buttons
SOURCE
CH
VOL
MENU
1
2
3
4
5
1. CHANNEL UP/DOWN button
Scans up/down through the channel list. In the menu system. They act like the up/down direction buttons on the remote and
adjust menu controls.
. VOLUME UP/DOWN button
2
Increases/decreases the volume. In the menu system, they act like the right/left direction buttons on the remote and adjust
menu controls
3
MENU button
Brings up the menu system
SOURCE button
Brings up the input menu
5. POWER button (Note: The location of the power button on the TV may vary according to TV model.)
Turns the TV on or off.
Note: The positions and names of the function buttons on the TV may vary according to TV model.
Sockets
Note: The location and names of the sockets on the TV may vary according to
TV model, and not all sockets are available on all models.
HDMI3 socket (input) at the side
HDMI IN3
SD
The HDMI can be used to connect a
PC with a compatible video card installed, certain DVD players or a high-definition
compatible digital satellite decoder. This socket p
connection that carries both video and audio data by way of an integrated mini-plug
cable.
USB socket (input) at the side
This socket can be used to connect an USB device.
Note: The number of USB sockets on the TV may vary according to TV model.
SD socket (input) at the side
This socket can be used to connect an SD card.
Note: This socket may not be available for some models.
(High-Definition Multimedia Interface) socket
rovides an uncompressed digital
AV IN2
AUDIO
VIDEO
R
L
AV2 RCA audio + video sockets (input) at the side
These sockets can be used to connect a range of equipment, including video
recorders, camcorders, decoders, satellite receivers, DVD players, or games
consoles. The VIDEO IN2 socket p rovides composite video connection.
EN 5
HDMI IN1
HDMI IN2
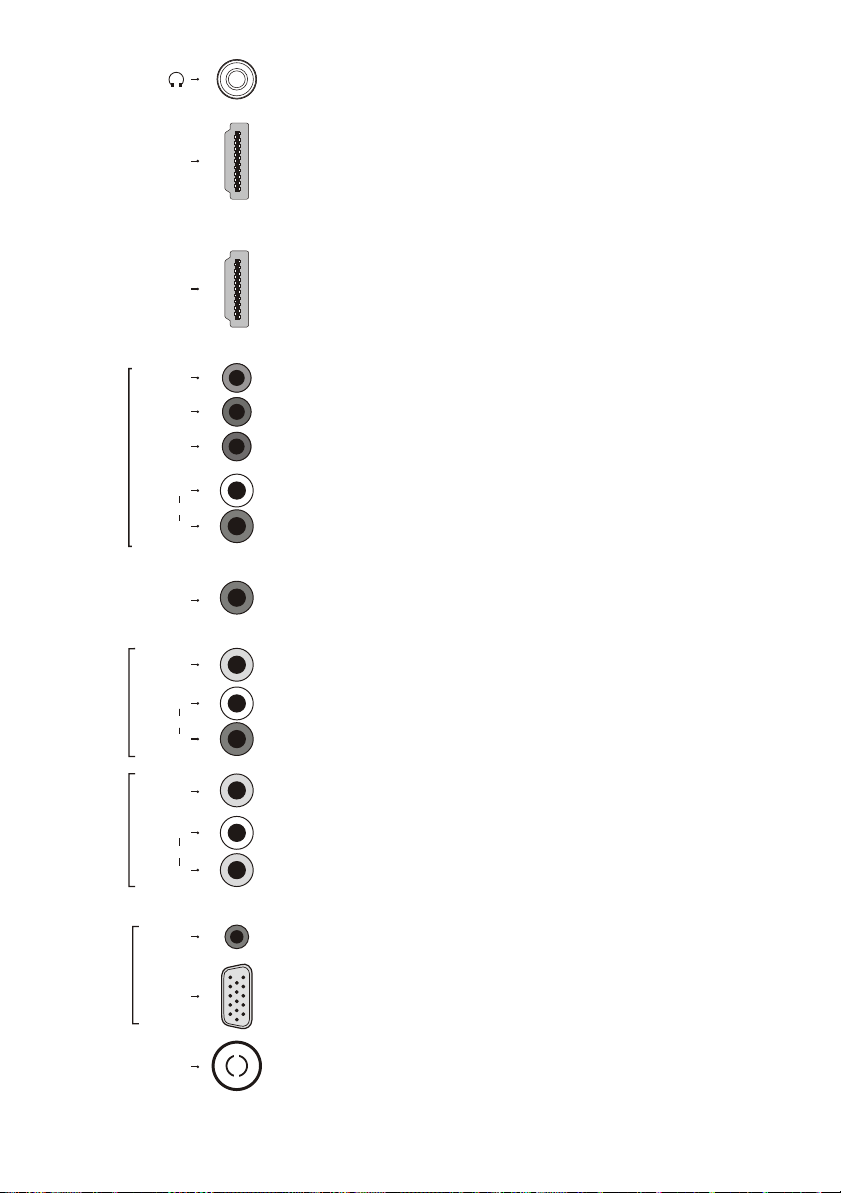
Headphone socket (output) at the side
This socket can be used to connect headphones or stereo earphones.
HDMI1 socket (input) at the back
The HDMI can be used to connect a
PC with a compatible video card installed, certain DVD players or a high-definition
compatible digital satellite decoder. This socket p
connection that carries both video and audio data by way of an integrated mini-plug
cable.
(High-Definition Multimedia Interface) socket
rovides an uncompressed digital
HDMI2 socket (input) at the back
The HDMI can be used to connect a
PC with a compatible video card installed, certain DVD players or a high-definition
compatible digital satellite decoder. This socket p
connection that carries both video and audio data by way of an integrated mini-plug
cable.
(High-Definition Multimedia Interface) socket
rovides an uncompressed digital
COMPONENT
AUDIO/VIDEO IN
AUDIO/VIDEO
OUT
AV IN1
VGA AUDIO
/VDIEO IN
Pb/Cb
Pr/Cr
AUDIO
SPDIF OUT
VIDEO
AUDIO
VIDEO
AUDIO
AUDIO
VGA
Y
L
R
YPBPR component sockets (input) at the back
These can be used to connect a device that has component video sockets, such as
a DVD player. The component sockets can recognize if the device you're connecting
to is Y Pb Pr compatible or Y Cb Cr compatible. The component sockets provide
excellent picture quality because the video is separated into three separate parts.
YPBPR component audio sockets (input) at the back
The two sockets can be used to obtain sound when using the YPBPR component
sockets.
SPDIF socket (output) at the back
Use a digital coaxial cable to connect your TV to a compatible audio receiver.
AUDIO/VIDEO sockets (output) at the back
These sockets can be used to connect
L
R
the TV on the same channel you are recording.
composite video connection.
a VCR to record programs. You must leave
The VIDEO OUT socket p rovides
AV1 RCA audio + video sockets (input) at the back
L
R
These sockets can be used to connect a range of equipment, including video
recorders, camcorders, decoders, satellite receivers, DVD players, or game
consoles. The VIDEO IN1 socket p
rovides composite video connection.
VGA audio socket (input) at the back
The socket can be used to obtain sound when using the VGA socket.
VGA socket (input) at the back
This socket can be used to connect a computer.
6 EN
ANTENNA IN
ANTENNA IN socket (input) at the back
This socket can be used to connect the outside aerial or cable network.

Remote Control Functions
Note: -Remote Control ( Depending on the models) and operation of remote control
may be affected by bright artifical light near to the TV.
Most of your television's functions are available via the menus that appear on the
screen. The remote control supplied with your set can be used to navigate through
the menus and to configure all the general settings.
(On/Off button) Turns the TV on or off.
MENU Brings up the menu system.
FORMAT
FREEZE
TV
SCENEA
USB
EXIT
SOURCE Press to select signal source.
SCENEA Deletes the selected file in the playlist .
DUAL
SLEEP
FREEZE
BACK A/CH
(MUTE) Reduces the TV's volume to its minimum level. Press again
CH +/- Scans up or down through the current channel list.
SOUND
PICTURE
Selects a picture format.
TV Access the TV mode.
Access the USB mode.
USB
Toggles the demonstration menu on or off.
DEMO
Switches Stereo and Nicam Stereo to
Mono. Selects first language (Dual I)
or second language (Dual II) in bilingual programmes.
Sets a delay after which the TV switches off.
Note: -DEMO.SCENEA,DUAL
Red,Green,Blue keys depend on model be work in USB mode.
Freezes the picture.
EXIT Exits the menu system.
(up, down, left and right direction buttons) Highlights different items
in the menu system and adjusts the menu controls.
Confirms your selection.
OK
Returns to a previous screen.
Toggles between the current channel
Displays the status information.
INFO
Increases or decreases volume.
+/-
To restore the volume.
SLEEP
0-9 (numeric buttons) Enters channel numbers.
Toggles through the sound modes:STEREO,MUSIC,MOVIE,NEWS,
and PERSONAL.
Toggles through the picture preset settings:STANDARD,BRIGHT,
SOFT and PERSONAL.
keys depend on model.
and the last viewed channel.
EN 7

4 Use your TV
Switching on
Follow the instructions on this page on how to switch on your TV set and the remote
control before going on to following pages describing how to use the channel set-up
procedure.
1. Insert two AAA batteries in the remote control.
Precautions on using batteries:
- Only use the battery types specified.
- Make sure you use the correct polarity.
- Do not mix new and used batteries.
- Do not use rechargeable batteries.
- Do not expose batteries to excessive heat such as sunshine, fire or the like,
throw them in a fire, recharge them or try to open them, as this could cause
them to leak or explode.
- Remove the batteries from the remote control if you are not using it for a long
period of time.
2. Connect the power cable to a mains socket.
Your TV set should only be connected to an AC supply. It must not be connected
HDMI IN 1
HDMI IN 2
Y
SPDIF
Pr/CrPb/Cb
VIDEO
VIDEO
AUDIO
ANTENNA
IN
L
LRL
AUDIO
AUDIO
AUDIO
VGA
R
R
AV IN 1
COMPONENT
AUDIO/VIDEO
VGA AUDIO
AUDIO/VIDEO IN
OUT
/VIDEO IN
HDMI IN 1
HDMI IN 2
Y
SPDIF
Pr/CrPb/Cb
VIDEO
VIDEO
AUDIO
ANTENNA
IN
L
LRL
AUDIO
AUDIO
AUDIO
VGA
R
R
AV IN 1
COMPONENT
AUDIO/VIDEO
VGA AUDIO
AUDIO/VIDEO IN
OUT
/VIDEO IN
to a DC supply. If the plug is detached from the cable, do not, under any
circumstances, connect it to a mains socket, as there is a risk of electric shock.
Note: The figures are for representation only. The location of the power socket at
the back of the television might differ depending on the model.
3. Connect the outside aerial or cable network to the ANTENNA IN socket at the
back of the TV set.
The aerial socket (75 OHM - VHF / UHF / cable) can be used for connecting
an external aerial or other equipment fitted with a modulator (video recorder,
satellite receiver, etc.). We recommend that you do not connect other equipment
(video recorder, satellite receiver, etc.) to your TV set to begin with, so as not to
complicate the set-up procedure with the additional steps involved. Connect
them when you have finished setting up the channels.
4. Switch the TV on by pressing the power button.
Note:
HDMI IN 1
HDMI IN 2
HDMI-1 HDMI-2
Y
SPDIF
Pr/CrPb/Cb
VIDEO
VIDEO
AUDIO
ANTENNA
IN
L
LRL
AUDIO
AUDIO
AUDIO
VGA
R
R
AV IN 1
COMPONENT
AUDIO/VIDEO
VGA AUDIO
/
/
AV1
VGA /
AUDIO/VIDEO IN
OUT
/VIDEO IN
The location of the power button on the TV may vary according to TV model.
If the TV set is in standby mode, press the button on the remote control or
the CH+/- buttons on the remote control or at the side of the TV set to turn on
the TV.
Switching off
To put the TV set into standby mode, press the button on the remote control. The TV set remains powered up,
but with low energy consumption.
To switch off the TV set, .
8 EN
press the power button

Automatic Channel Set-up
Channel
Auto Tuning
Intelligent Tuning
Manual Tuning
Fine-Tune
Sound System
Programme Edit
Manual Tuning
Current Channel
Band
Search
Press MENU to return Press EXIT to exit
1
VHFL
49.70 Mhz
Channel set-up involves selecting all the settings required to be able to search for and
store all the channels you can receive. Make sure that the television is switched on
and follow all the steps in turn specified hereafter.
42.25HZ
Display the menu by pressing the MENU button. Press the left or direction button
DK
to select the Channel icon and press the or down direction or OK button to display
the Channel menu.
1. the Auto Tuning option.
Press the up or down direction button to select
2. Press the direction button or OK button to start channel search.
Note: Depending on the number of channels you receive, it may take several
minutes for the channel search to finish. If you want to interrupt the process,
press the MENU button. The channels already found will be stored.
Always start tunning from channel number 1.
3.
Channels are arranged in a pre-set order. Refer to the following sections if you want
to fine tune or skip a channel, or swap two channels.
left or right
up
right
Intelligent Channel Set-up
This operation will keep all the existed channels and add newly found channels to the
end of the channel list.
Intelligent Tuning option.
2. Press the direction or OK button to start intelligent tuning.
Note: If you want to interrupt the process, press the MENU button. The channels
already found will be stored.
left or right
ress the up or down direction button to select1. Activate the Channel menu and p the
Manual Channel Set-up
Follow the below procedure if you find that some channels have not been stored after
the automatic set-up as well as the intelligent set-up.
1. Activate the Channel menu and p the
Manual Tuning option.
2. Press the direction or OK button to enter the Manual Tuning menu.
3. Select the Current Channel option and press the
a channel number to store the channel that will be found.
4. If necessary, press the up or down direction button to select the Band option and
press the
direction button to toggle among VHFH, UHF and VHFL.
5. Press the up or down direction button to select
or right
6.
Press MENU to return or EXIT to close the menu.
right
left or right
the Search option and press the
direction button to search manually.
ress the up or down direction button to select
left or right
direction button to select
left
Fine Tuning a Channel
If the picture is not clear you can fine tune the channel.
1. Activate the Channel menu and p the
Fine-Tune option.
2. Press the left or right direction button for fine tuning
3. Press MENU to return or EXIT to close the menu.
ress the up or down direction button to select
EN 9

Setting the Sound System
Programme Edit
Current Channel
Target Cnannel
Interchange
Skip
Sound Noise
Press MENU to return Press EXIT to exit
No
Mode1
1
1
?
1. Activate the Channel menu and p the
Sound System option.
2. Press the direction or OK button to display the selectable options.
3. Press the up or down direction button to
D/K, I, B/G and MN.
.
4 Press MENU to return or EXIT to close the menu.
right
ress the up or down direction button to select
select an appropriate sound system:
Note:Sound system for India :BG.
Programme Edit
You can use this function to swap two channels or skip a channel.
1. Activate the Channel menu and p the
Programme Edit option.
2. Press the right direction or OK button to enter the Programme Edit menu.
ress the up or down direction button to select
Swapping Two Channels
Press the up or down direction button to
1. select the Current Channel option and press
the left or right
2. Press the up or down direction button to select
the left or right
3. Press the up or down direction button to select
the left or right
direction button to select a channel number.
direction button to select the Target Channel number.
direction or OK button to swap.
the Target Channel option and press
the Interchange option and press
Skipping a Channel
10 EN
If a channel was stored twice or its reception is poor, you can simply skip it. The skipped
channels can not be selected by pressing the CH+/- buttons.
1. select the Current Channel option and
Press the up or down direction button to
press the left or right
2. Press the up or down direction button to select
right
direction button to select Yes.
direction button to select the channel number to be skipped.
the Skip option and press the left or
Adjusting the sound noise
Press the up or down direction button to
1. select the Sound Noise option.
2. Press the left or right direction button to select .
3. Press MENU to return or EXIT to close the menu.
Mode 1 or Mode 2

Picture
Back Light
Picture Mode
Zoom
Brightness
Contrast
Color
Sharpness
Tint
Color Temp.
Natural Light
Dynamic Contrast
Sound Mode
EQ
Balance
Smart Volume
Scene
Headphone Volume
Sound
80
Standard
Full
50
50
50
50
0
Normal
Off
Off
DeskTop Mode
Stereo
5 Use more of your TV
Adjusting the Picture
The menus for adjusting the picture are used to obtain the best picture setting according to
your preference, the type of programme you are watching and the ambient lighting.
Display the menu by pressing the MENU button. Press the left or right direction button
to select the Picture icon and press the or down direction or OK button to display
the Picture menu. The Picture options are as below:
Note: Some options may not be available for certain signal sources.
Back Light:
room lighting. Use the left or right direction button to adjust.
Picture Mode: use the direction or OK
then press the up or down direction button to scroll
Personal, Bright, Standard and Soft,
Note: When selecting
defaulted setting in factory.
Zoom: use the direction or OK
or down direction button to scroll
Full Signal and Nature,
Note: Nature is available only in PC and HDMI-PC mode.
You are recommended to use the
full screen mode. Do not use the display mode with black bands on both sides of the picture
(such as 4:3) for long time, otherwise the LCD screen may be damaged permanently.
Brightness:
Contrast:
Color:
Sharpness:
Tint:
Note: Tint is only available for NTSC system.
Color Temp. : adjusts the color temperature of the picture. Use the direction or OK
to display the selectable options, then press the up or down direction button to scroll
the color settings: Cool for a more blue palette of picture colors; Normal; and Warm for a
more red palette of picture colors
Natural Light: turns on this option to adjust the brightness of the back light according to
the content of the inputted signal automatically, so as to optimize the picture quality
and decrease the power consumption.
Dynamic Contrast: turns on this option to adjust the contrast automatically.
Note: Natural Light and Dynamic Contrast are not available in PC mode.
Press MENU to return or EXIT to close the menu.
this option can be used to adjust the brightness of the backlight,depending on
right
button to display the selectable options,
Bright, Standard or Soft, the Back Light will restore to the
button to display the selectable options, then press the up
right
and press OK to confirm.
adjusts the brightness of the picture.
adjusts the difference between the light and dark areas of the picture.
adjusts the richness of color.
adjusts the crispness of the edges in the picture.
adjusts the balance between the red and green levels.
Adjusting the Sound
Display the menu by pressing the MENU button. Press the left or right direction button to select
the Sound icon and press the or down direction or OK button to display the Sound menu.
The Sound options are as below:
Sound Mode: use the direction or OK
then press the up or down direction button to scroll
Stereo, Music, News, Movie and Personal.
EQ: adjusts the audio frequency settings. Select the EQ option,then press the right
0
Off
0
direction or OK button to enter, then press the up or down direction button to select an option
and press the left or right direction button to adjust.
Note: The Sound EQ is adjusted, only when the Sound Mode is in Personal Mode.
Balance: Use the direction button to balance the sound between the left and right
speakers.
Smart Volume: turns on this option to keep the same sound level for all channels.
Note:SMART Volume is disable in HDMI mode.
Scene: Use the direction or OK
or down direction button to scroll the scene preset setting: DeskTop Mode and HangUp
Mode.
Headphone Volume: adjusts the sound volume of the headphones.
Warning: Excessive sound pressure from earphones and headphones can cause hearing loss.
Press MENU to return or EXIT to close the menu.
left or right
right button to display the selectable options, then press the up
up
right button to display the selectable options,
up
and press OK to confirm.
through the picture preset settings:
through the picture size: 4:3, Full, Subtitle, Wide Screen,
right
button
through
.
through the sound preset settings:
through
EN 11

Setting
Source Setting
Startup Setting
Motion Enhance
Language
Color System
Child Lock
Time Setting
Help Information
HDMI CEC
Restore to Default
12 EN
On
English
AUTO
Off
Off
Setting
Source Setting
Startup Setting
Motion Enhance
Language
Color System
Child Lock
Time Setting
Help Information
HDMI CEC
Restore to Default
Current Time
Turn on Time
Wake Up Source
Wake Up Channel
Turn off Time
Sleep Timer
English
AUTO
Function Settings
Display the menu by pressing the MENU button. Press the left or right direction button
On
Off
Off
to select the Setting icon and press the up or down direction or OK button to display
the Setting menu. The Setting options are as below:
Note: Some options may be not available for certain signal sources.
Source Setting: press the right direction or OK button to display the selectable
options, then press the up or down direction button to select an option and press the
right direction or OK button to enter.
Rename: press the up or down direction button to select your desired option and
press the right direction or OK button to confirm the selection, then press up or
down direction button to select a new name for the source and press OK to confirm.
Smart Switch: press the left or right direction button to select a desired setting:
Switch, Display and Off.
Switch: if an equipment, e.g. a DVD player, has been connected to the sockets
on the TV set and turned on, e.g. AV1 sockets, the TV set will switch to that signal
source automatically (AV1 for this example).
Display: if an equipment, e.g. a DVD player, has been connected to the sockets
on the TV set and turned on, e.g. AV1 sockets, the TV set will display a prompt
message on the screen. You can select OK to switch to that signal source (AV1 for
this example) or EXIT to ignore the prompt.
Off: disables the Smart Switch function.
When SMART SWITCH function is selected as Switch/Display,then front panel Source key
can not be work.
Startup Setting: Sets the startup picture or music.
Open Picture: press the left or right button to select Off or captured
picture (max. to 4) as Open Picture.
Open Music: press the left or right button to select Off, Default or Personal as Open Music.
Note: The Personal item is only available when capturing a music segment and if
selecting Personal, the TV will automatically play the captured music when turning on.
Motion Enhance : reduces the flicker or standstill when camera lens horizontally move in film.
Language: using the left or right direction button to select your desired menu language .
Note: The available languages might differ depending on the model.
Color System: use the right direction or OK button to display the selectable options,
then press the up or down direction button to select your desired color system (Note:
available color system might differ depending on the model.
Note:Color system for India :PAL.
Child Lock: Use the number buttons to input the password (The default is 0000).
Then press the left or right direction button to select the watch time. To cancel the limit,
select Off.
And you can also change the password: press the up or down direction button to select
the PW Modify item and press the right direction or OK button to confirm, then enter
a new password twice.
Note: If you forget the password, enter 7117 to override any existing codes.
Time Setting: Press the up or down direction button to select the Time Setting item,
then press the right direction or OK button to enter.
--:--
--:--
TV
Current Time: press the left, right, up, down direction button to set the current time.
1
--:--
Turn on Time: press the left, right, up, down direction button to set the turn on time.
Off
Wake Up Source: press the left or right direction button to select the wake up
signal source.
Wake Up Channel: press the left or right direction button to select a wake up
channel.
Note: Only when the wake up source is TV, this function can be available.
), and press OK to confirm.
Turn off Time: press the left, right, up, down direction button to set the turn off time.
Sleep Timer: sets a period of time after which the TV set goes into standby mode.
Use the left or right direction button to set the period (240 minutes maximum).
To disable this function, select Off.
The

Help Information: Selects On or Off to activate or disable the function of displaying
the information about how to operate using the left or right direction button.
HDMI CEC: Selects On or Off to activate or disable the HDMI CEC function among
the unit and other equipments using the left or right direction button.
When turning on the HDMI equipment, such as a DVD player, the TV will automatically
turn on and switch to HDMI source.
If the unit is connected with HDMI equipment, press the Standby button to enter in
standby mode, and the HDMI equipment is also enter in standby mode.
The short keys includes the up, down, left, right direction, OK and Standby buttons.
When connecting HDMI equipment, pressing these button can control the equipment.
Note: CEC function is available only when connecting a equipment with CEC function.
Restore to default: restores all the settings to default settings in factory.
Press MENU to return or EXIT to close the menu.
Selecting a Signal Source or Look over
the Layout of Terminals
TV Ypbpr
HDMI1
AV1 AV2
Source
HDMI2
HDMI3
Layout
Display the menu by pressing the MENU button. Press the left or right direction button
to select the Source icon and press the or down direction or OK button to display
PC
the Source menu.
Selecting a Signal Source
1. Press the up, down, left or right direction button to select your desired source:
TV, Ypbpr, PC, HDMI1, HDMI2, HDMI3, AV1 and AV2. (Note: The available
source might differ depending on the model.)
up
2. Press the OK button to confirm the selection.
Note: You can press the SOURCE button on the remote control to switch the
source. But if the SMART switch function is on, pressing the source button
shall result in switching between the connected sources only .
Look over the Layout of Terminals
1. Press the up, down, left or right direction button to select Layout and press OK to
display Interface Status.
2. Press the up, down, left or right direction button to look over.
Press MENU to return or EXIT to close the menu.
3.
Geometry Settings
Geometry
Auto Adjust
Horizontal Pos.
Vertical Pos.
AD Clock
Phase
Display the menu by pressing the MENU button. Press the left or right direction button
to select the Geometry icon and press the or down direction or OK button to display
the Geometry menu.
50
50
Note: This function is only available in PC mode.
0
60
Auto Adjust: press the direction or OK button to adjust the picture's position,
phase and clock automatically. The menu will auto exit after the adjustment is finished.
right
up
Horizontal Pos. (Horizontal Position): adjusts the picture's position left or right.
Vertical Pos. (Vertical Position): adjusts the picture's position upward or downward.
AD Clock: adjusts the clock sync of the picture.
Phase: adjusts the picture if there is flicker of screen letters, color misalignment, or
blurring.
Press MENU to return or EXIT to close the menu.
EN 13

1
2
USB 2.0
Return
Movie
C
USB Functions
Connect a USB device to a USB socket and display the main menu by pressing the
MENU button.
Notes:
In USB disk catalog, pressing MENU can display File Operation menu and you can
press the up or down button to toggle among Movie, Music Show, Photo Show and
Auto Play, then press the left or right direction or OK button to confirm.
The short keys of USB include:
The up, down, left, right direction buttons and OK, blue button (sound track/zoom),
red button (rotate), yellow button (open picture saving/ open music capturing),
green button (subtitle) .
Note:Front Panel VOL+/VOL- keys are not applicable in music mode.
Use Virus free Pen Drive /USB.
Playing movie:
1. Press the left or right direction button to select Movie icon, then press the up or
down direction or OK button to enter the USB interface.
2. Press the left or right direction button to select the USB disk symbol and press the
OK button to enter.
3. Press the up, down, left or right direction button to select a movie file, then press OK
to play it.
4. You can press the OK button to pause or continue to play, press EXIT to stop playing,
press the left or right direction button repeatedly to select the searching speed: 2X, 4X,
8X and 16X (backwards or forwards), the sound will be muted. Press the up or down
button to select last or next film.
5. Press INFO to display the information of playing video, and press again to clear.
6. Press the green button to display the subtitle if available.
7. Press EXIT to exit.
Playing Music :
1. Press the left or right direction button to select Photo icon, then press the up or
down direction or OK button to display the Photo menu.
2. Press the up or down direction button to select the Music Show item and press the
right direction or OK button to enter the USB interface.
3. Press the left or right direction button to select the USB disk symbol and press OK
to enter.
4. Press the up, down, left or right direction button to select a music file, then press OK
to play it.
5. You can press the OK button to pause or continue to play, press EXIT to stop playing,
press the up or down direction button to select last or next music.
6. Pressing the yellow button can capture a music segment as wake up music when
playing music.
7. Select the Return symbol to return previous folder.
14 EN

1
2
USB 2.0
Return
Music Show
Photo Show
Auto Play
Photo
Showing photo:
1. Activate the Photo menu and press the up or down direction button to select the Photo
Show item and press the left or right direction or OK button to enter the USB interface.
2. Press the left or right direction button to select the USB disk symbol and press OK
to enter.
3. Press the up, down, left or right direction button to select a photo file, then press OK
to show.
4. You can press the OK button to pause or continue to play, press the up or down
direction button to select the last or next photo, press EXIT to stop playing, press the
red button to rotate the photo, press the blue button to zoom the photo, press the yellow
button to set the photo as open picture.
C
5. Press Exit to exit.
Auto play
1. Activate the Photo menu and press up or down direction button to select the Auto
Play item and press the left or right direction or OK button to enter the USB interface.
2. Press the left or right direction button to select the USB disk symbol and press OK
to auto play the picture and music simultaneously.
Note: This function is only available when the pictures and music are synchronously
located in the USB root catalog.
6 FAQ
Attention:
1. Some non-standard mobile storage device may/may not be recognized.
Please change to use the standard device.
This system supports the following file formats:
2.
Picture format:
Video format: , etc..
Audio format:
Note: For coding files, there are many kinds of non-standard coding method, so this
system
JPEG BMP PNG
H.264 RM/RMVB XVID MPEG4 MPEG2 MPEG1
MP3 WMA
can not be guaranteed to support the file formats using any coding method.
Frequently Asked Questions:
1. Under the following conditions, this system can not decode the file and the file
can not play normally:
-The parameters of file, such as the pixel of picture, code rate of audio and video file,
sampling rate of audio file, exceed the limit of the system;
-The format of file is not matched or the file is harmed.
Note: The code rate this system supports does not exceed 20Mbps.
2. Hot plug: Do not disconnect when the system is reading or transmitting data,
avoid damaging the system or the device.
3. Pay attention to the power supply of the device when you are using a mobile hard
disk or a digital camera. If the power supply is not sufficient or not stable, you may
encounter problems during operating or can not operate at all. In this case, please
restart the device, or unplug the device and plug it again, and ensure that its power
supply is normal.
4. The system supports standard USB1.1 and USB2.0 devices, such as standard
U-disks, MP3 players, mobile hard disks, etc..
5. For obtaining better audio and video quality, suggests to use the external device
which accords with USB2.0 standard.
6. Connecting two USB hard disk devices
speed of reading or other problems, suggests to connect two U disk or one USB
hard disk and one U-disk simultaneously.
7. When playing the video with high compression ratio, these phenomenons, such as
picture standstill and menu long time response, are normal.
8. For some USB device with power supply, such as large size hard disk, MP4, etc.,
Suggests using it with power to avoid electric power shortage.
simultaneously can cause to slow the
EN 15

7 Other Information
Troubleshooting
Most problems you encounter with your TV can be corrected
by consulting the following troubleshooting list.
No picture, no sound
1. Check if the fuse or circuit breaker is working.
2. Plug another electrical device into the outlet to make sure
it is working or turned on.
3. Power plug is in a bad contact with the outlet.
4. Check the signal source.
No color
1. Change the color system.
2. Adjust the saturation.
3. Try another channel. Black-white program may be
received.
Remote control does not work
1. Change the batteries.
2. Batteries are not installed correctly.
3. Main power is not connected.
No picture, normal sound
1. Adjust the brightness and contrast.
2. Broadcasting failure may happen.
Normal picture, no sound
1. Press the Vol+ button to increase volume.
2. Volume is set to mute, press the mute button to restore
sound.
3. Change the sound system.
4. Broadcasting failure may happen.
Unorderly ripples on the picture
It is usually caused by local interference, such as cars, daylight
lamps and hair driers. Adjust the antenna to minimize the
interference.
Blank screen in VGA mode
Perhaps the TV can not recognize the resolution set by the PC.
Suggest to change to the best resolution or other standard
resolutions of the Windows system.
Snowy dots and interference
If the antenna is located in the fringe area of a television signal
where the signal is weak, the picture may be marred by dots.
When the signal is extremely weak, it may be necessary to install
a special antenna to improve the reception.
1. Adjust the position and orientation of the indoor/outdoor antenna.
2. Check the connection of antenna.
3. Fine tune the channel.
4. Try another channel. Broadcasting failure may happen.
Ignition
Black spots or horizontal streaks appear, or the picture flutters or
drifts. This is usually caused by interference from car ignition
system, neon lamps, electric drills, or other electrical appliance.
Ghost
Ghosts are caused by the television signal following two paths. One
is the direct path, the other is reflected from tall buildings, hills, or
other objects. Changing the direction or position of the antenna may
improve the reception.
Radio frequency interference
This interference produces moving ripples or diagonal streaks, and in
some case, loss of contrast in the picture. Find out and remove the
radio interference source.
16 EN

8 Product
Multimedia
information
Product information is subject to change
without notice. For detailed product
information, go to www.philips.com/support.
Supported display resolutions
Computer formats (HDMI)
Resolution - refresh rate :
800 x 600 - 60Hz
1024 x 768 - 60Hz
1280 x 720 - 50Hz, 60Hz
1280 x 768 - 60Hz
1280 x 800 - 60Hz
1280 x 960 - 60Hz
1280 x 1024 - 60Hz
1360 x 768 - 60Hz
1440 x 900 - 60Hz
1680 x 1050 - 60Hz
1920 x 1080 - 50Hz, 60Hz
Computer formats (VGA)
Resolution - refresh rate :
800 x 600 - 60Hz, 70Hz, 72Hz, 75Hz
1024 x 768 - 60Hz, 70Hz,72Hz, 75Hz
1152 x 864 - 60Hz, 70Hz, 72Hz, 75Hz
1280 x 720 - 60Hz, 72Hz, 75Hz
1280 x 768 - 60Hz, 70Hz, 72Hz, 75Hz
1280 x 960 - 60Hz, 75Hz
1280 x 1024 - 60Hz, 70Hz, 72Hz, 75Hz
1360 x 768 - 60Hz, 70Hz, 72Hz, 75Hz
1600 x 900 - 75Hz
1600 x 1024 - 60Hz, 70Hz, 75Hz
1920 x 1200 - 60Hz, 70Hz, 72Hz, 75Hz
Video formats
Resolution - refresh rate:
480i - 60Hz
480p - 60Hz
576i - 50Hz
576p - 50Hz
720p - 50Hz , 60Hz
1080i - 50Hz, 60Hz
Suppor ted USB storage device: USB devices
(Only NTFS, FAT 16 and FAT 32 USB stor age
d evices are supported)
MPEG1, MPEG2, MPEG4, H.264, RM,
RMVB, MOV
Suppor ted Multimedia file formats:MJPEG
Images: JPEG/BMP/PNG
Audio: MP3/WMA/M4A(AAC)
Note
names must not exceed 128
Multimedia
characters.
file
Tuner/Reception/
Transmission
Antenna input: 75ohm coaxial (IEC 75)
TV sys tem: PAL ,B/G,D/K,I
Video playback: PAL, NTSC,SECAM
Remote control
Batteries: 2 x AAA
Power
Mains power : AC 110~240 V , 50- 60 Hz
Standby power: < 1 W
Ambient temperature: 5 to 40 degrees
Celsius
EN 17

Supported TV mounts
To mount the TV, purchase a Philips TV mount
or a VESA-compatible TV mount. To prevent
damage to cables and connectors, be sure to
leave a clearance of at least 2.2 inches or 5.5cm
from the back of the TV.
TV screen
size (inches)
32PFL5505/V7
42PFL5505/V7
46PFL5505/V7
Required
pitch (mm)
200X200
400X400
400X400
Required
mounting bolts
4 x M6
4 x M6
4 x M6
42PFL5505/V7
Without TV stand
Dimensio n (WxHxD): 1034x 664
x 100 (mm)
Weight: 18 kg
46PFL5505/V7
Without TV stand
Dimensio n (WxHxD): 1124x 716
x 102 (mm)
Weight: 21 kg
Product specifi
Design and specifications are subject to change
without notice.
32PFL5505/V7
Without TV stand
Dimensio n (WxHxD): 804 x 534
x 100 (mm)
Weight: 10.5 kg
cation
18 EN
72-LPMS68-E00BE

Consumer Guidelines
1. Kindly ensure that the dealer fills up Warranty card correctly.
2. To avail the Warrantyplease register your product with the Philips -
Logon to www.Philips.com
OR
Contact Philips Consumer Care Centre
3. In the unlikely event of a defect developing in the TV set contact the Philips Customer
Care Centre for obtaining warranty service and inform of the defect observed in the
set, the type no.and serial no.of the set.
4. On your lodging a complaint, a trained technician will call on you promptly. In the
event of the technician deciding that set requires attention at the service station; kindly
arrange to deliver the set to the service station designated by technician for further
attention. "Home calls" by the technician would however be restricted within the
municipal limits of the city / town in which the set has been registered.
Type no.
Purchased By: Name
Address:
_
Sold by: Name
Address:
_
Model no.:
Serial no.:
Contact Customer Service Executive at:
1800 102 2929(Toll free No.)
1860 180 1111 (Chargable No.)
RegdOffice: PE Electronics Ltd,Auto Cars Compound,Adalat Road,Aurangabad,431005.
_
_
_
MADE IN PRC
Serial No.
_
46PFL5505/V7
42PFL5505/V7
32PFL5505/V7
_
_
Sold by(User rubber stamp)
Date of Purchase
Tel. No.
Tel. No.
_
_
_

WARRANTY
This TV receiver is covered under
warranty against any defect arising out
of faulty or defective material or workman
ship for a period of 12 months from the
date of purchase.
Should a defect develop in this set during
the period of warranty,PE Electronics
Limited undertakes to get the set repaired
free of charge either.
From whom the set has been purchased or
through an Authorised Service Center for
warranty service. However, if the
Purchaser has to shift his residence to
another town on account of transfer or
other reasons, the warranty benefit will be
available at the Authorised Service Center.
The warranty is not valid in case of any of
the following events:
The TV set is not used according to instructions given in the 'Direction for use'
Defects are caused by improper or reckless use.
Any repair work carried out by persons other than a Philips dealer or Authorised
Service Center.
Any modification or alteration of any nature made in the electrical circuitry of the est.
This Warranty Card is not completed and signed immediately on delivery of the set
by the Philips Dealer.
Fading effects and/or Ghosts (Multiple Image) in picture, if any, arising due to location
/ signal reception.
Defects due to causes beyond control like lightning, abnormal voltage, Acts of God or
while in transit to purchaser's residence.
(Refer Consumer Guidelines for further details)

 Loading...