

Philips 42PF5520D User Manual


ADDENDUM
Important Customer Information
Because of the advanced technology used in your Philips Digital TV and our commitment to continually providing
you with the most up-to-date product performance, we would like to highlight the following.
After you turn off your TV set in a dark room, you may notice a very faint light emitted from the screen for a few
minutes. This is because the TV is scanning the network for possible software updates and new services. This is
normal operation and is in accordance with all stringent quality and safety standards Philips delivers.
Information clientèle importante
Vu la sophistication de la technologie utilisée dans votre télévision numérique Philips et étant donné notre engagement à vous offrir continuellement des produits présentant des performances à la pointe, nous souhaitons vous
apporter la précision suivante.
Après avoir éteint votre TV dans une pièce sombre, vous pouvez remarquer que l’écran émet une légère lueur
durant quelques minutes. La télévison est en effet en train de scanner le réseau à la recherche d’éventuelles mises
à jour logicielles ou de nouveaux services. C’est tout à fait
sécurité strictes auxquelles se conforme Philips.
normal et conforme aux normes de qualité et de
Información importante para el cliente
Dada la technología avanzada que utiliza su Philips Digital TV y nuestro compromiso de proporcionarle siempre el
rendimiento más actual posible, nos gustaria informarle de lo siguiente.
Después de apagar el televisor en una sala oscura, puede que vea una luz tenue emitida por la pantalla durante unos
minutos. Esto es debido a que el televisor está mirando en la red si hay actualizaciones y servicios nuevo disponibles.
Esto es
normal, y cumple con las exigentes normas de calidad y seguridad de Philips.
Informazione importante per il cliente
English
Français
Español
Italiano
A causa della tecnologia avanzata usata dal Philips Digital TV e dal nostro impegno nel fornirle sempre le più alte
pretazioni, siamo lieti di informarle su quanto segue.
Una volta spento il televisore in una stanza buia, è possibile continuare a vedere una luce tenue sullo schermo per
qualche minuto. Ciò è dovuto al fatto che il televisor sta cercando sulla rete se vi sono aggiornamenti e nuovi servizi
disponibili. Si tratta di
Wichtige Kundeninformation
Aufdrund der fortgeschrittenen Technologie, die bei Ihrem Digitalfernseher von Philip verwendet wird, und da wir
stets darum bem
hinweisen.
Wenn Sie lhr TV-Set in einem dunklen Raum abschalten, ist es m
schwachen Lichtschein ausstrahlt. W
Software-Updates und neuen Services. Es handelt sich dabei um einen
Qualit
ä
ts- und Scherheitsstandards, die Philips garantiert.
Tarkeaa tietoa asiakkaille
Koska Philipsin digitaalisessa TV-vataanottimessa käytettaan edistynyttä tekniikkaa ja koska haluamme lisäksi, ett
tuotteemme tarjoavat sinulle aina viimeisintä mahdollisia suorituskyky
Kun kytket TV;n p
johtuu siitä, että TV ottaa yhteyden verkkoon hakeakseen mahdollisia ohjelmistopäivityksiä ja uusia palveluita. Tämä on
laitteen
normaalia toimintaa ja kaikkien Philipsin noudattamien tiukkojen laatuja turvallisuusnormien mukaista.
Viktig kundinformation
På grund av den avanccerade teknik som finns i din Philips digitala TV och var strävan efter att fortlöpande förse dig
med den allra senaste produkinformationen vill vi uppmarksamma dig p
Nar du st
ett par minuter. Detta beror p
Detta
ä
nger av TV;n i ett morkt rum kan du eventuellt se ett mycket svagt ljus som stralar ut fran skarmen under
ä
r normalt och sker i enlighet med Philips alla stränga kvalitets- och säkerhetsstandarder..
un’operazione normale che adempie le rigorose norme di qualtà e sicuerezza di Philips.
Deutsch
ü
ht sind, lhnen die neuesten Produktleistungen zu bieten, möchten wir Sie gerne auf Folgendes
ö
ä
hrend dieser Zeit überprüft lhr Fernseher das Netzwerk nach möglichen
glich, dass das Gerät
normalen Vorgang,
für
einige Minuten einen
gemäß
den strengen
Suomi
ä korostaa seuraavia seikkoja.
äälle pimeässä huoneessa, ruudusta heijastuu erittäin heikkoa valoa muutaman minuutin ajan. Tämä
Svenska
å fö
ljande.
å
att TV:n skannar in nätverket och söker efter mojliga uppdateringar och nya tjänster.
ä

Introduction
Thank you for purchasing this television set.
This handbook has been designed to help you install and operate your TV set.
We would strongly recommend that you read it thoroughly.
Presentation of the television . . . . . . . . . . . . . . . . . . . . . . . . . . . . . . . . . . . . . . . . . . . . . . . . . . . . . . . . . . . . . . . . . . 2
Remote control . . . . . . . . . . . . . . . . . . . . . . . . . . . . . . . . . . . . . .. . . . . . . . . . . . . . . . . . . . . . . . . . . . . . . . . . . . . . . . . . 2
Digital or Analogue channels ? . . . . . . . . . . . . . . . . . . . . . . . . . . . . . . . . . . . . . . . . . . . . . . . . . . . . . . . . . . . . . . .. . . . 2
The remote control keys . . . . . . . . . . . . . . . . . . . . . . . . . . . . . . . . . . . . . . . . . . . .. . . . . . . . . . . . . . . . . . . . . . .. ... . .. 3
Mode selector . . . . . . . . . . . . . . . . . . . . . . . . . . . . . . . . . . . . . . . . .. . . . . . . . . . . . . . . . . . . . . . . . . . . . . . . . . .. . . . . . . . 4
Installing your television set. . . . . . . . . . . . . . . . . . . . . . . . . . . . . . . . . . . . . . . . .. . . . .. ... . .. . . . . . . . .. . . . . . ... . .. 4
Switching on for the first time . . . . . . . . . . . . . . . . . . . . . . . . . . . . . . . . . . . . . . . . . .. ... . .. . . . . . . . . . . . . .. ... . . . .. 5
Understanding the information on the banner . . . . . . . . . . . . . . . . . . . . . . . . . . .... . .. . . . . . . . .. . . . .. ... . .. .. 5
Rearrange services . . . . . . . . . . . . . . . . . . . . . . . . . . . . . . . . . . . . . . . . . . . . . . . . . . . . .... . .. . . . . . . . . . . . . .. ... . . . ... 6
View or Listen to new TV services . . . . . . . . . . . . . . . . . . . . . . . . . . . . . . . . . . . . .... . .. . . . . . . . .. . . . .. ... . .. ... 6
Add new services . . . . . . . . . . . . . . . . . . . . . . . . . . . . . . . . . . . . . . . . . . . . . . . . . .. . . .... . .. . . . . . . . .. . . . . . ... . .. ... 6
Reinstall all services . . . . . . . . . . . . . . . . . . . . . . . . . . . . . . . . . . . . . . . . . . . . . . . . . .... . .. . . . . . . . .. . . . .. ... . .. ... . ..7
Test reception . . . . . . . . . . . . . . . . . . . . . . . . . . . . . . . . . . . . . . . . . . . . . . . . . . . . .. .... . .. . . . . . . . .. . . . .. ... . .. ... . .. 7
Language and location preferences . . . . . . . . . . . . . . . . . . . . . . . . . . . . . . . . . . . .. .. . . . . . . . .. . . . .. ... . .. ... . .. . 8
Access restrictions . . . . . . . . . . . . . . . . . . . . . . . . . . . . . . . . . . . . . . . . . . . . . . . . . . .. .. . . . . . . . .. . . . .. ... . .. ... . .. . 8
Setting up your favourite list . . . . . . . . . . . . . . . . . . . . . . . . . . . . . . . . . . . . . . . . . .. .. . . . . . . . .. . . . .. ... . .. ... . .. . 9
Information menu . . . . . . . . . . . . . . . . . . . . . . . . . . . . . . . . . . . . . . . . . . . . . . . . . . . .. .. . . . . . . . . . . . . .. ... . .. ... . .. . 9
DIGITAL MENUS
Downloading new software . . . . . . . . . . . . . . . . . . . . . . . . . . . . . . . . . . . . . . . . . . . . .. .. . . . . . . . .. . . . .. ... . .. ... . .9
Using the Options menu . . . . . . . . . . . . . . . . . . . . . . . . . . . . . . . . . . . . . . . . . . . . . . . .. .. . . . . . . . .. . . . .. ... . .. ... . .10
TV guide . . . . . . . . . . . . . . . . . . . . . . . . . . . . . . . . . . . . . . . . . . . . . . . . . . . . . . . . . . . . . . . .. .. . . . . . . . .. . . . .. ... . .. ... . 10
Recording function . . . . . . . . . . . . . . . . . . . . . . . . . . . . . . . . . . . . . . . . . . . . . . . .. . . . . .. .. . . . . . . . .. . . . . . ... . . . ... . 11
English
Français
Español
Italiano
Deutsch
Automatic tuning of analogue programmes . . . . . . . . . . . . . . . . . . . . . . . . . . . . .. .. .. . . . . . . . .. . . . .. ... . .. ... . 12
Program sort . . . . . . . . . . . . . . . . . . . . . . . . . . . . ... . . . . . . . . . . . . . . . . . . . . . . . . . . . .. .. .. . . . . . . . .. . . . .. ... . .. ... . 12
Manual tuning of analogue programmes . . . . . . . . . . . . . . . . . . . . . . . . . . . . . . . .. .. .. . . . . . . . .. . . . . . ... . .. ... . 12
Other settings in the install menu . . . . . . . . . . . . . . . . . . . . . . . . . . . . . . . . . . . . . . ... .. . . . . . . . .. . . . .. ... . .. ... . 13
Picture settings . . . . . . . . . . . . . . . . . . . . . . . . . . . . . . . . . . . . . . . . . . . . . . . . . . .. . . . . . ... .. . . . . . . . .. . . . .. ... . .. ... .13
Sound adjustments . . . . . . . . . . . . . . . . . . . . . . . . . . . . . . . . . . . . . . . . . . . . . . . . . . . . . ... .. . . . . . . . .. . . . .. ... . .. ... .13
Feature settings . . . . . . . . . . . . . . . . . . . . . . . . . . . . . . . . . . . . . . . . . . . . . . . . . . . . . . . . ... .. . . . . . . . .. . . . .. ... . .. ... . 13
Screen Formats . . . . . . . . . . . . . . . . . . . . . . . . . . . . . . . . . . . . . . . . . . . . . . . . . . . . .. . . . ... .. . . . . . . . .. . . . .. ... . .. ... 14
Digital text . . . . . . . . . . . . . . . . . . . . . . . . . . . . . . . . . . . . . . . . . . . . . . . . . . . . . . .. . . . . . ... .. . . . . . . . .. . . . .. ... . .. ... .14
Analogue Teletext . . . . . . . . . . . . . . . . . . . . . . . . . . . . . . . . . . . . . . . . . . . . . . . . . . . . . . ... .. . . . . . . . .. . . . .. ... . .. ... . 15
ANALOGUE
Using in the PC monitor mode . . . . . . . . . . . . . . . . . . . . . . . . . . . .. . . . . . ... .. . . . . . . . .. . . . .. ... . .. ... .. . . .. . . ..16
Using in the HD (high definition) mode . . . . . . . . . . . . . . . . . . . . . . . . . . . .. . . . . . ... .. . . . . . . . .. . . . .. ... . .. . .17
Connecting peripheral equipment . . . . . . . . . . . . . . . . . . . . . . . . . . . . . . . . . . . . . . . ... .. . . . . . . . .. . . . .. ... . .. . ..18
Tips . . . . . . . . . . . . . . . . . . . . . . . . . . . . . . . . . . . . . . . . . . . . . . . . . . . . . . . . . . . .. . . . . . . . . ... .. . . . . . . . .. . . . .. ... . .. . ..20
Recycling
The packaging of this product is intended to be recycled. Apply to the local authorities
for correct disposal.
Disposal of your old product
Your product is designed and manufactured with highly quality material and components,
which can be recycled and reused. When this crossed-out wheeled bin symbol is attached
to a product, it means the product is covered by the European Directive 2002/976/EC.
Please inform yourself about thelocal seperate collection system for electrical and
electronic products.
Please act according to your local rules and do not dispose of your old products with your
normal household waste. The correct disposal of your old product will help prevent
potential negative consequences for the environment and human health.
Suomi
Svenska
1

Presentation of the Television
7
42” TV
8
37” TV
& Television keys
•POWER : to switch the TV on or off.
•
VOLUME – / + : to adjust sound level.
• MENU : to access or close menus.
The PROGRAM – / + keys can be
used to select an adjustment and the
VOLUME – / + keys to make that
adjustment.
•PROGRAM – / + : to select
programmes.
Rear of set :
The main connections are made at the
bottom of the television.
For more details on connections, see page 18-19.
é Power socket
“ DVI and audio input for connectinga HD
(high definition) equipment or computer
with DVI output.
‘
EXT1 and EXT2 sockets
(
TV aerial socket
§
Common interface slot
è
SPDIF socket
!
Side connections
Remote control
Insert the two R6-type batteries (supplied) making
sure that they are the right way round.
The batteries supplied with this appliance do not contain
mercury or nickel cadmium. If you have access to a
recycling facility, please use this facility
(if in doubt, consult your dealer).When the batteries are
replaced, use the same type.
Digital or Analogue channels
To r eceive TV channels, your television is equipped with 2 tuners. One is for digital channels, the other is for
analogue channels. Use the key of the remote control to switch the TV between analogue and digital mode.
Then use the P(age) +/– or keys to select channels.
2
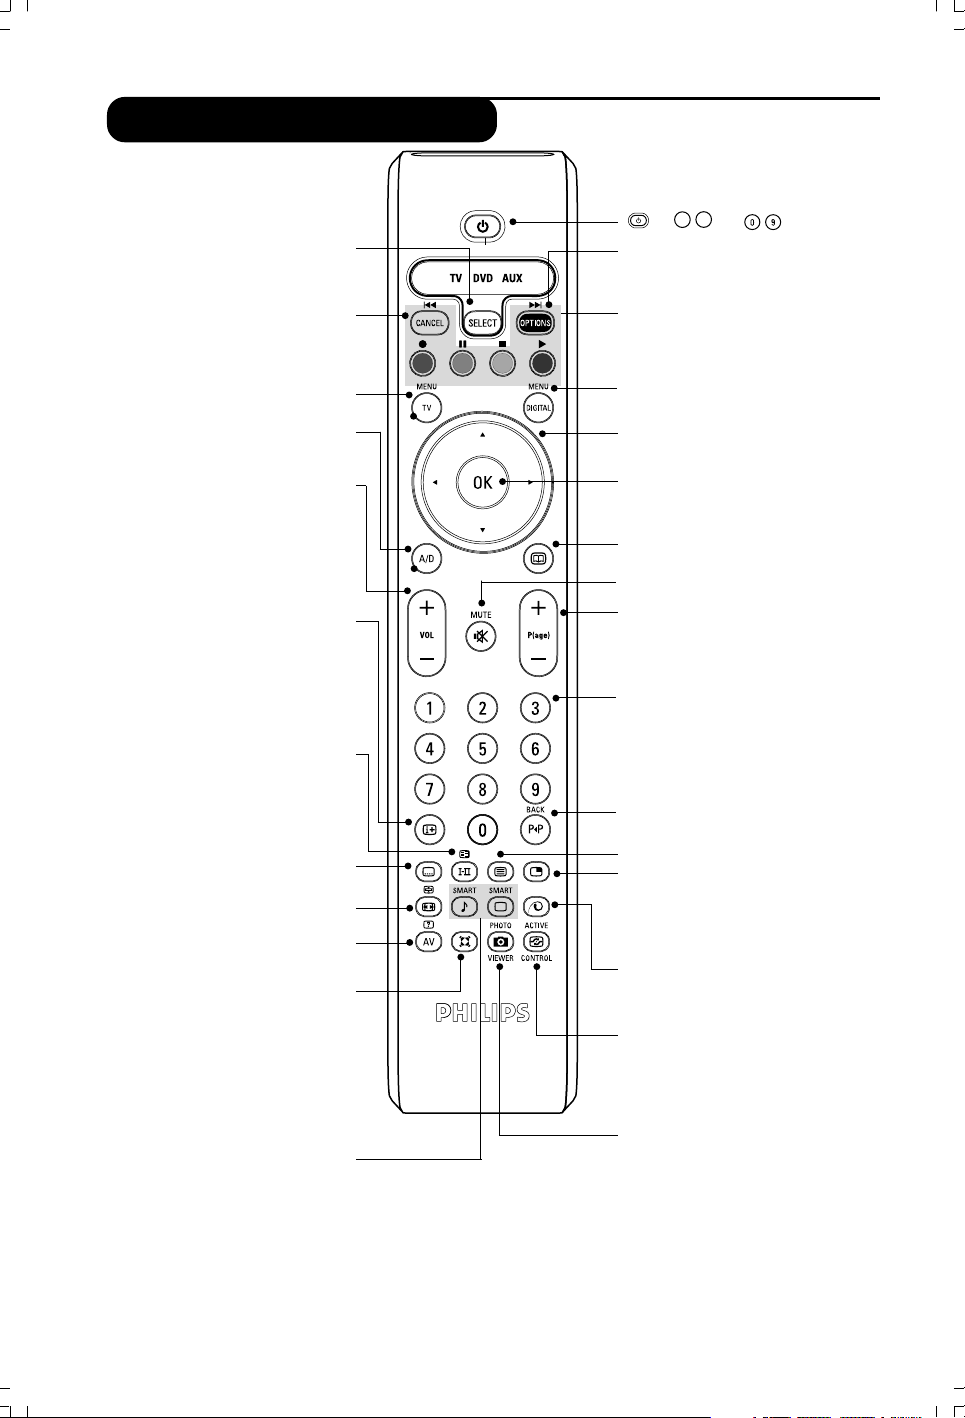
The remote control keys
Mode selector
To activate the remote control in
TV, DVD or AUX mode (see p 4).
Cancel
AUX/DVD key (see p. 4).
Standby
To set the TV to standby mode.To
switch the TV set on again, press
+
, P
Options menu (see p. 10).
Teletext features (see p. 15) and
AUX/DVD keys (p. 4).
or .
–
To display or edit from the analogue
Analogue or Digital mode
To switch the television between
Screen information
In digital mode, press once to display
the information banner, 2nd time to
get more information on
the programme and a 3rd time to
In analogue mode, this displays/
removes the programme
informations (number, name, sound
mode). Hold down for 5 seconds to
permanently display the analogue
programme number on the screen.
To switch from Stero to Mono or to
choose between different languages
When the sound mode is switched to
Mono, the indication is displayed in red.
To activate/deactivate the subtitle
mode (when TV is in digital mode).
Screen format (see p. 14)
or teletext key (see p15).
Select EXT sockets (see p. 18)
or teletext key (see p15).
To activate/deactivate the Virtual
Dolby Surround* effect. In stereo,
you can obtain Dolby Surround Pro
Logic sound quality. In mono, a
stereo spatial effect is simulated.
* Manufactured under licence from Dolby
Laboratories. “Dolby” “Pro Logic” and the
double-D symbol are trademarks of Dolby
Picture and sound settings
Accesses a series of picture
The position Personal coresponds to
the settings stored in the menus.
TV menu
menus.
analogue and digital mode.
Volume
To adjust the sound level.
remove it (see p. 5).
Sound mode
(Dual I, Dual II,..).
Subtitle mode
Surround sound
Laboratories
and sound settings.
Digital menu
To display or exit from the digital
menus (when TV is in digital mode).
Cursor
These 4 keys are used to move within
the menu or to directly access the
screen formats.
OK
Confirms selection. Also access
program list in Analogue or Digital
mode.
TV guide (see p. 10).
Mute
To disable or enable the sound.
Programme selection
To access the next or previous
programme (or page in digital menus).
Numerical keys
For direct access to programmes. For
a 2 (3) digit programme number, the
second (third) digit must be entered
before the dash disappears. The
number, the name (and the sound
mode, in analogue mode) are displayed
for a few seconds.
Previous programme
To access the previously viewed
programme. In Digital mode, it also
used as an edit or back space key.
Teletext feature (see p. 15)
PIP on/off
Display PIP screen on TV. Subsequent
presses of the key changes size of the
window. For display of PIP screen in
PC or HD mode, see p. 18.
Pixel + (depending on version)
Switches the Pixel + demonstration
mode on or off.
Active control
Optimises the picture quality
depending on the quality of the
incoming signal and ambient light
conditions.
.
Unused key.
3

Mode selector
Press the
control indicator lights up to display the selected mode. It switches off
automatically after 20 seconds if left idle. The remote control automatically returns to TV
mode.
The following keys are operational depending on the equipment :
standby
pause
(SELECT) key to select the required mode : DVD or AUX (amplifier). The remote
OK validation
fast rewind
navigation and adjustments
fast forward
recording
digit keys
stop
play
tv menu
cancel
OSD menu
programme selection
audio selection
Installing your television set
4
& Positioning the television set
Place your TV on a solid stable surface. To avoid
danger, do not expose the TV to water or a heat
source (e.g. lamp, candle, radiator). Do not
obstruct the ventilation grid at the rear
é Connecting the aerials
• Use the aerial connection lead supplied and
connect the ¬ socket situated at the bottom of
the TV to your aerial socket.
• Connect the power lead to the television and the
mains plug into the wall socket (220-240V/50 Hz).
For connecting other appliances, see pagess 18-19.
“ Switching on
To switch on the set, press the POWER key. A
green indicator comes on and the screen lights
up. Go straight to the chapter “Switching on for
the first time on page 5. If the television remains
in standby mode, press the P(age) + key on the
remote control.
The indicator will flash when you use the remote
control.

Switch on for the first time
The first time the TV set is switched on, a
congratulation message will appear on screen.
The language of which changes every 5 seconds.
If the menu is not displayed, press and hold down
the MENU key on the side of the TV set for
5 seconds to display the menu.
& Press the
key on the remote control, the
OK
moment your prefered language is visible
on the screen.The Setup menu is displayed :
é The language, corresponding country and time
zone is now preselected according to the opening
screen. However, you can still change your
preferences before you start a service scan.
é The language, corresponding country and time
zone is now preselected according to the
opening screen. However, you can still change your
preferences before you start a service scan.
“ With the cursor keys, select language, country
or Time zone and check if the adjustment is
according to your preferences. If necessary, use the
cursor keys to make your adjustment and press
OK
to exit.
CAUTION : if you select a wrong country, the channel
numbering will not be according to the standard for
your country.
‘ Select service scan from the menu and press
OK
to start the installation. The service scan menu is
displayed. All the digital and analogue programmes
are searched for and stored automatically. When
the search is complete, the menu will indicate
the number of digital services and analogues
programmes found.
( Press the
key twice to start watching TV.
OK
The television then displays the current
programme. The installation is now complete.
NOTE : If at some point of time you decide to
reset to the factory default settings, press and hold
down the MENU key on the side of the TV set
for 5 seconds. A congratulation message will
appear on screen. Repeat steps 1 - 5 as if this
was the first time you have turned on the TV.
Understanding the information in the banner
When you select a digital programme, an
information banner is displayed for a few
seconds at the top of the screen.
You can also use the
key of the remote control
to display this banner.A second press displays more
information about the programme (when available).
Banner description
The banner contains information on the
preset number, channel name, programme
duration, transmission clock, programme title
and the time remaining of the current
programme.
Symbols description :
i more information about this programme is
available : press the
key to display or remove it.
i subtitling is available : if you want to display
them, press the i key or the OPTIONS key to
access the options menu and select subtitles.
4 other audio languages are availables and can be
selected in the options menu.
s the selected Favourite list is displayed in the
one of the colour (red, green, yellow or blue) of
the activated list.
Note : A white colour s will appear if the
programme is stored in one or more of the favourite
list which is currently not activated.
5

Rearrange services
This menu allows you to change the order of
the stored digital channels and radio stations.
&
From the digital mode, press the key
to display the setup menu.
é Use the œ key to select installation and press
É twice to select the Service lists menu.
View or Listen to new services
This menu allows you to check the availability
of new TV channels or new radio stations that
have been launched by the broadcaster after
the initial installation.
&
From the digital mode, press the key
to display the setup menu.
é Use the œ key to select installation and press
É twice to select the Service lists menu.
“ Use the o œ keys to select Rearrange
services and press É.
‘ Use the o œ keys to select the channel you want
to exchange.
( Press OK to activate.
If you want to uninstall the selected channel, press
the red key.
§ Select (o œ) the new channel number you want
to exchange it with.
è Press OK to confirm. The exchange is done.
! Repeat the operations ‘ to è until all the
channels are in the required order.
ç Press the key to leave the menu.
“ Use the o œ keys to select View new TV
channels or Listen to new Radio station.
‘ If new services are availables, press É to
enter into the list and use the o œ keys to
move through the list.
( Press the
key to leave the menu.
Add new services
This menu allows you to search for new TV
channels or radio stations that have been launched
by the broadcaster after the initial installation.
6
&
From the digital mode, press the key to
display the setup menu.
é Use the œ key to select installation and press
É.
“ Select Service setup (œ) and press É.
‘ Press É to select Add new services and
press
The search begins and only new channels will
be stored and added to the channel list menu.
The percentage of the installation that has
been completed and the number of channels
found is displayed.
( When the search is complete, select Store and
press OK to accept the new services.
§ Press the key to leave the menu.
to activate the installation.
OK

Reinstall all services
This menu allows you to reinstall all the digital
TV channels and radio stations.
&
From the digital mode, press the key
to display the setup menu.
Test reception
This menu allows you to check the strengh of
the signal you are receiving through your aerial.
&
From the digital mode, press the key
to display the setup menu.
é Use the œ key to select installation and press
É to display the installation menu.
é Use the œ key to select installation and press
É.
“ Select Service setup (œ) and press É.
‘ Select Reinstall all services (œ) and press É.
OK
( Press
A search is then made for all digital services
which are then stored automatically.
When the search is completed, the menu will
indicate the number of digital services found.
§ When the search is complete, press
store the services.
è Press the key to leave the menu.
“ Use œ to select Test reception and press É.
You obtain an indication of the actual
programme frequency, the network name, the
signal quality and strength.
‘ You now have to enter the frequency of the
digital channel you want to test.
Your TV magazine can provide the list of digital
channel numbers. Use the table on page 20 to get
the frequency.
( If the signal quality and strength is poor, a
message appears at the bottom of the menu
prompting you to enter the frequency between
the lower and the higher limit. If after keying
the frequency, the reception is still poor, you
can try improving, renewing, adjusting or
updating the aerial. It is however advisable to
contact a specialised aerial installer in order to
achieve best results.
to start the installation.
OK
to
7
Language and location preferences
This menu allows you to select your preferred
language for audio, subtitle, teletext and menu
and make changes to the location (country
and time zone).
&
From the digital mode, press the key
to display the setup menu.
é Use the œ key to select preferences and
press É.
“ Select Languages, Location or Digital Audio
Output (œ) and press É.
‘ Use the o œ keys to select a setting and
Access restrictions
This menu allows you to setup the access
restrictions of the digital channels.
&
From the digital mode, press the key
to display the setup menu.
é Use the œ key to select Access restriction
and press É.
press É to enter into the sub-menu. Make
your adjustment and press
Language default settings
• Audio : to select the audio sound language.
• Subtitle/Teletext : to select the
subtitle/teletext language.
• Subtitling mode : off, on or auto (subtitle only
displayed in case of original audio transmission).
• Subtitles for hearing impaired : to activate or
deactivate the specific subtitle for hearing
impaired (if made available by the broadcaster).
• System : to select the menu language.
Location settings
• Country : to select the country where you are
located.
• Time zone : to select the time zone where
you are located.
Digital Audio Output settings
To select AC3 (if the amplifier supports the
Dolby Digital format) or PCM (if it doesn’t
support Dolby Digital format).
( Press the
• Maturity rating : select your preferred rating to
lock the channel.
Maturity rating will only block certain programmes if
the broadcaster provides data with the programme.
• TV channels : select the TV channel you want
to lock and press
• Radio station : select the radio station you
want to lock and press OK.
• Change pin code : press É to enter in the
menu. Follow the on-screen instruction to
change your access code.
The default pin code is 1234. If you have forgotten
your personal code, you can reset to the default pin
code (1234) by enter the universal code 0711.
key to leave the menu.
OK
OK
.
or p to exit.
“ Press the É key to enter into the Set pin
code protection menu.
‘ Use the ÑÉ keys to set to on and press
to exit.You can then access the other
OK
adjustments :
Warning : the moment you use any kind of access
restriction, you need to fill in the pin code when you
schedule a program for recording.
8
( Press the key to leave the menu.
The TV is equipped with a Common Interface (CI)
slot (see p.19). A CI module can enable additional
services, for example Pay TV. The Access Restrictions
menu will show the CI Access Restrictions when a CI
module is installed. The CI module is responsible for the
messages and texts on screen. In case of failure or
strange behaviour, you must call your CI service provider.
Close

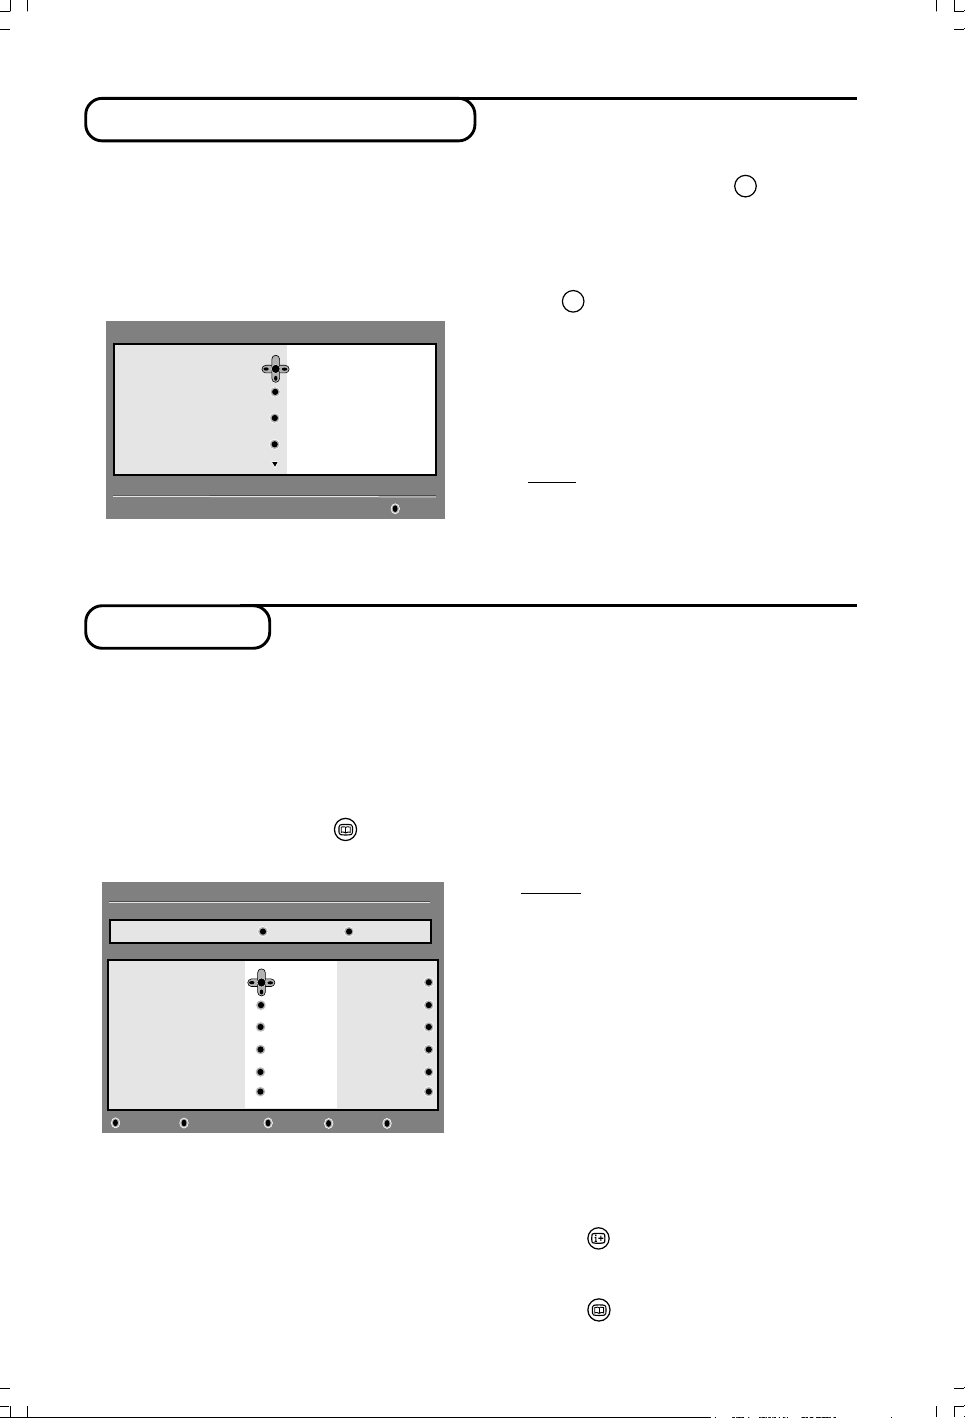
Setting up your favourite list
This menu enables you to create a favourite
list with your prefered TV channels and radio
stations. For example, each member of your
family can create his/her own favourite list.
&
From the digital mode, press the key
to display the setup menu.
Setup
Favourites
Preferences
Information
Access restrictions
Installation
Make changes to your lists of favourite services
List 1
List 2
List 3
List 4
11:46
Close
é Press É to enter into the favourites list menu. You
have the choice to create 4 different favourite lists.
Information
This menu provides information about the software
version and the installation of new software.
& From the digital mode, press the key
to display the setup menu.
é Use the œ key to select information and
press É twice.
Setup
Favourites
Preferences
Information
Access restrictions
Installation
Provides information on problem reports and ...
System software
The software version is displayed.
11:46
Close
“ Use the o œ keys to select your favourite
list : List 1, List 2, List 3 or List 4 and press π.
‘ Use the o œ keys to select a setting and press
É to enter into the sub-menu.
• Name : use the ÑÉ keys to move around
the name display area (16 characters) and the
– P(age) + keys to select the characters.When
the name has been entered, press
to exit.
OK
• Select TV channels : use the o œ keys to
select your favourite TV channels and confirm
with OK. Press Ñ to exit.
• Select radio stations : use the o œ keys to
select your favourite radio station and
confirm with u. Press Ñ to exit.
•Add all services : press OK if you want to
add all the service into your favourite list.
• Remove all services : press OK if you want to
remove all the service from your favourite list.
( Press the key to leave the menu.
§ Your favourite list can be selected using the
options menu (see next page).
“ You can activate the menu to automatically
accept any software update of your digital TV.
Normally the product will detect if an update is
available while it is in standby mode. Next time
the television is turned on a banner will appear
at the bottom of the screen indicating new
OK
software is available. Selecting
activates the
software download. The software download
menu will give a description of the software
together with the date and time of the
download. This may update certain menus,
functions or add new features, but the general
way in which the TV operate will not change.
Once accepted the download will take place at
the designated time and date.
Note:The TV must be put into standby when
the download is due in order for it to take place.
‘ Press the
key to leave the menu.
Downloading new software
Whenever a new software is available, it is advisable to always accept and download the software.
In case new software is available, you will see a message when you switch on the TV.
New software and upgrade instructions can be obtained from the website : www.philips.com/support
9
Using the Options menu
This menu gives you direct access to the:
favourite list, the language selection and some
other selections.
& From the digital mode, press the white OPTIONS
key to display the options menu.
é Use the o œ keys to select a setting and
press É to enter the sub-menu.
Options
Favourites
Subtitle language
Audio language
Mode
Selects the active favourite list
None
List 1
List 2
List 3
List 4
Exit
TV guide
The TV guide is an Electronic Service Guide
that allows you to look up digital programmes
as you would in a newspaper or TV magazine.
You can navigate through the list of digital
programmes and obtain detailed information
on the programmes. You can also program the
TV to provide a digital channel to be recorded.
& From the digital mode, press the
display the TV guide :
1 17:15-17:25 17:24
BBC ONE See It Saw
Now/Next Today
Preset/service Now Next
1 BBC ONE
2 BBC TWO
3ITV Channel 3
4 Channel 4
5ITV 2
6
BBC CHOICE
See It Saw
Snooker
Tr is ha
-
Gmtv2
Oakie Doke
A list of all the digital programmes in the
currently selected favourite list is displayed.
é Use the œ key to enter into the
Preset/service list or press É to access
Today list.
“ Use the ÑÉ keys to select a programme.
10
key to
Microsoap
Ice Skating
This morning
-
This afternoon
Bodger & Badger
OptionsCloseTo pRecord listRecord
•Favourites : use the o œ keys to select your
favourite list and confirm with
OK
.
The “none” option deactivate any favourite list.
To create your own favourite list, see page 9.
• Subtitle language : use the Ïîkeys to
temporarily change the language and confirm
with
.
OK
• Audio language : to temporarily change the
audio sound language.
To permanently change the audio and subtitle
languages, use the Preferences menu (p. 8).
• Mode : you can choose to only have radio
stations, TV channels or services without
audio or video.
Remark : for the UK only, the TV list will contain
both radio stations and TV channels.
• Banner duration : to select the duration for
which the banner is visible.
“ Press the white OPTIONS key to leave the
menu.
‘ The TV guide features are displayed at the bottom
of the screen. Use the coloured keys red, green,
yellow, blue or white to activate them :
• Record (red key) : this feature enables you to
record a digital channel even the TV is in
standby mode. You will still have to program
your video recorder. If you wish to continue
watching another digital channel after setting a
timer, you can do so by changing channels in the
normal way.
Important : In digital mode, if you change the channel
when recording starts, the TV will record the last
channel you have selected.
• Record list (green key) : this menu gives the
list of recording schedules.You can check,
modify, delete or add a new schedule by using
the cursor or coloured keys as indicated on
the screen.
• Top (yellow key) : to go directly to the top of the
list.
• Close (blue key) : to exit from the TV guide.
• Options (white † key) : with this menu, you
can select your favourite list, mode or themes.
Themes are areas of interest, you can for
example decide to display only : drama, news,
movie, ...
( Press the
key if you want to display more
information about the selected programme (if
available).
§ Press the key to leave the menu.

Recording function
This feature enables you to record a digital
channel while the TV is in standby mode. You
will still have to program your video recorder.
If you wish to continue watching another digital
channel after setting a timer, you can do so by
changing channels in the normal way.
IMPORTANT : The video recorder must be
connected to EXT2. Please note that it is NOT
possible to record one digital channel and watch
another digital channel at the same time.You can
however record a digital channel and watch an
analogue channel on your TV, or vice versa.
& From the digital mode, press the
key to
display the TV guide.
é Use the œ key to enter into the Preset/service
list or press É to access Today list.
“ Press the RED key to call the Record menu.
2 BBC 2
Name
Service
Enter your pin code if locked
Day & Month
Start time
End time
Audio language
See it saw
2 BBC 2
16/02
12:15
12:30
English
CloseCancelStore
11:46
‘ Use the o œ keys to select a setting and
press É to enter into the sub-menu. Make
your adjustment and press OK or Ñ to exit.
• Name : the selected programme will be
displayed here.
• Service : you can change the number of the
programme you want to record. Press OK to
confirm.
Note : it is only possible to change to a number
that is in the currently selected favourite list.
• Enter your pin code if locked : enter your
secret code only if you have activated the
access restriction feature (see p.8). Press
OK
to confirm.
•Day & Month : enter the date by using the
or – P(age) + keys. Press
OK
to exit
• Start time : enter the start time.
• End time : enter the end time.
• Audio language : select your language and
confirm with OK.
• Subtitle language : make your selection and
confirm with OK.
• Subtitles for hearing impaired : select Ye s
or No and confirm with
OK
.
• Occurrence : select Once, Daily or Weekly
and confirm with
OK
.
( Press the RED key to store your recording.
The TV guide reappears.
You can press the GREEN key to display the list of
recordings you have set.
§ If you have finished watching television, you must
leave it in standby in order for the recording
program to be activated.
IMPORTANT : never switch off the TV with the power
button when a recording has been programmed,
but use the standby key on the remote control.
è If you wish to continue watching another
digital channel after setting a timer, you can do
so by changing channels in the normal way.
Important : In digital mode, if you change the channel
when the recording starts, the TV will record the last
channel. you have selected.
! If you are watching another digital channel when
the timer is due to start, the timer alarm will sound
and present you with the option of switching
channels or continuing to watch the current
channel.
ç You can also watch analogue channels while
recording digital channels. Press the key to
switch the TV to analogue mode.
11
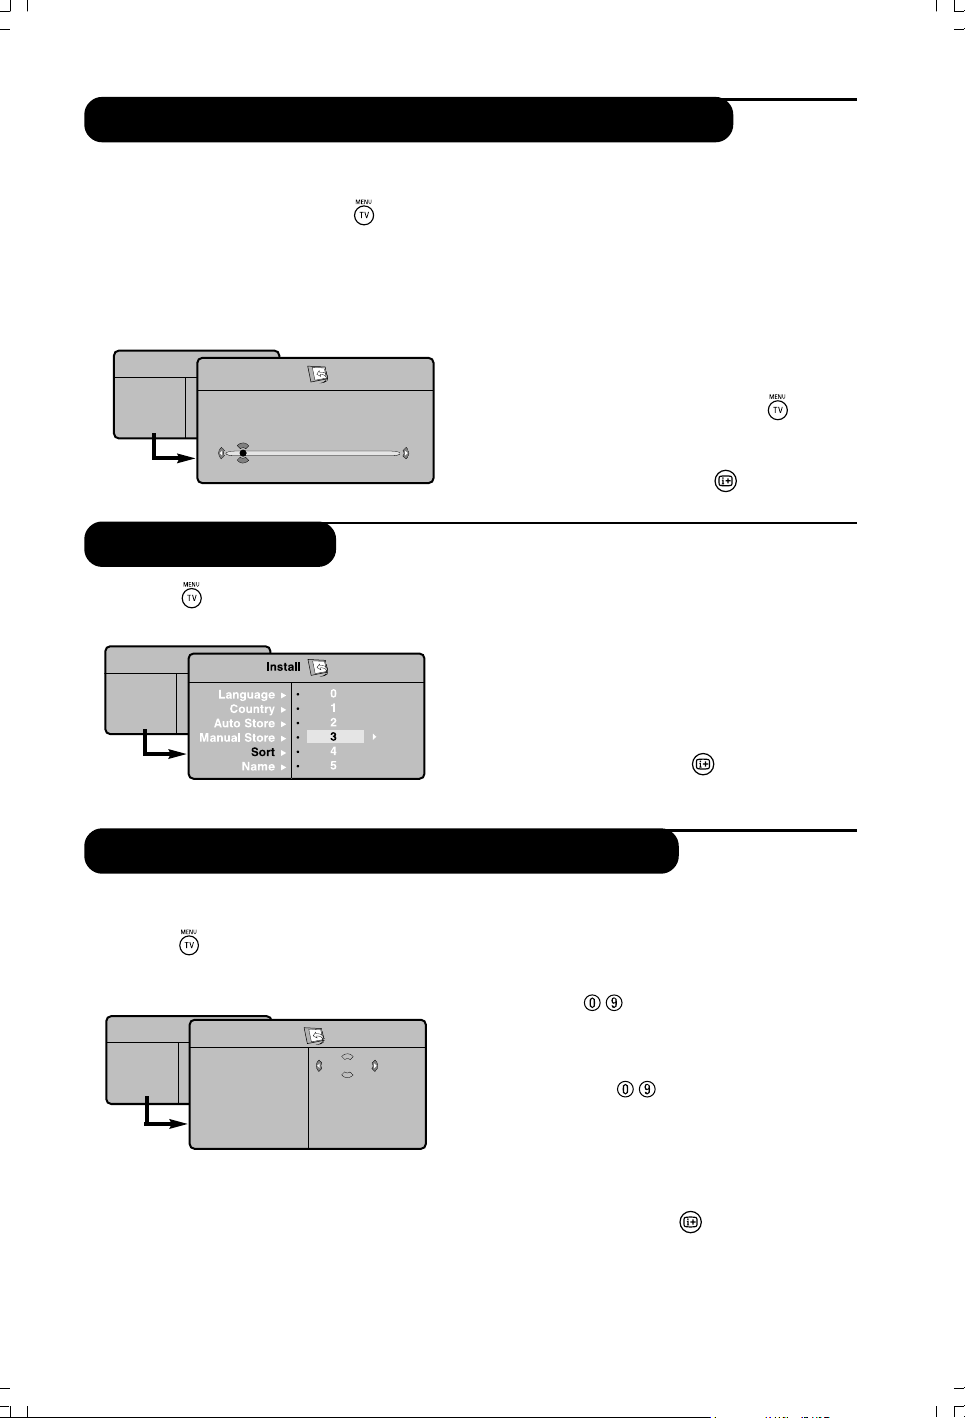
Automatic tuning of analogue programmes
This menu allows you to automatically search for all
the analogue programmes available in your region.
& From the analogue mode, press the
(TV menu) key to display the main menu.
é With Cursor (œ É ) keys to select Install and
then Auto Store. Press É and the search begins.
After several minutes, the Install menu reappears
automatically.
TV Menu
Picture
Sound
Features
Install
Auto Store
Program
TV
É
É
196 MHz
8
Program sort
& Press the key.The TV Menu is displayed on
the screen.
TV Menu
Picture
Sound
Features
Install
“ If the transmitter or the cable network broadcasts
the automatic sort signal, the programmes will be
correctly numbered.
‘ If this is not the case, the programme will be
numbered in descending order strating at 99, 98,
97, etc
Use the Sort menu to renumber them.
Some transmitters or cable networks broadcast their
own sort parameters (region, language, etc). Where this
is the case, make your choice using the o œ keys and
confirm with the É
key.
To exit or interrupt the search, press the key.
If no picture is found, refer to the chapter entitled Tips
on p.20
( To exit from the menu, press
key.
é With the cursor, select the Install menu followed
by the Sort menu.
“ Select the programme you want to move using
the o œ keys and press É.
‘ Then use the o œ keys to select the new number
and validate with
Ñ
.
( Repeat steps “ and ‘ for each program you
wish to renumber.
§ To quit the menus, press .
Manual tuning of analogue programmes
This menu is used to store the programmes one
at a time.
& Press the
(TV menu) key.
é With Cursor (œ É ) keys to select Install and
then Manual Store.
TV Menu
Picture
Sound
Features
Install
Manual Store
System
Search
Program No.
Fine Tune
Store
Eur
ope
“ System : select Europe (automatic detection*)
or Western Europe (BG standard), Eastern
Europe (DK standard), United Kingdom
(I standard) or France (LL’ standard),
* Except for France (LL’ standard) : in this case,
select the option FRANCE.
12
‘ Search : press É
programme is found, the scanning stops and its
name is displayed (when available). Go to the
next step. If you know the frequency of the
required programme, this can be entered directly
using the keys.
If no programme is found, refer to the Tips chapter on
page 20.
( Program No : enter the required number with
the ÑÉ or (0 to 9) keys.
§ Fine Tune : if the reception is not satisfactory,
adjust using the ÑÉ keys.
è Store : press É key. The programme is stored.
! Repeat steps ‘ to è for each programme to
store.
ç To quit the menu, press
key. The search starts. Once a
key.
Other settings in the install menu
& Press the (TV menu) key and select Install
menu.
é Name : If required, you can give a name to the
programmes. Use the
ÑÉ
keys to move
around the name display area (5 characters) and
the o œ keys and to select the characters.
Picture settings
& Press the (TV menu) key, then É key.
The Picture menu is displayed.
TV Menu
Picture
Sound
Features
Install
Picture
Brightness
Colour
Contrast
Sharpness
Colour Temp.
Store
39
é Use the o œ keys to select a setting and the
ÑÉ
keys to adjust.
Sound settings
& Press the (TV menu) key, select Sound (œ)
and press π key. The Sound menu is displayed.
TV Menu
Picture
Sound
Features
Install
Delta Volume
Dolby Virtual
é Use the o œ keys to select a setting and the
ÑÉ
keys to adjust.
“ Once the adjustments have been made, select
Store and press É to store them.
‘ Press
key to exit.
Equalizer
Balance
AVL
Store
Sound
É •
É
É
É
É
É
•
•
•
•
120 Hz
500 Hz
1500 Hz
5 KHz
10 KHz
When the name has been entered, use the Ñ key
to exit. The name is stored.
“ To quit the menu, press
key.
“ Once the adjustments have been made, select
Store and press
É
to store them. Press
key to exit.
Description of the adjustments :
• Brightness : this changes the picture brilliance.
• Colour : this changes the intensity of the colour.
• Contrast : this changes the difference between
the light and dark tones
• Sharpness : this changes the picture definition.
• Colour Temp. : this changes the colour
rendering : Cold (bluer), Normal (balanced) or
Warm (redder).
• Store : to store the picture adjustments and
settings.
Description of the adjustments :
• Equalizer : to adjust the sound tone (from
bass : 120 Hz to treble 10 kHz.
• Balance : this balances the sound on the left
and right speakers.
• Delta Volume : this is used to compensate any
volume discrepancies between the different
programmes or EXT sockets. This setting is
available for programmes 0 to 40 and the EXT
sockets.
•AVL (Automatic Volume Leveller) : this is the
used to limit increases in sound, especially on
programme change or advertising slots.
• Dolby Virtual : to activate/deactivate the
surround sound effect. You can also access these
settings with the
key.
• Store : this is used to store the sound settings.
Feature settings
& Press (TV menu), select Features (œ) and
press É. You can adjust:
é Contrast + : automatic adjustment of the
picture contrast which permanently sets the
darkest part of the picture to black.
“ NR : attenuates picture noise (snow) in difficult
reception conditions.
‘ Sleep : to select an automatic standby period.
( PIP: to adjust the size and position of the PIP
screen.
§ To quit the menus, press
.
13

Screen Formats
The pictures you receive may be transmitted in 16:9 format (wide screen) or 4:3 format
(conventional screen). 4:3 pictures sometimes have a black band at the left and right of the screen
(letterbox format).This function allows you to optimise the picture display on screen.
Press the key to select the different modes:
This TV set is also equipped with automatic switching which will select the correct-screen format, provided the
specific signals are transmitted with the programmes. NOTE : When in HD mode, the only screen format
available is Widescreen.
4:3
The picture is reproduced in 4:3 format and a black band is displayed on
either side of the picture.
Movie Expand 14:9
The picture is enlarged to 14:9 format, a thin black band remains on both
sides of the picture.
Movie Expand 16:9
The picture is enlarged to 16:9 format.This mode is recommended when
displaying
pictures which have black bands at the top and bottom (letterbox format).
Subtitle Zoom
This mode is used to display 4:3 pictures using the full surface of the
screen leaving the sub-titles visible.
Superzoom
This mode is used to display 4:3 pictures using the full surface of the
screen by enlarging the sides of the picture.
Widescreen
This mode restores the correct proportions of images transmitted in
16:9.
Note: If you display a 4:3 picture in this mode, it will be enlarged horizontally.
Digital Text
Some digital channels, which you select like any other channel, offer dedicated teletext services (for instance
BBCTEXT). Some digital channels also offer information on the programme being broadcast (a message may
appear at the bottom of the screen).
& To use the digital teletext, follow the instructions on screen.
é Depending on the service, you can be asked to use the cursor keys, the coloured keys, the Teletext On/Off
) and sometimes the numerical keys.
key (
P -/+
“ When you have finished watching teletext, select a different channel with
instructions to return to picture.
keys or follow the on screen
14

Teletext
Teletext is an information system broadcast by certain channels which can be consulted like a
newspaper. It also offers access to subtitles for viewers with hearing problems or who are not familiar
with the transmission language (cable networks, satellite channels, etc.).
Press :
Teletext call This is used to call or exit teletext mode.The summary
Selecting a page Enter the number of the page required using the 0 to 9 or
Direct access Coloured areas are displayed at the bottom of the screen.
to the items The 4 coloured keys are used to access the items or
Contents This returns you to the contents page (usually page 100).
Stop sub-page Certain pages contain sub-pages which are automatically
acquisition displayed successively.This key is used to stop or resume
Double page To activate or deactivate the double page teletext
teletext display mode.The active page is displayed on the left and
Hidden To display or hide the concealed information (games
information solutions).
You will obtain :
appears with a list of items that can be accessed. Each item
has a corresponding 3 digit page number.
If the channel selected does not broadcast teletext, the
indication 100 will be displayed and the screen will remain
blank (in this case, exit teletext and select another channel).
- P(age) + keys. Example: page 120, enter 120. The number
is displayed top left, the counter turns and then the page is
displayed. Repeat this operation to view another page.
If the counter continues to search, this means that the
page is not transmitted. Select another number.
corresponding pages. The coloured areas flash when the
item or the page is not yet available.
sub-page acquisition.The indication
the following page is displayed on the right. Press f you
want to hold a page (i.e. the contents page).The active
page is then displayed on the right.To return to normal
mode, press
.
appears top left.
Enlarge a page This allows you to display the top or bottom part of the
Favourite pages Instead of the standard coloured areas displayed at the
o
page and then return to normal size.
œ
bottom of the screen, you can store 4 favourite pages on
the first 40 channels which can then be accessed using the
coloured keys (red, green, yellow, blue). Once set, these
favourite pages will
selected.
& Press the
é Display the teletext page that you want to store.
“ Press the coloured key of your choice for 3 seconds. The
page is now stored.
‘ Repeat the operation with the other coloured keys.
( Now when you consult teletext, your favourite pages will
appear in colour at the bottom of the screen.To temporarily
retrieve the standard items, press
return the standard items as the default, press
seconds.
become the default every time teletext is
key to change to favourite pages mode.
. To clear everything and
for 5
15

Using in PC monitor mode
NOTE
– When using the TV as a PC monitor, slight diagonal interference lines may be observed when it is operated under
electromagnetic interference environment but will not affect the performance of this product.
– For better performance, good quality DVI cable with good noise isolation filter is recommended.
PC Mode
Your TV can be used as a computer monitor.
The PIP function lets you display a superimposed
image to watch the TV channels at the same time.
The PIP function only works if your PC has a digital
output. You must first of all connect the computer and
adjust the resolution (see p.18).
Choosing PC mode
& Press the AV key on the remote control to
display the Source List.
é Use the o œ keys to select PC and
then press the cursor É key to switch the TV
to PC mode (DVI In).
To return to TV mode, press the AV key, select
TV and validate with É key.
Using PIP
While in PC mode you can call up a window
for TV channels.
Attention: the PIP feature is only available if a
computer is connected to the DVI In (see p. 21).
& Press the æ key to display the PIP screen.
The television image is reproduced in a small
superimposed window.
é Subsequent presses of the æ key changes
the size of the window, switches to dual
screen and turns PIP off.
“ Use the P –/+ keys to change the programmes
of the PIP screen.
Here is the list of the different display resolutions available on your TV :
Using the PC menus
Press the MENU key to access the specific
settings of the PC monitor mode. Use the
cursor to adjust them (the settings are
automatically saved):
• Picture:
- Brightness / Contrast : to adjust the
brightness and contrast.
- Horizontal / Vertical* : to adjust the
horizontal and vertical placing of the image.
- Colour Temp. : this changes the colour
rendering : Cold (bluer), Normal (balanced) or
Warm (redder).
• Audio Selection: to choose the sound
reproduced on the TV (PC/HD or TV).
• Features:
- Phase/Clock*: eliminates the horizontal
(Phase) and vertical (Clock) interfering lines.
- Format : to choose between full screen or
native format of the PC screens.
- PIP : to adjust the size and position of the PIP
screen.
- Auto Adjust*: position is set automatically.
• Reset To Factory Setting: to return to the
factory settings (default settings).
* These adjustments are not available when a
computer is connected to the DVI In .
640 x 350 p 800 x 600 p 1152 x 864 p
Digital PC (DVI-I) 640 x 480 p 832 x 624 p 1280 x 960 p
720 x 400 p 1024 x 768 p 1280 x 1024 p
Analogue PC (YPbPr)
640 x 350 p 720 x 400 p 832 x 624 p
640 x 480 p 800 x 600 p 1024 x 768 p
16

Using in HD (High Definition) mode
HD Mode
The HD (High Definition) mode allows you to
enjoy clearer and sharper pictures through the
DVI inputs if you are using a HD
receiver/ equipment that can transmit high
definition programming.
You must first of all connect the HD equipment
(see p. 18).
Choosing HD mode
& Press the AV key on the remote control to
display the Source List.
é Use the cursor o œ key to select HD and
then press the cursor key to switch the TV
to HD mode.
To r eturn to TV mode, press the AV key,
select TV and validate with É key.
Using the HD menus
Press the MENU key to access the specific
settings of the HD mode. Use the cursor to
adjust them (the settings are automatically
saved):
Picture:
• Brightness: this changes picture brilliance.
• Colour: this changes the intensity of the
colour.
• Contrast: this changes the difference
between the light and dark tones.
• Sharpness: this changes the picture definition.
• Colour Temp .: this changes the colour
rendering: Cold (bluer), Normal (balanced)
or Warm (redder).
• Store: to store the picture adjustments and
settings.
Sound:
• Equalizer: to adjust the sound tone (from
bass: 120 Hz to treble: 10 kHz).
• Balance: this balances the sound on the left
and right speakers.
• Delta Volume: this is used to compensate
any volume discrepancies between the
different programs or EXT sockets.This
setting is available for programs 0 to 40 and
the EXT sockets.
• AVL (Automatic Volume Leveller): this is
used to limit increases in sound, especially on
program change or advertising slots.
• Dolby Virtual:To activate / deactivate the
surround sound effect.You can also access
these settings with key k.
• Store: this is used to store the sound
settings.
Features:
• Sleep (Only available on certain versions) : to
select an automatic standby period.
• PIP : to adjust the size and position of the
PIP screen.
• Horizontal Shift : to adjust the horizontal placing
of the image.
Here is the list of the different display resolutions available on your TV :
Digital HD (DVI-I)
Analogue PC (YPbPr)
EDTV 480 p HDTV 720 p HDTV 1080 i
EDTV 576 p
480 i 480 p 720 p
576 i 576 p 1080 i
17

Connecting peripheral equipment
The television has 2 external sockets situated at the back of the set (EXT1 and EXT2) and sockets on
the side. Press the AV key on the remote control to display Source List and select TV or peripheral
equipment connected to EXT1, EXT2/SVHS2, AV/SVHS3, PC or HD.
The EXT1 socket has audio, CVBS/RGB inputs and audio, CVBS outputs.
The EXT2 socket has audio, CVBS/S-VHS inputs and audio, CVBS outputs.
The side connections has audio inputs, CVBS/S-VHS inputs, headphone out.
Video Recorder
EXT. 2
HD equipment
DVI-I
)
DVI
AUDIO
IN
(HD/PC
Computer
DVI-I
DVI
AUDIO IN
)
(HD/PC
Video recorder (only)
Carry out the connections shown opposite, using
a good quality euroconnector cable.
If your video recorder does not have a euroconnector
socket, the only connection possible is via the aerial
cable.You will therefore need to tune in your video
recorder’s test signal and assign it programme number 0
(refer to manual store, p. 12).
To reproduce the video recorder picture, press 0 key.
Video recorder with decoder
Connect the decoder to the second euroconnector
socket of the video recorder.You will then be able to
record scrambled transmissions.
Make the connections as shown opposite.
With the AV key, select HD.
For more information on using HD mode see page 17.
PC with DVI
Connect the monitor output (DVI) of your computer
to the DVI-I In of the TV. Connect the sound output
Audio out of the computer to the input DVI Audio In
of the TV.
(HD/PC
18
DVI-I
DVI
)
AUDIO IN
Digital
PC
PC with VGA
Connect the monitor output (VGA) of your
computer via a VGA/DVI adaptor to the DVI In of the
TV. Connect the sound output Audio out of the
computer to the input DVI Audio In of the TV.
For more information on using PC mode see page 16.
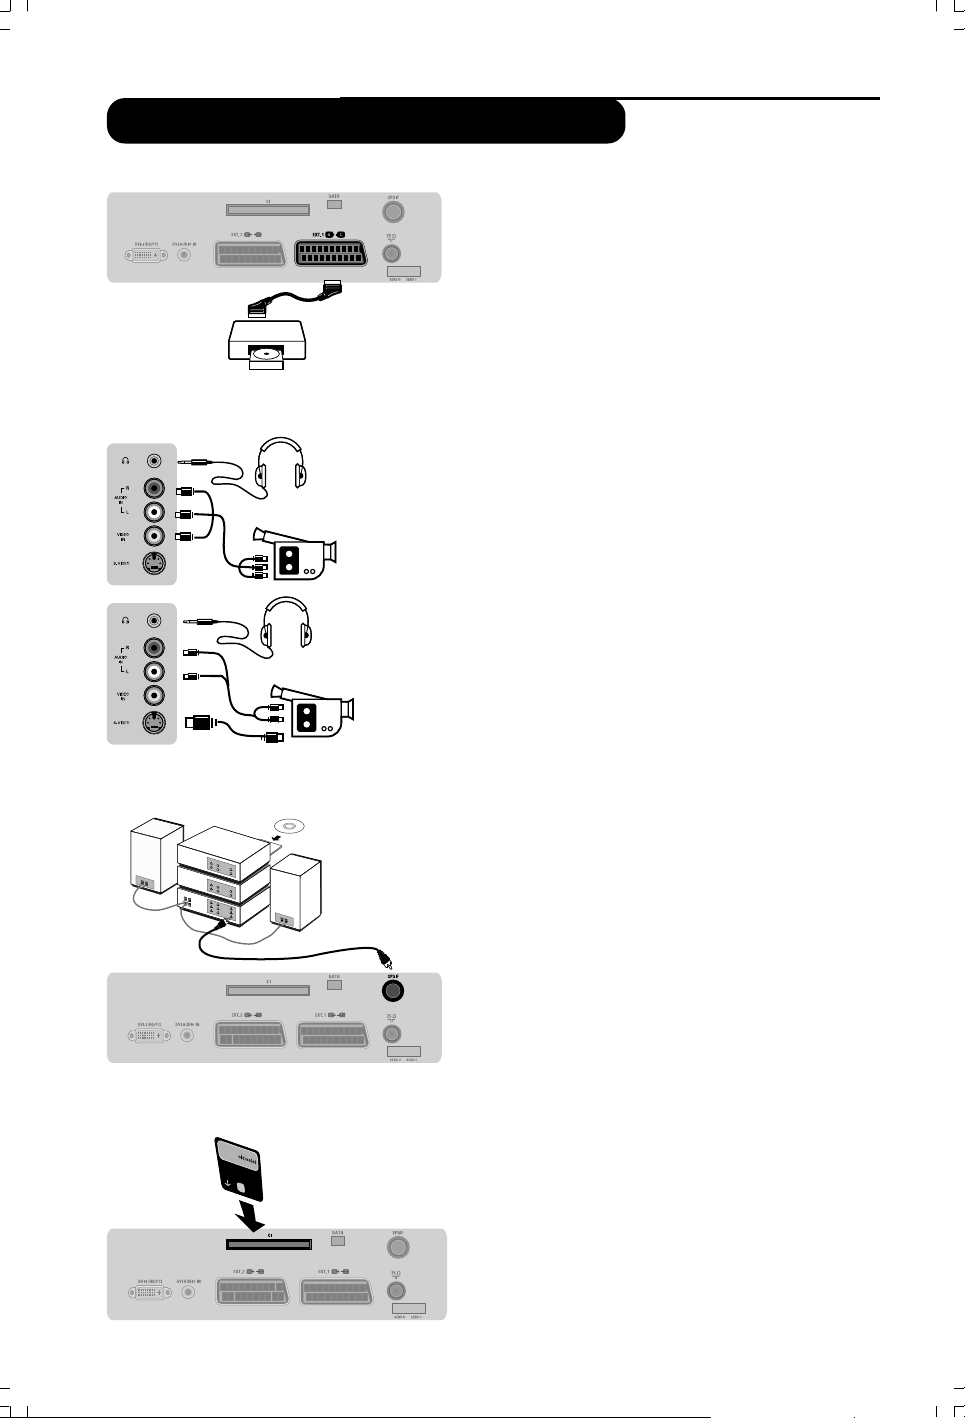
Connecting peripheral equipment
Other equipment
Side connections
EXT 1
Satellite receiver, decoder,CDV, games, etc.
Carry out the connections shown opposite.
To optimise picture quality, connect the equipment which
produces the RGB signals (digital decoder, games, etc.) to
EXT1, and the equipment which produces the
S-VHS signals (S-VHS and Hi-8 video recorders, certain
DVD drives) to EXT2 and all other equipment to either
EXT1 or EXT2.
To select connected equipment
Press the AV key to select EXT1, EXT2/S-VHS2 (S-
VHS signals from the EXT2 socket).
Make the connections as shown opposite.
With the AV key, select AV/S-VHS3.
For a mono set, connect the sound signal to the AUDIO L (or
AUDIO R) input.The sound automatically comes out of the left
and right speakers of the set.
Headphones
When headphones are connected, the sound on the TV
set will be cut.The VOLUME -/+ keys are used to adjust
the volume level. The headphone impedance must be
between 32 and 600 Ohms.
Amplifier connection
Common interface
CI (Common interface)
To connect to a hi-fi system, use an audio connection
cable and connect the television’s “SPDIF” output to a
“DIGITAL IN” input on the amplifier (amplifier with
coaxial digital input).
Note : If you select AC3 sound, you must have your TV conected
to a Home Theatre System or amplifier. In this mode, no sound
will be heard from the TV speakers directly.
SPDIF
A common interface is available to connect a CAM
(conditional access module) and a smartcard. Please
contact your service provider to get more information
about these modules.
Note : the television should always be switched off before any
module is inserted in the common interface slot.
19

Tips
Poor reception The proximity of mountains or high buildings may be responsible for ghost pictures,
echoing or shadows. In this case, try manually adjusting your picture: see Fine Tune
(p. 12) or modify the orientation of the outside aerial. If you are using an indoor aerial,
reception may be difficult in certain conditions.You can improve reception by rotating
the aerial. If the reception remains poor, you will need to use an external aerial
No picture Have you connected the aerial socket properly? Have you chosen the right system?
(p. 12). Poorly connected euroconnector cables or aerial sockets are often the cause
of picture or sound problems (sometimes the connectors can become half
disconnected if the TV set is moved or turned). Check all connections.
No sound If on certain channels you receive a picture but no sound, this means that you do not
have the correct TV system. Modify the System setting (p. 12). The amplifier
connected to the TV does not deliver any sound? Check that you have not confused
the audio output with the audio input.
PC and PIP modes Check that you have configured the computer on a compatible display resolution
don’t work (see p. 18).
Remote control The TV set does not react to the remote control; the indicator on the set no
longer flashes when you use the remote control? Replace the battery.
Standby To save power, your set is fitted with components that give it a very low power
consumption when in standby mode (less than 1 W).
Cleaning the set Only use a clean, soft and lint-free cloth to clean the screen and the casing of your
set. Do not use alcohol-based or solvent-based products.
Still no results? Disconnect the mains plug of the TV for 30 seconds then reconnect it.
If your TV set breaks down, never attempt to repair it yourself: contact your
dealer’s after-sales service.
Centre Frequencies Table (in KHz)
Digital Frequency Nominal Centre
Channel Frequency KHz
21 . . . . . . . . . . . . . . . . .474 000
22 . . . . . . . . . . . . . . . . .482 000
23 . . . . . . . . . . . . . . . . .490 000
24 . . . . . . . . . . . . . . . . .498 000
25 . . . . . . . . . . . . . . . . .506 000
26 . . . . . . . . . . . . . . . . .514 000
27 . . . . . . . . . . . . . . . . .522 000
28 . . . . . . . . . . . . . . . . .530 000
29 . . . . . . . . . . . . . . . . .538 000
30 . . . . . . . . . . . . . . . . .546 000
31 . . . . . . . . . . . . . . . . .554 000
32 . . . . . . . . . . . . . . . . .562 000
33 . . . . . . . . . . . . . . . . .570 000
34 . . . . . . . . . . . . . . . . .578 000
35 . . . . . . . . . . . . . . . . .586 000
36 . . . . . . . . . . . . . . . . .594 000
37 . . . . . . . . . . . . . . . . .602 000
38 . . . . . . . . . . . . . . . . .610 000
39 . . . . . . . . . . . . . . . . .618 000
40 . . . . . . . . . . . . . . . . .626 000
41 . . . . . . . . . . . . . . . . .634 000
42 . . . . . . . . . . . . . . . . .642 000
43 . . . . . . . . . . . . . . . . .650 000
44 . . . . . . . . . . . . . . . . .658 000
45 . . . . . . . . . . . . . . . . .666 000
20
Digital Frequency Nominal Centre
Channel Frequency KHz
46 . . . . . . . . . . . . . . . . .674 000
47 . . . . . . . . . . . . . . . . .682 000
48 . . . . . . . . . . . . . . . . .690 000
49 . . . . . . . . . . . . . . . . .698 000
50 . . . . . . . . . . . . . . . . .706 000
51 . . . . . . . . . . . . . . . . .714 000
52 . . . . . . . . . . . . . . . . .722 000
53 . . . . . . . . . . . . . . . . .730 000
54 . . . . . . . . . . . . . . . . .738 000
55 . . . . . . . . . . . . . . . . .746 000
56 . . . . . . . . . . . . . . . . .754 000
57 . . . . . . . . . . . . . . . . .762 000
58 . . . . . . . . . . . . . . . . .770 000
59 . . . . . . . . . . . . . . . . .778 000
60 . . . . . . . . . . . . . . . . .786 000
61 . . . . . . . . . . . . . . . . .794 000
62 . . . . . . . . . . . . . . . . .802 000
63 . . . . . . . . . . . . . . . . .810 000
64 . . . . . . . . . . . . . . . . .818 000
65 . . . . . . . . . . . . . . . . .826 000
66 . . . . . . . . . . . . . . . . .834 000
67 . . . . . . . . . . . . . . . . .842 000
68 . . . . . . . . . . . . . . . . .850 000
69 . . . . . . . . . . . . . . . . .858 000

Introduction
Vous venez d’acquérir ce téléviseur, merci de votre confiance.
Nous vous conseillons de lire attentivement les instructions qui suivent pour mieux comprendre les
possibilités offertes par votre téléviseur.
Nous espérons que notre technologie vous donnera entière satisfaction.
Présentation du téléviseur................................................................................................................................... 2
Télécommande .......................................................................................................................................................2
Programmes numériques ou analogiques ? .....................................................................................................2
Les touches de la télécommande ...................................................................................................................... 3
Sélecteur de mode................................................................................................................................................. 4
Installation du téléviseur ......................................................................................................................................4
Première mise sous tension ................................................................................................................................ 5
Comprendre les informations du bandeau...................................................................................................... 5
Réorganiser les chaînes ........................................................................................................................................ 6
Regarder ou écouter les nouvelles chaînes .................................................................................................... 6
Ajouter de nouveaux programmes ...................................................................................................................6
Réinstaller toutes les chaînes ............................................................................................................................. 7
Test de réception ................................................................................................................................................... 7
Langue et pays préférentiels................................................................................................................................ 8
Restrictions d’accès ............................................................................................................................................... 8
Organiser vos listes de favoris ........................................................................................................................... 9
Informations ............................................................................................................................................................9
Téléchargement d’un nouveau logiciel ............................................................................................................. 9
Utilisation des options du menu ..................................................................................................................... 10
MENUS NUMÉRIQUES
Guide TV ............................................................................................................................................................... 10
Fonction d’enregistrement ................................................................................................................................ 11
English
English
Français
Français
Español
Español
Italiano
Italiano
Deutsch
Deutsch
Mémorisation auto. des programmes analogiques ..................................................................................... 12
Classement des programmes............................................................................................................................12
Mémorisation manuel des programmes analogiques................................................................................. 12
Autres réglages du menu Installation............................................................................................................. 13
Réglages de l’image ............................................................................................................................................. 13
Réglages du son ................................................................................................................................................... 13
Réglages des options .......................................................................................................................................... 13
Formats 16:9 ........................................................................................................................................................ 14
Télétexte numérique ..........................................................................................................................................14
Télétexte analogique .......................................................................................................................................... 15
ANALOGIQUES
Utilisation en mode moniteur PC .................................................................................................................. 16
Utilisation en mode HD (Haute Définition) ................................................................................................. 17
Raccordement d’autres appareils.................................................................................................................... 18
Conseils ..................................................................................................................................................................20
Directive pour le recyclage
L’emballage de cet appareil peut être recyclé. Conformez-vous aux règles en vigueur dans
votre localité pour une élimination appropriée.
Elimination de votre ancien produit.
Votre téléviseur est conçu et fabriqué avec des matériaux et composants de haute qualité
qui peuvent être recyclés et réutilisés.
La directive européenne 2002/96/EC s’applique à tous les appareils marqués de ce logo
(poubelle barrée). Renseignez-vous sur les systèmes de collecte mis à votre disposition
pour les appreils électriques et électroniques.
Conformez-vous aux règles en vigueur dans votre localité et ne jetez pas vos anciens
appareils avec les déchêts ménagers. L’élimination appropriée de votre ancien appareil aidera
à prévenir les effets négatifs sur l’environnement et la santé humaine.
Suomi
Suomi
Svenska
Svenska
1

Présentation du téléviseur
7
42” TV
8
37” TV
& Les touches du téléviseur
•POWER : pour allumer ou éteindre le
téléviseur.
•
VOLUME – / + : pour régler le niveau
sonore.
• MENU : pour appeler ou quitter les
menus.
Les touches PROGRAM – / + permettent
de sélectionner un réglage et les touches
VOLUME – / + de régler.
•PROGRAM – / + : pour sélectionner les
programmes.
Face arrière :
Les raccordements principaux s’effectuent par
le dessous du téléviseur.
Pour plus de détails sur les raccordements, voir page
18-19.
é Alimentation
“ Prise DVI et entrée audio pour le
raccordement d’un appareil HD (Haute
Définition) ou d’un ordinateur avec sortie
DVI
‘
Prises péritel EXT 1 et EXT 2
(
Prise d’antenne TV
§
Logement d’interface et
è
Prise SPDIF ordinaires
!
Connexions latérales
Télécommande
Introduisez les 2 piles de type R6 fournies en
respectant les polarités.
Les piles livrées avec l’appareil ne contiennent ni mercure ni
cadmium nickel, dans un souci de préserver l’environnement.
Veillez à ne pas jeter vos piles usagées mais à utiliser les moyens
de recyclage mis à votre disposition (consultez votre
revendeur).
Programmes numériques ou analogiques ?
Pour la réception des chaînes TV, votre téléviseur est équipé de 2 tuners; l’un pour les programmes numériques,
l’autre pour les programmes analogiques. Utilisez la touche
analogique ou numérique. Ensuite, utilisez les touches P(age) + / – ou
2
de la télécommande pour commuter le TV en mode
pour sélectionner le programme désiré.

Les touches de la télécommande
Sélecteur de mode
Pour activer la télécommande en
mode TV, DVD ou AUX (voir p. 4).
Veille
Permet de mettre en veille le
téléviseur. Pour l’allumer, appuyez sur
+
, P
ou .
–
Menu Options (voir p. 10).
Touche VCR/DVD (voir p. 4).
Annuler
Menu TV
Pour appeler ou quitter les menus
analogiques.
Mode Analogique ou Digital
Pour commuter le téléviseur en
mode analogique ou numérique.
Volume
Pour ajuster le niveau sonore.
Info. d’écran
En mode numérique, appuyez un fois
pour afficher le bandeau
d’informations, une 2
obtenir plus d’informations sur le
programme et une 3
l’effacer (voir p. 5). En mode
analogique, cette touche permet
d’afficher/effacer les informations sur
le programme (numéro, nom, mode
son). Appuyez pendant 5 secondes
pour obtenir l’affichage permanent
du numéro de programme
ème
fois pour
ème
fois pour
analogique sur l’écran.
Mode son
Permet de forcer les émissions Stéréo
en Mono ou pour les émissions
bilingues de choisir entre les
différentes langues (Dual I, Dual II, ...).
L’indication Mono est rouge lorsqu’il
s’agit d’une position forcée.
Mode sous-titres
Pour activer/désactiver le mode
sous-titres (lorsque le TV est en
mode numérique).
Formats 16:9 (voir p. 14).
Fonctions télétexte (voir p. 15).
Sélection prises EXT (voir p. 18).
Fonctions télétexte (voir p. 15).
Son Surround
Pour activer / désactiver l’effet
Virtual Dolby Surround*. En stéreo,
vous obtenez les effets sonores
arrières du Dolby Surround Pro
Logic. En mono, vous obtenez un effet
Laboratories. ”Dolby” et le symbole double-D
sont des marques de Dolby Laboratories.
spatial pseudo stéréo.
* Fabriqué sous licence de Dolby
Préréglages image et son
Permet d’accéder à une série de
préréglages de l’image et du son.
La position Personnel correspond
aux réglages effectués dans les menus.
Fonctions télétexte (voir p. 15)
et touches VCR/DVD (p. 4).
Menu Digital
Pour afficher/effacer les menus (lorsque
le TV est en mode numérique).
Curseur
Ces 4 touches vous permettent de
naviguer dans les menus ou d’avoir un accès
direct aux différents formats 16:9.
OK key
Confirme la sélection – Permet également
d’accéder à la liste de programmes en
mode Analogique ou Numérique.
Guide TV (voir p. 10).
Coupure son
Pour supprimer ou rétablir le son.
Sélection des programmes
Pour accéder au programme (ou page)
inférieur ou supérieur.
Touches numériques
Accès direct aux programmes. Pour un
programme à 2 (ou 3) chiffres, il faut
ajouter le 2
le trait ne disparaisse. Le numéro, le nom
(et le mode son, en analogique)
ème
(3
ème
) chiffre avant que
s’affichent quelques instants.
Programme précédent
Pour accéder au programme affiché
précédemment. En mode numérique,
également utilisé comme touche
d’édition ou touche de rappel arrière.
Fonctions télétexte (voir p. 15)
PIP marche/arrêt
Pour afficher l’écran PIP à l’écran du
téléviseur. Toute pression subséquente
de la touche permet de changer la taille
de la fenêtre. Pour afficher l’écran PIP
en mode PC/HD, voir p. 18.
Pixel + (selon la version)
Permet de mettre le mode de
démonstration Pixel + en marche et en
arrêt.
Contrôle actif
Optimise la qualité de l’image selon la
qualité du signal d’entrée et des
conditions de lumière ambiante.
Touche non utilisée.
3

Sélecteur de mode
Appuyez sur la touche
Le voyant de la télécommande s’allume pour montrer le mode sélectionné. Il s’éteint
automatiquement après 20 secondes sans action (retour au mode TV).
En fonction de l’équipement, les touches suivantes sont opérationnelles :
veille,,
pause,
lecture
retour rapide,
avance rapide,
enregistrement,
stop,
menu tv
annuler
(SELECT) pour sélectionner le mode désiré : DVD ou AUX (
OK validation,
navigation et réglages,
touches numériques,
menu OSD,
sélection des programmes,
choix du langage,
amplificateur
Installation du téléviseur
).
& Positionnement du téléviseur
Placez votre téléviseur sur une surface solide et
stable. Pour prévenir toute situation dangereuse,
ne pas exposer le téléviseur à des projections
d’eau, à une source de chaleur (lampe, bougie,
radiateur, ...) et ne pas obstruer les grilles de ventilation situées à l’arrière.
é Raccordements
• Utilisez le cordon de liaison d’antenne fourni
et raccordez la prise ¬ située en dessous du
téléviseur à votre prise d’antenne.
• Branches le cordon d’alimentation sur le secteur
(220-240 V / 50 Hz).
Pour le raccordement d’autres appareils, voir p. 18-19.
“ Mise en marche
Pour allumer le téléviseur, appuyez sur la touche
POWER. Un voyant s’allume en vert et l’écran
s’illumine. Allez directement au chapitre installation
rapide, page 5.
Si le téléviseur reste en veille, appuyez sur la touche
P(age) + de la télécommande.
Le voyant clignote lorsque vous utilisez la
télécommande.
4

Première mise sous tension
La première fois que vous allumez le téléviseur, un
message de félicitations apparaît à l’écran. La
langue d’affichage change toutes les 5 secondes.
Si le menu n’apparaît pas, maintenez appuyées
pendant 5 secondes les touches MENU du téléviseur,
pour le faire apparaître.
& Appuyez sur la touche
à l’instant ou votre langue est visible à
l’écran. Le menu d’installation apparaît :
Installation
de la télécommande,
OK
“ Avec le curseur, sélectionnez la langue, le pays ou
le fuseau horaire et vérifiez si le réglage correspond
à vos préférences. Si nécessaire, utilisez le curseur
pour modifier less réglages et appuyez sur
OK
.
Attention : si vous sélectionnez un mauvais pays, la
numérotation des programmes ne sera pas celle
habituellement utilisée dans votre pays.
‘ Sélectionnez le choix Recherche des stations et
appuyez sur
pour démarrer l’installation. Le menu
OK
Recherche des stations s’affiche.
Tous les programmes numériques et analogiques
sont mémorisés automatiquement. A la fin de la
recherche, le menu indique le nombre de
programmes numériques et analogiques trouvés.
( Appuyez sur la touche OK pour commencer à
regarder les programmes TV. L’installation est
terminée.
Définir les options et lancer la recherche
REMARQUE : Si vous décidez, à un moment
donné, de réinitialiser aux paramètres définis
en usine, appuyez et maintenez enfoncée pendant
5 secondes la touche MENU sur le côté du
téléviseur. Un message de félicitations apparit
é La langue, le pays et le fuseau horaire est
présélectionné en accord avec l’écran ouvert. Vous
avez toujours la possibilité de modifier vos
à l’écran. Répétez les étapes 1-5 comme si c’était
la première fois que vous mettez le téléviseur
sous tension.
préférences avant de démarrer la recherche.
Comprendre les informations du bandeau
Quand vous sélectionnez un programme numérique,
un bandeau d’informations s’affiche quelques secondes
en haut de l’écran.
Vous pouvez aussi utiliser la touche
télécommande pour afficher le bandeau.
ème
appui sur cette touche affiche plus
Un 2
de la
d’informations sur le programme (si disponible).
Description du bandeau :
numéro
de chaîne
FR2 Billard
nom de chaîne
heure de début
et de fin du
programme
titre du programme
symboles
Minutes restantes : 14
heure
durée restante
du programme
Le bandeau d’informations donne le numéro et le
nom de la chaîne TV, l’heure de début et de fin du
programme, son titre et le temps restant du
programme courant.
Description des symboles :
i plus d’informations sont disponibles sur ce
programme : appuyez sur la touche pour les
afficher ou les effacer.
i des sous-titres sont disponibles : pour les afficher,
appuyez sur la touche i ou la touche
OPTIONS et sélectionner le sous-titre dans le
menu options.
4 d’autres langues audio sont disponibles et peuvent
être sélectionnées dans le menu options.
s ce logo apparaît dans la couleur de la liste des
programmes favoris sélectionné.
Remarque : une couleur blanche apparaît si le
programme est mémorisé dans une (ou plusieurs) liste
favorite qui n’est pas actuellement activée.
5

Réorganiser les chaînes
Ce menu vous permet de modifier l’ordre des
chaînes TV ou radio numériques mémorisés.
&
En mode numérique, appuyez sur la touche
pour afficher le menu principal.
é Utilisez la touche œ pour sélectionner
Installation et appuyez 2 fois surÉ pour
sélectionner le menu Liste des chaînes.
Installation
Installation
Liste des chaînes
Installation des Services
Test de réception
Modifier les programmes
Regardez les nouvelles
chaînes TV
Ecoutez les nouveaux
émetteurs radio
“ Utilisez les touches o œ pour sélectionner
Modifier les programmes et appuyez sur É.
‘ Utilisez les touches o œ pour sélectionner la
chaîne que vous souhaitez échanger.
( Appuyez sur OK pour activer.
Si vous souhaitez désinstaller la chaîne
sélectionnée, appuyez sur la touche rouge.
§ Sélectionnez (o œ) le nouveau numéro de chaîne
désiré.
è Appuyez sur OK pour confirmer l’échange.
! Répétez les opérations ‘ à è autant de fois
qu’il y a de chaîne à renuméroter.
ç Appuyez sur la touche
menus.
Gérer les listes de chaînes
Fermer
Regarder ou écouter les nouvelles chaînes
Ce menu vous permet de vérifier si de nouvelles
chaînes TV ou radio ont été lancées depuis
l’installation initiale.
&
En mode numérique, appuyez sur la touche
pour afficher le menu principal.
é Utilisez la touche œ pour sélectionner Installation
et appuyez 2 fois surÉ pour sélectionner le menu
Liste des chaînes.
“ Utilisez les touches o œ pour sélectionner
Regarder les nouvelles chaînes TV ou
Ecouter les nouveaux émetteur radio.
‘ Si de nouveaux services sont disponibles, appuyez
sur É pour entrer dans la liste et utilisez les
touches o œ pour vous déplacer dans la liste.
( Appuyez sur
pour quitter les menus.
pour quitter les
Ajouter de nouveaux programmes
&
Ce menu permet de rechercher les nouvelles
chaînes TV ou radio qui ont été lancées depuis
l’installation initiale.
Installation
Installation
Listes des chaînes
Installation des Services
Test de réception
Installation et gestion des services
Ajouter de nouveaux
programmes
Réinstaller toutes les chaînes
Fermer
6
En mode numérique, appuyez sur la touche
pour afficher le menu Installation.
é Utilisez la touche œ pour sélectionner
Installation et appuyez surÉ.
“ Sélectionnez Installation des services (œ) et
appuyez sur É.
‘ Appuyez sur É pour sélectionner Ajouter de
nouveaux programmes et appuyez sur
pour démarrer l’installation. La recherche
commence et seules les nouvelles chaînes sont
mémorisées et ajoutées dans le menu Liste des
chaînes. Le pourcentage de la recherche et le
nombre de programmes trouvés s’affichent.
( Quand la recherche est terminée, sélectionnez
mémoriser et appuyez sur OK pour accepter
les nouveaux programmes.
§ Appuyez sur pour quitter les menus.
OK

Réinstaller toutes les chaînes
Ce menu permet de réinstaller toutes les chaînes
numériques TV et radio.
&
En mode numérique, appuyez sur la touche
pour afficher le menu Installation.
Installation
Installation
Listes des chaînes
Installation des services
Test de réception
Installation et gestion des services
Ajouter de nouveaux
programmes
Réinstaller toutes les
chaînes
Fermer
Test de réception
Ce menu permet de vérifier la qualité du signal
reçu par votre antenne.
&
En mode numérique, appuyez sur la touche
pour afficher le menu Installation.
é Utilisez la touche œ pour sélectionner
Installation et appuyez surÉ pour afficher le
menu installation.
Installation
Installation
Listes des chaînes
Installation des Services
Test de réception
Test de qualité du signal
Fréquence
Nom du réseau
Qualité du signal
Niveau de signal
Fermer
é Utilisez la touche œ pour sélectionner
Installation et appuyez surÉ.
“ Sélectionnez Installation des services (œ)
et appuyez sur É.
‘ Sélectionnez Réinstaller toutes les chaînes
(œ) et appuyer sur É.
( Appuyez sur
pour démarrer l’installation.
OK
La recherche démarre et tous les programmes
numériques sont mémorisés. A la fin de la
recherche, le menu indique le nombre de
programmes trouvés.
§ Appuyez sur OK pour valider l’installation.
è Appuyez sur
pour quitter les menus.
“ Utilisez la touche œ pour sélectionner Test de
réception et appuyez sur É.
Vous obtenez une indication sur la fréquence du
programme actuel, le nom du réseau, la qualité
et le niveau du signal.
‘ Vous devez à présent entrer la fréquence de la
chaîne numérique que vous souhaitez tester.
Votre magazine tv peut vous fournir la liste des
canaux des programmes numériques. Utilisez le
tableau de la page 20 pour obtenir la
correspondance en fréquence.
( Si le niveau et la qualité du signal est médiocre,
un message apparaît, en bas du menu, vous
demandant d’entrer une fréquence entre la
limite haute et basse. Si après avoir entré la
fréquence, la réception reste médiocre, vous
pouvez essayer de l’améliorer en modifiant
l’orientation de l’antenne ou en la remplaçant.
Il est néanmoins conseillé de contacter un
spécialiste en installation d’antenne qui vous
garantira le meilleur résultat.
7

Langue et pays préférentiels
Ce menu permet de sélectionner votre langue
préférentielle pour l’audio, le sous-titre, le télétexte,
les menu, ainsi que le pays et le fuseau horaire.
&
En mode numérique, appuyez sur la touche
pour afficher le menu principal.
é Utilisez la touche œ pour sélectionner
Préférences et appuyez sur π.
Installation
Préférences
Langues
Pays
Sortie numérique
Sélectionnez la langue souhaitée
Audio
Sous-titres/Télétexte
Mode sous-titres
Sous-titres pour malentendants
Système
Fermer
“ Sélectionnez Langues, Pays ou Sortie
numérique (œ) et appuyez sur É.
‘ Utilisez les touches o œ pour sélectionner un
Restrictions d’accès
réglage et appuyez sur É pour entrer dans le sousmenu. Effectuez vos réglage et appuyez sur
p pour sortir.
Réglage de la langue par défaut
• Audio : choix de la langue du son.
• Sous-titres/Télétexte : choix de la langue des
sous-titres et du télétexte.
• Mode sous-titres : Arrêt, Marche ou Auto
(affichage des sous-titres uniquement lors des
diffusions en VO).
• Sous-titres pour malentendants : pour activer
ou désactiver les sous-titres spécifiques pour les
malentendants (si rendu disponible par le diffuseur).
• Système : choix de la langue des menus.
Réglages du pays
•Pays : sélectionner le pays ou vous êtes situé.
• Fuseau horaire : choix de votre fuseau horaire.
Réglage de la sortie numérique
Sélectionner AC3 (si votre amplificateur est
compatible avec le format Dolby Digital) ou PCM
(s’il ne l’est pas).
( Appuyez sur
pour quitter les menus.
OK
ou
Ce menu vous permet d’activer des restrictions
d’accès pour les chaînes numériques.
&
En mode numérique, appuyez sur la touche
pour afficher le menu principal.
é Utilisez la touche œ pour sélectionner
restrictions d’accès et appuyez sur É.
Installation
Restrictions d’accès
Activer la protection par
code personnel
Catégorie de programme
Programmes TV
Programmes Radio
Changez votre code
personnel
Commuter la protection code personnel entre “oui”ou”non”
Marche Arrêt
Fermer
“ Appuyez sur É pour entrer dans le menu
Activer la protection par code personnel.
‘ Utilisez les touches ÑÉ pour positionner sur
Activer et appuyez sur OK pour sortir. Vous
pouvez maintenant accéder aux réglages suivants:
Important : dès l’instant que vous utilisez une restriction
d’accès, vous devez entrer le code d’accès à chaque fois
que vous programmez un enregistrement.
8
• Catégorie de programme : permet de
verrouiller l’accès aux programmes en fonction
d’une classification par age.
Cette fonction n’est opérationnelle que si le diffuseur
transmet le signal d’identification.
•Programmes TV : sélectionnez la chaîne à
verrouiller et appuyez sur
OK
.
• Programmes Radio : sélectionnez la station
radio à verrouiller et appuyez sur OK.
• Changez votre code personnel : appuyez sur
É pour accéder au menu. Suivez les instructions
pour changer votre code personnel.
Le code d’accès par défaut est 1234. Si vous avez
oublié votre code personnel, taper le code universel
0711 pour rétablir le code d’accès par défaut (1234).
( Appuyez sur la touche
pour quitter le
menu.
Un connecteur Common Interface est disponible sur
votre téléviseur (voir p.19). Vous pouvez brancher un
lecteur de module universel offrant d’autres services
comme l’accès à des chaînes cryptées. Le menu
Restrictions d’accès du téléviseur vous permettra
d’accéder aux restrictions d’accès du lecteur de module
lorsque celui-ci est connecté. Le lecteur de module
universel pilote les messages qui s’affichent à l’écran. En
cas de panne, contactez votre opérateur.
 Loading...