

Page 1
User Manual
www.philips.com/usasupport
or call
1-888-PHILIPS (744-5477)
while with your product
(and Model / Serial number)
Philips vous remercie de
votre conance.
Besoin d'une aide
rapide?
Les Guide d'utilisation rapide et
Manuel de l'utilisateur regorgent
d'astuces destinées à simplier
l'utilisation de votre produit Philips.
Toutefois, si vous ne parvenez
pas à résoudre votre problème,
vous pouvez accéder à
notre aide en ligne à l'adresse
www.philips.com/usasupport
ou formez le
1-800-661-6162 (Francophone)
1-888-PHILIPS (744-5477)
(English speaking)
Veillez à avoir votre produit à
portée de main
(et model / serial nombre)
ARRÊT
Gracias por escoger Philips
Necesita ayuda
inmediata?
Lea primero la Guía de uso rápido o el
Manual del usuario, en donde encon-
trará
consejos que le ayudarán a disfrutar
plenamente de su producto Philips.
Si después de leerlo aún necesita ayuda,
consulte nuestro servicio de
asistencia en línea en
www.philips.com/usasupport
o llame al teléfono
1-888-PHILIPS (744-5477)
y tenga a mano el producto
(y número de modelo / serie)
AL
TO
!
26PF5321D/37
Manuel de l’utilisateur
Guía del usuario
26PF5351D/37
32PF5321D/37
32PF7321D/37
32PF7421D/37
37PF7321D/37
42PF5321D/37
42PF5321D/85
42PF5421D/37
42PF7321D/37
42PF7421D/37
50PF7321D/37
English
Quick Use Guide Inside!
Guide d’usage Rapide Incluse!
For Customer Use /
AE: Enter below the Serial No. which is located on the rear
of the cabinet. Retain this information for future reference.
FR: Entrez ci-dessous le numéro de série qui se trouve àà
l’arrière du boîtier du dispositif. Conservez ces informations
pour référence ultérieure.
ES: Escriba a continuación el Nº de serie, el cual se
encuentra en la parte posterior del gabinete. Guarde esta
información para referencia futura.
Model / Modèle / Modelo : ____________________________
Serial / Série / Serie: _________________________________
Guía de Uso Rápido Incluida!
Para Uso del Cliente
Français
Español
À l’usage du client /
Page 2
0&$
!
"
0&$
0&$
0&$
!
"
#
0&$
#
"
"
0&$
0&$
0&$
0&$
#
#
"
"
(
0&$
X
X
0&$
0&$
0&$
X
0&$
0&$
0&$
0&$
X
X
X
X
X
X
0&$
X
X
X
X
X
X
!
!
0&$
0&$
0&$
0&$
No wall mounting bracket provided. For wall mounting details, refer to page 2 of the user manual.
Montage pour mur non inclus. Pour plus de détails, consultez la page 2 de son manuel d’usager.
Montaje para pared no incluído. Para mas detalles, consulte la página 2 de su manual de usuario.
Page 3

How to make the optimal connection (These cables are not provided with the set.)
Comment réaliser une bonne connexion (Ces câbles ne sont pas fournis avec votre téléviseur.)
Cómo realizar la mejor conexión (Estos cables no se proporcionan con el aparato.)
HDMI
Audio
Best
HDMI
High-Defi nition Multimedia Interface provides an uncompressed,
all-digital audio/video connection.
(Please use a certifi ed HDMI cable).
HDMI to DVI-I
Convertor cable
Devices with only a DVI connection can be connected with a DVI
to HDMI convertor cable. You
must connect the Right (Red) and
DVI
Left (White) audio connectors of
AVI of the TV to the audio output
connectors of the device.
Better
Component Video
input
Provides superior picture quality by
separating the green, blue and red
luminance signals. Typically used
with red/white audio cables.
Supérieure
HDMI
L’interface HDMI (High-Defi nition
Multimedia Interface) propose une connexion décompressée audio/vidéo entièrement numérique. HDMI propose
l’ultimate connexion (Veuillez utiliser un
câble HDMI certifi é).
HDMI vers DVI-I
Câble de convertisseur
Les dispositifs dotés seulement d’une
connexion DVI peuvent être raccordés
à l’aide d’un câble de convertisseur
DVI vers HDMI. Vous devez raccorder
les connecteurs audio droit (rouge)
et gauche (blanc) AVI du téléviseur
aux connecteurs de sortie audio du
dispositif.
Excellente
Entrée vidéo composant
Fournit une qualité dimage supérieure
en séparant les signaux de luminance
vert, bleu et rouge. Utilisée généralement avec les câbles audio rouge/blanc.
Remarque: l’entrée vidéo composant
aparaît sur le tableau de connexions
comme YPbPr.
La mejor
HDMI
La interfaz multimedia de alta defi nición
(HDMI, por sus siglas en inglés) proporciona una conexión de audio/video
completamente digital sin comprimir.
La HDMI proporciona la mejor conexión (Sírvase utilizar un cable HDMI
certifi cado).
De HDMI a DVI-I
Cable convertidor
Los dispositivos que sólo cuenten con
una conexión DVI se pueden conectar
con un cable convertidor de DVI a
HDMI. Debe conectar los conectores
de audio derecho (rojo) e izquierdo
(blanco) de AVI del TV a los conectores
de salida de audio del dispositivo.
Mejor
Entrada de video
componente
Proporciona calidad de imagen superior
al separar las señales de luminancia
verde, azul y roja. Se usa normalmente
con cables de audio rojo/blanco.
Nota: La entrada de video componente
se muestra en el panel de conexión
como YPbPr.
Good
S-Video
Supplies a better picture than RF
and Composite connections. Used
with red/white audio cables.
Basic
Composite Audio/Video
Separate video (yellow) and audio
(red/white) cables that provide a
basic connection from the cable
box and other devices.
Note: The color of audio inputs
may differ, e.g. red/white or red/
black.
Good
RF cable (Digital Antenna/cable)
Basic
RF cable (Analog Antenna/cable)
Provides a connection for both
audio and video. (Reception vary by
location.
Bonne
S-Video
Fournit une meilleure image que les
connexions RF et composite. Utilisée
avec les câbles audio rouge/blanc.
De base
Audio/Vidéo
Composite
Câbles vidéo (jaune) et audio (rouge/
blanc) séparés fournissant une connexion de base à partir du boîtier de
connexion et autres dispositifs.
Remarque: La couleur des entrées
audio peut varier, par ex. rouge/blanc
ou rouge/noir.
Bonne
Câble RF (Antenne/Câble Numérique)
De base
Câble RF (Antenne/Câble Numérique)
Fournit une conexion de base pour
l’antenne ou le service et la vidéo.
Buena
S-Video
Brinda una mejor imagen que las conexiones RF y compuestas. Se usa con
cables de audio rojo/blanco.
Básica
Audio/Video
Compuesto
Cables de video (amarillo) y audio
(rojo/blanco), que proporcionan una
conexión básica de la caja de cable y
otros dispositivos.
Nota: El color de las entradas de audio
puede diferir, por ej., rojo/blanco o
rojo/negro.
Buena
Cable RF
(Antena/Cable Digital)
Básica
Cable RF (Antena/Cable Análogo)
Proporciona una conexión de antena o
cable básica.
Page 4
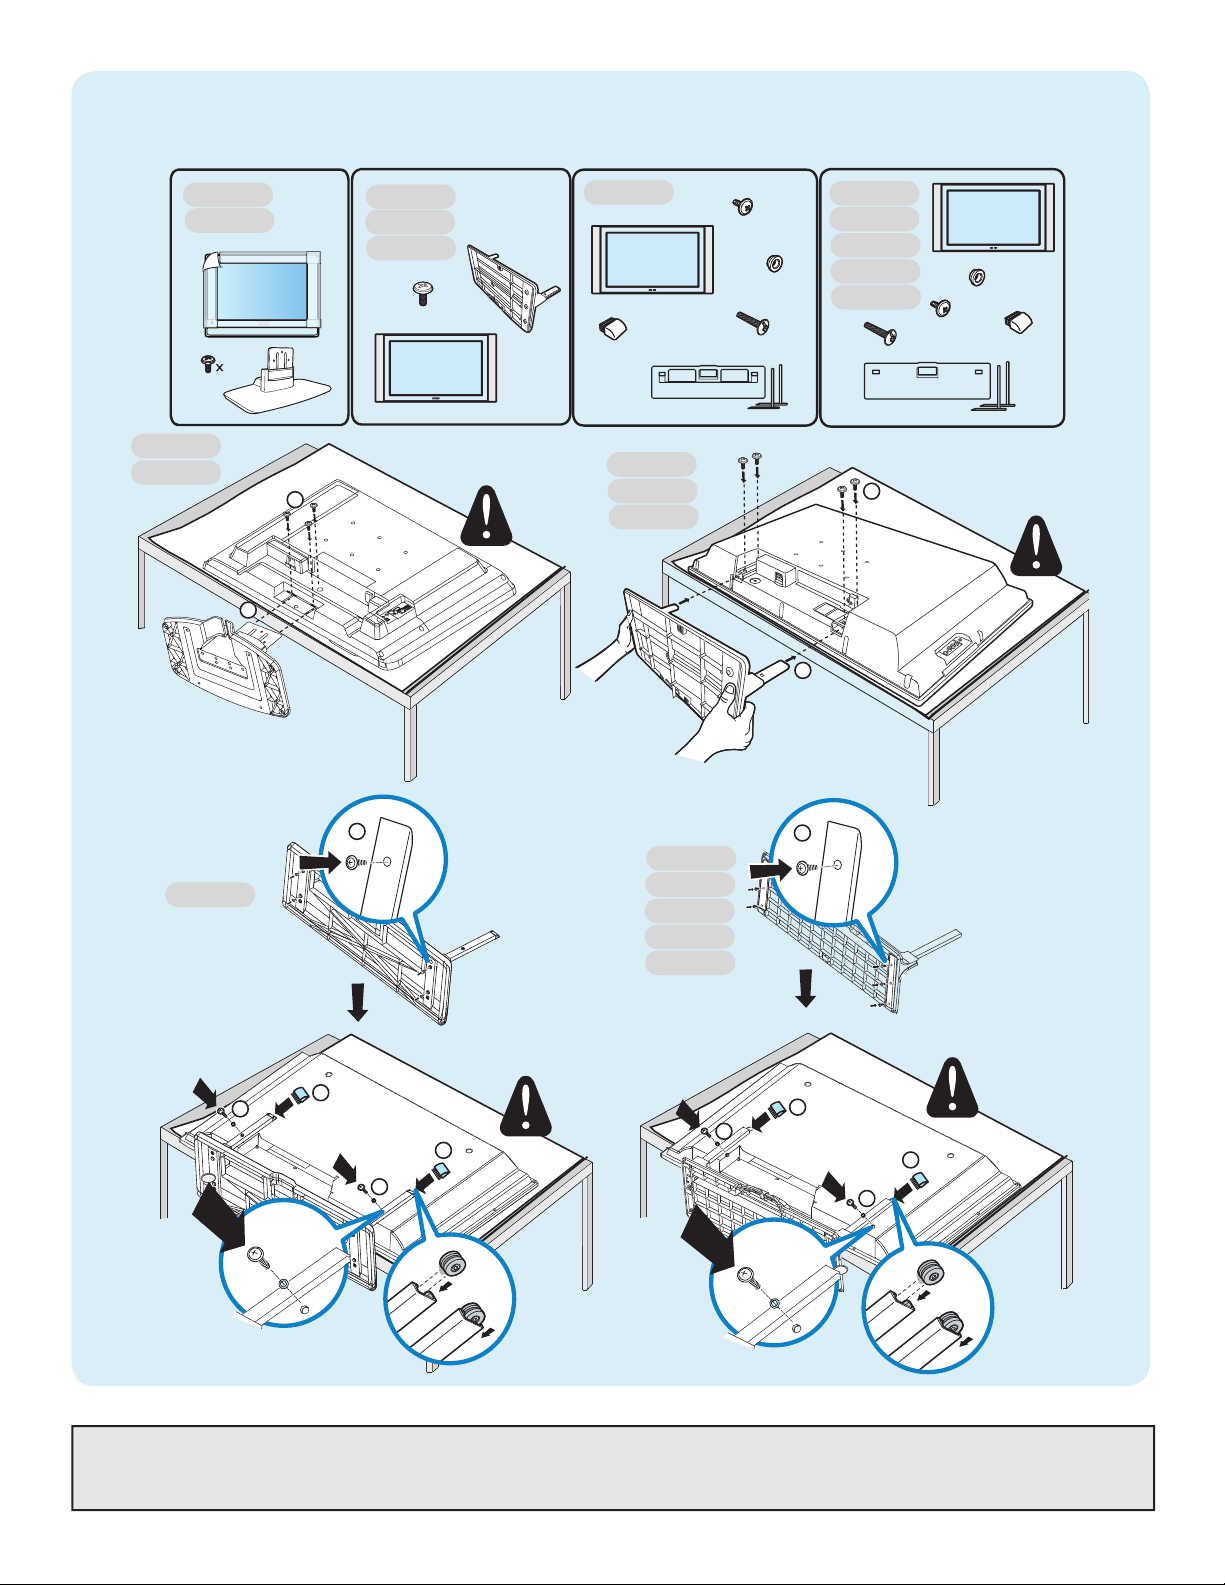
AE: Set-Top Box to TV
(
)
AUDIO OUT
(DIGITAL)
CABLE / ANTENNA
1a
FR: Boîtier de décodage
vers téléviseur
ES: De la caja superior
o caja de cable al TV
HDMI
OR/OU/O
RF
Details refer to page 20.
/Détails, consultez le page 20.
/Para detalles, consulte la pag. 20.
AE: Set-Top Box to TV
1b
FR: Boîtier de décodage
vers téléviseur
ES: De la caja superior
o caja de cable al TV
Component Video Input
/Entrée vidéo composant
/Entrada de video
componente
Details refer to page 21.
/Détails, consultez le page 21.
/Para detalles, consulte la pag. 21.
Page 5
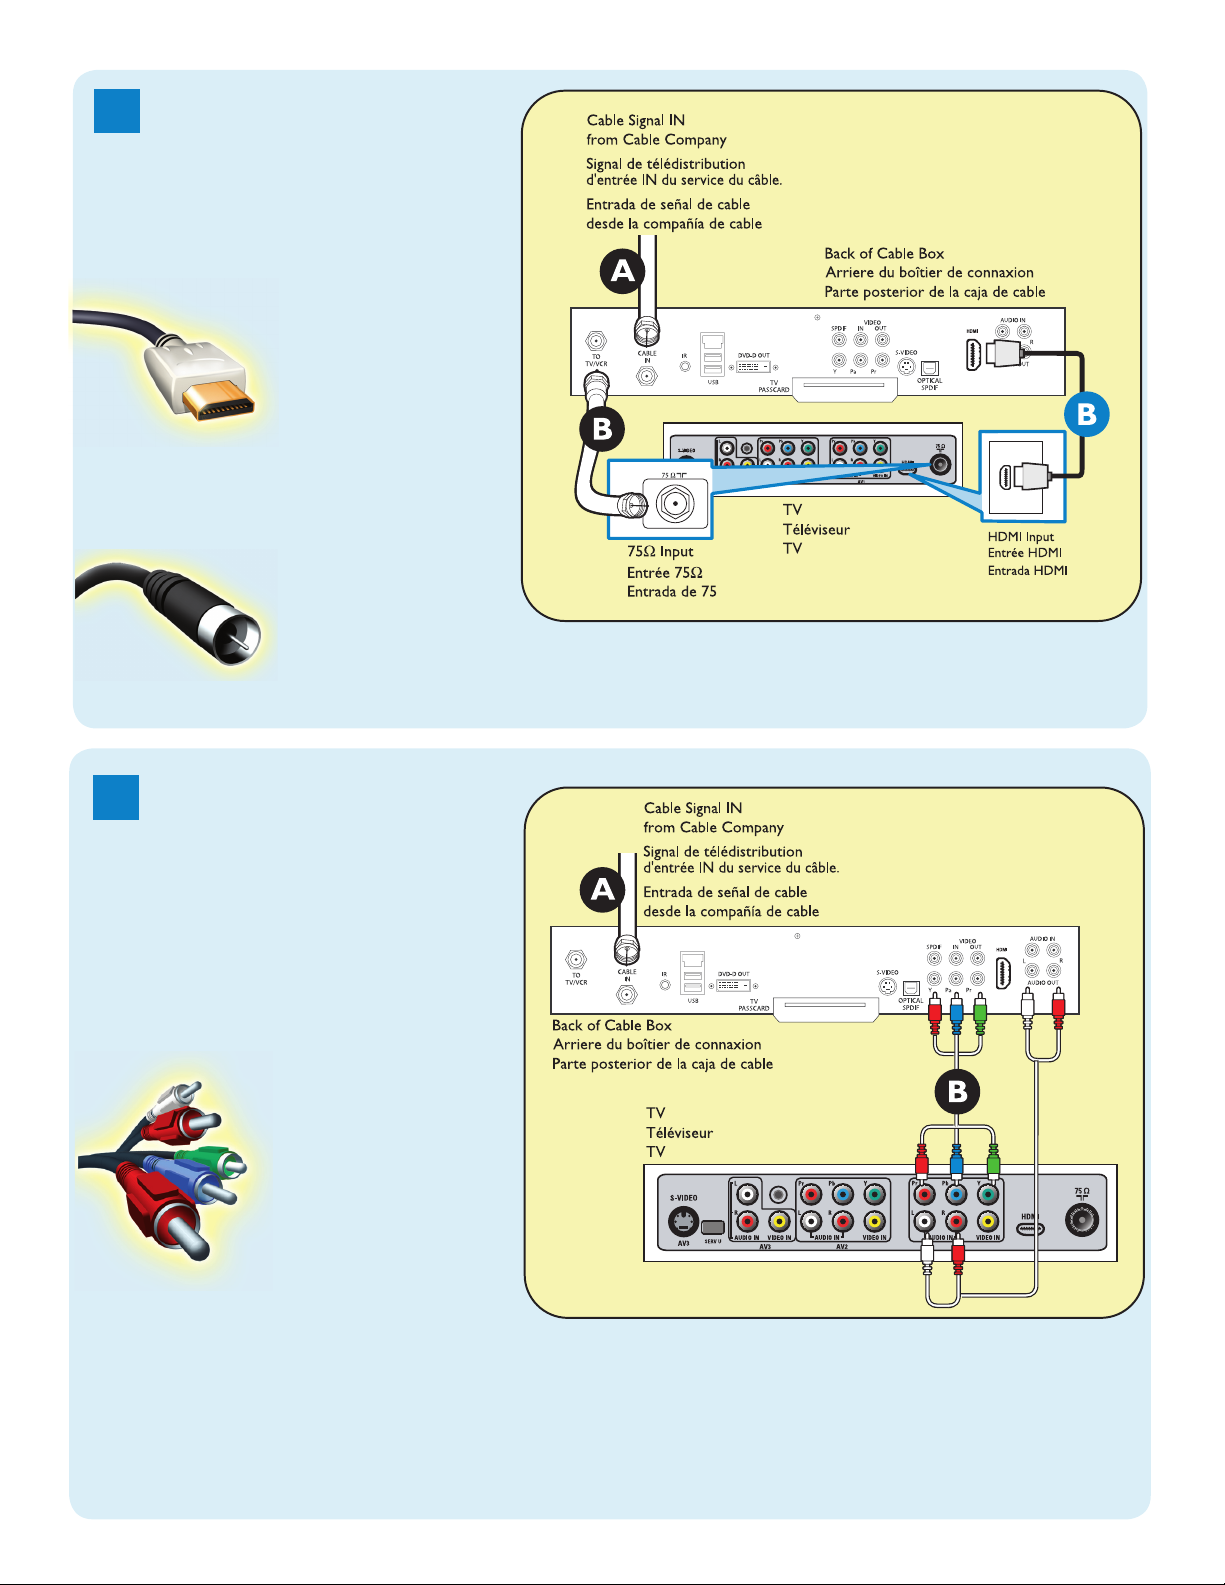
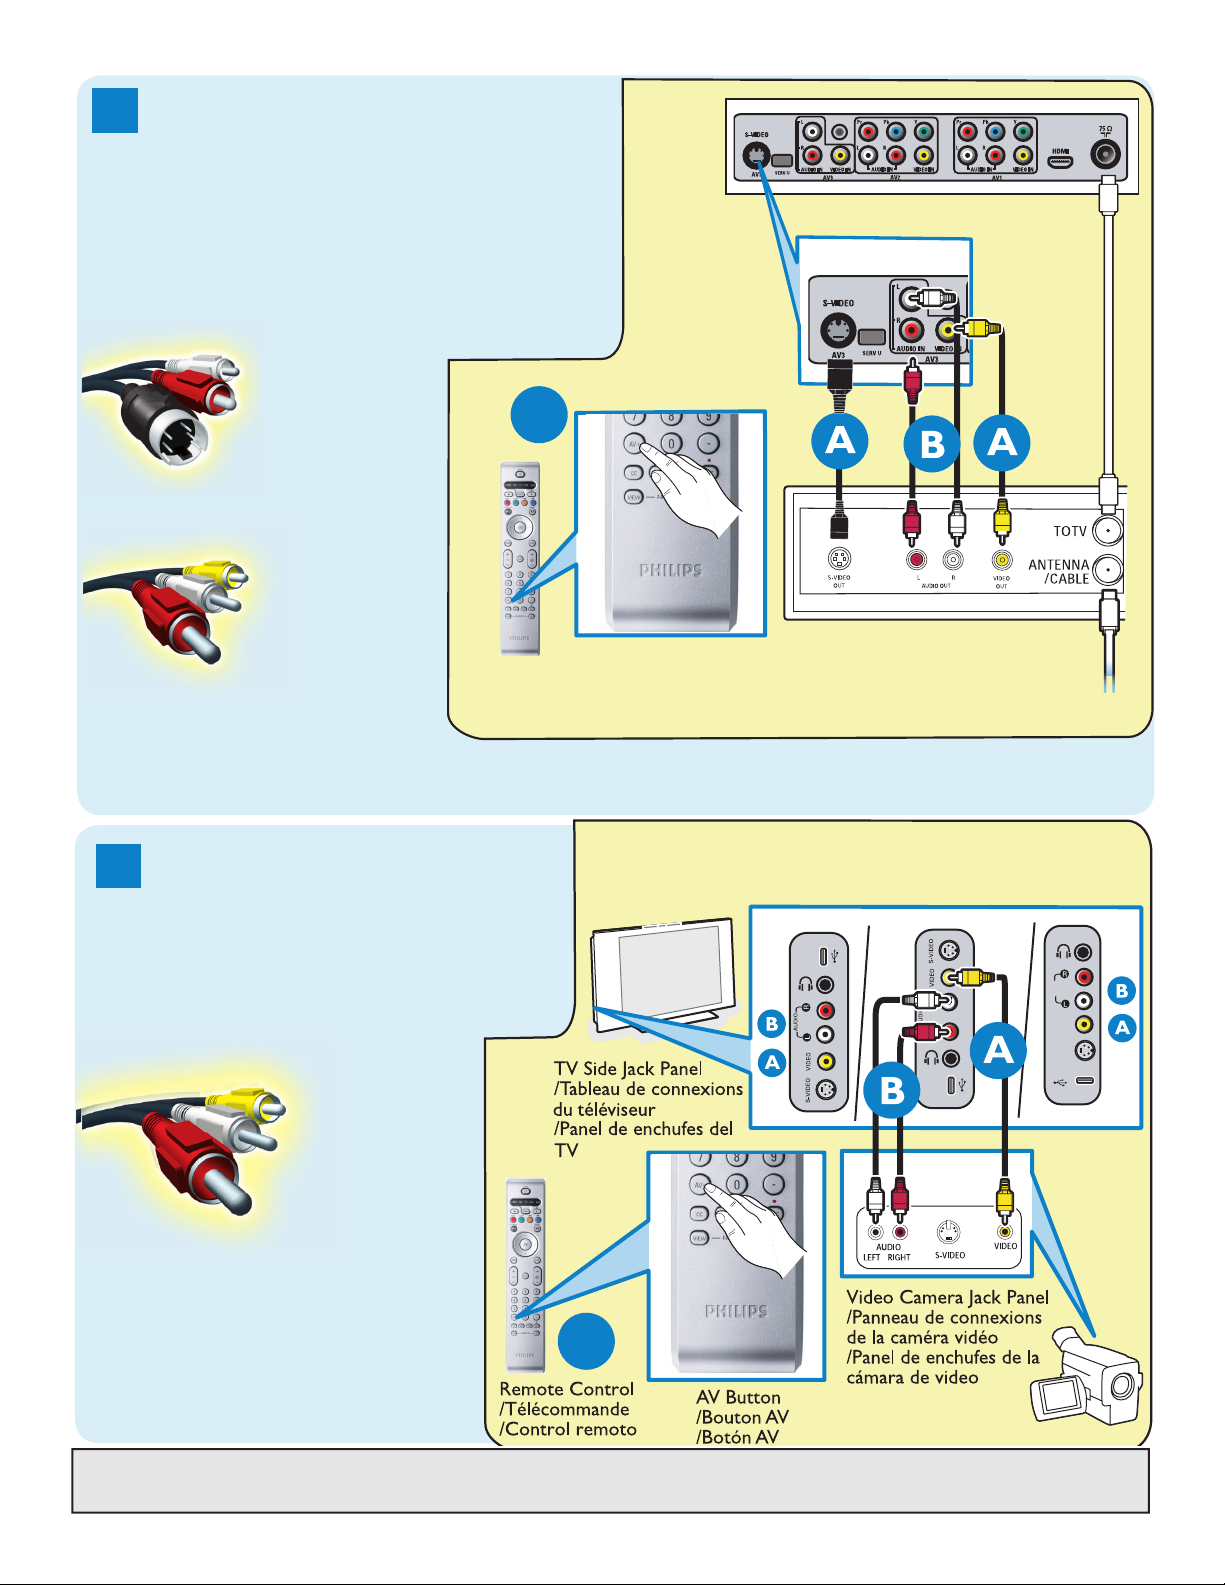
2a
(
)
AUDIO OUT
(DIGITAL)
CABLE / ANTENNA
Add for DVD Recording
S-VIDEO
OUT
OUT
OUT
L
R
AUDIO
VIDEO
COMP VIDEO
Y
Pb
Pr
C
AV Button
Bouton AV
Botón AV
Remote Control
Télécommande
Control remoto
(
)
AUDIO OUT
(DIGITAL)
CABLE / ANTENNA
A
Back of DVD Player/Recorder
Arrière du lecteur/enregistreur DVD
Parte posterior del reproductor/grabador
de DVD
B
Add for DVD Recording
AE: Progressive Scan DVD
Player/Recorder to TV
FR: Lecteur DVD/Enregistreur
DVD vers le téléviseur
ES: Del reproductor o grabador
de DVD al TV
HDMI
Details refer to page 21.
/Détails, consultez le page 21.
/Para detalles, consulte la pag. 21.
AE: Progressive Scan DVD
2b
Player/Recorder to TV
FR: Lecteur DVD ou Enregistreur
vers le téléviseur
ES: DVD vers le téléviseur Del
reproductor o grabador de
DVD al TV
Component Video Input
/Entrée vidéo composant
/Entrada de video
componente
Details refer to page 21.
/Détails, consultez le page 21.
/Para detalles, consulte la pag. 21.
Page 6
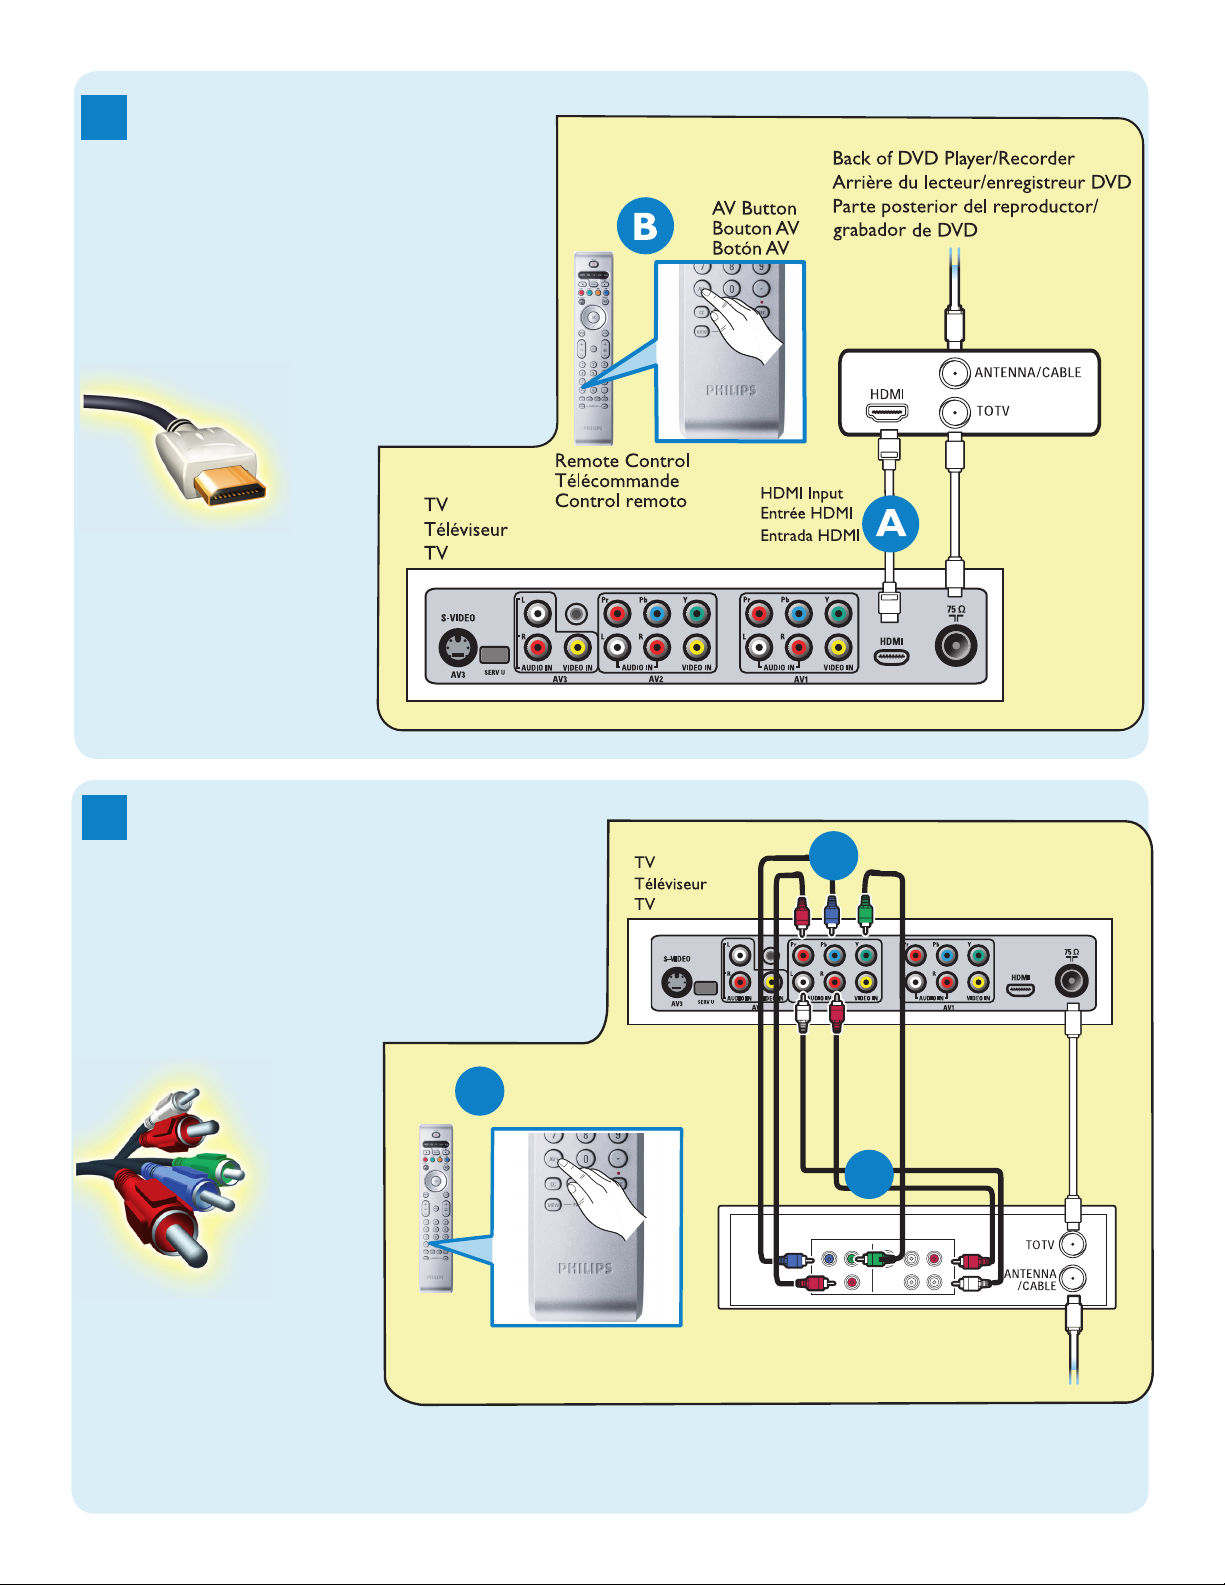
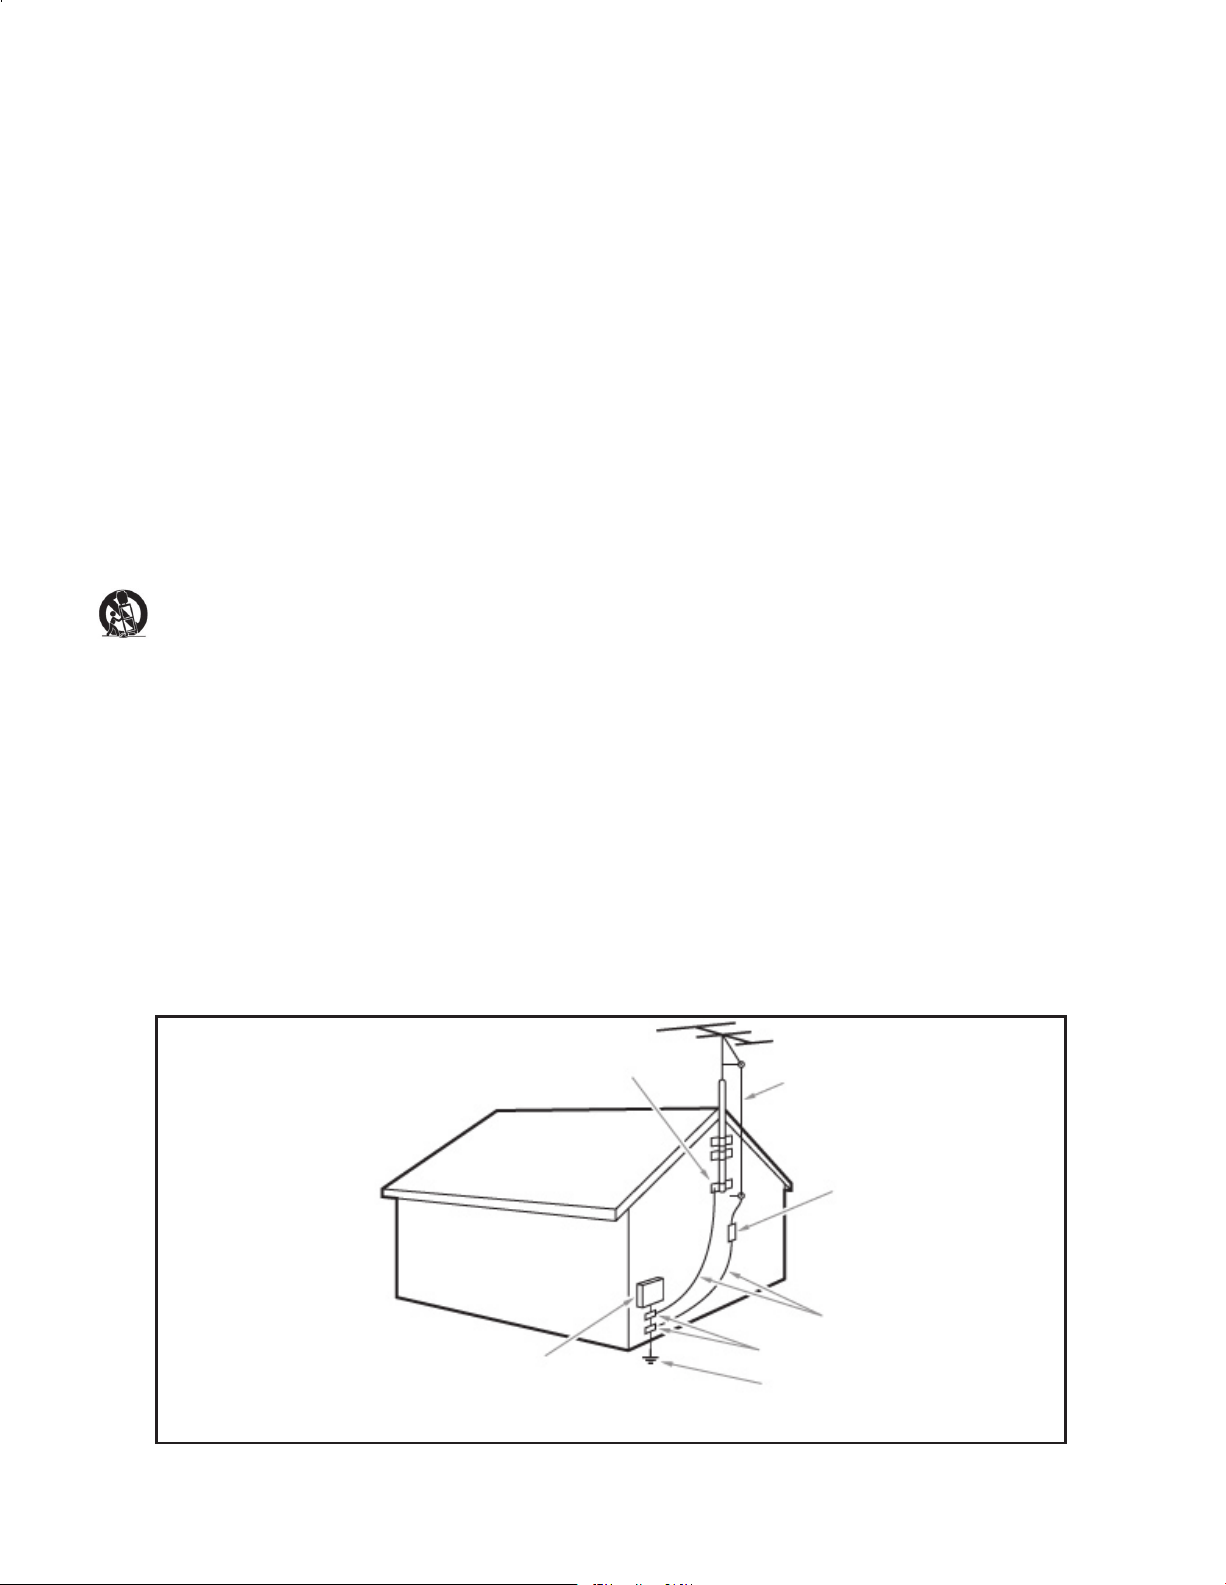
AE: DVD Player/Recorder/VCR
Back of DVD/VCR
Arrière du DVD/
Magnétoscope
Parte posterior del
DVD/VCR
C
AV Button
Bouton AV
Botón AV
Remote Control
Télécommande
Control remoto
Back of TV
Arrière du
Téléviseur
Parte posterior
del TV
S-Video Input
Entrée S-Vidéo
Entrada S-Video
(
)
AUDIO OUT
(DIGITAL)
CABLE / ANTENNA
(
)
AUDIO OUT
(DIGITAL)
Add for DVD
Recording
C
USB
USB
AUDIO
IN
VIDEO
IN
S-VIDEO
IN
USB
26PF5321D
32PF5321D
32PF7321D
32PF7421D
42PF5421D
42PF7421D
42PF5321D
42PF7321D
50PF7321D
37PF7321D
26PF5351D
3
to TV
FR: Lecteur DVD/Enregistreur
DVD/Magnétoscope vers le
téléviseur
ES: Del reproductor/grabador de
DVD/VCR al TV
S-Video
/S-Vidéo
/S-Video
OR/OU/O
Composite Audio-video
/Audio-Vidéo composite
/Audio-Video compuesto
AE: Video Camera /Games
4
Console to TV
FR: Caméra vidéo/Console
de jeux vers téléviseur
ES: De la cámara de video/
Consola de juegos al TV
Composite Audio-video
/Audio-Vidéo composite
/Audio-Video compuesto
Details refer to page 22.
/Détails, consultez le page 22.
/Para detalles, consulte la pag. 22.
Details refer to page 22.
/Détails, consultez le page 22.
/Para detalles, consulte la pag. 22.
For Installation and USB/headphone details, refer to page 23.
/Détails, consultez le page 23.
/Para detalles, consulte la pag. 23.
Page 7

Registering your model with PHILIPS makes you eligible for all of the valuable benefits
listed below, so don’t miss out. Complete and return your Product Registration Card at
once to ensure:
Return your Warranty Registration card today to
ensure you receive all the benefits you’re entitled to
For Customer Use
Enter below the Serial No., which is
located on the rear of the cabinet. Retain
this information for future reference.
Model No. __________________________
Serial No. __________________________
Congratulations on your purchase, and welcome to the
“family!”
Dear PHILIPS product owner:
Thank you for your confidence in PHILIPS.You’ve selected one
of the best-built, best-backed products available today.We’ll do
everything in our power to keep you happy with your
purchase for many years to come.
As a member of the PHILIPS “family,” you’re entitled to
protection by one of the most comprehensive warranties and
outstanding service networks in the industry.
What’s more, your purchase guarantees you’ll receive all the
information and special offers for which you qualify, plus easy
access to accessories from our convenient home shopping
network.
Most importantly, you can count on our uncompromising
commitment to your total satisfaction.
All of this is our way of saying welcome - and thanks for
investing in a PHILIPS product.
P.S. To get the most from your PHILIPS purchase, be
sure to complete and return your Product
Registration Card at once.
Know these
safety symbols
This “bolt of lightning” indicates
uninsulated material within your unit
may cause an electrical shock. For the safety
of everyone in your household, please do not
remove product covering.
The “exclamation point” calls attention
to features for which you should read
the enclosed literature closely to prevent
operating and maintenance problems.
WARNING:To reduce the risk of fire or
electric shock, this apparatus should not be
exposed to rain or moisture and objects
filled with liquids, such as vases, should not
be placed on this apparatus.
CAUTION: To prevent electric shock,
match wide blade of plug to wide slot, fully
insert.
ATTENTION :Pour éviter les chocs
électriques, introduire la lame la plus large de
la fiche dans la borne correspondante de la
prise et pousser jusqu’au fond.
CAUTION
RISK OF ELECTRIC SHOCK
DO NOT OPEN
CAUTION: TO REDUCE THE RISK OF ELECTRIC SHOCK, DO NOT
REMOVE COVER (OR BACK). NO USER-SERVICEABLE PARTS
INSIDE. REFER SERVICING TO QUALIFIED SERVICE PERSONNEL.
* Proof of Purchase
Returning the enclosed card
guarantees that your date of
purchase will be on file, so no
additional paperwork will be
required from you to obtain
warranty service.
* Product Safety
Notification
By registering your product you’ll
receive notification - directly
from the manufacturer - in the
rare case of a product recall or
safety defect.
* Additional Benefits of
Product Ownership
Registering your product
guarantees that you’ll receive all
of the privileges to which you’re
entitled, including special moneysaving offers.
Visit our World Wide Web Site at http://www.philips.com
t
s
Page 8
IMPORTANT SAFETY INSTRUCTIONS
Read before operating equipment
1. Read these instructions.
2. Keep these instructions.
3. Heed all warnings.
4. Follow all instructions.
5. Do not use this apparatus near water.
6. Clean only with a dry cloth.
7. Do not block any of the ventilation openings. Install in accordance with
the manufacturers instructions.
8. Do not install near any heat sources such as radiators, heat registers,
stoves, or other apparatus (including amplifiers) that produce heat.
9. Do not defeat the safety purpose of the polarized or grounding-type plug.
A polarized plug has two blades with one wider than the other. A
grounding type plug has two blades and third grounding prong. The wide
blade or third prong are provided for your safety. When the provided
plug does not fit into your outlet, consult an electrician for replacement
of the obsolete outlet.
10. Protect the power cord from being walked on or pinched particularly at
plugs, convenience receptacles, and the point where they exit from the
apparatus.
11. Only use attachments/accessories specified by the manufacturer.
12. Use only with a cart, stand, tripod, bracket, or table specified by
the manufacturer, or sold with the apparatus. When a cart is
used, use caution when moving the cart/apparatus combination
to avoid injury from tip-over.
13. Unplug this apparatus during lightning storms or when unused for long
periods of time.
14. Refer all servicing to qualified service personnel. Servicing is required
when the apparatus has been damaged in any way, such as power-supply
cord or plug is damaged, liquid has been spilled or objects have fallen
into apparatus, the apparatus has been exposed to rain or moisture,
does not operate normally, or has been dropped.
15. This product may contain lead or mercury. Disposal of these materials
may be regulated due to environmental considerations. For disposal or
recycling information, please contact your local authorities or the
Electronic Industries Alliance:www.eiae.org.
16. Damage Requiring Service - The appliance should be serviced by
qualified service personnel when:
A. The power supply cord or the plug has been damaged; or
B. Objects have fallen, or liquid has been spilled into the appliance; or
C. The appliance has been exposed to rain; or
D. The appliance does not appear to operate normally or exhibits a
marked
change in performance; or
E. The appliance has been dropped, or the enclosure damaged.
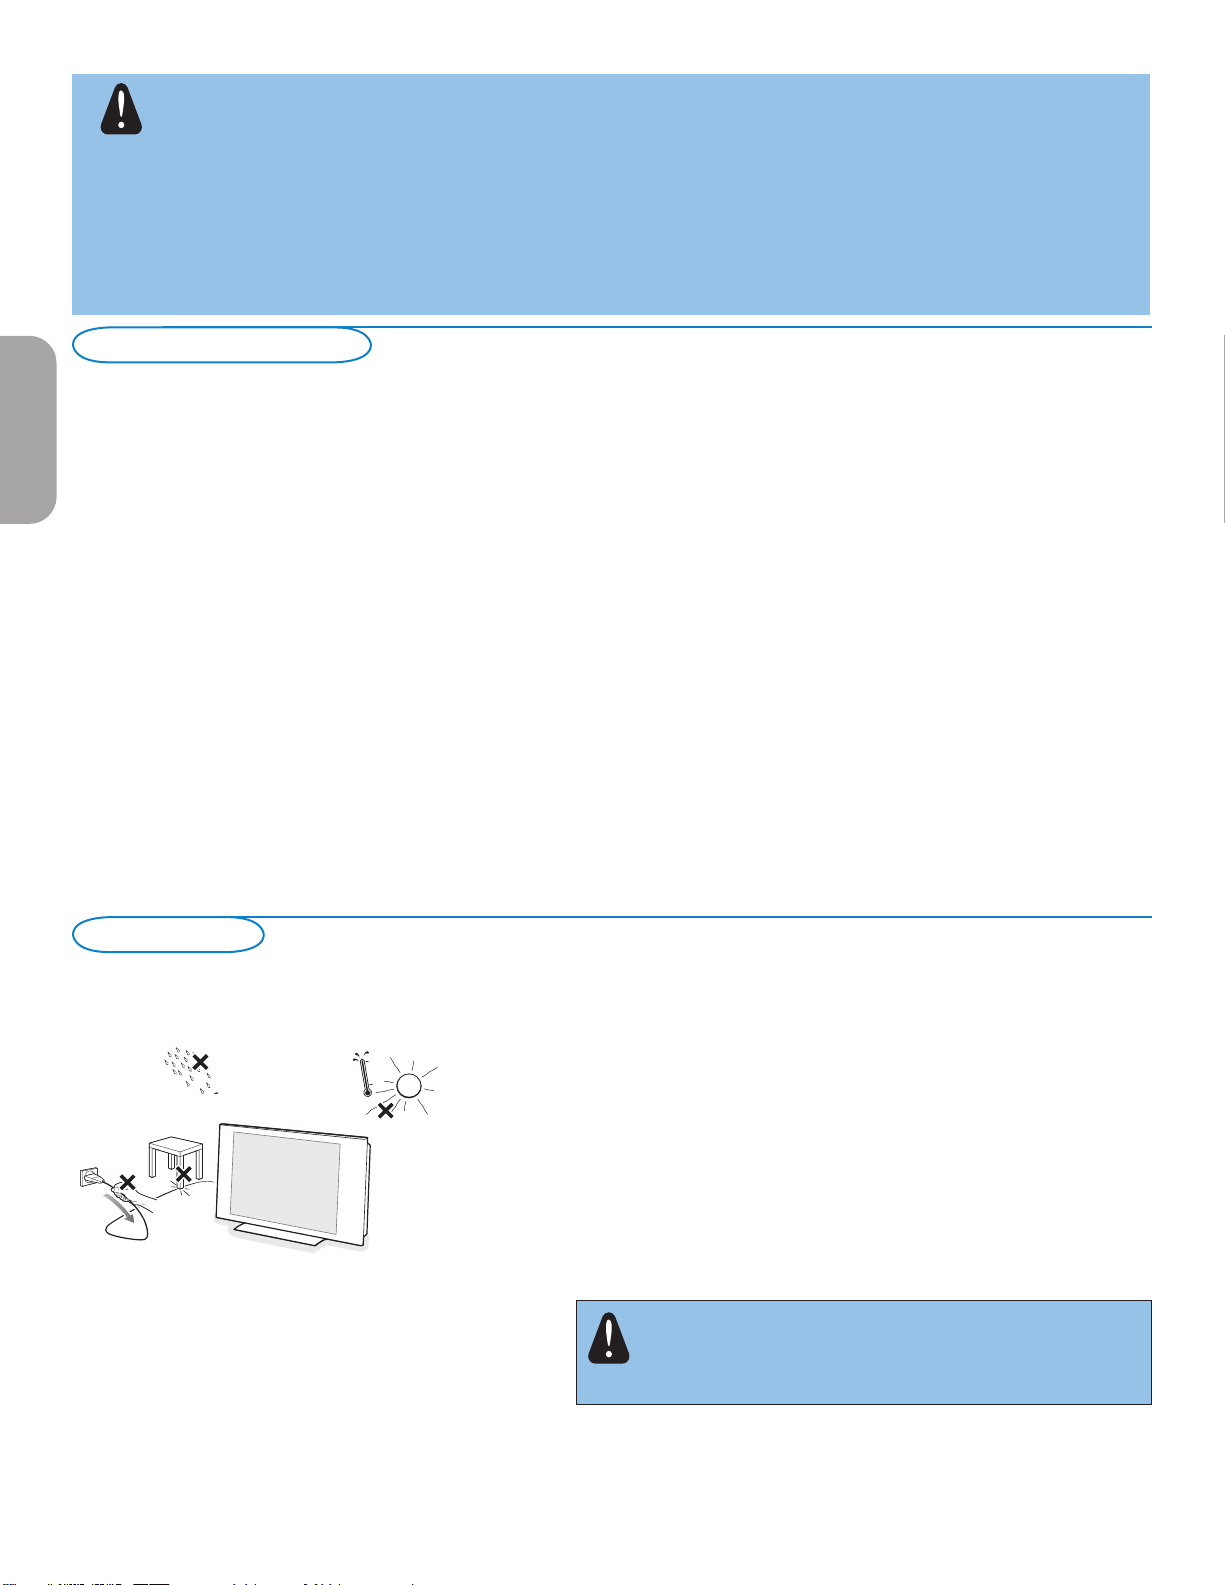
17. Tilt/Stability - All televisions must comply with recommended
international global safety standards for tilt and stability properties of its
cabinets design.
• Do not compromise these design standards by applying excessive pull
force to the front, or top, of the cabinet which could ultimately
overturn the product.
• Also,do not endanger yourself, or children, by placing electronic
equipment/toys on the top of the cabinet. Such items could
unsuspectingly fall from the top of the set and cause product damage
and/or personal injury.
18. Wall or Ceiling Mounting - The appliance should be mounted to a
wall or ceiling only as recommended by the manufacturer.
19. Power Lines - An outdoor antenna should be located away from
power lines.
20. Outdoor Antenna Grounding - If an outside antenna is connected to
the receiver, be sure the antenna system is grounded so as to provide
some protection against voltage surges and built up static charges.
Section 810 of the National Electric Code, ANSI/NFPA No. 70-1984,
provides information with respect to proper grounding of the mats and
supporting structure grounding of the lead-in wire to an antenna discharge unit, size of grounding connectors, location of antenna discharge unit, connection to grounding electrodes and requirements for
the grounding electrode. See Figure below.
21. Objects and Liquid Entry - Care should be taken so that objects do
not fall and liquids are not spilled into the enclosure through openings.
a) Warning: To reduce the risk of fire or electric shock, this apparatus
should not be exposed to rain or moisture and objects filled with
liquids, such as vases should not be placed on this apparatus.
22. Battery Usage CAUTION - To prevent battery leakage that may
result in bodily injury, property damage, or damage to the unit:
• Install all batteries correctly, with + and - alignment as marked on the
unit.
• Do not mix batteries (old and new or carbon and alkaline, etc.)
• Remove batteries when the unit is not used for a long time.
EXAMPLE OF ANTENNA GROUNDING AS PER
NATIONAL ELECTRICAL CODE (NEC)
GROUND CLAMP
ANTENNA LEAD IN WIRE
ANTENNA DISCHARGE UNIT
(NEC SECTION 810-20)
GROUNDING CONDUCTORS
(NEC SECTION 810-21)
GROUND CLAMPS
POWER SERVICE GROUNDING
ELECTRODE SYSTEM
(NEC ART 250, PART H)
ELECTRIC SERVICE EQUIPMENT
Note to the CATV system installer: this reminder is provided to call the CATV system installer’s attention to Article 820-40 of
the NEC that provides guidelines for proper grounding and, in particular, specifies that the cable ground shall be connected to the
grounding system of the building, as close to the point of cable entry as practical.
Page 9

Contents
A Guide to Digital TV ........................................................................ 2
Preparation ...........................................................................................2
Use of the remote control ................................................................ 5
Control Buttons on the TV .............................................................. 6
My Content ........................................................................................................7
To use the menus ................................................................................ 7
Introduction ..........................................................................................7
How to navigate through the Settings menus ....................................7
Demo....................................................................................................... 8
Installation ............................................................................................. 8
Select the menu language.....................................................................8
Store TV channels ................................................................................8
Weak channel installation ....................................................................9
Software upgrade ..................................................................................9
Setup menu .................................................................................................10
Preferences ........................................................................................ 10
- Picture/sound preferences .......................................................... 10
• Auto surround ....................................................................... 10
- Features preferences ................................................................... 10
• Caption service ...................................................................... 10
• Digital caption service ........................................................... 11
• Digital caption options ........................................................... 11
- Menu preferences ........................................................................ 12
• OSD ........................................................................................ 12
• Show emergency alerts (EAS) ............................................... 12
• Set/Change PIN ...................................................................... 12
- Reset AV settings ......................................................................... 12
Source ................................................................................................ 13
Clock .................................................................................................. 13
- Auto clock mode ......................................................................... 13
- Auto clock channel ...................................................................... 13
- Time - Day ................................................................................... 13
- Time zone .................................................................................... 13
- Daylight saving ............................................................................. 13
TV menu ..............................................................................................14
Picture menu ...................................................................................... 14
- Auto picture ................................................................................. 14
- Contrast ....................................................................................... 14
- Brightness ..................................................................................... 14
- Color ............................................................................................ 14
- Sharpness...................................................................................... 14
- Color temperature ...................................................................... 14
- Digital processing ......................................................................... 14
- Dynamic contrast ......................................................................... 14
- DNR (Digital Noise Reduction) .................................................. 15
- Color enhancement ..................................................................... 15
- Tint ............................................................................................... 15
- Picture format .............................................................................. 15
- Active Control ............................................................................. 15
Sound menu ....................................................................................... 15
- Auto sound ................................................................................. 15
- Volume ........................................................................................ 15
- Balance ........................................................................................ 15
- Headphone volume .................................................................... 16
- Sound mode ................................................................................ 16
- Alternate audio ........................................................................... 16
- Digital Audio Language ............................................................... 16
- Mono/Stereo ............................................................................... 16
- AVL (Automatic Volume Leveler) ............................................. 16
- Delta volume ............................................................................... 16
Features menu ................................................................................... 16
- Closed captions .......................................................................... 16
- Sleeptimer ................................................................................... 16
Channels menu .................................................................................. 17
- Lock after .................................................................................... 17
- Channel lock ............................................................................... 17
- TV ratings lock ............................................................................ 17
- Movie Ratings Lock ..................................................................... 18
- Preferred channels ...................................................................... 19
- Download rating table ................................................................ 19
- Region ratings lock ..................................................................... 19
- Clear region ratings .................................................................... 20
Connect Accessory Devices ...........................................................20
Set Top Box to TV ............................................................................ 20
Progressive Scan DVD Player/Recorder to TV ............................ 21
DVD Player/DVD Recorder/VCR to TV ......................................... 21
Video Camera/Games Console to TV ............................................. 22
Side connections - USB/Headphone .......................................... 22
Digital Surround receiver ............................................................ 22
Perform Installation ........................................................................... 23
Multimedia browser .........................................................................23
Multimedia Browser menu ................................................................ 24
Record with your recorder .............................................................24
Record a TV program ........................................................................ 24
To select connected devices ..........................................................25
Audio and video equipment buttons ...........................................25
Troubleshooting Tips .......................................................................26
Tips ........................................................................................................27
Glossary ................................................................................................28
Specifications ......................................................................................29
Annex 1 - Philips TV software upgrade with portable
memory ................................................................................................31
Annex 2 - Philips TV Slideshow Format with background
music .....................................................................................................33
Annex 3 - Philips TV USB ..............................................................35
EnglishFrançaiseEspañol
Care of the screen
See Tips, p. 26.
R End of life directives
Philips is paying a lot of attention to produce environmentally-friendly products in green focal areas. Your new TV
contains materials which can be recycled and reused. At the end of its life specialized companies can dismantle the
discarded TV to concentrate the reusable materials and to minimize the amount of materials to be disposed off.
Please ensure you dispose off your old TV according to local regulations.
Recycling
The materials used in your set are either reusable or can be recycled.
R
To minimise environmental waste,specialist companies collect used
appliances and dismantle them after retrieving any materials that can
be used again (ask your dealer for further details).
1
Page 10
Warning concerning stationary images on the TV screen (only for Plasma Displays)
A characteristic of Plasma Display Panels is that displaying the same image for a long time can cause a permanent
after-image to remain on the screen. This is called phosphor burn in.
Normal use of the TV should involve the showing of pictures that contain constantly moving and changing images that
fill the screen.
Please refer to pg 27 for details.
THIS IS NOT INCLUDED IN THE PHILIPS LIMITED WARRANTY.
A Guide to Digital TV
What is Digital Television (DTV)?
Digital Television (DTV) is relatively new type of broadcasting that promises to transform television viewing into a whole new
experience. Digital technology is used to capture images and sound to deliver a better picture quality. DTV technology is also
EnglishFrançaiseEspañol
capable of multicasting and interactive capabilities.
There are many levels of digital television quality. The most common are:
Standard Definition TV (SDTV)
SDTV is the basic level of quality display and resolution for both analog and digital. Transmission of SDTV can be in the traditional
(4:3) or widescreen (16:9) format.
Enhanced Definition TV (EDTV)
EDTV is better in picture quality than analog television. The formats for EDTV are 480p widescreen (16:9) or traditional (4:3).
EDTV is in the middle range quality between SDTV and HDTV.
High Definition TV (HDTV)
HDTV has the highest quality for digital broadcast formats. Its resolution is widescreen format (16:9). Combined with digitally
enhanced sound technology, HDTV sets new standards for sound and picture quality in television.
DTV is by far a more flexible and efficient technology than the analog broadcast system. Analog broadcasts can only provide one
program at a time. Digital television can broadcast a high definition program or more than one standard definition program at the
same time. This is often referred to as "multicasting". Digital television can also give you interactive video and data services through
a single digital channel.
Preparation
Do not insert the power plug in a wall socket before all connections
are made.
Place the TV on a solid surface or place the TV on the supplied stand. For
the mounting instructions of the stand, see the Cover Page.
For ventilation, leave at least 4” to 6” free all around the TV. Do not
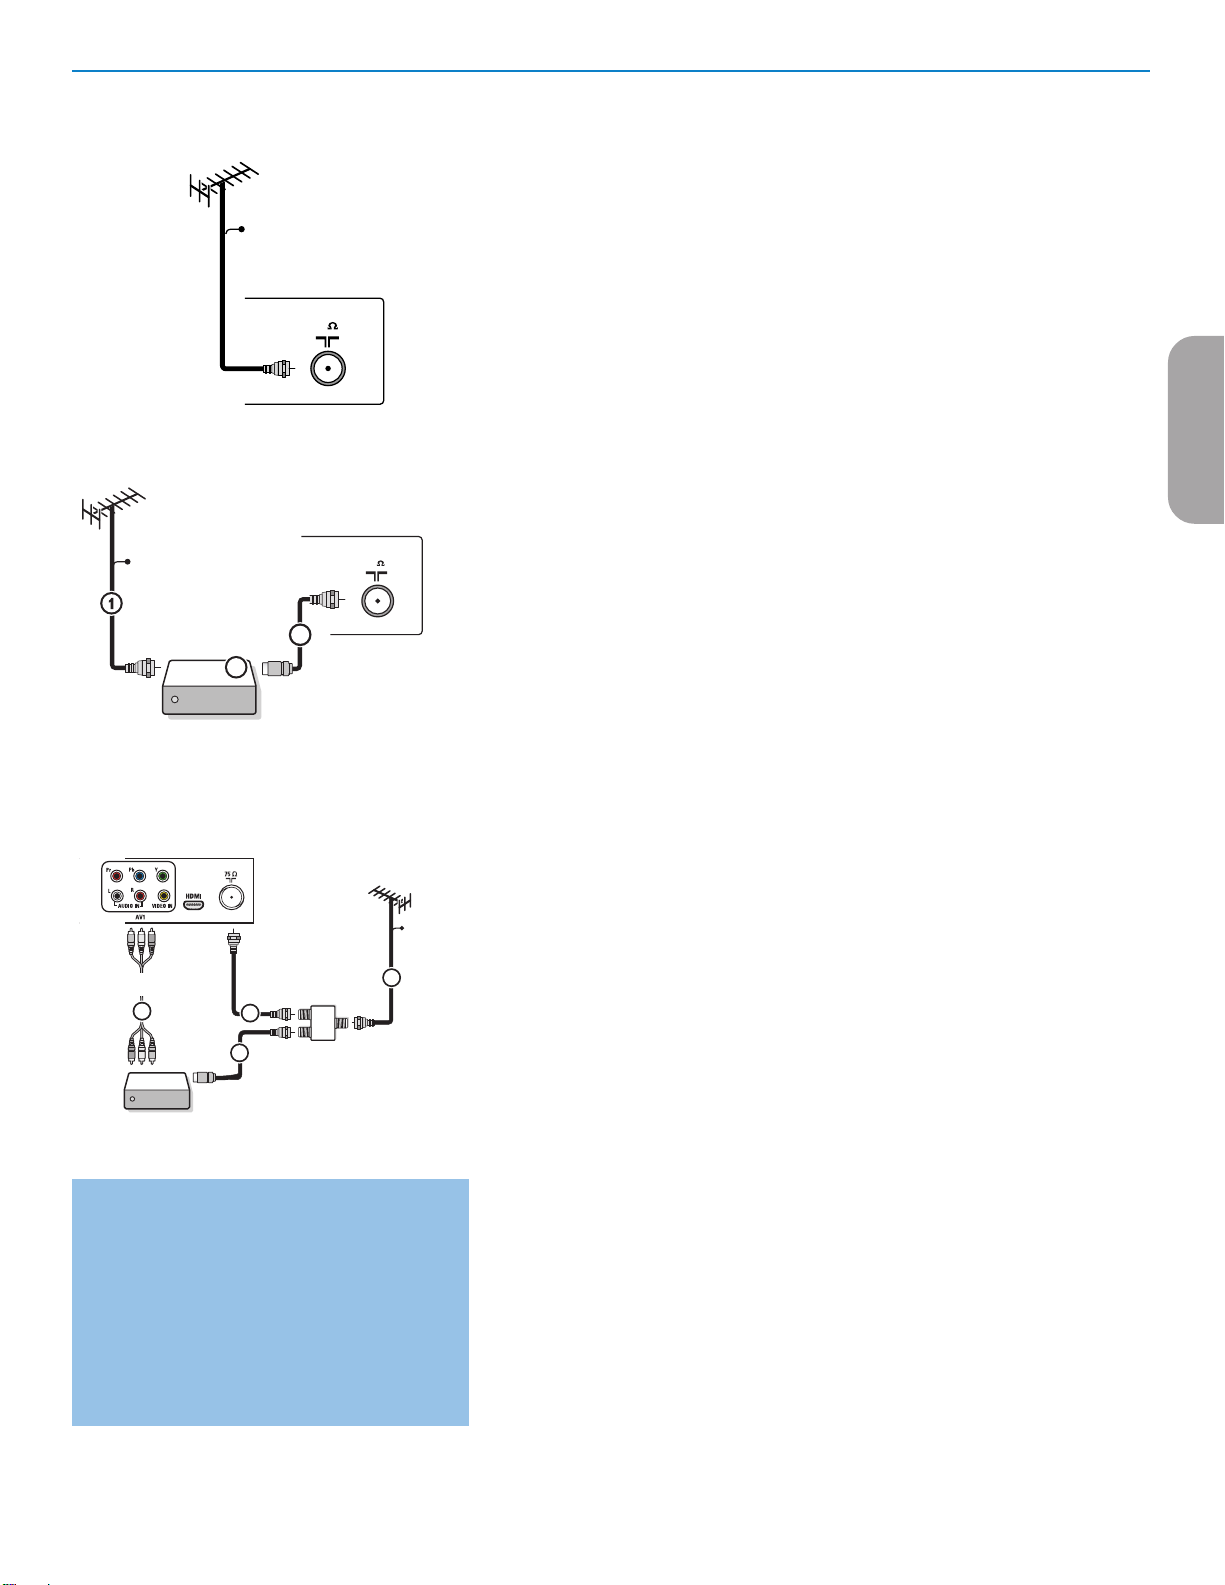
place the TV on a carpet. To prevent any unsafe situations, no naked flame
sources, such as lighted candles, should be placed in the vicinity.
Avoid heat, direct sunlight and exposure to rain or water. The equipment
shall not be exposed to dripping or splashing.
Mounting the TV on the wall
This TV is compatible with the VESA wall mounting standard. Please
contact your local electronics retailer for a VESA compliant bracket to wall
mount this TV.
Caution: Installing the TV requires special skill that should only be
performed by qualified personnel. You should not attempt to do
the work yourself. Philips bears no responsibility for improper
mounting or mounting that results in accident or injury.
2
Page 11
75
CABL E
75
Set-Top Box
OUT
OUTPUT
TO TV
IN
CABL E
3
2
SIGNAL
SPLITTER
Set-Top Box
OUT IN
3
2
CABLE
1
AV1 :
4
L + R + VIDEO
& Basic connections to the TV
Your integrated digital TV automatically decodes and displays the four basic DTV
picture resolution standards.
- SDTV (Standard Definition TV) are broadcast as 480i (480-line interlaced) or
480p (480-line progressive scan) video.
- HDTV (High-Definition TV) are broadcast either in the 1080i or 720p formats,
always with a widescreen picture.
Note: Progressive scan video (p) is more like that you see in a movie theater. Images are
much more distinct and free of flicker, and motion is smoother.
Next to analog NTSC broadcast reception, your TV has an integrated High
Definition TV tuner which receives, decodes and displays terrestrial ATSC and
unscrambled cable (QAM) signals.
HDTV quality is only reproduced when a broadcaster or cable provider broadcasts
HDTV signals.
Watching Cable TV programs that don’t
require the cable box
Since you’ve connected the cable TV signal
directly to the TV’s tuner, you can also watch the
unscrambled programs by simply tuning to the
desired channel. You must first use Autoprogram,
however, to store channels in the TV’s memory.
See page 8.
Note: This connection will supply stereo sound to
the TV if it is being broadcast by the station you are
watching.
There are 2 ways to get HDTV content:
- via cable,
- via antenna.
Note: This drawing is used wherever you can connect cable or antenna.
- Cable TV
Connect the cable TV signal to the CABLE/ANTENNA 75 Ω x jack at the bottom
of the TV. See page 8 for details on using Autoprogram to store channels in the
TV’s memory.
Note: this connection will supply stereo sound to the TV if it is being broadcast by the
station you are watching.
- Cable box with RF IN/OUT
• Connect the incoming cable TV signal to the cable IN jack 1 on the back of
the cable box.
• Connect a coaxial cable (not supplied) from the TO TV jack on the back of the
cable box to the CABLE/ANTENNA 75 Ω x jack 2 at the bottom of the TV.
Note: Your cable box may have a different label for the TO TV jack, such as
OUTPUT or OUT.
• Set the OUTPUT CH switch 3 of the cable box to CH 3 or 4 (whichever is
correct for your cable box), then tune the TV to the corresponding channel.
Once tuned, change channels at the cable box, not the TV.
Note: This connection will not supply stereo sound to the TV. The reason is that the RF
output on a cable box - labeled TO TV, OUT or OUTPUT for example - will not send a
stereo signal to the tuner (VHF/UHF) input on a TV.
- Cable box with A/V outputs
• Connect the incoming cable TV signal 1 to a signal splitter (not supplied).
The signal splitter enables you to avoid having to use the TO TV jack on the
back of the cable box. This jack will not supply stereo sound to the TV.
Note: Your cable box may have a different label for the TO TV jack, such as
OUTPUT or OUT.
• Connect a coaxial cable (not supplied) to a connector on the signal splitter and
to the CABLE/ANTENNA 75 Ω x jack 2 on the TV.
• Connect another coaxial cable (not supplied) to a connector on the signal
splitter and to the cable IN jack 3 on the back of the cable box.
• Connect A/V cables (not supplied) to the VIDEO and AUDIO L and R outputs
on the back of the cable box and to the AV2 video (labeled VIDEO) and
AUDIO (labeled L and R) jacks 4 on the back of the TV.
• To view programs from your cable box, first press the AV+ button on the
remote control.
• Press the cursor down or up buttons until the AV2 signal source is selected.
• Press the OK button to confirm your selection. The AV2 input source
becomes current for the viewing of cable TV programs through your cable box.
Note: If your cable box Audio/Video outputs will not supply video and stereo audio to
the TV, you will need to make the connection shown above in the example “Cable box
with RF IN/OUT”.
EnglishFrançaiseEspañol
3
Page 12

75
CABL E
EnglishFrançaiseEspañol
- Cable box with S-Video, component video (YPbPr) or HDMI connectors
See Connect Accessory Devices, p. 20.
- Antenna
Via antenna you can watch whatever DTV programs being broadcast in your
area for free.
If you’re not sure what HDTV programming is available in your area, contact
your local content provider or your local electronics store retailer.
Broadcasters are in the middle of a transition from analog to digital TV. This
means that a given broadcaster will have two channels on the air, one analog and
one digital.
Connect the incoming antenna signal to the CABLE/ANTENNA 75 Ω
x jack at the bottom of the TV. See page 8 for details on using Autoprogram
to store channels in the TV’s memory.
Note: This connection will supply stereo sound to the TV if it is being broadcast by the
station you are watching.
- Direct Broadcast Satellite (DBS)
Satellite systems offer many of the same premium channels as cable systems, and
often at a lower price. To get these channels, you’ll need to install a small dish
antenna outside.
There are 2 main DBS systems: DirecTV & DishNetwork. These systems require
separate, proprietary set top receiver boxes to decode their signals and send
them to your digital TV set. These boxes may include a digital TV tuner for offair DTV broadcasts.
Satellite broadcasters also provide major local channels, depending on the
market in which you live.
DBS also provides service in areas not covered by cable because they are in
rural areas or other areas not passed by a cable line.
DBS also allows you to watch pay-per-view events.
é Before installing your TV or before hanging it on the wall, connect all your
accessory devices. See p. 20.
“ Refer to the bottom of the set for the correct operation voltage. Insert the power
cord in the wall socket.
Consult your local dealer if your mains supply is different. To prevent damaging
the mains (AC) cord which could cause a fire or electric shock, do not place the
TV on the cord.
‘ Remote control:
Insert the 2 batteries supplied (Type R6-1,5V). Be sure the (+) and (-) ends of the
batteries line up correctly (inside of case is marked.)
The batteries supplied do not contain the heavy metals mercury and cadmium. Please
check on how to dispose of exhausted batteries according to local regulations.
( Turn the TV on:
Press the power switch B at the side of the TV. You may also press +CH/PAGE-
or POWER button on the remote control.
An indicator on the front of the TV lights up.
First time installation
Note: The first time (and only the first time) you turn on your set you see an installation introduction screen. The Installation procedure consists of a
series of screens that guide you through the process.
& After an introduction screen, you are asked to select a language of the TV’s on-screen-menus. (The text of the header and the info on screen
continuously change language.)
é Press the cursor up/down to highlight your language.
“ Press the OK button.
‘ Follow the on-screen instructions to proceed.
Note: Once you completed the initial installation procedure you can access the screens from the Settings menu. See p. 7.
4
Page 13
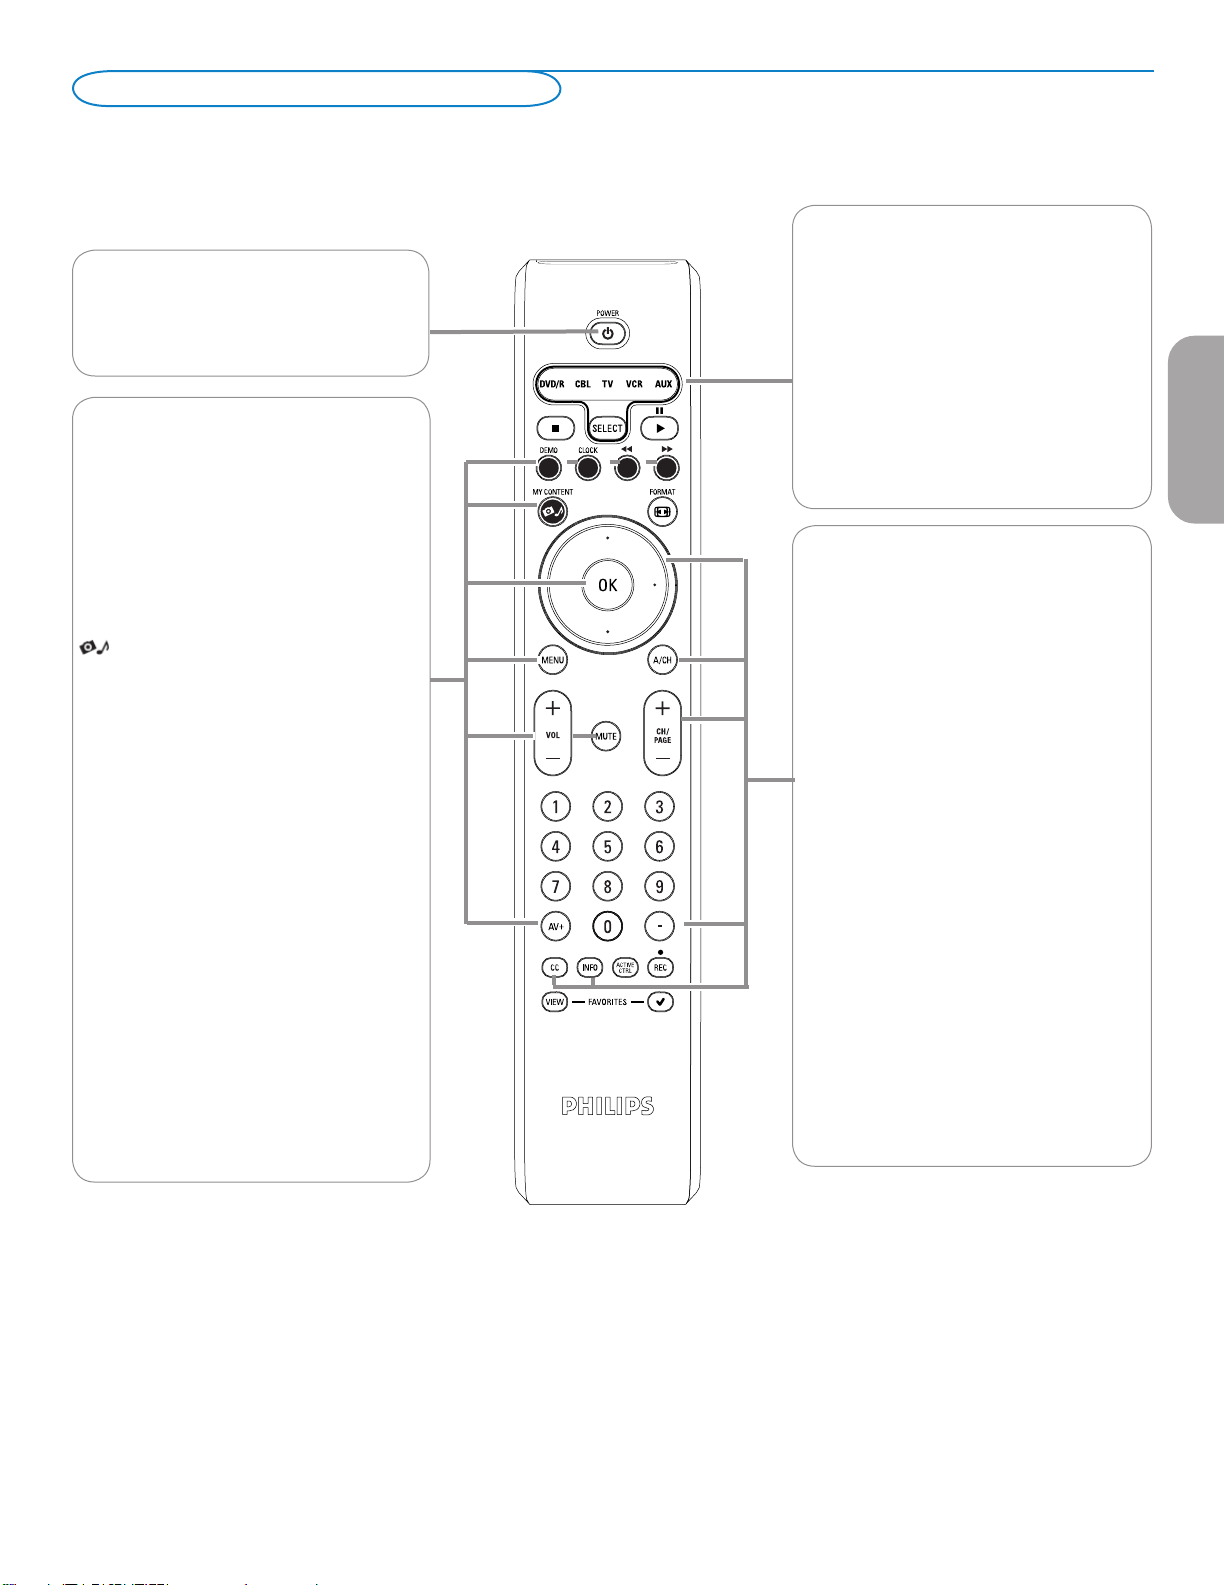
Use of the remote control
Note: For most buttons pressing a button once will activate the function. Pressing a second time will de-activate it.
When a button enables multiple options, a small list will be shown. Press repeatedly to select the next item in the list. The list will be removed automatically
after 6 seconds or press OK to remove immediately.
Note : Although this remote control can be used
for some other Philips products, it is not an
POWER
Press to turn on/off the TV from or to
standby mode.
The TV is never powered off completely unless it is
physically unplugged.
DEMO Demo menu on/off
See p. 8.
CLOCK on/off
Time display (for max. 10 minutes)
universal remote control.
DVD/R CBL TV VCR AUX
Press the SELECT button repeatedly to select
one of the system modes in which the remote
control can be used to operate that Philips
device.
If no action is undertaken within 60 seconds,
the remote control returns to TV mode.
After an action in the selected system mode
the remote control will remain in this mode
for 60 seconds and will then return to TV
mode.
EnglishFrançaiseEspañol
Color buttons
When functions attached to the color
buttons, the color buttons are shown on
screen.
MY CONTENT
Press to display the My Content menu on or
off, see p. 7.
OK
- to activate a setting
- to display the list of channels stored
(according to the selection made in the
Installation mode (Antenna or Cable), p. 8.
- starts playing content in the Home
Multimedia Browser application, p. 22.
MENU
Settings menu on/off, see p. 7.
Exit menu from sub-menu.
VOL Volume
Press + or - to adjust the volume.
MUTE
Interrupt the sound or restore it.
AV+
Press this button repeatedly to select the
source - AV1, AV2, AV3, HDMI, SIDE or TV
when in TV mode, according to where you
connected the accessory devices (p. 20).
Cursor buttons
Press the cursor buttons up/down, left/right to
navigate through the menus.
CH/PAGE Channel selection
- To browse through the TV channels or
sources stored in the preferred channel list
(see p. 19).
- To select between Antenna or Cable TV
channels, first make your selection in the
Settings menu, see, p. 7.
Note: You don’t have to start the installation
again once you have searched for and stored
the available TV channels.
A/CH
Press to alternate between the currently
viewed channel and the previously viewed
channel.
-
Press the dash (-) for digital channels.
INFO
Display information: Press to display (when
available) information about the selected TV
channel and program or accessory device.
CC
Press to display the transmitted closed
captions text on the screen.
To be continued.
5
Page 14
ENTRY_control_2005.eps
VOLUME
CHANNEL
MENU
POWER
.
OR
VOLUME
CHANNEL
MENU
POWER
.
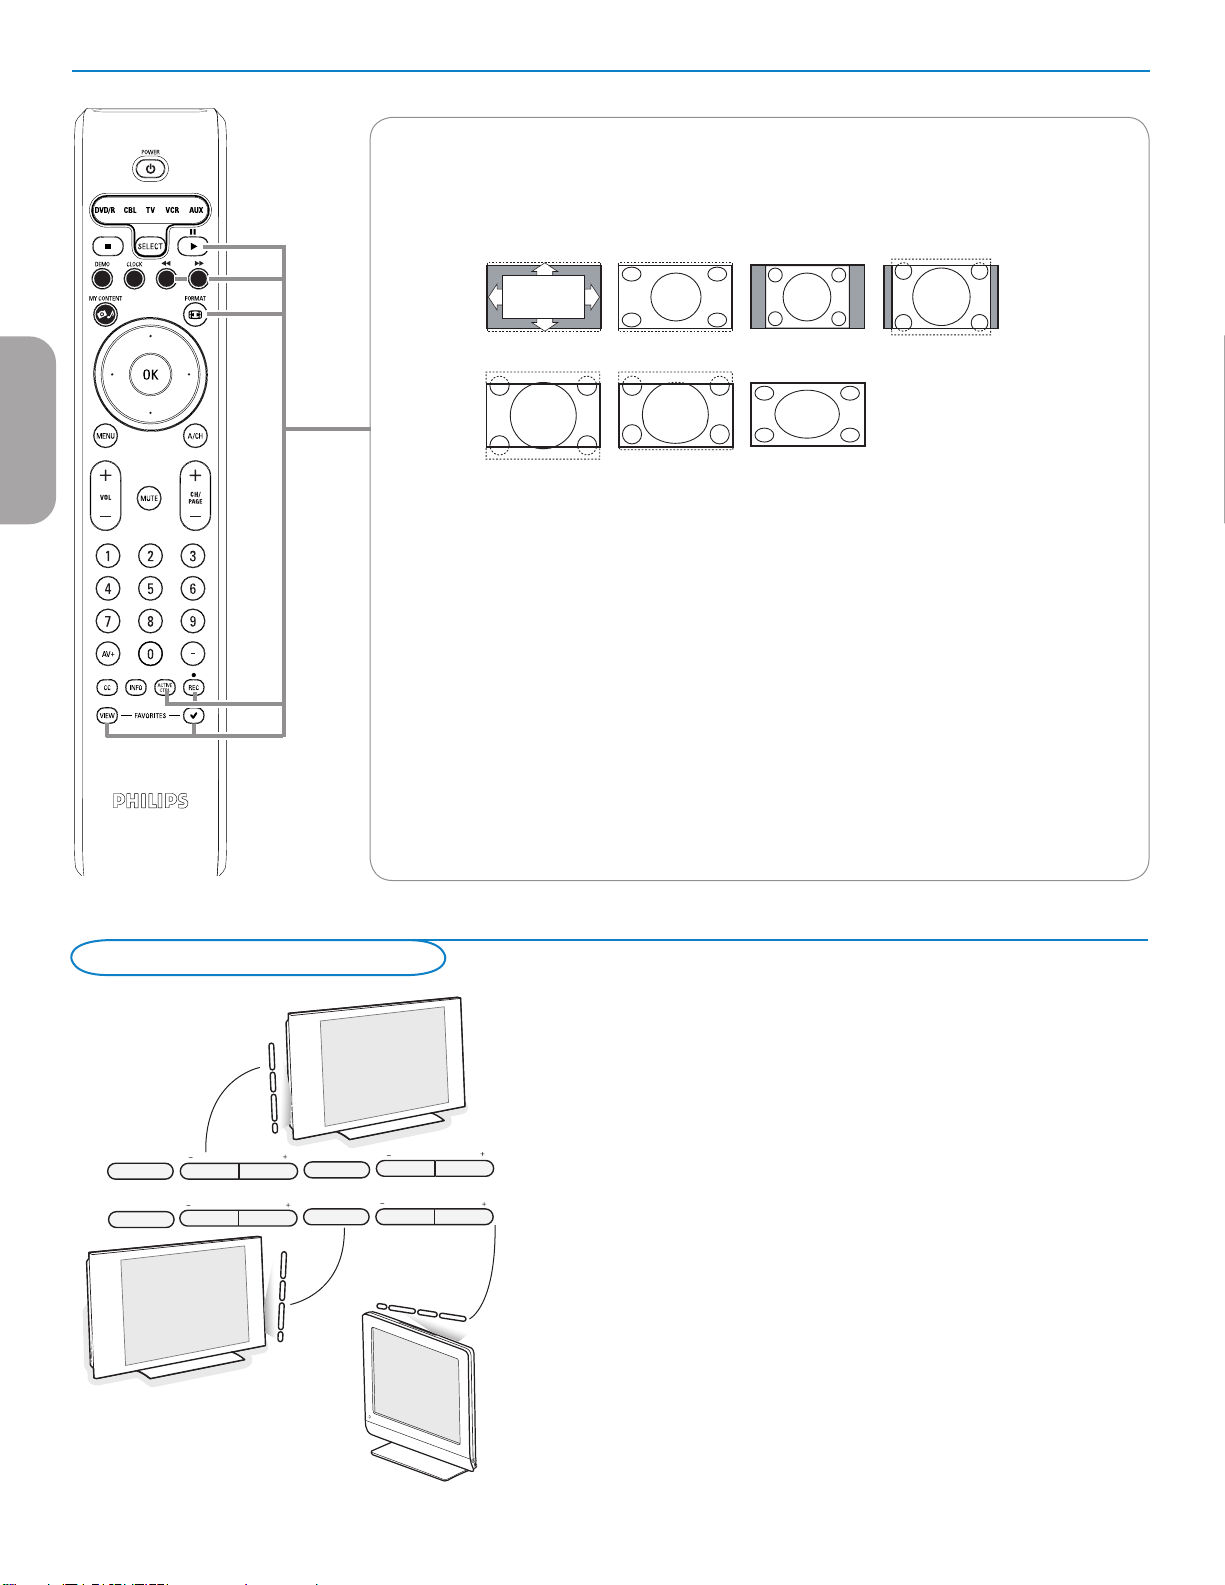
FORMAT
Press this button to summon a list of available display formats (depending on the receiving signal). This
lets you choose the display format of your preference.
Press this button repeatedly to select another picture format: Automatic, Super Zoom, 4:3, Movie
expand 14:9, Movie expand 16:9, 16:9 subtitle, Wide screen.
Automatic Super zoom 4:3 Movie expand 14:9
EnglishFrançaiseEspañol
Control Buttons on the TV
32PF5321D
32PF7321D
32PF7421D
Movie expand 16:9 16:9 subtitle Wide screen
Automatic makes the picture fill the screen as much as possible.
Super zoom removes the black bars on the sides of 4:3 programs with minimal distortion.
When in Movie expand 14:9, Movie expand 16:9 or Super zoom picture format, you can make subtitles
visible with the cursor up/down.
Note: With HD sources not all screen formats will be available.
ACTIVE CONTROL
Press to allow TV continuously measure and corrects all incoming signals in order to provide the best
picture possible.
FAVORITES
• VIEW To display a list of all channels marked as favorite (incl. subchannels).
• 3 To add or remove a channel in the favorite list of TV channels.
®Ò‡†ºπ
• Audio and Video equipment buttons. See p. 24.
• Multimedia browser functional buttons. See p. 23.
Should your remote be lost or broken you can still change some of the basic
settings with the buttons on your TV.
Press the power switch B to switch the TV on.
Press:
• the + VOLUME - button to adjust the volume;
• the + CHANNEL - buttons to select the TV channels or sources.
37PF7321D
42PF5321D
42PF5421D
42PF7321D
42PF7421D
50PF7321D
26PF5321D
26PF5351D
The MENU button can be used to summon the Settings menu without the
remote control.
Use:
•
the + VOLUME - buttons to select up/down menu items and the + CHANNEL -
buttons to select left/right menu items;
• the MENU button to confirm your selection.
Note:
When activated via the MENU button on the TV, only Exit lets you dismiss the menu.
Navigate to Exit and press the MENU button.
6
Page 15
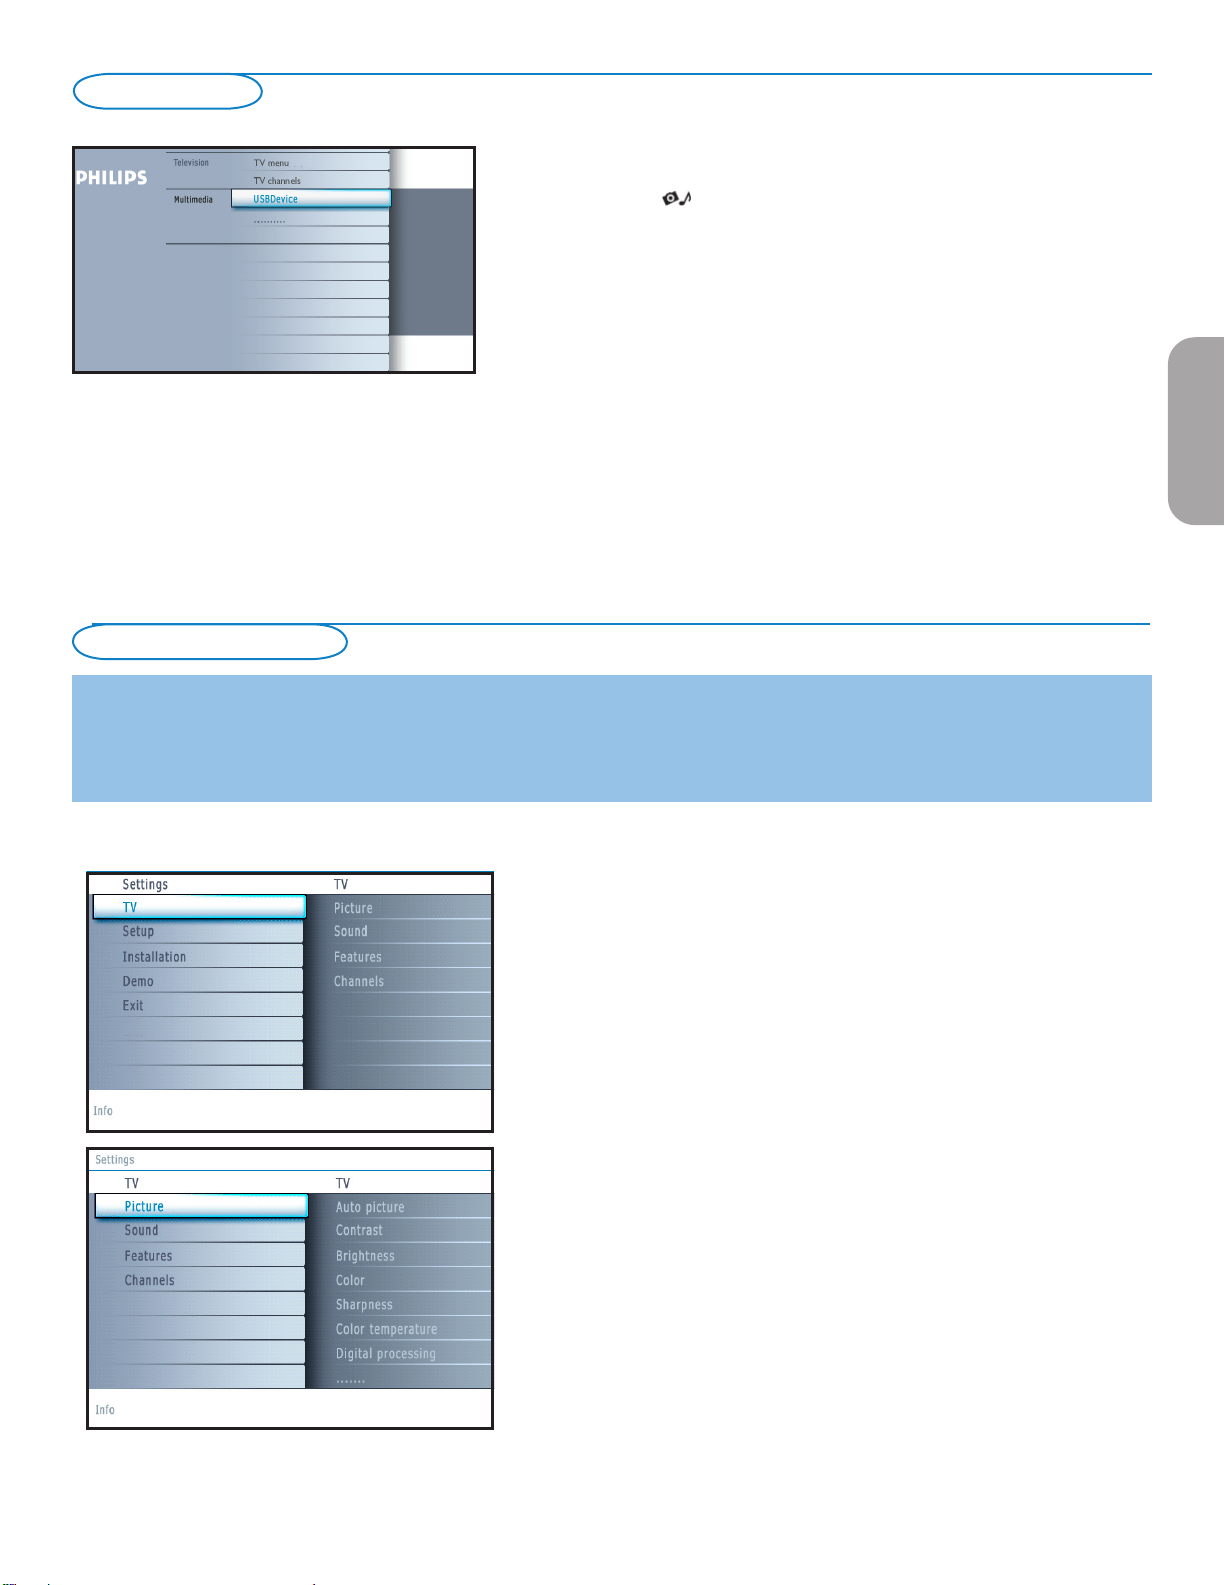
My Content
To use the menus
The My Content menu (and the underlying Multimedia browser) is intended to
contain all content, services, applications you are interested to consume.
& Press the button to activate.
é Press the cursor up/down to move the highlight up and down in the list of
menu items.
“ Press the cursor right to go deeper into the structure.
• Television:
TV channels leading to the list of TV channels; the left panel will contain
the analog channel numbers, the one-part channel numbers and the major
channel numbers in case of two-part digital channels. The right panel
will contain the available subchannels associated with the major channel
that is currently highlighted on the left panel. If there are no subchannels
associated with the currently selected channel in the left panel, the right
panel will remain empty.
• Multimedia
Contains the locally connected devices on which content (pictures, audio
files) is stored. See Multimedia browser, p. 22.
EnglishFrançaiseEspañol
Introduction
A lot of guiding instructions, help texts and messages will be displayed on your TV when using the menus or when trying to execute an action.
Please, follow the instructions and read the help text which are being displayed on the specific item highlighted.
The color buttons refer to different actions which may be executed depending on the activated device. Press the corresponding color button
on the remote control to perform the required action.
How to navigate through the Settings menus
The Settings menu allows you to access and change settings and preferences.
• Press the MENU button on the remote control to summon the Settings
menu.
- On the left panel the highlight can be set on a menu item with the cursor
up/down.
The right panel shows the content of the highlighted menu item in the left
panel.
Note: Sometimes not all the menu items are visible on the screen. Use the cursor
down to reveal all items.
- Use the cursor right to enter the right panel.
The content of the right panel is moved to the left panel and the right
panel shows the content of the newly highlighted item in the left panel.
Note: In some cases it is important that the picture can be watched while
adjusting the settings. This means that when the highlight is on the right side
panel, the other menu items hide away. When the cursor left is pressed again,
the hidden menu items re-appear and the highlight moves to the left panel.
• Press the cursor left to go one menu level up again.
- Press the OK button on the highlighted item to activate and to dismiss the
menu.
- Press the MENU button again to exit the Settings menu.
Note: The menu is also dismissed by pressing one of the color buttons (if present)
referring to certain actions which may be executed.
7
Page 16
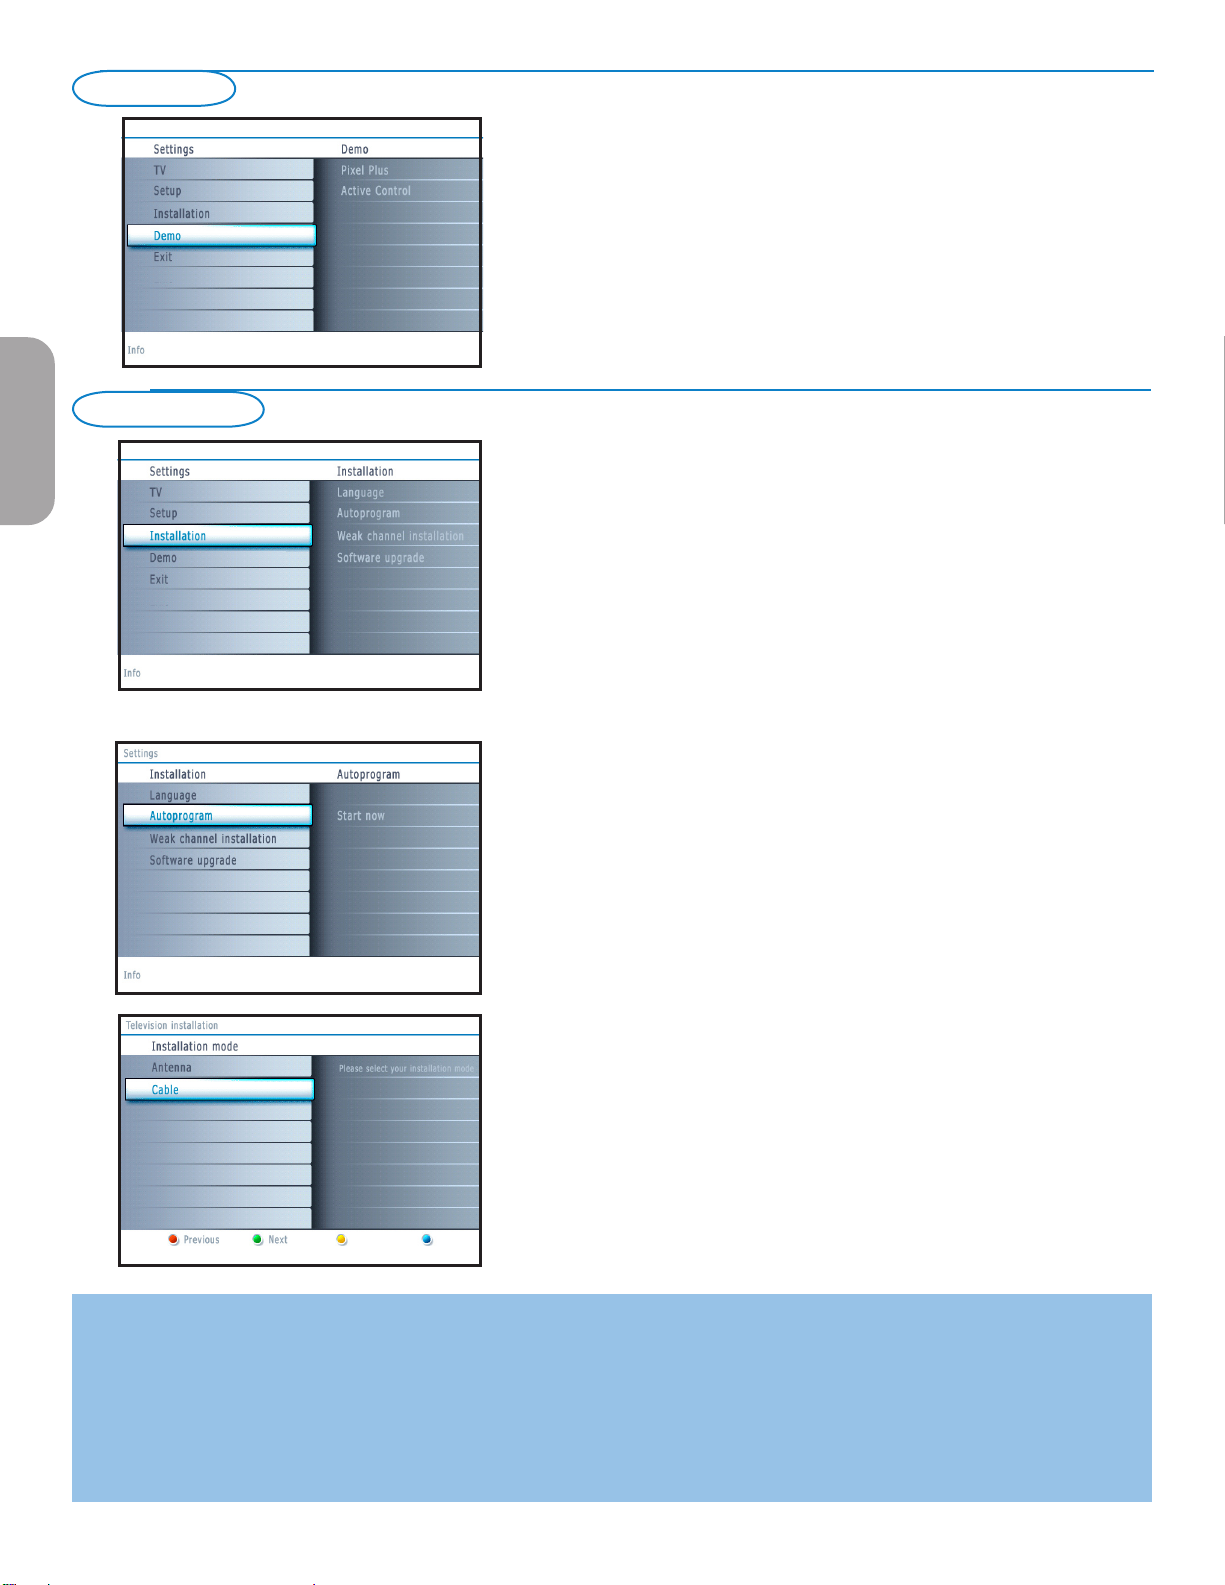
Demo
Installation
The Demo menu allows the user to get an idea of the features that are part of
the television.
& Select Demo in the Settings menu and press the cursor right.
é Highlight a desired demo with the cursor up/down.
“ Press OK to start playing the highlighted demo.
Press the green color button to automatically run all demos in sequence.
Press the red color button to stop the auto run function.
Press the red color button again to exit the demo and to return to TV
mode.
Note: The selected demo is played once.
The demos require no user interaction except for starting the demo.
EnglishFrançaiseEspañol
Select the menu language
& Press the MENU button on the remote control.
é Use the cursor down to select Installation in the Settings menu.
“ Use the cursor right to enter the Installation menu.
‘ Select Language and enter the list of available languages with the cursor
right.
( Select your language with the cursor up/down and press the OK button to
confirm you selection.
§ Proceed with the Installation menu.
Store TV channels
& Select Autoprogram in the Installation menu.
é Use the cursor right to enter the Autoprogram menu.
“ Press the OK button.
‘ Select Cable or Antenna in the Installation mode.
When Antenna is selected, the TV will detect antenna signals and will
search for antenna TV (NTSC and ATSC) channels available in your local
area.
When Cable is selected, the TV will detect cable company supplied signals
and will search for cable TV (NTSC, ATSC, QAM modulated) channels
available in your area.
Make sure that registration with your cable TV provider and connection of
equipment are completed.
( Press the green button “Next” on the remote control.
Note: All channels must be unlocked in order to autoprogram. If requested, enter
your PIN code to unlock all channels. See Menu preferences in the Settings, TV
menu, p. 14.
§ Press the green button “Start” to start autoprogramming.
The menu screen disappears and the progress of autoprogramming is
displayed. The progress bar indicates the number of analog and digital TV
channels found.
When Autoprogramming is complete, a message appears confirming
the completion. Press the red button "Finish" and the TV returns to the
Installation menu.
Notes:
• When you have locked TV channels while initiating autoprogram, a message appears asking to enter your PIN code in order to complete autoprogramming.
• When interrupted, the updated channel information is retained as well as the not yet updated old channel information.
• Background autoprogramming occurs only when the TV is turned on.
• Channel information of an ATSC channel is updated only for the ATSC channel currently tuned.
• If an NTSC channel is tuned, then in Background Autoprogramming the TV shall scan all the possible ATSC frequencies and update information.
• Weak channel installation : This allows you to manually tune weak ATSC channels in order to adjust the antenna and thus optimize signal quality for that
channel. (See Installation menu, Weak channel installation, p. 9.)
• Once you have searched for the available Antenna as well as the Cable TV channels, they are stored in the memory.
8
Page 17
Channel tuning
Available channels:
- Cable (analog NTSC or digital QAM): max. from 1 to 125
- Antenna (analog NTSC or digital ATSC): max. from 2 to 69
If a tuned channel is not yet in the master channel map, the TV will attempt
to tune the channel and it will be added to the map.
If the channel is not acquired, a message will appear that the channel is not
available.
When you tune an audio-only digital subchannel, a display appears with the
message Audio only.
Note: Digital Channel selection delay
Due to the tuning complexity of subchannel digital
programming, the time to select and view a digital
channel may take slightly longer than what the viewer
is normally accustomed to (as compared to analog
channel programs).
Digital channel broadcasts contain program and
system data information that must be processed
before the channel selection can be displayed.
Note: Subchannel selections
- The new standards employed with digital broadcasting make it possible to receive
multiple program channels under a single major channel number which can be
selected by pressing the digit remote control direct-acces channel number entry.
- The number of channels shown at installation includes paid channels but you
may not be able to see all of them unless you sign up with cable TV operators.
Important:
After the installation of the TV channels has been done, always make a selection
in the Installation menu between Antenna or Cable whether you want to watch
Antenna TV channels or Cable TV channels.
If you make use of a signal splitter do not forget to put the switch in the
corresponding position.
Weak channel installation
This enables you to do a weak ATSC digital channel installation. This is only
available for TV channels installed via an antenna connection (see p. 4).
& If a certain channel you expect to see is not tuned or is weak, you can install
it manually. Call your local broadcasting station to know what channel its
being transmitted on.
é
Select that channel in the displayed list of TV channels (in the antenna mode).
“ The signal strength is displayed and updated continuously as you rotate the
antenna.
EnglishFrançaiseEspañol
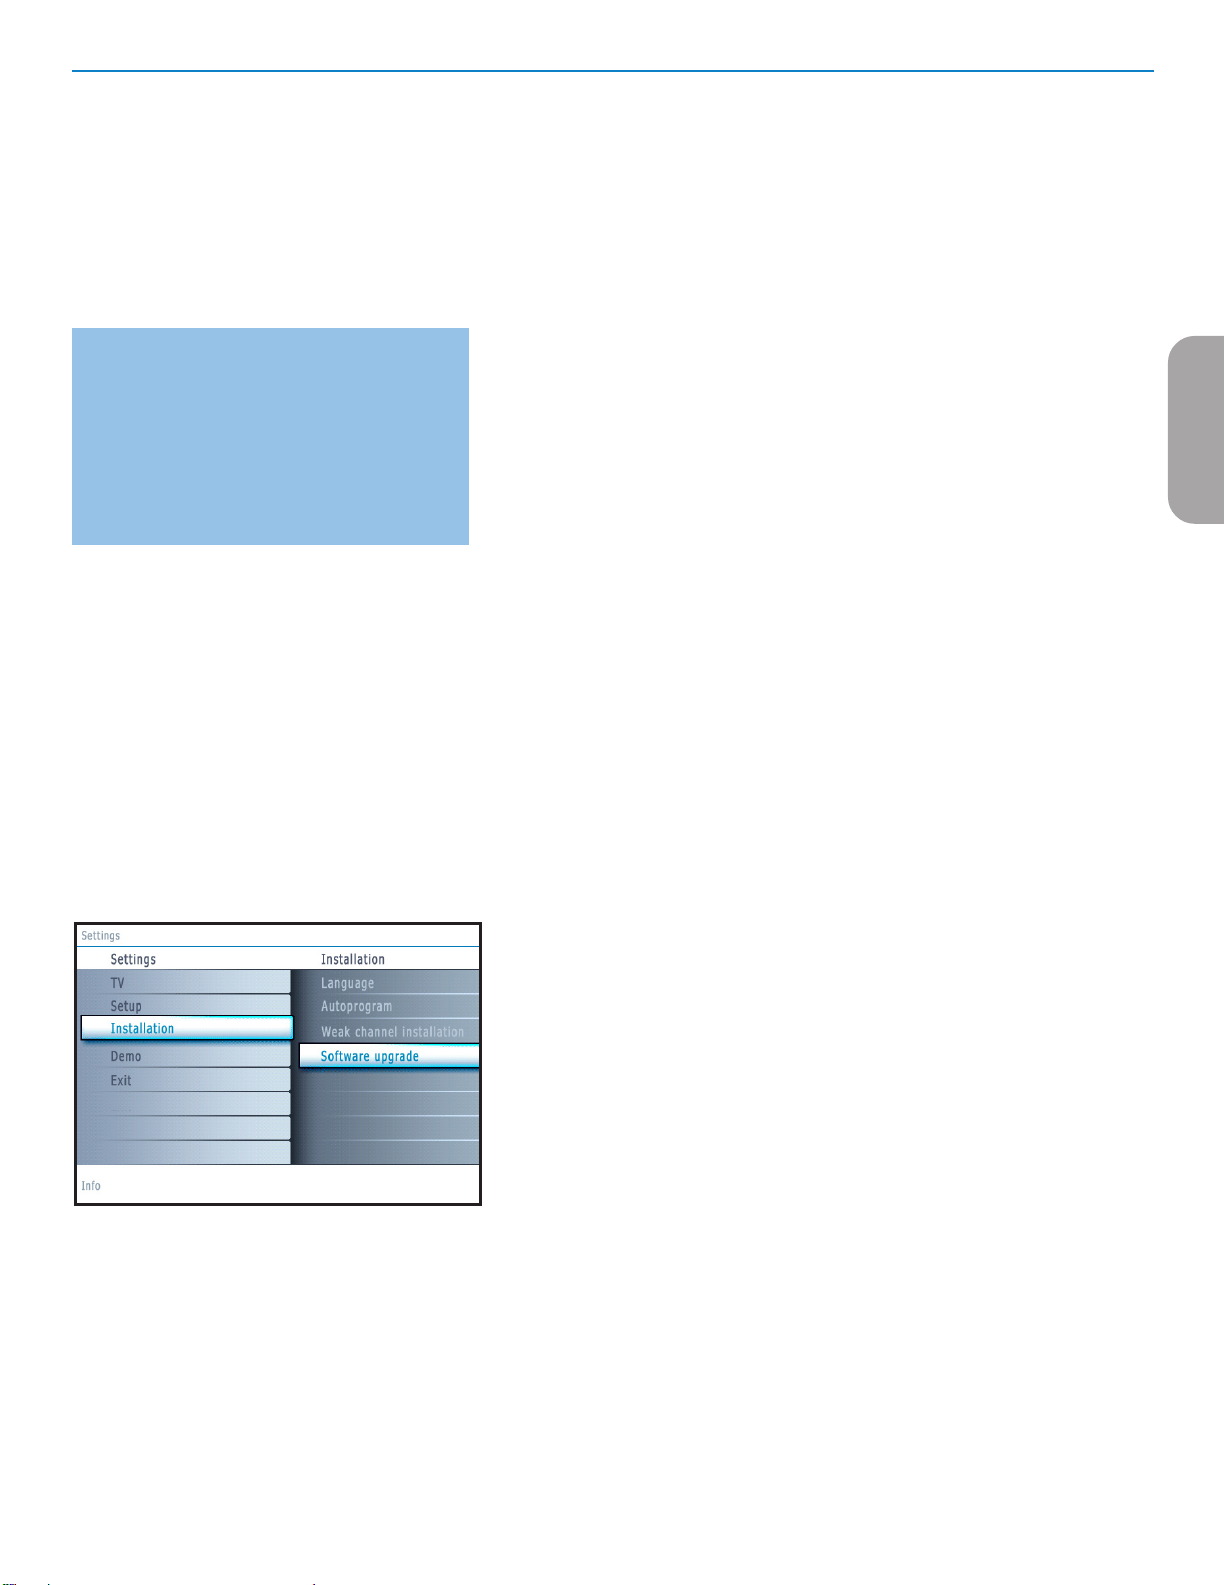
Software upgrade
This menu allows you to upgrade your TV software using a USB device.
USB upgrade
It is possible to initiate an upgrade procedure from a USB portable memory.
The memory device must be filled with the appropriate upgrade image (and
structure) which can be found on the www.philips.com/support website.
How to upload a new software version on your portable memory device,
see Annex 1, p. 30.
9
Page 18
Setup menu
EnglishFrançaiseEspañol
This menu is used to control the settings of special TV functions, features and
accessory devices.
The Preferences menu allows you to change settings that will typically be accessed
only occasionally.
The Source menu allows you to select a source.
The Clock menu allows you to use your TV as a clock. This setup is necessary for
the correct working of the Lock after feature.
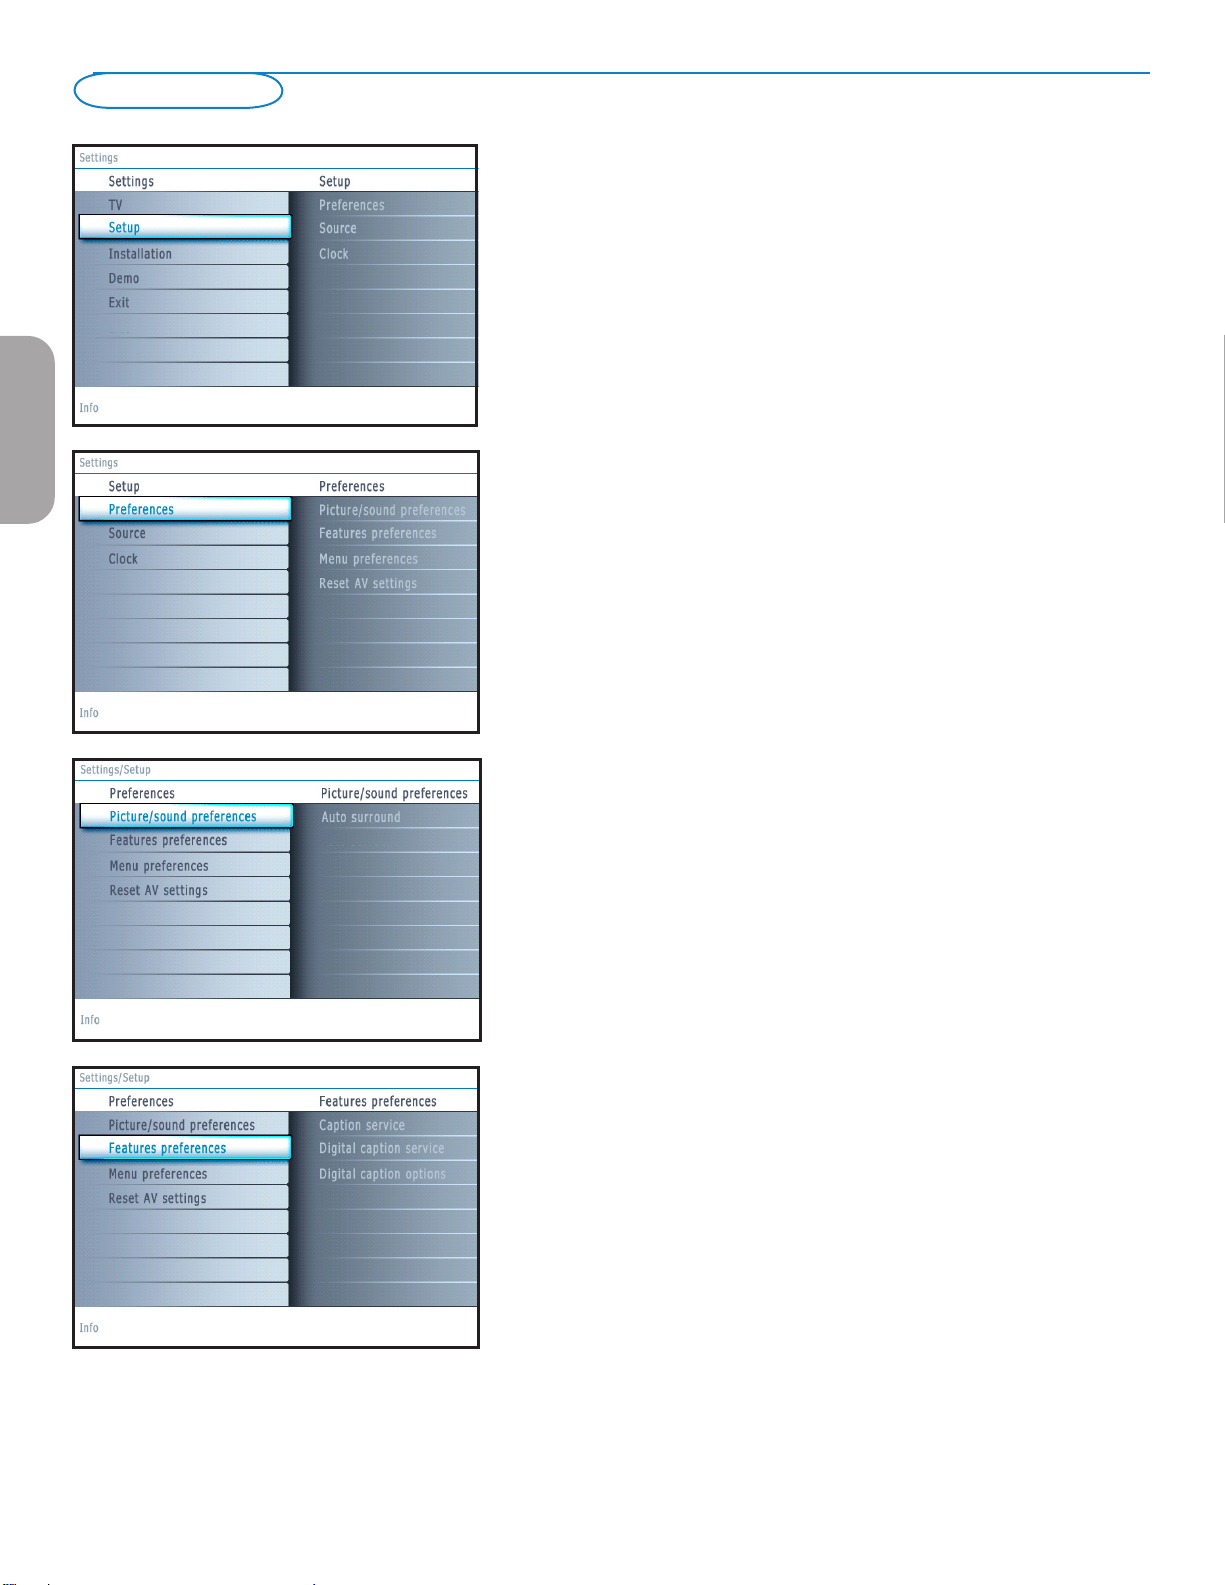
Preferences
& Press the MENU button.
é Select Setup with the cursor down and press the cursor right to select the
Preferences menu.
“ Press the cursor right again to select Picture/sound preferences.
‘ Press the cursor right once more to enter the Picture/sound preferences menu.
Picture/sound preferences
Auto surround
Sometimes the broadcaster transmits special signals for Surround sound encoded
programs. The TV automatically switches to the best surround sound mode
when Auto surround is switched On.
Features preferences
Caption service
This allows you to select the Closed Captions service levels of analog
broadcasting to be displayed.
Closed Captioning allows you to read the voice content of television programs
on the TV screen. Designed to help the hearing impaired, this feature uses onscreen ‘text boxes’ to show dialogue and conversations while the TV program is
in progress. Captions will appear on the screen during captioned broadcasts.
10
Page 19
Note: The captions do not always use correct spelling
and grammar. Not all TV programs and product
commercials are made for broadcast with Closed
Caption informations included. Refer to your area’s TV
program listings for the TV channels and times of Closed
Caption shows. The captioned programs are usually
noted in the TV listings with service marks such as ‘CC’.
& Select Captions service.
é Press the cursor right.
“ Select the desired Caption service:
• CC 1, 2, 3 or 4
Dialogue (and descriptions) for the action on the captioned TV program shows
on screen.
Usually CC 1 is the most used. CC 2 may be used for alternate languages if they
are being transmitted.
• T 1, 2, 3 or 4
Often used for channel guide, schedules, bulletin board information for Closed
Captions programs, news, weather informations or stock market reports.
Not all Caption services are necessarily being used by a TV channel during the
transmission of a Closed Caption program.
‘ See Closed Caption in the TV, Features menu, see p. 16, to turn the Caption
service On or Off.
Note: This television provides display of television closed captioning conforming with the
EIA-608 standard and in accordance with Sections 15.119 of the FCC rules.
How to switch on.
To switch ON the closed caption feature, go to feature ==> closed caption and
select 'On' or 'On during mute'.
Digital caption service
This allows you to configure the way you choose to view the digital captioning.
Select one of the digital service channels made available by the caption provider.
There are 6 standard services. Service 1 is designated as the Primary Caption
Service. This service contains the verbatim, or near-verbatim captions for the
primary language being spoken in the accompanying program audio.
Service 2 is designated as the Secondary Language Service. This service contains
captions in a secondary language which are translations of the captions in the
primary Caption Service. The other service subchannels are not pre-assigned. It
is up to the discretion of the individual caption provider to utilize the remaining
service channels.
EnglishFrançaiseEspañol
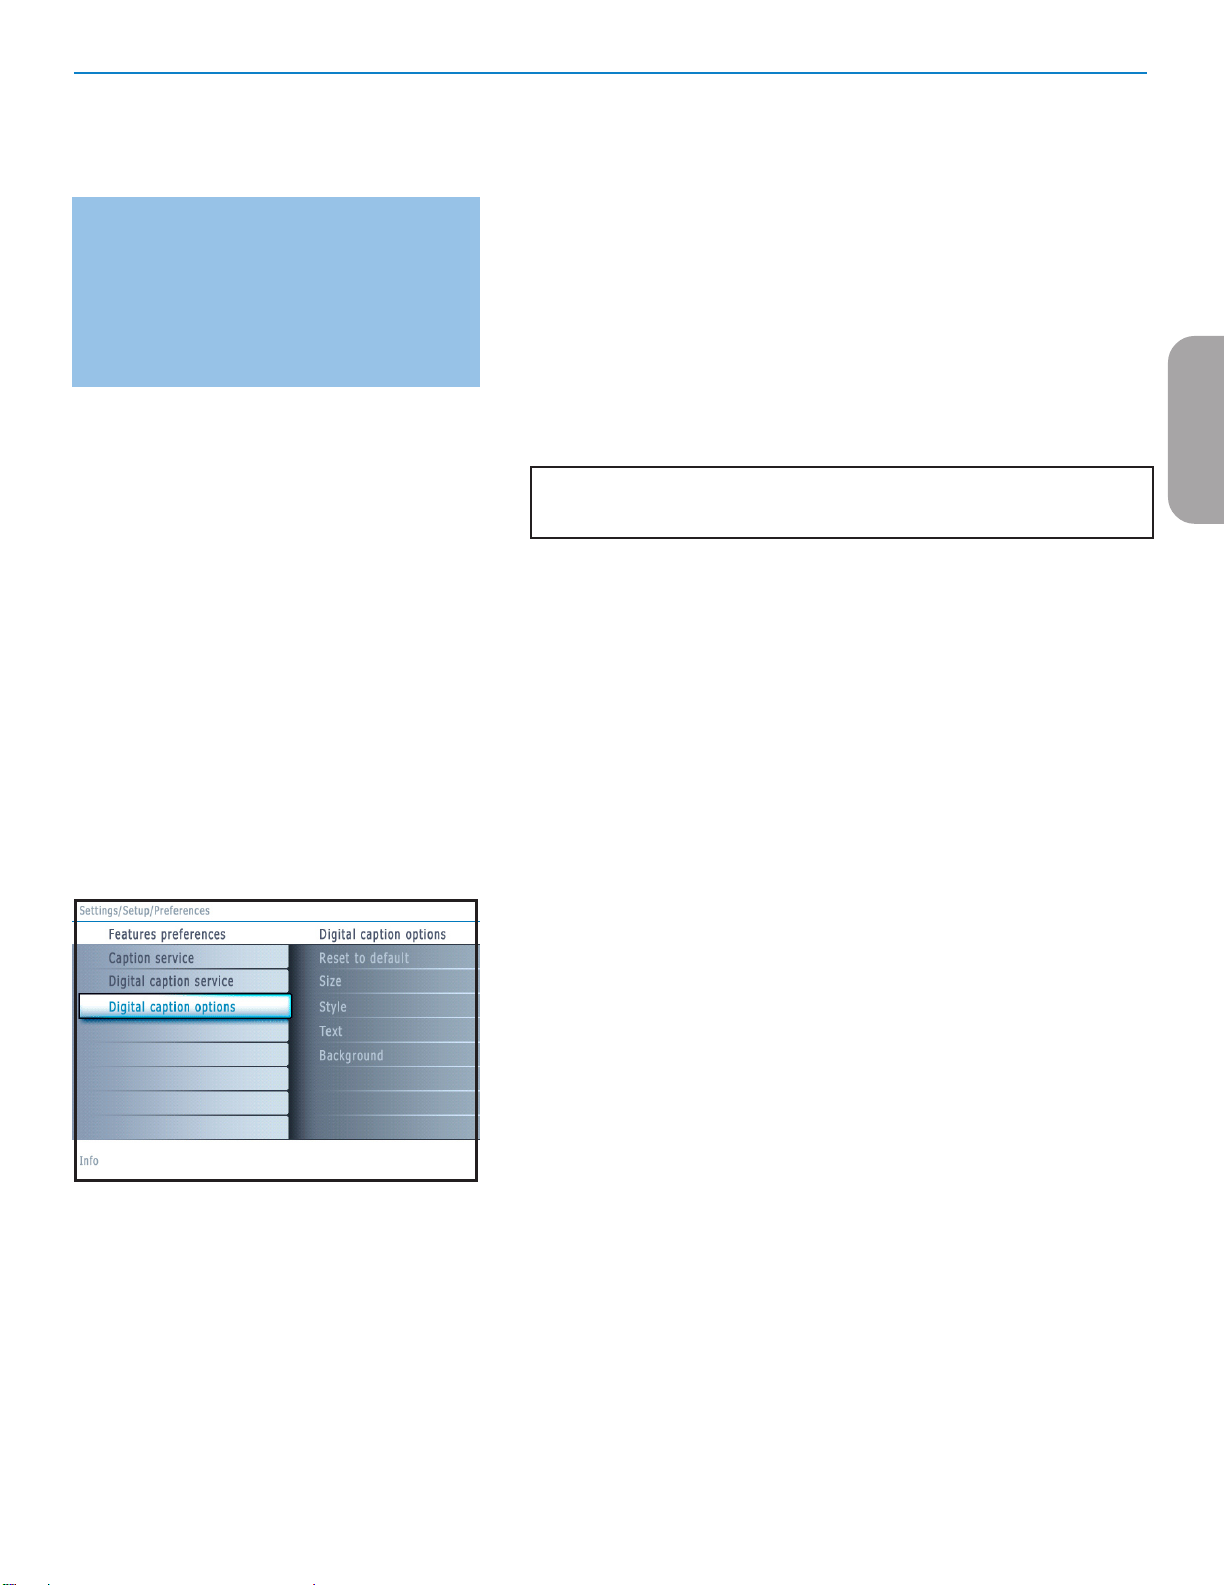
Digital caption options
This allows you to modify how digital captions are displayed on your TV.
Select from the following options to change the visual characteristics of your
TV’s digital captioning.
• Reset to default
Select this option to reset the digital caption options back to the captions
provider default settings.
Press the OK button to confirm.
• Size
Select this option to select the size of caption display according to your own
preference.
Select Default (Automatic), Small, Standard or Large and press the OK
button to confirm.
• Style
Select this option to select the font style of caption display according to your
own preference.
Select Default, Monospaced serif, Serif, Monospaced sans serif, Sans
serif, Casual, Cursive or Small caps...
• Text
Select this option to select the text color or the opacity of the text box of
caption display according to your own preference.
Select a color and one of the opacity options.
• Background
Select this option to select the character background color or one of
the background opacity options of caption display according to your own
preference.
Select a color and one of the opacity options.
11
Page 20
EnglishFrançaiseEspañol
Note: Emergency Alert Signalling is not possible:
- when content browsing;
- with analogue video sources.
Notes:
- You always have the possibility to remove the message
from the screen.
- The message display will overlap whatever menu
element or other message is on the screen.
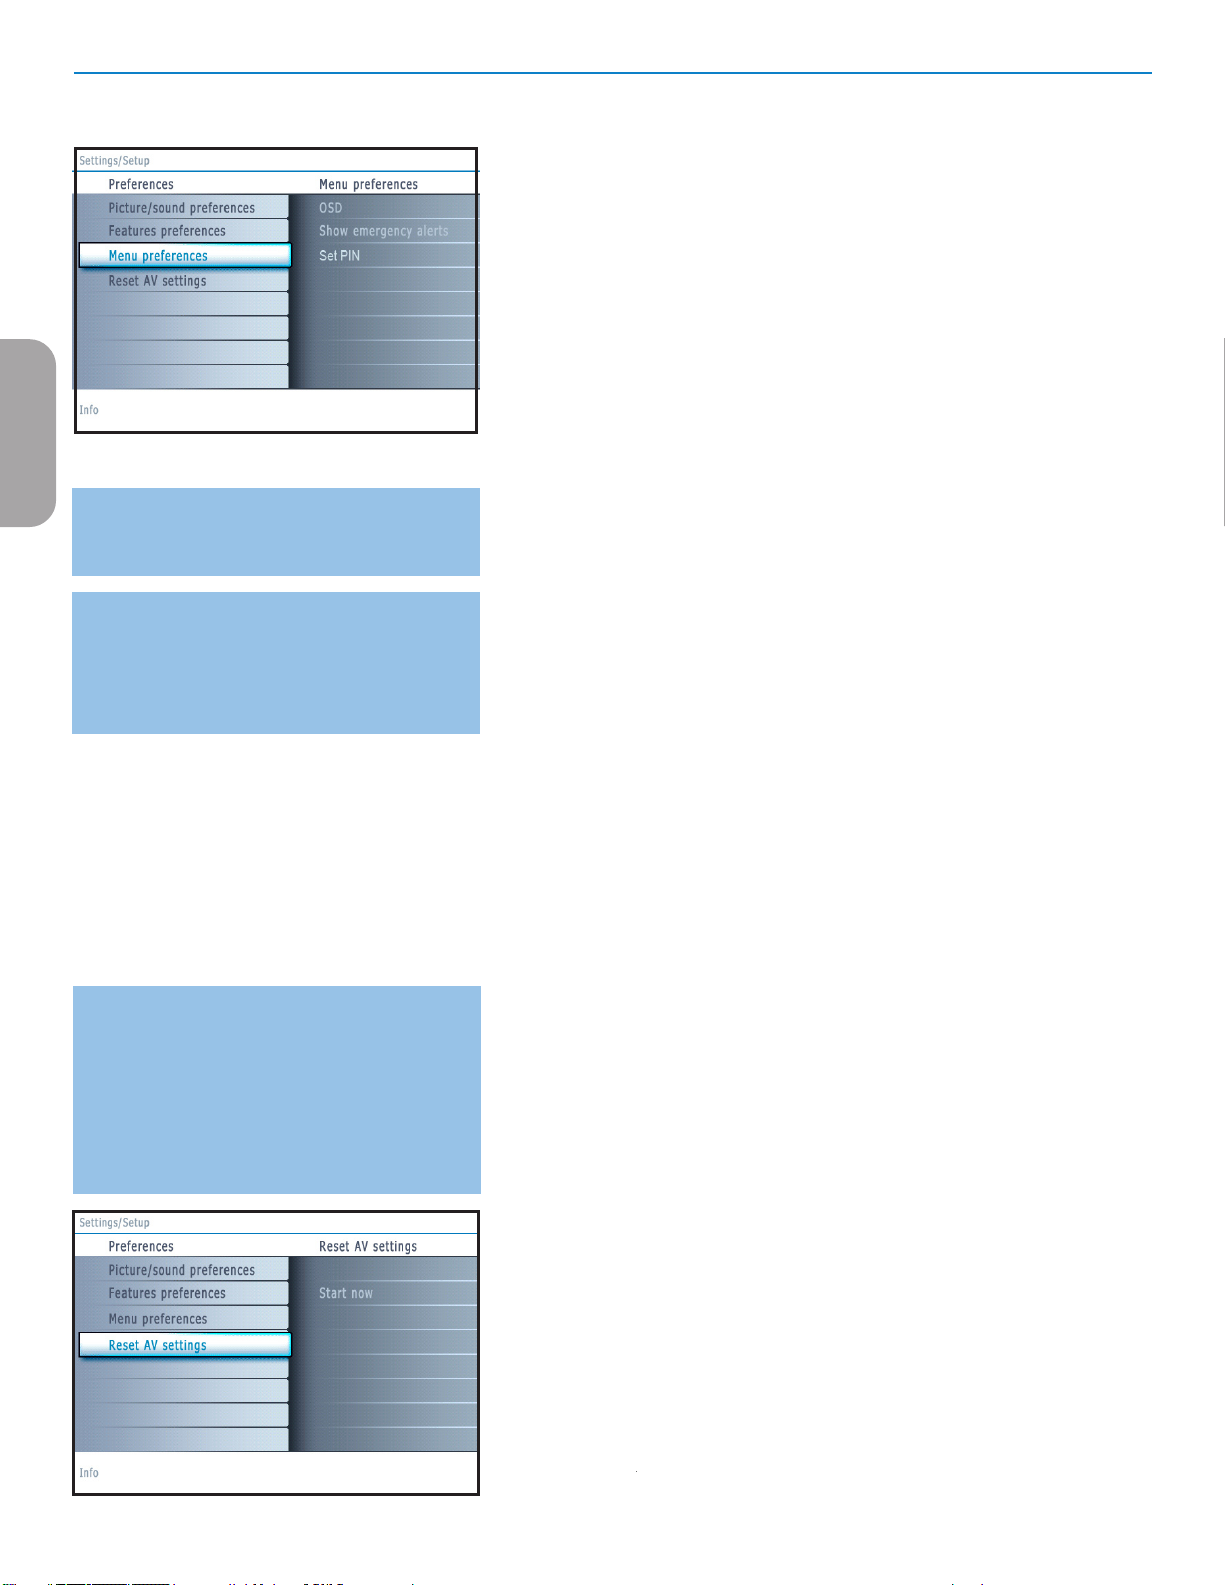
Menu preferences
OSD
& Select OSD.
é Press the cursor right to select Normal or Minimum.
Normal to activate the continuous display of the channel number (for max.
10 minutes) and extended display of TV channel and program information
on screen. E.g. information on the main or auxiliary program, input signal
quality of connected accessory devices, the display format, sound mode,
availability of Closed Caption service, the audio language, the rating,
sleeptimer setup.
Minimum to activate the display of reduced channel information.
Note: When Closed Captions is switched on, continuous display of the channel
number and clock is not possible. Volume indication bar will not be visible.
Show emergency alerts (EAS)
This allows you to select the alert priority level of the information
disseminated by the cable operator. The standard SCTE18 defines an
Emergency Alert signalling method for use by cable TV systems to signal
emergencies to digital devices such as digital set-top boxes, digital TVs and
digital VCRs.
The Emergency alert signalling scheme defined in the standard allows a
cable operator to disseminate emergency alert information related to state
and local-level emergencies and warnings in a cost-effective and efficient
way, while minimizing disruption of programming.
An Emergency alert message will have one of the following priorities: Low,
Medium, High or Maximum.
The Emergency alert message with priority High or Maximum will always
be presented. Low or Medium will be present or ignored depending on
the selected setting.
Important: When the TV clock is undefined (See Setup menu, Clock, p. 13), the
Emergency Alerts will be ignored.
Important: If you have forgotten your PIN!
& Select Change PIN in the Menu preferences
menu and press the cursor right.
é Press the cursor right to enter the overriding
PIN code 0-7-1-1.
“ Press the cursor again and enter a new personal
4-digit PIN code. The previous code is erased
and the new PIN-code is stored.
The Emergency Alert message display will contain following information:
- The Emergency Alert text
- The start time + date
- The end time + date.
& Select Show Emergency Alerts in the Menu preferences menu.
é Press the cursor right and select one of the Emergency alerts options:
- Always, when you always want the Emergency alert messages to be
displayed when available;
- Skip low priority, when you want the messages with low level to be
ignored;
- Skip low/medium priority, when you only want the messages with high
priority to be displayed.
Set/Change PIN
& Select Set or Change PIN with the cursor down.
é If no PIN-code exists yet, the menu item is set to Set PIN. Follow the
instructions on screen.
If a PIN-code has previously been entered, the menu item is set to Change
PIN. Follow the instructions on screen.
All number combinations from 0000 to 9999 are valid numbers.
“ The Menu preferences menu reappears with a message confirming that
the PIN has been created.
Reset AV settings
This function allows you to reset most of the picture and sound settings to
their predefined factory states.
& Select Reset AV settings with the cursor down.
é Press the cursor right.
“ Press the OK button to erase settings and reset them to their default
values.
‑
12
Page 21
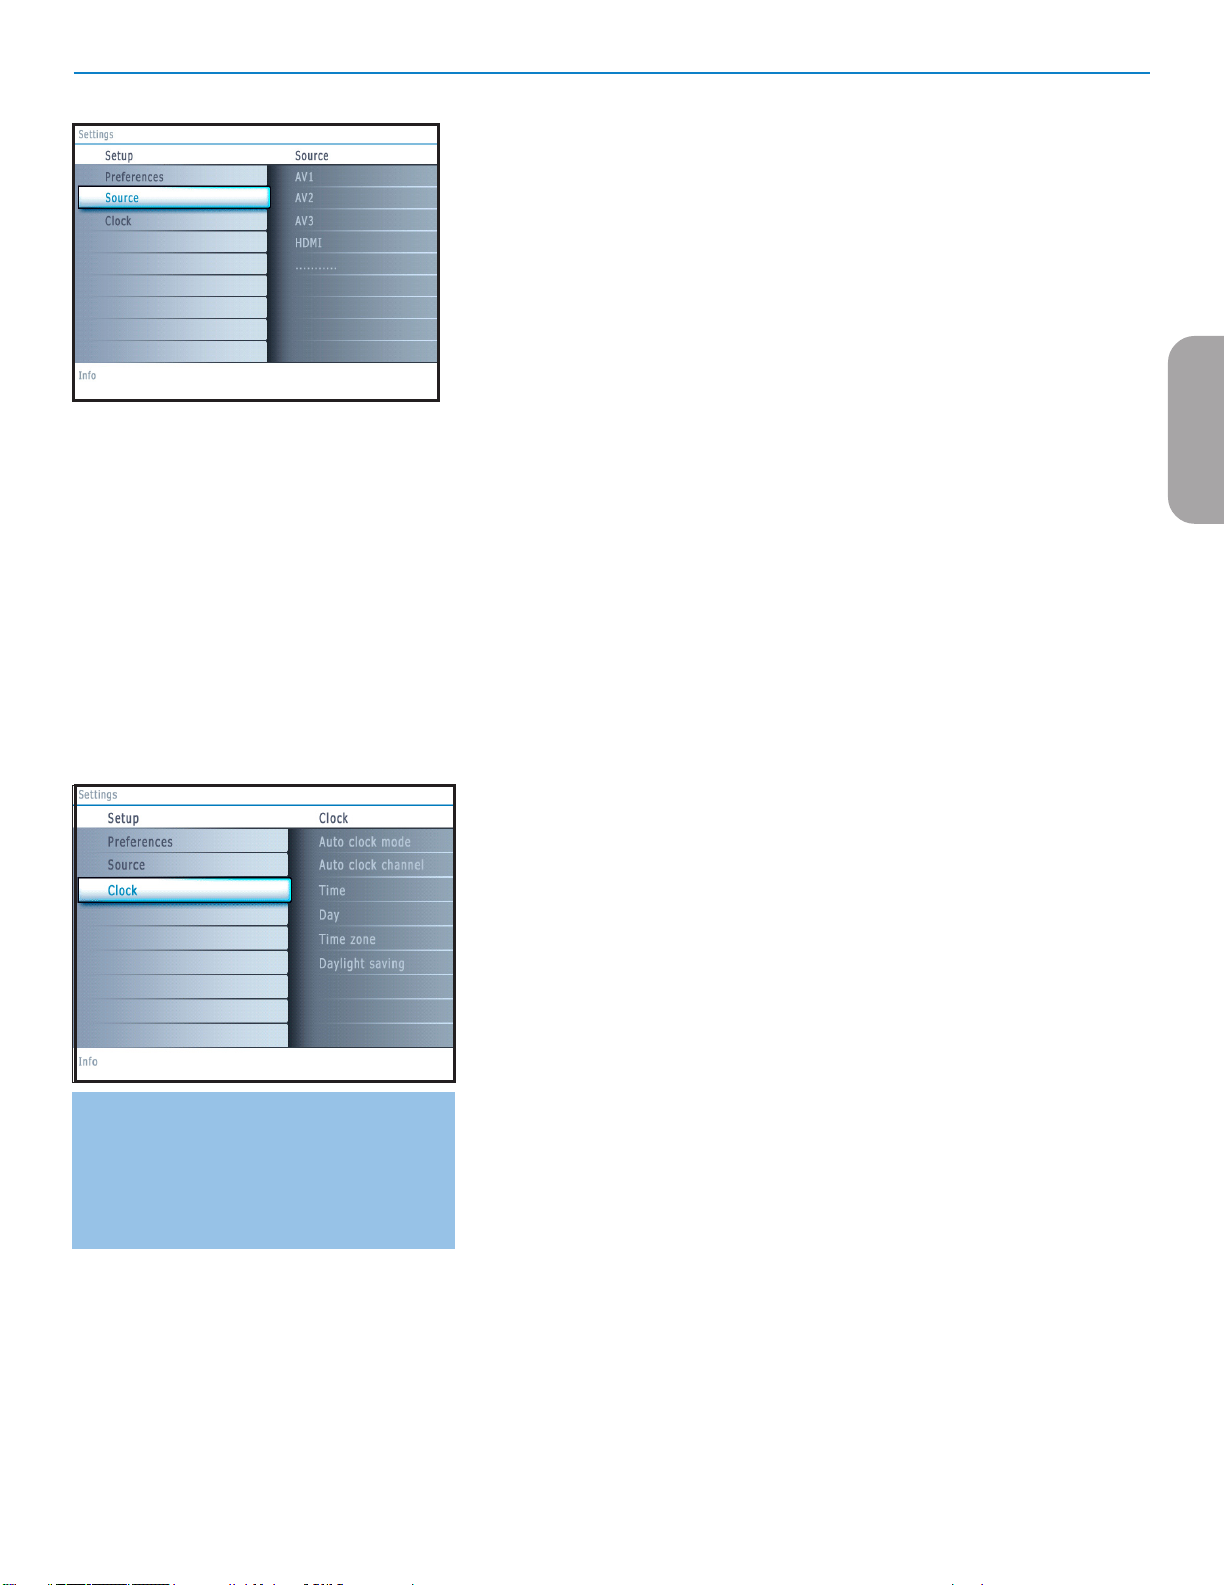
Source
This menu allows you to name/label the accessory devices you have connected to the
external inputs/outputs.
& Select Source in the Setup menu.
é Press the cursor right to enter the list of types of devices connected to the selected
input.
“ Select the accessory device with the cursor up/down.
When you select AV1, AV2, AV3, HDMI, Side or Analog Audio In, a list appears
allowing you to identify which type of accessory device is attached to this input.
Clock
This allows you to use your TV as a clock.
Note:
- Adjusting the clock is necessary for the correct working of Lock after (See TV settings, Channels,
p. 17) features.
- Closed captioning will not be displayed when the clock is being displayed. Press the clock
key again to switch off the clock if you want to see closed caption.
EnglishFrançaiseEspañol
Most of the TV channels do not transmit clock
information. There are a few cable channels who do
but they are at the end of the channel ring. There is
no clock transmission in antenna channels. In such
cases, either clock extraction takes a long time, or
there is no clock.
Auto clock mode
& Select Clock in the Setup menu.
é Press the cursor right to select the Auto clock mode.
“ Press the cursor right to instruct the TV to get the time automatically or manually.
Auto clock channel (only available when Auto clock mode is set to Automatic)
With the cursor buttons, select the channel number where time can be found by the
TV. Typically time can be found on PBS as well as some other channels.
Note: If Manual has been selected in the Auto clock mode, the Auto clock channel menu
item can not be selected.
Time - Day (only available when Auto clock mode is set to Manual)
With the cursor buttons, select and enter the correct time and day.
If Auto clock mode Manual has been selected, and no clock search has been done,
the system will keep the entered time and day.
Time zone (only available when Auto clock mode is set to Automatic)
This function allows you to select your local time zone. Broadcasted time
information will correct the clock display for your local time.
& Select Time zone with the cursor down.
é Press the cursor right to select your local time zone.
Daylight saving (only available when Auto clock mode is set to Automatic)
Daylight saving time is automatically set by specially broadcasted signals. This menu
item allows you to disable the automatic setting of daylight saving time. This is useful
if you live in an area or state where daylight saving is not applied, but you receive
channels from other areas where daylight saving signals are broadcasted.
& Select Daylight saving with the cursor down.
é Press the cursor right to select Automatic for automatic clock correction for
daylight saving time, based on specially broadcasted signals.
“ Select Off to disable automatic clock correction based on the specially broadcasted
signals.
13
Page 22
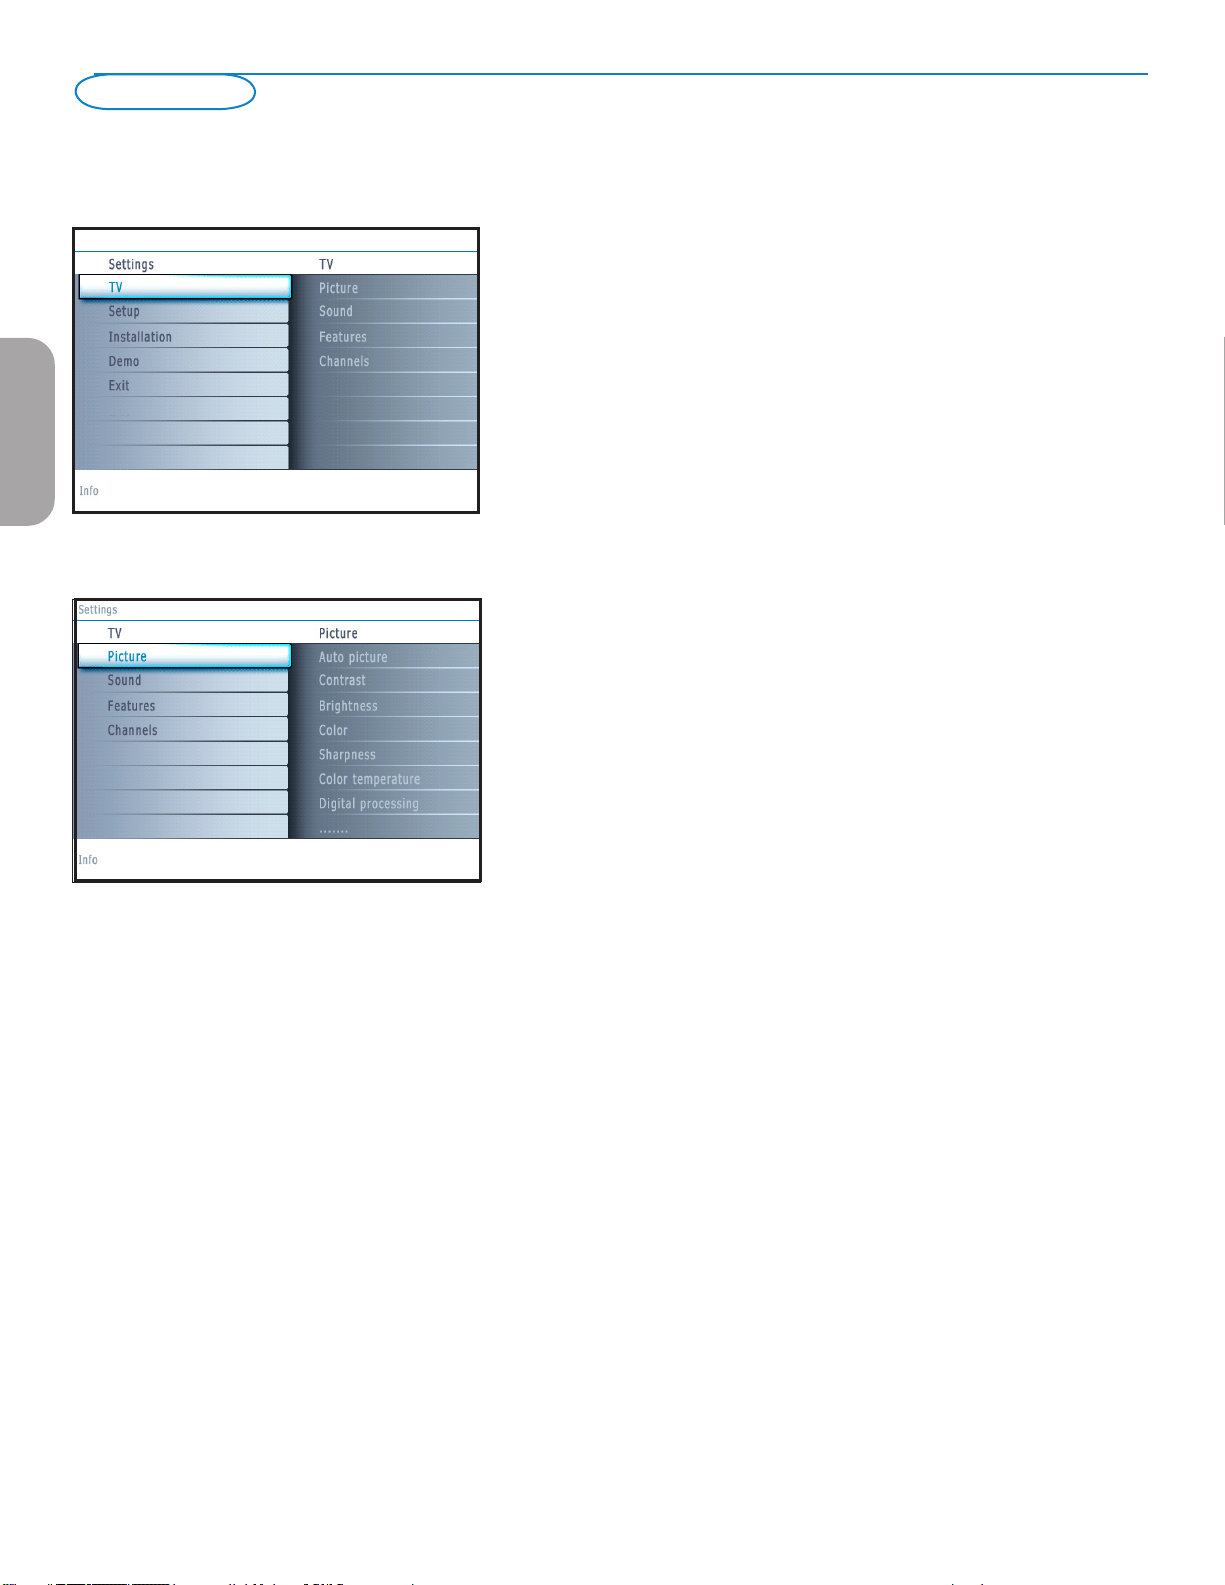
TV menu
EnglishFrançaiseEspañol
Press the MENU button on the remote control to summon the Settings menu. The
TV menu gives you an overview of the menus you can select.
Note: Depending on the input signal, one or more menu items may not be selectable.
Picture menu
Note: Some menu items are not available in case of HD sources.
& Press the cursor right to select Picture.
é Press the cursor right again to enter the Picture menu.
“ Select the menu items with the cursor up/down.
‘ Adjust the settings with the cursor left/right or enter the list of submenu items
with the cursor right. Select a submenu item with the cursor up/down.
Auto picture
Select Auto picture to display a list of predefined picture settings, each
corresponding with specific factory settings.
Personal refers to the personal preference settings of picture in the picture
menu.
Note: This Philips TV has been set at the factory to look best in bright store
environments which typically use fluorescent lighting. As your home will likely not be
as well lit as a store, we recommend that you cycle through the various auto picture
modes to find the one that best suits your own viewing conditions. Most consumers will
find that Natural is the correct choice.
Contrast
This will adjust the intensity of bright parts in the picture but keep the dark
parts unchanged.
Brightness
This will adjust the light output of the complete picture, which will mainly affect
the darker areas of the picture.
Color
This will adjust the saturation level of the colors to suit your personal
preference.
Sharpness
This will adjust the sharpness of fine details in the picture.
Color temperature
This will increase or decrease Warm (red) and Cool (blue) colors to suit
personal preferences.
Select Cool to give the white colors a blue, Normal to give the white colors a
neutral, Warm to give the white colors a red tint.
Digital processing
• Standard = line doubling eliminates the flicker.
• Pixel Plus = for everyday viewing, Pixel Plus is the most ideal setting, as it fully
processes the image to make every single pixel the best it can be, improving
contrast, sharpness, picture depth, and color reproduction and brilliance from
every source, including High Definition.
Standard mode is recommended only for very noisy or poorly mastered
sources or for those who find the smoothness of Pixel Plus (which eliminates
judder in the picture) unsettling.
Dynamic contrast
Automatically makes the contrast in the darker and the brighter picture areas
more noticeable as the image on the screen changes.
Normally select Maximum. It may be preferred to select Minimum,
Maximum or Off.
& Press the cursor right to enter the list.
é Select one of the settings with the cursor up/down.
“ Press the cursor left to return to the picture menu.
14
Page 23
DNR (Digital Noise Reduction)
Automatically filters out and reduces the image noise and improves picture
quality when receiving weak video signals.
& Press the cursor right to enter the list.
é Select Off, Minimum, Medium or Maximum according to the image noise.
“ Press the cursor left to return to the picture menu.
Color enhancement
When activated, this feature automatically controls green enhancement and blue
stretch. It makes the colors more vivid.
& Press the cursor right.
é Select On or Off in order to activate/de-activate Color enhancement with the
cursor right.
Tint
Allows you to select the color mix (hue) of the picture.
Picture format
This menu item performs the same as the FORMAT button on the remote
control. See Use of the remote control, p. 6.
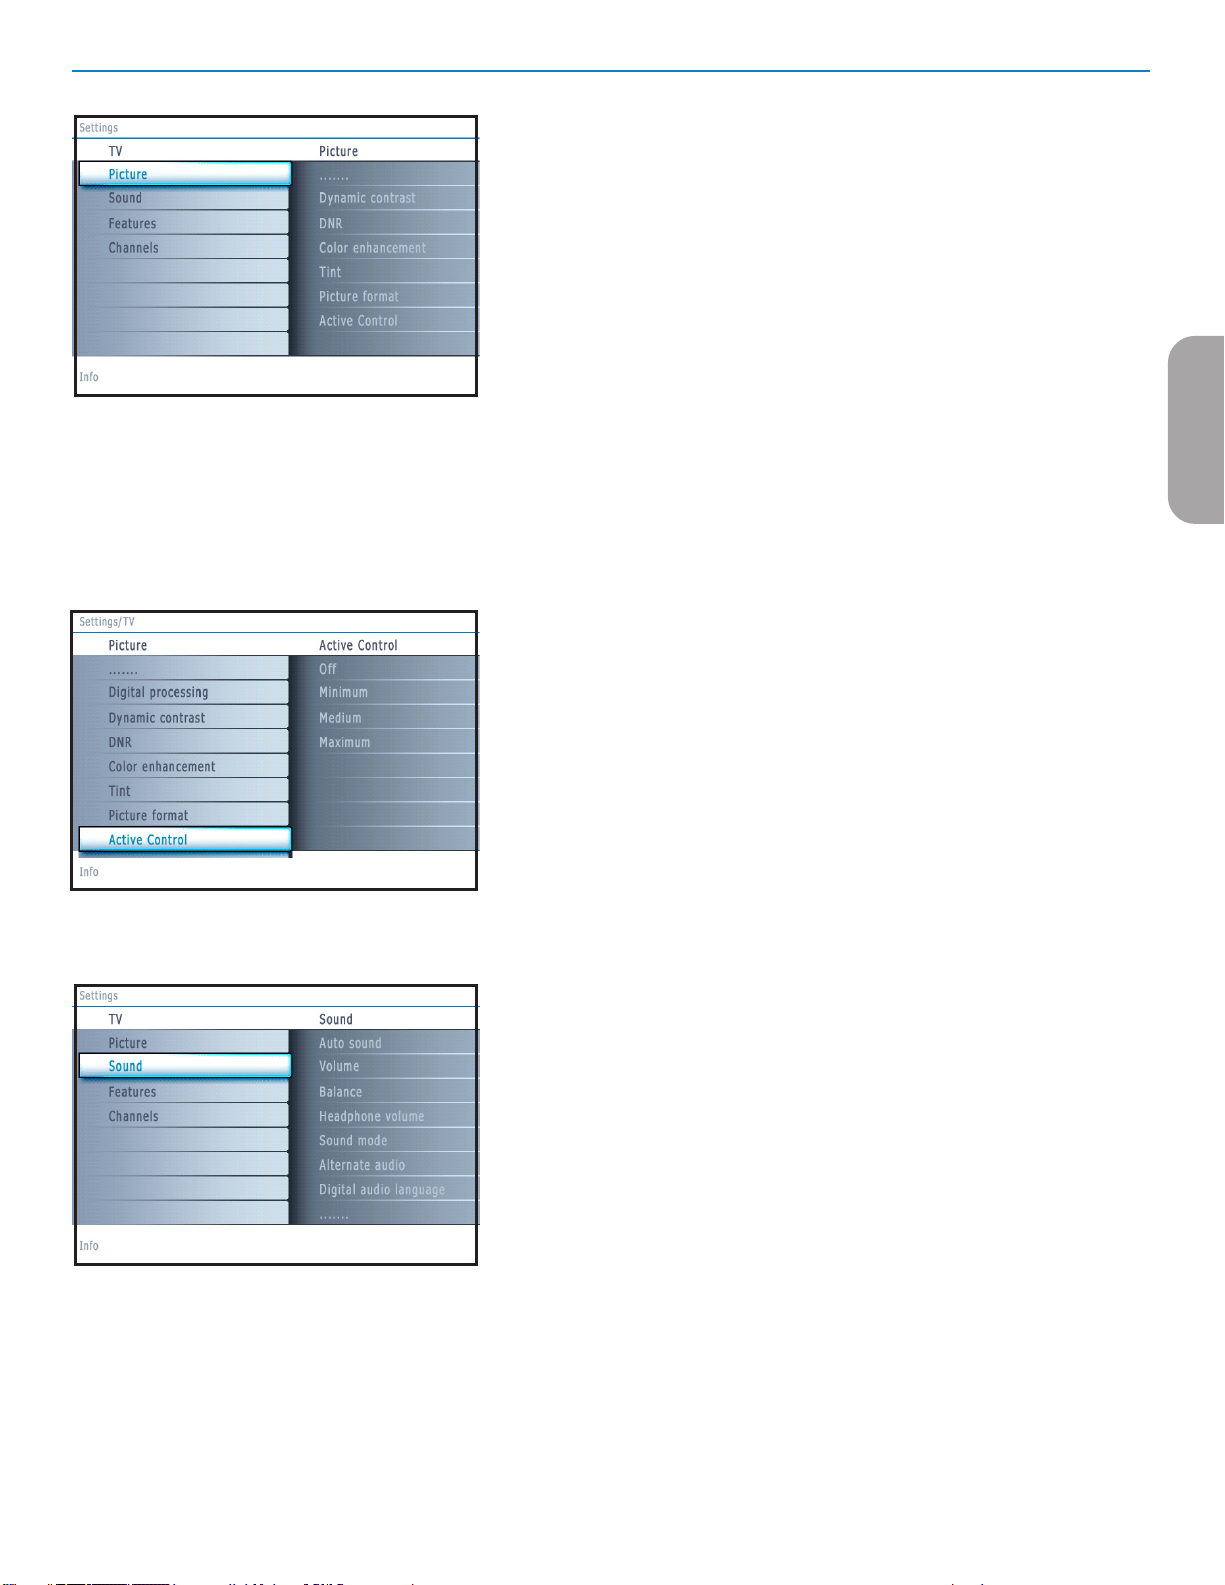
Active Control
The TV continuously measures and corrects all incoming signals in order to
provide the best picture possible.
& Select Active Control.
é Press the cursor right to enter the list of Active Control values.
“ Press the cursor right repeatedly to select the Active Control values Off,
Minimum, Medium or Maximum.
The picture settings are being optimized continuously. Those menu items can
not be selected.
‘ Press the OK button or wait for the time out to dismiss the Active Control
display.
EnglishFrançaiseEspañol
Sound menu
& Select Sound in the TV Settings menu.
é Press the cursor right to enter the sound menu.
“ Select the menu items with the cursor up/down and adjust the settings with the
cursor left/right.
Remember, control settings are at normal mid-range levels when the bar scale is
entered.
Auto sound
Select Auto sound to display a list of predefined sound settings, each
corresponding with specific factory settings of Treble and Bass.
& Press the cursor right to enter the list.
é Press the cursor up/down to select a predefined sound setting.
Personal refers to the personal preference settings of sound in the sound menu.
Note: The moment you are in a predefined Auto sound setting and you modify a setting
in the Sound menu, all values of the menu will overwrite the previously made personal
setting.
Volume
This will adjust the sound output level.
Balance
This will adjust the output of the right and left speakers to obtain the best
stereo reproduction for your listening position.
15
Page 24

EnglishFrançaiseEspañol
Headphone volume
This controls the level of sound through the headphones.
Sound mode
This selects the modes for stereo or surround sound reproduction dependent on
the broadcast signals or signals from external inputs received.
Alternate audio (only selectable with analog broadcast signals)
This gives you the possibility to swap between the Main and Second audio
Program (SAP) when it is available.
Digital Audio language (only selectable with digital broadcast signals)
This allows you to select your language preference in case of multilingual audio
track programs if available with digital broadcast signal.
Note: The default language for the digital channels is the installed menu language.
Mono/Stereo
This selects, per TV channel, Mono or Stereo sound when analog stereo
broadcasts are available.
AVL (Automatic Volume Leveler) (only available with analog broadcast and nonDigital signals)
This automatically reduces the volume differences between channels and
programs, providing a more constant overall level. This will also reduce the
dynamics of sound.
Delta volume
This allows you to correct for any permanent volume differences between TV
channels or external sources.
Features menu
& Select Features in the TV Settings menu.
é Press the cursor right to enter the features menu.
“ Select the menu items with the cursor up/down and adjust the settings with the
cursor left/right.
Closed captions
This displays the transmitted CC- or CS-text on the screen according to your
chosen CC or CS service in the Setup, Features preferences menu,
p. 10. This text can either be permanently displayed (assuming that the service is
available in the broadcast) or only when mute is active.
& Press the cursor right after having selected Closed captions.
é Select On, Off or On during mute.
Sleeptimer
This sets a time period after which the TV automatically turns to standby.
& Select Sleeptimer.
é Press the cursor right.
“ Select a value with the cursor up/down. The list will have values from 0 to 180
minutes.
When 0 is selected, the sleeptimer is turned off.
You can always turn off your TV earlier or select another time set.
Manufactured under license from Dolby Laboratories.
‘Dolby’ and the double-D symbol are trademarks of
Dolby Laboratories.
16
Page 25
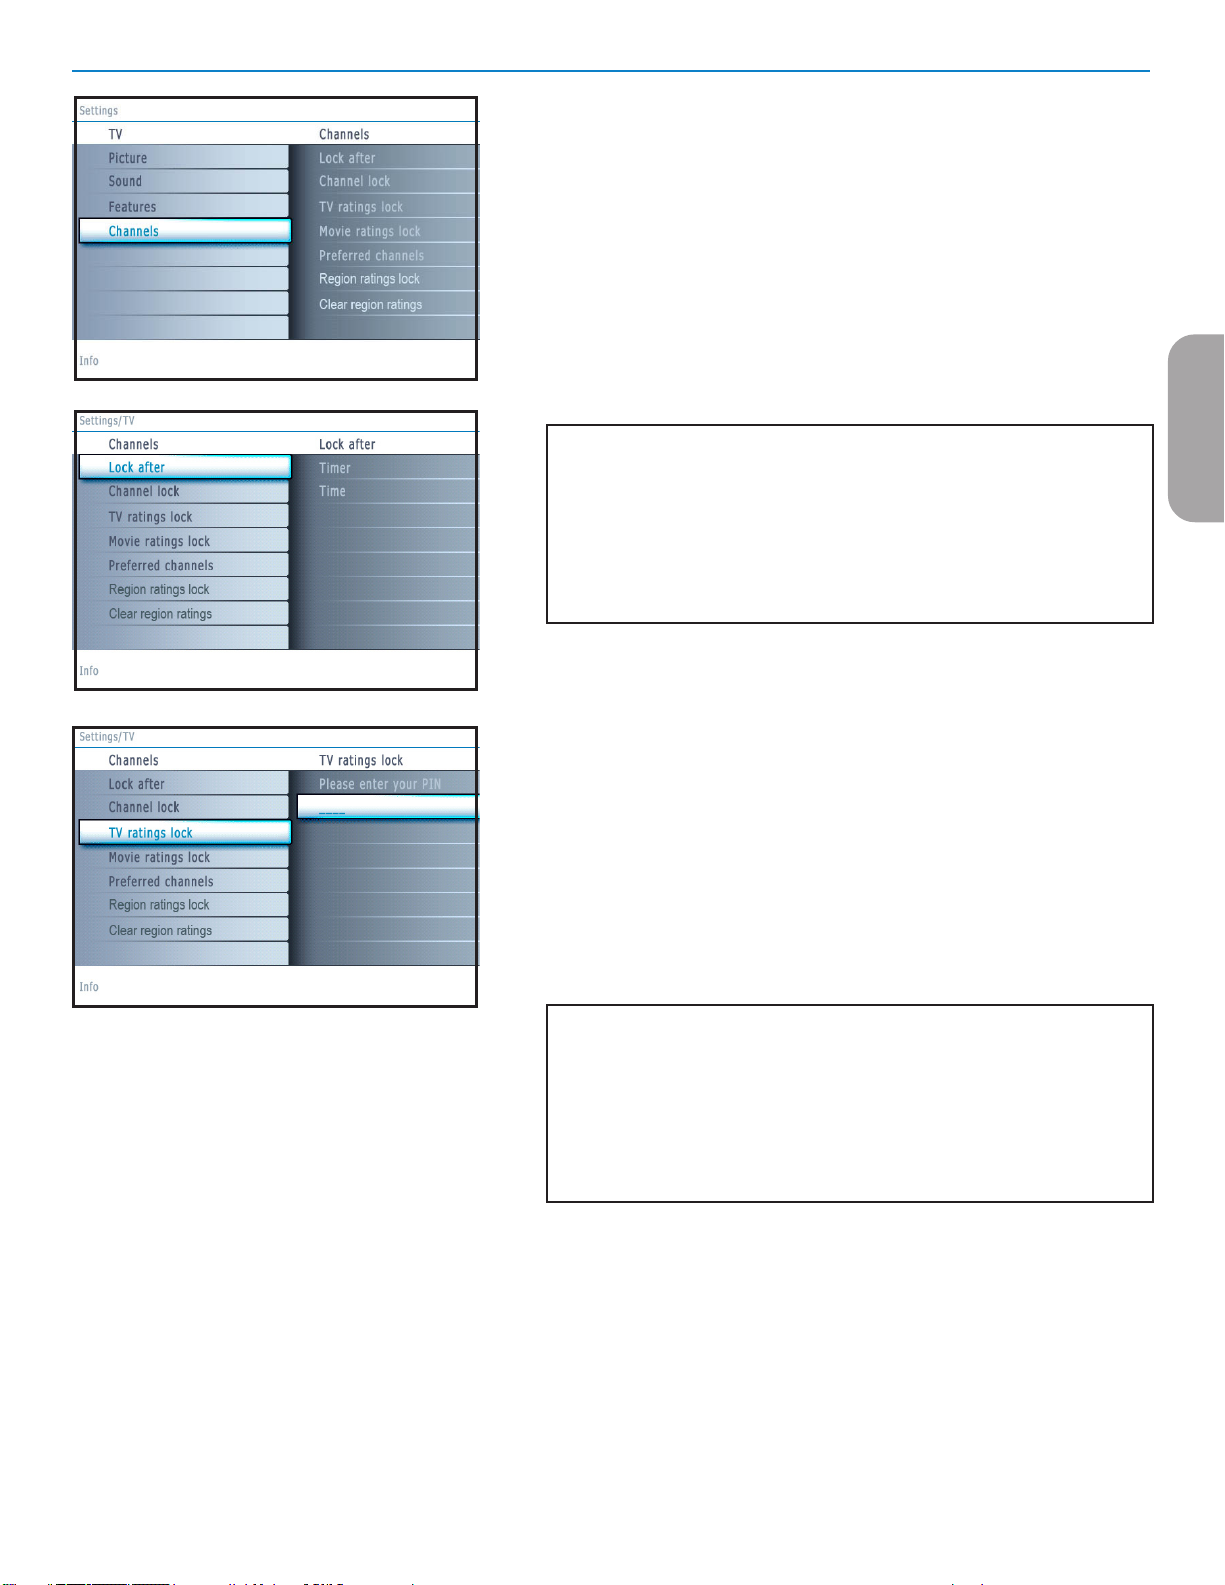
Channels menu
This menu can control special functions for the TV channels.
& Select Channels in the TV settings menu with the cursor up/down.
é Press the cursor right to enter the channels menu.
“ Press the cursor up/down to select a channels menu item.
Lock after
Note: Lock after is only selectable if time is known. See Setup, Clock menu, p. 13.
This allows you to prevent the viewing of the channels after a selectable time
delay. Locked channels can still be tuned, but the picture is blanked and the
audio is muted.
& Press the cursor right and select Timer On or Off.
When set to On this allows you to set the clock.
When having selected Timer On, you will be summoned to enter your PIN
(See below). Follow the instructions on screen.
Set/Change PIN
& Select Set or Change PIN with the cursor down.
é If no PIN-code exists yet, the menu item is set to Set PIN. Follow the
instructions on screen.
If a PIN-code has previously been entered, the menu item is set to
Change PIN. Follow the instructions on screen.
All number combinations from 0000 to 9999 are valid numbers.
“ The Menu preferences menu reappears with a message confirming that
the PIN has been created.
é Select Time and press the cursor right. This allows you to set the time after
which the lock is set.
“ Select AM or PM to select the correct period of the day.
‘ Enter the time with the digit or the cursor buttons and press OK to confirm.
Channel lock
This allows you to completely lock a certain TV channel or external source.
Select the channels or subchannels you want to lock and press OK to confirm.
TV ratings lock
Your TV is equipped with a V-chip. This allows you to control access to
individual programs based on their movie and TV ratings. All settings apply to
all AV inputs, except HDMI. The program content advisory data are sent by the
broadcaster or program provider.
& Select TV ratings lock with the cursor down.
é Press the cursor right to enter the list. You are asked to enter your code. (See
below). If the code is correct, a list appears, showing the age-based TV ratings
and a corresponding content-based ratings list.
Set/Change PIN
& Select Set or Change PIN with the cursor down.
é If no PIN-code exists yet, the menu item is set to Set PIN. Follow the
instructions on screen.
If a PIN-code has previously been entered, the menu item is set to
Change PIN. Follow the instructions on screen.
All number combinations from 0000 to 9999 are valid numbers.
“ The Menu preferences menu reappears with a message confirming that
the PIN has been created.
“ Select an age-based TV rating with the cursor up/down, and enter, if present,
the list with content-based ratings with the cursor right, and select one contentbased rating.
‘ Press OK to activate/de-activate the selected rating.
( Select another content-based rating if you like and press OK again.
You need only enter your PIN-code once while the menu is active.
You can lock/unlock any number of ratings on the list without re-entering your
code.
Each ratings item has a box-graphic in front of it to indicate whether or not
programs carrying that rating are currently locked:
• box with a 'X': all items in the contents-based list are locked as well;
• empty box: the item is unselected;
• box with a '/': some content-based ratings are selected/unselected.
EnglishFrançaiseEspañol
17
Page 26
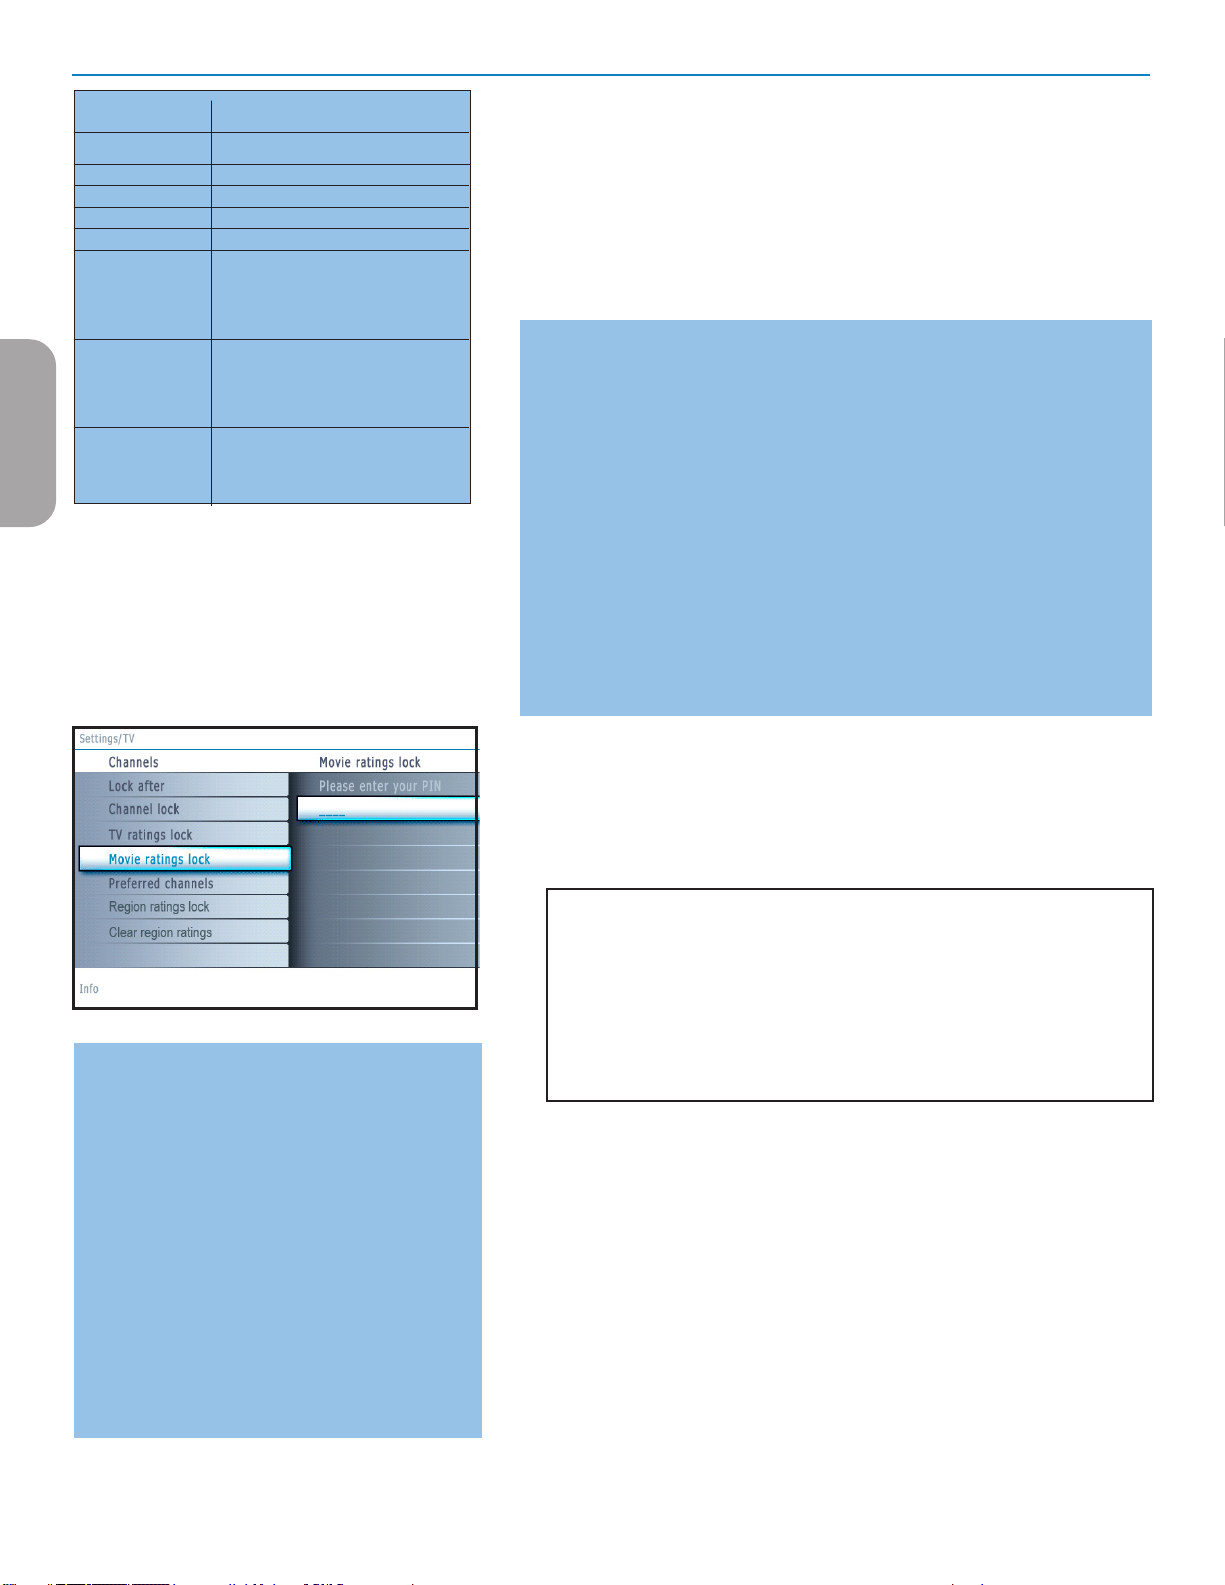
Age-based Rating Content-based Rating
All none
None none
TV-Y none
TV-Y7 (FV) Fantasy Violence
TV-G none
TV-PG (D) Dialog
(L) Language
(S) Sex
(V) Violence
TV-14 (D) Dialog
(L) Language
(S) Sex
(V) Violence
TV-MA (L) Language
(S) Sex
EnglishFrançaiseEspañol
(V) Violence
When All has been selected, all items in the age-based and in the contents-based
lists are locked.
If, while All is selected, any other item, either an age-based or content-based item,
is unselected, then All is automatically unselected.
None is the selection for items that either have no rating information or have a
rating of None. Both will be locked.
When an item on the age-based list is selected, all items below that item of the
same group are locked as well.
When you select a content-based rating, all identical content-based ratings in the
younger age-based categories are also selected.
appropriate for children of all ages with themes and elements suitable for
TV-Y
TV-Y7
TV-Y7-FV
TV-Y7 category
TV-G
strong language and little or no sexual dialogue or situations
TV-PG
children and which may need parental guidance. The program may contain
moderate violence, sexual dialogue and/or situations and some strong language.
TV-14
of age. These programs include one or more of the following:
intense violence, intense sexual situations, suggestive dialogue and strong
language.
TV-MA
under the age of 17. These programs may contain graphic violence, explicit sexual
activity and/or crude or indecent language.
children aged 2-6
programs designed for children age 7 and older
programs include fantasy violence more intense than other programs in the
programs suitable for all ages. These programs contain little or no violence, no
programs contain elements that some parents may find unsuitable for younger
programs contain elements that may not be suitable for children under 14 years
programs are designed to be viewed by adults and may be unsuitable for children
NR not rated
G movies with a mild content, suitable for all ages
PG movies for which parental guidance is
recommended. They may contain a few racy or
violent scenes or maybe some bad language
PG-13 movies for which parental guidance may be
recommended if under age 13
R restricted. The movies usually contain offensive
sex or bad language and may be unsuitable for
children under the age of 17. Parental guidance
or permission needed.
NC-17 even with parental permission, forbidden
under age 17. More offensive sex, violence or
bad language.
X movies which generally focus on sex,
violence and/or bad language. Also known as
pornography.
Movie Ratings Lock
This function allows you to control access to individual movies based on their
MPAA ratings (Motion Picture Association of America).
& Select Movie ratings lock with the cursor down.
é Press the cursor right to enter the list. You are asked to enter your code. (See
below). If the code is correct, a list appears, showing all valid MPAA content
ratings.
Set/Change PIN
& Select Set or Change PIN with the cursor down.
é If no PIN-code exists yet, the menu item is set to Set PIN. Follow the
instructions on screen.
If a PIN-code has previously been entered, the menu item is set to
Change PIN. Follow the instructions on screen.
All number combinations from 0000 to 9999 are valid numbers.
“ The Menu preferences menu reappears with a message confirming that
the PIN has been created.
“ Select a movie rating with the cursor up/down.
‘ Press OK to activate/de-activate the selected rating.
Each rating item has a box-graphic in front of it to indicate whether or not
programs carrying that rating are currently locked:
• box with a 'X': movies with this rating are locked;
• empty box: movies with this rating are unlocked.
When All has been selected, all items on the movie ratings list become selected.
(All movies are locked.)
If, while All is selected, any other item is unselected, then All is automatically
unselected.
When NR has been selected, no other item is selected.
When any other item has been selected, all ratings below are selected as well, thus
all movies with those ratings will be locked.
18
Page 27
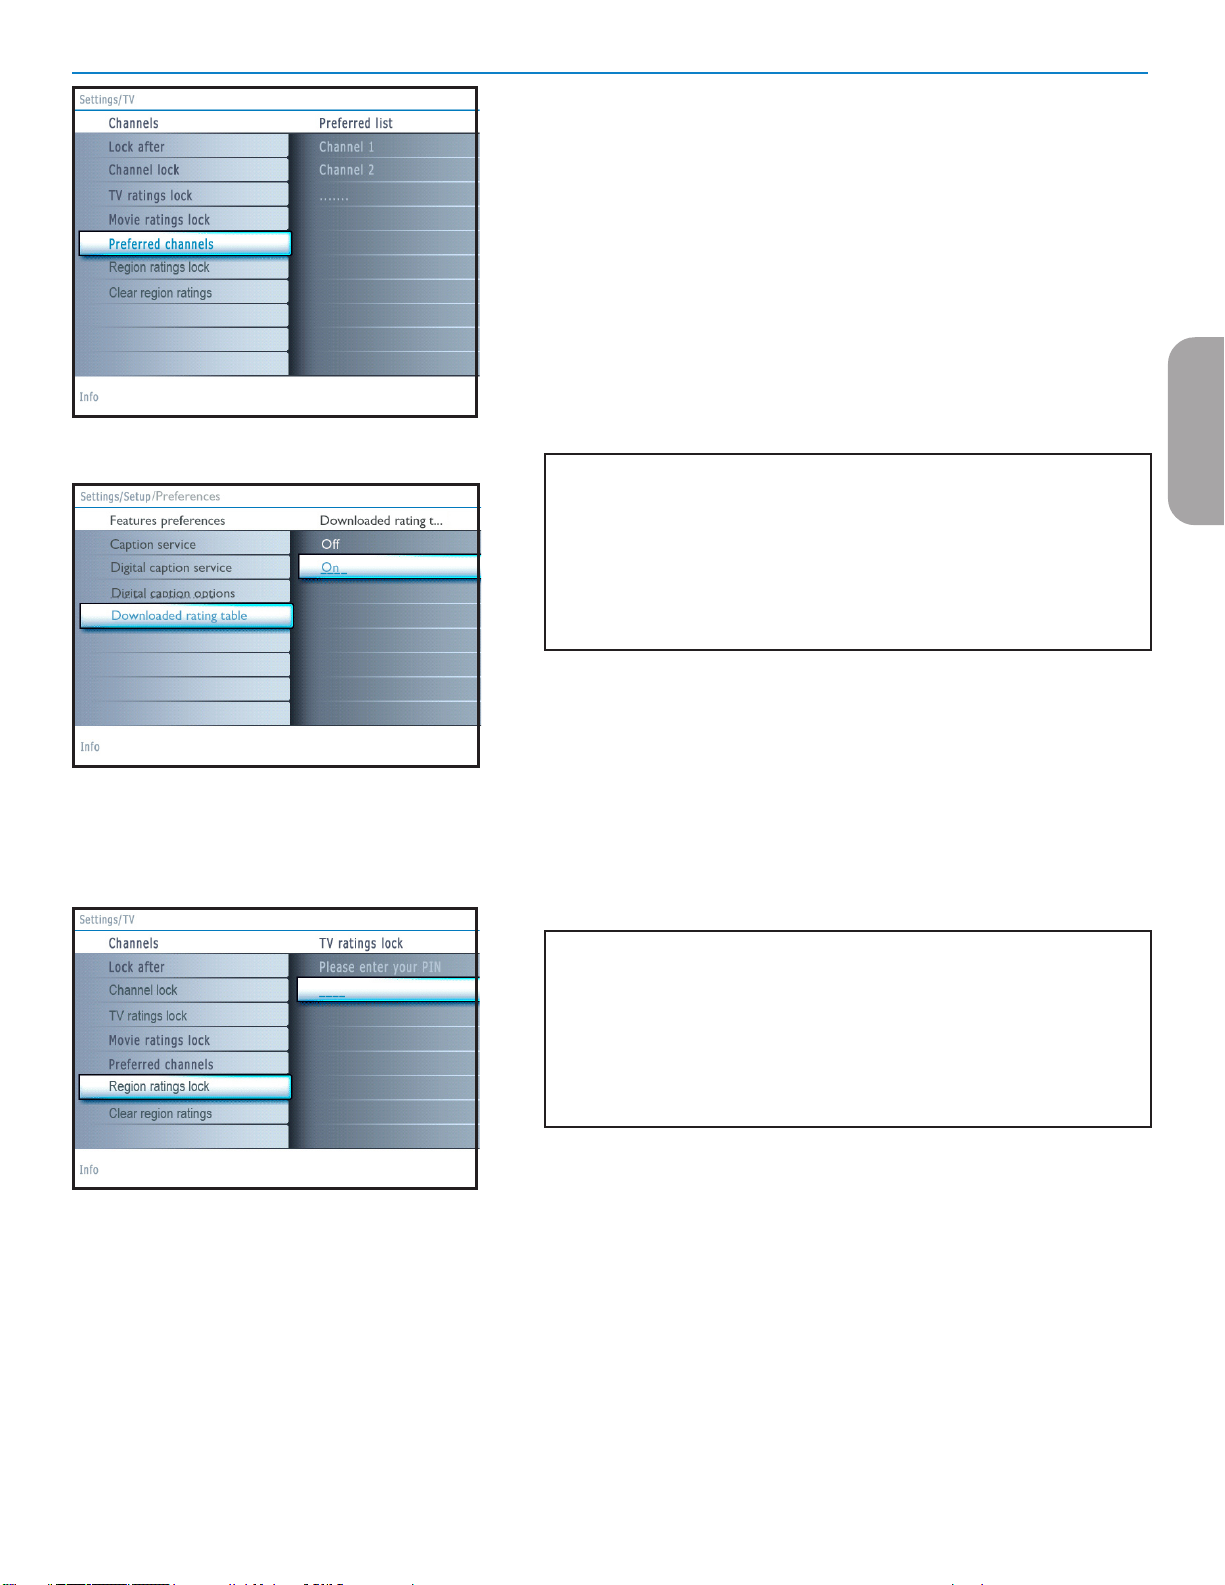
Preferred channels
A channel, when installed, is marked as preferred by default and added to the
channel list. This feature provides the ability to remove a channel number from
the channel list.
& Select Preferred channels with the cursor down.
é Press the cursor right to enter a list with all stored channel numbers.
“ Select the channel you want to remove with the cursor down.
‘ Press OK.
( Repeat to remove other channels.
Download rating table
This allows you to add region ratings lock options next to your current ones.
& Select Download rating table with the cursor down.
é Press the cursor right to enter the list. You are asked to enter your code. (See
below). If the code is correct, you can choose to on/off to download the rating
table.
Set/Change PIN
& Select Set or Change PIN with the cursor down.
é If no PIN-code exists yet, the menu item is set to Set PIN. Follow the
instructions on screen.
If a PIN-code has previously been entered, the menu item is set to
Change PIN. Follow the instructions on screen.
All number combinations from 0000 to 9999 are valid numbers.
“ The Menu preferences menu reappears with a message confirming that
the PIN has been created.
“ Select on/off to download the rating table.
‘ Press OK to activate/de-activate the selection.
EnglishFrançaiseEspañol
Note: - Before activating, please ensure regional ratings are broadcasted.
Region ratings lock
This function allows you to control access to digital programs based on
downloaded Region Ratings.
& Select Region ratings lock with the cursor down.
é Press the cursor right to enter the list. You are asked to enter your code. (See
below). If the code is correct, a list appears, showing the Region ratings and a
corresponding content-based ratings list.
Set/Change PIN
& Select Set or Change PIN with the cursor down.
é If no PIN-code exists yet, the menu item is set to Set PIN. Follow the
instructions on screen.
If a PIN-code has previously been entered, the menu item is set to
Change PIN. Follow the instructions on screen.
All number combinations from 0000 to 9999 are valid numbers.
“ The Menu preferences menu reappears with a message confirming that
the PIN has been created.
“ Select a Region rating with the cursor up/down, and enter, if present, the list
with content-based ratings with the cursor right, and select one content-based
rating.
‘ Press OK to activate/de-activate the selected rating.
( Select another content-based rating if you like and press OK again.
You need only enter your PIN-code once while the menu is active.
You can lock/unlock any number of ratings on the list without re-entering your
code.
Each ratings item has a box-graphic in front of it to indicate whether or not
programs carrying that rating are currently locked:
• box with a 'X': all items in the contents-based list are locked as well;
• empty box: the item is unselected;
• box with a '/': some content-based ratings are selected/unselected.
19
Page 28
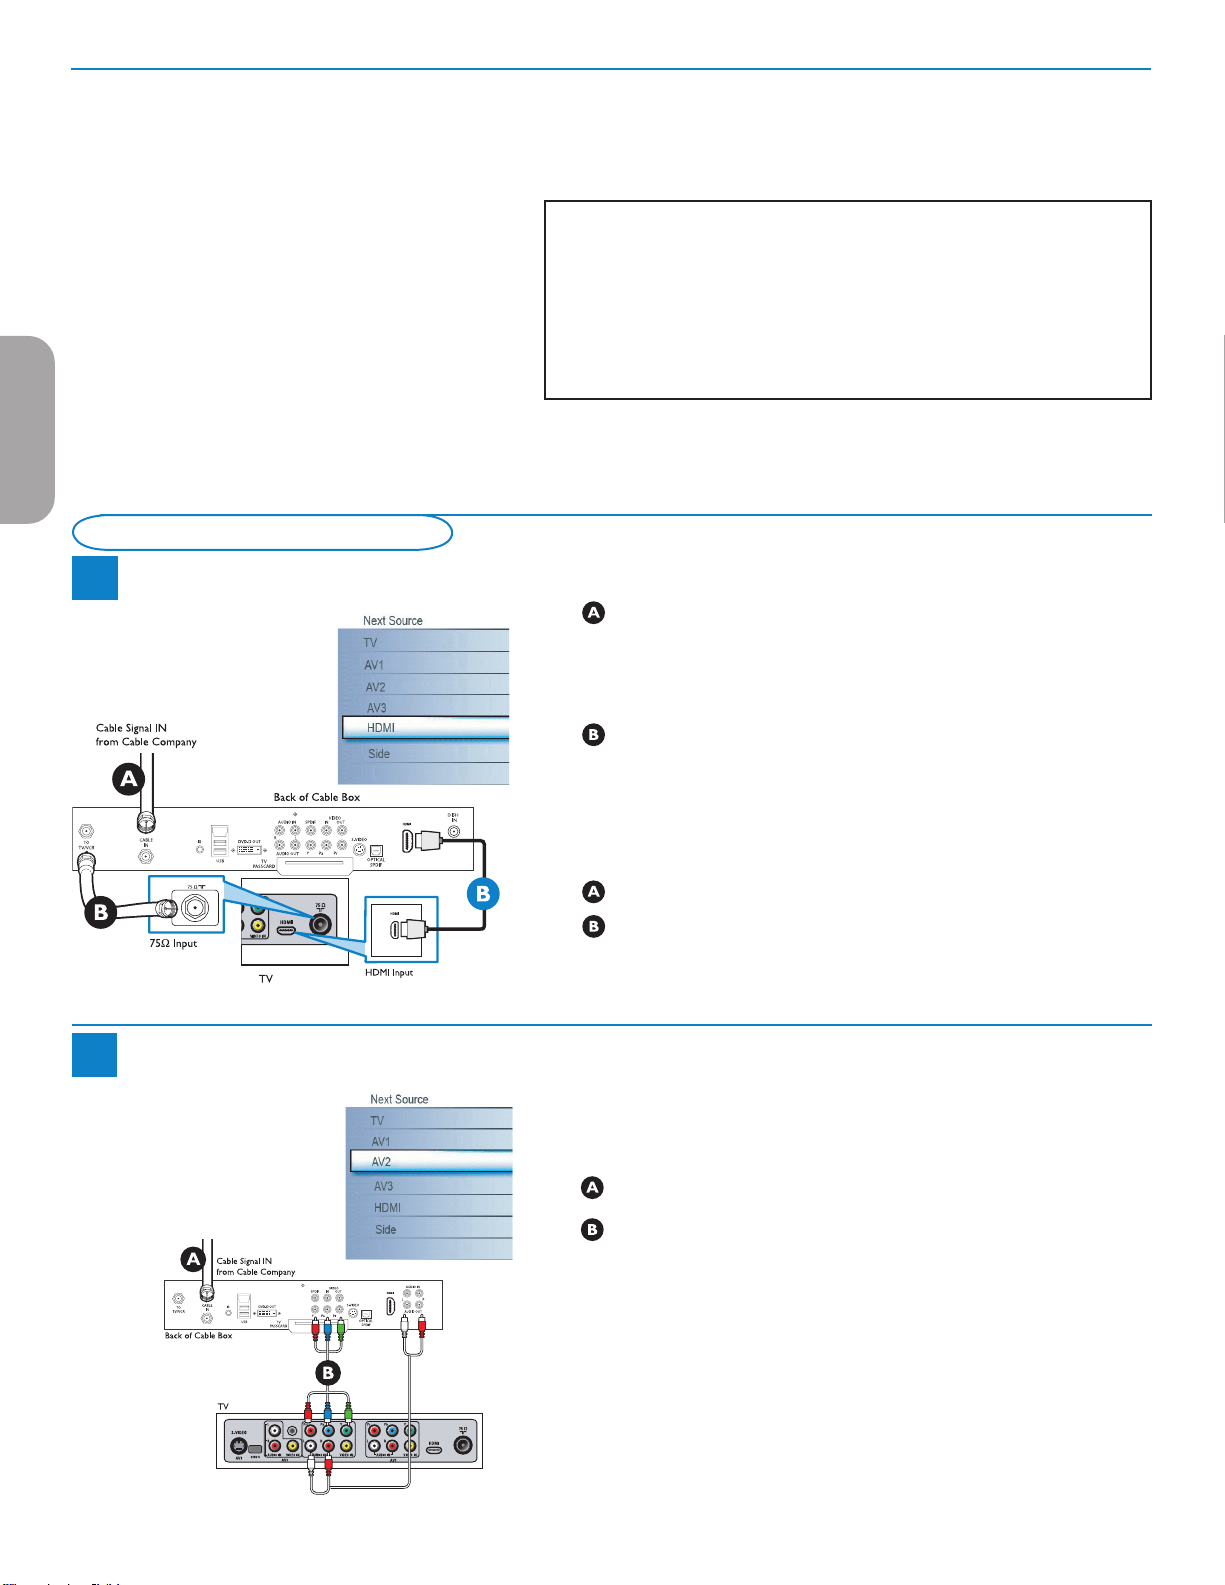
EnglishFrançaiseEspañol
CABLE / ANTENNA
(
)
AUDIO OUT
(DIGITAL)
CABLE / ANTENNA
Connect Accessory Devices
Clear region ratings
This function allows you to clear all the Region Ratings settings.
& Select Clear region ratings with the cursor down.
é Press the cursor right to enter the list. You are asked to enter your code. (See
below).
Set/Change PIN
& Select Set or Change PIN with the cursor down.
é If no PIN-code exists yet, the menu item is set to Set PIN. Follow the
instructions on screen.
If a PIN-code has previously been entered, the menu item is set to
Change PIN. Follow the instructions on screen.
All number combinations from 0000 to 9999 are valid numbers.
“ The Menu preferences menu reappears with a message confirming that
the PIN has been created.
“ Select Start now.
‘ Press OK to activate.
Note : The above 2 features (Region ratings lock and Clear region ratings) will be available
only in sets manufactured after the cut-off timeline, specified by the FCC mandate.
Set Top Box to TV
1a
Set-Top Box to TV
1b
Using HDMI
Connect RF cable from wall to input at back of the cable box.
Set output switch on set-top box to CH 3 or 4 and tune TV to same
channel.
In some cases, cable box will automatically tune to channel 3 or 4. Just change
channels until picture appears.
Connect cable box to TV using HDMI cable.
Note : If the accessory device has DVI output only, use a DVI to HDMI adapter
cable to connect to the HDMI connector. You need to also connect the audio
cable to L and R AUDIO jacks. Next, go to Menu => Setup => Source
=> Analog Audio In => and select HDMI.
Using RF Cable
Connect RF cable from wall to input at the back of the cable box.
Use second RF to connect the cable box to the TV's antenna input.
This connection gives mono sound. For stereo sound use also composite audio/
video connection (Refer to panel 3).
Using Component Video Input
Connect Component Video cable to input at back of the cable box.
Turn on TV and DVD Player/DVD recorder. Press CH+ or CH- on
remote control to tune to the video supplied by AV2.
Insert a prerecorded DVD into DVD player/DVD recorder and press
PLAY to verify correct connection.
20
Page 29
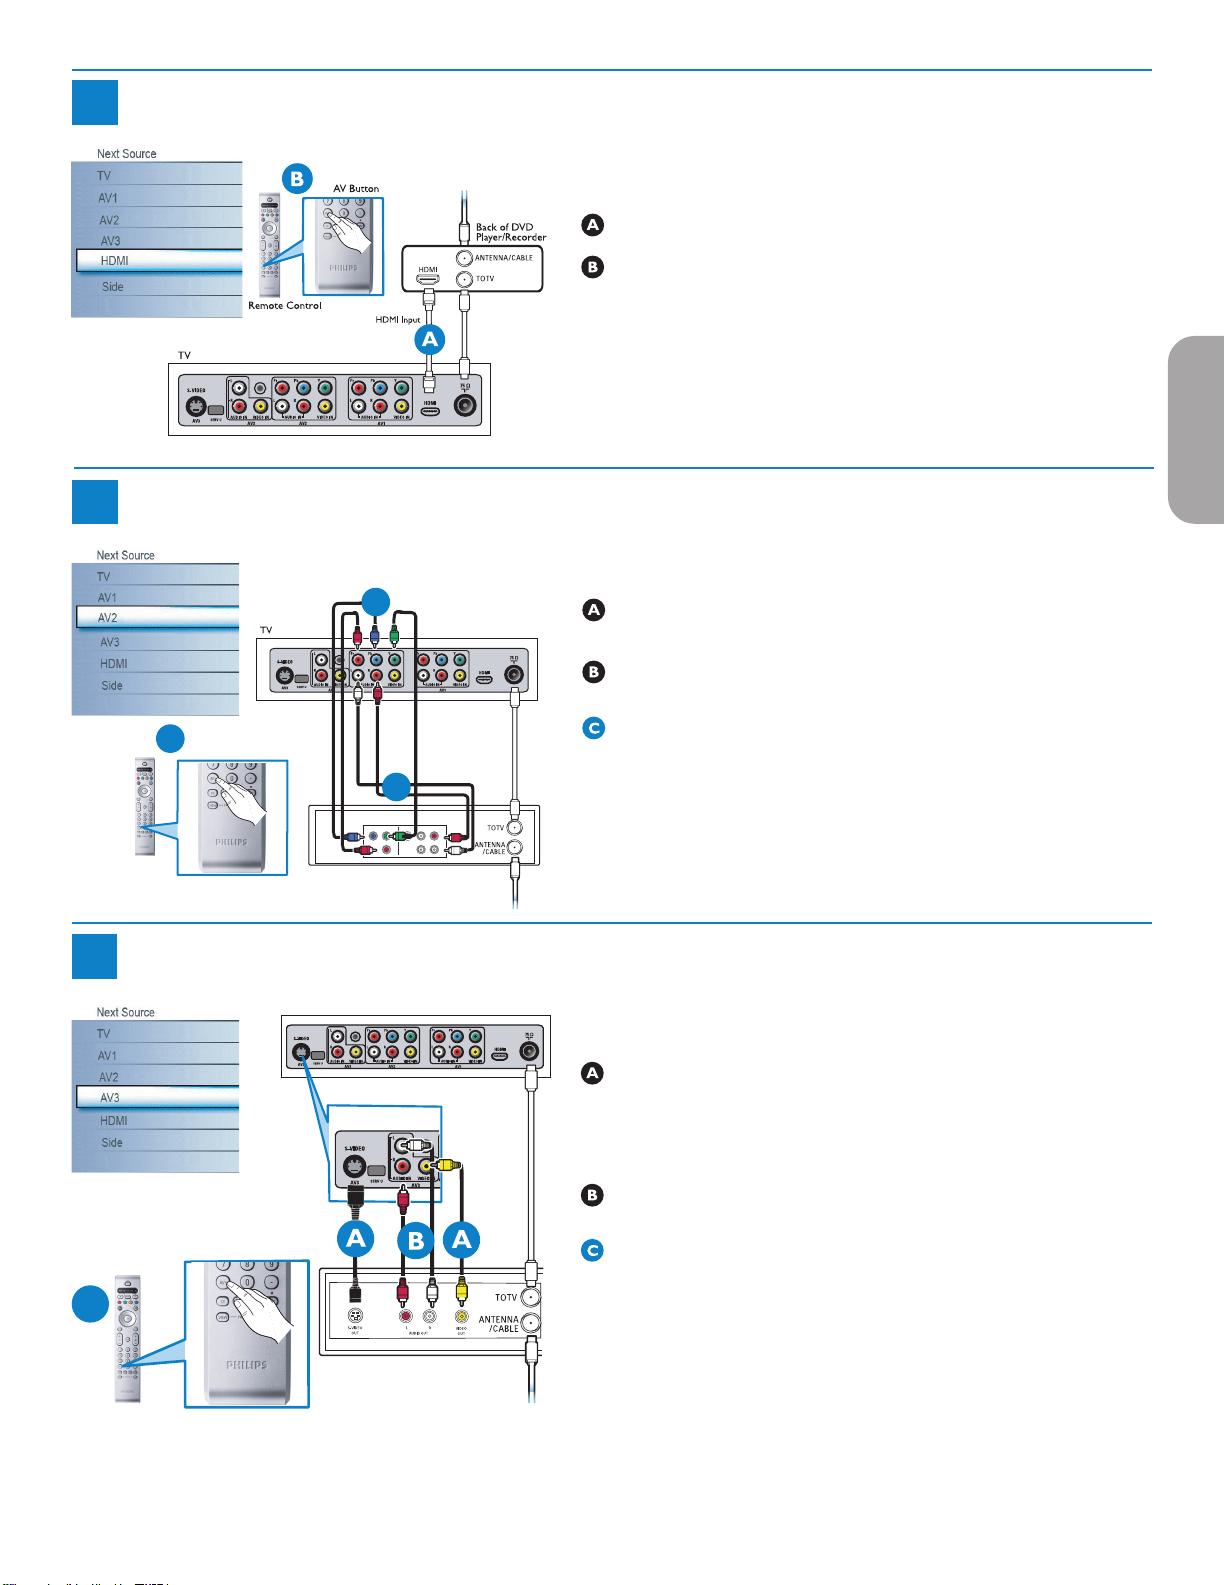
Progressive Scan DVD Player or DVD Recorder to TV
(
)
AUDIO OUT
(DIGITAL)
CABLE / ANTENNA
Add for DVD Recording
S-VIDEO
OUT
OUT
OUT
L
R
AUDIO
VIDEO
COMP VIDEO
Y
Pb
Pr
C
AV Button
Remote Control
(
)
AUDIO OUT
(DIGITAL)
CABLE / ANTENNA
A
Back of DVD Player/Recorder
B
Add for DVD Recording
Back of DVD/VCR
C
AV Button
Remote Control
Back of TV
S-Video Input
(
)
AUDIO OUT
(DIGITAL)
CABLE / ANTENNA
(
)
AUDIO OUT
(DIGITAL)
Add for DVD
Recording
2a
Using HDMI
Connect DVD player/DVD recorder to the TV using HDMI cable.
Turn on TV and DVD Player/DVD recorder. Press CH+ or CH- on
remote control to tune to the video supplied by HDMI.
Insert a prerecorded DVD into DVD player/DVD recorder and press
PLAY to verify correct connection.
Progressive Scan DVD Player/Recorder to TV
2b
Using Composite Video Input (YPbPr)
Insert Component Video connectors into their corresponding jacks on
both DVD player/DVD recorder and TV (Y, Pb and Pr).
Connect red/white audio cables into the audio output jacks on DVD
player/DVD recorder and audio AV inputs on TV.
EnglishFrançaiseEspañol
DVD Player/DVD Recorder/VCR to TV
3
Turn on TV and DVD Player/DVD recorder. Press AV on remote
control until the connected source appears on TV screen.
Insert a pre-recorded DVD into DVD player/DVD recorder and press PLAY to
verify correct connection.
Using S-Video or composite audio-video
Connect S-Video cable to S-Video input on back of TV and S-Video
output on the back of DVD/VCR player or recorder.
OR
Connect composite video cable to Video input on back of TV and Video
output on the back of DVD/VCR player or recorder.
Connect audio cables (red/white) to audio AV inputs on back of TV and
Audio outputs on back of DVD/VCR player or recorder.
Turn on TV and DVD/VCR player or recorder. Press AV button on the
remote control until AV1 or AV2 appears on TV screen.
Insert pre-recorded videotape/DVD into DVD/VCR player or recorder
and press PLAY to verify correct connection.
When you connect S-Video and AV2 at the same time, you can only hear sound
coming from S-Video.
21
Page 30
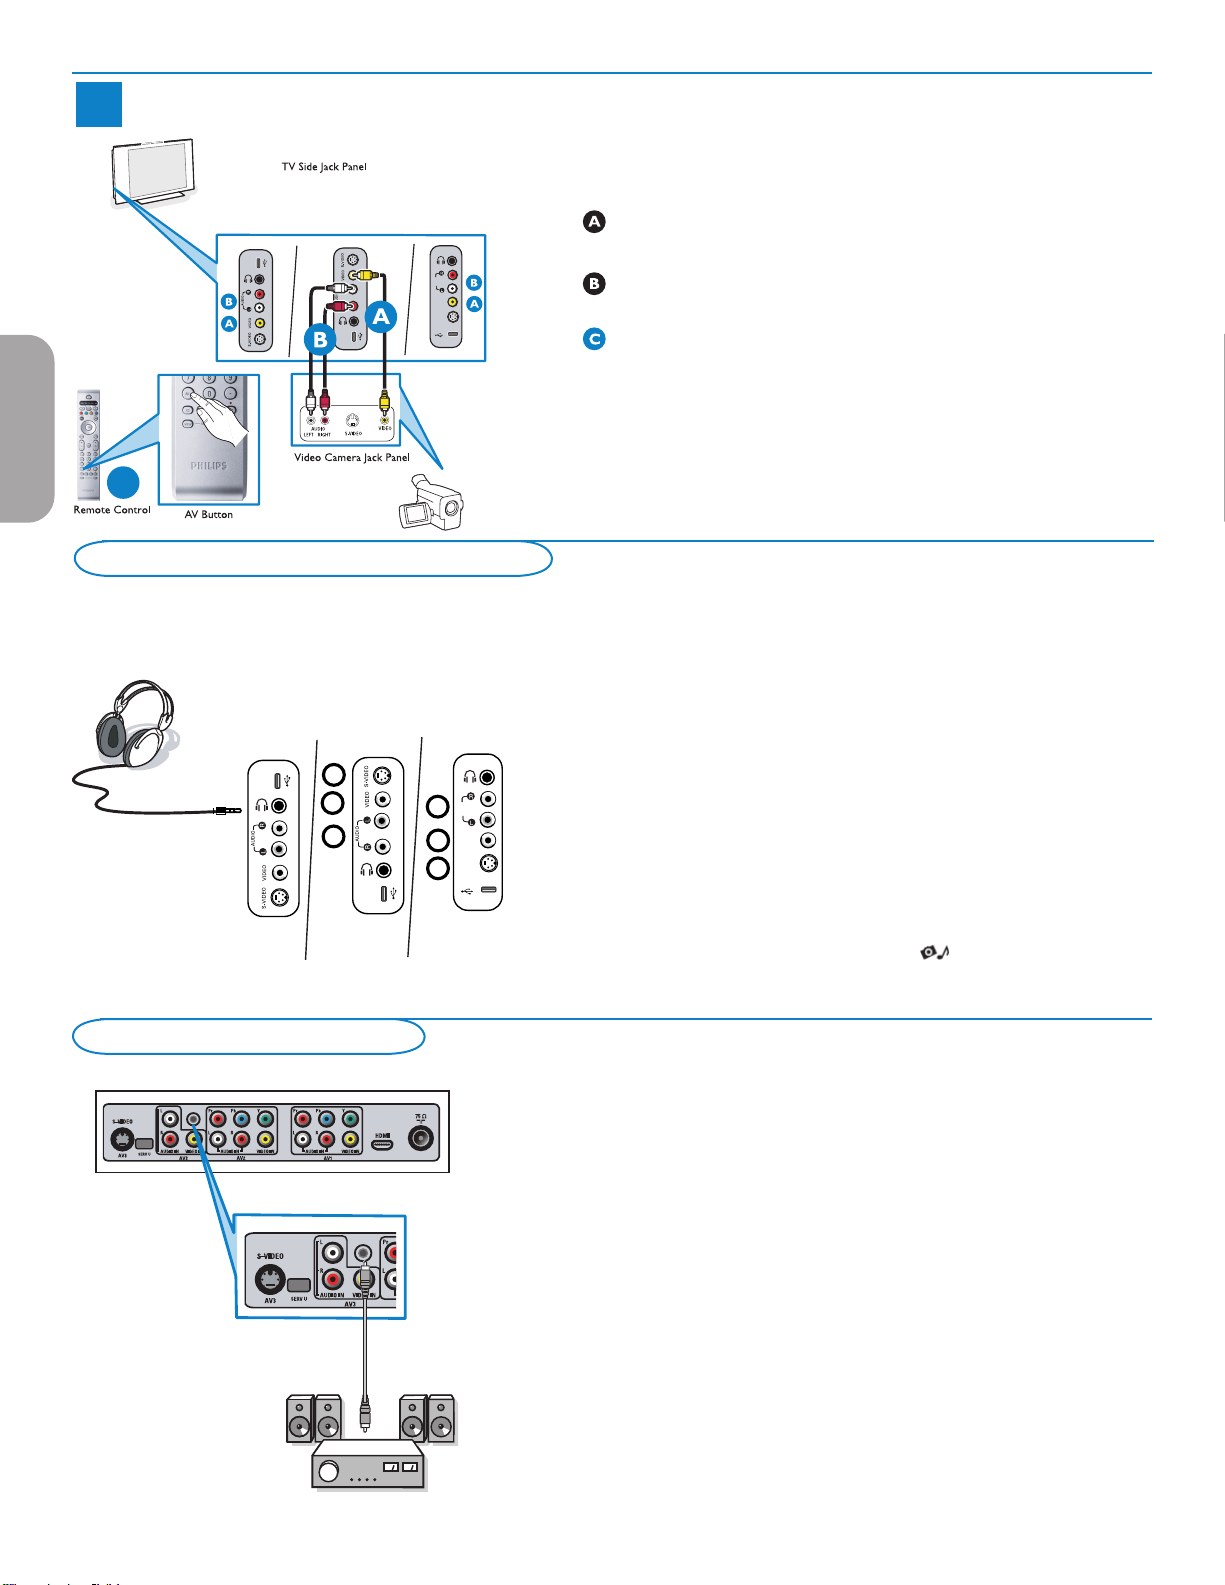
4
C
USB
USB
AUDIO
IN
VIDEO
IN
S-VIDEO
IN
USB
1
2
3
1
2
3
USB
USB
USB
AUDIO
IN
VIDEO
IN
S-VIDEO
IN
AUDI O OUT
(DIG ITAL)
Back of TV
(
)
AUDIO OUT
(DIGITAL)
CABLE / ANTENNA
(
)
AUDIO OUT
(DIGITAL)
EnglishFrançaiseEspañol
Video Camera/Games Console to TV
26PF5321D
37PF7321D
42PF5421D
42PF7421D
42PF5321D
42PF7321D
50PF7321D
26PF5351D
32PF5321D
32PF7321D
32PF7421D
Using Composite Audio/Video Input
Connect the video cable (yellow) from the video output on camera (or
other device) to the video input (yellow) located on the side of TV.
Connect audio cables (red/white) from audio outputs on device to audio
inputs (red/white) on the side of the TV.
Tip: For mono devices, connect only white audio cable from device's audio
output to white audio input on the side of TV.
Turn on the TV and the device. Press the AV button on the remote
control until FRONT/SIDE appears on TV screen.
Press PLAY on the device to verify connection.
Side connections - USB/Headphone
37PF7321D
42PF5421D
42PF7421D
42PF5321D
42PF7321D
50PF7321D
26PF5321D
26PF5351D
32PF5321D
32PF7321D
32PF7421D
Digital Surround receiver
Headphone
& Insert the plug into the headphone socket L as shown.
é Press the MUTE button on the remote control to switch off the internal
loudspeakers of the TV.
The headphone impedance must be between 8 and 4000 Ohm. The
headphone socket has a 3.5 mm jack.
In the Sound menu select Headphone volume to adjust the headphone
volume.
Viewing content from a USB device
Inserting a USB device
Note: USB devices are not supplied with this TV.
Insert a USB device in the USB connector at the side of the TV.
When a USB device is inserted, the Multimedia browser menu is displayed
automatically, see further.
Removing the USB device
& First switch off the My Content menu. To do so, navigate to the
Multimedia browser menu and press the button to exit the menu.
é Remove the USB device.
Connect a Digital MultiChannel Surround receiver to the DIGITAL AUDIO
OUT (SPDIF OUT) connector at the bottom of the TV.
The TV can output Digital audio via the DIGITAL AUDIO OUT (SPDIF OUT)
connector to an external amplifier or receiver.
If your amplifier or receiver has a matching connector for Digital Audio In,
you can connect it with a single cable to the TV’s DIGITAL AUDIO OUT
(SPDIF OUT).
See Connect Accessory Devices, p. 22.
22
Page 31
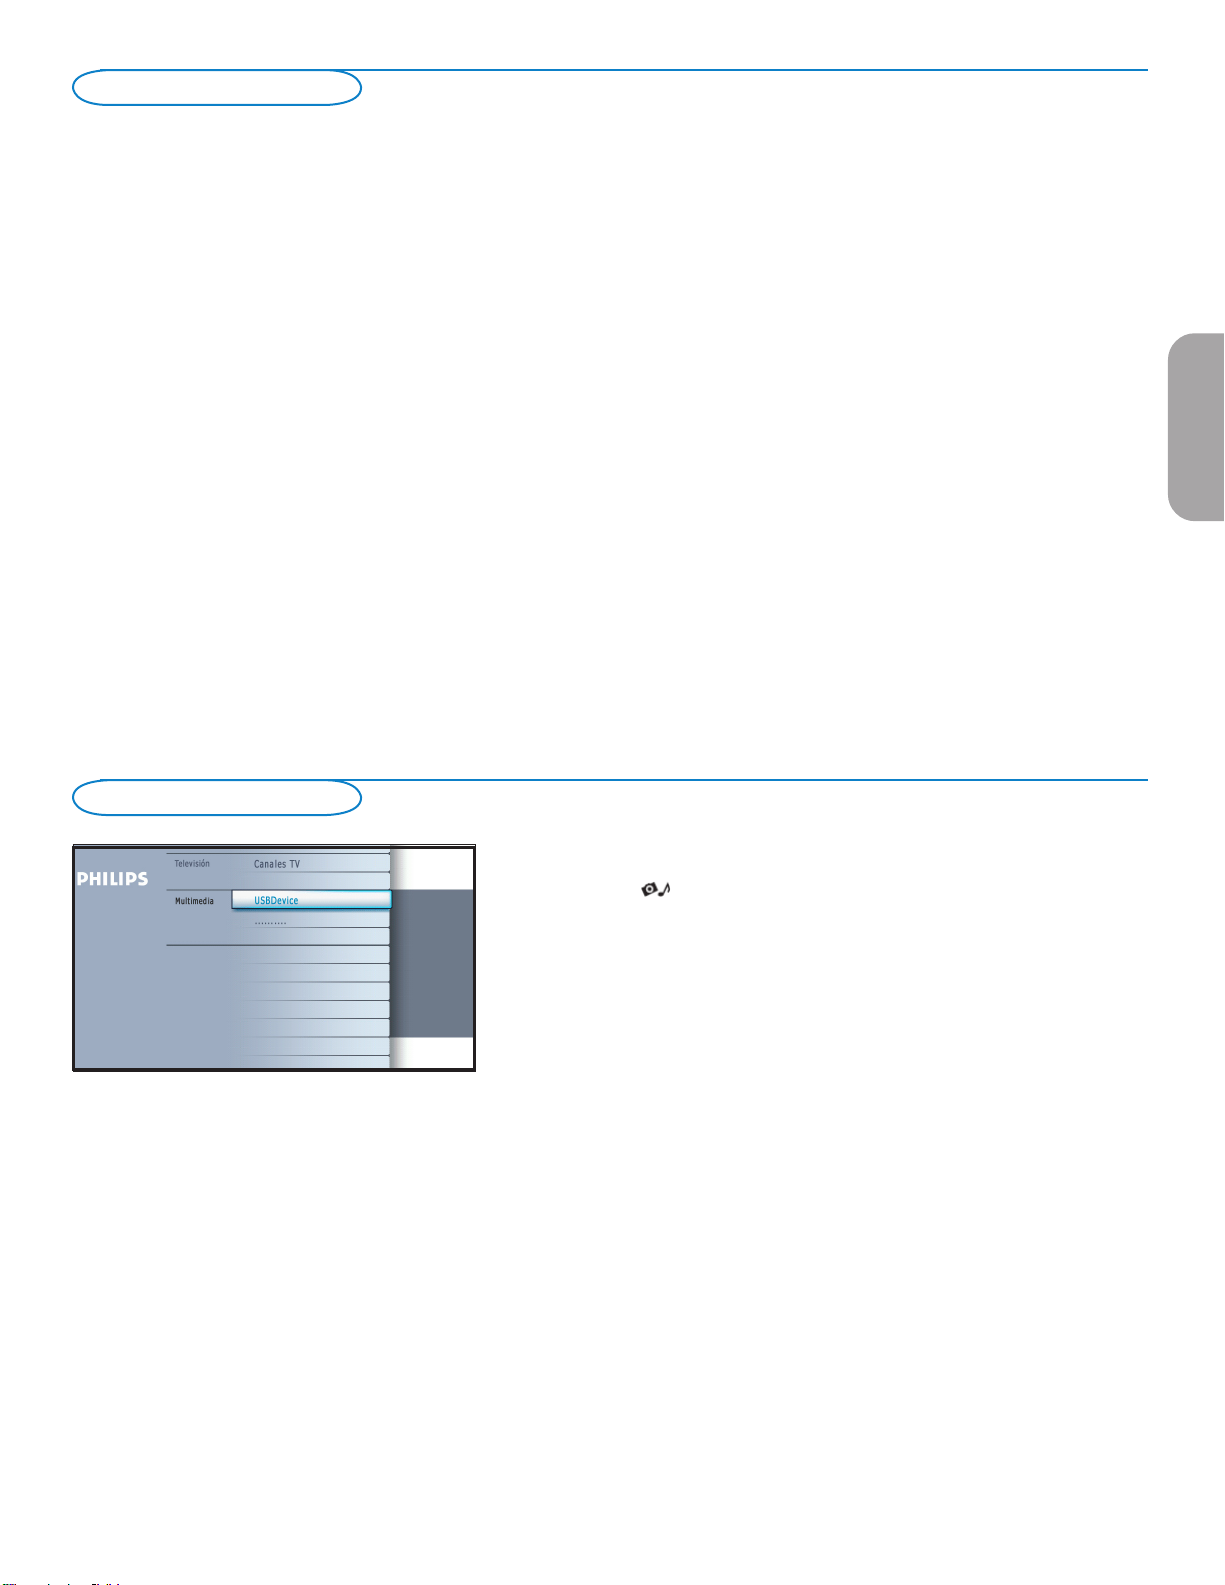
Perform installation
(Please skip this section if you have no cable connected to the Antenna input of the TV.)
& When the TV is powered-on for the first time you will be prompted to auto install the TV in order to receive the channels to receive the
channels that are broadcasted locally.
Note - The TV will take approximately 10-15 seconds to start up.
é Select the desired Language and press the green button "Next".
“ Select Cable or Antenna in the Installation mode and press the green button "Next".
‘ Auto Installation may take 20 to 40 minutes depending on the number of channels that are transmitted by the cable provider or
broadcaster.
( When the TV is not receiving any signal from the antenna/cable, the message CHANNEL NOT AVAILABLE will appear on the TV
screen. When no transmission is received from the broadcaster, a BLANK SCREEN will appear on the TV screen.
Note - The TV will go on to standby after 10 minutes. Press the POWER button on the remote control to on the TV.
§ You will not be able to receive pay channels when using direct antenna/cable connection to the television.
è When the Set-top box is connected to the television using coaxial cable, it is necessary to auto-program the television for the single channel
(3 or 4) that the Set-top box outputs and change the channels at the Set-top Box (using the set-top remote control) to view the program.
Refer to the manual for more details.
Note - The newly installed channels maybe sorted in a deifferent sequence on this TV. Please key using the CH +/- buttons to get to know
the new channel. Also you can use the OK key to see the list of channels.
! When the Set-top box is connected to the television using one of the AV connections (AV1/ AV2/ AV3/ HDMI), select that input source
(using the AV+ button) to view the programs and change the channels at the Set-top Box (using the set-top box remote control) to view the
program.
EnglishFrançaiseEspañol
Multimedia browser
Multimedia browser lets you display pictures or play audio files stored on a
USB device.
The Multimedia browser application is invoked from the My Content menu
(press the button) by selecting the USB device and pressing the cursor
right.
Notes:
- Following file formats can be reproduced:
• For pictures: JPEG
• For audio: MP3, MP3 Pro
- Only FAT/DOS-formatted memory devices are supported.
- If your digital camera is not supported, make sure your camera is switched on and
verify if its configuration settings are correct (see the manual of your camera).
- Philips cannot be responsible if your USB device is not supported.
23
Page 32
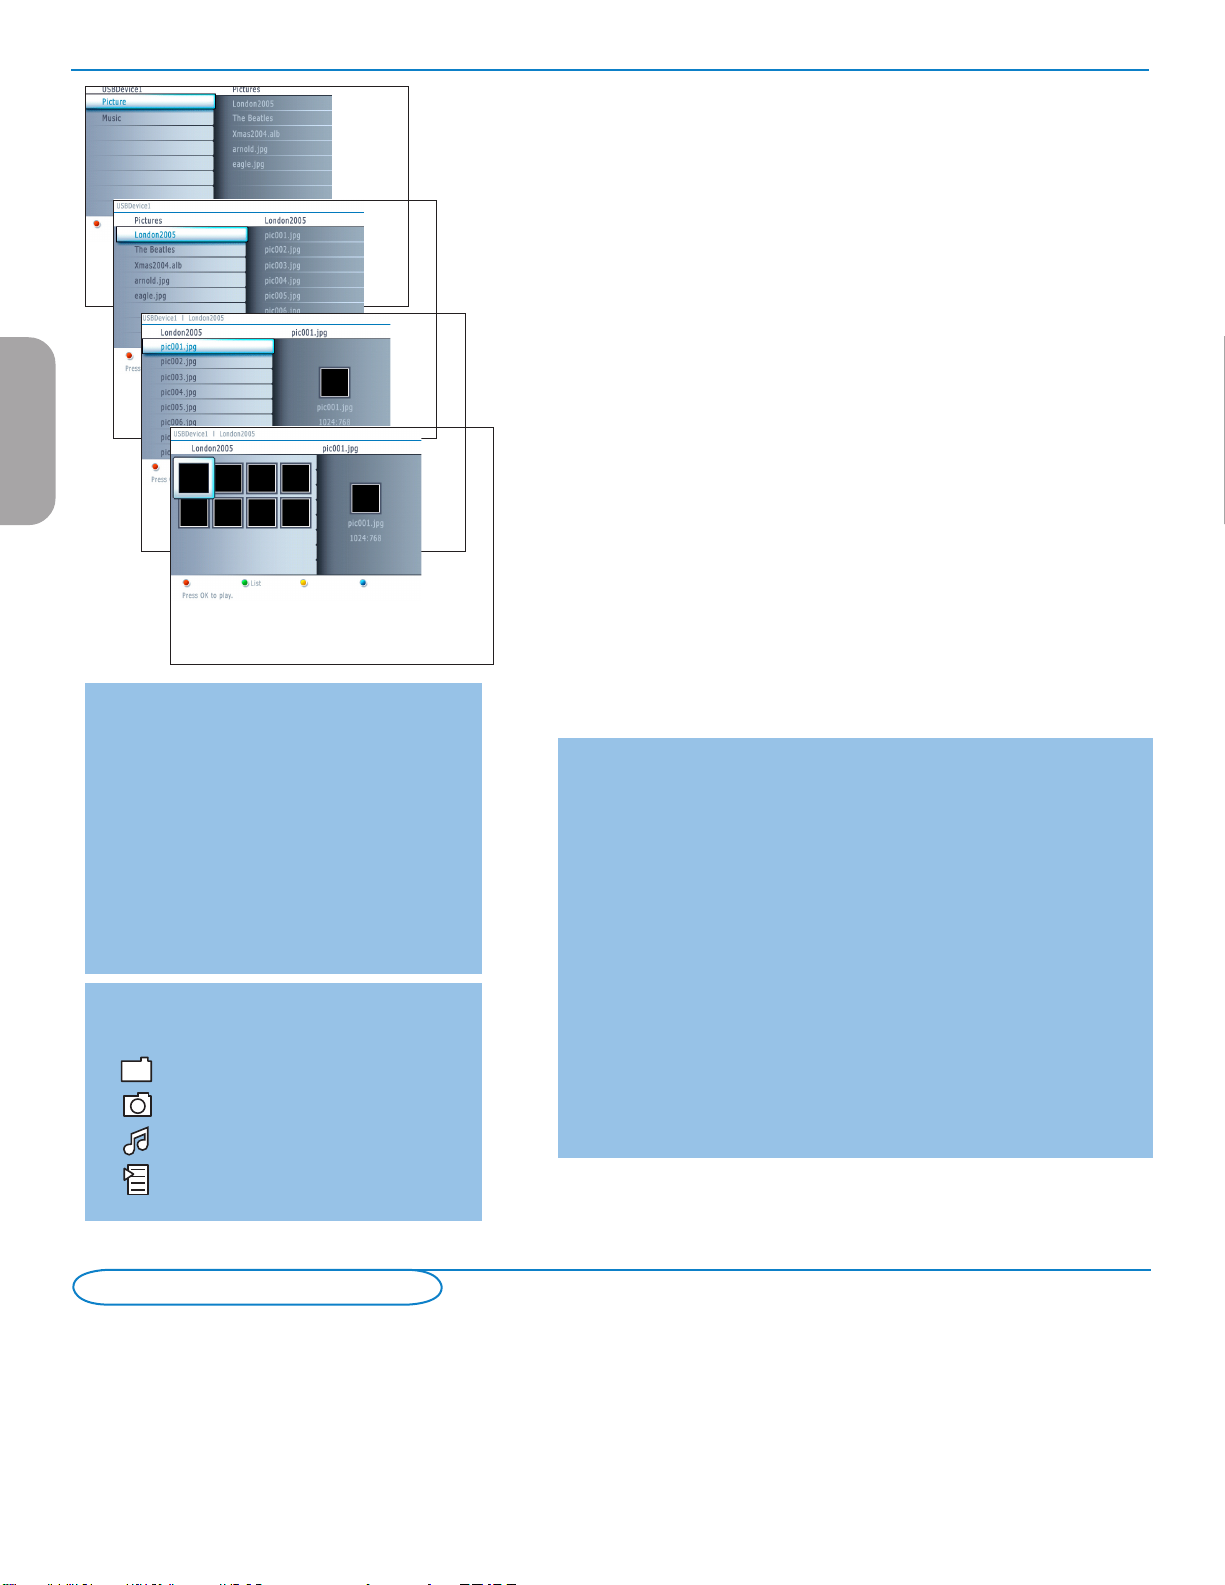
EnglishFrançaiseEspañol
Multimedia Browser menu
& Insert a USB device.
é Select the USB device under Multimedia with the cursor up/down.
The Multimedia browser will allow the user to browse content stored on
the inserted USB device.
Press the cursor right.
“ The 2-panel browser will be shown with the left panel containing the
content types (Music, Picture).
The right panel will display the content that is available of the selected
content type.
‘ Press the cursor up/down to select a content type and press the cursor
right to enter the content.
( Press the cursor up/down to select a file or a directory.
Note: Press the green color button to display all the image files in the current
directory as thumbnails when browsing pictures. Press the green button again to
display the image files in a list.
§ In case a file is selected, press the OK button to display a picture file or to
play an audio file.
In case a directory, album or playlist is selected, press the cursor right
to enter the content or press the OK button to start a slide show or a
playback of the files present in the directory, album or playlist.
è Press the cursor left to keep music playing and switch back to the
Multimedia menu.
! Press one of the color buttons on the remote control to perform the
corresponding function mentioned at the bottom of the screen.
The blue color button can be used to let the color re-appear.
ç To stop playing content, press the ‡ button on the remote control.
Notes:
• Your TV supports slide shows with
background music. See Annex 2, p. 32.
• The playback will continue to play even if temporarily
switched to browser screens. The audio will be
stopped when another song starts playing, or when
the end has been reached.
• Progressive JPEG files are not supported.
• The length of the files should not exceed 128
characters.
• Do not use a dot “.” in folder naming.
• More technical remarks can be found in Annex 3, p.
34.
Following icons may appear:
folder
pictures
music
self made playlist/album
Record with your recorder
Function buttons at the bottom of the screen
Details to display a description of the selected file or
directory;
Transitions to select if a transition during a slide show should
be applied;
Slide time to select the duration a picture will be displayed in
a slide show;
Rotate to rotate a picture;
Repeat one/all to repeat the playback of a music file;
Shuffle to shuffle music collections in a random way;
Other function buttons on the remote control
‡ to stop displaying content;
º to pause displaying content;
π to play a single file, start a slide show, playback of a
folder or other collection.
Record a TV program
You can record a TV program using your recorders tuner without affecting your TV.
& Select the channel number on your recorder.
é Set your recorder to record.
See the handbook for your recorder.
Switching channel numbers on your TV does not disturb recording !
24
Page 33
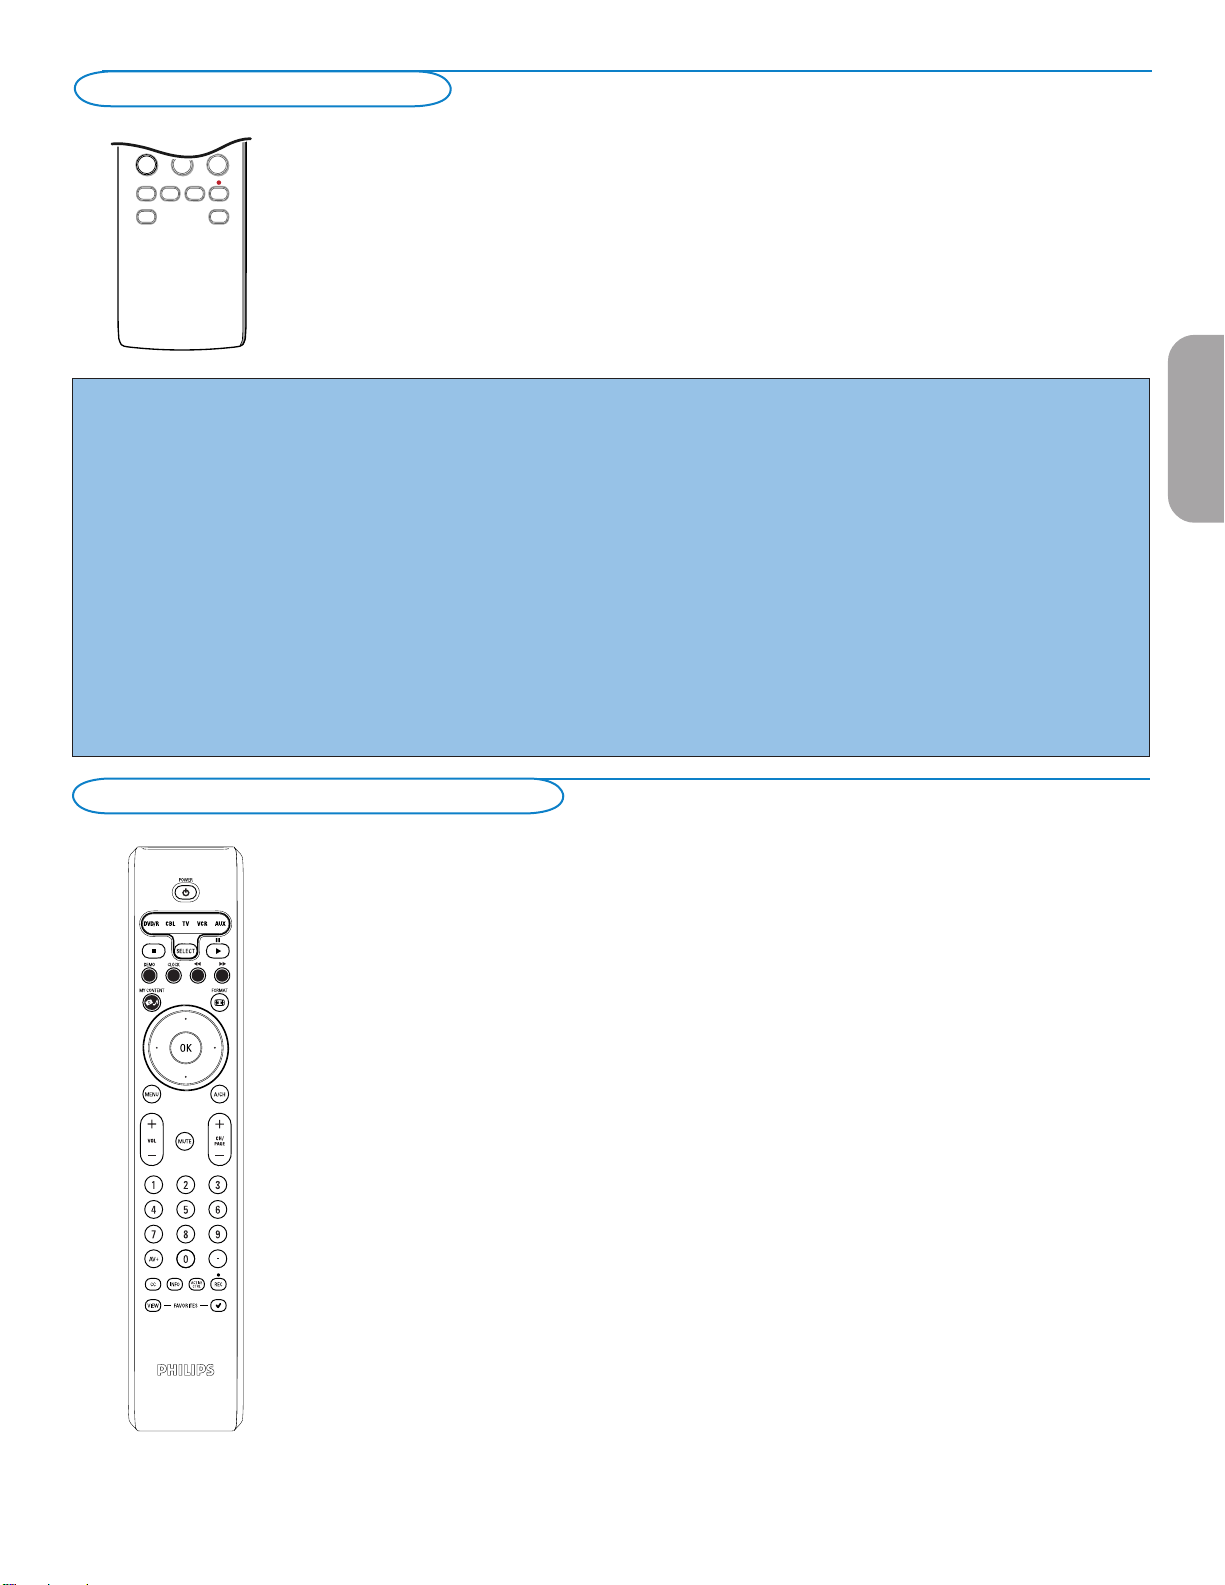
.@
TUVPQRS WXYZ
JKLGHI MNO
ABC DEF
+
-
+
-
DVD/R CBL TV VCR AUX
PIPMENU
1 2 3
4 5 6
7 8 9
0
¨
¨
¨
¨
TV
GUIDE
SELECT
DEMO CLOCK
MY CONTENT
VOL
CH/
PAGE
MUTE
AV+
-
ñ
à
¹
¼
POWER
3
- FAVORITES -
ACTIVE
CONTROL
REC
VIEW
CC
INFO
OK
=
_-
To select connected devices
& Press the AV+ button repeatedly or select Source in the Settings menu
é Press the cursor up/down.
“ Press OK.
Regulatory Notices - Federal Communications Commission Notice
This equipment has been tested and found to comply with the limits for a
Class B digital device, pursuant to part 15 of the FCC Rules. These limits
are designed to provide reasonable protection against harmful interference
in a residential installation. This equipment generates, uses, and can radiate
radio frequency energy and, if not installed and used in accordance with
the instructions, may cause harmful interference to radio communications.
However, there is no guarantee that interference will not occur in a
particular installation. If this equipment does cause harmful interference
to radio or television reception, which can be determined by turning
the equipment off and on, the user is encouraged to try to correct the
interference by one or more of the following measures:
Reorient or relocate the receiving antenna.
Increase the separation between the equipment and the receiver.
Connect the equipment into an outlet on a circuit different from that to
which the receiver is connected.
Consult the dealer or an experienced radio or television technician for
help.
(see p. 13) to select AV1, AV2, AV3, HDMI, Side or TV, according to
where you connected your devices.
Modifications The FCC requires the user to be notified that any changes or
modifications made to this device that are not expressly approved by
Philips Consumer Electronics may void the user’s authority to operate the
equipment.
Cables Connections to this device must be made with shielded cables with
metallic RFI/EMI connector hoods to maintain compliance with FCC Rules
and Regulations.
Canadian notice This Class B digital apparatus meets all requirements of the Canadian
Interference-Causing Equipment Regulations.
Avis Canadien Cet appareil numérique de la classe B respecte toutes les exigences du
Règlement sur le matériel brouilleur du Canada.
EnglishFrançaiseEspañol
Audio and video equipment buttons
Some of the audio and video equipment from our range of products can be operated with the
remote control of your TV.
Press one of the buttons after you pressed the SELECT button repeatedly according to the
equipment you want to operate with this remote control. See Use of the remote control, p.
5.
When no action is taken within 60 seconds, the remote control goes back to TV mode.
POWER to switch to standby
º for pause,
® for record,
Ò for rewind (VCR, CD);
‡ for stop,
π for play,
† for fast forward (VCR, CD);
INFO display information
MENU to switch the menu on or off
- CH + for chapter, channel, track selection
Notes:
- If no action is being undertaken within 60 seconds, the remote control returns to TV mode.
- After an action in the selected system mode, the remote control will remain in this mode for
60 seconds and will then return to TV mode or press the SELECT button to return to TV mode
immediately.
search down (DVD, AMP)
search up (DVD/AMP)
0 to 9 digit entry,
- tape index (VCR),
select a DVD chapter,
select a frequency (AMP)
cursor up/down
to select the next or the previous
disc (CD)
cursor left/right
to select the previous or following
track (CD)
25
Page 34

Kensington Security Slot (if present)
Your TV is equipped with a Kensington Security Slot, to prevent it from getting stolen.
An anti-theft Kensington lock has to be purchased separately.
The Kensington lock is a plastic-coated steel cable with a lock. One end has to be fixed to the opening of the TV and locked with a
special key. The other end is attached to a fixed point.
® Kensington and MicroSaver are registered US trademarks of ACCO World Corporation with issued registrations and pending applications in other
countries throughout the world. All other registered and unregistered trademarks are the property of their respective owners.
Troubleshooting Tips
Symptoms Possible Causes What you should do
No display on screen • Faulty power supply • Check whether power cord is properly connected into the mains socket. If there
• TV’s Power not turned is still no power, disconnect plug. Wait for 60 seconds and re-insert plug. Turn on
on TV again.
EnglishFrançaiseEspañol
• Press the POWER key on the TV and wait for 10-15sec.
• TV go to standby after • Press the POWER key on the remote control.
10min without video.
• Faulty aerial and cable • Check whether euroconnector cables or aerial sockets are properly connected.
• Wrong source selected. • Check whether the source is correctly selected. Press AV+ button to enter
Source list and select the correct source.
Poor reception • Faulty antenna connection • Faulty antenna connection
(snowish picture and • Weak transmission
noise • Wrong TV system • Have you chosen the right TV system? (refer to page 5).
Reddish picture in •
AV1/2/3 player
No sound • Zero volume level • Try increasing volume. (You will not see the volume indication if OSD set to
• Sound muted • Check that the sound is not muted.
• Aim remote control directly at sensor on front of TV.
•
Sound interference • Electrical appliances • Try turning off any electrical appliances, for example, hairdryer, vacuum cleaner
Interference lines • Wrong detection of • Check whether power cord is properly connected
seen on S-Video signal • Press the CH/PAGE +/– key on the remote control and do a channel up
• Make sure no composite video are connected on the same AV input.
Intermittent or • * HDCP (see glossary) • Noise is displayed if the connected digital equipment’s (DVD player or set-up
flickering picture on authentication failed box) *HDCP authentication failed. Check user manual for the digital equipment
in HDMI you are connecting.
• Use a HDMI compliant cable.
• Try unplugging the HDMI cable and replugging it back.
Black bar on top and • PC refresh rate too high • Change PC refresh rate to 60 Hz.
bottom of screen in
PC mode
Picture position •
adjustment
and types of HD sources cursor left/right or up/down buttons on the remote control.
Occasional appearance
black spots on the crystal panel precision technology giving you the fine picture details. Occasionally, a few
screen (LCD TV only)
black. Note that this does not affect the performance of the set.
PC modes do not • Wrong connections • Check whether connections are correct.
work • Wrong source selected. • Check whether the source is correctly selected. Press AV+ button to enter
• Wrong display resolution • Check whether you have configured the computer on a compatible display
TV not responding
to Remote control • Check if the green led blink when using remote control.
• Flat batteries. • Try changing the batteries.
Wrong setting of DVD
minimum)
Wrong audio selection
interference that are in use.
followed by a channel down.
Slight differences in output
signals from different brands
• Characteristic of liquid • This symptom is not a problem. The liquid crystal panel is built with very high and
non-active pixels may appear on the screen as a fixed point of red, blue, green or
Source list and select the correct source.
resolution.
•
Wrong polarity of batteries • Check polarity of the batteries.
• Set the DVD player to the correct output video format
• Go to menu => Setup => Source => Analog Audio In => select AV1
• When displaying a High Definition signal from the YPbPr inputs or HDMI input, if
necessary, you can adjust the picture position to the center of the screen with the
• Check if the remote control is in TV mode.
.
26
Page 35
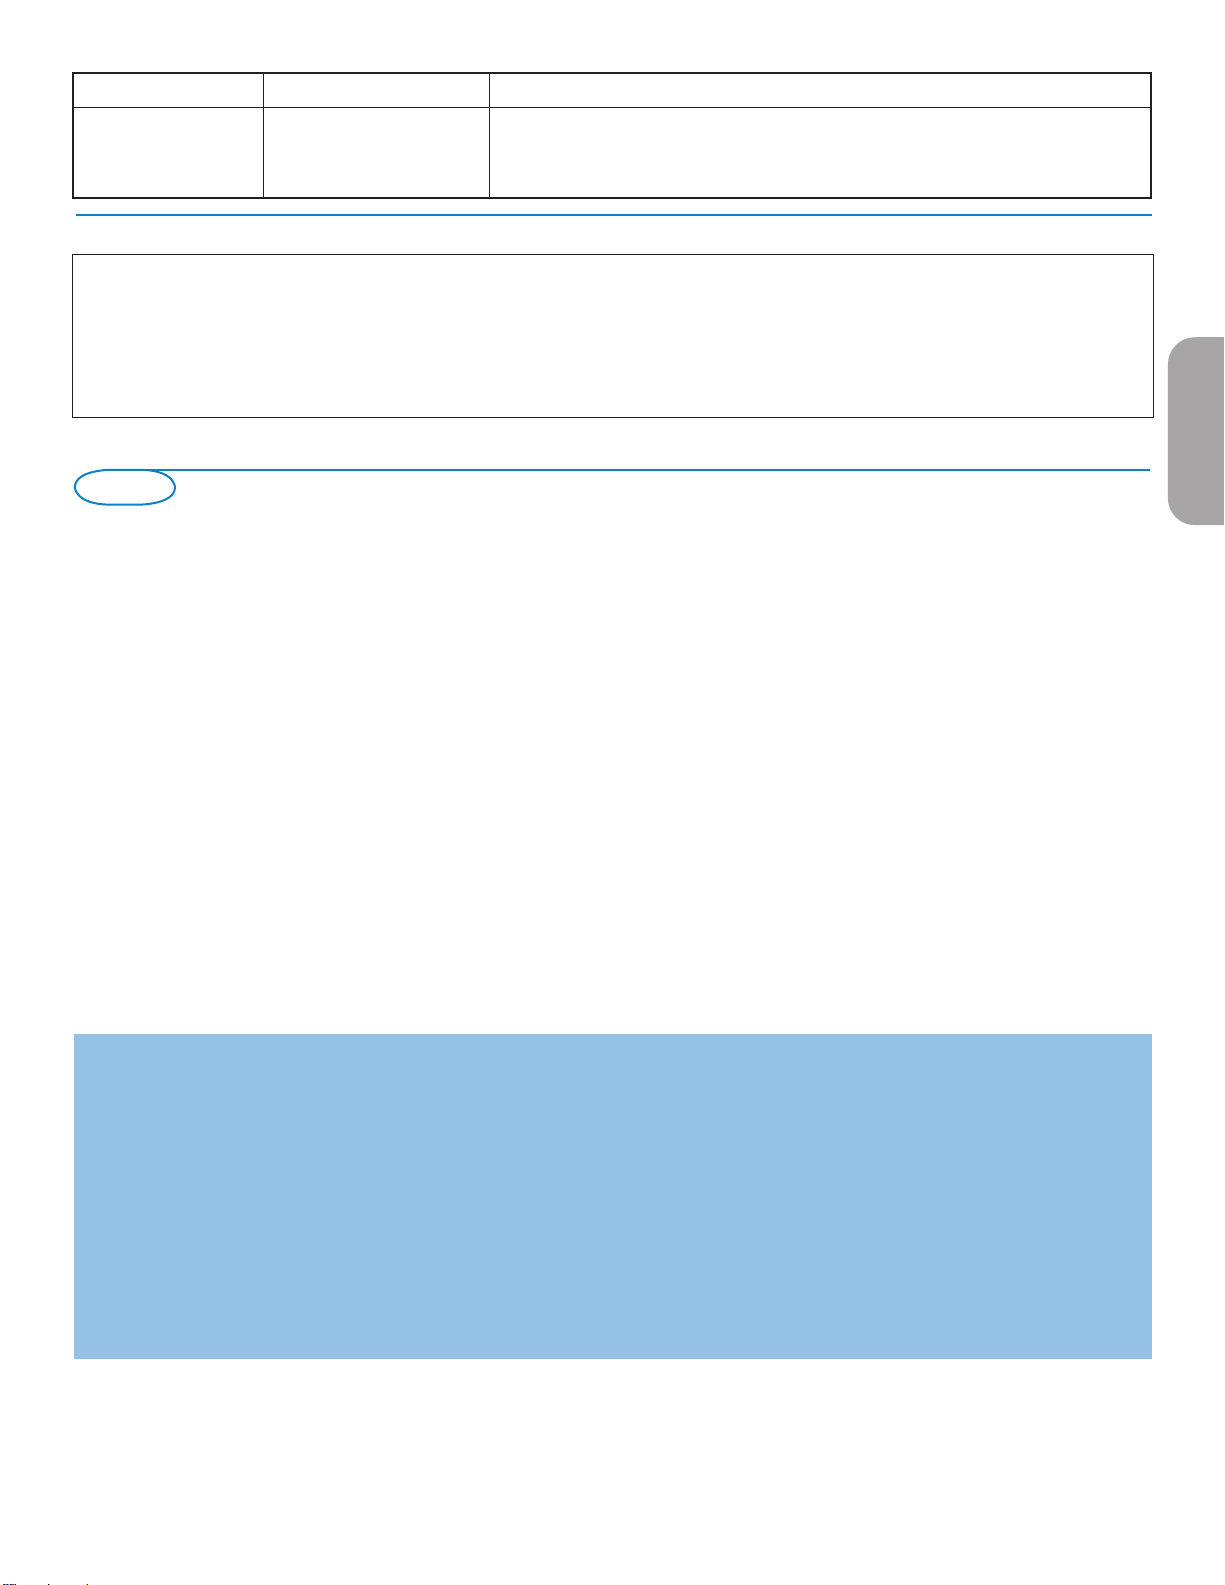
Symptoms Possible Causes What you should do
Unable to understand
the language on accidently main menu. Use the cursor down to select the third item on the main menu. Use
screen to operate set
down key to select correct language. Press the OK key confirm selection.
• Wrong language selected • Press the MENU key to exit menu from screen. Press the MENU key to enter
the cursor right key to enter into the next menu level and the cursor up and
If your problem is not solved
Turn your TV off and then on again once.
Never attempt to repair a defective TV yourself.
Check with your dealer or call a TV technician.
Telephone number Philips Customer
Care Center: 1-888-PHILIPS (744-5477)
Please, have the Model and Product number which you can find at
the back of your television set ready, before calling.
Tips
Care of the screen
Do not touch, push or rub or strike the screen with anything hard as this may scratch, mar or damage the screen permanently. And please
do not rub with dust clothes with chemical treatment.
Do not touch the surface with bare hands or greasy cloth (some cosmetics are detrimental to the screen). Unplug the TV before cleaning the
screen.
When the surface becomes dusty, please wipe gently with absorbent cotton or other soft materials like chamois soaks.
Do not use acetone, toluene and alcohol because they cause chemical damage. Do not use liquid cleaners or aerosol cleaners. Wipe off saliva
or water drops as soon as possible. Their long time contact with the screen causes deformations and color fading.
Plasma display characteristics
This Plasma display is designed to be used at altitudes up to 6562 ft above sea level (and/or local air pressure equal or above
800 hPa). Operating this set at higher altitude (lower air pressure) is possible. However, at high altitudes (or local air pressure equal or
below 800 hPa) the picture on this display may become unstable and picture performance can deteriorate. In addition, the plasma display may
produce a humming sound in these conditions.
These possible adverse effects relate to the altitude and are common of all plasma displays. Once the set is brought below aprox 6562 ft
(and/or local air pressure equal or above 800 hPa) its function will most likely return to normal.
Note: Transportation at high altitudes has no negative effect on the set or picture performance.
EnglishFrançaiseEspañol
How to dispose of batteries?
The batteries supplied do not contain the heavy metals mercury and cadmium. Nevertheless in many areas batteries may not be disposed of
with your household waste. Please ensure you dispose of batteries according to local regulations.
Examples of stationary images (this is not an all-inclusive list, you may encounter others in your viewing):
• TV and DVD menus: listings of DVD disk content;
• Black bars: when black bars appear at the left and right side of the screen, it is recommended to change to a picture format so that
the picture fills the entire screen;
• TV channel logo: present a problem if they are bright and stationary. Moving or low-contrast graphics are less likely to cause uneven
aging of the screen;
• Stock market stickers: presented at the bottom of the TV screen;
• Shopping channel logos and pricing displays: bright and shown constantly or repeatedly in the same location on the TV screen.
Examples of still pictures also include logos, computer images, time display, teletext and images displayed in 4:3 mode, static images or
characters, etc.
Notes:
- reduce contrast and brightness when viewing
- once burn-in occurs it will never disappear completely.
27
Page 36

Glossary
DVI (Digital Visual : A digital interface standard created by the Digital Display Working Group (DDWG) to convert analog signals into digital
Interface) signals to accommodate both analog and digital monitors.
VGA (Video : a common standard graphics display system for PCs.
Graphics Array)
RGB signals : These are the three video signals, Red Green Blue, which make up the picture. Using these signals improves picture
quality.
S-VHS signals : These are 2 separate Y/C video signals from the S-VHS and Hi-8 recording standards. The luminance signals Y (black and
white) and chrominance signals C (colour) are recorded separately on the tape. This provides better picture quality than
with standard video (VHS and 8 mm) where the Y/C signals are combined to provide only one video signal.
NICAM sound : Process by which digital sound can be transmitted.
16:9 : Refers to the ratio between the length and height of the screen. Wide screen televisions have a ratio of 16/9,
EnglishFrançaiseEspañol
conventional screen TV sets have a ratio of 4/3.
HDMI (High- : Provides an uncompressed, all digital audio/video interface between the TV and any HDMI-equipped audio/video
Definition Multi- component, such as set-top box, DVD player and A/V receiver. HDMI supports enhanced or high-definition video plus
media Interface) two-channeldigital audio.
System : Television pictures are not broadcast in the same way in all countries. There are different standards: BG, DK, I, and LL’.
The System setting (p. 5) is used to select these different standards. This is not to be confused with PAL or SECAM
colour coding. PAL is used in most countries in Europe, Secam in France, Russia and most African countries. The United
States and Japan use a different system called NTSC. The inputs EXT1 and EXT2 are used to read NTSC coded
recordings.
HDCP (High- : A specification developed by Intel for protecting digital entertainment that uses the DVI interface. HDCP encrypts
bandwidth Digital- content the transmission of digital content between the video source or transmitter such as a computer, DVD player
Content Protection) or set-top box and the digital display or receiver such as a monitor, television or projector.
28
Page 37

Specifications
26PF5321D/26PF5351D 32PF5321D 42PF5321D 32PF7321D/32PF7421D
PICTURE / DISPLAY
Aspect ratio 16 : 9 16 : 9 16 : 9 16 : 9
Picture Display
Picture Enhancement Pixel Plus Pixel Plus Pixel Plus Pixel Plus
Progressive Scan Progressive Scan Progressive Scan Progressive Scan
3/2 - 2/2 motion 3/2 - 2/2 motion 3/2 - 2/2 motion 3/2 - 2/2 motion
pull down pull down pull down pull down
Active Control Active Control Active Control Active Control
Auto Picture (6 modes) Auto Picture (6 modes) Auto Picture (6 modes) Auto Picture (6 modes)
Color, Contrast, Color, Contrast, Color, Contrast, Color, Contrast,
Sharpness Control Sharpness Control Sharpness Control Sharpness Control
SOUND
Ouput Power (RMS) 2 x 8W 2 x 15W
Sound Enhancement Auto Sound Auto Sound
Sound System Virtual Dolby Surround Virtual Dolby Surround
CONVENIENCE Auto Program
Closed Captioning Full text
Sleeptimer
Clock
USB
ON SCREEN DISPLAY English, French, Spanish
LANGUAGES
EnglishFrançaiseEspañol
CONNECTIVITY
Bottom AV1 / AV2 : Audio L/R input,
Composite Video input (CVBS),
Component Video input (YPbPr)
AV3 : Audio L/R input,
Composite Video input (CVBS),
SPDIF output (Digital Only)
S-Video input
HDMI
Side Headphone output
Audio L/R input,
Composite Video input (CVBS)
S-Video input
USB
WEIGHT &
DIMENSIONS :
Weight (incl. Packaging) : 17 kg / 38 lbs 22 kg / 49 lbs 47 kg / 103 lbs 23 kg / 50 lbs
Weight (excl. Packaging) : 13 kg / 29 lbs 19 kg / 42 lbs 39 kg / 86 lbs 20 kg / 43 lbs
Carton Dimension
(WxDxH) : 35" x 22" x 9" 40" x 28" x 10" 53" x 37" x 13" 40" x 28" x 10"
Product Dimension
(WxDxH) : 28" x 22" x 10" 37" x 22" x 9" 49" x 29" x 11" 37" x 22" x 9"
screen size : 26" / 67cm 32" / 82cm 42" / 107cm 32" / 82cm
POWER
CONSUMPTION : 130 W 140 W 400 W 140 W
880mm x 560mm x 214mm 1000mm x 690mm x 240mm 1328mm x 930mm x 330mm 1012mm x 698mm x 240mm
698mm x 541mm x 247mm
924mm x 550mm x 222mm 1236mm x 720mm x 280mm 935mm x 553mm x 222mm
STANDBY POWER 0.5 W 0.64 W 0.71 W 0.63 W
CONSUMPTION :
VOLTAGE : 100 - 250 V~ 110 - 120 V~ 110 - 240 V~ 110 - 120 V~
CONSUMPTION : 50 / 60 Hz 60 Hz 50 / 60 Hz 60 Hz
Note : For 42PF5321D/85, it is compatible for high altitude.
29
Page 38

Specifications
37PF7321D 42PF5421D/42PF7421D 42PF7321D 50PF7321D
PICTURE / DISPLAY
Aspect ratio 16 : 9 16 : 9 16 : 9 16 : 9
Picture Display
Picture Enhancement Pixel Plus Pixel Plus Pixel Plus Pixel Plus
Progressive Scan Progressive Scan Progressive Scan Progressive Scan
3/2 - 2/2 motion 3/2 - 2/2 motion 3/2 - 2/2 motion 3/2 - 2/2 motion
pull down pull down pull down pull down
Active Control Active Control Active Control Active Control
Auto Picture (6 modes) Auto Picture (6 modes) Auto Picture (6 modes) Auto Picture (6 modes)
Color, Contrast, Color, Contrast, Color, Contrast, Color, Contrast,
Sharpness Control Sharpness Control Sharpness Control Sharpness Control
SOUND
Ouput Power (RMS) 2 x 15W
EnglishFrançaiseEspañol
Sound Enhancement Auto Sound
Sound System Virtual Dolby Surround
CONVENIENCE Auto Program
Closed Captioning Full text
Sleeptimer
Clock
USB
ON SCREEN DISPLAY
LANGUAGES
CONNECTIVITY
Bottom AV1 / AV2 : Audio L/R input,
Composite Video input (CVBS),
Component Video input (YPbPr)
AV3 : Audio L/R input,
Composite Video input (CVBS),
SPDIF output (Digital Only)
S-Video input
HDMI
Side Headphone output
Audio L/R input,
Composite Video input (CVBS)
S-Video input
USB
WEIGHT &
DIMENSIONS :
Weight (incl. Packaging) : 33 kg / 73 lbs 48 kg / 105 lbs 49 kg / 109 lbs 63 kg / 139 lbs
Weight (excl. Packaging) :
Carton Dimension
(WxDxH) : 47" x 33" x 13" 53" x 37" x 13" 53" x 37" x 13" 60" x 40" x 15"
Product Dimension
(WxDxH) : 44" x 26" x 10" 50" x 30" x 12" 50" x 30" x 12" 57" x 34" x 12"
screen size : 37" / 94cm 42" / 107cm 42" / 107cm 50" / 127 cm
English, French, Spanish
26 kg / 57 lbs 32 kg / 71 lbs 40 kg / 88 lbs 53 kg / 117 lbs
1191mm x 830mm x 330mm 1328mm x 939mm x 330mm
1114mm x 673mm x 257mm 1249mm x 760mm x 305mm
1328mm x 939mm x 330mm
1249mm x 739mm x 299mm 1425mm x 851mm x 305mm
1504mm x 1002mm x 374mm
POWER
CONSUMPTION 190 W (235W MAX) 270 W 400 W 480 W
STANDBY POWER 0.44 W 0.48 W 0.72 W 0.86 W
CONSUMPTION
VOLTAGE : 110 - 120 V~ 110 - 120 V~ 110 - 240 V~ 110 - 240 V~
CONSUMPTION : 60 Hz 60 Hz 50 / 60 Hz 50 / 60 Hz
30
Page 39

Annex 1 - Philips TV software upgrade with portable memory
Introduction
Philips offers software upgrade capability for your TV using USB portable memory.
After you have completed a software upgrade, your TV will typically perform
better.
What improvements are made depends on the upgrade software you are using as
well as the software your TV contained before the upgrade.
You can execute the software upgrade procedure yourself.
Be aware that the content of this document is addressing technical or software
skilled users.
Preparing a portable memory for software upgrade
For the procedure you will require:
• A personal computer with web browsing capability.
• An archive utility that supports the ZIP-format (e.g. WinZip for Windows or
StuffIt for Mac OS).
• A preferably empty USB memory stick.
Note: Only FAT/DOS-formatted portable memory is supported.
New software can be obtained from your dealer or can be downloaded from the
www.philips.com/support website:
& Go to www.philips.com/support using the web browser on your PC.
é Follow the procedure to find the information and the software related to your
TV.
“ Select the latest software upgrade file and download it to your PC.
‘ Decompress the ZIP-file and copy the file “autorun.upg” to the root directory of
the USB portable memory.
Note: Only use software upgrades that can be found on the www.philips.com/support web
site.
EnglishFrançaiseEspañol
Verifying the version of the TV software
Before starting the software upgrade procedure, it is advised to check what the
current TV software is.
& Select Software Upgrade in the Installation menu.
é Press the cursor right.
The Software Upgrade menu moves to the left panel.
“ Select Current Software Info to observe the version and the description of the
current software.
31
Page 40
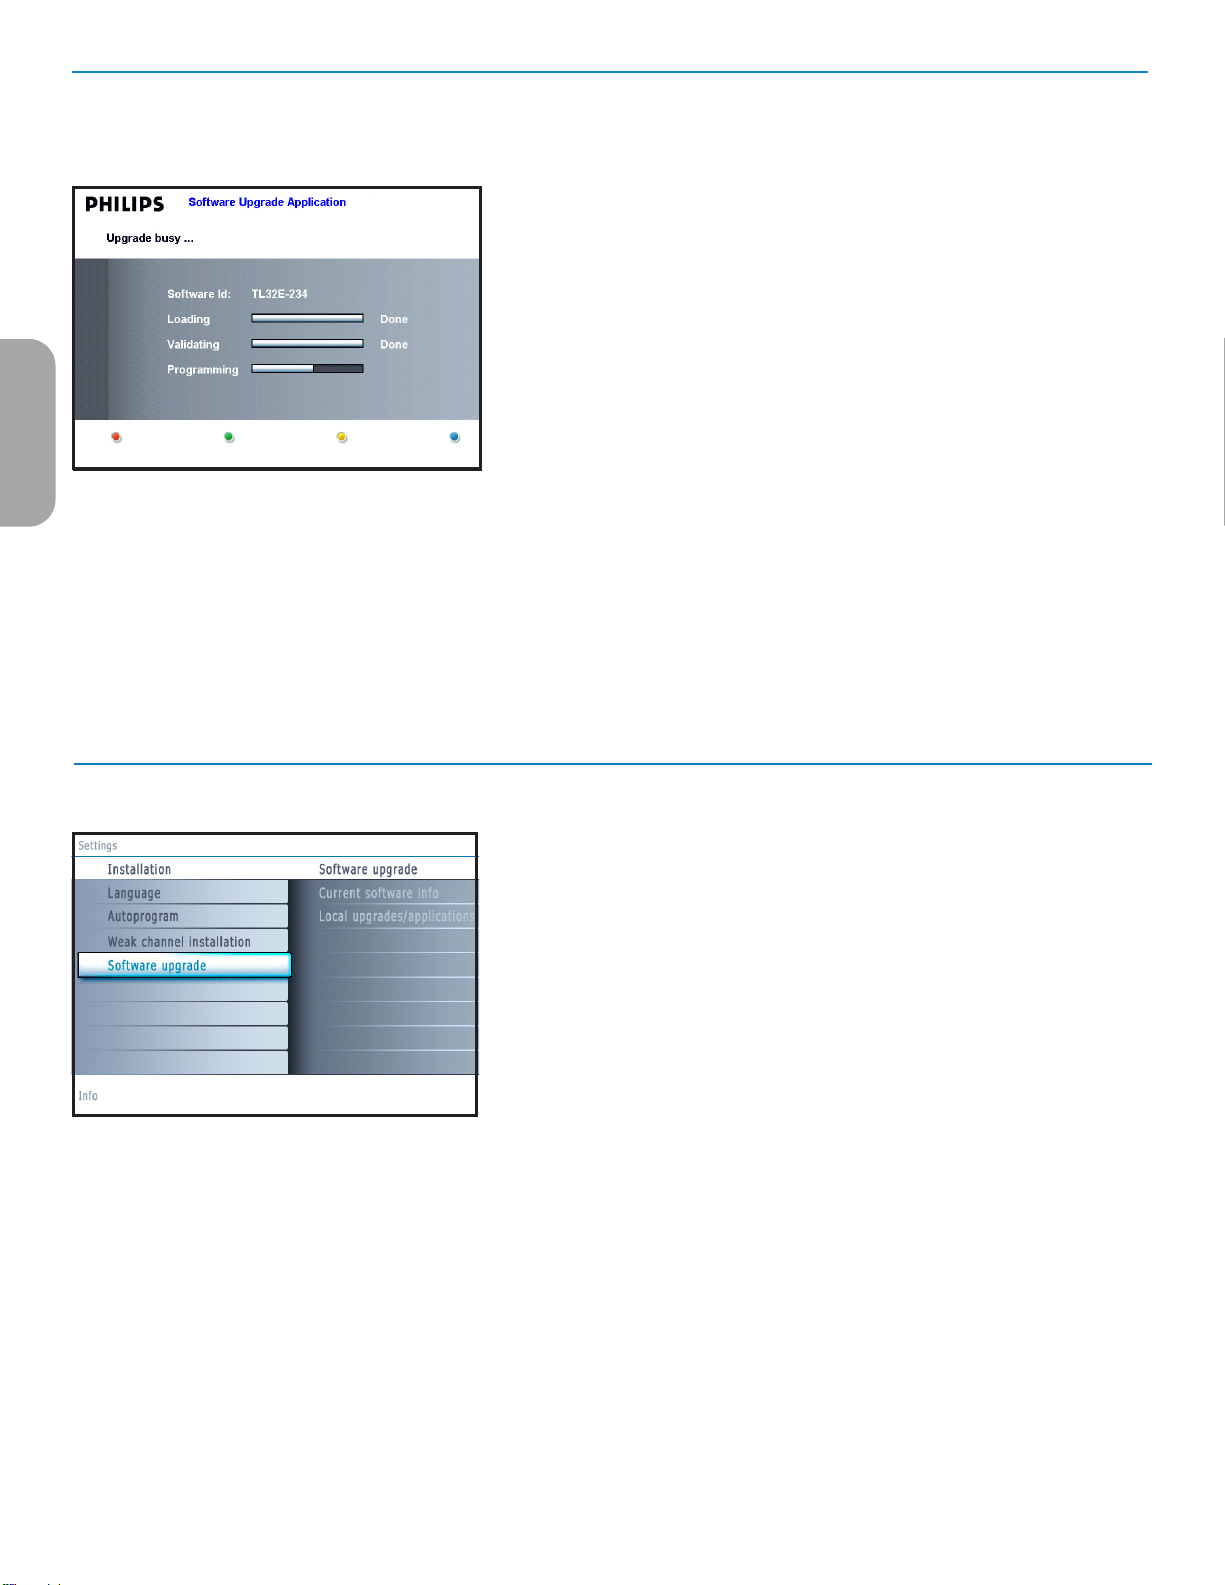
EnglishFrançaiseEspañol
Automatic software upgrade procedure
For an automatic software upgrade copy the “autorun.upg” file in the root
directory of the USB portable memory.
& Power off your TV and remove all memory devices.
é Insert the USB portable memory that contains the downloaded software
upgrade.
“ Switch on your TV with the power switch B at the right side of the TV.
‘ At startup the TV will scan the USB portable memory until it finds the
update content. The TV will automatically go to the upgrade mode. After a
few seconds it will display the status of the upgrade procedure.
Warning:
• You are not allowed to remove the USB portable memory during the software
upgrade procedure!
• In case of a power drop during the upgrade procedure, don’t remove the USB
portable memory from the TV. The TV will continue the upgrade as soon as the
power comes back.
• If you try to upgrade to a software version lower than the current version, a
confirmation will be asked. Downgrading to older software should only be done in
case of real necessity.
• If an error occurs during the upgrade you should retry the procedure or contact
your dealer.
( When the software upgrade was successful, remove the USB portable
memory and restart your TV with the power switch B at the right side of
the TV.
Your TV will start up with the new software.
Note: Once the upgrade is finished use your PC to remove the TV software from
your USB portable memory.
Manual software upgrade procedure
For a manual software upgrade copy the “autorun.upg” file in a directory
called “Upgrades” located in the root of the USB portable memory.
& Insert the portable memory that contains the downloaded software
upgrade.
é The TV will automatically start the content browser menu. Exit the menu
by pressing the MYCONTENT key.
“ Select Software Upgrade in the Installation menu. Go to Local upgrades/
applications.
The TV will list all compatible images available on the USB portable memory
and display the data for each selected upgrade image.
‘ Select the correct upgrade image and press the red color button to start
the upgrade.
Your TV will restart and will automatically go to the upgrade mode. After a
few seconds it will display the status of the upgrade procedure.
Warning:
If you try to upgrade to a software version equal or lower than the current version,
a confirmation will be asked. Downgrading to older software should only be done in
case of real necessity.
( When the software upgrade was successful, remove the USB portable
memory and restart your TV with the power switch B at the right side of
the TV.
Your TV will start up with the new software.
32
Page 41

Annex 2 - Philips TV Slideshow Format with background music
Notes:
- The latest version of this document can be found on the Philips support website (www.philips.com/support).
Use the type number of your TV (e.g. 32PF5321D/37) to find this documentation and other related files.
- Philips can’t be held responsible for any problems that may occur as a result of the content in this document. Errors reported to Philips will be adapted and
published on the Philips support website as soon as possible.
Introduction
This document explains how to make a Philips slideshow file with background audio.
Be aware that the content of this document is addressing technical or software skilled users.
To start the slideshow open the slideshow file in the Home network Browser of your TV.
& Press the button on the remote control after having inserted a USB device and switched on the TV.
é Go to where you stored the slideshow file (.alb) on your portable memory.
“ Select the slideshow file and press the OK button to start the slide show.
‘ To stop a slide show, press the ‡ button.
General Rules
• The slideshow will use plain ASCII XML syntax to allow the creation and editing of the slideshow files using simple tools.
• All references to network content must be based on the global address of the content.
• Content on a Portable Memory (PM) doesn't have a global address; as a result content from a PM can never be referenced from a slideshow
not stored on the PM itself.
• To maintain portability, a slideshow stored on a PM should ONLY reference content on the same PM. Referencing global addresses can
result in inconsistencies if the PM is used on a non-networked CE device. The latter is however not forbidden, it is only a recommendation.
• It is preferable that URL’s referencing PM content are based on a relative path starting from the directory where the slideshow is stored.
This path includes the device or drive name of the PM.
An absolute path to content will also be supported.
- relative path: pictures\test1.jpg, tamper.jpg, ..\new\bird.jpg, …
- absolute path: USB1:\pictures1\foo_bar.jpg, C:\f1.jpg, \organization.jpg, …
EnglishFrançaiseEspañol
General Format
The format and syntax below should be used to create the slideshow file (simple ascii text) with the extension .alb (.ALB)
Examples: slshow1.alb, summer_holiday_2004.ALB, test.alb, …
The following syntax should be used to create the text file:
<?xml version="1.0" encoding="ISO-885h9-1" ?>
<philips-slideshow version="1.0" >
<title>Title of the slideshow</title>
<audio>audio_url</audio>
<slide-duration>30</slide-duration>
<slides>
<slide>slide_1_url</slide>
<slide>slide_2_url</slide>
<slide>slide_3_url</slide>
<slide>slide_4_url</slide>
<slide>slide_5_url</slide>
<slide>slide_6_url</slide>
...
<slide>slide_N-1_url</slide>
<slide>slide_N_url</slide>
</slides>
</philips-slideshow>
33
Page 42

Supported XML-tags
The following table gives a description of the XML syntax.
Tag Name
philips-slideshow
title
audio
Use
mandatory
optional
optional
EnglishFrançaiseEspañol
slide-duration
slides
slide
Examples:
See on this CD in the directory Files/Slideshw/....
Copy the directory with the slideshow files to your portable memory.
optional
mandatory
optional
Description
Philips slideshow signature including the version.
The title of the playlist.
The audio-URL following this tag will define the music playing in
the background during the slideshow.
A single song or playlist (.m3u & .pls) are the only valid audio
references. Other reference will not result in any audio
playback. If a single song is referenced the song will be
repeated forever. If a playlist is referenced the playlist will be
played in sequence with a repeat at the end of the playlist.
The default display time (in 0,1 second) of a slide. The TV
application isn’t obliged to support this tag. The TV application
can force the use of one or multiple predefined display times.
Identifies the slides to show.
Identifies the URL of the individual slide.
<?xml version="1.0" encoding="ISO-885h9-1" ?>
<philips-slideshow version="1.0" >
<title>Philips AlbumFile</title>
<audio>Music\Nature.mp3</audio>
<slide-duration>50</slide-duration>
<slides>
<slide>Images\Image01.jpg</slide>
<slide>Images\Image02.jpg</slide>
<slide>Images\Image03.jpg</slide>
<slide>Images\Image04.jpg</slide>
<slide>Images\Image05.jpg</slide>
<slide>Images\Image06.jpg</slide>
<slide>Images\Image07.jpg</slide>
<slide>Images\Image08.jpg</slide>
<slide>Images\Image09.jpg</slide>
<slide>Images\Image10.jpg</slide>
<slide>Images\Image11.jpg</slide>
<slide>Images\Image12.jpg</slide>
</slides>
</philips-slideshow>
34
Page 43

Annex 3 - Philips TV USB
Notes:
- The latest version of this document can be found on the Philips support website (www.philips.com/support).
- The software of your TV is upgradeable. If you have problems first check if you have the latest software installed on your TV. The latest software, together with
instructions, can be found on the Philips support website.
Use the type number of your TV (e.g. 32PF5321D/37) to find this documentation and other related files.
- Philips can’t be held responsible neither for any errors in the content of this document nor for any problems as a result of the content in this document. Errors
reported to Philips will be adapted and published on the Philips support website as soon as possible.
Digital Content Issues
• Only FAT (DOS) formatted (initialized) portable memory is supported. Errors in this formatting can result in unreadable content. If such
problems appear try to re-format the card. Be aware that formatting the card will also delete all the content on it (pictures, music, …).
• The following file types are supported: .jpg, .jpeg, .mp3, .alb, .m3u and .pls.
• Only linear JPEG picture formats are supported. Progressive JPEG and JPEG2000 encodings are not supported.
• The length of a filename or directory name is limited to the length specified by the FAT12/16/32 file systems.
• Max. levels of nested directories is 19.
• Never use the supported file type extensions (.jpg, .jpeg, .mp3, .alb, .m3u and .pls) as extensions for directories as these directories will be
treated as corrupted files.
• The MP3 decoder does not support MPEG1 Layer 1 or Layer 2 playback.
• MP3 Pro files can be played with normal MP3 quality.
• The access and response time of the content on a device can differ depending on the type or brand of the device.
• The access and response time of the content on a device will decrease the more unsupported or corrupted files are on the device.
EnglishFrançaiseEspañol
Digital Camera Issues
If a USB connection between your digital camera and the TV isn’t working, you can try the solutions below to resolve your problem.
• Make sure your digital camera is switched on and verify if the configuration of your digital camera is correct (see the manual of your digital
camera for more information).
• Some digital cameras allow you to switch off the USB interface. Make sure that the USB interface is switched on before connecting to the TV.
• If you have a digital camera with only internal memory (no removable memory) you can try to copy the content manually to a a USB memory
device (e.g. Philips KEY product) using a personal computer.
• Some digital cameras allow you to switch between PTP (Picture Transfer Protocol) or “PC Link” and USB Mass Storage or “PC Drive”. Make
sure that you select USB Mass Storage or “PC Drive” on your digital camera.
• If your camera supports different interface settings be sure to try them one by one or contact the reseller of your camera to find out the
correct setting.
USB Memory Device Issues
• Devices connected to the USB port of your TV must be “Mass Storage Class” compliant. If your device (digital camera. MP3 player, portable
harddisk, …) is not “Mass Storage Class” compliant it will not be detected by the content browser of the TV.
• The following subsets of the Mass Storage Class specification are supported:
- The implementation of the TV is based on the “Universal Serial Bus Mass Storage Class Specification Overview” (v1.2, June 23, 2003)
including all documents referenced by the document. The document can be found on the USB standardisation website (www.usb.org).
- Full support of the USB Mass Storage Class Bulk-Only Transport (bInterfaceProtocol = 50h).
- Full support of SubClass Code = 05h; SFF-8070i spec.
- Full support of SubClass Code = 06h; SCSI transparent command set.
• For large USB memory devices, when you are in the Content Browser, it may take a long time before you can access your files.
• When using a USB portable harddisk: Due to the high power consumption of the harddisk, it is advised to use the external power supply of
the portable harddisk to guarantee proper working under all conditions.
35
Page 44

Philips, P.O. Box 671539, Marietta, GA. 30006-0026
PHILIPS LIMITED WARRANTY
ONE (1) YEAR
WARRANTY COVERAGE:
PHILIPS warranty obligation is limited to the terms set forth
below.
WHO IS COVERED:
Philips warrants the product to the original purchaser or the
person receiving the product as a gift against defects in materials and workmanship as based on the date of original purchase
(“Warranty Period”) from an Authorized Dealer. The original
sales receipt showing the product name and the purchase date
from an authorized retailer is considered such proof.
WHAT IS COVERED:
The Philips warranty covers new products if a defect arises and
a valid claim is received by Philips within the Warranty Period.
At its option, Philips will either (1) repair the product at no
charge, using new or refurbished replacement parts, or (2)
exchange the product with a product that is new or which has
been manufactured from new, or serviceable used parts and is
at least functionally equivalent or most comparable to the original product in Philips current inventory, or (3) refund the original purchase price of the product.
Philips warrants replacement products or parts provided under
this warranty against defects in materials and workmanship
from the date of the replacement or repair for ninety (90) days
or for the remaining portion of the original product’s warranty,
whichever provides longer coverage for you. When a product
or part is exchanged, any replacement item becomes your
property and the replaced item becomes Philips’ property.
When a refund is given, your product becomes Philips’ property.
Note: Any product sold and identified as refurbished or
renewed carries a ninety (90) day limited warranty.
Replacement product can only be sent if all warranty
requirements are met. Failure to follow all requirements can result in delay.
WHAT IS NOT COVERED - EXCLUSIONS AND LIMITATIONS:
This Limited Warranty applies only to the new products manufactured by or for Philips that can be identified by the trademark, trade name, or logo affixed to it. This Limited Warranty
does not apply to any non-Philips hardware product or any
software, even if packaged or sold with the product. NonPhilips manufacturers, suppliers, or publishers may provide a
separate warranty for their own products packaged with the
bundled product.
Philips is not liable for any damage to or loss of any programs,
data, or other information stored on any media contained within the product, or any non-Philips product or part not covered
by this warranty. Recovery or reinstallation of programs, data
or other information is not covered under this Limited
Warranty.
This warranty does not apply (a) to damage caused by accident,
abuse, misuse, misapplication, or non-Philips product, (b) to
damage caused by service performed by anyone other than
Philips or Philips Authorized Service Location, (c) to a product
or a part that has been modified without the written permission of Philips, or (d) if any Philips serial number has been
removed or defaced, or (e) product, accessories or consumables sold “AS IS” without warranty of any kind by including
refurbished Philips product sold “AS IS” by some retailers.
This Limited Warranty does not cover:
• Shipping charges to return defective product to Philips.
• Labor charges for installation or setup of the product, adjustment of customer controls on the product, and installation
or repair of antenna systems outside of the product.
• Product repair and/or part replacement because of improper
installation, connections to improper voltage supply, abuse,
neglect, misuse, accident, unauthorized repair or other cause
not within the control of Philips.
• Damage or claims for products not being available for use, or
for lost data or lost software.
• Damage occurring to product during shipping.
•A product that requires modification or adaptation to enable
it to operate in any country other than the country for
which it was designed, manufactured, approved and/or
authorized, or repair of products damaged by these modifications.
•A product used for commercial or institutional purposes
(including but not limited to rental purposes).
• Product lost in shipment and no signature verification receipt
can be provided.
• Failure to operate per Owner’s Manual.
TO OBTAIN ASSISTANCE IN THE U.S.A., PUERTO
RICO, OR U.S. VIRGIN ISLANDS…
Contact Philips Customer Care Center at:
1-888-PHILIPS (1-888-744-5477)
TO OBTAIN ASSISTANCE IN CANADA…
1-800-661-6162 (French Speaking)
1-888-PHILIPS (1-888-744-5477) - (English or Spanish
Speaking)
REPAIR OR REPLACEMENT AS PROVIDED UNDER THIS
WARRANTY IS THE EXCLUSIVE REMEDY FOR THE CONSUMER. PHILIPS SHALL NOT BE LIABLE FOR ANY INCIDENTAL OR CONSEQUENTIAL DAMAGES FOR BREACH OF
ANY EXPRESS OR IMPLIED WARRANTY ON THIS PRODUCT. EXCEPT TO THE EXTENT PROHIBITED BY APPLICABLE LAW, ANY IMPLIED WARRANTY OF MERCHANTABILITY OR FITNESS FOR A PARTICULAR PURPOSE ON THIS
PRODUCT IS LIMITED IN DURATION TO THE DURATION
OF THIS WARRANTY.
Some states do not allow the exclusions or limitation of incidental or consequential damages, or allow limitations on how
long an implied warranty lasts, so the above limitations or
exclusions may not apply to you.
This warranty gives you specific legal rights. You may have other rights which vary from state/province to state/province.
3121 233 48801
Page 45

L'enregistrement de votre modèle auprès de PHILIPS confirme votre éligibilité à tous les
bénéfices mentionnés ci-dessous. N'oubliez donc pas de remplir votre carte d'enregistrement de
garantie afin de bénéficier des services suivants :
Retournez rapidement votre carte d'enregistrement
de garantie pour profiter pleinement de votre achat.
A l'usage du client
Entrez ci-dessous le numéro de série qui
se trouve à l'arrière du boîtier de
l'appareil. Conservez ces informations pour
référence ultérieure.
Modèle n° __________________________
N° de série ______________________
Nous vous félicitons de votre achat et vous souhaitons la
bienvenue dans la "famille!"
Cher propriétaire d'un produit PHILIPS :
merci de votre confiance en PHILIPS.Vous avez choisi un
produit de fabrication et de garantie supérieures parmi les
meilleurs disponibles sur le marché. Et nous ferons de notre
mieux pour que vous soyez pleinement satisfait de votre achat
pendant longtemps.
En tant que membre de la "famille" PHILIPS, vous bénéficiez
d'une protection inégalée, qui repose sur l'une des garanties
les plus complètes et des réseaux de services sans pareil dans
le secteur.
De plus, votre achat garantit que vous recevrez toutes les
informations et offres spéciales auxquelles vous avez droit,
ainsi qu'un accès facile à toute une gamme d'accessoires
disponibles via notre réseau de téléachat.
Mais ce qui est encore plus important, vous pouvez compter
sur notre engagement total quand il s'agit de votre entière
satisfaction.
C'est notre façon de vous souhaiter la bienvenue et de vous
remercier de votre investissement dans un produit PHILIPS.
P.S. Pour bénéficier au maximum de votre produit
PHILIPS, pensez à remplir et à retourner votre carte
d'enregistrement de garantie le plus tôt possible.
Sachez reconnaître ces
symboles de sécurité
Ce symbole “d'éclair” signale les matériaux
non isolés présents dans votre appareil et
pouvant causer un choc électrique. Pour
assurer la sécurité des membres de votre famille,
veuillez ne pas enlever le couvercle de votre
produit.
Les “points d'exclamation” ont pour but
d'attirer votre attention sur des
caractéristiques à propos desquelles vous
devez lire soigneusement la documentation
accompagnant l'appareil afin d'éviter tout
problème d'exploitation ou d'entretien.
AVERTISSEMENT: Afin de réduire les risques
d'incendie ou de choc électrique, ne pas exposer
cet appareil à la pluie ni à l'humidité et ne pas
placer d'objets remplis de liquide, comme des
vases, sur le dessus de l'appareil.
ATTENTION:Pour éviter les chocs électriques,
introduire la lame la plus large de la fiche dans la
borne correspondante de la prise et pousser à
fond.
CAUTION
RISK OF ELECTRIC SHOCK
DO NOT OPEN
CAUTION: TO REDUCE THE RISK OF ELECTRIC SHOCK, DO NOT
REMOVE COVER (OR BACK). NO USER-SERVICEABLE PARTS
INSIDE. REFER SERVICING TO QUALIFIED SERVICE PERSONNEL.
* Preuve d'achat
Retournez la carte
d'enregistrement ci-jointe afin de
garantir l'archivage de la date
d'achat de votre produit dans nos
dossiers et éviter ainsi de devoir
remplir d'autres formulaires afin de
bénéficier du service de garantie.
* Notifications relatives
à la sécurité du produit
En enregistrant votre produit,
vous serez avisé - directement
par le fabricant - de tous les
défauts compromettant la
sécurité ou de tout retrait du
produit du marché.
* Avantages additionnels
de l'enregistrement du
produit
L'enregistrement de votre
produit garantit que vous
bénéficierez de tous les privilèges
auxquels vous avez droit, offresrabais spéciales comprises.
Visitez notre site web : http://www.usasupport.philips.com
t
s
Page 46

1. Lire ces instructions.
2. Conserver ces instructions.
3. Obéir à tous les avertissements.
4. Suivre toutes les instructions.
5. Éviter d'utiliser cet appareil à proximité de l'eau.
6. Nettoyer à l'aide d'un linge sec seulement.
7. Ne pas boucher les orifices de ventilation. Effectuer
l'installation selon les instructions du fabricant.
8. Ne pas installer l'appareil près d'une source de chaleur comme un
radiateur, un registre de chaleur, une cuisinière ou tout autre
appareil (y compris les amplificateurs) qui dégage de la chaleur.
9. Ne pas contourner la mesure de sécurité de la fiche polarisée ou de
mise à la terre. Une fiche polarisée est dotée de deux lames dont l'une
est plus large que l'autre. Une fiche avec mise à la terre est dotée de
deux lames auxquelles s'ajoute une troisième broche de mise à la terre.
La lame large, la troisième broche,est fournie pour votre sécurité.Si la
fiche fournie ne rentre pas dans votre prise secteur,consultez un
électricien qui changera votre prise murale obsolète.
10.Protéger le cordon d'alimentation pour éviter que l'on marche
dessus ou qu'il soit plié en particulier au niveau de la fiche, des prises
de courant de commodité et à l'endroit où il sort de l'appareil.
11.Utiliser uniquement des équipements/accessoires spécifiés par
le fabricant.
12. L'appareil ne doit être utilisé qu'avec le chariot, socle,
trépied, support ou table spécifié par le fabricant ou
vendu avec l'appareil. Un appareil utilisé en combinaison avec
un chariot doit être déplacé avec soin afin d'éviter les risques
de blessures occasionnées par le renversement de l'appareil.
13.Débrancher cet appareil durant les orages électriques ou lorsqu'il
n'est pas utilisé pour une période de temps prolongée.
14.L'entretien ou la réparation de l'appareil doit être effectué par
du personnel qualifié uniquement. Il faut faire réparer l'appareil
dès que celui-ci est endommagé d'une façon quelconque, qu'il
s'agisse du cordon ou de la fiche d'alimentation, si du liquide a
été renversé ou des objets sont tombés dans l'appareil, s'il a
été exposé à la pluie ou à une humidité excessive, s'il ne
fonctionne pas normalement ou s'il a subi un choc.
15.Ce produit peut contenir du plomb ou du mercure. La mise au
rebut de ces substances peut être réglementée par suite de
considérations environnementales. Pour de plus amples
informations concernant la mise au rebut ou le recyclage de
l'appareil, contacter les autorités locales ou l'Electronic
Industries Alliance : www.eiae.org.
16.Dommages nécessitant des réparations - L'appareil doit
être réparé par du personnel qualifié lorsque :
A. Le cordon ou la fiche d'alimentation est endommagé; ou
B. Des objets sont tombés dans l'appareil ou du liquide a été
renversé à l'intérieur; ou
C. L'appareil a été exposé à la pluie; ou
D. L'appareil semble ne pas fonctionner correctement ou
présente un changement de performance marqué; ou
E. L'appareil a subi un choc ou le boîtier est endommagé.
17.Inclinaison/stabilité - Tous les postes de télévision doivent
répondre aux normes de sécurité internationales globales
recommandées, relativement aux propriétés d'inclinaison et de
stabilité du boîtier.
• Il ne faut pas compromettre ces normes de construction en
exerçant une force excessive sur la partie avant ou supérieure,
susceptible d'entraîner le renversement de l'appareil.
• De plus, ne pas mettre vos enfants ni vous-même en danger,
en plaçant des appareils électroniques ou des jouets sur le
dessus du poste. Ces objets pourraient tomber du
téléviseur et entraîner des dommages ou des blessures.
18.Montage mural ou montage au plafond - Si l'appareil doit
être monté au mur ou au plafond, l'installation doit être
effectuée selon les recommandations du fabricant.
19.Lignes électriques - Une antenne extérieure doit être
installée loin des lignes électriques.
20.Mise à la terre d'une antenne extérieure - Si une antenne
extérieure est connectée au récepteur, s'assurer que le
système d'antenne est mis à la terre de façon à fournir une
protection contre les surcharges de courant et les charges
statiques accumulées.
L'article 810 du Code national de l'électricité,ANSI/NFPA No.
70-1984, offre des informations relatives à la mise à la terre
correcte du mât et des structures de support, la mise à la
terre de la descente d'antenne vers un dispositif de décharge,
la taille des connecteurs de mise à la terre, l'emplacement du
dispositif de décharge d'antenne, le raccordement des
conducteurs de terre ainsi qu'aux exigences relatives au
conducteur de terre.Voir la figure ci-dessous.
21.Pénétration d'objets et de liquide - Prendre tous les soins
nécessaires pour éviter que des objets tombent ou que des
liquides coulent dans le boîtier à travers les orifices.
a) Avertissement : Afin de réduire les risques d'incendie ou de
choc électrique, ne pas exposer cet appareil à la pluie ni à
l'humidité et ne pas placer d'objets remplis de liquide, comme
des vases, sur le dessus de l'appareil.
22.MISE en garde concernant les piles - Pour prévenir la
fuite des piles pouvant entraîner des blessures, des dégâts
matériels ou endommager l'appareil :
• Installer toutes les piles de façon à ce qu'elles correspondent
aux bornes + et -, tel qu'indiqué sur le dispositif.
• Ne pas mélanger les piles (neuves et usagées ou carbone et
alcaline, etc.).
• Retirer les piles du boîtier lorsque la télécommande n'est pas
utilisée pendant une période de temps prolongée.
CONSIGNES DE SÉCURITÉ IMPORTANTES
Veuillez lire ces consignes avant de faire fonctionner cet appareil
Remarque pour les installateurs de système de câble : Ce rappel s'adresse aux installateurs de système de câble afin d'attirer leur attention sur l'article 820-40 du code NEC
qui indique la marche à suivre pour une mise à la terre adéquate et,en particulier,spécifie que le câble de masse doit être raccordé au système de mise à la terre du bâtiment, aussi
près que possible du point d'entrée du câble.
EXEMPLE DE MISE A LA TERRE D'UNE ANTENNE SUIVANT LES RECOMMANDATIONS DU NATIONAL ELECTRICAL CODE (NEC)
ATTA CHE DE TERRE
FIL D'ENTREE DE L'ANTENNE
UNITE DE DECHARGE DE L'ANTENNE
(
SECTION NEC 810-20)
CONDUCTEURS DE MISE A LA
TERRE
(SECTION NEC 810-21)
ATTA CHES DE TERRE
SYSTEME ELECTRODE DE TERRE POUR SOURCE
ELECTRIQUE
(NEC ART 250, PART H)
EQUIPEMENT DE SERVICE ELECTRIQUE
Page 47

Table des matières
Recyclage
Votre nouveau téléviseur est constitué de matériaux réutilisables ou
recyclables. Afin de réduire les déchets dans l’environnement, des
entreprises spécialisées recueillent les appareils usagés et les
démontent afin de récupérer tout matériel réutilisable
(renseignez-vous auprès de votre revendeur pour de plus
amples détails).
Guide de la télévision numérique ................................................... 2
Préparation ...........................................................................................2
Utilisation de la télécommande ...................................................... 5
Boutons de commande sur le téléviseur ...................................... 6
Mon contenu .....................................................................................................7
Pour utiliser les menus ...................................................................... 7
Introduction ..........................................................................................7
Navigation dans les menus Paramètres ..............................................7
Démo....................................................................................................... 8
Installation ............................................................................................. 8
Sélection de la langue de menu ...........................................................8
Mémorisation des chaînes de télévision ..............................................8
Installation d’une chaîne faible .............................................................9
Mise à niveau logicielle .........................................................................9
Menu Configuration ................................................................................10
Préférences ........................................................................................ 10
- Préférences image/son ................................................................. 10
• Auto Surround ....................................................................... 10
- Options préférentielles ............................................................... 10
• Service de sous-titres ............................................................ 10
• Service de sous-titres numériques ........................................ 11
• Options de sous-titres numériques ...................................... 11
- Préférences de menu ................................................................... 12
• Affichage OSD ........................................................................ 12
• Afficher les alertes (EAS) ....................................................... 12
• Régler/Changer code ............................................................. 12
- Rétablir les réglages AV ............................................................... 12
Source ................................................................................................ 13
Horloge .............................................................................................. 13
- Mode horloge auto ...................................................................... 13
- Chaîne horloge auto .................................................................... 13
- Heure - Jour ................................................................................. 13
- Fuseau horaire ............................................................................. 13
- Heure d’été .................................................................................. 13
Menu TV ...............................................................................................14
Menu Image ........................................................................................ 14
- Auto picture ................................................................................. 14
- Contraste ..................................................................................... 14
- Luminosité .................................................................................... 14
- Couleur ........................................................................................ 14
- Définition ...................................................................................... 14
- Température de couleur ............................................................. 14
- Traitement numérique ................................................................ 14
- Contraste dynamique .................................................................. 14
- Commande DNR (Réduction du bruit numérique)................... 15
- Renforcement des couleurs ........................................................ 15
- Teinte ........................................................................................... 15
- Format d’image ............................................................................ 15
- Active Control ............................................................................. 15
Menu Son ........................................................................................... 15
- Auto Son ..................................................................................... 15
- Volume ........................................................................................ 15
- Équilibre ...................................................................................... 15
- Volume du casque d’écoute ....................................................... 16
- Mode Son .................................................................................... 16
- Audio de rechange...................................................................... 16
- Langue audio numérique ............................................................ 16
- Mono/Stéréo ............................................................................... 16
- Commande AVL (Limiteur de niveau automatique) ................. 16
- Volume Delta .............................................................................. 16
Menu Options .................................................................................... 16
- Sous-titres ................................................................................... 16
- Arrêt programmé ....................................................................... 16
Menu Chaînes .................................................................................... 17
- Verrouiller après ........................................................................ 17
- Verrouillage de chaîne ................................................................ 17
- Verrouillage des classements TV ............................................... 17
- Verrouillage des classements Cinéma ....................................... 18
- Chaînes préférentielles ............................................................... 19
- Téléchargement du tableau de classements .............................. 19
- Verrouillage des classements Région ........................................ 19
- Effacer les classements Région ................................................... 20
Connexion de dispositifs externes ...............................................20
Boîtier de décodage vers téléviseur ................................................. 20
Lecteur DVD/enregistreur DVD à balayage progressif
vers téléviseur .................................................................................... 21
Lecteur DVD/enregistreur DVD/magnétoscope vers téléviseur ... 21
Caméra vidéo/Console de jeux vers téléviseur ............................... 22
Connexions latérales - USB/Casque d’écoute ................................. 22
Récepteur Surround numérique ....................................................... 22
Réalisation de l’installation ................................................................ 23
Navigateur de Multimédia ..............................................................23
Menu du navigateur Multimédia ........................................................ 24
Enregistrement avec un magnétoscope .....................................24
Enregistrement d’un programme de télévision ................................ 24
Sélection des périphériques branchés ........................................25
Boutons de matériel audio et vidéo ............................................25
Astuces de dépannage .....................................................................26
Astuces .................................................................................................27
Glossaire ...............................................................................................28
Spécifications ......................................................................................29
Annexe 1 - Mise à niveau du logiciel du téléviseur Philips avec
une mémoire portable .....................................................................31
Annexe 2 - Format de diaporama pour téléviseur Philips avec
background audio ..............................................................................33
Annexe 3 - Philips TV USB .............................................................35
Française
R Instructions pour appareils en fin de cycle de vie
Philips s’efforce de fabriquer des produits qui ne nuisent pas à l’environnement. Votre nouveau téléviseur est constitué
Soin de l’écran
Voir astuces, p. 28.
de matériaux recyclables et réutilisables. Des entreprises spécialisées démontent les téléviseurs arrivés en fin de cycle
de vie pour récupérer les matériaux réutilisables afin de réduire au minimum les déchets.
Veillez à vous défaire de votre ancien téléviseur en respectant les réglementations locales en vigueur.
R
1
Page 48
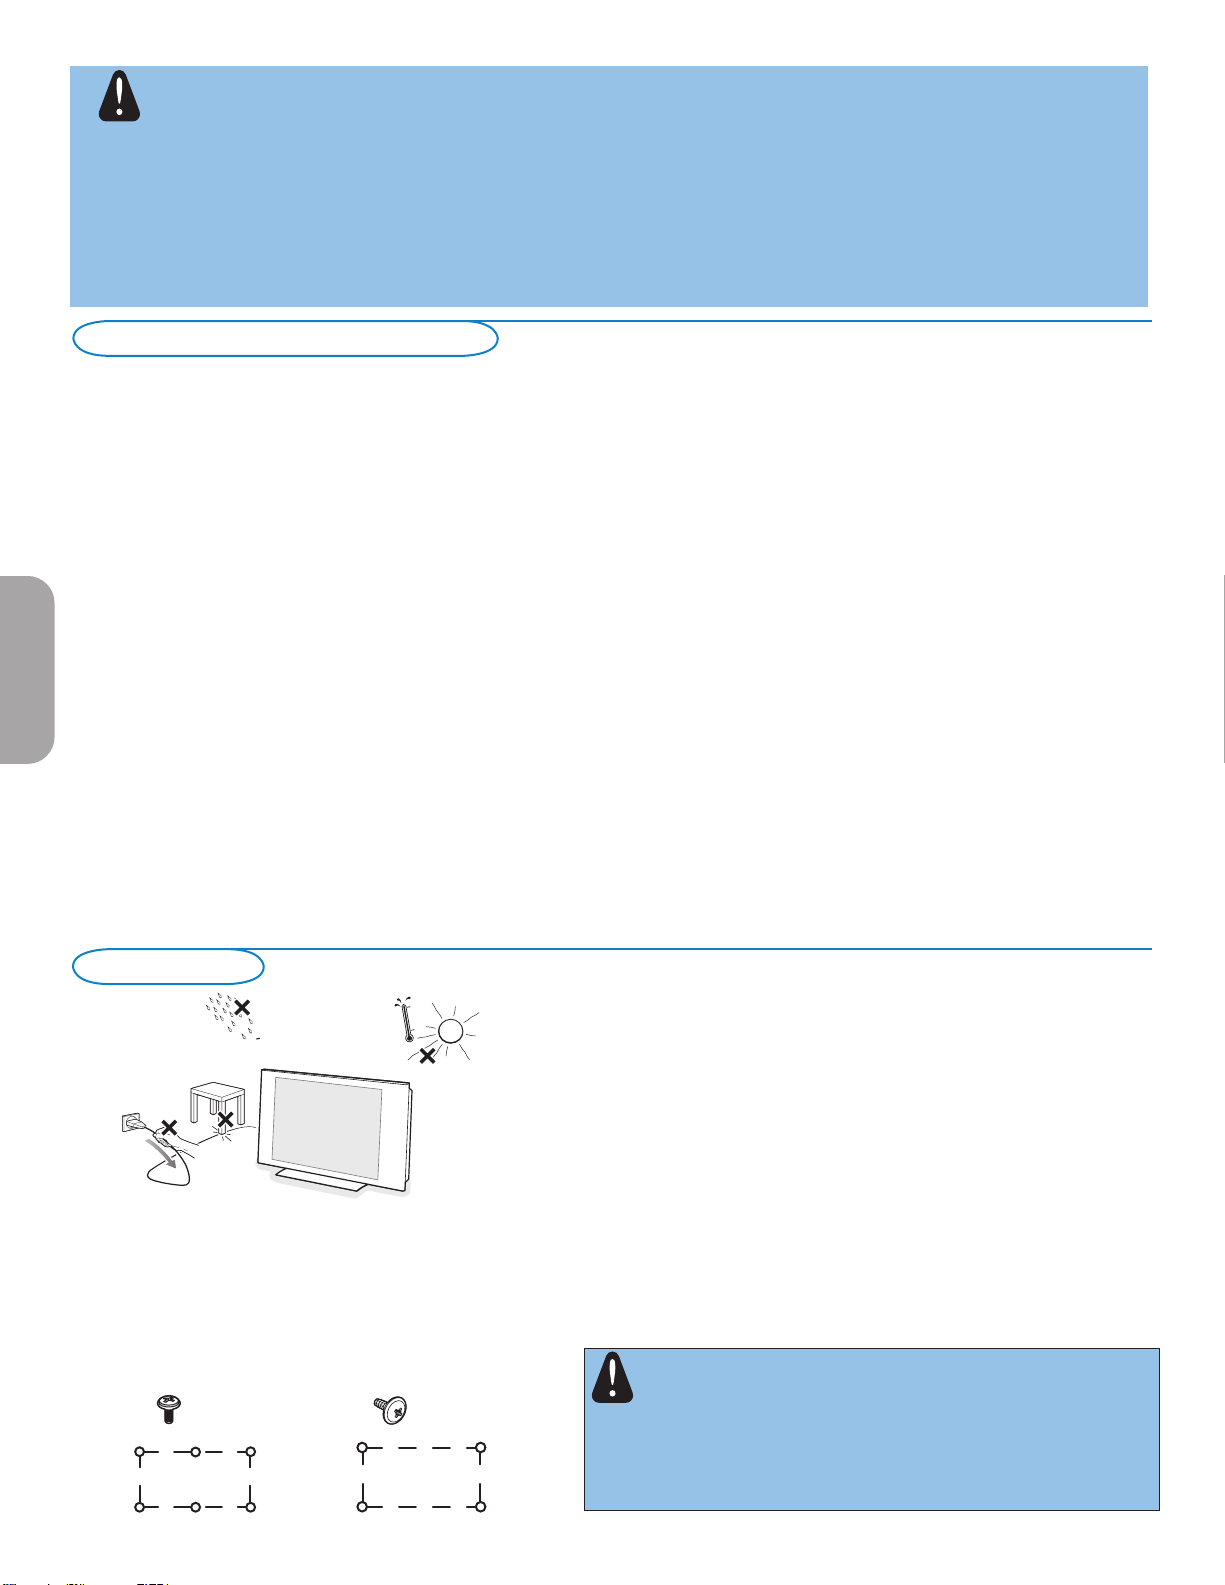
Avertissement concernant les images fixes sur l’écran du téléviseur
(écrans Plasma uniquement)
Une caractéristique des écrans au plasma est que l’affichage prolongé d’une même image peut entraîner la permanence
d’une post-image à l’écran. C’est ce que l’on appelle les images rémanentes.
L’utilisation normale du téléviseur est celle qui consiste à afficher des images en mouvement constant et à changer des
images qui remplissent l’écran.
Détails, consultez la page 27.
CELA N'EST PAS INCLUS DANS LA GARANTIE LIMITÉE DE PHILIPS
Guide de la télévision numérique
Qu’est-ce que la télévision numérique (DTV)?
La télévision numérique (DTV) est un type de télédiffusion relativement nouveau promettant de transformer l’écoute de la
télévision en une toute nouvelle expérience. La technologie numérique est utilisée pour faire la capture des images et de l’audio
et offrir une plus grande fidélité de reproduction. La technologie DTV offre également des fonctionnalités d’interactivité et de
multidiffusion.
Plusieurs niveaux de qualité de télévision numérique sont disponibles. Les plus courants sont :
Télévision à définition normalisée (TVDN)
TVDN est le niveau de base dans la qualité d’affichage et la résolution pour les systèmes analogique et numérique. TLa transmission
de la TVDN peut se faire sous le format traditionnel (4:3) ou grand écran (16:9).
Télévision à définition étendue (TVDE)
La TVDE offre une meilleure qualité de l’image que la télévision numérique. Les formats pour la TVDE sont grand écran 480p
(16:9) ou traditionnel (4:3). La TVDE est en milieu de gamme relativement à la qualité entre la TVDN et la TVHD.
Française
Télévision haute définition (TVHD)
La TVHD propose la meilleure qualité pour les formats de télédiffusion numérique. Sa résolution est le format grand écran (16:9).
Utilisée de concert avec la technologie audio améliorée numériquement, la TVHD établit une nouvelle norme dans la qualité des
sons et de l’image dans l’univers de la télévision.
La télévision numérique est une technologie plus flexible et plus efficace que le système de télédiffusion analogique. La télédiffusion
numérique ne peut fournir qu’un seul programme à la fois. La télévision numérique peut transmettre un programme haute
définition ou plusieurs programmes de définition standard à la fois. Ceci est souvent appelé « multidiffusion ». La télévision
numérique propose également des services de données et de vidéo interactive à travers un seul canal numérique.
Préparation
Detalles del montaje de pared VESA,
26PF5321D 37PF7321D
26PF5321D 42PF5321D
32PF5321D 42PF5421D
32PF7321D 42PF7321D
32PF7421D 42PF7421D
50PF7321D
MIS-E, C MIS-F, 800, 400, 8
6 x (M4) 4 x (M8)
200mm
m
m
0
0
1
800mm
m
m
0
0
4
N’insérez pas la fiche dans la prise murale avant d’avoir effectué tous
les branchements.
Placez le téléviseur sur une surface solide ou sur le socle fourni à cet effet.
Pour les instructions de montage du socle, voir la brochure fournie à cet
effet.
Laissez un espace d’au moins 4” à 6” autour du téléviseur pour la
ventilation. Ne posez pas votre téléviseur sur un tapis. Pour éviter
toute situation peu sûre, aucune flamme nue (par exemple des bougies
allumées) ne doit être placée sur le téléviseur ou à proximité. Evitez
toute exposition à la chaleur, aux rayons directs du soleil et à la pluie ou
à l’eau. L’équipement ne doit pas être exposé à des fuites d’eau ou des
éclaboussures.
Montage du TV sur le mur
Ce Téléviseur est compatible avec le montage de mur VESA conventionnel.
La faveur de contacter à son distributeur local d’eléctronicos pour acquérir
un support qui s’acquitte de la norme VESA quand ce type de montage sera
préféré.
Attention: L’installation du téléviseur requiert des compétences
spécifiques et ne doit être effectuée que par du personnel
qualifié. N’essayez pas de l’effectuer vous-même. Philips décline
toute responsabilité en cas de montage incorrect ou susceptible de causer
un accident ou des blessures.
Vérifiez si le montage mural est suffisamment solide pour satisfaire les
normes de sécurité.
2
Page 49
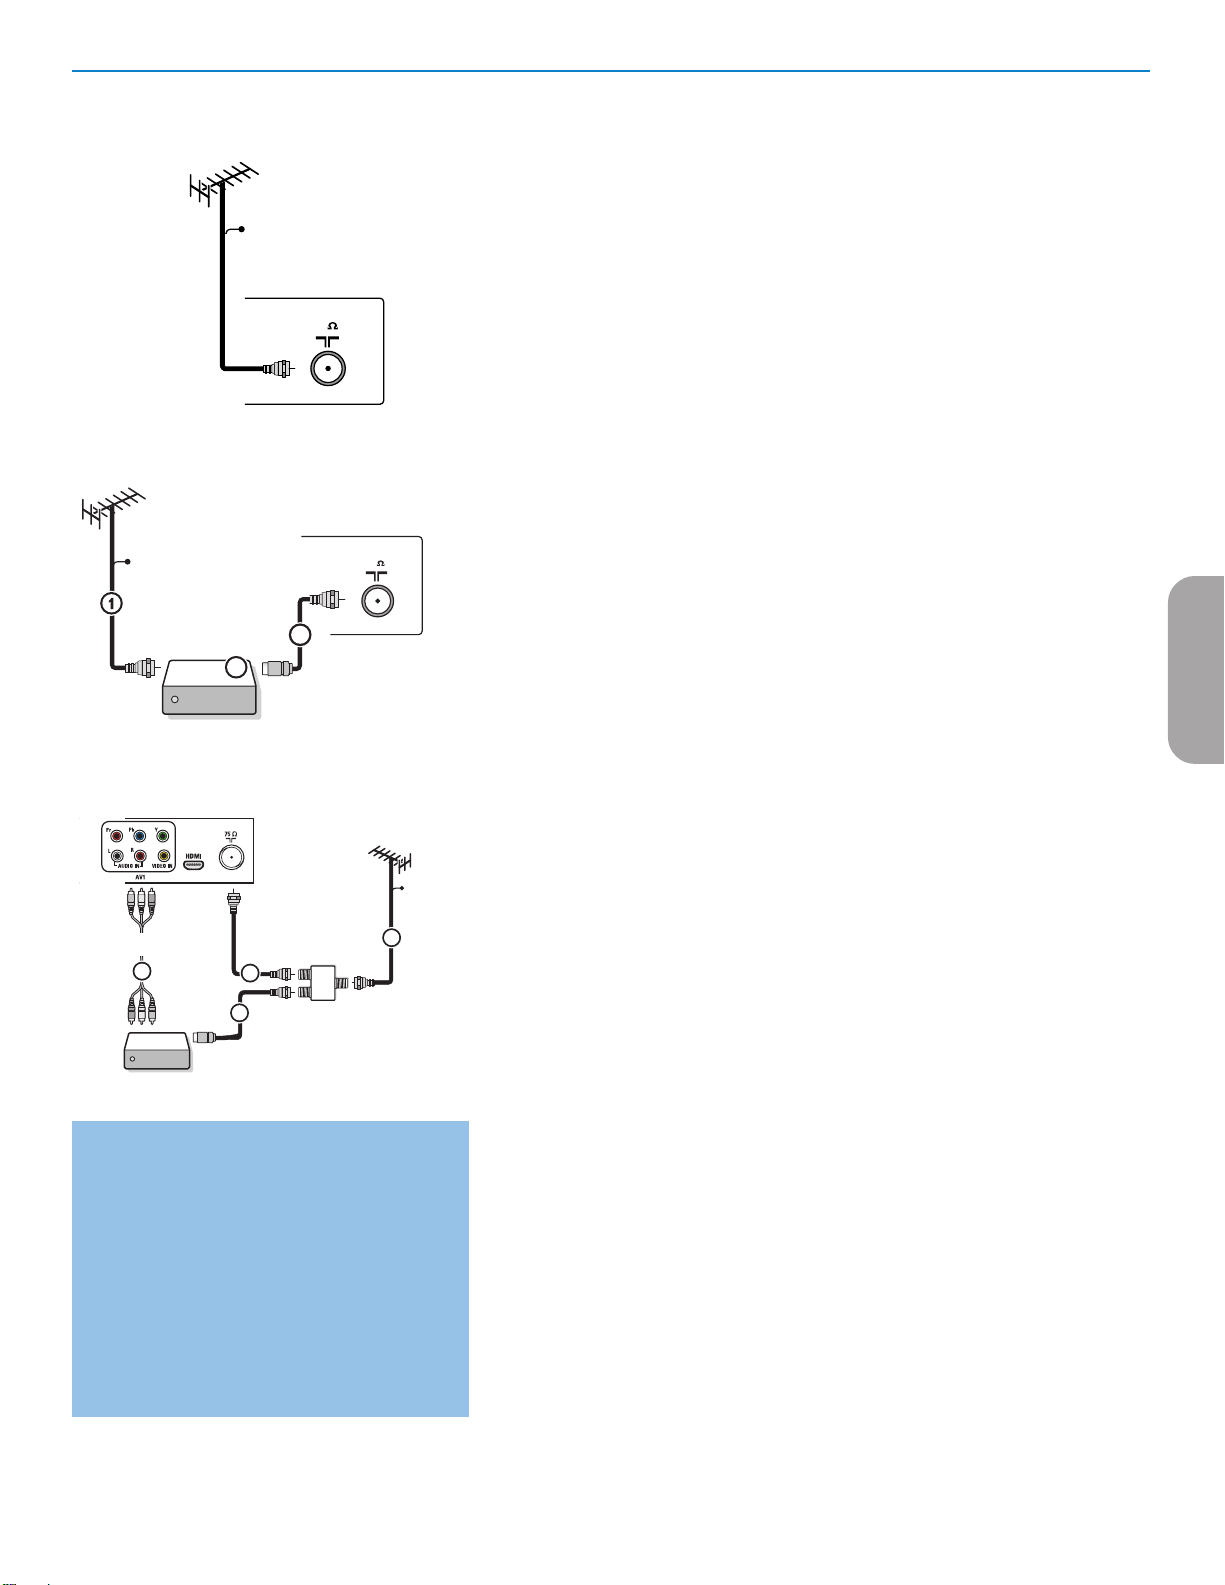
Visualisation de programmes de
75
CABL E
75
Set-Top Box
OUT
OUTPUT
TO TV
IN
CABL E
3
2
SIGNAL
SPLITTER
Set-Top Box
OUT IN
3
2
CABLE
1
AV1 :
4
L + R + VIDEO
télévision par câble ne nécessitant pas le
câblosélecteur
Etant donné que vous avez connecté le signal
TV par câble directement au syntoniseur du
téléviseur, vous pouvez aussi regarder des
programmes en clair en vous syntonisant
simplement sur la chaîne voulue. Vous devez
toutefois utiliser au préalable Programmation auto
pour mémoriser les chaînes dans le téléviseur.
Voir page 8.
Remarque : Ce branchement fournira du son stéréo au
téléviseur si la chaîne que vous regardez en diffuse.
Remarque: Si les sorties Audio/Vidéo de votre câblosélecteur
ne fournissent pas de vidéo ni de son stéréo au téléviseur,
vous devrez effectuer le branchement illustré ci-dessus dans
l’exemple “Câblosélecteur avec RF IN/OUT”.
& Branchements de base du téléviseur
Branchements de base du téléviseur
Votre téléviseur numérique intégré décode et affiche automatiquement les quatre
standards de résolutions d’image DVD de base et les affiche.
- la SDTV (TV à définition standard) est diffusée sous la forme de vidéo 480i (480 lignes
en balayage entrelacé) ou 480p (480 lignes en balayage progressif).
- la HDTV (TV haute définition) est diffusée dans les formats 1080i ou 720p, toujours
avec une image pour écran large.
Remarque: la vidéo à balayage progressif (p) ressemble davantage à l’image vue au cinéma.
Les images sont plus nettes et dépourvues de papillotement, le mouvement plus fluide.
Outre la réception NTSC analogique, votre TV est doté d’un syntoniseur TV haute
définition qui reçoit, décode et affiche les signaux ATSC terrestres et les signaux câblés
désembrouillés (MAQ).
La qualité HDTV n’est reproduite que lorsqu’un télédiffuseur ou un opérateur de
réseau câblé émet des signaux HDTV.
Il y a deux moyens d’obtenir du contenu HDTV :
- par câble,
- par antenne.
Remarque: ce branchement fournira du son stéréo au téléviseur si la chaîne que vous regardez
en diffuse.
- La télévision par câble
Branchez le signal TV par câble à la fiche-jack de cable/antenna
75 Ω x située dans le bas du téléviseur. Reportez-vous à la page 10 pour obtenir
davantage de détails sur l’utilisation de la Programmation auto pour la mémorisation
des chaînes.
Remarque: ce branchement fournira du son stéréo au téléviseur si la chaîne que vous regardez
en diffuse.
- Câblosélecteur avec rf in/out (entrée/sortie RF)
• Branchez le signal TV câble entrant à la fiche-jack in 1 du câble à l’arrière du
câblosélecteur.
• Connectez un câble coaxial (pas fourni) entre la fiche-jack to tv à l’arrière du boîtier
et la fiche-jack cable/antenna 75 Ω x 2 située dans le bas du téléviseur.
Remarque: L’étiquette de la fiche-jack TO TV de votre câblosélecteur peut différer, par
exemple output ou out.
• Mettez le commutateur OUTPUT CH 3 du câblosélecteur sur CH 3 ou 4 (selon
votre câblosélecteur), puis syntonisez le téléviseur sur la chaîne correspondante.
Une fois le réglage effectué, changez les chaînes sur le câblosélecteur, pas sur le
téléviseur.
Remarque: Ce branchement ne fournira pas de son stéréo à votre téléviseur. Cela, parce que
la sortie RF du câblosélecteur - étiquetée TO TV, OUT ou OUTPUT par exemple - n’enverra pas
de signal stéréo à l’entrée tuner (VHF/UHF) d’un téléviseur.
- Câblosélecteur à sorties AV
• Branchez le signal TV de câble entrant 1 à un répartiteur de signaux (pas fourni).
Le répartiteur de signaux vous permet d’éviter de devoir utiliser la fiche-jack TO TV
située à l’arrière du câblosélecteur. Cette fiche-jack ne fournira pas de son stéréo
au téléviseur.
Remarque: L’étiquette de la fiche-jack TO TV de votre câblosélecteur peut différer, par
exemple OUTPUT ou OUT.
• Branchez un câble coaxial (pas fourni) à un connecteur du répartiteur de signaux et
à la fiche-jack CABLE/ANTENNA 75 Ω x jack 2 du téléviseur.
• Branchez un autre câble coaxial (pas fourni) à un connecteur du répartiteur de
signaux et à la fiche-jack IN jack 3 située à l’arrière du câblosélecteur.
• Branchez les câbles AV (pas fournis) aux sorties VIDEO et AUDIO L et R à l’arrière
du boîtier et aux fiches-jacks AV2 video (étiquette VIDEO) et AUDIO (étiquette L
et R) 4 à l’arrière du téléviseur.
• Pour visualiser des programmes en provenance du câblosélecteur, vous devez
commencer par appuyer sur le bouton AV+ de la télécommande.
• Appuyez sur les boutons bas et haut du curseur jusqu’à ce que la source de signal
AV2 soit sélectionnée.
• Appuyez sur le bouton OK pour confirmer votre sélection. La source d’entrée AV2
devient celle courante pour la visualisation des programmes de TV par câble via
votre câblosélecteur.
3
Française
Page 50
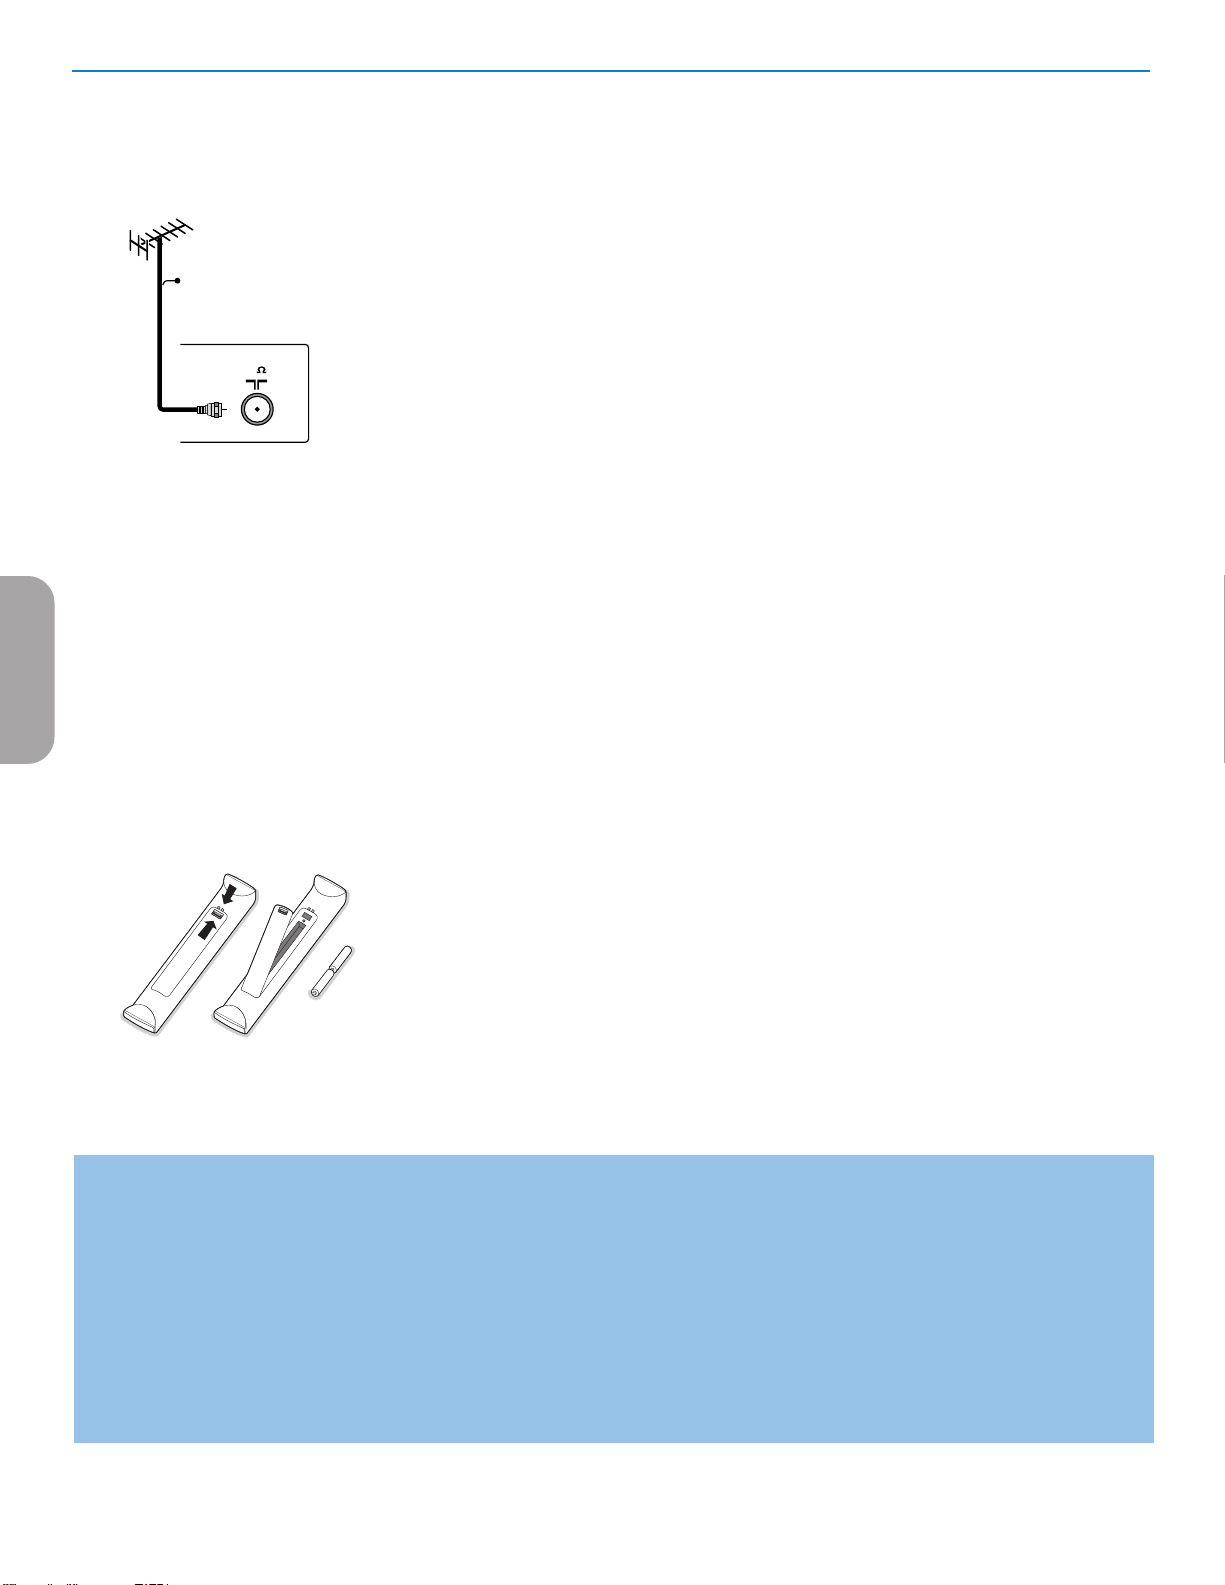
75
CABL E
Française
- Câblosélecteur doté de connecteurs S-Video, composant vidéo (YPbPr) ou HDMI
Voir Branchement des périphériques, p. 22-23.
- Antenne
Vous pouvez regarder via l’antenne tous les programmes DTV diffusés gratuitement
dans votre zone.
Si vous ignorez les programmes HDTV disponibles dans votre zone, contactez le
fournisseur de contenu ou le magasin d’appareils électroniques le plus proche.
Les organismes de télédiffusion passent actuellement de l’analogique au numérique. Du
coup, il arrive fréquemment qu’un télédiffuseur diffuse deux chaînes, l’une analogique
et l’autre numérique.
Branchez le signal d’antenne entrant à la fiche-jack CABLE/ANTENNA 75 Ω
x dans le bas de votre téléviseur. Reportez-vous à la page 8 pour obtenir davantage
de détails sur l’utilisation de la Programmation auto pour la mémorisation des chaînes.
Remarque: ce branchement fournira du son stéréo au téléviseur si la chaîne que vous regardez
en diffuse.
- Satellite de radiodiffusion directe (SRD)
Les systèmes par satellite offrent un grand nombre de chaînes de qualité proposées par
les systèmes par câble, et souvent à un prix inférieur. Pour recevoir ces canaux, vous
devrez installer une antenne à réflecteur en extérieur.
Il existe deux systèmes SRD principaux: DirecTV et DishNetwork. Ces systèmes
requièrent des boîtiers récepteurs propriétaires se posant sur le téléviseur pour
décoder les signaux et les transmettre à votre poste TV numérique. Ces boîtiers
peuvent inclure un syntoniseur TV numérique pour les diffusions DTV hertziennes.
Les organisme de télédiffusion par satellite proposent également les principales chaînes
locales, selon les zones d’habitation.
Le SRD atteint également les zones rurales et autres non-couvertes par le câble. Et,
cette solution permet les services à paiement sélectif.
é Afin d’installer votre téléviseur, branchez tous vos appareils, voir p. 20.
“ Vérifiez au bas du téléviseur si la tension de fonctionnement est correcte. Insérez le
cordon d’alimentation dans la prise murale.
Consultez votre revendeur si votre alimentation secteur ne correspond pas. Afin
d’éviter tout endommagement du cordon d’alimentation (AC) qui pourrait entraîner des
risques d’incendie ou d’électrocution, ne placez jamais le téléviseur sur le cordon.
‘ Télécommande:
Introduisez les deux piles fournies (Type R6-1,5V). Vérifiez que les extrémités (+) et (–)
des piles correspondent avec les bornes (+) et (–) à l’intérieur du boîtier.
Les piles livrées avec la télécommande ne contiennent pas de métaux lourds comme le mercure
et le cadmium. Informez-vous sur les dispositions en vigueur dans votre pays pour la mise au
rebut des piles usées.
( Mise en service du téléviseur:
Appuyez sur le bouton B situé sur la droite du téléviseur. Appuyez sur les boutons
+CH/PAGE- ou sur le bouton POWER de la télécommande.
Un voyant s’allume sur la façade du téléviseur.
Première utilisation
Remarque: la première fois (et uniquement la première fois) que vous allumez votre appareil, vous voyez un écran d’introduction relatif à l’installation. La
procédure d’installation se compose d’une série de pages-écrans qui vous guident.
& Après un premier écran de présentation, il vous est demandé de sélectionner une langue pour les menus à l’écran du téléviseur. (La langue du texte,
du titre et des informations affichées change continuellement).
é Appuyez sur le curseur haut/bas pour mettre la langue de votre choix en surbrillance.
“ Appuyez sur le bouton OK.
‘ Suivez les instructions données à l’écran pour poursuivre la procédure d’installation.
Remarque: une fois la procédure d’installation initiale complétée, vous pouvez accéder aux écrans depuis le menu Réglages. Voir p. 7.
4
Page 51
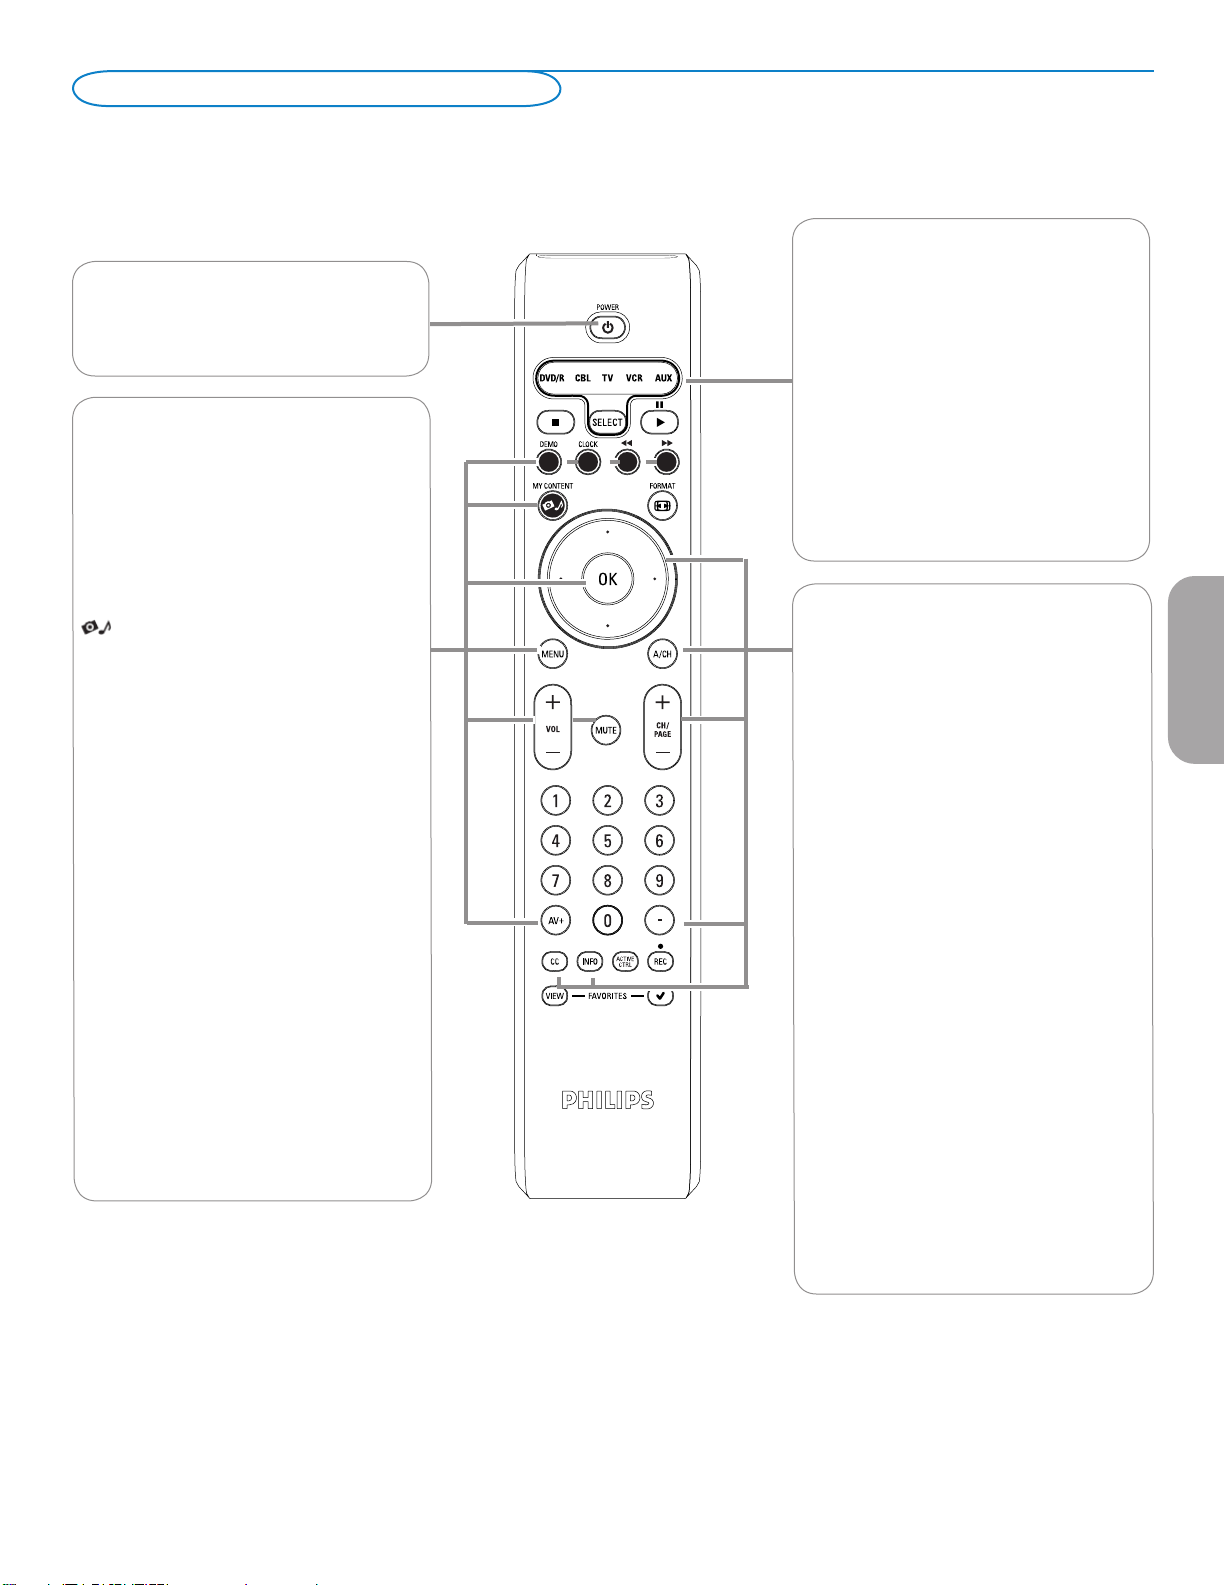
Utilisation de la télécommande
Remarque: Pour la plupart des boutons, vous activerez la fonction en appuyant une fois sur le bouton. Si vous appuyez une seconde fois, la fonction
sera désactivée.
Lorsqu’un bouton permet d’activer plusieurs fonctions, une petite liste sera affichée. Appuyez de manière répétée afin de sélectionner l’élément suivant dans la
liste. La liste disparaîtra automatiquement après 6 secondes, sinon, appuyez sur OK pour la faire disparaître immédiatement.
Remarque : bien que cette télécommande puisse
être utilisée avec certains autres produits Philips, il
POWER
Appuyez pour allumer/éteindre la TV ou
pour la mettre en position de veille. Un
téléviseur n’est jamais complètement hors tension
à moins d’être débranché de la prise murale.
DEMO Menu Démo Marche/Arrêt
Voir p. 8.
CLOCK (horloge) Marche/Arrêt
Affichage de l’heure (pendant 10 min. maxi.)
Boutons colorés
Les boutons colorés s’affichent à l’écran
lorsque des fonctions y sont associées.
MY CONTENT (MON CONTENU)
Appuyez sur ce bouton pour afficher le menu
Marche ou Arrêt de l’écran Accueil, voir p. 7.
ne s’agit pas d’une télécommande universelle.
DVD/R CBL TV VCR AUX
Appuyez sur le bouton SELECT à plusieurs
reprises pour sélectionner l’un des modes
système dans lequel la télécommande peut
être utilisée pour faire fonctionner ce
dispositif Philips.
Si aucune action n’a été prise dans les 60
secondes, la télécommande retourne au
mode TV.
Si un bouton est enfoncé dans le mode
système sélectionné, la télécommande restera
dans ce mode pendant 60 secondes puis
repassera au mode TV.
Boutons du curseur
Appuyez sur les boutons haut/bas et gauche
droite du curseur pour naviguer dans les
menus.
OK
- Permet d’activer un réglage
- Permet d’afficher la liste des chaînes
mémorisées conformément à la sélection
effectuée en mode Installation (Antenne ou
Câble), p. 8.
- Lance la lecture du contenu dans
l’application de navigateur Multimédia, p. 24.
MENU
Menu Réglages Marche/Arrêt, Voir p. 7.
VOL Volume
Appuyez sur + ou - pour régler le volume.
MUTE (Sourdie)
Permet de supprimer/rétablir le son.
AV+
Appuyez sur ce bouton à plusieurs reprises
pour sélectionner AV1, AV2, AV3, HDMI,
SIDE ou TV en mode TV, en fonction du
branchement des périphériques (p. 20).
il continue
CH/PAGE Sélection des chaînes
- Vous permet de naviguer dans les chaînes
TV et les sources figurant dans votre liste
de chaînes préférentielles (see p. 19).
- TPour sélectionner les chaînes de télévision
par câble ou celles de l’antenne, commencez
par effectuer votre sélection dans le menu
Réglages, voir p. 7.
Remarque : Vous n’aurez pas à recommencer
l’installation une fois que vous aurez recherché
et mémorisé les chaînes de télévision disponibles.
A/CH
Appuyez sur ce bouton pour basculer de la
chaîne couramment visualisée à la chaîne
visualisée précédente et vice versa.
-
Tapez le tiret (-) pour les chaînes numériques.
INFO
Affichage d’informations: Appuyez pour
afficher (si disponibles) les informations de la
chaîne et du programme sélectionnés ou de
l’appareil accessoire.
CC
Appuyez sur ce bouton pour afficher le texte
des sous-titres diffusés à l’écran
Française
5
Page 52
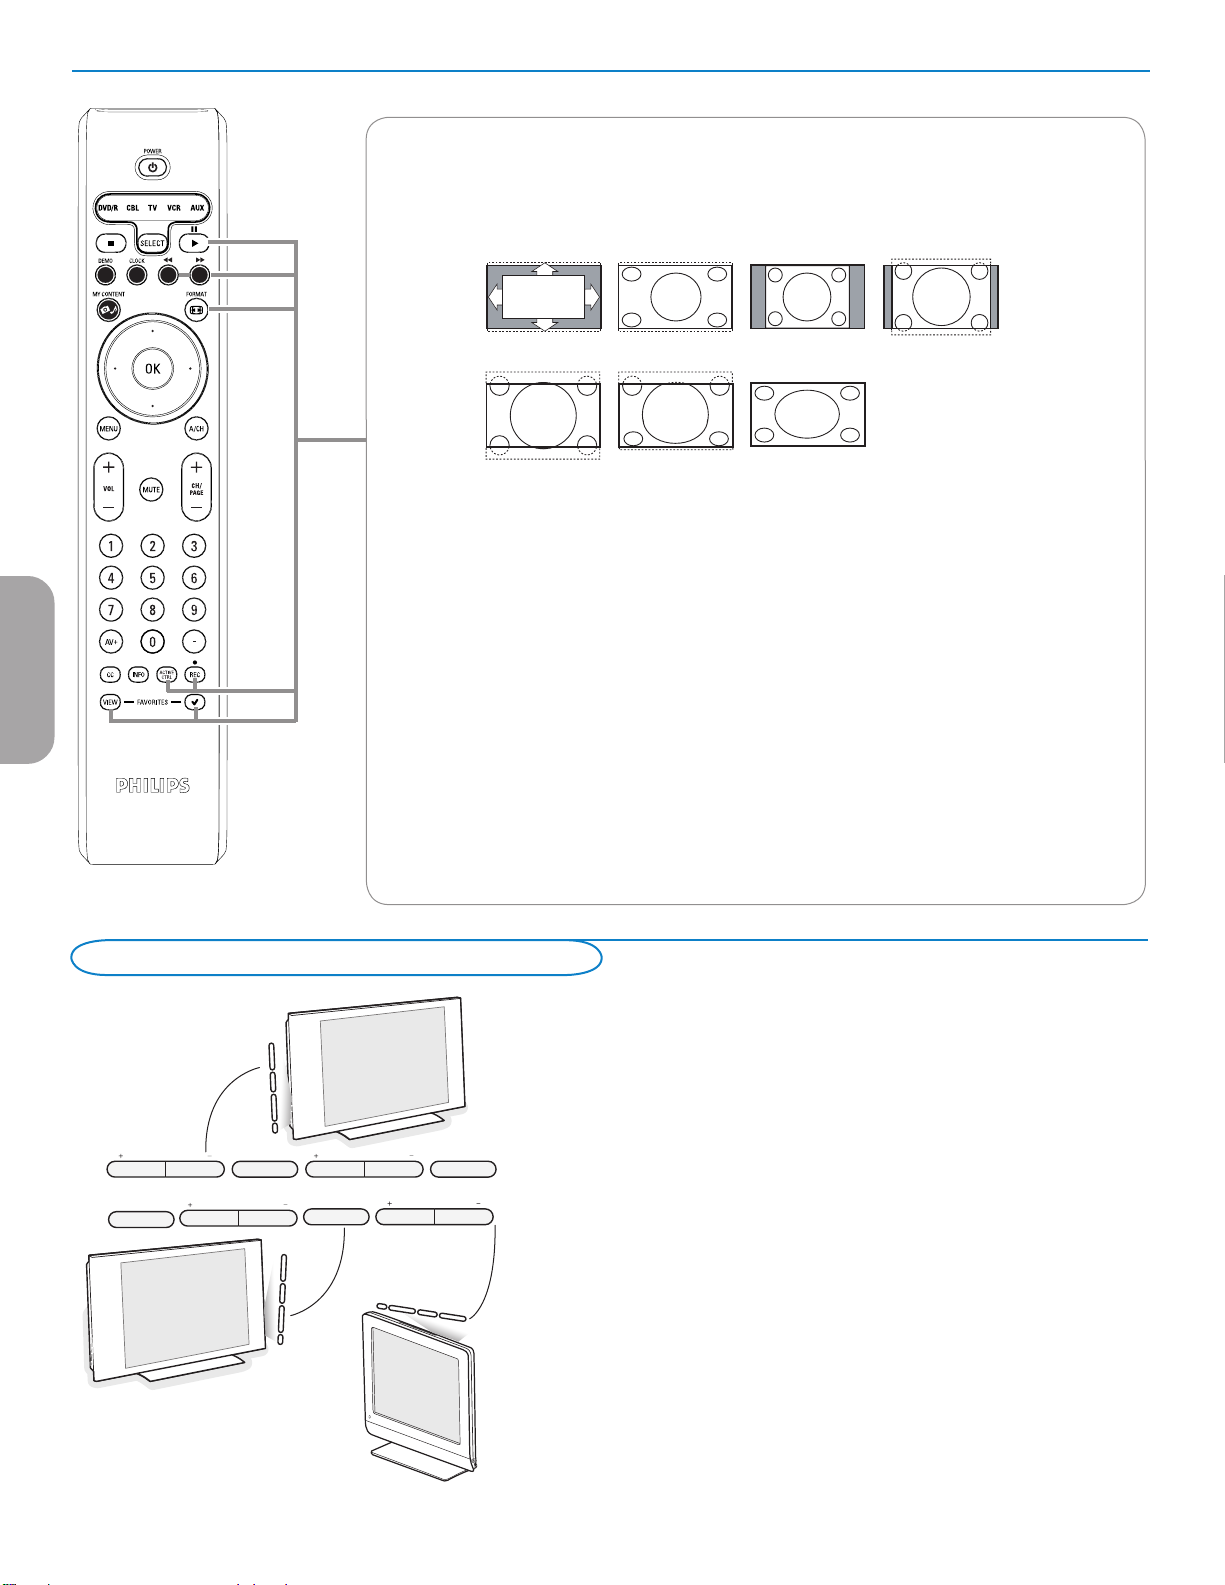
ENTRY_control_2005.eps
VOLUME
CHANNEL
MENU POWER
.
VOLUME
CHANNEL
MENU
POWER
.
OU
Française
FORMAT
Appuyez sur ce bouton pour obtenir la liste des formats d’affichage disponibles (en fonction du signal
reçu). Cette opération vous permettra de choisir votre format d’affichage préféré.
Appuyez plusieurs fois sur ce bouton pour sélectionner un autre format d’affichage: Automatique, Super
zoom 4:3, Ext. image 14:9, Ext. image 16:9, 16:9, 16:9 sous-titre, Plein écran.
Automatique Super zoom 4:3 Ext. image 14:9
Ext. image 16:9 16:9 sous-titre Plein écran
Automatique a pour effet d’agrandir l’image afin qu’elle remplisse l’écran au maximum.
Super 4:3 supprime les barres noires sur les côtés des programmes 4:3 avec une distorsion minimale.
En mode Ext. image 14:9, Ext. image 16:9 ou Super 4:3, vous pouvez afficher les sous-titres avec le
curseur haut/bas.
Remarque: Avec des sources HD tous les formats d’image ne sont pas disponibles.
ACTIVE CONTROL
Appuyez sur ce bouton pour que le téléviseur mesure et corrige continuellement tous les signaux
d’entrée afin de fournir une image supérieure.
FAVORITES (Programmes préférentiels)
• VIEW Permet d’afficher la liste de vos chaînes préférées (sous-chaînes comprises).
• 3 Vous permet d’ajouter une chaîne à la liste de vos chaînes préférées ou de l’en retirer.
®Ò‡†ºπ
• Boutons pour les appareils AV. Voir p. 21.
• Boutons de fonction du navigateur de Multimédia. Voir p. 25.
Boutons de commande sur le téléviseur
32PF5321D
32PF7321D
32PF7421D
37PF7321D
42PF5321D
26PF5351D
26PF5321D
42PF5421D
42PF7321D
42PF7421D
50PF7321D
Si vous perdez ou cassez votre télécommande, vous pouvez toujours modifier
certains réglages de base au moyen des boutons situés sur le côté droit du
téléviseur.
Appuyez sur le bouton B pour allumer le téléviseur.
Appuyez sur:
• le bouton + VOLUME - pour régler le volume;
• les boutons + CHANNEL - pour sélectionner les chaînes TV ou les sources.
Le bouton MENU pour appeler le menu Réglages sans utiliser la télécommande.
Utilisez:
• les boutons + VOLUME - et les boutons + CHANNEL - pour sélectionner
des éléments de menu dans les directions indiquées;
• le bouton MENU pour confirmer votre sélection.
Remarque:
Lorsque le menu est activé via le bouton MENU situé sur du téléviseur, seule la fonction
Sortie permet de le faire disparaître.
Naviguez vers Sortie et appuyez sur le bouton MENU.
6
Page 53

My Content
Utilisation des menus
Le menu My Content (et le navigateur de multimédia sous-jacent) devrait
contenir l’ensemble des informations, services et applications susceptibles de
vous intéresser.
& Appuyez sur le bouton button pour l’activer.
é Appuyez sur les boutons haut/bas du curseur pour changer l’élément mis en
surbrillance dans la liste des éléments de menu.
“ Appuyez sur le bouton droit du curseur ou sur le bouton ok pour
descendre dans la structure.
• Télévision :
Chaînes de télévision vous amène à la liste des chaînes de télévision; le
panneau de gauche présenté contiendra les numéros des chaînes analogiques, les
numéros des chaînes en une partie et les numéros des chaînes principales dans le
cas de chaînes numériques en deux parties. Celui de droite contiendra les souschaînes associées à la chaîne principale mise en surbrillance dans le panneau de
gauche. Si aucune sous-chaîne n’est associée à la chaîne couramment sélectionnée
dans le panneau de gauche, le panneau de droite restera vide.
• Multimédia :
Contient les périphériques connectés localement sur lesquels du contenu
(images, fichiers audio) est stocké. Voir Navigateur de Multimédia, p. 24.
Introduction
Des instructions, des textes d’aide et des messages s’affichent sur votre téléviseur lorsque vous utilisez les menus ou essayez d’effectuer
une opération.
Veuillez suivre les instructions et lire les textes d’aide relatifs à l’élément mis en surbrillance, qui s’affichent.
Les boutons de couleur font référence aux différentes opérations qui peuvent être effectuées pour le périphérique activé. Appuyez sur le
bouton de couleur correspondant de la télécommande pour effectuer l’opération demandée.
Navigation dans les menus Paramètres
Le menu Réglages vous permet d’accéder aux réglages, aux préférences et
aux réglages réseau et de les modifier.
• Appuyez sur le bouton MENU de la télécommande pour afficher le menu
Réglages.
- Il est possible de mettre en surbrillance une option de menu sur le
panneau de gauche au moyen des boutons haut/bas du curseur.
Le panneau de droite indique le contenu de l’option de menu mise en
surbrillance sur le panneau de gauche.
Remarque: Tous les éléments du menu ne sont pas toujours visibles à l’écran.
Utilisez le curseur bas pour les faire apparaître tous.
- Utilisez le curseur droit pour entrer dans le panneau droit.
Le contenu du panneau de droite passe dans le panneau de gauche et
le panneau de droite indique le contenu de la nouvelle option mise en
surbrillance dans le panneau de gauche.
Remarque: Dans certains cas, il est important de pouvoir visualiser l’image
pendant les réglages. Dans ce cas, lorsque le panneau de droite est en
surbrillance, les autres options de menu sont masquées. Lorsque vous réappuyez sur le curseur gauche, les éléments de menu masqués réapparaissent
et le panneau de gauche est de nouveau mis en surbrillance.
Française
• Appuyez sur le curseur gauche pour remonter d’un niveau dans le menu.
- Appuyez sur le bouton OK sur l’option de menu mise en évidence pour
l’activer et fermer le menu.
- Appuyez de nouveau sur le bouton MENU pour quitter le menu
Réglages.
Remarque: Ce menu peut également être fermé en appuyant sur un des
boutons colorés (s’il y en a) relatifs à des opérations exécutables.
7
Page 54
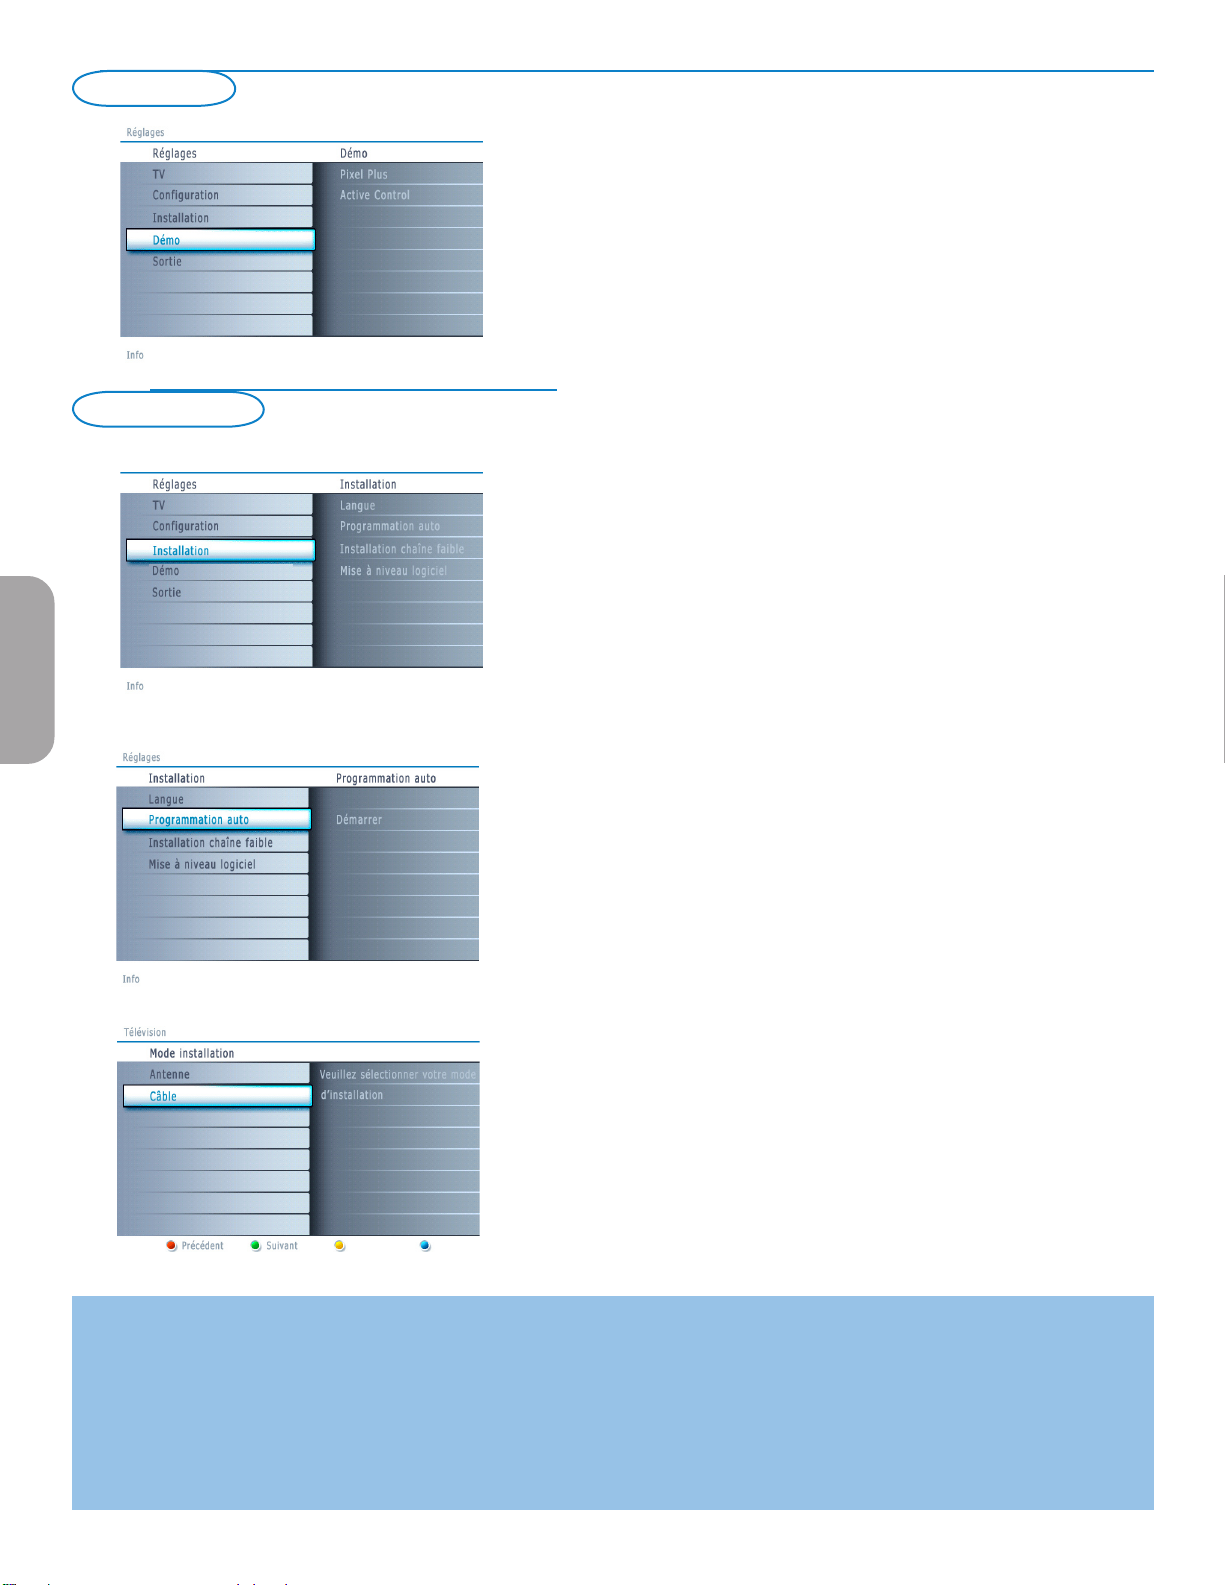
Démo
Installation
Française
Le menu Démo permet à l’utilisateur de se faire une idée des fonctions dont
est doté son téléviseur.
& Sélectionnez Démo dans le menu Réglages et appuyez sur le curseur droit.
é Mettez en surbrillance la démo de votre choix à l’aide du curseur haut/bas.
“ Appuyez sur OK pour lancer la démo mise en surbrillance.
Appuyez sur le bouton de couleur verte pour exécuter automatiquement
toutes les démos les unes à la suite des autres.
Appuyez sur le bouton de couleur rouge pour arrêter la fonction
d’exécution automatique.
Appuyez de nouveau sur le bouton de couleur rouge pour sortir de la
démo et revenir au mode TV.
Remarque: La démo sélectionnée est exécutée une fois.
The demos require no user interaction except for starting the demo.
Sélection de la langue de menu
& Appuyez sur le bouton MENU de la télécommande.
é Utilisez le curseur bas pour sélectionner Installation dans le menu
Réglages.
“ Utilisez le curseur droit pour entrer dans le menu Installation.
‘ Sélectionnez Langue et entrez dans la liste des langues disponibles avec le
curseur droit.
( Sélectionnez votre langue à l’aide du curseur de direction haut/bas et
appuyez sur le bouton OK de la télécommande pour confirmer votre
choix.
§ Passez au menu Installation.
Mémorisation des chaînes de télévision
& Sélectionnez Programmation auto dans le menu Installation.
é Utilisez le curseur droit pour entrer dans le menu Programmation auto.
“ Appuyez sur le bouton OK.
‘ Sélectionnez Câble ou Antenne dans le mode Installation.
Si Antenne est sélectionné, le téléviseur détectera les signaux d’antenne
et recherchera les chaînes de télévision hertziennes (NTSC et ATSC)
disponibles dans votre zone.
Si Câble est sélectionné, le téléviseur détectera les signaux émis par votre
câblopérateur et recherchera les chaînes de télévision par câble (NTSC,
ATSC, QAM modulé) disponibles dans votre zone.
Assurez-vous de vous être enregistré correctement auprès de votre
fournisseur de TV par câble et d’avoir branché correctement l’équipement.
( Appuyez sur le bouton vert “Suivant” de la télécommande.
Remarque: Déverrouillez toutes les chaînes pour pouvoir procéder à la
programmation automatique. Si nécessaire, introduisez votre code. Voir Préférences
menu, dans Réglages, menu TV p. 14.
§ Appuyez sur le bouton vert “Lancer” pour lancer la programmation
automatique.
L’écran de menu affiché est remplacé par la progression de l’opération de
programmation automatique. La barre de progression indique le nombre de
chaînes de télévision analogiques et numériques trouvées.
Une fois la Programmation auto terminée, un message confirmant la bonne
fin de l’opération s’affiche et le téléviseur bascule sur la première chaîne de
télévision installée.
Remarques:
• Lorsque vous avez verrouillé les chaînes de télévision au début de la programmation automatique, un message vous demandant d’entrer votre code s’affiche afin
de compléter la programmation automatique.
• En cas d’interruption, les informations à jour des chaînes sont conservées ainsi que celles des anciennes informations sur les chaînes.
• La programmation automatique en arrière-plan n’est effectuée que lorsque le téléviseur est allumé.
• Pour les chaînes ATSC, les informations sur les chaînes ne sont mises à jour que pour la chaîne ATSC sur laquelle vous êtes couramment syntonisé.
• Si la chaîne réglée est une chaîne NTSC, avec la Programmation auto en arrière-plan, le téléviseur devrait balayer toutes les fréquences ATSC possibles et
mettre les informations à jour.
• Vous permet d’optimiser la qualité du signal des chaînes ATSC faibles en ajustant manuellement l’antenne (voir menu Installation, Installation chaîne faible, p. 9.)
• Une fois que vous aurez recherché les chaînes de télévision disponibles à la fois via l’antenne et le câble, celles-ci seront mémorisées.
8
Page 55

Remarque: Délai de sélection des chaînes numériques
Compte-tenu de la complexité de la syntonisation
de la programmation des sous-chaînes numériques,
le temps nécessaire pour sélectionner et afficher une
chaîne numérique pourra être légèrement supérieur
à ce à quoi l’utilisateur est habitué (avec les chaînes
analogiques).
Les chaînes numériques peuvent fournir des
informations sur les émissions et le système, qui
doivent être traitées avant l’affichage de la chaîne
sélectionnée.
Syntonisation des chaînes
Chaînes disponibles:
- Câble (NTSC analogique ou QAM numérique): maxi. de 1 à 135
- Terrestre (NTSC analogique ou QAM numérique) maxi. de 2 à 69
Si une chaîne syntonisée ne figure pas déjà dans la carte des chaînes
maîtresses, le téléviseur essaiera de syntoniser la chaîne qui sera ensuite
ajoutée à la carte.
Si la chaîne n’est pas acquise, un message indiquant qu’elle n’est pas
disponible s’affichera.
Lorsque vous vous syntonisez sur une sous-chaîne numérique ne diffusant
que du son, un message s’affiche.
Remarque: Sélections des sous-chaînes ATSC
Les nouvelles normes fixées dans le domaine de la diffusion numérique permettent
de recevoir plusieurs chaînes de programmes sous un numéro de chaîne principal,
qui se sélectionne en entrant les chiffres du numéro de cette chaîne en accès direct
sur la télécommande.
Important:
Une fois les chaînes de télévision installées, vous devez sélectionner Antenne
ou Câble dans le menu Installation selon si vous voulez regarder les chaînes de
télévision via l’antenne ou via le câble. Si vous utilisez un séparateur de signaux,
n’oubliez pas de mettre l’interrupteur dans la position adéquate.
Installation d’une chaîne faible
Vous permet de procéder à une installation de chaîne numérique ATSC faible.
Cette option est uniquement disponible pour les chaînes de télévision installées
via le branchement d’une antenne (voir p. 4).
& Sélectionnez une chaîne dans la liste des chaînes (en mode antenne).
é L’intensité du signal s’affiche et est mise à jour au fur et à mesure que vous
faites tourner l’antenne.
Mise à niveau logicielle
Ce menu vous permet de mettre à niveau le logiciel de votre téléviseur en
utilisant un périphérique USB.
Mise à jour USB
Il est possible de lancer une procédure de mise à niveau depuis une
mémoire portable. Ce périphérique de mémoire doit être rempli avec
l’image de mise à niveau (et la structure) adéquate, disponible sur le site web
www.philips.com/support.
Pour savoir comment télécharger une nouvelle version du logiciel sur votre
périphérique de mémoire portable, consultez Annex 1, p. 31.
Française
9
Page 56
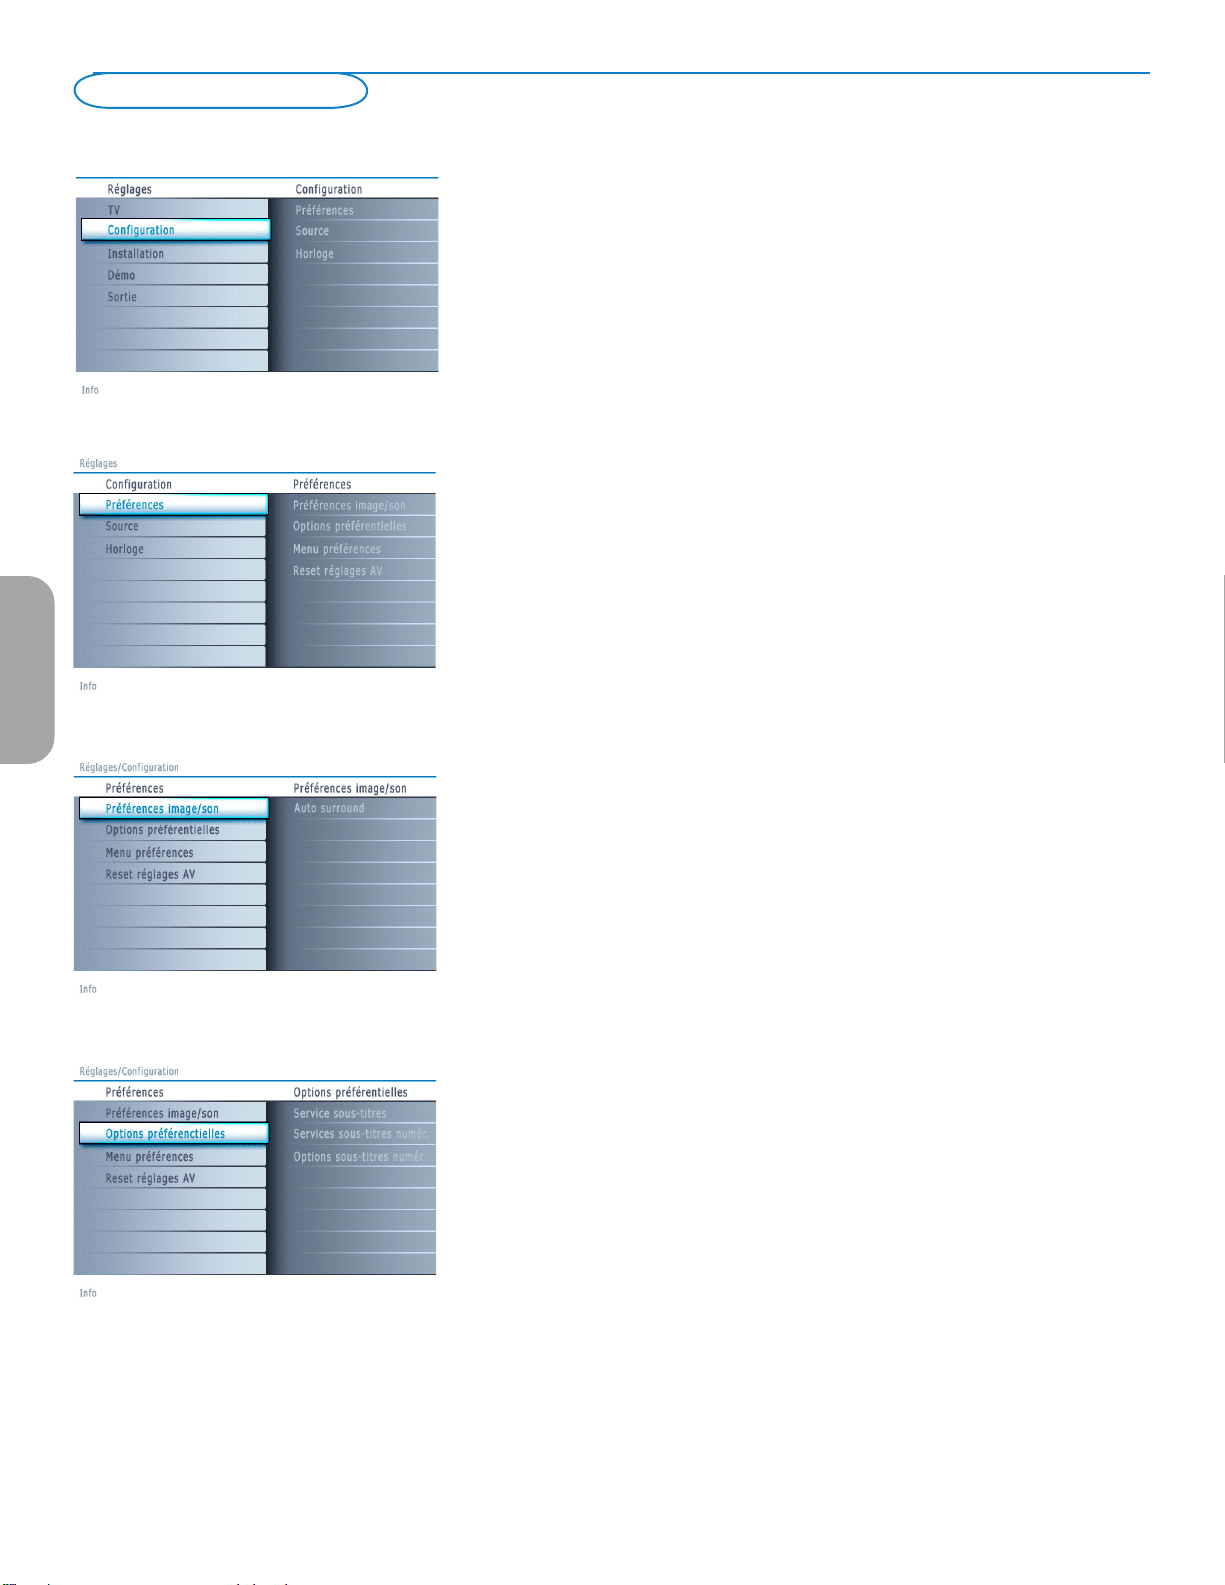
Menu Configuration
Française
Menu de configuration des fonctions TV spéciales, des caractéristiques et des
périphériques.
Le menu Préférences vous permet de modifier des réglages utilisés
occasionnellement.
Le menu Source vous permet de sélectionner une source.
Le menu Horloge vous permet d’utiliser le téléviseur comme une horloge. Pour une
bonne utilisation de l’option Verrouiller après, sélectionnez l’option correcte.
Préférences
& Appuyez sur le bouton MENU.
é Sélectionnez Configuration avec le curseur bas et appuyez sur le curseur droit
pour sélectionner le menu Préférences.
“ Appuyez de nouveau sur le curseur pour sélectionner Préférences image/son.
‘ Appuyez encore une fois sur le curseur droit pour entrer dans le menu
Préférences image/son.
Préférences image/son
Auto surround
Il arrive que les télédiffuseurs transmettent des signaux spéciaux pour les
programmes codés en son surround. Le téléviseur bascule automatiquement sur
le mode de son surround le plus adapté lorsque Auto surround est mis sur
Marche.
Options préférentielles
Service de sous-titres
Vous permet de sélectionner les niveaux du service Sous-titres de télédiffusion
analogique à afficher.
Les sous-titres codés vous permettent de lire le contenu vocal des programmes
de télévision sur votre écran TV. Cette fonction, à l’intention des malentendants,
utilise des ‘boîtes de texte’ à l’écran pour afficher les dialogues et les
conversations en même temps que le programme de télévision. Les sous-titres
codés apparaissent à l’écran durant les télédiffusions à sous-titres.
10
Page 57
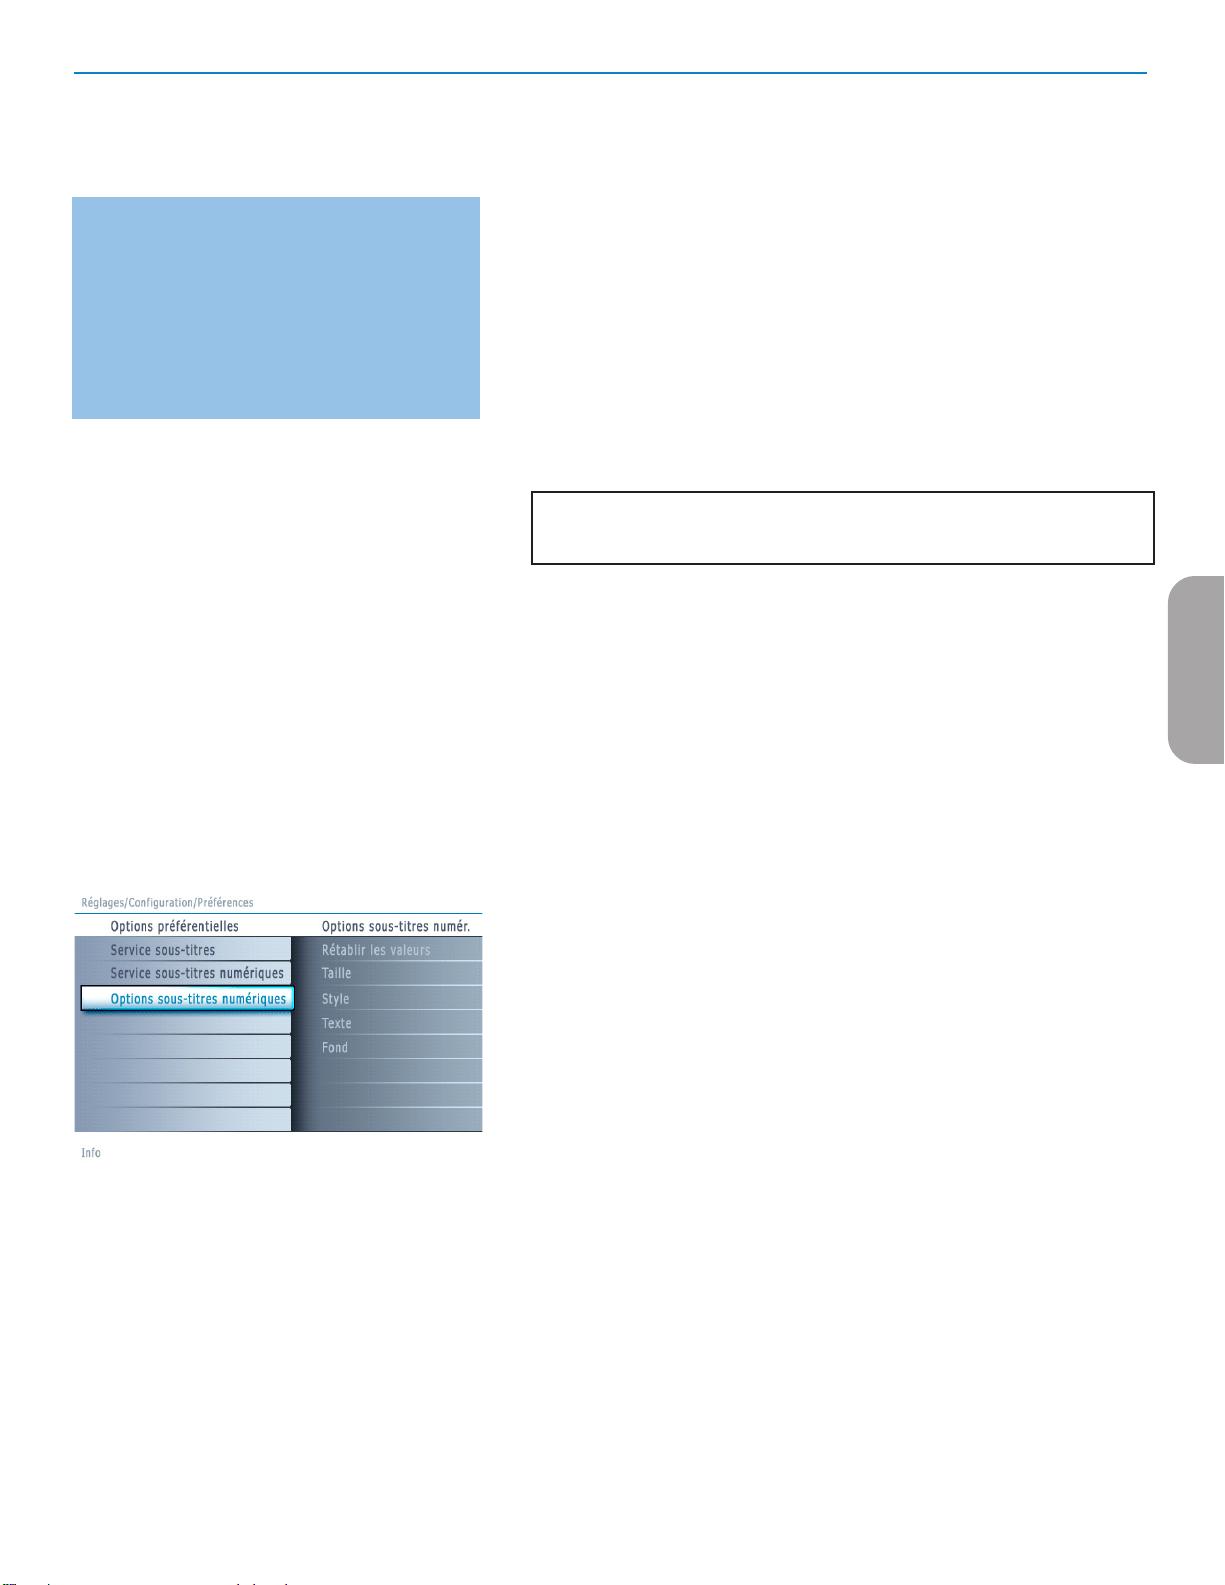
Remarque: L’orthographe et la grammaire des soustitres ne sont pas toujours parfaites. Toutes les
émissions de télévision et toutes les publicités de
produits ne sont pas conçues pour être diffusées avec
des informations de sous-titrage. Consultez les listings
de télévision de votre zone pour connaître les chaînes
de télévision proposant des émissions sous-titrées et les
horaires de diffusion. Les programmes sous-titrés sont
en général marqués dans les listings TV par un signe tel
que “CC”.’
& Sélectionnez Service sous-titres.
é Appuyez sur le curseur droit.
“ Sélectionnez le Service sous-titres désiré:
• CC 1, 2, 3 ou 4
Dialogue (et descriptions) des actions d’un programme de télévision à sous-
titrage codé à l’écran.
En général, CC 1 est le mode le plus utilisé. CC 2 peut être utilisé pour des
langues alternatives si elles sont transmises.
• T 1, 2, 3 ou 4
Souvent utilisés comme guide de chaînes, horaires, affichage d’informations sur
les émissions sous-titrées, nouvelles, météo et bourse.
Les services de sous-titrage codé ne sont pas tous utilisés nécessairement par
une chaîne de télévision lors de la transmission d’une émission sous-titrée.
‘ Voir Sous-titres codés dans le menu TV, Options, p. 16 pour activer/ désactiver
le service de sous-titrage.
Remarque: Ce poste de télévision fournit des fonctions de sous-titrage codé répondant
aux normes EIA-608 et selon les articles 15.119 des règlements de la FCC.
Comment mettre en marche
Pour mettre la fonction de sous-titres en MARCHE, accédez à option ==>
sous-titres puis sélectionnez ‘Marche’ ou ‘Marche en sourdine’.
Service de sous-titres numériques
Vous permet de choisir comment vous souhaitez visualiser les sous-titres
numériques. Sélectionnez l’une des chaînes de service numériques proposées
par le fournisseur des sous-titres.Il existe six services standard. Le Service 1 est
le Primary Caption Service. Ce service contient des sous-titres in extenso ou
presque dans la langue principale parlée dans l’audio d’accompagnement.
Le Service 2 est le Secondary Language Service. Ce service contient des sous-
titres dans une langue secondaire, qui sont des traductions des sous-titres du
Primary Caption Service. Les autres sous-chaînes de service ne sont pas préattribuées. Leur utilisation est à la discrétion du fournisseur des sous-titres.
Options de sous-titres numériques
Vous permet de modifier l’affichage des sous-titres numériques sur votre
téléviseur. Sélectionnez l’une des options suivantes pour changer les
caractéristiques visuelles des sous-titres numériques sur votre téléviseur.
Française
• Rétablir les valeurs par défaut
Sélectionnez cette option pour rétablir les options de sous-titrage numérique
aux valeurs par défaut du fournisseur des sous-titres.
Appuyez sur le bouton OK pour confirmer.
• Taille
Sélectionnez cette option pour sélectionner la taille d’affichage des sous-titres
selon vos préférences.
Sélectionnez (Par) défaut, Petit, Standard ou Grand puis appuyez sur le
bouton ok pour confirmer.
• Style
Sélectionnez cette option pour sélectionner le style de l’affichage des sous-
titres selon vos préférences.
Sélectionnez (Par) défaut, Monospaced serif, Serif, Monospaced sans
serif, Sans serif, Par hasard, Italique ou Petites capitales...
• Texte
Sélectionnez cette option pour sélectionner la couleur du texte ou l’opacité
de l’affichage des sous-titres selon vos préférences.
Sélectionnez une couleur et une des options d’opacité.
• Fond
Sélectionnez cette option pour sélectionner la couleur de fond des caractères
ou l’une des options d’opacité du fond de l’affichage des sous-titre selon vos
préférences.
Sélectionnez une couleur et une des options d’opacité.
11
Page 58

Remarque: La signalisation des alertes d’urgence n’est pas
possible:
- en cas de navigation dans le contenu;
- avec des sources vidéo analogiques.
Remarques:
- Vous avez toujours la possibilité d’éliminer le message
de l’écran.
- L’affichage du message chevauchera tout élément de
menu ou autre message se trouvant à l’écran.
Française
Préférences de menu
Affichage OSD
& Sélectionnez OSD.
é Appuyez sur le curseur droit pour sélectionner Normal ou Minimum.
Normal pour activer l’affichage continu du numéro de la chaîne (pendant
10 minutes maxi.), l’affichage étendu de la chaîne de télévision et les
informations à l’écran relatives au programme. Par ex.: informations
sur le programme principal ou auxiliaire, qualité du signal d’entrée des
périphériques branchés, format d’affichage, mode son, disponibilité du
service sous-titres, langue du son, la qualification, la configuration de l’arrêt
programmé.
Minimum pour activer l’affichage d’un nombre réduit d’informations sur la
chaîne.
Remarque: Quand Sous-titres codés est activé l’affichage continu du numéro de la
chaîne et de l’heure n’est pas possible.
Afficher les alertes (EAS)
Vous permet de sélectionner le niveau de priorité de l’information diffusée
par la société de télédistribution. La norme SCTE18 définit une méthode de
signalisation des alertes d’urgence pouvant être utilisée par les systèmes de
télédiffusion par câble pour signaler des urgences aux services numériques
tels que les boîtiers numériques se posant sur le téléviseur, les téléviseurs
numériques et les magnétoscopes numériques.
Le modèle de signalisation des alertes d’urgence défini dans la norme
permet à une société de télédistribution de diffuser des informations
d’alerte d’urgence relatives à des urgences et des avertissements de niveaux
fédéral et local de façon efficace et peu coûteuse tout en minimisant
l’interruption des programmes.
Tout message d’alerte d’urgence a l’une des priorités suivantes: Faible,
Moyenne, Haute ou Maximum. Un message d’alerte d’urgence de
priorité Haute ou Maximum sera toujours présenté. Un message Faible ou
Moyenne sera présenté ou ignoré suivant le réglage sélectionné.
Important: Lorsque l’horloge du téléviseur n’est pas réglée (voir menu Configuration,
Horloge, p. 13), les alertes d’urgence sont ignorées.
Important: Vous avez oublié votre code !
& Sélectionnez Changez code dans le menu
Menu préférences et appuyez sur le curseur
droit.
é Appuyez sur le curseur droit pour entrer le
code PIN de contournement 0-7-1-1.
“ Appuyez de nouveau sur le curseur et entrez
un nouveau code personnel à quatre chiffres. Le
code précédent est effacé et le nouveau est mis
en mémoire.
L’affichage d’un message d’alerte d’urgence contiendra les informations
suivantes :
- le texte de l’alerte d’urgence
- l’heure de début + la date,
- l’heure de fin + la date.
& Sélectionnez Montrer les alertes d’urgence dans le menu Préférences.
é Appuyez sur le curseur droit et sélectionnez l’une des options d’alerte
d’urgence :
- Toujours, quand vous voulez que les messages d’alerte d’urgence
disponibles soient toujours affichés ;
- Sauter priorité faible, quand vous voulez que les messages de niveau de
priorité faible soient ignorés ;
- Sauter priorité faible/moyenne, quand vous voulez que seuls les messages
de priorité élevée soient affichés.
Régler/Changer code
& Sélectionnez Introduisez code ou Changez code avec le curseur bas.
é Si aucun code n’a encore été créé, l’élément de menu indique Introduisez
code. Suivez les instructions à l’écran.
Si un code a déjà été composé, l’élément de menu indique Changez code.
Suivez les instructions à l’écran.
Toutes les combinaisons de chiffres de 0000 à 9999 sont valables.
“ Le menu Menu préférences apparaît à nouveau, avec un message
confirmant que le code a été créé.
Rétablir les réglages AV
Cette fonction vous permet de réinitialiser la plupart des réglages son et image
afin de les faire correspondre à nouveau aux préréglages d’usine.
& Sélectionnez Reset réglages AV avec le curseur bas.
é Appuyez sur le curseur droit.
“ Appuyez sur le bouton OK pour annuler les réglages et leur faire retrouver
leur valeur par défaut.
‑
12
Page 59

Source
Ce menu vous permet d’identifier les périphériques que vous avez connectés aux
entrées/sorties externes.
& Sélectionnez Source dans le menu Configuration.
é Appuyez sur le curseur droit pour entrer dans la liste des types de périphériques
branchés à l’entrée sélectionnée.
“ Sélectionnez le périphérique avec le curseur haut/bas.
Quand vous sélectionnez AV1, AV2, AV3, HDMI 1, HDMI 2, Side ou Digital
Audio In, une liste vous permettant d’identifier le type de périphérique branché à
cette entrée s’affiche.
Horloge
Permet d’utiliser le téléviseur comme une horloge.
Remarque:
- Le réglage de l’heure est nécessaire pour le bon fonctionnement de l’option Verrouiller après
(voir Réglages TV, Chaînes, p. 17).
- Le Sous-titres ne peuvent pas être déployés en même temps que l'horloge. Appuyez nouvellement le bouton CLOCK pour éteindre l'horloge, si vous désirez voir les Sous-titres.
La plupart des chaînes ne transmettent pas
d’informations de nature temporelle. Quelques chaînes
par câble le font mais elles se situent à la fin de
la boucle des chaînes. L’heure n’est pas transmise
par les chaînes à antenne. Dans ces cas, soit la
récupération de l’heure est trop longue soit il n’y a
pas d’horloge.
Mode horloge auto
& Sélectionnez Horloge dans le menu Configuration.
é Appuyez sur le curseur droit pour sélectionner le Mode horloge auto.
“ Appuyez sur le curseur droit pour que le téléviseur affiche l’heure automatiquement
ou manuellement.
Chaîne horloge auto (disponible uniquement lorsque le Mode horloge auto est sur Automatique)
En utilisant les boutons du curseur, choisissez le numéro de chaîne où le téléviseur
peut trouver l’affichage de l’heure. Habituellement, vous pouvez trouver l’affichage de
l’heure sur PBS ainsi que sur certaines autres chaînes.
Remarque: Si Manuel a été sélectionné dans le Mode horloge auto, le sujet du menu Chaîne
horloge auto ne peut être sélectionné.
Heure - Jour (disponible uniquement lorsque le Mode horloge auto est sur Manuel)
En utilisant les boutons du curseur, sélectionnez et introduisez l’heure et le jour
corrects.
Si vous avez sélectionné Mode horloge auto Manuel et s’il n’y a pas eu de
recherche de l’heure, le système gardera l’heure et le jour introduits.
Fuseau horaire (disponible uniquement lorsque le Mode horloge auto est sur Automatique)
Cette fonction vous permet de sélectionner votre fuseau horaire local. L’information
de temps transmise adaptera l’affichage de l’horloge à votre temps local.
& Sélectionnez Fuseau horaire avec le curseur bas.
é Appuyez sur le curseur droit pour sélectionner votre fuseau horaire local.
Heure d’été disponible uniquement lorsque le Mode horloge auto est sur Automatique)
L’heure d’été est réglée automatiquement au moyen de signaux spéciaux. Cette
option du menu vous permet de désactiver le réglage automatique de l’heure d’été.
Cela peut être utile lorsque vous habitez dans une région ou un pays où l’heure
d’été n’est pas appliquée, mais où vous recevez des canaux d’autres régions où les
signaux pour l’heure d’été sont transmis.
& Sélectionnez Heure d’été avec le curseur bas.
é Appuyez sur le curseur droit pour sélectionner Automatique pour une adaptation
automatique de l’horloge à l’heure d’été par les signaux spéciaux.
“ Sélectionnez Arrêt pour désactiver l’adaptation automatique de l’horloge par les
signaux spéciaux.
13
Française
Page 60

Menu TV
Appuyez sur le bouton MENU de la télécommande pour afficher le menu Réglages.
Le menu TV vous donne un aperçu des menus que vous pouvez sélectionner.
Remarque: Selon le signal d’entrée, certaines options de menu ne pourront pas être
sélectionnées.
Menu Image
Remarque: Certains paramètres ne sont pas disponibles pour les sources HD..
& Appuyez sur le curseur droit pour sélectionner Image.
é Appuyez de nouveau sur le curseur droit pour entrer dans le menu Image.
“ Sélectionnez les éléments de menu avec le curseur haut/bas.
‘ Ajustez les réglages à l’aide du curseur gauche/droit ou entrez dans la liste
d’éléments de sous-menu à l’aide du curseur droit. Sélectionnez un élément de
sous-menu à l’aide du curseur haut/bas.
Auto image
Sélectionnez Auto image pour faire apparaître une liste de réglages d’image définis,
correspondant chacun à un des préréglages d’usine.
Préférentiel se rapporte aux paramètres personnels pour l’image dans le menu
image.
Remarque: Ce téléviseur Philips a été préréglé en usine pour être optimal dans les
environnements éclairés des magasins qui utilisent d’ordinaire l’éclairage fluorescent.
Comme il est peu probable que vous éclairiez votre maison comme un magasin,
nous vous conseillons de parcourir les différents modes Auto Image pour trouver
celui qui conviendra le mieux à vos propres conditions de visionnage. La plupart des
consommateurs opteront pour le mode Naturelle.
Française
Contraste
Permet de régler l’intensité des zones vives de l’image en laissant les zones
sombres inchangées.
Luminosité
Réglage du niveau de luminosité de l’image complète, affectera principalement les
zones plus sombres de l’image.
Couleur
Réglage du niveau de saturation des couleurs selon vos préférences personnelles.
Définition
Réglage de la définition et des détails fins de l’image.
Température de couleur
Augmentera ou diminuera les couleurs Chaud (rouge) et Froid (bleu) en
fonction de vos préférences personnelles.
Sélectionnez Froid pour donner aux couleurs blanches une teinte bleu, Normal
pour leur donner une teinte neutre, Chaud pour leur donner une teinte rouge.
Traitement numérique
• Standard = Le doublage des lignes élimine le papillotement.
• Pixel Plus = pour la visualisation quotidienne, Pixel Plus est le paramètre
idéal car il traite complètement l’image pour reproduire chaque pixel le mieux
possible, en améliorant le contraste, la définition, la profondeur de l’image, la
reproduction de la couleur et de la lumière de chaque source, Haute Définition
comprise.
Le mode Standard est recommandée seulement pour des sources très
bruyantes ou pas bien maîtrisées ou pour ceux qui trouvent la douceur du Pixel
Plus (qui supprime de la vibration dans l’image) inconvenante.
Contraste dynamique
Cette option renforce automatiquement le contraste dans les zones d’image plus
foncées et plus brillantes tandis que l’image à l’écran change.
Normalement, sélectionnez Maximun. Il peut être souhaitable de choisir
Minimum, Maximum ou Arrêt.
& Appuyez sur le curseur droit pour entrer dans la liste.
é Sélectionnez l’un des réglages à l’aide du curseur haut/bas.
“ Appuyez sur le curseur gauche pour retourner au menu Image.
14
Page 61

Commande DNR (Réduction du bruit numérique)
Cette option filtre et réduit automatiquement le bruit d’image et améliore la
qualité de l’image lorsque les signaux vidéo captés sont faibles.
& Appuyez sur le curseur droit pour entrer dans la liste.
é Sélectionnez Arrêt, Minimum, Medium ou Maximum en fonction du bruit
d’image.
“ Press the cursor left to return to the picture menu.
Renforcement des couleurs
Cette fonction permet de corriger automatiquement le renforcement des verts
et l’étirement des bleus. Les couleurs sont plus vives.
& Appuyez sur le curseur droit.
é Sélectionnez Marche ou Arrêt afin d’activer/désactiver le renforcement des
couleurs avec le curseur droit.
Teinte
Vous permet d’ajuster les couleurs (tons) de l’image.
Format d’image
Cet élément de menu fonctionne de la même façon que le bouton FORMAT de
la télécommande. Voir Utilisation de la télécommande, p. 6.
Active Control
Le téléviseur mesure et corrige continuellement tous les signaux qu’il
réceptionne afin d’obtenir la meilleure image possible.
& Sélectionnez Active Control.
é Appuyez sur le curseur droit pour entrer dans la liste des valeurs d’Active
Control.
“ Appuyez plusieurs fois sur le curseur droit pour sélectionner les valeurs d’Active
Control Arrêt, Minimum, Medium ou Maximum.
Les paramètres de l’image sont optimisés en continu. Les éléments du menu ne
peuvent pas être sélectionnés.
‘ Appuyez sur le bouton OK ou patientez pendant le délai défini pour que
l’affichage Active Control disparaisse.
Française
Menu Son
& Sélectionnez Son dans le menu Réglages TV.
é Appuyez sur le curseur droit pour entrer dans la liste des valeurs d’Active
Control.
“ Sélectionnez les éléments du menu avec le curseur haut/bas et ajustez les
réglages avec le curseur gauche/droit.
Lorsque les barres des visuels sont centrées les réglages sont à mi-niveau.
Auto son
Sélectionnez Auto son pour afficher une liste de paramètres de son définis,
correspondant chacun à un des préréglages usine des Aigus et des Graves.
& Appuyez sur le curseur droit pour entrer dans la liste.
é Sélectionnez un paramètre de son prédéfini avec le curseur haut/bas.
Préférentiel se rapporte aux paramètres personnels pour le son dans le menu
son.
Remarque: Lorsque vous avez activé les préréglages son et que vous modifiez un réglage
dans le menu son, toutes les nouvelles valeurs que vous introduisez dans ce menu
remplacent les réglages préalables.
Volume
Permet de régler le niveau de sortie du son.
Équilibre
Réglage de la sortie audio des haut-parleurs gauche et droite pour obtenir une
reproduction stéréo optimale pour votre position d’écoute.
15
Page 62

Française
Volume du casque d’écoute
Contrôle le niveau sonore du casque.
Mode son
Sélectionne les modes de reproduction spatial ou surround selon les signaux de
diffusion ou les signaux d’entrées externes reçus.
Audio de rechange (uniquement sélectable avec les signaux de diffusion analogique)
Ceci vous permet de choisir entre le Programme audio (SAP) principal et
secondaire si disponible.
Langue audio numérique (uniquement sélectable avec les signaux de diffusion numérique)
Vous permet de sélectionner votre langue préférée en cas de pistes audio
plurilingues si disponibles avec le signal de diffusion numérique.
Remarque: La langue par défaut des chaînes numériques est la langue installée pour les
menus.
Mono/Stéréo
Sélection par chaîne du mode son mono ou stéréo, lorsque la transmission
analogique stéréo est disponible.
Commande AVL (Limiteur de niveau automatique) (uniquement disponible avec
les signaux de diffusion numérique et non-numérique)
Réduit automatiquement les différences de volume entre chaînes et programmes,
offrant un niveau général plus constant. Réduit également la dynamique du son.
Volume Delta
Vous permet de rectifier toute différence de volume permanente entre chaînes ou
sources externes.
Menu Options
& Sélectionnez Options dans le menu Réglages
é Appuyez sur le curseur droit pour entrer dans le menu Options.
“ Sélectionnez les éléments du menu avec le curseur haut/bas et ajustez les réglages
avec le curseur gauche/droit.
Sous-titres
Affiche sur l’écran du téléviseur le texte CC ou CS diffusé suivant le service CC
ou CS choisi dans Configuration, menu Options préférentielles, p. 10. Ce texte
peut soit être affiché en permanence (en assumant que ce service est disponible
dans la diffusion), soit seulement lorsque l’option Suppression du son est activée.
& Appuyez sur le curseur droit après avoir sélectionné Sous-titres codés.
é Sélectionnez Marche, Arrêt ou Actif sans son.
Arrêt programmé
Programme une durée après laquelle le téléviseur passera automatiquement en
position de veille.
& Sélectionnez Arrêt programmé.
é Appuyez sur le curseur droit.
“ Sélectionnez une valeur avec le curseur haut/bas. La liste sera composée des
valeurs de 0 à 180 minutes.
Quand 0 est sélectionné, l’arrêt programmé est désactivé.
Vous pouvez toujours arrêter votre téléviseur plus tôt ou sélectionner une autre
heure.
Fabriqué sous licence de Dolby Laboratories.
‘Dolby’ ‘Pro Logic’” et le symbole double-D sont des
marques de commerce de Dolby Laboratories.
16
Page 63

Menu Chaînes
Menu de fonctions spéciales pour les chaînes de télévision.
& Sélectionnez Chaînes dans le menu Réglages avec le curseur haut/bas.
é Appuyez sur le curseur droit pour entrer dans le menu Chaînes.
“ Appuyez sur le curseur haut/bas pour sélectionner un élément du menu Chaînes.
Verrouiller après
Remarque: Verrou après ne peut être sélectionnée que si l’heure et la date sont connues.
Voir Configuration, Horloge, p. 13.
Vous permet d’empêcher la visualisation des chaînes après une certaine période de
temps. Il reste possible de se syntoniser sur les chaînes verrouillées mais l’image est
blanche et le son muet.
& Appuyez sur le curseur droit et sélectionnez Minuteur Marche ou Arrêt.
Quand elle est sur Marche, vous pouvez régler l’heure.
Après avoir sélectionné Minuteur Marche, vous serez invité à entrer votre code
(Voir ci-dessous). Suivez les instructions à l’écran.
Régler/Changer CODE
& Sélectionnez Régler ou Changer CODE à l’aide du bouton de curseur bas.
é Si aucun code n’existe, l’élément de menu est réglé à Régler CODE.
Suivez les instructions à l’écran.
Si un code a déjà été créé, l’élément de menu est réglé à Changer
CODE. Suivez les instructions à l’écran.
Toutes les combinaisons de chiffres de 0000 à 9999 sont valides.
“ Le menu Préférences de menu est affiché de nouveau avec un message
confirmant la création de votre code.
é Sélectionnez Heure et appuyez sur le curseur droit. Vous permet de préciser
l’heure à laquelle le verrouillage sera activé.
“ Sélectionnez AM ou PM pour sélectionner la partie de la journée concernée.
‘ Entrez l’heure avec les chiffres ou les boutons du curseur et appuyez sur OK pour
confirmer.
Verrouillage de chaîne
Ceci vous permet de verrouiller complètement une chaîne télévisée ou une
source externe donnée. Sélectionnez les chaînes ou les sous-chaînes que vous
voulez verrouiller et appuyez sur OK pour confirmer.
Verrouillage des classements TV
Votre téléviseur dispose d’une puce anti-violence. Celle-ci vous permet de
contrôler l’accès aux programmes individuels selon leur qualification TV et
cinéma. Tous les paramètres s’appliquent à toutes les entrées AV (HDMI
exceptée). Des informations sur le contenu des programmes sont envoyées par
le télédiffuseur ou le fournisseur de programmes.
& Sélectionnez Verrou qualifications TV avec le curseur bas.
é Appuyez sur le curseur droit pour entrer dans la liste. Vous êtes invité à entrer
votre code. (Voir ci-dessous). Si le code est correct, le menu Verrou qualifications
TV est affiché de nouveau.
Régler/Changer CODE
& Sélectionnez Régler ou Changer CODE à l’aide du bouton de curseur bas.
é Si aucun code n’existe, l’élément de menu est réglé à Régler CODE.
Suivez les instructions à l’écran.
Si un code a déjà été créé, l’élément de menu est réglé à Changer
CODE. Suivez les instructions à l’écran.
Toutes les combinaisons de chiffres de 0000 à 9999 sont valides.
“ Le menu Préférences de menu est affiché de nouveau avec un message
confirmant la création de votre code.
“ Sélectionnez une qualification TV selon l’âge avec le curseur haut/bas, et entrez
dans la liste, si elle est présente, avec qualification selon le contenu à l’aide du
curseur droit puis sélectionnez une qualification selon le contenu.
‘ Appuyez sur OK pour activer/désactiver la qualification sélectionnée.
( Sélectionnez une autre qualification selon le contenu, au besoin, et appuyez sur OK
de nouveau.
Vous n’avez à entrer votre code qu’une seule fois alors que le menu est actif.
Vous pouvez verrouiller/déverrouiller toutes les qualifications de la liste sans devoir
entrer votre code de nouveau.
Chaque élément de qualification est accompagné d’un graphique encadré servant à
indiquer si le programme portant cette qualification est présentement verrouillé:
• Un graphique avec 'X' : Tous les éléments de la liste selon le contenu sont également
verrouillés ;
• Un graphique vide : l’article n’est pas sélectionné;
• Un graphique avec '/' : Certaines qualifications selon le contenu sont sélectionnées/
désélectionnées.
17
Française
Page 64

Qual. selon l’âge Qualification selon le contenu
Tous Aucun(e)
Aucun(e) Aucun(e)
TV-Y Aucun(e)
TV-Y7 (FV) Fantaisie Violence
TV-G none
TV-PG (D) Dialogue
(L) Langue
(S) Contenu sexuel
(V) Violence
TV-14 (D) Dialogue
(L) Langue
(S) Contenu Sexuel
(V) Violence
TV-MA (L) Langue
(S) Contenu Sexuel
(V) Violence
Française
NR (Not rated) Sans qualification.
G Films au contenu modéré, appropriés à tous les
âges.
PG Films pour lesquels une surveillance parentale
est recommandée. Ceux-ci peuvent contenir
certaines scènes corsées ou violentes ou
quelquefois un langage grossier.
PG-13 Films pour lesquels une surveillance parentale
est recommandée dans le cas d’enfants de
moins de 13 ans.
R Réservé aux adultes. Ces films contiennent
généralement des scènes sexuelles offensives ou
un langage grossier et peuvent être inappropriés
aux jeunes de moins de 17 ans. Surveillance ou
autorisation parentale nécessaire.
NC-17 Interdit aux moins de 17 ans même avec
une autorisation parentale. Scènes sexuelles
offensives, violence ou langage grossier.
X Films qui se concentrent généralement sur
le sexe, la violence et/ou un langage grossier.
Connu également sous le nom de pornographie.
Lorsque Tous est sélectionné, tous les éléments de la liste selon le contenu et selon
l’âge sont verrouillés. Si, lorsque Tous est sélectionné, tout autre élément, classé
selon l’âge ou selon le contenu, est désélectionné, alors Tous est automatiquement
désélectionné.
Aucun(e) est la sélection pour les éléments ne disposant d’aucune information de
qualification ou disposant d’une qualification de Aucun(e). Les deux seront verrouillés.
Lorsqu’un élément de la liste selon l’âge est sélectionné, tous les éléments en
dessous de cet élément du même groupe sont également verrouillés. Lorsque vous
sélectionnez une qualification selon le contenu, toutes les qualifications au contenu
identique dans les catégories des plus jeunes sont également sélectionnées.
Approprié pour les enfants sans limite d’âge avec des thèmes et des éléments qui
TV-Y
TV-Y7
TV-Y7-FV
TV-G
ou pas de violence, pas de langage offensif et peu ou pas de dialogue ou
situation sexuelle.
TV-PG
inappropriés pour les enfants plus jeunes et pouvant nécessiter une
surveillance parentale. Le programme peut contenir des situations de
violence et des dialogue sexuel modérés ainsi qu’un langage offensif.
TV-14
enfants de moins de 14 ans. Ces programmes comportent un ou plusieurs
des éléments suivants: Violence intense, situations sexuelles intenses,
dialogues suggestifs et langage offensif.
TV-MA
jeunes de moins de 17 ans. Ces programmes peuvent contenir de la
violence en images, des situations sexuelles explicites et/ou un langage cru
ou indécent.
conviennent à des enfants de 2 à 6 ans.
Programmes conçus pour les enfants de 7 ans et plus.
Programmes contenant de la violence imaginaire plus intense que dans les
programmes de la catégorie TV-Y7
Programmes appropriés à tous les âges. Ces programmes contiennent peu
Programmes contenant des éléments que certains parents jugent
Programmes contenant des éléments pouvant ne pas être appropriés à des
Programmes à l’intention des adultes et pouvant être inappropriés aux
Verrouillage des classements Cinéma
Cette fonction vous permet de contrôler l’accès à des films individuels selon leur
qualification MPAA (Motion Picture Association of America)
& Sélectionnez Verrou qualif. Ciné avec le curseur bas.
é Appuyez sur le curseur droit pour entrer dans la liste. Vous êtes invité à entrer
votre code. (Voir ci-dessous). Si le code est correct, le menu Verrou qualif.
Ciné est affiché de nouveau.
Régler/Changer CODE
& Sélectionnez Régler ou Changer CODE à l’aide du bouton de curseur bas.
é Si aucun code n’existe, l’élément de menu est réglé à Régler CODE.
Suivez les instructions à l’écran.
Si un code a déjà été créé, l’élément de menu est réglé à Changer
CODE. Suivez les instructions à l’écran.
Toutes les combinaisons de chiffres de 0000 à 9999 sont valides.
“ Le menu Préférences de menu est affiché de nouveau avec un message
confirmant la création de votre code.
“ Sélectionnez une qualification de cinéma avec le curseur haut/bas.
‘ Appuyez sur OK pour activer/désactiver la qualification sélectionnée.
Chaque élément de qualification est accompagné d’un graphique encadré servant à
indiquer si le programme portant cette qualification est présentement verrouillé:
• Un graphique avec 'X' : Les films portant cette qualification sont verrouillés;
• Un graphique vide : Les films portant cette qualification sont déverrouillés.
Lorsque Tous est sélectionné, tous les éléments de la liste de qualification cinéma
sont sélectionnés. (Tous les films sont verrouillés.)
Si, lorsque Tous est sélectionné, tout autre élément est désélectionné, alors Tous
est automatiquement désélectionné.
Lorsque NR a été sélectionné, aucun autre élément n’est sélectionné.
Lorsque tout autre élément a été sélectionné, toutes les qualifications suivantes
sont également sélectionnées, de sorte que tous les films portant cette qualification
seront verrouillés.
18
Page 65

Chaînes préférentielles
Une chaîne, lorsqu’elle est installée, est marquée par défaut comme étant
préférée et ajoutée à la liste des chaînes. Cette fonction offre la possibilité de
supprimer une chaîne de la liste des chaînes.
& Sélectionnez Chaînes préférentielles avec le curseur bas.
é Appuyez sur le curseur droit pour entrer dans la liste de tous les numéros de
chaîne mémorisés.
“ Sélectionnez la chaîne que vous souhaitez avec le curseur bas.
‘ Appuyez sur OK.
( Répétez l’opération pour supprimer d’autres chaînes.
Téléchargement du tableau de classements
Cette fonction vous permet d’ajouter des options de verrouillage de classements
Région à côté de vos options actuelles.
& Sélectionnez Téléchargement du tableau de classements à l’aide du
bouton de curseur bas.
é Appuyez sur le bouton de curseur droit pour accéder à la liste. Vous êtes invité
à entrer votre code. (Voir ci-dessous). Si le code est correct, vous pouvez
choisir Marche/Arrêt pour télécharger le tableau de classements.
Régler/Changer CODE
& Sélectionnez Régler ou Changer CODE à l’aide du bouton de curseur bas.
é Si aucun code n’existe, l’élément de menu est réglé à Régler CODE.
Suivez les instructions à l’écran.
Si un code a déjà été créé, l’élément de menu est réglé à Changer
CODE. Suivez les instructions à l’écran.
Toutes les combinaisons de chiffres de 0000 à 9999 sont valides.
“ Le menu Préférences de menu est affiché de nouveau avec un
message confirmant la création de votre code.
“ Sélectionnez marche/arrêt pour télécharger le tableau de classements.
‘ Appuyez sur OK pour activer/désactiver la sélection.
Remarque : avant d’activer, assurez-vous que des classements régionaux sont diffusés.
Verrouillage des classements Région
Cette fonction vous permet de contrôler l’accès aux programmes numériques
selon les classifications téléchargées selon la région.
& Sélectionnez Verrouillage des classifications selon la région à l’aide du
curseur bas.
é Appuyez sur le curseur droit pour entrer dans la liste. Vous êtes invité à
entrer votre code. (Voir ci-dessous). Si le code est correct, une liste est affichée
indiquant les classifications selon la région ainsi qu’une liste correspondante de
classifications selon le contenu.
Régler/Changer CODE
& Sélectionnez Régler ou Changer CODE à l’aide du bouton de curseur bas.
é Si aucun code n’existe, l’élément de menu est réglé à Régler CODE.
Suivez les instructions à l’écran.
Si un code a déjà été créé, l’élément de menu est réglé à Changer
CODE. Suivez les instructions à l’écran.
Toutes les combinaisons de chiffres de 0000 à 9999 sont valides.
“ Le menu Préférences de menu est affiché de nouveau avec un message
confirmant la création de votre code.
“ Sélectionnez une classification selon la région à l’aide du curseur haut/bas et
entrez dans la liste (si elle est affichée) avec classifications selon le contenu à
l’aide du curseur droit puis sélectionnez une classification selon le contenu.
‘ Appuyez sur OK pour activer/désactiver la classification sélectionnée.
( Sélectionnez une autre classification selon le contenu, au besoin, et appuyez sur
OK de nouveau.
Vous n’avez qu’à entrer votre code une seule fois alors que le menu est actif.
Vous pouvez verrouiller/déverrouiller toutes les classifications de la liste sans devoir
entrer votre code de nouveau.
Chaque élément de classification est accompagné d’un graphique encadré servant à
indiquer si le programme portant cette classification est présentement verrouillé :
• encadré avec un 'X' : tous les éléments dans la liste selon le contenu sont
également verrouillés ;
• encadré vide : l’article est dessélectionné ;
• encadré avec un ‘/’ : certaines classifications selon le contenu sont sélectionnées/
dessélectionnées.
Française
19
Page 66

Connexion de dispositifs externes
Effacer les classements Région
Cette fonction vous permet d’effacer tous les réglages de classification selon
la région.
& Sélectionnez Effacer les classifications selon la région à l’aide du curseur bas.
é Appuyez sur le curseur droit pour entrer dans la liste. Vous êtes invité à entrer
votre code. (Voir ci-dessous).
Régler/Changer CODE
& Sélectionnez Régler ou Changer CODE à l’aide du bouton de curseur bas.
é Si aucun code n’existe, l’élément de menu est réglé à Régler CODE.
Suivez les instructions à l’écran.
Si un code a déjà été créé, l’élément de menu est réglé à Changer
CODE. Suivez les instructions à l’écran.
Toutes les combinaisons de chiffres de 0000 à 9999 sont valides.
“ Le menu Préférences de menu est affiché de nouveau avec un message
confirmant la création de votre code.
“ Sélectionnez Commencer maintenant.
‘ Appuyez sur OK pour activer.
Remarque : les deux options ci-dessus (Verrouillage de classements Région et Effacer les
classements Région) seront disponibles seulement dans les téléviseurs fabriqués
après la période limite spécifiée par le mandat de la FCC.
Boîtier de décodage vers téléviseur
1a
Française
Boîtier de décodage vers téléviseur
1b
Avec HDMI
Raccordez le câble RF du mur à l’entrée à l’arrière du boîtier de
connexion. Réglez l’interrupteur de sortie du boîtier de décodage à CH3
ou CH4 et réglez le téléviseur à la même chaîne.
Dans certains cas, le boîtier de connexion se syntonise automatiquement à la
chaîne 3 ou 4 et vous n’avez qu’à changer les chaînes jusqu’à ce que l’image
apparaisse.
Raccordez le boîtier de connexion au téléviseur à l’aide d’un câble HDMI.
Remarque : si le dispositif externe ne dispose que d’une sortie DVI, utilisez un
câble adaptateur DVI vers HDMI pour raccorder au connecteur HDMI. Vous
devez également raccorder le câble audio aux prises AUDIO L(gauche) et
R(droite). Accédez ensuite à Menu => Configuration => Source =>
Entrée Audio Analogique => et sélectionnez HDMI.
Avec un câble RF
Raccordez le câble RF du mur à l’entrée à l’arrière du boîtier de connexion.
Utilisez un second câble RF pour raccorder le boîtier de connexion à
l’entrée d’antenne du téléviseur.
Cette connexion fournit le son en monophonie. Pour un son en stéréophonie,
utilisez également la connexion audio/vidéo composite (se reporter au panneau 3).
Avec l’entrée vidéo composant
Raccordez le câble vidéo composant à l’entrée à l’arrière du boîtier de
connexion.
Mettez le téléviseur ainsi que le lecteur DVD/enregistreur DVD sous
tension. Appuyez sur le bouton CH+ ou CH- de la télécommande pour
accéder à la vidéo fournie par AV2.
Insérez un DVD préenregistré dans le lecteur DVD/enregistreur DVD et
appuyez sur le bouton de lecture (PLAY) pour vérifier le raccordement.
20
Page 67
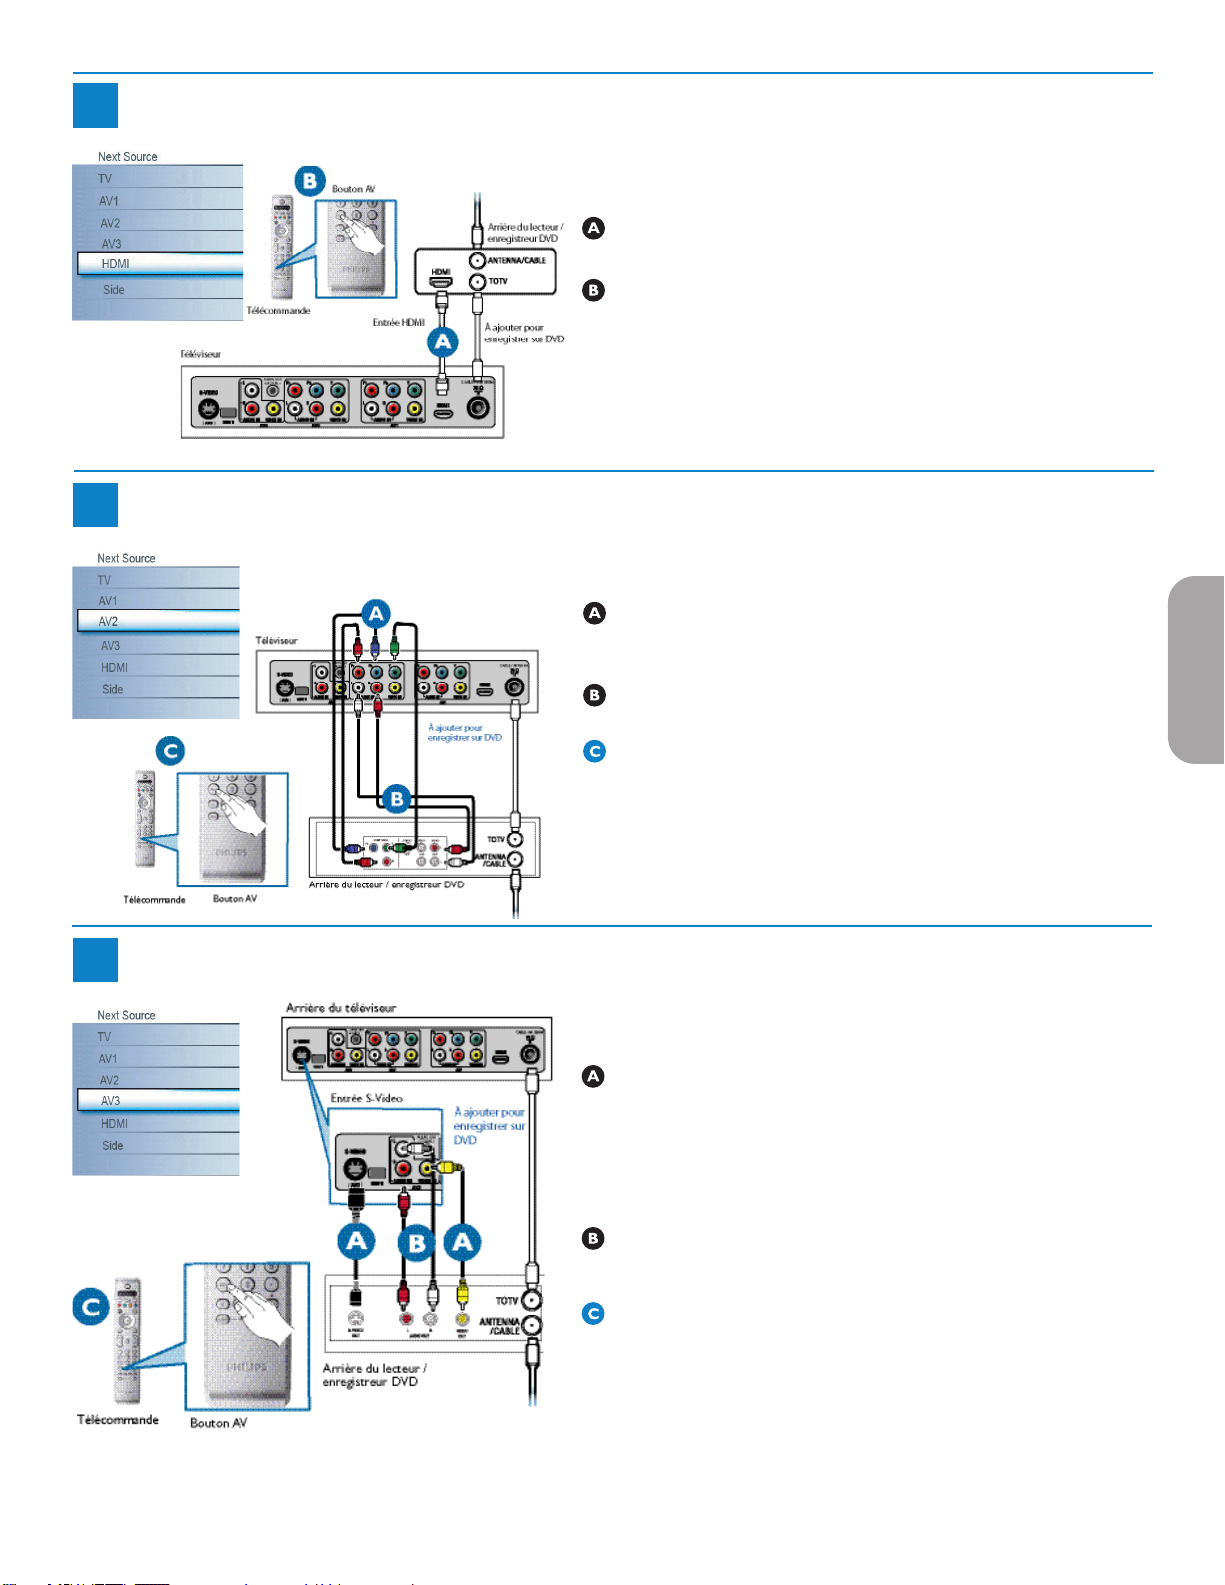
Lecteur DVD ou enregistreur DVD à balayage progressif vers téléviseur
2a
Avec HDMI
Raccordez le lecteur DVD / enregistreur DVD au téléviseur à l’aide du
câble HDMI.
Mettez le téléviseur ainsi que le lecteur DVD / enregistreur DVD sous
tension. Appuyez sur le bouton CH+ ou CH- de la télécommande pour
accéder à la vidéo fournie par HDMI.
Insérez un DVD préenregistré dans le lecteur DVD/enregistreur DVD et
appuyez sur le bouton de lecture (PLAY) pour vérifier le raccordement.
Lecteur DVD/enregistreur DVD à balayage progressif vers téléviseur
2b
Avec l’entrée vidéo composite (YPbPr)
Insérez les connecteurs vidéo composant dans leurs prises
correspondantes sur le lecteur DVD/enregistreur DVD et le téléviseur
(Y, Pb et Pr).
Raccordez les câbles audio rouge/blanc dans les prises de sortie audio du
lecteur DVD / enregistreur DVD et les entrées audio AV du téléviseur.
Mettez le téléviseur ainsi que le lecteur DVD / enregistreur DVD sous
tension. Appuyez sur le bouton AV de la télécommande jusqu’à ce que la
source connectée apparaisse à l’écran du téléviseur.
Française
Insérez un DVD préenregistré dans le lecteur DVD/enregistreur DVD et
appuyez sur le bouton de lecture (PLAY) pour vérifier le raccordement.
Lecteur DVD/enregistreur DVD/magnétoscope vers téléviseur
3
À l’aide de S-Vidéo ou de audio-vidéo composite
Raccordez le câble S-Vidéo à l’entrée S-Video à l’arrière du téléviseur
et à la sortie S-Video à l’arrière du lecteur DVD/enregistreur DVD/
magnétoscope.
OU
Raccordez le câble vidéo composite à l’entrée Video à l’arrière du
téléviseur et à la sortie Video à l’arrière du lecteur DVD/enregistreur
DVD/magnétoscope.
Raccordez les câbles audio (rouge/blanc) aux entrées AV audio à
l’arrière du téléviseur et aux sorties Audio à l’arrière du lecteur DVD/
enregistreur DVD/magnétoscope.
Mettez le téléviseur ainsi que le lecteur DVD/enregistreur DVD/
magnétoscope sous tension. Appuyez sur le bouton AV de la
télécommande jusqu’à ce que AV1 ou AV2 apparaisse à l’écran de
télévision.
Insérez une cassette vidéo/DVD préenregistrée dans le lecteur DVD/
enregistreur DVD/magnétoscope et appuyez sur le bouton de lecture
(PLAY) pour vérifier le raccordement.
Lorsque vous raccordez S-Vidéo et AV2 en même temps, vous n’entendez
l’audio qu’à partir de S-Vidéo.
21
21
Page 68
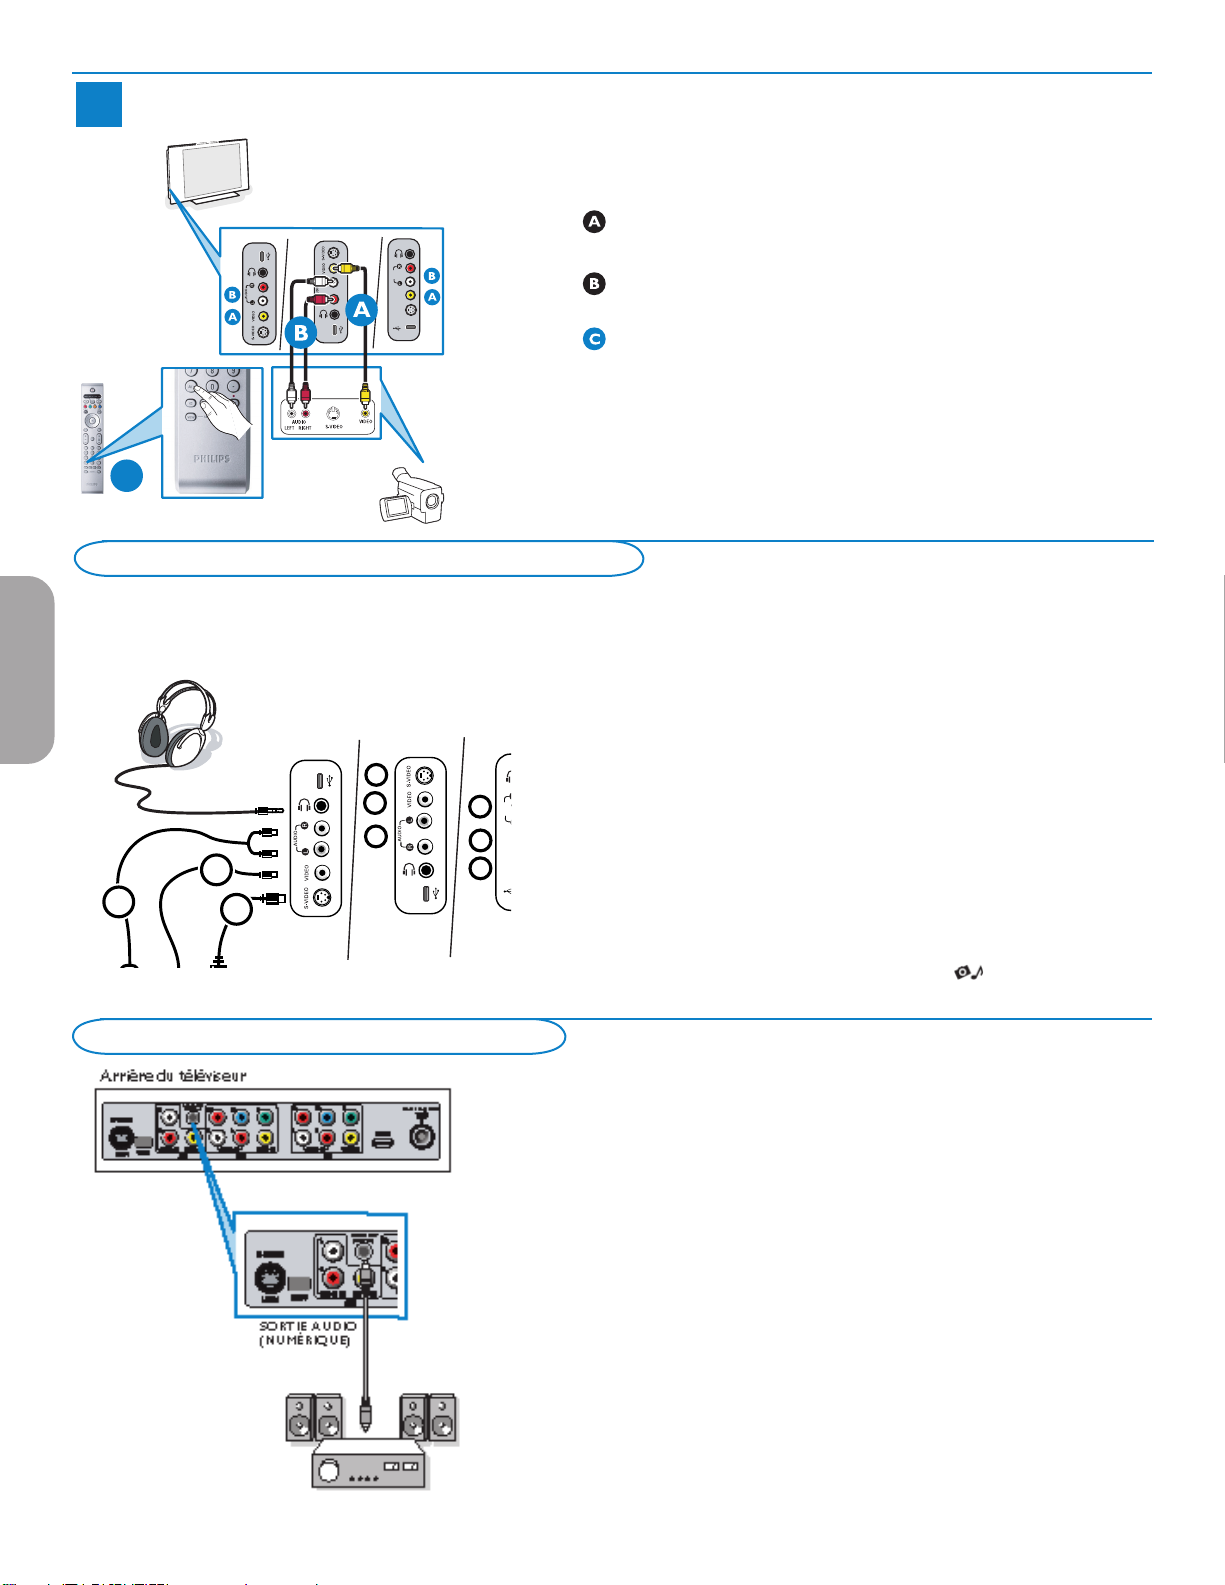
Caméra vidéo/Console de jeux vers téléviseur
C
USB
USB
AUDIO
IN
VIDEO
IN
S-VIDEO
IN
USB
26PF5321D
32PF5321D
32PF7321D
32PF7421D
37PF7321D
42PF7421D
42PF5321D
42PF7321D
50PF7321D
26PF5351D
Panneau de connexions
latéral du téléviseur
Panneau de connexions
de la caméra vidéo
Bouton AV
Télécommande
42PF5421D
1
2
3
1
2
3
1
2
3
USB
USB
USB
AUDIO
IN
VIDEO
IN
S-VIDEO
IN
4
Connexions latérales - USB/Casque d’écoute
Française
37PF7321D
42PF5421D
42PF7421D
42PF5321D
42PF7321D
50PF7321D
26PF5351D
26PF5321D
32PF5321D
32PF7321D
32PF7421D
Avec l’entrée audio/vidéo composite
Raccordez le câble vidéo (jaune) de la sortie vidéo de la caméra (ou
autre dispositif) à l’entrée vidéo (jaune) située sur le côté du téléviseur.
Raccordez les câbles audio (rouge/blanc) des sorties audio du dispositif
aux entrées audio (rouge/blanc) sur le côté du téléviseur.
Astuce : pour les dispositifs monophoniques, raccordez seulement le câble audio
blanc de la sortie audio du dispositif à l’entrée audio blanche sur le côté du
téléviseur.
Mettez le téléviseur et le dispositif sous tension. Appuyez sur le bouton
AV de la télécommande jusqu’à ce que AVANT/LATÉRAL apparaisse à
l’écran de télévision.
Appuyez sur le bouton de lecture (PLAY) du dispositif pour vérifier le
raccordement.
Casque d’écoute
& Insérez la fiche dans la prise du casque d’écoute L tel qu’indiqué.
é Appuyez sur le bouton MUTE de la télécommande pour mettre les
haut-parleurs internes du téléviseur hors tension.
L’impédance du casque d’écoute doit se situer entre 8 et 4000 Ohms. Le
casque d’écoute dispose d’une prise de 3,5 mm.
Depuis le menu Son, sélectionnez Volume du casque d’écoute pour
régler le volume du casque d’écoute.
Récepteur ambiophonique numérique
Affichage du contenu d’un dispositif USB
Insertion d’un dispositif USB
Remarque : les dispositifs USB ne sont pas fournis avec ce téléviseur.
Insérez un dispositif USB dans le connecteur USB sur le côté du téléviseur.
Lorsqu’un dispositif USB est inséré, le menu du navigateur multimédia est
affiché automatiquement. Voir plus loin.
Retrait du dispositif USB
& Quittez d’abord le menu Mon Contenu. Pour ce faire, naviguez le menu du
navigateur multimédia et appuyez sur le bouton pour quitter le menu.
é Enlevez le dispositif USB.
Raccordez un récepteur ambiophonique multichaîne numérique au
connecteur de SORTIE AUDIO NUMÉRIQUE (SPDIF OUT) dans le
bas du téléviseur.
Le téléviseur peut reproduire un son numérique via le connecteur de
SORTIE AUDIO NUMÉRIQUE (SPDIF OUT) vers un amplificateur
ou récepteur externe.
Si votre amplificateur ou récepteur dispose d’un connecteur correspondant
pour l’entrée audio numérique, vous pouvez le brancher avec un seul câble
à la SORTIE AUDIO NUMÉRIQUE (SPDIF OUT) du téléviseur.
Se reporter à la rubrique Raccordement de dispositifs externes, p. 22.
22
Page 69
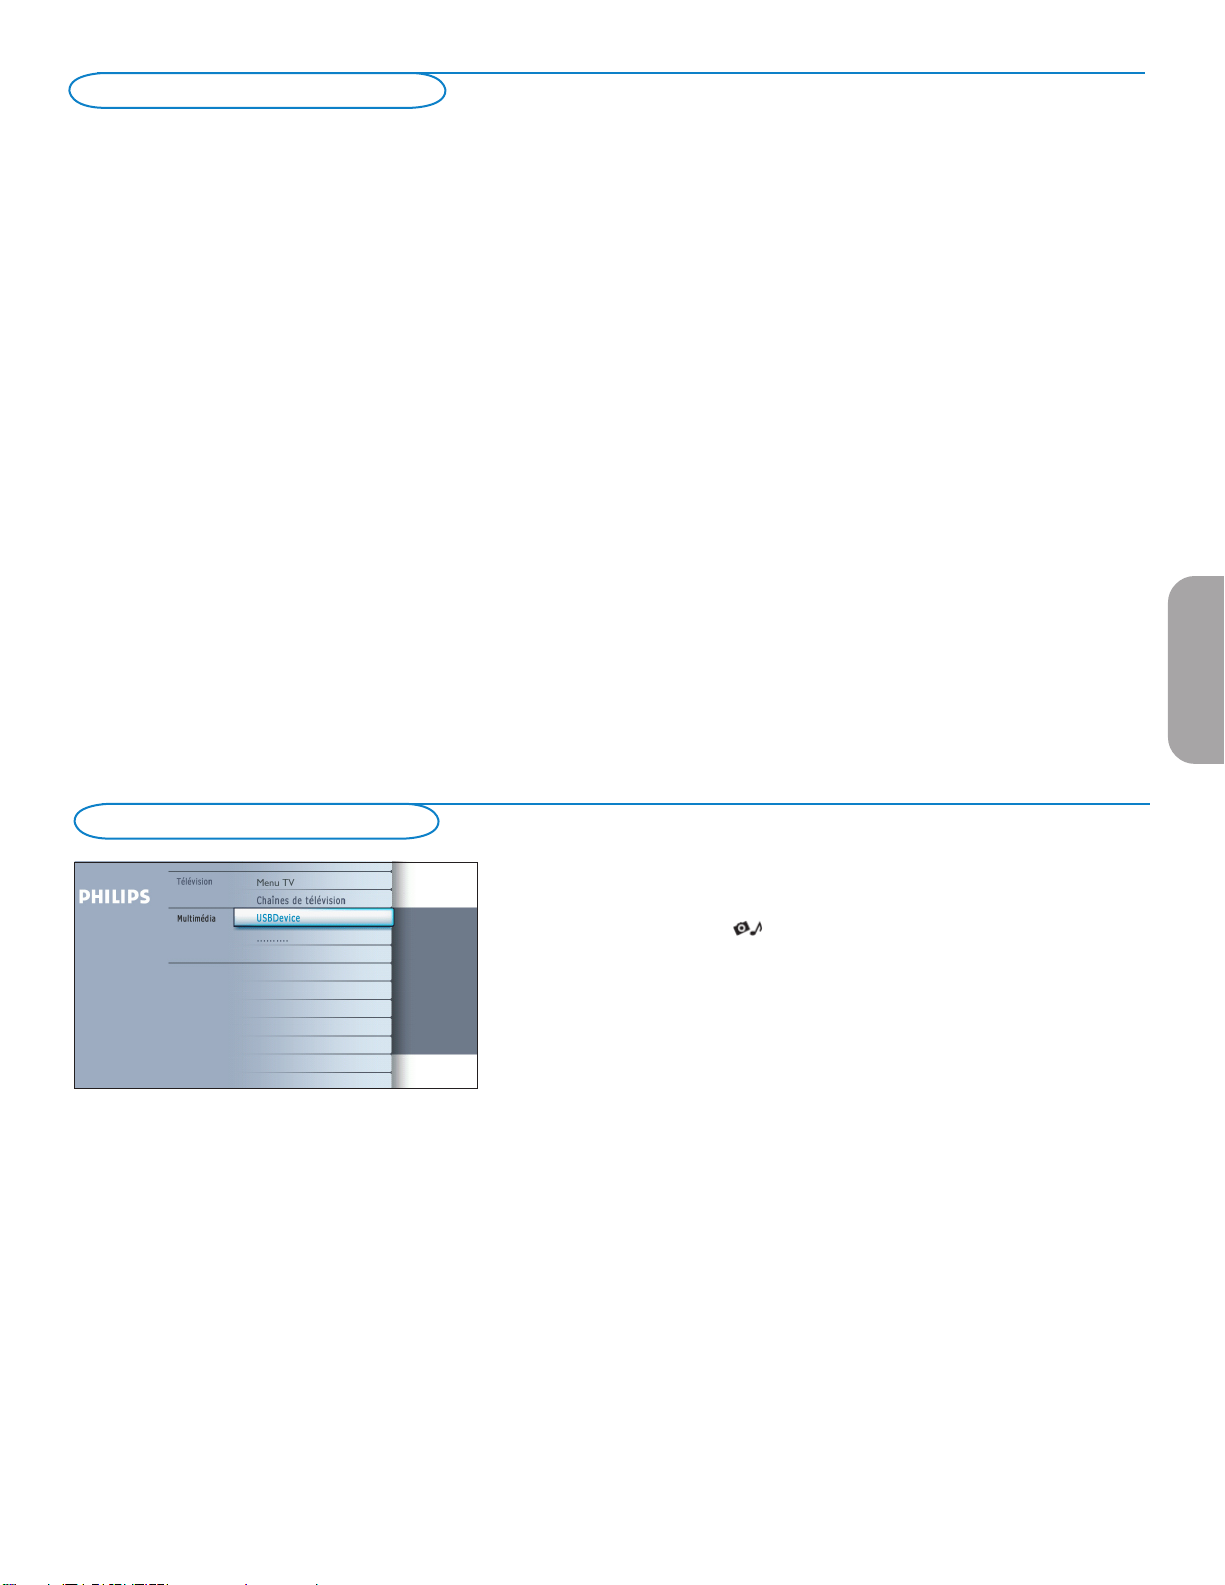
Réalisation de l’installation
(Passez à la rubrique suivante si aucun câble n’est raccordé à l’entrée d’antenne du téléviseur.)
& Lorsque le téléviseur est mis sous tension pour la première fois, vous serez invité à installer automatiquement le téléviseur afin de recevoir
les chaînes diffusées localement.
Remarque – Le téléviseur prendra environ entre 10-15 secondes pour démarrer.
é Sélectionnez la Langue appropriée et appuyez sur le bouton vert « Suivant ».
“ Sélectionnez Câble ou Antenne sous le mode Installation et appuyez sur le bouton vert « Suivant ».
‘ L’installation automatique prendra de 20 à 40 minutes selon le nombre de chaînes diffusées par le fournisseur de service du câble ou
le télédiffuseur.
( Lorsque le téléviseur ne reçoit aucun signal de l’antenne/du câble, AUCUNE CHAÎNE DISPONIBLE est affiché à l’écran de télévision.
Lorsque aucune transmission n’est reçue du télédiffuseur, un ÉCRAN VIDE est affiché à l’écran de télévision.
Remarque – Le téléviseur passera au mode d’attente après 10 minutes. Appuyez sur le bouton d’ALIMENTATION de la télécommande
du téléviseur.
§ Vous ne pourrez recevoir aucune chaîne de télévision payante lorsque vous utilisez la connexion directe antenne/câble sur le téléviseur.
è Lorsque le boîtier de décodage est raccordé au téléviseur à l’aide d’un câble coaxial, il faut réaliser la programmation automatique du
téléviseur pour la chaîne unique (3 ou 4) reproduit par le boîtier de décodage et changer les chaînes à partir du boîtier de décodage (en
utilisant la télécommande du boîtier de décodage) pour afficher le programme. (Se reporter au guide de l’utilisateur pour de plus amples
informations.)
Remarque – Les nouvelles chaînes installées pourront être organisées différemment sur ce téléviseur. Veuillez utiliser les boutons CH +/-
pour vous familiariser avec la nouvelle chaîne. Vous pouvez également utiliser le bouton OK pour afficher une liste des chaînes.
! Lorsque le boîtier de décodage est raccordé au téléviseur à l’aide d’une des connexions AV (AV1/ AV2/ AV3 / HDMI), sélectionnez cette
source d’entrée (à l’aide du bouton AV+) pour afficher les programmes et changer les chaînes à partir du boîtier de décodage (à l’aide de la
télécommande du boîtier de décodage) pour afficher le programme.
Navigateur de Multimédia
Le navigateur Multimédia vous permet d’afficher des photos ou de lire des
fichiers audio stockés sur un périphérique USB.
L’application de navigateur Multimédia s’appelle depuis le menu My Content
(appuyez sur le bouton button) en sélectionnant un périphérique et en
appuyant sur le curseur droit.
Remarques:
- Les formats de fichiers suivants peuvent être reproduits:
• Pour les images: JPEG
• Pour le son: fichiers MP3, MP3 Pro
- Seuls les périphériques de mémoire formatés FAT/DOS sont supportés.
- Si votre appareil photo numérique n’est pas supporté, assurez-vous que votre
appareil photo est bien sous tension et que sa configuration est correcte (voir son
mode d’emploi).
- Philips n’est pas responsable des incompatibilités éventuelles de votre appareil USB
ou carte mémoire.
Française
23
Page 70
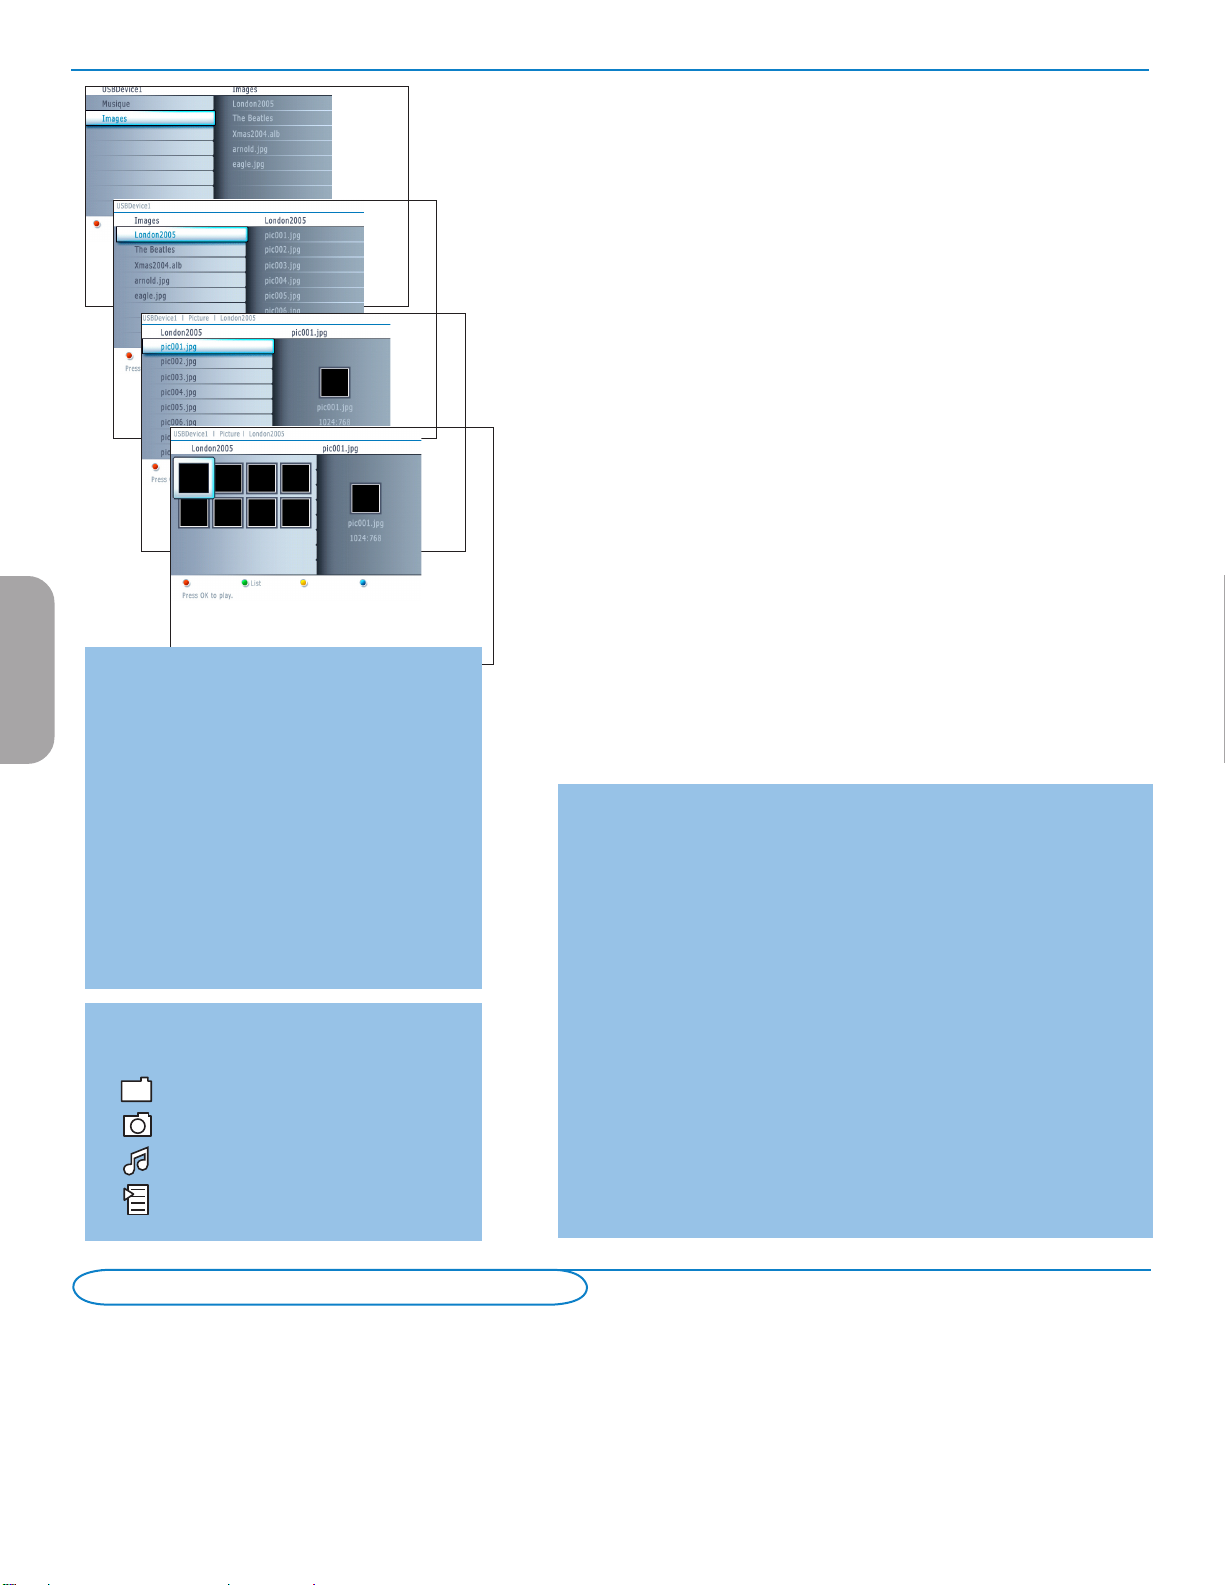
Remarques:
• Votre téléviseur supporte les diaporamas
Française
agrémentés d’une musique de fond. Voir Annex 2, p.
33.
• La lecture se poursuivra même si des écrans de
navigateur s’affichent temporairement. Le son
s’arrêtera lorsqu’un autre morceau commencera ou
une fois arrivé à la fin.
• Les fichiers JPEG progressifs ne sont pas pris en
charge.
• La longueur des fichiers ne peut pas dépasser 128
caractères.
• N’utilisez pas de point « . » dans le nom d’un
dossier.
• Vous trouverez d’autres remarques d’ordre technique
dans l’Annexe 3, p. 35.
Les icônes suivantes peuvent apparaître :
Répertoire
Images
Musique
Liste préférentielle/album
Menu du navigateur Multimédia
& Insérez un périphérique USB.
é Sélectionnez le périphérique USB sous Multimédia au moyen du curseur
haut/bas. Le navigateur Multimédia permet à l’utilisateur d’explorer le contenu
stocké sur le périphérique USB inséré.
Appuyez sur le curseur droit.
“ Le navigateur à deux panneaux s’affichera et son panneau gauche indiquera les
types de contenus (Musique, Image).
Le panneau de droite affichera le contenu du type de contenu sélectionné.
‘ Appuyez sur le curseur haut/bas pour sélectionner un type de contenu et sur
le curseur droit pour entrer dans le contenu.
( Appuyez sur le curseur haut/bas pour sélectionner un fichier ou un répertoire.
Remarque : Appuyez sur le bouton vert pour afficher tous les fichiers d’image du
répertoire courant sous forme de miniatures lorsque vous parcourez les images.
Appuyez de nouveau sur le bouton vert pour afficher les fichiers d’images sous la
forme d’une liste.
§ Si vous avez sélectionné un fichier, appuyez sur le bouton OK pour l’afficher
s’il s’agit d’un fichier d’image ou l’écouter s’il s’agit d’un fichier audio.
Si vous avez sélectionné un répertoire, un album ou une liste de chansons,
appuyez sur le curseur droit pour entrer dans le contenu ou sur le bouton
OK pour lancer un diaporama ou lire les fichiers présents dans ce répertoire,
cet album ou cette liste de chansons.
è Appuyez sur le curseur gauche pour conserver le son lorsque vous revenez au
menu Multimédia.
! Appuyez sur l’un des boutons colorés de la télécommande pour lancer la
fonction correspondante indiquée dans le bas de l’écran.
Vous pouvez utiliser le bouton de couleur bleue pour laisser la couleur
réapparaître.
ç Pour arrêter la lecture du contenu, appuyez sur le bouton ‡ de la
télécommande.
Boutons de fonction au bas de l’écran
Details Permet d’afficher une description du fichier ou
répertoire sélectionné ;
Transitions Permet de sélectionner si appliquer une transition
Slide time Permet de sélectionner la durée d’affichage des dias
Rotate pour faire tourner une image ;
Repeat one/all Permet de répéter la lecture d’un fichier musical ;
Shuffle Permet de mélanger de façon aléatoire les
Autres boutons de fonction de la télécommande
‡ Permet de mettre fin à l’affichage du contenu ;
º Permet de figer l’affichage du contenu ;
π Permet de lire un unique fichier, de lancer un
pendant un diaporama ;
d’un diaporama ;
chansons d’une collection ;
diaporama, la lecture d’un dossier ou d’une autre
collection.
Enregistrement avec un magnétoscope
Enregistrement d’un programme de télévision
Vous pouvez enregistrer un programme de télévision à l’aide du syntoniseur de votre magnétoscope sans affecter votre téléviseur.
& Sélectionnez le numéro de la chaîne sur votre magnétoscope.
é Réglez votre magnétoscope pour enregistrer.
Consultez le manuel de votre magnétoscope.
Vous n’affectez pas l’enregistrement lorsque vous changez de numéro de chaîne !
24
Page 71
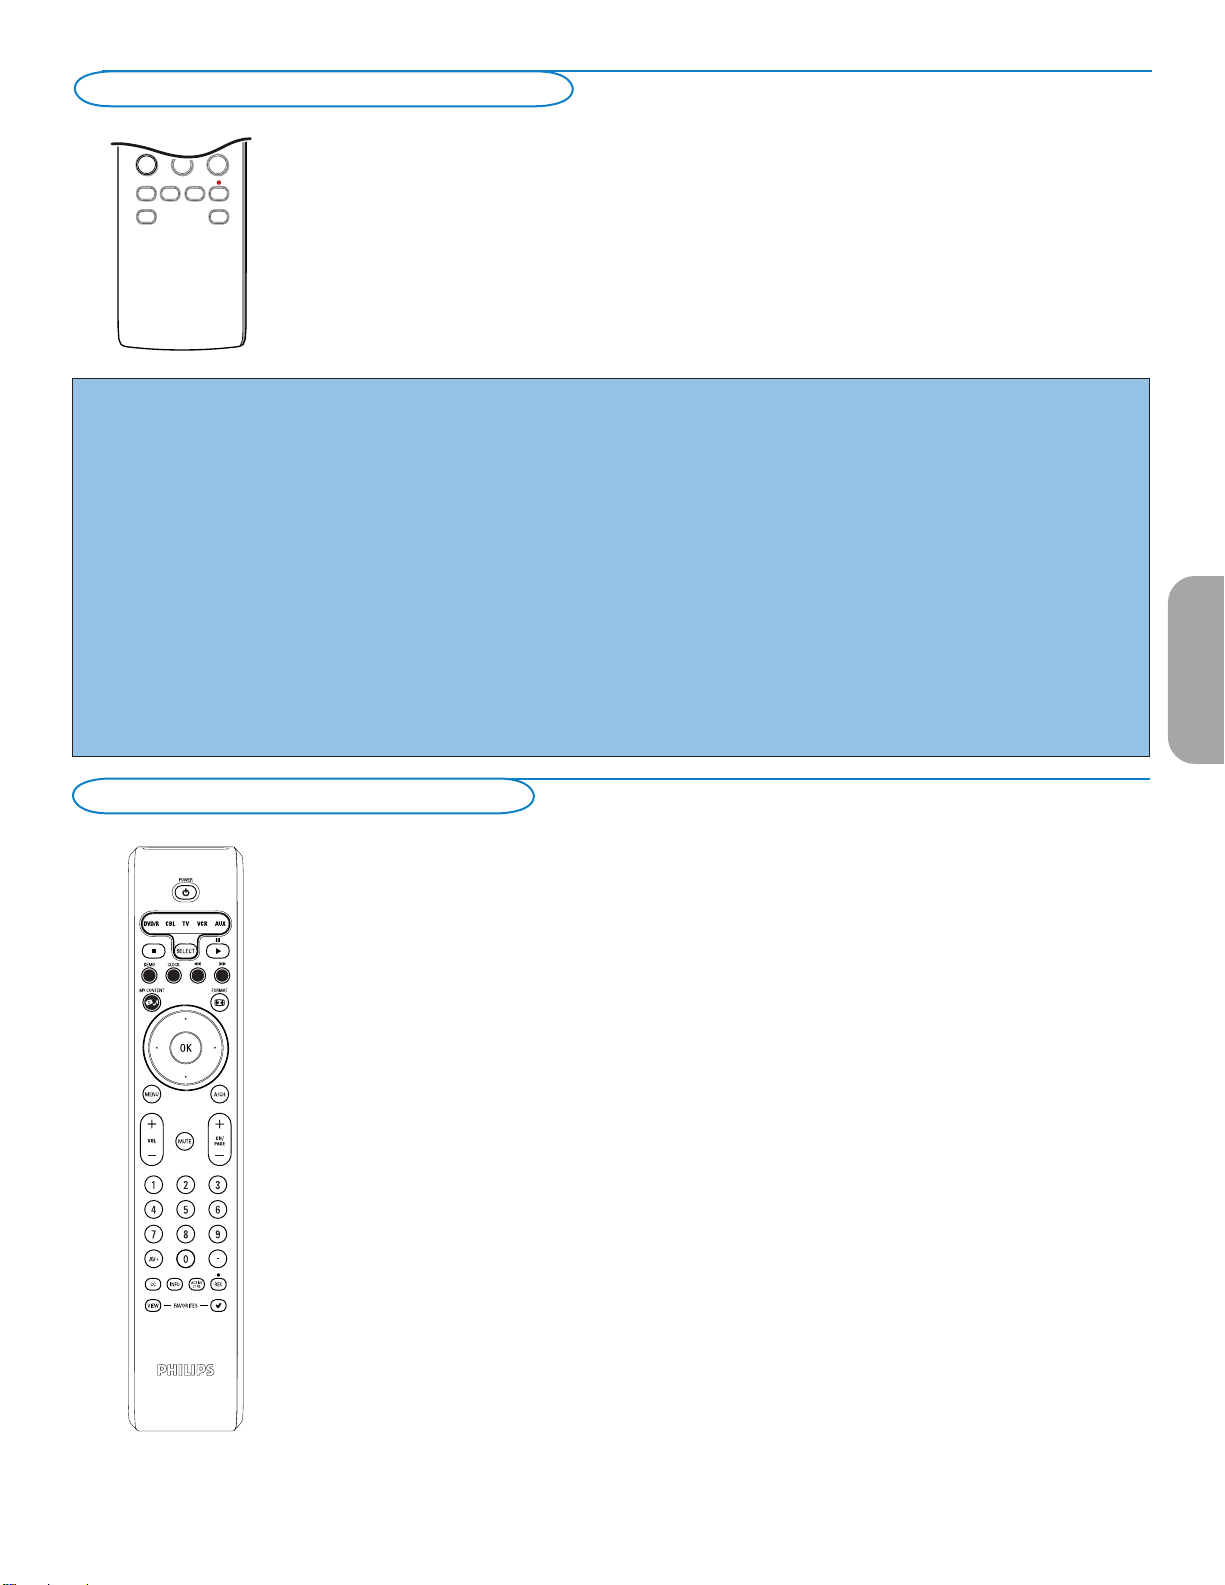
.@
TUVPQRS WXYZ
JKLGHI MNO
ABC DEF
+
-
+
-
DVD/R CBL TV VCR AUX
PIPMENU
1 2 3
4 5 6
7 8 9
0
¨
¨
¨
¨
TV
GUIDE
SELECT
DEMO CLOCK
MY CONTENT
VOL
CH/
PAGE
MUTE
AV+
-
ñ
à
¹
¼
POWER
3
- FAVORITES -
ACTIVE
CONTROL
REC
VIEW
CC
INFO
OK
=
_-
Sélection des périphériques branchés
& Appuyez plusiers fois sur le bouton AV+ ou sélectionnez Source dans le
é Appuyez sur le curseur haut/bas.
“ Appuyez sur OK.
Regulatory Notices - Federal Communications Commission Notice
Cet équipement a été testé et jugé compatible avec les limites s’appliquant
aux appareils numériques de Classe B, conformément à la partie 15 des
règles du FCC. Ces limites ont été définies pour fournir une protection
raisonnable contre les interférences nuisibles dans le cadre d’une
installation résidentielle. Cet équipement génère, utilise et peut émettre de
l’énergie radiofréquence et, s’il n’est pas installé ni utilisé conformément
aux instructions, peut causer des interférences gênantes pour les
communications radio. Rien ne garantit toutefois que des interférences
ne surviendront pas dans une installation particulière. Si cet équipement
cause des interférences gênantes pour la réception de la radio ou de la
télévision, ce qui peut être déterminé en mettant l’équipement hors puis
sous tension, l’utilisateur devra essayer de corriger ces interférences en
prenant une ou plusieurs des mesures suivantes :
Réorienter ou déplacer l’antenne de réception.
Augmenter la distance entre l’équipement et le récepteur.
Connecter l’équipement à une prise d’un circuit autre que celui auquel le
récepteur est branché.
Consulter son revendeur ou un technicien de radiotélévision expérimenté.
menu Réglages (voir p. 13) pour sélectionner AV1, AV2, AV3, HDMI, Side
ou TV, en fonction de où vous avez branché vos périphériques.
Modifications Le FCC requiert que l’utilisateur soit informé que tous les changements
ou modifications apportés à ce périphérique sans l’autorisation expresse
de Philips Consumer Electronics peuvent annuler le droit de l’utilisateur à
utiliser l’équipement.
Câbles Les connexions à cet appareil doivent être effectuées avec des câbles
blindés avec des boîtiers de connecteur RFI/EMI métalliques afin de
conserver la conformité avec les règles et réglementations du FCC.
Canadian notice This Class B digital apparatus meets all requirements of the Canadian
Interference-Causing Equipment Regulations.
Avis Canadien Cet appareil numérique de la classe B respecte toutes les exigences du
Règlement sur le matériel brouilleur du Canada.
Française
Boutons de matériel audio et vidéo
La plupart des appareils électroniques qui font partie de notre gamme de produits fonctionnent
à partir de la télécommande de votre téléviseur.
Appuyez sur l’un des boutons après avoir appuyé plusieurs fois sur le bouton SELECT en
fonction du périphérique que vous voulez commander avec cette télécommande. Voir
Utilisation de la télécommande, p. 5.
Si aucun bouton n’est enfoncé dans les 60 secondes, la télécommande se remet en mode TV.
.
POWER pour passer en position de veille
º pour marquer une pause,
® fpour enregistrer,
Ò pour rembobiner (VCR, CD);
‡ pour arrêter,
π pour lancer la lecture,
† pour avance rapide (VCR, CD);
INFO affiche des informations
MENU pour activer/désactiver le menu
- CH + pour sélectionner un chapitre, une
Remarques :
- Si aucun bouton n’est enfoncé dans les 60 secondes, la télécommande se remet en mode TV.
- Après une action dans le mode système sélectionné, la télécommande reste dans ce mode pendant
60 secondes puis revient au mode TV, vous pouvez aussi appuyer sur le bouton SELECT pour revenir
immédiatement au mode TV.
pour rembobiner (DVD, AMP)
recherche avant (DVD/AMP)
chaîne, une bande
0 à 9 entrée de chiffres,
- contenu de la cassette (VCR),
sélectionner un chapitre de
DVD, sélectionner une fréquence
(AMP)
curseur haut/bas
pour choisir le disque suivant ou
précédent (CD)
curseur gauche/droit
pour choisir la bande précédente ou
suivante (CD)
25
Page 72

Slot de sécurité Kensington (si présent)
Votre téléviseur est équipé d’un slot de sécurité Kensington pour la protection contre le vol. Le verrou antivol Kensington doit être
acheté séparément.
Le verrou Kensington est un câble en acier gainé de plastique muni d’un verrou. Il se fixe à une extrémité au slot ad hoc du téléviseur
et se ferme avec une clé spéciale. L’autre extrémité se raccorde à un point fixe.
® Kensington et MicroSaver sont des marques É.-U. déposées d’ACCO World Corporation faisant l’objet d’enregistrements et de demandes en
cours dans d’autres pays du monde entier. Toutes les autres marques déposées et non sont la propriété de leurs détenteurs respectifs.
Astuces de dépannage
Symptômess Causes possibles Actions à prendre
Aucune image à l’écran • Bloc d’alimentation défectueux
Mauvaise réception
(image neigeuse et bruits)
Image rougeâtre sous
AV1/2/3
Pas d’audio • Niveau de volume à zéro
Française
Interférence sonore • Interférence causée par des
Couleur S-Vidéo de faible
luminosité
Image intermittente ou
tremblotante sous HDMI
Barre noire dans le haut
et le bas de l’écran en
mode PC
Réglage de la position de
l’image
Points noirs apparaissant
à l’occasion à l’écran
(téléviseur ACL
seulement)
Les modes PC ne
fonctionnent pas
• Le téléviseur n’est pas sous
tension
• Le téléviseur passe au mode
d’attente après 10 minutes sans
vidéo.
• Antenne ou câble défectueux
• Mauvaise source sélectionnée
• Mauvaise connexion d’antenne
• Transmission faible
• Mauvais système de télévision
• Mauvais réglage du lecteur DVD • Réglez le lecteur DVD au format vidéo de sortie approprié.
• Son en sourdine
• Mauvaise sélection audio
appareils électriques
• Mauvaise détection du signal • Vérifiez que le cordon d’alimentation est branché correctement.
• Authentification *HDCP (se
reporter au glossaire) échouée
• Taux de rafraîchissement PC
trop élevé
• Légères différences entre les
signaux de sortie de marques et de
types de source HD différents
• Caractéristiques des panneaux
ACL
• Mauvaises connexions
• Mauvaise source sélectionnée
• Mauvaise résolution
d’affichage
La télécommande ne
fait pas fonctionner le
téléviseur
• Mauvaise polarité des piles
• Piles à plat
• Vérifiez que le cordon d’alimentation est branché correctement dans la prise secteur. S’il
n’y a toujours pas d’alimentation, débranchez la fiche. Attendez 60 secondes puis réinsérez
la fiche. Mettez de nouveau le téléviseur sous tension.
• Appuyez sur le bouton D’ALIMENTATION du téléviseur et attendez entre 10-15
secondes.
• Appuyez sur le bouton D’ALIMENTATION de la télécommande.
• Assurez-vous que les eurocâbles ou les prises d’antenne sont raccordés correctement.
• Assurez-vous que la source est sélectionnée correctement. Appuyez sur le bouton AV+
pour accéder à la liste de Sources et sélectionnez la source appropriée.
• Raccordement d’antenne défectueux
• Avez-vous choisi le bon système de télévision ? (Consultez la page 5)
• Essayez d’augmenter le volume. (L’indicateur de volume n’est pas affiché si OSD est réglé à
minimum)
• Assurez-vous que le son n’est pas en sourdine.
• Dirigez la télécommande vers le capteur sur le devant du téléviseur.
• Accédez à Menu => Configuration => Source => Entrée audio analogique =>
sélectionnez AV1
• Essayez de mettre tout appareil électrique utilisé hors tension, comme par exemple un
séchoir à cheveux ou un aspirateur.
• Appuyez sur la touche CH/PAGE +/- de la télécommande et effectuez un canal
haut suivi d’un canal bas.
• Vérifiez de ne pas avoir de Video Compuesto branché sur la même entée d'AV.
•Du bruit est affiché si l’authentification *HDCP du matériel numérique connecté (lecteur
DVD ou décodeur) a échouée. Consultez le manuel de l’utilisateur du matériel numérique
que vous utilisez.
• Utilisez un câble HDMI standard.
• Changez le taux de rafraîchissement PC à 60 Hz.
• Lors de l’affichage d’un signal haute définition des entrées YPbPr ou de l’entrée HDMI,
le cas échéant, vous pouvez régler la position de l’image au centre de l’écran à l’aide des
boutons de curseur gauche/droite ou haut/bas de la télécommande.
• Ce symptôme n’est pas un problème. Le panneau à affichage à cristaux liquides utilise une
technologie de haute précision proposant une grande définition au niveau des images. À
l’occasion, quelques pixels inactifs peuvent apparaître à l’écran sous la forme d’un point fixe
rouge, bleu, vert ou noir. Veuillez prendre note que ceci n’a aucun effet sur la performance
du téléviseur.
• Vérifiez que les connexions sont bien réalisées.
• Vérifiez que la source est sélectionnée correctement.. Appuyez sur le bouton
AV+ pour accéder à la liste de sources et sélectionnez la source appropriée.
• Vérifiez que vous avez configuré l’ordinateur à une résolution d’affichage
compatible.
• Vérifiez que la télécommande est sous le mode TV.
• Vérifiez que le voyant del vert clignote lorsque vous utilisez la télécommande.
• Vérifiez la polarité des piles.
• Essayez de changer les piles.
26
Page 73

Symptômess Causes possibles Actions à prendre
Impossible de comprendre
la langue affichée à l’écran
pour faire fonctionner le
téléviseur
Toujours pas de résultats ?
Mettez votre téléviseur hors service. Remettez-le en service.
N’essayez jamais de réparer vous-même une panne de
téléviseur.
Consultez votre revendeur ou un technicien.
• Mauvaise langue sélectionnée de
façon accidentelle
• Appuyez sur MENU pour quitter le menu à l’écran du téléviseur. Appuyez sur la
touche MENU pour accéder au menu principal. Utilisez le curseur bas pour sélectionner le
troisième élément du menu principal. Utilisez la touche curseur droit pour accéder au niveau
de menu suivant et la touche curseur haut et bas pour sélectionner la langue appropriée.
Appuyez sur OK pour confirmer la sélection
Numéro de téléphone du Philips Customer
Care Center: 1-888-PHILIPS (744-5477)
Avant de téléphoner au service Consommateurs de Philips, notez
le modèle et le numéro de série complet de votre TV, qui sont
inscrits sur une étiquette collée au dos de l’appareil.
Astuces
Soin de l’écran
Ne pas toucher, frapper, frotter l’écran avec quoi que ce soit de dur, ce qui pourrait rayer et abîmer l’écran de façon permanente. Ne pas
frotter l’écran avec un tissu poussiéreux contenant un produit chimique.
Ne pas toucher l’écran à mains nues ou avec un tissu gras (certains cosmétiques sont dangereux pour l’écran). Débrancher le TV avant tout
nettoyage.
Lorsque la surface devient poussiéreuse, essuyer légèrement avec du coton absorbant ou d’autres matériaux doux.
Ne pas utiliser d’acétone, toluène ou alcool sous peine de dommages chimiques. Ne pas utiliser de nettoyant liquide ou en aérosol. Essuyer
toutes gouttes (eau...) éventuellement projetées sur l’écran aussi vite que possible. Les laisser en contact prolongé avec l’écran entraînera des
déformations et un estompage des couleurs.
Caractéristiques des écrans au plasma
Cet écran au plasma a été conçu pour être utilisé à une altitude maximale de 2 000 mètres (6 562 pieds) au-dessus du niveau de la mer
(et/ou une pression d’air locale supérieure ou égale à 800 hPa). Le faire fonctionner à une altitude supérieure (pression de l’air plus basse)
est possible mais à une altitude élevée (ou à une pression d’air locale inférieure ou égale à 800 hPa), l’image risque d’être instable et les
performances d’affichage de se détériorer. De surcroît, dans ces conditions, un écran au plasma pourra émettre un bourdonnement.
Ces possibles effets négatifs sont liés à l’altitude et sont communs à tous les écrans au plasma. Une fois l’appareil ramené en-dessous de 2 000
mètres (et/ou une pression d’air locale supérieure ou égale à 800 hPa), il recommencera très probablement à fonctionner normalement.
Remarque : le transport à des altitudes élevées n’a pas d’effets négatifs sur l’appareil ni sur les performances d’affichage.
Française
Comment mettre les piles au rebut ?
Les piles livrées avec la télécommande ne contiennent pas de métaux lourds comme le mercure et le cadmium. Néanmoins, dans un grand
nombre de localités, il est interdit de mettre les piles au rebut avec les déchets ménagers. Veuillez vous assurer de mettre les piles au rebut
selon les règlements locaux.
Exemples d’images stationnaires (cette liste n’est pas exhaustive, vous pouvez expérimenter d’autres cas de figure) :
• Menus TV et DVD : listings du contenu des disques DVD ;
• Barres noires : Lorsque des barres noires apparaissent sur la gauche et la droite de l’écran, il est recommandé de passer à un format
d’image qui remplisse tout l’écran ;
• Logo des chaînes TV : présentent un problème s’ils sont lumineux et statiques. Les graphiques en mouvement ou à faible contraste
sont moins susceptibles d’accélérer le vieillissement inégal de l’écran ;
• Vitrophanies boursières : présentées dans le bas de l’écran du téléviseur ;
• Logos des chaînes d’achats et affichage des prix : lumineux et affichés en permanence ou de façon répétée au même endroit sur
l’écran du téléviseur.
D’autres exemples d’images fixes sont les logos, les images d’ordinateur, l’affichage de l’heure, le télétexte et les images affichées en
mode 4:3, les images ou les caractères statiques, etc.
Remarques :
- Régler le contraste et la lumière lors de la visualisation
- une image rémanente ne disparaîtra jamais complètement une fois apparue.
27
Page 74

Glossaire
DVI (Digital Visual : norme d’interface numérique créée par le groupe DDWG (Digital Display Working Group) pour convertir les signaux
Interface) analogiques en signaux numériques afin de prendre en charge les moniteurs analogiques et numériques.
VGA (Video : norme d’affichage graphique en couleur standard pour PC.
Graphics Array)
Signaux RVB : il s’agit des trois signaux vidéo, Rouge Vert Bleu, dont se compose une image. L’utilisation de ces signaux améliorent la
qualité de l’image.
Signaux S-VHS : il s’agit des 2 signaux vidéo Y/C séparés des normes d’enregistrement S-VHS et Hi-8. Les signaux de luminance Y (noir et
blanc) et les signaux de chrominance C (couleur) sont enregistrés séparément sur la cassette. Cette technique propose
une meilleure qualité d’image que la vidéo standard (VHS et 8 mm) où les signaux Y/C sont combinés pour fournir un seul
signal vidéo.
Son NICAM : Procédé par lequel le son numérique peut être transmis.
16:9 : Fait référence au rapport entre la longueur et la hauteur de l’écran. Les téléviseurs grand écran ont un rapport 16/9 alors
que les écrans ordinaires ont un rapport 4/3.
HDMI (High- : Propose une interface audio/vidéo entièrement numérique et non comprimée entre le téléviseur et tout composant
Definition Multi- audio/vidéo HDMI comme un décodeur, un lecteur DVD et un récepteur A/V. HDMI permet de prendre en charge
media Interface) la vidéo améliorée ou haute définition définition ainsi qu’une audio numérique à deux canaux.
Système : les images de télévision ne sont pas transmises de la même façon dans tous les pays. Il existe plusieurs normes différentes
BG, DK, I, et LL’. Le réglage du système (p. 5) est utilisé pour sélectionner ces différentes normes. Il ne faut pas confondre
celles-ci avec les codes de couleur PAL ou SECAM. PAL est utilisé dans la majorité des pays européens, Secam en France,
en Russie et dans la majorité des pays africains. Les États-Unis et le Japon utilisent un système différent appelé NTSC.
Les entrées EXT1 et EXT2 sont utilisées pour lire les enregistrements codés NTSC.
HDCP (High- : Spécification développée par Intel pour protéger un film ou une émission numérique utilisant l’interface DVI.
Française
bandwidth Digital- HDCP chiffre la transmission du contenu numérique entre la source vidéo ou le transmetteur comme un ordinateur,
Content Protection) un lecteur DVD ou un décodeur et l’afficheur ou le récepteur numérique comme un moniteur, un téléviseur ou un
projecteur.
28
Page 75

Spécifications
26PF5321D/26PF5351 32PF5321D 42PF5321D 32PF7321D/32PF7421D
IMAGE / AFFICHAGE
Rapport de format 16 : 9 (LCD) 16 : 9 (LCD) 15 : 9 (Plasma) 16 : 9 (LCD)
Affichage d’image
Enrichissement d’image Pixel Plus Pixel Plus Pixel Plus Pixel Plus
Balayage progressif Balayage progressif Balayage progressif Balayage progressif
Fonction Motion Fonction Motion Fonction Motion Fonction Motion
pull down 3/2 – 2/2 pull down 3/2 – 2/2 pull down 3/2 – 2/2 pull down 3/2 – 2/2
Active Control Active Control Active Control Active Control
Auto Picture (6 modes) Auto Picture (6 modes) Auto Picture (6 modes) Auto Picture (6 modes)
Commandes de couleur, Commandes de couleur, Commandes de couleur, Commandes de couleur,
contraste, netteté contraste, netteté contraste, netteté contraste, netteté
SON
Puissance de sortie 2 x 8W 2 x 15W
(Valeur efficace) Auto Sound Auto Sound
Enrichissement du son Virtual Dolby Surround Virtual Dolby Surround
Chaîne audio
FONCTIONNALITÉS Programmation automatique
Texte intégral de sous-titres
Minuterie de mise en veille
Horloge
USB
LANGUES Anglais, français, espagnol
AFFICHABLES
À L’ÉCRAN
CONNECTIVITÉ
Partie inférieure AV1 / AV2 : Entrée audio gauche et droite :
Entrée vidéo composite (CVBS)
Entrée vidéo composant (YPbPr)
AV3 : Entrée audio gauche et droite :
Entrée vidéo composite (CVBS)
Sortie SPDIF (numérique seulement)
Entrée S-Vidéo
HDMI
Sur le côté Sortie de casque d’écoute
Entrée audio gauche et droite :
Entrée vidéo composite (CVBS)
S-Video input
USB
POIDS ET
DIMENSIONS :
Poids (emballage inclus) : 17 kg / 38 lb 22 kg / 49 lb 47 kg / 103 lb 23 kg / 50 lb
Poids (emballage exclus) : 13 kg / 29 lb 19 kg / 42 lb 39 kg / 86 lb 20 kg / 43 lb
Dimension de la boîte
(LxPxH) : 35" x 22" x 9" 40" x 10" x 28" 53" x 13" x 37" 40" x 10" x 28"
Dimension du produit
(LxPxH) : 28" x 22" x 10" 37" x 22" x 9" 49" x 29" x 11" 37" x 22" x 9"
taille de l’écran : 26" / 67cm 32" / 82cm 42" / 107cm 32" / 82cm
CONSOMMATION
D'ENERGIE: 130 W 140 W 400 W 140 W
CONSOMMATION
D'ENERGIE EN 0,5 W 0,64 W 0,71 W 0,64 W
ATTENTE:
TENSION: 100 - 250 V~ 110 - 120 V~ 110 - 240 V~ 110 - 120 V~
FRÉQUENCE: 50 / 60 Hz 60 Hz 50 / 60 Hz 60H
880mm x 560mm x 214mm 1000mm x 240mm x 690mm 1328mm x 330mm x 930mm 1012mm x 240mm x 698mm
698mm x 541mm x 247mm
924mm x 550mm x 222mm 1236mm x 720mm x 280mm 935mm x 553mm x 222mm
Française
Note: Le modèle 42PF5321D/85, est compatible pour de hautes régions sur le niveau de la mer.
29
Page 76

Spécifications
37PF7321D 42PF5421D/42PF7421D 42PF7321D 50PF7321D
IMAGE / AFFICHAGE
Rapport de format 16 : 9 (LCD) 16 : 9 (LCD) 15 : 9 (Plasma) 16 : 9 (Plasma)
Affichage d’image
Enrichissement d’image Pixel Plus Pixel Plus Pixel Plus Pixel Plus
Balayage progressif Balayage progressif Balayage progressif Balayage progressif
Fonction Motion Fonction Motion Fonction Motion Fonction Motion
pull down 3/2 – 2/2 pull down 3/2 – 2/2 pull down 3/2 – 2/2 pull down 3/2 – 2/2
Active Control Active Control Active Control Active Control
Auto Picture (6 modes) Auto Picture (6 modes) Auto Picture (6 modes) Auto Picture (6 modes)
Commandes de couleur, Commandes de couleur, Commandes de couleur, Commandes de couleur,
contraste, netteté contraste, netteté contraste, netteté contraste, netteté
SON
Puissance de sortie 2 x 15W
(Valeur efficace) Auto Sound
Enrichissement du son Virtual Dolby Surround
Chaîne audio
FONCTIONNALITÉS Auto Program
Closed Captioning Full text
Sleeptimer
Clock
USB
LANGUES English, French, Spanish
AFFICHABLES
À L’ÉCRAN
Française
CONNECTIVITÉ
Partie inférieure AV1 / AV2 : Entrée audio gauche et droite :
Entrée vidéo composite (CVBS),
Entrée vidéo composant (YPbPr)
AV3 : Entrée audio gauche et droite :
Entrée vidéo composite (CVBS)
Sortie SPDIF (numérique seulement)
Entrée S-Vidéo
HDMI
Sur le côté Sortie de casque d’écoute
Entrée audio gauche et droite :
Entrée vidéo composite (CVBS)
Entrée S-Vidéo
USB
POIDS ET
DIMENSIONS :
Poids (emballage inclus) : 33 kg / 73 lb 48 kg / 105 lb 49 kg / 109 lb 63 kg / 139 lb
Weight (excl. Packaging) :
Dimension de la boîte
(LxPxH) : 47" x 13" x 33" 53" x 13" x 37" 53" x 13" x 37" 60" x 15" x 40"
Dimension du produit
(LxPxH) : 44" x 26" x 10" 50" x 30" x 12" 50" x 30" x 12" 57" x 34" x 12"
taille de l’écran : 37" / 94cm 42" / 107cm 42" / 107cm 50" / 127 cm
CONSOMMATION
D'ENERGIE: 190 W (235W MAX) 270 W 400 W 480 W
CONSOMMATION
D'ENERGIE EN 0,44 W 0,48 W 0,71 W 0,86 W
ATTENTE:
TENSION: 110 - 120 V~ 110 - 120 V~ 110-240V~ 110 - 240 V~
FRÉQUENCE: 60 Hz 60 Hz 50 / 60Hz 50 / 60 Hz
26 kg / 57 lb 32 kg / 71 lb 40 kg / 88 lb 53 kg / 117 lb
1191mm x 330mm x 830mm 1328mm x 330mm x 939mm
1114mm x 673mm x 257mm 1249mm x 760mm x 305mm
1328mm x 330mm x 939mm 1504mm x 374mm 1002mm
1249mm x 739mm x 299mm 1425mm x 851mm x 305mm
30
Page 77

Annexe 1 - Mise à niveau du logiciel du téléviseur Philips avec une mémoire portable
Introduction
Philips vous permet de mettre à niveau le logiciel de votre téléviseur en utilisant
une mémoire portable USB.
Une fois la mise à niveau du logiciel terminée, votre téléviseur devrait voir son
fonctionnement amélioré.
Les améliorations effectuées dépendront du logiciel de mise à niveau que vous
utilisez et du logiciel dont était doté votre téléviseur avant la mise à niveau.
Vous pouvez effectuer vous-même la procédure de mise à niveau.
Soyez toutefois conscient que le contenu de ce document s’adresse à des
utilisateurs compétents sur le plan technique et en matière de logiciels.
Préparation d’une mémoire portable pour la mise à jour du
logiciel
Vous aurez besoin dans le cadre de cette procédure des éléments suivants :
• Un ordinateur équipé d’un navigateur web.
• Un utilitaire d’archivage qui supporte le format ZIP (par ex. WinZip pour
Windows ou Suffit pour Mac OS).
• Un périphérique de mémoire USB de préférence vide.
Remarque : Seuls les mémoires portables formatées FAT/DOS sont prises en charge.
Vous pouvez vous procurer le nouveau logiciel auprès de votre revendeur ou le
télécharger du site web www.philips.com/usasupport :
& Allez à www.philips.com/usasupport en utilisant le navigateur web de votre PC.
é Suivez la procédure pour trouver les informations et le logiciel correspondant à
votre téléviseur.
“ Sélectionnez le fichier de mise à niveau le plus récent et téléchargez-le sur votre
PC.
‘ Décompressez le fichier ZIP et copiez le fichier “autorun.upg” dans le répertoire
racine de la mémoire portable USB.
Remarque : Utilisez uniquement les mises à jour du logiciel disponibles sur le site web
www.philips.com/usasupport.
Française
Vérification de la version du logiciel du téléviseur
Avant de vous lancer dans une mise à niveau, nous vous conseillons de contrôler
la version courante installée sur votre téléviseur.
& Sélectionnez Mise à niveau logiciel dans le menu Installation.
é Appuyez sur le curseur droit.
Le menu Mise à niveau logiciel passe sur le panneau de gauche.
“ Sélectionnez Info logiciel actuel pour obtenir la version et la description du
logiciel installé.
31
Page 78

Française
Procédure de mise à niveau automatique du logiciel
& Mettez votre téléviseur hors tension et retirez tous les périphériques de
mémoire.
é Insérez la mémoire portable USB qui contient le logiciel de mise à niveau
téléchargé.
“ Mettez votre téléviseur sous tension au moyen du bouton B.
‘ Au démarrage, le téléviseur balayera la mémoire portable USB jusqu’à
ce qu’il trouve le contenu de mise à niveau. Le téléviseur passera alors
automatiquement en mode de mise à niveau. Au bout de quelques
secondes, il affichera le statut de la procédure de mise à niveau.
Avertissement :
• Il est interdit de retirer la mémoire portable pendant la procédure de mise à
niveau du logiciel !
• En cas de panne de courant pendant la procédure de mise à niveau, ne retirez
pas la mémoire portable USB du téléviseur. Le téléviseur poursuivra la mise à
jour dès que le courant sera rétabli.
• Si vous essayez d’effectuer une mise à niveau vers une version du logiciel égale
ou inférieure à la version courante, une confirmation sera demandée. La mise
à niveau vers un logiciel de niveau inférieur ne doit être effectuée qu’en cas de
nécessité réelle.
• Si une erreur survient pendant la mise à niveau, vous devez réessayer la
procédure ou contacter votre revendeur.
( Une fois la mise à niveau du logiciel effectuée avec succès, retirez la
mémoire portable USB et redémarrez votre téléviseur avec le bouton B.
Votre téléviseur démarrera avec le nouveau logiciel.
Remarque : Une fois la mise à niveau du logiciel terminée, utilisez votre PC pour
retirer le logiciel du téléviseur de votre mémoire portable.
Procédure de mise à niveau manuelle du logiciel
Dans le cas d’une mise à niveau manuelle, copiez le fichier “autorun.upg”
dans un répertoire appelé “Upgrade” situé dans la racine de la mémoire
portable USB.
& Insérez la mémoire portable qui contient le logiciel de mise à niveau
téléchargé.
é Le téléviseur démarrera automatiquement au menu de navigateur de
contenu. Quittez le menu en appuyant sur la touche MYCONTENT.
“ Sélectionnez Mise à niveau logiciel dans le menu Installation. Allez à
Mises à niveau/applications locales.
Le téléviseur devrait lister toutes les images compatibles disponibles sur
la mémoire portable et afficher les données correspondant à chacune des
images sélectionnées.
‘ électionnez l’image de mise à niveau adéquate et appuyez sur le bouton de
couleur rouge pour lancer la mise à niveau.
Vous serez averti du début de la procédure de mise à niveau et informé du
déroulement du processus et du statut final.
Attention :
Si vous essayez d’effectuer une mise à niveau vers une version du logiciel égale ou
inférieure à la version courante, une confirmation sera demandée. La mise à niveau
vers un logiciel de niveau inférieur ne doit être effectuée qu’en cas de nécessité
réelle.
( Une fois la mise à niveau du logiciel effectuée avec succès, retirez la
mémoire portable USB et redémarrez votre téléviseur avec le boutonB.
Votre téléviseur démarrera avec le nouveau logiciel.
32
Page 79

Annexe 2 - Format de diaporama pour téléviseur Philips avec background audio
Remarques :
- Vous trouverez la dernière version de ce document sur le site web de support de Philips (www.philips.com/usasupport).
Utilisez le numéro du type de votre TV (p.e. 32PF5321D/37) pour trouver cette documentation et autres fichiers y afférents.
- Philips ne pourra être tenu responsable des problèmes survenant en rapport avec le contenu du présent document. Les erreurs signalées à Philips seront
corrigées et publiées sur le site web de support de Philips dès que possible.
Introduction
Ce document explique comment faire un fichier diaporama Philips avec background audio.
Soyez conscient du fait que ce document s’adresse à des utilisateurs experts sur le plan technique ou des logiciels.
Pour lancer le diaporama, ouvrez le fichier diaporama dans le Navigateur de Multimédia de votre téléviseur.
& Appuyez sur le bouton de votre télécommande après avoir inséré un appareil USB et allumé le téléviseur.
é Allez à l’endroit où vous avez sauvegardé le fichier diaporama (.alb) sur votre mémoire portable.
“ Sélectionnez le fichier diaporama et appuyez sur le bouton OK pour démarrer le diaporama.
‘ Pour arrêter un diaporama, appuyez sur le bouton ‡.
Règles générales
• Le diaporama utilisera le simple format ASCII XML pour permettre de créer et de modifier les fichiers du diaporama au moyen d’outils
simples.
• Toutes les références au contenu du réseau doivent être basées sur l’adresse générale du contenu.
• Le contenu enregistré sur une mémoire portable (MP) n’a pas d’adresse générale ; par conséquent, une référence au contenu issu d’une MP
n’est pas possible à partir d’un diaporama qui n’est pas sauvegardé sur la MP elle-même.
• Pour préserver la portabilité, un diaporama sauvegardé sur une MP devrait exclusivement renvoyer à un contenu sur la même MP. Renvoyer
à des adresses générales peut entraîner des incohérences si la MP est utilisée sur un appareil CE qui n’est pas sur réseau. Ceci n’est
cependant pas interdit, ce n’est qu’une recommandation.
• Il est préférable que les URL renvoyant au contenu d’une MP soient basés sur un chemin relatif partant du répertoire dans lequel le
diaporama est sauvegardé. Ce chemin comprend l’appareil ou le nom du disque de la MP.
Un chemin absolu vers le contenu sera également supporté.
- chemin relatif : pictures\test1.jpg, tamper.jpg, ..\new\bird.jpg, …
- chemin absolu : USB1:\pictures1\foo_bar.jpg, C:\f1.jpg, \organisation.jpg, …
Française
Format général
Le format et la syntaxe ci-dessous seront utilisés pour créer le fichier diaporama (simple texte ascii) avec l’extension .alb (.ALB) Exemples:
slshow1.alb, summer_holiday_2004.ALB, test.alb, …
Il conviendrait d’utiliser la syntaxe suivante pour créer le fichier texte :
<?xml version="1.0" encoding="ISO-885h9-1" ?>
<philips-slideshow version="1.0" >
<title>Title of the slideshow</title>
<audio>audio_url</audio>
<slide-duration>30</slide-duration>
<slides>
<slide>slide_1_url</slide>
<slide>slide_2_url</slide>
<slide>slide_3_url</slide>
<slide>slide_4_url</slide>
<slide>slide_5_url</slide>
<slide>slide_6_url</slide>
...
<slide>slide_N-1_url</slide>
<slide>slide_N_url</slide>
</slides>
</philips-slideshow>
33
Page 80

Etiquettes XML supportées
La table qui suit donne une description de la syntaxe XML.
Nom de l’étiquette
philips-slideshow
title
audio
slide-duration
slides
slide
Utilisation
obligatoire
facultatif
facultatif
facultatif
obligatoire
facultatif
Française
Exemples:
Voir sur ce CD, répertoire Files/Slideshw/....
Copiez le répertoire avec les fichiers du diaporama dans votre mémoire portable.
Description
Signature diaporama Philips, y compris la version.
Le titre de la liste de lecture.
L’URL audio qui suit cette étiquette définira la musique de fond qui sera
jouée pendant le diaporama.
Une simple chanson ou liste de lecture (.m3u & .pls) sont les seules
références audio valables. D’autres références n’entraîneront pas de
reproduction d’enregistrements audio. Si une simple chanson est utilisée
comme référence, elle sera répétée à l’infini. Si c’est une liste de lecture, elle
sera lue successivement avec une répétition à la fin de la liste de lecture.
Le temps d’affichage par défaut (0,1 seconde) d’une dia. L’application TV ne
doit pas nécessairement supporter cette étiquette. L’application TV peut
forcer l’utilisation d’un ou de plusieurs temps d’affichage prédéfinis.
Identifie les dias à montrer.
Identifie l’URL ou la dia individuelle.
<?xml version="1.0" encoding="ISO-885h9-1" ?>
<philips-slideshow version="1.0" >
<title>Philips AlbumFile</title>
<audio>Music\Nature.mp3</audio>
<slide-duration>50</slide-duration>
<slides>
<slide>Images\Image01.jpg</slide>
<slide>Images\Image02.jpg</slide>
<slide>Images\Image03.jpg</slide>
<slide>Images\Image04.jpg</slide>
<slide>Images\Image05.jpg</slide>
<slide>Images\Image06.jpg</slide>
<slide>Images\Image07.jpg</slide>
<slide>Images\Image08.jpg</slide>
<slide>Images\Image09.jpg</slide>
<slide>Images\Image10.jpg</slide>
<slide>Images\Image11.jpg</slide>
<slide>Images\Image12.jpg</slide>
</slides>
</philips-slideshow>
34
Page 81

Annexe 3 - Philips TV USB
Remarques:
- La dernière version de ce document figure sur le site web d’assistance de Philips (www.philips.com/usasupport).
- Le logiciel de votre téléviseur peut être mis à niveau. En cas de problème, contrôlez si la version installée sur votre téléviseur est bien la dernière. La dernière version
disponible figure, avec le instructions correspondantes, sur le site web d’assistance de Philips.
Utilisez le numéro du type de votre téléviseur (par ex. 32PF5321D/37) pour trouver les fichiers de documentation et autres pertinents.
- Philips décline toute responsabilité relativement aux erreurs contenues dans ce document et à tout problème pouvant découler du contenu de ce document. Les
erreurs signalées à Philips seront corrigées et publiées le plus rapidement possible sur le site web d’assistance de Philips.
Problèmes liés au contenu numérique
• Seules les mémoire portables formatées (initialisées) FAT (DOS) sont prises en charge. Les erreurs de formatage peuvent rendre le contenu
illisible. En cas de problème de ce type, essayez de reformater la carte. Ayez présent à l’esprit que formater la carte en supprimera également
tout le contenu (images, titres musicaux, …).
• Les types de fichiers suivants sont pris en charge : .jpg, .jpeg, .mp3, .alb, .m3u et .pls.
• Seuls les formats d’image JPEG linéaires sont pris en charge; le codage JPEG progressif ne l’est pas.
• La longueur des noms de fichiers et de répertoires est limitée à celle spécifiée par les systèmes de fichiers FAT12/16/32.
• Les niveaux maximum de répertoires nichés sont 19.
• N’utilisez jamais les extensions de types de fichiers prises en charge (.jpg, .jpeg, .mp3, .alb, .m3u et .pls) comme des extensions de répertoires
car ces répertoires seraient alors traités comme des fichiers corrompus.
• Le décodeur MP3 ne prend pas en charge la lecture MPEG1 de couche 1 ou 2.
• Les fichiers MP3 Pro peuvent être lus avec une qualité MP3 normale.
• Les temps d’accès au contenu d’un périphérique et de réponse peuvent différer selon le type et la marque de ce périphérique.
• Les temps d’accès au contenu d’un périphérique et de réponse diminueront plus il y aura de fichiers non pris en charge ou corrompus sur ce
périphérique.
Française
Problèmes liés aux appareils photo numériques
Si la connexion USB entre votre appareil numérique et le téléviseur ne fonctionne pas, essayez les solutions suivantes pour résoudre le problème.
• Vérifiez si votre appareil photo est bien allumé et s’il est correctement configuré (pour plus d’informations, consultez le manuel qui
l’accompagne).
• Certains appareils photo numériques permettent de désactiver l’interface USB : assurez-vous que cette interface est activée avant le
branchement au téléviseur.
• Si votre appareil numérique n’a qu’une mémoire interne (pas de mémoire amovible), vous pouvez essayer d’en copier manuellement le contenu
sur une carte de mémoire ou un périphérique USB (par ex. un produit Philips KEY) en utilisant un ordinateur.
• Certains appareils photo numériques permettent de basculer entre PTP (Picture Transfer Protocol) ou “PC Link” et USB Mass Storage ou “PC
Drive”. Assurez-vous de sélectionner USB Mass Storage ou “PC Drive” sur votre appareil.
• Si votre appareil photo prend en charge plusieurs réglages d’interface, veillez à les essayer un à un ou contactez le revendeur de votre appareil
pour trouver le réglage adéquat.
Problèmes liés aux périphériques de mémoire USB
• Les périphériques connectés au port USB de votre téléviseur doivent être conformes “Massa Orage class”. Un appareil (appareil photo
numérique, lecteur MP3, disque dur portable, …) non compatible “Mass Storage Class” ne sera en effet pas détecté par le navigateur de
contenu du téléviseur.
• Les sous-ensembles suivants de la spécification Mass Storage Class sont pris en charge :
- L’implémentation de ce téléviseur est basée sur la spécification “Universal Serial Bus Mass Storage Class Specification Overview” (v1.2, 23
juin 2003) qui inclut tous les documents référencés par ce document. Ce document figure sur le site web de la standardisation USB (www.
usb.org).
- Prise en charge intégrale du USB Mass Storage Class Bulk-Only Transport (bInterfaceProtocol = 50h).
- Prise en charge intégrale de la sous-classe de code 05h; spéc. SFF-8070i.
- Prise en charge intégrale de la sous-classe de code 06h ; ensemble de commandes transparentes à SCSI.
• Pour les périphériques USB de grande taille, l’accès aux fichiers risque d’être long quand vous êtes dans le navigateur de contenu.
• Si vous utilisez un disque dur portable USB : à cause de la consommation élevée du disque dur, il est conseillé d’utiliser l’alimentation externe
du disque dur portable pour garantir un bon fonctionnement dans toutes les conditions.
35
Page 82

Philips, P.O. Box 671539, Marietta, GA. 30006-0026
GARANTIE LIMITÉE PHILIPS
UN (1) AN
COUVERTURE DE GARANTIE:
La provision pour garanties de PHILIPS se limite aux termes
énumérés ci-dessous.
QUI EST COUVERT?
Philips garantit le produit au premier acheteur ou à la personne
recevant le produit en cadeau contre tout défaut de matière ou
de main d’œuvre conformément à la date d’achat originale («
Période de garantie ») d’un distributeur agréé. Le reçu de vente
original indiquant le nom du produit ainsi que la date d’achat
d’un détaillant agréé est considéré comme une preuve d'achat.
QU'EST-CE QUI EST COUVERT?
La garantie de Philips couvre les nouveaux produits en cas de
défaut et suivant la réception par Philips d’une réclamation
valide dans les limites de la garantie. Philips s’engage, à son
choix, à (1) réparer le produit gratuitement avec des pièces de
rechange neuves ou remises à neuf, ou à (2) échanger le produit pour un produit neuf ou ayant été fabriqué à partir de
pièces neuves ou usagées en bon état et au moins fonctionnellement équivalent ou comparable au produit d’origine dans l’inventaire actuel de Philips, ou à (3) rembourser le prix d’achat
initial du produit.
Philips garantit les produits ou pièces de remplacement prévus
sous cette garantie contre tout défaut de matière ou de main
d’œuvre à partir de la date de remplacement ou de réparation
pour une période de quatre-vingt-dix (90) jours ou pour la portion restante de la garantie du produit d’origine, la plus longue
de ces couvertures étant à retenir. Lorsqu’un produit ou une
pièce est échangée, tout article de rechange devient votre propriété et l’article remplacé devient la propriété de Philips.
Lorsqu’un remboursement est effectué, votre produit devient la
propriété de Philips.
Remarque : tout produit vendu et identifié comme
étant remis à neuf ou rénové porte une garantie limitée
de quatre-vingt-dix (90) jours.
Un produit de remplacement ne pourra être envoyé
que si toutes les exigences de la garantie ont été
respectées. Tout manquement de répondre à toutes les
exigences pourra entraîner un délai.
CE QUI N’EST PAS COUVERT - EXCLUSIONS ET
LIMITATIONS:
Cette garantie limitée ne s’applique qu’aux nouveaux produits
fabriqués par ou pour Philips pouvant être identifiés par la marque de commerce, le nom commercial ou le logo qui y sont
apposés. Cette garantie limitée ne s’applique à aucun produit
matériel ou logiciel non Philips, même si celui-ci est incorporé
au produit ou vendu avec celui-ci. Les fabricants, fournisseurs
ou éditeurs non-Philips peuvent fournir une garantie séparée
pour leurs propres produits intégrés au produit fourni.
Philips ne saurait être tenu responsable de tout dommage ou
perte de programmes, données ou autres informations mis en
mémoire dans tous médias contenus dans le produit ou de tout
produit ou pièce non-Philips non couvert par cette garantie. La
récupération ou réinstallation des programmes, données ou
autres informations n’est pas couverte par cette garantie limitée.
Cette garantie ne s’applique pas (a) aux dommages causés par
un accident, un abus, un mauvais usage, une mauvaise application ou à un produit non-Philips, (b) aux dommages causés par
un service réalisé par quiconque autre que Philips ou qu’un centre de service agréé de Philips, (c) à un produit ou pièce ayant
été modifié sans la permission écrite de Philips, ou (d) si tout
numéro de série de Philips a été supprimé ou défiguré, ou (e) à
un produit, accessoire ou produit non durable vendu « TEL
QUEL » sans garantie de quelque description que ce soit par
l’inclusion de produits remis à neuf Philips vendu « TEL QUEL »
par certains détaillants.
Cette garantie limitée ne couvre pas:
• les frais d'expédition pour le renvoi du produit défectueux à
Philips.
• les frais de main-d'œuvre pour l'installation ou la configuration
du produit, le réglage des commandes sur le produit du client
ainsi que l'installation ou la réparation du système d'antenne
externe au produit.
• la réparation du produit et/ou le remplacement des pièces à
cause d'une mauvaise installation, d'un raccordement à une alimentation électrique incorrecte, d’un emploi abusif, d'une négligence, d’un mauvais usage, d'un accident, d'une réparation non
autorisée ou de toute autre cause non contrôlable par Philips.
• tout dommage ou réclamation pour des produits non
disponibles à l’utilisation ou pour des données perdues ou logiciel perdu.
• tout dommage au produit encouru lors de l’expédition.
• un produit nécessitant une modification ou adaptation afin de
permettre l'utilisation dans tout pays autre que celui pour
lequel il était désigné, fabriqué, approuvé et/ou autorisé ou
toute réparation du produit endommagé par ces modifications.
• un produit utilisé à des fins commerciales ou institutionnelles
(y compris mais non de façon limitative les fins de location).
• un produit perdu lors de l’expédition sans preuve signée de la
réception.
• tout manquement d’exploiter le produit selon le manuel de
l’utilisateur.
POUR OBTENIR DE L’AIDE AUX ÉTATS-UNIS, À
PUERTO RICO OU AUX ÎLES VIERGES
AMÉRICAINES …Communiquez avec le centre de service à
la clientèle de Philips au: 1-888-PHILIPS (1-888-744-5477)
POUR OBTENIR DE L’AIDE AU CANADA…
1-800-661-6162 (pour un service en français)
1-888-PHILIPS (1-888-744-5477) (pour un service en anglais ou
en espagnol)
LA RÉPARATION OU LE REMPLACEMENT
CONFORMÉMENT À CETTE GARANTIE CONSTITUE LE
SEUL REMÈDE POUR LE CONSOMMATEUR. PHILIPS N’EST
AUCUNEMENT RESPONSABLE DE TOUT DOMMAGE
ACCESSOIRE OU INDIRECT RÉSULTANT DE LA VIOLATION DE TOUTE GARANTIE EXPRESSE OU IMPLICITE SUR
CE PRODUIT. SAUF DANS LA MESURE INTERDITE PAR LES
LOIS APPLICABLES, TOUTE GARANTIE IMPLICITE DE
QUALITÉ LOYALE ET MARCHANDE OU D’UTILITÉ PARTICULIÈRE DU PRODUIT EST LIMITÉE DANS LE TEMPS À LA
DURÉE DE CETTE GARANTIE.
Certains états ne reconnaissent pas l'exclusion ou la limitation
de la responsabilité pour dommages indirects ou accessoires,
ou autorisent des limitations sur la durée d’une garantie
implicite, il est donc possible que les limitations ou exclusions
mentionnées ci-dessus soient sans effet dans votre cas.
Cette garantie vous donne des droits légaux spécifiques. Il est possible que vous bénéficiiez de droits supplémentaires variant d'un État/Province à l'autre.
3121 233 48881
36
Page 83

Devuelva su Tarjeta de registro de producto hoy
mismo para aprovechar al máximo su compra.
Al registrar su modelo en PHILIPS, usted podrá obtener todos los valiosos beneficios que se indican a continuación,
¡no se los pierda! Llene y devuelva su Tarjeta de registro del producto ahora mismo para garantizar:
*Comprobante
de compra
La devolución de la tarjeta que se
incluye garantiza que se archive la fecha
de compra, de modo que no necesitará
más papeleo para obtener el servicio
de garantía.
*Notificación de
seguridad del producto
Al registrar su producto, recibirá
la notificación (directamente del
fabricante) en el raro caso de que
se deba retirar un producto o tenga
defectos en la seguridad.
Felicitaciones por su compra y
¡bienvenido a la “familia”!
Estimado propietario de un producto PHILIPS:
Gracias por confiar en PHILIPS. Usted ha escogido uno de los
productos mejor construidos y con mejor respaldo disponible
hoy en día. Haremos todo lo que esté a nuestro alcance por
mantenerlo satisfecho con su compra durante muchos años.
Como miembro de la “familia” PHILIPS, usted tiene derecho a
estar protegido por una de las garantías más completas y redes
de servicio más sobresalientes de la industria. Lo que es más: su
compra le garantiza que recibirá toda la información y las ofertas
especiales a las que tiene derecho, además de tener un fácil
acceso a los accesorios desde nuestra cómoda red de compra
desde el hogar.
Y lo que es más importante: usted puede confiar en nuestro
irrestricto compromiso con su satisfacción total.
Todo esto es nuestra manera de decirle bienvenido y gracias por
invertir en un producto PHILIPS.
*Beneficios adicionales de
la propiedad
del producto
Al registrar su producto, garantiza que
recibirá todos los privilegios a los cuales
tiene derecho, lo que incluye las ofertas
especiales para ahorrar dinero.
Conozca estos símbolos
de
PRECAUCIÓN: PARA REDUCIR EL RIESGO DE DESCARGA ELÉCTRICA,
NO RETIRE LA CUBIERTA (O TAPA POSTERIOR). ADENTRO NO HAY
unidad que puede causar una descarga
eléctrica. Para la seguridad de todos en su
hogar, no retire la cubierta del producto.
literatura adjunta para evitar problemas
operativos y de mantenimiento.
ADVERTENCIA: Para reducir el riesgo de
incendio o descarga eléctrica, este aparato
no se debe exponer a la lluvia ni a la
humedad, y no se le deben colocar encima
objetos llenos de líquido como jarrones.
CAUTION: To prevent electric shock, match
wide blade of plug to wide slot, fully insert.
ATTENTION : Pour éviter les choc
électriques, introduire la lame la plus large
de la fiche dans la borne correspondante
de la prise et pousser jusqu’au fond.
seguridad
PRECAUCIÓN
RIESGO DE DESCARGA
ELÉCTRICA. NO ABRIR
PARTES UTILIZABLES POR EL USUARIO. REFIERA EL SERVICIO
A PERSONAL DE SERVICIO CAPACITADO.
Este “relámpago” indica que existe
material no aislado dentro de la
El “signo de exclamación” llama la
atención hacia funciones sobre las
que debería leer con atención en la
P.S.: Para aprovechar al máximo su compra PHILIPS,
asegúrese de llenar y de devolver inmediatamente su
Tarjeta de registro del producto.
Visite nuestro sitio en el World Wide Web en http://www.usasupport.philips.com
2
Page 84
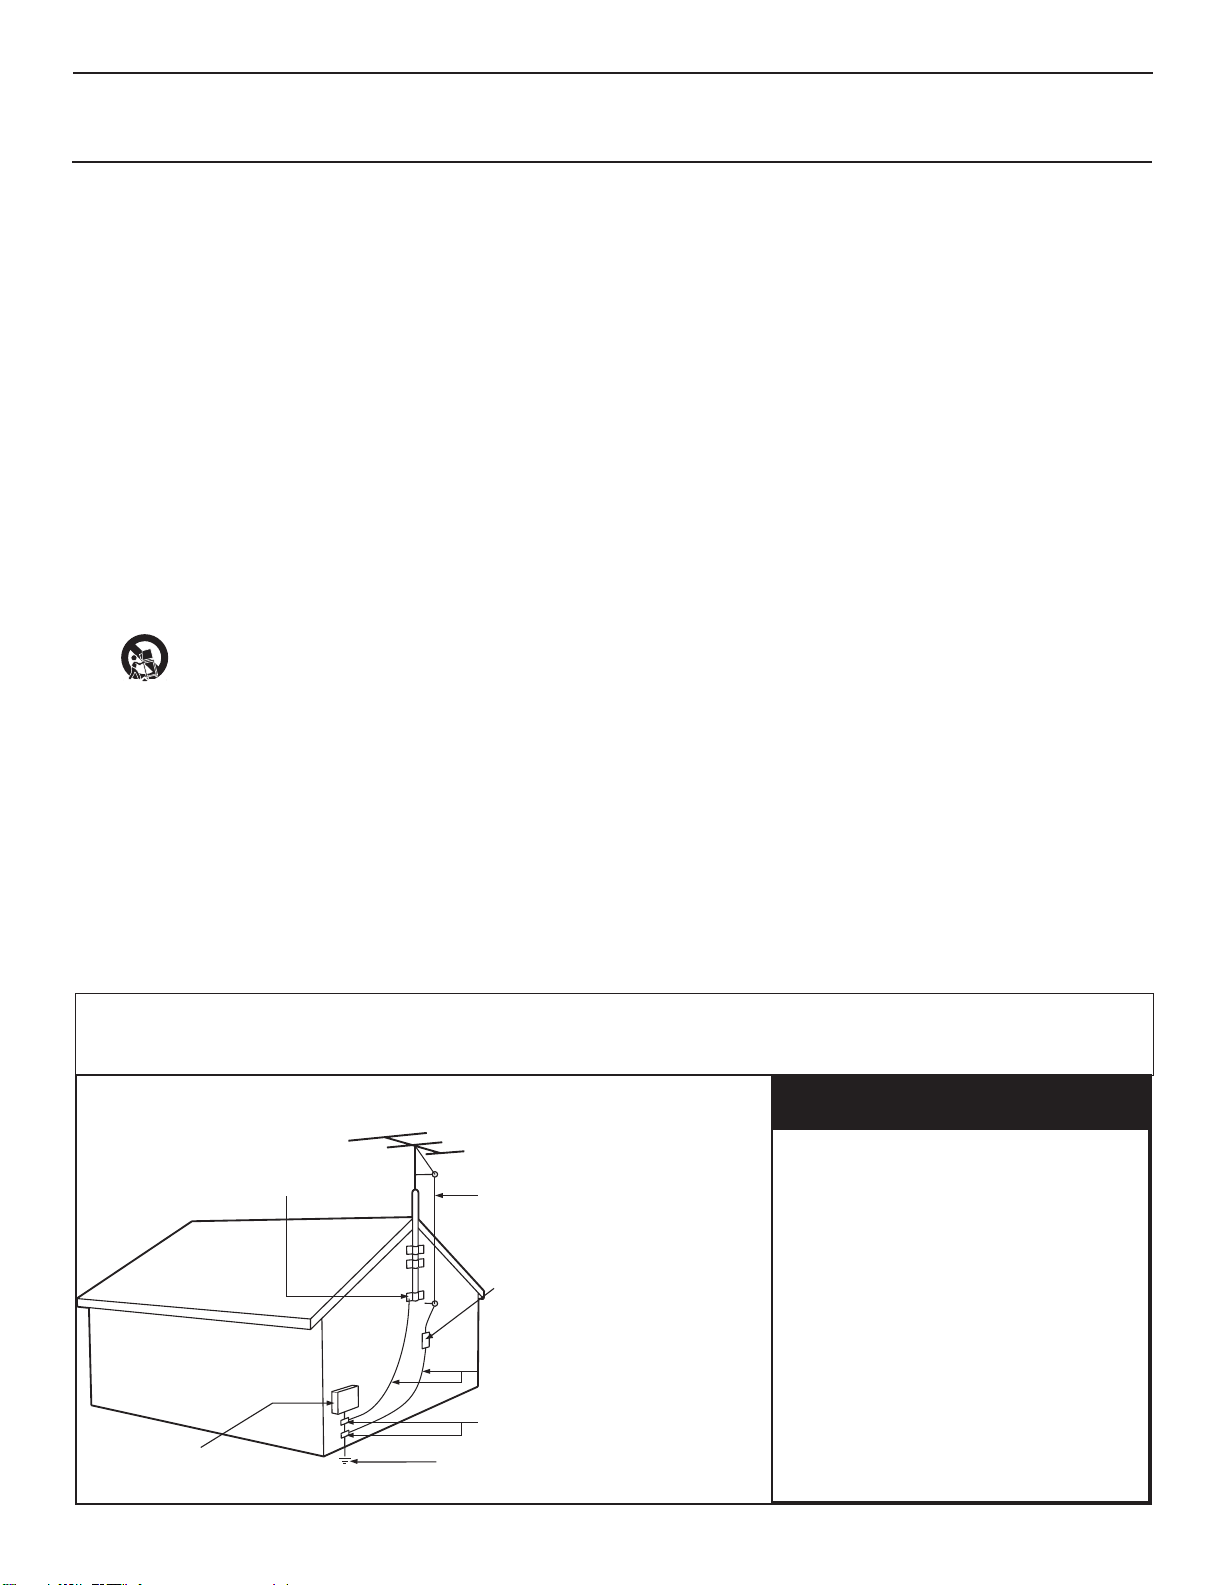
INSTRUCCIONES DE SEGURIDAD IMPORTANTES
Léalas antes de operar el equipo
1. Lea estas instrucciones.
2. Guarde estas instrucciones.
3. Preste atención a todas las advertencias.
4. Siga todas las instrucciones.
5. No use este TV cerca del agua.
6. Límpielo solamente con un paño seco.
7. No bloquee ninguno de los orificios de ventilación. Instálelo de
acuerdo con las instrucciones de los fabricantes.
8. No lo instale cerca de fuentes de calor, tales como radiadores,
compuertas de tiro (registros) de calor, estufas u otros aparatos (lo
que incluye amplificadores) que generen calor.
9. No anule el objetivo de seguridad del enchufe polarizado o de
conexión a tierra. Un enchufe polarizado tiene dos paletas, una más
ancha que la otra. Un enchufe de conexión a tierra tiene dos paletas
y una tercera espiga de conexión a tierra. La paleta más ancha o la
tercera espiga se entrega para su seguridad. Si el enchufe que se
proporciona no se ajusta a su tomacorriente, consulte a un electricista
para que reemplace el tomacorriente obsoleto.
10. Evite pisar o apretar el cable de suministro eléctrico, especialmente
en los enchufes, tomacorrientes y en el punto en que salen del
aparato.
11. Sólo use los aditamentos/accesorios que especifique el fabricante.
12. Utilice sólo un carro, soporte, trípode, repisa o mesa que
especifique el fabricante o que se venda junto con el TV. Si
usa un carro, tenga precaución cuando mueva la
combinación carro/TV para evitar lesiones si éste se vuelca.
13. Desenchufe este TV durante las tormentas eléctricas o cuando no se
use durante períodos prolongados.
14. Deje que personal calificado realice todo el servicio. Es necesario que
el TV reciba servicio si se ha dañado de algún modo, como cuando
se daña el cable o enchufe de suministro eléctrico, se ha derramado
líquido o le han caído objetos dentro, cuando el TV ha estado
expuesto a lluvia o humedad, no funciona bien o se ha caído.
15. Es posible que este producto contenga plomo y mercurio. Es posible
que la eliminación de estos materiales esté regulada debido a
consideraciones medioambientales. Para obtener información acerca
de la eliminación o del reciclaje, comuníquese con sus autoridades
locales o con la Asociación de Industrias Electrónicas: www.eiae.org.
16. Daños que requieran servicio: El TV debe recibir el servicio de
personal de servicio calificado cuando:
A. se ha dañado el cable de alimentación o el enchufe;
B. han caído objetos o se ha derramado líquido dentro del TV;
C. el TV ha quedado expuesto a la lluvia;
D. el TV parece no funcionar normalmente o su rendimiento ha
cambiado notoriamente;
E. se ha dejado caer el TV o se ha dañado la caja.
17. Inclinación/Estabilidad: Todos los televisores deben cumplir normas
de seguridad generales que se recomiendan en todo el mundo en
cuanto a las propiedades de inclinación y estabilidad del diseño de su
gabinete.
• No comprometa estas normas de diseño aplicando una fuerza de
tracción excesiva a la parte delantera o superior del gabinete, lo que
finalmente puede hacer que el producto se vuelque.
• Además, no se ponga en peligro usted mismo ni a sus niños
colocando equipos electrónicos o juguetes sobre el gabinete. Dichos
artículos pueden caer inesperadamente desde la parte superior del
aparato y dañarlo y/o causar lesiones personales.
18. Montaje en la pared o cielo raso: El TV se debe montar en una pared
o cielo raso únicamente como lo recomienda el fabricante.
19. Líneas de energía eléctrica: Una antena exterior se debe ubicar lejos
de las líneas de energía.
20. Conexión a tierra de la antena exterior: Si se conecta una antena
exterior al receptor, asegúrese de que el sistema de antena esté
conectado a tierra para proporcionar cierta protección contra
sobrevoltajes y acumulación de cargas electrostáticas.
En la Sección 810 del Código Eléctrico Nacional ANSI/NFPA 70 Nº 70-
1984, se proporciona información sobre la adecuada conexión a tierra
de las esteras y estructuras de apoyo, la conexión a tierra del alambre
de acometida a una unidad de descarga de antena, el tamaño de
los conectores de conexión a tierra, la ubicación de la unidad de
descarga de antena, la conexión a los electrodos y los requisitos
del electrodo de conexión a tierra. Consulte la figura que aparece a
continuación.
21. Entrada de objetos y líquidos: Se debe tener cuidado de que no
caigan objetos dentro de los orificios de la caja ni se derramen
líquidos a través de ellos.
a) Advertencia: Para reducir el riesgo de incendio o descarga eléctrica,
este aparato no se debe exponer a la lluvia ni a la humedad, y no se le
deben colocar encima objetos llenos de líquido como jarrones.
22. PRECAUCIÓN sobre el uso de las baterías: Para evitar escapes de
las baterías que pueden resultar en lesiones corporales, daño a la
propiedad o a la unidad:
• no mezcle las baterías (nuevas con antiguas o de carbono con
Nota para el instalador del sistema CATV: Se hace este recordatorio para llamar la atención del instalador del sistema CATV sobre el Artículo 82040 del Código Eléctrico Nacional (NEC, por sus siglas en inglés), en donde se proporcionan instrucciones para la adecuada conexión a tierra y
en donde, en particular, se especifica que la tierra de los cables se debe conectar al sistema de conexión a tierra del edificio, tan cerca del punto
de entrada del cable como sea posible.
Ejemplo de conexión a tierra de la antena
según NEC, Código Eléctrico Nacional
AVISO IMPORTANTE SOLO PARA
MEXICO
PHILIPS MEXICANA, S.A. DE C.V. NO
SE HACE RESPONSABLE POR DAÑOS O
ABRAZADERA DE CONEXIÓN A TIERRA
EQUIPO DE SERVICIO ELÉCTRICO
ALAMBRE DE ACOMETIDA DE LA ANTENA
UNIDAD DE DESCARGA
DE ANTENA
CONDUCTORES DE CONEXIÓN A TIERRA
(SECCIÓN 810-21 de NEC)
ABRAZADERAS DE CONEXIÓN A TIERRA
SISTEMA DE ELECTRODOS DE CONEXIÓN A TIERRA DEL SERVICIO
ELÉCTRICO
(SECCIÓN 810-20 de NEC)
(ART 250 de NEC, PARTE H)
DESPERFECTOS CAUSADOR POR:
- MALTRATO, DESCUIDO O MAL USO, PRESENCIA DE
INSECTOS O ROEDORES (CUCARACHAS,RATONES,
ETC.).
- CUANDO EL APARATO NO HAYA SIDO OPERADO DE
ACUERDO CON EL INSTRUCTIVO DE USO, FUERA
DE LOS VALORES NOMINALES Y TOLERANCIAS
DE LAS TENSIONES (VOLTAJE), FRECUENCIA
(CICLAJE) DE ALIMENTACION ELECTRICA Y LAS
CARACTERISTICAS QUE DEBEN REUNIR LAS
INSTALACIONES AUXILIARES. - POR FENOMENOS
NATURALES TALES COMO: TEMBLORES,
INUNDACIONES, INCENDIOS, DESCARGAS
ELECTRICAS, RAYOS, ETC. O DELITOS CAUSADOS
3
Page 85

Contenido
Reciclaje
Los materiales que se usan en su aparato no son reutilizables ni se
pueden reciclar. Para minimizar los desechos al medio ambiente,
empresas especializadas recogen los aparatos usados y los desarman
después para recuperar todo el material que se pueda reutilizar
(consulte a su distribuidor para obtener mayores detalles).
Introducción a la TV digital .............................................................. 2
Preparación ........................................................................................... 2
Uso del control remoto ..................................................................... 5
Botones de control del TV ............................................................... 6
Mi contenido .....................................................................................................7
Uso de los menús ................................................................................ 7
Introducción .........................................................................................7
Navegación a través del menú Ajustes ...............................................7
Demostración ....................................................................................... 8
Instalación .............................................................................................. 8
Selección de idioma del menú .............................................................8
Memorización de canales de TV ..........................................................8
Instalación de canales con señal débil ..................................................9
Actualización de software ....................................................................9
Menú Configuración ................................................................................10
Preferencias ........................................................................................ 10
- Preferencias de imagen/sonido ................................................... 10
• Surround Automático ............................................................ 10
- Preferencias de funciones ............................................................ 10
• Servicio de subtítulos ............................................................. 10
• Servicio de subtítulos digitales .............................................. 11
• Opciones de subtítulos digitales ........................................... 11
- Preferencias de menú .................................................................. 12
• OSD ........................................................................................ 12
• Mostrar alarmas de emergencia (EAS) ................................. 12
• Configurar/Cambiar código ................................................... 12
- Borrar ajustes AV ........................................................................ 12
Fuente ................................................................................................. 13
Reloj ................................................................................................... 13
- Modo reloj automático ................................................................ 13
- Canal con reloj automático ......................................................... 13
- Tiempo - Día ................................................................................ 13
- Huso horario................................................................................ 13
- Horario de verano ....................................................................... 13
Menú TV ...............................................................................................14
Menú Imagen ...................................................................................... 14
- Auto Picture ................................................................................. 14
- Contraste ..................................................................................... 14
- Brillo ............................................................................................. 14
- Color ............................................................................................ 14
- Realce ........................................................................................... 14
- Temperatura color ...................................................................... 14
- Procesamiento digital .................................................................. 14
- Contraste dinámico ..................................................................... 14
- DNR (Reducción digital del ruido) ............................................. 15
- Realce del color ........................................................................... 15
- Matiz ............................................................................................. 15
- Formato de pantalla ..................................................................... 15
- Active Control ............................................................................. 15
Menú Sonido ...................................................................................... 15
- Auto sound ................................................................................. 15
- Volumen ...................................................................................... 15
- Balance ........................................................................................ 15
- Volumen del auricular ................................................................ 16
- Modo Sonido .............................................................................. 16
- Alternar audio ............................................................................. 16
- Idioma de audio digital ............................................................... 16
- Mono/Estéreo ............................................................................. 16
- AVL (Nivelador automático de volumen) ................................. 16
- Nivelador de volumen ................................................................ 16
Menú Funciones ................................................................................. 16
- Subtítulos encapsulados ............................................................. 16
- Temporizador de apagado programado .................................... 16
Menú Canales ..................................................................................... 17
- Bloquear después........................................................................ 17
- Bloqueo de canales ..................................................................... 17
- Bloqueo de clasificaciones de TV .............................................. 17
- Bloqueo de clasificaciones de películas ..................................... 18
- Canales preferidos ...................................................................... 19
- Descargar tabla de clasificaciones ............................................. 19
- Bloqueo de clasificaciones regionales ........................................ 19
- Borrar clasificaciones regionales ................................................ 20
Conexión de dispositivos accesorios ...........................................20
Caja superior de ajuste al TV ............................................................ 20
Reproductor/grabador de DVD con exploración
progresiva al TV ................................................................................. 21
Reproductor/grabador de DVD/VCR al TV .................................... 21
Cámara de video/Consola de juegos al TV ...................................... 22
Conexiones laterales: USB/auricular ................................................ 22
Receptor de sonido digital ................................................................ 22
Realizar instalación ............................................................................ 23
Navegador de Multimedia ..............................................................23
Menú Navegador de Multimedia ....................................................... 24
Grabación con el grabador .............................................................24
Grabación de un programa de TV .................................................... 24
Para seleccionar equipos periféricos conectados ....................25
Botones del equipo de audio y video ...........................................25
Antes de llamar al servicio técnico ..............................................26
Consejos ...............................................................................................27
Glosario ................................................................................................28
Especificaciones .................................................................................29
Anexo 1 - Actualización con memoria portátil del software
del televisor Philips ...........................................................................31
Anexo 2 - Televisor Philips con formato de presentación de
imágenes y música de fondo ..........................................................33
Anexo 3 - Philips TV USB ...............................................................35
Español
R Directivas sobre el final de la vida útil de los dispositivos
Philips se esfuerza al máximo para que su producción se ciña a estrictos criterios medioambientales. Este televisor
Cuidado de la pantalla
Consulte Consejos, pag. 28.
contiene materiales aptos para reciclaje y reutilización. Existen compañias especializadas que, al final del ciclo de
vida del televisor, pueden encargarse de desmontarlo para recuperar los materiales reutilizabbles y reducir al mínimo
el material que debe desecharse. Infórmese acerca de las regulaciones locales para eliminar su televisor antiguo.
R
1
Page 86
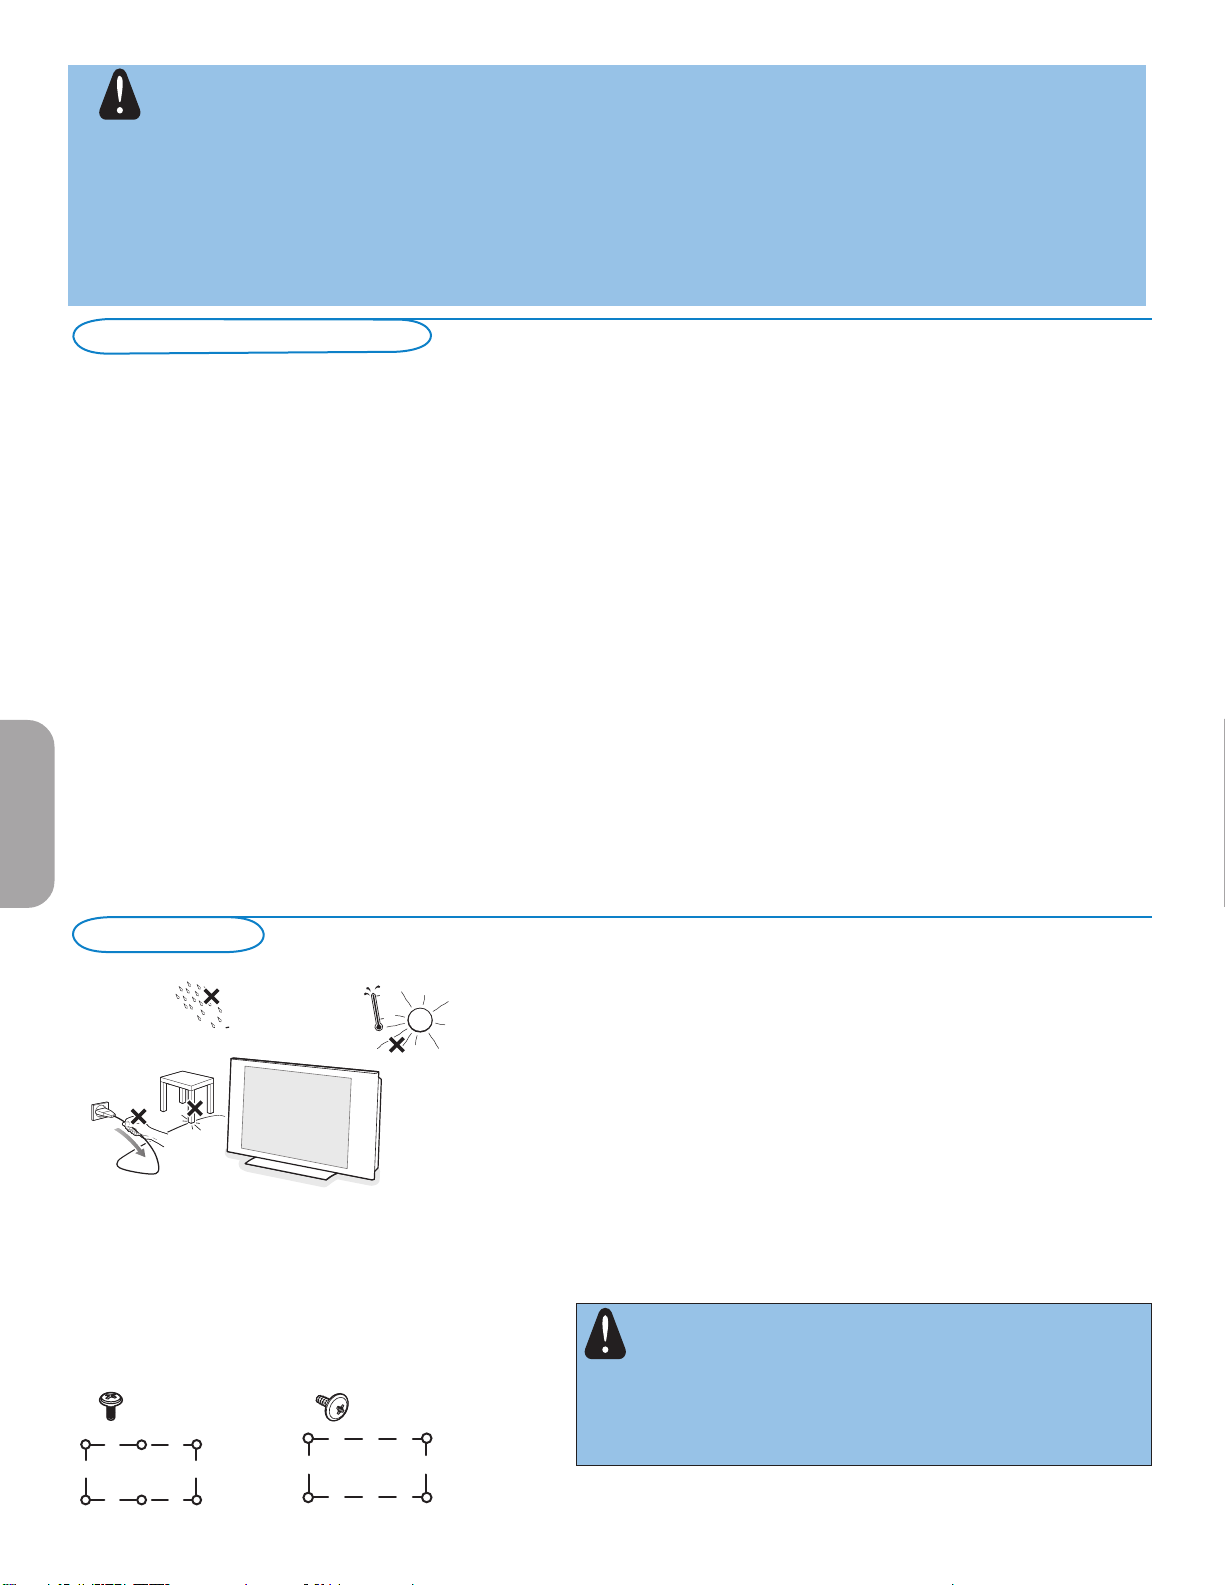
Advertencia respecto a las imágenes fijas en la pantalla (solo en el caso de pantallas de Plasma)
Es característico de las pantallas de plasma que cuando muestran una imagen fija durante mucho tiempo puede quedar
un rastro permanente de la misma en la pantalla. Este problema se denomina quemado del fósforo.
El uso normal de los televisores supone la reproducción de imágenes con movimiento y cambios constantes que llenan
toda la pantalla.
Consulte la página 27 para detalles
ESTO NO ESTA INCLUIDO EN LA GARANTIA LIMITADA DE PHILIPS
Introducción a la TV digital
¿Qué es la televisión digital (DTV)?
La televisión digital (DTV, por sus siglas en inglés) es un tipo de transmisión relativamente nuevo que promete transformar la
manera en que vemos televisión en una experiencia totalmente nueva. La tecnología digital se utiliza para capturar imágenes y
sonido y así brindar una mejor calidad de imagen. La tecnología DTV también tiene las capacidades interactivas y de transmisión
múltiple.
Existen muchos niveles de calidad de televisión digital. Los más comunes son:
TV de definición estándar (SDTV)
SDTV es el nivel básico de calidad de imagen y resolución para aparatos analógicos y digitales. La transmisión de SDTV puede ser
en el formato tradicional (4:3) o de pantalla ancha (16:9).
TV de definición mejorada (EDTV)
EDTV tiene una mejor calidad de imagen que la televisión analógica. Los formatos para EDTV son pantalla ancha de 480p (16:9) o
el tradicional (4:3). EDTV es la calidad de rango medio entre SDTV y HDTV.
TV de alta definición (HDTV)
HDTV tiene la calidad más alta para los formatos de transmisión digital. Su resolución es el formato de pantalla ancha (16:9). En
combinación con tecnología de sonido mejorada digitalmente, HDTV establece nuevos estándares de calidad de sonido e imagen
para la televisión.
DTV es una tecnología más flexible y eficaz que el sistema de transmisión analógico. Las transmisiones analógicas sólo pueden
Español
proporcionar un programa a la vez. La televisión digital puede transmitir un programa de alta definición o más de un programa
de definición estándar a la vez. Generalmente a esto se le llama “transmisión múltiple”. La televisión digital también puede
proporcionarle servicios de video y datos interactivos a través de un solo canal digital.
Preparación
No inserte el enchufe en el tomacorriente antes de realizar todas las
conexiones.
Coloque el televisor sobre una superficie sólida o sobre el soporte
suministrado. Para ver instrucciones sobre el montaje del soporte, consulte
el folleto que se suministra por separado. Para facilitar la ventilación, deje
un espacio libre de al menos 10 o 15 cm/4 o 6 pulg. en torno al televisor.
No coloque el televisor sobre moqueta. Con el fin de evitar situaciones de
riesgo, no coloque velas encendidas ni otros generadores de llamas junto
al equipo. Evite el calor y la exposición directa a la luz solar, a la lluvia o al
agua. El equipo no se debe exponer a salpicaduras o goteos.
Detalles del montaje de pared VESA,
26PF5321D 37PF7321D
26PF5321D 42PF5321D
32PF5321D 42PF5421D
32PF7321D 42PF7321D
32PF7421D 42PF7421D
50PF7321D
MIS-E, C MIS-F, 800, 400, 8
6 x (M4) 4 x (M8)
200mm
m
m
0
0
1
800mm
m
m
0
0
4
Montaje del televisor en la pared
Este Televisor es compatible con el montaje de pared VESA convencional.
Favor de contactar a su distribuidor local de eléctronicos para adquirir un
soporte que cumpla con la norma VESA cuando se prefiera este tipo de
montaje.
Precaución: La instalación del televisor require conocimientos
especiales y sólo debe realizarla personal especializado. No debe
intentar dicha tarea personalmente. Philips no se hace responsable del
montaje incorrecto ni de montajes que provoquen accidentes o lesiones.
Cerciórese de que el sistema de montaje esté bien fijado y cumpla las
normas de seguridad.
2
Page 87
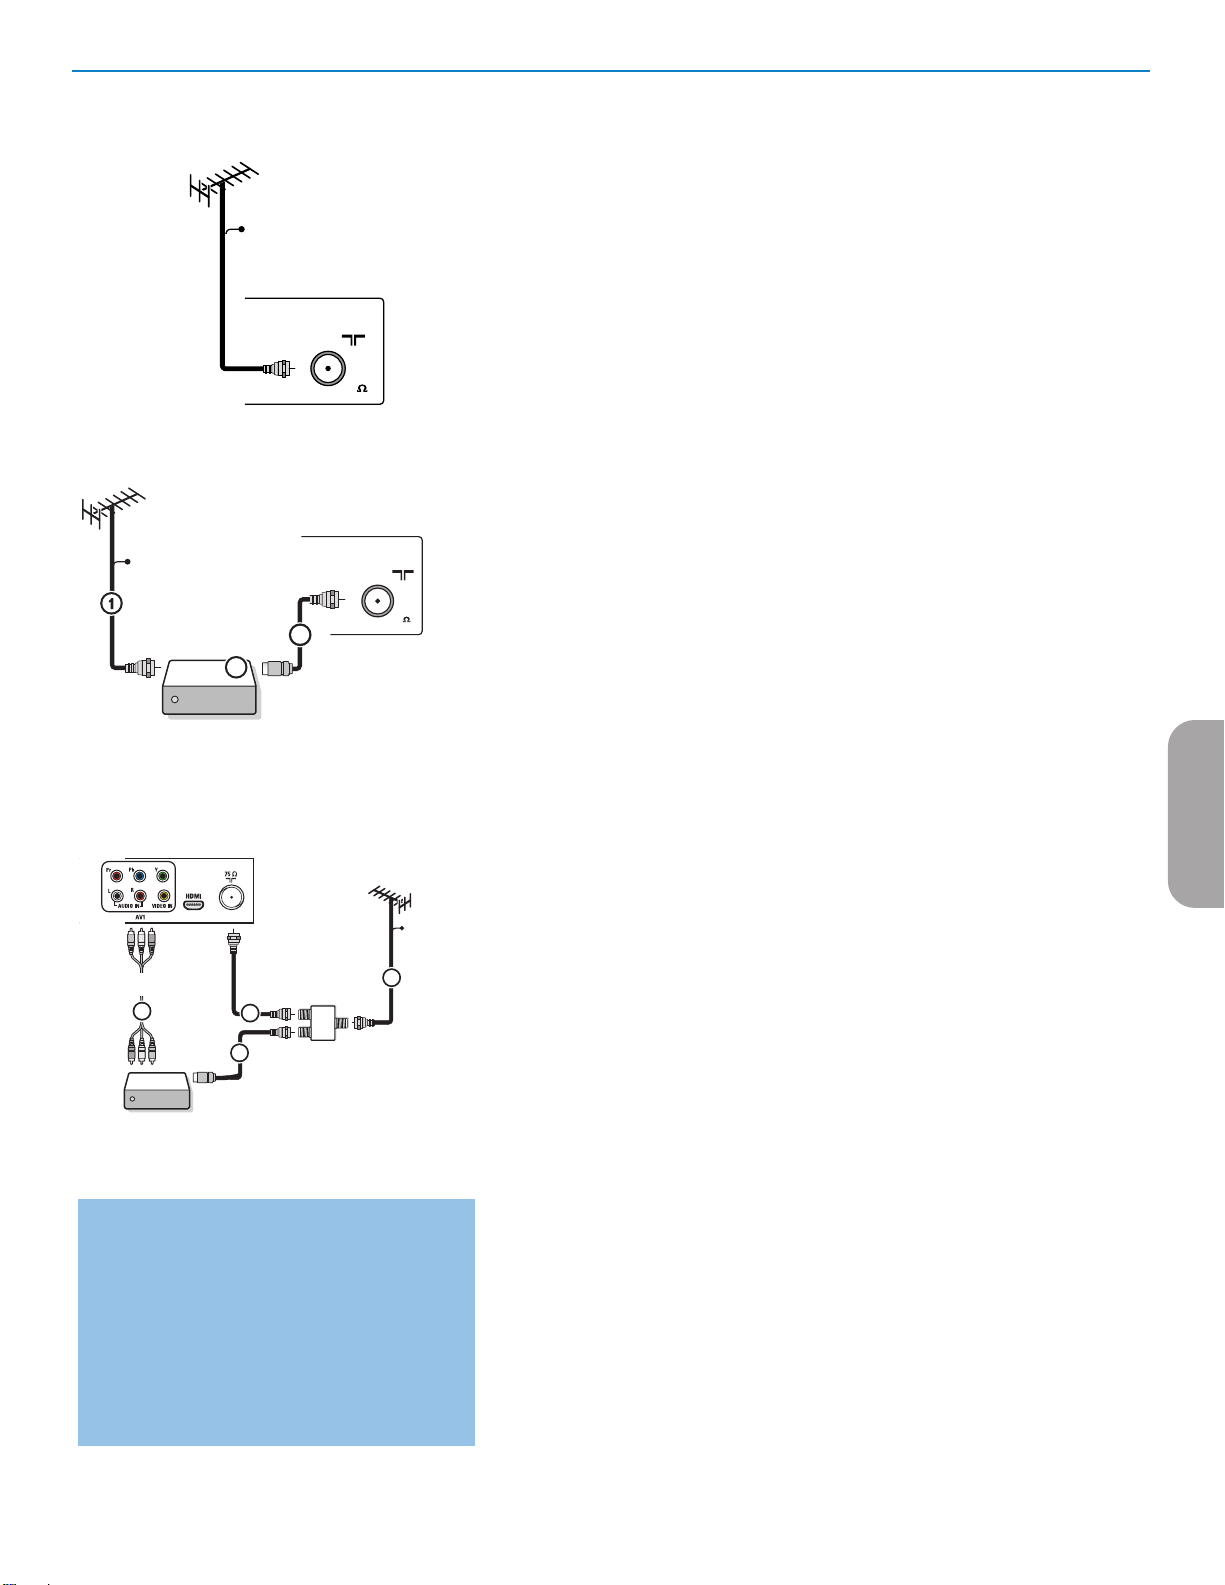
ANTENNACABLE /
75
CABL E
CABLE / ANTENNA
75
Set-Top Box
OUT
OUTPUT
TO TV
IN
CABL E
3
2
SIGNAL
SPLITTER
Set-Top Box
OUT IN
3
2
CABLE
1
AV1 :
4
L + R + VIDEO
Programas de TV por cable para los que no
se necesita caja de cable
Dado que la señal de TV por cable está conectada
directamente al sintonizador del televisor, puede
ver los programas en abierto simplemente
seleccionando el canal que desee. Sin embargo,
primero deberá utilizar la Sintonización
automátiva para almacenar los canales en la
memoria del televisor. Consulte la página 8.
Nota: esta conexión suministra sonido estereofónico
al televisor, si se emite por la estación que tiene
sintonizada.
& Conexiones básicas del televisor
Este televisor digital integrado descodifica y muestra automáticamente las cuatro
normas de resolución de imagen de DTV básicas.
- La SDTV (TV de definición estándar) se emite como video de 480i (entrelazado
de 480 líneas) o 480p (exploración progresiva de 480 líneas).
- La HDTV (TV de alta definición) se emite en formato 1080i o 720p,
siempre como imagen panorámica.
Nota: el video de exploración progresiva (p) ofrece una imagen similar a la de los cines.
Las imágenes son mucho más nítidas y sin parpadeo, y los movimientos son más fluídos.
Además de la recepción de emisión NTSC analógica, el televisor cuenta con un
sintonizador de TV de alta definición integrado, que recibe, descodifica y reproduce
señales ATSC terrestres y de calbe (QAM) descodificadas. La calidad HDTV sólo
se reproduce si el emisor o proveedor de cable emite señales HDTV.
Existen dos maneras de recibir contenido HDTV:
- por cable y por antenna.
Nota: se utiliza esta ilustración dondequiera que usted pueda conectar el cable o la
antena.
- TV por Cable
Conecte la señal de TV por cable a la toma CABLE/ANTENNA 75 Ω x situada
en la base del televisor. Consulte la página 8 para ver detalles sobre el uso de
Sintonización automática para almacenar canales en la memoria del televisor.
Nota: esta conexión suministra sonido estereofónico al televisor, si se emite por la
estación que tiene sintonizada.
- Caja de cable con RF IN/OUT (entrada/salida rf)
• Conecte la señal de entrada de TV por cable IN 1 en la parte posterior de la
caja de cable.
• Conecte un cable coaxial (no suministrado) entre la toma TO TV de la parte
posterior de la caja de cable y la toma CABLE/ANTENNA 75 Ω x 2 en la
base del televisor.
Nota: es posible que la caja de cable tenga una etiqueta distinta en la toma TO TV ,
como OUTPUT o OUT.
• Ajuste el interruptor OUTPUT CH 3 de la caja de cable en la posición CH 3
o 4 (la que corresponda a su caja de cable), y a conticuación sintonice el canal
correspondiente en el televisor. Una vez sintonizado, cambie de canales en la
caja de cable, no en el televisor.
Nota: esta conexión suministra sonido estereofónico al televisor. La razón es que
la salida RF de la caja de cable (etiquetada como TO TV, OUT o OUTPUT, por
ejemplo) no envia señal estereofónica a la entrada de sintonizador (VHF/UHF) del
televisor.
- Caja de cable con salidas AV
• Conecte la señal de entrada de TV por cable 1 a un divisor de señales (no
suministrado). Con el uso del divisor de señales no es necesario utilizar la toma
TO TV de la parte posterior de la caja de cable. Esta toma no suministrará
sonido estereofónico al televisor.
Nota: es posible que la caja de cable tenga una etiqueta distinta en la toma TO TV
OUTPUT o OUT.
• Conecte un cable coaxial (no suministrado) a un conector del divisor de
señales y a la toma CABLE/ANTENNA 75 Ω x 2 del televisor.
• Conecte otro cable coaxial (no suministrado) a un conector del divisor de
señales y a la toma de cable IN 3 de la parte posterior de la caja de cable.
• Conncte cable A/V (no suministrados) a las salidas VIDEO y AUDIO L y R de
la parte posterior de la caja de cable y a las tomas de video AV2 (etiquetadas
como VIDEO) y de AUDIO (etiquetadas L y R) 4 de la parte posterior del
televisor.
• Para ver programas desde la caja de cable, primero debe oprimir el botón AV+
del control remoto.
• Oprima los botones de cursor arriba o abajo hasta seleccionar la fuente de
señal AV2.
• Oprima el botón OK para confirmar la elección. La fuente de entrada AV2 se
convierte en la actual para la visión de programas de TV por cable a través de
la caja de cable .
Nota: si las salidas Audio/Video de la caja de cable no suministran imagen y sonido
estereofónico al televisor, deberá establecer la conexión indicada antes en el ejemplo
"Caja de cable con RF IN/OUT”.
Español
3
Page 88
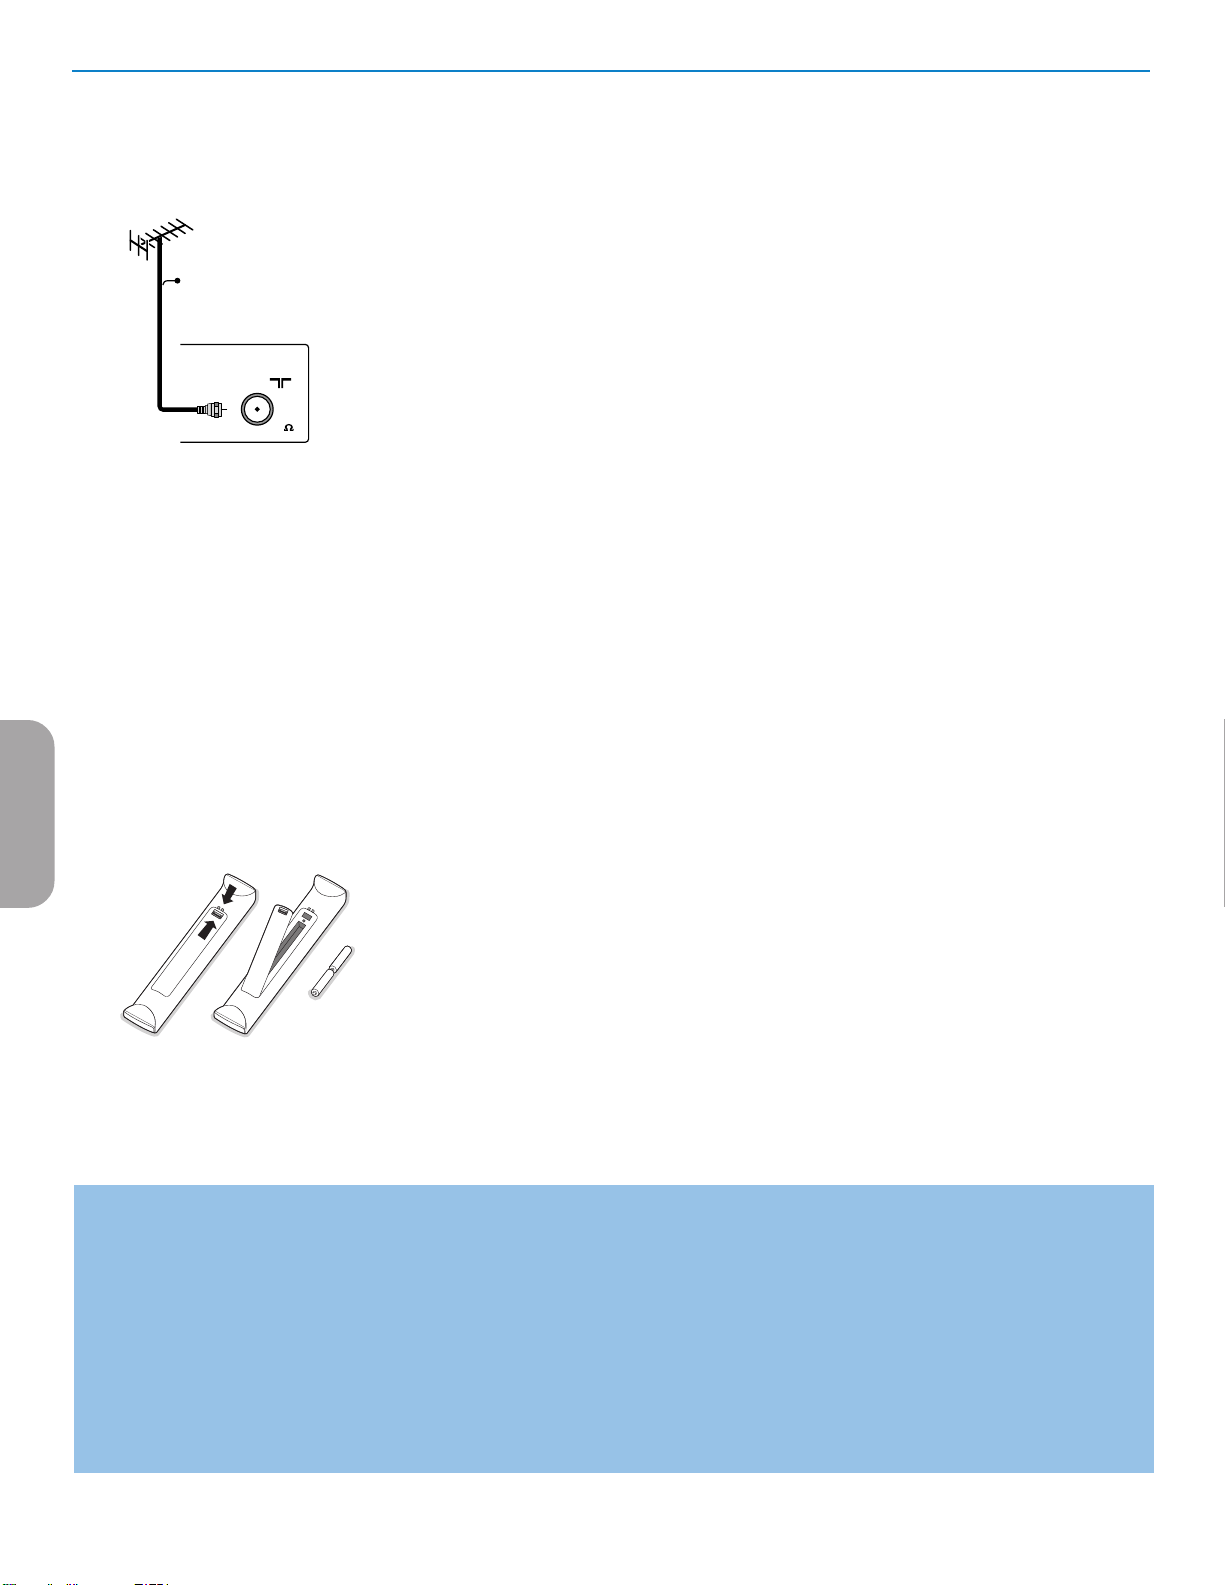
ANTENNACABLE /
75
CABL E
Español
- Caja de cable con S-Video, video en componentes (YPbPr) o conectores
HDMI. Consulte Conexión de equipos periféricos, pág. 22-23.
- Antena
La antena le permite ver los programas DTV que se emiten en su zona de
manera gratuita.
Si no conoce la programación HDTV disponible en su zona, consulte al
proveedor de contenido o al distribuidor de productos electrónicos más
próximo.
Las emisoras se encuentran a mitad del proceso de la transición de televisión
analógica a digital. Por lo tanto, determinadas emisoras emiten dos canales a la
vez, uno analógico y otro digital.
Conecte la señal de entrada de antena a la toma CABLE/ANTENA 75 Ω
x en la base del televisor. Consulte la página 8 para ver detalles sobre el uso
de Sintonización Automática para almacenar canales en la memoria del televisor.
Nota: Esta conexión suministra sonido estereofónico al televisor, si se emite por la
estación que tiene sintonizada.
- DBS (Direct Broadcast Satellite)
Los sistemas de satélite ofrecen muchos de los mismos canales complementarios
que los sistemas de cable, aunque con frecuencia a menor precio. Para acceder a
dichos canales debe instalar una pequeña antena parabólica en el exterior.
Los principales sistemas DBS son dos: DirectTV y DishNetwork. Para utilizar
estos sistemas es necesario contar con receptores digitales distintos, para que
cada uno descodifique sus señales respectivas y la envíe al televisor digital.
Dichos receptores pueden contar con sintonizador de TV digital para las
emisiones DTV por ondas.
Las emisoras de televisión por satélite también suministran grandes canales
locales, dependiendo de cada mercado.
DBS también ofrece servicios de zonas sin acceso a cable, por tratarse de áreas
rurales o lugares a los que no llega el tendido.
El sistema DBS también permite ver transmisiones de pago por visión (pay-perview).
é Antes de instalar su televisor, conecte todos sus equipos periféricos, consulte la
pág. 20.
“ Consulte en la base del aparato el valor de tensión correcto para su
funcionamiento. Introduzca el cable de alimentación en el tomacorriente.
Si el suministro de corriente que recibe es distinto, consulte al distribuidor local.
Para evitar que el cable de alimentación (CA) se dañe, lo que podría provocar
incendios o descargas eléctricas, no apoye el televisor sobre el cable.
‘ Control remoto:
Instale las dos pilas (tipo R6-1,5V) que se entregan junto con el aparato. Asegúrese
que los extremos (+) y (-) de las baterías correspondan a las marcas al interior de
la caja.
Las pilas incluídas con el control remoto del televisor no contienen mercurio ni cadmio, que
son metales pesados. Asegúrese de desechar las pilas agotadas de conformidad con las
normas vigentes.
( Encienda el televisor:
Oprima el botón de encendido B situado en el lado derecho del televisor.
Oprima los botones +CH/PAGE- o el botón POWER del control remoto.
Se enciende un indicador en la parte frontal del televisor.
Instalación por primera vez
Nota: Cuando encienda el televisor por primera vez (sólo esa vez), aparecerá automáticamenet en pantalla un procedimiento de instalación.
La instalación consta de una serie de pantallas que guían al usuario a lo largo del procedimiento.
& Después de que aparezca una pantalla de presentación, se solicita al usuario que seleccione el idioma de los menús en pantalla del televisor (el texto
del encabezamiento y de la información en pantalla cambia de idioma de manera continua).
é Oprima el cursor arriba/abajo y resalte el idioma que desee.
“ Oprima el botón OK .
‘ Siga las instrucciones en pantalla para continuar con el procedimiento de instalación.
Nota: Si interrumpe el procedimiento de instalación inicial, también podrá realizar los ajustes en el menú Ajustes. Consulte la pág. 7.
4
Page 89
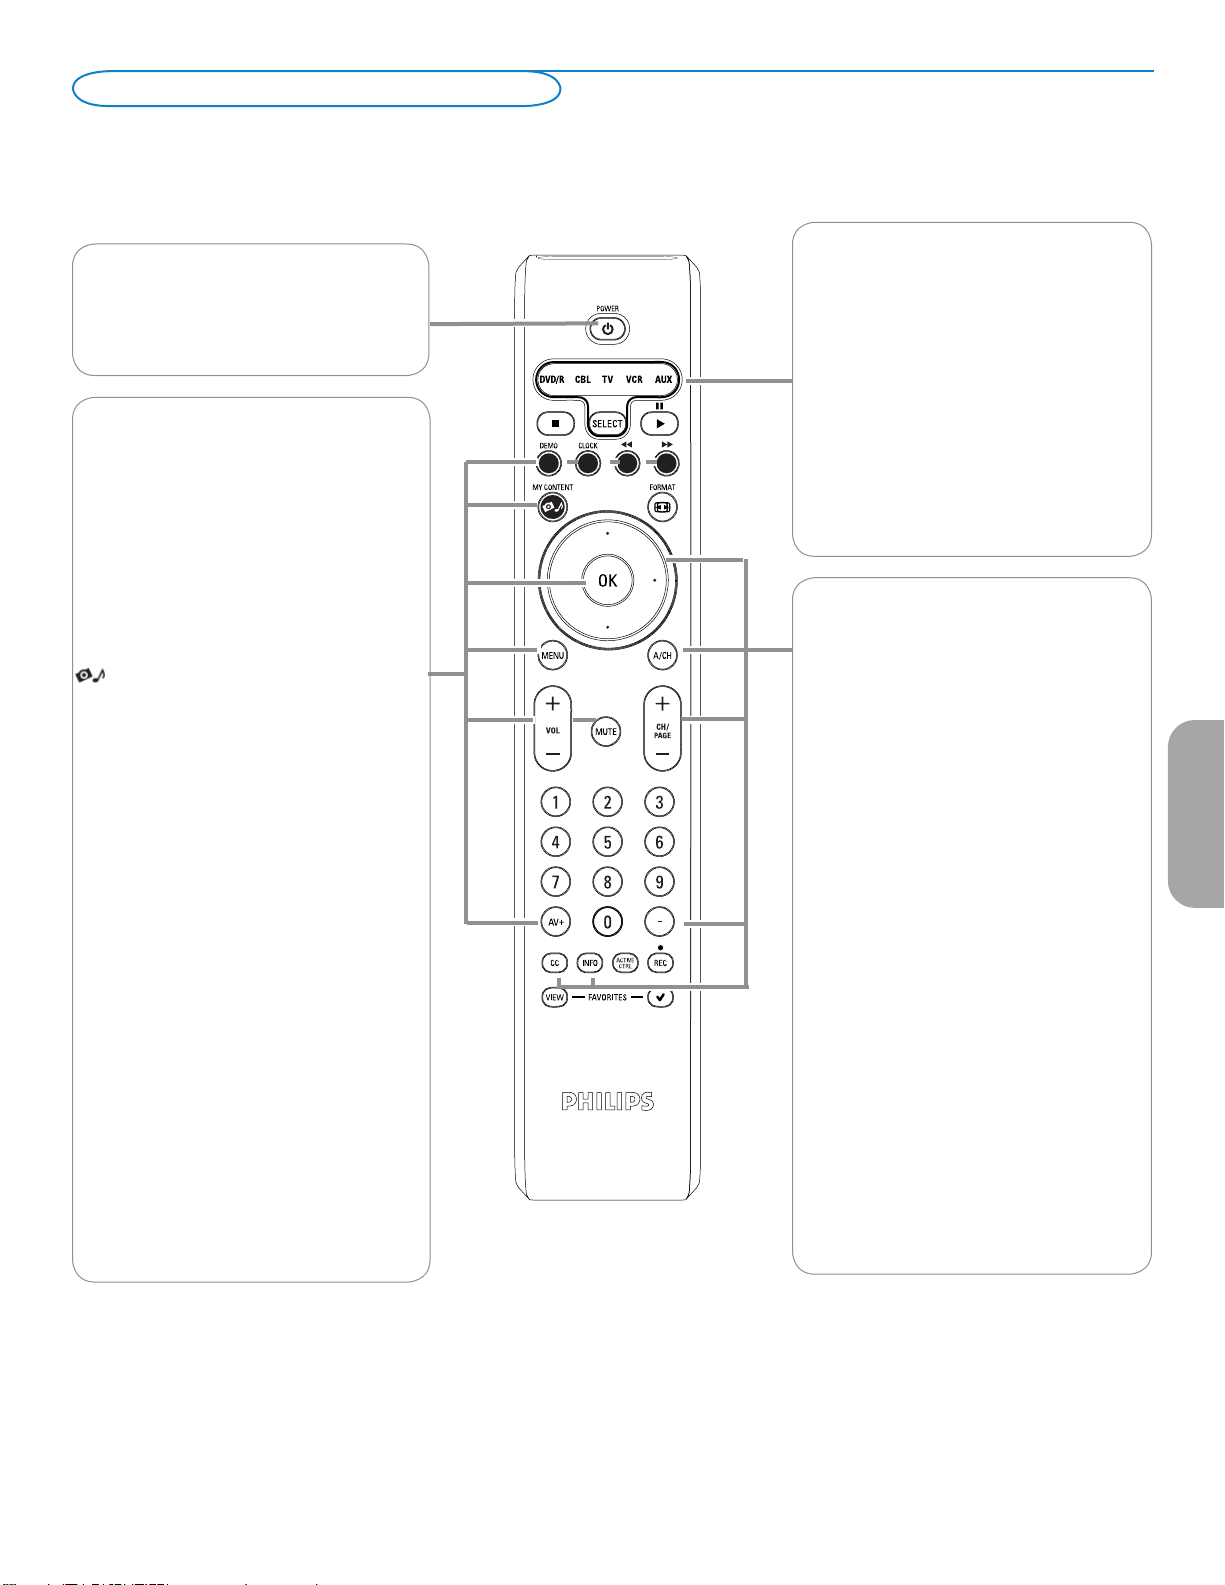
Uso del control remoto
Nota: en la mayoría de los casos, basta oprimir un botón una vez para activar la función. Al oprimirlo por segunda vez, se desactiva.
Cuando un botón active varias opciones, aparecerá una lista breve. Oprima repetidamente para seleccionar la siguiente opción de la lista. La lista
desaparecerá automáticamente al cabo de 6 segundos, o puede oprimir OK para que desaparezca de inmediato.
Nota: Aunque este control remoto se puede usar
POWER
Oprima este botón para encender/apagar el
televisor en el modo de espera.
El televisor nunca queda desconectado de la
corriente, salvo si se desenchufa fisicamente.
DEMO Demo Activación/desactivación
Consulte pág 8.
CLOCK (reloj) Activación/desactivación
Aparece la hora en la pantalla (durante 10
minutos como máximo).
para otros productos Philips, no es un control
remoto universal.
DVD/R CBL TV VCR AUX
Presione repetidamente el botón SELECT
(Seleccionar) para seleccionar uno de los
modos del sistema en los que el control
remoto se pueda usar para operar dicho
dispositivo Philips.
Si no se realiza ninguna acción dentro de 60
segundos, el control remoto vuelve al modo
de TV.
Después de una acción en el modo de
sistema seleccionado, el control remoto
permanece en dicho modo durante 60
segundos y vuelve al modo TV.
Botones de color
Si existen funciones vinculadas a los botones
de color, estos se muestran en pantalla.
MY CONTENT (mi contenido)
Oprima este botón para activar o desactivar
el menú de inicio en pantalla, Consulte la
pág. 7.
OK
- para activar un ajuste
- para mostrar la lista de canales almacenados
(de acuerdo con la selección realizada en el
modo Instalación(antena o cable), pág. 8.
- iniciar la reproducción de contenido en la
aplicación Navegador de multimedia, pág. 24.
MENU
Activación/desactivación del menú Ajustes.
Consulte la pág. 7.
VOL Volumen
Oprima + o - para ajuste el volumen.
MUTE (silencio)
Permite interrumpir el sonido o recuperarlo.
AV+
Oprima varias veces para seleccionar los
canales AV1, AV2, AV3, HDMI, SIDE o TV
en el modo TV, dependiendo de como haya
conectado los dispositivos periféricos.
(pág. 20).
Botones de cursor
Oprima los botones de cursor arriba/abajo,
derecho/izquierdo para desplazarse por los
menús.
CH/PAGE Selección de canales
- Permite explorar los canales o fuentes de
TV almacenados en la lista de canales
preferidos (consulte la pág. 19).
- Para seleccionar entre canales de Antena
o de TV por Cable, realize primero la
selección en el menú Ajustes, pág. 7.
Nota: No es necesario que reinicie la instalación
después de haber buscado y almacenado los
Español
canales de TV disponibles.
A/CH
Oprima este botón para alternar entre el canal
actual y el que vió previamente.
-
Introduzca el guión (-) para canales digitales.
INFO
Información: Oprima este botón para
mostrar información en pantalla (si está
disponible) acerca del canal de TV y del
programa o equipo periférico seleccionado.
CC
Oprima botón CC para desplegar en pantalla
los subtítulos.
Continua..
5
Page 90

ENTRY_control_2005.eps
VOLUME
CHANNEL
MENU POWER
.
VOLUME
CHANNEL
MENU
POWER
.
O
FORMAT
Oprima este botón para acceder a una lista de los formatos de imagen disponibles (dependiendo de la
señal recibida). Permite elegir el formato de imagen preferido.
Oprima este botón repetidamente para cambiar de formato de imagen: Automático, Super Zoom, 4:3,
Ampliar imágenes 14:9, Ampliar imágenes 16:9, Subtítulos 16:9, Pantalla panorámica.
Español
Automático Super zoom 4:3
Ampliar imágenes 16:9 Subtítulos 16:9 Pantalla panorámica
Ampliar imágenes 14:9
Con Automático la imagen llena la pantalla al máximo.
Super zoom elimina las franjas negras a los lados de los programas 4:3 con una distorsión mínima.
Con los formatos Ampliar imágenes 14:9, Ampliar imágenes 16:9 o Super zoom,se pueden hacer
visibles los subtítulos mediante el uso del cursor arriba/abajo.
Nota: con fuentes de emisión de HD (alta definición) no están disponibles todos los formatos de imagen.
ACTIVE CONTROL
Presione para permitir al TV medir y corregir continuamente todas las señales entrantes y así
proporcionar la mejor calidad de imagen posible.
FAVORITES
• VIEW Este botón permite mostrar la lista de todos los canales definidos como favoritos (incl. los
subcanales).
• 3 Este botón permite añadir o eliminar canales de la lista de canales de TV preferidos.
®Ò‡†ºπ
• Botones para equipos de sonido e imagen. Consulte la pág. 21.
• Botones para funciones de Multimedia. Consulte la pág. 25.
Botones de control del TV
32PF5321D
32PF7321D
32PF7421D
37PF7321D
42PF5321D
42PF5421D
42PF7321D
42PF7421D
50PF7321D
26PF5351D
26PF5321D
Si el control remoto se rompe o extravía, siempre será posible modificar
determinados ajustes de imagen y sonido con los botones situados en el
televisor.Oprima el botón B para encender el televisor.
Oprima:
• los botones + VOLUME - para ajustar el volumen;
• losbotones + PROGRAM/CHANNEL - para seleccionar canales de TV o
fuentes.
El botón MENU puede emplearse para acceder al menú Ajustes sin usar el
control remoto.
Utilice:
• los botones + VOLUME - para seleccionar opciones de menú arriba/abajo y
los botones + PROGRAM/CHANNEL - para seleccionar opciones de menú
izquierda/derecha;
• el botón MENU para confirmar la elección.
Nota:
Si las funciones se han activado mediante el botón MENU situadio en el televisor, solo
es posible salir del menú mediante el uso de Salir.
Desplácese hasta Salir y oprima el botón MENU.
6
Page 91
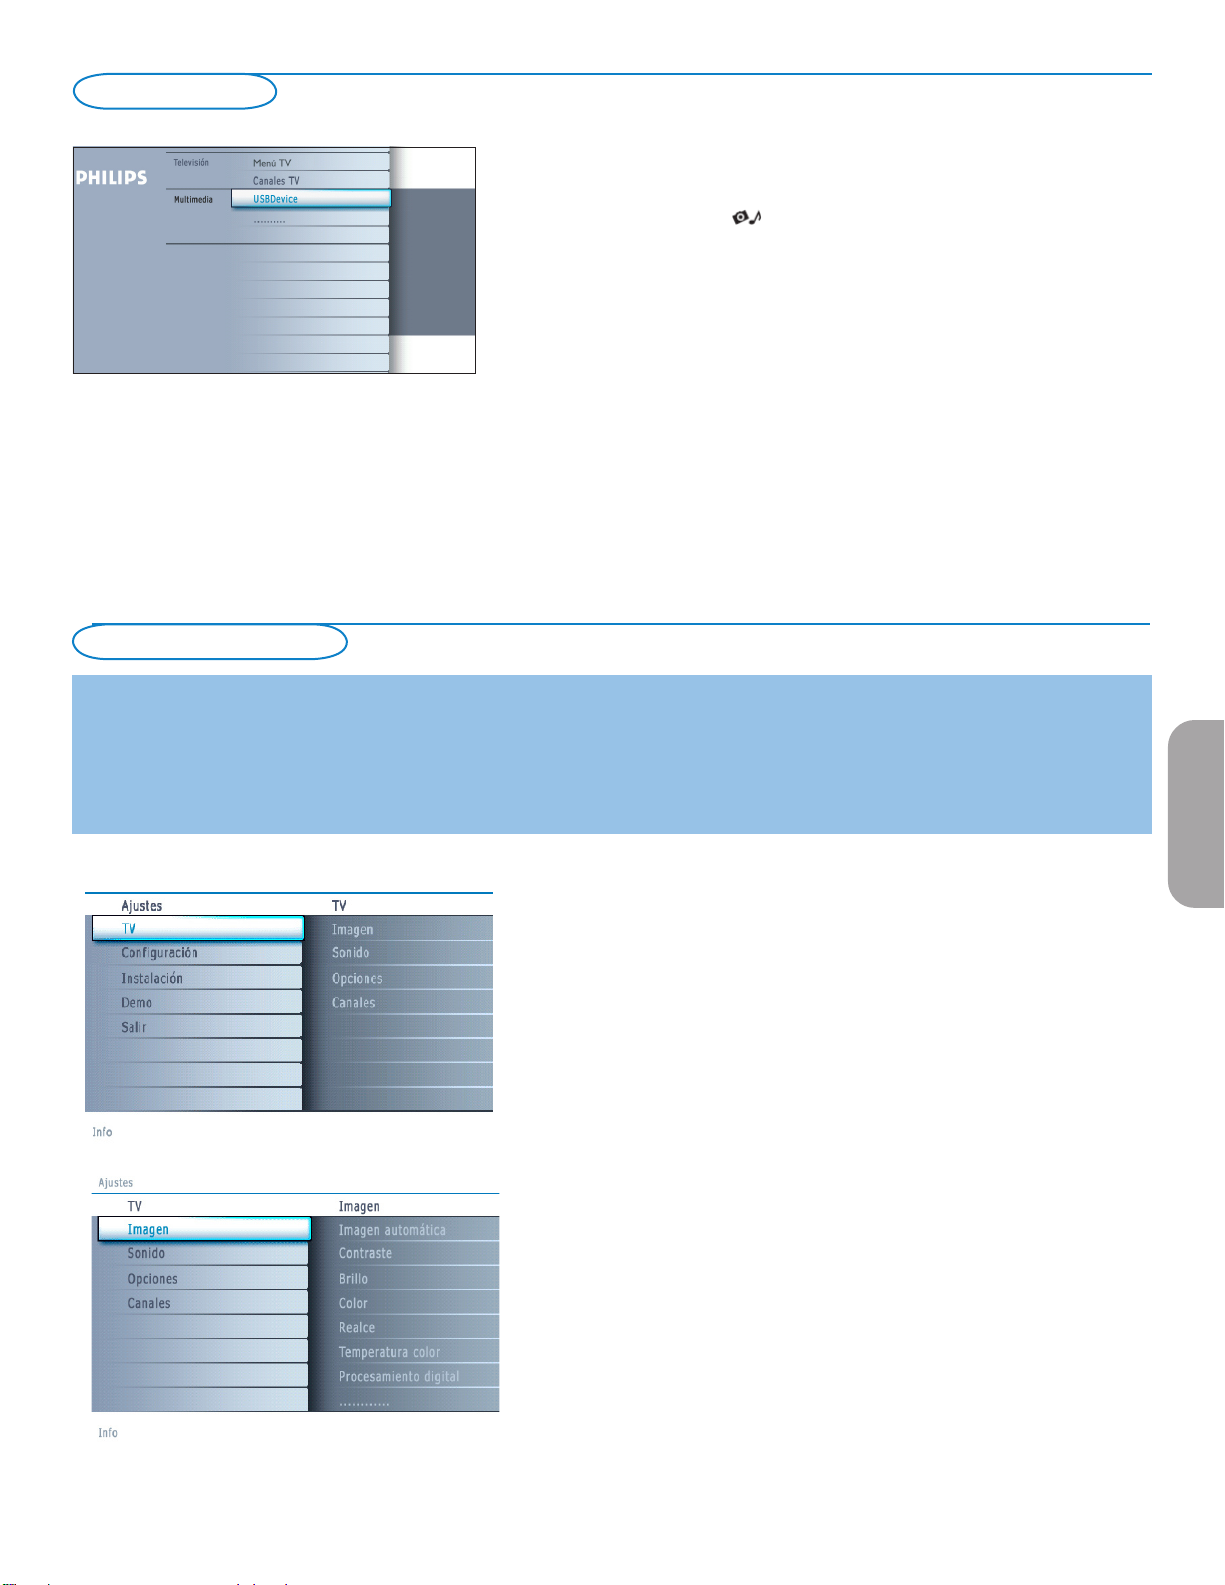
Mi contenido
Uso de los menús
El menú My Content (y su navegador de multimedia) enumera todo el
contenido, los servicios y las aplicaciones que interesan al usuario.
& Oprima el botón para la activación.
é Oprima el cursor arriba/abajo para desplazar la barra de resalte por la lista
de opciones del menú.
“ Oprima el cursor derecho para profundizar en la estructura.
• Televisión:
Canales TV para ir a la laista de canales de TV; El panel izquierdo
contiene los números de canales analógicos, los números de canales de una
parte y los números de canales digitales principales de dos partes, en caso
de haberlos. El panel derecho contiene los subacnales disponibles asociados
con el canal principal que se muestra resaltado en el panel izquierdo. Si no
hay subcanales asociados con el canal actualmente seleccionado en el panel
izquierdo, el panel derecho permanece vacío.
• Multimedia:
Contiene los dispositivos conectados localmente en los que se elmacena
el contenido (imágenes, archivos de sonido) Consulte navegador de
Multimedia, pág. 24.
Introducción
Cuando se utilizan los menús o se intenta ejecutar alguna acción, aparece gran cantidad de instrucciones, textos y mensajes de ayuda en la
pantalla del televisor.
Siga dichas instrucciones y lea los textos de ayuda que se muestran sobre la opción resaltada.
Los botones de color remiten a distintas acciones que pueden ejecutarse, dependiendo del dispositivo activado. Oprima el botón de color
correspondiente del control remoto para ejecutar la acción requerida.
Navegación a través del menú Ajustes
El menú Ajustes permite acceder a ajustes, preferencias y ajustes de red y
modificarlos.
• Oprima el botón MENU del control remoto para acceder al menú Ajustes.
- Se puede utilizar el cursor arriba/abajo para situar el resaltado sobre una
opción de menú en el panel izquierdo.
El panel derecho muestra el contenido de la opción de menú resaltada en
el panel izquierdo.
Nota: en ciertos casos no todas las opciones del menú son visibles en pantalla.
Desplace el cursor hacia abajo para ver todas las opciones.
- Utilize el cursor derecho para acceder al panel derecho
El contenido del panel derecho se desplaza al panel izquierdo y el panel
derecho muestra el contenido de la opción que se acaba de resaltar en el
panel izquierdo.
Nota: en algunos casos es importante ver la imagen mientras se realizan los
ajustes. Esto quiere decir que cuando el elemento resaltado se encuentre en el
panel derecho, las demás opciones de menú permanecerán ocultas. Al volver
a oprimir el cursor izquierdo, reaparecerán las opciones de menú y la barra de
resalte se desplazaró al panel izquierdo..
• Oprima el cursor izquierdo para volver a ascender un nivel de menú.
- Oprima el botón OK sobre la opción resaltada para activarla y salir del
menú.
- Vuelva a oprimir el botón MENU para salir del menú Ajustes.
Nota: también se puede salir del menú si se oprime uno de los botones de color
(si están presentes) relacionados con ciertas acciones que pueden ejecutarse.
Español
7
Page 92

Demostración
Instalación
El menú Demo permite hacerse una idea de las opciones que ofrece el
televisor.
& Seleccione Demo en el menú Ajustes y oprima el cursor derecho.
é Resalte la demostración que desee con el cursor arriba/abajo.
“ Oprima OK para iniciar la demostración resaltada.
Oprima el botón verde para ejecutar todas las demostraciones de manera
secuencia..
Oprima el botón rojo para detener la ejecución automática.
Vuelva a oprimir el botón rojo para salir de la demostración y volver al
modo TV.
Nota: La demostración seleccionada se ejecutaró solo una vez.
Las demostraciones no requieren la intevención del usuario, excepto para su inicio.
Selección de idioma del menú
& Oprima el botón MENU en el control remoto.
é Utilize el cursor abajo para seleccionar Instalación en el menú Ajustes.
“ Utilize el cursor derecho para acceder al menú Instalación.
‘ Seleccione idioma y acceda a la lista de idiomas disponibles con el cursor
derecho.
( Seleccione el idioma con el cursor arriba/abajo y oprima el botón OK para
confirmar la elección.
§ Continúe con el menú Instalación.
Memorización de canales de TV
& Seleccione Sintonización Automática en el menú Instalación.
é Utilize el cursor derecho para acceder al menú Sintonización Automática.
“ Oprima el botón OK.
Español
Notas:
• Si bloqueó canales de TV cuando iniciaba la sintonización automática, aparece un mensaje solicitando que introduzca su código para poder completarla..
• Si se interrumpe el proceso, la información de canal actualizada se conserva junto con la información de canal antigua que aún no se actualizó.
• La sintonización automática en segundo plano solo se produce cuando el televisor está encendido.
• La información de canal ATSC solo se actualiza respecto al canal ATSC sintonizado actualmente.
• Si se sintoniza un canal NTSC, el televisor explorará todas las frecuencias de ATSC posibles y actualizará la información cuando se encuentre en
sintonización automática en segundo plano.
• Instalación de canales de recepción débil : Permite afinar manualmente la sintonía de canales ATSC de recepción debil, con el fin de ajustar la antena y,
de ese modo, la calidad de señal del canal. (consulte Menú Instalación, Instalación de canales de rececpión débil, pág. 9.)
• Después de haber buscado los canales de antena y de TV por cable disponibles, se almacenan en la memoria.
‘ Seleccione Cable o Antenna en el modo Instalación.
Si selecciona Antena, el TV detectará las señales de antena y buscará los
canales de televisión de antena (NTSC y ATSC) disponibles en su zona.
Si selecciona Cable, el TV detectará las señales suministradas por la
compañía de cable y buscará los canales de televisión por cable (NTSC,
ATSC, Modulación QAM) disponibles en su zona.
Cerciórese de haber completado el registro con el proveedor de TV por
cable y la conexión de los equipos.
( Oprima el botón verde “Siguiente” del control remoto.
Nota: para realizar la sintonización automática es necesario que todos los canales
estén desbloqueados. Si se le solicita, introduzca su código para desbloquear todos
los canales. Consulte Preferencias de menú en el menú Ajustes, TV, pág. 15.
§ Oprima el botón verde “Iniciar” para comenzar la sintonización automática.
Desaparece la pantalla de menús y se muestra el avance de la sintonización
automática. La barra de avance indica el número de canales de TV
analógicos y digitales hallados.
Cuando finaliza la sintonización automática, aparece un mensaje que lo
confirma. Presione el botón "Terminar" para regresar al menú Instalación
8
Page 93

Nota: Retardo de selección de canales
digitales
Debido a la complejidad de la programación digital de
subcanales, el tiempo que lleva seleccionar y ver un
canal digital puede tardar un poco más de lo habitual
(en comparación con los programas de acanales
analógicos).
Las emisiones de canales digitales contienen
información de programas y de datos de sistema que
deben procesarse antes de que aparezca en pantalla
el canal seleccionado.
Sintonización de canales
Canales disponibles:
- Cable (NTSC analógico o QAM digital): máx. de 1 a 135
- Antenna (NTSC analógico o ATSC digital): máx. de 2 a 69
Si el canal sintonizado aún no se encuentra en el mapa de canales maestro,
el televisor intenta sintonizarlo y se añade al mapa.
Si no se capta el canal, aparece un mensaje indicando que el canal no está
disponible.
Si se sintoniza un subcanal digital de solo sonido, apaerce un mensaje en
pantalla indicando que el programa solo contien audio.
Nota: Selección de subcanales
Las nuevas normas que se emplean en las emisiones digitales permiten recibir
varios canales de programas agrupados en un solo número de canal principal, que
puede seleccionarse oprimiendo el número de acceso directo al canal en el control
remoto.
Importante:
Una vez realizada la sintonización de los canales de TV, siempre debe seleccionar
Antena o Cable en el menú Instalación, dependiendo de los canales que desee ver.
Si utiliza un divisor de señales, no olvide situar el conmutador en la posición
correspondiente.
Instalación de canales con señal débil
Permite instalar canales digitales ATSC de recepción débil. Esto solo está
disponible para los canales de TV instalados mediante conexión de antena
(consulte la pág. 4).
& Seleccione un canal de la lista de canales (en el modo de Antena).
é La fuerza de la señal se muestra y actualiza continuamente, a medida que se
hace girar la antena.
Actualización de Software
Este menú permite actualizar el software de TV mediante un dispositivo
USB.
Actualización de USB
Es posible iniciar un procedimiento de actualización mediante una memoria
portátill USB.
El dispositivo de memoria debe contner la imagen (y estructura) de
actualización adecuada, que puede encontrarse en el sitio web www.philips.
com/support.
Para ver instrucciones sobre la descarga de una versión de software nueva
en el dispositivo de memoria portátil, consulte Anexo 1, pág. 32.
Español
9
Page 94
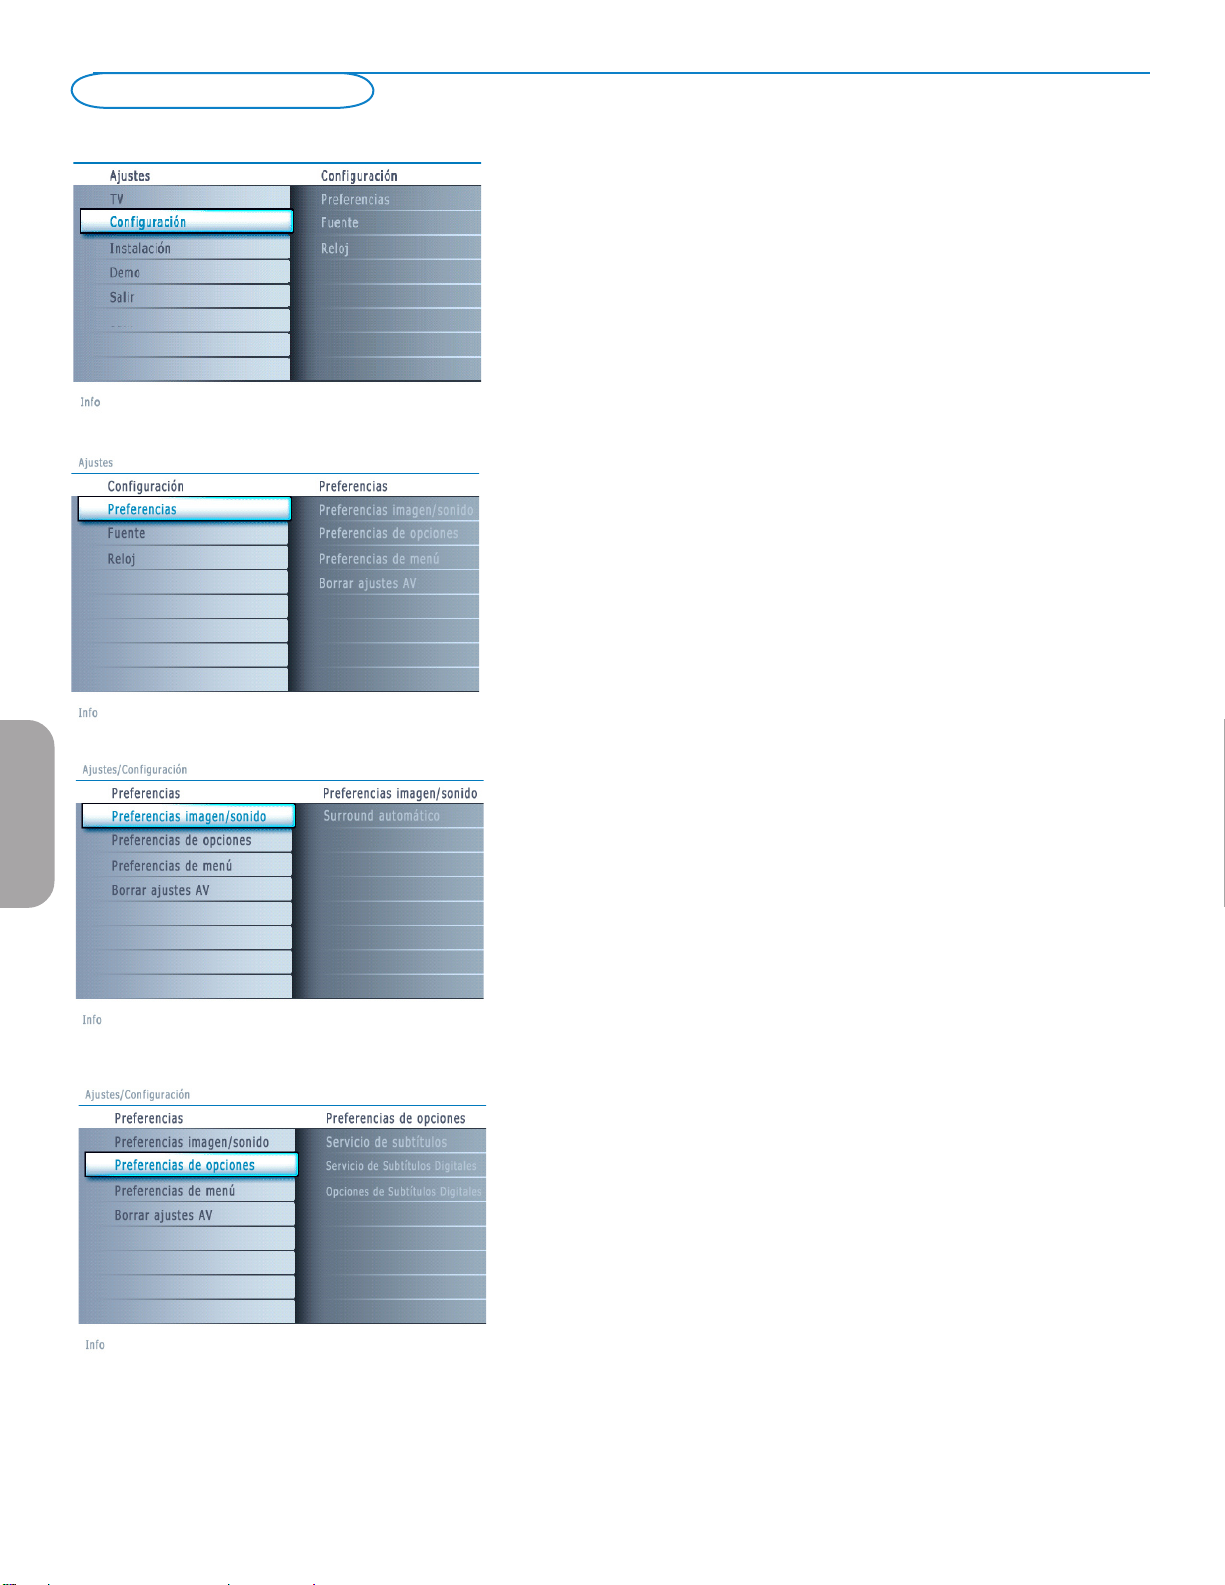
Menú Configuración
Este menú permite controlar los ajustes de funciones de TV especiales, de opciones
y de equipos periféricos.
El menú Preferencias permite cambiar ajustes a los que se suele acceder solo
ocasionalmente.
El menú Fuente permite seleccionar una fuente.
El menú Reloj permite usar su TV como reloj. Para que los bloqueos funcionen
adecuadamente debe elegir la opción correcta.
Preferencias
& Oprima el botón MENU.
é Seleccione Configuración con el cursor hacia abajo y oprima el cursor derecho
para seleccionar el menú Preferencias.
“ Vuelva a oprimir el cursor derecho para seleccionar Preferencias imagen/
sonido.
‘ Oprima el cursor derecho una vez más para acceder al menú Preferencias
imagen/sonido.
Preferencias de imagen/sonido
Surround Automático
En ciertos casos, las emisoras transmiten señales especiales para programas
codificados con sonido surround. El televisor cambia automáticamente al mejor
modo de sonido surround cuando Surroud automático se selecciona como
Activado.
Español
Preferencias de funciones
Servicio de subtítulos
Esta opción permite seleccionar niveles de Servicio de subtítulos para las
emisiones analógicas.
Subtítulos permite leer el contenido de voz de los programas de televisión en
la pantalla del televisor. Esta función, diseñada para personas con problemas
auditivos, utiliza "cuadros de texto" en pantalla para mostrar diálogos y
conversaciones mientras se emite el programa de TV. Los textos aparecen en
pantalla durante las transmisiones subtítuladas.
10
Page 95

Nota: los subtítulos, no siempre carecen de errores
ortográficos o gramaticales. No todos los programas ni
anuncios comerciales de TV se elaboran para su emisión
con información de subtítulos incluída. Consulte la lista
de programas de TV de su zona para ver los canales
de TV y horarios en los que se ofrecen subtítulos. Los
programas con subtítulos se suelen identificar en las
listas de TV con marcas de servicio como "CC".
& Seleccione Servicio de subtítulos.
é Oprima el cursor derecho.
“ Seleccione el Servicio de subtítulos que desee:
• CC 1, 2, 3 o 4
En la pantalla aparecen el diálogo (y las descripciones) de la acción del programa
de TV subtítulado.
Generalmente, CC 1 es el mas usado. CC 2 se puede usar para idiomas
alternativos, si se transmiten.
• T 1, 2, 3 o 4
A menudo se usan para guías de canales, programaciones, información de
tableros de avisos de programas con subtítulos, noticias, información del tiempo
o informes de bolsa.
Los canales de TV no utilizan necesariamente todos los Servicios de Subtítulos
durante la transmisión de programas subtítulados.
‘ Consulte Subtítulos en el menú TV, Opciones, pág. 16, para activar o desactivar
el Servicio de Subtítulos.
Nota: este receptor de televisión proporciona visualización de subtítulos de televisión de
acuerdo con la norma EIA-608 y las secciones 15.119 de las normas de la FCC.
Encendido.
Para encender la función de subtítulos encapsulados, vaya a Función ==>
Subtítulos encapsulados y seleccione “Encendidos” o “Encendidos durante mudo”.
Servicio de Subtítulos Digitales
Este función permite configurar la visualización de subtítulos digitales.
Seleccione uno de los canales con servicio digital que pone a su disposición el
proveedor de subtítulos.
Existen 6 servicios estándar. El Servicio 1 está designado como servicio de
subtítulos principal. Este servicio ofrece subtítulos literales, o casi literales, del
principal idioma que se habla en el programa de sonido adjunto.
El Servicio 2 está designado como servicio de subtítulos secundario. Este servicio
ofrece subtítulos en un idioma secundario, que son traducciones de los subtítulos
del servicio principal. Los demás subcanales de servicio no están asignados
previamente. El suo de los demás canales de servicio depende de la desición del
proveedor de subtítulos.
Opciones de Subtítulos Digitales
Esta función permite modificar el modo de visualización de los subtítulos digitales.
Seleccione entre las opciones siguientes para cambiar las características visuales
del subtítulado digital del televisor.
Español
• Reiniciar a valores por defecto
Seleccione esta opción para recuperar los ajustes por defecto de los
subtítulos digitales, establecidos por le proveedor.
Oprimna el botón OK para confirmar.
• Tamaño
Con esta opción puede seleccionar el tamaño de la visualización de los
subtítulos según sus preferencias.
Seleccione Predeterminado, Pequeño, Estándar o Grande y oprima el
botón OK para confirmar.
• Estilo
Con esta opción puede seleccionar el estilo de tipo de letra de los subtítulos,
de acuerdo con sus preferencias.
Seleccione Predeterminado, Serif no proporcional, Serif, Sans serif no
proporcional, Sans serif, Casual, En cursiva o Mayúsculas pequeñas.
• Texto
Esta opción permite seleccionar el color del texto o la opacidad del recuadro
de texto de los subtítulos según sus preferencias.
Seleccione un color y una de las opciones de opacidad.
• Fondo
Esta opción permite seleccionar el color de fondo de los caractéres o una
de las opciones de opacidad de fondo de los subtítulos en función de sus
preferencias.
Seleccione un color y una de las opciones de opacidad.
11
Page 96
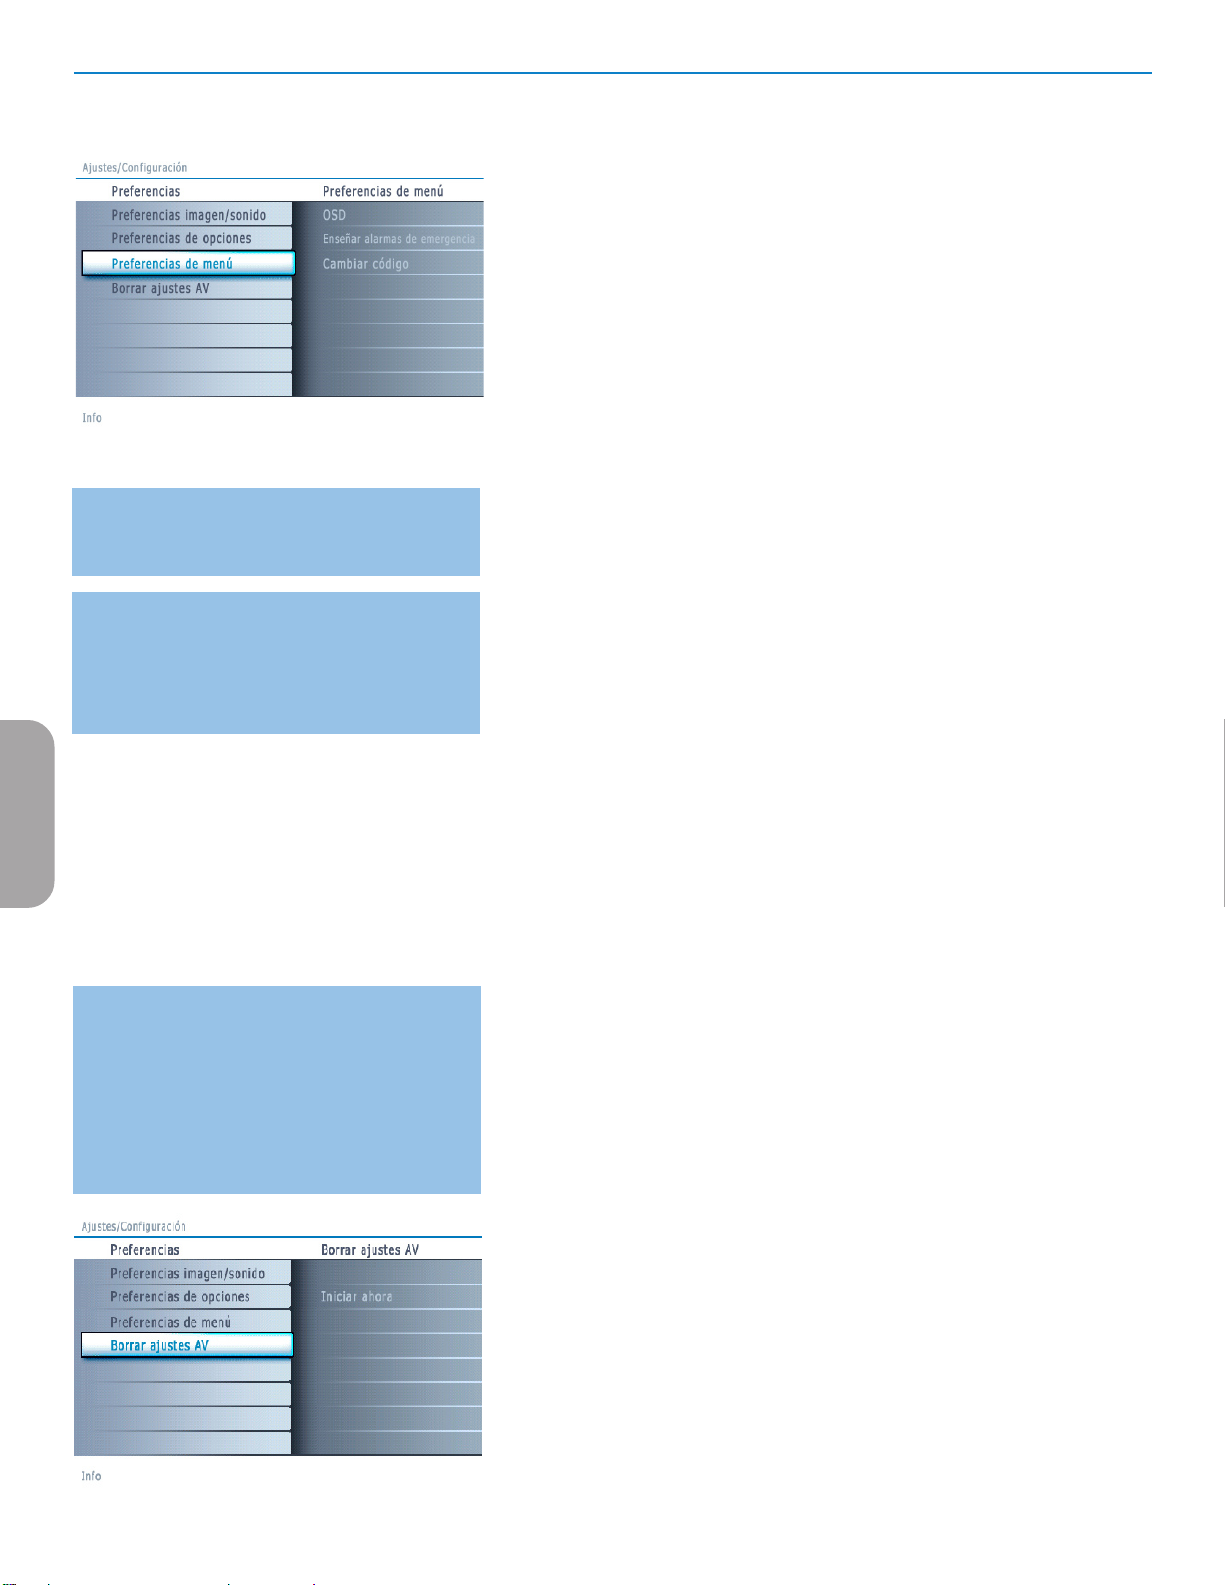
Nota: no es posible recibir alarmas de emergencia:
- mientras se navega por los contenidos;
- con fuentes de video analógicos..
Notas:
- Siempre se cuenta con la posibilidad de borrar el
mensaje de la pantalla.
- La pantalla de mensaje se superpone a cualquier
opción de menú u otro mensaje en pantalla.
Preferencias de menú
OSD
& Seleccione OSD.
é Oprima el cursor derecho para seleccionar Normal o Mínimo.
Normal activa la visualización continua del número de canal (máx. 10
minutos), la visualización ampliada del canal de televisión y la información
del programa en pantalla. Por ejemplo, la información sobre el programa
principal o secundario, calidad de la señal de entrada de los equipor
periféricos, formato de pantalla, modo de sonido, disponibilidad del
servicio de subtítulos, idioma del sonido, clasificación o configuración del
temporizador.
Mínimo activa la visualización de información reducida del canal.
Nota: Cuando se ha activado la opción de subtítulos, no es posible la visualización
continua de número de canal y reloj.
Mostrar alarmas de emergencia (EAS)
Permite seleccionar el nivel de prioridad de alarma de la información
difundida por el operador de cable. La norma SCTE18 define un método de
señal de alarma de emergencia que pueden utilizar los sistemas de TV por
cable para enviar señales de emergencia a dispositivos digitales, tales como
receptores digitales y televisores o VCR digitales.
El esquema de señales de alarma de emergencia que define la norma
permite al operador de cable difundir información de alarma referente
a emergencias y advertencias en grandes regiones o en zonas locales, de
manera económica y eficaz, al tiempo que se reduce la interrupción de la
programación.
Los mensajes de alarma de emergencia pueden tener una de las prioridades
siguientes: Baja, Media, Alta o Máxima.
Siempre se presentan los mensajes de alarma de emergencia de prioridad
Alta o Máxima. Las alarmas de prioridad Baja o Media podrán
presentarse o no, dependiendo de la configuración seleccionada.
Importante: si el reloj del televisor no se ha ajustado (consulte menú
Configuración, Reloj, pág. 13), las alarmas de emergencia no se registran.
Español
Importante: si ha olvidado su código
& Seleccione Cambiar Código en el Menú
preferencias y oprima el cursor derecho.
é Oprima el cursor derecho para introducir el
código de cancelación 0-7-1-1.
“ Vuelva a oprimir el cursor e introduzca un
código personal de 4 dígitos. Se borra el código
anterior y se almacena el nuevo.
El mensaje de alarma de emergencia contiene la siguiente información:
- El texto de la alarma de emergencia
- La hora y fecha de inicio
- La hora y fecha de finalización
& Seleccione Enseñar alarmas de emergencia en el menú Preferencias.
é Oprima el cursor derecho y seleccione una de las opciones de alarmas de
emergencia:
- Siempre, si desea que los mensajes de alarma de emergencia aparezcan en
pantalla cuando estén disponibles;
- Suprimir baja prioridad, si no desea recibir los mensajes de prioridad baja;
- Suprimir prioridad media/baja, si solo desea recibir los mensajes de
prioridad alta.
Configurar/Cambiar Código
& Seleccione Determinar o Cambiar Código, utilizando el cursor abajo.
é Si aún no existe código, la opción de menú aparece en Determinar
Código. Siga las instrucciones en pantalla.
Si ha introducido un código anteriormente, la opción del menú aparece en
Cambiar Código. Siga las instrucciones en pantalla.
Todas las combinaciones de números de 0000 a 9999 son válidas.
“ El Menú Preferencias de menú reaparecerá con un mensaje que confirma
que el código se ha creado.
Borrar ajustes AV
Esta función permite recuperar la mayoría de las configuraciones de imagen y
sonido de fábrica.
& Seleccione Borrar ajustes AV con el cursor abajo.
é Oprima el cursor derecho.
“ Oprima el botón OK para borrar los ajustes y recuperar los valores
predeterminados.
12
Page 97
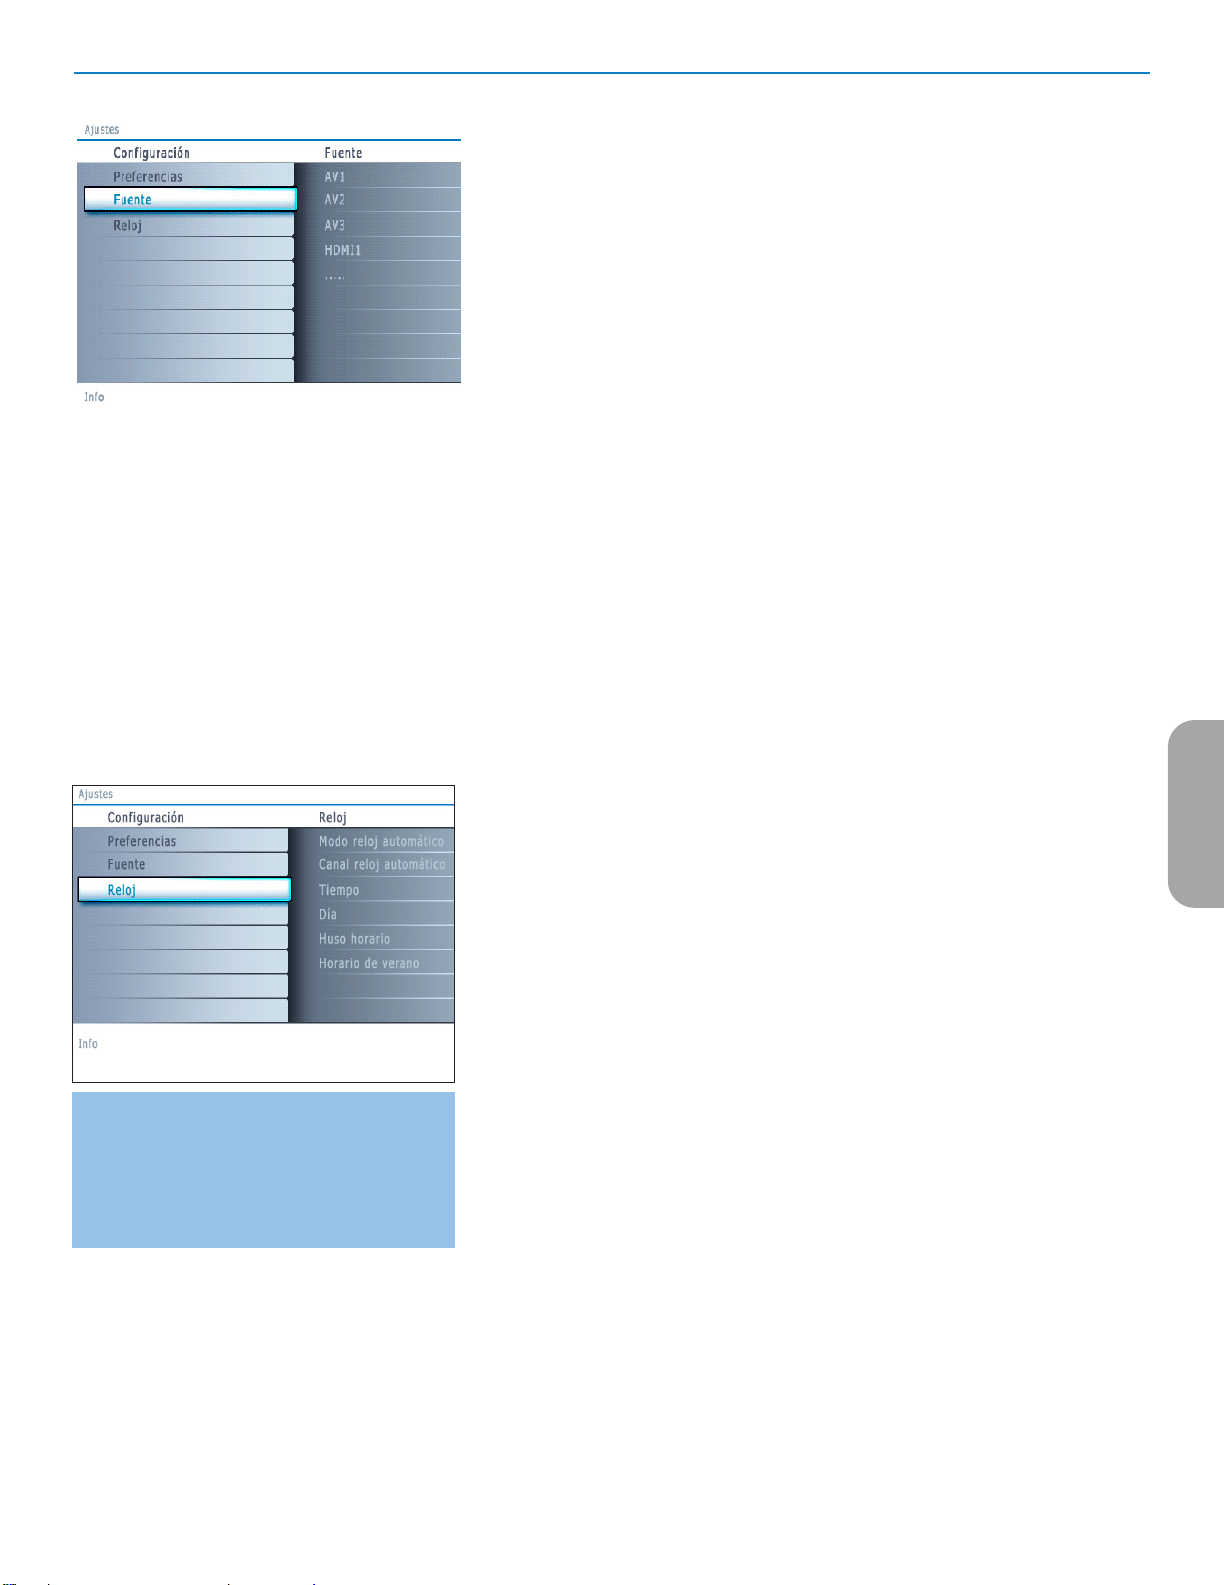
Fuente
Este menú permite identificar los equipos periféricos que tenga conectados a las
entradas/salidas externas.
& Seleccione Fuente en el menú Configuración.
é Oprima el cursor derecho para acceder a la lista de tipos de periféricos conectados
a la entrada seleccionada.
“ Seleccione el dispositivo periférico con el cursor arriba/abajo.
Al seleccionar AV1, AV2, AV3, HDMI, Side o Analog Audio In, aparece una
lista para identificar el tipo de accesorio que se encuentra conectado a la entrada
respectiva.
Reloj
Esta opción permite utilizar el televisor como reloj.
Nota:
- El ajuste del reloj es necesario para el funcionamiento correcto de Bloquear después (consulte
Ajustes de TV, Canales, pág. 17).
- Los subtitulos no pueden ser desplegados al mismo tiempo que el reloj. Presione nuevamente
el botón CLOCK para apagar el reloj, si usted desea ver subtitulos.
La mayoría de los canales de TV no transmiten
información horaria. Algunos pocos canales de cable
lo hacen, pero no son de los más importantes. Los
canales de antena no transmiten información horaria.
En tales casos, la captación de hora requiere mucho
tiempo o directamente no exite reloj.
Modo reloj automático
& Seleccione Reloj en el menú configuración.
é Oprima el cursor derecho para seleccionar el Modo reloj automático.
“ Oprima el cursor derecho para indicar al televisor que obtenga la hora de manera
automática o manual.
Canal reloj automático (solo disponible cuando Modo reloj automático está ajustado en
Automático)
Con los botones del cursor, elija el número de canal en el que el televisor puede
obtener la hora. Normalmente, la hora se puede hallar en PBS y el otros canales.
Nota: si ha elegido Manual en Modo reloj automático, no se puede seleccionar la opción de
menú Canal reloj automático.
Tiempo - Día (solo está disponible cuando Modo reloj automátivo está ajustado como Manual)
Con los botones de cursor, elija e introduzca la hora exacta y el día.
Si ha elegido Modo reloj Automático Manual y no se ha realizado la búsqueda, el
sistema mantendrá la hora y la fecha que se introdujeron.
Huso Horario (solo disponible cuando Modo reloj automático está ajustado en Automático)
Esta función permite seleccionar el huso horario local. La información horaria
transmitida sincroniza el reloj con la hora local.
& Seleccione Huso Horario con el cursor abajo.
é Oprima el cursor derecho para seleccionar el huso horario local.
Horario de Verano (solo disponible cuando Modo reloj automático está ajustado en Automático)
El horario de verano se configura de manera automática mediante señales
transmitidas especialmente. Esta opción de menú permite desactivar el ajuste
automátivo de horario de verano. Esto resulta útil si se reside en una zona en la que
no se aplica el horario de verano, pero se reciben canales de otras zonas donde se
transmiten las señales de dicho horario.
& Seleccione Horario de Verano con el cursor abajo.
é Oprima el cursor derecho para seleccionar Automático, de modo que el reloj
se adapte de manera automática al horario de verano, basándose en las señales
especiales emitidas.
“ Seleccione Apagado para desactivar la corrección automática del reloj basada en
señales transmitidas especialmente.
Español
13
Page 98
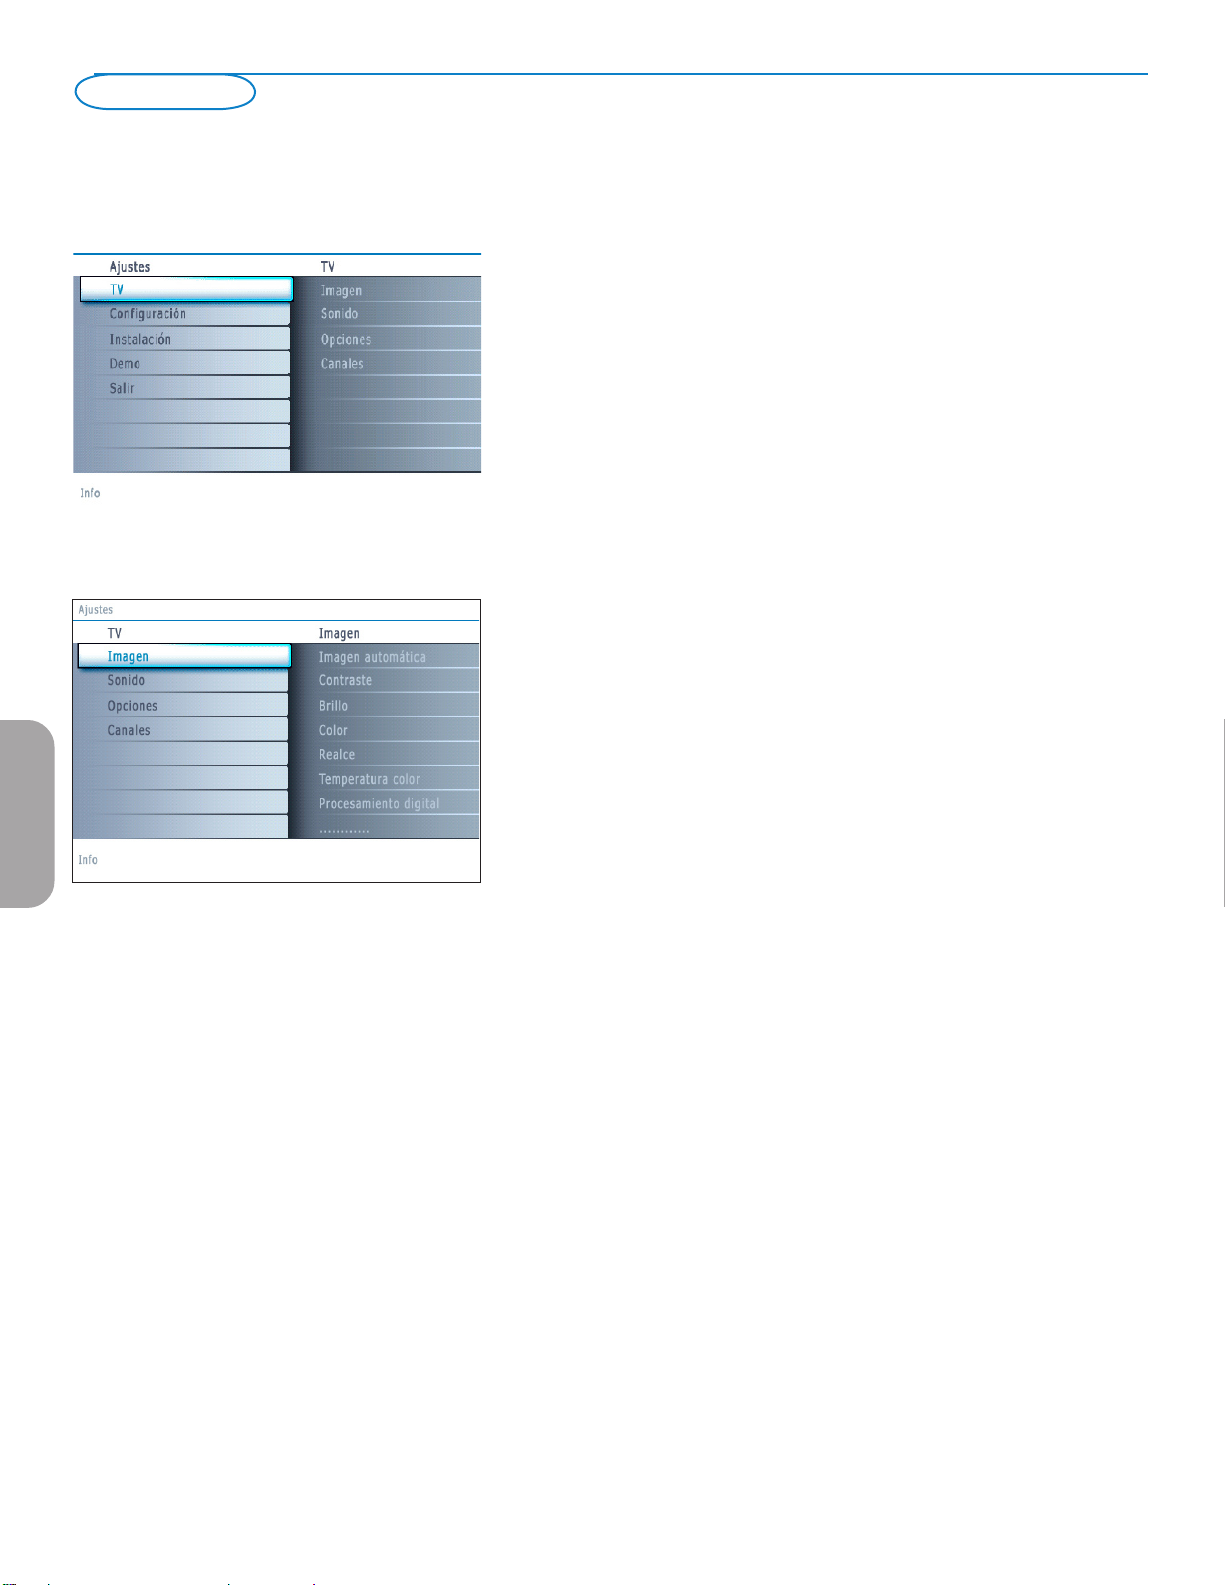
Menú TV
Oprima el botón MENU del control remoto para ir al menú Ajustes. El menú TV
ofrece un resumen de los menús que puede seleccionar.
Nota: Dependiendo de la señal de entrada, es posible que no se pueda seleccionar una o
más opciones de menú
Menú Imagen
Nota: algunas opciones de menú no están disponibles en el caso de fuentes HD.
& Oprima el cursor derecho para seleccionar Imagen.
é Vuelva a oprimir el cursor derecho para acceder al menú Imagen.
“ Seleccione las opciones de menú con el cursor arriba/abajo
‘ Ajuste la configuración con el cursos derecho/izquierdo o acceda a la lista
de opciones de submenú con el cursor derecho. Seleccione una opción del
submenú con el cursor arriba/abajo.
Auto Picture
Seleccione Imagen Automática para ver una lista de ajustes de imagen
predefinidos, correspondientes a los ajustes específicos de fábrica.
Personal hace referencia a los ajustes personales que se realizan en el menú
imagen.
Nota: este televisor de Philips se ha ajustado en fábrica para que ofrezca una imagen
óptima en ambientes muy iluminados, como en los que se utilizan luces fluorecentes.
Como los hogares no suelen tener las condiciones de iluminación de los comercios,
se recomienda que pruebe todos los modos de imagen automática hasta encontrar
el más adecuado para sus condiciones particulares. La mayoría de los usuarios
consideran que Natural es el mejor ajuste.
Español
Contraste
Ajusta la intensidad de las partes brillantes de la imagen, sin afectar a las zonas
oscuras.
Brillo
Ajusta la salida de la luz de toda la imagen, que afecta principalmente a las
zonas más oscuras de la imagen.
Color
Ajusta el nivel de saturación de los colores para adecuarlo a los gustos
personales.
Realce
Ajusta la nitidez de los detalles pequeños de la imagen.
Temperatura color
Aumenta o reduce los colores Cálido (rojo) y Fresco (azul) para adaptarlos a
los gustos personales.
Seleccione Fresco para dar un tono azulado a los blancos, Normal para dar a
los blancos un tono neutro, o Cálido para dar a los blancos un tono rojizo.
Procesamiento Digital
• Estándar = el doblado de líneas elimina el parpadeo.
• Pixel Plus = Pixel Plus es el mejor ajuste para el visionado diario, ya que
procesa la imagen por completo para optimizar al máximo cada pixel,
mejorando contraste, nitidez, profundidad, reproducción del color y brillo
del contenido procedentes dd todas las fuentes, incluida la Alta Definición.
Estandar es el modo que se recomienda sólo para fuentes con masterización
muy ruidosa o deficiente, o en el caso de quienes no se sienten cómodos con
la fluidez de Pixel Plus (que elimina el parpadeo de la imagen).
Contraste dinámico
Resalta automáticamente el contraste en las zonas más oscuras y más claras de
la imagen cuando cambia la imagen de la pantalla.
Normalmente seleccione Máximo. Algunos usuarios pueden preferir
seleccionar Mínimo, Máximo or Apagado.
& Oprima el cursor derecho para acceder a la lista.
é Seleccione uno de los ajustes con el cursor arriba/abajo.
“ Oprima el cursor izquierdo para volver al menú Imagen.
14
Page 99

DNR (Reducción digital del ruido)
Esta opción filtra y reduce automáticamente el efecto de ruido y mejora la
calidad de imagen cuando se reciben señales de video débiles.
& Oprima el cursor derecho para acceder a la lista.
é Seleccione Apagado, Mínimo, Medio o Máximo según el ruido de la imagen
presente.
“ Oprima el cursor izquierdo para volver al menú Imagen.
Realce del color
Cuando se activa, esta función controla automáticamente la mejora del verde y
la dilatación del azul. Da vivacidad a los colores.
& Oprima el cursor derecho.
é Seleccione Encendido o Apagado con el cursor derecho para activar/desactivar
el Realce del Color.
Matiz
Este control permite seleccionar la mezcla de color (tonalidad) de la imagen.
Formato de pantalla
Esta opción de menú ejecuta la misma función que el botón FORMAT del
control remoto. Consulte Uso del Control remoto, pág. 6.
Active Control
El televisor mide continuamente todas las señales de entrada y las corrige para
proporcionar la mejor calidad de imagen posible.
& Seleccione Active Control.
é Oprima el cursor derecho para acceder a la lista de valores de Active Control.
“ Oprima el cursor derecho varias veces para seleccionar los valores de Active
Control Apagado, Mínimo, Medio o Máximo.
Los ajustes de imagen se optimizan de manera continua. Esas opciones de menú
no pueden seleccionarse.
‘ Oprima el botón OK o espere a que se agote el tiempo para salir de la pantalla
de Active Control.
Menú Sonido
& Seleccione Sonido en el menú Ajustes, TV.
é Oprima el cursor derecho para acceder al menú Sonido.
“ Seleccione las opciones de menú con el cursor arriba/abajo y ajuste la
configuración con el cursor derecho/izquierdo.
Recuerde que los ajustes de control están a nivel normal medio cuando se
centra la escala de la barra.
Español
Auto sound
Seleccione Sonido Automático para ver una lista de ajustes de sonido
predefinidos, correspondientes a los ajustes específicos de fábrica de Agudos y
Bajos.
& Oprima el cursor derecho para acceder a la lista.
é Seleccione un ajuste de sonido predefinido con el cursos arriba/abajo.
Personal hace referencia a los ajustes personales que se realizan en el menú
Sonido.
Nota: cuando se está en un ajuste predefinido de sonido y se modifica un ajuste en
el menú Sonido, todos los valores del mená sustituyen al ajuste personal realizado
previamente.
Volumen
Esta función permite ajustar el nivel de salida del sonido.
Balance
Con esta opción se ajusta la salida de los altavoces derecho e izquierdo, para
obtener la mejor reproducción estereofónica teniendo en cuenta su posición de
escucha.
15
Page 100

Volumen del auricular
Permite controlar el nivel de sonido de los auriculares.
Modo Sonido
Permite seleccionar los modos para una reproducción de sonido más espacial o
surround, dependiente de las señales de emisión o de las señales procedentes de
entradas externas.
Alternar audio (solo seleccionable con las señales de emisión analógicas)
Esta función permite cambiar entre el Programa Audio Principal y Secundario
(SAP) cuando esté disponible.
Idioma de audio digital (solo seleccionable con las señales de emisión digitales)
Permite seleccionar la preferencia de Idioma en el caso de programas con pistas
de sonido multilingües, si están disponibles con señal de transmisión digital.
Nota: el idioma predefinido de los canales digitales es el definido en el menú de
instalación.
Mono/Estéreo
Esta opción permite seleccionar, en cada programa de TV, el sonido mono o
estéreo cuando hay disponibles emisiones analógicas en estéreo.
AVL (Nivelador automático de volumen) (solo disponibles con las señales de emisión
analógicas y non-Dolby Digital)
Con esta función se reducen automáticamente las diferencias de volumen entre
canales y programas, ofreciendo un nivel general más constante.
También reduce la dinámica del sonido.
Español
Nivelador de Volumen
Permite corregir cualquier diferencia de volumen permanente entre los canales de
TV o las fuentes externas.
Menú Funciones
& Seleccione Opciones en el menú Ajustes, TV.
é Oprima el cursor derecho para acceder al menú Opciones.
“ Seleccione las opciones de menú con el cursor arriba/abajo y ajuste la
configuración con el cursor derecho/izquierdo.
Subtítulos encapsulados
Esta opción permite ver en pantalla el texto CC o CS transmitido, según el
servicio CC o CS seleccionado en el menú Configuración, Preferencias de
Opciones, pág. 10. Dicho texto puede verse permanentemente en pantalla
(suponiendo que el servicio esté disponible en la emisión) o solo cuando se
desactiva el sonido.
& Oprima el cursor derecho después de seleccionar Subtítulos.
é Seleccione Encendido, Apagado o Pantalla sin sonido.
Temporizador de apagado programado
Permite establecer un periodo de tiempo después del cual el televisor cambia
automáticamente al modo "en espera".
& Seleccione Temporizador.
é Oprima el cursor derecho.
“ Seleccione un valor con el cursor arriba/abajo. La lista muestra valores desde 0
hasta 180 minutos.
Cuando 0 es seleccionado, el temporizador queda desactivado.
Siempre podrá apagar el televisor antes del tiempo señalado o seleccionar otro
ajuste de tiempo.
Fabricado bajo licencia de Dolby Laboratories
"Dolby" "Pro Logic" y el símbolo de doble D son
marcas registradas de Dolby Laboratories.
16
 Loading...