

Page 1

User Manual
Manuel de l’utilisateur
Guía del usuario
42MD459B
LCD TV/BD/DVD
English
1-866-341-3738
1-866-341-3738
Quick Use Guide Inside!
Guide d’usage Rapide Incluse!
Guía de Uso Rápido Incluida!
HIGH-DEFINITION TELEVISION
1-866-341-3738
Français
Español
MODEL NUMBER SERIAL NUMBER
Page 2

Return your Product Registration Card or register online at
www.magnavox.com/support today to get the very most from your purchase.
Registering your model with MAGNAVOX makes you eligible for all of the valuable benets listed below, so don’t miss out.
Complete and return your Product Registration Card at once,
or register online at www.magnavox.com/support to ensure:
*Proof of Purchase
Returning the enclosed card
guarantees that your date of
purchase will be on le, so no
additional paperwork will be
required from you to obtain
warranty service.
Congratulations on your purchase,
and welcome to the “family!”
Dear MAGNAVOX product owner:
Thank you for your condence in
MAGNAVOX. You’ve selected one of the
best-built, best-backed products available today.
We’ll do everything in our power to keep you happy
with your purchase for many years to come.
As a member of the MAGNAVOX “family,” you’re
entitled to protection by one of the most
comprehensive warranties and outstanding service
networks in the industry. What’s more, your
purchase guarantees you’ll receive all the
information and special oers for which you qualify,
plus easy access to accessories from our convenient
home shopping network.
Most importantly, you can count on our
uncompromising commitment to your total
satisfaction.
All of this is our way of saying welcome - and
thanks for investing in a MAGNAVOX product.
*Product Safety
Notication
By registering your product, you’ll
receive notication directly from
the manufacturer - in the rare
case of a product recall or safety
defect.
Know these safety symbols
This “bolt of lightning” indicates
uninsulated material within your unit
may cause an electrical shock. For the safety
of everyone in your household, please do not
remove product covering.
The “exclamation point” calls attention to
features for which you should read the enclosed literature closely to prevent operating
and maintenance problems.
WARNING : To reduce the risk of re or
electric shock, this apparatus should not be
exposed to rain or moisture and objects lled
with liquids, such as vases, should not be
placed on this apparatus.
CAUTION : To prevent electric shock, match
wide blade of plug to wide slot, fully insert.
ATTENTION : Pour éviter les choc électriques,
introduire la lame la plus large de la che dans
la borne correspondante de la prise et pousser
jusqu’au fond.
*Additional Benets
Registering your product
guarantees that you’ll receive all
of the privileges to which you’re
entitled, including special
money-saving oers.
P.S. To get the most from your MAGNAVOX
purchase, be sure to complete and return your
Product Registration Card at once or register
online at:
www.magnavox.com/support
Visit our World Wide Web Site at www.magnavox.com/support
2
EN
For Customer Use
Enter below the Serial No. which is located
on the rear of the cabinet. Retain this
information for future reference.
Model No._____________________________
Serial No. _____________________________
Page 3
IMPORTANT SAFETY INSTRUCTIONS
Read before operating equipment
Read these instructions.
1.
Keep these instructions.
2.
Heed all warnings.
3.
Follow all instructions.
4.
Do not use this apparatus near water.
5.
Clean only with a dry cloth.
6.
7.
Do not block any of the ventilation openings.
Install in accordance with the manufacturers instructions.
8.
Do not install near any heat sources such as radiators, heat
registers, stoves, or other apparatus (including ampliers)
that produce heat.
Do not defeat the safety purpose of the polarized or
9.
grounding-type plug. A polarized plug has two blades with
one wider than the other. A grounding type plug has two
blades and third grounding prong. The wide blade or third
prong are provided for your safety. When the provided
plug does not t into your outlet, consult an electrician for
replacement of the obsolete outlet.
Protect the power cord from being walked on or pinched
10.
particularly at plugs, convenience receptacles, and the point
where they exit from the apparatus.
Only use attachments/accessories specied by the
11.
manufacturer.
12
13.
14.
15.
Use only with a cart, stand, tripod, bracket, or table
specied by the manufacturer, or sold with the appara-
tus. When a cart is used, use caution when moving the
cart/apparatus combination to avoid injury from tip-over.
Unplug this apparatus during lightning storms or when unused for long periods of time.
Refer all servicing to qualied service personnel. Servicing is
required when the apparatus has been damaged in any way,
such as power-supply cord or plug is damaged, liquid has
been spilled or objects have fallen into apparatus, the apparatus has been exposed to rain or moisture, does not operate
normally, or has been dropped.
Damage Requiring Service - The appliance should be
serviced by qualied service personnel when:
A. The power supply cord or the plug has been damaged;
B. Objects have fallen, or liquid has been spilled into the
appliance;
C. The appliance has been exposed to rain
D. The appliance does not appear to operate normally or
exhibits a marked change in performance;
E. The appliance has been dropped, or the enclosure damaged.
16.
Tilt/Stability - All televisions must comply with
recommended international global safety standards for tilt
and stability properties of its cabinet design.
• Do not compromise these design standards by applying
excessive pull force to the front, or top, of the cabinet
which could ultimately overturn the product.
• Also, do not endanger yourself, or children, by placing
electronic equipment/toys on the top of the cabinet. Such
items could unsuspectingly fall from the top of the set and
cause product damage and/or personal injury.
17.
Wall or Ceiling Mounting - The appliance should be
mounted to a wall or ceiling only as recommended by the
manufacturer.
18.
Power Lines - An outdoor antenna should be located away
from power lines.
19.
Outdoor Antenna Grounding - If an outside antenna is
connected to the receiver, be sure the antenna system is
grounded so as to provide some protection against voltage
surges and built up static charges.
Section 810 of the National Electric Code, ANSI/NFPA
No. 70-1984, provides information with respect to proper
grounding of the mast and supporting structure, grounding of the lead-in wire to an antenna discharge unit, size of
grounding connectors, location of antenna-discharge unit ,
connection to grounding electrodes, and requirements for
the grounding electrode. See Figure below.
20.
Object and Liquid Entry - Care should be taken so that
objects do not fall and liquids are not spilled into the enclosure through openings.
21.
Battery Usage CAUTION - To prevent battery leakage
that may result in bodily injury, property damage, or
damage to the unit:
• Install all batteries correctly, with + and - aligned as
marked on the unit.
• Do not mix batteries (old and new or carbon and
alkaline, etc.).
• Remove batteries when the unit is not used for a long
time.
Note to the CATV system installer : This reminder is provided to call the CATV system installer’s attention to Article
820-40 of the NEC that provides guidelines for proper grounding and, in particular, species that the cable ground shall
be connected to the grounding system of the building, as close to the point of cable entry as practical.
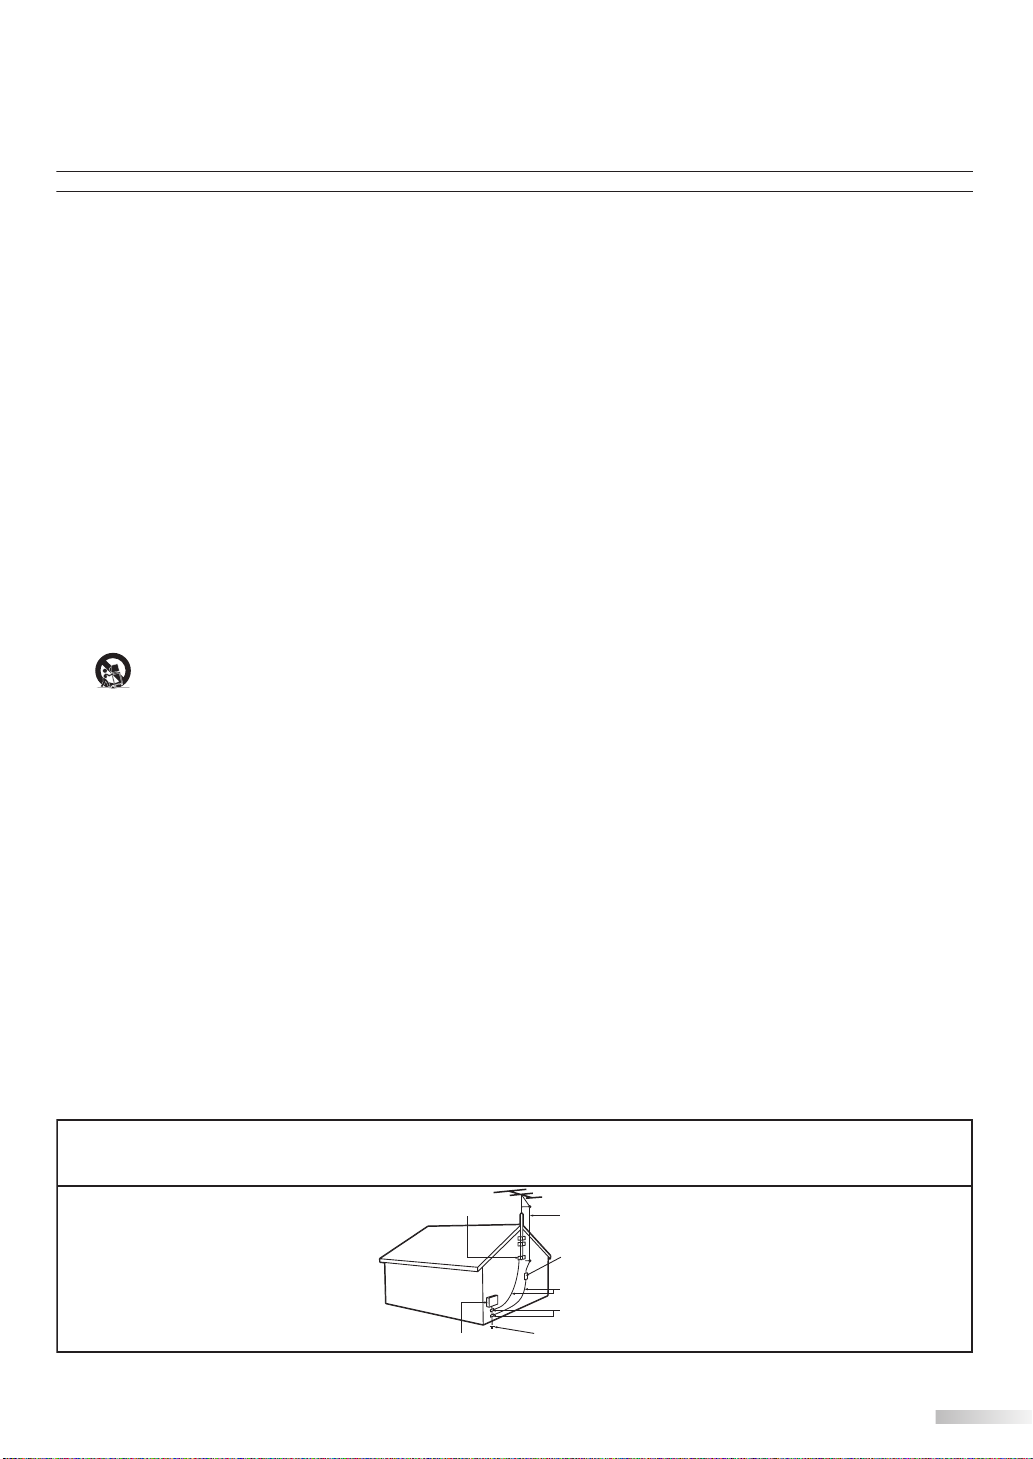
Example of Antenna Grounding as
per NEC - National Electric Code
GROUND CLAMP
ELECTRIC SERVICE EQUIPMENT POWER SERVICE GROUNDING ELECTRODE SYSTEM (NEC ART 250, PART H)
ANTENNA LEAD IN WIRE
ANTENNA DISCHARGE UNIT (NEC SECTION 810-20)
GROUNDING CONDUCTORS (NEC SECTION 810-21)
GROUND CLAMPS
3
EN
Page 4
NTRODUCTION
I
5 Precaution
Do not place the unit on the furniture that is capable of being tilted by a child and an adult leaning, pulling, standing or climbing
on it. A falling unit can cause serious injury or even death.
FCC WARNING
This apparatus may generate or use radio frequency energy. Changes or modifications to this apparatus may cause harmful
interference unless the modifications are expressly approved in the manual. The user could lose the authority to operate this
apparatus if an unauthorized change or modification is made.
RADIO-TV INTERFERENCE
This apparatus has been tested and found to comply with the limits for a Class B digital device, pursuant to Part 15 of the FCC
Rules. These limits are designed to provide reasonable protection against harmful interference in a residential installation.
This apparatus generates, uses, and can radiate radio frequency energy and, if not installed and used in accordance with the
instructions, may cause harmful interference to radio communications. However, there is no guarantee that interference will
not occur in a particular installation. If this apparatus does cause harmful interference to radio or television reception, which
can be determined by turning the apparatus off and on, the user is encouraged to try to correct the interference by one or
more of the following measures:
1) Reorient or relocate the receiving antenna.
2) Increase the separation between the apparatus and receiver.
3) Connect the apparatus into an outlet on a circuit different from that to which the receiver is connected.
4) Consult the dealer or an experienced radio/TV technician for help.
DECLARATION OF CONFORMITY
Trade Name: MAGNAVOX Responsible Party: FUNAI CORPORATION, INC.
Model: 42MD459B Address: 201 Route 17 North Suite No. 903 Rutherford, New Jersey 07070 U.S.A.
Telephone Number: 201-727-4560
This Class B digital apparatus complies with Canadian ICES-003.
This apparatus should not be placed in a built-in installation such as a bookcase or rack unless proper ventilation is provided.
Make sure to leave a space of 4 inches (10cm) or more around this apparatus.
Disconnect the mains plug to shut off when find trouble or not in use. The mains plug shall remain readily operable.
CAUTION: Danger of explosion if battery is incorrectly replaced. Replace only with the same or equivalent type.
WARNING: Batteries (battery pack or battery installed) shall not be exposed to excessive heat such as sunshine, fire or the like.
Like all LCD products, this set contains a lamp with Mercury, please dispose of according
to all Local, State and Federal laws. For the disposal or recycling information, contact:
www.mygreenelectronics.com or www.eiae.org
WARNING: To prevent injury, this apparatus must be securely attached to the floor/wall in accordance with the instructions.
LASER SAFETY
This unit employs a laser. Only a qualified service person should remove the cover or attempt to service this device, due
to possible eye injury.
CAUTION: Use of controls or adjustments or performance of procedures other than those specified herein may result in
hazardous radiation exposure.
CAUTION: Visible and invisible laser radiation when open and interlock defeated. Do not stare into beam.
LOCATION:
IMPORTANT COPYRIGHT INFORMATION
Unauthorized copying, broadcasting, public performance and lending of discs are prohibited. This product incorporates
copyright protection technology that is protected by U.S. patents and other intellectual property rights. Use of this
copyright protection technology must be authorized by Macrovision, and is intended for home and other limited
viewing uses only unless otherwise authorized by Macrovision. Reverse engineering or disassembly is prohibited.
Inside, near the deck mechanism.
4
EN
Page 5
TO AVOID THE HAZARDS OF ELECTRICAL SHOCK AND FIRE
• Do not handle the AC power cord with wet hands.
• Do not remove this unit's cabinet. Touching parts inside the cabinet could result in electric shock and/or damage to this
unit. For service and adjustment inside the cabinet, call a qualified dealer or an authorized service center.
• Do not pull on the AC power cord when disconnecting it from an AC outlet. Grasp it by the plug.
• Do not put your fingers or objects into the unit.
LOCATION AND HANDLING
• The openings should not be blocked by placing the unit on a bed, sofa, carpet, rug, or other similar surface.
• Do not install the unit near or over a radiator or heat register.
• Do not install the unit in direct sunlight, near strong magnetic fields, or in a place subject to dust or strong vibration.
• Avoid a place with drastic temperature changes.
• Install the unit in a horizontal and stable position. Do not place anything directly on top or bottom of the unit.
Depending on your external devices, noise or disturbance of the picture and/or sound may be generated if the unit is
placed too close to them. In this case, please ensure enough space between the external devices and the unit.
• Depending on the environment, the temperature of this unit may increase slightly. This is not a malfunction.
DEW CONDENSATION WARNING
• Dew condensation may form inside the unit in the following conditions. If so, do not use this unit at least for a few
hours until its inside gets dry.
- The unit is moved from a cold place to a warm place.
- Under conditions of high humidity.
- After heating a cold room.
NOTE ABOUT RECYCLING
• This unit’s packaging materials are recyclable and can be reused.
Please dispose of any materials in accordance with your local recycling regulations.
• Batteries should never be thrown away or incinerated but disposed of in accordance with your local
regulations concerning chemical wastes.
INTRODUCTION PREPARATION
WATCHING TV
OPTIONAL SETTING
OPERATING BLU-RAY
WHEN CARRYING THIS UNIT
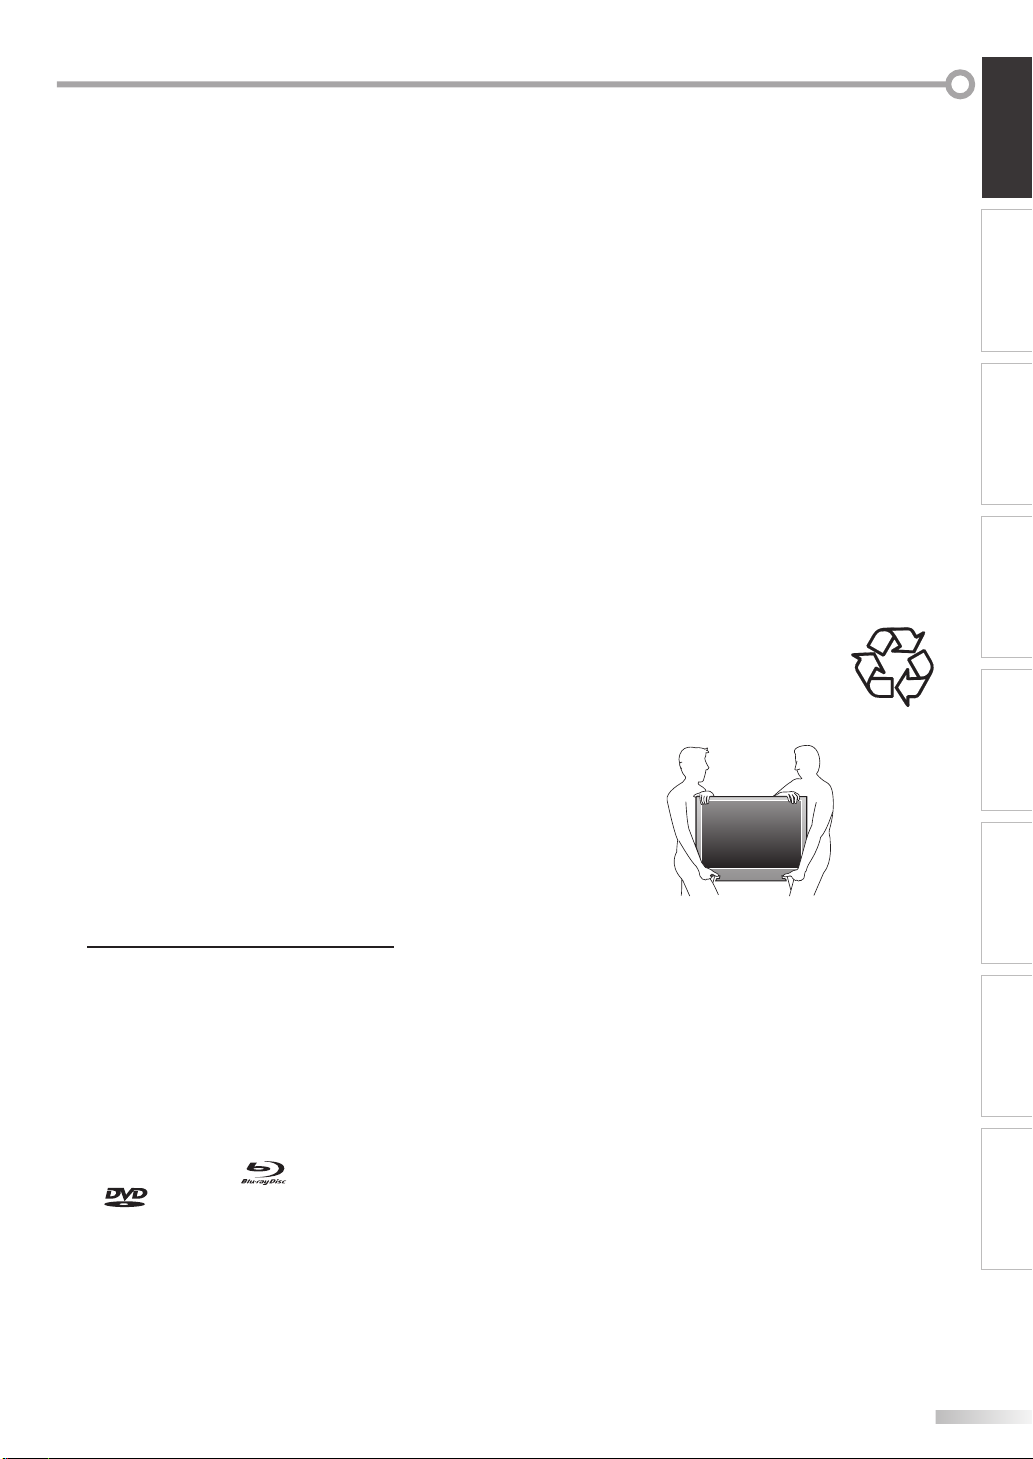
• At least two people are required when carrying this unit.
• Make sure to hold the upper and bottom frames of the TV firmly as illustrated.
5 Trademark Information
• HDMI, the HDMI logo and High-Definition Multimedia Interface are trademarks or registered trademarks of HDMI
Licensing LLC.
• Manufactured under license from Dolby Laboratories. “Dolby” and the double-D symbol are trademarks of Dolby
Laboratories.
• Manufactured under license under U.S. Patent #’s: 5,451,942; 5,956,674; 5,974,380; 5,978,762; 6,487,535 & other U.S.
and worldwide patents issued & pending. DTS and DTS 2.0 + Digital Out are registered trademarks and the DTS
logos and Symbol are trademarks of DTS, Inc. © 1996-2008 DTS, Inc. All Rights Reserved.
• Products that have earned ENERGY STAR® are designed to protect the environment through superior energy
efficiency.
• “Blu-ray Disc“ and
•
• “BONUSVIEW” is a trademark of Blu-ray Disc Association.
• Java and all other Java trademarks and logos are trademarks or registered trademarks of Sun Microsystems, Inc. in
is a trademark of DVD Format/Logo Licensing Corporation.
the United States and / or other countries.
are trademarks.
BLU-RAY SETTING TROUBLESHOOTING
INFORMATION
EN
5
Page 6
NTRODUCTION
➁
screw holes
I
5 Symbols Used in this Manual
The following is the description for the symbols used in this manual. Description refers to:
TV FUNCTIONS BLURAY FUNCTIONS
BD
: Playback of BD-video
TV
: Analog TV operation
DTV
: Digital TV operation
• If neither symbol appears under the function heading,
operation is applicable to both.
• If none of symbol appears under the function heading,
operation is applicable to all.
DVD
: Playback of DVD-video
CD
: Playback of audio CD
5 Supplied Accessories
user manual
(1EMN24659)
quick start guide
(1EMN24663)
main remote
control
(NF034UD)
simple remote
control (NH100UD)
registration card
(1EMN24699)
screw kit for
attaching the stand
(1ESA20607)
batteries
(AA x 2)
AA
AA
• If you need to replace these accessories, please refer to the part No. with the illustrations and call our toll free
customer support line found on the cover of this manual.
batteries
(AAA x 2)
AAA
cable
management tie
(1EM428657)
AAA
AC power cord
(WAV0162LW001) or
(WAV0162LTE03)
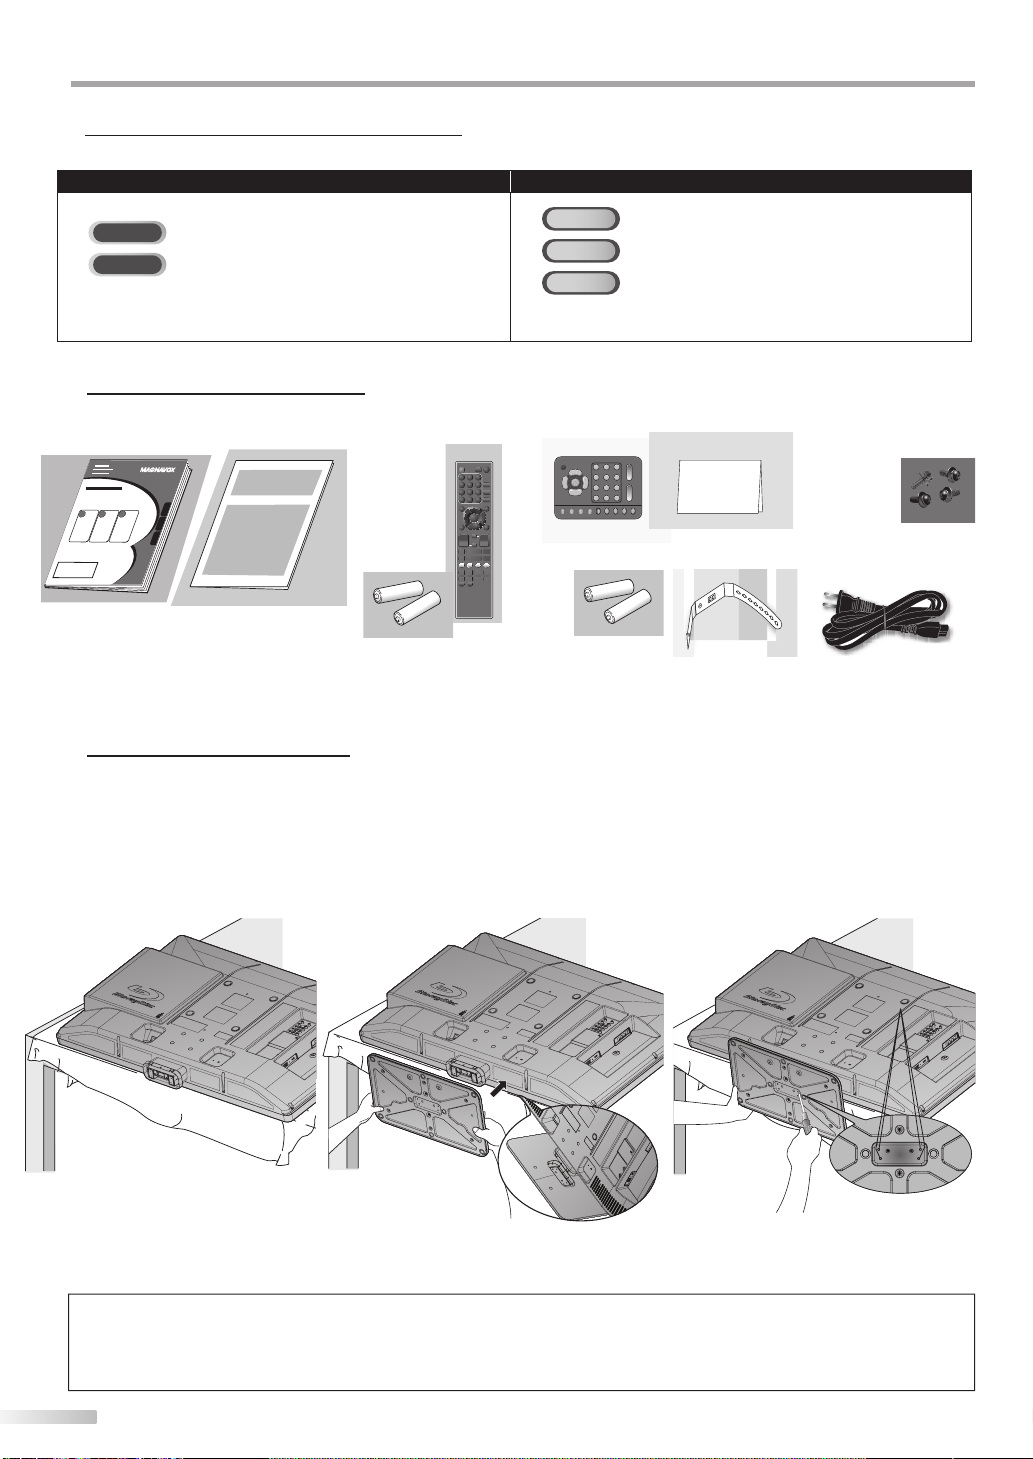
5 Attaching the Stand
You must attach the stand to the unit to have it as a table top unit. Be sure the front and rear of the stand match the proper
direction.
Spread a thick and soft cloth over a
1
table as shown below.
Place the main unit face down onto it.
Make sure not to damage the screen.
At least two people are required at
this step.
Insert the neck under the bottom
2
of the main unit to the stand’s hole
(shown by arrow
➀
).
➀
front side
Drive Phillips pan screws in the 4
3
threaded holes at the bottom of the
stand until they are tight.
screw holes
➁
To remove the stand from this unit
Unscrew the Phillips pan screws indicated by above “➁”screw
holes. After the screws are removed pull the stand up toward
the rear of the unit. Be careful not to drop the stand when you
remove it.
Note:
• When attaching the stand, ensure that all screws are tightly fastened. If the stand is not properly attached, it could cause the unit to fall,
resulting in injuries as well as damage to the unit.
• Make sure to use a table which can support the weight of this unit and is larger than this unit.
• Make sure the table is in a stable location.
6
EN
Page 7

5 Features
INTRODUCTION PREPARATION
TV BD/DVD
• DTV/TV/CATV
- You can use your remote control to select
channels which are broadcast in digital format and
conventional analog format. Also, cable subscribers
can access their cable TV channels.
• Information Display (DTV only)
- You can display the title, contents and other
information of the current DTV program on the TV
screen.
• Autoprogram
- This unit automatically scans and memorizes
channels available in your area, eliminating difficult
setup procedures.
• Child Lock
- This feature allows you to block children’s access to
inappropriate programs.
• Closed Caption Decoder
- Built-in closed caption decoder displays text for
closed caption supported programs.
• MTS/SAP Tuner
- Audio can be selected from the remote control.
• Auto Shut Off Function
- If there is no signal input from the antenna terminal
and no operation for 15 minutes, the unit will turn
off automatically.
• Sleep Timer
- This feature will automatically turn off the power of
the unit at a specific time.
• Choices for On-screen Language
- Select your on-screen language:
English, Spanish or French.
• Stereo Sound Function
• PLL Frequency Synthesized Tuning
- Provides free and easy channel selection and lets
you tune directly to any channel using the number
buttons on the remote control.
• Various Adjustment for Picture and Sound
- Customizes image quality to suitable for your room
and sets the sound as your preference.
• HDMI Input
- When using HDMI1 Input, you can enjoy this unit
as a PC monitor if your PC has DVI output terminal.
• Component Video Input
• S-Video Input
• AV Input
• USB Terminal
- The JPEG or the MP3 files stored in a USB flash
memory can be played back on this unit.
• Digital Audio Output
• Analog Audio Output
• Dolby Digital Sound
- Enjoy Dolby Digital multi-channel surround sound
when you connect the unit to your Dolby Digital
decoder.
• DTS
- You can enjoy movie dynamic and realistic sound
like movie theater when you connect the unit to
your DTS decoder.
• Still / Fast / Slow / Step Playback
- Various playback modes are available including still
pictures, fast forward/reverse, slow motion and step
frames.
• BD/DVD Menus in a Desired Language
- You can display BD/DVD menus in a desired
language, if available on a BD-video or a DVD-video.
• Auto Power Off
- If there is no operation for 20 minutes, the unit will
turn itself off automatically.
• Parental Lock
- Block the viewing of a
unsuitable for children.
• Resume Playback
- Lets you resume playback from the point at which
playback was stopped.
• Bit Rate Indication
• DRC (dynamic range control)
- You can control the range of sound volume.
• Selecting a Camera Angle
- You can select the desired camera angle, if a BD/DVD
contains sequences recorded from different angles.
• Virtual Surround
• Search
- chapter search / title search / track search / time
search
• Marker
- The part on the disc designated by user can be
called back.
• Repeat
- chapter / title / track / all / A-B
• Program Playback for audio CD
- You can program the order of tracks to play them
back in designated order.
• Random Playback for audio CD
- This unit can shuffle the order of tracks to play them
back in randomly.
Accessing from [SAP] button
During playback
• Choices for Audio Language and Stereo Sound
Function
- Select your desired languages or stereo sound
function when different options are available on
your disc.
BD-video or a DVD-video
WATCHING TV
OPTIONAL SETTING
OPERATING BLU-RAY
BLU-RAY SETTING TROUBLESHOOTING
INFORMATION
Accessing from [SUBTITLE] button
During playback
• Subtitles in a Desired Language
- You can select a desired language for displaying
subtitle, if that language is available on a
or a DVD-video.
a
BD-video
7
EN
Page 8

NTRODUCTION
I
5 Contents
Important Safety Instructions . . . . . . . . . . . . . . . . . . . . . . . . . . . . . . .3
INTRODUCTION
Precaution . . . . . . . . . . . . . . . . . . . . . . . . . . . . . . . . . . . . . . . . . . . . . . 4
Trademark Information. . . . . . . . . . . . . . . . . . . . . . . . . . . . . . . . . . 5
Symbols Used in this Manual . . . . . . . . . . . . . . . . . . . . . . . . . . . .6
Supplied Accessories . . . . . . . . . . . . . . . . . . . . . . . . . . . . . . . . . . . . 6
Attaching the Stand . . . . . . . . . . . . . . . . . . . . . . . . . . . . . . . . . . . . . 6
Features . . . . . . . . . . . . . . . . . . . . . . . . . . . . . . . . . . . . . . . . . . . . . . . . . 7
Control Panel . . . . . . . . . . . . . . . . . . . . . . . . . . . . . . . . . . . . . . . . . . .9
Terminals . . . . . . . . . . . . . . . . . . . . . . . . . . . . . . . . . . . . . . . . . . . . . . .9
Remote Control Function . . . . . . . . . . . . . . . . . . . . . . . . . . . . . .10
Installing the Batteries . . . . . . . . . . . . . . . . . . . . . . . . . . . . . . . . . .11
PREPARATION
Antenna Connection . . . . . . . . . . . . . . . . . . . . . . . . . . . . . . . . . . .12
Connection to Cable Receiver or Satellite Box . . . . . . . . . .12
External Device Connection . . . . . . . . . . . . . . . . . . . . . . . . . . . .13
Cable Management . . . . . . . . . . . . . . . . . . . . . . . . . . . . . . . . . . . .16
Plug In the AC Power Cord . . . . . . . . . . . . . . . . . . . . . . . . . . . . .16
TV Functions
Initial Setup . . . . . . . . . . . . . . . . . . . . . . . . . . . . . . . . . . . . . . . . . . . .17
WATCHING TV
Channel Selection . . . . . . . . . . . . . . . . . . . . . . . . . . . . . . . . . . . . . .18
Volume Adjustment . . . . . . . . . . . . . . . . . . . . . . . . . . . . . . . . . . . .18
Sleep Timer . . . . . . . . . . . . . . . . . . . . . . . . . . . . . . . . . . . . . . . . . . . .18
Still Mode . . . . . . . . . . . . . . . . . . . . . . . . . . . . . . . . . . . . . . . . . . . . . .19
Switching Each Input Mode . . . . . . . . . . . . . . . . . . . . . . . . . . . .19
Switching Audio Mode . . . . . . . . . . . . . . . . . . . . . . . . . . . . . . . . .19
TV Screen Information. . . . . . . . . . . . . . . . . . . . . . . . . . . . . . . . . .20
TV Screen Display Mode . . . . . . . . . . . . . . . . . . . . . . . . . . . . . . . .21
OPTIONAL SETTING
Main Menu . . . . . . . . . . . . . . . . . . . . . . . . . . . . . . . . . . . . . . . . . . . . .22
Autoprogram . . . . . . . . . . . . . . . . . . . . . . . . . . . . . . . . . . . . . . . . . .22
Channel List . . . . . . . . . . . . . . . . . . . . . . . . . . . . . . . . . . . . . . . . . . . .23
Add Channels . . . . . . . . . . . . . . . . . . . . . . . . . . . . . . . . . . . . . . . . . .23
Antenna Confirmation . . . . . . . . . . . . . . . . . . . . . . . . . . . . . . . . .24
Language Selection . . . . . . . . . . . . . . . . . . . . . . . . . . . . . . . . . . . .24
Picture Adjustment . . . . . . . . . . . . . . . . . . . . . . . . . . . . . . . . . . . .25
Sound Adjustment . . . . . . . . . . . . . . . . . . . . . . . . . . . . . . . . . . . . .26
Closed Caption . . . . . . . . . . . . . . . . . . . . . . . . . . . . . . . . . . . . . . . . .27
Child Lock . . . . . . . . . . . . . . . . . . . . . . . . . . . . . . . . . . . . . . . . . . . . . .30
PC Settings . . . . . . . . . . . . . . . . . . . . . . . . . . . . . . . . . . . . . . . . . . . . .34
Energy Saving Mode . . . . . . . . . . . . . . . . . . . . . . . . . . . . . . . . . . .35
Location . . . . . . . . . . . . . . . . . . . . . . . . . . . . . . . . . . . . . . . . . . . . . . .35
Current Software Info . . . . . . . . . . . . . . . . . . . . . . . . . . . . . . . . . .36
JPEG/MP3 Playback . . . . . . . . . . . . . . . . . . . . . . . . . . . . . . . . . . . .36
BLU-RAY Functions
OPERATING BLU-RAY
Playable Media . . . . . . . . . . . . . . . . . . . . . . . . . . . . . . . . . . . . . . . . .38
Unplayable Media . . . . . . . . . . . . . . . . . . . . . . . . . . . . . . . . . . . . . .38
Playback . . . . . . . . . . . . . . . . . . . . . . . . . . . . . . . . . . . . . . . . . . . . . . .39
Using the Title Menu,
Disc Menu / Pop-up Menu . . . . . . . . . . . . . . . . . . . . . . . . . . . .39
Resume Playback . . . . . . . . . . . . . . . . . . . . . . . . . . . . . . . . . . . . . .40
Fast Forward / Fast Reverse . . . . . . . . . . . . . . . . . . . . . . . . . . . .40
Slow Forward . . . . . . . . . . . . . . . . . . . . . . . . . . . . . . . . . . . . . . . . . .40
Paused / Step-by-step Playback . . . . . . . . . . . . . . . . . . . . . . . .40
Repeat Playback. . . . . . . . . . . . . . . . . . . . . . . . . . . . . . . . . . . . . . . .41
Rapid Playback . . . . . . . . . . . . . . . . . . . . . . . . . . . . . . . . . . . . . . . . .41
Random Playback . . . . . . . . . . . . . . . . . . . . . . . . . . . . . . . . . . . . . .41
Programmed Playback . . . . . . . . . . . . . . . . . . . . . . . . . . . . . . . . .42
Search Functions . . . . . . . . . . . . . . . . . . . . . . . . . . . . . . . . . . . . . . .43
On-screen Display . . . . . . . . . . . . . . . . . . . . . . . . . . . . . . . . . . . . . .45
Special Settings . . . . . . . . . . . . . . . . . . . . . . . . . . . . . . . . . . . . . . . .46
BLU-RAY SETTING
Blu-ray Setup Menu . . . . . . . . . . . . . . . . . . . . . . . . . . . . . . . . . . . .49
Blu-ray Language Setting . . . . . . . . . . . . . . . . . . . . . . . . . . . . . .49
Blu-ray Video Setting . . . . . . . . . . . . . . . . . . . . . . . . . . . . . . . . . . .50
Blu-ray Audio Setting. . . . . . . . . . . . . . . . . . . . . . . . . . . . . . . . . . .51
Parental Setting . . . . . . . . . . . . . . . . . . . . . . . . . . . . . . . . . . . . . . . .52
Others. . . . . . . . . . . . . . . . . . . . . . . . . . . . . . . . . . . . . . . . . . . . . . . . . .53
Reset to the Default Setting . . . . . . . . . . . . . . . . . . . . . . . . . . . .54
Language Code List . . . . . . . . . . . . . . . . . . . . . . . . . . . . . . . . . . . .54
TROUBLESHOOTING
FAQ . . . . . . . . . . . . . . . . . . . . . . . . . . . . . . . . . . . . . . . . . . . . . . . . . . . .55
Troubleshooting Guide . . . . . . . . . . . . . . . . . . . . . . . . . . . . . . . .56
INFORMATION
Glossary . . . . . . . . . . . . . . . . . . . . . . . . . . . . . . . . . . . . . . . . . . . . . . . .58
Maintenance . . . . . . . . . . . . . . . . . . . . . . . . . . . . . . . . . . . . . . . . . . .58
Cable Channel Designations . . . . . . . . . . . . . . . . . . . . . . . . . . .59
General Specifications . . . . . . . . . . . . . . . . . . . . . . . . . . . . . . . . . .59
Electrical Specification . . . . . . . . . . . . . . . . . . . . . . . . . . . . . . . . .59
Other Specifications . . . . . . . . . . . . . . . . . . . . . . . . . . . . . . . . . . . .59
Limited Warranty . . . . . . . . . . . . . . . . . . . . . . . . . . . . . . . . . . . . . . .60
To get the latest software information of this unit, please visit the following our website;
http:// www.magnavox.com/support/updates
© 2009 Funai Electric Co., Ltd.
All rights reserved. No part of this manual may be reproduced, copied, transmitted, disseminated, transcribed, downloaded or stored in
any storage medium, in any form or for any purpose without the express prior written consent of Funai.
Furthermore, any unauthorized commercial distribution of this manual or any revision hereto is strictly prohibited.
Information in this document is subject to change without notice. Funai reserves the right to change the content herein without the
obligation to notify any person or organization of such changes.
with the design is a registered trademark of Funai Electric Co., Ltd and may not be used in any way without the express written
consent of Funai. All other trademarks used herein remain the exclusive property of their respective owners. Nothing contained in this
manual should be construed as granting, by implication or otherwise, any license or right to use any of the trademarks displayed herein.
Misuse of any trademarks or any other content in this manual is strictly prohibited. Funai shall aggressively enforce its intellectual property
rights to the fullest extent of the law.
8
EN
Page 9
INTRODUCTION PREPARATION
V
y
POWER
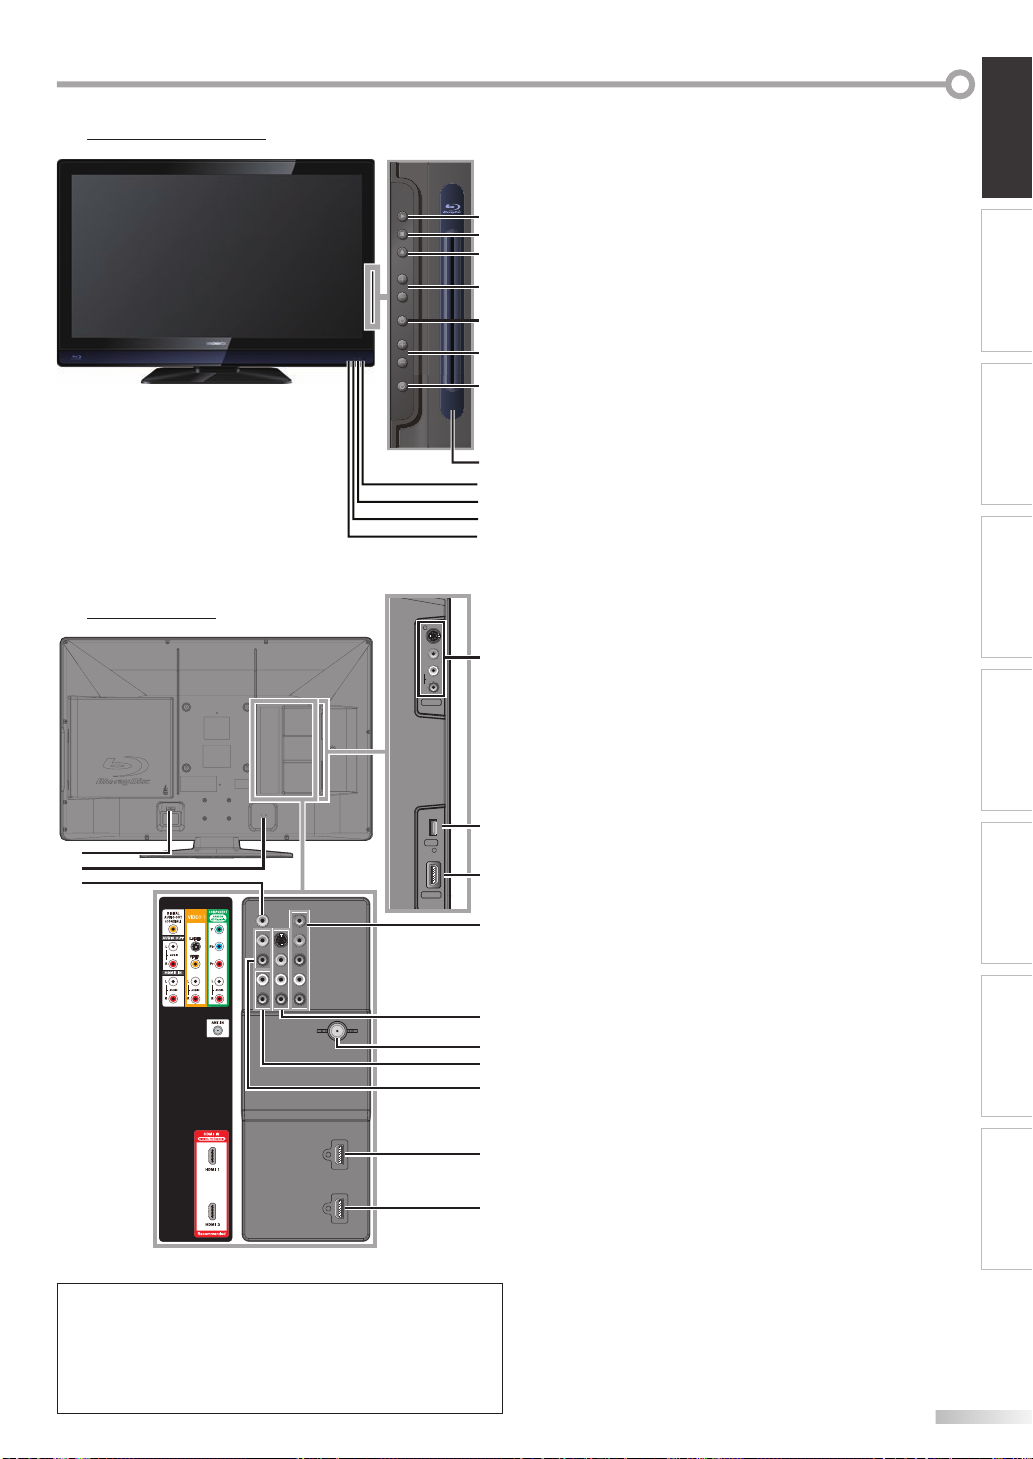
5 Control Panel
1. B (play) (p. 39)
Press to begin the disc playback.
2. C (stop) (p. 39)
Press to stop the disc playback.
A
(eject) (p. 39)
PLAY
STOP
EJECT
VOLUME
MENU
CHANNEL
POWER
3.
1
2
3
4
5
6
7
Press to eject the disc.
4. VOLUME + /
Press to adjust the volume or move right (+) / left (
through the main menu items.
5. MENU
Press to display the main menu.
6. CHANNEL + /
Press to select channels or move up (+) / down (
through the main menu items.
7. POWER
(p. 22)
y (p. 17)
-
(p. 18)
-
(p. 18 / p. 19)
-
)
-
)
WATCHING TV
Press to turn the unit on and off.
8. Disc loading Slot (p. 39)
8
9
10
11
12
Insert the disc with the label side facing forward.
9. Infrared sensor Window
Receives infrared rays transmitted from the remote
control.
10. POWER Indicator
Lights up green when power is on.
OPTIONAL SETTING
11. STAND BY Indicator
Lights up red when power is off.
5 Ter mi na ls
S-VIDEO
VIDEO
L
AUDIO
R
VIDEO 2
12. DISC Indicator
[Side Panel]
13
13.
Lights up orange when the disc is inserted.
S-Video / Video / Audio Input jack for VIDEO 2
(p. 14)
S-Video, RCA video, RCA audio cable connection from
an external device.
OPERATING BLU-RAY
14. USB terminal (p. 16)
Use this terminal only to play back MP3 / JPEG files
stored in the USB flash memory, or when software
update is needed.
15. HDMI 2 Input jack (p. 12 / p. 13)
BLU-RAY SETTING TROUBLESHOOTING
16
17
18
14
USB
15
HDMI 2
19
HDMI connection from HDMI device.
[Rear Panel]
16. AC power Inlet (p. 16)
Connect the supplied AC power cord for a standard AC
outlet.
17. Cable management (p. 16)
Attach the supplied holder here to bundle the cables.
18. Digital Audio Output jack (p. 14)
Coaxial digital cable connection for a decoder or an
20
21
22
23
audio receiver.
Component Video and Audio Input jack
19.
(p. 12 / p. 14)
RCA component video cable and RCA audio cable
connection from an external device.
S-Video / Video / Audio Input jack for VIDEO 1
20.
(p. 14)
S-video, RCA video, RCA audio cable connection from
an external device.
21. Antenna Input jack (p. 12)
24
coaxial cable connection for your antenna or cable TV
RF
INFORMATION
signal.
22. Audio Input jack for HDMI 1 (p. 13 / p. 15)
25
RCA audio cable connection from a DVI device.
When you connect your PC that has a DVI terminal,
use a stereo mini plug-RCA conversion cable as well.
(For HDMI 1 Input jack only)
Note for USB terminal:
• User should not connect any devices to the USB terminal such
as digital camera, keyboard, mouse, etc. (because these will not
work).
• The software update is, in most cases, handled by an authorized
service person or in some circumstances the user may be asked
to do the software upgrade themselves.
23. Audio Output jack (p. 15)
RCA audio cable connection for an external device.
24. HDMI 1 Input jack (p. 12 / p. 13 / p. 15)
HDMI connection for HDMI or DVI device.
When you connect your PC that has a DVI terminal, you
can enjoy this unit as a PC monitor.
25. HDMI 3 Input jack (p. 12 / p. 13)
HDMI connection from HDMI device.
9
EN
Page 10
NTRODUCTION
y
I
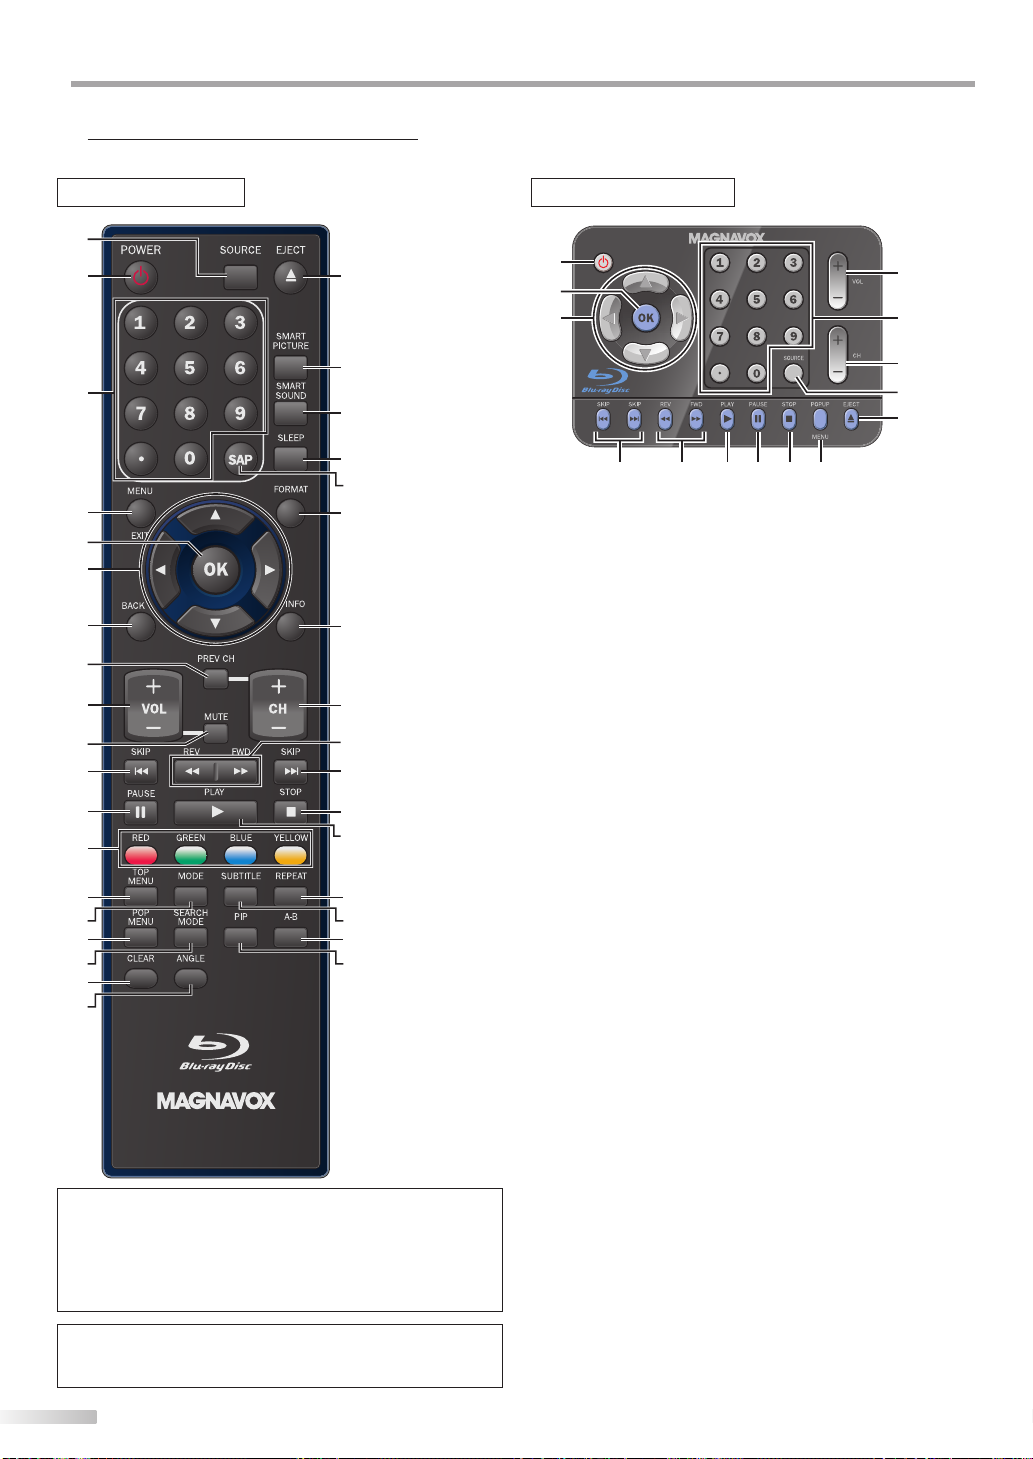
5 Remote Control Function
Main remote control Simple remote control
1
2
20
2
5
6
9
3
21
3
22
23
24
4
25
5
6
7
26
8
9
10
11
12
13
14
15
16
17
27
28
11
29
30
31
32
33
34
18
19
When using a universal remote control to operate
this unit.
• Make sure the component code on your universal remote
control is set to our brand.
Refer to the manual accompanying your remote control for
more details.
Note:
• This manual is described only the main remote control buttons
on each function. The simple remote control is omitted.
27
1
20
11
1. SOURCE (p. 19)
Press to access connected external devices
like a BD/DVD recorder.
2. POWER
Press to turn the unit on and off.
3. Number buttons (p. 18)
• Press to select channels.
• Press to select chapter, title (BD/DVD), or track (CD)
• (dot)
• Press to shift the subchannel from the main channel.
4. MENU / EXIT (p. 22 / p. 49)
Press to display the main menu.
5. OK (p. 17)
Press to decide the command of setting when the
main menu is displayed.
6.
s
Press to move left / right / up / down through
the items.
7. BACK (p. 20)
Press to return to the previous menu operation.
8. PREV CH (p. 18)
Press to return to previously viewed channel.
9. VOL + /
Press to adjust the volume.
10. MUTE (p. 18)
Press to turn the sound on and off.
11. SKIP H / G (p. 44)
Press to skip forward or backward chapters, titles (BD/
DVD) or tracks (CD).
12. PAUSE F (p. 19 / p. 40)
TV mode
• Press to pause screen image.
BLU-RAY mode
• Press to pause the disc playback.
13. RED / GREEN / BLUE / YELLOW buttons (p. 41)
• Press to select items on some BD menus. (BD)
• In the File list, Random or Program playback mode,
14. TOP MENU (p. 39)
Press to display the top menu (BD/DVD).
y (p. 17)
directly.
/ B / K / L (p. 17)
-
(p. 18)
press to switch between pages. (CD)
29 16123028
10
EN
Page 11
INTRODUCTION PREPARATION
15. MODE (p. 41)
• Press to display the setting for the rapid playback
and the picture adjustment (BD/DVD).
• Press to display the setting for the virtual surround
(BD/DVD).
• Press to display the setting for the noise reduction
(DVD).
• In stop mode with BD inserted, press to display a
menu for setting the BD audio mode (BD).
• In stop mode with audio CD inserted, press to display
menus for program and random playback (CD).
16. POP MENU (p. 39)
Press to display the pop-up menu / disc menu
(BD/DVD).
17. SEARCH MODE (p. 43)
Press to display the search menu.
18. CLEAR (p. 41)
• Press to clear the numbers entered incorrectly.
• Press to cancel the point A for A-B repeat.
• Press to remove the track number in program input
(CD).
19. ANGLE (p. 48)
Press to access various camera angles on the disc
(BD/DVD).
20. EJECT
Press to eject the disc.
21. SMART PICTURE (p. 25)
Press to select the desired smart picture setting.
22. SMART SOUND (p. 26)
Press to select the desired smart sound setting.
23. SLEEP (p. 18)
Press to activate the sleep timer.
24. SAP (p. 19 / p. 47)
Digital mode (DTV)
Analog mode (TV)
A
(p. 39)
• Press to select the audio language.
• Press to select the audio mode.
BLU-RAY mode
• Press to select the audio language (BD/DVD), or
sound mode (CD).
25. FORMAT (p. 21)
Press to select aspect ratio available for the TV screen.
26. INFO (p. 20 / p. 45)
Digital mode (DTV)
• Press to display the channel information, signal type
and TV setting.
Analog mode (TV)
• Press to display the channel number, signal type and
TV setting.
External input mode
• Press to display the external input mode, signal type
and TV setting.
BLU-RAY mode
• Press to display the current status.
27. CH + /
28. REV E / FWD D (p. 40)
29. STOP C (p. 39)
Press to stop the disc playback.
30. PLAY B (p. 40)
Press to begin the disc playback.
31. REPEAT (p. 41)
Press to toggle between various repeat modes.
32. SUBTITLE (p. 46)
Press to display the subtitle menu (BD/DVD).
33. A-B (p. 41)
Press to playback a defined section between point A
34. PIP (p. 48)
Press to turn the picture-in picture feature on or off
-
(p. 18 / p. 19)
Press to select channels and the external input mode.
Press to begin slow forward playback during the
pause mode (BD/DVD) and search forward or
backward through the disc.
and B repeatedly.
(only applicable to BD-video which supports the PIP
fiunction).
WATCHING TV
OPTIONAL SETTING
OPERATING BLU-RAY
BLU-RAY SETTING TROUBLESHOOTING
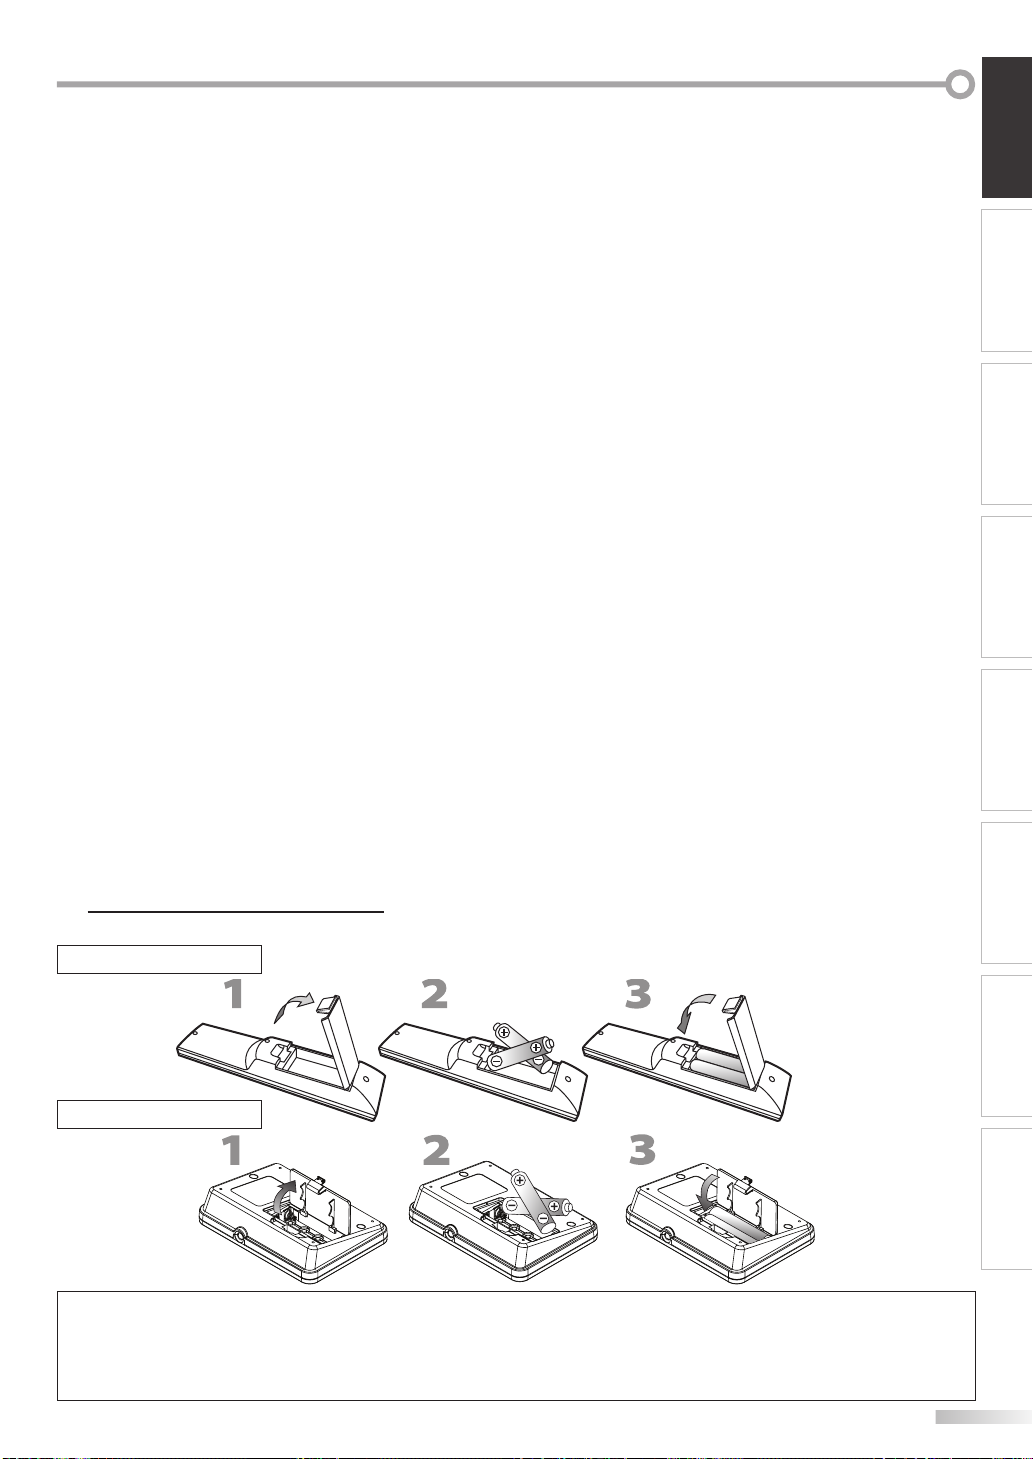
5 Installing the Batteries
Install the batteries matching the polarity indicated inside battery compartment of the remote control.
Main remote control
(AA x 2)
Simple remote control
(AAA x 2)
Battery Precautions:
• Be sure to follow the correct polarity as indicated in the battery compartment. Reversed batteries may cause damage to the device.
• Do not mix different types of batteries together (e.g., Alkaline and Carbon-Zinc, or rechargeable batteries like ni-cad, ni-mh, etc) or
old batteries with fresh ones.
• If the device is not to be used for a long period of time, remove the batteries to prevent damage or injury from possible battery leakage.
• Do not try to recharge batteries; they can overheat and rupture.
INFORMATION
11
EN
Page 12
REPARATION
(red)
(blue)
(green)
(red)
(blue)
(green)
P
No supplied cables are used in this connection:
Please purchase the necessary cables at your local store.
High Speed HDMI cable (also known as HDMI category 2 cable) is recommended for the better compatibility.
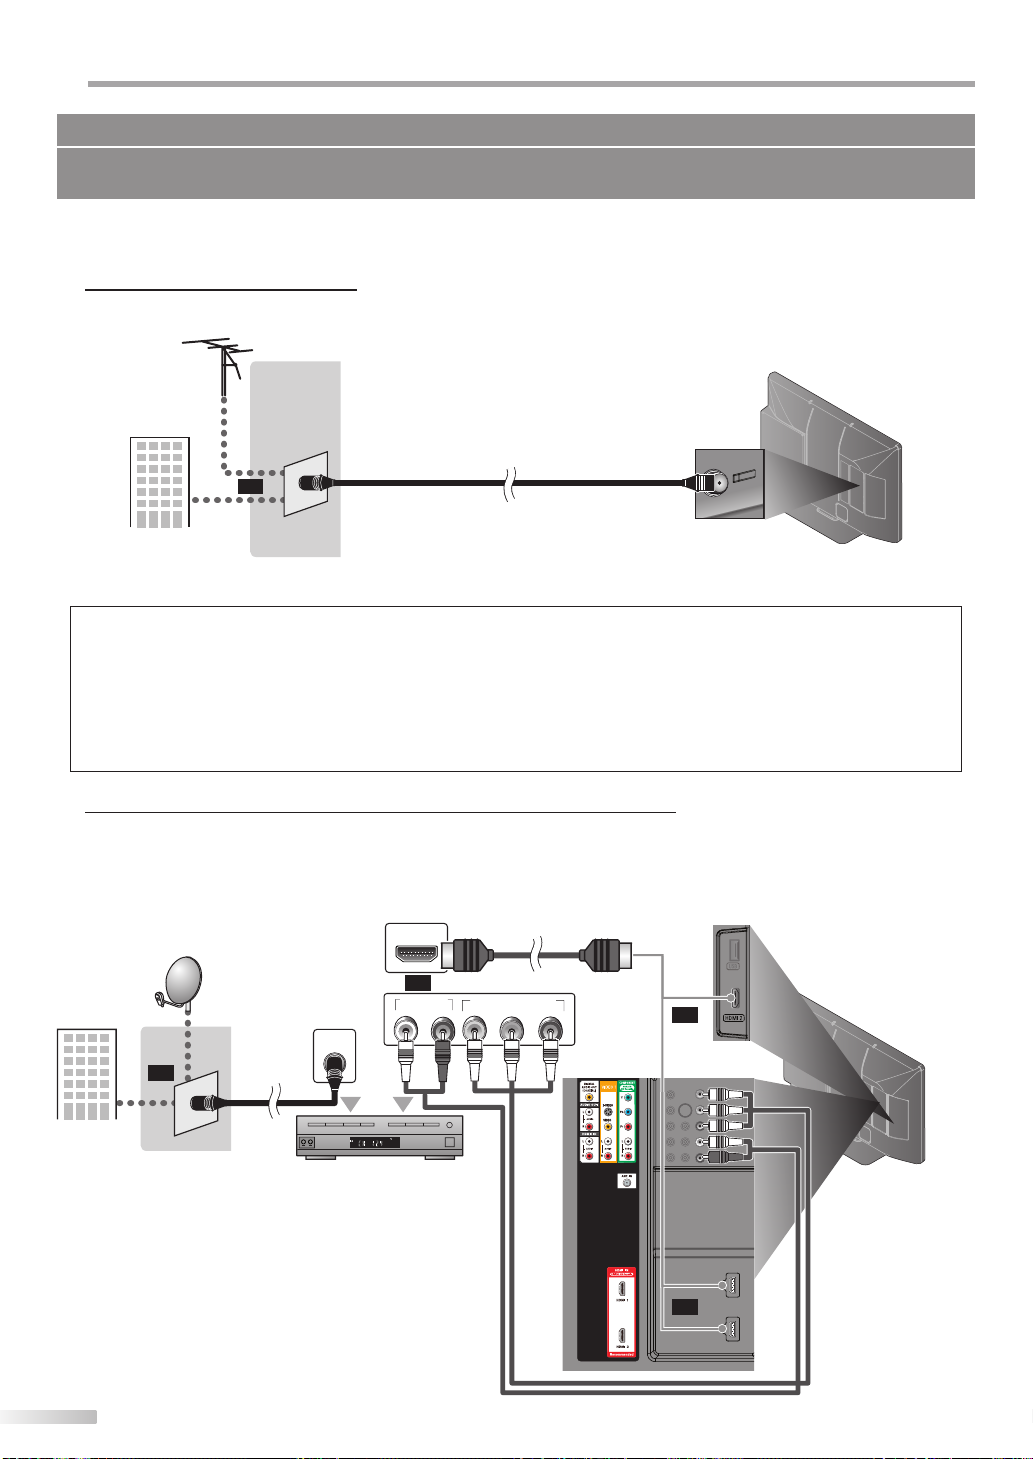
Before you connect...
Be sure your antenna or other device is connected properly before plugging in the AC power cord.
5 Antenna Connection
Connect the RF coaxial cable on your home outlet to the antenna input jack of this unit.
e.g.)
VHF / UHF
antenna
RF coaxial cable
or
cable TV signal
* Once connections are completed, turn on the unit and begin initial setup. Channel scanning is necessary for the unit
to memorize all available channels in your area. (Refer to “Initial Setup” on page 17.)
Note:
• If you have any question about the DTV’s antenna, visit www.antennaweb.org for further information.
• Depending on your antenna system, you may need different types of combiners (mixers) or separators (splitters). Contact your local
electronics store for these items.
• For your safety and to avoid damage to this unit, please unplug the RF coaxial cable from the antenna input jack before moving the unit.
• If you use an antenna to receive analog TV, it should also work for DTV reception. Outdoor or attic antennas will be more effective than
settop versions.
• To switch your reception source easily between antenna and cable, install an antenna selector.
• If you connect to the cable system directly, contact the CATV installer.
rear of this unit
5 Connection to Cable Receiver or Satellite Box
Use an HDMI or an RCA component video cable to connect the HDMI or the component video input jack of the unit to the
HDMI or the component video output jack of the cable receiver / satellite box.
If you connect to the unit’s Component Video Input jack, connect RCA audio cables to the Audio L/R jacks below the
Component Video connector.
COMPONENT VIDEO OUT
RL
(green)
(green)
HDMI cable
Pr/CrPb/CbY
(red)
(blue)
(red)
(blue)
or
(green)
(blue)
(red)
or
side or
rear of this unit
RCA component video cable
and RCA audio cable
e.g.)
satellite dish
ANT IN
or
cable TV signal
including PPV
RF coaxial
cable
cable receiver / satellite box
* You can also connect this unit to the cable receiver
or satellite box other than the HDMI or the
component video output jack because they might
have different output jacks.
* Required cables and connecting methods of the
cable receiver / satellite box, or the availability
channel for the clear QAM may differ depending on
the cable / satellite provider. For more information,
please contact your cable / satellite provider.
HDMI OUT
or
AUDIO OUT
STEREO
PCM
12
EN
Page 13
No supplied cables are used in this connection:
To HDMI1
input jack only
Please purchase the necessary cables at your local store.
High Speed HDMI cable (also known as HDMI category 2 cable) is recommended for the better compatibility.
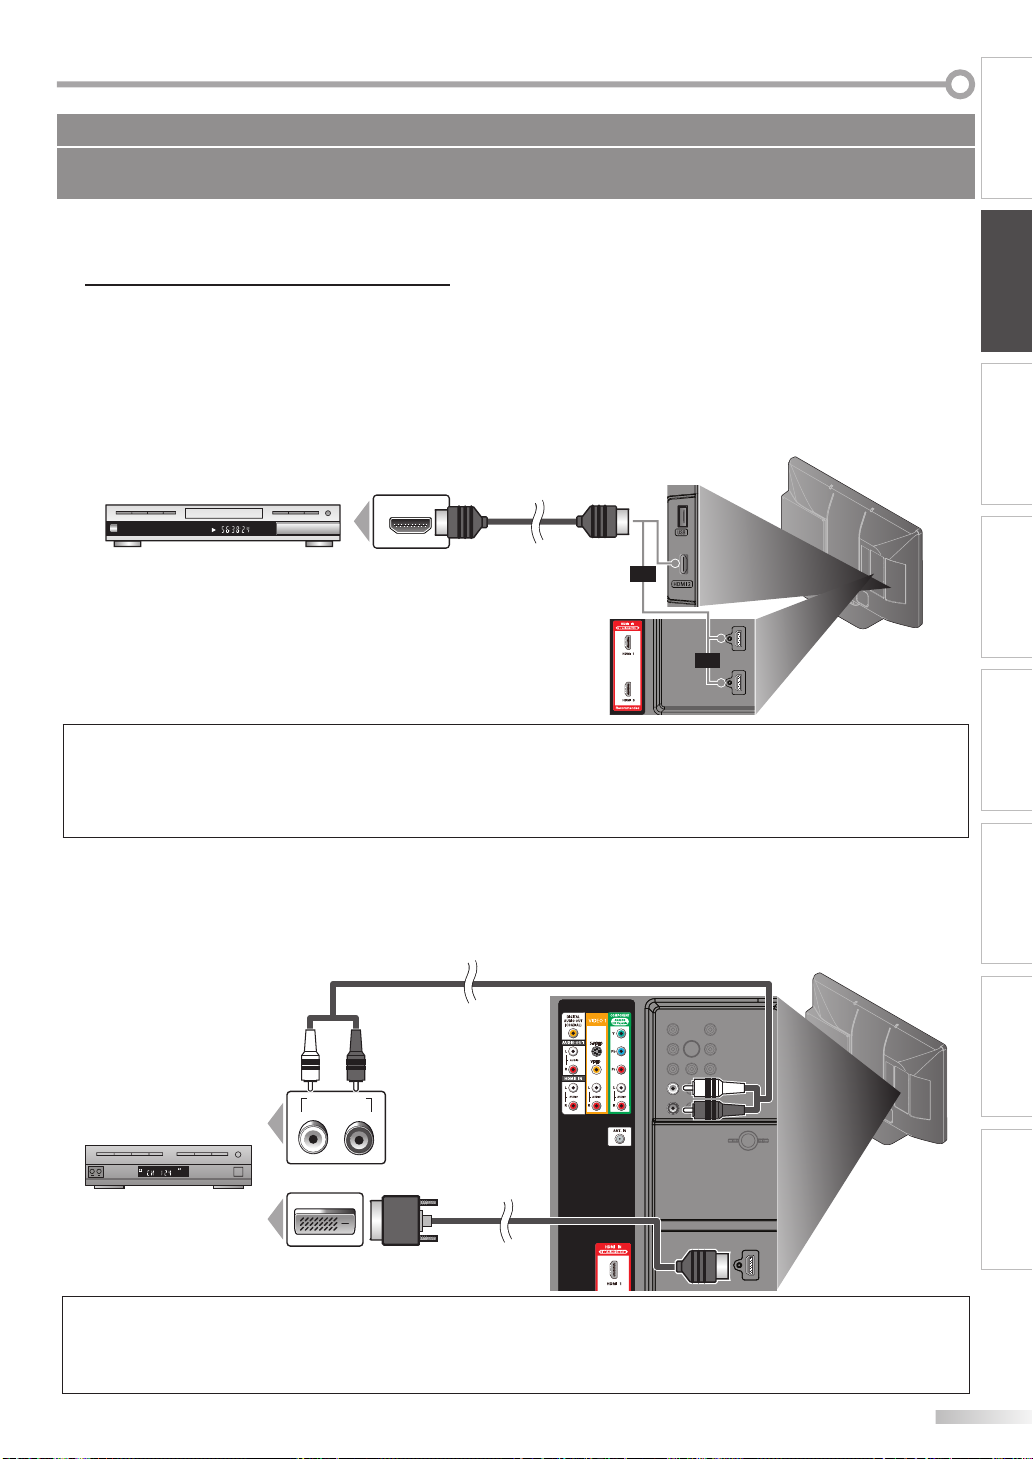
5 External Device Connection
[HDMI Connection]
HDMI connection offers the highest picture quality.
HDMI (High-Definition Multimedia Interface) transports high definition video and multi-channel digital audio
through a single cable.
e.g.)
TITLE 5
CHAPTER 15
REPEAT A-B
HDMI OUT
HDMI cable
side or
rear of this unit
INTRODUCTION
PREPARATION
WATCHING TV
OPTIONAL SETTING
BD/DVD recorder
with the HDMI output jack
or
or
Note:
• This unit accepts 480i / 480p / 720p / 1080i / 1080p video signals, and 32kHz / 44.1kHz / 48kHz audio signals.
• This unit accepts only 2 channel audio signal (LPCM).
• You need to select “PCM” for the digital audio of the device you connected or check the HDMI audio setting.
There may be no audio output if you select “Bitstream”, etc.
• This unit only accepts signals in compliance with EIA861.
[HDMI-DVI Connection]
Use an HDMI-DVI conversion cable to connect the unit to external video devices equipped with DVI output jack.
e.g.)
STEREO
PCM
cable receiver or satellite box
with the DVI output jack
AUDIO OUT
DVI OUT
RCA audio cable
RL
rear of this unit
OPERATING BLU-RAY
BLU-RAY SETTING TROUBLESHOOTING
INFORMATION
HDMI-DVI
conversion cable
Note:
• This unit accepts 480i / 480p / 720p / 1080i / 1080p video signals.
• HDMI-DVI connection requires separate RCA audio connections as well.
• Audio signals are converted from digital to analog for this connection.
• DVI does not display 480i image that is not in compliance with EIA/CEA-861/861B.
To HDMI1
input jack only
13
EN
Page 14
REPARATION
(green)
(blue)
(red)
P
No supplied cables are used in this connection:
Please purchase the necessary cables at your local store.
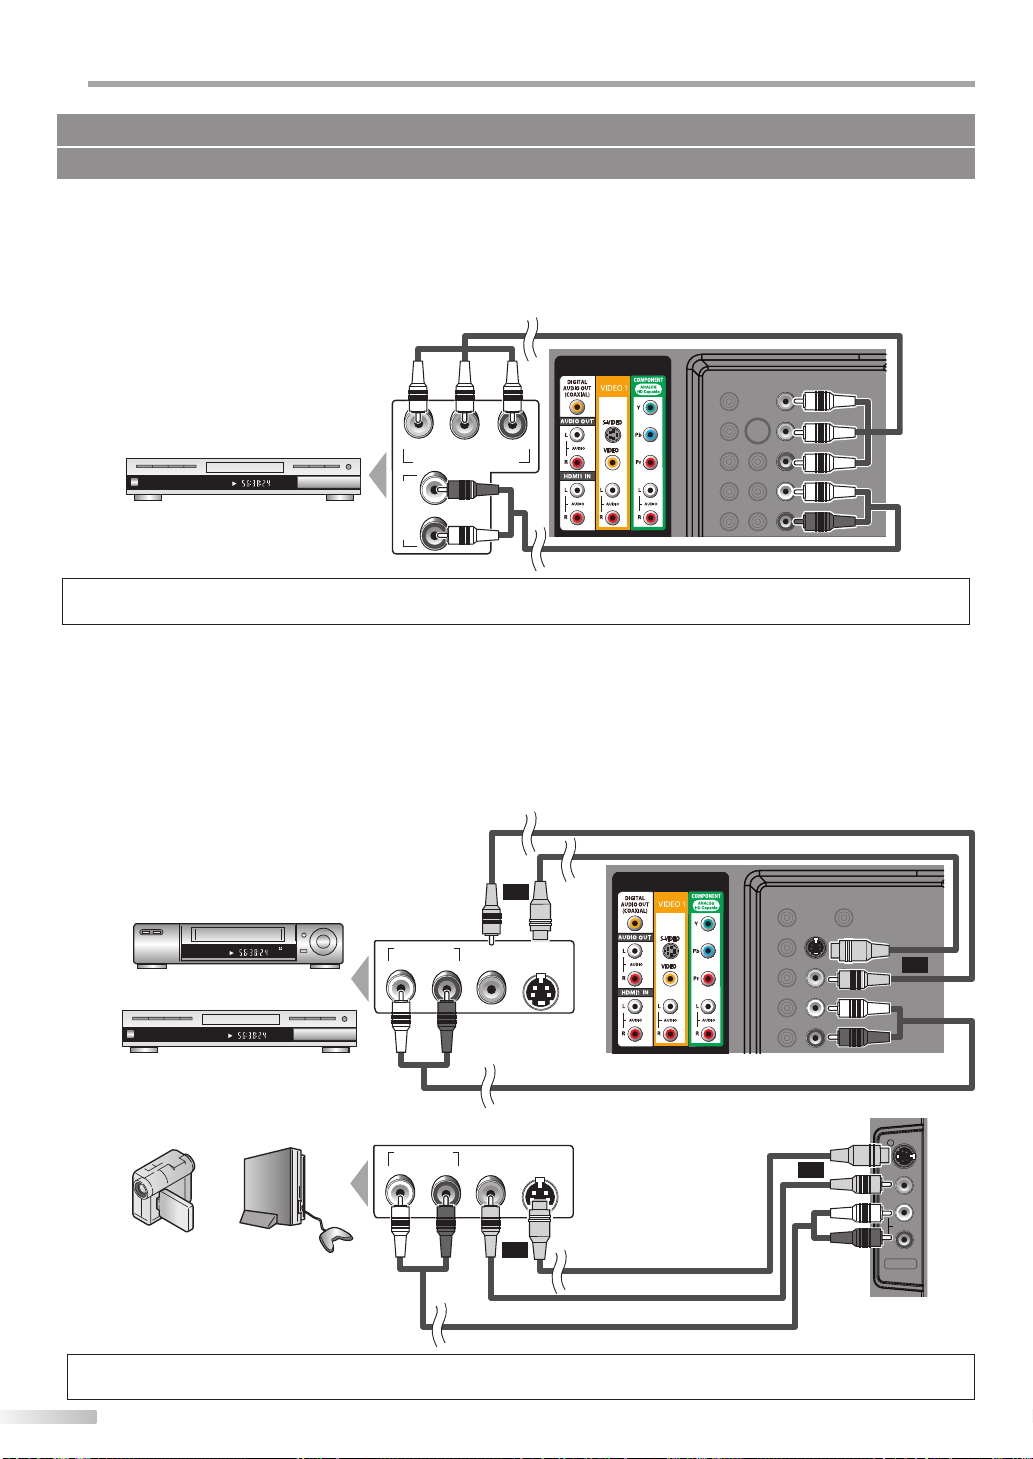
[Component Video Connection]
RCA component video connection offers better picture quality for video devices connected to the unit.
If you connect to the unit’s Component Video Input jack, connect RCA audio cables to the Audio L/R jacks below the
Component Video connector.
e.g.)
TITLE 5
CHAPTER 15
REPEAT A-B
BD/DVD recorder with
the component video output jack
(red)(blue)(green)
COMPONENT VIDEO OUT
R
AUDIO OUT
L
Pr/CrPb/CbY
RCA component video cable
(green)
(blue)
(red)
RCA audio cable
Note:
• This unit accepts 480i / 480p / 720p / 1080i video signals.
rear of
this unit
[S-Video or Video Connection]
S-video connection offers good picture quality and an RCA video connection offers standard picture quality for video
devices connected to the unit.
If you connect to the unit’s S-Video Input jack or Video Input jack, connect RCA audio cables to the Audio L/R jacks
below the Video connector.
When the audio jack of the video device is monaural, connect an RCA audio cable to the Audio L input jack.
e.g.)
<VIDEO 1>
<VIDEO 1>
STEREO
VCR
TITLE 5
CHAPTER 15
REPEAT A-B
BD/DVD recorder with
the S-Video or video output jack
<VIDEO 2>
camcorder
video game
STAND-BY
AUDIO OUT
AUDIO OUT
or
VIDEO
OUT
S-VIDEO
OUT
RL
rear of this unit
VIDEO
OUT
S-VIDEO
or
OUT
S-Video cable
RL
RCA video cable
RCA audio cable
RCA video cable
S-Video cable
RCA audio cable
or
L
R
VIDEO 2
side of this unit
or
S-VIDEO
VIDEO
AUDIO
Note:
• If you connect to the S-Video Input jack and the Video Input jack at the same time, the S-Video connection will have priority.
14
EN
Page 15
No supplied cables are used in this connection:
To HDMI1
Input jack only
HDMI-DVI
conversion cable
Please purchase the necessary cables at your local store.
INTRODUCTION
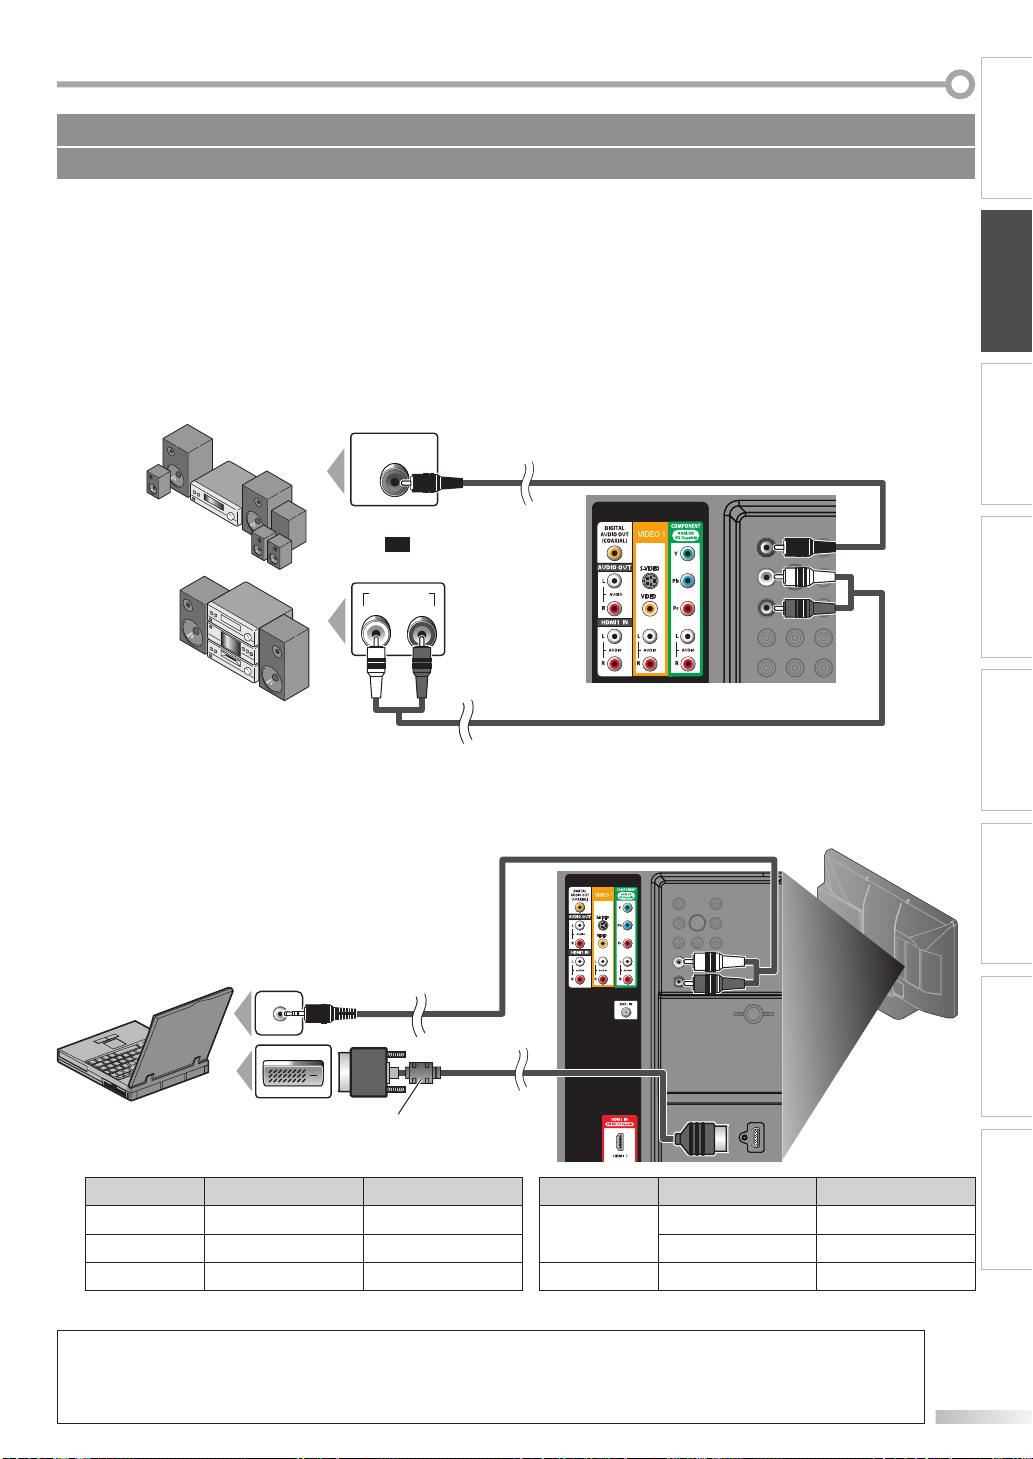
[Audio Output Connection]
À Digital (for digital broadcasting only)
If you connect this unit to an external digital audio device, you can enjoy multi-channel audio like 5.1ch digital
broadcasting sound. Use a digital audio coaxial cable to connect the unit to external digital audio devices.
During BD or DVD playback, you can enjoy Dolby Digital and DTS surround sound.
À Analog (for both analog and digital broadcasting)
If you connect this unit to an external analog audio device, you can enjoy stereo (2-channel) audio.
Use an RCA audio cable to connect the unit to external analog audio devices.
e.g.)
Dolby Digital or
DTS decoder
stereo system
DIGITAL AUDIO
COAXIAL IN
or
AUDIO IN
digital audio coaxial cable
RL
rear of this unit
RCA audio cable
[PC Connection]
This unit can be connected to your PC that has a DVI terminal.
Use an HDMI-DVI conversion cable for this connection and it requires stereo mini plug-RCA conversion cable as well.
If you connect this unit to your PC, you can use this unit as a PC monitor.
e.g.)
rear of this unit
PREPARATION
WATCHING TV
OPTIONAL SETTING
OPERATING BLU-RAY
BLU-RAY SETTING TROUBLESHOOTING
stereo mini plug-RCA
conversion cable
DVI OUT
HDMI-DVI
conversion cable
personal computer
HDMI-DVI conversion cable
should be with ferrite core.
The following signals can be displayed:
To HDMI1
Input jack only
Format Resolution Refresh rate Format Resolution Refresh rate
VGA 640 x 480 60Hz
SVGA 800 x 600 60Hz 1,360 x 768 60Hz
WXGA
1,280 x 768 60Hz
XGA 1,024 x 768 60Hz FHD 1,920 x 1,080 60Hz
Other formats or non-standard signals will not be displayed correctly.
Note:
• Please purchase the HDMI-DVI conversion cable that has a ferrite core.
• The following operations may reduce noise.
- Attach a ferrite core to the AC power cord of your PC.
- Unplug the AC power cord and use the built-in battery of your PC.
INFORMATION
15
EN
Page 16
REPARATION
P
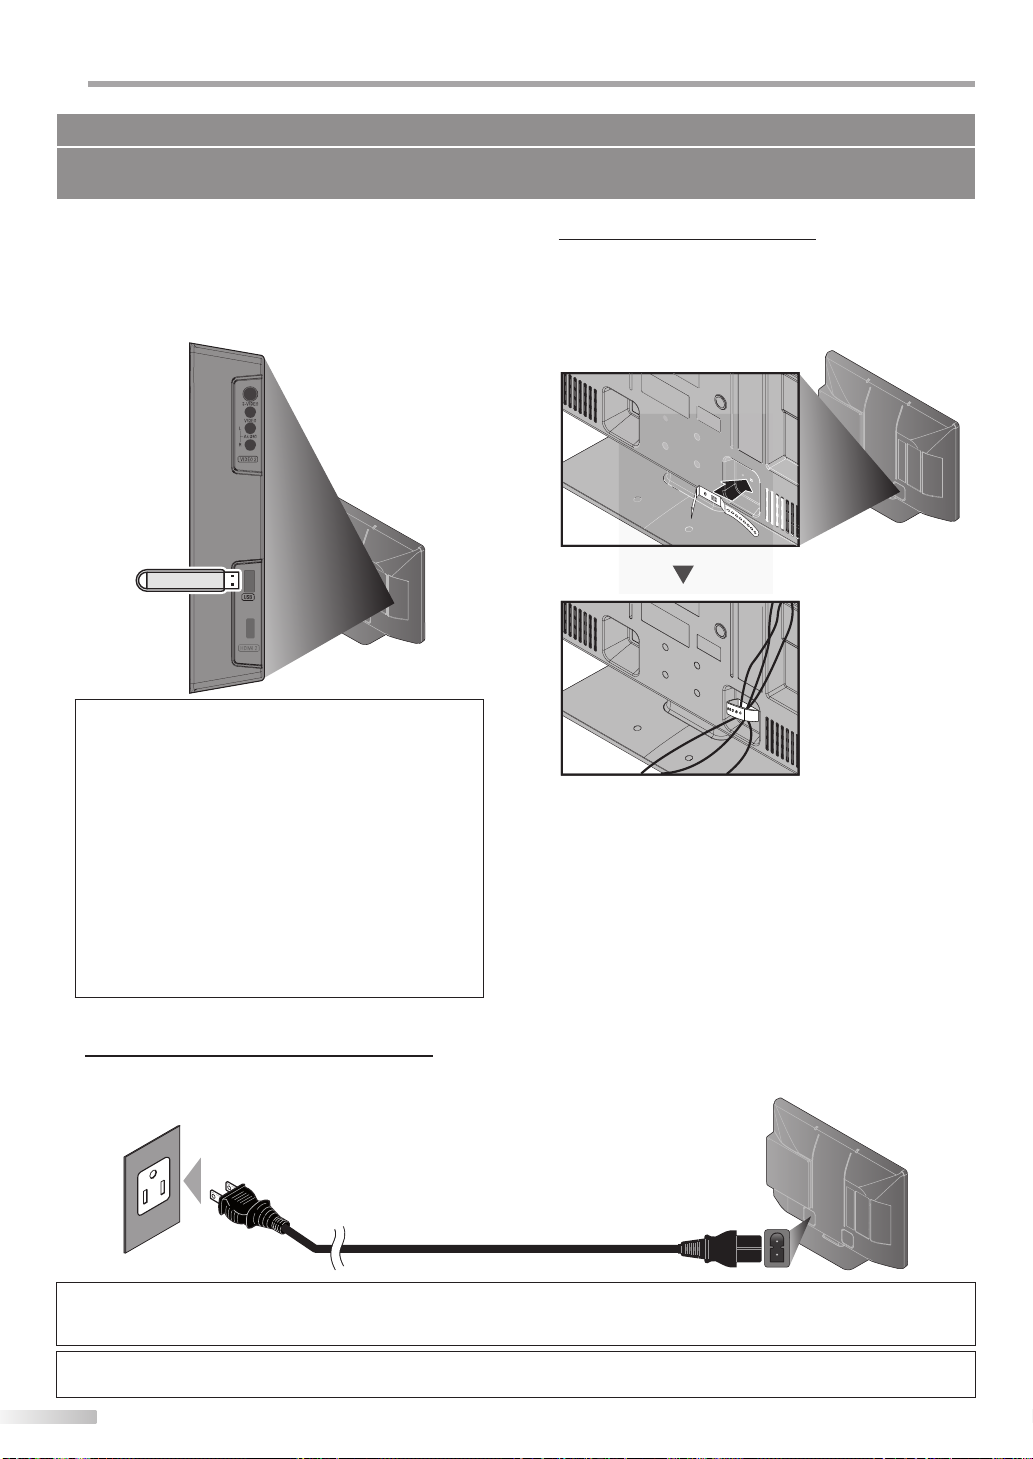
Supplied accessories used in this connection are as follows:
• cable management tie x 1
• AC power cord x 1
[USB Flash Memory]
This unit offers easy playback JPEG pictures and MP3
musics.
Insert the USB flash memory to the USB terminal shown
as below. For more details, refer to “JPEG/MP3 Playback”
on page 36.
side of this unit
Note:
• The USB flash memory is not supplied with this unit.
• Do not use an extension cord between the USB flash
memory and the unit. Always insert the USB flash memory
to this unit directly.
• We do not guarantee the all USB flash memory can be
supported on this unit.
• Be sure to keep a backup copy of the original files on your
device before you play them back on this unit.
We have no responsibilities for damage or loss of your
stored data.
• When you ready to remove a USB flash memory, at first turn
off the unit to avoid any damage for your data and the unit.
• If the USB flash memory left behind in the USB terminal and
you turn off the unit, the “USB”(main menu) will appear
automatically when you turn on the unit again.
5 Cable Management
Attach the supplied cable management tie first into the
holes on the lower side of the rear of this unit shown
as below. Keep the cables through this holder to avoid
tangle them.
rear of this unit
5 Plug In the AC Power Cord
Make sure that the AC power cord must be plugged to an AC outlet after all the necessary connections are completed.
rear of this unit
AC power cord
AC outlet
Caution:
• Do not connect the AC power cord to a power supply outside the indicated voltage of this unit (AC 120V).
Connecting the AC power cord to a power supply outside of this range may result in fire or electrical shocks.
Note:
• Each time you plugged in the AC power cord, any operations will not be performed for a few seconds. This is not a malfunction.
16
EN
Page 17
These operations are accessible by remote control. Some may also be accessible by controls on the main unit.
TV Functions
INTRODUCTION
5 Initial Setup
This section will guide you through the unit’s initial setting which includes
selecting a language for your on-screen menu and autoprogram, which
automatically scans and memorizes viewable channels.
Before you begin:
Make sure the unit is connected to antenna or cable.
After making all the necessary connections,
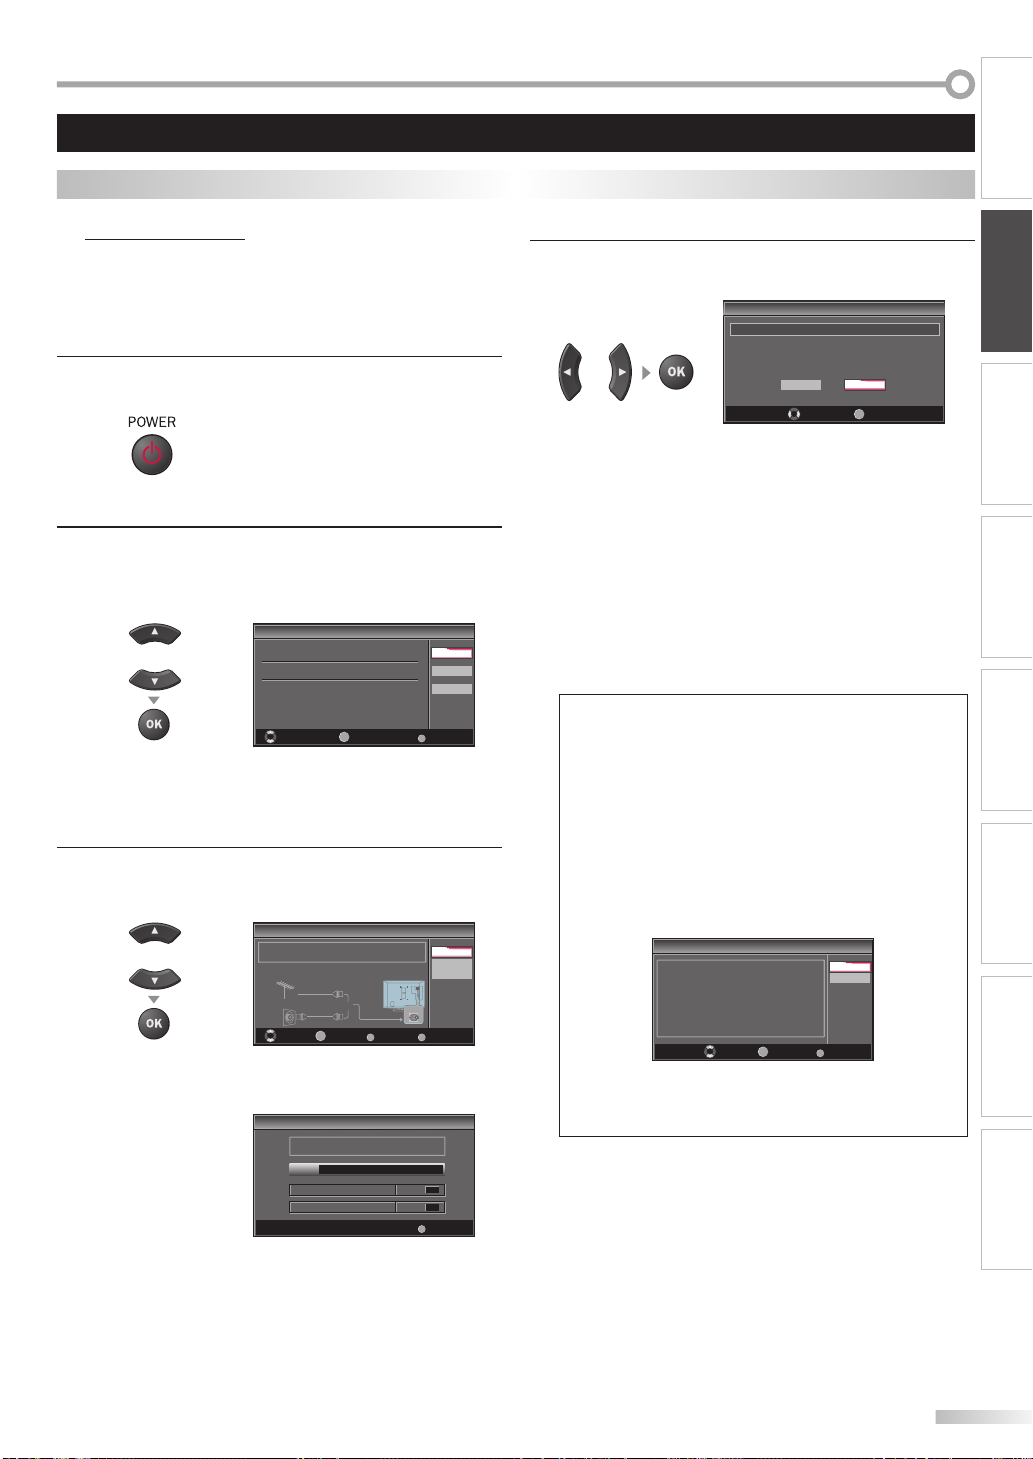
1
press [POWER yy] to turn on the unit.
• This operation may take a few moments.
Use [Cursor K / L] to select the on-screen language
2
from the choices on the right side of the TV screen.
(English / Español / Français)
Initial Setup
Initial Setup
or
Select the language for setup display.
Elija el idioma de ajuste.
Sélectionner langue écran config.
Select Skip
OK
OK
• “Initial Setup” menu on step 3 will be displayed in the
selected language after you press [OK].
Use [Cursor K / L] to select “Antenna” for TV channels
3
or “Cable” for CATV channels, then press [OK].
Initial Setup
Initial Setup
Make sure the antenna is connected to ''ANT. IN'' jack.
or
Select your signal source.
Antenna
Or
Cable
OK
Select Skip
• “Autoprogram” will begin.
Initial Setup
Initial Setup
Now the system is scanning for channels, please wait.
Auto programming will take up to 20 minutes to complete.
0%
Analog channels 0ch
Digital channels 0ch
English
Español
Français
MENU
Antenna
Cable
Skip
ANT.IN
MENUBACK
BackOK
MENU
Skip
Use [Cursor s / B] to select the desired location setting,
4
then press [OK].
Initial Setup
Initial Setup
Select “Retail” or “Home” for your location.
or
Retail
Home
OK
Select
OK
• Select ”Retail”, the unit will be set up with predefined
setting for retail displays. In this setting, the power
consumption may possibly exceed the limited
requirement of the ENERGY STAR® qualification.
• Select ”Home”, the unit is set to maximize the energy
efficiency for home setting and it can be adjusted
through a choice of picture and sound quality
according to your preference.
• When the initial setup is completed, the lowest
memorized channel with the confirmation message
of the location setting will be displayed on the TV
screen.
Note:
• If you connect the cable system directly, contact the CATV
installer.
• If you press [POWER yy] or [MENU / EXIT] during
autoprogram, this setting will be canceled.
• The initial autoprogram function can be executed for either
“Antenna” or “Cable” only once. When you change the
connection (Antenna / Cable), set autoprogram again.
(Refer to page 22.)
• If there is no signal input from the antenna terminal and
no operation for several seconds after you turn on the unit,
“Helpful Hints” appears. Follow the instructions listed on the
TV screen.
Initial Setup
Initial Setup
No channel is registered.
Try Autoprogram again?
Verify that you have a cable connected to the "ANT. IN" jack on the
back panel of the TV, the cannel installation process searches this
connection. If you are using a cable or satellite box please confirm
the input to which you have connected the box and use "SOURCE"
key on the remote control to tune to the appropriate source input.
OK
Select Skip
OK
Retry
Later
MENU
• You must set ”Home” in step 4. Otherwise, the settings
of picture and sound quality you adjusted will not be
memorized after you turn off the unit.
After an initial setup is completed...
• If you want to scan the channels automatically again,
refer to “Autoprogram” on page 22.
• You can add the desired channels unmemorized by
“Autoprogram”. Refer to “Add Channels” on page 23.
• If you want to change to another language, refer to
“Language Selection” on page 24.
• If you want to change the location setting, refer to
“Location” on page 35.
PREPARATION
WATCHING TV
OPTIONAL SETTING
OPERATING BLU-RAY
BLU-RAY SETTING TROUBLESHOOTING
INFORMATION
17
EN
Page 18
ATCHING TV
W
5 Channel Selection
Select channels by using [CH + / -] or [the Number buttons].
• To select the memorized channels, use [CH + / -] or
[the Number buttons].
• To select the non-memorized channels, use
[the Number buttons].
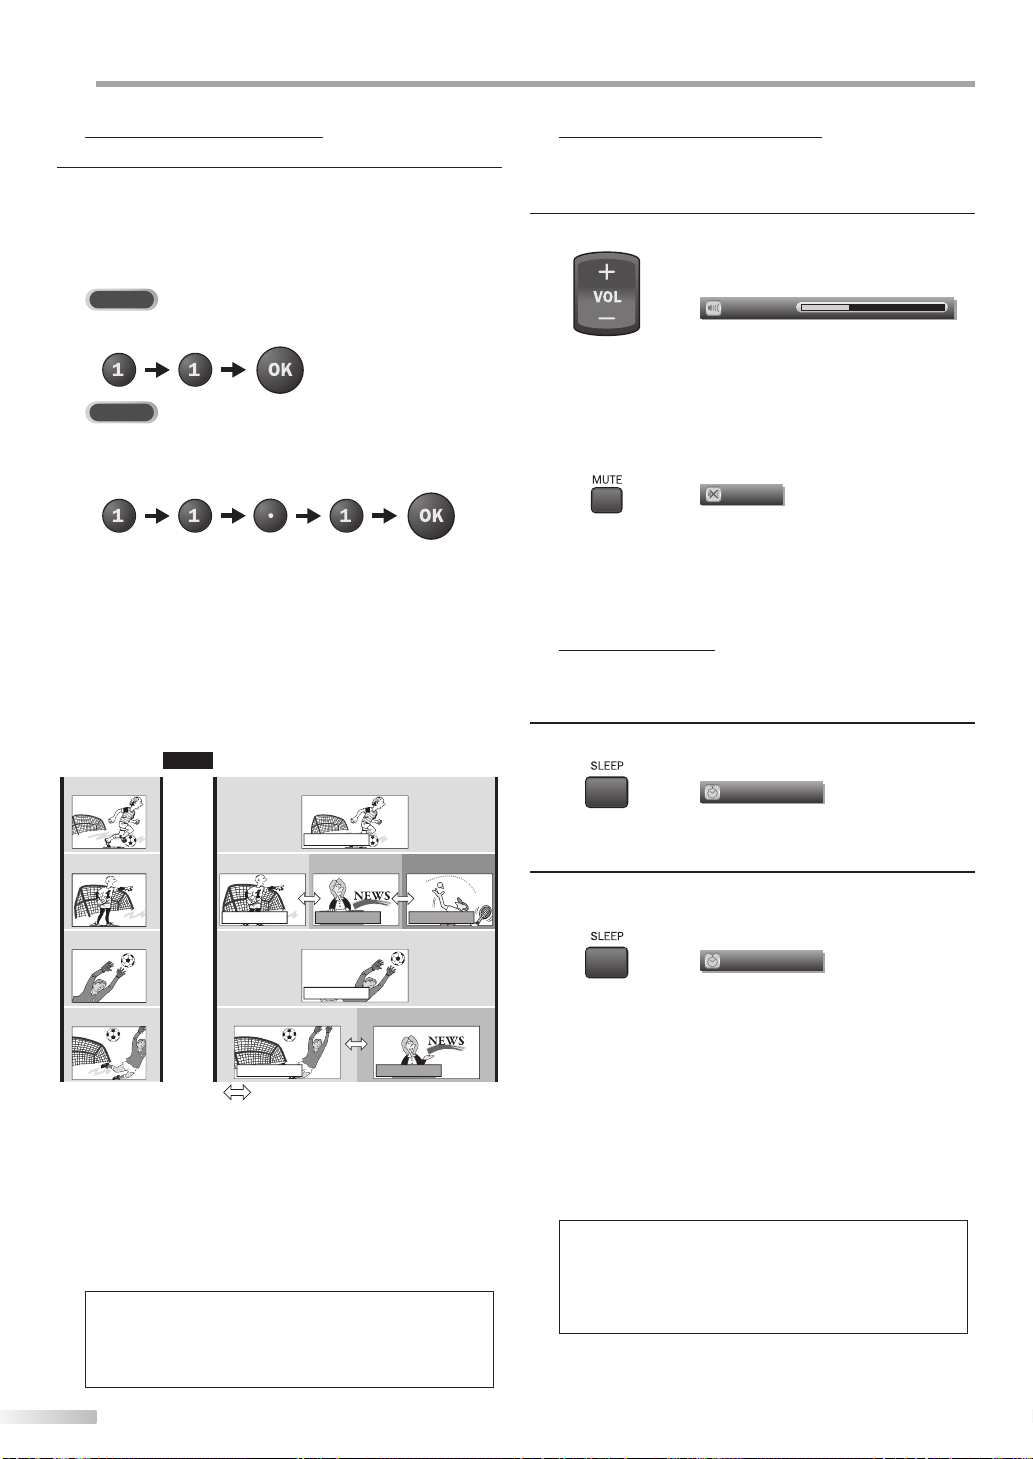
To Use [the Number buttons]
TV
- When selecting analog channel 11
DTV
- When selecting digital channel 11.1
Be sure to press [•] before
entering the subchannel number.
• Press [PREV CH] to return to the previously viewed
channel.
About digital TV broadcasting:
With its high definition broadcast, digital broadcasting
far surpasses analog broadcasting in both its picture
and sound quality. Not all digital TV broadcasts are high
definition (HD). To confirm whether your watching TV
program is in HD, refer to the program guide, contact
your cable / satellite provider or local TV stations.
NTSC
(analog mode)
CH4
CH4
CH4
CH4
(Soccer)
(Soccer)
(Soccer)
(Soccer)
Air time
6:00
6:30
7:00
7:30
8:00
pm
pm
pm
pm
pm
CH4-1
main channel
CH4-1
main channel
can be changed by using [CH + / -].
What is the subchannel?
By using high compression technology, digital
broadcasting offers a service that enables multiple
signals to send simultaneously.
Therefore, you can select more than one program per
main channel since digital broadcasting technology
distinguishes between multiple channels broadcast by
a single network.
Note:
• “No Signal” will appear on the TV screen after the
subchannel broadcast is over.
• “Audio only program“ message will appear on the TV
screen, when you receive only sound signal.
(Soccer)
(Soccer)
ATSC
(digital mode)
(Soccer)
CH4-1
main channel
CH4-2
(Soccer)
CH4-1
main channel
(News)
CH4-3
subchannelsubchannel
CH4-2
subchannel
(News)
(Tennis)
5 Volume Adjustment
This section describes how to adjust the volume. The mute function, which
turns the sound off and on, is also described.
Use [VOL + / -] to adjust the audio volume.
Volume 30
The volume bar will be displayed at the bottom of the
TV screen when adjusting the volume.
• The volume bar will automatically disappear in a few
seconds.
Press [MUTE] to turn off and on the sound.
Mute
“Mute” is displayed on the TV screen for a few seconds.
+ /
-
Press [MUTE] again or [VOL
] to recover the
original volume.
5 Sleep Timer
The sleep timer can be set to automatically turn off the unit after an
incremental period of time.
Press [SLEEP] to set the sleep timer.
1
Sleep
Sleep timer display appears on the TV screen.
Press [SLEEP] repeatedly to change the amount of time
2
until shut off.
Sleep
You can set your unit to turn off after a set period of
time (from 30 to 120 minutes).
• Each press of [SLEEP] will increase the time by 30
minutes.
• After setup, the sleep timer display can be called up
for checking by pressing [SLEEP].
To cancel the sleep timer
Press [SLEEP] repeatedly until “Sleep Off” is displayed
on the TV screen.
Note:
• The sleep timer display will automatically disappear in a
few seconds.
• When you disconnect the unit from the AC outlet or when
a power failure occurs, the sleep timer setting will be
canceled.
Off
120min.
18
EN
Page 19
INTRODUCTION
5 Still Mode
You can pause the image shown on the TV screen.
Press
[PAUSE F] to pause the image shown on the TV
screen.
FREEZE
• The sound output will not be paused.
• If no signal is detected or protected signal is received
during still mode, the image remains paused and the
sound output will be muted.
• The still function will be released after 5 minutes.
To cancel still mode, press any button except
[POWER yy].
5 Switching Each Input Mode
You can easily switch with the remote control to the DTV (ATSC) and TV
(NTSC) or to access external devices when they are connected to the unit.
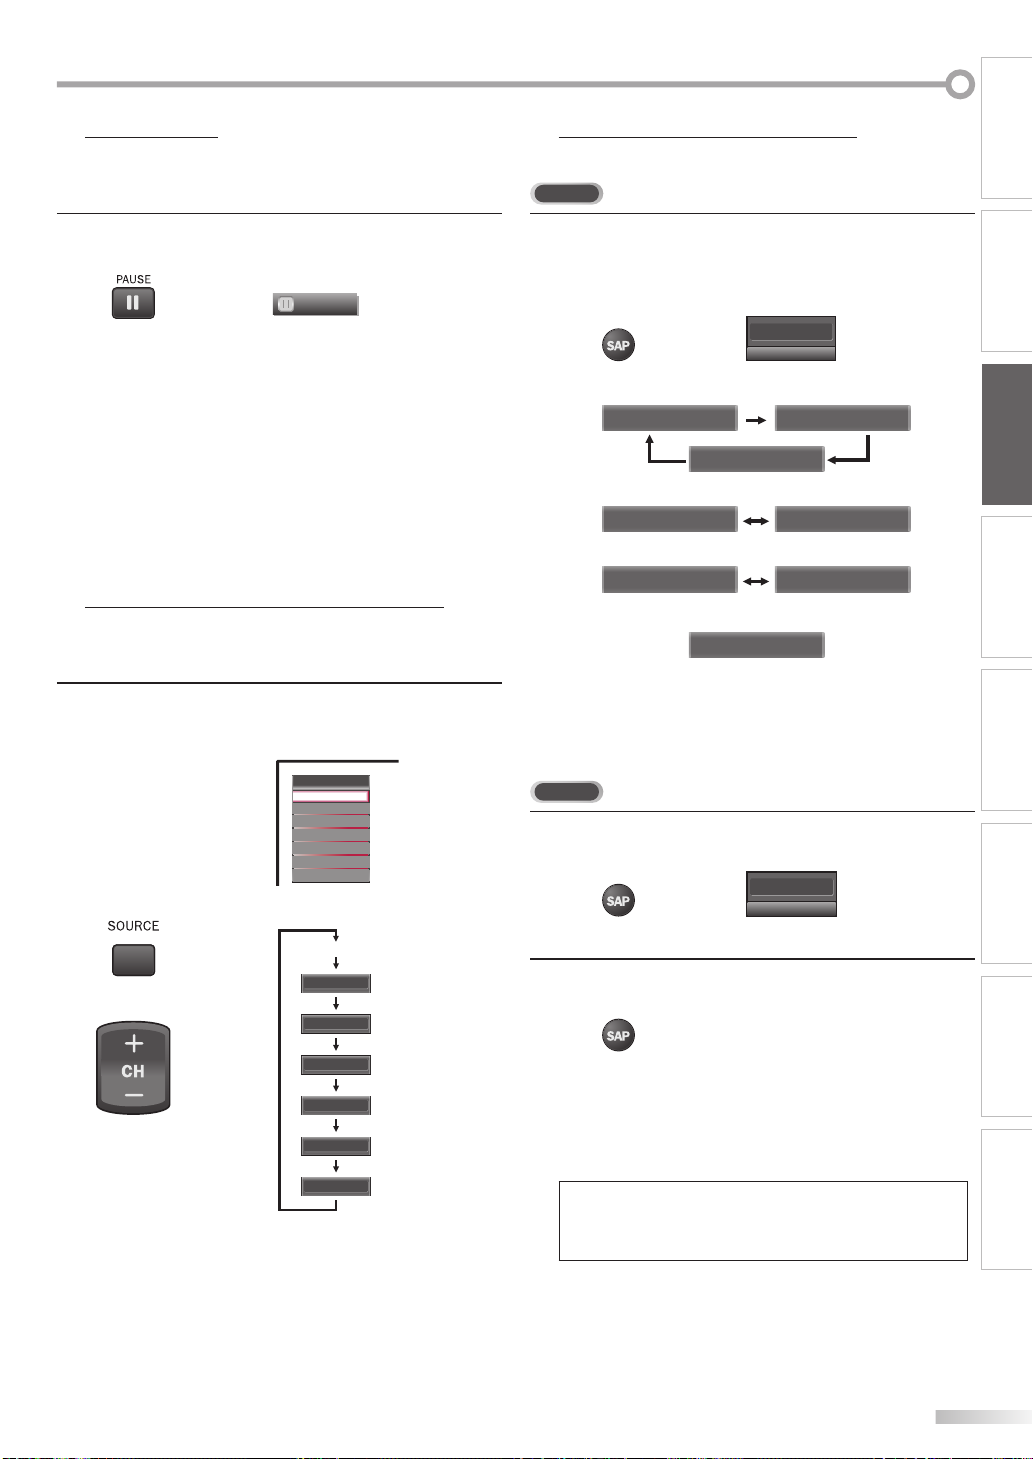
Press [SOURCE] or [CH +] repeatedly to cycle through
the input modes.
5 Switching Audio Mode
This section describes how to switch the audio in the analog mode and how
to switch the audio language in the digital mode.
TV
Press [SAP] to display the currently selected audio
mode. While receiving an MTS broadcast, press
repeatedly to cycle through the available audio
channel.
11
When all audio are available
SAP / STEREO SAP / MONO
SAP / STEREO
When stereo and monaural audio are available
MONO / STEREO MONO / STEREO
When SAP and monaural audio are available
SAP / MONO SAP / MONO
When only monaural audio is available
(cannot be switched)
STEREO : Outputs stereo-audio
SAP : Outputs second audio program
MONO : Outputs mono-audio
SAP / STEREO
MONO
PREPARATION WATCHING TV
OPTIONAL SETTING
OPERATING BLU-RAY
Source
TV
Video1
Video2
Component
HDMI1
HDMI2
HDMI3
DTV/TV channel
or
Video1
Video2
Component
HDMI1
HDMI2
HDMI3
(or PC input)
• Pressing [CH -] reverses the direction of the input
modes.
DTV
Press [SAP] to display the currently selected language
1
and the number of available languages.
11.1
Press [SAP] repeatedly to cycle through the available
2
English 1/3
audio languages.
• Available languages differ depending on the
broadcast. “Other” is displayed when the audio
language cannot be acquired, or the acquired
languages are other than English, Spanish or French.
Note:
• [SAP] does not control external audio devices.
• The information display will automatically disappear in a
few seconds.
BLU-RAY SETTING TROUBLESHOOTING
INFORMATION
EN
19
Page 20
ATCHING TV
W
5 TV Screen Information
You can display the currently selected channel or other information such as
the audio mode on the TV screen.
TV
In the analog mode, the current channel number and the audio mode are
displayed.
DTV
In the digital mode, the detailed broadcasting information for the current
channel such as program title, program guides are displayed.
Press [INFO].
11
• The current channel number, audio mode, type of
resolutions for video signal, TV aspect ratio, CC and
TV program rating are displayed on the top-right
corner of the TV screen.
• To clear the display, press [INFO] again. You can also
press [BACK].
SAP / STEREO
480i
480i
SD
SD
TV-PG DLSV
4:3
4:3
CC
CC
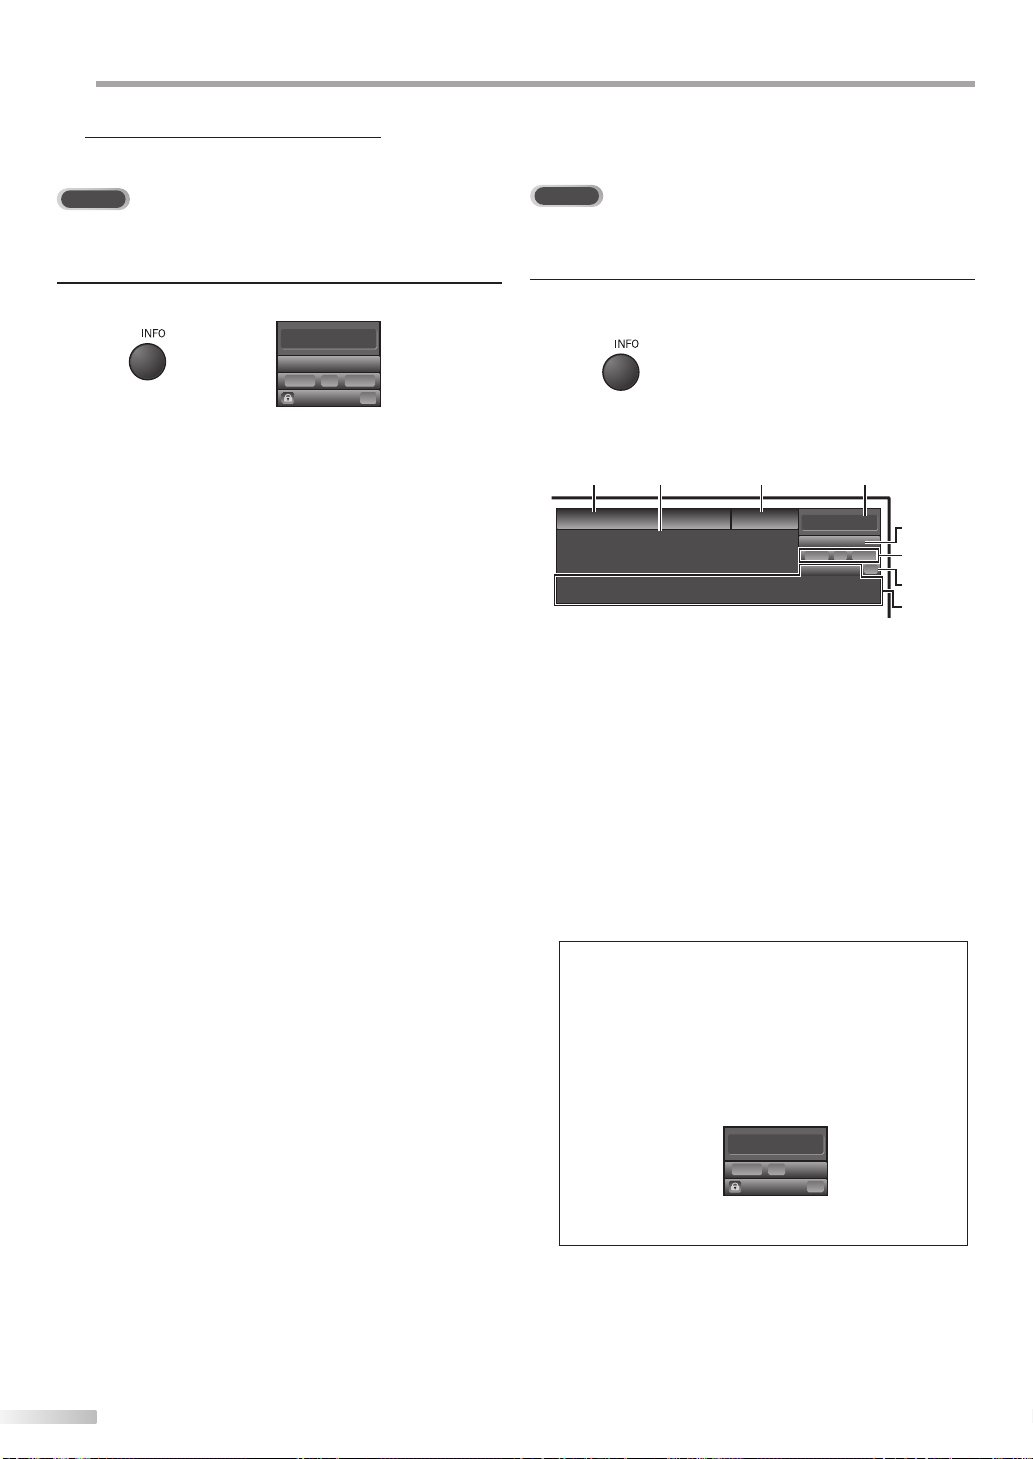
Press [INFO] to display the details of the currently
selected program.
Broadcasting information
The following information is displayed.
1 2
A Day of Memories
A Day of Memories
A quarter-century ago,which may now qualify as the
good old days of newspapering,run-of-paper sales
accounted for 80 percent of the industry's advertising
revenues. Department stores and supermarket were
TV: TV-14
1 program title
2 program guide
(The program guide added to broadcasting
information is displayed to a maximum of 4 lines.)
3 broadcast station
4 channel number
5 audio language
(Refer to “Switching Audio Mode” on page 19.)
6 effective scanning lines and scan mode
7 digital TV format
8 program aspect ratio
9 CC (not available if closed caption is set to “Off”)
10 child lock rating
34
KABC
KABC
English 1/2
1080i
1080i
Rating
11.1
16:9HDHD
16:9
CC
CC
5
6, 7, 8
9
10
20
EN
Note:
• When the program guide consists of more than 4 lines, use
[Cursor K/ L] to scroll.
• “No description provided.” is displayed when the program
guide is not provided.
• While the program guide is displayed, the closed caption
function is interrupted.
• In external input mode, the following screen is displayed;
e.g.) When an external device is connected to Video input
jack.
Video
480iSDSD
480i
TV-PG DLSV
• The information display will automatically disappear in
1 minute.
CC
CC
Page 21
5 TV Screen Display Mode
4 types of display modes can be selected when the broadcasting station
is sending 4:3 or 16:9 video signal. And 3 types of display modes can be
selected for PC input signal.
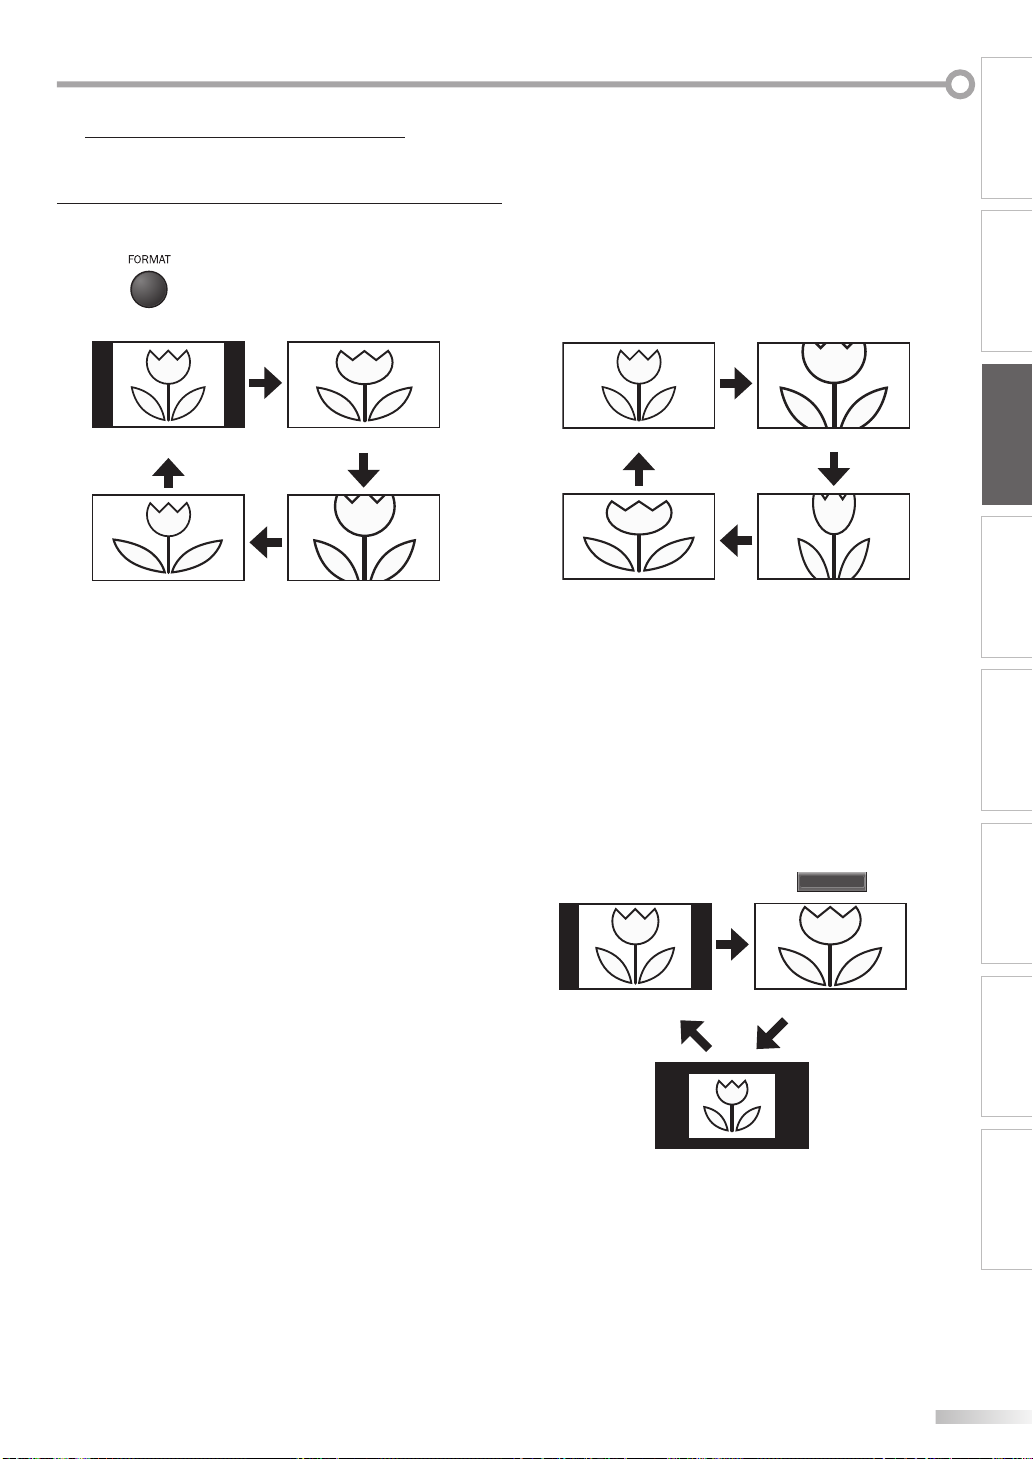
Press [FORMAT] repeatedly to switch the TV aspect
ratio.
For 4:3 video signal
INTRODUCTION
PREPARATION WATCHING TV
For 16:9 video signal
Normal
Wide
16:9
Movie Expand
Normal
Display a 4:3 picture at its original size. Sidebars appear
on both edges of the screen.
16:9
Display a 4:3 picture at a 16:9 size; the picture is
stretched horizontally to fill the screen.
Movie Expand
Display a 4:3 picture at a 16:9 size; the picture is
stretched horizontally and vertically to fill the screen.
This crops out the top and bottom of the picture.
Wide
Display the picture with its center at the original size
and the edges stretched horizontally to fill the screen.
Normal
Wide
Zoom
Movie Expand
Normal
Display a 16:9 picture at its original size.
Zoom
Display a 16:9 picture at its maximum size without
changing its horizontal and vertical ratio.
Movie Expand
Display a vertically stretched picture.
Wide
Display a horizontally stretched picture.
For PC input signal through
Normal Full
HDMI1
Input mode
OPTIONAL SETTING
OPERATING BLU-RAY
BLU-RAY SETTING TROUBLESHOOTING
Normal
Display a proportionately stretched picture. Sidebars
appear on both edges of the screen.
Dot By Dot
Full
Display a picture that is stretched out of proportion to
fill the screen.
Dot By Dot
Display a picture in its original size.
INFORMATION
21
EN
Page 22
PTIONAL SETTING
O
5 Main Menu
This section describes the overview of the main menu displayed when you
press [MENU / EXIT]. For more details, see the reference page for each item.
The main menu consists of the function setting items below.
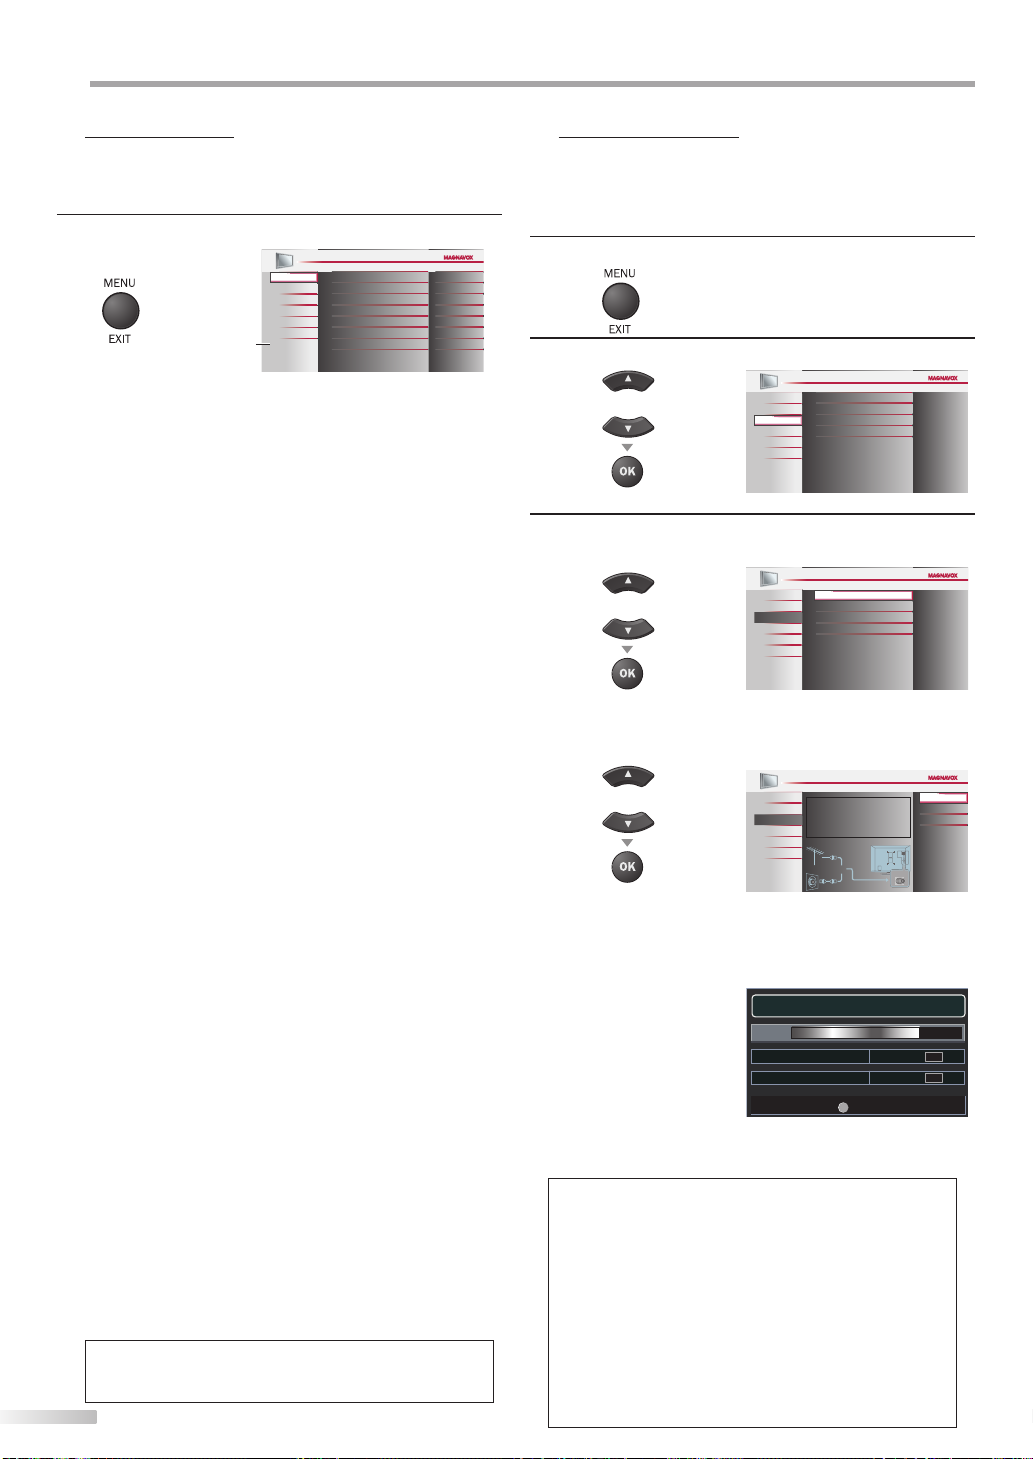
Press [MENU / EXIT].
PICTURE
Smart Picture
SOUND
SETUP
FEATURES
LANGUAGE
BLU-RAY
USB
*
Brightness
Contrast
Color
Tint
Sharpness
Color Temperature
PICTURE
You can adjust the picture quality.
(Refer to “Picture Adjustment” on page 25.)
SOUND
You can adjust the sound quality.
(Refer to “Sound Adjustment” on page 26.)
MENU
• You can automatically scan the viewable channels.
(Refer to “Autoprogram” on page 22.)
• You can skip the undesired channels when selecting
+ /
-
the channels using [CH
].
(Refer to “Channel List” on page 23.)
• You can add the channels that were not scanned by
the autoprogram.
(Refer to “Add Channels” on page 23.)
FEATURES
• You can change the display format for closed
caption, which displays the dialogue of a TV program
or other information across the TV screen.
(Refer to “Closed Caption” on page 27.)
• You can set the viewing limitations.
(Refer to ‘‘Child Lock” on page 30.)
• You can adjust the position, stability and clarity of the
PC screen.
(Refer to “PC Settings” on page 34.)
• You can select the energy saving mode.
(Refer to “Energy Saving Mode” on page 35.)
• When you adjust the desired “PICTURE” and
“SOUND” mode, you must switch the setting from
“Retail” to “Home”. (Refer to “Location” on page 35.)
• You can confirm the version of the software currently
used in this unit.
(Refer to ”Current Software Info” on page 36.)
LANGUAGE
You can change the language (English, Spanish,
French) displayed on the main menu.
(Refer to “Language Selection” on page 24.)
BLU-RAY
You can customize some functions for the disc
playback. Make sure the player is in stop mode.
(Refer to “BLU-RAY SETTING“ section on page 49.)
USB
You can view the picture or listen to the music that the
JPEG or the MP3 files stored in a USB flash memory.
(Refer to “JPEG/MP3 Playback” on page 36.)
Note:
“USB” will appear only when the USB flash memory is inserted
*
to this unit.
22
EN
Personal
Normal
5 Autoprogram
If you switch wires (e.g., between antenna and CATV) or if you move the
unit to a different area after the initial setting, or if you restore the DTV
channel you deleted, you will need to perform autoprogram.
Before you begin: Make sure the unit is connected to antenna or cable.
Press [MENU / EXIT] to display the main menu.
1
30
60
36
0
0
Use [Cursor K / L] to select “SETUP” , then press [OK].
2
or
Use [Cursor K / L] to select “Autoprogram”, then press
3
PICTURE
SOUND
SETUP
FEATURES
LANGUAGE
BLU-RAY
USB
Autoprogram
Channel List
Add Channels
Antenna
[OK].
PICTURE
or
SOUND
SETUP
FEATURES
LANGUAGE
BLU-RAY
USB
Autoprogram
Channel List
Add Channels
Antenna
Use [Cursor K / L] to select an appropriate option, then
press [OK].
or
PICTURE
SOUND
SETUP
FEATURES
LANGUAGE
BLU-RAY
USB
Autoprogram will rescan all channels.
Autoprogramming will take up to 20 minutes
to complete.
Select your signal source.
Antenna
Cable
• When aerial antenna is connected, select “Antenna”.
• When connected to CATV, select “Cable”.
• “Autoprogram” will begin.
Now the system is scanning for channels, please wait.
Auto programming will take up to 20 minutes to complete.
75%
Analog channels 10 ch
• When the scanning and memorizing are completed,
the lowest memorized channel will be displayed.
Note:
• After setting “Autoprogram”, using [CH + / -] on the remote
control skips unavailable programs automatically.
• If you connect the cable system directly, contact the CATV
installer.
• If you press [POWER yy] or [MENU / EXIT] during
autoprogram, the setting will be canceled.
• Even if “Autoprogram“ is completed, the channel setting will
be lost if the AC power cord is unplugged before turning off
the unit by pressing [POWER yy].
• The PIN Code will be required once you set a PIN Code in the
“Child Lock“ (Refer to page 30).
• If you want to change your PIN Code, follow the instruction
of “Change PIN” (Refer to page 33).
Back
Antenna
Cable
Or
ANT.IN
6 chDigital channels
MENU
Exit
Page 23
INTRODUCTION
5 Channel List
The channels selected here can be skipped when selecting the channels
using [CH + / -].
Those channels can still be selected with [the Number buttons].
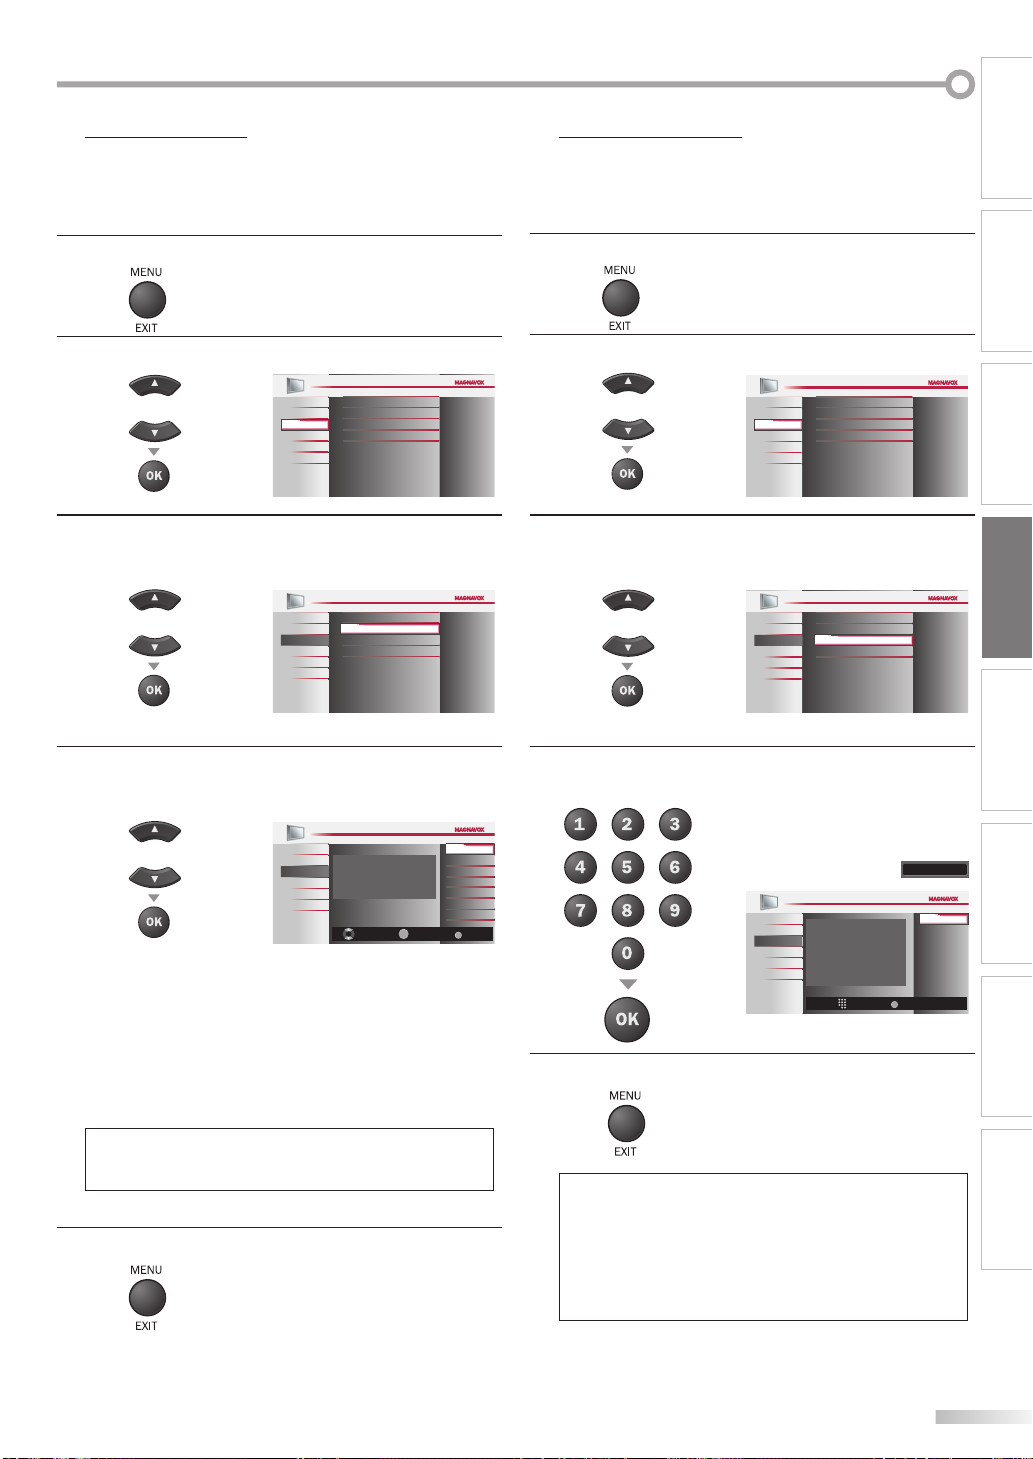
Press [MENU / EXIT] to display the main menu.
1
Use [Cursor K / L] to select “SETUP”, then press [OK].
2
PICTURE
or
Use [Cursor K / L] to select “Channel List”, then press
3
[OK].
or
SOUND
SETUP
FEATURES
LANGUAGE
BLU-RAY
USB
PICTURE
SOUND
SETUP
FEATURES
LANGUAGE
BLU-RAY
USB
Autoprogram
Channel List
Add Channels
Antenna
Autoprogram
Channel List
Add Channels
Antenna
5 Add Channels
This function lets you add the channels that were not added by the
autoprogram due to the receptible condition at the initial setting.
Press [MENU / EXIT] to display the main menu.
1
Use [Cursor K / L] to select “SETUP”, then press [OK].
2
or
Use [Cursor K / L] to select “Add Channels”, then press
3
PICTURE
SOUND
SETUP
FEATURES
LANGUAGE
BLU-RAY
USB
[OK].
or
BLU-RAY
USB
PICTURE
SOUND
SETUP
FEATURES
LANGUAGE
Autoprogram
Channel List
Add Channels
Antenna
Autoprogram
Channel List
Add Channels
Antenna
PREPARATION
WATCHING TV
OPTIONAL SETTING
OPERATING BLU-RAY
Use [Cursor K / L] to select the channel you want to
4
remove, then press [OK].
or
PICTURE
SOUND
SETUP
FEATURES
LANGUAGE
BLU-RAY
USB
Highlight channels for Ch Up/Down key
selection.
OK
Ch Select Watch/Skip
• The channel display for the removed channel
darkens. You will not be able to select the channel
again using [CH + / -].
• To reactivate a removed channel, use [Cursor K / L] and
press [OK]. The registered channels are highlighted.
• When you remove a main channel, its subchannels
are removed as well.
Note:
• The channel with the “DTV” indicated on the display is
ATSC. Otherwise the channel is NTSC.
Press [MENU / EXIT] to exit.
5
DTV 11.1
DTV
DTV
BACK
Back
Use [the Number buttons] to enter the number of the
4
channel you want to add, then press [OK].
BLU-RAY SETTING TROUBLESHOOTING
11.2
11.3
PICTURE
SOUND
For analog channels, select a channel to be
added using number keys.
SETUP
For digital channels, you must perform
FEATURES
Autoprogram function.
LANGUAGE
BLU-RAY
USB
Ch Change
BACK
Press [MENU / EXIT] to exit.
5
Note:
• If setup completes successfully,
“Added to the channel list” is displayed.
• If external input is used, it is not possible to register the
channel and “Unavailable” will be displayed on the TV
screen.
• By using [CH + / -], you can select the memorized channels
only.
11
Add channels
Back
INFORMATION
EN
23
Page 24
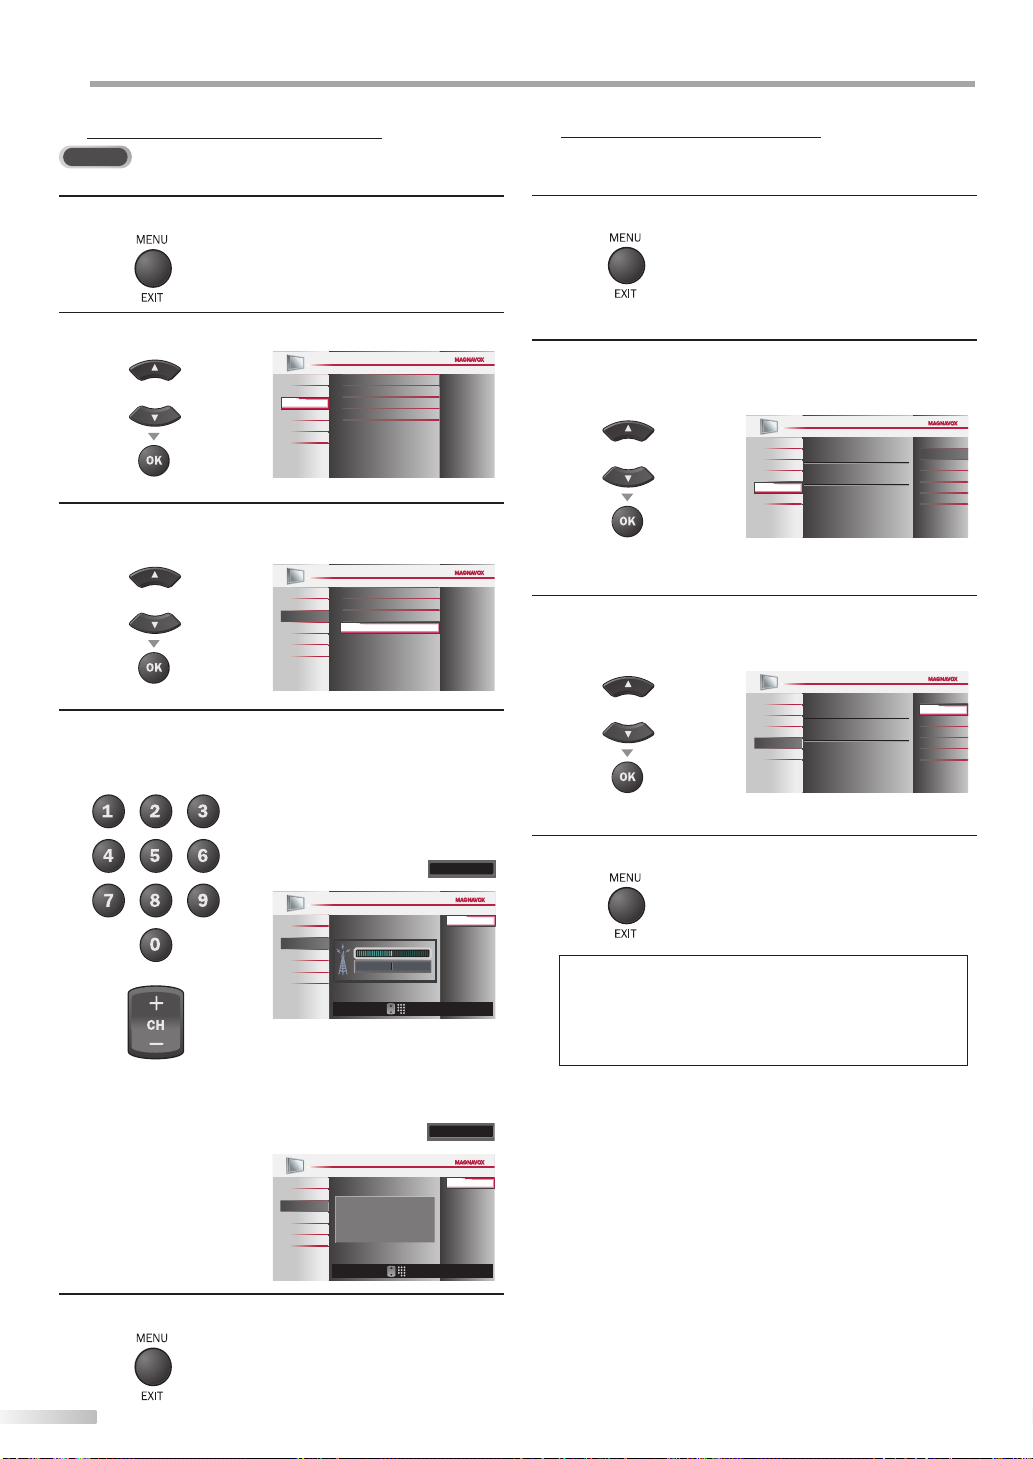
PTIONAL SETTING
O
5Antenna Confirmation
DTV
This function lets you check the digital signal strength of each channel.
Press [MENU / EXIT] to display the main menu.
1
Use [Cursor K / L] to select “SETUP”, then press [OK].
2
PICTURE
Autoprogram
Channel List
or
Use [Cursor K / L] to select “Antenna”, then press
3
[OK].
or
Use [the Number buttons] or [CH
4
channel for which you want to check the digital signal
strength.
SOUND
SETUP
FEATURES
LANGUAGE
BLU-RAY
USB
PICTURE
SOUND
SETUP
FEATURES
LANGUAGE
BLU-RAY
USB
Add Channels
Antenna
Autoprogram
Channel List
Add Channels
Antenna
+ /
-
] to select the
5 Language Selection
You can choose English, Spanish, or French as your on-screen language.
Press [MENU / EXIT] to display the main menu.
1
Use [Cursor K / L] to select “LANGUAGE”, then press
2
[OK].
PICTURE
Select the language for setup display.
or
Use [Cursor K / L] to select “English”, “Español” or
3
SOUND
SETUP
FEATURES
LANGUAGE
BLU-RAY
USB
Elija el idioma de ajuste.
Sélectionner langue écran config.
“Français”, then press [OK].
PICTURE
Select the language for setup display.
or
SOUND
SETUP
FEATURES
LANGUAGE
BLU-RAY
USB
Elija el idioma de ajuste.
Sélectionner langue écran config.
English
Español
Français
English
Español
Français
PICTURE
SOUND
SETUP
FEATURES
LANGUAGE
BLU-RAY
USB
Current 50
• If the channel is set to analog channel or external
input, you cannot confirm the antenna condition.
PICTURE
SOUND
SETUP
Indicator is available for digital
FEATURES
LANGUAGE
BLU-RAY
USB
broadcasting only.
Press [MENU / EXIT] to exit.
5
24
EN
Press [MENU / EXIT] to exit.
11.1
Back
50 Max
4
Note:
• If you need the English menus instead of the Spanish or
CH
Ch Change
French menus, press [MENU / EXIT]. Use [Cursor K / L] to
select “IDIOMA” or “LANGUE”, then press [OK].
Use [Cursor K / L] to select “English”, then press [OK]. Press
[MENU / EXIT] to exit the main menu.
Video
Back
CH
Ch Change
Page 25
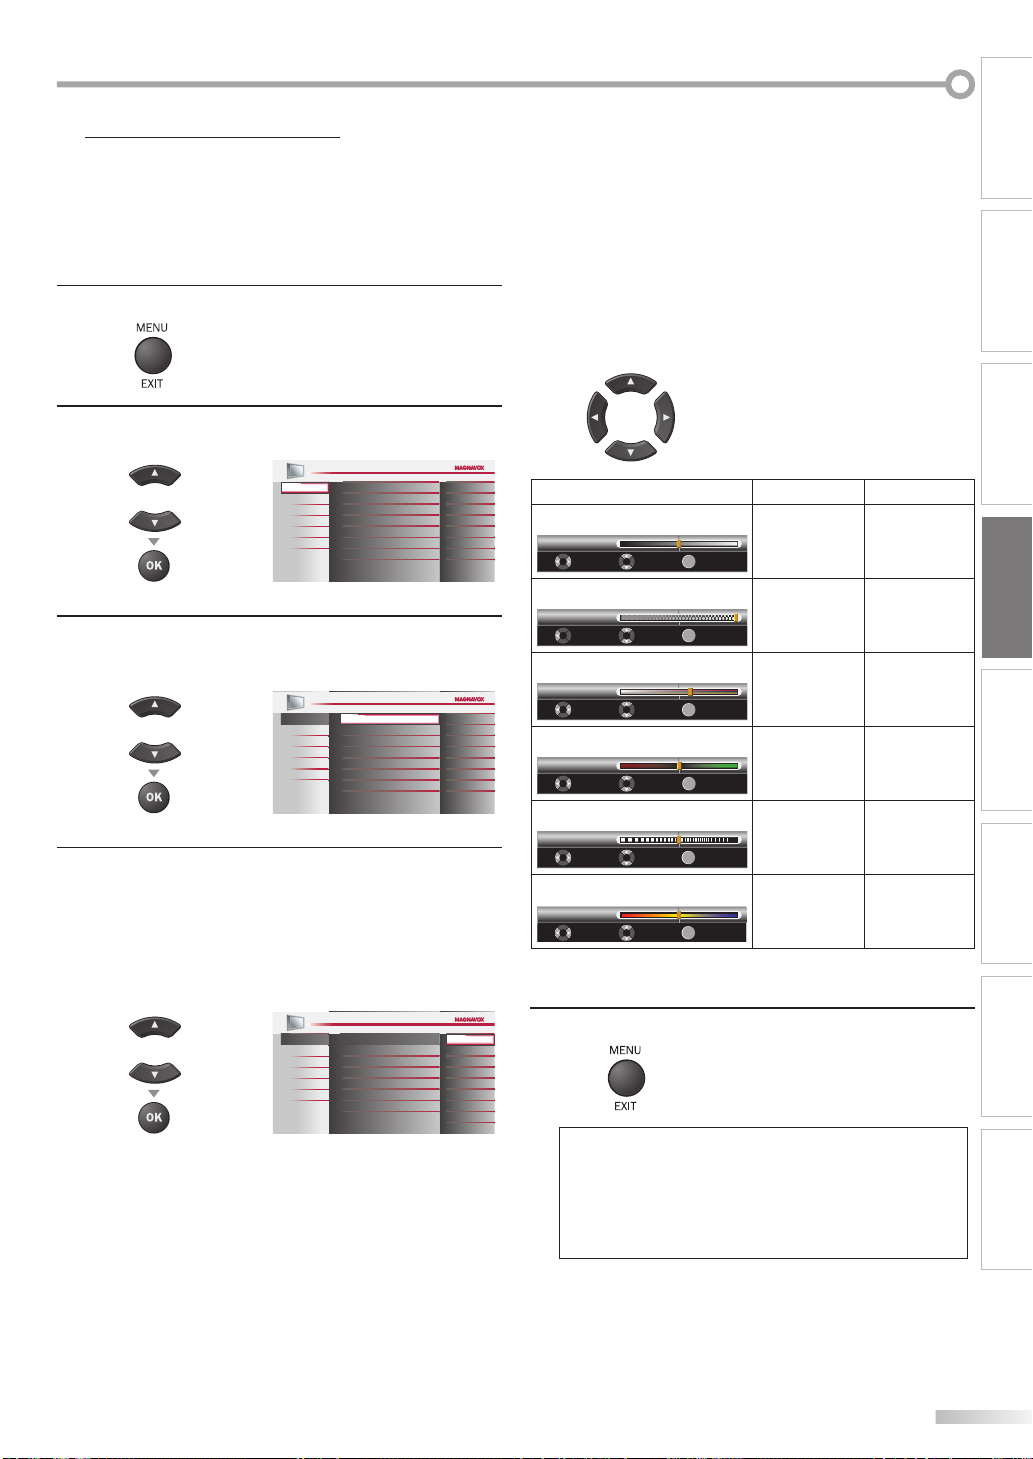
5 Picture Adjustment
You can adjust brightness, contrast, color, tint, sharpness and color
temperature.
INTRODUCTION
Before you begin: You must set ”Home” in ”Location” (Refer to page 35).
Otherwise, the settings you adjusted will not be
memorized after you turn off the unit.
Press [MENU / EXIT] to display the main menu.
1
Use [Cursor K / L] to select “PICTURE”, then press [OK].
2
PICTURE
Smart Picture
or
Use [Cursor K / L] to select the item you want to adjust,
3
SOUND
SETUP
FEATURES
LANGUAGE
BLU-RAY
USB
Brightness
Contrast
Color
Tint
Sharpness
Color Temperature
Personal
Normal
then press [OK].
PICTURE
or
Adjust the picture quality.
4
SOUND
SETUP
FEATURES
LANGUAGE
BLU-RAY
USB
Smart Picture
Brightness
Contrast
Color
Tint
Sharpness
Color Temperature
Personal
Normal
Smart Picture
Use [Cursor K / L] to select the desired setting, then
press [OK].
(‘‘Personal“, ‘‘Standard“, ‘‘Sports“, ‘‘Movie“ and ‘‘Game“)
30
60
36
Brightness
0
0
Brightness
Contrast
Contrast
Color
Color
30
60
Tint
36
0
Tint
0
Sharpness
Sharpness
Color Temperature
Color Temp. Normal
Brightness, Contrast, Color, Tint, Sharpness,
Color Temperature
Use [Cursor K / L] to select the desired setting, then
use [Cursor
or
30
60
36
0
0
/
s
B
] to adjust.
OK
MoveAdjust OK
OK
MoveAdjust
OK
MoveAdjust
OK
MoveAdjust
OK
MoveAdjust
OK
MoveAdjust
Cursor
s
to decrease
brightness
to decrease
OK
OK
contrast
to decrease
color intensity
Cursor
to increase
brightness
to increase
contrast
to increase
color intensity
to add red to add green
OK
to soften to sharpen
OK
to add warm
OK
colors
to add cool
colors
PREPARATION
WATCHING TV
B
OPTIONAL SETTING
OPERATING BLU-RAY
BLU-RAY SETTING TROUBLESHOOTING
Press [MENU / EXIT] to exit.
PICTURE
Smart Picture
or
SOUND
SETUP
FEATURES
LANGUAGE
BLU-RAY
USB
Brightness
Contrast
Color
Tint
Sharpness
Color Temperature
Personal
Standard
Sports
Movie
Game
5
Note:
INFORMATION
• If you press [SMART PICTURE], the items for “Smart
Picture“ ("Personal", "Standard", "Sports", "Movie" and
"Game") will appear at the upper left of the TV screen, in
which you can switch to the desired setting.
• To cancel picture adjustment, press [MENU / EXIT].
• Only the ‘‘Personal“ setting can be adjusted.
25
EN
Page 26
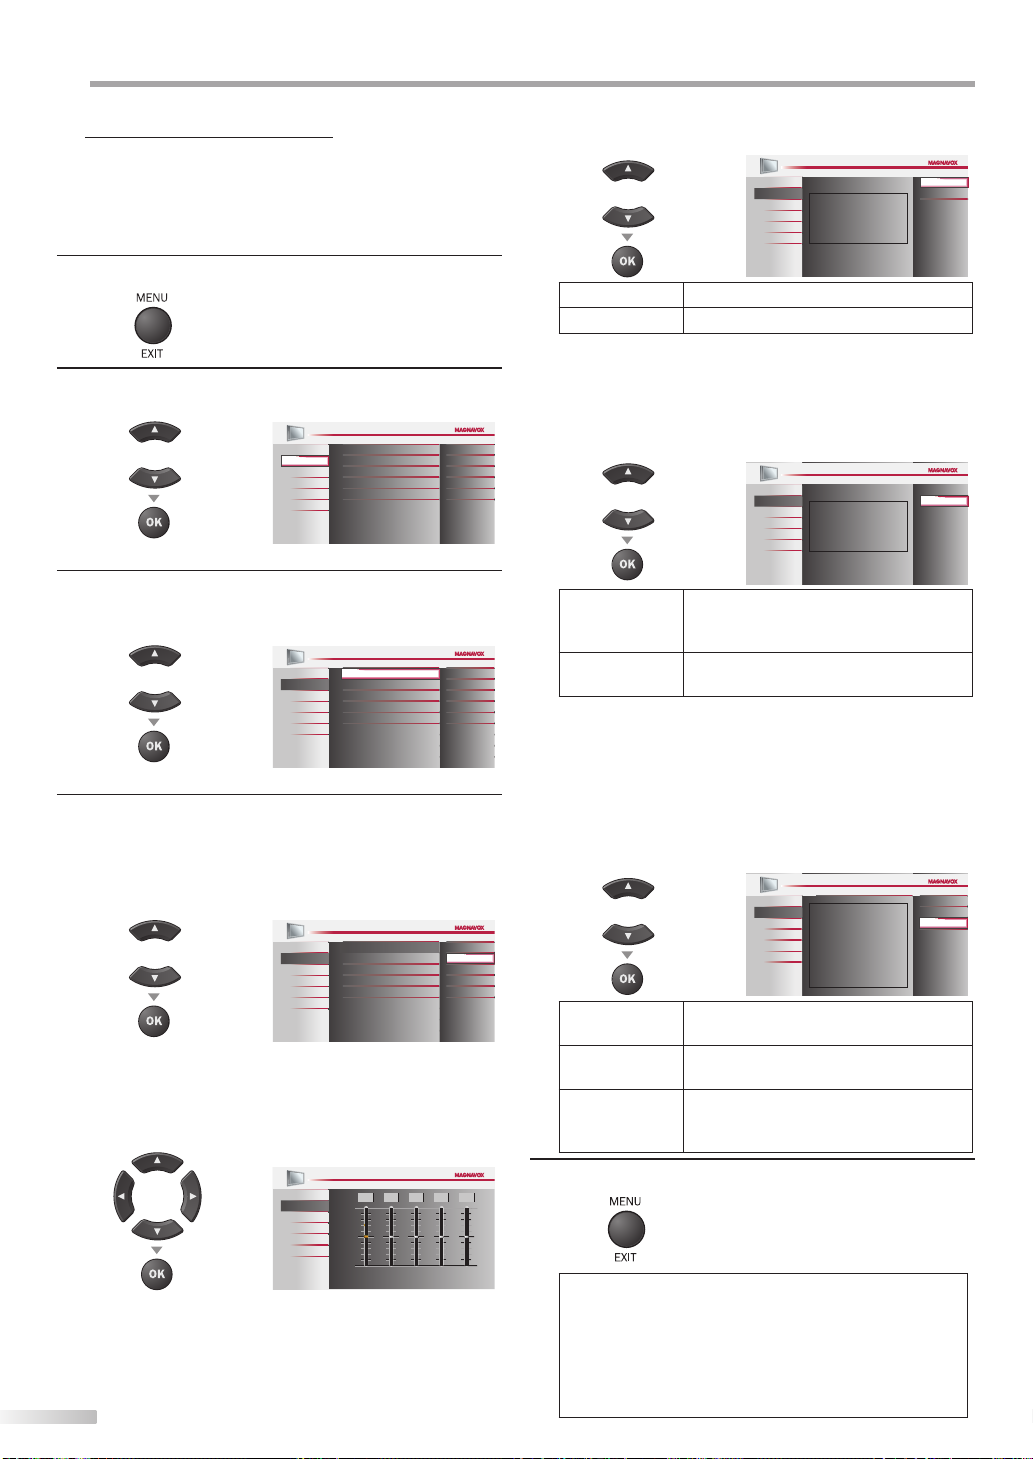
PTIONAL SETTING
O
5 Sound Adjustment
You can adjust the smart sound, equalizer and some other sound functions.
Before you begin: You must set ”Home” in ”Location” (Refer to page 35).
Press [MENU / EXIT] to display the main menu.
1
Use [Cursor K / L] to select “SOUND”, then press [OK].
2
Use [Cursor K / L] to select the sound type you want to
3
adjust, then press [OK].
Adjust the following items.
4
Smart Sound
Use [Cursor K / L] to select the desired setting, then
press [OK].
(“Personal “, “Standard “, “Movie “, “Music “ and “News “)
Equalizer
Adjust tonal quality for each frequencies.
Use [Cursor s /
use [Cursor K / L] to adjust the level, then press [OK].
Virtual Surround Sound
Virtual Surround Sound gives you the stereo phonic
virtual space through your existing 2-channel stereo
system.
26
EN
Otherwise, the settings you adjusted will not be
memorized after you turn off the unit.
or
PICTURE
SOUND
SETUP
FEATURES
LANGUAGE
BLU-RAY
USB
Equalizer
Virtual Surround Sound On
Auto Volume Leveling
TV Speakers
PICTURE
or
SOUND
SETUP
FEATURES
LANGUAGE
BLU-RAY
USB
Smart Sound
Equalizer
Virtual Surround Sound On
Auto Volume Leveling
TV Speakers
PICTURE
Smart Sound
or
SOUND
SETUP
FEATURES
LANGUAGE
BLU-RAY
USB
Smart Sound
Equalizer
Virtual Surround Sound Movie
Auto Volume Leveling
TV Speakers
<>
] to select the specific frequency and
B
or
PICTURE
SOUND
SETUP
FEATURESFEATURES
LANGUAGE
BLU-RAY
USB
0
120Hz0500Hz01.5kHz05kHz010kHz
StandardSmart Sound
Off
Ext. Amp
Standard
Off
Ext. Amp
Personal
Standard
Music
News
Use [Cursor K / L] to select the desired option, then
press [OK].
PICTURE
or
SOUND
SETUP
FEATURES
LANGUAGE
BLU-RAY
USB
This selects the modes for more spatial or
surround sound reproduction.
On Emphasized effect.
Off Natural effect.
Auto Volume Leveling
This function keeps a constant loudness differential
between the TV commercials and the programs.
Use [Cursor K / L] to select the desired option, then
press [OK].
PICTURE
SOUND
SETUP
FEATURES
LANGUAGE
BLU-RAY
USB
Auto Volume Leveling reduces volume
differences between
channels and programs, providing
a consistent audio level.
On
Off
or
Select if you want to reduce volume
differences between the TV commercials
and the programs.
Select if you want to remove the auto
volume leveling.
TV Speakers
Select the audio output from the unit’s speakers, or not.
If your amplifier compatible with the CEC function is
connected to this unit using an HDMI cable, some part
of the sound operations such as volume up can access
synchronized by using this unit’s remote control.
Use [Cursor K / L] to select the desired option, then
press [OK].
PICTURE
SOUND
SETUP
FEATURES
LANGUAGE
BLU-RAY
USB
"On":
Sound will be output from the TV speakers.
"Off":
Sound will not be output from the TV
speakers.
"Ext. Amp":
Operation is possible by connecting to the
HDMI-CEC compatible amp with a HDMI
cable. For details look in the user manual.
On
Off
or
The sound will be output from the unit’s
speakers.
The sound will not be output from the
unit’s speakers.
This function allows you to control audio
Ext. Amp
output from CEC-compatible devices
with the unit’s remote control.
Press [MENU / EXIT] to exit.
5
Note:
• If you press [SMART SOUND], the items for “Smart Sound“
(“Personal”, “Standard”, “Movie”, “Music” and “News”) will
appear at the upper left of the TV screen, in which you can
switch to the desired setting.
• To cancel sound adjustment, press [MENU / EXIT].
• We do not guarantee 100% interoperability with other
brands of CEC compliant devices.
On
Off
On
Off
On
Off
Ext. Amp
Page 27
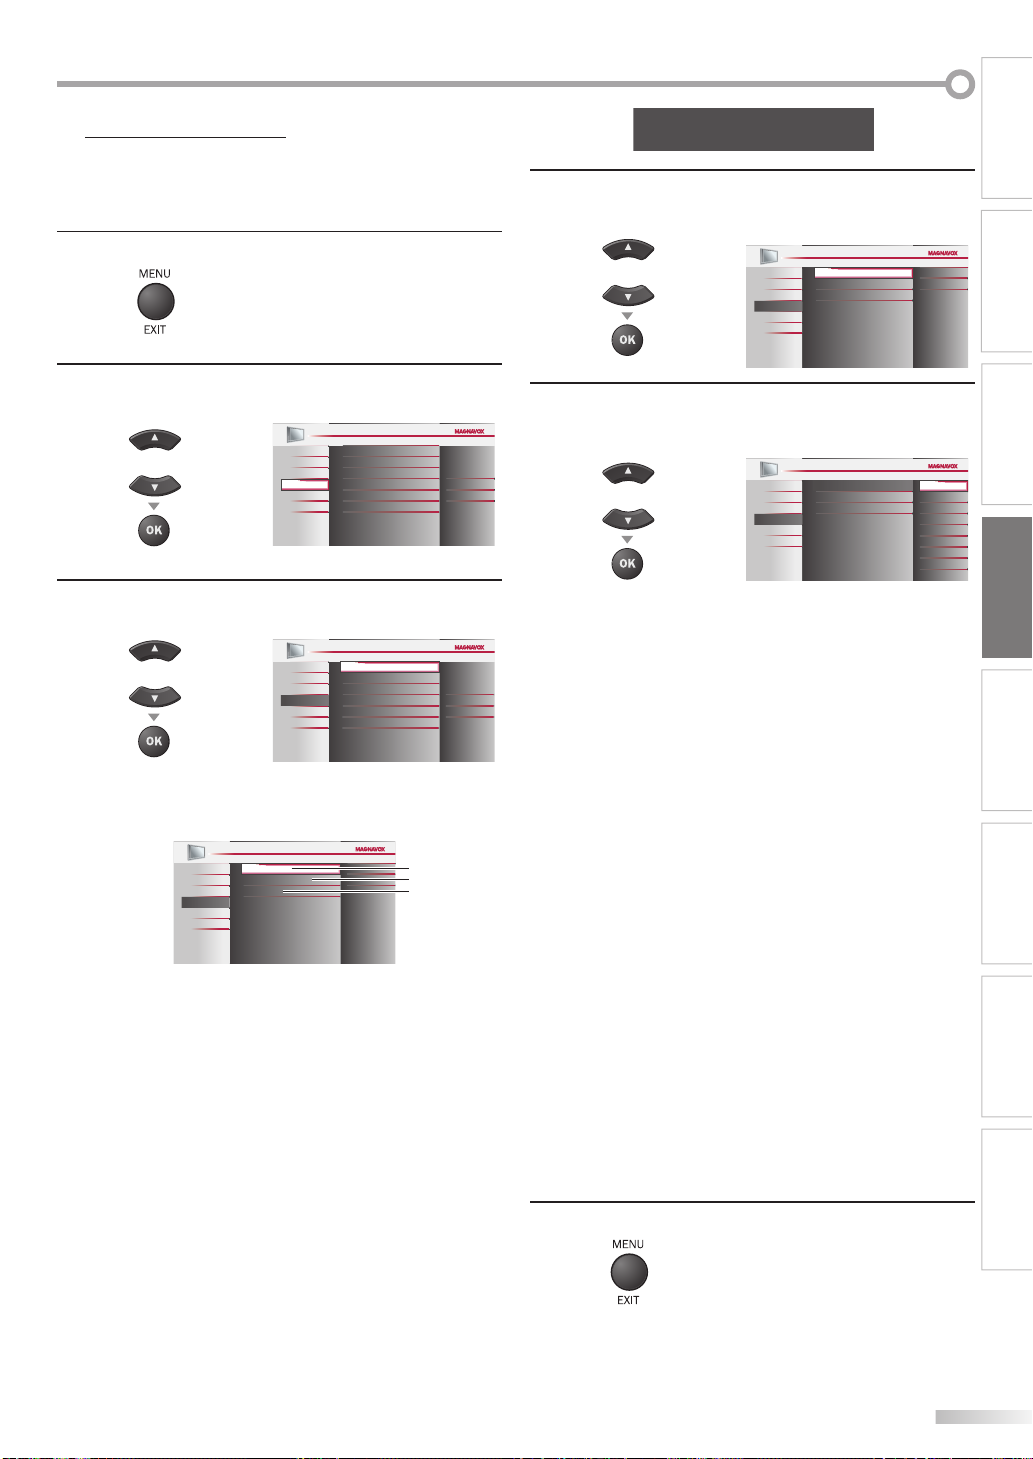
INTRODUCTION
A. Caption Service
5 Closed Caption
You can view closed captioning (CC) for TV programs, movies and news.
Closed caption refers to text of dialogue or descriptions displayed onscreen.
Press [MENU / EXIT] to display the main menu.
1
Use [Cursor K / L] to select “FEATURES”, then press
2
[OK].
Closed Caption
PICTURE
Child Lock
or
Use [Cursor K / L] to select “Closed Caption”, then
3
press [OK].
or
See the following description for setting each item.
PICTURE
SOUND
SETUP
FEATURES
LANGUAGE
BLU-RAY
USB
...
A
“A. Caption Service”
...
B
“B. Digital Caption Service”
...
C
“C. Caption Style”.
SOUND
SETUP
FEATURES
LANGUAGE
BLU-RAY
USB
PICTURE
SOUND
SETUP
FEATURES
LANGUAGE
BLU-RAY
USB
Caption Service
Digital Caption Service
Caption Style
PC Settings
Energy Saving Mode
Location
Current Software Info
Closed Caption
Child Lock
PC Settings
Energy Saving Mode
Location
Current Software Info
Off
Off
D page 27
D page 28
D page 28
On
Home
On
Home
A
B
C
A. Caption Service
Use [Cursor K / L] to select “Caption Service”, then
4
press [OK].
or
Use [Cursor K / L] to select the desired closed caption,
5
PICTURE
SOUND
SETUP
FEATURES
LANGUAGE
BLU-RAY
USB
Caption Service
Digital Caption Service
Caption Style
then press [OK].
BLU-RAY
USB
Caption Service
Digital Caption Service
Caption Style
PICTURE
or
SOUND
SETUP
FEATURES
LANGUAGE
Caption mode
CC-1 and T-1;
are the primary caption and text services.
The captioning or text is displayed in the same
language as the program’s dialogue
(up to 4 lines of script on the TV screen, where it
does not obstruct relevant parts of the picture).
CC-3 and T-3;
serve as the preferred data channels.
The captioning or text is often a secondary language.
CC-2, CC-4, T-2 and T-4;
are rarely available and broadcasters use them only
in special conditions, such as when “CC-1” and
“CC-3” or “T-1” and “T-3” are not available.
• There are 3 display modes according to programs:
Paint-on mode:
Displays input characters on the TV screen
immediately.
Pop-on mode:
Once characters are stored in memory, they are
displayed all at once.
Roll-up mode:
Displays the characters continuously by scrolling
(max. 4 lines).
PREPARATION
Off
Off
WATCHING TV
Off
CC-1
CC-2
CC-3
CC-4
T-1
T-2
T-3
T-4
OPTIONAL SETTING
OPERATING BLU-RAY
BLU-RAY SETTING TROUBLESHOOTING
INFORMATION
Press [MENU / EXIT] to exit.
6
27
EN
Page 28
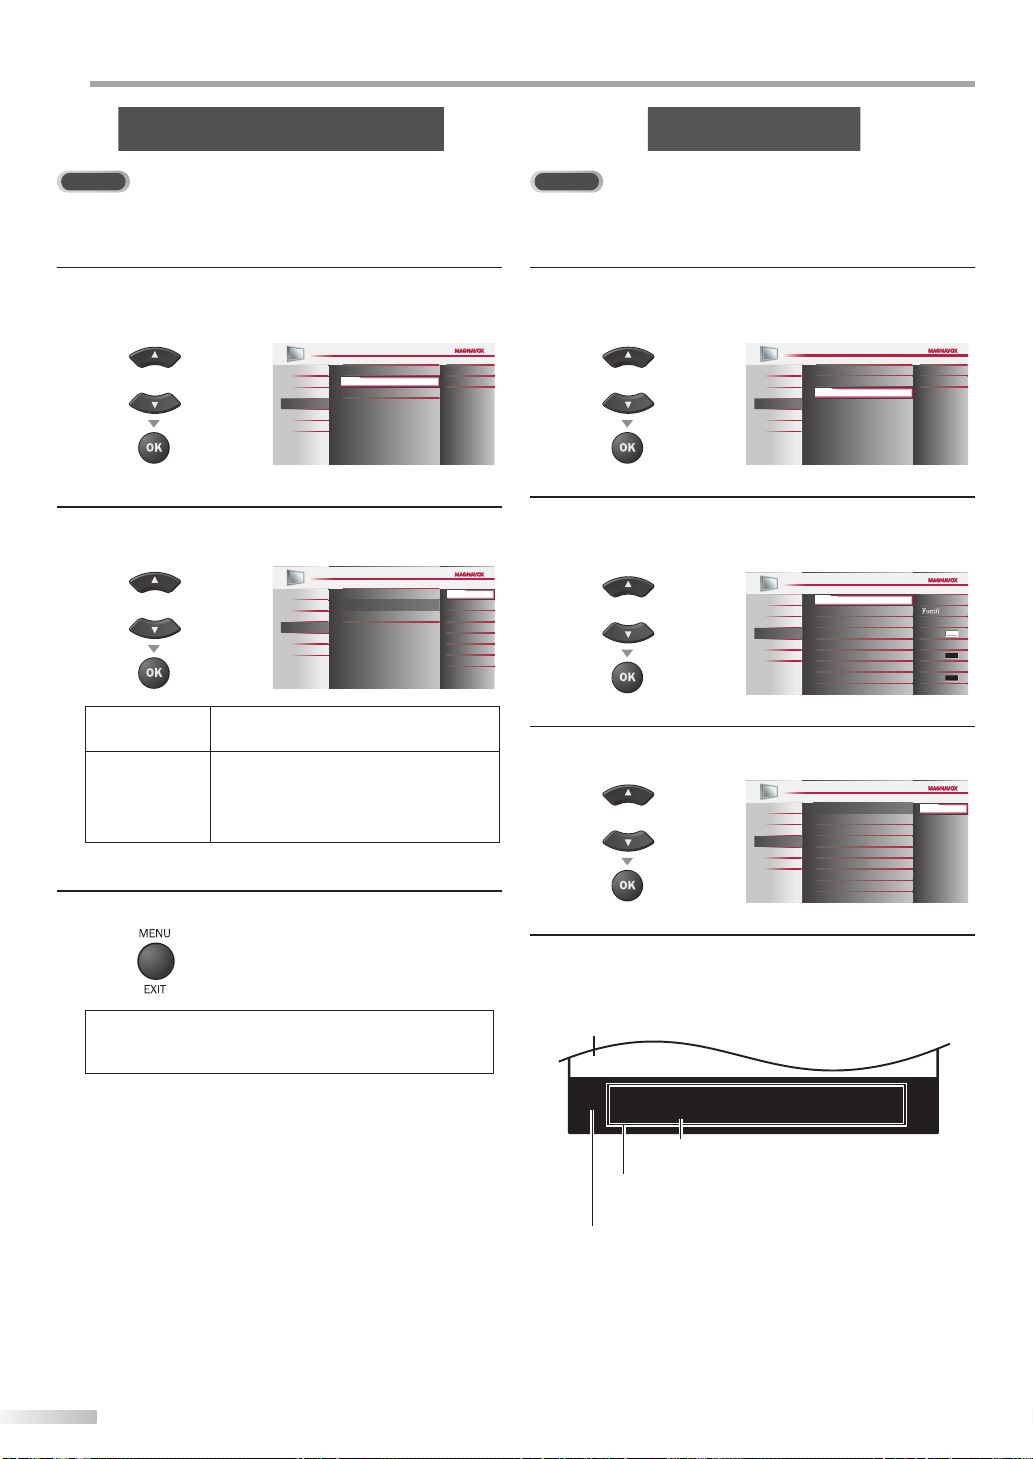
PTIONAL SETTING
B. Digital Caption Service
C. Caption Style
O
B. Digital Caption Service
DTV
In addition to the basic closed caption described on page 27, DTV has its
own closed caption called digital caption service. Use this menu to change
the settings for digital caption service.
/
Use [Cursor
4
K
L] to select “Digital Caption Service”,
then press [OK].
Off
Off
Use [Cursor
5
PICTURE
Caption Service
Digital Caption Service
or
SOUND
SETUP
FEATURES
LANGUAGE
BLU-RAY
USB
Caption Style
/
K
L] to select the desired digital caption
service, then press [OK].
or
Off
CS-1 to CS-6
Press [MENU / EXIT] to exit.
6
Select if you do not want digital caption
service. This is the default.
Select one of these before changing
any other item in “Closed Caption”
menu. Choose “CS-1” under normal
circumstances.
PICTURE
SOUND
SETUP
FEATURES
LANGUAGE
BLU-RAY
USB
Caption Service
Digital Caption Service
Caption Style
Off
CS-1
CS-2
CS-3
CS-4
CS-5
CS-6
C. Caption Style
DTV
You can change the caption style such as font, color or size, etc.
/
Use [Cursor
4
K
L] to select “Caption Style”, then press
[OK].
Use [Cursor
5
PICTURE
or
SOUND
SETUP
FEATURES
LANGUAGE
BLU-RAY
USB
/
K
L] to select “User Setting”, then press
Caption Service
Digital Caption Service
Caption Style
[OK].
User Setting
Font Style
Font Size
Font Color
Font Opacity
Background Color
Background Opacity
Edge Color
Edge Type None
User Setting
Font Style
Font Size
Font Color
Font Opacity
Background Color
Background Opacity
Edge Color
Edge Type
Use [Cursor
6
PICTURE
or
SOUND
SETUP
FEATURES
LANGUAGE
BLU-RAY
USB
/
K
L] to select “On”, then press [OK].
PICTURE
or
SOUND
SETUP
FEATURES
LANGUAGE
BLU-RAY
USB
Off
Off
Off
Middle
White
Solid
Black
Solid
Black
On
Off
Note:
• “Digital Caption Service” that you can switch differs
depending on the broadcast description.
28
EN
/
K
Use [Cursor
7
Then use [Cursor
L] to select an item, then press [OK].
/
K
L] to select the desired setting
and press [OK].
Picture display
ABCDEFGHIJKL
ABCDEFGHIJKL
Edge
(Edge Color and Edge Type)
Font
(Font Style, Font Size, Font Color and Font Opacity
or Transparency)
Background
(Background Color and Background Opacity or
Transparency)
• The setting description for each item is shown on the
next page.
• Review your setting choice made on the next page
by looking in the upper right corner of the displayed
setting box (not all selections show the differences
selected).
Page 29
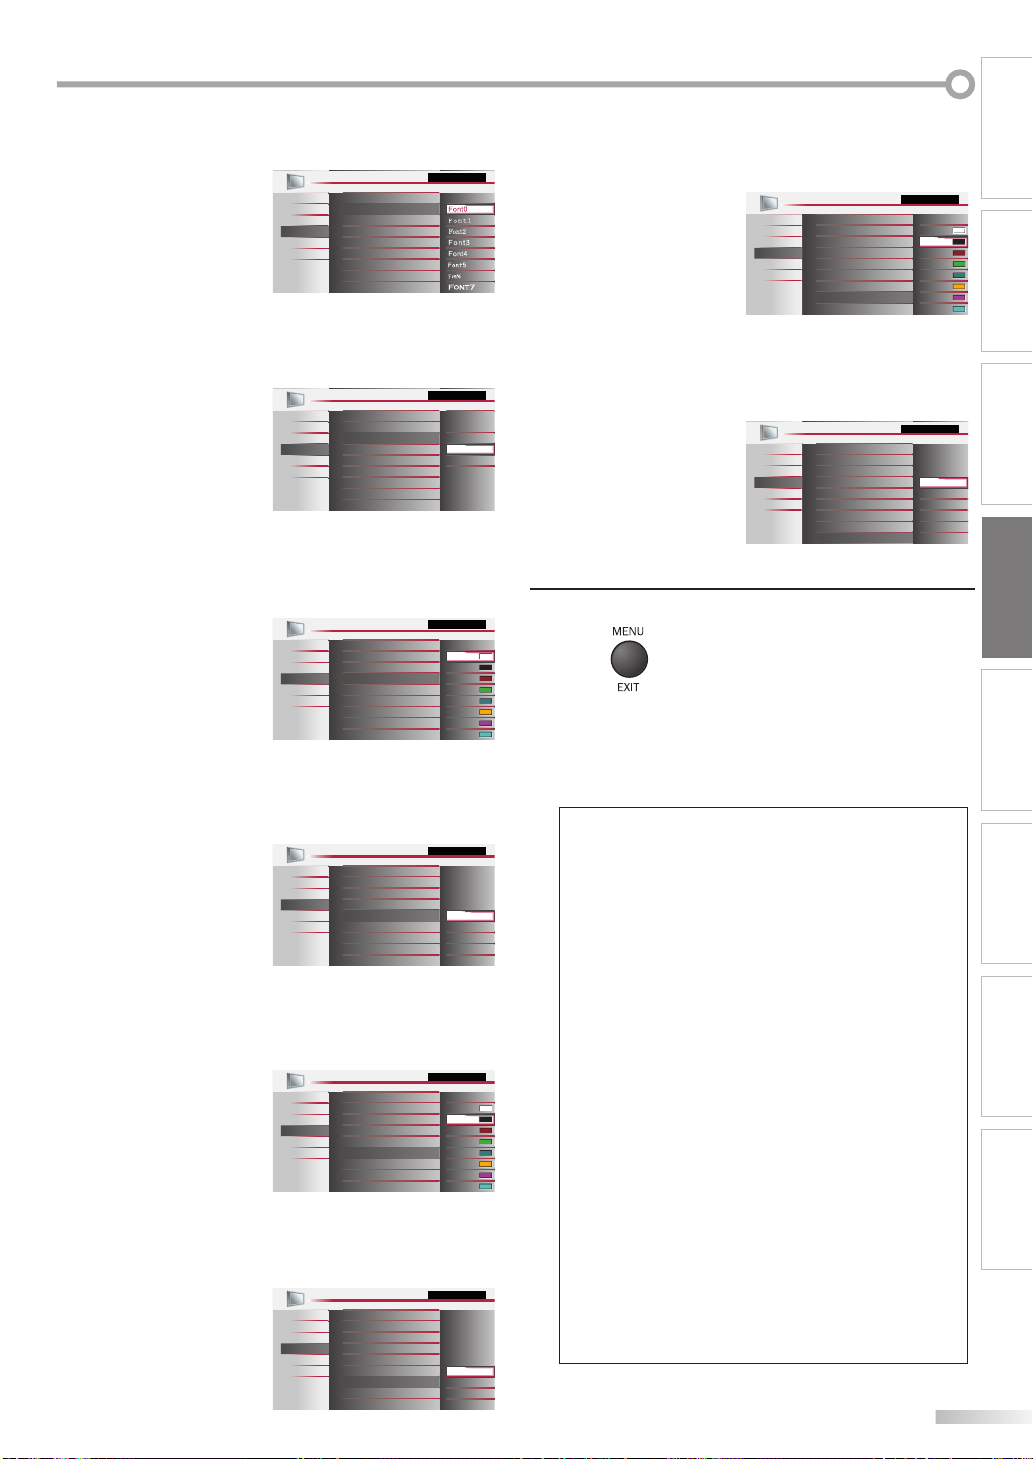
INTRODUCTION
Font Style
Closed Captioning font style can be changed as below.
Closed Caption
User Setting
PICTURE
Font Style
SOUND
Font Size
SETUP
Font Color
FEATURES
Font Opacity
LANGUAGE
BLU-RAY
Background Color
USB
Background Opacity
Edge Color
Edge Type
Font Size
Font size of the displayed caption can be switched as
below.
Closed Caption
PICTURE
User Setting
Font Style
SOUND
SETUP
FEATURES
LANGUAGE
BLU-RAY
USB
Font Size
Font Color
Font Opacity
Background Color
Background Opacity
Edge Color
Edge Type
Large
Middle
Small
Font Color
Font color of the displayed caption can be switched as
below.
Closed Caption
User Setting
PICTURE
SOUND
SETUP
FEATURES
LANGUAGE
BLU-RAY
USB
Font Style
Font Size
Font Color
Font Opacity
Background Color
Background Opacity
Edge Color
Edge Type
White
Black
Red
Green
Blue
Yel l o w
Magenta
Cyan
Edge Color
Edge color of the displayed caption can be switched as
below.
User Setting
Font Style
Font Size
Font Color
Font Opacity
Background Color
Background Opacity
Edge Color
Edge Type
PICTURE
SOUND
SETUP
FEATURES
LANGUAGE
BLU-RAY
USB
Edge Type
Edge type of the displayed caption can be switched as
below.
User Setting
Font Style
Font Size
Font Color
Font Opacity
Background Color
Background Opacity
Edge Color
Edge Type
Press [MENU / EXIT] to exit.
8
PICTURE
SOUND
SETUP
FEATURES
LANGUAGE
BLU-RAY
USB
Closed Caption
White
Black
Red
Green
Blue
Yel l o w
Magenta
Cyan
Closed Caption
None
Raised
Depressed
Uniform
L. Shadow
R.Shadow
PREPARATION
WATCHING TV
OPTIONAL SETTING
OPERATING BLU-RAY
Font Opacity
Font opacity of the displayed caption can be switched
as below.
Closed Caption
User Setting
PICTURE
Font Style
SOUND
Font Size
SETUP
Font Color
FEATURES
LANGUAGE
BLU-RAY
USB
Font Opacity
Background Color
Background Opacity
Edge Color
Edge Type
Solid
Flash
Translucent
Transparent
Background Color
Background color of the displayed caption can be
switched as below.
Closed Caption
User Setting
PICTURE
Font Style
SOUND
SETUP
FEATURES
LANGUAGE
BLU-RAY
USB
Font Size
Font Color
Font Opacity
Background Color
Background Opacity
Edge Color
Edge Type
White
Black
Red
Green
Blue
Yel l o w
Magenta
Cyan
Background Opacity
Background opacity of the displayed caption can be
switched as below.
Closed Caption
User Setting
PICTURE
Font Style
SOUND
Font Size
SETUP
Font Color
FEATURES
Font Opacity
LANGUAGE
BLU-RAY
Background Color
USB
Background Opacity
Edge Color
Edge Type
Solid
Flash
Translucent
Transparent
Note:
• To show the closed caption on your TV screen, broadcast
signal must contain the closed caption data.
• Not all TV programs and commercials have the closed
caption or all types of the closed caption.
• Captions and texts may not match the TV voice exactly.
• Changing channels may delay the closed caption for a few
seconds.
• Adjusting or muting the volume may delay the closed
caption for a few seconds.
• Abbreviations, symbols and other grammatical shortcuts
may be used in order to keep pace with the on-screen
action. This is not a malfunction.
• The caption or text characters will not be displayed while
the main menu or functions display is shown.
• If a black box appears on the TV screen, this means that
the closed caption is set to the text mode. To clear the box,
select “CC-1”, “CC-2”, “CC-3”, “CC-4” or “Off”.
• If the unit receives poor quality television signals, the
captions may contain errors, or there might be no captions
at all. Some possible causes of poor quality signals are:
- Automobile ignition noise
- Electric motor noise
- Weak signal reception
- Multiplex signal reception (ghosts or screen flutter)
• The unit retains the closed caption setting if the power fails.
• Closed caption will not be displayed when you are using an
HDMI connection.
• When the unit receives special effects playback signal (i.e.,
Search, Slow and Still) from a VCR’s video output channel
(CH3 or CH4), the unit may not display the correct caption
or text.
BLU-RAY SETTING TROUBLESHOOTING
INFORMATION
29
EN
Page 30
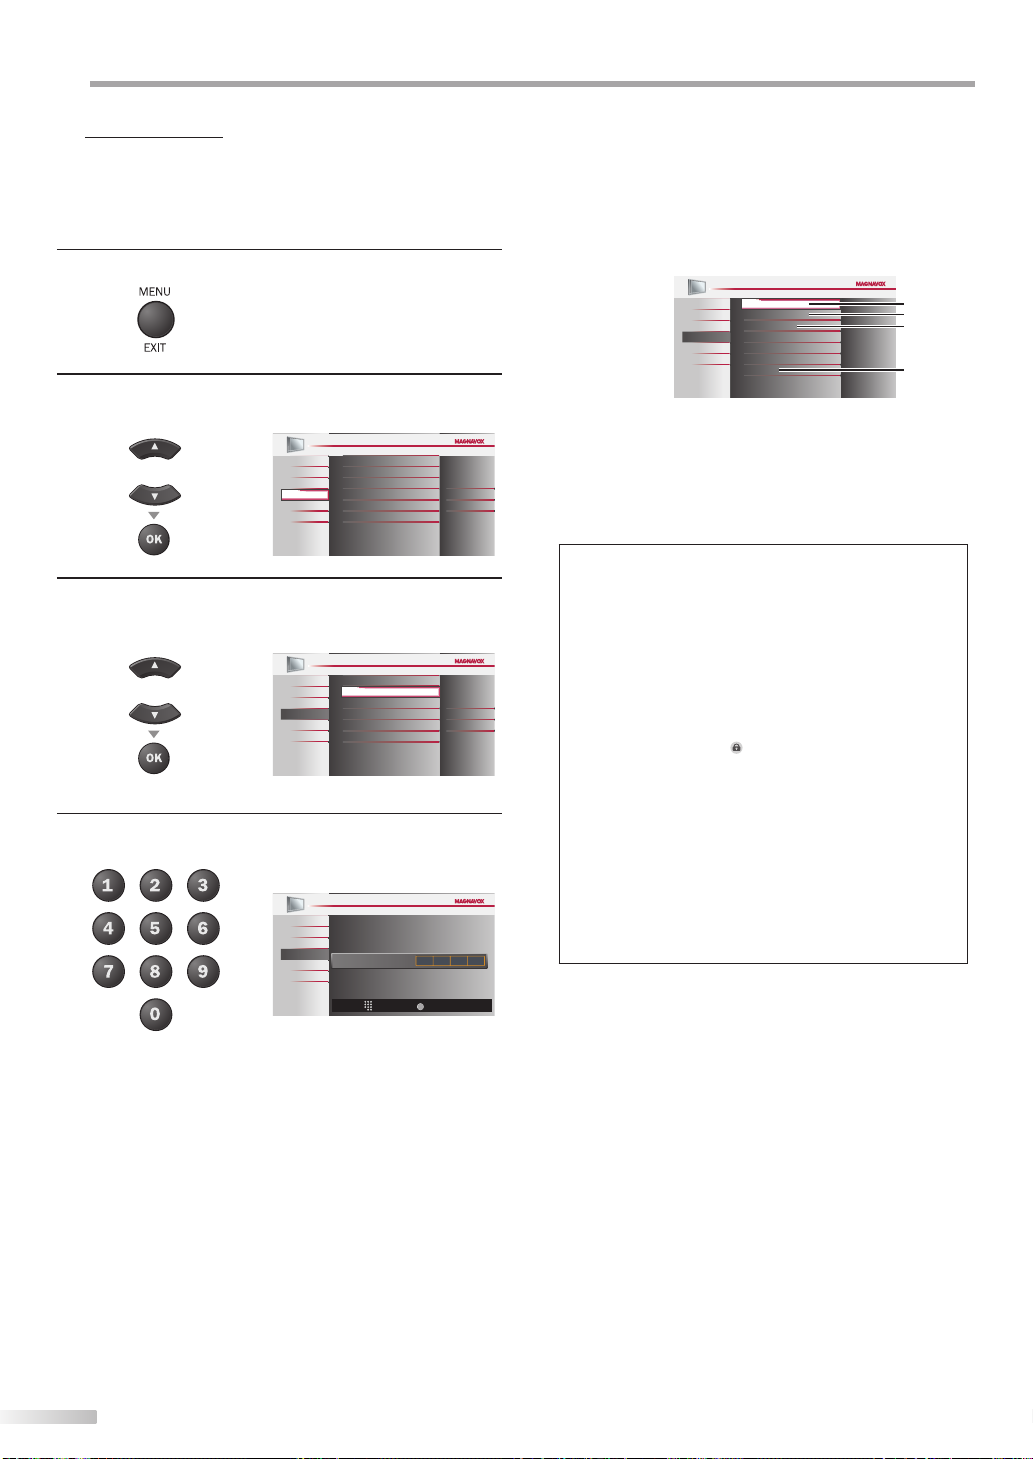
PTIONAL SETTING
O
5 Child Lock
Child lock reads the ratings for programs, then denies access to the
programs which exceed the rating level you set. With this function, you
can block certain programs inappropriate for children and any channels or
external input modes can be invisible.
Press [MENU / EXIT] to display the main menu.
1
/
K
Use [Cursor
2
L] to select “FEATURES”, then press
[OK].
Closed Caption
PICTURE
Child Lock
or
Use [Cursor K / L] to select “Child Lock”, then press
3
SOUND
SETUP
FEATURES
LANGUAGE
BLU-RAY
USB
PC Settings
Energy Saving Mode
Location
Current Software Info
[OK].
Closed Caption
PICTURE
Child Lock
or
Use [the Number buttons] to enter the 4-digit
4
SOUND
SETUP
FEATURES
LANGUAGE
BLU-RAY
USB
PC Settings
Energy Saving Mode
Location
Current Software Info
numbers for your PIN Code.
PICTURE
SOUND
SETUP
FEATURES
LANGUAGE
BLU-RAY
USB
Enter PIN
PIN Code
See the following description for setting each item.
PICTURE
SOUND
SETUP
FEATURES
LANGUAGE
BLU-RAY
USB
Channel Lock
US Movie ratings lock
US TV ratings lock
Canadian English Rating
Canadian French Rating
Region ratings lock
Change PIN
A
B
C
D
...
A
On
Home
“A. Channel Lock”
...
B
“B. US Movie ratings lock”
...
C
“C. US TV ratings lock”.
...
D
“D. Change PIN”
D page 31
D page 31
D page 32
D page 33
Note:
• When you select a rating and set it to “Block”, the higher
ratings will be blocked automatically. The lower ratings will
be available for viewing.
• When you set the highest rating to “View”, all ratings turn to
“View” automatically.
• To block any inappropriate programs, set your limits in “US
Movie ratings lock”, “US TV ratings lock” and
On
Home
_
BACK
Back
“Region ratings lock”.
• The child lock setting will be retained after a power failure
(except the access code reverts to 0000).
• If the rating is blocked, will appear.
• “Region ratings lock” will be available when the TV receives
a digital broadcast using the new rating system.
• If the broadcasting signal does not have the region ratings
lock information, “Region ratings lock is currently not
available.” will appear.
This message will also appear when you try to access
“Region ratings lock” after you have cleared the region
ratings lock information, and the new information has not
been downloaded since.
• The Canadian rating systems on this TV are based on
CEA-766-A and the Canadian Radio-Television and
Telecommunications Commission (CRTC) policy.
• When you have not set up your PIN Code,
enter [0], [0], [0], [0].
• When the PIN Code is correct, “Child Lock” menu is
displayed.
30
EN
Page 31

INTRODUCTION
A. Channel Lock
B. US Movie ratings lock
A. Channel Lock
Particular channels or external input modes can be invisible in this
function.
Use [Cursor K / L] to select “Channel Lock”, then press
5
[OK].
PICTURE
Channel Lock
SOUND
or
Use [Cursor K / L] to select the desired rating, then
6
SETUP
FEATURES
LANGUAGE
BLU-RAY
USB
US Movie ratings lock
US TV ratings lock
Canadian English Rating
Canadian French Rating
Region ratings lock
Change PIN
press [OK] repeatedly to switch between “View” and
“Block”.
or
Press [MENU / EXIT] to exit.
7
PICTURE
SOUND
SETUP
FEATURES
LANGUAGE
BLU-RAY
USB
Select
Video1
Video2
Component
HDMI1
HDMI2
HDMI3
11.1DTV
OK
View / Block
B. US Movie ratings lock
US Movie ratings lock is the rating system created by MPAA (Motion Picture
Association of America).
PREPARATION
Use [Cursor K / L] to select “US Movie ratings lock”,
5
then press [OK].
PICTURE
or
Use [Cursor K / L] to select the desired rating, then
6
SOUND
SETUP
FEATURES
LANGUAGE
BLU-RAY
USB
press [OK] repeatedly to switch between “View” and
“Block”.
PICTURE
or
BACK
Back
Rating Category
X Mature audience only
NC-17 No one under 17 admitted
R
PG-13 Unsuitable for children under 13
PG Parental guidance suggested
G General audience
NR No rating
Restricted; under 17 requires accompanying
parent or adult guardian
SOUND
SETUP
FEATURES
LANGUAGE
BLU-RAY
USB
Channel Lock
US Movie ratings lock
US TV ratings lock
Canadian English Rating
Canadian French Rating
Region ratings lock
Change PIN
X
NC-17
R
PG-13
PG
G
NR
OK
View / Block
Select
WATCHING TV
OPTIONAL SETTING
BACK
Back
OPERATING BLU-RAY
BLU-RAY SETTING TROUBLESHOOTING
Press [MENU / EXIT] to exit.
7
INFORMATION
31
EN
Page 32

PTIONAL SETTING
C. US TV ratings lock
O
C. US TV ratings lock
Use [Cursor K / L] to select “US TV ratings lock”, then
5
press [OK].
Channel Lock
PICTURE
US Movie ratings lock
or
Use [Cursor K / L / s
6
SOUND
US TV ratings lock
SETUP
Canadian English Rating
FEATURES
Canadian French Rating
LANGUAGE
Region ratings lock
BLU-RAY
Change PIN
USB
/
B
] to select the desired rating,
then press [OK] repeatedly to switch between “View”
and “Block”.
PICTURE
or
SOUND
SETUP
FEATURES
LANGUAGE
BLU-RAY
USB
TV-MA
TV-14
TV-PG
TV-G
TV-Y7
TV-Y
Select
FV
V S L D
OK
View / Block
Press [MENU / EXIT] to exit.
7
To set the sub ratings
As for TV-MA, TV-14, TV-PG, or TV-Y7, you can further
set the sub ratings to block specific elements of
programming. To set the sub ratings, follow the step
below.
Rating Category
TV-MA Mature audience only higher
TV-14 Unsuitable for children under 14
TV-PG Parental guidance suggested
TV-G General audience
TV-Y7
Appropriate for all children 7 and
older
TV-Y Appropriate for all children lower
Sub Rating Category Rating
FV Fantasy Violence T V-Y7
V Violence
S Sexual Situation
L Coarse Language
D Suggestive Dialogue TV-PG, TV-14
BACK
Back
Note:
• Blocked sub rating will appear beside the main rating
category in “US TV ratings lock” menu.
• You cannot block a sub rating (D, L, S or V) if the main
rating is set to “View”.
• Changing the category to “Block” or “View” automatically
changes all its sub ratings to the same (“Block” or “View”).
TV-PG
TV-14
TV-MA
/
s
B
Use [Cursor K / L /
] to select the desired rating,
then press [OK] repeatedly to switch between “View”
and “Block”.
PICTURE
SOUND
or
SETUP
FEATURES
LANGUAGE
BLU-RAY
USB
TV-MA
TV-14
TV-PG
TV-G
TV-Y7
TV-Y
Select
32
EN
FV V S L D
BACK
OK
View / Block
Back
Page 33

D. Change PIN
D. Change PIN
Although the default code (0000) is supplied with the TV, you can set your
own PIN Code.
INTRODUCTION
Use [Cursor K / L] to select “Change Pin”, then press
5
[OK].
Cannel Lock
PICTURE
SOUND
or
Press [the Number buttons] to enter the new 4-digit
6
SETUP
FEATURES
LANGUAGE
BLU-RAY
USB
US Movie ratings lock
US TV ratings lock
Canadian English Rating
Canadian French Rating
Region ratings lock
Change PIN
PIN Code.
• Enter PIN Code again in “Confirm Pin” entry field.
PICTURE
SOUND
SETUP
FEATURES
LANGUAGE
BLU-RAY
USB
Enter PIN
Confirm PIN
PIN Code
Press [MENU / EXIT] to exit.
7
PREPARATION
WATCHING TV
OPTIONAL SETTING
_
BACK
Back
OPERATING BLU-RAY
Note:
• Make sure new PIN Code and confirm PIN Code must be
exactly the same. If they are different, the space is cleared
for reentering.
• Your PIN Code will be erased and return to the default
(0000) when a power failure occurs.
If you forget the PIN Code, unplug the AC power cord for 10
seconds to restore the PIN Code to 0000.
BLU-RAY SETTING TROUBLESHOOTING
INFORMATION
EN
33
Page 34

PTIONAL SETTING
O
5 PC Settings
This function lets you adjust the PC screen position during PC input through
the HDMI 1 Input jack.
Press [MENU / EXIT] to display the main menu.
1
/
K
Use [Cursor
2
L] to select “FEATURES”, then press
[OK].
Closed Caption
PICTURE
Child Lock
SOUND
SETUP
FEATURES
LANGUAGE
BLU-RAY
USB
PC Settings
Energy Saving Mode
Location
Current Software Info
Use [Cursor
3
or
/
K
L] to select “PC Settings”, then press
[OK].
Closed Caption
PICTURE
Child Lock
or
SOUND
SETUP
FEATURES
LANGUAGE
BLU-RAY
USB
PC Settings
Energy Saving Mode
Location
Current Software Info
On
Home
On
Home
Adjust the setting.
5
Position Reset
Use [Cursor K / L] to select “Reset”, then press [OK].
PICTURE
SOUND
or
SETUP
FEATURES
LANGUAGE
BLU-RAY
USB
Resets the display position of
the picture.
• The horizontal/vertical position of the PC screen are
automatically adjusted.
Horizontal Position, Vertical Position
Use [Cursor
Horizontal Position
H. Position
Vertical Position
V. Position
6
0
0
Press [MENU / EXIT] to exit.
/
s
B
] to adjust.
OK
MoveAdjust OK
OK
MoveAdjust OK
to move PC
+-
screen left
to move PC
+-
screen up
Cursor
s
Cursor
to move PC
screen right
to move PC
screen down
Cancel
Reset
B
Use [Cursor K / L] to select the setting you want to
4
adjust, then press [OK].
Position Reset
PICTURE
or
SOUND
SETUP
FEATURES
LANGUAGE
BLU-RAY
USB
Horizontal Position
Vertical Position
34
EN
Note:
• You may not obtain an appropriate screen with
0
0
“Position Reset“ for some signals. In this case, adjust the
settings manually.
Page 35

INTRODUCTION
5 Energy Saving Mode
You can set whether the power consumption is saved or not.
Press [MENU / EXIT] to display the main menu.
1
/
K
Use [Cursor
2
[OK].
Use [Cursor
3
press [OK].
L] to select “FEATURES”, then press
Closed Caption
or
PICTURE
SOUND
SETUP
FEATURES
LANGUAGE
BLU-RAY
USB
Child Lock
PC Settings
Energy Saving Mode
Location
Current Software Info
/
K
L] to select “Energy Saving Mode”, then
Closed Caption
PICTURE
Child Lock
or
SOUND
SETUP
FEATURES
LANGUAGE
BLU-RAY
USB
PC Settings
Energy Saving Mode
Location
Current Software Info
On
Home
On
Home
5 Location
When you select ”Retail”, the power consumption may possibly exceed the
limited requirement of the ENERGY STAR® qualification.
Press [MENU / EXIT] to display the main menu.
1
/
K
Use [Cursor
2
[OK].
Use [Cursor
3
L] to select “FEATURES”, then press
Closed Caption
PICTURE
Child Lock
or
SOUND
SETUP
FEATURES
LANGUAGE
BLU-RAY
USB
PC Settings
Energy Saving Mode
Location
Current Software Info
/
K
L] to select “Location”, then press [OK].
PICTURE
or
SOUND
SETUP
FEATURES
LANGUAGE
BLU-RAY
USB
Closed Caption
Child Lock
PC Settings
Energy Saving Mode
Location
Current Software Info
On
Home
On
Home
PREPARATION
WATCHING TV
OPTIONAL SETTING
OPERATING BLU-RAY
/
Use [Cursor
4
K
L] to select the desired mode, then
press [OK].
or
On
Off
Press [MENU / EXIT] to exit.
5
Select if you want to reduce the power
consumption.
The power consumption may possibly
exceed the limited requirement of the
ENERGY STAR® qualification.
PICTURE
SOUND
SETUP
FEATURES
LANGUAGE
BLU-RAY
USB
When set to “On”,power consumption is
reduced by decreasing backlight brightness.
/
K
Use [Cursor
4
press [OK].
On
Off
Press [MENU / EXIT] to exit.
5
L] to select the desired location, then
PICTURE
or
SOUND
SETUP
FEATURES
LANGUAGE
BLU-RAY
USB
Location Home is recommended for
normal home use.
In the Retail Store mode, all settings are
fixed.
Retail
Home
BLU-RAY SETTING TROUBLESHOOTING
INFORMATION
EN
35
Page 36

PTIONAL SETTING
O
5 Current Software Info
This function shows what version of the software currently used.
Press [MENU / EXIT] to display the main menu.
1
/
K
Use [Cursor
2
[OK].
Use [Cursor
3
then press [OK].
Confirm the version of the software currently used.
4
Press [MENU / EXIT] to exit.
5
L] to select “FEATURES”, then press
Closed Caption
PICTURE
Child Lock
or
SOUND
SETUP
FEATURES
LANGUAGE
BLU-RAY
USB
PC Settings
Energy Saving Mode
Location
Current Software Info
/
K
L] to select “Current Software Info”,
Closed Caption
PICTURE
Child Lock
or
SOUND
SETUP
FEATURES
LANGUAGE
BLU-RAY
USB
PC Settings
Energy Saving Mode
Location
Current Software Info
PICTURE
SOUND
Release Version:
CM42OB_1.0
SETUP
FEATURES
LANGUAGE
BLU-RAY
USB
On
Home
On
Home
Back
5 JPEG/MP3 Playback
This unit can play JPEG and MP3 files. Use the USB flash memory contains
those files.
Insert the USB flash memory to the USB terminal of this
1
unit.
PICTURE
SOUND
This menu allows you to enjoy your photos and
music via your USB device.
SETUP
FEATURES
LANGUAGE
BLU-RAY
USB
• The main menu appears automatically.
/
K
Use [Cursor
2
L] to select “USB” and press [OK].
The highlight will move to the name of your USB flash
memory, then press [OK] again.
PICTURE
SOUND
or
Use [Cursor
3
/
K
L] to select “Picture” or “Music”, and
then press [OK] or [Cursor
or
or
This menu allows you to enjoy your photos and
music via your USB device.
SETUP
FEATURES
LANGUAGE
BLU-RAY
USB
].
B
Your USB
Picture
Music
1 2 3 4
Press “OK” key to play/pause.
Picture
Note:
It is recommended that files to be played back in this unit are
recorded under the following specifications:
<MP3>
• Sampling frequency : 32 kHz or 44.1 kHz or 48 kHz
• Constant bit rate : 32 kbps - 320 kbps
<JPEG>
• Upper limit : 24 Mpixel
Image1.jpg
Image2.jpg
Image3.jpg
Image4.jpg
Image5.jpg
Your USB
Your USB
36
EN
Page 37

INTRODUCTION
[Picture]
/
K
Use [Cursor
press [OK] or [Cursor
• To switch a “List” or a “Thumbnails”,
press [2] by [the number button].
• The unit goes to the slide show automatically.
To pause/begin the slide show, press [OK].
• You can use [the number buttons] (between [1]
and [4]) to see the file detail (➀) or change the
following settings (➁~➃).
Item Detail
➀
More detail
➃
Start show
➁
Transitions
➂
Slide time
➃
Stop show
➁
Rotate
➂
Zoom
L] to select the desired file, and then
].
B
Your USB
Picture
Image1.jpg
Image2.jpg
Image3.jpg
Image4.jpg
Image5.jpg
1 2 3 4
Press “OK” key to play/pause.
Your USB
Picture
1 2 3 4
Press “OK” key to play/pause.
Picture: Image1.jpg
By:
1 2 3 4
Press [1] to display file details below.
“Name”, “Album”, “Date”, “Size” and “Nex t”.
Press [1] again to disappear file details.
Press [4] or [OK] to start the slide show.
While the slide show is on, the following setting
will be displayed.
Press [2], then use [Cursor
way of the transition mode choosing from;
“Dissolve”, “Wipe right”, “Wipe left”, “Wipe up”,
“Wipe down”, “Box in” and “Box out”.
Press [2], then use [Cursor
display time choosing from;
“Short”, “Medium” and “Long”.
Press [4] or [OK] to stop the slide show.
While the slide show is off, the following setting
will be displayed.
Every press on [2] will turn the picture clockwise
by 90 degrees.
Press [3], then use [Cursor
zoom factor (1x, 2x or 4x).
Press [OK] to set the zoom factor.
Picture
Image1.jpg
Thumbnails
Picture
Image1.jpg
List
TransitionsMore detail Slide time Stop show
/
K
L] to select the
/
K
L] to change the
/
K
L] to select the
Image1.jpg
1200:900
2009:04:02 17:42:06
Image1.jpg
[Music]
/
K
Use [Cursor
press [OK] or [Cursor
L] to select the desired file, and then
].
B
Your USB
Music
Music1.mp3
Music2.mp3
1 2 3 4
Press “OK” key to play/pause.
Music
Music1.mp3
Title:
Artist:
Album:
Duration:
Year:
• Playback will begin from the file you choose.
To pause/begin the playback, press [OK].
• You can use [the number buttons] (between [1]
and [3]) to see the file detail (➀) or change the
following settings (➁ or ➂).
Track: Music1
Artist: None
1 2 3 4
00:53 04:28
RepeatMore detail Shuffle
Item Detail
➀
More detail
Press [1] to display file details below.
“Title”, “Artist”, “Album”, “Duration” and “Year”.
Press [1] again to disappear file details.
Press [2] to play back the desired file repeatedly.
➁
Repeat
Press [2] to play back the all files in the folder
repeatedly.
To cancel the repeat playback, press [2] until “ ”
or “ ” disappears.
➂
Shuffle
Press [MENU / EXIT] to exit.
4
Press [3] to play back the music randomly.
To return to the normal playback, press [3] again.
Note:
• To go back to the previous screen (except when the “List” is
displayed), press [Cursor s].
• The USB flash memory is not supplied with this unit.
• We do not guarantee the all USB flash memory can be
supported on this unit.
• Be sure to keep a back up copy of the original files on your
device before you play them back on this unit.
We have no responsibilities for damage or loss of your
stored data.
• When you ready to remove a USB flash memory, at first turn
off the unit to avoid any damage for your data and the unit.
Music1
None
Easy Symphony
00:04:28
2007
PREPARATION
WATCHING TV
OPTIONAL SETTING
OPERATING BLU-RAY
BLU-RAY SETTING TROUBLESHOOTING
INFORMATION
EN
37
Page 38

PERATING BLU-RAY
O
5 Playable Media
BLU-RAY Functions
Media Type
Logo
Recorded
Signal
Media Size 5 inches (12 cm)
BD-video DVD-video DVD-RW DVD-R
MPEG2,
MPEG-4 AVC,
SMTPE VC-1
MPEG2 CD-DA
DVD+RW
DVD+R audio CD CD-RW CD-R DTS-CD
-
digital
audio
5 Unplayable Media
NEVER play back the following discs. Otherwise, malfunction may result!
3 inches (8 cm) disc, BD with region codes other than A, BD-RE (Ver. 1.0), BD-R (Ver. 1.2, HTL 4x or LTH 2x),
BD-ROM for personal computers, BD-RE/-R with MP3 or JPEG files, Total Hi Def, BD-DVD combination, HD DVD,
DVD with region codes other than 1 or ALL, DVD-RAM, DVD-ROM for personal computers, DVD-RW/-R/+RW/+R with MP3
or JPEG files, DVD-audio, CD-I, Photo CD, Video CD, CDV, CD-G, CD-ROM for personal computers, CD-RW/-R with MP3 or
JPEG files including Kodak Picture CD, the discs with labels, scratches, stains, blemishes, etc.
On the following disc, the sound MAY NOT be heard.
super audio CD
Any other discs without compatibility indications
Note:
• Unfinalized discs cannot be played back.
• For DVD-RW/R, discs recorded in the VR (video recording) format cannot be played back. Only the finalized video format discs can be
played back.
• Some discs cannot be played back because of incompatible recording conditions, characteristics of the recorder or special properties of
discs.
• Only the sound recorded on the normal CD layer can be delivered. The sound recorded on the high density super audio CD layer cannot be
delivered.
• Do not use a single CD adaptor which makes 3 inches (8 cm) to 5 inches (12 cm) disc.
• You can play back discs with the marks listed in “Playable Media”. If you use non-standardized discs, this unit may not play them back or
the sound and video quality will be compromised.
Region Codes
This unit has been designed to play back
BD-video with region “A” and DVD-video with
region “1” or “ALL”. You cannot play back
BD-video or DVD-video that are labeled for
other regions. Look for the symbols on the
right on your BD-video or DVD-video.
If these region symbols do not appear on your
BD-video or DVD-video, you cannot play back
the disc in this unit.
The letter or number inside the globe refers to
region of the world.
A BD-video or DVD-video labeled for a specific
region can only be played back in the unit with
the same region code.
38
EN
BD-video
DVD-video
Color Systems
BD-video and DVD-video are recorded in different color
systems throughout the world. The most common color
system is NTSC (which is used primarily in the United
States and Canada).
This unit uses NTSC, so the disc you play back must be
recorded in the NTSC system. You cannot play back the
disc recorded in other color systems.
Structure of Disc Contents
The contents of BD/DVD are generally divided into titles.
Titles may be further subdivided into chapters.
BD/DVD
Title1 Title2
Chapter 1
Audio CD are divided into tracks.
Track 1
Chapter 2
Track 2
Chapter 1
Audio CD
Track 3
Chapter 2
Track 4
Chapter 3
Track 5
Page 39

Pop-up Menu
These operations are accessible by remote control. Some may also be accessible by controls on the main unit.
INTRODUCTION
5 Playback
Before you begin:
Turn on the amplifier and any other equipment which is connected to this unit.
Make sure the external audio receiver (not included) are set to the correct channel.
Press [POWER yy] to turn on the unit.
1
Insert a disc with label facing forward.
2
label
• In case the DVD was recorded on both sides, make
sure the label of the side you want to play back is
facing forward.
The unit switches to the BLU-RAY mode when the unit was
3
in TV mode and detects the type of disc. (BD, DVD or CD)
Then s
tarts
playback
e.g.) BD
• When you insert an audio CD, “File List” will appear.
• Press [PLAY B] if the unit does not go to the BLU-RAY
mode or the playback does not start automatically.
Press [STOP C] to stop playback temporarily.
4
TR
File List
CD_DA
8
9
10
11
12
13
14
1 / 13
automatically
0 : 00 : 03
3:36
4:14
4:45
3:50
3:53
4:20
5:01
Page DownPage Up
.
BD
1 / 3
5 Using the Title Menu,
Disc Menu / Pop-up Menu
BD
Many of BD-video and DVD-video discs contain title menu (BD-video / DVDvideo), disc menu (DVD-video) or pop-up menu (BD-video) which guides
you through the available functions in the disc.
The contents of the menus may differ depending on the discs.
Title menu (BD-video / DVD-video)
Press [TOP MENU].
1
• The title menu will appear.
Use [Cursor K / L / s / B] to select an item, then press [OK].
2
or
Press [TOP MENU] to exit.
3
Pop-up menu (BD-video) / Disc menu (DVD-video)
Press [POP MENU].
1
DVD
e.g.) Top Menu
Title 1 Top Menu
Chapter 2
Chapter 3
Chapter 4
Chapter 5
Chapter 6
e.g.) Disc Menu
Disc Menu
Subtitle
Audio
Angles
Shooting Episode (Bonus Title)
Back to Topmenu
e.g.) Pop-up Menu
PREPARATION
WATCHING TV
OPTIONAL SETTING
OPERATING BLU-RAY
BLU-RAY SETTING TROUBLESHOOTING INFORMATION
• If playback remains stopped for 20 minutes, the unit
will turn itself off automatically when “Auto Power
Off“ is set to “On“.
5
Press [EJECT A] to eject the disc.
Note:
• “ ” may appear at the top-right on the TV
screen when the operation is prohibited by the
disc or this unit.
• Some BD/DVD may start playback from title 2 or 3 due to
specific programs.
• During the playback of a 2-layered disc, pictures may stop
for a moment. This happens while the 1st layer is being
switched to the 2nd layer. This is not a malfunction.
• When you cannot remove the disc, you may try either
following operations.
- Press and hold [EJECT A] on the unit for more than 5
seconds.
- Unplug the AC power cord and plug it in again, then press
[EJECT A].
It will take about 10 seconds to eject the disc, while that the
unit will not respond to any key commands.
Pop-up Menu
Title 1 Title 2 Bonus Title
• The disc menu will appear when DVD-video is inserted.
• For BD-video, this is a special feature available for some
BD-videos. When you press [POP MENU], a menu pops out
on the TV screen during playback.
Use [Cursor K / L / s / B] to select an item, then press [OK].
2
or
Press [POP MENU] to exit.
3
Note:
• Menu operations may vary depending on the disc.
Refer to the manual accompanying the disc for more
details.
Ifyouhaveso
methingtosa
y,seethispict
urebeforeyou
39
EN
Page 40

PERATING BLU-RAY
O
5 Resume Playback
BD
Press [STOP C] during playback.
1
• Resume message will appear on the TV screen.
Press [PLAY B].
2
• Playback will resume from the point at which
Note:
• To cancel resume, press [STOP C] one more time in the
• The resume information will be kept even when the unit is
DVD
Resume ON
Press 'PLAY' to play from here.
Press ‘PLAY’ to play from here.
To play the beginning,
To play from the beginning, press ‘STOP’ first
press 'STOP' first and then 'PLAY'.
and then ‘PLAY’.
playback was stopped.
stop mode. On some discs, [STOP C] will not work while
the resume message appears. Please wait until the message
disappears.
turned off. However, ejecting the disc will cancel the resume
feature. Playback will start at the beginning the next time
you insert the disc.
Resume ON
5 Slow Forward
BD
During playback, press [PAUSE F],
1
then press [FWD D].
• Every time you press [FWD D], playback speed will
change.
Press [PLAY B] to return to normal playback.
2
Note:
• The approximate speed for the slow forward playback is 1
• Only slow forward is available.
• Set “Still Mode” setting to “Field” in “Video” menu if pictures
DVD
(1/16x), 2 (1/8x), 3 (1/2x).
in the slow forward playback mode are blurred.
(Refer to “Still Mode” on page 50.)
1
5 Fast Forward / Fast Reverse
BD
During playback, press [FWD D] repeatedly for fast
1
forward.
During playback, press [REV E] repeatedly for fast
reverse.
• Every time you press [FWD D] or [REV E], the
playback speed will change.
Press [PLAY B] to return to normal playback.
2
Note:
• For BD, the approximate speed for the fast forward is 1 (1.3x),
• For DVD, the approximate speed for the fast forward or
• For audio CD, the approximate speed is 1 (2x), 2 (8x), and 3 (30x).
• For audio CD, fast forward / fast reverse search between
DVD
2 (10x), 3 (30x), 4 (70x), and 5 (200x). And for the fast reverse,
it is 1 (2x), 2 (10x), 3 (30x), 4 (70x), and 5 (200x).
reverse playback is 1 (2x), 2 (8x), 3 (20x), 4 (50x), and 5 (100x).
different tracks are not available during program and random
playback.
D
E
5 Paused / Step-by-step Playback
Press [PAUSE F] during playback.
1
1
1
• Playback will be paused and sound will be muted.
Press [PLAY B] to return to normal playback.
2
BD
In pause mode, press [PAUSE F] repeatedly.
1
• Every time you press [PAUSE F], playback will
advance one step at a time.
Press [PLAY B] to return to normal playback.
2
DVD
Note:
• Set “Still Mode” to “Field” in the “Video” menu if pictures in the
step-by-step playback are blurred. (Refer to page 50.)
• Only step by step forward is available.
40
EN
Page 41

INTRODUCTION
5 Repeat Playback
Repeats playback particular chapter, title or track during playback.
You can also repeat playback between A and B on a disc.
During playback, press
1
Press [REPEAT] to change the repeat mode.
2
BD DVD
Off (repeat Off)
Chapter (current chapter repeat)
Title (current title repeat)
CD
Off (repeat Off)
Track (current track repeat)
All (entire disc repeat)
To cancel repeat playback, press [REPEAT] repeatedly
3
until “Off“ appears.
A-B repeat
During playback, press [A-B] at your desired starting
1
point (A).
Press [A-B] once again at your desired ending point (B).
2
• Point B should be set in the same chapter, title or
track as point A.
• Within a few seconds, the section A-B will begin to
play back repeatedly.
To cancel A-B repeat, press [A-B] repeatedly until “Off“
3
appears.
[REPEAT].
Off
A -
A -
5 Rapid Playback
BD
This function plays back approximately at 1.3 times the normal playback
while keeping the sound output. This function is available only on discs
recorded in the Dolby Digital format.
During playback, press [MODE] repeatedly until “ ”
1
appears.
Press
2
or or
Off Plays back in normal speed.
Press [PLAY B] to return to normal playback.
3
Note:
• Virtual surround does not work during this function.
• This function may not work at some points on a disc.
• During this function, 2ch LPCM signal will be output from
DVD
[OK]
or
[Cursor s / B]
Plays back approximately at 1.3 times of normal
playback.
Digital Audio Output jack.
Off
to switch “ ” (1.3x), or “Off”.
Off
5 Random Playback
CD
This function shuffles the playing order of tracks instead of playback in the sequence.
In stop mode, press [MODE] repeatedly until “Random”
1
menu appears.
1
audio CD
2
“Random” will be displayed.
3
“CD -DA” will be displayed.
4
File list
5
Operation guide
6
Total playback time of all tracks
7
Playback status
Press [PLAY B] to start random playback.
2
Track information
File list in the original order
Press [RED] to go to the previous page.
Press [GREEN] to go to the next page.
1 75 6
TR
Random Total
CD_DA
1 0:36
2
3
4
5
6
7
- - / 16
1:14
0:45
0:50
0:53
0:20
0:54
4
32
Page Down
1 : 13 : 29
PREPARATION
WATCHING TV
OPTIONAL SETTING
OPERATING BLU-RAY
BLU-RAY SETTING TROUBLESHOOTING INFORMATION
Note:
• Repeat setting (except “All”) will be cleared when moving to
another title or chapter, track.
• Repeat playback or A-B repeat may not available with some discs.
• A-B repeat does not function during chapter, title, track or all
repeat playback.
• To cancel point A, press [CLEAR] at step 1 in “A-B Repeat”.
• Stopping playback will cancel “A-B Repeat”.
To exit from the random playback mode, press [STOP C]
3
first, then press [MODE] repeatedly until “File List” appears.
41
EN
Page 42
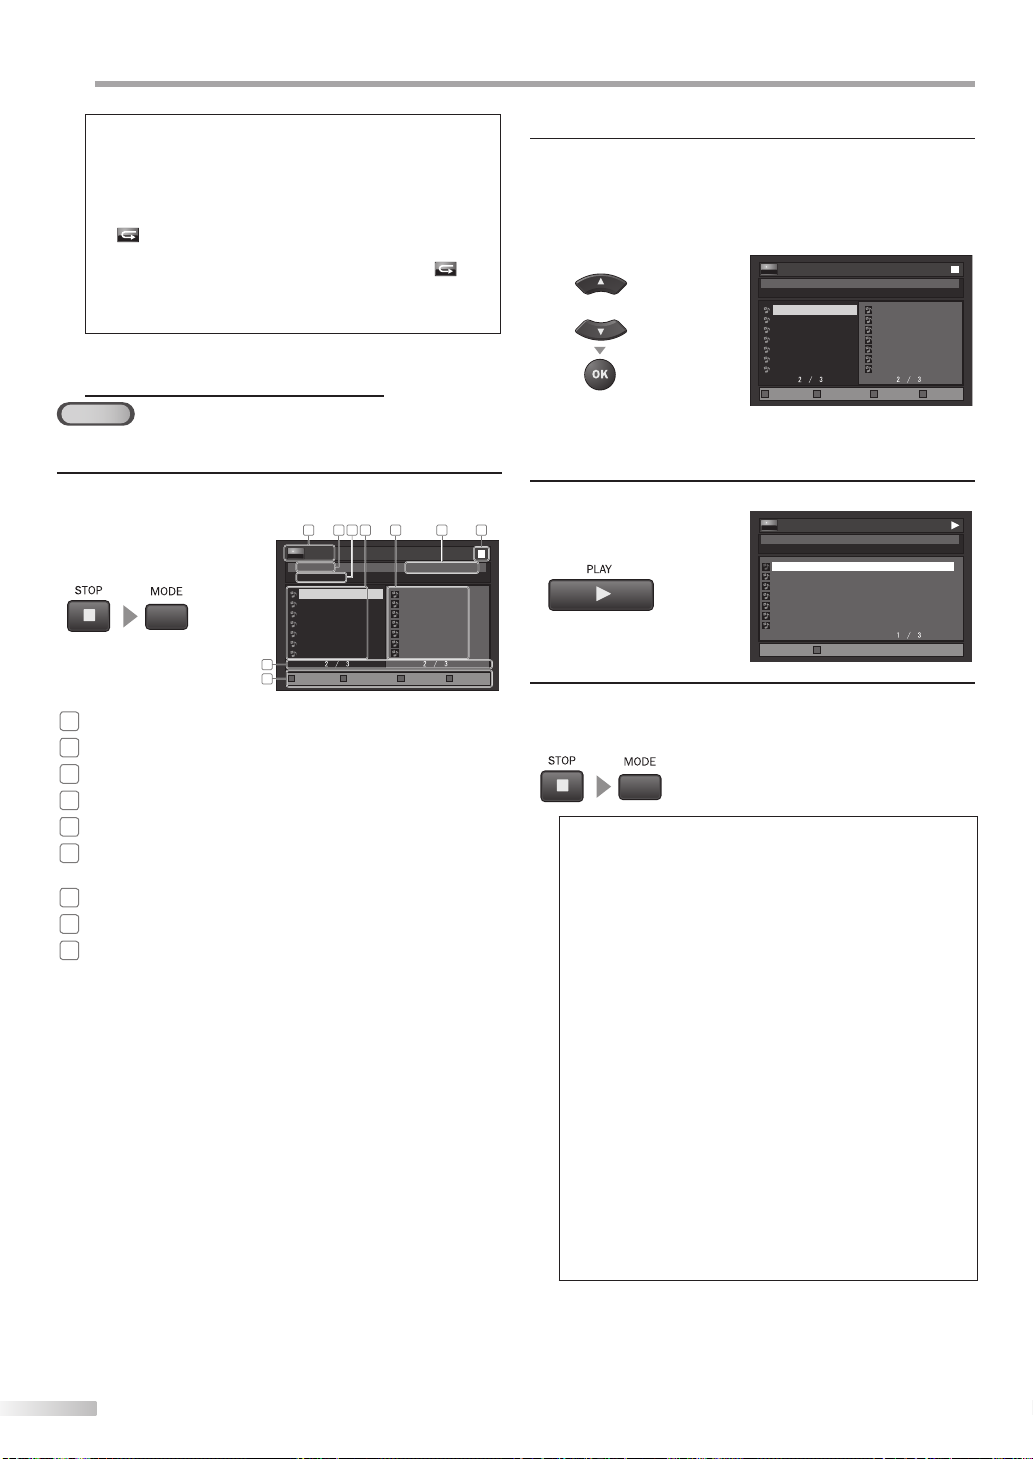
PERATING BLU-RAY
O
Note:
• During the random playback, press [STOP C] once to set the
resume point, and then press [PLAY B] to resume random
playback from where [STOP C] was pressed (audio CD).
• To repeat the current track in the random mode, follow the
steps 1 and 2 in “Repeat Playback” on page 41 and select
“
Track”.
• To repeat the entire random selections, follow the steps 1
and 2 in “Repeat Playback” on page 41 and select “ All”.
• Playback from a desired track is not available during random
playback.
• Press [BACK] to switch to the program playback mode.
5 Programmed Playback
CD
You may determine the order in which tracks will play back.
In stop mode, press [MODE] repeatedly until “Program”
1
menu appears.
1
audio CD
2
“Program” will be displayed.
3
“CD -DA” will be displayed.
4
File list
5
Programmed list
6
Cumulative playback time of all tracks in the
Track information
File list in the original order
File list in the programmed order
programmed list
7
Playback status
8
Current page / Total page number
9
Operation guide
Press [RED] to go to the previous
page in the le list.
Press [GREEN] to go to the next page
in the le list.
Press [BLUE] to go to the previous
page in the programmed list.
Press [YELLOW] to go to the next
page in the programmed list.
• The programmed tracks are displayed in the right
hand screen.
• Press [CLEAR] to erase the last track of the program.
• Use [Cursor K / L] to select “All Clear” at the bottom
of the list to erase all the tracks in the program.
1 732 4 5
TR
- - / 16
Program Total
CD_DA
0:36
8
1:14
9
0:45
10
0:50
11
0:53
12
0:20
13
0:54
14
8
9
2
1:14
0:50
4
1:14
9
0:50
11
0:53
12
0:54
14
0:36
8
Page Down Page Prev Page NextPage Up
6
0 : 26 : 24
Use [Cursor K / L] to select a desired track, then press
2
[OK] to store.
• Additional tracks may be on other screens. Use
[Cursor
K / L
] to go on to the next / previous pages.
• Repeat this step until you have selected all the tracks
you wish to play back in the program.
TR
- - / 16
Program Total
or
CD_DA
8
9
10
11
12
13
14
2
0:36
1:14
0:45
0:50
0:53
0:20
0:54
Page Down Page Prev Page NextPage Up
1:14
0:50
4
1:14
9
0:50
11
0:53
12
0:54
14
0:36
8
• Up to 99 tracks can be ordered.
• If 8 or more tracks were in a program, use
[BLUE/YELLOW] to see all the tracks.
Press [PLAY B] to start programmed playback.
3
TR
2/16
0:01:05
Program Total
CD_DA
2
1:14
0:50
4
1:14
9
0:50
11
0:53
12
0:54
14
0:36
8
Page Down
To exit from the programmed playback mode, press
4
[STOP C] first, then press [MODE] repeatedly until “File
List” appears.
Note:
• While a program is being played back, [STOP C] works as
follows:
- Pressing [STOP C] once: The track will be in the resume
mode. Next time you press [PLAY B], the playback
will resume from the point where it is stopped in the
programmed playback.
- During program playback, press [STOP C] twice to display
the program screen. To go back to the normal program
playback, press [BACK] to exit from the program screen,
then press [PLAY B].
• To repeat the current track in the program, press [REPEAT]
repeatedly until “ Track” appears during playback.
• To repeat the entire program, press [REPEAT] repeatedly
until “All” appears during playback.
• The program will be cleared when;
- the unit is turned into the standby mode.
- the media mode is switched to the TV mode.
- the disc is removed.
• You cannot use [the Number buttons] to select another
track during programmed playback. Use [RED/GREEN] to
select other tracks in the program.
• You cannot combine random playback with programmed
playback.
• You cannot alter a programmed order during playback.
• You can start programmed playback only while in “Program”
menu.
0 : 26 : 24
0:26:24
42
EN
Page 43

INTRODUCTION
Chapter / Title / Track Search
Time Search
5 Search Functions
By using [SEARCH MODE], you can select the following search modes.
BD DVD
Chapter Search
/12
Title Search
TT
MKR
TT
Off
CD
TR
Off
/12
0
1 23
/12
0
Time Search
Marker Search
Chapter Search
Time Search
Note:
• For BD/DVD, chapter search cannot be performed in the
stop mode. For BD, it also cannot be performed when the
unit has kept the resume information.
• The total number of chapters / titles / tracks in your disc;
with less than 10 chapters / titles / tracks, press the chapter /
title / track number directly. To play a double-digit chapter /
title / track, press the chapter / title / track number.
• Track search is not available for programmed or random
playback.
Time Search
You can select the desired time which the disc is played back from.
During playback, press [SEARCH MODE] repeatedly
1
until “ “ appears.
e.g.) BD
TOTAL
0 0 : 42 : 58
2
Press [the Number buttons] to select your desired
time lapse within 30 seconds.
TOTAL
0 0 : 42 : 58
PREPARATION
WATCHING TV
OPTIONAL SETTING
OPERATING BLU-RAY
Chapter / Title / Track Search
You can select chapters, titles or tracks on the disc.
During playback, press [SEARCH MODE] repeatedly
1
until “ “ / “TR“ appears.
• If you want to perform the title search,
press [SEARCH MODE] repeatedly until “TT“ appears.
e.g.) BD
_ _ / 1 2
Press [the Number buttons] to select your desired
2
chapter, title or track within 30 seconds.
_ _ / 1 2
To play back a single-digit chapter, title or track when
there are more than 10 chapters, titles or tracks, press
[OK] after entering the chapter, title or track number.
Playback will start automatically from the chapter, title
3
or track you selected.
Playback will start automatically from the time you
3
selected.
Note:
• When there is no need to enter a number, “0” appears
automatically. For example, “0: 0_: _ _” appears in the time
search menu if the total time of the title or track is less than
10 minutes.
• Press [CLEAR] to erase the incorrect input at step 2.
• Time search can only be performed during playback or
when the unit has kept the resume information (except for
BD). It cannot be performed in the stop mode.
BLU-RAY SETTING TROUBLESHOOTING INFORMATION
EN
43
Page 44
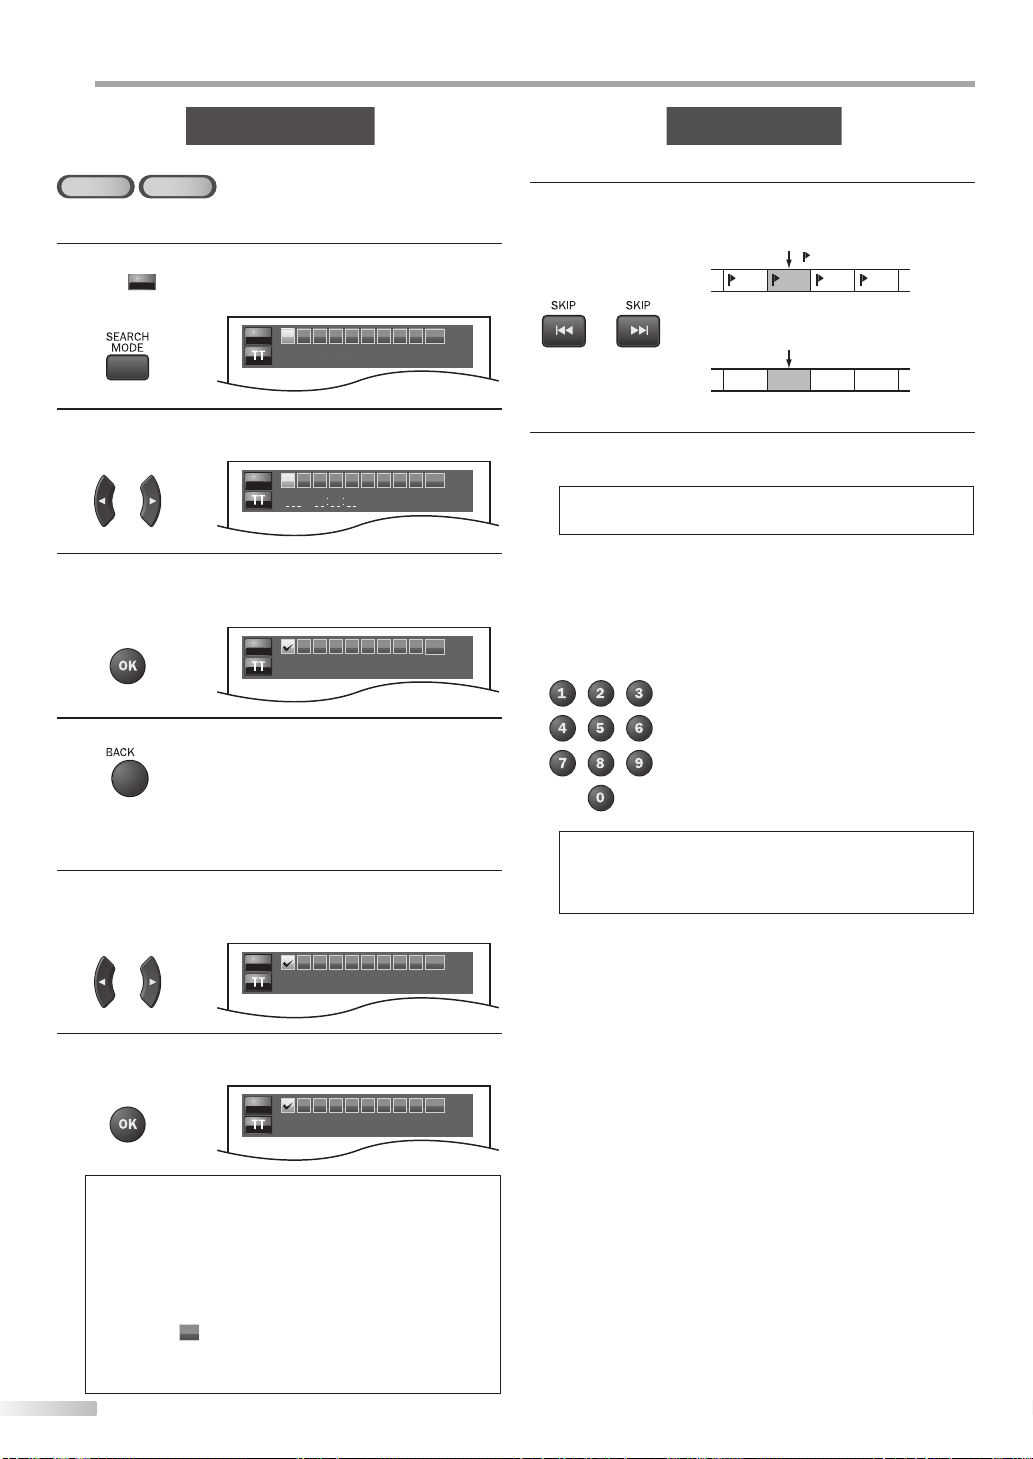
PERATING BLU-RAY
Marker Search
Direct Search
O
Marker Search
This feature allows you to assign a specific point on a disc to be called back later.
BD
DVD
To set a marker
During playback, press [SEARCH MODE] repeatedly
1
2
3
MKR
until “
Use [Cursor s / B] to select an available marker within
30 seconds.
When the playback reaches the point at which you
want to set a marker, press [OK].
• Marker is now set.
or
“ appears.
e.g.) BD
MKR
MKR
MKR
1 23456789
1 23456789
23456789
1 0 : 13 : 05
AC
AC
AC
Direct Search
Using [SKIP H / G]
During playback, press [SKIP H / G] repeatedly
1
until a desired chapter, title or track will be selected.
current chapter/track
/TR 1 /TR 2 /TR 3 /TR 4
[SKIP H] [SKIP G]
or
Playback will start automatically from the chapter, title
2
or track you selected.
current title
TT 1 TT 2 TT 3 TT 4
[SKIP H] [SKIP G]
(If the disc has no chapter.)
(TR)
(
)
or
(TT)
Note:
• [SKIP H / G] are not available when playback is stopped.
Using [the Number buttons]
Press [the Number buttons] to select your desired
chapter, title or track.
Press [BACK] to exit.
4
To return to the marker later
Repeat step 1 in “To set a marker”.
1
select the desired marker.
e.g.) BD
MKR
or
Press [OK] at the desired marker to restart playback
2
from the specific point which you set.
MKR
Note:
• Marker search menu will disappear in about 30 seconds
when there is no input.
• You can mark up to 9 points.
• To clear a marker, select the marker to be cleared, and then
press [CLEAR].
• Ejecting the disc or turning off the power will erase all
markers.
• Selecting “
also erase all markers.
• For BD, marker search cannot be performed when the unit
has kept resume information or the unit is in the stop mode.
” at step 3 in the section “To set a marker” will
AC
Use [Cursor s / B] to
23456789
1 0 : 13 : 05
23456789
1 0 : 13 : 05
44
EN
Note:
• As for the BD-video, how it performs will be strongly
determined by the disc, and may not perform as described
here.
AC
AC
Page 45

5 On-screen Display
You can check the information about the current disc by pressing [INFO]
on the remote control.
During playback, press [INFO] repeatedly until
1
your desired screen display mode appears.
INTRODUCTION
PREPARATION
BD
Title / Chapter information
• current title number
• current chapter number / total chapters
1 1/10 A B
• current repeat setting appears
only when the repeat setting is active
C: chapter repeat / T: title repeat /
A B: A-B repeat
• appears only when multi-angle is available
on the BD
• current playback status
Title information
• total titles
1 / 18 0 : 08 : 04
• elapsed time of the current title
• remaining time of the current title
1 / 18 1 : 46 : 19-
AB
AB
disappear
CD
1 / 14 0 : 00: 51
• current repeat setting appears only when the repeat
1 / 14 0 : 03: 43
Track information
• current track number / total tracks
• elapsed time of the current track
• current playback status
setting is active
T: track repeat / A: all repeat / A B: A-B repeat
-
DVD
Chapter information
• current chapter number / total chapters
• elapsed time of the current chapter
3 / 5 0 : 01 : 02
• current repeat setting appears
only when the repeat setting is active
C: chapter repeat / T: title repeat /
A B: A-B repeat
• appears only when multi-angle is available
on the DVD
• current playback status
• remaining time of the current chapter
3 / 5 0 : 58 : 08-
Title information
• current title number / total titles
• elapsed time of the current title
1 / 18 0 : 08 : 04
• remaining time of the current title
1 / 18 1 : 46 : 19-
AB
AB
AB
AB
WATCHING TV
OPTIONAL SETTING
OPERATING BLU-RAY
BLU-RAY SETTING TROUBLESHOOTING INFORMATION
Bit rate information
• bit rate indication for the amount of audio
and video data currently being read
T
• layer number appears only
when playing a 2-layered disc
L0: Layer 0 is played back
L1: Layer 1 is played back
T
disappear
L1
Disc information
1 / 14 0 : 02: 47
-
1 / 14 0 : 51: 17
• remaining time of the current track
T
• elapsed time of the entire disc
• remaining time of the entire disc
T
45
EN
Page 46

PERATING BLU-RAY
Subtitle Language
BD Audio Mode
O
5 Special Settings
Subtitle Language
This unit allows you to select a subtitle language (if available) during BD/
DVD playback.
BD
During playback, press [SUBTITLE] repeatedly to
1
display “Primary Subtitle”, “Secondary Subtitle” or
“Subtitle Style”.
2
Use [Cursor K / L] repeatedly until your desired
subtitle or style.
or
• current subtitles language
• subtitles can be varied on the
e.g.)
displayed number
Primary Subtitle Off (subtitle Off)
Primary Subtitle 1 ENG / 4 (English subtitle)
Primary Subtitle 2 FRE / 4 (French subtitle)
...
Press [SUBTITLE] to exit.
3
Primary Subtitle 1 ENG / 4
Press [SUBTITLE] to exit.
3
Note:
• To cancel the subtitle, select “Off” at step 2.
• Using [Cursor s / / B] can also be switched between current
subtitle setting and “Off”.
• If your language is not shown after pressing [Cursor K / L]
several times, the disc may not have that language. However,
some discs allow you to change subtitle languages setting in
the disc menu or pop-up menu. (Operation varies depending
on the disc, so refer to the manual along with the disc.)
• When “Not Available” appears on the TV screen, it means no
subtitle is recorded on the scene.
• If you choose a language that has 3-letter-language code,
the code will be displayed every time you change the subtitle
language setting. If you choose any other languages, “---”
will be displayed instead. (Refer to page 54.)
• Ejecting the disc will cancel your subtitle setting.
• If 4-digit language code appears in the subtitle menu, refer
to “Language Code List“ on page 54.
BD Audio Mode
There are 2 options for the “BD Audio Mode” setting; either by setting the
output to the secondary and interactive audio accompanied by the primary
audio or by setting only the primary audio. Depending on the setting of
the mode, Dolby Digital, Dolby Digital Plus, Dolby TrueHD, DTS, or DTS-HD
output changes between multi LPCM and bitstream.
BD
In stop mode, press [MODE] repeatedly until
1
“ “ appears.
BD Audio Mode Mix Audio Output
DVD
During playback, press [SUBTITLE].
1
2
Use [Cursor K / L] repeatedly until your desired
subtitle.
or
• current subtitles language
e.g.)
• subtitles can be varied on the displayed number
Off (subtitle Off)
1 ENG /3 (English subtitle)
2 FRE /3 (French subtitle)
1 ENG / 4
...
46
EN
Use [Cursor K / L] to select the sound level.
2
or
Mix
Audio
Output
HD Audio
Output
Press [BACK] to exit.
3
If it is available, BD-video’s secondary and
interactive audio will be output with the
primary audio. The secondary audio is the
audio for the secondary video (Director’s
comment etc.) and the interactive audio is the
audio for the interactive application (Button
click sounds etc.).
Only the primary audio will be output.
BD Audio Mode HD Audio Output
Note:
• In “Mix Audio Output” mode, if there is no secondary and
interactive audio, the audio will be output as “HD Audio
Output” mode.
Page 47

Audio Soundtrack
Audio Soundtrack
Some BD and DVD contain multiple audio streams.
Those are often in different audio languages or audio formats.
For BD, available audio varies depending on “BD Audio Mode” setting.
Refer to page 46 for more information.
BD
During playback, press [SAP] repeatedly to display
1
“Primary” or “Secondary”.
Primary 1 ENG LPCM Multi-ch / 6
CD
During playback, press [SAP] repeatedly until the
1
desired sound mode appears.
Stereo
INTRODUCTION
PREPARATION
• current audio language
• current audio format
• audio stream can be varied on the displayed
number
Use [Cursor K / L] to select your desired audio stream.
2
e.g.)
Primary 1 ENG LPCM (English audio)
Primary 2 ENG Dolby D (English audio)
Primary 3 FRE DTS (French audio)
Press [SAP] repeatedly to exit.
3
DVD
During playback, press [SAP] repeatedly until your
1
desired language appears.
1 ENG Dolby D 3/2.1ch 48k /3
• current audio language
• current audio format
• audio stream can be varied on the displayed
number
Use [Cursor K / L] to select your desired audio stream.
2
e.g.)
1 ENG Dolby D 3/2.1ch 48k (English audio)
• current audio stream channel
Use [Cursor K / L] to select your desired audio stream
2
channel.
Stereo Both right and left channels are
active (stereo).
R-ch Only right channel is active.
L-ch Only left channel is active.
Press [SAP] repeatedly to exit.
3
Note:
• The secondary audio will not be output when the secondary
video is not displayed or when “BD Audio Mode” is set to
“HD Audio Output”. (For some BD, secondary audio will be
output even when secondary video is off.)
• The sound mode cannot be changed during playback of
discs not recorded in multiple audio.
• Some discs allow changing the audio language setting on
the disc menu. (Operation varies depending on the discs.
Refer to the manual accompanying the disc.)
• [SAP] may not work on some discs with multiple audio
streams or channels (e.g. DVDs that allow changing audio
setting on the disc menu).
• If you select a language that has a 3-letter-language code,
the code will be displayed every time you change the audio
language setting. If you select any other languages, “---” will
be displayed instead. (Refer to page 54.)
• Audio Language selection cannot be made during rapid
playback.
• If 4-digit-language code appears in the subtitle menu, refer
to page 54.
• If the disc has no audio language, “Not Available” will be
displayed on the TV screen.
• For DTS-CD (5.1 music disc), selecting audio streams or
channels is not available.
WATCHING TV
OPTIONAL SETTING
OPERATING BLU-RAY
BLU-RAY SETTING TROUBLESHOOTING INFORMATION
1 FRE Dolby D 2/0ch 48k (French audio)
1 SPA Dolby D 2/0ch 48k (Spanish audio)
Press [SAP] repeatedly to exit.
3
47
EN
Page 48

PTIONAL SETTING
Camera Angles
PIP (Bounusview) Setting
Virtual Surround
Noise Reduction
O
Camera Angles
BD
Some BD/DVD may contain scenes which have been shot simultaneously
from various angles. You can change the camera angle if “
the screen.
During playback, press [ANGLE] repeatedly
1
until “ “ appears.
Use [Cursor K / L] repeatedly until your desired
2
camera angle appears.
Press [BACK] or [ANGLE] to exit.
3
Note:
• If “Angle Icon” is set to “Off” in “Others” menu, “ ” will not
BD
Some BD-video have the PIP function which enables you to display the
secondary video in the primary video. You can call up the secondary video
by pressing [PIP] whenever the scene contains the secondary video.
DVD
1 / 3
• angles can be varied on the displayed number.
or
or
appear. (Refer to page 53.)
PIP (Bounusview) Setting
2 / 3
” appears on
Virtual Surround
You can enjoy virtual surround on your 2 channel stereo system.
During playback, press [MODE] repeatedly until “ ”
1
appears.
Off
Use [Cursor K / L] to select the sound level.
2
or
Off No surround effect
1 Natural surround effect
2 Stronger surround effect
Press [BACK] to exit.
3
Note:
• Virtual surround does not function during rapid playback.
• For the virtual surround, audio signal will always be
2-channel LPCM.
• Turn down the level or select “Off” if the sound is distorted.
Noise Reduction
DVD
Reduces the noise of the playback picture.
1
During playback, press [PIP].
1
• primary video
• Secondary video
• PIP information will appear.
Use [Cursor K / L] to select the secondary video you
2
want.
• The secondary video will be displayed and the
secondary audio will be output.
Press [BACK] or [PIP] to remove the PIP information.
3
or
Note:
• Secondary video can also be called up by pressing [MODE].
• The secondary audio will not be output when the secondary
audio is set to “Off” or when “BD Audio Mode” is set to “HD
Audio Output”. Refer to “Audio Soundtrack” on page 47 and
“BD Audio Mode” on page 46.
48
EN
During playback, press [MODE] repeatedly until “ ”
1
appears.
Noise Reduction Off
Use [Cursor s / B] to select the sound level.
2
or
Off Shows the original picture as recorded.
1
2
3
Press [BACK] to exit.
3
Note:
• The setting will remain the same even if the unit is turned to
the standby mode.
• You cannot adjust the setting during rapid playback.
Executes 3D noise reduction which detects and
deletes the noise by comparing each picture
frames.
Executes MPEG noise reduction which reduces
the block noise and mosquito noise on the
subtitle on movie.
Executes both MPEG noise reduction and 3D
noise reduction.
Noise Reduction 1
Page 49

LU-RAY SETTING
B
Settings are only effective when the unit is in BLU-RAY mode and any discs should not be played back.
5 Blu-ray Setup Menu
You can change the desired language when playing back the disc.
Press [MENU / EXIT] to display the main menu.
1
PICTURE
SOUND
SETUP
FEATURES
LANGUAGE
BLU-RAY
USB
Smart Picture
Brightness
Contrast
Color
Tint
Sharpness
Color Temperature
Personal
Normal
INTRODUCTION
Use [Cursor K / L] to select “ “, then press [OK].
4
Language
30
or
60
36
0
0
Audio Original
Subtitle Off
Disc Menu English
PREPARATION
Use [Cursor K / L] to select “BLU-RAY”, then press [OK].
2
PICTURE
or
SOUND
SETUP
FEATURES
LANGUAGE
BLU-RAY
USB
Press “OK” key to move to BD Setup.
Quick
Use [Cursor K / L] to select “ ”, then press [OK].
3
Quick
or
Digital Out Bitstream
• The “Quick“ menu will appear on the TV screen.
Use [OK] to select your desired digital output.
4
When playing back discs recorded in Dolby
Bitstream
LPCM
Digital, Dolby Digital Plus, Dolby TrueHD, DTS
or DTS-HD, the corresponding core stream
(Dolby Digital or DTS) are output.
2ch LPCM signal will be output from Digital
Audio Out jack.
Custom
Use [Cursor K / L] to select the desired item, then press
5
[OK].
Language
or
Audio Original
Subtitle Off
Disc Menu English
Audio *1, *2 (Default: Original)
Select the desired audio language.
Language
Audio
or
Original
English
French
Spanish
German
Italian
Swedish
Subtitle *1, *2 (Default: Off )
Select the desired subtitle language.
Language
Subtitle
or
Off
English
French
Spanish
German
Italian
Swedish
WATCHING TV
OPTIONAL SETTING
OPERATING BLU-RAY
BLU-RAY SETTING
TROUBLESHOOTING
5 Blu-ray Language Setting
You can change the desired language when playing back the disc.
Follow steps 1-2 above, then use [Cursor K / L] to
3
select “ ”, then press [OK].
Custom
or
Language
Video
Audio
Parental
Others
Disc Menu *1 (Default: English)
Select the desired language in Blu-ray menu.
Language
Disc Menu
or
English
French
Spanish
German
Italian
Swedish
Dutch
EN
INFORMATION
49
Page 50

LU-RAY SETTING
B
Note:
• To change the on-screen language, call up “Language”
from the main menu and set the desired language.
(Refer to “Language Selection” on page 24.)
*1
• Language options are not available with some discs.
• If “Other” is selected in “Audio”, “Subtitle” or
“Disc Menu” menu, press 4-digit number to enter the code
for the desired language. (Refer to “Language Code List”
on page 54.)
• Only the languages supported by the disc can be selected.
*2
• Language setting for Audio and Subtitle are not available
with some discs.
-
Press [SUBTITLE] to select subtitles available on the BD/DVD.
-
Press [SAP] to select audio available on the BD/DVD.
• If the BD/DVD’s default settings for audio and subtitle are
the same language, the subtitles may not show unless you
turn them on.
Press [MENU / EXIT] to exit.
6
5 Blu-ray Video Setting
You can change the desired language when playing back the disc.
Follow steps 1-2 on page 49, then use [Cursor K / L] to
3
select “ ”, then press [OK].
Custom
or
Language
Video
Audio
Parental
Others
Progressive Mode (Default: Auto)
Sets the optimum progressive output for the images in
a material stored.
Video
Progressive Mode Auto
Still Mode Auto
Auto
Video
Detects 24 frame film material (movies) and
automatically select appropriate progressive
mode.
Suited for playing back vidro material discs
(TV shows or animation).
Still Mode (Default: Auto)
Adjusts picture resolution and quality in “Still Mode”.
Video
or
Auto
Field
Frame
Automatically selects the best resolution
setting (“Frame” or “Field”).
Select “Field” when the pictures are distorted.
Stabilizes the pictures, although the picture
quality may become coarse.
Select “Frame” when you want to display
motionless oictures in high resolution.
Improves the picture quality, although it may
produce the pictures distorted.
Progressive Mode Auto
Still Mode Auto
Use [Cursor K / L] to select “ ”, then press [OK].
4
Video
or
Use [Cursor K / L] to select the desired item, then
5
Progressive Mode Auto
Still Mode Auto
press [OK].
Video
or
Progressive Mode Auto
Still Mode Auto
50
EN
Press [MENU / EXIT] to exit.
6
Page 51

5 Blu-ray Audio Setting
Choose the appropriate audio settings for your equipment. It only affects
during the playback of BD/DVD.
Follow steps 1-2 on page 49, then use [Cursor K / L] to
3
select “ ”, then press [OK].
Custom
or
Language
Video
Audio
Parental
Others
Down Sampling (Default: On)
This function is available only on digital outputting of a
disc recorded in 96kHz.
Audio
BD Audio Mode Mix Audio Output
Digital Out Bitstream
Down Sampling On
DRC Auto
INTRODUCTION
PREPARATION
WATCHING TV
Use [Cursor K / L] to select “ ”, then press [OK].
4
Audio
or
Use [Cursor K / L] to select the desired item, then press
5
BD Audio Mode Mix Audio Output
Digital Out Bitstream
Down Sampling On
DRC Auto
[OK].
BD Audio Mode (Default: Mix Audio Output)
You can select whether to output the primary and
secondary audio or only the primary audio.
Audio
BD Audio Mode Mix Audio Output
Digital Out Bitstream
Down Sampling On
DRC Auto
Mix Audio
Output
HD Audio
Output
At the same time, 7 outputs the primary and
secondary audio if it is available.
Outputs only the primary audio.
On When outputting in 48kHz.
Off When outputting the original sound.
Note:
• When playing back a 96 kHz disc with the copyright
protection or when ‘‘Virtual Surround” is set to “1” or “2”,
the sound will be down sampled at 48 kHz even if the
“Down Sampling” is set to “Off”.
(Refer to “Virtual Surround” on page 48.)
DRC (dynamic range control) (Default: On)
This function is available only on the discs which are
recorded in the Dolby Digital format.
Audio
or
When the discs that are recorded in the Dolby
Auto
On
Off No effects (original sound).
TrueHD format is in playback, this unit detects
DRC setting of the disc and set the DRC setting
of this unit to “On” or “Off” automatically.
Compress the range between soft and loud
sounds.
BD Audio Mode Mix Audio Output
Digital Out Bitstream
Down Sampling On
DRC
Auto
OPTIONAL SETTING
OPERATING BLU-RAY
BLU-RAY SETTING
TROUBLESHOOTING
Digital Out (Default: Bitstream)
Set to “Bitstream“ when this unit is connected to a
Dolby Digital decoder and DTS decoder.
Audio
BD Audio Mode Mix Audio Output
Digital Out Bitstream
Down Sampling On
DRC Auto
When playing back discs recorded in Dolby
Bitstream
LPCM
Digital, Dolby Digital Plus, Dolby TrueHD, DTS
or DTS-HD, the corresponding core stream
(Dolby Digital or DTS) are output.
2ch LPCM signal will be output from Digital
Audio Out jack.
Press [MENU / EXIT] to exit.
6
INFORMATION
51
EN
Page 52

LU-RAY SETTING
B
5 Parental Setting
Parental setting prevents your children from viewing inappropriate
materials. (password protected.) Playback will stop if the ratings exceed
the levels you set.
Follow steps 1-2 on page 49, then use [Cursor K / L] to
3
select “ ”, then press [OK].
Custom
or
Language
Video
Audio
Parental
Others
Use [Cursor K / L] to select the desired item, then press
6
[OK].
Parental
or
BD Rating Level 0
DVD Rating Level All
Password Change
Use [Cursor K / L] to select “ ”, then press [OK].
4
Parental
or
Use [the Number buttons] to enter the 4-digit
5
BD Rating Level 0
DVD Rating Level All
numbers (except for the default password 4737) for
your password, then press [OK].
Parental
Password
Please enter a 4 - digit password.
• If you have set password already, use
[the Number buttons] to enter the current 4-digit
password.
• If you forget the passwprd, enter [4], [7], [3], [7].
The password will be cleared and “BD Rating Level”,
“DVD Rating Level” will be set to “0”, “All” accordingly.
BD Rating Level
All To release the limitation.
Age
Setting
To set the age limitation.
• After selecting Age Setting, use [the Number
buttons] to enter the age from 0 – 254. (e.g. for
age 15, press [0], [1], [5]).
DVD Rating Level
All
8 [Adult]
7 [NC-17] No one under 18 admitted.
6 [R]
5 [PGR] Parental guidance recommended.
4 [PG-13] Unsuitable for children under 13.
3 [PG] Parental guidance suggested.
2 [G] General audience.
1
[Kid Safe]
Press [MENU / EXIT] to exit.
7
Parental Control is inactive; all discs can
played back.
DVD software of any grades (adult / general /
children) can be played back.
Restricted; under 18 requires accompanying
parent or adult guardian.
Suitable for children.
52
EN
Page 53

To change the Password
Follow steps 1-2 on page 49 and 3-5 on page 52.
6
Use [Cursor K / L] to select “Password Change”, then
press [OK].
Parental
or
Use [the Number buttons] to enter the new 4-digit
7
password.
Note:
• BD-video/DVD-video may not respond to parental lock
settings. Make sure this function works with your BD-video/
DVD-video.
• Record the password in case you forget it.
• If you forget the passwprd, enter [4], [7], [3], [7].
The password will be cleared and “BD Rating Level”, “DVD
Rating Level” will be set to “0”, “All” accordingly.
• A power failure will not erase your password.
Press [MENU / EXIT] to exit.
8
BD Rating Level 0
DVD Rating Level All
Password Change
Parental
Password
Please enter a 4 - digit password.
0000
Don’t forget the password.
Press ‘OK’ to activate password.
5 Others
You can change the other functions.
Follow steps 1-2 on page 49, then use [Cursor K / L] to
3
select “
Use [Cursor K / L] to select “ ”, then press [OK].
4
Use [Cursor K / L] to select the desired item, then press
5
[OK].
Angle Icon (Default: On)
You can set whether to display the angle icon or not
during BD/DVD playback.
On
Off
”, then press [OK].
or
or
During BD/DVD playback, the angle icon will
appear on the TV screen when the BD/DVD
has the scene with various angles.
The angle icon will be unshown even if the
BD/DVD has the scene with various angles.
Custom
Language
Video
Audio
Parental
Others
Others
Angle Icon On
Auto Power Off On
Others
Angle Icon On
Auto Power Off On
INTRODUCTION
PREPARATION
WATCHING TV
OPTIONAL SETTING
OPERATING BLU-RAY
BLU-RAY SETTING
TROUBLESHOOTING
Auto Power Off (Default: On)
Others
Angle Icon On
This unit is automatically turned off and goes
On
Off Sets off the “Auto Power Off”.
Press [MENU / EXIT] to exit.
6
to the standby mode after 20 minutes of no
use.
Auto Power Off
On
INFORMATION
53
EN
Page 54

LU-RAY SETTING
B
5 Reset to the Default Setting
You can reset all the settings except for the parental setting and on-screen
menu language or clear the saved BD-ROM data.
Follow steps 1-2 on page 49, then use [Cursor K / L] to
3
select “ ”, then press [OK].
Initialize
or
Use [Cursor K / L] to select desired item, then press
4
[OK].
or
Setup (Default: No)
Select “Yes” to reset the setup menu to the default.
or
Erase Saved BD-ROM Data (Default: No)
Select “Yes” to erase all saved BD-ROM Data from the
player
or
Note:
• When you want to cancel the initialization, select “No” at
step 4, then press [OK].
Press [MENU / EXIT] to exit.
5
Setup
Erase Saved BD-ROM Data
Initialize
Setup
Erase Saved BD-ROM Data
Initialize
Setup
Initialize?
NO
YES
Initialize
Erase Saved BD-ROM Data
Do you wish to erase BD-ROM data from the player?
THIS WILL ERASE ALL SAVED BD-ROM DATA
FROM THE PLAYER.
NO
YES
5 Language Code List
Language Code
Abkhazian 4748
Afar 4747
Afrikaans 4752
Albanian 6563
Amharic 4759
Arabic 4764
Armenian 5471
Assamese 4765
Aymara 4771
Azerbaijani 4772
Bashkir 4847
Basque 5167
Bengali;Bangla 4860
Bhutani 5072
Bihari 4854
Bislama 4855
Breton 4864
Bulgarian [BUL] 4853
Burmese 5971
Byelorussian 4851
Cambodian 5759
Catalan 4947
Chinese [CHI] 7254
Corsican 4961
Croatian 5464
Czech [CZE] 4965
Danish [DAN] 5047
Dutch [DUT] 6058
English [ENG] 5160
Esperanto 5161
Estonian 5166
Faroese 5261
Fiji 5256
Finnish [FIN] 5255
French [FRE] 5264
Frisian 5271
Galician 5358
Georgian 5747
German [GER] 5051
Greek [GRE] 5158
Greenlandic 5758
Guarani 5360
Gujarati 5367
Hausa 5447
Hebrew 5569
Hindi 5455
Hungarian [HUN] 5467
Icelandic [ICE] 5565
Indonesian 5560
Interlingua 5547
Interlingue 5551
Inupiak 5557
Irish [IRI] 5347
Italian [ITA] 5566
Japanese [JPN] 5647
Javanese 5669
Kannada 5760
Kashmiri 5765
Kazakh 5757
Kinyarwanda 6469
Kirghiz 5771
Kirundi 6460
Korean [KOR] 5761
Kurdish 5767
Laothian 5861
Latin 5847
Latvian;Lettish 5868
Lingala 5860
Lithuanian 5866
Macedonian 5957
Malagasy 5953
Malay 5965
Malayalam 5958
Maltese 5966
Maori 5955
A-B
C-E
F-H
I-K
L-N
Language Code
Marathi 5964
Moldavian 5961
Mongolian 5960
Nauru 6047
Nepali 6051
Norwegian [NOR] 6061
O-R
Occitan 6149
Oriya 6164
Oromo(Afan) 6159
Panjabi 6247
Pashto;Pushto 6265
Persian 5247
Polish [POL] 6258
Portuguese [POR] 6266
Quechua 6367
Rhaeto-Romance 6459
Romanian [RUM] 6461
Russian [RUS] 6467
S
Samoan 6559
Sangho 6553
Sanskrit 6547
Scots Gaelic 5350
Serbian 6564
Serbo-Croatian 6554
Sesotho 6566
Setswana 6660
Shona 6560
Sindhi 6550
Singhalese 6555
Siswat 6565
Slovak [SLO] 6557
Slovenian 6558
Somali 6561
Spanish [SPA] 5165
Sundanese 6567
Swahili 6569
Swedish [SWE] 6568
T
Tagalog 6658
Tajik 6653
Tamil 6647
Tatar 6666
Telugu 6651
Thai 6654
Tibetan 4861
Tigrinya 6655
Tonga 6661
Tsonga 6665
Turkish [TUR] 6664
Turkmen 6657
Twi 6669
U-Z
Ukrainian 6757
Urdu 6764
Uzbek 6772
Vietnamese 6855
Volapuk 6861
Welsh 4971
Wolof 6961
Xhosa 7054
Yiddish 5655
Yoruba 7161
Zulu 7267
54
Note:
• If you choose a language that has a 3-letter abbreviation,
the code will be displayed every time you change the audio
or subtitle language setting above. If you choose any other
language, ‘---’ will be displayed instead. (3-letter abbreviation is
written in bracket.)
EN
Page 55

ROUBLESHOOTING
T
5 FAQ
INTRODUCTION
Question Answer
• Check the antenna or cable connection to the main unit.
• Check the batteries of the remote control.
• Check if there is an obstacle between the infrared sensor window and the
remote control.
• Test the signal output. If OK, then possible infrared sensor trouble.
My remote control does not work.
What should I do?
How come the Initial setup appears every
time I turn on this unit?
Why I cannot watch some of TV programs.
How come there is no image from the
connected external devices?
Whenever I entered channel number,
it changes automatically.
My disc cannot be played back.
Is there any way I can play my disc?
Why are captions not displayed entirely?
Or, captions are delayed behind the
dialogue.
How can I set the clock ? • There is no clock function on this unit.
(Refer to “IR Signal Check” on page 58.)
• Aim the remote control directly at the infrared sensor window on the front
of the unit.
• Reduce the distance to the unit.
• Re-insert the batteries with their polarities (+/– signs) as indicated.
• When there is an infrared-equipped device such as PC near this unit, it
may interrupt the remote control signal of this unit.
• Move the infrared-equipped device away from this unit, change the angle
of the infrared sensor or turn off the infrared communication function.
• Connect the RF coaxial cable to the unit directly and run the initial setup.
• Make sure to complete the channel scan before turning off the unit.
• Make sure autoprogram has been completed.
(Refer to “Autoprogram” on page 22.)
• Autoprogram must be completed when you set up the unit for the first
time or move it to a location where previously unavailable channels are
broadcast.
• The selected channel may not be broadcasting.
• When autoprogram is interrupted and not completed,
some channels will not be received. Make sure to complete.
(Refer to “Autoprogram” on page 22.)
• The selected channel cannot be viewed by the “Child Lock” setting.
(Refer to ‘‘Child Lock” on page 30.)
• The unit requires some kind of antenna input. An indoor antenna (VHF /
UHF), an external antenna (VHF /UHF) or an RF coaxial cable from your
wall cable/satellite box needs to be plugged into the unit.
• Check if the right input mode is selected by pressing [SOURCE] or using
[CH + / -]. (Refer to “Switching Each Input Mode” on page 19.)
• Check the antenna or cable connection to the unit.
• When using the Composite Video Connection check that the Green
(Y), Blue (Pb/Cb) and Red (Pr/Cr) connectors are connected to their
corresponding colored jacks on the unit.
• Many digital channels have alternate channel numbers. The unit changes
the numbers automatically to the ones signifying the broadcasting
stations. These are the numbers used for analog broadcasts.
• Clean the disc.
• Ensure the disc is correctly inserted.
• Check if the disc is defective by trying another disc.
• Cancel the parental lock or change the control level.
• Insert a correct disc that plays back on this unit.
• Handle a disc with special care so that it does not have fingerprints,
scratches or dusts on its surface.
• Captions that are delayed a few seconds behind the actual dialogue are
common for live broadcasts. Most captioning production companies can
display a dialogue to maximum of 220 words per minute. If a dialogue
exceeds that rate, selective editing is used to insure that the captions
remain up-to date with the current TV screen dialogue.
PREPARATION
WATCHING TV
OPTIONAL SETTING
OPERATING BLU-RAY
BLU-RAY SETTING
TROUBLESHOOTING
INFORMATION
EN
55
Page 56

ROUBLESHOOTING
T
5 Troubleshooting Guide
If the unit does not perform properly when operated as instructed in this manual,
check the following chart and all connections once before calling for service.
Symptom Remedy
• Make sure the AC power cord is plugged in.
• Make sure that the AC outlet supplies the proper voltage, plug another electrical
No power
You cannot turn off the unit
immediately.
Control button does not work.
Power is ON but no screen
image.
No picture or sound
T
V
No color
Adjusted ‘‘PICTURE” or ‘‘SOUND”
is not effective every time turn
on the unit.
Sound OK, picture poor
Picture OK, sound poor
You see a distorted picture or
hear an unusual sound.
appliance into the AC outlet.
• If a power failure occurs, unplug the AC power cord for 1 minute to allow the unit
to reset itself.
• The unit may take about 1 minute to be shutting down when;
- you turn off this unit right after you turned on this unit.
- you turn off this unit right after you switch any input modes such as the DTV/TV
channels, Video, Component or HDMI while a disc is playing back.
• Press only one button at a time. Do NOT press more than one buttons at the same
time.
• Check whether the connection of the antenna, cable receiver or satellite box is
connected correctly.
• Check whether all the cables to the unit are connected to the correct output jack
of your device like BD/DVD recorder.
• Make sure that the selected input mode is connected to the working input jack.
• Check if your computer is NOT in sleep mode when the input mode of this unit is
in PC mode. Tap any key on the keyboard to wake up your computer.
• Check if the power is on.
• Check if the right input mode is selected.
• Check whether all the cables to the unit are connected to the correct output jack
of your device like BD/DVD recorder.
• View other TV channels. The problem might be limited to the broadcasting station.
• Turn off the unit and wait for about 1 minute, then turn on the unit again.
• Check whether the connection of the antenna, cable receiver or satellite box is
connected correctly.
• Make sure that the selected input mode is connected to the working input jack.
• Check if your computer is NOT in sleep mode when the input mode of this unit is
in PC mode. Tap any key on the keyboard to wake up your computer.
• Make sure that the sound is not muted. Press [MUTE] so that the volume bar and
current volume level will appear on the TV screen.
• Make sure that the volume is NOT set to “0” or “Mute”. If so, use [VOL
adjust the desired volume.
• View other TV channels. The problem might be limited to the broadcasting station.
• Adjust “Color” in the main menu.
• You must set ”Home” in ”Location” (Refer to page 35).
Otherwise, the settings you adjusted will not be memorized after you turn off the
unit.
• Electrical interference from nearby appliances may affect picture quality.
• Adjust “Contrast” and “Brightness” in the main menu.
• View other TV channels. The problem might be limited to the broadcasting station.
• For the best picture quality, watch “high definition” wide screen programs.
If the HD content is not available, watch “standard definition” programs instead.
• View other TV channels. The problem might be limited to the broadcasting station.
• Check if the audio cable is connected in correctly.
• You may be getting interference from electrical appliances, automobiles,
motorcycles or uorescent lights.
• Try moving the unit to another location to see if this is the cause of the problem.
+ /
-
] to
Ghosts, lines or streaks in
picture
You see “noise” or “trash” on the
screen.
Different color marks on the TV
screen
56
EN
• Electrical interference from nearby appliances may affect picture quality.
• View other TV channels. The problem might be limited to the broadcasting station.
• When the capabilities of the unit exceed the capabilities of the digital
broadcasting, the signal will be increased to match the capabilities of the display
of the unit. This may cause noise or trash.
• View other TV channels. The problem might be limited to the broadcasting station.
Page 57

INTRODUCTION
Symptom Remedy
You switch to a different input
and the volume.
You switch to a different input
and the screen size changes.
The display image does not
cover the entire screen.
T
Captions are displayed as a
V
white box.
No caption is displayed in the
Closed Caption-supported
program.
No caption is displayed when
playing back a disc or a cassette
tape containing captions.
Black box is displayed on the TV
screen.
Completely distorted picture
or black/white picture with BD/
DVD.
Picture freezes momentarily
during playback.
Disc cannot be played.
B
D
/
Buttons do not work or the unit
D
stops responding.
V
The unit does not respond to
D
some operating commands
during playback.
• This unit will memorize the volume level from the last time you adjusted it.
• If the volume of the sound from another device is higher or lower, then the
loudness will change.
• This unit will memorize the viewing mode from the last time you used the
particular input modes.
• If you are using the unit as a PC monitor, make sure that “Horizontal Position” and
“Vertical Position” in “PC Settings” are set correctly.
• If you are watching TV or using the Video, S-Video, Component Video or HDMI with
480i Input, press [FORMAT] repeatedly to switch various screen modes.
• Interference from buildings or weather conditions may cause captioning to be
incomplete.
• Broadcasting station may shorten the program to insert advertisement.
The closed caption decoder cannot read the information of the shortened
program.
• The disc or cassette tape may be illegally copied, or the caption signal might not
have been read during copying.
• The text mode is selected for caption. Select “CC-1”, “CC-2”, “CC-3”, “CC-4” or “Off”.
• Make sure the disc is compatible with the unit.
• Check the disc for finger prints/scratches and clean with a soft cloth wiping from
center to edge.
• Clean the disc.
• Ensure the disc is correctly inserted.
• Check if the disc is defective by trying another disc.
• Cancel the parental lock or change the control level.
• Insert a correct disc that plays on this unit.
• Handle a disc with special care so that it does not have fingerprints, scratches, or
dusts on its surface.
• To completely reset the unit, unplug the AC power cord from the power outlet for
5-10 seconds.
• Operations may not be permitted by the disc. Refer to the instructions of the disc.
PREPARATION
WATCHING TV
OPTIONAL SETTING
OPERATING BLU-RAY
BLU-RAY SETTING
TROUBLESHOOTING
Angle does not switch.
Playback does not start when
the title is selected.
The password for rating level
has been forgotten.
• The angle cannot be switched for BD/DVD which do not contain multiple angles.
In some cases multiple angles are only recorded for specific scenes.
• Check the “Parental” setting.
• Enter the default password (4737), then your forgotten password will be cleared.
Note:
• To get the latest software information of this unit, please visit the following our website;
http:// www.magnavox.com/support/updates
• The LCD panel is manufactured to provide many years of useful life. Occasionally a few non active pixels may appear as a fixed point of
blue, green or red. This is not to be considered a defect in the LCD screen.
• Some functions are not available in specific modes, but this is not a malfunction. Read the description in this manual for more details on
correct operations.
• Some functions are prohibited on some discs.
INFORMATION
57
EN
Page 58

NFORMATION
I
5 Glossary
AT SC
Acronym that stands for Advanced
Television Systems Committee and the
name of the digital broadcasting standards.
Aspect Ratio
The width of a TV screen relative to its
height. Conventional TVs are 4:3 (in other
words, the TV screen is almost square);
widescreen models are 16:9 (the TV screen
is almost twice as wide as its height).
BD-Java
With some BD which support Java
applications, you can enjoy the interactive
functions such as games or interactive
menus.
CEC (Consumer Electronics Control)
This allows you to operate the linked
functions between our brand devices with
CEC feature and this unit.
Component Video
This is a video signal format that conveys
each of 3 principal colors of light (red,
blue and green) through different signal
lines. This allows the viewers to experience
picture colors as original as it is. There are
several signal formats, including Y / Pb / Pr
and Y / Cb / Cr.
DTS (Digital Theater System)
DTS is a multi-channel surround sound
system. By connecting to DTS decoder,
you can enjoy movie dynamic and realistic
sound like movie theater. DTS surround
sound technologies were developed by
DTS, Inc.
Dolby Digital
The system developed by Dolby
Laboratories to compress digital sound. It
offers stereo sound (2ch) or multi-channel
audio.
HDMI
(High-Definition Multimedia Interface)
Interface that supports all uncompressed,
digital audio/video formats including
set-top box, BD/DVD recorder or digital
television, over a single cable.
HDTV (High Definition TV)
Ultimate digital format that produces high
resolution and high picture quality.
NTSC
Acronym that stands for National Television
Systems Committee and the name of the
current analog broadcasting standards.
Off the air NTSC signals will no longer be
sent by broadcasting stations during 2009.
Password / PIN Code
A stored 4-digit number that allows access
to parental control features.
Region Code
Regions associate discs and players with
particular areas of the world. This unit will
only play back discs that have compatible
region codes. You can find the region code
of your unit by looking on the rear panel.
Some discs are compatible with more than
one region (or all regions).
SAP (Secondary Audio Program)
Second-audio channel delivered separately
from main-audio channel. This audio
channel is used as an alternate in bilingual
broadcasting.
SDTV (Standard Definition TV)
Standard digital format that is similar to the
NTSC picture quality.
S-Video
Offers higher quality images by delivering
each signal, color (c) and luminance (y)
independently of each other through a
separate cable.
5 Maintenance
Cabinet Cleaning
• Wipe the front panel and other exterior surfaces of the unit with
a soft cloth immersed in lukewarm water and wrung dry.
• Never use a solvent or alcohol. Do not spray insecticide
liquid near the unit. Such chemicals may cause damage and
discoloration to the exposed surfaces.
Panel Cleaning
Wipe the panel of the unit with a soft cloth. Before cleaning the
panel, disconnect the AC power cord.
Disc Handling
Handle the discs so that fingerprints and dust do not adhere to
the surfaces of the discs.
• Always store the disc in its protective case when it is not used.
• To clean-off, use a soft cloth.
• Do not use a hard cloth since this will mar the disc.
• Wipe the disc in a straight line form center to edge.
• Never wipe with a circular motion.
Servicing
Should your unit become inoperative, do not try to correct the
problem yourself. There are no user serviceable parts inside.
Turn off the unit, unplug the AC power cord and call our toll free
customer support line found on the cover of this manual to locate
an authorized service center.
If the Laser Optical Pickup Unit is Dirty
If the unit still does not perform properly when it is operated, while
referring to the relevant sections and to "Troubleshooting Guide"
in this owner’s manual, the laser optical pickup unit may be dirty.
Consult your dealer or an Authorized Service Center for inspection
and cleaning of the laser optical pickup unit.
IR Signal Check
If the remote control is not working properly, you can use a digital
camera (including a cellular phone with built-in camera) to see if it
is sending out an infrared signal.
• With a digital camera
(including built-in cell phone cameras):
Point the Digital Camera towards the remote
control infrared diode at the front of the remote
control. Press any button on the remote control
and look through the camera display. If the
infrared pulsating light appears through the
camera, the remote control is sending out an IR
signal.
• Do not use detergent or abrasive cleaning agents.
58
EN
Page 59

5 Cable Channel Designations
If you subscribe to cable TV, the channels are displayed as 1-135. Cable companies often designate channels with letters or letter-number combinations.
Please check with your local cable company. The following is a chart of common cable channel designations.
CATV channel
TV Display
CATV channel
TV Display
CATV channel
TV Display
CATV channel
TV Display
CATV channel
TV Display
CATV channel
TV Display
CATV channel
TV Display
5A122334455667788991010111112121313A14B15C16D17E18F19G20H
I22J23K24L25M26N27O28P29Q30R31S32T33U34V35W36W+1
W+743W+844W+945W+1046W+1147W+1248W+1349W+1450W+1551W+1652W+1753W+1854W+1955W+2056W+2157W+2258W+2359W+2460W+2561W+2662W+27
W+2864W+2965W+3066W+3167W+3268W+3369W+3470W+3571W+3672W+3773W+3874W+3975W+4076W+4177W+4278W+4379W+4480W+4581W+4682W+4783W+48
W+4985W+5086W+5187W+5288W+5389W+5490W+5591W+5692W+5793W+5894A-595A-496A-397A-298A-199W+59
W+65
W+66
W+67
W+68
W+69
W+70
W+71
W+72
W+73
W+74
W+75
W+76
W+77
W+78
106
W+86
127
107
W+87
128
108
W+88
129
109
W+89
130
110
W+90
131
111
W+91
132
112
W+92
133
113
W+93
134
114
W+94
135
115
116
117
118
119
W+79
120
W+2 W+339W+440W+541W+6
37 38
W+60
W+61
100
W+80
121
101
W+81
122
102
W+82
123
W+62
103
W+83
124
W+63
104
W+84
125
W+64
W+85
INTRODUCTION
21
PREPARATION
42
63
84
105
WATCHING TV
126
5 General Specifications
TV
TV format: ATSC / NTSC-M TV standard
Closed caption system:
§15.122 / FCC (digital CC)
§15.119 / FCC (analog CC)
Channel coverage (ATSC / NTSC):
Terrestrial VHF: 2~13 UHF: 14~69
CATV 2~13, A~W,
W+1~W+94 (analog W+1~W+84),
A-5~A-1, 5A
Tuning system: Channel frequency synthesized tuning system
Channel access: Direct access keyboard,
Programmable scan, and up / down
BD/DVD
Discs (playback compatibility):
BD-video, BD-RE/-R,
DVD-video, DVD-RW/-R, DVD+RW/+R,
audio CD, CD-RW/-R
Frequency response:
BD / DVD (linear sound): 20 Hz to 20 kHz (sample rate: 48 kHz)
20 Hz to 44 kHz (sample rate: 96 kHz)
CD: 20 Hz to 20 kHz
Signal-to-noise ratio (S/N ratio):
CD: 85 dB (JEITA)
Total distortion factor:
BD / DVD / CD: 1 KHz 0.007% (JEITA)
5 Electrical Specification
Sound Output: 10W, 8Ω x 2
5 Other Specifications
Terminals:
Antenna Input: VHF / UHF / CATV 75Ω unbalanced (F-type)
Audio Input: RCA jack (L/R) x 8 500mV rms
Video Input: RCA jack x 2 1V p-p (75Ω)
S-Video Input: Mini DIN 4-pin jack x 2 Y: 1V p-p (75Ω)
C: 286mV p-p (75Ω)
Component Video Input:
RCA jack x 3 Y: 1V p-p (75Ω)
Pb/Cb: 700mV p-p (75Ω)
Pr/Cr: 700mV p-p (75Ω)
HDMI input: HDMI 19pin x 3
USB input: USB x 1
Coaxial Digital Audio Output:
RCA jack x 1 500mV p -p (75Ω)
Audio Output: RCA jack (L/R) x 2 500mV rms
Remote control:
Operating temperature:
41°F (5°C) to 104°F (40°C)
Power requirements:
120V~ AC +/- 10%, 60Hz +/- 0.5%
Power consumption (maximum):
282W
LCD: 42 inches full HD panel
Dimensions: <without stand> <with stand>
W: 40.4 inches (1,026.0mm) 40.4 inches (1,026.0mm)
H: 26.2 inches (664.5mm) 28.6 inches (725.0mm)
D: 5.4 inches (137.0mm) 12.3 inches
Weight: 58.5 lbs. (26.5kg) 63.8 lbs.
Digital encoded infrared light system
(310.0mm)
(28.9kg)
OPTIONAL SETTING
OPERATING BLU-RAY
BLU-RAY SETTING TROUBLESHOOTING
INFORMATION
• Designs and speci cations are subject to change without notice and without
our legal obligation.
• If there is a discrepancy between languages, the default language will be
English.
59
EN
Page 60
LIMITED WARRANTY
NINETY (90) DAY LABOR / ONE(1)YEAR PARTS
WARRANTY COVERAGE:
This warranty obligation is limited to the terms as set forth
below.
WHO IS COVERED:
This product warranty is issued to the original purchaser or the
person receiving the product as a gift against defects in materials
and workmanship as based on the date of original purchase
(“Warranty Period”) from an Authorized Dealer. The original
sales receipt showing the product name and the purchase date
from an authorized retailer is considered such proof.
WHAT IS COVERED:
This warranty covers new products if a defect in material or
workmanship occurs and a valid claim is received within the
Warranty Period. At its option, the company will either (1)
repair the product at no charge, using new or refurbished
replacement parts, or (2) exchange the product with a product
that is new or which has been manufactured from new, or serviceable used parts and is at least functionally equivalent or most
comparable to the original product in current inventory, or (3)
refund the original purchase price of the product.
Replacement products or parts provided under this warranty are
covered against defects in materials and workmanship from the
date of the replacement or repair for ninety (90) days or for the
remaining portion of the original product’s warranty, whichever
provides longer coverage for you. When a product or part is
exchanged, any replacement item becomes your property and the
replaced item becomes company property. When a refund is
given, your product becomes company property.
Note: Any product sold and identified as refurbished or
renewed
Replacement product can only be sent if all warranty
requirements are met. Failure to follow all requirements
can result in delay.
WHAT IS NOT COVERED - EXCLUSIONS AND LIMITATIONS:
This Limited Warranty applies only to new company manufac-
to any hardware product or any software, even if packaged or
sold with the product, as manufacturers, suppliers, or publishers
may provide a separate warranty for their own products packaged with the bundled product.
carries a ninety (90) day limited warranty.
mission, or (d) if any serial number has been removed or defaced,
or (e) product, accessories or consumables sold “AS IS” without
warranty of any kind by including refurbished product sold “AS
IS” by some retailers.
This Limited Warranty does not cover:
• Shipping charges to return defective product.
• Labor charges for installation or setup of the product, adjustment of customer controls on the product, and installation or
repair of antenna/signal source systems outside of the product.
• Product repair and/or part replacement because of improper
installation or maintenance, connections to improper voltage
supply, power line surge, lightning damage, retained images or
tent for extended periods, product cosmetic appearance items
due to normal wear and tear, unauthorized repair or other
cause not within the control of the company.
• Damage or claims for products not being available for use, or
for lost data or lost software.
• Damage from mishandled shipments or transit accidents when
returning product.
it to operate in any country other than the country for which
it was designed, manufactured, approved and/or authorized, or
• A product used for commercial or institutional purposes
(including but not limited to rental purposes).
can be provided.
• Failure to operate per Owner’s Manual.
TO OBTAIN ASSISTANCE…
Contact the Customer Care Center at:
1-866-341-3738
REPAIR OR REPLACEMENT AS PROVIDED UNDER THIS
WARRANTY IS THE EXCLUSIVE REMEDY FOR THE CONSUMER, WITH THE ISSUING COMPANY NOT LIABLE FOR
ANY INCIDENTAL OR CONSEQUENTIAL DAMAGES FOR
BREACH OF ANY EXPRESS OR IMPLIED WARRANTY ON
THIS PRODUCT. EXCEPT TO THE EXTENT PROHIBITED BY
APPLICABLE LAW, ANY IMPLIED WARRANTY OF MERCHANTABILITY OR FITNESS FOR A PARTICULAR PURPOSE
ON THIS PRODUCT IS LIMITED IN DURATION TO THE
DURATION OF THIS WARRANTY.
The company is not liable for any damage to or loss of any programs, data, or other information stored on any media contained
within the product, or other additional product or part not covered by this warranty. Recovery or reinstallation of programs,
data or other information is not covered under this Limited
Warranty.
This warranty does not apply (a) to damage caused by accident,
abuse, misuse, neglect, misapplication, or non-supplied product,
(b) to damage caused by service performed by anyone other than
company approved Authorized Service Location, (c) to a product
FUNAI CORPORATION, Inc. 19900 Van Ness Avenue, Torrance, CA 90501
60
EN
Some states do not allow the exclusions or limitation of incidental or consequential damages, or allow limitations on how long an
implied warranty lasts, so the above limitations or exclusions may
not apply to you.
Printed in China
Page 61

Français
EN
61
Page 62

User Manual
Manuel de l’utilisateur
Guía del usuario
42MD459B
LCD TV/BD/DVD
English
1-866-341-3738
1-866-341-3738
Quick Use Guide Inside!
Guide d’usage Rapide Incluse!
Guía de Uso Rápido Incluida!
HIGH-DEFINITION TELEVISION
1-866-341-3738
Français
Español
MODEL NUMBER SERIAL NUMBER
Page 63

Renvoyez votre carte d’enregistrement de produit ou enregistrez-vous en ligne aujourd’hui
sur le site www.magnavox.com/support pour proter au mieux de votre achat.
L’enregistrement de votre modèle auprès de MAGNAVOX vous donne droit à tous les bénéces avantageux
énumérés ci-dessous, alors n’hésitez pas. Remplissez la carte d’enregistrement de votre produit et envoyez-la
aussitôt ou enregistrez-vous en ligne sur le site www.magnavox.com/support pour assurer :
*Preuve d’achat
*Avis de sécurité du
*des bénéces supplémentaires
produit
En retournant la che ci-jointe,
vous garantirez que votre
date d’achat sera le X et vous
n’aurez besoin d’aucun autre
document pour obtenir du
service en matière de garantie.
Félicitations pour votre achat et bienvenue
dans la « famille »!
Cher propriétaire d’un produit MAGNAVOX :
Merci de faire conance à MAGNAVOX. Vous
avez choisi l’un des produits les mieux fabriqués et
garantis oerts sur le marché actuel.
Nous ferons tout en notre pouvoir pour que vous
soyez satisfait de votre achat pendant plusieurs
années.
En tant que membre de la « famille »
MAGNAVOX, vous pouvez proter de l’une des
garanties les plus complètes et de l’un des réseaux
de service les plus exceptionnels de l’industrie.
De plus, votre achat vous garantit que vous
recevrez tous les renseignements et les ores
spéciales auxquels vous avez droit tout en ayant
accès à des accessoires par le biais de notre
réseau d’achats à domicile des plus pratiques.
Le plus important, c’est que vous pouvez vous
er à notre engagement profond à vous satisfaire
pleinement.
C’est notre façon de vous souhaiter la bienvenue
et de vous remercier d’investir dans un produit
MAGNAVOX.
En inscrivant votre produit, votre
serez directement avisé par notre
fabricant en cas de retrait de
produit ou de défaut compromettant la sécurité, ce qui arrive très
peu souvent.
Familiarisez-vous avez ces symboles de sécurité
Cet « éclair » est associé à des
composantes non isolées à même
votre produit qui pourraient causer un choc
électrique. Pour assurer la sécurité de tous les
membres de votre domicile, veuillez ne
pas retirer le boîtier du produit.
Le « point d’exclamation » attire
l’attention sur les fonctions pour
lesquelles vous devriez lire la documentation
ci-jointe an de prévenir les problèmes en
matière d’utilisation et d’entretien.
AVERTISSEMENT : Pour réduire les risques
de feu ou de choc électrique, cet appareil ne
devrait pas être exposé à la pluie ou à l’humidité
et les objets contenant des liquides, tels que des
vases, ne devraient pas être placés sur cet
appareil.
ATTENTION : Pour éviter le choc électrique,
introduire la lame la plus large de la che dans
la borne correspondante de la prise et pousser
jusqu’au fond.
En inscrivant votre produit, vous
êtes assuré de bénécier de tous
les privilèges auxquels vous avez
droit, y compris les ores vous permettant d’économiser.
P.S. Pour proter au mieux de votre achat
MAGNAVOX, veillez à remplir la carte
d’enregistrement de votre produit et
l’envoyer aussitôt ou à vous enregistrer en
ligne sur le site :
www.magnavox.com/support
Consultez notre site Web à www.magnavox.com/support
2
FR
À l’attention du client
Inscrire ci-dessous le numéro de série qui
se trouve à l’arrière du core. Conserver
ce renseignement pour consultation future.
Numéro de modèle _______________________
Numéro de série _________________________
Page 64

INSTRUCTIONS IMPORTANTES EN MATIÈRE DE SÉCURITÉ
À lire avant utilisation
Lire ces instructions.
1.
Garder ces instructions.
2.
Tenir compte de tous les avertissements.
3.
Suivre toutes les instructions.
4.
Ne pas utiliser cet appareil à proximité d’eau.
5.
Nettoyer seulement avec un linge sec.
6.
Ne pas bloquer les ouvertures d’aération. Installer selon les
7.
instructions du fabricant.
Ne pas installer près de sources de chaleur telles que les radia-
8.
teurs, les bouches d’air chaud, les cuisinières ou tout autre
appareil (y compris les amplicateurs) produisant de la chaleur.
Ne pas contourner le dispositif de sécurité que représente la
9.
che polarisée ou la che avec mise à la terre. Une che polarisée possède deux lames dont l’une d’elles est plus large que
l’autre. Une che avec mise à la terre comporte deux lames et
une broche de mise à terre. La lame large et la broche de mise
à la terre sont prévues pour votre sécurité. Si la che fournie
ne convient pas à votre prise, consulter un électricien pour
qu’il remplace la prise désuète.
10.
Protéger le cordon d’alimentation de façon à ce qu’il ne soit
pas ni écrasé, ni coincé, surtout près des ches, des blocs
multiprises et du point de sortie de l’appareil.
11.
N’utiliser que des accessoires spéciés par le fabricant.
12
Utiliser le téléviseur uniquement avec le chariot, le meuble, le
trépied, le support ou la table recommandés par le
fabricant ou vendus avec l’appareil. En cas d’utilisation
d’un chariot, être prudent lors du déplacement du
chariot et de l’appareil pour éviter des blessures dues au
renversement.
Débrancher cet appareil pendant les orages ou lorsqu’il n’est
13.
pas utilisé pendant de longues périodes.
14.
Consulter un membre du personnel compétent pour toute
demande de service. Il faut faire réparer l’appareil s’il est
endommagé, par exemple, si le cordon d’alimentation ou la
prise a été endommagé(e), si un liquide ou un objet a pénétré
à l’intérieur de l’appareil, ou si l’appareil a été exposé à la pluie
ou à l’humidité, s’il fonctionne anormalement ou s’il est tombé.
15.
Dommage nécessitant du service - L’appareil devrait être
vérié par un membre du personnel compétent quand :
A. Le cordon d’alimentation ou la prise a été endommagé(e)
B. Des objets ou des liquides ont pénétré à l’intérieur de
l’appareil
C. Si l’appareil a été exposé à la pluie
D. Si l‘appareil ne semble pas fonctionner
normalement ou s’il démontre des changements agrants en
matière de rendement.
E. Si l’appareil est tombé ou si l’enceinte est endommagée.
Basculement et (ou) stabilité - Tous les téléviseurs doivent
16.
se soumettre aux normes de sécurité d’ensemble
internationales recommandées en matière de basculement
et de stabilité au sujet de la conception de son core.
• Ne pas compromettre ces normes de conception en appliquant une force excessive à l’avant ou sur le dessus du
core, car à la limite, il pourrait entraîner le renversement du
produit.
• De plus, ne pas vous mettre en danger, vous et vos enfants,
en plaçant de l’équipement électronique et (ou) des jouets
sur le dessus du core. De tels articles pourraient tomber
sans avertissement du dessus du téléviseur et endommager le
produit et (ou) causer des blessures corporelles.
Installation au mur ou au plafond - L’appareil ne devrait
17.
pas être xé à un mur ou au plafond à moins de suivre les
recommandations du fabricant.
Lignes électriques - Une antenne extérieure ne devrait pas
18.
être située à proximité des lignes électriques.
Mise à la terre d’une antenne extérieure - Si une
19.
antenne extérieure est branchée au récepteur, s’assurer que
le circuit d’antenne est mis à la terre pour permettre une
protection adéquate contre les surtensions et l’accumulation
de charges électrostatiques.
La section 810 du Code électrique national (numéro 70-1984
de l’ANSI/NFPA ) fournit des renseignements au sujet de la
mise à la terre adéquate d’un mât, d’une structure de
support ou des câbles de descente au dispositif de décharge
d’antenne, de la taille des conducteurs de mise à la terre, de
l’emplacement du dispositif de décharge d’antenne, du
raccordement des électrodes de mise à la terre et des
exigences pour mettre les électrodes à la terre. Voir le
schéma ci-dessous.
Pénétration d’objets ou de liquides - Des précautions
20.
doivent être prises pour éviter que des objets ou des liquides
ne pénètrent à l’intérieur de l’enceinte par le biais des ouvertures.
Utilisation de piles ATTENTION- Pour prévenir les
21.
fuites de piles qui pourraient entraîner des blessures corporelles ou des dommages matériels ou à l’unité :
• Installer toutes les piles de façon appropriée en alignant
le + et le - tel qu’indiqué sur l’unité.
• Ne pas mélanger les piles (anciennes ou récentes ou au
carbone et alcalines, etc.).
• Enlever les piles quand l’unité n’est pas utilisée pendant
de longues périodes.
Remarque pour l’installateur de systèmes de câblodistribution
câblodistribution que l’article 820 -40 du NEC fournit des conseils pour une mise à la terre correcte et préconise notamment
que la mise à la terre du câble doit être reliée au système de mise à la terre de l’immeuble, aussi près que possible du point
où le câble entre dans l’immeuble.
Remarque pour l’installateur de
systèmes de câblodistribution
MATÉRIEL D’ALIMENTATION ÉLECTRIQUE
COLLIER DE MISE À LA TERRE
: Cet avis rappelle à l’installateur de systèmes de
CÂBLE DE DESCENTE D’ANTENNE
DISPOSITIF DE DÉCHARGE D’ANTENNE (SECTION 810-20 DU NEC)
CONDUCTEURS DE MISE À LA TERRE (SECTION 810-21 DU NEC)
COLLIERS DE MISE À LA TERRE
ÉLECTRODE DE MISE À LA TERRE DE L’ALIMENTATION ÉLECTRIQUE (ART. 250, PARTIE H DU NEC)
3
FR
Page 65

NTRODUCTION
I
Précautions
Ne placez pas cet appareil sur un meuble qui pourrait être renversé par un enfant ou un adulte qui pourrait s’y appuyer, le tirer ou
monter dessus. La chute de l’appareil peut causer des blessures graves ou même la mort.
AVERTISSEMENT DE LA FCC
Cet appareil peut générer ou utiliser de l’énergie de radiofréquence. Des changements ou modifications apportés à cet appareil
peuvent causer un brouillage nuisible, à l’exception des modifications explicitement approuvées dans ce manuel. L’utilisateur
peut perdre le droit d’utiliser cet appareil s’il effectue un changement ou une modification sans autorisation.
BROUILLAGE RADIO-TV
Cet appareil a été testé et jugé conforme aux limites pour appareil numérique de Classe B, conformément à la Partie 15 des Règlements
de la FCC. Ces limites sont conçues pour assurer une protection raisonnable contre le brouillage nuisible dans une installation
résidentielle. Cet appareil génère, utilise et peut émettre de l’énergie de radiofréquence ; s’il n’est pas installé et utilisé conformément
aux instructions, il peut brouiller les communications radio. Par ailleurs, il n’est pas garanti qu’il ne causera pas de brouillage dans une
installation donnée. Si cet appareil brouille la réception de la radio ou du téléviseur, ce qui peut être vérifié en éteignant et rallumant
l’appareil, l’utilisateur est invité à essayer d’annuler le brouillage en prenant l’une ou plusieurs des mesures suivantes :
1) Réorientez ou repositionnez l’antenne.
2) Augmentez la distance entre l’appareil et le récepteur.
3) Branchez l’appareil sur une prise de courant qui se trouve sur un circuit différent de celui auquel le récepteur est branché.
4) Informez-vous auprès du détaillant ou d’un technicien spécialisé en radios/téléviseurs pour obtenir de l’aide.
DÉCLARATION DE CONFORMITÉ
Nom Commercial : MAGNAVOX Personne Responsable : FUNAI CORPORATION, INC.
Modèle : 42MD459B Adresse : 201 Route 17 North Suite No. 903 Rutherford, New Jersey 07070 U.S.A.
Numéro de Téléphone : 201-727-4560
Cet appareil numérique de la classe B est conforme à la norme NMB-003 du Canada.
Cet appareil ne doit pas être placé dans un meuble fermé, par exemple une bibliothèque ou une étagère, sans assurer une
ventilation appropriée. Laissez un espace de 4 pouces, ou 10 cm, minimum autour de cet appareil.
Débranchez la fiche d’alimentation pour éteindre l’appareil en cas de problème ou lorsque vous ne l’utilisez pas.
La fiche d’alimentation doit être facilement accessible.
ATTENTION: Il y a danger d’explosion si les piles ne sont pas remplacées correctement. Remplacez-les uniquement avec
AVERTISSEMENT: Les piles (emballées ou installées) ne doivent jamais être exposées à une chaleur excessive telle que celle
des piles du même modèle ou d’un modèle équivalent.
du soleil, des flammes ou autre source similaire.
Comme tout produit LCD, cet équipement comporte une lampe contenant du mercure.
Éliminez-la conformément à la législation en vigueur. Pour toute information concernant
l’élimination ou le recyclage, contactez : www.mygreenelectronics.com ou www.eiae.org
AVERTISSEMENT: Pour éviter les risques de blessure, cet appareil doit être fermement fixé au sol/mur conformément
CONSIGNES DE SÉCURITÉ RELATIVES AU LECTEUR LASER
Cet appareil utilise un laser. Le couvercle de protection de ce dispositif ne doit être retiré que par un technicien de
maintenance qualifié. De même, l’entretien de ce dispositif doit être confié à un technicien qualifié. Le non-respect de
ces consignes peut occasionner des lésions oculaires graves.
MISE EN GARDE : L’UTILISATION DE COMMANDES, DE RÉGLAGES OU DE PROCÉDURES AUTRES QUE CEUX DÉCRITS
MISE EN GARDE : PRÉSENCE D’UN RAYON LASER VISIBLE ET INVISIBLE LORSQUE L’APPAREIL EST OUVERT ET QUE LE
EMPLACEMENT : À L’INTÉRIEUR DE L’APPAREIL, PRÈS DU MÉCANISME DE CHARGEMENT DU DISQUE.
INFORMATIONS IMPORTANTES RELATIVES AU COPYRIGHT
Il est formellement interdit de copier, diffuser, projeter en séance publique et prêter des disques sans autorisation. Ce
produit est équipé d’un dispositif de protection du copyright protégé par des brevets américains et d’autres droits de
propriété intellectuelle. L’utilisation de ce dispositif de protection du copyright doit être autorisée par Macrovision et,
sauf autorisation contraire accordée par Macrovision, est limitée au cercle familial ou privé. Toute ingénierie inverse ou
désassemblage est strictement interdit(e).
aux instructions.
DANS LE PRÉSENT MANUEL RISQUE D’EXPOSER L’UTILISATEUR À UN RAYONNEMENT DANGEREUX.
DISPOSITIF DE VERROUILLAGE EST DÉSACTIVÉ. NE PAS REGARDER LE FAISCEAU DU RAYON LASER.
4
FR
Page 66

POUR ÉVITER LES RISQUES DE CHOC ÉLECTRIQUE ET D’INCENDIE
• Ne manipulez jamais le cordon d’alimentation secteur avec les mains mouillées.
• Ne démontez pas le boîtier du téléviseur. Si vous touchez les composants se trouvant à l’intérieur du boîtier, vous
risquez une électrocution ou d’endommager le téléviseur. Pour l’entretien et le réglage d’éléments se trouvant dans le
boîtier, faites appel à un revendeur qualifié ou à un centre de réparation agréé.
• Ne tirez pas sur le cordon d’alimentation pour le débrancher de la prise murale.
• N’introduisez ni vos doigts ni aucun objet dans le téléviseur.
EMPLACEMENT ET MANIPULATION
• Ne bloquez pas les orifices en plaçant le téléviseur sur un lit, un sofa, de la moquette, un tapis ou une surface similaire.
• Ne placez pas le téléviseur à proximité ou sur un radiateur ou une bouche de chaleur.
• N’exposez pas le téléviseur à la lumière directe du soleil ; ne le placez pas à proximité de champs magnétiques
importants, ni à un endroit soumis à de fortes vibrations.
• Évitez les emplacements soumis à des changements de température extrêmes.
• Installez le téléviseur en position horizontale et stable. Ne placez rien directement sous ou sur le téléviseur. Si le
téléviseur est placé trop près de vos équipements externes, il est possible que ceux-ci (selon leur type) provoquent du
bruit ou des perturbations de l’image et/ou du son. Dans ce cas, assurez-vous de laisser suffisamment d’espace entre les
équipements externes et le téléviseur.
• En fonction de l’environnement, la température du téléviseur peut augmenter légèrement. Il ne s‘agit pas d’un
dysfonctionnement.
AVERTISSEMENT CONCERNANT LA CONDENSATION
• De la condensation peut se former à l’intérieur de l’appareil dans les conditions suivantes. Dans ce cas, ne pas utiliser
l’appareil pendant quelques heures de manière à lui laisser le temps de sécher.
- L’appareil a été déplacé d’un endroit froid vers un endroit chaud.
- L’appareil est situé dans un environnement très humide.
- L’appareil est situé dans une pièce froide qui vient d’être chauffée.
REMARQUE SUR LE RECYCLAGE
• Le matériel d’emballage de ce téléviseur est recyclable et peut être réutilisé. Veuillez procéder à la sélection de
ce matériel conformément aux réglementations locales de recyclage.
• Vous ne devez jamais jeter les piles ni les incinérer mais les déposer dans les endroits recommandés par les
réglementations concernant les déchets chimiques.
LORSQUE VOUS DÉPLACEZ CE APPAREIL
• Il faut au moins deux personnes pour porter ce appareil.
• Assurez-vous de tenir fermement les cadres inférieur et supérieur du
téléviseur comme indiqué sur l’illustration.
INTRODUCTION PRÉPARATION
REGARDER LA
TÉLÉVISION
CONFIGURATION
OPTIONNELLE
LECTEUR DE BLU-RAY
FONCTIONNEMENT DU
RÉGLAGE DU
BLU-RAY
Information sur les Marques Commerciales
• HDMI, le logo HDMI et High-Definition Multimedia Interface (Interface multi-support haute définition) sont des
marques commerciales ou marques déposées de HDMI Licensing LLC.
• Fabriqué sous licence de Dolby Laboratories. Le terme «Dolby» et le sigle double D sont des marques commerciales
de Dolby Laboratories.
• Fabriqué sous licence sous les numéros de brevets américains : 5 451 942 ; 5 956 674 ; 5 974 380 ; 5 978 762 ; 6 487
535 ainsi que d’autres brevets américains et internationaux attribués ou en cours d’attribution. DTS et DTS 2.0 +
Digital Out sont des marques déposées et les logos et le symbole DTS sont des marques commerciales de DTS, Inc. ©
1996-2008 DTS, Inc. Tous droits réservés.
• Les produits labellisés ENERGY STAR® sont conçus pour protéger l’environnement par un rendement énergétique
supérieur.
• “Blu-ray Disc” et
•
• “BONUSVIEW” est une marque commerciale de Blu-ray Disc Association.
• Java, toutes les autres marques de commerce et tous les autres logos sont des marques de commerce ou des
est une marque commerciale de DVD Format/Logo Licensing Corporation.
marques déposées de Sun Microsystems, Inc. aux États- Unis et / ou dans les autres pays.
sont des marques de commerce.
DÉPANNAGE INFORMATION
5
FR
Page 67

NTRODUCTION
➁
trous de vis
I
Symboles Utilisés dans ce Manuel
Les symboles utilisés dans ce manuel sont décrits ci-dessous. La description concerne :
FONCTIONS TV FONCTIONS BLURAY
BD
: Lecture d’une BD vidéo
TV
: L’utilisation d’un téléviseur analogique
DTV
: L’utilisation d’un téléviseur numérique
•
Si aucun symbole n’apparaît sous l’indication de la fonction,
son utilisation s’applique aux deux types de téléviseur.
•
Si aucun symbole n’apparaît sous l’en-tête de fonction, la
fonction en question est disponible à tous les types de disques.
DVD
: Lecture de DVD vidéo
CD
: Lecture de CD audio
Accessoires Fournis
guide d’utilisation
(1EMN24659)
guide de
démarrage rapide
(1EMN24663)
télécommande
principale
(NF034UD)
piles
(AA x 2)
AAA
AAA
télécommande
simple (NH100UD)
piles
(AAA x 2)
AAA
AAA
carte
d’enregistrement
(1EMN24699)
serre-câbles
(1EM428657)
ensemble de vis
pour fixer le socle
(1ESA20607)
cordon
d’alimentation
secteur
(WAV0162LW001)
ou (WAV0162LTE03)
• Si vous devez remplacer ces accessoires, veuillez prendre comme référence le numéro indiqué sur les illustrations et
contacter le numéro gratuit de notre service d’aide à la clientèle, indiqué sur la couverture de ce manuel.
Montage du Support du Téléviseur
Vous devez fixer l’appareil sur son socle pour pouvoir le poser sur un meuble. Assurez-vous que l’avant et l’arrière du
support sont dans la bonne position.
Passez un chi on épais et doux sur
1
une table, tel qu’indiqué ci-dessous.
Placez l’appareil face avant sur
le tissu. Assurez-vous de ne pas
endommager l’écran.
Il faut au moins deux personnes
pour réaliser cette étape.
Pour Enlever le Support du Appareil
Dévissez les vis à tête plate Philips indiquées dans le
paragraphe “
socle vers le haut et vers l’arrière de l’appareil. Attention de
ne pas faire tomber le socle en le retirant.
” ci-dessus. Après avoir retiré les vis, tirez le
➁
Remarque :
• Lorsque vous montez le support, vérifiez que toutes les vis sont serrées correctement. Si le support n’est pas fixé correctement, l’appareil
risque de tomber, ce qui peut provoquer des blessures et endommager l’appareil.
• Utilisez une table qui puisse supporter le poids du appareil et qui soit plus grande que celui-ci.
• Assurez-vous que la table se trouve sur un emplacement stable.
6
FR
Insérez le col situé sur le dessous de
2
l’unité principale dans l’ori ce de la
base (cf. èche
➀
).
➀
côté avant
Insérez les vis à tête plate Philips
3
dans les 4 trous letés situés sous le
socle et vissez-les à fond.
➁
trous de vis
Page 68

Caractéristiques
TV BD/DVD
INTRODUCTION PRÉPARATION
• DTV/TV/CATV
- Vous pouvez utiliser la télécommande pour
sélectionner les chaînes diffusées en format
numérique ou analogique classique. Les abonnés
du câble peuvent également accéder aux chaînes
de câblodiffusion.
• Affichage d’Informations (uniquement DTV)
- Vous pouvez afficher le titre, le contenu et d’autres
informations relatives à l’émission DTV sur l’écran
du téléviseur.
• Programation Auto
- Cet appareil balaye automatiquement les chaînes
et mémorise celles qui sont disponibles dans
votre région, vous épargnant ainsi les difficiles
procédures de configuration.
• Verrouillage
- Cette fonction permet de bloquer l’accès des
enfants à des émissions inappropriées.
• Décodeur Sous-titres
- Le décodeur de sous-titres intégré affiche le texte
des émissions sous-titrées.
• Syntoniseur MTS/SAP
- L’audio peut être sélectionnée à l ‘aide de la
télécommande.
• Fonction de Mise Hors Tension Automatique
- Si aucun signal n’est reçu par la borne d’antenne et
qu’aucune commande n’est exécutée pendant 15
minutes, l’appareil se met automatiquement hors
tension.
• Minuterie de Sommeil
- Cette fonction permet d’éteindre l’appareil
automatiquement à l’heure spécifiée.
• Choix de Langue pour l’Affichage sur Écran
- Sélectionnez la langue du menu sur écran :
Anglais, Espagnol ou Français.
• Fonction de Son Stéréo
• Syntonisation par Synthétiseur de Fréquences PLL
- Permet de sélectionner librement et facilement les
chaînes, ainsi que de les syntoniser directement à
l’aide des touches numériques de la télécommande.
• Divers Réglages pour l’Image et le Son
- Permettent d’adapter la qualité de l’image aux
conditions de votre pièce et de régler le son en
fonction de vos préférences.
• Entrée HDMI
- Grâce à l’entrée HDMI1, vous pouvez utiliser ce
appareil comme moniteur pour votre PC pour cela,
ce dernier doit être équipé d’une sortie DVI.
• Entrée Vidéo à Composantes
• Entrée S-vidéo
• Entrée AV
• Port USB
- Cet appareil permet la lecture des fichiers JPEG ou
MP3 stockés sur une clé USB.
• Sortie Audio Numérique
• Sortie Audio Analogique
• Son Dolby Digital
- Profitez d’un son Surround multicanal Dolby Digital en
branchant l’appareil sur votre décodeur Dolby Digital.
• DTS
- Vous pouvez profiter d’un son réaliste et dynamique
comme dans une sale de cinema en branchant
l’appareil sur votre décodeur DTS.
• Image Fixe / Lecture Rapide / Lecture Lente /
Lecture Image par Image
Cet appareil propose différents modes de lecture, et
-
notamment la lecture d’images fixes, l’avance/retour rapide,
l’avance/retour lent(e) et la lecture image par image.
• Menus BD/DVD dans la Langue Désirée
- Vous pouvez afficher les menus BD/DVD dans la
langue désirée, si elle est disponible sur le BD vidéo
ou le DVD vidéo.
• Extinction Automatique
- Au bout de 20 minutes d’inutilisation, l’appareil
s’éteint automatiquement.
• Contrôle Parental
- Permet d’empêcher les enfants de regarder des BD
vidéo ou des DVD vidéo inadaptés à leur âge.
• Reprise de la Lecture
- Vous permet de reprendre la lecture à l’endroit précis
où elle a été arrêtée.
• Indication du Débit Binaire
• DRC (contrôle de la plage dynamique)
- Cette fonction vous permet de contrôler la plage de
volume sonore.
• Sélection d’un Angle de Caméra
- Vous pouvez sélectionner l’angle de caméra de votre
choix, si toutefois le BD/DVD contient des séquences
tournées sous différents angles.
• Virtual Surround
• Recherche
- recherche de chapitre / recherche de titre /
recherche de piste / recherche par durée écoulée
• Signet
Un signet permet à l’utilisateur d’accéder directement à
-
la partie du disque qu’il aura préalablement indiquée.
• Répétition
- chapitre / titre / piste / tout / A-B
• Lecture Programmée (CD audio)
- Vous pouvez programmer l’ordre de lecture des
pistes en fonction de vos préférences.
• Lecture Aléatoire (CD audio)
- Cet appareil peut lire les pistes de manière aléatoire.
Accès grâce à la touche [SAP]
Pendant la lecture
• Choix de la Langue Audio et Fonction Son Stéréo
- Sélectionnez la langue et le format sonore de votre
choix si votre disque comporte plusieurs options.
REGARDER LA
TÉLÉVISION
CONFIGURATION
OPTIONNELLE
LECTEUR DE BLU-RAY
FONCTIONNEMENT DU
RÉGLAGE DU
BLU-RAY
DÉPANNAGE INFORMATION
Accès grâce à la touche [SUBTITLE]
Pendant la lecture
• Des Sous-titres dans la Langue de Votre Choix
- Vous pouvez afficher les sous-titres dans la langue
de votre choix, si toutefois cette langue est prise en
charge par le BD-vidéo ou DVD vidéo.
7
FR
Page 69

NTRODUCTION
I
Contenu
Instructions Importantes en Matiére de Sécurité . . . . . . . . . . . .3
INTRODUCTION
Précautions . . . . . . . . . . . . . . . . . . . . . . . . . . . . . . . . . . . . . . . . . . . . . . . . .4
Information sur les Marques Commerciales . . . . . . . . . . . . . . . . .5
Symboles Utilisés dans ce Manuel . . . . . . . . . . . . . . . . . . . . . . . . . . .6
Accessoires Fournis . . . . . . . . . . . . . . . . . . . . . . . . . . . . . . . . . . . . . . . . .6
Montage du Support du Téléviseur . . . . . . . . . . . . . . . . . . . . . . . . .6
Caractéristiques . . . . . . . . . . . . . . . . . . . . . . . . . . . . . . . . . . . . . . . . . . . . .7
Panneau de Commande . . . . . . . . . . . . . . . . . . . . . . . . . . . . . . . . . . . .9
Bornes . . . . . . . . . . . . . . . . . . . . . . . . . . . . . . . . . . . . . . . . . . . . . . . . . . . . . .9
Boutons de la Télécommande . . . . . . . . . . . . . . . . . . . . . . . . . . . . 10
Insérer les Piles . . . . . . . . . . . . . . . . . . . . . . . . . . . . . . . . . . . . . . . . . . . . 11
PRÉPARATION
Connexion de l’Antenne . . . . . . . . . . . . . . . . . . . . . . . . . . . . . . . . . . 12
Connexion à un Décodeur de Diffusion
par Câble / Satellite . . . . . . . . . . . . . . . . . . . . . . . . . . . . . . . . . . . . . . 12
Connexion d’un Appareil Externe . . . . . . . . . . . . . . . . . . . . . . . . . 13
Gestion des Câbles . . . . . . . . . . . . . . . . . . . . . . . . . . . . . . . . . . . . . . . . 16
Branchez le Cordon d’Alimentation Secteur . . . . . . . . . . . . . . . 16
Fonctions TV
Installation Initiale . . . . . . . . . . . . . . . . . . . . . . . . . . . . . . . . . . . . . . . . 17
REGARDER LA TÉLÉVISION
Sélection de Chaîne . . . . . . . . . . . . . . . . . . . . . . . . . . . . . . . . . . . . . . . 18
Réglage du Volume . . . . . . . . . . . . . . . . . . . . . . . . . . . . . . . . . . . . . . . 18
Minuterie de Sommeil . . . . . . . . . . . . . . . . . . . . . . . . . . . . . . . . . . . . 18
Arrêt sur Image . . . . . . . . . . . . . . . . . . . . . . . . . . . . . . . . . . . . . . . . . . . 19
Parcours des Modes d’Entrée . . . . . . . . . . . . . . . . . . . . . . . . . . . . . 19
Changement du Mode Audio . . . . . . . . . . . . . . . . . . . . . . . . . . . . . 19
Informations sur Écran . . . . . . . . . . . . . . . . . . . . . . . . . . . . . . . . . . . . 20
Mode d’Affichage sur Écran de Télévision . . . . . . . . . . . . . . . . . 21
CONFIGURATION OPTIONNELLE
Menu Principal . . . . . . . . . . . . . . . . . . . . . . . . . . . . . . . . . . . . . . . . . . . . 22
Programmation Auto . . . . . . . . . . . . . . . . . . . . . . . . . . . . . . . . . . . . . 22
Liste Chaînes . . . . . . . . . . . . . . . . . . . . . . . . . . . . . . . . . . . . . . . . . . . . . . 23
Ajouter Chaînes . . . . . . . . . . . . . . . . . . . . . . . . . . . . . . . . . . . . . . . . . . . 23
Vérification de l’Antenne . . . . . . . . . . . . . . . . . . . . . . . . . . . . . . . . . . 24
Sélection de la Langue . . . . . . . . . . . . . . . . . . . . . . . . . . . . . . . . . . . . 24
Réglage de l’Image . . . . . . . . . . . . . . . . . . . . . . . . . . . . . . . . . . . . . . . . 25
Réglage du Son . . . . . . . . . . . . . . . . . . . . . . . . . . . . . . . . . . . . . . . . . . . 26
Sous-titres . . . . . . . . . . . . . . . . . . . . . . . . . . . . . . . . . . . . . . . . . . . . . . . . 27
Verrouillage . . . . . . . . . . . . . . . . . . . . . . . . . . . . . . . . . . . . . . . . . . . . . . . 30
Réglages PC . . . . . . . . . . . . . . . . . . . . . . . . . . . . . . . . . . . . . . . . . . . . . . . 34
Mode Economie d’Energie . . . . . . . . . . . . . . . . . . . . . . . . . . . . . . . . 35
Région . . . . . . . . . . . . . . . . . . . . . . . . . . . . . . . . . . . . . . . . . . . . . . . . . . . . 35
Info Logiciel Actuel. . . . . . . . . . . . . . . . . . . . . . . . . . . . . . . . . . . . . . . . 36
Lecture de Fichiers JPEG/MP3 . . . . . . . . . . . . . . . . . . . . . . . . . . . . . 36
Fonctions BLU-RAY
FONCTIONNEMENT DU LECTEUR DE BLU-RAY
Disques Lisibles . . . . . . . . . . . . . . . . . . . . . . . . . . . . . . . . . . . . . . . . . . . 38
Disques Non Lisibles . . . . . . . . . . . . . . . . . . . . . . . . . . . . . . . . . . . . . . 38
Lecture . . . . . . . . . . . . . . . . . . . . . . . . . . . . . . . . . . . . . . . . . . . . . . . . . . . 39
Utilisation des Menus de Titre,
des Menus de Disque / des Menus Contextuels . . . . . . . . . . 39
Reprise de la Lecture . . . . . . . . . . . . . . . . . . . . . . . . . . . . . . . . . . . . . . 40
Avance Lente / Retour Lent . . . . . . . . . . . . . . . . . . . . . . . . . . . . . . . 40
Avance Lente . . . . . . . . . . . . . . . . . . . . . . . . . . . . . . . . . . . . . . . . . . . . . 40
Mise en Pause /
Lecture Image par image . . . . . . . . . . . . . . . . . . . . . . . . . . . . . . . . 40
Répétition de la Lecture . . . . . . . . . . . . . . . . . . . . . . . . . . . . . . . . . . . 41
Lecture Rapide . . . . . . . . . . . . . . . . . . . . . . . . . . . . . . . . . . . . . . . . . . . . 41
Lecture Aléatoire . . . . . . . . . . . . . . . . . . . . . . . . . . . . . . . . . . . . . . . . . . 41
Programmation de la Lecture . . . . . . . . . . . . . . . . . . . . . . . . . . . . . 42
Fonctions de Recherche . . . . . . . . . . . . . . . . . . . . . . . . . . . . . . . . . . 43
Affichage des Menus à l’Écran . . . . . . . . . . . . . . . . . . . . . . . . . . . . . 45
Réglages Spéciaux . . . . . . . . . . . . . . . . . . . . . . . . . . . . . . . . . . . . . . . . 46
RÉGLAGE DU BLU-RAY
Menu de Configuration du Disque Blu-ray . . . . . . . . . . . . . . . . 49
Réglage de la Langue du Blu-ray . . . . . . . . . . . . . . . . . . . . . . . . . . 49
Réglages Vidéo du Disque Blu-ray . . . . . . . . . . . . . . . . . . . . . . . . . 50
Réglages Audio du Disque Blu-ray . . . . . . . . . . . . . . . . . . . . . . . . 51
Contrôle Parental . . . . . . . . . . . . . . . . . . . . . . . . . . . . . . . . . . . . . . . . . 52
Autres . . . . . . . . . . . . . . . . . . . . . . . . . . . . . . . . . . . . . . . . . . . . . . . . . . . . 53
Rétablir les Réglages par Défaut . . . . . . . . . . . . . . . . . . . . . . . . . . . 54
Liste des Codes de Langue . . . . . . . . . . . . . . . . . . . . . . . . . . . . . . . . 54
DÉPANNAGE
Foire aux Questions (FAQ) . . . . . . . . . . . . . . . . . . . . . . . . . . . . . . . . 55
Guide de Dépannage . . . . . . . . . . . . . . . . . . . . . . . . . . . . . . . . . . . . . 56
INFORMATION
Glossaire . . . . . . . . . . . . . . . . . . . . . . . . . . . . . . . . . . . . . . . . . . . . . . . . . . 58
Entretien . . . . . . . . . . . . . . . . . . . . . . . . . . . . . . . . . . . . . . . . . . . . . . . . . . 58
Désignation des Chaînes de Câblodiffusion . . . . . . . . . . . . . . . 59
Spécifications Générales . . . . . . . . . . . . . . . . . . . . . . . . . . . . . . . . . . 59
Spécifications Électriques . . . . . . . . . . . . . . . . . . . . . . . . . . . . . . . . . 59
Autres Spécifications . . . . . . . . . . . . . . . . . . . . . . . . . . . . . . . . . . . . . . 59
Garantie Limitée . . . . . . . . . . . . . . . . . . . . . . . . . . . . . . . . . . . . . . . . . . 60
Pour obtenir les dernières informations logicielles à propos de cet appareil, accédez à notre site Web ;
http:// www.magnavox.com/support/updates
© 2009 Funai Electric Co., Ltd.
Tous droits réservés. Aucune partie du présent manuel ne peut être reproduite, copiée, transmise, di usée, transcrite, téléchargée ou
stockée sur un support de stockage quelconque, sous aucune forme ou dans n’importe quel but sans consentement écrit exprès préalable
de Funai. En outre, toute di usion commerciale non autorisée du présent manuel ou de l’une de ses révisions est strictement interdite.
Les informations contenues dans ce document sont susceptibles d’être modi ées sans préavis. Funai se réserve le droit de modi er son
contenu sans obligation d’en informer une personne ou une organisation.
et le dessin forment une marque commerciale déposée de Funai Electric Co., Ltd et ne peuvent être utilisés en aucune façon
sans consentement écrit exprès de Funai. Toutes les autres marques mentionnées ici sont la propriété exclusive de leurs détenteurs
respectifs. Aucune information contenue dans le présent ne doit être interprétée comme un octroi, implicite ou autre, d’une licence ou
d’un droit quelconque à utiliser l’une de marques commerciales présentées ci-dessus. L’usage abusif de toute marque commerciale ou de
tout autre contenu du présent manuel est strictement interdit. Funai fera appliquer avec
détermination ses droits de propriété intellectuelle dans toute l’étendue des lois.
8
FR
Page 70

INTRODUCTION PRÉPARATION
PO
Panneau de Commande
1. B (lecture) (p. 39)
Permet de commencer la lecture du disque.
2. C (stop) (p. 39)
Permet d’arrêter la lecture du disque.
3.
A (éjecter) (p. 39)
PLAY
STOP
EJECT
VOLUME
MENU
CHANNEL
WER
POWER
Permet d’éjecter le disque.
4. VOLUME + / - (p. 18)
1
Appuyez pour régler le volume ou vous déplacer à
2
droite (+) / gauche (-) en utilisant les options du
3
menu principal.
5. MENU V (p. 22)
4
Appuyez pour afficher le menu principal.
6. CHANNEL + / - (p. 18 / p. 19)
5
Appuyez pour sélectionner les chaînes ou pour vous déplacer
vers le haut (+) / bas (-) dans les options du menu principal.
6
7. POWER y (p. 17)
Appuyez pour allumer ou éteindre l’appareil.
7
REGARDER LA
TÉLÉVISION
8. Fente de chargement du disque (p. 39)
Insérez le disque en veillant à ce que l’étiquette soit orientée
vers vous.
9. Fenêtre de capteur infrarouge
8
9
10
11
12
Capte les signaux de commande infrarouges émis par la
télécommande.
10. Indicateur POWER
S’allume en vert lorsque l’appareil est sous tension.
11. Indicateur STAND BY
CONFIGURATION
OPTIONNELLE
S’allume en rouge lorsque l’appareil est éteint.
Bornes
12. Indicateur de DISC
S’allume en orange lorsque le disque est inséré.
[Panneau Latéral]
S-VIDEO
VIDEO
L
AUDIO
R
VIDEO 2
16
17
18
USB
HDMI 2
Remarque pour Port USB :
• L’utilisateur ne doit raccorder aucun autre périphérique au port
USB (appareil photo numérique, clavier, souris, etc.) : ces derniers
ne fonctionneront plus.
• Dans la plupart des cas, la mise à jour du logiciel est faite par un
technicien agréé. Toutefois, dans certains cas, l’utilisateur peut
être invité à effectuer la mise à jour du logiciel lui-même.
13. Prises S-Vidéo / vidéo / prise d’entrée audio pour
13
VIDEO 2 (p. 14)
Raccordement d’un périphérique externe à l’aide d’un câble
S-Vidéo, d’un câble vidéo RCA ou d’un câble audio RCA.
14. Port USB (p. 16)
Utilisez cette borne uniquement pour lire des fichiers MP3 /
JPEG stockés sur la mémoire flash USB, ou lors d’une mise à jour
logicielle.
15. Prise d’entrée HDMI 2 (p. 12 / p. 13)
Raccordement d’un périphérique HDMI à l’aide d’un câble
14
HDMI.
[Panneau Arrière]
16. Port du cordon d’alimentation (p. 16)
15
19
20
21
22
23
24
25
Raccordez le cordon d’alimentation fourni à une prise murale.
17. Gestion des câbles (p. 16)
Vous pouvez regrouper les câbles en fixant ici le serre-câbles fourni.
18. Prise de sortie audio numérique (p. 14)
Connexion par câble coaxial numérique pour un décodeur
ou un récepteur audio.
19. Prise d’entrée vidéo à composantes et audio (p. 12 / p. 14)
Raccordement d’un périphérique externe à l’aide d’un câble
vidéo composant RCA et d’un câble audio RCA.
20. Prises S-Vidéo / vidéo / prise d’entrée audio pour
VIDEO 1 (p. 14)
Raccordement d’un périphérique externe à l’aide d’un câble
S-Vidéo, d’un câble vidéo RCA ou d’un câble audio RCA.
21. Prise d’antenne (p. 12)
Connexion de câble coaxial RF pour antenne ou décodeur de
diffusion par signal TV par câble.
22. Prise d’entrée audio pour HDMI 1 (p. 13 / p. 15)
Raccordement d’un périphérique DVI à l’aide d’un câble
audio RCA.
En connectant un PC doté d’un port DVI, utilisez un câble de
conversion à mini-fiche RCA stéréo.
(pour prise d’entrée HDMI 1 uniquement)
23. Prise de sortie audio (p. 15)
Raccordement d’un périphérique externe à l’aide d’un câble audio RCA.
24. Prise d’entrée HDMI 1 (p. 12 / p. 13 / p. 15)
Connexion HDMI pour appareil HDMI ou DVI.
En connectant un PC doté d’un port DVI, vous pouvez utiliser cet
appareil comme moniteur pour votre PC.
25. prise d’entrée HDMI 3 (p. 12 / p. 13)
Paccordement d’un périphérique HDMI à l’aide d’un câble
HDMI.
LECTEUR DE BLU-RAY
FONCTIONNEMENT DU
RÉGLAGE DU
BLU-RAY
DÉPANNAGE INFORMATION
9
FR
Page 71
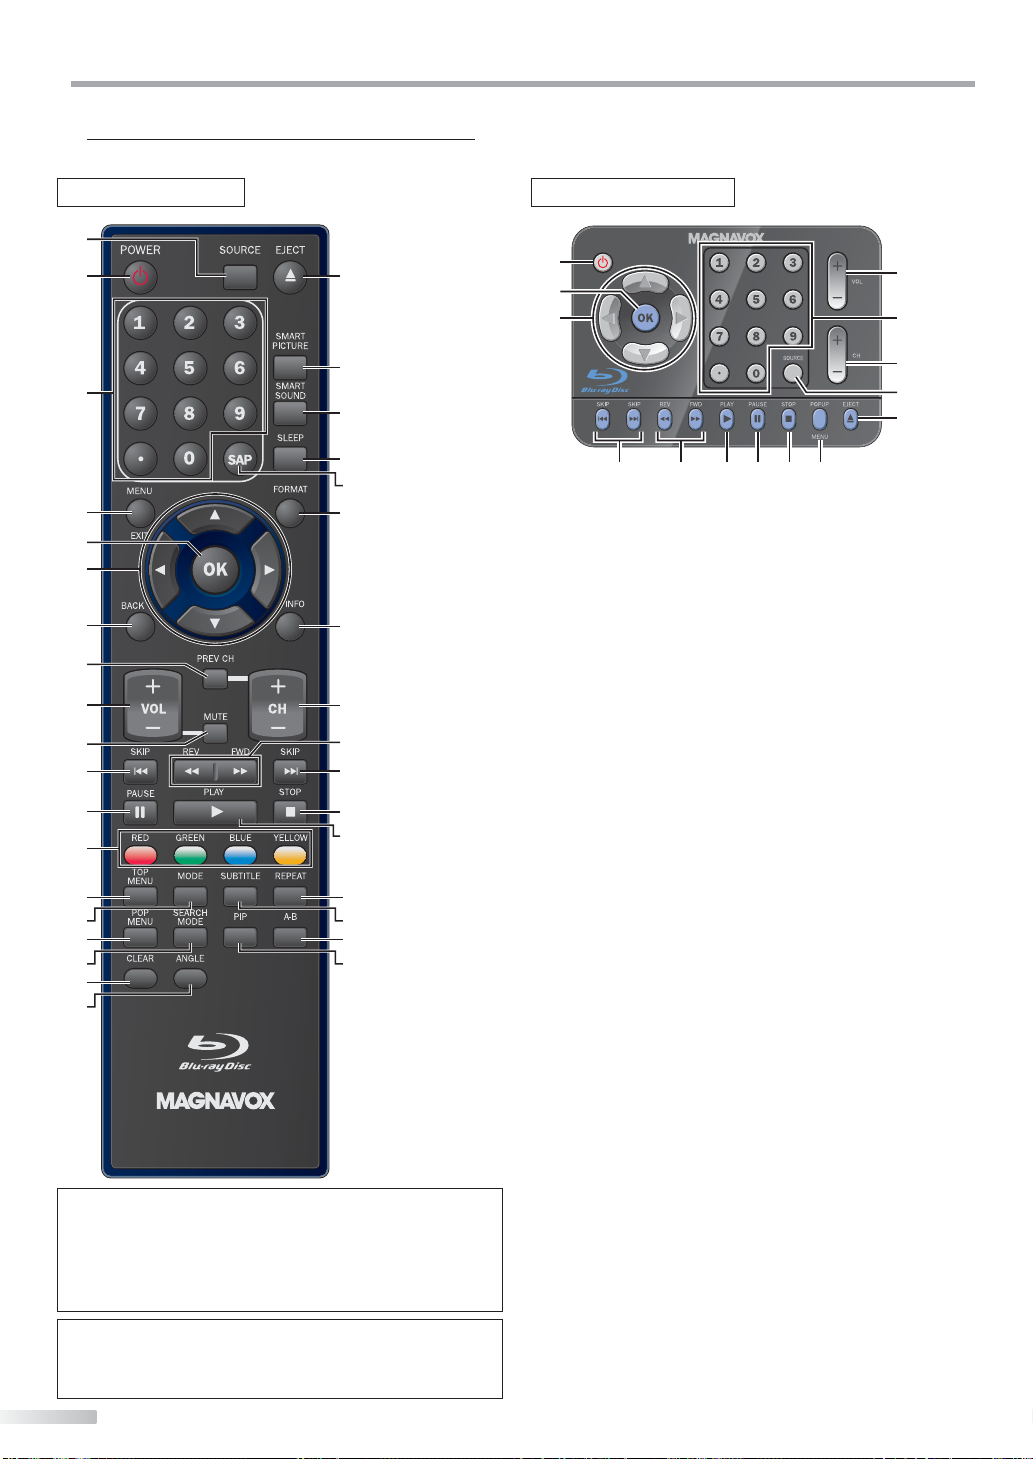
NTRODUCTION
I
Boutons de la Télécommande
Main remote control Simple remote control
1
2
20
2
5
6
9
3
21
3
22
23
24
4
25
5
6
7
26
8
9
10
11
12
13
14
15
16
17
27
28
11
29
30
31
32
33
34
18
19
Utilisation d’une télécommande universelle pour
commander cet appareil.
• Assurez-vous que le code composant de votre télécommande
universelle correspond bien à celui de notre marque.
Consultez le manuel accompagnant votre télécommande pour
toute information complémentaire.
Remarque :
• Ce manuel contient uniquement la description des principaux
boutons de la télécommande pour chaque fonction. La
télécommande simple est omise.
10
FR
27
1
20
11
1. SOURCE (p. 19)
Permet d’accéder à des périphériques extérieurs
connectés au téléviseur (un enregistreur
BD/DVD, par exemple).
2. POWER yy (p. 17)
Permet d’allumer et d’éteindre l’appareil.
3. Touches numériques (p. 18)
• Appuyez pour sélectionner les chaînes.
• Permet de sélectionner directement un chapitre, un
titre (BD/DVD) ou une piste (CD).
• (point)
• Appuyez pour passer de la canal principale à la souscanal.
4. MENU / EXIT (p. 22 / p. 49)
Appuyez pour afficher le menu principal.
5. OK (p. 17)
Appuyez pour valider la commande de configuration
lorsque le menu principal s’affiche.
6.
s
/ B / K / L (p. 17)
Appuyez pour vous déplacer vers la gauche, la droite,
le haut ou le bas dans les options.
7. BACK (p. 20)
Appuyez pour revenir au menu précédent.
8. PREV CH (p. 18)
Appuyez pour retourner au visionnement de la chaîne
précédente.
9. VOL + / - (p. 18)
Appuyez pour régler le volume.
10. MUTE (p. 18)
Appuyez pour activer ou désactiver le son.
11. SKIP H / G (p. 44)
Permet d’ignorer le chapitre, le titre (BD/DVD) ou la
piste (CD) précédente ou suivante.
12. PAUSE F (p. 19 / p. 40)
Mode TV
• Appuyez pour fait une pause d’image sur l’écran.
Mode BLU-RAY
• Permet de mettre la lecture du disque en pause.
13. boutons ROUGE / VERT / BLEU / JAUNE (p. 41)
• Permet de sélectionner des éléments dans certains
menus du BD (BD).
• Permet de changer de page dans la liste des Fichiers,
ou en mode de lecture Aléatoire ou Programmée. (CD)
14. TOP MENU (p. 39)
Permet d’accéder au menu principal d’un disque (BD/DVD).
15. MODE (p. 41)
• Permet d’afficher le réglage pour la lecture rapide et
le réglage de l’image (BD/DVD).
• Permet d’afficher le réglage pour le surround virtuel
(BD/DVD).
29 16123028
Page 72

INTRODUCTION PRÉPARATION
• Permet d’afficher le réglage pour la réduction du
bruit (DVD).
• En mode arrêt et lorsqu’un disque BD est inséré,
appuyez pour afficher un menu pour régler le mode
audio du BD (BD).
• En mode arrêt et alors qu’un CD audio est inséré,
appuyez pour afficher les menus pour lecture de
programme et lecture aléatoire (CD).
16. Touche POP MENU (p. 39)
Appuyez pour afficher le menu contextuel / disque
(BD/DVD).
17. Touche SEARCH MODE (p. 43)
Appuyez pour afficher le menu de recherche.
18. CLEAR (p. 41)
• Permet d’effacer les numéros mal saisis.
• Permet d’annuler le point A d’une A-B Répété.
• Permet d’effacer un numéro de piste en cas d’erreur
lors de la création d’un programme (CD).
19. ANGLE (p. 48)
• Appuyez pour accéder à divers angles de caméra sur
le disque. (BD/DVD).
A
20. EJECT
Permet d’éjecter le disque.
21. SMART PICTURE (p. 25)
Permet de sélectionner le mode d’image désiré.
22. SMART SOUND (p. 26)
Permet de sélectionner le mode sonore désiré.
23. SLEEP (p. 18)
Appuyez pour activer la minuterie de sommeil.
24. SAP (p. 19 / p. 47)
Mode numérique (DTV)
• Appuyez pour sélectionner la langue audio.
Mode analogique (TV)
• Appuyez pour sélectionner le mode audio.
Mode BLU-RAY
• Permet de sélectionner la langue audio (BD/DVD) ou
(p. 39)
le mode sonore (CD).
25. FORMAT (p. 21)
Appuyez pour sélectionner les rapports de format
disponibles pour l’écran du téléviseur.
26. INFO (p. 20 / p. 45)
Mode numérique (DTV)
• Appuyez pour afficher les informations de chaîne, le
type de signal et le réglage de télévision.
Mode analogique (TV)
• Appuyez pour afficher le numéro de chaîne, le type
de signal et le réglage de télévision.
Mode d’entrée externe
• Appuyez pour afficher le mode d’entrée externe, le
type de signal et le réglage de télévision.
Mode BLU-RAY
• Permet d’afficher l’état actuel.
27. CH + / - (p. 18 / p. 19)
Appuyez pour sélectionner les chaînes et le mode
d’entrée externe.
28. REV E / FWD D (p. 40)
Permet une avance lente en mode pause (BD/DVD) et
permet de parcourir un disque en avant ou en arrière.
29. STOP C (p. 39)
Permet d’arrêter la lecture d’un disque.
30. PLAY B (p. 40)
Permet de commencer la lecture du disque.
31. REPEAT (p. 41)
Appuyez pour passer d’un mode de répétition à un autre.
32. SUBTITLE (p. 46)
Appuyez pour afficher le menu de sous-titre (BD/DVD).
33. A-B (p. 41)
Appuyez pour lire une section déterminée entre le
point A et le point B de façon répétée.
34. PIP (p. 48)
Appuyez pour activer ou désactiver la fonction
d’incrustation d’image (uniquement applicable au
BD-vidéo qui prend en charge la fonction PIP).
Insérer les Piles
Insérez les piles en faisant correspondre leurs pôles avec ceux indiqués dans le logement à piles de la télécommande.
télécommande principale
REGARDER LA
TÉLÉVISION
CONFIGURATION
OPTIONNELLE
LECTEUR DE BLU-RAY
FONCTIONNEMENT DU
RÉGLAGE DU
BLU-RAY
(AA x 2)
télécommande simple
(AAA x 2)
Précautions Concernant les Piles :
• Vous devez insérer les piles en plaçant les pôles dans le bon sens, tel qu’indiqué dans le logement à piles. L’inversion des pôles
des piles peut causer des dommages à l’appareil.
• N’utilisez pas simultanément des piles de types différents (ex., alcalines et carbone/zinc ou piles rechargeables de type Ni-Cd,
Ni-Mh, etc.) ou des piles usagées avec des piles neuves.
• Si vous prévoyez de laisser l’appareil inutilisé pour une période prolongée, retirez les piles pour éviter les risques de dommages
ou de blessure causés par une fuite d’électrolyte.
• N’essayez pas de recharger les piles ; elles risqueraient de surchauffer et d’éclater.
DÉPANNAGE INFORMATION
11
FR
Page 73

RÉPARATION
(bleu)
(vert)
(bleu)
(vert)
(rouge)
(rouge)
P
Les câble pour cette connexion ne sont pas fournis :
Procurez-vous les câbles nécessaires chez votre détaillant local.
Le câble High Speed HDMI (connu également comme câble HDMI catégorie 2) est recommandé pour une meilleure compatibilité.
Avant toute connexion...
Avant de brancher le cordon d’alimentation, assurez-vous que l’antenne ou l’autre appareil est bien connecté.
Connexion de l’Antenne
Connectez le câble coaxial RF de la sortie murale à la prise d’entrée d’antenne de l’appareil.
ex.)
antenne
VHF / UHF
câble coaxial RF
ou
signal TV par câble
* Une fois les connexions terminées, allumez l’appareil et exécutez l’installation initiale.
Le balayage des chaînes est nécessaire pour que l’appareil mémorise toutes les chaînes disponibles dans votre région.
(Reportez-vous à “Installation Initiale”, page 17.)
Remarque :
• Visitez le site www.antennaweb.org pour toute question concernant l’antenne de télévision numérique (DT V).
• Suivant le type d’antenne, vous aurez peut-être besoin de types différents de combinateurs (mélangeurs) ou séparateurs (diviseurs).
Contactez votre magasin local de produits électroniques pour vous procurer ces articles.
• Par mesure de sécurité et pour éviter d’endommager l’appareil, déconnectez le câble coaxial RF de la prise d’entrée d’antenne avant de
déplacer l’appareil.
• Si vous utilisez une antenne pour capter la télévision analogique, cette antenne devrait également fonctionner pour capter la télévision
numérique (DTV). Les antennes installées à l’extérieur ou au grenier sont plus efficaces que les antennes posées sur le téléviseur.
• Pour permuter facilement la source entre l’antenne et le câble, installez un sélecteur d’antenne.
• Pour connecter le téléviseur directement au réseau de câblodiffusion (CATV), contactez le câblodistributeur.
arrière de l’appareil
Connexion à un Décodeur de Diffusion par Câble / Satellite
Utilisez un câble HDMI ou vidéo à composantes RCA pour relier la prise d’entrée HDMI ou vidéo à composantes de
l’appareil à la prise de sortie correspondante sur le décodeur de diffusion par câble / satellite.
Si vous branchez un périphérique sur la prise d’Entrée Vidéo composant de l’appareil, branchez des câbles audio RCA
sur les prises Audio L/R situées sous le connecteur Vidéo Composant.
ex.)
antenne
parabolique
signal TV par
câble avec PPV
ou
câble
coaxial RF
ANT IN
décodeur de diffusion
par câble / satellite
HDMI OUT
ou
AUDIO OUT
STEREO
PCM
* Vous pouvez également connecter cet appareil à
une prise de sortie autre que HDMI ou vidéo par
composantes si le décodeur de diffusion par câble /
satellite possède des prises de sortie différentes.
* Les câbles requis et les méthodes de connexion
au décodeur, ainsi que le canal de réception des
signaux MAQ en clair varient suivant le fournisseur
de diffusion par câble / satellite. Pour de plus
amples informations, contactez votre fournisseur de
12
service de télévision par câble ou par satellite.
FR
COMPONENT VIDEO OUT
RL
(vert)(vert)
câble HDMI
Pr/CrPb/CbY
(bleu)(bleu)
(rouge)(rouge)
ou
ou
(vert)(vert)
(bleu)(bleu)
(rouge)(rouge)
côté ou arrière de
l’appareil
câble video á
composantes RCA
et câble audio RCA
Page 74
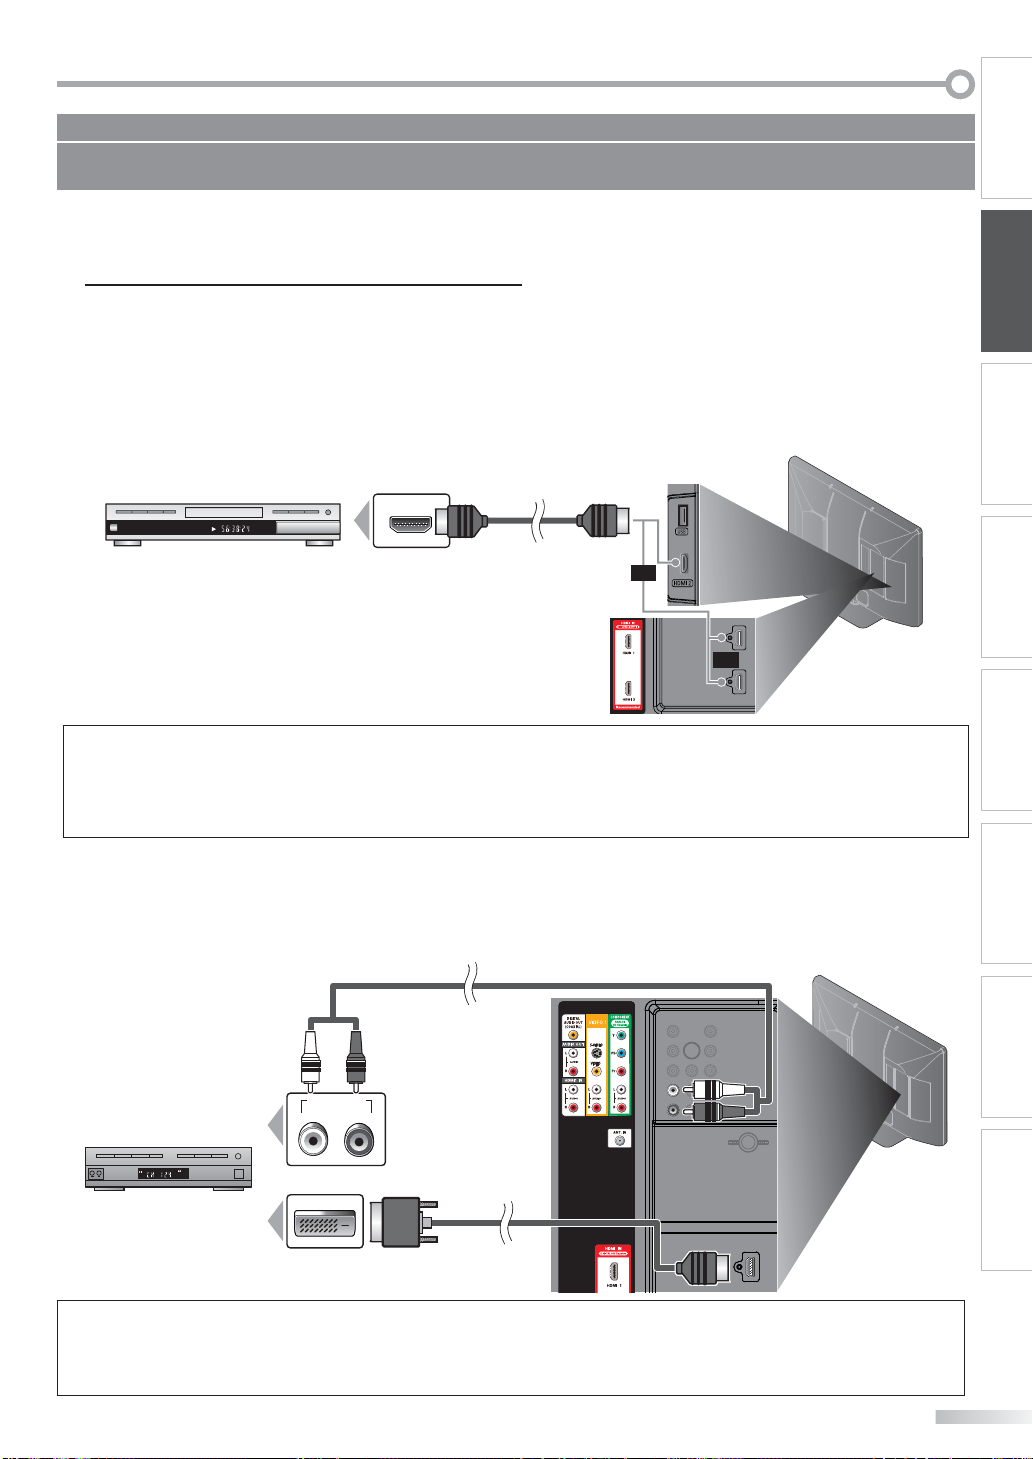
Les câble pour cette connexion ne sont pas fournis :
vers la prise d’entrée
HDMI1 uniquement
Procurez-vous les câbles nécessaires chez votre détaillant local.
Le câble High Speed HDMI (connu également comme câble HDMI catégorie 2) est recommandé pour une meilleure compatibilité.
Connexion d’un Appareil Externe
[Connexion HDMI]
La connexion HDMI permet d’obtenir une image de meilleure qualité.
La connexion HDMI (interface multimédia haute-définition) permet le transfert de signaux vidéo haute-définition et de
signaux numériques audio multicanal à l’aide d’un seul câble.
INTRODUCTION
PRÉPARATION
REGARDER LA
TÉLÉVISION
ex.)
TITLE 5
CHAPTER 15
REPEAT A-B
enregistreur BD/DVD avec prise de
sortie HDMI
HDMI OUT
câble HDMI
ou
ou
côté ou arrière de
l’appareil
Remarque :
• Ce appareil prend en charge les signaux vidéo 480i / 480p / 720p / 1080i / 1080p, et les signaux audio 32kHz / 44,1kHz / 48kHz.
• Ce appareil ne prend en charge que le signal audio à 2 chaînes (LPCM).
• Vous devez sélectionner “PCM” pour l’audio numérique de l’appareil connecté ou vérifier le réglage audio HDMI.
Le signal audio risque de ne pas être restitué si vous sélectionnez “Bitstream”, etc.
• Ce appareil ne prend en charge que les signaux conformes EIA861.
[Connexion HDMI-DVI]
Utilisez un câble de conversion HDMI-DVI pour raccorder l’appareil aux appareils vidéo externes équipés d’une prise de
sortie DVI.
ex.)
câble audio RCA
côté ou arrière de
l’appareil
CONFIGURATION
OPTIONNELLE
LECTEUR DE BLU-RAY
FONCTIONNEMENT DU
RÉGLAGE DU
BLU-RAY
DÉPANNAGE INFORMATION
AUDIO OUT
RL
STEREO
PCM
décodeur de diffusion par
câble / satellite avec prise de
sortie DVI
DVI OUT
câble de conversion
HDMI-DVI
Remarque :
• Ce appareil prend en charge les signaux vidéo 480i / 480p / 720p / 1080i / 1080p.
• La connexion HDMI-DVI nécessite également des branchements audio RCA séparés.
• Les signaux audio sont convertis d’analogique en numérique pour cette connexion.
• Le DVI n’affiche pas d’image 480i non conforme à la norme EIA/CEA-861/861B.
vers la prise d’entrée
HDMI1 uniquement
13
FR
Page 75

RÉPARATION
CHAPTER 15
REPEAT A-B
TITLE 5
AUDIO OUT
RL
VIDEO
OUT
S-VIDEO
OUT
STEREO
STAND-BY
(rouge)
(bleu)
(vert)
P
Les câble pour cette connexion ne sont pas fournis :
Procurez-vous les câbles nécessaires chez votre détaillant local.
[Connexion Vidéo à Composantes]
La connexion vidéo à composantes RCA offre une meilleure qualité d’image pour les appareils vidéo raccordés á
l’appareil.
Si vous branchez un périphérique sur la prise d’Entrée Vidéo composant de l’appareil, branchez des câbles audio RCA
sur les prises Audio L/R situées sous le connecteur Vidéo Composant.
ex.)
TITLE 5
CHAPTER 15
REPEAT A-B
enregistreur BD/DVD avec prise de
sortie vidéo composant
(rouge)
(bleu)(vert)
COMPONENT VIDEO OUT
R
AUDIO OUT
L
Pr/CrPb/CbY
câble vidéo à composantes RCA
(vert)
(bleu)
(rouge)
câble audio RCA
Remarque :
• Cet appareil prend en charge les signaux vidéo 480i / 480p / 720p / 1080i.
arrière de
l’appareil
[Connexion S-Vidéo ou Vidéo]
Pour les périphériques vidéo reliés à l’appareil, la connexion S-Vidéo offre une qualité d’image supérieure tandis que la
connexion vidéo RCA propose une qualité d’image standard.
Si vous branchez un périphérique sur la prise d’Entrée S-Vidéo ou Vidéo de l’appareil, branchez des câbles audio RCA
sur les prises Audio L/R situées sous le connecteur Vidéo.
Si la prise audio de l’appareil vidéo est monaurale, connectez le câble audio RCA à la prise d’entrée audio L (gauche).
ex.)
<VIDEO 1>
magnétoscope
enregistreur BD/DVD raccordé à la
prise de sortie S-Vidéo ou Vidéo
<VIDEO 2>
caméscope jeu vidéo
ou
arrière de l’appareil
AUDIO OUT
VIDEO
OUT
ou
S-VIDEO
OUT
câble S-Vidéo
RL
câble vidéo RCA
câble audio RCA
câble vidéo RCA
câble S-Vidéo
câble audio RCA
ou
côté de l’appareil
S-VIDEO
VIDEO
L
AUDIO
R
VIDEO 2
ou
Remarque :
• Si vous connectez à la fois la prise S-Vidéo et la prise vidéo, la connexion S-Vidéo aura la priorité.
14
FR
Page 76

Les câble pour cette connexion ne sont pas fournis :
vers la prise d’entrée
HDMI1 uniquement
câble de
conversion HDMI-DVI
Procurez-vous les câbles nécessaires chez votre détaillant local.
INTRODUCTION
[Connexion de Sortie Audio]
Numérique (pour le contenu diffusé en numérique uniquement)
Si vous connectez l’appareil à un appareil audio numérique externe, vous pourrez profiter d’un rendu audio
multicanal similaire au son diffusé en mode numérique 5.1 canaux.
Utilisez un câble coaxial audio numérique pour raccorder l’appareil aux appareils audio numériques externes.
Pendant la lecture d’un BD ou d’un DVD, vous pouvez profiter d’un son Dolby Digital ou DTS surround.
Analogique (diffusion analogique et numérique)
En connectant cet appareil à un appareil audio analogique externe, vous pourrez profiter d’un son stéréo (2 canaux).
Utilisez un câble audio RCA pour connecter l’appareil à des appareils audio analogiques externes.
ex.)
décodeur
Dolby Digital
système stéréo
DIGITAL AUDIO
COAXIAL IN
ou
AUDIO IN
câble coaxial audio numérique
RL
arrière de l’appareil
câble audio RCA
[Connexion PC]
Cet appareil peut être connecté à un PC doté d’un port DVI. Utilisez un câble de conversion HDMI-DVI pour établir cette
connexion. Vous aurez également besoin d’un câble de conversion à mini-fiche RCA stéréo.
Si vous connectez l’appareil à votre PC, vous pouvez l’utiliser comme moniteur.
ex.)
arrière de l’appareil
PRÉPARATION
REGARDER LA
TÉLÉVISION
CONFIGURATION
OPTIONNELLE
LECTEUR DE BLU-RAY
FONCTIONNEMENT DU
RÉGLAGE DU
BLU-RAY
câble de conversion à
mini-fiche RCA stéréo
DVI OUT
câble de
conversion HDMI-DVI
ordinateur personnel
Le câble de conversion
HDMI-DVI doit être doté d’une âme en ferrite.
Les signaux suivants peuvent être affichés :
Format Résolution
VGA 640 x 480 60Hz
SVGA 800 x 600 60Hz 1 360 x 768 60Hz
XGA 1 024 x 768 60Hz FHD 1 920 x 1 080 60Hz
Fréquence du
balayage vertical
Format Résolution
WXGA
Les autres formats ou les signaux non-standard ne sont pas affichés correctement.
Remarque :
• Veuillez acheter un câble de conversion HDMI-DVI avec un noyau en ferrite.
• Les opérations suivantes peuvent réduire le bruit.
- Placez un tore magnétique sur le cordon d’alimentation de votre PC.
- Débranchez le cordon d’alimentation de votre PC et utilisez la batterie intégrée.
vers la prise d’entrée
HDMI1 uniquement
Fréquence du
balayage vertical
1 280 x 768 60Hz
DÉPANNAGE INFORMATION
15
FR
Page 77
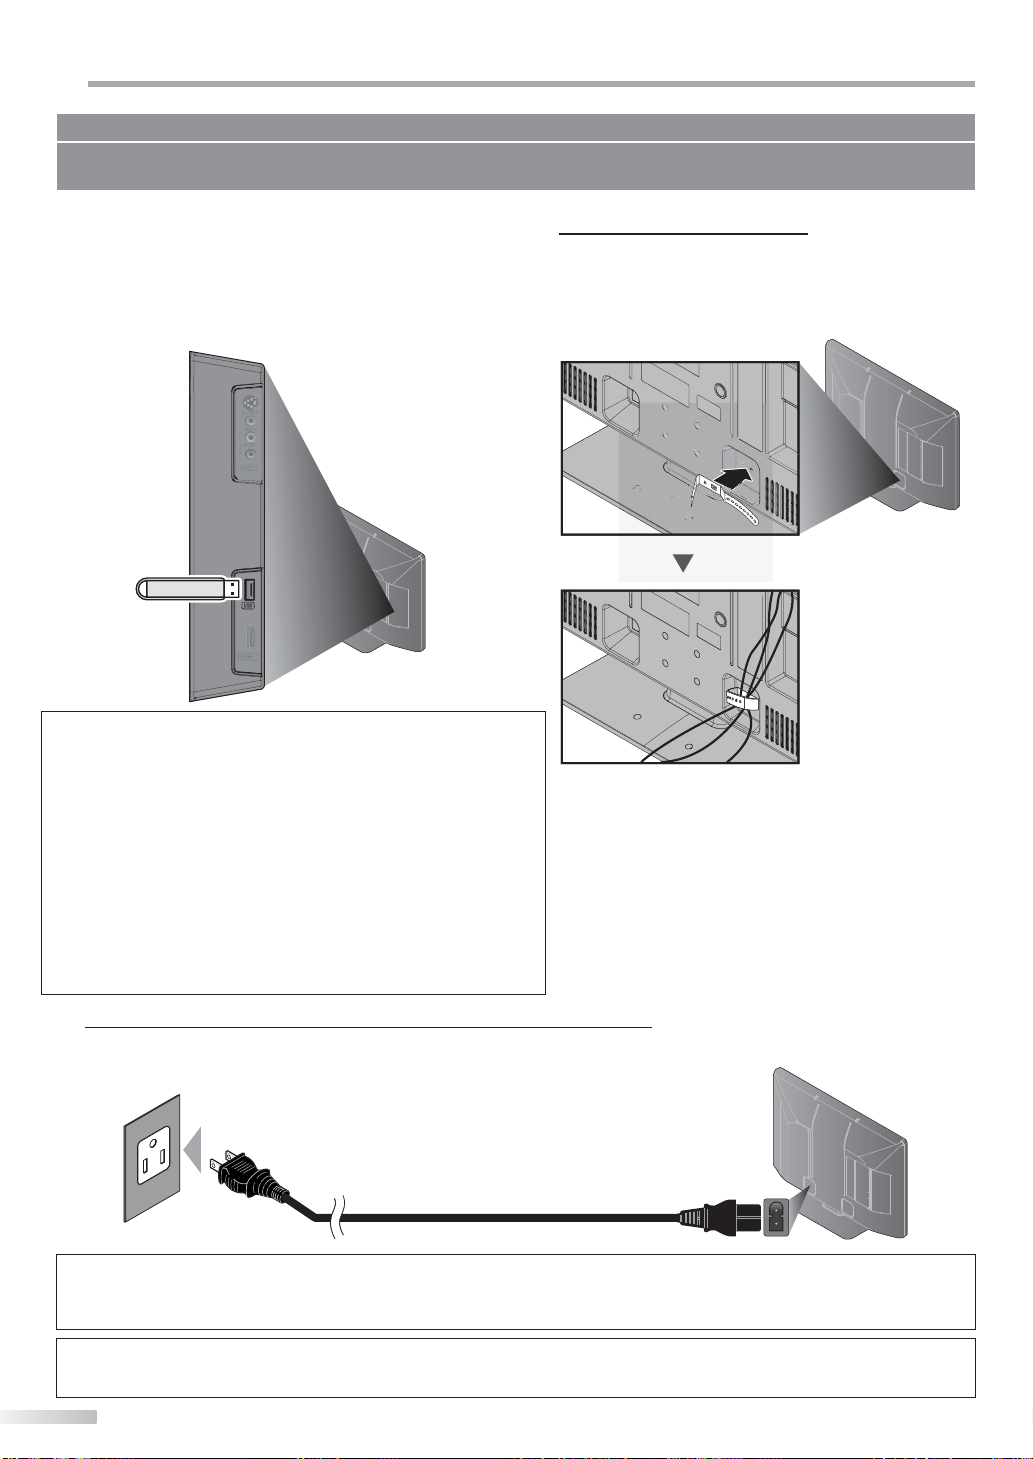
RÉPARATION
P
Les accessoires fournis utilisés pour réaliser ces branchements sont les suivants :
• serre-câbles x 1
• cordon d’alimentation secteur x 1
[USB Flash Memory]
Cet appareil permet de lire facilement les images JPEG et
les fichiers MP3.
Insérez la clé USB contenant les fichiers dans le port
USB, comme indiqué ci-après. Pour plus d’informations,
reportez-vous à la section “Lecture de Fichiers JPEG/MP3”
en page 36.
côté de l’appareil
Remarque :
• Cet appareil est fourni sans clé USB.
• Veuillez ne pas utiliser de rallonge USB entre la clé USB et l’appareil.
Insérez toujours directement la clé USB dans cet appareil, sans
intermédiaire.
• Nous ne garantissons pas la compatibilité de tous les modèles de clés USB
avec cet appareil.
• Assurez-vous de conserver une copie de sauvegarde des fichiers originaux
sur votre périphérique avant de les lire sur cet appareil. Nous n’assumons
aucune responsabilité concernant les dommages ou les pertes de vos
données stockées.
• Lorsque vous souhaitez retirer une clé USB de l’appareil, éteignez d’abord
le bloc téléviseur pour éviter d’endommager l’appareil ainsi que les
données présentes sur la clé.
• Si vous laissez une clé USB insérée dans le port USB après avoir
mis l’appareil hors tension, le menu principal “USB” apparaîtra
automatiquement à l’écran à la prochaine mise sous tension de l’appareil.
Gestion des Câbles
Fixez d’abord le serre-câbles fourni dans les trous situés
en partie inférieure de l’arrière de cet appareil, comme
illustré ci-après. Passez ensuite les câbles dans ce serrecâbles pour éviter qu’ils ne s’emmêlent.
arrière de l’appareil
Branchez le Cordon d’Alimentation Secteur
Ne branchez le cordon d’alimentation sur une prise murale qu’après avoir effectué tous les branchements nécessaires.
arrière de l’appareil
prise murale
Mise en garde :
• Ne branchez pas le cordon d’alimentation secteur sur une prise murale alimentée par une tension supérieure à celle préconisée pour cet
appareil (120 V c.a.).
En ne respectant pas cette mise en garde, vous risquez de provoquer un incendie ou de vous électrocuter.
Remarque :
• À chaque fois que vous branchez le cordon d’alimentation, aucune opération ne peut être réalisée pendant quelques secondes. Il ne s’agit
pas d’un dysfonctionnement.
16
FR
cordon d’alimentation secteur
Page 78
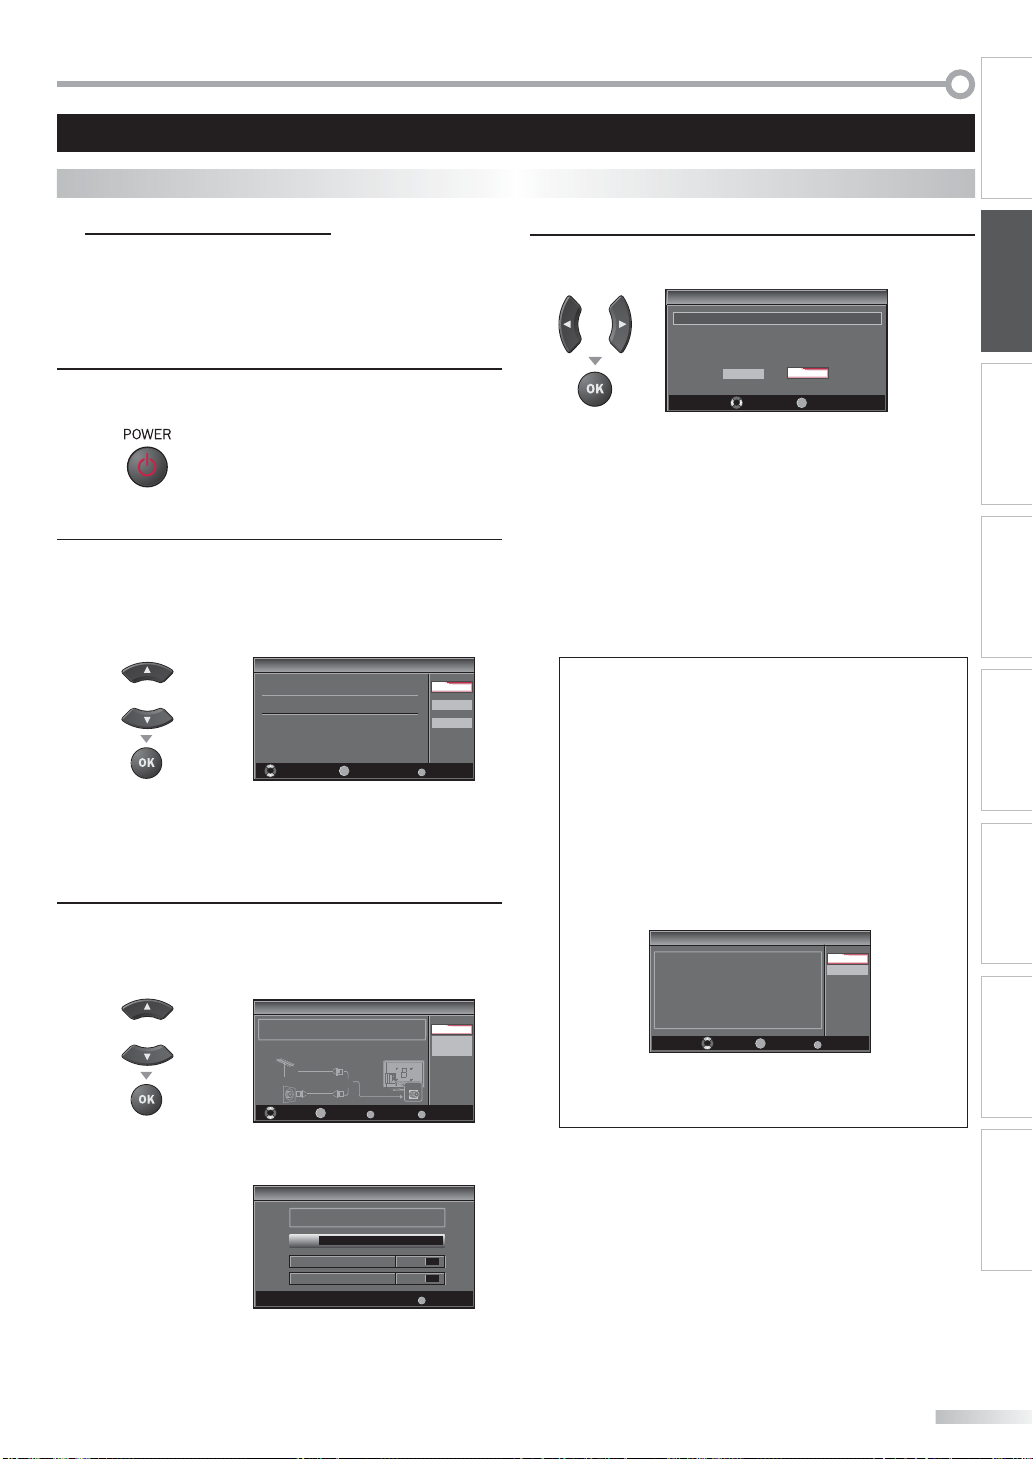
Ces opérations sont accessibles par la télécommande. Certaines peuvent aussi être accessibles par les commandes de l’appareil principal lui-même.
Fonctions TV
INTRODUCTION
Installation Initiale
Cette section vous guide à travers les étapes de la confi guration initiale
de l’appareil, qui comprennent la sélection de la langue pour le menu sur
écran, et le balayage automatique des chaînes, c’est-à-dire du balayage
automatique et de la mémorisation des chaînes captées.
Avant de commencer :
Assurez-vous que l’appareil est relié à une antenne ou au câble.
Une fois les connexions nécessaires eff ectuées,
1
appuyez sur [POWER yy] pour allumer l’appareil.
• Cette opération peut prendre un certain temps.
Utilisez [Curseur K / L] pour sélectionner la langue du
2
menu sur écran parmi les choix qui s’affi chent du côté
droit de l’écran du téléviseur.
(English / Español / Français)
Initial Setup
Initial Setup
ou
Select the language for setup display.
Elija el idioma de ajuste.
Sélectionner langue écran config.
Select Skip
OK
OK
• Le menu “Configuration Initiale”, à l’étape 3, s’affi
chera dans la langue sélectionnée après la pression
sur [OK].
Utilisez [Curseur K / L] pour sélectionner “Antenne”
3
pour les chaînes de télévision ou “Câble” pour les
chaînes de câblodiff usion, puis appuyez sur [OK].
Configuration initiale
Configuration initiale
Vérifier que l’antenne est connectée à “ANT. IN”.
ou
Sélectionner la source de votre signal.
Antenne
Ou
Câble
OK
Sélectionner Saut
• La “Programmation Auto” commence.
Configuration initiale
Configuration initiale
Le système balaie les chaînes. Attendre.
Il faudra jusqu’à 20 minutes pour terminer la programmation auto.
0%
Chaînes analogiques 0ch
Chaînes numériques 0ch
English
Español
Français
MENU
Antenne
Câble
Saut
ANT.IN
MEMUBACK
RetourOK
MENU
Saut
Sélectionnez le paramètre région de votre choix à l’aide
4
du [Curseur s / B], puis appuyez sur [OK].
Configuration Initiale
Configuration Initiale
ou
Sélectionnez “Magasin” ou “Maison” comme emplacement.
Magasin
Sélectionner
Maison
OK
OK
• Si vous sélectionnez “Magasin”, l’appareil est
configuré avec des paramètres d’affichage prédéfinis
et sa consommation peut parfois dépasser les valeurs
limites prévues par la norme ENERGY STAR®.
• Si vous sélectionnez “Maison”, le rendement
énergétique de l’appareil est optimisé pour une
utilisation à domicile et vous pouvez régler la qualité
de l’image et du son en fonction de vos préférences.
• Une fois les réglages initiaux effectués, la chaîne
mémorisée dotée du plus petit numéro ainsi qu’un
message vous demandant de confirmer le réglage du
lieu d’utilisation s’affichent sur l’écran du téléviseur.
Remarque :
• Pour connecter le téléviseur directement au réseau de
câblodiff usion (CATV), contactez le câblodistributeur.
• Si vous appuyez sur [POWER yy] ou [MENU / EXIT]
pendant le balayage automatique des chaînes, le
paramètre sera annulé.
• La fonction de balayage automatique initiale des chaînes
ne peut être exécutée qu’une seule fois, pour “Antenne” ou
“Câble”. Lorsque vous changez le branchement (Antenne
/ Câble), eff ectuez de nouveau le balayage automatique
des chaînes. (Reportez-vous à la page 22.)
• Si aucun signal n’est reçu par la borne d’antenne et
qu’aucune commande n’est exécutée pendant plusieurs
secondes après la mise sous tension de l’appareil, “Conseils
Utiles” apparaît. Suivez les instructions qui apparaissent
sur l’écran du téléviseur.
Configuration initiale
Configuration initiale
MENU
Recommencer
Plus tard
Pas de chaîne enregistrée.
Essayer programmation auto à nouveau?
Vérifiez si un câble est bien connecté à la prise "ANT. IN" à l’arr ière
du téléviseur, le procédé d’installation des chaînes recherche cette
connexion. Si vous utilisez un décodeur de diffusion par câble ou
satellite, confirmez l’entrée que vous avez connectée au décodeur
et appuyez sur la touche "SOURCE" de la télécommande
pour sélectionner l’entrée source appropriée.
OK
Sélectionner Saut
OK
• Vous devez régler “Maison” dans l’étape 4.
Dans le cas contraire, les modifications que vous aurez
apportées aux réglages ne seront pas mémorisées lorsque
vous éteindrez l’appareil.
Une fois la configuration initiale effectuée...
• Si vous souhaitez effectuer une nouvelle recherche
automatique des chaînes, consultez la section
“Programmation Auto” en page 22.
• Vous pouvez ajouter les chaînes désirées non
mémorisées par le “Programmation Auto”. Reportezvous à “Ajouter Chaînes”, page 23.
• Si vous souhaitez modifier la langue, consultez la
section “Sélection de la Langue” en page 24.
• Si vous souhaitez modifier l’Emplacement
géographique, consultez la section “Région” en page 35.
PRÉPARATION
REGARDER LA
TÉLÉVISION
CONFIGURATION
OPTIONNELLE
LECTEUR DE BLU-RAY
FONCTIONNEMENT DU
RÉGLAGE DU
BLU-RAY
DÉPANNAGE INFORMATION
FR
17
Page 79

EGARDER LA TÉLÉVISION
R
Sélection de Chaîne
Sélectionnez les chaînes en utilisant sur [CH + / -] ou
sur [les touches numériques].
• Pour sélectionner les chaînes mémorisées, utilisez
[CH
+ /
-
] ou [les touches numériques].
• Pour sélectionner les chaînes non mémorisées,
utilisez [les touches numériques].
Pour utiliser [les touches numériques]
TV
- Pour sélectionner la chaîne analogique 11
DTV
- Lorsque vous sélectionnez le canal numérique 11.1
N’oubliez pas d’appuyer sur la touche [•] avant
d’appuyer sur le numéro du sous-canal.
• Appuyez sur [PREV CH] pour revenir à la chaîne
que vous regardiez.
À propos de la télédiffusion numérique :
Avec sa diffusion à haute définition, la diffusion numérique surpasse
de loin la diffusion analogique, à la fois en termes de qualité d’image
et de qualité sonore.
Les programmes de télévision numérique ne sont pas tous diffusés
en haute définition (HD). Pour savoir si le programme visionné est en
HD, consultez un guide des programmes, contactez le fournisseur
câble / satellite du programme ou les stations locales de télévision.
NTSC
(mode analogique)
(Football)
CH4
En Ondes
6:00pm
ATSC
(mode numérique)
(Football)
CH4-1
Réglage du Volume
Cette section explique comment régler le volume. La fonction de coupure,
qui permet d’activer et de désactiver le son, y est aussi expliquée.
Utilisez [VOL + / -] pour régler le volume audio.
Volume 30
La barre de volume s’affiche au bas de l’écran du
téléviseur pendant le réglage du volume.
• La barre de volume disparaît automatiquement après
quelques secondes.
Appuyez sur [MUTE] pour activer ou désactiver le son.
Sourdine
“Sourdine” s’affiche sur l’écran du téléviseur pendant
quelques secondes.
Appuyez de nouveau sur [MUTE] ou utilisez [VOL + / -]
pour rétablir le niveau de volume initial.
Minuterie de Sommeil
La minuterie de sommeil peut être réglée pour éteindre automatiquement
l’appareil après l’écoulement d’une période de temps donnée.
Appuyez sur [SLEEP] pour régler la minuterie de sommeil.
1
Sommeil
L’affichage de la minuterie de sommeil apparaît sur
l’écran du appareil.
Hf
canal principale
(Football)
CH4-1
canal principale
(Football)
bascule à lt’aide de [CH + / -].
CH4-2
(Football)
(JT)
CH4-3
CH4-2
sous-canal
CH4
CH4
CH4
(Football)
(Football)
(Football)
6:30pm
7:00pm
7:30pm
8:00pm
CH4-1
canal principale
CH4-1
canal principale
Qu’est-ce qu’un sous-canal ?
Grâce à une technologie de compression élevée, la diffusion
numérique offre un service qui permet d’envoyer des
signaux multiples simultanément.
Il s’ensuit que vous pouvez sélectionner plus d’une émission
par chaîne principale, puisque la technologie de diffusion
numérique permet au téléviseur de faire la distinction entre
plusieurs chaînes diffusées par un seul réseau.
Remarque :
• “Pas de Signal” apparaît sur l’écran du téléviseur une fois la
diffusion de la sous-canal terminée.
•
Le message “Prog. audio seulement“ apparaît sur l’écran du
téléviseur lorsque vous recevez uniquement un signal audio.
18
FR
Appuyez plusieurs fois sur [SLEEP] pour modifi er le temps
(Tennis)
sous-canalsous-canal
2
qui doit s’écouler avant que le téléviseur ne s’éteigne.
Sommeil
120min.
Vous pouvez régler votre appareil pour qu’il s’éteigne
après une durée donnée (de 30 à 120 minutes).
(JT)
• Chaque pression sur [SLEEP] fait augmenter le temps
de 30 minutes.
• Une fois la minuterie de sommeil réglée, il est possible
de l’afficher pour vérification en appuyant sur [SLEEP].
Pour annuler la minuterie de sommeil
Appuyez plusieurs fois sur [SLEEP] jusqu’à ce que
“Sommeil Hf” s’affiche sur l’écran du téléviseur.
Remarque :
• L’affichage du paramètre de minuterie de sommeil
disparaît automatiquement après quelques secondes.
• Si vous débranchez l’appareil de la prise de courant ou
si une panne de courant survient, le paramètre de la
minuterie de sommeil sera annulé.
Page 80

INTRODUCTION
Arrêt sur Image
Vous pouvez figer l’image qui s’affiche à l’écran du téléviseur.
Appuyez sur
[PAUSE F] pour figer l’image qui s’affiche
à l’écran du téléviseur.
Image Fixe
• La sortie audio n’est pas mise en pause.
• Si aucun signal n’est détecté ou aucun signal protégé
n’est reçu pendant le mode arrêt sur image, l’image
reste en pause et la sortie audio est mise en sourdine.
• La fonction d’arrêt sur image sera désactivéeau bout
de 5 minutes.
Pour annuler le mode arrêt sur image, appuyez sur
n’importe quel bouton sauf [POWER yy].
Parcours des Modes d’Entrée
Vous pouvez facilement commuter la télécommande sur DTV(ATSC) et
TV(NTSC) ou accéder à un appareil externe connecté à l’appareil.
Appuyez plusieurs fois sur [SOURCE] ou [CH +] pour
parcourir les modes d’entrée.
Changement du Mode Audio
Cette section explique comment permuter l’audio en mode analogique et
comment changer la langue audio en mode numérique.
TV
Appuyez sur [SAP] pour afficher le mode audio
actuellement sélectionnée. Pendant la réception
d’une diff usion des MTS, appuyez plusieurs fois pour
parcourir les canaux audio disponibles.
11
Quand tous les modes sont disponibles
SAP / STÉRÉO SAP / MONO
SAP / STÉRÉO
Quand les modes audio stéréo et monaural sont
disponibles
MONO / STÉRÉO MONO / STÉRÉO
Quand les modes audio SAP et monaural sont disponibles
SAP / MONO SAP / MONO
Quand seul le mode audio monaural est disponible
(commutation impossible)
STÉRÉO : Émet l’audio stéréo
SAP : Émet le deuxième programme audio
MONO : Émet l’audio mono
SAP / STÉRÉO
MONO
PRÉPARATION
REGARDER LA
TÉLÉVISION
CONFIGURATION
OPTIONNELLE
LECTEUR DE BLU-RAY
FONCTIONNEMENT DU
Source
TV
Video1
Video2
Component
HDMI1
HDMI2
HDMI3
Chaîne DTV/TV
ou
Video1
Video2
Component
HDMI1
HDMI2
HDMI3
(ou entrée PC)
• Appuyer sur [CH -] inverse le sens du cycle des
modes d’entrée.
DTV
Appuyez sur [SAP] pour afficher la langue actuellement
1
sélectionnée et le nombre de langues disponibles.
11.1
Appuyez plusieurs fois sur [SAP] pour parcourir les
2
Anglais 1/3
langues audio disponibles.
• Les langues disponibles varient d’une diffusion à
l’autre. “Autre” s’affiche lorsque la langue audio n’est
pas disponible ou lorsque les langues disponibles
sont autres que l’anglais, l’espagnol ou le français.
Remarque :
• La pression sur [SAP] ne commande pas les appareils
audio externes.
• L’affichage des informations disparaît automatiquement
après quelques secondes.
RÉGLAGE DU
BLU-RAY
DÉPANNAGE INFORMATION
FR
19
Page 81

EGARDER LA TÉLÉVISION
R
Informations sur Écran
Vous pouvez affi cher sur l’écran du téléviseur la chaîne actuellement
sélectionnée ou d’autres informations, telles que le mode audio.
TV
En mode analogique, le numéro de canal actuel et le mode audio
s’affichent.
DTV
En mode numérique, les informations d’émission détaillées pour le canal actuel
telles que titre du programme ou guide des programmes sont affichées.
Appuyez sur [INFO].
11
SAP / STÉRÉO
480i
480i
• Le numéro de chaîne actuellement sélectionnée, le
mode audio, le type de résolution du signal vidéo, le
rapport de format du téléviseur, le type de soustitres et la cote de télévision s’affichent dans le coin
supérieur droit del’écran.
• Pour effacer l’affichage, appuyez de nouveau sur
[INFO]. Vous pouvez aussi appuyer sur [BACK].
SD
SD
TV-PG DLSV
4:3
4:3
CC
CC
Appuyez sur [INFO] pour afficher les informations du
programme actuel sélectionné.
Informations de diffusion
Les informations suivantes s’a chent.
1 2
Un jour de souvenirs
Un jour de souvenirs
Il y a un quart de siècle, à une époque que l’on peut
qualifier de bon vieux temps de la presse écrite, les ventes
d’espace publicitaire en emplacement indéterminé
représentaient 80 pour cent des revenus de publicité de cette
TV: TV-14
1 titre d’émission
2 guide des émissions
(Le guide des émissions s’affiche en plus des
informations de diffusion. Affichage de 4 lignes
maximum.)
3 station émettrice
4 numéro de chaîne
5 langue audio
(Reportez-vous à “Changement du Mode Audio”,
page 19.)
6 nombre réel de lignes de balayage et mode de
balayage
7 format de TV numérique
8 format d’image du programme
9 CC (non disponible si le paramètre Sous-titres
codés est réglé sur “Hf”)
10 catégorie de contenu bloquée
34
KABC
KABC
Anglais 1/2
1080i
1080i
Cote
11.1
16:9HDHD
16:9
CC
CC
5
6, 7, 8
9
10
20
FR
Remarque :
• Lorsque le guide des émissions comporte plus de 4 lignes,
utilisez [Curseur K/ L] pour faire défiler le texte.
• “Aucune description fournie.” s’affiche lorsque le guide des
émissions n’est pas disponible.
• Lorsque le guide des programmes est affiché, la fonction
de sous-titres est interrompue.
• En mode d’entrée externe, l’écran suivant s’affiche ;
ex.) Lorsqu’un appareil externe est connecté à la prise
d’entrée Vidéo.
Video
480iSDSD
480i
TV-PG DLSV
• L’affichage des informations disparaît automatiquement
au bout d’1 minute.
CC
CC
Page 82

Mode d’Affichage sur Écran de
Télévision
4 types de mode d’affichage peuvent être sélectionnés lorsque le diffuseur
émet un signal vidéo 4:3 ou 16:9. De même, 3 types de mode d’affichage
peuvent être sélectionnés lorsque le signal d’entrée provient d’un PC.
Appuyez plusieurs fois sur [FORMAT] pour changer le
rapport de format du téléviseur.
Pour un signal vidéo 4:3
Pour un signal vidéo 16:9
INTRODUCTION
PRÉPARATION
REGARDER LA
TÉLÉVISION
Normal
Large
16:9
Ext. image
Normal
Affiche une image 4:3 à sa taille originale. Des bandes
latérales apparaissent des deux côtés de l’écran.
16:9
Affiche une image 4:3 au format 16:9 ; l’image est étirée
horizontalement pour remplir l’écran.
Ext. image
Affiche une image 4:3 au format 16:9 ; l’image est étirée
horizontalement et verticalement pour remplir l’écran.
Le haut et le bas de l’image sont coupés.
Large
Affiche l’image avec le centre de celle-ci à la taille
originale et les côtés étirés horizontalement pour
remplir l’écran.
Normal
Large
Zoom
Ext. image
Normal
Affiche une image 16:9 à sa taille originale.
Zoom
Affiche une image 16:9 à sa taille maximum sans
modifier ses proportions horizontales et verticales.
Ext. image
Affiche une image étirée verticalement.
Large
Affiche une image étirée horizontalement.
Pour un signal d’entrée PC
via le mode d’entrée
Normal Plein
HDMI1
CONFIGURATION
OPTIONNELLE
LECTEUR DE BLU-RAY
FONCTIONNEMENT DU
RÉGLAGE DU
BLU-RAY
DÉPANNAGE INFORMATION
Pt par pt
Normal
Affiche une image étirée de façon proportionnelle. Des
bandes latérales apparaissent des deux côtés de l’écran.
Plein
Affiche une image étirée de façon non proportionnelle
pour remplir l’écran.
Pt par pt
Affiche une image à sa taille originale.
FR
21
Page 83

ONFIGURATION OPTIONNELLE
C
Menu Principal
Cette section présente un aperçu du menu principal qui s’affiche lors de la pression
sur [MENU / EXIT]. Pour de plus amples informations, reportez-vous à la page de
référence des options respectives.
Le menu principal comprend les options de configuration des fonctions ci-dessous.
Appuyez sur [MENU / EXIT].
IMAGE
Smart image
SON
CONFIGURATION
OPTIONS
LANGUE
BLU-RAY
USB
*
Luminosité
Contraste
Couleur
Teinte
Netteté
Température couleur
IMAGE
Vous pouvez régler la qualité de l’image.
(Reportez-vous à “Réglage de l’Image”, page 25.)
SON
Vous pouvez régler la qualité du son.
(Reportez-vous à “Réglage du Son”, page 26.)
CONFIGURATION
• Vous pouvez lancer un balayage automatique des
chaînes captées et retirer les chaînes indésirables.
(Reportez-vous à “Programmation Auto”, page 22.)
• Vous pouvez ignorer les chaînes non désirées à l’aide
de la touche [CH + /
-
].
(Reportez-vous à “Liste Chaînes”, page 23.)
• Vous pouvez ajouter manuellement les chaînes non
détectées lors du balayage automatique des chaînes.
(Reportez-vous à “Ajouter Chaînes”, page 23.)
OPTIONS
• Vous pouvez changer le format d’affichage des sous-titres,
qui affichent soit le dialogue des émissions de télévision,
soit d’autres informations, sur l’écran du téléviseur.
(Reportez-vous à “Sous-titres”, page 27.)
• Vous pouvez spécifier des restrictions d’accès au visionnement.
(Reportez-vous à “Verrouillage”, page 30.)
• Vous pouvez régler la position, la stabilité et la clarté
de l’écran du PC.
(Reportez-vous à ”Réglages PC”, page 34.)
• Vous pouvez choisir le mode d’économie d’énergie.
(Reportez-vous à “Mode Economie d’Energie”, page 35.)
• Lorsque vous réglez les modes “IMAGE” et “SON”
de votre choix, vous devez remplacer le réglage
“Magasin” par “Maison”.
(Reportez-vous à “Région”, page 35.)
• Vous pouvez vérifier le numéro de la version du
logiciel actuellement utilisée dans cet appareil.
(Reportez-vous à “Info Logiciel Actuel”, page 36.)
LANGUE
Vous pouvez changer la langue d’affichage du menu
principal (Anglais, Espagnol ou Français).
(Reportez-vous à “Sélection de la Langue”, page 24.)
BLU-RAY
Vous pouvez personnaliser certaines fonctions de
lecture du disque. Assurez-vous que l’appareil est en
mode stop. (Consultez la section “RÉGLAGE DU
BLU-RAY”, page 44.)
USB
Vous pouvez visionner les images (au format JPEG) et
écouter les fichiers musicaux (au format MP3) stockés
sur une clé USB. (Reportez-vous à “Lecture de Fichiers
JPEG/MP3”, page 36.)
Remarque :
* La mention “USB” ne s’affiche que si une clé USB est insérée
dans cet appareil.
22
FR
Préférentiel
Normal
30
60
36
0
0
Programmation Auto
Si vous changez de source de signal de câble (ex., si vous passez de celui de l’antenne
à celui de la câblodiffusion (CATV)), si vous déplacez l’appareil dans une région
différente après le réglage initial, ou si vous restaurez les canaux DTV après les avoir
supprimés, vous devrez effectuer à nouveau le balayage automatique des chaînes.
Avant de commencer :
Assurez-vous que l’appareil est relié à une antenne ou au câble.
Appuyez sur [MENU / EXIT] pour afficher le menu
1
principal.
Utilisez [Curseur K / L] pour sélectionner
2
“CONFIGURATION”, puis appuyez sur [OK].
IMAGE
ou
Utilisez [Curseur K / L] pour sélectionner
3
“Programmation Auto”, puis appuyez sur [OK].
ou
Utilisez [Curseur K / L] pour sélectionner une option
appropriée, puis appuyez sur [OK].
ou
• Si une antenne hertzienne est connectée, sélectionnez “Antenne”.
• Si un décodeur de câblodiffusion est connecté, sélectionnez “Câble“.
• La “Programmation Auto” commence.
• Une fois le balayage et la mémorisation terminés, la chaîne
mémorisée dont le numéro est le plus bas s’affichera.
Remarque :
•
Après avoir effectué “Programmation auto”, utiliser [CH + / -]
sur la télécommande permet de sauter automatiquement les
programmes indisponibles.
• Pour connecter le téléviseur directement au réseau de
câblodiffusion (CATV), contactez le câblodistributeur.
•
Si vous appuyez sur [
balayage automatique des chaînes, le paramètre sera annulé.
•
Même après un “Programmation auto”, le réglage des chaînes
est perdu si vous débranchez le cordon d’alimentation avant
d’éteindre l’appareil en appuyant sur [
•
Le Code NIP sera nécessaire une fois que vous aurez défini un
Code NIP de “Verrouillage” (Reportez-vous à la page 30).
• Pour modifier votre
fournies dans la section “Changez Code” (Reportez-vous à
la page 33).
POWER yy
Code NIP
, suivez les instructions
Programmation auto
Liste chaînes
SON
Ajouter chaînes
CONFIGURATION
Antenne
OPTIONS
LANGUE
BLU-RAY
USB
IMAGE
SON
CONFIGURATION
OPTIONS
LANGUE
BLU-RAY
USB
IMAGE
SON
CONFIGURATION
OPTIONS
LANGUE
BLU-RAY
USB
Chaînes analogiques 10 ch
Programmation auto
Liste chaînes
Ajouter chaînes
Antenne
Programmation auto balaye à nouveau toutes
les chaînes.
Il faudra jusqu’à 20 minutes pour terminer la
programmation auto.
Sélectionner la source de votre signal.
Antenne
Ou
Câble
Le système balaie les chaînes. Attendre.
Il faudra jusqu’à 20 minutes pour terminer la programmation auto.
75%
MENU
Quitter
Retour
Antenne
Câble
ANT.IN
6 chChaînes numériques
] ou [MENU / EXIT] pendant le
POWER yy
].
Page 84

INTRODUCTION
Liste Chaînes
Les chaînes sélectionnées ici peuvent être ignorées lors de la sélection de la
chaîne via la touche [CH + / -].
Ces chaînes restent accessibles à l’aide des [touches numériques].
Appuyez sur [MENU / EXIT] pour quitter le menu
1
principal.
Utilisez [Curseur K / L] pour sélectionner
2
“CONFIGURATION”, puis appuyez sur [OK].
IMAGE
Programmation auto
Liste chaînes
ou
Utilisez [Curseur K / L] pour sélectionner
3
“Liste chaînes”, puis appuyez sur [OK].
ou
SON
CONFIGURATION
OPTIONS
LANGUE
BLU-RAY
USB
IMAGE
SON
CONFIGURATION
OPTIONS
LANGUE
BLU-RAY
USB
Ajouter chaînes
Antenne
Programmation auto
Liste chaînes
Ajouter chaînes
Antenne
Ajouter Chaînes
Cette fonction vous permet d’ajouter les chaînes qui n’ont pas été ajoutées
par le balayage automatique des chaînes en raison des conditions de
réception lors du réglage initial.
Appuyez sur [MENU / EXIT] pour quitter le menu
1
principal.
Utilisez [Curseur K / L] pour sélectionner
2
“CONFIGURATION”, puis appuyez sur [OK].
IMAGE
Programmation auto
Liste chaînes
ou
Utilisez [Curseur K / L] pour sélectionner
3
“Ajouter chaînes”, puis appuyez sur [OK].
ou
SON
CONFIGURATION
OPTIONS
LANGUE
BLU-RAY
USB
IMAGE
SON
CONFIGURATION
OPTIONS
LANGUE
BLU-RAY
USB
Ajouter chaînes
Antenne
Programmation auto
Liste chaînes
Ajouter chaînes
Antenne
PRÉPARATION
REGARDER LA
TÉLÉVISION
CONFIGURATION
OPTIONNELLE
LECTEUR DE BLU-RAY
FONCTIONNEMENT DU
Utilisez [Curseur K / L] pour sélectionnez la chaîne que
4
vous désirer ignorer, puis appuyez sur [OK].
ou
IMAGE
SON
CONFIGURATION
OPTIONS
LANGUE
BLU-RAY
USB
Allume chaînes pour sélection avec touches
Ch Up/Down.
OK
Sélection Ch Visionner/Saut
• L’affichage de la chaîne qui a été supprimée devient
sombre. Vous ne pouvez plus sélectionner cette
+ /
-
chaîne en utilisant [CH
].
• Pour réactiver une chaîne supprimée, utilisez
[Curseur K / L] et appuyez sur [OK]. Les chaînes
enregistrées sont surlignées.
• Lorsque vous supprimez une canal principale, ses
sous-canal sont supprimées aussi.
Remarque :
• Les chaînes sont en mode ATSC si elles portent
l’indication“DTV”. Autrement elles sont en mode NTSC.
Appuyez sur [MENU / EXIT] pour quitter.
5
DTV 11.1
DTV
DTV
BACK
Retour
Utilisez [les touches numériques] pour entrer le numéro
4
de la chaîne que vous voulez ajouter, puis appuyez sur
[OK].
11.2
11.3
IMAGE
SON
Pour les chaînes analogiques, sélectionner
une chaîne à ajouter à l’aide des touches
CONFIGURATION
numériques.
OPTIONS
Chaînes numériques, exécuter la fonction
LANGUE
Programmation auto.
BLU-RAY
USB
Changement Ch
BACK
Ajouter chaînes
Retour
RÉGLAGE DU
BLU-RAY
11
DÉPANNAGE INFORMATION
Appuyez sur [MENU / EXIT] pour quitter.
5
Remarque :
• Si le réglage a été correctement effectué, le message
“Ajouté à la liste des chaînes” apparaît.
• Si l’entrée externe est utilisée, il n’est pas possible
d’enregistrer la chaîne et “Non disponible” s’affiche sur
l’écran du téléviseur.
• En utilisant [CH + / -], vous pouvez sélectionner les
chaînes mémorisées seulement.
FR
23
Page 85

ONFIGURATION OPTIONNELLE
Video
Retour
Changement Ch
IMAGE
SON
OPTIONS
LANGUE
BLU-RAY
USB
CONFIGURATION
Indicateur disponible uniquement
pour la transmission numérique.
CH
C
Vérification de l’Antenne
DTV
Cette fonction vous permet de vérifier la force du signal numérique de
chaque chaîne.
Appuyez sur [MENU / EXIT] pour quitter le menu
1
principal.
Utilisez [Curseur K / L] pour sélectionner
2
“CONFIGURATION”, puis appuyez sur [OK].
IMAGE
ou
Utilisez [Curseur K / L] pour sélectionner “Antenne”,
3
puis appuyez sur [OK].
ou
SON
CONFIGURATION
OPTIONS
LANGUE
BLU-RAY
USB
IMAGE
SON
CONFIGURATION
OPTIONS
LANGUE
BLU-RAY
USB
Programmation auto
Liste chaînes
Ajouter chaînes
Antenne
Programmation auto
Liste chaînes
Ajouter chaînes
Antenne
Sélection de la Langue
Vous avez le choix entre l’anglais, l’espagnol et le français comme langue de
menu sur écran.
Appuyez sur [MENU / EXIT] pour quitter le menu
1
principal.
Utilisez [Curseur K / L] pour sélectionner “LANGUE”,
2
puis appuyez sur [OK].
IMAGE
Select the language for setup display.
ou
Utilisez [Curseur K / L] pour sélectionner “English”,
3
SON
CONFIGURATION
OPTIONS
LANGUE
BLU-RAY
USB
Elija el idioma de ajuste.
Sélectionner langue écran config.
“Español” ou “Français” puis appuyez sur [OK].
ou
IMAGE
SON
CONFIGURATION
OPTIONS
LANGUE
BLU-RAY
USB
Select the language for setup display.
Elija el idioma de ajuste.
Sélectionner langue écran config.
English
Español
Français
English
Español
Français
Utilisez [les touches numériques] ou
4
sélectionnez la chaîne pour laquelle vous désirez vérifier
[CH + / -]
la puissance du signal numérique capté par l’antenne.
IMAGE
SON
CONFIGURATION
OPTIONS
LANGUE
BLU-RAY
USB
Actuel 50
CH
50 Max
Changement Ch
• Si la chaîne est réglée sur chaîne analogique ou entrée
externe, vous ne pouvez pas confirmer l’état de l’antenne.
Appuyez sur [MENU / EXIT] pour quitter.
5
pour
11.1
Retour
Appuyez sur [MENU / EXIT] pour quitter.
4
Remarque :
• Si vous souhaitez afficher les menus en français , et non
en anglais ou en espagnol, appuyez sur [MENU / EXIT].
Sélectionnez “LANGUAGE” ou “IDIOMA” à l’aide du
[Curseur K / L], puis appuyez sur [OK].
Sélectionnez “Français” à l’aide du [Curseur K / L], puis
appuyez sur [OK]. Appuyez sur [MENU / EXIT] pour quitter
le menu principal.
24
FR
Page 86

Réglage de l’Image
Vous pouvez régler la luminosité, le contraste, la couleur, la teinte, la
netteté et la température couleurs.
INTRODUCTION
Avant de commencer : Vous devez selectionner le paramètre “Maison”
dans “Région” (reportez-vous à la page 35). Dans
le cas contraire, les modifications que vous aurez
apportées aux réglages ne seront pas mémorisées
lorsque vous éteindrez l’appareil.
Appuyez sur [MENU / EXIT] pour quitter le menu
1
principal.
Utilisez [Curseur K / L] pour sélectionner “IMAGE”, puis
2
appuyez sur [OK].
IMAGE
Smart image
ou
Utilisez [Curseur K / L] pour sélectionner l’option que
3
SON
CONFIGURATION
OPTIONS
LANGUE
BLU-RAY
USB
Luminosité
Contraste
Couleur
Teinte
Netteté
Température couleur
Préférentiel
Normal
vous désirez régler, puis appuyez sur [OK].
IMAGE
ou
Régler la qualité de l’image.
4
SON
CONFIGURATION
OPTIONS
LANGUE
BLU-RAY
USB
Smart image
Luminosité
Contraste
Couleur
Teinte
Netteté
Température couleur
Préférentiel
Normal
Smart Image
Utilisez [Curseur K / L] pour sélectionner le réglage
souhaité, puis appuyez sur [OK].
(“Préférentiel”, “Standard”, “Sport”, “Film” et “Jeu”)
IMAGE
ou
SON
CONFIGURATION
OPTIONS
LANGUE
BLU-RAY
USB
Smart image
Luminosité
Contraste
Couleur
Teinte
Netteté
Température couleur
Préférentiel
Standard
Sport
Film
Jeu
Luminosité, Contraste, Couleur, Teinte, Netteté,
Température couleur
Utilisez [Curseur K / L] pour sélectionner le réglage de
votre choix, puis utilisez [Curseur
au réglage.
30
60
Luminosité
36
0
Luminosité
0
Contraste
Contraste
Couleur
Couleur
30
60
36
0
Teinte
0
Teinte
Netteté
Netteté
Température couleur
Temp. Couleur Normal
Appuyez sur [MENU / EXIT] pour quitter.
5
ou
30
60
36
0
0
OK
DéplacerAjuster OK
OK
DéplacerAjuster
OK
DéplacerAjuster
OK
DéplacerAjuster
OK
DéplacerAjuster
OK
DéplacerAjuster
PRÉPARATION
/
s
B
] pour procéder
Curseur
s
Curseur
B
pour réduire la
luminosité
pour réduire le
OK
contraste
pour atténuer
OK
la couleur
pour accentuer
OK
le rouge
pour
augmenter la
luminosité
pour
augmenter le
contraste
pour
accentuer la
couleur
pour
accentuer le
vert
REGARDER LA
TÉLÉVISION
CONFIGURATION
OPTIONNELLE
LECTEUR DE BLU-RAY
FONCTIONNEMENT DU
RÉGLAGE DU
OK
pour ajouter
des couleurs
pour adoucir
OK
chaudes
pour rendre
plus net
pour ajouter
des couleurs
froides
BLU-RAY
DÉPANNAGE INFORMATION
Remarque :
• Si vous appuyez sur [SMART PICTURE], les éléments du
menu “Smart Image“ (“Préférentiel”, “Standard”, “Sport”,
“Film” et “Jeu”) apparaissent en haut à gauche de l’écran
du téléviseur et vous pouvez choisir le réglage de votre
choix.
• Pour annuler réglage de l’image, appuyez sur
[MENU / EXIT].
• Seul le paramètre “Préférentiel” peut être réglé.
25
FR
Page 87

ONFIGURATION OPTIONNELLE
C
Réglage du Son
Vous pouvez régler le smart son, l’équaliseur et un certain nombre d’autres
fonctions sonores.
Avant de commencer : Vous devez selectionner le paramètre “Maison”
Appuyez sur [MENU / EXIT] pour quitter le menu
1
principal.
Utilisez [Curseur K / L] pour sélectionner “SON”, puis
2
appuyez sur [OK].
ou
Utilisez [Curseur K / L] pour sélectionner le type de son
3
que vous voulez régler, puis appuyez sur [OK].
ou
Réglez les paramètres suivants.
4
Smart Son
Utilisez [Curseur K / L] pour sélectionner le réglage de
votre choix, puis appuyez sur [OK].
(“Préférentiel”, “Standard”, “Film”, “Musique” et “Nouvelle”)
ou
Egaliseur
Permet de régler la qualité du son pour chaque fréquence.
Utilisez
[Curseur
spécifique et utilisez [Curseur K / L] pour régler le
volume sonore,
ou
Son d’ambiance virtuelle
Le son d’ambiance virtuelle vous offre l’espace
stéréophonique virtuel via votre système stéréo à 2
canaux existant.
Utilisez [Curseur K / L] pour sélectionner l’option de
votre choix, puis appuyez sur [OK].
26
FR
dans “Région” (reportez-vous à la page 32). Dans
le cas contraire, les modifications que vous aurez
apportées aux réglages ne seront pas mémorisées
lorsque vous éteindrez l’appareil.
IMAGE
SON
Egaliseur
CONFIGURATION
Son d’ambiance virtuelle
OPTIONS
Haut-parleurs du téléviseurEfHf
LANGUE
Haut-parleurs du téléviseur Amp. ext.
BLU-RAY
USB
IMAGE
Smart son
SON
Egaliseur
CONFIGURATION
Son d’ambiance virtuelle
OPTIONS
Nivelage auto du volumeEfHf
LANGUE
Haut-parleurs du téléviseur Amp. ext.
BLU-RAY
USB
IMAGE
Smart Sound
Smart son
SON
Egaliseur
CONFIGURATION
Son d’ambiance virtuelle
OPTIONS
Nivelage auto du volume
LANGUE
Haut-parleurs du téléviseur
BLU-RAY
USB
/
s
B] pour sélectionner la fréquence
puis appuyez sur [OK].
IMAGE
SON
CONFIGURATION
OPTIONS
LANGUE
BLU-RAY
USB
0
120Hz0500Hz01.5kHz05kHz010kHz
StandardSmart son
Standard
Préférentiel
Standard
Film
Musique
Nouvelle
IMAGE
ou
SON
CONFIGURATION
OPTIONS
LANGUE
BLU-RAY
USB
Sélectionne les modes de reproduction
SPATIAL ou SURROUND.
Ef Effet accentué.
Hf Effet naturel.
Nivelage auto du volume
La fonction maintient un volume sonore constant
en compensant les différences de volume sonore
constatées entre les publicités et les programmes.
Utilisez [Curseur K / L] pour sélectionner l’option de
votre choix, puis appuyez sur [OK].
IMAGE
SON
ou
Ef
Hf
Sélectionnez ce réglage pour réduire les
différences de volume sonore constatées
entre les publicités et les programmes.
Indiquez si vous souhaitez désactiver le
réglage automatique du volume sonore.
CONFIGURATION
OPTIONS
LANGUE
BLU-RAY
USB
Le nivelage auto du volume réduit les
différences de volume entre les
chaînes et les programmes, et offre un
niveau audio régulier.
Haut-parleurs du téléviseur
Permet de déterminer si le son est reproduit par les
haut-parleurs de l’appareil ou non.
Si un amplificateur compatible avec la fonction CEC
est connecté à cet appareil à l’aide d’un câble HDMI,
une partie des opérations effectuées sur le son
(augmentation du volume, par exemple) est accessible
de manière synchronisée à l’aide de la télécommande.
Utilisez [Curseur K / L] pour sélectionner l’option de
votre choix, puis appuyez sur [OK].
IMAGE
Ef
Hf
Amp. ext.
ou
SON
CONFIGURATION
OPTIONS
LANGUE
BLU-RAY
USB
Le son sera émis par les haut-parleurs de l’appareil.
Le son ne sera pas émis par les haut-
parleurs de l’appareil.
Cette fonction vous permet de contrôler la
sortie audio des appareils compatibles avec
"Ef" :
Son restitué par les haut-parleurs du
téléviseur.
"Hf" :
Son non restitué parles haut-parleurs.
"Amp. ext." :
Utilisation possible de l’amplificateur
compatible HDMI-CEC connecté avec un
câble HDMI. Pour plus d’information, voir le
manuel d’utilisation.
la fonction CEC à l’aide de la télécommande.
Appuyez sur [MENU / EXIT] pour quitter.
5
Remarque :
• Si vous appuyez sur [SMART SOUND], les éléments du
menu “Smart Son“ (“Préférentiel”, “Standard”, “Film”,
“Musique” et “Nouvelle”) apparaissent en haut à gauche
de l’écran du téléviseur, et vous pouvez choisir le réglage de
votre choix.
• Pour annuler le réglage du son, appuyez sur
[MENU / EXIT].
• Nous ne pouvons garantir une interopérabilité à 100 % avec
d’autres marques d’appareils compatibles avec le protocole CEC.
Ef
Hf
Ef
Hf
Ef
Hf
Amp.ext.
Page 88

INTRODUCTION
A. Service Sous-titrage
Sous-titres
Vous pouvez affi cher les sous-titres des émissions de télévision, des films
et des nouvelles. Les sous-titres désignent le texte des dialogues ou les
descriptions qui s’affichent à l’écran pour les personnes malentendantes.
Appuyez sur [MENU / EXIT] pour quitter le menu
1
principal.
Utilisez [Curseur K / L] pour sélectionner “OPTIONS”,
2
puis appuyez sur [OK].
Sous-titre
ou
Utilisez [Curseur K / L] pour sélectionner “Sous-titre”,
3
puis appuyez sur [OK].
ou
Suivez les instructions ci-dessous pour configurer
chacune des options.
IMAGE
SON
CONFIGURATION
OPTIONS
LANGUE
BLU-RAY
USB
...
A
“A. Service Sous-titrage”
...
B
“B. Service Sous-titrage Num”
...
C
“C. Style des Sous-titres”.
IMAGE
SON
CONFIGURATION
OPTIONS
LANGUE
BLU-RAY
USB
IMAGE
SON
CONFIGURATION
OPTIONS
LANGUE
BLU-RAY
USB
Service sous-titrage
Service sous-titrage num
Style des sous-titres
page 27
page 28
page 28
Verrouillage
Configurations du PC
Mode economie d’energie
Région
Info logiciel actuel
Sous-titre
Verrouillage
Configurations du PC
Mode economie d’energie
Région
Info logiciel actuel
Hf
Hf
Ef
Maison
Ef
Maison
A
B
C
A. Service Sous-titrage
Utilisez [Curseur K / L] pour sélectionner
4
“Service sous-titrage”, puis appuyez sur [OK].
ou
Utilisez [Curseur K / L] pour sélectionner le sous-titre
5
IMAGE
SON
CONFIGURATION
OPTIONS
LANGUE
BLU-RAY
USB
Service sous-titrage
Service sous-titrage num
Style des sous-titres
souhaité, puis appuyez sur [OK].
ou
IMAGE
SON
CONFIGURATION
OPTIONS
LANGUE
BLU-RAY
USB
Service sous-titrage
Service sous-titrage num
Style des sous-titres
Mode de Sous-titres
CC-1 et T-1 ;
sont les principaux services de sous-titres et de texte.
Les sous-titres ou le texte s’affichent dans la même
langue que le dialogue de l’émission
(jusqu’à 4 lignes de texte sur l’écran du téléviseur, là
où le texte ne cache pas les parties importantes de
l’image).
CC-3 et T-3 ;
servent de chaînes de données préférées.
Le sous-titrage ou le texte est souvent une langue
secondaire.
CC-2, CC-4, T-2 et T-4 ;
sont rarement disponibles car les diffuseurs
les utilisent uniquement dans des conditions
particulières, comme par exemple lorsque “CC-1” et
“CC-3” ou “T-1” et “T-3” ne sont pas disponibles.
• 3 modes d’affichage sont disponibles, suivant le
type d’émission :
Mode Paint-on :
Affiche immédiatement les caractères saisis sur
l’écran du téléviseur.
Mode Pop-on :
Affiche tous les caractères en même temps après
leur mise en mémoire.
Mode Roll-up :
Affiche les caractères de manière continue, par
défilement (max. 4 lignes).
PRÉPARATION
Hf
Hf
REGARDER LA
TÉLÉVISION
Hf
CC-1
CC-2
CC-3
CC-4
T-1
T-2
T-3
T-4
CONFIGURATION
OPTIONNELLE
LECTEUR DE BLU-RAY
FONCTIONNEMENT DU
RÉGLAGE DU
BLU-RAY
DÉPANNAGE INFORMATION
Appuyez sur [MENU / EXIT] pour quitter.
6
27
FR
Page 89

ONFIGURATION OPTIONNELLE
B. Service Sous-titrage Num
C. Style des Sous-titres
C
B. Service Sous-titrage Num
DTV
Outre les sous-titres codés de base décrits en page 27, le téléviseur
numérique possède ses propres sous-titres codés appelés service de soustitres numériques. Utilisez ce menu pour modi er les réglages du service de
sous-titres numériques.
/
K
Utilisez [Curseur
4
L] pour sélectionner
“Service sous-titrage num”, puis appuyez sur [OK].
IMAGE
Service sous-titrage
Service sous-titrage num
ou
Sélectionnez les sous-titres numériques de votre choix
5
à l’aide du [Curseur
ou
SON
Style des sous-titres
CONFIGURATION
OPTIONS
LANGUE
BLU-RAY
USB
/
K
L], puis appuyez sur [OK].
Service sous-titrage
IMAGE
Service sous-titrage num
SON
Style des sous-titres
CONFIGURATION
OPTIONS
LANGUE
BLU-RAY
USB
Sélectionnez ce paramètre si vous ne
Hf
désirez pas les DTVCC (sous-titres de
télévision numérique). Il s’agit du réglage
par défaut.
Sélectionnez un de ces services avant de
CS-1 - CS-6
changer toute autre option dans le menu
“Sous-Titre”. En temps normal, choisissez
“CS-1”.
Appuyez sur [MENU / EXIT] pour quitter.
6
Hf
Hf
Hf
CS-1
CS-2
CS-3
CS-4
CS-5
CS-6
C. Style des Sous-titres
DTV
Vous pouvez changer le style des sous-titres, comme par exemple la police
de caractères, la couleur, la taille, etc.
/
K
Utilisez [Curseur
4
L] pour sélectionner
“Style des sous-titres”, puis appuyez sur [OK].
ou
Utilisez [Curseur
5
IMAGE
SON
CONFIGURATION
OPTIONS
LANGUE
BLU-RAY
USB
/
K
L] pour sélectionner
Service sous-titrage
Service sous-titrage num
Style des sous-titres
“Param. utilis”, puis appuyez sur [OK].
Param. utilis
Style police
Taille police
Couleur police
Opacité police
Couleur l’arrière-plan
Opacité l’arrière-plan
Couleur bord
Type bord Aucun
Utilisez [Curseur
6
ou
IMAGE
SON
CONFIGURATION
OPTIONS
LANGUE
BLU-RAY
USB
/
K
L] pour sélectionner “Ef”, puis
appuyez sur [OK].
IMAGE
SON
CONFIGURATION
OPTIONS
LANGUE
BLU-RAY
USB
/
L] pour sélectionner une option,
Utilisez [Curseur
7
ou
K
puis appuyez sur [OK]. Puis utilisez [Curseur
Param. utilis
Style police
Taille police
Couleur police
Opacité police
Couleur l’arrière-plan
Opacité l’arrière-plan
Couleur bord
Type bord
K
sélectionner le réglage souhaité, et appuyez sur [OK].
Affichage de l’image
Hf
Hf
Hf
Police0
Moyenne
Blanc
Plein
Noir
Plein
Noir
Ef
Hf
/
L] pour
Remarque :
• Les “Service sous-titrage num” disponibles varient suivant
les spécifications de diffusion.
28
FR
ABCDEFGHIJKL
ABCDEFGHIJKL
Bord
Police
(Couleur bord et Type bord)
(Style police, Taille police, Couleur police, Opacité ou
Transparence police)
Arrière-plan
(Couleur de l’arrière-plan, Opacité ou Transparence de l’arrière-plan)
• Les différents réglages sont décrits sur la page suivante.
• Consultez les réglages que vous avez effectués
dans la page suivante en vous reportant au coin
supérieur droit de la fenêtre des paramètres affichée
(toutes les sélections n’indiquent pas les différences
sélectionnées).
Page 90

INTRODUCTION
Style police
Il est possible de changer comme ci-dessous le style de
police des sous-titres affichés.
sous-titre
Param. utilis
IMAGE
SON
CONFIGURATION
OPTIONS
LANGUE
BLU-RAY
USB
Style police
Taille police
Couleur police
Opacité police
Couleur l’arrière-plan
Opacité l’arrière-plan
Couleur bord
Type bord
Police0
Police1
Police2
Police3
Police4
Police5
Police
Police7
Taille police
Il est possible de changer comme ci-dessous lataille de
police des sous-titres affichés.
sous-titre
Param. utilis
IMAGE
Style police
SON
CONFIGURATION
OPTIONS
LANGUE
BLU-RAY
USB
Taille police
Couleur police
Opacité police
Couleur l’arrière-plan
Opacité l’arrière-plan
Couleur bord
Type bord
Grande
Moyenne
Petite
Couleur police
Il est possible de changer comme ci-dessous la couleur
de police des sous-titres affichés.
sous-titre
Param. utilis
IMAGE
SON
CONFIGURATION
OPTIONS
LANGUE
BLU-RAY
USB
Style police
Taille police
Couleur police
Opacité police
Couleur l’arrière-plan
Opacité l’arrière-plan
Couleur bord
Type bord
Blanc
Noir
Rouge
Ver t
Bleu
Jaune
Magenta
Cyan
Opacité police
Il est possible de changer comme ci-dessous l’opacité
de police des sous-titres affichés.
sous-titre
Param. utilis
IMAGE
Style police
SON
Taille police
CONFIGURATION
Couleur police
OPTIONS
LANGUE
BLU-RAY
USB
Opacité police
Couleur l’arrière-plan
Opacité l’arrière-plan
Couleur bord
Type bord
Plein
Clignotement
Translucide
Transparent
Couleur de l’arrière-plan
Il est possible de changer comme ci-dessous la couleur
d’arrière-plan des sous-titres affichés.
sous-titre
Param. utilis
IMAGE
Style police
SON
CONFIGURATION
OPTIONS
LANGUE
BLU-RAY
USB
Taille police
Couleur police
Opacité police
Couleur l’arrière-plan
Opacité l’arrière-plan
Couleur bord
Type bord
Blanc
Noir
Rouge
Ver t
Bleu
Jaune
Magenta
Cyan
Opacité de l’arrière-plan
Il est possible de changer comme ci-dessous l’opacité
d’arrière-plan des sous-titres affichés.
sous-titre
Param. utilis
IMAGE
Style police
SON
Taille police
CONFIGURATION
Couleur police
OPTIONS
Opacité police
LANGUE
BLU-RAY
Couleur l’arrière-plan
USB
Opacité l’arrière-plan
Couleur bord
Type bord
Plein
Clignotement
Translucide
Transparent
Couleur bord
Il est possible de changer comme ci-dessous la couleur
de bordure des sous-titres affichés.
Param. utilis
Style police
Taille police
Couleur police
Opacité police
Couleur l’arrière-plan
Opacité l’arrière-plan
Couleur bord
Type bord
IMAGE
SON
CONFIGURATION
OPTIONS
LANGUE
BLU-RAY
USB
Type bord
Il est possible de changer comme ci-dessous le type de
bordure des sous-titres affichés.
IMAGE
SON
CONFIGURATION
OPTIONS
LANGUE
BLU-RAY
USB
Appuyez sur [MENU / EXIT] pour quitter.
8
Param. utilis
Style police
Taille police
Couleur police
Opacité police
Couleur l’arrière-plan
Opacité l’arrière-plan
Couleur bord
Type bord
Remarque :
•
Pour que les sous-titres s’affichent sur l’écran du téléviseur, il
faut que le signal diffusé contienne des données de sous-titres.
• Les émissions de télévision et les annonces télévisées ne
sont pas toutes sous-titrées ou ne possèdent pas tous les
types de sous-titres.
• Il se peut que les sous-titres et le texte ne soient pas
parfaitement synchronisés avec la voix sur le téléviseur.
• Les changements de chaîne peuvent causer le retard des
sous-titres pendant quelques secondes.
• Le réglage du volume ou la coupure du son peuvent causer
le retard des sous-titres pendant quelques secondes.
•
Il se peut que des abréviations, des symboles ou d’autres formes
grammaticales abrégées soient utilisées pour que le texte
n’accuse pas de retard par rapport à l’action qui se déroule sur
l’écran. Il ne s’agit pas d’un dysfonctionnement.
• Les caractères des sous-titres ou du texte ne s’affichent pas
pendant l’affichage du menu principal ou des fonctions.
• Si une case noire apparaît sur l’écran du appareil, cela
signifie que les sous-titres sont réglés sur le mode texte.
Pour enlever la case, sélectionnez “CC-1”, “CC-2”, “CC-3”,
“CC-4” ou “Hf”.
•
Si l’appareil reçoit des signaux de mauvaise qualité, il se
peut que les sous-titres contiennent des erreurs ou
qu’aucun sous-titre ne soit disponible. Les causes possibles
de mauvaise qualité des signaux sont :
-
Le brouillage causé par le démarrage d’un véhicule automobile
- Le brouillage d’un moteur électrique
- La faiblesse du signal capté
- La réception d’un signal multiplex (image fantôme ou
scintillement de l’écran)
• En cas de coupure de courant, l’appareil garde en mémoire
les réglages de sous-titres que vous avez choisis.
• Le sous-titrage codé ne s’affichera pas si vous utilisez
uneconnexion HDMI.
• Lorsque l’appareil reçoit un signal de lecture d’effets
spéciaux (par exemple Recherche, Ralenti et Arrêt sur
image) depuis la chaîne de sortie vidéo du magnétoscope
(CH3 ou CH4), il se peutqu’il n’affiche pas les bons soustitres ou le bon texte.
sous-titre
Blanc
Noir
Rouge
Ver t
Bleu
Jaune
Magenta
Cyan
sous-titre
Aucun
Accru
Réduit
Uniforme
Ombre G.
Ombre Dr.
PRÉPARATION
REGARDER LA
TÉLÉVISION
CONFIGURATION
OPTIONNELLE
LECTEUR DE BLU-RAY
FONCTIONNEMENT DU
RÉGLAGE DU
BLU-RAY
DÉPANNAGE INFORMATION
29
FR
Page 91

ONFIGURATION OPTIONNELLE
Veuillez introduire votre code
Code NIP
Retour
BACK
_
IMAGE
SON
CONFIGURATION
OPTIONS
LANGUE
BLU-RAY
USB
C
Verrouillage
Le contrôle parental lit les cotes de protection parentale des émissions et
refuse l’accès aux émissions dont la cote est supérieure au niveau que vous
avez spéci é. Grâce à cette fonction, vous pouvez bloquer l’accès à certains
programmes ne convenant pas aux enfants et rendre invisibles certaines
chaînes ou modes d’entrée externe.
Appuyez sur [MENU / EXIT] pour quitter le menu
1
principal.
/
K
Utilisez [Curseur
2
puis appuyez sur [OK].
ou
Utilisez [Curseur K / L] pour sélectionner
3
“Verrouillage”, puis appuyez sur [OK].
ou
Utilisez [les touches numériques] pour saisir votre
4
Code NIP à quatre chiffres.
L] pour sélectionner “OPTIONS”,
Sous-titre
IMAGE
Verrouillage
SON
Configurations du PC
CONFIGURATION
Mode economie d’energie
OPTIONS
Région
LANGUE
BLU-RAY
Info logiciel actuel
USB
Sous-titre
IMAGE
Verrouillage
SON
Configurations du PC
CONFIGURATION
Mode economie d’energie
OPTIONS
Région
LANGUE
BLU-RAY
Info logiciel actuel
USB
Ef
Maison
Ef
Maison
Suivez les instructions ci-dessous pour configurer
chacune des options.
IMAGE
SON
CONFIGURATION
OPTIONS
LANGUE
BLU-RAY
USB
Verrouillage de chaîne
Verrou qualif. US Ciné
Verrou qualif. US TV
Classement EN-CA
Classement FR-CA
Taux régional
Changez code
A
B
C
D
...
A
“A. Verrouillage de Chaîne”
...
B
“B. Verrou qualif. US Ciné”
...
C
“C. Verrou qualif. US TV”.
...
D
“D. Changez Code”
page 31
page 31
page 32
page 33
Remarque :
• Lorsque vous sélectionnez une cote et la réglez sur “Barré”,
les cotes plus élevées sont automatiquement bloquées.
Les émissions à cote plus basse seront disponibles pour le
visionnement.
• Si vous réglez la cote la plus élevée sur “Vision”, toutes les
cotes sont automatiquement réglées sur “Vision”.
• Afin de verrouiller l’accès à tout programme inapproprié,
définissez vos préférences dans les paramètres “Verrou
qualif. US ciné”, “Verrou qualif. US TV” et “Taux régional”.
• Le réglage de verrouillage est mémorisé en cas de panne
de courant (mais le code d’accès est remis à 0000).
• Si la cote est bloquée, s’affiche.
• “Taux régional” est disponible lorsque l’appareil capte une
diffusion numérique au moyen du nouveau système de
cotes.
• Si le signal d’émission ne dispose pas des informations
régionales sur le verrouillage des cotes, “La taux régional
n’est actuellement pas disponible.” s’affiche.
Ce message apparaît aussi lorsque vous essayez d’accéder
à “Taux régional” après avoir effacé les informations
régionales sur le verrouillage des cotes, et si de nouvelles
informations n’ont pas été téléchargées depuis.
• Le système de cotes canadien sur ce appareil est basé sur
la norme CEA-766-A et la politique du CRTC (Conseil de la
radiodiffusion et des télécommunications canadiennes).
30
• Si vous n’avez pas encore défini votre Code NIP,
saisissez [0], [0], [0], [0].
• Lorsque le Code NIP est correct, le menu
“Verrouillage” s’affiche.
FR
Page 92

INTRODUCTION
A. Verrouillage de Chaîne
B. Verrou qualif. US Ciné
A. Verrouillage de Chaîne
Certaines chaînes ou certains modes d’entrée externes spécifiques peuvent
être invisibles lorsque cette fonction est active.
Utilisez [Curseur K / L] pour sélectionner “Verrouillage
5
de chaîne”, puis appuyez sur [OK].
IMAGE
Verrouillage de chaîne
SON
ou
Utilisez [Curseur K / L] pour sélectionner le rating de
6
CONFIGURATION
OPTIONS
LANGUE
BLU-RAY
USB
Verrou qualif. US Ciné
Verrou qualif. US TV
Classement EN-CA
Classement FR-CA
Taux régional
Changez code
votre choix, puis appuyez plusieurs fois sur [OK] pour
basculer entre “Vision” et “Barré”.
IMAGE
ou
Appuyez sur la touche [MENU / EXIT] pour quitter.
7
SON
CONFIGURATION
OPTIONS
LANGUE
BLU-RAY
USB
Sélectionner
Video1
Video2
Component
HDMI1
HDMI2
HDMI3
11.1DTV
OK
Vision / Barré
BACK
Retour
B. Verrou qualif. US Ciné
Le système américain de classement des films est celui créé par la MPAA
(Motion Picture Association of America).
Utilisez [Curseur K / L] pour sélectionner “Verrou
5
qualif. US Ciné”, puis appuyez sur [OK].
IMAGE
Verrouillage de chaîne
Verrou qualif. US Ciné
ou
Utilisez [Curseur K / L] pour sélectionner la cote
6
SON
CONFIGURATION
OPTIONS
LANGUE
BLU-RAY
USB
Verrou qualif. US TV
Classement EN-CA
Classement FR-CA
Taux régional
Changez code
désirée, puis appuyez plusieurs fois sur [OK] pour
permuter entre “Vision” et “Barré”.
ou
Caractéristique
IMAGE
SON
CONFIGURATION
OPTIONS
LANGUE
BLU-RAY
USB
Catégorie
X Public adulte seulement
NC-17 Aucune personne de moins de 17 ans admise
Restreint ; les moins de 17 ans doivent être
R
accompagnés d’un parent ou d’un tuteur
adulte
PG-13
Ne convient pas aux enfants de moins de 13 ans
PG Supervision parentale recommandée
G Tout public
NR Pas de classement
Sélectionner
X
NC-17
R
PG-13
PG
G
NR
OK
Vision / Barré
BACK
Retour
PRÉPARATION
REGARDER LA
TÉLÉVISION
CONFIGURATION
OPTIONNELLE
LECTEUR DE BLU-RAY
FONCTIONNEMENT DU
RÉGLAGE DU
BLU-RAY
Appuyez sur [MENU / EXIT] pour quitter.
7
DÉPANNAGE INFORMATION
31
FR
Page 93
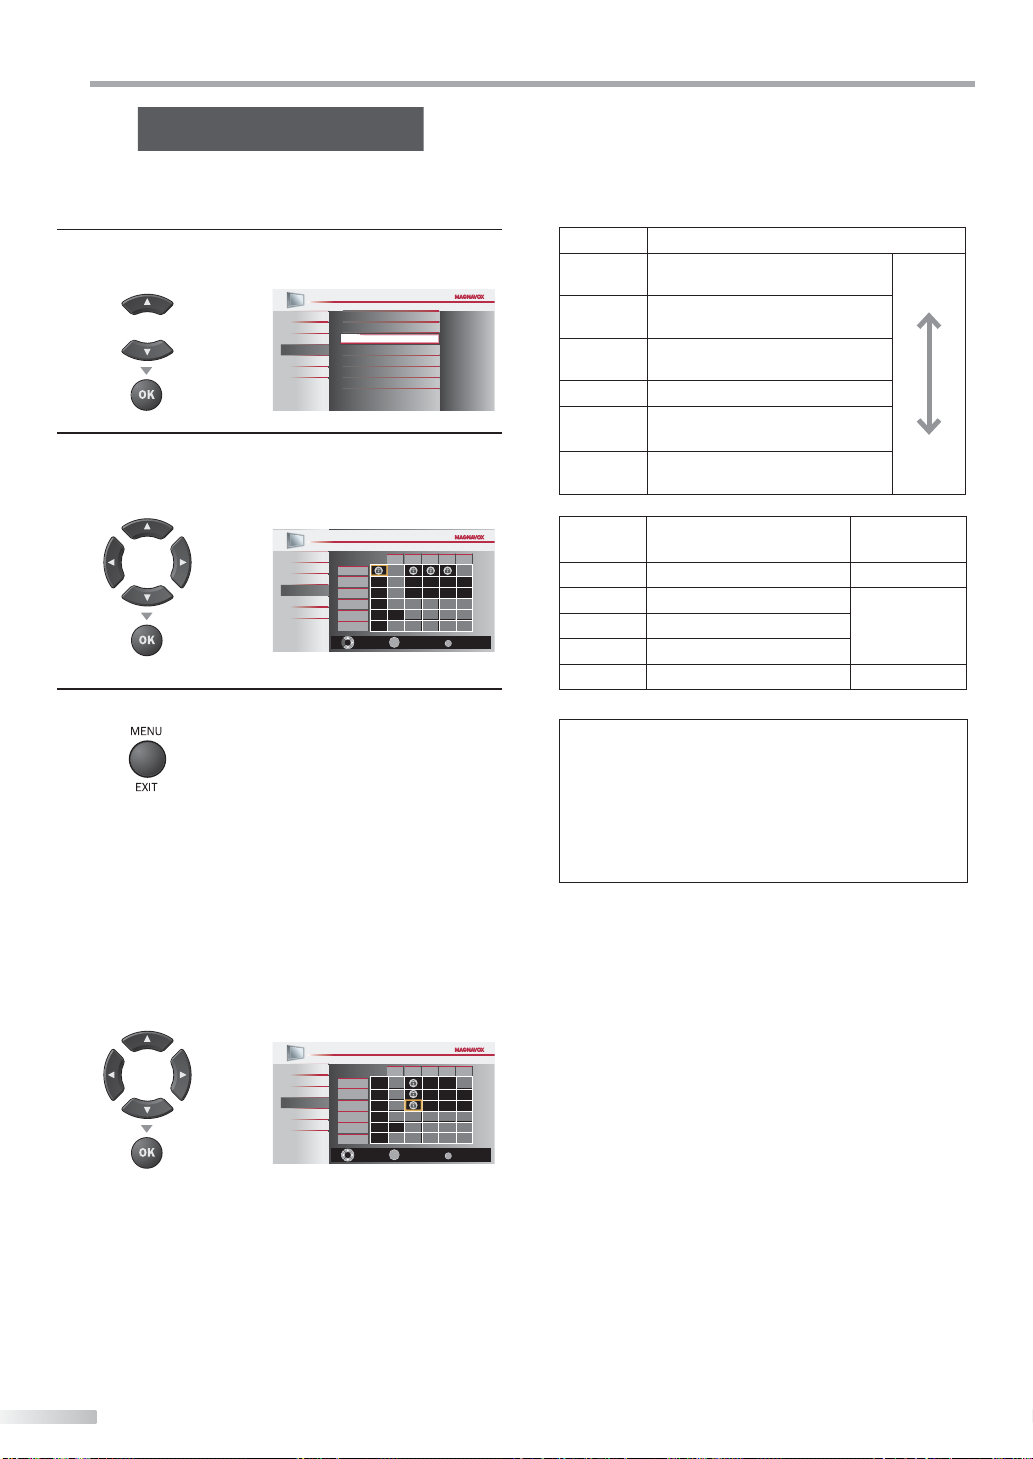
ONFIGURATION OPTIONNELLE
C. Verrou qualif. US TV
C
C. Verrou qualif. US TV
Utilisez [Curseur K / L] pour sélectionner “Verrou
5
qualif. US TV”, puis appuyez sur [OK].
IMAGE
Verrouillage de chaîne
Verrou qualif. US Ciné
ou
Utilisez [Curseur K / L / s
6
SON
Verrou qualif. US TV
CONFIGURATION
Classement EN-CA
OPTIONS
Classement FR-CA
LANGUE
Taux régional
BLU-RAY
Changez code
USB
/
B
] pour sélectionner la cote
désirée, puis appuyez plusieurs fois sur [OK] pour
permuter entre “Vision” et “Barré”.
ou
Appuyez sur [MENU / EXIT] pour quitter.
7
IMAGE
SON
CONFIGURATION
OPTIONS
LANGUE
BLU-RAY
USB
TV-MA
TV-14
TV-PG
TV-G
TV-Y7
TV-Y
Sélectionner
FV
V S L D
OK
Vision / Barré
Pour spécifier les cotes secondaires
Dans le cas de TV-MA, TV-14, TV-PG et TV-Y7, vous
pouvez aussi spécifier des cotes secondaires pour
bloquer l’accès à des éléments spécifiques des
émissions. Pour spécifier les cotes secondaires, suivez
les étapes ci-dessous.
Caractéristique
TV-MA Public adulte seulement
TV-14
TV-PG
Ne convient pas aux enfants de
moins de 14 ans
Supervision parentale
recommandée
Catégorie
plus
élevée
TV-G Tout public
TV-Y7
TV-Y Convient à tous les enfants
Convient à tous les enfants de 7
ans et plus
plus
basse
Sous
caractéristique
FV Fantaisie Violence TV-Y7
V Violence
BACK
Retour
S Scène à Caractère Sexuel
L Langage Vulgaire
D Dialogues Suggestifs TV-PG, TV-14
Catégorie Caractéristique
TV-PG
TV-14
TV-MA
Remarque :
• Les cotes secondaires barrées apparaissent à côté de la
catégorie de cote principale dans le menu
“Verrou qualif. US TV”.
• Il n’est pas possible de barrer une cote secondaire (D, L, S
ou V) si la cote principale est réglée sur “Vision”.
• Le changement d’une catégorie sur “Barré” ou “Vision”
règle automatiquement toutes ses cotes secondaires sur la
même valeur (“Barré” ou “Vision”).
/
s
B
Utilisez [Curseur K / L /
] pour sélectionner la cote
désirée, puis appuyez plusieurs fois sur [OK] pour
permuter entre “Vision” et “Barré”.
ou
IMAGE
SON
CONFIGURATION
OPTIONS
LANGUE
BLU-RAY
USB
TV-MA
TV-14
TV-PG
TV-G
TV-Y7
TV-Y
32
FR
Sélectionner
FV V S L D
BACK
OK
Vision / Barré
Retour
Page 94

D. Changez Code
D. Changez Code
Le code par défaut (0000) est fourni ave l’appareil, mais vous pouvez
spécifier votre propre Code NIP.
INTRODUCTION
Utilisez [Curseur K / L] pour sélectionner
5
“Changez code”, puis appuyez sur [OK].
Verrouillage de chaîne
IMAGE
SON
ou
Appuyez sur [les touches numériques] pour saisir le
6
CONFIGURATION
OPTIONS
LANGUE
BLU-RAY
USB
Verrou qualif. US Ciné
Verrou qualif. US TV
Classement EN-CA
Classement FR-CA
Taux régional
Changez code
nouveau Code NIP à 4 chiffres.
• Saisissez de nouveau le Code NIP dans l’espace
“Confirm PIN”.
IMAGE
SON
Veuillez introduire votre code
CONFIGURATION
OPTIONS
LANGUE
BLU-RAY
USB
Confirm PIN
Code NIP
Appuyez sur [MENU / EXIT] pour quitter.
7
PRÉPARATION
REGARDER LA
TÉLÉVISION
CONFIGURATION
OPTIONNELLE
_
BACK
Retour
LECTEUR DE BLU-RAY
FONCTIONNEMENT DU
Remarque :
• Assurez-vous que le nouveau Code NIP et le Code NIP de
confirmation sont identiques. S’ils sont différents, l’espace
de saisie devient vide pour permettre de saisir à nouveau le
Code NIP.
• Votre Code NIP sera effacé et remis à la valeur par défaut
(0000) si une panne de courant survient.
Si vous oubliez le Code NIP, débranchez le cordon
d’alimentation pendant 10 secondes pour remettre le Code
NIP à 0000.
RÉGLAGE DU
BLU-RAY
DÉPANNAGE INFORMATION
FR
33
Page 95
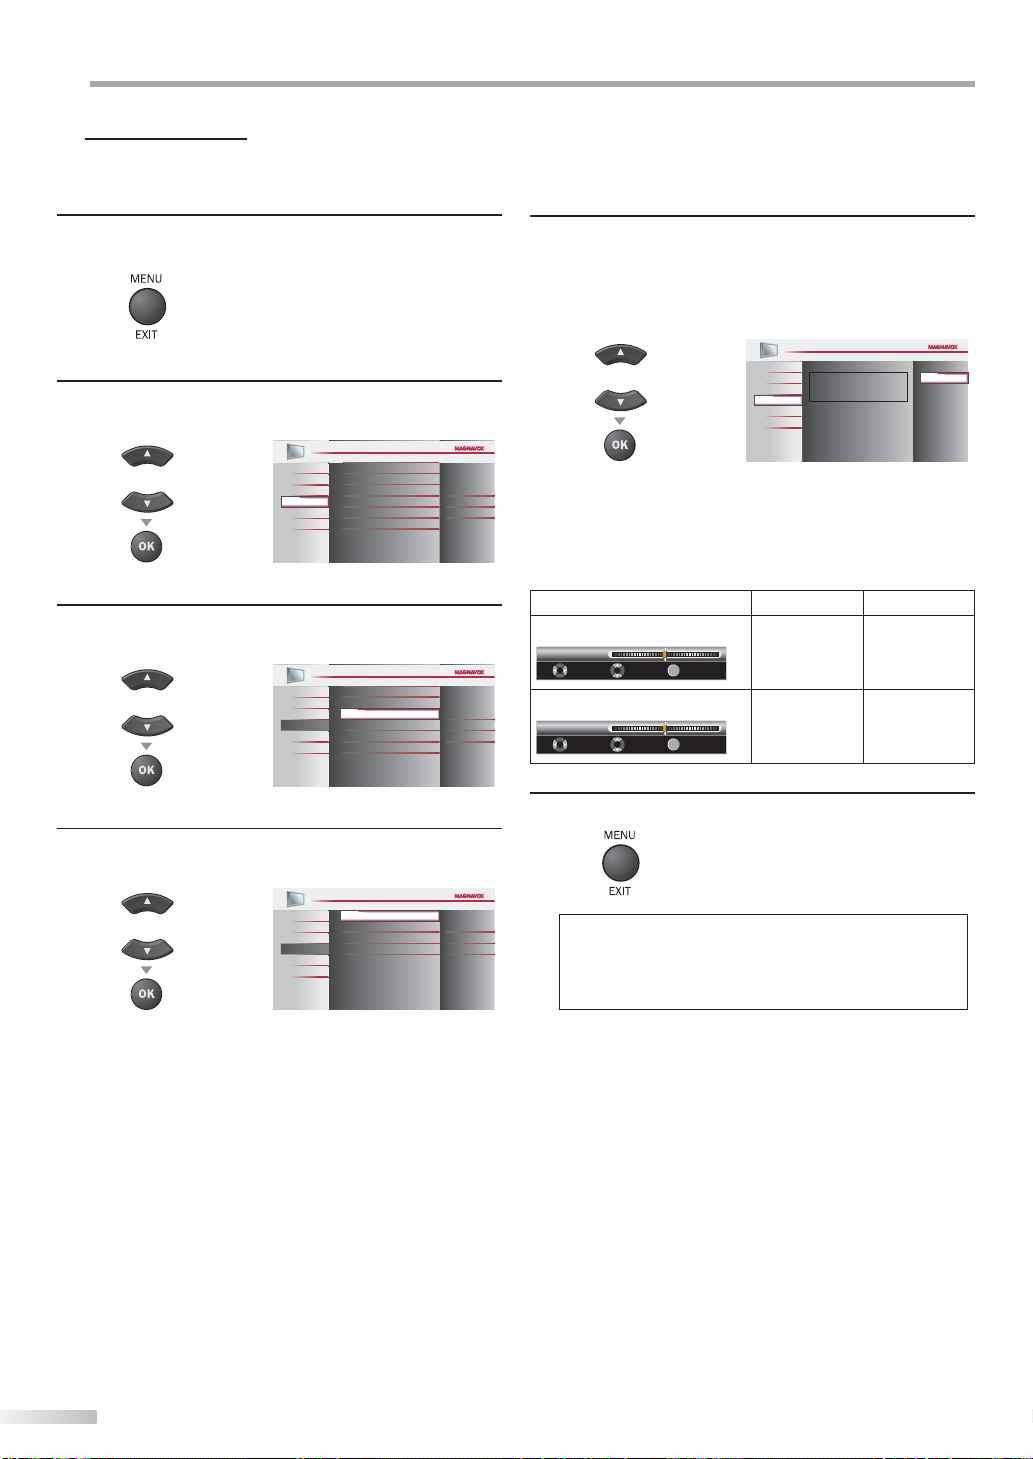
ONFIGURATION OPTIONNELLE
C
Réglages PC
Cette fonction vous permet de régler la position de l’écran du PC lorsque le
PC transmet des données via la prise d’entrée HDMI 1.
Appuyez sur [MENU / EXIT] pour quitter le menu
1
principal.
/
K
Utilisez [Curseur
2
L] pour sélectionner “OPTIONS”,
puis appuyez sur [OK].
Sous-titre
IMAGE
Verrouillage
ou
Utilisez [Curseur
3
K
SON
Configurations du PC
CONFIGURATION
Mode economie d’energie
OPTIONS
Région
LANGUE
Info logiciel actuel
BLU-RAY
USB
/
L] pour sélectionner
“Configurations du PC”, puis appuyez sur [OK].
Sous-titre
IMAGE
Verrouillage
ou
Utilisez [Curseur K / L] pour sélectionner le paramètre
4
SON
CONFIGURATION
OPTIONS
LANGUE
BLU-RAY
USB
Configurations du PC
Mode economie d’energie
Région
Info logiciel actuel
que vous voulez régler, puis appuyez sur [OK].
Réinitialisation de la position
IMAGE
ou
SON
CONFIGURATION
OPTIONS
LANGUE
BLU-RAY
USB
Position vorizontale
Position verticale
Ef
Magasin
Ef
Magasin
Régler la configuration.
5
Réinitialisation de la Position
Utilisez [Curseur K / L] pour sélectionner “Rétablir”,
puis appuyez sur [OK].
• La position horizontale/verticale de l’écran du PC est
Position Horizontale, Position Verticale
Utilisez [Curseur
Position Horizontale
Position H.
Position Verticale
Position V.
Appuyez sur [MENU / EXIT] pour quitter.
6
0
0
Remarque :
IMAGE
SON
ou
CONFIGURATION
OPTIONS
LANGUE
BLU-RAY
USB
Réinitialise la position d’affichage
de I’mage.
réglée automatiquement.
/
s
B
] pour régler.
Curseur
s
Curseur
pour déplacer
0
DéplacerAjuster OK
+-
OK
l’écran du PC
vers la gauche
pour déplacer
0
DéplacerAjuster OK
+-
OK
l’écran du PC
vers le haut
• Vous risquez de ne pas obtenir un écran approprié si
vous utilisez la fonction “Réinitialisation de la position”
avec certains signaux. Dans ce cas, réglez les paramètres
manuellement.
pour déplacer
l’écran du PC
vers la droite
pour déplacer
l’écran du PC
vers le bas
Annuler
Rétablir
B
34
FR
Page 96

INTRODUCTION
Mode Economie d’Energie
Vous pouvez choisir de réduire ou non la consommation électrique.
Appuyez sur [MENU / EXIT] pour affi cher le menu
1
principal.
/
K
Utilisez [Curseur
2
puis appuyez sur [OK].
ou
Utilisez [Curseur
3
“Mode economie d’energie”, puis appuyez sur [OK].
ou
L] pour sélectionner “OPTIONS”,
Sous-titre
IMAGE
Verrouillage
SON
Configurations du PC
CONFIGURATION
Mode economie d’energie
OPTIONS
Région
LANGUE
Info logiciel actuel
BLU-RAY
USB
/
K
L] pour sélectionner
Sous-titre
IMAGE
Verrouillage
SON
Configurations du PC
CONFIGURATION
Mode economie d’energie
OPTIONS
LANGUE
Région
BLU-RAY
Info logiciel actuel
USB
Ef
Maison
Ef
Maison
Région
Si vous avez sélectionné “Magasin”, il se peut que la consommation
dépasse les valeurs limites prévues par la norme ENERGY STAR®.
Appuyez sur [MENU / EXIT] pour accéder au menu
1
principal.
/
K
Utilisez [Curseur
2
puis appuyez sur [OK].
ou
Utilisez [Curseur
3
appuyez [OK].
ou
L] pour sélectionner “OPTIONS”,
Sous-titre
IMAGE
Verrouillage
SON
Configurations du PC
CONFIGURATION
Mode economie d’energie
OPTIONS
Région
LANGUE
Info logiciel actuel
BLU-RAY
USB
/
K
L] pour sélectionner “Région”, puis
Sous-titre
IMAGE
Verrouillage
SON
Configurations du PC
CONFIGURATION
Mode economie d’energie
OPTIONS
LANGUE
BLU-RAY
USB
Région
Info logiciel actuel
Ef
Maison
Ef
Maison
PRÉPARATION
REGARDER LA
TÉLÉVISION
CONFIGURATION
OPTIONNELLE
LECTEUR DE BLU-RAY
FONCTIONNEMENT DU
/
K
Utilisez [Curseur
4
L] pour sélectionner le mode
désiré, puis appuyez sur [OK].
IMAGE
ou
Ef
Sélectionnez ce réglage si vous souhaitez
réduire la consommation électrique.
SON
CONFIGURATION
OPTIONS
LANGUE
BLU-RAY
USB
Il se peut que la consommation de cet
Hf
appareil soit supérieure aux valeurs limites
prévues par la norme ENERGY STAR®.
Appuyez sur [MENU / EXIT] pour quitter.
5
Quand paramétré sur “Ef”, la conso. est réduite
en diminuant la luminosité du rétro-éclairage.
/
K
Utilisez [Curseur
4
votre choix, puis appuyez sur [OK].
Ef
Hf
5
ou
Appuyez sur [MENU / EXIT] pour quitter.
L] pour sélectionner le région de
IMAGE
SON
CONFIGURATION
OPTIONS
LANGUE
BLU-RAY
USB
L’emplacement Maison est
recommandé pour une utilisation
domestique normale.
En mode Magasin de détail, tous les
réglages sont fixes.
Magasin
Maison
RÉGLAGE DU
BLU-RAY
DÉPANNAGE INFORMATION
35
FR
Page 97

ONFIGURATION OPTIONNELLE
C
Info Logiciel Actuel
Cette fonction indique la version du logiciel actuellement utilisée.
Appuyez sur [MENU / EXIT] pour accéder au menu
1
principal.
/
K
Utilisez [Curseur
2
puis appuyez [OK].
ou
Utilisez [Curseur
3
“Info logiciel actuel”, puis appuyez sur [OK].
ou
Permet de connaître le numéro de la version du logiciel
4
actuellement utilisée.
Appuyez sur [MENU / EXIT] pour quitter.
5
L] pour sélectionner “OPTIONS”,
Sous-titre
IMAGE
Verrouillage
SON
Configurations du PC
CONFIGURATION
Mode economie d’energie
OPTIONS
Région
LANGUE
Info logiciel actuel
BLU-RAY
USB
/
K
L] pour sélectionner
Sous-titre
IMAGE
Verrouillage
SON
Configurations du PC
CONFIGURATION
Mode economie d’energie
OPTIONS
LANGUE
Région
Info logiciel actuel
BLU-RAY
USB
IMAGE
SON
Release Version:
CONFIGURATION
CM42OB_1.0
OPTIONS
LANGUE
BLU-RAY
USB
Ef
Maison
Ef
Maison
Retour
Lecture de Fichiers JPEG/MP3
Cet appareil peut lire des fichiers aux formats JPEG et MP3. Vous devez pour
ce faire stocker vos fichiers sur une clé USB.
Insérez la clé USB dans le port USB de cet appareil.
1
L] pour
L] pour
].
B
Image1.jpg
Image2.jpg
Image3.jpg
Image4.jpg
Image5.jpg
Votre USB
Votre USB
IMAGE
SON
Permet ďaccéder aux photos et à la musique de
CONFIGURATION
votre appareil USB.
OPTIONS
LANGUE
BLU-RAY
USB
• Le menu principal s’affiche automatiquement.
/
Utilisez les touches fléchées [Curseur
2
K
sélectionner “USB” et appuyez sur la touche [OK]. Le
nom de votre clé USB est alors sélectionné à l’écran ;
appuyez à nouveau sur la touche [OK].
ou
Utilisez les touches fléchées [Curseur
3
IMAGE
SON
CONFIGURATION
OPTIONS
LANGUE
BLU-RAY
USB
Permet ďaccéder aux photos et à la musique de
votre appareil USB.
/
K
sélectionner “Image” ou “Musique”, puis appuyez sur la
touche [OK] ou la touche fléchée [Curseur
Votre USB
ou
ou
Image
Musique
1 2 3 4
Appuyer sur la touche "OK" pour lire/pauser.
Image
Remarque :
Il est recommandé d’enregistrer les fi chiers qui seront lus sur
cet appareil en respectant les spéfi fi cations suivantes :
<MP3>
• Fréquence d’échantillonnage : 32 kHz ou 44,1 kHz ou 48 kHz
• Taux binaire constant : 32 kbps - 320 kbps
<JPEG>
• Limite supérieure : 24 Mpixel
36
FR
Page 98
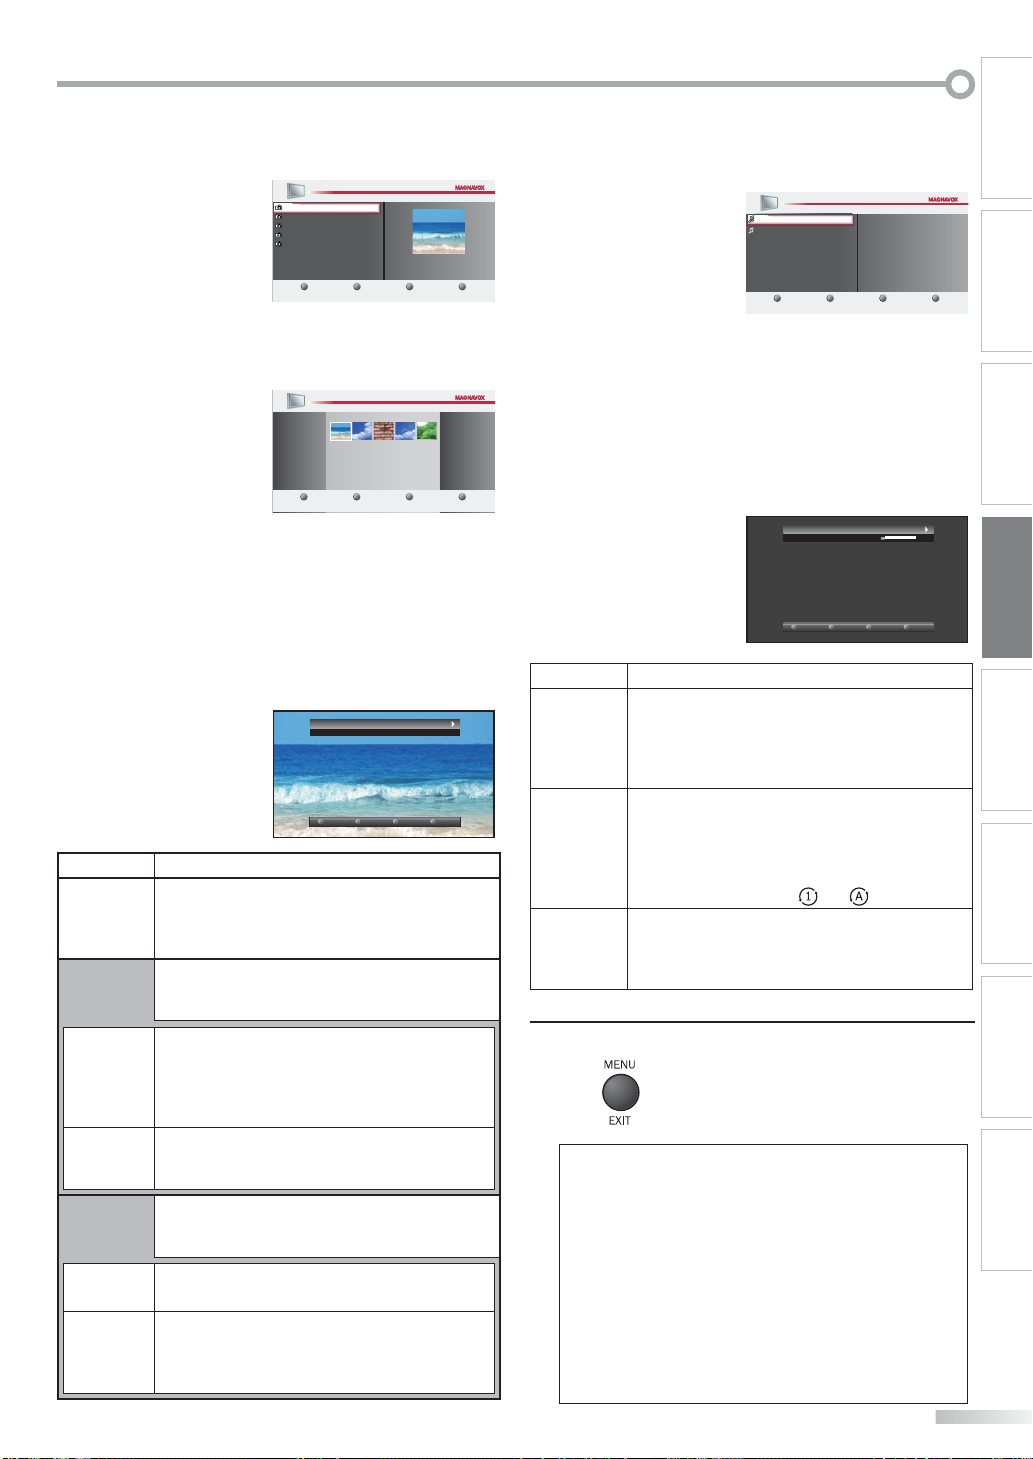
INTRODUCTION
[Image]
/
Utilisez [Curseur
écouter, puis appuyez sur [OK] ou [Curseur
• Pour alterner entre l’affichage des fichiers “Liste” ou
“Miniatures”, appuyez sur [2] en utilisant
[les touches numériques].
• L’appareil passe automatiquement en mode
diaporama lorsque vous visionnez une image.
Pour mettre le diaporama en pause ou le relancer,
appuyez sur la touche [OK].
• Vous pouvez utiliser [les touches numériques] [1] à
[4] pour afficher les informations relatives au fichier
visionné (➀) ou modifier les paramètres suivants
(➁-➃).
Fonction Description
➀
Plus de
détail
➃
Lancer/Mont
➁
Transitions
➂
Tempo défil.
➃
Arrêt défilem
➁
Tourner
➂
Zoom
K
L] pour sélectionner le fichier à
Vorte USB
Image
Image1.jpg
Image2.jpg
Image3.jpg
Image4.jpg
Image5.jpg
1 2 3 4
Miniatures
Appuyer sur la touche "OK" pour lire/pauser.
Vorte USB
Image
1 2 3 4
Liste
Appuyer sur la touche "OK" pour lire/pauser.
Image: Image1.jpg
By:
1 2 3 4
TransitionsPlus de détail Tempo défil. Arrêt défilem
Image
Image1.jpg
Image
Image1.jpg
].
B
Image1.jpg
1200:900
2009:04:02 17:42:06
Appuyez sur [1] pour afficher les informations
détaillées relatives au fichier. “Name”, “Album”,
“Date”, “Size” et “Next”. Appuyez à nouveau sur [1]
pour masquer les informations détaillées.
Appuyez sur [4] ou [OK] pour lancer le diaporama.
Les options suivantes sont accessibles et affichées
à l’écran lorsque le diaporama défile.
Appuyez sur [2], puis utilisez
/
[Curseur
K
L] pour sélectionner le mode de
transition à appliquer parmi ceux-ci :
“Dissolve”, “Wipe right”, “Wipe left”, “Wipe up”,
“Wipe down”, “Box in” et “Box out”.
/
Appuyez sur [2], puis utilisez [Curseur
K
pour modifier la durée d’affichage des images en
choisissant parmi “Shor t”, “Medium” et “Long”.
Appuyez sur [4] ou [OK] pour arrêter le diaporama.
Les options suivantes sont accessibles et affichées à
l’écran lorsque le diaporama est désactivé.
Chaque pression sur [2] va entraîner une rotation
de l’image de 90 ° dans le sens horaire.
/
Appuyez sur [3], puis utilisez [Curseur
K
pour sélectionner la puissance du zoom (1x, 2x
ou 4x). Appuyez ensuite sur [OK] pour valider la
puissance du zoom.
L]
L]
Image1.jpg
[Musique]
/
Utilisez [Curseur
écouter, puis appuyez sur [OK] ou [Curseur
K
L] pour sélectionner le fichier à
B
Vorte USB
Musique
Musique1.mp3
Musique2.mp3
1 2 3 4
Appuyer sur la touche "OK" pour lire/pauser.
Musique
Musique1.mp3
Titre:
Artiste:
Album:
Durée:
Année:
].
• La lecture va commencer à partir du fichier
sélectionné.
Pour mettre en pause ou reprendre la lecture,
appuyez sur [OK].
• Vous pouvez utiliser [les touches numériques] [1] à
[3] pour afficher les informations relatives au fichier
écouté (➀) ou modifier les paramètres suivants (➁
ou ➂).
Fonction Description
Appuyez sur [1] pour afficher les informations
➀
Plus de
détail
➁
Répéter
➂
Lecture alért
Appuyez sur [MENU / EXIT] pour quitter.
4
détaillées relatives au fichier .
“Titre”, “Artiste”, “Album”, “Durée” et “Année”.
Appuyez à nouveau sur [1] pour masquer les
informations détaillées.
Appuyez sur [2] pour lire le fichier sélectionné en
boucle.
Appuyez à nouveau sur [2] pour lire en boucle
tous les fichiers du dossier.
Pour annuler la lecture en boucle, appuyez sur [2]
jusqu’à ce que les icônes “
Appuyez sur [3] pour lire les fichiers selon un
ordre aléatoire.
Pour revenir à un mode de lecture normal,
appuyez à nouveau sur [3].
Morcean: Musique1
Artiste: None
1 2 3 4
00:53 04:28
RépéterPlus de détail Lecture alért
” ou “ ” aient disparu.
Remarque :
• Pour revenir à l’écran précédent (sauf en affichage “Liste”),
appuyez sur [Curseur s].
• Cet appareil est fourni sans clé USB.
• Nous ne garantissons pas la compatibilité de tous les
modèles de clés USB avec cet appareil.
• Veillez à conserver une copie de sauvegarde des fichiers
présents sur la clé USB avant de les lire sur cet appareil.
Nous déclinons toute responsabilité pour la perte ou la
dégradation de données stockées sur votre clé USB.
• Lorsque vous souhaitez retirer une clé USB de l’appareil,
éteignez d’abord le bloc téléviseur pour éviter
d’endommager l’appareil ainsi que les données présentes
sur la clé.
Musique1
None
Easy Symphony
00:04:28
2007
PRÉPARATION
REGARDER LA
TÉLÉVISION
CONFIGURATION
OPTIONNELLE
LECTEUR DE BLU-RAY
FONCTIONNEMENT DU
RÉGLAGE DU
BLU-RAY
DÉPANNAGE INFORMATION
37
FR
Page 99

ONCTIONNEMENT DU LECTEUR DE BLU-RAY
F
Fonctions BLU-RAY
Disques Lisibles
Type de disque
Logo
Signal
enregistré
Taille du disque
BD-video
MPEG2,
MPEG-4
AVC, SMTPE
VC-1
DVD-video
DVD-RW DVD-R
MPEG2 CD-DA
DVD+RW
5 pouces (12 cm)
DVD+R
audio CD
CD-RW CD-R DTS-CD
-
audio
numérique
Disques Non Lisibles
NE JAMAIS lire les disques suivants : cela risquerait d’entraîner un dysfonctionnement de l’appareil !
Disques de 3pouces (8cm), BD dont le code régional est différent de A, BD-RE (Ver. 1.0), BD-R (Ver. 1.2, HTL 4x ou LTH 2x),
BD-ROM pour PC, BD-RE/-R contenant des fichiers MP3 ou JPEG, Total haute définition, combi BD-DVD, HD DVD, DVD dont
le code régional est différent de 1 ou TOUT, DVD-RAM, DVD-ROM pour PC, DVD-RW/-R/+RW/+R contenant des fichiers MP3
ou JPEG, DVD audio, CD-I, CD photo, CD vidéo, CDV, CD-G, CD-ROM pour PC, CD-RW/-R contenant des fichiers MP3 ou JPEG,
y compris les CD Kodak Picture, les disques comportant des étiquettes, des rayures, des tâches, des imperfections, etc.
Sur le type de disque suivant, IL SE PEUT QUE le son soit inaudible.
Super Audio CD
Tous les autres disques ne figurant pas dans la liste des supports compatibles
Remarque :
• Les disques non finalisés ne peuvent pas être lus sur cet appareil.
• S’agissant des DVD-RW/R, les disques enregistrés au format VR (enregistrement vidéo) ne peuvent pas être lus. Seuls les disques vidéo
finalisés peuvent être lus.
• Certains disques ne peuvent pas être lus car ils ont été enregistrés dans des conditions d’enregistrement non prises en charge, sur un
graveur doté de caractéristiques inadaptées ou sur des disques dotés de propriétés spéciales.
• Seul le son enregistré sur la couche normale du CD pourra être entendu. Le son enregistré sur la couche haute densité d’un
Super Audio CD ne pourra pas être entendu.
• Ne pas utiliser d’adaptateur pour CD permettant de transformer un CD de 3 pouces (8 cm) en CD de 5 pouces (12 cm).
• Vous pouvez lire tous les types de disques figurant dans la liste des “Disques Lisibles”. Si vous utilisez des disques non standard,
cet appareil ne pourra pas les lire ou la qualité du son et de l’image risque d’être compromise.
Codes Régionaux
Cet appareil est prévu pour la lecture de
BD-vidéo de la région “A” et DVD-vidéo de la
région “1” ou “ALL”. Il ne peut pas lire les
BD-vidéo ou les DVD-vidéo marqués pour
d’autres régions. Repérez les symboles qui
se trouvent sur la droite de votre BD-vidéo
ou de votre DVD-vidéo.
Si ces symboles de région n’apparaissent
pas sur votre BD-vidéo ou votre DVD-vidéo,
cet appareil ne pourra pas lire le disque.
La lettre ou le chiffre à l’intérieur du globe
désigne la région dans le monde. Un
BD-vidéo ou un DVD-vidéo étiqueté pour
une région en particulier ne peut être lu
que sur un appareil portant le même code
de région.
38
FR
BD-vidéo
DVD-vidéo
Systèmes de Couleurs
Les BD-vidéo et les DVD-vidéo sont enregistrés selon des
systèmes de couleurs différents dans le monde entier. Le
système de couleur le plus courant est NTSC
(principalement utilisé aux États-Unis et au Canada).
Cet appareil utilise le système NTSC, aussi les disques que
vous lisez doivent être enregistrés au format NTSC. Vous ne
pouvez pas lire les disques enregistrés dans un autre format.
Structure of Disc Contents
Le contenu des BD / DVD est généralement divisé en titres.
Les titres peuvent être subdivisés en chapitres.
Titre1 Titre2
Chapitre 1
Les CD audio sont divisés en pistes.
Piste 1
Chapitre 2
Piste 2
BD/DVD
Chapitre 1
CD audio
Piste 3
Chapitre 2
Piste 4
Chapitre 3
Piste 5
Page 100

Menu Contextuel
Ces opérations sont accessibles à partir de la télécommande. Certaines peuvent également être accessibles à partir des commandes situées sur l’appareil.
INTRODUCTION
Lecture
Avant de commencer :
Allumez l’amplificateur et les autres équipements connectés à cet appareil.
Assurez-vous que le récepteur audio externe (non fourni) est réglé sur le bon canal.
Appuyez sur la touche [POWER yy] pour mettre
1
l’appareil sous tension.
Insérez un disque en veillant à ce que l’étiquette soit
2
orientée vers vous.
label
• Si le DVD a été enregistré sur ses deux faces, assurezvous que l’étiquette de la face que vous souhaitez lire
est orientée vers vous.
En mode TV, l’appareil passe en mode BLU-RAY lorsqu’il
3
détecte le type de disque. La lecture du (BD, DVD ou
CD) commence automatiquement.
ex.) BD
BD
• Lorsque vous insérez un CD audio, “Liste des Fichiers” apparaît.
TR
1 / 13
CD_DA
8
9
10
11
12
13
14
0 : 00 : 03
3:36
4:14
4:45
3:50
3:53
4:20
5:01
Suivante
1 / 3
Liste des Fichiers
Précédente
• Appuyez sur [PLAY B] si l’appareil ne passe pas en
mode BLU-RAY ou si la lecture ne commence pas
automatiquement.
Appuyez sur la touche [STOP C] pour interrompre
4
temporairement la lecture.
Utilisation des Menus de Titre,
des Menus de Disque /
des Menus Contextuels
BD
Plusieurs disques BD-vidéo et DVD-vidéo comportent un menu titre (BDvidéo / DVD-vidéo), un menu disque (DVD-vidéo) ou un menu contextuel
(BD-vidéo) qui vous guide parmi les fonctions disponibles du disque.
Le contenu des menus peut différer selon le disque.
Menu titre (BD-vidéo / DVD-vidéo)
Appuyez sur [TOP MENU].
1
• Le menu titre apparaîtra.
Utilisez [Curseur K / L / s / B] pour sélectionner un
2
item, ensuite appuyez sur [OK].
ou
Appuyez sur [TOP MENU] pour quitter.
3
Menu contextuel (BD-vidéo) / Menu disque (DVD-vidéo)
Appuyez sur [POP MENU].
1
DVD
ex.) Menu Racine
Titre 1 Menu Racine
Chapitre 2
Chapitre 3
Chapitre 4
Chapitre 5
Chapitre 6
ex.) Menu du Disque
Menu du Disque
sous-titre
Audio
Angles
Tournage (Titre Bonus)
Retour au Menu Racine
ex.) Menu Contextuel
PRÉPARATION
REGARDER LA
TÉLÉVISION
CONFIGURATION
OPTIONNELLE DÉPANNAGE INFORMATION
LECTEUR DE BLU-RAY
FONCTIONNEMENT DU
RÉGLAGE DU
BLU-RAY
• Si la lecture est interrompue pendant plus de 20
minutes, l’appareil s’éteint automatiquement lorsque
“Arrêt Auto.” est réglé sur “Ef ”.
Appuyez sur [EJECT A] pour éjecter le disque.
5
Remarque :
• “ ” peut apparaître dans le coin supérieur droit
de l’écran du téléviseur si une opération est rendue
inaccessible par le disque ou par l’appareil.
• La lecture de certains BD/DVD peut commencer à partir du titre 2
ou 3 à cause de programmes spécifiques.
• Pendant la lecture d’un disque double couche, les images peuvent
se figer temporairement. Cela se produit lors du passage de la 1ère
à la 2nde couche. Il ne s’agit pas d’un dysfonctionnement.
• Si vous ne parvenez pas à retirer le disque, essayez l’une des
opérations suivantes.
- Maintenez la touche [EJECT A] de l’appareil enfoncée pendant
plus de 5 secondes.
-
Débranchez le cordon d’alimentation, rebranchez-le, puis appuyez
sur la touche [EJECT A].
L’éjection du disque nécessite environ 10 secondes pendant
lesquelles l’appareil ne réagit à aucune commande.
Menu Contextuel
Titre 1 Titre 2 Titre Bonus
• Le menu du disque apparaît lorsqu’un DVD vidéo est inséré.
•
Il s’agit d’une fonction spéciale disponible sur certains BD vidéo.
Lorsque vous appuyez sur [POP MENU], un menu contextuel
apparaît à l’écran, sans que la lecture ne s’interrompe.
Utilisez [Curseur K / L / s / B] pour sélectionner un
2
item, ensuite appuyez sur [OK].
ou
Appuyez sur [POP MENU] pour quitter.
3
Remarque :
• Les opérations disponibles dans le menu varient en fonction
du disque utilisé. Consultez le manuel accompagnant le
disque pour toute information complémentaire.
Ifyouhaveso
methingtosa
y,seethispict
urebeforeyou
39
FR
 Loading...