

Page 1
40PFS4052/60
Page 2

Safety and Screen care
Safety
Risk of electr ic shock or fire!
Risk of shor t circuit or fire!
Risk of injury or damage to the TV!
Risk of injury to children!
Risk of swallowing batteries!
Risk of overheating!
Risk of injury, fire or power cord damage!
Risk of hearing damage!
Low temperatures
Screen care
INITIAL S ETUP
Read safety
TV stand installation and wall mounting instr uctions
TV stand installation
Wall mounting instructions
Tips on placement
Power cable
Antenna cable
Satellite dish
Connect ing Your Devices
About connection
Connectivity guide
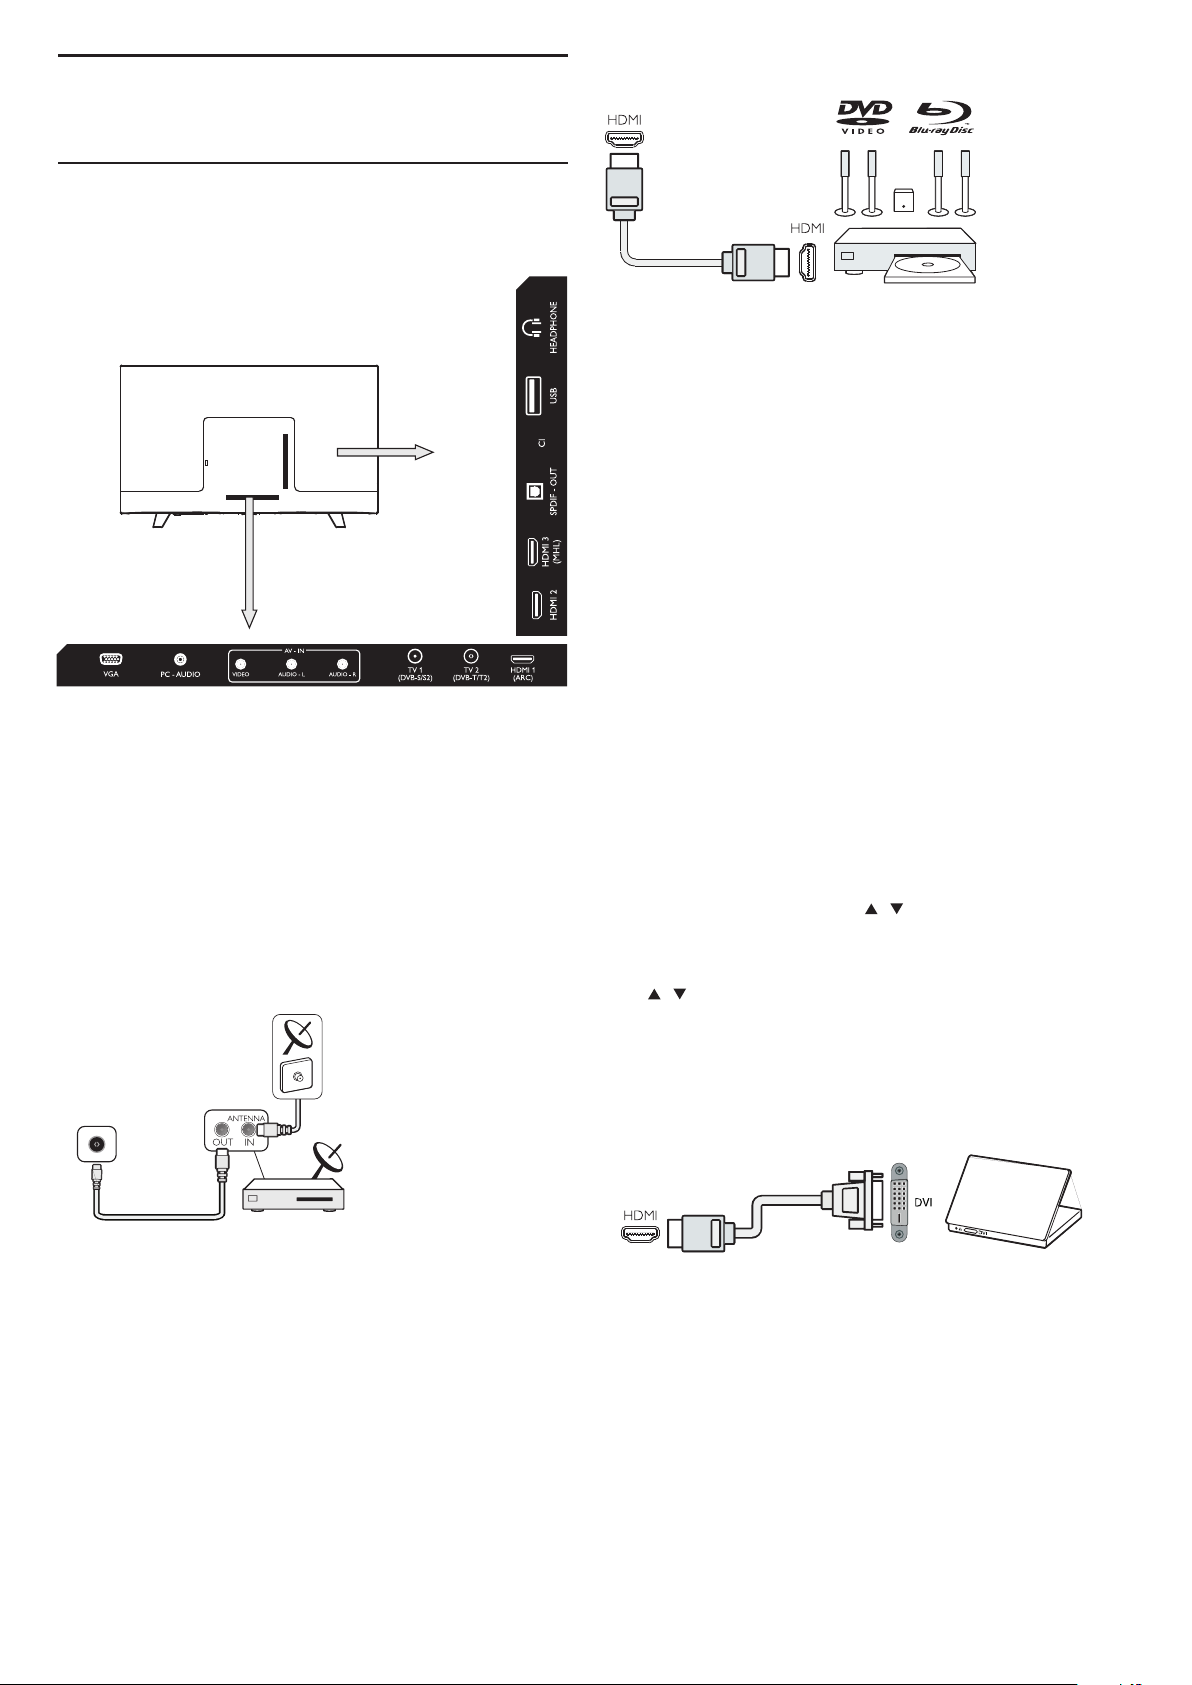
Antenna por t
HDMI por ts
Y Pb Pr - Audio L R
CVBS-Audio L R
Audio Out- Optical (SPDIF-OUT)
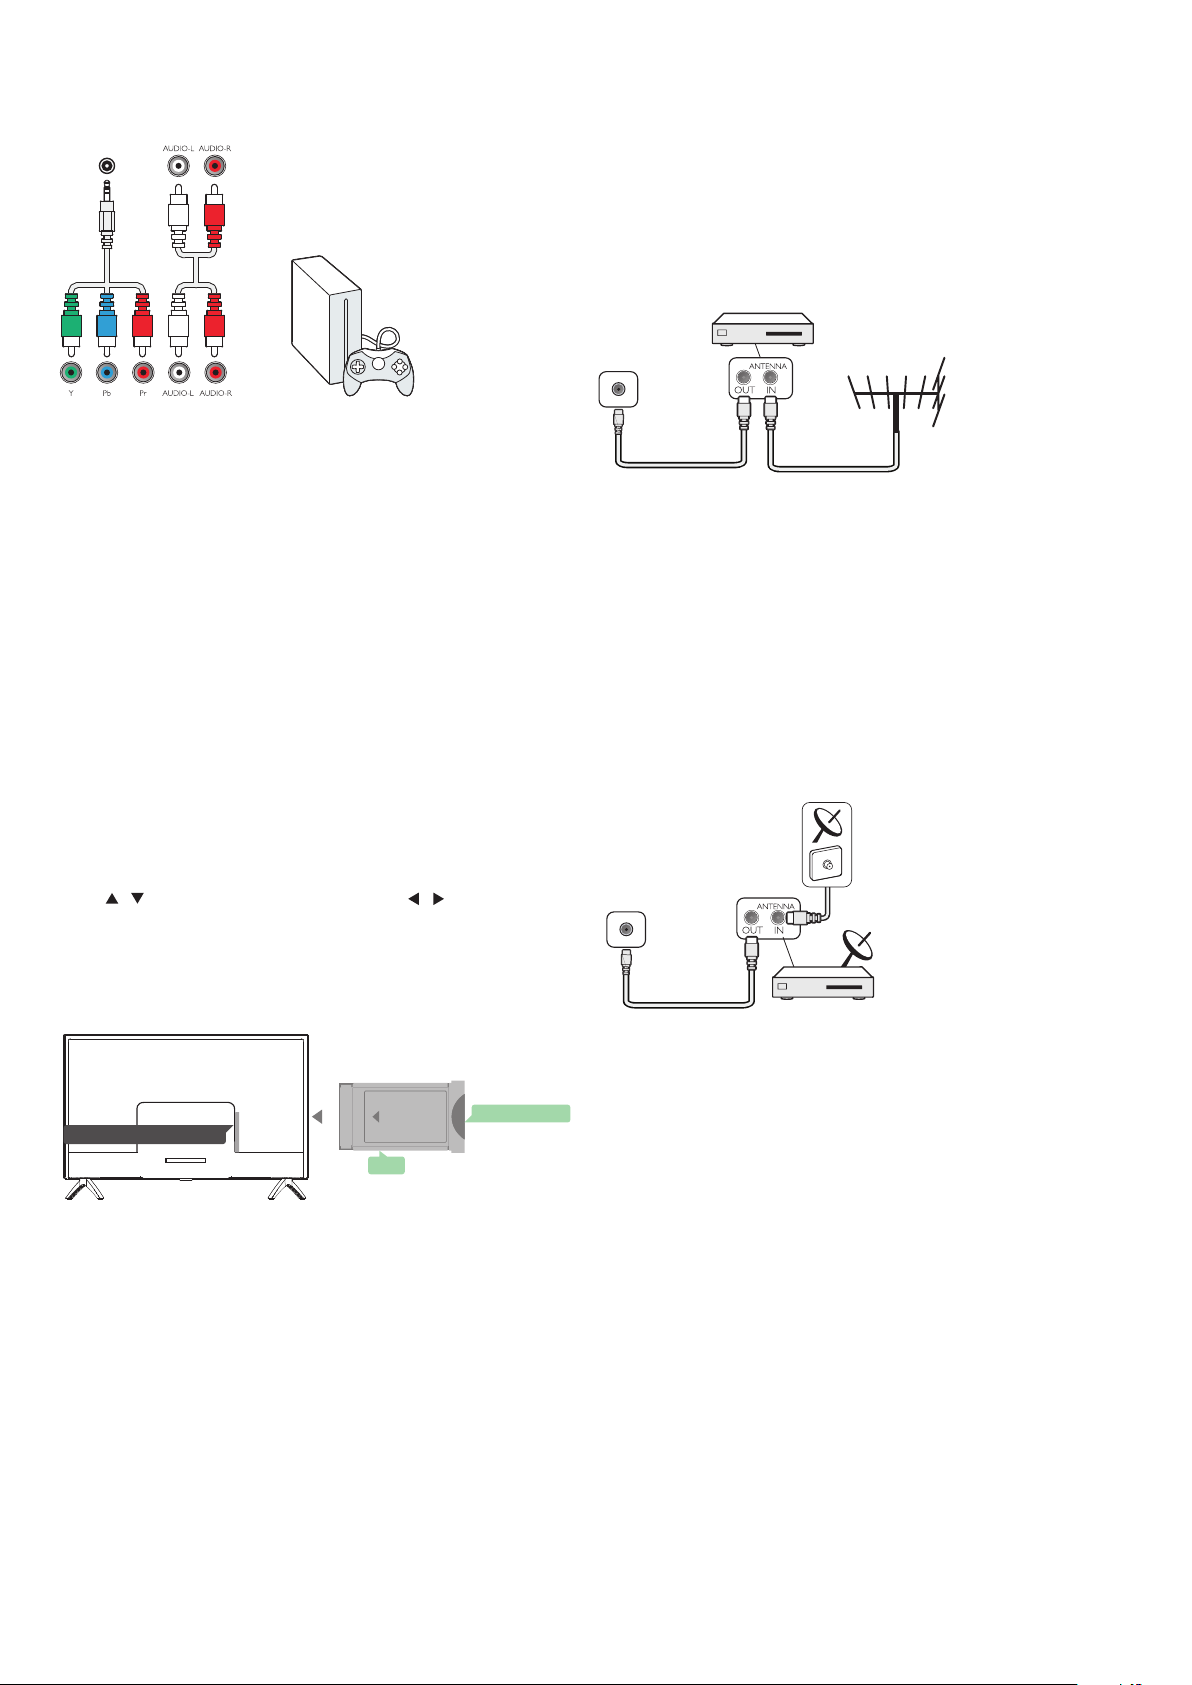
Common interface-CAM
CI+
CAM
Set-top box-STB
Satellite receiver
Home Theatre System
Connect with HDMI ARC
Connect with HDMI
Blue-ray Disc player
DVD player
Game console
USB flash drive
Computer
Headphone
USB interface
Remote Co ntrol
4
Key over view
4
Top view
4
4
Middle view
4
Bottom view
4
IR sensor
4
Batteries
4
Cleaning
4
4
TV channe ls
4
Channel list
4
About Channel list
Open a channel list
Filter a channel list
5
Watching TV channels
5
Tune to a channel
5
About move Channels
5
Lock a channel
5
Favour ite Channels
5
Open channel menu
5
5
Channel
5
Channelinstallation-Antenna, Cable
Update channels
6
Channel installation-Satellite
6
Watching Satellite Channel
6
Satellite Channel installation
6
Channel Edit
6
Schedule List
7
Signal information
7
Software Update (OAD)
7
CI information
7
Dish Setup
7
Manual Installation
7
Add a satellite
7
Transponder Setup
7
Ku_HOTBIRD Setup
8
8
TV Program Guide
8
What you need
8
Using the TV Program guide
8
Open the TV guide
8
Record
8
Remind
8
Prev Day
8
Next Day
8
10
10
10
10
10
11
11
11
11
11
11
11
11
11
11
11
11
11
11
12
12
12
12
12
12
12
12
12
12
12
12
12
12
13
13
13
13
13
13
13
13
13
13
Switch on
Power on/off, standby
Power on
Standby
Power off
Keys on TV
8
8
8
8
9
9
2
Page 3

Recording and Time-shift
Recording
What you need
Record a progr amme
Open the list of recording
Time-shift
What you need
Use Time-shift for a progr amme
Replay
Sources
Switch a device signal
From standby
EasyLink
Time
Time settings
Sleep timer
Time Zone
Auto Standby
OSD Timer
Summer Time
LOCK
System Lock
Set Password
Channel Lock
Parental Guidance
Key Lock
SETTING
Gener al Settings
Language
TTX Language
Audio Language
Subtitle Language
Hearing impaired
PVR file system
Aspect ratio
Blue screen
First time installation
Reset
Software Update (USB)
HDMI CEC-Easylink
Help
Home or Shop
14
MULTIMEDIA
14
From a USB connection
14
Photo
14
Music
14
Movie
14
TEXT
14
14
Specification information
14
Display resolutions
Multimedia
Sound power
14
Display resolution
14
Tuner/Reception/Transmission
14
Remote Control
14
Power Supply
Dimensions and weights
15
15
Software
15
Software update
15
Open source software
15
Open source license statement
15
15
Troubleshooting and support
15
Gener al issues
15
Channel issues
15
Picture issues
15
Sound issues
15
HDMI connection issues
15
Computer connection issues
Contact us
Warning
15
15
15
Term of use, copyrights and licenses
Term of use
15
Copyrights and Licenses
15
15
15
15
15
15
15
15
15
15
15
15
16
16
16
17
17
17
18
18
18
18
18
18
18
18
18
19
19
19
19
19
19
19
19
20
20
20
20
20
20
20
20
Picture 17
Picture Setting 17
Sound 17
Sound Setting 17
16
16
16
16
3
Page 4

Safety and Screen care
Safety
Risk of electric shock or fire!
• Never expose the TV t o rain or water.
• Never place liquid container s, such as vases, near the TV. If
liquid was spilt on or into the TV, disconnect the TV f ro m th e
power outlet immediately. Co nt ac t Ph il ip s Co ns um er Care to
have th e TV checked before use.
• Never place the TV, remote control or batteries near naked
flames or other heat sources, including direct sunlight.
• To preve nt t he s pr ea d of fire, keep candles or other flames
away from the TV, remote control and batter ie s at a ll t im es .
• Never inser t objects into the ventilation slots or other
openings on the TV.
• Wh en t he TV is swivelled ensure that no strain is exer ted on
the power cord. Strain on the power cord can loosen
connections and cause arcing.
• To disconnect the TV from the mains power, the power plug
of the TV mus t be d is co nn ec te d. When disconnecting the power,
always pull the power plug, never t he c or d. Ensure that you have
full access to the power plug, power cord and outlet socket a t al l
times.
Risk of shor t circuit or fire!
• Never expose the remote control or batteries to rain, water
or excessive heat.
• Avoid force coming onto power plugs. Loose power plugs
can cause arcing or fire .
Risk of injury or damage to the TV!
• Two people are required to lift and carr y a T V th at weighs
more than 25 kg or 55 lbs.
• Wh en s ta nd m ou nt in g th e T V, use only the supplied stand.
Secure the stand to the TV tightly. Place the TV on a flat, level
surface that can suppor t the combined weight of the TV and the
stand.
• Wh en you wall mounting the TV, use only a wall mount that
can suppor t the weight of the TV. Secure the wall mount to a wall
that can suppor t the combined weight of the TV and wall mount.
TP Vision Europe B.V. bears no responsibility for i mp ro pe r wa ll
mounting that result in accident, injur y or damage .
• If you need to store the TV, disassemble the stand from the
TV. Never lay th e T V on i ts b ac k wi th t he s ta nd i ns ta ll ed .
• Before you connect the TV to the power outlet, ensure that
the power vol ta ge matches the value printed on the back of the
TV. Never connect the TV to the power outlet if the voltage is
different.
• Parts of this product may be made of glass. Han dl e wi th c ar e
to avoi d in ju r y and damage.
Risk of injury to children!
• Follow these precautions to prevent the TV from toppling
over and causing injur y to children:
• Never place the TV on a surface covered by a cloth or other
material that can be pulled away.
• Ensure that no par t of the TV hangs over the edge of the
surface.
• Never place the TV on tall furn it ur e (s uc h as a b oo kc as e)
without anchor ing both the furniture and TV to the wall or a
suitable support.
• Educate children about the dangers of climbing on furniture
to reach the TV.
Risk of swallowing batteries!
• The product/remote control may contain a coin-type batter y,
which can be swallowed. Keep the batter y ou t of r ea ch o f ch il dr en
at all times!
Risk of overheating!
• Never install the TV in a confined space. Always leave a sp ac e
of at least 4 inches or 10 cm around the TV for ventilation. Ensure
cur tains or other objects never cover the ve nt il at io n sl ot s on t he
TV.
Risk of injury, fire or power cord damage!
• Never place the TV or any objects on the power cord.
• Disconnect the TV from the power outlet and antenna before
lightning stor ms. Dur ing lightning storms, never tou ch any par t o f
the TV, power c or d or a nt en na c able .
Risk of hearing damage!
• Avoid using earphones or headphones at high vo lu me s or for
prolonged periods of time.
Low temperatures
• If the TV is transpor ted in t em pe ratures below 5oC or 41oF,
unpack the TV and wait until the TV temperature matches room
temper ature befo re c on ne ct in g th e T V to t he p ower outlet.
Screen care
• Avoid stationar y images a s much as possible . Stationar y
images are images that remain on-screen for extended per io ds o f
time . Example: on-screen menus, black bars and time displays. If you
must use stationar y images, reduce screen contrast and brightness
to avoi d sc re en d am ag e.
• Unplug the TV befor e cl ea ni ng .
• Clean the TV and fr ame with a soft, damp cloth. Neve r us e
substances such as alcohol, chemicals or household cleaners o n th e
TV.
• Risk of damage to the TV screen! Never touch, pus h, rub or
strike t he s cr ee n wi th a ny object.
• To avoid deformations and color fading, wipe off water drops
as soon as possible.
• Note: Stationar y images may result in permanent damage to
the TV screen.
• Do not display stationar y images on the LCD screen for more
than two hours as this may result in ghost images. To pre vent this,
reduce screen br ightness and contrast.
• Viewing progr ams in the 4:3 for mats for extended periods of
time may leave different traces on the left and r ight edges of the
screen as well as along the border s of the image. Avoid using this
mode for extended peri od s of t im e.
• Displaying stationar y images from video games or computer s
for an extended peri od o f ti me m ay result in par tial after-images
and the appear ance of ghost images caused by screen burn. Reduce
screen brightness and contrast accordingly when using the TV in
this way.
• Ghost images, par tial after-images, and other traces that
appear on the TV screen as a result of the above are not covered by
the warranty.
4
Page 5
INITIAL SETUP
Read safety
Please read the safety instr uctions first before you u se t he TV.
In Help, go to S afety and Screen care .
TV stand installation and wall
mounting instructions
TV stand installation
You can find the instructions on how to install the TV stand in
the Quick Star t Guide that come together in the car to n box
when you unpack the TV. In case you have misplaced your Quick
Star t Guide, you can download it from www.philips.c om . Use the
product type number of the TV t o lo ok for the Quick Star t Guide
to download.
Wall mounting instructions
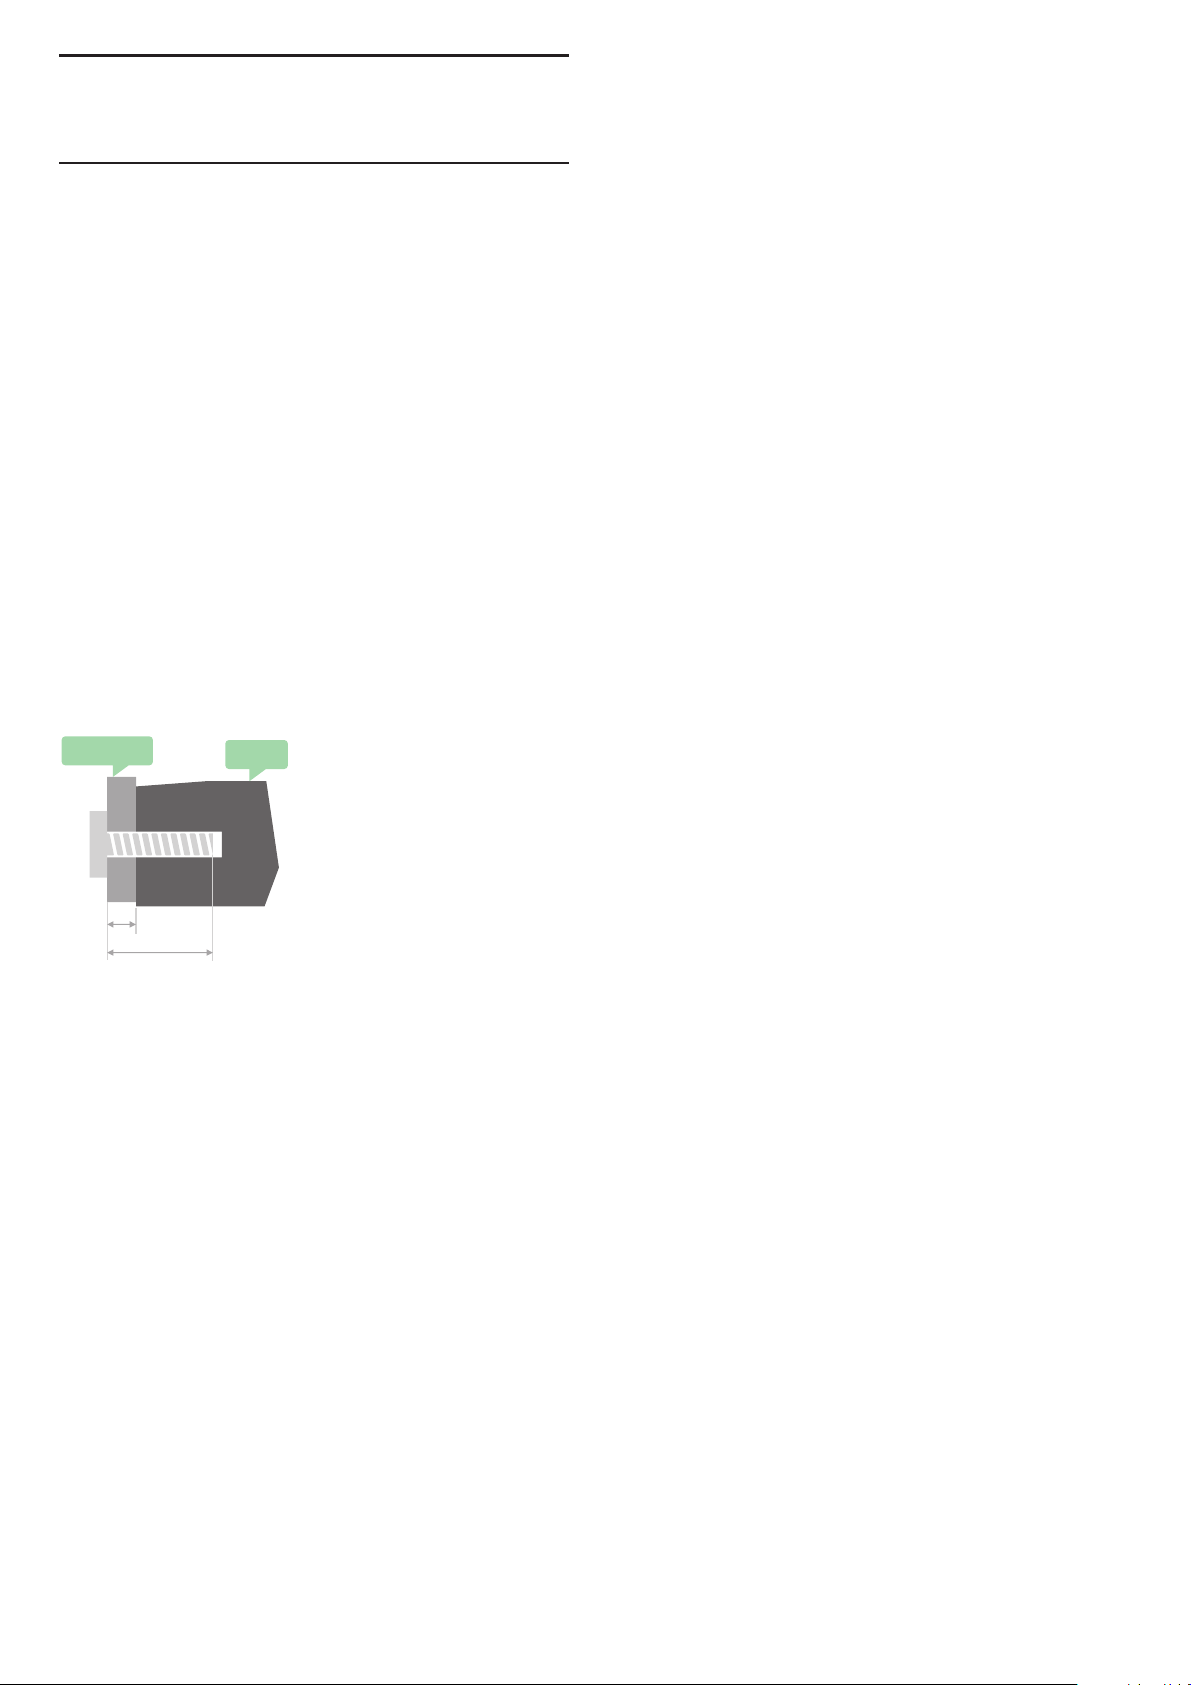
Your TV is also prepared for a VESA –compliant wall mount
br acke t (s ol d se pa rately).
Use The following VESA code when purchasing the wall mount.
To fix the br acket securely, use screws with a length indicated
in the drawi ng .
• Make sure that powe r pl ug i n th e wa ll s oc ket is accessible at all
time .
• Tips: If yo u do n ot u se t he TV for a long period of time, please
unplug the power cord.
Antenna cable
• Inser t the antenna plug fir mly in to t he AN TE NN A so cket at
the back of the TV.
• You can connect your own antenna signal from an antenna
distribu ti on s ys te m. Use an IEC Coax 75 Ohm RF antenna
connector. Use this antenna connection for DVB-T and DV B- C
input signals.
Satellite dish
For PHS and PFS models.
Attach the satellite F-type connector to the satellite connection
SAT at t he b ac k of TV.
VESA
L
min.&max.
Tips: This picture is only for reference.
Take note of the fo ll owing, the "L" is stand for the thickness of
VESA.
40PFS4052/60 :
VESA MIS-F 200x100mm.
Top side M4x25mm.
Bottom side M4x25mm.
Caution:
Wal l mo un ti ng t he TV requires special skills and should only be
perfor me d by qualified per so nn el. The TV wall Mounting should
meet safety standards according to TV ’s we ight. A ls o re ad t he
safety precautions before positioning the TV.
TP Vision Europe B.V. bears no responsibility for i mp ro pe r
actions.TV mounting that results in accident, injur y or damage .
TV
Tips on placement
• Position the T V wh er e li gh t does not shine directly on the
screen.
• Position the T V up to 15cm away from the wall.
• The ideal distance to watch TV is 3 times its diagonal screen
size . When seated yo ur e yes should be level with centre of
screen.
Power cable
• Inser t the power plug into the outlet complete.
5
Page 6
Connecting Your Devices
About connection
Connectivity guide
Always connect a device to the TV with the highest quality
connection Available . Also use good quality cables to ensure a
good transfe r of p ic tu re and sound. If you need help to co nn ec t
severa l de vi ces to the TV, you can visit the Philips TV connectivity
guide. The guide offer s information on how to connect and which
cables to use. Go to www.connectivityguide .p hi li ps .c om .
Antenna port
DVB-T/T2
HDMI ports
HDMI Quality
An HDMI connection has the best picture and sound quality.
Use an HDMI cable for TV signal.
For best signal quality tr ansfer, use a High speed HDMI cable and
do not use an HDMI cable longer than 5 m.
HDMI MHL
HDMI 3 connection on the TV have HDMI MHL (Mobile High-
Definition Link).
HDMI CEC-Easylink
Easylink: Wi th E as yl in k you can oper at e a co nn ec te d de vi ce
with the TV remote control, EasyLink uses HDMI CEC(Consumer
Electronics Control) to communicate with the connected devices.
Devices must support HDMI CEC and must be connected with an
HDMI connection.
EasyLink setup: Th e T V co me s wi th E as yl in k sw it ch ed o n. Make
sure that all HDMI CEC settings are proper ly set up on the
connected EasyLink devices. EasyLink might not wor k with devices
from other brands.
HDMI CEC on other brands: Th e HD MI CEC fun ct ionality has
different names on different brands. Some examples are: Anynet,
Aquos Link, Bravia Theatre Sync, Kuro Link, Simplink and V ie ra Link.
Not all br ands are fully c om pa ti ble with EasyLink.
Example HDMI CEC branding names are property of their
respective owner s.
Operate devices: You can oper ate a device connected to HDMI
and set up with HDMI CEC of TV connections. Press MENU key to
enter the main menu and select SETTING, press OK key e nt er t he
setting menu, on the screen press / key to select HDMI CEC .
Press OK key to enter submenu, sel ec t CE C co nt ro l to tur n on and
you can adjust these options.
Easy-Link On or Off: Ent er t he s et ti ng m enu, on the screen
press / key to select HDMI CEC. Press OK key to enter
submenu, select CEC control to turn on or off.
Easy-Link Remote Control: If you want devices to communicate
but you don’t want to operate them with the TV remote control,
you can switch off Easy-Link remote control separately.
You can control mul ti pl e HD MI -C EC c om pl ia nt d ev ic es with
your TV remote control.
In the settings menu, select EasyLink Remote control and select
off.
DVI t o HD MI
If you have a Set-top box (a digital receive r) o r Re co rd er,
connect the antenna cables to run the antenna signal through the
Set-top box or Recorder fir st before it enters the TV. In this way,
the antenna and Set-top box can send possible a dd it io na l
channels to the Recorder to record.
If you still own a device that on ly h as a DVI connection, you can
connect the device to any of the HDMI connection with a DVI to
HDMI adapter.
Use a DVI t o HD MI a da pt er i f your device only a DVI
connection. Use one of the HDMI connection and add an Audio
L/R cable to Audio in for sound, on the back of the TV.
Copy protection
DVI a nd H DM I ca bles suppor t HDCP(High-bandwith Digital
Content Protection). HDCP is a copy protection signal that
prevents copying content from a DVD disc or Blu-ray Disc. Also
referr ed t o as D RM (D ig ital Rigital Management).
6
Page 7
Y Pb Pr - Audio L R
CVBS-Composite video is a high quality connection. Next to
the CVBS signal is the Audio left and r ig ht for sound.
COMPONE TN
Y Pb Pr
Component video is a high quality connection. The YPbPr
connection can be used for High definition (HD) TV signals.
Mini-YPbPr
Please use mini-YPbPr wire to make connection. Mat ch t he
YPbPr (green, bl ue , red) connector colours with the cable plugs
when you connect.
Use an Audio L/R cinch cable if yo ur d ev ic e al so h as s ou nd .
CVBS-Audio L R
CVBS-Composite video is a high quality connection. Next to
the CVBS signal is the Audio left and r ig ht for sound.
Audio Out- Optical (SPDIF-OUT)
Audio-Out-Optical is a high quality sound connection. This
optical connection can car r y 5.1 audio channels. If your device,
typically a Home Th ea tr e( HT S) , has no HDMI ARC connection,
you can use this connection with the Audio In-Optical connection
on the HTS. The Audio-Out-Optical connection sends the sound
from the TV to the HTS.
You can Press MENU ke y to e nt er t he m ai n me nu and select
SOUND, press OK key e nt er t he s ub me nu, then on the screen
press / key to select SPDIF Mode, pr es s / key t o ad ju st
the options, like PCM, Auto, off.
Leave t he c ar d in t he s lo t pe rmanently.
It may take a few m inutes before the CAM is activated.
Removing the C AM will deactivate the broadcast service on the
TV.
If a C AM is inser t ed a nd s ub sc ription fees are paid,(connection
method can differ), you can watch the TV broadcast. The inser ted
CAM is exclusively for your TV.
Set-top box-STB
Digit al Rece ri ver S et Box
TV
Use 2 antenna to connect the antenna to the Set-top box(a
digital receiver) and the TV.
Next to the antenna connections, add an HDMI cable t o
connect the Set-top box to the TV.
Auto Standby
If you only use the remote control of the Set-top box. Do this to
prevent the TV from auto standby after a 5 hour period without a
key on the remote control of the TV.
To set Auto Standby, press MENU key and select TIME and press
OK key.
TIME > Aut o St an dby and set the slider bar to off.
Satellite receiver
DVB-S/S2
Common interface-CAM
CI+
COMMON INTERFACE
FRONT
CAM
This TV is ready fo r th e CI c on di ti on al Ac ce ss .
With CI+ you can watch premium HD programs, like movies
and spor ts live offered by digital TV broadcasters in your region.
These programs are scrambled by th e TV broadcaster and
descramble d with a prepaid CI+ module.
Contact a digital TV broadcaster for more information on
terms and conditions.
CAM
Inser t a C AM m od ul e.
Switch off the TV befor e in se r ting a CAM.
Use the CAM for the correct method of inser tion. Incorrect
inser tion can damage the C AM a nd TV.
Use the CI Interface slot on the TV to inser t the C AM card.
With the front of the card facing to you, gently inser t the CAM
as far as it will go.
SMART CARD
State llite R eceri ver
Connect the dish antenna cable to the satellite receiver.
Next to the antenna connections, add an HDMI cable t o
connect the Set-top box to the TV.
Auto Standby
If you only use the remote control of the Set-top box. Do this to
prevent the TV from auto standby after a 5 hour period without a
key on the remote control of the TV.
To set Auto Standby, press MENU key and select TIME and press
OK key.
TIME > Aut o St an dby and set the slider bar to off.
7
Page 8
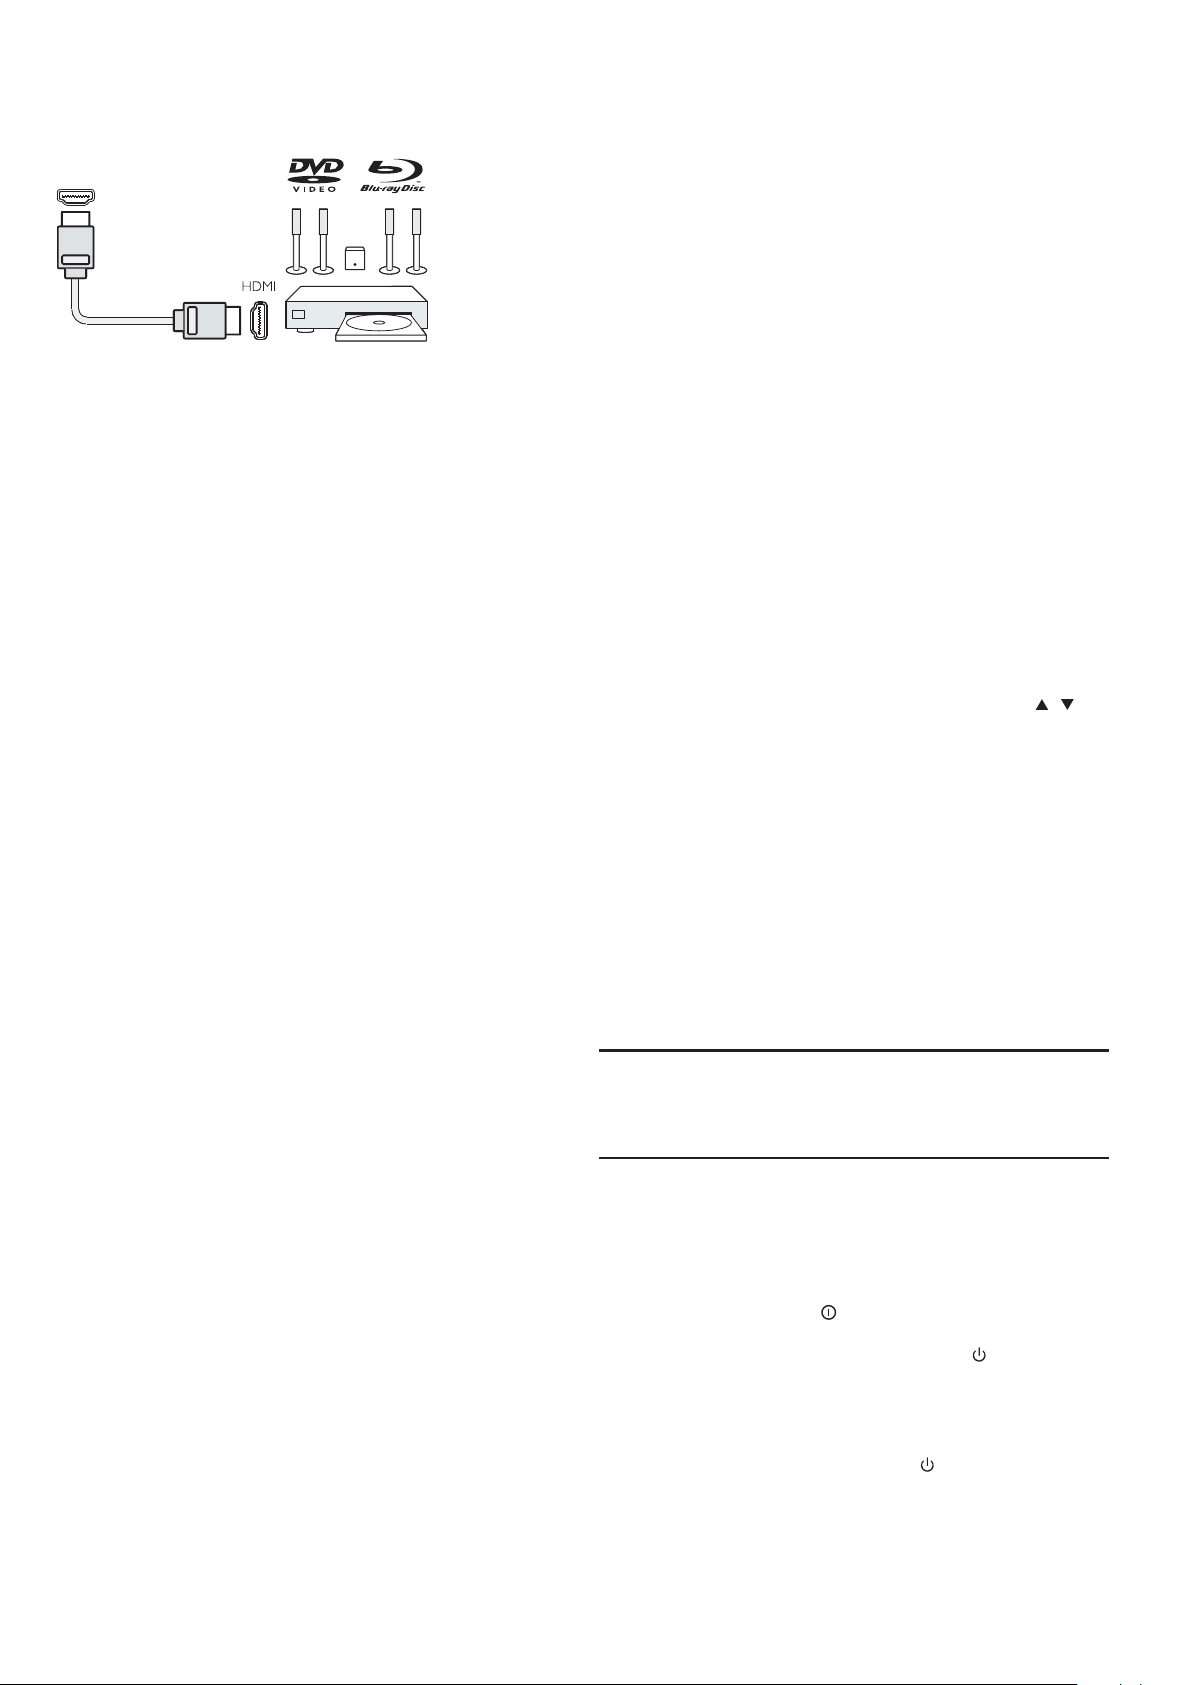
Home Theatre System
Connect with HDMI ARC
HDMI
(ARC)
Use an HDMI cable to connect a Home Theatre System (HTS)
to the TV. You can connect a Philips Soundbar or an HTS with a
built-in disc playe r.
HDMI ARC
HDMI 1 connection on the TV have HDMI ARC (Audio Return
Channel). If the device,typically a Home Theatre System(HTS),
also has the HDMI ARC connection, connect it to HDMI 1 on this
TV. With the HDMI ARC connection, you do not need to connect
the extr a audio cable that sends the sound of the T V pi ct ur e to
the HTS. The HDMI ARC connection combines both signals.
Audio to video synchronisation (sync)
If the sound does not match the video on screen ,you can set a
delay on most Home Th ea tr e Sy st em w it h a di sc player to match
the sound with video.
Connect with HDMI
Use an HDMI cable to connect a Home Theatre System (HTS)
to the TV. You can connect a Philips Soundbar or an HTS with a
built-in disc playe r.
If the Home Theatre System has no HDMI ARC connection,
add an optical audio cable (Toslink) to send the sound of the TV
picture to the Home Theatre System.
Audio to video synchronisation (sync)
If the sound does not match the video on screen, you c an s et a
delay on most Home Th ea tr e Sy st em w it h a di sc player to match
the sound with video.
Home Theatre
TV while the TV is switch on.
The TV detects the flash dr ive an d sh ow a window with a tips to
whether you can browse the USB flash drive.
If the tips is disappeared, you can press SO UR CE key, select
MULTIMEDIA and press OK key to enter.
Computer
You can connect your computer to the T V an d use the T V as a
PC monitor.
With HDMI
Use an HDMI cable to connect the computer to the TV.
With DV I to H DM I
Alternatively, you can use a DVI to HDMI adapter to connect
the PC to HDMI and an audio L/R cable (mini-jack3.5mm) to
AUDIO IN L/R on the back of the TV.
With VGA
Connect the PC IN jack (HD15-HD15) to VG A Port, on the
back of the TV. Then connect the audio cable to PC-AUD IO for
sound.
Headphone
You can connect a set of headphone to HEADPHONE Por t on
the back of the TV. Press +/- key on the remote control to adjust
the volume .
USB interface
Inser t USB storage device into USB interface of the TV. P re ss
SOURCE key to enter the signal input menu, the n pr es s / key
to select MULTIMEDIA. Press O K key to enter the USB
multimedia.
Note:
1. USB function support file format as,
PHOTO/M US IC /M OVIE/TEXT, the USB device format can only be
FAT/FAT32 system.
2. When connecting the USB por t on a n ex te rnal device current
is exceed 500mA, It will be caused damage of the TV.
3. When the USB device is wor ki ng , do not pull out immediately,
It will be caused damage of the TV system or the USB device
system.
Blue-ray Disc player
Use a High speed HDMI cable to connect the Blue-ray Disc
player To th e TV.
If the Blue-ray Di sc p layer has EasyLink HDMI CEC, you can
oper ate the player with the TV remote control.
DVD player
Use an HDMI cable to connect the DVD player to the TV.
If the DV D pl ayer has EasyLink HDMI CEC , you can operate
the player with the TV remote control.
Game console
HDMI: For best quality ,connect the game console with an
High speed HDMI cable to the TV.
Y Pb Pr- Audio L R: Connect the game console with a
component video cable (Y Pb Pr) and add an audio L/R cable fo r
sound to the TV.
CVBS- Au di o L R: Connect the game console to TV with a
composite cable (CVBS) and audio L/R cable to the TV.
USB flash drive
You can view photos or play your music and videos from a
connect USB flash dr ive.
Inser t a USB flash drive in one of the USB connections on the
Switch on
Power on/off, standby
Power on
Before you switch on the TV, make sure the power supply is
stable . When the TV is powered on, the power indicator is lights up.
If the TV have power s wi tc h " ", you can press "I" end to tu rn
power on, and press "O" end to tur n power off.
When the power indicator is lights up, press " " key on the
remote control or on the panel control of the TV, and then the TV
system will be r unning up.
Standby
When the TV system is ru nn in g, press " " key, and then the TV
will be switch to standby status.
8
Page 9
Power off
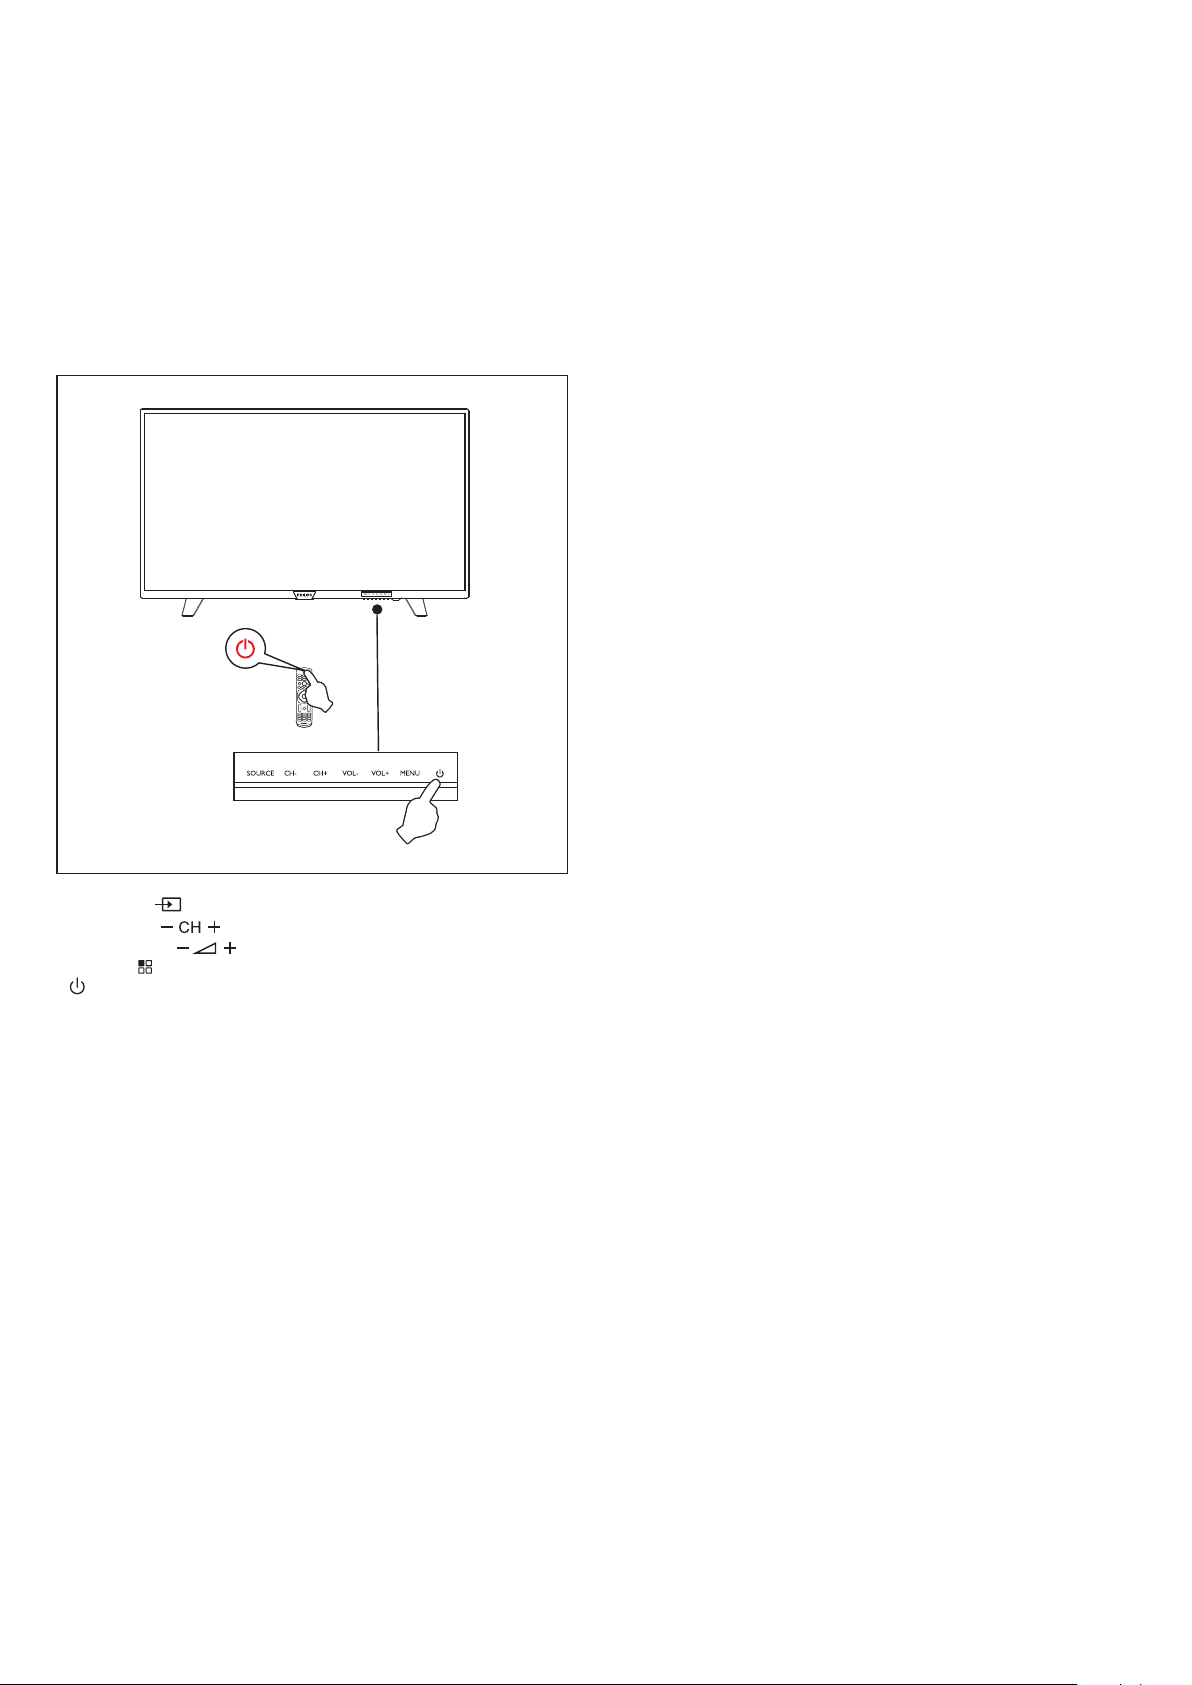
To switch the TV off completely, pr es s th e ha rd S wi tc h or
unplug the power cord, and then the power indicator will be
extinguished. If you d o no t us e th e T V for a long time, please
unplug the power cord.
Keys on TV
If you lost the remote control or its batteries are empty, you
can still do some basic TV oper ations.
View the control buttons as below:
40PFS4052/60
1. SOURCE ( ): Display the signal source list.
2. CH-/CH+ ( ): Switch the previous/next channel.
3. VOL-/VO L+ ( ) : reduce/Increase the volume.
4. MENU ( ): turn on/off the main menu.
5. : Tur n on/off the TV, to cut off power s up ply, please unplug the
power cable .
9
Page 10
TV GUIDE
SETUP
FORMAT
Remote Control
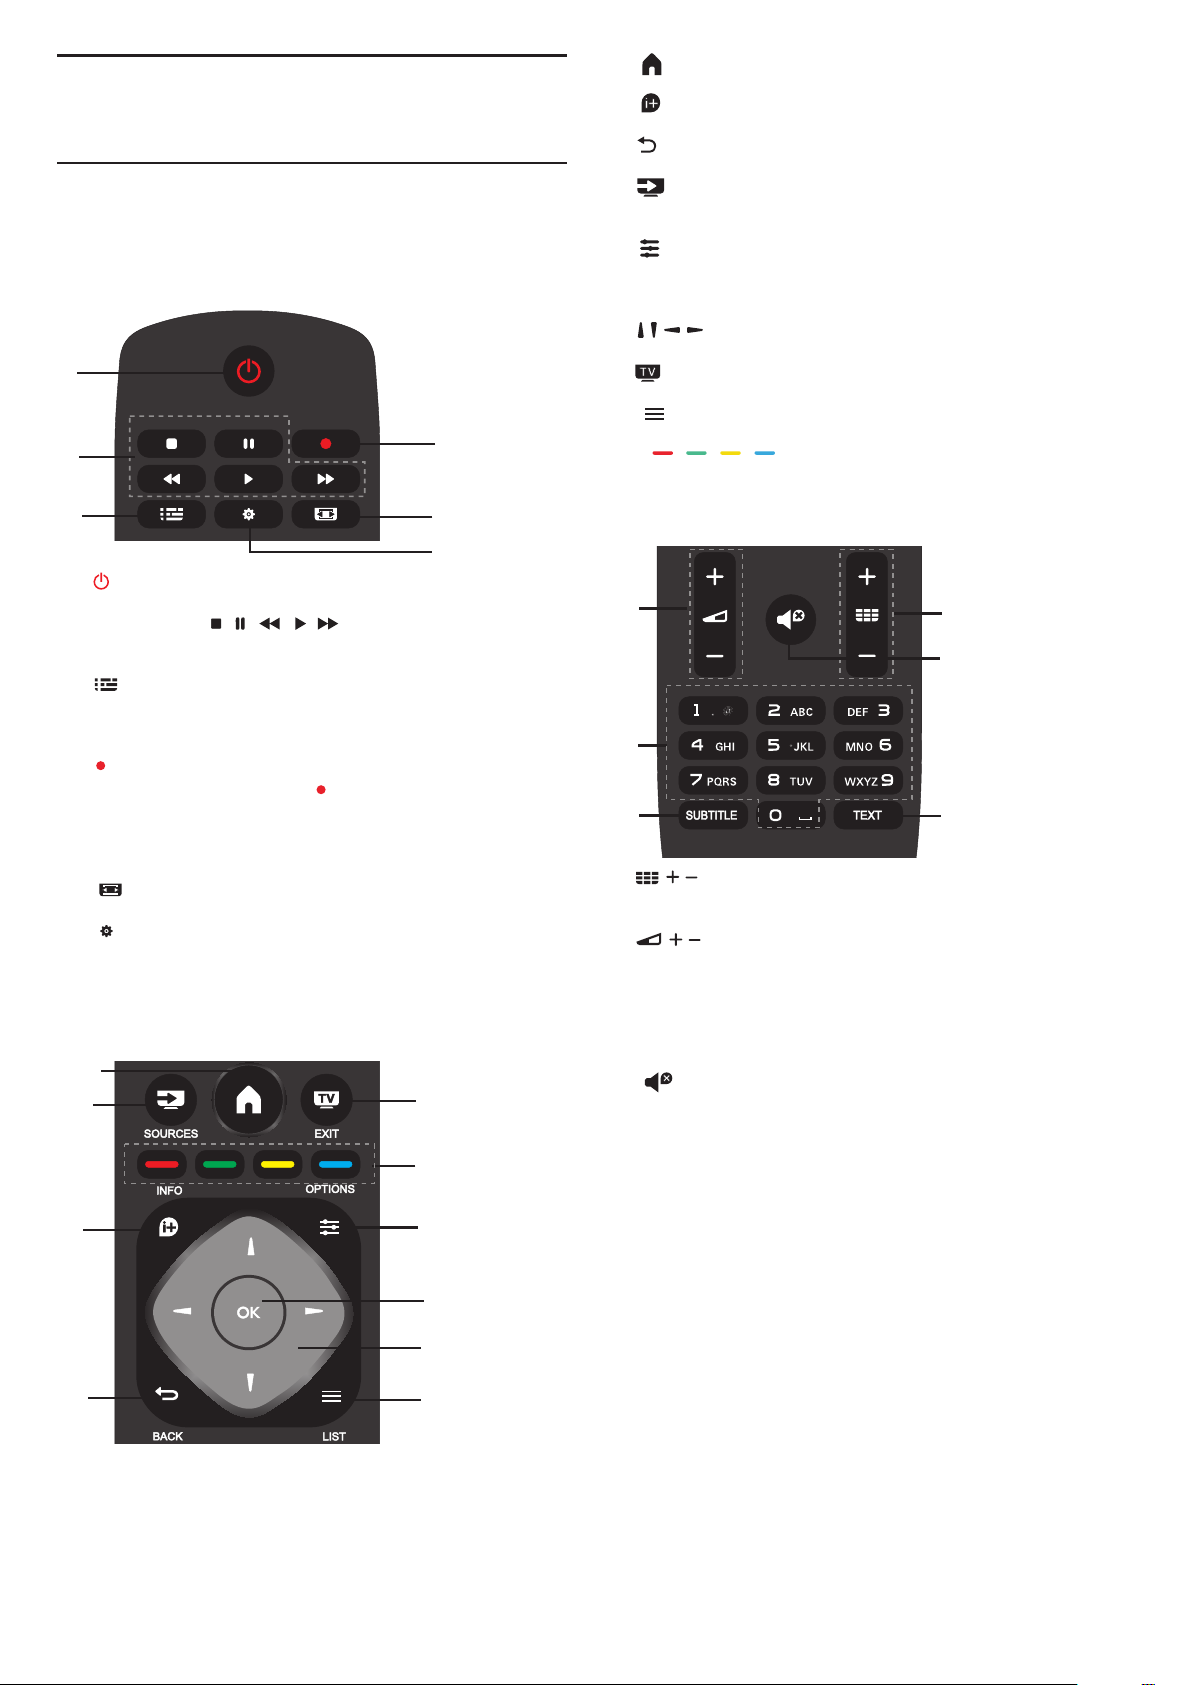
Key overview
Top view
1
2
3
1. Standby / on :
- To switch the TV on or back to Standby.
2.Play back keys
, , , ,
- Shor tcut keys in USB mode: STOP, PAUSE, REWIND, START,
FAS T FO RWARD.
3. TV GUIDE
- An Instant access to TV program guide.
- Availability of electronic program guide (EPG) is dependent
on broadcaster s or operator s.
4. Recording
- To record TV progr am, press ( Record) on the remote
control.
- To schedule a recording of an upcoming TV program, press TV
GUIDE then select the TV program you wish to record. Press
(Record) on remote control to set the recording schedule .
5. FORMAT
- Display the image aspect ratio.
6. SETUP
- Display the setting options on the TV s cr ee n you can adjust
these items by yourself.
Middle view
1
4
4
5
6
8
10
1.
- Tur n on/off the menu.
2. INFO
- Display the program information when it is available .
3. BACK
- Return to the previous channel.
4. SOURCES
- To open or close the Source menu- the list of connected
devices.
5. OPTIONS
- Select an item of option settings for the TV.
6. OK
- In menu mode: confir m the input or selection.
7. Arrow/ navigation keys, to navigate up, down, left or
right.
8. EXIT
- Press this key to exit menu and DTV.
9. LIST
- Look through channel list.
10. Color ke y
- The button’s f un ct io n follow the on-screen instr uctions.
Bottom view
2
3
4
1. /
-To Power on and switch to the previous/next channel in the
channel list. To open the previous/next page in Text /Teletext.
2. /
- To adjust the vo lu me l evel
3. Numeric keys (0~9)
- Select a channel or value.
4. SUBTITLE
- Display the subtitle message when current channel has
subtitle option.
5.
- To mut e th e so un d or t o re st or e it .
6. TEXT
- To open or close Text /Teletext.
1
5
6
2
3
5
6
7
9
10
Page 11

IR sensor
The TV can receive commands from a remote control that
uses IR(infr ared) to send commands. If you use such a remote
control, hold it close to the TV and make sure you point the
remote control at the infr ared sensor on the front of the TV.
Make sure that the line-of-sight between the remote control
and TV is not blocked by f ur niture, walls or other objects.
Batteries
1. Slide the batter y do or i n th e di re ct io n sh own by the arrow.
2. Inser t two type AAA-LR03-1.5V batteries into remote
control, make sure the + and the – ends of the batte ries line up
correctly.
3. Reposition the batter y d oo r.
Cleaning
Your Remote control is treated with a scratch-resistant
coating.
To clean the remote control, use a soft damp cloth. Neve r us e
substances such as alcohol, chemicals or household cleaners o n
the remote control.
Watching TV channels
Tune to a channel
To watching TV channels, press SO UR CE key to show signal
menu, you can select Satellite , DTV, ATV and press OK key to enter.
Switch channels
To switch channels, press CH-/CH+ key.
If you know the channel num be r, type in the number in current
TV channel, then the TV will auto Switch the number channel by
you typed.
Previous channel
To switch back to the previous tuned channel, press BACK key
to retur n the precious channel
Radio channel
If digital broadcasting is availabl e, di gi ta l radio stations are
installed during installation. Switch to a radio channel just like you
switch to a TV channel.
About move Channels
1. While you watching TV, press MENU key a nd s el ec t
CHANNEL, press OK key to enter.
2. In channel menu, select Channel Edit and press OK key t o
enter into channel list.
3.In channel list, you c an p re ss key to select your
channel, press key on the remote control to move channel, an d
▲/▼
press key to move i t.
4. Press OK key confir m
▲/▼
TV channels
Channel list
About Channel list
After a channel installation, all channels appear on the channel
list. Channels are show wi th t he ir n am e if t hi s in formation is
available .
There is a channel list with all installed channels. You can only
filter this list to show TV or only Radio channels.
With a channel list selected, press / key to select a
channel, then press OK key to watch the selected channel. You
can page up or page down the channels in that list when using
CH-/ CH+ key.
Radio stations
If digital broadcasting is availabl e, di gi ta l radio stations are
installed during installation. Switch to a radio channel just like you
switch to a TV channel.
Open a channel list
To open the current channel list..
Press SOURCE Key to switch to TV mode(DTV or ATV).
Press LIST key to open the cur re nt c ha nn el l is t.
Press LIST key again to close the channel list.
Filter a channel list
You can filter a list with all channels. You can set the channel list
to show only TV channels or only Radio stations.
To set a filter list with all channels.
1. While watching a TV c ha nn el .
2. Press / key to select a list.
3. You can select ALL, DTV or ATV, HD, Ra di o li st e tc .
Lock a channel
Lock and unlock a channel
To preven t ch il dr en f ro m wa tc hi ng a c ha nn el o r a pr og ramme,
you can lock channels or lock age Rated programme.
You can lock a channel to preve nt c hi ld re n fr om w atch in g it. To
watching a lock channel you need to enter the lock code. You can’t
lock progr ammes from connected devices.
To se t th e lo ck c ha nn el
1. While watching TV c ha nn el s, press MENU key and select
LOCK, press OK key to enter.
2. Input the code in lock system to log in, select channel lock and
press OK key to enter the channel list.
3. Press key to select your channel and press key on
the remote control to lock the channel, press ke y ag ai n to
unlock the channel.
Parental Guidance
To preven t ch il dr en f ro m wa tc hi ng a p ro gr amme not suitabl e for
their age, you can use Parental Guidan ce.
Some digital broadcaster s have age r ated their programmes.
When the age r ating of a programme is equal to or higher than the
age you have set as age r at in g for your child, th e pr og ramme will be
locked.
To set an age rating..
1. While watching TV c ha nn el s, press MENU key and select
LOCK, press OK to enter.
2. Input the code in lock system to log in, select Parental
Guidance and press OK key to enter.
3. Press / key to select yo ur a ge r ating.
The TV will ask for the code to unlock the progra mm e. For some
broadcasters/operator s, the TV only locks programme with a
higher r ating.
▲/▼
Favourite Channels
About Favourite Channels
You can create a favour it e ch an ne l li st t ha t on ly holds the
channels you want to watch. With The Favourite channel list
selected, yo u wi ll o nly see your favour ite channels when you switch
Through channels.
Create a Favourite list
1. While you watching TV, press MENU key and select
CHANNEL, press OK key to enter.
2. In channel menu, select Channel Edit and press OK key to
11
Page 12

enter into channel list.
3. In channel list, you can press / key to select your
channel, long press key on the remote control to set your
favou rite channel, and l on g pr es s key again to cancel it.
4. Press BAC K key to retur n the current channel, you can long
press key to show the Favouri te l is t.
Rename channel
1. While you entering ATV channel, press MENU ke y an d se le ct
CHANNEL, press OK key to enter.
2. In channel menu, select Channel Edit and press OK key to
enter into channel list.
3. You can press / key to select your channel, pre ss key
on the remote control to rename the channel.
4. Press OK key to confirm the channel name.
Open channel menu
Press MENU key on the remote control, th en pre ss / key
to select CHANNEL on the screen, press OK key to enter the
channel menu.
Channel
to enter satellite signal.
2. Press MENU key and select Channel, then press OK key to
enter channel menu.
3. Select Auto tuning and press OK ke y to e nt er Tu ni ng S et up
menu. You can press / key to select Countr y, Satellite , Scan
Mode , Channel Type, Service; an d pr es s / key adjust these
options, then press OK key to start tuning.
4. The TV will search for satellites available o n th e alignment of
your antenna dish. Th is m ay
Take a fe w mi nutes. When the tuning was finished, the channel
will store in channel list, yo u ca n pr es s CH L IS T key on the remote
control to show these information.
Tips: Pr es s ME NU key to exit tuning.
Channel Edit
Select CHANNEL, press OK key to enter channel menu , select
Channel Edit, press OK key enter channel list, press / key to
select the item you’d like to edit. You c an s el ec t th e co lo r keys to
edit these progammes with the tips on the screen.
Delete: Pr es s key on the remote control to delete the
selected channel.
Move: P re ss key on the remote control to highlight a channel,
and press / key to move, then press key t o co nfir m location.
Skip: Pr es s key on the remote control to skip the channel, and
press key again to cancel it.
Favourite: Lo ng p re ss key on the remote control to set your
favou rite channel, and l on g pr es s key again to cancel it.
Channel installation-Antenna,
Cable
Update channels
Programme scanning
Before you watching the programs of the TV, you need to scan
the programs. (Note: Make sure that the a nt en na i s co nn ec te d
proper ly before scanning).
Auto Tuning
Press MENU key to enter the main menu and select
CHANNEL, press OK key to enter channel menu, select Auto
Tuning, press key to open tuning setup. You can press / key
to adjust these options, and then press OK key t o st ar t searching.
ATV Ma nual Tuning
Select CHANNEL, press OK key to enter channel menu , select
ATV Ma nual Tuni ng , then press key to en te r su bm enu. You can
press / key to select the item to set, and then press / key
to adjust the options or search the channels by manual.
DTV Manual Tuning
Select CHANNEL, press OK key to enter channel menu , select
DTV Manual Tuning, then press / key to select channel, pr es s
OK key to star t s ea rc hi ng .
Channel installation-Satellite
Watching Satellite Channel
Press SOURCE key on the remote control to show menu.
Press / key to select Satellite , and p re ss O K key to enter
Satellite channel.
Satellite Channel installation
Before you watching satellite channel, you have to install
satellite channel. This TV has a built-in satellite DVB-S/S2 receiver.
Connect the cable from your satellite dis h di re ct ly to the T V. Use
a coaxial cable fit for c on ne ct in g a satellite antenna dish. Make
sure your satellite dish is perfectly a li gn ed before you star t
installation.
To install satellite channel...
1. Press SOURCE key and select Satellite, then press OK key
Schedule List
Select CHANNEL, press OK key to enter channel menu , select
Schedule List, Press OK key to look through the Channel schedule
list infor ma ti on o r Re co rd ed l is t in formation (it is available only in
DTV mode).
Signal information
Select CHANNEL, press OK key to enter channel menu , select
Signal infor ma ti on , Press OK key to look through the signal
inform at io n (i t is available only in DTV mode).
CI information
Select CHANNEL, press OK key to enter channel menu , select
CI infor ma ti on , Press OK key to look through the CI information (it
is need CI C AM).
Software Update(OAD)
Select Off or On.
Dish Setup
Manual Installation
Press / key to select Dish Setup, then press OK key to enter
the satellite channel Manual installation.
Add a satellite
In the Dish Setup menu, press / key to highlight left, middle
or r ight column. Wh en t he s at el li te i s hi gh li gh ted ,you can press
EXIT key to return p re vi ou s me nu.
1. Press key on the remote control to en te r Add m enu.
Satellite Name: Pr es s navigation ke y to e nt er r en am e page .
Use navigation keys to set a new complete n am e.
Longitude Direction: Press / navigation key to select
desired option.
Longitude An gl e: Press / key n avigation key to move the
cursor and press number keys on the remote control to in pu t
desired value.
12
Page 13

Band: Pr es s navigation key to select desired op ti on .
2. Press key on remote control to enter Edit menu. The
oper ations of Edit menu ar e th e sa me a s Add menu.
3. Press key on the remote control to en te r Sc an m enu.
Press / navigation ke y to s el ec t your desired item. Press /
navigation key to set Channel Search ,such as: Scan Mode ,
Channel Type and Ser vice Type.
4. Press key on the remote control to de le te t he s el ec te d
satellite.
/
Transponder Setup
Press TV GUIDE key on the remote control to switch satellite
and Transponder.
1. Press key on remote control to enter Add m enu.
Frequency: Press / navigation key t o move the cur so r an d
press number keys on remote control to input desired value.
Symbol (ks/s): Pre ss / n avigation key to move the cur sor
and press number keys on remote control to input desired value.
Polarity: Press / nav ig at io n key to select desired option.
2.Press key on remote control to enter Channel Search
menu. Press / navigation key to select yo ur d es ir ed i te m.
Press / navigation ke y to s et C ha nn el S ea rc h, such as: Scan
Mode , Channel Type and Service Type .
Ku_HOTBIRD Setup
When the Ku_HOTBIRD is selected, you can press /
navigation key to select these Item.
LNB (Low Noise Block) Type
Press / navigation ke y to e nt er s ub me nu. Then press /
navigation key to select desired opti on .
LNB Power
Press / navigation ke y to s el ec t de si re d op ti on .
22 kHz
Press / navigation ke y to s el ec t de si re d op ti on .
Ton eb ur st
Press / navigation ke y to s el ec t de si re d op ti on .
DisEqc1.0 (Digital Satellite Equipment Control)
Press / navigation ke y to s el ec t de si re d op ti on .
DisEqc1.1
Press / navigation ke y to s el ec t de si re d op ti on .
Motor
Press / navigation ke y to s el ec t de si re d op ti on .
TV Program Guide
What you need
With the TV guide you can View a list of the current and
scheduled TV programmes of your channels. Depending on where
the TV guide informatio n (d at e) i s co mi ng f ro m, analogue and
digital channels or only digital channels are shown. Not all channels
offer TV guide information.
The TV can collect TV guide information fo r th e ch an ne ls t ha t
are installed on the TV(eg: the channels you watch with TV). T he TV
can’t collect the TV guide inform at io n for channels viewed from a
digital receiver.
Using the TV Program guide
Open the TV guide
Press ( key to access TV progra m gu id e li st ( it i s
available o nly in DTV mode). You can select the color ke ys t o ed it
these programmes with the tips on the screen. The color keys
function introduce as below:
Record
Press key on the remote control to record the progra mm es
you wished.
Remind
You can press key o n th e re mo te c on tr ol t o se t re mi nd t he
programmes you wished.
Prev Day
Press key on the remote control to view progra mm es l is t of
the previous day.
Next Day
Press key on the remote control to view progra mm es l is t of
the next day.
TV GUIDE)
13
Page 14

Recording and Time-shift
Recording
What you need
You can record a digital TV broadcast and watch it later.
To record a TV programme you need...
1. A connected USB Hard Drive formatted on this TV.
2. Digital TV channels installed on this TV.
3. To receive channel information for the TV Guide on screen.
4. A reliable TV clock setting, If you reset the TV clock manually,
the recording may fail.
You can’t record when you are using Time-shift function.
In ter ms enfor ce me nt o f co pyright legislatio n, some DV B
provider s can apply different restri ct io n by means of DRM(
Digital Right Management) technology. In case of broadcasting
protected channels, recording, record validity or number of views
may be restr icted.
Recording may be completely prohibited, in case of tr yi ng t o
record a protected broadcasting or play back an expired
recording, an error message can appear.
Record a programme
In DTV mode, press ( Record) key to begin recording the
progamme . The recording function need connect with a USB
Hard Drive for matted on the TV.
To record the programme you are watching right now, pre ss (
Record) key on the remote control, then the recording will star t
immediately. When the progr amme was recording , you can select
■ key to stop it.
Schedule a recording
You can view and manage your recordings in the list of
recording. Next to the list of recordings, there is a separ ate list
for schooled recordings and reminder s.
Open or delete the list of recording
Select CHANNEL, press OK key to enter channel menu , select
Schedule List, Press OK key to look through the Channel
schedule list inform at io n or R ec or de d li st i nfor mation, press /
key to select schedule list or Recorded list. Pr es s / key to
select the recordings, and press OK key to play or press key on
remote control to delete the selected recording file. You can
press EXIT key to quit the list.
quit time-shift function. When you leave program for a shor t ti me ,
time-shift function can suspend and cache the playing program to
U disk. When you resume playing, the program can continue to be
played.
Replay
Since the TV stores the broadcast you are watching, you can
mostly replay the broadcast for a few seconds.
When you pause the programme , you can press (play) key to
play nor ma lly.
Sources
Switch a device signal
In the list of connections-the Source menu-you can find the
devices connected to the TV. Fro m th is S ou rc e me nu, yo u ca n
switch to a device .
Source menu
To open the sources menu, press SOURCE key on the remote
control. And then press / key to select the connected device,
press OK key to enter the signal source.
From standby
With the TV in standby, you can switch on a connected device
with your TV remote control.
Play
To switch on both disc player and TV f ro m st an dby and star t
playing the disc or programme immediately, press (play ) key on
the remote control.
The device should be with an HDMI cable and both TV and
device must have HDMI CEC switched on.
EasyLink
With EasyLink you can operate a connected device with the TV
remote control. EasyLink uses HDMI CEC to commun ic at e wi th
the connected devices. Devices mus t su pp or t HDMI CEC and must
be connected an HDMI connection.
Time-shift
What you need
You can use Time-shift function and resume watching it a bit
later.
Use Time-shift function you need...
1. A connected USB Hard Drive formatted on this TV.
2. Digital TV channels installed on this TV.
3. To receive channel information for the TV Guide on screen.
With the USB Hard Dr ive conn ec ted and formatted the TV
continuously stores the TV
Broadcast you are watching. When you switch to another
channel, the broadcast of the former channel is cleared. Als o
when you switch the TV to standby the broadcast is cleared.
You can’t use Time-shift function when you a re r ec or di ng .
Use Time-shift for a programme
In DTV mode, press key on the remote control ,time-shift
option menu will show on the screen, and the progr am is in
suspended status. press ■ key on the rem ot e co nt ro l to s to p an d
14
Page 15

Time
SETTING
Time settings
Sleep timer
With the sleep timer, you can set the TV to switch to standby
automatically after a preset time.
To se t th e sl ee p ti me r…
1. Press MENU key on the remote control, then press /
key to select TIME on the screen, press OK ke y to e nt er t he TIME
menu.
2. Press / key select Sleep Timer, then press / key to
adjust the value of standby time: Of f, 15minute , 30minutes,
45minutes, 60minut es , 90minutes, 120 minutes, 240 minut es .
Disable TV sleep timer :
Select the Off on the screen, then close the TV sleep timer.
Time Zone
Press / key select T im e Zo ne , the n pr es s / key to
adjust the time zone of different countr y.
Auto Standby
Press / key select Auto Standby, t he n pr es s / key to
adjust the time: Off, 3hour s, 4hours, 5hours.
OSD Timer
Press / key select OSD T im er, then press / key t o
adjust the menu display time ( 5 Seconds, 15Seconds, 30
Seconds).
Summer Time
Press / key select Summer Time, then press / key to
adjust the Summer Time: On, Of f, Auto.
General Settings
Language
Select a language for the TV system.
TTX Language
Select the language for Text/Tel et ex t.
Audio Language
Select the language for audio if the progr am me i s available.
Subtitle Language
Select the subtitle language if the programme is available .
Hearing impaired
Select the Hearing impaired on or off.
PVR file system
Manage the USB device for the recording progra mm e.
Aspect ratio
Adjust aspect ratio as: Zoom1, Zoom2, Auto, 4:3 , 16:9.
Blue screen
Turn in g on blue screen option ON will enable the TV s cr ee n to
turn blu e wh en t he re a re n o si gn al i np ut .
First time installation
When the TV was the fir st time installed, you can setup language ,
countr y, environment, auto tuning.
LOCK
System Lock
Select tur n on/off lock system. Block progr am option can work
when it is on state (The default password: 000 0) .
Set Password
Set new password.
Channel Lock
Press key to lock the progra mm e in t he c ha nn el l is t. You need
input the right password to view the progr amme when it is
locked.
Parental Guidance
Adjust the progr amme blocking level, this function help
Parents block unsuitable channel for their child age.
Key Lock
Select the Key Lock on or off.
Reset
Resetting the TV will cause all the settings to retur n to factor y
default status.
Software Update (USB)
Upgr ade software with the USB interface.
HDMI CEC-Easylink
Setup the HDMI CEC options.
Help
Enter the oper ation guide.
Home or Shop
If the Picture style is switched back to Vivid every time you
switch on the TV, th e TV l oc at io n is s et t o Sh op . A setting meant
for in-store promotion.
To set the TV for Home use…
1 - Press , select General settings and
press (r ight) to enter the menu.
2 - Select Location > Home and press OK.
3 - Press (left) repeatedly if necessary, to close
the menu.
15
Page 16
PICTURE
MULTIMEDIA
Picture Setting
Press MENU key to show main menu, select Picture icon and
press OK key to enter.
Picture Mode: press / key to set the picture display mode
such as: Per sonal, Vivid, Standard, Mild.
Contrast: pr es s / key t o ad ju st c on tr ast value of picture
(0~100).
Brightness: press / key to adjust brightness value of
picture (0~100).
Colour : press / key to adjust colour value of picture
(0~100).
Tint: press / key to adjust Tint value of picture (it is
available o nly in NTSC system).
Sharpness: pre ss / ke y to a dj us t sh ar pness value of
picture (0~100).
Colour Temp: press / key to set colour temperature of
picture such as: Cool, Normal, Warm.
Noise Reduction: pre ss / ke y to s et n oi se r ed uc ti on o f
picture such as: Off, Low, Middle, High, Default.
HDMI Mode: pre ss / ke y to s et t he p ic tu re o f HD MI
Mode .
SOUND
Sound Setting
Press MENU key to show main menu, select Sound icon and
press OK key to enter.
Sound Style: pre ss / ke y to s et t he s ou nd d is pl ay mode
such as: Standard, Music, Movie, Spor t s, Per sonal.
Treble: p re ss / ke y to a dj us t tr eble value of sound
(0~100).
Bass: pr es s / key t o ad ju st b as s va lu e of s ou nd ( 0~ 10 0) .
Balance: pre ss / ke y to a dj us t ba la nc e va lu e of s ou nd ( -
50~50).
Auto Volume Level: press / key to turn on or off the auto
volume level.
SPDIF Mode: pr es s / key t o se le ct t he S PD IF M od e of
sound, such as: PCM, Auto, Off.
AD Switch: pre ss / ke y to t ur n on or off the AD Switch.
From a USB connection
Inser t a USB device, press SOURCE ke y or M EN U key to
display menu, select MULTIMEDIA, an d pr es s OK key to enter
multimedia player.
Note: If want to exit MULTIMEDIA, please re-select the
source .
Photo
In the multimedia menu, press / key t o se le ct P ho to, and
press OK key enter. You can press / / / key to select the
picture in the File folder, then press START( ►) key on the
remote control to play the picture .
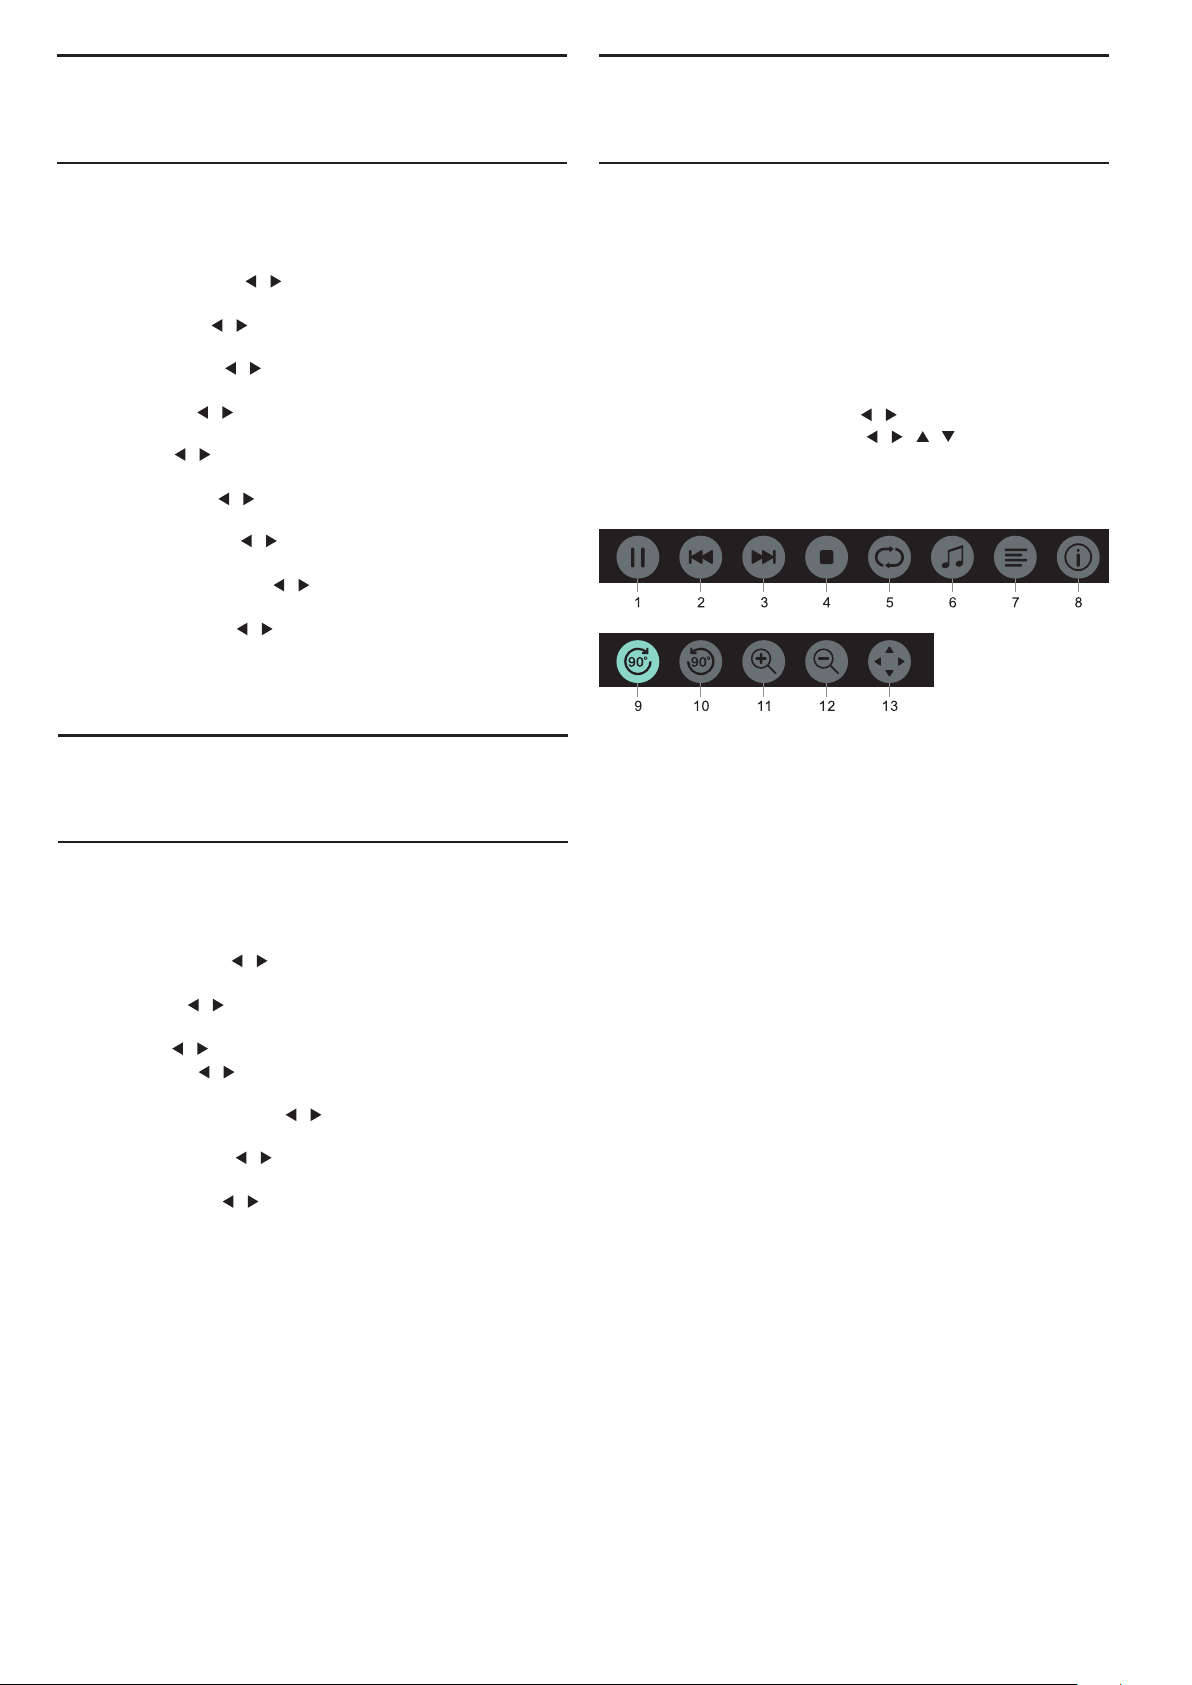
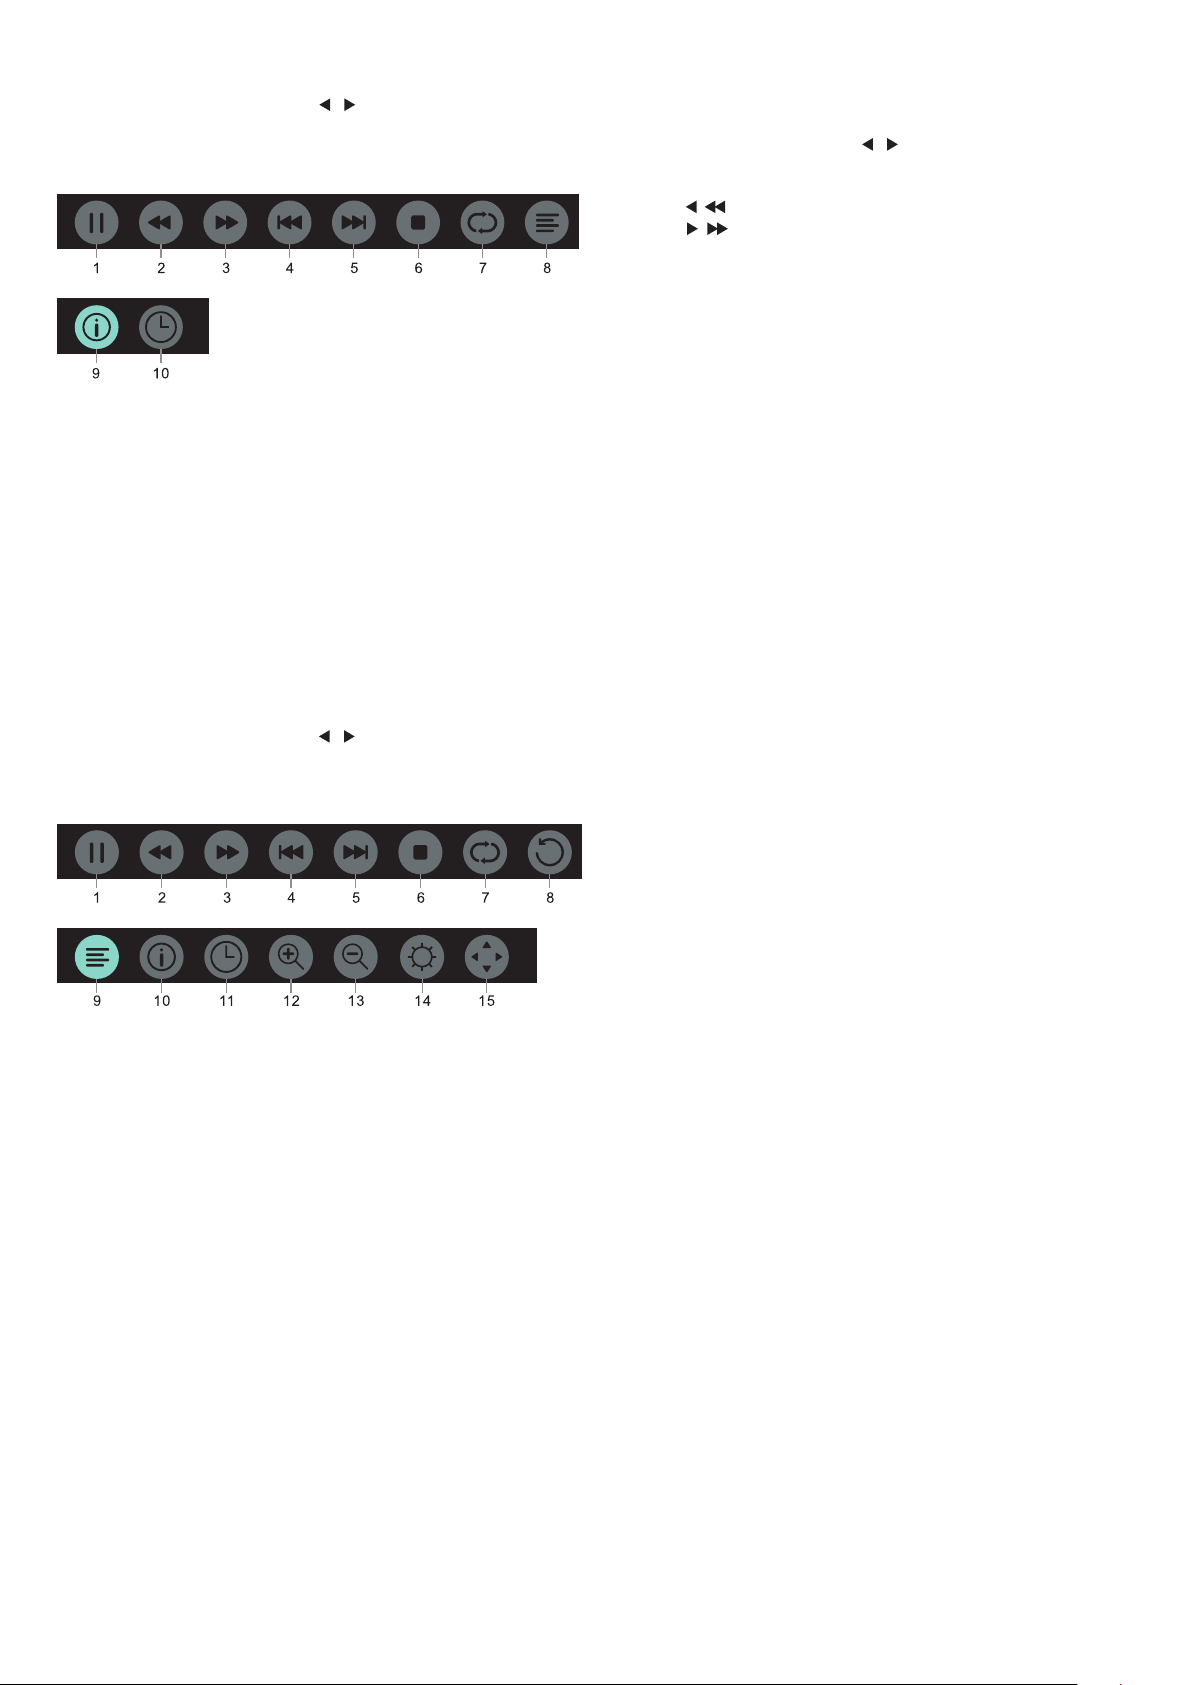
Picture player menu options:
1. Play / Pau se : Play / pause lantern slide .
2. Prev. : Play the previous picture .
3. Next: Play the next picture .
4. Stop: Stop playing picture and return back to previous
menu.
5. Repeat: Repeat playing picture: repeat1, rep ea t al l, repeat
none .
6. Music: Play background music.
7. Playlist: Show play photo list.
8. Info: Dis pl ay infor ma ti on o f ph ot o.
9. Rotate: Clockwise rotation photo.
10.Rotate: Counter-clockwise rotation photo.
11.Zoom in: Enlarge the photo.
12.Zoom out: Reduce the photo.
13.Move view: If the picture big enough to sur pa ss es t he
screen, yo u may use this function to move t he p ic tu re .
16
Page 17
Music
In the multimedia menu, press / key t o se le ct M us ic , and
press OK key enter. You can select the music in the File folder, and
press START(►) key to play on the remote control.
Music player menu options:
1. Play/Pau se : Play / pause mus ic .
2. FB: Press this ke y to f as t ba ck o f th e music, press START(►)
key to play normally.
3. FF: Press this ke y to f as t forward of the music , press
START(►) key to play nor mally.
4. Prev.: Play th e pr ev io us music .
5. Next: Play the next music .
6. Stop: Stop playing music and return b ac k to p re vi ou s me nu.
7. Repeat: Repeat playing music: repeat1, repeat all, repeat none.
8. Playlist: Show play mu si c li st .
9. Info: Dis pl ay infor ma ti on o f music.
10.Time picker : Select the time to play the music.
TEXT
The text menu options is same as Photo, please refer to photo
options.
In the multimedia menu, press / key t o se le ct TEXT, and
press OK key enter. You can select the T EX T in t he F il e folder, and
press START(►) key to play on the remote control.
1. Press / key to se le ct t he l as t pa ge .
2. Press / key to se le ct t he n ex t pa ge .
Movie
In the multimedia menu, press / key t o se le ct M ovie , and
press OK key enter. You can select the movie in the File folder, and
press START(►) key to play on the remote control.
Video player menu options:
1. Play / Pau se : Play / pause the video.
2. FB: Press this ke y to f as t ba ck o f th e vi de o, press START(►)
key to play normally.
3. FF: Press this ke y to f as t forward of the video, pr es s
START(►) key to play nor mally.
4. Prev.: Play th e pr ev io us v id eo.
5. Next: Play the next video.
6. Stop: Stop playing video and return back to previous menu.
7. Repeat: Repeat playing video: repeat1, rep ea t al l, repeat none.
8. SET A-B: Set A an d B, th e film will circulating play in the time
of A to B .
9. Playlist: Show play video list.
10.Info: Display infor mation of video.
11.Time picker : Select the time to play the video.
12.Zoom in: Enlarge the photo.
13.Zoom out: Reduce the photo.
14.Aspect Ratio: Adjust the aspect ratio: zoom1, zoom2, auto,
4:3, 16:9.
15.Move view: If the picture big enough to sur pa ss es t he s cr ee n,
you may use this function to move the picture .
17
Page 18

Specification
information
Display resolutions
Computer Formats: Resolution-refres h ra te :
FHD
640×480 60Hz
800×600 60Hz
1024×768 60Hz
1360×768 60Hz
1920×1080 60Hz
Video Formats:Resolution-refresh rate:
480i -60Hz
480p -60Hz
576i -50Hz
576p -50Hz
720p -50Hz, 60Hz
1080i -50Hz, 60Hz
1080p -50Hz, 60Hz
Multimedia
Suppor ted stor age device: USB (only FAT or FAT 32 USB
stor age devices are supported)
Compatible multimedia file format s:
Image: JPEG
Audio: Mp3
Video: MPEG 2 / MPEG4, H.264
Dimensions and weights
40PFS4052/60
Without base
Dimension (W×H×D) : 904×521×86(mm)
Weight: 5.9 Kg
With base
Dimension (W×H×D): 904×570×214(mm)
Weight: 6.1 Kg
Sound power
8W×2
Display resolution
40PFS4052/60 : 1920×1080
Tuner/Reception/Transmission
Aerial input: 75 ohm coaxial (IEC75)
Suppor ted Systems:
ATV: PAL, SECAM, NTSC
DTV: DVB-T/C/T2
Remote Control
Batter ies: 2×AAA
Power Supply
Main Power Supply: 100-240V~, 50/60Hz
Standby Ener gy C on su mp ti on : ≤0.5 W
Environment Temperature: 5-40 ℃
Power Consumption:
40PFS4052/60 : 55W
18
Page 19

Software
Software update
It might be necessar y t o up da te t he TV software . You need a
computer and a USB memor y d ev ic e to u pl oa d th e so ft wa re o n
the TV. Use a USB memory device with 256MB free space . Make
sure that wr ite protection is switched off.
1. Sta rt the update on TV.
To st ar t the software u pd at e....
Press MENU key, select SETTING and press OK key. Select
Software Update (USB), press OK key to star t update the
software .
Identify the TV.
Inser t the USB memor y into one of the USB connections of
the TV. An identification file is wr itten on the USB memory
device .
Download the TV s of tw ar e.
Inser t the USB memor y into you r co mp ut er.
On the USB memor y d ev ic e, se le ct l oc at e file and check it
carefully. View the software name as below:
Model: Software name
40PFS4052/60 MSD3463_S_ N51_48.bin
After download these files, and copy them onto the USB
memor y de vi ce . Do not pl ac e th e file in a folder.
• Inser t the USB memor y device to the TV.
• Press MENU key to show Main menu, select SETTING and
press OK key to enter.
• Select Software Update (USB), press OK key and s el ec t Y ES ,
the TV will upgrade software automatically.
• Wh en t he u pg rade process is complete 100%, the T V wi ll
automatically restar t t he b oo t up .
Update the TV software
The update star ts automatically. Th e T V it se lf o ff for about a
minutes and then back on again, please wai t.
Notice:
• Do not use the remote control.
• Do not remove the USB memory device from the TV.
• Please keep the power s ta ble during the upgrade software , if
it suddenly power o ff w il l da ma ge for the TV.
Open source software
This television contains open source software. TP V is io n
Europe B .V. her eby offers to deliver, upon request, a copy o f th e
complete cor responding source code for t he c opyr ig ht ed o pe n
source software packages used in this product for which such
offer is requested by the respective licenses.
This offer is valid up to three years after product purchase to
anyone in receipt of this infor mation. To obtain the source code,
please write in English to this email address
[email protected].
Open source license statement
Acknowledgements and License Texts fo r any open source
software used in this Philips TV.
This is a document descr ibing the distribution of the source
code used on the Philips TV, which fall either under the GNU
General Publ ic L ic en se (th e GP L), or t he G NU L es se r Ge ne ral
Public License (the LGPL), or any other open source license.
Instructions to obtain source code for this software can be found
in the user manual.
PHILIPS MAKES NO WARRANTIES WHATSOEVER, EITHER
EXPRESS OR IMPLIED, INCLUDING ANY WARRANTIES OF
MERCHANTAB IL IT Y OR F IT NE SS F OR A PARTICULAR
S
PURPOSE, REGARDING THIS SOFTWARE. Philips offer s no
suppor t for this software. The preceding does not affect your
warranties and statutor y r ights regarding any Ph il ip s pr od uc t( s)
you purchased. It only applies to this source code made available
to you.
This television contains open source software. TP Vision
Europe B.V. hereby offer s to d el iver, upon request, a copy of the
complete cor responding source code for t he c opyr ighted ope n
source software packages used in this product for which such offer
is requested by the respective licenses. This offer i s va li d up to
three year s after product purchase to anyone in receipt of this
inform at io n. To obtain the source code, please write in English to...
Intellectual Proper ty Dept.
TP Vision Europe B.V.
Pr ins Bernhardplein 200
1097 JB Amsterdam
Troubleshooting and
support
General issues
The TV cannot be switched on:
• Disconnect the power cabl e form the power outlet. Wait for
one minute before reconnecting it.
• Check that the power cable is securely connected.
The remote contro l is n ot working properly :
• Check that the remote batter ies are correctly inser ted
according to the “+/ -” or ie nt at io n.
• Replace the remote control batteries if they are flat or weak.
• Clean the remote control and TV sensor lens.
The TV menu is in the wrong language:
• Change the TV menu to your preferred language .
When turning the TV on /off or to standby, you hear a cre ak in g
sound from the TV c ha ss is :
• No action is required. The creaking sound comes from the
normal expansion and contraction of the TV as it c oo ls d own and
warms up. This doesn’t impact its perfor ma nc e.
Channel issues
No digital channels found during the installation:
• See the technical specifications to make sure that your TV
suppor ts DV B- T or DVB-C in your countr y.
• Make sure that all cables are proper ly connected.
Previously in st al le d ch an ne ls d o no t appear in the channel list:
• Check that the cor rect channel list is selected.
Picture issues
The TV is on, but there is no picture :
• Check that the antenna is proper ly connected to the TV.
• Check that the cor rect device is selected as the TV source.
There is sound but no picture :
• Check that the picture settings are correctly se t.
Poor T V re ce pt io n fr om t he a nt en na con ne ct io n:
• Check that the antenna is proper ly connected to the TV.
• Loudspeakers, unear thed audio devices, neon lights, high
buildings and other larg e ob je ct s ca n in fl ue nc e re ce pt io n qu al it y. If
19
Page 20

possible , you try to improve the reception quality by changing the
antenna direction or moving devices away from the TV.
• If the reception on one par ticular channel is poor, pl ea se fine
tune this channel.
There is poor picture q ua li ty f rom connected devices:
• Check that the devices are connected properly.
• Check that the picture settings are correctly se t.
The picture does not fit the screen; it is t oo big or too small:
• Tr y using a differ en t pi ct ur e format.
The picture position is incorre ct :
• Picture signals from some devices may not fit t he s cr ee n
correctly. Pl ea se c he ck t he s ig na l ou tp ut o f th e device .
Sound issues
The pictures are sh ow in g bu t sound quality is poor:
• Check that cables are proper ly c on ne ct ed .
• Check that the volume is not set to 0.
• Check that the sound is not muted.
• Check that the sound settings are correctly se t.
The pictures are sh ow in g bu t sound comes from one speaker
only:
• Veri fy t ha t so un d ba la nc e is s et t o th e ce nt re .
HDMI connection issues
There are p roblems with HDMI devices:
• Please note that HDCP (High-bandwidth Digital Content
Protection) suppor t can delay the time taken fo r a T V to d is pl ay
content from a HDMI device .
• If the TV does not recognition the HDMI device and on
picture is displayed, please try switching the signal source to
another device before switching it back again.
• If there are inter mittent sound disruptions, please check that
output settings from the HDMI device are cor rect.
Term of use, copyrights
and licenses
Term of use
2017© TP Vision Europe B .V. All ri gh ts r es er ved. Spe ci fications
are subject to change without notice . Trademarks are the property
of Koninklijke Philips N.V or their respective ow ne rs. TP Vision
Europe B .V. res er ves the right to change products at any time
without being obliged to adjust earlier supplies accordingly.
The material in this manua l is b el ie ved adequate for the
intended use of the system. If the product, or its individual modules
or procedures, are used for purposes other than those specified
herein, confir mation of their validity and suitability mus t be
obtained. TP Vision Europe B.V. warrants that the material itself
does not infringe any Un it ed S ta tes patents. No fur ther warranty is
expressed or implied.
TP Vision Europe B.V. cannot be held responsible neither for a ny
er ror s in t he c on te nt of this document nor for any problems as a
result of the content in this document. Error s repor ted to Philips
will be adapted and published on the Philips support website as
soon as possible .
Copyrights and Licenses
Computer connection issues
The computer display on t he TV is not stable:
• Check that your PC uses the suppor ted resolution and
refresh rate.
• Set the TV picture form at t o di sp lay scale.
Contact us
If you cannot resolve your problem, ple as e re fer to the FAQs
for this model at www.philips.com/suppor t.
If the problem remains unresolved, please contact your local
Philips Customer Ser v ic e Ce nt er.
Warning
Do not attempt to repair the TV yourself. This may cause
severe injure, ir re pa rable damage to your TV or vo id your
warranty.
Note:
Please make a note of your TV model and ser ial nu mber before
you contact Philips Customer Ser vice Center. These number s are
pr inted on the back/bottom of the TV and on the packaging.
20
Page 21
7
 Loading...