


Register your product and get support at LED TV
www.philips.com/welcome
32PFK4009
32PHK4009
40PFK4009
50PFK4009
Gebruikershandleiding

Inhoud
1 Uw nieuwe TV 3
1.1 Pause TV en opnamen 3
1.2 EasyLink 3
2 Installatie 4
2.1 Veiligheid 4
2.2 TV-standaard en wandmontage 4
2.3 Tips over plaatsing 4
2.4 Netsnoer 5
2.5 Antennekabel 5
2.6 Satellietschotel 5
3 Aansluitingen 6
3.1 Tips over aansluitingen 6
3.2 EasyLink HDMI CEC 7
3.3 Common Interface - CAM 8
3.4 Settopbox - STB 8
3.5 Satellietontvanger 9
3.6 Home cinema-systeem - HTS 9
3.7 Blu-ray Disc-speler 11
3.8 DVD-speler 11
3.9 Gameconsole 11
3.10 USB-schijf 11
3.11 USB Flash Drive 12
3.12 Camcorder 12
3.13 Computer 13
3.14 Hoofdtelefoon 13
4 Inschakelen 14
4.1 Ingeschakeld of Stand-by 14
5 Afstandsbediening 15
5.1 Toetsenoverzicht 15
5.2 IR-sensor 15
5.3 Batterijen 16
5.4 Schoonmaken 16
6 TV-zenders 17
6.1 TV-zenders bekijken 17
6.2 Zenders installeren 21
7 Satellietzenders 25
7.1 Satellietzenders bekijken 25
7.2 Lijst met satellietzenders 25
7.3 Favoriete satellietzenders 25
7.4 Satellietzenders vergrendelen 26
7.5 Satellietinstallatie 27
7.6 Problemen met satellieten 30
8 TV-gids 31
8.1 De TV-gids gebruiken 31
8.2 Opnamen 31
8.3 TV-gidsgegevens ontvangen 31
10.1 Sleeptimer 33
10.2 Klok 33
10.3 Automatisch uitschakelen 33
11 Uw foto's, video's en muziek 34
11.1 Via een USB-aansluiting 34
12 TV pauzeren 36
12.1 TV pauzeren 36
13 Opnemen 37
13.1 Wat hebt u nodig... 37
13.2 Een programma opnemen 37
13.3 Opname bekijken 37
14 Instellingen 38
14.1 Beeld 38
14.2 Game of computer 39
14.3 Indeling en randen 40
14.4 Geluid 40
15 Specificaties 43
15.1 Klimaat 43
15.2 Ontvangst voor PxHxxx9 / PxTxxx9 43
15.3 Ontvangst voor PxKxxx9 44
15.4 Display 44
15.5 Vermogen 44
15.6 Afmetingen en gewicht_4009 44
15.7 Connectiviteit 45
15.8 Multimedia 45
16 Software 46
16.1 Software-update 46
16.2 Softwareversie 46
16.3 Open source-software 46
16.4 Open source license 46
17 Problemen oplossen en ondersteuning 65
17.1 Problemen oplossen 65
17.2 Registreren 66
17.3 Help 66
17.4 Onlinehulp 66
17.5 Klantenservice/reparatie 67
18 Veiligheid en onderhoud 68
18.1 Veiligheid 68
18.2 Schermonderhoud 69
19 Gebruiksvoorwaarden, auteursrechten en licenties
70
19.1 Gebruiksvoorwaarden 70
19.2 Auteursrechten en licenties 70
Index 72
9 Bronnen 32
9.1 Bronnenlijst 32
9.2 Vanuit stand-by 32
9.3 EasyLink 32
10 Timers en klok 33
2

1
Uw nieuwe TV
1.1
Pause TV en opnamen
Als u een USB-schijf hebt aangesloten, kunt u een programma
onderbreken en opnemen als deze wordt uitgezonden via een
digitale TV-zender.
Zet uw TV op pauze en beantwoord dat dringende telefoontje,
of neem gewoon even pauze tijdens een sportwedstrijd. De
uitzending wordt opgeslagen op de USB-schijf en u kunt deze
later bekijken.
1.2
EasyLink
Met
EasyLink
Disc-speler, bedienen met de afstandsbediening van de TV.
EasyLink communiceert via HDMI CEC met de aangesloten
apparaten.
kunt u een aangesloten apparaat, zoals een Blu-ray
3

2
Installatie
2.1
Veiligheid
Lees voordat u uw TV gaat gebruiken eerst de
veiligheidsinstructies.
Ga in Help naar
2.2
Veiligheid en onderhoud
TV-standaard en wandmontage
TV-standaard
In de Snelstartgids die wordt geleverd bij de TV, vindt u
instructies voor het monteren van de TV-standaard. Bent u deze
gids kwijtgeraakt, dan kunt u die downloaden van
www.philips.com.
>
Veiligheid
.
Alleen gekwalificeerde technici met de vereiste vaardigheden
mogen de TV aan de wand bevestigen. De wandmontage van
de TV moet voldoen aan veiligheidsnormen voor TV's in deze
gewichtsklasse. Lees ook de veiligheidsinstructies ten aanzien van
de plaatsing van de TV.
TP Vision Europe B.V. is niet aansprakelijk voor ongelukken of
letsel als gevolg van ondeskundige bevestiging.
Wandmontage
Uw TV is ook voorbereid voor montage op een VESAcompatibele wandsteun (afzonderlijk verkrijgbaar).
Gebruik de volgende VESA-code bij de aanschaf van de
wandsteun . . .
Gebruik om de steun stevig te bevestigen schroeven met de
lengte die in de tekening is aangegeven.
Gebruik het producttypenummer van de TV om de juiste
snelstartgids te downloaden.
Wandmontage
Uw TV is ook voorbereid voor montage op een VESAcompatibele wandsteun (afzonderlijk verkrijgbaar).
Gebruik de volgende VESA-code bij de aanschaf van de
wandsteun . . .
Gebruik om de steun stevig te bevestigen schroeven met de
lengte die in de tekening is aangegeven.
- 23Pxx4009 - VESA MIS-F 75x75, M4 (minimaal 7,5 mm,
maximaal 8,5 mm)
- 32Pxx4009 - VESA MIS-F 100x100, M4 (minimaal 6,3 mm,
maximaal 11,7 mm)
- 40Pxx4009 - VESA MIS-F 200x200, M4 (minimaal 6,3 mm,
maximaal 11,7 mm)
- 50Pxx4009 - VESA MIS-F 400x400, M6 (minimaal 10 mm,
maximaal 14 mm)
- 42Pxx5199 - VESA MIS-F 200x200, M6
- 47Pxx5199 - VESA MIS-F 400x400, M6
- 55Pxx5199 - VESA MIS-F 400x400, M6
Let op
Alleen gekwalificeerde technici met de vereiste vaardigheden
mogen de TV aan de wand bevestigen. De wandmontage van
de TV moet voldoen aan veiligheidsnormen voor TV's in deze
gewichtsklasse. Lees ook de veiligheidsinstructies ten aanzien van
de plaatsing van de TV.
TP Vision Europe B.V. is niet aansprakelijk voor ongelukken of
letsel als gevolg van ondeskundige bevestiging.
2.3
Tips over plaatsing
- Plaats de televisie op een plek waar er geen licht op het
scherm valt.
- Plaats de TV maximaal 15 cm van de wand.
- De ideale afstand om TV te kijken bedraagt driemaal het
diagonale schermformaat. Als u zit, moeten uw ogen zich op
dezelfde hoogte bevinden als het midden van het scherm.
Let op
4

2.4
Netsnoer
- Sluit het netsnoer aan op de
de achterkant van de TV.
- Zorg ervoor dat het netsnoer stevig in de aansluiting is
geplaatst.
- Zorg dat u altijd gemakkelijk bij de stekker in het stopcontact
kunt.
- Trek het netsnoer altijd aan de stekker en nooit aan het snoer
uit het stopcontact.
In stand-by verbruikt deze TV zeer weinig energie, maar als u de
TV lang niet gebruikt, bespaart u energie door de stekker van
het netsnoer uit het wandstopcontact te halen.
voedingaansluiting
(POWER) aan
2.6
Satellietschotel
Sluit de satellietaansluiting type F aan op de satellietverbinding
aan de achterkant van de TV.
SAT
2.5
Antennekabel
Sluit de antenne goed aan op de
achterkant van de TV.
U kunt uw eigen antenne aansluiten of verbinding maken met
een antennesignaal van een antennedistributiesysteem. Gebruik
een IEC Coax 75 Ohm RF-antenneaansluiting.
Gebruik deze antenneaansluiting voor DVB-T- en DVB-Cingangssignalen.
ANTENNE
-ingang aan de
5

3
Aansluitingen
3.1
Tips over aansluitingen
Aansluitingsgids
Sluit apparaten altijd aan op de TV via de kwalitatief beste
aansluiting. Gebruik kabels van goede kwaliteit voor een
goede overdracht van beeld en geluid.
Raadpleeg de Philips TV-aansluitingsgids voor hulp bij het
aansluiten van meerdere apparaten op de TV. In deze gids
wordt uitgelegd hoe u de apparaten dient aan te sluiten en
welke kabels u dient te gebruiken.
Ga naar
Antenne
Hebt u een Settopbox (een digitale ontvanger) of recorder, sluit
dan de antennekabels zo aan dat het antennesignaal via de
Settopbox en/of recorder naar de TV gaat. Zo kunnen via de
antenne en de Settopbox eventueel extra zenders naar de
recorder worden gezonden en opgenomen.
www.connectivityguide.philips.com.
EasyLink HDMI CEC
Als uw apparaten zijn aangesloten via HDMI en beschikken over
EasyLink, kunt u ze bedienen met de afstandsbediening van de
TV. Hiertoe moet EasyLink HDMI CEC zijn ingeschakeld op de
TV en het aangesloten apparaat.
DVI-naar-HDMI
Gebruik een DVI-naar-HDMI-adapter als uw apparaat alleen een
DVI-aansluiting heeft. Gebruik een van de HDMI-aansluitingen
en sluit voor het geluid een Audio L/R-kabel (mini-aansluiting van
3,5 mm) aan op Audio In aan de achterzijde van de TV.
Kopieerbeveiliging
DVI- en HDMI-kabels bieden ondersteuning voor HDCP (Highbandwidth Digital Contents Protection). HDCP is een signaal
voor kopieerbeveiliging om te voorkomen dat inhoud van een
DVD of Blu-ray Disc wordt gekopieerd. Dit wordt ook wel
DRM (Digital Rights Management) genoemd.
HDMI ARC
HDMI
HDMI CEC
Een HDMI-aansluiting biedt de beste beeld- en geluidskwaliteit.
In een HDMI-kabel worden video- en audiosignalen
gecombineerd. Gebruik voor High Definition (HD)- of Full HD
(FHD)-TV-signalen een HDMI-kabel. Gebruik voor de beste
signaaloverdracht een snelle HDMI-kabel die niet langer is dan 5
meter.
HDMI 1-aansluiting op de TV beschikt over HDMI ARC (Audio
Return Channel). Als het apparaat, doorgaans een home cinemasysteem (HTS), ook beschikt over de HDMI ARC-aansluiting,
kunt u het aansluiten op HDMI 1 op deze TV. Met de HDMI
ARC-aansluiting hoeft u niet de extra audiokabel aan te sluiten
om het geluid van het TV-beeld via de HTS af te spelen. Het
beeld- en geluidssignaal wordt via de HDMI ARC-aansluiting
overgebracht.
Als u ARC wilt uitschakelen op de HDMI-aansluitingen, drukt u
op , selecteert u
instellingen
>
Geluid
en drukt u op OK. Selecteer
Setup
>
Geavanceerd
>
HDMI 1 - ARC
TV-
.
Scart
SCART is een aansluiting voor goede kwaliteit. U kunt de
SCART-aansluiting gebruiken voor CVBS- en RGB-videosignalen,
maar niet voor HDTV-signalen (High Definition). Een SCARTkabel brengt zowel het beeld als het geluid over.
Gebruik de SCART-adapterkabel om uw apparaat aan te sluiten.
6

EasyLink instellen
De TV wordt geleverd met EasyLink ingeschakeld. Zorg dat alle
HDMI CEC-instellingen correct zijn ingesteld op de aangesloten
EasyLink-apparaten. EasyLink werkt mogelijk niet in combinatie
met apparaten van een ander merk.
Audio Out - Optical
Audio Out - Optical is een zeer goede audioaansluiting. Deze
optische aansluiting ondersteunt 5.1-kanaals audio. Als uw
apparatuur, doorgaans een home cinema-systeem (HTS), geen
HDMI ARC-aansluiting heeft, kunt u deze audiokabel aansluiten
op een Audio In - Optical-aansluiting van het HTS. Via deze
audiokabel wordt het geluidssignaal van de TV naar het HTS
overgebracht.
U kunt de instelling voor het type audio-uitgangssignaal
aanpassen aan de audiomogelijkheden van uw home cinemasysteem.
HDMI CEC op andere merken
De HDMI CEC-functie heeft verschillende namen bij
verschillende merken. Enkele voorbeelden zijn Anynet, Aquos
Link, Bravia Theatre Sync, Kuro Link, Simplink en Viera Link. Niet
alle merken zijn volledig compatibel met EasyLink.
De hier als voorbeeld genoemde HDMI CEC-merknamen zijn
eigendom van de respectieve eigenaars.
Apparaten bedienen
Wilt u een apparaat bedienen dat is aangesloten op HDMI en is
geconfigureerd met EasyLink? Selecteer het apparaat, of de
activiteit ervan, in de lijst met TV-aansluitingen. Druk op
SOURCES
HDMI-aansluiting en druk op OK.
, selecteer een apparaat dat is aangesloten op een
Als het geluid niet gelijkloopt met het beeld op het scherm, kunt
u de audio-videosynchronisatie aanpassen.
3.2
EasyLink HDMI CEC
EasyLink
Met EasyLink kunt u een aangesloten apparaat bedienen via de
afstandsbediening van de TV. EasyLink maakt gebruik van HDMI
CEC (Consumer Electronics Control) om met de aangesloten
apparaten te communiceren. Apparaten moeten HDMI CEC
ondersteunen en met een HDMI-aansluiting zijn aangesloten.
Als u het apparaat hebt geselecteerd, kunt u het bedienen met
de afstandsbediening van de TV. Maar de toetsen en
OPTIONS
echter niet bij dat apparaat.
Als de benodigde toets niet aanwezig is op de afstandsbediening,
kunt u die toets selecteren in het menu Opties.
Druk op
menubalk. Selecteer op het scherm de gewenste apparaattoets
en druk op OK.
Mogelijk staan enkele zeer specifieke apparaattoetsen niet in het
menu voor de bedieningsknoppen.
Opmerking: alleen apparaten die de
functie
de afstandsbediening van de TV.
en sommige andere specifieke TV-toetsen werken
OPTIONS
EasyLink-afstandsbediening
en selecteer
ondersteunen, reageren op
Bedieningsknoppen
in de
7

EasyLink-instellingen
De TV wordt geleverd met alle EasyLink-instellingen
ingeschakeld. U kunt de respectieve EasyLink-instellingen stuk
voor stuk uitschakelen.
Neem contact op met een van die aanbieders voor meer
informatie over bepalingen en voorwaarden.
EasyLink
Als u EasyLink geheel wilt uitschakelen . . .
1. Druk op , selecteer
2. Selecteer
EasyLink
3. Selecteer
4. Selecteer
5. Druk zo nodig enkele malen op om het menu te sluiten.
EasyLink-afstandsbediening
Als u wilt dat apparaten communiceren, maar ze niet wilt
bedienen met de afstandsbediening van de TV, kunt u de
EasyLink-afstandsbediening afzonderlijk uitschakelen.
U kunt meerdere HDMI-CEC-compatibele apparaten bedienen
via de afstandsbediening van de TV.
In het EasyLink-instellingenmenu selecteert u
afstandsbediening
Afspelen met één druk op de knop
Wanneer u inhoud vanaf een HDMI-CEC-compatibel apparaat
afspeelt, wordt de TV direct vanuit stand-by ingeschakeld en
wordt automatisch de juiste bron geselecteerd.
Met één druk op de knop naar stand-by
Als u op de afstandsbediening van de TV op drukt, zet u de
TV en alle HDMI-CEC-compatibele apparaten op stand-by.
Audiobediening
Als u een HDMI-CEC-compatibel apparaat met luidsprekers
aansluit via de HDMI ARC-connector, kunt u de TV desgewenst
beluisteren via deze luidsprekers in plaats van de TVluidsprekers.
3.3
Setup
TV-instellingen
.
EasyLink
Uit
.
en druk vervolgens op OK.
en vervolgens
en druk op OK.
>
Algemene instellingen
.
Uit
>
EasyLink-
CAM
Een CAM-module plaatsen
Schakel uw TV uit voordat u een CAM plaatst.
Kijk op de CAM voor de juiste manier om de CAM te plaatsen.
Als u de CAM niet correct plaatst, kunnen de CAM en de TV
beschadigd raken.
Plaats de CAM-kaart in de Common Interface-sleuf van de TV.
Schuif de CAM voorzichtig zo ver mogelijk naar binnen terwijl
de voorkant van de kaart naar u gericht is.
Laat de kaart permanent in de sleuf zitten.
Het kan enkele minuten duren voordat de CAM wordt
geactiveerd. Als u de CAM verwijdert, deactiveert u de
uitzendservice op de TV.
Als een CAM is geplaatst en het abonnement is betaald
(aansluitingsmethoden kunnen verschillen), kunt u de
programma's bekijken. De geplaatste CAM is uitsluitend voor uw
TV bedoeld.
3.4
Settopbox - STB
Met twee antennekabels sluit u de antenne aan op de set-top
box (een digitale ontvanger) en de TV.
Common Interface - CAM
CI+
Deze TV is geschikt voor de CI+ Conditional Access.
Met CI+ kunt u premium HD-programma's, zoals films en sport,
ontvangen uit het aanbod van digitale TV-zenders in uw regio.
Deze programma's worden door de TV-zender gecodeerd en
vervolgens gedecodeerd met een prepaid CI+ module.
Aanbieders van digitale TV-zenders leveren deze CI+ module
(Conditional Access Module - CAM) wanneer u zich abonneert
op hun premium programma's. Deze programma's zijn sterk
beveiligd tegen kopiëren.
Naast de antenne-aansluitingen zit de HDMI-aansluiting voor het
aansluiten van de Settopbox op de TV.
Gebruik een SCART-kabel als de Settopbox geen HDMIaansluiting heeft.
8

Automatisch uitschakelen
Schakel deze automatische timer uit wanneer u uitsluitend de
afstandsbediening van de set-top box gebruikt. Zo voorkomt u
dat de TV automatisch uitschakelt nadat vier uur lang geen toets
van de TV-afstandsbediening is ingedrukt.
3.6
Home cinema-systeem - HTS
Een HTS aansluiten
Als u de timer wilt uitschakelen, drukt u op selecteert
u
Selecteer
instellingen
op
3.5
en drukt u op OK.
Setup
TV-instellingen
>
.
Uit
>
Algemene
Automatisch uitschakelen
en stel de schuifbalk in
Satellietontvanger
- Alleen voor TV's met een ingebouwde satelliettuner.
Sluit de schotelantennekabel aan op de satellietontvanger.
Sluit het home cinema-systeem (HTS) met een HDMI-kabel aan
op de TV. U kunt een Philips Soundbar of een HTS met een
ingebouwde disc-speler aansluiten.
Gebruik een SCART-kabel als het apparaat geen HDMIaansluiting heeft.
HDMI ARC
Als uw home cinema-systeem (HTS) een HDMI ARC-aansluiting
heeft, kunt u het systeem aansluiten op elke HDMI-aansluiting
op de TV. Met HDMI ARC hoeft u niet de extra audiokabel aan
te sluiten. De HDMI ARC-aansluiting brengt zowel het beeld als
het geluid over.
Alle HDMI-aansluitingen op de TV ondersteunen het ARCsignaal (Audio Return Channel). Hebt u het home cinemasysteem (HTS) aangesloten, dan wordt het ARC-signaal alleen
overgebracht via deze HDMI-aansluiting.
Naast de antenne-aansluiting zit de HDMI-aansluiting voor het
aansluiten van het apparaat op de TV.
Gebruik een SCART-kabel als het apparaat geen HDMIaansluiting heeft.
Automatisch uitschakelen
Schakel deze automatische timer uit wanneer u uitsluitend de
afstandsbediening van de set-top box gebruikt. Zo voorkomt u
dat de TV automatisch uitschakelt nadat vier uur lang geen toets
van de TV-afstandsbediening is ingedrukt.
Als u de timer wilt uitschakelen, drukt u op selecteert
u
Selecteer
instellingen
op
en drukt u op OK.
Setup
TV-instellingen
>
.
Uit
Automatisch uitschakelen
>
Algemene
en stel de schuifbalk in
Heeft het home cinema-systeem (HTS) geen HDMI ARCaansluiting, dan kunt u een extra optische audiokabel gebruiken
(Toslink) om het geluid van het TV-beeld naar het home cinemasysteem (HTS) over te brengen.
Geluid synchroniseren met beeld
Als het geluid niet correspondeert met het beeld op het scherm,
kunt u op de meeste home cinema-systemen met een discspeler
een vertraging instellen om het geluid op het beeld af te
stemmen.
9

Instellingen audio-uitvoer
Vertraging audio-uitvoer
meerkanaals audiosignaal van een TV-zender of aangesloten
speler naar het home cinema-systeem zenden. Als u een home
cinema-systeem zonder meerkanaals audioverwerking hebt,
selecteert u Stereo.
Wanneer er een home cinema-systeem op de TV is
aangesloten, moeten het beeld op de TV en het geluid van het
home cinema-systeem worden gesynchroniseerd.
Geluid automatisch synchroniseren met beeld
In de nieuwere home cinema-systemen van Philips vindt
automatisch synchronisatie tussen beeld en geluid plaats: beeld
en geluid lopen altijd synchroon.
Vertraging in audiosynchronisatie
Bepaalde home cinema-systemen hebben mogelijk een
vertraging in de audiosynchronisatie nodig om beeld en geluid
synchroon af te spelen. Verhoog de vertragingswaarde op het
home cinema-systeem totdat beeld en geluid synchroon lopen.
Mogelijk is een vertraging van 180 ms nodig. Raadpleeg de
gebruikershandleiding van het home cinema-systeem. Wanneer
op het home cinema-systeem een vertragingswaarde is ingesteld,
moet u op de TV Vertraging audio-uitvoer uitschakelen.
Vertraging audio-uitvoer uitschakelen . . .
1. Druk op , selecteer
2. Selecteer
Vertraging audio-uitvoer
3. Selecteer
4. Druk zo nodig enkele malen op om het menu te sluiten.
TV-instellingen
en druk vervolgens op OK.
Uit
Setup
.
en druk op OK.
>
Geluid
>
Geavanceerd
>
Indeling audio-uitvoer instellen . . .
1. Druk op , selecteer
2.
Selecteer
audio-uitvoer
3. Selecteer
4. Druk zo nodig enkele malen op om het menu te sluiten.
Afstelling audio-uitvoer
Met de instelling Afstelling audio-uitvoer stemt u het volume
(luidheid) van de TV en het home cinema-systeem af wanneer u
overschakelt van het ene apparaat naar het andere.
Volumeverschillen kunnen ontstaan door verschillen in
audioverwerking.
Het verschil in volume compenseren . . .
1. Druk op , selecteer
2.
Selecteer
audio-uitvoer
3. Als het volumeverschil groot is, selecteert u
volumeverschil klein is, selecteert u
Druk zo nodig enkele malen op om het menu te sluiten.
TV-instellingen
.
Meerkanaals
TV-instellingen
.
en druk op OK.
Setup
>
Geluid
of
Stereo
en druk op OK.
Setup
>
Geluid
>
Geavanceerd
.
>
Geavanceerd
.
Minder
Meer
>
Indeling
>
Afstelling
. Als het
Verschuiving audio-uitvoer
Als u op het home cinema-systeem geen vertraging kunt
instellen, kunt u op de TV het geluid synchroniseren. U kunt een
verschuiving instellen als compensatie voor de tijd die het home
cinema-systeem nodig heeft om de audio van het TV-beeld te
verwerken. U kunt de waarde instellen in stappen van 1 ms. De
maximumwaarde is 12 ms. Vertraging audio-uitvoer moet zijn
ingeschakeld.
Het geluid op de TV synchroniseren . . .
1. Druk op , selecteer
2.
Selecteer
Geavanceerd
3. Stel de audioverschuiving in met de schuifregelbalk en druk
op OK.
4. Druk zo nodig enkele malen op om het menu te sluiten.
Indeling audio-uitvoer
Als u een home cinema-systeem (HTS) hebt
met meerkanaals audiomogelijkheden zoals Dolby Digital, DTS®
en dergelijke, stelt u Indeling voor audio-uitvoer in op
Meerkanaals. Met Meerkanaals kan de TV het gecomprimeerde
TV-instellingen
>
Verschuiving audio-uitvoer
en druk op OK.
Setup
>
Geluid
>
.
Afstelling audio-uitvoer heeft gevolgen voor de geluidssignalen
Audio Out - Optical en HDMI ARC.
Problemen met HTS-geluid
Geluid zonder ruis
Als u een video vanaf een USB-stick of aangesloten computer
afspeelt, wordt het geluid van uw home cinema-systeem
mogelijk vervormd.
1. Druk op , selecteer
2.
Selecteer
voor audio-uitvoer.
Geen geluid
Controleer het volgende als het geluid van de TV niet via het
home cinema-systeem wordt weergegeven . . .
- Controleer of u de HDMI-kabel hebt aangesloten op
een
HDMI-aansluitingen op de TV zijn HDMI ARC-aansluitingen.
- Controleer of de instelling
Ingeschakeld
Ga
naar >
TV-instellingen
HDMI ARC
Setup
en druk op
Setup
>
Geluid
OK.
>
Geavanceerd
>
-aansluiting van het home cinema-systeem. Alle
>
Geluid
op uw TV is
>
.
>
TV-instellingen
HDMI ARC
Indeling
10

Geavanceerd
>
HDMI 1 - ARC
.
HDMI
3.7
Blu-ray Disc-speler
Sluit de Blu-ray Disc-speler met een
de TV.
Als de Blu-ray Disc-speler beschikt over EasyLink HDMI CEC,
kunt u de speler bedienen met de afstandsbediening van de TV.
3.8
snelle HDMI-kabel
aan op
DVD-speler
Sluit de DVD-speler met een HDMI-kabel op de TV aan.
Gebruik een SCART-kabel als het apparaat geen HDMIaansluiting heeft.
Voor de beste kwaliteit sluit u de gameconsole met een snelle
HDMI-kabel aan op de TV.
Video-Audio LR / Scart
Sluit de DVD-speler met een samengestelde kabel (CVBS) en
een audio L/R-kabel aan op de TV.
Als uw gameconsole alleen beschikt over Video- (CVBS) en
Audio L/R-uitvoer, gebruikt u een LR- (audio en video) naarSCART-adapter om verbinding te maken via de SCARTaansluiting.
Opmerking: de CVBS-naar-SCART-adapter wordt niet
meegeleverd bij de TV.
Als de DVD-speler is aangesloten via HDMI en beschikt over
EasyLink CEC, kunt u de speler bedienen met de
afstandsbediening van de TV.
3.9
Gameconsole
3.10
USB-schijf
Wat hebt u nodig...
Wanneer u een USB-schijf aansluit, kunt u een TV-uitzending
onderbreken en opnemen, maar dat is alleen mogelijk bij digitale
TV-uitzendingen (DVB-uitzending en dergelijke).
Onderbreken
Als u een uitzending wilt onderbreken, hebt u een vaste schijf
nodig die compatibel is met USB 2.0 en die over minimaal 32
GB schijfruimte beschikt.
11

Opnemen
3.11
Om een uitzending te onderbreken en op te nemen, hebt u
minimaal 250 GB schijfruimte nodig.
TV-gids
Alvorens een USB-schrijf te kopen, is het aan te raden om na te
gaan of u in uw land digitale TV-zenders kunt opnemen.
Druk op
TV-gidspagina een knop Opnemen bevindt, kunt u programma's
van digitale TV-zenders opnemen.
TV GUIDE
op de afstandsbediening. Als zich op de
Installatie
Voordat u een uitzending kunt pauzeren of opnemen, moet u
een USB-schijf aansluiten en formatteren.
1. Sluit de USB-schijf aan op een van de
de TV. Sluit tijdens het formatteren geen andere USB-apparaten
aan op de andere USB-poorten.
-aansluitingen van
USB
USB Flash Drive
U kunt foto's bekijken of muziek- en videobestanden afspelen
vanaf een aangesloten USB-stick.
Plaats terwijl de TV is ingeschakeld een USB-stick in een van de
-aansluitingen van de TV.
USB
De TV detecteert de USB-stick en opent een lijst met de
inhoud.
Als de lijst met inhoud niet automatisch verschijnt, drukt u op
SOURCE
Als u niet meer wilt kijken of luisteren naar de inhoud die op de
USB-stick staat, drukt u op
activiteit.
Als u de USB-stick wilt ontkoppelen, kunt u de stick op elk
moment verwijderen.
, selecteert u
en drukt u op OK.
USB
of selecteert u een andere
EXIT
2. Schakel de USB-schijf en de TV in.
3. Als de TV is afgestemd op een digitale TV-zender, drukt u op
(Onderbreken). Hiermee wordt het formatteren gestart.
Volg de instructies op het scherm.
Wanneer de USB-schijf is geformatteerd, laat u deze permanent
aangesloten.
Waarschuwing
Het USB-station wordt uitsluitend geformatteerd voor deze TV.
U kunt geen opgeslagen opnamen op een andere TV of PC
afspelen. Kopieer of wijzig opnamebestanden op het USB-station
niet met een computerprogramma, omdat u hiermee de
opnamen beschadigt. Als u een andere USB-schijf formatteert,
gaat de inhoud op de eerste schijf verloren. Als u een USB-schijf
die u voor de TV hebt gebruikt, bij een computer wilt gebruiken,
moet u die schijf opnieuw formatteren.
3.12
Camcorder
HDMI
Gebruik voor de beste kwaliteit een HDMI-kabel om de
camcorder op de TV aan te sluiten.
12

Video-Audio LR / Scart
Instellingen
U kunt een HDMI-, YPbPr- of SCART-aansluiting gebruiken om
een camcorder aan te sluiten. Als uw camcorder alleen een
Video- (CVBS) en Audio L/R-uitgang heeft, kunt u een Video
Audio L/R-naar-SCART-adapter gebruiken om het apparaat op
de SCART-aansluiting aan te sluiten.
Opmerking: de CVBS-naar-SCART-adapter wordt niet
meegeleverd bij de TV.
3.13
Computer
Ideale beeldscherminstelling
Als uw computer is toegevoegd als apparaat van het type
Computer in het menu Bron (lijst met aansluitingen), wordt de
TV automatisch ingesteld op de ideale Computerinstelling.
Als u via uw computer naar films wilt kijken of wilt gamen, kunt
u het beste de TV weer instellen op de instellingen voor TVkijken of gamen.
De TV handmatig op de ideale instelling zetten . . .
1. Druk op , selecteer
2. Selecteer
of computer
3. Selecteer
kijken) en druk op OK.
4. Druk zo nodig enkele malen op om het menu te sluiten.
Denk eraan om de instelling Game of Computer terug te zetten
op
Computer
3.14
TV-instellingen
en druk op OK.
(om te gamen) of
Game
als u klaar bent met gamen.
en druk op OK.
Setup
>
Beeld
>
Geavanceerd
Computer
>
Game
(om een film te
Aansluiten
U kunt uw computer aansluiten op de TV en de TV als
computerscherm gebruiken.
Met HDMI
Sluit de computer met een HDMI-kabel op de TV aan.
Met DVI-naar-HDMI
Ook kunt u een DVI-naar-HDMI-adapter gebruiken om de PC
aan te sluiten op HDMI en een Audio L/R-kabel (mini-aansluiting
van 3,5 mm) op AUDIO IN L/R aan de achterkant van de TV.
Hoofdtelefoon
U kunt een hoofdtelefoon aansluiten op de -aansluiting van de
TV. Dit is een mini-aansluiting van 3,5 mm. U kunt het volume
van de hoofdtelefoon afzonderlijk aanpassen.
Het volume aanpassen . . .
1. Druk op , selecteer
2. Selecteer
hoofdtelefoon
3. Druk op (omhoog) of (omlaag) om het volume aan te
passen.
4. Druk zo nodig enkele malen op om het menu te sluiten.
TV-instellingen > Geluid
en druk op OK.
en druk op OK.
Setup
>
Volume
13
4
Inschakelen
4.1
Ingeschakeld of Stand-by
Zorg dat het netsnoer is aangesloten aan de achterkant van de
TV voordat u de TV inschakelt.
Als het rode indicatielampje uit is, drukt u op de aan-uitknop aan
de zijkant van de TV om de TV op stand-by te zetten. Het rode
indicatielampje gaat dan branden.
Als de TV in stand-by staat, drukt u op op de
afstandsbediening om de TV in te schakelen.
Overschakelen naar stand-by
Als u de TV op stand-by wilt zetten, drukt u op op de
afstandsbediening.
TV uitschakelen
Om de TV uit te schakelen, drukt u op de aan-uitknop aan de
zijkant van de TV. Het rode indicatielampje is dan uit. De TV is
nog steeds aangesloten op het stroomnet, maar het
energieverbruik is minimaal.
Als u de TV geheel wilt uitschakelen, trekt u de stekker uit het
stopcontact.
Trek het netsnoer altijd aan de stekker en nooit aan het snoer
uit het stopcontact. Zorg dat u altijd goed bij de stekker, het
netsnoer en het wandstopcontact kunt.
14

5
Afstandsbediening
5.1
Toetsenoverzicht
Bovenzijde
4.
BACK
Hiermee schakelt u terug naar de vorige zender.
Hiermee sluit u een menu zonder de instellingen te wijzigen.
5.
HOME
Hiermee opent of sluit u het hoofdmenu.
6.
EXIT
Hiermee kunt u weer televisiekijken.
7.
OPTIONS
Hiermee opent en sluit u het optiemenu.
8. OK-toets
Hiermee bevestigt u een selectie of instelling.
1.
Stand-by
Hiermee schakelt u de TV of de stand-bystand in.
2. Afspeel
- Afspelen , om af te spelen.
- Onderbreken , om het afspelen te onderbreken
- Stoppen , om het afspelen te stoppen
- Terugspoelen , om terug te spoelen
- Vooruitspoelen , om vooruit te spoelen
- Opnemen , om direct op te nemen
3.
TV GUIDE
Hiermee opent of sluit u de TV-gids.
4.
SETUP
Hiermee opent u het menu Instellingen.
5.
FORMAT
Hiermee opent of sluit u het menu Beeldformaat.
/
toetsen
Aan
Midden
9.
Pijl-/ navigatie
Hiermee navigeert u omhoog, omlaag, naar links en naar rechts.
10.
LIST
Hiermee opent of sluit u de zenderlijst.
toetsen
Onderkant
1.
Volume
Hiermee past u het volumeniveau aan.
2.
Cijfertoetsen
Hiermee kunt u een TV-zender rechtstreeks selecteren of tekst
invoeren.
en
teksttoetsenblok
1.
SOURCES
Hiermee opent of sluit u het menu Bronnen, de lijst van de
aangesloten apparaten.
2.
Gekleurde toetsen
De toetsen functioneren zoals aangegeven op het scherm.
3.
INFO
Hiermee opent en sluit u programma-informatie.
3.
SUBTITLE
Hiermee schakelt u ondertitels in of uit of schakelt u automatisch
de ondertitels in.
4.
Zender
Hiermee schakelt u naar de volgende of vorige zender in de
zenderlijst, opent u de volgende of vorige pagina in teletekst of
start u het volgende of vorige hoofdstuk op een disc.
5.
Dempen
Hiermee dempt u het geluid of schakelt u het weer in.
6.
TEXT
Hiermee opent en sluit u teletekst.
15

5.2
IR-sensor
De TV kan worden bediend met een afstandsbediening die
werkt op IR (infrarood). Bij een IR-afstandsbediening moet u
ervoor zorgen dat u de infraroodsensor van de
afstandsbediening op de voorkant van de TV richt.
5.3
Batterijen
1. Schuif de batterijklep in de richting zoals aangegeven door de
pijl.
2. Vervang de oude batterijen door twee batterijen van het type
AAA-LR03-1,5V
de juiste richting liggen.
3. Plaats de batterijklep terug.
4. Schuif de batterijklep weer terug tot u een klik hoort.
. Zorg dat de + en - kanten van de batterij in
Haal de batterijen uit de afstandsbediening als u de
afstandsbediening lange tijd niet gaat gebruiken.
Gooi oude batterijen veilig weg volgens de
verwijderingsinstructies.
5.4
Schoonmaken
De afstandsbediening is voorzien met een krasbestendige
coating.
Reinig de afstandsbediening met een zachte, vochtige doek.
Gebruik nooit stoffen als alcohol, chemische middelen of
allesreinigers voor de afstandsbediening.
16

6
Lijst met zenders
TV-zenders
6.1
TV-zenders bekijken
Overschakelen naar een andere zender
Als u TV wilt kijken, drukt u op . De TV is afgestemd op de
TV-zender waarnaar u het laatst hebt gekeken.
Ook kunt u op drukken om het Hoofdmenu te openen.
Selecteer TV en druk op OK.
Om tussen zenders te schakelen, drukt u op of . Als
u het zendernummer weet, kunt u het invoeren met de
cijfertoetsen.
Nadat u het nummer hebt ingevoerd, drukt u op OK om naar
die zender te gaan.
Druk op om terug te keren naar de zender waarop het
laatst werd afgestemd.
Lijst met alle zenders weergeven
1. Terwijl u naar een TV-zender kijkt, drukt u op
de zenderlijst te openen.
2. Druk op
3. Selecteer
Nieuwe zenders
Favoriete zenders
U kunt een lijst favoriete zenders maken met alleen de zenders
die u wilt bekijken. Wanneer de lijst favoriete zenders is
geselecteerd, ziet u alleen uw favoriete zenders wanneer u door
de zenders bladert.
Een lijst met favoriete zenders maken
1. Terwijl u een TV-zender kijkt, drukt u op
zenderlijst te openen.
2. Selecteer de zender die u als favoriet wilt markeren en druk
op
3. Selecteer
geselecteerde zender wordt gemarkeerd met een .
4. Druk op als u klaar bent. De zenders zijn toegevoegd aan
de lijst Favorieten.
5. Als u een zender uit de lijst met favorieten wilt verwijderen,
selecteert u de zender met . Druk vervolgens
op
.
OK
Herordenen
OPTIONS
, gevolgd door
Lijst
.
OPTIONS
OPTIONS
.
Favorieten toevoegen
, selecteer
om het menu Opties te openen.
Alle, Favorieten, Radio
en druk op OK. De
Favorieten verwijderen
LIST
om
LIST
of
om de
en druk op
om de
+
Overschakelen naar een zender uit de lijst met zenders
Terwijl u een TV-zender kijkt, drukt u op
zenderlijsten te openen.
De zenderlijst kan uit meerdere pagina's zenders bestaan. Als u
de volgende of vorige pagina wilt weergeven, drukt u op
of
Druk nogmaals op
zonder over te schakelen naar een andere zender.
Radiozenders
Als digitale uitzendingen beschikbaar is, worden tijden de
installatie digitale radiozenders geïnstalleerd. U schakelt over naar
een andere radiozender zoals u ook naar een andere TV-zender
overschakelt.
.
om de zenderlijsten te sluiten
LIST
LIST
U kunt de volgorde van de zenders in de zenderlijst Favorieten
wijzigen.
1. In de zenderlijst
verplaatsen.
2. Druk op
3. Selecteer
4. Selecteer de zender die u wilt verplaatsen en druk op OK.
5. Druk op de
naar een andere locatie te verplaatsen en druk op OK.
6. Druk op
7. Selecteer
U kunt een andere zender markeren en dezelfde handeling
uitvoeren.
Favoriete zenders aan andere zenderlijsten toevoegen of eruit
verwijderen
Alle zenders en radiostations in de zenderlijsten
kunnen als favoriet worden gemarkeerd.
Nieuw
In deze lijsten markeert u de zender die u wilt toevoegen aan de
favorietenlijst, en vervolgens drukt u op
Favorieten toevoegen
De geselecteerde zender wordt gemarkeerd met een .
Om een zender uit de lijst met favorieten te verwijderen,
Favorieten
OPTIONS
Herordenen
navigatietoetsen
OPTIONS
Herordenen beëindigen
markeert u de zender die u wilt
.
en druk op OK.
om de gemarkeerde zender
als u klaar bent.
en druk op OK.
OPTIONS
en druk op OK.
Alle, Radio
. Selecteer
en
17

selecteert u
Zenders hernoemen
U kunt zenders in de zenderlijst hernoemen.
1. Selecteer de zender die u wilt hernoemen in een van de
zenderlijsten.
2. Druk op
3. Selecteer
Favorieten verwijderen
OPTIONS
Nwe naam
.
en druk op OK.
en drukt u op OK.
4. Selecteer de leeftijd en druk op OK.
5. Druk zo nodig enkele malen op om het menu te sluiten.
6. Als u de leeftijdsclassificatie wilt uitschakelen, selecteert
u
als leeftijd.
Geen
U wordt gevraagd de code in te voeren om het programma te
ontgrendelen. Bij sommige zenders vergrendelt de TV alleen
programma's met een hogere classificatie.
De vergrendelcode instellen of wijzigen
De vergrendelcode instellen of de huidige code wijzigen . . .
Zender vergrendelen
Om te voorkomen dat kinderen naar een bepaalde zender of
een bepaald programma kunnen kijken, kunt u zenders
vergrendelen of programma's met een bepaalde
leeftijdsclassificatie vergrendelen.
Zender vergrendelen
Om te voorkomen dat kinderen naar een bepaalde zender
kijken, kunt u deze vergrendelen. Als u naar een vergrendelde
zender wilt kijken, moet u de kinderslotcode invoeren. U kunt
geen programma's van aangesloten apparaten vergrendelen.
Een zender vergrendelen . . .
1. Terwijl u naar een TV-zender kijkt, drukt u op
de
zenderlijst
2. Selecteer in elke lijst de zender die u wilt vergrendelen.
3. Druk op
de zenderlijst wordt een vergrendelde zender aangeduid met
een slot .
Als u een vergrendelde zender wilt ontgrendelen, selecteert u
de vergrendelde zender in de zenderlijst, drukt u
op
Vervolgens geeft u de kinderslotcode op.
Leeftijdsclassificatie
U kunt een leeftijdsclassificatie gebruiken om te voorkomen dat
kinderen naar programma's kijken waarvoor ze te jong zijn.
Sommige digitale zenders kennen een leeftijdsgrens toe aan hun
programma's. Is de classificatie hoger dan of gelijk aan de
classificatie die u voor uw kind hebt ingesteld, dan wordt het
programma vergrendeld.
Om naar een vergrendeld programma te kunnen kijken, moet u
de code van het kinderslot invoeren. De leeftijdsclassificatie
wordt ingesteld voor alle zenders.
Een leeftijdsclassificatie instellen . . .
1. Druk op , selecteer
2.
Selecteer
Leeftijdsclassificatie
3. Voer de 4-cijferige code voor het kinderslot in. Voer de
4-cijferige code voor het kinderslot in en bevestig deze. U kunt
nu een leeftijdsclassificatie instellen.
te openen.
OPTIONS
Zenderinstellingen
OPTIONS
en selecteert u
Setup
en druk op
en selecteer
Zender ontgrendelen
en druk op OK.
>
Kinderslot
OK.
LIST
om
.
Zender vergrendelen
>
. In
1. Druk op , selecteer
2. Selecteer
en druk op OK.
3. Als er al een code is ingesteld, voert u de huidige code voor
het kinderslot in en voert u vervolgens de nieuwe code
tweemaal in.
De nieuwe code is ingesteld.
Bent u uw code vergeten?
Als u de kinderslotcode wilt negeren en een nieuwe code moet
invoeren omdat u de code bent vergeten, voert u
Zenderinstellingen
en druk op OK.
Setup
>
Kinderslot
>
Code wijzigen
8888
in.
Beeldformaat
Als er zwarte balken boven en onder of aan de zijkanten van het
beeld worden weergegeven, kunt u het beeldformaat omzetten
in een formaat dat het hele scherm in beslag neemt.
Het beeldformaat wijzigen . . .
1. Terwijl u naar een TV-zender kijkt, drukt u op om het
menu
Beeldformaat
2. Selecteer een instelling uit de lijst en druk op OK.
De volgende beeldformaten zijn beschikbaar . . .
- Auto
Het beeldformaat aanpassen aan de invoerbron.
-
Superzoom
Hiermee worden de zwarte balken aan de zijkanten van
uitzendingen met het formaat 4:3 verwijderd. Het beeld wordt
aan het scherm aangepast.
• Filmformaat 16:9
Formaat 4:3 wijzigen in 16:9. Niet aanbevolen voor HD of PC.
- Breedbeeld
Rekt het beeld uit naar een formaat van 16:9.
-
Niet geschaald
Expertmodus voor HD- of PC-invoersignalen. Pixel-voorpixelweergave. Bij beelden afkomstig van een computer blijven
zwarte balken mogelijk zichtbaar.
- 4:3
Het traditionele 4:3-formaat gebruiken.
te openen.
18

Teletekst
5. Als u wilt stoppen met zoeken drukt u op (omhoog) totdat
er niets meer is geselecteerd.
Teletekstpagina's
Om teletekst te openen terwijl u naar een TV-zender kijkt, drukt
u op
Druk nogmaals op TEXT om teletekst te sluiten.
Een teletekstpagina selecteren
Een pagina selecteren . . .
1. Voer het paginanummer in met de nummertoetsen.
2. Gebruik de pijltjestoetsen om te navigeren.
3. Druk op een kleurtoets om een van de gekleurde
onderwerpen onder in het scherm te selecteren.
Teletekstsubpagina's
Een teletekstpagina kan meerdere subpagina's bevatten. De
nummers van de subpagina's worden weergegeven op een balk
naast het nummer van de hoofdpagina.
Druk op of om een subpagina te selecteren.
T.O.P.-teletekstpagina's
Sommige zenders bieden T.O.P.-teletekst.
Als u T.O.P.-teletekstpagina's binnen teletekst wilt openen, drukt
u op
Favoriete pagina's
In de TV wordt een lijst bijgehouden van de 10 laatste
teletekstpagina's die u hebt geopend. U kunt deze pagina's
eenvoudig opnieuw openen via de kolom Favoriete
teletekstpagina's.
1. Wanneer u teletekst hebt geopend, selecteert u de ster in de
linkerbovenhoek van het scherm om de kolom met favoriete
pagina's weer te geven.
2. Druk op (omlaag) of (omhoog) om een paginanummer
te selecteren en druk op OK om de pagina te openen.
Met de optie
Teletekst doorzoeken
U kunt een woord selecteren en teletekst doorzoeken om elk
stuk tekst te vinden waarin dit woord voorkomt.
1. Open een teletekstpagina en druk op OK.
2. Selecteer met de pijltoetsen een woord of nummer.
3. Druk nogmaals op OK om rechtstreeks naar de
eerstvolgende keer dat dit woord of nummer voorkomt, te gaan.
4. Druk nogmaals op OK om naar de daaropvolgende keer dat
het woord of nummer voorkomt, te gaan.
.
TEXT
OPTIONS
en selecteert u
T.O.P.-overzicht
Favoriete pagina's wissen
.
kunt u de lijst wissen.
Teletekst van een aangesloten apparaat
Bepaalde apparaten die TV-zenders ontvangen, bieden ook
teletekst.
Teletekst van een aangesloten apparaat openen . . .
1. Druk op , selecteer het apparaat en druk op OK.
2. Terwijl u naar een zender kijkt op het apparaat, drukt u op
OPTIONS
Vervolgens selecteert u de toets en drukt u op OK.
3. Druk op om de apparaattoetsen te verbergen.
4. Druk nogmaals op om teletekst te sluiten.
Digitale tekst (alleen Verenigd Koninkrijk)
Enkele aanbieders van digitale televisie bieden speciale Digitale
tekst of interactieve TV aan op hun digitale TV-zenders. Dit
omvat de gebruikelijke teletekst waarin u met de cijfer-, kleur- en
pijltjestoetsen kunt navigeren en selecteren.
Druk op om Digitale tekst te sluiten.
Teletekstopties
Druk in Teletekst op
opties te selecteren . . .
- Pagina bevriezen/Bevriezen van pagina stoppen
Automatisch afwisselen van subpagina's stoppen.
- Dual screen / Full screen
De TV-zender en teletekst naast elkaar weergeven.
- T.O.P.-overzicht
T.O.P.-teletekst openen.
- Vergroten/Normale weerg.
De teletekstpagina vergroten zodat u deze gemakkelijker kunt
lezen.
- Onthullen
Verborgen informatie op een pagina zichtbaar maken.
- Subpagina’s doorlopen
Subpagina's doorlopen wanneer deze beschikbaar zijn
- Taal
De tekengroep van teletekst wijzigen.
- Teletekst 2.5
Teletekst 2.5 activeren voor meer kleuren en een betere
grafische weergave.
Teletekst instellen
Teleteksttaal
Bij sommige zenders van digitale TV zijn meerdere teleteksttalen
beschikbaar.
De eerste en tweede voorkeurtaal voor teletekst inschakelen . . .
en selecteert u
OPTIONS
Apparaattoetsen weergeven
.
om een van de volgende
.
19

1. Druk op , selecteer
2. Selecteer
3. Selecteer
teletekst
4. Selecteer de gewenste taal voor teletekst.
5. Druk zo nodig enkele malen op om het menu te sluiten.
Teletekst 2.5
Teletekst 2.5 biedt, indien beschikbaar, meer kleuren en een
betere grafische weergave. Teletekst 2.5 is de
standaardfabrieksinstelling.
Teletekst 2.5 uitschakelen . . .
1. Druk op
2. Terwijl u naar teletekst kijkt, drukt u op
3. Selecteer
4.Druk zo nodig enkele malen op om het menu te sluiten.
Zenderinstellingen
Voorkeurtaal teletekst
.
.
TEXT
Teletekst 2.5
en druk op OK.
Setup
>
>
.
Uit
.
Talen
of
Alternatieve taal
OPTIONS
.
Ondertiteling en talen
Ondertiteling
Ondertitelingen inschakelen.
ondertitelingstaal
4. Selecteer een taal en druk op OK.
5. Druk zo nodig enkele malen op om het menu te sluiten.
Een taal voor de ondertitels selecteren als geen van de
voorkeurstalen beschikbaar is . . .
1. Druk op
2. Selecteer
ondertitels tijdelijk wilt laten weergeven en druk op OK.
Ondertiteling voor analoge zenders
In het geval van analoge zenders moet u de ondertitels voor elke
zender handmatig instellen.
1. Schakel over naar een zender en druk op
te openen.
2. Ga naar de pagina voor ondertiteling, meestal
3. Druk nogmaals op
Als u Aan selecteert in het menu Ondertiteling terwijl u naar
een analoge zender aan het kijken bent, worden de ondertitels,
indien beschikbaar, weergegeven.
Om erachter te komen of een zender analoog of digitaal is,
schakelt u over naar de zender en opent u
.
Opties
en druk op OK.
OPTIONS
Taal ondertit.
TEXT
.
, selecteer de taal waarin u de
om teletekst
TEXT
.
888
om teletekst te sluiten.
in het menu
Status
Druk op
U hebt voor de ondertiteling de volgende opties:
uit, Ondertiteling aan,
Als u ondertiteling wilt inschakelen voor programma's die niet in
uw taal zijn (dus niet in de taal die u voor de TV hebt ingesteld),
selecteert u
ondertiteling weergegeven wanneer u het geluid dempt met .
Bij analoge zenders zijn de ondertitels beschikbaar via
Ondertiteling voor digitale zenders
Voor digitale zenders hoeft de ondertiteling niet via teletekst te
worden ingesteld.
Digitale zenders kunnen de ondertitels voor bepaalde
programma's in verschillende talen bevatten. U kunt een eerste
en een tweede voorkeurtaal voor de ondertiteling instellen. Als
de ondertiteling in een van uw voorkeurtalen beschikbaar is,
wordt deze op de TV weergegeven.
Als er geen ondertiteling in een van de geselecteerde talen
beschikbaar is, kunt u uit de beschikbare talen voor ondertiteling
een andere taal kiezen.
Druk op om de eerste en tweede taal voor de ondertitels in te
stellen:
SUBTITLE
om het menu Ondertiteling te openen.
of
Automatisch
Automatisch
. Met deze instelling wordt ook
.
Ondertiteling
teletekst
Audiotalen
Digitale TV-zenders kunnen de audio van een programma in
verschillende talen uitzenden. U kunt een eerste en een tweede
voorkeurtaal voor de audio instellen. Als audio in een van deze
.
talen beschikbaar is, schakelt de TV over naar deze audio.
Als geen van de voorkeurtalen voor audio beschikbaar is, kunt u
een andere audiotaal selecteren, indien beschikbaar.
De eerste en tweede voorkeurtaal voor audio inschakelen . . .
1. Druk op , selecteer
2. Selecteer
3. Selecteer
op OK.
4. Selecteer een taal en druk op OK.
5. Druk zo nodig enkele malen op om het menu te sluiten.
Een audiotaal selecteren wanneer geen van de audiotalen van
uw voorkeur beschikbaar is . . .
1. Druk op
2. Selecteer
wilt horen en druk op OK.
Audiotalen voor doven en slechthorenden en visueel
gehandicapten
Een aantal digitale TV-zenders zenden audio en ondertitels uit
die speciaal zijn aangepast voor doven en slechthorenden en
visueel gehandicapten.
Zenderinstellingen
Primaire audiotaal
OPTIONS
Taal audio
en druk op OK.
Setup
en
of
.
en selecteer de audiotaal die u tijdelijk
Talen.
Secundaire audiotaal
en druk
1. Druk op , selecteer
2. Selecteer
3. Selecteer
Zenderinstellingen
Primaire ondertitelingstaal
en druk op OK.
Setup
en
Talen.
of
Secundaire
20

Menutaal
Nieuwe zenders
De taal van de TV-menu's en -berichten wijzigen . . .
1. Druk op , selecteer
2. Selecteer
Menutaal
3. Selecteer de gewenste taal en druk op OK.
4. Druk zo nodig enkele malen op om het menu te sluiten.
6.2
TV-instellingen
en druk op OK.
en druk op OK.
Setup
>
Algemene instellingen
>
Zenders installeren
Zenders bijwerken
Automatisch bijwerken
Als u digitale zenders ontvangt, kunt u op de TV instellen dat de
lijst automatisch wordt bijgewerkt met nieuwe zenders.
U kunt ook zelf een zenderupdate starten.
Automatische zenderupdate
Eenmaal per dag, om zes uur 's ochtends, worden automatisch
de zenders bijgewerkt en nieuwe zenders opgeslagen. Nieuwe
zenders worden opgeslagen in de lijst Alle zenders, maar ook in
de lijst Nieuwe zenders. Lege zenders worden verwijderd.
Als nieuwe zenders worden gevonden of zenders zijn bijgewerkt
of verwijderd, verschijnt bij het opstarten van de TV een bericht.
De TV moet op stand-by staan om automatisch zenders bij te
werken.
Berichten bij het inschakelen van de TV uitschakelen . . .
1. Druk op , selecteer
2. Selecteer
3. Selecteer
De automatische zenderupdate uitschakelen . . .
1. Druk op , selecteer
2. Selecteer
3. Selecteer
zenderupdate
Een update starten
Zelf een update starten . . .
1. Druk op , selecteer
2. Selecteer
3. Selecteer
scherm. Het bijwerken kan enkele minuten duren.
In bepaalde landen wordt Automatische zenderupdate
uitgevoerd terwijl u TV kijkt of wanneer de TV in stand-by staat.
Zenderinstellingen
Installatie zenders
Zenderinstellingen
Installatie zenders
>
.
Uit
Zenders zoeken
Zenders bijwerken
en druk op OK.
Setup
en druk op OK.
>
Zenderupdatebericht
en druk op OK.
Setup
en druk op OK.
>
Automatische
en druk op OK.
Setup
en druk op OK.
en volg de instructies op het
>
Uit
.
Nieuwe zenders die zijn toegevoegd met de automatische
zenderupdate, zijn gemakkelijk te vinden in de zenderlijst
Dezelfde nieuwe zenders zijn ook opgeslagen in de zenderlijst
of
Alle
Nieuwe zenders blijven staan in de zenderlijst
markeert als favoriet of erop afstemt.
Radio
.
Nieuw
Nieuw
, tot u ze
Zenders opnieuw installeren
U kunt zoeken naar zenders en zenders opnieuw installeren en
alle andere TV-instellingen ongemoeid laten. Ook kunt u de TV
geheel opnieuw instellen.
Als er een kinderslotcode is ingesteld, moet u deze code
opgeven voordat u de zenders opnieuw kunt installeren.
Zenders opnieuw installeren
Alleen de zenders opnieuw installeren . . .
1. Druk op , selecteer
2. Selecteer
op OK.
3. Selecteer het land waar u de TV wilt installeren.
4. Selecteer
naar zenders kan enkele minuten duren. Volg de instructies op
het scherm.
Volledige installatie
De TV geheel opnieuw instellen . . .
1. Druk op , selecteer
2. Selecteer
opnieuw inst.
duren. Volg de instructies op het scherm.
Fabrieksinstellingen
Met de fabrieksinstellingen herstelt u de oorspronkelijke TVinstellingen voor beeld en geluid. De oorspronkelijke
fabrieksinstellingen herstellen . . .
1. Druk op , selecteer
2. Selecteer
Fabrieksinstellingen
3. Druk op OK om te bevestigen.
4. Druk zo nodig enkele malen op om het menu te sluiten.
Zenders zoeken
Antenne (DVB-T)
TV-instellingen
en druk op OK. Het instellen kan enkele minuten
TV-instellingen
en druk op OK.
en druk op OK.
Setup
>
Zenders opnieuw inst.
of
Kabel (DVB-C)
en druk op OK.
Setup
>
Algemene instellingen
en druk op OK.
Setup
>
Algemene instellingen
en druk
. Het zoeken
>
TV
>
Zenderlijst kopiëren
Introductie
.
Zenderlijst kopiëren dient alleen te worden uitgevoerd door
leveranciers en deskundige gebruikers. In bepaalde landen is
Zenderlijst kopiëren alleen beschikbaar voor het kopiëren van
satellietzenders.
21

Met
Zenderlijst kopiëren
zenders kopiëren naar een Philips-TV uit dezelfde serie. U
vermijdt zo het tijdrovende zoeken naar zenders en u kunt een
voorgeprogrammeerde zenderlijst uploaden naar een TV.
Gebruik een USB-stick van minimaal 1 GB.
Voorwaarden
- Beide TV's zijn van hetzelfde bouwjaar.
- Beide TV's zijn van hetzelfde type hardware. Kijk op het etiket
met het TV-type op de achterkant van de TV of dit het geval is.
Meestal staat er Q . . . LA
- De softwareversie van de twee TV's komt overeen.
Huidige versie
De softwareversie van de TV kunt u controleren via
software
Zenderlijst kopiëren
Een zenderlijst kopiëren . . .
1. Schakel de TV waarop de zenders zijn geïnstalleerd in. Sluit
een USB-geheugenapparaat aan.
2. Druk op , selecteer
3. Selecteer
Zenderlijst kopiëren
op OK. U wordt mogelijk gevraagd de tijdens de installatie
ingevoerde kinderslotcode in te voeren om de zenderlijst van
deze TV te kunnen kopiëren.
4. Als u de lijst hebt gekopieerd, koppelt u het USB-
geheugenapparaat los.
Nu kunt u de gekopieerde zenderlijst naar een andere Philips-TV
uploaden.
Zenderlijst uploaden
Een gekopieerde zenderlijst uploaden
De manier waarop u een zenderlijst uploadt, is afhankelijk van
het feit of uw TV is ingesteld of niet.
Naar een TV die nog niet is ingesteld
1. Steek de stekker in het stopcontact om de installatie te
starten en selecteer de gewenste taal en het land. U kunt
Zenders zoeken overslaan. Voltooi de installatie.
2. Sluit het USB-opslagapparaat met de zenderlijst van de andere
TV aan.
3. U start het uploaden van de zenderlijst door te drukken
op ,
Setup
4. Selecteer
Zenderlijst kopiëren
Mogelijk wordt u gevraagd de kinderslotcode van deze TV in te
voeren.
5. Er verschijnt een melding als de zenderlijst naar de TV is
gekopieerd. Koppel het USB-opslagapparaat los.
in
> Setup > Software-instellingen
TV-instellingen
te selecteren en op OK te drukken.
TV-instellingen
kunt u de op een TV geïnstalleerde
.
en druk op OK.
Setup
>
Algemene instellingen
>
Naar USB kopiëren
en druk ten slotte
>
Algemene instellingen
>
Naar TV kopiëren
en druk op OK.
Inf.huidige
>
>
Naar een TV die al is ingesteld
1. Controleer de landinstelling van de TV. (U controleert deze
instelling door te drukken op ,
vervolgens te drukken op OK. Selecteer
Zenders opnieuw installeren
vervolgens op
sluiten.)
Als het land juist is, gaat u verder met stap 2.
Als het land niet juist is, moet u de TV opnieuw instellen. Als u
de TV opnieuw wilt instellen, drukt u op , selecteert
u
Setup
Algemene instellingen
juiste land en sla Zenders zoeken over. Voltooi de installatie.
Wanneer u klaar bent, gaat u verder met stap 2.
2. Sluit het USB-opslagapparaat met de zenderlijst van de andere
TV aan.
3. U start het uploaden van de zenderlijst door te drukken
op ,
Setup
4. Selecteer
Zenderlijst kopiëren
Mogelijk wordt u gevraagd de kinderslotcode van deze TV in te
voeren.
5. Er verschijnt een melding als de zenderlijst naar de TV is
gekopieerd. Koppel het USB-opslagapparaat los.
Annuleren
en drukt u op OK. Selecteer
>
te selecteren en op OK te drukken.
TV-instellingen
>
te selecteren en
Setup
Zenders zoeken
en druk op OK. Druk op en
om het zoeken naar zenders af te
TV-instellingen
TV opnieuw inst.
>
Algemene instellingen
Naar TV kopiëren
> OK. Selecteer het
en druk op OK.
>
>
>
DVB-T of DVB-C
DVB-T- of DVB-C-ontvangst
Als in uw land zowel DVB-T- als DVB-C-ontvangst mogelijk is,
en de TV beide signalen kan ontvangen, hebt u bij het instellen
van de zenders een van beide geselecteerd.
Als u de DVB-instelling wilt wijzigen en de zenders opnieuw wilt
instellen. . .
1. Druk op , selecteer
2. Selecteer
3. Selecteer
(DVB-T)
4. Selecteer de gewenste DVB-instelling.
5. Druk zo nodig enkele malen op om het menu te sluiten.
DVB-C-zenderinstallatie
Voor het gemak zijn alle DVB-C-instellingen ingesteld op
automatisch.
Als u van uw provider specifieke DVB-C-instellingen, zoals een
netwerk-ID of een netwerkfrequentie, hebt gekregen, voert u
desgevraagd deze waarde(n) bij het instellen van de zenders in.
Tijdens het instellen van de zenders kan het zijn dat de scanoptie
moet worden aangepast (volledige of snelle scan) of dat een
bepaalde signaalsnelheid in het menu
ingevoerd. Voor het instellen van een
signaalsnelheid eerst op
Conflicterende zendernummers
Zenderinstellingen
Zenders instellen
of
Kabel (DVB-C)
en druk op OK.
Setup
en druk op OK.
>
Antenneaansluiting
en druk op OK.
Handmatig
worden ingesteld.
Instellingen
signaalsnelheid
moet worden
>
Antenne
moet de
22

In een aantal landen kunnen verschillende TV-zenders hetzelfde
zendernummer hebben. Tijdens het instellen van de zenders
wordt de lijst met conflicterende zendernummers weergegeven.
In het geval van een zendernummer met meerdere TV-zenders
moet u aangeven welke TV-zender u op het desbetreffende
zendernummer wilt instellen.
Netwerkfrequentie
Wanneer de
Frequentiescan
op
Snel
of
Geavanceerd
staat,
kunt u hier de netwerkfrequentie invoeren die u van uw
kabelaanbieder hebt ontvangen. Gebruik de cijfertoetsen om
deze waarde in te voeren.
DVB-T + DVB-C
Als u van zowel een DVB-T-ingang als een DVB-C-ingang
gebruik kunt maken, kunt u uw TV zowel op DVB-T als op DVBC instellen. Installeer het ene systeem gevolgd door het andere
systeem en gebruik daarvoor alle benodigde instellingen.
Als beide systemen eenmaal zijn geïnstalleerd, moet u het
gewenste antenne-ingangssignaal op de
antenne
-aansluiting
achter op de TV aansluiten, en de TV op het desbetreffende
systeem instellen om naar de ingestelde zenders te kunnen
kijken.
Zie hierboven voor het selecteren van de DVB-T- of DVB-Cinstelling.
DVB-instellingen
DVB-instellingen openen
1. Druk op , selecteer
2. Selecteer
3. Selecteer
Zenders zoeken
Zender opnieuw installeren
en druk op OK.
Setup
en druk op OK.
.
4. Selecteer het land waar u deze TV wilt installeren.
5. Selecteer
6. Selecteer
Kabel (DVB-C)
Start met zoeken naar zenders
Instellingen voor DVB-C-instellingen
.
of selecteer
.
7. Druk zo nodig enkele malen op om het menu te sluiten.
Frequentie scannen
Selecteer de methode voor het zoeken van zenders. U kunt
scannen selecteren en de voorgeprogrammeerde
Snel
instellingen gebruiken die door de meeste kabelaanbieders in uw
land worden gebruikt.
Als er hierdoor geen zenders worden geïnstalleerd, of als
sommige zenders ontbreken, kunt u de uitgebreide methode
met
Volledig
scannen kiezen. Bij deze methode duurt het
zoeken naar en installeren van zenders langer.
Netwerk-ID
Wanneer de
Frequentiescan
op
staat, kunt u hier de
Snel
netwerkfrequentie invoeren die u van uw kabelaanbieder hebt
ontvangen. Gebruik de cijfertoetsen om deze waarde in te
voeren.
Digitale zenders
Als u weet dat uw kabelaanbieder geen digitale zenders
aanbiedt, kunt u het zoeken naar digitale zenders overslaan.
Selecteer
Uit
.
Modus signaalsnelheid
Als uw kabelaanbieder u voor installatie van de TV-zenders geen
specifieke
signaalsnelheid
Modus signaalsnelheid
heeft verstrekt, laat u de instelling
op
Automatisch
staan.
Als u een specifieke signaalsnelheid hebt ontvangen, selecteert u
Handmatig
. Het kan echter zijn dat de waarde die u hebt
ontvangen, al in de voorgeprogrammeerde lijst met
signaalsnelheden staat vermeld. Selecteer
Voorgeprogrammeerde signaalsnelheid
om te controleren of
de desbetreffende waarde automatisch beschikbaar is.
Symboolsnelheid
Wanneer de
Modus signaalsnelheid
op
Handmatig
staat, kunt u
de signaalsnelheid invoeren die u van uw kabelaanbieder hebt
ontvangen. Gebruik de cijfertoetsen om deze waarde in te
voeren.
Analoge zenders
Als u weet dat uw kabelaanbieder geen analoge zenders
aanbiedt, kunt u het zoeken naar analoge zenders overslaan.
Selecteer
Uit
.
Geen restrictie/gecodeerd
Als u beschikt over een abonnement en een CAM - Conditional
Access Module voor betaal-TV, selecteert u
gecodeerde kanalen
. Als u geen abonnement op zenders of
services van betaal-TV hebt, kunt u alleen zenders met
niet-gecodeerde zenders
selecteren.
Niet gecodeerde +
Alleen
Handmatige installatie
Analoge TV-zenders kunnen handmatig, zender voor zender
worden ingesteld.
Analoge zenders handmatig instellen . . .
1. Druk op , selecteer
en druk op OK.
Setup
23

2. Selecteer
Zenderinstellingen
Analoog: handmatige installatie
-
Systeem
U stelt het TV-systeem in door
te drukken.
OK
>
Installatie zenders
en druk op OK.
Systeem
te selecteren en op
>
Selecteer uw land of het deel van de wereld waar u zich nu
bevindt.
- Zender zoeken
Selecteer
Zender zoeken
zoeken. Selecteer
Zoeken
en druk op OK om een zender te
en druk op OK. U kunt ook zelf een
frequentie invoeren. Als de ontvangst slecht is, drukt u nogmaals
op
Zoeken
. Als u de zender wilt vastleggen, selecteert u
Klaar
en drukt u op OK.
- Fijn afstemmen
Als u een zender nauwkeurig wilt afstemmen, selecteert u
afstemmen
en drukt u op OK. U kunt de zender nauwkeurig
Fijn
afstemmen met of .
Als u de gevonden zender wilt opslaan, selecteert u
Klaar
en
drukt u op OK.
- Opslaan
U kunt de zender onder het huidige zendernummer of als nieuw
zendernummer opslaan.
Selecteer
Vastleggen onder huidig zendernummer
Vastleggen onder nieuw zendernummer
.
of
U kunt deze stappen opnieuw uitvoeren totdat u alle
beschikbare analoge TV-zenders hebt gevonden.
24

7
Opties van zenderlijst
Satellietzenders
7.1
Satellietzenders bekijken
- Alleen voor TV's met een ingebouwde satelliettuner.
Satellietzenders bekijken . . .
Druk op en selecteer
af op de satellietzender die u als laatst hebt bekeken.
Van zender wisselen
Als u van zender wilt wisselen, drukt u op
stemt af op de volgende zender in de geselecteerde zenderlijst.
U kunt ook de cijfertoetsen op de afstandsbediening gebruiken
als u het zendernummer weet. Als u wilt terugkeren naar de
vorige zender die werd weergegeven, drukt u op .
U kunt via de lijst met satellietzenders ook rechtstreeks op een
zender afstemmen.
7.2
Satelliet
Lijst met satellietzenders
Over de zenderlijst
en druk op OK. De TV stemt
+
of
. De TV
-
De opties van de zenderlijst weergeven voor de huidige zender .
. .
1. Selecteer een zender als de lijst met alle zenders wordt
weergegeven en druk op
2. Selecteer de gewenste optie en druk op OK.
Beschikbare opties voor satellietzenders . . .
- Satelliet
Filter de zenderlijst zodat deze alleen de zenders van een
bepaalde satelliet of van alle satellieten weergeeft.
- Niet gecodeerde/gecodeerde kanalen
Filter de zenderlijst zodat deze alleen de gratis zenders, alleen de
gecodeerde zenders, of beide weergeeft. Gecodeerde zenders
herkent u aan een .
- Vergrendelen
U kunt een zender vergrendelen. Selecteer eerst een zender in
de lijst, druk op
moet de 4-cijferige code voor het kinderslot invoeren. Een
vergrendelde zender wordt aangeduid met een slot .
- Ontgrendelen
Hiermee ontgrendelt u een vergrendelde zender. Selecteer een
vergrendelde zender in de lijst, druk op
selecteer
kinderslot invoeren.
Ontgrendelen
OPTIONS
OPTIONS
en selecteer
. U moet de 4-cijferige code voor het
.
Vergrendelen
OPTIONS
. U
en
Wanneer de satellietzenders zijn ingesteld, worden deze in de
zenderlijst opgeslagen. U kunt de lijst met alle zenders bekijken
of de lijst filteren op uw favoriete zenders of op radiozenders.
Na een zenderupdate vindt u de toegevoegde zenders in de lijst
met nieuwe zenders.
U kunt vanuit elke lijst direct op een zender afstemmen. De lijst
die u in de zenderlijst selecteert, bepaalt op welke zenders u
afstemt met de toetsen + en -.
U kunt de volgorde van de zenders alleen wijzigen in de lijst met
favoriete zenders.
Een lijstfilter selecteren
De lijst die u in de zenderlijst selecteert, bepaalt op welke
zenders u afstemt met de toetsen + en
Een zenderlijst selecteren . . .
1. Druk op , selecteer
2. Druk op
wordt weergegeven, is de huidige zender geselecteerd.
3. Navigeer omhoog om
Radio, TV
of
Nieuw
LIST
Satelliet
om de zenderlijst te openen. In de lijst die
te selecteren.
en druk op OK.
of een van de filters
Alle
.
Favorieten
,
Zenderlijst kopiëren
Zenderlijst kopiëren
leveranciers en deskundige gebruikers. Met Zenderlijst kopiëren
kunt u de op een TV geïnstalleerde zenders kopiëren naar een
Philips-TV uit dezelfde serie. Met Zenderlijst kopiëren kunt u
terrestriële en satellietkanalen kopiëren.
7.3
dient alleen te worden gebruikt door
Favoriete satellietzenders
Favoriete zenders
U kunt zenders markeren als favoriete zenders. Uw favoriete
satellietzenders worden opgeslagen in de lijst
lijst met satellietzenders.
en
tussen uw favoriete zenders wilt
-
Favoriete zenders bekijken
Maak een lijst met favoriete zenders om eenvoudig tussen de
zenders die u wilt bekijken te kunnen wisselen. Alleen in deze
lijst kunt u de volgorde van de zenders aan uw voorkeur
aanpassen.
Als u alleen met
wisselen, selecteert u de lijst Favorieten in de zenderlijst en sluit
+
Favorieten
in de
25

u de zenderlijst weer.
Er zijn twee lijsten met favorieten: een voor TV-zenders en een
voor satellietzenders.
7.4
Satellietzenders vergrendelen
Zender vergrendelen
Uw lijst met favorieten instellen
Een lijst met uw favoriete zenders samenstellen . . .
1. Terwijl u een TV-zender kijkt, drukt u op
zenderlijsten te openen.
2. Selecteer de lijst
3. U wordt gevraagd direct zenders toe te voegen. Druk op OK.
Selecteer de zenders in de volgorde waarin u ze in de lijst wilt
opslaan, om te voorkomen dat u later tijd kwijt bent aan het
opnieuw ordenen van deze zenders.
4. Als u een zender aan de lijst Favorieten wilt toevoegen,
selecteert u de zender en drukt u op OK. Vervolgens kunt u een
andere zender selecteren om als favoriet toe te voegen.
5. Druk op om de actie te voltooien.
Favorieten
.
LIST
om de
Favoriete zenders toevoegen of verwijderen
Favorieten aan de lijst toevoegen of uit de lijst verwijderen . . .
1. Terwijl u een TV-zender kijkt, drukt u op
zenderlijsten te openen.
2. Selecteer de zender die u als favoriet wilt markeren en druk
op
OPTIONS
3. Selecteer
geselecteerde zender wordt gemarkeerd met een .
4. Druk op als u klaar bent. De zenders zijn toegevoegd aan
de lijst Favorieten.
Als u een zender uit de lijst met favorieten wilt verwijderen,
selecteert u
.
Favorieten toevoegen
Favorieten verwijderen
en druk op OK. De
LIST
en drukt u op OK.
om de
Om te voorkomen dat kinderen naar een bepaalde zender
kijken, kunt u deze vergrendelen. Als u naar een vergrendelde
zender wilt kijken, moet u de kinderslotcode invoeren. U kunt
geen programma's van aangesloten apparaten vergrendelen.
Een zender vergrendelen . . .
1. Terwijl u een TV-zender kijkt, drukt u op
Zenderlijst
2. Selecteer in elke lijst de zender die u wilt vergrendelen.
3. Druk op
de zenderlijst wordt een vergrendelde zender aangeduid met
een slot .
Als u de vergrendelde zender wilt ontgrendelen, selecteert u de
vergrendelde zender in de zenderlijst en kiest u de optie
ontgrendelen
te openen.
OPTIONS
. U moet de kinderslotcode opgeven.
en selecteer
Zender vergrendelen
LIST
om de
. In
Zender
Een leeftijdsclassificatie gebruiken
U kunt een leeftijdsclassificatie gebruiken om te voorkomen dat
kinderen naar programma's kijken waarvoor ze te jong zijn.
Sommige digitale zenders kennen een leeftijdsgrens toe aan hun
programma's. Is de classificatie hoger dan of gelijk aan de
classificatie die u voor uw kind hebt ingesteld, dan wordt het
programma vergrendeld.
Om naar een vergrendeld programma te kunnen kijken, moet u
de code van het kinderslot invoeren. De leeftijdsclassificatie
wordt ingesteld voor alle zenders.
Een leeftijdsclassificatie instellen . . .
Favoriete zenders opnieuw ordenen
U kunt alleen zenders in de lijst Favorieten herordenen.
1. In de zenderlijst
verplaatsen.
2. Druk op
3. Selecteer
4. Selecteer de zender die u wilt verplaatsen en druk op OK.
5. Druk op de
naar een andere locatie te verplaatsen en druk op OK.
6. Druk op
7. Selecteer
Herordenen
navigatietoetsen
OPTIONS
Herordenen beëindigen
markeert u de zender die u wilt
Alle
OPTIONS
.
en druk op OK.
om de gemarkeerde zender
als u klaar bent.
en druk op OK.
1. Druk op , selecteer
2.
Selecteer
Leeftijdsclassificatie
3. Voer de 4-cijferige code voor het kinderslot in. Als u nog geen
code hebt ingesteld, selecteert u
op OK. Voer een 4-cijferige code voor het kinderslot in en
bevestig deze. U kunt nu een leeftijdsclassificatie instellen.
4. Selecteer de leeftijd en druk op OK.
5. Druk zo nodig enkele malen op om het menu te sluiten.
6. Als u de leeftijdsclassificatie wilt uitschakelen, selecteert
u
Geen
U wordt gevraagd de code in te voeren om het programma te
ontgrendelen. Bij sommige zenders vergrendelt de TV alleen
programma's met een hogere classificatie.
Satellietinstelling.
en druk op
als leeftijd.
en druk op OK.
Setup
>
Kinderslot
OK.
Code instellen
>
en drukt u
26

Kinderslotcode
U kunt de code voor het kinderslot instellen of wijzigen.
De vergrendelcode instellen of de huidige code wijzigen . . .
1. Druk op , selecteer
2. Selecteer
instellen
3. Als er al een code is ingesteld, voert u de huidige code voor
het kinderslot in en voert u vervolgens de nieuwe code
tweemaal in.
De nieuwe code is ingesteld.
Weet u de code voor het kinderslot niet meer?
Als u uw code niet meer weet, kunt u de huidige code
overschrijven en een nieuwe code invoeren.
1. Druk op , selecteer
2. Selecteer
druk op OK.
3. Voer de standaardcode
4. Voer nu een nieuwe code voor het kinderslot in en voer deze
nogmaals in om de code te bevestigen.
7.5
Satellietinstelling.
of
Code wijzigen
Satellietinstelling.
en druk op OK.
Setup
>
Kinderslot
en druk op OK.
en druk op OK.
Setup
>
Kinderslot
in.
8888
>
Code
>
Code wijzigen
en
Satellietinstallatie
Satellieten installeren
Informatie over het installeren van satellieten
Deze TV heeft een ingebouwde DVB-S/DVBS2-satellietontvanger. Sluit de kabel van de satellietschotel
rechtstreeks aan op de TV. Gebruik een coaxkabel die geschikt
is voor aansluiting van een satellietschotelantenne. Zorg dat de
satellietschotel perfect is uitgelijnd voor u met de installatie
begint.
zenders. Als u alleen naar satellietzenders kijkt, kunt u de
installatie van TV-zenders overslaan.
Via het menu Configuratie kunt u altijd opnieuw satellieten
installeren.
Satellietzenders installeren . . .
1. Druk op , selecteer
2. Selecteer
3. Selecteer
4. Op de TV wordt de huidige instelling van de installatie
weergegeven. Als dit de gewenste satellietinstallatie is, kunt u
naar satellieten zoeken. Selecteer
naar stap 5. Als de huidige instelling niet de gewenste instelling is,
selecteert u
4b - Selecteer in het menu Instellingen het aantal satellieten dat
u wilt installeren. Als u een Unicable-instelling gebruikt, selecteert
u
Unicable voor 1 satelliet
afhankelijk van het aantal satellieten dat u voor Unicable wilt
installeren. Selecteer de gewenste instelling en druk op OK.
4c - Als het aantal satellieten is ingesteld of als alle instellingen
voor Unicable zijn voltooid, selecteert u
.
OK
5. De TV zoekt naar beschikbare satellieten in het bereik van uw
schotelantenne. Dit kan enkele minuten duren. Als er een
satelliet is gevonden, worden de naam en de sterkte van de
ontvangst op het scherm weergegeven. Als er een zenderpakket
beschikbaar is voor de gevonden satellieten, kunt u het
gewenste pakket selecteren.
6. Als u de zenders van de gevonden satellieten wilt installeren,
selecteert u
aantal (radio)zenders weergegeven.
7. Als u de satellietinstellingen, alle satellietzenders en
satellietradiozenders wilt opslaan, selecteert u
drukt u op OK.
Satelliet zoeken
Satellieten installeren
Instellingen
Installeren
en druk op OK.
Setup
en druk op OK.
en druk op OK.
Zoeken
en drukt u op OK. Ga naar stap 4b.
of
Unicable voor 2 satellieten
en drukt u op OK. Op de TV wordt het
en druk op OK. Ga
Zoeken
en drukt u op
Voltooien
en
,
Zenderpakketten
Maximaal 4 satellieten
U kunt op deze TV maximaal 4 satellieten (4 LNB's) installeren.
Selecteer aan het begin van de installatie het aantal satellieten
dat u wilt installeren. Zo kunt u de installatie sneller laten
verlopen.
Unicable
U kunt een Unicable-systeem gebruiken om de schotelantenne
aan te sluiten op de TV. Als u satellieten installeert voor een
Unicable-systeem aan het begin van de installatie of dit voor 1 of
2 satellieten is.
Installeren
U kunt de satellieten installeren als u de TV voor het eerst
instelt. De satellietinstallatie volgt na de installatie van TV-
Over zenderpakketten
Satellieten bieden mogelijk zenderpakketten met gratis zenders
voor een bepaald land. Sommige satellieten bieden
abonnementen waarbij u betaald voor een zenderpakket.
Als u een abonnement kiest, wordt u mogelijk gevraagd of u een
snelle of een volledige installatie wilt uitvoeren.
Selecteer
zenderpakket te installeren en selecteer
satellietzenders
abonnementen raden wij een snelle installatie aan. Als u extra
satellieten hebt die geen onderdeel uitmaken van uw
abonnement, raden we een volledige installatie aan. Alle
geïnstalleerde zenders worden opgeslagen in de lijst Alle.
27
Alleen zenders van satellietaanbieders
Alle
om alle beschikbare zenders te installeren. Voor
om alleen het

Unicable-instelling
Het Unicable-systeem
U kunt een Unicable-systeem gebruiken om de schotelantenne
aan te sluiten op de TV. In een Unicable-systeem wordt de
schotelantenne met één kabel op alle satellietontvangers in het
systeem aangesloten. Unicable wordt met name gebruikt in
flatgebouwen. Als u gebruikmaakt van een Unicable-systeem,
wordt u tijdens de installatie gevraagd een User Band-nummer
en overeenkomstige frequentie toe te wijzen. Op deze TV kunt
u met Unicable 1 of 2 satellieten installeren.
Als er na een Unicable-installatie zenders ontbreken, is er
mogelijk op hetzelfde moment nog een installatie op het
Unicable-systeem uitgevoerd. Voer de installatie opnieuw uit om
de ontbrekende zenders te installeren.
Als u slechts een of twee satellieten hebt geïnstalleerd, kunt u
met de huidige installatie-instellingen mogelijk niet een extra
satelliet toevoegen. Als u de installatie-instellingen moet wijzigen,
dient u de volledige satellietinstallatie opnieuw uit te voeren. U
kunt de optie
instellingen moet wijzigen.
Een satelliet toevoegen . . .
1. Druk op , selecteer
2. Selecteer
3. Selecteer
satellieten worden weergegeven.
4. Selecteer
satellieten.
5. Als de TV een of meer satellieten gevonden heeft, selecteert
u
Installeren
satellieten worden op de TV geïnstalleerd.
6. Als u de (radio)zenders wilt opslaan, selecteert
u
Voltooien
Satelliet toevoegen
Setup
Satelliet zoeken
Satelliet toevoegen
Toevoegen
en drukt u op OK. De zenders van de gevonden
en drukt u op OK.
en druk op OK. De TV zoekt nieuwe
niet gebruiken als u de
en druk op OK.
en druk op OK.
en druk op OK. De huidige
User Band-nummer
In een Unicable-systeem moet elke aangesloten
satellietontvanger een nummer hebben (bijv. 0, 1, 2 of 3 enz.).
U vindt de beschikbare User Bands en de bijbehorende
nummers op de Unicable-switchbox. User Band wordt soms
afgekort tot UB. Er zijn Unicable-switchboxen met 4 of 8 User
Bands. Als u Unicable selecteert in de instellingen, wordt u
gevraagd het unieke User Band-nummer toe te wijzen voor de
ingebouwde satellietontvanger. Een satellietontvanger kan niet
hetzelfde User Band-nummer hebben als een andere
satellietontvanger in het Unicable-systeem.
User Band-frequentie
Voor de ingebouwde satellietontvanger is naast het unieke User
Band-nummer ook de frequentie van het geselecteerde User
Band-nummer nodig. Deze frequenties staan meestal naast het
User Band-nummer op een Unicable-switchbox.
Satelliet toevoegen
U kunt een extra satelliet toevoegen aan uw huidige
satellietinstallatie. Dit heeft geen invloed op de geïnstalleerde
satellieten en de bijbehorende zenders. Bij bepaalde
satellietproviders is het echter niet mogelijk om een satelliet toe
te voegen.
De extra satelliet is slechts een aanvulling, niet het
hoofdabonnement of de hoofdsatelliet waarvan u het
zenderpakket gebruikt. Doorgaans voegt u een vierde satelliet
toe, als u al drie satellieten hebt geïnstalleerd. Als u vier
satellieten hebt geïnstalleerd, kunt u eerst een satelliet
verwijderen. Pas dan kunt u een nieuwe satelliet toevoegen.
Instellingen
Een satelliet verwijderen
U kunt een of meer satellieten uit uw huidige satellietinstallatie
verwijderen. Hierbij worden de satelliet en de bijbehorende
zenders verwijderd. Bij bepaalde satellietproviders kunt u echter
geen satelliet verwijderen.
Satellieten verwijderen . . .
1. Druk op , selecteer
2. Selecteer
3. Selecteer
satellieten worden weergegeven.
4. Selecteer met de pijltoetsen de satelliet die u wilt verwijderen.
5. Druk op OK om een satelliet voor verwijdering te markeren.
Druk opnieuw op OK om de markering ongedaan te maken.
6. Selecteer
De satellieten worden verwijderd.
7. Selecteer
verwijderen te sluiten.
Satelliet zoeken
Satelliet verwijderen
Verwijderen,
Afsluiten
en druk op OK om het menu Satelliet
en druk op OK.
Setup
en druk op OK.
en druk op OK. De huidige
druk op OK en bevestig uw keuze.
Satellietzenders bijwerken
Eenmaal per dag, om 6 uur 's ochtends, worden de
satellietzenders automatisch bijgewerkt. Bij een zenderupdate
worden nieuwe zenders gezocht en toegevoegd aan de
zenderlijst. Zenders die niet meer beschikbaar zijn, worden
verwijderd. Als een provider de zendervolgorde wijzigt, wordt
de zenderlijst van de TV bijgewerkt. De TV moet op stand-by
staan om de zenders automatisch te kunnen bijwerken. U kunt
ook zelf op elk willekeurig moment een zenderupdate uitvoeren.
Nieuwe zenders die tijdens de zenderupdate zijn gevonden,
worden gemarkeerd met de letter N en opgenomen in de
zenderlijst Nieuw. Ook worden nieuwe zenders toegevoegd aan
de zenderlijst Alle. Nieuwe zenders blijven in de zenderlijst
Nieuw staan tot u erop afstemt of ze als favoriet markeert.
28

Uit
>
.
>
Optie
Gereed
De automatische zenderupdate uitschakelen
U kunt de TV 's nachts volledig uitschakelen om te voorkomen
dat de zenderupdate wordt uitgevoerd. U kunt de automatische
update ook uitschakelen in het menu Instellingen.
1. Druk op , selecteer
2. Selecteer
Automatische zenderupdate
De update uitschakelen voor een bepaalde satelliet
1. Druk op , selecteer
2. Selecteer
voor automatische update
3. Selecteer met de pijltjestoetsen de satelliet die u niet wilt
bijwerken. Druk op OK om de markering van de satelliet
ongedaan te maken.
4. Selecteer
De zenders van de gemarkeerde satelliet worden niet door de
TV bijgewerkt.
Zelf een update starten
1. Druk op , selecteer
2. Selecteer
3. Selecteer
4. Als u wilt controleren welke satellieten zijn ingesteld voor de
update, selecteert u
5. Met de pijltjestoetsen markeert u de satellieten die u wilt
bijwerken of maakt u de markering ongedaan. Selecteer
en druk op OK.
6. Selecteer
enkele minuten duren.
7. Selecteer
Satellietinstelling.
Satellietinstelling.
Gereed
Satelliet zoeken
Zenders bijwerken
Bijwerken
Voltooien
en druk op OK om het menu te sluiten.
Instellingen
en druk op OK.
Setup
>
Installatie zenders
en selecteer
en druk op OK.
Setup
>
Installatie zenders
.
en druk op OK.
Setup
en druk op OK.
en druk op OK.
en drukt u op OK.
en druk op OK. Het bijwerken kan
en druk op OK.
Talen en audio
Gewenste taal en ondertiteling
Satellietzenders kunnen verschillende audio-, ondertitelings- en
teleteksttalen bevatten. U kunt de TV zo instellen dat deze
automatisch overschakelt naar de taal, ondertitelingstaal of
teleteksttaal van uw voorkeur, als deze taal beschikbaar is op de
zender of teletekstpagina's.
De gewenste taal instellen . . .
1. Druk op , selecteer
2. Selecteer
3. Selecteer
instelling.
4. Druk zo nodig enkele malen op om het menu te sluiten.
Audiobeschrijving
Satellietinstelling.
en druk op OK. Selecteer de gewenste
Talen
en druk op OK.
Setup
en druk op OK.
Luidsprekers / Hoofdtelefoon
U kunt selecteren hoe u het audiocommentaar wilt horen.
Alleen via de luidsprekers van de TV, alleen via de hoofdtelefoon
of beide.
Luidsprekers / Hoofdtelefoon instellen. . .
1. Druk op , selecteer
2. Selecteer
Luidsprekers/hoofdtelefoon
3. Selecteer
hoofdtelefoon
4. Druk zo nodig enkele malen op om het menu te sluiten.
Audio-effect
Soms is audiocommentaar van extra effecten voorzien, zoals
stereo of geluid dat langzaam vervaagt.
Audio-effecten inschakelen (indien beschikbaar)
1. Druk op , selecteer
2. Selecteer
Geluidseffecten
3. Selecteer
4. Druk zo nodig enkele malen op om het menu te sluiten.
Spraak
Het audiocommentaar kan ook de ondertiteling van gesproken
woorden bevatten.
Ondertiteling voor gesproken woorden inschakelen (indien
beschikbaar) . . .
1. Druk op , selecteer
2. Selecteer
Spraak
3. Selecteer
.
OK
4. Druk zo nodig enkele malen op om het menu te sluiten.
Satellietinstelling.
Luidsprekers, Hoofdtelefoon
en druk op OK.
Satellietinstelling.
en druk op OK.
of
Aan
Uit
Satellietinstelling.
en druk op OK.
Beschrijvend
en druk op OK.
Setup
>
Talen
en druk op OK.
en druk op OK.
Setup
>
Talen
en druk op OK.
en druk op OK.
Setup
>
Talen
(audio) of
Ondertiteling
>
Audiobeschrijving
of
Luidsprekers +
>
Audiobeschrijving
>
Audiobeschrijving
en druk op
>
>
>
Handmatige installatie
Handmatige installatie dient alleen te worden gebruikt door
deskundige gebruikers.
U kunt Handmatige installatie gebruiken om snel nieuwe zenders
van een satelliettransponder toe te voegen. Hiervoor moet u de
frequentie en polarisatie van de transponder weten. Alle zenders
van die transponder worden op de TV geïnstalleerd. Als de
transponder al eerder geïnstalleerd is, worden alle zenders
(oude en nieuwe) verplaatst naar het eind van de zenderlijst
Alle.
U kunt Handmatige installatie niet gebruiken als u het aantal
satellieten moet wijzigen. Als dit nodig is, dient u een volledige
installatie uit te voeren via Satellieten installeren.
Een transponder installeren . . .
29

1. Druk op , selecteer
2. Selecteer
zenders
3. Als er meer dan 1 satelliet is geïnstalleerd, selecteert u de
satelliet/LNB waarvoor u zenders wilt toevoegen.
4. Stel de vereiste
instelt op
invoeren bij
transponder.
5. Als er een transponder is gevonden, selecteert u
drukt u op OK om de nieuwe transponder op te slaan op de
geselecteerde LNB.
6. Selecteer
7.6
Satellietinstelling.
>
Handmatige installatie
Polarisatie
Handmatig
Signaalsnelheid
Afsluiten
, kunt u de signaalsnelheid handmatig
om de handmatige installatie te sluiten.
en druk op OK.
Setup
>
Installatie
in. Als u
. Voer de
en druk op OK.
Modus signaalsnelheid
Frequentie
in en zoek de
Opslaan
en
Problemen met satellieten
De TV kan de gewenste satellieten niet vinden of installeert
dezelfde satelliet tweemaal
- Zorg ervoor dat aan het begin van de installatie het juiste
aantal satellieten is ingevoerd in Instellingen. U kunt de TV 1, 2
of 3/4 satellieten laten zoeken.
De ontvangst is soms slecht
- Controleer of de schotelantenne goed vastzit. De schotel kan
bewegen door harde wind.
- Sneeuw en regen kunnen leiden tot een slechtere ontvangst.
Een LNB met twee koppen kan geen tweede satelliet vinden
- Als de TV één satelliet vindt, maar geen tweede vindt, draait u
de schotel een paar graden. Lijn de schotel uit voor het sterkste
signaal voor de eerste satelliet. Controleer de signaalsterkteindicator van de eerste satelliet op het scherm. Als de eerste
satelliet is ingesteld op het sterkste signaal, selecteert u Opnieuw
zoeken om de tweede satelliet te zoeken.• Zorg ervoor dat in
de instellingen Twee satellieten is ingesteld.
Het probleem is niet opgelost met de wijziging in de
instellingen voor de installatie
- Alle instellingen, satellieten en zenders worden pas opgeslagen
als de installatie is voltooid.
Alle satellietzenders zijn verdwenen
- Als u een Unicable-systeem gebruikt, zorg er dan voor dat u
een uniek User Band-nummer aan de satellietontvanger hebt
toegewezen in de Unicable-instellingen. Mogelijk maakt een
andere satellietontvanger gebruik van hetzelfde User Bandnummer.
Er lijken enkele satellietzenders uit de zenderlijst te zijn
verdwenen
- Als het lijkt alsof er zenders verdwenen zijn, heeft de zender
mogelijk de transponderlocatie van deze zenders gewijzigd. Als u
de zenderposities in de zenderlijst wilt herstellen, kunt u
proberen het zenderpakket bij te werken.
Ik kan een satelliet niet verwijderen
- Bij abonnementpakketten kunt u geen satelliet verwijderen. Als
u de satelliet wilt verwijderen, dient u een volledige installatie uit
te voeren, waarbij u een ander pakket selecteert.
30

8
TV-gids
8.1
De TV-gids gebruiken
Wat hebt u nodig...
programma's voor een van de volgende dagen te bekijken. Druk
op
U kunt ook op
selecteren.
Selecteer
om de gewenste dag te selecteren.
om terug te gaan naar de vorige dag.
OPTIONS
Vorige dag, Vandaag
drukken en
of
Dag wijzigen
Volgende dag
en druk op
OK
In de TV-gids vindt u het overzicht van de huidige en
geprogrammeerde TV-programma's van uw zenders. Afhankelijk
van waar de TV-gidsgegevens vandaan komen, worden er
analoge en digitale of alleen digitale zenders weergegeven. Niet
alle zenders beschikken over TV-gidsgegevens.
De TV kan TV-gidsgegevens ophalen voor de op de TV
geïnstalleerde zenders (bijvoorbeeld de zenders die u bekijkt
met Watch TV). De TV kan geen TV-gidsgegevens ophalen voor
zenders die u via een digitale ontvanger bekijkt.
De TV-gids openen
Druk op
Druk opnieuw op
De eerste keer dat u de TV-gids opent, scant de TV alle TV-
zenders op programma-informatie. Dit kan een aantal minuten in
beslag nemen. TV-gidsgegevens worden in de TV opgeslagen.
TV GUIDE
om de TV-gids te openen.
TV GUIDE
om de TV-gids te sluiten.
Afstemmen op een programma
Overschakelen naar een programma
Vanuit de TV-gids kunt u overschakelen naar een programma
dat op dat moment wordt uitgezonden.
Gebruik de pijltoetsen om een programma te markeren en te
selecteren.
Ga naar rechts om de programma's te bekijken die voor later
die dag staan geprogrammeerd.
Om over te schakelen naar het programma (de zender),
selecteert u het programma en drukt u op OK.
Gedetailleerde programmagegevens bekijken
Als u gedetailleerde gegevens van het geselecteerde programma
wilt oproepen, drukt u op
INFO
.
Zoeken op genre
Als de desbetreffende informatie beschikbaar is, kunt u op genre
naar geprogrammeerde programma's zoeken, zoals een film,
sportprogramma, enzovoort.
Als u op genre naar programma's wilt zoeken, drukt u op
OPTIONS
Selecteer een genre en druk op OK. De lijst met gevonden
programma's wordt weergegeven.
8.2
en selecteert u
Zoeken op genre
.
Opnamen
U kunt vanuit de TV-gids een TV-programma direct opnemen of
een opname instellen. Sluit een USB-schijf aan op de TV om de
opnamen op te slaan.
8.3
TV-gidsgegevens ontvangen
In bepaalde regio's en voor bepaalde zenders zijn mogelijk geen
TV-gidsgegevens beschikbaar. De TV kan TV-gidsgegevens
ophalen voor de op de TV geïnstalleerde zenders (bijvoorbeeld
de zenders die u bekijkt met Watch TV). De TV kan geen TVgidsgegevens ophalen voor kanalen die u via een digitale
ontvanger of decoder bekijkt.
De TV is standaard ingesteld op
TV-gidsgegevens instellen
TV-gidsgegevens instellen . . .
1. Druk op en selecteer
2. Druk op de toets .
3. Selecteer
4. Druk zo nodig enkele malen op om het menu te sluiten.
Van de zender
Van de zender
TV-gids
.
.
.
Dag wijzigen
In de TV-gids kunnen de programma's die voor de komende
dagen zijn geprogrammeerd, worden weergegeven (tot
maximaal 8 dagen vooruit).
Als de TV-gidsgegevens afkomstig zijn van de zender, kunt u op
drukken om het overzicht van de geprogrammeerde
+
31

9
Bronnen
9.1
Bronnenlijst
In de lijst met aansluitingen - het menu Bron - kunt u zien welke
apparaten op de TV zijn aangesloten. Via het menu Bron kunt u
overschakelen naar een apparaat.
Menu Bronnen
Als u het menu Bronnen wilt openen, drukt u op
Als u over wilt schakelen naar een aangesloten apparaat,
selecteert u het desbetreffende apparaat met de pijltjestoetsen
(links) of (rechts) en drukt u op OK.
Als u het menu Bron wilt sluiten zonder naar een apparaat over
te schakelen, drukt u nogmaals op
9.2
SOURCES
SOURCES
.
Vanuit stand-by
9.3
.
EasyLink
Met
EasyLink
afstandsbediening van de TV. EasyLink maakt gebruik van HDMI
CEC om met de aangesloten apparaten te communiceren.
Apparaten moeten HDMI CEC ondersteunen en met een
HDMI-aansluiting zijn aangesloten.
kunt u een aangesloten apparaat bedienen via de
Als de TV in stand-by staat, kunt u een aangesloten apparaat
inschakelen met de afstandsbediening van uw TV.
Afspelen
Als u zowel de discspeler als de TV vanuit stand-by wilt
inschakelen en de disc of het programma onmiddellijk wilt
afspelen, drukt u op (afspelen) op de afstandsbediening van
de TV.
Het apparaat moet zijn aangesloten met een HDMI-kabel en
zowel op de TV als op het apparaat moet HDMI CEC zijn
ingeschakeld.
Home cinema-systeem
U kunt uw home cinema-systeem (HTS) inschakelen om naar
een audiodisc of een radiostation te luisteren en de TV in standby laten staan.
Als u alleen het HTS wilt inschakelen terwijl de TV in stand-by
staat, drukt u op
TV.
SOURCES
op de afstandsbediening van de
32

10
Timers en klok
2. Selecteer
instellingen
op
0 (Uit)
3. Druk zo nodig enkele malen op om het menu te sluiten.
TV-instellingen
> Automatisch uitschakelen en stel de schuifbalk in
.
>
Algemene
10.1
Sleeptimer
Met de sleeptimer kunt u de TV zodanig instellen dat deze na
een ingestelde tijd automatisch in stand-by wordt gezet.
De sleeptimer instellen . . .
1. Druk op , selecteer
2. Selecteer
Sleeptimer
Met de schuifbalk kunt u de tijd in stappen van 5 minuten op
maximaal 180 minuten instellen. Als de tijd op 0 minuten is
ingesteld, staat de sleeptimer uit. U kunt altijd de TV al eerder
uitschakelen of de tijd opnieuw instellen.
3. Druk zo nodig enkele malen op om het menu te sluiten.
10.2
TV-instellingen
.
en druk op OK.
Setup
>
Algemene instellingen
>
Klok
Als u wilt weten hoe laat het is, drukt u op
in de TV-gids te kijken hoe laat het is.
TV GUIDE
om
In bepaalde landen wordt het UTC-signaal (Coordinated
Universal Time) niet bij digitale uitzendingen verzonden.
Hierdoor kan het zijn dat er niet automatisch wordt
overgeschakeld naar zomertijd of wintertijd en dat er op de TV
een verkeerde tijd wordt weergegeven.
De TV-klok wijzigen . . .
1. Druk op , selecteer
2. Selecteer
Klok > Autom. klokmodus
3. Selecteer
10.3
TV-instellingen
Zomertijd
en druk op OK.
Setup
>
Algemene instellingen
en selecteer
en selecteer de gewenste instelling.
Verschilt per land
>
.
Automatisch uitschakelen
Als de toetsen van de afstandsbediening gedurende 4 uur niet
worden aangeraakt, of als de TV gedurende 10 minuten geen
ingangssignaal en geen signalen vanuit de afstandsbediening
ontvangt, gaat de TV automatisch uit om energie te besparen.
Als u de TV als beeldscherm gebruikt of TV kijkt via een digitale
ontvanger (een set-top box, ofwel een STB) en u de
afstandsbediening van de TV niet gebruikt, zet u het automatisch
uitschakelen van de TV uit.
De functie
1. Druk op , selecteer
Automatisch uitschakelen
en druk op OK.
Setup
uitzetten . . .
33
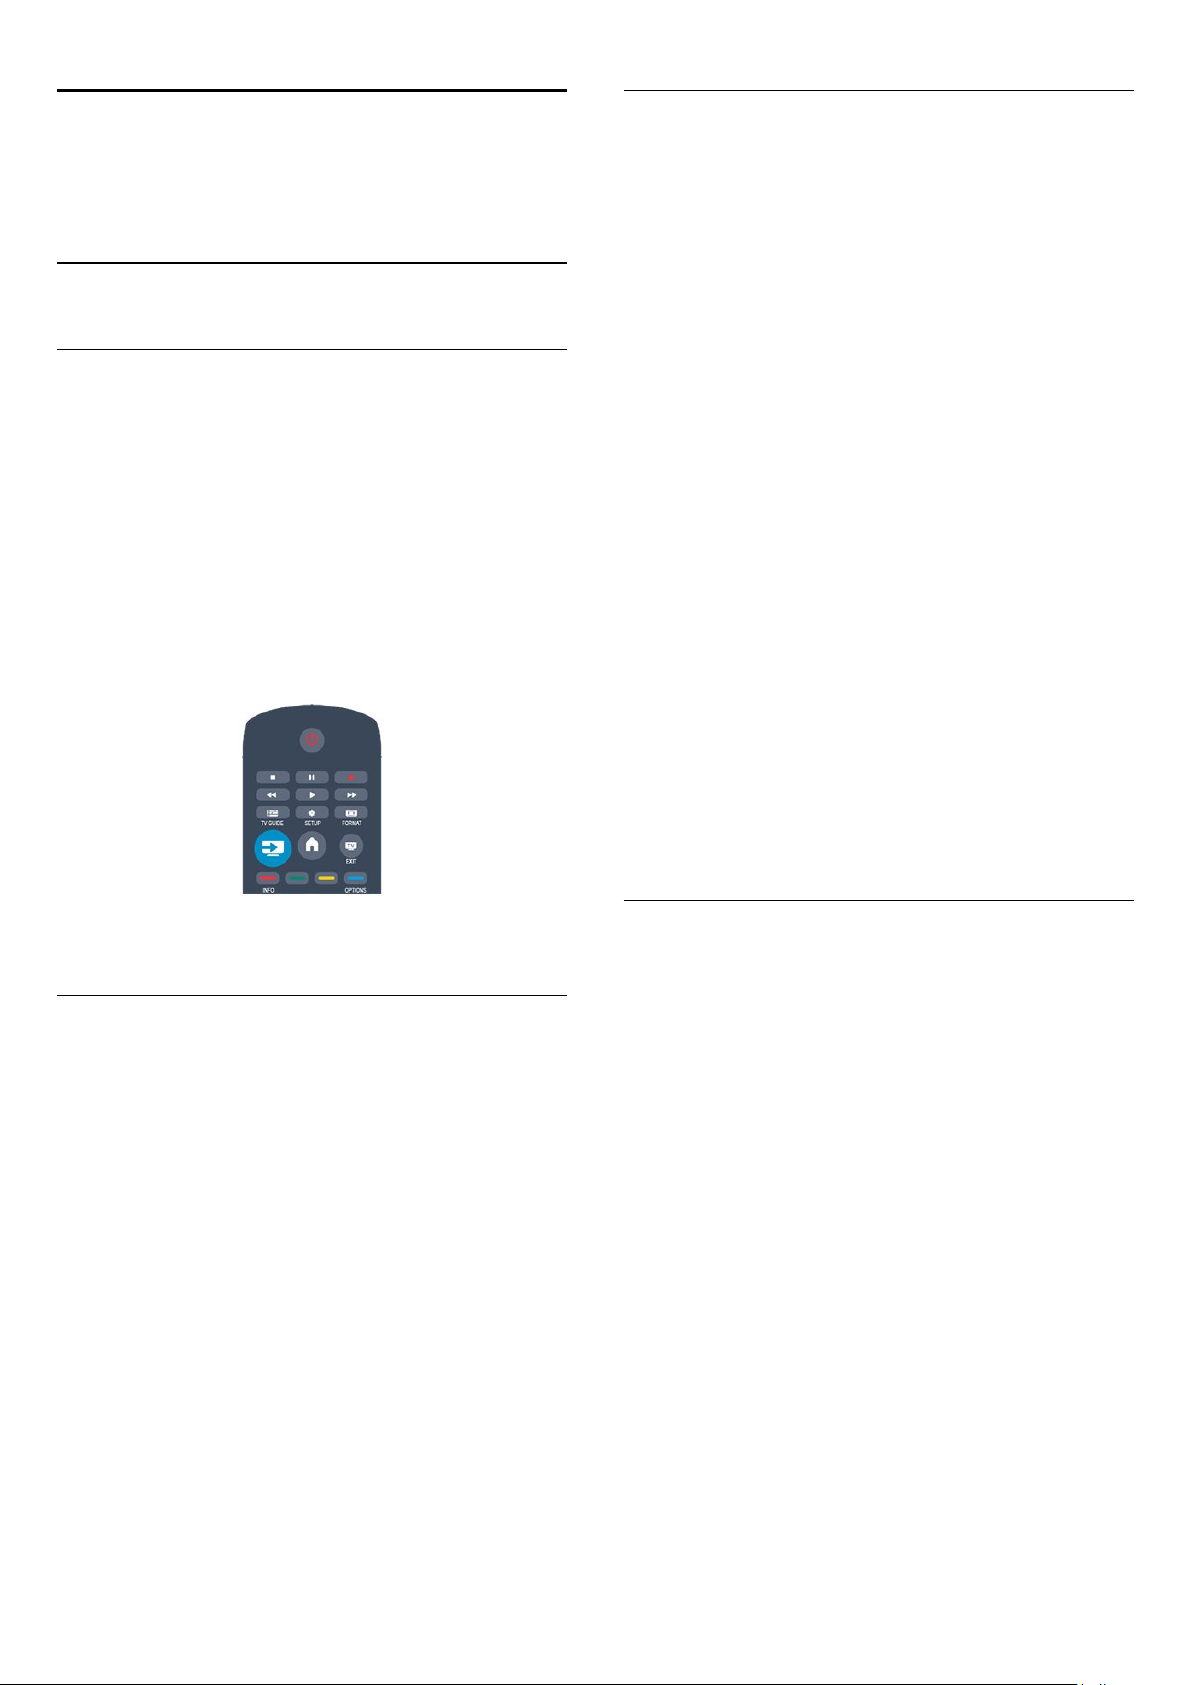
11
Foto’s bekijken
Uw foto's, video's en
muziek
11.1
Via een USB-aansluiting
Wat hebt u nodig...
U kunt uw foto's bekijken of uw muziek en video's afspelen
vanaf een aangesloten USB-stick of USB-schijf.
Vanaf een USB-opslagapparaat
Sluit een USB-stick of een USB-schijf op een van de USBaansluitingen aan terwijl de TV aanstaat. De TV zal het apparaat
herkennen en de bestanden worden vervolgens op de TV
weergegeven.
Als de lijst niet automatisch wordt weergegeven, drukt u op
SOURCES
, selecteert u
USB bladeren
en drukt u op OK.
Selecteer
Opties
Druk op
- Diapresentatie starten, diapresentatie stoppen
De diapresentatie starten of stoppen.
- Overgangen diapresentatie
hiermee stelt u de overgang tussen afbeeldingen in.
- Frequentie van diapresentatie
de afspeelduur van elke foto selecteren.
- Herhalen, Eén keer afspelen
de foto's herhaaldelijk of één keer afspelen.
- Shuffle uit, Shuffle aan
de foto's in de vaste of een willekeurige volgorde weergeven.
- Beeld roteren
de foto draaien.
- Info weergeven
de naam, datum en grootte van de foto, en de volgende foto in
de diapresentatie weergeven.
in de USB-browser en druk vervolgens op OK.
Beeld
OPTIONS
.
Menubalk
Als er een USB-schijf op de TV is aangesloten, worden de
bestanden op type gesorteerd. Ga naar de menubalk en
selecteer het type bestand waarnaar u op zoek bent.
Als u door bestanden bladert die op een computer staan, kunt u
alleen door de bestanden en mappen bladeren zoals die op de
computer zijn georganiseerd.
De menubalk
Ga naar de menubalk en selecteer het type bestand waarnaar u
wilt kijken of dat u wilt afspelen.
Selecteer
Mappen
bestand te zoeken.
of
Beeld, Muziek
openen en door uw mappen bladeren om naar een
. U kunt ook de weergave
Film
Als u
USB openen
andere activiteit.
wilt sluiten, drukt u op en selecteert u een
Muziek afspelen
Selecteer
.
OK
Opties
Druk op
- Afspelen stoppen
het afspelen stoppen.
- Herhalen, Eén keer afspelen
een nummer herhaaldelijk of eenmaal afspelen.
- Shuffle aan, Shuffle uit
nummers op volgorde of in willekeurige volgorde afspelen.
- Info weergeven
de bestandsnaam weergeven.
Als u
andere activiteit.
USB openen
in de USB-browser en druk vervolgens op
Muziek
OPTIONS
.
wilt sluiten, drukt u op en selecteert u een
34

Video's afspelen
Selecteer
Opties
Druk op
- Ondertiteling
geef de ondertiteling weer als deze beschikbaar is.
- Audiotaal
speel de audiotaal af als deze beschikbaar is.
- Herhalen, Eén keer afspelen
een video herhaaldelijk of eenmaal afspelen.
- Shuffle aan, Shuffle uit
video's in vaste of willekeurige volgorde afspelen.
- Info weergeven
de bestandsnaam weergeven.
Als u
USB openen
andere activiteit.
in de USB-browser en druk vervolgens op OK.
Film
OPTIONS
.
wilt sluiten, drukt u op en selecteert u een
35

12
TV pauzeren
12.1
TV pauzeren
U kunt een TV-uitzending pauzeren en later verder kijken.
Alleen digitale TV-zenders kunnen worden gepauzeerd. U dient
wel een USB-schijf aan te sluiten om de uitzending te kunnen
bufferen. U kunt een uitzending maximaal 90 minuten pauzeren.
Een uitzending pauzeren en hervatten
Druk op (Pauze) om een TV-uitzending te onderbreken. U
ziet kort een voortgangsbalk op het scherm.
Druk nogmaals op (Pauze) om de voortgangsbalk weer te
geven.
Druk op (Afspelen) om verder te gaan met kijken. Het
pictogram op het scherm geeft aan dat u een gepauzeerde
uitzending kijkt.
Terug naar de daadwerkelijke TV-uitzending
Als u naar de daadwerkelijke TV-uitzending wilt overschakelen,
drukt u op (Stoppen).
Vanaf het moment dat u overschakelt naar een digitale zender,
wordt de uitzending op de USB-schijf gebufferd. Wanneer u
overschakelt naar een andere digitale zender, wordt de
uitzending van de nieuwe zender gebufferd en wordt de
uitzending van de vorige zender gewist. Schakelt u over naar een
aangesloten apparaat (een Blu-ray Disc-speler of een digitale
ontvanger), dan stopt de USB-schijf met bufferen en wordt de
uitzending gewist. Ook wanneer u de TV overschakelt naar
stand-by, wordt de gebufferde uitzending gewist.
Tijdens het opnemen van een programma op de USB-schijf, mag
een TV-uitzending niet worden gepauzeerd.
Direct opnieuw afspelen
Wanneer u een TV-uitzending van een digitale zender bekijkt,
kunt u het programma meteen opnieuw afspelen.
Als u de laatste 10 seconden van een TV-uitzending opnieuw
wilt afspelen, drukt u eerst op (Pauze) en vervolgens op
(Links).
U kunt meerdere malen op drukken tot u het begin van het
gebufferde programma of de maximale tijdsduur hebt bereikt.
Voortgangsbalk
Wanneer de voortgangsbalk op het scherm wordt weergegeven,
drukt u op (Terugspoelen) of op (Vooruitspoelen) om te
bepalen vanaf welk punt u het gebufferde programma wilt
bekijken. Druk meerdere malen op deze toetsen om sneller
achteruit of vooruit te spoelen.
36

13
bent, vergeet dan niet de TV op
Opnemen
13.1
Wat hebt u nodig...
Als u een TV-programma wilt opnemen, hebt u het volgende
nodig . . .
- Een aangesloten USB-schijf die op deze TV is geformatteerd
- Digitale TV-zenders die op deze TV zijn geïnstalleerd (de
zenders die u bekijkt met Watch TV)
- Zenderinformatie voor de ingebouwde TV-gids
13.2
Een programma opnemen
Nu opnemen
U kunt een programma waarnaar u aan het kijken bent,
opnemen door te drukken op de toets (Opnemen) van de
afstandsbediening.
stand-by te zetten en de USB-schijf
in te schakelen.
Opnamelijst
Als u de lijst met opnamen en geprogrammeerde opnamen wilt
bekijken, drukt u op , selecteert u
.
OK
In deze lijst kunt u een opname selecteren om te bekijken,
opgenomen programma's verwijderen, de eindtijd van een
lopende opname wijzigen en controleren hoeveel vrije ruimte er
op de schijf beschikbaar is.
Verwijder een geprogrammeerde opname uit de TV-gids of uit
de lijst met opnamen
- Druk op
.
- Selecteer in TV-gids een geprogrammeerde opname en druk
vervolgens op
Lijst
om de lijst te openen en druk vervolgens op
Opname annuleren
Opnamen
.
en drukt u op
Als u de TV-gidsgegevens van de zender ontvangt, start de
opname meteen. U kunt de eindtijd van de opname in de lijst
met opnamen aanpassen.
Druk op (Stoppen) om de opname te stoppen.
Opname inplannen
U kunt de opname programmeren van een programma dat
vandaag of de komende acht dagen wordt uitgezonden.
1. Als u een opname wilt programmeren, drukt u op
TV-gids
Selecteer in de TV-gids de zender en het programma dat u wilt
opnemen.
U kunt het nummer van de zender invoeren om naar de zender
in de lijst te gaan.
Druk op (Rechts) of (Links) om door de programma's van
de zender te gaan.
Als u de datum van de lijst wilt wijzigen, drukt u op
en selecteert u
lijst en druk op OK.
2. Markeer het programma, druk op
automatisch als buffer wat tijd bij aan het einde van het
programma. U kunt indien nodig extra tijd toevoegen.
.
OPTIES
Dag wijzigen
. Selecteer de dag die u wilt in de
Opnemen
. De TV telt
Details
- Wanneer een programma wordt opgenomen, kunt u een
eerder opgenomen programma bekijken.
- Tijdens het opnemen kunt u niet overschakelen naar een
andere TV-zender.
- Tijdens het opnemen kunt u een TV-uitzending niet
onderbreken.
- Om goed te kunnen opnemen, moet de TV-klok op de juiste
tijd zijn ingesteld. Als u de TV-klok handmatig opnieuw instelt,
kunnen de opnamen mislukken.
13.3
Opname bekijken
Een opname bekijken . . .
1. Druk op , selecteer
2. Selecteer de opname in de lijst en druk op (Afspelen) om
het afspelen te starten. U kunt de toetsen (Vooruitspoelen),
(Terugspoelen), (Pauzeren) of (Stoppen) op de
afstandsbediening gebruiken.
Mislukte opname
Opnamen
en druk op OK.
Als u een programma wilt
opnemen wanneer u niet thuis
Als een geprogrammeerde opname door de zender is
verhinderd of als de uitzending is onderbroken, wordt een
opname gemarkeerd als
37
Mislukt
.

14
Beeldinstellingen
Instellingen
14.1
Beeld
Beeldstijl
U kunt het beeld op eenvoudige wijze aanpassen door via
Beeldstijl
1. Druk terwijl u naar een TV-zender kijkt op
het menu
2. Selecteer
3. Selecteer een stijl en druk op OK.
De beschikbare beeldstijlen zijn . . .
- Persoonlijk
- Levendig
- Natuurlijk
- Film
- Energiebesparing
- Standaard
- Foto
een vooraf geprogrammeerde instelling te selecteren.
OPTIONS
te openen.
Opties
Beeld en geluid
- Uw voorkeuren bij Snelle beeldinstellingen
- Ideaal voor TV kijken bij daglicht
- Instelling voor natuurlijke beelden
- zeer geschikt voor het kijken van films
- Energiezuinige instellingen
- Standaardfabrieksinstellingen
- Ideaal voor het bekijken van foto's
in de menubalk en kies
Beeldstijl
om
.
Contrast backlight
Met
Contrast achtergrondverlichting
de achtergrondverlichting aanpassen.
Het niveau aanpassen . . .
1. Druk op , selecteer
2. Selecteer
achtergrondverlichting
3. Druk op (rechts) en pas de waarde aan met (omhoog)
of (omlaag).
4. Druk zo nodig enkele malen op om het menu te sluiten.
Kleur
Met
Kleur
De kleur aanpassen . . .
1. Druk op , selecteer
2. Selecteer
3. Druk op (rechts) en pas de waarde aan met (omhoog)
of (omlaag).
4. Druk zo nodig enkele malen op om het menu te sluiten.
TV-instellingen
past u de kleurverzadiging van het beeld aan.
TV-instellingen
en druk op OK.
Setup
>
.
en druk op OK.
Setup
>
kunt u de helderheid van
>
Beeld
Beeld
Contrast
>
Kleur
.
Een beeldstijl aanpassen
U kunt een beeldstijl aanpassen. . .
1. Selecteer een stijl en druk op OK.
2. Druk op , selecteer
3. Selecteer
pas deze aan.
4. Druk zo nodig enkele malen op om het menu te sluiten.
De oorspronkelijke beeldstijlwaarden herstellen . . .
1. Druk op , selecteer
2. Selecteer
stijl die u wilt resetten.
3. Selecteer
Levendig
Als de beeldstijl bij het aanzetten van de TV telkens terugspringt
naar
wordt gebruikt om het product in de winkel goed voor de dag
te laten komen.
TV instellen voor thuisgebruik. . .
1. Druk op , selecteer
2. Selecteer
en druk op OK.
3. Selecteer
4. Druk zo nodig enkele malen op om het menu te sluiten.
TV-instellingen
TV-instellingen
Stijl herstellen
, is de TV-locatie ingesteld op
Intens
TV-instellingen
Thuis
en druk op OK.
Setup
, ga naar de gewenste instelling en
en druk op OK.
Setup
>
Beeld
en druk op OK. De stijl is hersteld.
en druk op OK.
Setup
>
Algemene instellingen
en druk op OK.
>
Beeldstijl
en selecteer de
. Deze instelling
Shop
>
Locatie
Scherpte
Met
Scherpte
beeld aan.
De scherpte aanpassen . . .
1. Druk op , selecteer
2. Selecteer
3. Druk op (rechts) en pas de waarde aan met (omhoog)
of (omlaag).
4. Druk zo nodig enkele malen op om het menu te sluiten.
Ruisonderdrukking
Met
Ruisreductie
foto bepalen.
Ruisreductie instellen . . .
1. Druk op , selecteer
2. Selecteer
3. Druk op (rechts) en selecteer
Maximum
4. Druk zo nodig enkele malen op om het menu te sluiten.
past u het scherpteniveau van fijne details van het
en druk op OK.
Setup
TV-instellingen
kunt u de hoeveelheid ruisreductie voor de
TV-instellingen
.
>
Setup
>
>
Beeld
en druk op OK.
Beeld
Scherpte
>
Ruisreductie
Uit, Minimum, Medium
.
.
of
MPEG-artefactreductie
Met
MPEG-artefactreductie
in de beelden. MPEG-artefacten hebben meestal de vorm van
kleine blokjes of kartelranden in het beeld.
38
zorgt u voor vloeiende overgangen

MPEG-artefact verminderen . . .
1. Druk op , selecteer
2. Selecteer
verminderen
3. Druk op (rechts) en selecteer
4. Druk zo nodig enkele malen op om het menu te sluiten.
TV-instellingen
.
en druk op OK.
Setup
>
Beeld
>
MPEG-artefact
of
Aan
Uit
.
Gewenste tint
Met
Gewenste tint
Als u een Gewenste tint wilt instellen, selecteert u
eerst
Aangepast
tint weer te geven. Gewenste tint is een instelling voor
deskundige gebruikers.
kunt u zelf een kleurtemperatuur instellen.
in de instelling
om het menu Gewenste
Tint
Digital Crystal Clear
Met
Digital Crystal Clear
afstemmen op de omliggende pixels om zo een prachtig HDbeeld te creëren.
1. Druk op , selecteer
2. Selecteer
3. Druk op (rechts) en selecteer de instellingen.
4. Druk zo nodig enkele malen op om het menu te sluiten.
De verschillende instellingen zijn . . .
- Geavanceerde scherpte
zichtbaar in de lijnen en contouren in het beeld.
- Dynamisch contrast
in de donkere, gematigd lichte, en lichte gedeelten van het beeld.
- Dynamische achtergrondverlichting
voor de achtergrondverlichting voor optimaal dynamisch
energieverbruik en contrast van het beeld.
- Kleurverbetering
levendigheid en details van kleuren.
Geavanceerde beeldinstellingen
Gamma
TV-instellingen
kunt u elke pixel verfijnen en
en druk op OK.
Setup
>
- Superieure scherpte, vooral
- Dynamische verbetering van de details
- Dynamische verbetering van de
>
Beeld
Digital Crystal Clear
- Selecteer een niveau
.
Een aangepaste kleurtemperatuur instellen . . .
1. Druk op , selecteer
2. Selecteer
Geavanceerd
3. Druk op (rechts).
4. Selecteer een instelling met de pijltoetsen. (WP is witpunt en
BL is zwartniveau.)
5. Druk op OK om een instelling te bevestigen. U kunt ook een
van de vooraf geprogrammeerde instellingen in dit menu
selecteren.
6. Druk zo nodig enkele malen op om het menu te sluiten.
Videocontrast
Met
Videocontrast
Het niveau aanpassen . . .
Druk op , selecteer
1.
2.
Selecteer
Videocontrast
Druk op (rechts) en pas de waarde aan met (omhoog)
3.
of (omlaag).
Druk zo nodig enkele malen op om het menu te sluiten.
4.
TV-instellingen
>
Gewenste tint
kunt u het videocontrastniveau verlagen.
TV-instellingen
.
en druk op OK.
Setup
>
Beeld
.
en druk op OK.
Setup
>
Beeld
>
>
Geavanceerd
>
Bij
Gamma
en het contrast van het beeld.
Het niveau aanpassen . . .
1. Druk op , selecteer
2. Selecteer
3. Druk op (rechts) en pas de waarde aan met (omhoog)
of (omlaag).
4. Druk zo nodig enkele malen op om het menu te sluiten.
Tint
Met
Een vooraf geprogrammeerde instelling selecteren . . .
1. Druk op , selecteer
2. Selecteer
3. Druk op (rechts) en selecteer
Selecteer
instellen.
4. Druk zo nodig enkele malen op om het menu te sluiten.
stelt u de niet-lineaire instelling in voor de helderheid
en druk op OK.
Setup
TV-instellingen
kunt u de kleurbalans wijzigen.
Tint
TV-instellingen
Aangepast
>
Setup
>
als u zelf een kleurtemperatuur wilt
>
Beeld
en druk op OK.
Beeld
Geavanceerd
>
Geavanceerd
Normaal, Warm
>
>
of
Gamma
.
Tint
.
Koel
Helderheid
Met
Helderheid
beeldsignaal in. Helderheid dient alleen te worden gebruikt door
.
deskundige gebruikers. We raden niet-deskundige gebruikers aan
om de helderheid aan te passen via de instelling
achtergrondverlichting.
Het niveau aanpassen . . .
1. Druk op , selecteer
2. Selecteer
Geavanceerd
3. Druk op (rechts) en pas de waarde aan met (omhoog)
of (omlaag).
4. Druk zo nodig enkele malen op om het menu te sluiten.
14.2
stelt u het helderheidsniveau van het
en druk op OK.
Setup
TV-instellingen
>
Helderheid
>
.
Beeld
>
Contrast
Game of computer
U kunt de TV overschakelen naar de ideale beeldinstelling voor
games of voor het gebruik van de TV als computermonitor. Er
zijn verschillende instellingen voor
een apparaat een juist type is ingesteld in het menu Bron -
Game
of
Computer
. Als in
39

Gameconsole of Computer - schakelt de TV automatisch over
naar de ideale instelling als u naar het apparaat schakelt. Als u de
instelling handmatig aanpast, vergeet deze dan niet uit te
schakelen als u weer naar een TV-zender of een ander
aangesloten apparaat schakelt.
De instelling handmatig aanpassen . . .
1. Druk op , selecteer
2. Selecteer
computer
3. Selecteer
u terug naar de beeldinstellingen voor TV kijken.
4. Druk zo nodig enkele malen op om het menu te sluiten.
14.3
TV-instellingen
.
Game, Computer
en druk op OK.
Setup
>
>
Beeld
of TV. Met de instelling TV keert
Geavanceerd
>
Spel of
Indeling en randen
-
Persoonlijk
geluid aanpassen
- Origineel
- Film
- Nieuws
- Muziek
- Game
Geluidsstijl aanpassen
U kunt een geluidsstijl aanpassen . . .
1. Selecteer een stijl en druk op OK.
2. Druk op , selecteer
3. Selecteer
pas deze aan.
4. Druk op om het menu te sluiten en de instelling op te
slaan.
- uw keuzes die werden doorgevoerd in Beeld en
- standaardfabrieksinstelling
- zeer geschikt voor het kijken van films
- zeer geschikt voor spraak
- zeer geschikt voor het luisteren naar muziek
- zeer geschikt voor games
en druk op OK.
Setup
TV-instellingen
, ga naar de gewenste instelling en
Beeldformaat
Als er zwarte balken boven en onder of aan de zijkanten van het
beeld worden weergegeven, kunt u het beeldformaat omzetten
in een formaat dat het hele scherm in beslag neemt.
Het beeldformaat wijzigen . . .
Terwijl u naar een TV-zender kijkt, drukt u op om het
1.
menu
Beeldformaat
Selecteer een instelling uit de lijst en druk op OK.
2.
te openen.
Schermranden
Met
Schermranden
vervormde randen te verbergen.
De randen aanpassen . . .
1. Druk op , selecteer
2. Selecteer
Schermranden
3. Druk op (rechts) en pas de waarde aan met (omhoog)
of (omlaag).
4. Druk zo nodig enkele malen op om het menu te sluiten.
maakt u het beeld iets groter om
en druk op OK.
Setup
TV-instellingen
.
>
Beeld
>
Indeling en randen
>
De oorspronkelijke waarden van de audiostijl herstellen . . .
1. Druk op , selecteer
2. Selecteer
TV-instellingen
en druk op OK.
Setup
>
Geluid
>
Stijl herstellen
.
Geluidsinstellingen
Bas
Met
Het niveau aanpassen . . .
1. Druk op , selecteer
2. Selecteer
3. Druk op (rechts) en pas de waarde aan met (omhoog)
of (omlaag).
4. Druk zo nodig enkele malen op om het menu te sluiten.
Treble
Met
geluid aan.
past u het niveau van de lage tonen van het geluid aan.
Bas
en druk op OK.
Setup
TV-instellingen
Hoge tonen
>
past u het niveau van de hoge tonen van het
Geluid
>
Bas
.
14.4
Geluid
Audiostijl
Voor het gemakkelijk aanpassen van het geluid, kunt u een
vooraf geprogrammeerde instelling selecteren met
1. Druk op
het menu
2. Selecteer Beeld en geluid in de menubalk en kies
3. Selecteer een Geluidsstijl en druk op OK.
De verschillende audiostijlen zijn . . .
Opties
OPTIONS
te openen.
terwijl u naar een TV-zender kijkt om
Geluidsstijl
Geluidsstijl
Het niveau aanpassen . . .
1. Druk op , selecteer
2. Selecteer
3. Druk op (rechts) en pas de waarde aan met (omhoog)
of (omlaag).
4. Druk zo nodig enkele malen op om het menu te sluiten.
.
.
Surround-modus
Met
Surround-modus
luidsprekers in.
Surround-modus instellen . . .
1. Druk op , selecteer
40
TV-instellingen
stelt u het geluidseffect van de TV-
en druk op OK.
Setup
>
Geluid
en druk op OK.
Setup
>
Hoge tonen
.

2. Selecteer
TV-instellingen
3. Druk op (rechts) en selecteer
>
>
Geluid
Surround-modus
Stereo, Incredible Surround
.
4. Druk zo nodig enkele malen op om het menu te sluiten.
Volume hoofdtelefoon
2. Selecteer
.
luidsprekers
TV-instellingen
.
3. Druk op (rechts) en selecteer
EasyLink autom. starten
>
>
Geluid
Geavanceerd
Uit, Aan, EasyLink
>
of
TV-
.
4. Druk zo nodig enkele malen op om het menu te sluiten.
Direct overschakelen op de luidsprekers . . .
Met
Volume hoofdtel.
kunt u het volume van een aangesloten
hoofdtelefoon afzonderlijk instellen.
Het volume aanpassen . . .
1. Druk op
OPTIONS
en selecteer
Beeld en geluid
in de
menubalk.
2. Druk op (rechts), selecteer
.
OK
Volume hoofdtel.
en druk op
3. Druk op (omhoog) of (omlaag) om het volume aan te
passen.
4. Druk zo nodig enkele malen op om het menu te sluiten.
Geavanceerde geluidsinstellingen
Automatische afstelling volume
Met
Automatische volumenivellering
stelt u de TV zo in dat
deze plotselinge volumeverschillen automatisch beperkt. Dit is
met name van toepassing aan het begin van reclameblokken of
wanneer u een andere zender kiest.
In- en uitschakelen . . .
1. Druk op , selecteer
2. Selecteer
TV-instellingen
Automatische volumenivellering
3. Druk op (rechts) en selecteer
en druk op OK.
Setup
>
Geluid
.
>
Geavanceerd
of
Aan
Uit
>
.
4. Druk zo nodig enkele malen op om het menu te sluiten.
1. Druk terwijl u TV kijkt op
en geluid
2. Selecteer
.
Luidsprekers
en selecteer TV of
OPTIONS
en selecteer
Versterker
Beeld
(audioapparaat).
3. Druk zo nodig enkele malen op om het menu te sluiten.
Kristalhelder geluid
Met
Clear Sound
verbetert u het geluid voor spraak. Deze
instelling is ideaal voor nieuwsprogramma's. U kunt de
spraakverbetering in- en uitschakelen.
In- en uitschakelen . . .
1. Druk op , selecteer
2. Selecteer
Sound
TV-instellingen
.
3. Druk op (rechts) en selecteer
en druk op OK.
Setup
>
Geluid
>
Geavanceerd
of
Aan
Uit
>
Clear
.
4. Druk zo nodig enkele malen op om het menu te sluiten.
HDMI1-ARC
Als u op geen van de HDMI-aansluitingen Audio Return Channel
(ARC) nodig hebt, kunt u het ARC-signaal uitschakelen.
Indeling audio-uitvoer
TV-luidsprekers
U kunt het TV-geluid verzenden naar een aangesloten
audioapparaat (een home cinema-systeem of audiosysteem).
Met
TV-luidsprekers
selecteert u waar u het TV-geluid wilt
horen en hoe u dit wilt bedienen.
- Als u
- Als u
selecteert, zijn de TV-luidsprekers altijd uitgeschakeld.
Uit
selecteert, zijn de TV-luidsprekers altijd ingeschakeld.
Aan
Als u via HDMI CEC een audioapparaat hebt aangesloten, kunt
u een van de EasyLink-instellingen gebruiken.
- Als
EasyLink
is geselecteerd, verzendt de TV het TV-geluid
naar het audioapparaat. De TV schakelt de TV-luidsprekers uit
wanneer het apparaat het geluid afspeelt.
- Als u
EasyLink automatisch starten
selecteert, schakelt de TV
het audioapparaat in, verzendt deze het TV-geluid naar het
apparaat en worden de TV-luidsprekers uitgeschakeld.
Als
EasyLink
of
EasyLink automatisch starten
is geselecteerd,
kunt u via het menu Beeld en geluid nog overschakelen naar de
TV-luidsprekers of de luidsprekers van het apparaat.
De TV-luidsprekers instellen. . .
1. Druk op , selecteer
en druk op OK.
Setup
Met
Indeling voor audio-uitvoer
kunt u het audio-uitvoersignaal
van de TV aanpassen aan de verwerkingsmogelijkheden van uw
home cinema-systeem.
Afstelling audio-uitvoer
Met
Afstelling audio-uitvoer
kunt u het geluidsvolume van uw
home cinema-systeem afstemmen op het geluidsvolume van de
TV wanneer u overschakelt van het ene apparaat naar het
andere.
Vertraging audio-uitvoer
Als u een vertraging in audiosynchronisatie instelt op uw home
cinema-systeem om het geluid te synchroniseren met het beeld,
dient u
Vertraging audio-uitvoer
op de TV uit te schakelen.
41

Verschuiving audio-uitvoer
Als u geen vertraging kunt instellen op het home cinemasysteem, kunt u met
instellen op de TV.
Verschuiving audio-uitvoer
een vertraging
Luidsprekers
Home cinema-systeem
U kunt het TV-geluid verzenden naar een verbonden
audioapparaat - een home cinema-systeem of audiosysteem.
U kunt selecteren waar u het TV-geluid wilt horen en hoe u het
wilt bedienen.
- Als u
- Als u
ingeschakeld.
Als u via HDMI CEC een audioapparaat hebt aangesloten, kunt
u een van de EasyLink-instellingen gebruiken.
- Als
naar het audioapparaat. De TV schakelt de TV-luidsprekers uit
wanneer het apparaat het geluid afspeelt.
- Als u
het audioapparaat in, verzendt deze het TV-geluid naar het
apparaat en worden de TV-luidsprekers uitgeschakeld.
Als EasyLink of EasyLink autom. starten is geselecteerd kunt u
indien nodig overschakelen op de TV-luidsprekers.
selecteert, zijn de TV-luidsprekers altijd uitgeschakeld.
Uit
TV-luidsprekers
EasyLink
is geselecteerd, verzendt de TV het TV-geluid
EasyLink automatisch starten
selecteert, zijn de TV-luidsprekers altijd
selecteert, schakelt de TV
De TV-luidsprekers instellen. . .
1. Druk op , selecteer
2. Selecteer
3. Druk op (rechts) en selecteer
EasyLink
4. Druk zo nodig enkele malen op om het menu te sluiten.
Direct overschakelen op de luidsprekers . . .
1. Druk terwijl u TV kijkt op
2. Selecteer
(audiosysteem).
3. Druk zo nodig enkele malen op om het menu te sluiten.
TV-instellingen
of
EasyLink autom. starten
Luidsprekers
en druk op OK.
Setup
>
en selecteer TV of
>
Geluid
.
Geluidsuitgang
Uit, TV-luidsprekers
.
.
,
Versterker
Plaatsing van de TV
Als onderdeel van de eerste installatie is deze instelling ingesteld
op
Op een TV-standaard
van de TV hierna hebt gewijzigd, dient u deze instelling te
wijzigen voor de beste geluidsweergave.
1. Druk op , selecteer
2. Selecteer
Plaatsing van de TV
3. Selecteer
op OK.
4. Druk zo nodig enkele malen op om het menu te sluiten.
TV-instellingen
Op een TV-standaard
of
Muurbevestiging
en druk op OK.
Setup
>
Algemene instellingen
en druk op OK.
. Als u de plaatsing
of
Muurbevestiging
>
en druk
42

15
Specificaties
15.1
Klimaat
Energie besparen
Met
Eco-instellingen
gebruikt.
Druk terwijl u TV-zenders kijkt op om
openen.
De actieve instellingen zijn gemarkeerd met een . U kunt een
markering voor elke instelling toevoegen of verwijderen met de
toets OK.
Druk opnieuw op om
Energiezuinig
Met deze beeldstijl wordt de meest energiezuinige instelling
gebruikt voor het beeld.
Scherm uit
Als u alleen naar muziek luistert, kunt u het TV-scherm uitzetten
om energie te besparen.
Selecteer
knop van de afstandsbediening om het scherm weer in te
schakelen.
Automatisch uitschakelen
Als de toetsen van de afstandsbediening gedurende 4 uur niet
worden aangeraakt, of als de TV gedurende 10 minuten geen
signaal ontvangt, gaat de TV automatisch uit om energie te
besparen.
Als u de TV als beeldscherm gebruikt of TV kijkt via een digitale
ontvanger (een set-top box, ofwel een STB) en u de
afstandsbediening van de TV niet gebruikt, moet u het
automatisch uitschakelen van de TV uitzetten.
Behalve deze Eco-instellingen, beschikt uw TV ook over
milieuvriendelijke instellingen waarmee het energieverbruik kan
worden beperkt.
Inactieve apparaten uit
Scherm uit
worden milieuvriendelijke instellingen
Eco-instellingen
Eco-instellingen
en druk op OK. Druk op een willekeurige
te sluiten.
te
.
op OK
3. U kunt een instelling selecteren om de desbetreffende
waarden te controleren.
Europees energielabel
Op het
van dit product. Hoe groener de energie-efficiëntieklasse van
een product, hoe minder energie het verbruikt.
Op dit label wordt naast de energie-efficiëntieklasse ook het
gemiddelde energieverbruik van dit product tijdens gebruik en
het gemiddelde energieverbruik gedurende een jaar vermeld. De
energieverbruikwaarden voor dit product zijn ook beschikbaar
op de Philips-website voor uw land:
Europees energielabel
staat de energie-efficiëntieklasse
www.philips.com/TV
Einde levensduur
Oude producten en batterijen weggooien
Uw product is vervaardigd van kwalitatief hoogwaardige
materialen en onderdelen, die kunnen worden gerecycled en
opnieuw gebruikt .
Als u op uw product een doorstreepte afvalcontainer op wieltjes
ziet, betekent dit dat het product valt onder de EU-richtlijn
2002/96/EG.
Win inlichtingen in over de manier waarop elektrische en
elektronische producten in uw regio gescheiden worden
ingezameld.
Neem bij de verwijdering van oude producten de lokale
wetgeving in acht en plaats uw producten niet bij het gewone
huishoudelijke afval. Als u oude producten correct verwijdert,
voorkomt u schadelijke gevolgen voor het milieu en de
volksgezondheid.
Schakel aangesloten EasyLink-HDMI-CEC-compatibele
(Consumer Electronic Control) apparaten uit die inactief zijn.
Energiebeheer
Dankzij het geavanceerde energiebeheer van deze TV wordt
energie optimaal benut. U kunt zelf zien hoe uw persoonlijke TVinstellingen, het helderheidsniveau van de beelden op het TVscherm en de lichtomstandigheden van de ruimte waarin de TV
zich bevindt, bepalend zijn voor het relatieve energieverbruik.
Het relatieve energieverbruik controleren . . .
1. Druk op , selecteer
2. Selecteer
en druk op OK.
Setup
Demo's bekijken > Active Control-demo en druk
Uw product bevat batterijen die, overeenkomstig de Europese
richtlijn 2006/66/EG, niet bij het gewone huishoudelijke afval
mogen worden weggegooid.
Win informatie in over de lokale wetgeving omtrent de
gescheiden inzameling van batterijen. Door u op de juiste wijze
van de batterijen te ontdoen, voorkomt u negatieve gevolgen
voor het milieu en de volksgezondheid.
43

15.2
Ontvangst voor PxHxxx9 /
PxTxxx9
- Antenne-ingang: 75 ohm coaxiaal (IEC75)
- Radiobanden: Hyperband, S-kanaal, UHF, VHF
- DVB: DVB-T (terrestrial, antenne) COFDM 2K/8K, DVB-T2:
alleen voor TV-typen '. . . T/12', DVB-C (kabel) QAM
- Analoge videoweergave: NTSC, SECAM, PAL
- Digitale videoweergave: MPEG2 SD/HD (ISO/IEC 13818-2),
MPEG4 SD/HD (ISO/IEC 14496-10)
- Digitale audioweergave (ISO/IEC 13818-3)
Displayresoluties
Computerindelingen - HDMI (resolutie vernieuwingsfrequentie)
640 x 480 - 60 Hz
800 x 600 - 60 Hz
1024 x 768 - 60 Hz
1280 X 720 - 60 Hz
1280 X 768 - 60 Hz
1280 x 1024 - 60 Hz
1360 x 768 - 60 Hz
1600 x 900 - 60 Hz*
1680 x 1050 - 60 Hz*
1920 x 1080 - 60 Hz*
15.3
Ontvangst voor PxKxxx9
- Antenne-ingang: 75 ohm coaxiaal (IEC75)
- Radiobanden: Hyperband, S-kanaal, UHF, VHF
- DVB: DVB-T (terrestrial, antenne) COFDM 2K/8K, DVB-T2:
alleen voor TV-typen '. . . T/12', DVB-C (kabel) QAM
- Analoge videoweergave: NTSC, SECAM, PAL
- Digitale videoweergave: MPEG2 SD/HD (ISO/IEC 13818-2),
MPEG4 SD/HD (ISO/IEC 14496-10)
- Digitale audioweergave (ISO/IEC 13818-3)
- Ingang satellietantenne: 75 ohm F-type
- Bereik ingangsfrequentie: 950 - 2150 MHz
- Bereik ingangsniveau: 25 - 65 dBm
- DVB-S/S2 QPSK, signaalsnelheid: 2 - 45 Msymbol, SCPC en
MCPC
- Ondersteunde satellieten: Astra 19.2°E, Astra 23.5°E, Astra
28.2°E, Hotbird 13.0°E, TürkSat 42.0°E, Eutelsat 7°W, Thor
1°W
- Ondersteuning voor Astra HD+
- LNB: DiSEqC 1.0, ondersteuning voor 1 tot 4 LNB's,
polariteitselectie: 14/18V, bandselectie: 22 kHz, toonburstmodus, LNB-vermogen maximaal 300 mA
Computerindelingen - VGA (resolutie - vernieuwingsfrequentie)
640 x 480 - 60 Hz
800 x 600 - 60 Hz
1024 x 768 - 60 Hz
1280 x 1024 - 60 Hz
1360 x 768 - 60 Hz
1600 x 900 - 60 Hz*
1600 x 1200 - 60 Hz*
1920 x 1080 - 60 Hz*
Video-indelingen (resolutie - vernieuwingsfrequentie)
480i - 60 Hz
480p - 60 Hz
576i - 50 Hz
576p - 50 Hz
720p - 50 Hz, 60 Hz
1080i - 50Hz, 60 Hz
1080p - 24 Hz, 25 Hz, 30 Hz, 50 Hz, 60 Hz
* Alleen voor bepaalde modellen.
15.5
Vermogen
15.4
Display
Type
Schermdiameter:
- 23Pxx4009 : 58 cm / 23 inch
- 32Pxx4009 : 81 cm / 32 inch
- 40Pxx4009 : 102 cm / 40 inch
- 50Pxx4009 : 127 cm / 50 inch
Schermresolutie:
- PFxxxx9 : 1920x1080p
- PHxxxx9 : 1366x768p
Productspecificaties kunnen zonder voorafgaande kennisgeving
worden gewijzigd. Ga voor meer specificaties van dit product
naar www.philips.nl/support
Vermogen
- Netstroom: AC 220 - 240 V +/-10%
- Omgevingstemperatuur: 5°C tot 35°C
- Stroomverbruik stand-bymodus: minder dan 0,3W
- Energiebesparende functies: lichtsensor, eco-modus, beeld uit
(voor radio), Automatisch uitschakelen, menu Eco-instellingen.
De informatie over de voeding die op het typeplaatje staat
vermeld, is het energieverbruik van dit product tijdens normaal
gebruik (IEC 62087 Ed.2). Het maximale vermogen dat tussen
haakjes staat vermeld, wordt gebruikt voor elektrische veiligheid
(IEC 60065 Ed. 7.2).
44
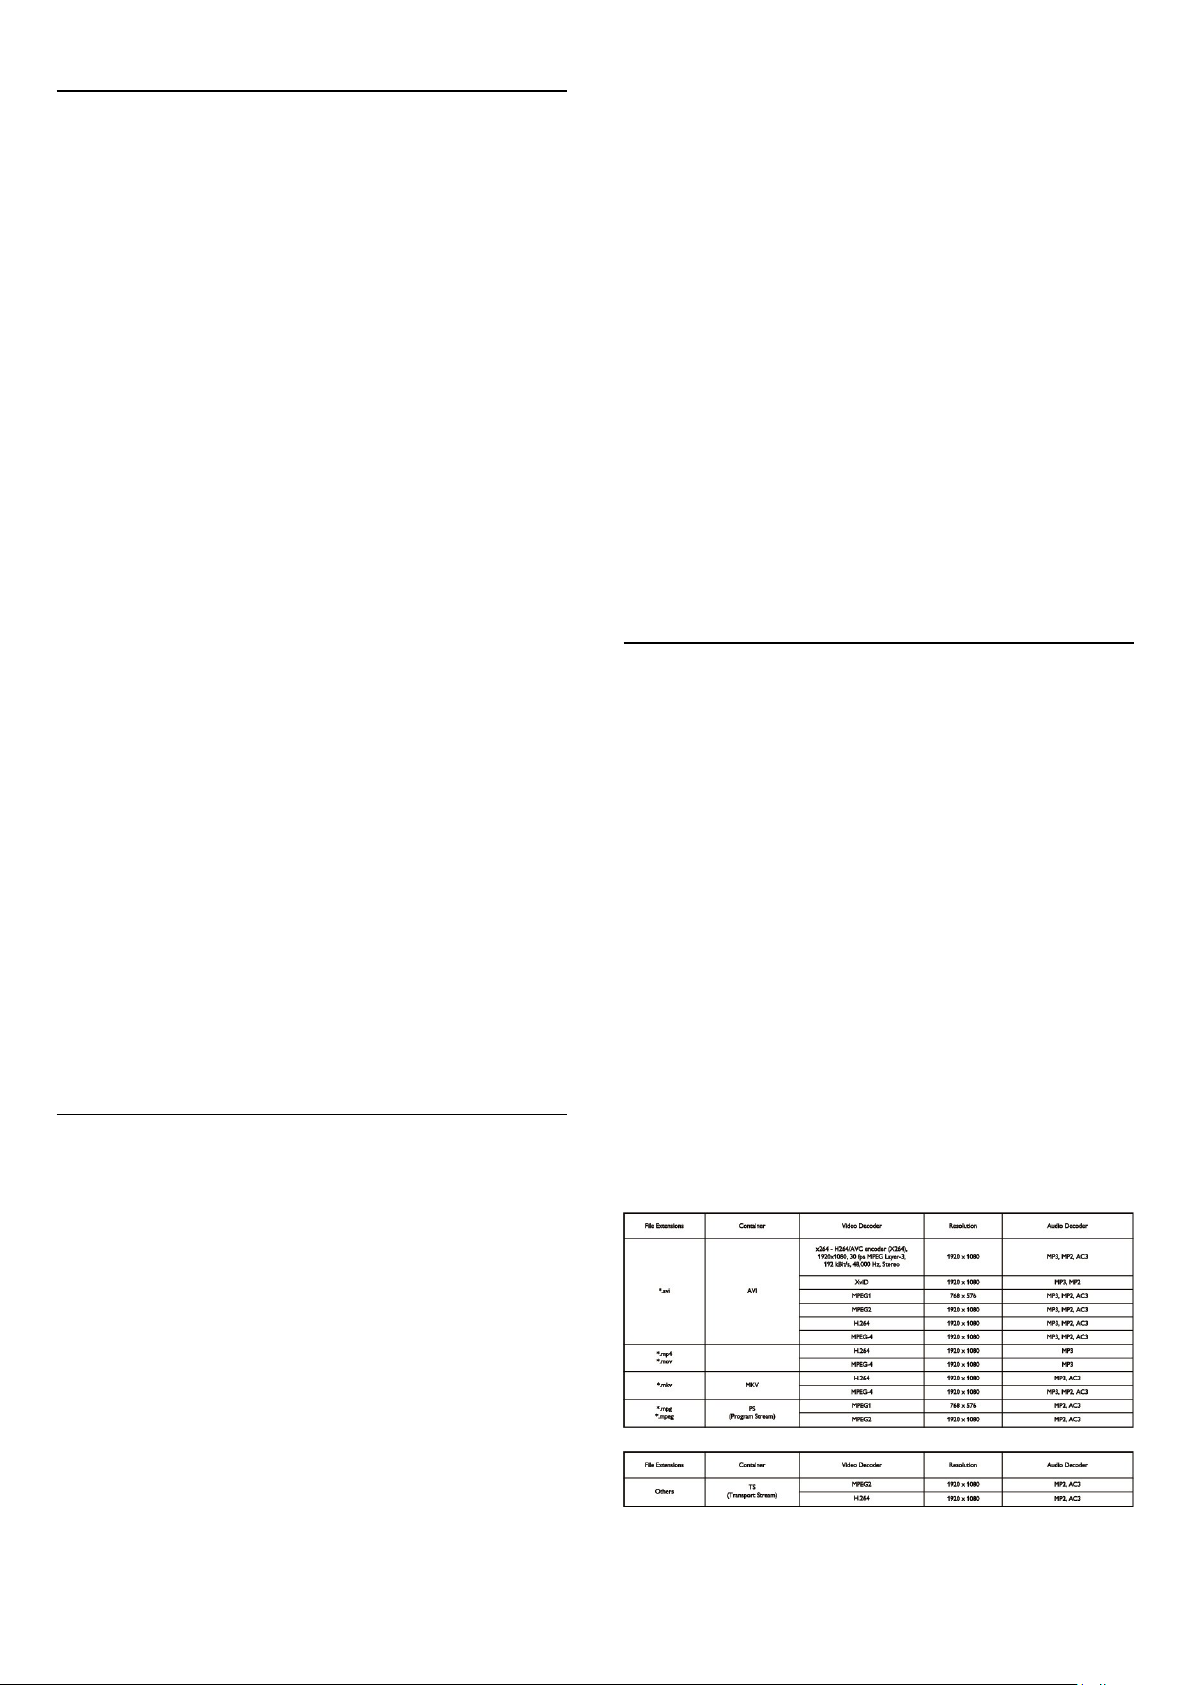
15.6
Afmetingen en gewicht_4009
23Pxx4009
- zonder TV-standaard:
Breedte 545,1 mm - Hoogte 344 mm - Diepte 55,5 mm Gewicht ±3,05 kg
- CI: Common Interface
- USB
- Satelliet
Voor PxHxxx9/PxTxxx9
Achterzijde TV
- met TV-standaard:
Breedte 545,1 mm - Hoogte 385,6 mm - Diepte 145 mm Gewicht ±3,26 kg
32Pxx4009
- zonder TV-standaard:
Breedte 726,5 mm - Hoogte 435,6 mm - Diepte 87,8 mm Gewicht ±4,83 kg
- met TV-standaard:
Breedte 726,5 mm - Hoogte 462,3 mm - Diepte 333,8 mm Gewicht ±4,98 kg
40Pxx4009
- zonder TV-standaard:
Breedte 903,5 mm - Hoogte 523,1 mm - Diepte 88,1 mm Gewicht ±7,4 kg
- met TV-standaard:
Breedte 903,5 mm - Hoogte 550,4 mm - Diepte 255,8 mm Gewicht ±7,8 kg
50Pxx4009
- zonder TV-standaard:
Breedte 1123,6 mm - Hoogte 658 mm - Diepte 88 mm Gewicht ±12,4 kg
- met TV-standaard:
Breedte 1123,6 mm - Hoogte 684,4 mm - Diepte 256 mm Gewicht ±13 kg
- HDMI 1 ARC: HDMI Audio Return Channel
- HDMI 2
- SERV. U: servicepoort
- TV ANTENNA: 75 ohm, coaxiaal (IEC)
- SCART (RGB/CVBS): SCART-adapter
- AUDIO IN (DVI): ministereoaansluiting van 3,5 mm
- DIGITAL AUDIO OUT: SPDIF
- Hoofdtelefoons: ministereoaansluiting van 3,5 mm
Zijkant TV
- CI: Common Interface
- USB
15.8
Multimedia
Opmerking: namen van multimediabestanden mogen niet langer
zijn dan 128 tekens.
Ondersteunde multimedia-aansluitingen
- USB 2.0 (FAT/FAT 32/NTFS): sluit alleen de USB-apparaten
aan die 500 mA stroom of minder verbruiken.
Ondersteunde beeldbestanden
- JPEG: *.jpg, *.jpeg
- PNG: *.png.jpg
Ondersteunde geluidsbestanden
- MPEG1: *.mp3
15.7
Connectiviteit
Voor PxKxxx9
Achterzijde TV
- HDMI 1 ARC: HDMI Audio Return Channel
- HDMI 2
- SERV. U: servicepoort
- TV ANTENNA: 75 ohm, coaxiaal (IEC)
- SCART (RGB/CVBS): SCART-adapter
- AUDIO IN (DVI): ministereoaansluiting van 3,5 mm
- DIGITAL AUDIO OUT: SPDIF
- Hoofdtelefoons: ministereoaansluiting van 3,5 mm
Zijkant TV
Ondersteunde videobestanden
- *.avi, *.mp4, *.mov, *.mkv, *.mpg, *.mpeg
Ondersteunde ondertitelindeling
- SRT: ondersteuning voor meerdere talen
Ondersteunde audio-/video-indelingen
45

16
16.2
Software
16.1
Software-update
Bijwerken vanaf USB
Mogelijk moet de TV-software worden bijgewerkt. U hebt een
computer en een USB-geheugenapparaat nodig om de software
te kunnen uploaden naar de TV. Gebruik een USBgeheugenapparaat met 256 MB vrije ruimte. De schrijfbeveiliging
moet zijn uitgeschakeld.
1. De update starten op de TV
De software-update starten . . .
Druk op , selecteer
Selecteer
2. De TV identificeren
Sluit het USB-geheugen aan op een van de USB-aansluitingen
van de TV.
Selecteer
identificatiebestand geschreven op het USB-geheugenapparaat.
3. De TV-software downloaden
Sluit het USB-geheugen aan op uw computer.
Zoek het bestand
en dubbelklik erop.
Klik op
Als er nieuwe software beschikbaar is, downloadt u het .zipbestand.
Nadat de download is voltooid, pakt u het bestand uit en
kopieert u het bestand
geheugenapparaat.
Plaats dit bestand niet in een map.
4. De software van de TV bijwerken
Sluit het USB-geheugen opnieuw aan op de TV. De update
wordt automatisch uitgevoerd.
De TV schakelt zichzelf uit (10 seconden) en vervolgens schakelt
de TV weer in. Een ogenblik geduld.
Doe het volgende niet. . .
- de afstandsbediening gebruiken
- het USB-geheugenapparaat loskoppelen van de TV
Koppel het USB-geheugenapparaat nooit los van de TV als er
tijdens de update een stroomstoring optreedt. Als de
stroomstoring voorbij is, gaat de update verder.
Software bijwerken
en druk op OK. Er wordt een
Start
'update.htm'
ID versturen
en druk op OK.
Setup
.
autorun.upg
>
en druk op OK.
USB
op het USB-geheugenapparaat
naar het USB-
Softwareversie
De huidige softwareversie van de tv controleren . . .
1. Druk op , selecteer
2. Selecteer
3. Selecteer
4. Druk zo nodig enkele malen op om het menu te sluiten.
16.3
Software-instellingen
Inf.huidige software
en druk op OK.
Setup
en zie
en druk op OK.
Releaseversie.
Open source-software
Deze televisie bevat open source-software. U kunt bij TP Vision
Europe B.V een kopie van de volledige versie van de
bijbehorende broncode aanvragen voor de met copyright
beschermde open source-softwarepakketten die in dit product
zijn gebruikt en waarvoor dit wordt aangevraagd op grond van
de respectieve licenties.
Dit aanbod is geldig tot drie jaar na aankoop van het product
voor iedereen die deze informatie ontvangt.
Indien u de broncode wilt ontvangen, richt u zich schriftelijk en
in het Engels tot . . .
Intellectual Property Dept.
TP Vision Europe B.V.
Prins Bernhardplein 200
1097 JB Amsterdam
The Netherlands
16.4
Open source license
Acknowledgements and License Texts for any open source
software used in this product.
This is a document describing the distribution of the source
code used in this product, which fall either under the GNU
General Public License (the GPL), or the GNU Lesser General
Public License (the LGPL), or any other open source license.
Instructions to obtain source code for this software can be
found in the documentation supplied with this product.
TP VISION MAKES NO WARRANTIES WHATSOEVER,
EITHER EXPRESS OR IMPLIED, INCLUDING ANY
WARRANTIES OF MERCHANTABILITY OR FITNESS FOR A
PARTICULAR PURPOSE, REGARDING THIS SOFTWARE. TP
Vision offers no support for this software. The preceding does
not affect your warranties and statutory rights regarding any
product(s) you purchased. It only applies to this source code
made available to you.
zlib (1.2.7) A massively spiffy yet delicately unobtrusive
compression library. Source: http://www.zlib.net/ This piece of
software is made available under the terms and conditions of the
zlib license, which can be found below.
libjpeg (6b) It is a widely used C library for reading and writing
46

JPEG image files. Source: http://libjpeg.sourceforge.net/ This piece
of software is made available under the terms and conditions of
the JPEG license, which can be found below.
libsqlite3 (3.7.14) SQLite is a C library that implements an SQL
database engine. Programs that link with the SQLite library can
have SQL database access without running a separate RDBMS
process.
Source:
http://linuxappfinder.com/package/libsqlite3-0 This piece of
software is made available under the terms and conditions of the
SQLite public domain license, which can be found below.
Openssl (1.0.0.d) A toolkit implementing SSL v2/v3 and TLS
protocols with full-strength cryptography world-wide. Source:
www.openssl.org This piece of software is made available under
the terms and conditions of the Apache license, which can be
found below.
libboost (1.51) Provides a repository for free peer-reviewed
portable C++ source libraries. The emphasis is on libraries
which work well with the C++ standard library. Source:
www.boost.org This piece of software is made available under
the terms and conditions of the Boost license, which can be
found below.
libdirectfb (1.4.11) DirectFB is a graphics library which was
designed with embedded systems in mind. It offers maximum
hardware accelerated performance at a minimum of resource
usage and overhead. Source: http://directfb.org This piece of
software is made available under the terms and conditions of the
GNU Lesser General Public License, which can be found below.
libTomMath (0.42.0) A free open source portable number
theoretic multiple-precision integer library written entirely in C.
Source: http://libtom.org/ This piece of software is made
available under the terms and conditions of the WTFPL license,
which can be found at this site: www.wtfpl.net/txt/copying
MTD utility (1.5.0) MTD subsystem (Memory Technology
Devices) provides an abstraction layer for raw flash devices. It
makes it possible to use the same API when working with
different flash types and technologies, e.g. NAND, OneNAND,
NOR, AG-AND, ECC'd NOR, etc. MTD subsystem does not
deal with block devices like MMC, eMMC, SD, CompactFlash,
etc. These devices are not raw flashes but they have a Flash
Translation layer inside, which makes them look like block
devices. These devices are the subject of the Linux block
subsystem, not MTD.
Source:
http://www.linux-mtd.infradead.org/source.html This piece of
software is made available under the terms and conditions of the
GNU General Public License, which can be found below.
FFMpeg (0.6) Cross-platform solution to record, convert and
stream audio and video. It includes libavcodec - the leading
audio/video codec library. Source: www.ffmpeg.org This piece of
software is made available under the terms and conditions of the
GNU Lesser General Public License version 2.1 or GNU
General Public License version 2, which can be found below.
________________________________________
zlib LICENSE zlib.h -- interface of the 'zlib' general purpose
compression library version 1.2.8, April 28th, 2013
Copyright (C) 1995-2013 Jean-loup Gailly and Mark Adler
This software is provided 'as-is', without any express or implied
warranty. In no event will the authors be held liable for any
damages arising from the use of this software.
Permission is granted to anyone to use this software for any
purpose, including commercial applications, and to alter it and
redistribute it freely, subject to the following restrictions:
1. The origin of this software must not be misrepresented; you
must not claim that you wrote the original software. If you use
this software in a product, an acknowledgment in the product
documentation would be appreciated but is not required. 2.
Altered source versions must be plainly marked as such, and
must not be misrepresented as being the original software. 3.
This notice may not be removed or altered from any source
distribution.
Jean-loup Gailly (jloup@gzip.org) Mark Adler
(madler@alumni.caltech.edu)
________________________________________
Boost Software License - Version 1.0 - August 17th, 2003
Permission is hereby granted, free of charge, to any person or
organization obtaining a copy of the software and accompanying
documentation covered by this license (the "Software") to use,
reproduce, display, distribute, execute, and transmit the
Software, and to prepare derivative works of the Software, and
to permit third-parties to whom the Software is furnished to do
so, all subject to the following:
The copyright notices in the Software and this entire statement,
including the above license grant, this restriction and the
following disclaimer, must be included in all copies of the
Software, in whole or in part, and all derivative works of the
Software, unless such copies or derivative works are solely in the
form of machine-executable object code generated by a source
language processor.
THE SOFTWARE IS PROVIDED "AS IS", WITHOUT
WARRANTY OF ANY KIND, EXPRESS OR IMPLIED,
INCLUDING BUT NOT LIMITED TO THE WARRANTIES OF
MERCHANTABILITY, FITNESS FOR A PARTICULAR
PURPOSE, TITLE AND NON-INFRINGEMENT. IN NO
EVENT SHALL THE COPYRIGHT HOLDERS OR ANYONE
DISTRIBUTING THE SOFTWARE BE LIABLE FOR ANY
DAMAGES OR OTHER LIABILITY, WHETHER IN
CONTRACT, TORT OR OTHERWISE, ARISING FROM, OUT
OF OR IN CONNECTION WITH THE SOFTWARE OR THE
USE OR OTHER DEALINGS IN THE SOFTWARE.
________________________________________
Independent JPEG Group's free JPEG software This package
contains C software to implement JPEG image encoding,
decoding, and transcoding. JPEG is a standardized compression
method for full-color and gray-scale images.
The distributed programs provide conversion between JPEG
"JFIF" format and image files in PBMPLUS PPM/PGM, GIF, BMP,
and Targa file formats. The core compression and
decompression library can easily be reused in other programs,
such as image viewers. The package is highly portable C code;
we have tested it on many machines ranging from PCs to Crays.
We are releasing this software for both noncommercial and
commercial use.
Companies are welcome to use it as the basis for JPEG-related
products. We do not ask a royalty, although we do ask for an
acknowledgement in product literature (see the README file in
47

the distribution for details). We hope to make this software
industrial-quality --- although, as with anything that's free, we
offer no warranty and accept no liability. For more information,
contact jpeg-info@jpegclub.org.
Contents of this directory jpegsrc.vN.tar.gz contains source code,
documentation, and test files for release N in Unix format.
jpegsrN.zip contains source code, documentation, and test files
for release N in Windows format.
jpegaltui.vN.tar.gz contains source code for an alternate user
interface for cjpeg/djpeg in Unix format.
jpegaltuiN.zip contains source code for an alternate user
interface for cjpeg/djpeg in Windows format.
wallace.ps.gz is a PostScript file of Greg Wallace's introductory
article about JPEG. This is an update of the article that appeared
in the April 1991 Communications of the ACM.
jpeg.documents.gz tells where to obtain the JPEG standard and
documents about JPEG-related file formats.
jfif.ps.gz is a PostScript file of the JFIF (JPEG File Interchange
Format) format specification.
jfif.txt.gz is a plain text transcription of the JFIF specification; it's
missing a figure, so use the PostScript version if you can.
TIFFTechNote2.txt.gz is a draft of the proposed revisions to TIFF
6.0's JPEG support.
pm.errata.gz is the errata list for the first printing of the textbook
"JPEG Still Image Data Compression Standard" by Pennebaker
and Mitchell.
jdosaobj.zip contains pre-assembled object files for
JMEMDOSA.ASM. If you want to compile the IJG code for MSDOS, but don't have an assembler, these files may be helpful.
________________________________________
Expat LICENSE Copyright (c) 1998, 1999, 2000 Thai Open
Source Software Center Ltd
Permission is hereby granted, free of charge, to any person
obtaining a copy of this software and associated documentation
files (the "Software"), to deal in the Software without restriction,
including without limitation the rights to use, copy, modify,
merge, publish, distribute, sublicense, and/or sell copies of the
Software, and to permit persons to whom the Software is
furnished to do so, subject to the following conditions:
The above copyright notice and this permission notice shall be
included in all copies or substantial portions of the Software.
THE SOFTWARE IS PROVIDED "AS IS", WITHOUT
WARRANTY OF ANY KIND, EXPRESS OR IMPLIED,
INCLUDING BUT NOT LIMITED TO THE WARRANTIES OF
MERCHANTABILITY, FITNESS FOR A PARTICULAR
PURPOSE AND NONINFRINGEMENT. IN NO EVENT
SHALL THE AUTHORS OR COPYRIGHT HOLDERS BE
LIABLE FOR ANY CLAIM, DAMAGES OR OTHER LIABILITY,
WHETHER IN AN ACTION OF CONTRACT, TORT OR
OTHERWISE, ARISING FROM, OUT OF OR IN
CONNECTION WITH THE SOFTWARE OR THE USE OR
OTHER DEALINGS IN THE SOFTWARE.
________________________________________
DirectFB LICENSE (c) Copyright 2001-2007 The DirectFB
Organization (directfb.org) (c) Copyright 2000-2004
Convergence (integrated media) GmbH All rights reserved.
Written by Denis Oliver Kropp <dok@directfb.org>, Andreas
Hundt <andi@fischlustig.de>, Sven Neumann
<neo@directfb.org>, Ville Syrjälä <syrjala@sci.fi> and Claudio
Ciccani <klan@users.sf.net>.
This library is free software; you can redistribute it and/or modify
it under the terms of the GNU Lesser General Public License as
published by the Free Software Foundation; either version 2 of
the License, or (at your option) any later version. The complete
text of the license is found in the file COPYING.
________________________________________
GNU General Public LICENSE version 2 (GPLv2) Copyright (C)
1989, 1991 Free Software Foundation, Inc. 59 Temple Place,
Suite 330, Boston, MA 02111-1307 USA
Everyone is permitted to copy and distribute verbatim copies of
this license document, but changing it is not allowed.
Preamble The licenses for most software are designed to take
away your freedom to share and change it. By contrast, the
GNU General Public License is intended to guarantee your
freedom to share and change free software--to make sure the
software is free for all its users.
This General Public License applies to most of the Free Software
Foundation's software and to any other program whose authors
commit to using it. (Some other Free Software Foundation
software is covered by the GNU Library General Public License
instead.) You can apply it to your programs, too.
When we speak of free software, we are referring to freedom,
not price. Our General Public Licenses are designed to make
sure that you have the freedom to distribute copies of free
software (and charge for this service if you wish), that you
receive source code or can get it if you want it, that you can
change the software or use pieces of it in new free programs;
and that you know you can do these things
To protect your rights, we need to make restrictions that forbid
anyone to deny you these rights or to ask you to surrender the
rights. These restrictions translate to certain responsibilities for
you if you distribute copies of the software, or if you modify it.
For example, if you distribute copies of such a program, whether
gratis or for a fee, you must give the recipients all the rights that
you have. You must make sure that they, too, receive or can get
the source code. And you must show them these terms so they
know their rights.
We protect your rights with two steps: (1) copyright the
software, and (2) offer you this license which gives you legal
permission to copy, distribute and/or modify the software.
Also, for each author's protection and ours, we want to make
certain that everyone understands that there is no warranty for
this free software. If the software is modified by someone else
and passed on, we want its recipients to know that what they
have is not the original, so that any problems introduced by
others will not reflect on the original authors' reputations.
Finally, any free program is threatened constantly by software
patents. We wish to avoid the danger that redistributors of a
free program will individually obtain patent licenses, in effect
making the program proprietary. To prevent this, we have made
it clear that any patent must be licensed for everyone's free use
or not licensed at all.
The precise terms and conditions for copying, distribution and
modification follow.
48

TERMS AND CONDITIONS FOR COPYING, DISTRIBUTION
AND MODIFICATION
0. This License applies to any program or other work which
contains a notice placed by the copyright holder saying it may be
distributed under the terms of this General Public License. The
"Program", below, refers to any such program or work, and a
"work based on the Program" means either the Program or any
derivative work under copyright law: that is to say, a work
containing the Program or a portion of it, either verbatim or
with modifications and/or translated into another language.
(Hereinafter, translation is included without limitation in the term
"modification".) Each licensee is addressed as "you".
Activities other than copying, distribution and modification are
not covered by this License; they are outside its scope. The act
of running the Program is not restricted, and the output from
the Program is covered only if its contents constitute a work
based on the Program (independent of having been made by
running the Program). Whether that is true depends on what
the Program does.
1. You may copy and distribute verbatim copies of the
Program's source code as you receive it, in any medium,
provided that you conspicuously and appropriately publish on
each copy an appropriate copyright notice and disclaimer of
warranty; keep intact all the notices that refer to this License and
to the absence of any warranty; and give any other recipients of
the Program a copy of this License along with the Program.
You may charge a fee for the physical act of transferring a copy,
and you may at your option offer warranty protection in
exchange for a fee.
2. You may modify your copy or copies of the Program or any
portion of it, thus forming a work based on the Program, and
copy and distribute such modifications or work under the terms
of Section 1 above, provided that you also meet all of these
conditions: a) You must cause the modified files to carry
prominent notices stating that you changed the files and the date
of any change. b) You must cause any work that you distribute
or publish, that in whole or in part contains or is derived from
the Program or any part thereof, to be licensed as a whole at no
charge to all third parties under the terms of this License.
c) If the modified program normally reads commands
interactively when run, you must cause it, when started running
for such interactive use in the most ordinary way, to print or
display an announcement including an appropriate copyright
notice and a notice that there is no warranty (or else, saying that
you provide a warranty) and that users may redistribute the
program under these conditions, and telling the user how to
view a copy of this License. (Exception: if the Program itself is
interactive but does not normally print such an announcement,
your work based on the Program is not required to print an
announcement.)
These requirements apply to the modified work as a whole. If
identifiable sections of that work are not derived from the
Program, and can be reasonably considered independent and
separate works in themselves, then this License, and its terms,
do not apply to those sections when you distribute them as
separate works. But when you distribute the same sections as
part of a whole which is a work based on the Program, the
distribution of the whole must be on the terms of this License,
whose permissions for other licensees extend to the entire
whole, and thus to each and every part regardless of who wrote
it.
Thus, it is not the intent of this section to claim rights or contest
your rights to work written entirely by you; rather, the intent is
to exercise the right to control the distribution of derivative or
collective works based on the Program.
In addition, mere aggregation of another work not based on the
Program with the Program (or with a work based on the
Program) on a volume of a storage or distribution medium does
not bring the other work under the scope of this License.
3. You may copy and distribute the Program (or a work based
on it, under Section 2) in object code or executable form under
the terms of Sections 1 and 2 above provided that you also do
one of the following: a) Accompany it with the complete
corresponding machine-readable source code, which must be
distributed under the terms of Sections 1 and 2 above on a
medium customarily used for software interchange; or,
b) Accompany it with a written offer, valid for at least three
years, to give any third party, for a charge no more than your
cost of physically performing source distribution, a complete
machine-readable copy of the corresponding source code, to be
distributed under the terms of Sections 1 and 2 above on a
medium customarily used for software interchange; or, c)
Accompany it with the information you received as to the offer
to distribute corresponding source code. (This alternative is
allowed only for noncommercial distribution and only if you
received the program in object code or executable form with
such an offer, in accord with Subsection b above.)
The source code for a work means the preferred form of the
work for making modifications to it. For an executable work,
complete source code means all the source code for all modules
it contains, plus any associated interface definition files, plus the
scripts used to control compilation and installation of the
executable. However, as a special exception, the source code
distributed need not include anything that is normally distributed
(in either source or binary form) with the major components
(compiler, kernel, and so on) of the operating system on which
the executable runs, unless that component itself accompanies
the executable.
If distribution of executable or object code is made by offering
access to copy from a designated place, then offering equivalent
access to copy the source code from the same place counts as
distribution of the source code, even though third parties are
not compelled to copy the source along with the object code.
4. You may not copy, modify, sublicense, or distribute the
Program except as expressly provided under this License. Any
attempt otherwise to copy, modify, sublicense or distribute the
Program is void, and will automatically terminate your rights
under this License. However, parties who have received copies,
or rights, from you under this License will not have their licenses
terminated so long as such parties remain in full compliance.
5. You are not required to accept this License, since you have
not signed it. However, nothing else grants you permission to
modify or distribute the Program or its derivative works. These
actions are prohibited by law if you do not accept this License.
Therefore, by modifying or distributing the Program (or any
work based on the Program), you indicate your acceptance of
49

this License to do so, and all its terms and conditions for
copying, distributing or modifying the Program or works based
on it.
6. Each time you redistribute the Program (or any work based
on the Program), the recipient automatically receives a license
from the original licensor to copy, distribute or modify the
Program subject to these terms and conditions. You may not
impose any further restrictions on the recipients' exercise of the
rights granted herein. You are not responsible for enforcing
compliance by third parties to this License.
7. If, as a consequence of a court judgment or allegation of
patent infringement or for any other reason (not limited to
patent issues), conditions are imposed on you (whether by court
order, agreement or otherwise) that contradict the conditions of
this License, they do not excuse you from the conditions of this
License.
If you cannot distribute so as to satisfy simultaneously your
obligations under this License and any other pertinent
obligations, then as a consequence you may not distribute the
Program at all. For example, if a patent license would not permit
royalty-free redistribution of the Program by all those who
receive copies directly or indirectly through you, then the only
way you could satisfy both it and this License would be to refrain
entirely from distribution of the Program.
If any portion of this section is held invalid or unenforceable
under any particular circumstance, the balance of the section is
intended to apply and the section as a whole is intended to
apply in other circumstances.
It is not the purpose of this section to induce you to infringe any
patents or other property right claims or to contest validity of
any such claims; this section has the sole purpose of protecting
the integrity of the free software distribution system, which is
implemented by public license practices. Many people have
made generous contributions to the wide range of software
distributed through that system in reliance on consistent
application of that system; it is up to the author/donor to decide
if he or she is willing to distribute software through any other
system and a licensee cannot impose that choice.
This section is intended to make thoroughly clear what is
believed to be a consequence of the rest of this License.
8. If the distribution and/or use of the Program is restricted in
certain countries either by patents or by copyrighted interfaces,
the original copyright holder who places the Program under this
License may add an explicit geographical distribution limitation
excluding those countries, so that distribution is permitted only
in or among countries not thus excluded. In such case, this
License incorporates the limitation as if written in the body of
this License.
9. The Free Software Foundation may publish revised and/or
new versions of the General Public License from time to time.
Such new versions will be similar in spirit to the present version,
but may differ in detail to address new problems or concerns.
Each version is given a distinguishing version number. If the
Program specifies a version number of this License which applies
to it and "any later version", you have the option of following the
terms and conditions either of that version or of any later
version published by the Free Software Foundation. If the
Program does not specify a version number of this License, you
may choose any version ever published by the Free Software
Foundation.
10. If you wish to incorporate parts of the Program into other
free programs whose distribution conditions are different, write
to the author to ask for permission. For software which is
copyrighted by the Free Software Foundation, write to the Free
Software Foundation; we sometimes make exceptions for this.
Our decision will be guided by the two goals of preserving the
free status of all derivatives of our free software and of
promoting the sharing and reuse of software generally.
NO WARRANTY
11. BECAUSE THE PROGRAM IS LICENSED FREE OF
CHARGE, THERE IS NO WARRANTY FOR THE PROGRAM,
TO THE EXTENT PERMITTED BY APPLICABLE LAW.
EXCEPT WHEN OTHERWISE STATED IN WRITING THE
COPYRIGHT HOLDERS AND/OR OTHER PARTIES
PROVIDE THE PROGRAM "AS IS" WITHOUT WARRANTY
OF ANY KIND, EITHER EXPRESSED OR IMPLIED,
INCLUDING, BUT NOT LIMITED TO, THE IMPLIED
WARRANTIES OF MERCHANTABILITY AND FITNESS FOR
A PARTICULAR PURPOSE. THE ENTIRE RISK AS TO THE
QUALITY AND PERFORMANCE OF THE PROGRAM IS
WITH YOU. SHOULD THE PROGRAM PROVE DEFECTIVE,
YOU ASSUME THE COST OF ALL NECESSARY SERVICING,
REPAIR OR CORRECTION.
12. IN NO EVENT UNLESS REQUIRED BY APPLICABLE LAW
OR AGREED TO IN WRITING WILL ANY COPYRIGHT
HOLDER, OR ANY OTHER PARTY WHO MAY MODIFY
AND/OR REDISTRIBUTE THE PROGRAM AS PERMITTED
ABOVE, BE LIABLE TO YOU FOR DAMAGES, INCLUDING
ANY GENERAL, SPECIAL, INCIDENTAL OR
CONSEQUENTIAL DAMAGES ARISING OUT OF THE USE
OR INABILITY TO USE THE PROGRAM (INCLUDING BUT
NOT LIMITED TO LOSS OF DATA OR DATA BEING
RENDERED INACCURATE OR LOSSES SUSTAINED BY YOU
OR THIRD PARTIES OR A FAILURE OF THE PROGRAM TO
OPERATE WITH ANY OTHER PROGRAMS), EVEN IF SUCH
HOLDER OR OTHER PARTY HAS BEEN ADVISED OF THE
POSSIBILITY OF SUCH DAMAGES.
________________________________________
SQLite Copyright All of the deliverable code in SQLite has been
dedicated to the public domain by the authors. All code authors,
and representatives of the companies they work for, have signed
affidavits dedicating their contributions to the public domain and
originals of those signed affidavits are stored in a firesafe at the
main offices of Hwaci. Anyone is free to copy, modify, publish,
use, compile, sell, or distribute the original SQLite code, either in
source code form or as a compiled binary, for any purpose,
commercial or non-commercial, and by any means.
The previous paragraph applies to the deliverable code in
SQLite - those parts of the SQLite library that you actually
50

bundle and ship with a larger application. Portions of the
documentation and some code used as part of the build process
might fall under other licenses. The details here are unclear. We
do not worry about the licensing of the documentation and
build code so much because none of these things are part of the
core deliverable SQLite library.
All of the deliverable code in SQLite has been written from
scratch. No code has been taken from other projects or from
the open internet. Every line of code can be traced back to its
original author, and all of those authors have public domain
dedications on file. So the SQLite code base is clean and is
uncontaminated with licensed code from other projects.
Obtaining An Explicit License To Use SQLite Even though
SQLite is in the public domain and does not require a license,
some users want to obtain a license anyway. Some reasons for
obtaining a license include:
You are using SQLite in a jurisdiction that does not recognize
the public domain. You are using SQLite in a jurisdiction that
does not recognize the right of an author to dedicate their work
to the public domain. •You want to hold a tangible legal
document as evidence that you have the legal right to use and
distribute SQLite. •Your legal department tells you that you
have to purchase a license.
If you feel like you really have to purchase a license for SQLite,
Hwaci, the company that employs the architect and principal
developers of SQLite, will sell you one.
Contributed Code In order to keep SQLite completely free and
unencumbered by copyright, all new contributors to the SQLite
code base are asked to dedicate their contributions to the public
domain. If you want to send a patch or enhancement for
possible inclusion in the SQLite source tree, please accompany
the patch with the following statement:
The author or authors of this code dedicate any and all
copyright interest in this code to the public domain. We make
this dedication for the benefit of the public at large and to the
detriment of our heirs and successors. We intend this dedication
to be an overt act of relinquishment in perpetuity of all present
and future rights to this code under copyright law.
We are not able to accept patches or changes to SQLite that
are not accompanied by a statement such as the above. In
addition, if you make changes or enhancements as an employee,
then a simple statement such as the above is insufficient. You
must also send by surface mail a copyright release signed by a
company officer. A signed original of the copyright release
should be mailed to:
Hwaci 6200 Maple Cove Lane Charlotte, NC 28269 USA
________________________________________
GNU GENERAL PUBLIC LICENSE Version 2, June 1991
Copyright (C) 1989, 1991 Free Software Foundation, Inc. 51
Franklin Street, Fifth Floor, Boston, MA 02110-1301, USA
Everyone is permitted to copy and distribute verbatim copies of
this license document, but changing it is not allowed.
Preamble
The licenses for most software are designed to take away your
freedom to share and change it. By contrast, the GNU General
Public License is intended to guarantee your freedom to share
and change free software--to make sure the software is free for
all its users. This General Public License applies to most of the
Free Software Foundation's software and to any other program
whose authors commit to using it. (Some other Free Software
Foundation software is covered by the GNU Lesser General
Public License instead.) You can apply it to your programs, too.
When we speak of free software, we are referring to freedom,
not price. Our General Public Licenses are designed to make
sure that you have the freedom to distribute copies of free
software (and charge for this service if you wish), that you
receive source code or can get it if you want it, that you can
change the software or use pieces of it in new free programs;
and that you know you can do these things.
To protect your rights, we need to make restrictions that forbid
anyone to deny you these rights or to ask you to surrender the
rights. These restrictions translate to certain responsibilities for
you if you distribute copies of the software, or if you modify it.
For example, if you distribute copies of such a program, whether
gratis or for a fee, you must give the recipients all the rights that
you have. You must make sure that they, too, receive or can get
the source code. And you must show them these terms so they
know their rights.
We protect your rights with two steps: (1) copyright the
software, and (2) offer you this license which gives you legal
permission to copy, distribute and/or modify the software.
Also, for each author's protection and ours, we want to make
certain that everyone understands that there is no warranty for
this free software. If the software is modified by someone else
and passed on, we want its recipients to know that what they
have is not the original, so that any problems introduced by
others will not reflect on the original authors' reputations.
Finally, any free program is threatened constantly by software
patents. We wish to avoid the danger that redistributors of a
free program will individually obtain patent licenses, in effect
making the program proprietary. To prevent this, we have made
it clear that any patent must be licensed for everyone's free use
or not licensed at all.
The precise terms and conditions for copying, distribution and
modification follow.
TERMS AND CONDITIONS FOR COPYING, DISTRIBUTION
AND MODIFICATION 0. This License applies to any program
or other work which contains a notice placed by the copyright
holder saying it may be distributed under the terms of this
General Public License. The "Program", below, refers to any such
program or work, and a "work based on the Program" means
either the Program or any derivative work under copyright law:
that is to say, a work containing the Program or a portion of it,
either verbatim or with modifications and/or translated into
another language. (Hereinafter, translation is included without
limitation in the term "modification".) Each licensee is addressed
as "you".
Activities other than copying, distribution and modification are
not covered by this License; they are outside its scope. The act
of running the Program is not restricted, and the output from
the Program is covered only if its contents constitute a work
based on the Program (independent of having been made by
running the Program). Whether that is true depends on what
the Program does.
1. You may copy and distribute verbatim copies of the
Program's source code as you receive it, in any medium,
51

provided that you conspicuously and appropriately publish on
each copy an appropriate copyright notice and disclaimer of
warranty; keep intact all the notices that refer to this License and
to the absence of any warranty; and give any other recipients of
the Program a copy of this License along with the Program.
You may charge a fee for the physical act of transferring a copy,
and you may at your option offer warranty protection in
exchange for a fee.
2. You may modify your copy or copies of the Program or any
portion of it, thus forming a work based on the Program, and
copy and distribute such modifications or work under the terms
of Section 1 above, provided that you also meet all of these
conditions: a) You must cause the modified files to carry
prominent notices stating that you changed the files and the date
of any change. b) You must cause any work that you distribute
or publish, that in whole or in part contains or is derived from
the Program or any part thereof, to be licensed as a whole at no
charge to all third parties under the terms of this License. c) If
the modified program normally reads commands interactively
when run, you must cause it, when started running for such
interactive use in the most ordinary way, to print or display an
announcement including an appropriate copyright notice and a
notice that there is no warranty (or else, saying that you provide
a warranty) and that users may redistribute the program under
these conditions, and telling the user how to view a copy of this
License. (Exception: if the Program itself is interactive but does
not normally print such an announcement, your work based on
the Program is not required to print an announcement.)
These requirements apply to the modified work as a whole. If
identifiable sections of that work are not derived from the
Program, and can be reasonably considered independent and
separate works in themselves, then this License, and its terms,
do not apply to those sections when you distribute them as
separate works. But when you distribute the same sections as
part of a whole which is a work based on the Program, the
distribution of the whole must be on the terms of this License,
whose permissions for other licensees extend to the entire
whole, and thus to each and every part regardless of who wrote
it.
Thus, it is not the intent of this section to claim rights or contest
your rights to work written entirely by you; rather, the intent is
to exercise the right to control the distribution of derivative or
collective works based on the Program.
In addition, mere aggregation of another work not based on the
Program with the Program (or with a work based on the
Program) on a volume of a storage or distribution medium does
not bring the other work under the scope of this License.
3. You may copy and distribute the Program (or a work based
on it, under Section 2) in object code or executable form under
the terms of Sections 1 and 2 above provided that you also do
one of the following: a) Accompany it with the complete
corresponding machine-readable source code, which must be
distributed under the terms of Sections 1 and 2 above on a
medium customarily used for software interchange; or, b)
Accompany it with a written offer, valid for at least three years,
to give any third party, for a charge no more than your cost of
physically performing source distribution, a complete machinereadable copy of the corresponding source code, to be
distributed under the terms of Sections 1 and 2 above on a
medium customarily used for software interchange; or, c)
Accompany it with the information you received as to the offer
to distribute corresponding source code. (This alternative is
allowed only for non-commercial distribution and only if you
received the program in object code or executable form with
such an offer, in accord with Subsection b above.)
The source code for a work means the preferred form of the
work for making modifications to it. For an executable work,
complete source code means all the source code for all modules
it contains, plus any associated interface definition files, plus the
scripts used to control compilation and installation of the
executable. However, as a special exception, the source code
distributed need not include anything that is normally distributed
(in either source or binary form) with the major components
(compiler, kernel, and so on) of the operating system on which
the executable runs, unless that component itself accompanies
the executable.
If distribution of executable or object code is made by offering
access to copy from a designated place, then offering equivalent
access to copy the source code from the same place counts as
distribution of the source code, even though third parties are
not compelled to copy the source along with the object code.
4. You may not copy, modify, sublicense, or distribute the
Program except as expressly provided under this License. Any
attempt otherwise to copy, modify, sublicense or distribute the
Program is void, and will automatically terminate your rights
under this License. However, parties who have received copies,
or rights, from you under this License will not have their licenses
terminated so long as such parties remain in full compliance.
5. You are not required to accept this License, since you have
not signed it. However, nothing else grants you permission to
modify or distribute the Program or its derivative works. These
actions are prohibited by law if you do not accept this License.
Therefore, by modifying or distributing the Program (or any
work based on the Program), you indicate your acceptance of
this License to do so, and all its terms and conditions for
copying, distributing or modifying the Program or works based
on it.
6. Each time you redistribute the Program (or any work based
on the Program), the recipient automatically receives a license
from the original licensor to copy, distribute or modify the
Program subject to these terms and conditions. You may not
impose any further restrictions on the recipients' exercise of the
rights granted herein. You are not responsible for enforcing
compliance by third parties to this License.
7. If, as a consequence of a court judgment or allegation of
patent infringement or for any other reason (not limited to
patent issues), conditions are imposed on you (whether by court
order, agreement or otherwise) that contradict the conditions of
this License, they do not excuse you from the conditions of this
License. If you cannot distribute so as to satisfy simultaneously
your obligations under this License and any other pertinent
obligations, then as a consequence you may not distribute the
Program at all. For example, if a patent license would not permit
royalty-free redistribution of the Program by all those who
receive copies directly or indirectly through you, then the only
way you could satisfy both it and this License would be to refrain
52

entirely from distribution of the Program.
If any portion of this section is held invalid or unenforceable
under any particular circumstance, the balance of the section is
intended to apply and the section as a whole is intended to
apply in other circumstances.
It is not the purpose of this section to induce you to infringe any
patents or other property right claims or to contest validity of
any such claims; this section has the sole purpose of protecting
the integrity of the free software distribution system, which is
implemented by public license practices. Many people have
made generous contributions to the wide range of software
distributed through that system in reliance on consistent
application of that system; it is up to the author/donor to decide
if he or she is willing to distribute software through any other
system and a licensee cannot impose that choice.
This section is intended to make thoroughly clear what is
believed to be a consequence of the rest of this License.
8. If the distribution and/or use of the Program is restricted in
certain countries either by patents or by copyrighted interfaces,
the original copyright holder who places the Program under this
License may add an explicit geographical distribution limitation
excluding those countries, so that distribution is permitted only
in or among countries not thus excluded. In such case, this
License incorporates the limitation as if written in the body of
this License.
9. The Free Software Foundation may publish revised and/or
new versions of the General Public License from time to time.
Such new versions will be similar in spirit to the present version,
but may differ in detail to address new problems or concerns.
Each version is given a distinguishing version number. If the
Program specifies a version number of this License which applies
to it and "any later version", you have the option of following the
terms and conditions either of that version or of any later
version published by the Free Software Foundation.
If the Program does not specify a version number of this License,
you may choose any version ever published by the Free
Software Foundation.
10. If you wish to incorporate parts of the Program into other
free programs whose distribution conditions are different, write
to the author to ask for permission. For software which is
copyrighted by the Free Software Foundation, write to the Free
Software Foundation; we sometimes make exceptions for this.
Our decision will be guided by the two goals of preserving the
free status of all derivatives of our free software and of
promoting the sharing and reuse of software generally.
NO WARRANTY
11. BECAUSE THE PROGRAM IS LICENSED FREE OF
CHARGE, THERE IS NO WARRANTY FOR THE PROGRAM,
TO THE EXTENT PERMITTED BY APPLICABLE LAW.
EXCEPT WHEN OTHERWISE STATED IN WRITING THE
COPYRIGHT HOLDERS AND/OR OTHER PARTIES
PROVIDE THE PROGRAM "AS IS" WITHOUT WARRANTY
OF ANY KIND, EITHER EXPRESSED OR IMPLIED,
INCLUDING, BUT NOT LIMITED TO, THE IMPLIED
WARRANTIES OF MERCHANTABILITY AND FITNESS FOR
A PARTICULAR PURPOSE. THE ENTIRE RISK AS TO THE
QUALITY AND PERFORMANCE OF THE PROGRAM IS
WITH YOU. SHOULD THE PROGRAM PROVE DEFECTIVE,
YOU ASSUME THE COST OF ALL NECESSARY SERVICING,
REPAIR OR CORRECTION.
12. IN NO EVENT UNLESS REQUIRED BY APPLICABLE LAW
OR AGREED TO IN WRITING WILL ANY COPYRIGHT
HOLDER, OR ANY OTHER PARTY WHO MAY MODIFY
AND/OR REDISTRIBUTE THE PROGRAM AS PERMITTED
ABOVE, BE LIABLE TO YOU FOR DAMAGES, INCLUDING
ANY GENERAL, SPECIAL, INCIDENTAL OR
CONSEQUENTIAL DAMAGES ARISING OUT OF THE USE
OR INABILITY TO USE THE PROGRAM (INCLUDING BUT
NOT LIMITED TO LOSS OF DATA OR DATA BEING
RENDERED INACCURATE OR LOSSES SUSTAINED BY YOU
OR THIRD PARTIES OR A FAILURE OF THE PROGRAM TO
OPERATE WITH ANY OTHER PROGRAMS), EVEN IF SUCH
HOLDER OR OTHER PARTY HAS BEEN ADVISED OF THE
POSSIBILITY OF SUCH DAMAGES.
END OF TERMS AND CONDITIONS
________________________________________
GNU GENERAL PUBLIC LICENSE Version 3, 29 June 2007
Copyright © 2007 Free Software Foundation, Inc. http://fsf.org/
Everyone is permitted to copy and distribute verbatim copies of
this license document, but changing it is not allowed.
Preamble
The GNU General Public License is a free, copyleft license for
software and other kinds of works.
The licenses for most software and other practical works are
designed to take away your freedom to share and change the
works. By contrast, the GNU General Public License is intended
to guarantee your freedom to share and change all versions of a
program--to make sure it remains free software for all its users.
We, the Free Software Foundation, use the GNU General Public
License for most of our software; it applies also to any other
work released this way by its authors. You can apply it to your
programs, too.
When we speak of free software, we are referring to freedom,
not price. Our General Public Licenses are designed to make
sure that you have the freedom to distribute copies of free
software (and charge for them if you wish), that you receive
source code or can get it if you want it, that you can change the
software or use pieces of it in new free programs, and that you
know you can do these things.
To protect your rights, we need to prevent others from denying
you these rights or asking you to surrender the rights. Therefore,
you have certain responsibilities if you distribute copies of the
software, or if you modify it: responsibilities to respect the
freedom of others.
For example, if you distribute copies of such a program, whether
gratis or for a fee, you must pass on to the recipients the same
freedoms that you received. You must make sure that they, too,
receive or can get the source code. And you must show them
these terms so they know their rights.
Developers that use the GNU GPL protect your rights with two
steps: (1) assert copyright on the software, and (2) offer you this
License giving you legal permission to copy, distribute and/or
modify it.
For example, if you distribute copies of such a program, whether
gratis or for a fee, you must pass on to the recipients the same
freedoms that you received. You must make sure that they, too,
53

receive or can get the source code. And you must show them
these terms so they know their rights.
Developers that use the GNU GPL protect your rights with two
steps: (1) assert copyright on the software, and (2) offer you this
License giving you legal permission to copy, distribute and/or
modify it.
Finally, every program is threatened constantly by software
patents. States should not allow patents to restrict development
and use of software on general-purpose computers, but in those
that do, we wish to avoid the special danger that patents applied
to a free program could make it effectively proprietary. To
prevent this, the GPL assures that patents cannot be used to
render the program non-free.
The precise terms and conditions for copying, distribution and
modification follow.
TERMS AND CONDITIONS
0. Definitions. “This License” refers to version 3 of the GNU
General Public License. “Copyright” also means copyright-like
laws that apply to other kinds of works, such as semiconductor
masks. “The Program” refers to any copyrightable work licensed
under this License. Each licensee is addressed as “you”.
“Licensees” and “recipients” may be individuals or organizations.
To “modify” a work means to copy from or adapt all or part of
the work in a fashion requiring copyright permission, other than
the making of an exact copy. The resulting work is called a
“modified version” of the earlier work or a work “based on” the
earlier work.
A “covered work” means either the unmodified Program or a
work based on the Program.
To “propagate” a work means to do anything with it that,
without permission, would make you directly or secondarily
liable for infringement under applicable copyright law, except
executing it on a computer or modifying a private copy.
Propagation includes copying, distribution (with or without
modification), making available to the public, and in some
countries other activities as well.
To “convey” a work means any kind of propagation that enables
other parties to make or receive copies. Mere interaction with a
user through a computer network, with no transfer of a copy, is
not conveying.
An interactive user interface displays “Appropriate Legal
Notices” to the extent that it includes a convenient and
prominently visible feature that (1) displays an appropriate
copyright notice, and (2) tells the user that there is no warranty
for the work (except to the extent that warranties are
provided), that licensees may convey the work under this
License, and how to view a copy of this License. If the interface
presents a list of user commands or options, such as a menu, a
prominent item in the list meets this criterion.
1. Source Code.
The “source code” for a work means the preferred form of the
work for making modifications to it. “Object code” means any
non-source form of a work.
A “Standard Interface” means an interface that either is an
official standard defined by a recognized standards body, or, in
the case of interfaces specified for a particular programming
language, one that is widely used among developers working in
that language.
The “System Libraries” of an executable work include anything,
other than the work as a whole, that (a) is included in the
normal form of packaging a Major Component, but which is not
part of that Major Component, and (b) serves only to enable
use of the work with that Major Component, or to implement a
Standard Interface for which an implementation is available to
the public in source code form. A “Major Component”, in this
context, means a major essential component (kernel, window
system, and so on) of the specific operating system (if any) on
which the executable work runs, or a compiler used to produce
the work, or an object code interpreter used to run it.
The “Corresponding Source” for a work in object code form
means all the source code needed to generate, install, and (for
an executable work) run the object code and to modify the
work, including scripts to control those activities. However, it
does not include the work's System Libraries, or generalpurpose tools or generally available free programs which are
used unmodified in performing those activities but which are not
part of the work. For example, Corresponding Source includes
interface definition files associated with source files for the work,
and the source code for shared libraries and dynamically linked
subprograms that the work is specifically designed to require,
such as by intimate data communication or control flow
between those subprograms and other parts of the work.
The Corresponding Source need not include anything that users
can regenerate automatically from other parts of the
Corresponding Source.
The Corresponding Source for a work in source code form is
that same work.
2. Basic Permissions.
All rights granted under this License are granted for the term of
copyright on the Program, and are irrevocable provided the
stated conditions are met. This License explicitly affirms your
unlimited permission to run the unmodified Program. The
output from running a covered work is covered by this License
only if the output, given its content, constitutes a covered work.
This License acknowledges your rights of fair use or other
equivalent, as provided by copyright law.
You may make, run and propagate covered works that you do
not convey, without conditions so long as your license otherwise
remains in force. You may convey covered works to others for
the sole purpose of having them make modifications exclusively
for you, or provide you with facilities for running those works,
provided that you comply with the terms of this License in
conveying all material for which you do not control copyright.
Those thus making or running the covered works for you must
do so exclusively on your behalf, under your direction and
control, on terms that prohibit them from making any copies of
your copyrighted material outside their relationship with you.
Conveying under any other circumstances is permitted solely
under the conditions stated below. Sublicensing is not allowed;
section 10 makes it unnecessary.
3. Protecting Users' Legal Rights From Anti-Circumvention Law.
No covered work shall be deemed part of an effective
technological measure under any applicable law fulfilling
obligations under article 11 of the WIPO copyright treaty
adopted on 20 December 1996, or similar laws prohibiting or
restricting circumvention of such measures. When you convey a
54

covered work, you waive any legal power to forbid
circumvention of technological measures to the extent such
circumvention is effected by exercising rights under this License
with respect to the covered work, and you disclaim any
intention to limit operation or modification of the work as a
means of enforcing, against the work's users, your or third
parties' legal rights to forbid circumvention of technological
measures.
4. Conveying Verbatim Copies.
You may convey verbatim copies of the Program's source code
as you receive it, in any medium, provided that you
conspicuously and appropriately publish on each copy an
appropriate copyright notice; keep intact all notices stating that
this License and any non-permissive terms added in accord with
section 7 apply to the code; keep intact all notices of the
absence of any warranty; and give all recipients a copy of this
License along with the Program.
You may charge any price or no price for each copy that you
convey, and you may offer support or warranty protection for a
fee.
5. Conveying Modified Source Versions.
You may convey a work based on the Program, or the
modifications to produce it from the Program, in the form of
source code under the terms of section 4, provided that you
also meet all of these conditions: •a) The work must carry
prominent notices stating that you modified it, and giving a
relevant date. •b) The work must carry prominent notices
stating that it is released under this License and any conditions
added under section 7. This requirement modifies the
requirement in section 4 to “keep intact all notices”.
c) You must license the entire work, as a whole, under this
License to anyone who comes into possession of a copy. This
License will therefore apply, along with any applicable section 7
additional terms, to the whole of the work, and all its parts,
regardless of how they are packaged. This License gives no
permission to license the work in any other way, but it does not
invalidate such permission if you have separately received it. •d)
If the work has interactive user interfaces, each must display
Appropriate Legal Notices; however, if the Program has
interactive interfaces that do not display Appropriate Legal
Notices, your work need not make them do so.
A compilation of a covered work with other separate and
independent works, which are not by their nature extensions of
the covered work, and which are not combined with it such as
to form a larger program, in or on a volume of a storage or
distribution medium, is called an “aggregate” if the compilation
and its resulting copyright are not used to limit the access or
legal rights of the compilation's users beyond what the individual
works permit. Inclusion of a covered work in an aggregate does
not cause this License to apply to the other parts of the
aggregate.
6. Conveying Non-Source Forms.
You may convey a covered work in object code form under the
terms of sections 4 and 5, provided that you also convey the
machine-readable Corresponding Source under the terms of this
License, in one of these ways: a) Convey the object code in, or
embodied in, a physical product (including a physical distribution
medium), accompanied by the Corresponding Source fixed on a
durable physical medium customarily used for software
interchange. b) Convey the object code in, or embodied in, a
physical product (including a physical distribution medium),
accompanied by a written offer, valid for at least three years and
valid for as long as you offer spare parts or customer support for
that product model, to give anyone who possesses the object
code either (1) a copy of the Corresponding Source for all the
software in the product that is covered by this License, on a
durable physical medium customarily used for software
interchange, for a price no more than your reasonable cost of
physically performing this conveying of source, or (2) access to
copy the Corresponding Source from a network server at no
charge. c) Convey individual copies of the object code with a
copy of the written offer to provide the Corresponding Source.
This alternative is allowed only occasionally and
noncommercially, and only if you received the object code with
such an offer, in accord with subsection 6b. d) Convey the
object code by offering access from a designated place (gratis or
for a charge), and offer equivalent access to the Corresponding
Source in the same way through the same place at no further
charge. You need not require recipients to copy the
Corresponding Source along with the object code. If the place
to copy the object code is a network server, the Corresponding
Source may be on a different server (operated by you or a third
party) that supports equivalent copying facilities, provided you
maintain clear directions next to the object code saying where
to find the Corresponding Source. Regardless of what server
hosts the Corresponding Source, you remain obligated to ensure
that it is available for as long as needed to satisfy these
requirements. e) Convey the object code using peer-to-peer
transmission, provided you inform other peers where the object
code and Corresponding Source of the work are being offered
to the general public at no charge under subsection 6d.
A separable portion of the object code, whose source code is
excluded from the Corresponding Source as a System Library,
need not be included in conveying the object code work.
A “User Product” is either (1) a “consumer product”, which
means any tangible personal property which is normally used for
personal, family, or household purposes, or (2) anything
designed or sold for incorporation into a dwelling. In determining
whether a product is a consumer product, doubtful cases shall
be resolved in favor of coverage. For a particular product
received by a particular user, “normally used” refers to a typical
or common use of that class of product, regardless of the status
of the particular user or of the way in which the particular user
actually uses, or expects or is expected to use, the product. A
product is a consumer product regardless of whether the
product has substantial commercial, industrial or non-consumer
uses, unless such uses represent the only significant mode of use
of the product.
“Installation Information” for a User Product means any
methods, procedures, authorization keys, or other information
required to install and execute modified versions of a covered
work in that User Product from a modified version of its
Corresponding Source. The information must suffice to ensure
that the continued functioning of the modified object code is in
no case prevented or interfered with solely because modification
has been made.
55

If you convey an object code work under this section in, or with,
or specifically for use in, a User Product, and the conveying
occurs as part of a transaction in which the right of possession
and use of the User Product is transferred to the recipient in
perpetuity or for a fixed term (regardless of how the transaction
is characterized), the Corresponding Source conveyed under this
section must be accompanied by the Installation Information. But
this requirement does not apply if neither you nor any third
party retains the ability to install modified object code on the
User Product (for example, the work has been installed in
ROM).
The requirement to provide Installation Information does not
include a requirement to continue to provide support service,
warranty, or updates for a work that has been modified or
installed by the recipient, or for the User Product in which it has
been modified or installed. Access to a network may be denied
when the modification itself materially and adversely affects the
operation of the network or violates the rules and protocols for
communication across the network.
Corresponding Source conveyed, and Installation Information
provided, in accord with this section must be in a format that is
publicly documented (and with an implementation available to
the public in source code form), and must require no special
password or key for unpacking, reading or copying.
7. Additional Terms.
“Additional permissions” are terms that supplement the terms of
this License by making exceptions from one or more of its
conditions. Additional permissions that are applicable to the
entire Program shall be treated as though they were included in
this License, to the extent that they are valid under applicable
law. If additional permissions apply only to part of the Program,
that part may be used separately under those permissions, but
the entire Program remains governed by this License without
regard to the additional permissions.
When you convey a copy of a covered work, you may at your
option remove any additional permissions from that copy, or
from any part of it. (Additional permissions may be written to
require their own removal in certain cases when you modify the
work.) You may place additional permissions on material, added
by you to a covered work, for which you have or can give
appropriate copyright permission.
Notwithstanding any other provision of this License, for material
you add to a covered work, you may (if authorized by the
copyright holders of that material) supplement the terms of this
License with terms:
•a) Disclaiming warranty or limiting liability differently from the
terms of sections 15 and 16 of this License; or •b) Requiring
preservation of specified reasonable legal notices or author
attributions in that material or in the Appropriate Legal Notices
displayed by works containing it; or •c) Prohibiting
misrepresentation of the origin of that material, or requiring that
modified versions of such material be marked in reasonable ways
as different from the original version; or •d) Limiting the use for
publicity purposes of names of licensors or authors of the
material; or •e) Declining to grant rights under trademark law
for use of some trade names, trademarks, or service marks; or
•f) Requiring indemnification of licensors and authors of that
material by anyone who conveys the material (or modified
versions of it) with contractual assumptions of liability to the
recipient, for any liability that these contractual assumptions
directly impose on those licensors and authors.
All other non-permissive additional terms are considered
“further restrictions” within the meaning of section 10. If the
Program as you received it, or any part of it, contains a notice
stating that it is governed by this License along with a term that
is a further restriction, you may remove that term. If a license
document contains a further restriction but permits relicensing
or conveying under this License, you may add to a covered work
material governed by the terms of that license document,
provided that the further restriction does not survive such
relicensing or conveying.
If you add terms to a covered work in accord with this section,
you must place, in the relevant source files, a statement of the
additional terms that apply to those files, or a notice indicating
where to find the applicable terms.
Additional terms, permissive or non-permissive, may be stated in
the form of a separately written license, or stated as exceptions;
the above requirements apply either way.
8. Termination.
You may not propagate or modify a covered work except as
expressly provided under this License. Any attempt otherwise to
propagate or modify it is void, and will automatically terminate
your rights under this License (including any patent licenses
granted under the third paragraph of section 11).
However, if you cease all violation of this License, then your
license from a particular copyright holder is reinstated (a)
provisionally, unless and until the copyright holder explicitly and
finally terminates your license, and (b) permanently, if the
copyright holder fails to notify you of the violation by some
reasonable means prior to 60 days after the cessation.
Moreover, your license from a particular copyright holder is
reinstated permanently if the copyright holder notifies you of the
violation by some reasonable means, this is the first time you
have received notice of violation of this License (for any work)
from that copyright holder, and you cure the violation prior to
30 days after your receipt of the notice.
Termination of your rights under this section does not terminate
the licenses of parties who have received copies or rights from
you under this License. If your rights have been terminated and
not permanently reinstated, you do not qualify to receive new
licenses for the same material under section 10.
9. Acceptance Not Required for Having Copies.
You are not required to accept this License in order to receive
or run a copy of the Program. Ancillary propagation of a
covered work occurring solely as a consequence of using peerto-peer transmission to receive a copy likewise does not require
acceptance. However, nothing other than this License grants you
permission to propagate or modify any covered work. These
actions infringe copyright if you do not accept this License.
Therefore, by modifying or propagating a covered work, you
indicate your acceptance of this License to do so.
10. Automatic Licensing of Downstream Recipients.
Each time you convey a covered work, the recipient
automatically receives a license from the original licensors, to
run, modify and propagate that work, subject to this License.
You are not responsible for enforcing compliance by third
56

parties with this License.
An “entity transaction” is a transaction transferring control of an
organization, or substantially all assets of one, or subdividing an
organization, or merging organizations. If propagation of a
covered work results from an entity transaction, each party to
that transaction who receives a copy of the work also receives
whatever licenses to the work the party's predecessor in interest
had or could give under the previous paragraph, plus a right to
possession of the Corresponding Source of the work from the
predecessor in interest, if the predecessor has it or can get it
with reasonable efforts.
You may not impose any further restrictions on the exercise of
the rights granted or affirmed under this License. For example,
you may not impose a license fee, royalty, or other charge for
exercise of rights granted under this License, and you may not
initiate litigation (including a cross-claim or counterclaim in a
lawsuit) alleging that any patent claim is infringed by making,
using, selling, offering for sale, or importing the Program or any
portion of it.
11. Patents.
A “contributor” is a copyright holder who authorizes use under
this License of the Program or a work on which the Program is
based. The work thus licensed is called the contributor's
“contributor version”. A contributor's “essential patent claims”
are all patent claims owned or controlled by the contributor,
whether already acquired or hereafter acquired, that would be
infringed by some manner, permitted by this License, of making,
using, or selling its contributor version, but do not include claims
that would be infringed only as a consequence of further
modification of the contributor version. For purposes of this
definition, “control” includes the right to grant patent sublicenses
in a manner consistent with the requirements of this License.
Each contributor grants you a non-exclusive, worldwide, royaltyfree patent license under the contributor's essential patent
claims, to make, use, sell, offer for sale, import and otherwise
run, modify and propagate the contents of its contributor
version.
In the following three paragraphs, a “patent license” is any
express agreement or commitment, however denominated, not
to enforce a patent (such as an express permission to practice a
patent or covenant not to sue for patent infringement). To
“grant” such a patent license to a party means to make such an
agreement or commitment not to enforce a patent against the
party.
If you convey a covered work, knowingly relying on a patent
license, and the Corresponding Source of the work is not
available for anyone to copy, free of charge and under the terms
of this License, through a publicly available network server or
other readily accessible means, then you must either (1) cause
the Corresponding Source to be so available, or (2) arrange to
deprive yourself of the benefit of the patent license for this
particular work, or (3) arrange, in a manner consistent with the
requirements of this License, to extend the patent license to
downstream recipients. “Knowingly relying” means you have
actual knowledge that, but for the patent license, your conveying
the covered work in a country, or your recipient's use of the
covered work in a country, would infringe one or more
identifiable patents in that country that you have reason to
believe are valid.
If, pursuant to or in connection with a single transaction or
arrangement, you convey, or propagate by procuring
conveyance of, a covered work, and grant a patent license to
some of the parties receiving the covered work authorizing them
to use, propagate, modify or convey a specific copy of the
covered work, then the patent license you grant is automatically
extended to all recipients of the covered work and works based
on it.
A patent license is “discriminatory” if it does not include within
the scope of its coverage, prohibits the exercise of, or is
conditioned on the non-exercise of one or more of the rights
that are specifically granted under this License. You may not
convey a covered work if you are a party to an arrangement
with a third party that is in the business of distributing software,
under which you make payment to the third party based on the
extent of your activity of conveying the work, and under which
the third party grants, to any of the parties who would receive
the covered work from you, a discriminatory patent license (a)
in connection with copies of the covered work conveyed by you
(or copies made from those copies), or (b) primarily for and in
connection with specific products or compilations that contain
the covered work, unless you entered into that arrangement, or
that patent license was granted, prior to 28 March 2007.
Nothing in this License shall be construed as excluding or limiting
any implied license or other defenses to infringement that may
otherwise be available to you under applicable patent law.
12. No Surrender of Others' Freedom.
If conditions are imposed on you (whether by court order,
agreement or otherwise) that contradict the conditions of this
License, they do not excuse you from the conditions of this
License. If you cannot convey a covered work so as to satisfy
simultaneously your obligations under this License and any other
pertinent obligations, then as a consequence you may not
convey it at all. For example, if you agree to terms that obligate
you to collect a royalty for further conveying from those to
whom you convey the Program, the only way you could satisfy
both those terms and this License would be to refrain entirely
from conveying the Program.
13. Use with the GNU Affero General Public License.
Notwithstanding any other provision of this License, you have
permission to link or combine any covered work with a work
licensed under version 3 of the GNU Affero General Public
License into a single combined work, and to convey the resulting
work. The terms of this License will continue to apply to the
part which is the covered work, but the special requirements of
the GNU Affero General Public License, section 13, concerning
interaction through a network will apply to the combination as
such.
14. Revised Versions of this License.
The Free Software Foundation may publish revised and/or new
versions of the GNU General Public License from time to time.
Such new versions will be similar in spirit to the present version,
but may differ in detail to address new problems or concerns.
Each version is given a distinguishing version number. If the
Program specifies that a certain numbered version of the GNU
General Public License “or any later version” applies to it, you
have the option of following the terms and conditions either of
57

that numbered version or of any later version published by the
Free Software Foundation. If the Program does not specify a
version number of the GNU General Public License, you may
choose any version ever published by the Free Software
Foundation.
If the Program specifies that a proxy can decide which future
versions of the GNU General Public License can be used, that
proxy's public statement of acceptance of a version permanently
authorizes you to choose that version for the Program.
Later license versions may give you additional or different
permissions. However, no additional obligations are imposed on
any author or copyright holder as a result of your choosing to
follow a later version.
15. Disclaimer of Warranty.
THERE IS NO WARRANTY FOR THE PROGRAM, TO THE
EXTENT PERMITTED BY APPLICABLE LAW. EXCEPT WHEN
OTHERWISE STATED IN WRITING THE COPYRIGHT
HOLDERS AND/OR OTHER PARTIES PROVIDE THE
PROGRAM “AS IS” WITHOUT WARRANTY OF ANY KIND,
EITHER EXPRESSED OR IMPLIED, INCLUDING, BUT NOT
LIMITED TO, THE IMPLIED WARRANTIES OF
MERCHANTABILITY AND FITNESS FOR A PARTICULAR
PURPOSE. THE ENTIRE RISK AS TO THE QUALITY AND
PERFORMANCE OF THE PROGRAM IS WITH YOU.
SHOULD THE PROGRAM PROVE DEFECTIVE, YOU
ASSUME THE COST OF ALL NECESSARY SERVICING,
REPAIR OR CORRECTION.
16. Limitation of Liability.
IN NO EVENT UNLESS REQUIRED BY APPLICABLE LAW
OR AGREED TO IN WRITING WILL ANY COPYRIGHT
HOLDER, OR ANY OTHER PARTY WHO MODIFIES
AND/OR CONVEYS THE PROGRAM AS PERMITTED
ABOVE, BE LIABLE TO YOU FOR DAMAGES, INCLUDING
ANY GENERAL, SPECIAL, INCIDENTAL OR
CONSEQUENTIAL DAMAGES ARISING OUT OF THE USE
OR INABILITY TO USE THE PROGRAM (INCLUDING BUT
NOT LIMITED TO LOSS OF DATA OR DATA BEING
RENDERED INACCURATE OR LOSSES SUSTAINED BY YOU
OR THIRD PARTIES OR A FAILURE OF THE PROGRAM TO
OPERATE WITH ANY OTHER PROGRAMS), EVEN IF SUCH
HOLDER OR OTHER PARTY HAS BEEN ADVISED OF THE
POSSIBILITY OF SUCH DAMAGES.
17. Interpretation of Sections 15 and 16.
If the disclaimer of warranty and limitation of liability provided
above cannot be given local legal effect according to their terms,
reviewing courts shall apply local law that most closely
approximates an absolute waiver of all civil liability in connection
with the Program, unless a warranty or assumption of liability
accompanies a copy of the Program in return for a fee.
END OF TERMS AND CONDITIONS
________________________________________
GNU LESSER GENERAL PUBLIC LICENSE Version 2.1,
February 1999
Copyright (C) 1991, 1999 Free Software Foundation, Inc. 51
Franklin Street, Fifth Floor, Boston, MA 02110-1301 USA
Everyone is permitted to copy and distribute verbatim copies of
this license document, but changing it is not allowed.
[This is the first released version of the Lesser GPL. It also
counts as the successor of the GNU Library Public License,
version 2, hence the version number 2.1.]
Preamble
The licenses for most software are designed to take away your
freedom to share and change it. By contrast, the GNU General
Public Licenses are intended to guarantee your freedom to share
and change free software--to make sure the software is free for
all its users.
This license, the Lesser General Public License, applies to some
specially designated software packages--typically libraries--of the
Free Software Foundation and other authors who decide to use
it. You can use it too, but we suggest you first think carefully
about whether this license or the ordinary General Public
License is the better strategy to use in any particular case, based
on the explanations below.
When we speak of free software, we are referring to freedom
of use, not price. Our General Public Licenses are designed to
make sure that you have the freedom to distribute copies of
free software (and charge for this service if you wish); that you
receive source code or can get it if you want it; that you can
change the software and use pieces of it in new free programs;
and that you are informed that you can do these things.
To protect your rights, we need to make restrictions that forbid
distributors to deny you these rights or to ask you to surrender
these rights. These restrictions translate to certain responsibilities
for you if you distribute copies of the library or if you modify it.
For example, if you distribute copies of the library, whether
gratis or for a fee, you must give the recipients all the rights that
we gave you. You must make sure that they, too, receive or can
get the source code. If you link other code with the library, you
must provide complete object files to the recipients, so that they
can relink them with the library after making changes to the
library and recompiling it. And you must show them these terms
so they know their rights.
We protect your rights with a two-step method: (1) we
copyright the library, and (2) we offer you this license, which
gives you legal permission to copy, distribute and/or modify the
library.
To protect each distributor, we want to make it very clear that
there is no warranty for the free library. Also, if the library is
modified by someone else and passed on, the recipients should
know that what they have is not the original version, so that the
original author's reputation will not be affected by problems that
might be introduced by others.
Finally, software patents pose a constant threat to the existence
of any free program. We wish to make sure that a company
cannot effectively restrict the users of a free program by
obtaining a restrictive license from a patent holder. Therefore,
we insist that any patent license obtained for a version of the
library must be consistent with the full freedom of use specified
in this license.
Most GNU software, including some libraries, is covered by the
ordinary GNU General Public License. This license, the GNU
Lesser General Public License, applies to certain designated
libraries, and is quite different from the ordinary General Public
License. We use this license for certain libraries in order to
permit linking those libraries into non-free programs.
58

When a program is linked with a library, whether statically or
using a shared library, the combination of the two is legally
speaking a combined work, a derivative of the original library.
The ordinary General Public License therefore permits such
linking only if the entire combination fits its criteria of freedom.
The Lesser General Public License permits more lax criteria for
linking other code with the library.
We call this license the "Lesser" General Public License because
it does Less to protect the user's freedom than the ordinary
General Public License. It also provides other free software
developers Less of an advantage over competing non-free
programs. These disadvantages are the reason we use the
ordinary General Public License for many libraries. However, the
Lesser license provides advantages in certain special
circumstances.
For example, on rare occasions, there may be a special need to
encourage the widest possible use of a certain library, so that it
becomes a de-facto standard. To achieve this, non-free
programs must be allowed to use the library. A more frequent
case is that a free library does the same job as widely used nonfree libraries. In this case, there is little to gain by limiting the free
library to free software only, so we use the Lesser General
Public License.
In other cases, permission to use a particular library in non-free
programs enables a greater number of people to use a large
body of free software. For example, permission to use the GNU
C Library in non-free programs enables many more people to
use the whole GNU operating system, as well as its variant, the
GNU/Linux operating system.
Although the Lesser General Public License is Less protective of
the users' freedom, it does ensure that the user of a program
that is linked with the Library has the freedom and the
wherewithal to run that program using a modified version of the
Library.
The precise terms and conditions for copying, distribution and
modification follow. Pay close attention to the difference
between a "work based on the library" and a "work that uses the
library". The former contains code derived from the library,
whereas the latter must be combined with the library in order
to run.
TERMS AND CONDITIONS FOR COPYING, DISTRIBUTION
AND MODIFICATION
0. This License Agreement applies to any software library or
other program which contains a notice placed by the copyright
holder or other authorized party saying it may be distributed
under the terms of this Lesser General Public License (also
called "this License"). Each licensee is addressed as "you".
A "library" means a collection of software functions and/or data
prepared so as to be conveniently linked with application
programs (which use some of those functions and data) to form
executables.
The "Library", below, refers to any such software library or work
which has been distributed under these terms. A "work based
on the Library" means either the Library or any derivative work
under copyright law: that is to say, a work containing the Library
or a portion of it, either verbatim or with modifications and/or
translated straightforwardly into another language. (Hereinafter,
translation is included without limitation in the term
"modification".)
"Source code" for a work means the preferred form of the work
for making modifications to it. For a library, complete source
code means all the source code for all modules it contains, plus
any associated interface definition files, plus the scripts used to
control compilation and installation of the library.
1. You may copy and distribute verbatim copies of the Library's
complete source code as you receive it, in any medium,
provided that you conspicuously and appropriately publish on
each copy an appropriate copyright notice and disclaimer of
warranty; keep intact all the notices that refer to this License and
to the absence of any warranty; and distribute a copy of this
License along with the Library.
You may charge a fee for the physical act of transferring a copy,
and you may at your option offer warranty protection in
exchange for a fee.
2. You may modify your copy or copies of the Library or any
portion of it, thus forming a work based on the Library, and copy
and distribute such modifications or work under the terms of
Section 1 above, provided that you also meet all of these
conditions: a) The modified work must itself be a software
library. b) You must cause the files modified to carry prominent
notices stating that you changed the files and the date of any
change. c) You must cause the whole of the work to be licensed
at no charge to all third parties under the terms of this License.
d) If a facility in the modified Library refers to a function or a
table of data to be supplied by an application program that uses
the facility, other than as an argument passed when the facility is
invoked, then you must make a good faith effort to ensure that,
in the event an application does not supply such function or
table, the facility still operates, and performs whatever part of its
purpose remains meaningful. (For example, a function in a library
to compute square roots has a purpose that is entirely welldefined independent of the application. Therefore, Subsection
2d requires that any application-supplied function or table used
by this function must be optional: if the application does not
supply it, the square root function must still compute square
roots.)
These requirements apply to the modified work as a whole. If
identifiable sections of that work are not derived from the
Library, and can be reasonably considered independent and
separate works in themselves, then this License, and its terms,
do not apply to those sections when you distribute them as
separate works. But when you distribute the same sections as
part of a whole which is a work based on the Library, the
distribution of the whole must be on the terms of this License,
whose permissions for other licensees extend to the entire
whole, and thus to each and every part regardless of who wrote
it.
Thus, it is not the intent of this section to claim rights or contest
your rights to work written entirely by you; rather, the intent is
to exercise the right to control the distribution of derivative or
collective works based on the Library.
59

In addition, mere aggregation of another work not based on the
Library with the Library (or with a work based on the Library)
on a volume of a storage or distribution medium does not bring
the other work under the scope of this License.
3. You may opt to apply the terms of the ordinary GNU
General Public License instead of this License to a given copy of
the Library. To do this, you must alter all the notices that refer
to this License, so that they refer to the ordinary GNU General
Public License, version 2, instead of to this License. (If a newer
version than version 2 of the ordinary GNU General Public
License has appeared, then you can specify that version instead if
you wish.) Do not make any other change in these notices.
Once this change is made in a given copy, it is irreversible for
that copy, so the ordinary GNU General Public License applies
to all subsequent copies and derivative works made from that
copy. This option is useful when you wish to copy part of the
code of the Library into a program that is not a library.
4. You may copy and distribute the Library (or a portion or
derivative of it, under Section 2) in object code or executable
form under the terms of Sections 1 and 2 above provided that
you accompany it with the complete corresponding machinereadable source code, which must be distributed under the
terms of Sections 1 and 2 above on a medium customarily used
for software interchange.
If distribution of object code is made by offering access to copy
from a designated place, then offering equivalent access to copy
the source code from the same place satisfies the requirement
to distribute the source code, even though third parties are not
compelled to copy the source along with the object code.
5. A program that contains no derivative of any portion of the
Library, but is designed to work with the Library by being
compiled or linked with it, is called a "work that uses the
Library". Such a work, in isolation, is not a derivative work of the
Library, and therefore falls outside the scope of this License.
However, linking a "work that uses the Library" with the Library
creates an executable that is a derivative of the Library (because
it contains portions of the Library), rather than a "work that uses
the library".
The executable is therefore covered by this License. Section 6
states terms for distribution of such executables.
When a "work that uses the Library" uses material from a header
file that is part of the Library, the object code for the work may
be a derivative work of the Library even though the source code
is not. Whether this is true is especially significant if the work can
be linked without the Library, or if the work is itself a library. The
threshold for this to be true is not precisely defined by law.
If such an object file uses only numerical parameters, data
structure layouts and accessors, and small macros and small
inline functions (ten lines or less in length), then the use of the
object file is unrestricted, regardless of whether it is legally a
derivative work. (Executables containing this object code plus
portions of the Library will still fall under Section 6.)
Otherwise, if the work is a derivative of the Library, you may
distribute the object code for the work under the terms of
Section 6. Any executables containing that work also fall under
Section 6, whether or not they are linked directly with the
Library itself.
6. As an exception to the Sections above, you may also combine
or link a "work that uses the Library" with the Library to produce
a work containing portions of the Library, and distribute that
work under terms of your choice, provided that the terms
permit modification of the work for the customer's own use and
reverse engineering for debugging such modifications.
You must give prominent notice with each copy of the work
that the Library is used in it and that the Library and its use are
covered by this License. You must supply a copy of this License.
If the work during execution displays copyright notices, you must
include the copyright notice for the Library among them, as well
as a reference directing the user to the copy of this License.
Also, you must do one of these things: a) Accompany the work
with the complete corresponding machine-readable source code
for the Library including whatever changes were used in the
work (which must be distributed under Sections 1 and 2 above);
and, if the work is an executable linked with the Library, with the
complete machine-readable "work that uses the Library", as
object code and/or source code, so that the user can modify the
Library and then relink to produce a modified executable
containing the modified Library. (It is understood that the user
who changes the contents of definitions files in the Library will
not necessarily be able to recompile the application to use the
modified definitions.) b) Use a suitable shared library mechanism
for linking with the Library. A suitable mechanism is one that (1)
uses at run time a copy of the library already present on the
user's computer system, rather than copying library functions
into the executable, and (2) will operate properly with a
modified version of the library, if the user installs one, as long as
the modified version is interface-compatible with the version
that the work was made with. c) Accompany the work with a
written offer, valid for at least three years, to give the same user
the materials specified in Subsection 6a, above, for a charge no
more than the cost of performing this distribution. d) If
distribution of the work is made by offering access to copy from
a designated place, offer equivalent access to copy the above
specified materials from the same place. e) Verify that the user
has already received a copy of these materials or that you have
already sent this user a copy. For an executable, the required
form of the "work that uses the Library" must include any data
and utility programs needed for reproducing the executable
from it. However, as a special exception, the materials to be
distributed need not include anything that is normally distributed
(in either source or binary form) with the major components
(compiler, kernel, and so on) of the operating system on which
the executable runs, unless that component itself accompanies
the executable.
It may happen that this requirement contradicts the license
restrictions of other proprietary libraries that do not normally
accompany the operating system. Such a contradiction means
you cannot use both them and the Library together in an
executable that you distribute.
7. You may place library facilities that are a work based on the
Library side-by-side in a single library together with other library
facilities not covered by this License, and distribute such a
combined library, provided that the separate distribution of the
work based on the Library and of the other library facilities is
otherwise permitted, and provided that you do these two things:
a) Accompany the combined library with a copy of the same
60

work based on the Library, uncombined with any other library
facilities. This must be distributed under the terms of the
Sections above. b) Give prominent notice with the combined
library of the fact that part of it is a work based on the Library,
and explaining where to find the accompanying uncombined
form of the same work.
8. You may not copy, modify, sublicense, link with, or distribute
the Library except as expressly provided under this License. Any
attempt otherwise to copy, modify, sublicense, link with, or
distribute the Library is void, and will automatically terminate
your rights under this License. However, parties who have
received copies, or rights, from you under this License will not
have their licenses terminated so long as such parties remain in
full compliance.
9. You are not required to accept this License, since you have
not signed it. However, nothing else grants you permission to
modify or distribute the Library or its derivative works. These
actions are prohibited by law if you do not accept this License.
Therefore, by modifying or distributing the Library (or any work
based on the Library), you indicate your acceptance of this
License to do so, and all its terms and conditions for copying,
distributing or modifying the Library or works based on it.
10. Each time you redistribute the Library (or any work based
on the Library), the recipient automatically receives a license
from the original licensor to copy, distribute, link with or modify
the Library subject to these terms and conditions. You may not
impose any further restrictions on the recipients' exercise of the
rights granted herein. You are not responsible for enforcing
compliance by third parties with this License.
11. If, as a consequence of a court judgment or allegation of
patent infringement or for any other reason (not limited to
patent issues), conditions are imposed on you (whether by court
order, agreement or otherwise) that contradict the conditions of
this License, they do not excuse you from the conditions of this
License. If you cannot distribute so as to satisfy simultaneously
your obligations under this License and any other pertinent
obligations, then as a consequence you may not distribute the
Library at all. For example, if a patent license would not permit
royalty-free redistribution of the Library by all those who receive
copies directly or indirectly through you, then the only way you
could satisfy both it and this License would be to refrain entirely
from distribution of the Library.
If any portion of this section is held invalid or unenforceable
under any particular circumstance, the balance of the section is
intended to apply, and the section as a whole is intended to
apply in other circumstances.
It is not the purpose of this section to induce you to infringe any
patents or other property right claims or to contest validity of
any such claims; this section has the sole purpose of protecting
the integrity of the free software distribution system which is
implemented by public license practices. Many people have
made generous contributions to the wide range of software
distributed through that system in reliance on consistent
application of that system; it is up to the author/donor to decide
if he or she is willing to distribute software through any other
system and a licensee cannot impose that choice.
This section is intended to make thoroughly clear what is
believed to be a consequence of the rest of this License.
12. If the distribution and/or use of the Library is restricted in
certain countries either by patents or by copyrighted interfaces,
the original copyright holder who places the Library under this
License may add an explicit geographical distribution limitation
excluding those countries, so that distribution is permitted only
in or among countries not thus excluded. In such case, this
License incorporates the limitation as if written in the body of
this License.
13. The Free Software Foundation may publish revised and/or
new versions of the Lesser General Public License from time to
time. Such new versions will be similar in spirit to the present
version, but may differ in detail to address new problems or
concerns.
Each version is given a distinguishing version number. If the
Library specifies a version number of this License which applies
to it and "any later version", you have the option of following the
terms and conditions either of that version or of any later
version published by the Free Software Foundation. If the Library
does not specify a license version number, you may choose any
version ever published by the Free Software Foundation.
14. If you wish to incorporate parts of the Library into other free
programs whose distribution conditions are incompatible with
these, write to the author to ask for permission. For software
which is copyrighted by the Free Software Foundation, write to
the Free Software Foundation; we sometimes make exceptions
for this. Our decision will be guided by the two goals of
preserving the free status of all derivatives of our free software
and of promoting the sharing and reuse of software generally.
NO WARRANTY
15. BECAUSE THE LIBRARY IS LICENSED FREE OF CHARGE,
THERE IS NO WARRANTY FOR THE LIBRARY, TO THE
EXTENT PERMITTED BY APPLICABLE LAW. EXCEPT WHEN
OTHERWISE STATED IN WRITING THE COPYRIGHT
HOLDERS AND/OR OTHER PARTIES PROVIDE THE
LIBRARY "AS IS" WITHOUT WARRANTY OF ANY KIND,
EITHER EXPRESSED OR IMPLIED, INCLUDING, BUT NOT
LIMITED TO, THE IMPLIED WARRANTIES OF
MERCHANTABILITY AND FITNESS FOR A PARTICULAR
PURPOSE. THE ENTIRE RISK AS TO THE QUALITY AND
PERFORMANCE OF THE LIBRARY IS WITH YOU. SHOULD
THE LIBRARY PROVE DEFECTIVE, YOU ASSUME THE COST
OF ALL NECESSARY SERVICING, REPAIR OR CORRECTION.
16. IN NO EVENT UNLESS REQUIRED BY APPLICABLE LAW
OR AGREED TO IN WRITING WILL ANY COPYRIGHT
HOLDER, OR ANY OTHER PARTY WHO MAY MODIFY
AND/OR REDISTRIBUTE THE LIBRARY AS PERMITTED
ABOVE, BE LIABLE TO YOU FOR DAMAGES, INCLUDING
ANY GENERAL, SPECIAL, INCIDENTAL OR
CONSEQUENTIAL DAMAGES ARISING OUT OF THE USE
OR INABILITY TO USE THE LIBRARY (INCLUDING BUT
NOT LIMITED TO LOSS OF DATA OR DATA BEING
RENDERED INACCURATE OR LOSSES SUSTAINED BY YOU
OR THIRD PARTIES OR A FAILURE OF THE LIBRARY TO
OPERATE WITH ANY OTHER SOFTWARE), EVEN IF SUCH
HOLDER OR OTHER PARTY HAS BEEN ADVISED OF THE
POSSIBILITY OF SUCH DAMAGES.
________________________________________
61

GNU LESSER GENERAL PUBLIC LICENSE Version 3, 29 June
2007 Copyright © 2007 Free Software Foundation, Inc.
http://fsf.org/
Everyone is permitted to copy and distribute verbatim copies of
this license document, but changing it is not allowed. This
version of the GNU Lesser General Public License incorporates
the terms and conditions of version 3 of the GNU General
Public License, supplemented by the additional permissions listed
below.
0. Additional Definitions.
As used herein, “this License” refers to version 3 of the GNU
Lesser General Public License, and the “GNU GPL” refers to
version 3 of the GNU General Public License.
“The Library” refers to a covered work governed by this License,
other than an Application or a Combined Work as defined
below.
An “Application” is any work that makes use of an interface
provided by the Library, but which is not otherwise based on
the Library. Defining a subclass of a class defined by the Library is
deemed a mode of using an interface provided by the Library.
A “Combined Work” is a work produced by combining or
linking an Application with the Library. The particular version of
the Library with which the Combined Work was made is also
called the “Linked Version”.
The “Minimal Corresponding Source” for a Combined Work
means the Corresponding Source for the Combined Work,
excluding any source code for portions of the Combined Work
that, considered in isolation, are based on the Application, and
not on the Linked Version.
The “Corresponding Application Code” for a Combined Work
means the object code and/or source code for the Application,
including any data and utility programs needed for reproducing
the Combined Work from the Application, but excluding the
System Libraries of the Combined Work.
1. Exception to Section 3 of the GNU GPL.
You may convey a covered work under sections 3 and 4 of this
License without being bound by section 3 of the GNU GPL.
2. Conveying Modified Versions.
If you modify a copy of the Library, and, in your modifications, a
facility refers to a function or data to be supplied by an
Application that uses the facility (other than as an argument
passed when the facility is invoked), then you may convey a
copy of the modified version: a) under this License, provided
that you make a good faith effort to ensure that, in the event an
Application does not supply the function or data, the facility still
operates, and performs whatever part of its purpose remains
meaningful, or b) under the GNU GPL, with none of the
additional permissions of this License applicable to that copy.
3. Object Code Incorporating Material from Library Header Files.
The object code form of an Application may incorporate
material from a header file that is part of the Library. You may
convey such object code under terms of your choice, provided
that, if the incorporated material is not limited to numerical
parameters, data structure layouts and accessors, or small
macros, inline functions and templates (ten or fewer lines in
length), you do both of the following: a) Give prominent notice
with each copy of the object code that the Library is used in it
and that the Library and its use are covered by this License. b)
Accompany the object code with a copy of the GNU GPL and
this license document.
4. Combined Works.
You may convey a Combined Work under terms of your choice
that, taken together, effectively do not restrict modification of
the portions of the Library contained in the Combined Work
and reverse engineering for debugging such modifications, if you
also do each of the following: a) Give prominent notice with
each copy of the Combined Work that the Library is used in it
and that the Library and its use are covered by this License. b)
Accompany the Combined Work with a copy of the GNU GPL
and this license document. c) For a Combined Work that
displays copyright notices during execution, include the copyright
notice for the Library among these notices, as well as a
reference directing the user to the copies of the GNU GPL and
this license document. d) Do one of the following: 0) Convey
the Minimal Corresponding Source under the terms of this
License, and the Corresponding Application Code in a form
suitable for, and under terms that permit, the user to recombine
or relink the Application with a modified version of the Linked
Version to produce a modified Combined Work, in the manner
specified by section 6 of the GNU GPL for conveying
Corresponding Source. 1) Use a suitable shared library
mechanism for linking with the Library. A suitable mechanism is
one that (a) uses at run time a copy of the Library already
present on the user's computer system, and (b) will operate
properly with a modified version of the Library that is interfacecompatible with the Linked Version. e) Provide Installation
Information, but only if you would otherwise be required to
provide such information under section 6 of the GNU GPL, and
only to the extent that such information is necessary to install
and execute a modified version of the Combined Work
produced by recombining or relinking the Application with a
modified version of the Linked Version. (If you use option 4d0,
the Installation Information must accompany the Minimal
Corresponding Source and Corresponding Application Code. If
you use option 4d1, you must provide the Installation
Information in the manner specified by section 6 of the GNU
GPL for conveying Corresponding Source.)
5. Combined Libraries.
You may place library facilities that are a work based on the
Library side by side in a single library together with other library
facilities that are not Applications and are not covered by this
License, and convey such a combined library under terms of
your choice, if you do both of the following: a) Accompany the
combined library with a copy of the same work based on the
Library, uncombined with any other library facilities, conveyed
under the terms of this License. b) Give prominent notice with
the combined library that part of it is a work based on the
Library, and explaining where to find the accompanying
uncombined form of the same work.
6. Revised Versions of the GNU Lesser General Public License.
The Free Software Foundation may publish revised and/or new
versions of the GNU Lesser General Public License from time to
time. Such new versions will be similar in spirit to the present
version, but may differ in detail to address new problems or
concerns.
Each version is given a distinguishing version number. If the
62

Library as you received it specifies that a certain numbered
version of the GNU Lesser General Public License “or any later
version” applies to it, you have the option of following the terms
and conditions either of that published version or of any later
version published by the Free Software Foundation. If the Library
as you received it does not specify a version number of the
GNU Lesser General Public License, you may choose any
version of the GNU Lesser General Public License ever
published by the Free Software Foundation.
If the Library as you received it specifies that a proxy can decide
whether future versions of the GNU Lesser General Public
License shall apply, that proxy's public statement of acceptance
of any version is permanent authorization for you to choose that
version for the Library.
________________________________________
Apache LICENSE Version 2.0, January 2004
http://www.apache.org/licenses/ TERMS AND CONDITIONS
FOR USE, REPRODUCTION, AND DISTRIBUTION
1. Definitions.
"License" shall mean the terms and conditions for use,
reproduction, and distribution as defined by Sections 1 through
9 of this document. "Licensor" shall mean the copyright owner
or entity authorized by the copyright owner that is granting the
License.
"Legal Entity" shall mean the union of the acting entity and all
other entities that control, are controlled by, or are under
common control with that entity. For the purposes of this
definition, "control" means (i) the power, direct or indirect, to
cause the direction or management of such entity, whether by
contract or otherwise, or (ii) ownership of fifty percent (50%) or
more of the outstanding shares, or (iii) beneficial ownership of
such entity. "You" (or "Your") shall mean an individual or Legal
Entity exercising permissions granted by this License. "Source"
form shall mean the preferred form for making modifications,
including but not limited to software source code,
documentation source, and configuration files.
"Contribution" shall mean any work of authorship, including the
original version of the Work and any modifications or additions
to that Work or Derivative Works thereof, that is intentionally
submitted to Licensor for inclusion in the Work by the copyright
owner or by an individual or Legal Entity authorized to submit
on behalf of the copyright owner. For the purposes of this
definition, "submitted" means any form of electronic, verbal, or
written communication sent to the Licensor or its
representatives, including but not limited to communication on
electronic mailing lists, source code control systems, and issue
tracking systems that are managed by, or on behalf of, the
Licensor for the purpose of discussing and improving the Work,
but excluding communication that is conspicuously marked or
otherwise designated in writing by the copyright owner as "Not
a Contribution."
"Contributor" shall mean Licensor and any individual or Legal
Entity on behalf of whom a Contribution has been received by
Licensor and subsequently incorporated within the Work.
2. Grant of Copyright License. Subject to the terms and
conditions of this License, each Contributor hereby grants to
You a perpetual, worldwide, non-exclusive, no-charge, royaltyfree, irrevocable copyright license to reproduce, prepare
Derivative Works of, publicly display, publicly perform,
sublicense, and distribute the Work and such Derivative Works
in Source or Object form.
3. Grant of Patent License. Subject to the terms and conditions
of this License, each Contributor hereby grants to You a
perpetual, worldwide, non-exclusive, no-charge, royalty-free,
irrevocable (except as stated in this section) patent license to
make, have made, use, offer to sell, sell, import, and otherwise
transfer the Work, where such license applies only to those
patent claims licensable by such Contributor that are necessarily
infringed by their Contribution(s) alone or by combination of
their Contribution(s) with the Work to which such
Contribution(s) was submitted. If You institute patent litigation
against any entity (including a cross-claim or counterclaim in a
lawsuit) alleging that the Work or a Contribution incorporated
within the Work constitutes direct or contributory patent
infringement, then any patent licenses granted to You under this
License for that Work shall terminate as of the date such
litigation is filed.
4. Redistribution. You may reproduce and distribute copies of
the Work or Derivative Works thereof in any medium, with or
without modifications, and in Source or Object form, provided
that you meet the following conditions: (a) You must give any
other recipients of the Work or Derivative Works a copy of this
License; and (b) You must cause any modified files to carry
prominent notices stating that You changed the files; and (c)
You must retain, in the Source form of any Derivative Works
that You distribute, all copyright, patent, trademark, and
attribution notices from the Source form of the Work, excluding
those notices that do not pertain to any part of the Derivative
Works; and (d) If the Work includes a "NOTICE" text file as part
of its distribution, then any Derivative Works that You distribute
must include a readable copy of the attribution notices
contained within such NOTICE file, excluding those notices that
do not pertain to any part of the Derivative Works, in at least
one of the following places: within a NOTICE text file
distributed as part of the Derivative Works; within the Source
form or documentation, if provided along with the Derivative
Works; or, within a display generated by the Derivative Works, if
and wherever such third-party notices normally appear. The
contents of the NOTICE file are for informational purposes only
and do not modify the License. You may add Your own
attribution notices within Derivative Works that You distribute,
alongside or as an addendum to the NOTICE text from the
Work, provided that such additional attribution notices cannot
be construed as modifying the License.
You may add Your own copyright statement to Your
modifications and may provide additional or different license
terms and conditions for use, reproduction, or distribution of
Your modifications, or for any such Derivative Works as a
whole, provided Your use, reproduction, and distribution of the
Work otherwise complies with the conditions stated in this
License.
5. Submission of Contributions. Unless You explicitly state
otherwise, any Contribution intentionally submitted for inclusion
in the Work by You to the Licensor shall be under the terms
and conditions of this License, without any additional terms or
conditions.
63

Notwithstanding the above, nothing herein shall supersede or
modify the terms of any separate license agreement you may
have executed with Licensor regarding such Contributions.
6. Trademarks. This License does not grant permission to use
the trade names, trademarks, service marks, or product names of
the Licensor, except as required for reasonable and customary
use in describing the origin of the Work and reproducing the
content of the NOTICE file.
7. Disclaimer of Warranty. Unless required by applicable law or
agreed to in writing, Licensor provides the Work (and each
Contributor provides its Contributions) on an "AS IS" BASIS,
WITHOUT WARRANTIES OR CONDITIONS OF ANY KIND,
either express or implied, including, without limitation, any
warranties or conditions of TITLE, NON-INFRINGEMENT,
MERCHANTABILITY, or FITNESS FOR A PARTICULAR
PURPOSE.
You are solely responsible for determining the appropriateness
of using or redistributing the Work and assume any risks
associated with Your exercise of permissions under this License.
8. Limitation of Liability. In no event and under no legal theory,
whether in tort (including negligence), contract, or otherwise,
unless required by applicable law (such as deliberate and grossly
negligent acts) or agreed to in writing, shall any Contributor be
liable to You for damages, including any direct, indirect, special,
incidental, or consequential damages of any character arising as a
result of this License or out of the use or inability to use the
Work (including but not limited to damages for loss of goodwill,
work stoppage, computer failure or malfunction, or any and all
other commercial damages or losses), even if such Contributor
has been advised of the possibility of such damages.
9. Accepting Warranty or Additional Liability. While
redistributing the Work or Derivative Works thereof, You may
choose to offer, and charge a fee for, acceptance of support,
warranty, indemnity, or other liability obligations and/or rights
consistent with this License. However, in accepting such
obligations, You may act only on Your own behalf and on Your
sole responsibility, not on behalf of any other Contributor, and
only if You agree to indemnify, defend, and hold each
Contributor harmless for any liability incurred by, or claims
asserted against, such Contributor by reason of your accepting
any such warranty or additional liability.
________________________________________
64

17
Problemen oplossen en
ondersteuning
17.1
Problemen oplossen
startscherm van Philips is weergegeven
Wanneer de TV in stand-bystand staat, wordt een startscherm
van Philips weergegeven. Vervolgens schakelt de TV opnieuw
over op de stand-bystand. Dit is normaal. Wanneer de voeding
van de TV wordt uitgeschakeld en vervolgens weer ingeschakeld,
wordt het startscherm de volgende keer dat u de TV inschakelt
weergegeven. Als u de TV wilt inschakelen vanuit de standbystand, drukt u op een knop van de afstandsbediening of van
de TV.
Zenders
Er zijn tijdens de installatie geen digitale zenders gevonden
Lees de technische specificaties om te controleren of uw TV in
uw land DVB-T of DVB-C ondersteunt.
Zorg dat alle kabels goed zijn aangesloten en dat het juiste
netwerk is geselecteerd.
Eerder ingestelde zenders staan niet in de lijst met zenders
Controleer of de juiste zenderlijst is geselecteerd.
Algemeen
De TV gaat niet aan
- Haal het netsnoer uit het stopcontact. Wacht een minuut en
sluit het snoer vervolgens weer aan.
- Controleer of het netsnoer goed is aangesloten.
Krakend geluid bij het in- of uitschakelen
Wanneer u de TV in- of uitschakelt of in stand-bystand zet,
hoort u een krakend geluid vanuit de behuizing van de TV. Dit
krakende geluid wordt veroorzaakt door het uitzetten en
krimpen van de TV wanneer deze afkoelt en opwarmt. Dit is
normaal en heeft geen invloed op de prestaties van het
apparaat.
Het lampje van de stand-bystand blijft knipperen
Haal het netsnoer uit het stopcontact. Wacht 5 minuten en sluit
het snoer vervolgens weer aan. Als het lampje opnieuw begint
te knipperen, dient u contact op te nemen met de Philips
Klantenservice.
Verkeerde menutaal
De taal weer naar uw eigen taal wijzigen.
1. Druk op , selecteer
2. Selecteer
instellingen > Menutaal
3. Selecteer de gewenste taal en druk op OK.
4. Druk zo nodig enkele malen op om het menu te sluiten.
TV-instellingen
en druk op OK.
Setup
>
Algemene
en druk op OK.
Beeld
Geen beeld/vervormd beeld
- Controleer of de antenne goed is aangesloten op de TV.
- Controleer of het juiste apparaat is geselecteerd als
weergavebron.
- Controleer of het externe apparaat of de externe bron op de
juiste wijze is aangesloten.
Geluid maar geen beeld
- Controleer of de beeldinstellingen juist zijn ingesteld.
De TV reageert niet op de afstandsbediening
Het duurt even voordat de TV is opgestart. Tijdens het
opstarten reageert de TV niet op de afstandsbediening of de
bediening op de TV. Dit is normaal.
Als de TV hierna nog altijd niet reageert op de
afstandsbediening, kunt u controleren of de afstandsbediening
werkt met de camera van een mobiele telefoon. Schakel de
cameramodus van de telefoon in en richt de afstandsbediening
op de lens van de camera. Als u op een willekeurige knop van
de afstandsbediening drukt en u het infrarode LED-lampje van
de camera ziet knipperen, werkt de afstandsbediening naar
behoren. De TV moet worden gecontroleerd.
Als u het lampje niet ziet knipperen, is de afstandsbediening
misschien stuk of is de batterij bijna leeg.
U kunt de afstandsbediening niet op deze manier controleren als
deze draadloos is gekoppeld aan de TV.
De TV schakelt opnieuw over op de stand-bystand nadat het
Slechte antenne-ontvangst
- Controleer of de antenne goed is aangesloten op de TV.
- Luidsprekers, ongeaarde audio-apparaten, neonlampen, hoge
gebouwen en andere grote voorwerpen kunnen de
ontvangstkwaliteit beïnvloeden. Probeer de ontvangstkwaliteit
indien mogelijk te verbeteren door de richting van de antenne te
wijzigen of apparaten weg van de TV te verplaatsen.
- Als de ontvangst voor slechts één zender slecht is, probeert u
deze zender fijn af te stemmen.
Slecht beeld van een apparaat
- Controleer of het apparaat goed is aangesloten.
- Controleer of de beeldinstellingen juist zijn ingesteld.
De beeldinstellingen wijzigen na een tijdje
Zorg ervoor dat
instellingen wijzigen en opslaan in deze modus.
65
Locatie
is ingesteld op
Thuis
. U kunt

Er verschijnt een reclamebanner
EasyLink werkt niet
Zorg ervoor dat
Het beeld is niet gelijk aan het scherm
Wijzig het beeldformaat. Druk op .
Het beeldformaat is op iedere zender anders
Selecteer een beeldformaat dat niet automatisch is.
De beeldpositie is niet juist
Beeldsignalen van sommige apparaten worden mogelijk niet juist
weergegeven op het scherm. Controleer de signaaluitgang van
het verbonden apparaat.
Het computerbeeld is niet stabiel
Controleer of de PC de ondersteunde resolutie en
vernieuwingsfrequentie gebruikt.
Locatie
is ingesteld op
Thuis
.
Geluid
Geen geluid of matige geluidskwaliteit
Als er geen audiosignaal wordt gedetecteerd, schakelt de TV de
audio-uitgang automatisch uit. Dit is geen defect.
- Controleer of de geluidsinstellingen juist zijn ingesteld.
- Controleer of alle kabels goed zijn aangesloten.
- Controleer of het volume niet is uitgeschakeld of op het
minimum is ingesteld.
- Controleer of de TV-audio-uitgang is aangesloten op de audioingang van het home cinema-systeem.
- Er moet geluid uit de HTS-luidsprekers komen.
- Bij sommige apparaten moet de HDMI-audio-uitgang
handmatig worden ingeschakeld. Als de HDMI-audio-uitgang
reeds is ingeschakeld, maar u nog altijd geen geluid hoort, kunt u
proberen de digitale audio-indeling van het apparaat te wijzigen
naar PCM (Pulse Code Modulation). Voor instructies raadpleegt
u de documentatie die bij uw apparaat is geleverd.
- Controleer of uw HDMI-apparaten HDMI-CEC ondersteunen.
EasyLink-functies werken alleen op apparaten die HDMI-CEC
ondersteunen.
Er wordt geen volumepictogram weergegeven
- Dit is normaal indien er een HDMI-CEC-audioapparaat is
aangesloten.
Foto's, video's en muziek van een USB-apparaat worden niet
weergegeven
- Controleer of het USB-opslagapparaat MSC-compatibel is
(geschikt voor massaopslag), zoals wordt beschreven in de
documentatie bij het opslagapparaat.
- Controleer of het USB-opslagapparaat compatibel is met de
TV.
- Controleer of de audio- en beeldbestandsindelingen worden
ondersteund door de TV.
USB-bestanden worden schokkerig afgespeeld
- De overdrachtsprestaties van het USB-opslagapparaat kunnen
de snelheid van de gegevensoverdracht naar de TV beperken,
waardoor beeld en geluid niet goed worden weergegeven.
17.2
Registreren
Registreer uw TV en profiteer van een groot aantal voordelen,
zoals volledige productondersteuning (inclusief downloads),
exclusieve toegang tot informatie over nieuwe producten,
speciale aanbiedingen en kortingen, de kans op het winnen van
prijzen en zelfs deelname aan speciale onderzoeken over nieuwe
producten.
Ga naar
17.3
www.philips.com/welcome
Aansluitingen
HDMI
- Houd er rekening mee dat HDCP-ondersteuning (Highbandwidth Digital Content Protection) de beeldoverdracht
tussen een HDMI-apparaat en een TV kan vertragen.
- Als de TV het HDMI-apparaat niet herkent en er geen beeld
wordt weergegeven, probeert u de bron van het ene apparaat
naar een ander over te schakelen en weer terug.
- Als het geluid steeds wordt onderbroken, controleert u of de
uitganginstellingen van het HDMI-apparaat correct zijn.
- Als u een HDMI-DVI-adapter of HDMI-DVI-kabel gebruikt,
controleert u of er een extra audiokabel is aangesloten op
AUDIO IN (alleen mini-aansluiting), indien deze aanwezig is.
Help
De ondersteunende informatie (Help) van deze TV wordt op
het scherm weergegeven.
Help openen
1. Druk op om het Hoofdmenu te openen.
2. Selecteer
nvk_v8_20140827
66
en druk vervolgens op OK.
Help

17.4
Onlinehulp
Als u een probleem met betrekking tot uw Philips-TV wilt
oplossen, kunt u een beroep doen op onze onlineondersteuning.
U kunt uw taal selecteren en het modelnummer van uw product
invoeren.
Ga naar
Op de ondersteuningswebsite vindt u het telefoonnummer voor
uw land, alsmede antwoorden op veelgestelde vragen (FAQ's).
In sommige landen kunt u met een van onze
vertegenwoordigers chatten en uw vragen rechtstreeks of via email stellen.
U kunt nieuwe TV-software downloaden en de handleiding
downloaden en deze op uw computer doornemen.
17.5
www.philips.com/support
.
Klantenservice/reparatie
Voor ondersteuning en reparaties kunt u bellen met het
telefoonnummer van Klantenservice in uw land. Zoek het
telefoonnummer in de gedrukte documentatie die bij de TV is
meegeleverd.
Of raadpleeg onze website
Modelnummer en serienummer
Mogelijk vraagt men u naar het modelnummer en het
serienummer van de TV. Deze nummers vindt u op het
verpakkingslabel of op het typelabel aan de achter- of onderzijde
van de TV.
www.philips.com/support
.
Waarschuwing
Probeer de TV niet zelf te repareren. Dit kan leiden tot ernstig
letsel, onherstelbare schade aan uw TV of kan ervoor zorgen dat
uw garantie vervalt.
67

18
Veiligheid en
stopcontact kunt.
Risico op letsel of schade aan de TV
onderhoud
18.1
Veiligheid
Belangrijk
Lees alle veiligheidsinstructies goed door en zorg dat u deze
begrijpt voordat u de TV gebruikt. Als er schade ontstaat
doordat u instructies niet opvolgt, is de garantie niet van
toepassing.
De TV vastzetten, zodat deze niet omvalt
Gebruik altijd de meegeleverde wandsteun om te voorkomen
dat de TV omvalt. Monteer de steun en bevestig de TV er aan,
ook als u de TV op de vloer plaatst.
U vindt de montage-instructies in de met de TV meegeleverde
snelstartgids. Als u deze gids niet meer kunt vinden, kunt u deze
downloaden van www.philips.com
Gebruik het producttypenummer van de TV om de juiste
snelstartgids te downloaden.
- Een TV die meer dan 25 kilo weegt, dient door minimaal twee
mensen te worden opgetild en gedragen.
- Als u de TV op een standaard wilt plaatsen, dient u alleen de
meegeleverde standaard te gebruiken. Bevestig de standaard
stevig aan de TV.
Plaats de TV op een vlak oppervlak dat het gewicht van de TV
en de standaard kan dragen.
- Zorg bij wandbevestiging dat de wandsteun het gewicht van de
TV kan dragen en geen gevaar oplevert. TP Vision is niet
aansprakelijk voor ongelukken, letsel of schade als gevolg van
ondeskundige wandbevestiging.
- Dit product bevat glazen onderdelen. Ga hier voorzichtig mee
om, om letsel of schade te voorkomen.
Risico op schade aan de TV!
Controleer voordat u de TV aansluit op het stopcontact, of het
voltage overeenkomt met de waarde aan de achterkant van het
product. Sluit de TV nooit aan op het stopcontact als het voltage
afwijkt.
Letselgevaar voor kinderen
Risico op brand of een elektrische schok
- Stel de TV nooit bloot aan regen of water. Plaats objecten met
water, zoals een vaas, nooit in de buurt van de TV.
Mocht er onverhoopt vloeistof in de TV terechtkomen, dan
moet u de stekker direct uit het stopcontact halen.
Neem contact op met Philips Klantenservice om de TV te laten
nakijken voordat u deze gaat gebruiken.
- Stel de TV, afstandsbediening en batterijen nooit bloot aan
extreme hitte. Plaats ze nooit in de buurt van brandende
kaarsen, open vuur of andere hittebronnen (zoals direct
zonlicht).
- Steek geen voorwerpen in de ventilatiesleuven of andere
openingen van de TV.
- Plaats nooit zware voorwerpen op het netsnoer.
- Voorkom dat er kracht op de stekkers wordt uitgeoefend.
Loszittende stekkers kunnen vonken of brand veroorzaken. Zorg
dat het netsnoer niet strak wordt getrokken wanneer u de TV
draait.
- Haal de stekker van de TV uit het stopcontact om de TV
helemaal los te koppelen van de netspanning. Trek het netsnoer
altijd aan de stekker en nooit aan het snoer uit het stopcontact.
Zorg dat u altijd gemakkelijk bij de stekker, het netsnoer en het
Neem de volgende voorzorgsmaatregelen in acht om te
voorkomen dat de TV omvalt, waardoor kinderen letsel kunnen
oplopen.
- Plaats de TV nooit op een oppervlak met een kleed of ander
materiaal dat kan worden weggetrokken.
- Zorg ervoor dat geen enkel onderdeel van de TV over de rand
van het oppervlak hangt.
- Plaats de TV nooit op een hoog meubelstuk (zoals een
boekenkast) zonder het meubelstuk en de TV veilig aan de
wand of aan een geschikte steun te bevestigen.
- Leer uw kinderen dat het gevaarlijk is op meubilair te klimmen
om bij de TV te komen.
Risico op inslikken batterijen!
De afstandsbediening kan knoopcelbatterijen bevatten die kleine
kinderen gemakkelijk kunnen inslikken. Houd deze batterijen te
allen tijde buiten het bereik van kinderen.
68

Oververhittingsgevaar
Plaats de TV nooit in een afgesloten ruimte. Laat voor
voldoende ventilatie aan alle zijden van de TV een ruimte van
minstens 10 cm vrij. Zorg dat de ventilatiesleuven van de TV
nooit worden afgedekt door gordijnen of andere voorwerpen.
Onweer
Koppel de TV los van het elektriciteitsnet en de antenne als er
onweer op komst is.
Raak tijdens onweer geen enkel onderdeel van de TV, het
netsnoer of de antennekabel aan.
Risico op gehoorbeschadiging
Zet het volume niet te hoog als u een oortelefoon of
hoofdtelefoon gebruikt, en gebruik deze niet te lang.
Probeer het gebruik van stilstaande beelden zo veel mogelijk te
vermijden. Stilstaande beelden zijn beelden die gedurende
langere perioden op het scherm worden weergegeven. Tot
stilstaande beelden behoren schermmenu's, zwarte balken,
tijdsaanduidingen, enzovoort. Indien u stilstaande beelden moet
gebruiken, verlaagt u het beeldcontrast en de helderheid om
schade aan het scherm te voorkomen.
Lage temperaturen
Als de TV is vervoerd bij een temperatuur onder 5 °C, laat u de
TV na het uitpakken eerst op kamertemperatuur komen voordat
u de stekker in het stopcontact steekt.
Vochtigheid
Afhankelijk van temperatuur en vochtigheid kan lichte
condensvorming optreden aan de binnenkant van de glasplaat
aan de voorkant van de TV (geldt voor bepaalde modellen). U
kunt dit voorkomen door de TV niet bloot te stellen aan direct
zonlicht, hitte of extreme vochtigheid. Als er condens ontstaat,
verdwijnt deze vanzelf als de TV een aantal uren is ingeschakeld.
Het condensatievocht is niet schadelijk voor de TV en
veroorzaakt geen storingen.
18.2
Schermonderhoud
- Zorg dat het scherm nooit in aanraking komt met andere
voorwerpen.
- Haal de stekker uit het stopcontact voordat u de TV gaat
schoonmaken.
- Maak het scherm en de rand schoon door deze voorzichtig af
te vegen met een zachte, vochtige doek. Gebruik nooit stoffen
als alcohol, chemische middelen of allesreinigers voor de TV.
- Veeg waterdruppels zo snel mogelijk van het scherm om
vervormingen of kleurvervaging te voorkomen.
69

19
Gebruiksvoorwaarden,
auteursrechten en
licenties
19.1
Gebruiksvoorwaarden
2014 © TP Vision Europe B.V. Alle rechten voorbehouden.
Dit product is op de markt gebracht door TP Vision Europe B.V.
of een van haar filialen, waarnaar verder in dit document wordt
verwezen als TP Vision, de producent van het product. TP
Vision is de garantieverstrekker voor de TV waarbij deze
brochure is meegeleverd. Philips en het Philips-schildembleem
zijn gedeponeerde handelsmerken van Koninklijke Philips N.V.
Specificaties kunnen zonder voorafgaande kennisgeving worden
gewijzigd. Handelsmerken zijn het eigendom van Koninklijke
Philips N.V of hun respectieve eigenaars. TP Vision behoudt zich
het recht voor om op elk gewenst moment producten te
wijzigen en is hierbij niet verplicht eerdere leveringen aan te
passen.
of heldere lichtpuntjes (rood, groen of blauw) op het scherm
verschijnen. Dit is een structureel kenmerk van het display
(binnen veel voorkomende industriestandaarden); het is geen
defect. CE-conform Dit product voldoet aan de essentiële
vereisten en overige relevante bepalingen van de richtlijnen
2006/95/EC (laagspanning), 2004/108/EC (EMC) en 2011/65/EU
(ROHS, beperking van het gebruik van bepaalde gevaarlijke
stoffen in elektrische en elektronische apparatuur). Naleving van
norm voor elektromagnetische velden (EMF) TP Vision Europe
B.V. maakt en verkoopt vele consumentenproducten die net als
andere elektronische apparaten elektromagnetische signalen
kunnen uitstralen en ontvangen. Een van de belangrijkste
zakelijke principes van Philips is ervoor te zorgen dat al onze
producten beantwoorden aan alle geldende vereisten inzake
gezondheid en veiligheid en ervoor te zorgen dat onze
producten ruimschoots voldoen aan de EMF-normen die gelden
op het ogenblik dat onze producten worden vervaardigd. Philips
streeft ernaar geen producten te ontwikkelen, te maken en op
de markt te brengen die schadelijk kunnen zijn voor de
gezondheid. TP Vision bevestigt dat als zijn producten correct
voor het daartoe bestemde gebruik worden aangewend, deze
volgens de nieuwste wetenschappelijke onderzoeken op het
moment van de publicatie van deze handleiding veilig zijn om te
gebruiken. Philips speelt een actieve rol in de ontwikkeling van
internationale EMF- en veiligheidsnormen, wat Philips in staat
stelt in te spelen op toekomstige normen en deze tijdig te
integreren in zijn producten.
Het gedrukte materiaal dat bij de TV wordt geleverd en de
handleiding die in het geheugen van de TV is opgeslagen of die
wordt gedownload van de Philips-website, passen bij het
bedoelde gebruik van het systeem.
De inhoud van deze handleiding wordt toereikend geacht voor
het bestemde gebruik van het systeem. Indien het product of de
individuele modules of procedures worden gebruikt voor andere
doeleinden dan in deze handleiding zijn beschreven, moet de
geldigheid en geschiktheid van het systeem worden bevestigd.
TP Vision Europe B.V. garandeert dat het materiaal geen
octrooien uit de Verenigde Staten schendt. Philips biedt geen
verdere garanties, uitdrukkelijk dan wel impliciet. TP Vision
Europe B.V. kan niet verantwoordelijk worden gehouden voor
fouten in de inhoud van dit document of voor problemen die
het gevolg zijn van de inhoud van dit document. Fouten die
worden gerapporteerd aan Philips worden zo snel mogelijk
opgelost en gepubliceerd op de ondersteuningswebsite van
Philips. Garantievoorwaarden Letselgevaar, schade aan de TV of
vervallen van de garantie! Probeer de TV nooit zelf te repareren.
Gebruik de TV en de accessoires alleen zoals de fabrikant het
heeft bedoeld. Het waarschuwingsteken op de achterkant van
de TV duidt het risico van een elektrische schok aan. Verwijder
nooit de behuizing van de TV. Neem altijd contact op met de
klantenservice van Philips voor onderhoud of reparaties. De
garantie vervalt in geval van handelingen die in deze handleiding
uitdrukkelijk worden verboden of in geval van aanpassingen of
montages die niet in deze handleiding worden aanbevolen of
goedgekeurd. Pixelkenmerken Dit LCD/LED-apparaat heeft een
groot aantal kleurenpixels. Ondanks de minimaal 99,999%
effectieve pixels, kunnen er mogelijk voortdurend zwarte puntjes
19.2
Auteursrechten en licenties
HDMI
HDMI®
De termen HDMI en HDMI High-Definition Multimedia
Interface en het HDMI-logo zijn handelsmerken of
geregistreerde handelsmerken van HDMI Licensing LLC in de
Verenigde Staten en andere landen.
Dolby
Dolby®
Geproduceerd onder licentie van Dolby Laboratories. Dolby en
het symbool met de dubbele D zijn gedeponeerde
handelsmerken van Dolby Laboratories.
70

MHEG-software
Het auteursrecht op MHEG-software (de Software) die in deze
televisie (dit product) is opgenomen en die is meegeleverd om u
in staat te stellen functies voor interactieve televisie te gebruiken,
berust bij S&T CLIENT SYSTEMS LIMITED (de Houder). U hebt
toestemming de Software uitsluitend in combinatie met dit
product te gebruiken.
Kensington
Kensington en MicroSaver zijn gedeponeerde Amerikaanse
handelsmerken van ACCO World Corporation met depots en
aangevraagde depots in andere landen, wereldwijd.
Andere handelsmerken
Alle andere gedeponeerde en niet-gedeponeerde
handelsmerken zijn het eigendom van hun respectieve
eigenaren.
71

Index
72

Contact information
Argentina
0800 444 7749
Buenos Aires 0810 444 7782
België / Belgique
070 700 035 (0,15€/min.)
Bosna i Hercegovina
033 941 251 (Lokalni poziv)
Brazil
0800 701 0245
Sao Paulo 2938 0245
Бълария
02 4916 273 (Национален номер)
Česká republika
228880895 (Místní tarif)
Danmark
3525 8314
Deutchland
0180 501 04 69 (0,14€/Min.)
Ελλάδα
2111983028 (Εθνική κλήση)
España
902 88 10 83 (0,10€ + 0,08€/min.)
Estonia
6683061 (Kohalikud kõned)
France
01 57 32 40 50 (local)
Hrvatska
01 777 66 01 (Lokalni poziv)
Italia
0245 28 70 14 (chiamata nazionale)
Ireland
0818 210 140 (national call)
Northern Ireland
0844 338 04 88 (5p/min BT landline)
Kaзaкcтaн
8 10 800 2000 00 04 (free)
Latvia
6616 3263 (Vietējais tarifs)
Lithuania
8 5 214 0293 (Vietinais tarifais)
Luxembourg / Luxemburg
2487 1100 (Nationale Ruf / appel national)
Magyarország
06 1 700 8151 (Belföldi hívás)
Nederland
0900 202 08 71 (0,10€/min.)
Norge
22 97 19 14
Österreich
0820 40 11 33 (0,145€/Min.)
Polska
22 397 15 04 (Połączenie lokalne)
Portugal
707 78 02 25 (0,12€/min. - Móvel
0,30€/min.)
Romānä
031 6300042 (Tarif local)
Россия
8-800-22 00004 (бесплатно)
Suisse / Schweiz / Svizzera
0848 000 291 (0,081 CHF/Min.)
Србија
011 321 6840 (Lokalni poziv)
Slovakia
2 332 154 93 (Vnútroštátny hovor)
Slovenija
1 888 83 12 (Lokalni klic)
Suomi
09 88 62 50 40
Sverige
08 5792 9096 (lokalsamtal)
ประเทศไทย
02 652 7650
Türkiye
444 8 445
United Kingdom
0844 338 04 88 (5p/min BT landline)
Україна
0-800-500-480 (безкоштовно)
www.philips.com/support
(Thailand)
Powered by TCPDF (www.tcpdf.org)
Non-contractual images / Images non contractuelles / Außervertragliche Bilder
Specifications are subject to change without notice.
Philips and the Philips’ shield emblem are registered trademarks of Koninklijke Philips N.V.
and are used under license from Koninklijke Philips Electronics N.V.
All registered and unregistered trademarks are property of their respective owners.
2014 © TP Vision Europe B.V. All rights reserved.
www.philips.com
73
 Loading...