

Page 1
Color TV
Directions for Use
Color TV
Read this manual first!
Congratulations on purchasing this Philips product.
We ’ ve included everything you need to get star ted.
If you have any problems, Philips Representatives can
help you get the most from your new product by explaining:
• Hookups,
• First Time Setup, and
• Feature Operation.
Do not attempt to return this product to the store.
For fast help, call us first!
1-800-531-0039
Thank you for making Philips a part of your home!
Important!
Return your
Warranty
Registration Card
within 10 days.
See why inside.
3121 235 20431
Model No.:
Serial No.:
Page 2
2
Once your PHILIPS purchase is registered, you’re eligible to receive all the privileges
of owning a PHILIPS product. So complete and return the Warranty Registration
Card enclosed with your purchase at once. And take advantage of these important benefits.
Return your Warranty Registration card today to ensure you
receive all the benefits you’re entitled to.
Congratulations
on your
purchase,
and welcome to the
“family!”
Dear PHILIPS product owner:
Thank you for your confidence in PHILIPS.You’ve selected one of the best-built, best-backed products available
today.And we’ll do everything in our power to keep you happy with your purchase for many years to come.
As a member of the PHILIPS “family,” you’re entitled to protection by one of the most comprehensive warranties and outstanding service networks in the industry.
What’s more, your purchase guarantees you’ll receive all the information and special offers for which
you qualify, plus easy access to accessories from our convenient home shopping network.
And most importantly you can count on our uncompromising commitment to your total satisfaction.
All of this is our way of saying welcome–and thanks for investing in a PHILIPS product.
Sincerely,
Lawrence J. Blanford
President and Chief Executive Officer
Know these
safetysymbols
t This “bolt of lightning” indicates uninsulated material within your unit may cause an elec-
trical shock. For the safety of everyone in your household, please do not remove product covering.
s The “exclamation point” calls attention to features for which you should read the enclosed
literature closely to prevent operating and maintenance problems.
WARNING:TO PREVENT FIRE OR SHOCK HAZARD, DO NOT EXPOSE THIS EQUIPMENT
TO RAIN OR MOISTURE.
CAUTION:To prevent electric shock, match wide blade of plug to wide slot, and fully insert.
ATTENTION: Pour éviter les chocs électriques, introduire la lame la plus large de la fiche dans
la borne correspondante de la prise et pousser jusqu’au fond.
CAUTION
RISK OF ELECTRIC SHOCK
DO NOT OPEN
CAUTION: TO REDUCE THE RISK OF ELECTRIC SHOCK, DO NOT
REMOVE COVER (OR BACK). NO USER-SERVICEABLE PARTS
INSIDE. REFER SERVICING TO QUALIFIED SERVICE PERSONNEL.
Warranty
Verification
Registering your product within
10 days confirms your right to maximumprotection under the terms and
conditions of your PHILIPS warranty.
Owner
Confirmation
Your completed Warranty
Registration Card serves as
verification of ownership in the
event of product theft or loss.
Model
Registration
Returning your Warranty Registration
Card right away guarantees you’ll
receive all the information and special
offers which you qualify for as the
owner of your model.
P.S. Remember, to get the most from your
PHILIPS product, you must return your
Warranty Registration Card within 10
days. So please mail it to us right now!
R
E
G
I
S
T
R
A
T
I
O
N
N
E
E
D
E
D
W
I
T
H
I
N
1
0
D
A
Y
S
Hurry!
Visit our World Wide Web Site at http://www.philips.com
Page 3
3
IMPORTANT SAFETY INSTRUCTIONS
Read before operating equipment
1. Read these instructions.
2. Keep these instructions.
3. Heed all warnings.
4. Follow all instructions.
5. Do not use this apparatus near water.
6. Clean only with a dry cloth.
7. Do not block any of the ventilation openings. Install in accordance
with the manufacturers instructions.
8. Do not install near any heat sources such as radiators, heat regis-
ters, stoves, or other apparatus (including amplifiers) that produce
heat.
9. Do not defeat the safety purpose of the polarized or grounding-
type plug. A polarized plug has two blades with one wider than
the other. A grounding type plug has two blades and third grounding prong. The wide blade or third prong are provided for your
safety. When the provided plug does not fit into your outlet, consult an electrician for replacement of the obsolete outlet.
10. Protect the power cord from being walked on or pinched particu-
larly at plugs, convenience receptacles, and the point where they
exit from the apparatus.
11. Only use attachments/accessories specified by the manufacturer.
12. Use only with a cart, stand, tripod, bracket, or table
specified by the manufacturer, or sold with the app-
aratus. When a cart is used, use caution when moving
the cart/apparatus combination to avoid injury from tip-over.
13. Unplug this apparatus during lightning storms or when unused for
long periods of time.
14. Refer all servicing to qualified service personnel. Servicing is
required when the apparatus has been damaged in any way, such
as power-supply cord or plug is damaged, liquid has been spilled
or objects have fallen into apparatus, the apparatus has been
exposed to rain or moisture, does not operate normally, or has
been dropped.
15. This product may contain lead and mercury. Disposal of these
materials may be regulated due to environmental considerations.
For disposal or recycling information, please contact your local
authorities or the Electronic Industries Alliance: www.eiae.org
16. Damage Requiring Service - The appliance should be serviced
by qualified service personnel when:
A. The power supply cord or the plug has been damaged; or
B. Objects have fallen, or liquid has been spilled into the appli-
ance; or
C. The appliance has been exposed to rain; or
D. The appliance does not appear to operate normally or
exhibits a marked change in performance; or
E. The appliance has been dropped, or the enclosure damaged.
17. Tilt/Stability - All televisions must comply with recommended
international global safety standards for tilt and stability properties
of its cabinet design.
• Do not compromise these design standards by applying excessive pull force to the front, or top, of the cabinet which could ultimately overturn the product.
• Also, do not endanger yourself, or children, by placing electronic equipment/toys on the top of the cabinet. Such items could
unsuspectingly fall from the top of the set and cause product damage and/or personal injury.
18. Wall or Ceiling Mounting - The appliance should be mounted to
a wall or ceiling only as recommended by the manufacturer.
19. Power Lines - An outdoor antenna should be located away from
power lines.
20. Outdoor Antenna Grounding - If an outside antenna is connect-
ed to the receiver, be sure the antenna system is grounded so as to
provide some protection against voltage surges and built up static
charges.
Section 810 of the National Electric Code, ANSI/NFPA No. 701984, provides information with respect to proper grounding of
the mast and supporting structure, grounding of the lead-in wire to
an antenna discharge unit, size of grounding connectors, location
of antenna-discharge unit, connection to grounding electrodes, and
requirements for the grounding electrode. See Figure below.
21. Object and Liquid Entry - Care should be taken so that objects
do not fall and liquids are not spilled into the enclosure through
openings.
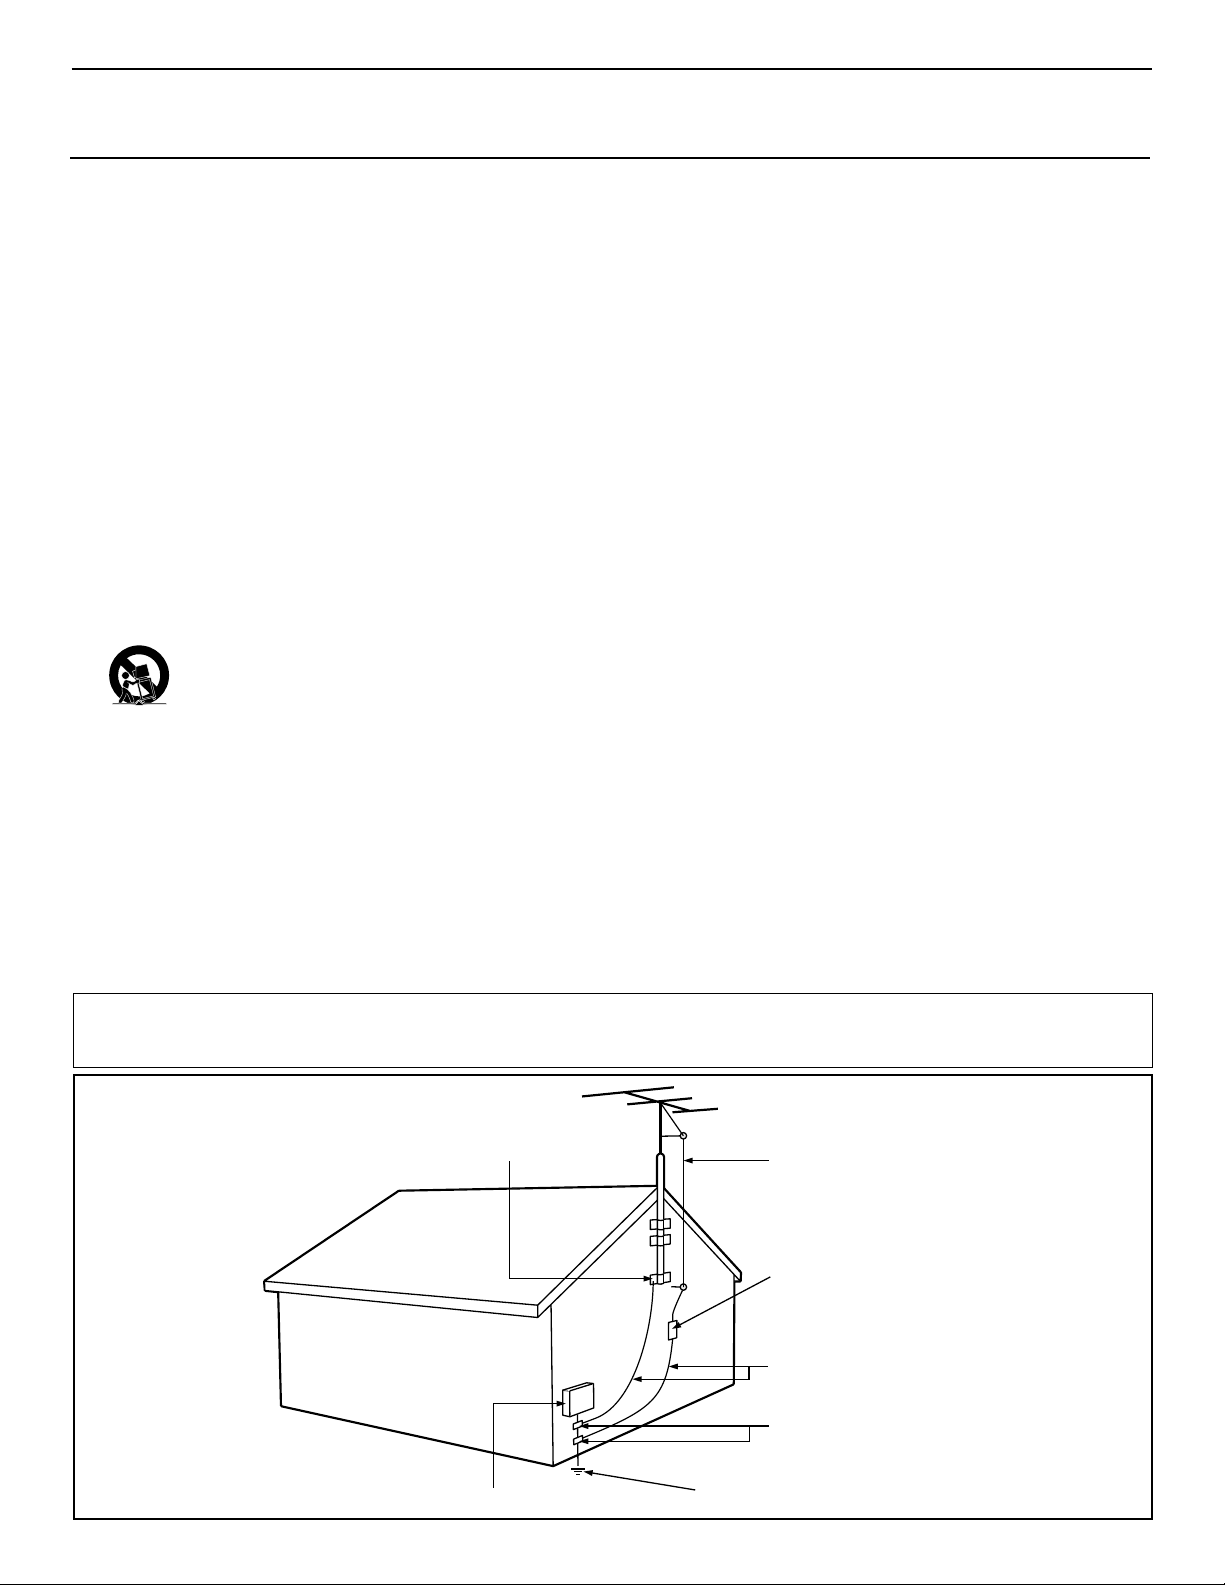
Example of Antenna Grounding
as per NEC - National Electric Code
Note to the CATV system installer: This reminder is provided to call the CATV system installer's attention to Article 820-40 of the NEC that
provides guidelines for proper grounding and, in particular, specifies that the cable ground shall be connected to the grounding system of the building, as close to the point of cable entry as practical.
GROUND CLAMP
ELECTRIC SERVICE EQUIPMENT
POWER SERVICE GROUNDING ELECTRODE SYSTEM (NEC ART 250, PART H)
ANTENNA LEAD IN WIRE
ANTENNA DISCHARGE UNIT
GROUNDING CONDUCTORS (NEC SECTION 810-21)
GROUND CLAMPS
(NEC SECTION 810-20)
Page 4
4
CONTENTS
INTRODUCTION
Welcome/Registration of Your TV . . . . . . . . . . . . . . . . . . . . .2
Safety/Precautions . . . . . . . . . . . . . . . . . . . . . . . . . . . . . . .2–3
Features . . . . . . . . . . . . . . . . . . . . . . . . . . . . . . . . . . . . . . . . . .5
AUDIO/VIDEO INPUT JACKS
Jack Panel descriptions and required cables . . . . . . .6
Using the AV 1 Input Jacks . . . . . . . . . . . . . . . . . . . . . . . . . .7
Using the AV 2 Input Jacks . . . . . . . . . . . . . . . . . . . . . . . . . .8
Using the Side (AV 3) Input Jacks . . . . . . . . . . . . . . . . . . . . .9
Using the AV 4 Input Jacks . . . . . . . . . . . . . . . . . . . . . . . . .10
Using the Component Video Input Jacks (CVI) . . . . . . . . . .11
Using the S-Video Input Jack . . . . . . . . . . . . . . . . . . . . . . . .12
Using the Monitor Output Jacks . . . . . . . . . . . . . . . . . . . . . .13
PICTURE MENU CONTROLS
Adjusting the Brightness Control . . . . . . . . . . . . . . .14
Adjusting the Color Control . . . . . . . . . . . . . . . . . . . . . . . . .14
Adjusting the Picture Control . . . . . . . . . . . . . . . . . . . . . . . .14
Adjusting the Sharpness Control . . . . . . . . . . . . . . . . . . . . .14
Adjusting the Tint Control . . . . . . . . . . . . . . . . . . . . . . . . . .14
How to set the Color Temp Control . . . . . . . . . . . . . . . . . . .14
How to use the Digital Options Control . . . . . . . . . . . . . . . .15
How to set the Dyn(amic) Contrast Control . . . . . . . . . . . .16
SOUND MENU CONTROLS
Adjusting the Treble Control . . . . . . . . . . . . . . . . . .17
Adjusting the Bass Control . . . . . . . . . . . . . . . . . . . . . . . . . .17
Adjusting the Balance Control . . . . . . . . . . . . . . . . . . . . . . .17
How to use the AVL control . . . . . . . . . . . . . . . . . . . . . . . . .18
How to use the Incr.(edible) Surround Control . . . . . . . . . .19
How to set the Stereo Control . . . . . . . . . . . . . . . . . . . . . . .19
How to set the TV to receive Secondary Audio
Programming, also known as the SAP Control . . . . . . . . . .20
How to set the Audio Out Control . . . . . . . . . . . . . . . . . . . .21
How to turn the TV speakers on or off using
the Speaker Control . . . . . . . . . . . . . . . . . . . . . . . . . . . . . . .22
FEATURE MENU CONTROLS
How to use the Timer controls:
Setting the TV Clock using the Time Control . . . . . . . . . .23
Setting a time for the TV to turn itself on using
the Start Time Control . . . . . . . . . . . . . . . . . . . . . . . . . . . .24
Setting a time for the TV to turn itself off using
the Stop Time Control . . . . . . . . . . . . . . . . . . . . . . . . . . . .25
Setting the TV to start on a specific channel using
the Channel Control . . . . . . . . . . . . . . . . . . . . . . . . . . . . . .26
How to activate the controls using the Activate Control . .27
How to view the time using the Display Control . . . . . . .28
How to activate the Active Control™ . . . . . . . . . . . . . . . . .29
How to use the AutoLock™ Controls:
Understanding the AutoLock™ Feature . . . . . . . . . . . . . .30
Setting up an AutoLock™ Access Code . . . . . . . . . . . . . .31
How to Block Channels . . . . . . . . . . . . . . . . . . . . . . . . . . .32
How to Clear All blocked channels at the same time . . . .33
Blocking programming based on Movie Ratings . . . . . . .34
Blocking programming based on TV Ratings . . . . . . . . . .35
AutoLock™ Blocking Options - Blocking Control . . . . . .36
AutoLock™ Blocking Options - No Rating Control . . . . .37
How to review the AutoLock™ Control Status . . . . . . . . .38
How to use the Closed Captioning Control . . . . . . . . . . . . .39
How to change the screen (size) format using
the Format Control . . . . . . . . . . . . . . . . . . . . . . . . . . . . . . . .40
REMOTE CONTROL RELATED FEATURES
How to set the Sleep Timer Control . . . . . . . . . . . .41
How to Use the Freeze Control . . . . . . . . . . . . . . . . . . . . . .42
Using the AutoPicture™ Control . . . . . . . . . . . . . . . . . . . . .43
Using the AutoSound™ Control . . . . . . . . . . . . . . . . . . . . . .44
Using the Surf Control (and Alternate Channel) . . . . . . . . .45
Using the Remote Control with accessory devices
Direct Access Method . . . . . . . . . . . . . . . . . . . . . . . . . . . .46
Code-Entry Method . . . . . . . . . . . . . . . . . . . . . . . . . . . . . .47
Search Method . . . . . . . . . . . . . . . . . . . . . . . . . . . . . . . . . .48
Direct-Entry Code list for accessory devices . . . . . . . . .49-50
Remote Control VCR Specific Button . . . . . . . . . . . . . . . . .51
GENERAL INFORMATION
Care and Cleaning . . . . . . . . . . . . . . . . . . . . . . . . . .52
Troubleshooting . . . . . . . . . . . . . . . . . . . . . . . . . . . . . . . . . .52
Glossary of terms . . . . . . . . . . . . . . . . . . . . . . . . . . . . . . . . .53
Index . . . . . . . . . . . . . . . . . . . . . . . . . . . . . . . . . . . . . . . . . . .54
Factory Service Locations . . . . . . . . . . . . . . . . . . . . . . . . . .55
Limited Warranty . . . . . . . . . . . . . . . . . . . . . . . . . . . . . . . . .56
Refer to the simple Quick Use and
Setup Guide (supplied with your TV)
for details on the following:
• Basic TV connections
• Basic TV and remote-control operation
• Onscreen menu navigation
• How to use the Installation features
Language, Tuner Mode, Auto Program,
Channel Edit, Name, and AutoChron™
QUICK USE AND SETUP GUIDE
b
P
1
2
b
P
1
3
2
Quick Use and Setup Guide
Important Notice/Warning . . . . . . . . . . . . . . . . . . . .1
Making Basic TVConnections
Basic Cable TVConnections . . . . . . . . . . . . . . . . .1
Basic Antenna TVConnections . . . . . . . . . . . . . . .1
Basic TVOperation . . . . . . . . . . . . . . . . . . . . . . . .2
Remote Battery Installation . . . . . . . . . . . . . . . . . . .2
Remote Control Button Descriptions . . . . . . . . . . . .2
CABLETV
our Cable TVinput into your home may be a single (75 ohm)
Y
cable or a converter box installation. In either case, the connection to the TVis very easy. Follow the steps below to connect
your cable signal to your new television.
If yourcable signal comes directly from a round 75Ωcoaxial
cable use the following steps:
Connect the open end of the round Cable Company supplied cableto the 75Ωinput on the TV. Screw it down finger
1
tight.
Plug the television in to the wall outletand turn the TVon.
Refer to the AUTOPROGRAM feature to program all the
2
available channels on your cable signal.
If yourcable signal comes from a cable box, use the following
steps:
Connect the open end of the round Cable Company supplied cable to
the cable signal IN(put) plug on the back of
3
the Cable Box.
Using a separate round coaxial cable, connect one end to the
OUT(put) plug on the back of the Cable Box.
4
Connect the otherend of the round coaxial cableto the
75Ωinput on the back of the television. Screw it down finger
5
tight.
Plug the television in to the wall outletand turn the TVon.
Refer to the TUNER and AUTOPROGRAM features on page
6
3 of this Quick Use Guide. TUNER should be set to the
CABLE option. AUTOPROGRAM can be set to program all
the available channels on your cable signal into the television’s memory.
ANTENNATV
combination antenna receives normal broadcast chan-
A
nels (VHF 2–13 and UHF 14–69). Your connection is
easy because there is only one 75Ω(ohm) antenna plug on
the back of your TV, and that’s where the antenna goes.
If yourantenna has a round cable(75 ohm) on the end,
then you're ready to connect it to the TV.
1
If yourantenna has flat, twin-lead wire (300 ohm), you
first need to attach the antenna wires to the screws on a
300- to 75-ohm adapter.
Push the round endof the adapter (or antenna) onto the
75Ω(ohm) plug on the back of the TV. If the round end of
2
the antenna wire is threaded, screw it down finger tight.
Plug the television in to the wall outletand turn the TV
Refer to the TUNER and AUTOPROGRAM features on
on.
3
page 3 of this Quick Use Guide. TUNER should be set to the
ANTENNAoption. AUTOPROGRAM can be set to program
all the available channels on your cable signal into the television’s memory.
CONTENTS
How to Use the Installation Features . . . . . . . . . .3-4
Using the Language Control . . . . . . . . . . . . . . . . . .3
Setting the Tuner Mode Control . . . . . . . . . . . . . . .3
How to Automatically Program Channels . . . . . . . .3
How to Add and Delete Channels . . . . . . . . . . . . . .4
How to set the AutoChron™Feature (Clock) . . . . .4
How to Name (Label) Channels . . . . . . . . . . . . . . . .4
BASICTV CONNECTIONS
Direct Cable Connection:
Cable Box Connection:
3
Cable Signal IN from
the Cable Company
Antenna Connection:
The combination antenna receives normal
broadcast channels 2-13 (VHF) and 14-69 (UHF).
Color TV
Color TV
IMPORTANT
NOTE: This owner's manual is used with several
different television models. Not all features (and
drawings) discussed in this manual will necessarily match those found with yourtelevision set.
This is normal and does not require that you contact yourdealeror request service.
WARNING: TO PREVENTFIRE OR SHOCK
HAZARD DO NOTEXPOSE THIS UNITTO
RAIN OR EXCESSIVE MOISTURE.
Cable signal coming from
Cable Company (Round
Outdoor or Indoor Antenna
(Combination VHF/UHF)
3121 233 42241
AC Power
Wall Outlet
75Ωcoaxial cable)
Power Plug
from back of TV
Jack Panel Back of TV
Jack Panel Back
4
of Cable Box
INPUT
OUTPUT
Round 75Ω
Coaxial Cable
6
b
Jack Panel
Back of TV
P
5
from back of TV
AC Power
Jack Panel
Wall Outlet
Back of TV
300 to 75-ohm
Adapter
Twin
Lead Wire
Power Plug
from back of TV
Round 75Ω
Coaxial Cable
from Antenna
AC Power
Wall Outlet
Power Plug
Page 5

5
Items Included with This TV
As you unpack your TV, please note that this Directions
for Use manual contains safety-tip information and
Factory Service Center locations, as well as a Warranty
Registration Card, remote control, and batteries for use
with the remote control.
Please take a few minutes to complete your registration
card. The serial number for the TV is on the rear of the set.
Refer to the back of this manual for instructions in the
cleaning and care of the TV.
FEATURES
Active Control™ continuously measures and corrects all incoming signals to help provide the best picture quality. This feature
monitors and corrects both the sharpness control and noise
reduction control.
Audio/Video Jack Panel allows direct connections with VCRs,
DVDs, or other devices, providing quality TV picture and sound
playback.
Audio Volume Leveler (AVL) Control keeps the TV sound at
an even level. Peaks and valleys that occur during program
changes or commercial breaks are reduced, making for a more
consistent, comfortable sound.
AutoChron™ automatically sets the right time of day and
maintains it with digital precision through brownouts, power
failures, and even Daylight Savings Time adjustments.
AutoLock™ allows you to block the viewing of certain channels or programs with certain ratings if you do not want your
children to view inappropriate materials.
Auto Programming scans (when activated) for all available
channels from regular antenna or cable signals and stores only
active broadcast stations in the TV’s memory.
AutoPicture™ allows you to change the picture settings (color,
tint, contrast, etc.) for various types of programming, such as
sports, movies, multimedia (games), or weak signals with the
push of one button.
AutoSound™ allows you to select from three factory-set controls and a personal control that you set according to your own
preferences through the onscreen Sound menu. The three factory-set controls (Voice, Music, and Theatre) enable you to tailor
the TV sound so as to enhance the particular programming you
are watching.
Channel Edit allows you to add or delete channels from the list
stored in the TV’s memory. Channel Edit makes it easy to limit
or expand the number of channels that are available to you when
you press the Channel (+) or (–) buttons on your remote control.
Closed Captioning allows the viewer to read TV program dialogue or voice conversations as onscreen text.
Dynamic Contrast helps to sharpen the picture quality by
improving the contrast between the darkest and brightest parts of
the picture.
Eye Fidelity (also know as Digital Options) give a choice of
two different scanning technics – Progressive Scan or Interlaced.
Progressive Scan doubles the number of visible lines per field by
displaying all picture frame lines at once, eliminating any picture
flicker. The Interlaced mode provides a double vertical display
scan, which reduces annoying motion sweeps. The Interlaced
mode will also smooth out the jagged lines sometimes seen on
the edges of curved or angled surfaces.
Infrared Remote Control works your TV and other remotecontrolled devices, such as VCRs, DVD players, cable converters, and satellite receivers.
Onscreen Menu shows helpful messages and instructions for
setting TV feature controls (can be viewed in English, French, or
Spanish).
Your new television and its packing contain materials that
can be recycled and reused. Specialized companies can recycle your product to increase the amount of reusable materials
and minimize the amounts that need to be properly disposed.
Your product also uses batteries that should not be thrown
away when depleted, but should be handed in and disposed of
as small chemical waste.
When you replace your existing equipment, please find out
about the local regulations regarding disposal of your old television, batteries, and packing materials.
END-OF-LIFE DISPOSAL
Sleep Timer automatically turns the TV OFF after a set amount
of time that you choose.
Standard Broadcast (VHF/UHF) or Cable TV (CATV) channel capability allows for viewing by antenna or cable.
Stereo capability, including a built-in audio amplifier and twinspeaker system, allows for the reception of TV programs broadcast in stereo sound.
Surf Button allows you to easily switch among only the channels that are of interest to you (the ones that you have
programmed into the TV’s Surf control through the onscreen
menu).
Timer allows you to set your TV to turn itself ON and OFF
once or daily like an alarm clock.
As an Energy Star® Partner, Philips Consumer
Electronics has determined this product meets
the Energy Star® guidelines for energy efficiency. Energy Star® is a U.S. registered mark. Using products
with the Energy Star® label can save energy. Saving energy
reduces air pollution and lowers utility bills.
Active Control, APAC, AutoPicture, AutoSound, AutoChron,
and Incredible Surround are trademarks of Philips Consumer
Electronics Company. Copyright 2001 Philips Consumer
Electronics.
*Manufactured under license from Dolby Laboratories.
“Dolby” and the double-D symbol are trademarks of Dolby
Laboratories.
Page 6
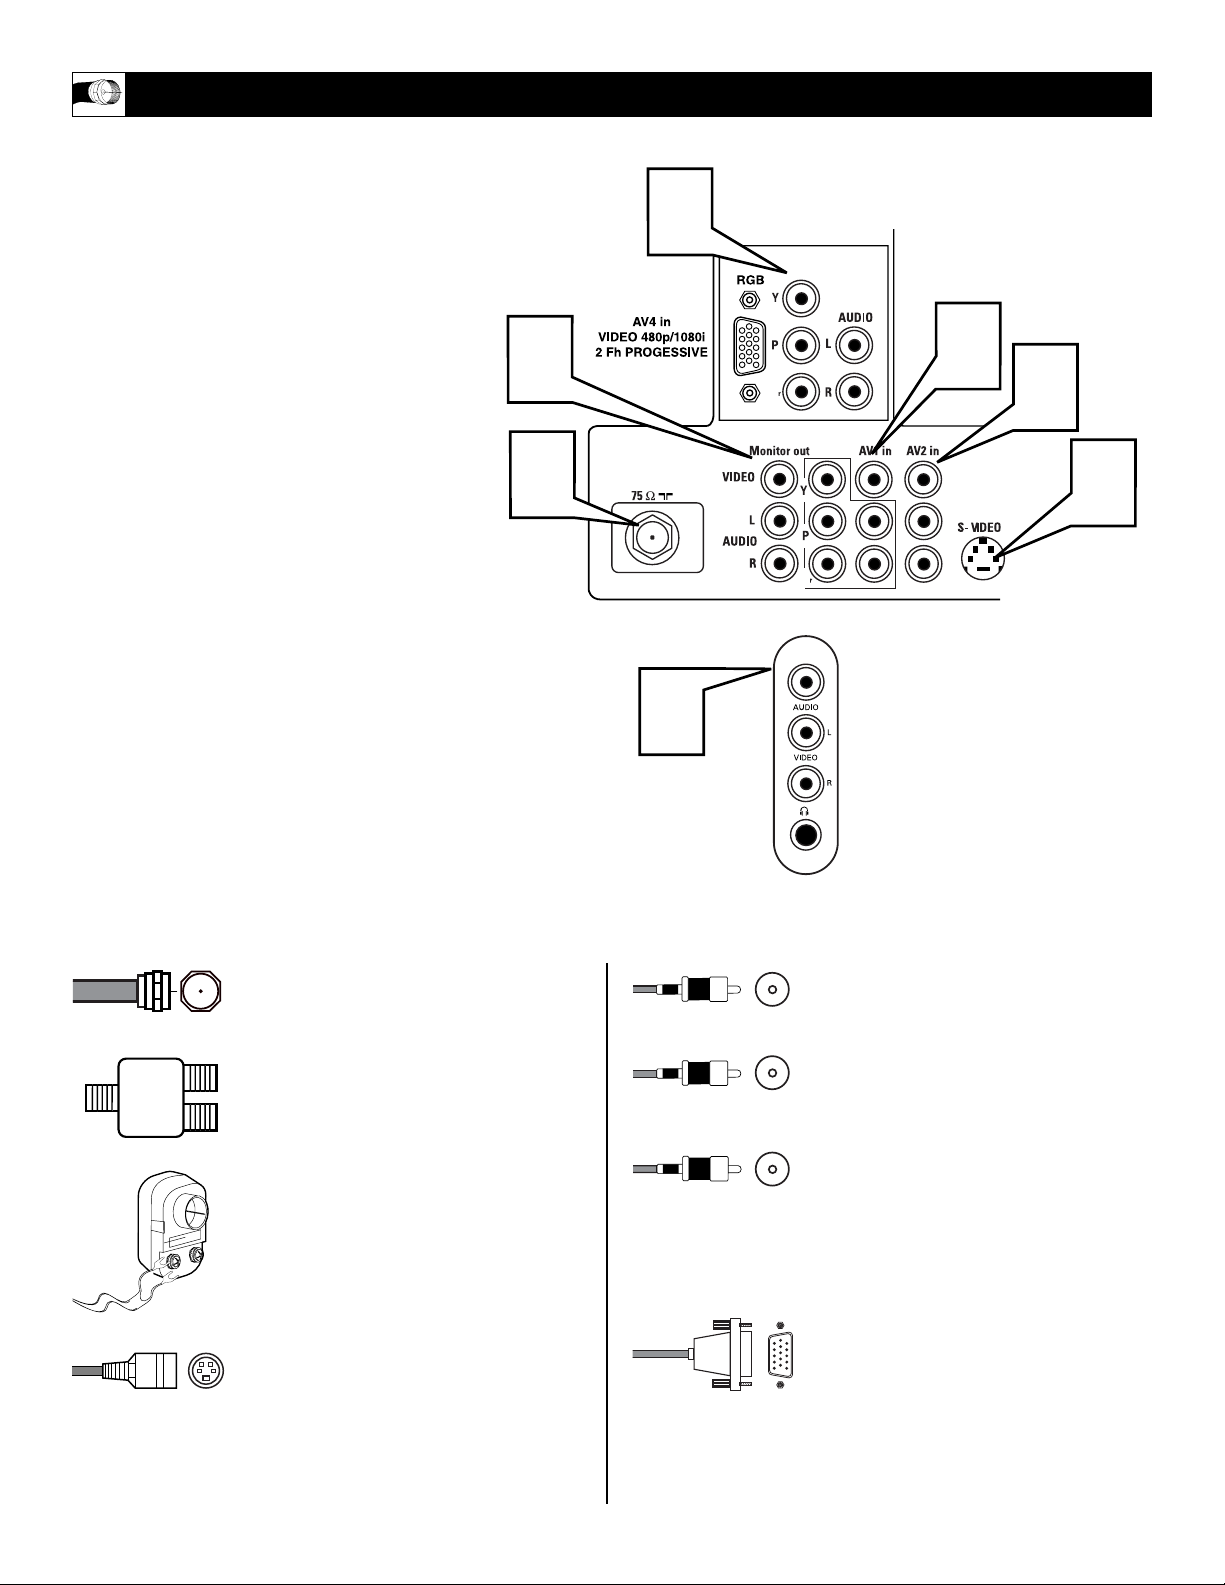
6
T
he television is equipped with external
input and output jacks for use with optional
accessory devices such as VCRs, DVD Player,
Gaming Units, Video Cameras, etc. The following gives a brief explanation of the different
types of jacks available and the type of cables
needed to make connections.
1
75Ω RF - Cable/Antenna Input connection jack. Located on the back of the television.
2
AV 1 in - Audio/Video connection jacks.
Located on the back of the television.
Along with Component Video Inputs.
3
AV 2 in - Audio/Video Input connection
jacks. Located on the back of the television.
4
S-Video Input jack - Used with the AV
2 in Audio Left and Right Input jacks.
Located on the back of the television.
5
Monitor Out - Audio/Video Output
connection jacks. Located on the back of
the television.
6
AV 4 in - Component Video, VGA
(RGB), and Audio Input connection
jacks. Located on the back of the television.
7
SIDE (AV 3) - Audio/Video Input jacks,
plus a Headphone jack located on the
side of the cabinet.
JACK P
ANEL DESCRIPTIONS AND REQUIRED CABLES
A 75-ohm coaxial cable connects signals
from an antenna or a cable TV company
to the antenna jack on the back of the TV.
Coaxial cables use “F” connectors.
A two-way signal splitter enables you to
take a single antenna or cable TV signal
and supply it to two different inputs.
A 300- to 75-ohm twin-lead adapter
accepts the antenna cables (called twinlead wires) from an antenna, allowing you
to connect the antenna signal to the TV.
An S-Video cable provides better picture
performance than regular (composite)
video connections.
S-Video cables can be used only with SVideo-compatible accessory devices. You
must also connect the left and right audio
cables to the AV 2 Audio in jacks because
the S-Video jack carries only the picture
signal, not the sound.
Video and audio cables with standard
RCA (phono) connectors connect the
video and audio jacks of accessory
devices such as VCRs and DVD players
to the jacks on the TV.
These connectors are usually color coded.
The jacks on your TV are also color
coded to match the colors of the connectors. Yellow for video (composite) and
Red and White for the right and left audio
channels. The video cables used to connect component video or RGB (high-resolution) jacks are color coded red, green,
and blue.
An VGA (HD15) cable makes a VGA
(RGB) connection to the HD INPUT-AV
4 jack on the rear of the TV.
Cable Descriptions:
Yellow - Video
White - Audio Left
Red - Audio Right
5
1
6
7
Located on the back of the TV
b
2
P
3
4
b
P
Located on the
side of the TV
Page 7
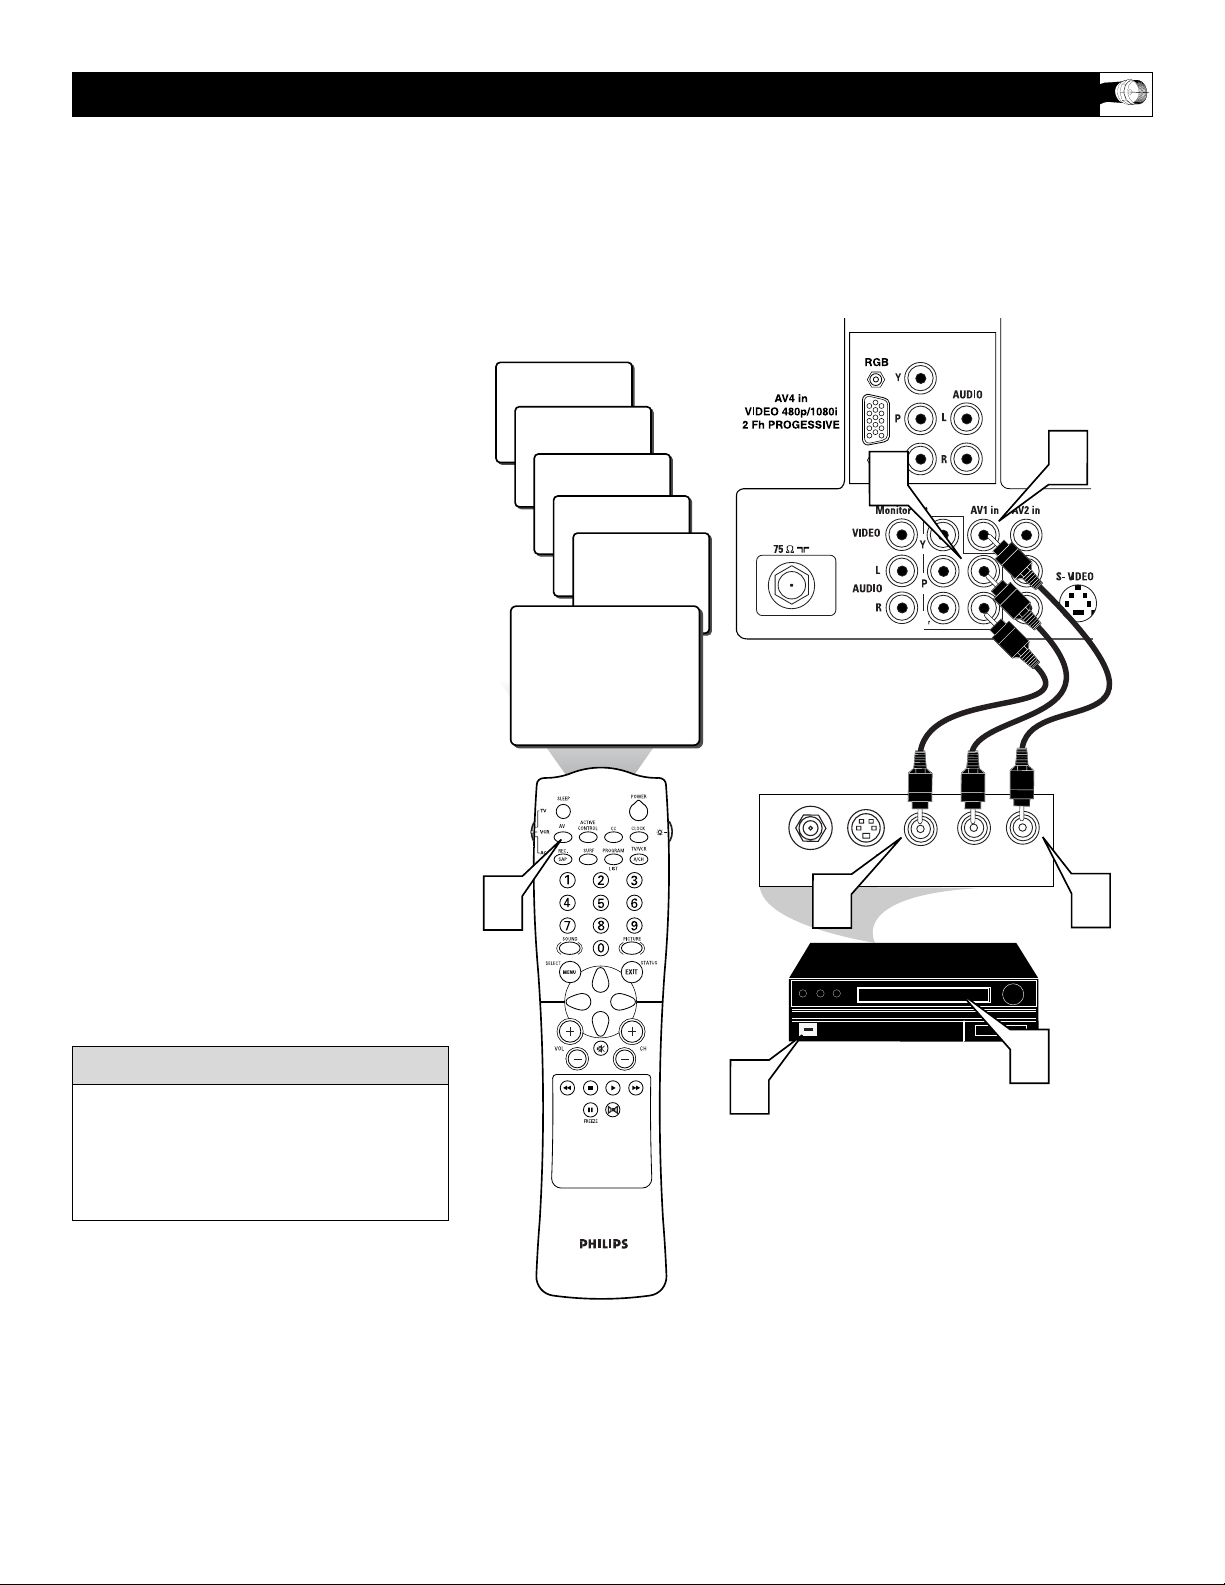
7
T
he TV’s audio/video input jacks are for
direct picture and sound connections
between the TV and a VCR (or similar device)
that has audio/video output jacks. Follow the
easy steps below to connect your accessory
device to the AV 1 Input Jacks located on the
back of the TV.
1
Connect the VIDEO (yellow) cable to
the VIDEO AV1 in jack on the back of
the TV.
2
Connect the AUDIO (red and white)
cables to the AUDIO (left and right)
AV1 in jacks on the rear of the TV.
3
Connect the VIDEO (yellow) cable to
the VIDEO OUT jack on the back of
the VCR.
4
Connect the AUDIO (red and white)
cables to the AUDIO (left and right)
OUT jacks on the rear of the VCR.
5
Turn the VCR (accessory device) and
the TV ON.
6
Press the AV button on the remote
control to select the AV1 channel. AV1
will appear in the upper left corner on
the TV screen.
7
With the VCR (or accessory device)
ON and a prerecorded tape (CD, DVD,
etc.) inserted, press the PLAY button
to view the tape on the television.
USING THE AV 1 I
NPUT JACKS
Repeatedly pressing the AV button on the
remote control will toggle the picture source
from the current channel, then AV1, CVI,
AV2, SIDE (AV3), and the AV4 Input Jack
connections.
cc
C
HECK IT OUT
AUDIO IN
(RED/WHITE)
VCR
(EQUIPPED WITH VIDEO AND
AUDIO OUTPUT JACKS)
VIDEO IN
(YELLOW)
BACK OF VCR
NOTE: Repeatedly pressing the AV button on the remote control will toggle the
picture source from the current channel, the AV1 channel, then the CVI channel,
then the AV2 channel, then the SIDE (AV3) channel and the AV4 channel. After the
AV4 channel, the AV button will select the current channel again.
BACK OF TV
24
AV4
SIDE
b
P
1
2
AV2
CVI
b
AV1
ANT/CABLE
OUT
S-VIDEO
OUT
P
R L
AUDIO OUT
VIDEO
OUT
6
5
4
3
7
Page 8
AUDIO IN
(RED/WHITE)
SECOND VCR
or ACCESSORY DEVICE
(EQUIPPED WITH VIDEO
AND AUDIO OUTPUT JACKS)
VIDEO IN
(YELLOW)
BACK OF 2ND VCR
BACK OF TV
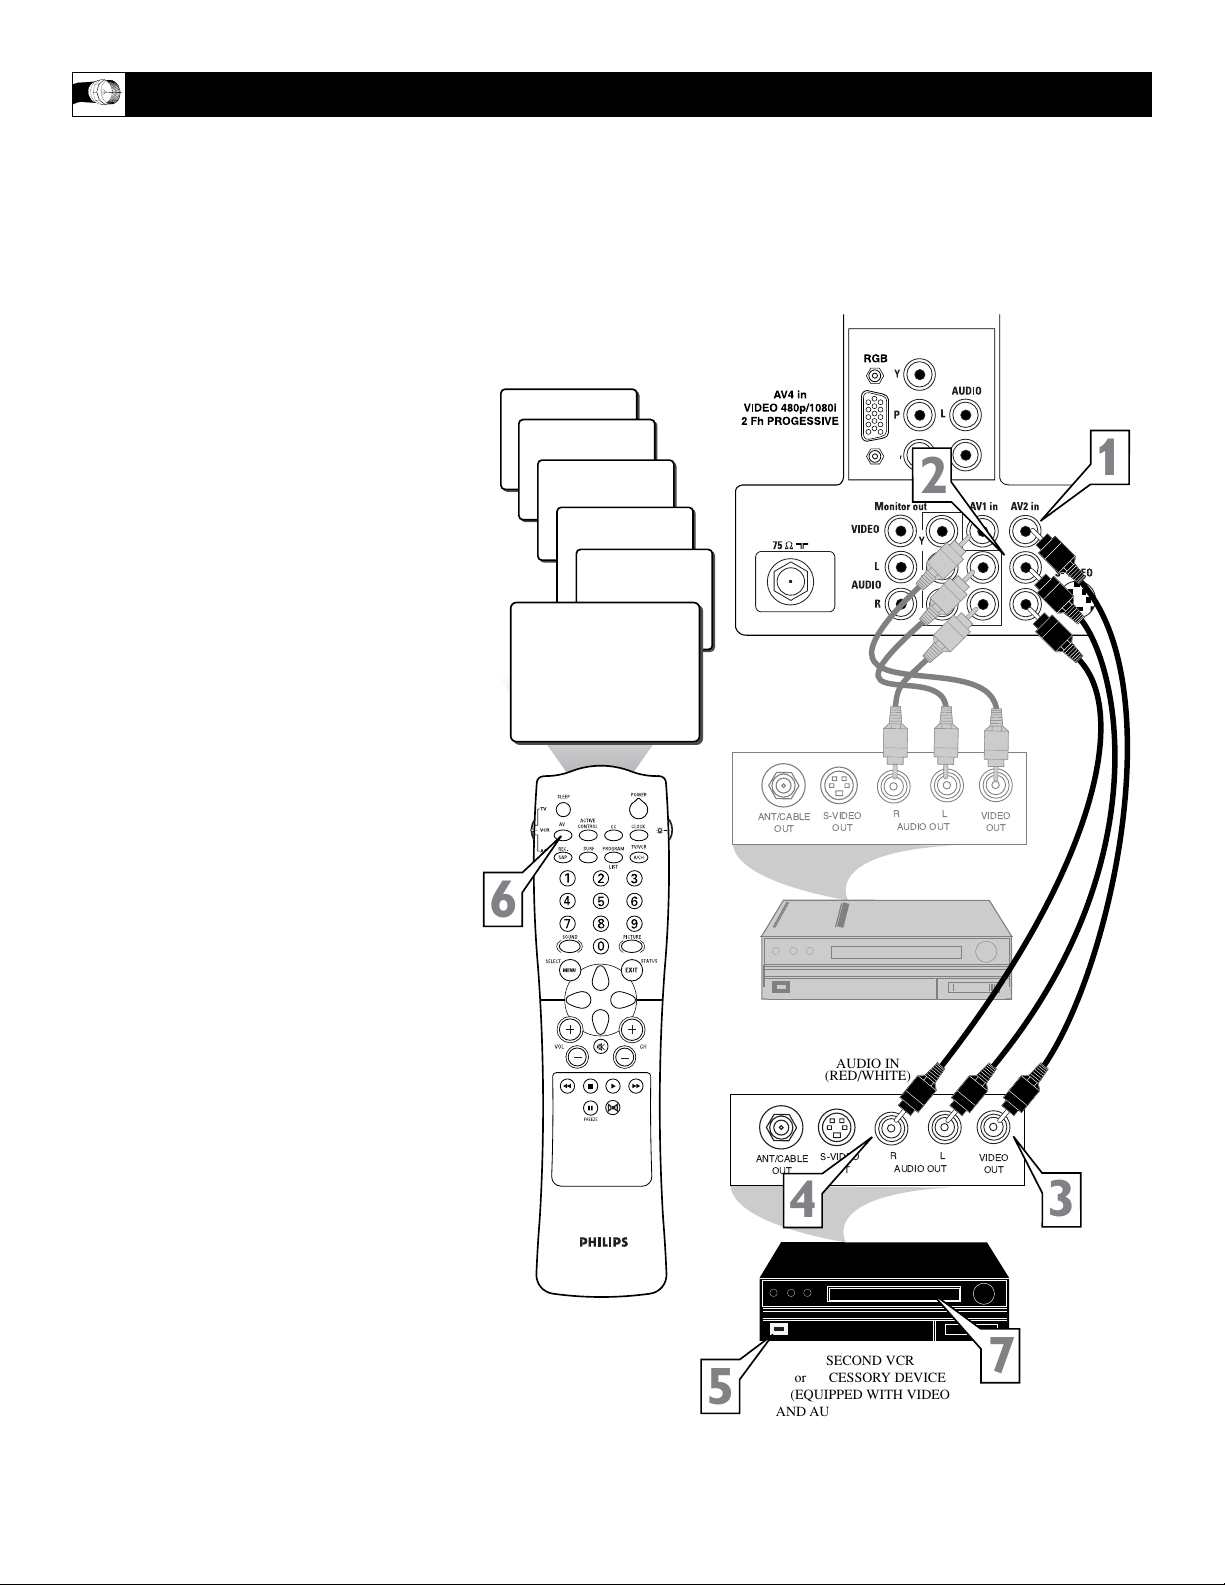
8
T
he TV’s audio/video input jacks allow you
connect multiple accessory devices at one
time to different sets of input jacks Follow the
easy steps below to connect an additional
accessory device to the AV 2 Input Jacks located on the back of the TV.
1
Connect the VIDEO (yellow) cable to
the VIDEO AV2 in jack on the back of
the TV.
2
Connect the AUDIO (red and white)
cables to the AUDIO (left and right)
AV2 in jacks on the rear of the TV.
3
Connect the VIDEO (yellow) cable to
the VIDEO OUT jack on the back of
the VCR.
4
Connect the AUDIO (red and white)
cables to the AUDIO (left and right)
OUT jacks on the rear of the VCR.
5
Turn the VCR (accessory device) and
the TV ON.
6
Press the AV button on the remote
control to select the AV2 channel. AV2
will appear in the upper left corner on
the TV screen.
7
With the VCR (or accessory device)
ON and a prerecorded tape (CD, DVD,
etc.) inserted, press the PLAY button
to view the tape on the television.
USING THE AV 2 I
NPUT JACKS
NOTE: Repeatedly pressing the AV button on the remote control will toggle the
picture source from the current channel, the AV1 channel, then the CVI channel,
then the AV2 channel, then the SIDE (AV3) channel and the AV4 channel. After the
AV4 channel, the AV button will select the current channel again.
FIRST VCR
CONNECTED TO AV1 INPUTS
CVI
AV1
24
AV4
SIDE
AV2
b
P
1
2
b
P
6
4
3
5
7
Page 9
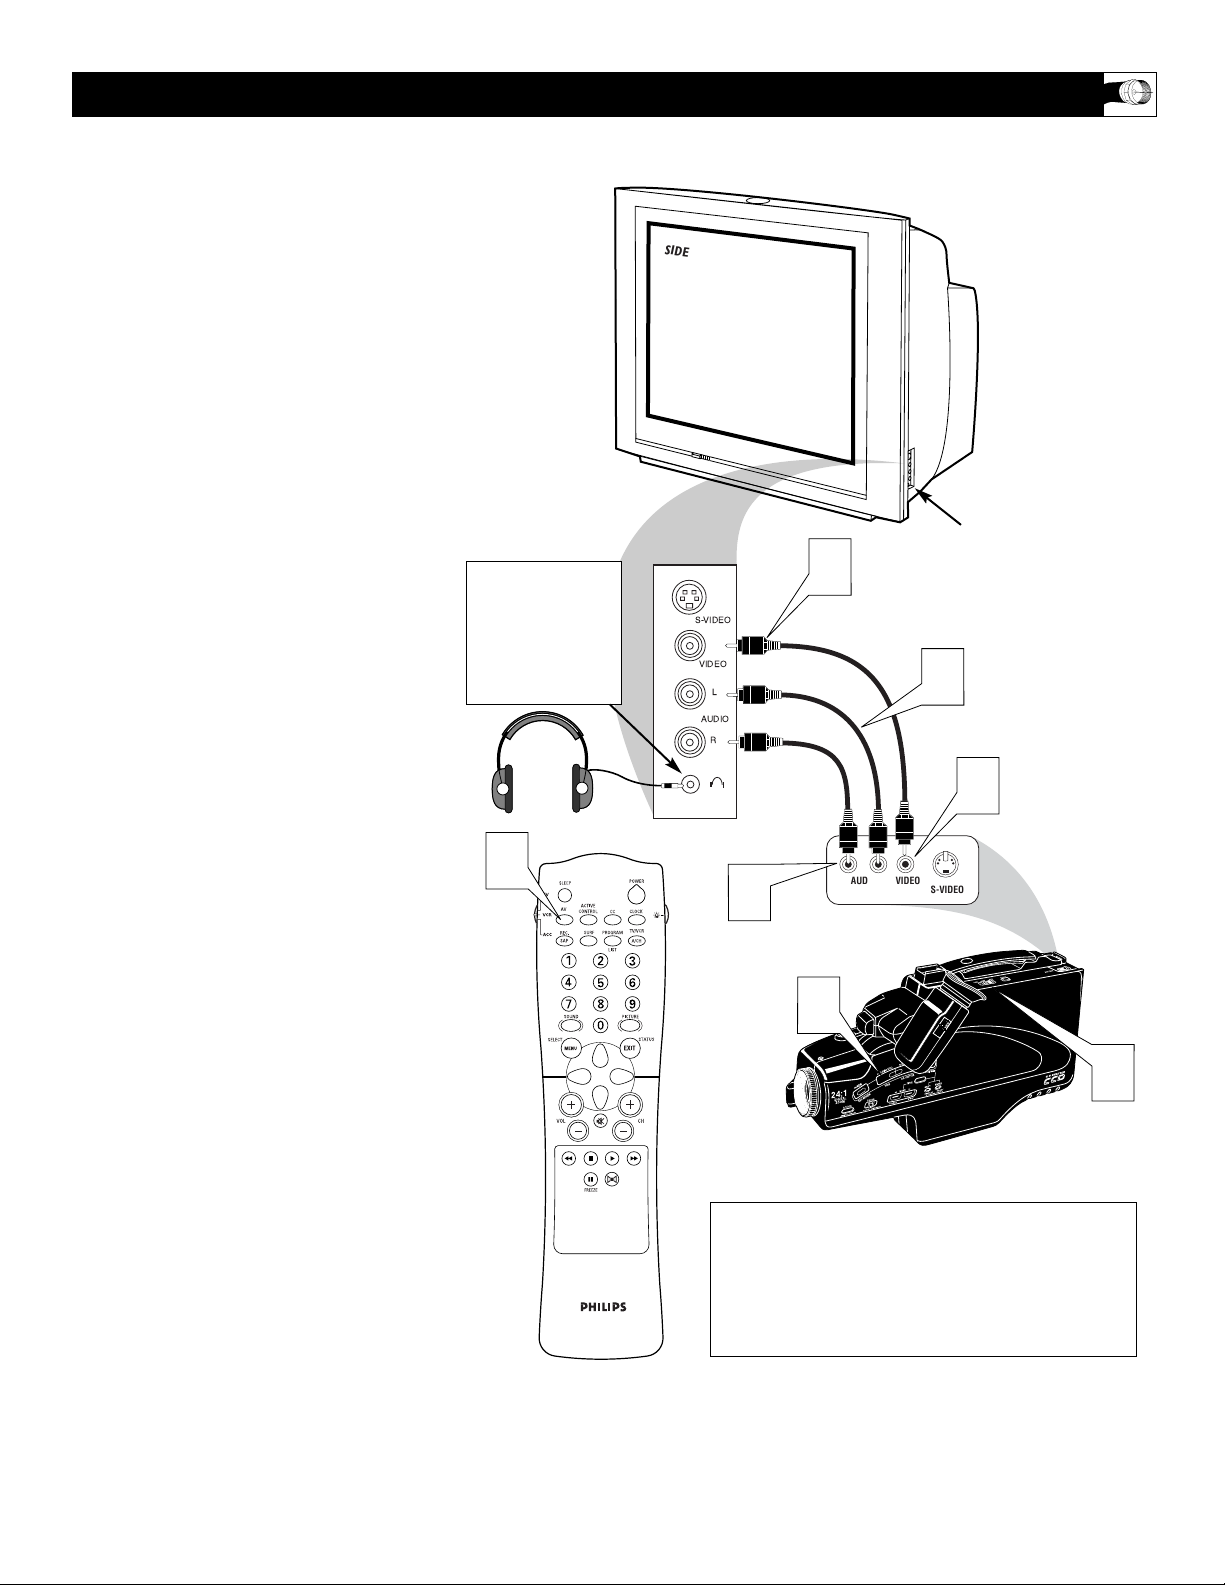
9
T
his television has input jacks conveniently
located on the side of the cabinet. These
jack are for easy hook-ups (without having to
move around to the back of the TV) for cameras, gaming units, and other accessory
devices that wouldn’t be connected permanently. Follow the easy steps below to connect
your accessory device to the SIDE (AV 3) Input
Jacks located on the right side of the TV.
1
Connect the VIDEO (yellow) cable to
the VIDEO in jack on the side of the
TV.
2
Connect the AUDIO (red and white)
cables to the AUDIO (left and right) in
jacks on the side of the TV.
3
Connect the VIDEO (yellow) cable to
the VIDEO OUT jack on the back of
the camera (or accessory device).
4
Connect the AUDIO (red and white)
cables to the AUDIO (left and right)
OUT jacks on the rear of the camera
(or accessory device).
5
Turn the camera (or accessory
device) and the TV ON.
6
Press the AV button on the remote
control to select the SIDE channel.
SIDE will appear in the upper left corner on the TV screen.
7
With the camera (or accessory device)
ON and a prerecorded tape (CD, DVD,
Game Card, etc., depending on type of
accessory device) inserted, press the
PLAY button to view the tape on the
television.
USING THE SIDE (AV 3) I
NPUT JACKS
VIDEO IN
(YELLOW)
NOTE: The S-Video Cable can be used in place of
the Yellow Video cable shown in this diagram. If
your camera or accessory device has a S-Video
output jack, connecting the video signal through
the S-Video jack will reproduce the video signal
with greater quality.
AUDIO IN
(RED/WHITE)
Jack Panel of Camera
or External Accessory
Device
SIDE (AV 3) Input Jacks
Located on the Side of
the Television Cabinet
The SIDE JACKS also
contain a HEADPHONE
JACK. When headphones
are plugged into this
jack, the sound coming
from the TV is muted
and can only be heard
through the headphones.
SIDE
S-VIDEO
VIDEO
L
AUDIO
R
1
2
3
6
4
LEFT RIGHT
VIDEOAUDIO
S-VIDEO
7
5
Page 10
10
T
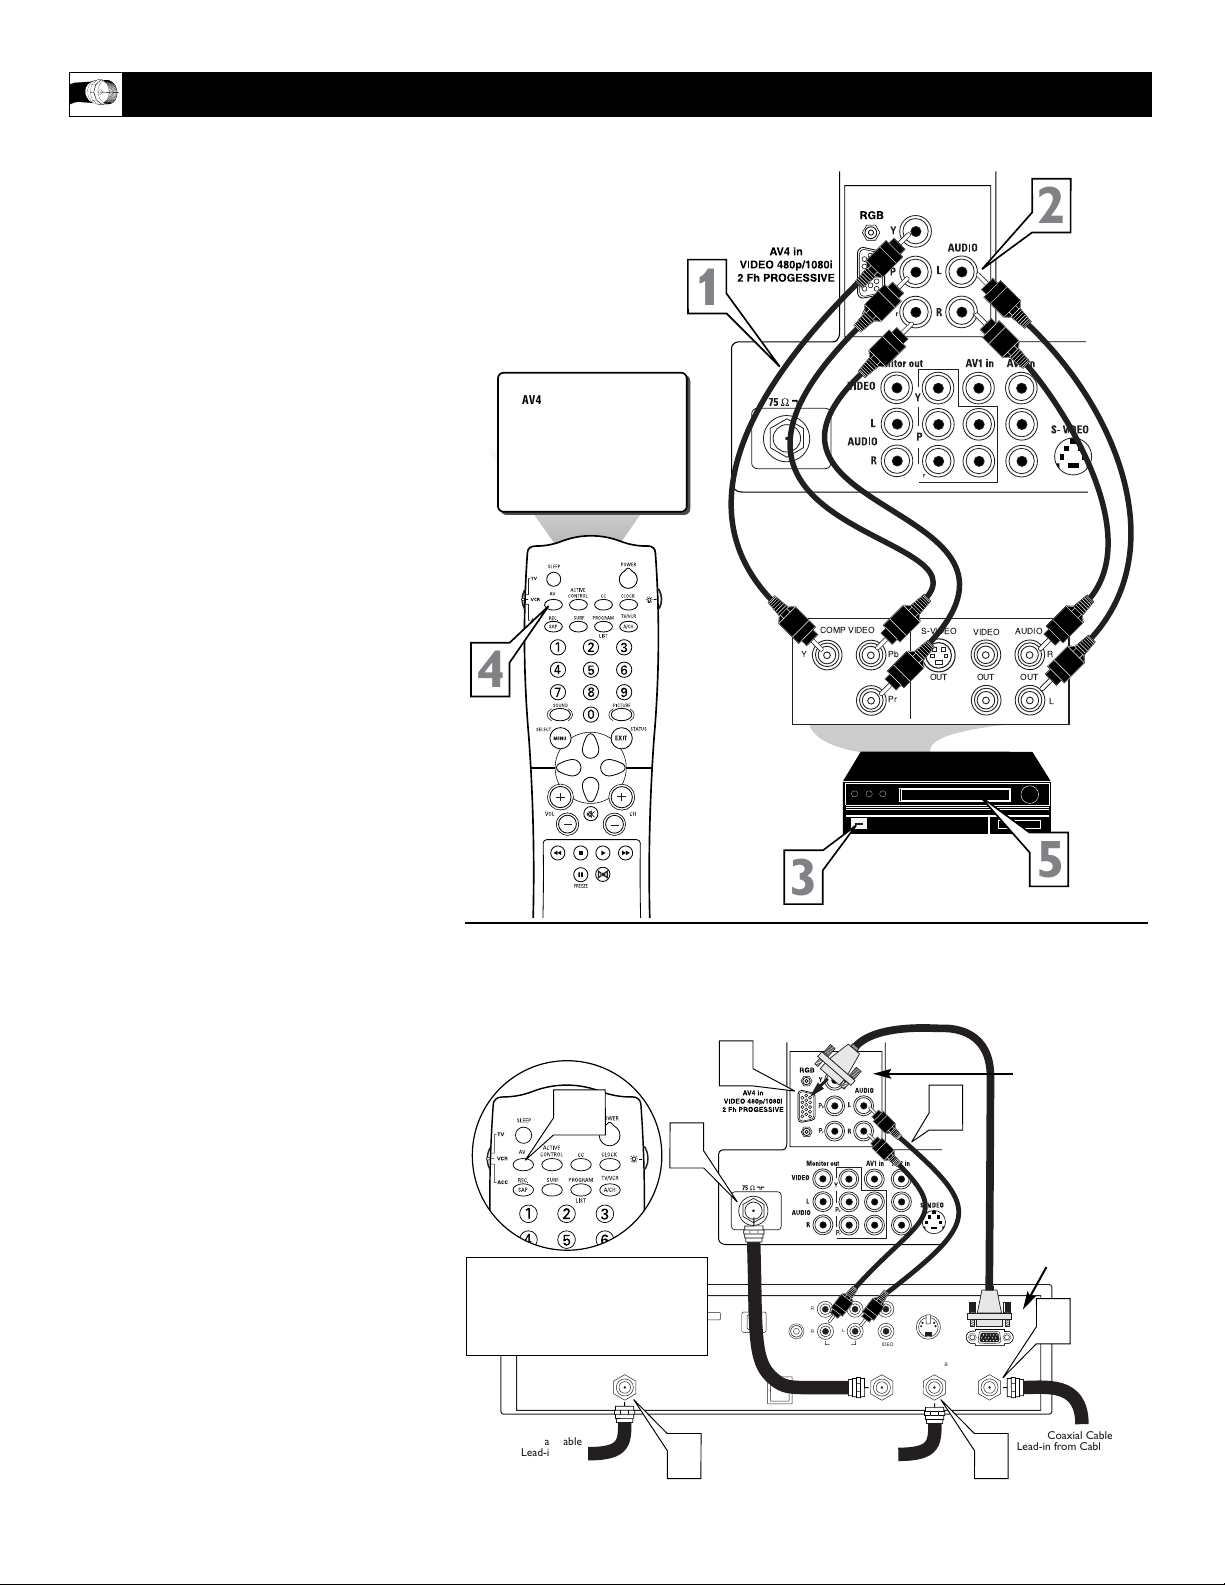
he AV4 Input Jacks provide Both Component
and VGA Video Inputs at 1080i or 480p, for
accessory like HD Receiver and Digital DVD
Players. Using the color difference signals (Pb,
Pr) and the luminance (Y) signal will improve
color bandwidth information.
Connecting a Digital device using the COMPONENT VIDEO Inputs:
1
Connect the Component (Y, Pb, Pr)
Video OUT jacks from the DVD player
(or similar device) to the (Y, Pb, Pr) AV4
in(put) jacks on the TV.
2
Connect the red and white AUDIO
CABLES to the Audio (left and right)
output jacks on the rear of the accessory
device to the Audio (L and R) AV4
in(put) jacks on the TV.
3
Turn the TV and the DVD (or digital
accessory device) ON.
4
Press the AV button on the remote to
tune to the AV4 channel.
5
Press the PLAY button on the DVD (or
digital accessory device) to view the program on the television.
Connect an HD Reviver to the VGA Input:
Please refer to your Receiver’s Owner’s Manual
for more detailed hookup options.
6
If using a Satellite Dish, Cable signal or
Antenna signal, connect the 75Ω round
cable from a Satellite Dish to the SATELLITE IN and/or the Cable and Antenna
signals to the ANTENNA “A” or “B” IN
on the back of the HD Receiver.
7
Connect another 75Ω round cable from
the OUT TO TV jack on the HD Receiver
to the 75Ω IN on the back of the TV.
8
Connect a VGA cable from the VGA
OUT on the HD Receiver to the AV4
VGA Input jack on the back of the TV.
9
Connect the Audio L(eft) and R(ight)
cables from the AUDIO Outputs on the
HD Receiver to the AV4 AUDIO Inputs
on the back of the TV.
With both the HD Receiver and the television ON, Press the AV button on the
remote to tune to the AV 4 Channel and
view the video input from the VGA supplied signal.
USING THE AV 4 I
NPUT JACKS
10
Using the VGA Input and a HD Receiver
Note: This is a very basic hookup, please refer to you HD Receiver’s (or accessory
device’s) Owner’s Manual for detailed hookup instructions.
Using the AV4 Component Video Inputs
JACK PANEL
ON BACK OF TV
JACK PANEL
ON BACK OF TV
JACK PANEL
OF DIGITAL DEVICE
SUCH AS A DVD PLAYER
JACK PANEL
OF HD RECEIVER
WITH VGA OUT
When using the AV4 channel (inputs),
some controls and features will not be
accessible for adjustment. SHARPNESS,
TINT, DYNAMIC CONTRAST, and the
FORMAT Controls will not be available.
Note: If the AV4 channel is
tuned and no signal connection
present, the screen could jump
or flash.
AUDIO IN
(RED/WHITE)
COMPONENT
VIDEO
CABLES
1
AV4
4
2
b
P
b
P
3
8
10
b
P
9
5
7
SATELLITE
ACCESS CARD
IN
DIGITAL AUDIO
OUTPUT
PHONE JACK
VCR
CONTROL
b
P
L
R
L
R
VIDEOAUDIO
OUT TO TV
S-VIDEO
ANTENNA BINANTENNA A
6
IN
Coaxial Cable
Lead-in from
Satellite Dish
Coaxial Cable Lead-in
from Alternate RF
Signal Source
Coaxial Cable
Lead-in from Cable Outlet,
66
Converter Box,
or VHF/UHF Antenna
Page 11
C
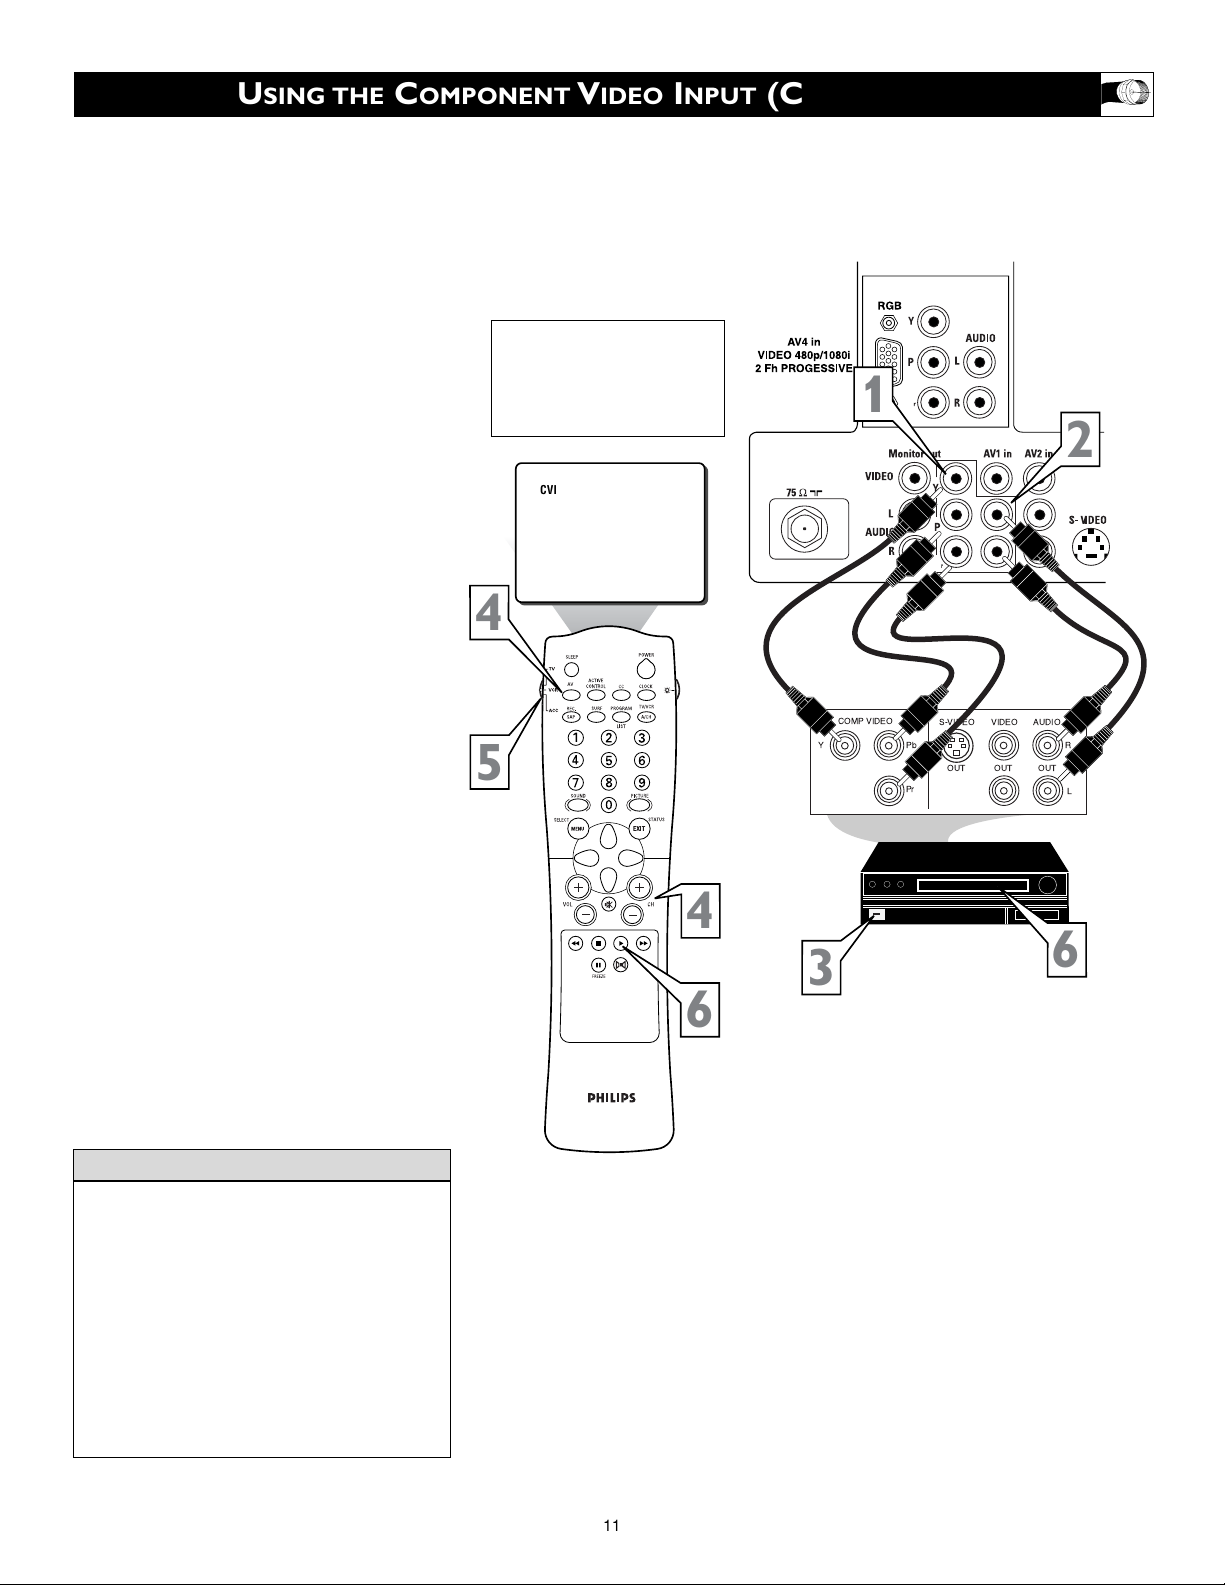
omponent Video inputs provide for the
highest possible color and picture resolution in the playback of digital signal source
material, such as with DVD players. The
color difference signals (Pb, Pr) and the luminance (Y) signal are connected and received
separately, which allows for improved color
bandwidth information (not possible when
using composite video or S-Video connections).
1
Connect the Component (Y, Pb, Pr)
Video OUT jacks from the DVD play-
er (or similar device) to the (Y, Pb, Pr)
in(put) jacks on the TV. When using
the Component Video Inputs, it is best
not to connect a signal to the AV1
Video Input.
2
Connect the red and white AUDIO
CABLES to the Audio (left and right)
output jacks on the rear of the accessory device to the Audio (L and R) AV1
in(put) jacks on the TV.
3
Turn the TV and the DVD (or digital
accessory device) ON.
4
Press the AV button or the CH +, –
buttons to scroll the available channels
until CVI appears in the upper left corner of the TV screen.
5
Slide the TV/VCR/ACC Switch to
the ACC position.
NOTE: The remote control may have
to be programmed to operate your
accessory device. Please refer to the
Using the Remote control with
Accessory Devices section starting on
page 46.
6
Insert a DVD disc into the DVD player
and press the PLAY button on the
remote.
11
USING THE C
OMPONENT VIDEO INPUT (CVI) JACKS
The description for the component video
connectors may differ depending on the
DVD player or accessory digital source
equipment used (for example, Y, Pb, Pr; Y,
B-Y, R-Y; Y, Cr, Cb). Although abbreviations and terms may vary, the letters b and r
stand for the blue and red color component
signal connectors, and Y indicates the luminance signal. Refer to your DVD or digital
accessory owner’s manual for definitions
and connection details.
HELPFUL HINT
AUDIO IN
(RED/WHITE)
COMPONENT
VIDEO
CABLES
BACK OF TV
ACCESSORY DEVICE
EQUIPPED WITH CONPO-
NENT VIDEO OUTPUTS.
The CVI connection will be dominate
over the AV1 Video Input. When a
Component Video Device is connected
as described, it is best not to have a
video signal connected to the AV1
Video Input jack.
CVI
4
5
1
b
P
b
P
2
4
6
3
6
Page 12

12
T
he S(uper)-Video connection on the rear
of the TV can provide you with better picture detail and clarity for the playback of
accessory sources such as DBS (digital
broadcast satellite), DVD (digital video
discs), video games, and S-VHS VCR (video
cassette recorder) tapes than the normal
antenna picture connections.
NOTE: The accessory device must have an
S-VIDEO OUT(put) jack in order for you to
complete the connection on this page.
1
Connect the S-VIDEO CABLE to the
S-VIDEO input jack on the rear of the
television.
2
Connect the AUDIO (red and white)
cables to the AUDIO AV2 in jacks on
the rear of the TV
.
3
Connect the S-VIDEO CABLE to the
S-VIDEO output jack on the accessory
device.
4
Connect the red and white AUDIO
cables to the AUDIO (left and right)
output jacks on the rear of the accessory device.
5
Turn the VCR, DVD or other accessory device ON.
6
Press the AV button on the remote
control to select the AV2 channel. AV2
will appear in the upper left corner on
the TV screen.
7
With the VCR (or accessory device)
ON and a prerecorded tape inserted,
press the PLAY button to view the
tape on the television.
USING THE S-V
IDEO INPUT JACKS
The S-Video jack and the AV 2 jacks work
together. When a device is connected to the
S-Video jack, do not connect a signal to the
AV 2 in Video jack. This could cause an
over-lapping of two video images on the TV
screen.
cc
C
HECK IT OUT
JACK PANEL
ON BACK OF TV
AUDIO CABLES
(Red & White)
S-VIDEO CABLE
(Red & White)
VCR or EXTERNAL
ACCESSORY DEVICE
WITH S-VIDEO OUTPUT
When using the S-Video
Input, do not connect an
video signal to the AV 2
in Video Jack. This could
cause a ghost image to
appear over the S-Video
signal.
CVI
AV1
24
AV4
SIDE
AV2
b
P
2
b
P
1
6
4
5
7
3
Page 13
13
T
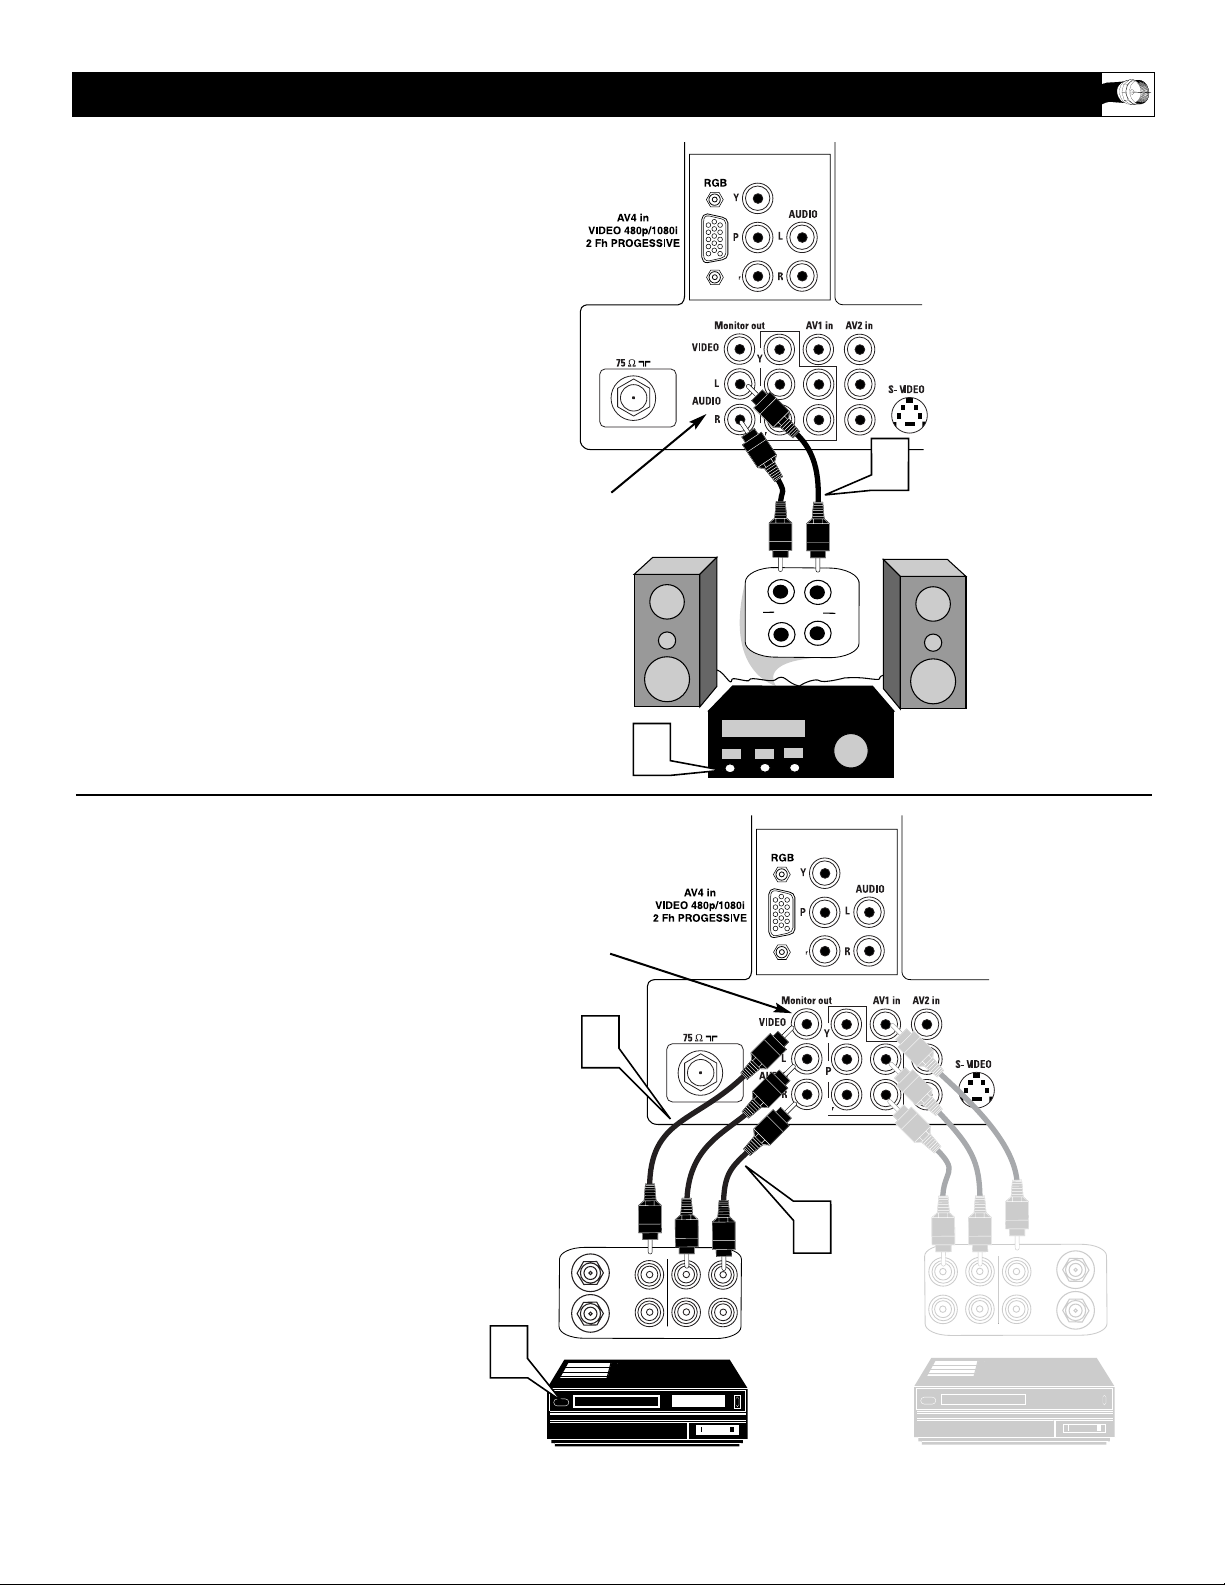
he Audio/Video (Monitor) Output jacks
are great for recording with a VCR or
used to connect an external audio system for
better sound reproduction.
For Audio System Connection:
1
Connect one end of the R(ight) and
L(eft) AUDIO (Monitor Out) jacks on
the TV to the R and L audio input jacks
on your amplifier or sound system. Set
the audio system’s volume to a normal
listening level.
NOTE: Refer to page 21 to set the TV’s Audio
Out Control to VARIABLE if you want to control the volume of the audio system with the
TV remote control. (Set the control to FIXED
if you want to control the volume from the
audio system.)
2
Turn the TV and audio system ON.
You can now adjust the sound level
coming from the audio system with the
VOLUME (+) or (–) button on the TV
or remote control.
For Second VCR Connection:
NOTE: Refer to page 7 for the proper
hookup of the first VCR. Follow the instructions on how to tune to the AV 1 channel to
view a pre-recorded tape.
The following steps allow you to connect a
second VCR to record the program while
your watching it.
3
Connect one end of the yellow Video
Cable to the Monitor Out VIDEO
plug. Connect the other end to the
VIDEO IN plug on the second VCR.
4
Connect one end of the red and white
Audio cable from the Monitor Out
AUDIO L and R plugs on the TV to the
AUDIO IN plugs on the VCR.
5
Turn the Second VCR ON, insert a
black VHS tape and it’s ready to record
what’s being viewed on the TV screen.
USING THE M
ONITOR OUTPUT JACKS
JACK PANEL
Located on the
back of the TV
AUDIO CABLES
(Red & White)
AUDIO SYSTEM
with AUDIO
INPUTS
MONITOR OUT
AUDIO L(eft) and R(ight)
JACK PANEL
Located on the
back of the TV
AUDIO CABLES
(Red & White)
FIRST VCR (accessory device)
(Hookup from Page 7)
MONITOR OUT
VIDEO &
AUDIO L(eft) and R(ight)
SECOND VCR
VIDEO CABLE
(Yellow)
b
P
b
P
3
ANTENNA
ANTENNA
5
IN
OUT
2
OUT OUT
VIDEO
IN
RL
AUDIO
IN
R
L
T
U
P
IN
V
/T
X
U
A
T
U
P
IN
O
N
O
H
P
b
P
b
P
4
1
LR
AUDIO
IN
ANTENNA
OUTOUT
IN
VIDEO
ANTENNA
OUT
IN
Page 14
14
T
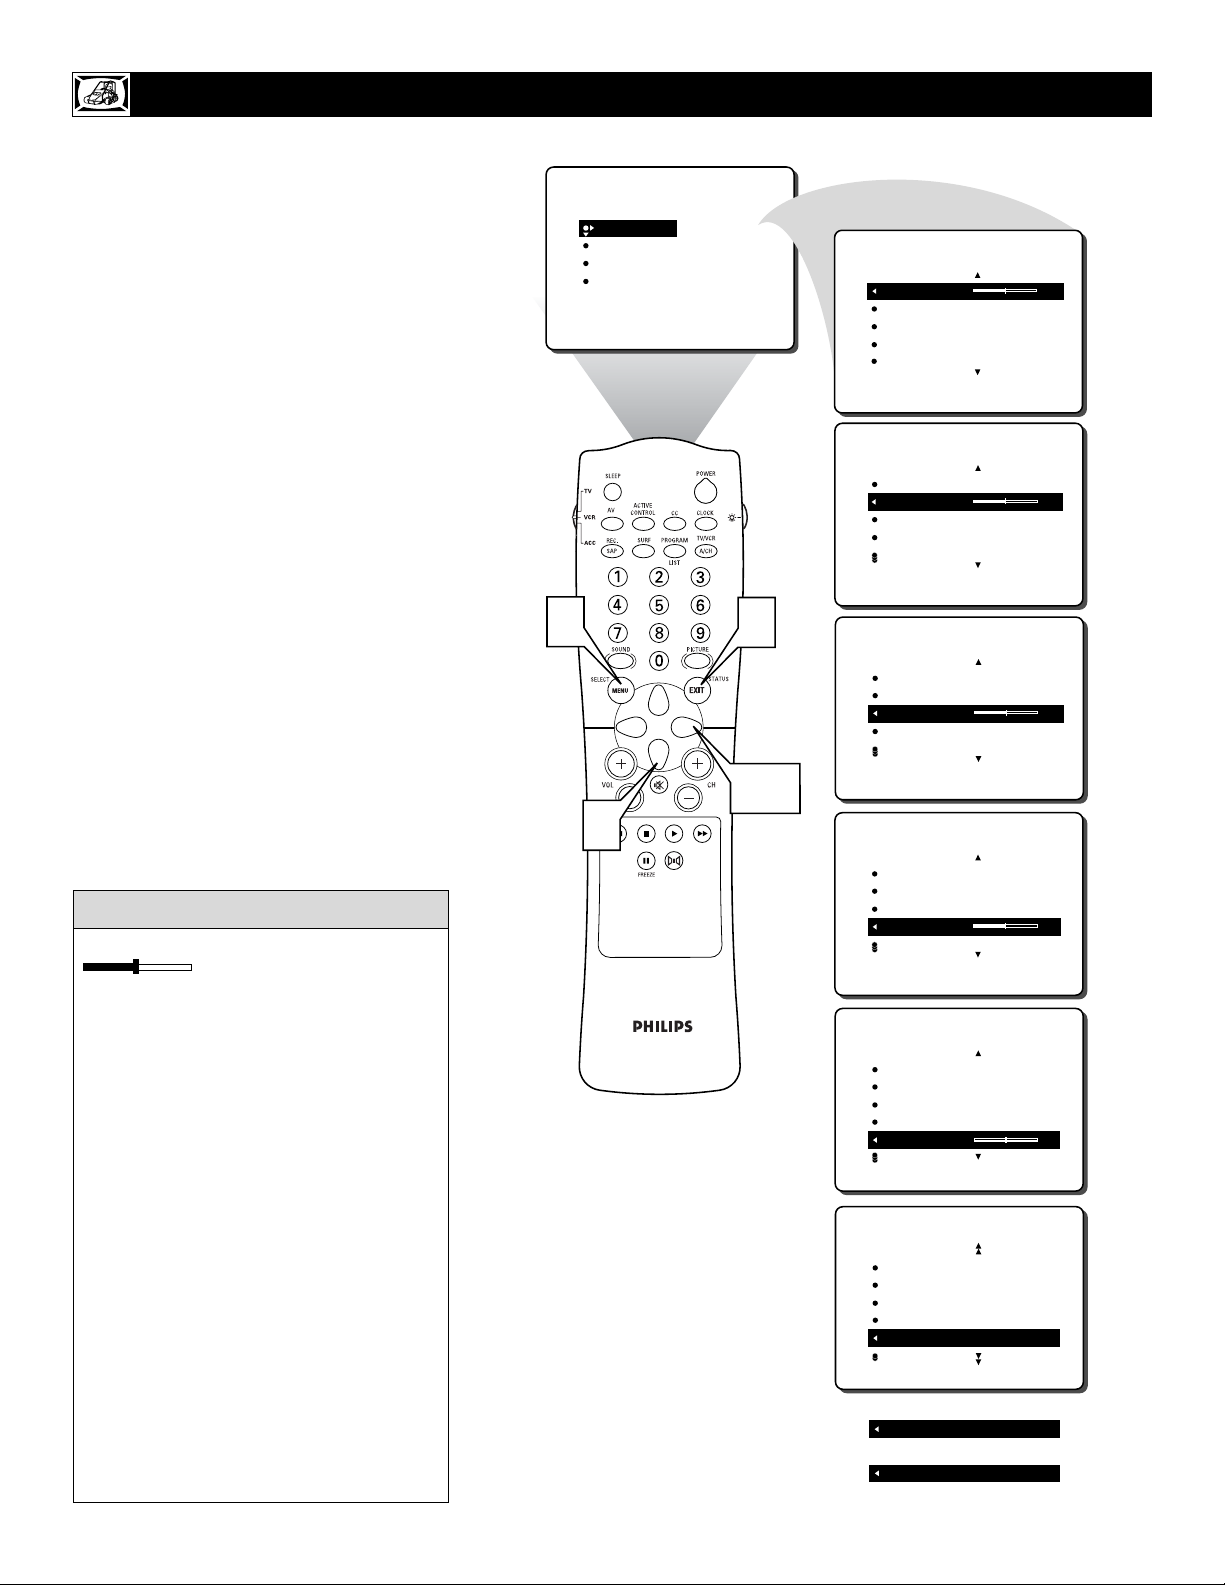
o adjust your TV picture controls, select a
channel and follow these steps.
1
Press the MENU button on the remote
control to show the onscreen menu. PICTURE will be highlighted.
2
Press the CURSOR RIGHT button and
the menu will shift to the left. BRIGHTNESS will be highlighted and an adjustment bar will be shown to the right.
3
Use the CURSOR LEFT or CURSOR
RIGHT button to adjust the BRIGHT-
NESS level of the picture.
4
After adjusting the BRIGHTNESS control, press the CURSOR DOWN button
to select another picture adjustment:
COLOR, PICTURE, SHARPNESS,
TINT, OR COLOR TEMP. Press the
CURSOR LEFT or CURSOR RIGHT
button to adjust the selected control.
NOTE: The menu will show only five items at a
time, so you will need to continue scrolling with
the CURSOR DOWN button to adjust the TINT
and COLOR TEMP.
5
Press the STATUS/EXIT button to
remove the menu from the screen.
ADJUSTING THE P
ICTURE CONTROLS
Remember, when the bar scale is centered
, the control settings are at
normal, mid-range levels. Picture adjustments are described here.
NOTE: The SHARPNESS and TINT
Controls will not be available for adjustments when tuned to the AV4 Inputs (AV4
Channel) and CVI Inputs (CVI Channel).
BRIGHTNESS – adds or subtracts light
from the darkest part of the picture.
COLOR – adds or eliminates color.
PICTURE – improves the detail of the light-
est parts of the picture.
SHARPNESS – improves the detail in the
picture.
TINT – adjusts the picture to obtain natural
skin tones.
COLOR TEMP offers NORMAL, COOL, or
WARM picture preferences.
NORMAL – keeps whites, white.
COOL – makes whites, bluish.
WARM – makes whites, reddish.
HELPFUL HINT
1
PICTURE
SOUND
FEATURES
INSTALL
4
BRIGHTNESS
COLOR
PICTURE
SHARPNESS
TINT
PICTURE
BRIGHTNESS 30
COLOR
PICTURE
SHARPNESS
TINT
PICTURE
BRIGHTNESS
COLOR 30
PICTURE
SHARPNESS
TINT
5
PICTURE
BRIGHTNESS
COLOR
PICTURE 30
SHARPNESS
TINT
2,3
PICTURE
BRIGHTNESS
COLOR
PICTURE
SHARPNESS 30
TINT
PICTURE
BRIGHTNESS
COLOR
PICTURE
SHARPNESS
TINT 0
PICTURE
COLOR
PICTURE
SHARPNESS
TINT
COLOR TEMP NORMAL
OR
COLOR TEMP WARM
OR
COLOR TEMP COOL
Page 15
15
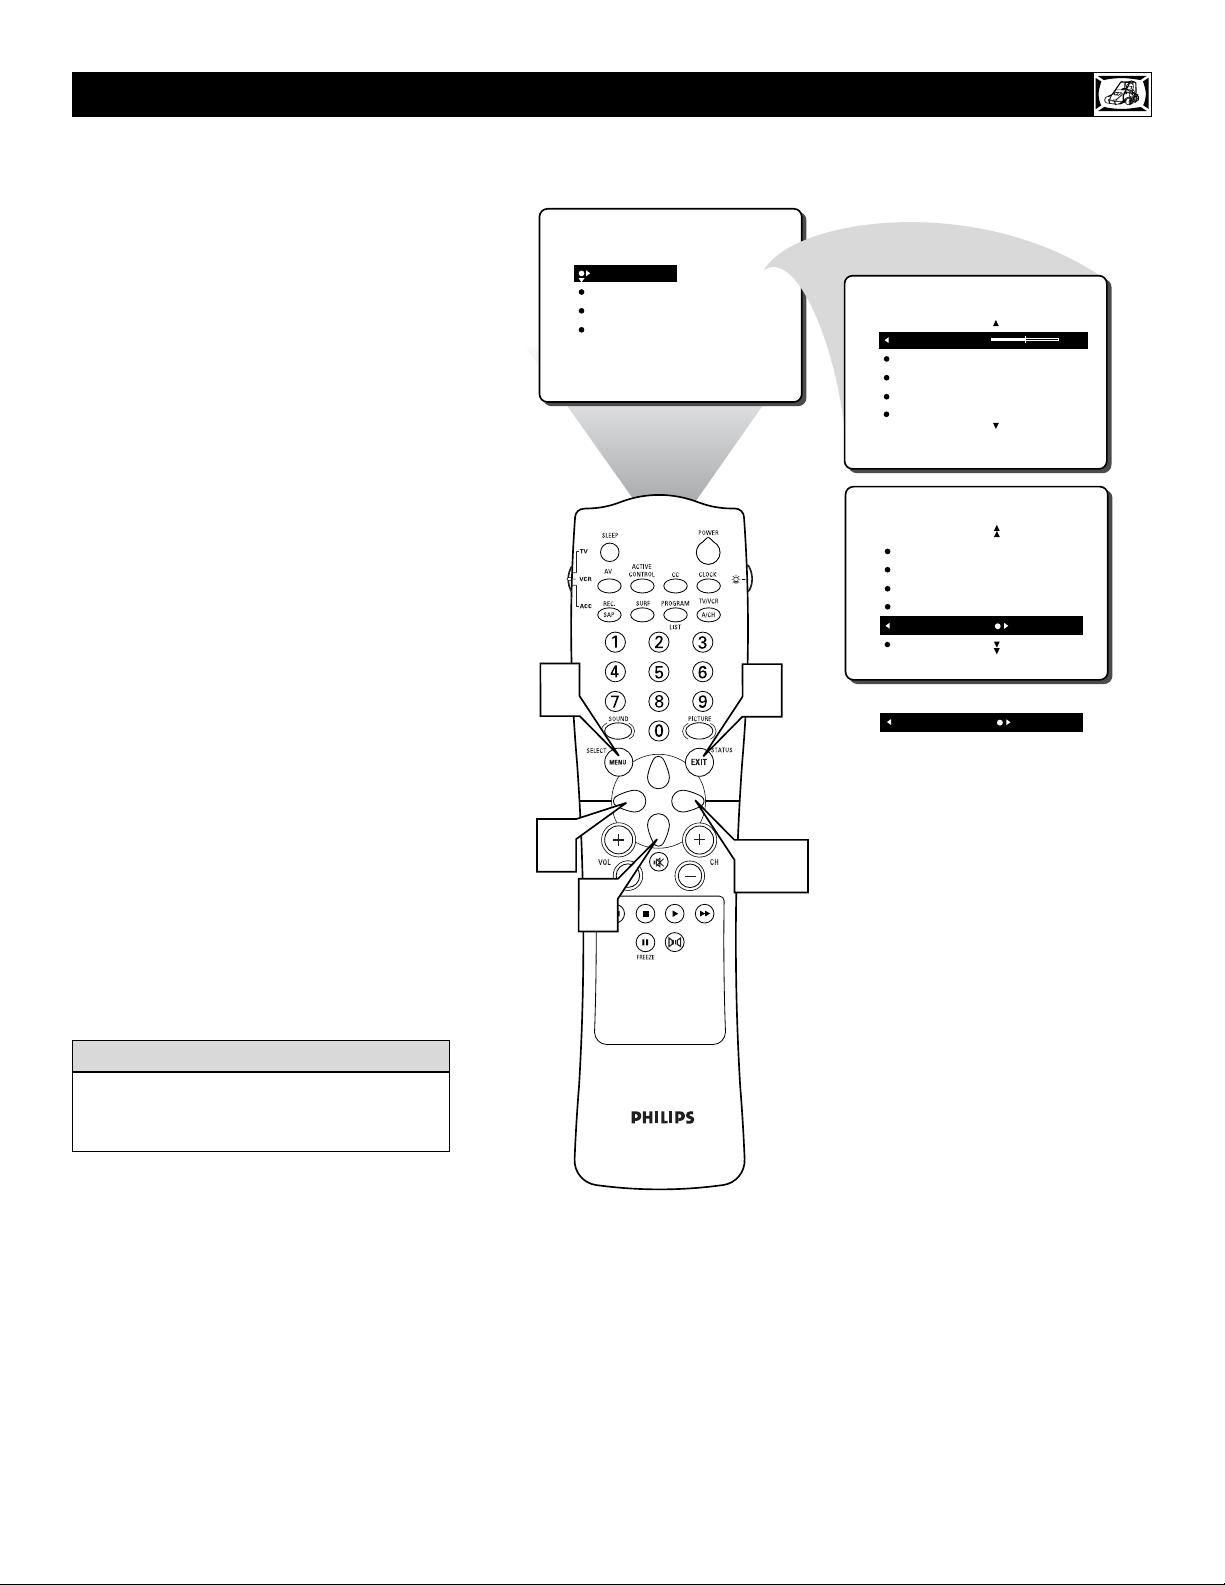
T
he Digital Options (Eye Fidelity) control
gives you a choice between two different
picture scanning modes: Progressive Scan
and Interlaced (1050i).
Progressive Scan doubles the number of picture lines, eliminating line flicker and providing a jitter-free picture.
Interlaced (1050i mode) improves the appearance of onscreen motion. All ‘Picture
Adjustment Controls’ stay controllable,
including the Active Control. It also helps
smooth out jagged lines that are sometimes
seen on curved and angled surfaces in the
picture.
1
Press the MENU button on the
remote to show the onscreen menu.
PICTURE will be highlighted.
2
Press the CURSOR RIGHT button and
the menu will shift to the left. BRIGHTNESS will be highlighted and an adjustment bar will be shown to the right.
3
Press the CURSOR DOWN button
repeatedly until the Digital Options
control is highlighted.
4
Press the CURSOR RIGHT or
LEFT button until you select the
option you want, either PROGRESSIVE or 1050i.
5
Press the STATUS/EXIT button to
remove the menu from the screen.
HOW TO
USE THE DIGITAL OPTIONS CONTROL
The Digital Options (Eye Fidelity) Control
is not available for use with the AV 4 input
jacks.
HELPFUL HINT
1
PICTURE
SOUND
FEATURES
INSTALL
BRIGHTNESS
COLOR
PICTURE
SHARPNESS
TINT
5
PICTURE
BRIGHTNESS 30
COLOR
PICTURE
SHARPNESS
TINT
PICTURE
PICTURE
SHARPNESS
TINT
COLOR TEMP
DIGITAL OPTIONS PROGRESSIVE
OR
DIGITAL OPTIONS 1050i LINES
4
2,4
3
Page 16
16
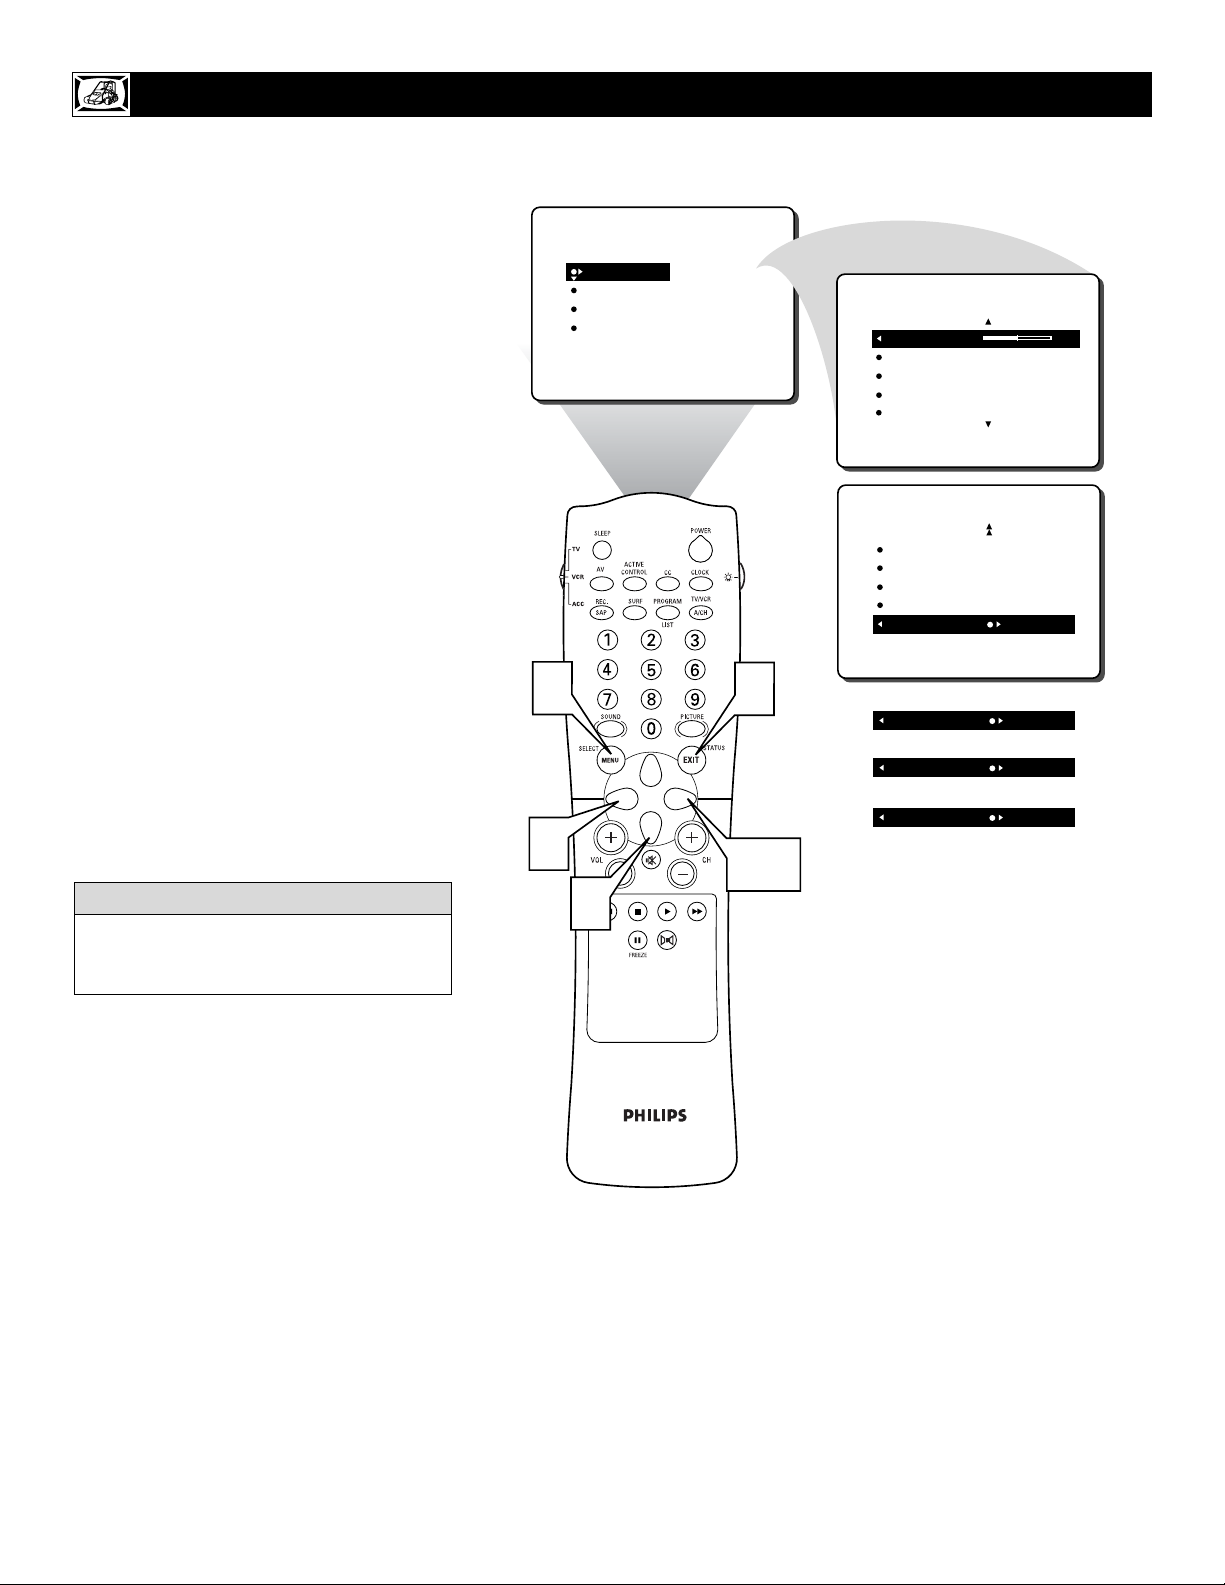
T
he Dynamic Contrast control allows you
to sharpen the picture quality by making
dark portions of the picture darker and light
portions of the picture more noticeable.
Normally, you will probably want to select
MED. In certain circumstances, however, you
may prefer MIN or MAX.
1
Press the MENU button on the
remote to show the onscreen menu.
PICTURE will be highlighted.
2
Press the CURSOR RIGHT button and
the menu will shift to the left. BRIGHTNESS will be highlighted and an adjustment bar will be shown to the right.
3
Press the CURSOR DOWN button
repeatedly until the DYN. CONTRAST control is highlighted.
4
Press the CURSOR RIGHT or
LEFT button until you select the
option you want, either OFF, MIN,
MED, or MAX.
5
Press the STATUS/EXIT button to
remove the menu from the screen.
HOW TO
SET THE DYNAMIC CONTRAST CONTROL
The Dynamic Contrast control is not available for use with the AV 4 Inputs (AV4
Channel).
HELPFUL
HINT
PICTURE
SOUND
FEATURES
INSTALL
1
BRIGHTNESS
COLOR
PICTURE
SHARPNESS
TINT
5
PICTURE
BRIGHTNESS 30
COLOR
PICTURE
SHARPNESS
TINT
PICTURE
SHARPNESS
TINT
COLOR TEMP
DIGITAL OPTIONS
DYN. CONTRAST OFF
OR
DYN. CONTRAST MIN
OR
DYN. CONTRAST MED
OR
DYN. CONTRAST MAX
4
2,4
3
Page 17
17
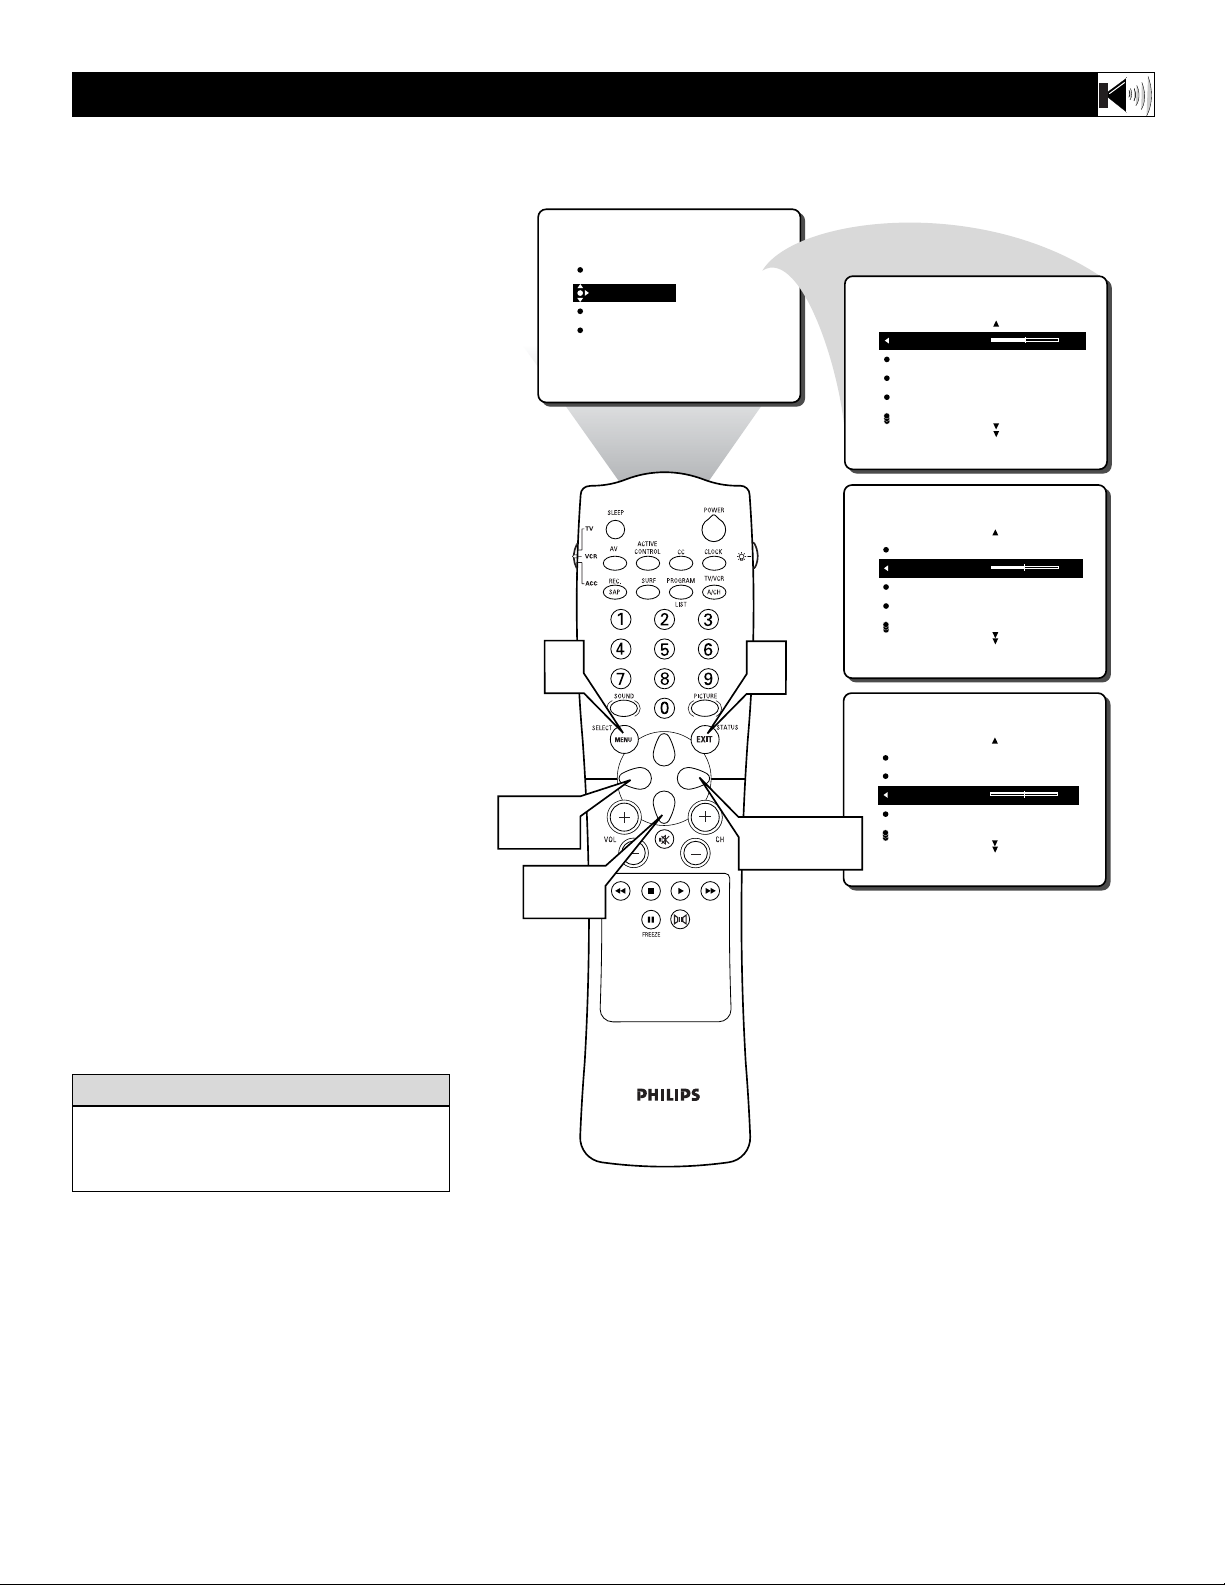
B
esides the normal volume level control,
your TV also has individual sound-adjustment controls. The TREBLE (high frequency), BASS (low frequency), and Speaker BALANCE may all be used to adjust the sound
playback of TV programs.
1
Press the MENU button on the
remote control to show the onscreen
menu.
2
Press the CURSOR DOWN button
once to highlight SOUND.
3
Press the CURSOR RIGHT button
and the menu will shift to the left.
TREBLE will be highlighted and an
adjustment bar will be shown to the
right.
4
Use the CURSOR RIGHT or CURSOR LEFT button to adjust the TRE-
BLE (high frequency) level of the television’s sound.
5
After adjusting the TREBLE control,
press the CURSOR DOWN button to
select another sound adjustment:
BASS or BALANCE.
6
Press the CURSOR RIGHT or CURSOR LEFT button to adjust the
selected control.
7
Press the STATUS/EXIT button to
remove the menu from the screen.
ADJUSTING THE T
REBLE,BASS,AND BALANCE CONTROLS
Remember, when the bar scale is centered,
speaker BALANCE is centered between the
TV’s left and right side speakers.
HELPFUL HINT
PICTURE
SOUND
FEATURES
INSTALL
1
TREBLE
BASS
BALANCE
AVL
INCR. SURROUND
7
SOUND
TREBLE 30
BASS
BALANCE
AVL
INCR. SURROUND
SOUND
TREBLE
BASS 30
BALANCE
AVL
INCR. SURROUND
4,6
2,5
SOUND
TREBLE
BASS
BALANCE 0
AVL
INCR. SURROUND
3,4,6
Page 18
18
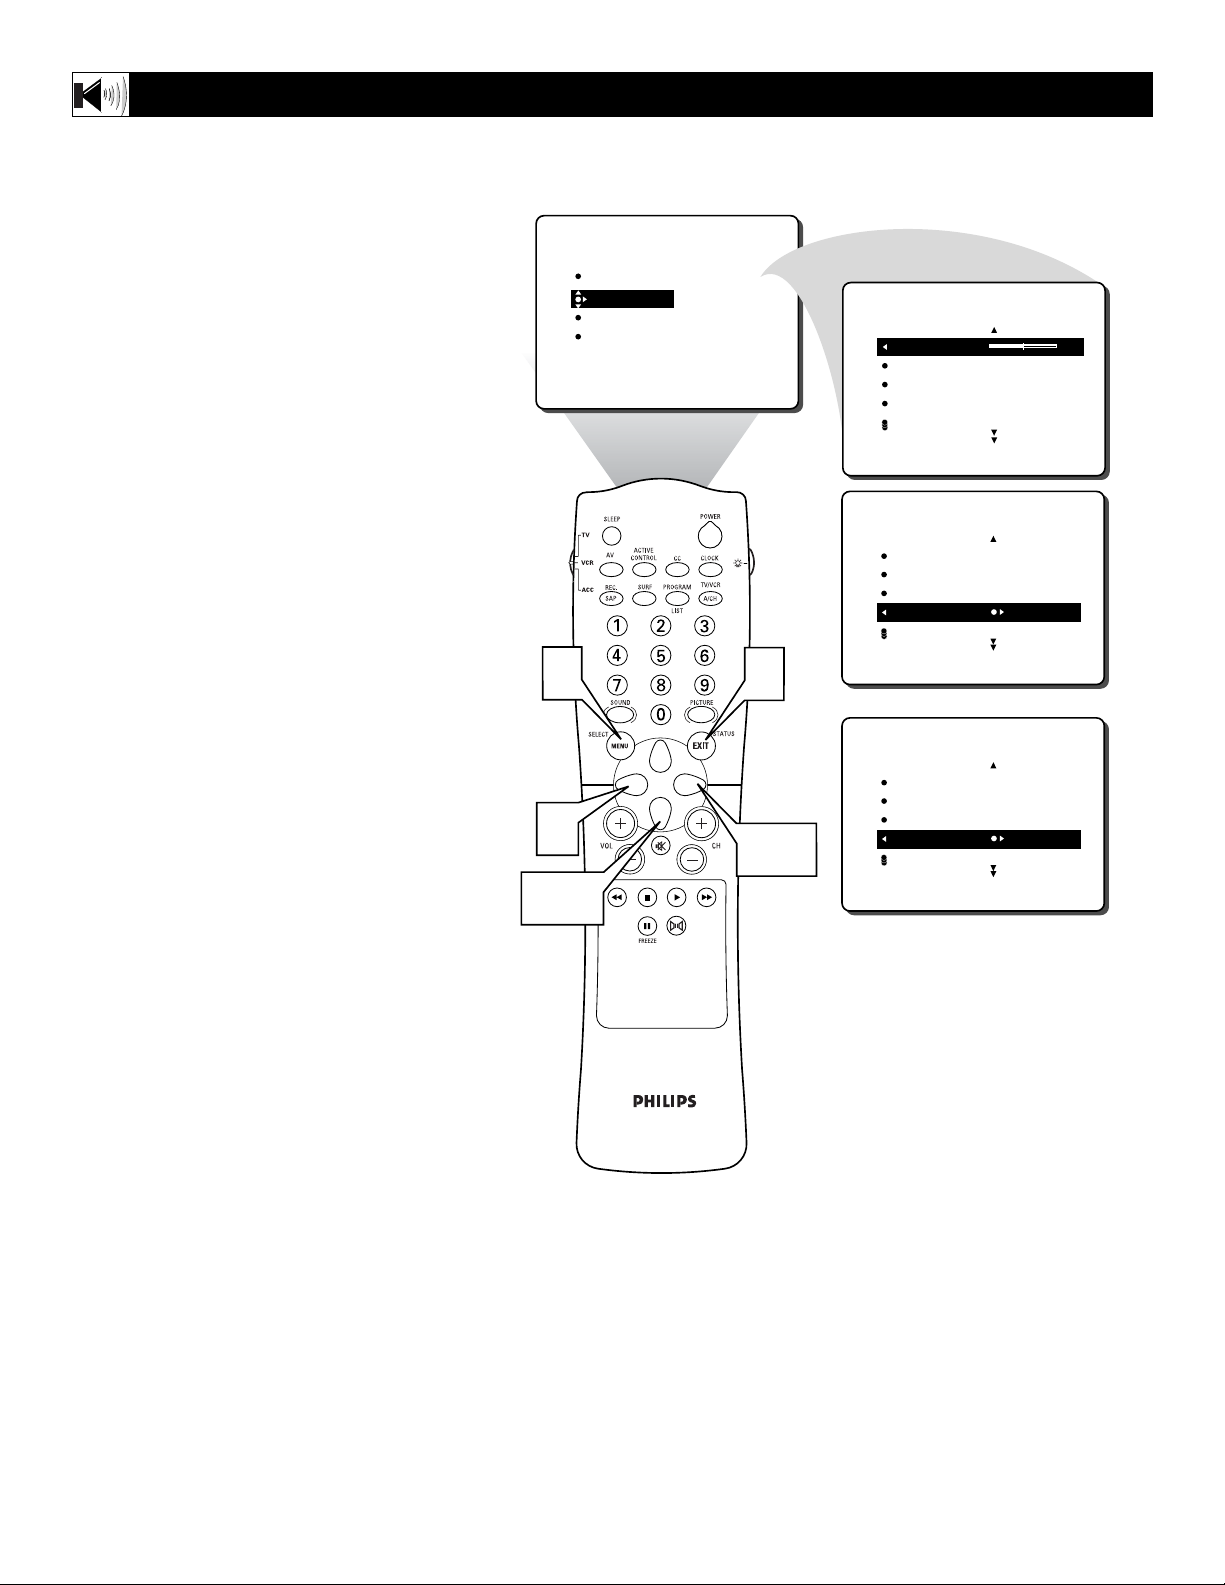
I
n most cases, the volume levels coming
from broadcast programming or commercials are never the same. With the AVL
(Audio Volume Leveler) control turned ON,
you can have the TV level out sound that is
being heard. This makes for a more consistent sound by reducing the peaks and valleys
that occur during program changes or commercial breaks. To turn the AVL ON, follow
these steps.
1
Press the MENU button on the
remote control to show the onscreen
menu.
2
Press the CURSOR DOWN button
once to highlight SOUND.
3
Press the CURSOR RIGHT button
and the menu will shift to the left.
TREBLE will be highlighted and an
adjustment bar will be shown to the
right.
4
Press the CURSOR DOWN button
repeatedly until AVL is highlighted.
5
Press the CURSOR RIGHT or CURSOR LEFT button to toggle AVL ON
or OFF.
6
Press the STATUS/EXIT button to
remove the menu from the screen.
HOW TO
USE THE AVL CONTROL
PICTURE
SOUND
FEATURES
INSTALL
1
TREBLE
BASS
BALANCE
AVL
INCR. SURROUND
6
5
3,5
2,4
SOUND
TREBLE 30
BASS
BALANCE
AVL
INCR. SURROUND
SOUND
TREBLE
BASS
BALANCE
AVL ON
INCR. SURROUND
OR
SOUND
TREBLE
BASS
BALANCE
AVL OFF
INCR. SURROUND
Page 19
19
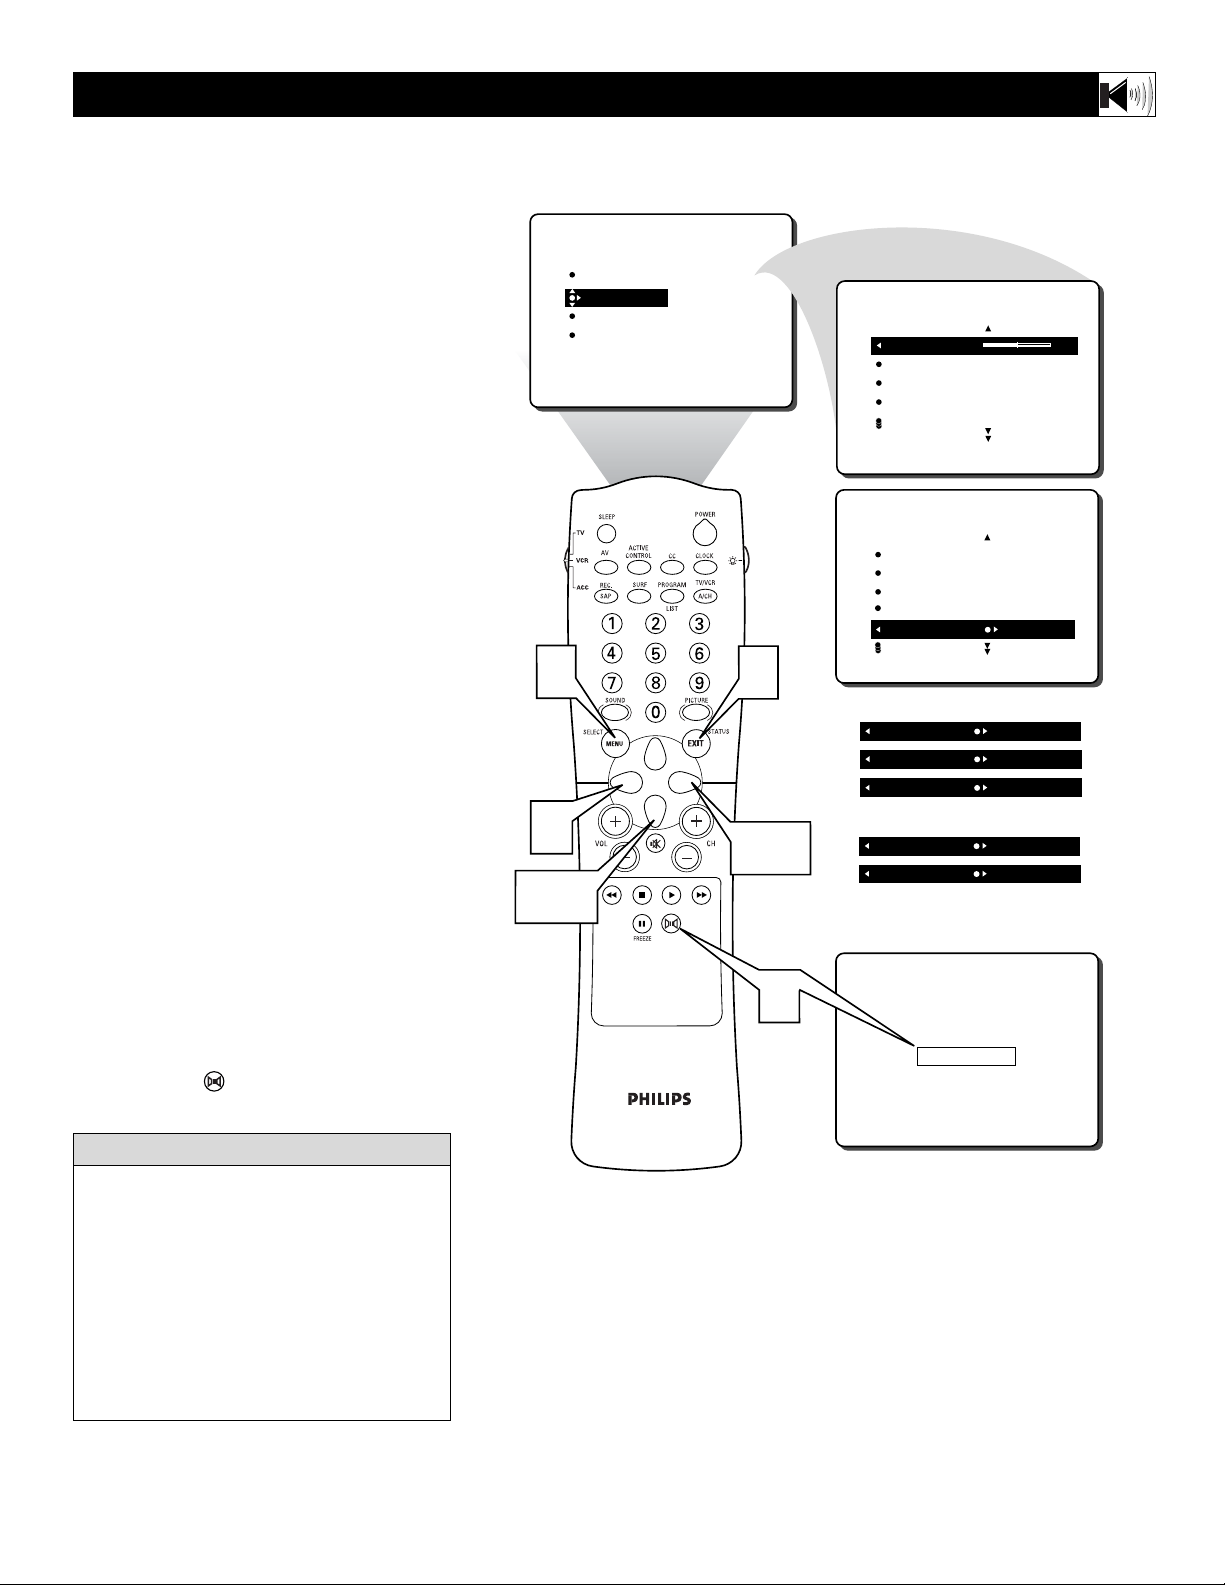
T
he Incredible Surround feature adds
greater depth and dimension to both monaural (MONO) and stereo TV sound. With
the control set to INCR. SURROUND
(Incredible Surround), the TV’s speakers can
add even wider sound separation to normal
broadcasts.
1
Press the MENU button on the
remote control to show the onscreen
menu.
2
Press the CURSOR DOWN button
once to highlight SOUND.
3
Press the CURSOR RIGHT button
and the menu will shift to the left.
TREBLE will be highlighted and an
adjustment bar will be shown to the
right.
4
Press the CURSOR DOWN button
repeatedly until INCR. SURROUND is
highlighted. (Incredible Surround)
5
Press the CURSOR RIGHT or CURSOR LEFT button to toggle the
INCR. SURROUND control settings.
If signal is Stereo: Select STEREO,
INCR. SURROUND, or DOLBY*
VIRTUAL.
If signal is MONO: Select MONO, or
SPATIAL.
6
Press the STATUS/EXIT button to
remove the menu from the screen.
7
You can also change the INCR. SURROUND onscreen menu control settings by pressing the VIRTUAL
DOLBY button on the remote control.
HOW TO
USE THE INCREDIBLE SURROUND CONTROL
SPATIAL – widens the sound, simulating a
broader, fuller sound.
INCR. SURROUND – widens the sound,
simulating a broader, fuller sound.
DOLBY* VIRTUAL (with Virtual Dolby
Surround signals) simulates the surround-
sound experience from two speakers using
Dolby Pro Logic* providing the listener
with the sensation of being surrounded by
additional speakers.
HELPFUL HINT
*Manufactured under license from Dolby Laboratories.
“Dolby”, “Pro Logic”, and the double-D symbol are
trademarks of Dolby Laboratories.
1
5
2,4
PICTURE
SOUND
FEATURES
INSTALL
TREBLE
BASS
BALANCE
AVL
INCR. SURROUND
6
3,5
SOUND
TREBLE 30
BASS
BALANCE
AVL
INCR. SURROUND
SOUND
TREBLE
BASS
BALANCE
AVL ON
INCR. SURROUND STEREO
If the signal is in STEREO, choose from:
INCR. SURROUND STEREO
INCR. SURROUND INCR. SURROUND
INCR. SURROUND DOLBY VIRTUAL
If the signal is in MONO, choose from:
INCR. SURROUND MONO
INCR. SURROUND SPATIAL
7
DOLBY VIRTUAL
Page 20
20
Y
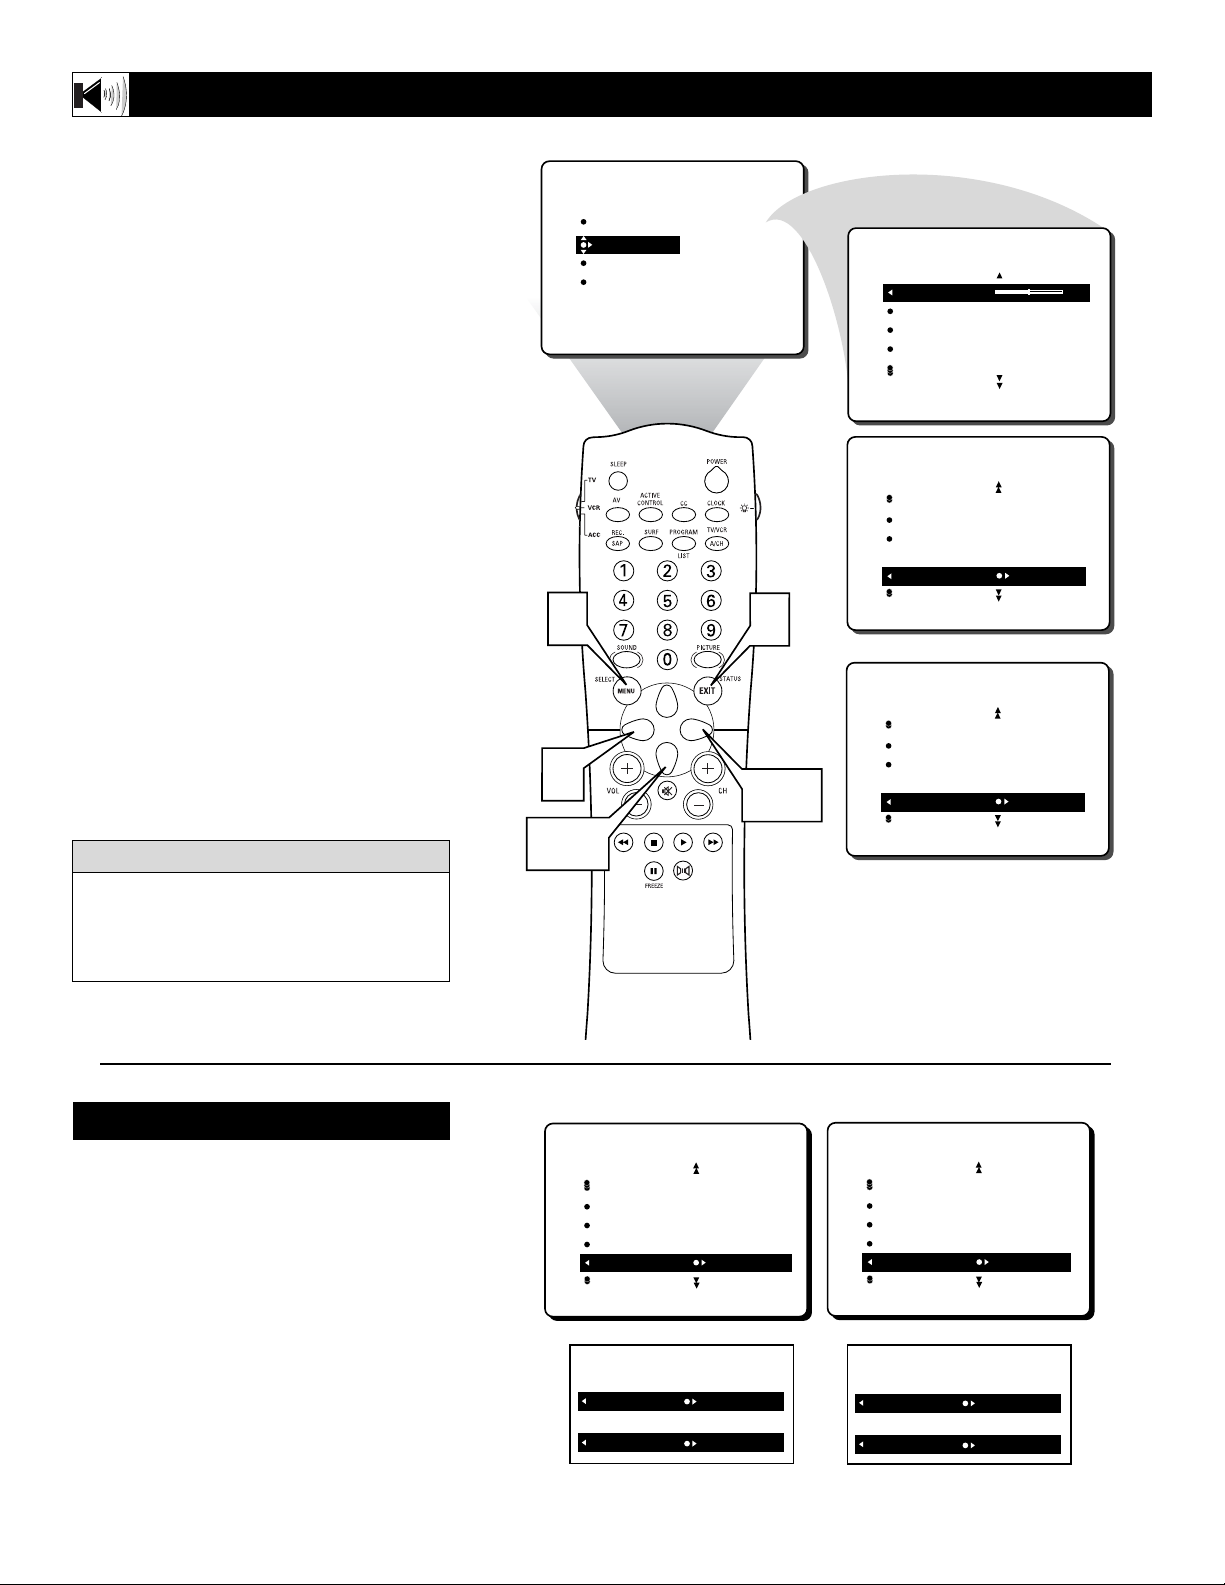
ou can receive broadcast stereo TV pro-
grams. The TV has both an amplifier and
twin speakers through which the stereo sound
can be heard.
1
Press the MENU button on the
remote control to show the onscreen
menu.
2
Press the CURSOR DOWN button
once to highlight SOUND.
3
Press the CURSOR RIGHT button
and the menu will shift to the left.
TREBLE will be highlighted and an
adjustment bar will be shown to the
right.
4
Press the CURSOR DOWN button
repeatedly until STEREO is highlighted.
5
Press the CURSOR RIGHT or CURSOR LEFT button to select STEREO
or MONO.
6
Press the STATUS/EXIT button to
remove the menu from the screen.
HOW TO
SET THE STEREO CONTROL
An SAP is an additional part of the stereo
broadcast system. Sent as a third audio
channel, an SAP can be heard apart from the
current TV program sound. TV stations are
free to use SAP for any number of purposes.
If an SAP signal is not present with a selected program, the SAP option cannot be selected. Also, if SAP is selected on a channel
(with SAP) and you select another channel,
when you return to the original channel, SAP
will be OFF. You will have to reselect the
SAP feature.
SAP-SECONDARY AUDIO PROGRAM
Remember, if stereo is not present on a
selected show and the TV is placed in the
STEREO mode, the sound coming from the
set will remain monaural.
HELPFUL HINT
PICTURE
SOUND
FEATURES
INSTALL
1
TREBLE
BASS
BALANCE
AVL
INCR. SURROUND
6
SOUND
SOUND
SOUND
5
3,5
TREBLE 30
BASS
BALANCE
AVL
INCR. SURROUND
BASS
BALANCE
AVL
INCR. SURROUND
STEREO STEREO
OR
BASS
BALANCE
AVL
INCR. SURROUND
STEREO MONO
2,4
SOUND
BALANCE
AVL
INCR. SURROUND
STEREO
SAP AVAILABLE
IF SECONDARY AUDIO PROGRAMING
IS BEING BROADCAST:
SAP AVAILABLE
SAP OFF
SOUND
BALANCE
AVL
INCR. SURROUND
STEREO
SAP NOT AVAILABLE
IF SECONDARY AUDIO PROGRAMING
IS NOT BEING BROADCAST:
OR
SAP NOT AVAILABLE
OR
SAP OFF
Page 21
21
I
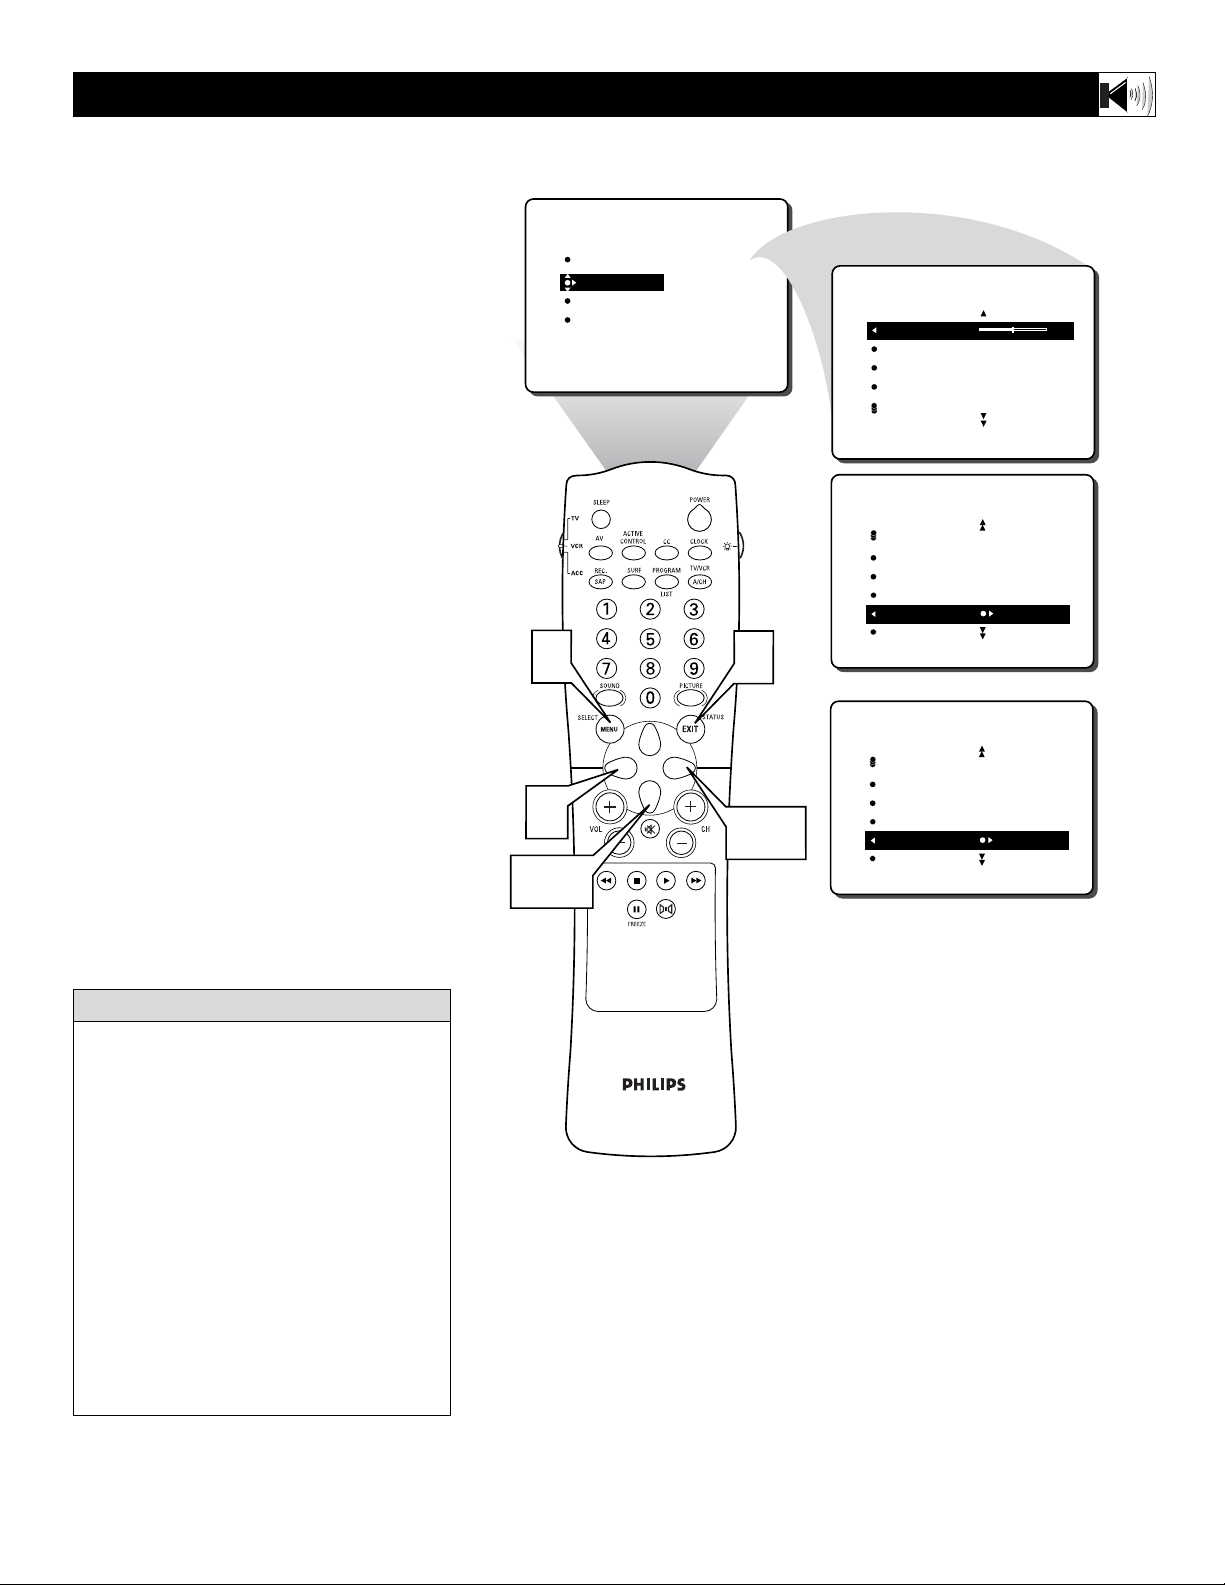
f you have connected the TV’s AUDIO
OUTPUT jacks to the AUDIO INPUT jacks
on a stereo receiver (see page 12 for connection instructions), set AUDIO OUT to either
VARIABLE or FIXED to determine whether
you adjust the volume at the stereo or at the
TV. If you select VARIABLE, change the volume at the TV using the TV’s remote control.
If you select FIXED, adjust the volume at the
stereo using the stereo’s controls. To select
FIXED or VARIABLE, follow these steps.
1
Press the MENU button on the
remote control to show the onscreen
menu.
2
Press the CURSOR DOWN button
once to highlight SOUND.
3
Press the CURSOR RIGHT button
and the menu will shift to the left.
TREBLE will be highlighted and an
adjustment bar will be shown to the
right.
4
Press the CURSOR DOWN button
repeatedly until AUDIO OUT is highlighted.
5
Press the CURSOR RIGHT or CURSOR LEFT button to select FIXED or
VARIABLE.
6
Press the STATUS/EXIT button to
remove the menu from the screen.
HOW TO
USE THE AUDIO OUT CONTROL
FIXED – If FIXED is selected, the sound
coming from the TV and being heard
through an external audio system is not
adjustable with the television’s volume
controls. The volume would have to be
adjusted at the audio system.
VARIABLE – If VARIABLE is selected,
the sound coming from the TV and being
heard through an external audio system can
be adjusted at the TV using the Volume +
or – buttons on the television or remote
control.
Remember, the connection instructions for
an external audio system is located on page
13.
HELPFUL
HINT
PICTURE
SOUND
FEATURES
INSTALL
1
TREBLE
BASS
BALANCE
AVL
INCR. SURROUND
6
SOUND
TREBLE 30
BASS
BALANCE
AVL
INCR. SURROUND
SOUND
AVL
INCR. SURROUND
STEREO
SAP
AUDIO OUT FIXED
OR
5
2,4
3,5
SOUND
AVL
INCR. SURROUND
STEREO
SAP
AUDIO OUT VARIABLE
Page 22
22
U
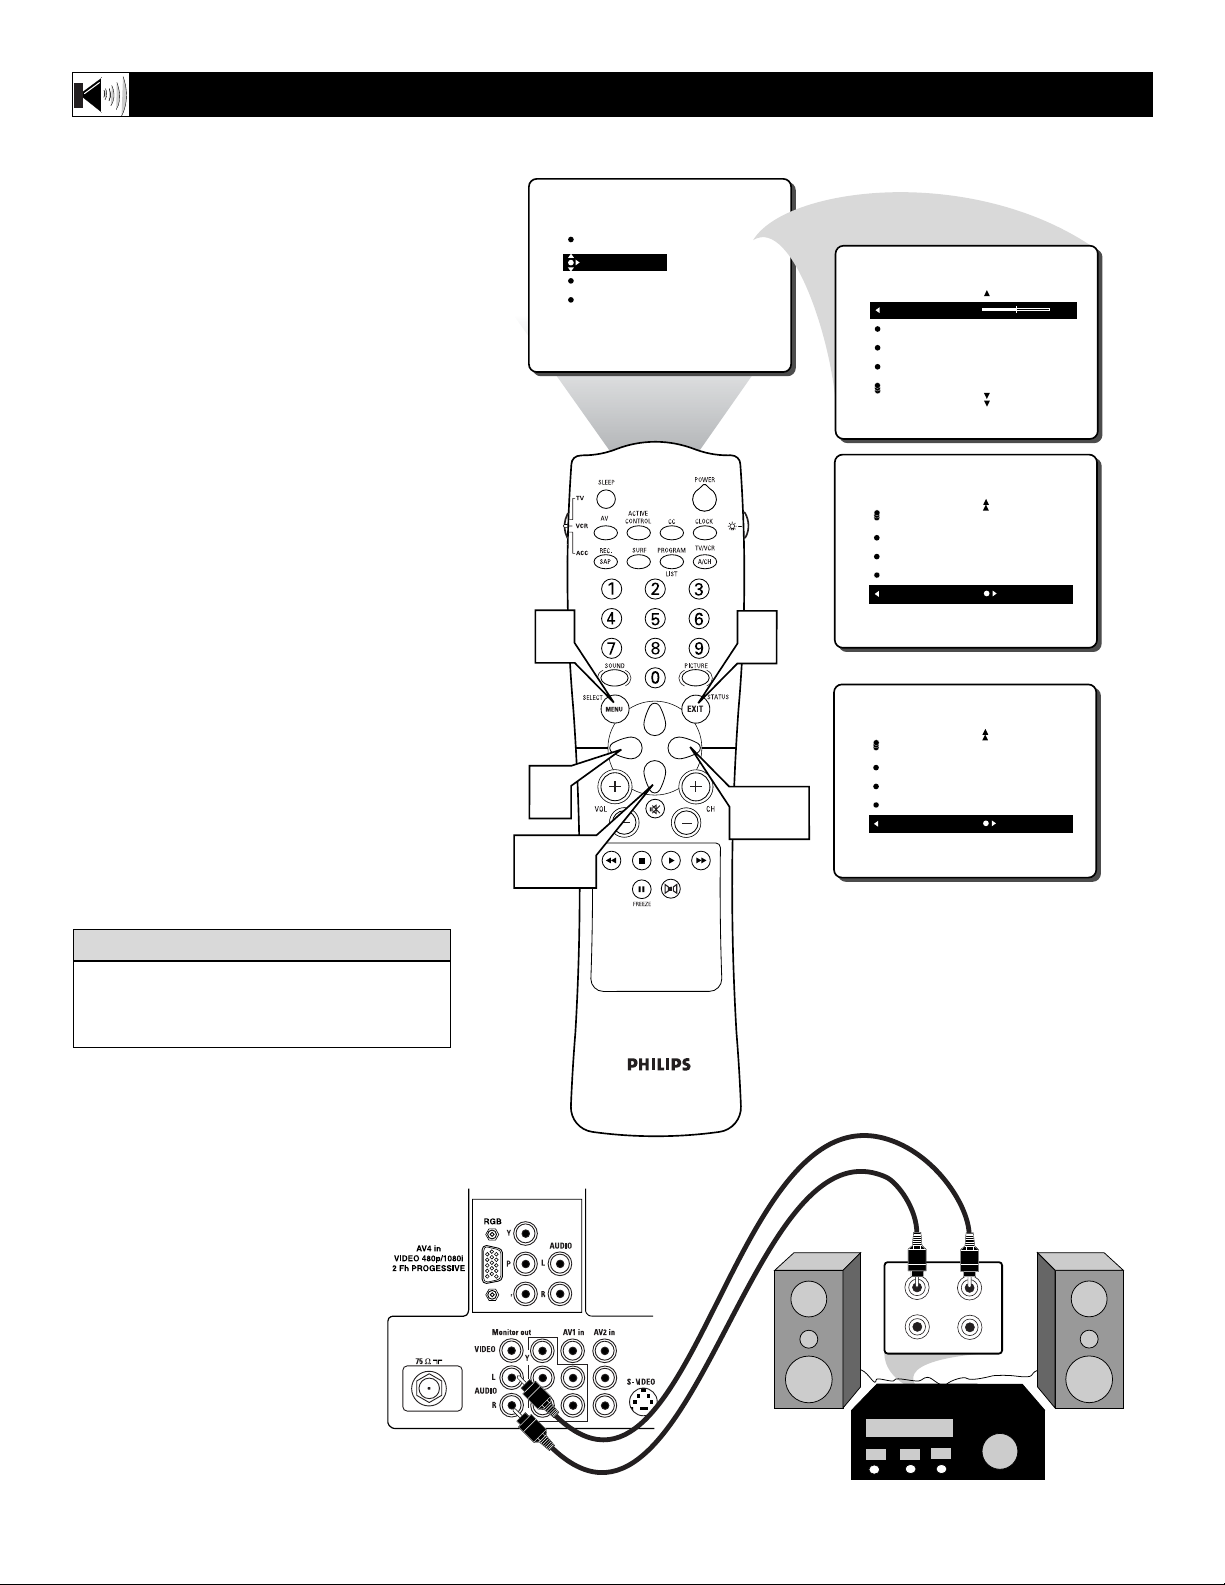
sing the TV’s Audio (Monitor) Output
jacks and TV Speaker ON/OFF control
an external audio system can be used to hear
the sound coming from the TV. The Speaker
Control will allow you to turn the television’s
speakers off so the TV sound would only be
heard through the audio system. Please refer
to page 13 for the proper connections needed
to hookup an external audio system.
1
Press the MENU button on the
remote control to show the onscreen
menu.
2
Press the CURSOR DOWN button
once to highlight SOUND.
3
Press the CURSOR RIGHT button
and the menu will shift to the left.
TREBLE will be highlighted and an
adjustment bar will be shown to the
right.
4
Press the CURSOR DOWN button
repeatedly until SPEAKERS is highlighted.
5
Press the CURSOR RIGHT or CURSOR LEFT button to turn the televi-
sion’s speakers ON or OFF.
6
Press the STATUS/EXIT button to
remove the menu from the screen.
HOW TO
TURN THE TV SPEAKERS ONOROFF
PICTURE
SOUND
FEATURES
INSTALL
TREBLE
BASS
BALANCE
AVL
INCR. SURROUND
TREBLE 30
BASS
BALANCE
AVL
INCR. SURROUND
SOUND
INCR. SURROUND
STEREO
SAP
AUDIO OUT
SPEAKERS ON
SOUND
3,5
1
6
5
2,4
OR
INCR. SURROUND
STEREO
SAP
AUDIO OUT
SPEAKERS OFF
SOUND
Be sure to first connect an external audio
system to the television’s Monitor Output
(audio) jacks.
HELPFUL HINT
Refer to page 13 for the proper
hookup procedure. If the SPEAKERS
Control is turned OFF and no external
audio system is connected, there will
be no sound heard at the TV.
Jack Panel
on back of TV
External Audio System
Jack Panel
b
P
P
b
R
AUX/TV INPUT
PHONO INPUT
L
Page 23
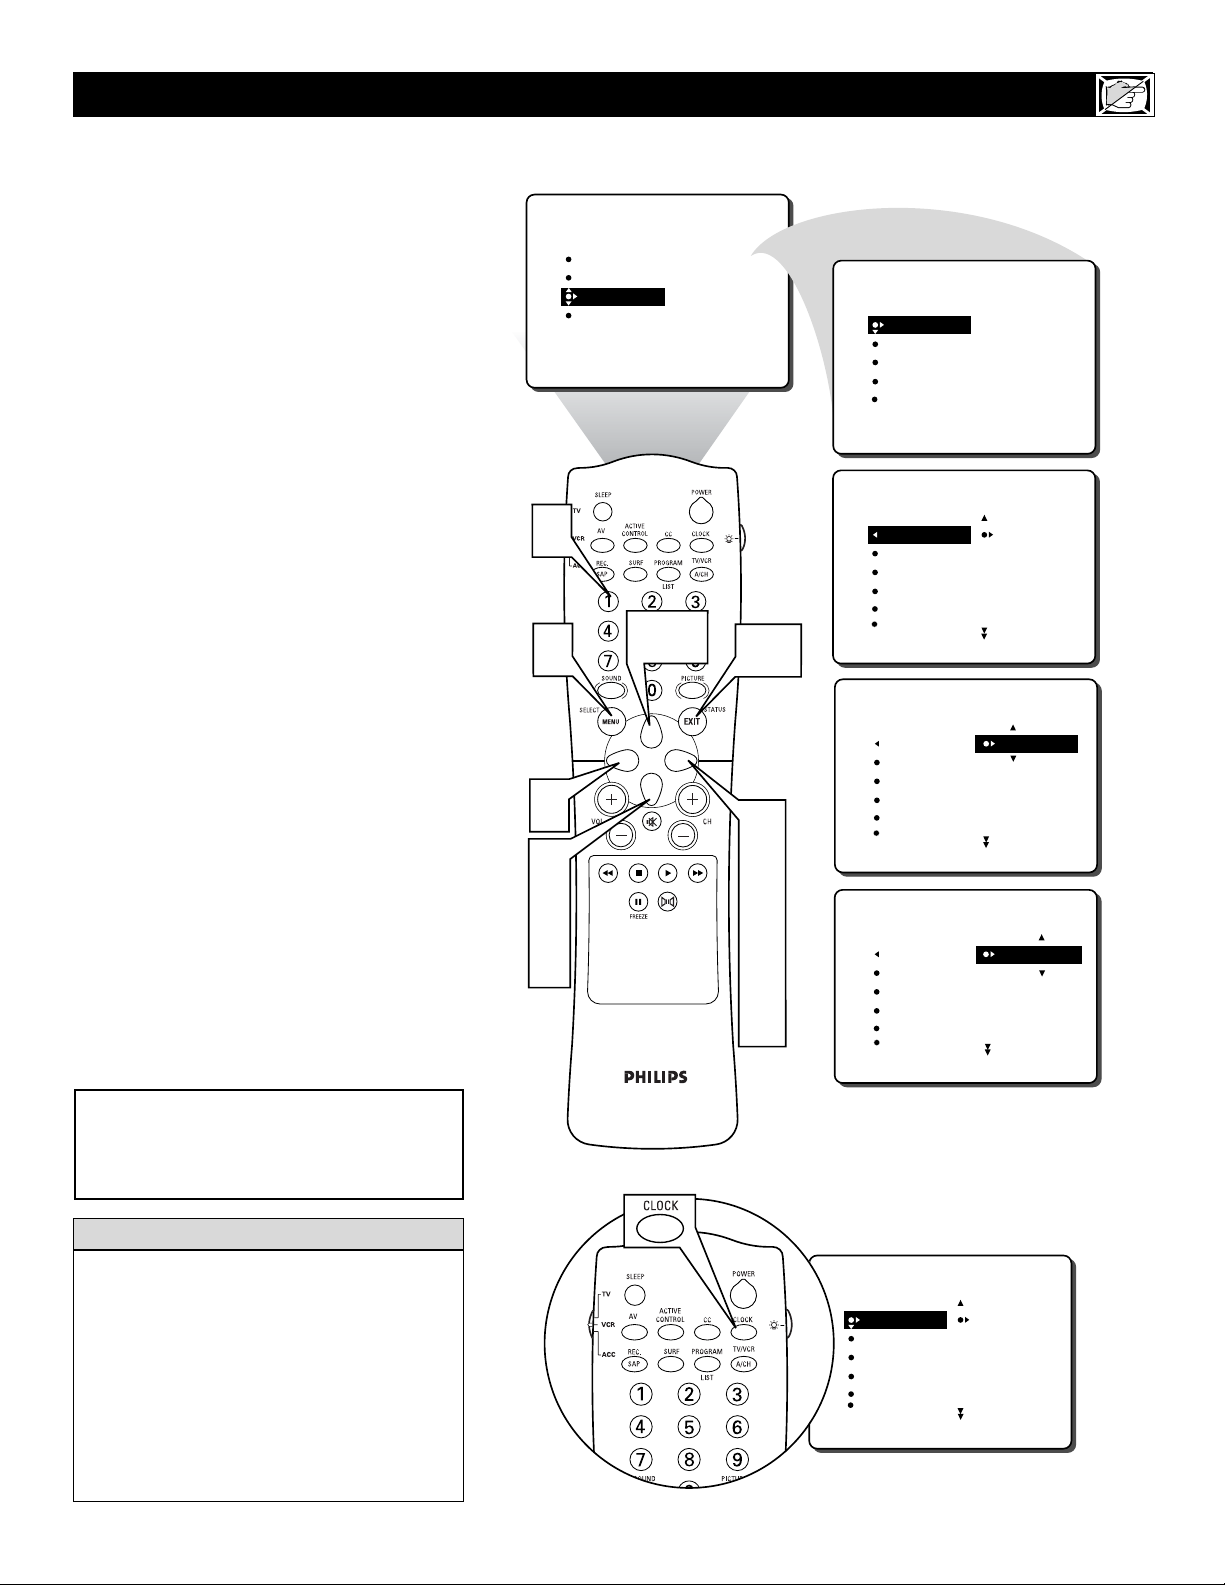
23
Y
our television comes with an on-screen
clock. During normal operation, the clock
appears on the screen when the STATUS/EXIT
button is pressed or if the TIMER DISPLAY
control is turned ON.
1
Press the MENU button on the
remote control to show the onscreen
menu.
2
Press the CURSOR DOWN button
twice to highlight FEATURES.
3
Press the CURSOR RIGHT button and
the menu will shift to the left. TIMER will
be highlighted.
4
With TIMER selected, press the CURSOR RIGHT button again to shift the
display left and highlight the TIME control.
5
Press the CURSOR RIGHT button
again to highlight the time indicator area.
6
Press the CURSOR LEFT or CURSOR
RIGHT button to select the position or
digit you wish to enter.
7
Press the CURSOR UP or CURSOR
DOWN button to select the digits for the
time. Or press the NUMBERED buttons to enter the correct time.
8
Press the CURSOR RIGHT button to
move to the AM or PM position.
9
Press the CURSOR UP or DOWN
button to set AM or PM.
Press the STATUS/EXIT button to
remove the menu from the screen.
SETTING THE TV C
LOCK USING THE TIMER CONTROL
Remember, be sure to press 0 first and then
the hour number for single-digit entries.
The Clock also can be set automatically using
the AutoChron
TM
feature found on page 4 of
the Quick Use and Installation Guide that
came with your television.
The TV’s clock settings may be lost when the
TV is unplugged (or when AC power to the set
is interrupted).
HELPFUL HINT
10
NOTE: The TIMER Controls can also be
accessed by pressing the CLOCK button
on the remote control. See lower diagram
on this page.
PICTURE
SOUND
FEATURES
INSTALL
7
1
6
TIMER
ACTIVE CTRL
AutoLock
CLOSED CAP
FORMAT
7,9
10
FEATURES
TIMER
ACTIVE CTRL
AutoLock
CLOSED CAP
FORMAT
FEATURES
FEATURES
TIMER
TIME _ _:_ _ AM
START TIME
STOP TIME
CHANNEL
ACTIVATE
FEATURES
FEATURES
TIMER
TIME 10:
START TIME
STOP TIME
CHANNEL
ACTIVATE
3
2
7
9
4
5
6
8
FEATURES
TIMER
TIME 10:30 AM
START TIME
STOP TIME
CHANNEL
ACTIVATE
TIME
START TIME
STOP TIME
CHANNEL
ACTIVATE
_ _
AM
FEATURES
TIMER
TIME _ _:_ _ AM
START TIME
STOP TIME
CHANNEL
ACTIVATE
Page 24
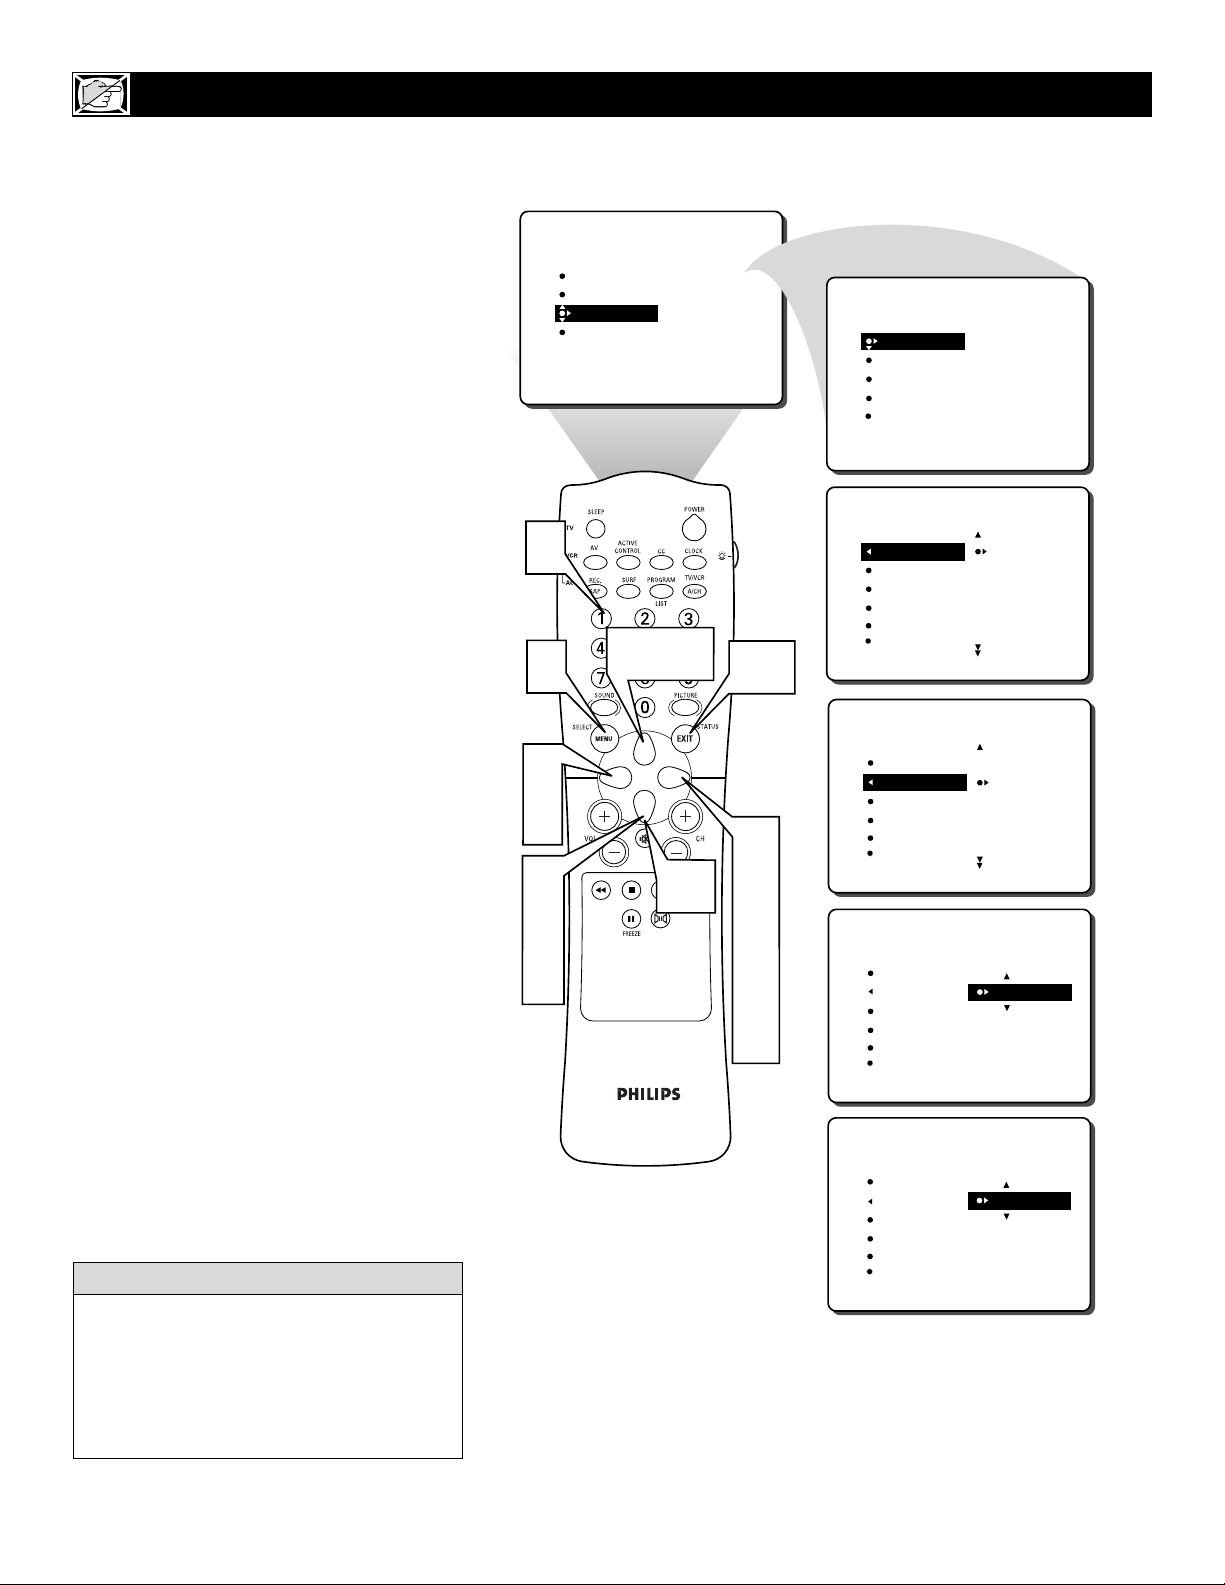
24
J
ust as you would an alarm clock, you can
set the TV to turn itself ON once or at the
same time every day. Follow these steps to set
the Start Time.
1
Press the MENU button on the
remote control to show the onscreen
menu.
2
Press the CURSOR DOWN button
twice to highlight FEATURES.
3
Press the CURSOR RIGHT button and
the menu will shift to the left. TIMER will
be highlighted.
4
With TIMER selected, press the CURSOR RIGHT button again to shift the
display left.
5
Press the CURSOR DOWN button
to highlight the START TIME control.
6
Press the CURSOR RIGHT button
again to highlight the time indicator
area.
7
Press the CURSOR RIGHT or CURSOR LEFT button to move among
the positions where the time is input.
8
Press the CURSOR UP or CURSOR
DOWN button to select the digits for
the time. Or press the NUMBERED
buttons to enter the time you want the
television to turn itself on.
9
Press the CURSOR RIGHT button to
move to the AM or PM position.
Press the CURSOR UP or DOWN
button to set AM or PM.
NOTE: The ACTIVATE Control (page 27)
must be set to ONCE or DAILY for the
START TIME Control to take effect.
Press the STATUS/EXIT button to
remove the menu from the screen.
SETTING THE TV
TO TURN ITSELF ON USING THE STA RT TIME CONTROL
Remember, be sure to press 0 first and then
the hour number for single-digit entries.
The ACTIVATE Control must be set to ONCE
or DAILY for the television to shut itself off at
the specified time. See page 27 for more
details about the ACTIVATE Control.
HELPFUL HINT
10
11
8
1
6
7
2
5
8
PICTURE
SOUND
FEATURES
INSTALL
8,10
TIMER
ACTIVE CTRL
AutoLock
CLOSED CAP
FORMAT
10
11
3
4
6
7
9
FEATURES
TIMER
ACTIVE CTRL
AutoLock
CLOSED CAP
FORMAT
FEATURES
FEATURES
TIMER
TIME _ _:_ _ AM
START TIME
STOP TIME
CHANNEL
ACTIVATE
FEATURES
FEATURES
TIMER
TIME
START TIME _ _:_ _ AM
STOP TIME
CHANNEL
ACTIVATE
FEATURES
FEATURES
TIMER
TIME 10:
START TIME 10:
STOP TIME
CHANNEL
ACTIVATE
FEATURES
FEATURES
TIMER
TIME 10:
START TIME 10:30AM
STOP TIME
CHANNEL
ACTIVATE
TIME
START TIME
STOP TIME
CHANNEL
ACTIVATE
_ _
_ _
_ _
AM
AM
AM
Page 25
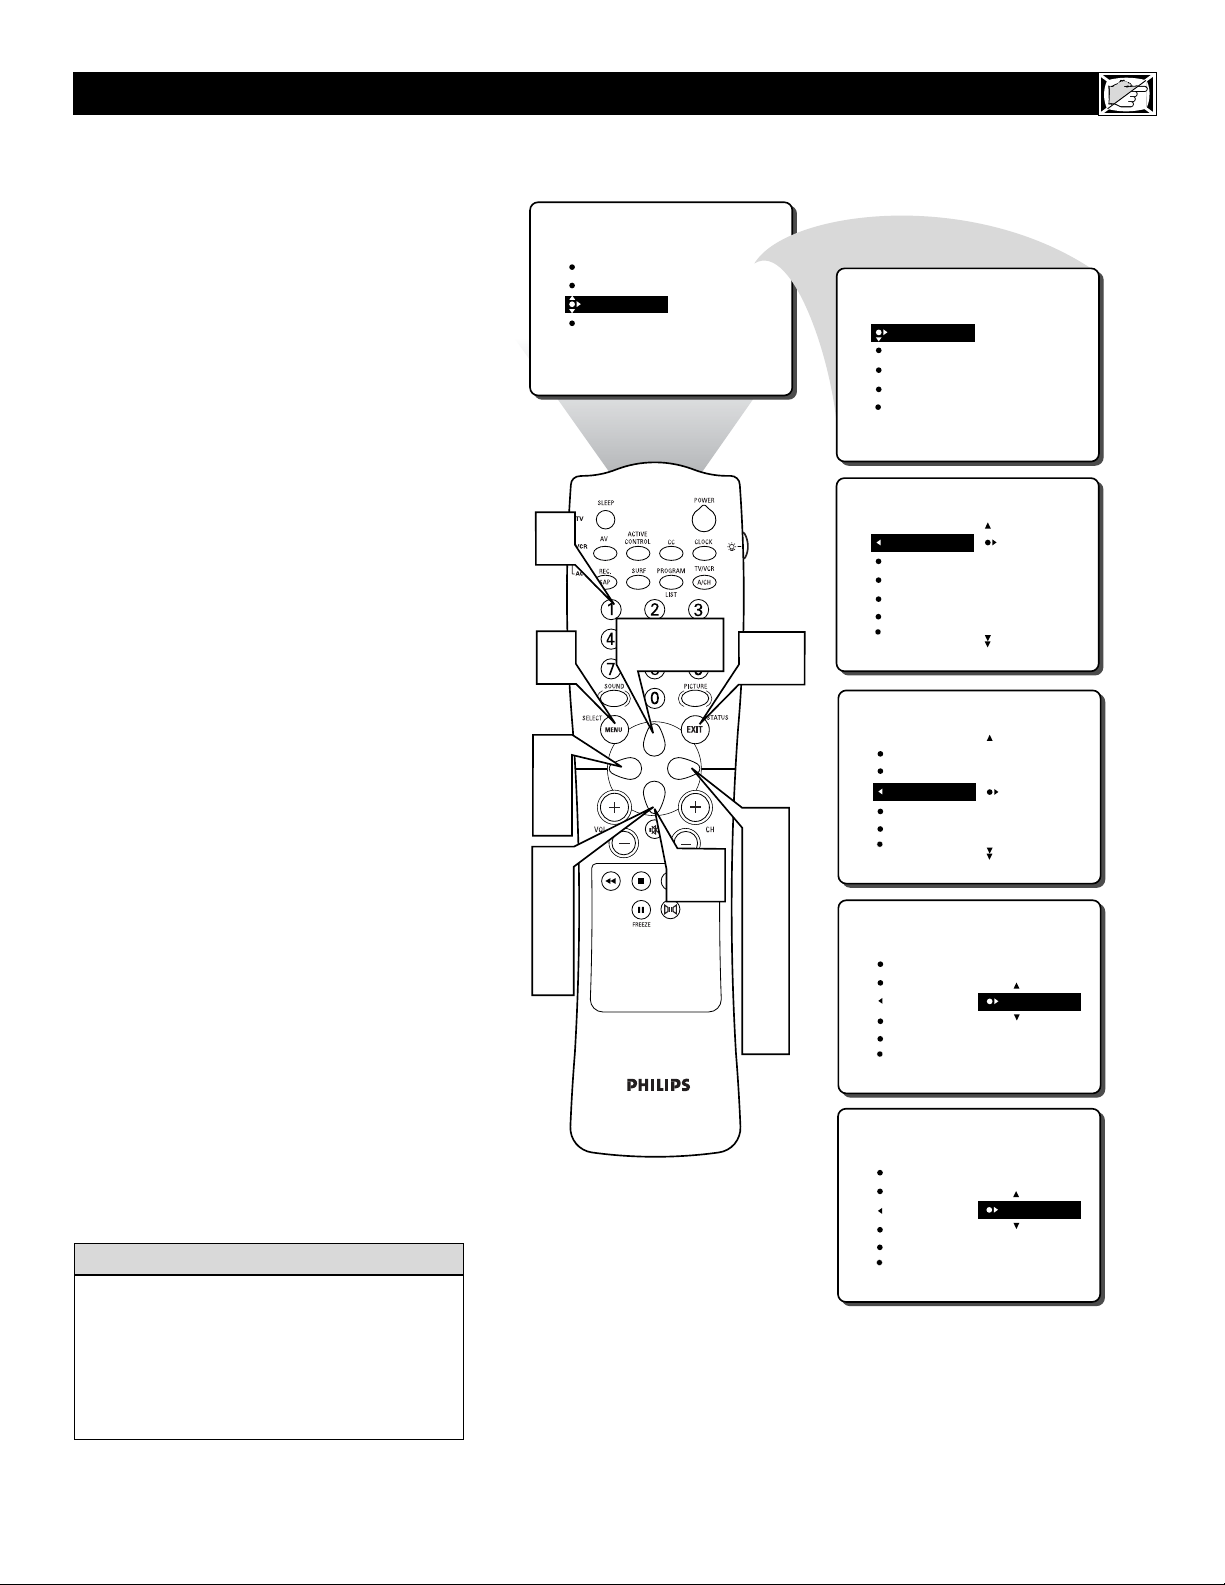
25
T
he following steps will guide you in setting the TV to turn itself OFF at a specific
time.
1
Press the MENU button on the
remote control to show the onscreen
menu.
2
Press the CURSOR DOWN button
twice to highlight FEATURES.
3
Press the CURSOR RIGHT button and
the menu will shift to the left. TIMER will
be highlighted.
4
With TIMER selected, press the CURSOR RIGHT button again to shift the
display left.
5
Press the CURSOR DOWN button
to highlight the STOP TIME control.
6
Press the CURSOR RIGHT button
again to highlight the time indicator
area.
7
Press the CURSOR RIGHT or CURSOR LEFT button to move among
the positions where the time is input.
8
Press the CURSOR UP or CURSOR
DOWN button to select the digits for
the time. Or press the NUMBERED
buttons to enter the time you want the
television to turn itself off.
9
Press the CURSOR RIGHT button to
move to the AM or PM position.
Press the CURSOR UP or DOWN
button to set AM or PM.
NOTE: The ACTIVATE Control (page 27)
must be set to ONCE or DAILY for the STOP
TIME Control to take effect.
Press the STATUS/EXIT button to
remove the menu from the screen.
SETTING THE TV TO TURN ITSELF OFF USING THE STOP TIME CONTROL
Remember, be sure to press 0 first and then
the hour number for single-digit entries.
The ACTIVATE Control must be set to ONCE
or DAILY for the television to shut itself off at
the specified time. See page 27 for more
details about the ACTIVATE Control.
HELPFUL HINT
10
11
8
1
6
7
2
5
8
PICTURE
SOUND
FEATURES
INSTALL
8,10
TIMER
ACTIVE CTRL
AutoLock
CLOSED CAP
FORMAT
10
11
3
4
6
7
9
FEATURES
TIMER
ACTIVE CTRL
AutoLock
CLOSED CAP
FORMAT
FEATURES
FEATURES
TIMER
TIME _ _:_ _ AM
START TIME
STOP TIME
CHANNEL
ACTIVATE
FEATURES
FEATURES
TIMER
TIME
START TIME
STOP TIME _ _:_ _ AM
CHANNEL
ACTIVATE
FEATURES
FEATURES
TIMER
TIME 10:
START TIME 10:
STOP TIME 11:
CHANNEL
ACTIVATE
FEATURES
FEATURES
TIMER
TIME 10:
START TIME 10:30AM
STOP TIME 11:30AM
CHANNEL
ACTIVATE
TIME
START TIME
STOP TIME
CHANNEL
ACTIVATE
_ _
_ _
_ _
_ _
AM
AM
AM
AM
Page 26
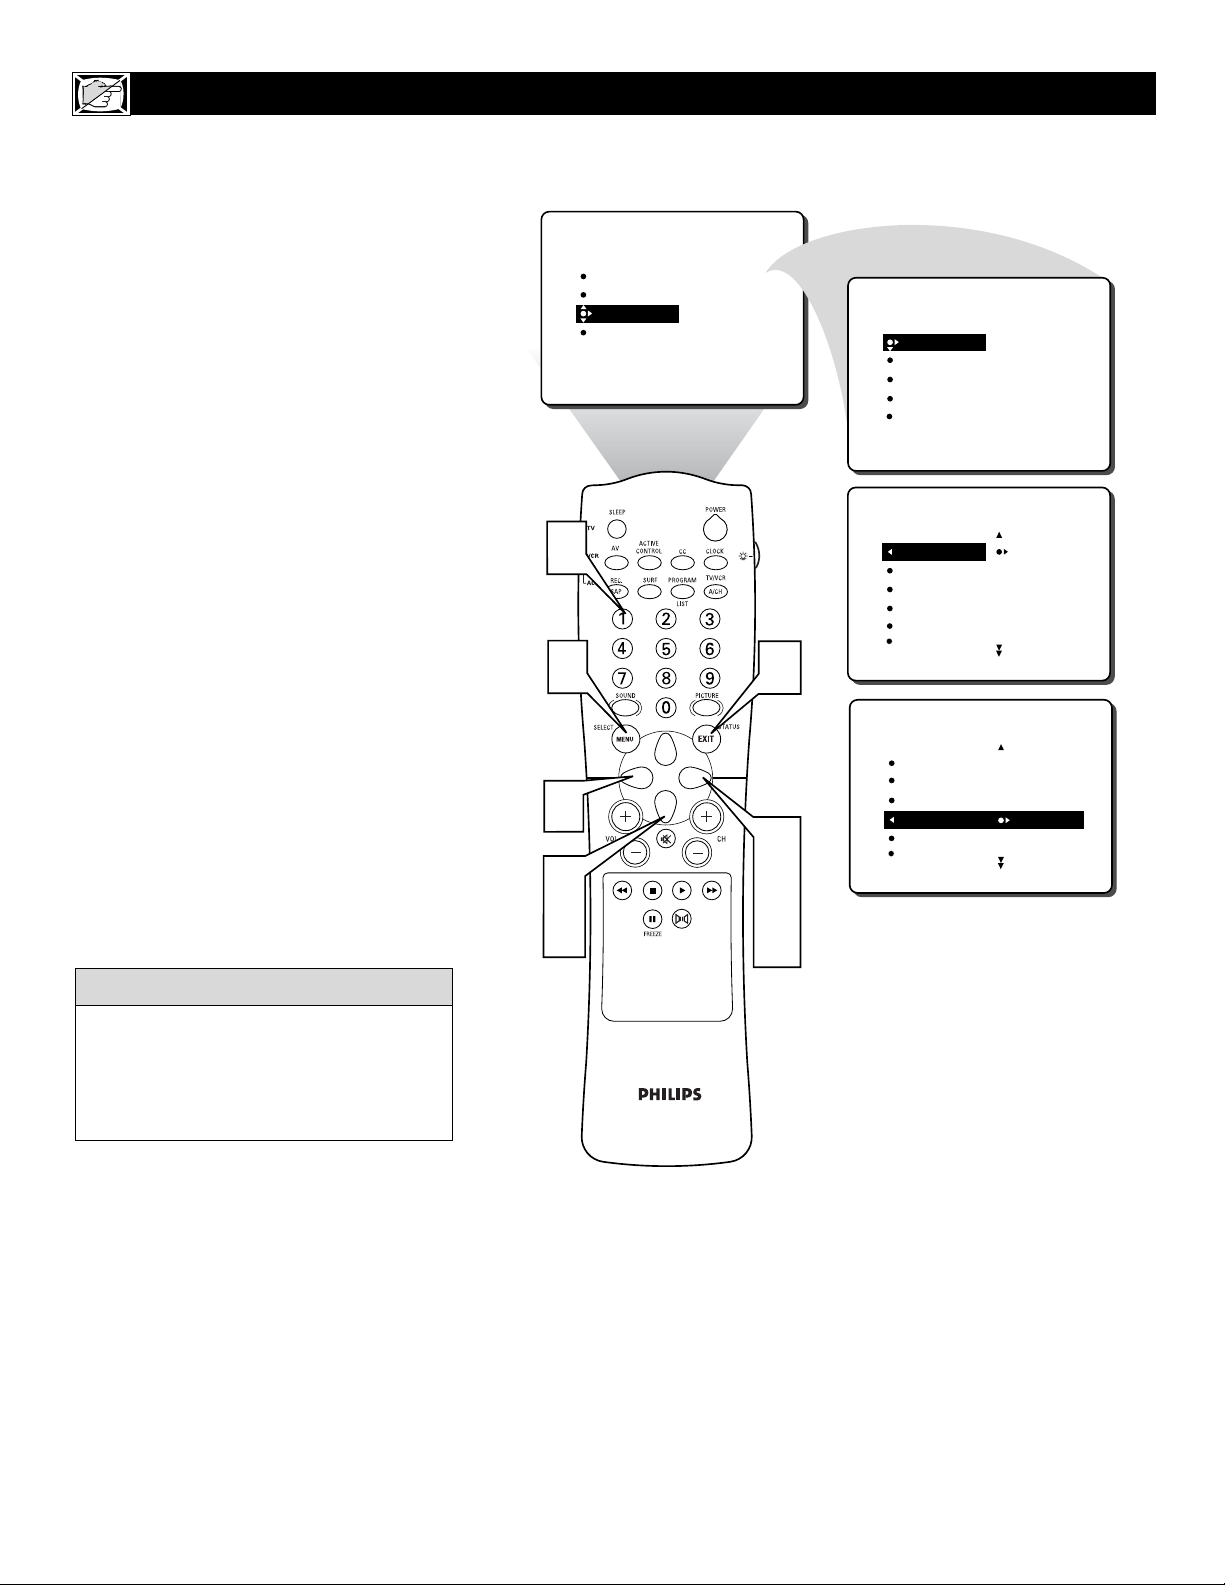
26
Y
ou can select a specific channel that the
television will tune to when the timer
turns the set ON. Follow these steps to select
the channel.
1
Press the MENU button on the
remote control to show the onscreen
menu.
2
Press the CURSOR DOWN button
twice to highlight FEATURES.
3
Press the CURSOR RIGHT button and
the menu will shift to the left. TIMER will
be highlighted.
4
With TIMER selected, press the CURSOR RIGHT button again to shift the
display left.
5
Press the CURSOR DOWN button
to highlight the CHANNEL Control.
6
Press the NUMBERED buttons to
enter the desired start-up channel. Or,
press the CURSOR RIGHT or CURSOR LEFT button repeatedly to enter
the start-up channel you want.
NOTE: The ACTIVATE Control (page 27)
must be set to ONCE or DAILY for this
Channel Control to take effect.
7
Press the STATUS/EXIT button to
remove the menu from the screen.
SETTING THE TV TO STA R TUP ON A SPECIFIC CHANNEL USING THE CHANNEL CONTROL
The ACTIVATE Control must be set to
ONCE or DAILY for the television to shut
itself off at the specified time. See page 27
for more details about the ACTIVATE
Control.
HELPFUL HINT
6
1
6
2
5
PICTURE
SOUND
FEATURES
INSTALL
TIMER
ACTIVE CTRL
AutoLock
CLOSED CAP
FORMAT
7
3
4
6
FEATURES
TIMER
ACTIVE CTRL
AutoLock
CLOSED CAP
FORMAT
FEATURES
FEATURES
TIMER
TIME _ _:_ _ AM
START TIME
STOP TIME
CHANNEL
ACTIVATE
FEATURES
FEATURES
TIMER
TIME
START TIME
STOP TIME
CHANNEL 12
ACTIVATE
TIME
START TIME
STOP TIME
CHANNEL
ACTIVATE
Page 27
27
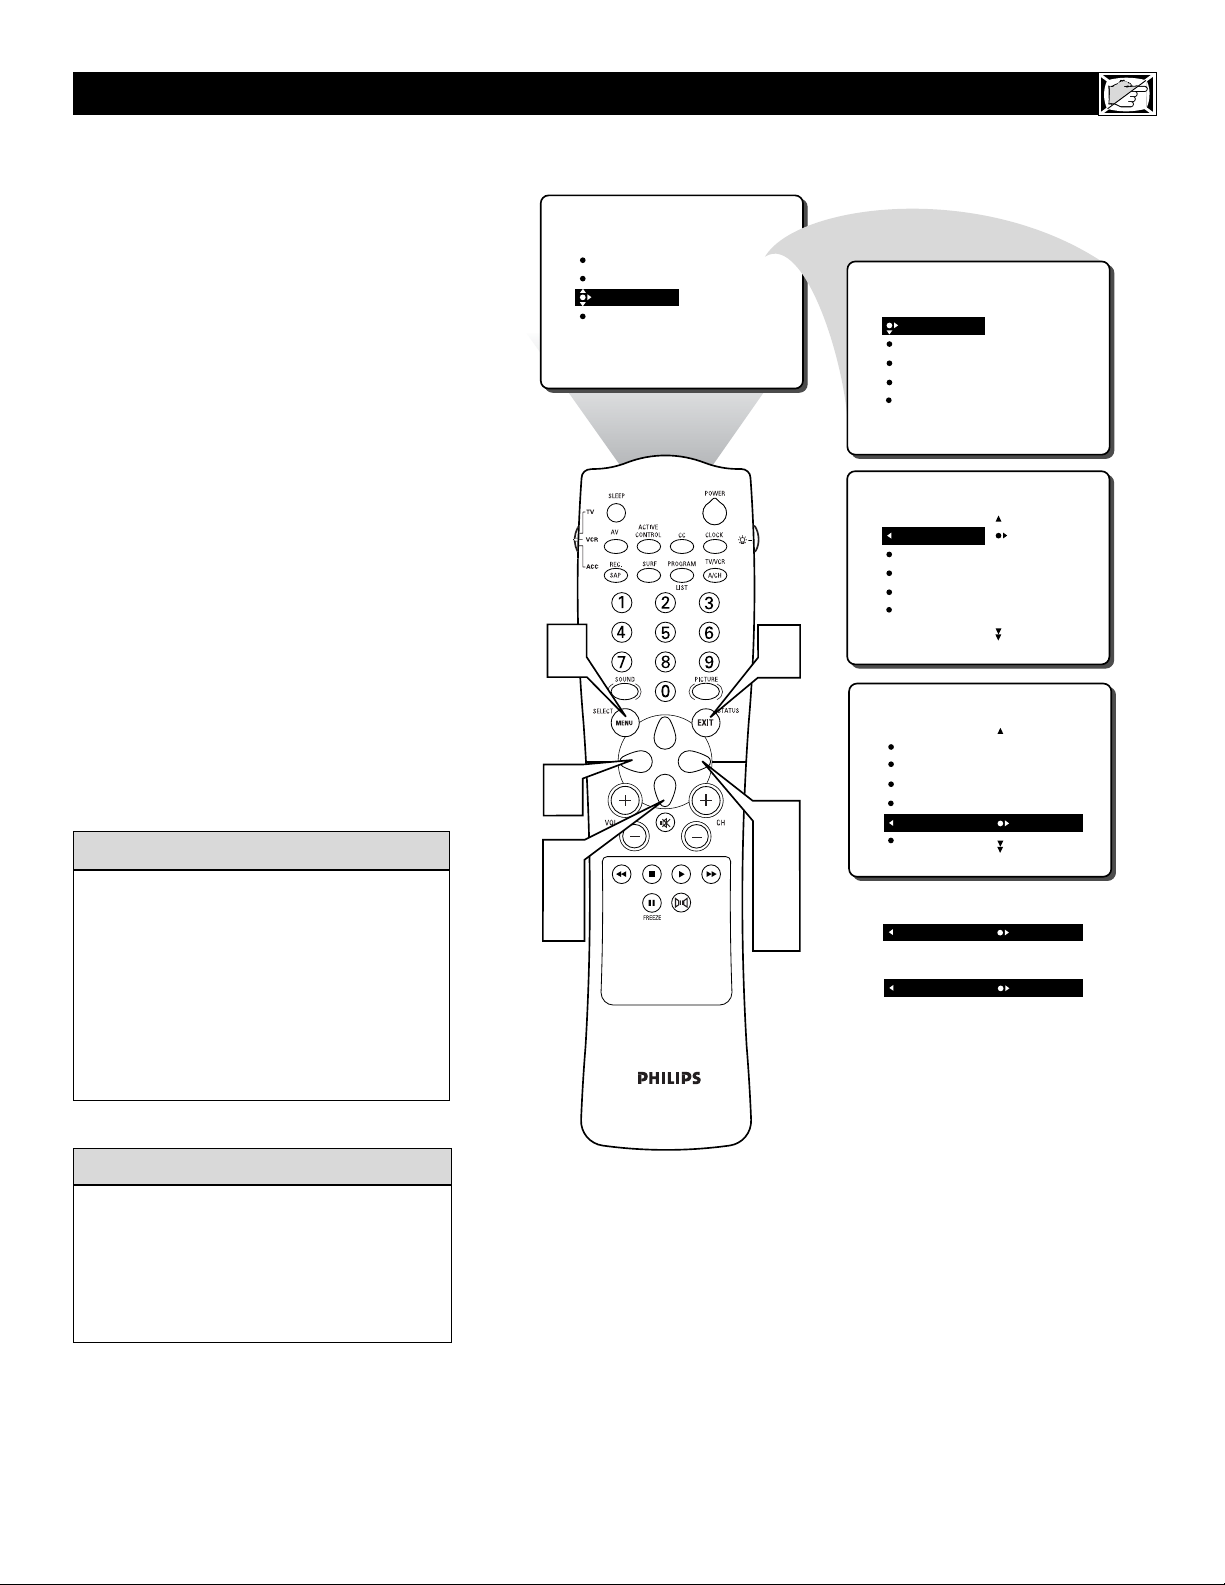
A
fter you have set the Time, Start Time,
Stop Time, and Start Channel, the timer
must be set to come on ONCE or DAILY, or
turned OFF through the ACTIVATE Control.
1
Press the MENU button on the
remote control to show the onscreen
menu.
2
Press the CURSOR DOWN button
twice to highlight FEATURES.
3
Press the CURSOR RIGHT button and
the menu will shift to the left. TIMER will
be highlighted.
4
With TIMER selected, press the CURSOR RIGHT button again to shift the
display left.
5
Press the CURSOR DOWN button
to highlight the ACTIVATE Control.
6
Press the CURSOR RIGHT or CURSOR LEFT button repeatedly to select
ONCE, DAILY or OFF.
7
Press the STATUS/EXIT button to
remove the menu from the screen.
HOW TO ACTIVATE THE TIMER CONTROL USING THE ACTIVATE CONTROL
Remember, before setting the TIMER controls, the TV’s clock must be set to the correct time manually (see page 23) or by
using the AutoChron™ feature described on
page 4 of the Quick Use and Installation
Guide.
HELPFUL HINT
With the ACTIVATE Control set to ONCE,
the START TIME, STOP TIME, and
START CHANNEL Controls will only be
activated one time.
With the ACTIVATE Control set to DAILY,
the START TIME, STOP TIME, and
START CHANNEL Controls will be activated every day of the week until it is
turned OFF or set to ONCE.
cc
C
HECK IT OUT
PICTURE
SOUND
FEATURES
INSTALL
1
6
2
5
TIMER
ACTIVE CTRL
AutoLock
CLOSED CAP
FORMAT
7
3
4
6
FEATURES
TIMER
ACTIVE CTRL
AutoLock
CLOSED CAP
FORMAT
FEATURES
FEATURES
TIMER
TIME _ _:_ _ AM
START TIME
STOP TIME
CHANNEL
ACTIVATE
FEATURES
FEATURES
TIMER
TIME
START TIME
STOP TIME
CHANNEL
ACTIVATE OFF
ACTIVATE ONCE
ACTIVATE DAILY
TIME
START TIME
STOP TIME
CHANNEL
ACTIVATE
OR
OR
Page 28
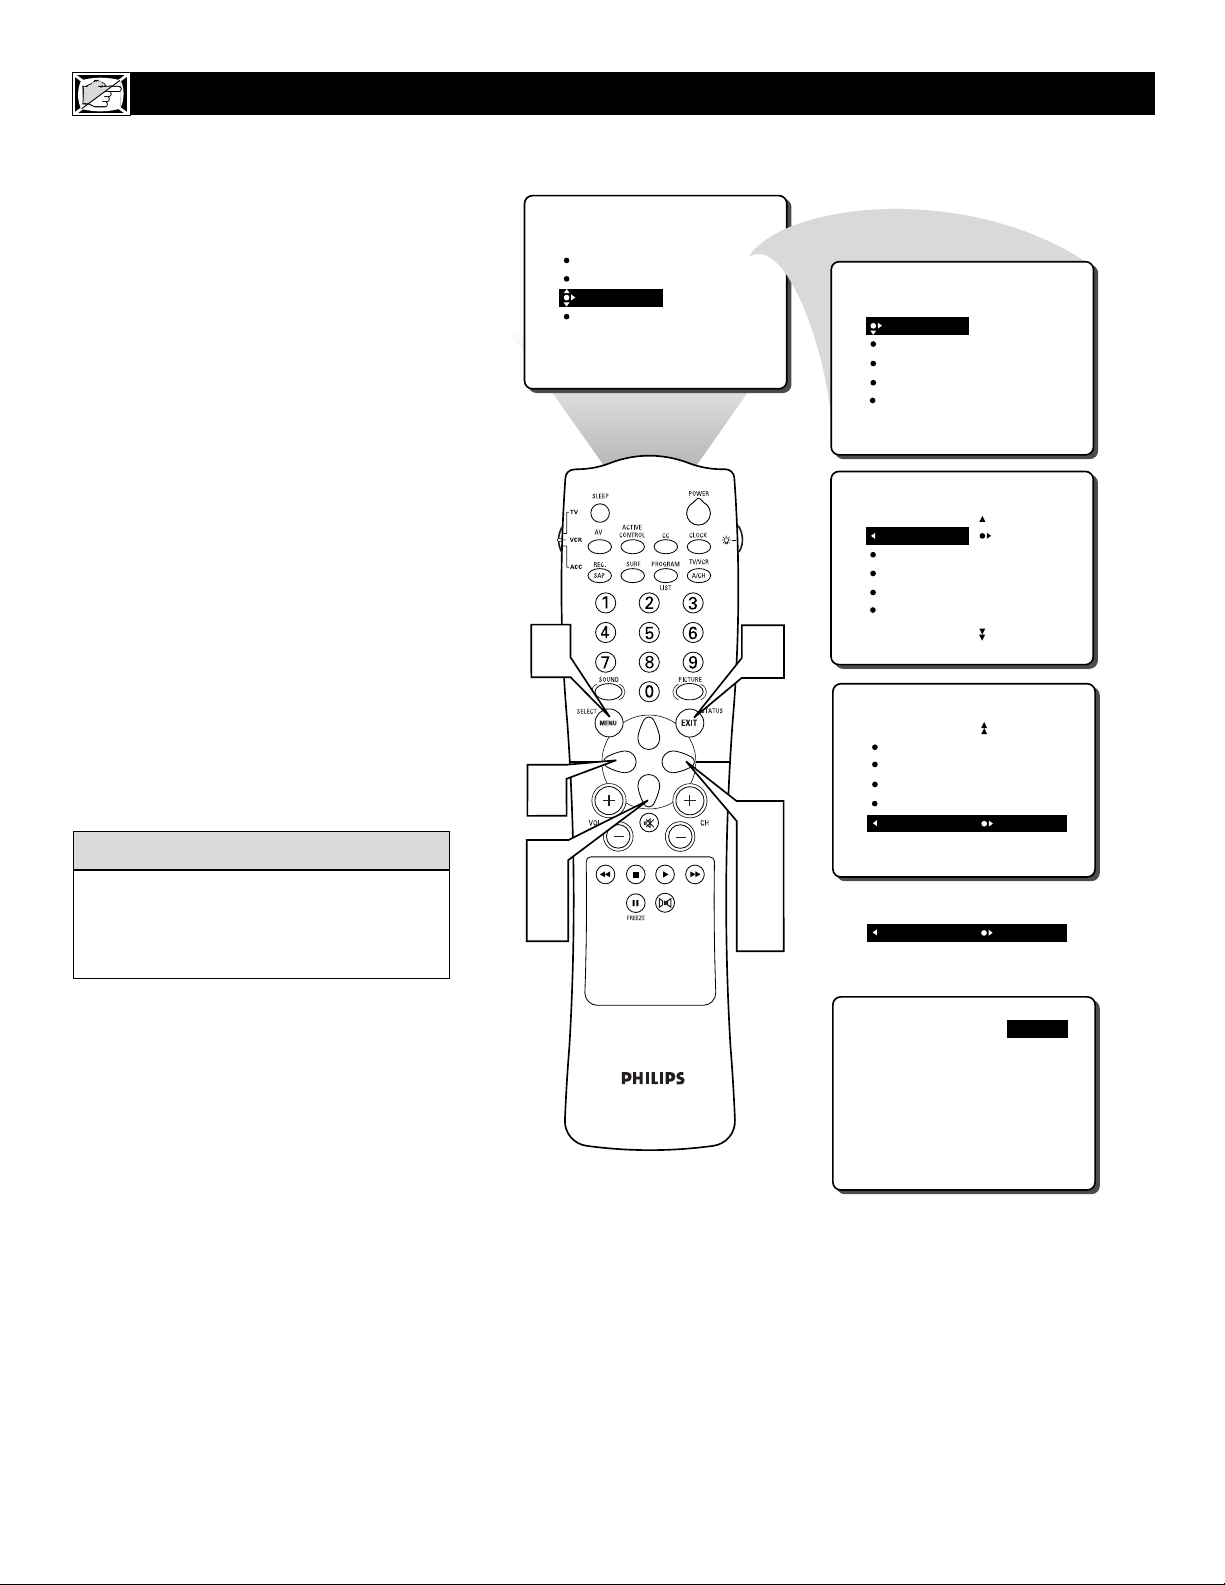
28
A
fter the TV’s clock has been set, you can
use your TV as a clock. The TIMER DISPLAY control allows you to permanently display the time in the upper right corner of the
screen.
1
Press the MENU button on the
remote control to show the onscreen
menu.
2
Press the CURSOR DOWN button
twice to highlight FEATURES.
3
Press the CURSOR RIGHT button and
the menu will shift to the left. TIMER will
be highlighted.
4
With TIMER selected, press the CURSOR RIGHT button again to shift the
display left.
5
Press the CURSOR DOWN button
to highlight the DISPLAY Control.
6
Press the CURSOR RIGHT or CURSOR LEFT button repeatedly to select
ON or OFF.
7
Press the STATUS/EXIT button to
remove the menu from the screen.
HOW TO VIEW THE TIME USING THE DISPLAY CONTROL
If the TIME has been set and the DISPLAY
Control set to ON, the current time will
appear in the upper right corner of the TV
screen while the TV is powered on.
cc
C
HECK IT OUT
1
6
2
5
PICTURE
SOUND
FEATURES
INSTALL
TIMER
ACTIVE CTRL
AutoLock
CLOSED CAP
FORMAT
7
3
4
6
FEATURES
TIMER
ACTIVE CTRL
AutoLock
CLOSED CAP
FORMAT
FEATURES
FEATURES
TIMER
TIME _ _:_ _ AM
START TIME
STOP TIME
CHANNEL
ACTIVATE
FEATURES
FEATURES
TIMER
START TIME
STOP TIME
CHANNEL
ACTIVATE
DISPLAY ON
DISPLAY OFF
TIME
START TIME
STOP TIME
CHANNEL
ACTIVATE
OR
10:30 AM
Page 29
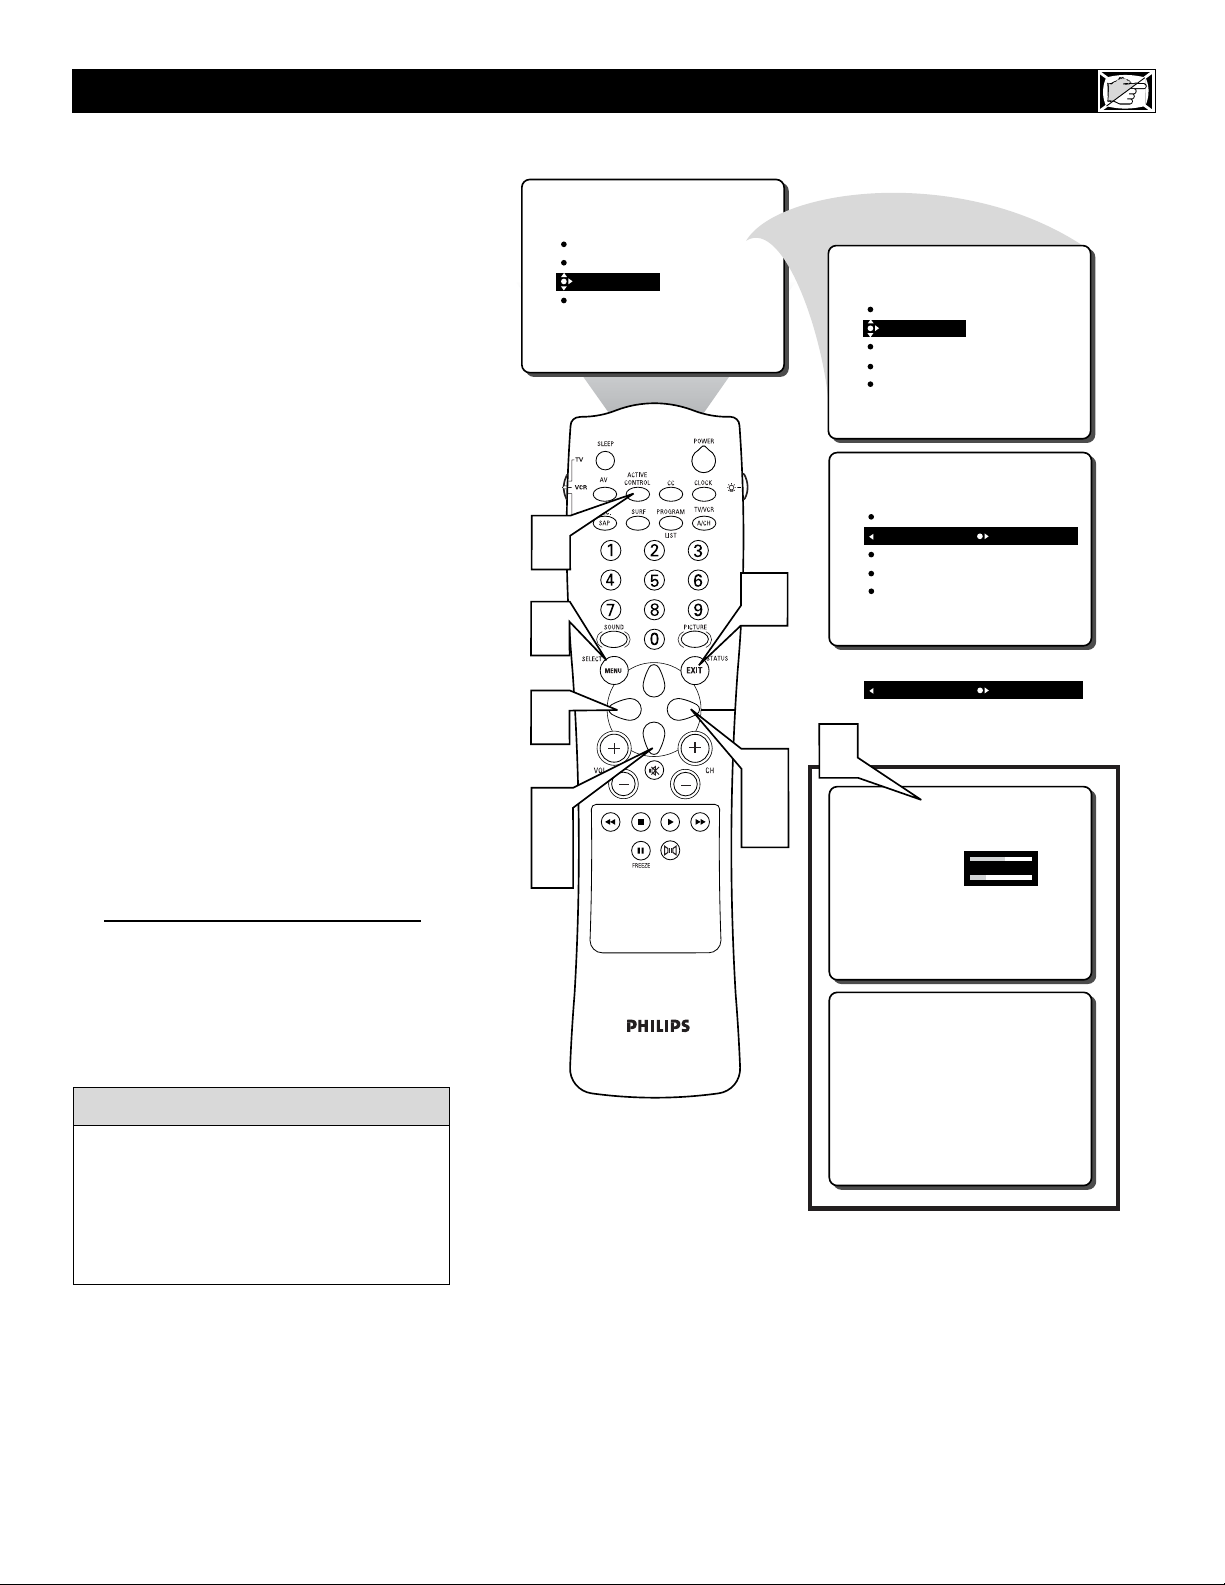
29
T
he Active Control monitors and adjusts
incoming video signals to help provide the
best picture quality.
When you choose to turn the Active Control
ON, the picture sharpness and noise reduction are controlled automatically. Active
Control adjusts these picture settings continuously and automatically.
NOTE: Active Control is not available for
signals connected to the AV4 inputs.
1
Press the MENU button on the
remote control to show the on-screen
menu.
2
Press the CURSOR DOWN button
twice to highlight FEATURES.
3
Press the CURSOR RIGHT button
and the menu will shift to the left.
4
Press the CURSOR DOWN button
repeatedly until the ACTIVE CTRL
(control) is highlighted.
5
Press the CURSOR RIGHT or CURSOR LEFT button repeatedly to tog-
gle the ACTIVE CONTROL ON or
OFF.
6
Press the STATUS/EXIT button to
remove the menu from the screen.
7
You can also press the ACTIVE
CONTROL button on the remote
control to toggle the ACTIVE CONTROL ON or OFF.
HOW TO USE THE ACTIVE CONTROL
Toggle the ACTIVE CONTROL ON with
the remote control and a screen display will
appear showing the Active Control in work.
You will see the sharpness and noise reduction settings changing to provide the best
possible picture quality.
cc
C
HECK IT OUT
PICTURE
SOUND
FEATURES
INSTALL
TIMER
ACTIVE CTRL
AutoLock
CLOSED CAP
FORMAT
FEATURES
TIMER
ACTIVE CTRL
AutoLock
CLOSED CAP
FORMAT
OFF
7
1
5
2
4
6
3
5
FEATURES
TIMER
ACTIVE CTRL OFF
AutoLock
CLOSED CAP
FORMAT 4:3
OR
ACTIVE CTRL ON
7
ACTIVE CONTROL ON
SHARPNESS 56
NOISE REDUCTION 20
ACTIVE CONTROL OFF
Page 30
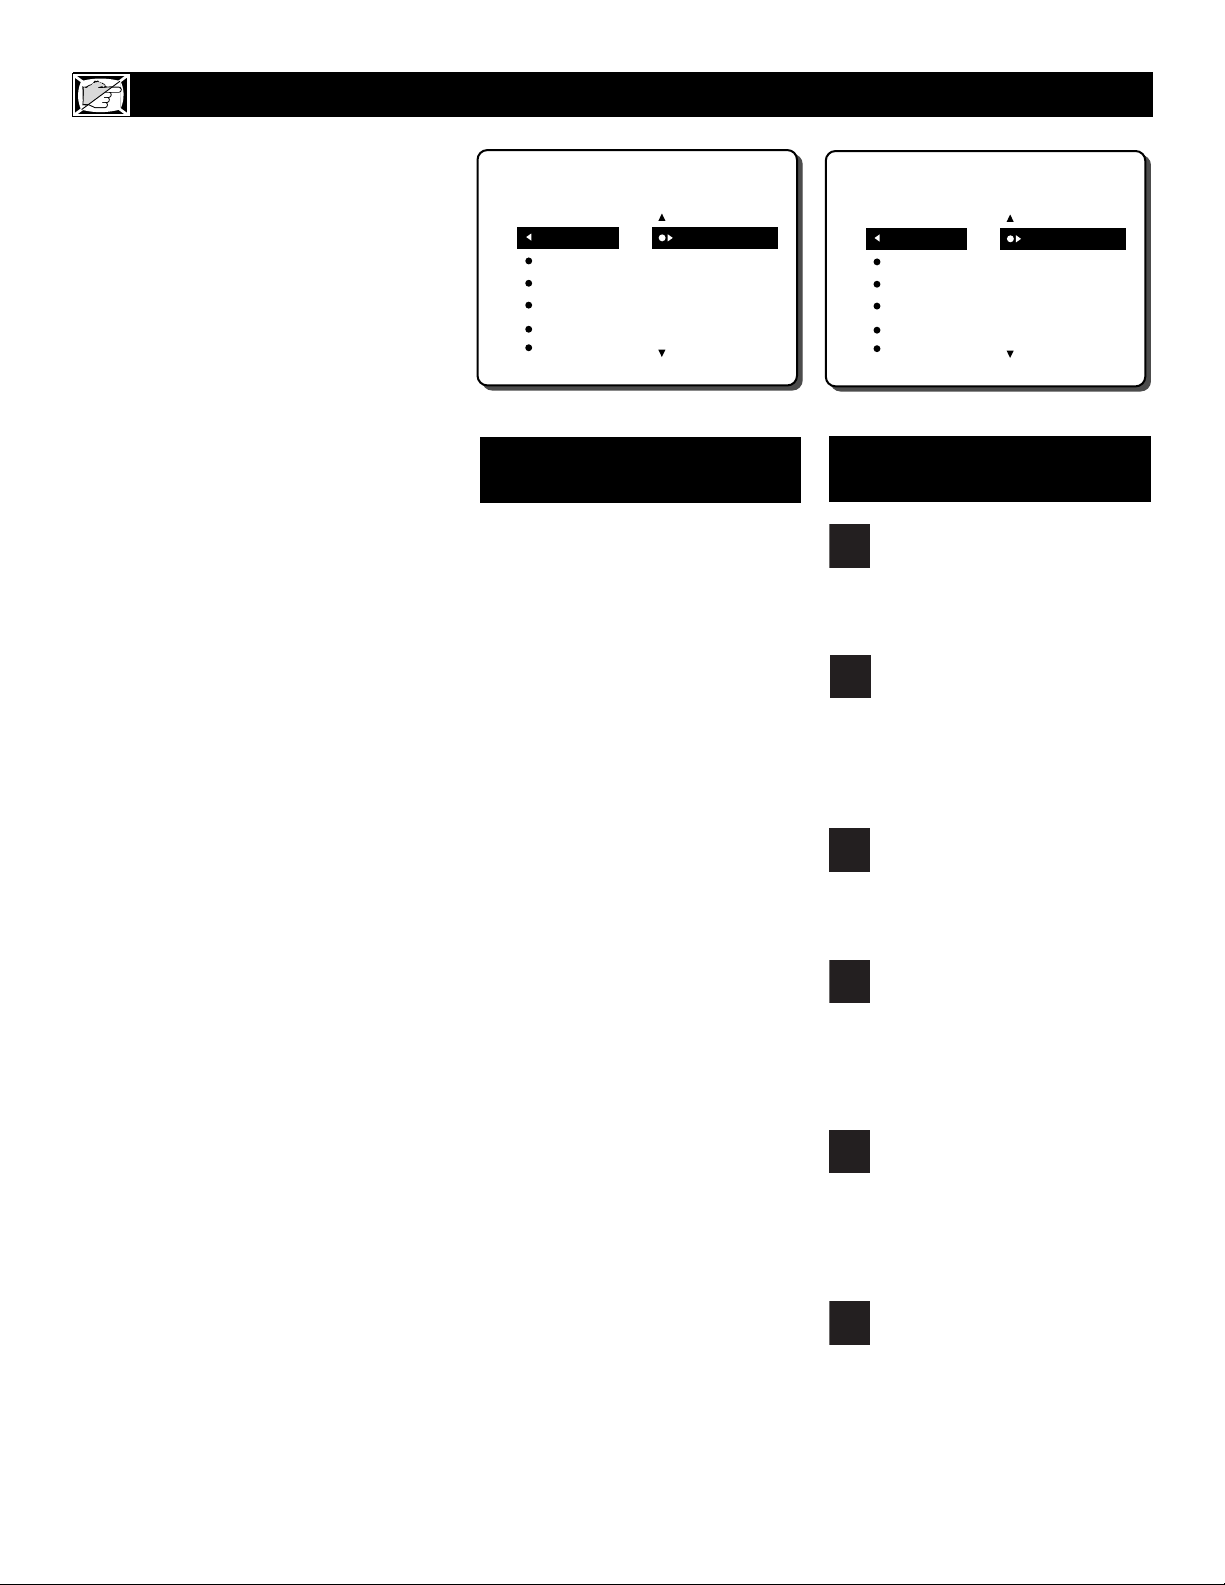
30
UNDERSTANDING THE
AUTOLOCK™ FEATURE
G: General Audience - All ages admitted.
Most parents would find this programming
suitable for all ages. This type of programming contains little or no violence, no
strong language, and little or no sexual dialogue or sexual situations.
PG: Parental Guidance Suggested -
This
programming contains material that parents
may find unsuitable for younger children. It
may contain one or more of the following:
Moderate violence, some sexual situations,
infrequent coarse language, or some suggestive dialogue.
PG-13: Parents Strongly Cautioned - This
programming contains material that parents
may find unsuitable for children under the
age of 13. It contains one or more of the following: violence, sexual situations, coarse
language, or suggestive dialogue.
R: Restricted -This programming is specifically designed for adults. Anyone under the
age of 17 should view this programming
only with an accompanying parent or adult
guardian. It contains one or more of the following: intense violence; intense sexual situations; strong, coarse language; or intensely
suggestive dialogue.
NC-17: No one under the age of 17 will be
admitted. - This type of programming should
be viewed by adults only. It contains graphic
violence; explicit sex; or crude, indecent language.
X: Adults Only - This type of programming
contains one or more of the following: very
graphic violence, very graphic and explicit or
indecent sexual acts, very coarse and intensely suggestive language.
MOVIE RATINGS
(M
OTIONPICTURE
A
SSOCIATION OFAMERICA
)
TV-Y: (All children -- This program is
designed to be appropriate for all children.) Designed for a very young audi-
ence, including children ages 2-6. This type of
programming is not expected to frighten
younger children.
TV-Y7: (Directed to Older Children --
This program is designed for children
ages 7 and above.) It may be more
appropriate for children who have acquired the
development skills needed to distinguish
between make-believe and reality. This programming may include mild fantasy and comic
violence (FV).
TV-G: (General Audience -- Most par-
ents would find this program suitable for
all ages.) This type of programming
contains little or no violence, no strong language, and little or no sexual dialogue or sexual
situations.
TV-PG: (Parental Guidance
Suggested -- This program contains
material that parents may find unsuit-
able for younger children.) This type of pro-
gramming contains one or more of the following: Moderate violence (V), some sexual situations (S), infrequent coarse language (L), or
some suggestive dialogue (D).
TV-14: (Parents Strongly Cautioned -
- This program contains some material
that many parents would find unsuitable
for children under 14 years of age.) This type
of programming contains one or more of the
following: intense violence (V); intense sexual
situations (S); strong, coarse language (L); or
intensely suggestive dialogue (D).
TV-MA: (Mature Audience Only --
This program is specifically designed to
be viewed by adults and therefore may
be unsuitable for children under 17.) This type
of programming contains one or more of the
following: graphic violence (V); explicit sexual
situations (S); or crude, indecent language (L).
TV PARENTAL GUIDELINES
(TV BROADCASTERS)
T
he AutoLock™ feature receives and
processes data sent by broadcasters or
other program providers that contain program content advisories. When programmed
by the viewer, a TV with AutoLock™ can
respond to the content advisories and block
program content that may be found objectionable (such as offensive language, violence,
sexual situations, etc.). This is a great feature
to censor the type of programming children
may watch.
In the AutoLock™ section, you’ll learn how
to block channels and programming that is
not rated, is unrated, or has no rating. You
will also find out how to turn these blocking
features ON or OFF. Following are brief
explanations of some terms and ratings related to the AutoLock™ feature.
AutoLock™ offers various Blocking
Options from which to choose:
BLOCKING: The BLOCKING control is
what can be thought of as the “master switch”
for AutoLock™. This control affects the settings you have chosen for blocking programs
according to movie ratings or TV ratings, or
for blocking programs that have no rating or
are unrated. When the BLOCKING control is
OFF, the blocking or censoring of programs is
disabled. When the BLOCKING control is
ON, blocking will occur according to the settings you have chosen.
NO RATING: ALL programming with no
content advisory data can be blocked if NO
RATING is set to ON.
Programming that has No Rating is not
encoded with any rating information from the
MPAA or the Parental Guidelines. Any programming could fall into this category.
You also can block individual channels or
block programming based on ratings of the
MPAA and TV broadcasters. (See a description of the ratings on this page.)
AutoLock
MOVIE RATING
G
PG
PG-13
R
NC-17
AutoLock
TV RATING
ON
TV-Y
TV-Y7
TV-G
TV-PG
TV-14
ON
TV
Y
TV
Y7
TV
G
TV
PG
TV
14
TV
MA
Page 31
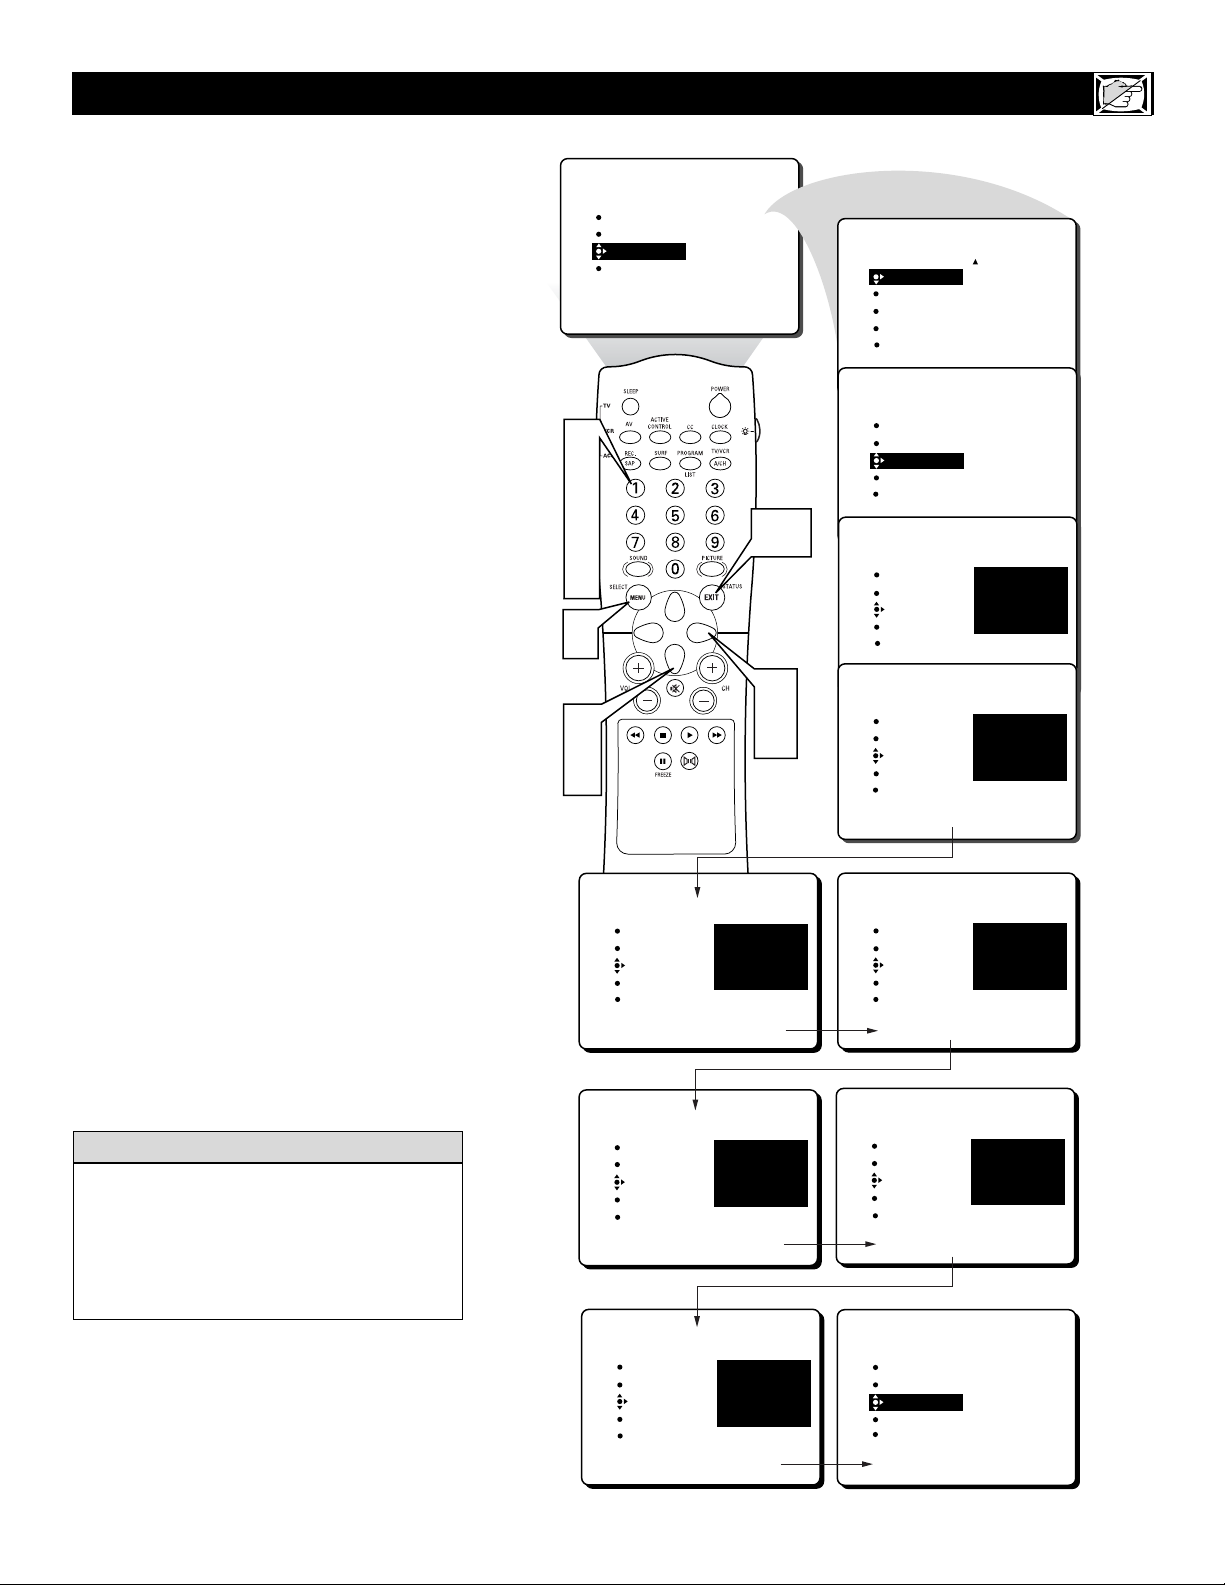
31
A
utoLockTMallows parents to block out or
“censor” any channels they think children should not watch. A channel blocked by
the AutoLock
TM
control cannot be viewed until
a correct access code is used to unlock the
channel for viewing. First, let’s set your
AutoLock access code.
1
Press the MENU button on the
remote control to show the onscreen
menu.
2
Press the CURSOR DOWN button
twice to highlight FEATURES.
3
Press the CURSOR RIGHT button
and the menu will shift to the left.
4
Press the CURSOR DOWN button
once to highlight the AutoLock control.
5
Press the CURSOR RIGHT button
to highlight ACCESS CODE.
6
Press 0,7,1,1 on the remote control.
INCORRECT will appear on the
screen.
7
Press 0,7,1,1 on the remote control
again. ENTER NEW CODE will
appear on the screen.
8
Enter a new four-digit code using the
number buttons. CONFIRM CODE
will appear on the screen.
9
Enter your new four-digit code again.
CORRECT will flash on the screen
briefly and the highlight bar goes back
to AutoLock.
Press the STATUS/EXIT button to
remove the menu from the screen.
SETTING UPANAUTOLOCK™ ACCESS CODE
Remember that 0711 is the default
AutoLockTMcode. If your access code has
been changed by someone other than you (a
child, for example) or you have forgotten the
code, you can always get in by inputting the
default code.
HELPFUL HINT
10
NOTE TO PARENTS: It isn’t possible for
your child to unblock a channel without knowing your access code or changing it to a new
one. If your code has been changed without
your knowledge, then you will become aware
that blocked channels may have been viewed.
6
7
8
9
1
2
4
PICTURE
SOUND
FEATURES
INSTALL
TIMER
ACTIVE CTRL
AutoLock
CLOSED CAP
FORMAT
10
3
5
FEATURES
TIMER
ACTIVE CTRL
AutoLock
CLOSED CAP
FORMAT
FEATURES
TIMER
ACTIVE CTRL
AutoLock
CLOSED CAP
FORMAT
FEATURES
TIMER
ACTIVE CTRL
AutoLock
CLOSED CAP
FORMAT
FEATURES
TIMER
ACTIVE CTRL
AutoLock
CLOSED CAP
FORMAT
HORA
HRA. DE INCICO
HRA. DE FIN
CANAL
ACTIVAR
ACCESS CODE
- - - -
ACCESS CODE
- - - -
ACCESS CODE
X X X X
FEATURES
TIMER
ACTIVE CTRL
AutoLock
CLOSED CAP
FORMAT
FEATURES
TIMER
ACTIVE CTRL
AutoLock
CLOSED CAP
FORMAT
FEATURES
TIMER
ACTIVE CTRL
AutoLock
CLOSED CAP
FORMAT
ACCESS CODE
X X X X
INCORRECT
ENTER
NEW CODE
- - - -
CONFIRM
CODE
X X X X
CORRECT
OPEN/CLOSE
FEATURES
FEATURES
FEATURES
TUNER A/B
TIMER
ACTIVE CTRL
AutoLock
CLOSED CAP
FORMAT
TIMER
ACTIVE CTRL
AutoLock
CLOSED CAP
FORMAT
TIMER
ACTIVE CTRL
AutoLock
CLOSED CAP
FORMAT
ACCESS CODE
- - - -
CONFIRM
CODE
- - - -
ACCESS CODE
- - - -
Page 32
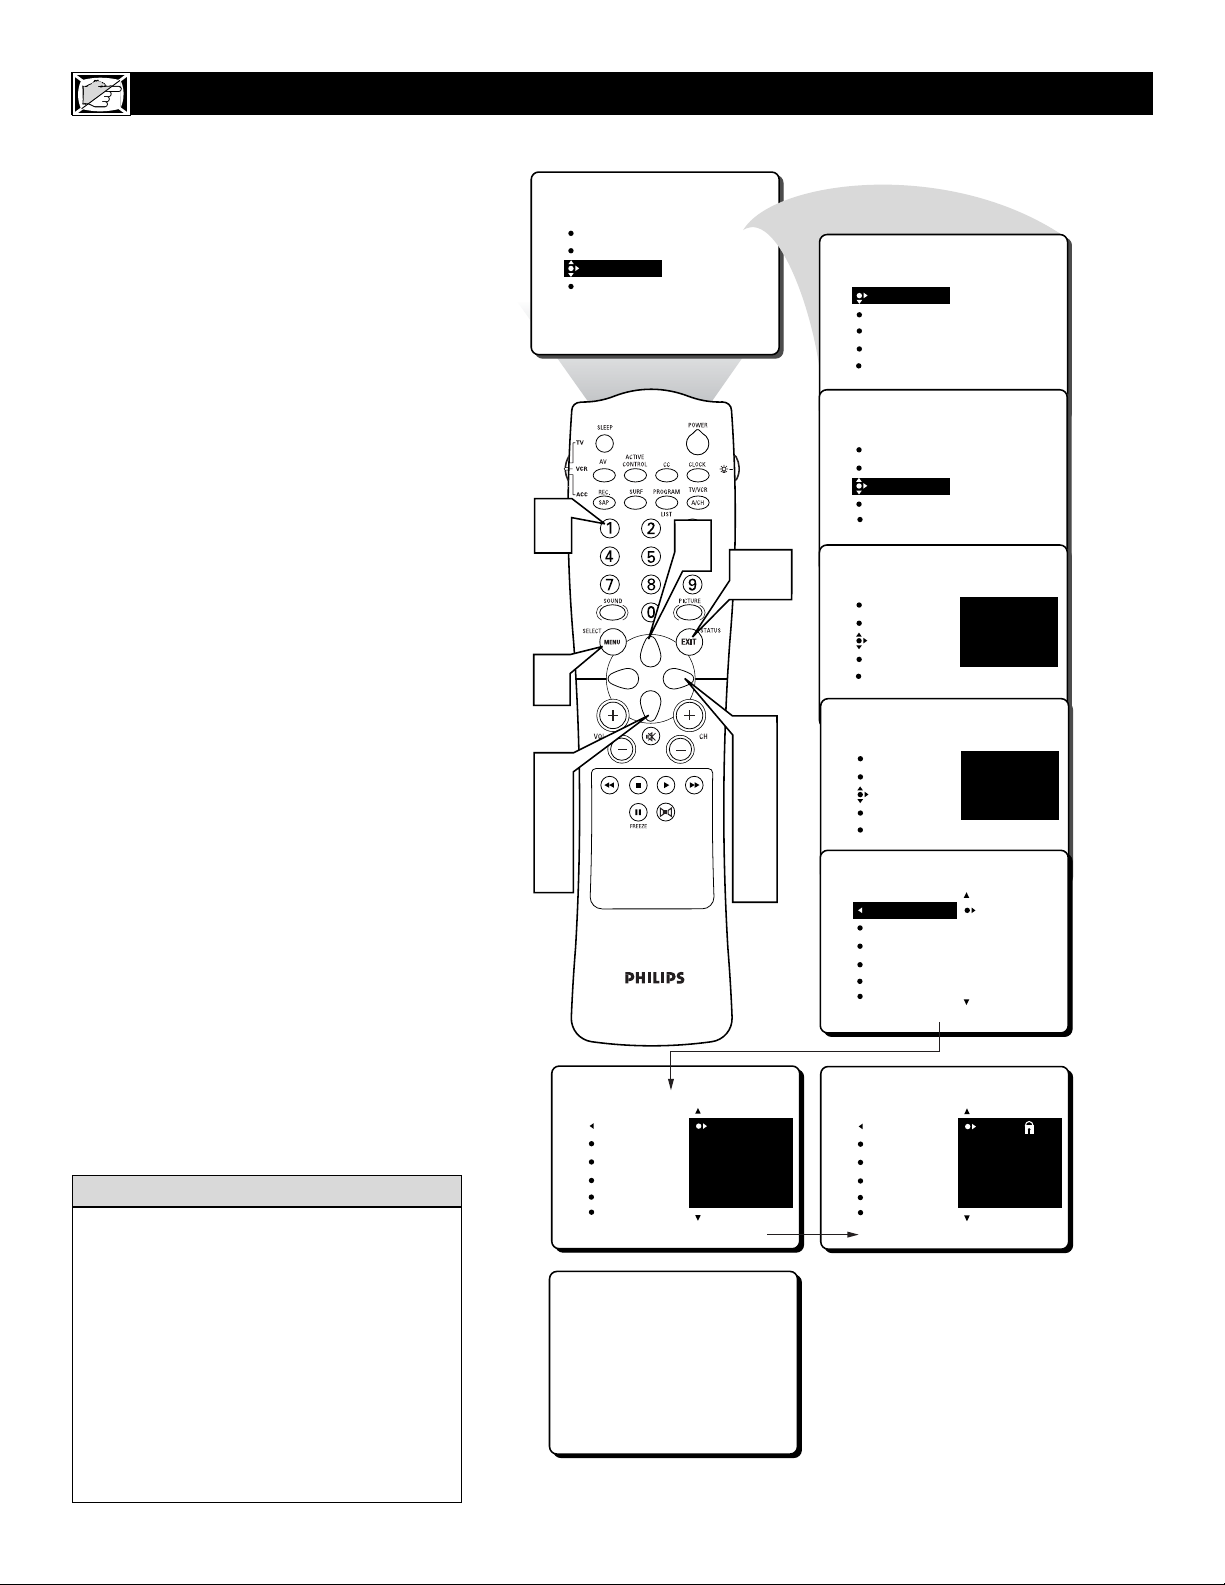
32
A
fter your personal access code has been
set (see the previous page), you are ready
to select the channels or inputs you want to
block out or censor.
1
Press the MENU button on the
remote control to show the onscreen
menu.
2
Press the CURSOR DOWN button
twice to highlight FEATURES.
3
Press the CURSOR RIGHT button
and the menu will shift to the left.
4
Press the CURSOR DOWN button
once to highlight the AutoLock™ control.
5
Press the CURSOR RIGHT button
again to highlight ACCESS CODE.
6
Enter your four-digit ACCESS
CODE. CORRECT will flash very
briefly and the menu will move to the
left with BLOCK CHANNEL highlighted.
7
Press the CURSOR RIGHT button
to highlight the TV’s available channels.
8
Press the CURSOR UP or CURSOR
DOWN button to highlight the chan-
nel you want to block.
9
Press the CURSOR RIGHT button
to block the channel. A padlock image
appears to the right of the channel
number.
Repeat steps 7 and 8 for any channels you
want to block from viewing.
Press the STATUS/EXIT button to
remove the menu from the screen.
HOW TO BLOCK CHANNEL USING AUTOLOCK™
Remember that 0711 is the default
AutoLock
TM
code. If your access code has
been changed by someone other than you (a
child, for example) or you have forgotten the
code, you can always get in by inputting the
default code.
NOTE: You also can block out the use of the
A/V external inputs on the rear of the TV. This
stops the viewing of VCR, DVD, and other
sources that can be shown through the A/V input
jacks. Select AV1, CVI, AV2, SIDE (AV3), or
AV4; and then select BLOCK.
H
ELPFUL HINT
10
If a channel is blocked by the
BLOCK CHANNEL option,
the TV will display the screen
shown to the right. To watch
the channel, enter your access
code or change the BLOCK
CHANNEL option back to off.
6
1
2
4
8
PICTURE
SOUND
FEATURES
INSTALL
FEATURES
AutoLock
BLOCK CHANNEL
SETUP CODE
CLEAR ALL
MOVIE RATING
TV RATING
Channel 12
Blocked by AutoLock
CHANNEL BLOCKING
Access code
- - - -
TIMER
ACTIVE CTRL
AutoLock
CLOSED CAP
FORMAT
8
10
12
13
14
15
16
3
5
7
9
FEATURES
TIMER
ACTIVE CTRL
AutoLock
CLOSED CAP
FORMAT
FEATURES
TIMER
ACTIVE CTRL
AutoLock
CLOSED CAP
FORMAT
FEATURES
TIMER
ACTIVE CTRL
AutoLock
CLOSED CAP
FORMAT
FEATURES
TIMER
ACTIVE CTRL
AutoLock
CLOSED CAP
FORMAT
FEATURES
AutoLock
BLOCK CHANNEL
SETUP CODE
CLEAR ALL
MOVIE RATING
TV RATING
FEATURES
AutoLock
BLOCK CHANNEL
SETUP CODE
CLEAR ALL
MOVIE RATING
TV RATING
HORA
HRA. DE INCICO
HRA. DE FIN
CANAL
ACTIVAR
ACCESS CODE
- - - -
ACCESS CODE
- - - -
ACCESS CODE
X X X X
AV2
AV3
ALL
1
2
12
13
14
15
16
Page 33
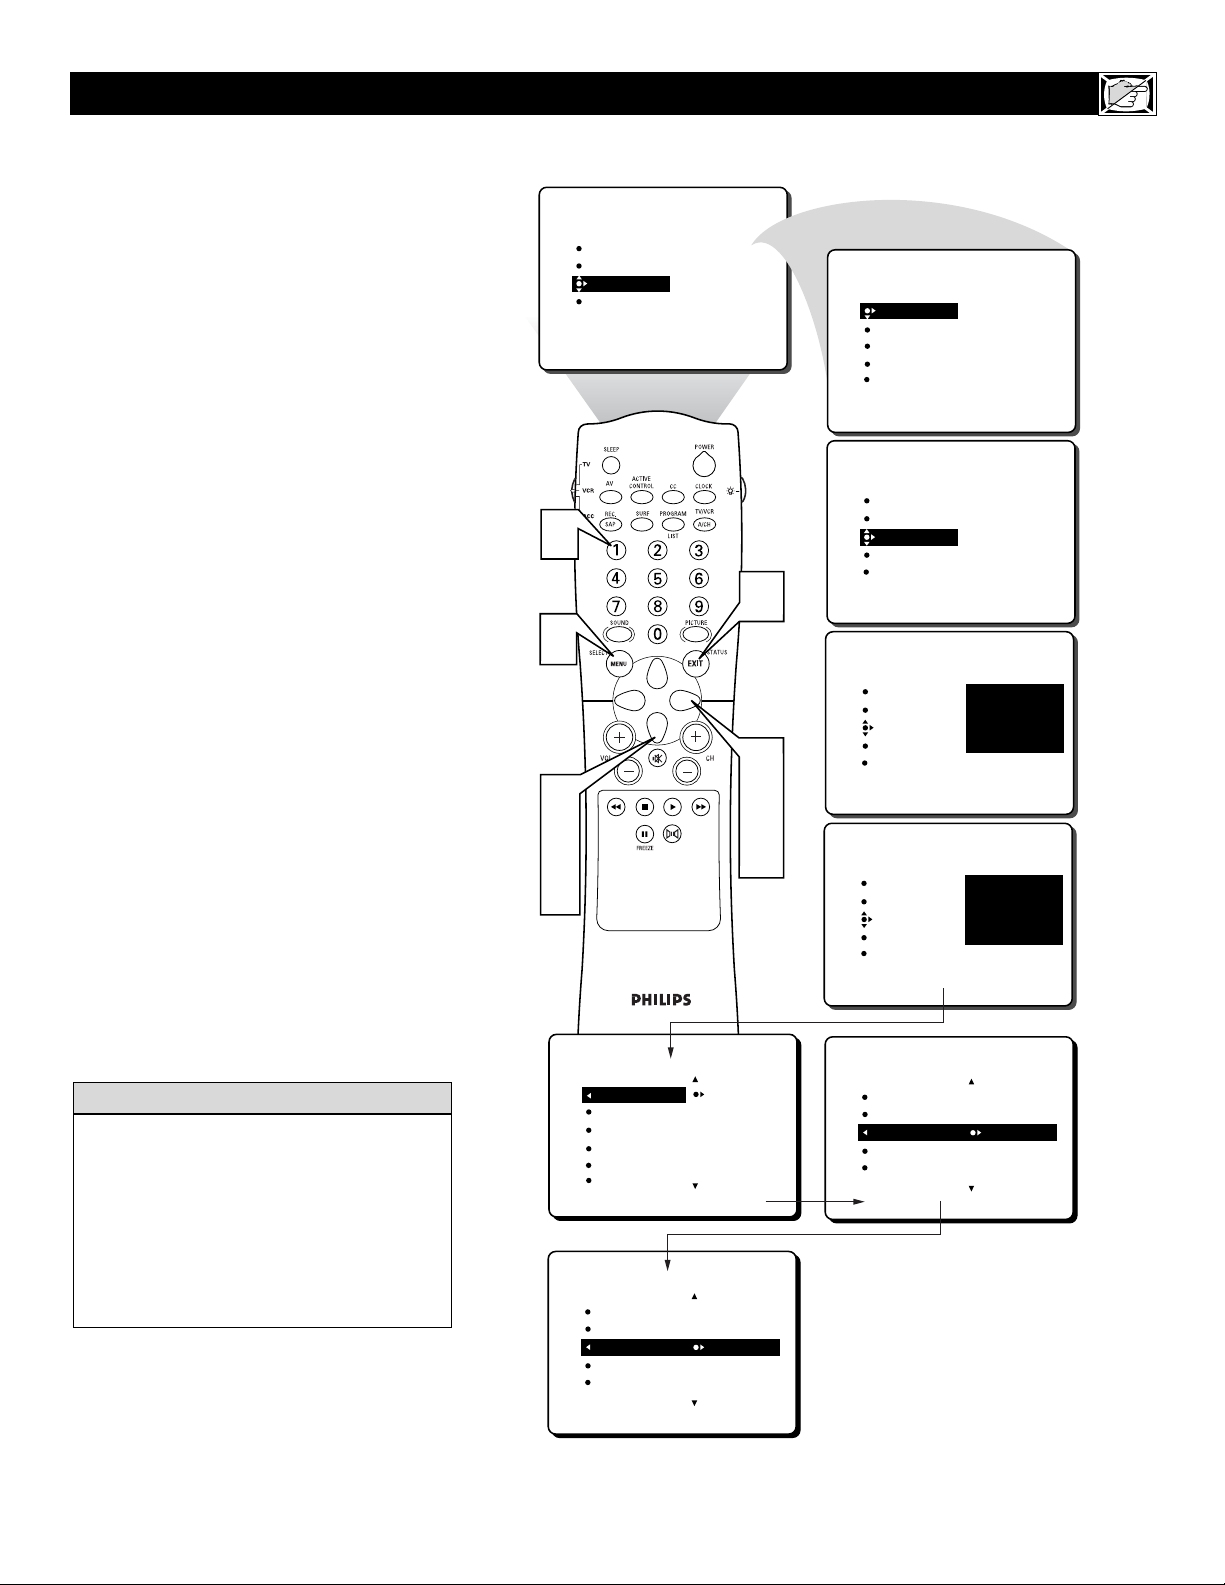
33
V
arious onscreen messages will appear
when someone tries to view blocked programming. The message is determined by how
the current programming is blocked. You may
view the blocked programming and turn OFF
the AutoLock™ feature by using the Clear All
control or by entering your access code.
1
Press the MENU button on the
remote control to show the onscreen
menu.
2
Press the CURSOR DOWN button
twice to highlight FEATURES.
3
Press the CURSOR RIGHT button
and the menu will shift to the left.
4
Press the CURSOR DOWN button
once to highlight the AutoLock™ control.
5
Press the CURSOR RIGHT button
again to highlight ACCESS CODE.
6
Enter your four-digit ACCESS
CODE and the menu will move to the
left with BLOCK CHANNEL highlighted.
7
Press the CURSOR DOWN button
twice to highlight CLEAR ALL.
8
Press the CURSOR RIGHT button
twice. The CLEAR ALL option will
display the word CLEARED. All
blocked channels and programming are
now viewable.
9
Press the STATUS/EXIT button to
remove the menu from the screen.
HOW TO CLEAR ALL BLOCKED CHANNELS USING AUTOLOCK™
If you tune to a specific channel that has
been blocked by BLOCK CHANNEL or
any of the AutoLock™ RATING options,
simply enter your four-digit access code to
view the channel.
NOTE: this will unblock ALL channels
until the TV is shut OFF. When powered
back ON, all previously blocked channels
will be blocked again.
HELPFUL HINT
6
1
2
4
7
PICTURE
SOUND
FEATURES
INSTALL
TIMER
ACTIVE CTRL
AutoLock
CLOSED CAP
FORMAT
9
3
5
8
FEATURES
TIMER
ACTIVE CTRL
AutoLock
CLOSED CAP
FORMAT
FEATURES
TIMER
ACTIVE CTRL
AutoLock
CLOSED CAP
FORMAT
FEATURES
TIMER
ACTIVE CTRL
AutoLock
CLOSED CAP
FORMAT
FEATURES
TIMER
ACTIVE CTRL
AutoLock
CLOSED CAP
FORMAT
HORA
HRA. DE INCICO
HRA. DE FIN
CANAL
ACTIVAR
ACCESS CODE
- - - -
ACCESS CODE
- - - -
ACCESS CODE
X X X X
FEATURES
AutoLock
BLOCK CHANNEL
SETUP CODE
CLEAR ALL
MOVIE RATING
TV RATING
FEATURES
AutoLock
BLOCK CHANNEL
SETUP CODE
CLEAR ALL CLEARED
MOVIE RATING
TV RATING
BLOCK OPTIONS
FEATURES
12
13
14
15
16
AutoLock
BLOCK CHANNEL
SETUP CODE
CLEAR ALL
MOVIE RATING
TV RATING
BLOCK OPTIONS
Page 34
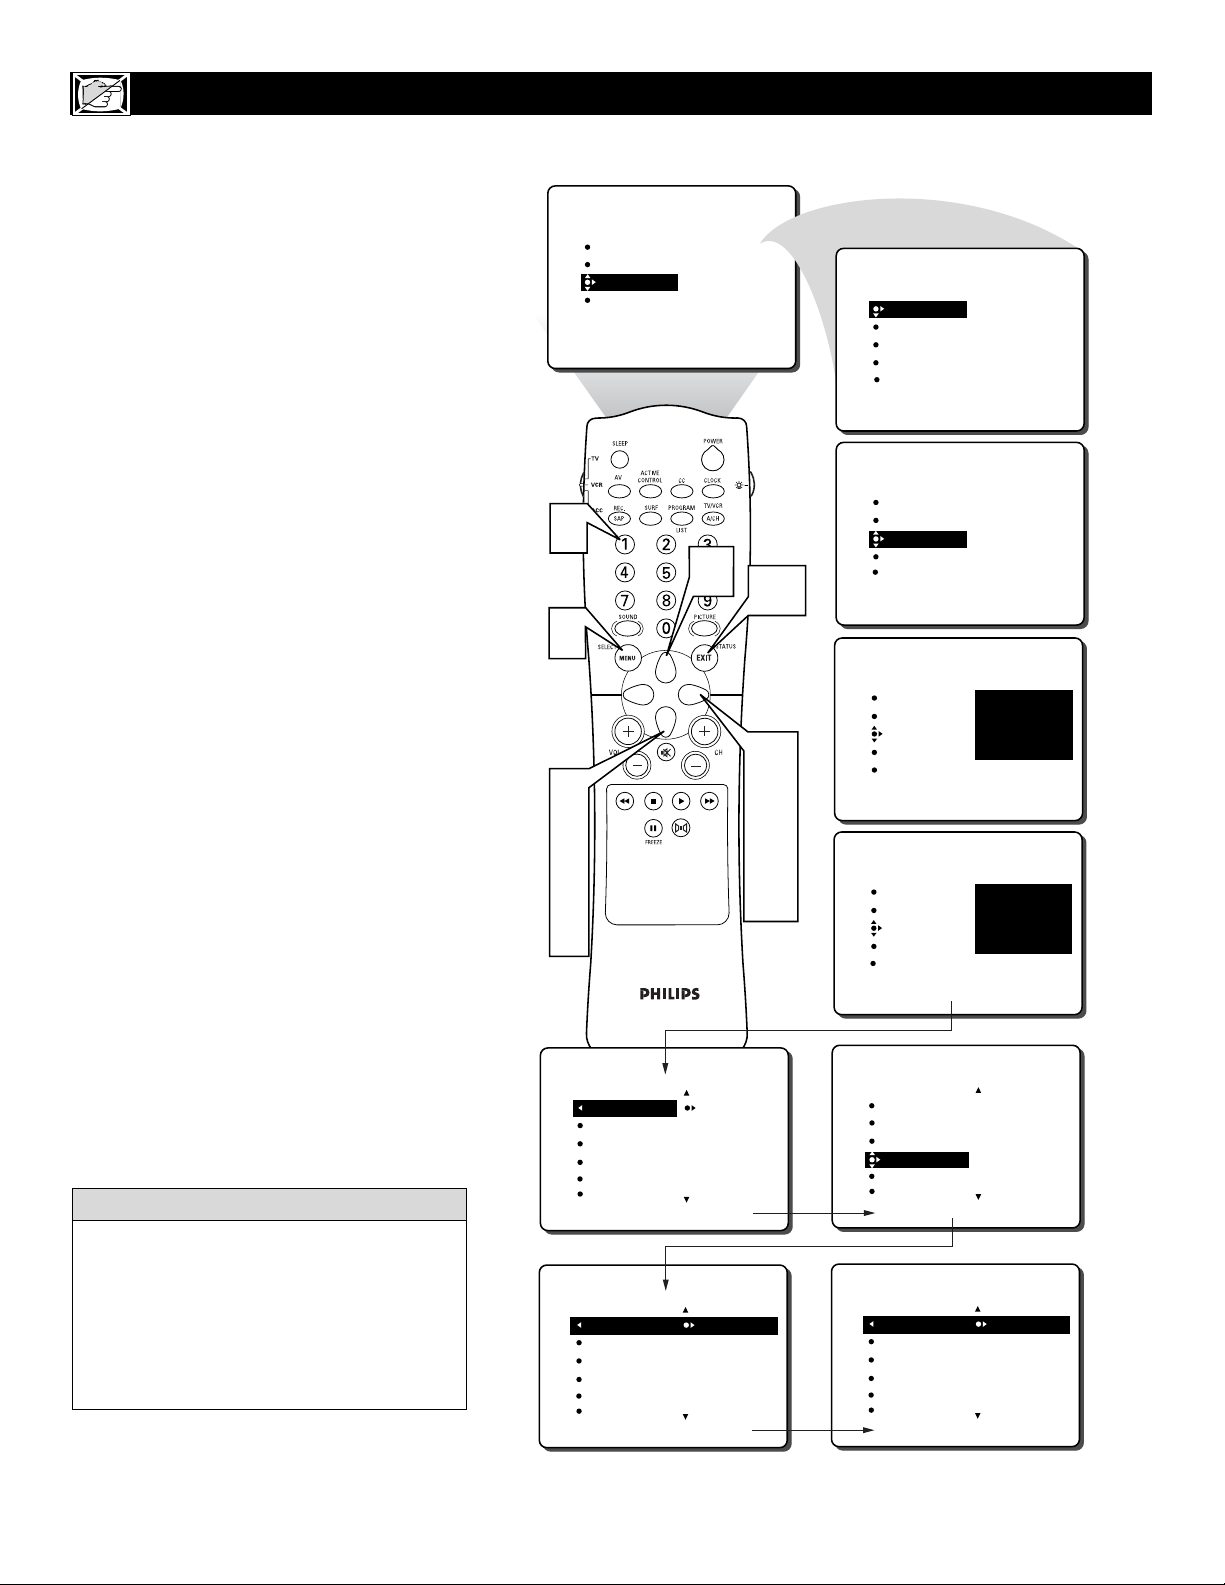
34
A
fter your personal access code has been
set, you can select specific movie ratings
that you want to censor.
1
Press the MENU button on the
remote control to show the onscreen
menu.
2
Press the CURSOR DOWN button
twice to highlight FEATURES.
3
Press the CURSOR RIGHT button
and the menu will shift to the left.
4
Press the CURSOR DOWN button
once to highlight the AutoLock™ control.
5
Press the CURSOR RIGHT button
again to highlight ACCESS CODE.
6
Enter your four-digit ACCESS
CODE. CORRECT will flash very
briefly and the menu will move to the
left with BLOCK CHANNEL highlighted.
7
Press the CURSOR DOWN button
repeatedly until MOVIE RATING is
highlighted.
8
Press the CURSOR RIGHT button
and the Rating menu shifts to the left
with G highlighted.
9
Press the CURSOR UP or CURSOR
DOWN button to highlight each rat-
ing you want.
Press the CURSOR RIGHT button
to turn the rating ON or OFF. Turning
the rating ON will block programs
with that rating from being seen.
Press the STATUS/EXIT button to
remove the menu from the screen.
HOW TO BLOCK PROGRAMMING BASED ON MOVIE RATINGS
When a rating is turned ON, all higher ratings
also will be turned on automatically. For
example, if the R rating is turned on, the NC-
17 and X ratings also will be turned on.
All Movie Ratings can be turned ON or OFF.
Refer to page 30 for Movie Rating definitions.
H
ELPFUL HINT
10
11
6
1
2
4
7
9
PICTURE
SOUND
FEATURES
INSTALL
TIMER
ACTIVE CTRL
AutoLock
CLOSED CAP
FORMAT
9
11
3
5
8
10
FEATURES
TIMER
ACTIVE CTRL
AutoLock
CLOSED CAP
FORMAT
FEATURES
TIMER
ACTIVE CTRL
AutoLock
CLOSED CAP
FORMAT
FEATURES
TIMER
ACTIVE CTRL
AutoLock
CLOSED CAP
FORMAT
FEATURES
TIMER
ACTIVE CTRL
AutoLock
CLOSED CAP
FORMAT
HORA
HRA. DE INCICO
HRA. DE FIN
CANAL
ACTIVAR
ACCESS CODE
- - - -
ACCESS CODE
- - - -
ACCESS CODE
X X X X
FEATURES
AutoLock
BLOCK CHANNEL
SETUP CODE
CLEAR ALL
MOVIE RATING
TV RATING
AutoLock
MOVIE RATING
G
PG
PG-13
R
NC-17
OFF
AV3
ALL
1
2
FEATURES
AutoLock
12
13
14
15
16
BLOCK CHANNEL
SETUP CODE
CLEAR ALL
MOVIE RATING
TV RATING
AutoLock
MOVIE RATING
G
PG
PG-13
R
NC-17
G
PG
PG-13
R
NC-17
ON
AV3
ALL
1
2
Page 35
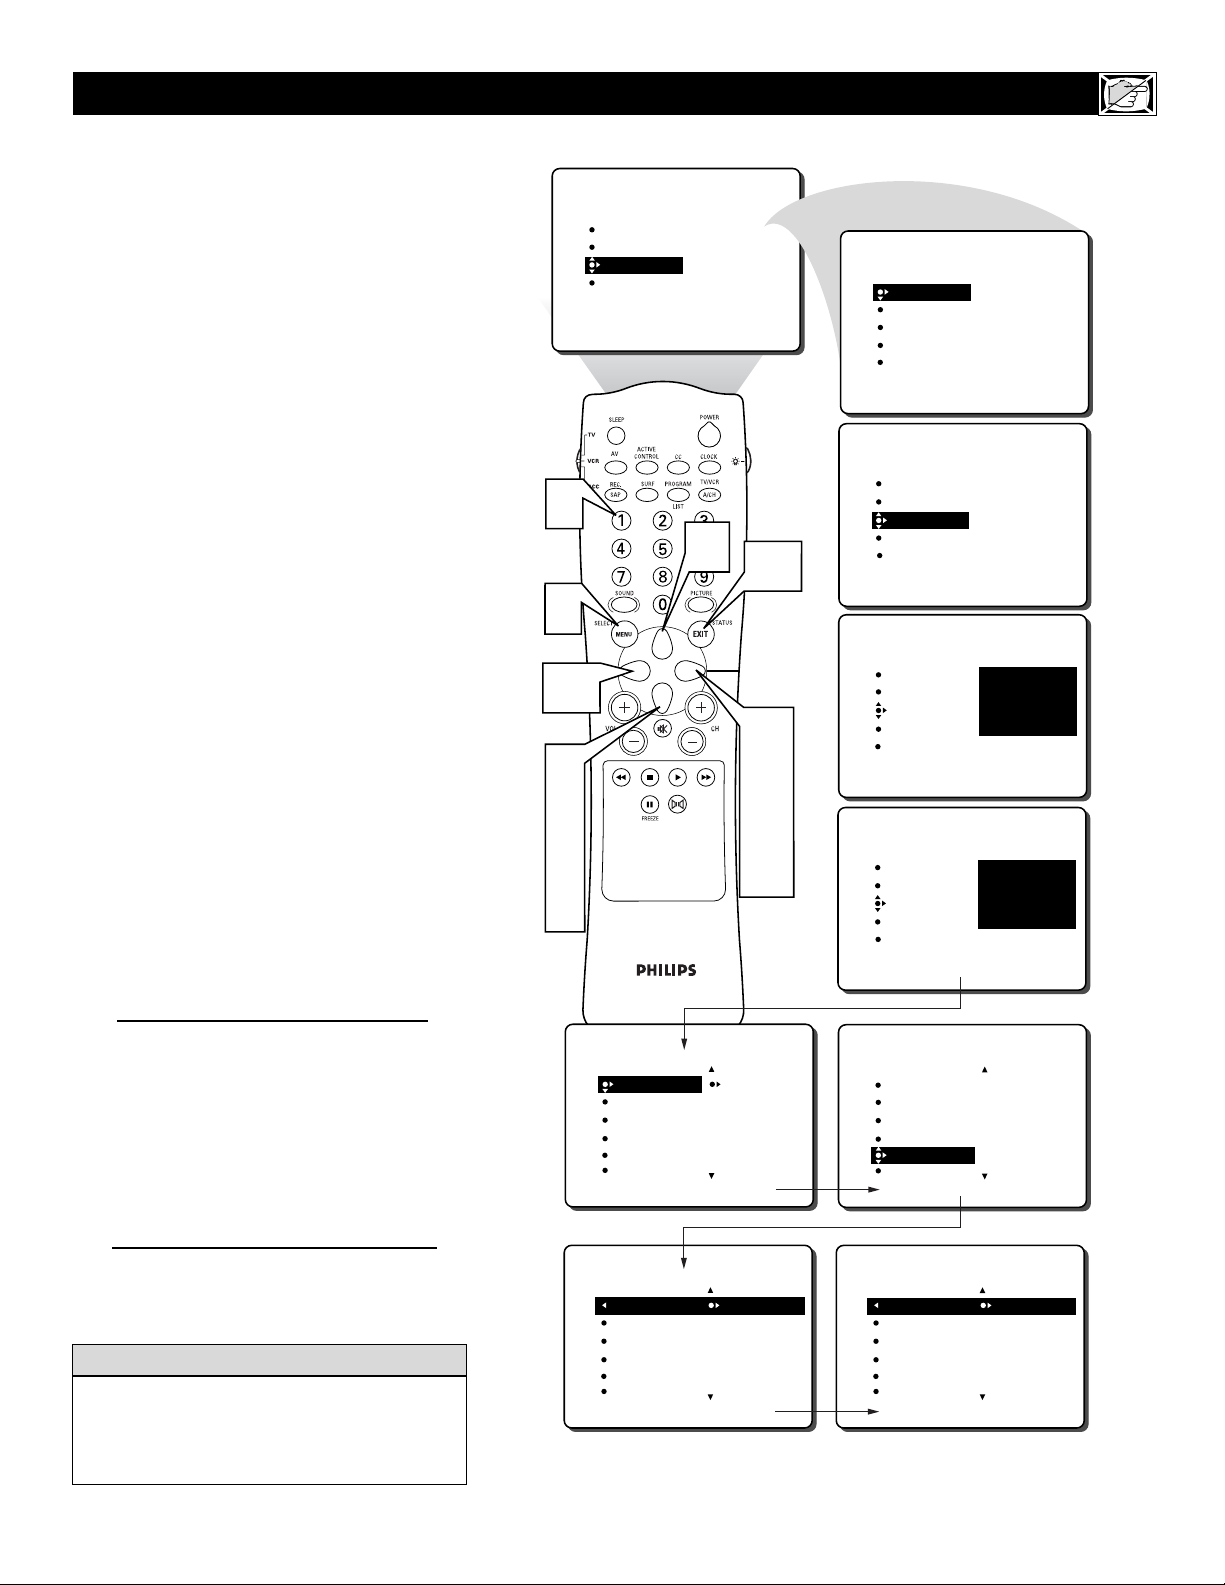
35
Y
ou can select specific TV ratings that you
want to censor by following these steps.
1
Press the MENU button on the
remote control to show the onscreen
menu.
2
Press the CURSOR DOWN button
twice to highlight FEATURES.
3
Press the CURSOR RIGHT button
and the menu will shift to the left.
4
Press the CURSOR DOWN button
once to highlight the AutoLock™ control.
5
Press the CURSOR RIGHT button
again to highlight ACCESS CODE.
6
Enter your four-digit ACCESS
CODE. CORRECT will flash very
briefly and the menu will move to the
left with BLOCK CHANNEL highlighted.
7
Press the CURSOR DOWN button
repeatedly until TV RATING is highlighted.
8
Press the CURSOR RIGHT button
and the menu will shift to highlight the
TV RATING options.
9
Press the CURSOR UP or DOWN
button to select a rating.
Press the CURSOR RIGHT or LEFT
button to turn the block on the rating
ON or OFF.
NOTE: More specific subratings (for violence,
sexual content, dialogue, or fantasy violence)
are available for TV-Y7, TV-PG, TV-14, and
TV-MA. (Refer to page 30 for definitions.)
To access these subratings, with the main rating
selected, press the CURSOR RIGHT button.
Then, repeat steps 9 and 10 to turn the sub-ratings ON or OFF.
Press the STATUS/EXIT button to
remove the menu from the screen.
HOW TO BLOCK PROGRAMMING BASED ON TV RATINGS
When a rating is turned ON, all higher ratings
also will be turned on automatically. For
example, if the R rating is turned on, the NC-
17 and X ratings also will be turned on.
HELPFUL HINT
10
11
6
1
10
2
4
7
9
PICTURE
SOUND
FEATURES
INSTALL
TIMER
ACTIVE CTRL
AutoLock
CLOSED CAP
FORMAT
9
11
3
5
8
10
FEATURES
TIMER
ACTIVE CTRL
AutoLock
CLOSED CAP
FORMAT
FEATURES
TIMER
ACTIVE CTRL
AutoLock
CLOSED CAP
FORMAT
FEATURES
TIMER
ACTIVE CTRL
AutoLock
CLOSED CAP
FORMAT
FEATURES
TIMER
ACTIVE CTRL
AutoLock
CLOSED CAP
FORMAT
HORA
HRA. DE INCICO
HRA. DE FIN
CANAL
ACTIVAR
ACCESS CODE
- - - -
ACCESS CODE
- - - -
ACCESS CODE
X X X X
FEATURES
AutoLock
AutoLock
TV RATING
BLOCK CHANNEL
SETUP CODE
CLEAR ALL
MOVIE RATING
TV RATING
TV-Y
TV-Y7
TV-G
TV-PG
TV-14
12
13
14
15
16
OFF
AV3
ALL
1
2
FEATURES
AutoLock
AutoLock
TV RATING
BLOCK CHANNEL
SETUP CODE
CLEAR ALL
MOVIE RATING
TV RATING
TV-Y
TV-Y7
TV-G
TV-PG
TV-14
TV-Y
TV-Y7
TV-G
TV-PG
TV-14
ON
AV3
ALL
1
2
Page 36
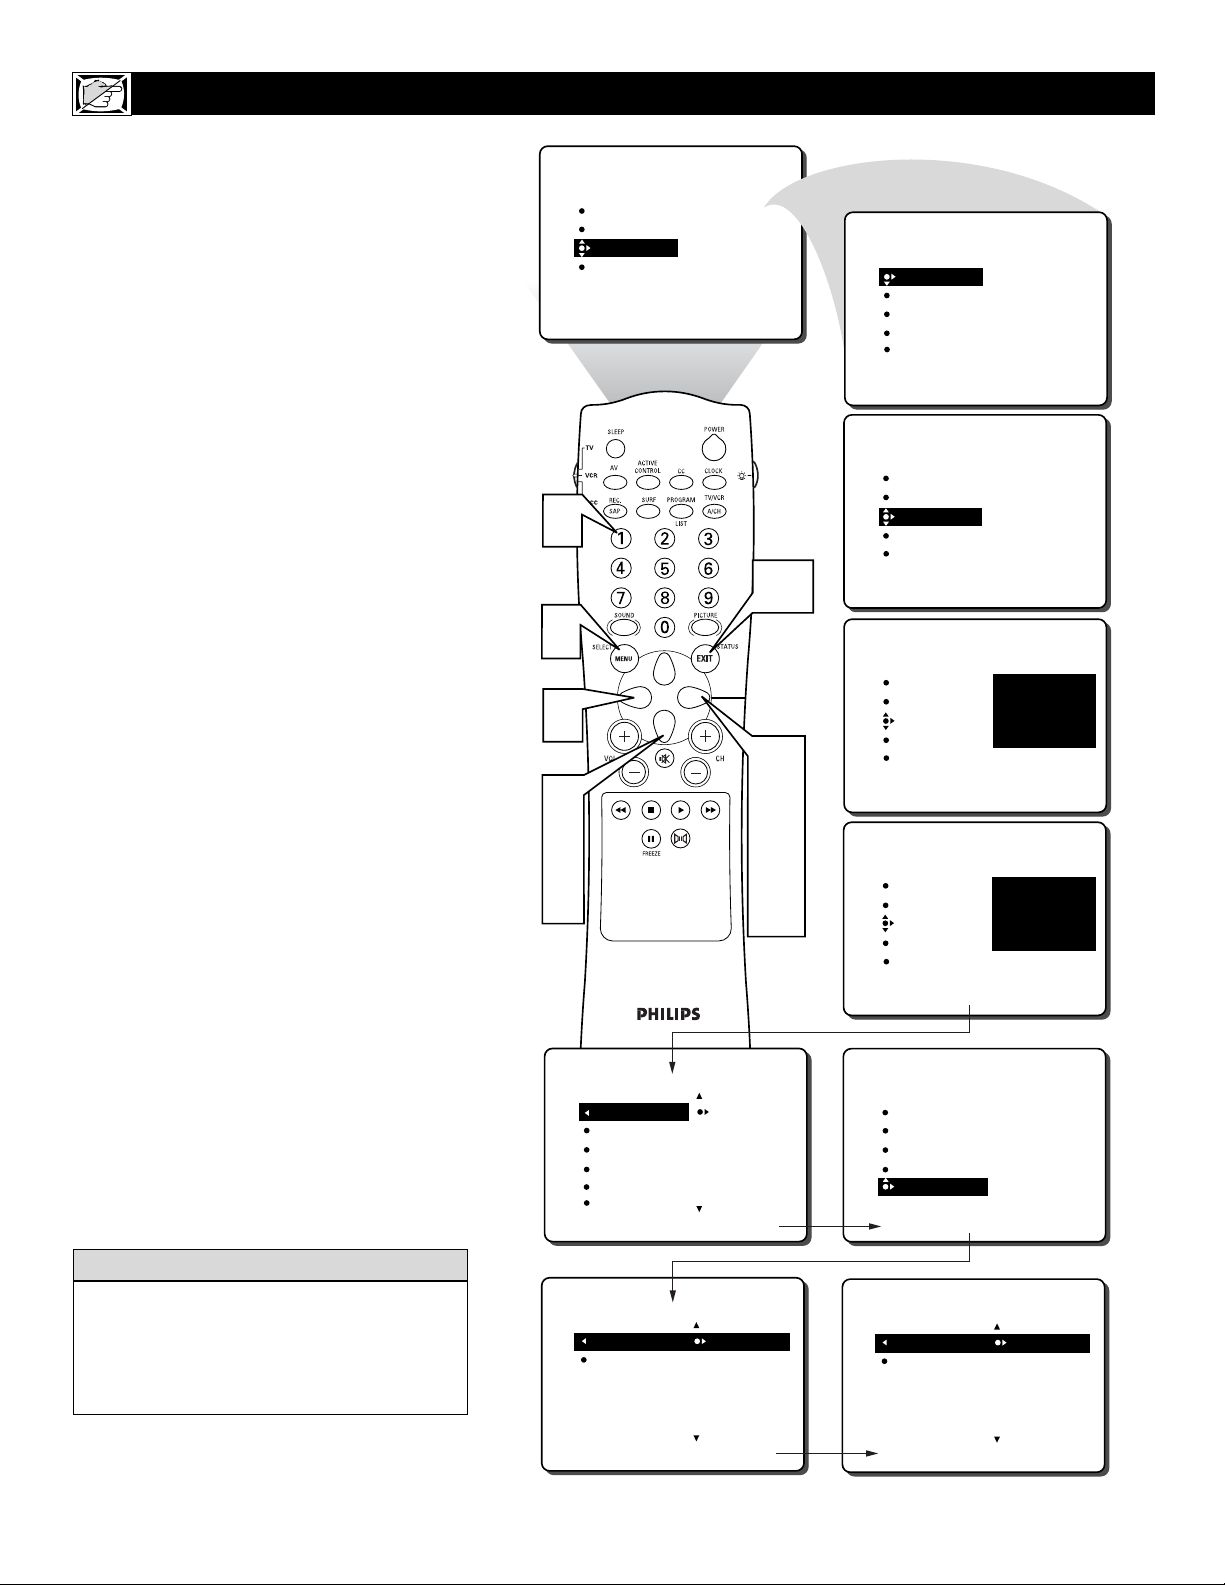
36
T
he BLOCKING control is what can be
thought of as the “master switch” for
AutoLock™. This control affects the settings
you have chosen for blocking programs
according to movie ratings or TV ratings, or
for blocking programs that have no rating or
are unrated. When the BLOCKING control is
OFF, the blocking or censoring of programs
is disabled. When the BLOCKING control is
ON, blocking will occur according to the settings you have chosen. Follow these steps to
toggle BLOCKING OFF or ON.
1
Press the MENU button on the
remote control to show the onscreen
menu.
2
Press the CURSOR DOWN button
twice to highlight FEATURES.
3
Press the CURSOR RIGHT button
and the menu will shift to the left.
4
Press the CURSOR DOWN button
once to highlight the AutoLock control.
5
Press the CURSOR RIGHT button
again to highlight ACCESS CODE.
6
Enter your four-digit ACCESS
CODE and the menu will move to the
left with BLOCK CHANNEL highlighted.
7
Press the CURSOR DOWN button
repeatedly until BLOCK OPTIONS is
highlighted.
8
Press the CURSOR RIGHT button
to enter the BLOCK OPTIONS menu.
BLOCKING will be highlighted.
9
Press the CURSOR RIGHT or
LEFT button to toggle BLOCKING
ON or OFF.
Press the STATUS/EXIT button to
remove the menu from the screen.
OTHER AUTOLOCK BLOCKING OPTIONS - BLOCKING CONTROL
Remember, when the BLOCKING control is
OFF, the blocking or censoring of programs is
disabled. When the BLOCKING control is
ON, blocking will occur according to the settings you have chosen.
HELPFUL HINT
10
PICTURE
SOUND
FEATURES
INSTALL
TIMER
ACTIVE CTRL
AutoLock
CLOSED CAP
FORMAT
FEATURES
TIMER
ACTIVE CTRL
AutoLock
CLOSED CAP
FORMAT
HORA
HRA. DE INCICO
HRA. DE FIN
CANAL
ACTIVAR
6
1
9
2
4
7
FEATURES
AutoLock
BLOCK CHANNEL
SETUP CODE
CLEAR ALL
MOVIE RATING
TV RATING
FEATURES
TIMER
ACTIVE CTRL
AutoLock
CLOSED CAP
FORMAT
ACCESS CODE
- - - -
10
FEATURES
3
TIMER
ACTIVE CTRL
AutoLock
CLOSED CAP
FORMAT
ACCESS CODE
- - - -
5
8
9
12
13
14
15
16
FEATURES
FEATURES
AutoLock
TIMER
ACTIVE CTRL
AutoLock
CLOSED CAP
FORMAT
SETUP CODE
CLEAR ALL
MOVIE RATING
TV RATING
BLOCK OPTIONS
ACCESS CODE
X X X X
BLOCKING
NO RATING
AutoLock
BLOCK OPTIONS
BLOCKING
NO RATING
OFF
AV3
ALL
1
2
OR
AutoLock
BLOCK OPTIONS
BLOCKING
NO RATING
ON
AV3
ALL
1
2
Page 37
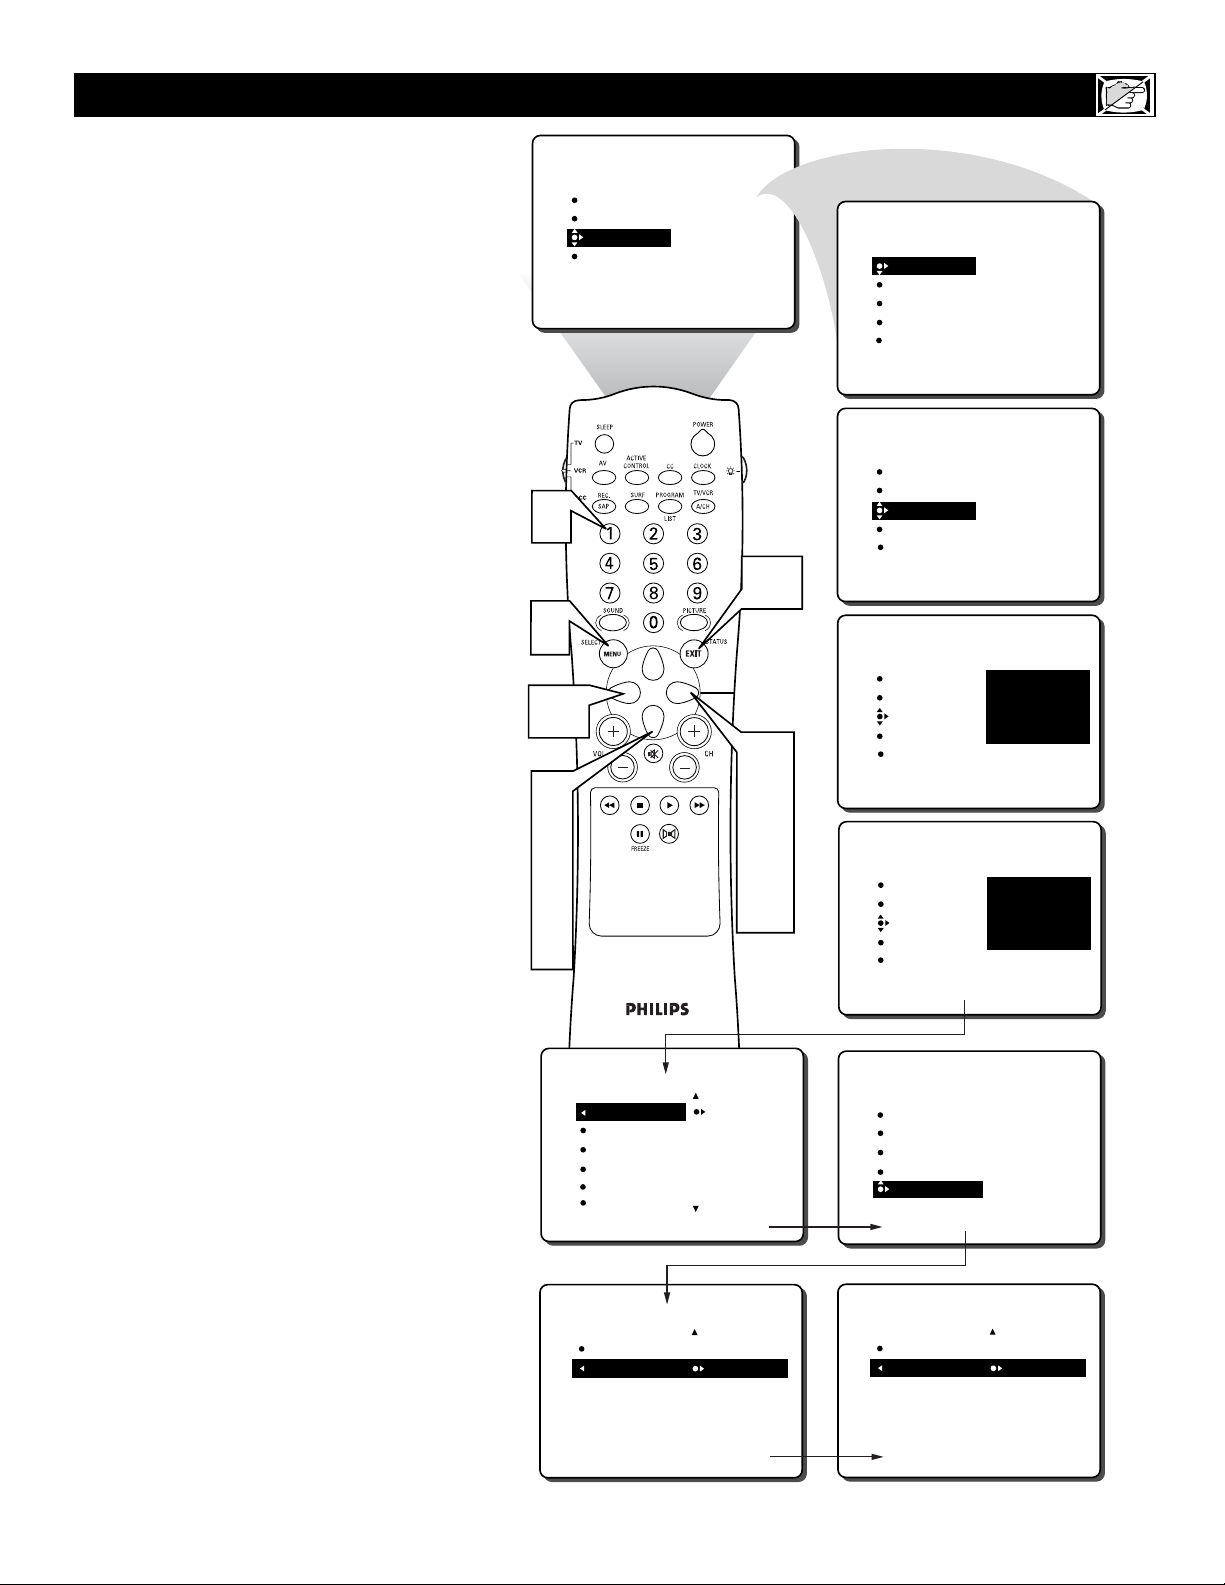
37
S
ome programming is not encoded with
content advisory data by the MPAA
(Motion Picture Association of America) or
the television broadcasters (see the explanation on page 30). To block such programming, follow these steps.
1
Press the MENU button on the
remote control to show the onscreen
menu.
2
Press the CURSOR DOWN button
twice to highlight FEATURES.
3
Press the CURSOR RIGHT button
and the menu will shift to the left.
4
Press the CURSOR DOWN button
once to highlight the AutoLock control.
5
Press the CURSOR RIGHT button
again to highlight ACCESS CODE.
6
Enter your four-digit ACCESS
CODE and the menu will move to the
left with BLOCK CHANNEL highlighted.
7
Press the CURSOR DOWN button
repeatedly until BLOCK OPTIONS is
highlighted.
8
Press the CURSOR RIGHT button
to enter the BLOCK OPTIONS menu.
BLOCKING will be highlighted.
9
Press the CURSOR DOWN button
to highlight the NO RATING option.
Press the CURSOR RIGHT or
LEFT button to toggle NO RATING
ON or OFF.
Press the STATUS/EXIT button to
remove the menu from the screen.
OTHER AUTOLOCK BLOCKING OPTIONS - NO RATING CONTROL
10
11
6
1
10
2
4
7
9
FEATURES
AutoLock
PICTURE
SOUND
FEATURES
INSTALL
BLOCK CHANNEL
SETUP CODE
CLEAR ALL
MOVIE RATING
TV RATING
TIMER
ACTIVE CTRL
AutoLock
CLOSED CAP
FORMAT
12
13
14
15
16
11
3
5
8
10
FEATURES
FEATURES
FEATURES
FEATURES
FEATURES
AutoLock
TIMER
ACTIVE CTRL
AutoLock
CLOSED CAP
FORMAT
TIMER
ACTIVE CTRL
AutoLock
CLOSED CAP
FORMAT
TIMER
ACTIVE CTRL
AutoLock
CLOSED CAP
FORMAT
TIMER
ACTIVE CTRL
AutoLock
CLOSED CAP
FORMAT
SETUP CODE
CLEAR ALL
MOVIE RATING
TV RATING
BLOCK OPTIONS
HORA
HRA. DE INCICO
HRA. DE FIN
CANAL
ACTIVAR
ACCESS CODE
- - - -
ACCESS CODE
- - - -
ACCESS CODE
X X X X
BLOCKING
NO RATING
AutoLock
BLOCK OPTIONS
BLOCKING
NO RATING
OFF
OFF
OFF
OR
AutoLock
BLOCK OPTIONS
BLOCKING
NO RATING
ON
ON
ON
Page 38
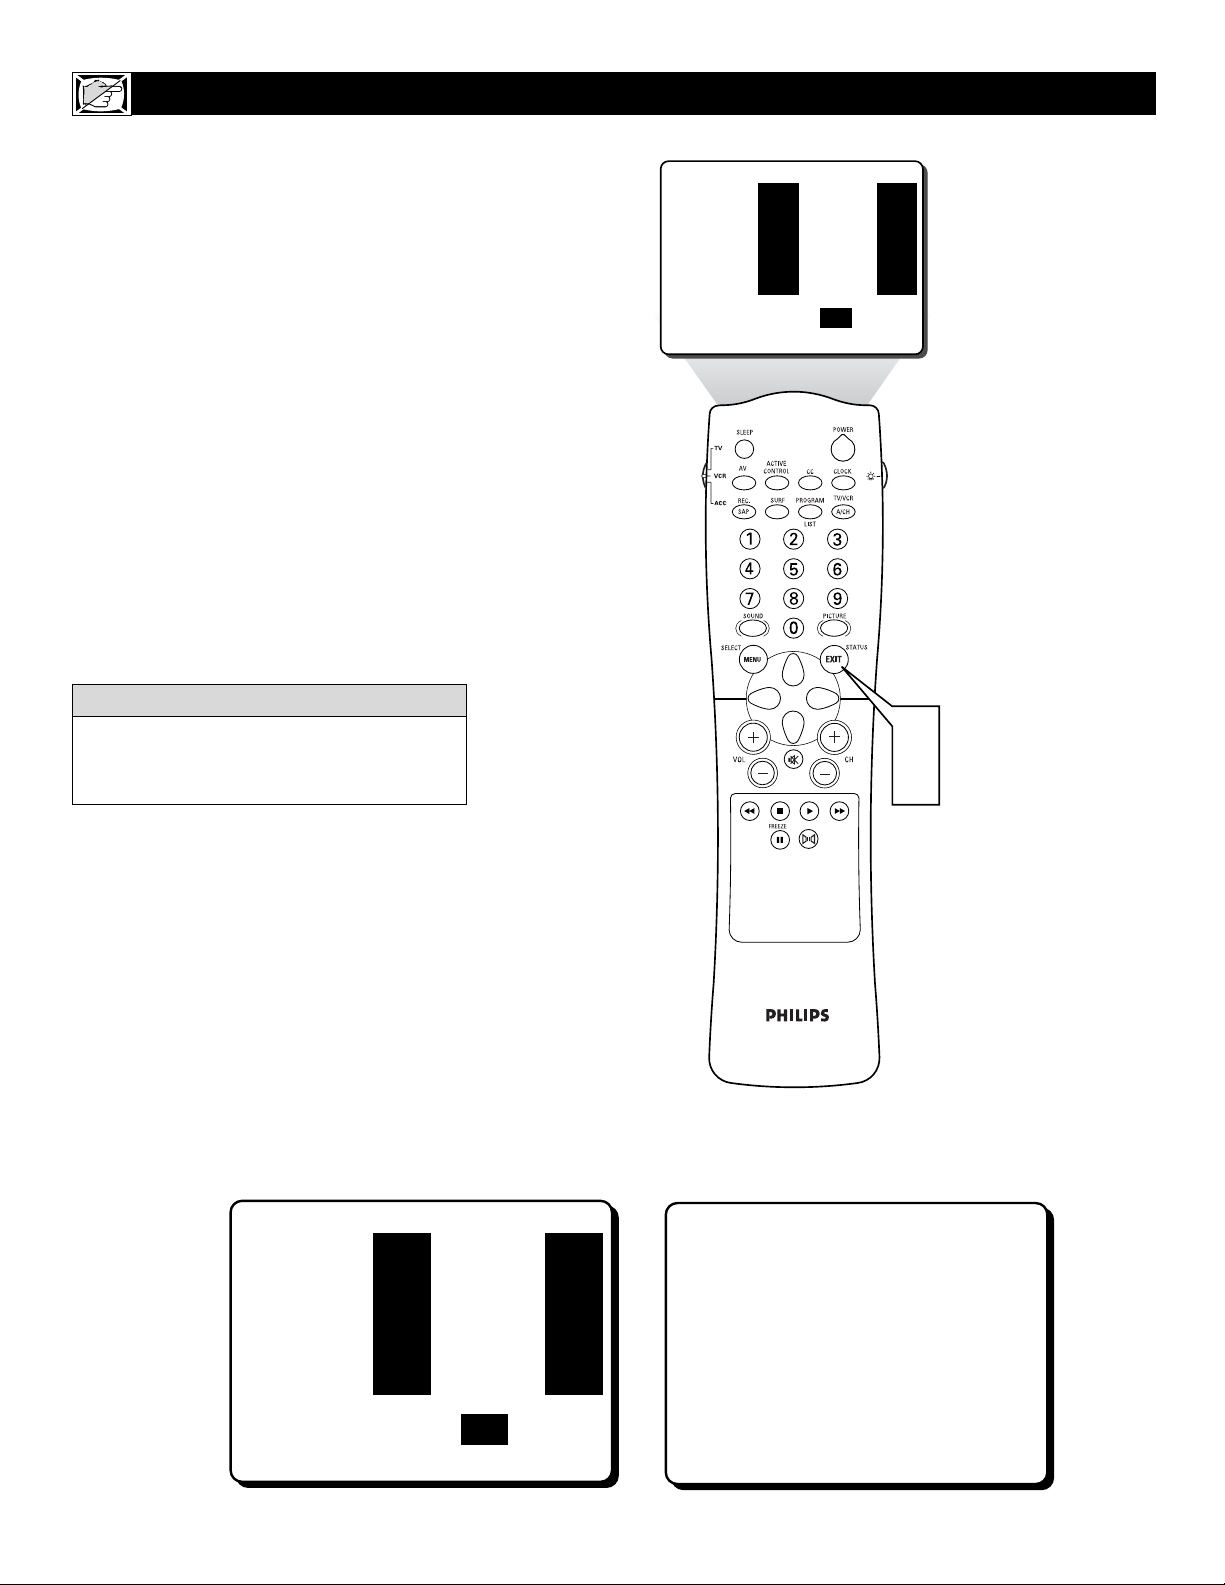
38
T
o remind you which ratings you have
blocked and which Block Options you
have selected, a review screen is available to
review your AutoLock
TM
settings. To access
this screen follow the steps below.
1
Press the STATUS/EXIT button on
your remote control TWICE. Your
AutoLockTMsettings will appear on the
screen.
NOTE: If you have blocked specific subratings, such as V for Violence in the TV-PG category, these blocked subratings will not appear
in the review. The subratings however, are still
blocked according to your selections.
2
After a few seconds, the settings will
leave the screen automatically, or you
can press the STATUS/EXIT button
a third time to remove them from the
screen.
HOW TO REVIEW THE AUTOLOCK™ STATUS SCREEN
The AutoLock™ Status screen will only
appear if the BLOCKING option is set to ON.
For details, see page 37.
HELPFUL HINT
This display will appear after the step 1 above
is completed if the AutoLock™ BLOCKING
option is set to ON.
This display will appear after the step 1 above
is completed if the AutoLock™ BLOCKING
option is set to OFF.
MOVIE RATING -
NO RATING
-
R
NC17
X
TV RATING -
Y7
PG
14
MA
ON
MOVIE RATING -
-
R
NC17
X
TV RATING -
Y7
PG
14
MA
1
2
AutoLock DISABLED
NO RATING
ON
Page 39
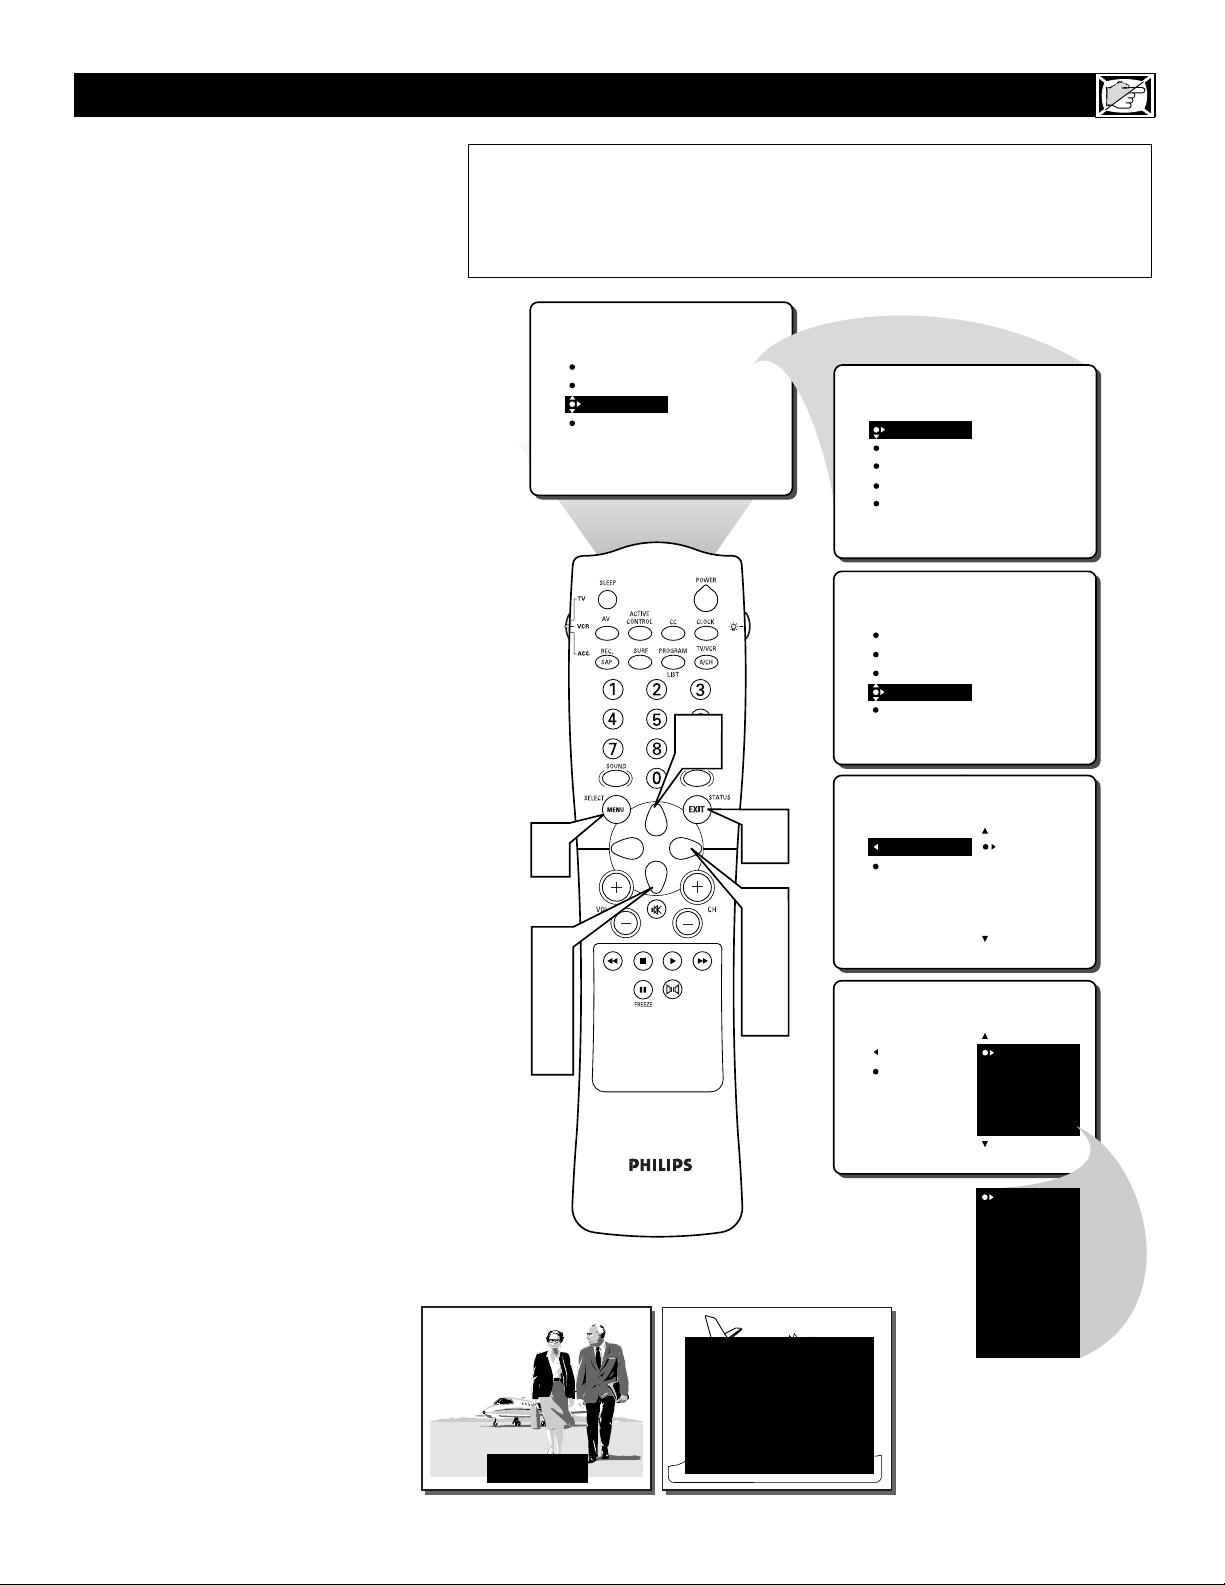
39
C
losed Captioning (CC) allows you to
read the voice content of television programs on the TV screen. Designed to help the
hearing impaired, this feature uses onscreen
“text boxes” to show dialogue and conversations while the TV program is in progress.
1
Press the MENU button on the
remote control to show the on-screen
menu.
2
Press the CURSOR DOWN button
twice to highlight FEATURES.
3
Press the CURSOR RIGHT button
and the menu will shift to the left.
4
Press the CURSOR DOWN button
repeatedly until the CLOSED CAP
control is highlighted.
5
Press the CURSOR RIGHT button
again. The menu will shift to the left
and CAPTION MODE will be highlighted.
6
Press the CURSOR RIGHT button
to highlight CAPTION MODEs.
7
Press the CURSOR UP or CURSOR
DOWN button to select a CAPTION
MODE: CC1, CC2, CC3, CC4, CC
MUTE, TXT1, TXT2, TXT3, or TXT4.
CC DISPLAY turns text OFF or ON if
the TV station broadcasting on the
channel is making CLOSED CAPTIONING available. With CC DISPLAY highlighted, press the CURSOR
RIGHT button to toggle Closed
Captioning ON or OFF.
NOTE: You also can press the CC button on
the remote control to turn the CC TEXT
option ON or OFF.
8
Press the STATUS/EXIT button to
remove the menu from the screen.
HOW TO USE THE CLOSED CAPTIONING CONTROL
NOTE: Not all TV programs and product commercials are broadcast with Closed
Captioning (CC). Nor are all Closed Captioning MODEs (CAPTION 1–4 or
TEXT 1–4) necessarily being used by broadcast stations during the transmission
of a program offering Closed Captioning. Refer to your area’s TV program listings for the stations and times of shows being broadcast with Closed Captioning.
CAPTION Mode
Example Display
TEXT Mode Example Display -
The TV screen will be
blocked from viewing.
PICTURE
SOUND
FEATURES
INSTALL
TIMER
ACTIVE CTRL
AutoLock
CLOSED CAP
FORMAT
FEATURES
FEATURES
TIMER
ACTIVE CTRL
AutoLock
CLOSED CAP
FORMAT
TIMER
ACTIVE CTRL
AutoLock
CLOSED CAP
FORMAT
HORA
HRA. DE INCICO
HRA. DE FIN
CANAL
ACTIVAR
CAPTION MPDE
CC DISPLAY
7
FEATURES
CLOSED CAP
1
2
4
7
JOHN: Why did they move the
meeting up to this week?
MARSHA: I don't know, but they
are pushing to close the deal.
8
3
5
6
CLOSE CAPTION PROGRAMS ON WXYZ
ALL ITEMS ARE EASTERN STANDARD TIME (EST)
CHECK LOCAL LISTINGS
FOR TIMES IN YOUR AREA
6:00 TOP OF THE MORNING
10:00 THE BEST LITTLE CALL-IN SHOW EVER
12:00 NOONDAY NEWS
1:30 AS YOUR LIFE TURNS MY WORLD AROUND
6:00 WORLD NEWS FOR TODAY
9:00 PLAYHOUSE MOVIE OF THE WEEK
FEATURES
CAPTION MODE
CC DISPLAY
CLOSED CAP
CAPTION MODE
CC DISPLAY
CC1
CC2
CC3
CC4
CC MUTE
CC1
CC2
CC3
CC4
CC MUTE
CC1
CC2
CC3
CC4
CC MUTE
TXT1
TXT2
TXT3
TXT4
Page 40
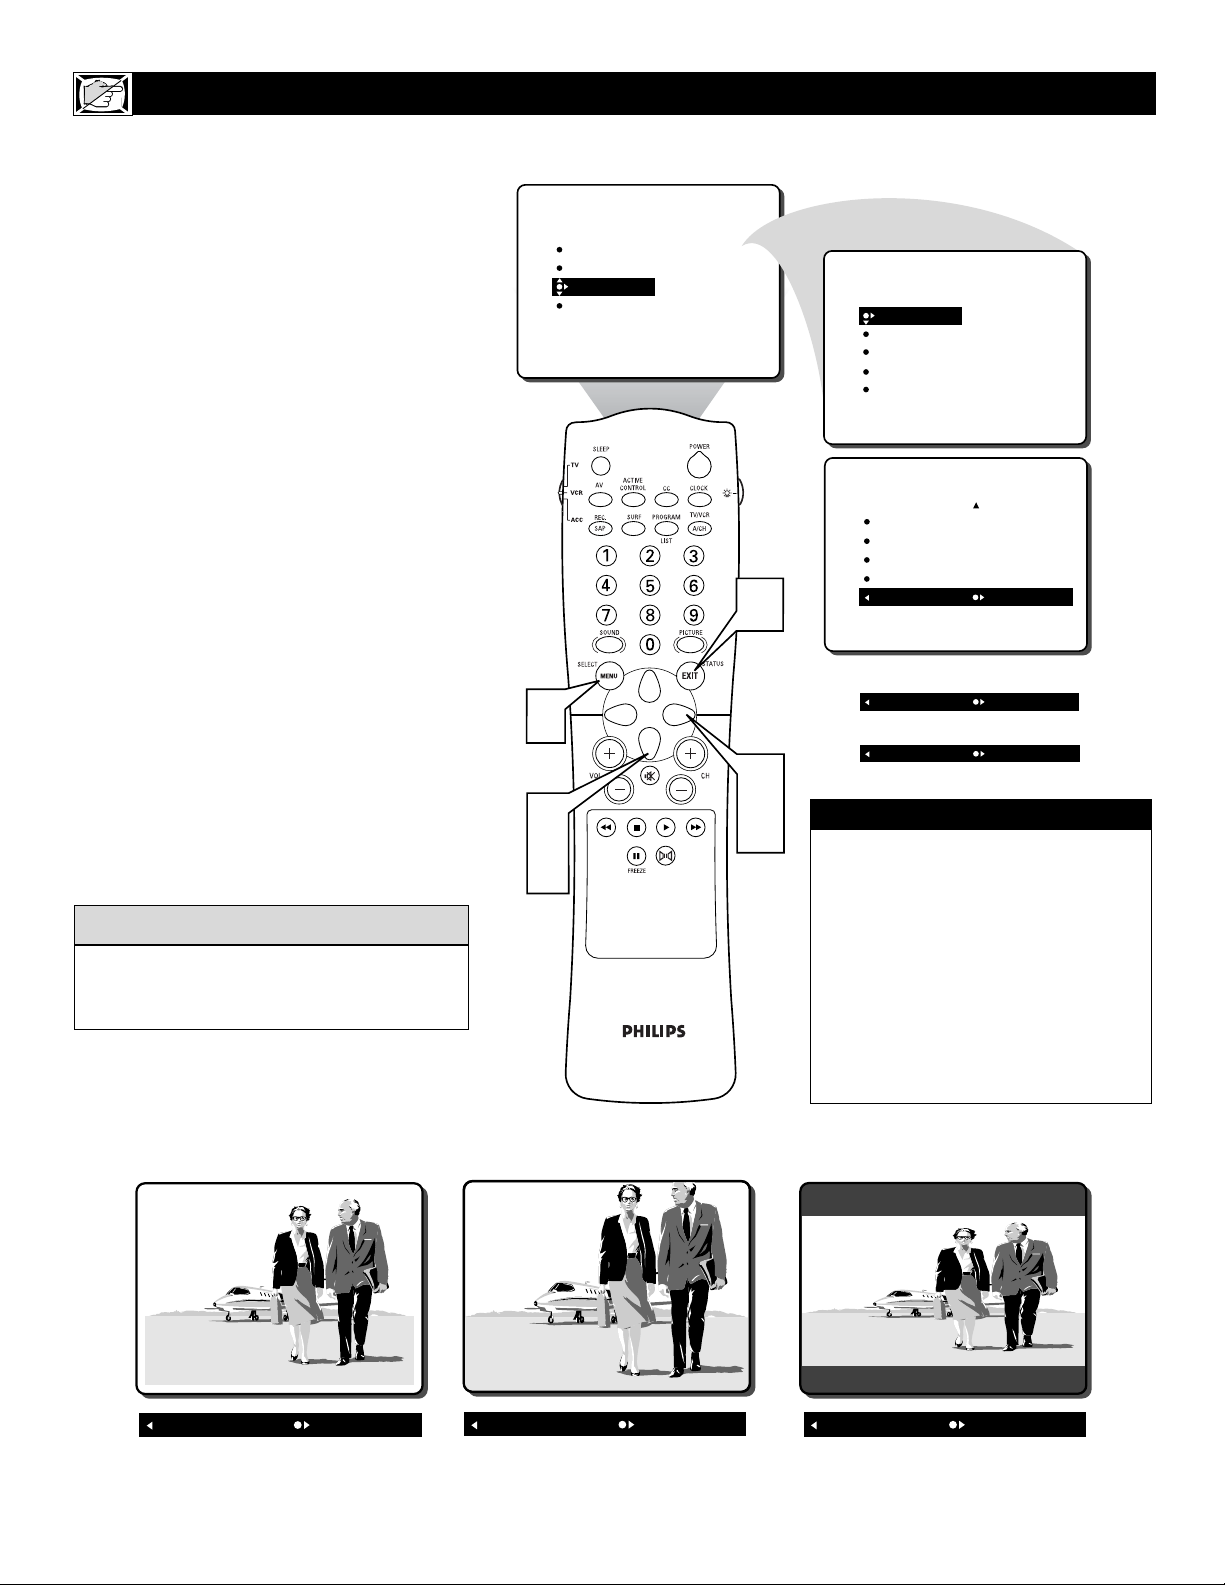
40
Y
ou can change the screen format size to
match the type of program you’re watching. Select the normal 4:3 aspect ratio or
expand the 4:3 aspect ratio to completely fill
the screen. There also is a compressed 16:9
aspect ratio, which allows movies to be
viewed in their full width (known as letter-box
style).
1
Press the MENU button on the
remote control to show the on-screen
menu.
2
Press the CURSOR DOWN button
twice to highlight FEATURES.
3
Press the CURSOR RIGHT button
and the menu will shift to the left.
4
Press the CURSOR DOWN button
repeatedly until the FORMAT control
is highlighted.
5
Press the CURSOR RIGHT button
repeatedly to toggle among the three
screen format sizes – 4:3, EXPAND
4:3, or COMPRESS 16:9.
6
Press the STATUS/EXIT button to
remove the menu from the screen.
HOW TO USE THE SCREEN FORMAT CONTROL
The FORMAT control is not available for use
with the AV 4 Inputs (AV4 Channel) if 1080i
signal is detected.
HELPFUL HINT
IMPORTANT NOTE:
Some DVD Discs are encoded with as
much as 30% more video information to
give the viewer the best possible picture
quality. With the DVD Player in the
16:9 picture format, the playback of this
type of disc (containing extra video
information), can produce a number of
small white lines in the upper portion of
the black letterbox area. With some of
these discs, this situation is unavoidable
and it does not require a service call.
1
2
4
PICTURE
SOUND
FEATURES
INSTALL
TIMER
ACTIVE CTRL
AutoLock
CLOSED CAP
FORMAT
6
3
5
FEATURES
TIMER
ACTIVE CTRL
AutoLock
CLOSED CAP
FORMAT
FEATURES
TIMER
ACTIVE CTRL
AutoLock
CLOSED CAP
FORMAT 4:3
FORMAT EXPAND 4:3
FORMAT COMPRESS 16:9
HORA
HRA. DE INCICO
HRA. DE FIN
CANAL
ACTIVAR
OR
OR
FORMAT 4:3
FORMAT EXPAND 4:3
FORMAT COMPRESS 16:9
Page 41
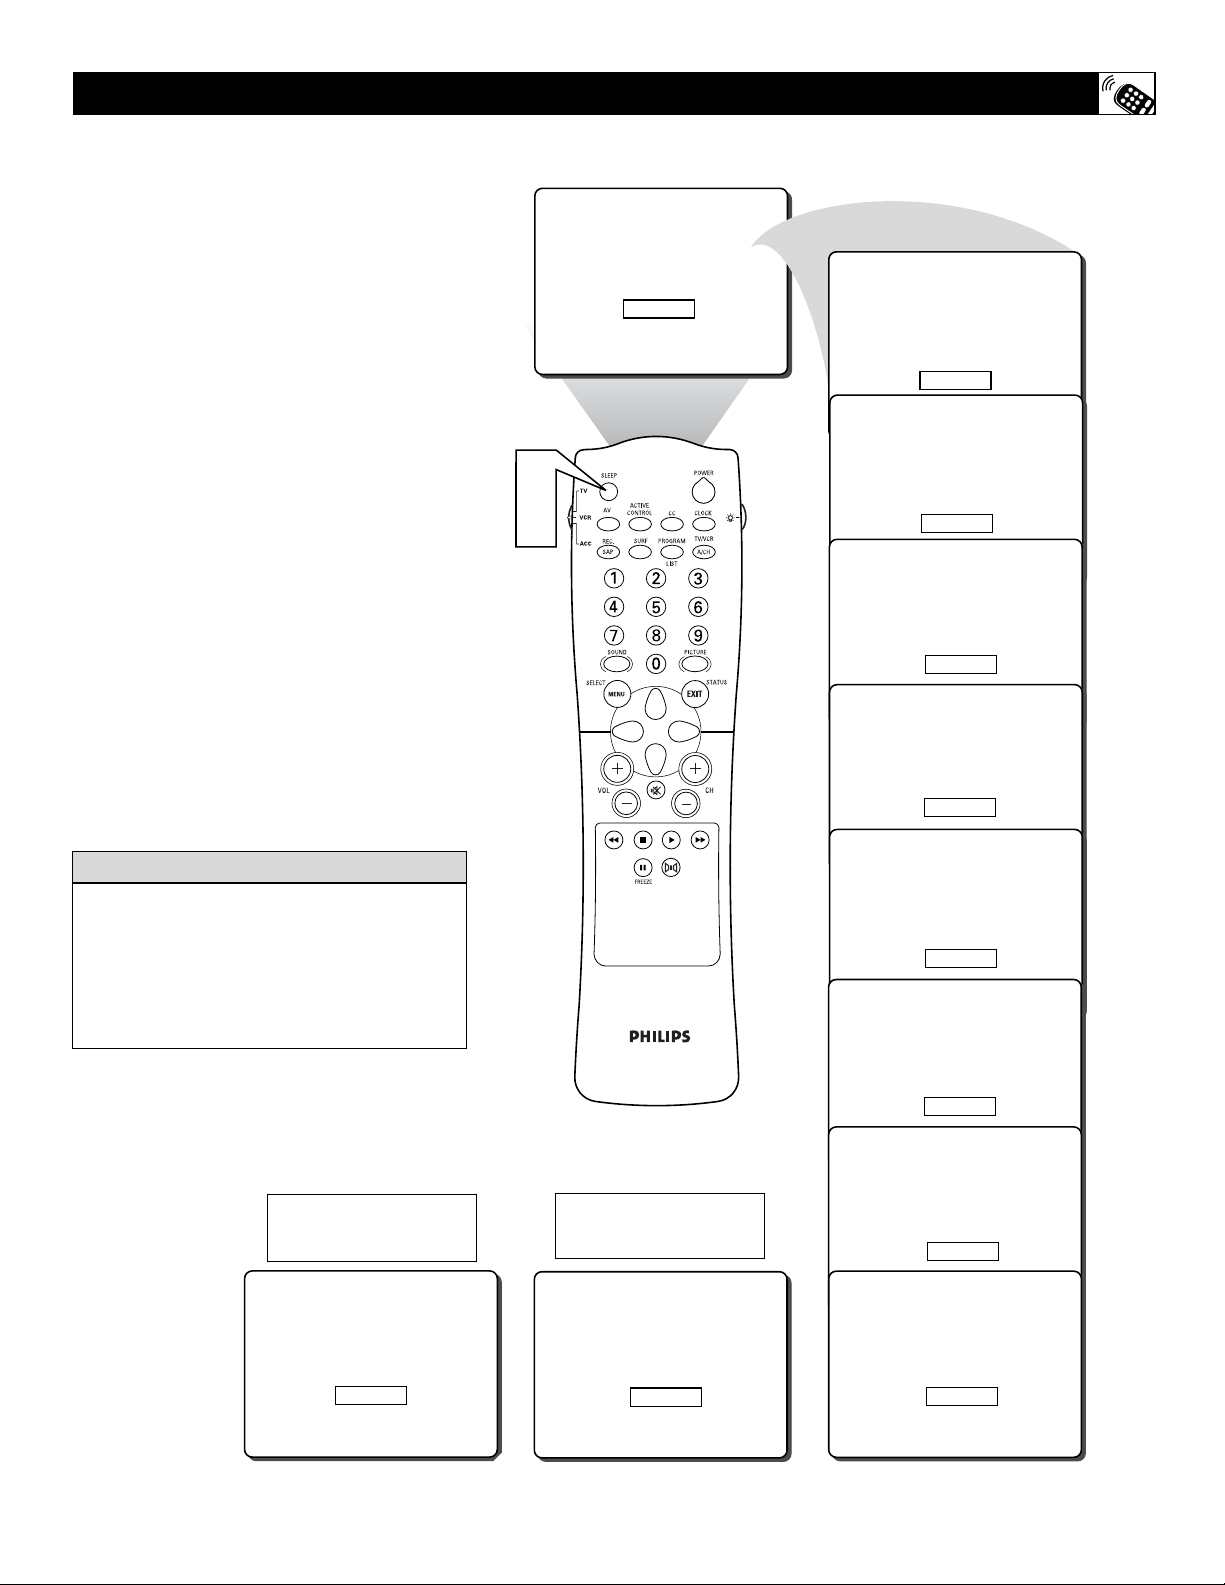
41
H
ave you ever fallen asleep in front of the
TV, only to have it wake you up at two in
the morning with a test pattern sound
screeching in your ears? Well, your TV can
enable you to avoid that discomfort by automatically turning itself off. With the Sleep
Timer feature, you can set a timer to automatically switch the TV OFF after a period of
time you choose (15-minute increments up to
60 minutes, then 30-minute increments up to
90 minutes, then 60-minute increments up to
240 minutes).
1
Press the SLEEP button on the
remote control. The SLEEP timer
onscreen display will appear in the
upper part of the screen.
2
Within five seconds, press the
SLEEP button repeatedly to pick the
amount of time (15-minute increments
up to 60 minutes, then 30-minute
increments up to 90 minutes, then 60minute increments up to 240 minutes)
before the TV will turn itself off.
An onscreen countdown will appear during
the last minute before the TV shuts itself off.
HOW TO SET THE SLEEP TIMER CONTROL
To see how many minutes remain before the
TV shuts itself off, press the STATUS/EXIT
button.
A Sleep Timer setting can be cancelled by
pressing any button during the last minute of
the operation.
HELPFUL
HINT
During the last minute of a
SLEEP timer setting, an onscreen
countdown will be displayed.
During the last 10 seconds of a
SLEEP timer setting, an onscreen
display will read GOOD BYE.
2
4
SLEEP OFF
SLEEP 15
SLEEP 30
SLEEP 45
SLEEP 60
50 SEC
GOOD BYE
SLEEP 90
SLEEP 120
SLEEP 180
SLEEP 240
Page 42
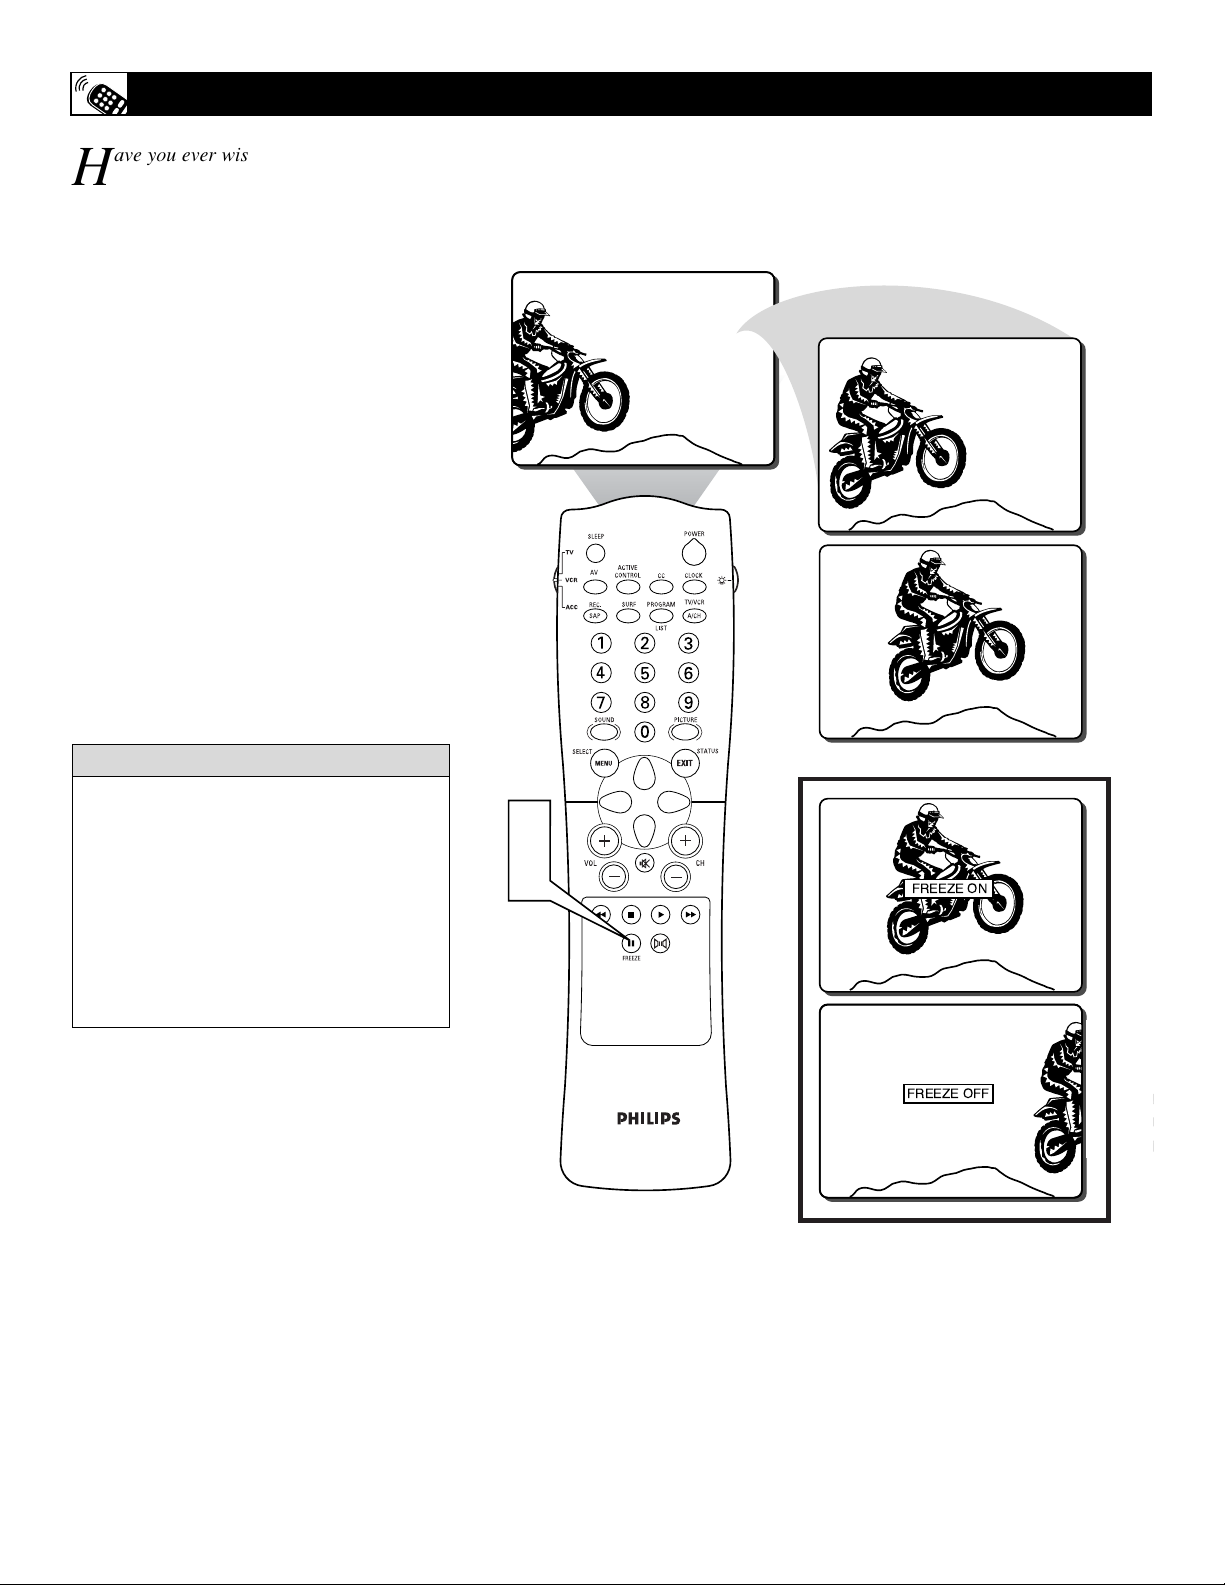
42
H
ave you ever wished you could freeze the
picture on the television broadcast to
write down a special telephone number or to
capture a needed address? Your television
will allow you to do just that with the press of
just one button on the remote control.
1
With a signal on the television screen,
simply press the FREEZE button on
the remote control to stop the picture at
any given moment.
The screen will read “FREEZE ON”
momentarily and the picture frozen on
the screen.
2
Press the FREEZE button on the
remote control again to resume normal
viewing.
The screen will read “FREEZE OFF”
momentarily while the television displays a normal moving picture again.
HOW TO USE THE FREEZE CONTROL
After freezing a picture on the screen, when
the FREEZE control is turned OFF, the normal signal programming will be shown at
it’s present time. The signal that was being
shown while the picture was frozen will not
be viewable.
If the FREEZE button is pressed when the
AV4 Inputs (AV4 Channel) is tuned, the
screen will read “FREEZE NOT AVAIL.”
HELPFUL HINT
1
2
FREEZE ON
FREEZE OFF
Page 43
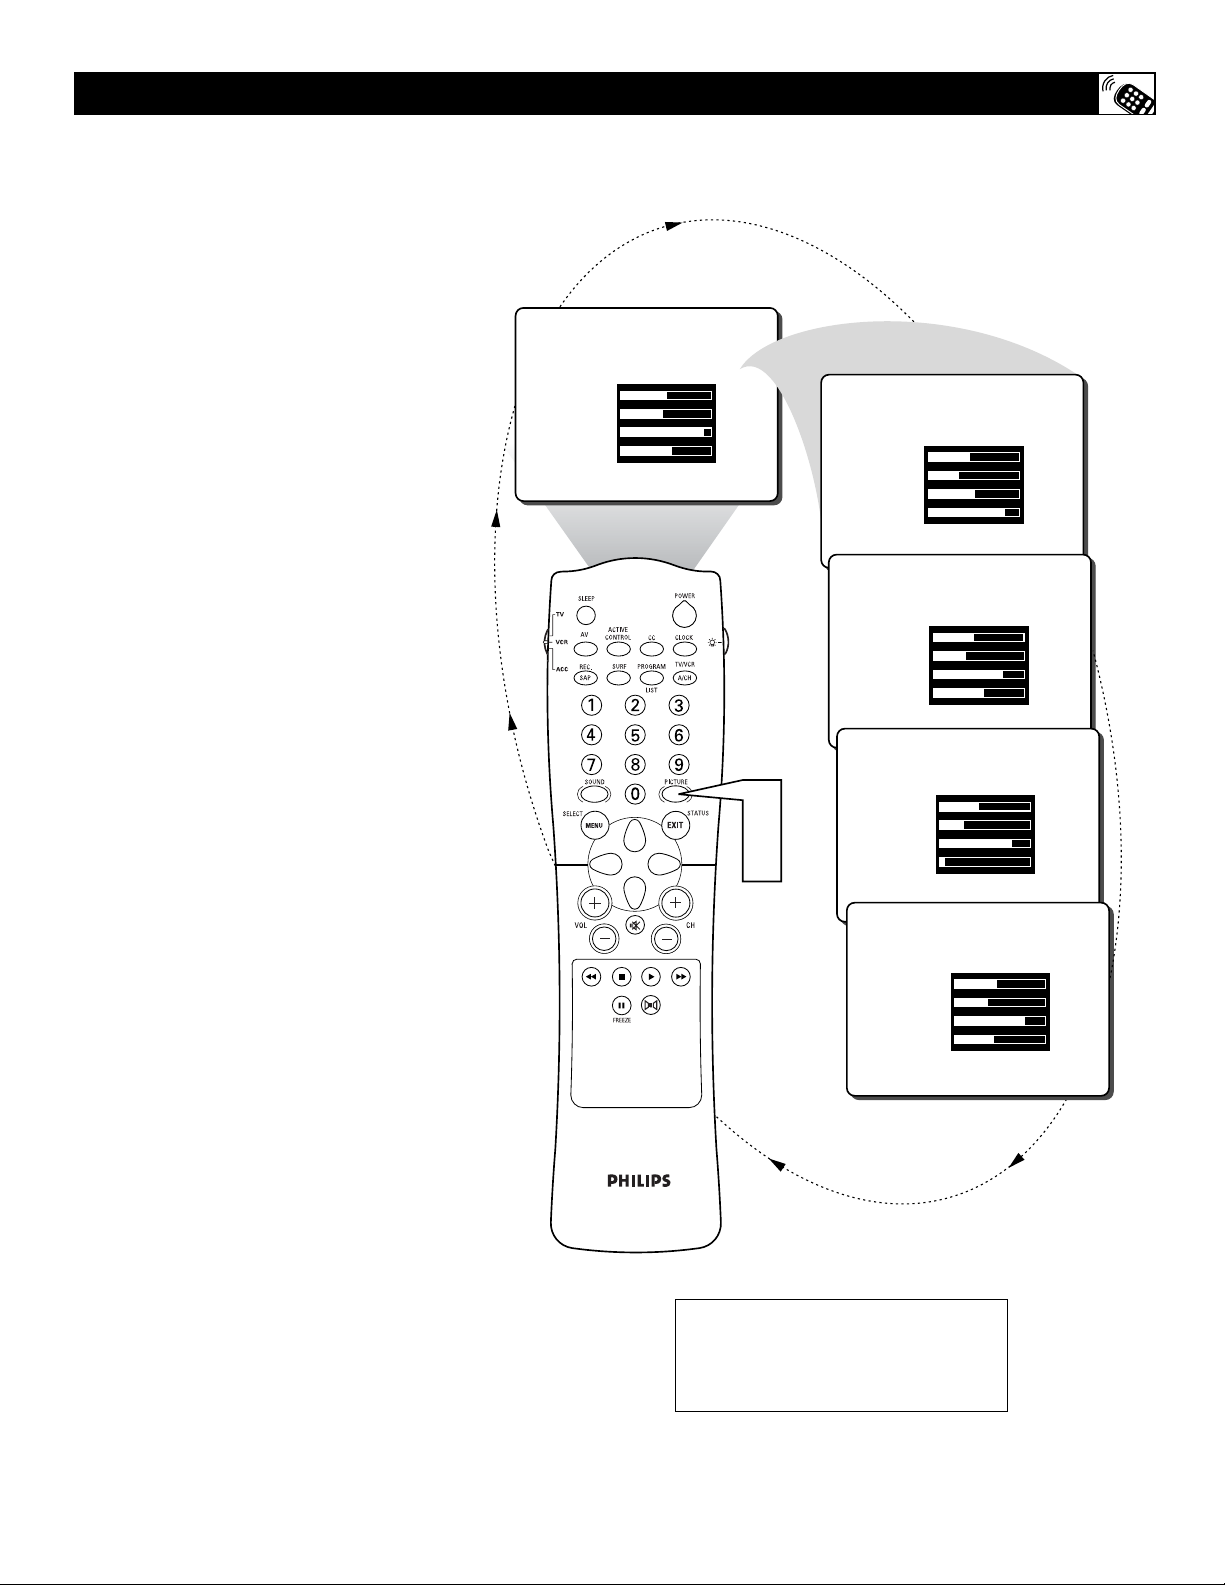
43
W
hether you’re watching a movie or a
video game, your TV has automatic
video control settings that will match with
your current program source or content.
AutoPicture™ quickly resets your TV’s video
controls for a number of different types of
programs and viewing conditions that you
may have in your home. The Movies, Sports,
Weak Signal, and Multimedia AutoPicture™
controls have been preset at the factory to
automatically adjust the TV’s brightness,
color, picture, sharpness, tint, and color temperature levels. The Personal AutoPicture™
settings are the ones that you made through
the PICTURE options within the onscreen
menu
1
Press the PICTURE button on the
remote control. The current
AutoPicture
TM
setting will appear in the
middle of the screen.
2
Press the PICTURE button repeatedly to select either PERSONAL,
MOVIES, SPORTS, WEAK SIGNAL,
or MULTIMEDIA picture settings.
NOTE: The PERSONAL setting and the
PICTURE options within the onscreen menu
are the same. This is the only option in
AutoPicture
TM
that can be changed. To adjust
these settings, use the PICTURE options
within the onscreen menu. All other settings
are set up at the factory during production and
cannot be adjusted.
HOW TO USE THE AUTOPICTURE™ CONTROL
NOTE: The values shown in the
diagram above are sample values
only. Your television’s values may
vary and display different numbers.
PERSONAL
BRIGHTNESS 48
COLOR 41
PICTURE 81
SHARPNESS 46
1
2
MOVIES
BRIGHTNESS 42
COLOR 30
PICTURE 50
SHARPNESS 86
SPORTS
BRIGHTNESS 43
COLOR 30
PICTURE 75
SHARPNESS 56
WEAK SIGNAL
BRIGHTNESS 43
COLOR 27
PICTURE 79
SHARPNESS 14
WEAK SIGNAL
MULTIMEDIA
BRIGHTNESS 45
COLOR 30
PICTURE 71
SHARPNESS 42
Page 44
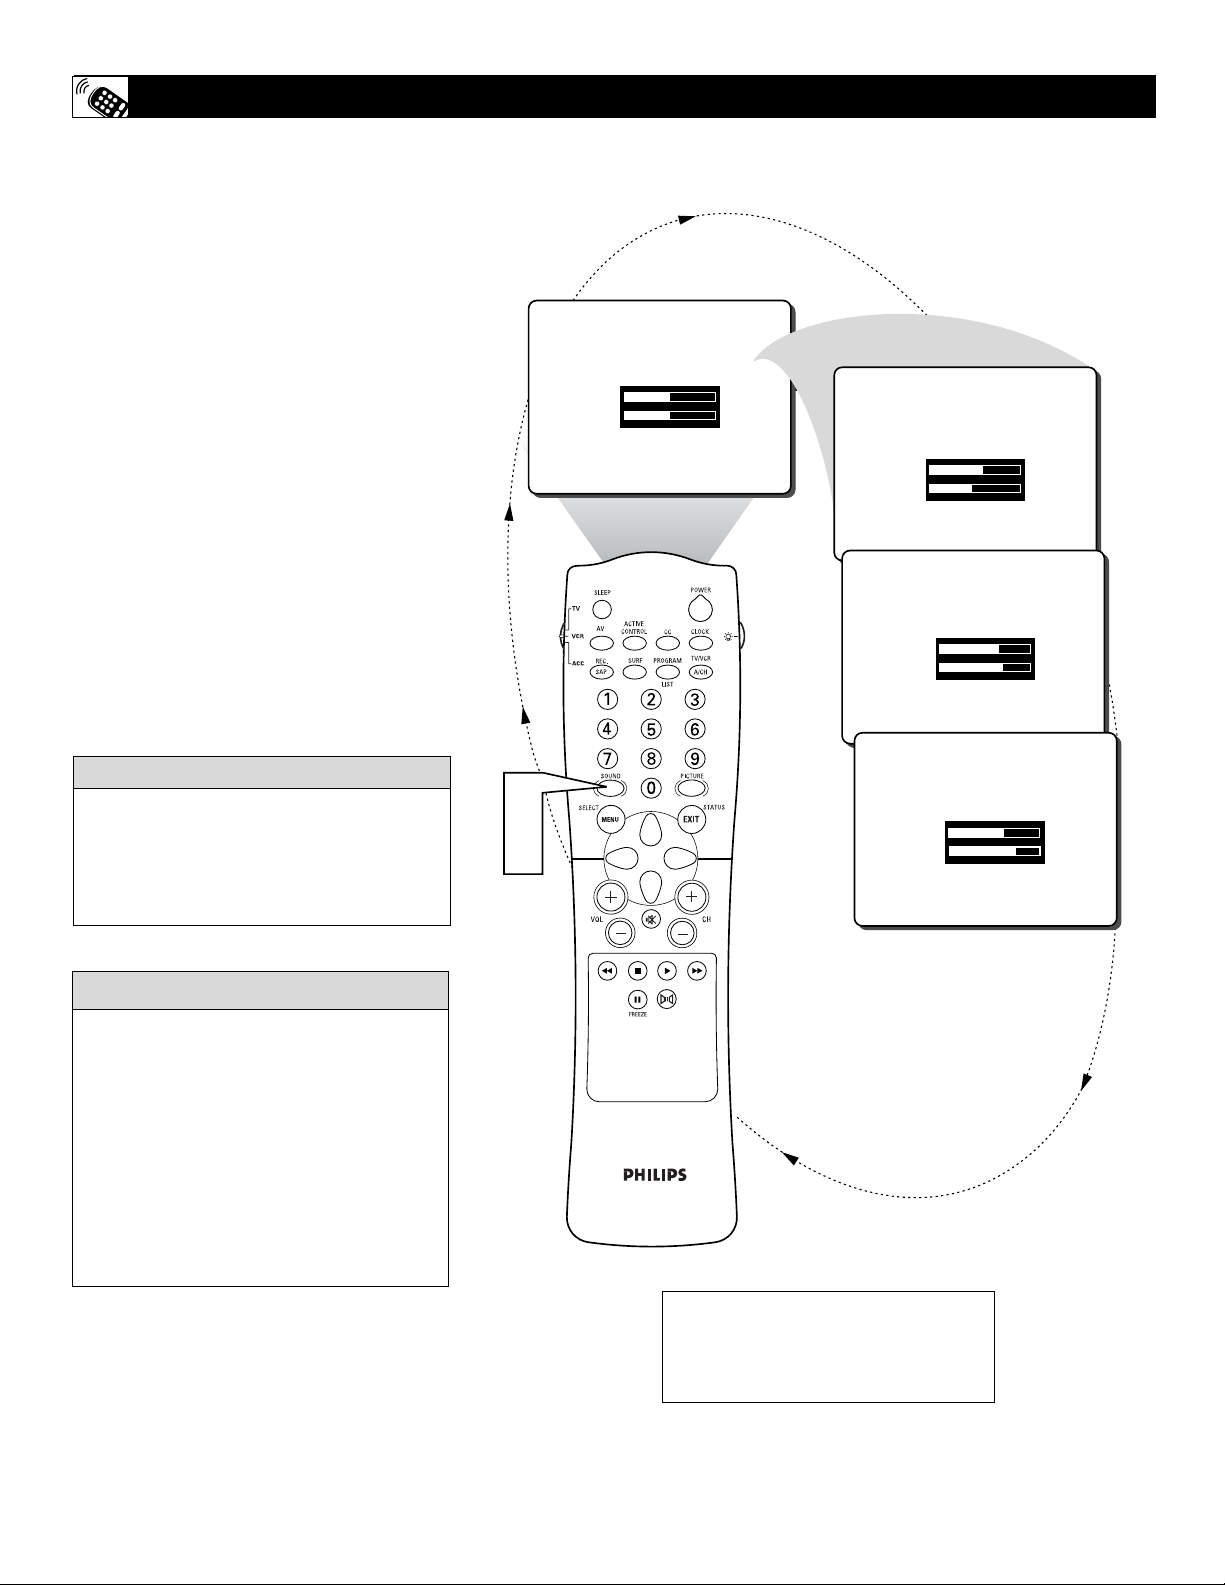
44
A
utoSound™ allows you to select from
three factory-set controls and a personal
control that you set according to your own
preferences through the onscreen Sound
menu. The three factory-set controls (Voice,
Music, and Theatre) enable you to tailor the
TV sound so as to enhance the particular program you are watching. Follow these steps to
select any of the options.
1
Press the SOUND button on the
remote control. The current
AutoSound
TM
setting will appear in the
middle of the screen.
2
Press the SOUND button repeatedly
to toggle among the four settings:
PERSONAL, VOICE, MUSIC, or
THEATRE.
Remember, only the PERSONAL control can
be changed by the viewer. This changes the
settings in the main onscreen menu’s SOUND
controls
HOW TO USE THE AUTOSOUND™ CONTROL
AutoSound
TM
works only with the programs
coming through the ANTENNA/CABLE
(ANT) input on the rear of the TV (RF
audio). It will not control the sound levels
for the external connections.
HELPFUL HINT
PERSONAL – presents the TV’s sound
according to the settings you make within
the sound menu.
VOICE – brings voices to the forefront and
emphasizes them. Moves music to the background.
MUSIC – emphasizes music over voices.
THEATRE – provides a balance between
voices and music.
cc
C
HECK IT OUT
NOTE: The values shown in the
diagram above are sample values
only. Your television’s values may
vary and display different numbers.
PERSONAL
TREBLE 49
BASS 49
VOICE
TREBLE 56
BASS 47
MUSIC
TREBLE 63
BASS 69
1
2
THEATRE
TREBLE 60
BASS 72
Page 45
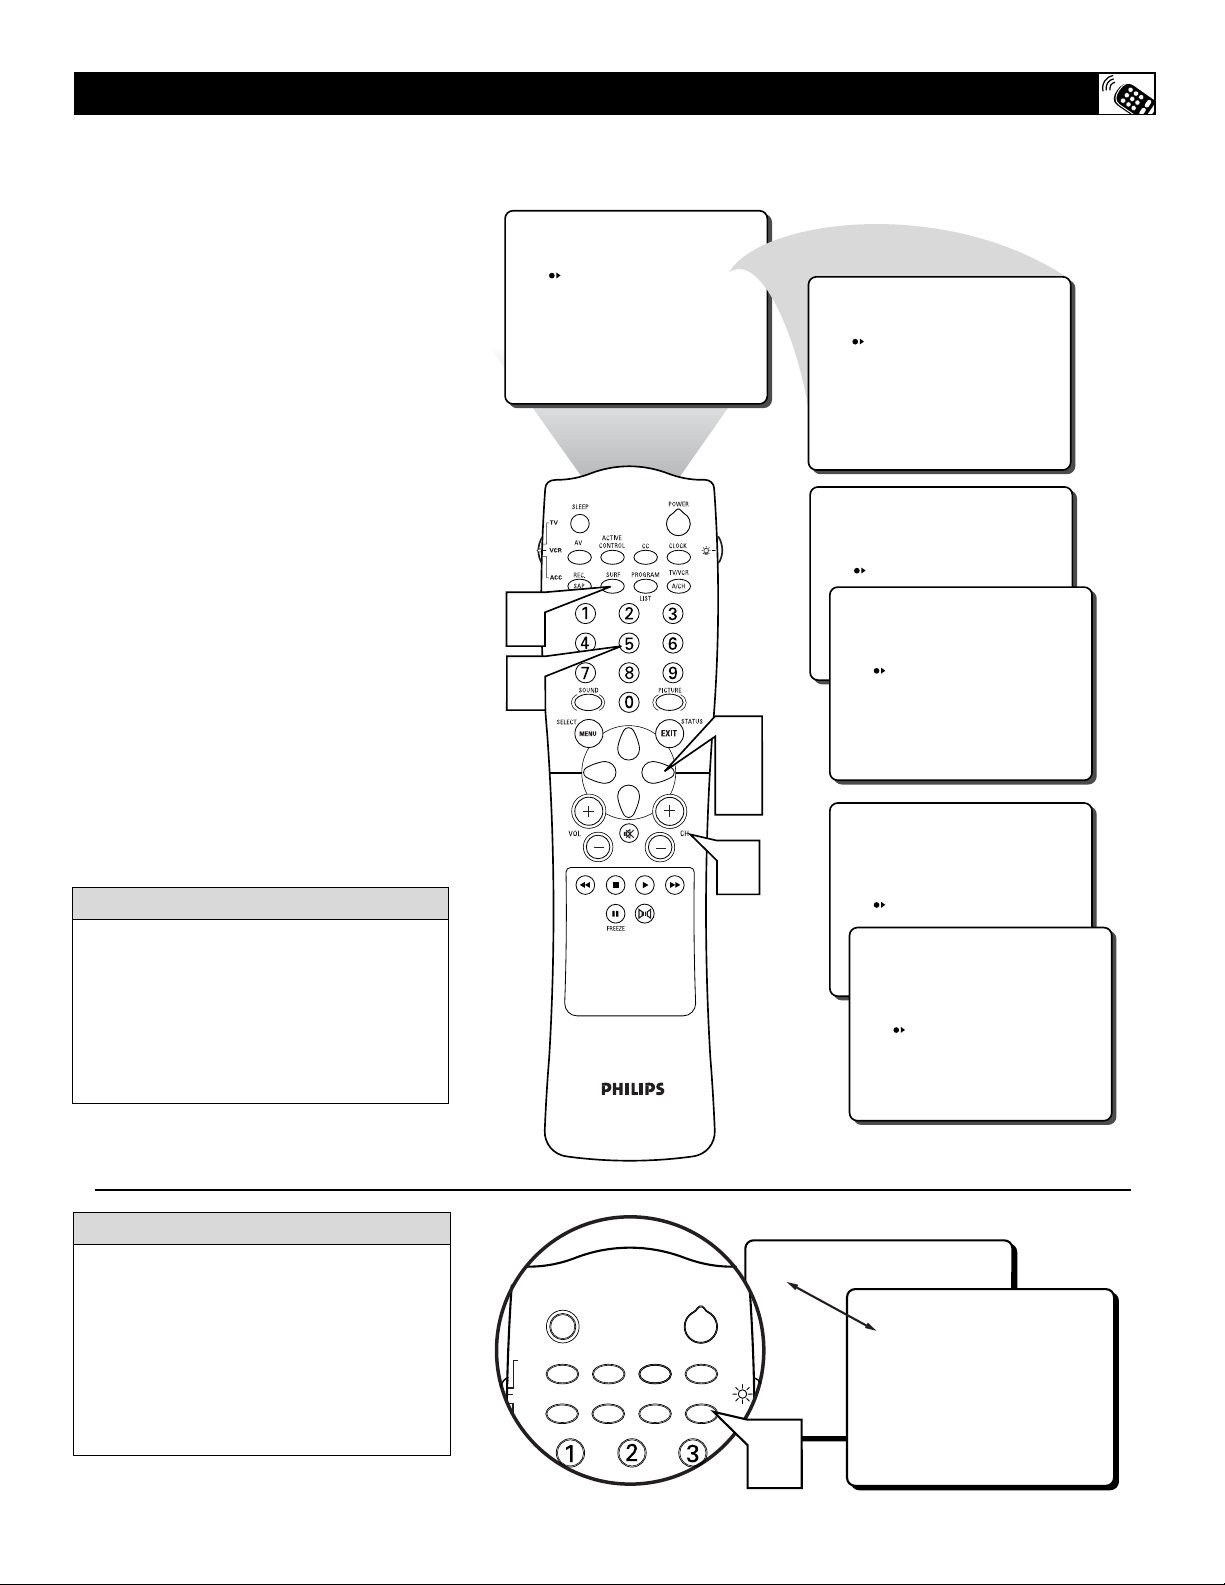
45
A
list or series of previously viewed chan-
nels can be selected with the SURF button
on your remote control. With this feature, you
can easily switch between different TV channels that currently interest you. The SURF
control allows you to set up to ten channels in
its quick viewing list.
1
Press the CHANNEL(+) or (–) button (or the numbered buttons) to select
a channel to add to the SURF list.
2
Press the SURF button on the remote
control. The onscreen display may
read, “SURF LIST EMPTY.” The number of the current channel will be
shown with “ADD?” to the right.
3
While the SURF list message or the
SURF channel list appears on the
screen, press the CURSOR RIGHT
button to add the present channel to
the SURF list.
4
If you want to delete the present channel
from the SURF list, press the CURSOR
RIGHT button again.
Repeat steps 1 through 3 to add more channels (up to 10) to the SURF list.
HOW TO USE SURF CONTROL (AND ALTERNATE CHANNEL)
Y
our remote also has an A/CH (Alternate
Channel) button. Pressing this button
will toggle between the current and one previous channel.
1
Press the A/CH button toggle
between the present channel and the
last previously viewed channel.
ALTERNATE CHANNEL BUTTON
Along with regularly programmed channels, the external video source connections
can be added to the SURF list. This means
that the AV1, CVI, AV2, AV3, and AV4
channels can be added to your SURF list.
Just tune to their channel and use the same
procedure described on this page.
HELPFUL HINT
SURF
12 ADD?
SURF LIST EMPTY
2
1
SURF
12 DELETE?
SURF
12
24 ADD?
SURF
12
24 DELETE?
3
4
SURF
1
5
CC
PROGRAM
LIST
POWER
CLOCK
TV/VCR
A/CH
SLEEP
ACTIVE
AV
TV
VCR
ACC
CONTROL
SURFREC.
SAP
12
24
32 ADD?
SURF
12
24
32 DELETE?
22
1
Page 46
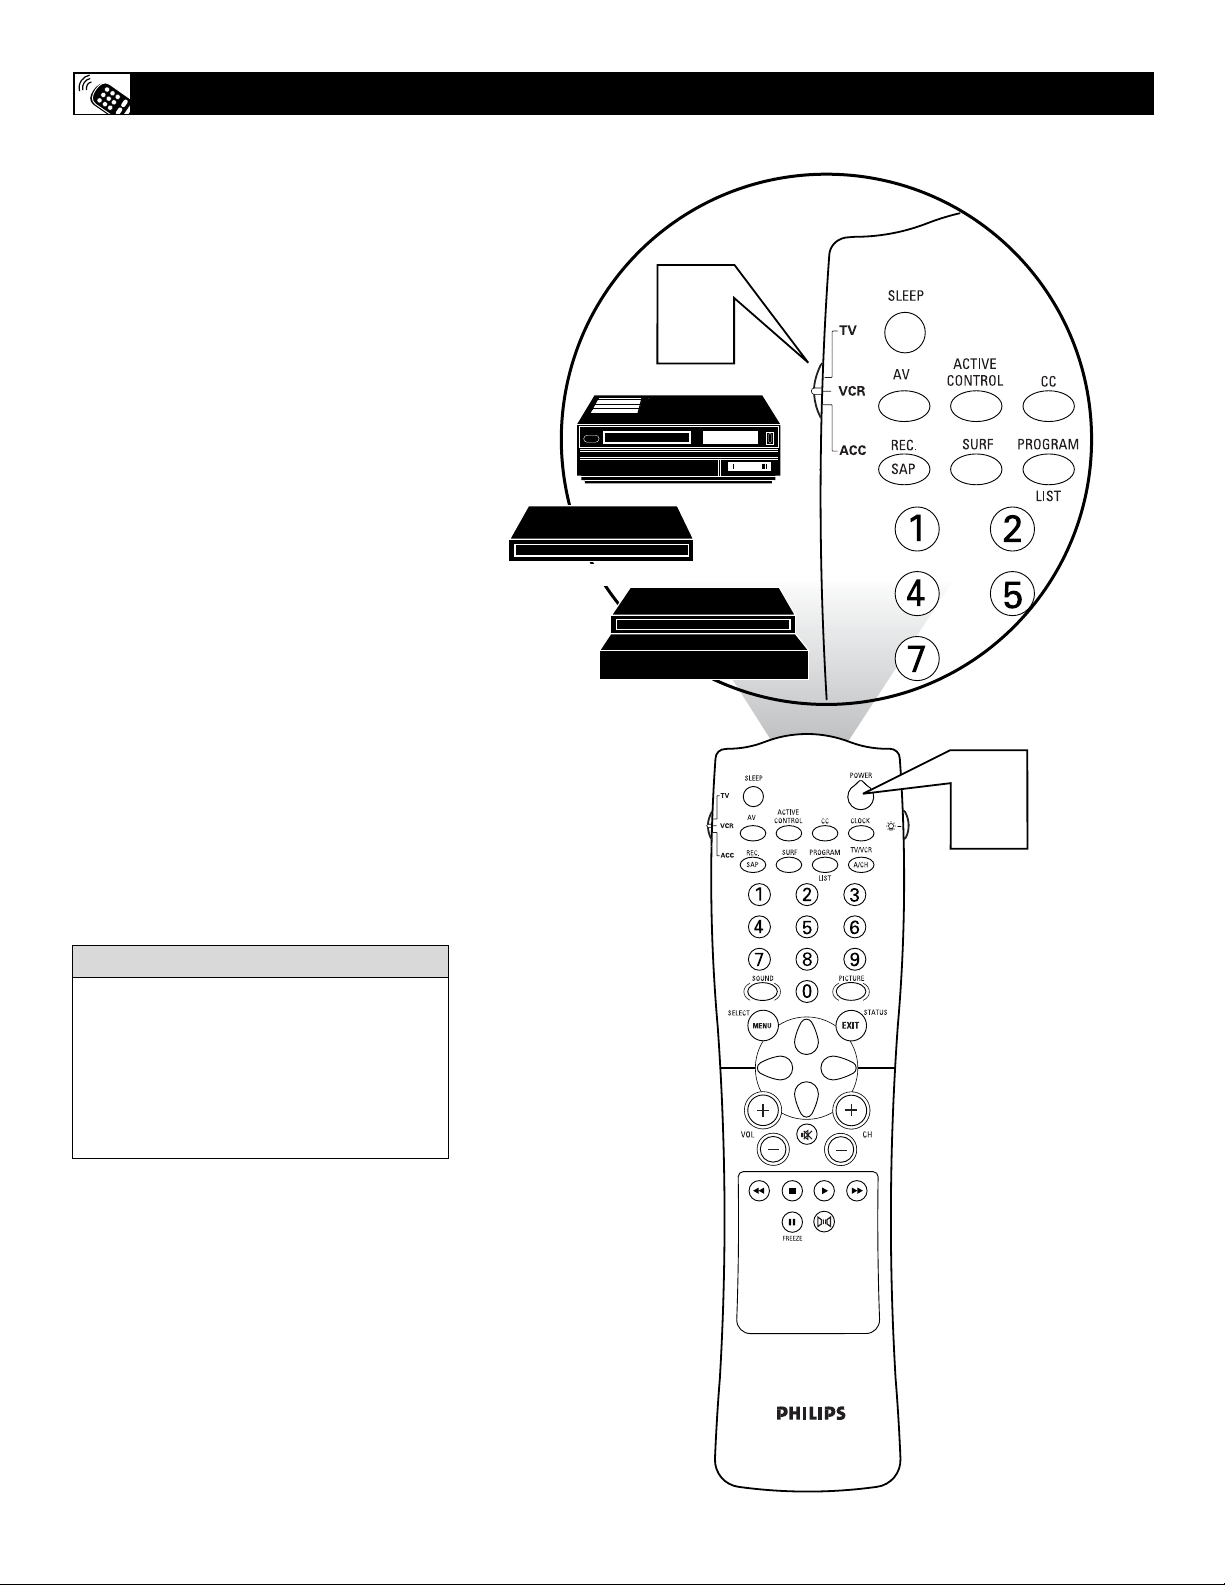
46
Y
our remote control is capable of working
your TV and many other devices that
respond to infrared remote control commands,
such as VCRs, cable boxes, satellite systems,
and DBS. Your remote may be already, as is, to
work an accessory device, or you may need to
use one of the methods (“Code Entry” or
“Search”) explained on pages 47 and 48.
First, try this simple test to see if your TV
remote control will give you direct access to
the accessory device’s functions, or if you will
need to try another method in order to set up
your TV remote control for that capability.
1
Place the TV/VCR/ACC mode
switch in the proper position.
2
Point the remote control at the remote
sensor window of the accessory device
and press the POWER button.
3
Does the remote control turn the device
ON?
If YES, stop and try other function buttons on
the remote. If they also work the device, then
the remote is ready and no further steps are
needed.
If NO, go to the next page to try the CodeEntry method.
USING THE REMOTE WITH ACCESSORY DEVICES - DIRECT ACCESS
Cable Converter
Satellite Receiver
VCR
It is recommended that you use Philips
brand external accessory devices with your
Philips television to insure proper remote
control functions. If you are using Philips
brand accessory devices, your remote control should be ready to use with these
devices.
HELPFUL HINT
1
2
Page 47
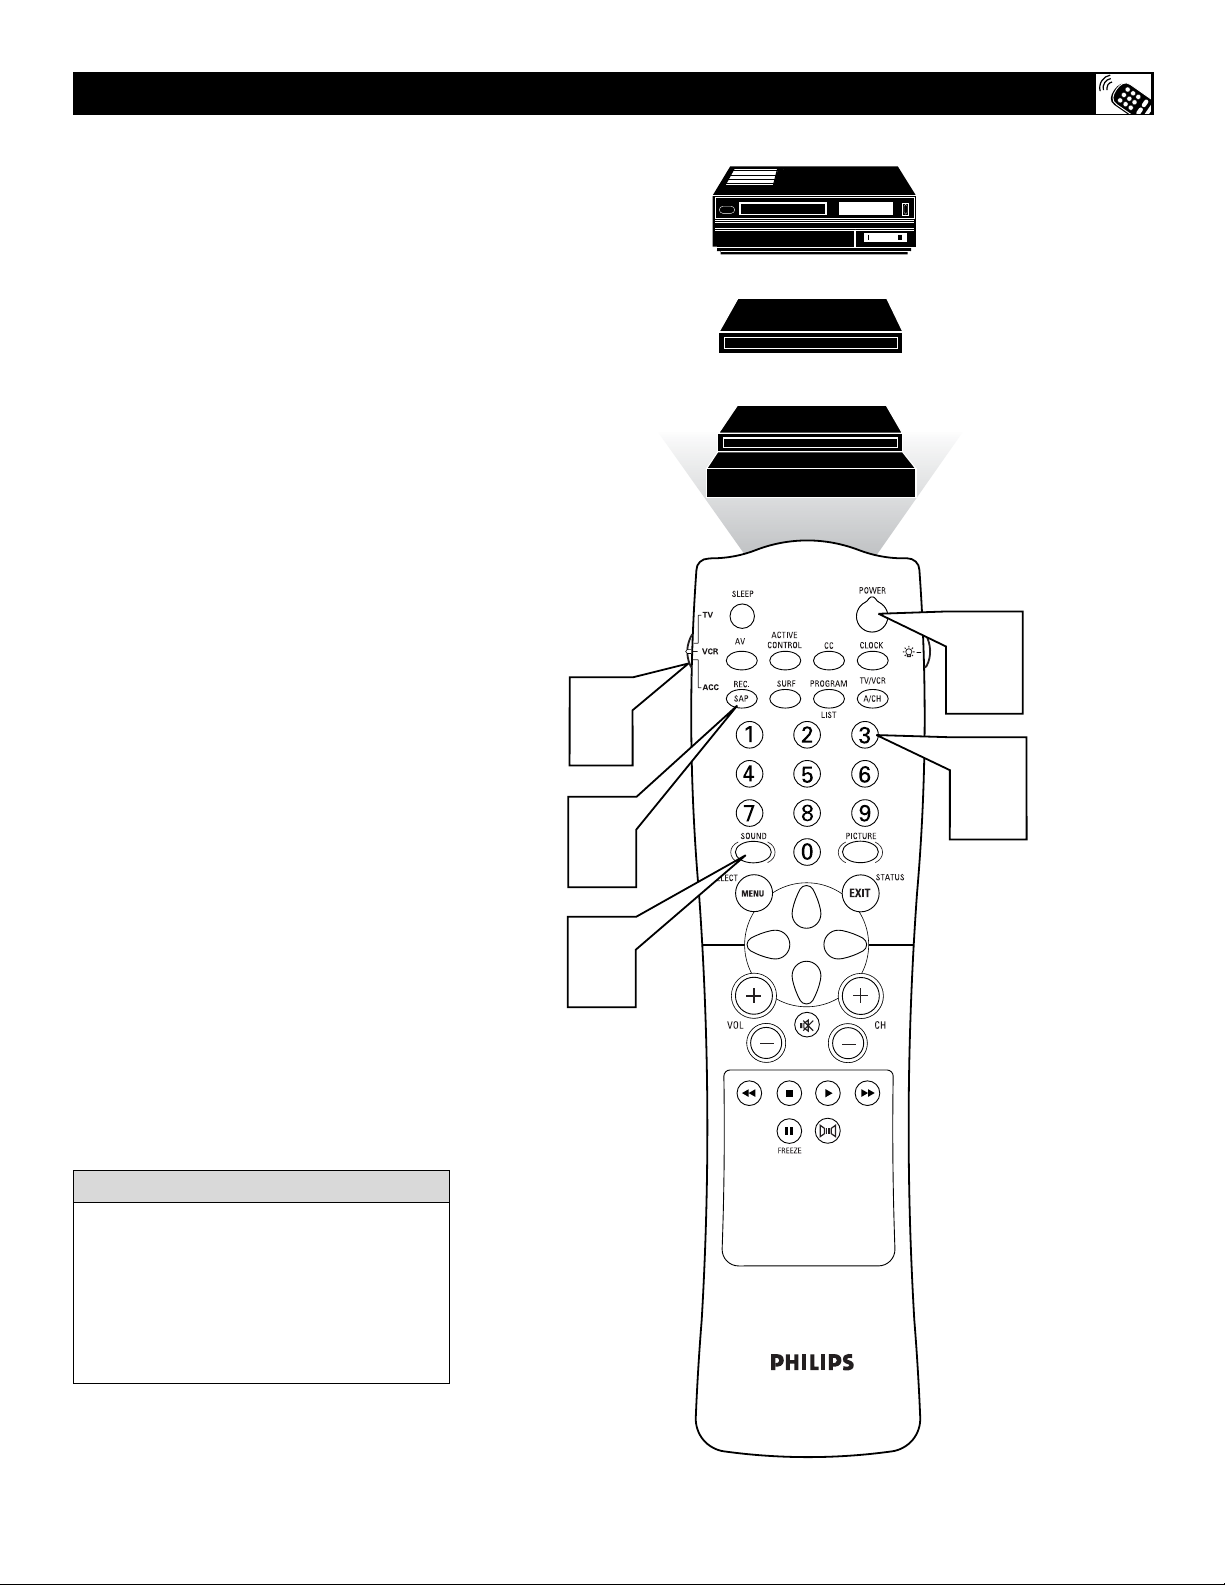
47
F
ollow these simple steps to enter a three-
digit Accessory Device Code Number that
will allow you to use your TV remote to work
the functions of an accessory device. Please
read through the steps once before performing them.
1
Look up a three-digit Accessory
Device Code Number for the accessory device (found on pages 49-50)
whose functions you want to work
with your TV’s remote control.
2
Press the REC(ord)/SAP button on
the remote control and release.
3
Press the SOUND button on the
remote within 30 seconds, then release.
4
Enter the three-digit Direct-Entry
Code Number for your desired device.
The remote is now ready to send commands to the unit.
5
Point the remote at the remote sensor
window of the device. Then press the
POWER button on the remote to turn
the unit ON.
NOTE: If the process just explained doesn’t
work the first time, repeat the same Accessory
Device code number.
If after a second try the TV remote control
does not operate your accessory device, see if
other three-digit Accessory Device Code
Numbers are shown for your device on the
list pages 49-50 and repeat the steps above
using a new number.
If after repeated attempts this method does
not work for you, go to the next page and follow the steps for using the Search method to
set up your remote control.
USING THE REMOTE WITH ACCESSORY DEVICES - CODE ENTRY
Cable Converter
Satellite Receiver
VCR
It is recommended that you use Philips
brand external accessory devices with your
Philips television to insure proper remote
control functions. If you are using Philips
brand accessory devices, your remote control should be ready to use with these
devices.
H
ELPFUL HINT
5
1
4
2
3
Page 48
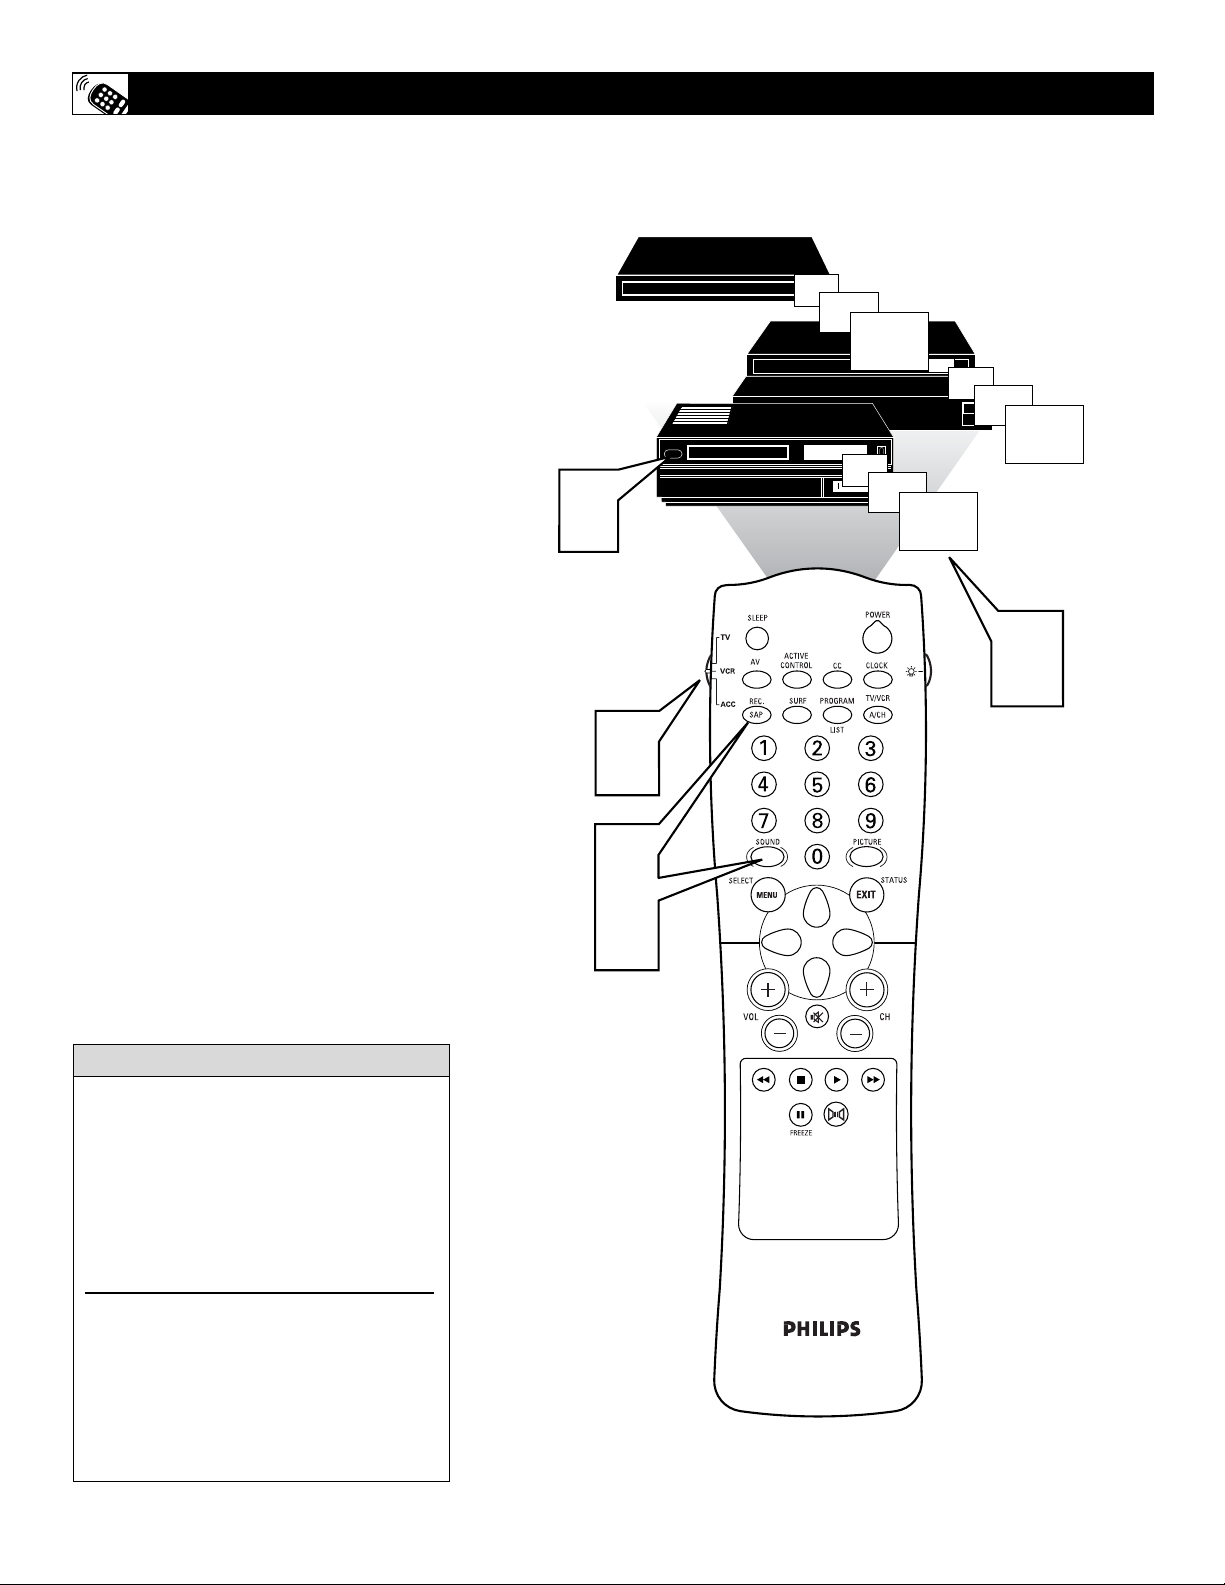
48
F
ollow these simple steps to have your TV
remote search for the code it needs to work
the functions of your accessory device. Please
read through the steps once before performing
them.
NOTE: The Search method works only with
devices equipped with channel display indicators or channel display capability.
1
Press the POWER button on the
device your are attempting to program
to turn it ON.
2
Slide the TV/VCR/ACC mode switch
to the VCR position if you’re setting
up a VCR or to the ACC position if
you’re setting up any other accessory
device.
3
Press the REC(ord)/SAP and
SOUND buttons simultaneously and
hold them down. The device will begin
to change channels after the remote
identifies the correct code.
4
When the channels start to change,
release the REC(ord)/SAP and
SOUND buttons.
NOTE: Don’t let the device scan up more
than five channels. If you do, the remote control may pass up the correct code, and another
two-minute search cycle will have to be done.
If no channel change happens within two
minutes, repeat steps 1–4. Should a channel
change still not occur, the remote will not
work the desired device.
USING THE REMOTE WITH ACCESSORY DEVICES - SEARCH
Cable Converter
Satellite Receiver
VCR
Don’t let the device scan up more than five
channels. If you do, the remote may pass up
the right code, and another two-minute
search cycle will have to be done.
If no channel change happens within two
minutes, repeat steps 1–4. Should a channel
change still not occur, the remote control
will not work the desired device.
It is recommended that you use Philips
brand external accessory devices with your
Philips television to insure proper remote
control functions. If you are using Philips
brand accessory devices, your remote control should be ready to use with these
devices.
HELPFUL HINT
1
2
3
07
08
06
07
09
08
09
06
07
08
09
4
4
Page 49

49
CODE-ENTRY CODE LIST FOR ACCESSORY DEVICES
REMOTE
VCR CODE NO.
Admiral . . . . . . . . . . . . . . . . . . . . . . . . .048
Advantz . . . . . . . . . . . . . . . . . . . . . . . . .358
Adventure . . . . . . . . . . . . . . . . . . . . . . .000
Aiko . . . . . . . . . . . . . . . . . . . . . . . . . . . .278
Aiwa . . . . . . . . . . .000, 037, 307, 348, 352
Akai . . . . . . . .041, 049, 053, 061, 106, 315
Alba . . . . . . . . . . . . . . . . . . . . . . . . . . . .352
Amercian High . . . . . . . . . . . . . . . . . . .035
Amstrad . . . . . . . . . . . . . . . . . . . . .325, 332
Asha . . . . . . . . . . . . . . . . . . . . . . . . . . . .240
Audiovox . . . . . . . . . . . . . . . . . . . . . . . .037
Baird . . . . . . . . . . . . . . . . . . . . . . . . . . .107
Beaumark . . . . . . . . . . . . . . . . . . . . . . . .240
Bell & Howell . . . . . . . . . . . . . . . . . . . .104
Blaupunkt . . . . . . . . . . . . . . .003, 006, 154
Brandt . . . . . . . . . . . . . . . . . .187, 320, 321
Broksonic . . . . . . .121, 184, 211, 295, 361
Bush . . . . . . . . . . . . . . . . . . . . . . . . . . . .352
CCE . . . . . . . . . . . . . . . . . . . . . . . .072, 278
Calix . . . . . . . . . . . . . . . . . . . . . . . . . . .037
Canon . . . . . . . . . . . . . . . . . . . . . . . . . . .035
Capehart . . . . . . . . . . . . . . . . . . . . . . . . .020
Carver . . . . . . . . . . . . . . . . . . . . . .081, 146
Citizen . . . . . . . . . . . . . . . . . . . . . .037, 278
Colt . . . . . . . . . . . . . . . . . . . . . . . . . . . .072
Combitach . . . . . . . . . . . . . . . . . . . . . . .352
Craig . . . . . . . . . . .037, 047, 072, 240, 271
Curtis Mathes . . . . . . . . . . . .035, 041, 060
Cybermax . . . . . . . . . . . . . . . . . . .051, 240
Daewoo . . . . . . . . . . . . . . . . .020, 045, 276
Daytron . . . . . . . . . . . . . . . . . . . . . . . . .020
Denon . . . . . . . . . . . . . . . . . . . . . . . . . .042
Dynatech . . . . . . . . . . . . . . . . . . . . . . . .000
Electrophonic . . . . . . . . . . . . . . . . . . . . .037
Emerex . . . . . . . . . . . . . . . . . . . . . . . . . .032
Emerson . . . .000, 002, 036, 037, 043, 061
. . . . . . . . . . .068, 088, 121, 164, 208, 209,
. . . . . . . . . . . .211, 212, 278, 295, 361, 479
Ferguson . . . . . . . . . . . . . . . .107, 320, 321
Fisher . . . . . . . . . . . . . . .047, 054, 066, 104
Fuji . . . . . . . . . . . . . . . . . . . . . . . .033, 035
Funai . . . . . . . . . . . . . . . . . . . . . . . . . . .000
GE . . . . . . . . . . . . . . . . .035, 060, 065, 202
Garrard . . . . . . . . . . . . . . . . . . . . . . . . . .000
Go Video . . . . . . . . . . . . . . . .232, 279, 432
Gold Star . . . . . . . . . . . . . . . . . . . .037, 038
Gradiente . . . . . . . . . . . . . . . . . . . .000, 406
Grundig . . . . . . . . . . . . .003, 007, 195, 347
HI-Q . . . . . . . . . . . . . . . . . . . . . . . . . . . .047
Harley Davidson . . . . . . . . . . . . . . . . . .000
Harman/Kardon . . . . . . . . . . . . . . .038, 075
Harwood . . . . . . . . . . . . . . . . . . . .068, 072
Headquarter . . . . . . . . . . . . . . . . . . . . . .046
Hinari . . . . . . . . . . . . . . . . . . . . . . .004, 352
Hitachi . . . . . . . . . . . . .000, 004, 041, 042,
. . . . . . . . . . . . . . . . . . . .065, 105, 168, 235
Ingersol . . . . . . . . . . . . . . . . . . . . . . . . .004
JVC . . . . . . . .008, 041, 067, 208, 384, 486
Jensen . . . . . . . . . . . . . . . . . . . . . . . . . .041
KEC . . . . . . . . . . . . . . . . . . . . . . . .037, 278
KLH . . . . . . . . . . . . . . . . . . . . . . . . . . . .072
Kenwood . . . . . . . . . . . .038, 041, 067, 384
Kodak . . . . . . . . . . . . . . . . . . . . . .035, 037
LXI . . . . . . . . . . . . . . . . . . . . . . . . . . . .037
Lloyd’s . . . . . . . . . . . . . . . . . . . . . .000, 206
REMOTE
VCR CODE NO.
Loewe . . . . . . . . . . . . . . . . . . . . . . . . . .004
Logik . . . . . . . . . . . . . . . . . . . . . . .004, 072
MEI . . . . . . . . . . . . . . . . . . . . . . . . . . . .035
MGA . . . . . . . . . . . . . . . . . . . . . . .043, 061
MGN Technology . . . . . . . . . . . . . . . . .240
MTC . . . . . . . . . . . . . . . . . . . . . . .000, 240
Magnavox . . . . . . .000, 035, 081, 146, 181
Marta . . . . . . . . . . . . . . . . . . . . . . . . . . .037
Matsui . . . . . . . . . . . . . . . . . .004, 348, 352
Matsushita . . . . . . . . . . . . . . .035, 162, 454
Memmorex . . . . . . . . . . . . . . . . . . . . . .307
Memorex . . . . . . .000, 035, 037, 039, 046,
. . . . . . . . . . .047, 048, 104, 240, 266, 307
Metz . . . . . . . . . . . . . . . . . . . . . . . .003, 347
Minolta . . . . . . . . . . . . . . . . . . . . .042, 105
Mitsubishi . . .043, 061, 067, 075, 173, 443
Motorola . . . . . . . . . . . . . . . . . . . .035, 048
Multitech . . . . . . . . . . . . . . . . . . . .000, 072
NAD . . . . . . . . . . . . . . . . . . . . . . . . . . .058
NEC . . . . . . . . . . . .036, 040, 041, 067, 104
Nikko . . . . . . . . . . . . . . . . . . . . . . . . . . .037
Nikon . . . . . . . . . . . . . . . . . . . . . . .034, 253
Noblex . . . . . . . . . . . . . . . . . . . . . . . . . .240
Nordmende . . . . . . . . . . . . . .297, 320, 321
Okano . . . . . . . . . . . . . . . . . . . . . . . . . .346
Olympus . . . . . . . . . . . . . . . . . . . .035, 226
Optimus . . . . . . . . . . . .037, 048, 058, 104,
. . . . . . . . . . . . . . . . . . . . . . . .162, 432, 454
Optonica . . . . . . . . . . . . . . . . . . . . . . . .062
Orion . . . . . . . . . . .004, 295, 348, 352, 479
Panasonic . . . . . . . . . . .035, 077, 162, 225,
. . . . . . . . . . . . . . . . . . . . . . . .226, 378, 454
Penney . . . . . . . . . . . . .035, 037, 038, 040,
. . . . . . . . . . . . . . . . . . . . . . . .042, 065, 105
Pentax . . . . . . . . . . . . . . . . . .042, 065, 105
Philco . . . . . . . . . . . . . . . . . . . . . . . . . . .035
Philips . . . . . . . . . .035, 062, 081, 110, 403
Pilot . . . . . . . . . . . . . . . . . . . . . . . . . . . .037
Pioneer . . . . . . . . . . . . . . . . . . . . . .058, 067
Portland . . . . . . . . . . . . . . . . . . . . . . . . .020
Profax . . . . . . . . . . . . . . . . . . . . . . . . . .322
Profitronic . . . . . . . . . . . . . . . . . . . . . . .240
Protec . . . . . . . . . . . . . . . . . . . . . . . . . . .072
Pulsar . . . . . . . . . . . . . . . . . . . . . . .039, 051
Quarter . . . . . . . . . . . . . . . . . . . . . . . . . .046
Quartz . . . . . . . . . . . . . . . . . . . . . . . . . .046
Quasar . . . . . . . . . . . . . .035, 077, 162, 454
RCA . . . . . . . . . . . . . . .042, 060, 065, 077,
. . . . . . . . . . . . . . . . . . . .105, 106, 149, 202
Radio Shack . . . . . . . . . . . . . . . . .000, 037
Radix . . . . . . . . . . . . . . . . . . . . . . . . . . .037
Randex . . . . . . . . . . . . . . . . . . . . . . . . . .037
Realistic . . . . . . . . .000, 035, 037, 045, 047
. . . . . . . . . . . . . . . . . . . 048, 062, 066, 104
Ricoh . . . . . . . . . . . . . . . . . . . . . . .034, 253
Runco . . . . . . . . . . . . . . . . . . . . . . . . . . .039
SEG . . . . . . . . . . . . . . . . . . . . . . . . . . . .322
SEI . . . . . . . . . . . . . . . . . . . . . . . . . . . . .004
STS . . . . . . . . . . . . . . . . . . . . . . . . . . . .042
Saba . . . . . . . . . . . . . . . . . . . .297, 320, 321
Saisho . . . . . . . . . . . . . . . . . . . . . . . . . .004
Salora . . . . . . . . . . . . . . . . . . . . . . . . . . .075
Samsung . . . . . . . . . . . .045, 051, 053, 240
Sanky . . . . . . . . . . . . . . . . . . . . . . .039, 048
Sansui . . . . . . . . . . . . . .000, 041, 067, 271
REMOTE
VCR CODE NO.
Sanyo . . . . . . . . . . .046, 047, 104, 240, 268
Saville . . . . . . . . . . . . . . . . . . . . . . . . . .352
Scott . . . . . . .043, 045, 121, 164, 211, 212
Sears . . . . . . . . . . .000, 035, 037, 042, 046,
. . . . . . . . . . . . . . . .047, 054, 066, 104, 105
Sharp . . . . . . . . . . . . . . . . . . . . . . .046, 062
Shintom . . . . . . . . . . . . . . . . . . . . . . . . .072
Shogun . . . . . . . . . . . . . . . . . . . . . .051, 240
Shoral . . . . . . . . . . . . . . . . . . . . . . . . . . .004
Siemens . . . . . . . . . . . . . . . . . . . . . . . . .003
Singer . . . . . . . . . . . . . . . . . . . . . . . . . . .072
Sinudyne . . . . . . . . . . . . . . . . . . . . . . . .004
Sony . . . . . . . . . . .000, 011, 022, 032, 033,
. . . . . . . . . . . . . . . . . . . .034, 035, 253, 275
Sunkel . . . . . . . . . . . . . . . . . . . . . . . . . .348
Sunpak . . . . . . . . . . . . . . . . . . . . . . . . . .253
Sylvania . . . . .000, 035, 043, 081, 103, 110
Symphonic . . . . . . . . . . . . . . . . . . . . . . .000
TMK . . . . . . . . . . . . . . . . . . .036, 208, 240
Tatung . . . . . . . . . . . . . . . . . . . . . . . . . .041
Teac . . . . . . . . . . . . . . . . . . . . . . . .000, 041
Technics . . . . . . . . . . . . . . . . . . . . .035, 162
Teknika . . . . . . . . . . . . . . . . .000, 035, 037
Telefunken . . . . . . . . . . . . . . .187, 320, 321
Tansal . . . . . . . . . . . . . . . . . . . . . . . . . . .322
Thomas . . . . . . . . . . . . . . . . . . . . . . . . .000
Thomson . . . . . . . . . . . . . . . . . . . . . . . .320
Toshiba . . . . . . . . .043, 045, 066, 212, 366
Totavision . . . . . . . . . . . . . . . . . . .037, 240
Towada . . . . . . . . . . . . . . . . . . . . . . . . .322
Unitech . . . . . . . . . . . . . . . . . . . . . . . . .240
Universum . . . . . . . . . . . . . . . . . . . . . . .325
Vactor . . . . . . . . . . . . . . . . . . . . . . . . . . .045
Vactor Research . . . . . . . . . . . . . . .038, 040
Video Concepts . . . . . . . . . . .040, 045, 061
Videosonic . . . . . . . . . . . . . . . . . . . . . . .240
Wards . .000, 035, 042, 047, 048, 060, 062,
. . . . . . . . . . .072, 081, 149, 161, 212, 240
XR-1000 . . . . . . . . . . . . . . . .000, 035, 072
Yamaha . . . . . . . . . . . . . . . . . . . . . . . . .038
Zenith . . . . . . . . . . . . . .000, 033, 034, 039
CABLE REMOTE
CONVERTOR CODE NO.
ABC . . . . . . . . . . . . . . .001, 003, 007, 008,
. . . . . . . . . . . . . . . . . . . .011, 013, 014, 017
Aliegio . . . . . . . . . . . . . . . . . . . . . . . . . .153
Andover . . . . . . . . . . . . . . . . . . . . . . . . .544
Antronix . . . . . . . . . . . . . . . . . . . . . . . . .022
Archer . . . . . . . . . . . . . . . . . . . . . .022, 153
Balcor . . . . . . . . . . . . . . . . . . . . . . . . . .056
British Telecom . . . . . . . . . . . . . . . . . . .105
Cable Star . . . . . . . . . . . . . . . . . . . . . . .056
Cablatenna . . . . . . . . . . . . . . . . . . . . . . .022
Cabletime . . . . . . . . . . .161, 271, 377, 448
Cableview . . . . . . . . . . . . . . . . . . . . . . .022
Century . . . . . . . . . . . . . . . . . . . . . . . . .153
Citizen . . . . . . . . . . . . . . . . . . . . . . . . . .153
Clyde . . . . . . . . . . . . . . . . . . . . . . . . . . .086
Colour Voice . . . . . . . . . . . . . . . . .025, 031
Comtec . . . . . . . . . . . . . . . . . . . . . . . . . .274
Comtronics . . . . . . . . . . . . . . . . . . . . . .040
Contec . . . . . . . . . . . . . . . . . . . . . . . . . .019
Cryptovision . . . . . . . . . . . . . . . . . . . . .600
Deceat . . . . . . . . . . . . . . . . . . . . . . . . . .423
Page 50

50
CODE-ENTRY CODE LIST FOR ACCESSORY DEVICES
CABLE REMOTE
CONVERTOR CODE NO.
Eastern . . . . . . . . . . . . . . . . . . . . . .002, 274
Everquest . . . . . . . . . . . . . . . . . . . .015, 040
Filmnet . . . . . . . . . . . . . . . . . . . . . . . . . .443
Focus . . . . . . . . . . . . . . . . . . . . . . . . . . .400
France Telecom . . . . . . . . . . . . . . . . . . .451
GC Electronics . . . . . . . . . . . . . . . . . . .056
GEC . . . . . . . . . . . . . . . . . . . . . . . . . . . .086
Ganard . . . . . . . . . . . . . . . . . . . . . . . . . .153
Gemini . . . . . . . . . . . . . . . . . .015, 070, 242
General Instrument . . . . . . . .011, 276, 476
Gold Star . . . . . . . . . . . . . . . . . . . . . . . .040
Grundig . . . . . . . . . . . . . . . . . . . . . . . . .529
Hamlin . . . . . . . . . . . . . .009, 020, 034, 259
Hitachi . . . . . . . . . . . . . . . . . . . . . . . . . .011
Hytex . . . . . . . . . . . . . . . . . . . . . . . . . . .007
Jasco . . . . . . . . . . . . . . . . . . . . . . . . . . .153
Jerrold . . . . . . . . . . . . . .003, 011, 012, 014,
. . . . . . . . . . . . . . . . . . . .015, 024, 276, 476
M.N.E. T. . . . . . . . . . . . . . . . . . . . . . . . .443
MNet . . . . . . . . . . . . . . . . . . . . . . . . . . .443
Macon . . . . . . . . . . . . . . . . . . . . . . . . . .033
Magnavox . . . . . . . . . . . . . . .027, 032, 334
Memorex . . . . . . . . . . . . . . . . . . . . . . . .000
Movie Time . . . . . . . . . . . . . . . . . . . . . .063
NSC . . . . . . . . . . . . . . . . . . . . . . . .063, 070
Oak . . . . . . . . . . . . . . . . . . . . . . . .007, 019
Optimus . . . . . . . . . . . . . . . . . . . . . . . . .021
Panasonic . . . . . . . . . . . . . . . .000, 021, 107
Paragon . . . . . . . . . . . . . . . . . . . . . . . . .000
Philips . .025, 027, 031, 153, 242, 290, 334
Pioneer . . . . . . . . . . . . . . . . . . . . . .533, 753
Popular Mechanics . . . . . . . . . . . . . . . .400
Pulsar . . . . . . . . . . . . . . . . . . . . . . . . . . .000
RCA . . . . . . . . . . . . . . . . . . . . . . . . . . . .021
Radio Shack . . . . . . . . . . . . . . . . . . . . . .015
Recoton . . . . . . . . . . . . . . . . . . . . . . . . .400
Regal . . . . . . . . . . . . . . . . . . . . . . .020, 259
Regency . . . . . . . . . . . . . . . . . . . . . . . . .002
Rembrandt . . . . . . . . . . . . . . . . . . .011, 070
Runco . . . . . . . . . . . . . . . . . . . . . . . . . . .000
SL Marx . . . . . . . . . . . . . . . . . . . . . . . . .040
Salora . . . . . . . . . . . . . . . . . . . . . . . . . . .382
Samsung . . . . . . . . . . . . . . . . . . . . . . . .040
Satbox . . . . . . . . . . . . . . . . . . . . . . . . . .375
Scientific Atlanta . . . . . . . . . .008, 017, 477
Signal . . . . . . . . . . . . . . . . . . . . . . .015, 040
Signature . . . . . . . . . . . . . . . . . . . . . . . .011
Sprucer . . . . . . . . . . . . . . . . . . . . . . . . . .021
Star Sight . . . . . . . . . . . . . . . . . . . . . . . .542
Starcom . . . . . . . . . . . . . . . . . . . . .003, 015
Stargate . . . . . . . . . . . . . . . . . . . . .015, 040
Starquest . . . . . . . . . . . . . . . . . . . . . . . .015
Sylvania . . . . . . . . . . . . . . . . . . . . . . . . .001
TV85 . . . . . . . . . . . . . . . . . . . . . . . . . . .063
Tandy . . . . . . . . . . . . . . . . . . . . . . . . . . .258
Tele+1 . . . . . . . . . . . . . . . . . . . . . . . . . .443
Teleservice . . . . . . . . . . . . . . . . . . . . . . .281
Teleview . . . . . . . . . . . . . . . . . . . . . . . .040
Texscan . . . . . . . . . . . . . . . . . . . . . . . . .001
Timeless . . . . . . . . . . . . . . . . . . . . . . . . .274
Tocom . . . . . . . . . . . . . . . . . .012, 013, 059
Toshiba . . . . . . . . . . . . . . . . . . . . . . . . .000
Tudl . . . . . . . . . . . . . . . . . . . . . . . . . . . .286
Tusa . . . . . . . . . . . . . . . . . . . . . . . . . . . .015
Unike . . . . . . . . . . . . . . . . . . . . . . .022, 153
CABLE REMOTE
CONVERTOR CODE NO.
United Artists . . . . . . . . . . . . . . . . . . . . .007
United Cable . . . . . . . . . . . . . . . . . . . . .003
Universal . . . . . . . . . . . .022, 056, 153, 191
Videoway . . . . . . . . . . . . . . . . . . . . . . . .250
Viewstar . . . . . . . . . . . . . . . . .027, 063, 258
Visi Cable+ . . . . . . . . . . . . . . . . . . . . . .461
Westminster . . . . . . . . . . . . . . . . . . . . . .105
Wolsey Gaine . . . . . . . . . . . . . . . . . . . .544
Zenith . . . . . . . . . . . . . . . . . .000, 054, 525
Zentek . . . . . . . . . . . . . . . . . . . . . . . . . .400
REMOTE
DBS CODE NO.
Alpha Star . . . . . . . . . . . . . . . . . . . . . . .772
Echostar . . . . . . . . . . . . . . . . . . . . . . . . .775
HTS . . . . . . . . . . . . . . . . . . . . . . . . . . . .775
Hitachi . . . . . . . . . . . . . . . . . . . . . . . . . .819
Hughes Network System . . . . . . . . . . . .749
Jerrold . . . . . . . . . . . . . . . . . . . . . . . . . .627
Magnavox . . . . . . . . . . . . . . . . . . .722, 724
Memorex . . . . . . . . . . . . . . . . . . . . . . . .724
Panasonic . . . . . . . . . . . . . . . . . . . . . . . .701
Philips . . . . . . . . . . . . . . . . . . . . . .722, 724
Primestar . . . . . . . . . . . . . . . . . . . . . . . .627
RCA . . . . . . . . . . . . . . . . . . . . . . . . . . . .566
Sony . . . . . . . . . . . . . . . . . . . . . . . . . . . .639
Toshiba . . . . . . . . . . . . . . . . . . . . . . . . .790
Uniden . . . . . . . . . . . . . . . . . . . . . . . . . .724
REMOTE
SATELLITE CODE NO.
AST . . . . . . . . . . . . . . . . . . . . . . . . . . . .351
Akai . . . . . . . . . . . . . . . . . . . . . . . . . . . .515
Alba . . . . . . . . . . . . . . . . . . . .352, 515, 613
Aldea . . . . . . . . . . . . . . . . . . . . . . . . . . .288
Amstrad . . . . .080, 252, 345, 461, 509, 689
Ankaro . . . . . . . . . . . . . . . . . .220, 288, 369
Anitron . . . . . . . . . . . . . . . . . . . . . . . . . .183
Armstrong . . . . . . . . . . . . . . . . . . . . . . .243
Astra . . . . . . . . . . . . . . . . . . . . . . . . . . .108
Avalon . . . . . . . . . . . . . . . . . . . . . . . . . .396
Axis . . . . . . . . . . . . . . . . . . . . . . . . . . . .369
BT . . . . . . . . . . . . . . . . . . . . . . . . .515, 668
Beko . . . . . . . . . . . . . . . . . . . . . . . . . . . .189
Best . . . . . . . . . . . . . . . . . . . . . . . . . . . .369
Boca . . . . . . . . . . . . . . . . . . . . . . . .243, 513
Bush . . . . . . . . . . . . . . . . . . . . . . . . . . . .067
Cambridge . . . . . . . . . . . . . . . . . . .344, 515
Channel Master . . . . . . . . . . . . . . . . . . .362
Commlink . . . . . . . . . . . . . . . . . . . . . . .288
Connexions . . . . . . . . . . . . . . . . . . . . . .396
Conrad . . . . . . . . . . . . . . . . . . . . . . . . . .607
Crown . . . . . . . . . . . . . . . . . . . . . . . . . .243
DDC . . . . . . . . . . . . . . . . . . . . . . . . . . . .362
DNT . . . . . . . . . . . . . . . . . . . . . . . . . . . .396
Echostar . . . . . . . . . . . . . . . . . . . . . . . . .396
Farguson . . . . . . . . . . . .067, 183, 189, 336
Fidelity . . . . . . . . . . . . . . . . . . . . . . . . . .252
Finiux . . . . . . . . . . . . . . . . . . . . . .108, 397
Fuba . . . . . . . . . . . . . . . . . . . . . . . .369, 396
G-Bat . . . . . . . . . . . . . . . . . . . . . . . . . . .183
Galaxis . . . . . . . . . . . . . . . . . . . . . . . . . .286
Gooding . . . . . . . . . . . . . . . . . . . . . . . . .571
Grundig . . . . . . . . . . . . .173, 189, 571, 750
Hinari . . . . . . . . . . . . . . . . . . . . . . . . . . .183
REMOTE
SATELLITE CODE NO.
Hirschmann . . . . . . . . . . . . . . . . . .397, 573
Houston . . . . . . . . . . . . . . . . . . . . . . . . .668
Huth . . . . . . . . . . . . . . . . . . . .220, 243, 268
ITT . . . . . . . . . . . . . . . . . . . . . . . . . . . . .108
Intervision . . . . . . . . . . . . . . . . . . . . . . .592
JVC . . . . . . . . . . . . . . . . . . . . . . . .515, 571
Kathrein . . . . . . . . . . . . .092, 504, 622, 658
La Sat . . . . . . . . . . . . . . . . . . . . . .513, 607
Lennox . . . . . . . . . . . . . . . . . . . . . . . . . .592
Lupus . . . . . . . . . . . . . . . . . . . . . . . . . . .369
Luxor . . . . . . . . . . . . . . . . . . . . . . .108, 573
Manhatten . . . . . . . . . . . . . . . . . . . . . . .592
Maspro . . . . . . . . . . . . . . . . . .092, 336, 750
Matsui . . . . . . . . . . . . . . . . . . . . . . . . . .571
Mediamarkt . . . . . . . . . . . . . . . . . . . . . .248
Minerva . . . . . . . . . . . . . . . . . . . . . . . . .571
Mintec . . . . . . . . . . . . . . . . . . . . . . . . . .576
Morgan’s . . . . . . . . . . . . . . . . . . . .243, 513
Newhaus . . . . . . . . . . . . . . . . . . . . . . . .220
Nikko . . . . . . . . . . . . . . . . . . . . . . .360, 713
Nokia . . . . . . . . . . . . . . . . . . .108, 397, 573
Nordmende . . . . . . . . . . . . . . . . . . . . . .362
Orbitech . . . . . . . . . . . . . . . . . . . . . . . . .501
Pace . . . . . . . . . . . .067, 183, 336, 455, 791
Paliadium . . . . . . . . . . . . . . . . . . . . . . . .571
Palsat . . . . . . . . . . . . . . . . . . . . . . . . . . .501
Philips . . . . . . . . . . . . . .200, 292, 571, 750
Phonotrend . . . . . . . . . . . . . . . . . .288, 592
Plasmatic . . . . . . . . . . . . . . . . . . . . . . . .442
Proset . . . . . . . . . . . . . . . . . . . . . . . . . . .288
Quadral . . . . . . . . . . . . . . . . . . . . .362, 628
RFT . . . . . . . . . . . . . . . . . . . . . . . .220, 288
Radix . . . . . . . . . . . . . . . . . . . . . . . . . . .396
SAT . . . . . . . . . . . . . . . . . . . . . . . .351, 461
SEG . . . . . . . . . . . . . . . . . . . . . . . . . . . .369
Saba . . . . . . . . . . . . . . . . . . . . . . . . . . . .336
Salora . . . . . . . . . . . . . . . . . . . . . . . . . . .108
Satec . . . . . . . . . . . . . . . . . . . . . . . . . . .183
Schwaiger . . . . . . . . . . . . . . . . . . .183, 504
Seemann . . . . . . . . . . . . . . . .396, 578, 626
Skymaster . . . . . . . . . . . . . . . . . . .288, 626
Sony . . . . . . . . . . . . . . . . . . . . . . . . . . . .704
Star Trak . . . . . . . . . . . . . . . . . . . . . . . .421
Strong . . . . . . . . . . . . . . . . . . . . . . . . . .421
Sunstar . . . . . . . . . . . . . . . . . . . . . . . . . .513
Tantec . . . . . . . . . . . . . . . . . . . . . . . . . .336
Techni Sat . . . . . . . . . . . . . . . . . . .262, 501
Teleka . . . . . . . . . . . . . . . . . . . . . .243, 613
Tonna . . . . . . . . . . . . . . . . . . . . . . . . . . .668
Triad . . . . . . . . . . . . . . . . . . . . . . . . . . .351
Universum . . . . . . . . . . . . . . . . . . . . . . .571
Vtech . . . . . . . . . . . . . . . . . . . . . . . . . . .351
Wisi . . . . . . . . . . . . . . . . . . . . . . . .351, 396
REMOTE
DVD CODE NO.
Kenwood . . . . . . . . . . . . . . . . . . . . . . . .534
Mitsubishi . . . . . . . . . . . . . . . . . . . . . . .521
Panasonic . . . . . . . . . . . . . . . . . . . . . . . .490
Philips . . . . . . . . . . . . . . . . . . . . . . . . . .539
Pioneer . . . . . . . . . . . . . . . . . . . . . . . . . .550
RCA . . . . . . . . . . . . . . . . . . . . . . . . . . . .522
Sony . . . . . . . . . . . . . . . . . . . . . . . . . . . .552
Toshiba . . . . . . . . . . . . . . . . . . . . . . . . .503
Page 51
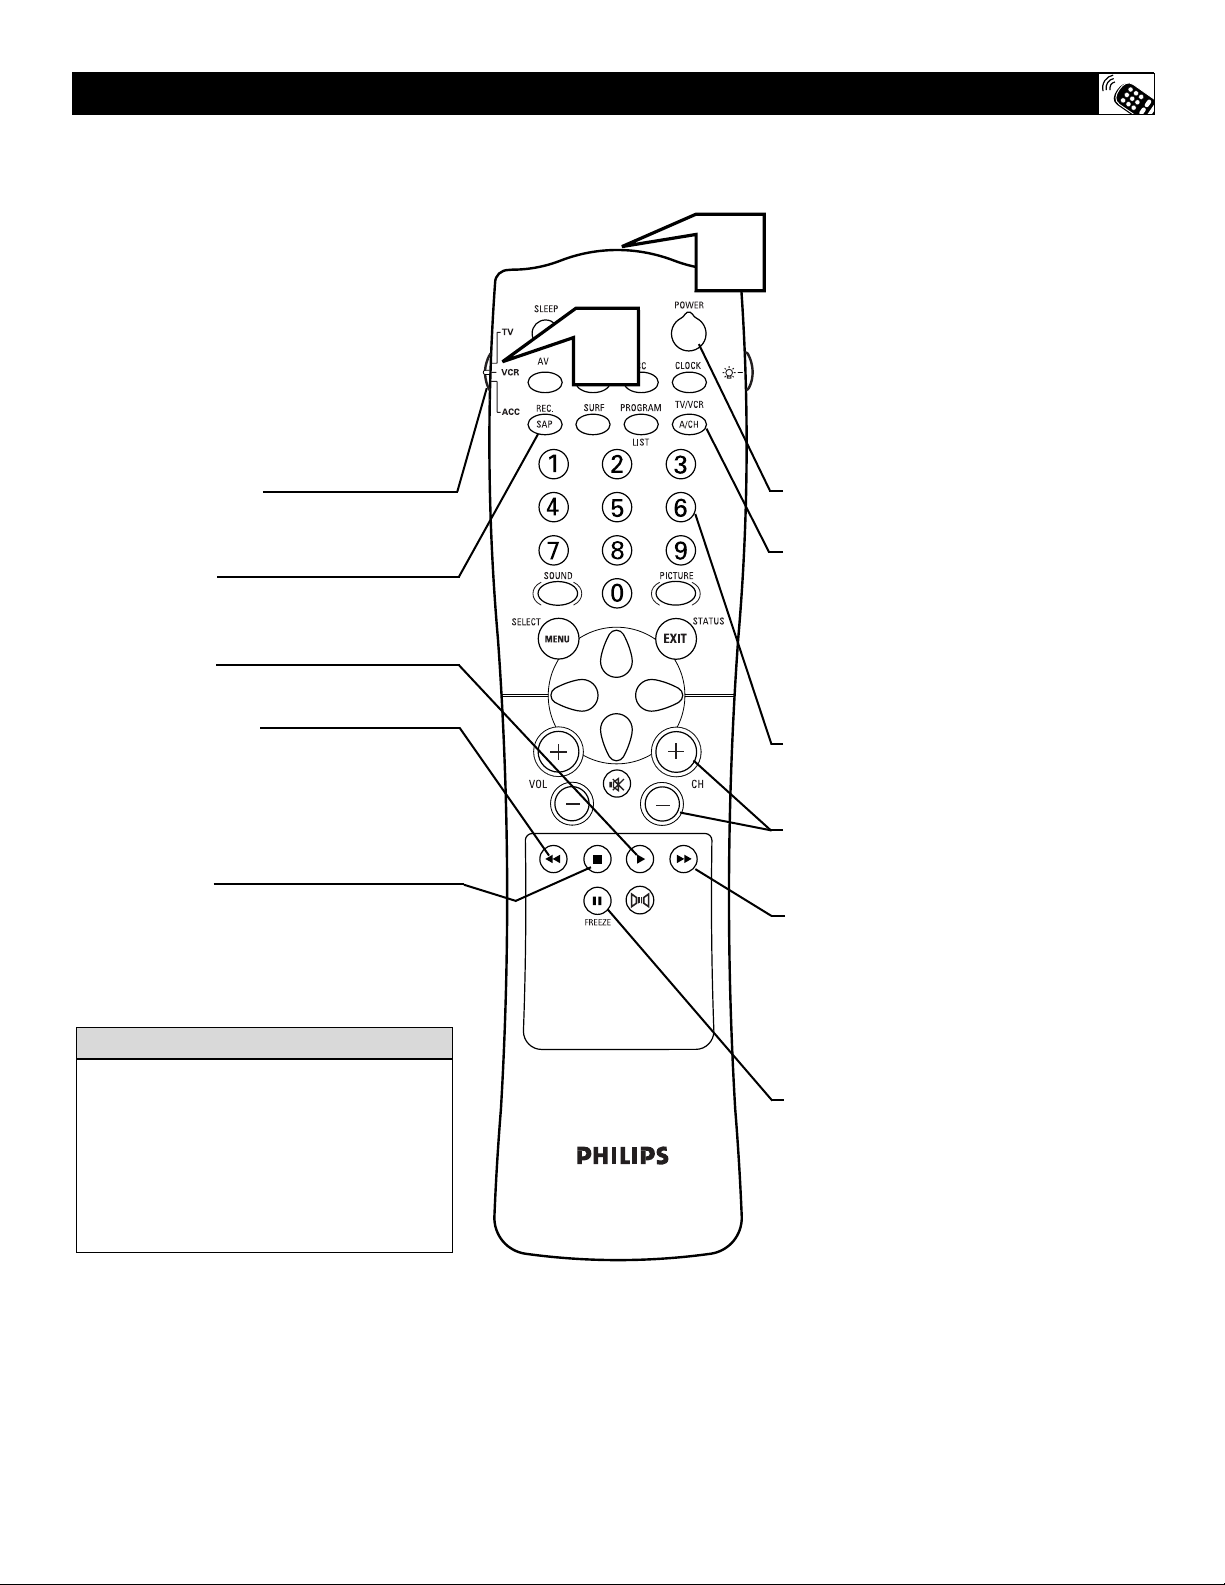
51
REMOTE CONTROL VCR SPECIFIC BUTTONS
W
hen using the TV remote control with a
VCR, first make certain it is set to control your VCR (by the REMOTE CODE or
SEARCH method).
1
Set the TV/VCR/ACC mode switch
to VCR on the remote control.
2
Point the top of the remote toward
the front of the VCR (remote sensor
window) when pressing the buttons.
Remember, the VCR buttons on the remote will
not operate your VCR if those features are not
found on your VCR remote control.
NOTE: All VCR functions (particularly
Search, Rewind, Fast Forward, etc.) will operate the same as with the original VCR remote
control provided with the VCR.
HELPFUL HINT
VCR System Switch
Set in the VCR position to send remote commands to the VCR.
Record Button
Hold the REC(ord/Sap) and PLAYbuttons
down to begin a VCR recording.
Play Button
Press to begin playback of a videotape.
Rewind Button
Press to rewind tapes. For some VCR’s, the
STOP button may have to be pressed first,
then REWIND. In playback mode, hold
down the button to view the picture moving
rapidly in reverse.
Stop Button ■
Press to stop the motion of a tape in playback, rewind, fast forward, and so on.
Power Button
Press to turn the VCR ON and OFF.
TV/VCR Button
Press while in the VCR mode (the VCR indicator on the front of the unit will light) to view
the playback of a tape. Press again to place in
the TV position (the VCR indicator light will
go off) to view one program while recording
another program.
Number Buttons
Press buttons for the direct selection of
VCR channels.
Channel + and – Buttons
Press to scan up or down through the VCR
channel numbers.
Fast Forward Button
Press to rapidly advance the tape. For some
VCRs, you may need to press the STOP
button first, then the FAST FORWARD
button. In playback mode, hold the button
down to view the picture moving rapidly in
the forward direction.
Pause Button II
Press to temporarily stop the tape during a
playback or recording. Press again to
release Pause.
2
1
Page 52

52
TROUBLESHOOTING
CARE AND CLEANING
WARNING Concerning Stationary Images on the TV
Screen:
Do not leave stationary or letterbox images on screen
for extended periods of time. This can cause uneven
picture-tube aging.
Normal use of the TV should involve the showing of pictures
that contain constantly moving and changing images that fill the
screen. Be careful not to leave nonmoving images on screen for
extended periods of time, or to display the same images on
screen too frequently, because subtle ghost images can be left
on the picture tubes. Sources of stationary images may be DVD
disks, laser disks, video games, CD-i disks, videotapes, digital
television boxes, broadcast channels, cable channels, satellite
channels, and others. Here are some examples of stationary
images (this is not an all-inclusive list; you may encounter
others in your viewing):
• DVD menus—listings of DVD disk content
• Letterbox black bars—shown at the top and bottom of the
TV screen when a wide screen (16:9) movie is viewed on a
TV with standard (4:3) aspect ratio.
• Video-game images and scoreboards
• Television station logos—present a problem if they are
bright and stationary; moving or low-contrast graphics are
less likely to cause uneven aging of the picture tube
• Stock-market tickers—presented at the bottom of the TV
screen
• Shopping channel logos and pricing displays—bright
and shown constantly or repeatedly in the same location on
the TV screen.
P
LACEMENT OF THE TV
•To avoid cabinet warping, cabinet color changes, and
increased chance of set failure, do not place the TV where
temperatures can become excessively hot; for example, in
direct sunlight or near a heating appliance.
• Be sure to allow a free flow of air to and from the perforated
back cover of the set.
CLEANING
•To avoid possible shock hazard, be sure the TV is unplugged
from the electrical outlet before cleaning.
• Regularly dust the TV with a dry, nonscratching duster to
keep the TV clean.
• When cleaning the TV, take care not to scratch or damage the
screen surface. Avoid wearing jewelry or using anything
abrasive. Do not use household cleaners. Wipe the front
screen with a clean cloth dampened with water. Use even,
easy, vertical strokes when cleaning.
• Gently wipe the cabinet surfaces with a clean cloth or sponge
dampened in a solution of cool, clear water and a mild soap
or detergent. Use a clean, dry cloth to dry the wiped surfaces.
• Occasionally vacuum the ventilation holes or slots in the back
cover of the set.
• Never use thinners, insecticide sprays, or other chemicals on
or near the cabinet, as they might cause permanent marring
of the cabinet finish.
No Power
• Check the TV power cord. Unplug the TV, wait 10 seconds,
then reinsert the plug into the outlet and push the POWER
button again.
• Check that the outlet is not on a wall switch.
• Be sure the fuse is not blown on the AC power strip, if one is
being used.
No Picture
• Check antenna connections. Are they properly secured to the
TV's ANT 75Ω plug?
• Check the TUNER MODE control for the correct tuner setting.
•Try running the Auto Program feature to find all available
channels.
• Press the AV button on the remote to make sure the correct
signal source is selected (FRONT or Current Channel).
No Sound
• Check the VOLUME buttons.
• Check the MUTE button on the remote control.
• If you’re attempting to hook up auxiliary equipment, check
the audio jack connections located on the front of the TV.
Remote Does Not Work
• Check the batteries. If necessary, replace them with AA
Heavy Duty (Zinc Chloride) or Alkaline batteries.
Remote Does Not Work Continued
• Clean the remote control and the remote control sensor window on the TV.
• Check the TV power cord. Unplug the TV, wait 10 seconds,
then reinsert the plug into the outlet and push the POWER
button again.
• Be sure the fuse is not blown on the AC power strip, if one is
being used.
• Check to be sure the TV outlet is not on a wall switch.
TV Displays Wrong Channel or No Channels Above 13
• Repeat channel selection.
• Add the desired channel numbers (using the CHANNEL
EDIT control) into the TV’s memory.
• Check to be sure the TUNER MODES are set to the CABLE
option and run the Auto Program feature to find all available
channels.
TV Displays white lines in letterbox when viewing a
DVD disc
• Some DVD Discs are encoded with as much as 30% more
video information to give the best possible picture quality.
With the DVD Player in the 16:9 picture format, the playback of this type of disc with extra video information, can
produce a number of small white lines in the upper portion
of the black letterbox area. With some of these discs, this situation is unavoidable and it does not require a service call.
Page 53

53
GLOSSARY OF TELEVISION TERMS
Active Control • Active Control continuously measures and corrects the incoming signals to provide the best picture possible.
Alternate Channel • Allows you to toggle between the last two
channels viewed by pressing the A/CH button on the remote
control.
Audio/Video Inputs • Jacks (standard RCA), located on the
back of the TV, used for external accessory devices. These jacks
are designed to receive higher picture resolution and offer
sound-connection options.
Auto Programming • When activated, this feature scans for all
available channels from regular antenna or cable signals and
stores only active broadcast stations in the TV’s memory.
Channel Edit • The feature that allows you to add or delete
channels from the list of channels stored in the TV’s memory.
Closed Captioning • The broadcast standard feature that allows
you to read the voice content of television programs on the TV
screen. Designed to help the hearing impaired, Closed
Captioning shows dialogue and conversations while a TV program is in progress.
Coaxial Cable • A single solid wire normally matched with a
metal plug (F-type) end connector that screws (or pushes) directly onto a 75-ohm input found on the television or VCR.
Component Video Inputs • Inputs that allow the separate reception of blue, red, and luminance signals. These inputs provide
the highest possible color and picture resolution in the playback
of digital signal-source material, such as the kind available from
DVD players.
Composite Video Input • An input in which all the components
required for displaying the onscreen image are combined in one
signal.
High-definition Television (HDTV) • High-resolution digital
television.
Incredible Stereo (or Surround) • False acoustic management
of the audio signal that produces a dramatic expansion of the
wall of sound that surrounds the listener and heightens overall
viewing pleasure.
Menu • An onscreen list of feature controls available for you to
adjust or set.
Onscreen Displays (OSD) • The wording or messages generated by the television (or VCR) to help you with specific feature
controls (color adjustment or programming, for example).
Remote Control Sensor Window • The window or opening
found on the television control panel through which infrared
remote control command signals are received.
Second Audio Program (SAP) • An additional audio channel
provided for in the Multichannel Television Sound (MTS)
broadcast standard. A monaural soundtrack included within the
recorded or video signal (usually containing a second language
translation for the displayed programming).
Status/Exit Button • The remote control function that allows
you to quickly confirm what channel number you are watching.
Status/Exit can also be used to clear the television of onscreen
displays or information. You can use Status/Exit rather than having to wait for the displays to “time out,” or automatically disappear from the screen.
S-Video Input • Signal input that allows direct connection of
high-resolution video sources, such as a satellite receiver, DVD
player, S (Super)-VHS videocassette recorder, or video games.
Provides improved picture resolution, sharpness, and clarity.
Tint • TV function that allows you to change the general color
balance between cool and warm. Adjust tint according to your
personal preference.
Page 54

54
INDEX
Active Control™ . . . . . . . . . . . . . . . . . . . . . . . . . . . . . . . . . . .29
Alternate Channel Control . . . . . . . . . . . . . . . . . . . . . . . . . . . .45
Audio Out Control . . . . . . . . . . . . . . . . . . . . . . . . . . . . . . . . . .21
AutoLock™ Controls
Access Code . . . . . . . . . . . . . . . . . . . . . . . . . . . . . . . . . . . . .31
AutoLock™ Status Screen . . . . . . . . . . . . . . . . . . . . . . . . . .38
Blocking Programs based on Movie Ratings . . . . . . . . . . . .34
Blocking Programs based on TV Ratings . . . . . . . . . . . . . .35
Blocking Channels . . . . . . . . . . . . . . . . . . . . . . . . . . . . . . . .32
Blocking Control (Activating Blocking Controls) . . . . . . . .36
Blocking based on No Ratings . . . . . . . . . . . . . . . . . . . . . . .37
Clearing All Blocked Channels . . . . . . . . . . . . . . . . . . . . . .33
Understanding the AutoLock™ Features . . . . . . . . . . . . . . .30
AutoPicture™ Control . . . . . . . . . . . . . . . . . . . . . . . . . . . . . . .43
AutoSound™ Control . . . . . . . . . . . . . . . . . . . . . . . . . . . . . . .44
AV L (Automatic Volume Leveler) Control . . . . . . . . . . . . . . .18
Balance Control . . . . . . . . . . . . . . . . . . . . . . . . . . . . . . . . . . . .17
Bass Control . . . . . . . . . . . . . . . . . . . . . . . . . . . . . . . . . . . . . . .17
Brightness Control . . . . . . . . . . . . . . . . . . . . . . . . . . . . . . . . . .14
Care and Cleaning Information . . . . . . . . . . . . . . . . . . . . . . . .52
Closed Captioning . . . . . . . . . . . . . . . . . . . . . . . . . . . . . . . . . .39
Color Control . . . . . . . . . . . . . . . . . . . . . . . . . . . . . . . . . . . . . .14
Color Temperature (Color Temp) Control . . . . . . . . . . . . . . . .14
Digital Options (Eye Fidelity™) Control . . . . . . . . . . . . . . . .15
Dyn(amic) Contrast Control . . . . . . . . . . . . . . . . . . . . . . . . . .16
Factory Service Locations . . . . . . . . . . . . . . . . . . . . . . . . . . . .55
Feature Highlights . . . . . . . . . . . . . . . . . . . . . . . . . . . . . . . . . . .5
Freeze Control . . . . . . . . . . . . . . . . . . . . . . . . . . . . . . . . . . . . .42
Glossary of Terms . . . . . . . . . . . . . . . . . . . . . . . . . . . . . . . . . .53
Incr.(edible) Surround Control . . . . . . . . . . . . . . . . . . . . . . . . .19
Index . . . . . . . . . . . . . . . . . . . . . . . . . . . . . . . . . . . . . . . . . . . . .54
Jack Panel Input/Output Connections
Audio Output Jacks . . . . . . . . . . . . . . . . . . . . . . . . . . . . . . . .13
Audio/Video Cables . . . . . . . . . . . . . . . . . . . . . . . . . . . . . . . .6
AV1 Input Jacks . . . . . . . . . . . . . . . . . . . . . . . . . . . . . . . . . . .7
Jack Panel Input/Output Connections Continued
AV2 Input Jacks . . . . . . . . . . . . . . . . . . . . . . . . . . . . . . . . . . .8
AV3 (Side with Headphone) Input Jacks . . . . . . . . . . . . . . . .9
AV4 (Component with VGA) Input Jacks . . . . . . . . . . . . . .10
CVI - Component Video Input Jacks . . . . . . . . . . . . . . . . . .11
Jack Panel Descriptions . . . . . . . . . . . . . . . . . . . . . . . . . . . . .6
Monitor Output Jacks . . . . . . . . . . . . . . . . . . . . . . . . . . . . . .13
S-Video Input Jacks . . . . . . . . . . . . . . . . . . . . . . . . . . . . . . .12
Picture Control . . . . . . . . . . . . . . . . . . . . . . . . . . . . . . . . . . . . .14
Registration of TV Information . . . . . . . . . . . . . . . . . . . . . . . . .2
Remote Control Use with Accessory Devices
Code-Entry Method of Identification . . . . . . . . . . . . . . . . . .47
Direct Access Method of Identification . . . . . . . . . . . . . . . .46
Direct-Entry Code List . . . . . . . . . . . . . . . . . . . . . . . . . .49-50
Search Method of Identification . . . . . . . . . . . . . . . . . . . . . .48
VCR Specific Buttons . . . . . . . . . . . . . . . . . . . . . . . . . . . . .51
Safety Information . . . . . . . . . . . . . . . . . . . . . . . . . . . . . . . . .2-3
SAP (Secondary Audio Programs) Control . . . . . . . . . . . . . . .20
Screen Format Control . . . . . . . . . . . . . . . . . . . . . . . . . . . . . . .40
Sharpness Control . . . . . . . . . . . . . . . . . . . . . . . . . . . . . . . . . .14
Sleep Timer Control . . . . . . . . . . . . . . . . . . . . . . . . . . . . . . . . .41
Stereo/Mono Control . . . . . . . . . . . . . . . . . . . . . . . . . . . . . . . .20
Surf (Channel Surf) Control . . . . . . . . . . . . . . . . . . . . . . . . . .45
Timer Controls
Activate Control . . . . . . . . . . . . . . . . . . . . . . . . . . . . . . . . . .27
Clock, Time Control . . . . . . . . . . . . . . . . . . . . . . . . . . . . . . .23
Display Control . . . . . . . . . . . . . . . . . . . . . . . . . . . . . . . . . . .28
Start Channel Control . . . . . . . . . . . . . . . . . . . . . . . . . . . . . .26
Start Time Control . . . . . . . . . . . . . . . . . . . . . . . . . . . . . . . .24
Stop Time Control . . . . . . . . . . . . . . . . . . . . . . . . . . . . . . . .25
Tint Control . . . . . . . . . . . . . . . . . . . . . . . . . . . . . . . . . . . . . . .14
Treble Control . . . . . . . . . . . . . . . . . . . . . . . . . . . . . . . . . . . . .17
Troubleshooting . . . . . . . . . . . . . . . . . . . . . . . . . . . . . . . . . . . .52
TV Speaker Control . . . . . . . . . . . . . . . . . . . . . . . . . . . . . . . . .22
Warranty (Limited) . . . . . . . . . . . . . . . . . . . . . . . . . . . . . . . . .56
Page 55
55
FACTORY SERVICE LOCATIONS
NOTE: If you reside in one of our Philips Factory Service
Branch areas (see directory on back), you can contact the
nearest Service Branch to obtain efficient and expedient repair
for your product. If your product is In-Warranty, you should
have proof-of-purchase to ensure No Charge Service. For
Out-of-Warranty service, call the location nearest you.
NOTA: Si vous résidez dans une des régions desservies par
une succursale de service après vente du fabricant Philips
(voir liste ci-dessous), vous pourrez contacter la branche de
service après vente la plus près de chez vous pour obtenir un
service après vente rapide et efficace. Si le produit est sous
garantie, il suffira de présenter une preuve d`achat pour bénéficier d'un service sans frais. Pour les produits non couverts
par la garantie, contactez le centre le plus près de chez vous.
In Canada
: How you can obtain efficient and expedient carry-in, mail-in, or in-home service for your product.
Please contact Philips at: 1-800-661-6162 (French speaking)
1-800-363-7278 (English or Spanish speaking)
Au Canada
: Comment obtenir le service après-vente pour les produits apportés ou envoyés par la poste à notre centre de service ou le service à
domicile. Veuillez contacter philips á: 1-800-661-6162 (Francophone)
1-800-363-7278 (Anglais ou Espagnol)
En el Canadá
: Cómo recibir servicio efficiente para su producto, en persona, por correo o a domicillo.
Favor de comunicarse con Philips al: 1-800-661-6162 (francófono)
1-800-363-7278 (Inglés o Español)
NOTA: Si Ud. reside en una de nuestras zonas para sucursales Philips de servicio al de fábrica (ver directorio más abajo), Ud. puede comunicarse con
la sucursal de servicio más cercana para obtener una reparación oportuna y eficaz de su producto. Si su producto está todavía bajo garantía, Ud.
debe presentar comprobante de compra para no ocasionar ningunos cargos por servicio. Para servicio después del vencimiento de la garantía, llame
al lugar más cercano de los abajo indicados.
QUALITY SERVICE IS AS CLOSE AS YOUR TELEPHONE! SIMPLY LOOK OVER THE LIST BELOW FOR THE NUMBER OF A FACTORY SERVICE CENTER
NEAR YOU
. YOUR PRODUCT WILL RECEIVE EFFICIENT AND EXPEDIENT CARRY-IN, MAIL-IN, OR IN-HOME SERVICE, AND YOU WILL RECEIVE PEACE OF
MIND
,
KNOWING YOUR PRODUCT IS BEING GIVEN THE EXPERT ATTENTION OF PHILIPS’ FACTORY SERVICE.
COMMENT OBTENIR NOTRE SERVICE APRÈS VENTE RAPIDE ET EFFICACE SOIT PAR COURRIER, À DOMICILE, OU EN SE PRÉSENTANT À UN CENTRE DE SERVICE PHILIPS. PLUS DE 600 CENTRES
DE RÉCEPTION DE PRODUITS À RÉPARER À TRAVERS LE PAYS: CONTACTER LE CENTRE DE SERVICE AUX CONSOMMATEURS LE PLUS PROCHE POUR SAVOIR L’EMPLACEMENT DE CES DÉPÔTS
DANS UN RAYON DE 50 À 75 MILES (80 KM À 120 KM) DU CENTRE DE SERVICE LOCAL.
CÓMO OBTENER UN SERVICIO OPORTUNO Y EFICIENTE POR CORREO, EN CASA O EN PERSONA PARA SU PRODUCTO A TRAVÉS DE UN CENTRO PHILIPS DE SERVICIO. MAS DE 600 SITIOS POR
TODO EL PAIS PARA LA RECEPCION DE PRODUCTOS NECESITADOS DE REPARACIONES: COMUNICARSE CON EL CENTRO DE SERVICIO DE FABRICA MAS CERCANO PARA ESTOS LUGARES DENTRO
DE UN RADIO DE 80 A 120 KM (50 A 75 MILLAS) DEL CENTRO DE SERVICIO LOCAL.
ATLANTA
Philips Factory Service
550 Franklin Road., Suite F
Marietta, GA 30067
800-273-1501
TAMPA
Philips Factory Service
1911 US Highway 301 North
Tampa, FL 33619
800-442-2027
SAN FRANCISCO
Philips Factory Service
681 East Brokaw Rd.
San Jose, CA 95112
800-300-9013
HOUSTON
Philips Factory Service
1110 N. Post Oak Rd., Suite
100
Houston, TX 77055
800-952-3254
CLEVELAND
Philips Factory Service
950 Keynote Circle
Brooklyn Heights, OH 44131
800-331-7037
DETROIT
Philips Factory Service
25173 Dequindre
Madison Heights, MI 48071
800-438-1398
DALLAS
Philips Factory Service
415 N. Main Street, #107
Euless, TX 76040
800-952-3254
CHICAGO
Philips Factory Service
1279 W. Hamilton Pkwy.
Itasca, IL 60143
800-531-2922
KNOXVILLE
Philips Factory Service
6700 D Papermill Rd.
Knoxville, TN 37919
800-821-1767
PHILADELPHIA
Philips Factory Service
352 Dunks Ferry Rd.
Bensalem, PA 19020
800-847-9320
EL4482-3 REV. DD
Rev. DD - 1/1/2002 3135 015 07541
Detroit/Toledo
•
Cleveland/
•
N Ohio
•
•
Chicago
•
San Francisco/Metro Area
Los Angeles★
•
★ Indicates In-Home Service Only
• Indicates In-Home/Carry-In Service
• Dallas
•
Houston
★ Columbus
Charlotte
★
•
Knoxville/E Tennessee
•
Atlanta/N Georgia
★ Orlando
Tampa/W Florida
•
★ Ft. Myers/SW Florida
★ Miami/SE Florida
•
Philadelphia/S New Jersey
★ Wash/Balt
Page 56

56
COLOR
TELEVISION
90 Days Free Labor
One Year Free Replacement of Parts (Two Years Free Replacement on Color Picture Tube)
This product can be repaired in-home.
LIMITED WARRANTY
WHO IS COVERED?
You must have proof of purchase to receive warranty service. A sales
receipt or other document showing that you purchased the product is
considered proof of purchase.
WHAT IS COVERED?
Warranty coverage begins the day you buy your product. For 90 days
thereafter, all parts will be repaired or replaced free, and labor is free.
From 90 days to one year from the day of purchase, all parts will be
repaired or replaced free, but you pay for all labor charges. From one
to two years from the day of purchase, you pay for the replacement or
repair of all parts except the picture tube, and for all labor charges.
After two years from the day of purchase, you pay for the replacement
or repair of all parts, and for all labor charges.
All parts, including repaired and replaced parts, are covered only for
the original warranty period. When the warranty on the product
expires, the warranty on all replaced and repaired parts also expires.
WHAT IS EXCLUDED?
Your warranty does not cover:
• labor charges for installation or setup of the product, adjustment of
customer controls on the product, and installation or repair of
antenna systems outside of the product.
• product repair and/or part replacement because of misuse, accident, unauthorized repair or other cause not within the control of
Philips Consumer Electronics Company.
• reception problems caused by signal conditions or cable or antenna
systems outside the unit.
•a product that requires modification or adaptation to enable it to
operate in any country other than the country for which it was
designed, manufactured, approved and/or authorized, or repair of
products damaged by these modifications.
• incidental or consequential damages resulting from the product.
(Some states do not allow the exclusion of incidental or consequential damages, so the above exclusion may not apply to you. This
includes, but is not limited to, prerecorded material, whether copyrighted or not copyrighted.)
• a product used for commercial or institutional purposes.
WHERE IS SERVICE AVAILABLE?
Warranty service is available in all countries where the product is officially distributed by Philips Consumer Electronics Company. In countries where Philips Consumer Electronics Company does not distribute
the product, the local Philips service organization will attempt to provide service (although there may be a delay if the appropriate spare
parts and technical manual(s) are not readily available).
MAKE SURE YOU KEEP...
Please keep your sales receipt or other document showing proof of
purchase. Attach it to this owner’s manual and keep both nearby.
Also keep the original box and packing material in case you need to
return your product.
BEFORE REQUESTING SERVICE...
Please check your owner’s manual before requesting service.
Adjustments of the controls discussed there may save you a service
call.
TO GET WARRANTY SERVICE IN U.S.A.,
PUERTO RICO OR U.S. VIRGIN ISLANDS...
Contact a Philips factory service center (see enclosed list) or authorized service center to arrange repair.
(In U.S.A., Puerto Rico and U.S. Virgin Islands, all implied warranties,
including implied warranties of merchantability and fitness for a particular purpose, are limited in duration to the duration of this express
warranty. But, because some states do not allow limitations on how
long an implied warranty may last, this limitation may not apply to
you.)
FOR WARRANTY COVERAGE IN CANADA...
Note: Product Warranty coverage may vary between countries where
product is distributed by Philips Consumer Electronics Company. In
order to receive full and specific warranty details for products sold and
serviced in Canada, please contact Philips at:
1-800-661-6162 (from Canada - French Speaking)
1-800-531-0039 (English and Spanish Speaking)
REMEMBER...
Please record the model and serial numbers found on the product
below. Also, please fill out and mail your warranty registration card
promptly. It will be easier for us to notify you if necessary.
MODEL # ________________________________________________
SERIAL # ________________________________________________
This warranty gives you specific legal rights. You may have other rights which vary from state/province to state/province.
Philips Consumer Electronics Company, P.O. Box 520890, Miami, FL 33152, (402) 536-4171
Printed in U.S.A.
 Loading...