

Page 1
Quick Use and Setup Guide
BASIC TV CONNECTIONS
1
2
Important Notice/Warning . . . . . . . . . . . . . . . . . . . . . .1
Making Basic TV Connections
Basic Cable TV Connections . . . . . . . . . . . . . . . . . . . .1
Basic Antenna TV Connections . . . . . . . . . . . . . . . . . .1
Basic TV and Onscreen Menu Operation . . . . . . . . . . .2
Remote Battery Installation . . . . . . . . . . . . . . . . . . . . .3
Remote Control Button Descriptions . . . . . . . . . . . . . .3
Using the Language Control . . . . . . . . . . . . . . . . . . . . .4
How to Automatically Program Channels . . . . . . . . . .4
How to Use the Demo Feature . . . . . . . . . . . . . . . . . . .4
IMPORTANT
NOTE: This owner's manual is used with
several different television models. Not all
features (and drawings) discussed in this
manual will necessarily match those found
with your television set. This is normal and
does not require that you contact your dealer or request service.
Color TV
Color TV
C
ONTENTS
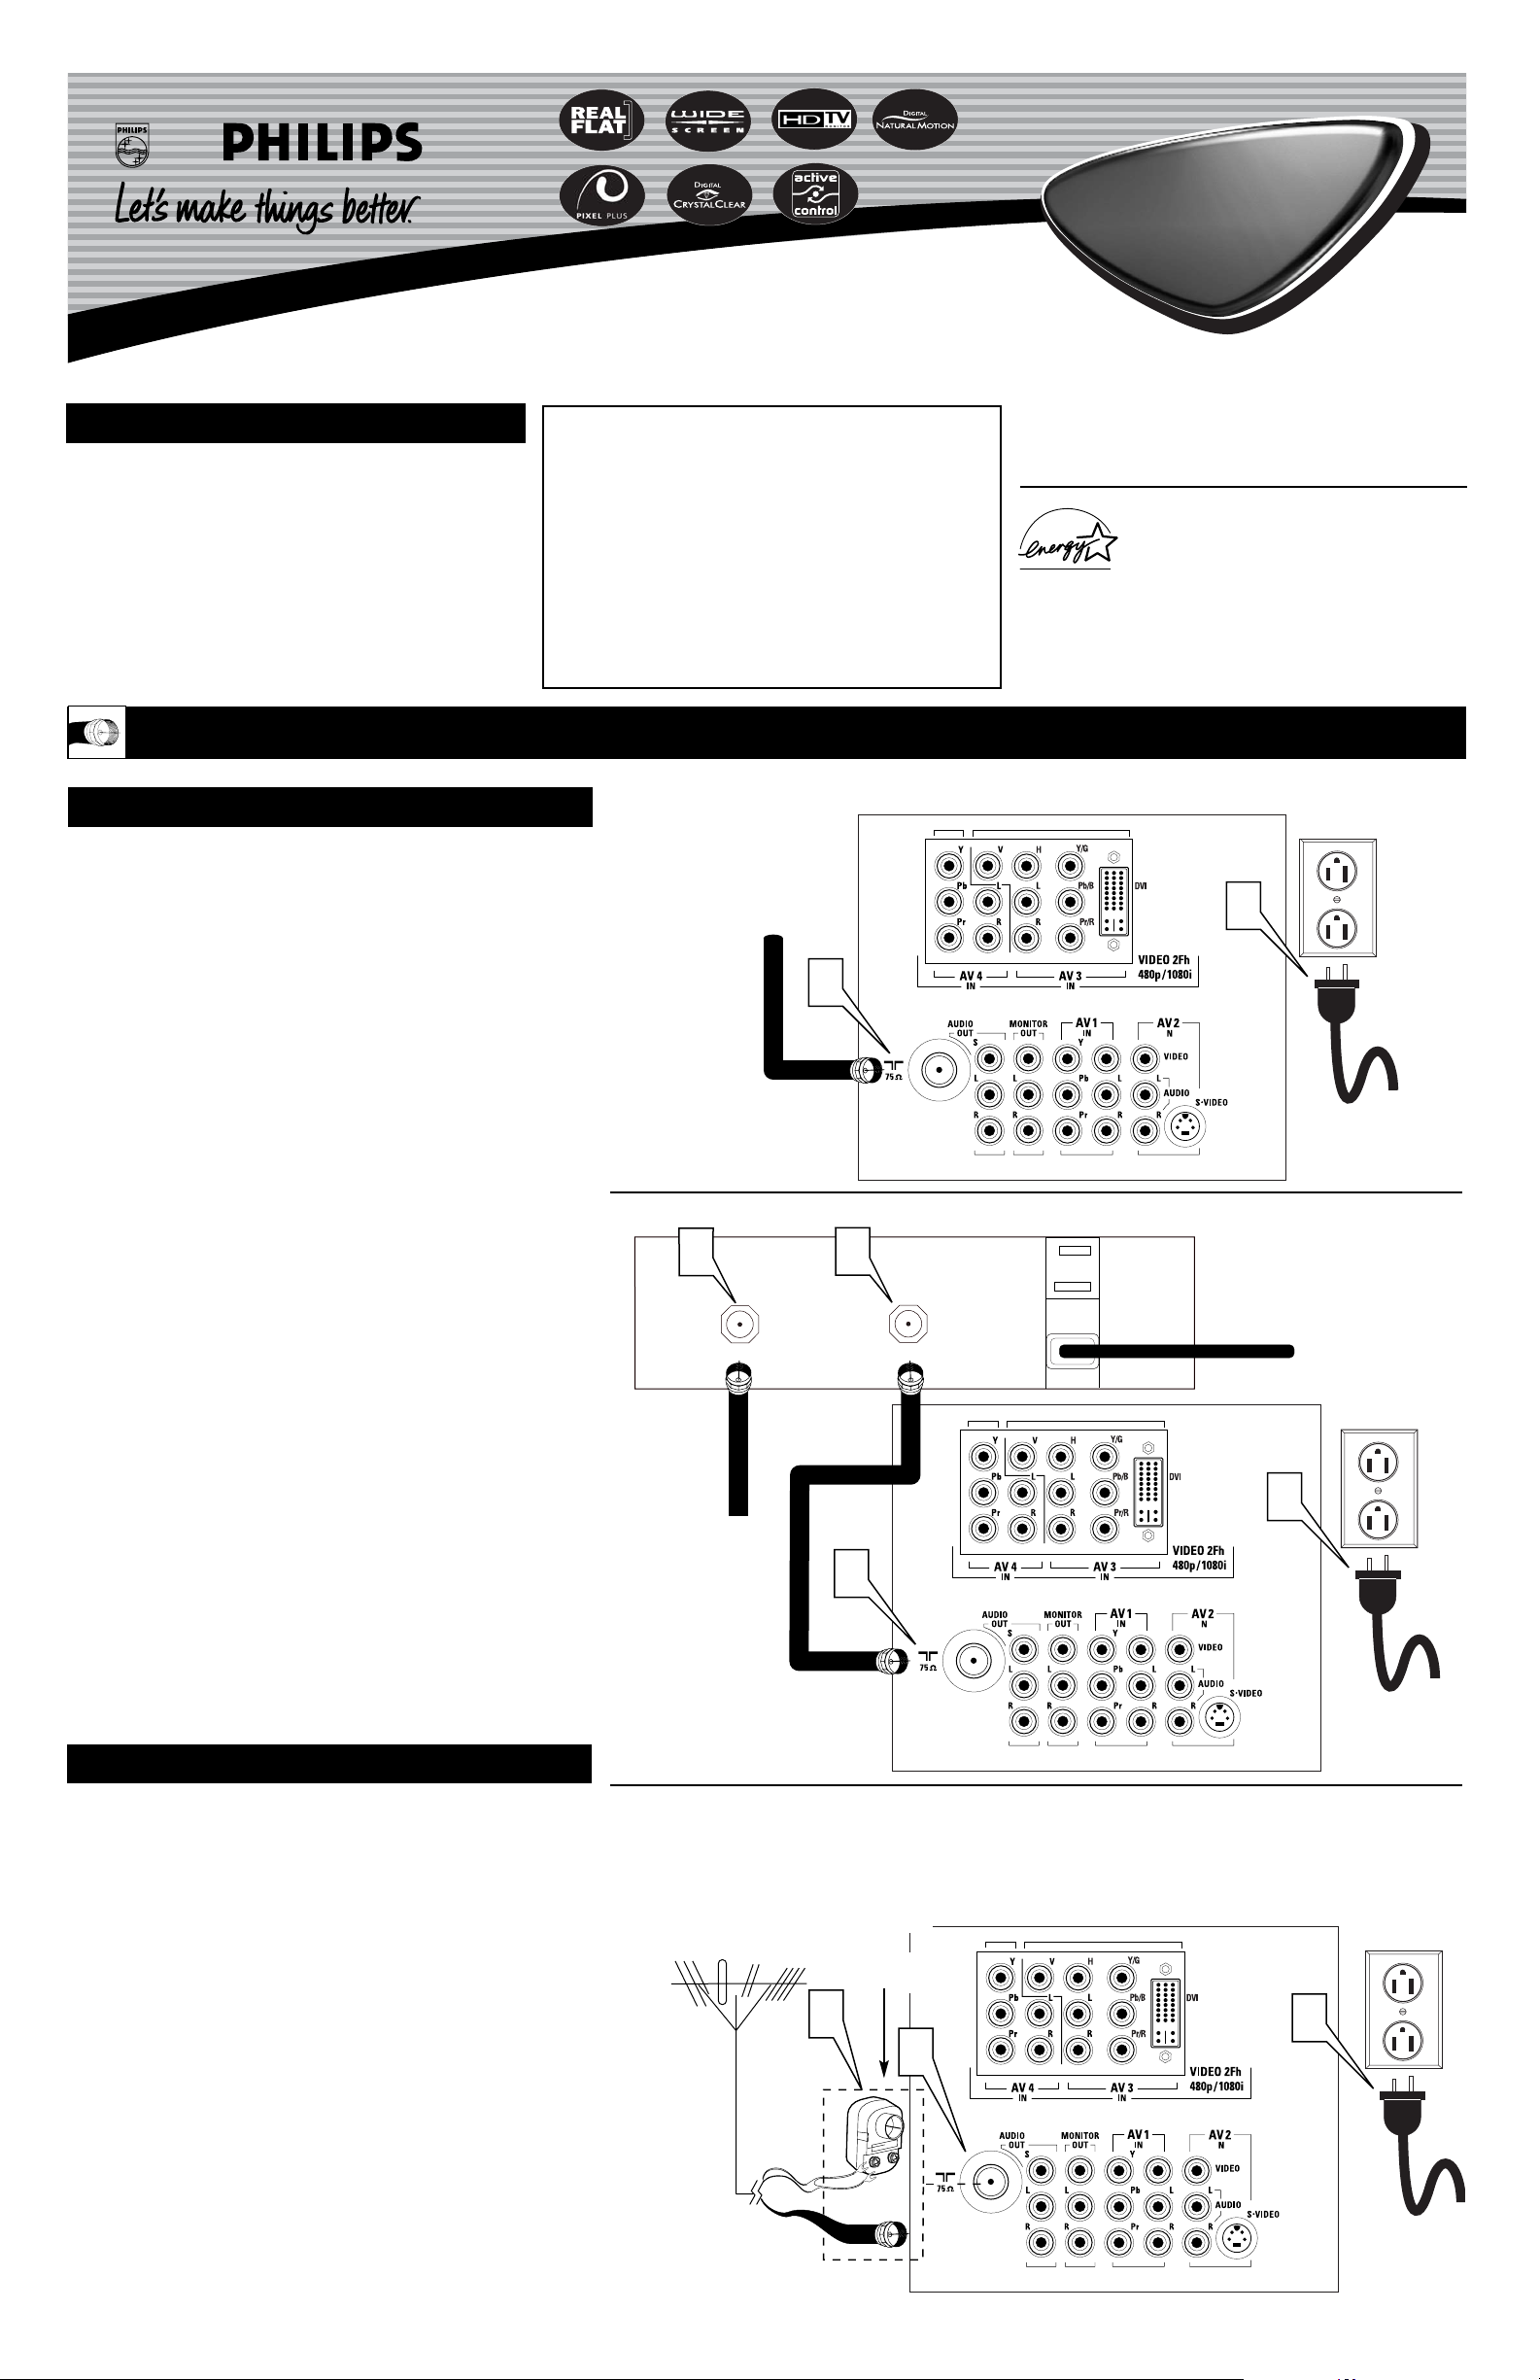
Y
our Cable TV input into your home may be a single (75
ohm) cable or a converter box installation. In either
case, the connection to the TV is very easy. Follow the steps
below to connect your cable signal to your new television.
If your cable signal comes directly from a round 75Ω coaxial
cable use the following steps:
1
Connect the open end of the round Cable Company supplied cable to the 75Ω input on the TV. Screw it down finger
tight.
2
Plug the television into the wall outlet and turn the TV on.
Refer to the AUTOPROGRAM feature to program all the
available channels on your cable signal.
If your cable signal comes from a cable box, use the following
steps:
3
Connect the open end of the round Cable Company supplied cable to
the cable signal IN(put) plug on the back of
the Cable Box.
4
Using a separate round coaxial cable, connect one end to the
OUT(put) plug on the back of the Cable Box.
5
Connect the other end of the round coaxial cable to the
75Ω input on the back of the television. Screw it down finger
tight.
6
Plug the television into the wall outlet and turn the TV on.
Refer to the TUNER and AUTOPROGRAM features on page
4 of this Quick Use Guide. TUNER should be set to the
CABLE option. AUTOPROGRAM can be set to program all
the available channels on your cable signal into the television’s memory.
CABLE TV
Direct Cable
Connection:
Cable Box Connection:
Cable signal coming from
Cable Company (Round
75Ω coaxial cable)
Jack Panel
Back of TV
AC Power
Wall Outlet
Power Plug
from back of TV
Jack Panel Back
of Cable Box
Cable Signal IN from
the Cable Company
Round 75Ω
Coaxial Cable
Jack Panel
Back of TV
AC Power
Wall Outlet
Power Plug
from back of TV
A
combination antenna receives normal broadcast channels (VHF 2–13 and UHF 14–69). Your connection is
easy because there is only one 75Ω (ohm) antenna plug on
the back of your TV, and that’s where the antenna goes.
1
If your antenna has a round cable (75 ohm) on the end,
then you're ready to connect it to the TV.
If your antenna has flat, twin-lead wire (300 ohm), you
first need to attach the antenna wires to the screws on a
300- to 75-ohm adapter.
2
Push the round end of the adapter (or antenna) onto the
75Ω (ohm) plug on the back of the TV. If the round end of
the antenna wire is threaded, screw it down finger tight.
3
Plug the television into the wall outlet and turn the TV
on.
Refer to the TUNER and AUTOPROGRAM features on
page 4 of this Quick Use Guide. TUNER should be set to the
ANTENNA option. AUTOPROGRAM can be set to program
all the available channels on your cable signal into the television’s memory.
ANTENNA TV
1
3
2
Antenna Connection:
Jack Panel, Back of TV
Power Plug
from back
of TV
AC Power
Wall Outlet
Round 75Ω Coaxial
Cable from Antenna
Twin
Lead Wire
300 to 75-ohm
Adapter
Outdoor or Indoor Antenna
(Combination VHF/UHF)
The combination antenna receives normal
broadcast channels 2-13 (VHF) and 14-69 (UHF).
WARNING: TO PREVENT FIRE OR SHOCK
HAZARD DO NOT EXPOSE THIS UNIT TO
RAIN OR EXCESSIVE MOISTURE.
As an Energy Star® Partner, Philips
Consumer Electronics has determined this
product meets the Energy Star® guidelines
for energy efficiency. Energy Star® is a U.S. registered
mark. Using products with the Energy Star® label can
save energy. Saving energy reduces air pollution and
lowers utility bills.
Cable Box
Power Cord
The signal coming
from the box will
be MONO.
3
INPUT
4
5
OUTPUT
6
Page 2
2
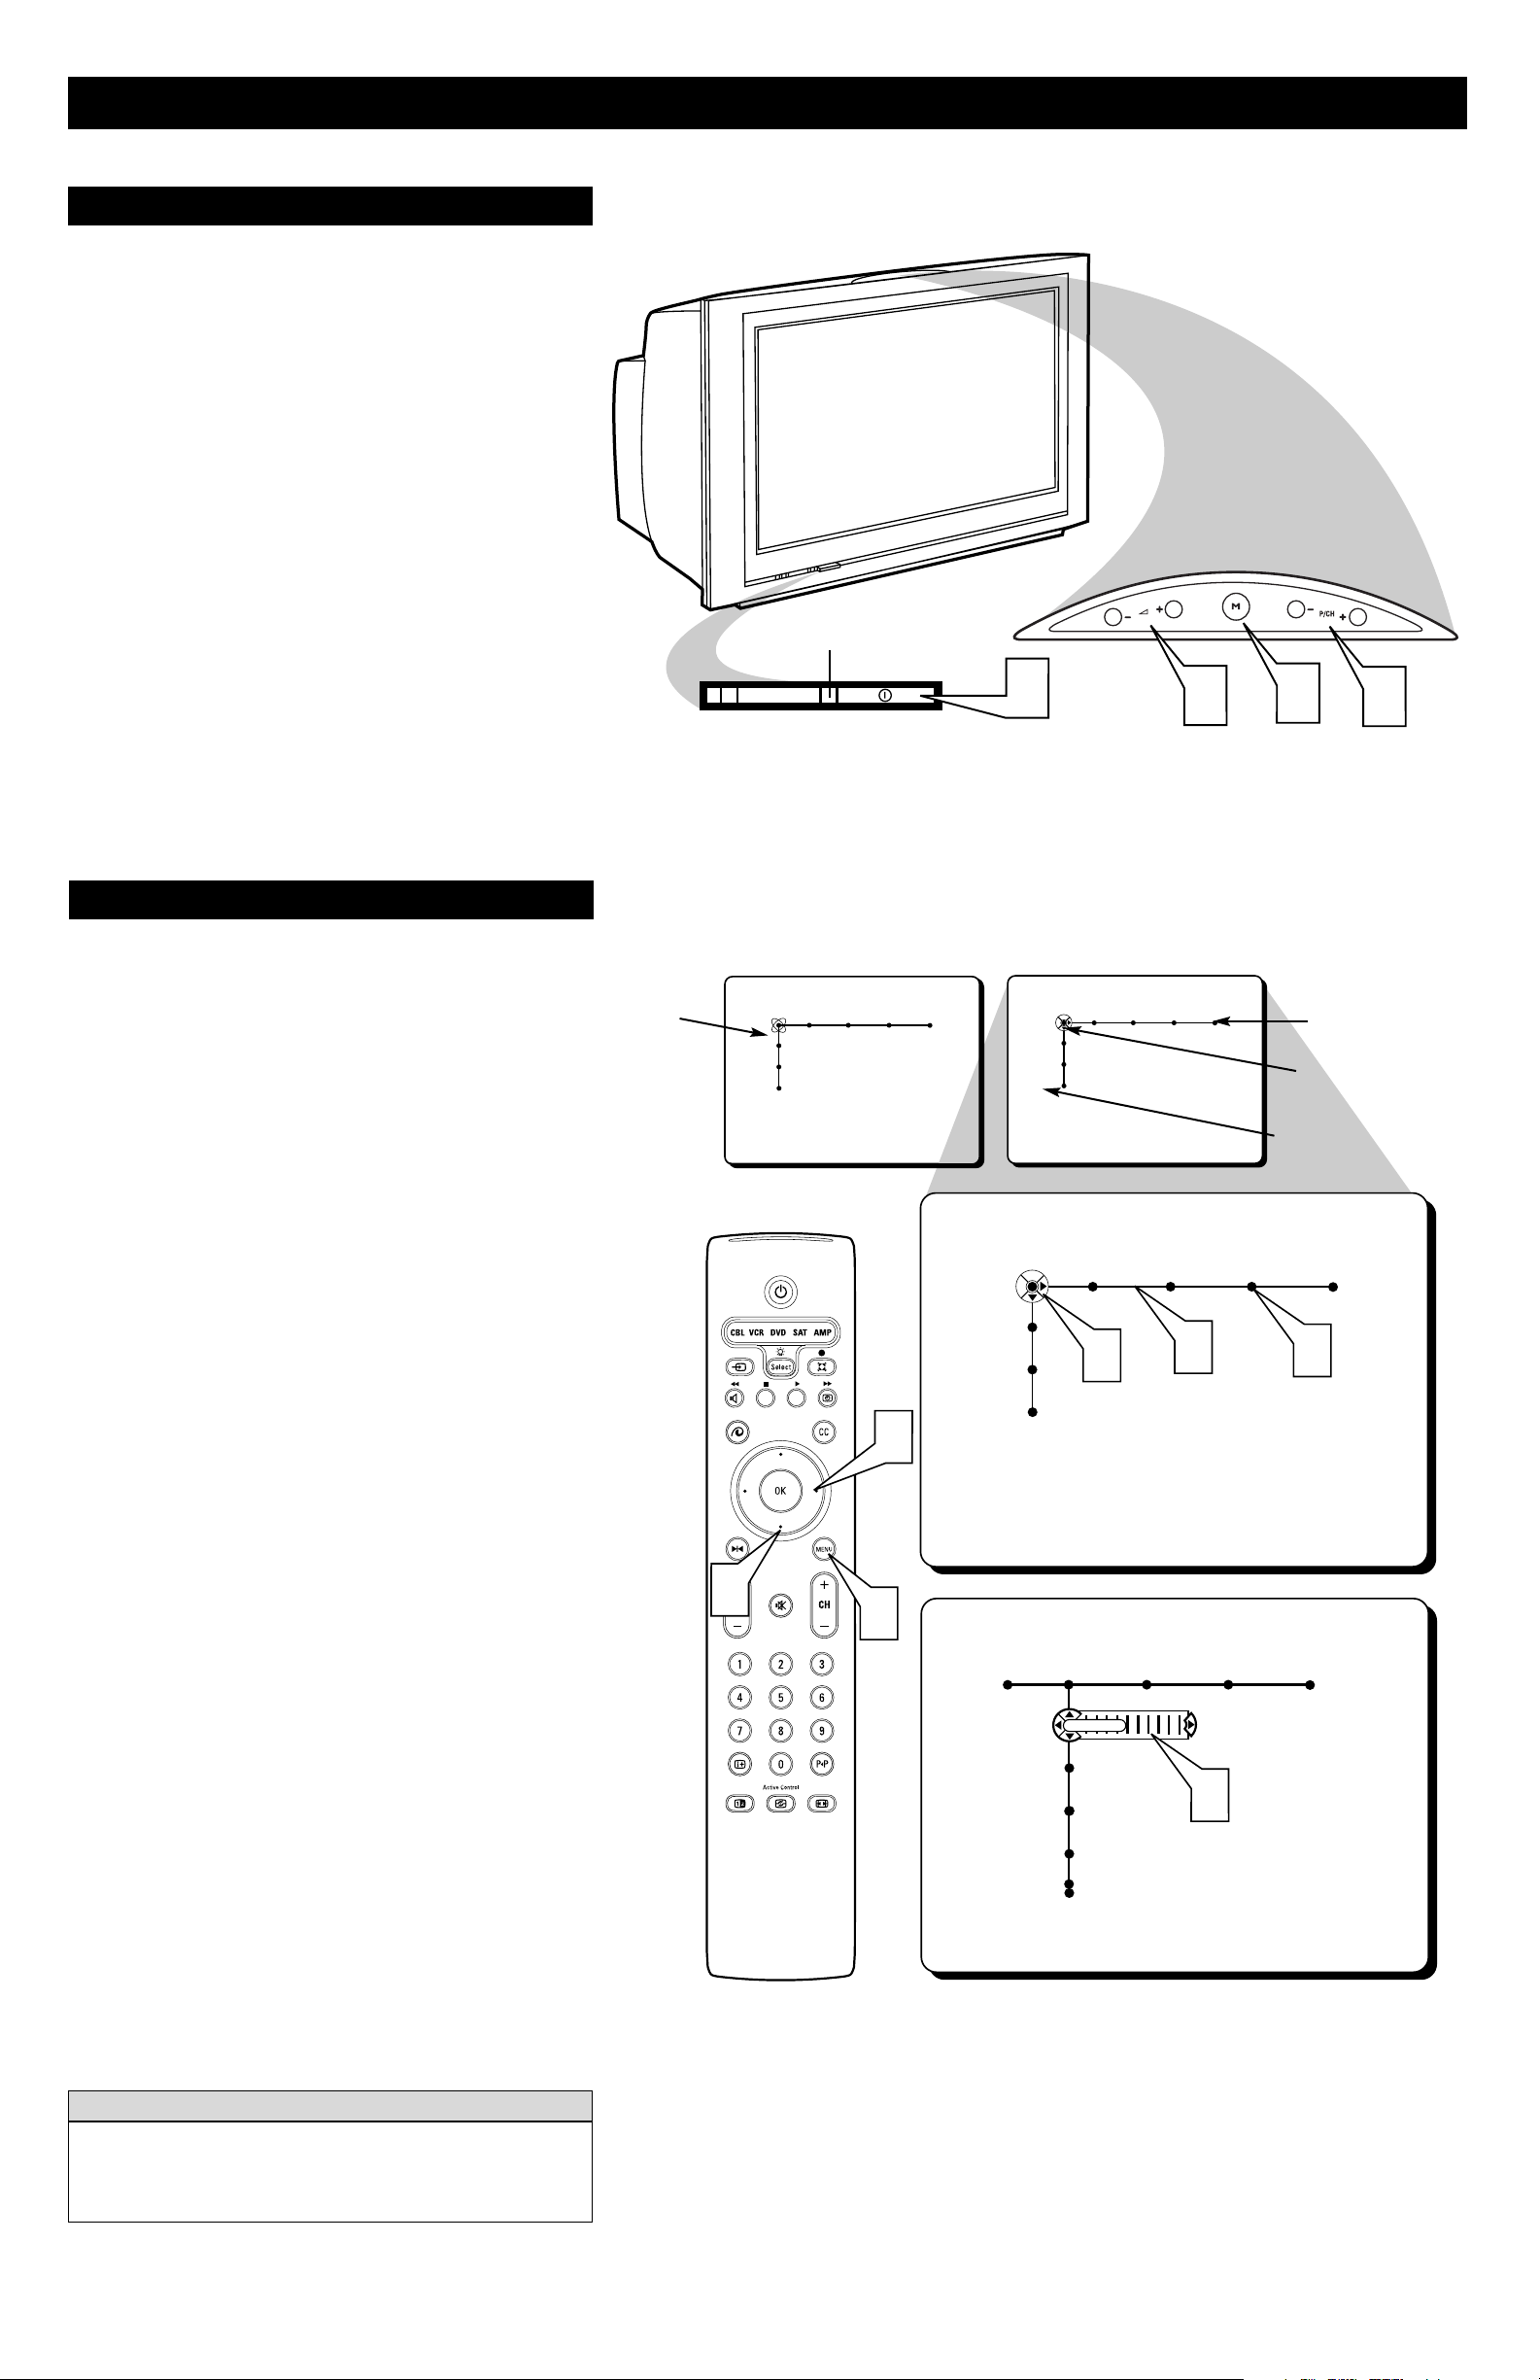
BASIC TV AND REMOTE OPERATION
Y
our television has a set of controls located on the top of
the cabinet for use when the remote control is not needed.
1
Press the POWER button to turn the TV ON. Located on
the front lower left of the cabinet.
2
Press the VOLUME (+) button to increase the sound
level or the VOLUME (–) button to lower the sound level.
Or, use to navigate right or left when the onscreen menu is
displayed.
3
Press the CHANNEL – (down) or + (up) button to select
TV channels. Or, use to navigate up and down when the
onscreen menu is displayed.
4
Press the M (Menu) button to display the onscreen menu
controls. If pressed while the onscreen menu is displayed, the
menu will be removed from the television screen.
There is also a set of Audio and Video Input jacks located on the
side of the television cabinet. This jack panel also contains a S-video
and headphone jack. These jacks are great for connecting a video
camcorder or any accessory device that will only be hooked up temporarily. Refer to the Directions for Use for more details.
TELEVISION
Remote Sensor Window
Volume, Channel, and Menu buttons are
located on the top of the television cabinet.
T
he TV onscreen menu controls are viewed within a
mobile map or track system. This system allows you to
move along linked paths tied to specific Feature Title categories (TV, Install, etc). Each press of the Cursor buttons on
the remote, or top of the TV, moves the cursor control to
balls or dots indicating specific controls. Each specific control may have multiple features that can be adjusted. The
animated onscreen menu structure will expand to view all
available onscreen controls. As it expands, it will display a
series of balls or dots grouped together to show more controls not displayed.
1
TRACK lines represent the structure of the onscreen
menu. They tie all the controls together and show the path
you can follow to access the available controls.
2
BALLS or DOTS indicate the titles of features or controls
available on this television. Some of these controls when
highlighted, may show more TRACKS and BALLS, indicating sub-categories or “lists” of controls within the highlighted control. These sub controls will also have TRACKS
and BALLS as described with the feature controls.
3
DIRECTION INDICATOR let’s you know which way
movement may take place within the onscreen menu. The
arrows on the DIRECTION INDICATOR simulate the
CURSOR buttons on the remote control (UP, DOWN,
RIGHT, or LEFT).
4
SLIDER controls will be displayed on some features,
allowing adjustments to the value of the control. Some
may show a box containing a list of multiple options settings. Others may only have an ON or OFF option.
5
To navigate the onscreen menu, start by pressing the
MENU button on the remote control. This will display the
onscreen menu in its starting position.
6
Press the CURSOR DOWN button to select any of the
SETTING, DEMO, or INSTALL controls. Press the CUR-
SOR RIGHT button on the remote control to select any of
the PICTURE, SOUND, FEATURES, or CHANNEL controls.
Refer to page 4 of this Quick Use Guide for details describing the
INSTALL and DEMO controls. Refer to the Directions for Use
manual for all other control descriptions (PICTURE, SOUND,
FEATURES, CHANNELS, or SETTINGS).
O
NSCREEN MENU
Pressing the MENU button once will display the onscreen
menu. Pressing the MENU button any time the onscreen menu
is displayed will remove the onscreen menu from the television
screen.
HELPFUL HINT
Tracks
Balls or Dots
Direction Indicator
Feature Titles or Controls
6
Settings
Demo
Install
Picture Sound Features Channels
TV
POWER
6
5
Settings
Demo
Install
TV
Contrast
Brightness
Sharpness
1
Picture Sound Features Channels
TV
Settings
Demo
Install
Picture Sound Features Channels
TV
3
Picture Sound Features Channels
Color
2
1
4
40
4
3
2
Page 3

REMOTE CONTROL OPERATION
3
Power Button
Press to turn the TV On or Off.
(Note: The TV is never really powered off completely
unless it physically unplugged from the power source.)
Sound Mode Button
Press this button to display a list of available sound
modes. Choose from Dolby Pro Logic, 3D Surround,
Dolby 3 Stereo, Stereo or Hall settings.
VCR Functions (, ■, , , ●) Buttons
When in the VCR Mode, these buttons will control the
Play, Stop, Fast Forward, Rewind, and Record functions.
Time Display Button
Press this button to display the current time on the TV
screen.
CC (Closed Caption) Button
Repeatedly pressing the CC button will turn CC ON,
OFF or ON whenever the MUTE button is pressed.
Cursor Ring Up/Down/Right/Left
Use the Cursor Ring Up, Down, Right, or Left to navigate through the onscreen menu and make selections or
changes within the controls.
Menu Button
Press to display the TV onscreen menu or to turn it off.
Channel +, – Button
Press to scroll through the available channels or sources
stored within the TV’s memory. See the Auto Program
section of this manual to learn how to store all available
channel into the TV’s memory.
Numbered Buttons
Press to directly access a specific TV channel. For two,
or three digit channel, enter all numbers. Press a single
digit button and hold a bit longer to directly access a single digit channel. These buttons also can be used to enter
values in certain onscreen menu controls.
PP (Surf) Button
If the SURF setting within the TV’s onscreen menu control is set to 2 channels, pressing this button will act like
an alternate channel button allowing you to toggle
between the current channel and the last viewed channel.
If the SURF setting is set to 9 channels, pressing this
button allows you to add and scroll up to nine of your
favorite channels.
Picture Format Button
Press this button repeatedly to scroll through all the
available picture formats. Choose between, 4:3, Movie
Expand 4:3, Movie Expand 16:9, Super Zoom, Wide
Screen, or 16:9 Subtitle.
Active Control Button
Pressing this button will display a demonstration of the
Active Control. Active Control can be set to four different levels within the onscreen menu.
OFF - will control the Sharpness and Dynamic
Contrast automatically.
MINIMUM - will control the Sharpness, Dynamic
Contrast and Noise Reduction levels automatically.
MEDIUM - will control the Dynamic Contrast,
Color, Sharpness and Noise Reduction levels automatically.
MAXIMUM - will control the Contrast, Dynamic
Contrast, Color, Sharpness, and Noise Reduction levels automatically.
Select (CBL VCR DVD SAT AMP) Button
Press the Select Button repeatedly to select one of the
system modes in which the remote can be used. Once the
mode is selected, an action must be made for the remote
to remain in the selected mode or it will default back to
the TV mode.
Backlight Button
Press and hold the Select Button for 2 seconds to backlight the Volume, Channel, Mute and Numbered buttons
on the remote.
Source Button
Press this button to select the different signal source
options when in the TV mode. Select the AV1, AV2, AV3,
AV4, SIDE or the current channel source.
Alternate Audio Button
If tuned to a channel that is broadcasting SAP (Second
Audio Programming), pressing the Alternate Audio button will toggle between standard or main audio and SAP.
If SAP is not present, the button will have no effect.
Pixel Plus Button
Press the Pixel Plus button and the TV screen will be
divided in half displaying the Pixel Plus Demo. The left
side will display the picture with Pixel Plus and Digital
Natural Motion switched OFF. The right side of the
screen will display the picture with Pixel Plus and Digital
Natural Motion switched ON. The demo will show the
benefits of Pixel Plus. Press again to turn the demo off.
OK Button
Press the OK button to activate or confirm menu choices.
Freeze Format Button
Pressing the Freeze button will freeze the picture in one
of the various Freeze options. Please note that the Freeze
option must be set within the TV’s onscreen menu.
Freeze Mode - The main picture will freeze
onscreen, press again to resume normal viewing.
Sound will continue to be heard.
Replay Mode - Will display a few seconds of stored
video in the PIP window.
Photo Finish Mode - Will display 6 PIP windows
of stored video picture.
Volume +, – Button
Press the + side of the button to increase the volume level
of the TV. Press the – side of the button to decrease the
volume level of the TV.
Mute Button
Press to eliminate the sound coming from the TV’s
speakers. Press again to restore the sound.
Display Information Button
Press this button to display information (when available)
about the current channel, program, source, number or
name, local time, CC availability, SAP availability, program ratings, display format, sound mode, and remaining
length of a Sleeptimer setting.
Dual Screen/PIP Button
Press repeatedly to toggle through the PIP options. PIP
settings must be set within the TV’s onscreen menu.
T
o load the supplied batteries into the remote:
1
Remove the battery compartment door on the back of
the remote.
2
Place the batteries (2-AA) in the remote. Be sure the (+)
and (–) ends of the batteries line up correctly (the inside of
the case is marked).
3
Reattach the battery compartment door.
Be sure to point the remote at the Remote Sensor window on the
front of the television when using the remote control to operate the
television.
REMOTE CONTROL BATTERIES
Remote Control
(shown from the bottom)
Battery Compartment Door
2 “AA” Batteries
Battery Compartment
R
EMOTE CONTROL
BUTTONS
1
3
2
Page 4

HOW TO USE THE INSTALLATION FEATURES
F
or our Spanish and French-speaking TV owners, an
onscreen LANGUAGE option is present. The LANGUAGE control enables you to set the TV’s onscreen menu
to be shown in either English, Spanish, or French.
1
Press the MENU button on the remote control to show
the onscreen menu.
2
Press the CURSOR DOWN button repeatedly until
INSTALL is highlighted.
3
Press the CURSOR RIGHT button to shift the menu to
the left and highlight LANGUAGE.
4
Press the CURSOR DOWN button to select ENGLISH,
ESPANOL (Spanish), or FRANCAIS (French).
5
After you have made your language selection, press the
OK button to confirm your selection.
6
Press the MENU button to remove the onscreen menu
from the TV screen.
LANGUAGE
Several features of this television can be placed into a demo
mode. Auto Demo will automatically show all the feature
demos in a sequential loop, one after another except for the
Dealer Demo mode. Specific demo modes can be selected
from the list of options within the Demo control. (For example: Auto demo, Dual screen, PIP, etc.)
The Dealer Demo also has a sub-list of options that
include: Digital options, Lightsensor, and 3D Y/C Comb filter.
1
Press the MENU button on the remote control to show
the onscreen menu.
2
Press the CURSOR DOWN button repeatedly until
DEMO is highlighted.
3
Press the CURSOR RIGHT button to shift the menu to
display the list of Demo mode options. To activate any of
the Dealer Demo modes, press the OK or CURSOR
RIGHT button.
DEMO MODE
Y
our TV can automatically set itself for local area (or
cable TV) channels. This makes it easy for you to
select only the TV stations in your area by pressing the
CHANNEL (+) or (–) button.
1
Press the MENU button on the remote control to show
the onscreen menu.
2
Press the CURSOR DOWN button repeatedly until
INSTALL is highlighted.
3
Press the CURSOR RIGHT button repeatedly to
shift the menu to the left and highlight AUTOPROGRAM.
4
Press the CURSOR DOWN button to highlight the
INSTALL MODE control.
5
Press the CURSOR RIGHT button to display a list of
Install mode options (Antenna, Automatic, Cable).
6
Press the CURSOR UP or DOWN button to select
one of the options. Select Antenna for normal outside or
inside type antenna. Select Cable for a cable company
supplied signal. When Automatic is selected the TV will
automatically set the mode based on the type of signal it
detects coming into the TV.
7
Press the CURSOR LEFT button after making your
Install mode selection.
8
Press the CURSOR DOWN button to highlight
INSTALL.
9
Press the CURSOR RIGHT button to start the
Autoprogramming process.
Press the MENU button to remove the onscreen menu
from the TV screen when the Autoprogramming process
has finished.
AUTO P
ROGRAM
After you’ve run Auto Program, check out the results. Press the CHANNEL (+) or (–) button and see
which channels you can select.
H
ELPFUL HINT
Remember, the LANGUAGE control makes only the TV’s
onscreen MENU items appear in English, Spanish, or French
text. It does not change the other onscreen text features, such as
Closed Captioning (CC), with TV shows.
HELPFUL HINT
10
4
5
2
4
1
6
3
Picture Sound Features Channels
TV
Settings
Demo
Install
Language Autoprogram
Press the cursor down to select
English
your menu language
Français
Español
Language Autoprogram
The language you have chosen is
English
Français
English
Español
TV
Settings
Demo
Install
Language Autoprogram
OK
Select your menu language with
English
Français
Español
the cursor up/down.
Press the OK key on the remote
control to confirm.
Language
7
2
4
6
8
6
3
5
9
1
10
TV
Settings
Demo
Install
Install mode
Install mode
Picture Sound Features Channels
Autoprogram
The TV will search for, find and store
all the available channels.
Install
Press the cursor down to proceed.
Autoprogram
Install
Antenna
Automatic
Cable
Settings
Demo
Install
Install mode
Install mode
TV
Autoprogram
Install
Autoprogram
Install
Automatic
Automatic
Language
Keep the predefined automatic
detection of
cable or anntenna
or make your own
selection.
Autoprogram
Install mode
Install
To Autoprogram Analog channels, press the right arrow.
Start
Autoprogram
Install mode
Install
24 analog channels found
Picture Sound Features Channels
TV
Settings
Demo
Install
Searching
Autoprogram
Install mode
Install
60 analog channels found
Autoprogramming is complete
TV
Settings
Demo
Install
Auto demo
Dual screen
Freeze-Replay-Photo finish
PIP
Install
Main Menu
- - -
Start
3
3
- - Install
Main Menu
Picture
Speakers
Active Control
Dealer demo
2
1
Demo
Auto demo
Dual screen
Freeze-Replay-Photo finish
PIP
Install
Main Menu
- - -
Demo
 Loading...