

Page 1

tv
Page 2

Page 3

Contents
Installation
Help?
If this instruction manual does
not give an answer or if ‘Tips’ do
not solve your TV problem, you
can call your Local Philips
Customer or Service Centre. See
the supplied World-wide
guarantee booklet.
Please, have the Model and
Product number which you can
find at the back of your
television set or on the
packaging, ready, before calling
the Philips helpline.
Model: 32PW9768
Product No: ............................................
R End of life directives
Philips is paying a lot of attention to
producing environmentally-friendly in
green focal areas.Your new TV contains
materials which can be recycled and
reused. At the end of its life specialised
companies can dismantle the
discarded TV to concentrate the
reusable materials and to minimise
the amount of materials to be
disposed of.
Please ensure you dispose of your old
TV according to local regulations.
Preparation ...................................................................................... 2
Keys on top of the TV ................................................................... 2
Your remote control .................................................................. 3-4
To use the menus ........................................................................... 5
Select the menu language and country ..................................... 5
Store TV channels .......................................................................... 6
Automatic installation ............................................................6
Manual installation................................................................... 6
Give name ................................................................................. 6
Reshuffle the programme list................................................. 7
Select favourite TV channels ................................................. 7
Install TV setup ............................................................................... 7
Speakers .................................................................................... 7
General .................................................................................. 8-9
Source ........................................................................................ 9
Decoder .................................................................................... 9
Demo .............................................................................................. 10
Operation
TV menu
Picture menu .................................................................... 10-11
Sound menu ..................................................................... 11-12
Features menu ................................................................. 12-13
Dual screen / PIP / Multipip........................................................ 14
NEXTVIEW/Teletext guide ...................................................... 15-16
Teletext ..................................................................................... 17-18
Flex TV .......................................................................................19-22
Connect peripheral equipment
Connecting and selecting equipment .................................23-24
Audio and video equipment keys ............................................. 25
Tips ................................................................................................ 26
English
DeutschFrançaisNederlandsItaliano
∂ППЛУИО¿
EasyLink features are based on the “one touch operation” approach.
This means that a sequence of actions are executed at the same
time in both the television and the video cassette recorder, provided
both are fitted with the EasyLink function and connected with the
eurocable supplied with your video recorder.
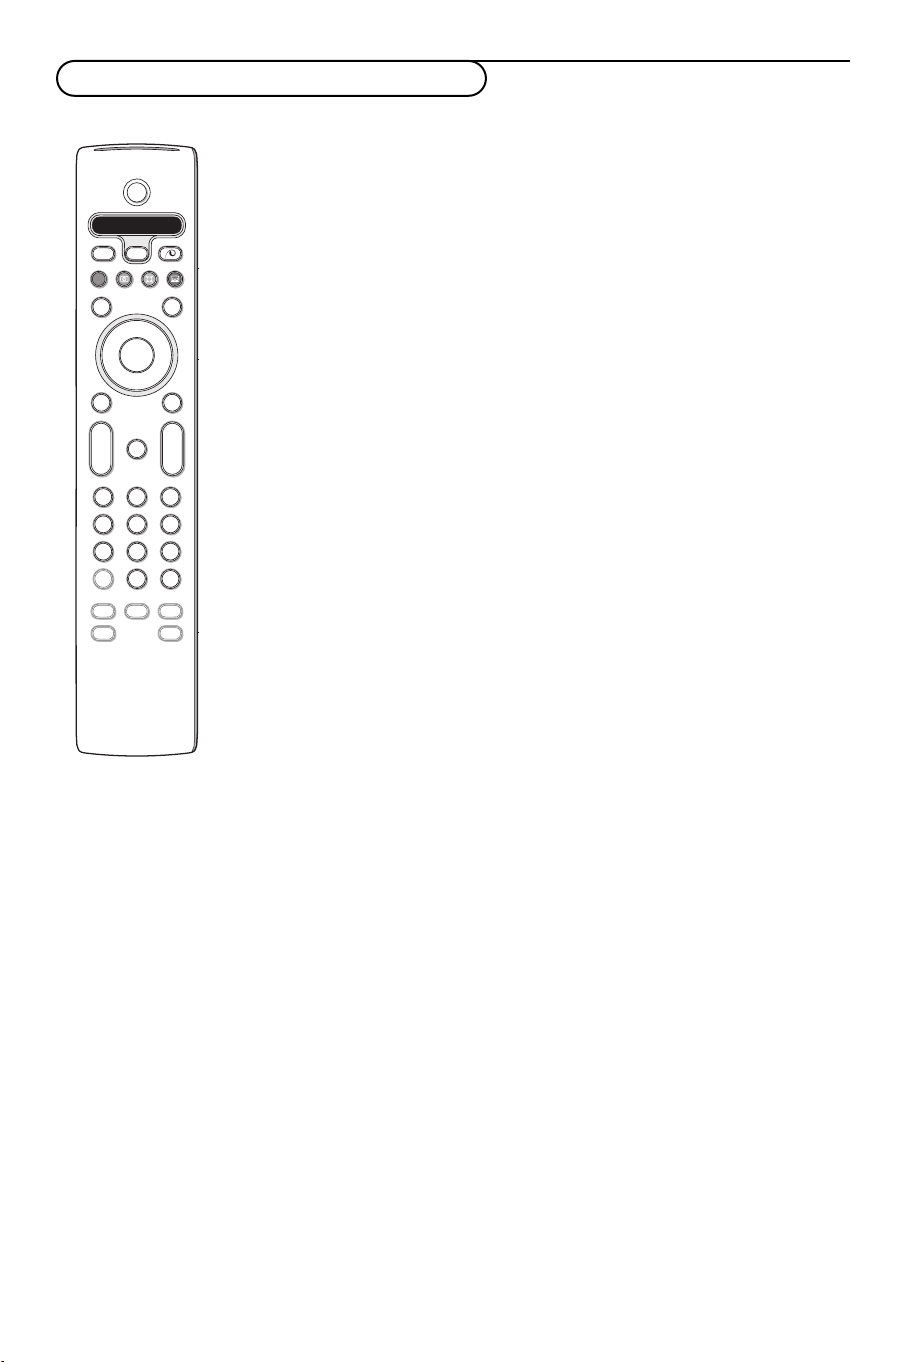
1
Page 4
Preparation
V
P
M
MENU/OK
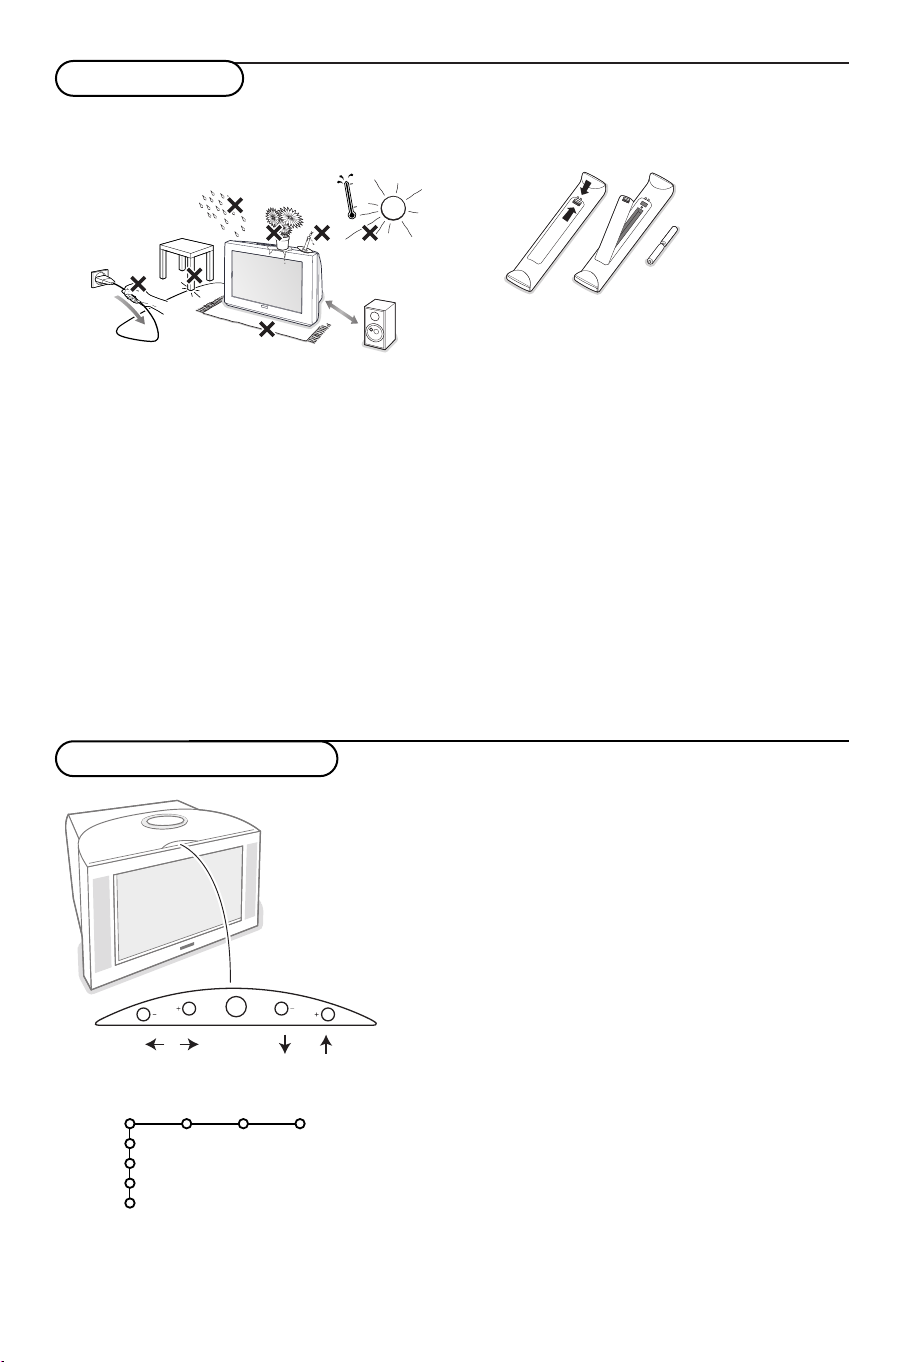
& Place the TV on a solid surface.
! 32PW9768: 60 kg !
min.
1m
For ventilation, leave at least 5 cm free all
around the TV. Do not place the TV on a
carpet.To prevent any unsafe situations, do not
place any objects on top of the TV.Avoid heat,
direct sunlight and exposure to rain or water.
é Insert the aerial plug firmly into the aerial
socket x at the back of the TV. For best
picture quality use the suppressor-aerial cable
supplied.
“ Insert the mains plug of the TV in the wall
socket having a mains voltage of 220V-240V.
‘ Remote control: Insert the 2 batteries supplied
(Type R6-1,5V).
The batteries supplied do not contain the heavy
metals mercury and cadmium. Please check on
how to dispose of exhausted batteries according to
local regulations.
( Switch the TV on : Press the power switch A
on the front of your TV.
An indicator on the front of the TV lights up
and the screen comes on.
If the TV is in standby mode (red indicator),
press the
-P+ keys on the remote control.
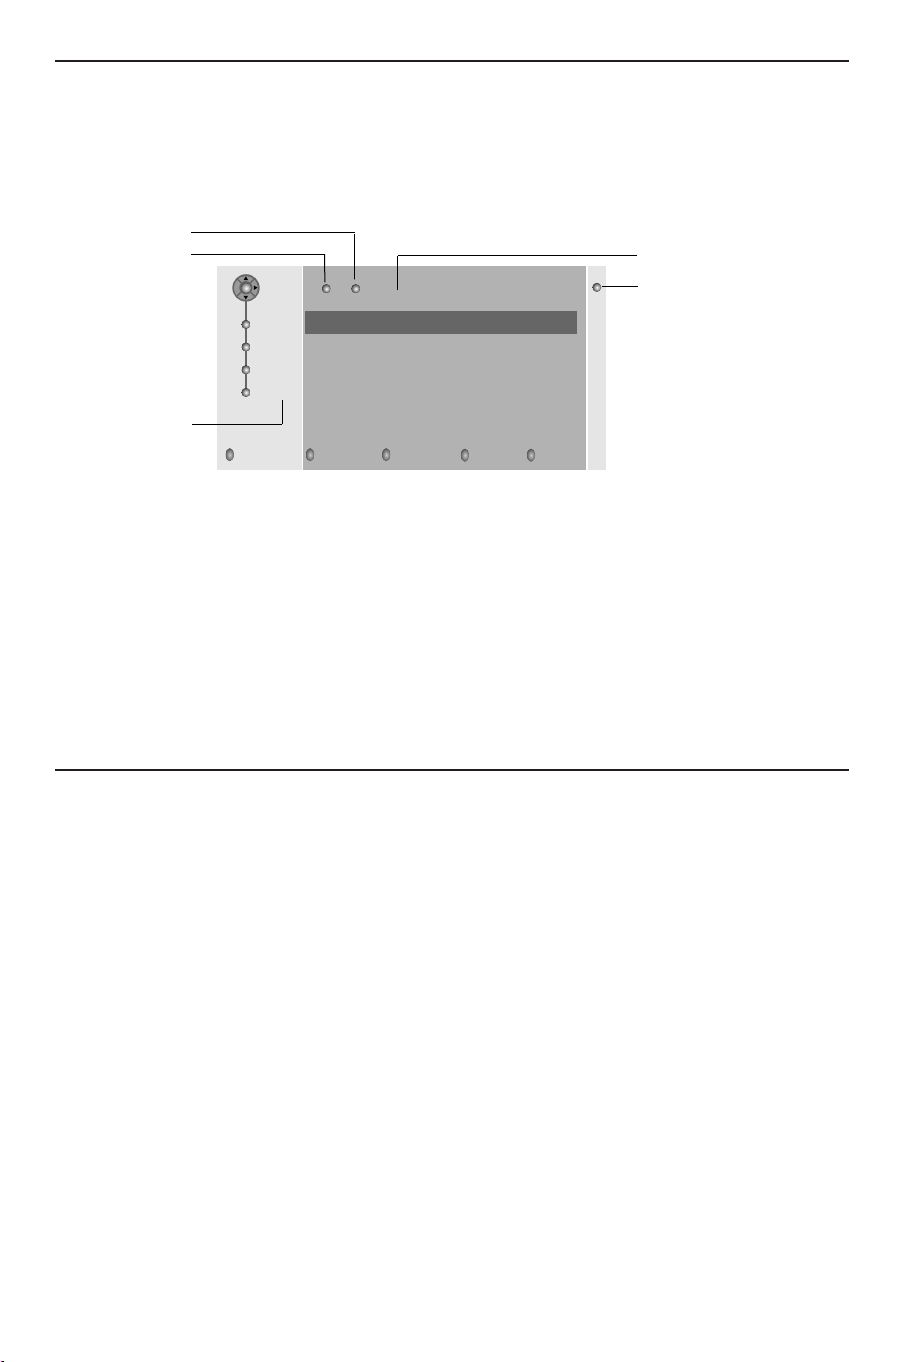
Keys on top of the TV
Picture Sound Features
Setup
Demo
Install
2
TV
Exit
Should your remote be lost or broken you can still
change some of the basic settings with the keys on
top of your TV.
Press:
• the V - or + key to adjust the volume;
• the -
P+ keys to select the TV channels or
sources.
The
M key can be used to summon the main menu
without the remote control.
Use:
• the V - and + keys and the
P- and P+ keys to
select menu items in the directions as shown;
• the
M key to confirm your selection.
Note:
When activated via the
M key on top of the TV, only
Exit lets you dismiss the menu.
Navigate to
Exit and press the M key.
Page 5

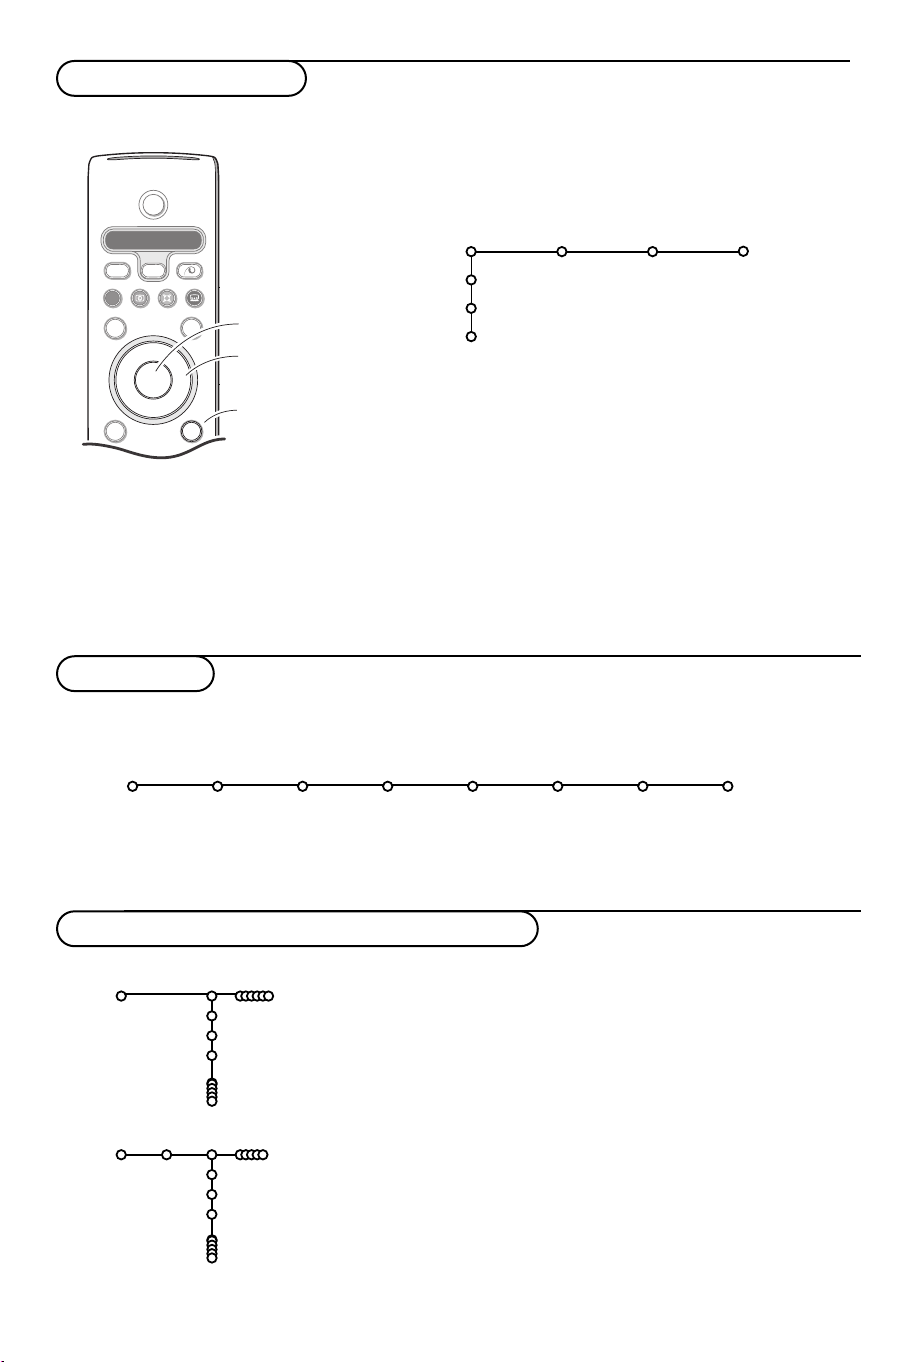
B
b
¬
+
-
V
+
-
P
v
b
i
0
h
q
Select
VCR DVD SAT AMP CD
MENU
DVR
OK
123
456
789
0
Ò®‡π
†
Active Control
æ
Ò
†
Ï
Pause Live
REC
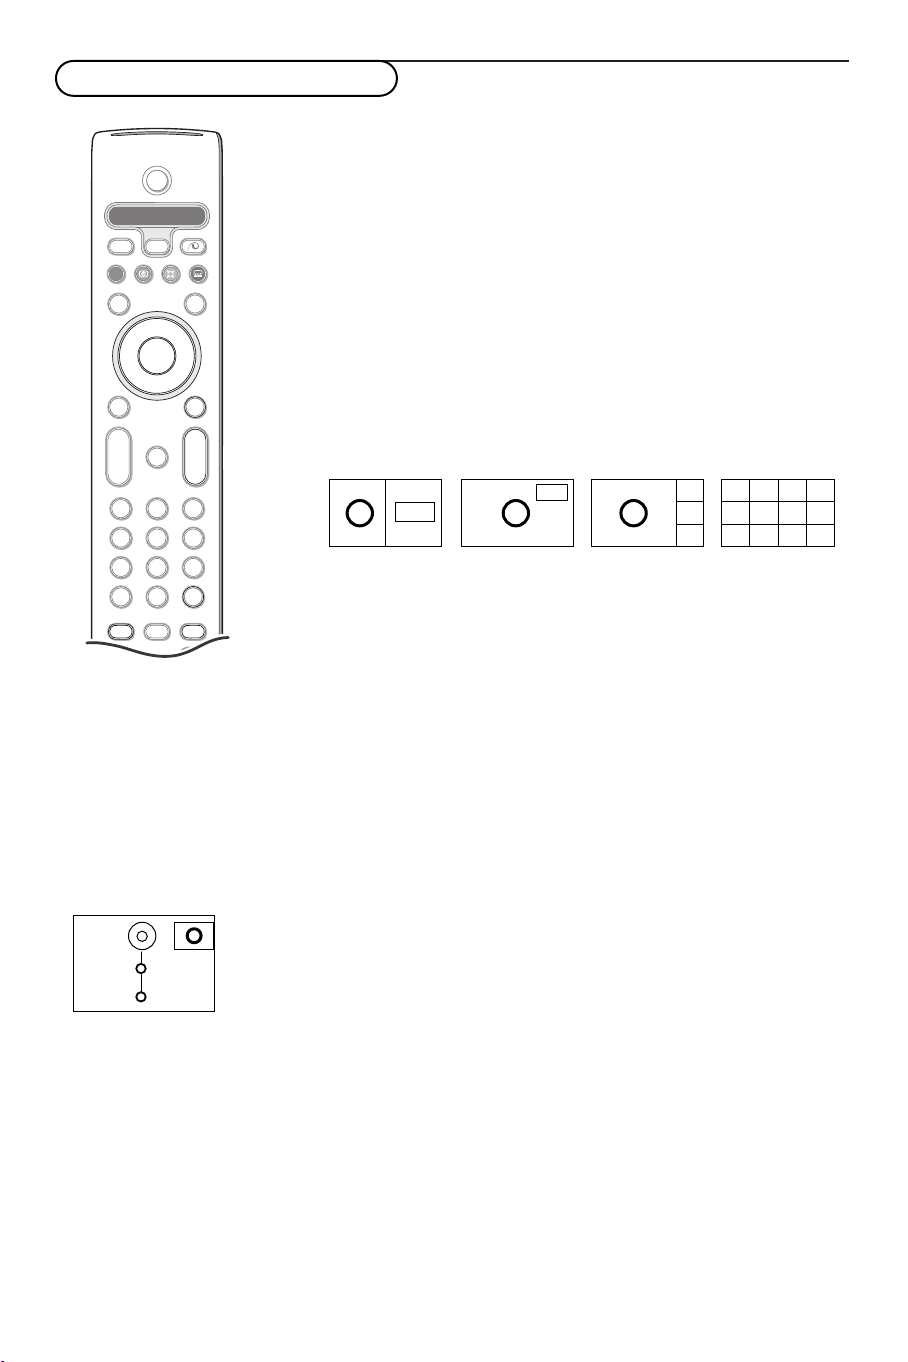
Use of the remote control RC4303
Note: For most keys pressing a key once will activate the function. Pressing a second time will de-activate it.
When a key enables multiple options, a small list will be shown. Press repeatedly to select the next item in the list.
The list will be removed automatically after 4 seconds or press
VCR DVD SAT AMP CD
Audio- and Video equipment keys
(p. 25)
v Select peripherals
(p. 24)
OK to remove immediately.
B Standby
Press to switch the TV on or off.
When switched off, a red
indicator on the TV lights up.
®Ò‡π†
Audio- and Video equipment keys
p. 25
REC / DVR / PAUSE / LIVE
Flex TV functions, see p. 19
U Time display
The time is displayed on the
screen.
Q Surround mode
Press this key repeatedly to
select another available surround
mode.
Ì Cinema Go
See separate Cinema Link
booklet supplied.
æ NEXTVIEW on/off p. 15
Press the
NEXTVIEW/ Teletext Guide on the
right half of the screen.
b key to show
x Pixel Plus demo on/off
In the right part Pixel Plus and
Digital Natural Motion are
switched on.
b Teletext on/off p. 17
Press the
b key to show
teletext on the right half of the
screen.
OK Press this key
• to activate your choice, when in
the menus.
• to display the programme list.
Ï Main menu on/off see p. 5
V To adjust the volume.
¬ Interrupt the sound or restore it.
PProgramme selection
To browse through the TV
channels and sources stored in
the favourite list.
0/9 Digit keys
To select a TV channel.
For a two digit programme
number, enter the second digit
before the dash disappears.To
switch immediately to a selected
one digit TV channel, keep the
digit key pressed a bit longer.
33
Page 6

B
b
¬
+
-
V
+
-
P
v
b
i
0
h
q
Select
VCR DVD SAT AMP CD
MENU
DVR
OK
123
456
789
0
Ò®‡π
†
Active Control
æ
Ò
†
Ï
Pause Live
REC
i On Screen information
Press to display information about the selected TV channel and
programme.
Menu/Remote control info
When a menu is on screen, press i to display info on the selected
menu item. For information on the remote control functions, while the
menu info is displayed, press any key on the remote control.
The normal function of the key is not executed.
0 Smart surf /
NEXTV
IEW themes
With this key you can easily switch between 2 up to 9 different TV
channels or sources or quickly select TV programmes if
NEXTVIEW with
defined themes is broadcast. See General, Smart surf, p. 8.
Press the
OK key or wait for the time out to dismiss the Smart surf
display.
b Dual screen / PIP / Multipip See p. 8 and p. 14
h Active control see p. 11
q Picture format
Press this key repeatedly or press the cursor up/down to select another
picture format:Auto format, Super zoom, 4:3, Movie Expand 14:9, Movie
Expand 16:9, Subtitle zoom or Wide screen.
Auto format Super zoom 4:3 Movie Expand 14:9
Movie Expand 16:9 Subtitle zoom Wide screen
Auto format makes the picture fill the screen as much as possible.
In case of subtitles in the bottom black bar,Auto format makes the
subtitles visible. If subtitles are only partly visible, press cursor up.
In case of a broadcaster logo in the corner of the top black bar, the logo
disappears from the screen.
Super zoom removes the black bars on the sides of 4:3 programs with
negligible distortion.
When in Movie Expand 14:9, 16:9, Super zoom or Subtitle zoom picture
format, you can make subtitles visible with the cursor up/down.
4
Page 7
B
b
¬
+
-
V
+
-
P
v
Select
VCR DVD SAT AMP CD
MENU
DVR
OK
Ò®‡π
†
æ
Ò
†
Ï
REC
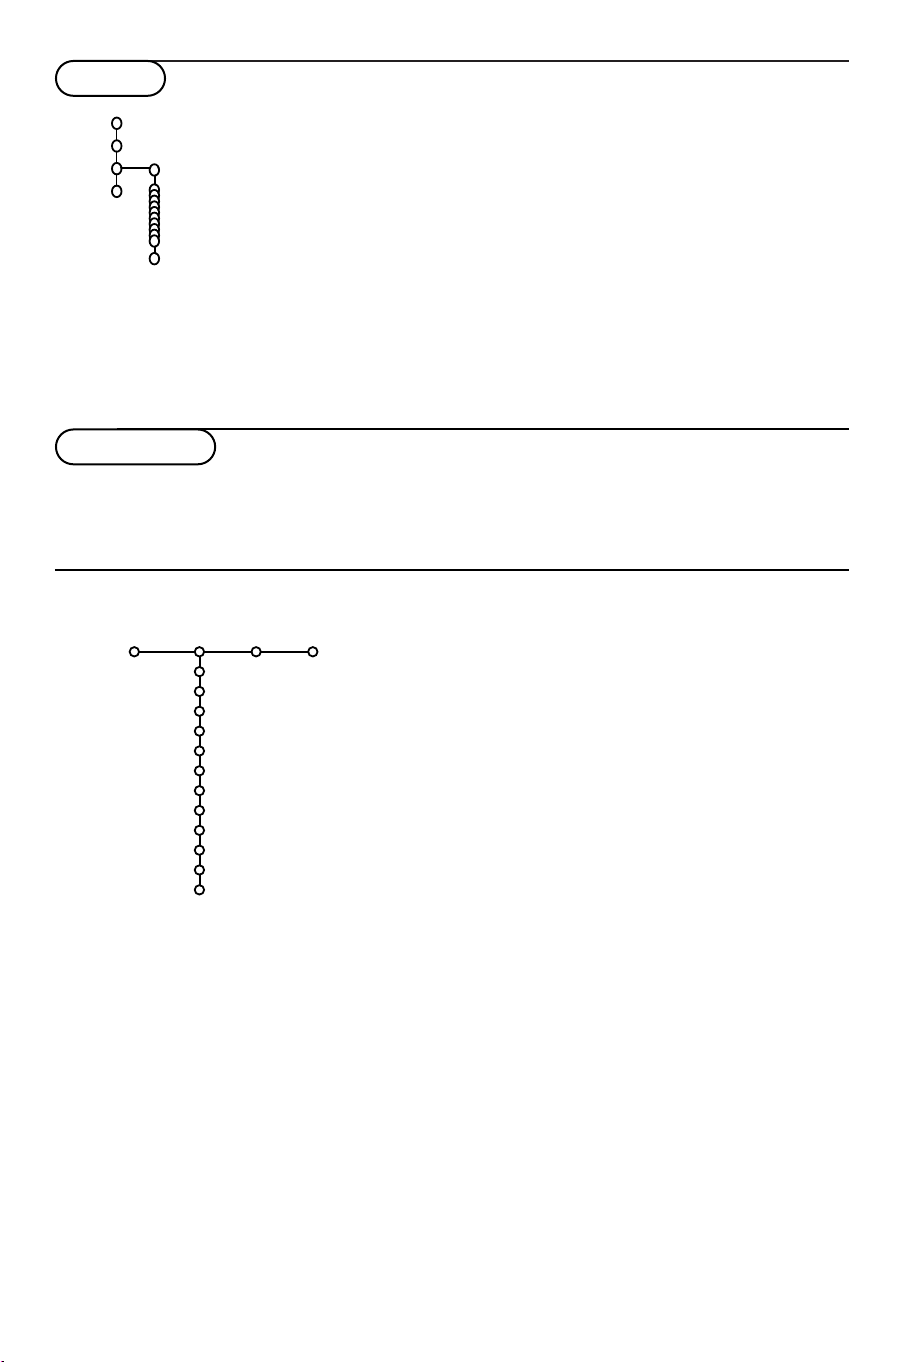
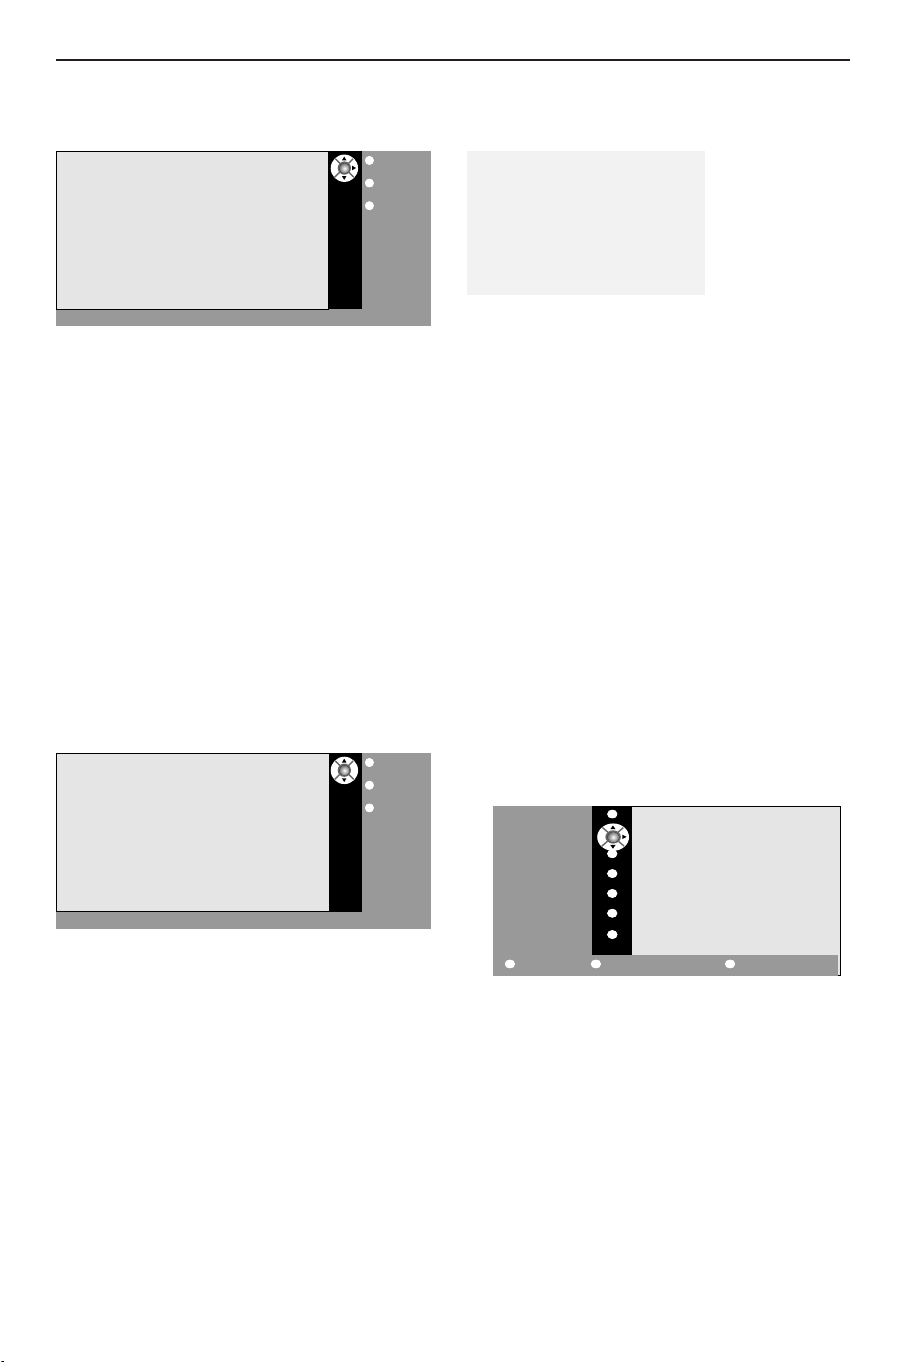
To use the menus
OK key to
activate
cursor to select
adjustments
return or switch
main menu on/off
& Press the MENU Ï key on the remote control to
summon the main menu.At any moment you can exit the
menu by pressing the
MENU Ï key again.
Note: If you have connected equipment with Cinema Link, more
menu items are present.
Picture Sound Features
TV
Setup
Demo
Install
é Use the cursor in the up/down direction to select the TV,
Setup, Demo or Install menu.
Use the cursor left/right to select
Picture, Sound or
Features.
Note: Sometimes not all the menu items are visible on the screen
(indicated by a cluster of blue balls). Use the cursor down or right
to reveal all items.
“ Use the cursor in the left/right direction to select the menu
item.
‘ Use the cursor up/down again to select the control you
want to select or to adjust.
Note: Items temporary not available or not relevant are displayed
in a light grey colour and cannot be selected.
Installation
The installation menu contains the following items:
Language Country Automatic Manual Give name Reshuffle Favourite
Install
EasyLink
If your video recorder has an EasyLink function, during installation, the language, country and available channels are
automatically transmitted to the video recorder.
Select the menu language and country
Language
English
Deutsch
Français
Country
Austria
Belgium
Croatia
Install
Install
install install programmes
& Press the MENU Ï key on the remote control.
é Use the cursor down to select Install.
“ Use the cursor right to select Language.
Follow the instructions on screen.
‘ Use the cursor up/down to select your preferred language
and press the
( Use the cursor right to select Country.
§ Select the country where you are now located and press
the
OK key.
Select
è Proceed with the Install menu.
OK key to confirm your selection.
Other when none of the countries applies.
5
Page 8

Store TV channels
After language and country are set correctly, you can now search for and store the TV channels in two
different ways: using Automatic Installation or Manual Installation (tuning-in channel by channel).
Select your choice with the cursor right.
Automatic installation
Install
& Select Automatic install in the Install menu.
Automatic install
Install Start
Note: All channels must be unlocked in order to
autoprogram. If requested, enter your code to unlock
all channels.
(See TV, Features menu, Childlock, p. 13.)
é Press the cursor down.
The autoprogramming option label
Start
appears.
“ Press the cursor right.
‘ The message Searching appears and the
progress of autoprogramming is displayed.
If a cable system or a TV channel which broadcasts
ACI (Automatic Channel Installation) is detected, a
programme list appears.Without ACI broadcast,
the channels are numbered according your
language and country selection.You can use
Reshuffle to renumber them. See p. 7.
It is possible that the cable company or the TV channel
displays a broadcast selection menu. Layout and items
are defined by the cable company or the TV channel.
Make your choice with the cursor and press the
OK
key.
Manual installation
Searching for and storing TV channels is done channel by channel.
You must go through every step of the Manual Installation menu.
Install
Manual install
Selection mode
System
Programme
Search
Fine tune
Store
& Select Manual install in the Install menu.
é Press the cursor down.
Follow the instructions on screen.
Note: Search or direct selection of a TV channel.
If you know the frequency, the C- or S-channel number, enter the 3 or
2 digits of the frequency or the channel number directly with the digit
keys 0 to 9 (e.g. 048). Press the cursor down to proceed.
Repeat to search for another TV channel.
Give name
Install
It is possible to change the name stored in the
memory or to assign a name to a TV channel for
which a name has not yet been entered.A name
with up to 5 letters or numbers can be given to
the programme numbers 0 to 99.
& Select Give Name in the Install menu and
press the cursor down.
6
Give name
VCR1
BBC1
BBC2
CNN
TVE
.....
® Space ® Delete
pπ
ABCDEFG 123
HIJKLMN 456
OPQRSTU 789
VWXYZ 0
® Shift ® Special
é Select the programme number.
Note: keep the cursor up/down pressed to scroll
through the programme list quickly.
“ Press the cursor right.
A keyboard appears on the screen.
Press the cursor right to enter the keyboard.
Press the cursor up/down, left/right to select
the first character and press
OK. Repeat for
every character you want to enter.
Select
Space to enter a space; Delete to erase
the highlighted character in the name entered;
Shift to display upper- or lowercase characters
on the keyboard;
characters on the keyboard. Press
Special to display special
OK to
confirm.
‘ Press the cursor left repeatedly when you have
finished the name giving.
( Select another programme number and repeat
steps
“ to ‘.
Page 9

Reshuffle the programme list
You can change the order of the stored TV
channels.
& Select Reshuffle in the Installation menu.
é Follow the instructions on screen.
TV Setup
Speakers General Source Decoder
Setup
Test tone
Balance
Centre volume
(Surround volume)
Surround speakers
Auto surround
Select Favourite TV channels
& Select Favourite programmes in the Install
menu.
é Select your programme number with the
cursor up/down.
“ Select Ye s or No with the cursor right.
‘ Repeat é and “ for every TV channel or
external you want to make a favourite or a
non-favourite TV channel or external.
The Setup menu contains items that control the
settings of the TV’s functions, features, services and
peripherals you may have connected.
The
Speakers menu reflects the speaker-related
controls.
The
General menu allows you to change settings
that will typically be accessed only occasionally.
The
Source menu allows you to select a source.
The
Decoder menu allows you to define one or
more programme numbers as decoder programme
numbers.
Speakers
Your TV is equipped with integrated front left, right
and centre loudspeakers, capable of reproducing
Stereo, Dolby 3 stereo and 3D Surround modes.
For full Dolby Pro Logic and Hall you should use
two amplified rear surround speakers connected to
the back of the TV.
See Extra loudspeakers/Amplifier, p. 24.
Depending on the output and Surround mode (see
Main menu,TV, Sound, Surround mode, p. 12)
selected, some menu items may be greyed out and
are not selectable.
Test tone controls
The menu item
balance the volume levels of the speakers.
& Select Test tone and press the cursor right.
é Once turned on, the Test Tone will circulate
through the left, centre, right speakers and
both rear surround speakers (if present).
“ Press the cursor up/down to select the desired
speaker for individual volume level adjustment.
‘ Press the cursor left/right to adjust the volume
level.
Test tone enables you to
Surround Speakers
See Connect Peripheral Equipment, Extra
loudspeakers/amplifier, p. 24.
If no Surround Speakers are connected do
not change the predefined factory settings
which is
Off. If Surround Speakers are
connected select On.
(Dolby Pro Logic and Hall are not available
if Off is selected.)
Auto Surround
Sometimes the broadcaster transmits
special signals for Surround Sound
encoded programmes.
The TV automatically switches to the best
surround sound mode when
Surround
is switched On.
Auto
However it is possible to overwrite this
setting.
7
Page 10

General
Setup
Menu background
Smart surf
Dual screen format
Factory settings
NEXTVIEW
provider
Tilt adjust
Programme title
Teletext level 2.5
Record quality
Set/Change code
General
This menu allows you to change various settings
that are presumably adjusted less frequently than
most other settings.
Press the i key on the remote control to get
information about the selected menu item.
OSD
Smart surf
& Select Smart surf.
é With the cursor left/right, select
•
2 programmes if you want the 0 key to
toggle between the current and the previously
selected channel,
•
9 programmes if you want the 0 key to
summon a list of up to 9 channels which can
be selected,
•
Theme if you want the 0 key to quickly
select TV programmes if
NEXTVIEW with
defined themes is broadcast.
To add/remove a channel or source:
Tune to the channel or source you wish to add
or remove. Press the 0 key and press the
cursor right to add or remove.
Note: If there are already 9 channels/sources in the
list, the one at the bottom of the list will be
removed.
Dual screen format
This menu allows you to select the preferred
format which can then be displayed toggling the
b key on and off.
See Dual screen/PIP/ Multipip, p. 14.
Select
Dual screen, PIP, PIP 3 or PIP 12 with
the cursor down.
When
Dual screen mode is activated with the
remote control b key, and when:
•
Dual screen is selected, the TV splits the
screen into two equally sized screens.
•
PIP is selected, the TV shows a full screen of
video with a pip window of video on top if it;
•
PIP3 or PIP12 is selected, the TV will display 3
or 12 pip screens.
Factory settings
This resets the picture and sound settings to
their predefined factory values, but maintains
the channel installation settings.
NEXTVIEW provider
Select a TV broadcaster that provides
NEXTVIEW data. How to make use of NEXTVIEW,
see p. 15.
OSD (On Screen Display)
See Use of the remote control, p. 4, i On
screen information.
& Select OSD.
é Select Normal to activate the continuous
display of the programme number.Also TV
channel and programme information are
extended.
Minimum will display reduced
channel information.
Note:When subtitles is switched on, see Features,
p.12, continuous display of the programme number
is not possible.
Teletext level 2.5
Some broadcasters offer the opportunity to
see more colours, other background colours
and nicer pictures in the teletext pages.
& Select Teletext level 2.5.
é Press the cursor right to select Teletext level
“ Press the cursor right again to select Teletext
to take advantage of this feature.
2.5 On
level 2.5 Off
if you like the more neutral
teletext layout.
The selection made is valid for all channels
which broadcast teletext level 2.5.
Note: It may take a few seconds before teletext
broadcast switches over to Teletext level 2.5.
Record quality
See Flex TV, Modifying the record quality of
Instant recording, p. 22.
8
Page 11

Set/Change code
The Child lock feature (see TV, Features, p. 13)
allows you to lock channels to prevent others from
watching certain programmes.To watch locked
channels, a 4-digit code must be entered.The
Set/Change code menu item allows you to create
or change a Personal Identification Number (PIN).
& Select Set/Change code.
é If no code exists yet, the menu item is set to
Set code. If a code has previously been
entered, the menu item is set to
Change code.
Follow the instructions on screen.
Source
Setup
This menu allows you to indicate the peripheral
you connected to one of the external inputs.
& Press the cursor right to enter the list of types
of peripherals attached to the selected input.
é Select the peripheral device with the cursor
up/down.
Source
EXT1
EXT2
EXT3
EXT4
SIDE
Centre input
Centre in vol.
Important:You have forgotten your code !
& Select Change code in the General menu and
press
OK.
é Press the cursor right and enter the overriding
code 8-8-8-8.
“ Press the cursor again and enter a new
personal 4-digit code.The previous code is
erased and the new code is stored.
Centre input - Centre in volume
When you have connected a surround receiver
to the TV see p. 24, the loudspeakers of the TV
can act as centre speaker, making a separate
centre speaker unnecessary.
Select
Centre input On or Cinema Link.
(in case you have connected a Cinema Link
surround receiver).
When having selected
On you can adjust the
Centre in volume with the cursor left/right to
correct volume level differences of the external
audio receiver and speakers.
Note:This is not the case with a Cinema Link
surround receiver.
Once you have selected the source type, e.g. DVD,
this source will automatically be selected when
your remote control is in DVD mode, see p. 3, and
when you press the v key on the remote
control.
Decoder
Decoder
Setup
Programme
Status
If a decoder or a descrambler is connected, see
p. 22, you can define one or more programme
numbers as decoder programme numbers.
& Select Decoder with the cursor right.
é Select Programme.
“ Select the programme number under which
you have stored the programme coming from
your decoder.
‘ Select Status.
• Select the input used to connect your decoder:
None, EXT1 or EXT2.
• Select
None if you do not want the selected
programme number being activated as a
decoder programme number.
Note: Select
EXT2 when the decoder is connected
to your EasyLink video recorder.
9
Page 12
Demo
The Demo menu allows to demonstrate the TV
features separately or in a continuous loop.
If
TV
Setup
Demo
Install
Auto demo
......
Auto demo has been selected the demo will
automatically present the features sequentially in a
loop. Press one of the cursor keys to stop the
Auto demo.
If one of the features has been selected, this
particular feature demo will run only once, and the
Demo menu will reappear. Flex TV demo however
Dealer demo - Digital options
- Light sensor
- Comb filter
will run continuously until it is stopped by pressing
one of the cursor keys or the
OK key on the
remote control.
Notes:
- The Dealer demo is not part of the automatic
sequence and can only be activated separately.
- The Flex TV demo is available in only 7 languages.
TV menu
Press the MENU Ï key on the remote control to summon the main menu.
Press the i key on the remote control to get information about the selected menu item.
&
Picture menu
Picture Sound Features
TV
Smart picture
Contrast
Brightness
Colour
Sharpness
Tint
Digital options
Dynamic contrast
DNR
Colour enhancement
(Hue)
Picture format
Press the cursor right to select Picture.
é Select the menu items in the Picture menu with the cursor
up/down.
“ Adjust the settings with the cursor left/right or enter the list of
submenu items with the cursor right. Select a submenu item with
the cursor up/down.
Note:To remove the menu background before adjusting the picture
settings, see Select TV setup, General, p. 8.
Smart picture
Select
Smart picture to display a list of predefined picture
settings, each corresponding with specific factory settings.
Personal refers to the personal preference settings of picture in
the picture menu.
Digital options
Pixel Plus is the most ideal setting, doubles the horizontal
resolution and increases the number of lines with 33%.You may
consider to select Movie Plus in case a halo effect should disturb
you. Dependent on your own preference, select Double lines, or
100 Hz Digital Scan.
10
Note:When 60 Hz NTSC material is used, the options are changed to
Pixel Plus, Movie Plus or Progressive, progressive scan without motion
compensation.
Page 13

Active Control
The TV continuously measures and corrects all incoming signals
in order to provide the best picture possible.
& Press the h key on the remote control.
é The Active Control menu appears.
“ Press the cursor up/down to select the Active Control values
Off, Minimum, Medium (recommended) or Maximum.
The picture settings are being optimised continuously and
automatically which is displayed by bars.The menu items can
not be selected.
‘ Press the cursor right to select Smart picture.
( Press the cursor up/down to select one of the predefined
picture settings.
§ Press the cursor right to select Active Display.
è Press the cursor up/down to select Bars, one of the Dual
screen demos or
Off.
When you select Dynamic contrast, Pixel Plus, Digital Noise
Reduction or Digital Natural Motion, the TV screen is divided
into two parts: in the left part the selected picture quality
setting is switched off; in the right part it is switched on.
! Press the h key again to switch off the Active Control menu.
Sound menu
TV
Smart sound
Equalizer
Volume
Headphone volume
Surround mode
(Dual I-II)
(Mono/Stereo)
(Nicam/Analogue)
(3D effect)
AVL
Delta volume
Sound
& Press the cursor right to select Sound.
é Select the menu items in the Sound menu with the cursor
up/down and adjust the settings with the cursor
left/right.Remember, control settings are at normal mid-range
levels when the bar scale is centred.
Smart sound
Select
Smart sound to display a list of predefined sound
settings, each corresponding with specific factory settings of
Tr eble and Bass.
Personal refers to the personal preference settings of sound in
the sound menu.
Notes:
- Some menu items are only available in case of a Cinema Link
configuration and when the Cinema Link is activated. Others are
steered by the audio receiver instead of by the TV. See the separate
Cinema Link booklet supplied.
- Dual X is only available with dual sound transmission.
-Mono/Stereo is only selectable in case of analogue stereo
transmission.
-Nicam/Analogue is only selectable in case of Nicam transmission.
- Some menu items are not available in Flex TV mode.
11
Page 14
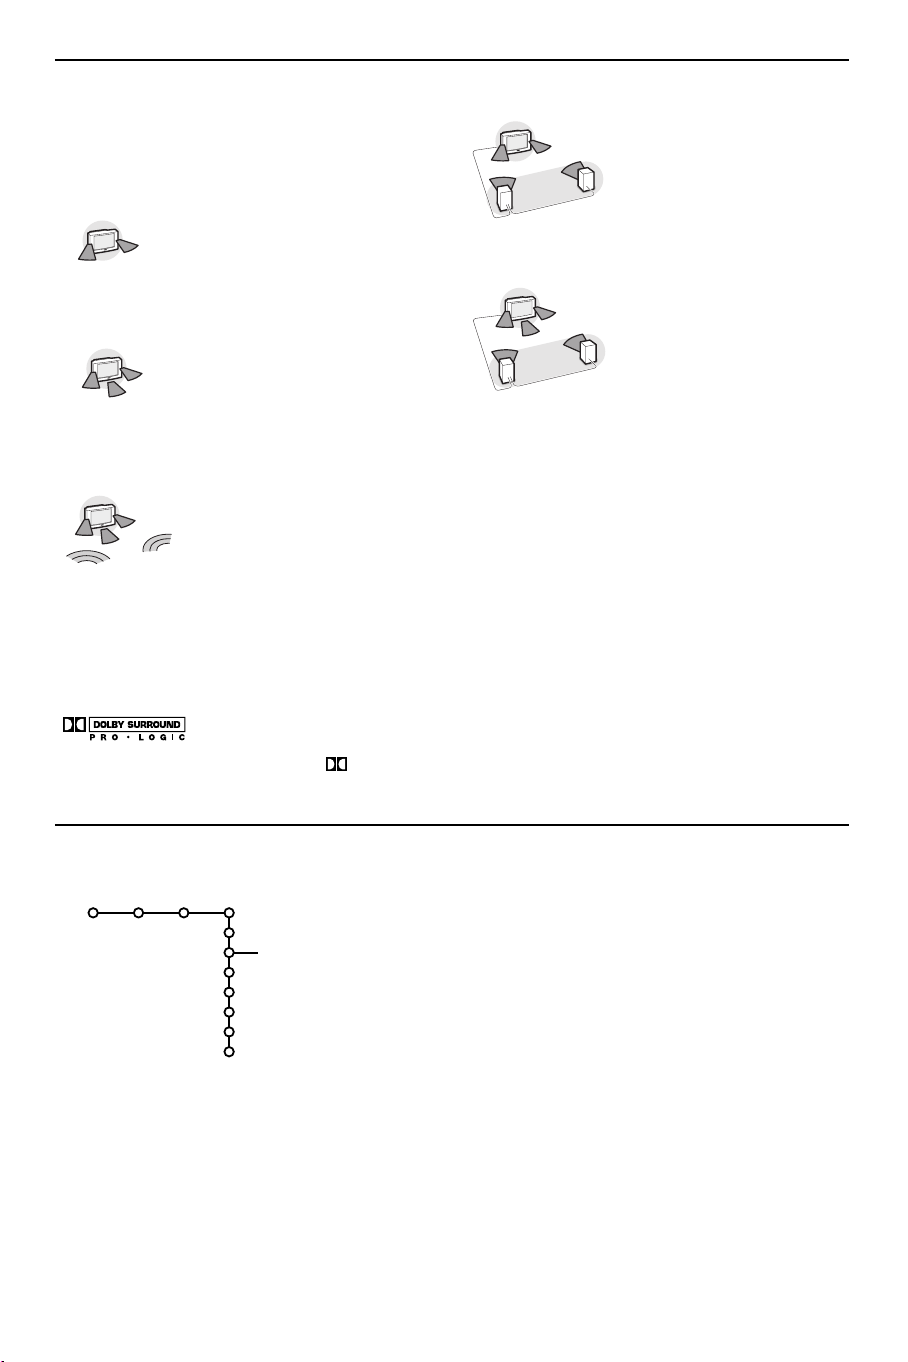
Surround Modes
Dependent on your personal preference and the
sound signal broadcasted, select one of the
Surround modes. Only the speakers indicated in
the drawings can reproduce sound.
Stereo
This mode reproduces only the
left and right front sound signals.
Dolby 3 Stereo
(optimal with Dolby Surround broadcasting)
The Dolby Pro Logic* sounds are
distributed over the front left, the
front right and the centre TV
loudspeakers.
3D Surround
(optimal with Dolby Surround broadcasting)
3D Surround enables you to
experience the 3D effect of
Dolby Surround Pro Logic
without the need of having rear
speakers connected or activated.
The graphical representation of the rear
loudspeakers is replaced by the symbol ®r.
Select the level of 3D effect with the cursor
left/right.
Hall
The sound signal is distributed over the rear
loudspeakers which creates a
hall effect from the rear.
The centre loudspeaker does
not reproduce any signal.
Dolby Pro Logic
(optimal with Dolby Surround broadcasting)
All front and rear
loudspeakers reproduce the
Dolby Surround Pro Logic
sounds.
This sound is always present
in the movie or programme
marked with G Dolby
Surround.
Note:
• Normal stereo broadcast is not always encoded to
produce a rear surround sound effect.
• In case of a Cinema Link receiver configuration
connected, only the surround modes of the external
receiver can be selected.
•Pro Logic and Hall can only be reproduced if Surround
speakers is set to Yes in the Setup, Speakers menu,
p. 7, and rear speakers are connected.
* Dolby’ ‘Pro Logic’ and the double-D symbol are trademarks of Dolby Laboratories Licensing Corporation. Manufactured under
license from Dolby Laboratories Licensing Corporation.
Features menu
Programme list
Press the
OK key to switch over to the
selected TV channel or external.
Select subtitles
The subtitle page must be stored for each TV
channel:
Switch on teletext and select the proper
subtitle page from the index. Switch off
teletext.
Subtitle On will automatically display them on
the selected TV channels if subtitles are in the
transmission.A symbol will indicate that the
mode is on.
Select
On during mute when you want to
have the subtitles automatically displayed only
when the sound has been muted with the ¬
key on the remote control.
Subtitle
On timer
Zoom
Features
Off
On
On during mute
TV
Programme list
Sleeptimer
Pause clear
Child lock
& Press the cursor right to select Features.
é Select the menu items with the cursor
up/down and adjust the settings with the
cursor left/right.
Press the i key on the remote control to get
information about the selected menu item.
12
Page 15

Pause clear
This allows you to clear the memory of your
live recordings. See p. 19.
Child lock
& Select Child lock.
Child lock
é Press the cursor right to enter the Child lock
Lock
Custom lock
Unlock
Age lock
Lock after
Programme lock
Category lock
menu.You’re summoned to enter your code.
Note:You have to re-enter your code each time you
enter the child lock menu.
Important:You have forgotten your code !
See p. 9.
“ Select one of the menu items of the child lock
menu:
•
Lock if you want to lock all channels and
externals.
•
Custom lock and press the cursor right.
The items Age lock and Category lock are only
available when
NEXTVIEW broadcast is available.
Select:
-
Age lock if you want to lock programmes
related to a certain age: off, 2, 4 ... 16;
-
Lock after if you want to lock all
programmes from a certain time onwards.
Press the cursor right and enter the time
with the cursor up/down and right. Press the
OK key to validate.
-
Programme lock if you want to lock a
certain TV channel or external;
-
Category lock if you want to lock
programmes related to a certain theme:
Movies, Sports, Shows.... See
• Select
Unlock to disable all locks you have set.
NEXTVIEW,p.15.
On timer
& Select On timer with the cursor down.
VCR1
BBC2
Off
On timer
é Select On with the cursor right.
“ Press the cursor right again to enter the
On
CNN
TVE
π.....
Sunday
Monday
.......
Daily
15:45
programme list.
‘ Select the TV channel or external you want
your TV to switch to on a selected time and
day.
( Press the cursor right again to select a day of
the week or to select
§ Press the cursor right once again to enter the
Daily.
time with the digit keys or with the cursor
up/down and press the
è Press the MENU Ï key to turn off the menu.
OK key to activate.
Note:To check your timer settings, press the i key.
Zoom
& Select Zoom with the cursor down and press
the
OK key.
é Press the OK key to select one of the zoom
magnifications (x1, x4, x9, x16).
“ Additionally you can shift the selected zoom
window over the screen with the cursor keys
up/down, left/right.
‘ Press the MENU Ï key to turn off the zoom
function.
13
Page 16
Dual screen / PIP / Multipip
Press the b key to switch on Dual screen, PIP or one of the PIP
modes.
Press the b key again.The screen that has a yellow border will become
B
the full main screen picture.
VCR DVD SAT AMP CD
v
REC
æ
Ò
DVR
+
V
-
123
456
789
i
b
Pause Live
†
Select
Ò®‡π
b
†
OK
MENU
Ï
+
¬
P
-
0
0
Active Control
q
h
Notes:
- Continuing to hold the b key down will cycle the TV through the various
formats launching a new format after each second the key is held down.
After standby of the TV, the preference as set in the Setup, General menu is
used.
-When Dual screen mode is selected, two picture formats are supported: Full
screen or 4:3 letterbox picture format (vertical squeeze).
- Audio from the right screen or the PIP plays to the headphones.
Display options
Dual screen PIP
AUX
AUX
PIP 3 PIP 12
PIP1 PIP1 PIP2 PIP3
PIP5 PIP6 PIP7
PIP2
PIP9 PIP10 PIP11 PIP12
PIP3
PIP4
PIP8
•Press the cursor right to highlight the right screen.
•Press the cursor down to highlight the single PIP screen.
•Press the cursor right to enter the Multipip screen and then use the
cursor keys to navigate through the PIP screens and to highlight a PIP
screen.
Changing TV channels or external sources in left, right, PIP or
Multipip screen
•Press the
-P+ keys or the 0 key or the digit keys in order to
change the TV channels or external sources in the highlighted screen.
Position
14
Size
Scan PIP 3 or PIP 12
Navigate to the lowest PIP and press the cursor down to display a
following series of PIP screens.
Define the position and the size of the single PIP screen
o
œ
& Select a Dual screen mode with a single PIP screen.
é Press the cursor down to highlight the PIP screen.A PIP menu
appears with which you can define the position and the size of the
PIP screen.
Note:When the PIP menu times out, press the
“ Press the cursor down again to select Position or Size.
‘ Press the OK key or the cursor right to activate.
( Use the cursor keys to define the position of the PIP screen.
OK key to make it reappear.
Use the cursor left/right to define the size of the PIP screen.
§ Press the OK key. The PIP menu reappears.
è Press the cursor up to the top of the menu to highlight the main
screen again.
! Press the OK key to switch off the menu or wait until it is timed out.
On-Screen information
The highlighted On-Screen information,which appears when changing
channels, always refers to the active screen.
Page 17

NEXTVIEW / Teletext guide
NEXTVIEW is an electronic guide that allows you to look up programmes as you would in a
newspaper or a TV magazine.You can sort the programmes by subject (films, sport...), obtain
detailed information and programme your video recorder if it comes with the
NEXTVIEWLink
function.
Important note: The
countries.When no
based on teletext programme information (if available) and offers most functions of
NEXTVIEW service is only available on certain programmes and in certain
NEXTVIEW information is broadcast, the teletext programme guide appears in its place.This is
NEXTVIEW.
Note:The broadcaster is responsible for the content of the information.
Call NEXTVIEW / Teletext guide
Press the æ key on the remote control to call the NEXTVIEW/Teletext guide.
A menu appears with the message One moment please.After a while you obtain:
•a NEXTVIEW page, if the selected channel broadcasts this service (the NEXTVIEW logo is displayed),
•a teletext page, if the selected channel does not broadcast
•
No information available is displayed if neither NEXTVIEW nor teletext are transmitted. In this case,
select another channel.
Select TV channels by theme
If
NEX
TVIEW with defined theme is broadcast, it is possible to quickly select TV programmes with the
0 key. See Setup, General menu, Smart surf, p. 8.
NEXTVIEW,
Display of a
The information is set by the channel that transmits the
General,
This logo is only displayed
transmission or when one
of the externals is selected.
NEXTVIEW
NEX
TVIEW provider, p. 8.
during a NEX
puck
TVIEW
page
Mon 05 Feb
Mon 03
Mon 03
Tue 04
Wed 05
Thu 06
Fri 07
Sat 08
Menu 18.00 Channel Theme
BBC1 18.00 BBC News
BBC2 18.00 The Simpsons
CNN 18.00 World News
FR2 18.00 On a tout essayé!
CH5 18.15 Tomorrow Never Dies
NEXTVIEW service. See also Setup menu,
18.00
NEXTVIEW guides
Programme name and
broadcast time
No logo indicates a teletext
programme guide
Review Record Remind Watch Lock
function keys
Picture/NEXTVIEW - Teletext Guide
& Press the æ key. Press the b key to show NEXTVIEW-Teletext Guide on the right of the screen.
é Use the cursor keys to select a TV channel.
“ Press the b key to switch off dual screen.
NEXTVIEW guides
& Use the cursor key left/right to select Time, Channel, Theme, the Date guide.
The
Time guide provides an overview of all programme titles active in the selected time block.The
Channel guide provides an overview of all programmes that are broadcast by a single channel during
one day. With the
programmes at the selected date, that matches with the selected category.
Going through the menu guide, the TV is collecting the sorting criteria to finally display a list of
programme events.
é Press the OK key to select the guide type.
“ Move the puck down and to the right to select the programmes.
If available a summary or commentary on the programme is displayed at the bottom of the screen.
‘ Use the cursor up/down to scroll through the programmes.
Date guide you can choose a specific date.The Theme guide displays a list of all
15
Page 18
Teletext Guide
& Enter with the digit keys, the teletext page number that contains the programme information for the
current channel.
é Press the cursor right to move the puck over the selection ball.
“ Use the cursor up/down to scroll through the different programmes.
page ball
selection ball
channel list
Mon 05 Feb 16.35
BBC1
BBC2
ITV
CH4
CH5
Review Record Remind Watch Lock
100 1
BBC CEEFAX
LIONS RECORD ANOTHER WIN 430
Index 100 News 300
BBC Info 110 Headlines 305
Children 120 Weather 400
Cookery 150 Sports 415
Education 200 Radio 500
subpages
scroll ball
• If the selected programme contains a page number with an optional subcode referring to a page with
more info about the programme, press the
OK key to display the information. Press the OK key again
to return to the programme guide page.
• If the selected programme guide page satisfies the VPT requirements,
- it will be possible to record, remind, watch or lock programmes:
- the TV will remember the last selected teletext page number of that channel that contains programme
guide information and indicates which programme starts at what time. Every time you press the æ
key, the teletext programme guide page of the selected TV channel will be available.
• When necessary you can select the subpage number by moving the cursor to the pageball and
pressing right.
Note:You must enter the teletext pagenumber for each channel.You can change the channels also by moving
the cursor up/down in the list in the left of the page.
Basic functions
Press one of the grey x,red ®,green U,yellow Q or blue Ì keys to activate a
Teletext Guide function.The keys appear in grey if the function is not available.
Review: this menu provides a list of programmes that are marked as reminders, those that have to be
recorded and those that are locked.This menu can be used to change or remove marked
programmes.
Record: to programme the recording of the video recorder (if it has a NEXTVIEWLink function and is
connected to
EXT. 2).
Remind: automatically switch on the TV if it is in standby or by displaying a message if the TV is on.
Lock: to lock certain programmes to prevent recording or watching.
For the functions Record, Remind or Lock, a small menu pops up in which you can choose the
interval: once, daily or weekly, or clear an earlier made record, remind or lock setting.The default
interval is set to
Once.To confirm the frequency, press the OK key.
Watch: to watch the selected and currently broadcast programme.
NEXTVIEW
or
Acquisition and updating of NEXTVIEW information
Acquisition and updating of NEXTVIEW is done when you are watching the TV channel of the selected
NEXTVIEW provider, see Setup menu, p. 8, or when the TV is switched to standby;
Acquisition of fresh data will happen once during the night.
Note: it may be necessary to put the TV in standby mode when all
returning from holiday.
16
NEXTVIEW information is outdated, e.g. when
Page 19

Teletext
Most TV channels broadcast information via teletext.This TV has a 1200 pages memory that will store
most broadcasted pages and subpages to reduce waiting time. After each programme change, the
memory is refreshed.
Switch Teletext on and off
•Press b to switch the teletext on.
102 «03 04 05 06 07 08 09 10 11 12»
BBC CEEFAX 102 Mon 05 Feb 16.35.22
BBC CEEFAX
LIONS RECORD ANOTHER WIN 430
Index 100 News 300
BBC Info 110 Headlines 305
Children 120 Weather 400
Cookery 150 Sports 415
Education 200 Radio 500
Lottery 230 Travel 550
Finance 240 Subtitling 888
Music 280 TV Listings 600
Red Green Yellow Blue
Select a Teletext page
- Enter the desired page number with the digit
keys, the cursor keys up/down, left/right or
with the
-P+ key.
- Select the options at the bottom of the screen
with the colour keys.
Previously selected page
(Only possible in case there is no list of favourite
teletext pages available. See p. 18.)
Press the 0 key.
Select the index teletext page
Press the grey colour key † to display the
main index (usually p.100).
Only for T.O.P teletext broadcasts :
Press i.A T.O.P. overview of the teletext
subjects available is displayed.
Select with the cursor up/down, left/right the
desired subject and press the OK key.
Not all TV channels broadcast T.O.P. teletext.
Select subpages
When a selected teletext page consists of
different subpages, a list of available subpages
appears on the screen.
Press the cursor left or right to select the next
or previous subpage.
Enlarge a Teletext page
Press q repeatedly to display the upper
teletext part, the lower teletext part and then
to return to the normal teletext page size.
When the teletext page is enlarged, you can
scroll the text, line by line using the cursor
up/down.
Active screen selection
When in dual screen picture/teletext, enter the
desired page number with the
press the
MENU Ï key, then select the left
-P+ key, then
screen (with the blue ball at the top).
You can now select a compressed or full screen
view of picture/teletext with the q key.
Hypertext
With hypertext you can quickly jump to a
pagenumber or search for a specific word
shown on the current teletext page.
& Press the OK key to highlight the first word or
a number on the page.
é Use the cursor up/down, left/right to select any
other word or number you want to search for.
“ Press the OK key to confirm. The search starts.
A message appears at the bottom of the screen
to indicate the searching, or that the word or
page is not found.
‘ Use the cursor up to exit hypertext.
17
Page 20

Teletext menu
(only available in full screen teletext mode)
& Press the MENU Ï key to activate the menu.
é Press the cursor up/down to select the menu
items.
“ Press the cursor right to activate.
Reveal
Reveals/conceals hidden information on a page,
such as solutions to riddles and puzzles.
Press the cursor right to activate.
Favourite
This list contains up to eight favourite teletext
pages. Only the pages of the current channel
can be selected.
& Press the cursor right to enter the list.
é Press the cursor right again to add the current
page or to select one of the favourite pages to
the list.
“ Press the MENU Ï key to watch the page.
‘ Use the 0 key to browse through the list of
favourite pages.
Search
Selecting a word
On the keyboard on screen you can type in a
random word you want to search for in the
teletext pages.Whether upper- or lowercase is
used has no influence.
puck
102 «03 04 05 06 07 08 09 10 11 12»
WORD
BBC1
NAME
FOOTBALL
Cancel Accept
Space Delete
ABCDEFG 1 2 3
HIJKLMN 4 5 6
OP QRSTU 7 8 9
V W X Y Z 0
Shift Special
Red Green Yellow Blue
& Press the cursor right to enter the keyboard.
é Press the cursor left/right, up/down to select
TELETEXT
the characters, words or functions.
“ Press the OK key to confirm each character
selected.
‘ Select Cancel to cancel the word; Space to
enter a space;
character selected;
lowercase or capital characters;
Delete to delete the last
Shift to switch between
Special to
display special characters on the keyboard and
press the
( Press the cursor left repeatedly to return to
OK key.
the Teletext menu again.
Searching a word
& Type in the word on screen or select a word
from the history list on the right and press
é Select Accept and press OK again.The message
OK.
Searching appears.
“ To cancel the searching or to search for a new
word, select
‘ When a word is not found, a message appears.
Keyboard and press OK.
When the word is found, it is highlighted in the
teletext page.To continue the search, press the
ok key.
Cycle subpages (if available)
Makes the subpages cycle automatically.
Press the cursor right to activate and to deactivate again.
Timed page
To display a specific page from a selected TV
channel at a certain time.
& Press the cursor right and select Ye s or No.
é Enter the time and pagenumber with the cursor
keys or the digit keys.
Note:Teletext does not have to remain switched on,
but you should watch the TV channel you have
selected the specific page from.
“ Press the cursor left to return to the TV menu
again.
Language
If the displayed characters on screen do not
correspond with the characters used by the
teletext broadcaster, you can change the
language group here.
Select
Group 1 or Group 2 with the cursor
right.
Press the
MENU Ï key to leave the Teletext
menu.
1818
Page 21

B
b
¬
+
-
V
+
-
P
v
b
i
0
h
q
Select
VCR DVD SAT AMP CD
MENU
DVR
OK
123
456
789
0
Ò®‡π
†
Active Control
æ
Ò
†
Ï
Pause Live
REC
Flex TV
Your Flex TV has an internal memory capacity to store programmes temporarily (Pause TV) and to
record programmes for an indefinite time (
1. Pause TV:From the moment your TV is switched on, in the background it automatically records the
programme you are watching.This gives you the opportunity to interrupt watching (with the
key) and to progress the viewing (by pressing the Pause key again) at a later time (max. 3 hours
later) without missing a single part of the programme.This is called Pause TV.
Note:When the Pause TV memory block (3 hours) is full, the background recording continues overwriting the
programmes recorded earlier.
2. Recording:A greater part of the memory of the Flex TV is reserved to record programmes you
want to keep (with a max. of 58 programmes and with a total max. recording time of appr. 28
hours).You may execute instant recordings with the ®
recordings with the
DVR key. See further on.
Notes:
- You may already start viewing before the recording is complete.
- When an instant or programmed recording has started, Pause TV is not possible at the same time.
- Flex TV functionality is not possible in Dual screen/PIP/Multipip.
REC Instant recording p. 22
Press to start a direct recording of the programme which is being
displayed.
DVR
Ta b le of Recordings and Programmed recording
See p. 21
PA USE TV
& Press the Pause key.
The picture will freeze while the TV keeps recording the live TV
programme in the background.
(The memory block is defined at 3 hours HQ - High Quality- recording.)
A time bar and a time indication show the growing delay from the real
time live programme as the pause continues.
Press the
é Press the Pause key again to continue watching the programme from the
point where you paused, without missing a part.
LIVE TV
Press the Live key to jump back to regular TV viewing.
Press again to return to the paused moment.
PA USE CLEAR
In case you might not want to share the programmes you have been
watching (the evening) before, and which have been automatically
recorded ( in the 3 hours memory block), you may consider to empty
the memory.
& Press the MENU Ï key.
é Select Pause clear in the Features menu. See TV menu, Features, p. 13
“ Press the OK key to erase the 3 hours memory block.
Recording).
Instant record key or programme your
i key to display the bar once again after it disappeared.
Pause
1919
Page 22
B
b
¬
+
-
V
+
-
P
v
b
i
0
h
q
Select
VCR DVD SAT AMP CD
MENU
DVR
OK
123
456
789
0
Ò®‡π
†
Active Control
æ
Ò
†
Ï
Pause Live
REC
Slow Motion
& Press the cursor right when the programme is paused.
The TV switches to slow motion at a quarter of the normal speed.
é Press the cursor right again.The TV switches to slow motion at half the
normal speed.
“ Press the Pause key to switch off slow motion.
Fast forward and backward
& Press the Pause key to continue watching the programme from the point
where you paused.
é Press the cursor right or left (for at least 1 second).
The TV switches to a higher speed of viewing in the forward or backward
direction.
“ Sequential cursor right or left actions will increase the speed to the next
step (x2, x4, x8, x 20, x 200).
‘ When viewing at a higher speed than normal in the forward or backward
direction, cursor right or left will bring the speed one step down or up.
( Press the Pause key to return to normal speed.
Instant Skip
Press the cursor right shortly, when continuing watching.
Each instant press will skip 30 seconds of the programme, e.g.
commercials.
Instant Replay
At any moment in time, you can press the cursor left to review the
previous 7 seconds once.
Note: Fast forward or backward, Instant skip and Instant replay are not possible from
a programme in a paused state.
20
Page 23
Ta b le of Recordings
& Press the DVR key.
lay
TUE 14 JAN HQ 120m Meet Joe Black
SUN 19 JAN SQ 140m Star Wars 3
SAT 08 FEB LP 240m Olympic opening
THU 13 FEB HQ 50m Miami Vice
FRI 15 MAR HQ 120m Manu vs Paris
SAT 07 APR SQ 30m Friends
MON 10 APR LP 25m Naked chef
Space Left LP 10.20h
Overview Scheduled record Set record
Overview
This menu allows you to
• view a list of programmes stored in the
memory (
Overview);
• view a list of programmed recordings
(
Scheduled record):
• set a programmed recording (
Set record).
Each recording is listed with the date of
recording, the picture quality (
HQ, SQ or LP)
with which the recording has been done, the
duration and the title of the recording.
In the
Overview menu it is indicated how
much free memory space is left. Each
programme can be played (
(
Delete) from this menu.The title of a
programme can be modified (
Play) or deleted
Modify) using a
virtual keyboard on screen.
é Press the corresponding green colour key on
the remote control to select the
list.
record
CANVA TUE 15 APR 15.37-16.37 Pauli
BBC1 SUN 27 APR 19.37-20.37 Naked chef
FOCUS SAT 03 MAY 16.25-16.55 Friends
BBC2 THU 08 MAY 20.18-20.45 Vicar
MERID FRI 23 MAY 21.15-22.10 No win
Overview Scheduled record Set record
Overview
“ Select Add to bring up the Programmed
record menu and to add a new programme
(See also Programmed Record),
change a programmed recording,
delete a programmed recording.
‘ Press the the red colour key to return to the
Overview list or the yellow colour key to
select
Set record. (See Programmed record.)
PPlay
Modify
Modify
Delete
Delete
Scheduled
Add
Modify
Modify
Delete
Delete
Modify to
Delete to
To modify a programme title with the virtual
keyboard
® Cancel ® Accept
® Space ® Delete
ABCDEFG 1 23
HIJKLMN 4 56
OPQRSTU 7 89
VWXYZ 0
® Shift ® Special
The virtual keyboard appears on the screen if you
have decided to modify a programme title.
& Press the cursor left/right, up/down to select the
characters, words or functions.
é Press the OK key to confirm each character
selected.
“ Select Cancel to cancel the modification; Space to
enter a space;
selected;
capital characters;
characters on the keyboard and press the
Delete to delete the last character
Shift to switch between undercast or
Special to display special
OK key.
‘ Select Accept to confirm the modified title.
Programmed Record
& Press the DVR key.
é Press the corresponding green colour key on
the remote control to select the
list.
record
Scheduled
“ Press the yellow colour key in the Scheduled
Record menu to select
Set Record to
programme a recording.
Channel
Title
Date
Start Time
Stop Time
Quality
Store
Overview Scheduled record Set record
Overview
‘ Use the cursor up/down, left/right to select and
02 BBC
Men In black
Tue 21 Aug
20.30
22.00
HQ
to enter the channel to record from, the date,
the start and stop time, the title of the
programme and the recording quality.
Remark: in order to avoid non-existing start or stop
time indications, it may happen that you have to
modify the second digit first before entering or
changing the first digit.
( Select Store and press OK to confirm the
recording data.
21
Page 24

Instant recording
& Press the REC key.
The recording starts immediately and a small
menu pops up where you have to enter the
duration time of the recording you want to
do.The default duration is set at 01.00 hour
but can be changed at any time.
é Press the cursor right and enter the duration
time of the recording with the digit keys or
with the cursor up/down.
Press the
REC key again to remove the menu.
OK key to confirm and press the
Note:
-Once the recording started, you may switch your
TV to standby or watch another programme.
DO NOT Power off your TV or else the recording
“ To stop the recording before the entered
duration time, press the
REC key, select Stop
and press the OK key.
To change the duration time, press the
key, and use the cursor keys to change the
duration time. Press the
and press the
REC key again to remove the
OK key to confirm
menu.
Modifying the record quality of Instant
recording
The recording duration depends on the
record quality you choose in the General
Setup menu, p. 8, to record in.
Do not change the HQ quality default setting
for the highest picture quality.
REC
may be lost.
- See Table of Recordings how to modifiy the
programme name (Record xxx) automatically
filled in.
Record quality Flex TV
•
HQ (High Quality) recording quality (approx.
6 hours) can be compared with DVD.
•
SQ (Standard Quality) with a quality still
better than VHS but a longer record duration
(approx. 11 hours).
•
LP (Long Play) (approx. 28 hours).
General remarks on Flex TV
- While a recording is in progress, and when a lock becomes active, the recording is stopped and you are
summoned to enter your code.
- The audio reproduction for Instant or Programmed Recording is always mono.
- The total number of already recorded ( in the Overview menu) + programmed ( in the Scheduled record menu)
recordings is limited to 58 programmes ( although there is still time space left).When the total number is
reached, first delete some recordings to create place for new ones.
- Pay attention not to programme overlapping recordings or recordings which start at the same time.
- When there is no free memory left, the oldest recorded programme is automatically erased and without any
warning.
- Once an Instant or Programmed Recording has started, you can start watching the programme while
the recording continues. Select the programme in the Overview menu.
To stop the recording while you are watching, first press the
press the
REC key and select Stop on the Recording menu on screen.
LIVE key on the remote control.Then
- Once the recording is set or has started, there is no need for the TV to remain on.You can switch the TV to
standby and the recording will happen in standby. DO NOT power off your TV.
-You can easily transfer recorded programmes to a DVD recorder or VCR, connected to
Select the programme in the Overview menu and select
Play.You record what you are watching on the screen.
- To stop an already started Programmed Record (before the entered stop time): press the
EXT 2.
REC key on the
remote control and select Stop on the Recording menu on screen.
-All Flex TV featuring is not applicable on copyright protected programmes and on programmes coming from
peripheral equipment connected to
EXTERNAL 2.
-To pause a NTSC transmission:
Select a NTSC programme and first clear the memory block with
press the
Pause key.
Pause clear in the Features menu.Then
To pause a PAL or SECAM transmission again:
Select the new programme and clear the memory block again.Then press the
Pause key.
22
Page 25

2
EXT.EXT.2EXT.
CABLE
1
4
2
3
1/21/2
EXT.EXT.
1/2
EXT.
CABLE
1
2
3
5
4
AU
D
IO
VIDEO
S•VIDEO
1 2 3
Connect Peripheral Equipment
There is a wide range of audio and video equipment that can be connected to your TV.
The following connection diagrams show you how to connect them.
EXT. 1 can handle CVBS and RGB, EXT. 2 CVBS, RGB and Y/C, EXT. 3 and EXT. 4 CVBS.
Note:
It is preferred to connect peripherals with RGB output to
If your recorder is provided with the Easylink function, it should be connected to
functionality.
Recorder (VCR-DVD+RW)
Connect the aerial cables 1, 2 and, to obtain the optimum
picture quality, eurocable 3 as shown.
If your recorder does not have a euroconnector, the only possible
connection is via the aerial cable.You will therefore need to tune in
your recorder’s test signal and assign it programme number 0 or
store the test signal under a programme number between 90 and
99, see Manual installation, p. 6.
See the handbook of your recorder.
Decoder and Recorder
Connect a eurocable 4 to your decoder and to the special
euroconnector of your recorder. See also the recorder handbook.
See Decoder, p. 9. You can also connect your decoder directly to
EXT. 1 or 2 with a eurocable.
Other equipment (satellite receiver, decoder, DVD, games, etc.)
& Connect the aerial cables 1, 2 and 3 as shown (only if
your peripheral has TV aerial in-/output).
Connect your equipment with a eurocable 4 or 5 to one of
the euroconnectors
quality.
é Look for the test signal of your peripheral in the same way as
you do for a recorder.
“ Make a selection in the Setup, Source menu, p. 9.
When a recorder is connected to
programme from your TV. Only when a recorder is connected to
EXT. 2 it is possible to record a programme from your TV as well as
from other connected equipment.
EXT. 1 or 2 as RGB provides a better picture quality.
EXT. 2 to benefit from the EasyLink
EXT.1, 2, 3 or 4 to obtain a better picture
EXT. 1 you can only record a
Side connections Camera or Camcorder
& Connect your camera or camcorder as shown.
é Connect to VIDEO 2 and AUDIO L 3 for mono
equipment. For stereo equipment also connect
S-VHS quality with an S-VHS camcorder is obtained by
connecting the S-VHS cables with the
AUDIO inputs 3.
Do not connect cable 1 and 2 at the same time.This may cause
picture distortion !
Headphone
& Insert the plug into the headphone socket L as shown.
é Press ¬ on the remote control to switch off the internal
loudspeakers of the TV.
The headphone impedance must be between 8 and 4000 Ohm.The
headphone socket has a 3.5 mm jack.
In the Sound menu select
headphone volume.
AUDIO R 3.
S-VIDEO input 1 and
Headphone volume to adjust the
23
Page 26

Connect extra loudspeakers/amplifier
AUDIO
Surround out
CENTRE INCENTRE INCENTRE IN
AUDIO
OUT
REAR
multimedia loudspeakers
& Select Surround speakers On in the Setup
menu, see p. 7.
é Connect the audio cables to the rear
loudspeakers and to the Dolby Surround
output
SURROUND OUT at the back of your
TV.There is only one output for both speakers.
“ Adjust the volume of the rear loudspeakers.
Use the Test tone function in the Speakers
menu, see p. 7.
Note: Once you have adjusted the volume of the
rear loudspeakers, do not change it while watching
TV as the whole configuration operates with the
volume adjustment of your TV.
To select connected equipment
(Analogue) MultiChannel surround receiver
& Connect a MultiChannel surround receiver to
the
AUDIO OUT R and L connectors at the
back of your TV.
é If you want the loudspeakers of your TV to act
as centre speaker, also connect an audio cable
to the MultiChannel surround receiver
CENTRE OUT connector and to the CENTRE
IN connector at the back of your TV.
“ Select Centre input On in the Source menu;
See p. 9.The loudspeakers of the TV will now
only produce centre sound.
‘ If necessary, adjust the volume level of the
centre sound in the
Centre in volume menu
item of the Source menu.The overall volume
has to be controlled via the MultiChannel
surround receiver.
Press the v key on the remote control repeatedly to select EXT1, EXT2, EXT3, EXT4 or SIDE
according to where you connected your equipment at the back or the right side of your TV.
Remark : Most equipment (decoder, recorder) carries out the switching itself, when it is switched on.
Cinema Link surround receiver
See the separate supplied Cinema Link instruction manual.
Attention: the sound info on screen will not correspond with the actual sound reproduction.
Recorder or DVD with EasyLink
The recorder (VCR or DVD+RW) or DVD can be
operated with the remote control via the
Recorder or DV D menu on screen.
Recorder
Òp‡π † ® Ï
Rwd Play Stop Play Ffw Rec Eject
Òp ‡ π † Ï
Prev. Play Stop Play Next Eject
DVD
24
& Press the MENU Ï key on the remote
control.
é Select the Recorder or DVD menu with the
cursor up/down.
“ Press the cursor left/right, up/down to select
one of the recorder or DVD functions.
If your EasyLink recorder has the system standby
function, when you press the B key for 3 seconds,
both TV and the recorder are switched to standby.
Page 27
Audio- and video equipment keys
B
b
¬
+
-
V
+
-
P
v
b
i
0
h
q
Select
VCR DVD SAT AMP CD
MENU
DVR
OK
123
456
789
0
Ò®‡π
†
Active Control
æ
Ò
†
Ï
Pause Live
REC
This system remote control operates the following Philips equipment:TV,
VCR, DVD, SAT (RC5),AMP (+TUNER), CD;
Press the
display. Another device can be selected by pressing Select repeatedly within
2 seconds.The led will blink slowly to indicate the device.
Press one of the keys on the remote control to operate the peripheral
equipment.
To r eturn to TV mode press Select while the led is blinking.
When no action is taken within 60 seconds, the remote goes back to TV
mode.
Note:When the
RC5/RC6 system select command is transmitted.
Select key to operate any of the equipment indicated in the
Select key is pressed and hold for more than 2 seconds, the
B to switch to standby
® for record,
Ò for rewind (
search down (
VCR, CD);
DVD , AMP)
‡ for stop
π for play
† for fast forward (
search up (
VCR, CD);
DVD/AMP)
æ to select your choice of
subtitle language (
RDS news/TA (
to shuffle play (
b to select a
RDS display (
info on screen (
DVD );
AMP);
CD)
DVD title;
AMP);
CD)
i display information
Ï to switch the menu on or
off
- P + for chapter, channel, track
selection
0 to 9 digit entry
0 tape index (
VCR),
select a DVD chapter,
select a frequency (
U VCR timer
Q surround on/off (
AMP, CD)
cursor up/down
to select the next or the
previous disc (
CD)
cursor left/right
to select the previous or
following track (
CD)
Additionally the DVD, SAT and CD indicator can be programmed to
operate the DVD-R, SAT (RC6), CD-R instead.
& Press the Select key repeatedly until no LED is lit.
é To program DVD-R,press the OK key + digit 2.
To program
To program
From now on, when the corresponding (
SAT (RC6),press the OK key + digit 4.
CD-R,press the OK key + digit 6.
DVD , SAT, CD) indicator is
selected, the remote control will operate your DVD-R, SAT (RC6) or
CD-R.
Note:To return to the modes programmed in the factory, either remove the
batteries for a few minutes, or press the OK key + digit 1 (DVD mode); or +
digit 3 (SAT-RC5) or + digit 5 (CD mode).
AMP)
25
Page 28

Tips
Care of the screen Clean the TV with a slightly damp soft cloth. Do not use abrasive solvent as it can
damage the TV screen.
Poor Picture •Have you selected the correct TV system in the manual installation menu?
• Is your TV or house aerial located too close to loudspeakers, non-earthed audio
equipment or neon lights, etc.?
• Mountains or high buildings can cause double pictures or ghost images.
Sometimes you can improve the picture quality by changing the direction of the
aerial.
• Is the picture or teletext unrecognisable? Check if you have entered the correct
frequency. See Installation, p. 6.
•Are brightness, sharpness and contrast out of adjustment? Select Factory
settings in the Setup, General menu, p. 8.
• Sometimes poor picture quality is possible when having activated an S-VHS
camera or camcorder connected to the right side of your TV and another
peripheral is connected to one of the externals at the same time. In this case
switch off one of the other peripherals.
Digital distortion The low quality of some digital picture material may be the cause of digital image
distortion. In this case select the Soft setting using the Picture menu, Smart
Picture, without changing the picture settings manually.
No picture • Is the aerial connected properly?
•Are the plugs tightly connected in the aerial socket?
• Is the aerial cable in good condition and does it have suitable plugs?
No sound • No sound on any channel? Check the volume isn’t at minimum.
• Is the sound interrupted with the mute key ¬? Check if your speaker
configuration corresponds with the selections made in the Setup menu,
Speakers, p. 7.
• No sound from the connected audio receiver? Select Centre input Off in the
Source menu, see p. 9.
No Surround •Perhaps the channel is not broadcasting good quality surround sound.
sound • No sound from the rear speakers or the centre speakers? Select an appropriate
surround mode, according to the broadcasted sound signal or adjust the
volume. See Surround Modes, p. 12.
No solution found Switch your TV off and then on again once. Never attempt to repair a defective
for your picture or TV yourself. Check with your dealer or call a TV technician.
sound problem ?
Menu
Have you selected the wrong menu? Press the MENU Ï key again to exit from
the menu.
NEXTVIEW No NEXTVIEW info:
See Acquisition and updating of NEXTVIEW information, p. 16.
Displayed time is wrong:
The broadcaster on programme number one does not transmit the correct local
date and time. Use Reshuffle in the installation menu to place another broadcaster
on programme number one.
Remote control • If your TV no longer responds to the remote control, the batteries may be dead.
• Check if the remote control is in the correct mode.
•You can still use the
Standby Your TV consumes energy in the standby mode. Energy consumption contributes
M key and the -/+ keys at the top of your TV.
to air and water pollution.
Power consumption: 1,1 W.
26
Page 29

Inhaltsverzeichnis
Einstellung
Hilfe ?
Falls Sie in der Bedienungsanleitung keine Antworten auf Ihre
Fragen finden sollten, oder die
genannten ‘Nützliche Hinweise’
Ihre Probleme nicht lösen, dann
können Sie beim örtlichen Philips
Info- oder Service Center anrufen.
Siehe dazu auch die beiliegende
World-Wide Guarantee Broschüre.
Bitte halten Sie die Produktbezeichnung und Modellnummer
bereit - welche Sie an der
Rückwand des Fernsehgerätes
oder an der Verpackung finden bevor Sie bei der Hotline anrufen.
Model: 32PW9768
Product No: .............................................
R Entsorgungs-Richtlinien
Philips legt größten Wert auf die
Herstellung umweltverträglicher
Produkte im Rahmen eines
umfassenden Umweltprogramms.
Ihr neues Fernsehgerät enthält
Materialien, die rückgewonnen und
wiederverwertet werden können.
Spezialbetriebe können die
ausrangierten Geräte in Ihre
Bestandteile zerlegen und die
wiederverwertbaren Materialien
sammeln. Damit verringert sich die
Menge der Materialien, die
entsorgt werden müssen. Bitte,
erkundigen Sie sich nach den
örtlichen Bestimmungen, hinsichtlich
der Entsorgung Ihres alten Gerätes.
Vorbereitung ..................................................................................... 2
Die Tasten oben am Fernsehgerät ............................................... 2
Ihre Fernbedienung ...................................................................... 3-4
Benutzung der Menüs ..................................................................... 5
Wahl der Menüsprache und des Landes .................................... 5
Speichern der Fernsehsender ....................................................... 6
Automatische Einstellung ........................................................ 6
Manuelle Einstellung ................................................................. 6
Namen geben ............................................................................ 6
Umprogrammieren ................................................................... 7
Vorzugsprogramme wählen .................................................... 7
Grundeinstellung .............................................................................. 7
Lautsprecher ................................................................................... 7
Allgemein ................................................................................ 8-9
Quelle .......................................................................................... 9
Decoder ...................................................................................... 9
Demo ................................................................................................ 10
Bedienung
TV Menü
Bildmenü ............................................................................. 10-11
Tonmenü ............................................................................. 11-12
Menü der Sonderfunktionen .......................................... 12-13
Dual Bild / PIP / Multipip ...............................................................14
NEXTVIEW/Videotext Guide ................................................... 15-16
Videotext ................................................................................... 17-18
Flex TV ....................................................................................... 19-22
Periphere A/V-Geräte anschließen
Anschluß und Wahl der Geräte ........................................... 23-24
Audio- und Videogeräte-Tasten .................................................. 25
Nützliche Hinweise ................................................................. 26
Deutsch
Die EasyLink-Wahlmöglichkeiten stützen sich auf das Prinzip der
"Bedienung mittels einer einzigen Taste". Das bedeutet, daß eine
bestimmte Anzahl aufeinanderfolgender Handlungen zur gleichen Zeit
durchgeführt werden, z.B. sowohl am Fernsehgerät wie auch am
Videorecorder, wenn beide mit einer EasyLink-Steuerung versehen und
über ein Euro-A/V-Kabel, das mit dem Videorecorder geliefert wird,
verbunden sind.
1
Page 30

Vorbereitung
1m
min.
V
P
M
MENU/OK
& Stellen Sie das Fernsehgerät auf einen festen
Untergrund.
! 32PW9768: 60 Kg !
Lassen Sie zur Belüftung an allen Seiten
mindestens 5 cm, um das Gerät herum frei.
Stellen Sie das TV-Gerät nicht auf einen Teppich.
Zur Vermeidung möglicher Gefahren, bitte keine
Gegenstände auf das Gerät stellen.Vermeiden
Sie, daß das Fernsehgerät in der Nähe einer
Hitzequelle oder an einem Platz in der prallen
Sonne aufgestellt wird, und jeden direkten
Kontakt mit Regen oder Wasser.
é Stecken Sie den Antennenstecker fest in die
Antennenbuchse x an der Rückseite des
Fernsehgerätes. Benutzen Sie das dem Gerät
beiliegende Spezial-Antennenkabel
“ Schließen Sie das Fernsehgerät an eine
Netzsteckdose mit eine Netzspannung von
220V-240V.
‘ Fernbedienung: Legen Sie die beiden
mitgelieferten Batterien (Typ R6-1,5V) ein.
Die mitgelieferten Batterien enthalten nicht die
Schwermetalle Quecksilber und Kadmium. Bitte,
erkundigen Sie sich, wie leere Batterien, den örtlichen
Vorschriften entsprechend, zu entsorgen sind.
( Fernsehgerät einschalten: Drücken Sie die
Netztaste A vorne am Fernsehgerät. Ein Licht
und der Bildschirm leuchten auf.Wenn das
Fernsehgerät im Bereitsschaftsstand steht (rotes
Licht), die Tasten
-P+ auf der Fernbedienung
drücken.
Die Tasten oben am Fernsehgerät
TV
Konfig.
Demo
Einstell.
Beenden
2
2
Bild Ton Sonderfkt
Falls Ihre Fernbedienung unauffindbar ist oder nicht
funktioniert, können Sie trotzdem einige Einstellungen mit den Tasten oben am Fernsehgerät
ändern.
Drücken Sie:
• die V - oder + Taste, um die Lautstärke zu
regulieren.
• die Tasten -P+, um die entsprechenden
Fernsehsender oder Quellen auszuwählen.
Die Taste
M kann dazu verwendet werden, das
Hauptmenü ohne die Fernbedienung abzurufen.
Benutzen Sie:
• die Tasten V - und + sowie die Tasten
P- und P+,
um die Menüpunkte in den angegebenen
Richtungen auszuwählen.
• die
M-Taste, um Ihre Wahl zu bestätigen
Achtung!
Wenn das Menü über die Taste
gerät aktiviert wird, können Sie nur über
M oben am Fernseh-
Beenden das
Menü verlassen.
Beenden anwählen und die Taste M drücken.
Page 31

Benutzung der Fernbedienung RC4303
Benutzung der Fernbedienung
RC4303
Achtung! Für die meisten Tasten gilt, dass die Funktion aktiviert wird, wenn die Taste einmal gedrückt wird.
Durch nochmaliges Drücken wird die Funktion deaktiviert.Wenn eine Taste mehrere Optionen umfasst, wird eine
kurze Übersicht angezeigt. Mehrmals drücken, um den nächsten Punkt in der Liste auszuwählen.
Die Liste wird nach 4 Sekunden automatisch ausgeblendet.
OK drücken, um sie sofort auszublenden.
B Bereitschaft
VCR DVD SAT AMP CD
Audio- und Videogeräte-Tasten
(S. 25)
v A/V-Geräte wählen
(S. 24)
®Ò‡π†
Audio- und Videogeräte-Tasten
(S. 25)
REC / DVR / PAUSE / LIVE
Funktionen des Flex-TV
(Fernseh) Geräts, siehe S. 19
U Zeitanzeige
Die Zeit erscheint auf dem
Bildschirm.
Q Raumklang
Drücken Sie mehrmals diese
B
VCR DVD SAT AMP CD
Select
v
Ò®‡π
REC
æ
OK
¬
†
Ò
DVR
+
V
-
†
b
MENU
Ï
+
P
-
Drücken Sie, um das Fernsehgerät ein- oder auszuschalten.
Das Fernsehgerät ist ausgeschaltet und die rote LED-Anzeige
leuchtet auf.
x Pixel Plus Demo ein/aus
Im rechten Teil werden Pixel Plus
und Digital Natural Motion
eingeschaltet.
b Videotext ein/aus S. 17
Die Taste
b drücken, um
Videotext auf der rechten Hälfte
des Bildschirms anzuzeigen.
OK Drücken Sie diese Taste
• um Ihre Wahl in die Menüs
einzugeben.
• um die Programmliste
anzuzeigen.
Taste, um einen anderen
verfügbaren Raumklang Modus zu
wählen.
Ì Cinema Go
Siehe die separat mitgelieferte
CinemaLink-Bedienungsanleitung.
æ NEXTVIEW ein/aus S. 15
b drücken, um die NEXTVIEW/
Videotext-Übersicht auf der
rechten Hälfte des Bildschirms
anzuzeigen.
123
456
789
i
Active Control
b
Pause Live
h
0
0
q
Ï Hauptmenü siehe S. 5
V Um die Lautstärke zu regeln.
¬ Unterbricht den Ton oder
schaltet ihn wieder ein.
Fernsehsender wählen
P
Um die in der Favoritenliste
gespeicherten Fernsehsender und
Quellen zu durchlaufen.
0/9 Zifferntasten
Um einen Fernsehsender zu
wählen. Bei einer zweistelligen
Programmnummer die zweite
Ziffer eingeben, bevor der Strich
verschwindet. Um unmittelbar auf
einen gewählten Fernsehsender
mit einstelliger Nummer zu
schalten, müssen Sie die
Zifferntaste ein bisschen länger
gedrückt halten.
3
Page 32

B
b
¬
+
-
V
+
-
P
v
b
i
0
h
q
Select
VCR DVD SAT AMP CD
MENU
DVR
OK
123
456
789
0
Ò®‡π
†
Active Control
æ
Ò
†
Ï
Pause Live
REC
i Bildschirmanzeige
Drücken Sie, um Informationen zu zeigen in Bezug auf den gewählten
Fernsehsender und das gewählte Programm.
Menü/Fernbedieningsinformation
Wenn ein Menü am Bildschirm zu sehen ist, i drücken, um
Informationen über den ausgewählten Menüpunkt anzuzeigen.Für
Informationen über die Fernbedienungs-Funktionen, während die MenüInformationen gezeigt werden, irgendeine Taste auf der Fernbedienung
drücken.
Die normale Funktion der Taste wird nicht ausgeführt.
0 Smart surf / NEXTVIEW Themen
Mit dieser Taste können Sie leicht umschalten zwischen 2 bis max. 9
verschiedenen Fernsehsendern oder Quellen oder schnell
Fernsehprogramme auswählen, wenn
NEXTVIEW mit definierten Themen
gesendet wird. Siehe unter Allgemein, Smart Surf, S. 8.
Die Taste
das Smart Surf-Bildschirm zu verlassen.
OK drücken oder warten, bis die nötige Zeit verstrichen ist, um
b Dual Bild / PIP / Multipip
Siehe S. 8 und p. S. 14.
h Active control siehe S. 11.
q Bildformat
Drücken Sie wiederholt diese Taste oder drücken Sie die Cursor-Taste
auf/ab, um ein anderes Bildformat zu wählen:Autom. Format, Super Zoom,
4:3, Zoom 14:9, Zoom 16:9, Untertitel Zoom, Breitbild.
Autom. Format Super Zoom 4:3 Zoom 14:9
Zoom 16:9 Untertitel Zoom Breitbild
Mit dem Autom. Format wird das Bildschirm möglichst viel mit dem Bild
gefüllt. Im Falle von Untertiteln im schwarzen Streifen unten auf dem
Schirm macht Autom. Format diese Untertitel sichtbar. Wenn Untertitel
nur teilweise sichtbar sind, die Cursor-Taste auf drücken..
Ein Logo eines Fernsehsenders in der Ecke des schwarzen Streifens oben
auf dem Bildschirm erscheint nicht auf dem Schirm.
Super Zoom entfernt die schwarzen Streifen auf den Seiten von 4:3Programmen, mit einem Minimum an Verzerrung.
In Zoom 14:9, 16:9 oder Super Zoom können Sie die Untertitel sichtbar
machen, indem Sie die Cursor-Taste auf/ab benutzen.
4
Page 33

Benutzung der Menüs
B
b
¬
+
-
V
+
-
P
v
Select
VCR DVD SAT AMP CD
MENU
DVR
OK
Ò®‡π
†
æ
Ò
†
Ï
REC
Menü-Punkt
wählen
OK-Taste zum
aktivieren
Menü ein- oder
ausschalten
Drücken Sie die i-Taste auf der
Fernbedienung, um Informationen
in Bezug auf die selektierte
Menüwahlmöglichkeit zu erhalten.
& Drücken Sie auf die MENU Ï-Taste auf der Fernbedienung,
so daß Sie zum Hauptmenü kommen. Sie können jederzeit
das Menü verlassen, indem Sie erneut die
MENU Ï-Taste
drücken.
Anmerkung: Falls das Gerät mit Cinema Link verbunden ist, sind
mehr Menüpunkte vorhanden.
TV
Bild Ton Sonderfkt
Konfig.
Demo
Einstell.
é Benutzen Sie die Cursor-Tasten auf/ab, um TV, Konfig.,
Demo oder Einstell. zu wählen.
Die Cursor-Taste nach links/nach rechts drücken, um
Bild,
To n oder Sonderfunktionen auszuwählen.
Anmerkung: Manchmal sind nicht alle Menüpunkte am Bildschirm
zu sehen (angezeigt durch eine Gruppe blauer Punkte). Benutzen
Sie die Cursortaste ab oder rechts, um alle Menüpunkte
erscheinen zu lassen.
“ Benutzen Sie die Cursor-Tasten links/rechts, um die
Menüwahlmöglichkeit zu wählen.
‘ Benutzen Sie wiederum die Cursor-Tasten auf/ab, um die
Einstellung, die Sie wählen oder anpassen wollen, zu wählen.
Achtung: Zeitweilig nicht verfügbare oder nicht relevante
Funktionen werden in hellgrauer Farbe angezeigt und können nicht
ausgewählt werden.
Einstellung
Das Einstellungsmenü enthält die nachfolgenden Punkte:
Sprache Land Autom. Manuelle Namen Umpro- Vorzugs-
Einstell.
EasyLink
Wenn Ihr Videorecorder über eine EasyLink-Funktion verfügt, werden während der Einstellung die Spracheinstellung,
die Ländereinstellung und die verfügbaren Programme automatisch an den Videorecorder weitergeleitet
Ihre Menüsprache und Ihr Land wählen
Deutsch
Français
Österreich
Kroatien
Sprache
English
Land
Belgien
Einstell.
Einstell.
Einstell. Einstell. zuweisen grammieren programme
& Drücken Sie die MENU Ï-Taste auf der Fernbedienung.
é Benutzen Sie die Cursor-Taste ab, um Einstell. zu wählen.
“ Benutzen Sie die Cursor-Taste rechts um Sprache zu
wählen. Befolgen Sie die Anweisungen auf dem Schirm.
‘ Benutzen Sie die Cursor-Tasten auf/ab, um Ihre Sprache zu
wählen und drücken Sie die
OK-Taste, um Ihre Auswahl zu
bestätigen.
( Benutzen Sie die Cursor-Taste rechts, um Land zu wählen.
§ Wählen Sie das jeweilige Land, in der Sie sich jetzt befinden
und drücken Sie die
OK-Taste. Weitere wählen, wenn keines
der angegebenen Länder zutrifft.
è Gehen Sie weiter zum Einstellungsmenü.
5
Page 34

Fernsehsender speichern
Wenn die Sprach- und Ländereinstellungen korrekt eingestellt sind, können Sie jetzt die Fernsehsender auf
zwei verschiedene Weisen suchen und speichern: durch automatische Einstellung oder manuelle Einstellung
(Feinabstimmung der einzelnen Sender). Ihre Auswahl mit der Cursor-Taste nach rechts vornehmen.
Automatische Einstellung
Einstell.
& Wählen Sie Autom. Einstell. im Einstellungs-
Menü.
Bemerkung: Für keinen einzigen Sender darf die
Sicherung eingeschaltet sein, wenn Sie automatisch
einstellen wollen.Wenn nötig, geben Sie Ihren Code
ein, um die Sicherung für alle Sender auszuschalten.
(Siehe TV, Menü Sonderfkt, Kindersicherung, S. 13.)
é Drücken Sie auf die Cursortaste ab. Die
Textzeile
erscheint.
Manuelle Einstellung
Einstell.
Autom. Einstellung
Einstell. Start
Start für die automatische Einstellung
Manuelle Einstellung
Wahl-Modus
System
Programme
Suchen
Feinabstimmung
Speichern
Das Suchen und Speichern von Fernsehsendern wird Sender für
Sender vorgenommen. Sie müssen jeden Schritt des ManuelleEinstellung-Menüs durchlaufen.
& Wählen Sie Manuelle Einstellung im Einstellungsmenü.
é Drücken Sie auf die Cursortaste ab.
Befolgen Sie die Anweisungen auf dem Schirm.
Bemerkung: Suchen oder selbst einen Fernsehsender eingeben:
Wenn Sie die Frequenz oder die E- bzw S-Sendernummer kennen,
geben Sie direkt die 3 Ziffern oder die Frequenz mit den Zifferntasten
0 bis 9 ein (e.g. 048). Drücken Sie auf die Cursortaste ab, um weiter
zu gehen.
Wiederholen, wenn Sie einen anderen Fernsehsender speichern
wollen.
“ Drücken Sie auf die rechte Cursortaste.
‘ Die Textzeile Suchlauf erscheint und der
Suchlauf wird auf dem Schirm gezeigt.
Falls ein Kabelsystem oder ein Fernsehsender,
das/der ACI (Automatic Channel Installation)
unterstützt, erkannt wird, erscheint eine ProgrammListe. Ohne ACI werden die Fernsehsender
entsprechend Ihrer Sprachauswahl und Ihrer
Ländereinstellung nummeriert. Mit Änderung der
Programmliste können Sie diese neu nummerieren.
Siehe S. 7.
Es ist möglich, daß der Kabelnetzbetreiber ein eigenes
Kanalwählmenü ausstrahlt. Die Aufmachung und der
Inhalt sind von der Kabelfernsehgesellschaft vorgegeben.
Wählen Sie zwischen den angebotenen Möglichkeiten
mit den Cursor-Tasten, und drücken Sie die
OK-Taste.
Namen zuweisen
Einstell.
Es ist möglich, einen gespeicherten Sendernamen zu
ändern, oder jenen Kanälen einen Namen zu geben,
für die noch keiner vergeben wurde. Den
Programmnummern 0 bis 99 kann ein Name von
höchstens 5 Buchstaben oder Ziffern zugeordnet
werden.
& Wählen Sie Namen zuweisen im Menü
Einstell., und drücken Sie die Cursor-Taste ab.
é Wählen Sie die Programmnummer.
6
Namen zuweisen
VCR1
BBC1
BBC2
CNN
TVE
.....
pπ
® Space ® Löschen
ABCDEFG 123
HIJKLMN 456
OPQRSTU 789
VWXYZ 0
® Shift ® Weitere
Bemerkung: Drücken Sie nach wie vor auf die
Cursor-Taste auf/ab, um durch die Programmliste zu
navigieren.
“ Drücken Sie die rechte Cursor-Taste.
Auf dem Schirm erscheint eine Tastatur.
Die Cursor-Taste rechts drücken, um die Liste
zu aktivieren. Drücken Sie die Cursor-Taste
auf/ab, links/rechts, um den ersten Buchstaben
zu wählen und drücken Sie die
Wählen Sie
Space, um einen Zwischenraum
OK-Taste.
einzugeben; Löschen,um den Buchstaben, der
im eingegebenen Namen aufleuchtet, zu
löschen;
Shift, um große oder kleine
Buchstaben auf der Tastatur zu wählen;
Weitere um ein Sonderzeichen auf der Tastatur
anzugeben. Drücken Sie
‘ Drücken Sie die Cursor-Taste mehrmals links,
OK zum Bestätigung.
nachdem Sie den Namen eingegeben haben.
( Wählen Sie eine andere Programmnummer und
wiederholen Sie die Schritte
“ bis ‘.
Page 35

Änderung der Programmliste
Die zugewiesenen Programmnummern können
nach eigener Wahl neu geordnet werden.
& Wählen Sie Umprogrammieren im
Einstellungsmenü.
é Befolgen Sie die Anweisungen auf dem Schirm.
Vorzugsprogramme wählen
& Wählen Sie Vorzugsprogramme im
Einstellungsmenü.
é Wählen Sie Ihre Vorzugsprogrammnummer mit
den Cursor-Tasten auf/ab.
“ Wählen Sie ja oder nein mit den Cursor-Tasten
links/rechts.
‘ Wiederholen Sie é und “ für jeden Fernseh-
sender oder für jedes periphere Gerät, den/das
Sie zu einem bevorzugten oder nicht
bevorzugten Sender oder peripheren Gerät
machen wollen.
Konfiguration
Lautspr. Allgem. Quelle Decoder
Konfig.
Testsignal
Balance
Lautst. Center
(Lautst. Raumklang)
Raumklang Lautspr.
Autom. Raumklang
Lautsprecher
Ihr Fernsehgerät ist mit eingebauten Lautsprechern
vorne links, rechts und in der Mitte ausgestattet,
die für Stereo, Dolby 3 Stereo und 3D Raumklang
konzipiert sind. Für einen vollständigen Dolby Pro
Logic und Hall Raumklang benutzen Sie zwei
Raumklang-Lautsprecher mit Verstärkung, die an
der Hinterseite des Fernsehgerätes angeschlossen
sind. Siehe Zusatzlautsprecher/Verstärker, S. 24.
Abhängig vom gewählten Ausgangs- und
Raumklangmodus (siehe Hauptmenü,TV,
Raumklang,Tonmodus, S. 12) ist es möglich, daß
manche Menüwahlmöglichkeiten in grau dargestellt
sind und sich nicht selektieren lassen.
Testsignal Einstellungen
Die Menüwahlmöglichkeit
Ihnen, für die Lautstärke der Lautsprecher einen
Bezugswert zu haben und deren Balance zueinander
anzupassen.
& Wählen Sie Testsignal und drücken Sie die
Cursor-Taste rechts.
é Nachdem Sie Ein gewählt haben, wird dieses
Tonsignal fortwährend durch den linken
Lautsprecher, den Lautsprecher Zentrum, den
rechten Lautsprecher und beide Raumklanglautsprecher hinten (wenn angeschlossen)
gesendet.
Testsignal ermöglicht es
Das Menü Konfiguration enthält Wahlmöglichkeiten, die
sorgen für die Einstellungen der verschiedenen
Funktionen, Sonderfunktionen und Leistungen Ihres
Fernsehgeräts, und für die Einstellungen von eventuell an
Ihr Fernsehgerät angeschlossenen peripheren Geräten.
Das Menü
Lautsprecher enthält die Einstellungen in
Bezug auf die Lautsprecher.
Im Menü
Allgemein können Sie verschiedene
Einstellungen ändern, die vermutlich weniger oft
angepasst werden als andere Einstellungen.
Im Menü
Im Menü
Quelle können Sie eine Quelle selektieren.
Decoder können Sie eine oder mehrere
Programmnummern als bevorzugte DecoderProgrammplätze definieren.
“ Drücken Sie die Cursor-Taste auf/ab, um den
gewünschten Lautsprecher, dessen individuelle
Lautstärke Sie anpassen möchten, zu wählen.
‘ Drücken Sie die Cursor-Taste links/rechts, um
die Lautstärke anzupassen.
Raumklanglautsprecher
Siehe Periphere Geräte anschließen,
Zusatzlautsprechter/ Verstärker anschließen,
S. 24.Wenn keine Raumklang-lautsprecher
angeschlossen sind, dürfen Sie die Werksvoreinstellung, das heißt
Aus, nicht ändern.
Wenn Raumklanglautsprecher angeschlossen
sind, wählen Sie
Ein. (Dolby Pro Logic und Hall
sind nicht erhältlich, wenn Aus gewählt ist.)
Automatische Raumklang
Manchmal überträgt ein Sender besondere
Signale für Programme, die im Raumklang
ausgestrahlt werden. Das TV-Gerät schaltet
automatisch in den bestmöglichen Surround
Sound-Modus, wenn die Funktion
Raumklang ein
geschaltet ist.
Autom.
Es ist immerhin möglich, diesen Raumklangmodus abzuschalten.
7
Page 36

Allgemein
Konfig.
Menü-Hintergrund
Smart Surf
Dual Bildformat
Werksvoreinstell.
NEXTVIEW Anbieter
Regelung Bildlage
Programmtitel
Videotext 2.5
Aufnahmequalität
Code eingeben/ändern
Über dieses Menü können Sie verschiedene
Einstellungen ändern, die vermutlich weniger oft
angepaßt werden als andere Einstellungen.
Drücken Sie die Taste i auf der
Fernbedienung, wenn Sie nähere Informationen
über den jeweils ausgewählten Menüpunkt
haben möchten.
Smart Surf
& Wählen Sie Smart Surf.
é Mit den Cursor-Tasten links/rechts, wählen Sie
•
2 Programme,wenn Sie mit der Taste 0
vom jetzigen auf den vorigen gewählten
Sender umschalten wollen,
•
9 Programme,wenn Sie mit der Taste 0
eine Liste von höchstens 9 Sendern, die
gewählt werden können, abrufen wollen,
•
Thema, falls Sie mit der Taste 0 schnell
Fernsehprogramme auswählen möchten, wenn
NEXTVIEW
wird.
Um einen neuen Sender oder eine neue
Quelle hinzuzufügen/zu entfernen:
Stellen Sie das Fernsehgerät auf den Sender
oder die Quelle, den/die Sie hinzufügen oder
entfernen wollen. Drücken Sie die Taste 0 und
drücken Sie die Cursor-Taste rechts, um
hinzuzufügen/zu entfernen.
Bemerkung: Wenn das Verzeichnis schon neun
Sender/Quellen enthält, wird dieser/diese, der/die
sich unten befindet, entfernt werden
Dual Bildformat
Über dieses Menü können Sie das von Ihnen
gewünschte Format auswählen, das dann
dargestellt werden kann, indem Sie die Taste
b ein- und ausschalten. Siehe Dual
Bild/PIP/Multipip, S. 14.
Dual Bild, PIP,PIP 3 oder PIP 12 auswählen
mit der Cursor-Taste ab.
Allgem.
OSD
mit definierten Themen gesendet
Wenn Dual Bild über die Taste b auf der
Fernbedienung aktiviert ist und wenn:
•
Dual Bild ausgewählt wurde, wird der FS-
Bildschirm in zwei gleich große Teile aufgeteilt.
•
PIP ausgewählt wurde, wird das Fernsehgerät
ein vollständiges Bild mit einem PIP-Schirm
anzeigen;
•
PIP 3 oder PIP 12 ausgewählt wurde, wird das
Fernsehgerät 3 oder 12 PIP-Schirme anzeigen.
Werksvoreinstellungen
Mit dieser Funktion werden die Bild- und
Toneinstellungen auf die Werksvoreinstellungen
zurückgesetzt, bleiben aber die Einstellungen für
die Senderauswahl erhalten.
NEXTVIEW Anbieter
Ein Fernsehsender auswählen, der
Daten anbietet.Wie Sie
NEX
TVIEW
NEXTVIEW-
verwenden
sollen, siehe Seite 15.
OSD (On Screen Display-Bildschirmanzeige)
Siehe Benutzung der Fernbedienung, S. 4, i.
& Wählen Sie OSD.
é Wählen Sie Normal, um die ununterbrochene
Wiedergabe der Programmnummer sowie die
vergrößerte Wiedergabe des Fernsehsenders
und der Programminformationen auf dem
Schirm zu aktivieren.
Minimum, um die
Wiedergabe von reduzierten Fernsehsenderinformationen zu aktivieren.
Bemerkung: Wenn Untertitel eingeschaltet ist, siehe
Sonderfkt, S. 12, ist eine ununterbrochene
Wiedergabe der Programmnummer nicht möglich.
Videotext 2.5
Manche Sender bieten die Möglichkeit, auf den
Videotextseiten mehr Farben, andere Hintergrundfarben und schönere Bilder einzustellen.
& Wählen Sie Videotext 2.5.
é Drücken Sie die Cursor rechts, um Videotext
zu wählen, wenn Sie diese Einstellung
2.5 Ja
benutzen wollen.
“ Drücken Sie erneut die Cursor-Taste rechts, um
Videotext 2.5 Nein zu wählen, wenn Sie das
neutralere Layout der Videotextseiten
bevorzugen. Diese Wahl gilt für alle Sender, die
Videotext ausstrahlen.
Bemerkung : Es kann einige Sekunden dauern, bevor
Videotext auf Videotext 2.5 umschaltet.
Aufnahmequalität
Siehe Flex-TV, Aufnahmequalität bei
Sofortaufnahme ändern, S. 22.
8
Page 37

Code eingeben/ändern
Mit der Einstellung Kindersicherung (siehe TV,
Sonderfkt, S. 13) können Sie dafür sorgen, daß
Kinder sich bestimmte Programme nicht
anschauen können. Um die Sicherung auszuschalten, sollen Sie eine Zugangszahl eingeben.
Dank der Menüwahlmöglichkeit Code eingeben/
ändern können Sie eine Persönliche Identifikationsnummer (PIN) eingeben oder ändern.
& Wählen Sie Code eingeben/ändern.
é Wenn noch keine Code besteht, erscheint im
Menü
Code eingeben.
Wenn zuvor schon eine Code eingegeben
wurde, erscheint im Menü
Code ändern.
Befolgen Sie die Anweisungen auf dem Schirm.
Wichtig : Sie haben Ihre Code vergessen !
& Wählen Sie Code ändern im Menü Allgemein,
und drücken Sie
é Drücken Sie die Cursor-Taste rechts, und geben
OK.
Sie den vorrangigen Code 8-8-8-8 ein.
“ Drücken Sie wiederum die Cursor-Taste und
geben Sie einen neuen persönlichen vierstelligen
Code ein. Die vorige Code wird gelöscht und
der neue Code wird gespeichert.
Quelle
Konfig.
Quelle
EXT1
EXT2
EXT3
EXT4
Side
Center Eingang
Center-Lautst.
Mit diesem Menü können Sie das periphere Gerät,
das Sie an einen der externen Eingänge
angeschlossen haben, wählen.
& Drücken Sie die Cursor-Taste rechts, um zur
Liste der verschiedenen Namen von peripheren
Geräten, die mit dem gewählten Eingang
verbunden ist, Zugang zu haben.
é Wählen Sie das periphere Gerät, indem Sie die
Cursor-Taste auf/ab benutzen.
Nachdem Sie die Quelle, zum Beispiel DVD,
gewählt haben, wird diese Quelle automatisch
gewählt werden, wenn Ihre Fernbedienung sich
im DVD-Modus befindet, siehe S. 3, und wenn
Sie die Taste v auf der Fernbedienung
drücken.
Decoder
Konfig.
Falls Sie einen Decoder angeschlossen haben, siehe
S. 23, können Sie eine oder mehrere Programmnummern als bevorzugte Decoder-Programmplätze
definieren.
& Wählen Sie Decoder mit den Cursor-Tasten
rechts.
é Wählen Sie Programme.
Decoder
Programme
Status
Center Eingang - Center-Lautstärke
Wenn Sie einen Raumklang-Empfänger an das
Fernsehgerät angeschlossen haben, siehe S. 24,
können die Lautsprecher des Fernsehgeräts als
mittlerer Lautsprecher fungieren, so dass ein
separater mittlerer Lautsprecher unnötig ist.
Wählen Sie
Link
Center Eingang Ein oder Cinema
aus (falls Sie einen Cinema Link
Raumklang-Empfänger angeschlossen haben).
Nachdem Sie
Ein ausgewählt haben, können Sie
mit der Cursortaste links/rechts die Lautstärke
Zentrum nachstellen, damit Unterschiede in der
Lautstärke des externen Audioempfängers und
der Lautsprecher ausgeglichen werden können.
Bemerkung : Dies ist nicht möglich mit einem
Cinema Link Raumklang-Empfänger.
“ Wählen Sie die Programmnummer, unter der
Sie das Programm von Ihrem Decoder
gespeichert haben.
‘ Wählen Sie Status.
• Wählen Sie den Eingang, die Sie benutzen, um
Ihren Decoder anzuschließen:
EXT2.
• Wählen Sie
Nichts,wenn Sie nicht wollen, daß
Nichts, EXT1,
die gewählte Programmnummer als eine
Decoder-Programmnummer aktiviert wird.
Achtung:
EXT2 auswählen, wenn der Decoder mit Ihrem
EasyLink-Videorecorder verbunden ist.
9
Page 38

Demo
Das Menü Demo zeigt die Fernseheinstellungen
entweder einzeln oder zyklisch.
TV
Konfig.
Demo
Einstell.
Autom. Demo
......
Wenn
Autom. Demo gewählt wurde, werden
automatisch alle Einstellungen nacheinander in
zyklischer Weise gezeigt. Drücken Sie eine der
Cursor-Tasten, um Auto Demo zu stoppen.Wenn
eine der Einstellungen gewählt wurde, wird die
Vorführung dieser Einstellung nur einmal gezeigt,
Demo für Händler - Digitale Optionen
- Lichtsensor
- Kammfilter
und das Menü Demo erscheint aufs neue.
Tr otzdem wird die Flex TV-Demo ununterbrochen
funktionieren, bis sie unterbrochen wird, indem eine
der Cursortasten oder die
OK-Taste auf der
Fernbedienung gedrückt wird.
Bemerkung :
- Demo für Händler gehört nicht zum automatischen
Zyklus und kann nur separat aktiviert werden.
- Die Flex TV-Demo ist nur in 7 Sprachen erhältlich.
TV Menü
Drücken Sie die MENU Ï-Taste auf der Fernbedienung, um das Hauptmenü erscheinen zu lassen.
Drücken Sie die Taste i auf der Fernbedienung, um Informationen über den ausgewählten
Menüpunkt zu erhalten.
Bildmenü
TV
Smart Bild
Kontrast
Helligkeit
Farbsättigung
Schärfe
Farbweiß
Digitale Optionen
Dynamic Contrast
DNR
Farbnachbesserung
(NTSC-Farbton)
Bildformat
Bild Ton Sonderfkt
& Drücken Sie die Cursor-Taste rechts, um Bild zu wählen.
é Wählen Sie die Menüwahlmöglichkeiten im Bildmenü mit der
Cursor-Taste auf/ab.
“ Passen Sie die Einstellungen mit der Cursor-Taste links/rechts an
oder gehen Sie zur Liste von Submenüwahlmöglichkeiten mit der
Cursor-Taste rechts.Wählen Sie eine Submenüwahlmöglichkeit
mit der Cursor-Taste auf/ab.
Bemerkung: Um den Menühintergrund zu entfernen, bevor Sie die
Bildeinstellungen anpassen, siehe Konfiguration, Allgemein, S. 8.
Smart Bild
Smart Bild auswählen, um eine Liste voreingestellter
Bildeinstellungen am Bildschirm zu zeigen, wobei jede
Bildeinstellung spezifischen Werksvoreinstellungen entspricht.
PP-Werte bezieht sich auf die persönlichen für das Bild
gewählten Einstellungen im Bildmenü.
Digitale Optionen
Pixel Plus ist die idealste Einstellung, verdoppelt die horizontale
Auflösung und erhöht die Zeilenzahl um 33%. Sie haben die
Möglichkeit Movie Plus auszuwählen, wenn ein Schatten-Effekt
Sie stören sollte. Sie können, wenn Sie das wünschen, Zeilen
verdoppelt oder 100 Hz Digital Scan auswählen.
Achtung:Wenn 60 Hz NTSC-Material verwendet wird, werden die
Optionen geändert zu Pixel Plus, Movie Plus oder Progressive,
Progressive Scan ohne Bewegungsausgleich.
10
Page 39

Active Control
Das Fernsehgerät misst ständig alle
ankommenden Signale und bessert sie
gegebenenfalls nach, um eine möglichst gute
Bildwiedergabe zu liefern.
& Drücken Sie die h-Taste auf der
Fernbedienung.
é Das Menü Active Control (Aktivregelung)
erscheint.
“ Die Cursor-Taste auf/ab drücken, um die Active
Control-Einstellungen
Aus, Minimum, Mitte
(empfohlen) oder Maximum zu aktivieren.
Die Bildeinstellungen werden ständig und
automatisch optimiert, was am Bildschirm mit
Leisten dargestellt wird. Die Menüpunkte
können nicht angewählt werden.
‘ Die Cursor-Taste rechts drücken, um Smart
anzuwählen.
Bild
( Die Cursor-Taste auf/ab drücken, um eine von
den vordefinierten Bildeinstellungen
auszuwählen.
§ Die Cursor-Taste rechts drücken, um Aktiv
Display
è Die Cursor-Taste auf/ab drücken, um
Menüleisten zeigen anzuwählen, eine von den
Dual Bild Demos oder
anzuwählen.
Aus.
Wenn Sie Dynamic Contrast, Pixel Plus, DNR
(Digitale Rauschunterdrückung) oder Digital
Natural Motion anwählen, wird der Bildschirm
in zwei Teile aufgeteilt: Im linken Teil wird die
ausgewählte Bildqualitätseinstellung
ausgeschaltet; im rechten Teil wird sie
eingeschaltet.
! Die Taste h nochmals drücken, um das Menü
Active Control auszuschalten.
Tonmenü
TV
Smart Ton
Equalizer
Lautstärke
Lautst. Kopfhörer
Raumklang
(Ton I-II)
(Mono/Stereo)
(Nicam/Analog)
(3D Effekt)
Prog. Lautstärke
AVL
To n
& Drücken Sie die Cursor-Taste rechts, um To n zu wählen.
é Wählen Sie die Menüwahlmöglichkeiten im Tonmenü mit der
Cursor-Taste auf/ab und passen Sie die Einstellungen mit der
Cursor-Taste links/rechts an.
Denken Sie daran, daß die Einstellungen sich in der Mitte des
Streifens auf einem normalen, zentralen Niveau befinden.
Smart Ton
Smart Ton anwählen, um eine Liste voreingestellter
Toneinstellungen am Bildschirm anzuzeigen, wobei jede
Einstellung spezifischen Werksvoreinstellungen von Höhen und
Tiefen entspricht.
PP-Werte bezieht sich auf die persönlichen
für den Ton gewählten Einstellungen im Tonmenü.
Bemerkung:
- Manche Menüwahlmöglichkeiten sind nur vorhanden im Falle einer
Cinema Link-Konfiguration und wenn Cinema Link aktiviert ist. Andere
werden vom Audioempfänger gesteuert, und nicht vom Fernsehgerät.
Siehe die separat mitgelieferte Cinema-Link-Bedienungsanweisung.
-Ton X ist nur erhältlich im Falle von Dual-Sound-Sendungen.
- Mono/Stereo kann nur gewählt werden im Falle von analogen
stereophonen Sendungen.
- Nicam/Analog kann nur gewählt werden im Falle von Nicam-Sendungen.
- Manche Menüpunkte sind im Flex-TV-Modus nicht verfügbar.
11
Page 40

Raumklang-Modi
Je nach Ihren persönlichen Wünschen und dem
ausgestrahlten Tonsignal, einen von den RaumklangModi auswählen.
Stereo
Dieser Tonmodus gibt nur die
Tonsignale von links und von rechts
wieder.
Dolby 3 Stereo
(Optimal bei einer Dolby Surround-Sendung)
Die Dolby Pro Logic* Klänge
werden über die Fernsehlautsprecher vorne links, vorne rechts
und in der Mitte hervorgebracht.
3D Raumklang
(Optimal bei einer Dolby Surround-Sendung)
Der 3D-Raumklang ermöglicht es
Ihnen, eine Erfahrung der Wirkung
von Dolby Surround Pro Logic*
zu machen, ohne daß Sie hinten
angeschlossene oder aktivierte Lautsprecher
brauchen. Die graphische Darstellung der
Lautsprecher hinten wird vom Zeichen ®r
ersetzt.Wählen Sie mit dem Cursor
links/rechts die richtige Stärke der
Im Lizenz von Dolby Laboratories hergestellt.‘Dolby’ ‘Pro Logic’ und das doppel D Symbol G sind
Warenzeichen der Dolby Laboratories.
Ve rtrauliche, unveröffentlichte Schriften.© 1992-1997 Dolby Laboratories, Inc.
3D-Effekt.
Hall
Das Tonsignal wird verteilt
über die hinteren
Lautsprecher, was von hinten
aus einen Saaleffekt (Hall)
hervorruft. Der mittlere
Lautsprecher gibt kein einziges
Tonsignal wieder.
Dolby Pro Logic
(Optimal bei einer Dolby Surround-Sendung)
Alle vorderen und hinteren
Lautsprecher geben den
Dolby Surround Pro Logic
Klang wieder. Dieser Ton wird
immer wiedergegeben, wenn
ein Film oder Programm mit
dem Symbol
G Dolby
Surround gekennzeichnet ist.
Hinweis:
•Normaler Stereoton ist nicht immer für die Wiedergabe über die hinteren Surround-Lautsprecher codiert.
•Falls eine Cinema Link-Empfänger-Konfiguration
angeschlossen ist, können nur die Raumklang-Modi des
externen Empfängers ausgewählt werden.
•Pro Logic und Hall können nur wiedergegeben werden,
wenn der Parameter Raumklang-lautsprecher im
Menü Grundeinstellung, Lautsprecher, S. 8, auf Ja
eingestellt ist und hintere Lautsprecher angeschlossen
sind.
•Falls ein Kopfhörer angeschlossen ist, so ist nur der
Surround Mode
Stereo Kopfhörer verfügbar.
Sonderfunktionen Menü
TV
Programmliste
Untertitel
Autom.Abschaltung
Pause-Reset
Kindersich.
Timer Ein
& Drücken Sie die Cursor-Taste rechts, um
Sonderfkt zu wählen.
é Wählen Sie die Menüwahlmöglichkeiten im
Menü Sonderfkt mit der Cursor-Taste auf/ab
und passen Sie die Einstellungen mit der
Cursor-Taste links/rechts.
Drücken Sie die Taste i auf der
Fernbedienung, um Informationen über den
ausgewählten Menüpunkt zu erhalten.
12
Sonderfkt
Aus
Ein
Ein mit Tonstop
Zoom
Programmliste
Drücken Sie die
OK-Taste, um auf den
gewählten Fernsehsender oder auf das gewählte
periphere Gerät umzuschalten.
Untertitel wählen
Die Untertitelungsseite muss für jeden
Fernsehsender gespeichert werden:
Schalten Sie Videotext ein und wählen Sie die
richtige Untertitelseite aus dem VideotextInhaltsverzeichnis. Schalten Sie Videotext aus.
Wenn die Funktion
Ein), werden die Untertitel automatisch in den
(
Untertitel aktiviert ist
ausgewählten Fernsehprogrammen erscheinen,
wenn Untertitel mit ausgestrahlt werden.
Symbol gibt an, daß der Modus eingeschaltet
.Wählen Sie Ein mit Tonstop,wenn Sie
ist
wollen, daß die Untertitel automatisch
wiedergegeben werden, falls der Ton zeitweilig
unterbrochen wurde mit der Taste ¬ auf der
Fernbedienung.
Ein
Page 41

Pause-Reset
Hiermit können Sie den Speicher Ihrer LiveAufnahmen leeren. Siehe S. 19.
Kindersicherung
& Wählen Sie Kindersicherung.
Ve rriegeln
Kindersich.
é Drücken Sie die Cursor-Taste rechts, um zum
Ve rriegelung
Entriegeln
Altersgrenze
Ve rrieg. nach
Programmverr.
Kategorieverr.
Menü Kindersicherung überzugehen. Sie werden
darum gebeten, Ihre Code einzugeben.
Bemerkung : Sie sollen Ihren Kode jedesmal eingeben, bevor Sie zum Menü Kindersicherung gehen.
Wichtig: Sie haben Ihren Code vergessen!
Siehe S. 9.
“ Wählen Sie eine der Menüwahlmöglichkeiten
des Menüs Kindersicherung:
•
Verriegeln wenn Sie alle Sender und externen
Quellen verriegeln wollen.
Verriegelung und drücken Sie die Cursor-Taste
•
rechts. Die Möglichkeiten Altersgrenze und
Kategorieverriegelung sind vorhanden, wenn
NEXTVIEW erhältlich ist.Wählen Sie:
Altersgrenze,wenn Sie die Sicherung für
Programme, die mit einem bestimmten Alter
verbunden sind, einschalten möchten:Aus, 2..
16
-
Verriegeln nach wenn Sie die Sicherung für
alle Programme nach einem bestimmten
Zeitpunkt einschalten wollen. Drücken Sie die
Cursor-Taste rechts, um den Zeitpunkt mittels
der Cursor-Taste auf/ab und rechts einzugeben.
Drücken Sie die
Programmverr. wenn Sie einen bestimmten
-
OK-Taste zur Bestätigung.
Fernsehsender oder eine externe Quelle
sperren wollen.
Kategorieverr.,wenn Sie die Sicherung für
Programme, die mit einem bestimmten Thema
verbunden sind, einschalten möchten : Filme,
Sport, Schauen.... Siehe
•
Entriegeln, um die Sicherung für alle Sender
NEXTVIEW,S.15.
und externen Quellen gleichzeitig
auszuschalten.
Timer Ein
& Wählen Sie Timer Ein.
VCR1
BBC2
Aus
Timer Ein
é Wählen Sie Ein mit den Cursor-Tasten rechts.
“ Drücken Sie wiederum die Cursor-Taste rechts,
Ein
CNN
TVE
π.....
Sonntag
Montag
.......
Tägl.
15:45
um zur Liste der Sender überzugehen.
‘ Wählen Sie den Fernsehsender oder das
periphere Gerät, auf den/das Sie Ihr Fernsehgerät an einem bestimmten Tag und zu einem
bestimmten Zeitpunkt umschalten wollen.
( Drücken Sie wiederum die Cursor-Taste rechts,
um einen Tag der Woche zu wählen oder um
Täglich zu wählen.
§ Drücken Sie nochmals die Cursor-Taste rechts,
um den Zeitpunkt einzugeben mittels der
Zifferntasten oder der Cursor-Taste auf/ab, und
drücken Sie die
è Drücken Sie die MENU Ï-Taste, um das
OK-Taste zur Aktivierung.
Menü auszuschalten.
Bemerkung: Um Ihre Zeitangaben zu überprüfen,
drücken Sie die i-Taste.
Zoom
& Mit der Cursortaste nach unten Zoom
anwählen und dann die Taste OK drücken.
é Die Taste OK drücken, um eine von den Zoom-
Vergrößerungsmöglichkeiten auszuwählen (x1,
x4, x9,x16).
“ Außerdem können Sie das ausgewählte Zoom-
Fenster über den Bildschirm bewegen mit den
Cursor-Tasten auf/ab, links/rechts.
‘ Die MENU Ï-Taste drücken, um die Zoom-
Funktion auszuschalten.
13
Page 42

Dual Bild / PIP / Multipip
Die Taste b drücken, um auf Dual Bild, PIP oder einen von den PIP-Modi
umzuschalten. Die Taste b abermals drücken. Der Bildschirm,der einen
B
VCR DVD SAT AMP CD
Select
v
Ò®‡π
REC
æ
Ò
OK
†
b
†
gelben Seitenrand hatte, füllt jetzt den ganzen Schirm.
Anmerkungen:
-Wenn man die Taste b gedrückt hält, scrollt das Fernsehgerät durch die
verschiedenen Formate und wird nach jeder Sekunde, wo man die Taste gedrückt
hält, ein neues Format aktiviert. Nachdem das Fernsehgerät in den
Bereitschaftsstand geschaltet wurde, werden die in Grundeinstellung, Hauptmenü
gespeicherten Vorzugseinstellungen verwendet.
- Wenn Dual Bild aktiviert wurde, werden zwei Bildformate unterstützt: Full Screen
oder 4:3 Letterbox Bildformat (vertikale Kompression).
- Audio vom rechten Bildschirm oder dem PIP wird den Kopfhörern zugeleitet.
¬
0
Active Control
h
MENU
Ï
+
P
-
Displaymöglichkeiten
Dual Bild PIP
AUX
- Die Cursor-Taste rechts drücken, um den PIP-Bildschirm zu aktivieren.
0
q
- Die Cursor-Taste ab drücken, um den einzelnen PIP-Schirm zu
markieren.
- Die Cursor-Taste rechts drücken, um zum Multipip-Schirm zu gelangen,
unn dann benutzen Sie die Cursor-tasten zum Navigieren durch den
PIP-Schirm und um einen PIP-Schirm zu kennzeichnen.
DVR
+
V
-
123
456
789
i
b
Pause Live
Änderung der Fernsehsender oder der
externen Quellen im linken, rechten, PIPoder Multipip-Schirm
Drücken Sie die
-P+-Tasten, die 0-Taste oder
die Zifferntasten, um die Programme oder die
externen Quellen im markierten Schirm
umzuschalten.
Scan PIP3 oder PIP 12
Navigieren Sie bis zum unteren PIP-Schirm und
drücken Sie die Cursor-Taste ab, um die
nächste Serie PIP-Schirme erscheinen zu lassen.
Definieren der Stellung und Formates des
einzelnen PIP-Schirms
& Wählen Sie einen Dual Bild Mode mit einem
einzelnen PIP-Schirm.
é Die Cursor-Taste ab drücken, um den PIP-
Schirm zu markieren.
o
œ
Stellung
Format
Ein PIP-Menü erscheint, mit
dem Sie die Stellung und das
Format des PIP-Schirms
definieren können.
Bemerkung: Wenn das PIP-Menü verschwindet, die
OK-Taste drücken, um es erneut aufzurufen.
PIP 3 PIP 12
AUX
PIP1 PIP1 PIP2 PIP3
PIP5 PIP6 PIP7
PIP2
PIP9 PIP10 PIP11 PIP12
PIP3
“ Nochmals die Cursor-Taste ab drücken, um
PIP4
PIP8
Stellung oder Format auszuwählen.
‘ Drücken Sie die OK-Taste oder die Cursor-
Taste rechts, um zu bestätigen.
( Definieren Sie mit den Cursor-Tasten die
Stellung des PIP-Schirms.
Definieren Sie mit den Cursor-Tasten
links/rechts das Format des PIP-Schirms.
§ Drücken Sie die OK-Tasten. Das PIP-Menü
erscheint.
è Drücken Sie die Cursor-Taste auf bis zum
Anfang des Menüs, um den Hauptbildschirm
wieder anzuzeigen.
! Drücken Sie die OK-Taste um das Menü zu
verlassen oder warten bis es nach kurzer Zeit
selbstständig verschwindet.
Bildschirmanzeige
Die markierten Informationen, die erscheinen,
wenn Fernsehsender geändert werden,
verweisen immer auf den aktiven Bildschirm.
14
Page 43

NEXTVIEW / Videotext Guide
NEXTVIEW ist ein elektronischer Führer, mit dem Sie Programme aufsuchen,wie bei einer
Zeitung oder einem Fernsehmagazin. Sie können die Programme nach Thema suchen (z.B. Filme,
Sport...), detaillierte Auskünfte über Programme erholen und Ihr Videogerät programmieren,
unter der Bedingung, daß es mit
NEXTVIEW
Link versehen ist.
Wichtige Bemerkung: Der NEXTVIEW-Service gilt nur für bestimmte Programme und in bestimmten
Ländern. Wenn keine
gründet auf Videotext-Programminformationen (wenn vorhanden) und bietet die meisten
NEXTV
IEW-Informationen gesendet werden, erscheint der Videotext-Programmführer. Dies
NEXTVIEW
-Funktionen.
Bemerkung: Der Fernsehsender trägt die Verantwortung für den Inhalt der Informationen. Das Fernsehgerät ist
verantwortlich für den Empfang dieser Informationen und für deren Wiedergabe an den Benutzer.
NEXTVIEW/Videotext Guide ein- und ausschalten
Drücken Sie die æ-Taste auf der Fernbedienung, um das NEXTVIEW/Videotext Guide-Menü
einzuschalten. Ein Menü erscheint mit der Nachricht
• eine
NEX
TVIEW-Seite, wenn der gewählte Sender diesen Service sendet (
• eine Videotext-Seite, wenn der gewählte Sender
•
Keine Information erhältlich erscheint, wenn entweder NEXTVIEW noch Videotext gesendet werden.
Moment bitte. Nach einiger Zeit sehen Sie:
NEXTVIEW-Logo wird gezeigt.)
NEXTVIEW nicht sendet,
In diesem Fall sollen Sie einen anderen Sender wählen.
Fernsehsender nach Thema wählen
Wenn die Programme im Programmführer oder NEXTV
IEW deutlich unterschiedliche Themen aufweisen,
ist es möglich, sehr schnell mittels die 0-Taste bestimmte Fernsehprogramme zu wählen. Siehe
Konfiguration, Menü Allgemein, Smart surf, S. 8.
Darstellung einer
Die Information wird von dem Programmanbieter bereitgestellt der den NEXTVIEW
Siehe Konfiguration, Menü Allgemein,
Dieses Logo wird nur von
NEXTVIEW Programm-
anbieter angezeigt. Kein Logo
läßt erkennen, daß es ein
NEXTVIEW Seite
puck
Man 03
Man 03
Die 04
Mit 05
Don 06
Fre 07
Sam 08
NEXTVIEW Anbieter, S.8.
Mon 05 Feb 18.00
Menü 18.00 Kanal Thema
BBC1 18.00 BBC News
BBC2 18.00 The Simpsons
CNN 18.00 World News
FR2 18.00 On a tout essayé!
CH5 18.15 Tomorrow Never Dies
Service sendet.
NEXTVIEW
Programmname und
Sendezeit
Steuerung
Videotext Programm Guide
ist.
Übers. Aufn. Hinw. Sehen Verr.
Funktions-Tasten
Bild/NEXTVIEW-Videotext Guide
& Drücken Sie die æ-Taste. b drücken, um die NEXTVIEW/ Videotext auf der rechten Hälfte des
Bildschirms anzuzeigen.
é Benutzen Sie die Cursor-Tasten um einen Fernsehsender zu wählen.
“ Drücken Sie die b-Taste, um Dual Bild auszuschalten.
NEXTVIEW Guides
& Benutzen Sie die Cursor-Taste links/rechts, um Zeit, Kanal, Thema, die Datum zu wählen.
Der
Zeitführer bietet eine Übersicht über alle Programmtitel, die in der selektierten Zeitspanne
vorhanden sind. Der
Sender während eines einzigen Tages gesendet werden. Mit dem
spezifisches Datum wählen. Der
die zur gewählten Kategorie gehören.Wenn das Fernsehgerät den Menüführer durchläuft, werden die
Auswahlkriterien berücksichtigt und wird schließlich eine Programmliste wiedergegeben.
é Drücken Sie die OK-Taste, um den gewünschten Führertyp zu wählen.
“ Bewegen Sie den Puck nach unten und nach rechts, um die Programme zu selektieren.Wenn vorhanden
wird eine Übersicht oder eine Erläuterung zum Programm unten auf dem Schirm gezeigt.
‘ Benutzen Sie die Cursor-Taste auf/ab, um durch die Programme zu navigieren.
Kanalführer bietet eine Übersicht über alle Programme, die von einem einzigen
Datumführer können Sie ein
Themaführer zeigt eine Liste aller Programme am gewählten Datum,
15
Page 44

Videotext-Guide
& Mit den Zifferntasten die Videotextseitennummer eingeben, die die Programminformationen für den
heutigen Sender enthält.
é Die Cursor-Taste rechts drücken, um den Puck über den Auswahlpunkt zu bewegen.
“ Benutzen Sie die Cursor-Taste auf/ab, um durch die verschiedenen Programme zu navigieren.
Seitepunkte
Punkt
Man 05 Feb 16.35
BBC1
BBC2
ITV
CH4
CH5
Senderliste
Übers. Aufn. Hinw. Sehen Verr.
100 1
BBC CEEFAX
LIONS RECORD ANOTHER WIN 430
Index 100 News 300
BBC Info 110 Headlines 305
Children 120 Weather 400
Cookery 150 Sports 415
Education 200 Radio 500
•Wenn das gewählte Programm eine Seitennummer enthält, mit einem fakultativen Subkode, der auf eine
Seite mit näheren Auskünften in Bezug auf das Programm hinweist, drücken Sie die
Informationen erscheinen zu lassen. Drücken Sie nochmals die
OK-Taste, um zur Seite des Programm-
führers zurückzukehren.
•Wenn die gewählte Seite des Programmführers den VPT-Normen entspricht,
- wird es möglich, Programme aufzunehmen, zu programmieren, aufzurufen oder zu sichern.
- wird das Fernsehgerät die zuletzt gesehene Videotextseite des Senders behalten, der Informationen des
Programmführers enthielt und der angibt, welches Programm an welchem Zeitpunkt anfängt. Immer,
wenn Sie die æ-Taste Drücken, wird die Videotextseite des Programmführers des gewählten
Fernsehsenders erhältlich sein.
•Wenn nötig, können Sie die Unterseitennummer auswählen, indem Sie den Cursor zu dem die jeweilige
Seite markierenden Punkt bewegen und rechts drücken.
Achtung! Sie müssen die Videotextseitennummer für jeden Sender eingeben. Sie können die Sender ebenfalls
ändern, indem Sie in der links auf der Seite stehenden Liste den Cursor nach oben oder nach unten bewegen.
Subseiten
Scroll ball
OK-Taste, um die
Grundfunktionen
Drücken Sie eine der grauen x,roten ®, grünen U, gelben Q oder blauen Ì Tasten, um eine
NEXTVIEW- oder Videotext Guide-Funktion zu aktivieren. Die Tasten sind in grau wiedergegeben, wenn
die Funktion nicht vorhanden ist.
Übersicht: Dieses Menü bietet eine Liste von Programmen, die als Erinnerungen markiert wurden, von
diesen, die aufgenommen und von diesen, die gesichert wurden. Dieses Menü kann dazu verwendet
werden, markierte Programme zu verändern oder zu entfernen.
Aufnahme: um die Aufnahme des Videogerätes zu programmieren (wenn es mit
ist und an den Ausgang
EXT. 2 angeschlossen ist).
NEXTVIEWLink versehen
Hinweis: schaltet das Fernsehgerät ein, wenn es sich im Bereitschaftsstand befindet, oder stoppt die
Sendung eines Programms, indem eine Nachricht auf dem Schirm erscheint, wenn das Fernsehgerät
eingeschaltet ist.
Verriegeln: um bestimmte Programme zu sichern, damit verhindert wird, daß sie aufgenommen oder
gesehen werden. Für die Funktionen Aufnahme, Hinweis oder Verriegelung erscheint ein kleines Menü, in
dem Sie das Intervall wählen können: einmal,täglich oder wöchentlich, oder eine frühere Einstellung für
Aufnahme, Hinweis oder Sicherung löschen können. Das Standardintervall ist Einmal. Drücken Sie die
OK-Taste, um die Frequenz zu bestätigen.
Sehen: um die gewählten und im Moment gesendeten Programme zu sehen.
Sammlung und Anpassung der NEXTVIEW-Informationen
Sammlung und Anpassung von NEXTVIEW-Informationen erfolgen, während Sie sich den Fernsehkanal des
gewählten
Bereitschafts-stand geschaltet ist.
Die Sammlung der letzten Angaben und Informationen erfolgt einmal während der Nacht.
Bemerkung: Es könnte manchmal notwendig sein, z.B. nach der Rückkehr aus dem Urlaub, das Gerät zuerst in
den Bereitschafts-Zustand zu schalten, wenn nur
angezeigt werden.
16
NEXTVIEW-Anbieter ansehen, siehe Allgemein-Menü S. 8, oder wenn das Fernsehgerät im
NEXTVIEW-Informationen zu bereits gelaufenen Programmen
Page 45

Videotext
Die meisten Fernsehsender strahlen Information über Videotext/Teletext aus. Dieses Fernsehgerät hat
einen Speicher von 1200 Seiten, der die meist gesendeten Seiten und Subseiten speichert, um die Wartezeit
zu beschränken. Nach jeder Programmänderung nimmt der Speicher eine Bildwiederholung vor.
Videotext ein- und ausschalten
Drücken Sie b, um den Videotext einzuschalten.
102 «03 04 05 06 07 08 09 10 11 12»
BBC CEEFAX 102 Mon 05 Feb 16.35.22
BBC CEEFAX
LIONS RECORD ANOTHER WIN 430
Index 100 News 300
BBC Info 110 Headlines 305
Children 120 Weather 400
Cookery 150 Sports 415
Education 200 Radio 500
Lottery 230 Travel 550
Finance 240 Subtitling 888
Music 280 TV Listings 600
Rot Grün Gelb Blau
Eine Videotext-/Teletextseite wählen
- Die gewünschte Seitennummer eingeben mit
den Zifferntasten, mit den Cursor-Tasten auf/ab,
links/rechts, oder mit den
-P+ Tasten
- Wählen Sie mit den farbigen Tasten, die den
Farboptionen unten im Bildschirm entsprechen,
das gewünschte Thema.
Zuletzt gesehene Videotextseite
(Nur möglich, falls keine Favoritenliste mit
Videotextseiten verfügbar ist. Siehe S. 18.)
Drücken Sie die 0-Taste.
Das Inhaltsverzeichnis wählen
Drücken Sie die graue † Taste, um das
Hauptinhaltsverzeichnis (normalerweise S. 100)
auf dem Bildschirm erscheinen zu lassen.
Nur für T.O.P.-Videotext-Sendungen:
Drücken Sie i. Ein T.O.P. Überblick von den
vorhandenen Themen erscheint.
Wählen Sie mit den Cursor-Tasten auf/ab,
links/rechts das gewünschte Thema und drücken
Sie die
OK-Taste. Nicht alle Sender senden den
T. O.P. Videotext aus.
Mehrfachseiten wählen
Wenn die gewählte Videotext-/Teletextseite
mehrere Textseiten enthält, erscheint eine
Textseite auf dem Bildschirm.
Drücken Sie die Cursor-Taste links oder rechts,
um die nächste oder die vorige Subseite zu
wählen.
Eine Videotextseite vergrößern
Mehrmals die Taste q drücken, um den
oberen Teil der Videotextseite, den unteren Teil
der Videotextseite anzuzeigen, und dann zur
Videotextseite im Normalformat zurückzukehren.Wenn die Videotextseite vergrößert
wird, können Sie mit Hilfe der Cursor-Taste
auf/ab eine Zeile nach der anderen durch den
Text scrollen.
Aktive Bildschirmauswahl
Wenn Dual Bild/Videotext aktiviert ist, die
gewünschte Seitennummer eingeben mit
-P+
Tasten, die MENU Ï-Taste drücken, und dann
den linken Bildschirm auswählen (mit dem
blauen Punkt oben). Jetzt können Sie eine
komprimierte oder Vollbildschirmanzeige von
Bild/Videotext erhalten mit der q Taste.
Hypertext
Mit Hypertext können Sie egal welches Wort
oder egal welche Zahl auf der Videotextseite,
die Sie jetzt sehen, selektieren und suchen.
& Drücken Sie die OK-Taste, um das erste Wort
oder eine Zahl auf der Seite aufleuchten zu
lassen.
é Benutzen Sie die Cursor-Taste, um das Wort
oder die Zahl, das/die Sie suchen, zu wählen.
“ Drücken Sie die OK-Taste zur Bestätigung.
Eine Nachricht erscheint unten auf dem Schirm,
um anzugeben, daß gesucht wird oder daß das
Wort oder die Seite nicht gefunden wurde.
‘ Die Cursor-Taste auf drücken, um Hypertext zu
verlassen.
17
Page 46

Videotext Menü
(nur möglich in Videotextmodus mit vollständigen
Schirm)
& Drücken Sie die MENU Ï-Taste, um das
Menü zu aktivieren.
é Drücken Sie die Cursor-Taste auf/ab, um die
Menüwahlmöglichkeiten zu wählen.
“ Die Cursor-Taste rechts drücken, um zu
aktivieren.
Info enthüllen
Enthüllt/verbirgt verborgene Informationen auf
einer Seite, wie zum Beispiel Lösungen für
Rätsel und Aufgaben. Drücken Sie die CursorTaste rechts zur Aktivierung.
Bevorzugt
Diese Liste enthält höchstens acht bevorzugte
Videotext-Seiten. Nur die Seiten des momentanen Senders können selektiert werden.
& Die Cursor-Taste rechts drücken, um die Liste
zu aktivieren.
é Nochmals die Cursor-Taste rechts drücken, um
die heutige Seite hinzuzufügen oder um eine
von den Favoritenseiten der Liste hinzuzufügen.
“ Die MENU Ï-Taste drücken, um sich die Seite
anzusehen.
‘ Die Taste 0 drücken, um durch die Liste mit
den Favoritenseiten zu scrollen.
Suchen
Ein Wort auswählen
Mittels der Tastatur auf dem Schirm können Sie
ein Wort eingeben, das Sie in den VideotextSeiten suchen wollen. Es ist gleichgültig, ob Sie
Groß- oder Kleinbuchstaben benutzen.
102 03 04 05 06 07 08 09 10 11 12
BBC1
WORD
NAME
FOOTBALL
Puck
& Die Cursor-Taste rechts drücken, um die
Annullieren Akzept.
Space Löschen
ABCDEFG 1 2 3
HIJKLMN 4 5 6
OP QRSTU 7 8 9
V W X Y Z 0
Shift Weitere
Rot Grün Gelb Blau
TELETEXT
Tastatur zu aktivieren.
é Drücken Sie die Cursor-Taste links/rechts,
auf/ab, um die Zeichen,Wörter oder
Funktionen zu wählen.
“ Drücken Sie die OK-Taste, um jedes gewählte
Zeichen zu bestätigen.
‘ Wählen Sie Annullieren, um das gewählte
Wort oder Zeichen zu löschen;
einen Zwischenraum einzugeben;
das zuletzt gewählte Zeichen zu löschen;
Space,um
Löschen,um
Shift,
um große oder kleine Zeichen zu wählen;
Weitere, um ein Sonderzeichen auf der
Tastatur anzugeben und drücken Sie die
OK-
Taste.
( Drücken Sie wiederholt die Cursor-Taste links,
um zum Videotext-Menü zurückzukehren.
Wortsuche
& Geben Sie das Wort ein oder wählen Sie ein
Wort aus der Liste mit den zuvor gesuchten
Wörtern rechts auf dem Schirm, und drücken
Sie die
OK-Taste.
é Wählen Sie Akzept. und drücken Sie die OK-
Taste. Die Nachricht Suchlauf erscheint.
“ Um das Suchen abzubrechen oder nach einem
neuen Wort zu suchen,Tastatur auswählen und
OK drücken.
‘ Wenn ein Wort nicht gefunden wurde, erscheint
eine Mitteilung.Wenn das Wort gefunden wird,
wird es in der Videotextseite markiert. Um
weiterzusuchen, die Taste
OK drücken.
Subseiten durchlaufen (falls vorhanden)
Wechselt die Subseiten automatisch.
Die Cursor-Taste rechts drücken, um zu
aktivieren und wieder zu deaktivieren.
Programmierte Seite
Um eine bestimmte Seite zu einem bestimmten
Zeitpunkt erscheinen zu lassen.
& Drücken Sie die Cursor-Taste rechts, um Ja
oder Nein zu wählen.
é Geben Sie den Zeitpunkt und die Seiten-
nummer mit der Cursor-Taste oder mit den
Zifferntasten ein.
Bemerkung : Videotext muß nicht eingeschaltet
bleiben, aber Sie sollten das Programm weiter
anschauen, von welchem die bestimmte Seite
ausgewählt wurde.
“ Die Cursor-Taste links drücken, um zur TV-
Menü-Seite zurückzukehren.
Sprache
Wenn die Zeichen auf dem Schirm nicht
übereinstimmen mit den Zeichen, die vom
Videotext-Sender benutzt werden, können Sie
hier die Sprachgruppe ändern.
Wählen Sie
Gruppe 1 oder Gruppe 2 mit den
Cursor-Tasten rechts.
Drücken Sie die
MENU Ï-Taste, um das
Videotext-Menü zu verlassen.
18
Page 47

B
b
¬
+
-
V
+
-
P
v
b
i
0
h
q
Select
VCR DVD SAT AMP CD
MENU
DVR
OK
123
456
789
0
Ò®‡π
†
Active Control
æ
Ò
†
Ï
Pause Live
REC
Flex TV
Ihr Flex-TV besitzt einen internen Speicher, um Programme zeitlich zu speichern (Pause TV) und
Programme zeitlich unbegrenzt zu speichern (
1. Pause TV: Sobald Sie das Fernsehgerät einschalten, wird das Programm aufgenommen, welches Sie
sich gerade anschauen. Dieses gibt Ihnen die Möglichkeit, das Zuschauen mit der
unterbrechen und das Zuschauen später innerhalb von 3 Stunden lückenlos fortzusetzen (
Taste erneut drücken. Dieses nennt sich
Anmerkung : Wenn der Pause TV-Block voll ist (3 Stunden), werden die Aufnahmen ab dem zuerst
aufgenommen Programm überschrieben.
2.Aufnahme: Der größere Teil des Speichers vom Flex TV kann frei programmiert werden (maximal
58 Programme mit einer gesamten Aufnahmezeit von 28 Stunden).
Die Sofort-Aufnahme erfolgt über die ®
die
DVR -Taste programmieren. Siehe weiter hinten.
Anmerkungen :
- Sie können mit der Wiedergabe beginnen, schön bevor die Aufnahme beendet wurde.
-Wenn eine Sofortaufnahme oder eine programmierte Aufnahme läuft, kann Pause TV nicht genutzt werden.
-Flex TV ist nicht nutzbar bei Dual Bild/PIP/Multipip.
REC Sofortaufnahme S. 22
Mit Sofortaufnahme können Sie eine Aufnahme starten, indem Sie eine
Taste drücken.
Aufnahme).
Pause-Taste zu
Pause-
Pause TV.
Instant record-Taste oder es lassen sich Aufnahmen über
DVR Aufzeichnungsverzeichnis und Programmierte Aufnahme
Siehe S. 21
Pause
& Drücken Sie die Pause-Taste.
Das Bild wird stillstehen, während das Fernsehgerät die Livesendung im
Hintergrund weiter aufnehmen wird. (Der Block wurde auf 3 Stunden
HQ-Aufnahme (High Quality) eingestellt.
Ein Zeitgeber zeigt die zunehmende Verzögerung im Vergleich zu der
Livesendung an, während die Pause andauert.
Wenn die Anzeigebalken verschwunden sind, drücken Sie die
i Taste
nochmals, um sie erneut anzuzeigen.
é Drücken Sie nochmals die Pause-taste, um die Programme lückenlos von
dort aus weiter zu betrachten, wo sie unterbrochen haben.
Live
Drücken Sie die Live-Taste, um die Fernsehsendung wieder normal
anzusehen. Drücken Sie die Taste nochmals, um zum Moment in dem Sie
die Sendung unter-brochen haben, zurückzukehren.
Pause-Reset
Wenn Sie nicht wollen, dass jemand anders die FS-sendungen, die Sie sich
(am vorigen Abend) angesehen haben, und die automatisch (im 3 StundenSpeicher-Satz) aufgezeichnet worden sind, ansehen kann, könnten Sie den
Speicher leeren.
& Drücken Sie die MENU Ï-Taste auf der Fernbedienung.
é Wählen Sie Pause-Reset aus im Menü Sonderfunktionen. Siehe
Fernsehmenü, Sonderfunktionen, S. 13.
“ Drücken Sie die Taste OK, um die Daten im Speicherblock von 3 Stunden
zu löschen.
19
Page 48

B
b
¬
+
-
V
+
-
P
v
b
i
0
h
q
Select
VCR DVD SAT AMP CD
MENU
DVR
OK
123
456
789
0
Ò®‡π
†
Active Control
æ
Ò
†
Ï
Pause Live
REC
Zeitlupe
& Drücken Sie die Cursortaste rechts, wenn die Sendung unterbrochen
ist. Das FS-Gerät schaltet auf Zeitlupe mit 1/4 der normalen
Geschwindigkeit um.
é Drücken Sie nochmals die Cursortaste rechts. Das FS-Gerät schaltet auf
Zeitlupe mit 1/2 der normalen Geschwindigkeit um.
“ Drücken Sie die Pause-Taste, um die Zeitlupe auszuschalten.
Schneller Vor- und Rücklauf
& Drücken Sie die Pause-taste, um die Sendung weiter anzusehen ab dem
Moment, in dem Sie sie unterbrochen haben.
é Drücken Sie die Cursor-Taste (links oder rechts) länger als eine Sekunde.
Das Fernsehgerät schaltet auf eine höhere Wiedergabegeschwindigkeit
vorwärts oder rückwärts um.
“ Wenn Sie die Cursor-Taste links oder rechts aufs neue drücken, wird sich
die Geschwindigkeit um eine Stufe erhöhen (x2, x4, x8, x20, x200).
‘ Wenn Sie sich eine Sendung ansehen mit einer Geschwindigkeit, die höher
ist als die normale Geschwindigkeit in sogar Vorwärts- als
Rückwärtsrichtung, können Sie die Geschwindigkeit um eine Stufe
vermindern, indem Sie die Cursor-Taste rechts oder links drücken.
( Drücken Sie die Pause-Taste, um auf die normale Geschwindigkeit
zurückzukehren.
Instant Skip
Drücken Sie die Cursor-Taste rechts kurz, während der normalen
Wiedergabe. Bei jedem Druck auf die Cursor-taste werden Sie 30
Sekunden der Sendung, z.B.Werbespots, überspringen.
Sofortige Wiederholung
Sie können jederzeit die Cursor-Taste links drücken, um sich die letzten 7
Sekunden ein Mal aufs neue anzusehen.
Anmerkung : Schneller Vor- oder Rücklauf, Instant Skip, sofortige Wiederholung
sind während der Pause-Funktion nicht nutzbar.
20
Page 49

Aufzeichnungsverzeichnis
& Drücken Sie die DVR-Taste.
TUE 30 APR HQ 120m Meet Joe Black
SUN 08 JUN LP 140m Star Wars 3
SAT 10 AUG LP 240m Olympic opening
THU 14 DEC HQ 50m Miami Vice
FRI 02 JUN HQ 120m Manu vs Paris
SAT 26 JUN LP 30m Friends
MON 10 FEB LP 25m Naked chef
Space Left LP 10.20h
Übersicht Timer Aufnahme Aufnahme
Via dieses Menü können Sie
• sich ein Verzeichnis der aufgezeichneten
Sendungen, die im Speicher gespeichert worden
sind, ansehen (
Übersicht);
• sich eine Liste der programmierten Aufnahmen
ansehen (
Timer Aufnahme);
• eine programmierte Aufnahme einstellen
Aufnahme).
(
Bei jeder Aufnahme werden das Datum der
Aufnahme, die Bildqualität (
HQ oder LP), mit
der die Aufnahme ausgeführt wurde, die Dauer
und der Titel der Aufnahme aufgeführt.
Im Menü
Übersicht können Sie sehen, wieviel
Speicher noch verfügbar ist.Via dieses Menü
kann jede aufgezeichnete Fernsehsendung
abgespielt (
Play) oder gelöscht (Löschen)
werden. Der Titel einer Sendung kann mit hilfe
von einer virtuellen Tastatur geändert (
werden.
é Drücken Sie die grüne Taste der Fernbedienung,
um die vorgesehene
Aufnahme-Liste
aufzurufen.
CANVA TUE 15 APR 15.37-16.37 Pauli
BBC1 SUN 27 APR 19.37-20.37 Naked chef
FOCUS SAT 03 MAY 16.25-16.55 Friends
BBC2 THU 08 MAY 20.18-20.45 Vicar
MERID FRI 23 MAY 21.15-22.10 No win
Übersicht Timer Aufnahme Aufnahme
“ Drücken Sie Füge zu, um das Aufnahmemenü
anzuzeigen und eine Programmierung
hinzufügen (Siehe auch “Programmierte
Aufnahme”),
Ändern, um eine gewählte
Programmierung zu ändern und
eine gewählte Programmierung zu löschen.
‘ Drücken Sie die rote Taste der Fernbedienung,
um zur
Aufnahme-Liste zurückzukehren oder
die gelbe Taste, um die Aufnahme zu bestätigen
(Siehe auch “Programmierte Aufnahme”).
Play
Ändern
Löschen
Ändern)
Füge zu
Ändern
Löschen
Löschen,um
Um einen Sendungs-Titel zu verändern, mittels
die virtuelle Tastatur
® Annulieren ® Akzept.
® Space ® Löschen
ABCDEFG 1 23
HIJKLMN 4 56
OPQRSTU 7 89
VWXYZ 0
® Shift ® Weitere
Um einen Sendungs-Titel zu verändern, benutzen
Sie die virtuelle Tastatur.
& Drücken Sie die Cursortaste links/rechts, auf/ab, um
Zeichen,Wörter oder Funktionen auszuwählen.
é Drücken Sie die Taste OK, um jedes ausgewählte
Zeichen zu bestätigen.
“ Wählen Sie Annulieren,um die Änderung zurück
zu setzen;
Space, um ein Leerzeichen einzufügen;
Löschen, um das letzte ausgewählte Zeichen zu
löschen;
Shift, um zwischen Klein- und
Großbuchstaben umzuschalten;
Weitere,um
Sonderzeichen auf der Tastatur zu zeigen, und
drücken Sie die Taste
‘ Wählen Sie Akzept., um die Änderung zurück zu
OK.
akzeptieren.
Programmierte Aufnahme
& Drücken Sie die DVR-Taste.
é Drücken Sie die grüne Taste der Fernbedienung,
um die vorgesehene
Aufnahme-Liste
aufzurufen.
“ Drücken Sie die gelbe Taste, um eine Aufnahme
zu programmieren.
Kanal
Titel
Datum
Startzeit
Stopzeit
Qualität
Speichern
Übersicht Timer Aufnahme Aufnahme
‘ Benutzen Sie die Cursortaste auf/ab,
02 BBC
Men In black
Tue 21 Aug
20.30
22.00
HQ
links/rechts, um den Sender, das Datum, die
Anfangs- und Endzeit, den Titel der Sendung
und die Aufnahmequalität auszuwählen und
einzugeben.
Bemerkung : Um nicht bestehende Zeitangaben
zum Starten oder Stoppen einer Aufnahme zu
vermeiden, ist es möglich, dass Sie zunächst die
zweite Ziffer ändern müssen, bevor Sie die erste
Ziffer eingeben oder ändern.
( Wählen Sie Speichern und drücken Sie OK,um
die eingegebenen Daten zu bestätigen.
21
Page 50

Sofortaufnahme
& Drücken Sie die REC-Taste. Das Aufzeichnen
beginnt automatisch, und auf dem Bildschirm
erscheint ein kleines Menü, in das Sie die
Dauer der Aufnahme eingeben müssen. Die
Standarddauer wurde auf 01.00 Stunde
eingestellt, aber kann immer geändert werden.
é Drücken Sie die Cursortaste rechts und geben
Sie mit den Zifferntasten oder der Cursortaste
auf/ab die Dauer der Aufnahme ein.
Drücken Sie zur Bestätigung die
dann die
REC-Taste, um das Menü zu
OK-Taste und
verlassen.
Bemerkung:
- Sobald die Aufnahme beginnt, können Sie Ihren
Fernseher aus Stand-By schalten oder ein anderes
Programm schauen. Das Gerät BITTE NICHT über
den Netzschalter ausschalten, da sonst Ihre
Aufnahme verloren geht.
-Finden Sie in der Übersicht der Aufnahmen die
Information, wie der Programm-Name (Aufnahme
xxxx wird automatisch eingefügt) geändert werden
kann.
“ Um die Aufnahme vor Ablauf der eingestellten
Dauer einzustellen, drücken Sie die
wählen Sie
Taste
Stoppen aus und drücken Sie die
OK.
REC-Taste,
Um die Zeitdauer zu ändern, drücken Sie die
REC Taste und verändern Sie die Zeitdauer
mit den Cursor-Tasten.
Drücken Sie zur Bestätigung die
dann die
REC-Taste, um das Menü zu
OK-Taste und
verlassen.
Ändern der Aufnahmequalität bei
Sofortaufnahme.
Die Dauer der Aufnahme hängt von der
Aufnahmequalität, die Sie im Menü
Grundeinstellung, S. 8, ausgewählt haben, ab.
Ändern Sie die Standard-
HQ-Einstellung nicht,
wenn Sie die höchste Bildqualität wünschen.
Aufnahmequalität
HQ (High Quality) Aufnahmequalität (bis zu 6
•
Stunden) ist vergleichbar mit DVD-Qualität.
•
SQ (Standard Quality) mit einer besseren
Qualität als VHS und einer Aufnahmedauer von
bis zu 11 Stunden.
•
LP (Long Play) (bis zu 28 Stunden).
Grundsätzliche Bemerkungen zu Flex TV
-
Wenn eine Sicherungs- oder Sperrfunktion aktiviert wird, während eine Sendung aufgenommen wird, wird die Aufnahme
eingestellt, und werden Sie darum gebeten, Ihren Kode einzugeben
Der Ton bei Sofortaufnahme wird immer Mono wiedergegeben.
-
Die Anzahl der Aufnahmen im Aufzeichnungsverzeichnis und im Timer-Menü ist auf 58 Programme begrenzt (auch
-
wenn noch Aufnahmekapazität zur Verfügung steht). Sobald die 58 Aufnahmen ausgeschöpft sind, werden die alten
Aufnahmen überschrieben.
.
- Bitte achten Sie darauf, dass Sie keine programmierten Aufnahmen in der Anfangszeit überlappen.
- Sobald kein Speicherplatz mehr vorhanden ist, wird die älteste Aufnahme ohne Ankündigung überschrieben.
- Wenn eine Sofortaufnahme oder programmierte Aufnahme begonnen ist, können Sie sich die
Fernsehsendung ansehen, während sie aufgezeichnet wird.Wählen Sie das Programm im ÜbersichtsMenü aus. Zum Beenden der Aufnahme während Sie fernsehen, drücken Sie zuerst die Live-Taste auf
der Fernbedienung. Dann drücken Sie die REC-Taste und wählen Stop im Aufnahme-Menü auf dem
Bildschirm.
-
Sobald die Aufnahme programmiert ist oder begonnen hat ist es nicht notwendig, den Fernseher eingeschaltet zu
lassen. Sie können das Fernsehgerät in den Bereitschaftsstand schalten. Die Aufnahme wird dann im
Bereitschaftsstand gemacht werden. Schalten Sie Ihr Fernsehgerät NICHT AUS.
-
Sie können aufgenzeichnete Sendungen in einfacher Weise zu einem an EXT 2 angeschlossen DVD-Recorder oder
VCR übertragen.Wählen Sie die Sendung im Menü Übersicht aus und aktivieren Sie die Wiedergabe (Play). Sie
werden dann dasjenige, was Sie auf dem Bildschirm sehen, aufzeichnen.
-
Um eine laufende programmierte Aufnahme vor dem eingegeben Endzeitpunkt abzubrechen, drücken Sie die REC Ta st e der
Fernbedienung und wählen Stop im Aufnahme-Menü des Bildschirms aus.
- Mit der Flex TV-Funktion können keine kopiergeschützten Programme und keine über EXTERNAL 2 zugeführten
Programme aufgenommen werden.
- Unterbrechung einer NTSC-Sendung:
Wählen Sie ein NTSC-Programm aus und löschen zuerst den Aufnahmeblock mit Pause-Reset im Menü
Sonderfunktionen. Dann drücken Sie die Pause-Taste.
Um wieder eine PAL- oder SECAM-Sendung zu unterbrechen:Wählen Sie das neue Programm aus und löschen
abermals den Aufnahmeblock. Dann drücken Sie die Pause-Tasten.
22
Page 51

Periphere A/V-Geräte anschließen
2
EXT.EXT.2EXT.
CABLE
1
4
2
3
1/21/2
EXT.EXT.
1/2
EXT.
CABLE
1
2
3
5
4
AU
D
IO
VIDEO
S•VIDEO
1 2 3
Es gibt eine große Auswahl an elektronischen A/V-Geräten, die an Ihr Fernsehgerät angeschlossen werden
können. Den nächsten Anschlußschemen können Sie entnehmen,wie angeschlossen werden muss.
Bemerkung: EXT. 1 ist geeignet für CVBS und RGB, EXT. 2 für CVBS,Y/C und RGB, EXT. 3 und EXT. 4 nur für CVBS.
Peripheriegeräte mit einem RGB Ausgang sollen an
Bildqualität liefert.Wenn Ihr Recorder mit einer EasyLink-Funktion ausgestattet ist, sollte er an
werden, um die EasyLink-Funktionalität benutzen zu können.
Recorder (VCR-DVD
+RW)
Schließen Sie die Antennenkabel 1, 2 und, um eine bessere
Bildqualität zu bekommen, das Euro-A/V-Kabel 3, so wie gezeigt an.
Wenn Ihr Recorder nicht über eine Eurosteckverbindung verfügt, ist der
einzig mögliche Anschluss über das Antennenkabel. Dazu müssen Sie das
Testsignal des Recorders einstellen und ihm die Programmnummer 0
zuweisen oder das Testsignal unter einer Programmnummer zwischen 90
und 99 speichern, siehe Manuelle Einstellung, S.6. Schauen Sie zunächst
in der Bedienungsanleitung Ihres Recorders nach.
Decoder und Recorder
Schließen Sie ein Euro-A/V-Kabel 4 an die Euro-A/V-Buchse Ihres
Decoders und an die spezielle Euro-A/V-Buchse Ihres Recorders an.
Beachten Sie auch die Betriebsanleitung Ihres Recorders. Siehe auch
Decoder, S. 9. Sie können ebenfalls Ihren Decoder sofort an
2 anschließen mittels des Euro-A/V-Kabel.
EXT. 1 oder 2 angeschlossen werden, da RGB eine bessere
EXT. 2 angeschlossen
EXT. 1 oder
Andere periphere Geräte
Zusatzanschlüsse
(Satellitenempfänger, Decoder, DVD, Spiele usw.)
& Die Antennenkabel 1, 2 und 3 so anschließen, wie gezeigt wird
(nur wenn Ihr Peripheriegerät TV-Antennen-Ein-/Ausgang hat). Ihr Gerät
mit einem Eurokabel 4 oder 5 an einen von den Eurosteckverbindungen
EXT. 1,2,3 oder 4 anschließen, um eine bessere
Bildqualität zu erhalten.
é Suchen Sie das Testsignal Ihres peripheren A/V-Gerätes auf dieselbe
Weise, wie bei einem Recorder.
“ Machen Sie eine Auswahl unter Konfiguration, Menü Quelle, S. 9.
Mit einem an
Programm Ihres Fernsehgerätes aufnehmen. Es ist nur mit
EXT. 1 angeschlossenen Videorecorder können Sie lediglich ein
EXT. 2 möglich,
Programme sowohl von Ihrem Fernsehgerät als auch von anderen
angeschlossenen A/V-Gerätes aufzunehmen
Kamera und Camcorder
& Ihre Kamera oder Ihren Camcorder so anschließen, wie gezeigt wird.
é Verbinden Sie das Gerät mit VIDEO 2 und AUDIO L 3,wenn es
sich um ein Mono-Gerät handelt. Schließen Sie auch
AUDIO R 3 an,
wenn Sie ein Stereo-Gerät besitzen.
S-VHS Qualität wird bei einem Camcorder erreicht, wenn die
S-VHS-Kabel an die Ausgänge
S-VIDEO 1 und AUDIO 3
angeschlossen werden.
Schließen Sie Kabel 1 und 2 niemals gleichzeitig an. Dieses kann zur
Beeinträchtigung der Bildqualität führen !
Kopfhörer
& Den Stecker in den Kopfhöreranschluss L so einstecken, wie gezeigt
wird.
é Drücken Sie die Taste ¬, um die internen Lautsprecher Ihres
Fernsehgerätes auszuschalten.Der Kopfhörer sollte eine Impedanz von 8 bis
4000 Ohm und einen 3,5 mm Klinkenstecker haben.
Lautst. Kopfhörer im Tonmenü wählen, um die Lautstärke des
Kopfhörers zu regeln.
23
Page 52

Zusatzlautsprecher/Verstärker anschließen
AUDIO
Surround out
CENTRE INCENTRE INCENTRE IN
AUDIO
OUT
Multimedia-Lautsprecher
&
Wählen Sie Raumklang Lautsprecher Ja im
HINTEN
Menü Konfiguration, siehe S. 7.
é Schließen Sie die Audio-Kabel an die hinteren
Lautsprecher und an den Dolby RaumklangAusgang
SURROUND OUT an der Hinterseite
des Fernsehgeräts, wie im Bild gezeigt, an. Es
gibt nur einen einzigen Ausgang für beide
Lautsprecher.
“ Stellen Sie die Lautstärke der hinteren
Lautsprecher nach. Sie können dabei die
Testsignal-Funktion im Menü Lautsprecher
benutzen, siehe Seite 7.
Bemerkung: Nachdem Sie die Lautstärke des
Verstärkers nachgestellt haben, sollen Sie sie nicht
mehr ändern, während Sie fernsehen, da die ganze
Anlage sich ab jetzt auf die Einstellung der
Lautstärke Ihres Fernsehgeräts eingestellt hat.
Mehrkanal-Raumklang-Empfänger (Analog)
& Schließen Sie einen Mehrkanal-Raumklang-
é Wenn Sie die Lautsprecher Ihres Fernsehgeräts
“ Wählen Sie Center-Lautst. Ein aus im Menü
‘ Wenn nötig, müssen Sie die Lautstärke des
Empfänger an die
AUDIO OUT R- und L-
Konnektoren hinten an Ihrem Fernsehgerät an.
als mittlerer Lautsprecher fungieren lassen
möchten, müssen Sie ebenfalls ein Audio-Kabel
an die
CENTRE OUT-Buchse des Mehrkanal-
Raumklang-Empfängers sowie an die
IN-Buchse hinten an Ihrem Fernsehgerät
CENTRE
anschließen.
Quelle, S. 9. Die Fernsehlautsprecher werden
jetzt nur Zentralton wiedergeben.
Zentraltons über den Menüpunkt
Lautstärke
im Menü Quelle regeln. Die globale
Center-
Lautstärke muss über den MehrkanalRaumklang-Empfänger geregelt werden.
Angeschlossene periphere A/V-Geräte wählen
Drücken Sie die v Taste, um EXT1, EXT2, EXT3, EXT4 oder SIDE zu wählen, abhängig davon, wo Sie
Ihr Gerät an die Rückseite oder an die rechte Seite Ihres Fernsehgerätes angeschlossen haben.
Bemerkung: Die meisten A/V-Geräte (Decoder, Recorder) führen die Umschaltung selbst durch.
Cinema Link Raumklang-Verstärker
Siehe die separat mitgelieferte CinemaLink-Bedienungsanleitung.
Achtung: Die Toninformation auf dem Bildschirm wird der tatsächlichen aktuellen Tonwiedergabe nicht
entsprechen.
Recorder oder DVD mit EasyLink
Der Recorder (VCR oder DVD+RW) oder
DVD kann über das
Menü auf dem Schirm bedient werden.
Recorder
Òp‡π † ® Ï
Rwd Play Stop Play Ffw Rec Eject
DVD
Òp ‡ π † Ï
Prev. Play Stop Play Next Eject
24
Recorder- oder DVD-
& Drücken Sie die MENU Ï-Taste auf der
Fernbedienung.
é Wählen Sie das Recorder- oder DVD-Menü
mit der Cursor-Taste auf/ab.
“ Drücken Sie die Cursor-Taste links/rechts,
auf/ab, um eine der Recorder- oder DVDFunktionen zu wählen.
Wenn Ihr EasyLink Recorder mit einer System
Bereitschaft versehen ist und wenn Sie die B-Taste
während drei Sekunden eingedrückt halten, werden
sowohl das Fernsehgerät wie das Videogerät
vorübergehend in den Bereitschaftszustand
umgeschaltet.
Page 53

Audio- und Videogeräte-Tasten
B
b
¬
+
-
V
+
-
P
v
b
i
0
h
q
Select
VCR DVD SAT AMP CD
MENU
DVR
OK
123
456
789
0
Ò®‡π
†
Active Control
æ
Ò
†
Ï
Pause Live
REC
Mit dieser System-Fernbedienung lassen sich folgemde Philips Geräte
bedienen: DVD, SAT (RC5),AMP (+Tuner), CD.
Die Taste
Geräten zu betreiben. Durch Drücken können auch andere Geräte
ausgewählt werden. Mehrmals drücken innerhalb von 2 Sekunden. Die LEDAnzeige blinkt langsam, um das Gerät anzuzeigen.
Eine von den Tasten auf der Fernbedienung drücken, um die peripheren
Geräte zu betreiben. Um zum TV-Modus zurückzukehren,
während die LED-Anzeige blinkt.
Wenn innerhalb von 60 Sekunden nichts passiert, kehrt die Fernbedienung in
den TV-Modus zurück.
Bemerkung: Wenn länger als 2 Sekunden auf die
der Befehl zum Auswählen des RC5/RC6-Systems übertragen.
Select drücken, um eines von den auf dem Display angezeigten
Select drücken,
Select-Taste gedrückt wird, wird
B um in den Bereitschaftsstand
zu schalten
® Aufnahme,
Ò um zurückzuspulen (
VCR, CD);
um niedrigere Frequenzen zu
suchen (
DVD , AMP)
‡ Stopp,
π Wiedergabe,
† um vorwärtszuspulen
(
VCR, CD);
um höhere Frequenzen zu
suchen (
DVD/AMP)
æ um Ihre Sprache für Untertitel
zu wählen (
RDS-Nachrichten/TA (
DVD );
AMP);
um die Nummern in einer
anderen Reihenfolge spielen zu
lassen (
CD)
b um einen
wählen; RDS-Anzeige (
Schirmanzeige (
DVD -Titel zu
AMP);
CD)
i um Informationen zu zeigen
Ï um das Menü ein- oder
auszuschalten
-P+ für die Wahl von Kapitel,
Sender, Nummer
0 bis 9 Zifferneingabe
0 Bandinhalt (
ein
DVD -Kapitel wählen,
eine Frequenz wählen (
VCR),
AMP)
U VCR Zeitanzeige
Q Raumklang Ein/Aus (
AMP, CD)
Cursor-Taste auf/ab
um die nächste oder vorige
Platte zu wählen (
CD)
Cursor-Taste links/rechts
um die nächste oder vorige
Nummer zu wählen (
höher/niedrig suchen (
CD)
AMP)
Zusätzlich können die Tasten DVD, SAT und CD umprogrammiert
werden auf DVD-R, SAT (RC6), CD-R
& Die Select Taste wiederholt drücken, bis keine LED leuchte. (TV Mode)
é Zur Programmierung DVD-R, die OK Taste + die Zahl 2 drücken.
Zur Programmierung
Zur Programmierung
SAT (RC 6), die OK Taste + die Zahl 4 drücken.
CD-R, die OK Taste + die Zahl 6 drücken.
Danach kann die Fernbedienung Ihren DVD-R, SAT (RC6) oder CD-R
bedienen, wenn die zugehörige LED-Anzeige (
DVD , SAT, CD)
aufleuchtet.
Anmerkung: Um auf die Werkseinstellungen zurück zu kehren, die Batterien für ein
paar Minuten herausnehmen, oder drücken Sie die
(DVD-Modus) oder
OK +3 (SAT- RC 5) oder OK + 5 (CD-Modus).
OK Taste + die Zahl 1
25
Page 54

Nützliche Hinweise
Tips
Pflege des Ihr Fernsehgerät mit einem wenig feuchten und weichen Tuch reinigen. Keine
Bildschirmes aggressiven Reinigungsmittel verwenden, die die Schutzschicht Ihres
Fernsehbildschirmes beschädigen können.
Schlechtes Bild • Haben Sie das korrekte TV-System im Menü Manuelle Einstellung ausgewählt?
Digitale Verzerrung Die niedrige Qualität bestimmter digitaler Bildmaterialien kann die Ursache für die
Kein Bild • Ist die Antenne sorgfältig angeschlossen?
Kein Ton •Keinen Ton bei egal welchem FS-Sender? Überprüfen Sie, ob die Lautstärke nicht
Kein Raumklang •Kontrollieren Sie, ob der Raumklang-Kanal eine gute Qualität sendet.
Keine Lösung für Schalten Sie Ihr Gerät aus und sofort wieder ein (nur einmal).Versuchen Sie
Ihr Problem mit niemals, ein defektes Fernsehgerät selbst zu reparieren. Ziehen Sie Ihre
Bild oder Ton Fachhändler zu Rate oder rufen Sie einen Fernsehtechniker heran.
gefunden?
Menü Haben Sie das falsche Menü gewählt ? Drücken Sie die
NEXTVIEW Keine NEXTVIEW Informationen:
Fernbedienung • Sollte Ihr Fernsehgerät nicht mehr auf die Fernbedienung reagieren, könnten deren
Bereitschaft Ihr Fernsehgerät verbraucht Energie im Bereitschaftsstand. Energieverbrauch trägt zur
• Befindet sich Ihr Fernsehgerät oder Ihre Hausantenne nicht zu nahe an
Lautsprechern, nicht geerdeten Audio-Geräten oder Leuchtstofflampen usw.?
• Berge oder hohe Gebäude können Doppelbilder oder Geisterbilder
verursachen. Manchmal können Sie die Bildqualität durch eine Richtungsänderung
der Außenantenne verbessern.
• Ist das Bild oder VT/TXT nicht zu erkennen? Überprüfen Sie, ob Sie die richtige
Frequenz eingestellt haben. Siehe Einstellung, S. 6.
• Sind Helligkeit, Schärfe und Kontrast nicht richtig eingestellt ? Selektieren Sie
Werksvoreinstellung im Konfigurations-Menü, S. 8.
• Die Bildqualität kann manchmal schlecht sein, wenn eine ans Fernsehgerät
angeschlossene S-VHS-Kamera eingeschaltet ist und gleichzeitig auch ein anderes
Gerät an eines der Buchsen angeschlossen ist. In diesem Fall eines der beiden
Geräte ausschalten.
digitale Verzerrung von Bildern sein. In diesem Fall wählen Sie die Option Weich über
die Smart Bild Taste auf der Fernbedienung, ohne die PIP-Parameter im Menü Bild
manuell zu verändern.
• Sind die Stecker gut in der Antennenbuchse befestigt?
• Ist das Antennenkabel in gutem Zustand und mit den richtigen Steckern
versehen?
auf Minimum eingestellt ist.
• Wird der Ton nicht unterbrochen durch die Ton AUS-Taste
Ihre Lautsprecher-aufstellung den im Menü Lautsprecher gemachten Wahlen auf
Seite 7 entspricht.
•Kein Ton aus dem angeschlossenen Audio-Empfänger ? Wählen Sie dann Center
Eingang Aus im Menü Quellen aus, siehe S. 9.
•Kein Ton aus den hinteren oder mittleren Lautsprechern? Wählen Sie einen richtigen
Raumklangmodus, der dem gesendeten Tonsignal entspricht, oder regeln Sie die
Lautstärke oder überprüfen Sie, ob der Sender für die drahtlose Übertragung richtig
angeschlossen ist. Siehe Raumklang Mode, S. 12.
zu verlassen.
Siehe Sammeln und Aktualisieren der
Falsche Uhrzeit:
Der Sender auf Speicherplatz 1 überträgt Ortszeit und Datum nicht richtig.
Wähle Umprogrammieren im Menü einstellung und programmieren Sie einen anderen
Sender auf Speicherplatz 1.
Batterien leer oder der falsche Modus (TV oder andere Peripheriegeräte) angewählt
worden sein.
• Sie können aber immer noch die m- und die -/+ Tasten oben an Ihrem Gerät
benutzen.
Luft- und Wasserverunreinigung bei.
Stromverbrauch: 1,1 W.
NEXTVIEW,S.16.
¬? Überprüfen Sie, ob
MENU Ï-Taste, um das Menü
26
Page 55

Ta b le des matières
Installation
Aide?
Si dans le mode d'emploi vous
n'avez pas la réponse à votre
question ou si les ‘Conseils’ donnés
ne vous ont pas aidé à résoudre
votre problème de TV, vous devez
téléphoner au service
consommateur de votre pays, voir
le document 'World-wide
guarantee'.
Avant de téléphoner au Service
Consommateurs de Philips, notez
le modèle et le numéro de série
complet de votre TV, lesquels sont
inscrits sur une étiquette collée au
dos de l'appareil, ou bien vous
trouverez ces informations sur une
étiquette collée sur 2 cotés au bas
de l'emballage.
Modèle: 32PW9768
N° de série: ...........................................
R Que faire lorsque votre
téléviseur est hors d'usage?
Philips s’efforce de fabriquer des
produits qui ne nuisent pas à
l’environnement. Votre nouveau
téléviseur est constitué de
matériaux recyclables et réutilisables.
Des entreprises spécialisées
démontent les téléviseurs arrivés en
fin de cycle de vie pour récupérer les
matériaux réutilisables afin de
réduire au minimum les déchets.
Informez-vous sur les dispositions de
votre pays concernant les téléviseurs
hors d'usage.
Préparation ........................................................................................ 2
Les touches en haut du téléviseur ............................................... 2
Votre télécommande ........................................................................ 3-4
Utilisation des menus .......................................................................5
Sélectionnez votre langage et votre pays ................................... 5
Mise en mémoire des chaînes ..................................................... 6
Installation automatique ......................................................... 6
Installation manuelle ............................................................... 6
Nom du programme .............................................................. 6
Modifier la liste des programmes ........................................ 7
Sélection des programmes préférentiels ........................... 7
Configuration TV .............................................................................. 7
Haut-parleurs .......................................................................... 7
Général .................................................................................... 8-9
Source ........................................................................................ 9
Décodeur .................................................................................... 9
Demo ................................................................................................ 10
Utilisation
Menu TV
Menu image ........................................................................ 10-11
Menu son ............................................................................ 11-12
Menu options .................................................................... 12-13
Deux écrans / PIP / Mosaïque .....................................................14
NEXTVIEW/Guide télétexte ................................................... 15-16
Télétexte ................................................................................... 17-18
Flex TV ....................................................................................... 19-22
Branchement des périphériques
Branchement et sélection des périphériques .................. 23-24
Touches pour les appareils A/V ................................................... 25
Conseils ......................................................................................... 26
Français
Les options de EasyLink sont basées sur le principe "commande au
moyen d'une seule touche". Cela signifie qu'un certain nombre
d'opérations consécutives sont exécutées simultanément par le
téléviseur et le magnétoscope si les deux appareils disposent de la
fonction EasyLink et sont connectés par le câble péritel qui est fourni
avec le magnétoscope.
1
Page 56

Préparation
V
P
M
MENU/OK
& Placez le téléviseur sur une surface solide et
stable.
! 32PW9768: 60 kg !
min.
1m
Prévoyez un espace libre d'au moins 5 cm
autour de l'appareil pour l'aération. Pour
prévenir toute situation dangereuse, ne rien
poser dessus tel qu’un objet couvrant, rempli de
liquide ou dégageant de la chaleur. De plus, le
téléviseur ne doit pas être exposé à des
projections d’eau.
é Introduisez la fiche d'antenne dans l'entrée
d'antenne x à l'arrière du téléviseur. En cas
de perturbation (points blancs sur l’image) lors
de la réception d’émetteurs VHF Bande 1 il est
conseillé de brancher le câble d’antenne antiparasite fourni.
“ Introduisez la fiche secteur dans la prise de
courant 220V - 240V.
‘ Télécommande: Introduisez les deux piles
fournies (Type R6-1,5V).
Les piles livrées avec la télécommande ne
contiennent pas de métaux lourds tels que le
mercure ou le cadmium. Informez-vous pour
connaître les dispositions en vigueur dans votre
pays.
( Mise en service du téléviseur:Appuyez sur la
touche M/A A en face avant du téléviseur.
Un voyant s’allume en face avant du téléviseur
et l’écran s’illumine. Si le téléviseur est en
position veille, voyant rouge allumé, appuyez sur
la touche
-P+ sur la télécommande.
Les touches en haut du téléviseur
TV
Config.
Demo
Install.
Sortie
2
2
Image Son Options
Si votre télécommande est perdue ou cassée, vous
pouvez toujours modifier quelques réglages de base
avec les touches situées sur le dessus du téléviseur.
Appuyez sur:
• les touches - ou + V pour régler le volume;
• les touches
P- P+ pour sélectionner les chaînes
TV ou les sources
La touche
M est utilisée pour appeler le menu
principal sans utiliser la télécommande.
Utilisez:
• les touches - ou + (Menu Droite/Gauche) V et
les touches
P- et P+ (Menu Haut/Bas) pour
sélectionner des éléments du menu dans les
directions indiquées;
• la touche
M pour confirmer votre sélection.
Important :
Lorsque le menu est activé via la touche
M en haut du
téléviseur, seule la fonction Sortie peut le faire
disparaître. Naviguez vers
sur la touche
M.
Sortie (P- P+) et appuyez
Page 57

Utilisation de la télécommande RC4303
B
b
¬
+
-
V
+
-
P
v
b
i
0
h
q
Select
VCR DVD SAT AMP CD
MENU
DVR
OK
123
456
789
0
Ò®‡π
†
Active Control
æ
Ò
†
Ï
Pause Live
REC
Remarque: Pour la plupart des touches, vous activerez la fonction en appuyant une fois sur la touche. Si vous
appuyez une seconde fois, la fonction sera désactivée. Lorsqu’une touche permet d'activer plusieurs fonctions, une
petite liste sera affichée.Appuyez de manière répétée afin de sélectionner l’élément suivant dans la liste. La liste
disparaîtra automatiquement après 4 secondes, sinon, appuyez sur
OK pour la faire disparaître immédiatement.
VCR DVD SAT AMP CD
Touches pour les appareils A/V,
p. 25.
v Sélection des périphériques
p. 24.
®Ò‡π†
Touches pour les appareils A/V,
p. 25.
REC / DVR / PAUSE / LIVE
Fonctions Flex TV,voir p. 19
U Demander l’heure
L’heure est affichée à l’écran.
Q Son Surround
Appuyez plusieurs fois sur cette
touche pour choisir un autre son
surround disponible.
Ì Cinema Go
Voir le manuel d’instructions
Cinema Link fourni séparément.
æ NEXTVIEW marche/arrêt p. 15
Appuyez sur la touche
afficher
dans la moitié droite de l’image.
NEXTVIEW/ Guide TXT
b pour
B Position veille
Appuyez pour mettre en ou hors
service le téléviseur. Lorsque le
téléviseur est en veille, le voyant
rouge s’allume.
x Demo Pixel Plus marche/arrêt
Sur le côté droit, Pixel Plus et
Digital Natural Motion sont
activés.
b Télétexte marche/arrêt p. 17
Appuyez sur la touche
b pour
appeler le télétexte qui sera
affiché sur la droite de l’écran.
OK Appuyez sur cette touche
• pour activer le choix que vous
avez effectué dans les menus.
• pour afficher la liste des
programmes.
Ï Menu principal marche/arrêt
voir p. 5
V Pour régler le volume.
¬ Pour supprimer/rétablir le son.
P Sélection des chaînes
Pour parcourir les chaînes de
télévision et les sources mises en
mémoire dans votre liste de
favoris.
0/9 Touches chiffrées
Choix direct d’une chaîne de
télévision. Si le numéro de chaîne
est à deux chiffres, introduisez le
second chiffre avant que le trait
ne disparaisse. Pour appeler une
chaîne de 0 à 9 appuyez sur la
touche chiffrée un peu plus
longtemps.
3
Page 58

B
b
¬
+
-
V
+
-
P
v
b
i
0
h
q
Select
VCR DVD SAT AMP CD
MENU
DVR
OK
123
456
789
0
Ò®‡π
†
Active Control
æ
Ò
†
Ï
Pause Live
REC
i Affichage d’information à l’écran
Appuyez pour afficher les informations de la chaîne de télévision
Information menu / télécommande
Lorsqu’un menu apparaît à l’écran, appuyez sur i pour afficher les
informations concernant l’élément du menu sélectionné. Pour des
informations sur les fonctions de la télécommande, lorsque le menu
information est affiché, appuyez sur n’importe quelle touche de la
télécommande. La fonction normale de cette touche ne sera pas
exécutée.
0 Smart surf / Thèmes NEXTVIEW
Cette touche vous permet de faire un choix entre 2 à 9 chaînes ou
sources différentes ou de sélectionner rapidement les programmes si
NEXTVIEW est transmis avec des thèmes définis.Voir Général, Smart surf,
p. 8 Appuyez sur la touche
disparaisse.
OK ou attendez que l’affichage Smart surf
b Deux écrans / PIP / Mosaïque
Voir p. 8 et p. 14.
h Active control voir p. 11.
q Format d’image
Appuyez plusieurs fois sur cette touche ou utilisez le curseur de direction
haut/bas pour sélectionner l’un des formats d’image: Format auto., Super
4:3, 4:3, Ext. image 14:9, Ext. image 16:9, Zoom sous-titre, Plein écran.
Format auto. Super 4:3 4:3 Ext. image 14:9
Ext. image 16:9 Zoom sous-titre Plein écran
Si vous avez sélectionné le Format auto., l’image remplira l’écran au
maximum. Le Format auto. permet visualiser les éventuels sous-titres de
la barre noire dans le bas de l’écran. Si les sous-titres ne sont qu’en partie
visibles, appuyez sur la touche de direction haut. Si le logo d’un diffuseur
est affiché dans l’un des 2 coins supérieurs, il disparaîtra de l’écran.
La fonction Super 4:3 supprime les barres noires apparaissant de chaque
côté de l’image des programmes 4:3, ceci avec une distorsion minimale.
Si votre téléviseur est en format: Ext. image 14:9, 16:9, Super 4:3 ou
Zoom sous-titre, vous pouvez faire apparaître les sous-titres à l’aide du
curseur de direction haut/bas.
4
Page 59

Utilisation des menus
B
b
¬
+
-
V
+
-
P
v
Select
VCR DVD SAT AMP CD
MENU
DVR
OK
Ò®‡π
†
æ
Ò
†
Ï
REC
sélectionner un
sujet des menus
touche OK
pour valider
retourner ou
mettre en/hors
service le menu
principal
& Appuyez sur la touche MENU Ï de la télécommande pour
faire apparaître le menu principal. À tout moment, vous
pouvez sortir du menu en appuyant à nouveau sur la touche
MENU Ï.
Remarque : si votre système est équipé de Cinema Link, le menu
dispose de plus d’éléments.
Image Son Options
TV
Configur.
Demo
Installer
é Utilisez le curseur de direction haut/bas pour sélectionner le
menu
TV, Configur., Demo ou Installer.
Utilisez le curseur de direction gauche/droite pour
sélectionner le menu
Image, Son ou Options.
Remarque : tous les éléments du menu ne sont pas toujours
visibles à l’écran (indiqué par plusieurs boules bleues). Utilisez le
curseur de direction bas ou droite pour les faire apparaître tous.
“ Sélectionnez l’élément de menu à l’aide du curseur
gauche/droite.
‘ A l’aide du curseur haut/bas, choisissez la commande que
vous souhaitez sélectionner ou ajuster.
Remarque : les éléments temporairement non disponibles ou non
pertinents sont affichés en gris clair et ne peuvent être
sélectionnés.
Installation
Le menu Installation comprend les éléments suivants:
Langage Pays Install. Install. Nom du Modifier n° Programmes
autom. manuelle programme de progr. préférent.
Installer
EasyLink
Après que la nouvelle chaîne ou la chaîne supplémentaire a été mémorisée, le téléviseur transmet automatiquement
cette (ces) chaîne(s) de télévision au magnétoscope si celui-ce dispose de la fonction EasyLink.
Sélectionnez votre langage et votre pays
Installer
Installer
Langage
English
Deutsch
Français
Pays
Autriche
Belgique
Croatie
& Appuyez sur la touche MENU Ï de la télécommande.
é Utilisez le curseur de direction bas pour sélectionner
Installer.
“ Utilisez le curseur de direction droite pour sélectionner
Langage. Suivez les instructions à l’écran.
‘ Utilisez le curseur de direction haut/bas pour sélectionner
votre langue préférentielle et appuyez sur la touche
OK
pour confirmer votre choix.
( Utilisez le curseur de direction droite pour sélectionner
Pays.
§ Sélectionnez le pays dans lequel vous vous trouvez et
appuyez sur la touche
OK. Sélectionnez Autre quand le pays
où vous vous trouvez n’est pas dans la liste.
è Passez au menu Installer.
5
Page 60

Mémoriser les chaînes de télévision
Après avoir correctement sélectionné votre langue et votre pays, vous pouvez maintenant rechercher et
mémoriser les chaînes de télévision de deux façons différentes : en utilisant l’Installation Automatique ou
Manuelle (introduction chaîne par chaîne). Faites votre choix à l’aide du curseur de direction droite.
Installation automatique
Installer
& Sélectionnez Install. autom. dans le menu
Installer.
Remarque: toutes les chaînes doivent être
déverrouillées pour pouvoir utiliser l’installation
automatique. Si nécessaire, composez votre code
pour déverrouiller toutes les chaînes (voir TV, menu
Options, Verrouillage, p. 13.)
é Appuyez sur le curseur bas. L’étiquette Marche
relative à l’option de programmation
automatique apparaît à l’écran.
Installation manuelle
Installer
Install. autom.
Installer Marche
Install. manuelle
Mode sélection
Système
Programme
Cherche
Réglage fin
Mémoriser
La recherche et la mise en mémoire des chaînes de télévision est
exécutée chaîne par chaîne.Vous devez passer par toutes les étapes
du menu Installation manuelle.
& Sélectionnez Install. manuelle dans le menu Installer.
é Appuyez sur le curseur bas. Suivez les instructions à l’écran.
Remarque: Recherche ou sélection directe d’une chaîne de télévision: Si
vous connaissez la fréquence ou le numéro du canal C ou S,
introduisez les trois chiffres de la fréquence ou du canal à l’aide des
touches chiffrées de 0 à 9 (par ex. : 048).Appuyez sur le curseur bas
pour continuer.
Répétez pour mémoriser une autre chaîne.
“ Appuyez sur le curseur droite.
‘ Le message Recherche s’affiche et le
déroulement de la programmation automatique
apparaît à l’écran.
Si un réseau câblé ou une chaîne de télévision
diffusant les informations d’installation automatique
des chaînes (ACI) est détecté, une liste de
programmes apparaît. Sans la diffusion ACI, les
chaînes sont numérotées en fonction de votre
langue et de votre pays.Vous pouvez utiliser la
fonction Modifier pour les reclasser.Voir p. 7.
Il est possible que le réseau câblé ou la chaîne de
télévision affiche ses propres paramètres. Ces
paramètres sont alors définis par le réseau ou la chaîne
de télévision concernée. Faites votre sélection à l’aide du
curseur et appuyez sur la touche
OK.
Nom du programme
Installer
Il est possible de modifier le nom de la chaîne déjà
mémorisé ou d'attribuer un nom à une chaîne
encore dépourvue de nom.Vous pouvez donner un
nom de 5 lettres ou chiffres au maximum aux
numéros de programme 0 à 99.
& Choisissez Nom du programme dans le menu
Installer et appuyez sur le curseur bas.
é Sélectionnez le numéro de programme.
Remarque: maintenez le curseur de direction
haut/bas enfoncé afin de parcourir la liste des
programmes.
6
Nom du programme
VCR1
BBC1
BBC2
CNN
TVE
.....
pπ
® Espace ® Effacer
ABCDEFG 123
HIJKLMN 456
OPQRSTU 789
VWXYZ 0
® Shift ® Spécial
“ Appuyez sur le curseur droite.
Un clavier apparaît à l’écran.A l’aide des
touches de direction droite/gauche et haut/bas
sélectionnez les lettres, chiffres et fonctions en
prenant soin de valider votre choix par la
touche
OK. Répétez pour chaque lettre que
vous désirez entrer.
Sélectionnez
Effacer pour effacer le caractère mis en
évidence dans le nom introduit;
Espace pour entrer une espace;
Shift pour
afficher les caractères en majuscule ou
minuscule du clavier et
caractères spéciaux. Appuyez sur la touche
Spécial pour afficher les
OK
pour valider.
‘ Appuyez plusieurs fois sur le curseur de
direction gauche lorsque vous avez fini
d’attribuer un nom à la chaîne ou au
périphérique sélectionné.
( Sélectionnez un autre numéro de programme et
répétez les étapes
“ à ‘.
Page 61

Modifier la liste des programmes
Vous pouvez, à votre guise, reclasser les chaînes
mémorisées.
& Choisissez Modifier n° progr. dans le menu
Installer.
é Suivez les instructions à l’écran.
Configuration
HP Général Source Décodeur
Configur.
Signal test
Balance
Volume central
(Volume surround)
HP surround
Auto surround
Programmes préférentiels
& Choisissez Programmes préférentiels dans le
menu Installer.
é Choisissez votre numéro de programme
préférentiel à l’aide du curseur haut/bas.
“ Sélectionnez Oui ou Non avec le curseur
gauche/droite.
‘ Répétez les étapes é et “ pour toutes les
chaînes de télévision ou sources externes que
vous souhaitez définir en tant que
préférentielles ou non.
Le menu Configuration contient les items relatives aux
fonctions TV, accessoires, et périphériques que vous aurez
branchés.
Le menu
liées aux haut-parleurs.
Le menu
paramètres qui ne seront utilisés que rarement.
Le menu
source.
Le menu
plusieurs numéros de programme pour les chaînes
nécessitant d’un décodeur.
HP (Haut-Parleurs) donnera les commandes
Général vous permet de modifier les
Source vous permet de sélectionner une
Décodeur vous permet de réserver un ou
Haut-Parleurs
Votre téléviseur est équipé d’un ensemble de HP
intégrés: gauche, droite et centre, capable de
reproduire les modes Stéréo, Dolby 3 stéréo et
3D surround.
Pour la reproduction des sons Dolby Pro Logic et
Hall, il est conseillé d’utiliser deux HP surround
amplifiés.Voir HP supplémentaires/Amplificateur,
p. 24.
En fonction de la capacité et du mode Surround
sélectionné (voir Menu principal,TV, Son, Son
surround, p. 12), certains éléments du menu
peuvent être de couleur grise et ne peuvent être
sélectionnés.
Signal test
L'élément du menu
régler le niveau de chacun des HP jusqu’à ce
qu’ils soient bien équilibrés.
& Sélectionnez Signal test et appuyez sur le
curseur droite.
é Une fois activé, le Signal test va circuler dans les
HP gauche, centre, et droite ainsi que dans les
deux HP surround (s’ils sont présents).
Signal test vous permet de
“ Appuyez sur le curseur de direction haut/bas
pour sélectionner le HP pour lequel vous
voulez effectuer un réglage individuel du niveau
sonore.
‘ Appuyez sur le curseur de direction
gauche/droite pour régler son volume sonore.
Haut-parleurs surround
Voir Branchement des périphériques, HP
supplémentaires/Amplificateur à la page 24.
Si aucun haut-parleur surround n’est branché,
ne changez pas le préréglage d’usine:
Arrêt.
Si des haut-parleurs surround sont branchés,
choisissez
Marche. (Dolby Pro Logic et Hall ne
sont pas disponibles si Arrêt est choisi.)
Auto Surround
Parfois des informations sont transmises dans
les programmes afin d’activer automatiquement
le mode de reproduction son surround du TV.
Ces informations sont prises en compte
lorsque la fonction
activée. Néanmoins il est possible de
Auto Surround est
désactiver cette fonction.
7
Page 62

Général
Configur.
Fond du menu
Format Deux écrans
Diffuseur
Intro./Changer code
Smart surf
Préréglage d’usine
NEXTVIEW
Ajust. inclin. image
Titre programme
Télétexte 2.5
Qualité enregist.
Smart surf
& Sélectionnez Smart surf.
é A l’aide du curseur gauche/droite, sélectionnez
•
2 programmes si vous souhaitez passer
alternativement, à l’aide de la touche 0, de la
chaîne que vous avez sélectionnée à la chaîne
que vous aviez sélectionnée préalablement,
•
9 programmes pour appeler à l’écran, au
moyen de la touche 0, une liste comprenant
jusqu’à 9 chaînes pouvant être sélectionnées,
•
Thème si vous voulez sélectionner rapidement
les programmes de télévision au moyen de la
touche 0, si
thèmes définis.
Ajouter/supprimer une nouvelle chaîne ou
source:
Sélectionnez la chaîne ou la source que vous
souhaitez ajouter/supprimer.Appuyez sur la
touche 0, puis utilisez le curseur droite pour
procéder à l’ajout/la suppression.
Remarque: S’il y a déjà neuf chaînes/sources dans la
liste, la chaîne ou la source figurant en bas de celleci sera supprimée.
Format Deux écrans
Ce menu vous permet de sélectionner votre
format préféré qui peut alors être affiché en
appuyant successivement sur la touche b.
Voir Deux écrans/PIP/Mosaïque, p. 14.
Au moyen du curseur bas, sélectionnez
, PIP,PIP 3 ou PIP 12.
écrans
Lorsque ce mode est activé avec la touche b
de la télécommande, et lorsque :
•
Deux écrans est sélectionné, l’écran du TV est
divisé en 2 parties de taille identiques:
•
PIP est sélectionné, la petite image PIP est
visible dans la partie haute de l’écran du TV;
•
PIP 3 ou PIP12 est sélectionné, sur l’écran du
TV sera visible 3 ou 12 écrans PIP.
Général
OSD
NEXTVIEW est diffusé avec des
Deux
Ce menu vous permet d’accéder à des paramètres
rarement modifiés durant la vie du TV.
Appuyez sur la touche i de la télécommande
afin d’obtenir des informations concernant
l’élément du menu sélectionné.
Préréglage d’usine
Cette fonction rétablit les paramètres d’image
et de son préréglés en usine, mais conserve les
paramètres d’installation des chaînes.
Diffuseur
NEXTVIEW
Sélectionnez une chaîne qui propose NEXTVIEW.
Comment utiliser
NEXTVIEW,voir p. 15.
OSD (Affichage sur l’écran)
Voir Utilisation de la télécommande, p. 4, i
sur les informations à l’écran.
& Sélectionnez OSD.
é Sélectionnez Normal pour activer l’affichage
continu du numéro de programme et des
informations relatives au programme en cours;
Minimum pour activer l’affichage d’un nombre
réduit d’informations du programme en cours.
Remarque: lorsque l’option Sous-titres est activée
(voir Options, p. 12), il n’est pas possible d’afficher
en continu le numéro du programme.
Télétexte 2.5
Certains diffuseurs offrent la possibilité de
profiter d’un nombre plus élevé de couleurs, de
couleurs de fond différentes et d’images de
meilleure qualité dans les pages Télétexte 2.5.
& Sélectionnez Télétexte 2.5.
é Appuyez sur le curseur droite pour
sélectionner
Télétexte 2.5 Marche pour
profiter de cette option.
“ Appuyez à nouveau sur le curseur droite pour
sélectionner
Télétexte 2.5 Arrêt si vous
préférez que la mise en pages du Télétexte soit
plus neutre.La sélection faite vaut pour toutes
les chaînes proposant le service Télétexte.
Remarque: quelques secondes peuvent s’avérer
nécessaires avant que le Télétexte ne passe au
niveau 2.5.
Qualité d’enregistrement
Voir Flex TV, Modifier la qualité ’enregistrement
d’un enregistrement instantané, p. 22.
8
Page 63

Introduire/Changer code
L’option
Verrouillage (voir TV, Options, p. 13)
permet de verrouiller des chaînes et ainsi
d’empêcher de regarder certains programmes. Pour
regarder les chaînes verrouillées, il est nécessaire de
composer un code d’accès. L’élément de menu
Changer code vous permet de créer ou de
modifier un numéro d’identification personnel.
& Sélectionnez Intro./Changer code.
é Si aucun code n’a encore été créé, l’élément de
menu indique Introduisez code.
Si un code a déjà été composé, l’élément de
menu indique
Changer code.Toutes les
combinaisons de chiffres de 0000 à 9999 sont
valables.
Important: vous avez oublié votre code !
& Sélectionnez Changez code dans le menu
Général et appuyez sur
é Appuyez sur le curseur de direction droite et
OK.
composez le code déterminant 8-8-8-8.
“ Appuyez à nouveau sur le curseur et saisissez
un nouveau code à quatre chiffres pour
remplacer le code précédent.
Source
Configur.
Source
EXT1
EXT2
EXT3
EXT4
Side
Entrée centrale
Vol. entr. centr.
Ce menu vous permet de sélectionner le
périphérique que vous avez branché à l’une des
entrées externes.
& Utilisez le curseur de direction droite pour
entrer dans la liste de périphériques branchés à
l’entrée sélectionnée.
é Sélectionnez le périphérique à l’aide du curseur
de direction haut/bas.
Lorsque vous avez sélectionné la source, p. ex.
DVD, celle-ci sera automatiquement
sélectionnée lorsque votre télécommande sera
en mode DVD (voir p. 3) et lorsque vous
appuierez sur la touche de celle-ci.
Décodeur
Configur.
Si vous avez branché un décodeur, voir p. 23, vous
pouvez réserver un ou plusieurs numéros de
programme pour les chaînes utilisant un décodeur.
& Sélectionnez Décodeur à l’aide du curseur
droite.
é Sélectionnez Programme.
Décodeur
Programme
Status
Entrée centrale - Volume entrée centrale
Lorsque que vous avez connecté le Module de
Réception RF surround au TV, voir p. 24, les HP
du TV représentent le HP central de ce fait il
n’est pas nécessaire d’ajouter un HP central.
Sélectionnez
Cinema Link (cas d’une liaison Cinema Link
Entrée centrale Marche ou
TV au récepteur surround).
Lorsque vous avez sélectionné
Marche vous
devez équilibrer le volume sonore du HP
central et celui des HP du récepteur audio avec
le curseur de direction Gauche/Droite.
Note: ce n’est pas le cas avec une liaison Cinema
Link du TV au récepteur surround..
“ Sélectionnez le numéro sous lequel vous avez
mémorisé le programme provenant de votre
décodeur.
‘ Sélectionnez Status.
• Sélectionnez l’entrée utilisée pour brancher
votre décodeur:
• Sélectionnez
Aucune, EXT1,EXT2.
Aucune si vous ne voulez pas que
le programme sélectionné soit activé en tant
que numéro de programme décodeur.
Note: Sélectionnez
EXT2 si votre décodeur est
connecté à votre magnétoscope EasyLink.
9
Page 64

Demo
TV
Configur.
Demo
Installer
Demo autom.
......
Le menu Démonstration permet au téléviseur de
faire une démonstration de ses options, séparément
ou en boucle continue.
Si vous avez sélectionné
Demo autom., la démon-
stration présentera automatiquement toutes les
options de manière séquentielle, en boucle. Pour
arrêter la démonstration automatique, appuyez sur
l’une des touches du curseur. Si vous avez
Démo dealer - Options numériques
- Capteur de lumière
- Comb filter
sélectionné l’une des options, la démonstration de
cette option sera présentée une seule fois, et le
menu Demo apparaîtra de nouveau. Néanmoins, la
démo Flex TV continuera à fonctionner jusqu’à ce
qu’on l’arrête en appuyant sur l’une des touches du
curseur ou sur la touche
OK de la télécommande.
Remarque:
- le mode Demo dealer ne fait pas partie de la
séquence automatique et ne peut être activé que
séparément.
- La démo Flex TV est uniquement disponible en 7
langues.
Menu TV
Appuyez sur la touche MENU Ï de la télécommande pour appeler à l’écran le menu principal.
Appuyez sur la touche i de la télécommande afin d’obtenir des informations concernant
l’élément du menu sélectionné.
Menu Image
Image Son Options
TV
Smart image
Contraste
Lumière
Couleur
Définition
Teinte
Options numérique
Contraste dynam.
DNR
Couleurs renforc.
(Teinte)
Format d’image
& Utilisez le curseur de direction droite pour sélectionner Image.
é A l’aide du curseur de direction haut/bas, sélectionnez les
éléments de menu dans le menu Image.
“ Ajustez les réglages à l’aide du curseur de direction
gauche/droite ou entrez dans la liste d’éléments de sous-menu à
l’aide du curseur de direction droite. Sélectionnez un élément de
sous-menu à l’aide du curseur haut/bas.
Remarque: pour faire disparaître le fond du menu avant d’ajuster les
réglages image, voir Sélection configuration TV, Général p. 8.
Smart image
Sélectionnez
Smart image pour faire apparaître une liste de
paramètres image définis, correspondant chacun à un des
préréglages d’usine.
Préférentiel se rapporte aux paramètres personnels pour
l’image dans le menu image.
Options numériques
Pixel Plus est le paramètre idéal, il double la résolution
horizontale et augmente le nombre de lignes de 33 %.Vous
pouvez sélectionner Movie Plus dans le cas où vous seriez gêné
par un effet de halo.
Vous pouvez envisager, en fonction de vos préférences, de
sélectionner Double lines, ou Digital Scan 100 Hz.
Remarque : lorsque l’équipement NTSC 60 Hz est utilisé, les options
sont modifiées en Pixel Plus, Movie Plus ou Progressive, balayage
progressif sans compensation de mouvement.
10
Page 65

Active Control
Le téléviseur mesure et corrige en temps réel tous les signaux qu’il
réceptionne afin d’obtenir la meilleure image possible.
& Appuyez sur la touche h de la télécommande.
é Le menu Active Control apparaît.
“ Utilisez le curseur de direction haut/bas pour sélectionner les
valeurs Active Control
Arrêt, Minimum, Médium
(recommandé) ou Maximum.
Les paramètres de l’image sont optimisés en continu et
automatiquement, comme l’affichent les barres. Les éléments du
menu ne peuvent pas être sélectionnés.
‘ Appuyez sur le curseur de direction droite pour sélectionner
Smart image.
( Appuyez sur le curseur de direction haut/bas pour sélectionner
un des paramètres de l’image définis.
§ Appuyez sur le curseur de direction droite pour sélectionner
Affich. actif.
è Appuyez sur le curseur de direction haut/bas pour sélectionner
Afficher les bars, une des démos de Deux écrans ou Arrêt.
Lorsque vous sélectionnez Contraste Dynamique, Pixel Plus,
DNR (Réduction du Bruit Numérique) ou Digital Natural
Motion, l’écran du téléviseur est divisé en deux parties: partie
gauche le paramètre sélectionné est désactivé; partie droite il est
activé.
! Appuyez à nouveau sur la touche h pour mettre le menu
Active Control hors service.
Menu Son
TV
Smart son
Egaliseur
Volume
Volume du casque
Son surround
(Langage I-II)
(Mono/Stéréo)
(Nicam/Analogique)
(Effet 3D)
AVL
Delta volume
Son
& Appuyez sur le curseur de direction droite pour sélectionner
Son.
é Sélectionnez les éléments de menu dans le menu Son à l’aide du
curseur de direction haut/bas et ajustez les réglages à l’aide du
curseur de direction gauche/droite. Lorsque que les barres des
visuels sont centrés les réglages sont à mi-niveau.
Smart son
Sélectionnez
Smart son pour afficher une liste de paramètres
de son définis, correspondant chacun avec à un des préréglages
usine des Aigues et des Graves.
Préférentiel se rapporte aux paramètres personnels pour le
son dans le menu son.
Remarques:
- Certains éléments du menu ne sont disponibles qu’en cas de
configuration Cinema Link et si vous avez activé l’option Cinema Link.
D’autres éléments du menu sont commandés par le récepteur audio
plutôt que par le téléviseur.Voir le livret Cinema Link fourni
séparément.
- Langage X n’est disponible qu’avec la transmission sonore bilingue.
- Mono/Stéréo ne peut être sélectionné qu’en cas de transmission
analogique stéréo.
- Nicam/Analogique ne peut être choisi que dans le cas d’une
transmission Nicam.
- Certains éléments du menu ne sont pas disponibles en mode Flex TV.
11
Page 66

Son surround
En fonction de vos préférences et du signal son
émis, sélectionnez un des modes surround.
Stéréo
Ce mode de reproduction
reproduit uniquement les voies
sonores avant gauche et droite.
Dolby 3 Stéréo
(optimal avec transmission Dolby Surround)
Les sons Dolby Pro Logic* sont
diffusés entre les haut-parleurs
avant gauche, droite et central.
3D Surround
(optimal avec transmission Dolby Surround)
Le mode 3D Surround vous
permet de profiter de l’effet
Dolby Surround Pro Logic* sans
devoir brancher ou activer les
haut-parleurs arrière.Les haut-parleurs arrière sont
illustrés sur la représentation par le symbole ®r.
Sélectionnez le niveau de
l’effet 3D désiré en
utilisant le curseur en direction gauche/droite.
Hall
Le signal sonore spécial est
diffusé par les HP arrière, ce
qui crée un effet hall venant
de l’arrière. Le haut-parleur
central ne diffuse aucun son.
Dolby Pro Logic
(optimal avec transmission Dolby Surround)
Les 3 HP avant (TV) et arrière
(Surround) reproduisent les
sons Dolby Pro Logic. Les
informations sont toujours
encodés dans les films et
programmes avec le logo G
Dolby Surround.
Notes:
• Les émissions stéréo standards ne sont pas toujours
encodées pour produire du son surround arrière.
• Lorsqu’une configuration Cinema Link est connectée,
seuls les modes surround du récepteur externe
peuvent être sélectionnés.
•Les modes de reproduction Pro Logic et Hall ne sont
possibles que si les HP surround sont sur Oui dans le
menu Configuration, HP, page 7, et si les haut-parleurs
arrière sont connectés.
•Lorsqu’un casque est raccordé, seul le mode Surround
Casque Stéréo est disponible.
Fabriqué sous licence de Dolby Laboratories.‘Dolby’ ‘Pro Logic’" et le symbole double-D G sont des marques de commerce de
Dolby Laboratories. Oeuvres confidentielles non publiées. © 1992-1997 Dolby Laboratories, Inc.
Menu Options
TV
Liste programmes
Sous-titre
Arrêt programmé
Effacer Pause
Ve rrouillage
Min. marche
& Utilisez le curseur de direction droite pour
sélectionner
é Sélectionnez les éléments du menu avec le
Options
Arrêt
Marche
Actif sans son
Zoom
Options.
curseur de direction haut/bas et ajustez les
réglages avec le curseur de direction
droite/gauche.
Appuyez sur la touche i de la télécommande
afin d’obtenir des informations concernant
l’élément du menu sélectionné.
12
Liste des programmes
Appuyez sur la touche
OK pour passer à la
chaîne de télévision ou la source choisie.
Sélection des sous-titres
La page des sous-titres doit être enregistrée
pour chaque chaîne:
Activez le télétexte et sélectionnez la page
sous-titre appropriée. Désactivez le télétexte.
Sous-titre Marche les affichera
automatiquement sur les chaînes de TV
sélectionnées si ces chaînes les transmettent.
Un symbole indique que ce mode est activé.
Sélectionnez
Actif sans son si vous désirez que
les sous-titres s’affichent automatiquement
lorsque le son a été provisoirement coupé à
l’aide de la touche ¬ de la télécommande.
Page 67

Effacer Pause
Cette touche vous permet d’effacer la mémoire
de vos enregistrements en direct.Voir p. 19.
Verrouillage
& Sélectionnez Verrouillage.
Ve rrouillage
é Utilisez le curseur de direction droite pour
Ve rrouiller
Ve rrouillage
Déverrouiller
Ve rrou âge
Ve rrou après
Ve rrou progr.
Ve rrou catég.
entrer dans le menu Verrouillage.Vous êtes alors
invité à entrer votre code d’accès.
Remarque :Vous devez introduire votre code chaque
fois que vous entrez dans le menu verrouillage.
Important: vous avez oublié votre code !
Voir p. 9.
“ Sélectionnez un des éléments du menu:
•
Verrouiller si vous voulez verrouiller toutes les
chaînes et sources externes.
•
Verrouillage et appuyez sur le curseur de
direction droite. Les options Selon âge et
Verrou catég. sont disponibles si le système
NEXTVIEW est disponible.
Sélectionnez:
-
Verrou âge si vous désirez verrouiller les
programmes en fonction de l’âge, 2,4...16.
-
Verrou après si vous souhaitez verrouiller
tous les programmes à partir d’une heure
précise. Utilisez le curseur droite et entrez
l’heure à l’aide du curseur haut/bas et droite.
Appuyez sur la touche
-
Verrou progr. si vous voulez verrouiller une
OK pour activer.
chaîne ou une source externe déterminée;
-
Verrou catég. si vous désirez verrouiller des
programmes en relation avec un thème
déterminé: Films,Sports,..Voir
• Sélectionnez
Déverrouiller pour déverrouiller
NEXTVIEW,p.15
toutes les chaînes et sources verrouillées.
Minuterie marche
& Sélectionnez Min. marche.
VCR1
BBC2
Marche
Min. marche
é Sélectionnez Marche avec le curseur droite.
“ Appuyez à nouveau sur le curseur droite pour
Arrêt
CNN
TVE
π.....
Dimanche
Lundi
.......
Journ.
15:45
entrer dans la liste des programmes.
‘ Sélectionnez la chaîne de télévision ou la source
extérieure sur laquelle vous souhaitez que
votre téléviseur se règle à l’heure et le jour de
votre choix.
( Appuyez à nouveau sur le curseur droite pour
sélectionner un jour de la semaine ou
§ Utilisez à nouveau le curseur de direction
Journ..
droite pour entrer l’heure ou entrez l’heure à
l’aide des touches chiffrées ou du curseur
haut/bas et appuyez sur
è Appuyez sur la touche MENU Ï pour mettre
OK pour activer.
hors service le menu.
Note: Pour vérifier vos réglages, appuyez sur i.
Zoom
& Sélectionnez Zoom avec le curseur vers le bas
et appuyez sur la touche
é Appuyez sur la touche OK pour sélectionner
OK.
un des agrandissements zoom (x1, x4, x9, x16).
“ En outre, vous pouvez bouger la fenêtre zoom
sélectionnée à travers l’écran avec les touches
du curseur haut/bas, gauche/droite.
‘ Appuyez sur la touche MENU Ï pour
désactiver la fonction zoom.
13
Page 68

Deux écrans / PIP / Mosaïque
Appuyez sur la touche b pour passer au mode Deux écrans, PIP ou l’un
des modes PIP.Appuyez à nouveau sur la touche b.L’écran au bord jaune
deviendra l’écran plein principal.
B
VCR DVD SAT AMP CD
v
REC
æ
Ò
DVR
+
V
-
123
456
789
i
b
Pause Live
†
Select
Ò®‡π
b
†
OK
MENU
Ï
+
¬
P
-
0
0
Active Control
q
h
Remarques:
- Si vous continuez à enfoncer la touche b, les différents formats défileront sur
l’écran de votre téléviseur, à raison d’un nouveau format chaque seconde tant que
la touche est enfoncée. Lorsque la TV est en veille, les préférences telles que
définies dans Configuration, Menu Général sont utilisées.
- Quand le mode Deux écrans est sélectionné, deux formats d’image sont
possibles : Plein écran ou format d’image 4:3 letter box (format 16 : 9).
- Le son audio de l’écran de droite ou de l'écran PIP est diffusé dans les écouteurs.
Options d’affichage
Deux écrans PIP
- Appuyez sur le curseur de direction droite pour mettre l’écran de
droite en évidence.
- Appuyez sur le curseur de direction bas pour mettre l’écran PIP en
évidence.
- Appuyez sur le curseur de direction droite pour rentrer dans ‘l'écran
Multipip et utilisez les touches de navigation afin de mettre en évidence
l’écran PIP choisi.
Modifier les chaînes ou les sources externes en écran gauche,
droit, PIP ou Mosaïque
Appuyez sur la touche
afin de modifier les chaînes ou les sources externes dans l’écran mis en
évidence.
AUX
PIP 3 PIP 12
AUX
PIP1 PIP1 PIP2 PIP3
PIP5 PIP6 PIP7
PIP2
PIP9 PIP10 PIP11 PIP12
PIP3
-P+ ou la touche 0 ou les touches chiffrées
PIP4
PIP8
14
Position
Taille
Scan PIP3 ou PIP 12
Naviguez vers l’écran PIP le plus bas et appuyez sur la touche de
curseur bas afin d’afficher une nouvelle série d’écrans PIP.
Définir la position et les dimensions de l’écran mono PIP
o
œ
& Sélectionnez le mode Deux écrans avec incrustation d’un écran PIP.
é Appuyez sur la touche de curseur Bas pour mettre en évidence l’écran
PIP. Le menu PIP apparaît. Il permet de déterminer la position et les
dimensions de l’écran PIP.
Note: Après un certain temps le Menu PIP disparaît, appuyez sur la touche
OK pour le faire réapparaître
“ Nouvel appui sur la touche de curseur Bas pour sélectionner Position
ou Taille.
‘ Appuyez sur la touche OK ou la touche de curseur Bas pour valider.
( Définir la position de l'écran PIP avec les touches de curseur. Définir les
dimensions de l'écran PIP avec les touches de curseur droite/gauche.
§ Appuyez sur la touche OK. Le Menu PIP réapparaît.
è Naviguez vers le haut du menu pour remettre en évidence l'écran
principal.
! Appuyez sur la touche OK pour effacer le Menu ou attendez qu'il
s'efface de lui même.
Information affichée à l'écran
Au changement de chaîne, les informations affichées sont relatives à
l'écran actif.
Page 69

NEXTVIEW / Guide Télétexte
NEXTVIEW est un guide électronique qui vous permet de consulter les programmes comme
vous le feriez avec un journal ou un magazine TV. Vous pouvez trier les programmes par sujet
(films, sport...), obtenir des informations détaillées et programmer votre magnétoscope s’il
possède la fonction
NEXTVIEW
Link.
Remarque importante: Le service NEXTVIEW n’est disponible que pour certains programmes et dans
certains pays. Quand le ser vice
NEXTVIEW
n'est pas disponible, le Guide programme Télétexte apparaît à sa place.
Celui-ci est basé sur l’information de programmes Télétexte (quand il est disponible) et offre la plupart des fonctions
de
NEXTVIEW. Remarque: La station est responsable du contenu de l’information.
Mise en et hors service du NEX
TVIEW/Guide Télétexte
Appuyez sur la touche æ de la télécommande pour mettre en ou hors service le NEXTVIEW/Guide
Télétexte. Un menu apparaît avec le message
• une page
NEXTVIEW, si la chaîne choisie diffuse ce service (le logo NEXTVIEW est affiché ).
Attendez s.v.p. Après quelques instants vous obtenez:
• une page télétexte, si la chaîne choisie ne diffuse pas NEXTVIEW,
•
Pas d’information disponible s'affiche si ni NEXTVIEW ni télétexte ne sont transmis. Dans ce cas,
choisissez une autre chaîne.
Sélection des chaînes par thème
Si les programmes repris dans
NEXTVIEW ont des thèmes définis, il est possible de sélectionner des
programmes TV au moyen de la touche 0.Voir Configuration, menu Général, Smart surf p. 8.
Affichage d’une page
NEX
TVIEW
L’information est définie par la chaîne qui transmet le service NEXTVIEW.
Voir également le menu Configuration, Général, Diffuseur
palet
Ce logo est seulement
affiché durant une
transmission NEXTVIEW.
L’absence de logo indique un
affichage télétexte.
Lun 05 Fév 18.00
Lun 03
Lun 03
Mar 04
Mer 05
Jeu 06
Ven 07
Sam 08
Aperçu Record Prépr. Regard Verr.
Menu 18.00 Chaîne Thème
BBC1 18.00 BBC News
BBC2 18.00 The Simpsons
CNN 18.00 World News
FR2 18.00 On a tout essayé!
CH5 18.15 Tomorrow Never Dies
NEXTVIEW,p.8.
Guides NEX
Nom du programme et
heure de diffusion
touches fonction
TVIEW
Image/NEXTVIEW - Guide Télétexte
& Appuyez sur la touche æ. Appuyez sur la touche b pour afficher NEXTVIEW/ Guide TXT dans la
moitié droite de l’image.
é Utilisez le curseur pour sélectionner une chaîne de télévision.
“ Appuyez sur la touche b pour éteindre le format 2 écrans.
Guides NEXTVIEW
& Utilisez le curseur de direction gauche/droite pour choisir Heure, Chaîne, Thème, la Date.
Le
Guide horaire donne une vue générale de tous les titres des programmes disponibles durant
l’espace de temps choisi. Le
sont diffusés par une chaîne déterminée pendant une journée.Avec le
choisir un jour spécifique. Le
choisie qui correspondent avec la catégorie choisie.
En parcourant le Guide Menu, la TV rassemble les critères de sélection pour afficher une liste de
programmes selon vos critères de choix.
é Appuyez sur la touche OK pour choisir le type de guide.
“ Amenez le palet vers le bas et à droite pour sélectionner les programmes.
Si disponible, un résumé ou un commentaire sur le programme est affiché en bas de l’écran.
‘ Utilisez le curseur de direction haut/bas pour faire défiler les programmes.
Guide des chaînes donne une vue générale de tous les programmes qui
Guide des dates vous pouvez
Guide des thèmes affiche une liste de tous les programmes à la date
15
Page 70

Guide Télétexte
& À l’aide des touches numériques, entrez le numéro de la page télétexte qui contient les informations
sur les programmes de la chaîne en question.
é Appuyez sur le curseur de direction droite pour déplacer le palet à travers la boule de sélection.
“ Utilisez le curseur haut/bas pour parcourir les différents programmes.
bouton de page
bouton de
sélection
liste des chaînes
Lun 05 Fév 16.35
BBC1
BBC2
ITV
CH4
CH5
Aperçu Record Prépr. Regard Verr
100 1
BBC CEEFAX
LIONS RECORD ANOTHER WIN 430
Index 100 News 300
BBC Info 110 Headlines 305
Children 120 Weather 400
Cookery 150 Sports 415
Education 200 Radio 500
sous-pages
bouton de défilement
• Si le programme choisi contient un numéro de page avec un sous-code optionnel se référant à une
page contenant plus d’information sur le programme, appuyez sur la touche
information.Appuyez de nouveau sur la touche
OK pour retourner à la page du guide des
OK pour afficher cette
programmes.
• Si la page du guide des progr. choisie remplit les conditions VPT,
- il sera possible d’enregistrer, de rappeler,de regarder ou de verrouiller les programmes,
- le téléviseur se souviendra du numéro de la dernière page télétexte sélectionnée sur cette chaîne
contenant des informations du guide des programmes et indiquant quel programme commence à quelle
heure. Chaque fois que vous appuyez sur la touche æ, la page du guide des programmes télétexte de
la chaîne sélectionnée s'affichera.
• Si nécessaire, vous pouvez sélectionner le numéro de sous-page en déplaçant le curseur à la boule
indiquant la page et en appuyant sur le curseur de direction droite.
Remarque :Vous devez introduire le numéro de la page télétexte pour chaque chaîne.Vous pouvez également
changer les chaînes en déplaçant le curseur de direction haut/bas dans la liste présente à la gauche de l’image.
Fonctions de base
Appuyez sur une des touches grise x,rouge ®,verte U, jaune Q ou bleue Ì pour activer une
fonction
disponible.
Aperçu: ce menu donne une liste de programmes qui sont marqués comme rappels, ceux qui doivent être
enregistrés et ceux qui sont verrouillés. Il est possible d’utiliser ce menu pour modifier ou effacer des
programmes marqués.
Record: pour programmer l’enregistrement par le magnétoscope (s’il est équipé du système NEXTVIEWLink
et s’il est branché sur l'entrée
Préprogrammation: va allumer automatiquement la TV si elle est en mode de veille ou arrêter un
programme en cours de diffusion pour émettre un message si la TV est allumée.
Verrouiller: pour verrouiller certains programmes afin d’éviter son enregistrement ou sa vision.
Pour les fonctions Enreg., Préprog. ou Verrouiller, vous voyez apparaître un petit menu, dans lequel vous
pouvez choisir l’intervalle (1 fois, Journ. ou Hebdo.) ou effacer un réglage effectué préalablement
concernant un enregistrement, une préprogrammation ou un verrouillage. L’intervalle est réglé par
défaut sur 1 fois. Pour confirmer la fréquence, appuyez sur la touche
Regarder: pour regarder le programme choisi et actuellement diffusé.
NEXTVIEW ou du Guide Télétexte. Les touches apparaissent en gris si la fonction n’est pas
EXT. 2).
OK.
Réception et mise à jour des informations
NEX
TVIEW
Votre téléviseur reçoit et met à jour les informations NEXTVIEW lorsque vous regardez la chaîne de
télévision correspondant au diffuseur
NEXTVIEW sélectionné, voir menu Configuration p. 8, ou lorsque
le téléviseur est en position de veille.
Les nouvelles informations seront réceptionnées en une fois pendant la nuit.
Remarque : il peut être nécessaire de mettre votre téléviseur en position de veille lorsque toutes les informations
NEXTVIEW sont périmées, par exemple lorsque vous revenez de vacances.
16
1616
Page 71

Télétexte
Certaines chaînes de télévision transmettent des informations au moyen d'un système télétexte. Cette TV
a 1200 pages de mémoire qui vont mémoriser la plupart des pages et des sous-pages diffusées pour
réduire le délai d’attente. Après chaque modification de programme, la mémoire est rafraîchie.
Mise en et hors service du télétexte
Appuyez sur b pour mettre en service le
télétexte.
102 «03 04 05 06 07 08 09 10 11 12»
BBC CEEFAX 102 Lun 05 Fév 16.35.22
BBC CEEFAX
LIONS RECORD ANOTHER WIN 430
Index 100 News 300
BBC Info 110 Headlines 305
Children 120 Weather 400
Cookery 150 Sports 415
Education 200 Radio 500
Lottery 230 Travel 550
Finance 240 Subtitling 888
Music 280 TV Listings 600
Rouge Vert Jaune Bleu
Sélection d’une page de télétexte
- Entrez le numéro de la page souhaitée à l’aide
des touches numériques, des touches du
curseur de direction haut/bas, gauche/droit ou
de la touche
-P+.
- Choisissez le sujet souhaité à l’aide des touches
colorées correspondant aux options en bas de
l’écran.
Sélection de la page précédente
(Uniquement possible au cas où aucune liste des
pages de télétexte favorites n’est disponible.
Voir p. 18.)
Appuyez sur la touche 0.
Sélection de l’index du système
télétexte
Appuyez sur la touche grise † pour faire
apparaître l’index (en général p. 100).
Uniquement pour les diffuseurs utilisant
les systèmes télétexte T.O.P:
Appuyez i. Un aperçu T.O.P. des divers sujets
apparaît.
Sélectionnez avec le curseur haut/bas, gauche/
droite le sujet souhaité et appuyez sur la touche
OK.Toutes les chaînes de télévision ne
transmettent pas le télétexte T.O.P.
Sélection des sous-pages
Lorsqu’une page de télétexte sélectionnée
comprend plusieurs sous-pages, une liste des
sous-pages disponibles apparaît à l’écran.
Appuyez sur le curseur de direction gauche ou
droite pour sélectionner la sous-page suivante
ou précédente.
Double hauteur page télétexte
Appuyez plusieurs fois sur la touche q pour
afficher la partie supérieure du télétexte, la
partie inférieure du télétexte et ensuite revenir
au format d’image normal. Quand la fonction
double hauteur est activée, vous pouvez faire
défiler le texte ligne par ligne en utilisant le
curseur de direction haut/bas.
Sélection écran actif
En mode deux écrans Image/Télétexte, entrez
le numéro de la page souhaitée à l’aide de la
touche
-P+, puis appuyez sur la touche MENU
Ï, puis sélectionnez l’écran de gauche (à l’aide
de la boule bleue supérieure).
Vous pouvez maintenant sélectionner un écran
comprimé ou plein à l’aide de la touche q.
Hypertexte
Grâce à la fonction Hypertexte, vous pouvez
sélectionner et chercher tout mot ou numéro
dans la page Télétexte actuelle.
& Appuyez sur la touche OK pour mettre en
évidence le premier mot ou numéro de la page.
é Utilisez le curseur de direction haut/bas,
gauche/droite pour sélectionner le mot ou le
numéro que vous souhaitez chercher.
“ Appuyez sur la touche OK pour confirmer. Un
message apparaît en bas de l’écran pour
indiquer que la recherche est en cours, ou que
le mot ou la page n’est pas trouvé.
‘ Utilisez le curseur de direction haut pour sortir
de l’hypertexte.
17
Page 72

Menu Télétexte
(seulement disponible en mode télétexte plein écran)
& Appuyez sur la touche MENU Ï pour activer
le menu.
é Utilisez le curseur de direction haut/bas pour
sélectionner les éléments du menu.
“ Appuyez sur le curseur de direction droite
pour activer.
Informations cachées
Affiche/dissimule les informations cachées d’une
page, telles que les solutions des devinettes et
des mots croisés.Appuyez sur le curseur de
direction droite pour activer.
Préférentiel
Cette liste contient jusqu’à huit pages Télétexte
préférentielles. Seules les pages de la chaîne
actuelle peuvent être sélectionnées.
& Appuyez sur le curseur de direction droite
pour entrer dans la liste.
é Appuyez à nouveau sur le curseur de direction
droite pour ajouter la page courante ou pour
sélectionner une des pages favorites dans la
liste.
“ Appuyez sur la touche MENU Ï pour
visualiser la page.
‘ Utilisez la touche 0 pour parcourir la liste
des pages favorites.
Chercher
Sélectionner un mot
A l’aide du clavier à l’écran, vous pouvez entrer
un mot que vous souhaitez chercher dans les
pages Télétexte. L’utilisation de majuscules ou
de minuscules n’a pas d’importance.
102 03 04 05 06 07 08 09 10 11 12
BBC1
WORD
NAME
FOOTBALL
palet
& Appuyez sur le curseur de direction droite
Annul. Accept.
Espace Effacer
ABCDEFG 1 2 3
HIJKLMN 4 5 6
OP QRSTU 7 8 9
V W X Y Z 0
Shift Spécial
Rouge V ert Jaune Bleu
TELETEXT
pour entrer dans le clavier.
é Utilisez le curseur de direction gauche/droite et
haut/bas pour sélectionner les caractères, les
mots ou les fonctions.
“ Appuyez sur la touche OK pour confirmer
chaque caractère sélectionné.
‘ Sélectionnez Annul. pour annuler le mot
sélectionné,
Espace pour entrer une espace,
Effacer pour effacer le dernier caractère
sélectionné,
Shift pour afficher les caractères
en majuscule ou en minuscule du clavier et
Spécial pour afficher les caractères spéciaux du
clavier et appuyez sur la touche
( Appuyez plusieurs fois sur le curseur de
OK.
direction gauche pour revenir au menu
Télétexte.
Recherche d’un mot
& Entrez le mot à l’écran ou sélectionnez un mot
dans l’historique à droite et appuyez sur
é Sélectionnez Accept. et appuyez sur OK.Le
message
“ Pour annuler la recherche ou pour rechercher
Recherche apparaît à l’écran.
OK.
un nouveau mot, sélectionnez Clavier et
appuyez sur OK.
‘ Lorsque le mot n’est pas trouvé, un message
apparaît à l’écran. Lorsqu’il a été trouvé, le mot
est mis en évidence dans la page Télétexte. Pour
poursuivre la recherche, appuyez sur
OK.
Passage en revue des sous-pages (si présent)
Passe automatiquement en revue les souspages.Appuyez sur le curseur de direction
droite pour activer et désactiver la fonction.
Page programmée
Permet d’afficher une page spécifique à une
heure précise.
& Utilisez le curseur de direction droite et
sélectionnez
é Entrez l’heure et le numéro de page à l’aide du
Oui ou Non.
curseur ou des touches numériques.
Remarque: il n'est pas nécessaire que le Télétexte
reste activé. Il n’est pas possible d’afficher une page
programmée si le téléviseur est en mode de veille.
“ Appuyez sur le curseur de direction gauche
pour revenir au menu TV.
Langage
Si les caractères affichés à l’écran ne
correspondent pas aux caractères utilisés par
l’émetteur du télétexte, cette fonction vous
permet de changer le groupe de langues.
Sélectionnez
Groupe 1 ou Groupe 2 à l’aide
du curseur de direction droite.
Appuyez sur la touche
MENU Ï pour quitter
le Menu Télétexte.
18
Page 73

B
b
¬
+
-
V
+
-
P
v
b
i
0
h
q
Select
VCR DVD SAT AMP CD
MENU
DVR
OK
123
456
789
0
Ò®‡π
†
Active Control
æ
Ò
†
Ï
Pause Live
REC
Flex TV
Votre Flex TV a une capacité mémoire interne lui permettant de stocker des programmes
temporairement (
(
Enregistrement).
1. Pause TV: Dès que votre téléviseur est allumé, il enregistre automatiquement en arrière-plan le
programme que vous regardez. Ceci vous permet d'interrompre le visionnement de l'émission (avec
la touche
ultérieur (3 heures max.) sans rien rater du programme. Cette option s'appelle Pause TV.
Remarque : Lorsque le bloc mémoire de Pause TV (3 heures) est plein, l'enregistrement en arrière-plan
continue et écrase les programmes enregistrés plus tôt.
2. Enregistrement: Une part importante de la mémoire du Flex TV est réservée à l'enregistrement
de programmes que vous voulez conserver (58 programmes max. et un temps d'enregistrement
total max. d'environ 28 heures).Vous pouvez faire des enregistrements instantanés avec la touche
®
Instant record ou programmer vos enregistrements avec la touche DVR .Voir plus loin.
Remarques :
- Vous pouvez déjà commencer à visionner avant la fin de l'enregistrement.
- Lorsqu'un enregistrement instantané ou programmé a commencé, Pause TV n'est plus possible.
- L'option Flex TV n'est pas possible en mode Deux écrans/PIP/Mosaïque.
Pause TV) et d'enregistrer des programmes pendant une durée indéterminée
Pause) et de le reprendre (en appuyant à nouveau sur la touche Pause) à un moment
REC Enregistrement p. 22
Grâce à l’enregistrement instant, vous pouvez commencer à enregistrer
en appuyant sur une touche.
DVR
Liste des enregistrements et Enregistrement programmé
Voir p. 21
PA USE
& Appuyez sur la touche Pause
L’image va s’arrêter pendant que la TV continue à enregistrer le
programme TV en direct à l’arrière-plan. (Le bloc est défini à 3 heures
d’enregistrement HQ - Haute Qualité.)
Une barre indique l’augmentation du retard par rapport au programme
en direct pendant que la pause continue.
Appuyez sur la touche
i pour afficher à nouveau les barres après leur
disparition.
é Appuyez à nouveau sur la touche Pause pour poursuivre le visionnement
du programme en repartant exactement de l'endroit où vous l'avez
interrompu, sans rien rater.
LIVE
Appuyez sur la touche Live pour revenir à un visionnage TV régulier.
Appuyez à nouveau pour retourner au moment mis en pause.
PA USE CLEAR
Au cas où vous ne voudriez pas partager les programmes que vous avez
regardés (le soir) auparavant, et qui ont été enregistrés automatiquement
(dans l’espace mémoire de 3 heures), vous pourriez envisager de vider la
mémoire.
& Appuyez sur la touche MENU Ï sur la télécommande.
é Sélectionnez Effacer Pause dans le menu Options.Voir menu TV,
Options, p. 13.
“ Appuyez sur la touche OK pour effacer les 3 heures du bloc mémoire.
19
Page 74

B
b
¬
+
-
V
+
-
P
v
b
i
0
h
q
Select
VCR DVD SAT AMP CD
MENU
DVR
OK
123
456
789
0
Ò®‡π
†
Active Control
æ
Ò
†
Ï
Pause Live
REC
Ralenti
& Appuyez sur le curseur de direction droite lorsque le programme est en
pause. La TV passe en ralenti à un quart de la vitesse normale.
é Appuyez à nouveau sur le curseur de direction droite. La TV passe en
ralenti à la moitié de la vitesse normale.
“ Appuyez sur la touche Pause pour éteindre le ralenti.
Avance et Arrière Rapide
& Appuyez à nouveau sur la touche Pause pour poursuivre le visionnement
du programme de l'endroit où vous l'avez interrompu.
é Appuyez sur le curseur de direction droite ou gauche (pendant au moins
1 seconde). Le téléviseur passe à un visionnement plus rapide en avant ou
en arrière.
“ Des pressions successives sur le curseur de direction droite ou gauche
augmenteront la vitesse par étapes (x2, x4, x8, x 20, x 200).
‘ Lorsque vous regardez à une vitesse supérieure à la normale, en avant ou
en arrière, le curseur de direction droite ou gauche reculera la vitesse
d’une étape.
( Appuyez sur la touche Pause pour revenir à une vitesse normale.
Saut instantané
Appuyez brièvement sur le curseur de direction droite, tout en
continuant de visionner.
Chaque pression instantanée avancera le programme de 30 secondes, p.e.
publicités.
Répétition instantanée
À tout moment, vous pouvez appuyer sur le curseur de direction gauche
pour revoir les 7 dernières secondes.
Remarque :Avance rapide ou retour arrière, saut instantané et lecture
instantanée ne sont pas possibles à partir d'un programme en état de pause.
20
Page 75

Liste des Enregistrements
& Appuyez sur la touche DVR.
TUE 30 APR HQ 120m Meet Joe Black
SUN 08 JUN LP 140m Star Wars 3
SAT 10 AUG LP 240m Olympic opening
THU 14 DEC HQ 50m Miami Vice
FRI 02 JUN HQ 120m Manu vs Paris
SAT 26 JUN LP 30m Friends
MON 10 FEB LP 25m Naked chef
Space Left LP 10.20h
Aperçcu Enregist. programmé Config.
Ce menu vous permet
• de voir une liste de programmes enregistrés
stockés dans la mémoire (Aperçu) ;
• de voir une liste d’enregistrements
programmés (
Enregist. programmé):
• de fixer un enregistrement programmé (
enreg.).
Chaque enregistrement est consigné avec la
date d’enregistrement, la qualité d’image (
ou LP) avec laquelle a été effectué l’enregistrement, la durée et le titre de l’enregistrement.
Dans le menu
Aperçu, la quantité d’espace
libre dans la mémoire est indiquée. Chaque
programme peut être joué (
(
Effacer) de ce menu. Le titre d’un programme
peut être modifié (
Modifier) au moyen d’un
Lecture) ou effacé
clavier virtuel présent sur l’écran.
é Appuyez sur la touche de couleur verte sur
votre télécommande pour sélectionner la liste
des
Enregistrements programmés.
CANVA TUE 15 APR 15.37-16.37 Pauli
BBC1 SUN 27 APR 19.37-20.37 Naked chef
FOCUS SAT 03 MAY 16.25-16.55 Friends
BBC2 THU 08 MAY 20.18-20.45 Vicar
MERID FRI 23 MAY 21.15-22.10 No win
Aperçcu Enregist. programmé Config.
“ Sélectionnez Ajouter pour faire apparaître le
menu Enregistrement programmé et pour
ajouter un nouveau programme. voir aussi
Enregistrement programmé),
modifier une programmation,
Modifier pour
Effacer pour
supprimer une programmation.
‘ Appuyez sur la touche de couleur rouge pour
retourner sur la liste (
créer une programmation (
Aperçu), ou jaune pour
Config. enreg.)
(voir aussi Enregistrement programmé).
Lecture
Modif.
Effacer
Config.
HQ
Ajouter
Modif.
Effacer
Pour modifier un titre de programme avec le
clavier virtuel
® Annul. ® Accept.
® Espace ® Effacer
ABCDEFG 1 23
HIJKLMN 4 56
OPQRSTU 7 89
VWXYZ 0
® Shift ® Spécial
Le clavier virtuel apparaît sur l’écran lorsque vous
avez décidé de modifier un titre.
& Appuyez sur le curseur de direction gauche/droite,
haut/bas pour sélectionner les caractères, mots ou
fonctions.
é Appuyez sur la touche OK pour valider chaque
caractère sélectionné.
“ Sélectionnez Annuler pour effacer une modification;
Espace pour entrer un espace; Effacer pour effacer
le dernier caractère sélectionné;
des caractères minuscules aux majuscules;
Shift pour passer
Spécial
pour afficher les caractères spéciaux sur le clavier
et appuyez sur la touche
‘ Sélectionnez Accept.pour confirmer la modification
OK.
du titre.
Enregistrement programmé
& Appuyez sur a touche DVR.
é Appuyez sur la touche de couleur verte sur
votre télécommande pour sélectionner la liste
des
Enregistrements programmés.
“ Appuyez sur la touche de couleur jaune dans le
menu de programmation d’enregistrement pour
créer une programmation (
Canal
Titre
Date
Heure début
Heure de fin
Qualité
Mémoriser
Aperçu Enregist.programmé Config.enreg.
‘ Utilisez le curseur de direction haut/bas,
Config. enreg.).
02 BBC
Men In black
Tue 21 Aug
20.30
22.00
HQ
gauche/droite pour sélectionner et pour entrer
la chaîne à partir de laquelle vous allez
enregistrer, la date, l’heure de début et de fin, le
titre du programme et la qualité de
l’enregistrement.
Remarque : afin d'éviter des indications de temps
de commencement ou d'arrêt inexistantes, il peut
arriver que vous deviez modifier le second chiffre
avant d'entrer ou de changer le premier chiffre.
( Sélectionnez Mémoriser et appuyez sur OK
pour valider les données de l’enregistrement.
21
Page 76

Enregistrement instantané
& Appuyez sur la touche REC.
L’enregistrement démarre immédiatement et
un petit menu apparaît, dans lequel vous devez
entrer la durée de l’enregistrement que vous
désirez faire. La durée par défaut est fixée à
01.00 heure mais elle peut être modifiée à
tout moment.
é Appuyez sur le curseur de direction droite et
entrez la durée de l’enregistrement au moyen
des touches chiffrées ou avec le curseur de
direction haut/bas.
Appuyez sur la touche
appuyez à nouveau sur la touche
OK pour confirmer et
REC pour
supprimer le menu.
Remarques:
- Une fois que l’enregistrement a démarré, vous
pouvez mettre votre TV en veille ou regarder un
autre programme.
N'ETEIGNEZ PAS votre téléviseur au risque de
perdre l'enregistrement.
-Voir dans la liste d’enregistrement pour modifier le
nom du programme inséré automatiquement
(Record xxxx).
“ Pour arrêter l’enregistrement avant la fin de
durée introduite, appuyez sur la touche
sélectionnez
OK.
Arrêt et appuyez sur la touche
REC,
Pour modifier la durée, appuyez sur la touche
REC et utilisez les curseurs pour changer la
valeur.Appuyez sur la touche
OK pour
confirmer et appuyez à nouveau sur la touche
REC pour supprimer le menu.
Modifier la qualité d’enregistrement d’un
Enregistrement instantané
La durée de l’enregistrement dépend de la
qualité d’enregistrement que vous choisissez
dans le menu Configuration, Générale, p. 8.
Ne changez pas le paramètre
HQ par défaut
pour la meilleure qualité d’image.
Qualité d’enregistrement
• HQ (High Quality - 6 heures approx.) est
comparable à la qualité DVD.
•
SQ (Standard Quality) permet une qualité
supérieure au VHS mais avec une durée plus
longue (11 heures approx.).
•
LP (Long Play) (28 heures approx.).
Remarques générales sur le Flex TV
- Lorsqu’un enregistrement est en cours, et lorsqu’un verrouillage devient actif, l’enregistrement est arrêté et vous
êtes prié d’entrer votre code.
-La reproduction audio pour l’enregistrement instantané est toujours mono.
-Le nombre total d'enregistrements déjà effectués ( dans le menu Overview) + programmés (dans le menu
Enregistrement programmé) est limité à 58 programmes (bien qu'il reste du temps-espace). Lorsque le nombre
total est atteint, effacez d'abord quelques enregistrements pour créer de l'espace pour les nouveaux.
-Veillez à ne pas programmer des enregistrements qui se chevauchent ou qui commencent à la même heure.
- Lorsqu’il n’y a plus d’espace disque disponible, les anciens enregistrements sont effacés automatiquement et
sans message d’alerte.
- Dès qu’un enregistrement Instantané ou Programmé a commencé, vous pouvez commencer à
regarder le programme pendant que l’enregistrement continue. Sélectionnez le programme dans le
menu d’aperçu.
Pour arrêter l’enregistrement durant le visionnement du programme, presser d’abord la touche Live
de la télécommande. Presser ensuite la touche
Enregistrement affiché sur l’écran.
REC et sélectionner Stop dans le menu
- Une fois que l’enregistrement est programmé ou a démarré, il n’est pas nécessaire que le TV reste allumé.
Vous pouvez passer votre TV en veille sans que l’enregistrement soit perturbé. N'ETEIGNEZ PAS votre téléviseur.
-Vous pouvez facilement transférer des programmes enregistrés vers un lecteur DVD ou VCR, connecté à
EXT 2.
Sélectionnez le programme dans le menu Aperçu et activez Lecture.Vous enregistrez ce que vous regardez à
l'écran.
-Pour stopper avant l’heure fixée un enregistrement programmé qui a déjà démarré, pressez la touche
REC de
la télécommande et sélectionnez Stop dans le menu qui apparaît sur l’écran.
- Les options Flex TV ne sont pas toutes possibles lors de programmes protégés par le droit d'auteur et lors de
programmes provenant de matériel périphérique branché sur
EXTERNAL 2.
-Mise en pause d’une source NTSC:
Sélectionner la source NTSC et effacer tout d’abord le bloc mémoire avec la fonction
Options. Presser ensuite la touche
Pause.
Effacer Pause du menu
Mise en pause d’une source PAL ou SECAM:
Sélectionner le programme et effacer à nouveau le bloc mémoire. Presser alors la touche Pause.
22
Page 77

Branchement des périphériques
2
EXT.EXT.2EXT.
CABLE
1
4
2
3
1/21/2
EXT.EXT.
1/2
EXT.
CABLE
1
2
3
5
4
A
U
DIO
VIDEO
S•VIDEO
1 2 3
Vous pouvez brancher une large gamme d’appareils électroniques sur votre téléviseur.
Les diagrammes de connexion suivants vous décrivent le mode de connexion.
Remarque:
brancher les périphériques en RVB sur les entrées
Si votre magnétoscope est pourvu de la fonction EasyLink, il faut le connecter à
fonctionnalités EasyLink..
EXT.1 fonctionne avec CVBS et RVB, EXT.2 CVBS, RVB et Y/C, EXT.3 et EXT. CVBS. Il est préférable de
EXT.1 ou 2, ce format offrant les meilleures performances.
EXT.2 pour bénéficier des
Enregistreur (VCR-
DVD +RW
)
Branchez les câbles d’antenne 1, 2, pour obtenir une meilleure
qualité d’image, le câble péritel 3 tel qu’indiqué.
Si votre magnétoscope ne dispose pas d’une prise péritel, la seule
connexion possible se fait via le câble d’antenne. Pour cela, vous
devrez régler votre magnétoscope sur le signal test, et lui donner le
numéro de programme 0 ou enregistrer le signal test sous un
numéro de programme compris entre 90 et 99, voir Installation
Manuelle, p. 6. Consultez le manuel de votre enregistreur.
Décodeur et Enregistreur
Branchez un câble péritel 4 sur la prise péritel de votre décodeur
et sur la prise péritel spéciale de votre enregistreur. Consultez
également le manuel de votre enregistreur. Voir également
Décodeur, p. 9.Vous pouvez également brancher votre décodeur
directement à
EXT.1 ou 2 avec un câble péritel.
Autres appareils périphériques (récepteur satellite, décodeur, DVD, jeux, etc.)
& Branchez les câbles d'antenne 1, 2 et 3 tel qu'indiqué
(uniquement si votre périphérique dispose d’une entrée/sortie
pour antennes TV). Branchez votre équipement avec un câble
péritel 4 ou 5 à l’un des prises péritel
d’obtenir une meilleure qualité d’image.
é Cherchez le canal RF de votre périphérique tout comme pour
un enregistreur.
“ Opérez une sélection dans Configuration, Menu Source, p. 9.
En connectant un enregistreur à
EXT.1, vous ne pouvez enregistrer
que le programme de votre téléviseur.
à partir de votre téléviseur ou d’un autre appareil branché.
EXT.1, 2, 3 ou 4 afin
EXT.2 vous permet d'enregistrer
Connexions latérales
Caméra ou Caméscope
& Branchez votre caméra ou caméscope comme indiqué.
é Branchez la VIDEO 2 et AUDIO L 3 pour un appareil
mono, et également sur
AUDIO R 3 pour un appareil stéréo.
Vous obtiendrez la qualité S-VHS avec un caméscope S-VHS en
branchant les câbles S-VHS sur
S-VIDEO 1 et sur AUDIO
3.
Attention: Ne pas brancher les câbles 1 et 2 en même temps.
Cela peut produire des distorsions dans l’image !
Casque
& Insérez la fiche dans la prise du casque L comme indiqué.
é Appuyez sur ¬ sur la télécommande pour mettre hors service
les HP de votre téléviseur.
La prise du casque est du type jack 3.5 mm, l’impédance est de 8 à
4000 Ohm.
Choisissez
Volume du casque dans le menu son, afin de régler
le volume du casque.
23
Page 78

Haut-Parleurs supplémentaires / Amplificateur
AUDIO
Surround out
CENTRE INCENTRE INCENTRE IN
AUDIO
OUT
HP multimédia DERRIÈRE
&
Sélectionnez HP surround Marche dans le
Menu Configuration, p. 7.
é Branchez les câbles audio sur les HP arrière et
sur la sortie Dolby Surround
OUT à l’arrière de votre TV. Il n’y a qu’une
SURROUND
sortie pour les deux haut-parleurs.
“ Réglez le volume des haut-parleurs arrière.
Utilisez la fonction Test de la tonalité dans le
menu Haut-parleurs, voir page 7.
Remarque:Après avoir réglé le volume des hautparleurs arrière, ne le modifiez plus tant que vous
regardez la télévision; le volume de toute votre
installation est en effet contrôlé par le bouton de
réglage du volume de votre téléviseur.
Pour sélectionner les périphériques
Récepteur MultiCanaux surround
(analogique)
& Connectez la sortie du récepteur Surround
Multicanaux au connecteur
L dans le dos de votre TV.
é Si vous voulez utiliser les HP du TV comme
AUDIO OUT R et
enceinte centrale connectez aussi, avec un câble
audio, la sortie
l'entrée
“ Sélectionnez Entrée Centrale Marche dans le
CENTRE OUT du récepteur a
CENTRE IN dans le dos du TV.
Menu Source.Voir p. 9. Les HP du TV sont
devenus l'enceinte centrale.
‘ Si nécessaire réglez le volume sonore du HP
central dans le Menu Source, item
. Les autres volumes étant regles par
centr
Vol. entr.
l'intermédiaire du récepteur.
Appuyez sur la touche v afin de sélectionner EXT1, EXT2, EXT3, EXT4 ou SIDE, l’entrée sur
laquelle vous avez branché votre appareil à l’arrière ou à droite de votre téléviseur.
Remarque: la plupart des périphériques (décodeur, enregistreur) gèrent d’eux-mêmes la commutation.
Amplificateur Cinema Link surround
Voir le manuel d’instructions Cinema Link fourni séparément
Attention : les informations relatives au son affichées à l’écran ne correspondent alors plus au son que vous
entendez en réalité.
Enregistreur ou DVD avec EasyLink
L’enregistreur (VCR ou DVD+RW) ou le DVD
peut être activé en passant par le menu
Enregist. ou DVD sur l'écran.
Enregistr.
Òp‡π † ® Ï
Rwd Play Stop Play Ffw Rec Eject
DVD
Òp ‡ π † Ï
Prev. Play Stop Play Next Eject
24
& Appuyez sur la touche MENU Ï sur la
télécommande.
é Choisissez le menu Enregistreur ou DVD avec
le curseur de direction haut/bas.
“ Utilisez le curseur gauche/droite, haut/bas pour
choisir une des fonctions de l’enregistreur ou
du DVD.
Si votre magnétoscope EasyLink dispose de la
fonction système veille, et après appui de 3
secondes sur la touche B, téléviseur et
magnétoscope passent en veille.
Page 79

Touches pour les appareils A/V
B
b
¬
+
-
V
+
-
P
v
b
i
0
h
q
Select
VCR DVD SAT AMP CD
MENU
DVR
OK
123
456
789
0
Ò®‡π
†
Active Control
æ
Ò
†
Ï
Pause Live
REC
Cette télécommande peut commander les appareils suivants:TV, VCR, DVD,
SAT (RC5),AMP (+TUNER), CD.
Appuyer sur la touche
indiqué dans l’affichage.A chaque pression sur la touche
appareil est sélectionné. La répétition doit être effectuée dans les 2
secondes, l’indicateur clignotera lentement pour indiquer l’appareil
sélectionné.
Appuyez sur l’une des touches de la télécommande pour commander le
périphérique. Pour revenir au mode TV, appuyez sur
l’indicateur clignote. Si aucune touche n’est enfoncée dans les 60 secondes, la
télécommande se remet en mode TV.
Note: Lorsque la touche
RC5/RC6 est transmis.
B pour passer en position de
® pour enregistrer,
Ò pour rebobiner (
‡ pour arrêter,
π pour le mode lecture,
† avance rapide (
æ pour choisir la langue des
b pour choisir un titre
i afficher information
En supplément, les fonctions DVD, SAT et CD peuvent être reprogrammées
pour commander un DVDR, SAT (RC6) ou CD-R à la place.
& Presser répétitivement la touche Select jusqu’à ce qu’aucune LED ne
é Pour programmer le DVD-R,presser la touche OK en même temps que
Remarque : Pour revenir à la configuration par défaut, on peut soit retirer les piles
Select pour commander n’importe quel périphérique
Select un autre
Select pendant que
Select est tenue pressée plus de 2 secondes, le code
Ï pour activer/désactiver le
veille
recherche arrière (
VCR, CD);
DVD , AMP)
VCR, CD);
recherche avant (dvd,
AMP)
menu
-P+ pour sélectionner un chapitre,
une chaîne, une bande
0 à 9 entrée d’un chiffre,
0 contenu de la cassette (
choisir un chapitre
choisir une fréquence (
VCR),
DVD ,
AMP)
U timer du magnétoscope
Q surround marche/arrêt
AMP, CD)
sous-titres (
DVD );
actualités RDS /TA (
mélanger (
afficher RDS (
info à l'écran (
CD)
AMP)
CD)
AMP);
DVD ;
(
curseur haut/bas
pour choisir le disque suivant
ou précédent (
CD)
curseur gauche/droit
pour choisir la bande
précédente ou suivante (
recherche avant/arrière (
CD)
AMP)
soit allumée.
la touche 2.
Pour programmer le
SAT (RC6),presser la touche OK en même temps
que la touche 4.
Pour programmer le
CD-R,presser la touche OK en même temps que
la touche 6.
A présent, lorsque la fonction correspondante est sélectionnée (
SAT, CD), la télécommande commandera votre DVDR, SAT (RC6) ou
DVD ,
CD-R.
durant quelques minutes, soit presser simultanément la touche
OK + 1
(DVD), OK + 3 (SAT-RC5) ou OK + 5 (CD).
25
Page 80

Conseils
Tips
Entretien de Nettoyez votre téléviseur avec un chiffon doux légèrement humide. N'utilisez pas
l’écran produit de nettoyage agressif susceptible d'abîmer la couche de protection de votre
écran.
Mauvaise image •Avez-vous choisi le bon système de télévision dans le menu d’installation
Absence d’image • L'antenne est-elle correctement raccordée?
Distorsion La mauvaise qualité de certains équipements numériques peut engendrer une
numérique distorsion de l’image numérique. Dans ce cas, sélectionnez le préréglage Doux dans le
Absence de son • Aucune des chaînes ne diffuse du son? Vérifiez si le volume n’est pas réglé sur sa
Pas de son • La chaîne ne diffuse peut-être pas un son surround de bonne qualité.
surround • Les HP arrière ou centraux ne diffusent aucun son? Sélectionnez un mode surround
Vous ne trouvez Mettez vote téléviseur hors service. Remettez-le en service. N’essayez jamais de
pas de solution à réparer vous-même une panne de téléviseur.
votre problème Consultez votre revendeur ou un technicien?
d’image ou de son?
Télécommande • Si votre TV ne répond plus à la télécommande, les piles peuvent être déchargées.
manuelle ?
•Votre téléviseur et/ou votre antenne interne se trouvent-ils trop près des HPs,
d'une installation audio sans prise de terre, de tubes néon, etc.?
• La proximité de montagnes ou de hauts immeubles peut être à l'origine d'images
dédoublées ou d'ombres. Parfois, on obtient une meilleure qualité d'image en
changeant la direction de l'antenne externe.
• Est-ce que l’image ou le télétexte est méconnaissable? Vérifiez si vous avez introduit
la fréquence correcte.Voir Installation, p. 6.
• La luminosité la définition et le contraste sont-ils déréglés? Sélectionnez Préréglages
d’usine dans le menu Configuration, Général, p. 8.
• Une mauvaise qualité d'image est parfois possible quand une caméra S-VHS,
raccordée à droite de l'appareil, fonctionne alors qu'un autre appareil est branché à
l’une des connecteurs. Dans ce cas, mettez un des appareils hors service.
• Les fiches sont-elles fermement enfoncées dans la prise d'antenne?
• Le câble d'antenne est-il en bon état et muni des fiches adéquates?
menu Image, Smart image, sans changer les réglages manuellement.
position minimum.
• Le son est-il interrompu lorsque vous appuyez sur la touche
configuration de vos HP correspond aux sélections que vous avez effectuées dans le
menu Configuration, HP, p. 7.
• Pas de son provenant du récepteur audio ? Sélectionnez Entrée centrale Arrêt dans
le Menu Source,Voir p. 9.
adapté au signal sonore transmis ou ajustez le volume ou vérifiez si l’émetteur FM
correctement raccordée.Voir Modes Surround, p. 12.
• Vérifiez que la télécommande soit en mode correct.
•Vous pouvez toujours utiliser la touche M et les touches -/+ en haut du téléviseur.
¬? Vérifiez si la
Menu Vous n'avez pas choisi le menu que vous vouliez? Appuyez une nouvelle fois sur la
NEXTVIEW Pas d'info NEXTVIEW
Veille Votre TV consomme de l'énergie en veille. Cette consommation contribue a la
touche
MENU Ï pour sortir du menu.
Voir Recherche et mis à jour de l’information NEXTVIEW,p.16.
Heure affichée inexacte:
La chaîne sur le programme 1 ne transmet pas le groupe date/heure local
correctement.Voir Modifier n° de programme dans le menu installation pour installer
une autre chaîne sur le programme 1.
pollution de l'air et de l'eau.
Consommation : 1,1 W.
26
Page 81

Inhoud
Installatie
Help?
Indien deze handleiding geen
antwoord geeft op uw vraag of
indien ‘Tips’ uw TV-probleem niet
oplost, kunt u de Lokale Philips
Klantendienst of Servicecentrum
bellen. Zie het bijgevoegde Worldwide guarantee boekje.
Gelieve het Model en Product
nummer dat u kan vinden op de
achterzijde van uw televisietoestel
of op de verpakking, klaar te
houden vooraleer de Philips helplijn
te bellen.
Model: 32PW9768
Product No: ..............................................
R Richtlijnen voor einde
levensduur
Philips besteedt veel aandacht aan
een milieuvriendelijke productie in
een groene omgeving.. Uw nieuwe TV
bevat materialen die voor hergebruik
geschikt zijn. Aan het eind van de
levensduur van de TV kunnen
gespecialiseerde bedrijven de
afgevoerde TV ontmantelen om het
voor hergebruik geschikte materiaal
te verzamelen, en zo weinig mogelijk
materiaal te hoeven wegdoen.
Informeer a.u.b. naar de plaatselijke
voorschriften voor het wegdoen van
uw oude TV-toestel.
Voorbereiding ................................................................................... 2
Toetsen bovenaan op het toestel ................................................. 2
Uw afstandsbediening ...................................................................3-4
Het menu gebruiken ....................................................................... 5
Uw menutaal en uw land kiezen .................................................. 5
TV-zenders vastleggen .................................................................... 6
Automatische installatie .......................................................... 6
Handmatige installatie .............................................................. 6
Zender een naam geven .......................................................... 6
Herschikken ............................................................................... 7
Favoriete TV-zenders kiezen .................................................. 7
Configuratie instellen ...................................................................... 7
Luidspreker ................................................................................ 7
Algemeen ................................................................................ 8-9
Bron ............................................................................................. 9
Decoder ...................................................................................... 9
Demo ................................................................................................ 10
Bediening
TV menu
Beeldmenu ......................................................................... 10-11
Geluidsmenu ...................................................................... 11-12
Diversen menu .................................................................. 12-13
Dual screen / PIP / Multipip ..........................................................14
NEXTV
IEW/Teletekst gids ........................................................ 15-16
Teletekst ..................................................................................... 17-18
Flex TV ....................................................................................... 19-22
Randapparatuur aansluiten
Randapparatuur aansluiten en selecteren ........................ 23-24
Audio- en video-apparatuur toetsen ........................................ 25
Tips .................................................................................................. 26
Nederlands
De EasyLink-opties zijn gebaseerd op het principe "bediening door
middel van één toets". Dit betekent dat een aantal opeenvolgende
handelingen terzelfdertijd uitgevoerd worden in bvb. het televisietoestel
en de videorecorder indien beiden over de EasyLink-functie beschikken
en verbonden zijn via de eurokabel die samen met de videorecorder
geleverd werd.
1
Page 82

Voorbereiding
V
P
M
MENU/OK
& Plaats uw toestel op een harde ondergrond.
! 32PW9768: 60 kg !
min.
1m
Laat voor ventilatie minstens 5 cm vrij rondom
de TV. Plaats de TV niet op een tapijt. Om
onveilige situaties te voorkomen, plaats geen
voorwerpen bovenop het toestel.Vermijd
warmte en rechtstreeks zonlicht en stel het
televisietoestel niet bloot aan regen of water.
é Sluit de antenne goed aan op de antenne-ingang
x op de achterzijde van de TV. U kunt de
beeldkwaliteit verbeteren door de bijgeleverde
ontstoringskabel aan te sluiten.
“ Stop de stekker in het stopcontact met een
netspanning van 220V - 240V.
De toetsen bovenaan op het TV-toestel
‘ Afstandsbediening: Plaats de 2 meegeleverde
batterijen (type R6-1,5V) in het batterijvak.
Niet weggooien
maar inleveren
NL
als KCA.
De bijgeleverde batterijen bevatten niet de zware
metalen kwik en cadmium. Informeer a.u.b. naar de
plaatselijke voorschriften voor het afvoeren van lege
batterijen.
( TV inschakelen: Druk op de schakelaar A
vooraan op uw TV. Een lampje vooraan op het
televisietoestel en het scherm lichten op. Als de
TV in de standby stand staat (rood lampje), druk
dan op de
-P+ toetsen op de afstandsbediening.
TV
Configur.
Demo
Install.
Verlaten
2
2
Beeld Geluid Diversen
Wanneer uw afstandsbediening zoek is of wanneer
die niet meer werkt, dan kunt u nog steeds de
toetsen vooraan op uw TV-toestel gebruiken.
Druk
• op de V – of + toets om het volume aan te
passen
• op de
-P+ toetsen om de TV-zenders of de
externe bronnen te selecteren
De
M toets kan worden gebruikt om het
hoofdmenu op te roepen zonder de
afstandsbediening te moeten gebruiken.
Gebruik
• de V - en + toetsen en de
P- en P+ toetsen om
menu-instellingen te selecteren in de aangeduide
richting;
•
de M toets om uw keuze te bevestigen
Opmerking:
Wanneer u instellingen activeert via de
bovenaan op het TV-toestel, kunt u enkel met
M toets
Verlaten
het menu verlaten.
Ga naar
Verlaten en druk op de M toets.
Page 83

Gebruik van de afstandsbediening RC4303
B
b
¬
+
-
V
+
-
P
v
b
i
0
h
q
Select
VCR DVD SAT AMP CD
MENU
DVR
OK
123
456
789
0
Ò®‡π
†
Active Control
æ
Ò
†
Ï
Pause Live
REC
Opmerking: bij de meeste toetsen is één druk op de toets voldoende om de functie te activeren.
Een tweede druk op de toets zal de functie inactiveren. Als met een toets verschillende instellingen mogelijk zijn,
wordt een korte lijst van de mogelijkheden getoond. Druk herhaaldelijk op de toets om het volgende item in de lijst
te selecteren. Na 4 seconden verdwijnt de lijst automatisch. U kunt ook op
laten verdwijnen.
VCR DVD SAT AMP CD
Audio- en Video apparatuur
toetsen (p. 25)
v Randapparatuur kiezen
(p. 24
OK drukken om hem onmiddellijk te
B Standby
Druk op deze toets om de TV in
of uit te schakelen. Het toestel is
uitgeschakeld en een rood lampje
licht op.
®Ò‡π†
REC / DVR / PAUSE / LIVE
Audio- en Video apparatuur
toetsen (p. 25)
Flex TV functies, zie p. 19
U Tijd oproepen
De tijd verschijnt op het scherm.
Q Surround mode
Druk herhaaldelijk op deze
toets om een andere beschikbare surround-mode te kiezen
Ì Cinema Go
æ NEXTVIEW aan/uit p. 15
Zie de afzonderlijk bijgeleverde
Cinema Link handleiding.
Druk op
b om de NEX
Teletext Gids op de rechterkant
van het scherm te laten
verschijnen.
TV
IEW/
x Pixel Plus demo aan/uit
Aan de rechterkant van het
scherm worden Pixel Plus en
Digital Natural Motion
geactiveerd.
b Teletekst aan/uit p. 17
Druk op de
b toets om
teletekst te laten verschijnen op
de rechterkant van het scherm.
OK Druk op deze toets
• om uw keuze in de menu's te
activeren.
• om de programmalijst te doen
.
verschijnen.
Ï Hoofdmenu zie p. 5
V Om de geluidssterkte te regelen.
¬ Om het geluid te onderbreken, of
om het geluid terug te krijgen.
PTV- zenders kiezen
Om snel de TV-zenders en de
externe bronnen uit de
voorkeurlijst te doorlopen.
0/9 Cijfertoetsen
Om een TV-zender te kiezen.
Geef voor een programmanummer met twee cijfers het
tweede cijfer in voor het streepje
verdwijnt. Indien u onmiddellijk
naar een gekozen TV-zender met
één cijfer wilt overschakelen,
moet u de cijfertoets iets langer
ingedrukt houden.
3
Page 84

B
b
¬
+
-
V
+
-
P
v
b
i
0
h
q
Select
VCR DVD SAT AMP CD
MENU
DVR
OK
123
456
789
0
Ò®‡π
†
Active Control
æ
Ò
†
Ï
Pause Live
REC
i Scherminfo
Druk om informatie te verkrijgen over de geselecteerde TV-zender en het
programma.
Menu/Remote control info
Wanneer een menu op het scherm is verschenen, kunt u op i drukken
om informatie over de geselecteerde menu-instelling te krijgen. Voor
informatie over de functies van de afstandsbediening drukt u op om het
even welke toets op de afstandsbediening terwijl de menu-informatie op
het scherm zichtbaar is. De normale functie van de toets wordt niet
uitgevoerd.
0 Smart surf / NEXTVIEW thema’s
Deze toets laat u toe gemakkelijk over te schakelen tussen 2 tot 9
verschillende TV-zenders of externe bronnen,en TV-programma's snel te
kiezen als
NEXTVIEW met bepaalde thema's wordt uitgezonden.
Zie Algemeen, Smart surf, p. 8.
Druk op de
Smart surf scherm te verlaten.
OK toets of wacht tot de nodige tijd verstreken is om het
b Dual screen / PIP / Multipip
Zie p. 8 en p. 14.
h Active control zie p. 11.
q Beeldformaat
Druk herhaaldelijk op deze toets of druk op de cursor op/neer om een
ander beeld-formaat te kiezen: Autom. formaat, Super zoom, 4:3,
Filmformaat 14:9, Filmformaat 16:9, Ondertitel zoom of Breedbeeld.
Autom. formaat Super zoom 4:3 Filmformaat 14:9
Filmformaat 16:9 Ondertitel zoom Breedbeeld
Autom. formaat zorgt ervoor dat het scherm zoveel mogelijk met beeld
gevuld is. Indien er ondertitels in de zwarte balk onderaan het scherm
vallen, maakt Autom. formaat de ondertitels zichtbaar.Als ondertitels
slechts gedeeltelijk zichtbaar zijn, druk dan op de cursor naar boven.
Indien een logo van een zender in de hoek van de zwarte balk bovenaan
het scherm valt, verdwijnt het logo van het scherm
Super zoom verwijdert de zwarte balken aan de zijkanten van 4:3
programma’s, met een minimum aan vervorming.
In het beeldformaat Filmformaat 14:9, 16:9 of Super zoom kunt u
ondertitels zichtbaar maken door de cursor op/neer te bewegen.
4
Page 85

B
b
¬
+
-
V
+
-
P
v
Select
VCR DVD SAT AMP CD
MENU
DVR
OK
Ò®‡π
†
æ
Ò
†
Ï
REC
Gebruik van de menu’s
instellingen kiezen
activeren met de
OK toets
terugkeren of
hoofdmenu aan- of
uitschakelen
Druk op de i toets om
informatie over de geselecteerde
menu-instelling te krijgen.
& Druk op de MENU Ï toets op de afstandsbediening om
het hoofdmenu op te roepen. U kunt op elk ogenblik het
menu verlaten door opnieuw op de
MENU Ïtoets te
drukken.
Opmerking: als u toestellen die over Cinema Link beschikken hebt
aangesloten, zullen er meer menu-instellingen zijn.
Beeld Geluid Diversen
TV
Configur.
Demo
Install.
é Gebruik de cursor op/neer om de menu’s TV, Configuratie,
Demo of Install. te selecteren.
Gebruik de cursor links/rechts om
Beeld, Geluid of
Diversen te selecteren.
Opmerking: Soms zijn niet alle menu-instellingen zichtbaar op het
scherm (wordt aangeduid door een groep blauwe bolletjes).
Beweeg de cursor naar beneden om alle menu-instellingen
zichtbaar te maken.
“ Gebruik de cursor links/rechts om de menu-instelling te
selecteren.
‘ Gebruik de cursor opnieuw op/neer om de instelling die u
wenst te selecteren of aan te passen te selecteren.
Opmerking: Instellingen die tijdelijk niet beschikbaar of niet
relevant zijn worden weergegeven in een lichtgrijze kleur en
kunnen niet worden geselecteerd.
Installatie
Het installatiemenu omvat de volgende instellingen:
Taal Land Autom. Handm. Naam Herschikken Voorkeur
installatie installatie geven zenders
Install.
EasyLink
Indien uw videorecorder met een EasyLink functie is uitgerust worden tijdens de installatie de taal, het land en de
beschikbare zenders automatisch naar de videorecorder overgebracht.
Kies uw menutaal en land
Install.
Install.
English
Nederlands
Oostenrijk
Croatië
Taal
.....
Land
België
& Druk op de toets MENU Ï van de afstandsbediening.
é Druk de cursorknop naar beneden om Install. te kiezen.
“ Druk de cursorknop naar rechts om Taal te kiezen.
Volg de instructies op het scherm.
‘ Gebruik de cursor op/neer om de taal van uw voorkeur te
kiezen en druk op de
OK-toets om uw keuze te bevestigen.
( Druk de cursorknop naar rechts om Land te kiezen.
§ Selecteer het land waar u zich nu bevindt en druk op de OK
toets. Selecteer Ander wanneer geen enkel land van
toepassing is.
è Ga verder met het Install. menu.
5
Page 86

TV-zenders vastleggen
Nadat de taal en het land correct werden ingesteld, kunt u de TV-zenders zoeken en vastleggen. Dit kan op
twee manieren gebeuren :Automatische Installatie of Handmatige Installatie (zender per zender
afstemmen).Selecteer uw keuze met de cursor rechts.
Automatische installatie
Install.
& Kies Autom. installatie in het Installatiemenu.
Opmerking: geen enkele zender mag vergrendeld
zijn indien u automatisch wilt programmeren. Geef
indien nodig uw PIN-code in om alle zenders te
ontgrendelen. (Zie TV, Diversen, Kinderslot, p. 13.)
é Druk de cursorknop naar beneden.
De tekstregel
programmeren verschijnt.
“ Druk de cursorknop naar rechts.
‘ Het bericht Zoeken verschijnt en de
vooruitgang wordt op het scherm getoond.
Handmatige installatie
Install.
Fijnafstemming
Autom. installatie
Install. Start
Handm. installatie
Selectiewijze
Systeem
Programma
Zoeken
Vastleggen
Start voor het automatisch
TV-zenders zoeken en vastleggen gebeurt zender per zender.
U moet alle stappen doorlopen van het Handmatige Installatie menu.
& Kies Handm. installatie in het Install. menu.
é Druk de cursorknop naar beneden.
Volg de instructies op het scherm.
Opmerking: Zelf een TV-zender ingeven of zoeken
Als u de frequentie, of het C- of S-kanaalnummer kent, kunt u deze
direct ingeven met de cijfertoetsen 0 tot 9 (e.g. 048)). Druk de
cursorknop naar beneden om verder te gaan.
Herhaal om een andere TV-zender vast te leggen.
Als een kabelsysteem of een TV-zender die ACI
(Automatic Channel Installation) uitzendt wordt
gevonden, verschijnt een programmalijst. Indien
geen ACT wordt uitgezonden, worden de zenders
genummerd in overeenstemming met uw selectie
van taal en land. U kunt Herschikken gebruiken om
de zenders opnieuw te nummeren. Zie p. 7.
Het is mogelijk dat de kabelmaatschappij of de TVzender een selectiemenu op het scherm doet
verschijnen. De lay-out en de instellingen zijn bepaald
door de kabelmaatschappij of de TV-zender.
Maak uw keuze met de cursor en druk op de
OK toets.
Zender een naam geven
Install.
U kunt de reeds ingevulde programmanaam
veranderen of een naam geven aan een programma
waarvan nog geen naam ingevuld is. Aan de
programma-nummers 0 tot 99 kunt u een naam
ingeven van max. 5 letters of cijfers.
& Kies Naam geven in het Install. menu en druk
de cursorknop naar beneden.
é Kies het programmanummer.
Opmerking: houd de op/neer toets ingedrukt om de
programmalijst te doorlopen.
6
Naam geven
VCR1
BBC1
BBC2
CNN
TVE
.....
® Spatie ® Wissen
pπ
ABCDEFG 123
HIJKLMN 456
OPQRSTU 789
VWXYZ 0
® Shift ® Andere
“ Druk de cursorknop naar rechts.
Op het scherm verschijnt een toetsenbord.
Beweeg de cursor rechts om het toetsenbord
te activeren. Beweeg de cursor op/neer,
links/rechts om de eerste letter te selecteren
en druk op
OK. Herhaal dit voor elke letter die
u wenst in te voeren.
Selecteer
Wissen om de letter die oplicht in de
ingevoerde naam te wissen;
Spatie om een spatie in te voegen;
Shift om
hoofdletters of kleine letters op het
toetsenbord te krijgen;
Andere om speciale
tekens op het toetsenbord te krijgen. Druk op
OK om te bevestigen.
‘ Beweeg de cursor herhaaldelijk naar links
wanneer u de naam van de geselecteerde
zender of het geselecteerde randapparaat hebt
ingevoerd.
( Selecteer een ander programmanummer en
herhaal stappen
“ tot ‘.
Page 87

De programmalijst herschikken
U kunt, volgens uw eigen keuze, de toegewezen
nummers van de TV-zenders herschikken.
& Kies Herschikken in het Install. menu.
é Volg de instructies op het scherm.
Configuratie
Luidspr. Algemeen Bron Decoder
Config.
Testsignaal
Balans
Center volume
(Surround volume)
Surround LS
Auto surround
Voorkeurzenders kiezen
& Kies Voorkeurzenders in het Install. menu.
é Kies uw programmanummer met de cursor
op/neer.
“ Kies Ja of Nee met de cursor links/rechts.
‘ Herhaal é en “ voor elke TV-zender of elke
externe bron waarvan u een favoriete of nietfavoriete TV-zender of externe bron wenst te
maken.
Het Configuratie menu bevat items die de
instellingen regelen van de TV functies en de diverse
mogelijkheden.
Het
Luidsprekers menu bevat de instellingen met
betrekking tot de luidsprekers.
In het
Algemeen menu kunt u verschillende
instellingen veranderen waarvan wordt aangenomen
dat ze minder vaak worden aangepast dan de
meeste andere instellingen.
In het
Bron menu kunt u een bron selecteren.
In het
Decoder menu kunt u één of meer
programmanummers voorbehouden voor de
zenders die u via uw decoder ontvangt.
Luidsprekers
Uw TV-toestel is uitgerust met geïntegreerde
luidsprekers vooraan links,rechts en centraal. Deze
luidsprekers kunnen Stereo, Dolby 3 stereo en 3D
surround geluid weergeven.Voor een volledige
weergave van Dolby Pro Logic en Hall, gebruik de
twee versterkte surround-luidsprekers. Zie Extra
luidsprekers/Versterker, p. 24.
Afhankelijk van de output en de geselecteerde
Surround mode (zie Hoofdmenu,TV, Geluid,
Surround modes, p. 12), is het mogelijk dat sommige
menu-instellingen niet kunnen worden geselecteerd.
Testsignaal
De menu-instelling
het geluidsniveau van elke luidspreker aan te
passen tot ze met elkaar in balans zijn.
& Selecteer Testsignaal en druk op de cursor
rechts.
é Nadat hij werd geactiveerd, zal het Testsignaal
door de linker, center en rechter luidspreker en
door beide surround luidsprekers achteraan
(indien aangesloten) worden gezonden.
“ Druk op de cursor op/neer om de luidspreker
te selecteren waarvan u het geluidsniveau wenst
aan te passen.
‘ Druk op de cursor links/rechts om het
geluidsniveau aan te passen.
Testsignaal stelt u in staat
Surround luidsprekers
Zie Randapparatuur aansluiten, Externe
Luidsprekers, p. 24.
Indien geen Surround luidsprekers zijn
aangesloten, wijzig dan de fabrieksinstelling
Uit) niet. Indien Surround Luidsprekers zijn
(
aangesloten, selecteer dan
Aan. (Dolby Pro
Logic en Hal zijn niet beschikbaar indien Uit
geselecteerd wordt .)
Auto Surround
Soms zendt de omroep speciale signalen uit
voor programma’s die voor surround-geluid
gecodeerd zijn.Wanneer
geschakeld is, stelt de TV automatisch de
in
Auto Surround
beste surround-geluid mode in. Het is echter
mogelijk deze instelling op te heffen.
7
Page 88

Algemeen
Configur.
Menu achtergrond
Dual screen form.
Fabrieksinstelling
NEXTVIEW
Beeld kantelen
Programmatitel
Teletekst 2.5
Opnamekwaliteit
Code ingeven/wijzigen
Smart surf
& Selecteer Smart surf.
é Selecteer, met de cursor links/rechts
•
2 zenders als u met de 0 toets wenst over
te schakelen van de huidige zender naar de
vorige geselecteerde zender en omgekeerd,
•
9 zenders als u met de 0 toets een lijst
wenst op te roepen van maximaal 9 zenders
die kunnen worden geselecteerd,
•
Thema indien u wenst dat de 0 toets snel
TV-programma's selecteert als
bepaalde thema's wordt uitgezonden.
Om een nieuwe zender of een nieuwe bron
toe te voegen/te verwijderen:
Stem af op de zender of op de bron die u
wenst toe te voegen of te verwijderen. Druk op
de 0 toets en druk op de cursor rechts om
toe te voegen of te verwijderen.
Opmerking: Als er reeds negen zenders/bronnen in
de lijst voorkomen, zal de laatste van de lijst worden
verwijderd.
Dual screen formaat
Met dit menu kunt u het formaat dat uw
voorkeur wegdraagt selecteren door de b
toets op aan of uit te zetten. Zie Dual
screen/PIP/Multipip, p. 14.
Selecteer
door de cursor naar beneden te bewegen.
Als Dual screen werd geactiveerd met de b
toets op de afstandsbediening en als :
•
Dual screen werd geselecteerd, zal het scherm
in twee gelijke schermen worden opgesplitst.
•
PIP werd geselecteerd, de TV toont een
volledig scherm met bovenaan een pip venster;
•
PIP 3 of PIP 12 werd geselecteerd, zullen 3 of
12 pip schermen verschijnen.
Fabrieksinstelling
Hierdoor worden de fabrieksinstellingen voor
beeld en geluid hersteld, maar de instellingen
die werden gedaan bij de installatie van de
zenders blijven behouden.
Algemeen
Smart surf
provider
OSD
NEXTVIEW met
Dual screen, PIP, PIP 3 of PIP 12
Met dit menu kunt u verschillende instellingen
veranderen waarvan wordt aangenomen dat ze
minder vaak worden aangepast dan de meeste
andere instellingen.
Druk op de i toets op de afstandsbediening
om informatie over de geselecteerde menuinstelling te krijgen.
NEXTVIEW provider
Kies een zender die
uitzendt. Hoe je
NEXTVIEW-informatie
NEXTVIEW gebruikt, zie p. 15.
OSD (aan Screen Display - Scherminfo)
Zie Gebruik van de afstandsbediening, p. 4, i
Scherminfo.
& Selecteer OSD.
é Kies Normaal om de ononderbroken weergave
van het programmanummer en de uitgebreide
weergave van de TV-zender en de programmainformatie te activeren.
Minimum om de
weergave van beperkte informatie over de
zender te activeren.
Opmerking: Wanneer Ondertiteling is ingeschakeld,
zie Diversen, p. 13, is het niet mogelijk het
programmanummer ononderbroken weer te geven.
Teletekst 2.5
Sommige zenders bieden de mogelijkheid op de
teletekst-pagina’s meer kleuren, andere achtergrondkleuren en mooiere beelden te verkrijgen.
& Selecteer Teletekst 2.5.
é Druk de cursorknop naar rechts om Teletekst
2.5 Aan
te kiezen, indien u van deze optie
gebruik wenst te maken.
“ Druk de cursorknop opnieuw naar rechts om
Teletekst 2.5 Uit te kiezen indien u de
voorkeur geeft aan de meer neutrale
presentatie van de teletekstpagina’s. De selectie
geldt voor alle zenders die teletekst uitzenden.
Opmerking: het kan enkele seconden duren
vooraleer teletekst naar Teletekst 2.5 overschakelt.
Opnamekwaliteit
Zie Flex TV,Wijzigen van de kwaliteit van
Instant opname, p. 22.
8
Page 89

Code ingeven/wijzigen
Het Kinderslot (zie TV, Diversen, p. 13) maakt
het u mogelijk zenders te vergrendelen om te
vermijden dat kinderen naar bepaalde
programma’s kijken. Om naar de vergrendelde
zenders te kunnen kijken, moet u een
toegangscode invoeren. De menu-instelling
Code Instellen/Wijzigen laat u toe een
Persoonlijk Identificatienummer (PIN) aan te
maken of te wijzigen.
& Selecteer Code ingeven/wijzigen.
é Indien nog geen code bestaat, is het menu
ingesteld op
Code ingeven.
Indien reeds een code werd ingevoerd, is het
menu ingesteld op
Code wijzigen.Volg de
instructies op het scherm.
Belangrijk : u bent uw code vergeten !
& Selecteer Code wijzigen in het Algemeen menu
en druk op
é Druk op de cursor rechts en voer de
OK.
overheersende code 8-8-8-8 in.
“ Druk opnieuw op de cursortoets en geef een
nieuwe persoonlijke PIN-code in, bestaande uit
4 cijfers. De vorige PIN-code wordt gewist en
de nieuwe PIN-code wordt opgeslagen.
Bron
Configur.
Dit menu laat u toe het randapparaat te selecteren
dat u aan een van de externe ingangen hebt
aangesloten.
& Druk op de cursor rechts om toegang te
Bron
EXT1
EXT2
EXT3
EXT4
Side
Center input
Center inp. vol.
hebben tot de lijst met de namen van de
randapparaten die aan de geselecteerde ingang
zijn gekoppeld.
é Selecteer het randapparaat met de cursor
op/neer.
Nadat u de bron, bijv. DVD, hebt geselecteerd,
zal die bron automatisch worden geselecteerd
wanneer uw afstandsbediening zich in DVDmode bevindt, zie p. 3, en wanneer u op de v
toets op de afstandsbediening drukt.
Decoder
Configur.
Bij aansluiting van een decoder of descrambler,
zie p. 23, kunt u één of meer programmanummers
voorbehouden voor de zenders die u via uw
decoder ontvangt.
& Selecteer Decoder met de cursor rechts.
é Selecteer Programma.
Decoder
Programma
Status
Center input - Center in volume
Als u een surround ontvanger op het TV-toestel
hebt aangesloten, zie p. 24, kunnen de
luidsprekers van de TV dienst doen als centrale
luidspreker, zodat een afzonderlijke centrale
luidspreker overbodig wordt.
Selecteer
Als u
Center input Aan of Cinema Link.
Aan hebt geselecteerd, kunt u het
Centrale volume regelen met de cursor links/
rechts, om het verschil in volume tussen de
externe audio-ontvanger en de luidsprekers bij
te stellen.
“ Selecteer het programmanummer waaronder u
het programma dat van uw decoder komt hebt
opgeslagen.
‘ Selecteer Status.
• Selecteer de ingang die u hebt gebruikt om
uw decoder aan te sluiten:
EXT2.
Geen, EXT1,
• Selecteer Geen als u niet wilt dat het
geselecteerde programmanummer geactiveerd
wordt als decoder programmanummer.
Opmerking: selecteer
EXT2 indien de decoder op uw
EasyLink video recorder is aangesloten.
9
Page 90

Demo
TV
Configur.
Demo
Install.
Autom. demo
......
Het Demo menu demonstreert de mogelijkheden van de
TV, hetzij afzonderlijk, hetzij continu in een kringloop.
Indien
Autom. demo werd geselecteerd, zal de demo
automatisch alle mogelijkheden na elkaar demonstreren in
een kringloop. Druk op een van de cursortoetsen om de
Auto demo te stoppen. Indien een van de mogelijkheden
werd geselecteerd, zal die mogelijkheid slechts één maal
worden gedemonstreerd, waarna het Demo menu zal
Dealer demo - Digitale opties
- Lichtsensor
- Comb filter
verschijnen.
De Flex TV demo daarentegen loopt continu. Druk op een
van de cursortoetsen of op de
OK toets om de Flex TV
demo te stoppen.
Opmerking:
- De Dealer demo maakt geen deel uit van de automatische
opeenvolging van demonstraties en kan enkel afzonderlijk
worden geactiveerd.
- De Flex TV demo is enkel beschikbaar in 7 talen.
TV menu
Druk op de MENU Ï toets op de afstandsbediening om het hoofdmenu op te roepen.
Druk op de i toets op de afstandsbediening om informatie over de geselecteerde menuinstelling te krijgen.
Beeldmenu
Beeld Geluid Diversen
TV
Smart beeld
Contrast
Helderheid
Kleur
Scherpte
Tint
Digitale opties
Dynamic contrast
DNR
Kleurverbetering
(Hue)
Beeldformaat
& Druk de cursorknop naar rechts om Beeld te selecteren.
é Selecteer de menu-instellingen in het Beeldmenu door de cursor
op/neer te gebruiken.
“ Pas de instellingen aan door de cursor links/rechts te gebruiken
of ga naar de lijst van instellingen van een submenu door de
cursor rechts te gebruiken. Selecteer een instelling in een
submenu met de cursor op/neer.
Opmerking: om de menu-achtergrond te verwijderen vooraleer u de
beeldinstellingen aanpast, zie Configuratie instellen, Algemeen, p. 8.
Smart beeld
Selecteer
Smart beeld om een lijst van vooraf ingestelde
beeldinstellingen te krijgen. Elke instelling stemt overeen met
een bepaalde fabrieksinstelling.
Persoonlijk verwijst naar de persoonlijke voorkeursinstellingen
voor het beeld in het beeldmenu.
Digitale opties
Pixel Plus is de ideale instelling. Hiermee wordt de horizontale
resolutie verdubbeld en wordt het aantal lijnen met 33 %
verhoogd. Kies eventueel voor de Movie Plus instelling mocht er
een storend halo-effect optreden.Afhankelijk van uw eigen
voorkeur kunt u echter ook Dubbele lijnen of 100 Hz Digital
Scan kiezen.
Opmerking: Indien 60 Hz NTSC apparatuur wordt gebruikt, zijn de
opties Pixel Plus, Movie Plus of Progressive, progressive scan zonder
bewegings-compensatie.
10
Page 91

Active Control
De TV meet en verbetert voortdurend alle inkomende signalen
om zo de best mogelijk beeld-kwaliteit te verzekeren.
& Druk op de h toets op de afstandsbediening.
é Het Active Control menu verschijnt.
“ Druk op de cursor op/neer om de Active Control waarden Uit,
Minimum, Medium (aanbevolen) of Maximum te selecteren.
De beeldinstellingen worden voortdurend en automatisch
verbeterd, hetgeen door middel van balken wordt weergegeven.
De menu-instellingen kunnen niet worden geselecteerd.
‘ Druk op de cursor rechts om Smart beeld te selecteren.
( Druk op de cursor op/neer om een van de vooraf ingestelde
beeldinstellingen te selecteren.
§ Druk op de cursor rechts om Display actief te selecteren.
è Druk op de cursor op/neer om Toon balken, een van de Dual
screen demo's of
Uit te selecteren.
Als u Dynamic contrast, Pixel Plus, DNR (Digital Noise
Reduction) of Digital Natural Motion selecteert, wordt het TVscherm opgesplitst in twee delen : aan de linkerkant wordt de
geselecteerde beeldkwaliteit uitgeschakeld, aan de rechterkant
wordt hij ingeschakeld.
! Druk opnieuw op de h toets om het Active Control menu uit
te schakelen.
Geluidsmenu
TV
Smart geluid
Equalizer
Volume
Volume hoofdtelef.
Surround mode
(Dual I-II)
(Mono/Stereo)
(Nicam/Analoog)
(3D effect)
AVL
Delta volume
Geluid
& Druk op de cursor rechts om Geluid te selecteren.
é Selecteer de menu-instellingen in het Geluidsmenu door de
cursor op/neer te gebruiken en pas de instellingen aan met de
cursor links/rechts. Denk eraan dat de instellingen zich op een
normaal, centraal niveau bevinden wanneer ze in het midden van
de schaalverdeling op de balk staan.
Smart geluid
Selecteer
Smart geluid om een lijst van vooraf ingestelde
geluidsinstellingen te doen verschijnen. Elke instelling komt
overeen met een bepaalde fabrieksinstelling voor Treble en Bass.
Persoonlijk verwijst naar de persoonlijke voorkeursinstellingen
voor het geluid in het geluidsmenu.
Opmerking:
- Sommige menu-instellingen zijn enkel beschikbaar bij een Cinema Link
configuratie en wanneer de Cinema Link geactiveerd is.Andere worden
door de audio-ontvanger gestuurd en niet door het TV-toestel. Zie de
afzonderlijk bijgeleverde Cinema Link handleiding.
- Dual X is enkel beschikbaar bij dual sound uitzendingen.
- Mono/Stereo kan enkel geselecteerd worden bij analoge stereouitzendingen.
- Nicam/Analoog kan enkel worden geselecteerd bij Nicamuitzendingen.
- Sommige menu-instellingen zijn niet beschikbaar in de Flex TV mode.
11
Page 92

Surround modes
Selecteer een van de Surround modes, afhankelijk
van uw persoonlijke voorkeur en het uitgezonden
geluidssignaal.
Stereo
Bij deze geluidskeuze worden alleen
geluidssignalen door de linker en de
rechter luidsprekers vooraan
gezonden.
Dolby 3 Stereo
(optimaal met Dolby Surround uitzending)
De Dolby Pro Logic* geluiden
worden verdeeld over de
luidsprekers links en rechts
vooraan en de centrale
luidspreker.
3D Surround
(optimaal met Dolby Surround uitzending)
Met 3D Surround krijgt U het
Dolby Surround Pro Logic *effect zonder dat U luidsprekers
achteraan moet aansluiten. De
grafische voorstelling van de
luidsprekers achteraan wordt vervangen door
het symbool ®r. Kies het niveau van het
door de cursor naar links/rechts te
effect
bewegen
.
3D
Hall
Het speciale geluidssignaal
wordt via de luidsprekers
achteraan verdeeld, waardoor
een hal-effect van achteraan
gecreëerd wordt.Uit de
centrale luidspreker komt
geen geluid.
Dolby Pro Logic
(optimaal met Dolby Surround uitzending)
Alle luidsprekers vooraan en
achteraan geven het Dolby
Surround Pro Logic geluid
weer. Dit geluid is altijd
aanwezig als een film of een
programma gemarkeerd is met
G Dolby Surround.
Opmerking:
•Normale stereo uitzendingen zijn niet altijd gecodeerd
om een surround geluid achteraan weer te geven.
• Indien een Cinema Link configuratie is aangesloten,
kunnen de surround modes van de ontvanger worden
geselecteerd.
•Pro Logic en Hall kunnen enkel worden weergegeven
indien Surround luidsprekers op Ja is ingesteld in het
Configuratie-menu, Luidsprekers, p. 8, en indien
luidsprekers achteraan zijn aangesloten.
•Wanneer een hoofdtelefoon aangesloten is, is enkel de
surround mode
Stereo-Hoofdtelefoon beschikbaar.
‘Dolby’ ‘Pro Logic’ en het dubbele D-symbool G zijn handelsmerken van Dolby Laboratories Licensing
Corporation. Gefabriceerd onder licentie van Dolby Laboratories Licensing Corporation.
Diversen menu
TV
Programmalijst
Ondertitel
Sleeptimer
Pause wissen
Kinderslot
Timer aan
& Druk op de cursor rechts om Diversen te
selecteren.
é Selecteer de menu-instellingen in het menu
Diversen met de cursor op/neer en pas de
instellingen aan met de cursor links/rechts.
Druk op de i toets op de
afstandsbediening om informatie over de
geselecteerde menu-instelling te krijgen.
12
Diversen
Uit
Aan
Aan met mute
Zoom
Programmalijst
Druk op
OK om naar de geselecteerde TV-
zender of externe bron over te schakelen.
Ondertiteling kiezen
De ondertitelpagina moet voor elke TV-zender
worden opgeslagen:
Schakel teletekst in en kies de gewenste
ondertitelingspagina uit de index. Schakel
teletekst uit.
Ondertitel Aan zal de ondertitels automatisch
zichtbaar maken op de geselecteerde TVzenders indien ondertitels worden uitgezonden.
Een symbool geeft aan dat de ondertiteling
werd geactiveerd. Selecteer
Aan met mute als
u wilt dat de ondertiteling automatisch wordt
weergegeven als het geluid wordt onderbroken
door middel van de ¬ toets op de
afstandsbediening.
Page 93

Pause wissen
Hiermee kunt u het geheugen van uw liveopnames leegmaken. Zie p. 19.
Kinderslot
& Selecteer Kinderslot.
Vergrendelen
Kinderslot
é Druk op de cursor rechts om naar het
Vergrendeling
Ontgrendelen
Leeftijdsgrens
Vergrendel na
Programmavergr.
Inhoudsvergr.
Kinderslot-menu te gaan. U wordt verzocht uw
PIN-code in te voeren.
Opmerking: u moet uw code opnieuw invoeren
telkens u het Kinderslot-menu hebt verlaten.
Belangrijk : u bent uw PIN-code vergeten !
Zie p. 9.
“ Selecteer een van de menu-instellingen van het
Kinderslot-menu:
•
Vergrendelen als u alle zenders en alle externe
bronnen wilt vergrendelen.
•
Vergrendeling en druk op de cursor rechts.
De instellingen Leeftijdsgrens en
Inhoudsvergrendeling zijn beschikbaar indien
NEXTVIEW wordt uitgezonden. Selecteer:
-
Leeftijdsgrens indien u programma’s wenst te
vergrendelen die enkel geschikt zijn vanaf een
zekere leeftijd: uit, 2, 4 ... 16.
-
Vergrendel na indien u alle programma’s
wenst te vergrendelen die na een bepaald
tijdstip worden uitgezonden. Druk op de
cursor rechts en voer het tijdstip in met de
cursor op/neer en rechts. Druk op de
OK-
toets om te bevestigen.
-
Programmavergr. indien u de programma’s
van een bepaalde TV-zender of een bepaalde
externe bron wenst te vergrendelen.
-
Inhoudsvergr. indien u programma’s wenst te
vergrendelen die verband houden met een
bepaald thema: Film, Sport, Shows.... Zie
NEX
TVIEW,p.15.
• Ontgrendelen om alle ingestelde
vergrendelingen tegelijk te ontgrendelen.
Timer aan
& Selecteer Timer aan.
VCR1
BBC2
Uit
Timer aan
é Selecteer Aan met de cursor rechts.
“ Druk opnieuw op de cursor rechts om naar de
Aan
CNN
TVE
π.....
Zondag
Maandag
.......
Dagel.
15:45
lijst met zenders te gaan.
‘ Selecteer de TV-zender of de externe bron
waarnaar u wilt dat de TV op een bepaalde dag
en een bepaald tijdstip overschakelt.
( Druk opnieuw op de cursor rechts om een dag
van de week te selecteren of om
Dagelijks te
kiezen.
§ Druk opnieuw op de cursor rechts om de tijd
in te voeren met de cijfertoetsen of met de
cursor op/neer en druk op
è Druk op de MENU Ï toets om het menu uit
OK om te activeren.
te schakelen.
Opmerking : Druk op de i toets om uw
timerinstellingen te controleren.
Zoom
& Selecteer Zoom met de cursor naar beneden
en druk op de
é Druk op de OK toets om een van de zoom-
OK toets.
vergrotingen te selecteren (x1, x4, x9, x16).
“ Bovendien kunt u het geselecteerde zoom-
scherm over het scherm doen verschuiven met
de cursortoetsen op/neer, links/rechts.
‘ Druk op de MENU Ï toets om de
zoomfunctie uit te schakelen.
13
Page 94

Dual screen / PIP / Multipip
Druk op de b toets om Dual screen, PIP of een van de PIP modes te
activeren. Druk opnieuw op de b toets. Het scherm met de gele rand zal
B
VCR DVD SAT AMP CD
v
REC
æ
Ò
DVR
+
V
-
123
456
789
i
b
Pause Live
†
Select
Ò®‡π
b
†
OK
MENU
Ï
+
¬
P
-
0
0
Active Control
q
h
het volledige hoofdscherm worden.
Opmerkingen:
- Als u de b toets ingedrukt houdt, zullen de verschillende formaten na elkaar op
het scherm verschijnen. Per seconde dat u de toets ingedrukt houdt, zal een
ander formaat verschijnen. Nadat de TV in de standby stand werd geschakeld, zal
de voorkeursinstelling, zoals ingesteld in het Configuratiemenu,Algemeen, worden
gebruikt.
- Als Dual screen werd geselecteerd, zijn twee beeldformaten mogelijk :Volledig
scherm of 4:3 brievenbusformaat (verticale samendrukking).
- Het geluid van het rechterscherm of van het PIP-scherm zal te horen zijn in de
hoofdtelefoon.
Weergavemogelijkheden
Dual screen PIP
- Druk de cursor naar rechts om het rechter scherm te laten oplichten.
- Druk de cursor naar beneden om een enkel PIP scherm te laten
oplichten.
- Druk de cursor naar rechts om naar het Multipip scherm te gaan en
gebruik dan de cursortoetsen om te navigeren in de PIP schermen en
een PIP scherm te laten oplichten.
TV-zenders of externe bronnen wijzigen in linker, rechter, PIP of
Multipip scherm
Druk op de
TV-zenders of externe bronnen in het scherm dat oplicht te wijzigen.
PIP 3 PIP 12
AUX
AUX
-P+ toets, op de 0 toets of op de cijfertoetsen om de
PIP1 PIP1 PIP2 PIP3
PIP5 PIP6 PIP7
PIP2
PIP9 PIP10 PIP11 PIP12
PIP3
PIP4
PIP8
Afmeting
14
Positie
Scan PIP3 of PIP 12
Ga met de cursor naar het onderste PIP-scherm en druk de cursor
naar beneden om de volgende reeks PIP-schermen te doen verschijnen.
Positie en afmeting bepalen van een enkel PIP scherm
o
œ
& Selecteer een Dual screen mode met een enkel PIP scherm.
é Druk de cursor naar beneden om het PIP scherm te laten oplichten.
Een PIP menu verschijnt waarin u de positie en de afmeting van het PIP
scherm kan bepalen.
Opmerking: Wanneer het PIP menu verdwijnt, druk op de
OK toets om het
opnieuw te laten verschijnen.
“ Druk de cursor naar beneden om Positie of Afmeting te kiezen.
‘ Druk op de OK toets of op de cursor naar rechts om te activeren.
( Gebruik de cursortoetsen om de positie van het PIP scherm te
bepalen. Gebruik de cursortoetsen links/rechts om de afmeting van het
PIP scherm te bepalen.
§ Druk op de OK toets. Het PIP menu verschijnt opnieuw.
è Beweeg de cursor naar de bovenkant van het menu om het
hoofdscherm opnieuw te laten oplichten.
! Druk op de OK toets om het menu uit te schakelen of wacht tot de
tijd verstreken is.
Scherminfo
De scherminfo die oplicht en verschijnt wanneer de zenders worden
gewijzigd, heeft altijd betrekking op het actieve scherm.
Page 95

NEXTVIEW / Teletekst gids
NEXTVIEW is een elektronische gids waarmee u programma’s kunt opzoeken zoals u dat zou
doen in een krant of een TV-magazine. U kunt de programma’s volgens onderwerp schikken
(films, sport...), gedetailleerde informatie verkrijgen en uw recorder programmeren, indien die is
uitgerust met de
Belangrijke opmerkingen:
landen. Indien geen
NEXTVIEW
programma-informatie van teletekst (indien beschikbaar) is gebaseerd en de meeste functies van
NEXTVIEWLink functie.
NEXTVIEW is enkel beschikbaar voor bepaalde programma’s en in bepaalde
-informatie wordt uitgezonden, verschijnt de teletekst-programmagids, die op de
NEXTVIEW biedt.
Opmerking: De zender is verantwoordelijk voor de inhoud van de informatie. De TV is verantwoordelijk voor de
ontvangst van die informatie en voor de presentatie ervan aan de gebruiker.
NEXTVIEW
/Teletekstgids in- of uitschakelen
Druk op de æ toets op de afstandsbediening om de NEXTVIEW/Teletekstgids in of uit te schakelen.
Een menu verschijnt met de boodschap
• een
NEXTVIEW pagina, indien de gekozen zender deze dienst biedt (het NEXTVIEW logo verschijnt),
• een teletekstpagina, indien de gekozen zender geen
•
Geen informatie beschikbaar indien noch NEXTVIEW noch teletekst worden uitgezonden. Kies een
Even wachten. Na een poosje krijgt u:
NEXTVIEW uitzendt,
andere zender.
Kies TV-zenders volgens thema
Indien programma’s in de NEXTVIEW-gids een bepaald thema hebben, is het mogelijk TV-programma’s
snel te kiezen door middel van de 0 toets. Zie Configuratie,Algemeen menu, Smart surf, p. 8.
Een
NEXTVIEW pagina weergeven
De informatie wordt weergegeven door de zender die de
Algemeen,
Dit logo wordt enkel
weergegeven tijdens een
NEXTVIEW uitzending. Geen
logo duidt een teletekst
NEXTVIEW provider, p. 8.
puck
Maa 03
Maa03
Di 04
Wo 05
Do 06
Vr 07
Za 08
Maa 05
Feb 18.00
Menu 18.00 Zender Thema
BBC1 18.00 BBC News
BBC2 18.00 The Simpsons
CNN 18.00 World News
FR2 18.00 On a tout essayé!
CH5 18.15 Tomorrow Never Dies
NEXTVIEW aanbiedt. Zie ook Configuratie,
NEXTVIEW guides
Programmanaam en
tijdstip van uitzending
programmagids aan.
Overz. Opname Voorpr Kijken Vergr
functietoetsen
Beeld/NEXTVIEW-Teletekstgids
& Druk op de æ toets. Druk op de b toets om de NEXTVIEW/ Teletekst Gids op de rechterkant van
het scherm te laten verschijnen.
é Gebruik de cursortoetsen om een TV-zender te kiezen.
“ Druk op de b toets om dual screen uit te schakelen.
NEXTVIEW guides
& Gebruik de cursor links/rechts om Tijd, Zender, Thema, de datum (of het menu) te selecteren.
De
Tijdsgids biedt een overzicht over alle programma-titels die beschikbaar zijn in de geselecteerd
tijdspanne. De
op een bepaalde dag worden uitgezonden. Met de
De
Themagids toont een lijst van alle programma’s die op de geselecteerde datum worden
Zendergids biedt een overzicht over alle programma’s die door één bepaalde zender
Datumgids kunt u een welbepaalde dag kiezen.
uitgezonden en die tot de geselecteerde categorie behoren.
Wanneer de TV de menugids doorloopt, wordt rekening gehouden met de selectiecriteria en wordt
uiteindelijk een lijst met programma’s weergegeven.
é Druk op de OK toets om het type gids te selecteren.
“ Beweeg de puck naar beneden en aar rechts om de programma’s te selecteren. Indien beschikbaar
wordt een samenvatting van of uitleg over het programma onderaan het scherm weergeven.
‘ Gebruik de cursor op/neer om de programma’s te doorlopen.
15
Page 96

Teletekst gids
& Voer door middel van de cijfertoetsen het nummer in van de teletekstpagina die de programma-
informatie bevat voor de huidige zender.
é Druk op de cursor rechts om de puck over het bolletje te bewegen.
“ Gebruik de cursor op/neer om de programma’s te doorlopen.
paginabol
selectiebol
Maa 05 Feb 16.35
BBC1
BBC2
ITV
CH4
CH5
zenderlijst
Overz. Opname Preprog Kijken Vergr
100 1
BBC CEEFAX
LIONS RECORD ANOTHER WIN 430
Index 100 News 300
BBC Info 110 Headlines 305
Children 120 Weather 400
Cookery 150 Sports 415
Education 200 Radio 500
• Indien het geselecteerde programma een pagina bevat met een optionele subcode die verwijst naar een
pagina met meer informatie over het programma, druk dan op de OK-toets om de informatie op het
scherm te doen verschijnen. Druk opnieuw op de
OK-toets om naar de programmagidspagina terug te
keren.
• Indien de geselecteerde programmagidspagina aan de VPT-vereisten voldoet,
- zal het mogelijk zijn programma’s op te nemen, voor te programmeren, te bekijken of te vergrendelen:
- zal de TV de laatst geselecteerde teletekstpagina van die zender onthouden, die informatie in verband
met de programmagids bevatte en die aanduidt welk programma wanneer begint.Telkens u op de æ
toets drukt, zal de teletekstpagina van de gekozen zender, die de programmagids bevat, verschijnen.
• Indien nodig kunt u het nummer van de subpagina selecteren door de cursor naar het bolletje voor de
pagina te bewegen en rechts te drukken.
Opmerking: U moet het nummer van de teletekstpagina invoeren voor elke zender. U kunt de zenders ook
wijzigen door de cursor op/neer te bewegen in de lijst aan de linkerkant van de pagina.
subpagina’s
scroll bol
Basisfuncties
Druk op de grijze x,rode ®,groene U, gele Q of blauwe Ì toets om een functie van de
Teletekst of
NEXTVIEW te activeren. De toetsen zijn grijs indien die functie niet beschikbaar is.
Overzicht: dit menu toont een lijst met programma’s die gemerkt zijn als programma’s waaraan u
herinnerd moet worden, die opgenomen moeten worden en die vergrendeld zijn. Dit menu kan
worden gebruikt om gemarkeerde programma's te wijzigen of te verwijderen. .
Opname: om het opnemen met de videorecorder te programmeren (indien uitgerust met de
NEXTVIEWLink functie en aangesloten op EXT. 2).
Voorprogrammeren:om de TV automatisch in te schakelen wanneer hij zich in standby bevindt of om
een boodschap op het scherm te laten verschijnen wanneer de TV ingeschakeld is.
Vergrendelen: om bepaalde programma’s te vergrendelen en zo te voorkomen dat ze opgenomen of
bekeken worden.Voor de functies Opname,Voorprogrammatie of Vergrendelen verschijnt een klein
menu waarin u het interval kunt kiezen: eenmalig, dagelijks of wekelijks, of waarmee u een vroegere
instelling kunt wissen. Standaard wordt het interval op Eenmalig ingesteld. Druk op de
OK toets om de
frequentie te bevestigen.
Kijken: om het geselecteerde en op dat ogenblik uitgezonden programma te bekijken.
Ontvangst en updaten van NEXTVIEW info
De ontvangst en het updaten van NEXTVIEW gebeurt terwijl U de TV-zender van de gekozen NEXTVIEW-
provider bekijkt, zie Configuratiemenu, p. 8, of wanneer het televisietoestel in standby staat.
Het televisietoestel ontvangt daarna nog éénmaal nieuwe informatie tijdens de nacht.
Opmerking: het kan noodzakelijk zijn het televisietoestel in standby te zetten wanneer alle
verouderd is, bijvoorbeeld wanneer U uit vakantie terugkomt.
16
NEXTVIEW informatie
Page 97

Teletekst
De meeste TV-zenders zenden informatie uit via teletekst. Deze TV heeft een geheugen van 1200
pagina’s, dat de meest uitgezonden pagina’s en subpagina’s opslaat om de wachttijd te beperken. Het
geheugen wordt vernieuwd na elke programma-wijziging.
Teletekst in- en uitschakelen
Druk op b om teletekst in te schakelen.
102 «03 04 05 06 07 08 09 10 11 12»
BBC CEEFAX 102 Maa 05 Feb 16.35.22
BBC CEEFAX
LIONS RECORD ANOTHER WIN 430
Index 100 News 300
BBC Info 110 Headlines 305
Children 120 Weather 400
Cookery 150 Sports 415
Education 200 Radio 500
Lottery 230 Travel 550
Finance 240 Subtitling 888
Music 280 TV Listings 600
Rood Groen Geel Blauw
Teletekst pagina kiezen
- Geef het gewenste paginanummer in met de
cijfertoetsen
links/rechts of met de
, de cursortoetsen op/neer,
-P+ toets.
- Kies met de kleurtoetsen, overeenkomstig de
gekleurde opties onderaan het scherm, het
gewenste onderwerp.
De vorige teletekstpagina kiezen
(Enkel mogelijk indien er geen lijst met favoriete
teletekstpagina’s beschikbaar is. Zie p. 18.)
Druk op de 0 toets.
Teletekst inhoudspagina kiezen
Druk op de grijze kleurtoets † om de
inhoudspagina te laten verschijnen (meestal
p. 100).
Enkel voor T.O.P. teletekst-uitzendingen :
Druk op i. Een T.O.P.-overzicht van de
beschikbare rubrieken en onderwerpen
verschijnt. Kies met de cursor op/neer,
links/rechts de gewenste rubriek, het gewenste
onderwerp en de pagina en druk op de
toets. Niet alle TV-zenders zenden het T.O.P.
teletekst systeem uit.
OK
Subpagina’s kiezen
Wanneer een geselecteerde teletekstpagina uit
verschillende subpagina's bestaat, verschijnt een
lijst van de beschikbare subpagina's op het
scherm.
Druk op de cursor links of rechts om de
volgende of de vorige subpagina te selecteren.
Teletekstpagina vergroten
Druk herhaaldelijk op q om achtereenvolgens
de bovenste en de onderste helft van de
teletekstpagina te doen verschijnen, en om
daarna terug te keren naar de normale
teletekstpagina. Wanneer de teletekstpagina
vergroot is, kunt u de tekst regel per regel
doorlopen door middel van de cursor op/neer.
Actieve schermselectie
Wanneer u zich in dual screen beeld/teletekst
bevindt, geef het gewenste paginanummer in
met de
-P+ toets, druk dan op de MENU Ï-
toets en selecteer daarna het linkerscherm
(met het blauwe bolletje bovenaan). Nu kunt u
kiezen tussen een samengedrukte of een
volledig beeld/teletekstpagina met de q toets.
Hypertext
Met hypertext kunt u pagina’s selecteren en
zoeken die om het even welk woord of cijfer
bevatten dat in de huidige teletekstpagina
voorkomt.
& Druk op de OK toets om het eerste woord of
een cijfer in de pagina te doen oplichten.
é Gebruik de cursor op/neer, links/rechts om het
woord of het cijfer dat u wenst te zoeken, te
selecteren.
“ Druk op de OK toets om te bevestigen.
Een boodschap verschijnt onderaan het scherm
om aan te geven dat het zoeken bezig is of dat
het woord of de pagina niet gevonden werd.
‘ Druk op de cursor naar boven om hypertext te
verlaten.
17
Page 98

Teletekst menu
(Enkel mogelijk in teletekstmode met volledig scherm)
& Druk op de toets MENU Ï om het menu te
activeren.
é Selecteer de menu-instellingen met de cursor
op/neer.
“ Druk op de cursor rechts om de instelling te
activeren.
Verborgen informatie
Onthult/verbergt verborgen informatie op een
pagina, zoals oplossingen voor raadsels en puzzels.
Druk op de cursor rechts om de instelling te
activeren.
Voorkeur
Deze lijst bevat maximaal 8 favoriete teletekstpagina’s. Enkel de pagina’s van de zender waar u
naar kijkt, kunnen geselecteerd worden.
& Druk op de cursor rechts om toegang te krijgen
tot de lijst.
é Druk opnieuw op de cursor rechts om de huidige
pagina toe te voegen of om een van de pagina's uit
de voorkeurlijst te selecteren.
“ Druk op de MENU Ï toets om de pagina te
bekijken.
‘ Gebruik de 0 toets om de lijst met favoriete
pagina's te doorlopen.
Zoeken
Een woord selecteren
U kunt het toetsenbord op het scherm gebruiken
om een woord te typen dat u wilt zoeken in de
teletekstpagina’s. Het is niet belangrijk of kleine
letters of hoofdletters worden gebruikt.
102 03 04 05 06 07 08 09 10 11 12
BBC1
WORD
NAME
FOOTBALL
puck
Annuleer Akkoord
Spatie Wissen
ABCDEFG 1 2 3
HIJKLMN 4 5 6
OP QRSTU 7 8 9
V W X Y Z 0
Shift Andere
Rood Groen Geel Blauw
TELETEXT
& Druk op de cursor rechts om toegang te krijgen
tot het keyboard.
é Gebruik de cursor links/rechts, op/neer om de
karakters, woorden of functies te selecteren.
‘ Selecteer Annuleer om het geselecteerde
woord of karakter te annuleren; Spatie om een
spatie in te voegen; Wissen om het laatst
geselecteerde karakter te wissen; Shift om over
te schakelen van kleine letters naar hoofdletters
en vice versa; Andere om speciale tekens op het
toetsenbord te krijgen.
( Druk herhaaldelijk op de cursor links om naar
het Teletekstmenu terug te keren.
Een woord zoeken
& Typ het woord op het scherm in of kies een
woord uit de lijst met eerder opgezochte
woorden en druk op de
é Selecteer Akkoord en druk opnieuw op OK.
OK toets.
Het bericht Zoeken verschijnt.
“ Om het zoeken te stoppen of een nieuw woord
te zoeken, moet u Keyboard selecteren en op
OK drukken.
‘ Als een woord niet wordt gevonden, verschijnt
een boodschap. Als het woord wordt gevonden,
licht het op in de teletekstpagina. Druk op de
OK-toets om het zoeken verder te zetten.
Subpagina’s doorlopen (indien aanwezig)
Hiermee worden de subpagina’s automatisch
beurtelings weergegeven. Druk op de cursor
rechts om in- en uit te schakelen.
Geprogrammeerde pagina
Om een bepaalde pagina op een bepaald tijdstip
te doen verschijnen.
& Druk op de cursor rechts om Ja of Nee te
kiezen.
é Geef de tijd en het paginanummer in met de
cursor of met de cijfertoetsen.
Opmerking:Teletekst moet niet ingeschakeld blijven,
maar u moet de TV-zender bekijken waarvan u een
bepaalde pagina gekozen hebt.
“ Druk op de cursor links om naar het TV-menu
terug te keren.
Taal
Als de letters die op het scherm verschijnen
niet overeenkomen met de letters die door de
teletekstzender worden gebruikt, kunt u hier de
taalgroep wijzigen. Selecteer Groep 1 of
Groep 2 met de cursor rechts.
Druk op de
MENU Ï toets om het Teletekst
menu te verlaten.
“ Druk op de OK toets om elk karakter te
bevestigen.
18
Page 99

B
b
¬
+
-
V
+
-
P
v
b
i
0
h
q
Select
VCR DVD SAT AMP CD
MENU
DVR
OK
123
456
789
0
Ò®‡π
†
Active Control
æ
Ò
†
Ï
Pause Live
REC
Flex TV
Uw Flex TV heeft een intern geheugen waarin programma’s tijdelijk kunnen worden opgeslagen
(
Pause TV) en waarin programma’s voor onbepaalde tijd kunnen worden opgenomen (Opname).
1. Pause TV:Vanaf het ogenblik waarop uw TV wordt ingeschakeld, begint hij automatisch het
programma dat u bekijkt op te nemen. Dat maakt het u mogelijk te stoppen met kijken (door
middel van de
opnieuw op de
Pause TV genoemd.
Opmerking : Als het Pause TV geheugen (3 uur) vol is, worden de voordien opgenomen programma’s
overschreven.
2. Opname: Een groot deel van het geheugen van de Flex TV is bestemd voor het opnemen van
programma’s die u wilt bewaren (met een maximum van 58 programma’s en een totale maximale
opnametijd van ongeveer 28 uur). U kunt rechtstreeks opnemen door middel van de ®
record
Opmerkingen :
- U kunt het programma reeds bekijken voor de opname beëindigd is.
- Wanneer u rechtstreeks opneemt of wanneer een geprogrammeerde opname is gestart, kunt u Pause TV niet
gebruiken.
- De Flex TV functie kan niet worden gebruikt met Dual screen/PIP/Multipip.
Pause toets) en het programma later (maximaal 3 uur later) verder te bekijken (door
Pause toets te drukken), zonder ook maar iets te missen. Deze functie wordt
Instant
toets of uw opnames programmeren met de DVR toets. Zie verder.
REC Instant opname p. 22
Met Instant opname kunt u met een druk op een toets het opnemen
starten.
DVR
Overzicht van opname en Geprogrammeerde Opname
Zie p. 20
Pause
& Druk op de Pause toets.
Het beeld zal stilstaan, terwijl de TV het live TV-programma op de
achtergrond blijft opnemen.
(Het opnameblok is ingesteld op 3 uur HQ - High Quality – opname.) Een
tijdsbalk duidt het toenemende tijdsverschil met het live-programma aan
naarmate de pauze voortduurt.
Druk op de
i toets om de balken opnieuw te laten verschijnen.
é Druk opnieuw op de Pause toets om het programma te bekijken vanaf
het punt waarop u bent gestopt, zonder ook maar iets te missen.
Live
Druk op de Live toets om opnieuw gewoon naar het TV-programma te
kijken. Druk opnieuw op deze toets om naar het ogenblik waarop u de
pauze hebt ingelast terug te keren.
Pause wissen
Als u niet wilt dat iemand anders de programma’s ziet die u (de vorige
avond) hebt bekeken en die automatisch werden opgenomen (in het
geheugenblok van 3 uur), kunt u overwegen het geheugen leeg te maken.
& Druk op de MENU Ï toets.
é Selecteer Pause wissen in het Diversen menu.
Zie TV menu, Diversen, p. 13.
“ Druk op de OK-toets om het geheugenblok van 3 uur te wissen.
19
Page 100

B
b
¬
+
-
V
+
-
P
v
b
i
0
h
q
Select
VCR DVD SAT AMP CD
MENU
DVR
OK
123
456
789
0
Ò®‡π
†
Active Control
æ
Ò
†
Ï
Pause Live
REC
Slow motion
& Druk op de cursortoets rechts wanneer een pauze is ingelast. De TV
schakelt over naar slow motion met een vierde van de normale snelheid.
é Druk opnieuw op de cursortoets rechts. De TV schakelt over naar slow
motion met de helft van de normale snelheid.
“ Druk op de Pause toets om slow motion uit te schakelen.
Snel vooruit-/achteruitspoelen
& Druk op de Pause toets om het programma te bekijken vanaf het punt
waarop u bent gestopt.
é Druk op de cursortoets links of rechts (gedurende minstens 1 seconde).
De TV schakelt op een hogere afspeelsnelheid (vooruit of achteruit) over.
“ Wanneer u opnieuw op de cursortoets links of rechts drukt, zal de
snelheid een stap versnellen (x2, x4, x8, x20, x200).
‘ Wanneer u een programma bekijkt met een snelheid die hoger is dan de
normale snelheid, hetzij in voorwaartse, hetzij in achterwaartse richting,
kunt u met een druk op de cursortoets links of rechts de snelheid een
stap vertragen.
( Druk op de Pause toets om naar de normale snelheid terug te keren.
Instant Overslaan
Druk kort op de cursortoets rechts terwijl u verder kijkt.
Bij elke druk op de cursortoets wordt 30 seconden van het programma
overgeslagen, b.v. reclame..
20
Instant Herhalen
U kunt op om het even welk ogenblik op de cursortoets links drukken om
de laatste 7 sec. één maal opnieuw te bekijken.`
Opmerking : versneld afspelen (vooruit of achteruit), overslaan en onmiddellijke
weergave zijn niet mogelijk wanneer u de Pause toets hebt ingedrukt.
 Loading...