

Page 1
tv
Page 2

MODEL :
PROD. NO :
GB
Please note the reference numbers
for your TV set located on the
packaging or on the back of the set.
FR Veuillez noter les références de
votre téléviseur situées sur
l’emballage ou au dos de l’appareil.
NL Let op de referenties van uw
televisietoestel die op de
verpakking of op de achterkant
van het toestel staan.
DE
Notieren Sie die
Referenznummern Ihres
Fernsehgeräts, die sich auf der
Verpackung bzw. auf der
Rückseite des Geräts befinden.
IT Notare i riferimenti del vostro
televisore situati sull’imballaggio o
sul retro dell’apparecchio.
DK Bemærk de oplysninger om dit
TV, der findes på kassen eller
bagsiden af TV-apparatet.
NO Noter deg referansen for TV-
apparatet, som du finner på
emballasjen eller på baksiden av
apparatet.
SU Notera de uppgifter om er TV
som återfinns på kartongen eller
baksidan av TV-apparaten.
SF Lue myös television
myyntipakkauksessa tai television
takana olevat merkinnät.
ES
Anote las referencias de su televisor
que se encuentran en el embalaje o
en la parte trasera del aparato.
PT
Anote as referências do seu
televisor localizadas na embalagem
ou na parte de trás do aparelho.
GR ™ЛМВИТЫЩВ ЩИ˜ Ф‰ЛБ›В˜ ¯Ъ‹ЫЛ˜
ЩЛ˜ ЩЛПВfiЪ·Ы‹˜ Ы·˜ Ф˘
‚Ъ›ЫОФУЩ·И ЫЩЛ Ы˘ЫОВ˘·Ы›· ‹
ЫЩФ ›Ыˆ М¤ЪФ˜ ЩЛ˜ Ы˘ЫОВ˘‹˜
TR Ambalaj›n üzerinde ya da aletin
arkas›nda bulunan referanslar›
baflka bir yere not edin.
HU Kérjük vegye figyelembe az Ön
televíziójának a hátoldalán és a
csomagoláson feltüntetett
katalógusszámokat.
RU
á‡Ô˯ËÚ ÌÓÏ ÏÓ‰ÂÎË
‚‡¯Â„Ó ÚÂ΂ËÁÓ‡, ÍÓÚÓ˚È
Û͇Á‡Ì ̇ ÛÔ‡ÍÓ‚Ó˜ÌÓÈ
ÍÓÓ·Í ËÎË Ì‡ Á‡‰ÌÂÈ
ÒÚÓÓÌ ‡ÔÔ‡‡Ú‡.
PL Prosimy o zanotowanie oznaczeń
telewizora umieszczonych na
opakowaniu lub tylnej części
urządzenia.
CZ
Poznamenejte si typové údaje Vašeho
televizoru umístěné na obalu nebo
na zadní straně přístroje.
SK
Poznačte si typové údaje Vášho
televízora nachádzajúce sa na obale
alebo na zadnej strane prístroja.
Page 3
5
6
7
8
9
$
%
&
(
)
~
M
NIM
#
+
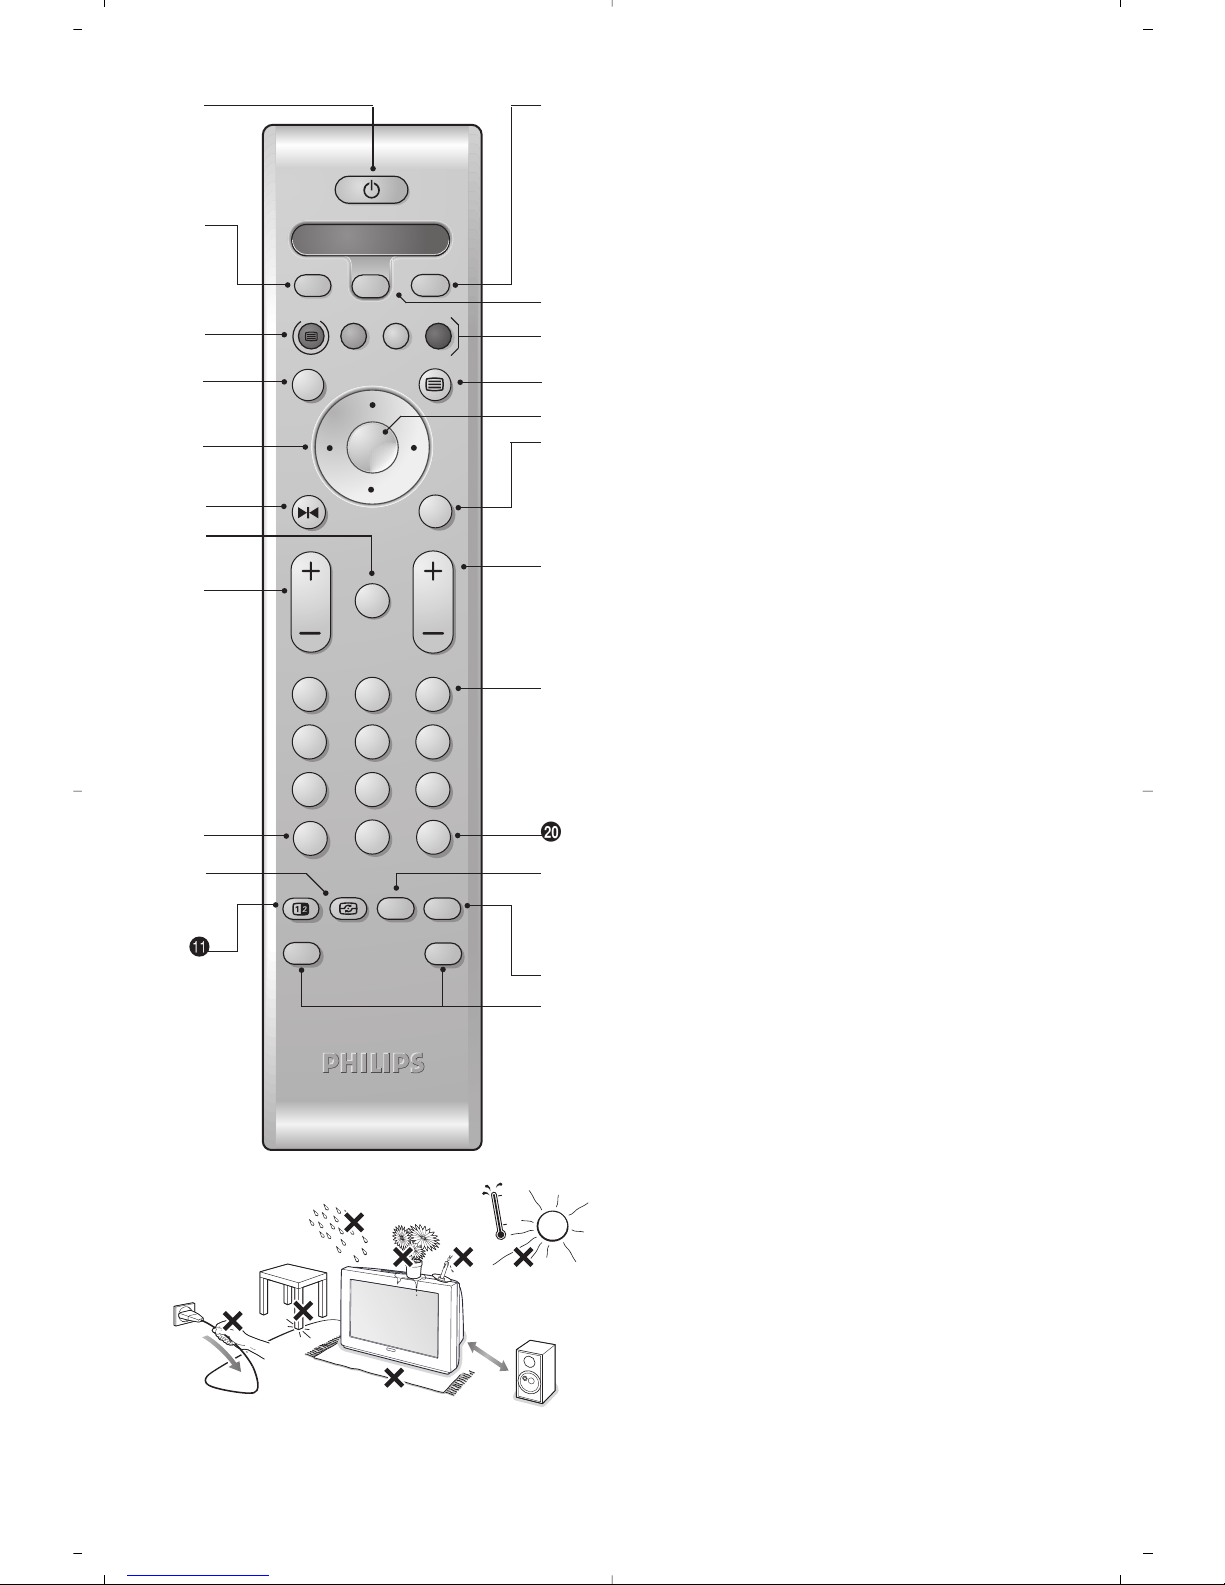
GB For detail explanation of the remote control’s
function and safety page, please refer to page 3.
FR Pour les instructions détaillées sur la fonction
de télécommande et les pages d’informations
relatives à la sécurité, veuillez vous reporter à la
page 3.
NL Zie pagina 3 voor meer informatie over de
functies van de afstandsbediening en de
veiligheidsinformatie.
DE Eine detaillierte Beschreibung der Funktionen
der Fernbedienung sowie Sicherheitshinweise
finden Sie auf Seite 3.
IT Per istruzioni dettagliate sulle funzioni del
telecomando e la sicurezza andare a pagina 3.
DK Yderligere oplysninger om fjernbetjeningens
funktion og sikkerhed finder du på side 3.
NO For detaljert forklaring av fjernkontrollens
funksjoner og sikkerhetsside, se side 3.
SU Mer information om fjärrkontrollens funktion
och säkerhetssidan finns på sidan 3.
SF Lisätietoja kaukosäätimen toiminnasta ja
turvallisuusasioista saat sivulta 3.
ES Para explicaciones más detalladas de la función
de control remoto y la página de seguridad,
diríjase a la página 3.
PT Para obter explicações detalhadas sobre as
funções do controlo remoto e da página de
segurança, consulte a página 3.
GR °И· ПВЩФМВЪВ›˜ ВВНЛБ‹ЫВИ˜ ЩЛ˜ ПВИЩФ˘ЪБ›·˜
ЩФ˘ ЩЛПВ¯ВИЪИЫЩЛЪ›Ф˘ О·И ЩЛ ЫВП›‰· МВ М¤ЩЪ·
·ÛÊ·Ï›·˜ ·Ó·ÙÚ¤ÍÙ ÛÙË ÛÂÏ›‰· 3.
TR Uzaktan kumandanın ifllevi ve güvenlik sayfası ile
ilgili ayrıntılı açıklama için 3. sayfaya bakın.
HU A távkapcsoló funkcióival és a biztonsági oldallal
kapcsolatos részletes tudnivalókat a 3. oldalon
olvashatja.
RU èÓ‰Ó·ÌÓ ÓÔËÒ‡ÌË ̇Á̇˜ÂÌËfl ÔÛθڇ
‰ЛТЪ‡МˆЛУММУ„У ЫФ‡‚ОВМЛfl Л
ЛМЩУП‡ˆЛ˛ ФУ ЪВıМЛНВ ·ВБУФ‡ТМУТЪЛ
ТПУЪЛЪВ М‡ ТЪ‡МЛˆВ 3.
PL Szczegółowy opis funkcji pilota i informacje
o bezpieczeństwie znajdują się na stronie 3.
CZ Podrobné pokyny pro používání funkce
dálkového ovladače a bezpečnostní pokyny
najdete na straně 3.
SK Detailné vysvetlenie funkcií diaľkového
ovládača a o informácie bezpečnosti
nájdete na strane 3.
2
5
8
0
Œ
1
4
7
Ë
[
”
MENU
P
Ê
·
¢
œ
Æ
‡
π
OK
3
6
9
ù
Select
Y
Ÿ
†
¢
CONTROL
-
SMART
ACTIVE
ª
SMART
K
`
VCR DVD SAT AMP CD
1
2
3
4
!
Å
,
-
.
/
Page 4

Page 5
1
Introduction
Table of Contents
Thank you for purchasing this television set.
This handbook has been designed to help you install and operate your TV set.
We would strongly recommend that you read it thoroughly.
Note:
Specification and information subject to change without notice.
Installation
Installing your television set . . . . . . . . . . . . . . . . . . . . . . . . . . . . . . . . . . . . . . . . . .2
The keys on the TV set . . . . . . . . . . . . . . . . . . . . . . . . . . . . . . . . . . . . . . . . . . . . . .2
Remote control keys . . . . . . . . . . . . . . . . . . . . . . . . . . . . . . . . . . . . . . . . . . . . . . .3
Safety information . . . . . . . . . . . . . . . . . . . . . . . . . . . . . . . . . . . . . . . . . . . . . . . . . .3
Quick installation . . . . . . . . . . . . . . . . . . . . . . . . . . . . . . . . . . . . . . . . . . . . . . . . . .4
Program sort . . . . . . . . . . . . . . . . . . . . . . . . . . . . . . . . . . . . . . . . . . . . . . . . . . . . . .4
Program name . . . . . . . . . . . . . . . . . . . . . . . . . . . . . . . . . . . . . . . . . . . . . . . . . . . . .4
Manual store . . . . . . . . . . . . . . . . . . . . . . . . . . . . . . . . . . . . . . . . . . . . . . . . . . . . . .5
Favourite Programmes . . . . . . . . . . . . . . . . . . . . . . . . . . . . . . . . . . . . . . . . . . . . . .5
Other settings in the Install menu . . . . . . . . . . . . . . . . . . . . . . . . . . . . . . . . . . . . .5
Operation
Picture settings . . . . . . . . . . . . . . . . . . . . . . . . . . . . . . . . . . . . . . . . . . . . . . . . . . . .6
Sound adjustments . . . . . . . . . . . . . . . . . . . . . . . . . . . . . . . . . . . . . . . . . . . . . . . . .6
Feature settings . . . . . . . . . . . . . . . . . . . . . . . . . . . . . . . . . . . . . . . . . . . . . . . . . . . .6
Timer function . . . . . . . . . . . . . . . . . . . . . . . . . . . . . . . . . . . . . . . . . . . . . . . . . . . .7
TV lock . . . . . . . . . . . . . . . . . . . . . . . . . . . . . . . . . . . . . . . . . . . . . . . . . . . . . . . . . .7
Teletext . . . . . . . . . . . . . . . . . . . . . . . . . . . . . . . . . . . . . . . . . . . . . . . . . . . . . . . . . .8
Screen Formats . . . . . . . . . . . . . . . . . . . . . . . . . . . . . . . . . . . . . . . . . . . . . . . . . . . .9
Using PIP . . . . . . . . . . . . . . . . . . . . . . . . . . . . . . . . . . . . . . . . . . . . . . . . . . . . . . . . .9
Peripherals
Video recorder . . . . . . . . . . . . . . . . . . . . . . . . . . . . . . . . . . . . . . . . . . . . . . . . . . .10
Other equipment . . . . . . . . . . . . . . . . . . . . . . . . . . . . . . . . . . . . . . . . . . . . . . . . .10
Sides connections . . . . . . . . . . . . . . . . . . . . . . . . . . . . . . . . . . . . . . . . . . . . . . . . .10
Amplifier . . . . . . . . . . . . . . . . . . . . . . . . . . . . . . . . . . . . . . . . . . . . . . . . . . . . . . . . .10
EasyLink Function . . . . . . . . . . . . . . . . . . . . . . . . . . . . . . . . . . . . . . . . . . . . . . . . .11
Video recorder or DVD, SAT,AMP, CD keys
. . . . . . . . . . . . . . . . . . . . . . . . . . . .11
Practical information
Tips . . . . . . . . . . . . . . . . . . . . . . . . . . . . . . . . . . . . . . . . . . . . . . . . . . . . . . . . . . . .12
Safety Information: Electric, Magnetic and Electromagnetic Fields . . . . . . . . . . . .12
Glossary . . . . . . . . . . . . . . . . . . . . . . . . . . . . . . . . . . . . . . . . . . . . . . . . . . . . . . . .13
°
Recycling
This packaging of this set can be recovered or recycled.Apply to the local authorities in order
to minimise environmental waste.
Disposal of your old product.
Your product is designed and manufactured with high quality materials and components, which
can be recycled and reused.
When this crossed-out wheeled bin symbol is attached to a product it means the product is
covered by the European Directive 2002/96/EC. Please inform yourself about the local
separate collection system for electrical and electronic products.
Please act according to your local rules and do not dispose of your old products with
your normal household waste.The correct disposal of your old product will help prevent
potential negative consequences for the environment and human health.
Page 6
2
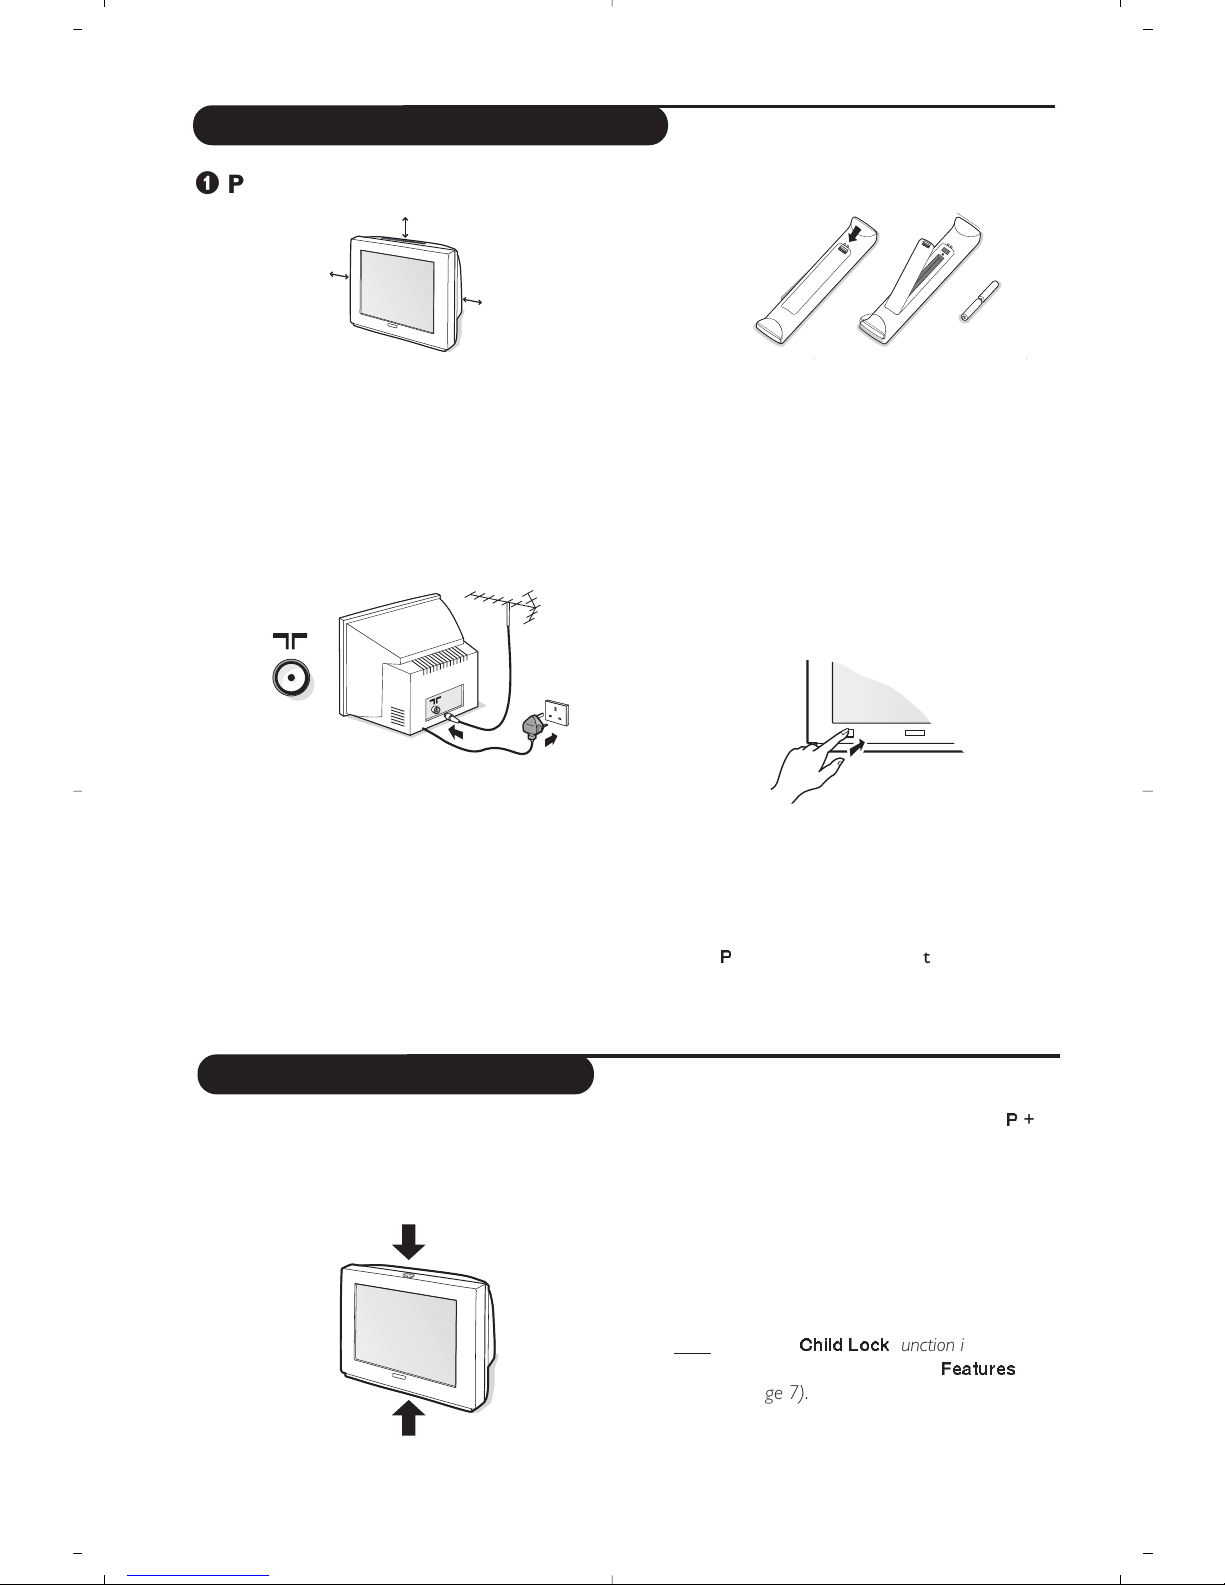
The television set has 4 or 5 keys which are
located on the front or the top of the set
depending on the model.
The VOLUME - + (- ” +) keys are used to
adjust sound levels.The PROGRAM - + (-
P
+)
keys are used to select the required programmes.
To access the menus, simultaneously hold down
the
” - and ” + keys (or MENU key).
The PROGRAM - + keys may then be used to
select an adjustment and the -
” + keys to
make that adjustment.
To exit from the menus, hold down the 2
” -
and
” + keys (or MENU key).
Note : when the
Child Lock
function is activated,
these keys are unavailable (refer to
Features
menu on page 7).
&
Positioning the television set
Place your TV on a solid, stable surface, leaving
a space of at least 5 cm around the appliance.
To avoid accidents, do not put anything on the
set such as a cloth or cover, a container full of
liquid (vase) or a heat source (lamp).
The set must not be exposed to water.
é
Connections
• Insert the aerial plug into the : socket at
the rear of the set.
If you are using an indoor aerial, reception may be
difficult in certain conditions.You can improve
reception by rotating the aerial. If the reception
remains poor, you will need to use an external aerial.
• Insert the mains plug into a wall socket
(220-240 V / 50 Hz).
“
Remote control
Insert the two R6-type batteries (supplied)
making sure that they are the right way round.
Check that the mode selector is set to TV.
The batteries supplied with this appliance do
not contain mercury or nickel cadmium.
If you have access to a recycling facility, please
do not discard your used batteries (if in
doubt, consult your dealer).When the
batteries are replaced, use the same type.
‘
Switching on
To switch on the set, press the on/off key.
A red indicator comes on and the screen
lights up. Go straight to the chapter Quick
installation on page 4.
If the television remains in standby mode,
press
P
# on the remote control.
The indicator will flash when you use the
remote control.
5 cm
5 cm
5 cm
Installing your television set
The keys on the TV set
Page 7

• Plug the TV into a 220V – 240V AC, 50 Hz supply.
• Disconnect mains plug when :
– the red light below the TV screen is flashing continuously.
– a bright white line is displayed across the screen.
– there is a lightning storm.
– the set is left unattended for a prolonged period of time.
• Cleaning the TV screen. Never use abrasive cleaning agents. Use a slight damp chamois leather or soft cloth.
• No naked flame sources, such as lighted candles, should be placed on top of the TV or in the vicinity.
• Do not place your TV set under direct sunlight or heat.
• Do not cover or block the TV as it could lead to overheating.
• Leave at least 5 cm around each side of TV set to allow for proper ventilation.
• Avoid placing your set (e.g. near the window) where it is likely to be exposed to rain or water.
• Battery Usage CAUTION – To prevent battery leakage that may result in bodily injury, property damage, or
damage to the unit:
– Install all batteries correctly, with + and – aligned as marked on the unit.
– Do not mix batteries (old and new or carbon and alkaline, etc.).
– Remove batteries when the unit is not used for a long time.
Useful Tips
• Do not leave your set on standby mode for a prolonged period of time. Switch off set to allow it to be
demagnetised.A demagnetised set supports good picture quality.
• Do not shift or move the set around when it is switched on. Uneveness in colour in some parts of the screen may
occur.
• Never attempt to repair a defective TV yourself.Always consult a skilled service personnel.
3
Remote control keys
Safety Information
& Standby
To set the TV to standby mode.
To switch the TV set on again, press b,P @#or 0
9.
é
Select peripherals (p.10)
Press several times to select the required EXT
connector.
“ List of programmes
To display/clear the list of programmes.
Use the <> cursor
to select a programme and the cursor to display it.
The symbol + is displayed alongside all programmes which
are locked (p.7).
‘
NEXTVIEW:
refer to the separate booklet (only available on certain
models).
( Cursor
These 4 keys are used to move around the menus
(oœpπ)
.
§ Freeze the picture
è Mute
To mute or restore the sound.
! Volume
To adjust the sound level.
ç Screen information
To display / remove the programme number, the name (if
it exists), the time, the sound mode and the time
remaining on the timer. Hold down for 5 seconds to
permanently display the programme number on the
screen.The volume level and the smart control
adjustments are then displayed each time they are used.
à
Active Control (according to the version)
Optimizes the quality of the picture according to the
quality of reception.
Å
Dual screen
(according to the version)
To activate/disable the display on
2 screens. The second screen displays teletext.
# Surround Sound
To activate / deactivate the surround sound effect. In
stereo, this gives the impression that the speakers are
further apart. For models equipped with Virtual Dolby
Surround*, you can experience Dolby Surround Pro
Logic sound effects.
$ Mode selector (p. 11)
To activate the remote control in TV,VCR, DVD, SAT,
AMP or CD mode.
% Teletext keys (p. 8),
PIP (p.9) or VCR / DVD (p.11).
& Teletext (p. 8).
( Audio and video equipment key (p.11)
) Menu
To call up or exit the menus.
~ Programme selection
To access the next or previous TV channel from the list
of Favourite Programmes (see p. 5).
+ Digit keys
Direct access to the programmes. For a 2 digit
programme, enter the 2nd digit before the dash
disappears.
, Sound mode
Used to force programmes in Stereo and Nicam
Stereo to Mono or, for bilingual programmes, to
choose between Dual I or Dual II.
The Mono indication is red when in forced position.
- Sleeptimer
To select the length of time before the set
automatically switches to standby (from 0 to 240
minutes).
. Screen Format (p. 9).
/ Smart picture and sound
Used to access a series of predefined
picture and sound
settings.
The personal position relates to settings selected from the
menus.
* Manufactured under license from Dolby Laboratories.
“Dolby” and the double-D symbols are trademarks of Dolby Laboratories.
Page 8
4
Quick installation
Program sort
Program name
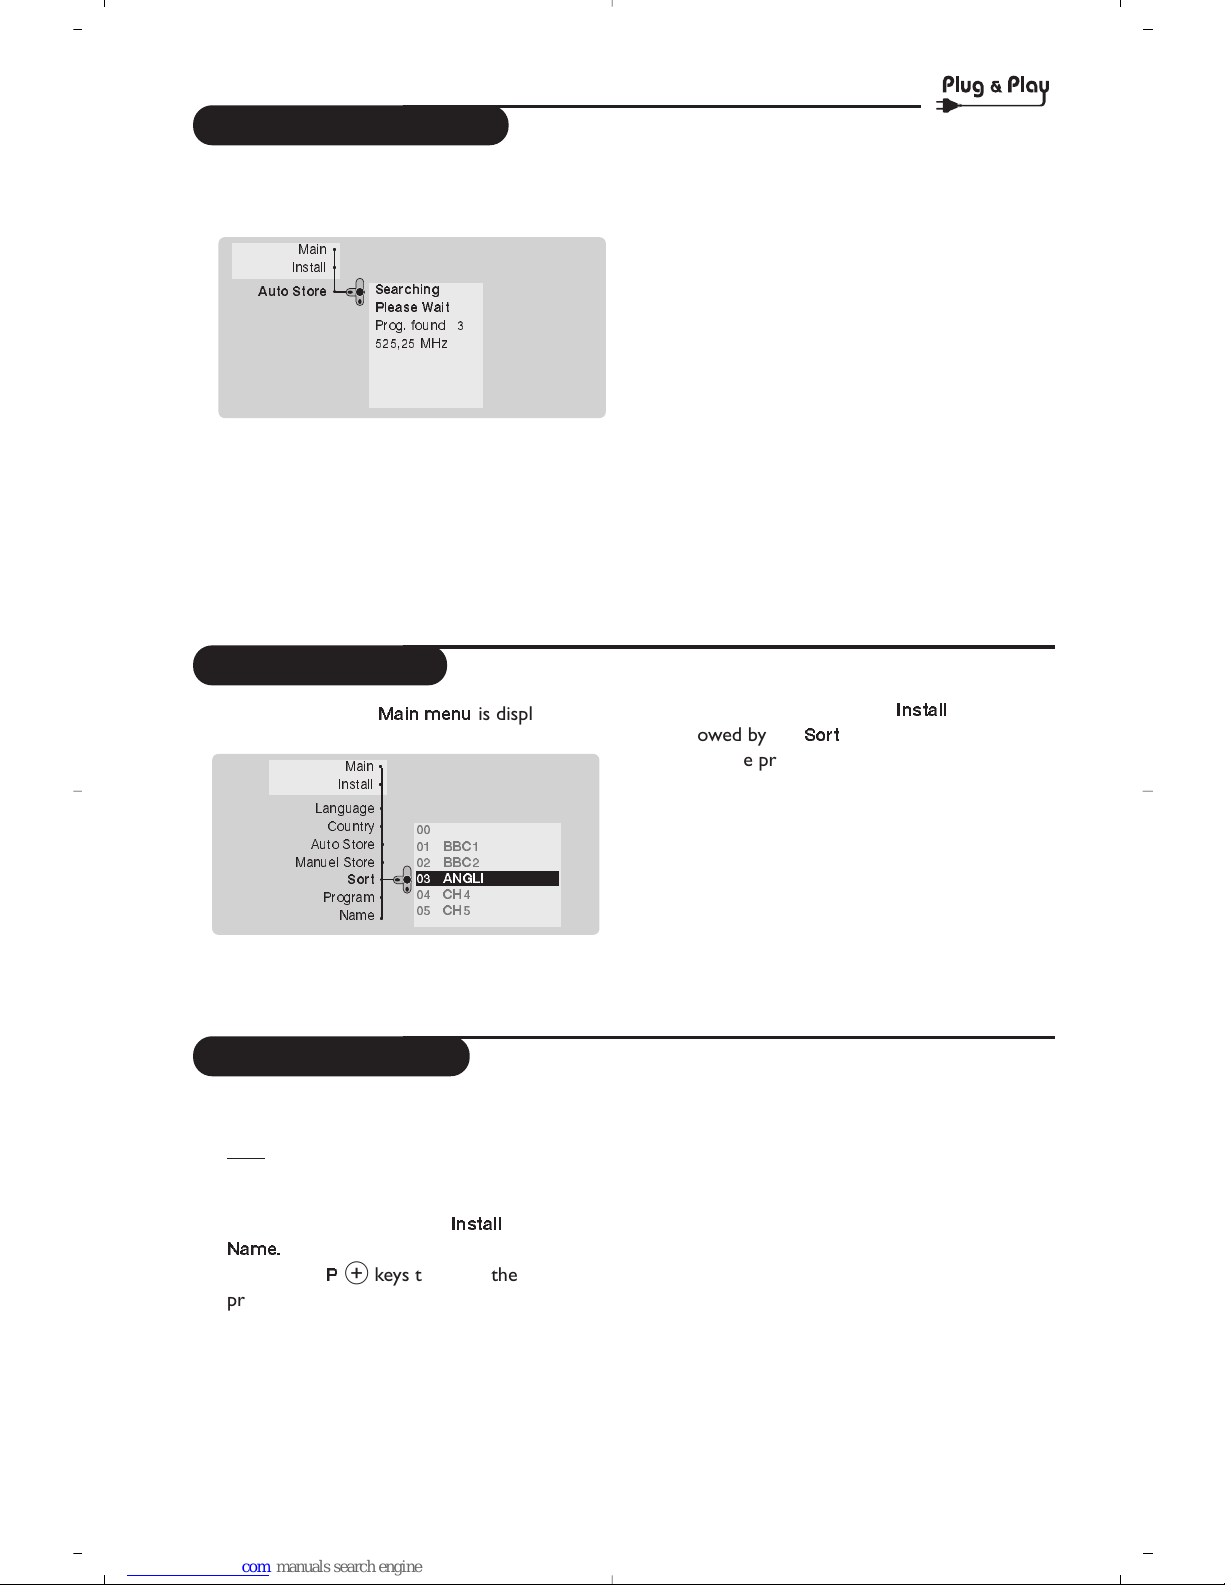
The first time you switch on the television, a
menu appears on the screen and the tuning
starts automatically.
If the menu is not displayed, press and hold down
the
”- and ”+ keys on the TV set for 5
seconds to start the tuning
(or MENU key
depending on versions).
All the available TV programs will be stored.
This operation takes a few minutes.The display
shows the progress of the search and the
number of programs found.
At the end of the search, the menu disappears.
To exit or interrupt the search, press H. If no
program is found, consult the possible solutions p. 12.
& If the transmitter or cable network sends the
automatic sort signal, the programs will be
numbered correctly.In this case, the
installation is complete.
é If this is not the case, you need to use the
Sort menu to number the programs correctly.
Some transmitters or cable networks broadcast
their own sort parameters (region, language, etc.).
In this case, indicate your choice using the
<>
keys and validate with .
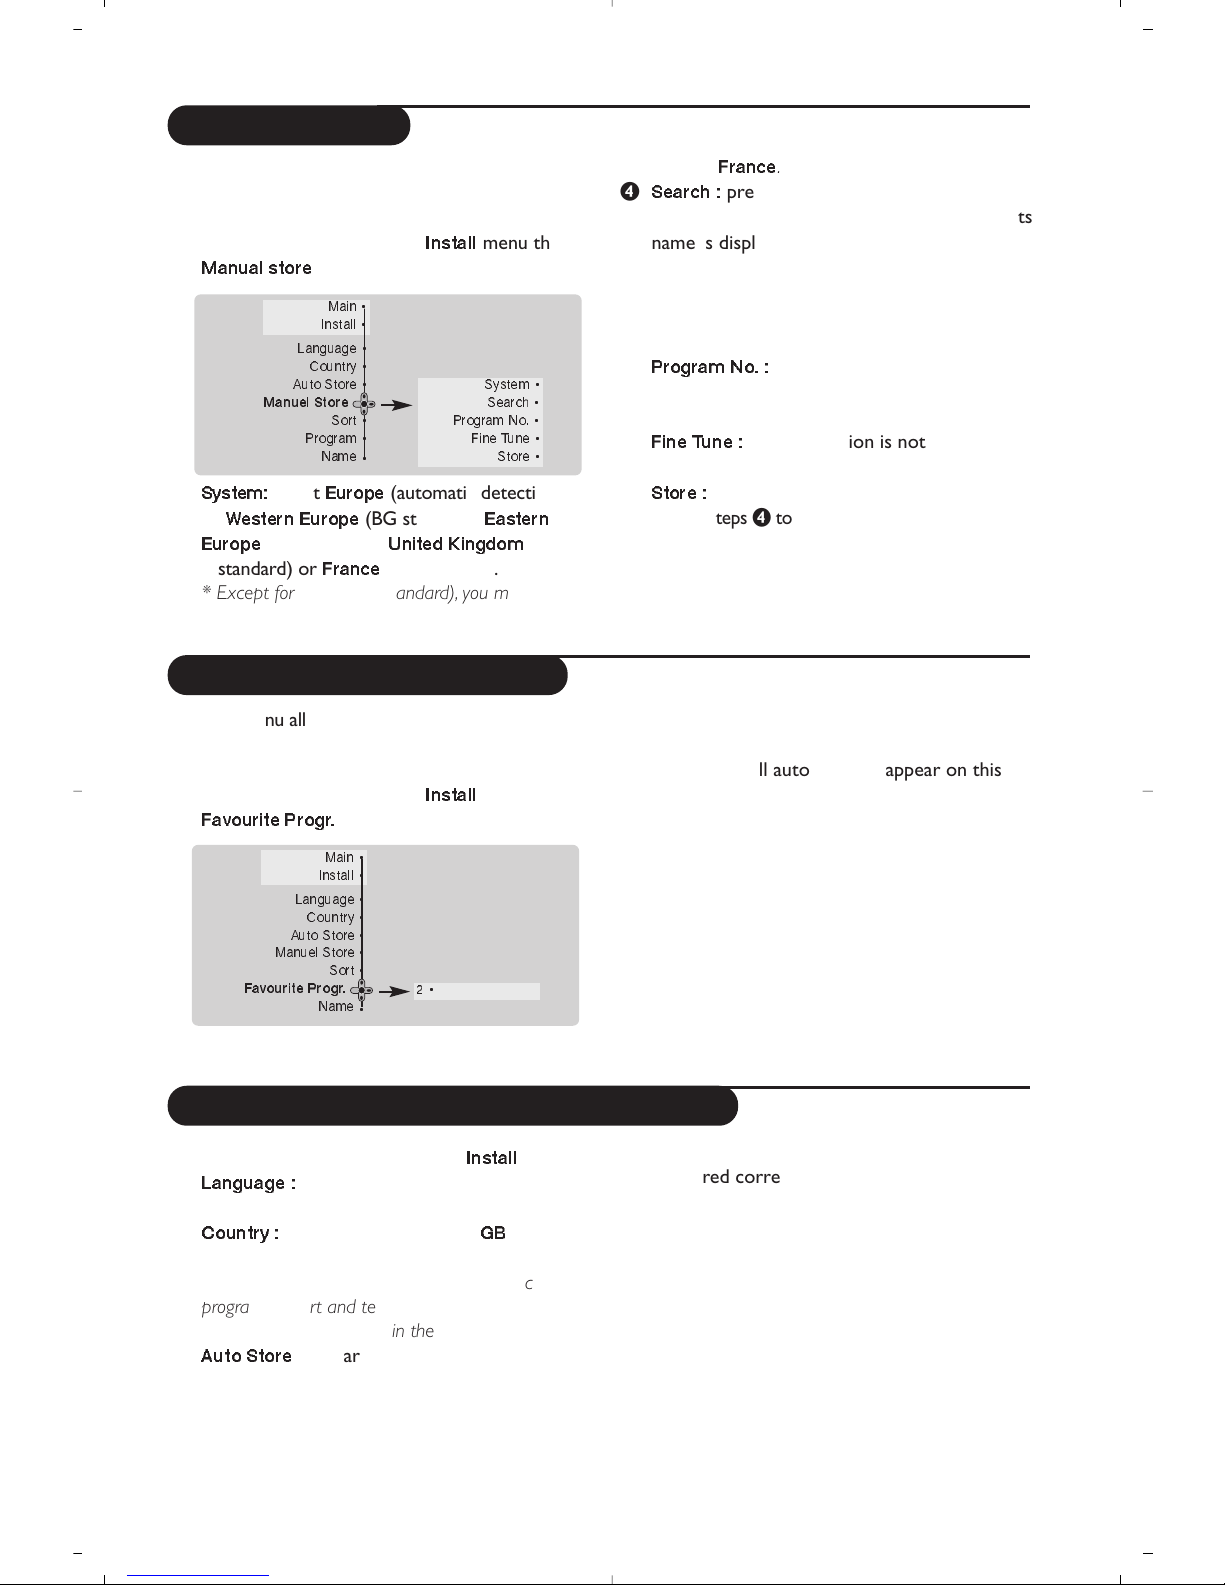
& Press key H.The
Main menu
is displayed on
the screen.
é With the cursor, select the
Install
menu
followed by the
Sort
menu.
“ Select the programme you want to move using
the <> cursor and press .
‘ Then use the <> cursor to select the new
number and validate with .
( Repeat steps “ and ‘ for each program you
wish to renumber.
§ To quit the menus, press
d.
If required, you can give a name to the
programmes and external connectors.
Note
: on installation, the programs are named
automatically when an identification signal is sent.
& Press the
H key.
é With the cursor, select the
Install
menu, then
Name.
“ Use the @
P
# keys to select the
programme to name or rename.
‘ Use the cursor to move around the name
display area (5 characters) and the <> cursor
to select the characters.
( When the name has been entered, use the
H
cursor to exit.The name is stored.
§ Repeat steps “ to ( for each programme
you wish to name.
è To quit the menus, press
d.
Main •
Install •
Auto Store •
Main •
Install •
Language •
Country •
Auto Store •
Manuel Store •
Sort •
Program •
Name
•
Searching
Please Wait
Prog. found 3
525,25 MHz
00
01 BBC1
02 BBC2
03ÆANGLI
04 CH4
05 CH5
Page 9
5
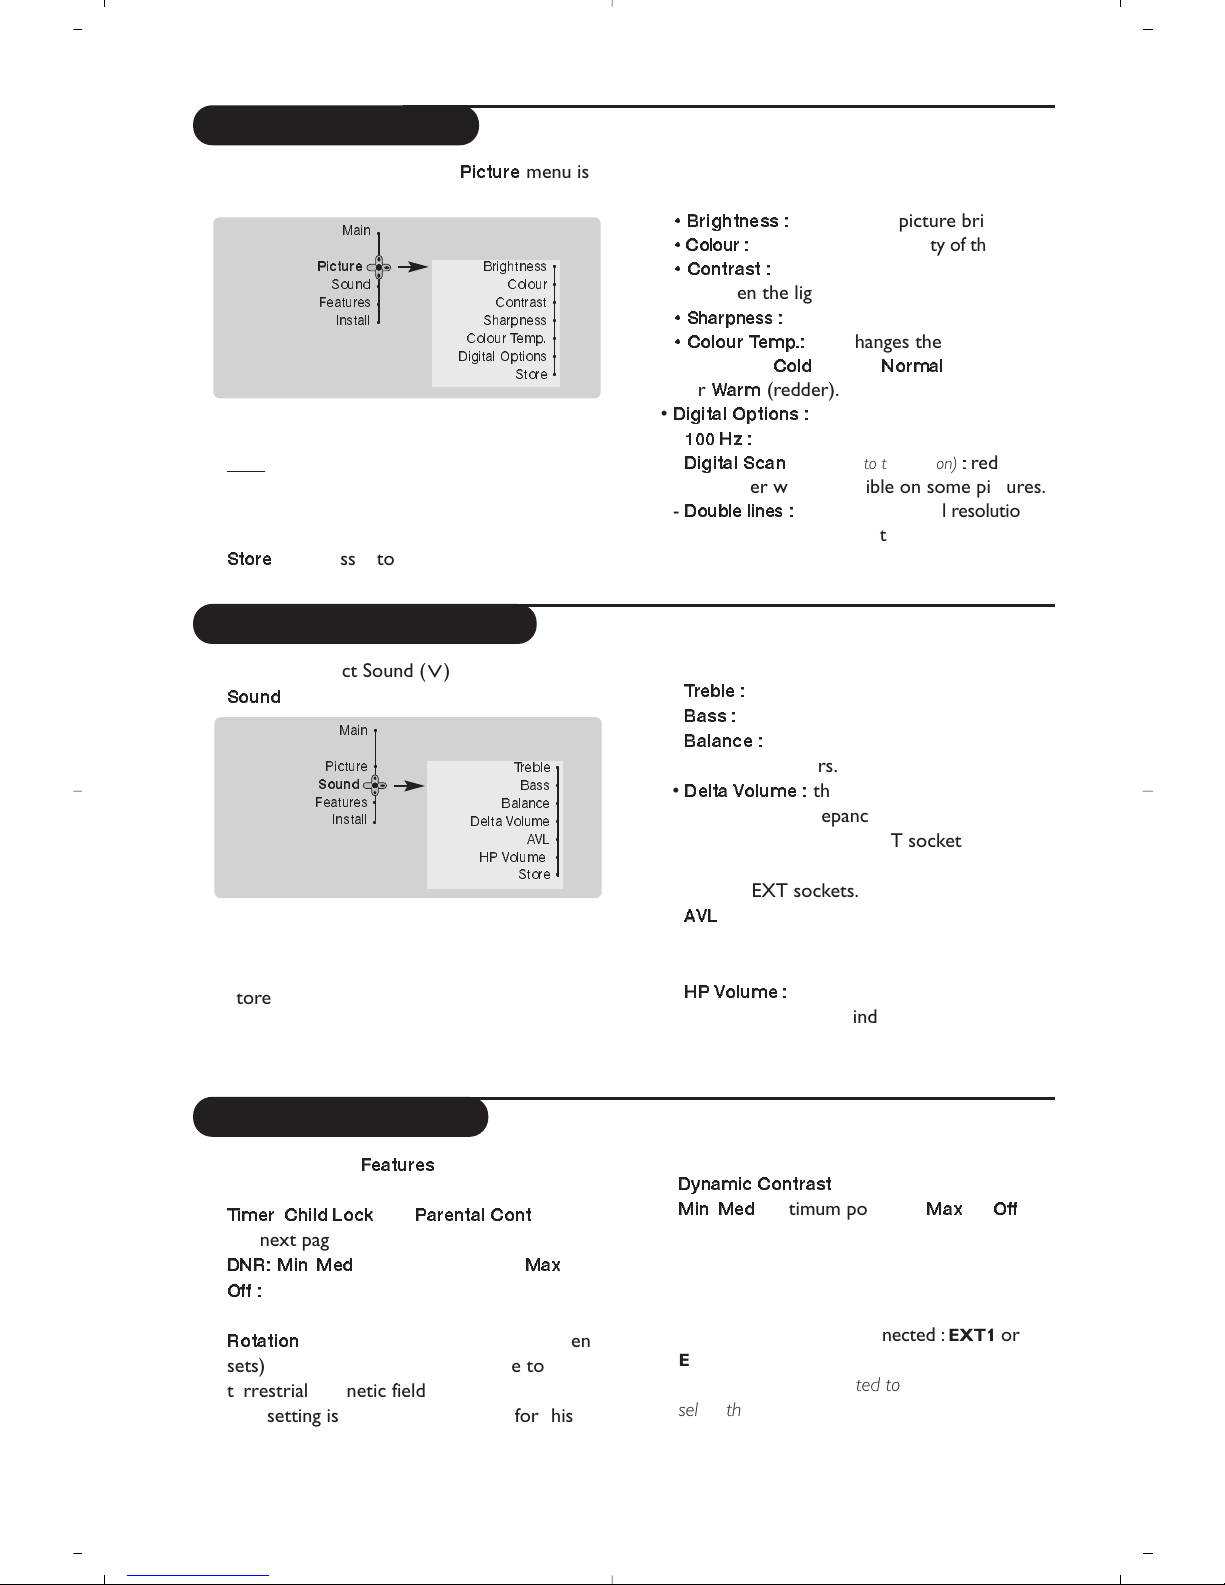
Manual store
Favourite programmes
This menu is used to store the programmes
one at a time.
& Press the
H key.
é With the cursor, select the
Install
menu then
Manual store
:
“
System:
select
Europe
(automatic detection*)
or
Western Europe
(BG standard),
Eastern
Europe
(DK standard),
United Kingdom
(I standard) or
France
(LL’ standard).
* Except for France (LL’ standard), you must select
choice
France
.
‘
Search :
press .The search starts. Once a
programme is found, the scanning stops and its
name is displayed (when available). Go to the
next step. If you know the frequency of the
required programme, this can be entered
directly using the
0 to 9 keys.
If no picture is found, consult the possible solutions (p. 12).
(
Program No. :
enter the required number with
the or
0 to 9 keys.Example : program 1,
enter
01.
§
Fine Tune :
if the reception is not satisfactory,
adjust using the cursor.
è
Store :
press .The program is stored.
! Repeat steps ‘ to è for each programme to
store.
ç To quit the menus, press d.
This menu allows you to select the programmes
to be accessed with the
@ P # key.
& Press the
H key.
é With the cursor, select the
Install
menu then
Favourite Progr.
and press .
The list of favourite programmes is displayed.
The programmes that were stored at
installation will automatically appear on this
list.
“ Use the up/down cursor to select the
required programme.
‘ Use the left/right cursor to add or remove a
programme from the list.
( Run through steps “ and ‘ for each
programme to be added or removed from the
list.
§ To exit, press
d several times.
Other settings in the Install menu
& Press the H key and select the
Install
menu:
é
Language :
to change the display language for
the menus.
“
Country :
to select your country (GBfor
Great Britain).
This setting is used for the search, automatic
programme sort and teletext display. If your
country does not appear in the list, select “. . .”
‘
Auto Store
: to start automatic search for all
programmes available in your region. If the
transmitter or cable network sends the
automatic sort signal, the programmes will be
numbered correctly.If this is not the case, you
need to use the Sort menu to renumber the
programmes (see p. 4).
Some transmitters or cable networks broadcast
their own sort parameters (region, language, etc.).
In this case, indicate your choice using the <>
cursor and validate with . To quit or interrupt the
search, press
H. If no picture is found, consult the
possible solutions (p. 12).
( To quit the menus, press
d.
Main •
Install •
Language •
Country •
Auto Store •
Manuel Store
Sort •
Program •
Name
•
System •
Search •
Program No. •
Fine Tune •
Store •
Main •
Install •
Language •
Country •
Auto Store •
Manuel Store •
Sort •
Favourite Progr.
Name
•
2•
Page 10
6
Picture settings
Sound adjustments
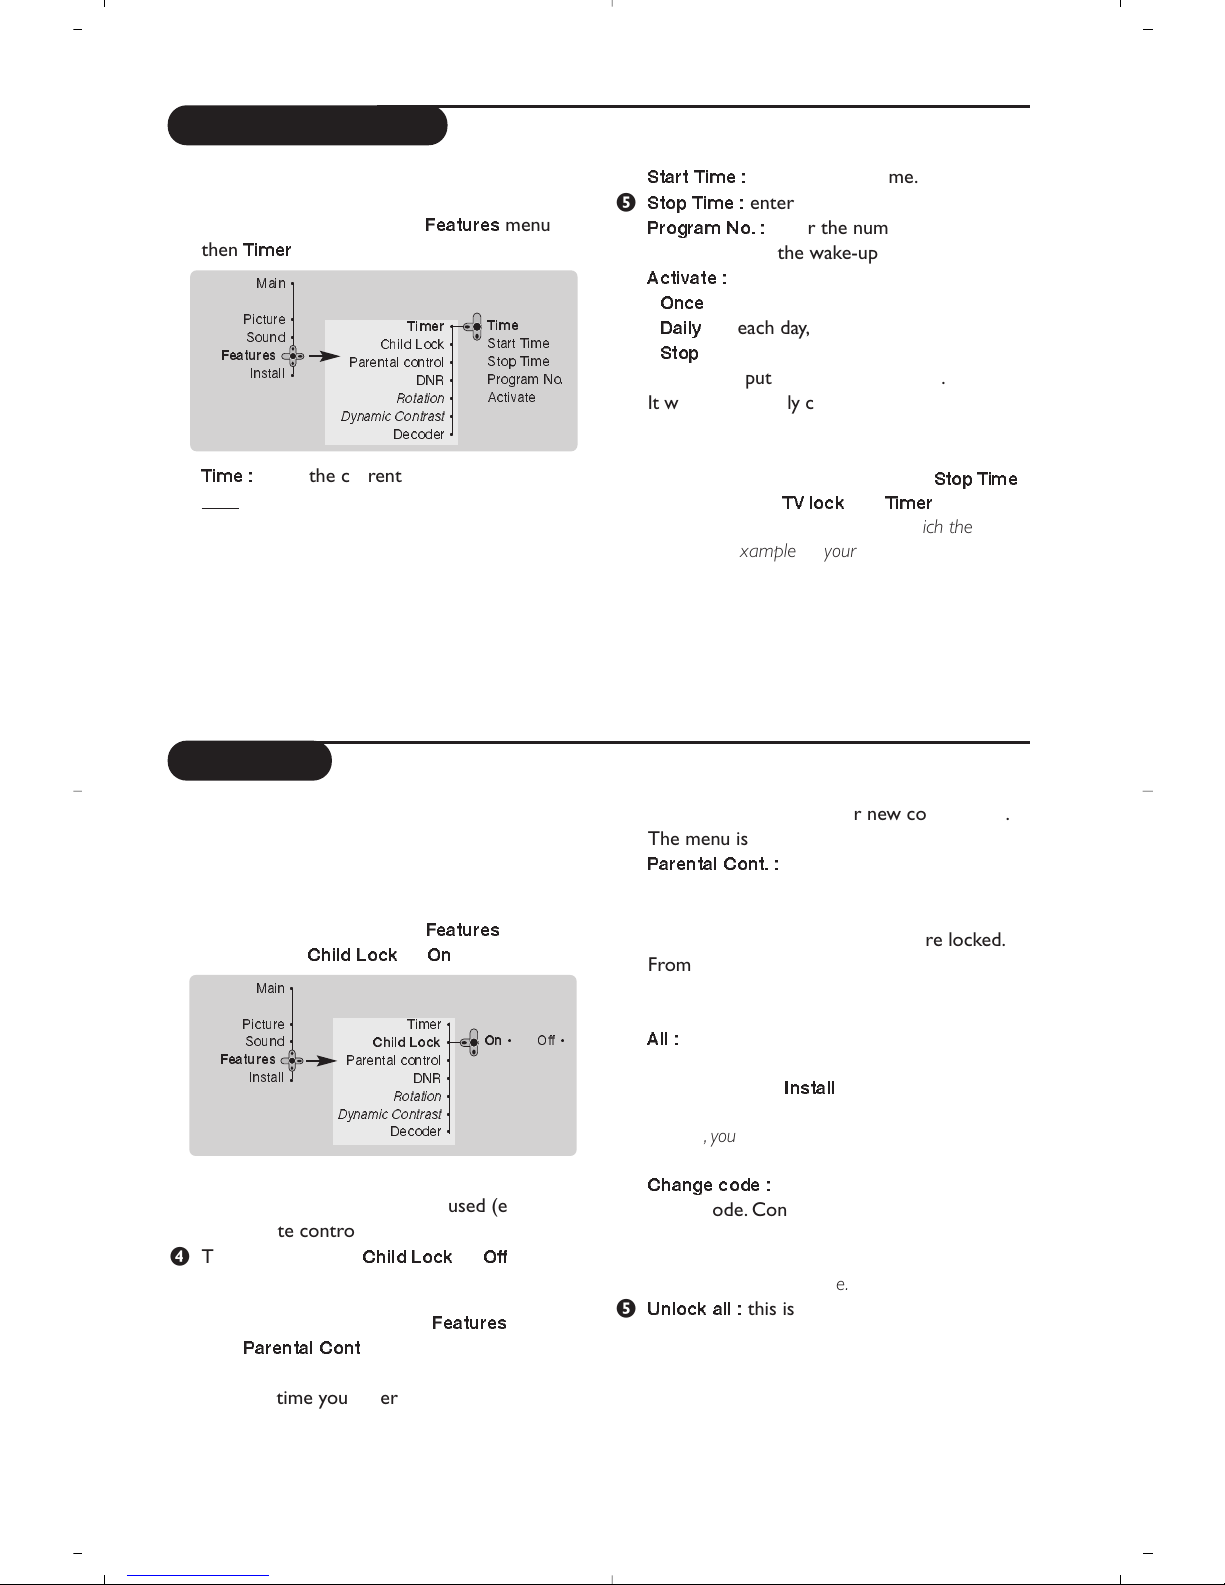
& Press H then cursor.The
Picture
menu is
displayed :
é Use the <> cursor to select a setting and the
cursor to adjust.
Note : during the picture adjustment, only the
selected line remains displayed. Press <> to
display the menu again.
“ Once the adjustments have been made, select
Store
and press to store them.
Press d to exit.
Description of the adjustments :
• Brightness :
this changes picture brilliance.
• Colour :
this changes the intensity of the colour.
• Contrast :
this changes the difference
between the light and dark tones.
•
Sharpness :
this changes the picture definition.
• Colour Temp.:
this changes the colour
rendering:
Cold
(bluer),
Normal
(balanced)
or
Warm
(redder).
•
Digital Options :
-
100 Hz :
100 Hz processing.
-
Digital Scan
(according to the version)
:
reduces
line flicker which is visible on some pictures.
-
Double lines
:
doubling of vertical resolution
which removes visible picture lines.
Advised for NTSC (60Hz) pictures.
& Press H, select Sound (>) and press .The
Sound
menu is displayed :
é Use the <> cursor to select a setting and the
cursor to adjust.
“ Once the adjustments have been made, select
Store and press to store these changes.
‘ To quit the menus, press
d.
Description of the settings :
•
Treble :
this alters the high frequency sounds.
•
Bass :
this alters the low frequency sounds.
•
Balance :
this balances the sound on the left
and right speakers.
•
Delta Volume :
this is used to compensate
any volume discrepancies between the
different programs or EXT sockets.
This setting is available for programs 0 to 40
and the EXT sockets.
•
AVL
(Automatic Volume Leveller) : this is
used to limit increases in sound, especially on
program change or advertising slots.
•
HP Volume :
allows you to adjust the
headphones volume independently from the
loud-speakers on the TV set.
Feature settings
& Press H, select
Features
(>) and press .You
can adjust :
é
Timer,Child Lock
and
Parental Cont
.:
see next page
“
DNR: Min,Med
(optimum position),
Max
or
Off :
attenuates picture noise (snow) in difficult
reception conditions.
‘
Rotation
(only available on very large screen
sets) : large screen sets are sensitive to
terrestrial magnetic field variations.
This setting is used to compensate for this by
adjusting the picture rotation.
(
Dynamic Contrast
(according to the version) :
Min,Med
(optimum position),
Max
or
Off
.
Enhances the contrast of details in lighter,
average and darker areas.
§
Decoder : select the programme(s) that use the
external decoder then select the connector
where the decoder is connected :
EXT1 or
EXT2.
If the decoder is connected to the video recorder,
select the video recorder’s connector (
EXT2).
è To quit the menus, press
d.
Brightness •
Colour •
Contrast •
Sharpness •
Colour Temp. •
Digital Options •
Store •
Main
•
Picture
Sound
•
Features
•
Install
•
Treble •
Bass •
Balance •
Delta Volume •
AVL •
HP Volume •
Store •
Main •
Picture •
Sound
Features •
Install
•
Page 11
7
Timer function
TV lock
This menu lets you use the TV set as an alarm.
& Press the
H key.
é With the cursor, select the
Features
menu
then
Timer
:
“
Time :
enter the current time.
Note : the time is updated automatically each time
the TV set is switched on via the teletext information
on programme 1. If this program does not have
teletext, the update will not take place.
‘
Start Time :
enter the start time.
(
Stop Time :
enter the standby time.
§
Program No. :
enter the number of the
programme for the wake-up alarm.
è
Activate :
the settings include:
•
Once
for a single alarm,
•
Daily
for each day,
•
Stop
to cancel.
! Press b to put the TV set in standby.
It will automatically come on at the time
programmed. If you leave the TV set on, it will
just change programmes at the time entered
(and will go to standby mode at the
Stop Time
).
By combining the
TV lock
and
Timer
functions,
you can restrict the period during which the TV set
is used, for example by your children.
You can block certain programs or inhibit use
of the TV set completely by locking the keys.
Child lock
& Press H.
é With the cursor, select the
Features
menu
and position
Child Lock
to On.
“ Turn off the TV set and hide the remote
control.The TV set cannot be used (except via
the remote control).
‘ To cancel : position
Child Lock
to
Off
.
Parental control
& Press the H key, select the
Features
menu
then
Parental Cont
.:
é You must enter your secret access code.
The first time you enter this, enter code 0711
twice and then enter your new code choice.
The menu is displayed.
“
Parental Cont. :
Use the <> cursor to select
the TV programme required and validate with
.The
+ symbol will be displayed opposite
the programmes or sockets that are locked.
From now on, to view a locked programme,
you must enter your secret code, otherwise
the screen will stay blank.
All :
this is used to lock all the TV programmes and
EXT connectors.
The access to the
Install
menu is also locked.
Caution, for encrypted programs using an external
decoder, you must lock the corresponding EXT
socket.
‘
Change code :
this allows you to enter a new
4 digit code. Confirm your new code by
entering it a second time.
If you have forgotten your secret code, enter the
universal code 0711 twice.
(
Unlock all :
this is used to unlock all locked
programmes.
§ Press the
d key to quit.
Timer •
Child Lock •
Parental control •
DNR •
Rotation
•
Dynamic Contrast
•
Decoder •
Time
Start Time
Stop Time
Program No.
Activate
Main •
Picture •
Sound •
Features
Install
•
Timer
•
Child Lock
•
Parental control •
DNR •
Rotation
•
Dynamic Contrast
•
Decoder •
Main •
Picture •
Sound •
Features
Install
•
On •
Off
•
Page 12
8
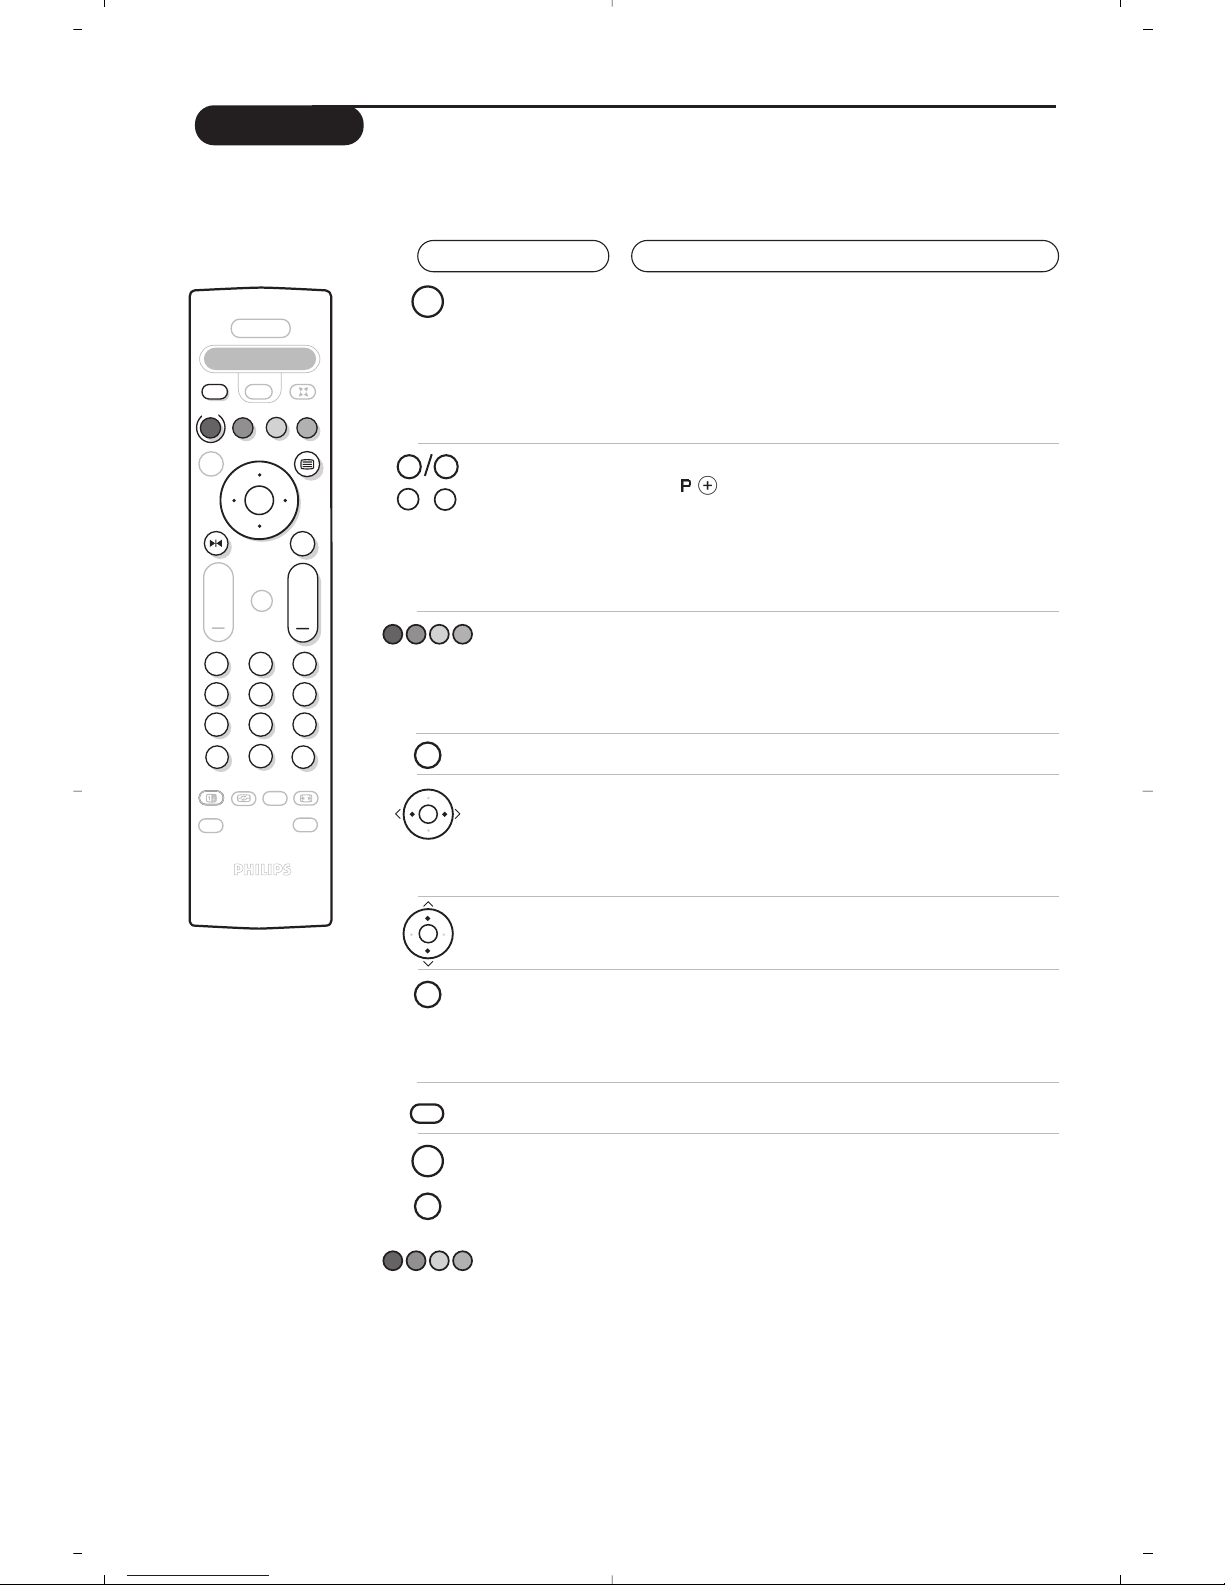
Teletext
Press :
You will obtain :
Teletext is an information system broadcast by certain channels which can be consulted like a
newspaper. It also offers access to subtitles for viewers with hearing problems or who are not familiar
with the transmission language (cable networks, satellite channels, etc.).
¤
0 9
Ë
P
-
+
ù
SMART
ACTIVE
SMART
CONTROL
213
546
879
0
Ë
[
Œ
ù
.
POWER
OK
OK
OK
VCR DVD SAT AMP CD
-
ª
`
”
+
+
P
MENU
Y
Select
Æ
Ê
¢
¢
·
Ÿ
¤
Y
Ÿ
Ë
MENU
Teletext call
Selecting a
page
This is used to call teletext, change to transparent mode
and then exit.The summary appears with a list of items
that can be accessed. Each item has a corresponding
3 digit page number.
If the channel selected does not broadcast teletext, the
indication 100 will be displayed and the screen will remain
blank (in this case, exit teletext and select another channel).
Enter the number of the page required using the
0 to 9
or @
P
# keys. Example: page 120,enter 120.The
number is displayed top left,the counter turns and then
the page is displayed.Repeat this operation to view
another page.
If the counter continues to search, this means that the page is
not transmitted. Select another number.
Direct access
to the items
Coloured areas are displayed at the bottom of the screen.
The 4 coloured keys are used to access the items or
corresponding pages.
The coloured areas flash when the item or the page is not yet
available.
Contents
This returns you to the contents page (usually page 100).
Direct
selection of
sub-pages
Enlarge
a page
Double page
teletext
(only available
on certain
versions)
Certain pages contain sub-pages (for example, page 120
contains sub-pages
1/3, 2/3 and 3/3).
Use the cursor to directly access the sub-pages of
your choice.
This allows you to display the top or bottom part of the
page and then return to normal size.
To activate or deactivate the double page teletext display
mode.The active pa
ge is di
splayed on the left and the
following page is displayed on the right. Press if you want to
hold a page (i.e. the contents page).The active page is then
displayed on the right.To return to normal mode, press e.
Hidden
information
Favourite
pages
To display or hide the concealed information (games
solutions).
Instead of the standard coloured areas displayed at the bottom
of the screen, you can store 4 favourite pages on the first 40
channels which can then be accessed using the coloured keys
(red, green, yellow, blue). Once set,these favourite pages will
become the default every time tetetext is selected.
& Press the H key to change to favourite pages mode.
é Display the teletext page that you want to store.
“ Press the coloured key of your choice for 3 seconds.
The page is now stored.
‘ Repeat the operation with the other coloured keys.
( Now when you consult teletext, your favourite pages
will appear in colour at the bottom of the screen.
To temporaly retrieve the standard items, press H.
To clear everything, and return the standard items as the
default, press d for 5 seconds.
Page 13
9
Screen Formats
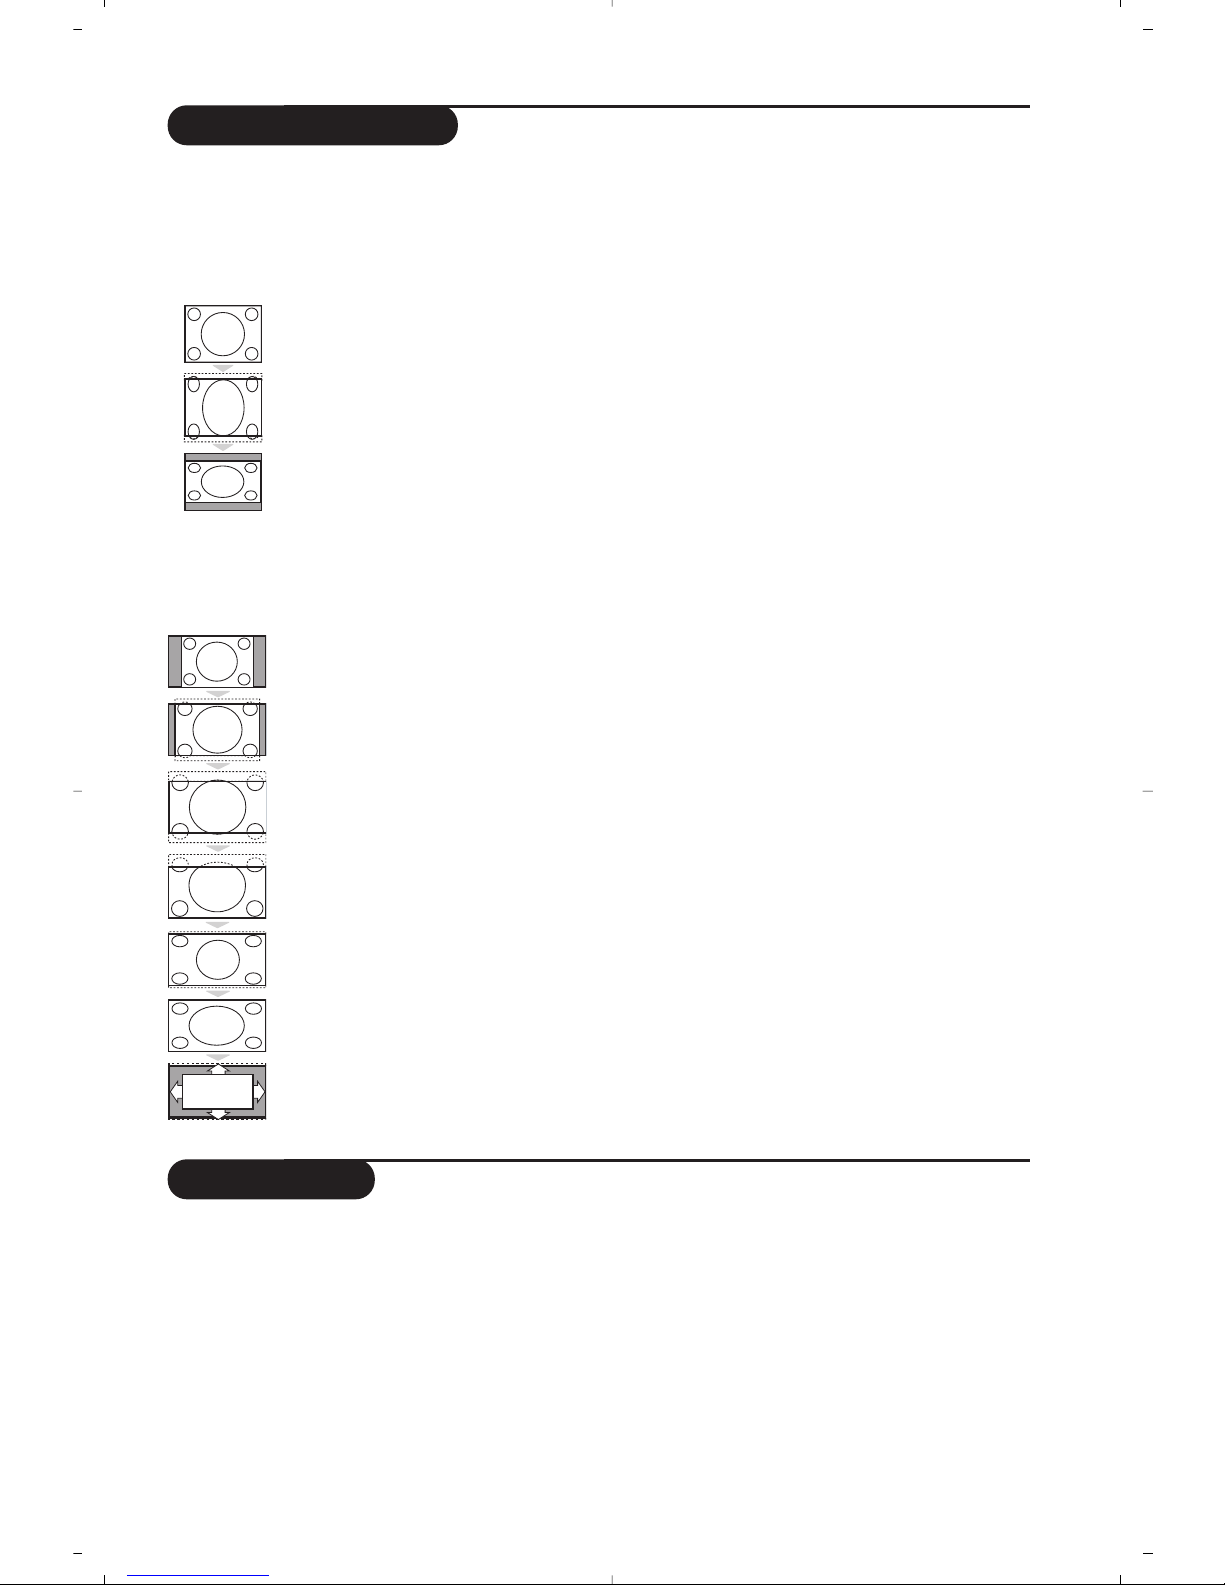
The pictures you receive may be transmitted in 16:9 format (wide screen) or 4:3 format
(conventional screen). 4:3 pictures sometimes have a black band at the top and bottom of the screen
(letterbox format).This function allows you to optimise the picture display on screen.
If your television is equipped with a 4:3 screen.
Press the p key (or <> cursor) to select the different modes:
If your television is equipped with a 16:9 screen.
Press the p key (or cursor) to select the different modes:
This TV set is also equipped with automatic switching which will select the correct-screen format, provided the
specific signals are transmitted with the programmes.
4:3 The picture is reproduced in 4:3 format and a black band is displayed on either
side of the picture.The picture may be progressively enlarged using the <>
cursor.
The picture is enlarged to 14:9 format, a thin black band remains on both sides of the
picture.The <> cursor allow you to compress and move the image vertically to view
the top or bottom of the picture (subtitles).
The picture is enlarged to 16:9 format.This mode is recommended when displaying pictures
which have black bands at the top and bottom (letterbox format). Use the <> cursor if you
wish to compress and move the image vertically to view the top or bottom of the picture.
This mode is used to display 4:3 pictures using the full surface of the screen leaving
the sub-titles visible. Use the <> cursor to increase or decrease the compression
at the bottom of the screen.
This mode is used to display 4:3 pictures using the full surface of the screen by
enlarging the sides of the picture.The
<> cursor allow you to scroll the image up
or down the screen.
This mode restores the correct proportions of pictures transmitted in 16:9 using
full screen display.
(only available on certain versions). The format of the picture is automatically adjusted
to fill as much of the screen as possible.
Zoom 14:9
Zoom 16:9
Subtitle Zoom
Super Wide
Widescreen
Auto Format
The picture is enlarged vertically.This mode is used to cancell the black bands
when watching a programme in letterbox format.
The picture is reproduced in 4:3 format.
The picture is compressed vertically into 16:9 format.
4:3
Expand 4:3
Compress 16:9
Using PIP
This feature enables you to display a small
superimposed window.You can display in this
window the picture from an appliance connected
to the TV (e.g. video recorder,DVD, ...).
& Press the key to display the PIP screen.
A small superimposed window appears in the
main screen.
é Use the key to select a picture from the
appliance connected to the TV.
“ Press the key again to change the size of the
window then make it disappear.
‘ Use the key if you want to hide the window.
You can also shift it progressively by using the
cursor (only on position 5).
( Use the key if you want to swap the
2 pictures.
(only available on certain versions)
Page 14
10
S•VIDEO
VIDEO
AUDIO
*
Connecting peripheral equipment
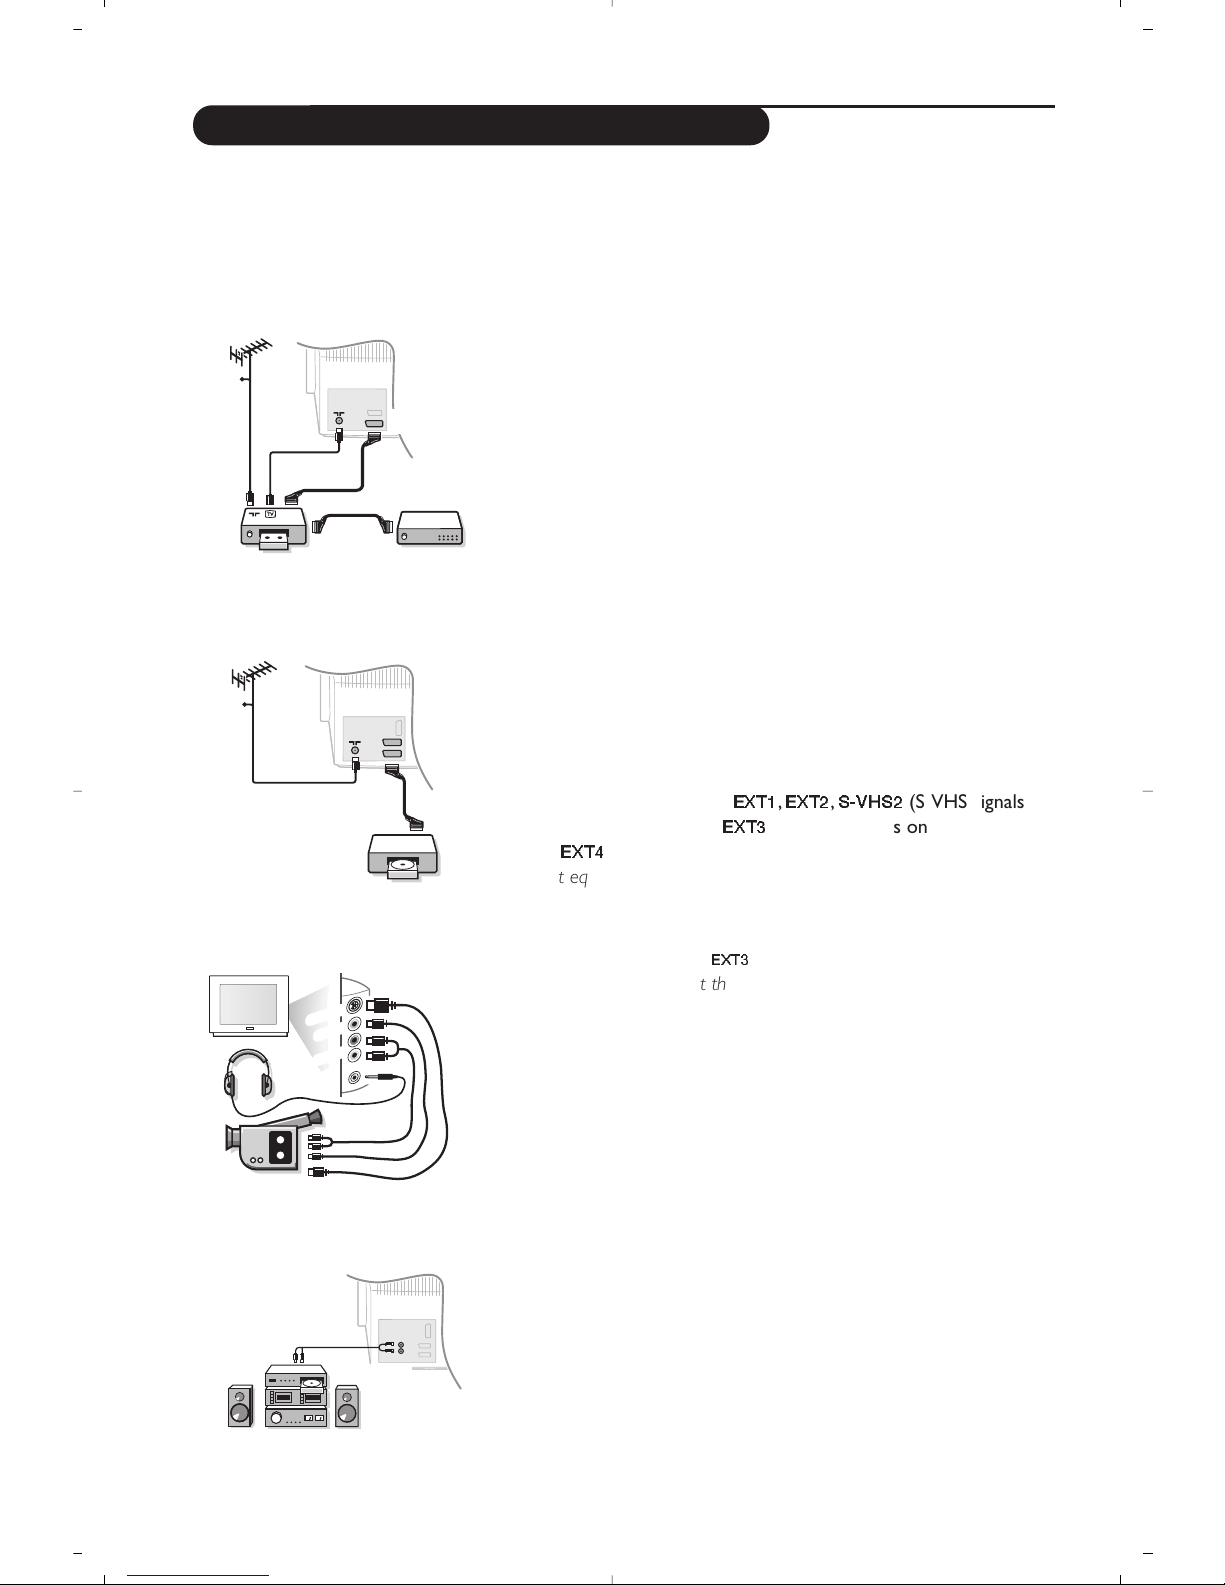
Carry out the connections shown opposite, using a good quality
euroconnector cable.
If your video recorder does not have a euroconnector socket, the only
connection possible is via the aerial cable.You will therefore need to
tune in your video recorder's test signal and assign it programme
number 0 (refer to manual store, p. 5).
To reproduce the video recorder picture, press
0.
Video recorder with decoder
Connect the decoder to the second euroconnector socket of
the video recorder.You will then be able to record scrambled
transmissions. See also the
Decoder menu (page 6).
Depending on the versions, the TV set is equipped with 2 or 3 SCART connectors EXT1, EXT2 and
EXT4 located on the rear.
The EXT1 connector has audio video inputs/outputs and RGB inputs.
The EXT2 connector has audio video inputs/outputs and S-VHS inputs.
The EXT4 connector (if available) has audio video inputs/outputs and RGB inputs.
Video recorder
Satellite receiver, decoder, DVD, games, etc.
Carry out the connections shown opposite.
To optimise picture quality, connect the equipment which
produces the RGB signals (digital decoder, games,etc.) to EXT1 or
EXT4, and the equipment which produces the S-VHS signals (SVHS and Hi-8 video recorders, certain DVD drives) to EXT2.
To select connected equipment
Press the key to select
EXT1,EXT2,S-VHS2
(S-VHS signals
from the EXT2 socket),
EXT3
for connections on the front panel
and
EXT4
(if available).
Most equipment (decoder, video recorder) carries out the switching itself.
Make the connections as shown opposite.
With the key, select
EXT3
.
For a mono set, connect the sound signal to the AUDIO L (or AUDIO
R) input.The sound automatically comes out of the left and right
speakers of the set. Do not connect VIDEO and S-VIDEO cable at the
same time.This may cause picture distortion.
Headphones
Press the
m key to mute the sound on the TV set (see also
sound settings, page 6).
The headphone impedance must be between 32 and 600 Ohms.
Other equipment
Side connections
Amplifier
(only available on certain versions)
VCR
CABLE
EXT 2
CABLE
AUDIO
To connect to a hi-fi system, use an audio connection cable and
connect the “L” and “R” outputs on the TV set to the “AUDIO
IN” “L” and “R” input on your hi-fi amplifier.
Page 15
11
If your video recorder has an EasyLink function, during installation, the
language, country and available channels are automatically transmitted to
the video recorder. Equally, when the video recorder is in standby,
pressing the
· key on the remote control will start the recording of the
same programme displayed on the TV set.
The video recorder must be connected to the EXT2 connector (see p. 10).
Video recorder or DVD, SAT,AMP, CD keys
EasyLink Function
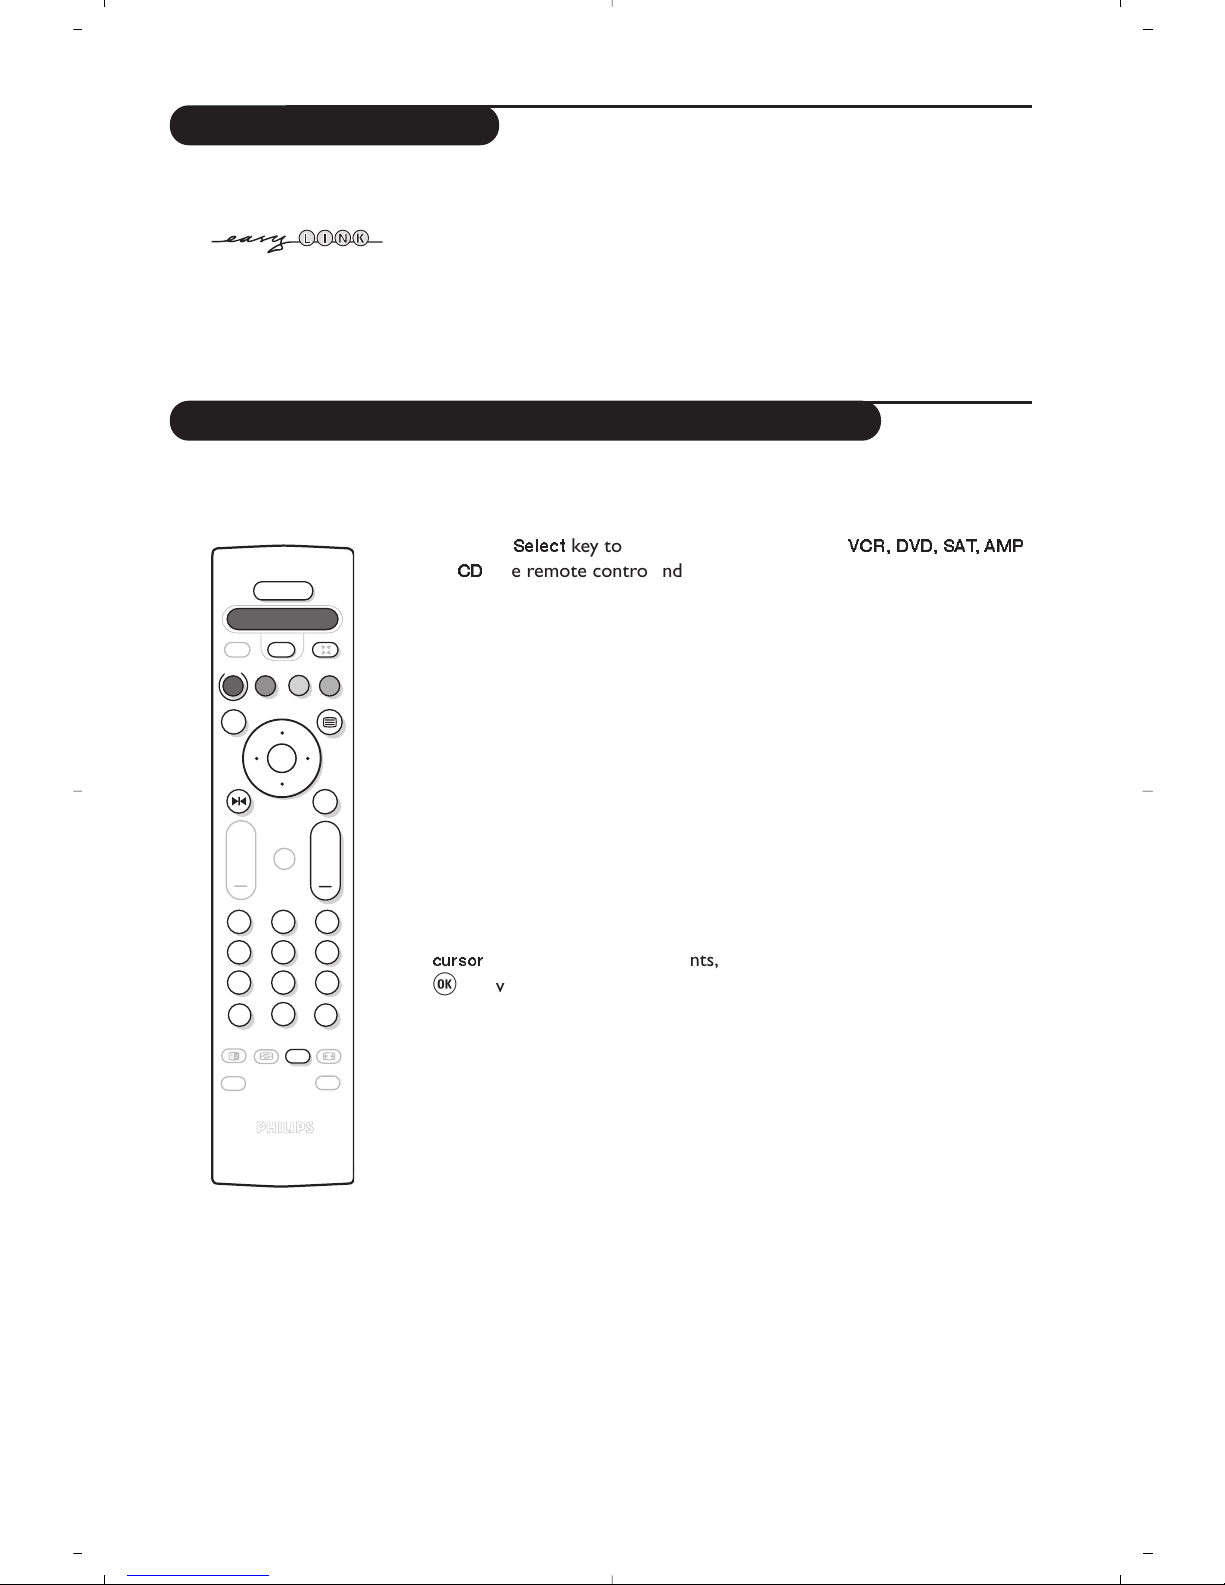
The remote control lets you control the main functions of the VCR or DVD.
Press the
Select
key to select the required mode :
VCR, DVD, SAT , AMP
or CD.The remote control indicator lights up to display the selected
mode. It switches off automatically after 60 seconds if left idle.
The remote control automatically returns to TV mode.
The following keys are operational, depending on the equipment :
. standby,
¢ fast rewind,
∫ fast forward,
· recording,
Ê stop,
Æ play,
pause,
c DVD : subtitling language
o DVD : subtitle selection
VCR : tape list function,
H menu,
cursor
navigation and adjustments,
u validation,
09 digit keys,
@ P # programme selection,
e audio selection.
d OSD menu,
% VCR timer.
The remote control is compatible with all video recorders using the RC5
standard and all DVDs using the RC6 standard.
SMART
ACTIVE
SMART
CONTROL
213
54
6
879
0
Ë
[
Œ
ù
.
POWER
OK
VCR DVD SAT AMP CD
-
ª
`
”
+
+
P
MENU
Y
Select
Æ
Ê
¢
¢
Ÿ
¤
·
(only available on certain versions)
Page 16
12
Tips
Poor reception
The proximity of mountains or high buildings
may be responsible for ghost pictures,
echoing or shadows. In this case, try manually
adjusting your picture: see
Fine Tuning
(p.5)
or modify the orientation of the outside
aerial.
Does your antenna enable you to receive
broadcasts in this frequency range (UHF or
VHF band)?
In the event of difficult reception (snowy
picture) switch the
Dynamic NR
on the
Features
menu to ON. (p. 6).
No picture
If the television does not switch on, please
press the standby key
b (located on the
remote control) twice.
Have you connected the aerial socket properly?
Have you chosen the right system? (p. 5).
Poorly connected euroconnector cables or
aerial sockets are often the cause of picture or
sound problems (sometimes the connectors
can become half disconnected if the TV set is
moved or turned). Check all connections.
Peripheral equipment gives a black and
white picture
To play a video cassette, check that it has
been recorded under the same standard
(PAL, SECAM, NTSC) which can be replayed
by the video recorder.
The remote control no longer works
Check that the mode selector on the side of
the remote control is set to TV.
No sound
If on certain channels you receive a picture
but no sound, this means that you do not
have the correct TV system. Modify the
System
setting (p. 5).
Teletext
Are certain characters not displayed
correctly? Check that the
Country
setting has
been positioned correctly (p.5).
Remote control
The TV set does not react to the remote
control; the indicator on the set no longer
flashes when you use the remote control?
Replace the batteries.
Standby
When you switch the TV set on it remains in
standby mode and the indication
Locked
is
displayed when you use the keys on the TV
set?
The
Child Lock
function is switched On(p. 7).
If the set receives no signal for 15 mins, it
automatically goes into standby mode.
In standby mode, your TV consumes less than
5W depending on model. In order to be more
environmentally friendly, please use the on/off
(power) switch to turn the set off completely.
Still no results ?
If your TV set breaks down, never attempt to
repair it yourself: contact your dealer's aftersales service.
Cleaning the set
Only use a clean, soft and lint-free cloth to
clean the screen and the casing of your set.
Do not use alcohol-based or solvent-based
products.
Safety Information: Electric, Magnetic and Electromagnetic Fields (“EMF”)
1. Philips Royal Electronics manufactures and sells many products targeted at consumers, which, like
any electronic apparatus, in general have the ability to emit and receive electro magnetic signals.
2. One of Philips’ leading Business Principles is to take all necessary health and safety measures for
our products, to comply with all applicable legal requirements and to stay well within the EMF
standards applicable at the time of producing the products.
3. Philips is committed to develop, produce and market products that cause no adverse health effects.
4. Philips confirms that if its products are handled properly for their intended use, they are safe to use
according to scientific evidence available today.
5. Philips plays an active role in the development of international EMF and safety standards, enabling
Philips to anticipate further developments in standardization for early integration in its products.
Page 17

Glossary
RGB Signals :
These are 3 Red, Green and Blue video signals which directly drive the red, green and
blue emitters in the cathode ray tube. Using these signals provides better picture quality.
NICAM sound :
Process by which digital sound can be transmitted.
System :
Television pictures are not broadcast in the same way in all countries.There are different
standards: BG, DK, I,and L L’.The SYSTEM setting (p. 6) is used to select these different standards.
This is not to be confused with PAL or SECAM colour coding. Pal is used in most countries in
Europe, Secam in France, Russia and most African countries.The United States and Japan use a
different system called NTSC.
100Hz : Conventional televisions (50 Hz) produce a visible image flicker.Thanks to 100 Hz technology,
the scanning frequency is doubled. It is visually more comfortable and the flickering effect is
reduced.
16:9 :
Refers to the ration between the length and height of the screen.
Wide screen televisions have a ration of 16/9, conventional screen TV sets have a ration of 4/3.
13
Page 18

CANAL ................FREQ (MHz)
E2 ........................48.25
E3 ........................55.25
E4 ........................62.25
E5 ......................175.25
E6 ......................182.25
E7 ......................189.25
E8 ......................196.25
E9 ......................203.25
E10 ....................210.25
E11 ....................217.25
E12 ....................224.25
R1 ........................49.75
R2 ........................59.25
R3 ........................77.25
R4 ........................85.25
R5 ........................93.25
R6 ......................175.25
R7 ......................183.25
R8 ......................191.25
R9 ......................199.25
R10 ....................207.25
R11 ....................215.25
R12 ....................223.25
S1 ......................105.25
S2 ......................112.25
S3 ......................119.25
S4 ......................126.25
S5 ......................133.25
S6 ......................140.25
S7 ......................147.25
S8 ......................154.25
S9 ......................161.25
S10 ....................168.25
S11 ....................231.25
S12 ....................238.25
S13 ....................245.25
S14 ....................252.25
CANAL ................FREQ (MHz)
S15 ....................259.25
S16 ....................266.25
S17 ....................273.25
S18 ....................280.25
S19 ....................287.25
S20 ....................294.25
H1 ......................303.25
H2 ......................311.25
H3 ......................319.25
H4 ......................327.25
H5 ......................335.25
H6 ......................343.25
H7 ......................351.25
H8 ......................359.25
H9 ......................367.25
H10 ....................375.25
H11 ....................383.25
H12 ....................391.25
H13 ....................399.25
H14 ....................407.25
H15 ....................415.25
H16 ....................423.25
H17 ....................431.25
H18 ....................439.25
H19 ....................447.25
21.......................471.25
22.......................479.25
23.......................487.25
24.......................495.25
25.......................503.25
26.......................511.25
27.......................519.25
28.......................527.25
29.......................535.25
30.......................543.25
31.......................551.25
32.......................559.25
CANAL ................FREQ (MHz)
33.......................567.25
34.......................575.25
35.......................583.25
36.......................591.25
37.......................599.25
38.......................607.25
39.......................615.25
40.......................623.25
41.......................631.25
42.......................639.25
43.......................647.25
44.......................655.25
45.......................663.25
46.......................671.25
47.......................679.25
48.......................687.25
49.......................695.25
50.......................703.25
51.......................711.25
52.......................719.25
53.......................727.25
54.......................735.25
55.......................743.25
56.......................751.25
57.......................759.25
58.......................767.25
59.......................775.25
60.......................783.25
61.......................791.25
62.......................799.25
63.......................807.25
64.......................815.25
65.......................823.25
66.......................831.25
67.......................839.25
68.......................839.25
69 .......................855.2
5
ITALY
CANALE ..............FREQ (MHz)
A ..........................53.75
B ..........................62.25
C ..........................82.25
D ........................175.25
E ........................183.75
F.........................192.25
G ........................201.25
H ........................210.25
H1 ......................217.25
FRANCE
CANAL ................FREQ (MHz)
2...........................55.75
3...........................60.50
4...........................63.75
5...........................176.0
6...........................184.0
7...........................192.0
8...........................200.0
9...........................208.0
10.........................216.0
B ........................116.75
C ........................128.75
D ........................140.75
E ........................159.75
F.........................164.75
G ........................176.75
H ........................188.75
I..........................200.75
J .........................212.75
K ........................224.75
L.........................236.75
M........................248.75
N ........................260.75
O ........................272.75
P ........................284.75
Q ........................296.75
Table of TV frequencies.
Frequenztabelle der Fernsehsender.
Liste des fréquences TV.
Frequentietabel TV-Zenders.
Tabella delle frequenze TV.
Lista de frecuencias TV.
Lista das frequências TV
Liste over TV senderne.
Tabell over TV-frekvenser.
Tabell över TV-frekvenser.
TV-taajuustaulukko.
K·Ù¿ÏÔÁÔ˜ Û˘¯ÓÔÙ‹ÙˆÓ ÔÌÒÓ.
CФЛТУН ˜‡ТЪУЪ ФВВ‰‡Ъ˜ЛНУ‚.
A televizió-adóállomások
frekvenciáinak a listája.
Lista częstotliwości stacji nadawczych.
Seznam frekvenčních pásem vysílačů.
Zoznam frekvenčných pásiem vysielačov.
EUROPE
Positioning the TV
For the best results, choose a position where light
does not fall directly on the screen, and at some
distance away from radiators or other sources of
heat. Leave a space of at least 5 cm all around the
TV for ventilation, making sure that curtains,
cupboards etc. cannot obstruct the air flow through
the ventilation apertures.The TV is intended for use
in a domestic environment only and should never be
operated or stored in excessively hot or humid
atmospheres.
General Points
Please take note of the section entitled 'Tips' at the
end of this booklet.
Interference
The Department of Trade and Industry operates a
Radio Interference Investigation Service to help TV
licence holders improve reception of BBC and IBA
programmes where they are being spoilt by
interference.
If your dealer cannot help, ask at a main Post Office
for the booklet "How to Improve Television and
Radio Reception".
Mains connection
Before connecting the TV to the mains, check that the
mains supply voltage corresponds to the voltage
printed on the type plate on the rear panel of the TV. If
the mains voltage is different,consult your dealer.
Important
Should it become necessary to replace the mains
fuse, this must be replaced with a fuse of the same
value as indicated on the plug.
1. Remove fuse cover and fuse.
2.The replacement fuse must comply with BS1362
and have the ASTA approval mark. If the fuse is
lost, make contact with your retailer in order to
verify the correct type.
3. Refit the fuse cover.
In order to maintain conformity to the EMC directive,
the mains plug on this product must not be removed.
Connecting the aerial
The aerial should be connected to the socket
marked : at the back of the set.An inferior aerial
is likely to result in a poor, perhaps unstable picture
with ghost images and lack of contrast. Make-shift loft
or set-top aerials are often inadequate.Your dealer
will know from experience the most suitable type for
your locality.
Should you wish to use the set in conjunction with
other equipment, which connects to the aerial socket
such as TV games, or a video camera it is recommended
that these be connected via a combiner unit to avoid
repeated connection and disconnection of the aerial plug.
Fitting the stand (if provided)
Use only the stand provided with the set, making
sure that the fixings are properly tightened.A
diagram showing how to assemble the stand is
packed with the stand. Never use a make-shift stand,
or legs fixed with woodscrews.
Information for users in the UK (not applicable outside the UK)
Page 19
3139 125 3555.1 Esp-salsa sofa
 Loading...