

Philips 32PW6006-79R, 32PW5407, 32PW6006, 28PW6006 User Manual

TV
TV

IMPORTANT
Information for users in the UK (not applicable outside the UK)
Positioning the TV
For the best results, choose a position where light does not fall directly on the screen,and at
some distance away from radiators or other sources of heat. Leave a space of at least 5 cm all
around the TV for ventilation, making sure that curtains, cupboards etc. cannot obstruct the air
flow through the ventilation apertures.
The TV is intended for use in a domestic environment only and should never be operated or
stored in excessively hot or humid atmospheres.
General Points
Please take note of the section entitled 'Tips' at the end of this booklet.
Interference
The Department of Trade and Industry operates a Radio Interference Investigation Service to
help TV licence holders improve reception of BBC and IBA programmes where they are being
spoilt by interference.
If your dealer cannot help, ask at a main Post Office for the booklet "How to Improve Television
and Radio Reception".
Mains connection
Before connecting the TV to the mains, check that the mains supply voltage corresponds to the
voltage printed on the type plate on the rear panel of the TV.If the mains voltage is different,
consult your dealer.
Important
This apparatus is fitted with an approved moulded 13 Amp plug.To change a fuse in this type of
plug proceed as follows:
1. Remove fuse cover and fuse.
2. Fit new fuse which should be a BS1362 5A,A.S.T.A. or BSI approved type.
3. Refit the fuse cover.
In order to maintain conformity to the EMC directive, the mains plug on this product must not
be removed.
Connecting the aerial
The aerial should be connected to the socket marked
: at the back of the set.An inferior
aerial is likely to result in a poor, perhaps unstable picture with ghost images and lack of contrast.
Make-shift loft or set-top aerials are often inadequate.Your dealer will know from experience the most
suitable type for your locality.
Should you wish to use the set in conjunction with other equipment, which connects to the aerial
socket such as TV games, or a video camera it is recommended that these be connected via a
combiner unit to avoid repeated connection and disconnection of the aerial plug.
Fitting the stand (if provided)
Use only the stand provided with the set, making sure that the fixings are properly tightened.A
diagram showing how to assemble the stand is packed with the stand.
Never use a make-shift stand,or legs fixed with woodscrews.

1
Introduction
Ta b le of Contents
Thank you for purchasing this television set.
This handbook has been designed to help you install and operate your TV set.
We would strongly recommend that you read it thoroughly.
We hope our technology meets entirely with your satisfaction.
Installation
Installing your television set . . . . . . . . . . . . . . . . . . . . . . . . . . . . . . . . . . . . . . . . . .2
The keys on the TV set . . . . . . . . . . . . . . . . . . . . . . . . . . . . . . . . . . . . . . . . . . . . . .2
Remote control keys . . . . . . . . . . . . . . . . . . . . . . . . . . . . . . . . . . . . . . . . . . . . . . .3
Quick installation . . . . . . . . . . . . . . . . . . . . . . . . . . . . . . . . . . . . . . . . . . . . . . . . . .4
Program sort . . . . . . . . . . . . . . . . . . . . . . . . . . . . . . . . . . . . . . . . . . . . . . . . . . . . . .4
Program name . . . . . . . . . . . . . . . . . . . . . . . . . . . . . . . . . . . . . . . . . . . . . . . . . . . . .4
Manual store . . . . . . . . . . . . . . . . . . . . . . . . . . . . . . . . . . . . . . . . . . . . . . . . . . . . . .5
Other settings in the Install menu . . . . . . . . . . . . . . . . . . . . . . . . . . . . . . . . . . . . .5
Operation
Using the radio (only available on certain versions) . . . . . . . . . . . . . . . . . . . . . . .5
Picture settings . . . . . . . . . . . . . . . . . . . . . . . . . . . . . . . . . . . . . . . . . . . . . . . . . . . .6
Sound adjustments . . . . . . . . . . . . . . . . . . . . . . . . . . . . . . . . . . . . . . . . . . . . . . . . .6
Feature settings . . . . . . . . . . . . . . . . . . . . . . . . . . . . . . . . . . . . . . . . . . . . . . . . . . . .6
Timer function . . . . . . . . . . . . . . . . . . . . . . . . . . . . . . . . . . . . . . . . . . . . . . . . . . . .7
TV lock . . . . . . . . . . . . . . . . . . . . . . . . . . . . . . . . . . . . . . . . . . . . . . . . . . . . . . . . . .7
Teletext . . . . . . . . . . . . . . . . . . . . . . . . . . . . . . . . . . . . . . . . . . . . . . . . . . . . . . . . . .8
16:9 Formats . . . . . . . . . . . . . . . . . . . . . . . . . . . . . . . . . . . . . . . . . . . . . . . . . . . . . .9
Peripherals
Video recorder . . . . . . . . . . . . . . . . . . . . . . . . . . . . . . . . . . . . . . . . . . . . . . . . . . .10
Other equipment . . . . . . . . . . . . . . . . . . . . . . . . . . . . . . . . . . . . . . . . . . . . . . . . .10
Amplifier . . . . . . . . . . . . . . . . . . . . . . . . . . . . . . . . . . . . . . . . . . . . . . . . . . . . . . . .10
To select connected equipment . . . . . . . . . . . . . . . . . . . . . . . . . . . . . . . . . . . . .10
Side connections . . . . . . . . . . . . . . . . . . . . . . . . . . . . . . . . . . . . . . . . . . . . . . . . . .11
VCR key . . . . . . . . . . . . . . . . . . . . . . . . . . . . . . . . . . . . . . . . . . . . . . . . . . . . . . . .11
Practical information
Tips . . . . . . . . . . . . . . . . . . . . . . . . . . . . . . . . . . . . . . . . . . . . . . . . . . . . . . . . . . . .12
Glossary . . . . . . . . . . . . . . . . . . . . . . . . . . . . . . . . . . . . . . . . . . . . . . . . . . . . . . . .12
Table of TV frequencies . . . . . . . . . . . . . . . . . . . . . . . . . . . . . . . . . . . . . . . . . . . . .13
°
Recycling
The materials used in your set are either reusable or can be recycled.
To minimise environmental waste, specialist companies collect used appliances
and dismantle them after retrieving any materials that can be used again (ask
your dealer for further details).
English
2
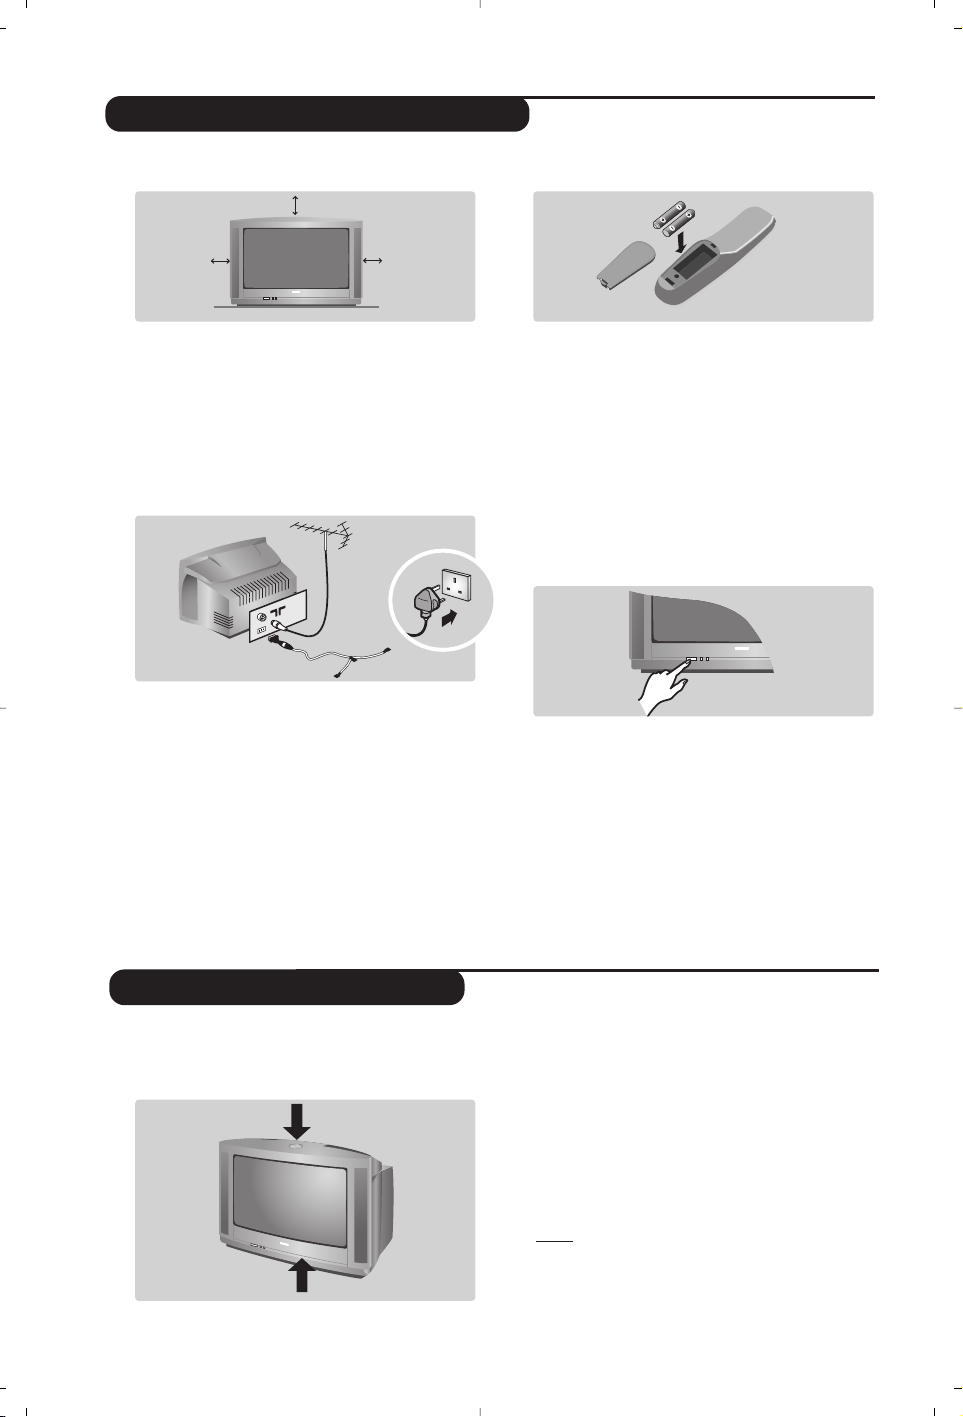
The television set has 4 keys which are located
on the front or the top of the set depending
on the model.
The VOLUME - + (- ” +) keys are used to
adjust sound levels.The PROGRAM - + (- P +)
keys are used to select the required programmes.
To access the menus, simultaneously hold down
the
” - and ” + keys.The PROGRAM - +
keys may then be used to select an adjustment
and the -
” + keys to make that adjustment.
To exit from the menus, hold down the 2
” -
and
” + keys.
Note: when the Child Lock function is activated,
these keys are unavailable (refer to Features
menu on page 7).
&
Positioning the television set
Place your TV on a solid, stable surface, leaving
a space of at least 5 cm around the appliance.
To avoid accidents, do not put anything on the
set such as a cloth or cover, a container full of
liquid (vase) or a heat source (lamp).The set
must not be exposed to water.
é
Connections
• Insert the aerial plug into the : socket at
the rear of the set.
• For the versions equipped with a radio:
insert the radio aerial socket into the FM
ANT socket using the adapter supplied.
If you are using an indoor aerial, reception may be
difficult in certain conditions.You can improve
reception by rotating the aerial. If the reception
remains poor, you will need to use an external aerial.
• Insert the mains plug into a wall socket (220240 V / 50 Hz).
“
Remote control
Insert the two R6-type batteries (supplied)
making sure that they are the right way round.
Check that the mode selector is set to TV.
The batteries supplied with this appliance do
not contain mercury or nickel cadmium. If you
have access to a recycling facility, please do not
discard your used batteries (if in doubt,
consult your dealer).When the batteries are
replaced, use the same type.
‘
Switching on
To switch on the set, press the on/off key.
A red indicator comes on and the screen
lights up. Go straight to the chapter Quick
installation on page 4.
If the television remains in standby mode,
press P
# on the remote control.
The indicator will flash when you use the
remote control.
5 cm
5 cm
5 cm
FM.
ANT.
Installing your television set
The keys on the TV set
3
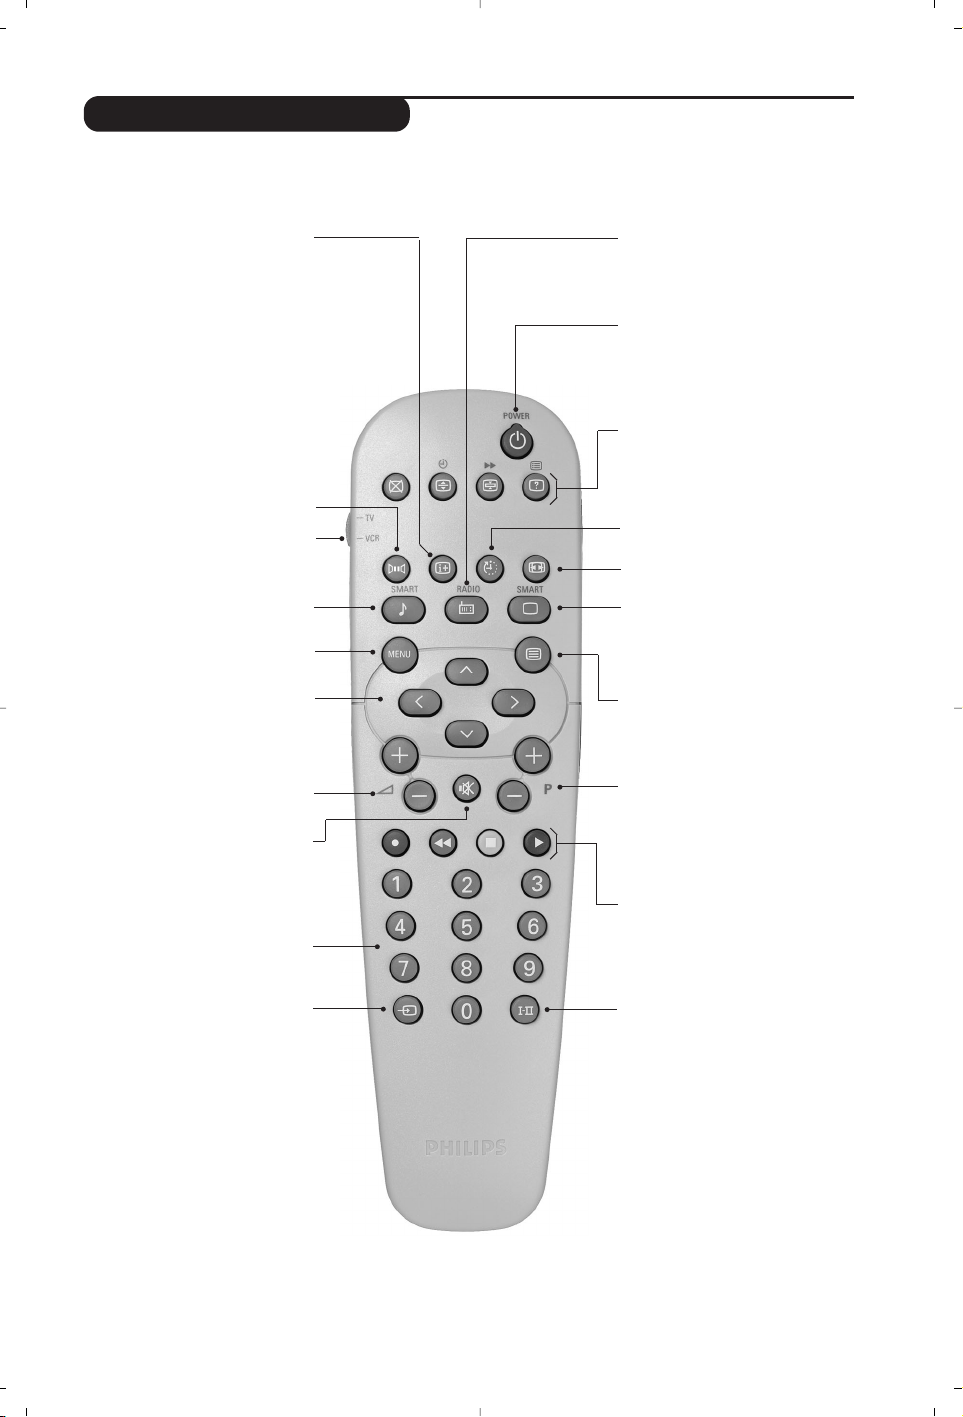
Remote control keys
To display / clear the program
number, name (if it exists), time,
audio mode and time remaining for
the sleep feature. Press the key for
5 seconds to activate permanent
display of the number.This key is
also used to exit from the menu.
Screen information / permanent no.
Surround Sound
(only available on certain versions)
To activate / deactivate the
surround sound effect. In stereo,
this gives the impression that the
speakers are further apart. For
models equipped with Virtual
Dolby Surround*, you can
experience Dolby Surround Pro
Logic sound effects. In mono, a
stereo spatial effect is simulated.
VCR key (p.11)
Pre-set sound
Used to access a series of stored
settings:
Speech, Music, Theatre
and return to Personal.
Menu
To call up or exit the menus.
Volume
To adjust the sound level
Cursor
These 4 keys are used to move
around the menus or provide
direct access to the different 16:9
formats (p.9).
Number keys
Direct access to the programmes.
For a 2 digit program, enter the
2nd digit before the dash
disappears.
Selection of EXT socket
Press several times to select
EXT1, EXT2, S-VHS and AV.
Radio / TV mode
To switch the TV set to radio or
TV mode (for versions equipped
with radio).
Standby
Lets you place the TV set on
standby. To turn on the TV, press
P @@, b, 0 to 9 (or Â).
Teletext keys (p.8),VCR keys
(p.11) and list of radio stations ı
(p. 5)
Sleep
To select an automatic standby after a
preset time (from 0 to 240 minutes).
16:9 modes (p. 9)
Pre-set image
Used to access a series of stored
settings:
Rich, Natural, Soft,
Multimedia and return to Personal.
Mute
To mute or restore the sound.
Program selection
To access the next or previous
programme.The number,(name)
and sound mode are displayed for
a few moments.
For some programs, the title of the
program will be displayed at the
bottom of the screen.
Sound mode
Used to force programmes in
Stereo to Mono or, for bilingual
programs, to choose between Dual
I
or Dual II.For TV sets equipped
for Nicam reception, depending on
the programmes, you can force the
Stereo Nicam sound to Mono or
select between Nicam Dual I,
Nicam Dual II and Mono.
The Mono indication is red when in
forced position.
Teletext (p. 8)
Teletext keys (p.8)
or VCR keys (p.11)
* “Dolby” and the double-D symbols £ are trademarks of the Dolby Laboratories Licensing Corporation.
Manufactured under license of Dolby Laboratories Licensing Corporation.
 Loading...