

Page 1

User Manual
Thank you for choosing Philips.
Need help fast?
Read your Quick Use Guide and/or
Owner's Manual first for quick tips
that make using your Philips product
more enjoyable.
If you have read your instructions
and still need assistance,
you may access our online help at
www.usasupport.philips.com
or call
1-888-PHILIPS (744-5477)
while with your product
(and Model / Serial number)
STOP
27PT9015D
32PT7005D
32PT9005D
Enter below the Serial No. which is located
on the rear of the cabinet. Retain this
information for future reference.
Model No. __________________________
Serial No. __________________________
For Customer Use
Page 2
Return your Product Registration Card today
to get the very most from your purchase.
Registering your model with PHILIPS makes you eligible for all of the valuable benefits listed below, so don't miss out.
Complete and return your Product Registration Card at once to ensure:
*Proof of
Purchase
Returning the enclosed card guarantees
that your date of purchase will be on
file, so no additional paperwork will be
required from you to obtain warranty
service.
*Product Safety
Notification
By registering your product, you'll
receive notification - directly from the
manufacturer - in the rare case of a
product recall or safety defect.
Congratulations on your purchase,
and welcome to the “family!”
Dear PHILIPS product owner:
Thank you for your confidence in PHILIPS. You’ve selected one
of the best-built, best-backed products available today. We’ll do
everything in our power to keep you happy with your purchase for
many years to come.
As a member of the PHILIPS “family,” you’re entitled to protection
by one of the most comprehensive warranties and outstanding
service networks in the industry. What’s more, your purchase
guarantees you’ll receive all the information and special offers
for which you qualify, plus easy access to accessories from our
convenient home shopping network.
Most importantly, you can count on our uncompromising
commitment to your total satisfaction.
All of this is our way of saying welcome - and thanks for investing in
a PHILIPS product.
*Additional Benefits
of Product Ownership
Registering your product guarantees that
you'll receive all of the privileges to which
you're entitled, including special moneysaving offers.
Know these
safety symbols
This “bolt of lightning” indicates
uninsulated material within your unit
may cause an electrical shock. For the safety
of everyone in your household, please do not
remove product covering.
The “exclamation point” calls attention
to features for which you should
read the enclosed literature closely to
prevent operating and maintenance problems.
WARNING: To reduce the risk of fire or
electric shock, this apparatus should not be
exposed to rain or moisture and objects filled
with liquids, such as vases, should not be
placed on this apparatus.
CAUTION: To prevent electric shock,
match wide blade of plug to wide slot, fully
insert.
ATTENTION: Pour éviter les choc
électriques, introduire la lame la plus large de
la fiche dans la borne correspondante de la
prise et pousser jusqu’au fond.
P.S. To get the most from your PHILIPS purchase,
be sure to complete and return your Product
Registration Card at once.
Visit our World Wide Web Site at http://www.usasupport.philips.com
2
Page 3
IMPORTANT SAFETY INSTRUCTIONS
Read before operating equipment
1. Read these instructions.
2. Keep these instructions.
3. Heed all warnings.
4. Follow all instructions.
5. Do not use this TV near water.
6. Clean only with a dry cloth.
7. Do not block any of the ventilation openings. Install in accordance
with the manufacturers instructions.
8. Do not install near any heat sources such as radiators, heat
registers, stoves, or other apparatus (including amplifiers) that
produce heat.
9. Do not defeat the safety purpose of the polarized or groundingtype plug. A polarized plug has two blades with one wider than the
other. A grounding type plug has two blades and third grounding
prong. The wide blade or third prong are provided for your safety.
When the provided plug does not fit into your outlet, consult an
electrician for replacement of the obsolete outlet.
10. Protect the power cord from being walked on or pinched
particularly at plugs, convenience receptacles, and the point where
they exit from the apparatus.
11. Only use attachments/accessories specified by the manufacturer.
12. Use only with a cart, stand, tripod, bracket, or table
specified by the manufacturer, or sold with the TV
When a cart is used, use caution when moving
the cart/TV combination to avoid injury from tip-over.
13. Unplug this TV during lightning storms or when unused for long
periods of time.
14. Refer all servicing to qualified service personnel. Servicing is
required when the TV has been damaged in any way, such as
power-supply cord or plug is damaged, liquid has been spilled or
objects have fallen into apparatus, the TV has been exposed to rain
or moisture, does not operate normally, or has been dropped.
15. This product may contain lead and mercury. Disposal of these
materials may be regulated due to environmental considerations.
For disposal or recycling information, please contact your local
authorities or the Electronic Industries Alliance: www.eiae.org
16. Damage Requiring Service - The TV should be serviced by qualified
service personnel when:
A. The power supply cord or the plug has been damaged; or
B. Objects have fallen, or liquid has been spilled into the TV; or
C. The TV has been exposed to rain; or
Note to the CATV system installer: This reminder is provided to call the CATV system installer's attention to Article 820-40 of the NEC
that provides guidelines for proper grounding and, in particular, specifies that the cable ground shall be connected to the grounding system of the
building, as close to the point of cable entry as practical.
D. The TV does not appear to operate normally or exhibits a
marked change in performance; or
E. The TV has been dropped, or the enclosure damaged.
17. Tilt/Stability - All televisions must comply with recommended
international global safety standards for tilt and stability properties
of its cabinet design.
• Do not compromise these design standards by applying excessive
pull force to the front, or top, of the cabinet which could ultimately
overturn the product.
• Also, do not endanger yourself, or children, by placing electronic
equipment/toys on the top of the cabinet. Such items could
unsuspectingly fall from the top of the set and cause product
damage and/or personal injury.
18. Wall or Ceiling Mounting - The TV should be mounted to a
wall or ceiling only as recommended by the manufacturer.
19. Power Lines - An outdoor antenna should be located away from
power lines.
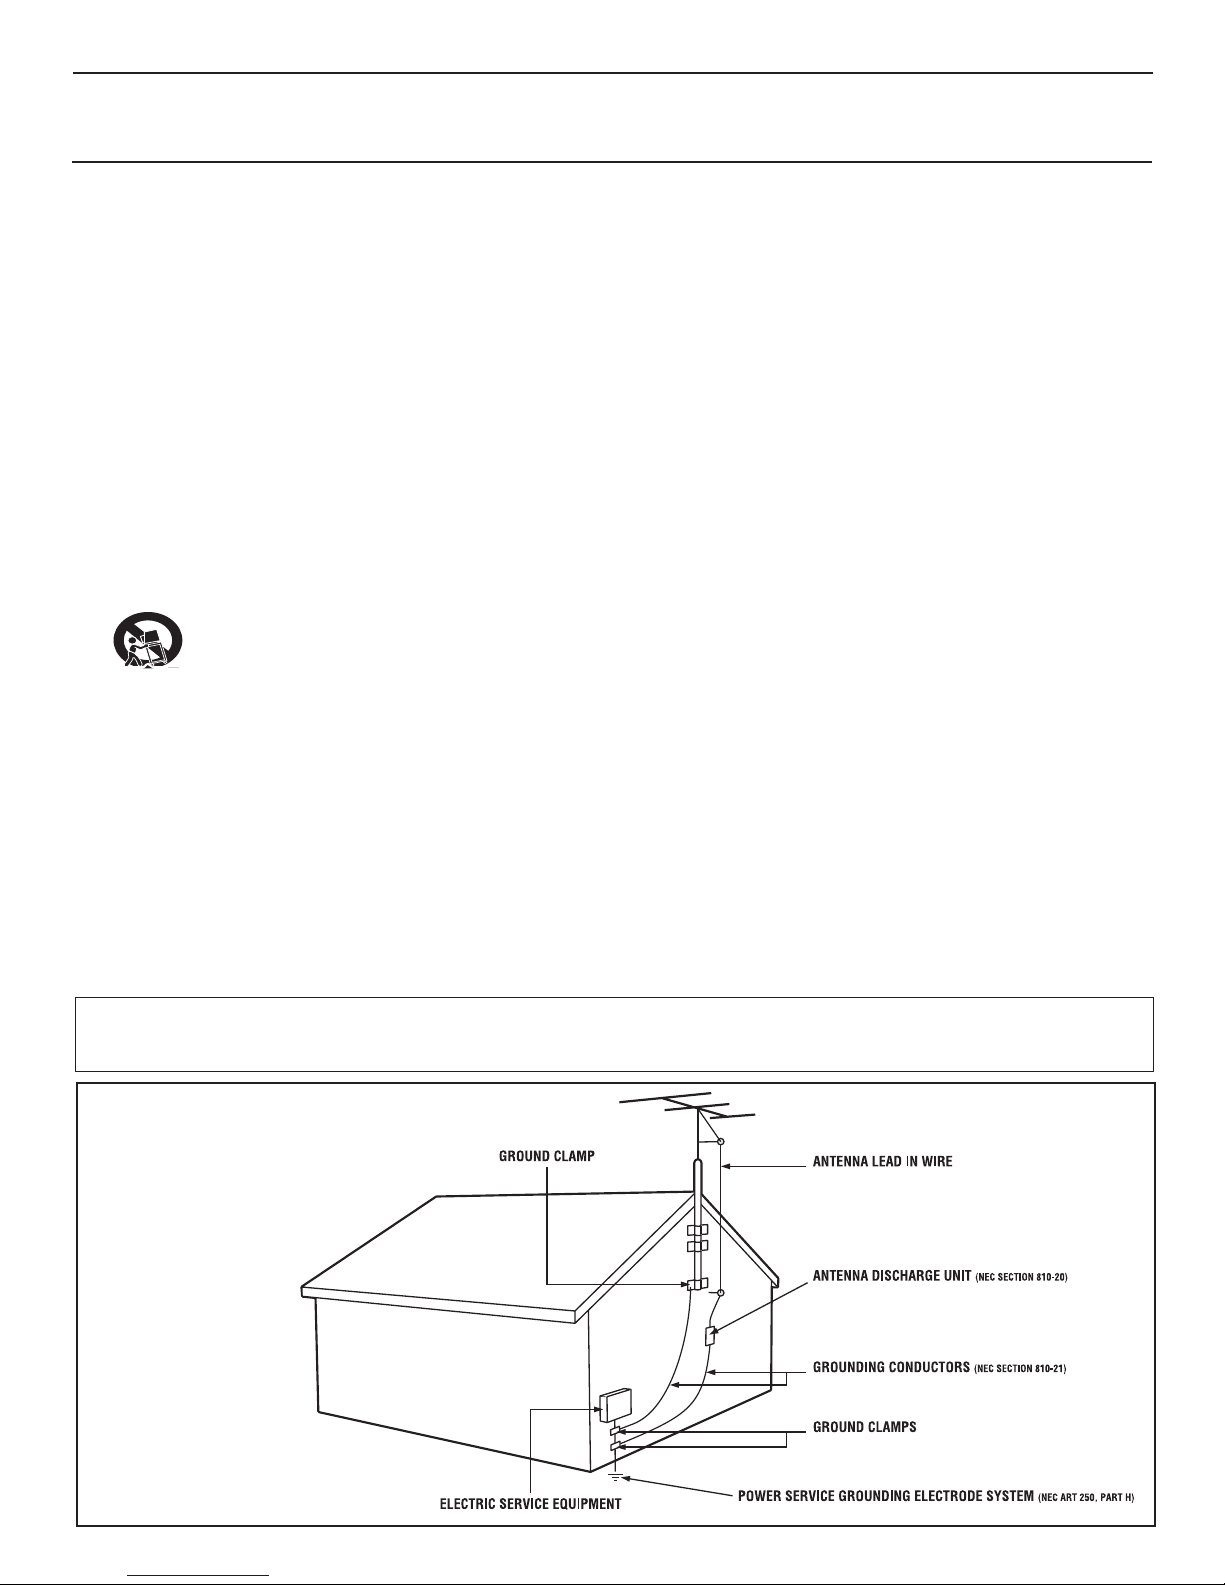
20. Outdoor Antenna Grounding - If an outside antenna is
connected to the receiver, be sure the antenna system is grounded so
as to provide some protection against voltage surges and built up static
charges.
Section 810 of the National Electric Code, ANSI/NFPA No. 70-
1984, provides information with respect to proper grounding of
the mast and supporting structure, grounding of the lead-in wire to
an antenna discharge unit, size of grounding connectors, location
of antenna-discharge unit, connection to grounding electrodes, and
requirements for the grounding electrode. See Figure below.
21. Object and Liquid Entry - Care should be taken so that
objects do not fall and liquids are not spilled into the enclosure
through openings.
a) Warning: To reduce the risk of fire or electric shock, this
apparatus should not be exposed to rain or moisture and objects
filled with liquids, such as vases, should not be placed on this
apparatus.
22. Battery Usage CAUTION - To prevent battery leakage that
may result in bodily injury, property damage, or damage to the unit:
• Install all batteries correctly, with + and - aligned as marked on
the unit.
• Do not mix batteries (old and new or carbon and alkaline, etc.).
• Remove batteries when the unit is not used for a long time.
Example of Antenna Grounding
as per NEC - National Electric Code
3
Page 4
CONTENTS
INTRODUCTION
Welcome/Registration of Your TV . . . . . . . . . . . . . . . . . . . . . .2
Safety/Precautions . . . . . . . . . . . . . . . . . . . . . . . . . . . . . . . . . . 2/3
A Guide to Digital TV . . . . . . . . . . . . . . . . . . . . . . . . . . . . . . . .5
Quick Tips Before You Start . . . . . . . . . . . . . . . . . . . . . . . . . .5
GETTING STARTED
Description of Remote Control buttons . . . . . . . . . . . . . . . . . . 6
Basic TV and Remote Control Operation . . . . . . . . . . . . . . . .7
First Time You Turn On The TV . . . . . . . . . . . . . . . . . . . . . . .8
INSTALLATION MENU
Auto Install . . . . . . . . . . . . . . . . . . . . . . . . . . . . . . . . . . . . . . . .9
How To Use The Language Controls . . . . . . . . . . . . . . . . . . .10
How To Use The Tuner Mode Control . . . . . . . . . . . . . . . . .11
Channel Edit (Add or skip channels) . . . . . . . . . . . . . . . . . . .12
Auto Chron (Synchronisation of time) . . . . . . . . . . .13
Digital
Digita
l
Timer - Time Zone . . . . . . . . . . . . . . . . . . . . . . . . . .14
l
Timer - Daylight Saving . . . . . . . . . . . . . . . . . . . . . . . . 14
Digital
l
Digita
l
How To Add Or Skip Weak Digital Signals . . . . . . .15
Emergency Alert Setting . . . . . . . . . . . . . . . . . . . . . . 16
Digita
l
Factory Channel Reset . . . . . . . . . . . . . . . . . . . . . . .16
l
Digita
Digital Audio (Selecting audio languages) . . . . . . . . .17
Digita
l
Picture Menu Controls . . . . . . . . . . . . . . . . . . . . . . . . . . . . . . .18
Sound Menu Controls . . . . . . . . . . . . . . . . . . . . . . . . . . . . . . .19
FEATURES MENU
Understanding Autolock Controls . . . . . . . . . . . . . . . . . . . . . .20
AutoLock . . . . . . . . . . . . . . . . . . . . . . . . . . . . . . . . . . . . . . . . . 21
AutoLock - Blocking Channels . . . . . . . . . . . . . . . . . . . . . . . .22
Block / Clear All Channels At The Same Time . . . . . . . . . . . .23
Blocking Options . . . . . . . . . . . . . . . . . . . . . . . . . . . . . . . . . . .23
Movie Ratings . . . . . . . . . . . . . . . . . . . . . . . . . . . . . . . . . . . . . . 24
TV Ratings . . . . . . . . . . . . . . . . . . . . . . . . . . . . . . . . . . . . . . . .25
How To Use the Timer Menu Controls . . . . . . . . . . . . . . . . .26
Close Captioning Display in Digital Mode . . . . . . . . .27
Digita
l
Caption Option in Digital Mode . . . . . . . . . . . . . . . .27
Digita
l
Close Captioning in Analog Mode . . . . . . . . . . . . . . . . . . . . . .28
SleepTimer . . . . . . . . . . . . . . . . . . . . . . . . . . . . . . . . . . . . . . . .29
Rotation . . . . . . . . . . . . . . . . . . . . . . . . . . . . . . . . . . . . . . . . . .29
How To Use The Format Control . . . . . . . . . . . . . . . . . . . . . 30
OTHER FEATURES
Active Control . . . . . . . . . . . . . . . . . . . . . . . . . . . . . . . . . . . .17
Auto Picture . . . . . . . . . . . . . . . . . . . . . . . . . . . . . . . . . . . . . . .18
Auto Sound . . . . . . . . . . . . . . . . . . . . . . . . . . . . . . . . . . . . . . . 19
Information Banner and Electronic Program Guide . 31
Digita
l
FEATURES
Active Control continuously measures and corrects all incoming
signals to help provide the best picture quality. This feature
monitors and corrects both the sharpness control and noise
reduction control (Pg. 17).
Audio Volume Leveler (AVL) Control keeps the TV sound at
an even level. Differences in volume levels during commercial breaks
are reduced, making for a more consistent, comfortable sound for
your listening pleasure (Pg. 19).
AutoChron
sets the clock of the TV automatically or manually. For
automatic selection, there will be queries for Time Zone, Day Light
saving and channel to seek clock. For manual selection, you need to
key in the time.
(Pg. 13).
AutoLock lets you block channels or programs from viewing with
content not suitable for children or with restricted TV ratings (Pg.
21).
AutoPicture lets you change the picture settings (color, tint,
contrast, etc.) for various types of programming, such as sports,
movies, multimedia (games), or weak signals with the push of one
button (Pg. 18).
AutoSound lets you select from four pre-set controls and a
personal control that you set according to your own preferences
through the onscreen Sound menu. The four pre-set controls
(Speech, Movie, Music, and Multimedia) lets you custom set the TV
sound to enhance the particular programming you are watching (Pg.
19).
Channel Edit lets you add or skip channels from the list stored in
the TV memory. Channel Edit makes it easy to limit or expand the
number of channels that are available to you when you press the
Channel (+) or (–) buttons on your remote control (Pg. 12).
Closed Captioning allows the viewer to read TV program
dialogue or voice conversations as onscreen text. (Pg. 27-28).
Digital Audio allows you to switch to another audio language
when it is available. This is only for programs that are shown in
more than one audio language (Page 17).
Sleep Timer automatically turns OFF the TV after a set amount of
time that you have chosen ( Page 29).
As an Energy Star® Partner, Philips Consumer
Electronics has determined this product meets
the Energy Star® guidelines for energy efficiency
Energy Star® is a U.S. registered mark. Using
products with the Energy Star® label can save energy. Saving
energy reduces air pollution and lowers utility bills.
IMPORTANT INFORMATION
Glossary . . . . . . . . . . . . . . . . . . . . . . . . . . . . . . . . . . . . . . . . . .32
Troubleshooting . . . . . . . . . . . . . . . . . . . . . . . . . . . . . . . . . 33-34
Cleaning and Care . . . . . . . . . . . . . . . . . . . . . . . . . . . . . . . . . .35
Specifications . . . . . . . . . . . . . . . . . . . . . . . . . . . . . . . . . . . . . .36
Limited Warranty . . . . . . . . . . . . . . . . . . . . . . . . . . . . . . . . . . .37
Index . . . . . . . . . . . . . . . . . . . . . . . . . . . . . . . . . . . . . . . . . . .38
Active Control, AutoPicture, AutoSound, AutoChron, and
Incredible Surround are trademarks of Philips Consumer
Electronics Company. Copyright 2001 Philips Consumer
Electronics.
*Manufactured under license from Dolby
Laboratories. “Dolby” and the double-D symbol
are trademarks of Dolby Laboratories.
4
Page 5

A GUIDE TO DIGITAL TV
What is Digital Television (DTV)?
Digital Television (DTV) is a relatively new type of broadcasting that promises to transform television viewing into a whole
new experience. Digital technology is used to capture images and sound to deliver a better picture quality.
There are many levels of digital television quality. The most common are:
Standard Definition TV (SDTV)
SDTV is the basic level of quality display and resolution for both analog and digital. Transmission of SDTV can be in the
traditional (4:3) or widescreen (16:9) format.
Enhanced Definition TV (EDTV)
EDTV is better in picture quality than analog television. The formats for EDTV are 480p widescreen (16:9) or traditional (4:3).
EDTV is in the middle range quality between SDTV and HDTV.
High Definition TV (HDTV)
HDTV has the highest quality for digital broadcast formats. Its resolution is widescreen format (16:9). Combined with digitally
enhanced sound technology, HDTV sets new standards for sound and picture quality in television.
Difference between Digital and Analog ?
Digital Television is a more flexible and efficient technology than the analog broadcast system. Analog broadcasts can only
provide one program at a time. Digital television can broadcast a high definition program or more than one standard definition
program at the same time. With Digital television you can receive information of programs through the Information Banner
and Electronic Program Guide. This information is provided by the broadcaster.
QUICK TIPS BEFORE YOU START
1 When the TV is powered-on for the first time you will be prompted to auto install the TV in order to receive the channels
that are broadcasted locally.
2 Auto Installation may take 20 to 40 minutes depending on the number of channels that are transmitted by the cable provider
or broadcaster.
3 When the TV is not receiving any signal from the antenna / cable, NO SIGNAL will appear on the TV screen. This can be
caused by the antenna / cable not being plugged in correctly or when the wrong tuner mode is selected.
When no transmission is received from the broadcaster, NO PROGRAM will appear on the TV screen.
4 You will not be able to receive pay channels when using direct antenna / cable connection to the television.
5 When the Set-top box is connected to the television using coaxial cable, it is necessary to auto-program the television for the
single channel (3 or 4) that the Set-top box outputs and change the channels at the Set-top Box to view the program.
6 When the Set-top box is connected to the television using AV connection, select the television input source for the
Set-top box to view the program and change the channels at the Set-top Box to view the program.
7 Pressing the A/D button on the remote control toggles the TV between Digital and Analog Mode.
Accessories List : 1 Remote Control
2 AA batteries
1 User Manual
1 Warranty Card
5
Page 6
DESCRIPTION OF REMOTE CONTROL BUTTONS
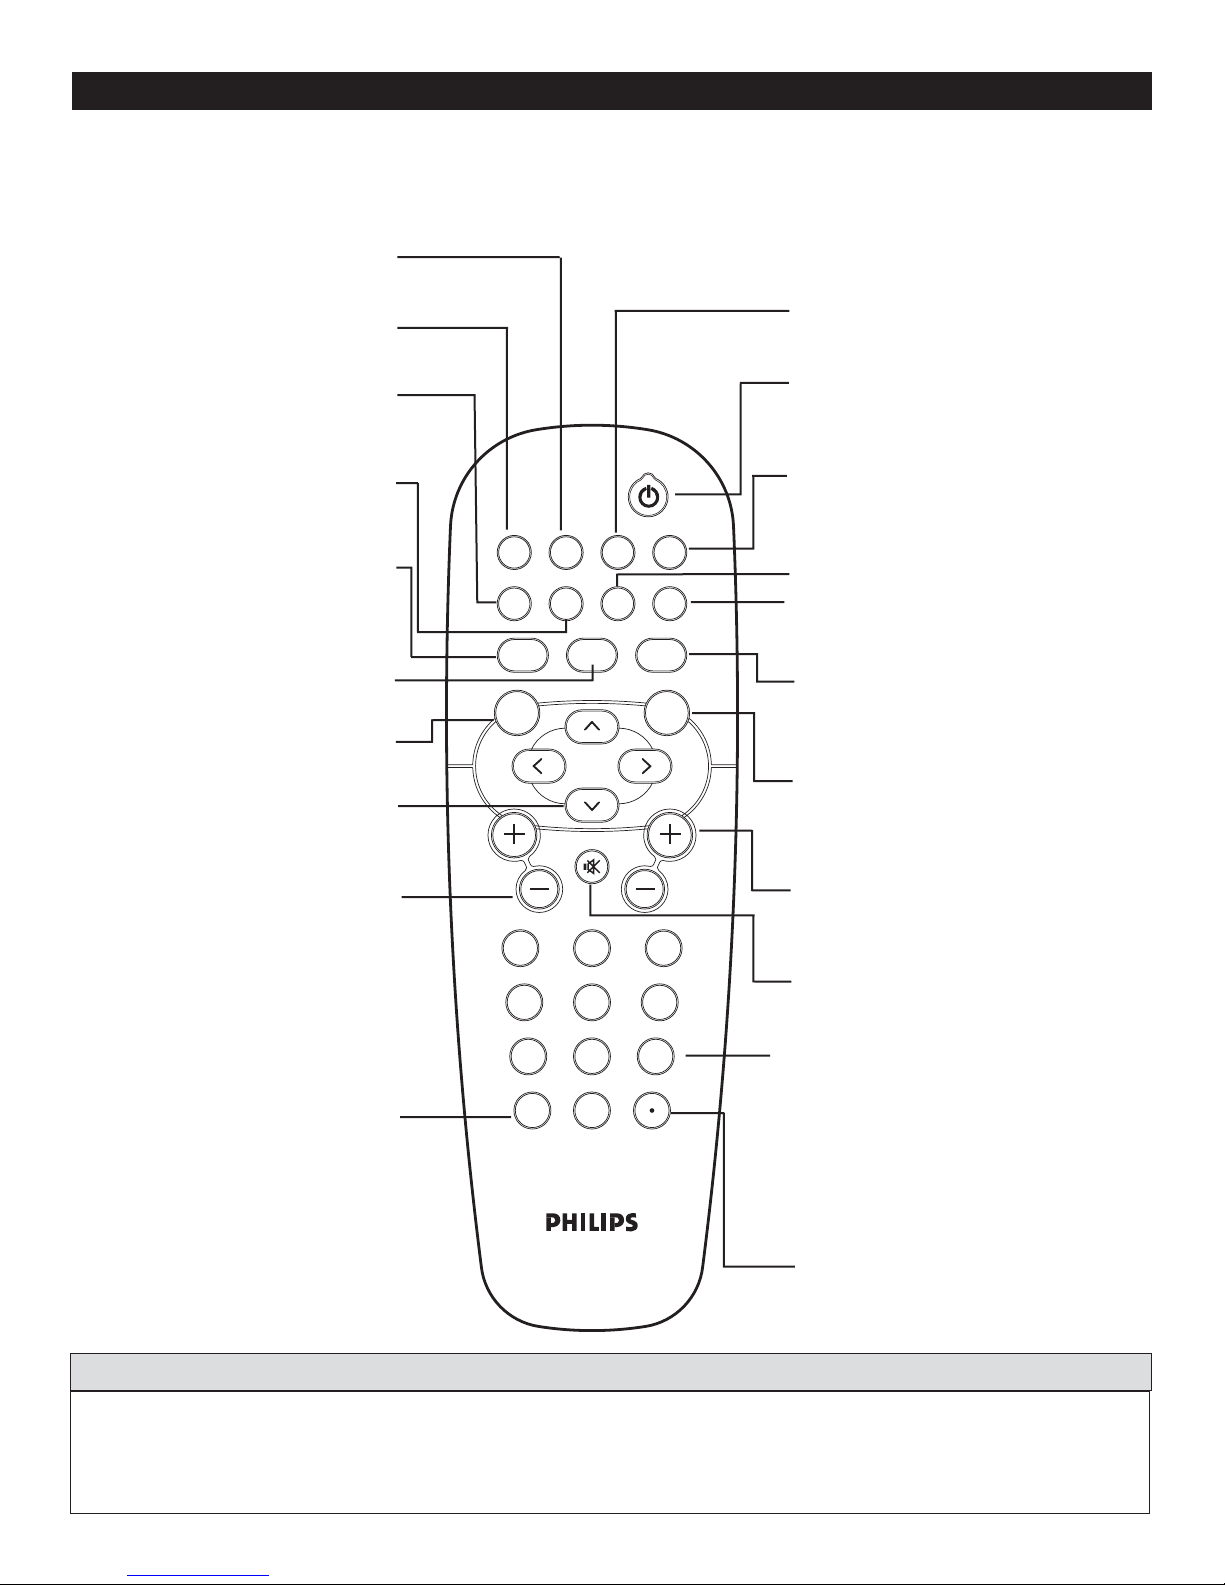
CLOCK Button - Sets the TV
clock On or Off.
FORMAT Button - To select
picture format.
AV Button - To select different signal
sources connected to the AV inputs on
the TV(eg. DVD, VCR, Camcorder etc.)
SAP Button - Toggle between SAP,
Mono and Stereo Sound.
POWER
FORMAT CLOCK SLEEP GUIDE
SLEEP Button - Sets the TV to
automatically turn itself off after
a period of time you choose
POWER Button - Press to turn the
TV On or put on Standby mode.
* Guide Button - Displays the
Electronic Program guide (only in
Digital Mode)
AUTO SOUND Button - To
select factory-defined sound settings.
(Personal, Theatre, Music, or Voice).
A/D (ANALOG/DIGITAL)
Button - To select Analog or
Digital mode.
MENU Button - To display the main
menu.
Cursor Buttons (< , >, <, > )
- To highlight and select items on
the TV onscreen menu.
VOL(ume) + / - Buttons
- To increase or decrease the
TV sound level.
A/CH (Alternate Channel)
Button - Toggle between last
viewed and current channel.
AV SAP
AUTO
SOUND
MENU OK
VOL CH
A/D
MUTE
CC INFO
AUTO
PICTURE
123
4
56
789
A/CH
0
CC Button - Closed Captioning.
* INFO Button - To display channel
number, sound mode, time and status of
the sleeptimer, etc.
AUTO PICTURE Button - To choose
from five pre-defined picture settings.
(Personal, Movies, Sports, Weak Signal,
or Multimedia).
OK Button - To activate selection of
antenna / cable mode the first time you
auto install the TV.
CH(annel) + or CH(annel)- Buttons
- To select channels in ascending or
descending order.
MUTE Button - To turn off
the sound from the TV.
NUMERIC (0-9) Buttons - To select
TV channels or enter values in the onscreen menu. For single channel entries,
press the numbered button for the channel you desire. The TV will pause for a
second or two before changing to the
chosen channel.
* The quality and accuracy of the information on the program guide and information banner are transmitted from broadcasters.
You may see a difference in broadcast time if the broadcaster is from a different time zone area (refer to page 31).
The INFO button can also be used to exit the menu display from the TV screen.
DOT Button - To enter values for minor
channels eg. 36.4
HELPFUL HINTS
66
Page 7
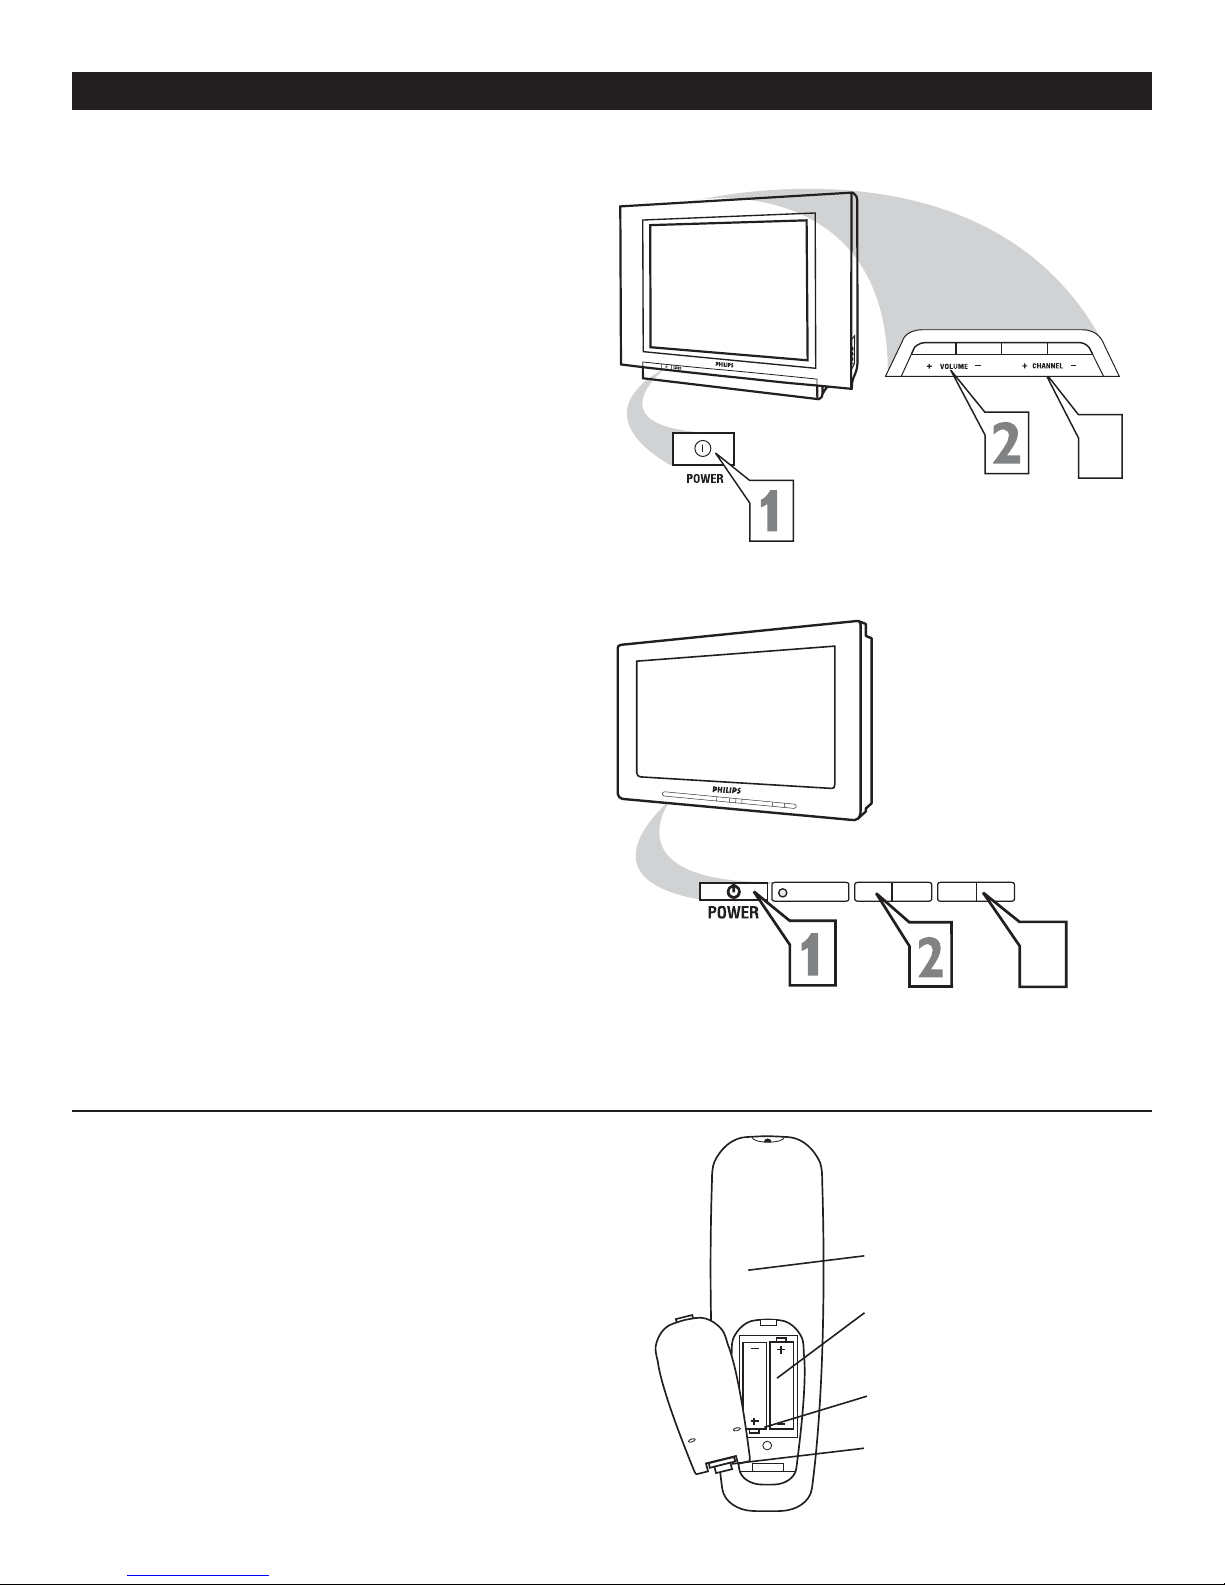
BASIC TV AND REMOTE CONTROL OPERATION
Press POWER button on the TV to turn it
on. Pressing any button on the front panel
1
of the TV will also turn the TV On.
Press the VOLUME + to increase the
sound level and VOLUME – to lower the
2
sound level.
Pressing both buttons together will display
the onscreen menu. While in menu mode,
use these buttons to make adjustments or
selections.
Press CHANNEL + or – to select TV
channels.
3
Point the remote control towards the
remote sensor window on the front of the
4
TV when using the remote control.
Press MENU button on the remote to
display the onscreen menu.
5
32PT9005D
3
27PT9015D
32PT7005D
REMOTE CONTROL
ow to load the supplied batteries into the remote
H
control.
Remove the battery compartment lid on the
back of the remote control.
1
Insert two AA-sized batteries into the battery
compartment, making sure the positive + and
2
negative - polarity line up correctly as indicated
inside the case.
Close the battery lid.
3
-
+
>
<
3
Back of Remote
Battery Compartment
2 AA-sized batteries
Battery compartment lid
7
Page 8

FIRST TIME YOU TURN ON THE TV
he first time you turn on the new TV set, you will see a screen that helps you to auto install the programs. Follow
the instructions on this screen to start auto installation. Digital and Analog auto installation will be performed
T
at the same time. Auto installation may take 20 to 40 minutes depending on the number of channels available. You
will see the progress of the auto installation represented by the 2 bars below the words Analog Channels and Digital
Channels respectively. An active hour-glass will be displayed on the TV screen to indicate that auto installation is still
in progress, please wait.
Note : This screen will only appear the first time you turn on the TV. If you wish to auto install programs
later, please follow the procedure in the next page (page 9).
POWER
Please connect Antenna or Cable to TV
Select TV signal by Î or ï and press OK
Æ
Antenna
Cable
Installation may take about 30 mintues.
Auto Install
Analog channels 39
Digital Channels 45
FORMAT CLOCK SLEEP GUIDE
AV SAP
AUTO
SOUND
MENU OK
VOL CH
A/D
MUTE
CC INFO
AUTO
PICTURE
123
456
789
A/CH
0
OK
>
>
< >
HELPFUL HINTS
ANTENNA : If you have and off-air or roof-top
antenna, select Antenna.
CABLE : If you have subscribed to cable signal from
any cable company, or you are receiving free-to-air cable
channels through your wall connection select Cable.
When you install in either Digital or Analog mode,
both Digital and Analog channels will be installed.
88
Page 9
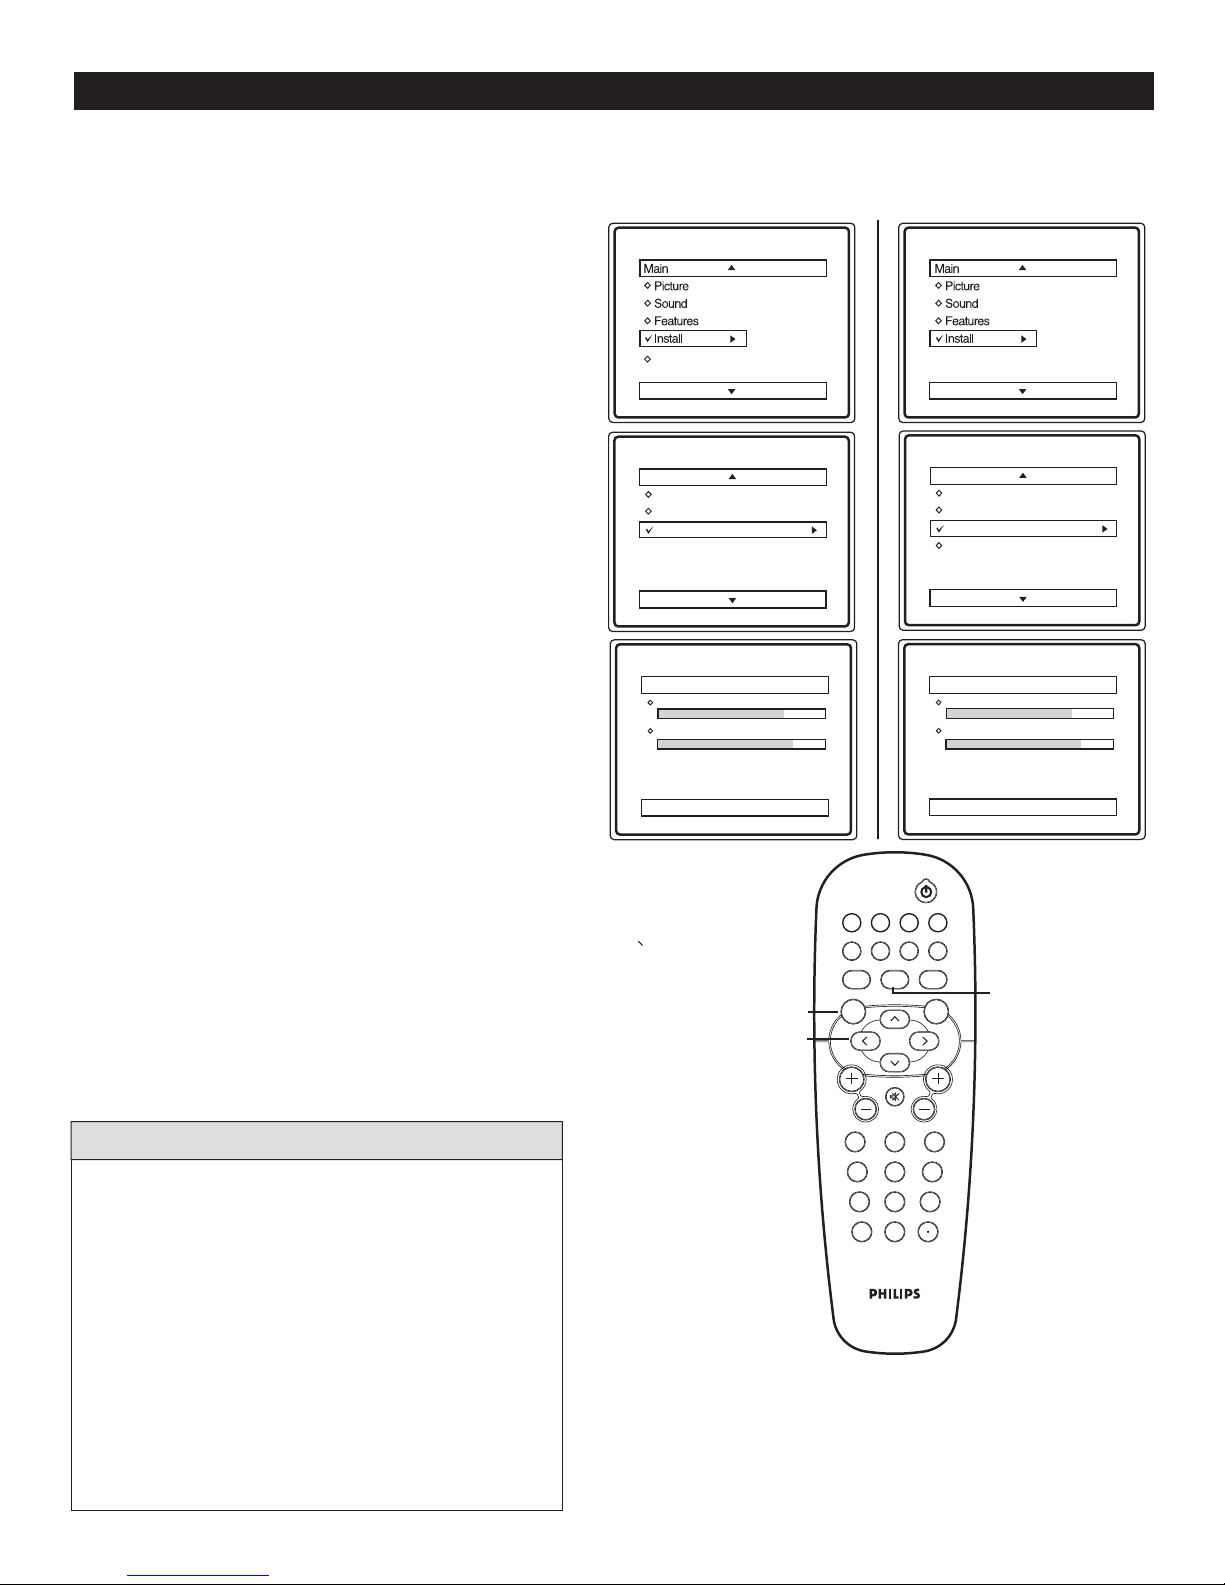
AUTO INSTALL
ou can auto install programs on your TV. This makes it easy for you to select only the TV stations in your area
when the CHANNEL (+), (–) buttons are pressed.
Y
Follow these steps for Digital Mode and Analog Mode
Complete the antenna or cable signal connection
1
2
3
4
5
before activating AUTO INSTALL. See How to
make the best connection guide for details.
Press MENU button on the remote control to
display the onscreen menu.
Press CURSOR < or > to scroll through the
onscreen menu until you see Install highlighted.
Press CURSOR > to display the Install menu
features.
Press CURSOR < or > to scroll through the
Install features until you see Auto Install highlighted.
Press CURSOR > to start Auto Installation.
6
Auto Install will begin. This may take 20 to 40
7
8
minutes depending on the number
of channels available.
When finished, press MENU button on the remote
control twice to exit the menu display from
the TV screen.
Digital Mode Analog Mode
Language
Tuner Mode
Auto Install
DTV Setup
Install
Language
Tuner Mode
Auto Install
Auto Install
Analog channels 39
Digital Channels 45
Install
Language
Tuner Mode
Auto Install
Channel Edit
Auto Install
Analog channels 39
Digital Channels 45
Language
Tuner Mode
Auto Install
Channel Edit
HELPFUL HINTS
When CABLE is selected, channels 1 to 135 are available
in Digital Mode and Channels 1 to 125 are available in
Analog Mode.
When ANTENNA is selected, channels 2 to 69 are
available for both Digital and Analog Modes.
When you are in Digital Mode, channel numbers will be
displayed as 23-1, or 100-2 etc.
When you install in either Digital or Analog mode,
both Digital and Analog channels will be installed.
MENU
>
>
< >
POWER
FORMAT CLOCK SLEEP GUIDE
AV SAP
CC INFO
MUTE
AUTO
A/D
PICTURE
0
AUTO
SOUND
MENU OK
VOL CH
123
456
789
A/CH
A/D
toggles between
digital and analog
mode
9
Page 10
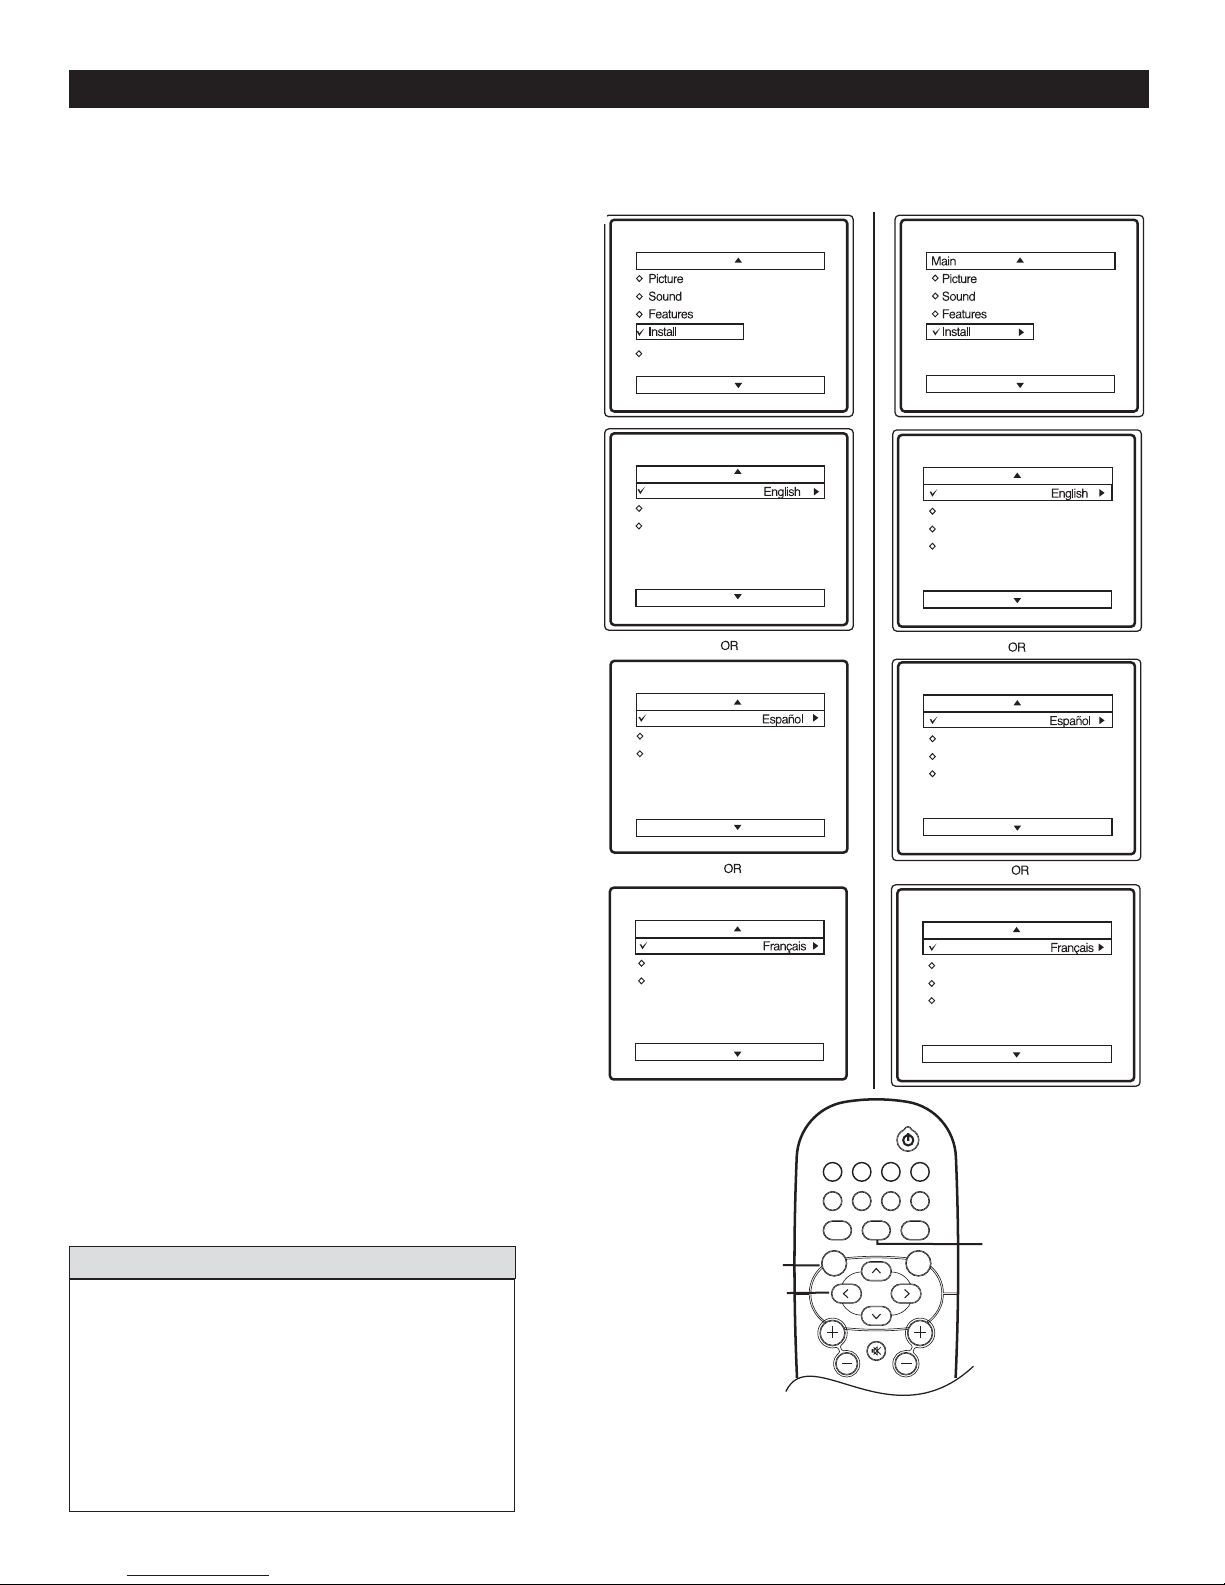
HOW TO USE THE LANGUAGE CONTROL
or French and Spanish speaking TV owners an onscreen Language option is present. With the Language control you
can set the TV’s on-screen menu to be shown in English, French, or Spanish.
F
Follow these steps for Digital Mode and Analog Mode
Press MENU button on the remote control to display
1
2
3
4
5
6
7
the onscreen menu.
Press CURSOR < or > to scroll through the
onscreen menu until you see Install highlighted.
Press CURSOR > to display the Install menu
features.
Press CURSOR < or > to scroll through the
Install features until you see Language highlighted.
Press CURSOR > to select English, Français
(French) or Español (Spanish).
When finished, press MENU button on the remote
twice to exit the menu from the TV screen.
Press A/D button on the remote to switch between
Digital and Analog Channels.
Digital Mode
Main
Language
Tuner Mode
Auto Install
DTV Setup
Install
Language
Tuner Mode
Auto Install
Instalar
Idioma
Sintonia
Auto Instalar
Analog Mode
Language
Tuner Mode
Auto Install
Channel Edit
Install
Language
Tuner Mode
Auto Install
Channel Edit
Instalar
Idioma
Sintonia
Auto Instalar
Editar Canal
HELPFUL HINT
The Language control only makes the TV on-screen
Menu items appear in English, Spanish, or French
text.
It does not change the other on-screen text
languages such as Closed Caption (CC) TV
programmes.
Press A/D button on the remote control to toggle
between Digital and Analog Mode.
Installation
Langue
Mode synt.
Installation auto
MENU
>
>
< >
POWER
FORMAT CLOCK SLEEP GUIDE
AV SAP CC INFO
A/D
MUTE
AUTO
PICTURE
AUTO
SOUND
MENU OK
VOL CH
Installation
Langue
Mode synt.
Installation auto
Editer progr.
A/D
toggles between
digital and analog
mode
10
Page 11
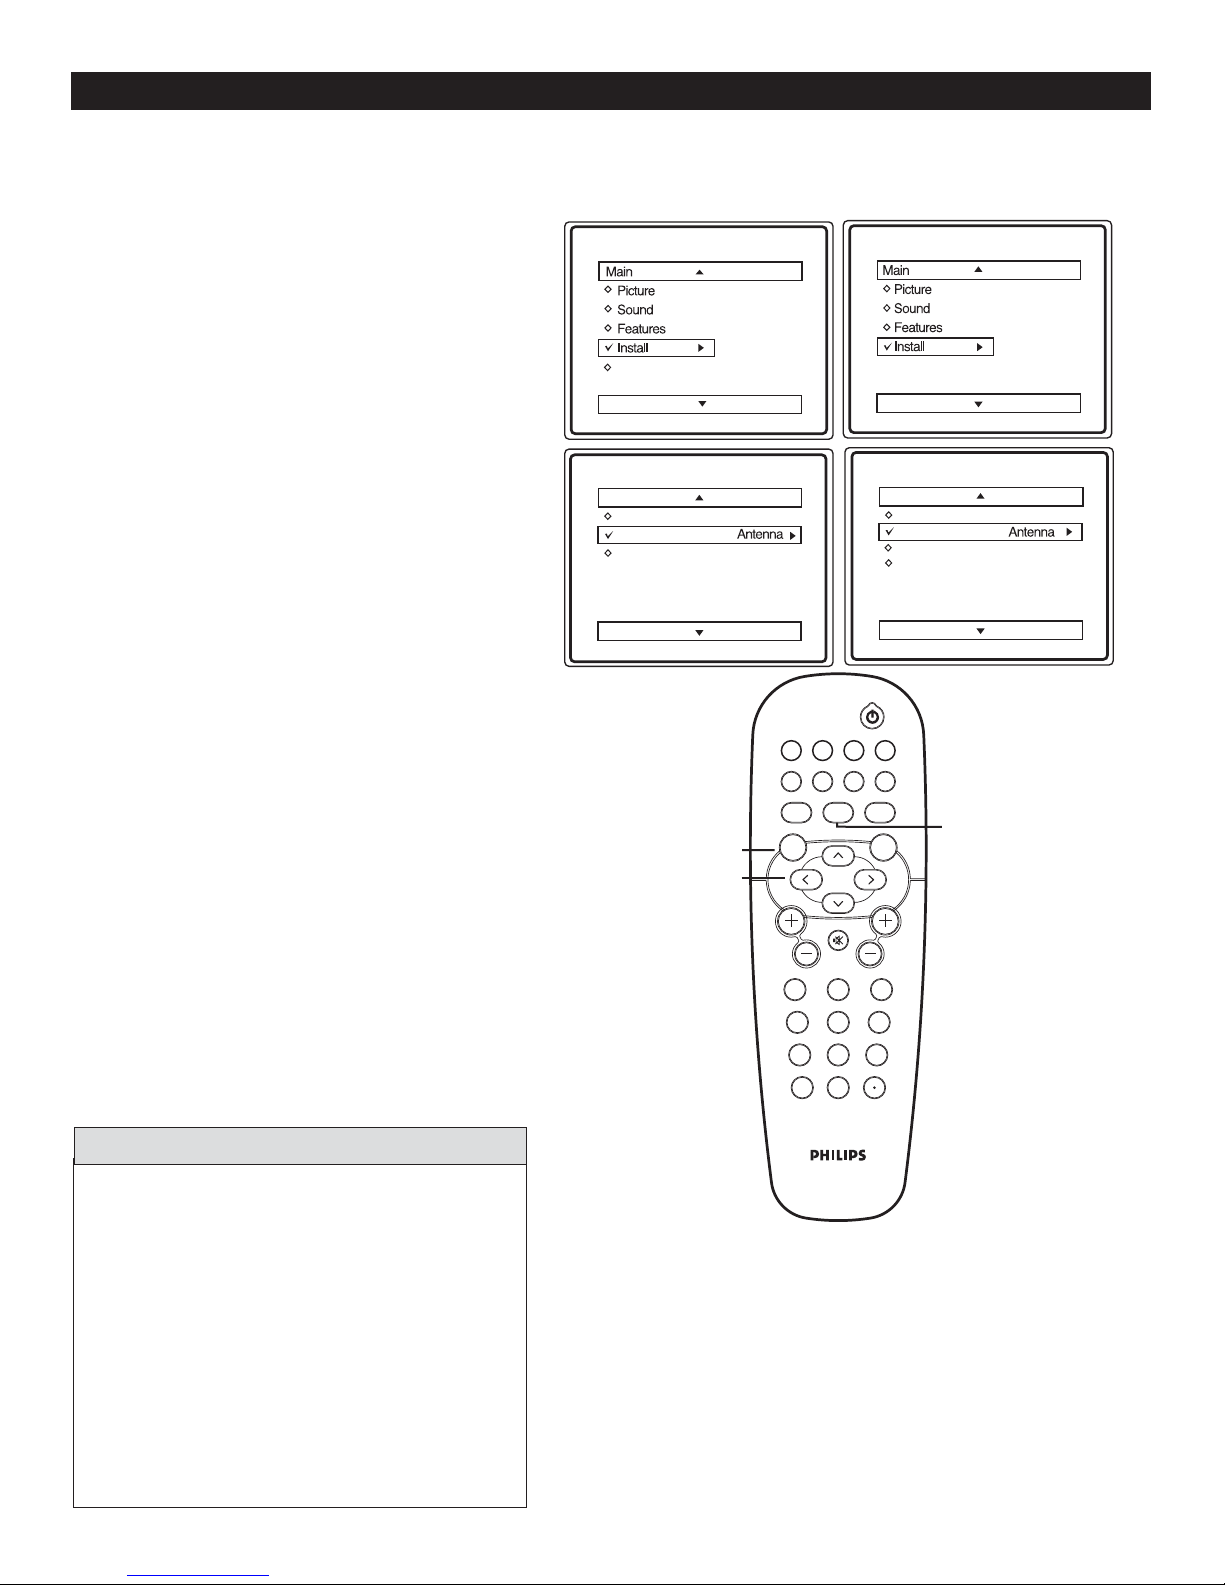
HOW TO USE THE TUNER MODE CONTROL
he TUNER MODE control lets you change the TV input signal to ANTENNA or CABLE mode. It is important
that you know which type of signal to look for (Cable or Antenna).
T
Follow these steps for Digital Mode and Analog Mode
Press MENU button on the remote control to
display the onscreen menu.
1
Press CURSOR < or > to scroll through
the onscreen menu until you see Install
2
highlighted.
Press CURSOR > to display the Install menu
features.
3
Press CURSOR < or > to scroll through the
Install features until you see Tuner Mode
4
highlighted.
Press CURSOR > to select Antenna or Cable.
5
When finished, press MENU button on the
remote control twice to exit the menu from
6
the TV screen.
Digital Mode Analog Mode
DTV Setup
Install
Language
Tuner Mode
Auto Install
MENU
>
>
Language
Tuner Mode
Auto Install
< >
POWER
FORMAT CLOCK SLEEP GUIDE
AV SAP
AUTO
SOUND
MENU OK
A/D
CC INFO
AUTO
PICTURE
Install
Language
Tuner Mode
Auto Install
Channel Edit
toggles between
digital and analog
mode
Language
Tuner Mode
Auto Install
Channel Edit
A/D
HELPFUL HINTS
When CABLE is selected, channels 1-135 are
available in Digital Mode and Channels 1-125 are
available in Analog Mode.
When ANTENNA is selected, channels 2-69 are
available for both Digital and Analog Modes.
When you install in either Digital or Analog
mode, both Digital and Analog channels will be
installed.
Press A/D button on the remote control to toggle between
Digital and Analog Mode.
MUTE
VOL CH
123
456
789
A/CH
0
1111
Page 12
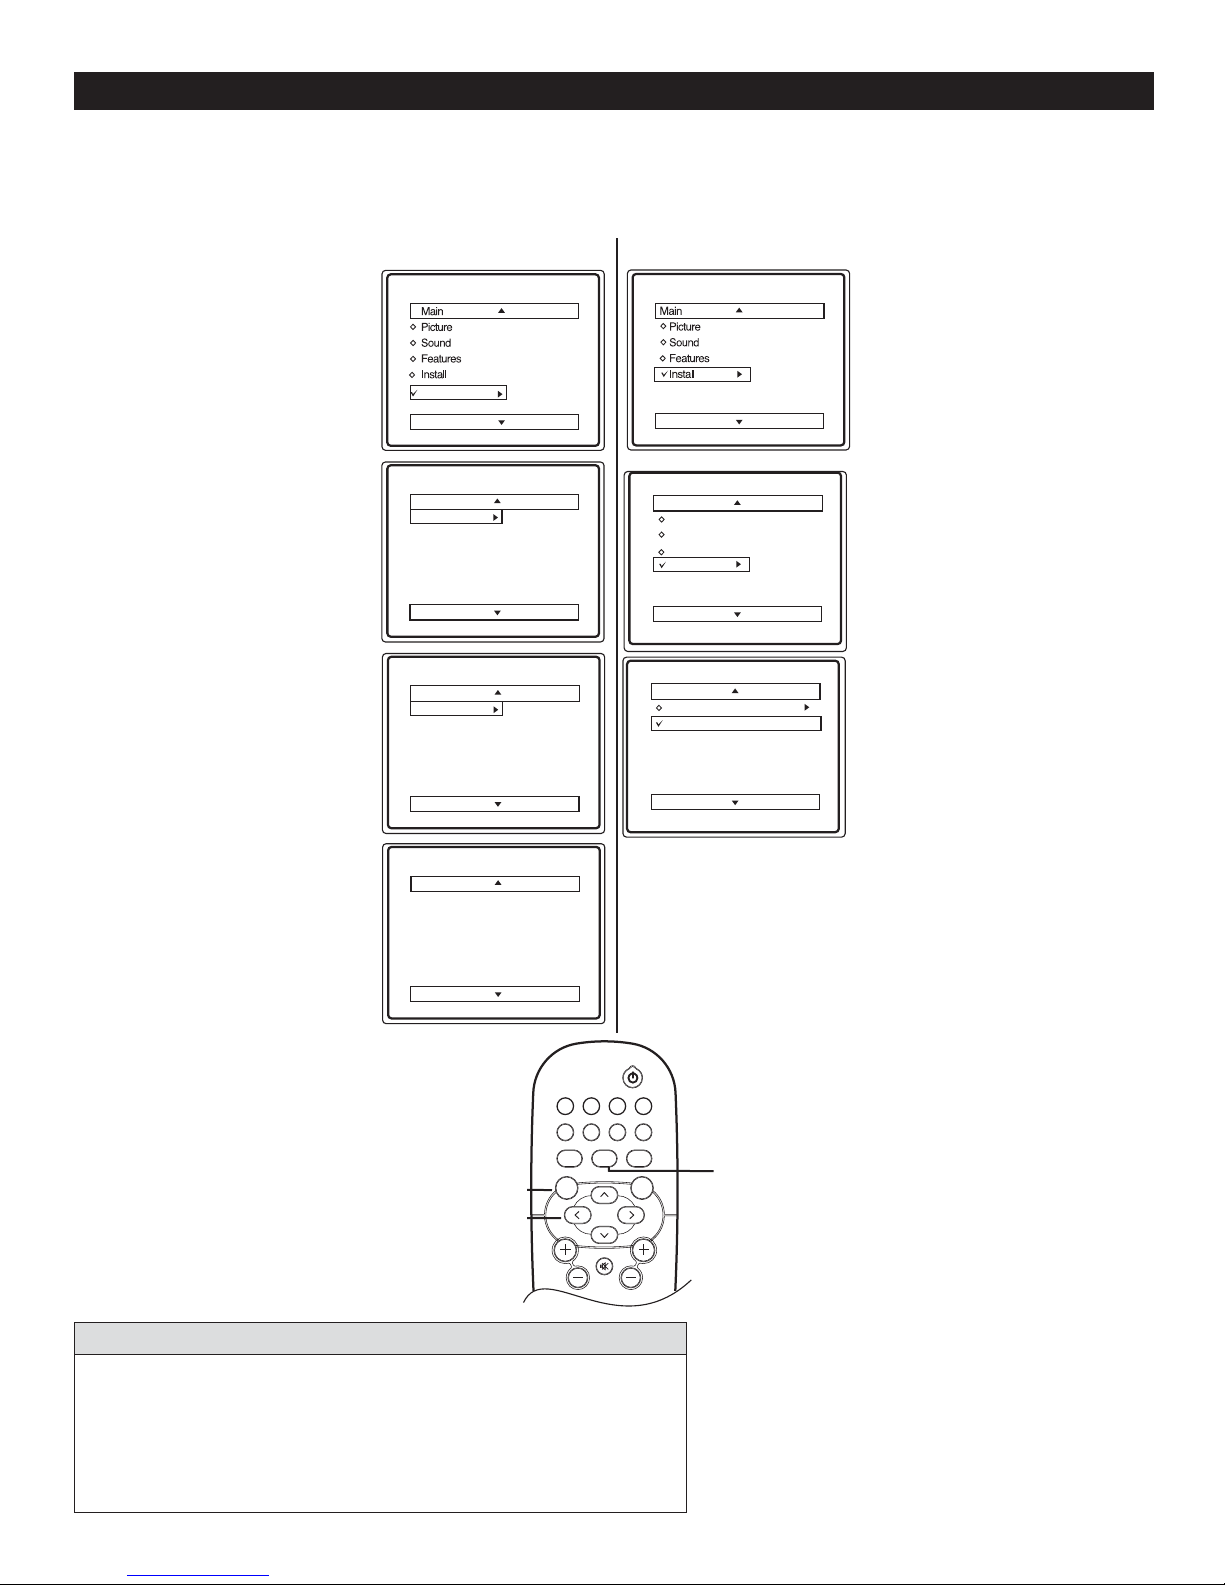
CHANNEL EDIT (ADD OR SKIP CHANNELS)
hannel Edit allows you to add or skip channels from your favorite list.
C
Follow these steps for Digital Mode
Press MENU on the
remote control to
1
display the onscreen
menu.
Press CURSOR < or
2
3
4
5
6
7
8
Note : When you are in Digital
Mode you can only add or skip
programs in Digital Channels.
> to scroll through the
onscreen menu until
you see DTV Setup
highlighted.
Press CURSOR >
to highlight the Ch.
Install menu features.
Press CURSOR < or
> to scroll through
the Ch. Install features
until you see Channel
Edit highlighted.
Press CURSOR > to
display the Channel Edit
options.
Press CURSOR < or
> to scroll the menu to
highlight the channel you
wish to add or skip.
Press CURSOR > or <
to toggle between Added
or Skipped. If Skipped is
selected, the channels will
be skipped when scrolling
channels with the CH+ or
CH- . If Added
is selected, the channels
will not be skipped when
scrolling channels with the
CH+ or CH- .
When finished, press
MENU on the remote
control four times to
exit the menu from the
TV screen.
Digital Mode Analog Mode
Language
Tuner Mode
Auto Install
DTV Setup
DTV Setup
Ch. Install
Digital Audio
Timer
Closed Caption
Emerg Alert
Ch. Install
Channel Edit
Weak Dig Sig
AutoLock
Fact CH Reset
Channel Edit
2 - 1 WCBS - DT Added
35 - 1 MELCO
MENU
>
>
< >
Channel Edit
Weak Dig Sig
AutoLock
Fact CH Reset
FORMAT CLOCK SLEEP GUIDE
AV SAP CC INFO
SOUND
MENU OK
VOL CH
AUTO
MUTE
Install
Language
Tuner Mode
Auto Program
Channel Edit
Channel Edit
Channel 3
Skipped
POWER
AUTO
A/D
PICTURE
Language
Tuner Mode
Auto Install
Channel Edit
Channel
Skipped
A/D
toggles between
digital and analog
mode
off
Follow these steps for Analog Mode
Press MENU on the
remote control to
1
display the onscreen
menu.
Press CURSOR < or >
to scroll through the
2
onscreen menu until you
see Install highlighted.
Press CURSOR > to
display the Channel
3
Edit menu features.
Press CURSOR < or
4
5
6
7
8
Note : When you are in Analog
Mode you can only add or skip
programs in Analog Channels.
> until the Channel you
wish to Edit is displayed.
Press CURSOR > to
highlight Skipped option.
Use CURSOR > or < to
toggle between on or off.
If On is selected, the
channels will be skipped
when scrolling channels
with the CH+ or CH- . If
Off is selected, the channels
will not be skipped when
scrolling channels with the
CH+ or CH- .
When finished, press
MENU button on the
remote control three
times to exit the menu
from the TV screen.
HELPFUL HINT
It is important to auto install the TV (Refer page 9) before you try to Edit
the Channels. If auto installation is not done, Channel Edit will show an
error message : Favorite Channel list is empty. You must Auto Install.
Press A/D button on the remote control to toggle between Digital and
Analog Mode.
1212
Page 13
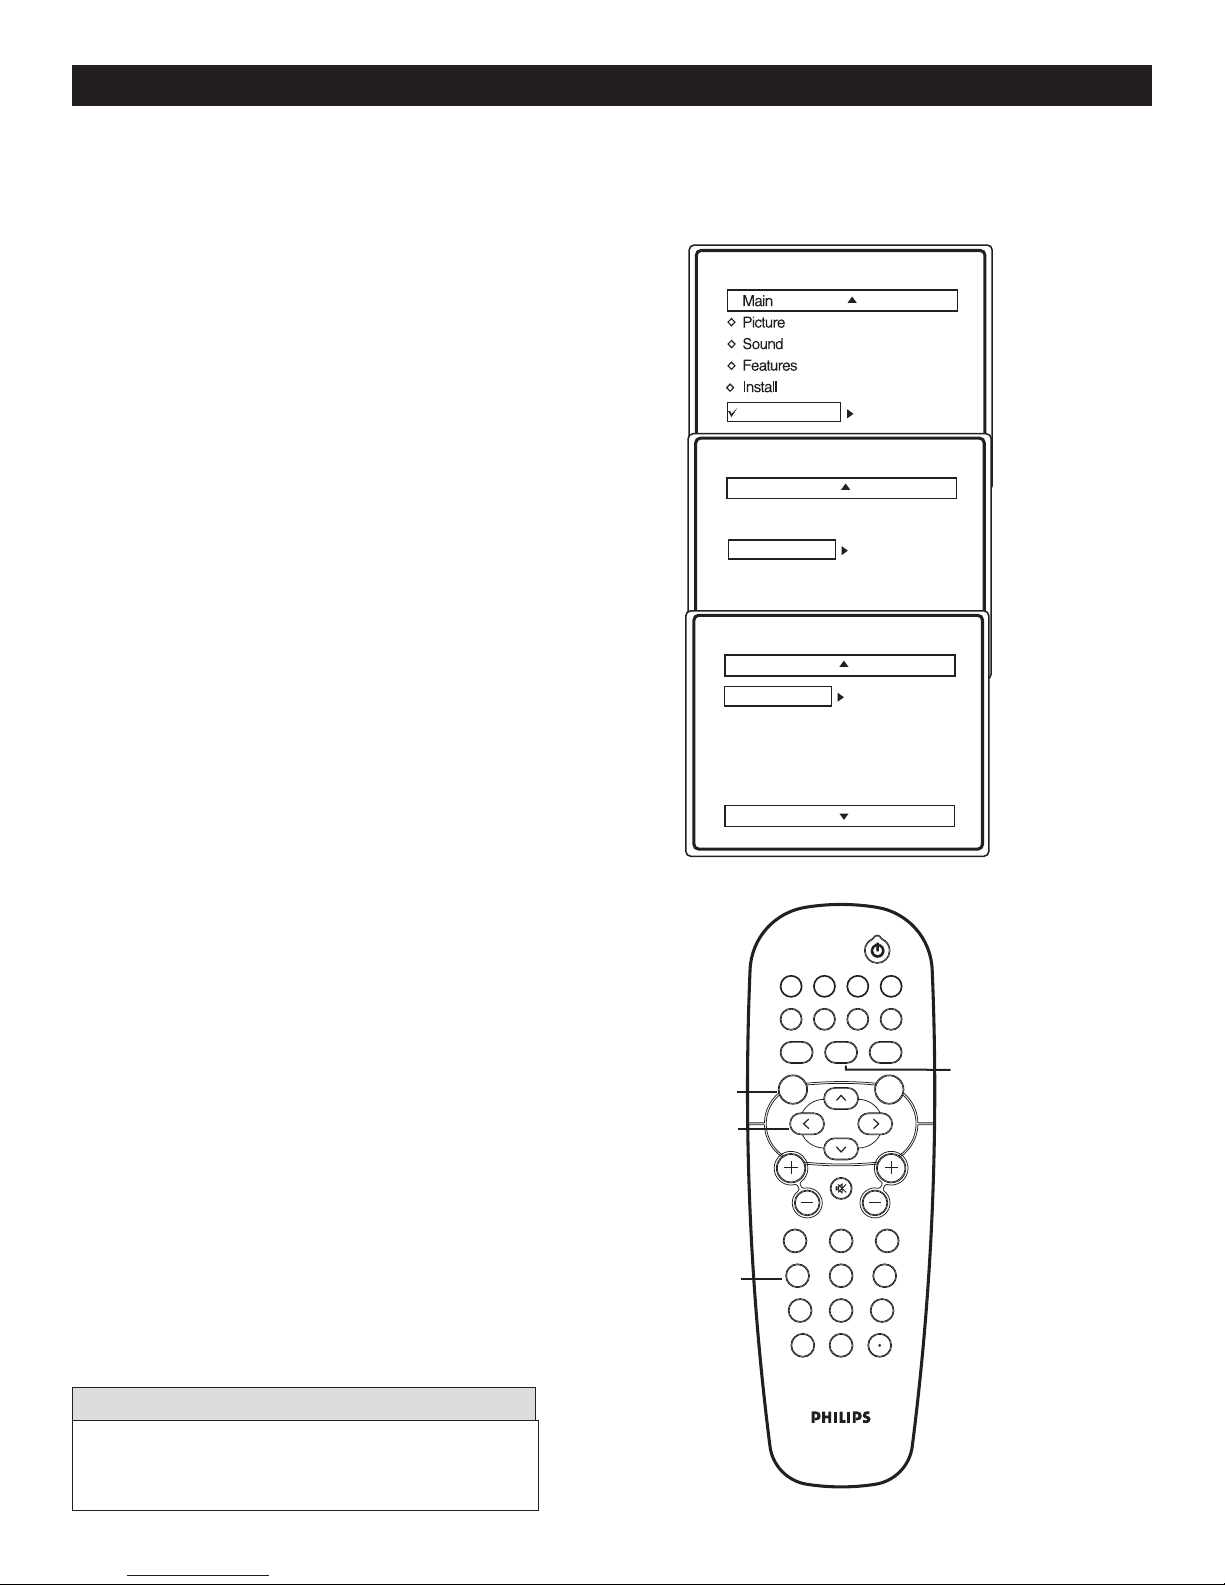
AUTO CHRON (SYNCHRONISATION OF TIME)
uto Chron allows you to set the clock of the TV automatically for automatic selection, there will be queries for
Channel, Time Zone and Day Light saving. After successful setup, Auto Chron will automatically maintain the
A
correct time. This feature is ONLY available in Digital Mode.
Press MENU button on the remote
1
2
3
4
5
6
control to display the onscreen menu.
Press CURSOR < or > to scroll
through the onscreen menu until you
see DTV Setup highlighted.
Press CURSOR > followed by CURSOR
< or > to scroll through the DTV Setup
features until you see Timer highlighted.
Press CURSOR > followed by
CURSOR < or > until Auto Chron is
highlighted.
Press CURSOR > followed by the
NUMERIC buttons on the
remote control to enter the channel
number which has the time you want your
TV to be synchronized to.
When finished, press MENU button on
the remote control three times to exit the
menu from the TV screen.
Digital Mode
DTV Setup
DTV Setup
Ch. Install
Digital Audio
Timer
Closed Caption
Emerg Alert
Timer
Auto Chron
Time Zone
Daylight Sav.
Auto Chron
Time Zone
Daylight Sav.
Enter Channel
0 - 0
HELPFUL HINT
Press A/D button on the remote control to toggle between
Digital and Analog Mode.
MENU
>
>
< >
NUMERIC
POWER
FORMAT CLOCK SLEEP GUIDE
AV SAP
AUTO
SOUND
MENU OK
VOL CH
123
CC INFO
AUTO
A/D
PICTURE
MUTE
456
789
A/CH
0
A/D
toggles between
digital and analog
mode
13
Page 14
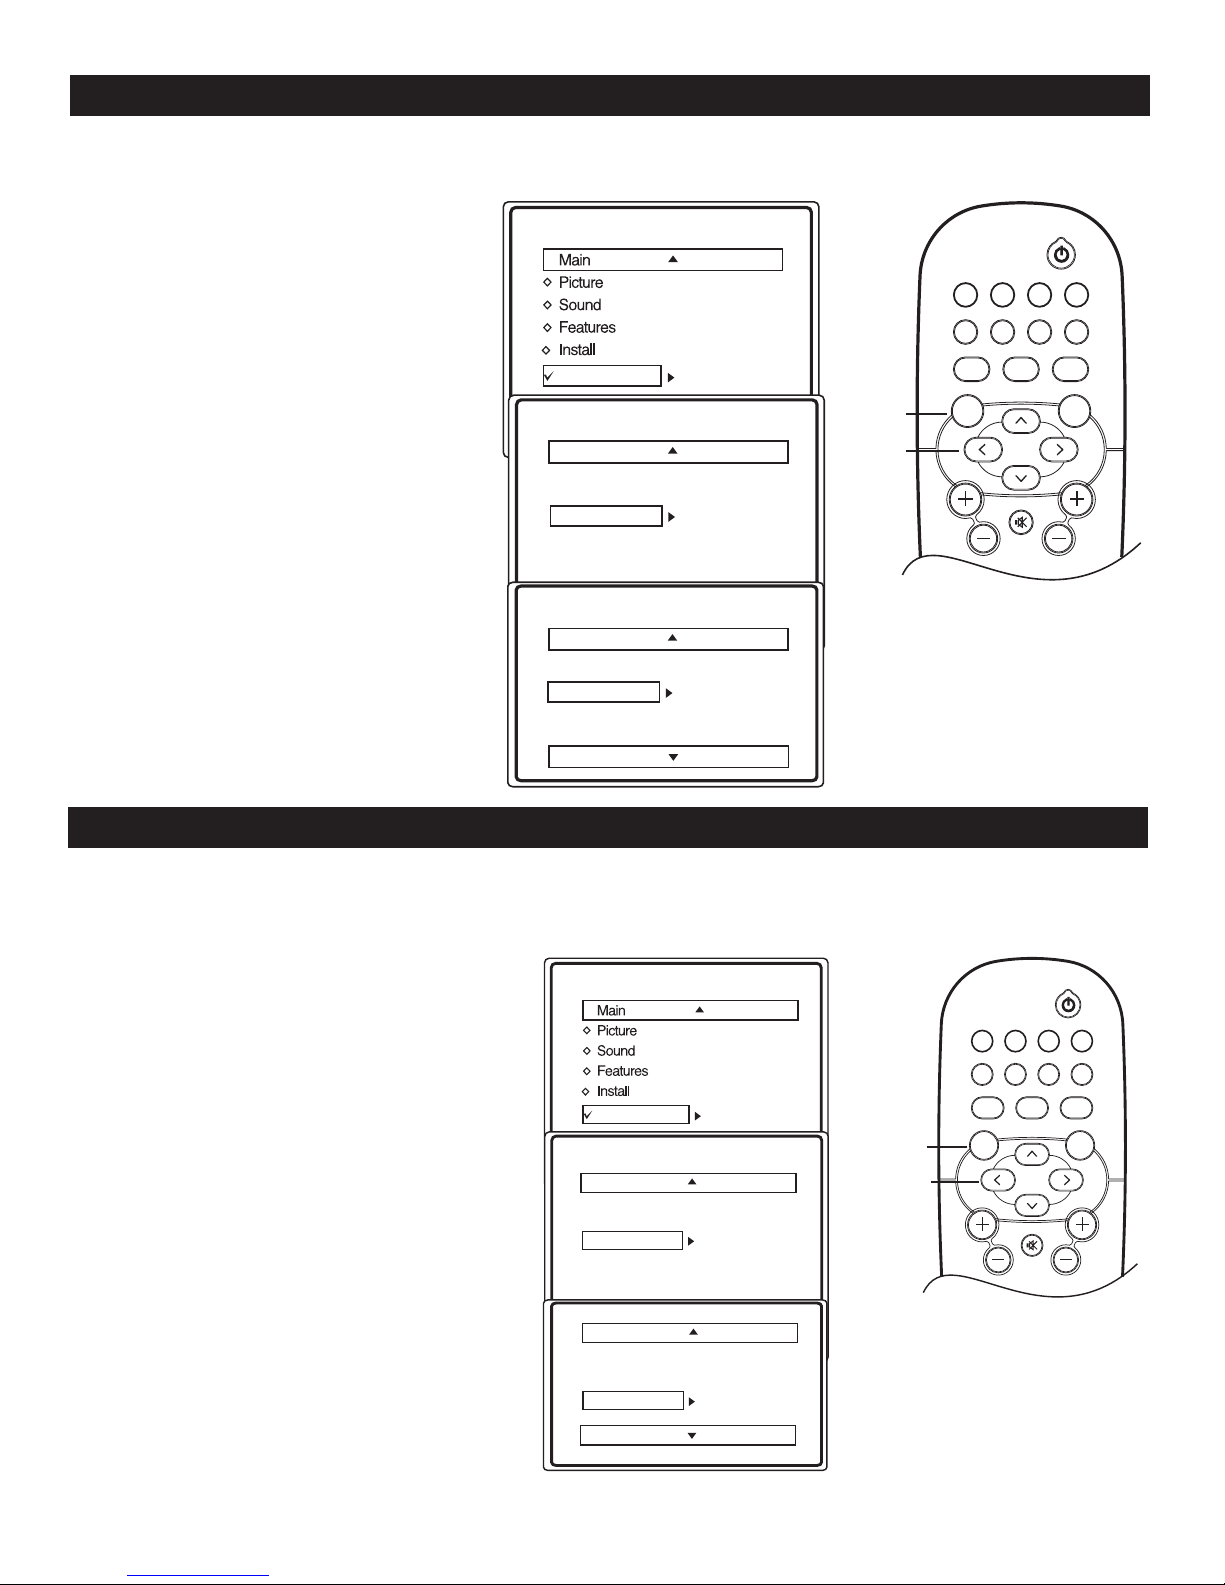
TIMER - TIME ZONE
imer feature allows you to select the time zone you are in.
T
Press MENU button on the remote
1
2
3
4
5
control to display the onscreen menu.
Press CURSOR < or > to scroll
through the onscreen menu until you
see DTV Setup highlighted.
Press CURSOR > followed by
CURSOR < or > to scroll through
the DTV Setup features until you see
Timer highlighted.
Press CURSOR > followed by
CURSOR < or > until Time Zone is
highlighted.
Press CURSOR > repeatedly to select
the Time Zone you are in. Choices
include Central, Mountain, Pacific,
Alaska, Hawaii, Atlantic and Eastern.
This Feature is ONLY available in Digital Mode.
Digital Mode
DTV Setup
DTV Setup
Ch. Install
Digital Audio
Timer
Closed Caption
Emerg Alert
Auto Chron
Time Zone
Daylight Sav.
MENU
>
>
< >
POWER
FORMAT CLOCK SLEEP GUIDE
AV SAP CC INFO
A/D
MUTE
AUTO
PICTURE
AUTO
SOUND
MENU OK
VOL CH
6
When finished, press MENU button on
the remote control four times to exit the
menu from the TV screen.
Timer
Auto Chron
Time Zone
Daylight Sav.
Pacific
TIMER - DAYLIGHT SAVING
aylight Saving feature in Digital Mode allows you to adjust the timer on the TV an hour ahead of the official
standard time. Daylight Saving is ONLY available in Digital Mode.
D
Press MENU button on the remote
1
2
3
4
5
6
control to display the onscreen menu.
Press CURSOR < or > to scroll
through the onscreen menu until you
see DTV Setup highlighted.
Press CURSOR > followed by CURSOR
< or > to scroll through the DTV Setup
features until you see Timer highlighted.
Press CURSOR > followed by
CURSOR < or > until Daylight Sav is
highlighted.
Press CURSOR > to select On or
Off. If Daylight Saving is set to On,
the Timer on the TV will display One hour
ahead of the actual time. If Daylight
Saving is set to Off, the Timer on the TV
will display the actual Time set.
When finished, press MENU button on
the remote four times to exit the menu
from the TV screen.
Digital Mode
DTV Setup
DTV Setup
Ch. Install
Digital Audio
Timer
Closed Caption
Emerg Alert
Timer
Auto Chron
Time Zone
Daylight Sav.
Auto Chron
Time Zone
Daylight Sav.
on
MENU
>
>
< >
FORMAT CLOCK SLEEP GUIDE
AV SAP CC INFO
SOUND
MENU OK
VOL CH
AUTO
A/D
MUTE
POWER
PICTURE
AUTO
Please be reminded to set Daylight Saving to Off
after the Daylight Saving Season.
14
Page 15
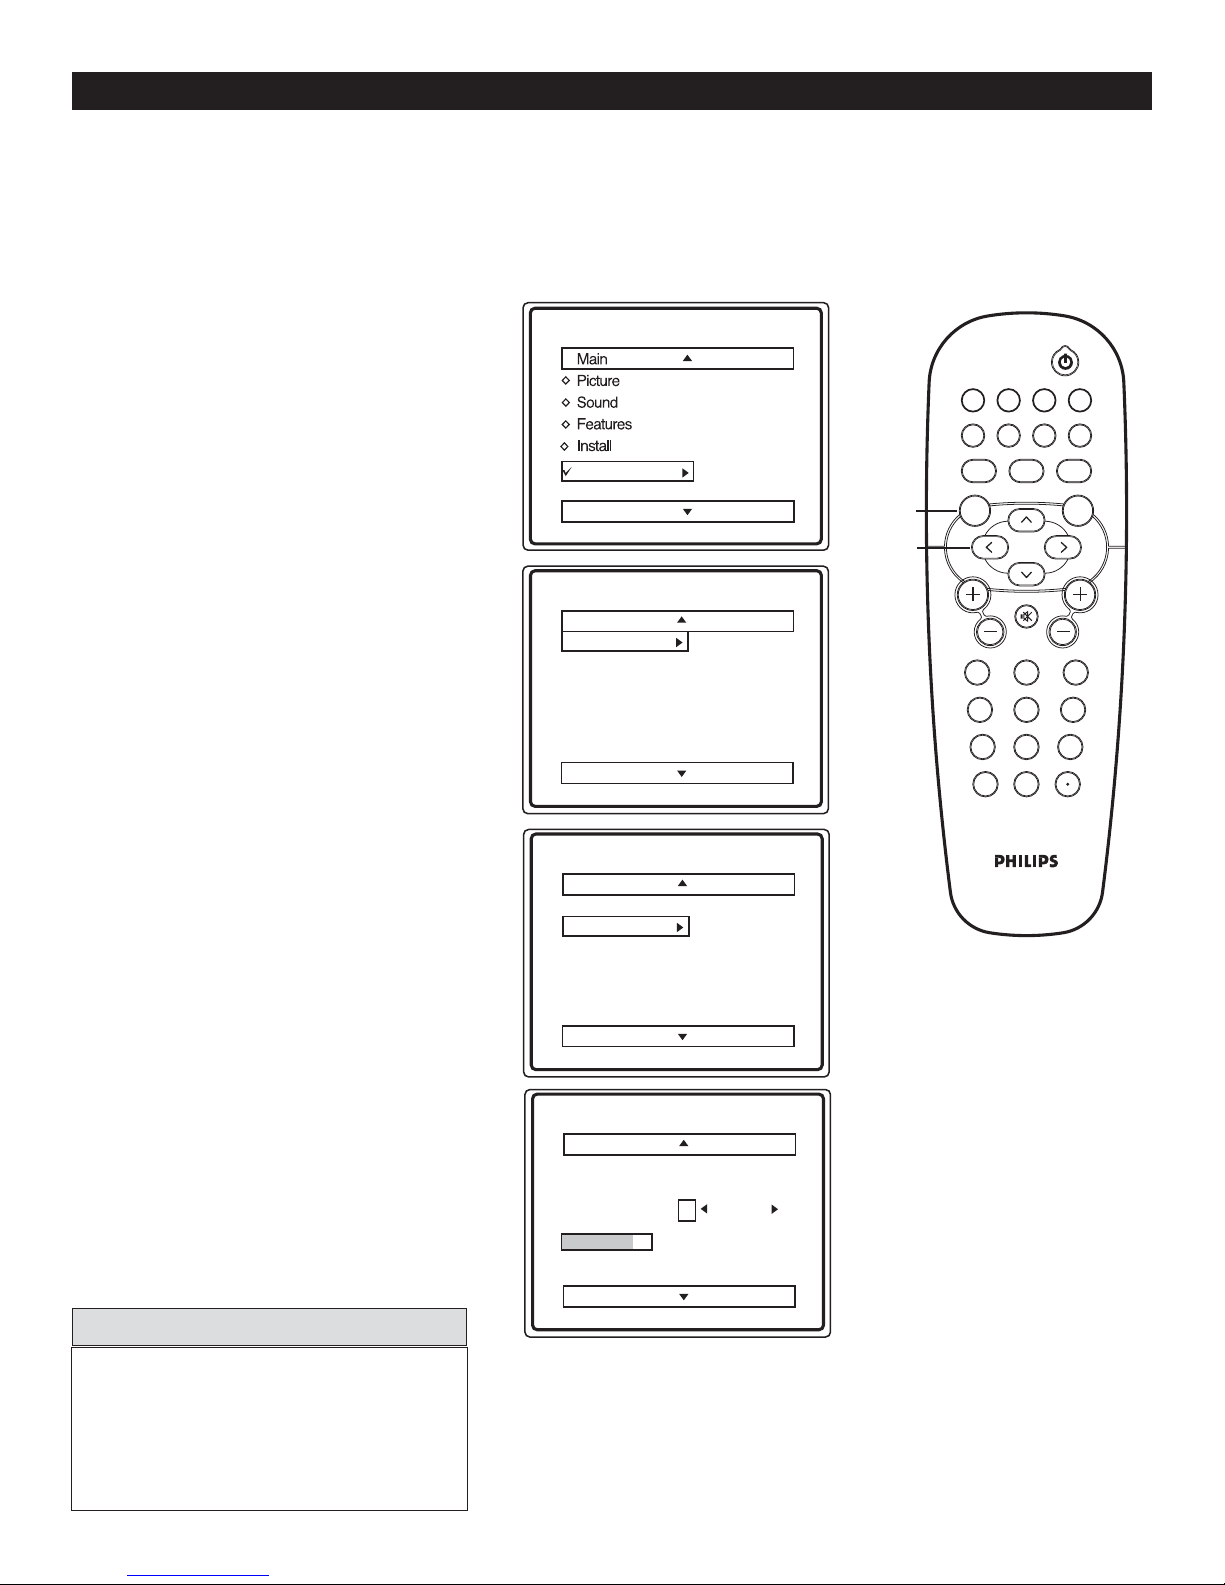
HOW TO ADD OR SKIP WEAK DIGITAL SIGNAL
igital broadcasting is still new. It is not uncommon for a broadcaster to only send out a digital signal for part of
D
a day. The reception could also come and go. If you program your channels when the signal is not being sent
or is weak it will not be saved in your channel setup. Using the Weak Digital Signal feature here, you can add those
channels with weak or no signals to your channel list. Adding or skipping Weak Digital Signal can ONLY be
done in Digital Mode.
Digital Mode
Press MENU button on the remote
control to display the onscreen menu.
1
Press CURSOR < or > to scroll
through the onscreen menu until you
2
see DTV Setup highlighted.
Press CURSOR > to display the DTV
Setup menu features.
3
Press CURSOR < or > to
scroll through the DTV SETUP
4
features until you see Ch. Install
highlighted. Press CURSOR > to display
Ch. Install features.
Press CURSOR < or > to scroll
through the DTV Setup features until you
5
see Weak Dig Sig highlighted.
Press CURSOR > to display the Weak
Dig Sig options.
6
Use CURSOR < or > to highlight the
channel you wish to add or skip.
7
Use CURSOR > to toggle between
Added or Skipped. If Skipped is selected
8
the channels will be skipped when scrolling
channels with CH+ or CH-. If Added is
selected the channels will not be skipped when
scrolling channels with CH+ or CH-.
DTV Setup
DTV Setup
Ch. Install
Digital Audio
Timer
Closed Caption
Emerg Alert
Ch. Install
Channel Edit
Weak Dig Sig
AutoLock
Fact CH Reset
Channel Edit
Weak Dig Sig
AutoLock
Fact CH Reset
MENU
>
>
< >
FORMAT CLOCK SLEEP GUIDE
AV SAP
AUTO
SOUND
MENU OK
VOL CH
123
456
789
A/CH
A/D
MUTE
0
POWER
CC INFO
AUTO
PICTURE
When finished, press MENU button
on the remote five times to exit the menu
9
from the TV screen.
HELPFUL HINTS
When no transmission is received from the
broadcaster, the message, 'NO PROGRAM'
will appear on the TV screen.
Press A/D button on the remote control to toggle
between Digital and Analog Mode.
Weak Dig Sig
Signal
Strength
15
5
6
7
8
9
Skipped
Page 16
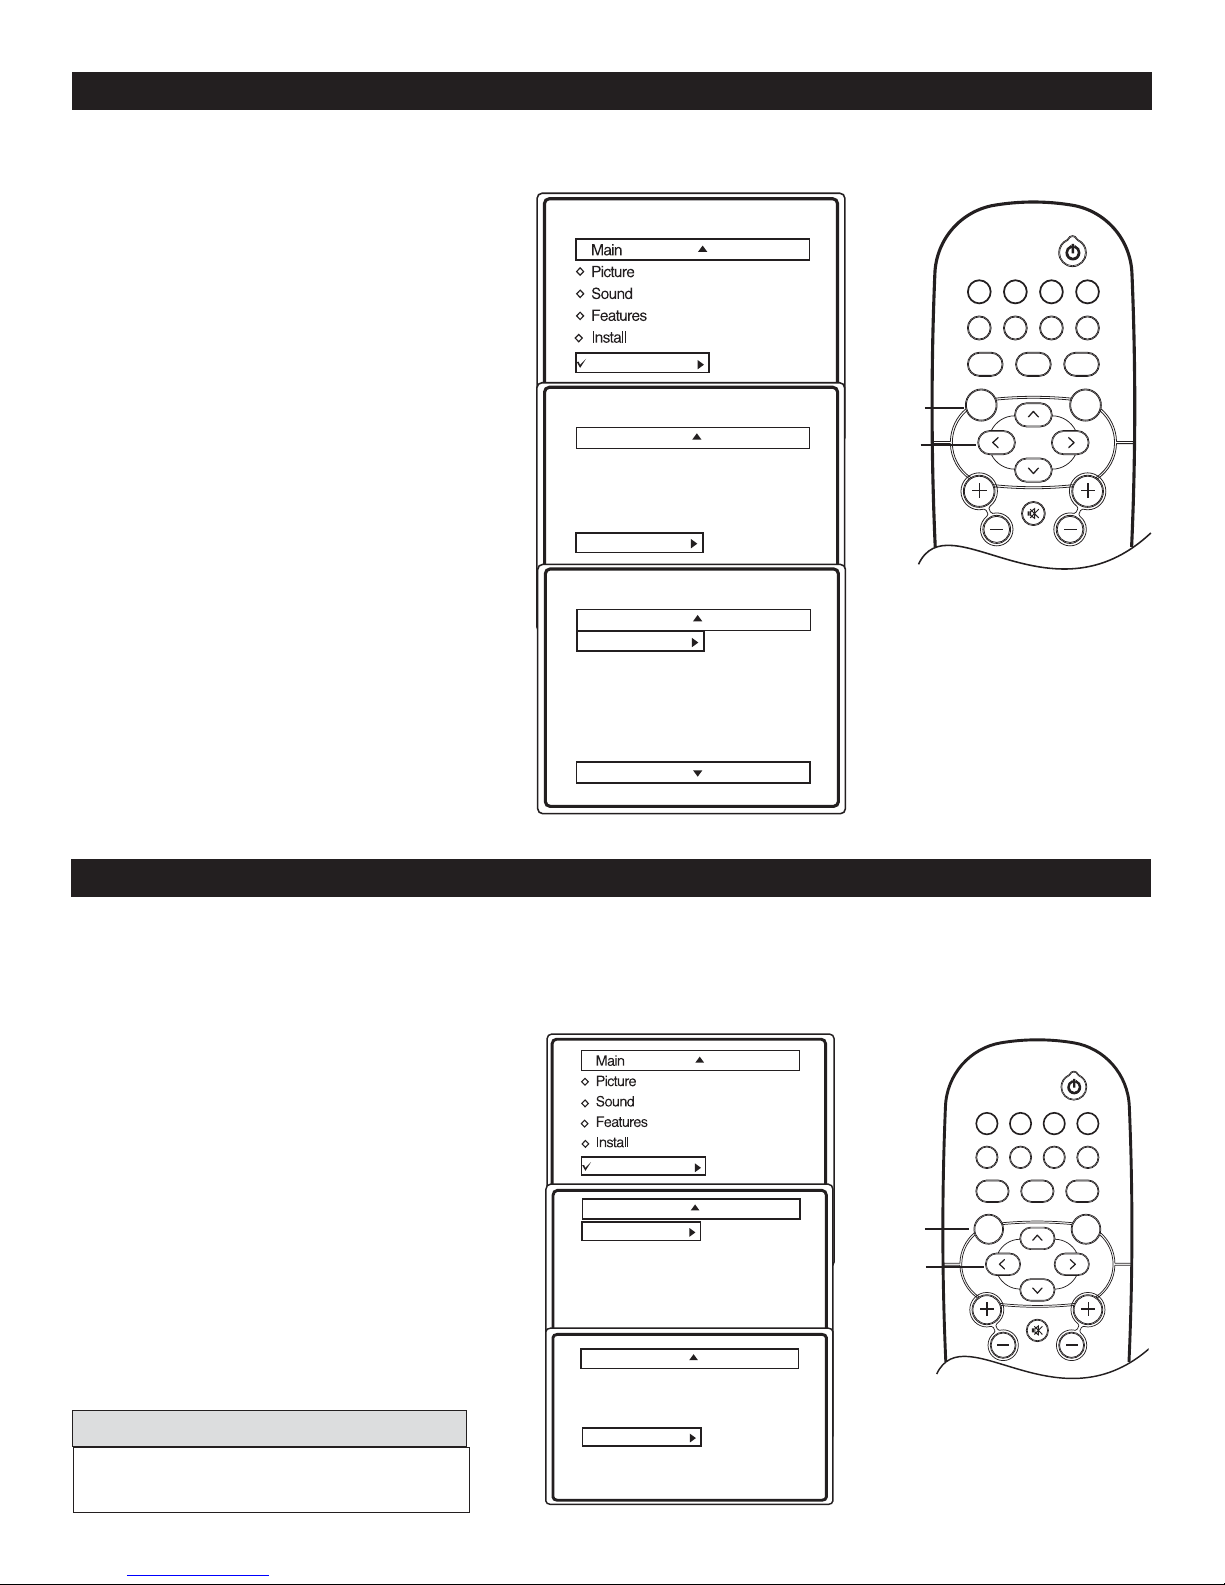
EMERGENCY ALERT SETTING
mergency Alert lets you display or discard emergency alerts for Low or Medium priority.
This feature is ONLY available in Digital mode.
E
Digital Mode
Press MENU button on the remote control
to display the onscreen menu.
1
Press CURSOR < or > to scroll through
the onscreen menu until you see DTV Setup
2
menu highlighted.
Press CURSOR > to display the DTV
Setup menu features.
3
Press CURSOR < or > to scroll through the
DTV Setup features until you see Emerg
4
Alert highlighted.
Press CURSOR > to enter the the Emerg
5
6
7
Alert sub menu.
Press CURSOR < or > to highlight either
Medium or Low.
Press CURSOR > to switch between On
or Off. If On is selected, the TV will display
the alert of that priority.
DTV Setup
DTV Setup
Ch. Install
Digital Audio
Timer
Closed Caption
Emerg Alert
Emerg Alert
Medium
Low
Medium
Low
on
MENU
>
>
< >
FORMAT CLOCK SLEEP GUIDE
AV SAP CC INFO
AUTO
A/D
SOUND
MENU OK
MUTE
VOL CH
POWER
AUTO
PICTURE
When finished, press MENU buttion on the
remote control four times to exit the menu
8
from the TV screen.
* Emergency Alert will not be visible if no
broadcast is received or when the TV is in
Stanby mode.
FACTORY CHANNEL RESET
actory Channel Reset feature lets you erase the contents of the master, user and favorite channel lists. This restores the
TV to the initial state before the first Auto Program operation. This feature is ONLY available in Digital Mode. For
F
instructions on how to Auto Install the TV again, refer to page 9.
Press MENU on the remote control to
display the onscreen menu.
1
Press CURSOR < or > to scroll
through the onscreen menu until you see
2
DTV Setup highlighted.
Press CURSOR > to display the Ch.
Install menu features.
3
Press CURSOR < or > to scroll through
the Ch. Install features until you see Fact
4
CH Reset highlighted.
Press CURSOR > to clear all
DTV settings OR Press the Menu button
5
on the remote control to maintain the
DTV settings.
HELPFUL HINTS
Press A/D button on the remote control to toggle
between Digital and Analog Mode.
Digital Mode
DTV Setup
DTV Setup
Ch. Install
Digital Audio
Timer
Closed Caption
Emerg. Alert
Ch. Install
Channel Edit
Weak Dig Sig
AutoLock
Fact CH Reset <clear all DTV ?
“menu” key to
maintain DTV>
MENU
>
>
< >
FORMAT CLOCK SLEEP GUIDE
AV SAP CC INFO
AUTO
A/D
SOUND
MENU OK
MUTE
VOL CH
POWER
PICTURE
AUTO
16
Page 17
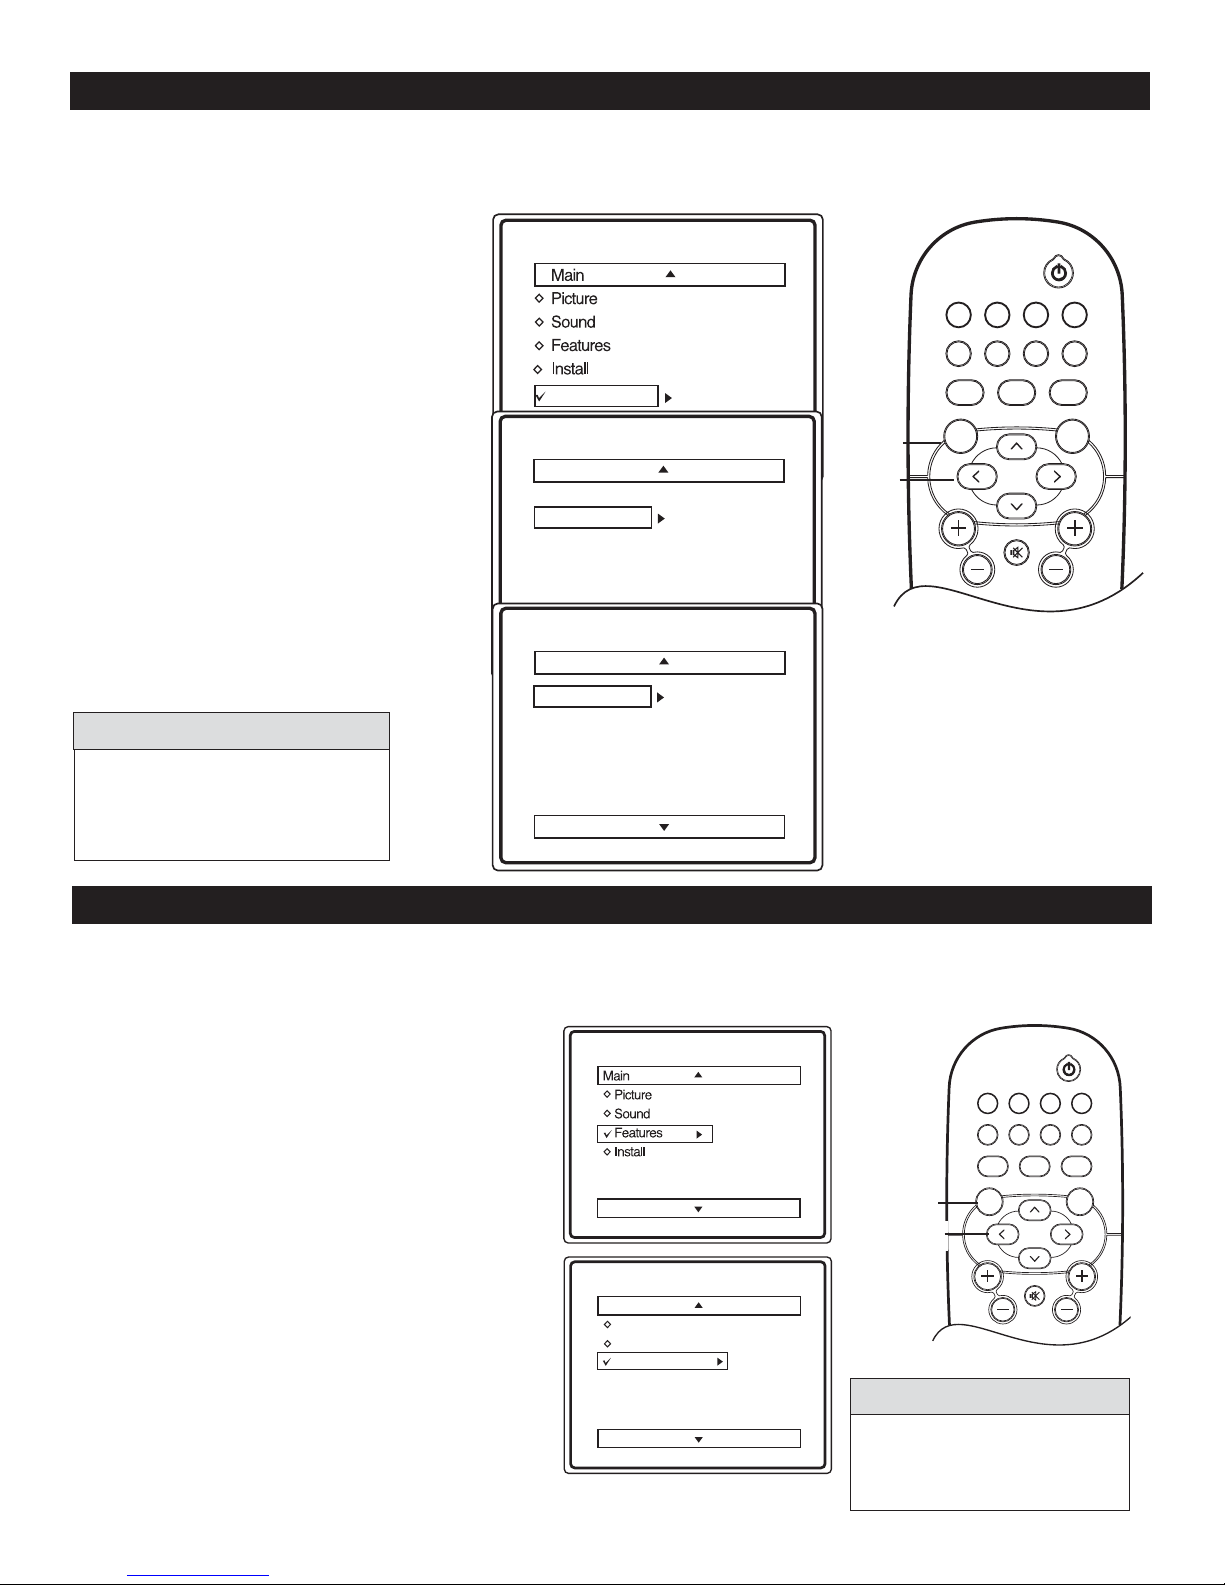
DIGITAL AUDIO (SELECTING AUDIO LANGUAGES)
igital Audio allows you to switch to another audio language when it is available. This feature is ONLY available in Digital
Mode.
D
Press MENU button on the remote
control to display the onscreen menu.
1
Press CURSOR < or > to scroll
through the onscreen menu until you
2
see DTV Setup highlighted.
Press CURSOR > to display the
DTV Setup menu features.
3
Press CURSOR < or > to scroll
through the DTV SETUP features until
4
you see Digital Audio highlighted.
Press CURSOR > to select the
language you want to hear.
5
HELPFUL HINTS
This is only for programs that are
shown in more than one audio
language.
Digital Mode
DTV Setup
DTV Setup
Ch. Install
Digital Audio
Timer
Closed Caption
Emerg Alert
Digital Audio
Multi Lingual English
Multi Lingual
MENU
>
>
< >
POWER
FORMAT CLOCK SLEEP GUIDE
AV SAP CC INFO
A/D
MUTE
AUTO
PICTURE
AUTO
SOUND
MENU OK
VOL CH
ACTIVE CONTROL OPTIONS
ctive control options adjusts the picture quality according to the signal strength coming in.
This feature is ONLY available in Analog Mode.
A
Press MENU button on the remote control to
display the onscreen menu.
1
Press CURSOR < or > to scroll through
the onscreen menu until you see Features
2
highlighted.
Press CURSOR > or < to display the
Features menu.
3
Press CURSOR < or > repeatedly until you
see Active Control highlighted.
4
Press CURSOR > or < to toggle the Active
5
6
Control to On and Off. When On is
selected, the TV will automatically adjust the
picture quality according to the signal strength
received.
When finished, press MENU button on the
remote control twice to exit the menu from
the TV screen.
Analog Mode
Features
Timer
AutoLock
Active Control
Timer
AutoLock
Active Control
MENU
>
On
Press A/D button on the remote
control to toggle between Digital
and Analog Mode.
FORMAT CLOCK SLEEP GUIDE
AV SAP CC INFO
AUTO
A/D
SOUND
MENU OK
>
< >
MUTE
VOL CH
HELPFUL HINTS
POWER
PICTURE
AUTO
17
Page 18
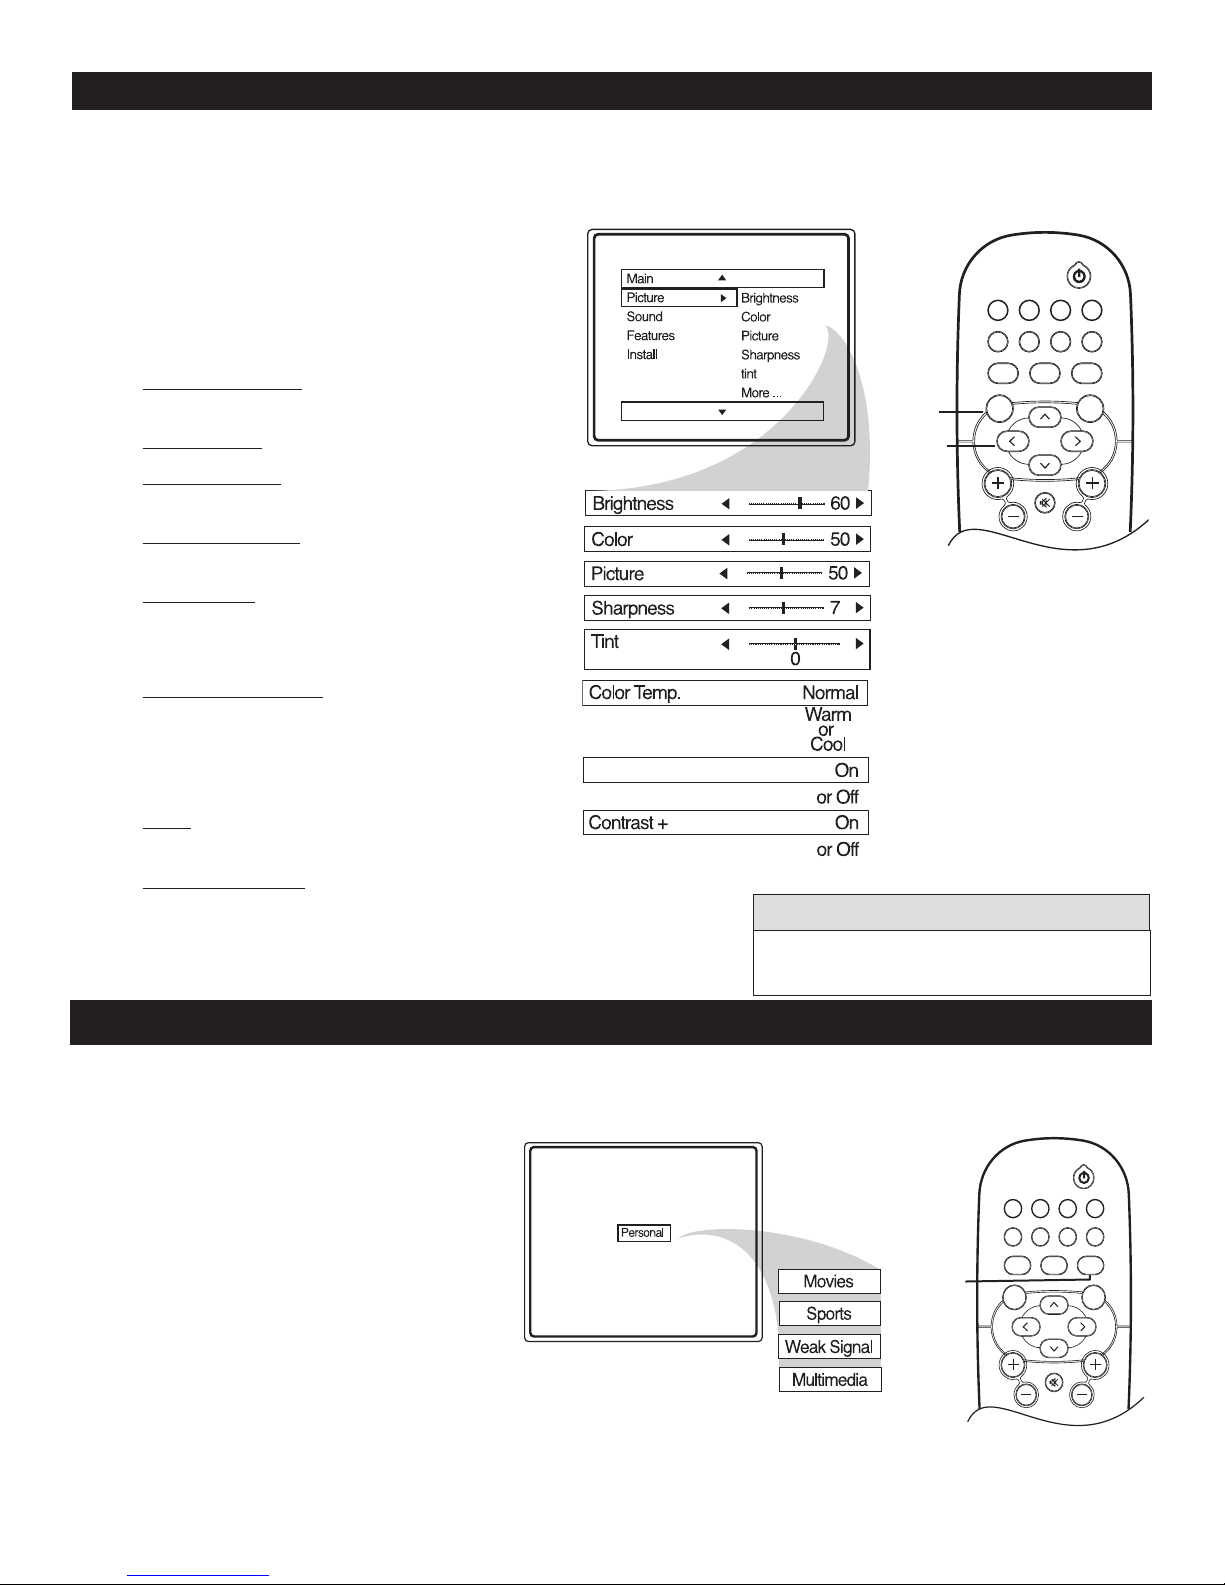
PICTURE MENU CONTROLS
o adjust your TV picture controls, select a channel and use the Picture Menu Controls listed below. Your selection is
stored as Personal.
T
Press MENU button on the remote control to
display the onscreen menu.
1
Press CURSOR < or > to until the Picture
menu feature is highlighted.
2
Digital and Analog Mode
POWER
FORMAT CLOCK SLEEP GUIDE
Press
3
Brightness Control - until the darkest parts of the
picture are as bright as you want.
Picture Control - until the lightest parts of the
picture show good detail.
Sharpness Control - to improve sharpness in the
picture.
Tint Control - adjust natural skin tones in the
picture quality.
Note : Tint is not available in Digital Mode
Color Temp Control - to select Normal, Cool,
or Warm picture preferences. For Normal, whites
will mainain their whiteness;
Cool will make the whites bluish; and Warm will
make the whites reddish.
DNR - When set to On Dynamic Noise Reduction
Contrast + Control - when set to On, the
Contrast + control helps to “sharpen” the
picture quality. The black portions of the picture
become richer in darkness and the whites become
brighter.
CURSOR > or < to adjust
Color Control - to add or remove color.
helps to eliminate "noise" from the picture.
DNR
AV SAP CC INFO
A/D
MUTE
AUTO
PICTURE
MENU
>
>
< >
AUTO
SOUND
MENU OK
VOL CH
HELPFUL HINTS
Press A/D button on the remote control to toggle
between Digital and Analog Mode.
hether you’re watching a movie or a sporting event, your TV has automatic video control settings to enhance
your current program source or content.
W
Press AUTO PICTURE button on the
1
2
NOTE: The way you choose to set the Picture Menu
Controls will become your Personal setting.
remote control. The current Auto Picture
setting will display on the screen.
Press AUTO PICTURE repeatedly to
select either Personal, Movies, Sports,
Weak Signal or Multimedia picture
settings.
AUTO PICTURE
18
AUTO
PICTURE
POWER
FORMAT CLOCK SLEEP GUIDE
AV SAP CC INFO
MUTE
AUTO
A/D
PICTURE
AUTO
SOUND
MENU OK
VOL CH
Page 19

SOUND MENU CONTROLS
o adjust your TV sound, use the Sound Menu Controls listed below.
T
Press MENU button on the remote control
to display the onscreen menu.
1
Press CURSOR > to until the Sound menu
feature is highlighted.
2
Press
CURSOR > or < to adjust
3
Treble: Enhance the high frequency sounds.
Bass: Enhance the low frequency sounds.
SAP: Secondary Audio Programming is sent as
Balance: Level of sound coming from the left
and right speakers.
AVL: (Auto Volume Leveler) When turned
On, AVL will level out the sound being heard
when sudden change in volume occurs during
commercial breaks or channel changes.
Incr. Surround: Select Incr. Surround or
Stereo settings if you're in Stereo mode.
Select Mono or Spatial if you're in Mono mode.
a third audio channel, a SAP signal can be heard
apart from the current TV program sound.
Note: If SAP is not present on a selected show,
No SAP will be displayed on the TV screen.
Sound: toggles between Stereo or Mono
settings.
Note: If Stereo is not present on a selected
show and the TV is in Stereo mode, the sound
coming from the TV will remain in the Mono
mode.
HELPFUL HINTS
Press A/D button on the remote control to toggle
between Digital and Analog Mode.
Digital Mode
MENU
>
>
< >
Your selection is stored as Personal.
Analog Mode
L
Incr. Surround
FORMAT CLOCK SLEEP GUIDE
AV SAP CC INFO
AUTO
SOUND
MENU OK
VOL CH
MUTE
R
POWER
AUTO
A/D
PICTURE
Incr. Surround
or Stereo
or
Spatial
or Mono
he Auto Sound feature allows the listener to select between four different pre-set sound options.
T
Press AUTO SOUND button on the remote
control. The current Auto Sound setting will
1
be displayed in the middle of the TV screen.
Press AUTO SOUND repeatedly to
toggle between the four settings. (Personal,
2
Theatre, Music, or Voice).
NOTE: The way you choose to set the Sound Menu
Controls will become your Personal setting.
AUTO SOUND
19
AUTO
SOUND
POWER
FORMAT CLOCK SLEEP GUIDE
AV SAP CC INFO
MUTE
AUTO
A/D
PICTURE
AUTO
SOUND
MENU OK
VOL CH
Page 20

UNDERSTANDING AUTOLOCK CONTROLS
utoLock is a feature that lets the TV receive and process data sent by broadcasters or other program providers with program content
A
advisory. When programmed by the viewer, a TV with AutoLock can respond to the content advisory and block program content
that may be found objectionable (such as offensive language, violence, sexual situations, etc.). This feature is useful for adults to prevent
certain types of programs from being viewed by children.
AutoLock offers various BLOCKING controls to choose from:
Access Code - An Access Code must be set to prevent children from unblocking questionable or censored programming set by their
parents.
Channel Block - After an access code has been programmed, you cannot block individual channels including the A/V inputs.
Clear All - Lets you clear all channels being blocked from your viewing set with the Channel Block Control.
Block All - Lets you block ALL channels except A/V inputs.
No Rating / Unrated - ALL programing with no content advisory data can be blocked if NO RATING / Unrated is set to ON.
Movie Ratings - Certain blocking options exist which will block programming based on ratings patterned by the Motion Pictures
Association of America (MPAA).
TV Ratings - Like the Movie Ratings, programs can be blocked from viewing using standard TV ratings set by TV broadcasters.
MOVIE RATINGS
G: General Audience - All ages admitted. Suitable for all ages.
PG: Parental Guidance Suggested - Contains material
unsuitable for younger children.
PG-13: Parents Strongly Cautioned - Contains material
unsuitable for children under the age of 13.
R: Restricted - Suitable for adults above 17 years of age only.
NC-17: No one under the age of 17 will be admitted.
X: Adults Only - Contains one or more of the following: very
graphic violence, very graphic and explicit or indecent sexual acts,
very coarse and intensely suggestive language.
TV RATINGS
TV-Y : Designed for a very young audience, including children
ages 2-6
TV-Y7: Appropriate for children age 7 and above who have
acquired the development skills needed to distinguish between
make-believe and reality.
acquired the development skills needed to distinguish between
make-believe and reality.
TV-G : Suitable for most audiences. Contains little or no violence,
no strong language, and little or no sexual dialogue or situations.
TV-PG: Contains material unsuitable for younger children.
Could contain Moderate violence (V), some sexual situations (S),
infrequent coarse language (L), or some suggestive dialogue (D).
TV-14: Contains some material unsuitable for children under
14 years of age. Contains one or more of the following: intense
violence (V), intense sexual situations (S), strong coarse language
(L), or intensely suggestive dialogue (D).
TV-MA - Viewed by adults and therefore may be unsuitable for
children under 17. Contains one or more of the following: graphic
violence (V), explicit sexual situations (S), or crude indecent
language (L).
20
Page 21
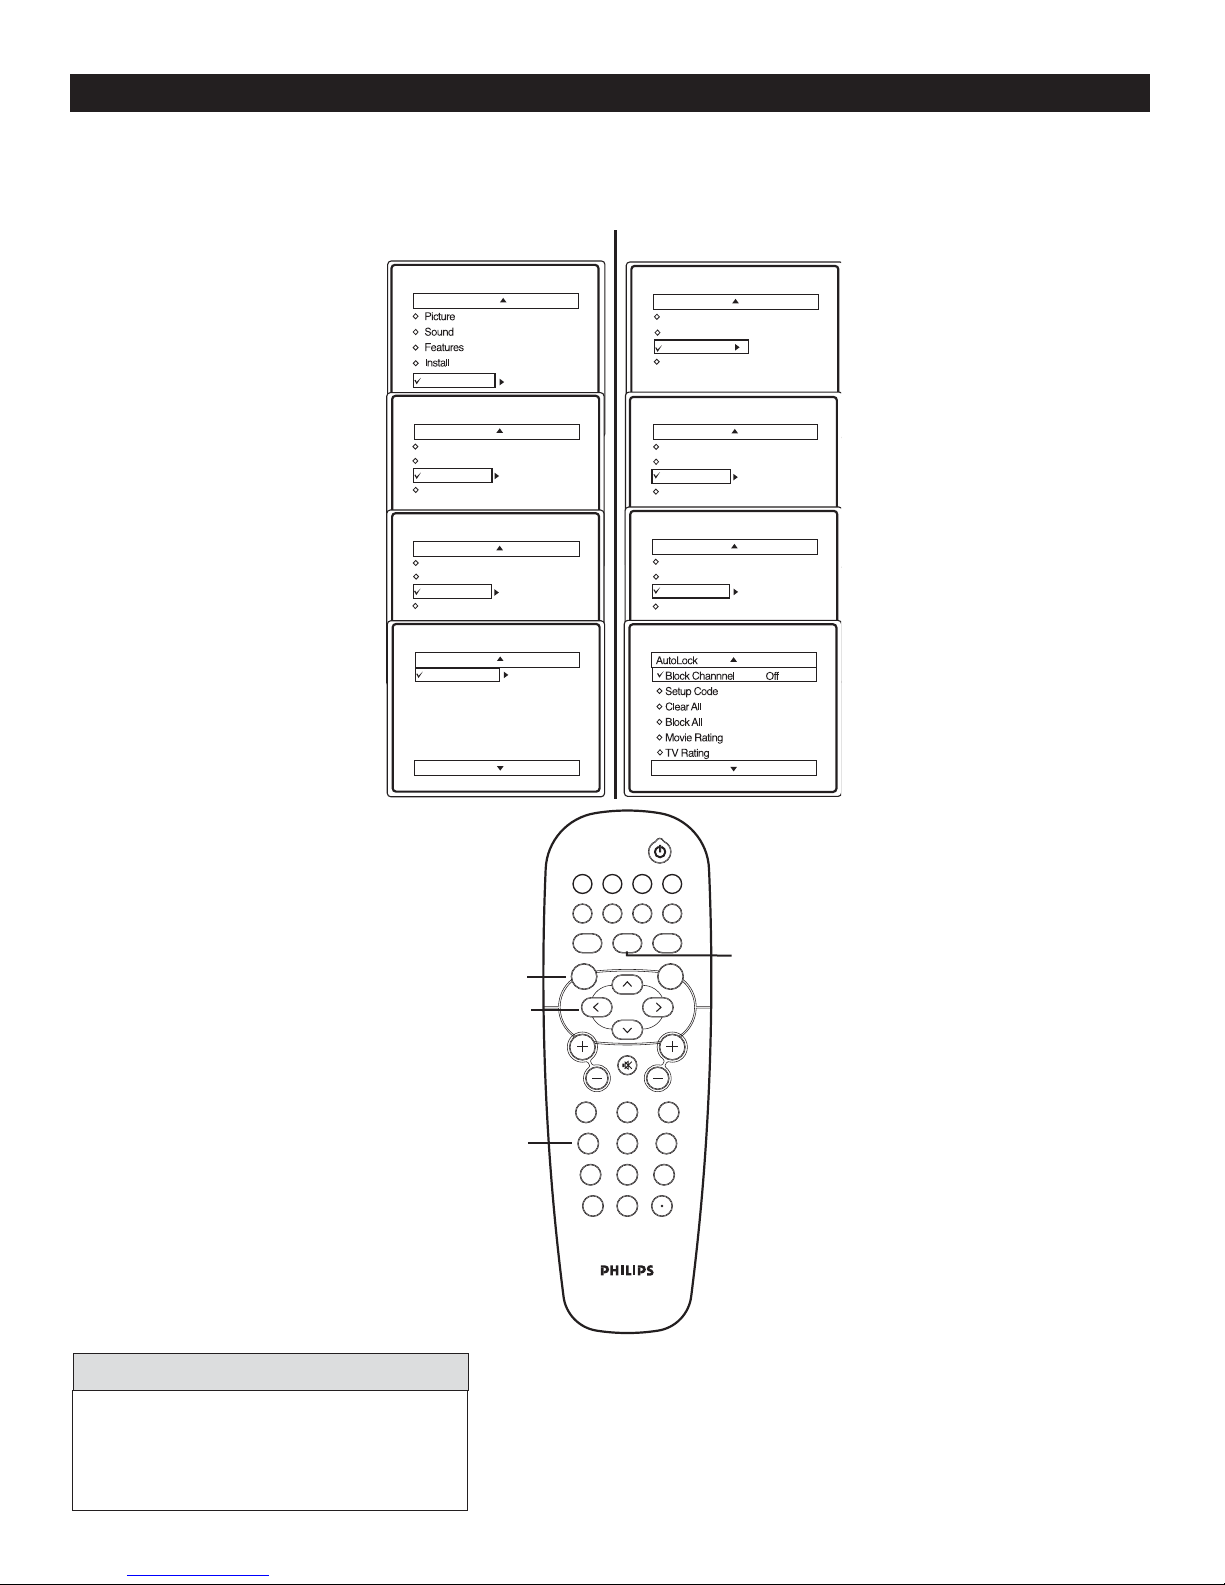
AUTOLOCK
utoLock allows the viewer to block out any channels. A channel blocked by the AutoLock control cannot be viewed
until a correct access code is used to unlock the channel for viewing.
A
Follow these steps for Digital Mode
Press MENU button on
the remote control to
1
display the onscreen menu.
Press CURSOR < or
2
3
4
5
"Password _ _ _ _" will
6
> to scroll through the
onscreen menu until
you see DTV Setup
highlighted. Press
CURSOR > to display
DTV Setup features.
Press CURSOR < or
> to scroll through the
DTV Setup features until
Ch. Install is highlighted.
Press CURSOR >
followed by CURSOR
< or > until
you see AutoLock
highlighted.
Press CURSOR > to
enter the AutoLock
mode.
appear.
Press CURSOR >
followed by the
NUMERIC buttons on the
remote control to enter
the access code. 0711
is the default. The first
time you enter the code,
Incorrect will appear on
the screen. Enter the same
code again. Correct will
be displayed. Now can
proceed to block channels.
Digital Mode
Main
DTV Setup
Ch. Install
Channel Edit
Weak Dig Sig
AutoLock
Fact CH Reset
Ch. Install
Channel Edit
Weak Dig Sig
AutoLock
Fact CH Reset
AutoLock
Block Channel
NUMERIC
MENU
>
>
< >
Password _ _ _ _
Incorrect
Password _ _ _ _
Correct
FORMAT CLOCK SLEEP GUIDE
VOL CH
Analog Mode
Main
Picture
Sound
Features
Install
Features
Time
Rotation
AutoLock
Active Control
Features
Time
Rotation
AutoLock
Active Control
POWER
AV SAP
CC INFO
AUTO
SOUND
MENU OK
123
4
789
A/CH
AUTO
A/D
PICTURE
MUTE
56
0
Timer
Rotation
AutoLock
Close Cap.
Active Control
Access Code
_ _ _ _
Incorrect
New Code
_ _ _ _
A/D
toggles between
digital and analog
mode
Follow these steps for Analog mode
Press MENU button on
the remote control to
1
display the onscreen menu.
Press CURSOR < or
> to scroll through the
2
onscreen menu until you
see Features highlighted.
Press CURSOR > to
display the Features
3
menu.
Press CURSOR < or >
repeatedly until you
4
see AutoLock highlighted.
Press CURSOR > to
enter the AutoLock
5
mode.
"Access Code _ _ _ _" will
appear.
Using the NUMERIC
6
7
buttons on the remote
control enter the access
code. 0711 is the default.
The first time you enter
the code, Incorrect will
appear on the screen.
Enter the same code again.
You will be prompted to
enter a new code.
Use the NUMERIC
buttons on the remote
control enter the access
code of your choice.
Enter the same code a
second time to confirm
it. Once the new code is
confirmed, the AutoLock
menu will appear. You can
now access the functions
available in the menu.
HELPFUL HINTS
When you are in Digital Mode you can only
AutoLock Digital Channels.
When you are in Analog Mode you can
only AutoLock Analog Channels.
Note : Remember this new code
which you have set. You can use
this code to access AutoLock
features in both Digital and Analog
mode. If you forget the new code
you have set, key 0711 to access
AutoLock features.
21
Page 22
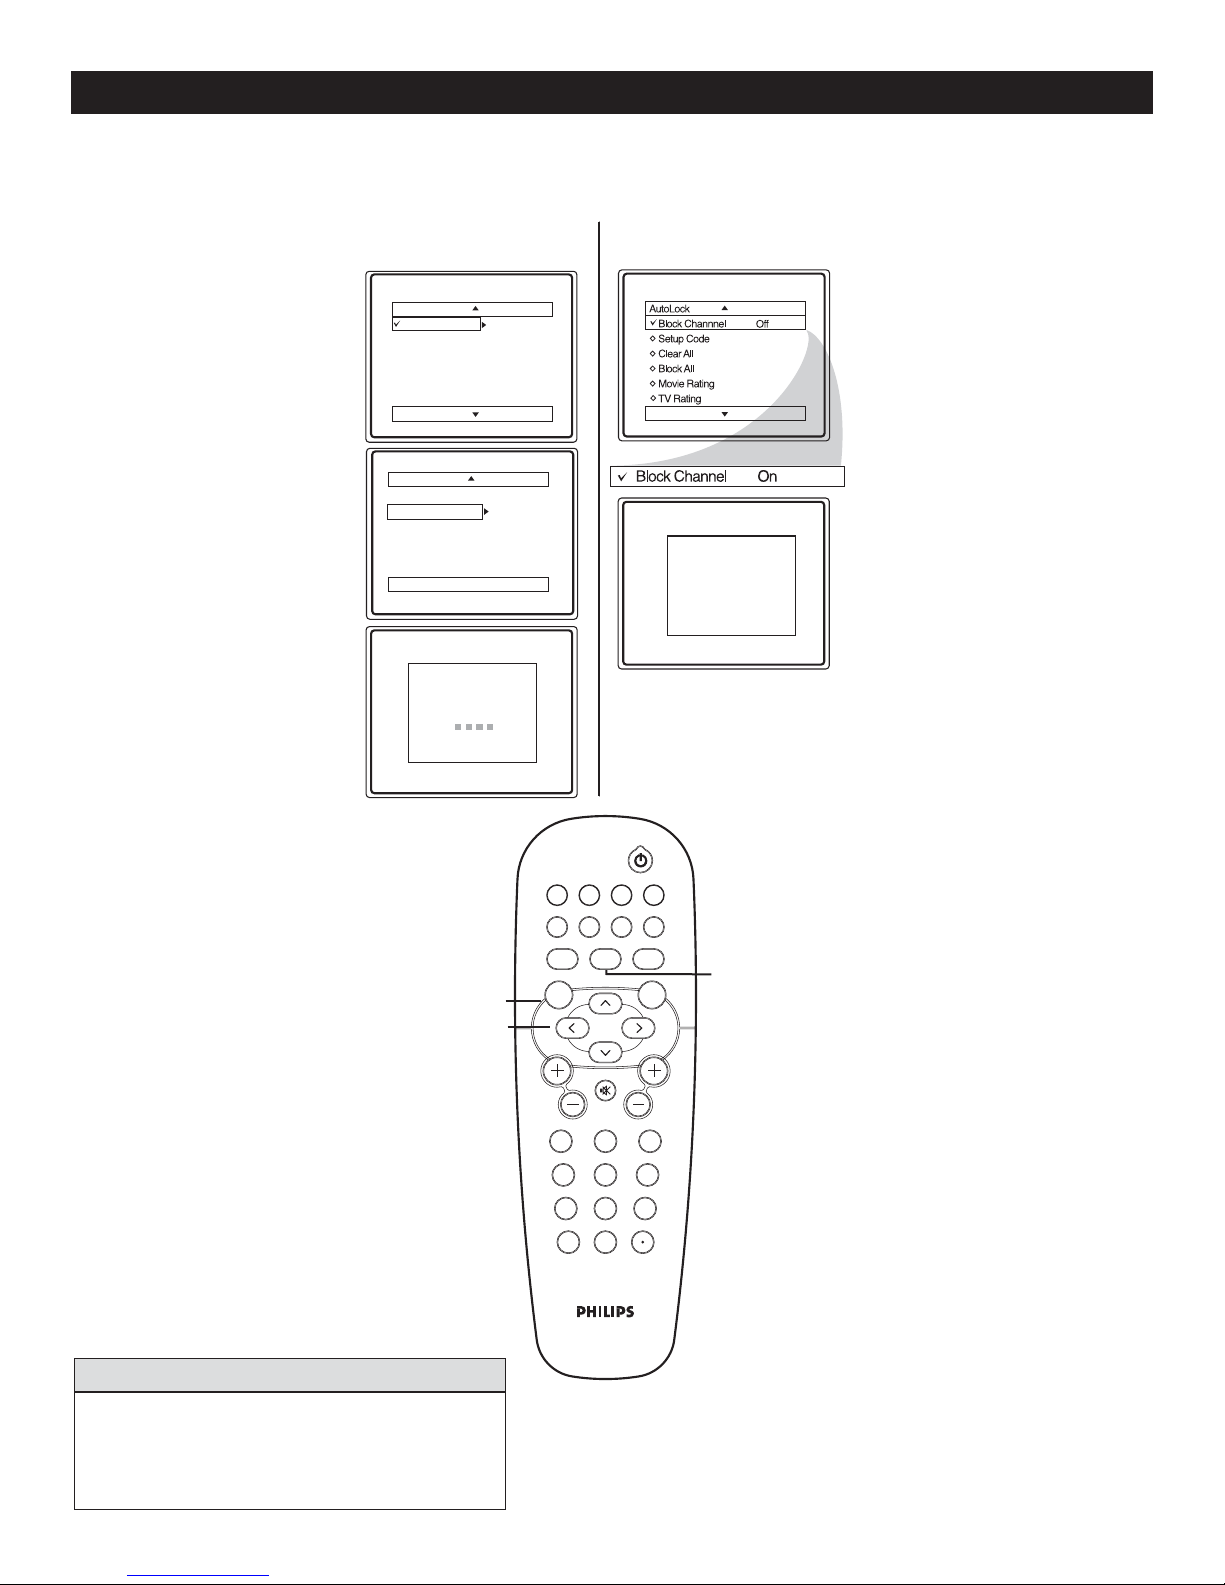
AUTOLOCK - BLOCKING CHANNELS
fter you have set your personal access code (see previous page), you are now ready to select the channels you want
to block.
A
Follow these steps for Digital Mode
After Setting your
1
2
3
4
5
When Block is
Note : When you are in Digital
Mode you can only block
Digital Channels.
personal access code
(see previous
page), press CURSOR
< or > until you
see Block Channel
highlighted.
Press CURSOR >
to enter the Block
Channel menu. Press
CURSOR > or < to
Block or unBlock the
channel.
Press CURSOR <
or > to highlight the
channel you wish to
Block or Unblock.
Press CURSOR > or
< to select Block or
Unblock.
When finished, press
MENU button on the
remote control three
times to exit the menu
from the TV screen.
selected, a message will
appear to show you
the channel that has
been Blocked.
Digital Mode
AutoLock
Block Channel
Block Channel
All Channels
2 - 1 WCBS - DT
35 - 1 MELCO
59 - 1
Blocked Channel
35 - 1 MELCO
MENU
>
>
Blocked
< >
Analog Mode
POWER
FORMAT CLOCK SLEEP GUIDE
AV SAP
AUTO
SOUND
MENU OK
VOL CH
CC INFO
AUTO
A/D
PICTURE
MUTE
123
456
789
A/CH
0
Channel 4
Blocked by AutoLock
Channel Block
Access Code
_ _ _ _
A/D
toggles between
digital and analog
mode
Follow these steps for Analog Mode
After Setting your
1
2
3
4
When Block
Note : When you are in Analog
Mode you can only block Analog
Channels.
personal access code (see
previous page), press
CURSOR < or > until
you see Block Channel
highlighted.
Press CURSOR < or
> to select channels
you wish to block. Press
CURSOR > or < to
select between Block and
Unblock.
Press CURSOR >
or < to select Block or
Unblock.
When finished, press
MENU on the remote
control three times to
exit the menu from the
TV screen.
is selected, a message will
appear to show you the
channel that has been
Blocked.
HELPFUL HINTS
If you forget your code, the 0711 is the default
and can be used to enter and create a new access
code.
22
Page 23

BLOCK / CLEAR ALL CHANNELS AT THE SAME TIME
fter blocking specific channels there may come a time when you want to block or clear all the channels at the
same time. This can be done only after you have entered your access code and the AutoLock features are
A
displayed on the screen (refer to page 21).
Follow these steps for Digital Mode
Press CURSOR > to select
Block channel. Press the
1
CURSOR > button to
enter the Block Channel
menu.
Press CURSOR < or >
2
3
until All Channels
is highlighted. Press
CURSOR > or < to
toggle between Block and
Unblock. If Unblock is
selected, all channels will
be viewable. If Block is
selected, ALL available
channels will be blocked
from viewing.
When finished, press
MENU four times to exit
the menu.
Digital Mode
AutoLock
Block Channel
Block Channel
All Channels
2 - 1 WCBS - DT
35 - 1 MELCO
59 - 1
Unblock
Analog Mode
Clear All
Block All
FORMAT CLOCK SLEEP GUIDE
MENU
>
>
< >
VOL CH
POWER
AV SAP CC INFO
AUTO
A/D
SOUND
MENU OK
MUTE
AUTO
PICTURE
On
Off
Follow these steps for Analog mode
Press CURSOR > to
1
2
If Block All is set to on
3
select either Clear All or
Block All.
If Clear All is set to on, all
channels will be viewable.
all available channels will be
blocked from viewing.
When finished, press MENU
on the remote control four
times to exit the menu from
the TV screen.
BLOCK OPTIONS
lock Options allows you to block programs by ratings instead of channels. This can be done only after you have
entered your access code and AutoLock feature is displayed on the screen.
B
Note : To access this menu for both Digital and Analog Mode, follow the steps for Analog mode (Page 21).
Follow these steps for both Digital and Analog Mode
Press CURSOR < or > until you see Block
Options highlighted.
1
Press CURSOR < or > to display the Block
Options (Unrated, No Rating or Blocking) menu.
2
Press CURSOR < or > until you see the
3
4
desired Option is highlighted. When highlighted,
each feature can be turned On or Off using
CURSOR > or < on the remote control.
When finished, press MENU four times to exit
the menu.
Digital Mode
Unrated
No rating
Blocking
Analog Mode
FORMAT CLOCK SLEEP GUIDE
AV SAP CC INFO
AUTO
SOUND
MENU
>
>
< >
MENU OK
Unrated
No rating
Blocking
POWER
A/D
AUTO
PICTURE
HELPFUL HINTS
Press A/D button on the remote control to toggle
between Digital and Analog Mode.
MUTE
VOL CH
23
Page 24
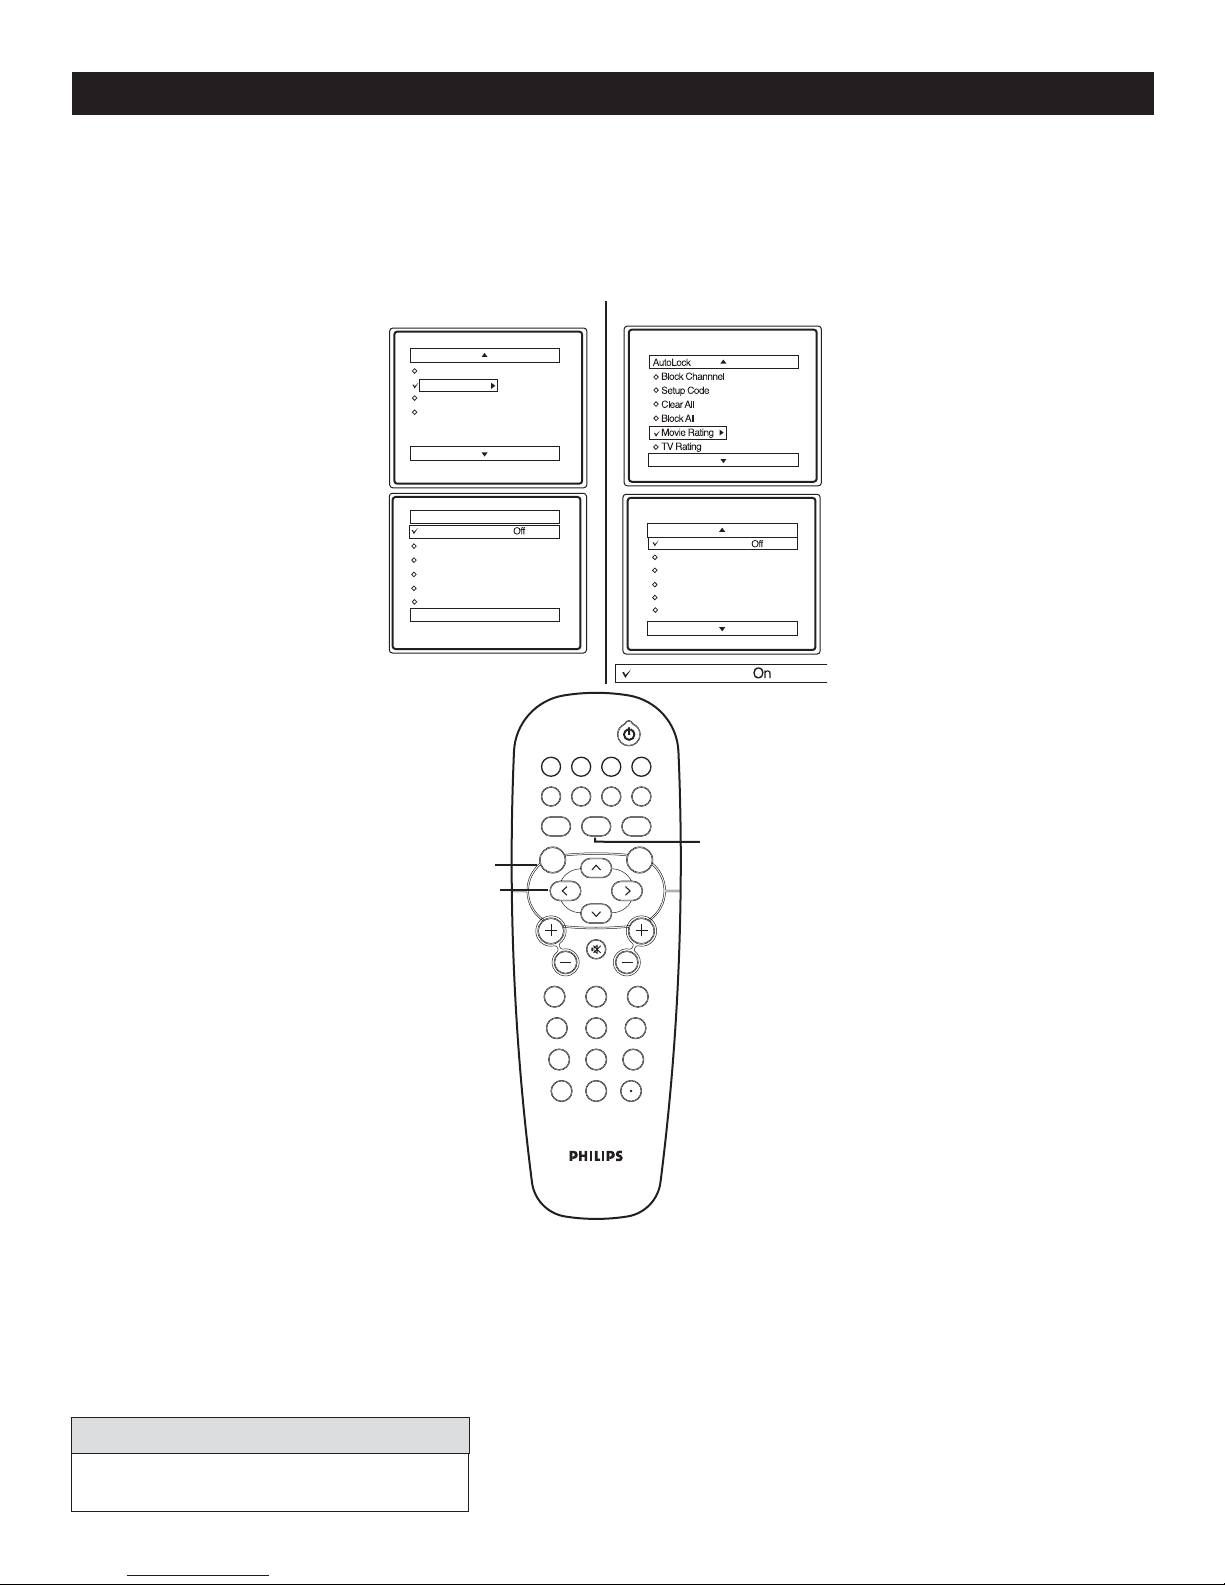
MOVIE RATINGS
he AutoLock feature can block programs based on the Movie Industry ratings. Once you have entered your
access code and the AutoLock features are displayed on the screen.
T
Note : To access this menu for both Digital and Analog Mode, follow the steps for Analog mode (Page 21).
Follow these steps for Digital Mode
Press CURSOR < or
1
2
> until you see Block by
Rating highlighted.
Press the CURSOR > to
display the Movie Rating
options (G, PG, PG-13, R,
NC17, or X).
Press CURSOR < or
3
> to highlight any of the
Movie Rating options.
When highlighted, all these
options can be turned On
(which will allow blocking)
or Off (which will allow
viewing).
Press CURSOR > on the
remote control to turn
4
the rating option On or
Off.
Digital Mode
AutoLock
Setup Code
Movie Rating
TV Rating
Block Options
Movie Rating
G
PG
PG-13
R
NC-17
X
>
MENU
>
< >
G
PG
PG-13
R
NC-17
X
FORMAT CLOCK SLEEP GUIDE
AV SAP
AUTO
SOUND
MENU OK
Analog Mode
Movie Rating
G
PG
PG-13
R
NC-17
X
G
POWER
CC INFO
AUTO
A/D
PICTURE
G
PG
PG-13
R
NC-17
X
A/D
toggles between
digital and analog
mode
Follow these steps for Analogue mode
Press CURSOR < or >
1
2
until you see Movie Rating
highlighted.
Press CURSOR > to
display the Movie Rating
options (G, PG, PG-13, R,
NC17, or X).
Press CURSOR < or > to
3
highlight any of the Movie
Rating options. When
highlighted, all these options
can be turned On (which will
allow blocking) or Off (which
will allow viewing).
Use CURSOR > on the
4
remote control to turn the
rating option On or Off.
HELPFUL HINTS
Press A/D button on the remote control to toggle
between Digital and Analog Mode.
MUTE
VOL CH
123
456
789
A/CH
0
24
Page 25
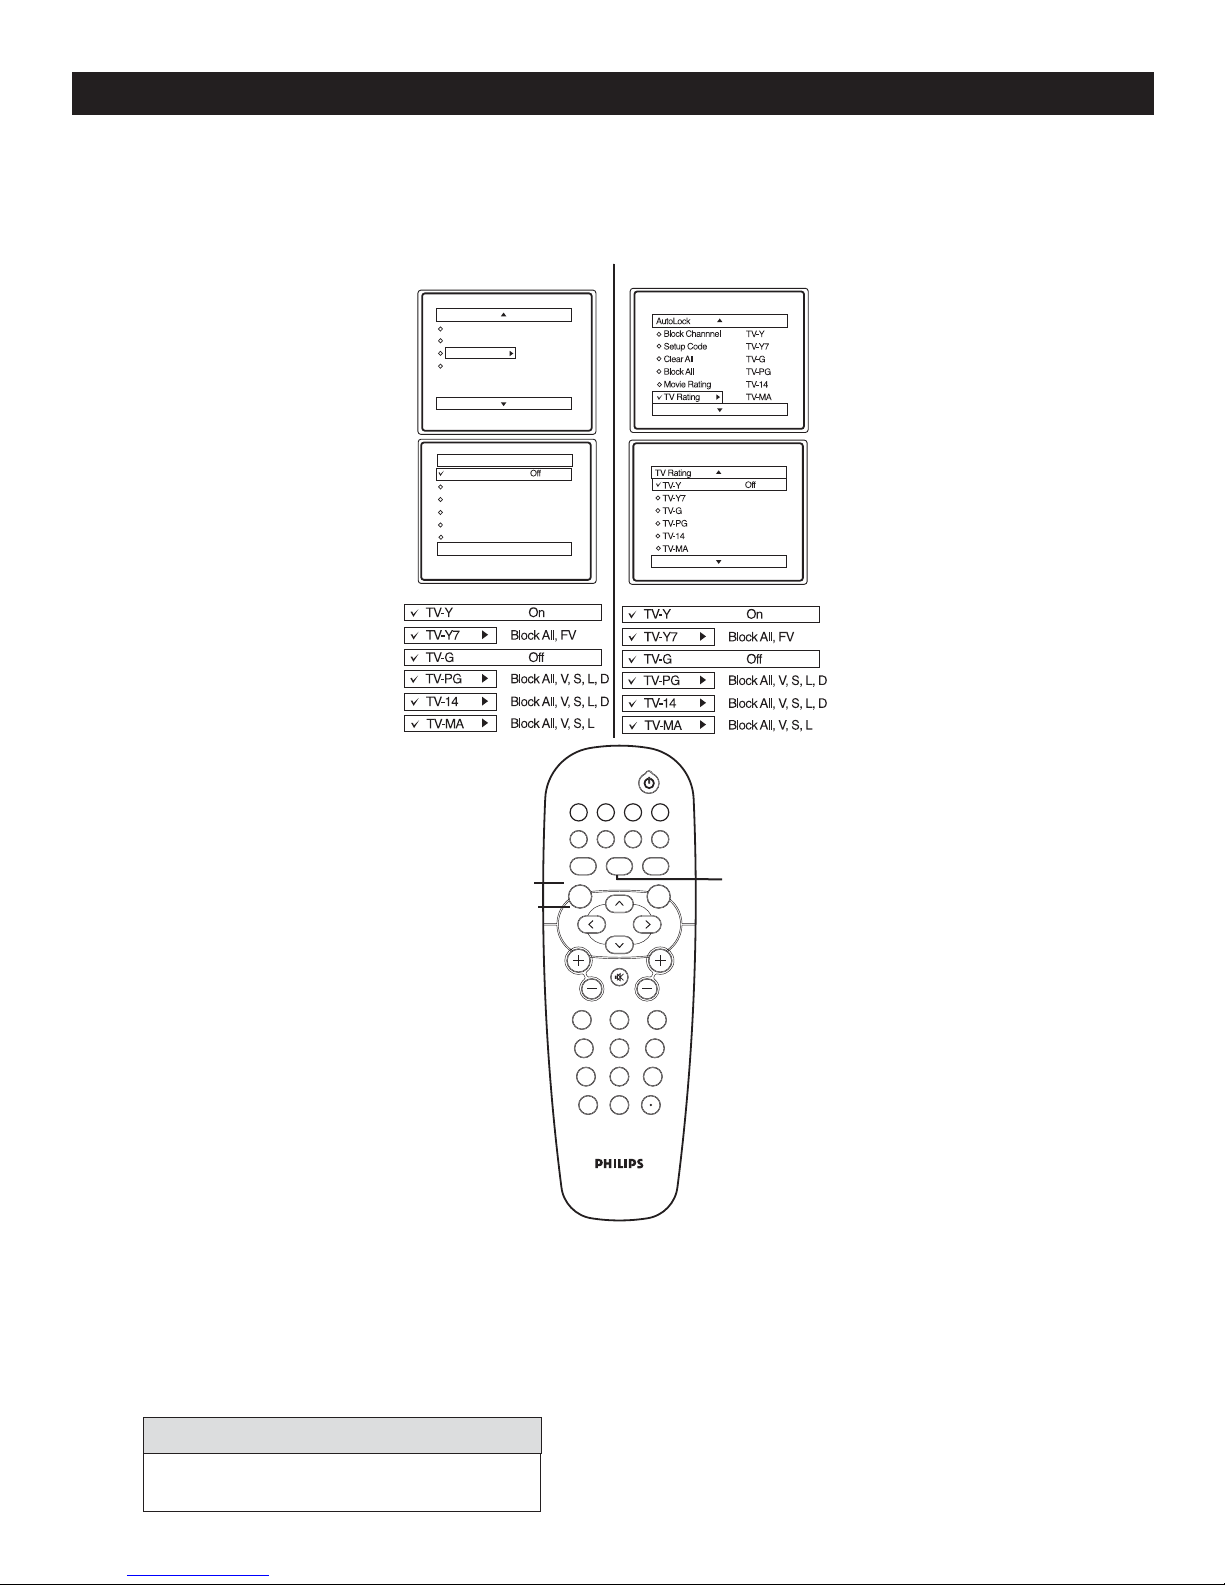
TV RATINGS
he AutoLock feature can block programs based on the TV Industry ratings.
and the AutoLock features are displayed on the screen (refer to page 22).
T
Note : To access this menu for both Digital and Analog Mode, follow the steps for Analog mode (Page 21).
When you have entered your access code
Follow these steps for Digital Mode
Press CURSOR < or >
until you see TV Rating
1
highlighted.
Press the CURSOR > to
display the TV Rating options
2
(TV-Y, TV-Y7, TV-G, TV-PG,
TV-14 or TV-MA).
Press CURSOR < or > to
3
4
5
6
highlight any of the TV Rating
options. When highlighted,
all these options can be
turned On (which will allow
blocking) or Off (which will
allow viewing).
Press CURSOR > or < to
turn the rating option On or
Off.
If the TV-Y7, TV-PG, TV-
14 or TV-MA sub-menu
is accessed, press
CURSOR < or > to select
one of the options (Block All,
V, S, L, D or FV).
Press CURSOR > to turn
option On or Off.
Digital Mode Analog Mode
AutoLock
Setup Code
Movie Rating
TV Rating
Block Options
TV Rating
TV-Y
TV-Y7
TV-G
TV-PG
TV-14
TV-MA
MENU
>
>
< >
TV-Y
TV-Y7
TV-G
TV-PG
TV-14
TV-MA
FORMAT CLOCK SLEEP GUIDE
AV SAP
AUTO
SOUND
MENU OK
VOL CH
123
POWER
CC INFO
AUTO
A/D
PICTURE
MUTE
456
789
A/CH
0
A/D
toggles between
digital and analog
mode
Follow these steps for Analog Mode
Press CURSOR < or >
until you see TV Rating
1
highlighted.
Press the CURSOR > to
2
3
4
5
6
display the TV Rating options
(TV-Y, TV-Y7, TV-G, TV-PG,
TV-14 or TV-MA).
Press CURSOR < or >
until any of the TV Rating
options is highlighted. All
these highlighted options can
be turned On (which will
allow blocking) or Off
(which will allow viewing).
Press CURSOR > to turn
the TV-Y or TV-G rating
On or Off. OR press the
CURSOR > to enter the
sub-menus.
If the TV-Y7, TV-PG, TV-14
or TV-MA
sub-menu is accessed,
press CURSOR < or > to
select one of the options
(Block All, V, S, L, D or FV).
Press CURSOR > to turn
option On or Off.
HELPFUL HINTS
Press A/D button on the remote control to toggle
between Digital and Analog Mode.
25
Page 26

HOW TO USE THE TIMER MENU CONTROLS
our television comes with an onscreen clock. The TV can also be set to turn on or off at a specific time and tune
to a specific channel when it powers itself on.
Y
Press the MENU button on the remote
1
2
3
4
5
6
7
control to display the onscreen menu.
Press the CURSOR < or > button until
Features is highlighted.
Press the CURSOR > button to
display the Features menu.
Press the CURSOR > button to
display the Timer menu.
Press the CURSOR > button to
access the Timer menu.
Press the CURSOR < or >¸
until one of the Timer controls (Time,
Start Time, Stop Time, Channel, Activate, or
Displayhighlight) is hightlighted.
Press the CURSOR > to display the menu
for the selected item. Make adjustments to
the selected items by following the steps
below.
Digital Mode
Timer
AutoLock
DTV Setup
Features
Timer
Rotation
AutoLock
Analog Mode
Timer
Rotation
AutoLock
Auto Control
Features
Timer
Rotation
AutoLock
AutoControl
Time: Enter the current time using the
NUMERIC buttons. Use the CURSOR
> or < to toggle the AM and PM setting.
Start Time: Use the NUMERIC buttons to
enter the time you want the TV to turn
itself On. Use the CURSOR > or < to
toggle the AM and PM setting.
Stop Time: Use the NUMERIC buttons to
enter the time you want the TV to turn itself
Off. Use the CURSOR > or < to toggle the
AM and PM setting.
Channel: In Digital Mode, use CH +
or CH- to select DTV which is the last
viewed digital channel. In Analog Mode,
use the NUMERIC buttons or the CH + or
CH- buttons to enter the startup channel.
Activate: Set the timer to turn itself Off,
Once or Daily. Press the CURSOR > or <
to select Once, Daily, or Off.
Display: Press the CURSOR > or <
to toggle between On or Off. If On is
selected, the time will be displayed all the
time when the TV is on. When Off is
selected, the time will only appear
when the INFO button is pressed.
NOTE : Display is not available in Digital
Mode.
Press the MENU button on the remote
8
control three times to remove the onscreen
menu from the TV screen.
DTV
POWER
FORMAT CLOCK SLEEP GUIDE
AV SAP
CC INFO
MENU
>
>
< >
NUMERIC
AUTO
SOUND
MENU OK
VOL CH
123
AUTO
A/D
PICTURE
MUTE
4
56
789
A/CH
0
A/D
toggles between
digital and analog
mode
HELPFUL HINTS
In Digital Mode : Before you turn off the TV you have to switch to
the desired digital channel because the TV will wake up in the last
viewed digital channel.
In Analog Mode : You can specify which channel to wake up to.
Press A/D button on the remote control to toggle between Digital and
Analog Mode.
26
Page 27
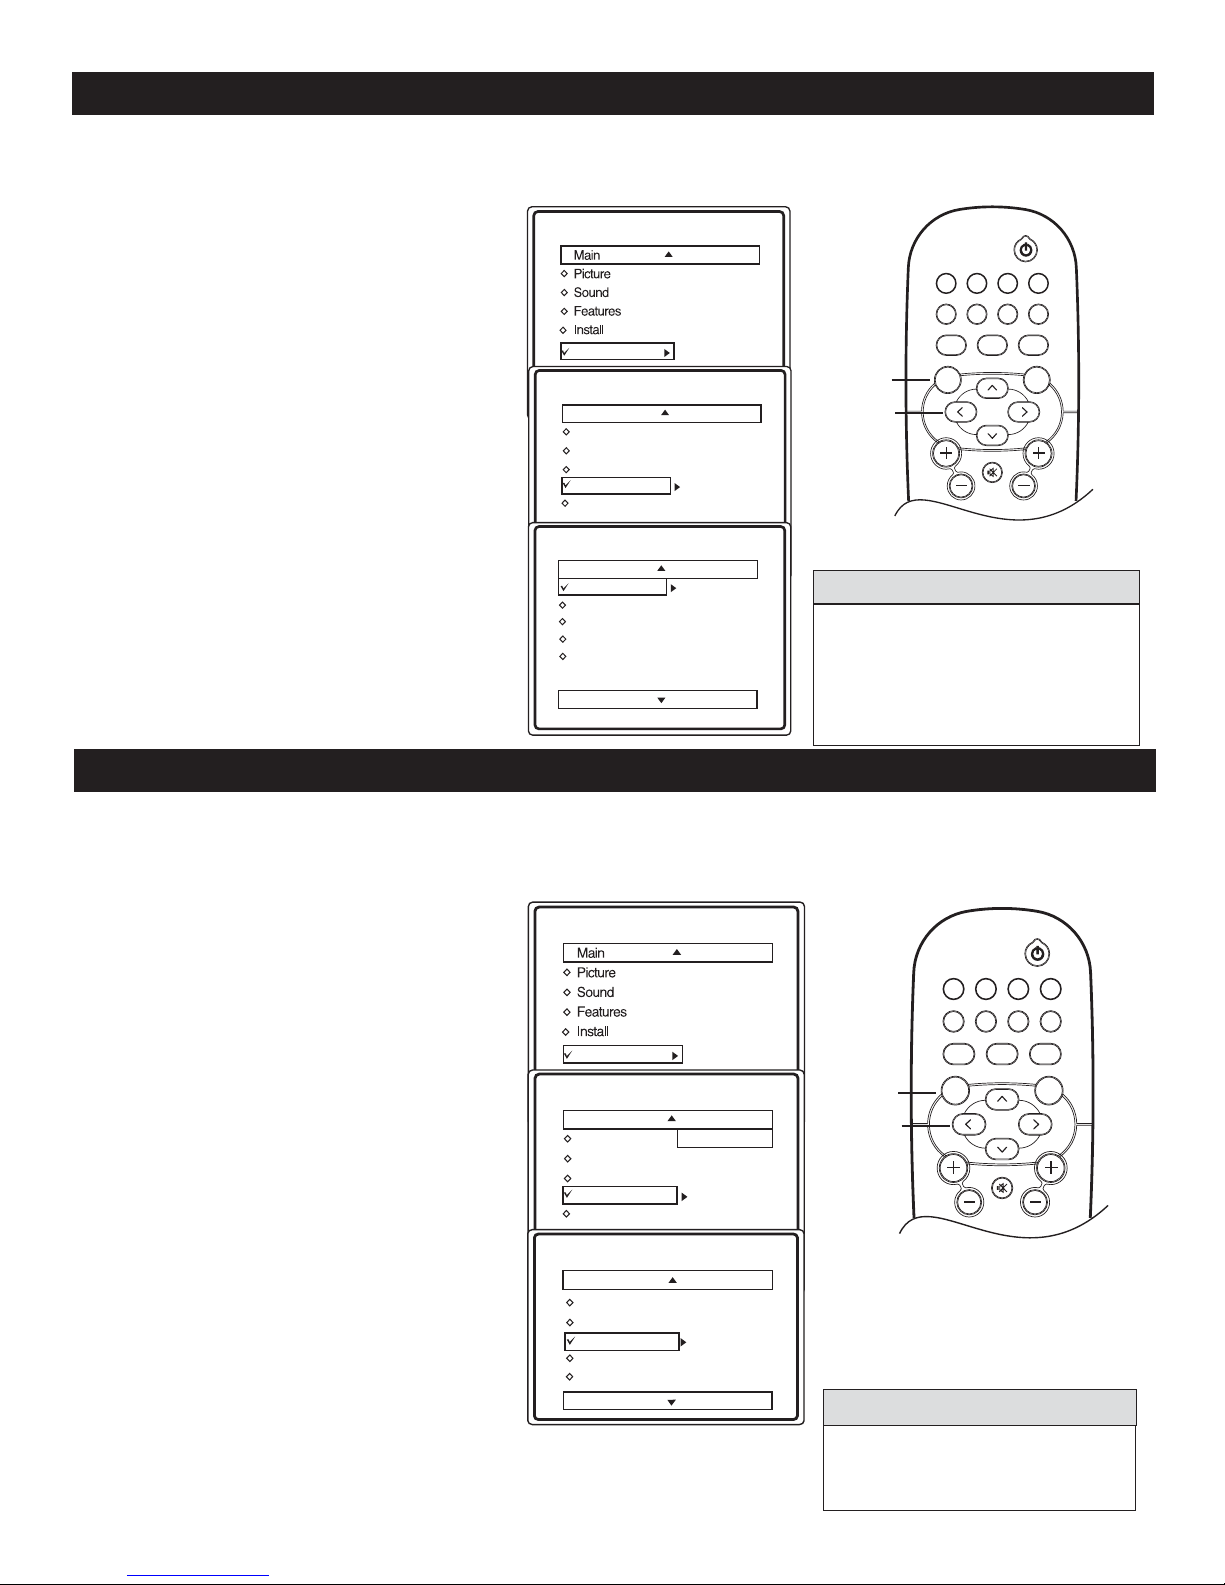
CLOSE CAPTIONING DISPLAY IN DIGITAL MODE
hen in digital mode, you can assign display options to your closed captioning options.
W
1
2
3
4
5
6
This feature is ONLY available in Digital Mode.
Press MENU button on the remote control
to display the onscreen menu.
Press
CURSOR < or >
DTV Setup highlighted.
Press CURSOR > to display the DTV
Setup options.
Press CURSOR < or > until you
see Close Caption highlighted. Press
CURSOR > to enter Display menu
options.
Press CURSOR > to toggle to the options
that you want – Off, Always on or On
when muted.
When finished, press MENU button on the
remote control to exit the menu from the
TV screen
.
until you see
Digital Mode
DTV Setup
DTV Setup
Ch. Install
Digital Audio
Timer
Closed Caption
Emerg Alert
Closed Caption
Display
Service
Caption Option
Caption Text
CC Background
Ch. Install
Digital Audio
Timer
Closed Caption
Emerg Alert
Display
Service
Caption Option
Caption Text
CC Background
Always On
POWER
FORMAT CLOCK SLEEP GUIDE
AV SAP CC INFO
A/D
MUTE
AUTO
PICTURE
MENU
>
>
< >
AUTO
SOUND
MENU OK
VOL CH
HELPFUL HINTS
An alternative way of activating
closed caption is by pressing the CC
button on the remote control.
Close Captions may take 10 - 20
seconds to appear on the TV screen.
CAPTION OPTION IN DIGITAL MODE
aption Option lets you select the default option or options that you have assigned to your Close captioning
service. This feature is ONLY available in Digital Mode.
C
Press MENU button on the remote control
to display the onscreen menu.
1
Press
CURSOR < or >
Setup highlighted.
2
Press CURSOR > to display the DTV Setup
3
4
5
6
7
options.
Press CURSOR < or > until you
see Close Caption highlighted. Press
CURSOR > to enter Caption Option
menu options.
Press CURSOR > to toggle to the options
that you want – Use Default or Use
Options.
When Use Options is choosen, you will
be prompted to select text size, color, opacity,
edge color, type and CC background color.
When finished, press MENU button on the
remote control to exit the menu from the TV
screen
.
until you see DTV
Digital Mode
Ch. Install
Digital Audio
Timer
Closed Caption
DTV Setup
DTV Setup
Ch. Install
Digital Audio
Timer
Closed Caption
Emerg Alert
Closed Caption
Display
Service
Caption Option
Caption Text
CC Background
Emerg Alert
Display
Service
Caption Option
Caption Text
CC Background
Use Option
FORMAT CLOCK SLEEP GUIDE
AV SAP CC INFO
AUTO
SOUND
MENU
>
>
< >
MENU OK
VOL CH
HELPFUL HINTS
Press A/D button on the remote
control to toggle between Digital and
Analog Mode.
A/D
MUTE
POWER
PICTURE
AUTO
27
Page 28
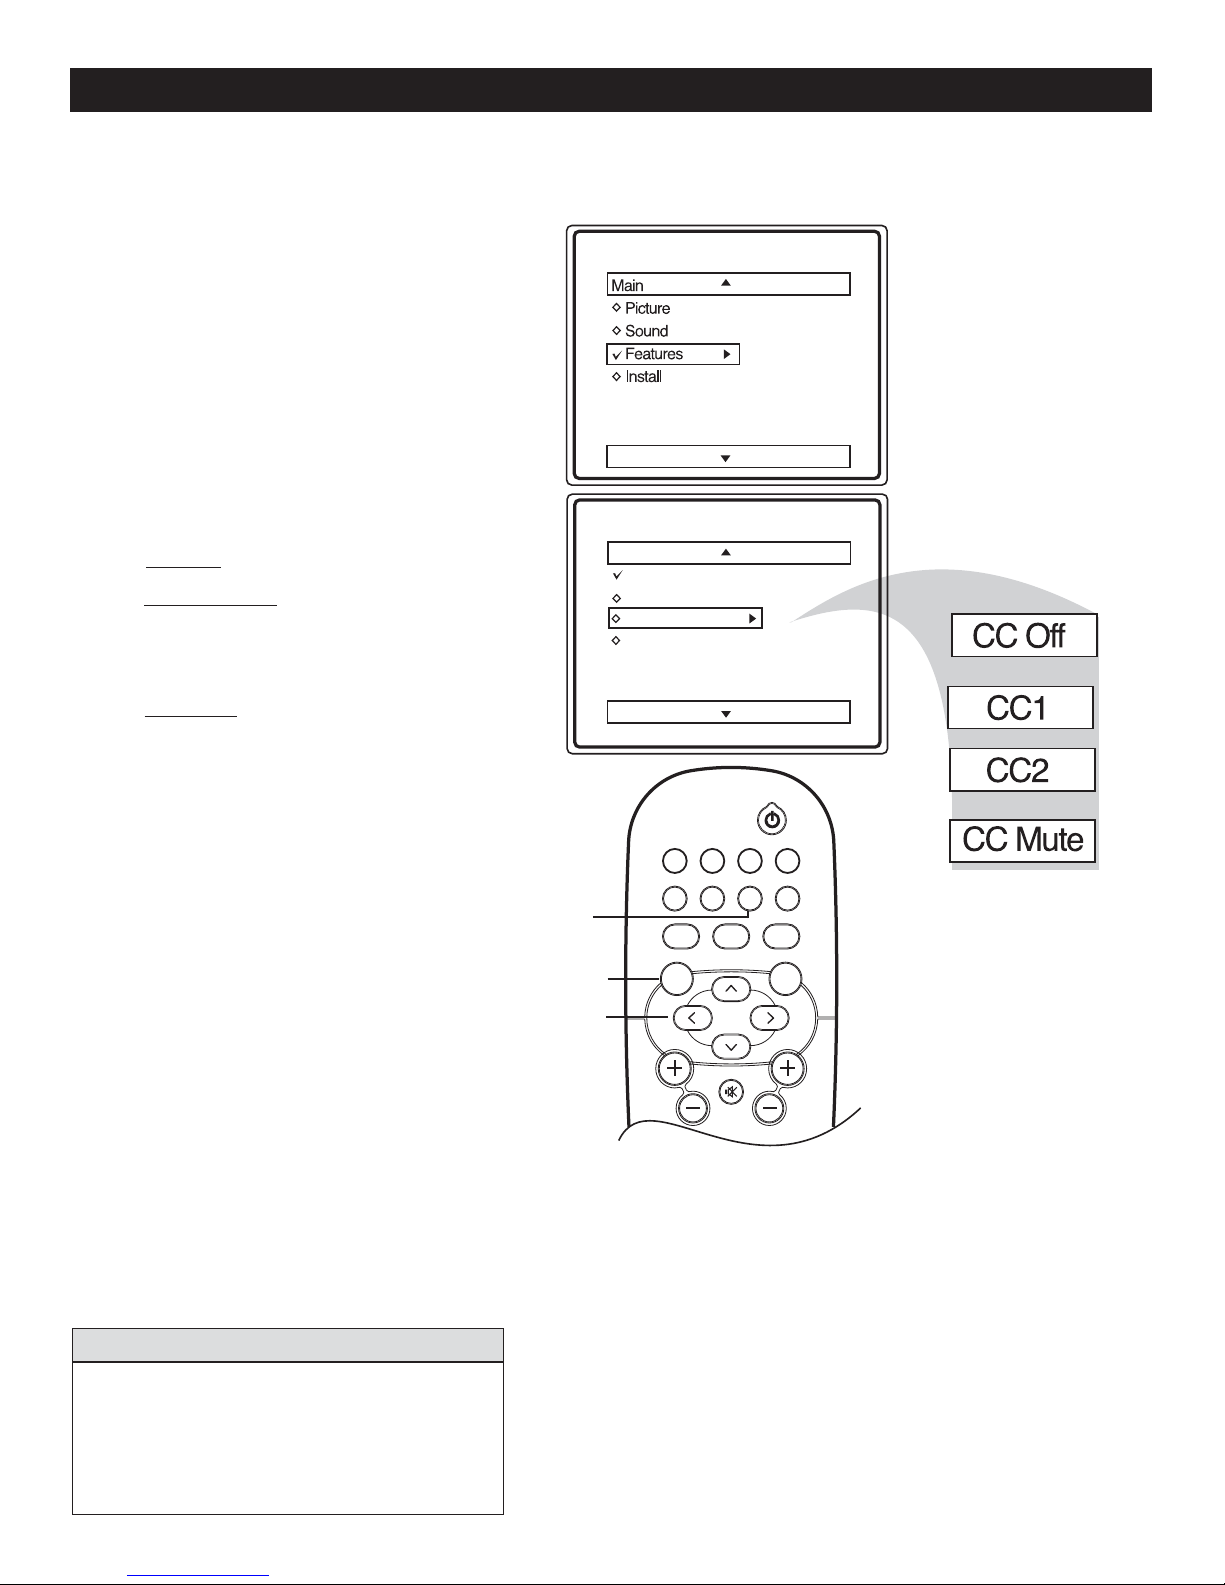
CLOSE CAPTIONING IN ANALOG MODE
lose captioning in analog mode allows you to select the close caption setting while watching analog transmission.
C
Analog Mode
Press the MENU button on the remote
1
2
3
4
5
CC Off : Turns Close Captioning Off.
control to display the onscreen menu.
Press the CURSOR < or > button until
Features is highlighted.
Press the CURSOR < or > button to
display the Features menu.
Press the CURSOR > button to
display the Close Caption menu.
Press the CURSOR > repeatedly to select
one of the close caption settings namely CC
Off, CC1, CC2 and CC Mute
CC1 and CC2 : Depending on the
broadcaster, this displays the close caption
languages available in the program at the
time of broadcast.
Timer
AutoLock
Close Caption
Active Control
Features
Timer
AutoLock
Closed Caption
Active Control
CC Mute : Displays close caption when the
TV is muted.
Press the MENU button on the remote
6
control three times to remove the onscreen
menu from the TV screen.
CC
MENU
>
>
< >
POWER
FORMAT CLOCK SLEEP GUIDE
AV SAP CC INFO
A/D
MUTE
AUTO
PICTURE
AUTO
SOUND
MENU OK
VOL CH
HELPFUL HINTS
An alternative way of activating closed caption
is by pressing the CC button on the remote
control.
Close Captions may take a while to appear on the
TV screen.
2828
Page 29
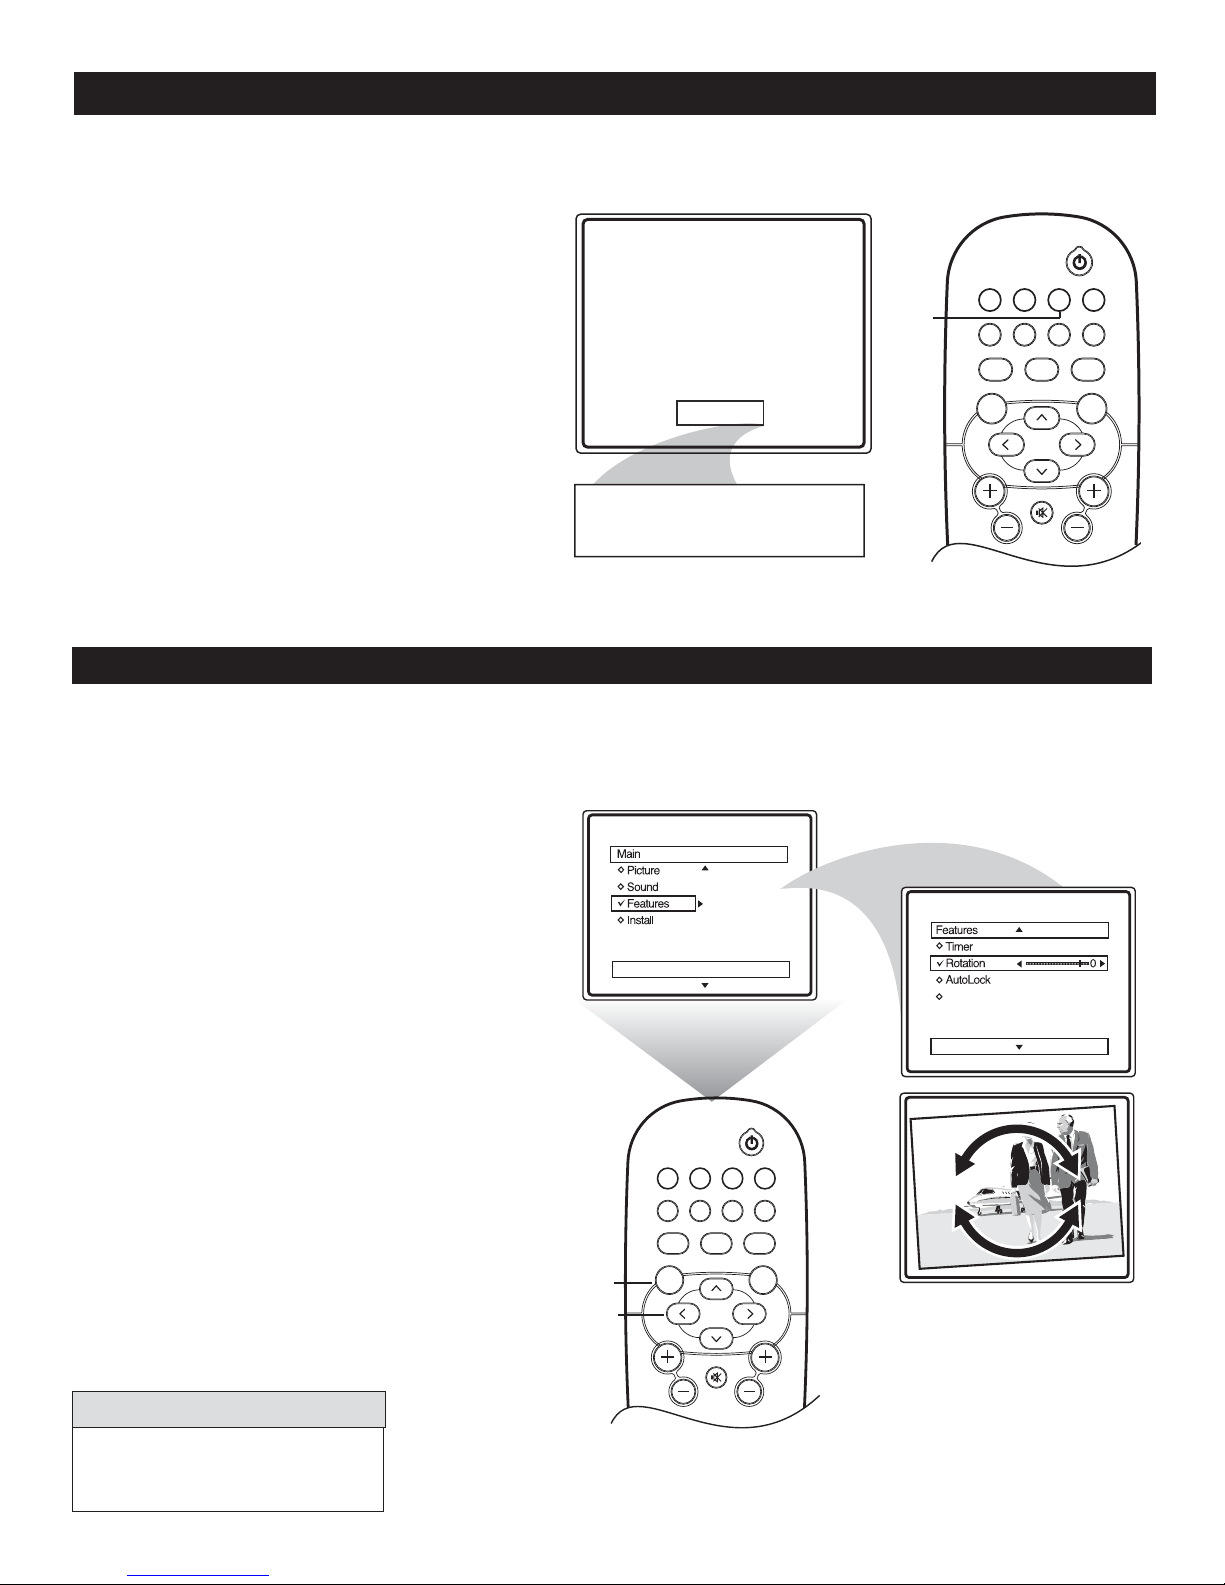
SLEEPTIMER
he SleepTimer feature allows you to set a timer to automatically turn the TV off after a period of time you choose
- 15, 30, 45, 60, 90, 120, 180 or 240 minutes.
T
Digital and Analog Mode
Press SLEEP button on the remote control to
display the sleeptimer menu.
1
Press
SLEEP button on the remote control
2
NOTE: An onscreen countdown will appear during
the last minute before the TV switches
Off. If any button is pressed during the last
minute of the countdown, the Sleep Timer
setting will be cancelled.
to select the amount of time (15, 30, 45, 60,
90, 120, 180 or 240 minutes) before the TV
automatically switches Off.
SLEEP
Sleep 15
15, 30, 45, 60, 90, 120, 180,
240
FORMAT CLOCK SLEEP GUIDE
AV SAP CC INFO
AUTO
A/D
SOUND
MENU OK
MUTE
VOL CH
ROTATION
ometimes the video transmitted to the TV screen might appear slightly tilted. The Rotation control lets you correct the
problem by adjusting the screen in a clockwise or counterclockwise direction.
S
POWER
PICTURE
AUTO
Press MENU button on the remote control to
display the onscreen menu.
1
Press CURSOR < or > until you see Features
highlighted.
2
Press CURSOR > to display feature menu.
3
Press CURSOR < or > until you see Rotation
control highlighted.
4
Press CURSOR > or < to rotate the picture on the
screen clockwise or counter clockwise.
5
Note : The amount of rotation will be minimal.
Press MENU twice to exit the menu from the TV
screen.
6
HELPFUL HINTS
Press A/D button on the remote
control to toggle between Digital and
Analog Mode.
32PT9005D Only
FORMAT CLOCK SLEEP GUIDE
AV SAP CC INFO
AUTO
SOUND
MENU
>
>
< >
MENU OK
VOL CH
Timer
Rotation
AutoLock
Active Control
POWER
AUTO
A/D
PICTURE
MUTE
Active Control
292929
Page 30
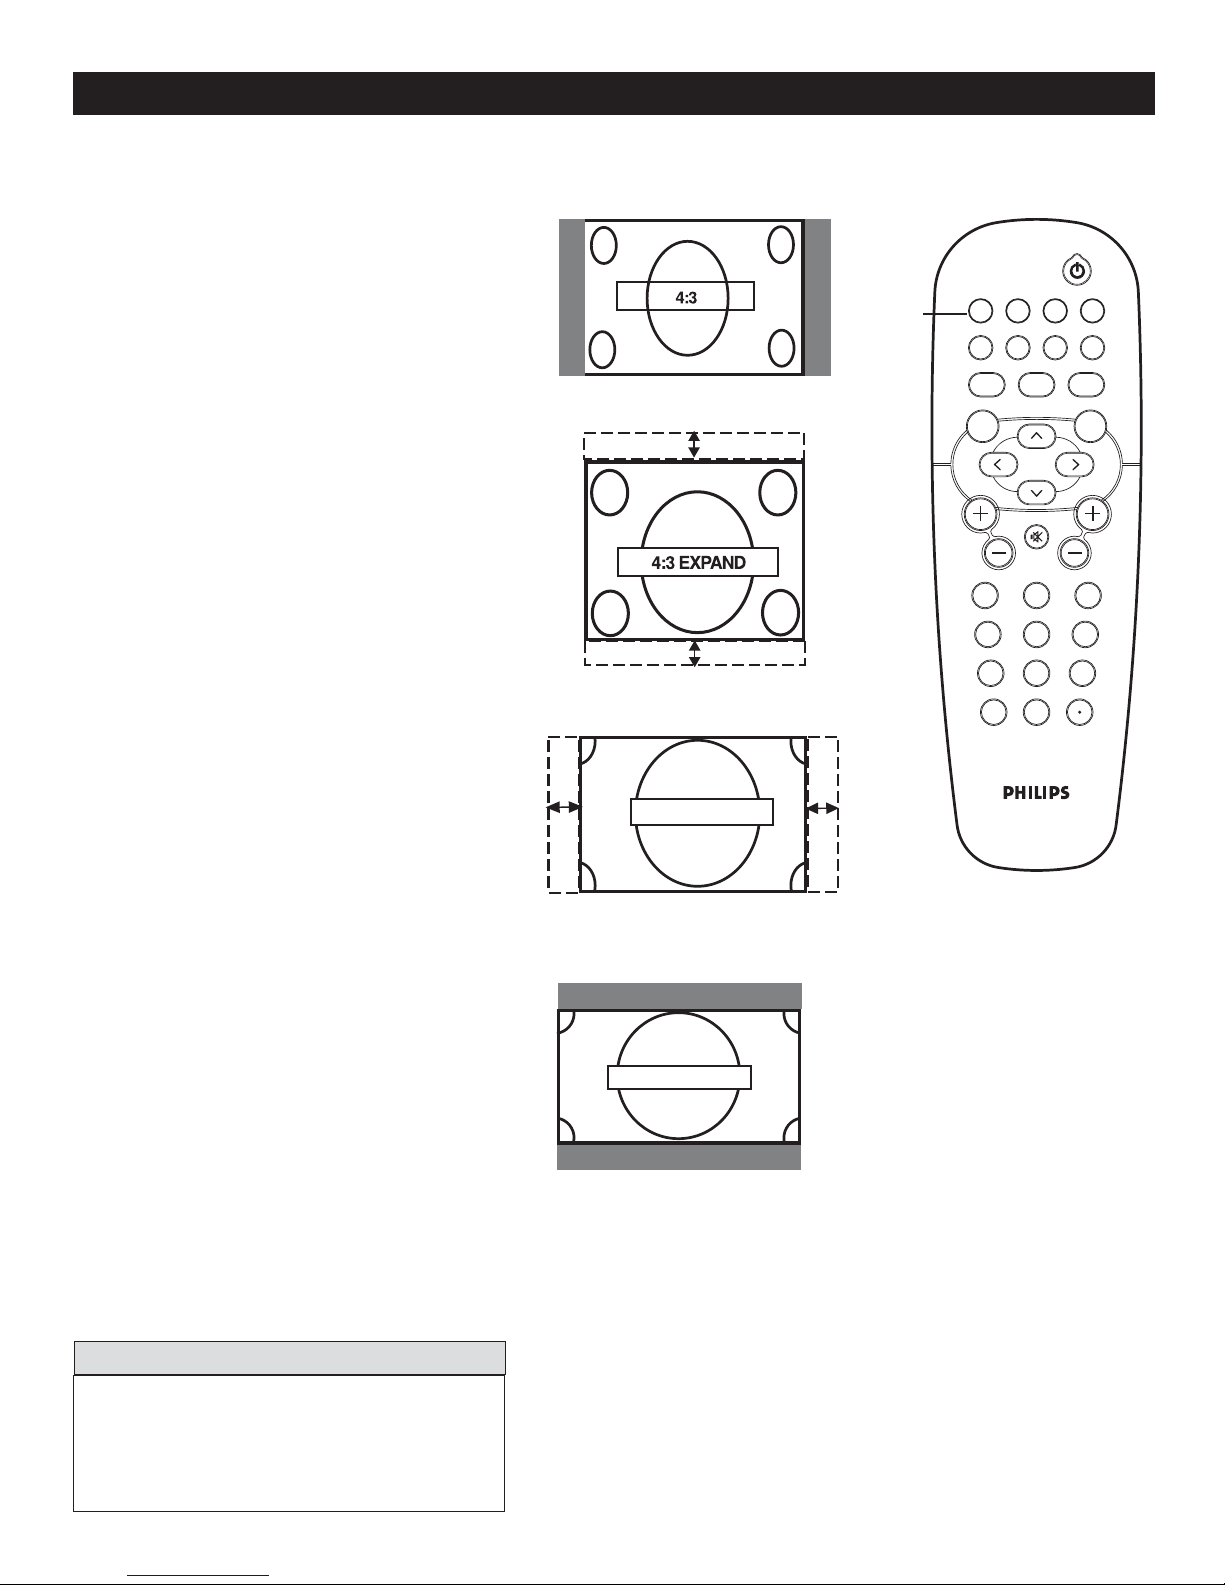
HOW TO USE THE FORMAT CONTROL
he format Control feature allows you to select the picture-format mode.
T
Selecting a Picture Format Using the
Remote Control
Press FORMAT button on the remote
1
2
control once to see the current pictureformat mode.
Press FORMAT button repeatedly on the
remote control to select one of the screen
format options namely 4:3, 4:3 Expand, 4:3
Stretch and 16:9 Compress.
Picture-Format Modes
4:3 Shows picture in its original (4:3
aspect ratio) format. You will see
2 side borders on the TV screen.
4:3 Expand Expands the picture
vertically.
4:3
4:3 EXPAND
FORMAT
POWER
FORMAT CLOCK SLEEP GUIDE
AV SAP
AUTO
SOUND
MENU OK
VOL CH
A/D
MUTE
CC INFO
AUTO
PICTURE
123
4
56
789
A/CH
0
4:3 Stretch Expands the picture
horizontally eliminating the
side borders on both sides of the
TV screen.
16:9 Compress Expands the picture horizontally
delivering a home-cinema
experience. You will see 2 black
borders at the top and bottom of
the screen.
HELPFUL HINTS
Picture-format mode can only be activated when
you are watching High-definition (HD) programs.
4:3 STRETCH
4:3 STRETCH
16:9 COMPRESS
16:9 COMPRESS
Press A/D button on the remote control to toggle
between Digital and Analog Mode.
30
Page 31

INFORMATION BANNER AND ELECTRONIC PROGRAM GUIDE
he Information Banner displays information of the program that is being transmitted. This feature is ONLY
available in Digital.
T
Digital Mode
Information Banner
Thu 1 June 08:38AM
CC
HD
Press INFO button on the remote control once to see the
1
Information Banner.
Note : The Information Banner displays the channel number, time and
features that are available in the program that is being shown. Feature
logos that are lighted up show that the feature is available.
35-1 MELCO
1080i Norway wit....
No Rating
Electronic Program Guide
Press GUIDE button on the remote control once to see the
2
Note : The Electronic Program Guide displays the program schedule that
will be broadcast on the channel.
When any of these logos on the Information Banner and Electronic
Program Guide are lighted up, it means the features are available.
Electronic Program Guide.
High Definition Program.
Surround Sound.
Close Captioning Text.
INFORMATION BANNER
35-1 MELCO
1080i Norway wit....
08:56AM - 09:01AM
08:56AM - 09:01AM 1080i Norway with PS .....
09:01AM - 09:06AM 1080 i LIP Sync. with PS...
ELECTRONIC PROGRAM GUIDE
Thu 1 June 08:38AM
CC
HD
POWER
FORMAT CLOCK SLEEP GUIDE
AV SAP CC INFO
AUTO
SOUND
MENU OK
AUTO
A/D
PICTURE
No Rating
GUIDE
INFO
Dolby Digital Sound.
Signal strength the TV is receiving.
HELPFUL HINTS
The quality and accuracy of the information on the Information
Banner and Electronic Program Guide are transmitted from
broadcasters. You may see a difference in broadcast time if the
broadcaster is from a different time zone area.
If "No Information" appears on the screen when the INFO or GUIDE
button on the remote control is pressed, it means the broadcaster is not
providing any information.
The INFO button can also be used to exit the menu display from the
TV screen.
MUTE
VOL C H
31
Page 32

GLOSSARY
Aspect Ratio The ratio between the width and height of the TV picture on the screen. In a normal TV set the aspect ratio is 4
Audio Video (A/V) A term often used when discussing a channel on a TV receiver or on video equipment, which has been
ATSC ATSC: Advanced Television Systems Committee. Formed to establish technical standards for advanced
CVBS Composite Video Baseband Signal. In broadcast television this refers to the video signal,
DTV Digital television. Generic term that refers to all digital television formats, including high-definition television
DOLBY Digital Dolby Digital - Six-channel digital audio standard that is part of the U.S. digital television standard; also called AC-3 or Digital
Digital Tuner A digital tuner serves as the decoder required to receive and display digital broadcasts. It can be included inside TV sets or
HDTV The generally agreed upon definition of HDTV is approximately twice the vertical and horizontal picture resolution of today’s
NTSC National television system committee. The organization that developed the analog television standard currently in use in the
Progressive Scan In Progressive Scanning all the horizontal scan lines are scanned on to the screen at one time. The Digital TV and HDTV
Resolution Resolution: A measurement of the finest (smallest) detail that is visible in a video image. TV Resolutions may be expressed as
to 3 (4:3). The new aspect ratio in HDTV is 16:9 which resembles the aspect ratio in a movie theatre
(Widescreen). New TV systems support both 4:3 and 16:9 aspect ratio and can automatically switch between
them.
especially designed to accept VCR audio-video signals. This channel automatically activates special circuitry
within the TV set to prevent picture distortion and skewing. It is also used for audio-video processors, which
handle both types of signals.
television systems, including digital high definition television (HDTV).
including the colour information and syncs
(HDTV) and standard-definition television (SDTV).
5.1. The channels consist of front left, front right, front center, surround or rear left, surround or rear right, and a separate
subwoofer
via a set-top box.
NTSC TV, which essentially makes the picture twice as sharp. HDTV also has a screen ratio of 16:9 as compared with most of
today’s TV screens, which have a screen ratio of 4:3. HDTV offers reduced motion artifacts (i.e. ghosting, dot crawl), and
offers 5.1 independent channels of CD-quality stereo surround sound, (also referred to as AC-3).
U.S., Canada, and Japan. Now generally used to refer to that standard. The NTSC standard combines blue, red, and green
signals modulated as an AM signal with an FM signal for audio.
Standards accept both Interlaced Scan and Progressive Scan broadcast and display methods.
number of pixels in an image; or more commonly, “As Total Number of (horizontally scanned) Lines used to create the image.
Standard Digital TV Resolutions:
SDTV: 480i - The picture is 704x480 pixels, 480p - The picture is 704x480 pixels.
HDTV: 720p - The picture is 1280x720 pixels, 1080i - The picture is 1920x1080 pixels, 1080p - The picture is 1920x1080
pixels.
3232
Page 33

TROUBLESHOOTING TIPS
Check this List of Symptoms and Suggested Steps To Take before requesting Service. You may be able to solve the problem yourself.
If you face problems connecting the TV to external devices, please refer to the User Guide of the external device or call their service centers
for help. Charges for TV installation and adjustments of customer controls are not covered under your warranty.
SYMPTOMS SUGGESTED STEPS TO TAKE
Hookup
Installation
Installation
Installation
Can't get external
audio equipment
to work with TV.
Can't get the AV
channels on the TV
screen.
TV displays wrong
channel or no
channels above 13
Channel numbers
do not follow the
channel number
of the
programs.
1. SPDIF output audio only in digital mode and the audio equipment used must have the decoder.
2. Ensure that Monitor Out Audio LR output audio is connected to Audio In of device (refer to
Connection Guide Panel 3).
Press the AV button on the remote control repeatedly to select the desired AV channels. Note:
SVHS can only be selected if a S-VHS device is connected and powered on.
Go to TUNER MODE in the television menu and select the correct signal source, then perform the
automatic installation again. (Refer to page 11).
Go to TUNER MODE in the television menu and select the correct signal source, then perform the
automatic installation again. (Refer to page 11).
Installation
Installation
Installation
AutoLock
Close Caption
Digital Audio
Channel numbers
look different. Eg.
23-1, 45-3 etc.
Auto installation is
taking too long.
Cannot add or
skip channels from
favorite list. Error
message "Favorite
Channel list
is empty. You
must Auto
Install."
Unable to
change Autolock
password.
Close Captioning
text does not
appear.
Unable to switch
to another audio
language
You are in Digital Mode. Press
Analog mode.
Auto installation may take 20 to 40 minutes depending on the number of channels that are available.
1. You may not have completed auto installation. Do an auto installation again (refer to page 9).
2. You may have chosen the wrong TUNER MODE. Go to TUNER MODE in the TV menu
and select the correct signal source, then perform the auto installation again (refer to
page 11).
You can change the Autolock password via the feature menu (refer to page 21)
Close Captioning text takes a while to appear. If Close Captioning text still does not appear, press
the CC button on the remote control again to switch to another Close Captioning channel (refer
to page 27and 28).
You can only select different audio languages when the program is broadcasted in different audio
language (refer to page 17).
A/D button on the remote control to toggle between Digital and
Format Control
Information
Banner
Unable to change
picture-format.
"No
Information"
appears on the TV
screen.
Picture-format mode can only be activated when you are watching high-definition (HD) program.
Press the INFO button on the remote control. If the Information Banner does not show
lighted, you are not watching a HD program and therefore format control cannot be activated (refer
to page 30)
Information is broadcaster dependent. If the broadcaster does not provide any information. "No
Information" will be displayed when the INFO or GUIDE button on the remote control is
pressed (refer to page 31)
33
Page 34
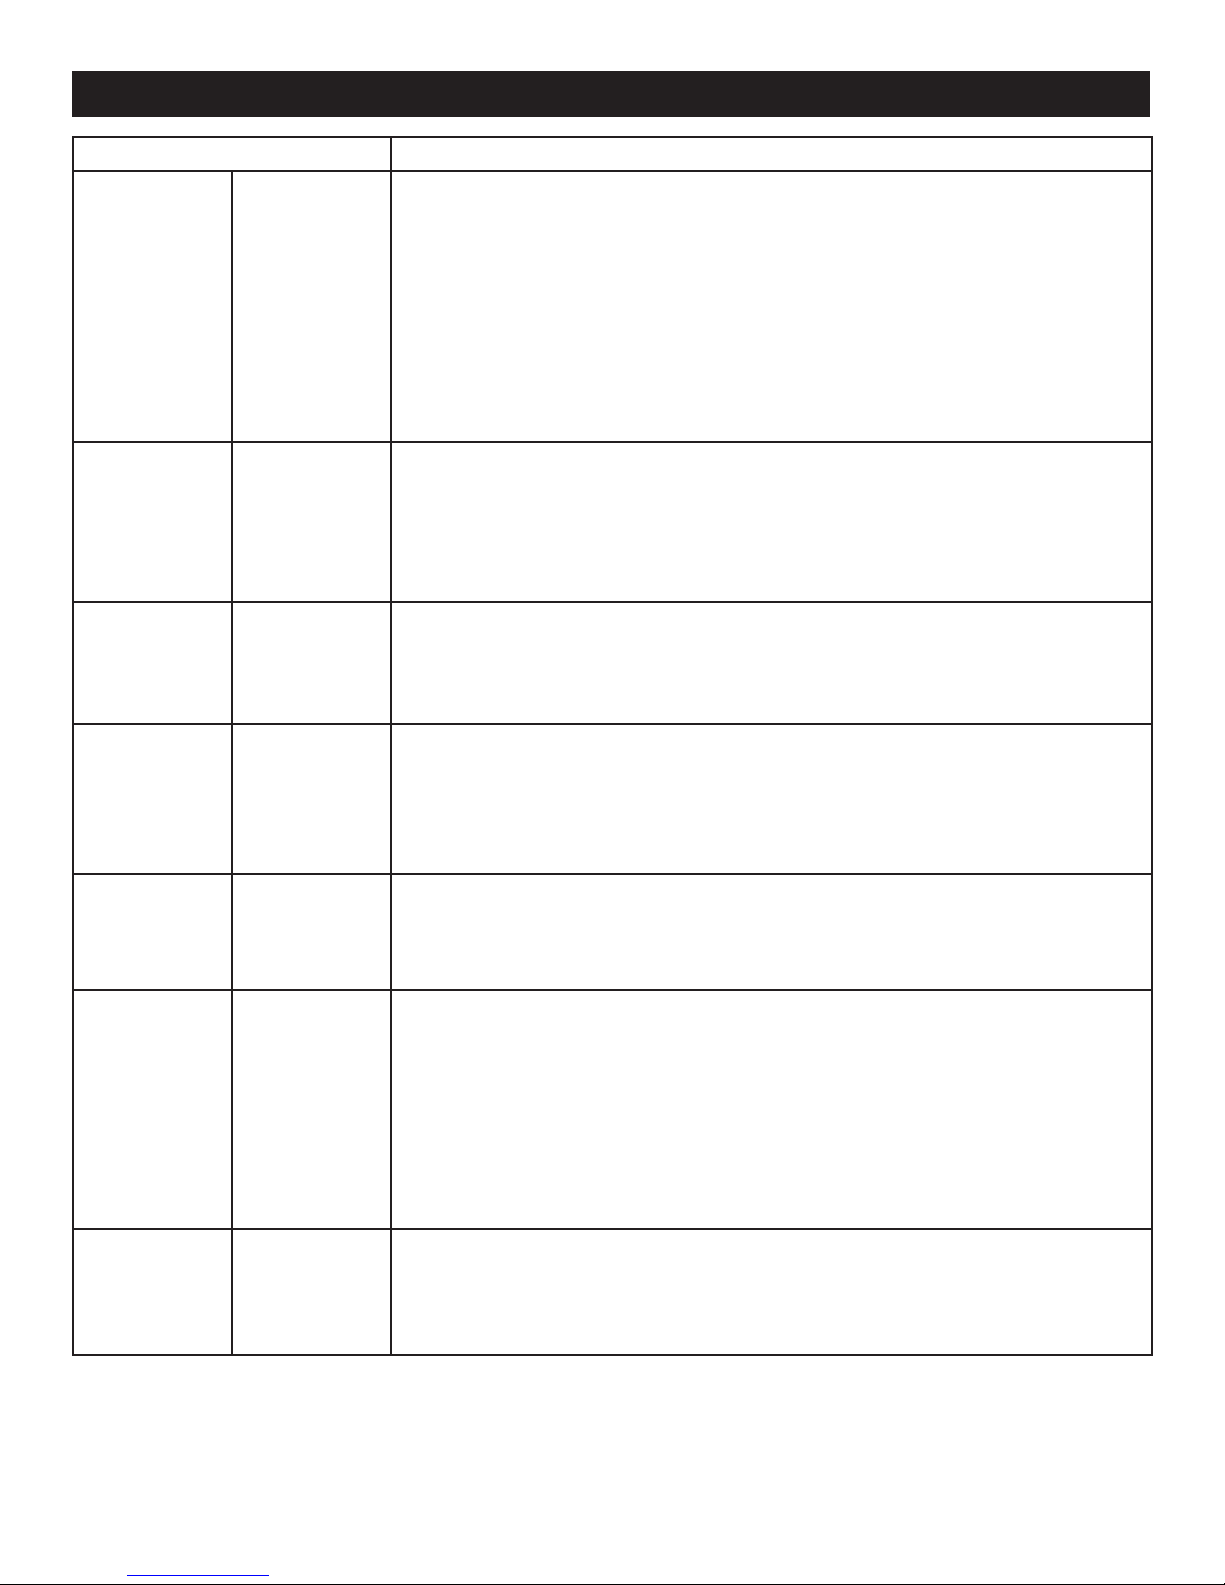
Settings
TROUBLESHOOTING TIPS
SYMPTOMS SUGGESTED STEPS TO TAKE
Error messages
appear on the
screen of TV:
Sound
Sound
General
No Signal
No Program
Audio Only
Sound is not in
Stereo.
Disturbing sound
(such as buzzing,
clicking, cracking,
humming, whistling
etc.)
No power to the TVCheck the TV power cord. Unplug the power cord from the TV, wait 10 seconds, then reinsert
Check that the antenna / cable is connected properly and that you have selected the correct
tuner mode (refer to page 11).
There could be temporarily no transmission on the selected channel. You may like to add these
channels to the Weak Dig Sig. list. (refer to page 15). When transmission is resumed or when
available, your TV will receive it.
The current channel has only audio transmission.
This could be due to any of the following reasons:
1. Not all transmitted broadcasts by the cable or broadcast stations are in STEREO. Try checking
with several major network stations to be sure that the station you selected is in STEREO.
2. When SAP is turned ON, the sound mode is automatically set to MONO.
3. Sound mode is set to MONO. Set the sound mode to STEREO. (Refer to page 19).
4. When using an AV input, the television will not display STEREO even though it is producing
stereo sound.
It is normal to hear a disturbing sound (such as buzzing, clicking, cracking, humming, whistling, etc)
from a distance less than 2 meters (6 feet) with the television sound muted.
If problem occurs on one channel, you may have a signal problem. Please contact the cable provider
or local broadcaster regarding the specifi c channel.
the plug into your wall outlet. Power On the TV again.
Plug the power cord directly to the wall socket and not via an extension cord.
If you need to use an extension cord, check that the fuse on the AC power strip is not blown.
General
General
General
TV is not
responding to
Remote Control
No Picture on the
TV screen
TV Displays white
lines in letterbox
when viewing a
DVD disc
Ensure the batteries are inserted into the remote control according to the illustration in the battery
compartment. Refer to page 7.
Reset the TV by disconnecting the power plug from the wall
outlet for 10 seconds and then reconnecting it again.
Check antenna connections. Are they properly secured to the TV ANT 75 ohm plug?
Check the TUNER MODE control for the correct tuner setting.
Try running the Auto Install feature to find all available channels (refer to page 9).
Press the AV button on the remote control to make sure the correct signal source is selected
(FRONT, AV1, AV2, Current Channel, etc.).
Note: SVHS can only be selected if a S-VHS device is connected and powered on.
Some DVD Discs are encoded with as much as 30% more video information to give the best
possible picture quality. With the DVD Player in the 16:9 picture format, the playback of this
type of disc with extra video information can produce a number of small white lines in the
upper portion of the black letterbox area. With some of these discs, this problem is inherent
and does not require a service call.
34
Page 35

CLEANING AND CARE
WARNING Concerning Stationary Images on the TV Screen:
Do not leave stationary or letterbox images on screen for
extended periods of time. This can cause uneven picture-tube
aging.
Normal use of the TV should involve the showing of pictures
that contain constantly moving and changing images that fill the
screen. Be careful not to leave nonmoving images on screen
for extended periods of time, or to display the same images
on screen too frequently, because subtle ghost images can be
left on the picture tubes. Sources of stationary images may be
DVD disks, laser disks, video games, CD-i disks, videotapes,
digital television boxes, broadcast channels, cable channels, satellite channels, and others. Here are some examples of stationary images (this is not an all-inclusive list; you may encounter
others in your viewing):
• DVD menus—listings of DVD disk content
• Letterbox black bars—shown at the top and bottom of the
TV screen when a wide screen (16:9) movie is viewed on a
TV with standard (4:3) aspect ratio.
• Video-game images and scoreboards
• Television station logos—present a problem if they are
bright and stationary; moving or low-contrast graphics are
less likely to cause uneven aging of the picture tube
• Stock-market tickers—presented at the bottom of the TV
screen
• Shopping channel logos and pricing displays—bright and
shown constantly or repeatedly in the same location on the
TV screen.
Placement of the TV
• To avoid cabinet warping, cabinet color changes, and
increased chance of set failure, do not place the TV where
temperatures can become excessively hot; for example, in
direct sunlight or near a heating appliance.
• Be sure to allow a free flow of air to and from the perforated back cover of the set.
Cleaning
• To avoid possible shock hazard, be sure the TV is unplugged
from the electrical outlet before cleaning.
• Regularly dust the TV with a dry, nonscratching duster to
keep the TV clean.
• When cleaning the TV, take care not to scratch or damage
the screen surface. Avoid wearing jewelry or using anything
abrasive. Do not use household cleaners. Wipe the front
screen with a clean cloth dampened with water. Use even,
easy, vertical strokes when cleaning.
• Gently wipe the cabinet surfaces with a clean cloth or
sponge dampened in a solution of cool, clear water and a
mild soap or detergent. Use a clean, dry cloth to dry the
wiped surfaces.
• Occasionally vacuum the ventilation holes or slots in the
back cover of the set.
• Never use thinners, insecticide sprays, or other chemicals on
or near the cabinet, as they might cause permanent damage
of the cabinet finish.
35
35
Page 36
SPECIFICATIONS
27PT9015D 32PT9005D 32PT7005D
PICTURE / DISPLAY
Aspect ratio : 4:3 4:3 4:3
Picture Display
Picture Enhancement 27" Real Flat Picture,
Scavem, Auto Picture (5
modes)
32" Real Flat Picture,
2D Comb fi lter,
Scavem, Auto Picture
(5 modes)
32" Black Matrix
Picture tube,
Auto Picture
(5 modes)
SOUND
Sound Power (Output RMS)
Sound Enhancement
CONVENIENCE
ON SCREEN DISPLAY
LANGUAGES
CONNECTIVITY
Rear
Color, Contrast,
Sharpness Control
English, French, Spanish
Color, Contrast,
Sharpness Control
2 x 5w
Incredible Surround
Auto Program
Easy toggle Digital / Analog modes
Closed Captioning Full text
Sleeptimer
Clock
Component Video Input (Y Pb Pr)
S-Video (SVHS)
Composite Video input (CVBS)
Antenna / Cable RF In
SPDIF Out (Digital Only)
Audio Out (Cinch)
Color, Contrast,
Sharpness Control
Side
ELECTRICAL INFORMATION
Voltage (V)
Frequency (Hz)
Approx. consumption (W)
Max. consumption (W)
WEIGHT & DIMENSIONS :
Weight (incl. Packaging) :
Weight (excl. Packaging) :
Visible diagonal / screen size :
Specifications and information are subject to change without notice.
USA MEXICO
120V~
60Hz
120W
132W
49 kg / 108 lbs
44 kg / 97 lbs
27 inch / 68.6 cm
127V~
Composite Video Input (CVBS)
Headphone Jack
USA
120V~
60Hz
134W
147W
76 kg / 167 lbs
71 kg / 156 lbs
32 inch / 81.3 cm
60Hz
127W
139W
36
USA
120V~
60Hz
125W
137W
60 kg / 132 lbs
55 kg / 121 lbs
32 inch / 81.3 cm
Page 37

PHILIPS LIMITED WARRANTY
90 Days Labor & One (1) Year Parts & Two (2) Years Display
PHILIPS CONSUMER ELECTRONICS warrants this prod-
uct against defect in material or workmanship, subject to any conditions set forth as follows:
PROOF OF PURCHASE: You must have proof of the date
of purchase to receive warranted repair on the product. A sales
receipt or other document showing the product and the date
that you purchased the product as well as the authorized retailer
included, is considered such proof.
COVERAGE:
(If the product is determined to be defective)
LABOR: For a period of ninety (90) days from the date of purchase, Philips will repair or replace the product, at its option, at
no charge, or pay the labor charges to any Philips authorized
repair facility. After the period of ninety (90) days, Philips will no
longer be responsible for charges incurred.
PARTS: For a period of one (1) year from the date of purchase,
Philips will supply at no charge, new or rebuilt replacement parts
in exchange for defective parts. Philips authorized service centers
will provide removal and installation of the part under the specified labor warranty.
DISPLAY: For a period of two (2) years from the date of purchase, Philips will supply, at no charge, a new or rebuilt active
display device in exchange for the defective display. Philips authorized service centers will provide removal and installation of the
parts under the specified labor warranty.
TO OBTAIN WARRANTY SERVICE IN THE U.S.A.,
PUERTO RICO, OR U.S. VIRGIN ISLANDS…
Contact Philips Customer Care Center at:
1-888-PHILIPS (1-888-744-5477)
TO OBTAIN WARRANTY SERVICE IN CANADA…
1-800-661-6162 (French Speaking)
1-888-PHILIPS (1-888-744-5477) - (English or Spanish
Speaking)
REPAIR OR REPLACEMENT AS PROVIDED UNDER THIS
WARRANTY IS THE EXCLUSIVE REMEDY FOR THE
CONSUMER. PHILIPS SHALL NOT BE LIABLE FOR ANY
INCIDENTAL OR CONSEQUENTIAL DAMAGES FOR
BREACH OF ANY EXPRESS OR IMPLIED WARRANTY ON
THIS PRODUCT. EXCEPT TO THE EXTENT PROHIBITED
BY APPLICABLE LAW, ANY IMPLIED WARRANTY OF
MERCHANTABILITY OR FITNESS FOR A PARTICULAR
PURPOSE ON THIS PRODUCT IS LIMITED IN DURATION TO
THE DURATION OF THIS WARRANTY.
Some states do not allow the exclusions or limitation of incidental
or consequential damages, or allow limitations on how long an
implied warranty lasts, so the above limitations or exclusions may
not apply to you. In addition, if you enter into a service contract
agreement with the PHILIPS partnership within ninety (90) days of
the date of sale, the limitation on how long an implied warranty
lasts does not apply.
EXCLUDED FROM WARRANTY COVERAGE
Your warranty does not cover:
• Labor charges for installation or setup of the product, adjustment of customer controls on the product, and installation or
repair of antenna systems outside of the product.
• Product repair and/or part replacement because of improper
installation, connections to improper voltage supply, abuse,
neglect, misuse, accident, unauthorized repair or other cause
not within the control of Philips.
• A product that requires modification or adaptation to enable
it to operate in any country other than the country for which
it was designed, manufactured, approved and/or authorized, or
repair of products damaged by these modifications.
• Damage occurring to product during shipping when improperly
packaged or cost associated with packaging.
• Product lost in shipment and no signature verification of receipt
can be provided.
• A product used for commercial or institutional purposes
(including but not limited to rental purposes).
• Products sold AS IS or RENEWED.
This warranty gives you specific legal rights. You may have other rights which vary from state/province to state/province.
Philips, P.O. Box 671539, Marietta, GA. 30006-0026
(Warranty: 4835 710 27400)
3737
Page 38

INDEX
Accessories List . . . . . . . . . . . . . . . . . . . . . . . . . . . . . . . . . . . . . 5
Active Control . . . . . . . . . . . . . . . . . . . . . . . . . . . . . . . . . . . . . 17
AutoLock Controls
Access Code . . . . . . . . . . . . . . . . . . . . . . . . . . . . . . . . . . . . . 21
Block/Clear All Channels . . . . . . . . . . . . . . . . . . . . . . . . . . . 23
Movie Ratings . . . . . . . . . . . . . . . . . . . . . . . . . . . . . . . . . . . . 24
TV Ratings . . . . . . . . . . . . . . . . . . . . . . . . . . . . . . . . . . . . . . . 25
Blocking Options . . . . . . . . . . . . . . . . . . . . . . . . . . . . . . . . . . 23
Automatic Program . . . . . . . . . . . . . . . . . . . . . . . . . . . . . . . . . . 9
Auto Picture . . . . . . . . . . . . . . . . . . . . . . . . . . . . . . . . . . . . . . . 18
Auto Sound . . . . . . . . . . . . . . . . . . . . . . . . . . . . . . . . . . . . . . . . 19
AVL (Automatic Volume Leveler) Control . . . . . . . . . . . . . . . 19
Balance Control . . . . . . . . . . . . . . . . . . . . . . . . . . . . . . . . . . . . 19
Bass Control . . . . . . . . . . . . . . . . . . . . . . . . . . . . . . . . . . . . . . . 19
Brightness Control . . . . . . . . . . . . . . . . . . . . . . . . . . . . . . . . . . 18
Cleaning and Care . . . . . . . . . . . . . . . . . . . . . . . . . . . . . . . . . . 35
Channel Edit (Add or Skip channels) . . . . . . . . . . . . . . . . . 12
Closed Captioning in Digital Mode . . . . . . . . . . . . . . . . . . . . . 27
Closed Captioning in Analog Mode . . . . . . . . . . . . . . . . . . . . .28
Color Control . . . . . . . . . . . . . . . . . . . . . . . . . . . . . . . . . . . . . 18
Color Temperature (Color Temp) Control . . . . . . . . . . . . . . 18
Electronic Program Guide (EPG) . . . . . . . . . . . . . . . . . . . . . . . 31
Feature Highlights . . . . . . . . . . . . . . . . . . . . . . . . . . . . . . . . . . . . 4
Format Controls . . . . . . . . . . . . . . . . . . . . . . . . . . . . . . . . . . . . 30
Glossary . . . . . . . . . . . . . . . . . . . . . . . . . . . . . . . . . . . . . . . . . . 32
Guide To Digital TV . . . . . . . . . . . . . . . . . . . . . . . . . . . . . . . . . . 5
Index . . . . . . . . . . . . . . . . . . . . . . . . . . . . . . . . . . . . . . . . . . . . . 38
Information Banner . . . . . . . . . . . . . . . . . . . . . . . . . . . . . . . . . . 31
Language Control . . . . . . . . . . . . . . . . . . . . . . . . . . . . . . . . . . . 10
Picture Control . . . . . . . . . . . . . . . . . . . . . . . . . . . . . . . . . . . . . 18
Quick Tips . . . . . . . . . . . . . . . . . . . . . . . . . . . . . . . . . . . . . . . . . 5
Registration of TV Information . . . . . . . . . . . . . . . . . . . . . . . . . 2
Rotation . . . . . . . . . . . . . . . . . . . . . . . . . . . . . . . . . . . . . . . . . . 29
Safety / Precautions . . . . . . . . . . . . . . . . . . . . . . . . . . . . . . . . 2-3
Second Audio Programming (SAP) . . . . . . . . . . . . . . . . . . . . . 19
Sharpness Control . . . . . . . . . . . . . . . . . . . . . . . . . . . . . . . . . . 18
Sleeptimer . . . . . . . . . . . . . . . . . . . . . . . . . . . . . . . . . . . . . . . . 29
Specifications . . . . . . . . . . . . . . . . . . . . . . . . . . . . . . . . . . . . . . 36
Stereo/Mono Control . . . . . . . . . . . . . . . . . . . . . . . . . . . . . . . . 19
Timer Controls
Activate Control . . . . . . . . . . . . . . . . . . . . . . . . . . . . . . . . . . 26
Clock, Time Control . . . . . . . . . . . . . . . . . . . . . . . . . . . . . . 26
Display Control . . . . . . . . . . . . . . . . . . . . . . . . . . . . . . . . . . . 26
Channel Control . . . . . . . . . . . . . . . . . . . . . . . . . . . . . . . . . . 26
Start Time Control . . . . . . . . . . . . . . . . . . . . . . . . . . . . . . . . 26
Stop Time Control . . . . . . . . . . . . . . . . . . . . . . . . . . . . . . . . 26
Tint Control . . . . . . . . . . . . . . . . . . . . . . . . . . . . . . . . . . . . . . . 18
Treble Control . . . . . . . . . . . . . . . . . . . . . . . . . . . . . . . . . . . . . 19
Troubleshooting . . . . . . . . . . . . . . . . . . . . . . . . . . . . . . . . . 33-34
Tuner Mode Controls . . . . . . . . . . . . . . . . . . . . . . . . . . . . . . . 11
Warranty (Limited) . . . . . . . . . . . . . . . . . . . . . . . . . . . . . . . . . . 37
Weak Digital Signal (Add or Skip) . . . . . . . . . . . . . . . . . . . . . . 15
38
Page 39

Trademarks are the property of Koninklijke Philips Electronics N.V. or their respective owners.
2005 © Koninklijke Philips Electronics N.V. All rights reserved.
Specifications are subject to change without notice.
www.philips.com
3139 125 35342
39
 Loading...