

Page 1

Color TV
Color TV
27PT5441/37
32PT5441/37
27PT6441/37
27PT6442/37
3121 235 21512
Model No
.:_______________
Serial No.:
User Manual
Thank you for choosing Philips.
Need help fast?
Read your User Manual first for quick tips that
your using your Philips product more enjoyable. If
you have read your instructions and still need
assistance you may access our online help at
www.p4c.philips.com
or
call 1-888-PHILIPS (1-888-744-5477)
while with your product.
Page 2

Return your Product Registration Card today
to get the very most from your purchase.
Congratulations on your purchase, and welcome to the “family!”
Dear PHILIPS product owner:
Thank you for your confidence in PHILIPS.You’ve selected one of the best-built, bestbacked products available today.We’ll do everything in our power to keep you happy
with your purchase for many years to come.
As a member of the PHILIPS “family,” you’re entitled to protection by one of the most
comprehensive warranties and outstanding service networks in the industry.What’s
more, your purchase guarantees you’ll receive all the information and special offers for
which you qualify, plus easy access to accessories from our convenient home shopping
network.
Most importantly,you can count on our uncompromising commitment to your total
satisfaction.
All of this is our way of saying welcome - and thanks for investing in a PHILIPS product.
P.S. To get the most from your PHILIPS purchase, be sure to complete and
return your Product Registration Card at once.
Know these
safetysymbols
This “bolt of lightning” indicates uninsulated material within your unit may
cause an electrical shock. For the safety of everyone in your household,please
do not remove product covering.
The “exclamation point” calls attention to features for which you should read
the enclosed literature closely to prevent operating and maintenance problems.
WARNING: To r educe the risk of fire or electric shock, this apparatus should not
be exposed to rain or moisture and objects filled with liquids, such as vases, should
not be placed on this apparatus.
CAUTION: To prevent electric shock, match wide blade of plug to wide slot, fully
insert.
ATTENTION:Pour éviter les choc électriques, introduire la lame la plus large de la
fiche dans la borne correspondante de la prise et pousser jusqu’au fond.
Registering your model with PHILIPS makes you eligible for all of the valuable benefits
listed below, so don't miss out. Complete and return your Product Registration Card at
once to ensure:
*Proof of
Purchase
Returning the enclosed
card guarantees that your
date of purchase will be
on file, so no additional
paperwork will be
required from you to
obtain warranty service.
*Product Safety
Notification
By registering your product, you'll receive notification - directly from the
manufacturer - in the
rare case of a product
recall or safety defect.
*Additional
Benefits of Product
Ownership
Registering your product
guarantees that you'll
receive all of the privileges to which you're
entitled, including special
money-saving offers.
t
s
CAUTION
RISK OF ELECTRIC SHOCK
DO NOT OPEN
CAUTION: TO REDUCE THE RISK OF ELECTRIC SHOCK, DO NOT
REMOVE COVER (OR BACK). NO USER-SERVICEABLE PARTS
INSIDE. REFER SERVICING TO QUALIFIED SERVICE PERSONNEL.
Visit our World Wide Web Site at http://www.philips.com
Page 3

IMPORTANT SAFETY INSTRUCTIONS
Read before operating equipment
1. Read these instructions.
2. Keep these instructions.
3. Heed all warnings.
4. Follow all instructions.
5. Do not use this apparatus near water.
6. Clean only with a dry cloth.
7. Do not block any of the ventilation openings.
Install in accordance with the manufacturers
instructions.
8. Do not install near any heat sources such as radia-
tors, heat registers, stoves, or other apparatus
(including amplifiers) that produce heat.
9. Do not defeat the safety purpose of the polarized
or grounding-type plug. A polarized plug has two
blades with one wider than the other. A grounding
type plug has two blades and third grounding
prong. The wide blade or third prong are provided
for your safety. If the provided plug does not fit
into your outlet, consult an electrician for replacement of the obsolete outlet.
10. Protect the power cord from being walked on or
pinched particularly at plugs, convenience receptacles, and the point where they exit from the
apparatus.
11. Only use attachments/accessories specified by the
manufacturer.
12. Use only with a cart, stand, tripod, brack-
et, or table specified by the manufacturer,
or sold with the apparatus. When a cart is
used, use caution when moving the cart/apparatus
combination to avoid injury from tip-over.
13. Unplug this apparatus during lightning storms or
when unused for long periods of time.
14. Refer all servicing to qualified service personnel.
Servicing is required when the apparatus has been
damaged in any way, such as power-supply cord
or plug is damaged, liquid has been spilled or
objects have fallen into apparatus, the apparatus
has been exposed to rain or moisture, does not
operate normally, or has been dropped.
15. This product may contain lead and mercury.
Disposal of these materials may be regulated due
to environmental considerations. For disposal or
recycling information, please contact your local
authorities or the Electronic Industries Alliance:
www.eiae.org
16. Damage Requiring Service - The appliance
should be serviced by qualified service personnel
when:
A. The power supply cord or the plug has been dam-
aged; or
B. Objects have fallen, or liquid has been spilled into
the appliance; or
C. The appliance has been exposed to rain; or
D. The appliance does not appear to operate normal-
ly or exhibits a marked change in performance; or
E. The appliance has been dropped, or the enclosure
damaged.
17. Tilt/Stability - All televisions must comply with
recommended international global safety standards for tilt and stability properties of its cabinet
design.
• Do not compromise these design standards by
applying excessive pull force to the front, or top,
of the cabinet which could ultimately overturn the
product.
• Also, do not endanger yourself, or children, by
placing electronic equipment/toys on the top of
the cabinet. Such items could unsuspectingly fall
from the top of the set and cause product damage
and/or personal injury.
18. Wall or Ceiling Mounting - The appliance
should be mounted to a wall or ceiling only as
recommended by the manufacturer.
19. Power Lines - An outdoor antenna should be
located away from power lines.
20. Outdoor Antenna Grounding - If an outside
antenna is connected to the receiver, be sure the
antenna system is grounded so as to provide some
protection against voltage surges and built up static charges.
Section 810 of the National Electric Code,
ANSI/NFPANo. 70-1984, provides information
with respect to proper grounding of the mast and
supporting structure, grounding of the lead-in wire
to an antenna discharge unit, size of grounding connectors, location of antenna-discharge unit, connection to grounding electrodes, and requirements for
the grounding electrode. See Figure below.
21. Object and Liquid Entry - Care should be taken
so that objects do not fall and liquids are not
spilled into the enclosure through openings.
a) Warning: To reduce the risk of fire or electric
shock, this apparatus should not be exposed to rain
or moisture and objects filled with liquids, such as
vases, should not be placed on this apparatus.
22. Battery Usage CAUTION - To prevent battery
leakage that may result in bodily injury, property
damage, or damage to the unit:
• Install all batteries correctly, with + and aligned as marked on the unit.
• Do not mix batteries (old and new or carbon and
alkaline, etc.).
• Remove batteries when the unit is not used for a
long time.
Note to the CATV system installer: This
reminder is provided to call the CATV system
installer's attention to Article 820-40 of the NEC
that provides guidelines for proper grounding and,
in particular, specifies that the cable ground shall be
connected to the grounding system of the building,
as close to the point of cable entry as practical.
Example of Antenna Grounding as per
NEC - National Electric Code
ELECTRIC SERVICE EQUIPMENT
GROUND CLAMP
POWER SERVICE GROUNDING
ELECTRODE SYSTEM
(NEC ART 250, PART H)
ANTENNA LEAD
IN WIRE
ANTENNA
DISCHARGE
UNIT
(NEC SECTION 810-20)
GROUNDING
CONDUCTORS
(NEC SECTION 810-21)
GROUND CLAMPS
Page 4

Side 1
PANEL LAYOUT
PANEL INDEX
Subject Panel No.
Active Control . . . . . . . . . . . . . . . . .23
Antenna/Cable Basic Connection . . .1
Audio/Video Connections
AV1 Input Jacks . . . . . . . . . . . . . . .4
Component Video Input Jacks . . . .7
Headphone Jack . . . . . . . . . . . . . . .5
Monitor Output Jacks . . . . . . . . . . .8
S-Video Input Jacks . . . . . . . . . . . .6
Side AV Input Jacks . . . . . . . . . . . .5
AutoLock™ Controls
Access Code . . . . . . . . . . . . . . . . .25
Block All Channels . . . . . . . . . . . .27
Block Channels . . . . . . . . . . . . . . .26
Clear All Blocked Channels . . . . .27
Movie Ratings . . . . . . . . . . . . . . . .28
Other Blocking Options . . . . . . . .30
TV Ratings . . . . . . . . . . . . . . . . . .29
Understanding AutoLock™ . . . . .24
Automatically Programming TV . .13
AutoPicture™ Control . . . . . . . . . .32
AutoSound™ Control . . . . . . . . . . .32
Basic Remote Operation . . . . . . . . . .3
Basic Television Operation . . . . . . . .3
Subject Panel No.
Cable Box Connection . . . . . . . . . . .2
Care and Cleaning . . . . . . . . . . . . . .36
Channel Edit . . . . . . . . . . . . . . . . . .14
Clock Controls
Activate Control . . . . . . . . . . . . . .21
Clock . . . . . . . . . . . . . . . . . . . . . . .18
Display Control . . . . . . . . . . . . . . .22
Specific Channel . . . . . . . . . . . . . .20
Start or Stop Time . . . . . . . . . . . . .19
Closed Caption Control . . . . . . . . . .31
Demo Mode . . . . . . . . . . . . . . . . . . .30
Format Control . . . . . . . . . . . . . . . .17
Language Controls . . . . . . . . . . . . .11
Limited Warranty . . . . . . . . . . . . . .37
Picture Menu Controls . . . . . . . . . .15
QuadraSurf™ . . . . . . . . . . . . . . .33-34
Remote Batteries . . . . . . . . . . . . . . . .3
Remote Button Descriptions . . . .9-10
Sleeptimer . . . . . . . . . . . . . . . . . . . .31
Sound Menu Controls . . . . . . . . . . .16
Troubleshooting . . . . . . . . . . . . . . .35
Tuner Mode . . . . . . . . . . . . . . . . . . .12
Active Control, AutoPicture, AutoSound, and Incredible Surround are trademarks of Philips
Consumer Electronics Company. Copyright 2001 Philips Consumer Electronics.*Manufactured
under license from Dolby Laboratories. “Dolby” and the double-D symbol are trademarks of Dolby
Laboratories.
MODEL
REGISTRATION
INFORMATION
PANEL
2
PANEL
3
PANEL
8
PANEL
9
PANEL
14
PANEL
15
Side 2
SAFETY
INFO
PANEL
1
LIMITED
WARRANTY
(Panel 38)
COVER
Panel Index
and
Sequence
Panel
PANEL
4
PANEL
6
PANEL
20
PANEL
22
PANEL
24
PANEL
5
PANEL
7
PANEL
21
PANEL
23
PANEL
25
PANEL
10
PANEL
12
PANEL
26
PANEL
28
PANEL
30
PANEL
11
PANEL
13
PANEL
27
PANEL
29
PANEL
31
PANEL
16
PANEL
18
PANEL
32
PANEL
34
PANEL
36
PANEL
17
PANEL
19
PANEL
33
PANEL
35
PANEL
37
Page 5

BASIC ANTENNA AND CABLE CONNECTIONS
Y
our home’s signal input might
come from a single (75 ohm)
round cable, a Converter Box, or from
an antenna. In either case the connection to the TV is very easy.
1
If your Cable TV signal or
Antenna signal is a round
cable (75 ohm) then you're
ready to connect to the TV.
If your antenna has flat twinlead wire (300 ohm), you first
need to attach the antenna wires
to the screws on a 300 to 75 ohm
adapter.
If you have a Cable Converter
Box: Connect the Cable TV sig-
nal to the Cable Signal IN(put)
plug on the Converter.
2
Connect the Cable TV cable or
Antenna cable (or 300 to 75 ohm
adapter) to the 75Ω plug on the
TV.
If you have a Cable Converter
Box: Connect the OUT(put) plug
from the Converter to the 75Ω
plug on the TV.
After using the AutoProgram Control,
press the CH + and – buttons to scroll
through all the channels stored in the
television’s memory.
HELPFUL HINT
Back of TV
Cable signal
coming from
Cable Company
Jack Panel
Back of TV
75 ⍀
1
2
ANT 75‰
L/Mono
Monitor out
VIDEO
S-VIDEO
AV1 in
Y
Pb
Pr
AV2 in
AUDIO
R
COMPONENT VIDEO INPUT
Antenna Connection
300 to 75Ω
Adapter
Combination
VHF/UHF Antenna
(Outdoor or Indoor)
Twin Lead
Wire
Round Cable
75Ω
Back of TV
Direct Cable Connection
75Ω Round
Coaxial Cable
1
1
75 ⍀
ANT 75‰
VIDEO
L/Mono
AUDIO
2
Monitor out
AV2 in
AV1 in
Y
Pb
S-VIDEO
R
Pr
COMPONENT VIDEO INPUT
Page 6

TO
TV/VCR
CABLE
IN
IR
USB
DVD-D OUT
AUDIO IN
SPDIF
VIDEO
IN OUT
S-VIDEO
R L
AUDIO OUT
TV
PASSCARD
Y Pb Pr
OPTICAL
SPDIF
4
24
ANT 75‰
L/Mono
Monitor out
VIDEO
S-VIDEO
AV1 in
Y
Pb
Pr
AV2 in
AUDIO
R
COMPONENT VIDEO INPUT
L/Mono
Monitor out
VIDEO
S-VIDEO
AV1 in
Y
Pb
Pr
AV2 in
AUDIO
R
COMPONENT VIDEO INPUT
5
6
CABLE B
OX CONNECTIONS
2
I
f your cable signal uses a cable
box or decoder, follow the easy
steps below to complete the connection.
Cable Box (w/RF In/Outputs):
This connection will be mono.
1
Connect the Cable Company
supplied cable to
the signal
IN(put) plug on the back of the
Cable Box.
2
Using a separate round coaxial
cable, connect one end to the
OUT(put) (TO TV) plug on the
back of the Cable Box.
3
Connect the other end of the
round coaxial cable to the 75Ω
input on the back of the television. Screw it down finger tight.
NOTE: If applicable, set the OUTPUT CHANNEL SWITCH on the
back of the cable box to CH 3 or 4.
Tune the TV to the same channel and
change channels at the cable box. In
some cases, the cable box will automatically tune to either channel 3 or 4,
change channels until the picture
appears.
Cable Box (w/Audio/Video
Outputs):
This connection will supply Stereo
sound.
4
Connect the Cable Company
supplied cable to
the cable signal IN(put) plug on the back of
the Cable Box.
5
Using a RCA type Video Cable,
connect one end of the cable to
the Video (or ANT, your cable
box may be labeled differently)
Out jack on the cable box and
the other end to the AV1 Video
Input on the TV.
6
Connect one end of the Audio
Left and Right Cable to the left
and right Audio Out L & R
jacks on the cable box. Connect
the other end to the AV1 Audio L
& R Input jacks on the TV.
NOTE: Use the AV button on the TV
remote control to tune to the AV1
channel for the cable box signal. Once
tuned, change channels at the cable
box, not the television.
1
Jack Panel Back of Cable Box
Cable Signal IN from the
Cable Company
Round 75Ω
Coaxial Cable
Jack Panel Back of TV
Cable Signal IN
from the Cable
Company
Cable Box with A/V Outputs
Jack Panel Back of TV
Audio Cables
L (White) & R (Red)
Video Cable
(Yellow)
Cable Box (w/RF In/Outputs):
Cable Box (w/Audio/Video Outputs):
2
CABLE
TO
TV/VCR
DVD-D OUT
IR
IN
USB
VIDEO
AUDIO IN
SPDIF
IN OUT
R L
S-VIDEO
Y Pb Pr
AUDIO OUT
TV
PASSCARD
OPTICAL
SPDIF
3
75 ⍀
ANT 75‰
AV2 in
Monitor out
AV1 in
VIDEO
Y
L/Mono
Pb
AUDIO
S-VIDEO
R
Pr
COMPONENT VIDEO INPUT
Page 7

POWER
3
+
–
VOLUME
+
–
CHANNEL
2
1
BASIC TV AND R
EMOTE CONTROL OPERATION
3
1
Press the POWER button to
turn the TV ON.
Note: You can also press any
button on the front of the TV to
turn the TV ON.
2
Press the VOLUME + button
to increase the sound level, or
the VOLUME – button to
lower the sound level.
Pressing both buttons at the
same time will display the on-
screen menu. Once in the
menu, use these buttons to
make adjustments or selections.
3
Press the CHANNEL UP + or
DOWN – button to select TV
channels.
4
Point the remote control
toward the remote sensor window on the TV when operating
the TV with the remote.
REMOTE CONTROL
T
o load the supplied batteries
into the remote:
1. Remove the battery compartment lid on the back of the remote.
2. Place the batteries (2-AA) in
the remote. Be sure the (+) and (-)
ends of the batteries line up correctly (inside of case is marked.)
3. Reattach the battery lid.
Battery Compartment
2-AA Batteries
Battery Lid
Back of Remote
3
2
1
Standby Light Indicator - Red light will show
when in the Standby Mode. Press the Power
button to return the TV to it’s active state.
Remote Sensor - Sensor for
activating remote control com-
mands when the remote is
used to control the TV.
Example of Models 27PT6441/37 and 27PT6442/37
Example of Models 27PT5441/37 and 32PT5441/37
Page 8

AV (AUDIO/VIDEO) INPUT C
ONNECTION
4
Monitor out
Audio and video cables are not supplied with the TV, but are available
from Philips or electronics retailers.
HELPFUL HINT
Audio In
(Red and
White)
VCR Two (or accessory
device) (Equipped with
Video and Audio Output Jacks)
Video In
(Yellow)
Back of VCR
Back of TV
AV 1
Connection
AV2 Connection
VCR One (or
accessory device) (Equipped
with Audio and Video Output
Jacks)
T
he TV’s audio/video input jacks
are for direct picture and sound
connections between the TV and a
VCR (or similar device) that has
audio/video output jacks. Both the
AV1 and AV2 Input Jack connections
are shown on this page, but either
one can be connected alone. Follow
the easy steps below to connect your
accessory device to the AV1 and AV2
IN Jacks located on the back of the
TV.
1
Connect the VIDEO (yellow)
cable to the VIDEO AV 1 IN (or
AV2 IN) jack on the back of the
TV.
2
Connect the AUDIO (red and
white) cables to the AUDIO (left
and right) AV 1 IN (or AV2 in)
jacks on the rear of the TV.
3
Connect the VIDEO (yellow)
cable to the VIDEO OUT jack on
the back of the VCR (either one
or two) or accessory device being
used.
4
Connect the AUDIO (red and
white) cables to the AUDIO (left
and right) OUT jacks on the rear
of the VCR (either one or two) or
accessory device being used.
5
Turn the VCR (either one or
two) or accessory device and
the TV ON.
6
Press the AV button to set the
TV to its AV1or AV2 channel.
7
With either of the VCRs (or
accessory devices) ON and a prerecorded tape (CD, DVD, etc.)
inserted, press the PLAY button
to view the tape on the television.
VIDEO
L/Mono
AUDIO
R
1
AV1 in
Y
Pb
Pr
COMPONENT VIDEO INPUT
AV2 in
3
S-VIDEO
5
5
ANT/CABLE
OUT
ANT/CABLE
OUT
4
2
S-VIDEO
S-VIDEO
OUT
2
R L
VIDEO
AUDIO OUT
OUT
1
OUT
4
7
R L
VIDEO
AUDIO OUT
OUT
3
7
Page 9

SIDE AV CONNECTIONS
5
A
udio and Video Side Inputs are
available for a quick connec-
tion of a VCR, to playback video
from a camera, or attach a gaming device. Use the AV button on
the remote control to tune these
inputs.
1
Connect the video (yellow)
cable from the Video output
on the Camera (or accessory
device) to the Video (yellow)
Input located on the SIDE of
the TV.
2
For Stereo Devices: Connect
the audio cable (red and
white) from the Audio Left
and Right Outputs on the
Camera to the Audio In
(white) jack on the SIDE of
the television.
For Mono Devices: Connect
one end of the audio cable
from the Audio Out jack on
the device to the Audio In
(white) jack on the SIDE of
the television.
3
Turn the TV and the accessory device ON.
4
Press the AV button on the
remote control to tune the TV
to the side input jacks.
“Front” will appear on the
TV screen.
5
Press the PLAY button
on the accessory device to
view playback, or to access
the accessory device (camera,
gaming unit, etc.).
Front
Side Jack panel
of TV
Audio
Cables
Video
Cable
Jack Panel of Accessory Device
Optional
Headphones
3
5
3
LEFT RIGHT
4
1
VIDEO
L
2
AUDIO
R
VIDEOAUDIO
S-VIDEO
VOL
Page 10

S-VIDEO (S-VHS) I
NPUT CONNECTIONS
T
he S(uper)-Video connection on
the rear of the TV can provide
you with better picture detail and
clarity for the playback of accessory
sources such as DBS (digital broadcast satellite), DVD (digital video
discs), video games, and S-VHS VCR
(video cassette recorder) tapes than
the normal antenna picture connections.
NOTE: The accessory device must
have an S-VIDEO OUT(put) jack in
order for you to complete the connection on this page.
1
Connect one end of the SVIDEO CABLE to the S-
VIDEO jack on the back of the
TV. Then connect one end the
AUDIO (red and white)
CABLES to the AV1 in AUDIO
L and R (left and right) jacks on
the rear of the TV.
2
Connect other end of the SVIDEO CABLE to the S-VHS
(S-Video) OUT jack on the back
of the VCR. Then connect the
other ends of the AUDIO (red
and white) CABLES to the
AUDIO (left and right) OUT
jacks on the rear of the VCR.
3
Turn the VCR and the TV
ON.
4
Press the AV button or the
CH + or CH – buttons on the
remote to scroll the channels
until SVHS appears in the upper
left corner of the TV screen.
5
Now your ready to place a prerecorded video tape in the VCR
and press the PLAY button
.
VCR or External
Accessory Device
(with S-Video
Output)
Audio Cables
(Red &
White)
S-Video
Cable
Back of TV
6
Monitor out
VIDEO
L/Mono
AUDIO
R
2
AV1 in
Y
Pb
Pr
COMPONENT VIDEO INPUT
AV2 in
1
S-VIDEO
2
3
L R
AUDIO OUT
4
S-VIDEO
VIDEO
OUT
ANT/CABLE
OUT
OUT
1
5
VOL
Page 11

COMPONENT VIDEO (CVI) INPUT CONNECTIONS
C
omponent Video inputs provide
for the highest possible color
and picture resolution in the playback of digital signal source material, such as with DVD players. The
color difference signals (Pb, Pr) and
the luminance (Y) signal are connected and received separately,
which allows for improved color
bandwidth information (not possible
when using composite video or SVideo connections).
1
Connect the Component (Y,
Pb, Pr) Video OUT jacks from
the DVD player (or similar
device) to the (Y, Pb, Pr) in(put)
jack on the TV. When using the
Component Video Inputs, it is
best not to connect a signal to the
AV in Video Jack.
2
Connect the red and white
AUDIO CABLES to the Audio
(left and right) output jacks on
the rear of the accessory device
to the Audio (L and R) AV1 in
Input Jacks on the TV.
3
Turn the TV and the DVD (or
digital accessory device) ON.
4
Press the AV button or the
CH + or CH – buttons to
scroll the available channels
until CVI appears in the upper
left corner of the TV screen.
5
Insert a DVD disc into the
DVD player and press the
PLAY button on the DVD
Player.
The description for the component video
connectors may differ depending on the
DVD player or accessory digital source
equipment used (for example, Y, Pb, Pr; Y,
B-Y, R-Y; Y, Cr, Cb). Although abbreviations and terms may vary, the letters b and r
stand for the blue and red color component
signal connectors, and Y indicates the luminance signal. Refer to your DVD or digital
accessory owner’s manual for definitions and
connection details.
HELPFUL HINT
Component
Video Cables
(Green, Blue,
Red)
Audio
Cables
(Red &
White)
Accessory Device
Equipped with
Component Video
Outputs
Back of TV
The CVI connection will be dominate over the AV1
in Video Input. When a Component Video Device is
connected as described, it is best not to have a video
signal connected to the AV1 in Video Input jack.
7
Monitor out
VIDEO
L/Mono
Y
AUDIO
R
COMP VIDEO
COMPONENT VIDEO INPUT
1
3
AV2 in
AV1 in
2
Y
Pb
Pr
S-VIDEO
VIDEO
Pb
OUT
OUT
Pr
S-VIDEO
AUDIO
R
OUT
L
5
4
VOL
Page 12

MONITOR OUT
(PUT) CONNECTIONS
8
T
he Audio/Video (Monitor) Output
jacks are great for recording with
a VCR or used to connect an external audio system for better sound
reproduction.
AUDIO SYSTEM
CONNECTION:
1
Connect one end of the
R(ight) and L(eft) AUDIO
(Monitor Out) jacks on the TV
to the R and L audio input jacks
on your amplifier or sound system. Set the audio system’s volume to a normal listening level.
2
Turn the TV and audio system ON. To adjust the volume
on the audio system, you will
need to change the volume at
the external audio system, not
the television.
SECOND VCR CONNECTION:
NOTE: Refer to panel number 4 for
the proper hookup of the first VCR.
Follow the instructions on how to
tune to the AV1 channel to view a
pre-recorded tape.
The following steps allow you to
connect a second VCR to record
the program while your watching
it.
3
Connect one end of the yellow
Video Cable to the Monitor
Out VIDEO plug. Connect the
other end to the VIDEO IN plug
on the second VCR.
4
Connect one end of the red
and white Audio cable from
the Monitor Out AUDIO L and
R plugs on the TV to the
AUDIO IN plugs on the VCR.
5
Turn the Second VCR ON,
insert a VHS tape and it’s
ready to record what’s being
viewed on the TV screen.
Monitor out
Back of TV
Audio Cables
(Red and White)
Back of TV
Audio
Cables
1st VCR
(refer to panel 4 for
proper connection)
Video
Cable
2nd VCR with Audio and
Video Input Jacks
SECOND VCR CONNECTION:
AUDIO SYSTEM CONNECTION:
VIDEO
L/Mono
AUDIO
R
AV1 in
Y
Pb
Pr
COMPONENT VIDEO INPUT
AV2 in
S-VIDEO
1
3
R
L
T
U
P
IN
V
/T
X
U
A
T
U
P
IN
O
N
O
H
P
2
AV1 in
Y
Pb
Pr
COMPONENT VIDEO INPUT
RL
4
AV2 in
S-VIDEO
ANTENNA
OUTOUT
IN
VIDEO
LR
AUDIO
ANTENNA
OUT
IN
IN
Monitor out
VIDEO
L/Mono
AUDIO
R
ANTENNA
OUT OUT
IN
AUDIO
VIDEO
ANTENNA
OUT
IN
IN
5
Page 13

REMOTE CONTROL BUTTON
DESCRIPTIONS
9
QUADRASURF Buttons
(Red, Green, Yellow, Blue) Allows you to
store and surf up to 10 channels you
choose for each colored button.
A
V Button
Press to select an accessory signal input
from the front AV Inputs.
SMILEY
Button
Press to add channels to the
“QuadraSurf” lists. Works with all colored buttons.
AUT
O SOUND Button
Press repeatedly to choose from different
factory pre-defined sound settings.
Choose from Personal (how you set the
Sound Menu options), Voice (for programming with speaking only), Music
(for musical type programs such as concerts), or Theatre (used when watching
movies).
MENU
Button
Press to display the on-screen menu. Also
can be used to back out of the on-screen
menu until it disappears from the TV’s
screen.
CC Button
Press to activate the Closed Captioning
options. Repeatedly pressing the CC button will scroll the available options on the
TV screen.
V
OL(ume) + or - Buttons
Press the VOL + button to increase the
TV’s sound level. Press the VOL – button
to decrease the TV’s sound level.
MUTE Button
Press the mute button to eliminate the
sound being heard from the TV. “MUTE”
will be displayed on the TV’s screen.
Press again to restore the TV’s volume to
it’s previous level. pressing this button for
5 seconds will activate the Demo Mode.
(See panel 30 for more details.)
SLEEP
Button
Press the Sleep button to set the TV to
automatically turn itself off after a set
period of time. Press repeatedly to select
15, 30, 45, 60, 90, 120, 180, or 240 minutes.
VOL
Page 14
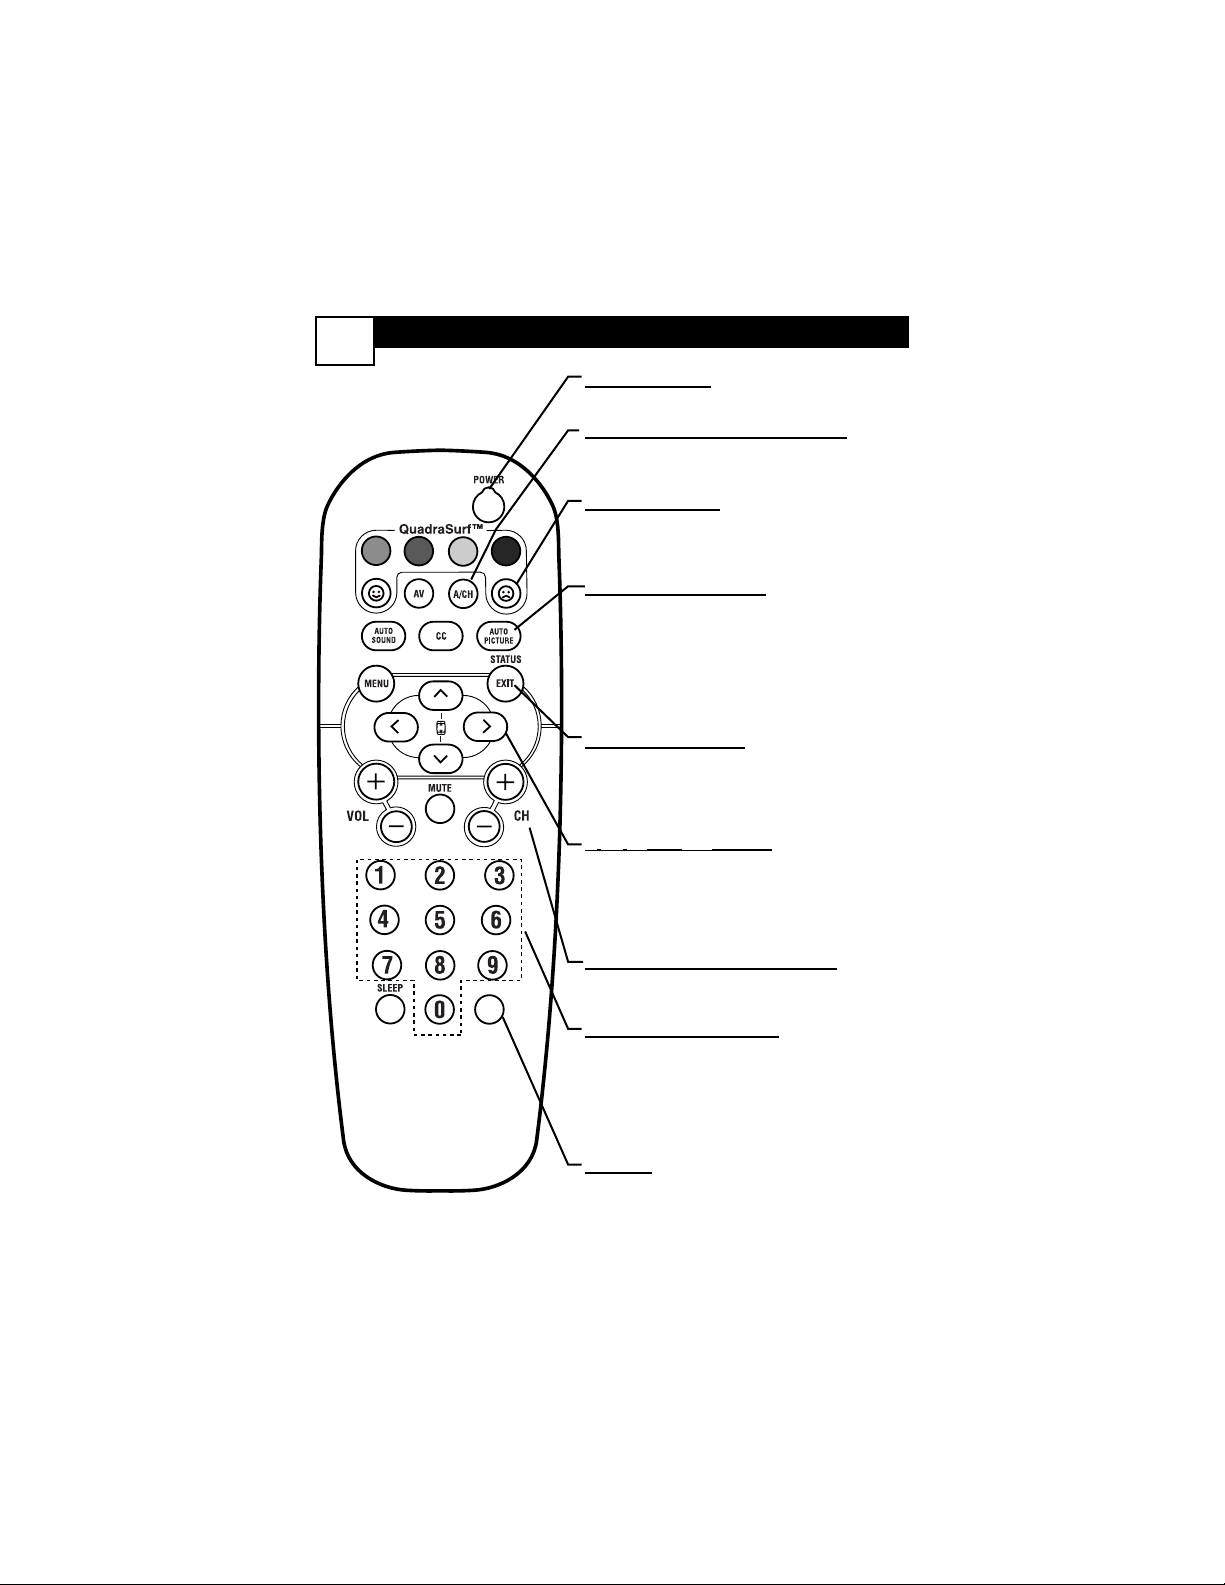
REMOTE CONTROL BUTTON DESCRIPTIONS
10
POWER Button
Press to turn the TV on or off.
A/CH
Button (Alternate Channel)
Press to toggle between the last viewed channel
and the channel presently being viewed.
FROWNIE Button
Allows you to delete channels from the “Quadra
Surf” lists for the colored buttons. Works with
all colored buttons.
AUT
O PICTURE Button
Press repeatedly to choose from 5 different factory predefined picture settings. Choose from
Personal (how you set the Picture Menu
Adjustment controls), Movies (for movies),
Sports (for any sporting event), Weak Signal
(used when the signal being received is not
great), or Multimedia (for video games).
ST
A
TUS/EXIT Button
Press to display the current channel number. If
the on-screen menu is displayed, press the
Status/Exit button of remove it from the TV’s
screen.
3
, 4, 1, and 2 Buttons
Press to navigate, select, and adjust controls
within the on-screen menu. Also use the CURSOR 3 or CURSOR 4 to activate or deactivate the EXPAND 4:3 screen formatting control.
CH(annel) + or
CH(annel)- Buttons
Press to select channels in ascending or
descending order.
NUMBERED
(0-9) Buttons
Press the numbered buttons to select TV channels or to enter certain values within the onscreen menu. For single channel entries, press
the numbered button for the channel you desire.
The TV will pause for a second or two before
changing to the chosen channel.
CLOCK:
Press to display the “Timer” menu. Within this
menu, set the time, set the TV to tune to a certain channel at a certain time once or daily.
VOL
Page 15
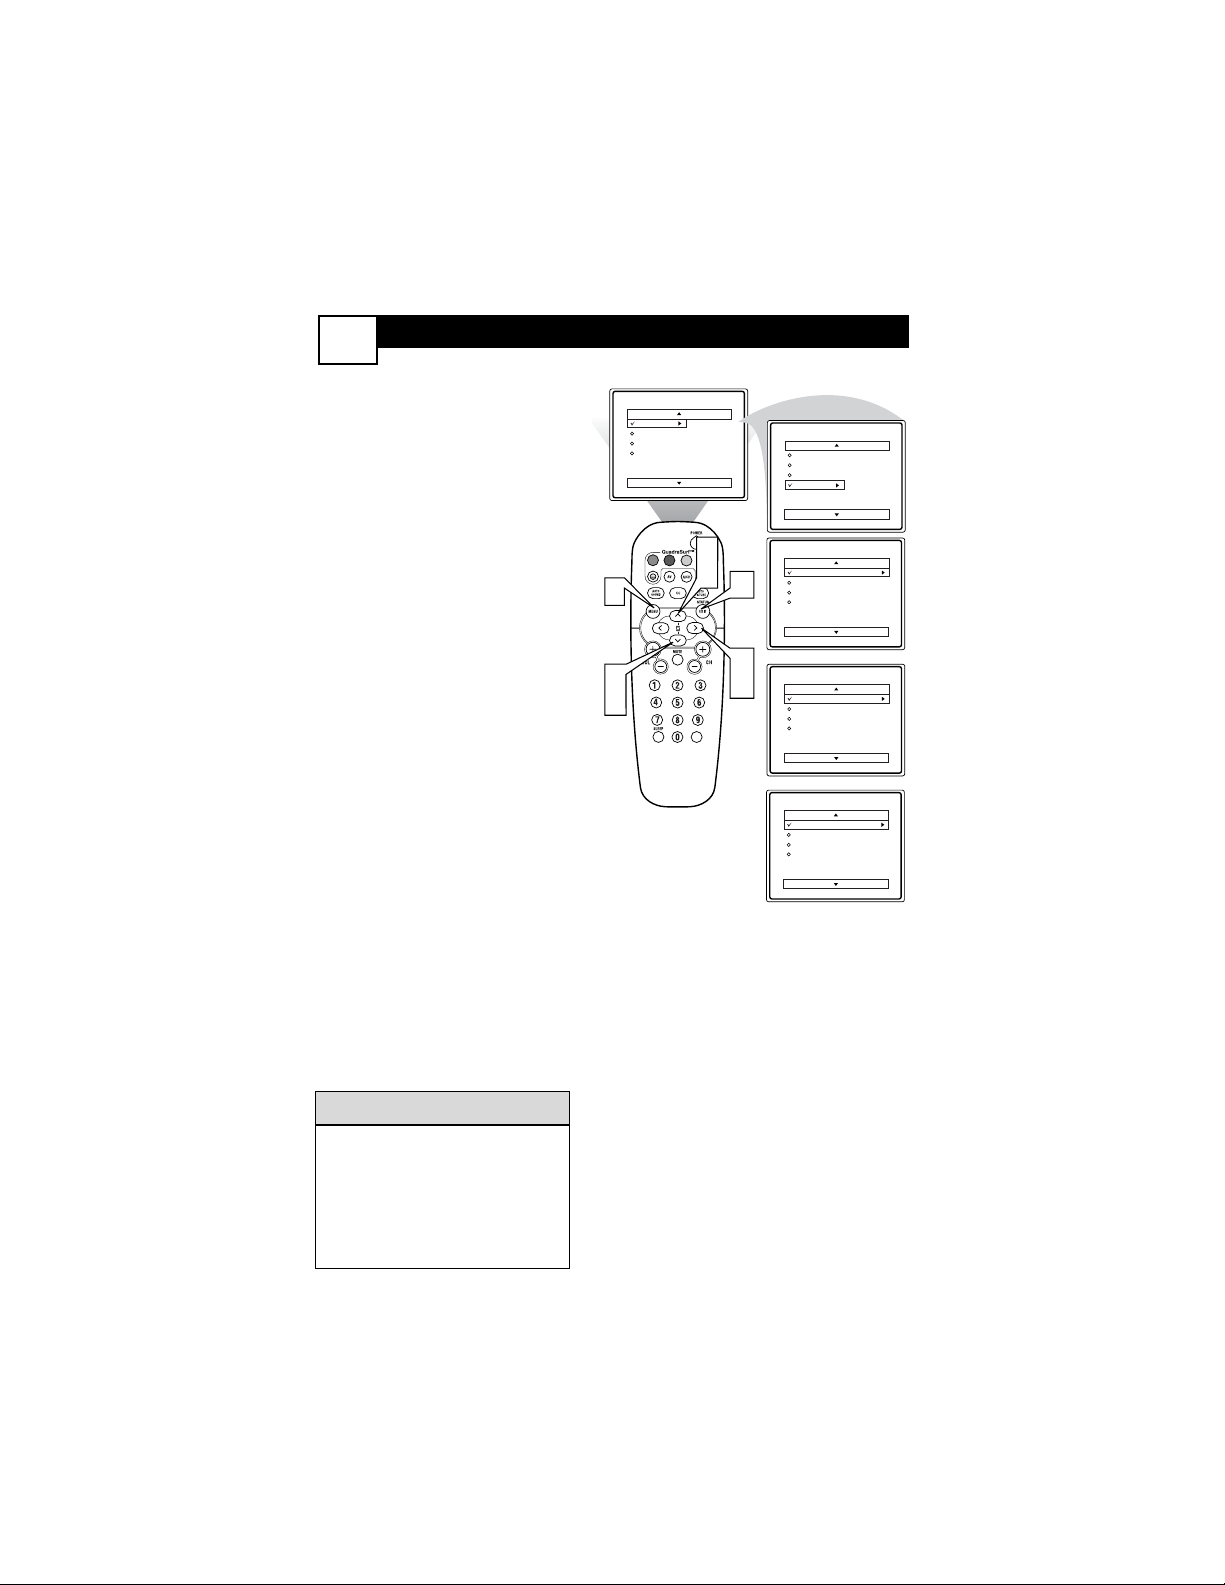
Main
F
or French and Spanish speaking
TV owners an onscreen
Language option is present. With the
Language control you can set the
TV’s on-screen menu to be shown in
English, French, or Spanish.
1
Press the MENU button on
the remote control to show the
on-screen menu.
2
Press the CURSOR UP 3 or
DOWN 4 buttons to scroll
though the on-screen menu
until the word Install is highlighted.
3
Press the CURSOR RIGHT
2 button to display the
Install menu features.
4
Press the CURSOR UP 3 or
DOWN 4 buttons to scroll
through the Install features until
the word Language is highlighted.
5
Press the CURSOR RIGHT
2 button repeatedly to select
English, Francais (French), or
Español (Spanish).
6
When finished, press the
STATUS/EXIT button to
remove the menu from the
TV’s screen.
HOW TO USE THE
LANGUAGE CONTROL
11
The Language control only
makes the TV’s on-screen Menu
items appear in English, Spanish,
or French text.
It does not change the other onscreen text features such as
Closed Caption (CC) TV shows.
HELPFUL HINT
Picture
Sound
Features
Install
Brightness
Color
Picture
Sharpness
Tint
More...
Main
Picture
Sound
Features
Install
Language
Tuner Mode
Auto Program
Channel Edit
1
2
4
2
4
VOL
Install
Language
Tuner Mode
6
Auto Program
Channel Edit
3
Instalar
5
Idioma
Sinton a
Auto Programa
Editar Canal
Installation
Langue
Mode synt.
Progr. auto.
diter progr.
English
OR
Espa ol
OR
Fran ais
Page 16
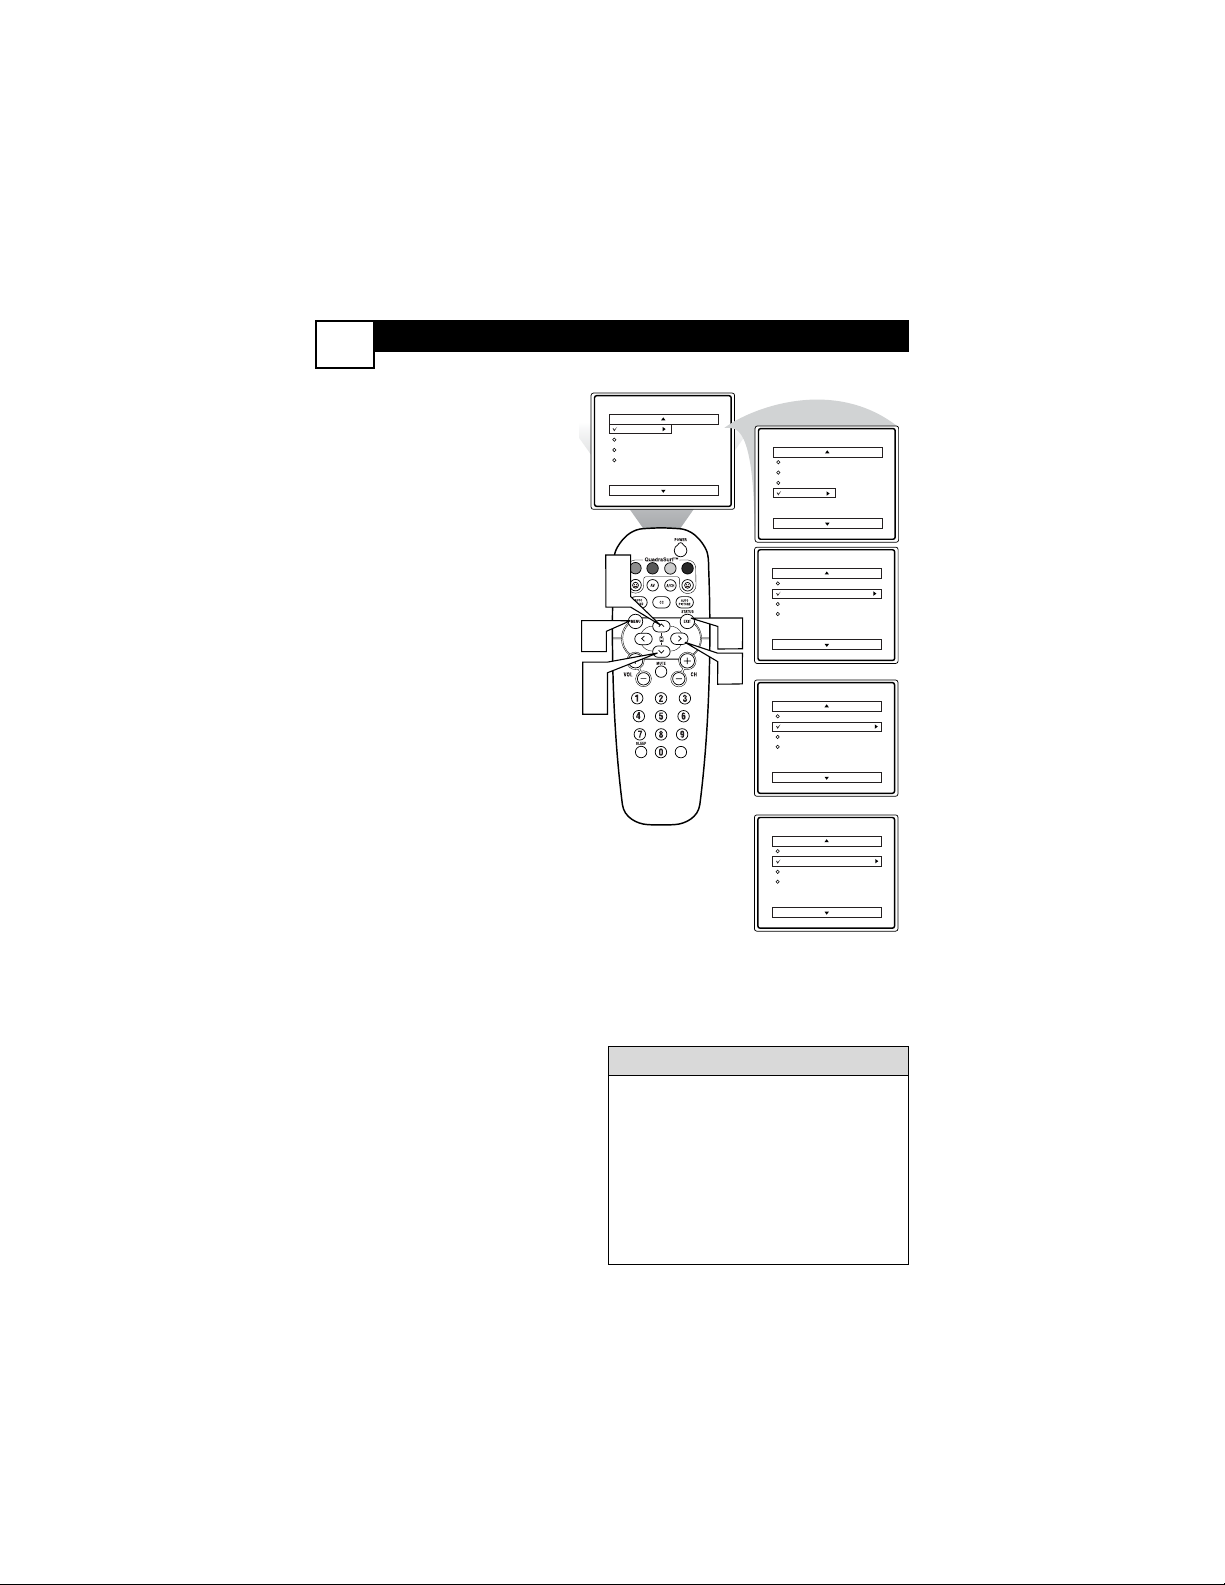
HOW TO USE THE
TUNER MODE CONTROL
12
T
he TUNER MODE control
allows you to change the TV’s
input signal to either ANTENNA,
CABLE, or AUTO mode. It’s
important for the TV to know
what type of signal to look for
(Cable TV or an Antenna). In the
AUTO mode, when the AUTO
PROGRAM feature is activated,
the TV will automatically choose
the correct mode.
1
Press the MENU button on
the remote to show the onscreen menu.
2
Press the CURSOR UP 3
or DOWN 4 buttons to
scroll through the on-screen
menu until the word Install
is highlighted.
3
Press the CURSOR
RIGHT 2 button to display
the Install menu features.
4
Press CURSOR UP 3 or
DOWN 4 buttons to scroll
the Install features until the
words Tuner Mode is highlighted.
5
Press the CURSOR
RIGHT 2 button to select
either Antenna, Cable, or
Auto mode.
6
When finished, press the
STATUS /EXIT button to
remove the on-screen menu
from the TV’s screen.
Main
When CABLE is selected, channels 1125 are available.
When ANTENNA is selected, channels 2-69 are available.
When AUTO is selected, the TV will
automatically set itself to the correct
mode based on the type of signal it
detects when the AUTO PROGRAM
feature is activated.
HELPFUL HINTS
Picture
Sound
Features
Install
Brightness
Color
Picture
Sharpness
Tint
More...
Main
Picture
Sound
Features
Install
Language
Tuner Mode
Auto Program
Channel Edit
2
4
1
2
4
Install
Language
Tuner Mode
Auto Program
Channel Edit
English
Antenna
6
Install
Language
Tuner Mode
Auto Program
Channel Edit
Install
Language
Tuner Mode
Auto Program
Channel Edit
OR
English
Cable
OR
English
Auto
VOL
3
Page 17
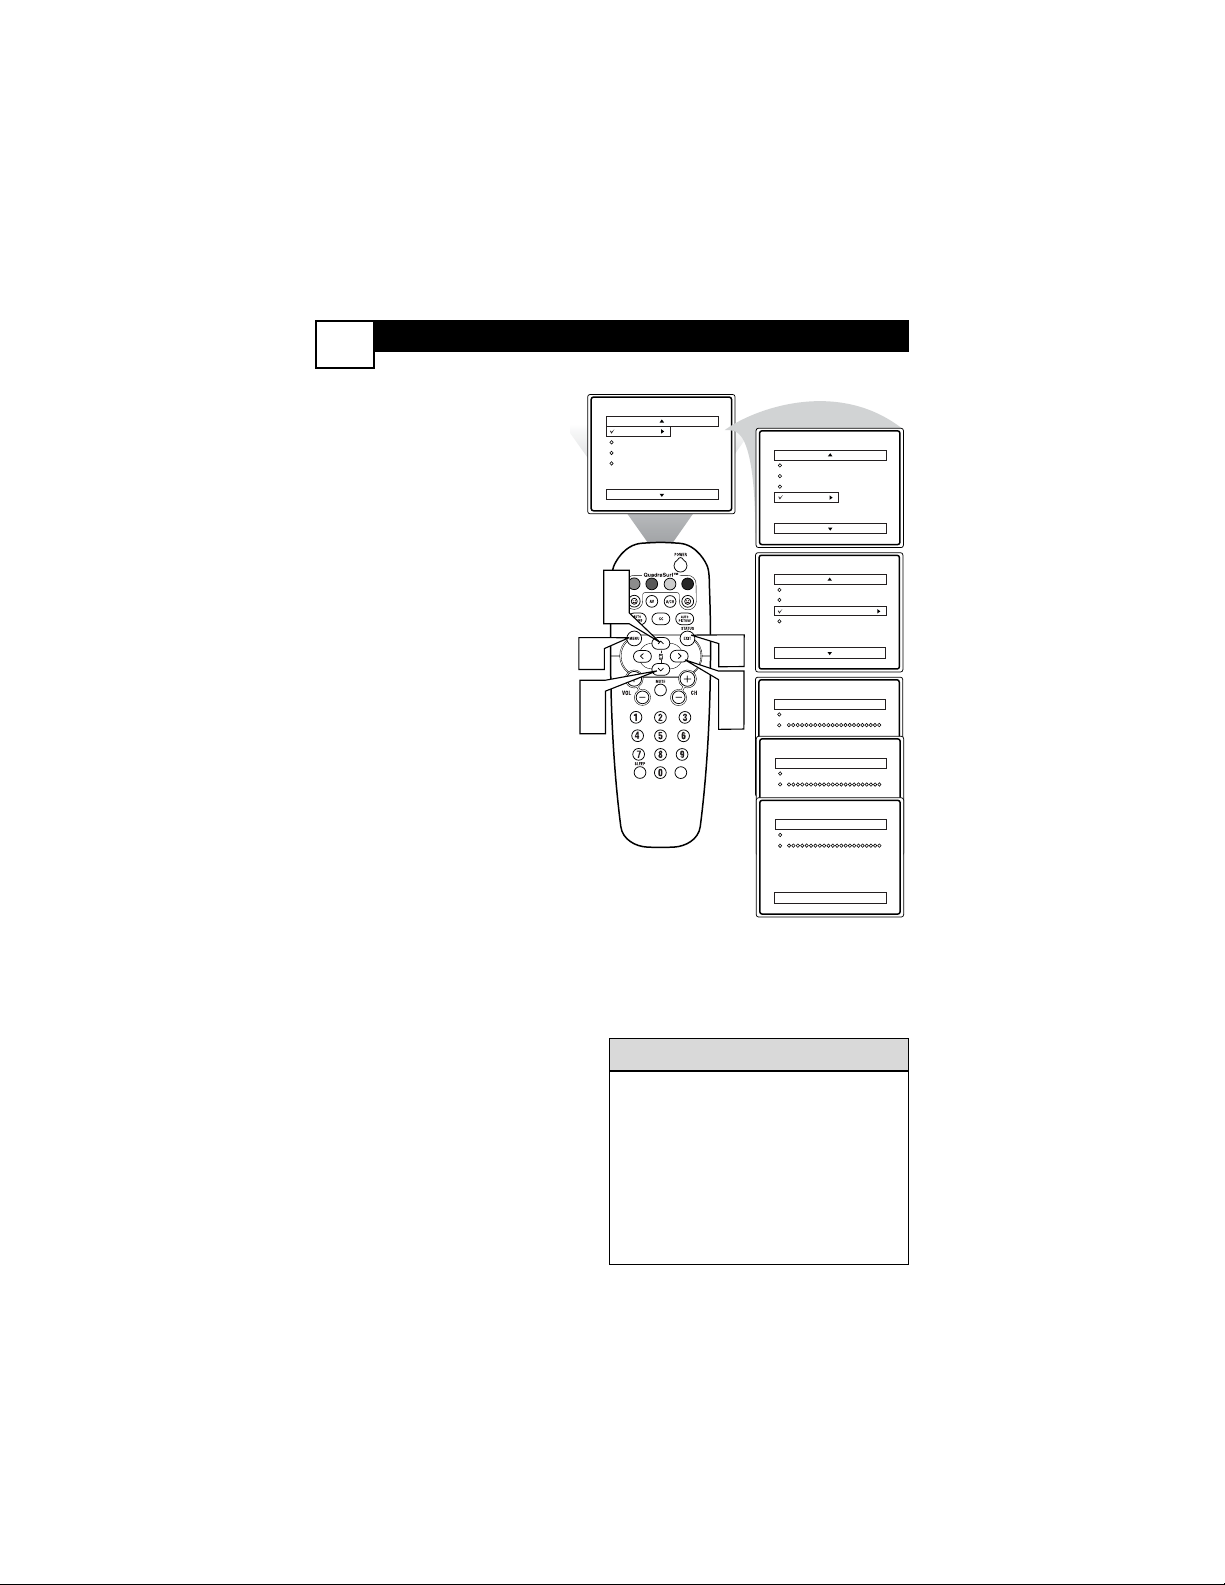
AUTOMATICALLY PROGRAM
13
Y
our TV can automatically set
itself for local area (or Cable
TV) channels. This makes it easy
for you to select only the TV stations in your area when the
CHANNEL (+), (–) buttons are
pressed.
Note: Make sure the antenna or
cable signal connection has been
completed before AUTO PROGRAM is activated.
1
Press the MENU button on
the remote to show the onscreen menu.
2
Press the CURSOR UP 3
or DOWN 4 buttons to
scroll through the on-screen
menu until the word Install
is highlighted.
3
Press the
CURSOR RIGHT
2 `button
to display the
Install menu features.
4
Press CURSOR UP 3 or
DOWN 4 buttons to scroll
the Install features until the
words Auto Program are
highlighted.
5
Press the
CURSOR RIGHT
2 button
to start the Auto
Program scanning of channels. Auto Programming will
store all available channels
in the TV’s memory then
tune to the lowest available
channel when done.
6
When finished, press the
STATUS /EXIT button to
remove the menu from the
TV’s screen.
When CABLE is selected, channels 1-
125 are available.
When ANTENNA is selected, chan-
nels 2-69 are available.
When AUTO is selected, the TV will
automatically set itself to the correct
mode based on the type of signal it
detects when the AUTO PROGRAM
feature is activated.
HELPFUL HINTS
Main
Picture
Brightness
Sound
Color
Features
Picture
Install
Sharpness
Tint
More...
2
4
1
VOL
2
4
Main
Picture
Language
Sound
Tuner Mode
Features
Auto Program
Install
Channel Edit
Install
Language
Tuner Mode
Auto Program
Channel Edit
6
3
Auto Program
Channel
5
Auto Program
Channel
Auto Program
Channel
12
13
14
Page 18
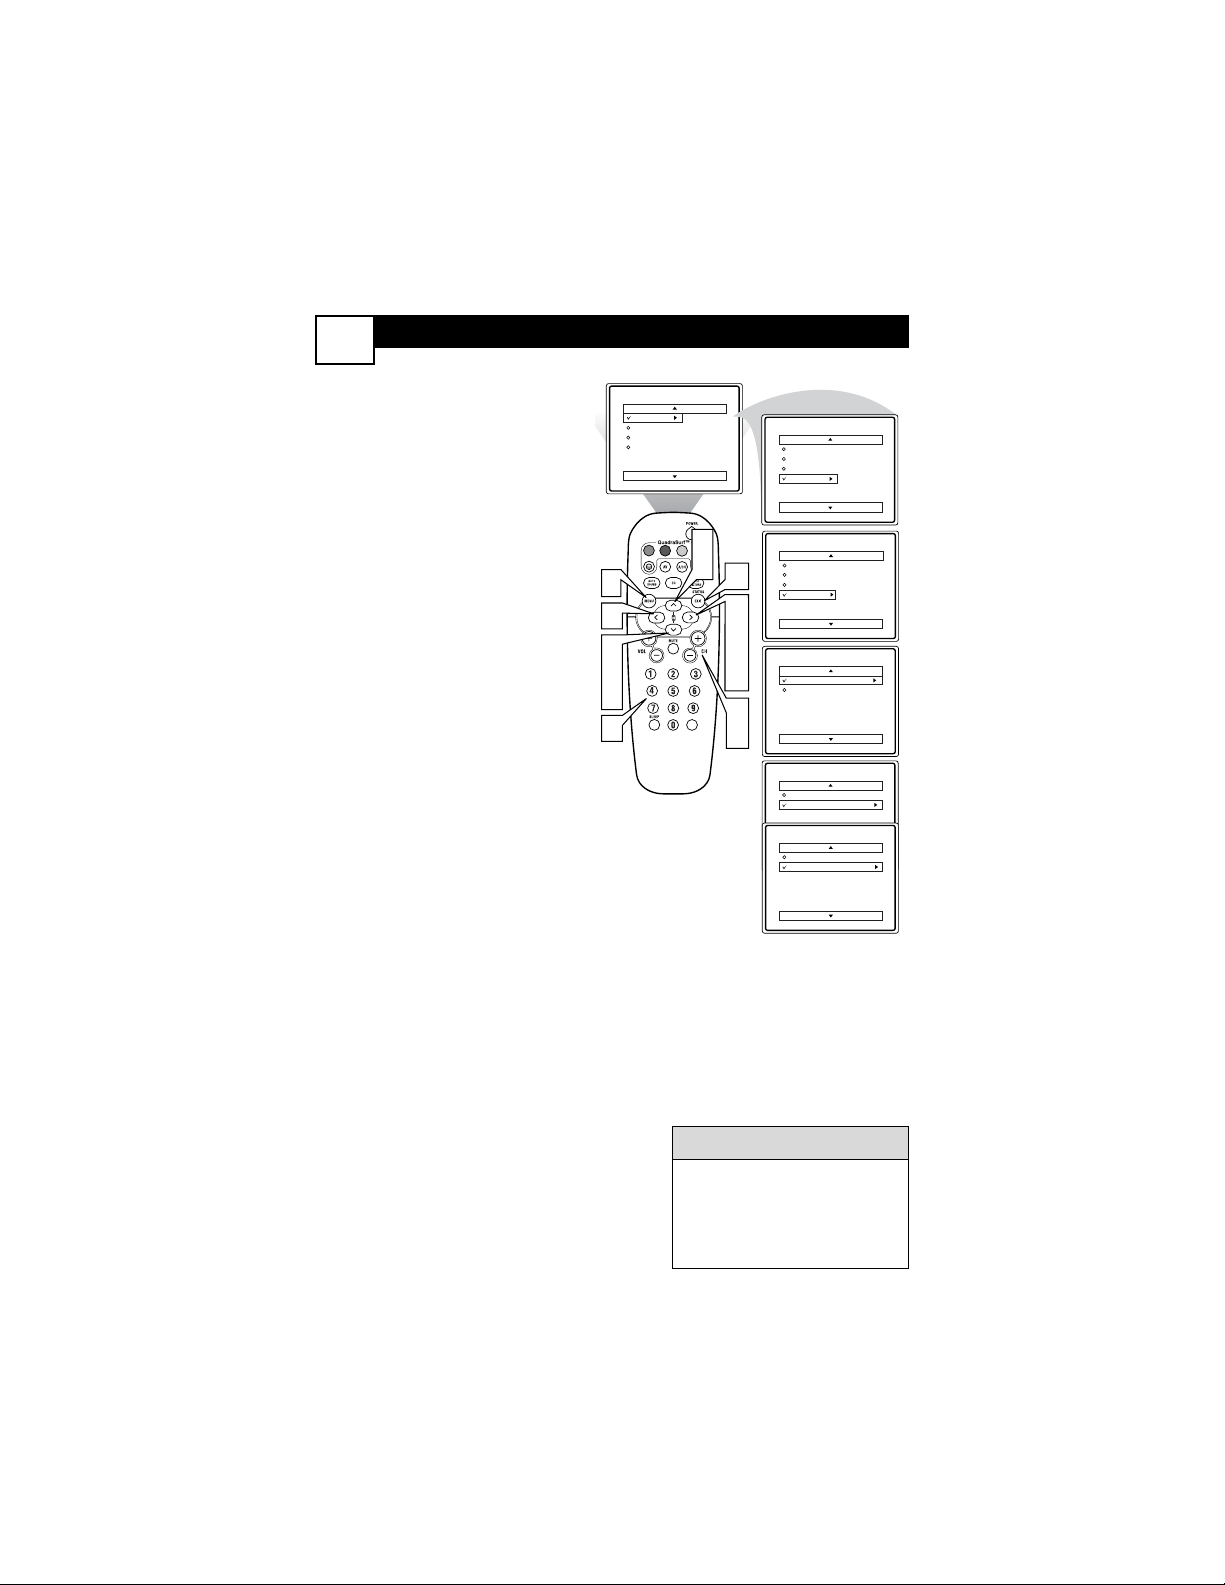
CHANNEL EDIT
14
C
hannel Edit makes it easy for you to
ADD or DELETE channels from the
list of channels stored in the TV’s memory.
1
Press the MENU button on the
remote control to show the onscreen menu.
2
Press the CURSOR UP 3 or
DOWN 4 buttons to scroll though
the on-screen menu until the word
Install is highlighted.
3
Press the CURSOR RIGHT 2
button to display the Install menu
features.
4
Press the CURSOR UP 3 or
DOWN 4 buttons to scroll through
the Install features until the words
Channel Edit are highlighted.
5
Press the CURSOR RIGHT 2
button to display the Channel Edit
options.
6
With the Channel Edit options
displayed, and Channel highlight-
ed; you can use the cursor buttons to
scroll through all available channels
that you wish to add (skipped OFF)
or delete (Skipped ON) from the
TV’s memory. You can also use the
NUMBERED buttons to go directly
to a specific numbered channel that
you want to add or skip. Or, you can
also use the CH+ or CH- to quickly
scan through the channels that have
not been skipped.
7
Using the CURSOR DOWN 4
button, scroll the menu to highlight
the word SKIPPED.
8
Now use the CURSOR RIGHT 2
to toggle between On or Off. If
ON is selected the channels is
skipped when scrolling channels
with the CH+ or CH- buttons. If
OFF is selected the channels is not
skipped when scrolling channels
with the CH+ or CH- buttons.
9
When finished, press the STATUS/EXIT button to remove the
menu from the screen.
Main
An “X” appearing in front of
any channel will indicate that
channel has skip on. When the
CH + or CH - buttons are used,
those channels will be skipped.
HELPFUL HINTS
Picture
Sound
Features
Install
Brightness
Color
Picture
Sharpness
Tint
More...
Main
Picture
Sound
Features
Install
Language
Tuner Mode
Auto Program
Channel Edit
1
6
2
4
7
6
2
4
Install
Channel
Language
Skipped
Tuner Mode
9
Auto Program
Channel Edit
3
VOL
5
8
Channel Edit
Channel
6
Skipped
12
6
8
Channel Edit
Channel
Skipped
Channel Edit
Channel
Skipped
On
Off
Page 19
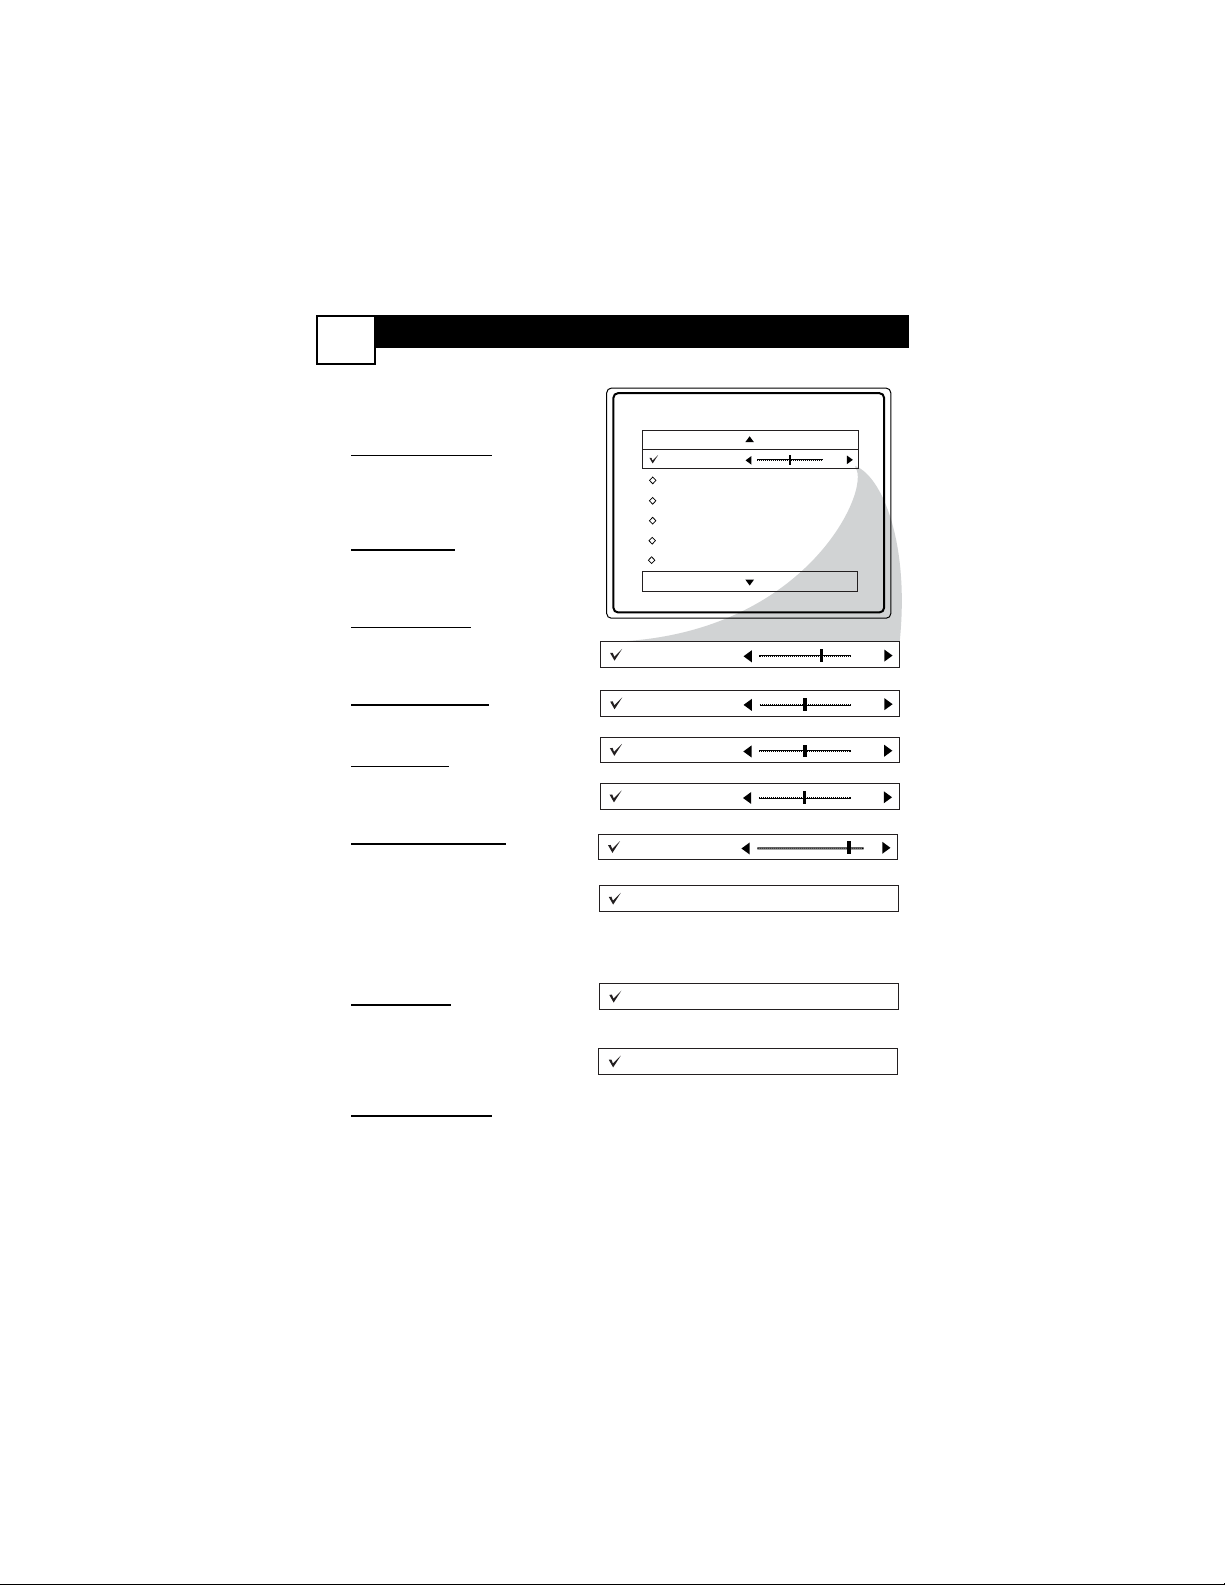
PICTURE MENU C
ONTROLS
15
Picture
T
o adjust your TV picture controls,
select a channel and use the
Picture Menu Controls listed below:
1
Brightness Control - Press the
CURSOR RIGHT 2 or LEFT
1 buttons until the darkest
parts of the picture are as bright
as you prefer.
2
Color Control -Press the
CURSOR RIGHT 2 or LEFT
1 buttons to add or eliminate
color.
3
Picture Control - Press the
CURSOR RIGHT 2 or LEFT
1 buttons until lightest parts of
the picture show good detail.
4
Sharpness Control - CURSOR
RIGHT 2 or LEFT 1 buttons
to improve detail in the picture.
5
Tint Contr
ol - Press the CURSOR RIGHT 2 or LEFT 1
buttons to obtain natural skin
tones.
6
Color Temp Control -Press
the CURSOR RIGHT 2 or
LEFT 1 buttons to select
Normal, Cool, or Warm picture
preferences. (Normal will keep
the whites, white; Cool will
make the whites, bluish; and
Warm will make the whites, reddish.)
7
DNR Control -Press the
CURSOR RIGHT 2 or LEFT
1 buttons to turn DNR On or
Off. Dynamic Noise Reduction
helps to eliminate “noise” from
the picture.
8
Contrast + Control - Press the
CURSOR RIGHT 2 or LEFT
1 buttons to toggle the control
On or OFF. The Contrast + control helps to “sharpen” the picture quality. The black portions
of the picture become richer in
darkness and the whites become
brighter.
Brightness
Color
Picture
Sharpness
Tint
Color Temp.
50
Brightness
Color
Picture
Sharpness
Tint
Color Temp.
DNR
Contrast +
65
50
50
50
0
Normal
Warm
or
Cool
On
Off
On
Off
Page 20
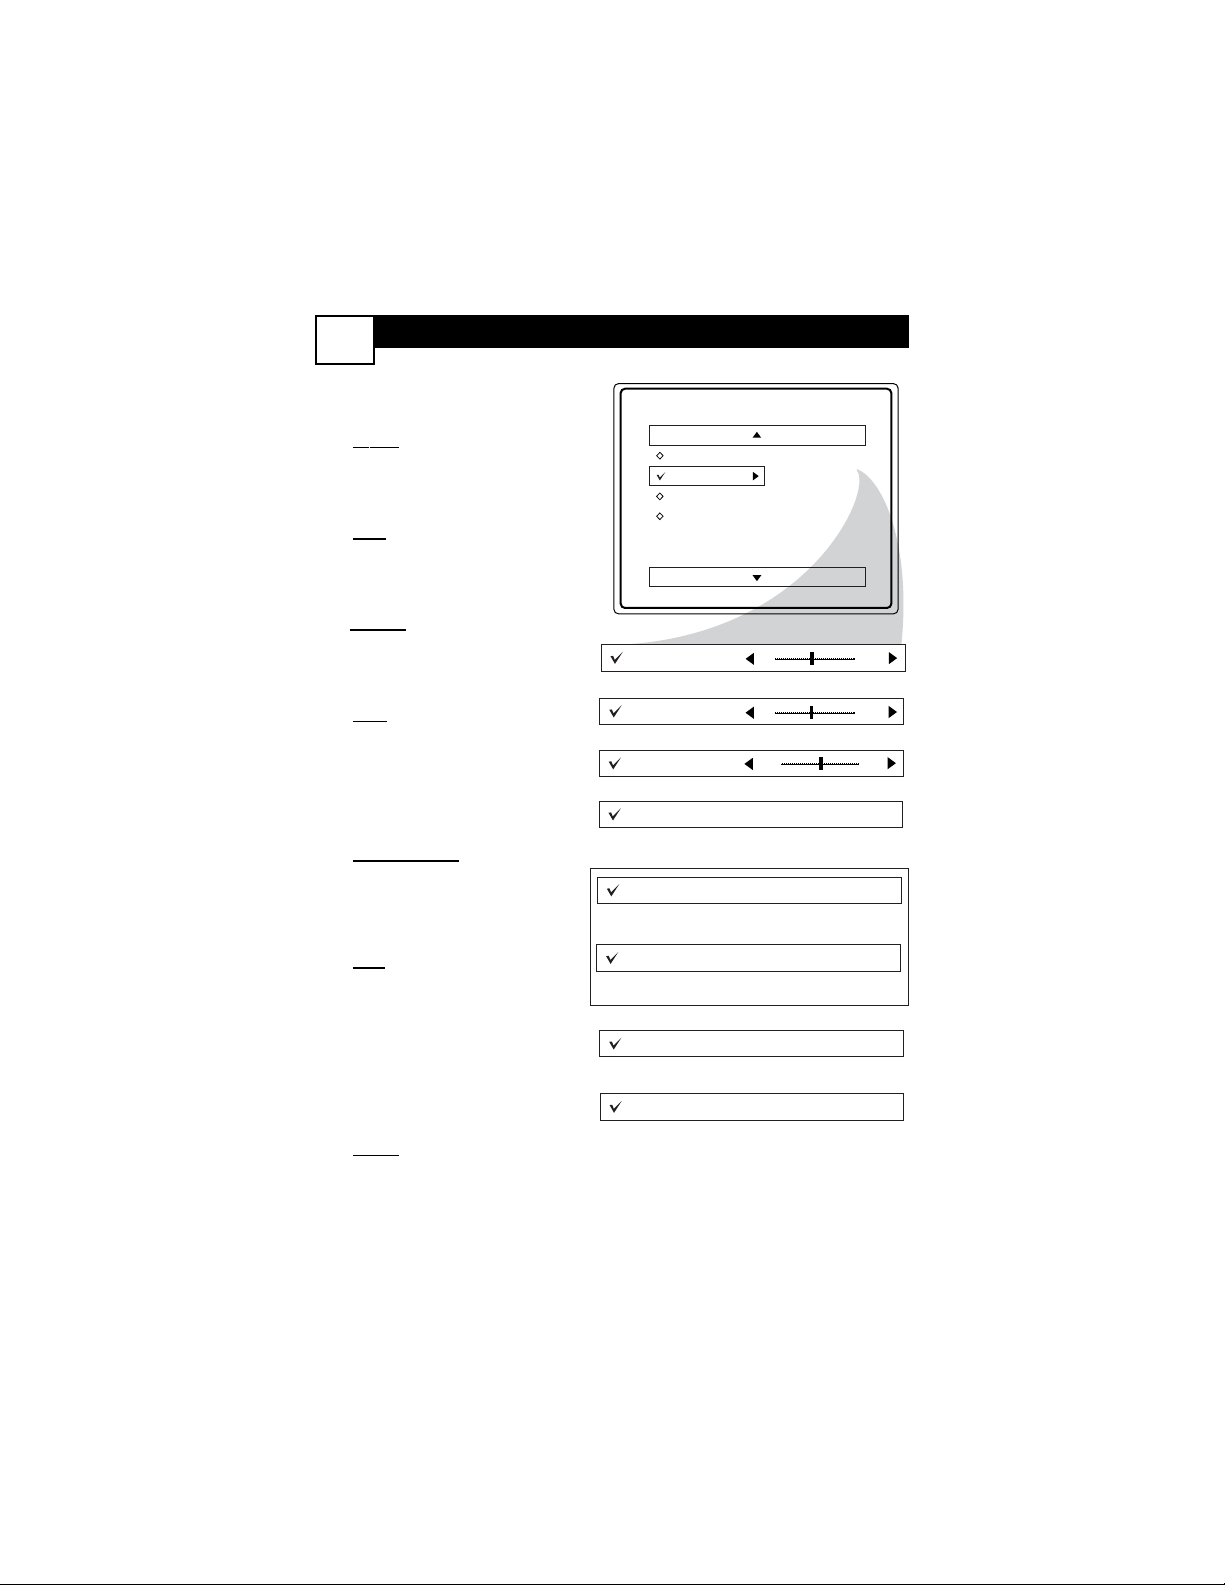
SOUND MENU CONTROLS
16
T
o adjust your TV sound, select and
use the Sound Menu Controls listed
below:
1
Treble:Press the
CURSOR
RIGHT 2 or LEFT 1 buttons
to adjust the control. The control
will enhance the high frequency
sounds.
2
Bass:Press the
CURSOR
RIGHT 2 or LEFT 1 buttons
to adjust the control. The control
will enhance the low frequency
sounds.
3
Balance: Press the
CURSOR
RIGHT 2 or LEFT 1 buttons
to adjust the level of sound coming from the left and right speakers.
4
AVL: (Auto Volume Leveler)
Press the
CURSOR RIGHT 2
or LEFT 1 buttons
to turn the
control On or Off. When On, AVL
will level out the sound being
heard when sudden changes in
volume occur during commercial
breaks or channel changes.
5
Incr. Surr
ound:Press the
CURSOR RIGHT 2 or LEFT 1 buttons
to select between Dolby
Virtual or Stereo settings (If
Stereo), or select Spatial or Mono
(If Mono).
6
SAP:Press the
CURSOR
RIGHT 2 or LEFT 1 buttons
to toggle this control to On or Off.
SAP is short for Secondary Audio
Programming and is sent as a
third audio channel, a SAP signal
can be heard apart from the current TV program sound.Note: If
SAP is not present on a selected
show No SAP will appear on the
screen.
7
Sound:Press the
CURSOR
RIGHT 2 or LEFT 1 buttons
to select between Stereo or Mono
settings. Note: If Stereo is not
present on a selected show and the
TV is placed in the Stereo mode,
the sound coming from the TV
will remain in the Mono mode.
Main
Picture
Sound
Features
Install
Treble
Bass
Balance
AVL
Incr. Surround
More...
Treble
Bass
Balance
AVL
Incr. Surround
Incr. Surround
SAP
Sound
L
Spatial
or Mono
Dolby Virtual
or Stereo
or Stereo
50
50
R
On
or Off
On
or Off
Mono
Page 21
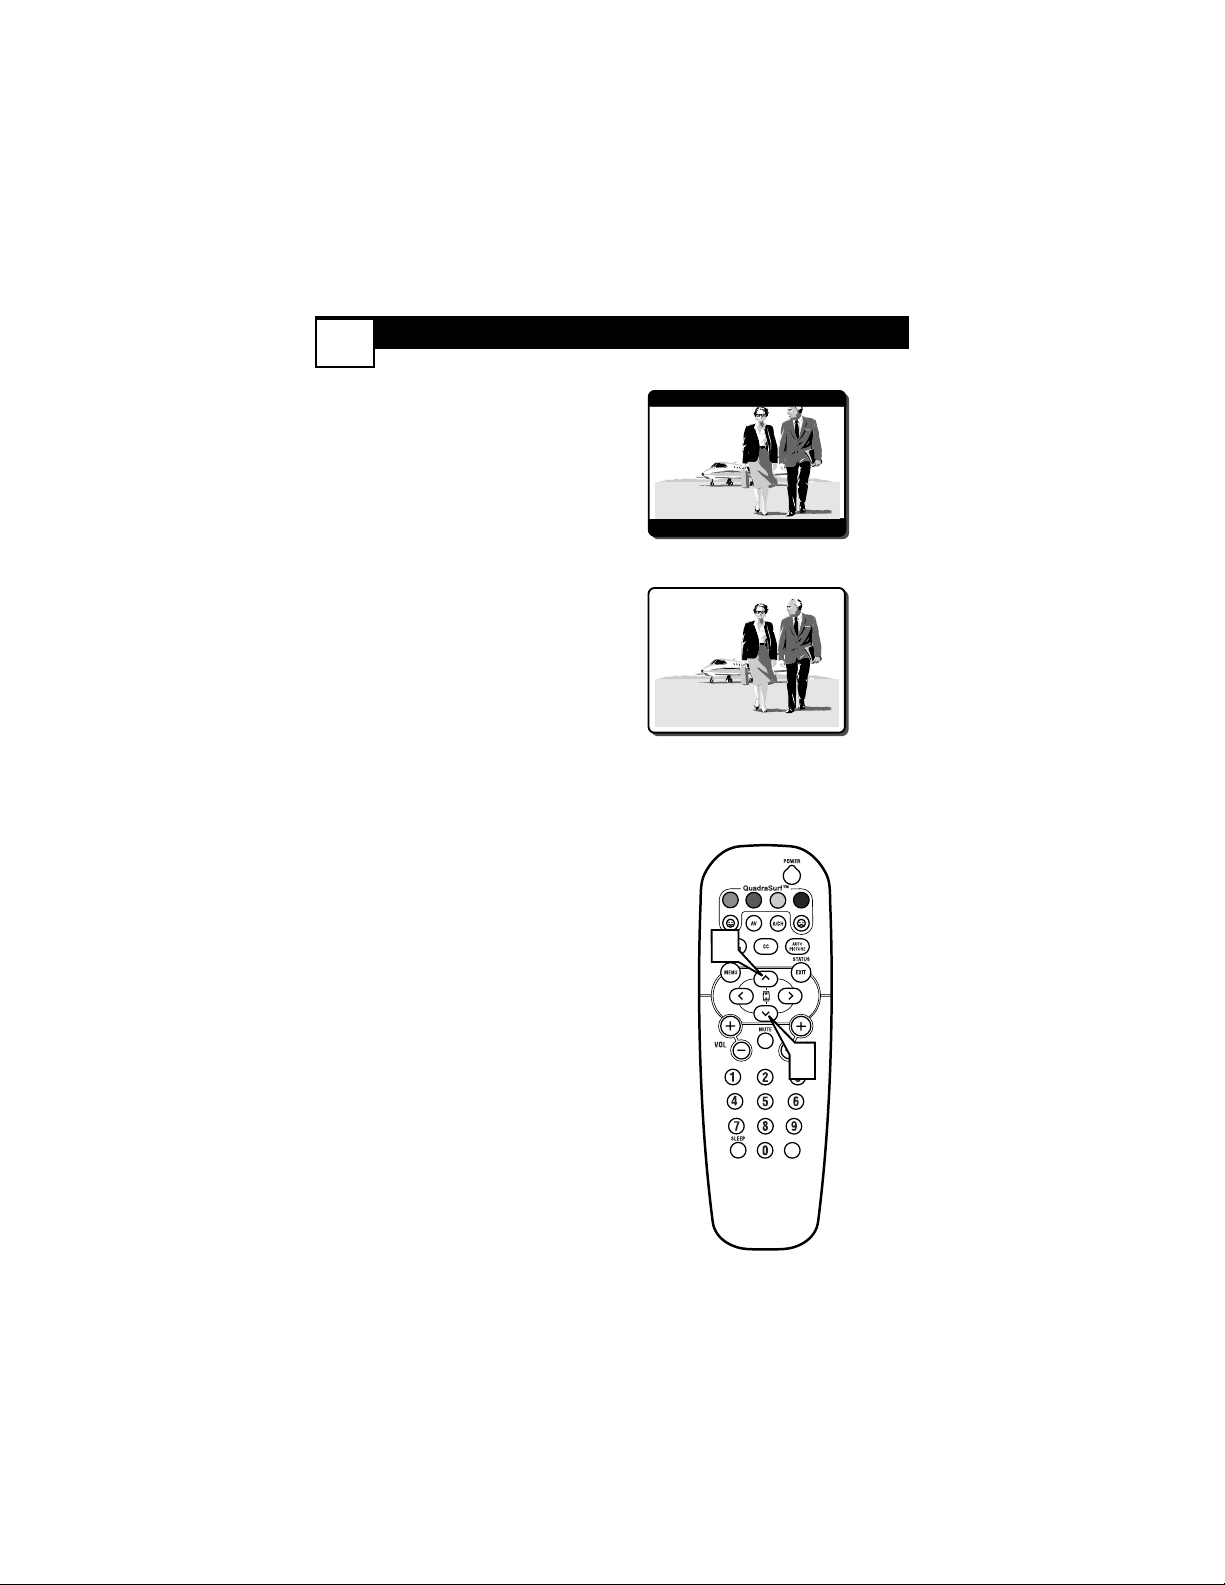
M
any times while watching
movies from a DVD player the
image is shown in “letter box” format. This is the format that is
shown in movie theaters. when
shown on a TV screen, the image
will have areas of black on top and
bottom of the screen.
1
Press the CURSOR UP3or
DOWN
4
buttons to select
one of the two options 4:3 or
Expand 4:3.
4:3 - Standard format for the
TV.
Expand 4:3 - Enlarges the
picture to fill out the entire
screen area, eliminating the
“letter box” effect.
HOW TO USE THE 4:3 EXPAND FORMAT CONTROL
17
4:3
Expand 4:3
1
VOL
1
Page 22
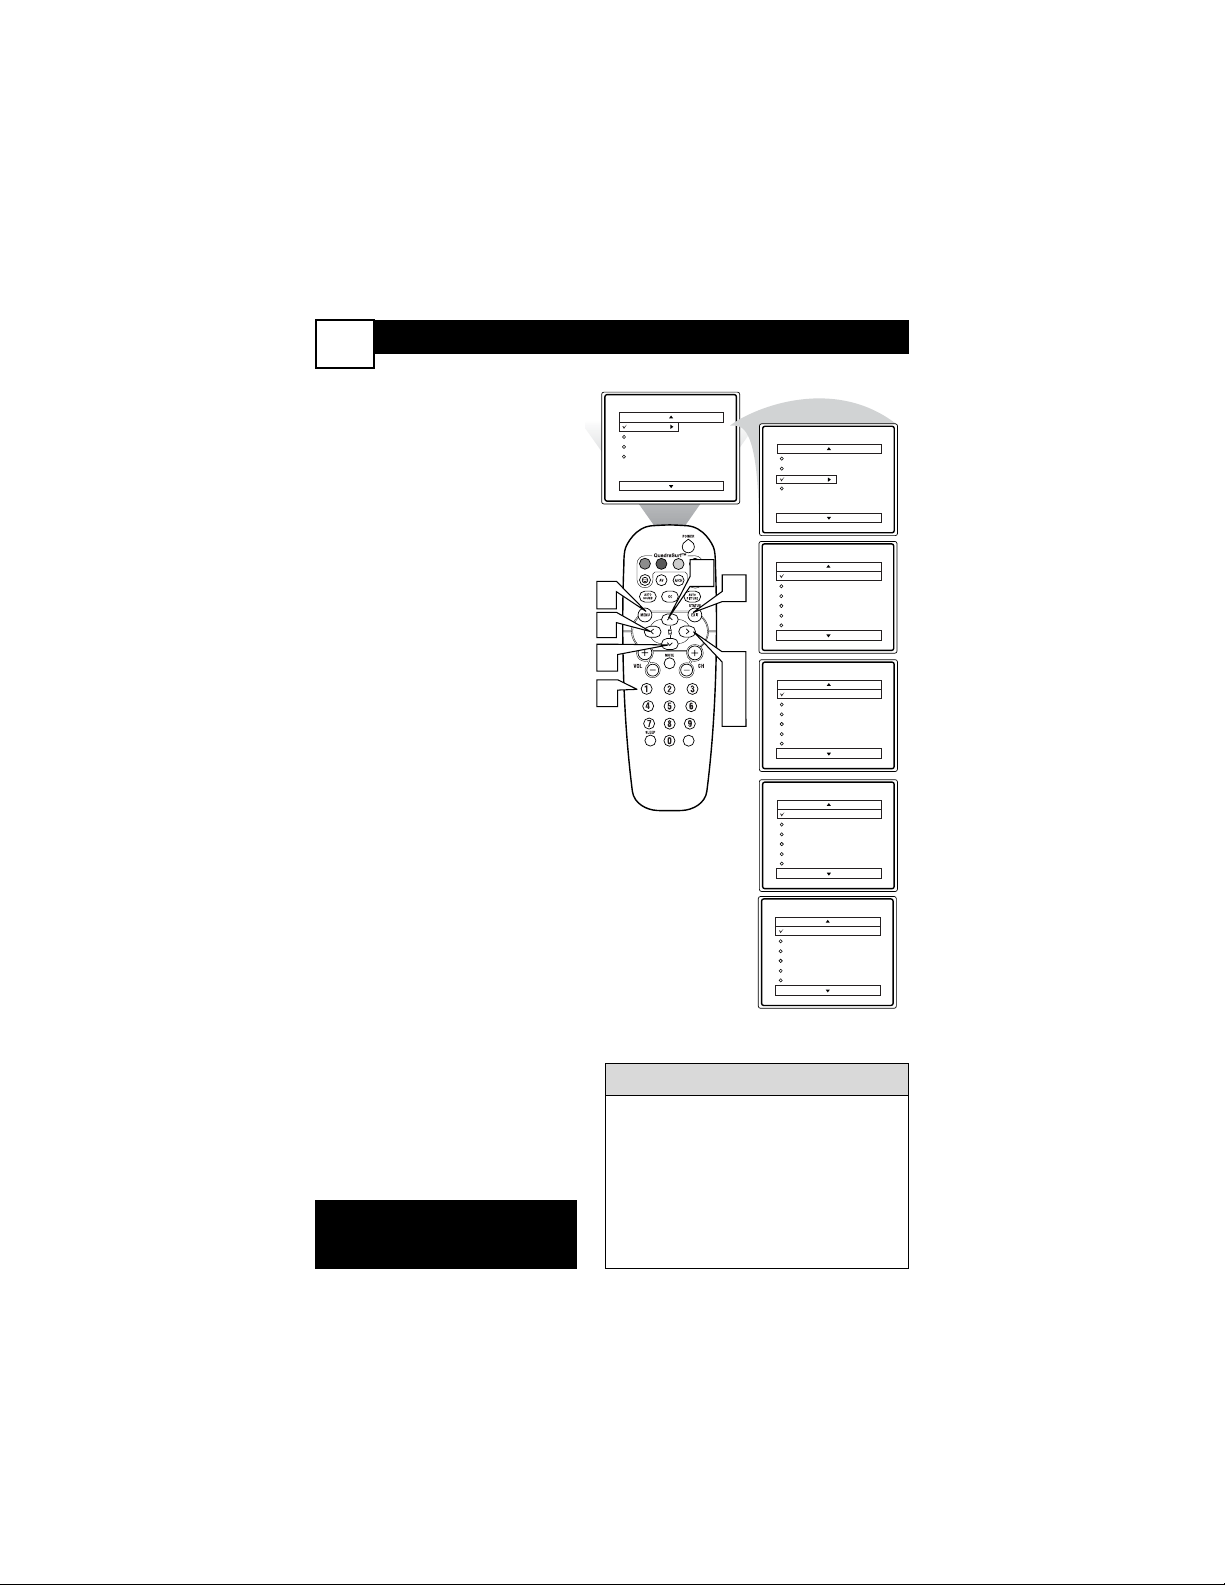
SETTING THE TV CLOCK USING THE TIMER CONTROL
18
Y
our television comes with an
on-screen clock. During normal operation, the clock appears
on the screen when the
STATUS/EXIT button is pressed or
if the Timer Display control is
turned On.
1
Press the MENU button on
the remote to show the onscreen menu.
2
Press the CURSOR UP 3 or
DOWN 4 buttons to scroll
through the on-screen menu
until the word Features is
highlighted.
3
Press the CURSOR RIGHT
2 button to display the
Features menu.
4
Press the CURSOR RIGHT
2 button to display the
Timer menu.
5
Enter the correct time by
using the Numbered buttons.
6
Press the CURSOR RIGHT
2 or CURSOR LEFT 1
buttons to change the AM or
PM setting.
7
When finished, press the
STATUS /EXIT button to
remove the on-screen menu
from the TV’s screen.
Main
NOTE: Active Control will only
appear in the menu of models
27PT6441/37 and 27PT6442/37.
Remember, be sure to press “0” and
then the hour number for single digit
entries.
You can get to the Clock setting by
pressing the Clock button on the
remote control.
The TV’s clock settings may be lost
when the TV is unplugged or when AC
power to the set is interrupted.
HELPFUL HINTS
Picture
Sound
Features
Install
Brightness
Color
Picture
Sharpness
Tint
More...
Main
Picture
Sound
Features
Install
Timer
AutoLock
Active Control
Digi. Pic. Demo
Timer
2
1
6
2
VOL
5
Time
Start Time
7
Stop Time
Channel
Activate
Display
3
Timer
Time
4
Start Time
Stop Time
6
Channel
Activate
Display
Timer
Time
Start Time
Stop Time
Channel
Activate
Display
Timer
Time
Start Time
Stop Time
Channel
Activate
Display
--:-- AM
10:-- AM
10:35 AM
10:35 PM
Page 23
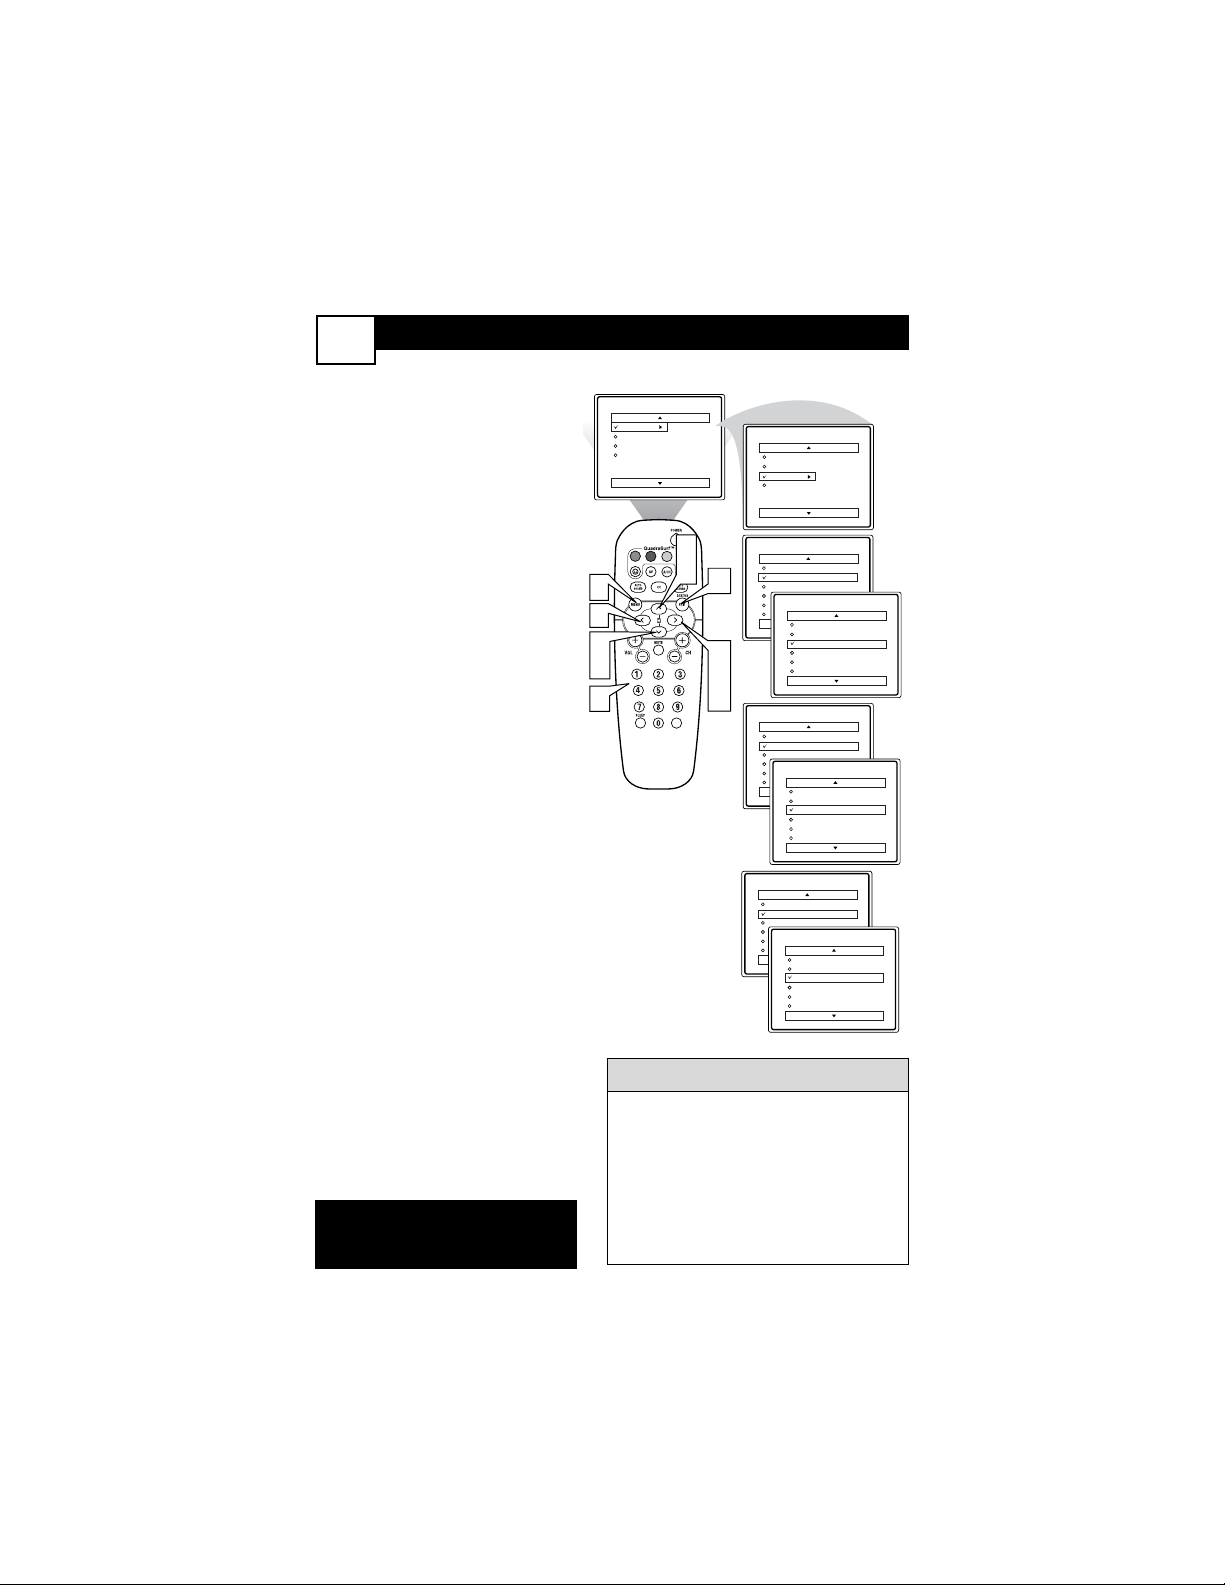
SETTING TV TO TURN ON OR OFF USING START OR STOP CONTROLS
19
Y
ou can set your TV to turn itself
on or off. You can set the TV to
turn itself On or Off once or at
the same time everyday. Follow
the steps below to set the Start and
Stop Time.
1
Press the MENU button on
the remote to show the onscreen menu.
2
Press the CURSOR UP 3 or
DOWN 4 buttons to scroll
through the on-screen menu
until the word Features is
highlighted.
3
Press the CURSOR RIGHT
2 button to display the
Features menu.
4
Press the CURSOR RIGHT
2 button to display the Timer
menu.
5
Press the CURSOR UP 3 or
DOWN 4 buttons to scroll
through the Timer menu until
Start Time or Stop Time is
highlighted.
6
Enter the correct time by
using the Numbered buttons.
7
Press the CURSOR RIGHT
2 or CURSOR LEFT 1 buttons to change the AM or PM
setting.
8
When finished, press the
STATUS /EXIT button to
remove the on-screen menu
from the TV’s screen.
NOTE: The Activate Control must
be set to Once or Daily for the television to turn On or Off at the specified time. See panel 21 for more
details.
Main
Remember, be sure to press “0” and
then the hour number for single digit
entries.
You can get to the Clock setting by
pressing the Clock button on the
remote control.
The TV’s clock settings may be lost
when the TV is unplugged or when
AC power to the set is interrupted.
HELPFUL HINTS
NOTE: Active Control will only
appear in the menu of models
27PT6441/37 and 27PT6442/37.
Picture
Sound
Features
Install
Brightness
Color
Picture
Sharpness
Tint
More...
Main
Picture
Sound
Features
Install
Timer
AutoLock
Active Control
Digi. Pic. Demo
1
7
2
5
6
2
5
VOL
Timer
Time
--:-- AM
Start Time
Stop Time
8
Channel
Activate
Display
Timer
Time
Start Time
10:-- AM
Stop Time
3
4
Channel
Activate
Display
7
Timer
Time
Start Time
10:35 AM
Stop Time
Channel
Activate
Display
Timer
Time
Start Time
Stop Time
10:35 AM
Channel
Activate
Display
Timer
Time
Start Time
10:35 PM
Stop Time
Channel
Activate
Display
Timer
Time
Start Time
Stop Time
10:35 PM
Channel
Activate
Display
Page 24
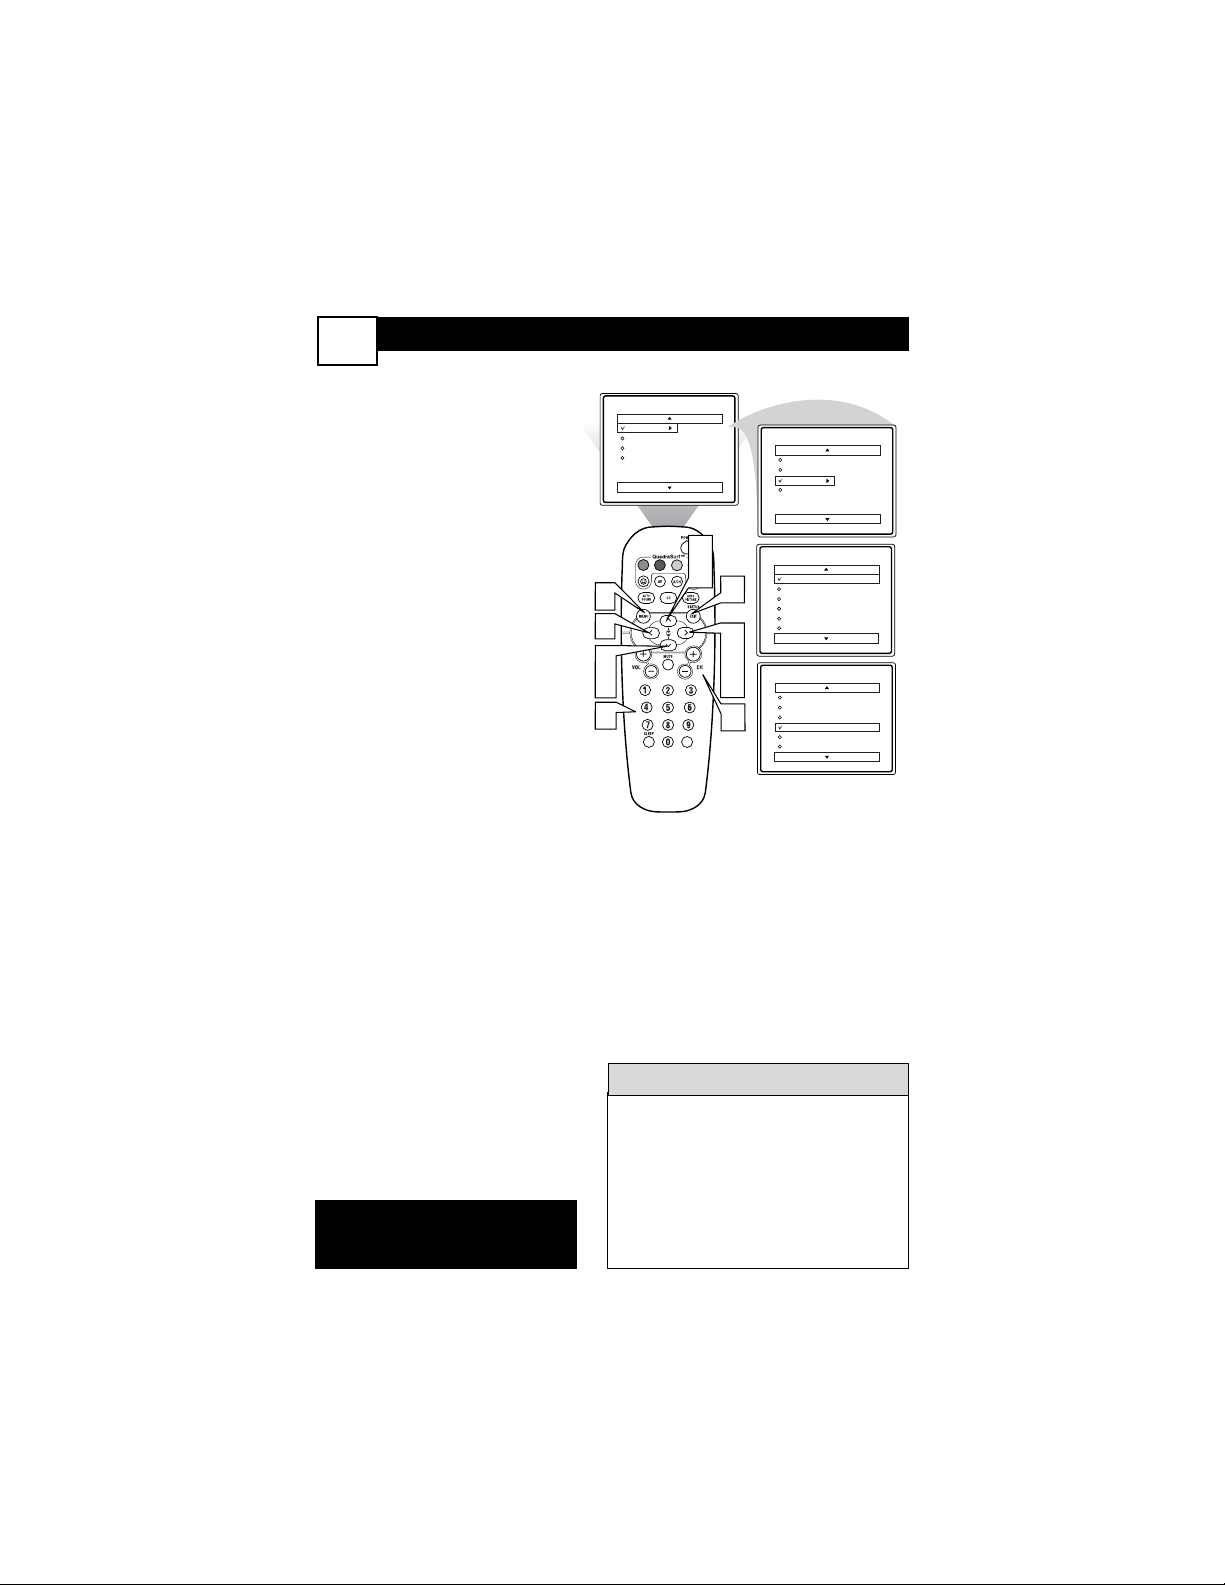
SETTING TV TO STARTUP ON A SPECIFIC CHANNEL
20
Y
ou can select a specific channel
that the television will tune to
when the timer turns the set On.
Follow these steps to select the
channel.
1
Press the MENU button on
the remote to show the onscreen menu.
2
Press the CURSOR UP 3 or
DOWN 4 buttons to scroll
through the on-screen menu
until the word Features is
highlighted.
3
Press the CURSOR RIGHT
2 button to display the
Features menu.
4
With Timer selected, press the
CURSOR RIGHT 2 button
to display the Timer menu.
5
Press the CURSOR UP 3 or
DOWN 4 buttons to scroll
through the Timer menu until
Channel is highlighted.
6
Press the Numbered buttons
to enter the desired start-up
channel. Or, press the CUR-
SOR RIGHT 2 or CURSOR
LEFT 1 or the CH+ or CH-
buttons repeatedly to enter the
start-up channel you want.
NOTE: The Activate Control must
be set to Once or Daily for this
Channel control to take effect.
7
When finished, press the
STATUS /EXIT button to
remove the on-screen menu
from the TV’s screen.
Main
Remember, be sure to press “0” and
then the hour number for single digit
entries.
You can get to the Clock setting by
pressing the Clock button on the
remote control.
The TV’s clock settings may be lost
when the TV is unplugged or when
AC power to the set is interrupted.
HELPFUL HINTS
NOTE: Active Control will only
appear in the menu of models
27PT6441/37 and 27PT6442/37.
Picture
Sound
Features
Install
Brightness
Color
Picture
Sharpness
Tint
More...
Main
Picture
Sound
Features
Install
Timer
AutoLock
Active Control
Digi. Pic. Demo
1
6
2
5
6
2
5
VOL
7
3
4
6
6
Timer
Time
Start Time
Stop Time
Channel
Activate
Display
Timer
Time
Start Time
Stop Time
Channel 2
Activate
Display
10:-- AM
Page 25
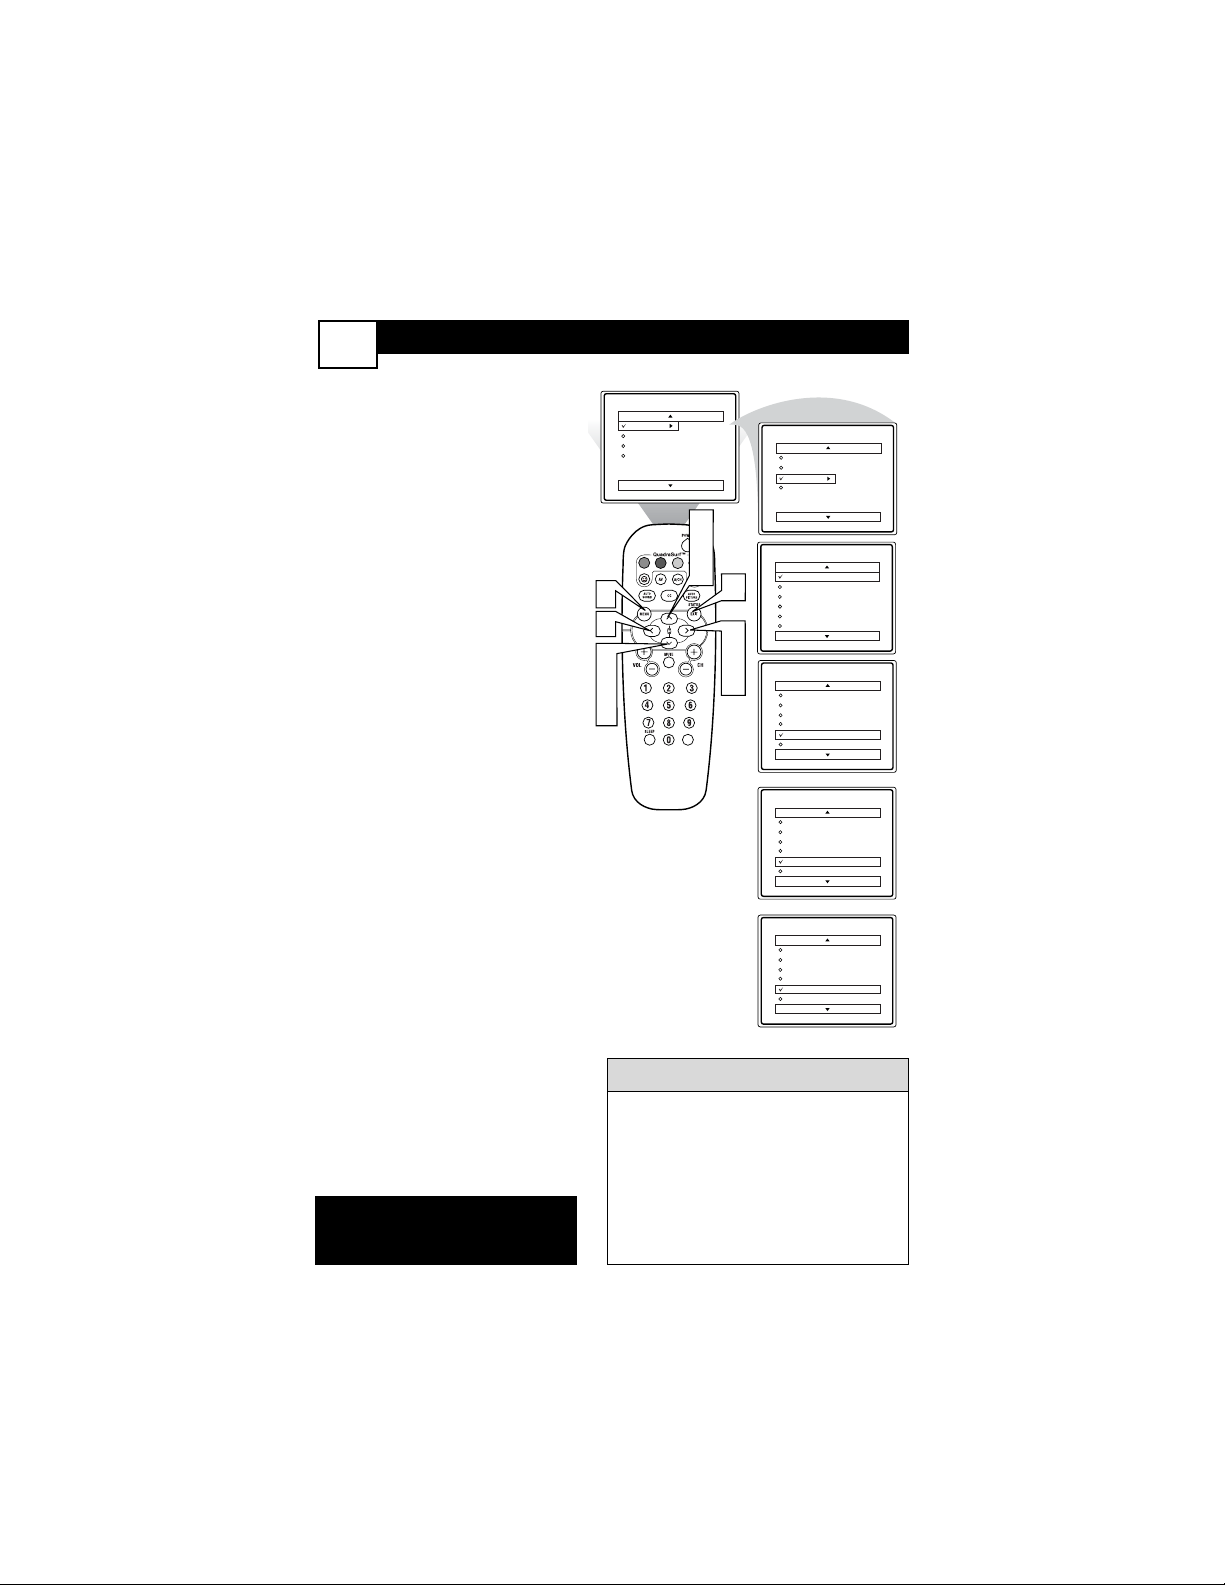
ACTIVATE CONTROL
21
A
fter you have set the Time, Start
Time, Stop Time, and Start
Channel, the timer must be set to
come on Once or Daily, or turned Off
through the Activate control.
1
Press the MENU button on the
remote to show the on-screen
menu.
2
Press the CURSOR UP 3 or
DOWN 4 buttons to scroll
through the on-screen menu
until the word Features is highlighted.
3
Press the CURSOR RIGHT 2
button to display the Features
menu.
4
Press the CURSOR UP 3 or
DOWN 4 buttons to scroll
through the on-screen menu
until the word Timer is highlighted.
5
Press the CURSOR RIGHT 2
button to display the Timer
menu.
6
Press the CURSOR UP 3 or
CURSOR DOWN 4 buttons
to highlight the Activate
Control.
7
Press the CURSOR RIGHT 2
or CURSOR LEFT 1 buttons
repeatedly to select Once, Daily,
or Off.
8
When finished, press the STATUS /EXIT button to remove
the on-screen menu from the
TV’s screen.
Remember, before setting the Timer controls, the TV’s clock must be set to the
correct time, see panel 18 for details.
The TV’s clock settings may be lost when
the TV is unplugged or when AC power
to the set is interrupted.
You can get to the Clock setting by pressing the Clock button on the remote control.
HELPFUL HINTS
NOTE: Active Control will only
appear in the menu of models
27PT6441/37 and 27PT6442/37.
1
7
2
4
6
Main
Picture
Sound
Features
Install
VOL
Brightness
Color
Picture
Sharpness
Tint
More...
Main
Picture
Timer
Sound
AutoLock
Features
Active Control
Install
Digi. Pic. Demo
2
4
6
Timer
Time
Start Time
8
Stop Time
Channel
Activate
Display
3
10:-- AM
5
Timer
7
Time
Start Time
Stop Time
Channel
Activate Off
Display
OR
Timer
Time
Start Time
Stop Time
Channel
Activate Daily
Display
OR
Timer
Time
Start Time
Stop Time
Channel
Activate Once
Display
Page 26
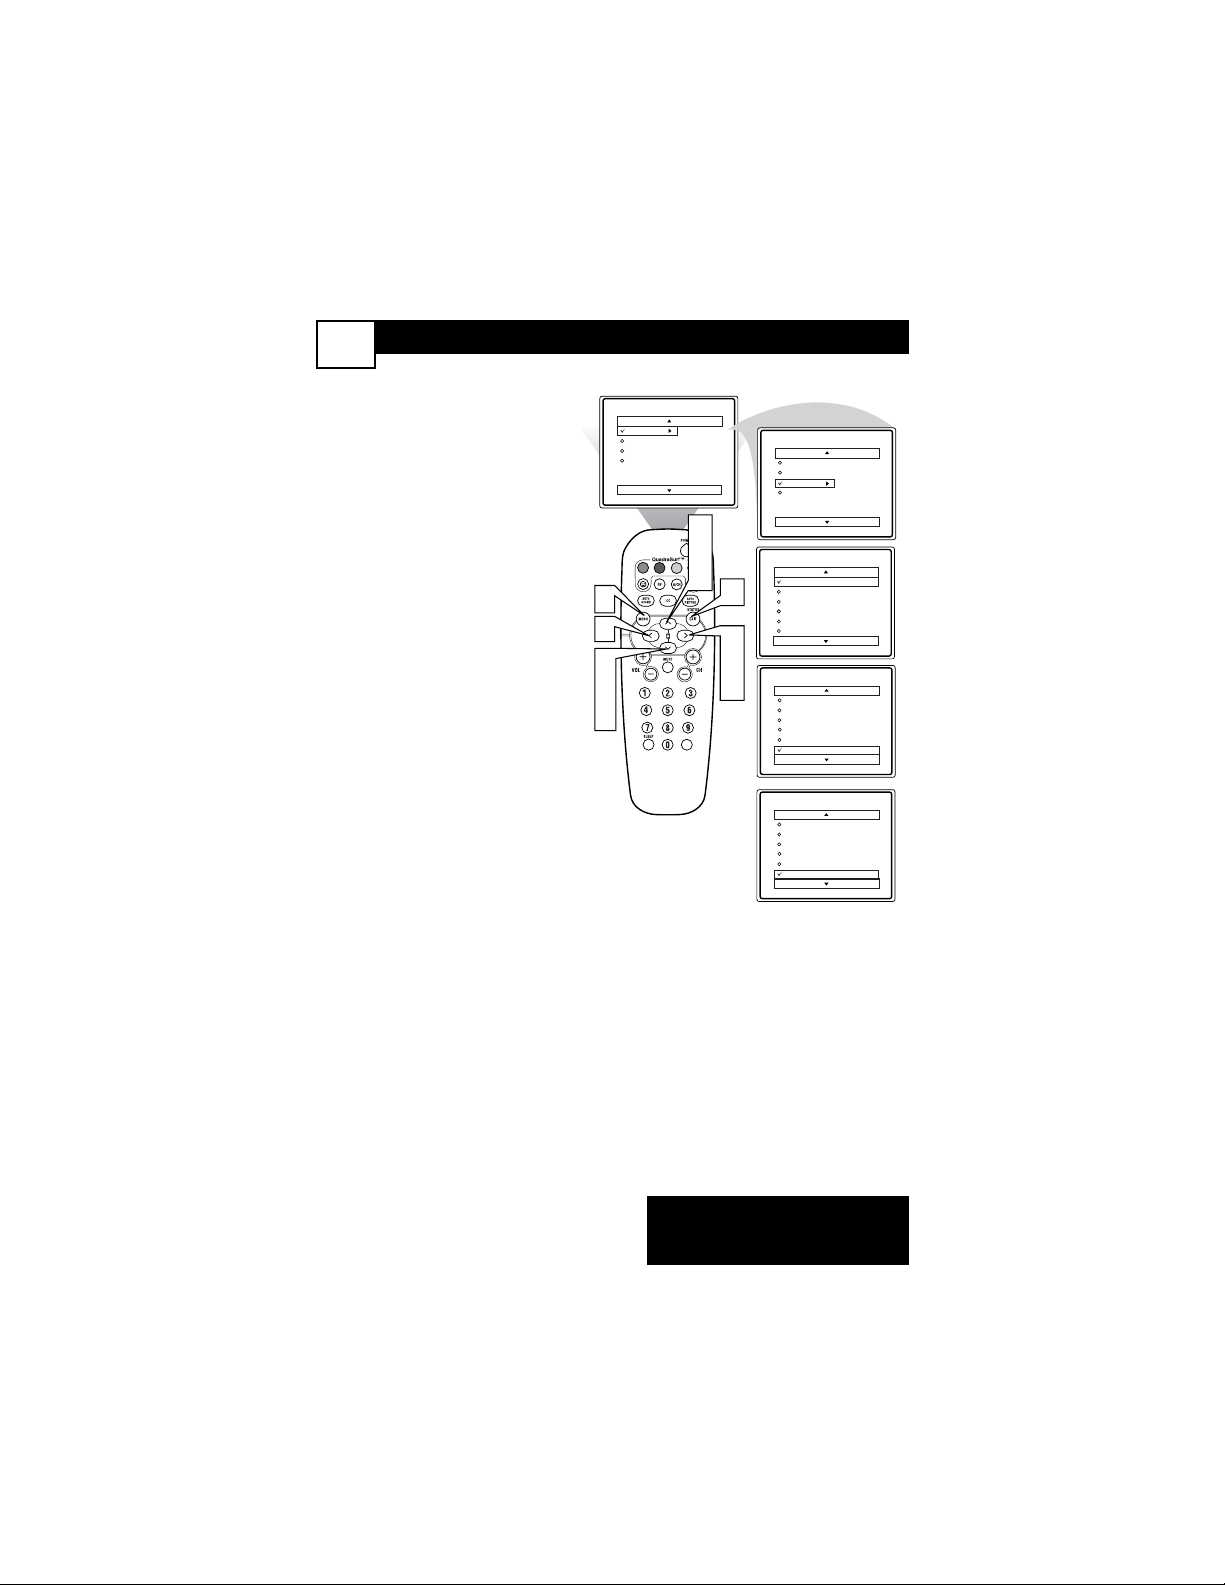
HOW TO VIEW TIME USING THE DISPLAY CONTROL
22
A
fter the TV’s clock has been
set, you can use your TV as a
clock. The Display control allows
you to permanently display the
time in the upper right corner of
the screen.
1
Press the MENU button on
the remote to show the onscreen menu.
2
Press the CURSOR UP 3 or
DOWN 4 buttons to scroll
through the on-screen menu
until the word Features is
highlighted.
3
Press the CURSOR RIGHT
2 button to display the
Features menu.
4
Press the CURSOR UP 3 or
DOWN 4 buttons to scroll
through the on-screen menu
until the word Timer is highlighted.
5
With Timer highlighted,
press the CURSOR RIGHT
2 button to display the
Timer menu.
6
Press the CURSOR UP 3 or
CURSOR DOWN 4 buttons
to highlight the Display
Control.
7
Press the CURSOR RIGHT
2 or CURSOR LEFT 1 buttons repeatedly to select On
or Off.
8
When finished, press the
STATUS /EXIT button to
remove the on-screen menu
from the TV’s screen.
NOTE: Active Control will only
appear in the menu of models
27PT6441/37 and 27PT6442/37.
Main
Picture
Sound
Features
Install
1
7
2
4
6
Brightness
Color
Picture
Sharpness
Tint
More...
Main
Picture
Sound
Features
Install
Timer
AutoLock
Active Control
Digi. Pic. Demo
2
4
6
VOL
8
3
5
7
Timer
Time
Start Time
Stop Time
Channel
Activate
Display
Timer
Time
Start Time
Stop Time
Channel
Activate
Display On
OR
Timer
Time
Start Time
Stop Time
Channel
Activate
Display Off
10:-- AM
Page 27
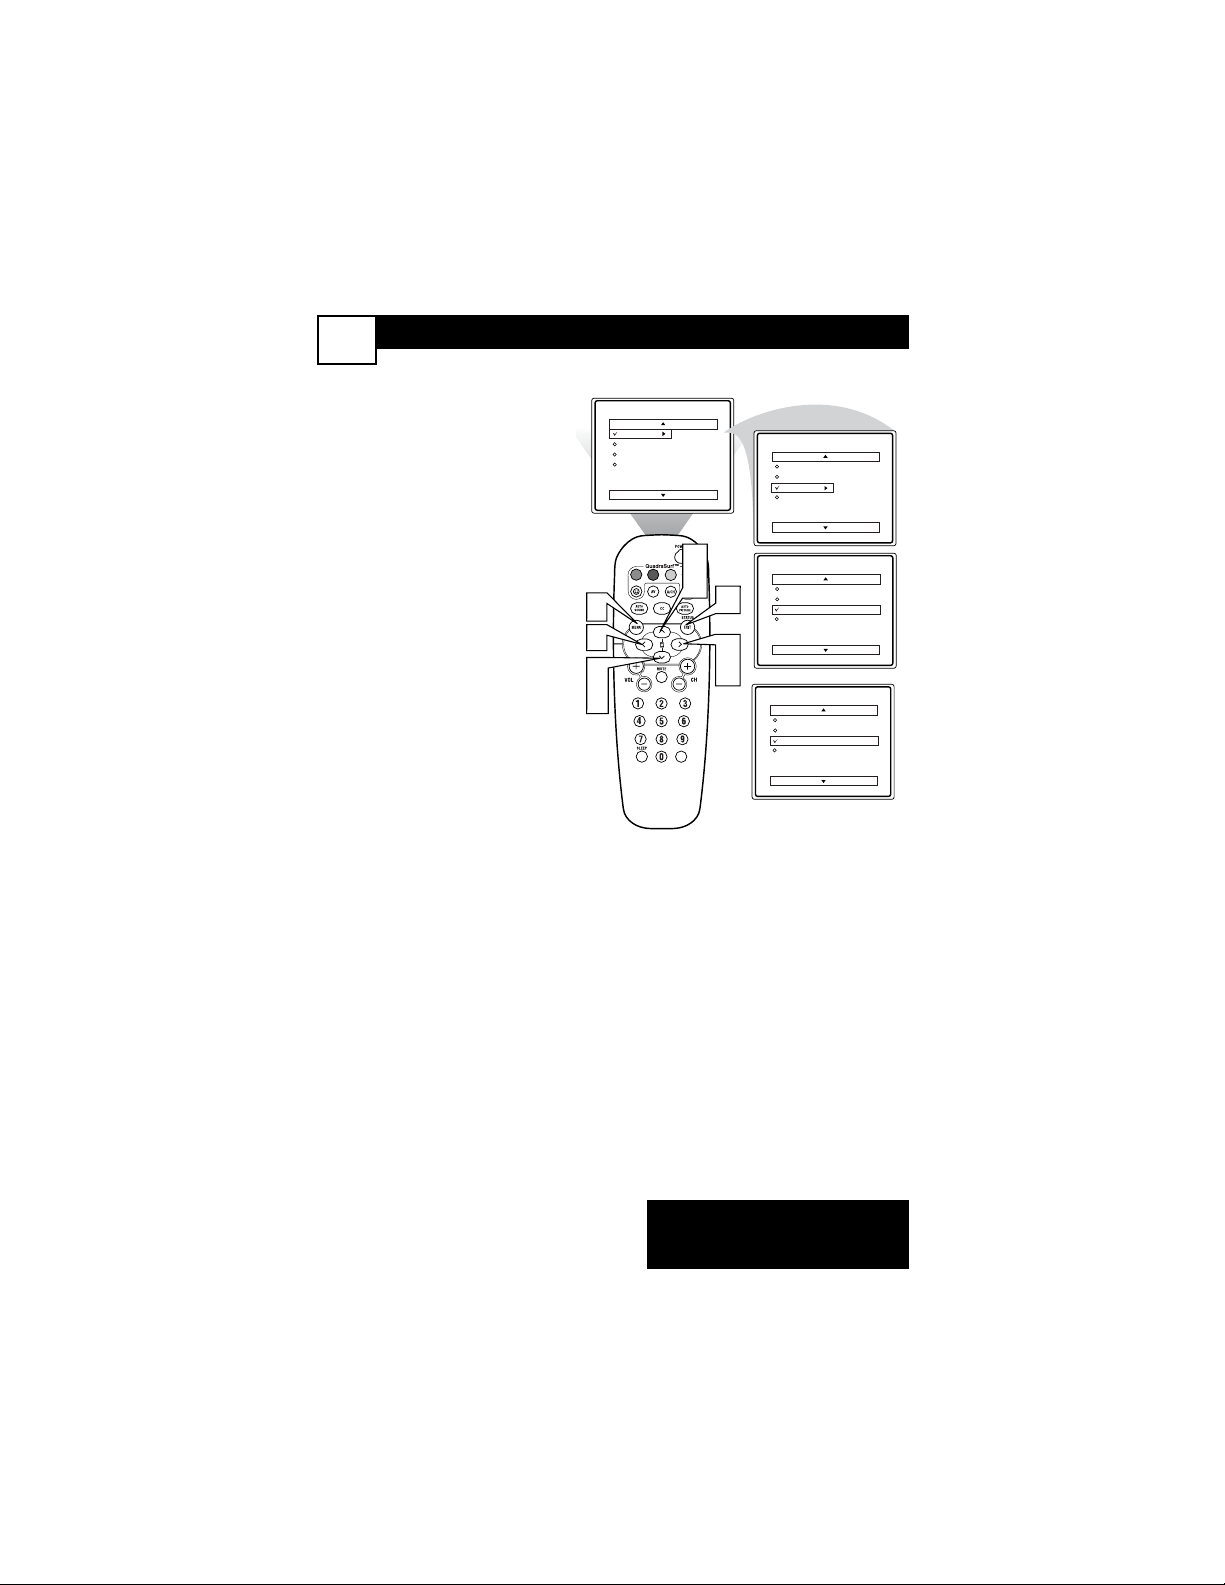
ACTIVE CONTROL OPTIONS
23
T
he Active Control monitors
and adjusts incoming video
signals to help provide the best
picture quality.
When you choose to turn the
Active Control On, the picture
sharpness and noise reduction are
controlled automatically. Active
Control adjusts these picture settings continuously and automatically.
NOTE: Active Control is only
available in models 27PT6441/37
and 27PT6442/37.
1
Press the MENU button on
the remote to show the onscreen menu.
2
Press the CURSOR UP 3
or DOWN 4 buttons to
scroll through the on-screen
menu until the word
Features is highlighted.
3
Press the CURSOR RIGHT
2 button to display the
Features menu.
4
Press the CURSOR UP 3
or DOWN 4 buttons to
repeatedly until Active
Control is highlighted.
5
Press the CURSOR RIGHT
2 or CURSOR LEFT 1
buttons to toggle the Active
Control On or Off.
6
When finished, press the
STATUS /EXIT button to
remove the on-screen menu
from the TV’s screen.
Main
NOTE: Active Control will only
appear in the menu of models
27PT6441/37 and 27PT6442/37.
Picture
Sound
Features
Install
Brightness
Color
Picture
Sharpness
Tint
More...
Main
Picture
Sound
Features
Install
Timer
AutoLock
Active Control
Digi. Pic. Demo
2
4
1
5
VOL
2
4
6
3
5
Features
Timer
AutoLock
Active Control On
Digi. Pic. Demo
OR
Features
Timer
AutoLock
Active Control Off
Digi. Pic. Demo
Page 28

UNDERSTANDING AUTOLOCK CONTROLS
24
T
he AutoLock™ feature is an integrat-
ed circuit that receives and processes
data sent by broadcasters, or other program providers, that contain program
content advisories. When programmed
by the viewer, a TV with AutoLock™ can
respond to the content advisories and
block program content that may be found
objectionable (such as offensive language, violence, sexual situations, etc.).
This is a great feature to censor the type
of viewing children may watch.
AutoLock™ offers various BLOCKING controls from which to choose:
Access Code - An Access Code must be
set to prevent children from unblocking
questionable or censored programming
set by their parents.
Channel Block - After an access code
has been programmed, you can block
individual channels including the A/V
inputs.
Clear All - Allows you clear all channels
being blocked from your viewing set
with the Channel Block Control.
Block All - Allows you to block ALL
channels and A/V inputs at one time.
Movie Ratings - Certain blocking
options exist which will block programming based on ratings patterned by the
Motion Pictures Association of America.
TV Ratings - Just like the Movie
Ratings, programs can be blocked from
viewing using standard TV ratings set by
TV broadcasters.
MOVIE
RA
TINGS
G: General Audience - All ages admit-
ted. Most parents would find this program suitable for all ages.
PG: Parental Guidance Suggested -
This programming contains material that
parents may find unsuitable for younger
children.
PG-13: Parents Strongly Cautioned -
This programming contains material that
parents may find unsuitable for children
under the age of 13.
MOVIE RATINGS Continued
R: Restricted - This is programming is
specifically designed for adults. Anyone
under the age of 17 should only view this
programming with an accompanying parent or adult guardian.
NC-17: No one under the age of 17 will
be admitted. - This type of programming
should be viewed by adults only.
X: Adults Only - This type of program-
ming contains one or more of the following: very graphic violence, very graphic
and explicit or indecent sexual acts, very
coarse and intensely suggestive language.
TV
RATINGS
TV-Y -- Designed for a very young audi-
ence, including children ages 2-6.
TV-Y7 -- It may be appropriate for chil-
dren age 7 and above who have acquired
the development skills needed to distinguish between make-believe and reality.
TV-G -- Suitable for most audiences, this
type of programming contains little or no
violence, no strong language, and little or
no sexual dialogue or situations.
TV-PG -- This program contains material
that parents may find unsuitable for
younger children. Could contain Moderate
violence (V), some sexual situations (S),
infrequent coarse language (L), or some
suggestive dialogue (D).
TV-14 -- This program contains some
material that many parents would find
unsuitable for children under 14 years of
age. This type of programming contains
one or more of the following: intense violence (V), intense sexual situations (S),
strong coarse language (L), or intensely
suggestive dialogue (D).
TV-MA -- This program is specifically
designed to be viewed by adults and therefore may be unsuitable for children under
17. This type of programming contains one
or more of the following: graphic violence
(V), explicit sexual situations (S), or crude
indecent language (L).
Page 29
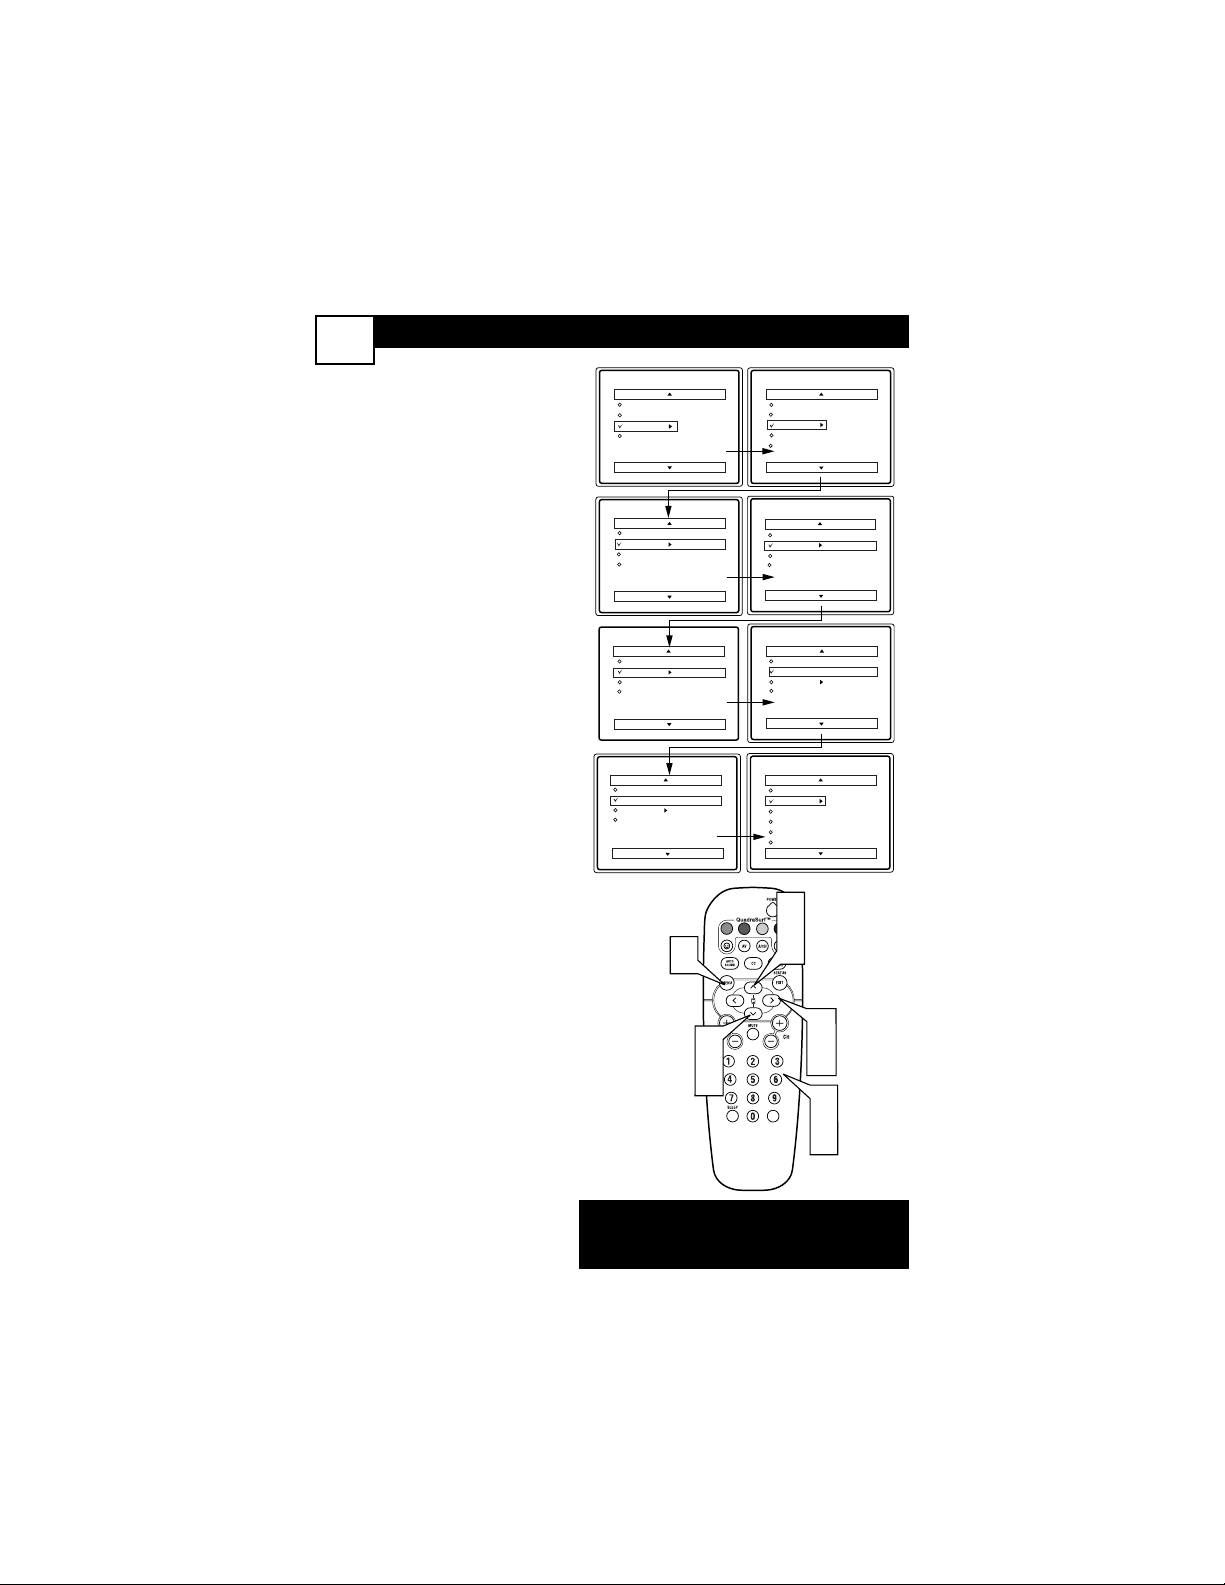
SETTING UPAN
ACCESS CODE
25
O
ver the next few panels you’ll
learn how to block channels
and get a better understanding of
the rating terms for certain programming.
First, let’s start by learning how to
set a personal access code:
1
Press the MENU button on
the remote to display the onscreen menu.
2
Press the CURSOR UP3or
DOWN
4
buttons until the
word Features is highlighted.
3
Press the CURSOR RIGHT
2 button to display the
Features menu options.
4
Press the
CURSOR UP3or
DOWN
4
buttons
until the
words Auto Lock™ are highlighted.
5
Press the CURSOR RIGHT
2 button. The screen will
read, “Access Code - - - - .”
6
Using the NUMBERED buttons, enter 0, 7, 1, 1.
“XXXX” appears on the
Access Code screen as you
press the numbered buttons.
“Incorrect Code” will appear
on the screen, and you will
need to enter 0, 7, 1, 1 again.
7
The screen will ask you to
enter a “New Code.” Enter a
“new” 4 digit code using the
NUMBERED buttons. The
screen will then ask you to
CONFIRM the code you just
entered. Enter your new code
again. “XXXX” will appear
when you enter your new code
and then display the
AutoLock™ menu options.
Proceed to the next panel to learn
more...
Main
NOTE: Active Control will only appear
in the menu of models 27PT6441/37 and
27PT6442/37.
Picture
Sound
Features
Install
Timer
Rotation
AutoLock
Active Control
Digi. Pic. Demo
Features
Timer
Rotation
AutoLock
Active Control
Digi. Pic. Demo
Timer
Start Time
Stop Time
Channel
Activate
Display
Features
Timer
AutoLock
Active Control
Digi. Pic. Demo
Features
Features
Timer
AutoLock
Active Control
Digi. Pic. Demo
Timer
AutoLock
Active Control
Digi. Pic. Demo
Access Code
- - - -
Access Code
XXXX
Incorrect
Confirm Code
XXXX
1
2
4
Features
Timer
Access Code
AutoLock
XXXX
Active Control
Digi. Pic. Demo
Features
Timer
New Code
AutoLock
- - - Active Control
Digi. Pic. Demo
AutoLock
Block Channel
OffStop Time
Setup Code
Channel
Clear All
Activate
Block All
Display
Movie Rating
TV Rating
2
4
VOL
3
5
6
7
Page 30
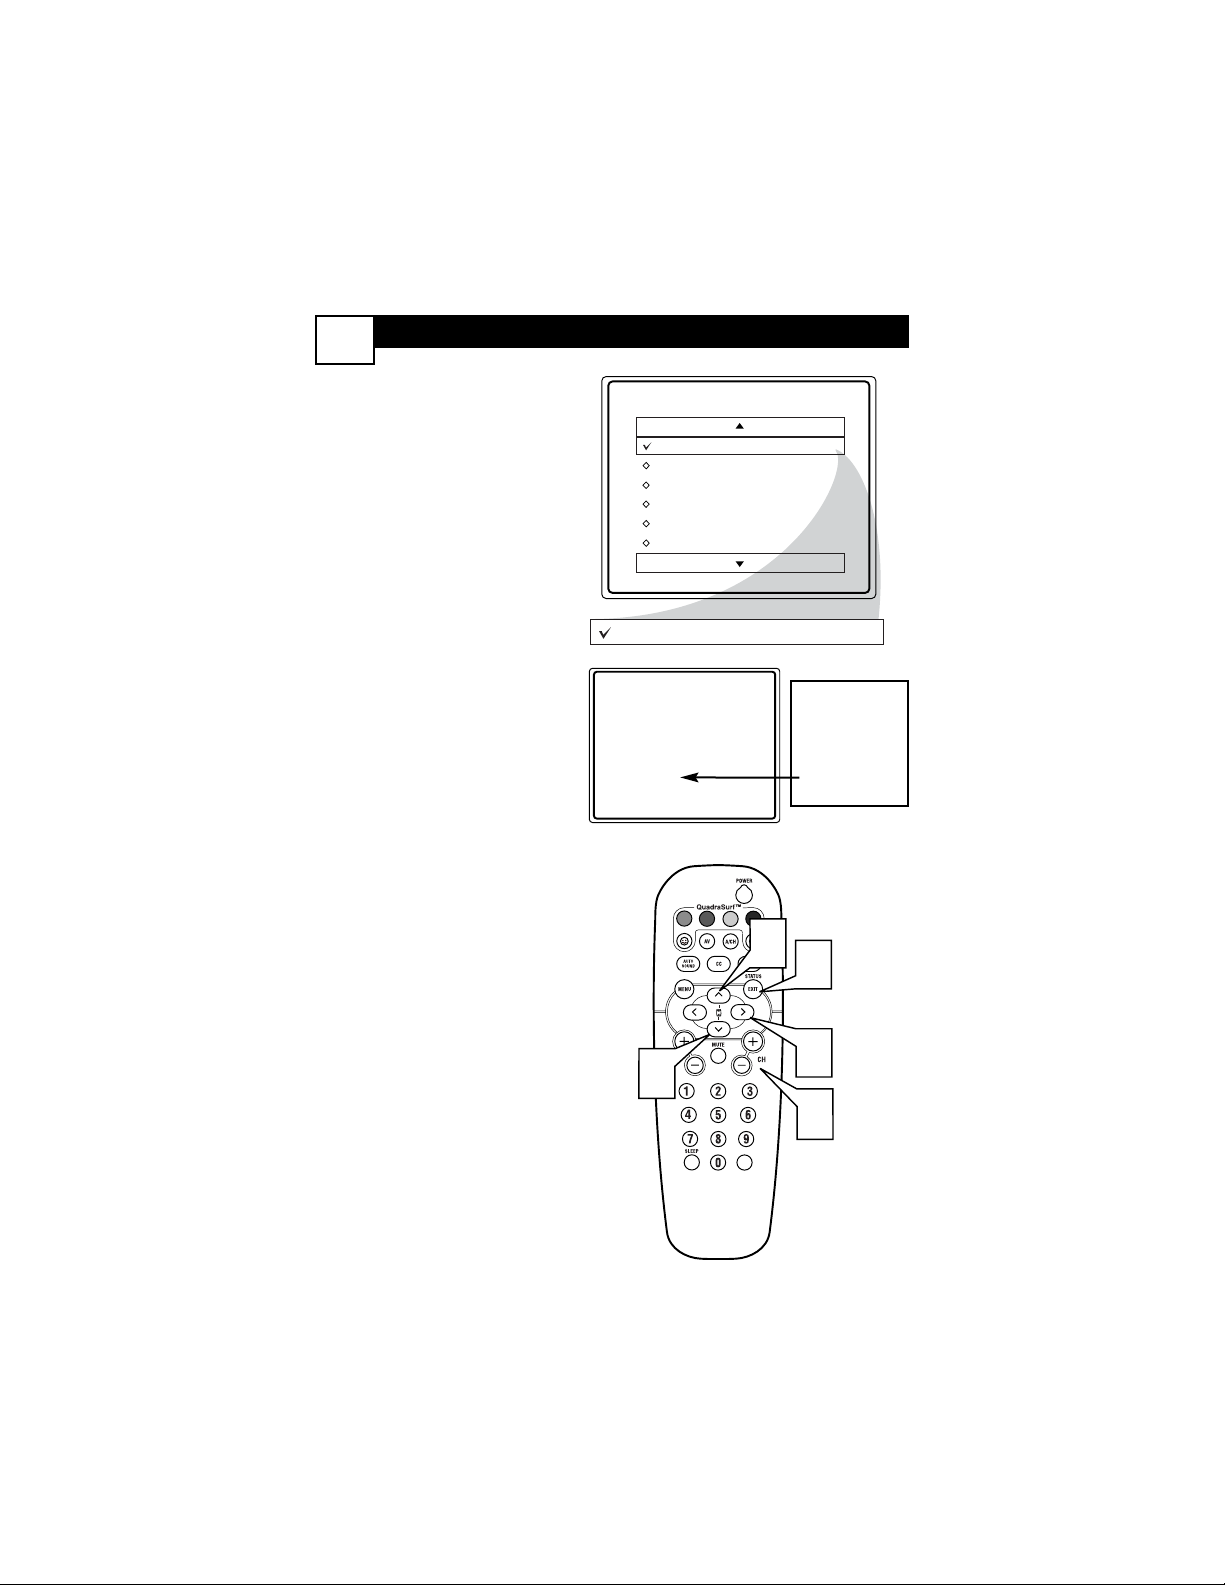
BLOCK CHANNELS
26
A
fter your personal access code
has been set (see previous
page), you are now ready to select
the channels or the A/V Inputs you
want to block out or censor.
Once you’ve entered your access
code and the AutoLock™ features
are displayed on the screen:
1
Press the CURSOR UP 3 or
DOWN 4 buttons until the
words Block Channel are
highlighted.
2
Press the CURSOR RIGHT
2 button to turn blocking
ON or OFF for that channel.
When ON is selected the
channel will be blocked.
3
Press the CH + or CH – button to select other channels
you wish to block. Repeat
steps 2-3 to block the new
channel.
4
When finished, press the
STATUS/EXIT button to
remove the menu from the
screen.
NOTE: If you ever forget your
code, the 0, 7, 1, 1 code is the factory default and can be used to
enter and create a new access code.
AutoLock
Enter your
Access Code to
view a tuned
channel that is
blocked with
Block Channel.
Block Channel
Setup Code
Clear All
Block All
Movie Rating
TV Rating
OffStop Time
Channel
Activate
Display
Block Channel
Channel 12
Blocked By AutoLock
Channel Blocking
Access Code
- - - -
VOL
1
On
1
4
2
3
Page 31
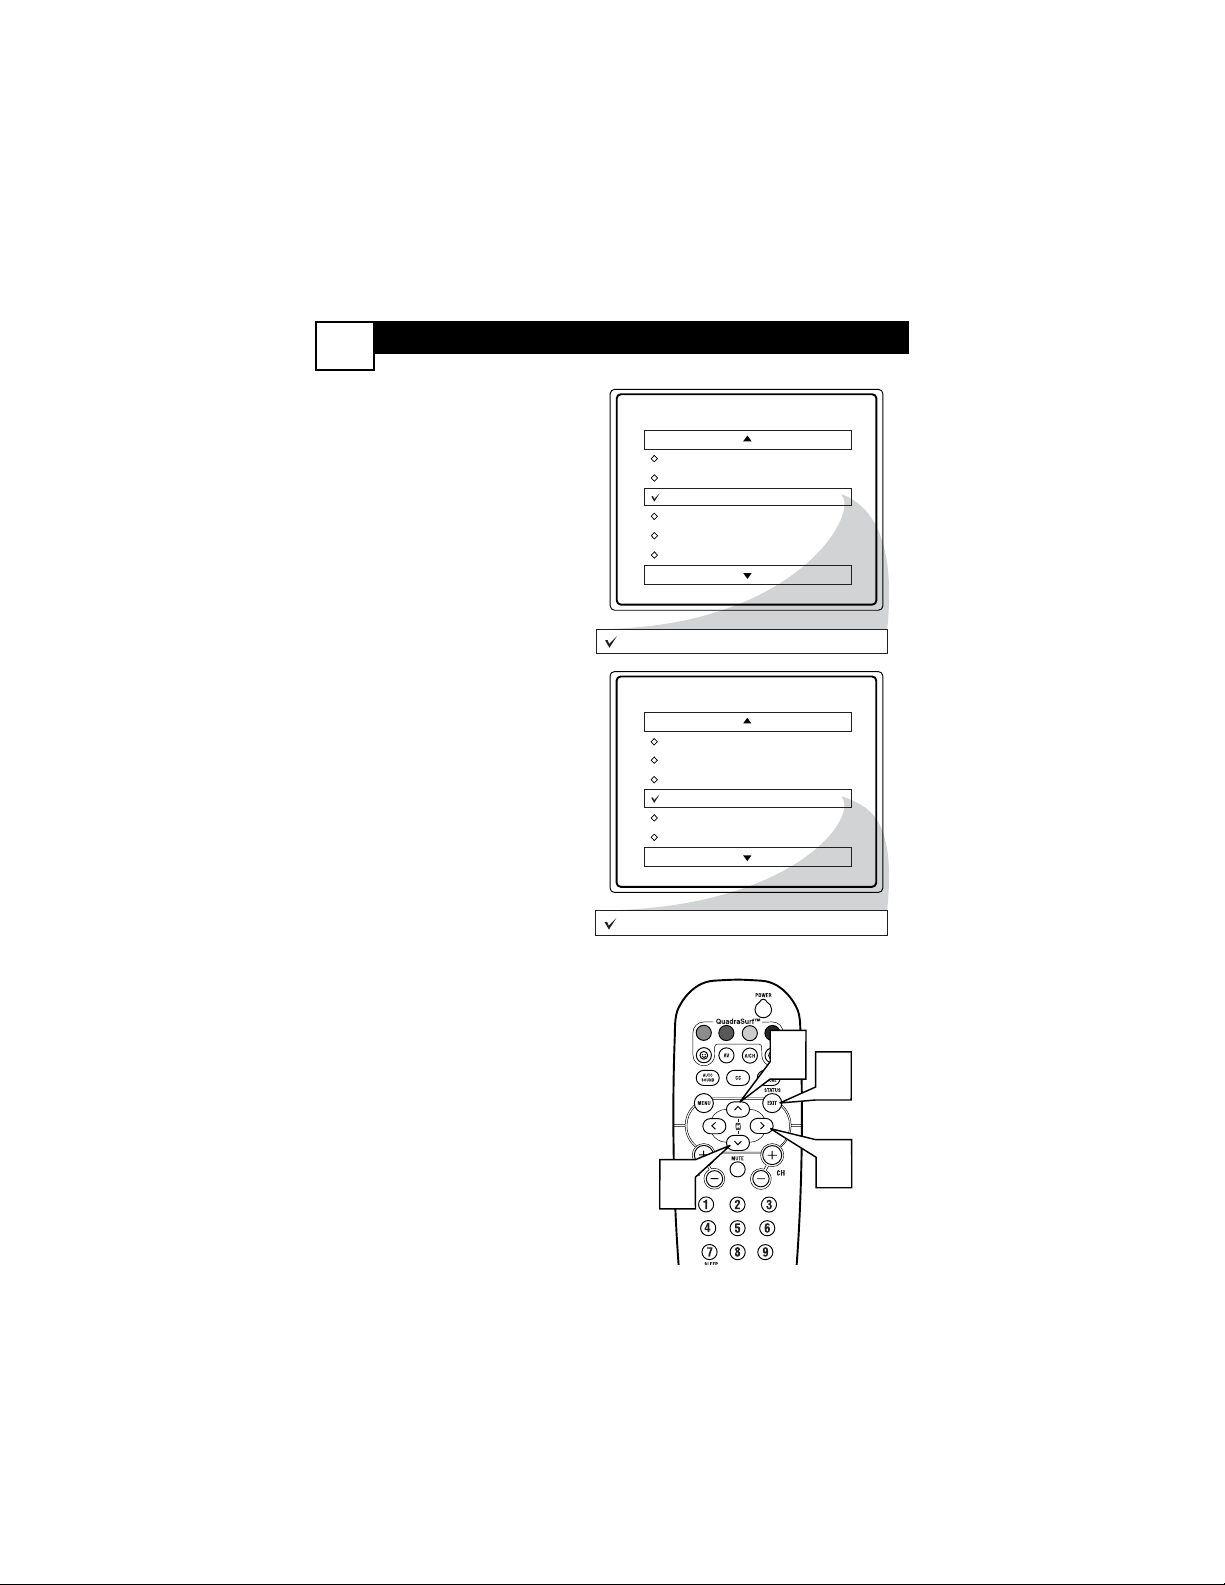
BLOCK/CLEAR ALL CHANNELS AT THE SAME TIME
27
A
fter blocking specific channels
there may come a time when
you want to block or clear all the
channels at the same time.
Once you’ve entered your access
code and the AutoLock™ features
are displayed on the screen:
1
Press the CURSOR UP 3 or
DOWN 4 buttons to select
either Clear All or Block All.
2
If Clear All is selected, press
the CURSOR RIGHT 2
button to clear all blocked
channels. All channels will be
viewable.
If Block All is selected, press
the CURSOR RIGHT 2
button to turn the control On
or Off. When On is selected,
ALL available channels will
be blocked from viewing.
3
When finished, press the
STATUS/EXIT button to
remove the menu from the
screen.
NOTE: If you ever forget your
code, the 0, 7, 1, 1 code is the factory default and can be used to
enter and create a new access
code.
AutoLock
Block Channel
Setup Code
Clear All
Block All
Movie Rating
TV Rating
Clear ?Stop Time
Channel
Activate
Display
Clear All
AutoLock
Block Channel
Setup Code
Clear All
Block All
Movie Rating
TV Rating
Block All
1
Cleared
Off
On
1
3
VOL
2
Page 32
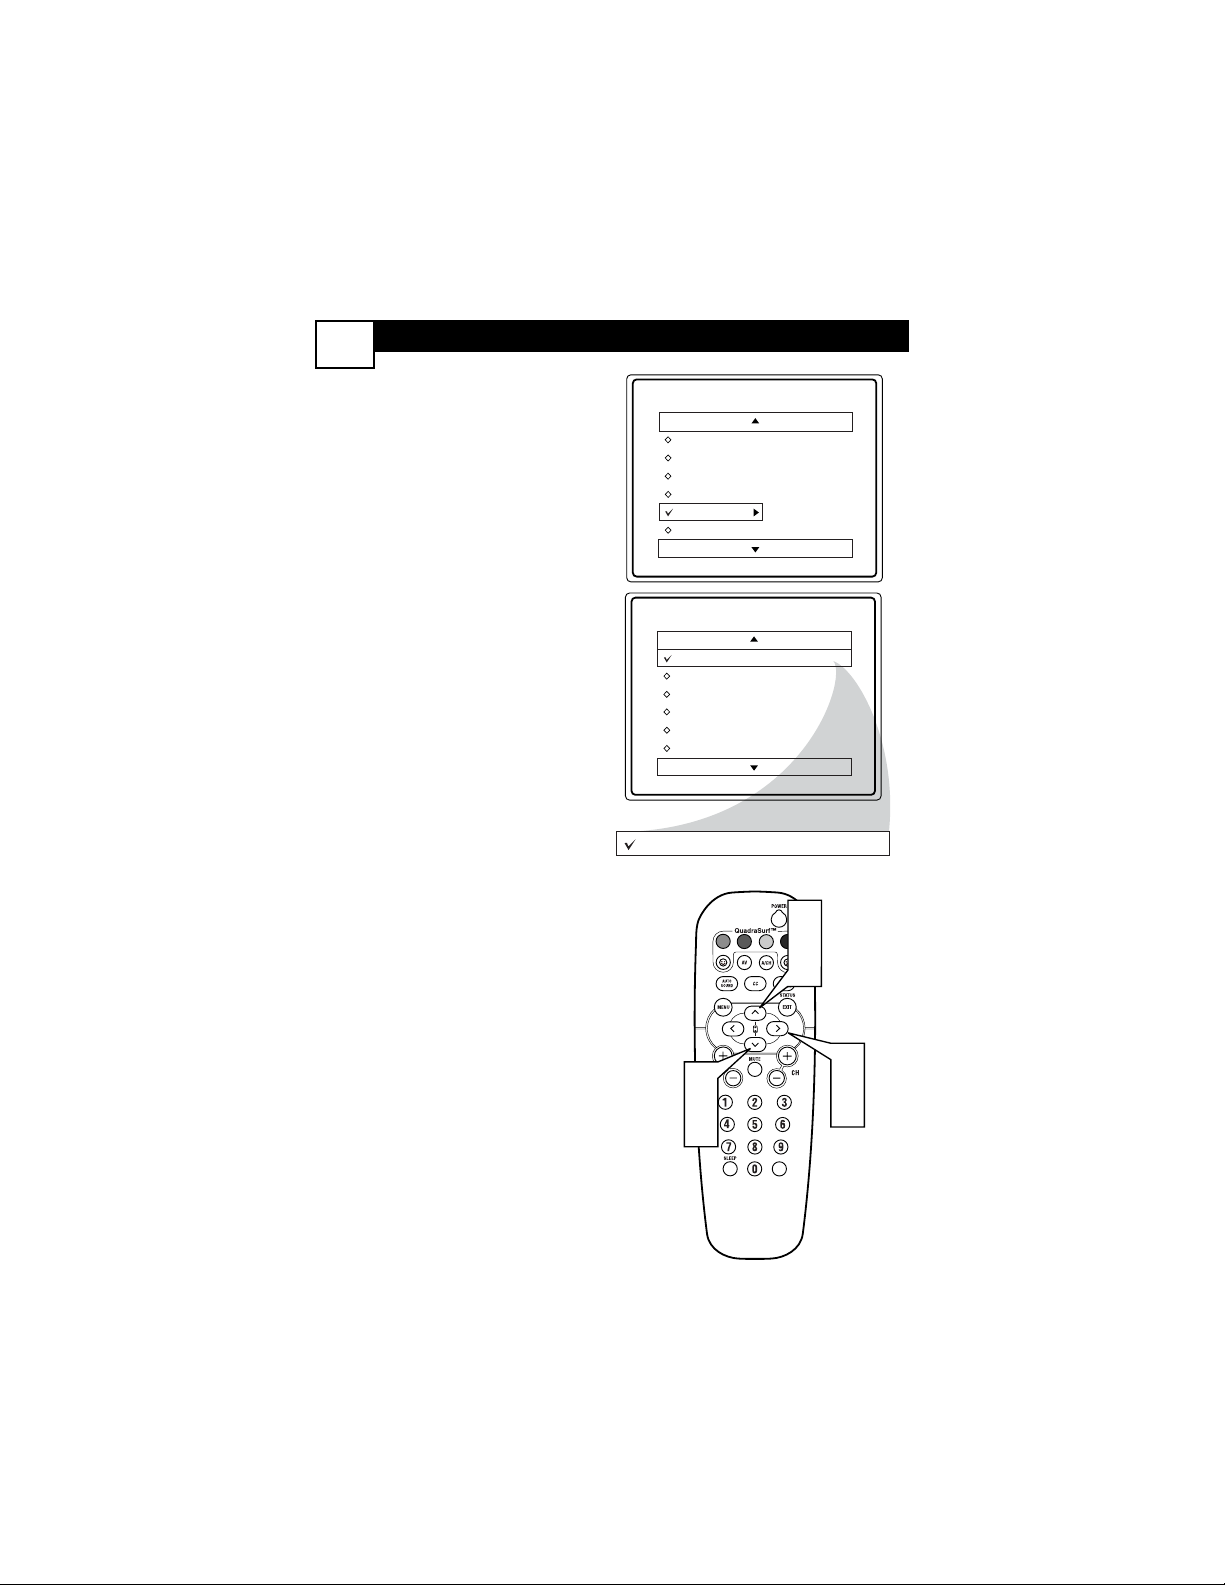
MOVIE RATINGS
28
T
he AutoLock™ feature can
block programming based on
the Movie Industry ratings.
Once you’ve entered your access
code and the AutoLock™ features
are displayed on the screen:
1
Press the CURSOR UP 3 or
DOWN 4 buttons to high-
light the words Movie Rating.
2
Press the
CURSOR RIGHT
2 button
to display the
Movie Rating options (G,
PG, PG-13, R, NC17, or X).
3
Press the CURSOR UP 3 or
DOWN 4 buttons to high-
light any of the Movie Rating
options. When highlighted,
all these options can be
turned On (which will allow
blocking) or Off (which will
allow viewing).
4
Use the
CURSOR RIGHT 2
button
on the remote to turn
the rating option On or Off.
When a rating level is chosen to be
blocked, any higher level rating
will also be blocked from viewing.
(i.e.: If “R” is selected to be
blocked, NC-17 and X will automatically be blocked.)
NOTE: If you ever forget your
code, the 0, 7, 1, 1 code is the factory default and can be used to
enter and create a new access
code.
AutoLock
Block Channel
Setup Code
Clear All
Block All
Movie Rating
TV Rating
G
PG
PG-13
R
NC-17
X
Movie Rating
G
G
PG
PG-13
R
NC-17
X
1
3
Off
On
1
3
VOL
2
4
Page 33
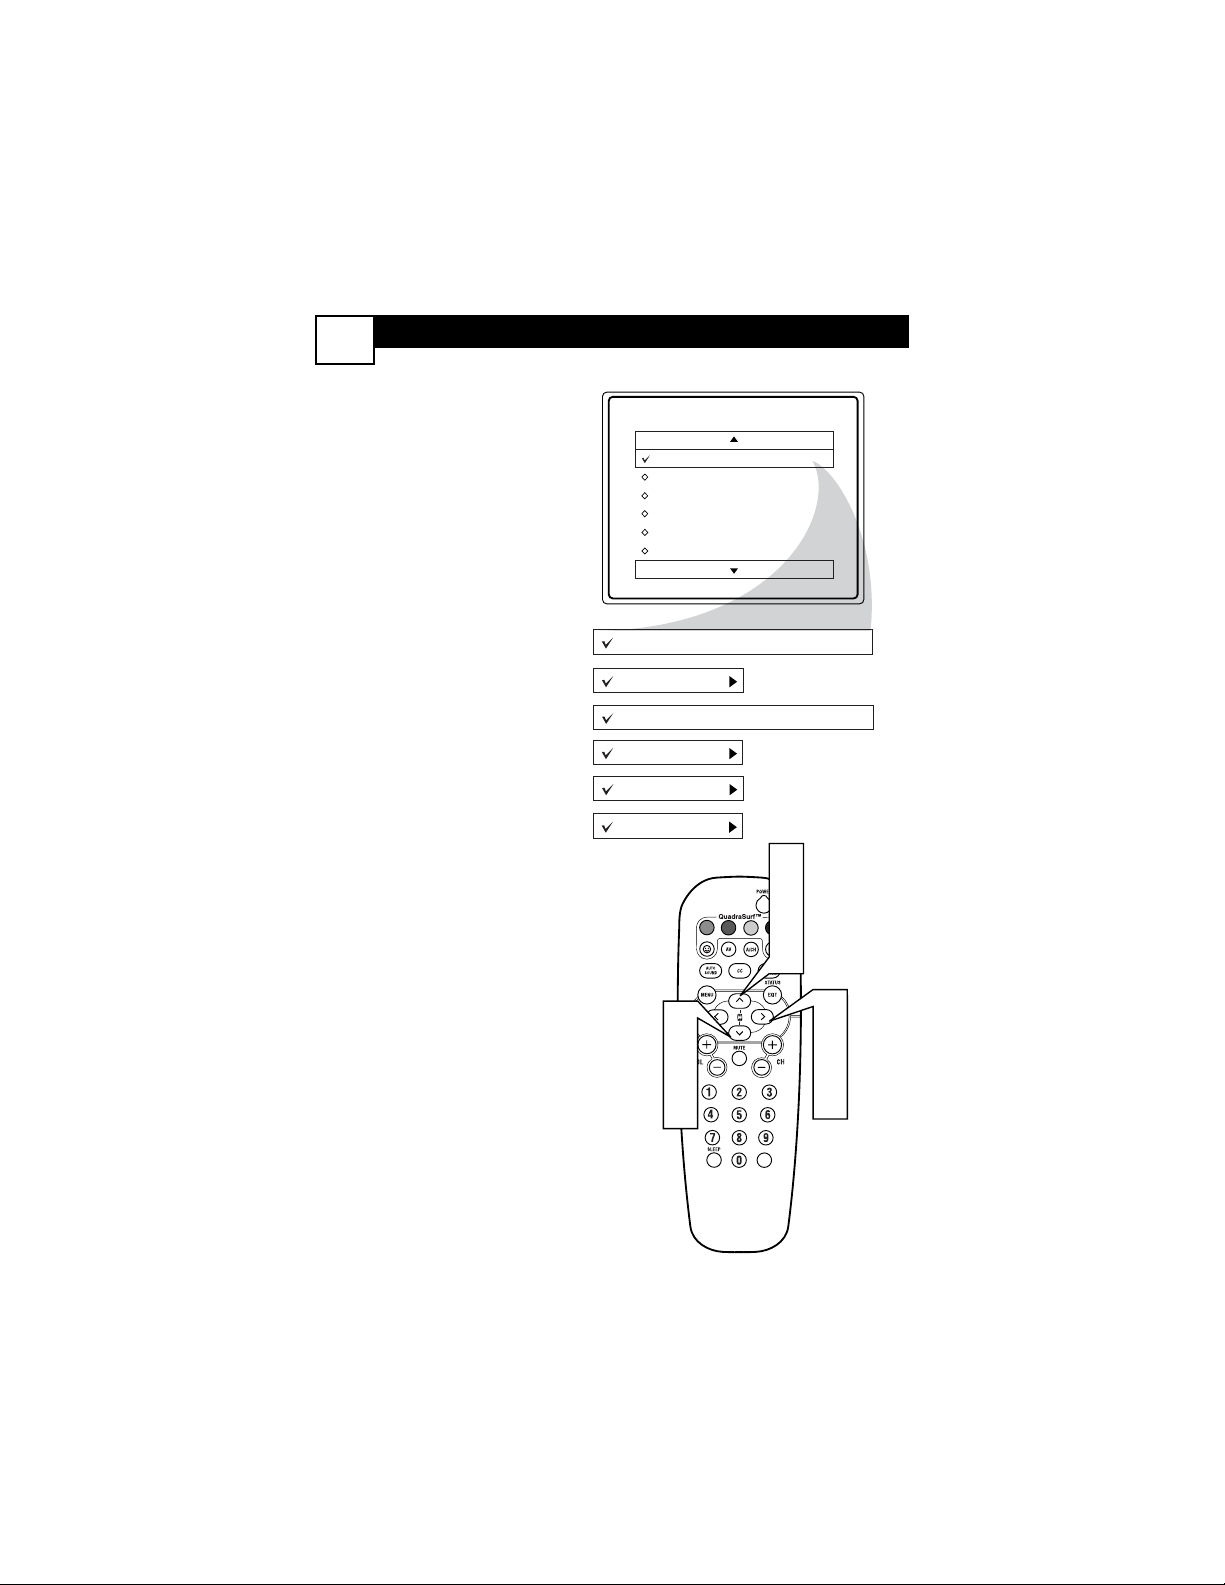
TV RATINGS
29
T
he AutoLock™ feature can
block programming based on the
TV Industry ratings.
Once you’ve entered your access
code and the AutoLock™ features
are displayed on the screen:
1
Press the
CURSOR UP 3 or
DOWN 4 buttons
to high-
light the words TV Rating.
2
Press the
CURSOR RIGHT
2 button
to display the TV
Rating options (TV-Y, TV-Y7,
TV-G, TV-PG, TV-14, or TVMA).
3
Press the
CURSOR UP 3 or
DOWN 4 buttons
to highlight any of the TV Rating
options. When highlighted, all
these options can be turned On
(which will allow blocking) or
Off (which will allow viewing).
NOTE: Some TV RATING options
also have sub-ratings. The ratings of
TV-Y7, TV-PG, TV-14, TV-MA can
be customized to block V (violence),
FV (fantasy violence), S (sexual situations), L (coarse language), or D (suggestive dialogue).
4
Press the
CURSOR RIGHT
2 button
on the remote to turn
the TV-Y or TV-G rating On or
Off. Or, press the
CURSOR
RIGHT 2 button
to enter the
sub-menus for the TV-Y7, TVPG, TV-14 or TV-MA ratings.
5
If the TV-Y7, TV-PG, TV-14 or
TV-MA sub-menu is accessed,
press the
CURSOR UP 3 or
DOWN 4 buttons
to select
one of the options (Block All, V,
S, L, D, or FV).
6
Press the
CURSOR RIGHT
2 button
on the remote to
turn the option ON or OFF.
TV Rating
TV-Y
TV-Y7
TV-G
TV-PG
TV-14
TV-MA
Off
TV-Y
TV-Y7
TV-G
TV-PG
TV-14
TV-MA
1
3
5
On
Block All, FV
Off
Block All, V, S, L, D
Block All, V, S, L, D
Block All, V, S, L
1
3
5
2
VOL
4
6
Page 34
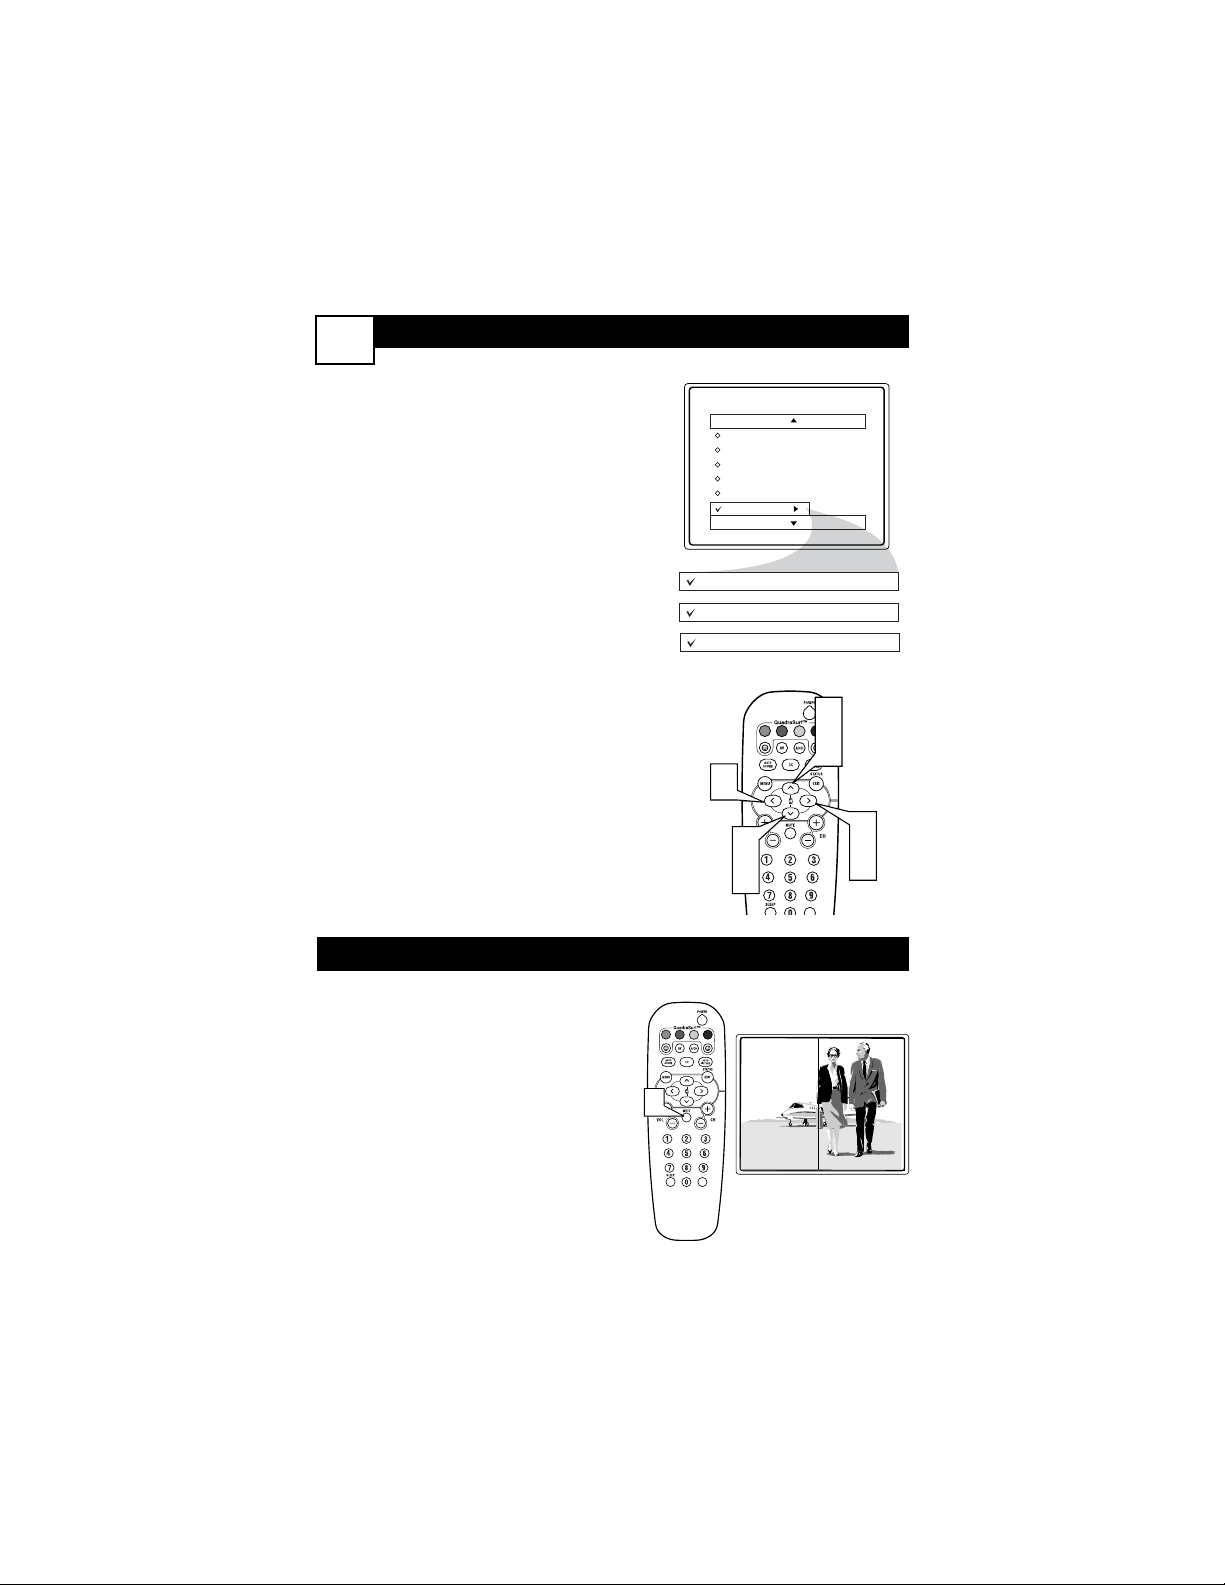
BLOCKING OPTIONS
30
A
utoLock™ offers the viewer other block-
ing features as well. With these Blocking
Options, the censoring can be turned ON or
OFF.
Once you’ve entered your access code and
the AutoLock™ features are displayed on the
screen:
1
Press the CURSOR UP 3 or DOWN
4 buttons until the words Block
Options are highlighted.
2
Press the
CURSOR RIGHT 2 button
to
display the Blocking Options (Blocking,
Unrated, or No Rating) menu.
Blocking: Might be called the “master
switch” for AutoLock™. When On, ALL
blocking/censoring will take place. When Off,
ALL blocking is disabled.
Unrated: ALL unrated programs based on the
Movie Ratings or Parental (TV) Guidelines
can be blocked if this feature is set to On and
the Blocking feature is set to OFF.
No Rating: ALL programming with NO content advisory data can be blocked if set to On
and the Blocking feature is set to OFF.
3
Press the CURSOR UP 3 or DOWN
4 buttons to highlight the desired fea-
ture.
4
When highlighted, each feature can be
turned On or Off using the
CURSOR
RIGHT 2
or the
CURSOR LEFT 1
buttons
on the remote.
AutoLock
DEMO MODE
W
ith Demo Mode On, a split screen demo
will be shown on the screen. The Demo
Mode will show the right side wih show a
sharper image with more natural motion.
1
Press the MUTE button on the remote
approximately 3-4 seconds. The split
screen demo appears. After 20 seconds,
the TV will automatically reurn to normal operation.
Note: You can also turn the Digital Picture
Demo On or Off by using on-screen menu.
Setup Code
Clear All
Block All
Movie Rating
TV Rating
Block Options
Blocking
Unrated
No Rating
On
On
On
1
3
4
1
VOL
VOL
1
3
2
4
Digi. Pic. Demo
Page 35
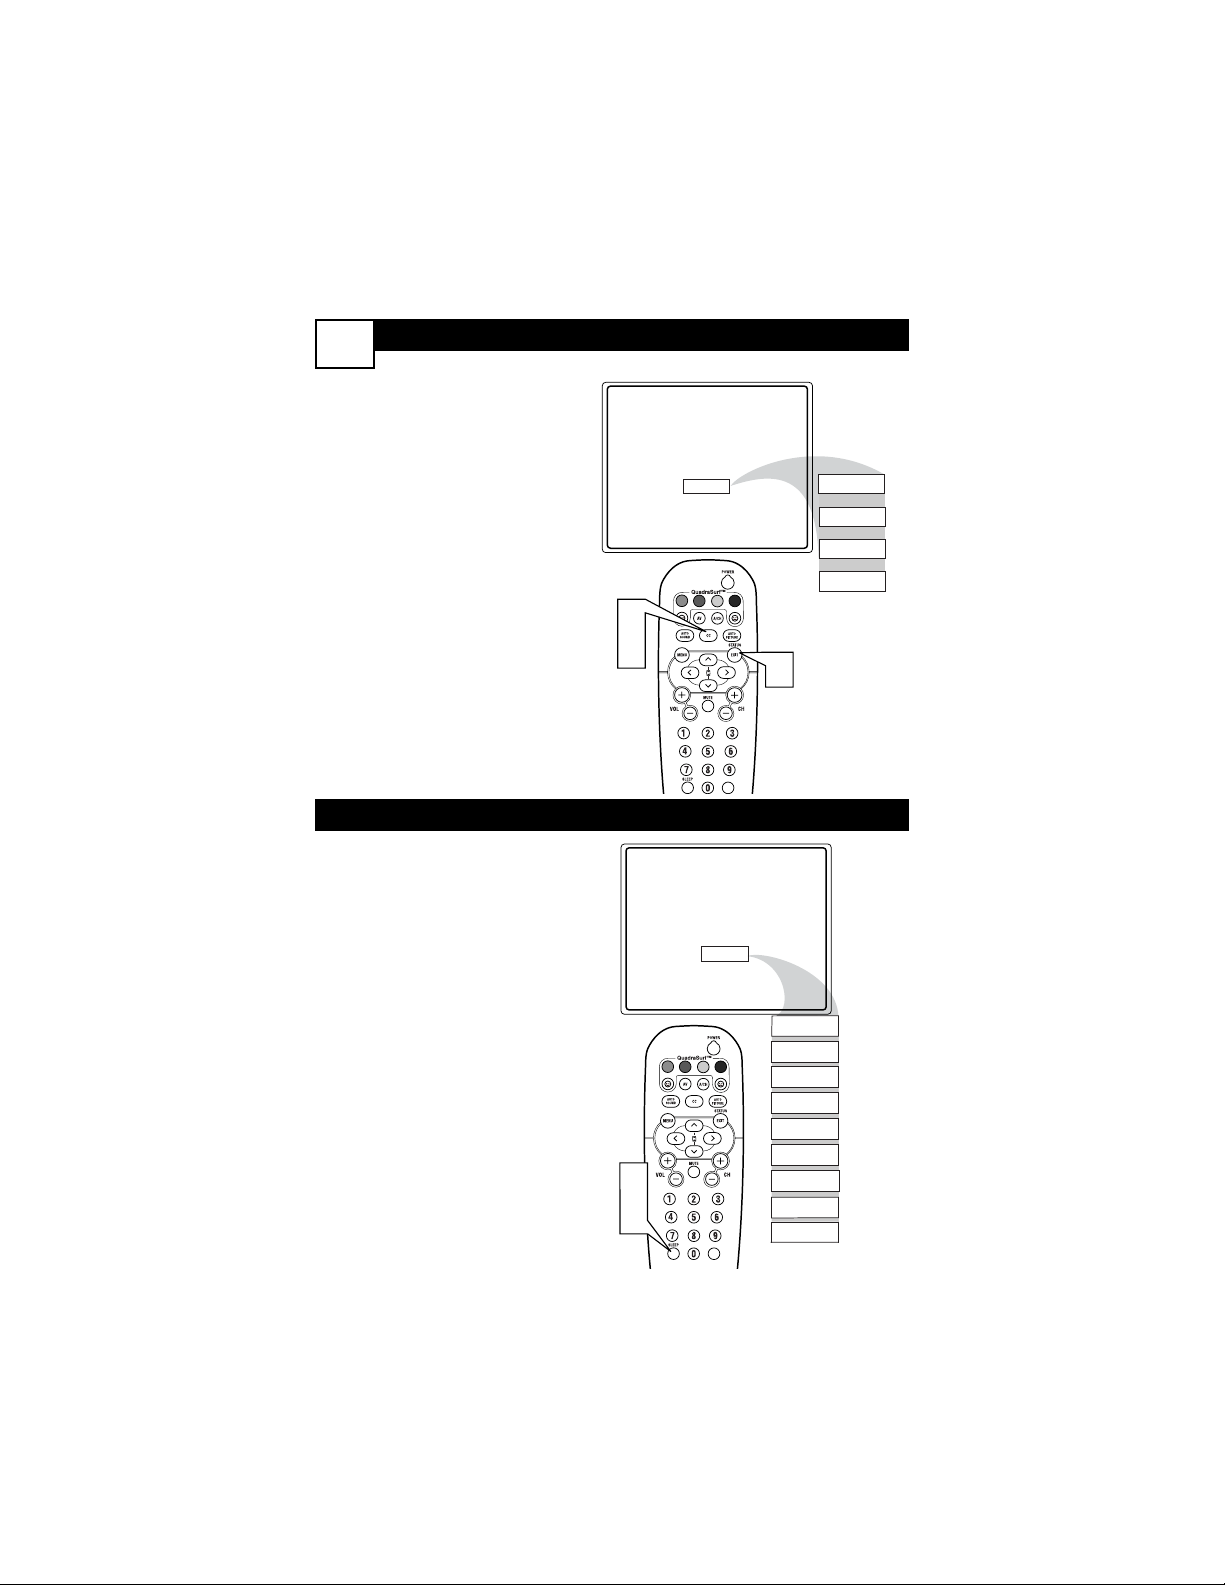
CLOSED CAPTIONING
31
C
losed Captioning (CC) allows
you to read the voice content of
television programs on the TV
screen. Designed to help the hearing impaired, this feature uses onscreen “text boxes” to show dialogue and conversations while the
TV program is in progress.
1
Press the CC button on the
remote to display the current
Closed Caption setting.
2
Press the CC button repeatedly to choose from the four
Closed Caption options (CC
Off, CC1, CC2, CC Mute).
3
When finished, press the STATUS /EXIT button to remove
the menu from the TV’s screen.
Y
our TV can be set to automatically turn itself off at a given
amount of time.
1
Press the SLEEP button on
the remote control and the
SLEEP timer display will
appear on the screen.
2
Press the SLEEP button
repeatedly to pick the amount
of time (15, 30, 45, 60, 90, 120,
180, or 240 minutes) before the
TV will turn itself off.
NOTE: An on-screen count down
will appear during the last minute
before the TV shuts itself off. If any
button is pressed during the last
minute of the countdown, the
Sleeptimer setting will be cancelled.
SLEEPTIMER
1
2
1
2
CC Off
CC Off
CC1
CC2
CC Mute
3
VOL
Sleep 15
Sleep 15
Sleep 30
Sleep 45
Sleep 60
Sleep 90
VOL
Sleep 120
Sleep 180
Sleep 240
Sleep off
Page 36
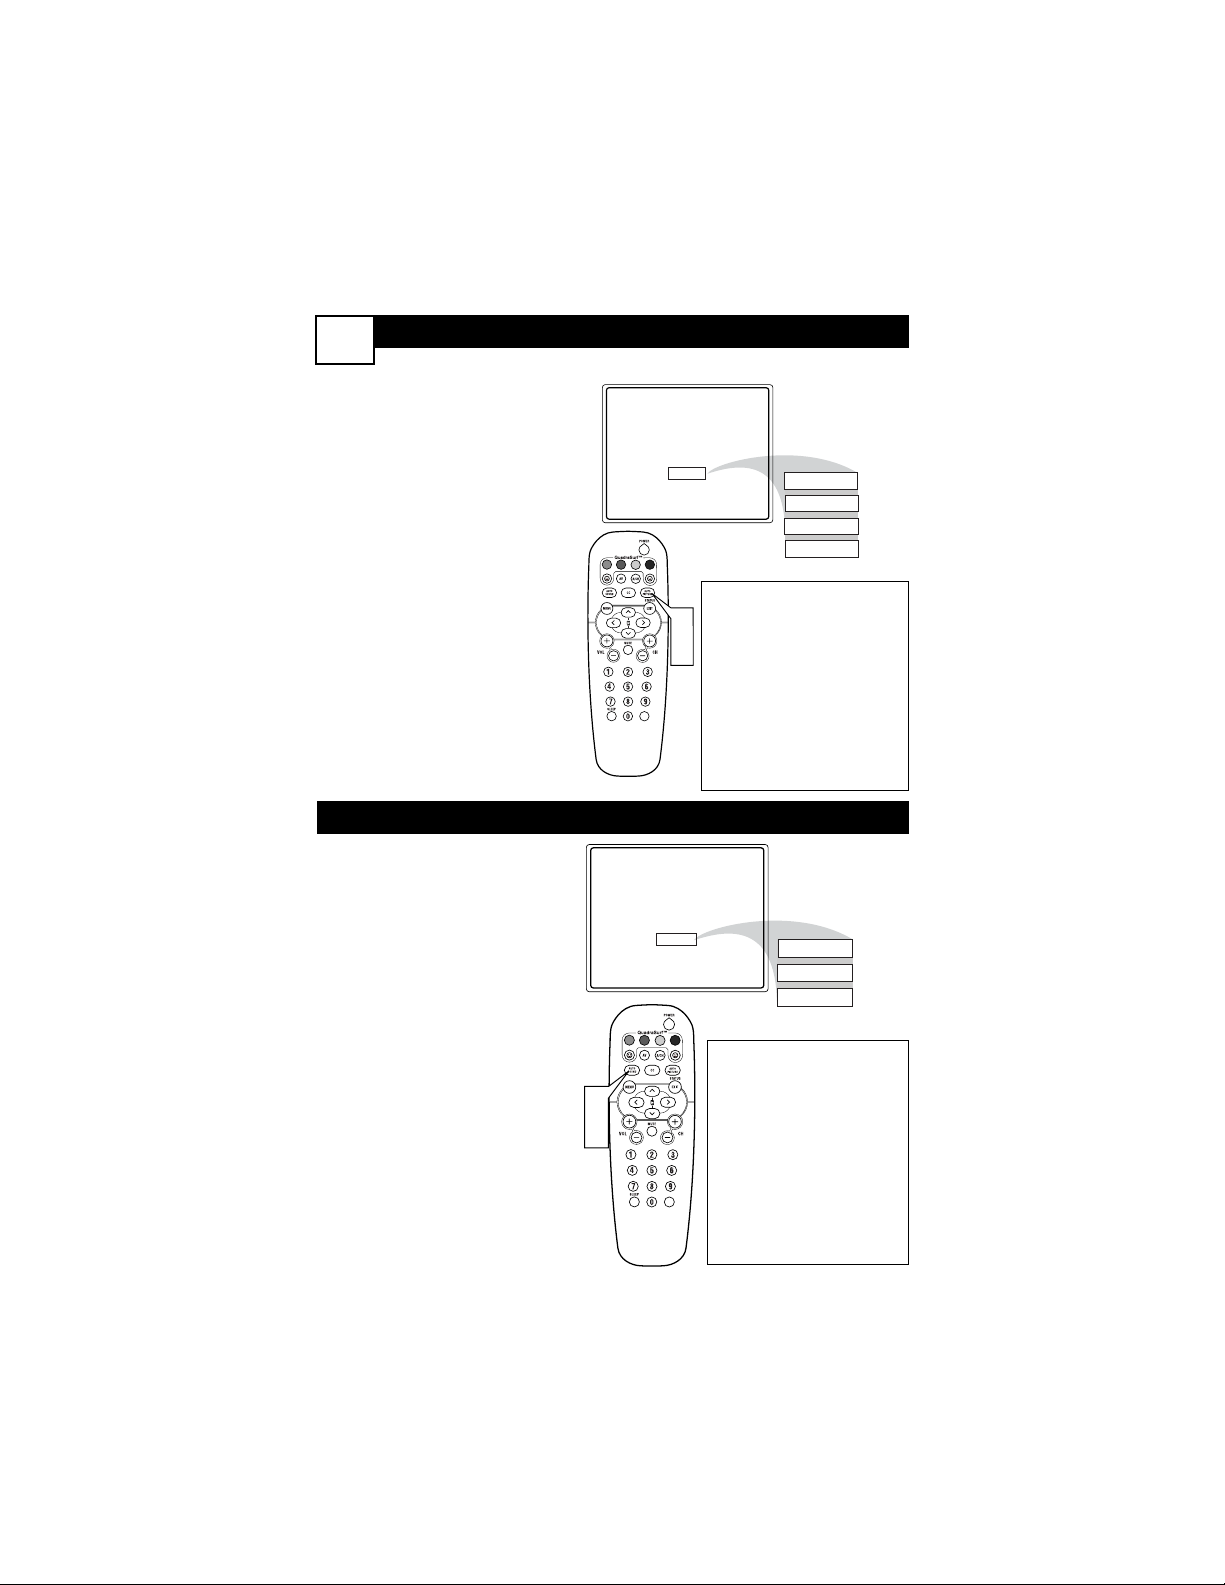
AUTO PICTURE
32
AUTO SOUND
W
hether you’re watching a
movie or a sporting event,
your TV has automatic video control settings matched for your current program source or content.
1
Press the AUTO PICTURE
button on the remote control.
The current Auto Picture setting will be displayed on the
screen.
2
Press the AUTO PICTURE
button repeatedly to select
either Personal, Movies,
Sports, Weak Signal, or MULTIMEDIA picture settings.
NOTE: The way you choose to set
the Picture Menu Controls will
become your Personal setting.
Personal
Movies - Preset picture options
for watching Video Tapes, or
DVDs.
Sports - Preset picture options
for watching sporting events.
Weak Signal - Preset picture
options for watching programs
where the reception is not at its
best.
Multimedia - Preset picture
options for use with video gaming.
T
he Auto Sound feature allows
the listener to select between
four different factory set sound
options.
1
Press the AUTO SOUND
button on the remote control.
The current Auto Sound setting will appear in the middle
of the screen.
2
Press the AUTO SOUND
button repeatedly to toggle
between the four settings.
(Personal, Theatre, Music, or
Voice)
NOTE: The way you choose to set
the Sound Menu Controls will
become your Personal setting.
Theatre - Preset sound
options for watching movies.
Dynamic Ultra Bass is included in this option.
Music- Preset sound options
for musical programming
where there is little dialogue.
Dynamic Ultra Bass is included in this option.
Voice - Preset sound options
for programming where heavy
dialogue is present.
Movies
Sports
Weak Signal
Multimedia
VOL
1
2
1
2
Personal
VOL
Theatre
Music
Voice
Page 37
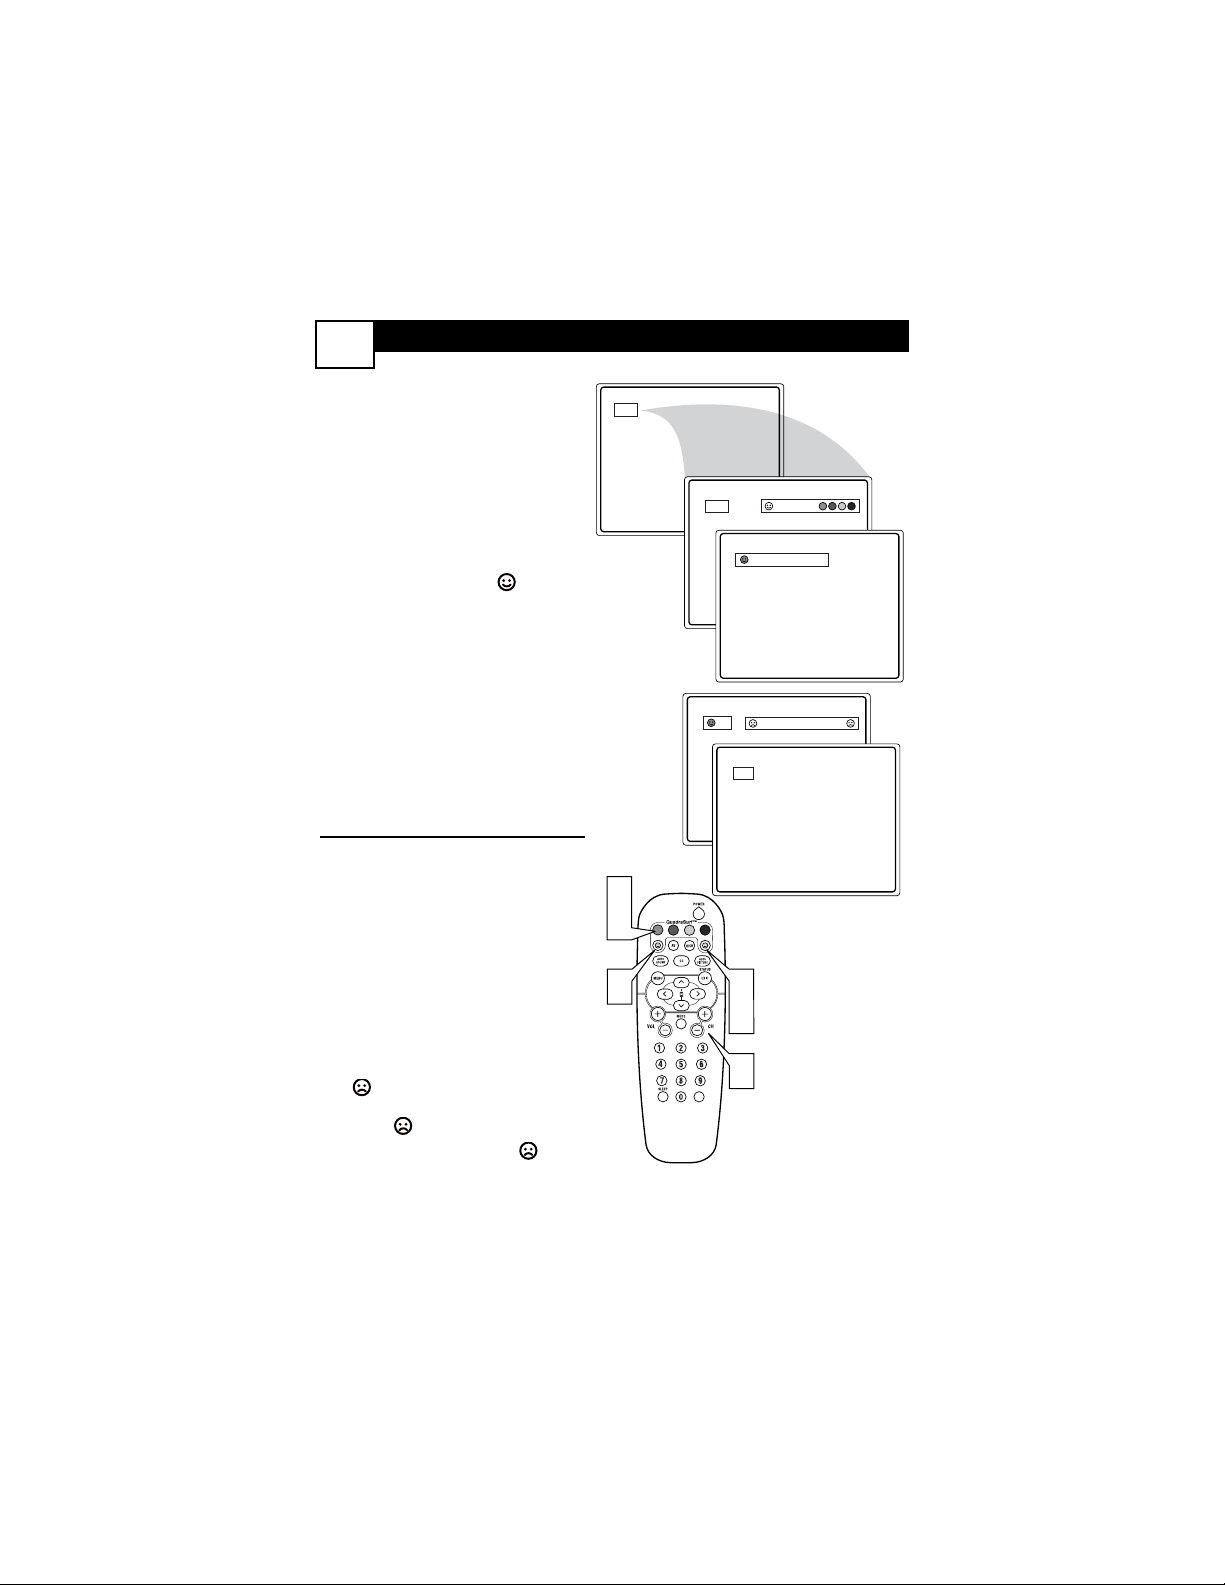
QUADRASURF
33
T
he QuadraSurf™ control allows
you set up four different personal channel Surf lists using the colored buttons (on the remote control), each holding up to ten channels in its quick viewing“list.”
1
Press the CHANNEL (+) or
(–) buttons (or the NUMBER
buttons) to select a channel to
add to one of the SURF lists.
2
Press the SMILEY button
on the remote control to ADD
the channel to one of the SURF
lists.
3
Press the corresponding COLORED (Red, Green, Yellow or
Blue) button to add the channel
to that button’s Surf list. (Up to
ten channels per button can be
stored.)
Repeat steps 1 through 3 to add
additional channels (up to 10) to
each of the the SURF lists.
To r emove a channel from one of
the SURF lists;
4
Press the COLORED
Quadra Surf button until the
desired channel appears. The
screen will display the channel
number with a colored
“Smiley” face to indicate the
Colored button it relates to.
5
While the “Smiley” face
channel indicator is displayed, press the FROWNIE
face button. The screen
will read, “Remove item? Press .”
6
Press the FROWNIE face
button again to confirm your
decision to remove the channel
from the Surf list.
Repeat steps 4-6 to remove other
channels from Surf lists.
12
3
4
2
12
12
Select List!
Added!
12
Remove Item? - Press
12
5
VOL
6
1
Page 38
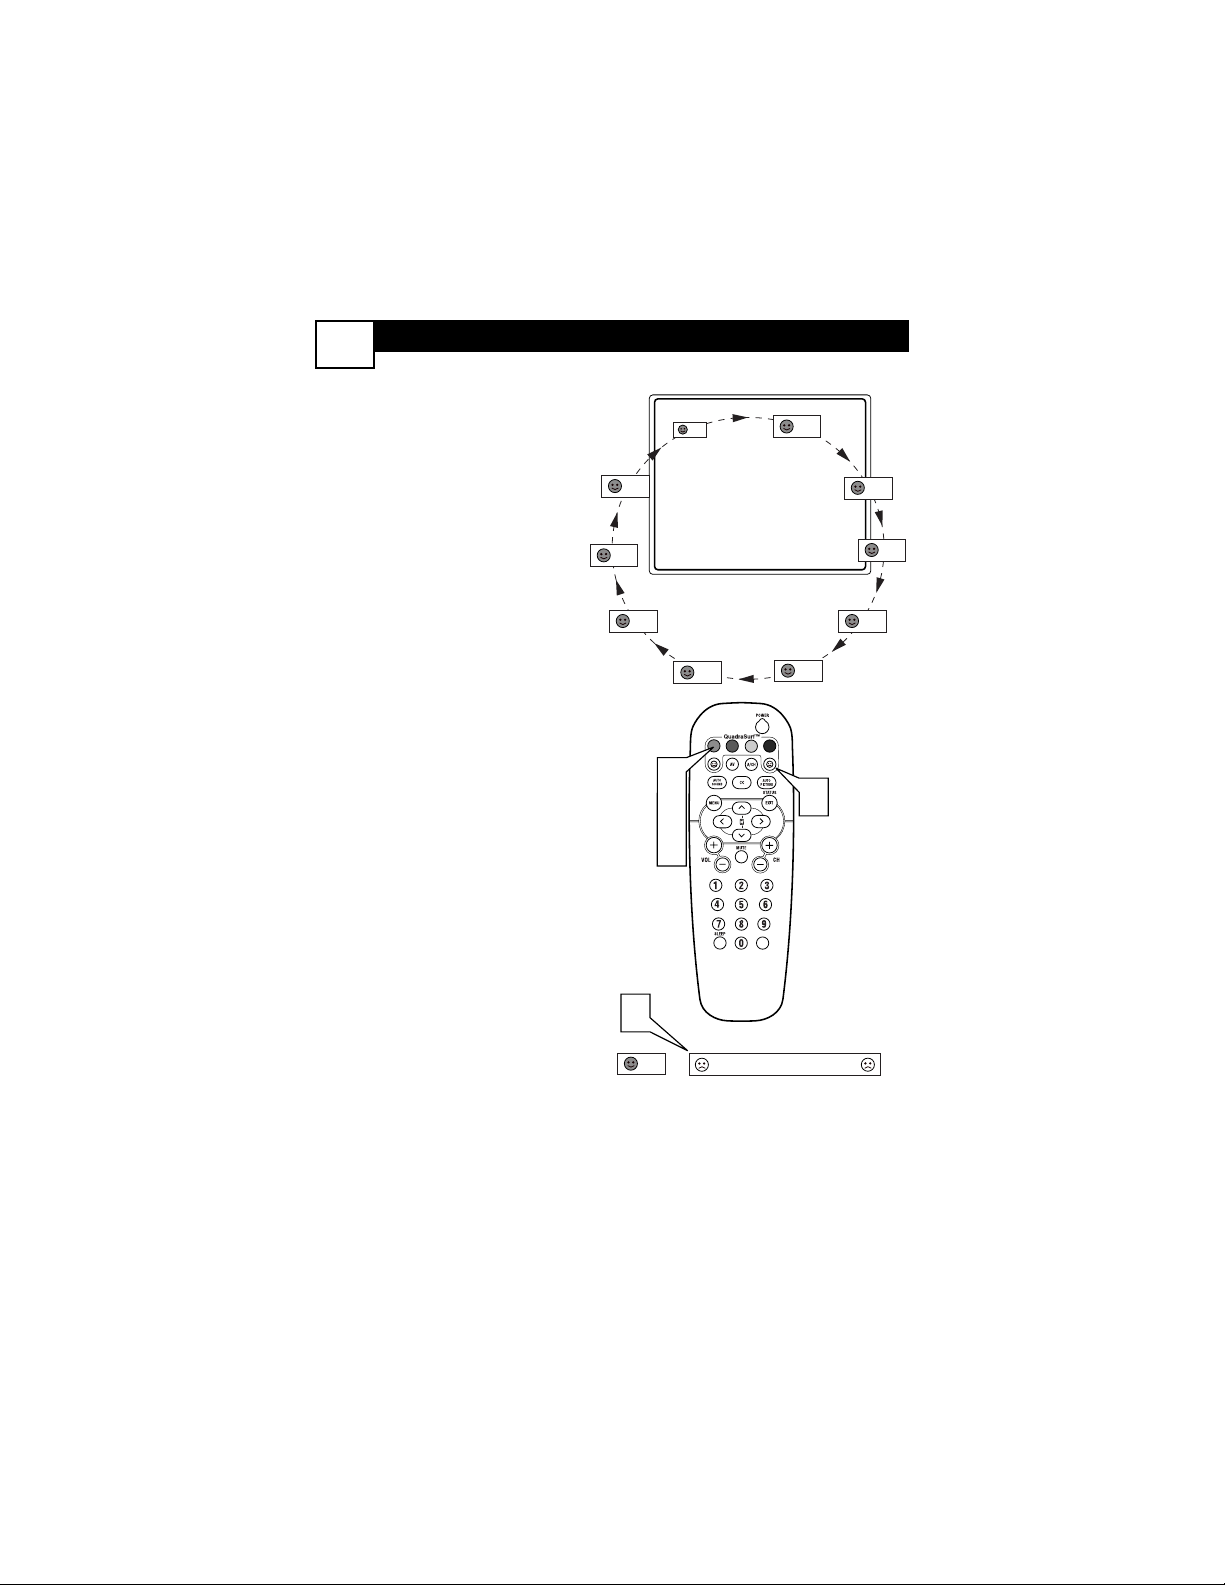
QUADRASURF
34
T
he Quadra Surf buttons on your
remote control allow you to store
up to 10 channels per button (40
total). You can even program the
A/V Input channels for each button
making them a “source” button.
Assuming channels have now been
added to the four Quadra Surf lists
(the four colored buttons, see the
previous page), let’s review how the
feature works.
1
Press one of the pre-programmed COLORED buttons
on the remote (Red, Green,
Yellow or Blue). The screen
will display a smiley face with
the first programmed channel
for that surf list.
2
While the colored “smiley”
face still appears on the
screen, press the same COLORED button on the remote to
tune the second channel programmed for that specific surf
list.
3
Repeatedly pressing the same
COLORED button while the
“smiley” face appears will tune
all the programmed channels.
Pressing the COLORED button
again will return you to the first
channel in the list.
If the “smiley” face disappears from
the screen and the same COLORED
button is pressed, the surf channels
will be displayed starting with the
FIRST programmed channel again.
4
Repeat steps 1-3 for the other
three COLORED buttons (Surf
lists) if desired.
5
Any time the “smiley” face
appears with the channel number, pressing the “frownie”
face button will allow you to
remove it from the list (see the
previous page for more details).
10
12
56
99
5
41
12
39
1
2
3
VOL
Remove Item? - Press
18
22
28
35
5
Page 39

TROUBLESHOOTING
No Power
• Check the TV power cord. Unplug the TV, wait 10 seconds, then reinsert
the plug into the outlet and push the POWER button again.
• Check that the outlet is not on a wall switch.
• Be sure the fuse is not blown on the AC power strip, if one is being used.
No Picture
• Check antenna connections. Are they properly secured to the TV's ANT
75Ω plug?
• Check the TUNER MODE control for the correct tuner setting.
•Try running the Auto Program feature to find all available channels.
• Press the AV button on the remote to make sure the correct signal source is
selected (FRONT or Current Channel).
No Sound
• Check the VOLUME buttons.
• Check the MUTE button on the remote control.
• If you’re attempting to hook up auxiliary equipment, check the audio jack
connections located on the front of the TV.
Remote Does Not Work
• Check the batteries. If necessary, replace them with AA Heavy Duty (Zinc
Chloride) or Alkaline batteries.
• Clean the remote control and the remote control sensor window on the TV.
• Check the TV power cord. Unplug the TV, wait 10 seconds, then reinsert
the plug into the outlet and push the POWER button again.
• Be sure the fuse is not blown on the AC power strip, if one is being used.
• Check to be sure the TV outlet is not on a wall switch.
TV Displays Wrong Channel or No Channels Above 13
• Repeat channel selection.
• Add the desired channel numbers (using the CHANNEL EDIT control) into
the TV’s memory.
• Check to be sure the TUNER MODES are set to the CABLE option and run
the Auto Program feature to find all available channels.
35
Page 40

CARE AND CLEANING
36
WARNING Concerning Stationary
Images on the TV Screen:
Do not leave stationary or letterbox
images on screen for extended periods of time. This can cause uneven
picture-tube aging.
Normal use of the TV should involve
the showing of pictures that contain
constantly moving and changing
images that fill the screen. Be careful
not to leave nonmoving images on
screen for extended periods of time,
or to display the same images on
screen too frequently, because subtle
ghost images can be left on the picture tubes. Sources of stationary
images may be DVD disks, laser
disks, video games, CD-i disks,
videotapes, digital television boxes,
broadcast channels, cable channels,
satellite channels, and others. Here
are some examples of stationary
images (this is not an all-inclusive
list; you may encounter others in
your viewing):
• DVD menus—listings of DVD
disk content
• Letterbox black bars—shown at
the top and bottom of the TV
screen when a wide screen (16:9)
movie is viewed on a TV with
standard (4:3) aspect ratio.
•Video-game images and scoreboards
•Television station logos—present
a problem if they are bright and
stationary; moving or low-contrast
graphics are less likely to cause
uneven aging of the picture tube
• Stock-market tickers—presented
at the bottom of the TV screen
• Shopping channel logos and pricing displays—bright and shown
constantly or repeatedly in the
same location on the TV screen.
Placement of the TV
•To avoid cabinet warping, cabinet
color changes, and increased
chance of set failure, do not place
the TV where temperatures can
become excessively hot; for example, in direct sunlight or near a
heating appliance.
• Be sure to allow a free flow of air
to and from the perforated back
cover of the set.
Cleaning
•To avoid possible shock hazard, be
sure the TV is unplugged from the
electrical outlet before cleaning.
• Regularly dust the TV with a dry,
nonscratching duster to keep the
TV clean.
• When cleaning the TV, take care
not to scratch or damage the screen
surface. Avoid wearing jewelry or
using anything abrasive. Do not
use household cleaners. Wipe the
front screen with a clean cloth
dampened with water. Use even,
easy, vertical strokes when cleaning.
• Gently wipe the cabinet surfaces
with a clean cloth or sponge dampened in a solution of cool, clear
water and a mild soap or detergent.
Use a clean, dry cloth to dry the
wiped surfaces.
• Occasionally vacuum the ventilation holes or slots in the back
cover of the set.
• Never use thinners, insecticide
sprays, or other chemicals on or
near the cabinet, as they might
cause permanent marring of the
cabinet finish.
Page 41

RENEWED
90 DAY
LIMITED WARRANTY
 Loading...