

Page 1
TPM17.7L
Chassis name
Platform Model name
32PHG5102/77
32PHG5102/78
32PHD5102/55
43PFG5102/77
TPM17.7L LA MTK5800
43PFG5102/78
43PFD5102/55
49PFG5102/77
49PFG5102/78
49PFD5102/55
Published by Amy.ma/SC 1751 Quality Subject to modification 3122 785 20433
2017 © TP Vision Netherlands B.V.
All rights reserved. Specifications are subject to change without notice. Trademarks are the
property of Koninklijke Philips Electronics N.V. or their respective owners.
TP Vision Netherlands B.V. reserves the right to change products at any time without being obliged to adjust
earlier supplies accordingly.
PHILIPS and the PHILIPS’ Shield Emblem are used under license from Koninklijke Philips Electronics N.V.
2017-Dec-22
Page 2

1.Product information……….……………………………………………………………………………………3
2.Connections overview……..…..…..………………..…………………………………………………………4
3.Mechanical Instructions………………….…………………………………………………………………….5
Cable dressing (32" 5102 series)………………………………………………………………………………5
Cable dressing (43" 5102 series)…………………….…………………………………………………………5
Cable dressing (49" 5102 series)………………………………………………………………………………6
Assembly/Panel Removal ………………………………………………………………………………………6
4.Service Modes…………….……………….………………….…………………………………………….….10
5.Software upgrading, Error Code and Panel Code………...……………………………………………..14
6.Circuit Descriptions…..……………………….………………………………………………………………19
7.IC Data Sheet……...……………………………………………………………………………………….…..24
8.Circuit Diagrams……………...……………………………………………………………………………….28
8.1 715G7734 PSU………………………………………………………………………..……………………28
8.2 715G7574 PSU………………………………………………………………………..……………………30
8.3 715G8251 SSB………………………………………………………………………..……………………31
8.4 715G8009 IR/LED Panel………………………………………………..…………………………………42
8.5 715G8010 IR/LED Panel………………………………………………..…………………………………43
8.6 715G7088 Keyboard control panel……………………………………………………………………….44
8.7 715G8728 Connection Panel…………………………………………………………………………….45
9.Styling Sheet……………….…………………….……………………………………………………………..46
5102 series 32"………………………………………………………………………………………………….46
5102 series 43"………………………………………………………………………………………………….47
5102 series 49"………………………………………………………………………………………………….48
Published by Amy.ma/SC 1751 Quality Subject to modification 3122 785 20433
2017 © TP Vision Netherlands B.V.
All rights reserved. Specifications are subject to change without notice. Trademarks are the
property of Koninklijke Philips Electronics N.V. or their respective owners.
TP Vision Netherlands B.V. reserves the right to change products at any time without being obliged to adjust
earlier supplies accordingly.
PHILIPS and the PHILIPS’ Shield Emblem are used under license from Koninklijke Philips Electronics N.V.
2017-Dec-22
Page 3

1. Product information
Product specifications are subject to change without notice.
For more specification details of this product, see
www.philips.com/support
Display
Type
Diagonal screen size
• 32PHG5102: 32 inch (80 cm)
• 43PFG5102: 43 inch (108 cm)
• 49PFG5102: 49 inch (123 cm)
Display resolution
• 32PHG5102: 1366 x 768p
• 43” & 49” PFG5102: 1920 x 1080p
Input resolution
Video formats
Resolution – Refresh rate
• 480i – 60 Hz
• 480p– 60 Hz
• 576i – 50 Hz
• 576p– 50 Hz
• 720p– 50 Hz, 60 Hz
• 1080i– 50 Hz, 60 Hz
• 1080p– 24 Hz, 25 Hz, 30 Hz
Computer formats
Resolutions(among others)
• 640 x 480p – 60Hz
• 800 x 600p – 60Hz
• 1024 x 768p – 60Hz
• 1280 x 768p – 60Hz
• 1360 x 765p – 60Hz
• 1360 x 768p – 60Hz
• 1280 x 1024p – 60Hz
• 1920 x 1080p – 60Hz
Power
• Line power: AC 110–220 V +/-10%
• Ambient temperature: 5°C to 35°C
• Power saving features: Eco mode,Picture mute(for
radio),Auto turn-off timer,Eco settings menu.
Connectivity
TV Side
• HDMI 1 in – MHL
• HDMI 2 in
• USB 1
• USB 2
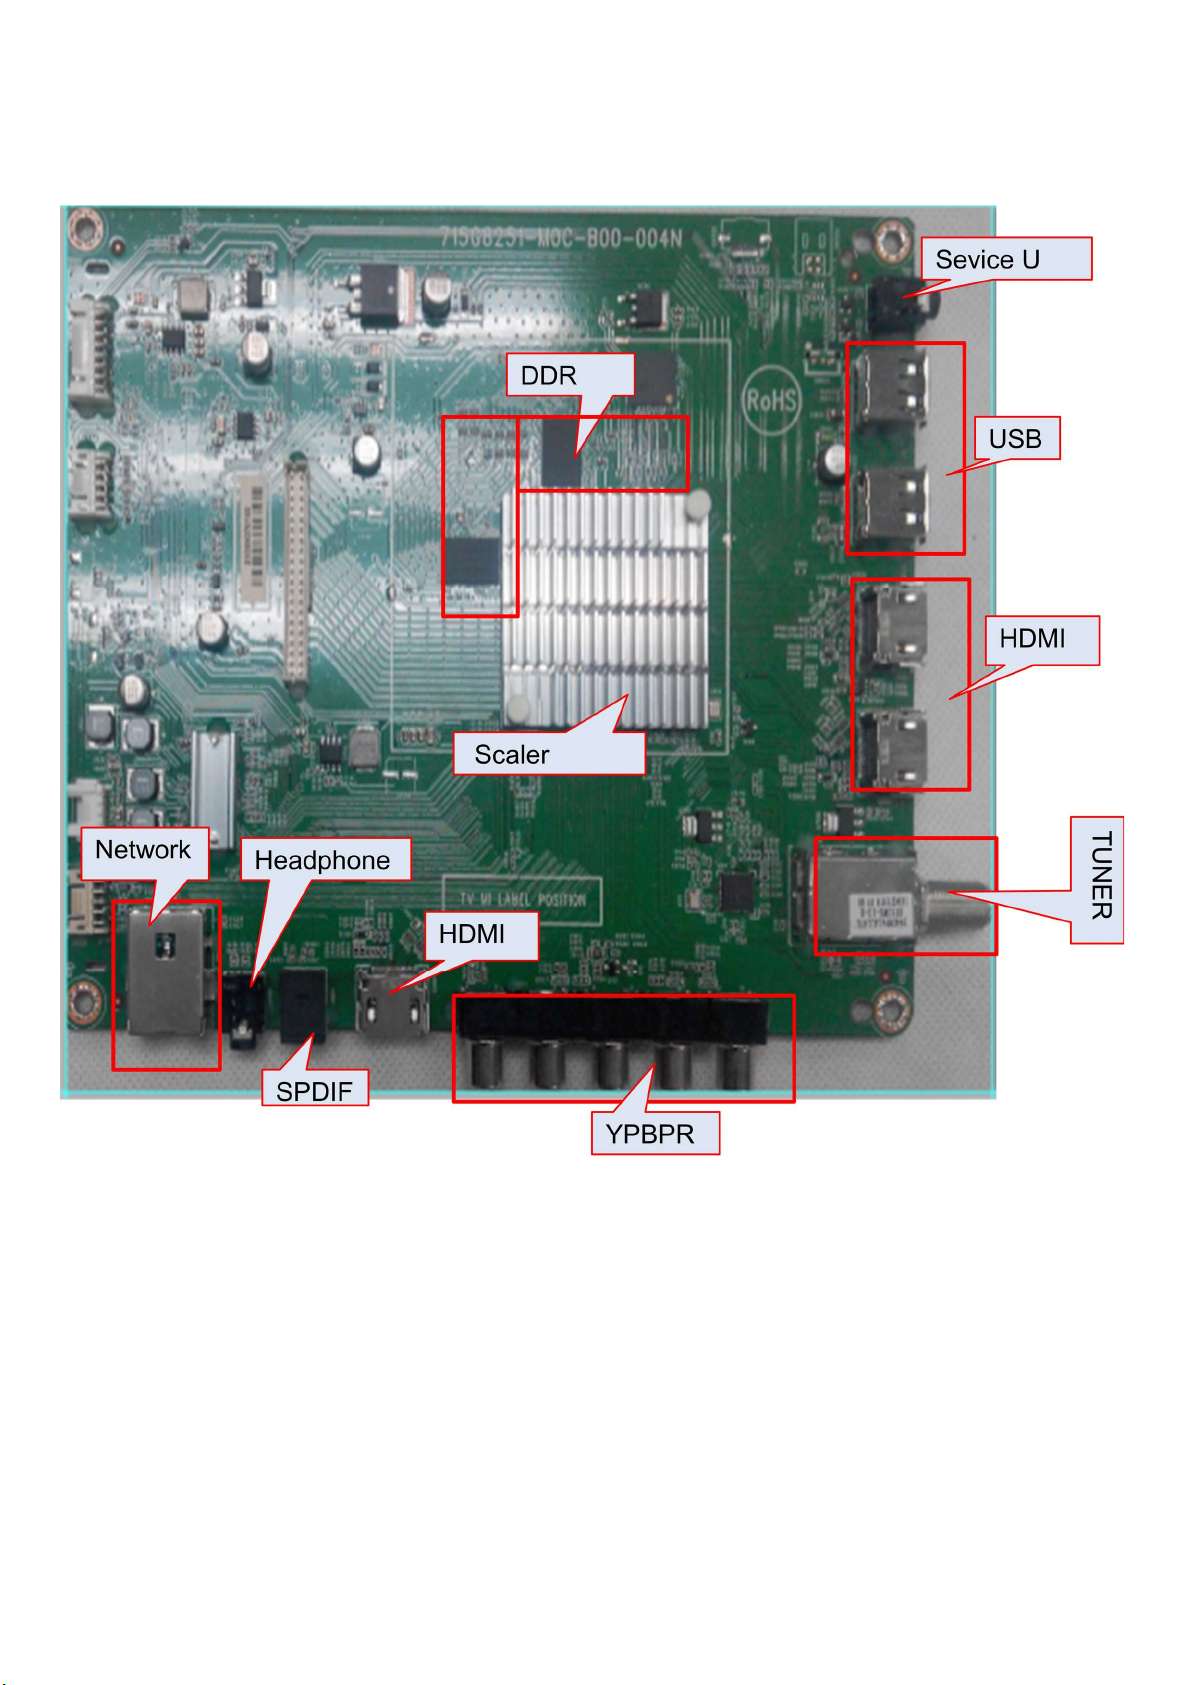
• 1x Serv.U
• Antenna(75 ohm)
TV Rear
• CVBS/Y Pb Pr: CVBS/Y Pb Pr, Audio L/R
• HDMI 3 in – ARC
• SPDIF: Digital Audio Out-Optical
• Network LAN – RJ45
• Headphones – Stereo mini-jack 3.5mm
Page 4
2. Connections Overview
Page 5
3. Mechanical Instructions
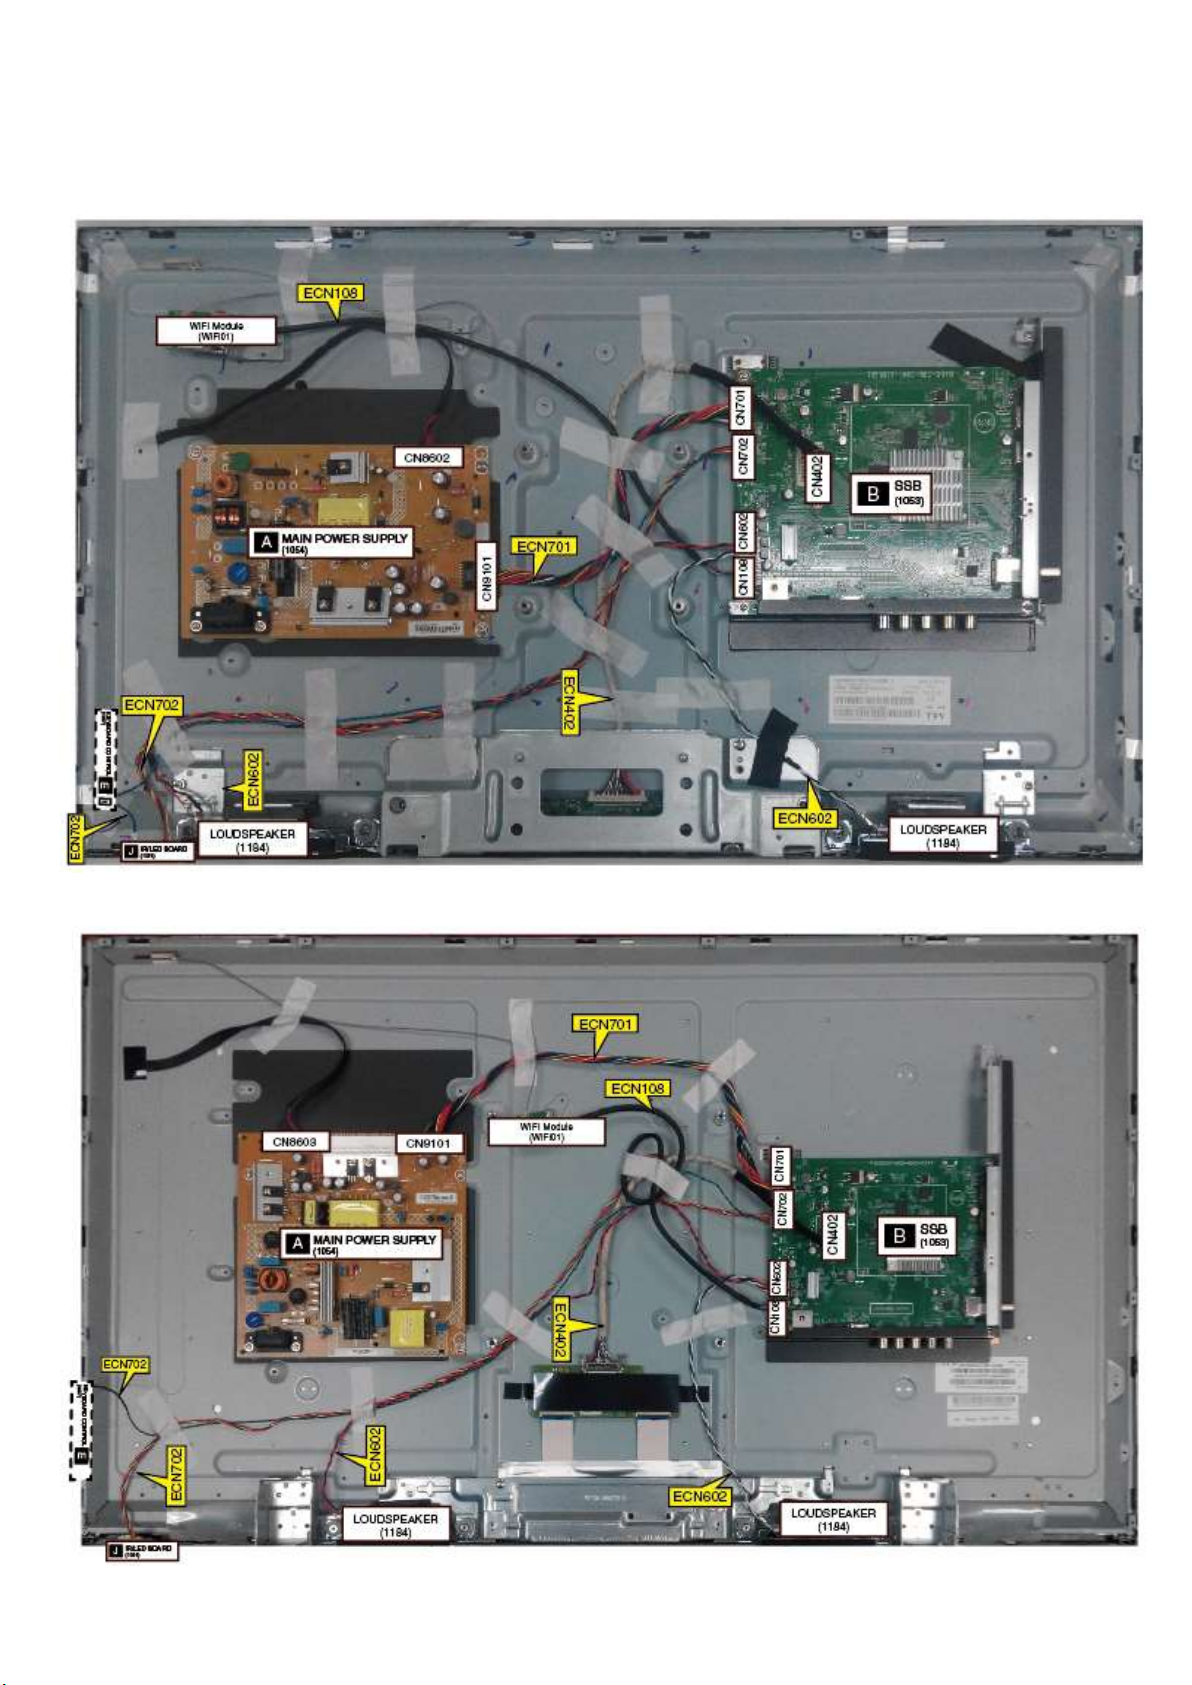
3.1 Cable Dressing
Cable dressing (32" 5102 series)
Cable dressing (43" 5102 series)
Page 6
3.2 Assembly/Panel Removal
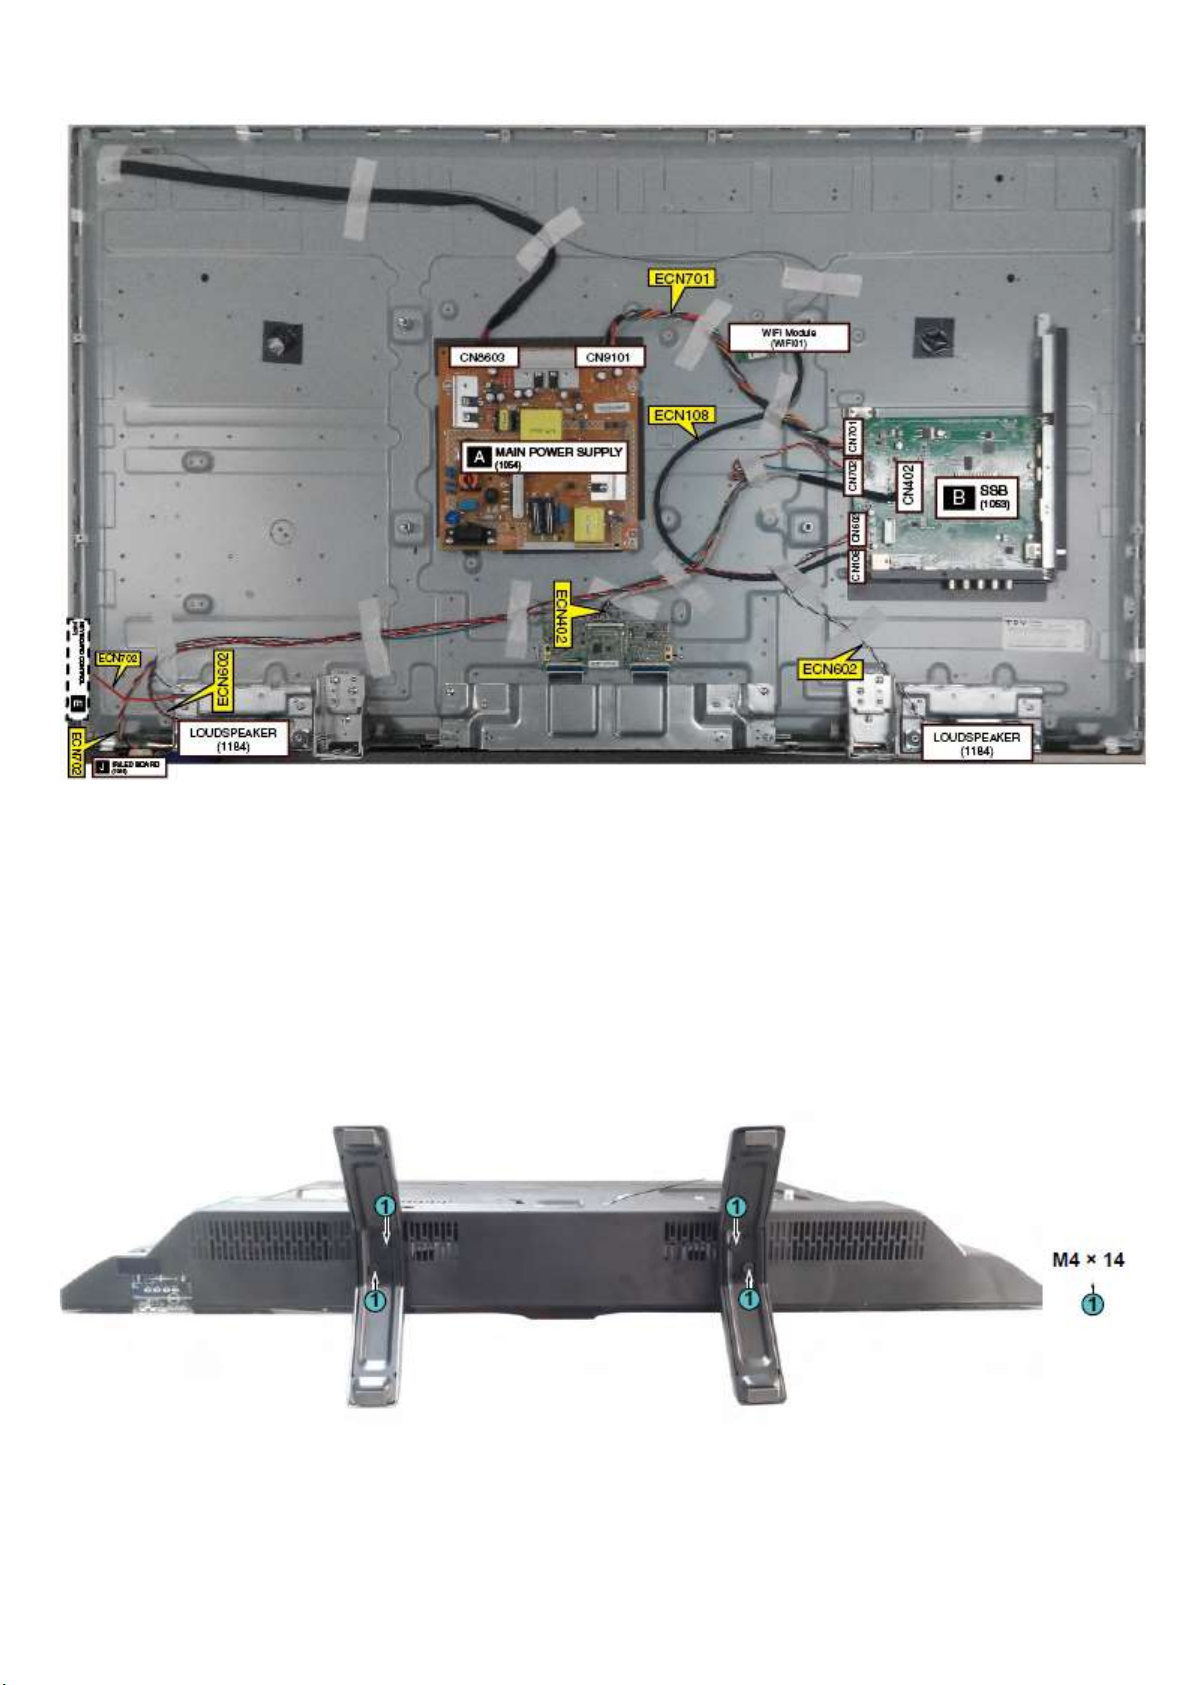
3.2.1 Stand removal
1. Remove the fixation screws [1] that secure the stand
2. Take the stand bracket out from the set.
Cable dressing (49" 5102 series)
3.2.2 Rear Cover
Warning: Disconnect the mains power cord before removing the rear cover.
1. Remove fixation screws [1] and [2] that secure the base assy..
2. Gently lift the rear cover from the TV. Make sure that wires and cables are not damaged while lifting the rear cover from the set.
Page 7
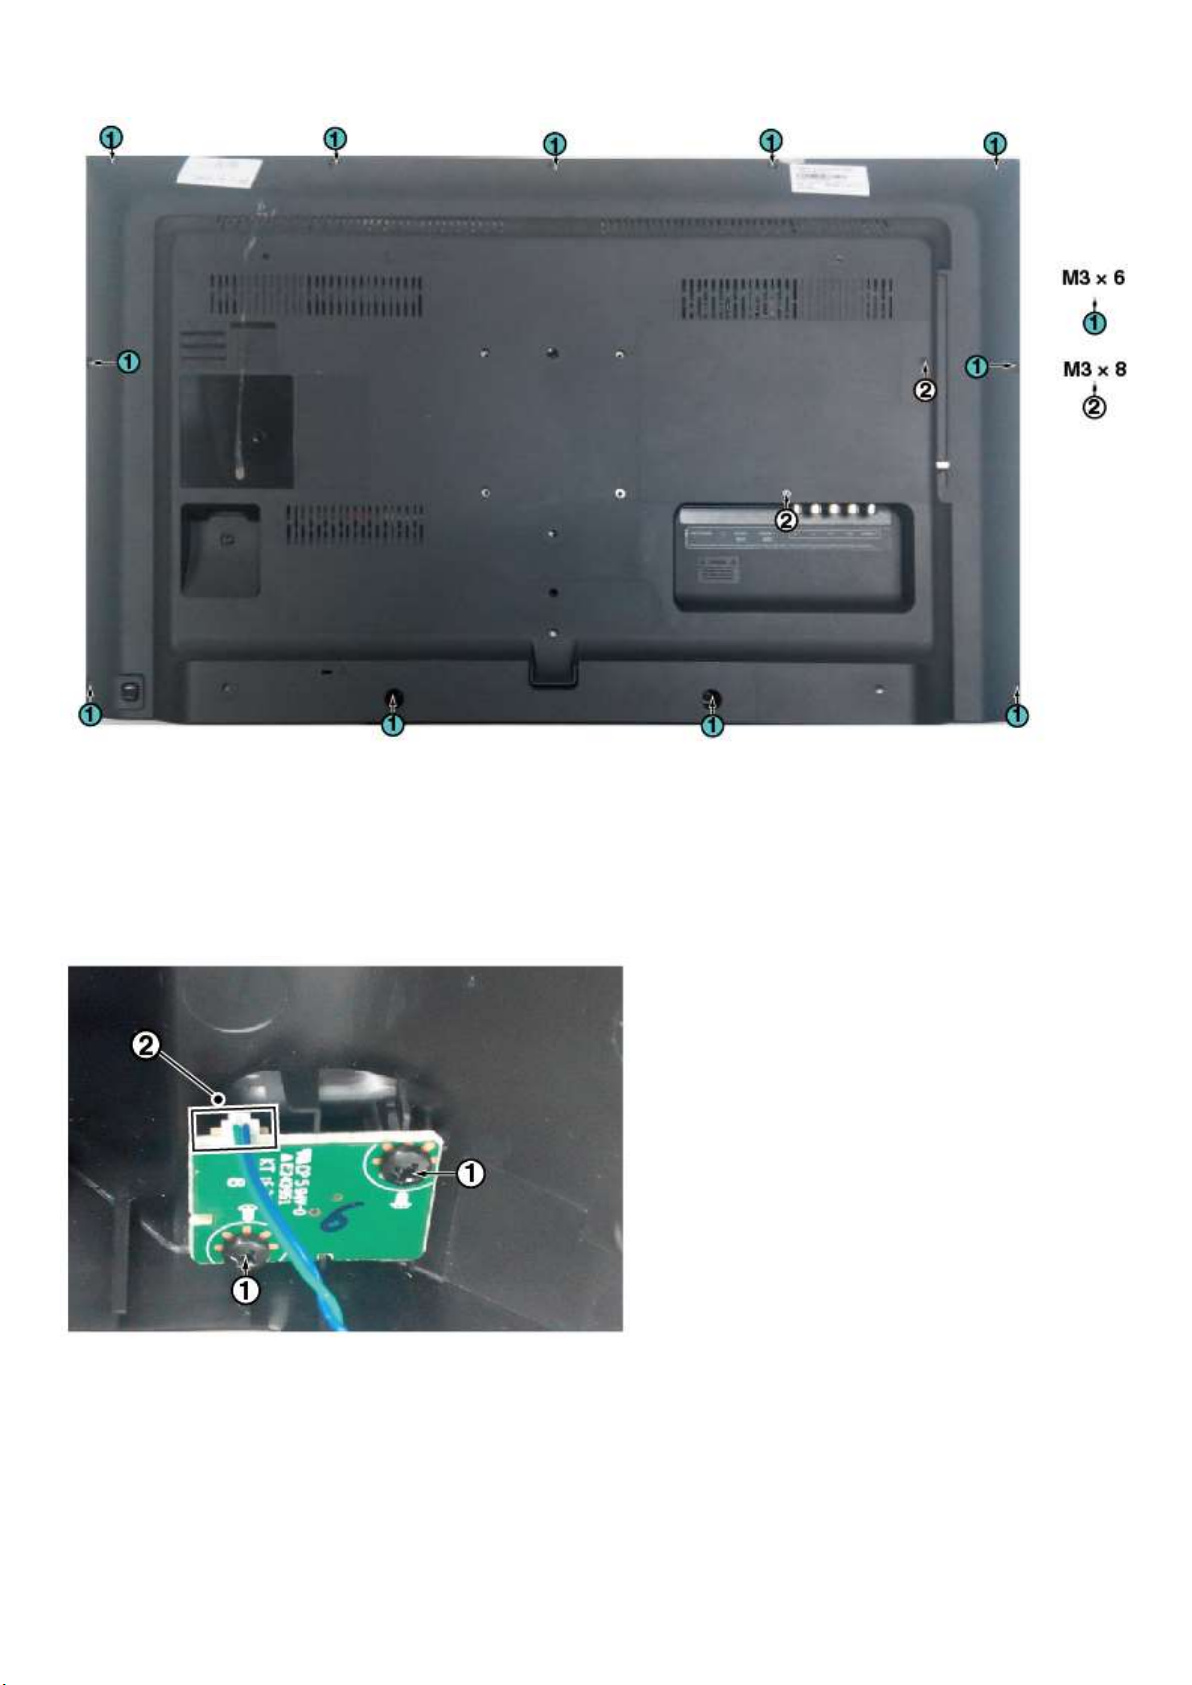
3.2.3 Keyboard Control Unit
1. Remove all the fixation screws from the keyboard control panel [1] and take it out from the Back cover
When defective, replace the whole unit.
2. Release the connector [2] from the SSB Board.
Caution: be careful, the Keyboard is catch on the Back cover, please be careful to avoid damage the fragile connectors!
3.2.4 Small Signal Board (SSB)
Caution: it is mandatory to remount all different screws at their original position during re-assembly. Failure to do so may result in damaging the
SSB.
1. Release the clips from the LVDS connector that connect with the SSB[1].
Caution: be careful, as these are very fragile connectors!
2. Unplug all other connectors [2] .
3. Remove all the fixation screws from the SSB [3].
Page 8
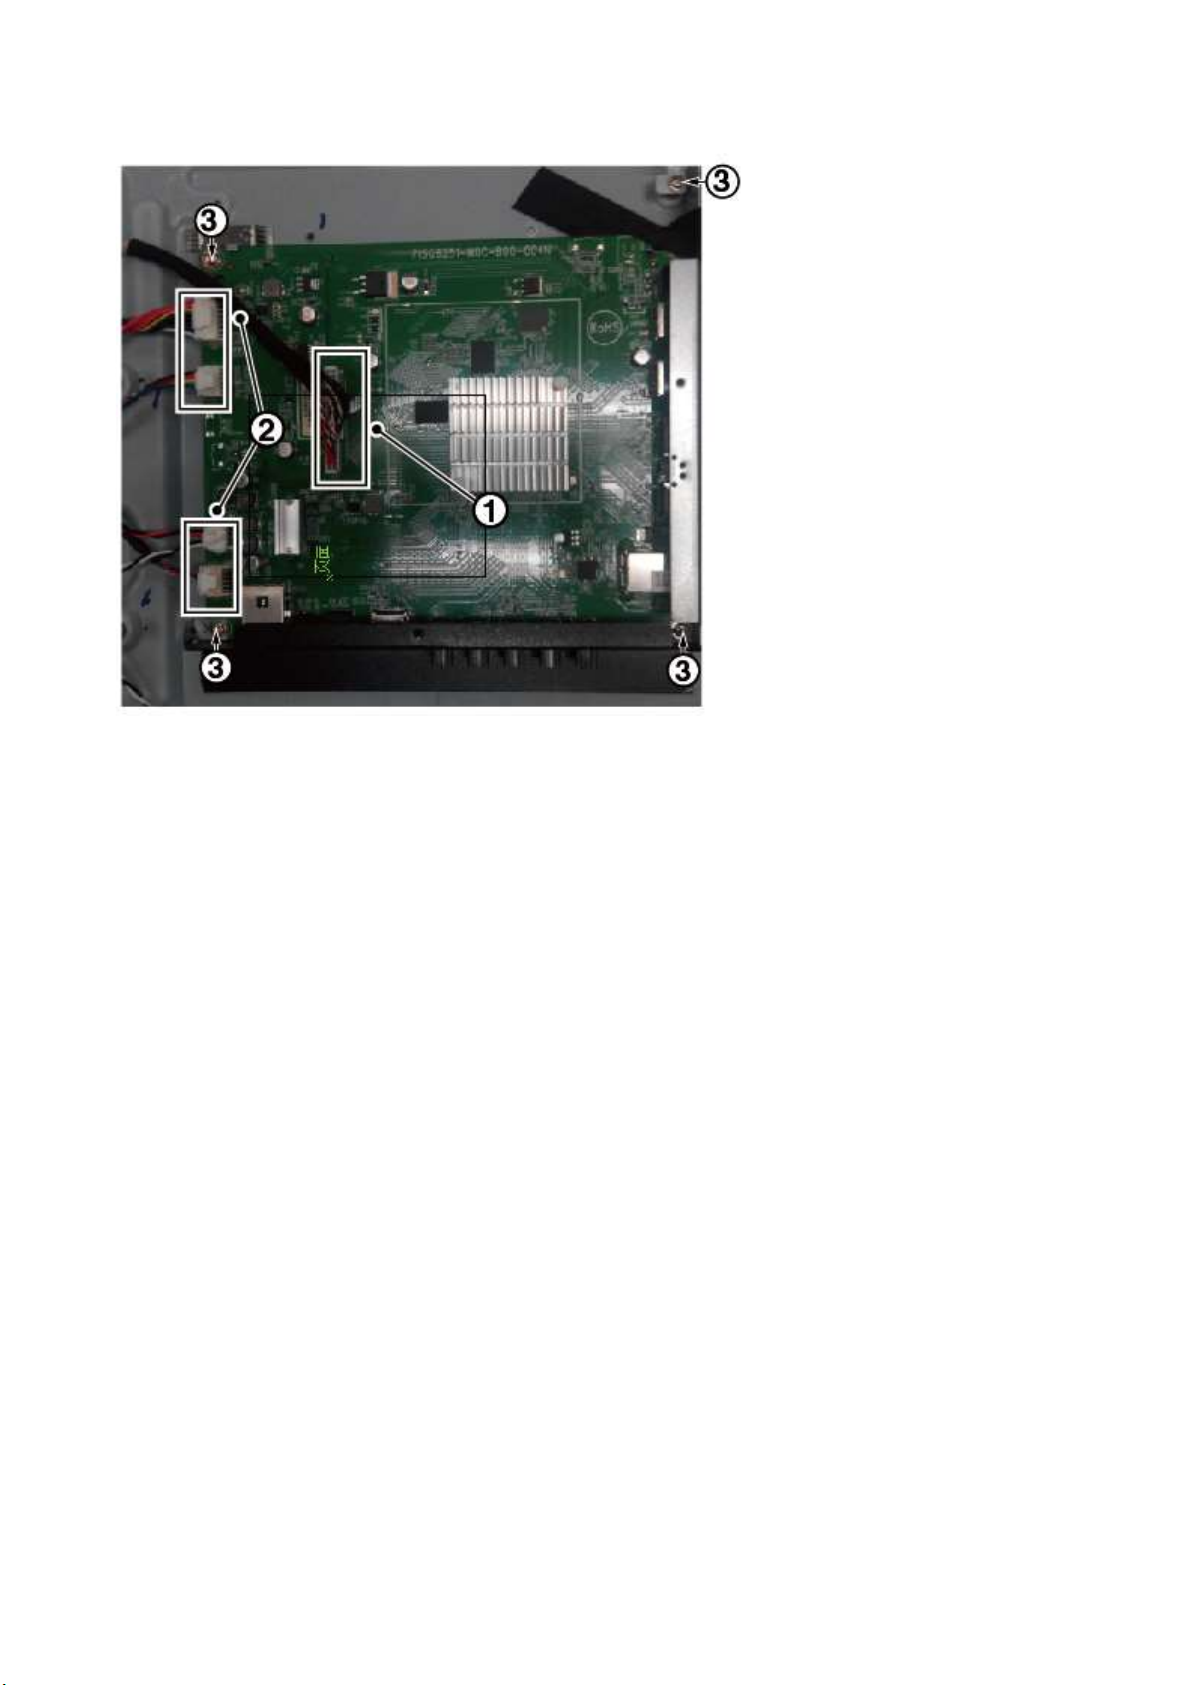
4. The SSB can now be shifted from side connector cover, then lifted and taken out of the I/O bracket.
3.2.5 Power Supply Unit (PSU)
Caution: it is mandatory to remount all different screws at their original position during re-assembly. Failure to do so may result in damaging the
PSU.
1. Gently unplug all connectors from the PSU.
2. Remove all fixation screws from the PSU.
3. The PSU can be taken out of the set now.
3.2.6 IR board Control Unit
1. Unplug the connector from the SSB.
Caution: be careful, as these are very fragile connectors!
2. Remove all the fixation screws [1], [2] and connector [3] from the IR board control unit.
3. Remove the IR lens [4], IR board [5] from the DECO_REAR_COVER.
When defective, replace the whole unit.
3.2.7 Speakers
1. Gently release the tapes that secure the speaker cables.
2. Unplug the speaker connector from the SSB.
3. Take the speakers out.
When defective, replace the both units.
3.2.8 WIFI module
1. Unplug the connector from the SSB..
2. Remove fixation screw that secure the WIFI module,
When defective, replace the whole unit.
Page 9

3.2.9 LCD Panel
1. Remove the SSB as described earlier.
2. Remove the PSU as described earlier.
3. Remove the keyboard control panel as described earlier.
4. Remove the stand bracket as described earlier.
5. Remove the IR/LED as described earlier.
6. Remove the fixations screws that fix the metal clamps to the front bezel. Take out those clamps.
7. Remove all other metal parts not belonging to the panel.
8. Lift the LCD Panel from the bezel.
When defective, replace the whole unit.
Page 10

4. Service Modes
4.1 Service Modes
The Service Mode feature is split into following parts:
Service Alignment Mode (SAM).
Factory Mode.
Customer Service Mode (CSM).SAM and the Factory mode offer features, which can be used by the Service engineer to repair/align a TV set.
SAM and the Factory mode offer features, which can be used by the Service engineer to repair/align a TV set. Some features are:
Make alignments (e.g. White Tone), reset the error buffer(SAM and Factory Mode).
Display information (“SAM” indication in upper right corner of screen, error buffer, software version, operating hours,options and option codes,
sub menus).
The CSM is a Service Mode that can be enabled by the consumer. The CSM displays diagnosis information, which the customer can forward to the
dealer or call centre. In CSM mode, “CSM”, is displayed in the top right corner of the screen. The information provided in CSM and the purpose of
CSM is to:
Increase the home repair hit rate.
Decrease the number of nuisance calls.
Solved customers’ problem without home visit.
Note: For the new model range, a new remote control (RC) is used with some renamed buttons. This has an impact on the activation of the Service
modes. For instance the old “MENU” button is now called “HOME” (or is indicated by a “house” icon).
4.2 Service Alignment Mode (SAM)
Purpose
To modify the NVM.
To display/clear the error code buffer.
To perform alignments.
Specifications
Operation hours counter (maximum five digits displayed).
Software version, error codes, and option settings display.
Error buffer clearing.
Option settings.
Software alignments (White Tone).
NVM Editor.
Set screen mode to full screen (all content is visible).
How to Activate SAM
To activate SAM, use one of the following methods:
Press the following key sequence on the remote control transmitter: “062596”, directly followed by the “INFO/OK” button. Do not allow the
display to time out between entries while keying the sequence.
Or via ComPair.
After entering SAM, the following items are displayed,
with “SAM” in the upper right corner of the screen to indicate that the television is in Service Alignment Mode.
How to Navigate
In the SAM menu, select menu items with the UP/DOWN keys on the remote control transmitter. The selected item will be indicated. When not
all menu items fit on the screen, use the UP/DOWN keys to display the next/previous menu items.
Page 11

With the “LEFT/RIGHT” keys, it is possible to:
– (De) activate the selected menu item.
– (De) activate the selected sub menu.
– Change the value of the selected menu item.
When you press the MENU button once while in top level SAM, the set will switch to the normal user menu (with the SAM mode still active in the
background).
How to Store SAM Settings
To store the settings changed in SAM mode (except the RGB Align settings), leave the top level SAM menu by using the POWER button on the
remote control transmitter or the television set. The mentioned exceptions must be stored separately via the STORE button.
How to Exit SAM
Use one of the following methods:
Switch the set to STANDBY by pressing the mains button on the remote control transmitter or the television set.
Via a standard RC-transmitter, key in “00” sequence.
Note: When the TV is switched “off” by a power interrupt while in SAM, the TV will show up in “normal operation mode” as soon as the power is
supplied again. The error buffer will not be cleared.
SAM mode overview
4.3 Factory mode:
Purpose
To perform extended alignments.
Specifications
Displaying and or changing Panel ID information.
Displaying and or changing Tuner ID information.
Error buffer clearing.
Various software alignment settings.
Testpattern displaying.
Public Broadcasting Service password Reset.
etc.
Page 12
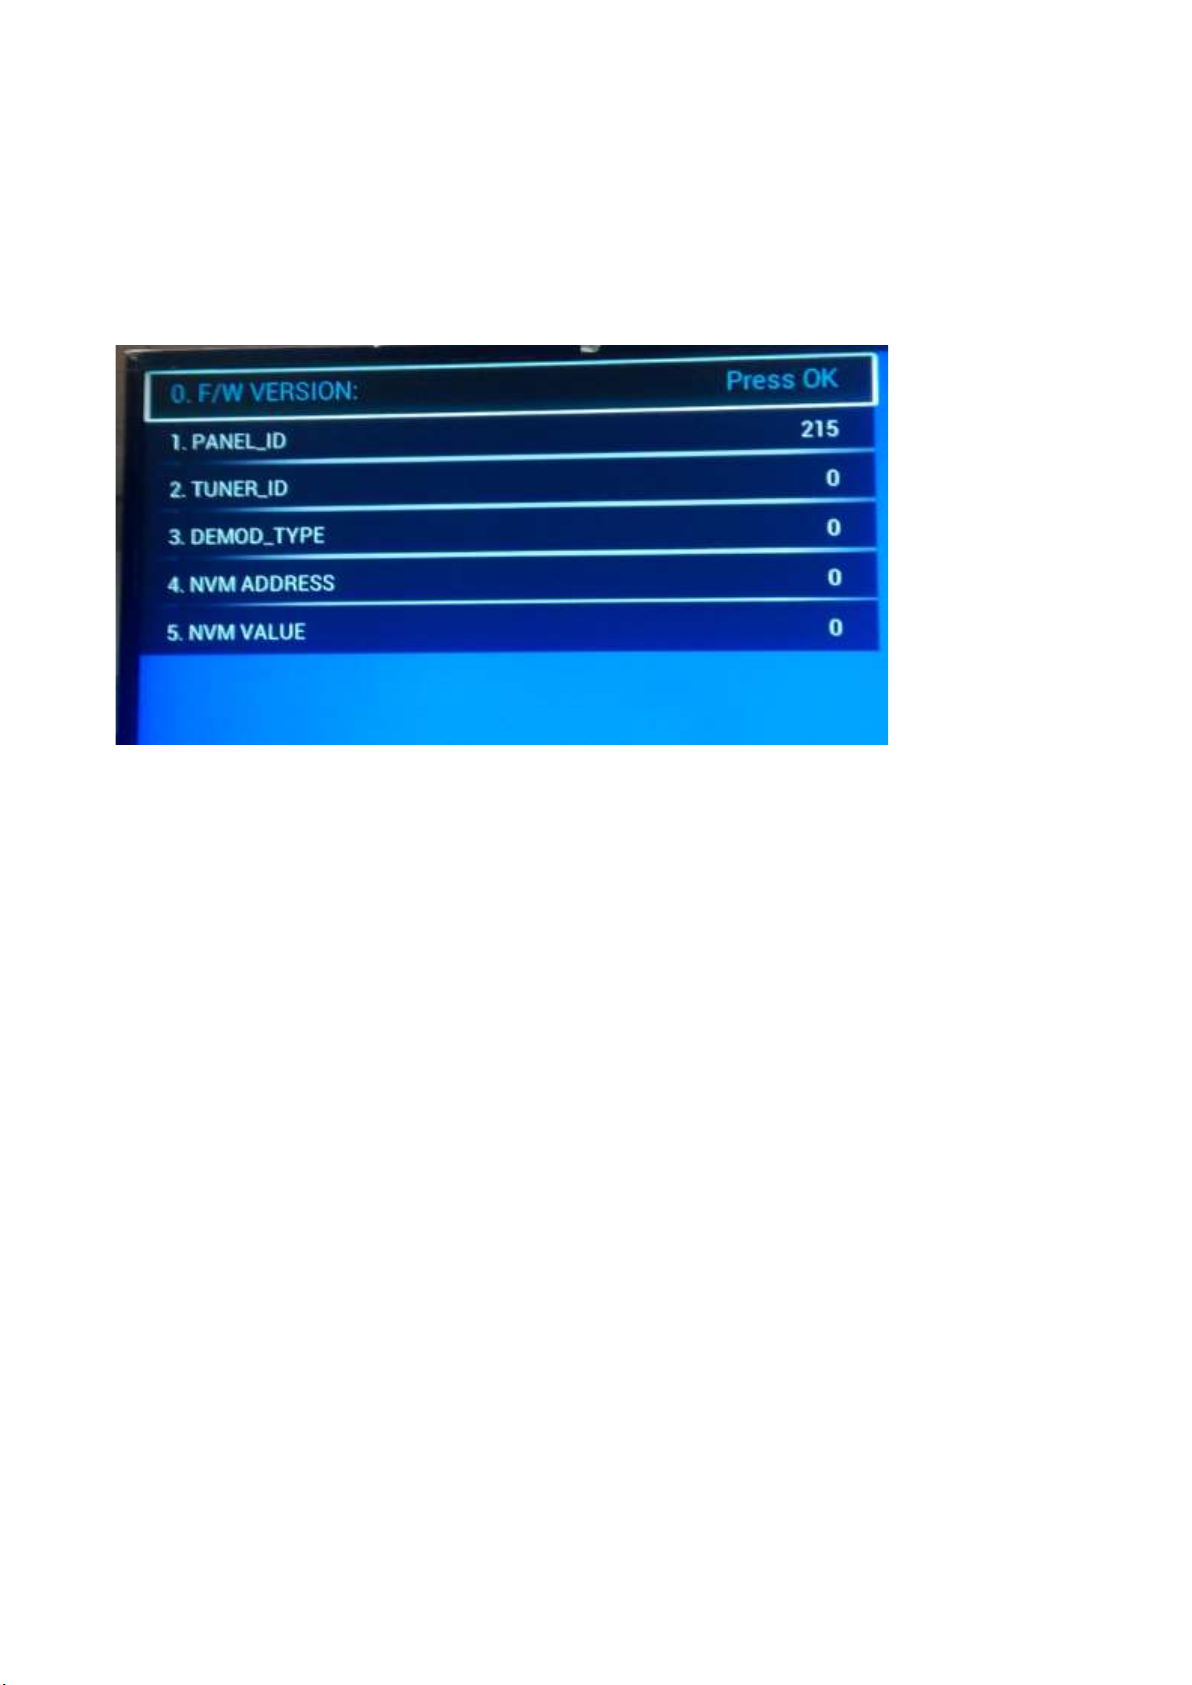
How to Activate the Factory mode
To activate the Factory mode, use the following method:
Press the following key sequence on the remote control transmitter: from the “menu/home” press “1999”, directly followed by the
“Back/Return” button. Do not allow the display to time out between entries while keying the sequence.
After entering the Factory mode, we can see many items displayed, use the UP/DOWN keys to display the next/previous menu items
Factory mode overview
How to Exit the Factory mode
Use one of the following methods:
Select EXIT_FACTORY from the menu and press the “OK” button.
Note: When the TV is switched “off” by a power interrupt, or normal switch to “stand-by” while in the factory mode, the TV will show up in “normal
operation mode” as soon as the power is supplied again. The error buffer will not be cleared.
4.4 Customer Service Mode (CSM)
Purpose
The Customer Service Mode shows error codes and information on the TVs operation settings.The call centre can instruct the customer (by
telephone) to enter CSM in order to identify the status of the set.This helps the call centre to diagnose problems and failures in the TV set before
making a service call.
The CSM is a read-only mode; therefore, modifications are not possible in this mode.
Specifications
Ignore “Service unfriendly modes”.
Line number for every
line (to make CSM language independent).
Set the screen mode to full
screen (all contents on screen is visible).
After leaving the Customer Service Mode, the original settings are restored.
Possibility to use “CH+” or “CH-” for channel surfing, or enter the specific channel number on the RC.
How to Activate CSM
To activate CSM, press the following key sequence on a standard remote control transmitter: “123654” (do not allow the display to time out
between entries while keying the sequence). After entering the Customer Service Mode, the following items are displayed. use the Right/Left keys
to display the next/previous menu items
Note: Activation of the CSM is only possible if there is no (user) menu on the screen!
Page 13
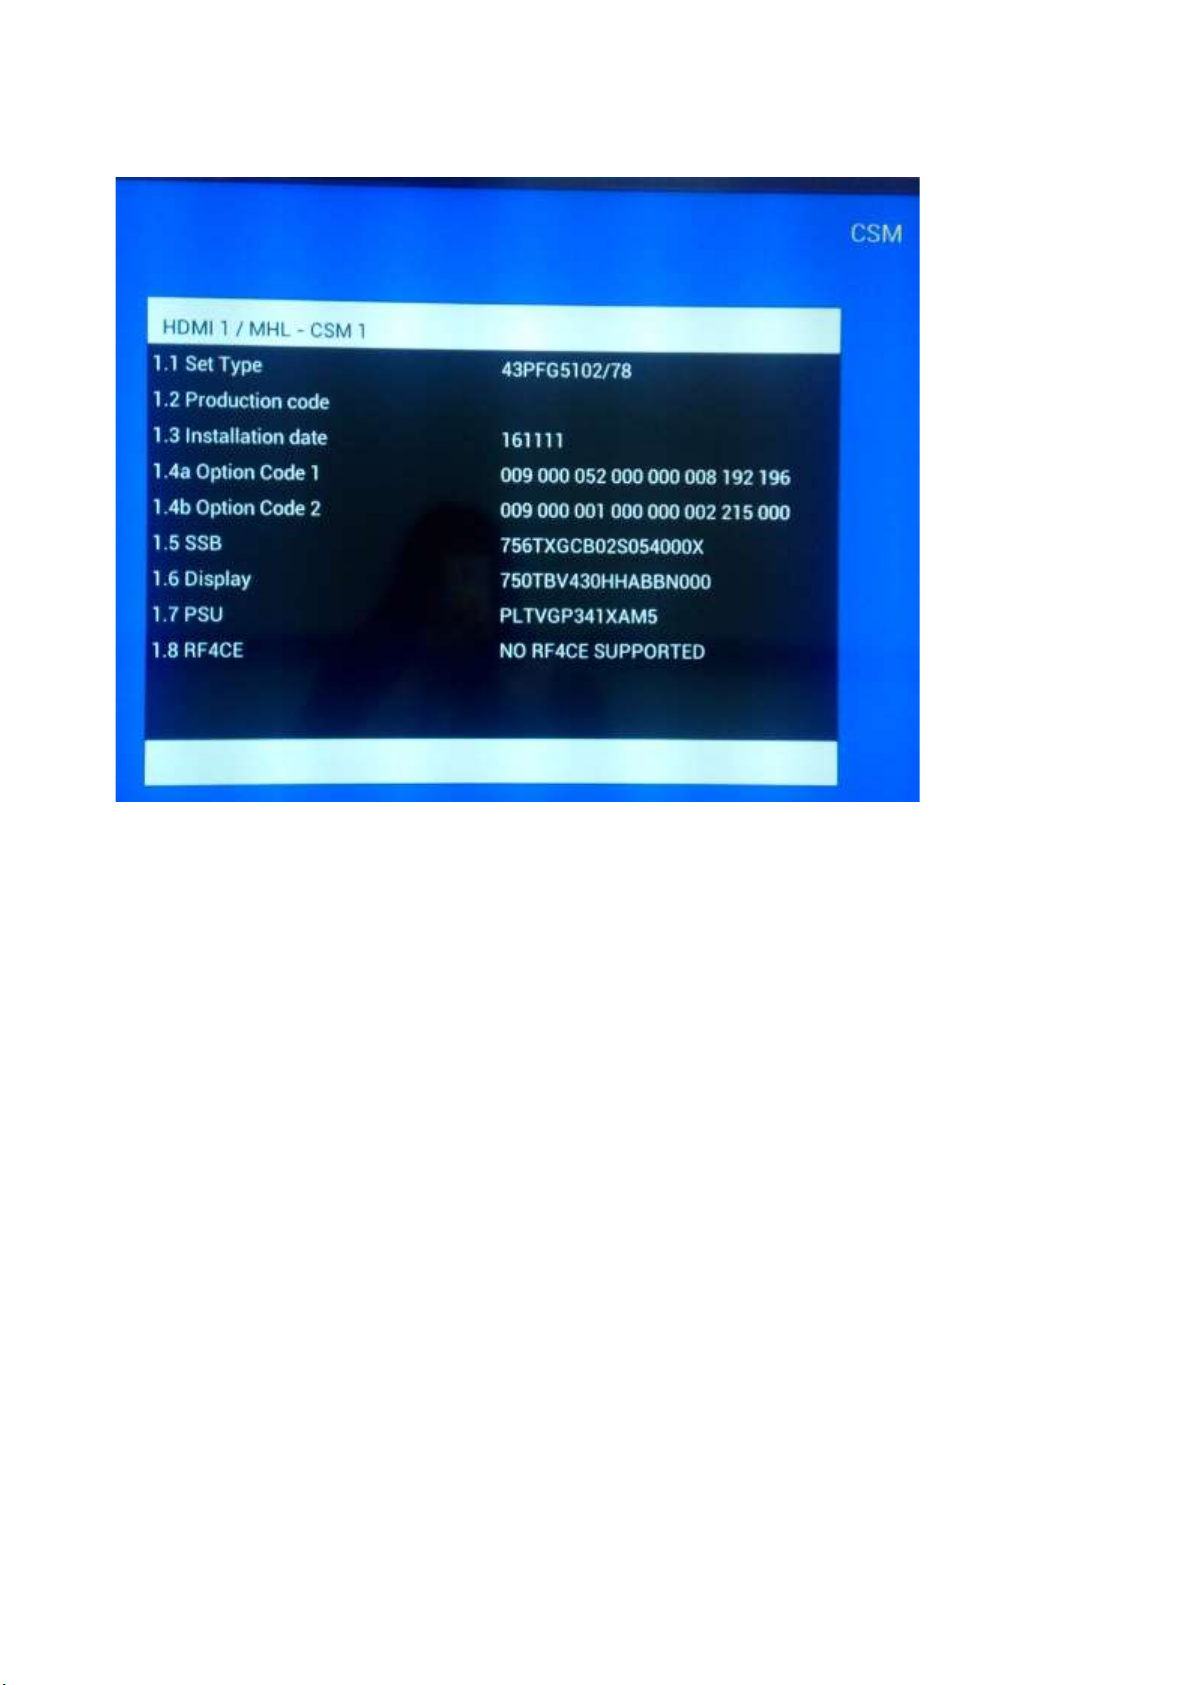
CSM Overview
How to Navigate
By means of the “CURSOR-DOWN/UP” knob (or the scroll wheel) on the RC-transmitter, can be navigated through the menus.
How to Exit CSM
To exit CSM, use one of the following methods.
Press the MENU/HOME button on the remote control transmitter.
Press the POWER button on the remote control transmitter.
Press the POWER button on the television set.
Page 14
5. Software Upgrading, Error code and Panel Code
5.1 Software Upgrading
5.1.1. The following update is for .pkg file.
1. Rename the file to “upgrade_loader.pkg”
2. Prepare a USB memory.
3. Copy the software to USB flash disk(root directory).
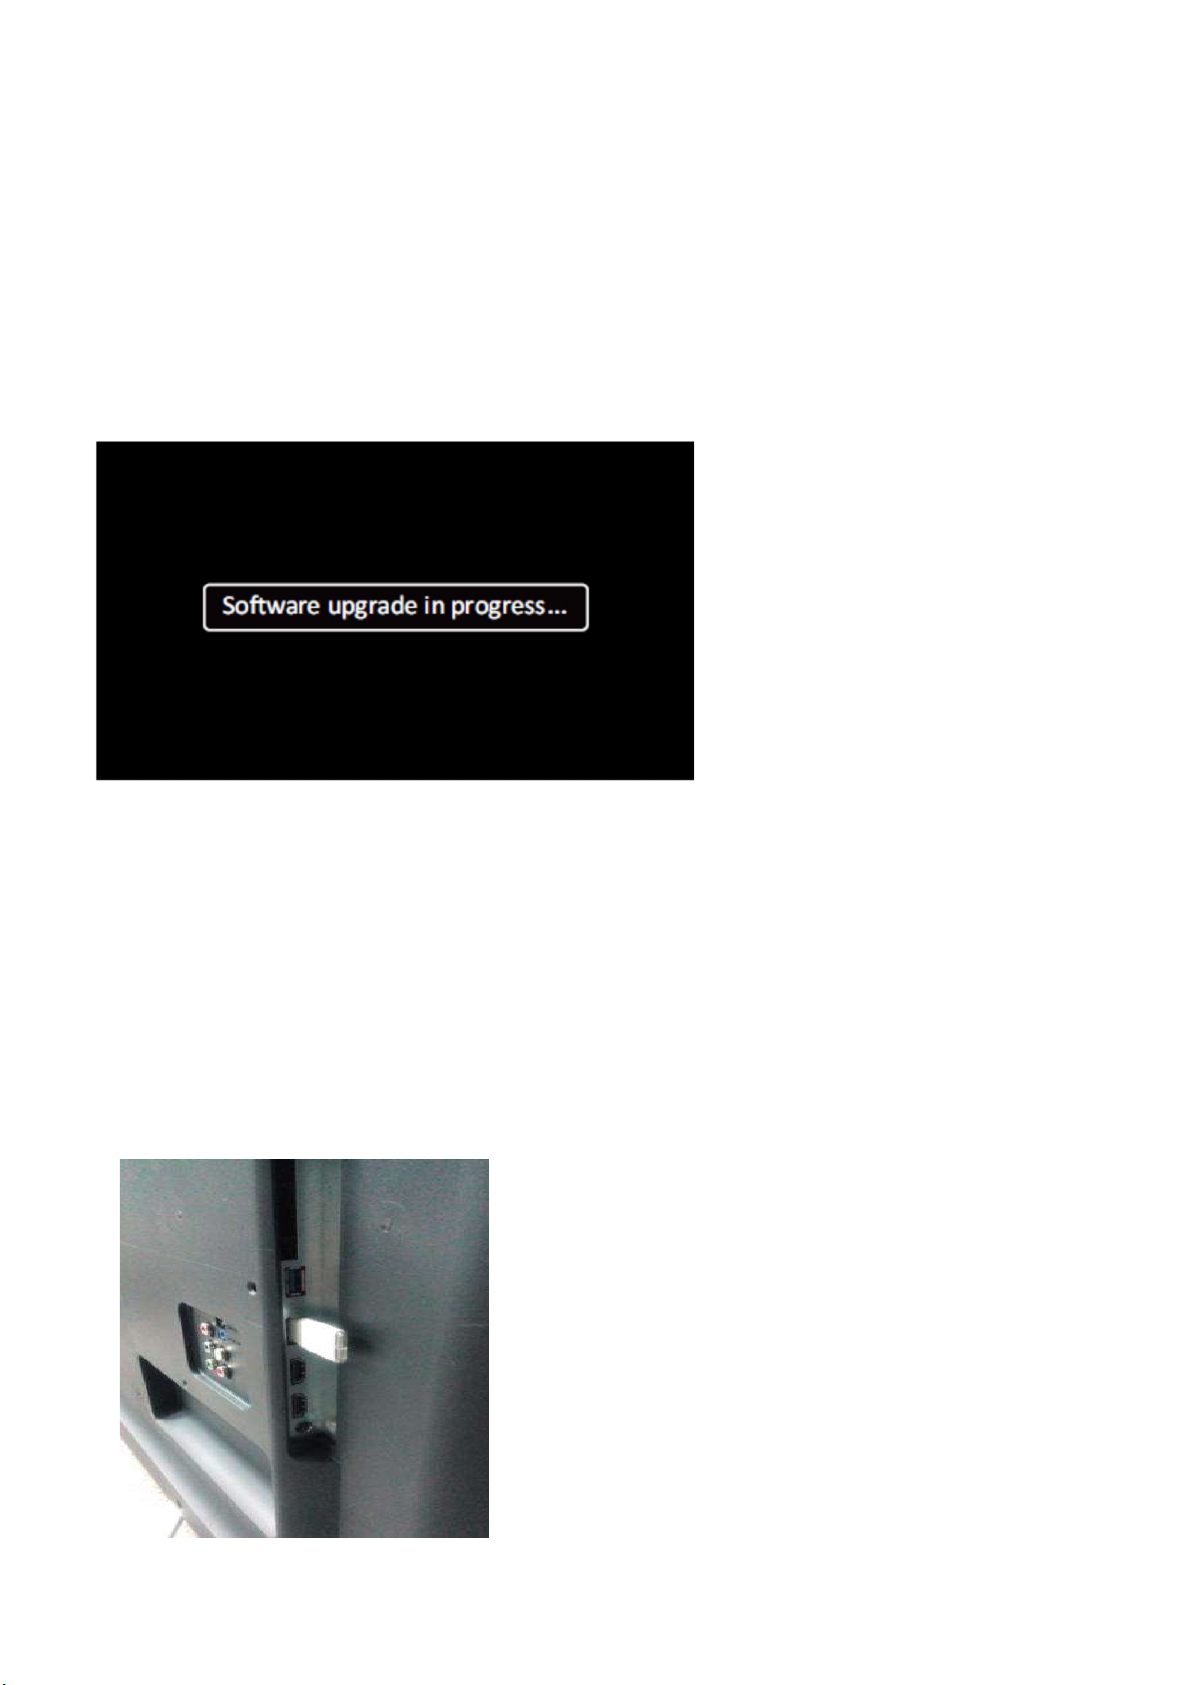
4. Switch off the TV and Insert the USB memory stick that contains the software update files in one of the TV’s USB 2.0 ports.
Note: It contains USB3.0 port, if connect on it, the software may can’t be detected.
5. Switch on the TV. The TV will detect the USB memory s tick automatically. Then a window jumps out as below
6. When the TV software is updated, the TV will turn on again automatically. Remove your USB flash drive.
7. We can enter in CSM or Factory mode to check the current software version.
5.1.2. The following update is for .upg file.
Step 1: Ready for F/W Upgrade
1. Rename the file to “autorun.upg”
2. Prepare a USB memory.
3. Copy the software to USB flash disk(root directory).
4. Switch on the TV and Insert the USB memory stick that contains the software update files in one of the TV’s USB 2.0 ports
Note the version of this F/W before you change the software file name.
Page 15
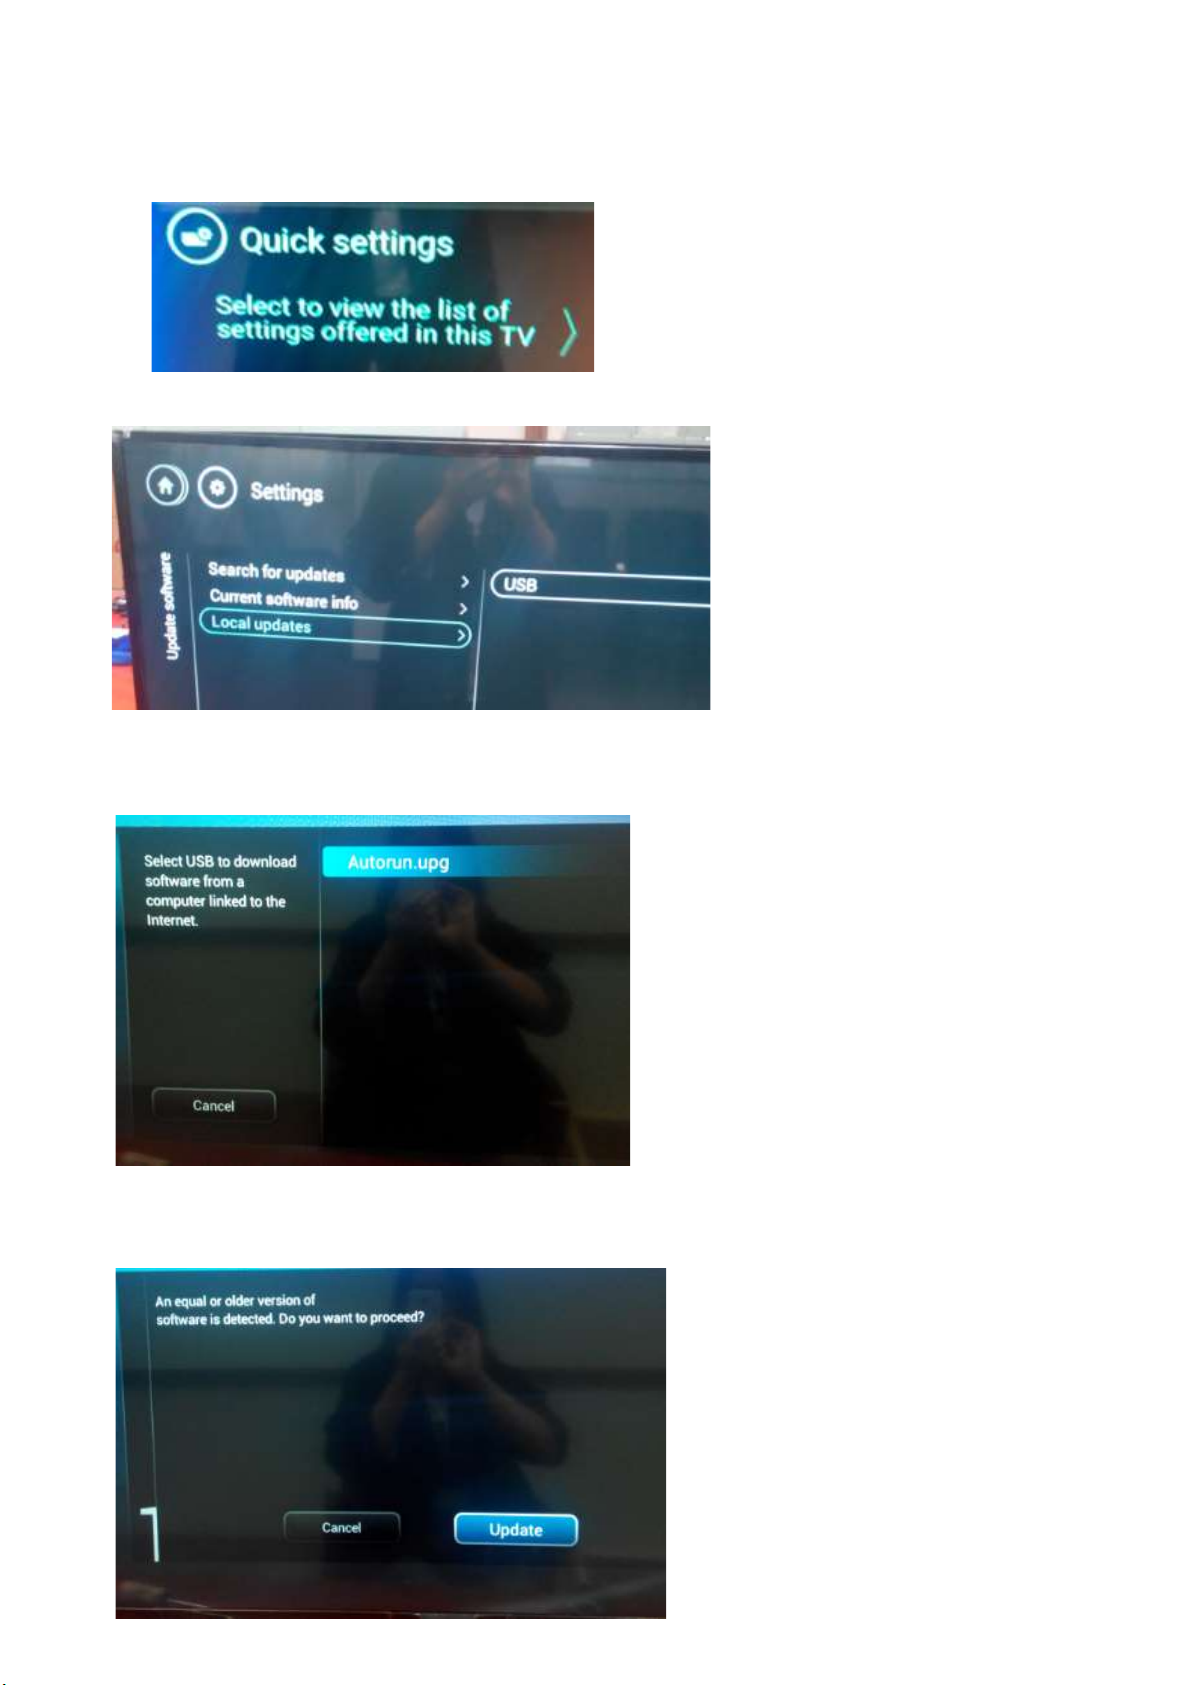
Step 2: F/W Upgrade
1. Press [Quick settings], then Choose [Update Software] in the Settings menu
2. Choose [Local Updates], then press OK.
3. Select the file that you downloaded and press OK
4. Choose [Update], then choose [Start] on following step
Page 16
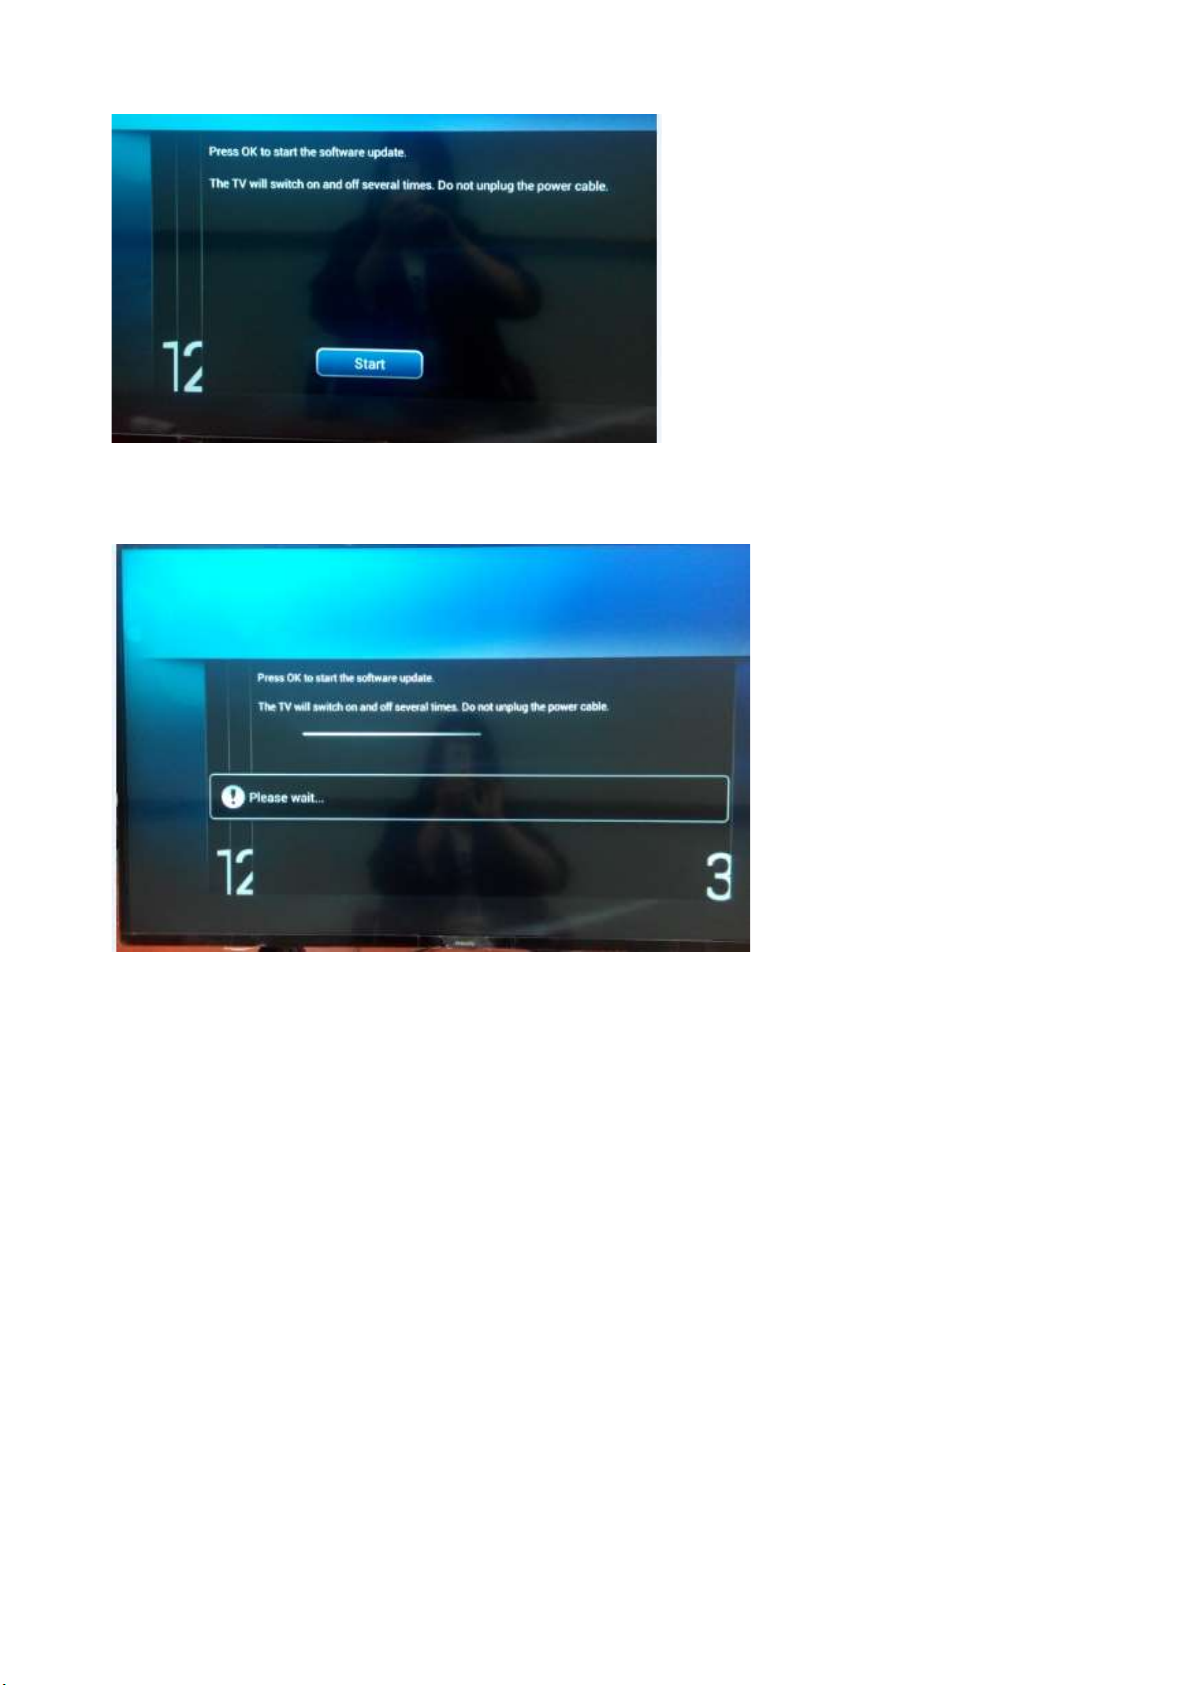
5. Upgrade in progress
Step 3: Check the SW version
1. After burning software, TV will restart
2. Press “123654”, enter Customer service mode to check if the software version is correct.
Caution: Please make sure that software upgrade is finished before unplug the USB and AC power!
5.2 Error Code
5.2.1 Introduction
Error codes are required to indicate failures in the TV set. In principle a unique error code is available for every:
• Activated (SW) protection.
• Failing I2C device.
• General I2C error.
The last five errors, stored in the NVM, are shown in the Service menu’s. This is called the error buffer.
The error code buffer contains all errors detected since the last time the buffer was erased. The buffer is written from left to right. When an error occurs that
is not yet in the error code buffer, it is displayed at the left side and all other errors shift one position to the right.
An error will be added to the buffer if this error differs from any error in the buffer. The last found error is displayed on the left.
An error with a designated error code never leads to a deadlock situation. It must always be diagnosable (e.g. error buffer via OSD or blinking LED).
In case a failure identified by an error code automatically results in other error codes (cause and effect), only the error code of the MAIN failure is displayed.
Page 17
5.2.2 How to Read the Error Buffer
You can read the error buffer in following ways:
• On screen via the SAM/CSM (if you have a picture).
Example:
– ERROR: 000 000 000 000 000: No errors detected
– ERROR: 013 000 000 000 000: Error code 13 is the last and only detected error
– ERROR: 034 013 000 000 000: Error code 13 was detected first and error code 34 is the last detected (newest) error
• Via the blinking LED procedure (when you have no picture).
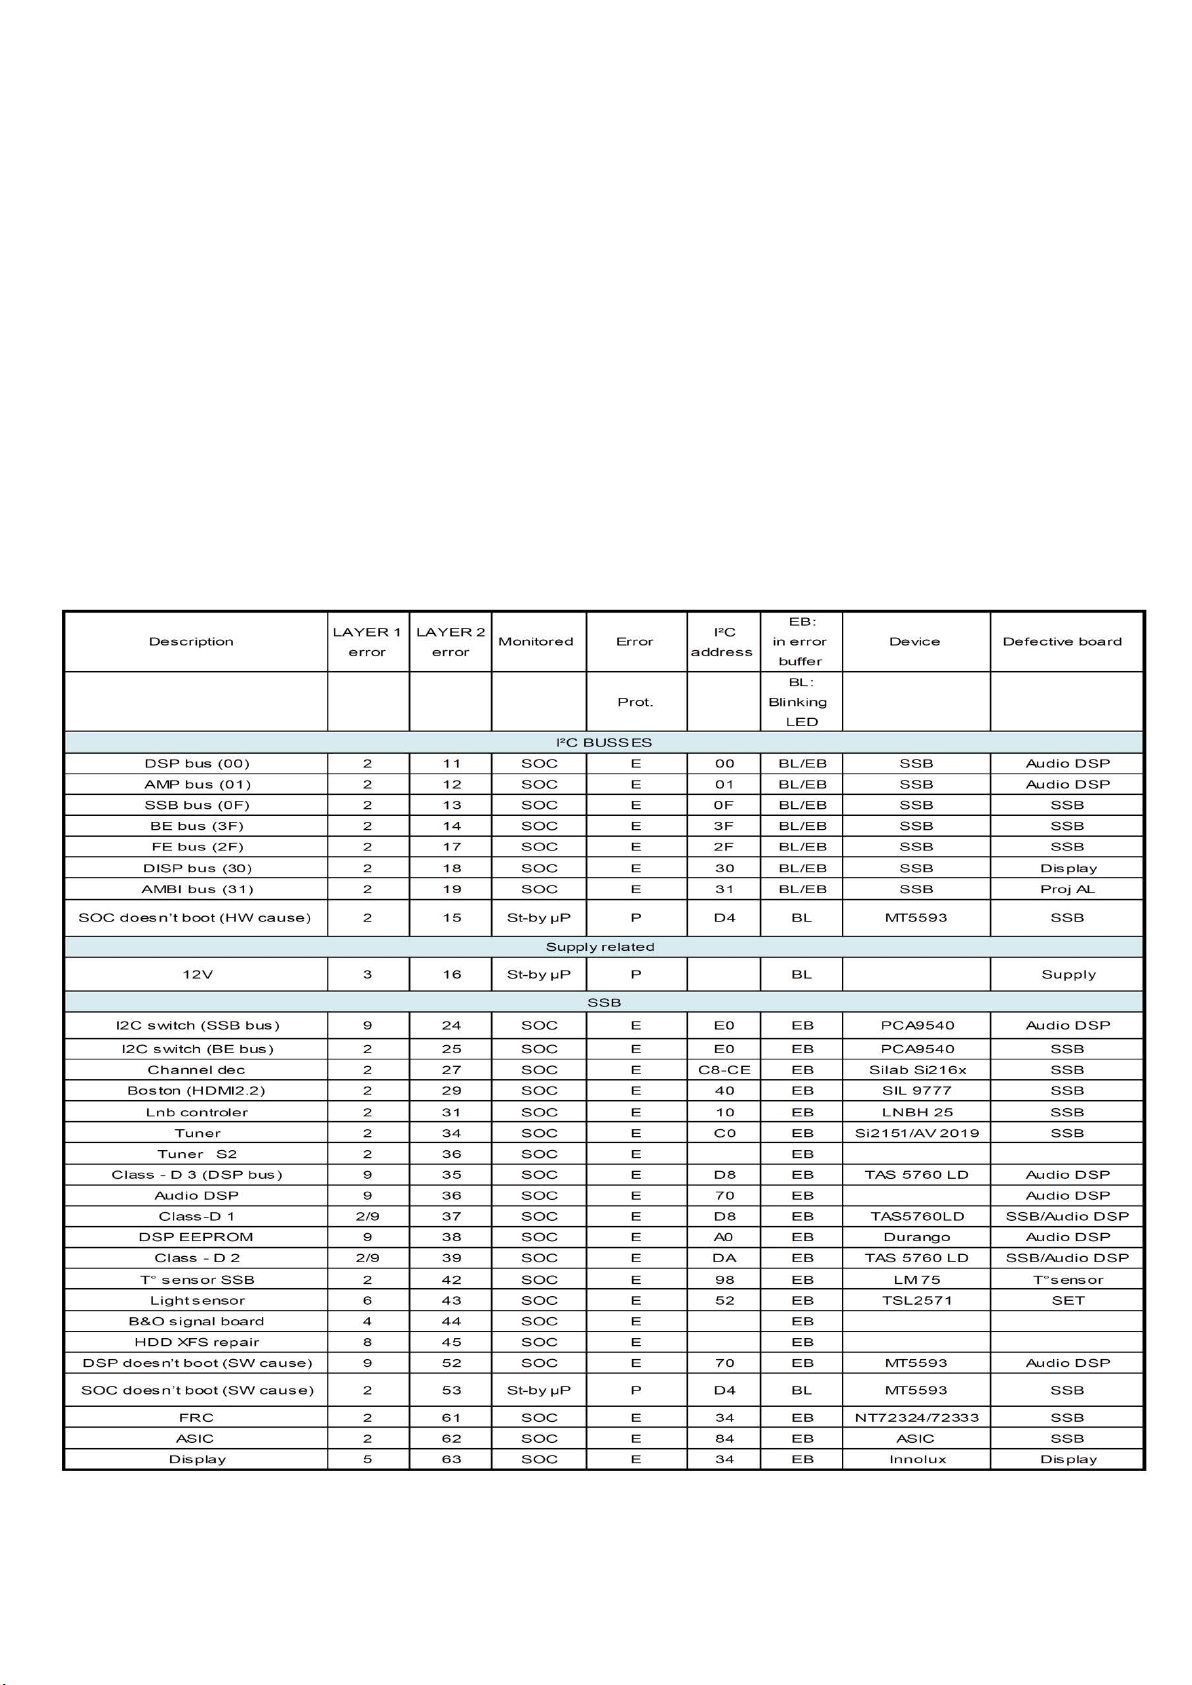
5.2.3 Error codes overview
In this chassis only “layer 2” error codes are available and point to problems on the SSB. They are triggered by LED blinking
when CSM is activated. Only the following layer 2 errors are defined:
5.2.4 How to Clear the Error Buffer
The error code buffer is cleared in the following cases:
• By using the CLEAR command in the SAM menu
• By using the CLEAR command in the Factory mode:
Page 18
• By using the following key sequence on the remote control transmitter: “062599” directly followed by the OK button.
• If the contents of the error buffer have not changed for 50 hours, the error buffer resets automatically.
Note: If you exit SAM by disconnecting the mains from the television set, the error buffer is not reset.
5.3 Panel Code
Press the following key sequence on a standard RC transmitter: “062598” directly followed by MENU and “xxx”, where “xxx” is a 3 digit decimal value
of the panel type: see column “Display Code” in below tab. After resetting the Display Code, restart the set immediately.
CTN_ALT BOM# Panel Type Display Code
32PHG5102/77 TPT315B5-1A058.L S24C 214
32PHG5102/77 TPT315B5-1A058.L S28A 218
32PHG5102/77 TPT315B5-AN10.S SH02L 232
32PHG5102/77 TPT315B5-WX226.K S4850Y 225
32PHG5102/77 TPT320B5-AT011H S011D 235
32PHG5102/77 TPT315B5-AN10. S SH02B 229
32PHG5102/77 TPT315B5-WHBN85.K SD850A 230
32PHG5102/77 TPT315B5-WHBN85.K SDN30A 231
32PHG5102/78 TPT315B5-1A058.L S24C 214
32PHG5102/78 TPT315B5-1A058.L S28A 218
32PHG5102/78 TPT315B5-AN10.S SH02L 232
32PHG5102/78 TPT315B5-WX226.K S4850Y 225
32PHG5102/78 TPT320B5-AT011H S011D 235
32PHG5102/78 TPT315B5-AN10. S SH02B 229
32PHG5102/78 TPT315B5-WHBN85.K SD850A 230
32PHG5102/78 TPT315B5-WHBN85.K SDN30A 231
32PHD5102/55 TPT315B5-1A058.L S24C 214
32PHD5102/55 TPT320B5-AT011H S011D 235
43PFG5102/77 TPT430H3-DUYSHA.G S1BC 215
43PFG5102/77 TPT430H3-HVN01.U S082D 217
43PFG5102/77 TPT430H3-HVN01.U S082K 236
43PFG5102/77 TPT430H3-HVN01.U S272W 226
43PFG5102/78 TPT430H3-DUYSHA.G S1BC 215
43PFG5102/78 TPT430H3-HVN01.U S082D 217
43PFG5102/78 TPT430H3-HVN01.U S082K 236
43PFG5102/78 TPT430H3-HVN01.U S272W 226
43PFD5102/55 TPT430H3-HVN01.U S082D 217
49PFG5102/77 TPT490F2-FHBN0.K S8940R 216
49PFG5102/78 TPT490F2-FHBN0.K S8940R 216
49PFD5102/55 TPT490F2-FHBN0.K S8940R 216
Page 19
6. Circuit Descriptions
6.1 Introduction
The TPM17.7L LA is a new chassis launched in LATAM in 2017. The whole range is covered by MT5800LUEJ HSFBGA-597 platform. The major deltas
versus its predecessor support NTSC;PAL-M; PAL-N AND ISDB-T with also multi-media, CEC,ARC, SPDIF functionality.
The TPM17.7L LA chassis comes with the following stylings:
series xxPHG5102/xx
series xxPHD5102/xx
series xxPFG5102/xx
series xxPFD5102/xx
6.1.1 Implementation
Key components of this chassis are:
SCALER MT5800LUEJ HSFBGA-597
DEMODULATOR SI2180-B60-GMR QFN-48
EMMC THGBMDG5D1LBAIT 4GB FBGA153
AUDIO Amplifier. AD87588-LG48NAY 20W E-LQFP-48
TUNER LATAM ST53WS-13-E
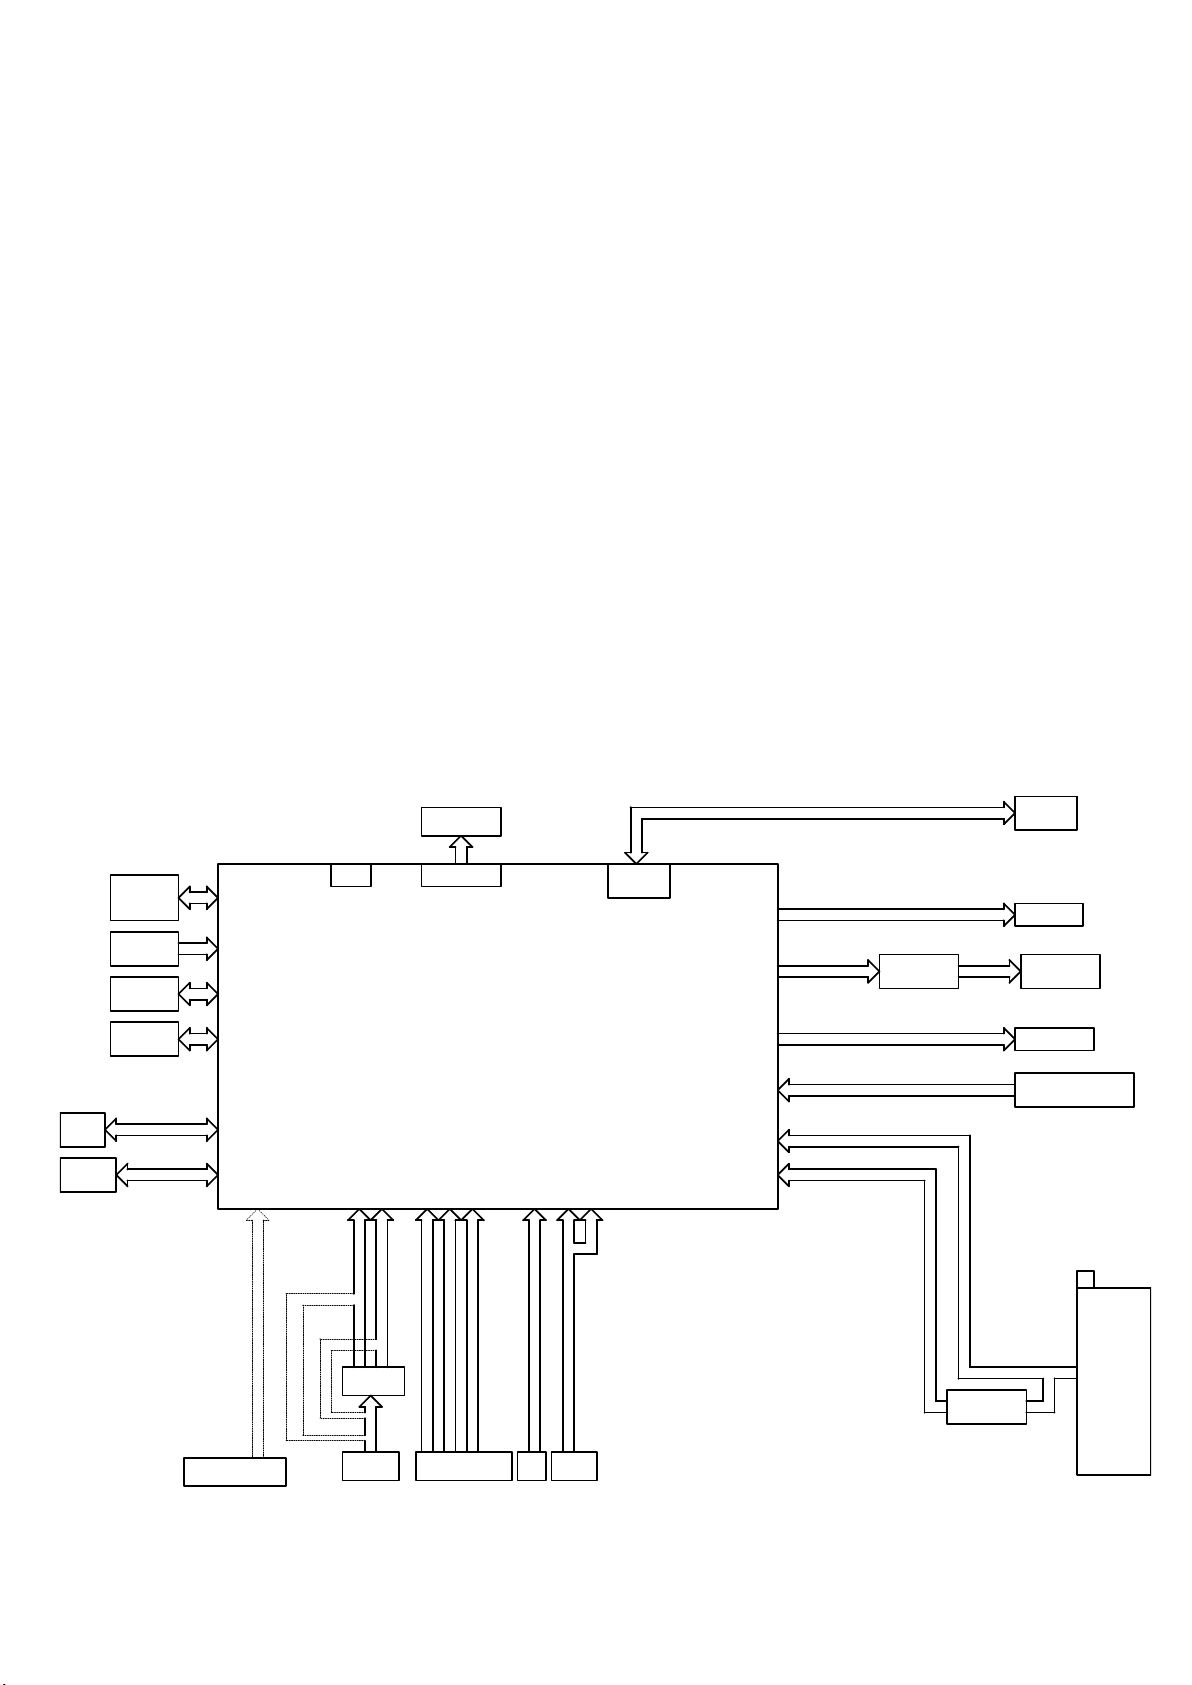
6.1.2 Block diagram
EMMC
Flash
Serial
Flash
DRAM
IR
JTAG
UART
EMMC INTERFACE
SPI
LVDS
GPIO LVDS Port
Main Chip
UM1
HDMI1
USB0/1
USB2/3
USB1/2
USB HUB
HDMI3
HDMI2
RGB
Embedded
Eth PHY
SPDIF OUT
SPEAKER AMP
HPOUT
LINE IN
Tuner AIF+/AIF-
ISTB-TB TS
CVBS
YPbPr1
DTV DEMOD
RJ45
SPDIF OUT
SPEAKER OUT
Headphone Out
LINE IN
TUNER
Wifi Wafer x1
USBx2
HDMIx3
VGA
YPbPr1
Page 20
6.2 Power Supply
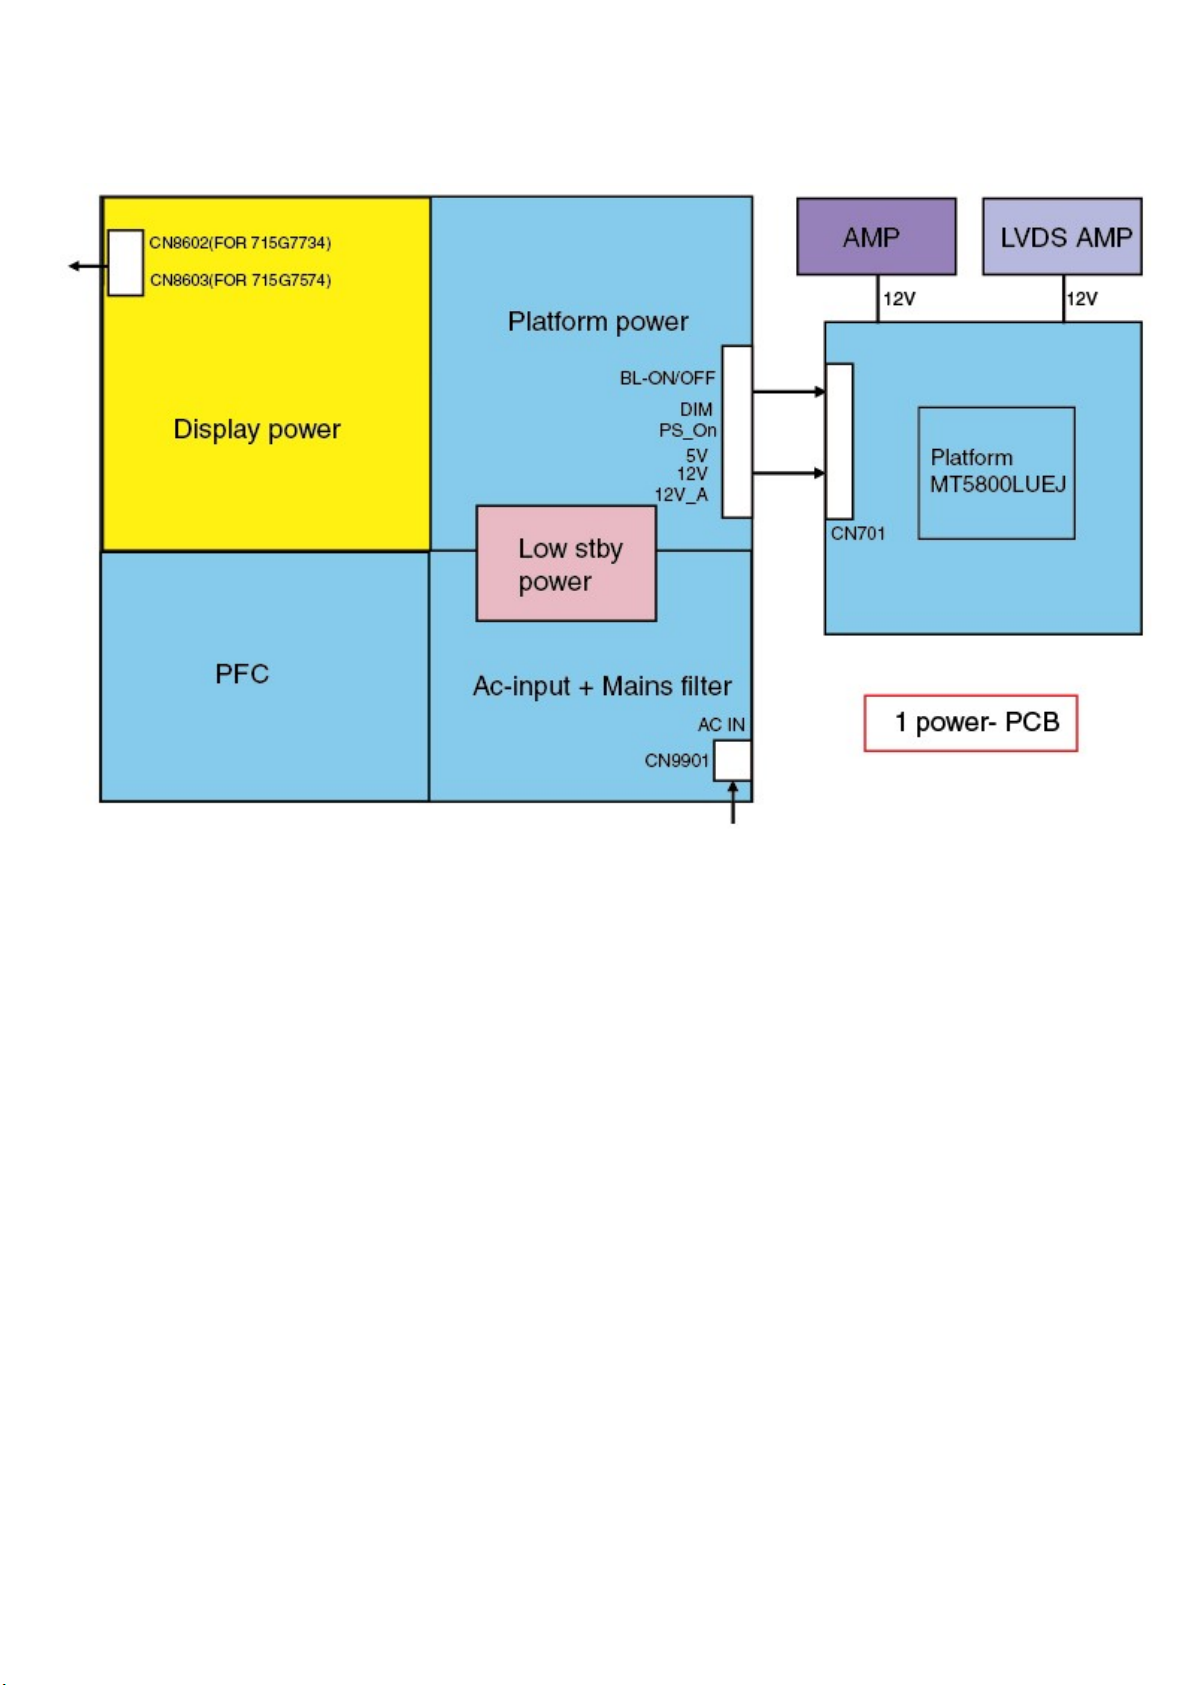
Power architecture of this platform.
6.2.1 Power Supply Unit
All power supplies are a black box for Service. When defective, a new board must be ordered and the defective one must be returned, unless the main fuse
of the board is broken. Always replace a defective fuse with one with the correct specifications! This part is available in the regular market.
Consult the Philips Service web portal for the order codes of the boards.
Important delta’s with the platform are:
• New power architecture for LED backlight
• “Boost”-signal is now a PWM-signal + continuous variable
The control signals are:
• PS-ON
• Lamp “on/off”
• DIM (PWM) (not for PSDL)
In this manual, no detailed information is available because of design protection issues.
• +8.5V output (standby mode)
• +12 output (on-mode)
• +12V_audio (audio AMP power)
• Output to the display; in case of
- IPB: High voltage to the LCD panel
- PSL and PSLS (LED-driver outputs)
- PSDL (high frequent) AC-current.
6.2.2 Diversity
The diversity in power supply units is mainly determined by the diversity in displays.
The following displays can be distinguished:
• CCFL/EEFL backlight: power panel is conventional IPB
Page 21
• LED backlight:
- side-view LED without scanning: PSL power panel
- side-view LED with scanning: PSLS power panel
- direct-view LED without 2D-dimming: PSL power panel
- direct-view LED with 2D-dimming: PSDL power panel.
PSL stands for Power Supply with integrated LED-drivers.
PSLS stands for a Power Supply with integrated LED-drivers with added Scanning functionality (added microcontroller).
PSDL stands for a Power Supply for Direct-view LED backlight with 2D-dimming.
6.3 DC/DC Converters
The on-board DC/DC converters deliver the following voltages(depending on set execution):
• +5V-SB, permanent voltage for the Stand-by Power system
• +3V3-STANDBY,voltage for IR/Key board
• +12V, input from the power supply for the panel common(active mode)
• +12V, input from the power supply for LNB supply
• +1V8, voltage for EMMC when TV on
• TUNER_3V3, supply voltage for tuner
• +5V-SW, input intermediate supply voltage for USB Power
• +12V-AUDIO1 for the AUDIO AMP
+1.2V_DEMOD voltage for Demodulator IC channel decoder
• +3V3SBI,voltage for WIFI
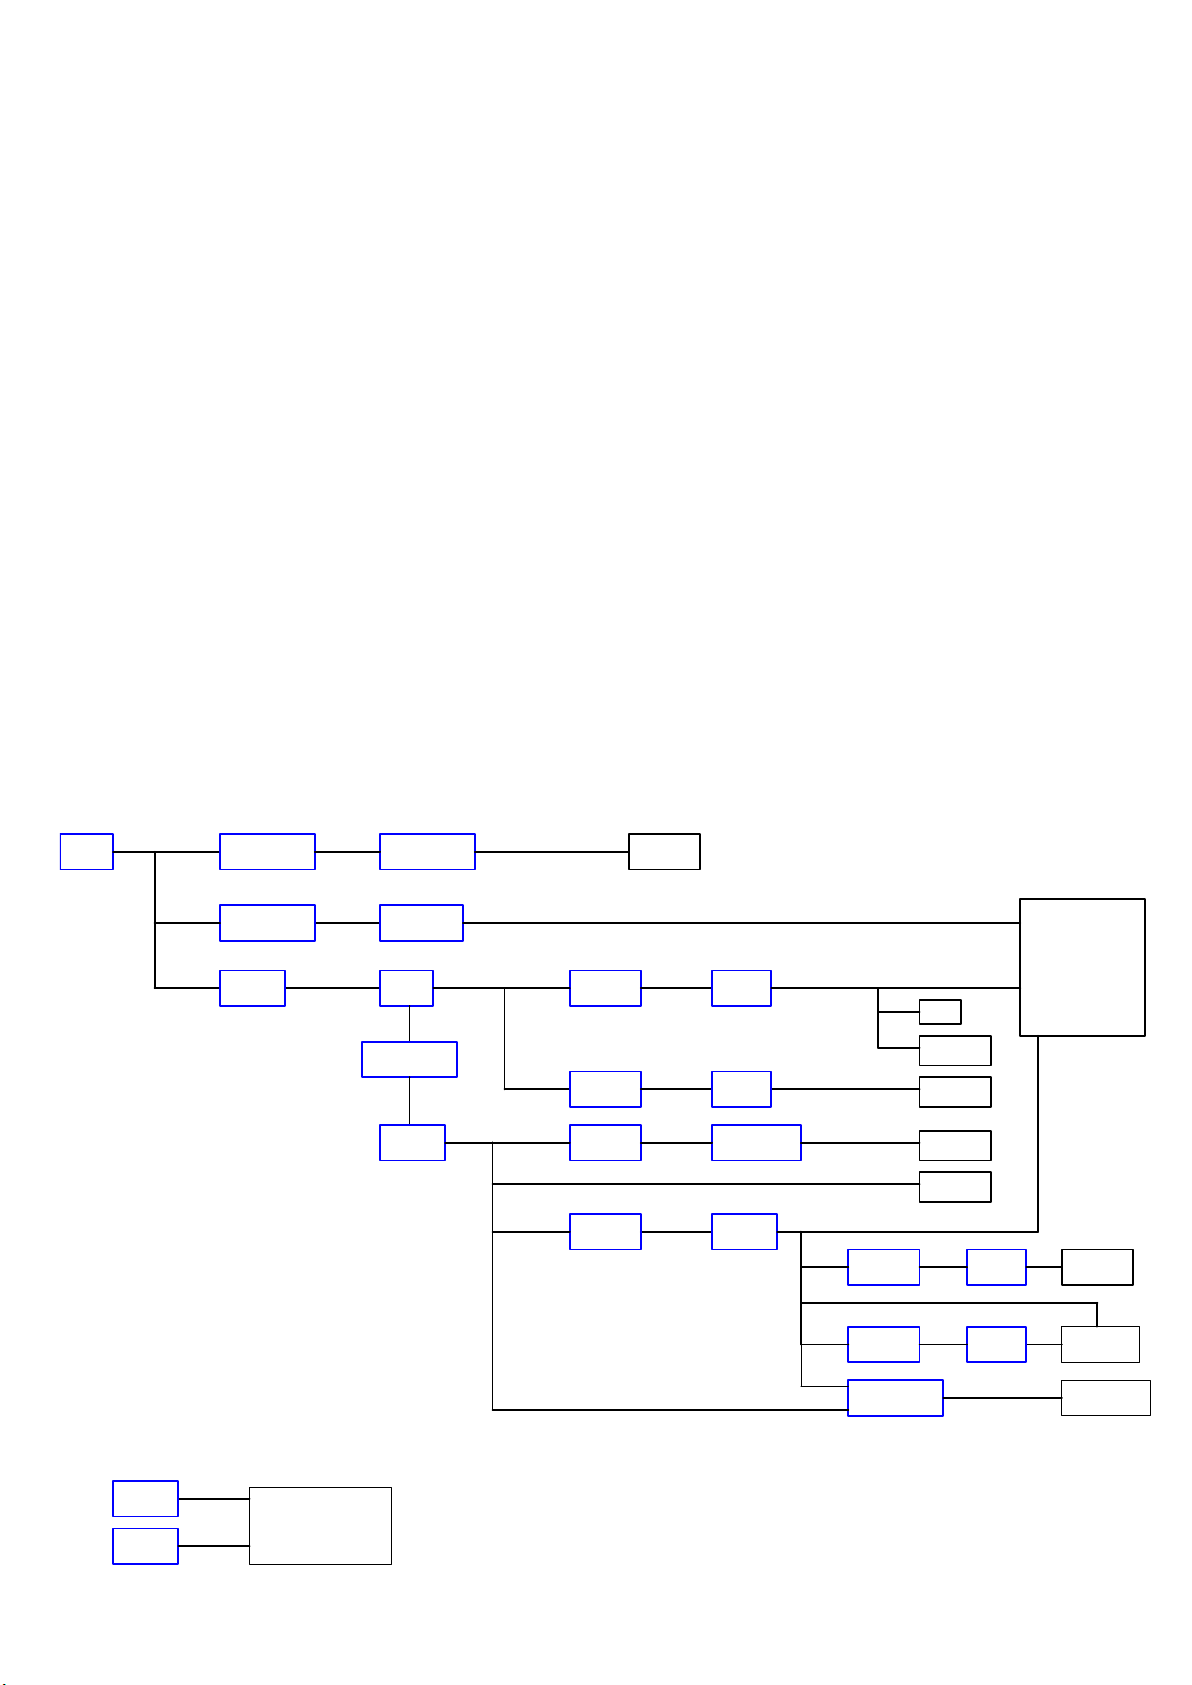
6.3.1 Power tree
Q401
+12V
MOS- AON4421
8A
PANELPANEL_VCC
U705
RT6206
5A
U703
RT6206
5A
VCCK
AVDD1V2
5VSB
Q401
MOS- AON4421
8A
+5V_SW
3255mA
1000mA
230mA
1A
U701
AP1117
1A
U706
G5695T
1A
U707
AZ1117
1A
U702
AZ1084
5A
3V3SB
DDRV
TUNER _3V3
AVDD3V3
DVDD3V3
290mA
30mA
153mA
2T2R
1T1R
50mA
U704
AZ1117
1A
U708
G912T63U
1A
U105
SW- AP3511
130mA
IR
RF4CE
DDR*2
TUNER
USB*2
+1.8V
+1.2V_
DEMOD
SOC
MT5582
EMMC
Demod IC
WIFI MODULE
12V_Amp
Amp IC - AD87588
AVDD3V3
DVDD3V3
Page 22
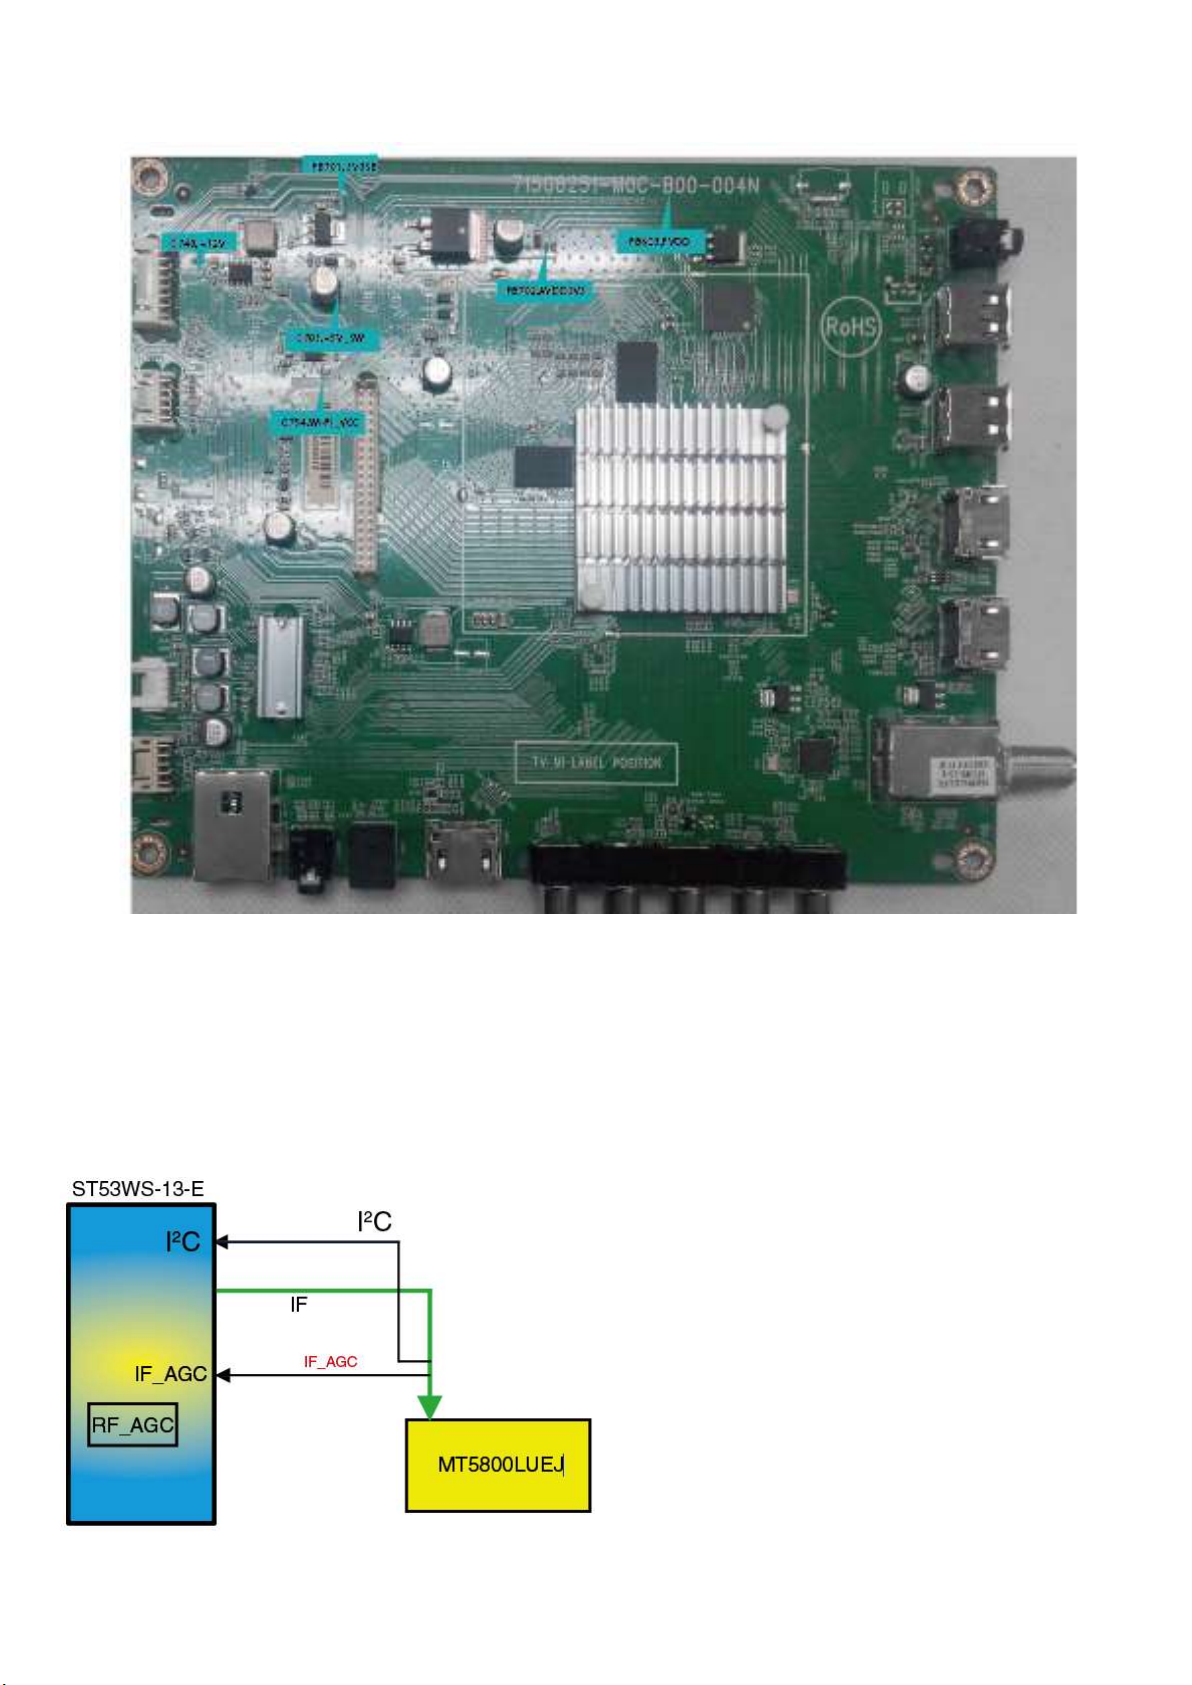
6.3.2 Power layout SSB
Power SSB Top View
6.4 Front-End Analogue and DVB-T, DVB-C;ISDB-T reception
6.4.1 DVB-C part
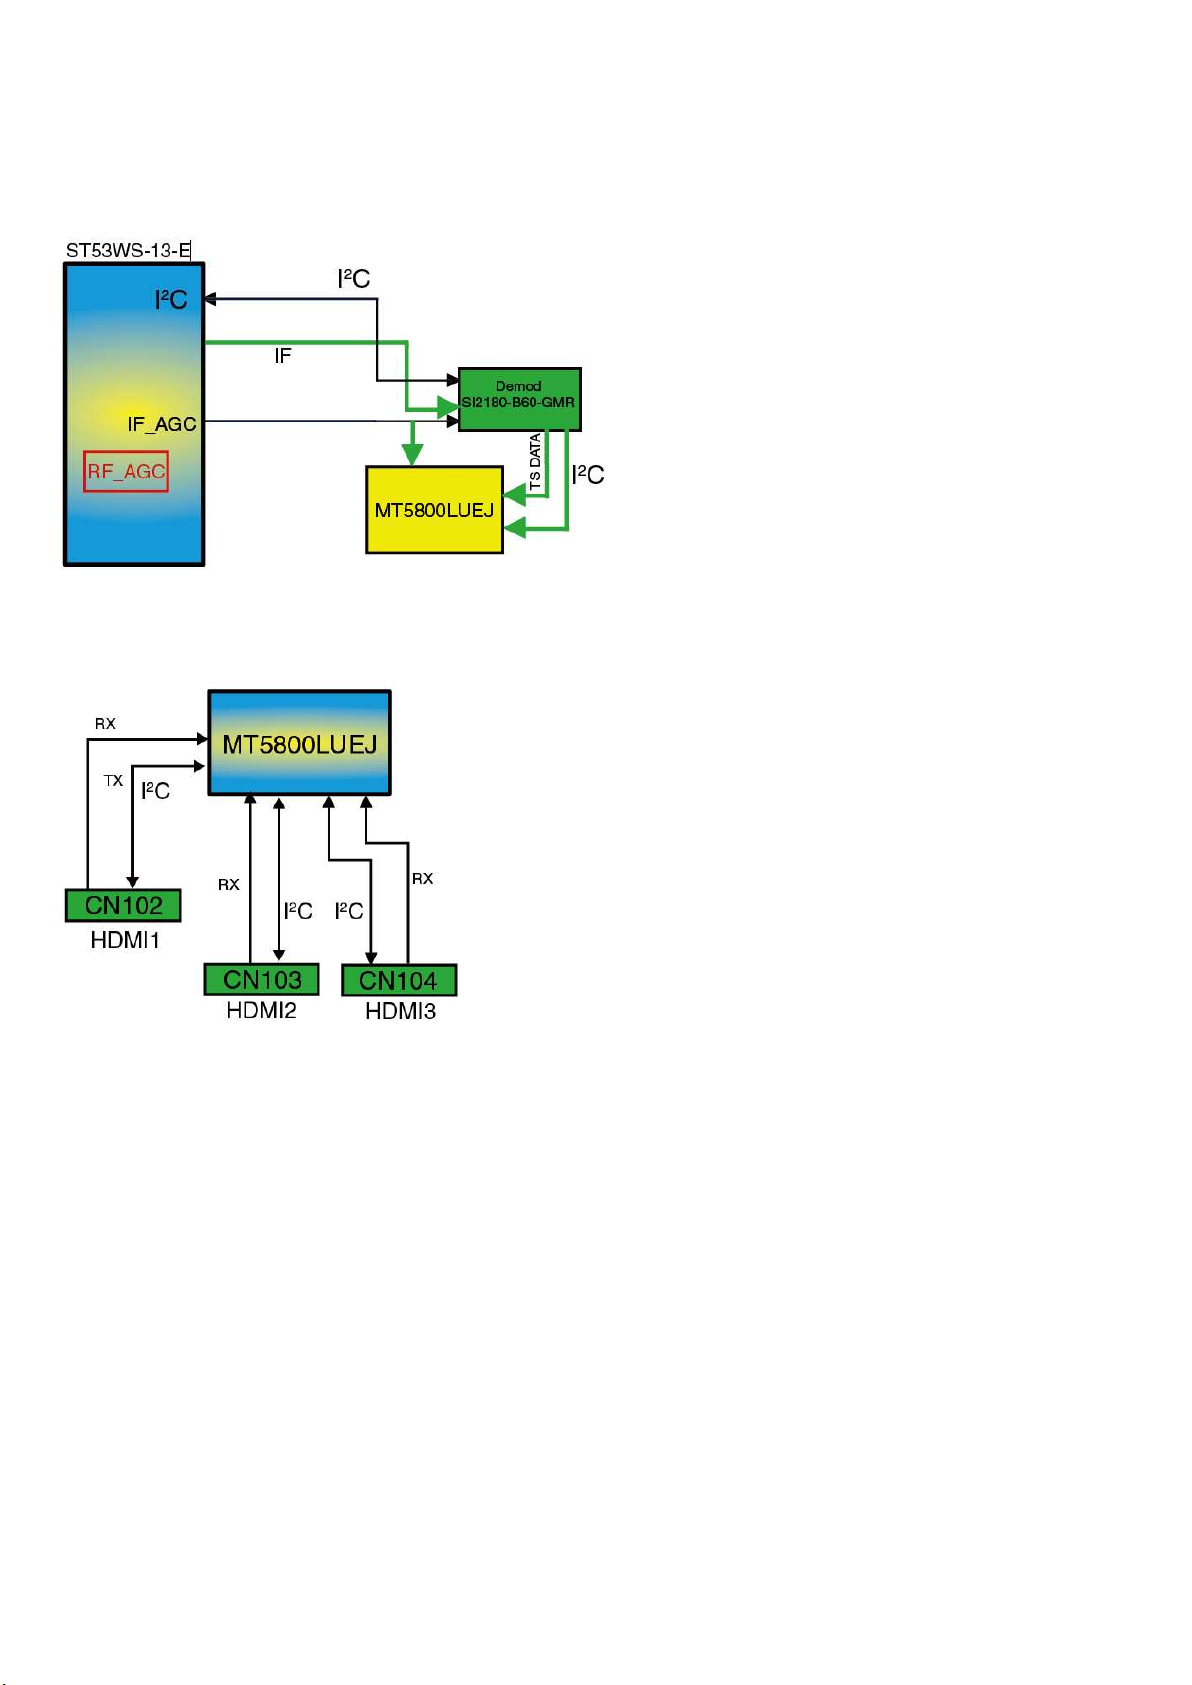
The Front-End for analogue tuner consist of the following key components:
• TUNER LATAM ST53WS-13-E
• SCALER MT5800LUEJ HSFBGA-597 Processor
Below find a block diagram of the front-end application for DVB-C part.
6.4.2 DTB-T2 part
The Front-End for DVT part consist of the following key components:
Page 23
• TUNER LATAM ST53WS-13-E
• SCALER MT5800LUEJ HSFBGA-597 Processor
• DEMODULATOR SI2180-B60-GMR QFN-48
Below find a block diagram of the front-end application for DTV part.
6.5 HDMI
Refer to below for the application.
The following HDMI connector can be used:
• HDMI 1: HDMI input ( TV digital interface support HDMI1.4/HDCP1.3) with digital audio/PC DVI input/ARC
• HDMI 2: HDMI input ( TV digital interface support HDCP) with digital audio/PC DVI input/ARC
• HDMI 3: HDMI input ( TV digital interface support HDMI1.4/HDCP1.3) with digital audio/PC DVI input/ARC
• +5V detection mechanism
• Stable clock detection mechanism
• MHL 2.0 function only for HDMI4
• Audio return channel(ARC)
• TMDS output control
• HPD control
• CEC control
6.6 Video and Audio Processing - MT5800LUEJ
The MT5800LUEJ is the main audio and video processor (or System-on-Chip) for this platform. It has the following features:
• Worldwide multi-standard analog TV demodulator
• demodulators
• Powerful quad core CPU
• 3D graphic support OpenGL ES 2.0
Page 24

• A muti-standard video decoder
• A transport de-multiplexer
• Rich format audio codec
• H.264 encoder
• HDMI 1.4a receiver with 3D support
• MHL2.0& Standby charging
• 2D/3D converter
• Local dimming (LED backlight)
• Ethernet MAC+PHY
• Two-link LVDS, mini-LVDS,V-by-one
The MT5800LUEJ family consists of a DTV front-end demodulator, a backend decoder and a TV controller and offers high integration for advanced
applications. It integrates a transport de-multiplexer, a high definition video decoder, an audio decoder, a two-link LVDS transmitter,a V-by-one transmitter,
and an NTSC/PAL/SECAM TV decoder with 3D comb filter(NTSC/PAL). The MT5800LUEJ enables consumer electronics manufacturers to build high
quality, low cost and feature-rich DTV
The MT5800LUEJ supports Full-HD MPEG1/2/4/H.264/HEVC(H.265)/MVC/VC1/VP8/VP9 video decoder standards, and JPEG. The MT5800LUEJ also
supports MediaTek MDDiTM de-interlace solution which can reach very smooth picture quality for motions. A 3D comb filter added to the TV decoder
recovers great details for still pictures. The special color processing technology provides a natural, deep colors and true studio quality video. Moreover, the
MT5800LUEJ family has built-in high resolution and high-quality audio codec
The MT5800LUEJ family enables true single-chip experience. It integrates high-quality HDMI1.4a, high speed VGA ADC, two-link LVDS, V-by-One,
USB2.0 receiver, Ethernet MAC+PHY, quad core CPU and 512K bytes L2 cache, OpenGL ES 1.1/2.0, OpenVG 1.1 compliant 3D graphic engine, and
demodulators..
The MT5800LUEJ family supports demodulation functions. It reserves transport stream inputs for external demodulators for other countries or areas. TV
maker can easily port the same UI to worldwide TV models. First-class adjacent and co-channel rejection capability grants excellent reception. Professional
error-concealment provides stable, smooth and mosaic-free video quality
Page 25
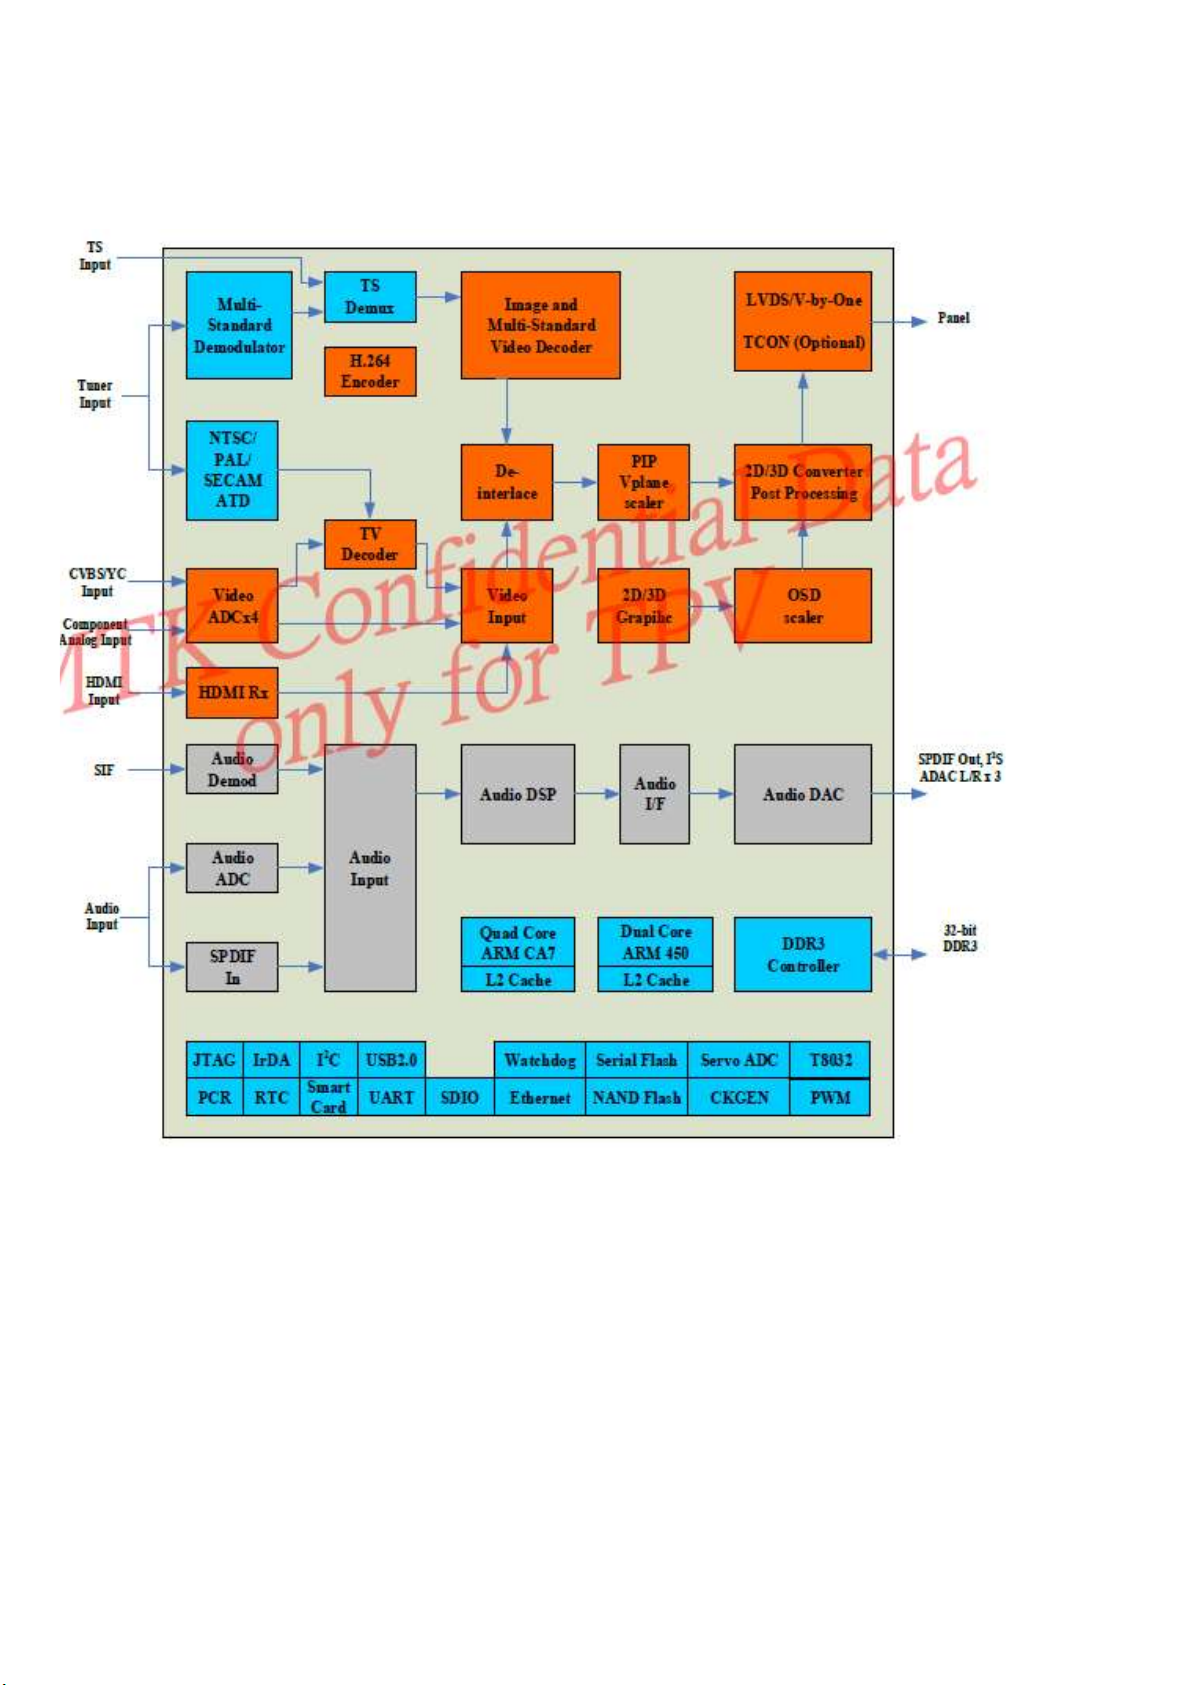
7. IC Data Sheets
7.1 MT5800LUEJ HSFBGA-597 (IC U401--SCALER)
Page 26
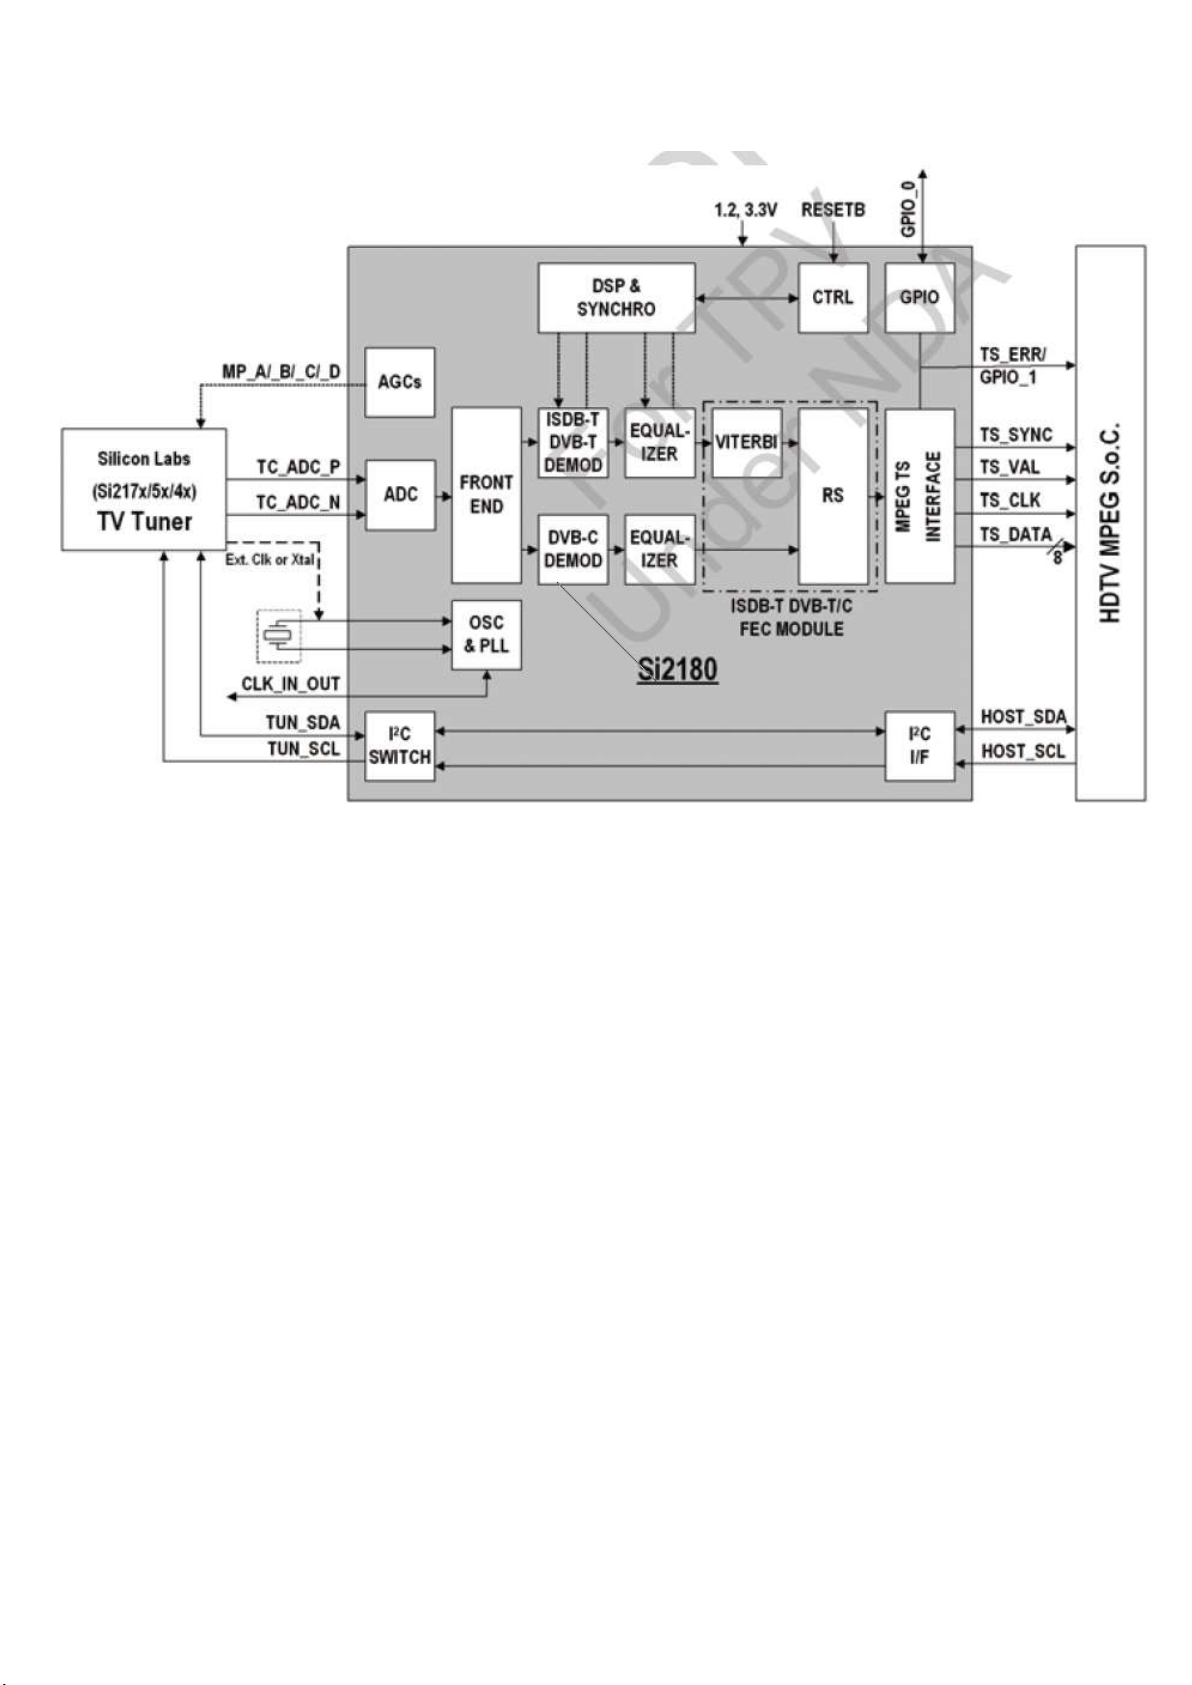
7.2 SI2180-B60-GMR (IC U101--DEMODULATOR)
Page 27
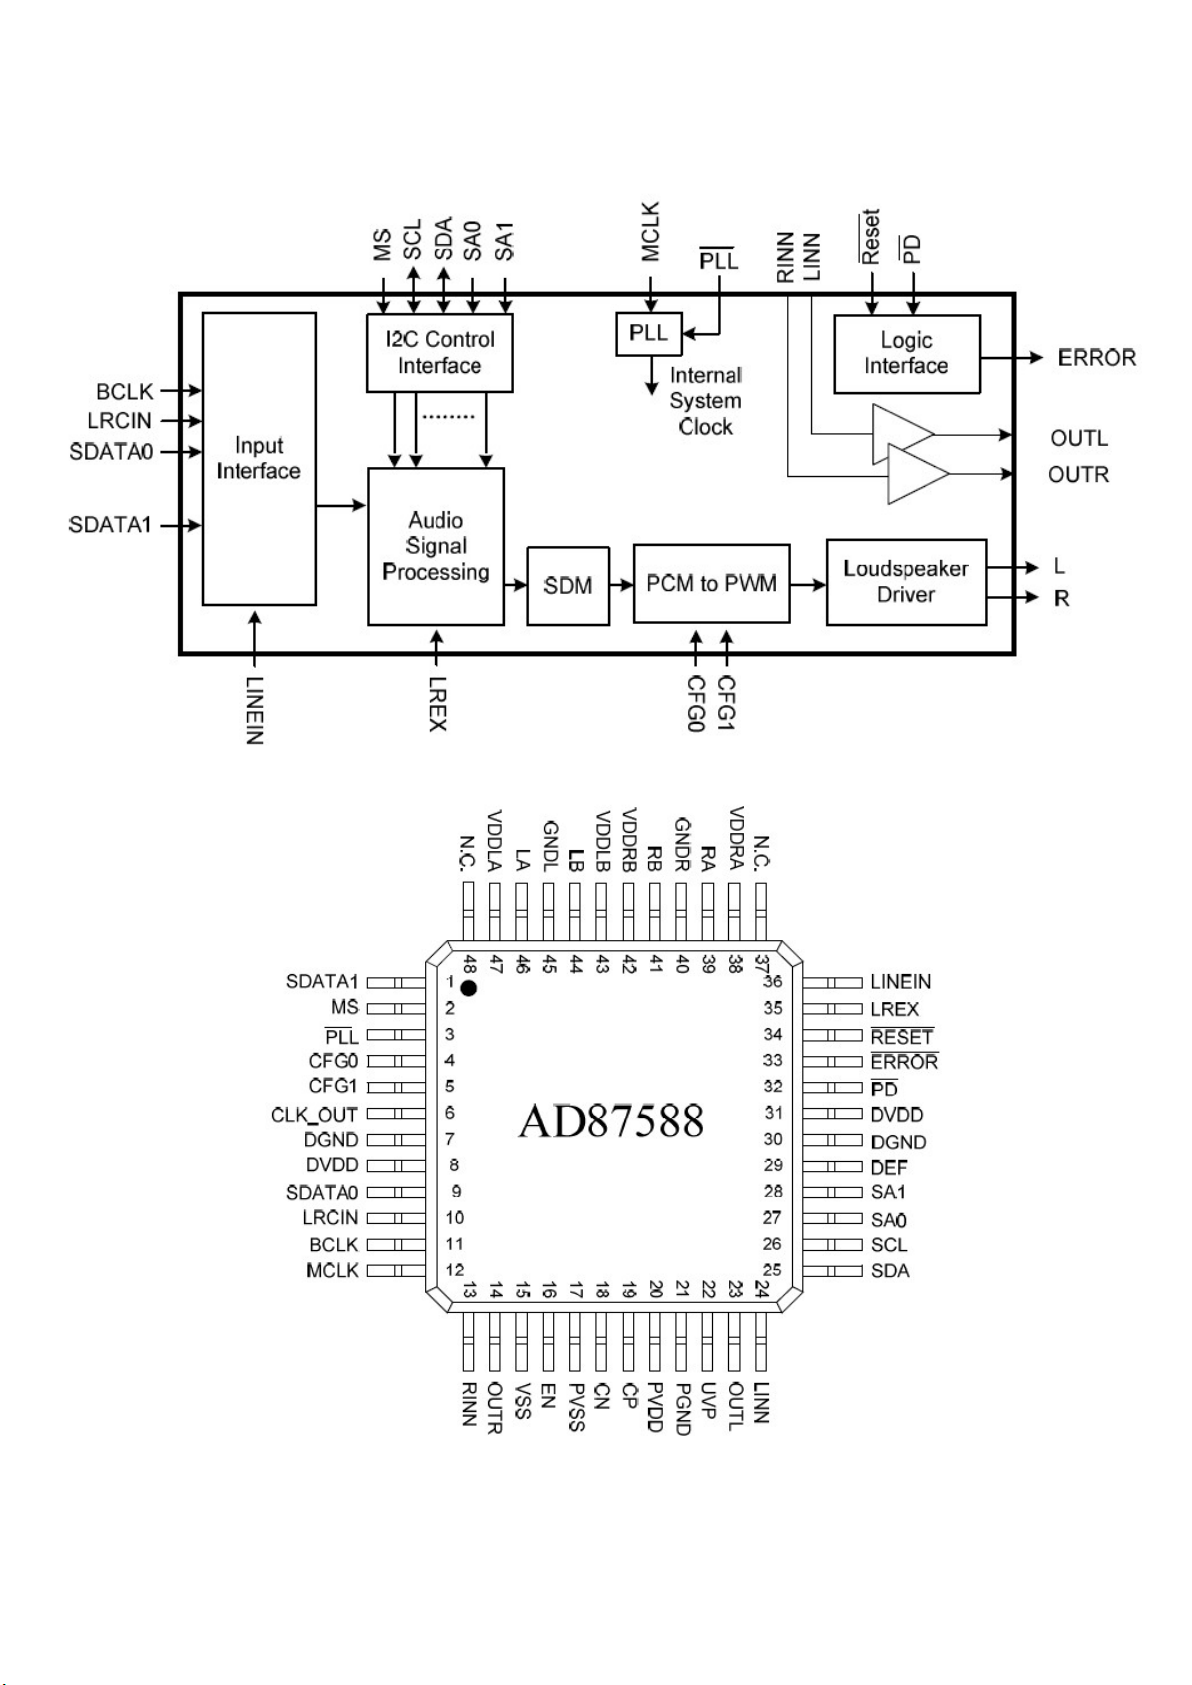
7.3 AD87588-LG48NAY (IC U601--AUDIO)
Page 28
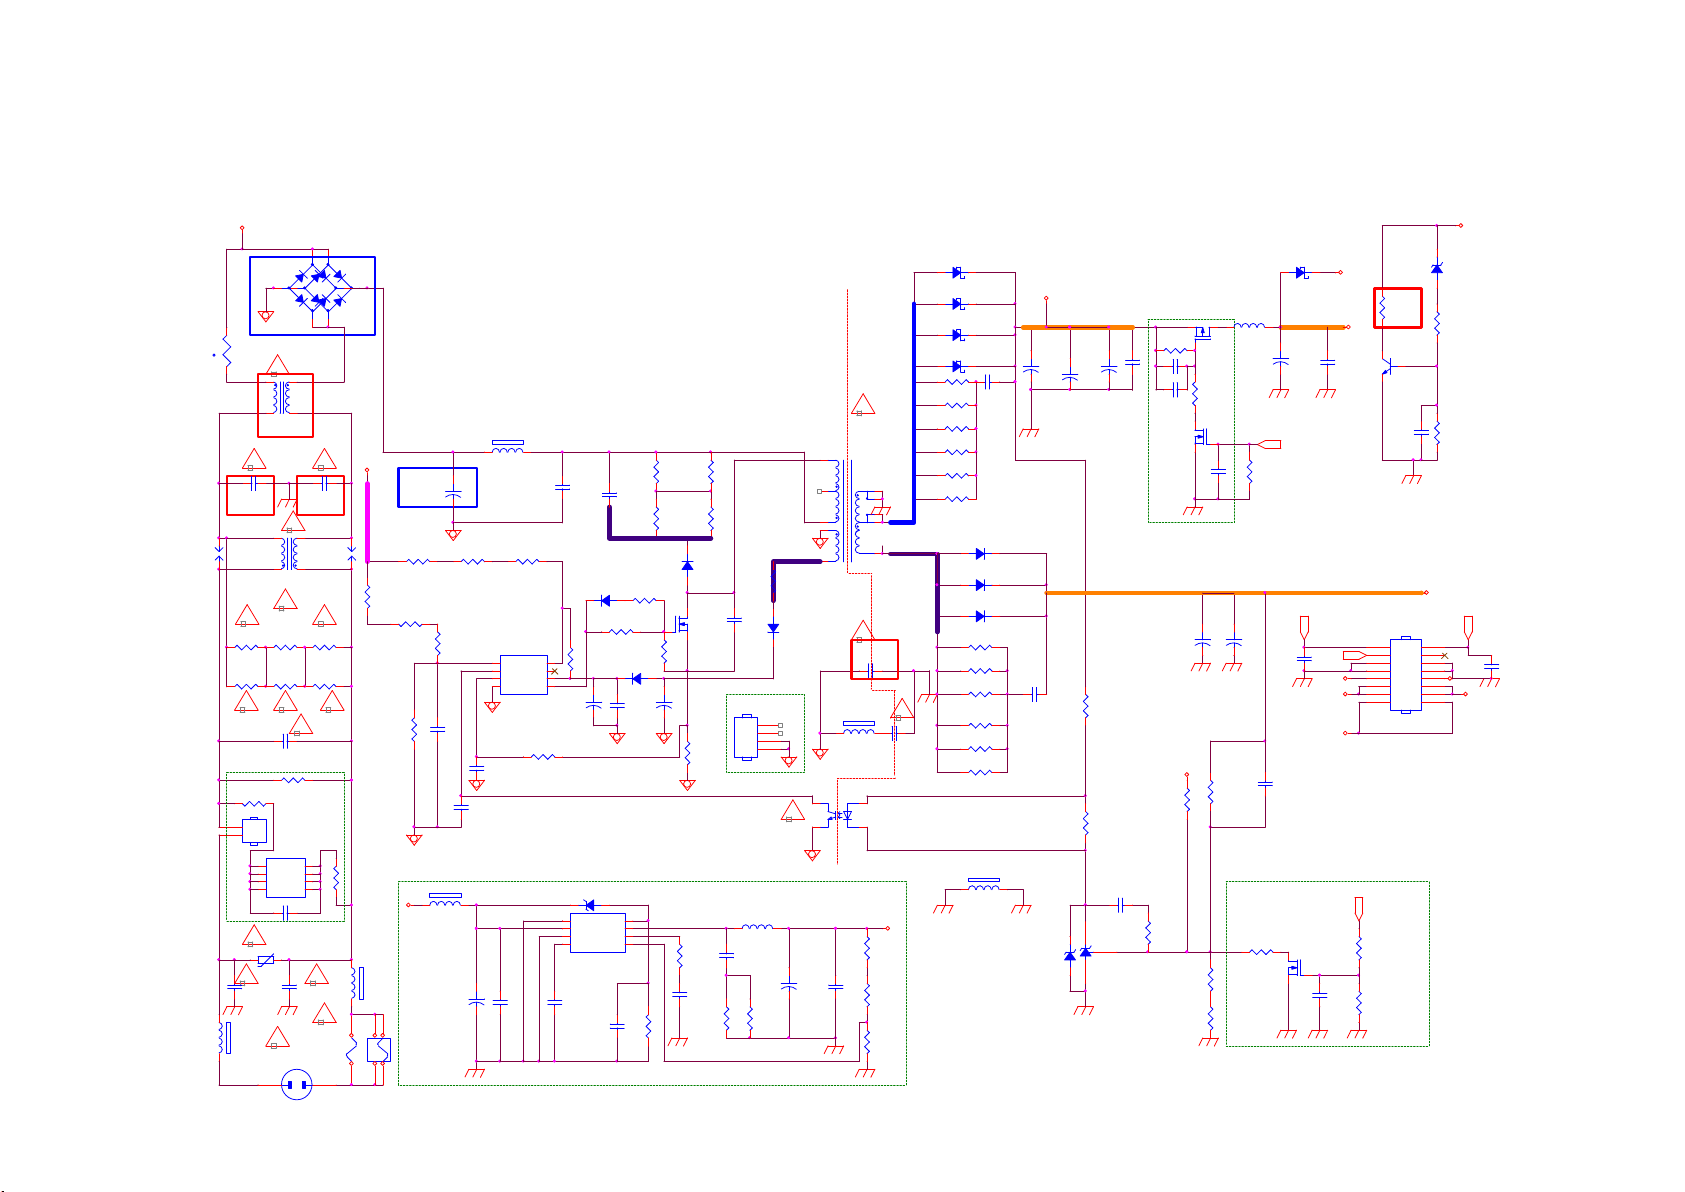
8.Circuit Diagrams
1
2
T4AH/250V
8.1 A 715G7734 PSU(For 32” 5102 Series)
8-1-1 AC Input
A
BD9901
NC/KBJ608G-F UC
4
12
NR9901
2.5R
t
!
3
L9903
4mH
! !
C9903
1000PF 250V
3
SG9902 SG9901
NC NC
L9901
18MH
!
R9903
620K +-1% 1/4W
R9905
620K +-1% 1/4W
R9904
620K +-1% 1/4W
R9906
620K +-1% 1/4W
! !!
C9901
470nF 275V
R9909
CN9902
2
NC/C ONN
N
1
JUMPER
L
U9901
1
NC
2
D1
3
D1
NC4NC
NC/C AP004DG-TL
C9906
NC/47pF
!
RV9901 680V
C9907
100PF 250V
FB9901
!
127R
CN9901
AC 2P
4
-
124
1000PF 250V
!
124
!
R9907
NC
D2
D2
C9910
100PF 250V
BD9902
3
3
GBL408-C
+
2
2
C9902
!!
R9901
620K +-1% 1/4W
R9902
620K +-1% 1/4W
8
7
6
5
R9908
!!
!
F9901
NC/T4AL 250V
12
1
+
12
NC
1
FB9902
127R
3 4
F9902
A
需破孔!!
100uF 450V
R9112
510K 1/4W
R9127
3.3M 1/4W
R9128
3.3M 1/4W
R9114
110K
+12V锣+5.2V(NC)
+12VS
1 2
C9801
510K 1/4W
R9142
3.3M 1/4W
C9125
1NF
FB9301
1 2
NC/BEAD
C9331
NC/470UF 25V
+
R9102
FB9908
BEAD
1 2
1
BNO
2
FB
3
CS
GND4OUT
C9106
330PF 50V
C9124
1NF
+
R9104
C9103
2.2NF
R9109
10R 1/8W 5%
R9110
D9106
IN4148W
C9104
0.1uF 50V
NC/BZ T52-B5V1
12
8
EN
7
LX
6
5
NC/3K OHM 1%
R9344
82K OHM 1%
R9105
82K OHM 1%
+
R9111
10K OHM +-5% 1/8W
C9105
10UF50V
C9113
2.2NF
R9103
510K 1/4W
D9104
IN4148W
47R 1%
U9101
PF6005AS
C9336
NC/220N 50V
R9146
8
0 OHM +-5% 1/8W
VCC
7
NC
6
VCC
5
+
C9102
2.2UF 50V
R9113
1K 1/4W
note:Q9101
Vac:90~264/Q9101匡ノ TK11A65D or 24NM65N
Vac:108~132/Q9101匡ノSTF8NM50N
Vac:198(176)~264/Q9101匡ノ TK6A65D
ZD9301
1
PGND
2
VIN
3
AGND
COMP
VCC4FB
U9301
NC/AOZ 3015AI
C9334
NC/100N 50V
C9330
NC/1N 50V
D9103
FR107G-A0
Q9101
TK6A65D(STA4,X,M)
R9101
0.27R 2W
R9345
NC/20K 1%
C9333
NC/2N 2 50V
R9358
NC/30R 1/4W
R9106
82K OHM 1%
R9107
82K OHM 1%
C9126
NC/100PF
For Q9101
HS9101
HEAT SINK
C9335
NC/2N 2 50V
L9301
1
2
3
4
R9361
NC/30R
R9108
4R7 1/4W 5%
D9105
PR1007G
!
U9102
EL817M(X)
+
+18V
L9101
3UH
R9307
NC/270K +-1% 1/8W
330UF 35V
C9116
+
R9144
NC/8. 2K 1/8W
C9127
1nF 50V
C9129
D9109
SR34H
1 2
+
C9111
470UF 25V
PS_ON
DIM
NC
Standby
筿 溃
Q9106
NC/2N 7002K
PS_ON
+12V_A
+12V
+5.2V
C9140
NC/1N 50V
+12V_A
+12V
C9112
0.1uF 50V
(NC)
PS_ON
R9130
1K OHM
Q9102
2N3904
C9119
0.1uF 50V
CN9101
CONN
1
3
5
7
9
11
13
15
R9143
NC/100K 1/ 8W 1%
R9145
NC/100K 1/ 8W 1%
+18V
ZD9101
BZT52-B22
1 2
470OHM +-5% 1/ 8W
R9129
R9131
1K 1/8W
ON/OFF
2
4
6
8
C9128
10
1nF 50V
12
+12V_A
14
16
+12V
D9110
SR510-22
1 2
D9111
SR510-22
1 2
D9112
SR510-22
1 2
D9101
SR510-22
1 2
R9115
22 OHM 1/4W
R9116
22 OHM 1/4W
22 OHM 1/4W
R9149
22 OHM 1/4W
R9117
8
NC
9
R9150
6
NC
7
10
D9102
SR515
D9107
SR515
D9108
SR515
5
3
4
2
1
COLDHOT
!
T9101
POWER X'FMR
!
C9904
1NF 250V
1 2
FB9906
NC
1
4
23
+5.2V
R9348
NC/10. 5K
C9323
NC/220N 50V
C9332
NC470UF 25V
R9342
NC/200R
R9347
NC/2K
C9908
NC
R9120
22 OHM 1/4W
R9140
22 OHM 1/4W
R9138
22 OHM 1/4W
!
R9118
NC
R9119
NC
R9139
NC
1 2
C9107
3.3NF 500V
FB9302
BEAD
+12VS
C9121
470uF 25V
+
C9108
470pF 1KV
ZD9104
BZT52-B16G
NC/470uF 25V
C9109
470uF 25V
+
1 2
C9101
C9110
0.1uF 50V
+
R9121
2K4 1/8W 5 %
R9122
9.1K OHM
C9117
220nF50V
U9103
TL431G-AE2-R
R9302
NC/100K 1/8W
C9307
NC/1uF
C9308
NC/1uF
NC/100N 50V
R9123
43K 1/8W 1 %
10K OHM +-5% 1/8W
R9124
9.31K +-1% 1/8W
680R 1/8W 1%
Q9306
NC/P1604ED
C9306
+12VS
R9126
R9141
JUMPER
R9304
NC/100K 1/ 8W
Q9305
NC/2N 7002KR9148
NC
330UF 35V
C9122
+
R9125
620K 1/8W 1%
Page 29
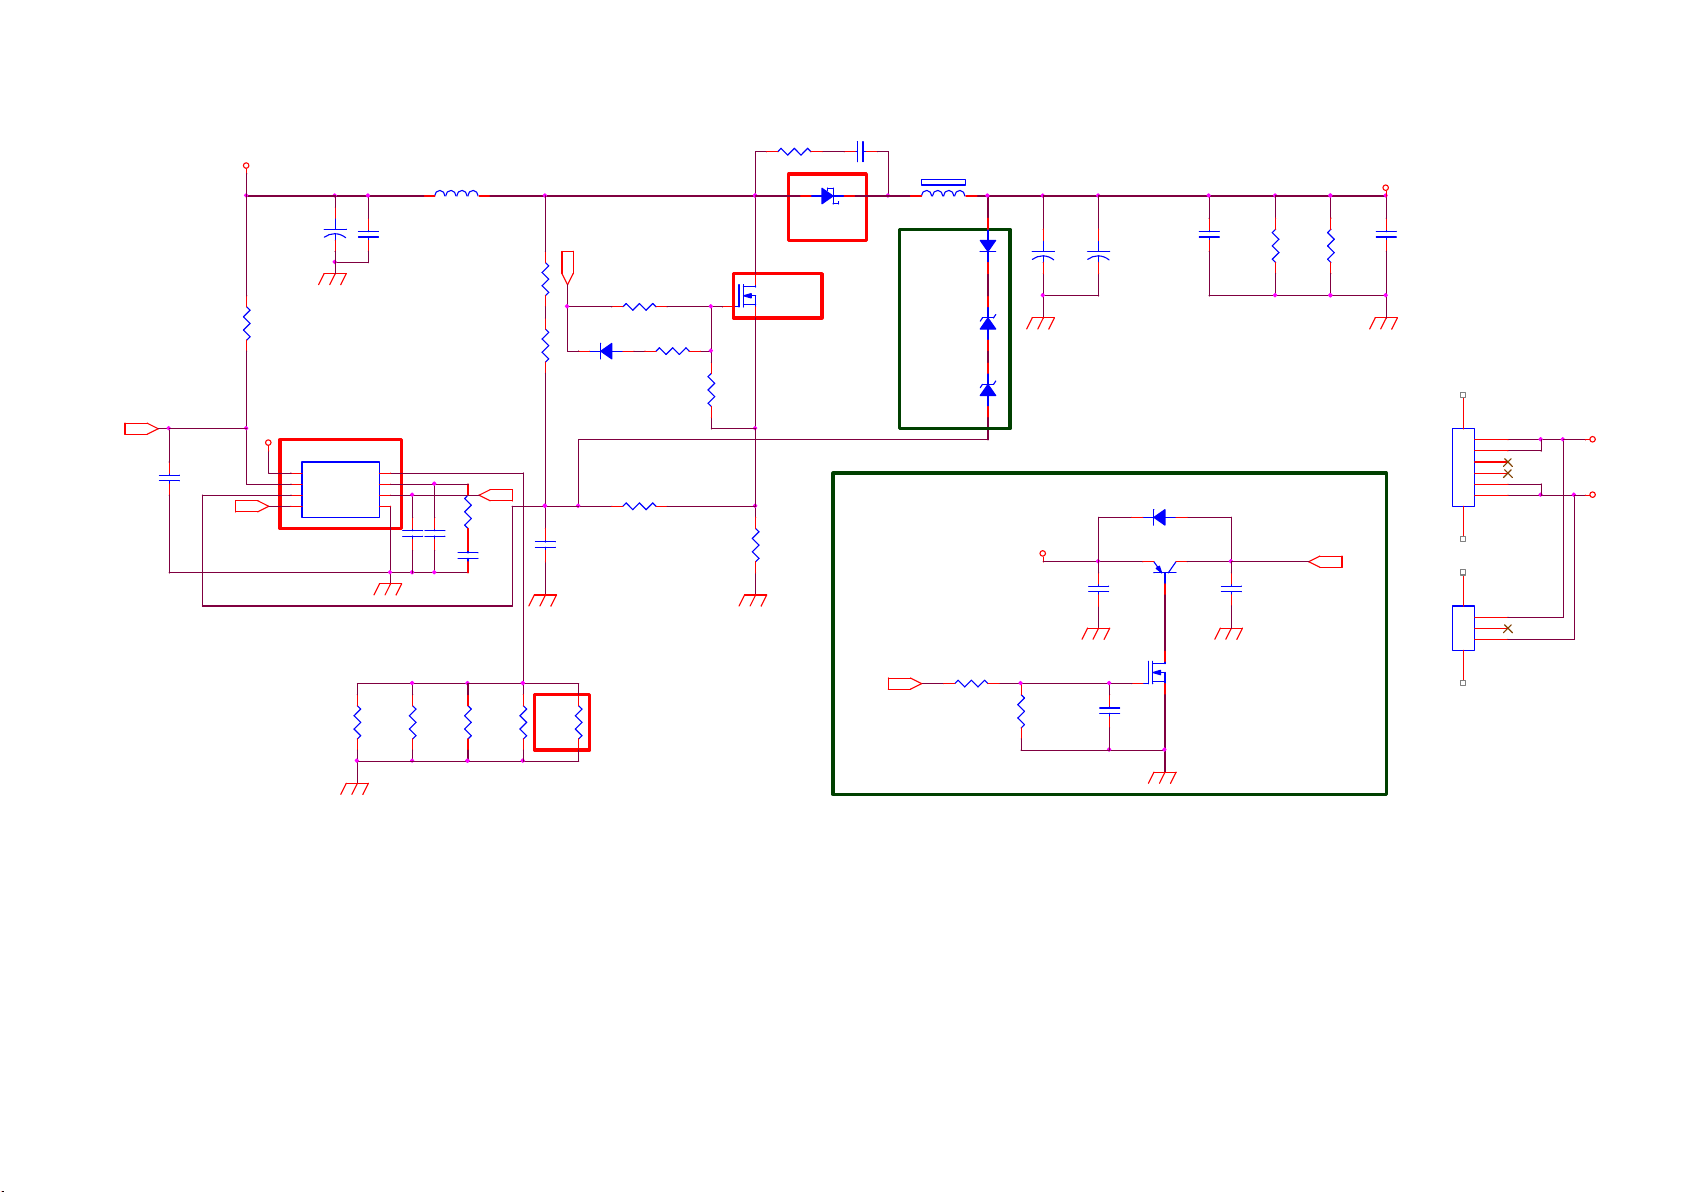
8-1-2 LED DRIVER
Vcc2
C8602
220nF50V
OUT
+18V
330UF 35V
R8602
NC
C8601
U8601
PF7708BS
1
LED
2
VCC
3
CS/OVP
OUT4GND
R8615
22K 1/4W
L8602
47uH
+
C8605
FB
GM
DIM
C8606
1NF
0.1uF 50V
8
7
6
5
0 OHM +-5% 1/ 8W
C8607
220pF 50V
62K 1/8W 1%
R8603
33K 1/8W 5%
C8603
47nF 50V
R8616
R8617
DIM
OUT
Q8601: 357G0763100601 or
357G0763100605
R8604
33R 1/ 8W 5%
D8603
IN4148W RHG
C8610
22pF 50V
R8609
10R 1/ 8W 5%
R8608
4.7KOH M +-1% 1/8W
Q8601
AOD2922
R8647
10K OHM +-5% 1/ 8W CN8602
R8601
0R05
C8617
100PF 500V
1 2
D8601
SR506
Add ON/OFF Function
FB8605
BEAD
1 2
D8602
1N4148
ZD8601
BZT52-B18
ZD8602
BZT52-B18
+
1 2
Add OVP Function
1 2
+12V
VLED+
NC/ 220uF 50V
220uF 50V
C8612
+
C8616
D8604
IN4148W RHG
C8604
0.47UF 50V
C8621
0.1uF 50V
Q8603
DTA144WN3/ S
R8612
100K
C8611
0.47UF 50V
R8611
NC
C8623
NC
Vcc2
78
45
CONN
1
2
3
4
5
6
CN8601
NC/ CONN
1
2
3
VLED+LED-
LED-
Q8602
R8652
1.2R 1%
R8653
1.2R 1%
R8654
1.2R 1%
R8655
1.2R 1%
R8656
1.5R 1%
R8656:
惠璶跑
BOM1.5R
ON/OF F
R8605
1K 1/8W
R8606
330K 1/8W 5%
C8609
0.1uF 50V
2N7002K
Page 30
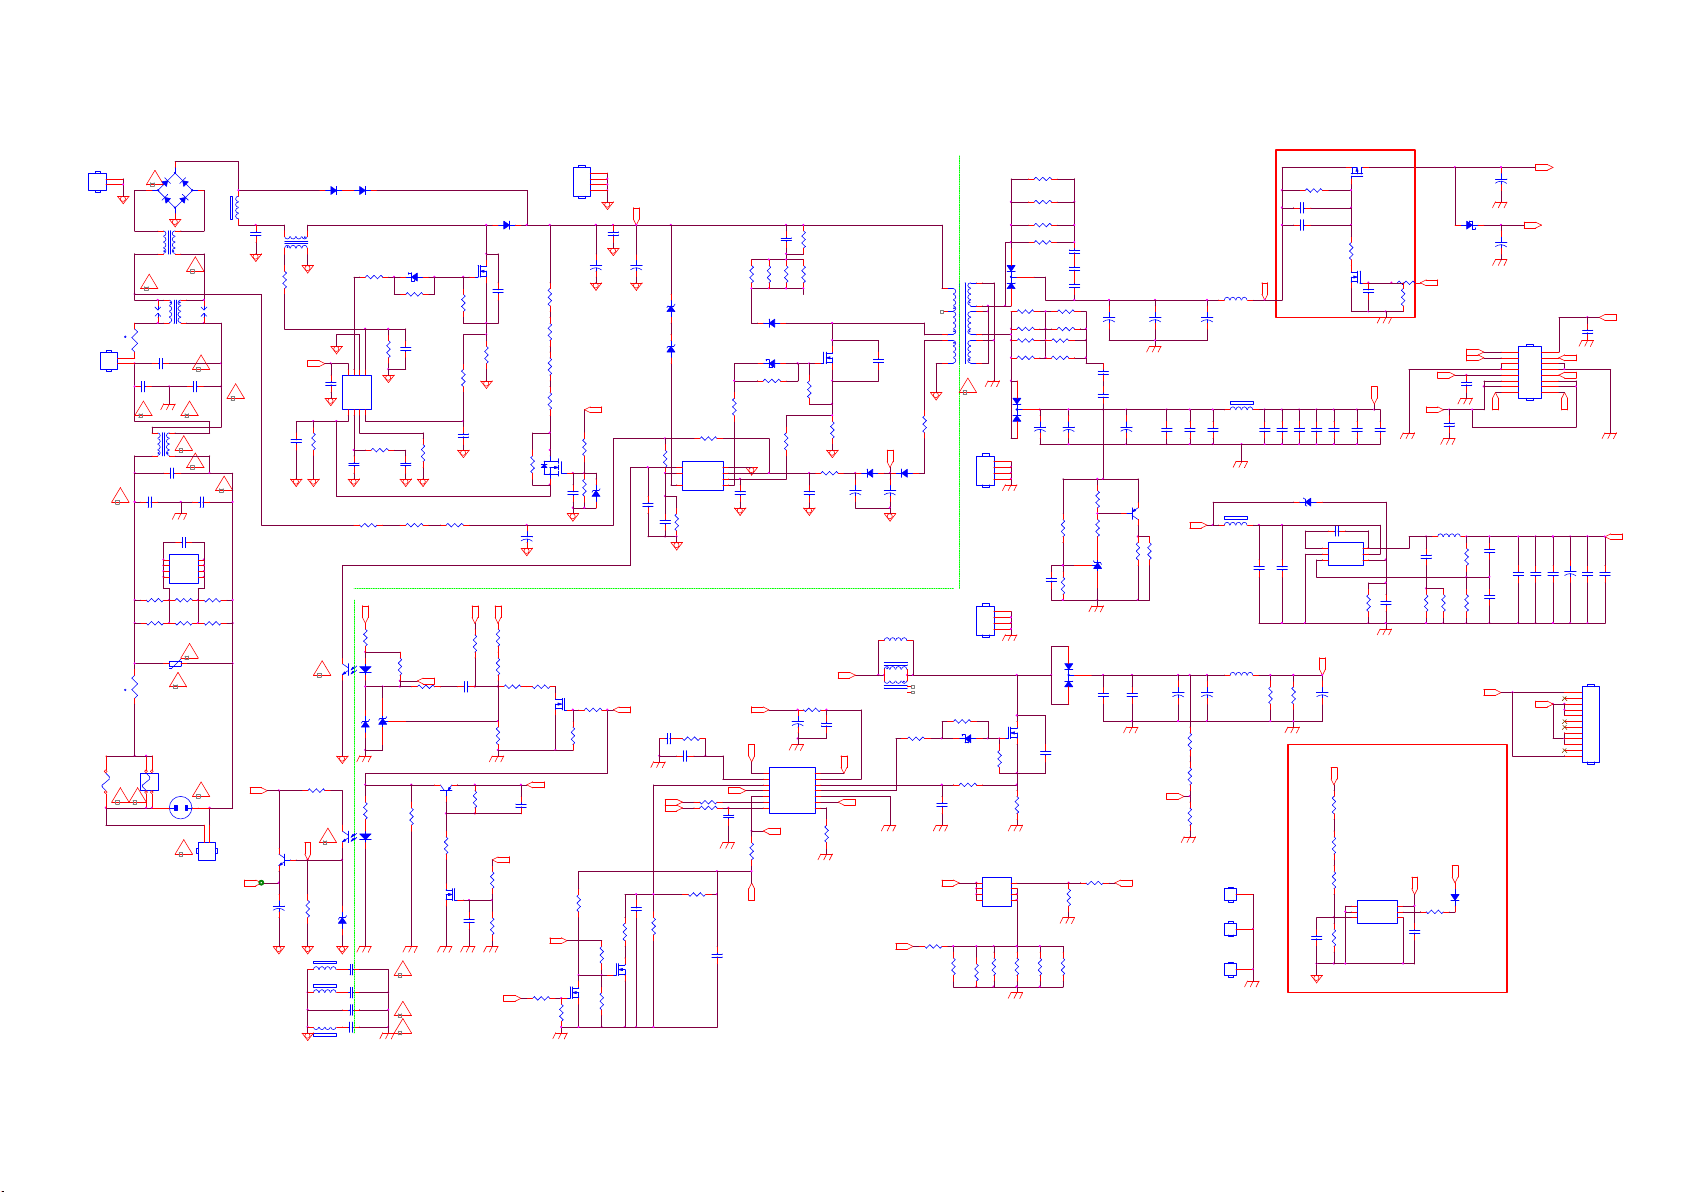
8.2 A 715G7574 PSU(For (For 43”/49” 5102 Series)
8-2-1 AC Input
HS9901
HEAT SINK
NR9901
1.5R
CONN-NC
CN9903
NR9900
1
2
DSPL-501N-A21F
2
1
1.5R
T5.0AL/250V
1
BD9901
TS10K80-01
+
!
2
3
124
!
NC
D1
D1
NC4NC
!
!
!
C9914
220PF 250V
!
C9912
47pF 250V
1
2
3
!
1
CN9902
CONN-NC
C9821
1UF 450V
DSPL-501N-A21F
SG9902
!
R9905
750K +-5% 1/4W
R9906
750K +-5% 1/4W
2
VCC_ON
!
1 2
VCC
FB9803
JUMPER
BTC4672M3
10UF 50V
EU5500 43"&40"
R9116=2M2 R
R9117=2M2 R
R9119=2M2 R
C9102=1UF/50V
R9109=130K R
Q9106
C9137
L9801
5
1
300uH
R9805
47K +-1% 1/4W
VCC_ON
C9808
100P 50V
PFC_OVP
+
-
4
3
124
L9903
0.25mH
!
12mH
SG9901
3
t
L9902
1 2
C9902
220NF 305V
C9913
220PF 250V
!
3
8mH
L9901
!
124
C9901
470nF 275V
C9911
!
47pF 250V
C9903
47PF
U9901
8
NC
7
D2
6
D2
5
R9901
CAP004DG-TL
750K +-5% 1/4W
R9903
330K 1/4W-NCR9902
750K +-5% 1/4W
R9904
330K 1/4W-NC
RV9901
12
680V
!
t
T5.0AH/250V
F9901
F9902
FUSE
NC
CN9901
1 2
3 4
!
!
1 2
AC 2P
!
4
3
C9806
100N 50V
!
R9169
2Kohm 1/4W +/ -5%
R9170
20K +-5% 1/8W
FB9906
1 2
FB9908
127R
1 2
127R-NC
FB9907
127R-NC
D9803
D9802
QG806C
QG806C
D9804
R9802
SCS160P
10R 1/8W 5%
R9803
33R 1/8W 5%
C9804
47P 50V
R9814
5K1 1/8W 1%
5
6
8
ZCD
OUT7VCC
GND
U9801
LD7591T
INV1COMP2RAMP3CS
4
R9813
10K OHM +-5% 1/8W
R9818
18.7K 1/8W 1%
C9809
47N 50V
C9810
0.47UF 50V
2.2M 1/4W
2.2M 1/4W
R9117
R9116
12V +24VS 12V
2K 1/8W 1%
R9124
12
43
U9103
R9125
EL817M(X)
2K 1/8W 5%
R9126
1K 1/8W 1%
U9102
ZD9106
BZT52-B13G
!
TL431G-AE2-R
1 2
R9150
2Kohm 1/4W +/ -5%
R9151
10K OHM +-5% 1/8W
12
43
U9104
EL817M(X)
ZD9101
1 2
BZT52-B16G
C9924
470PF 250V
!
C9921
1NF 250V-NC
C9922
1NF 250V
!
12
C9923
100PF 250V
!
12
R9806
R9810
470OHM +-5% 1/8W
C9807
220P 50V
R9812
30K 1/8W 1%
2.2M 1/4W
R9119
OVP
Q9107
MMBT3906
R9153
10K OHM +-5% 1/8W
Q9801
TK12A60W
10K OHM +-5% 1/8W
R9130
C9118
0.47UF 50V
Q9109
2N7002K
91KOHM +-1% 1/8W- NC
R9127
R9152
1K5 +-1% 1/8W
C9133
100N 50V
D9801
MUR460-28
C9819
470PF-NC
R9801
0.15R
R9808
0R05 1/4W-NC
+
R9173
0 OHM +-5% 1/8W
10K 1/8W 1%
R9134
6.2K OHM +-1% 1/8W
R9129
4.3K OHM 1%
PS_ON/OFF
R9154
10K OHM +-5% 1/8W
R9168
330K 1/8W 5%
1K OHM +-5% 1/8W-NC
A3D
100KOHM +-5% 1/8W-NC
3
2
C9102
1UF 50V
R9138
100R 1/8W 5%
12V
C9135
100N 50V-NC
A3D
1K OHM +-5% 1/8W-NC
R8612
R8611
HS9801
HEAT SINK
C9801
R9804
1MOHM +-1% 1/4W
R9807
1MOHM +-1% 1/4W
R9809
750K 1%
R9815
130K 1%
Q9802
BSS127
1
R9816
C9811 100N 50V
Q9103
2N7002K
R9148
R9149
100K 1/8W 1%
R8633
Q8605
2N7002K-NC
1
2
3
4
C9132
1NF
+
47UF 450V
VCC_ON
R9811
10K OHM +-5% 1/ 8W
1 2
ZD9103 BZT52-B18
100KOHM +-5% 1/8W
10K OHM +-5% 1/8W
R8631
C8611
100N 50V-NC
100KOHM +-5% 1/8W -NC
R8629
10K 1/8W 1%-NC
R8632
100KOHM +-5% 1/8W-NC
HV
+
0R05 1/4W
C9130
3.3NF 50V
DV12
BL_ON/OFF
Q8604
2N7002K-NC
47UF 450V
R9909
C9802
10N 50V
C9103
C8604
100N 50V
DIM
R8627
10K 1/8W 1%
ZD9107
BZT52-B39
1 2
ZD9108
BZT52-B39
1 2
R9910
4.7M 5% 1/8W
U9101
1
FB/OLP
2
BR
ST4DRV
SSC3S121A
R9109
130K 1%
R8615
10K OHM +-5% 1/8W
10N 50V-NC
C8605
R8609
0 OHM +-5% 1/8W
0 OHM +-5% 1/8W
R8610
R8626
150K 1/8W +/-1%
HOT
R91 04
C9104
82K 2W
2.2NF
POWER X'FMR
T9102
C9119
100PF-NC
VCC
D9103
PG1010R
+
C9125
47UF 50V
L8604
33uH-NC
L8601
33uH
2
1
8
1
L8603
33uH
LA5200 43"
R8604=1.3R
R8605=1.3R
R8606=1.3R
4
6
R8616
33R 1/8W 5%
C8606
470P 50V
R8630
100R 1/8W 5%
R91 12
3R9 1%
-VLED
1
2
3
4
5
!
R8617
0 OHM +-5% 1/8W
D8603
SCS160P-NC
R8623
10K OHM +-5% 1/8W
R8620
1K OHM +-5% 1/8W
0.3125V
R8607
R8602
1.2R 1%
1.2R 1%
EU5500 43" & LA5101 49"
R8604=1.0R
R8605=1.0R
R8606=1.2R
R9155
R9157
R9163
R9118
47 OHM 1/4W
47 OHM 1/4W
47 OHM 1/4W
47 OHM 1/4W
D9101
SARS01-V1
D9102
SCS160P
R9106
33R 1/8W 5%
R9105
10R 1/8W 5%
8
GND
7
VCC
6
OCP
5
C9139
330P 50V
+12V
C8601
10UF 50V
LED_FB
14
FB
13
GM
12
ADIM
11
VREF
VREF
10
FLAG
9
EN
8
DIM
C8602
1N 50V-NC
R8628
10K OHM +-5% 1/8W
VREF
C8603
1UF 16V
12
R9147
220R 1/8W 5%
C9128
100N 50V
R8614
0 OHM +-5% 1/8W
+
U8601
PF7909S
DIMOUT
VCC
CS
OUT
GND
OVP
RT
FLAG
Q9101
AOTF12N65
R9107
10K OHM +-5% 1/8W
R9101
0.2R 2W
R9135 1R 1/ 8W 5%
C9101
22uF50V
+24VS
C8612
1NF 50V
DIMOUT
1
2
3
4
5
6
7
R8624
150K 1/8W +/-1%
D9104
1N4148W
+
LED_OVP
LED_FB
COLD
12
7
9
8
11
6
HS9111
HEAT SINK
HS8601
HEAT SINK
12
5
D
6
D
7
D
8
D
AO4482L
R8603
1
2
3
4
1
2
3
4
Q8603
1.2R 1%
100 OHM 1/4W
100 OHM 1/4W
100 OHM 1/4W
3
2
D9111
TSF20U100C
1
R9132
470 OHM 1/4W
R9102
470 OHM 1/4W
R9167
470 OHM 1/4W
R9144
470 OHM 1/4W
D9121
3
FMXA-2202S
1
100K 1/8W 1%
Q8601
AOTF4126
0.3V
R8601
0R05
4
G
3
S
2
S
1
S
R8606
1.2R 1%
R9128
R9111
R9145
R9146
100 OHM 1/4W
2
+
C9121
330uF 35V
R91 62
C9150
1N 50V
R8604
1oHM 1% 1/4W
R9131
470 OHM 1/4W
R9103
470 OHM 1/4W
R9113
470 OHM 1/4W
R9114
470 OHM 1/4W
C9122
330uF 35V
R91 59
9K1 1/8W 1%
D8601
TSF20U100C
3
1
C8607
47PF-NC
R8605
1oHM 1% 1/4W
EU5500 40"
R8604=1.0R
R8605=1.0R
R8606=1.0R
C9141
2N2 50V
C9143
2N2 50V
C9146
2N2 50V
+
R9165
2K 1/8W 5%
R9166
20K +-5% 1/8W
2
C8614
3.3NF 500V-N C
R8613
100R 1/8W 5%
R8608
10K OHM +-5% 1/8W
+
C9111
470uF 25V
C9134
470pF 1KV
C9131
470pF 1KV
C9123
330uF 35V-NC
U9105
TL431G-AE2-R
C8613
R9164
3.3NF 500V-N C
+
1K 2W
DIMOUT
Q9104
BTB1424AM3
220uF 50V
LED_OVP
+
C9112
470uF 25V-NC
C9155
1uF
R9160
1K 2W
C8608
R8618
270K 1%
R8619
270K 1%
C9156
1uF
12V
+
+
C9113
470uF 25V
C9157
1uF
+
C8609
220uF 50V
2.5V
R8625
30K 1/8W 1%
L9100
3UH
1 2
FB9102
BEAD
FB9301
1 2
127R
L8602
3UH
GND1
GND-NC
GND2
GND-NC
GND3
GND-NC
+12V
+
1 2
D9107
SR34H-NC
C9145
100N 50V
10K 1/8W 1%
R9306
1.96KOHM +-1% 1/8W
+VLED
D9810
1N4148W/NC
FLAG
C9308
100P 50V
R93 05
C9313
4N7 50V/NC
C9124ㄏノ367G515X221HKT
470UF 25V
C9115
+
470UF 25VR9136
10
12
14
16
C9114
+12V_A
DIM
CN9101
CONN
2
4
6
8
C9302 10uF 16V
-VLED
C9120
1N 50V
1
3
PS_ON/OFF
5
7
9
+12V_A
11
13
15
+5.2V
+5.2V
+
C9310 22UF 50V
C9307 10uF 16V
C9312 100N 50V
C9311 1U F 16V-NC
C9309 10uF 16V
ripple noise
CN8603
12
11
10
9
8
7
6
5
4
3
2
1
CONN
R91 42
C9116
4.7UF 25V-NC
1UF
C9151
C9152
1uF
1uF-NC
ZD9102
BZT52-B5V1_R1_00001
12
1
BS
2
GND
FB3EN
C9303
+VLED
+
C8610
220uF 50V
HV
C9124
100N 50V
C9304
100N 50V
U9301
SY8113BADC
R9821
2Mohm 1/4W +/-1%/N C
R9822
2Mohm 1/4W +/-1%/N C
R9823
2Mohm 1/4W +/-1%/N C
R9824
15K 1/8W 1%/N C
Q9108
AOD4185
100KOHM +-5% 1/8W
Q9105
R9133
2N7002K
1K OHM +-5% 1/8W
PS_ON/OFF
R9143
330K 1/8W 5%
BL_ON/OFF
A3D
+12V_A
+24VS
C9154
C9153
1uF-NC
1uF-NC
6
LX
5
IN
4
R9302
3K 1/8W +/-1%
Vout = 0.6V * (1 + R9305/R9306)
= 0.6V * (1 + 10/1.96)
= 3.65V
Vout = 0.6V * (1 +R9305/R9306)
= 0.6V * (1 + 100/13)
= 5.21V
C9144
100N 50V
+12V
L9301
4.7uH
C9306
2N2 50V
0.6V
C9305
1N 50V
R9304
R9303
20R 1%
20R 1%
PFC_OVP
1
ISEN
2
GND
VSEN3IREF
U9802
LD8105GL/NC
VCC
R9825
6
VCC
5
OUT
4
510OHM +-5% 1/4W/NC
C9813
100N 50V/NC
100KOHM +-5% 1/8W
C9117
12V
C9126
C9148
C9149
1uF
1uF
1uF
C9301
100N 50V
4.7UF 25V
R8621
R8622
47K 1/4W / NC
47K 1/4W / NC
1
1
C9812
470PF 50V/NC
1
Page 31
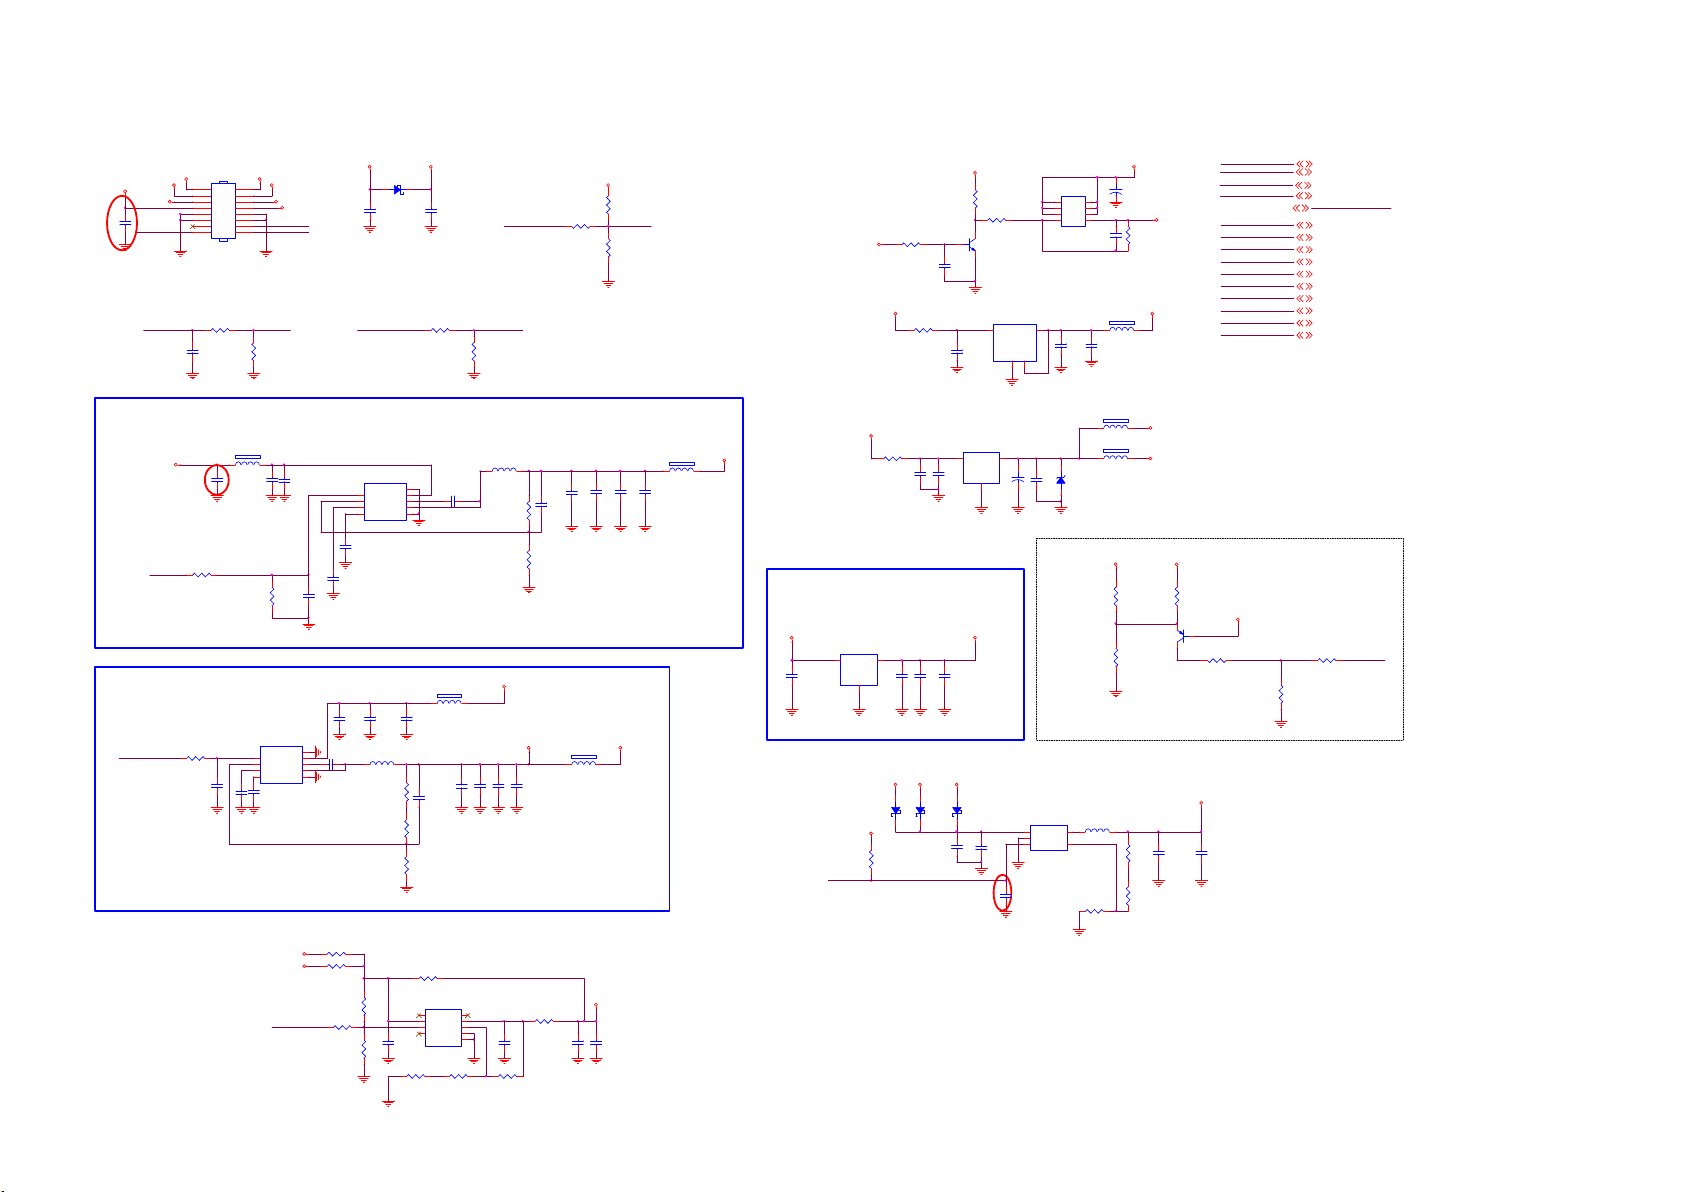
8.3 B 715G8251SSB
8-3-1 POWER SYSTEM
CN701
12V_Amp
C747
100NF 16V
BL_ON/OFF_PR E
Add by 0321
For EMI
BRIGHT ADJUST
BL_ DIMMING
Max:+3V3
Min: 0V
12V_AL
+12V
BL_ADJ_PRE
STB_PWR
2
4
6
8
10
12
14
16
CONN
C707
NC 10UF 16V
1
3
5
7
9
11
13
15
R720
0R05 1/16W
STB_PWR
R714
4.7K1/16W
12V_AL
+12V
PS_ON_PRE
BL_ADJ_PRE
BL_ADJ
12V_Amp
D703 F OR AP REGI ON USED
3V3SBSTB_PWR
D703
1 2
NC FB340M
C755
10UF 6.3V 20%
BL_ON/OFF
BL_ON/OFF_PRE BL_ON/OFF
C756
R722
0R05 1/16W
10UF 6.3V 20%
BL_O N/OFF:
Inverter on : High
Inverter of f: Low
R718
4K7 1/16W 5%
R705
100R 1/16W 5%
3V3SB
R703
4K7 1/16W 5%
R708
NC 22K 1/16W 5%
OPWRSB
BL_ADJ
BL_ON/OFF
FB_PWR_EN
7
VCCK
AVDD1V2
+5V_SW
3V3SB
AVDD3V3
DVDD3V3
+1.8V
DDRV
Wi-Fi_PWR_EN
Wi-Fi_VCC
12V-DETECT
OPWRSB 5
BL_ADJ 7, 8
BL_ON/OFF 7
OPCTRL12 7
12V-DETECT
VCCK 5
AVDD1V2 5
+5V_SW 5
3V3SB 5
AVDD3V3 5
DVDD3V3 5
+1.8V 5
DDRV 5
Wi-Fi_PWR_EN 5
Wi-Fi_VCC 5
Q702
D
D
D
G4S
AON4421
D
D
D
8
7
6
5
C702
100nF 50V
+5V_SW
+
1 2
FB701
120R 3A
C705
10uF 16V
C701
220UF 16V
R709
100K 1/10W
5VSB
3V3SB
100nF 50V
C703
R713
0R05 1/10W
C704
1uF 10V
5VSB
R704
10K 1/10W
R707
47K 1/10W 5%
Q703
BC847N3
U701
3
AP1117E33L-13-77
1
2
3
VOUT2VIN
C706
100NF 16V
ADJ(GND)
4
1
4
OPWRSB:
Normal: High
Stand_by:
Low
OPWRSBPS_ON_PRE
(+5V_SW ON/OFF):
Norm al: H igh
Stand _By: Low
VCCK
5VSB
R711
1K 1/10W
+12V to 5VSB
FB705
+12V
Add by 0321
For EMI
+12V
1 2
120R 6A
C748
100NF 16V
R730 1 00K 1/16W 5%
NC 22K 1/1 6W 5%
12V to Cor e Power
PS_ON_PRE
R701
0R05 1/16W
C733
1UF 10% 16V
1UF 10% 16V
Vout=0.7 65x (1+6.8K/12 K) =1.203V
C735
C719
10UF 16V
R732
1
2
3
U705
EN
FB
VREG5
SS4GND
RT6206BHGSP
C736
8.2NF 50V
STB_PWR
Wi-Fi_PWR_EN
C720
100NF 16V
C727
1UF 16V
9
GND
8
C731
VIN
7
100N 16V
BOOT
6
SW
5
5VSB
R1068
0R05 OHM R1072
10K 1/10W 5%
R745
10K 1/16W 5%
10K 1/10W 5%
1
2
3
C721
8.2NF 50V
C722
1UF 16V
C728
100N 16V
R1070
NC 0R05 O HM
R744
R746
U703
EN
FB
BOOT
VREG5
SS4GND
RT6206BHGSP
C729
10uF 16V
L702
3.3uH 30mOHM 6A
(650KHz)
R737
6K8 1%
R738
0R05 1/16W
R742
12K 1%
GND
VIN
SW
C750
10UF 10V
L701
C713
100NF 16V
3.3UH
124K 1%
22K 1%
R724
R727
9
8
7
6
5
Vout=0.76 5x (1+124K/2 2K) = 5.07V
GND
GND
ADJ
100N 16V
C737
R748
13K 1%
10UF 10V
C738
5
6
7
8
9
+12V
VCCK
10UF 10V
10UF 10V
C739
C740
C752
22UF 10V
R749
120K 1%
Vout=0.5x (1+R1/R2)
C730
10uF 16V
R747
330R 1%
C741
22P 50V
3
2
1
FB708
1 2
120R 3A
NC 0R05
RT9048GSP
NC4NC
VIN
VOUT
EN
NC
U710
C718
22PF 50V
120R 3A
R1071
0R05 OHM
C753
10UF 10V
C714
100NF 16V
FB709
1 2
C715
10UF 10V
Wi-Fi_VCC
AVDD1V2
C754
100NF 16V
C716
10UF 10V
C717
10UF 10V
FB704
1 2
120R 6A
FB702
120R 3A
1 2
+5V_SW
R723
5VSB
0R05 1/10W
C710
100NF 16V
U702
AZ1084CS2-3.3TRG1
C711
10uF 16V
VIN3VOUT
1
GND
100UF 16V
2
C712
ZD701
C709
+
100NF 16V
1 2
BZT52-B3V6
+5V to 1.8V FOR EMMC
DVDD3V3
10UF 6.3V
C723
DRAM Powe r
U704
AZ1117CD-1.8TRG1
3
OUT2IN
GND
1
STB_PWR
12
D704
NC FB340M
3V3SB
R734
4.7K1/16W
FB_PWR_EN
H:ENAB LE FB
L:DISA BLE FB
C724
10UF 6.3V
10UF 6.3V
C725
5VSB +5V_SW
12
D701
FB340M
C742
100NF 16V
+1.8V
C726
100NF 16V
LT: D7 04 NC
AP: D7 01, D702 NC
12
D702
FB340M
C743
10uF 16V
Add b y 0321
1
VIN
2
GND
EN3VFB
C749
NC 10UF 10V
U706
G5695T11U
5
LX
2.2uH
4
FB703
120R 3A
1 2
R725
L703
R741
10K 0.5% 1/16W
22K 1%
R728
15K 1%
R736
15K 1%
R739
0R05 1/16W
AVDD3V3
DVDD3V3
12V drop detect (3/18)
+12V12V_Amp
R726
Low drop detect
NC/22K 1%
3V3SB
Q706
BTA1576S3
R731
C732
10UF 6.3V 20 %
DDRV
C734
NC/100N 1 6V
22K 1%
R733
100K 1/16W 5%
R729
12V-DETECT
0R05 1/16W
H:NORM AL
L:12V DROP
Vout = 0.6x(1+R1/R2)1.5V
Vout = 0.6*(1+15/10)=1.5V
Page 32
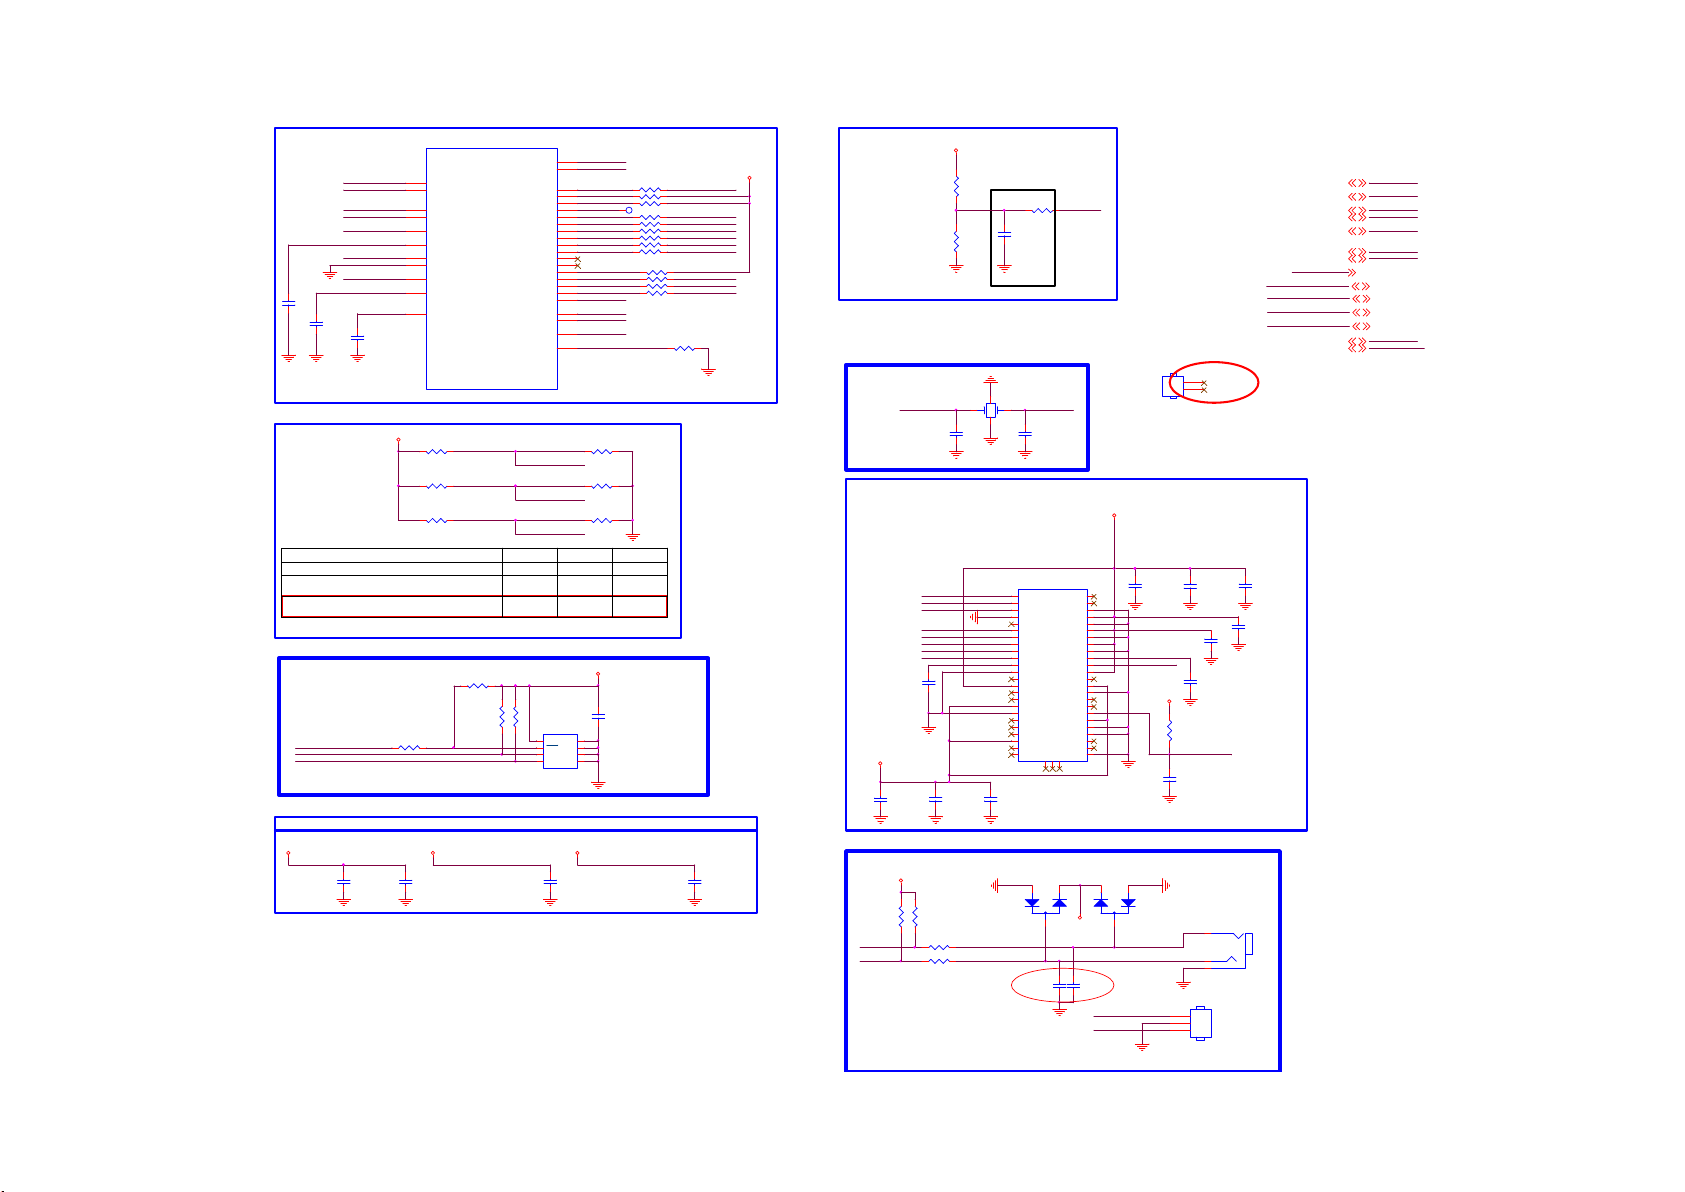
8-3-2 PERIPHERAL
U401-6
AE26
OSDA0
AH26
OSCL0
B28
XTALI
B27
XTALO
J22
AVDD33_REG_STB
J1
VCC3IO_EMMC
H24
AVDD33_RGB_STB
K21
AVSS33_RGB
J23
AVDD33_PLL_STB
U25
AVDD10_LDO EMMC_CLK
AVDD10_ELDO
C4004
4.7UF 10% 10V
Y26
AVDD10_LDO
AVDD10_ELDO
C4002
1UF 16V
OSDA0
OSCL0
XTALI
XTALO
AVDD33_REG_STB
VCC3IO_EMMC+1.8V
AVDD33_RGB_STB
AVSS33_RGB
AVDD33_PLL_STB
C4003
4.7UF 1 0% 10V
close to main chip
MT5800WUEJ
STRAPPING
STRAPPING
ICE mode + 24M + serial boot
ICE moce + 24M + ROM to 60bit ECC Nand boot
ICE moce + 24M + ROM to eMMC boot from
eMMC pins(share pins w/s NAND)
SYST EM EEPROM
SYS_EEPROM_WP
OSCL0
OSDA0
3V3SB
0R05 1/16W
R4015
NC 10K 1/ 16W 5%
R4017
NC 10K 1/ 16W 5%
R4019
NC 10K 1/ 16W 5%
R4026
4K7 1/16W 5%
Analog Po wer
AVDD33_REG_STB
C4021
10UF 10V
3V3SB
C4022
100NF 16V
R4021
R4023
2.2K 1/10W
AVDD33_RGB_STBAVDD33_REG_STB
T25
U0TX
T24
U0RX
J2
POWE#
N7
POOE#
M7
POCE1#
L7
POCE0#
P3
PDD7
N1
PDD6
N2
PDD5
N4
PDD4
M3
PDD3
L1
PDD2
N6
PDD1
P6
PDD0
N5
PARB#
L3
PACLE
K3
PAALE
P4
EMMC_CLK
P7
EMMC_RST
R26
OPWRSB
L25
ORESET#
L26
OIRI
AH27
FSRC_WR
R4016
LED_PWM0
LED_PWM1
OPCTRL3
LED_PWM0
R4024
2.2K 1/10W
M24128-BRMN6TP
10K 1/16W 5%
R4018
10K 1/16W 5%
R4020
10K 1/16W 5%
LED_PWM1 OPCTRL3
0
0 1
1
0 0
0
0
C4013
1UF 16V
U402
1
8
E0
VCC
2
7
E1
WC
3
6
E2
SCL
5
VSS4SDA
3V3SB3V3SB
C4023
100NF 16V
U0TX
U0RX
POWE__B
R4001 47R 1/ 16W 5%
POOE__B
R4092 4K7 1/16W 5%
POCE1__B
R4091 4K7 1/16W 5%
TP2 TP
PDD7
R4004 47R 1/ 16W 5%
PDD6
R4005 47R 1/ 16W 5%
PDD5
R4006 47R 1/ 16W 5%
PDD4
R4007 47R 1/ 16W 5%
PDD3
R4009 47R 1/ 16W 5%
PDD2
R4010 47R 1/ 16W 5%
PARB__B
R4093 4K7 1/16W 5%
PACLE
R4011 47R 1/ 16W 5%
PAALE
R4012 47R 1/ 16W 5%
R4013 47R 1/ 16W 5%
EMMC_RST
OPWRSB
ORESETB
OIRI
FSRC_WR
0
DVDD3V3
I2C Address "A0"
Pin7 WP
HI = > Disable wr ite
LO = > Enable Write
AVDD33_PLL_STB
POWE__B_E
PDD7_E
PDD6_E
PDD5_E
PDD4_E
PDD3_E
PDD2_E
PACLE_E
PAALE_E
EMMC_CLK_E
E-Fuse
R4014 4K7 1/16W 5%
C4024
100NF 16V
AVDD3V3
Reset
3V3SB
R4002
R4008
22K 1%
Close to U401 < 500mil
24MHz CRYSTAL
XTALI
EMM C 4GB
PAALE_E
PACLE_E
PDD2_E
PDD3_E
PDD4_E
PDD5_E
PDD6_E
PDD7_E
VDDI
C4012
1uF 10V
DVDD3V3
C4016
C4015
3V3SB
100NF 16V
R4028
4K7 1/16W 5%
R4029
100R 1/16W 5%
100R 1/16W 5%
R4030
10UF 6. 3V 20%
R4027
4K7 1/16W 5%
U0RX U0RX#
16K 1%
X401
1
24MHz
2 4
C4005
30PF
C4017
100NF 16V
U0TX#U0TX
Add for EMI
2016-0803
1K 1/16W 5%
C4001
100NF 16V
3
A3
DAT0
A4
DAT1
A5
DAT2
A6
VSS
A7
NC
B2
DAT3
B3
DAT4
B4
DAT5
B5
DAT6
B6
DAT7
C2
VDDI
C4
Vssq
C5
NC
C6
Vccq
D4
A1 index
E5
NC
E6
Vcc
E7
Vss
E8
NC
E9
NC
E10
NC
F5
Vcc
F10
NC
G3
NC
LBAV99LT1G
D401
close to mainchip
less than 500mil
4
OPWRSB
R4003
ORESETB
HS401
1
2
XTALO
C4006
30PF
+1.8V
U403
P10
NC
P7
NC
P6
Vssq
P5
Vccq
P4
Vssq
P3
Vccq
N5
Vssq
N4
Vccq
N2
Vssq
M6
CLK
M5
CMD
M4
Vccq
K10
NC
K9
Vcc
K8
Vss
K7
NC
K6
NC
K5
RSTN
J10
Vcc
J5
VSS
H10
Vss
H5
DS
G10
NC
G5
Vss
NCB1NCC1NC
THGBMDG5D1LBAIT
N1
1
2
2
3V3SB
3
C4180
C4179
1NF
1NF
U0TX#
U0RX#
3
C4007
100NF 16V
EMMC_CLK_E
POWE__B_E
1
LBAV99LT1G
D402
---><---|>
---><---|>
DVDD3V3
HEAT SINK
R4025
4K7 1/16W 5%
C4014
C4008
10UF 6.3V 20%
C4011
100NF 16V
C4025
NC 22P 50V
EMMC_RST
NC 10UF 6.3V 20%
CN401
2
3
1
PHONE JAC K
CN403
1
2
3
NC C ONN
7
SYS_EEPROM_WP
14
OSCL0
14
OSDA0
7
OPCTRL3
7,12
LED_PWM1
7,12
LED_PWM0
OIRI
3V3SB
AVDD3V3
DVDD3V3
+1.8V
U0RX
U0TX16
Add by 2016-0803
For EMI
R4179 & R4180_Delete 2016-0804
C4009
100NF 16V
C4010
100NF 16V
OPWRSB
SYS_EEPROM_WP
OSCL0
OSDA0
OPCTRL3
LED_PWM1
LED_PWM0
OIRI
3V3SB 5
AVDD3V3 5
DVDD3V3 5
+1.8V 5
U0RX
U0TX
12
Page 33
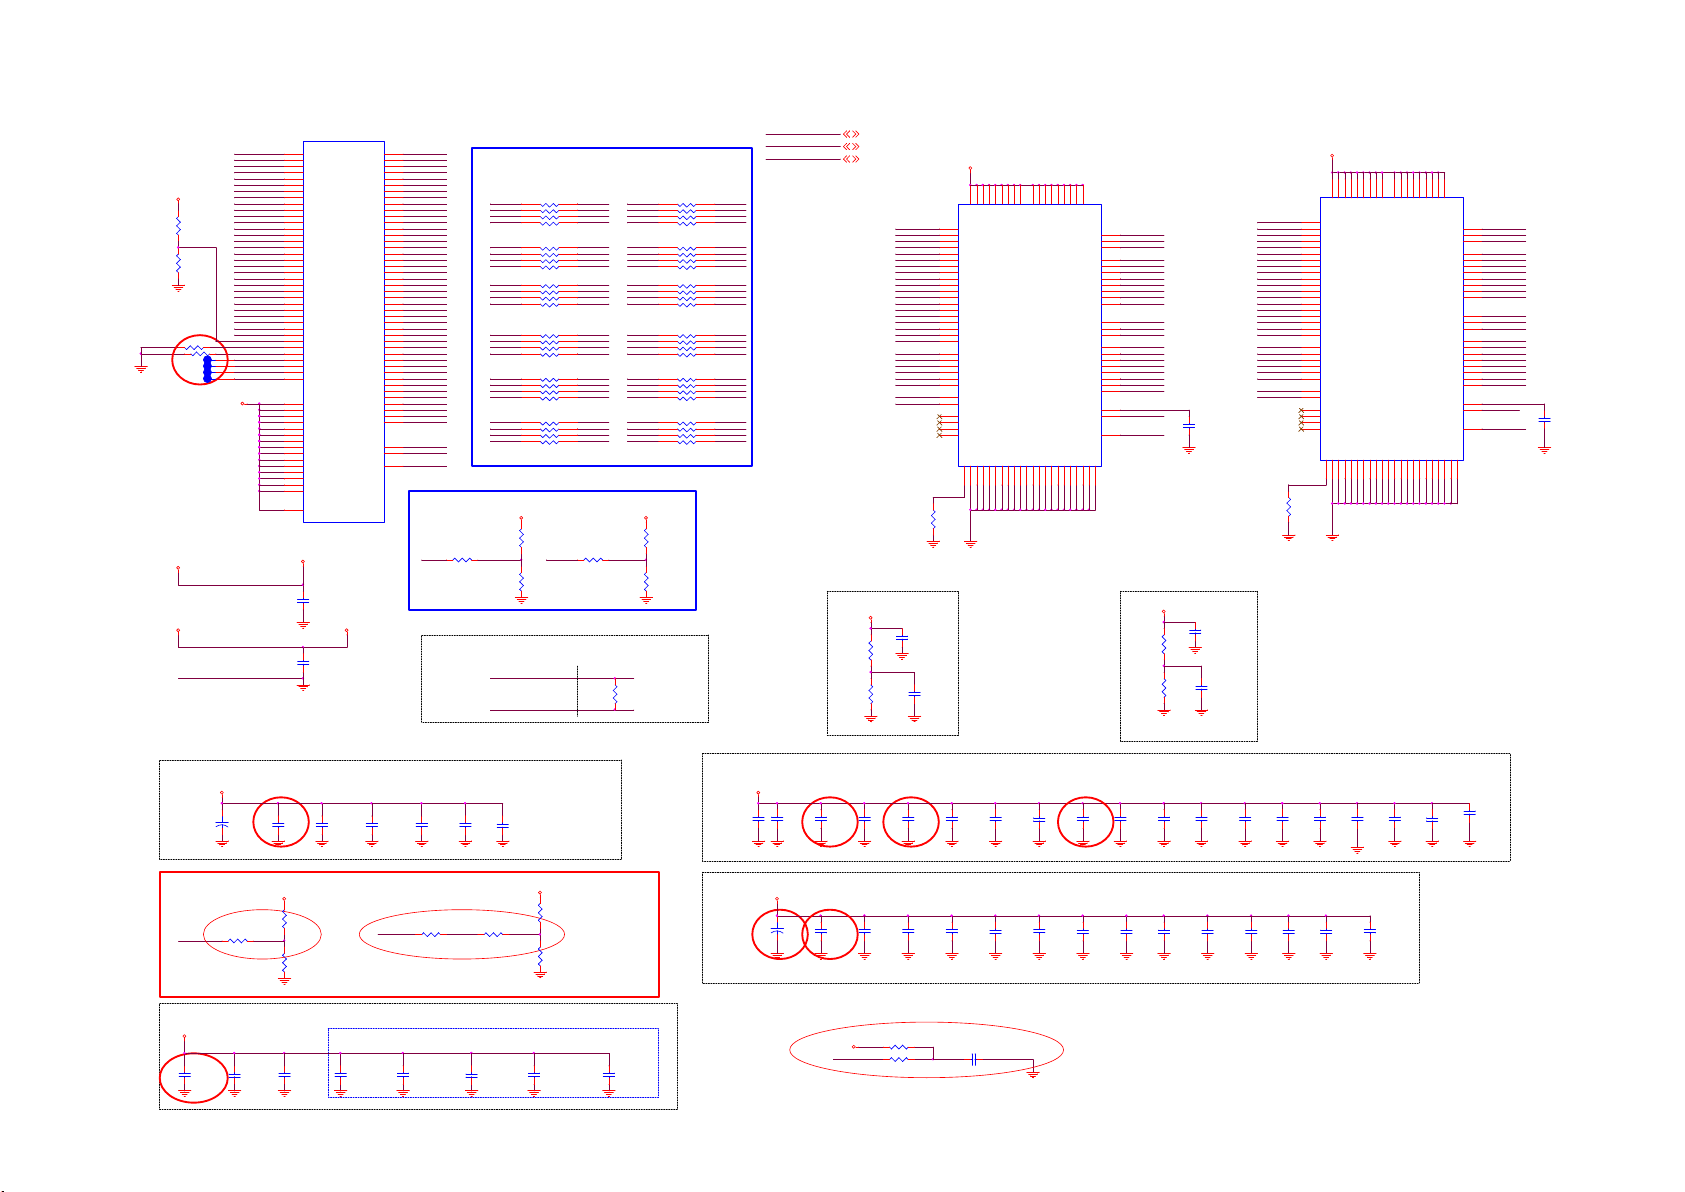
8-3-3 DRAM
For MCM Dram Reserve
DDRV
R4047
NC/1K
DDRVREF_A2
R4049
NC/1K
R4050 120 OHM 1/16W
R4051 47R 1/16W 5%
1
TP1DDR_DEBUG_PAD
1
TP95DDR_DEBUG_PAD
1
TP94DDR_DEBUG_PAD
1
TP93DDR_DEBUG_PAD
DDRV
AVDD3V3
AVSS12_DDR
RA0
RA1
RA2
RA3
RA4
RA5
RA6
RA7
RA8
RA9
RA10
RA11
RA12
RA13
RA14
RA15
RBA0
RBA1
RBA2
RCS
RCSD
RRAS
RCAS
RWE
RODT
RCKE
RRESET
RCLK0
RCLK0B
DDRVREF_A1
DDRVREF_A2
ARTP
ARTN
MEMTP
MEMTN
TP_HPCPLL
TN_HPCPLL
AVDD33_DDR
AVDD12_DDR
DDRVA
AB4
AC9
AE3
AE6
AD9
AE4
AC11
AD5
AE9
AE5
AE7
AD11
AE12
AC5
AE10
AE11
AD7
AE8
AC7
V4
W4
AA5
AA6
AC4
W5
W6
U6
AA4
Y4
U5
AE13
W9
W8
Y8
Y9
AC20
AD20
R4
T4
R5
T5
R6
T6
R7
T7
R8
V8
R9
T9
U9
V9
AB12
T8
AVDD33_DDR
U401-1
RA0
RA1
RA2
RA3
RA4
RA5
RA6
RA7
RA8
RA9
RA10
RA11
RA12
RA13
RA14
RA15
RBA0
RBA1
RBA2
RCS#
RCSD#
RRAS#
RCAS#
RWE#
RODT
RCKE
RRESET
RCLK0
RCLK0#
DDRVREF _A1
DDRVREF _A2
ARTP
ARTN
MEMTP
MEMTN
TP_HPCPLL
TN_HPCPLL
DDRV
DDRV
DDRV
DDRV
DDRV
DDRV
DDRV
DDRV
DDRV
DDRV
DDRV
DDRV
DDRV
DDRV
DDRV
DDRVA
MT5800WUEJ
C4028
1UF 6.3V
C4033
100NF 16V
AVDD33_DDR
AVDD12_DDR
AVSS12_DDR
AVDD12_DDRVCCK
AA3
RDQM0RDQM0
RDQM0
Y2
RDQS0RDQS0
RDQS0
Y1
RDQS0B
RDQS0#
U3
RDQ0RDQ0
RDQ0
AE2
RDQ1RDQ1
RDQ1
T3
RDQ2
RDQ2
AE1
RDQ3
RDQ3
R2
RDQ4RDQ4
RDQ4
AF2
RDQ5RDQ5
RDQ5
R1
RDQ6
RDQ6
AF1
RDQ7
RDQ7
W2
RDQM1RDQM1
RDQM1
AB3
RDQS1
RDQS1
AB2
RDQS1B
RDQS1#
AD2
RDQ8
RDQ8
U1
RDQ9
RDQ9
AD3
RDQ10
RDQ10
U2
RDQ11RDQ11
RDQ11
AC3
RDQ12RDQ12
RDQ12
V1
RDQ13
RDQ13
AC1
RDQ14RDQ14
RDQ14
V2
RDQ15RDQ15
RDQ15
AF8
RDQM2RDQM2
RDQM2
AG7
RDQS2RDQS2
RDQS2
AH7
RDQS2B
RDQS2#
AG3
RDQ16
RDQ16
AG12
RDQ17
RDQ17
AF3
RDQ18
RDQ18
AH12
RDQ19
RDQ19
AG2
RDQ20
RDQ20
AG13
RDQ21
RDQ21
AH2
RDQ22
RDQ22
AH13
RDQ23
RDQ23
AG6
RDQM3
RDQM3
AF9
RDQS3
RDQS3
AG9
RDQS3B
RDQS3#
AF12
RDQ24
RDQ24
AH4
RDQ25
RDQ25
AF11
RDQ26
RDQ26
AG4
RDQ27
RDQ27
AG10
RDQ28
RDQ28
AF5
RDQ29
RDQ29
AH10
RDQ30
RDQ30
AF6
RDQ31
RDQ31
U4
AVDD33_DDR
Y15
AVDD12_DDR
W15
AVSS12_DDR
Support asymmetry /symmetry DRAM
RCS 1_RCS 2_RCSD
R4054
47R 1/16W 5%
AD/CM Damping
RP401
4
5
2_WE#
2_RAS#
RP403
2_A7
2_A2
2_A5
2_A0
RP405
2_A3
2_A9
2_A13
RRESET
RP407
2_BA1
2_A10
2_BA0
2_BA2
RP409
2_A8
2_A14
2_A4
2_A1
RP411
2_A15
2_A12
2_A11
2_A6
DDRV
Differential Clock
NEAR Main Chip
RCLK0
3
6
2
7
1
8
22R
4
5
3
6
2
7
1
8
22R
4
5
3
6
2
7
1
8
22R
4
5
3
6
2
7
1
8
22R
4
5
3
6
2
7
1
8
22R
4
5
3
6
2
7
1
8
22R
R4052
NC 100R 1/16W 5%
RCSD
R4056
NC 100R 1/16W 5%
RWE
2_RODT2_RODT
RCAS
RRAS
RA7
RA2
RA5
RA0
RA3
RA9
RA13
RBA1
RA10
RBA0
RBA2
RA8
RA14
RA4
RA1
RA15 RA15
RA12
RA11
RA6
R4055
47R 1/16W 5%
NEAR DRAM
RP402
4
1_WE# RWE
3
2
1_CAS#2_CAS#
1
1_RAS#
RP404
4
1_A7
3
1_A2
2
1_A5
1
1_A0
RP406
4
1_A3
3
1_A9
2
1_A13
1
RP408
4
1_BA1
3
1_A10
2
1_BA0
1
1_BA2
RP410
4
1_A8
3
1_A14
2
1_A4
1
1_A1
RP412
4
1_A15
3
1_A12
2
1_A11
1
1_A6
DDRV
R4053
NC 100R 1/16W 5%
R4096
NC 100R 1/16W 5%
RCLK0
R4086
100R 1/16W 5%
RCLK0BRCLK0B
VCCK
AVDD3V3
DDRV
5
6
2_RODT2_RODT
7
RCAS
8
RRAS
22R
5
RA7
6
RA2
7
RA5
8
RA0
22R
5
RA3
6
RA9
7
RA13
8
RRESETRRESETR RESET
22R
5
RBA1
6
RA10
7
RBA0
8
RBA2
22R
5
RA8
6
RA14
7
RA4
8
RA1
22R
5
6
RA12
7
RA11
8
RA6
22R
VCCK 5
AVDD3V3 5
DDRV 5
1_A0
1_A1
1_A2
1_A3
1_A4
1_A5
1_A6
1_A7
1_A8
1_A9
1_A10
1_A11
1_A12
1_A13
1_A14
1_A15
1_BA0
1_BA1
1_BA2
1_RAS#
1_CAS#
1_WE#
1_RODT
RRESET
RCKE
RCLK0
RCLK0B
N3
P7
P3
N2
P8
P2
R8
R2
T8
R3
L7
R7
N7
T3
T7
M7
M2
N8
M3
J3
K3
L3
K1
T2
K9
J7
K7
J1
J9
L1
L9
A_ZQ1
R4083
240R 1%
DDRV
A0
A1
A2
A3
A4
A5
A6
A7
A8
A9
A10
A11
A12
NC
NC
NC
BA0
BA1
BA2
/RAS
/CAS
/WE
ODT
/RESET
CKE
CK
/CK
NC1
NC2
NC3
NC4
ZQ
L8
R9
T9
DDR3#1
H9
VDDB2VDDD9VDDG7VDDK2VDDK8VDDN1VDDN9VDDR1VDD
VSSA9VSSE1VSSG8VSSJ2VSSJ8VSSM1VSSM9VSSP1VSSP9VSST1VSS
VSS
B3
G9
VDDQA1VDDQA8VDDQC1VDDQC9VDDQD2VDDQE9VDDQF1VDDQH2VDDQ
DQSU
/DQSU
DQSL
/DQSL
VREFDQ
VREFCA
DQU0
DQU1
DQU2
DQU3
DQU4
DQU5
DQU6
DQU7
DQL0
DQL1
DQL2
DQL3
DQL4
DQL5
DQL6
DQL7
U407
NT5CB256M16DP-EK
D3
DMU
C7
B7
D7
C3
C8
C2
A7
A2
B8
A3
E7
DML
F3
G3
E3
F7
F2
F8
H3
H8
G2
H7
H1
M8
L2
/CS
VSSQB9VSSQB1VSSQD1VSSQD8VSSQE2VSSQE8VSSQF9VSSQG1VSSQ
RDQM1
RDQS1
RDQS1B
RDQ8
RDQ9
RDQ10
RDQ11
RDQ12
RDQ13
RDQ14
RDQ15
RDQM0
RDQS0
RDQS0B
RDQ0
RDQ1
RDQ2
RDQ3
RDQ4
RDQ5
RDQ6
RDQ7
DDRVREF _A1
A_VREFCA1
1_RCS
C4155
100NF 16V
2_A0
2_A1
2_A2
2_A3
2_A4
2_A5
2_A6
2_A7
2_A8
2_A9
2_A10
2_A11
2_A12
2_A13
2_A14
2_A15
2_BA0
2_BA1
2_BA2
2_RAS#
2_CAS#
2_WE#
2_RODT
RRESET
1_RCKE
RCLK0
RCLK0B
A_ZQ2
R4090
240R 1%
N3
P7
P3
N2
P8
P2
R8
R2
R3
R7
N7
M7
M2
N8
M3
K3
K1
K9
K7
T8
L7
T3
T7
J3
L3
T2
J7
J1
J9
L1
L9
DDRV
A0
A1
A2
A3
A4
A5
A6
A7
A8
A9
A10
A11
A12
NC
NC
NC
BA0
BA1
BA2
/RAS
/CAS
/WE
ODT
/RESET
CKE
CK
/CK
NC1
NC2
NC3
NC4
ZQ
L8
R9
T9
DDR3#2
H9
VDDB2VDDD9VDDG7VDDK2VDDK8VDDN1VDDN9VDDR1VDD
U408
NT5CB256M16DP-EK
VDDQA1VDDQA8VDDQC1VDDQC9VDDQD2VDDQE9VDDQF1VDDQH2VDDQ
D3
RDQM3
DMU
C7
RDQS3
DQSU
B7
RDQS3B
/DQSU
D7
RDQ24
DQU0
C3
RDQ25
DQU1
C8
RDQ26
DQU2
C2
RDQ27
DQU3
A7
RDQ28
DQU4
A2
RDQ29
DQU5
B8
RDQ30
DQU6
A3
RDQ31
DQU7
E7
RDQM2
DML
F3
RDQS2
DQSL
G3
RDQS2B
/DQSL
E3
RDQ16
DQL0
F7
RDQ17
DQL1
F2
RDQ18
DQL2
F8
RDQ19
DQL3
H3
RDQ20
DQL4
H8
RDQ21
DQL5
G2
RDQ22
DQL6
H7
RDQ23
DQL7
H1
DDRVREF_A2
VREFDQ
M8
A_VREFCA2
VREFCA
L2
/CS
VSSQB9VSSQB1VSSQD1VSSQD8VSSQE2VSSQE8VSSQF9VSSQG1VSSQ
VSSA9VSSE1VSSG8VSSJ2VSSJ8VSSM1VSSM9VSSP1VSSP9VSST1VSS
VSS
B3
G9
2_RCSD
C4156
100NF 16V
DRAM NT5CB64M16GP-EK 4G FBGA-96
DDR3#1 Ref Volt.
DDRV
R4094
1Kohm 1/16W +/-1%
A_VREFCA1
R4095
1Kohm 1/16W +/-1%
C4031
100NF 16V
C4036
100NF 16V
DDR3#2 Ref Volt.
DDRV
R4089
1Kohm 1/16W +/ -1%
A_VREFCA2
R4154
1Kohm 1/16W +/ -1%
C4029
100NF 16V
C4034
100NF 16V
CAPs for DRAM IO Power ( Close to MT5582 )
DDRV
22uF 6.3V
DDRV
R4068
NC/100R 1/16W 5%
R4071
NC/100R 1/16W 5%
C4073
100NF 16V
C4040
4.7UF 10% 10VC4039
C4074
100NF 16V
DDRV
C4071
10UF 10V
+
RCKE
56R 1/16W 5%
Close to Main Chip
C4038
100UF 16V
R401
C4072
1UF 6.3V
1_RCKE
C4042
100NF 16V
100NF 16V
R403
RODT 1_RODT
0R05 1/16W
C4075
100NF 16V
C4079
100NF 16V
R402
C4076
1UF 6.3V
10NF 50V
2_RODT
56R 1/16W 5%
DDRV
R4087
NC/100R 1/16W 5%
R4072
NC/100R 1/16W 5%
C4077
100NF 16V
modify by 11/26
Main Chip Bottom Side
C4078
10UF
C4170
22uF 6.3V
cost down by 11/27
DDRV
cost down by 11/27
CAPs for DRAM IO Power ( Close to DDR#1 )
C4045
10UF 10V
C4063
10UF 10V
R4088
R4070
0R05 1/16W
C4046
1UF 6.3V
C4064
100NF 16V
NC/47K 1/ 16W 5%
C4044
C4043
22uF 6.3V
22uF 6.3V
CAPs for DRAM IO Power ( Close to DDR#2 )
DDRV
+
C4061
C4062
NC 100UF 16V
22uF 6.3V
DDRV
RRESET
C4047
100N 50V
C4065
100NF 16V
C4070 100NF 16V
C4048
100NF 16V
C4066
1UF 6.3V
C4049
100NF 16VC4081
C4067
100NF 16V
2014/10/22 Modify
C4158
22uF 6.3V
C4068
100NF 16V
C4050
4.7UF 10% 16V
C4069
100NF 16V
C4051
100NF 16V
C4154
100NF 16V
C4052
100NF 16V
C4157
100NF 16V
C4053
100NF 16V
C4150
100NF 16V
C4054
NC 100NF 16VC4041
100NF 16V
C4151
C4055
100NF 16V
C4153
1UF 6.3V
C4084
100NF 16V
C4152
NC/22UF 6.3V
C4085
100NF 16V
C4086
1UF 6.3V
C4087
100NF 16V
Page 34
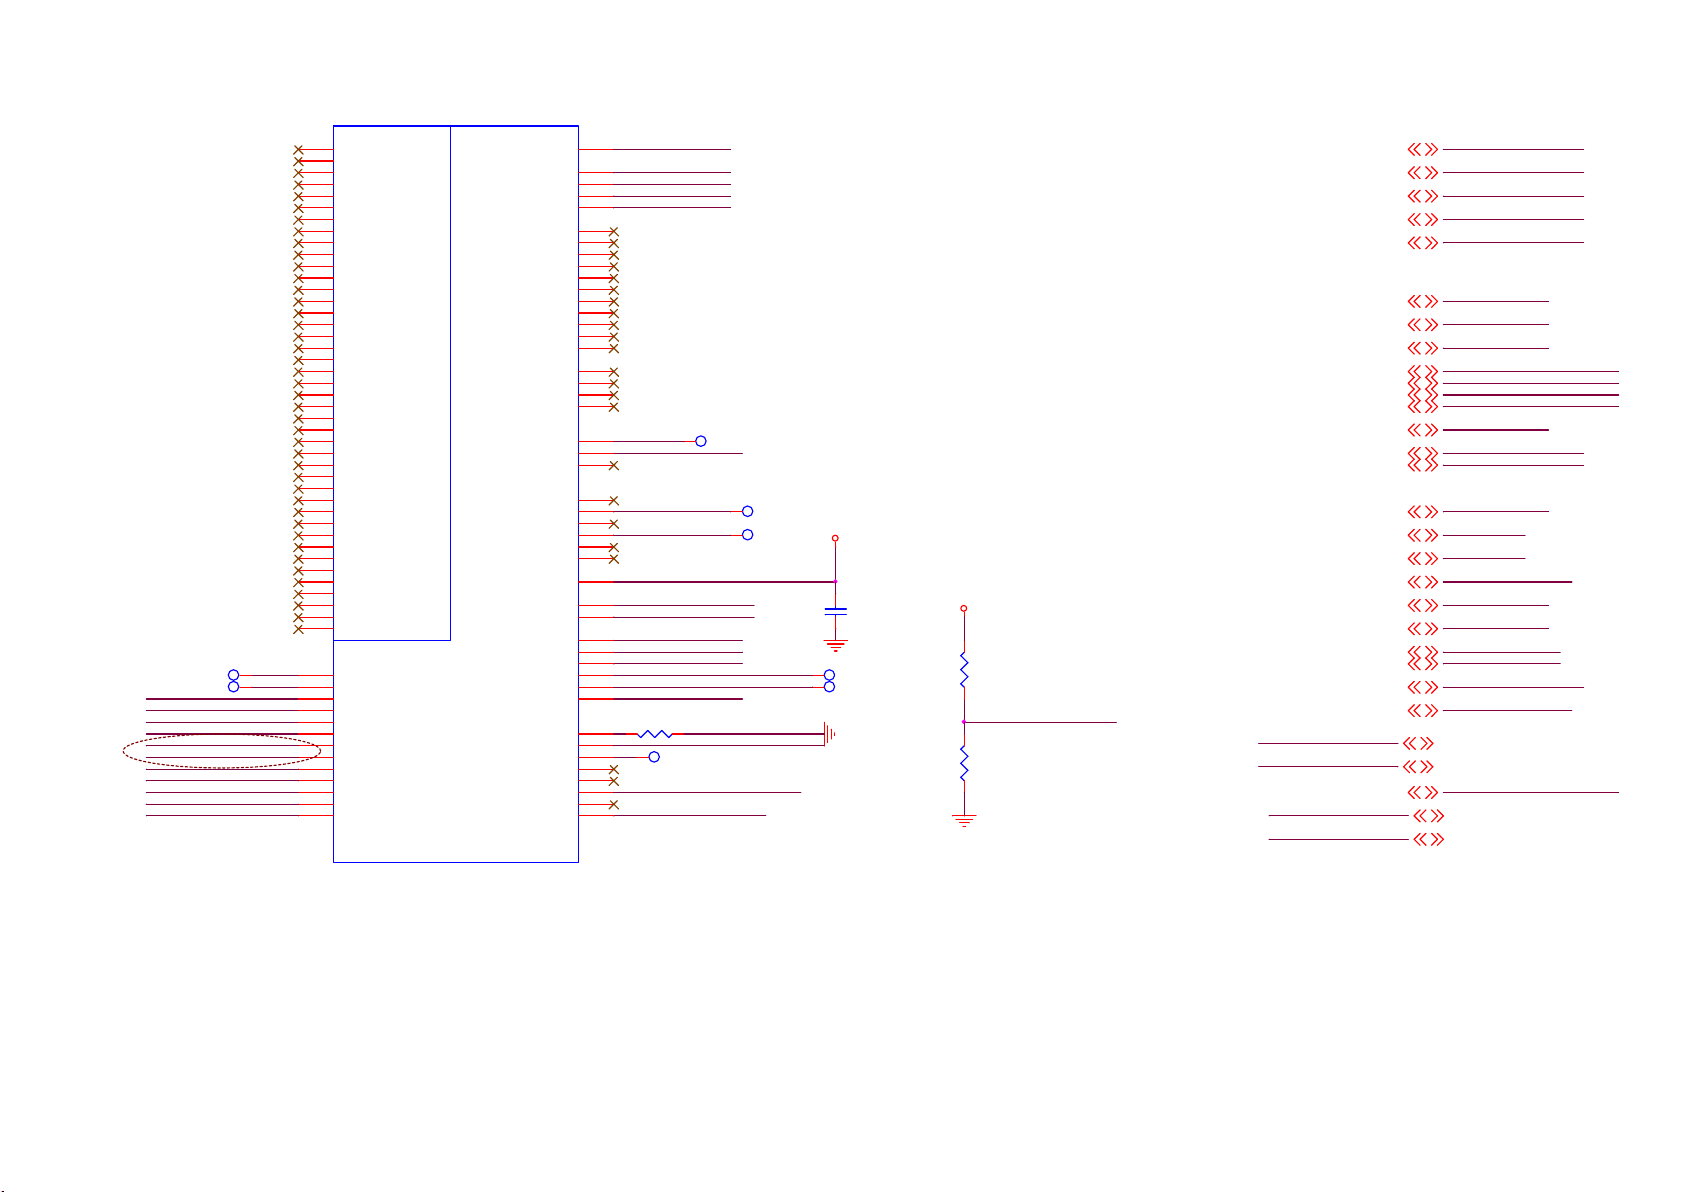
8-3-4 MII/GPIO
2016-0803
TP97TP
TP96TP
OPCTRL2Wi-Fi_PW R_EN
OPCTRL3
OPCTRL4RESET_RF4CE#
OPCTRL5WIF I_IRQn
DETECT_YPBPR n
WOL_ON/ OFF OPCTRL8
BL_ON/OF F OPC TRL10
OPCTRL6Wi-Fi-R eset
OPCTRL9HPDET#
OPCTRL11MHL_PWR_EN
OPCTRL12FB_PWR _EN
DETECT_YPBPRn
change to OPCTRL7
U401-7
P26
P25
P24
N24
M24
M23
M22
K23
L23
E20
D20
G18
F18
D2
D1
C3
C1
C2
B1
A1
A2
C5
B5
D6
A5
A3
D5
E4
B4
H5
D4
D3
E5
F5
H6
H4
A4
B3
C4
E1
E2
G3
D9
B9
B8
B7
D7
E3
F3
G2
A9
A8
A7
C7
C6
CI_A0
CI_A1
CI_A2
CI_A3
CI_A4
CI_A5
CI_A6
CI_A7
CI_A8
CI_A9
CI_A10
CI_A11
CI_A12
CI_A13
CI_A14
CI_MCLKI
CI_MIVAL
CI_MISTRT
CI_MDI0
CI_MDI1
CI_MDI2
CI_MDI3
CI_MDI4
CI_MDI5
CI_MDI6
CI_MDI7
CI_D 0
CI_D 1
CI_D 2
CI_D 3
CI_D 4
CI_D 5
CI_D 6
CI_D 7
CI_MDO0
CI_MDO1
CI_MDO2
CI_MDO3
CI_MDO4
CI_MDO5
CI_MDO6
CI_MDO7
OPCTRL0
OPCTRL1
OPCTRL2
OPCTRL3
OPCTRL4
OPCTRL5
OPCTRL6
OPCTRL7
OPCTRL8
OPCTRL9
OPCTRL10
OPCTRL11
OPCTRL12
MT5800WUEJ
GPIO0
GPIO1
GPIO2
GPIO3
GPIO4
GPIO5
GPIO6
GPIO7
GPIO8
GPIO9
GPIO10
GPIO11
GPIO12
GPIO13
GPIO14
GPIO15
GPIO16
GPIO17
GPIO18
GPIO19
GPIO20
GPIO21
GPIO22
GPIO23
GPIO24
GPIO25
GPIO26
GPIO27
GPIO28
GPIO29
GPIO30
GPIO31
GPIO32
GPIO33
GPIO34
GPIO35
GPIO36
GPIO37
GPIO38
GPIO39
GPIO40
GPIO41
DEMOD_RST
DEMOD_TSCLK
DEMOD_TSDATA0
DEMOD_TSSYNC
DEMOD_TSVAL
CI_I NT
CI_TSCLK
CI_TSDATA0
CI_TSSY NC
CI_TSVAL
CI_R ST
PVR_TSCLK
PVR_TSVAL
PVR_TSSYN C
PVR_TSDATA0
PVR_TSDATA1
SPI_CLK1
SPI_CLK
SPI_DATA
SPI_CLE
OPWM2
OPWM1
OPWM0
SD_D0
SD_D1
SD_D2
SD_D3
SD_CMD
SD_CLK
VCC3I O_SD
LED_PWM0
LED_PWM1
GPIO42
GPIO43
GPIO44
GPIO45
GPIO46
GPIO47
ADIN 0_SRV
ADIN 1_SRV
ADIN 2_SRV
ADIN 3_SRV
ADIN 4_SRV
ADIN 5_SRV
ADIN 6_SRV
ADIN 7_SRV
E13
DEMOD_RESET
F13
DEMOD_TSCLK
F12
DEMOD_TS0
F11
DEMOD_TSSYNC
G13
DEMOD_TSVALID
D10
D12
E11
F4
E12
B2
E10
A11
F10
B11
C9
G1
C11
D11
C10
AE25
AG26
AF26
K4
L5
SD_D1
L4
L6
SD_D3
K5
H1
H2
R22
LED_PWM0
R24
LED_PWM1
J6
J7
G11
H11
H12
G12
K24
L24
J24
E28
F25
F26
H25
H26
Bathroom_AU D_EN
USB_PWR _EN
R4075
10K+-5%1/16W
ADIN 1_SRV KEY_PAD 0
TP46 TP
AMP_RESET
TP47
BL_ADJOPWM1
TP7 TP
TP8 TP
Strapping
Strapping
12V-DETECT
SYS_EEPR OM_WP
DIVER SITY3
AVDD3V3
C4088
100NF 16V
TP50 TP
TP51 TP
3V3SB
R4059
10K 1/10W 5%
R4060
10K 1/10W 5%
DIVER SITY3
4
BL_ON/OF F
4,8
BL_ADJ
4
OPCTRL12
9
DETECT_YPBPRn
7,10
OPCTRL11
11
OPCTRL5
11
OPCTRL6
11
Wi-Fi_PWR _EN
DEMOD_RESET7,13
14
OPCTRL9
7,11
5
SYS_EEPROM_WP
5,12
LED_PWM0
5,12
LED_PWM1
4
12V-DETECT
12
KEY_PAD 0
5
OPCTRL3
5,14
OSDA0
5,14
OSCL0
OPCTRL2
3V3SB
AVDD3V3
Bathroom_AUD _EN13
USB_PWR_EN
AMP_RESET
DEMOD_TSSYNC7,13
DEMOD_TSVALID7, 13
DEMOD_TSCLK7,13
DEMOD_TS013
OPCTRL8
RESET_RF4CE #16
OPCTRL10 BL_ON/OF F
BL_ADJ
FB_PWR _ENOPCTRL12
DETECT_YPBPR n
MHL_PWR_ENOPCTRL11
OPCTRL5 WIF I_IRQn
OPCTRL6 W i-Fi-Res et
OPCTRL2 W i-Fi_PWR _EN
DEMOD_TSSYNC
DEMOD_TSVALID
DEMOD_TSCLK
DEMOD_TS0
DEMOD_RESET
HPDET#OPCTRL9
OPCTRL8 WOL_ON/ OFF
SYS_EEPR OM_WP
LED_PWM0
LED_PWM1
12V-DETECT
KEY_PAD 0
OPCTRL3
OSDA0
OSCL0
OPCTRL2 Wi-Fi_PWR _EN
RESET_RF4C E#
3V3SB 5
AVDD3V3 5
Bathroom_AU D_EN
USB_PWR _EN 5
AMP_RESET 5
Page 35
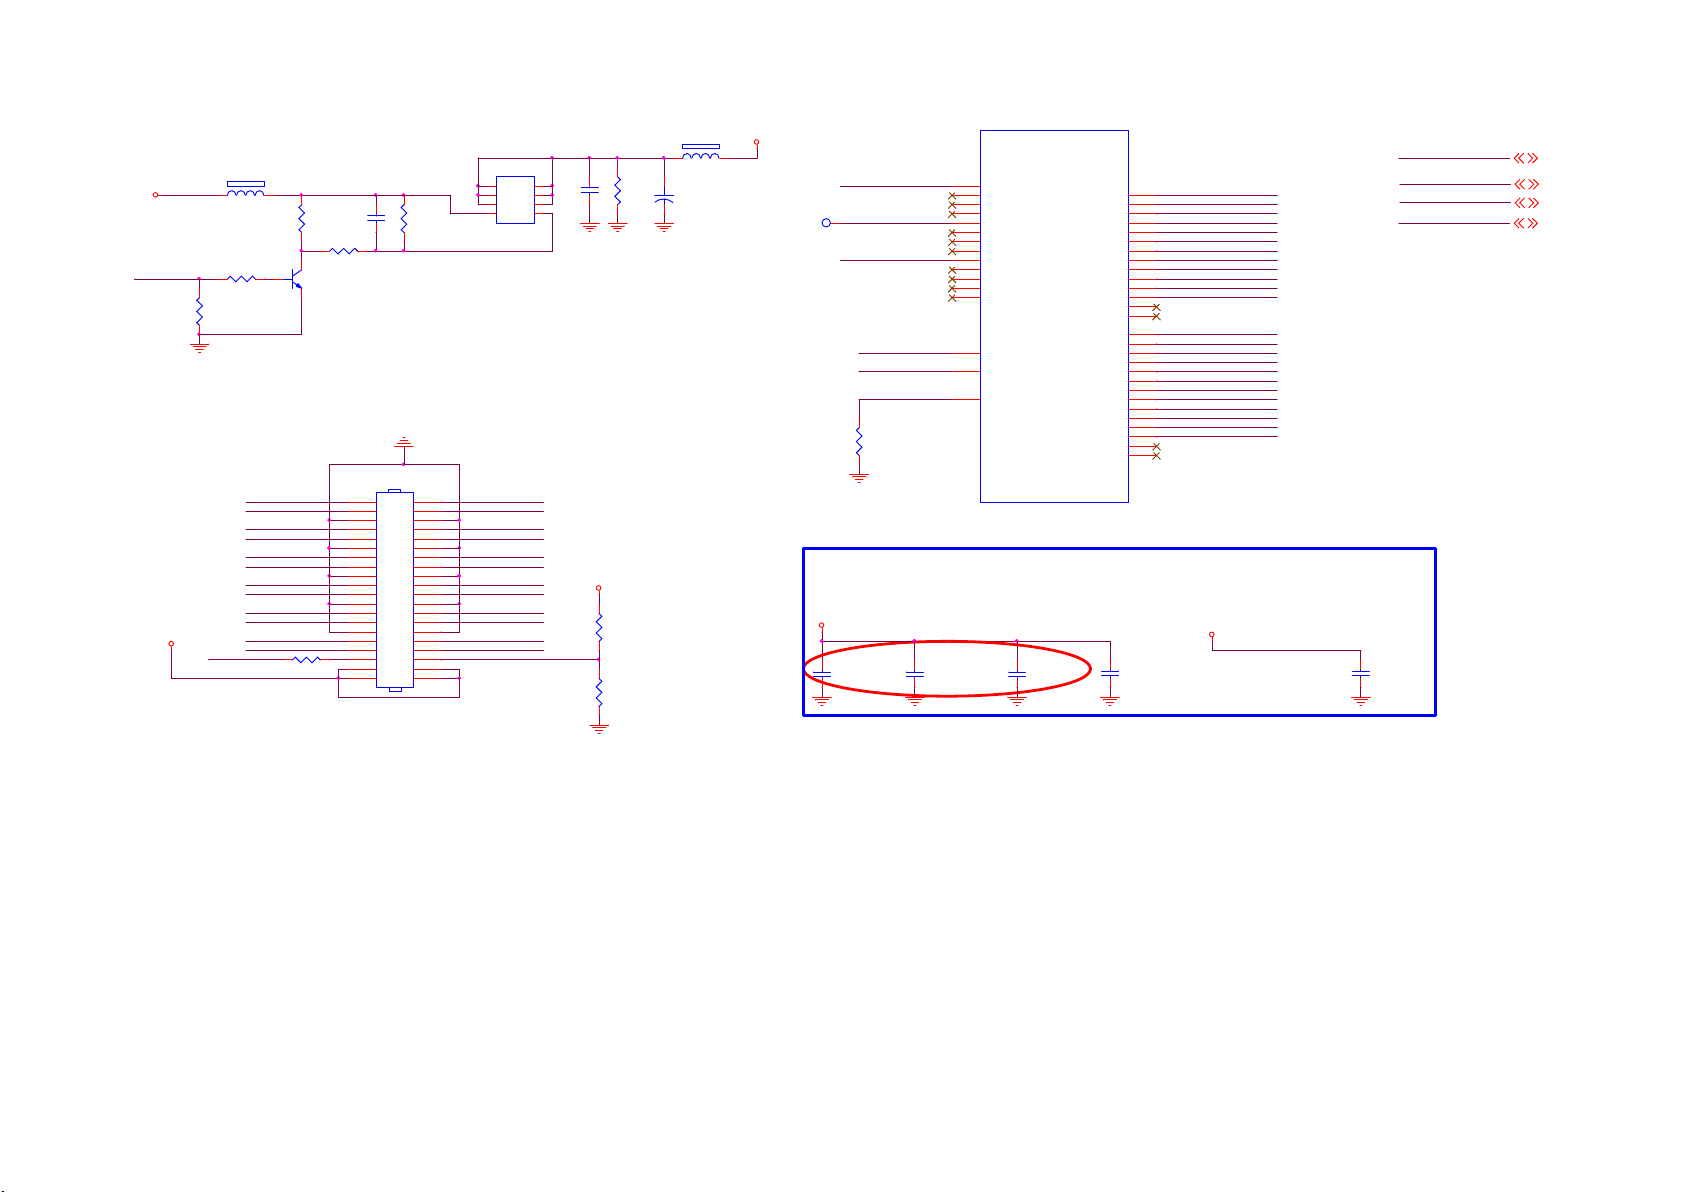
8-3-5 LVDS
+12V
PANEL POWER
1:ON ;
0:OFF
PANEL_ON
4.7K 1/10W
PANEL_VCC
R4066
LVDS
BL_ADJ
FB401
120R 6A
1 2
R4065
4.7K 1/10W
LVDSTX_AE4P
LVDSTX_AECKP
LVDSTX_AE2P
LVDSTX_AE0P
LVDSTX_AO3P
LVDSTX_AOCKP
LVDSTX_AO1P LVDSTX_AO1N
0.1uF
R4063
4.7K 1/10W
R4064
150K 1/10W 5%
Q402
LMBT3904LT1G
R4033
0R05 1/16W
C4089
2
4
6
8
10
12
14
16
18
20
22
24
26
28
30
32
34
36
38
40
CN402
CONN
R4061
100K 1/10W
1
3
5
7
9
11
13
15
17
19
21
23
25
27
29
31
33
35
37
39
Q401
8
D
D
7
D
D
6
D
D
5
G4S
AON4421
LVDSTX_AE4N
LVDSTX_AE3NLVDSTX_AE3P
LVDSTX_AECKN
LVDSTX_AE2N
LVDSTX_AE1NLVDSTX_AE1P
LVDSTX_AE0N
LVDSTX_AO4NLVDSTX_AO4P
LVDSTX_AO3N
LVDSTX_AOCKN
LVDSTX_AO2NLVDSTX_AO2P
LVDSTX_AO0NLVDSTX_AO0P
LVDS_SEL
AE18
AF18
AD17
AE15
AD15
AC19
AD18
AD19
AC17
AD16
AC15
AC18
AB17
AG14
G22
AF14
U401-2
TCON0
TCON1
TCON2
TCON3
TCON4
TCON5
TCON6
TCON7
TCON8
TCON9
TCON10
TCON11
TCON12
AVDD12_LVDS
AVDD33_LVDSA
REXT_VPLL
MT5800WUEJ
AE0P
AE0N
AE1P
AE1N
AE2P
AE2N
AECKP
AECKN
AE3P
AE3N
AE4P
AE4N
AE5P
AE5N
AO0P
AO0N
AO1P
AO1N
AO2P
AO2N
AOCKP
AOCKN
AO3P
AO3N
AO4P
AO4N
AO5P
AO5N
AF19
AE0P L VDSTX_AE0P
AE19
AE0N LVDSTX_AE0N
AH19
AG19
AH18
AE2P L VDSTX_AE2P
AG18
AE2N LVDSTX_AE2N
AF17
AE17
AF16
AE16
AH16
AG16
AG15
AH15
AF24
AE24
AF23
AE23
AH23
AG23
AF22
AOCKP LVDSTX_AOCKP
AE22
AOCKN LVDSTX_AOCKN
AF21
AE21
AH21
AO4P LVDSTX_AO4P
AG21
AO4N LVDSTX_AO4N
AF20
AE20
BL_ADJ
AVDD1V2
LVDSTX_AE1PAE1P
LVDSTX_AE1NAE1N
LVDSTX_AECKPAECKP
LVDSTX_AECKNAECKN
LVDSTX_AE3PAE3P
LVDSTX_AE3NAE3N
LVDSTX_AE4PAE4P
LVDSTX_AE4NAE4N
LVDSTX_AO0PAO0P
LVDSTX_AO0NAO0N
LVDSTX_AO1PAO1P
LVDSTX_AO1NAO1N
LVDSTX_AO2PAO2P
LVDSTX_AO2NAO2N
LVDSTX_AO3PAO3P
LVDSTX_AO3NAO3N
AVDD3V3
DVDD3V3
BL_ADJ 4,7
AVDD1V2 5
AVDD3V3 5
DVDD3V 3 5
FB711
PANEL_VCC
1 2
+
C4090
220UF 16V
120R 6A
TP17 TP
LVDS_SEL TCON 0
TCON4
PANEL_ON TCON8
AVDD12_LVDS
AVDD33_LVDSA
REXT_VPLL
R4067
24K 1%
1
C4111
2
3
0.1uF
R4062
1K8 +-5% 1/8W
Analog Power
DVDD3V3
R4084
NC 10K 1/16W
R4085
NC 10K 1/16W
AVDD1V2
NC/1U F 16V
C4091
C4092
NC/1U F 16V
AVDD12_LVDS
C4093
1UF 16V
Cost down part
C4094
100NF 16V
AVDD3V3
AVDD33_LVDSA
C4095
100NF 16V
Page 36
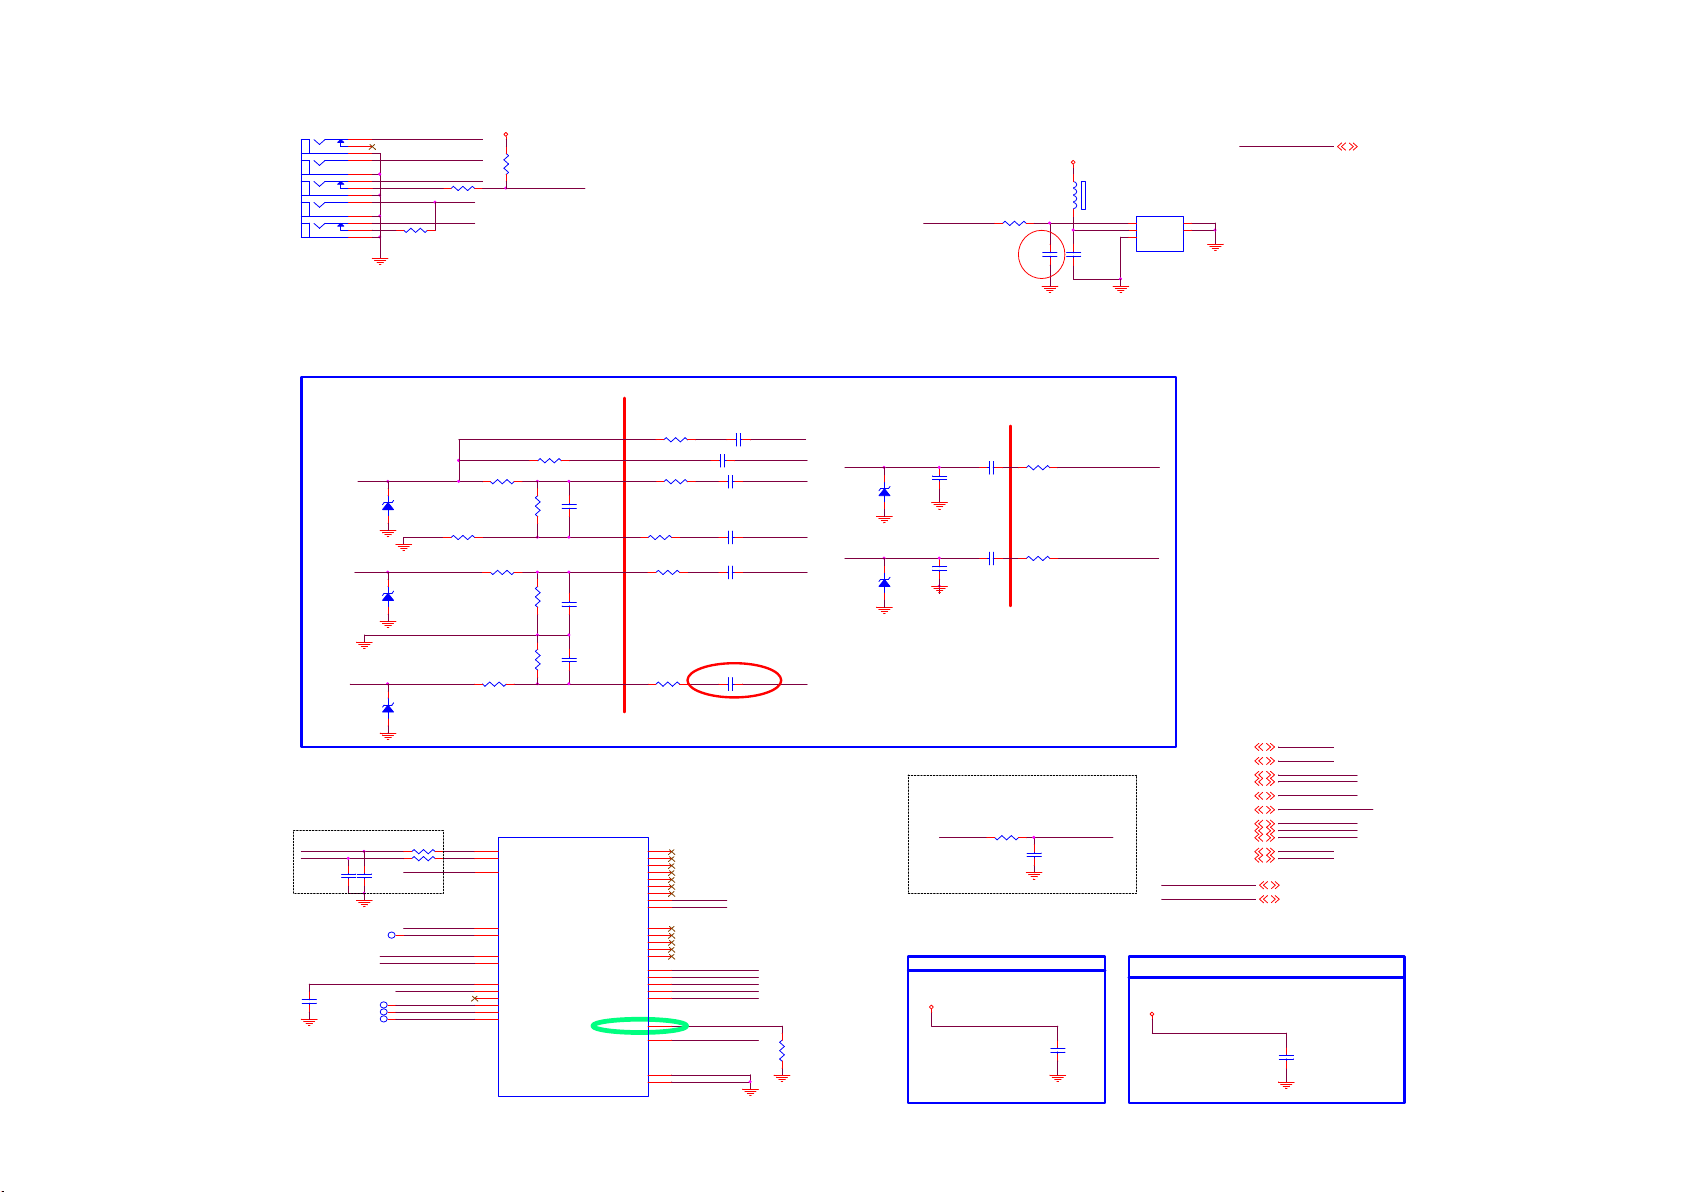
8-3-6 YPbPr/CVBS/SPDIF INTERFACE
CN101
13
12
E
11
10
D
9
8
7
C
6
5
B
4
3
2
A
1
RCA JAC K 13P
YPbPr for AP 3 88G078G15 7ACL
CVBS for LT
R1001
NC 0R05 1/16W
Y_IN_ 0
PB_IN_0
PR_IN_0
YBRL_IN 0
YBRR _IN0
3V3SB
R1094
10K 1/16W
R1097
100R 1/16W 1%
DETECT_YPBPRn
SPDIF_OUT
R601
33R 1/16W 5%
Add for EMI
2016-0803
C4181
120PF 50V
DVDD3V3
12
C601
100NF 16V
FB1001
120R 3A
SPDIF OUT
CN601
3
VIN
TH2
2
VCC
TH1
1
GND
CONN
DVDD3V3
5
4
DVDD3V3 5
YPBPR IN
NEAR YPBPR CONNECTOR
Y_IN_0
ZD123
NC U DZSNP5.6B
1 2
PB_IN_0
ZD124
NC U DZSNP5.6B
1 2
PR_IN_0
ZD125
NC U DZSNP5.6B
1 2
Close to Main Ch ip
D_IFP
D_IFN
C4159
NC 47pF 50V
C4112
1uF 10V
51R 1%
C4160
NC 47pF 50V
TP18 TP
CVBS_COM
TP10 TP
TP11 TP
TP12 TP
R4031
OSCL1
OSDA1
-------><-------
R1009 0R05 1/ 16W
-------><-------
-------><-------
R4032
51R 1%
AVDD12_DEMOD
IF_AGC
RF_AGC
CVBS3P
CVBS1P
CVBS0P
SIF_COM
R1005
0R05 1/16W
R1008
75 OHM +-5% 1/16W
R1012
0R05 1/16W
R1014
75 OHM +-5% 1/16W
R1015
75 OHM +-5% 1/16W
R1016
0R05 1/16W
U401-4
D27
ADCINP_D EMOD
D28
ADCINN _DEMOD
E27
AVDD12_DEMOD
F15
IF_AGC
E14
RF_AGC
E15
OSCL1
D15
OSDA1
H27
CVBS_COM
H28
CVBS3P
J25
CVBS2P
G28
CVBS1P
G26
CVBS0P
G25
SIF_COM
MT5800WUEJ
R1004 10R 1/ 16W 5%
AVDD33_VIDEO_STB
Y1
C1006
10PF 50V
PB1
C1011
10PF 50V
C1012
10PF 50V
PR1
VGA_SDA
VDACX_OUT
AVSS33_XTAL
AVSS33_DEMOD
NEAR MT5581
R1003 100R 1/ 16W 5%
R1006 100R 1/ 16W 5%
R1010 100R 1/ 16W 5%
R1013 100R 1/ 16W 5%
R1017 100R 1/ 16W 5%
HSYN C
VSYNC
RP
GP
BP
COM
SOG
VGA_SCL
COM1
PB1P
PR1P
Y1P
SOY1
COM0
PB0P
PR0P
Y0P
SOY0
C1002 1. 5NF 50V
R27
R28
N26
N28
P28
N27
P27
T28
TXD_RF4CE
T27
RXD_RF4CE
M25
L28
L27
M26
N25
K26
COM0
K25
PB0P
J26
PR0P
K27
Y0P
K28
SOY0
CBVS out for field test
G27
H23
AVDD33_VIDEO_STB
J20
AVSS33_XTAL
K20
AVSS33_DEMOD
C1001 47NF 16V
C1005
10NF 50V
C1007
10NF 50V
C1008
10NF 50V
C1013
10NF 50V
CVBS3P
SOY0
Y0P
COM0
PB0P
PR0P
R123
75 OHM +-5% 1/16W
YBRR_I N0
ZD126
NC U DZSNP5.6B
YBRL_IN 0
ZD127
NC U DZSNP5.6B
---><---|>
C1003
10N 50V
1 2
---><---|>
C1009
10N 50V
1 2
Close to Main Ch ip
IF_AGC IF_AGCT
Analog Power 1V2
AVDD1V2
C1004 1UF 16V
C1010 1UF 16V
R1007
30Kohm 1/16W +/-5%
R1011
30Kohm 1/16W +/-5%
NEAR YPBPR CONNECTOR
ATSC Only
R101
10K 1%
C4099
47NF 16V
AVDD12_DEMOD
C4097
100NF 16V
AIN_R0
AIN_L0
TXD_RF4CE
RXD_RF4CE
13
13
14
7
DETECT_YPBPRn
13
13
13
14
14
AVDD1V2
3V3SB
Analog Power 3V3
3V3SB
D_IFP
D_IFN
SPDIF_OUT
IF_AGCT
OSCL1
OSDA1
AIN_R0
AIN_L0
AVDD33_VIDEO_STB
TXD_RF4CE
RXD_RF4CE
D_IFP
D_IFN
SPDIF_OUT
DETECT_YPBPRn
IF_AGCT
OSCL1 T_OSCL
OSDA1 T_OSDA
AIN_R0
AIN_L0
AVDD1V2 5
3V3SB 5
C4098
100NF 16V
Page 37
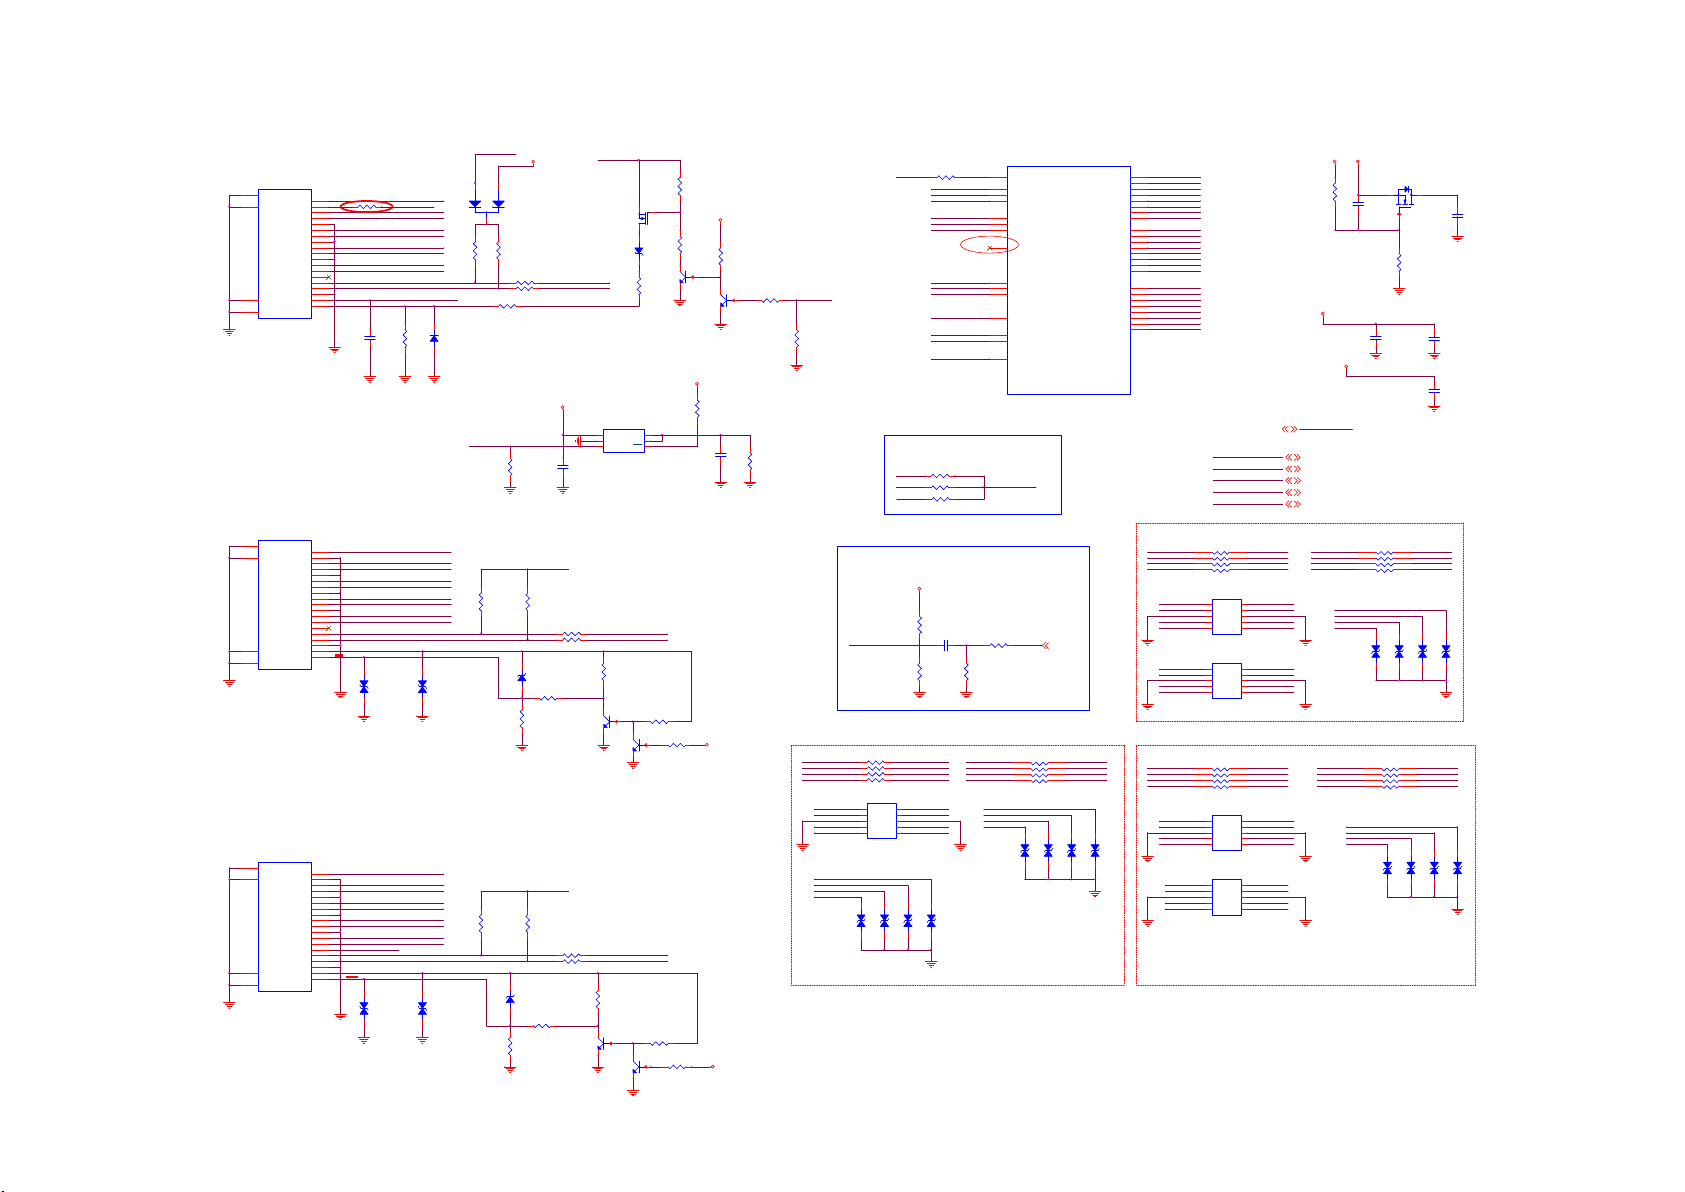
8-3-7 HDMI
HDMI1+M HL(side)
CN102
20
SHLD0
1
TMDSD2+
SHLD2
SHLD3
SHLD1
HDMI 19P
DSHLD0
TMDSD2TMDSD1+
DSHLD1
TMDSD1TMDSD0+
DSHLD2
TMDSD0-
TMDSC+
CSHLD0
TMDSC-
DDC_GND
2
3
4
5
6
7
8
9
10
11
12
13
CEC
14
NC
15
SCL
16
SDA
17
18
VCC5
19
HPD
22
23
21
HDMI2(side )
CN103
20
SHLD0
1
TMDSD2+
SHLD2
SHLD3
SHLD1
HDMI 19P
DSHLD0
TMDSD2TMDSD1+
DSHLD1
TMDSD1TMDSD0+
DSHLD2
TMDSD0-
TMDSC+
CSHLD0
TMDSC-
DDC_GND
2
3
4
5
6
7
8
9
10
11
12
13
CEC
14
NC
15
SCL
16
SDA
17
18
VCC5
19
HPD
22
23
21
HDMI3(dow n)
CN104
20
SHLD0
1
TMDSD2+
SHLD2
SHLD3
SHLD1
HDMI 19P
DSHLD0
TMDSD2TMDSD1+
DSHLD1
TMDSD1TMDSD0+
DSHLD2
TMDSD0-
TMDSC+
CSHLD0
TMDSC-
DDC_GND
2
3
4
5
6
7
8
9
10
11
12
13
CEC
14
NC
15
SCL
16
SDA
17
18
VCC5
19
HPD
22
23
21
MHL TMD S impedanc e:
Zdiff=9 0ohm,
Zcome=2 7.5ohm
R1078 5.1R 1/16W
HEAC+_PORT2#
SCL_0
SDA_0
------><-------
CEC_2
SCL_1
SDA_1
PWR5V_2
ZD101
EGA10603V05A1-B
1 2
SCL_2
SDA_2
ZD104
EGA10603V05A1-B
1 2
MHL_SENSE
R1028NC 470K 1/1 6W 5%
C1014100NF 16V
PWR5V_3
RX_0_2
RX_0_2B
RX_0_1
RX_0_1B
RX_0_0
RX_0_0B
RX_0_C
RX_0_CB
CEC_1
2
K
D1003BAS316WS
A
1
MHL_CD_SENSE:
HDMI Mode: Low
MHL Mode: High
RX_1_2
RX_1_2B
RX_1_1
RX_1_1B
RX_1_0
RX_1_0B
RX_1_C
RX_1_CB
ZD102
EGA10603V05A1-B
1 2
RX_2_2
RX_2_2B
RX_2_1
RX_2_1B
RX_2_0
RX_2_0B
RX_2_C
RX_2_CB
CEC_3
ZD105
EGA10603V05A1-B
1 2
PWR5V_1
1
2
3
47K 1/16W 5%
R1020
47K 1/16W 5%
R1025 100R 1/16W 5%
R1026
33R 1/16W 5%
MHL POWER
MHL_PWR_EN
R1033
47K 1/16W 5%
R1042
47K 1/16W 5%
PDZ24B
R1048
100K 1/16W 5%
D1001
LBAT54CLT1G
R1021
R1031
300K
PDZ24B
ZD103
1 2
ZD106
1 2
+5V_SW
R1023
100R 1/16W 5 %
C1015
10UF 10V
PWR5V_2
R1034
47K 1/16W 5%
R1038
75R 1/16W 1%
R1040
100K 1/16W 5%
PWR5V_3
R1043
47K 1/16W 5%
R1047
75R 1/16W 1%
HDMI_0_SCL
HDMI_0_SDA
HDMI_0_HPD_CBU S
+5V_SW
U104
2
1
G529A1TB1U
R1035 100R 1/ 16W 5%
R1036 100R 1/ 16W 5%
HDMI_1_HPD
3
Q104
MMBT3904
1
R1044 100R 1/ 16W 5%
R1045 100R 1/ 16W 5%
HDMI_2_HPD
3
Q106
MMBT3904
1
PWR5V_1
IN3OUT
GND
EN
R1037
910R
Q105
MMBT3904
R1046
910R
2
Q107
MMBT3904
2
Q101
AO3401A
13
OUT
OC
HDMI_1_SCL
HDMI_1_SDA
3
1
HDMI_2_SCL
HDMI_2_SDA
3
1
R1024
820R
D1002
BAT54
MMBT3904
4
5
6
R1039
2
R1049
2
Q102
R1030
3K3 1/16W 5%
MHL_OC
20K 1/16W
R1041
47K 1/16W 5%
20K 1/16W
R1050
47K 1/16W 5%
R1018
10K 1/16W 5%
R1019
100R 1/16W 5%
3
2
1
MMBT3904
3V3SB
10UF 10V
Analog Pow er
+5V_SW
U401-5
HDMI_0_SCL
HDMI_1_SCL
HDMI_2_SCL
HDMI_0_SDA
HDMI_1_SDA
HDMI_2_SDA
HDMI_0_HPD_CBUS
HDMI_1_HPD
HDMI_2_HPD
MHL_SENSE
AVDD12_HDMI1
AVDD12_HDMI2
AVDD33_HDMI
0R05 1/16W
0R05 1/16W
C1017
1uF 10V
C19
C16
D19
U23
D16
G19
U24
E18
E17
F19
T22
E16
A14
U26
G20
R1055
180ohm 1/16W +/ -5%
R1061
82R
RX_0_1B
RX_0_1
RX_0_2B
RX_0_2
CEC_1
SCL_0
SDA_0
PWR5V_1
HDMI_CEC
HDMI_0_SCL
HDMI_1_SCL
HDMI_2_SCL
HDMI_0_SDA
HDMI_1_SDA
HDMI_2_SDA
HDMI_0_PWR5V
HDMI_0_HPD_CBU S
HDMI_1_HPD
HDMI_2_HPD
MHL_SENSE
AVDD12_HDMI
AVDD12_HDMI
AVDD33_HDMI
MT5800WUEJ
HDMI_CEC
RP102 5R1
5
6
7
8
ZD107
ZD108
1 2
NC TVM0 G5R5M261R-KB
14
ARC
4
3
2
1
ZD109
1 2
1 2
NC TVM0 G5R5M261R-KB
NC TVM0 G5R5M261R-KB
HDMI_CEC CEC
R4074 100R 1/16W 5%
3V3SB
R1022
20K 1/16W
R1027
3
2
Q103
1
PWR5V_1
C1016
3V3SB
3V3SB
47K 1/16W 5%
R1032
10K 1/16W 5%
MHL_SENSEPWR5V_1
R1029
300K
RX_0_CB
RX_0_C
RX_0_0B
RX_0_0
HDMI_0_RX_2
HDMI_0_RX_2B
HDMI_0_RX_1
HDMI_0_RX_1B
HDMI_0_RX_CB
HDMI_0_RX_C
HDMI_0_RX_0B
HDMI_0_RX_0
Delete TP49 for EMI
2016-0803
HDMI-CEC
CEC_1
R1085
CEC_2
R1086
CEC_3
R1087 0R05 1/16W
Audio Return Channel (ARC)
+5V_SW
R1054
1
2
3
4
1 2
NC TVM0G5R 5M261R-KB
U102
CH1
NC
CH2
NC
VN
VN
CH3
NC
CH45NC
NC TVU1240R1A
ZD112
1 2
NC TVM0G5R 5M261R-KB
ZD113
10
9
8
7
6
1 2
NC TVM0G5R 5M261R-KB
47K 1/16W 5%
R1059
47K 1/16W 5%
HDMI_0_RX_CB
HDMI_0_RX_C
HDMI_0_RX_0B
HDMI_0_RX_0
HDMI_0_RX_2
HDMI_0_RX_2B
HDMI_0_RX_1
HDMI_0_RX_1B
ZD114
1 2
NC TVM0G5R 5M261R-KB
HEAC+_PORT2#
R501 5.1R 1/ 16W
R502 5.1R 1/16W
R503 5.1R 1/16W
R504 5.1R 1/16W
ZD111
HDMI_0_RX_0
HDMI_0_RX_0B
HDMI_0_RX_1
HDMI_0_RX_1B
HDMI_0_RX_2
HDMI_0_RX_2B
HDMI_0_RX_C
HDMI_0_RX_CB
HDMI_1_RX_0
HDMI_1_RX_0B
HDMI_1_RX_1
HDMI_1_RX_1B
HDMI_1_RX_2
HDMI_1_RX_2B
HDMI_1_RX_C
HDMI_1_RX_CB
HDMI_2_RX_0
HDMI_2_RX_0B
HDMI_2_RX_1
HDMI_2_RX_1B
HDMI_2_RX_2
HDMI_2_RX_2B
HDMI_2_RX_C
HDMI_2_RX_CB
HDMI_0_RX_1B
HDMI_0_RX_1
HDMI_0_RX_2B
HDMI_0_RX_2
ZD110
1 2
NC TVM0 G5R5M261R-KB
A17
B17
A16
B16
A15
B15
C17
D17
A20
B20
A19
B19
C18
D18
C21
B21
W26
W25
V26
V25
V28
V27
Y28
Y27
HDMI_0_RX_0
HDMI_0_RX_0B
HDMI_0_RX_1
HDMI_0_RX_1B
HDMI_0_RX_2
HDMI_0_RX_2B
HDMI_0_RX_C
HDMI_0_RX_CB
HDMI_1_RX_0
HDMI_1_RX_0B
HDMI_1_RX_1
HDMI_1_RX_1B
HDMI_1_RX_2
HDMI_1_RX_2B
HDMI_1_RX_C
HDMI_1_RX_CB
HDMI_2_RX_0
HDMI_2_RX_0B
HDMI_2_RX_1
HDMI_2_RX_1B
HDMI_2_RX_2
HDMI_2_RX_2B
HDMI_2_RX_C
HDMI_2_RX_CB
RX_1_C
RX_1_0
HDMI_1_RX_0
HDMI_1_RX_0B
HDMI_1_RX_C
HDMI_1_RX_CB
HDMI_1_RX_2
HDMI_1_RX_2B
HDMI_1_RX_1
HDMI_1_RX_1B
RX_2_CB
RX_2_C
RX_2_0B
RX_2_0
HDMI_2_RX_0
HDMI_2_RX_0B
HDMI_2_RX_C
HDMI_2_RX_CB
HDMI_2_RX_2
HDMI_2_RX_2B
HDMI_2_RX_1
HDMI_2_RX_1B
7
AVDD1V2
+5V_SW
3V3SB
AVDD3V3
DVDD3V3
RP103 5R1
5
6
7
8
U103
1
CH1
2
CH2
3
VN
4
CH3
CH45NC
NC TVU1240R1A
U106
1
CH1
2
CH2
3
VN
4
CH3
CH45NC
NC TVU1240R1A
RP105 5R1
5
6
7
8
U107
1
CH1
2
CH2
3
VN
4
CH3
CH45NC
NC TVU1240R1A
U108
1
CH1
2
CH2
3
VN
4
CH3
CH45NC
NC TVU1240R1A
OPCTRL11
4
3
2
1
NC
NC
VN
NC
NC
NC
VN
NC
4
3
2
1
NC
NC
VN
NC
NC
NC
VN
NC
10
9
8
7
6
10
9
8
7
6
10
9
8
7
6
10
9
8
7
6
HDMI_1_RX_CB
HDMI_1_RX_C
HDMI_1_RX_0B
HDMI_1_RX_0
HDMI_1_RX_0
HDMI_1_RX_0B
HDMI_1_RX_C
HDMI_1_RX_CB
HDMI_1_RX_2
HDMI_1_RX_2B
HDMI_1_RX_1
HDMI_1_RX_1B
HDMI_2_RX_CB
HDMI_2_RX_C
HDMI_2_RX_0B
HDMI_2_RX_0
HDMI_2_RX_0
HDMI_2_RX_0B
HDMI_2_RX_C
HDMI_2_RX_CB
HDMI_2_RX_2
HDMI_2_RX_2B
HDMI_2_RX_1
HDMI_2_RX_1B
AVDD3V3
R4073
1K 1/16W 5%
100K 1/16W 5%
AVDD1V2
AVDD12_HDMI1
AVDD1V2
OPCTRL11 MHL_PWR_EN
AVDD1V2 5
+5V_SW 5
3V3SB 5
AVDD3V3 5
DVDD3V3 5
RP104 5R1
RX_1_1BRX_1_CB
RX_1_1
RX_1_2BRX_1_0B
RX_1_2
CEC_2
SCL_1
SDA_1
PWR5V_2
ZD115
RP106 5R1
RX_2_1B
RX_2_1
RX_2_2B
RX_2_2
CEC_3
SCL_2
SDA_2
PWR5V_3
C4115
10NF 50V
R4069
5
6
7
8
1 2
NC TVM0G5 R5M261R-KB
5
6
7
8
ZD119
Q403
AO3414
C4147
100NF 16V
AVDD12_HDMI2
4
3
2
1
ZD116
1 2
NC TVM0G5 R5M261R-KB
ZD120
1 2
NC TVM0G5 R5M261R-KB
4
3
2
1
ZD117
1 2
NC TVM0G5 R5M261R-KB
AVDD33_HDMI
HDMI_1_RX_1B
HDMI_1_RX_1
HDMI_1_RX_2B
HDMI_1_RX_2
ZD118
1 2
NC TVM0G5 R5M261R-KB
HDMI_2_RX_1B
HDMI_2_RX_1
HDMI_2_RX_2B
HDMI_2_RX_2
ZD121
1 2
NC TVM0G5 R5M261R-KB
C4148
4.7UF 6.3 V
C4149
100NF 16V
1 2
NC TVM0G5 R5M261R-KB
ZD122
NC TVM0G5 R5M261R-KB
1 2
C4116
100NF 16V
Page 38
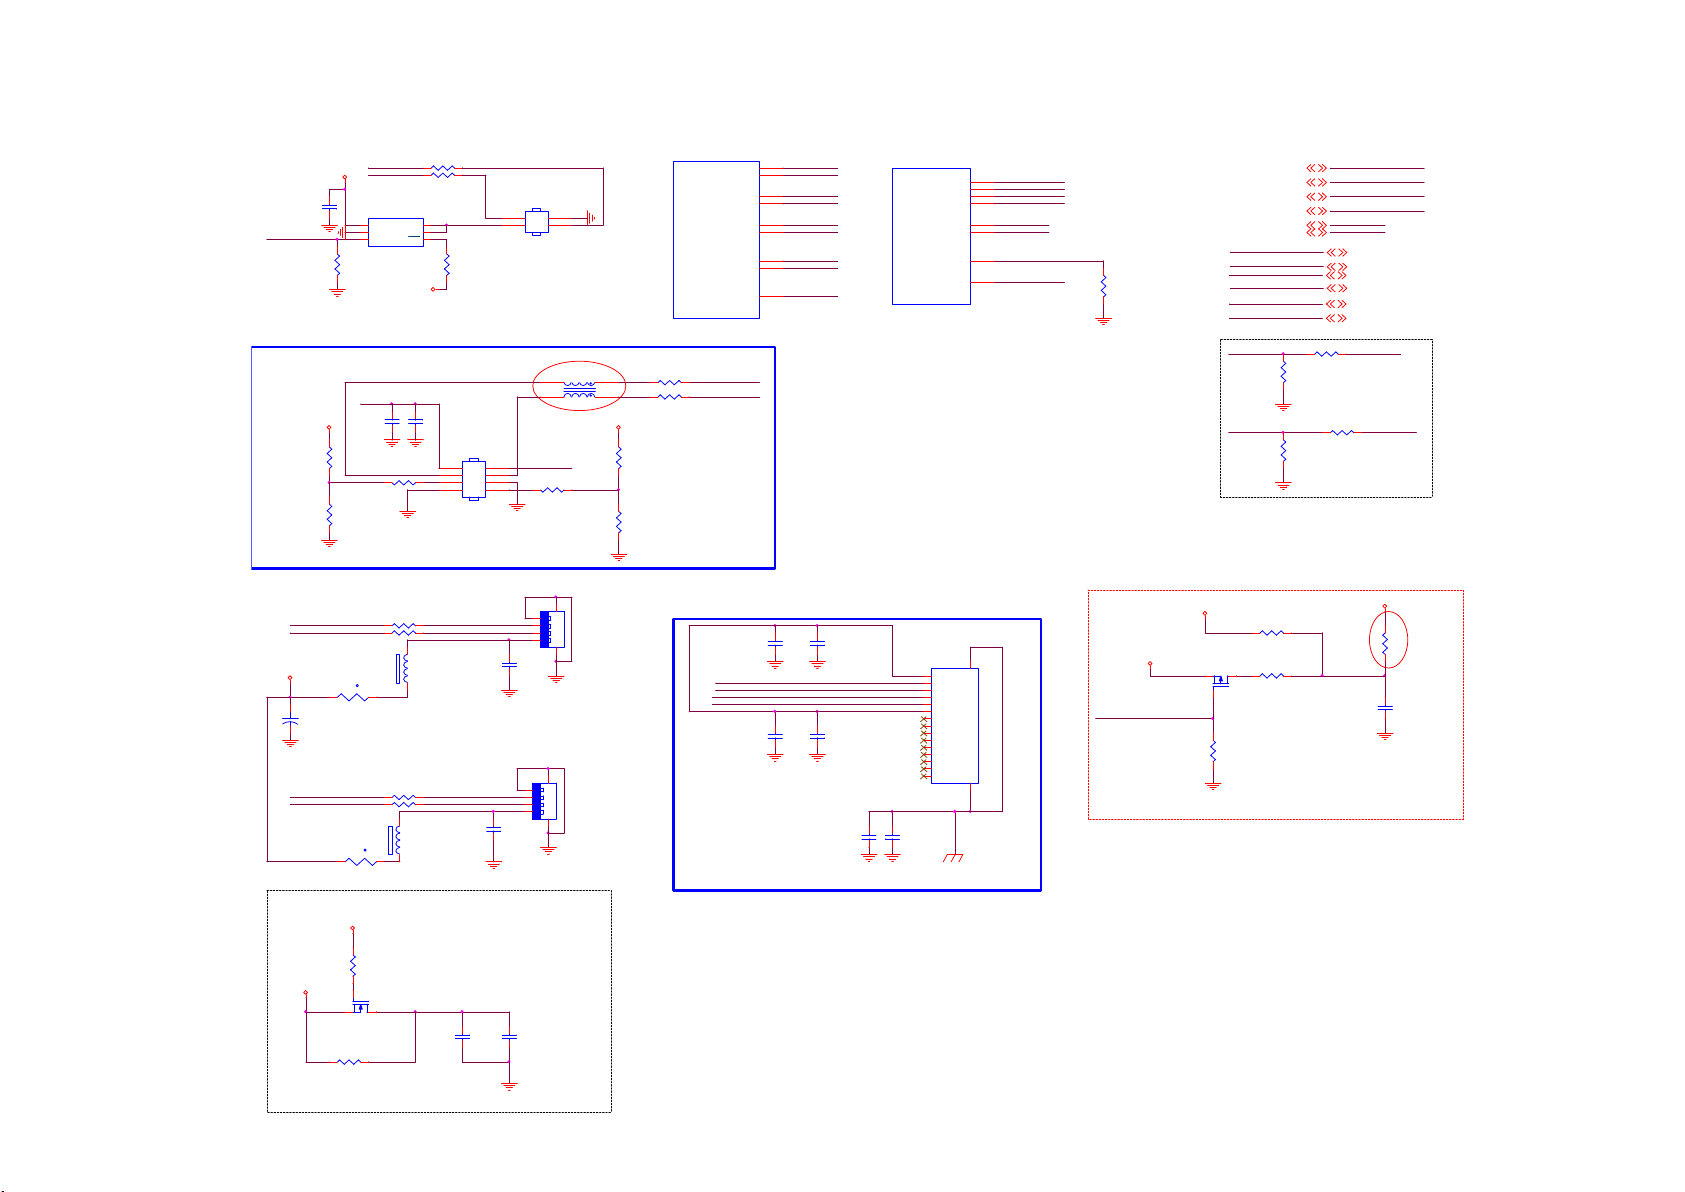
8-3-8 USB/WIFI/RJ45
USB_DP_P0
+5V_SW
USB_DM_P0
C1033
NC 1uF 10V
USB_PWR_EN
NC G529A1TB1U
IN3OUT
2
GND
1
EN
U711
R1089
NC 4.7 K1/16W
Wi- Fi CONNECTOR
Wi-Fi_VCC
C1034
10uF 25V
3V3SB
R4057
10K 1/10W 5%
Wi-Fi-Reset
R4058
NC 10K 1/10W 5%
R1079 NC 2.2R 1%
R1088 NC 2.2R 1%
4
5
OUT
6
OC
3V3SB
C1035
10uF 25V
R1066
0R05 1/16W
NC CON N
2
1
R1090
NC 4. 7K1/16W
Add L103 for EMI
2016-0803
CN108
2
4
6
8
CONN
CN704
1
3
5
7
4
3
2
3
Wi-Fi_VCC
90OHM
L103
R1069
0R05 1/16W
1
4
WIFI _IRQn
3V3SB
R1067
10K 1/16W 5%
U401-8
MT5800WUEJ
R1064 2.2R 1%
R1065 2.2R 1%
R1063
NC 10K 1/16W 5%
USB_DP_P0
USB_DM_P0
USB_DP_P1
USB_DM_P1
USB_DP_P2
USB_DM_P2
USB_DP_P3
USB_DM_P3
AVDD33_USB
USB_DP_P3
USB_DM_P3
B12
A12
C13
D13
D14
C14
AD28
AD27
F23
USB_DP_P0
USB_DM_P0
USB_DP_P1
USB_DM_P1
USB_DP_P2
USB_DM_P2
USB_DP_P3
USB_DM_P3
AVDD33_USB
U401-9
AVDD33_ETH
MT5800WUEJ
TXVP_0
TXVN_0
RXVP_1
RXVN_1
PHYLED1
PHYLED0
REXT
AB27
AB26
AC25
AC26
AA25
AA26
AB28
AB25
TXVP
TXVN
RXVP
RXVN
PHYLED1
PHYLED0
REXT
AVDD33_ETH
R1084
24K 1%
7,11
OPCTRL8
7,11
OPCTRL5
7
OPCTRL6
OPCTRL2
14
PWRDN-H P
14
PWRDN
DVDD3V3
AVDD3V3
3V3SB
+5V_SW
Wi-Fi_VCC
USB_PWR_EN
PHYLED1
PHYLED0
OPCTRL8 WOL_ON/OF F
OPCTRL5 WIFI _IRQn
OPCTRL6 W i-Fi-Reset
OPCTRL2 Wi-Fi_PWR _EN
R1080 0R05 1/16W
R1081
10K 1/16W 5%
R1082 0R05 1/16W
R1083
10K 1/16W 5%
PWRDN-H P
PWRDN
DVDD3V3 5
AVDD3V3 5
3V3SB 5
+5V_SW 5
Wi-Fi_VCC 5
USB_PWR_EN 5
PWRDN -HP
PWRDN
+5V_SW
USB_DP_P1
USB_DM_P1
+
C1022
100UF 16V
USB_DP_P2
USB_DM_P2
TH101
PTCR
1 2
TH102
PTCR
1 2
R1073 2.2R 1%
R1074 2.2R 1%
t
R1075 2.2R 1%
R1076 2.2R 1%
t
1 2
FB106
120R 3A
1 2
FB107
120R 3A
C1025
65
4
CN105
3
USB CONN
2
1234
1
C1024
10UF 25V
65
4
CN106
3
USB CONN
2
1234
1
10UF 25V
ETHERNET PHY
C1027
C1028
0.1uF 25V
10NF 50V
SMD/0402
TXVP
TXVN
RXVP
RXVN
C1029
C1030
0.1uF 25V
10NF 50V
SMD/0402
100NF 16V
C1031
C1032
10NF 50V
1
2
3
4
5
6
7
8
9
10
11
12
13
14
15
RJ45
TCT P1
TD+ P2
TD- P3
RD+ P4
RD- P5
RCT P6
NC P7
NC P8
NC P9
NC P10
NC P11
Y- P12
Y+ P13
G- P14
G+ P15
16
17
CN107
TH1
TH2
RJ45 15P
3V3SB
WOL_ON/OFF
10K 1/16W 5%
H: DISABLE
L:ENABLE
AVDD3V3
R128
Q110
AO3401A
R126
NC 0R05 1/16W
R127
0R05 1/16W
AVDD33_ETH
3V3SB
C142
100NF 16V
R129
NC 0R 05 1/16W
SEPARATE GROUND
+5V_SW
R124
10K 1/10W 5%
AVDD3V3
Q109
AO3414
R125
NC 0R 05 1/16W
AVDD33_USB
C140
1UF 25V
C141
100NF 16V
Page 39
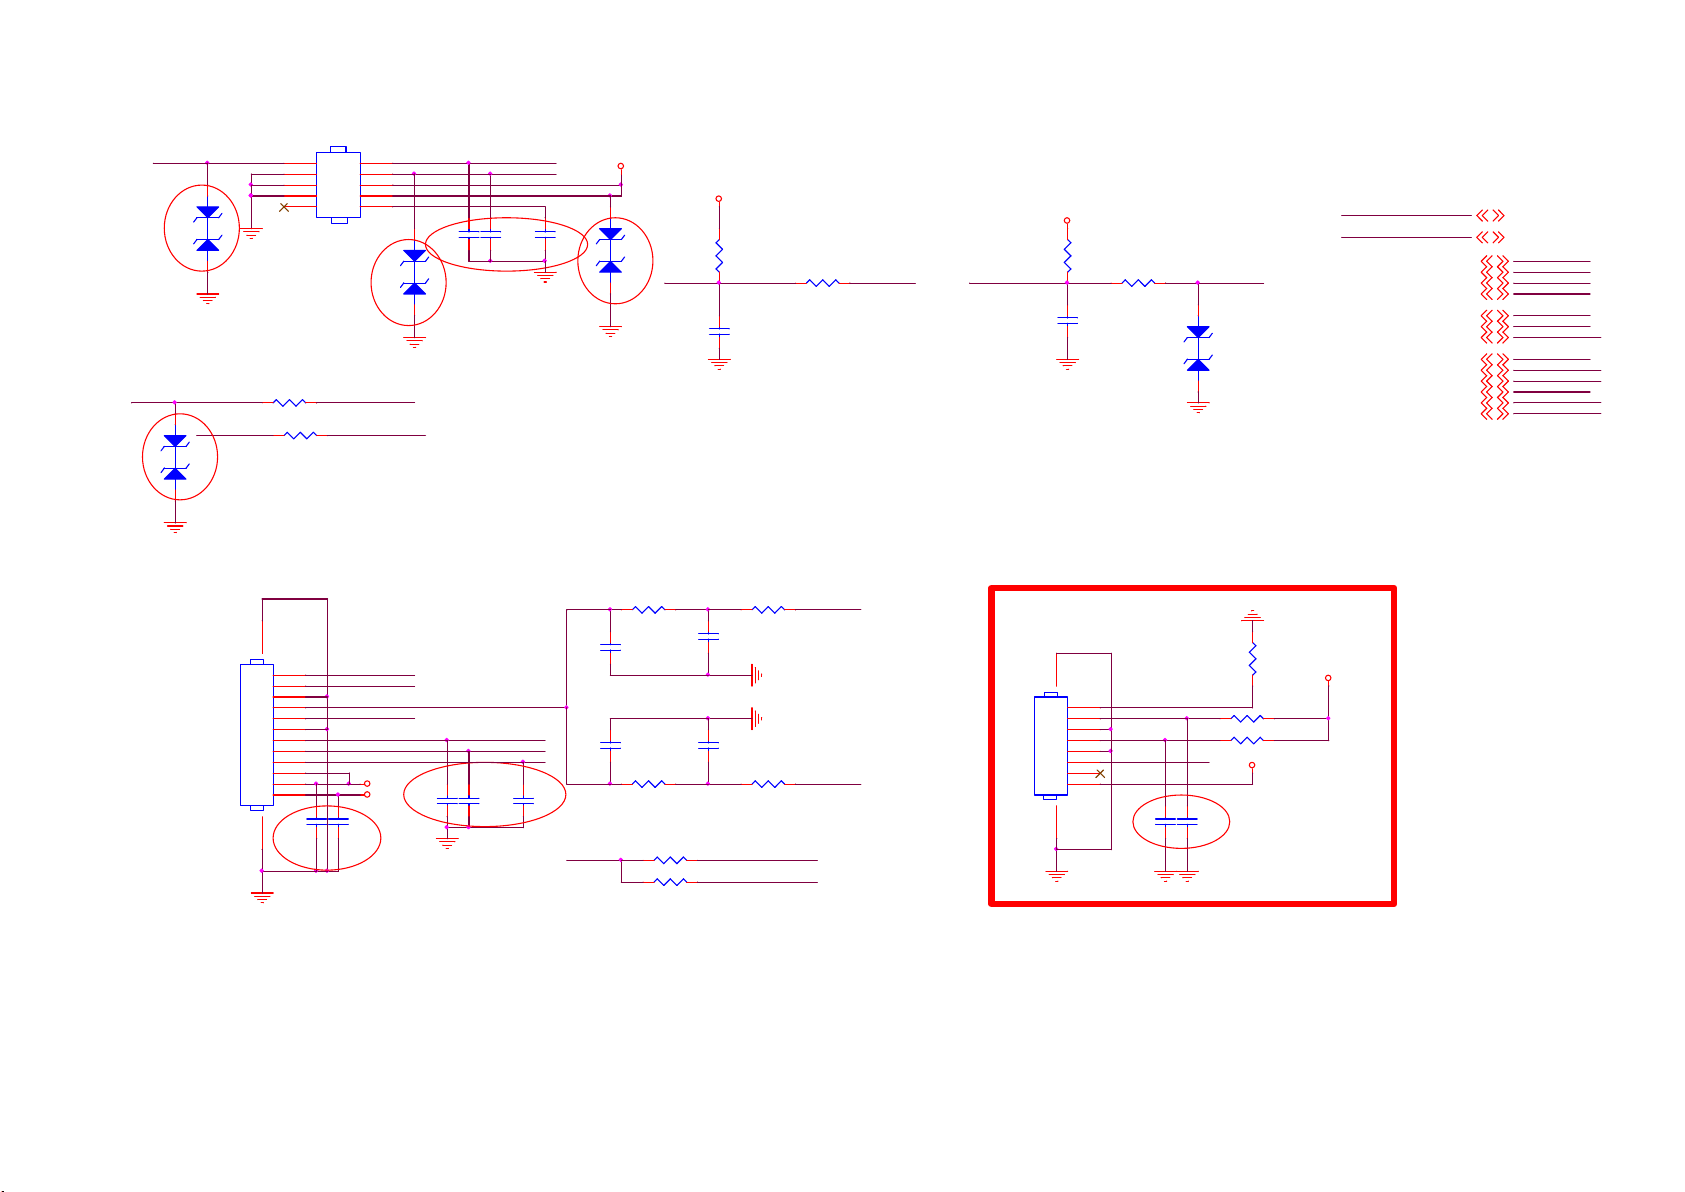
8-3-9 KEY/IR/RF4CE
2016-0803
LED_W/ B/G
12
ZD702
Add for ESD
2016-0926
LED_R
ZD705
AZ5123-01H
12
Add for ESD
2016-0926
AZ5123-01H
CN702
2
4
6
8
10
CONN
Add for ESD
2016-0926
R4141
100R 1/16 W 5%
R4142 100R 1/16W 5%
1
3
5
7
9
ZD704
LED_PWM0
LED_PWM1LED_W/B /G
12
C4171
1NF
AZ5123-01H
LED_R
IR
ADC1
C4172
1NF
ZD703
C4173
1NF
Add for EMI
2016-0803
Add for ESD
2016-0926
3V3SB
12
AZ5123-01H
OIRI
3V3SB
R4148
10K 1/16W 5%
C4138
100pF 50V
R4149
100R 1/16 W 5%
3V3SB
R4143
6.8K1/16W
IR
KEY_PAD 0
100NF 16V
C4137
R4144
AZ5123-01H
100R 1/ 16W 5%
12
ZD401
ADC1
+5V_SW
3V3SB
5,7
5,7
5
7
LED_PWM0
LED_PWM1
OIRI
KEY_PAD 0
TXD_RF4C E
RXD_RF4CE
RESET_RF4CE#16
OPWRSB
AL1_ADAC16
AR1_ADAC16
U0RX
U0TX16
Bathroom_AUD _EN16
+5V_SW 5
3V3SB 5
LED_PWM0
LED_PWM1
OIRI
KEY_PAD 0
TXD_RF 4CE
RXD_RF4CE
RESET_RF4CE#
OPWRSB
AL1_ADAC
AR1_ADAC
U0RX
U0TX
Bathroom_AUD _EN
HTV M odule
CN705
1314
1
2
3
4
5
6
7
8
9
10
11
NC CONN
12
100NF 1 6V
Bathroom_L_R
Bathroom_AUD _EN
C4183
100NF 16V
Add for EMI
2016-0803
U0RX
U0TX
IR_R C
IR_SSB
OPWRSB
+5V_SW
3V3SB
C4174
NC 1NF
C4175
NC 1NF
R4076
NC 510R 1/ 16W 5%
C4118
C4117
NC 10NF 50V
C4119
NC 10NF 50V
C4176
NC 1NFC4182
OIRI IR_R C
R4078
NC 510R 1/ 16W 5%
R4080 NC 100R 1/16W 5%
R4081 NC 100R 1/16W 5%
NC 1NF
C4120
NC 1NF
R4077
NC 200R 1/16W 5%
AL1_ADAC
AR1_ADAC
R4079
NC 200R 1/16W 5%
IR_SSB
RF4CE Interface
910
0.5mm FFC conn
CN703
1
2
3
4
5
6
7
8
NC CONN
RESET_RF4CE#
TXD_RF4C ETXD_RF4CE
RXD_RF4CE
C4083
NC 120PF 50V
Add C4082/C4083 for EMI
R4145
NC 10K 1/16W 5%
R4146 NC 4.7K 1/16W
R4147 NC 4.7K 1/16W
OIRI
3V3SB
C4082
RESET_RF4CE#
NC 120PF 50V
HI : NORMAL
LO: RESET ACTI VE
3V3SB
Page 40
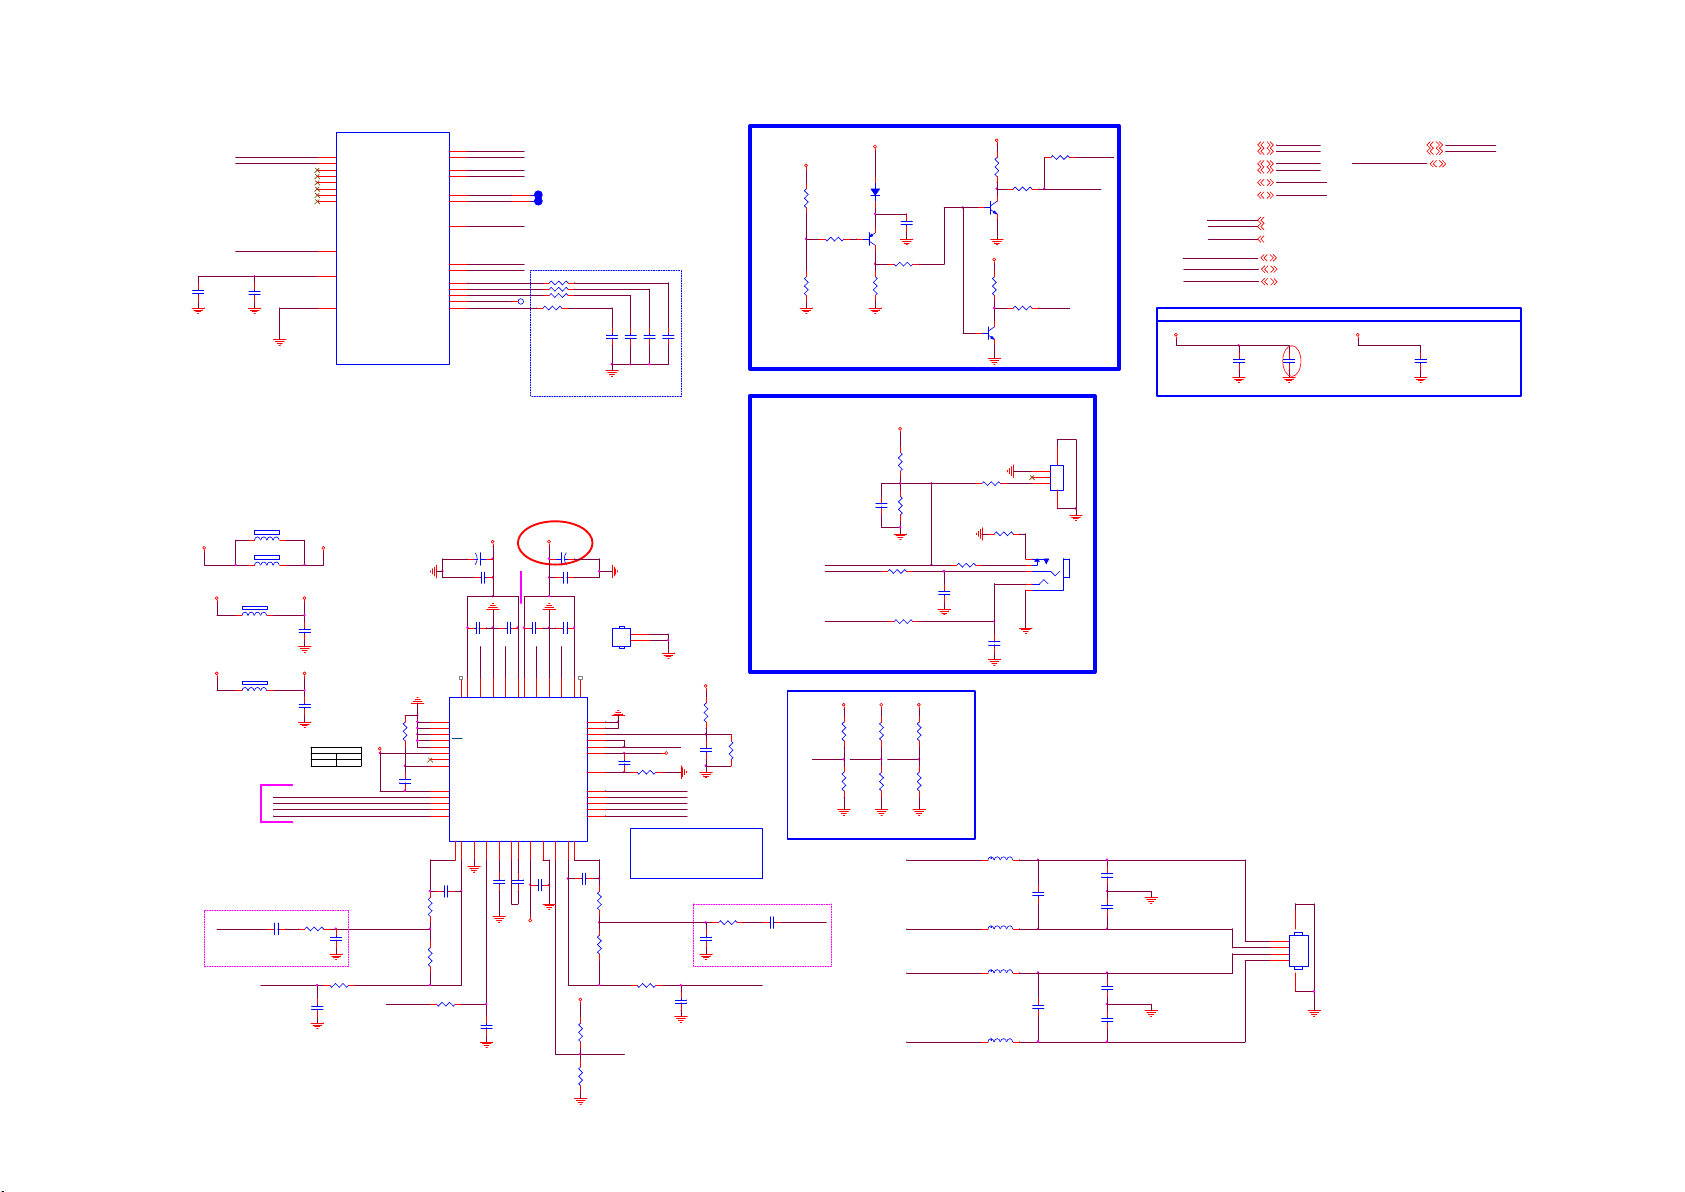
8-3-10 AMP
C4139
100NF 16V
12V_Amp
VMID_AADC
DVDD3V3
DVDD3V3
AR0_ADAC
AIN_R0
AIN_L0
AVDD33_AADC
C4140
1UF 16V
AVSS33_CLN
FB601
120R 3A
FB602
120R 3A
FB603
1 2
120R 3A
FB604
1 2
120R 3A
Independet
Gnd
shielding
SDI
LRCLKI
BICKI
MCLK
Close to MT5581
C615
1uF 10V
HPOUTR
12
12
PVDD
AUD_V33
C602
4.7UF 10% 10V
AUD_V33HP
C603
4.7UF 10% 10V
R603
16K 1%
C616
330PF 50V
C22
C24
B23
E23
D23
A22
B22
C23
E21
D22
K19
Srereo
CFG0
L
R606
10R 1/16W 1%
C617
1uF 10V
U401-3
AIN_R0
AIN_L0
AIN_R1
AIN_L1
AIN_R2
AIN_L2
AIN_R3
AIN_L3
AVDD33_AADC
VMID_AADC
AVSS33_CLN
MT5800WUEJ
CFG1
H
0R05 1/16W
AUD_V33
R634
PWRDN-H P
A25
AR0_ADAC
C25
AL0_ADAC
B26
AR1_ADAC
A27
AL1_ADAC
B25
AR2_ADAC
A26
AL2_ADAC
F21
AVDD33_ADAC
AG27
ASPDIFI
AH28
ASPDIFO0
AF27
AOBCK
AD26
AOLRCK
AG28
AOMCLK
AE27
AOSDATA1
AF28
AOSDATA0
Close to U601
10UF 16V
49
THERMALPAD
1
SDATA1
2
MS
3
PLL
4
CFG0
5
CFG1
6
CLK_OUT
7
DGND
C612
1uF 10V
8
DVDD
9
SDATA0
10
LRCIN
11
BCLK
12
MCLK
RINN13OUTR14VSS15EN16PVSS17CN18CP19PVDD20PGND21UVP22OUTL23LINN
C618
68PF 50V
R604
43K 1/16W
R605
16K 1%
R607
22R 1/16W 5%
AR0_ADAC
AL0_ADAC
AR1_ADAC
AL1_ADAC
AR2_ADAC
AL2_ADAC
AVDD33_ADAC
ARC
ASPDIFO0
AOSDATA1
PVDD
C604
NC 220uF 16V
+
C606
C608
0.1uF 25V
LA
47NC48
VDDLA
Spearate
VCC trace
C609
0.1uF 25V
LB
45LA46
GNDL
C619
0.1uF 25V
C634
1uF 10V
1
1
R4150 22R 1/16W 5%
R4151 22R 1/16W 5%
R4152 22R 1/16W 5%
TP16 TP
R4153
Close to main chip
470uF 16V
C610
0.1uF 25V
RB
42
43LB44
VDDLB
VDDRB
C621
1uF 10V
C620
1uF 10V
AUD_V33HP
TP14
DDR_DEBUG_PAD
DDR_DEBUG_PAD
TP15
22R 1/16W 5%
Modufy by 1014
PVDD
C605
+
C607
10UF 16V
C611
0.1uF 25V
RA
37
38RA39
40RB41
GNDR
VDDRA
LINEIN
LREX
RESET#
ERROR#
PD#
DVDD
DGND
DEF
SA1
SA0
SCL
SDA
24
68PF 50V
AUD_V33HP
R610
R611
SDI
C4141
10PF 50V
Close to U601
U601
AD87588-LG48NAY
NC
36
35
34
33
32
31
30
29
28
27
26
25
C622
R608
43K 1/16W
R609
16K 1%
1K 1/16W 5%
PWRDN-H P
1K 1/16W 5%
BICKI
LRCLKI
MCLK
C4142
C4144
C4143
10PF 50V
10PF 50V
10PF 50V
HS601
1
2
HEAT SINK
AMP_RESET
AMP_PWRDN
AUD_V33
C613
1uF 10V
R635
0R05 1/16W
AMP_DEF
AMP_SA1
AMP_SA0
OSCL0
OSDA0
HP GAI N
L: -( R609/R613 )
R: -( R605/R603 )
R612
10R 1/16W 1%
C625
1uF 10V
AUD_V33
R602
1MOHM 1/16W +/-5%
C614
1uF 10V
Close to MT5581
R613
16K 1%
C624
330PF 50V
R640
NC 10K 1/ 16W 5%
HPOUTL
Mute CKT
+12V
R623
10K 1/16W 5%
R627
0R05 1/16W
R628
10K 1/16W 5%
Headphone for HTV
NC 4K7 1/ 16W 5%
NC 100NF 16V
HPDET#
HPOUTR
HPOUTL
AUD_V33
R614
NC 10K 1/ 16W 5%
AMP_SA0 AMP_SA1LBAMP_DEF
R617
10K 1/16W 5%
I2C Address =0x60 default mode mute
C623
1uF 10V
AL0_ADAC
3V3SB
23
1
BC857BW
Q601
R633
C636
AUD_V33
R615
R618
D601
NC BAS316WS
C635
NC 10UF 6.3V
R630
4.7K 1/16W
R629
100K 1/16W 5%
Anti-Po p CKT
3V3SB
R622
NC 4K7 1/ 16W 5%
HPOUTR_ISO
R620
0R05 1/16W
R621
0R05 1/16W
AUD_V33
R616
NC 10K 1/ 16W 5%
NC 10K 1/ 16W 5%
R619
10K 1/16W 5%
10K 1/16W 5%
LA
RA
RB
10K 1/16W 5%
10K 1/16W 5%
NC 0R05 1/ 16W
C633
100NF 16V
HPOUTL_ISO
C632
100NF 16V
DVDD3V3
R639
AMP_PWRDN
R626
0R05 1/16W
Q602
BC847C
R632
0R05 1/16W
Q603
BC847C
Add by 0321
For HTV
R638
NC 0R05 1/16W
R637
0R05 1/16W
L601
15UH
L602
15UH
L603
15UH
L604
15UH
3
2
1
CN603
3
4
2
5
1
PHONE JAC K 5P
C626
470NF 50V
C629
470NF 50V
0R05 1/16W
PWRDN
PWRDN-H P
4 5
CN604
NC CON N
C627
33nF 50V
C628
33nF 50V
C630
33nF 50V
C631
33nF 50V
R625
DVDD3V3
R631
R636
11
PWRDN-H P
11
PWRDN
9
AIN_R0
9
AIN_L0
10,14
ARC
7
OPCTRL9
OSDA0
OSCL0
ASPDIFO0
3V3SB
AVDD3V3
DVDD3V3
Analog Power
AVDD3V3
AVDD33_ADAC
C4145
100NF 16V
LSPK+
LSPK-
RSPK+
RSPK-
OSDA0
OSCL0
SPDIF_OUT
CN602
3V3SB 5
4
3
2
1
PWRDN-H P
PWRDN
AIN_R0
AIN_L0
ARC
HPDET#
AVDD3V3 5
DVDD3V3 5
5 6
AMP_RESET
5
5
9
AVDD3V3
C4146
10UF 16V
cost down part 065G060310605M M
AL1_ADAC16
AR1_ADAC16
AVDD33_AADC
C4096
100NF 16V
AL1_ADAC
AR1_ADAC
AMP_RESET 5
Page 41
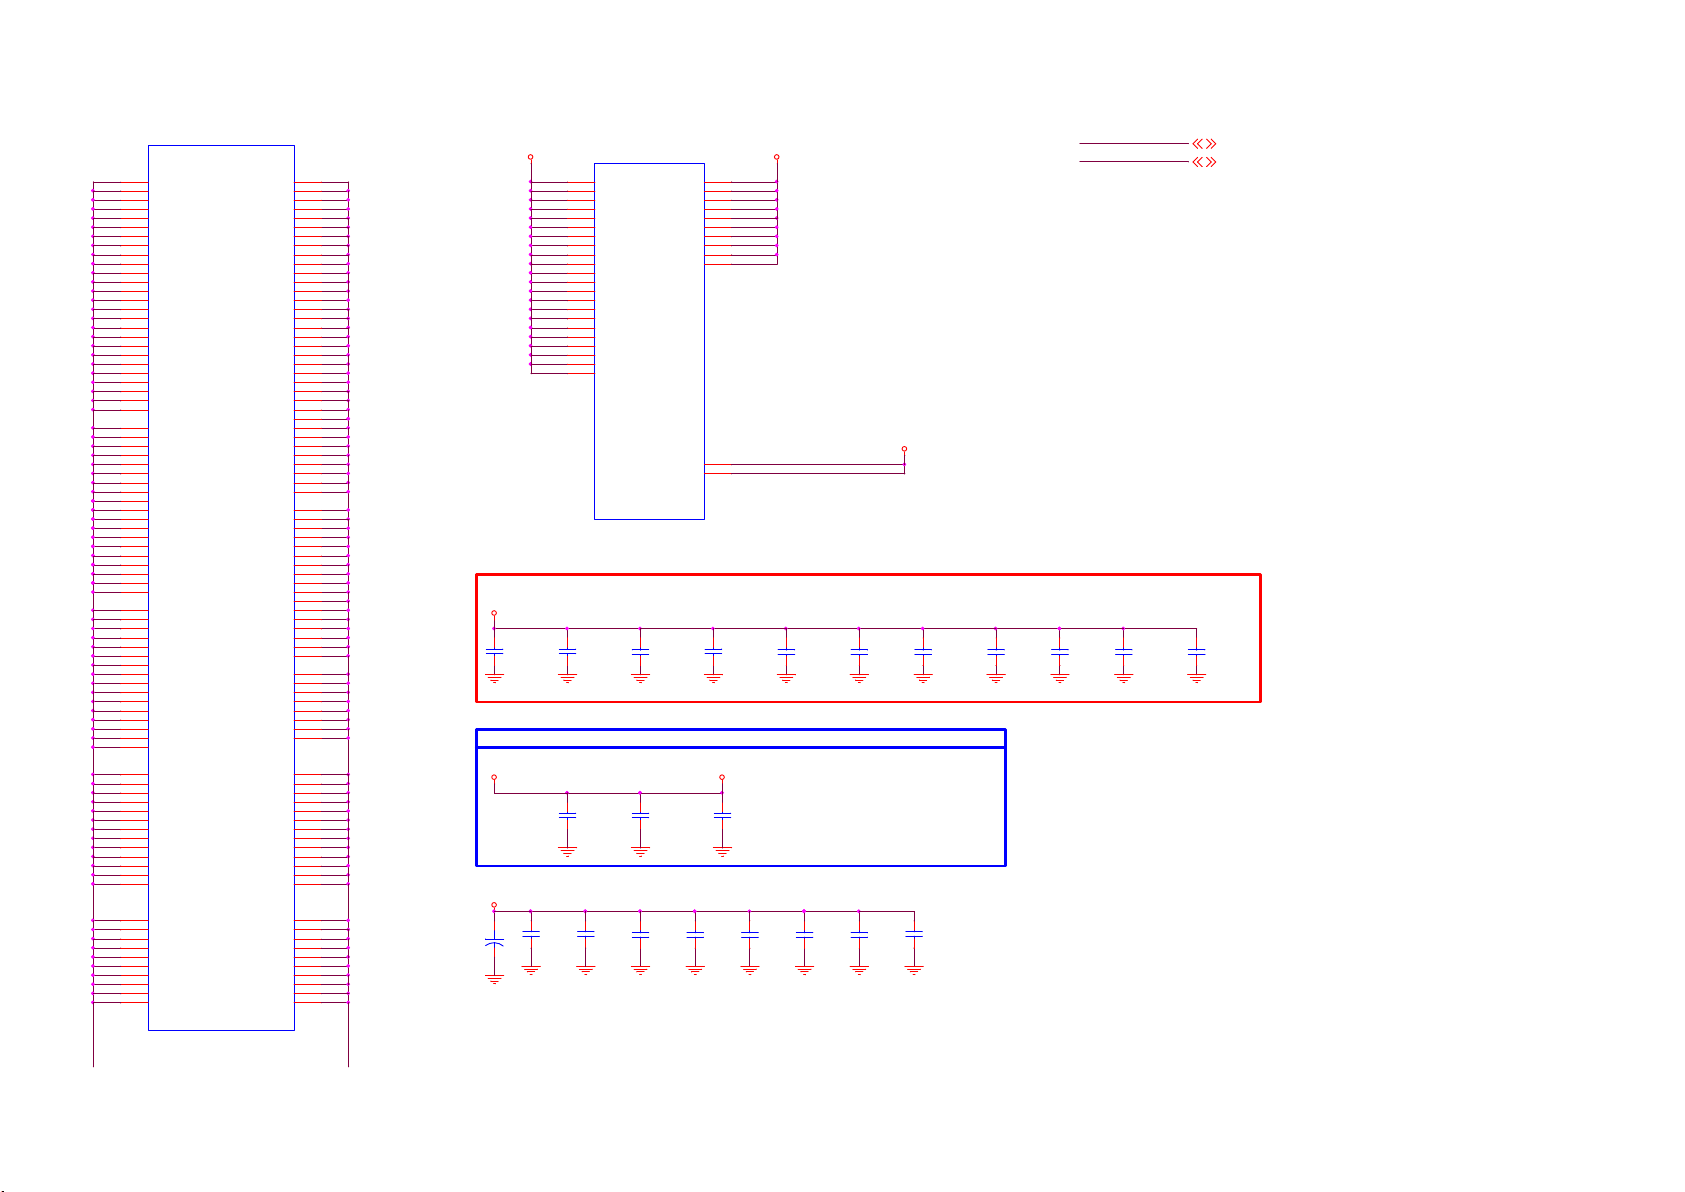
8-3-11 VCCK/DVSS
U401-11
AB1
DVSS
AG1
DVSS
L2
DVSS
AC2
DVSS
H3
DVSS
J3
DVSS
N3
DVSS
R3
DVSS
V3
DVSS
Y3
DVSS
M4
DVSS
AD4
DVSS
AF4
DVSS
J5
DVSS
P5
DVSS
AB5
DVSS
E6
DVSS
F6
DVSS
G6
DVSS
K6
DVSS
AH6
DVSS
E7
DVSS
F7
DVSS
G7
DVSS
H7
DVSS
U7
DVSS
W7
DVSS
AF7
DVSS
E8
DVSS
F8
DVSS
G8
DVSS
H8
DVSS
U8
DVSS
AA8
DVSS
E9
DVSS
F9
DVSS
G9
DVSS
K9
DVSS
L9
DVSS
M9
DVSS
N9
DVSS
AB9
DVSS
AH9
DVSS
K10
DVSS
L10
DVSS
M10
DVSS
N10
DVSS
AF10
DVSS
K11
DVSS
L11
DVSS
M11
DVSS
N11
DVSS
P11
DVSS
R11
DVSS
T11
DVSS
U11
DVSS
V11
DVSS
W11
DVSS
AB11
DVSS
C12
DVSS
C15
DVSS
J17
DVSS
K17
DVSS
L17
DVSS
M17
DVSS
N17
DVSS
P17
DVSS
R17
DVSS
T17
DVSS
U17
DVSS
V17
DVSS
J18
DVSS
K18
DVSS
L18
DVSS
M20
DVSS
N20
DVSS
AB20
DVSS
E22
DVSS
P22
DVSS
AC22
DVSS
T23
DVSS
AC23
DVSS
AC24
DVSS
D24
DVSS
DVSS
DVSS
DVSS
DVSS
DVSS
DVSS
DVSS
DVSS
DVSS
DVSS
DVSS
DVSS
DVSS
DVSS
DVSS
DVSS
DVSS
DVSS
DVSS
DVSS
DVSS
DVSS
DVSS
DVSS
DVSS
DVSS
DVSS
DVSS
DVSS
DVSS
DVSS
DVSS
DVSS
DVSS
DVSS
DVSS
DVSS
DVSS
DVSS
DVSS
DVSS
DVSS
DVSS
DVSS
DVSS
DVSS
DVSS
DVSS
DVSS
DVSS
DVSS
DVSS
DVSS
DVSS
DVSS
DVSS
DVSS
DVSS
DVSS
DVSS
DVSS
DVSS
DVSS
DVSS
DVSS
DVSS
DVSS
DVSS
DVSS
DVSS
DVSS
DVSS
DVSS
DVSS
DVSS
DVSS
DVSS
DVSS
DVSS
DVSS
DVSS
DVSS
DVSS
K12
L12
M12
N12
P12
R12
T12
U12
V12
W12
K13
L13
M13
N13
P13
R13
T13
U13
V13
W13
AB13
AC13
AD13
AF13
G14
J14
K14
L14
M14
N14
P14
R14
T14
U14
V14
W14
AD14
AE14
J15
K15
L15
M15
N15
P15
R15
T15
U15
V15
J16
K16
L16
M16
N16
P16
R16
T16
U16
V16
W16
AB16
M18
N18
P18
R18
T18
U18
V18
AB18
L19
M19
N19
AB19
L20
Y25
AD25
AF25
C26
D26
E26
T26
C27
A28
C28
VCCK VCCK
W17
W18
W19
W20
W21
Y16
Y17
Y18
P19
R19
T19
U19
V19
Y19
P20
R20
T20
U20
V20
Y20
U21
V21
U401-10
VCCK
VCCK
VCCK
VCCK
VCCK
VCCK
VCCK
VCCK
VCCK
VCCK
VCCK
VCCK
VCCK
VCCK
VCCK
VCCK
VCCK
VCCK
VCCK
VCCK
VCCK
VCCK
MT5800WUEJ
VCCK POWER
Bottom Side Capacitors
VCCK
C4110
22UF 16V
C4100
10UF 16V
3V3 IO Power
AVDD3V3 VCC3IO_AB
VCCK
+
C4169
NC 100U F 16V
Close to Main Chip
C4018
4.7uF 10V
C4168
C4166
10UF 16V
22UF 16V
VCCK
VCCK
VCCK
VCCK
VCCK
VCCK
VCCK
VCCK
VCCK
VCCK
VCC3IO_A
VCC3IO_B
C4101
4.7UF 10% 10V
C4019
100NF 16V
C4161
100NF 16V
Y21
W22
Y22
AA22
AB22
Y23
AA23
AB23
AA24
AB24
G21
F22
C4102
10UF 16V
C4162
100NF 16V
VCC3IO_A
VCC3IO_B
C4020
NC/100N F 16V
C4163
100NF 16V
C4103
100NF 16V
C4164
100NF 16V
C4104
100NF 16V
C4165
100NF 16V
VCC3IO_AB
C4105
100NF 16V
C4167
22UF 16V
C4106
100NF 16V
VCCK
AVDD3V3
C4107
100NF 16V
C4108
100NF 16V
VCCK 5
AVDD3V3 5
C4109
100NF 16V
MT5800WUEJ
Page 42
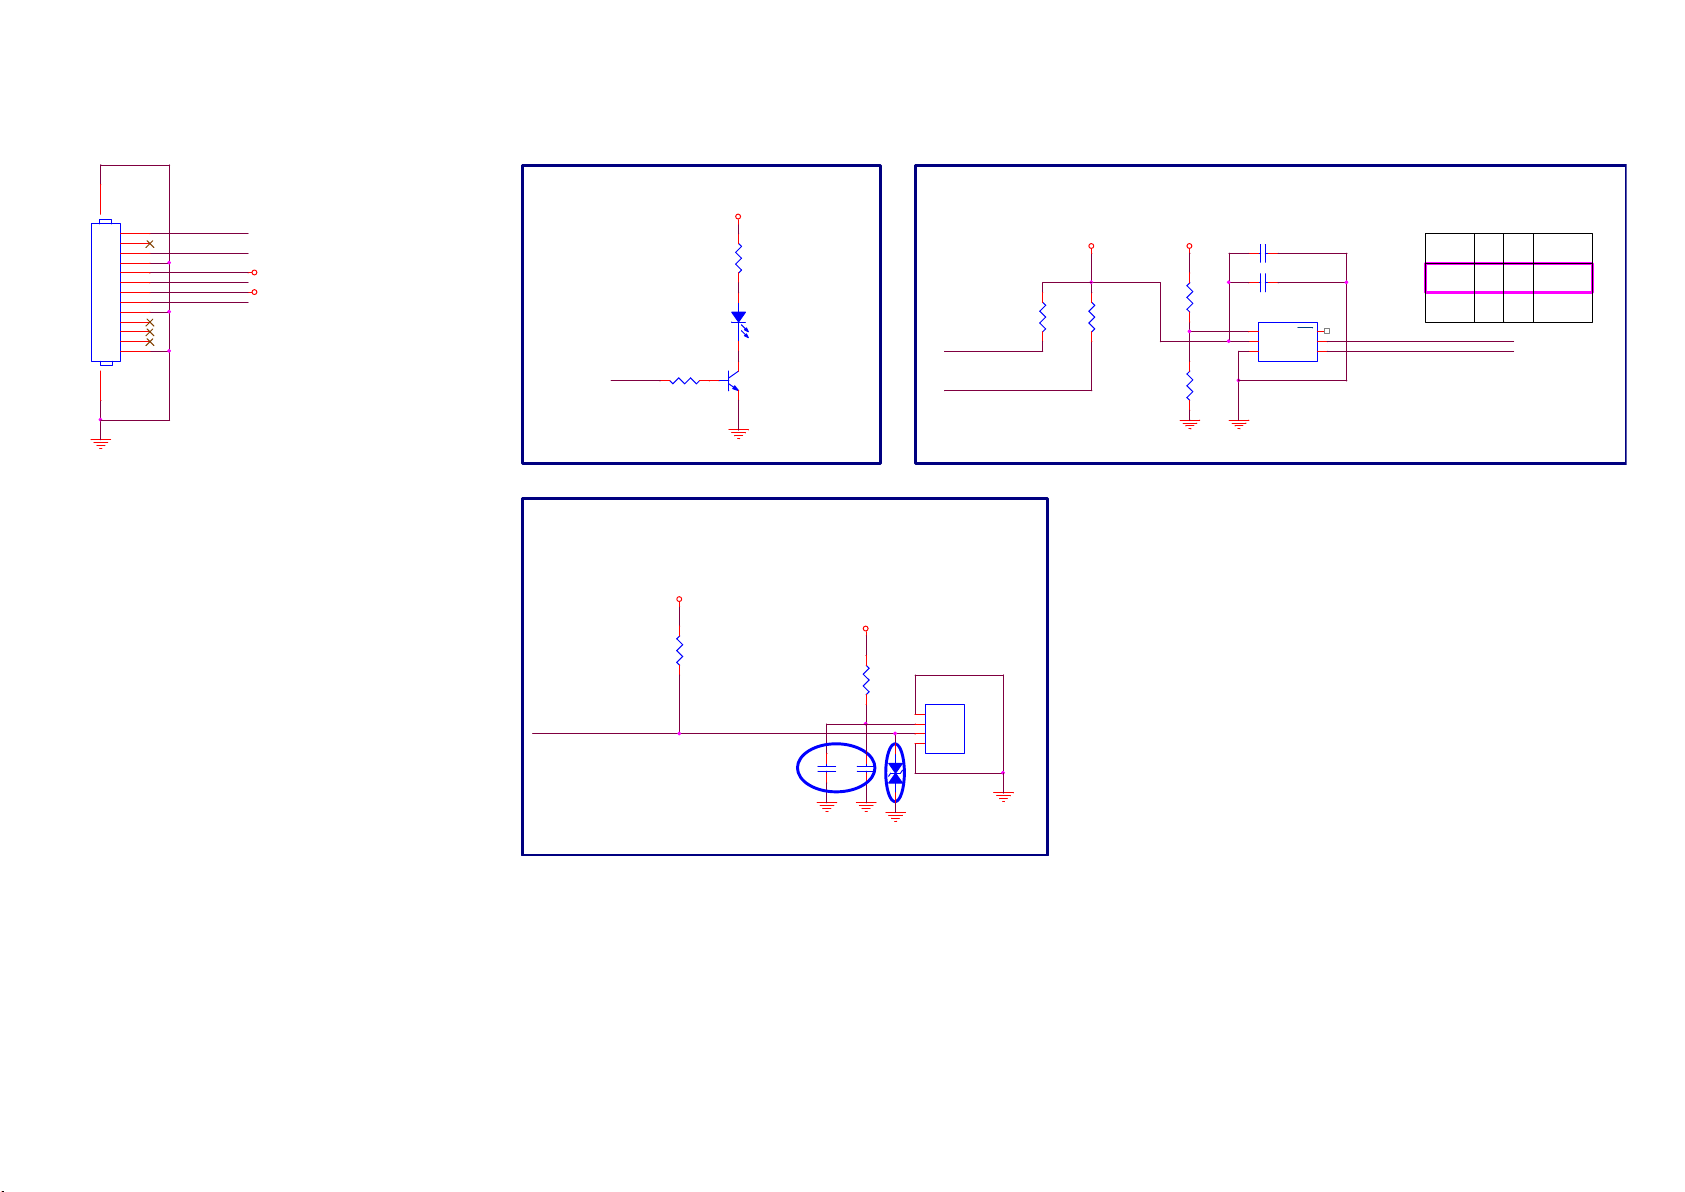
8.4 J 715G8009 IR/LED Panel (For 32/43” 5102 Series)
8-4-1 IR & LED & Light Sensor
1415
CN201
1
2
3
4
5
6
7
8
9
10
11
12
13
LED_R
RC-IR
LS_SCL
LS_SDA
3V3SB
DVD3V3
Standby LED
LED201
GPSS008RC4
R202
LED_R
1K 1/16W 5%
3V3SB
12
Red
Q201
BC847BW
R201
100R 1/16W 5%
Light Sensor
R221
LS_SCL
LS_SDA
NC/ 10K 1/16W 5%
DVD3V3
R222
DVD3V3
NC/ 10K 1/16W 5%
R223
NC/ 0R05 1/16W
R224
NC/ 0R05 1/16W
C222 N C/ 1uF 10V
C221 N C/ 100N 16V
U221
NC/ JSA-1130
1
ADDR
INT
2
VDD
SDA
GND3SCL
R223R224
I2C addr
JSA-1130
0R
0x44
6
5
4
JSA-1130NCNC 0R
LS_SDA
LS_SCL
0x45
Digital Light Sensor
IR Receiver
3V3SB
3V3SB
R203
NC/ 2K7 1/16W 5%
RC-I R
1uF 10V
C201
C202
1uF 10V
Close to U201
R204
100R 1/16W 5%
TSOP75436TR
1
2
3
4
12
ZD201
MLVG0402
Close to U201
GND
VCC
Vout
GND
U201
Page 43
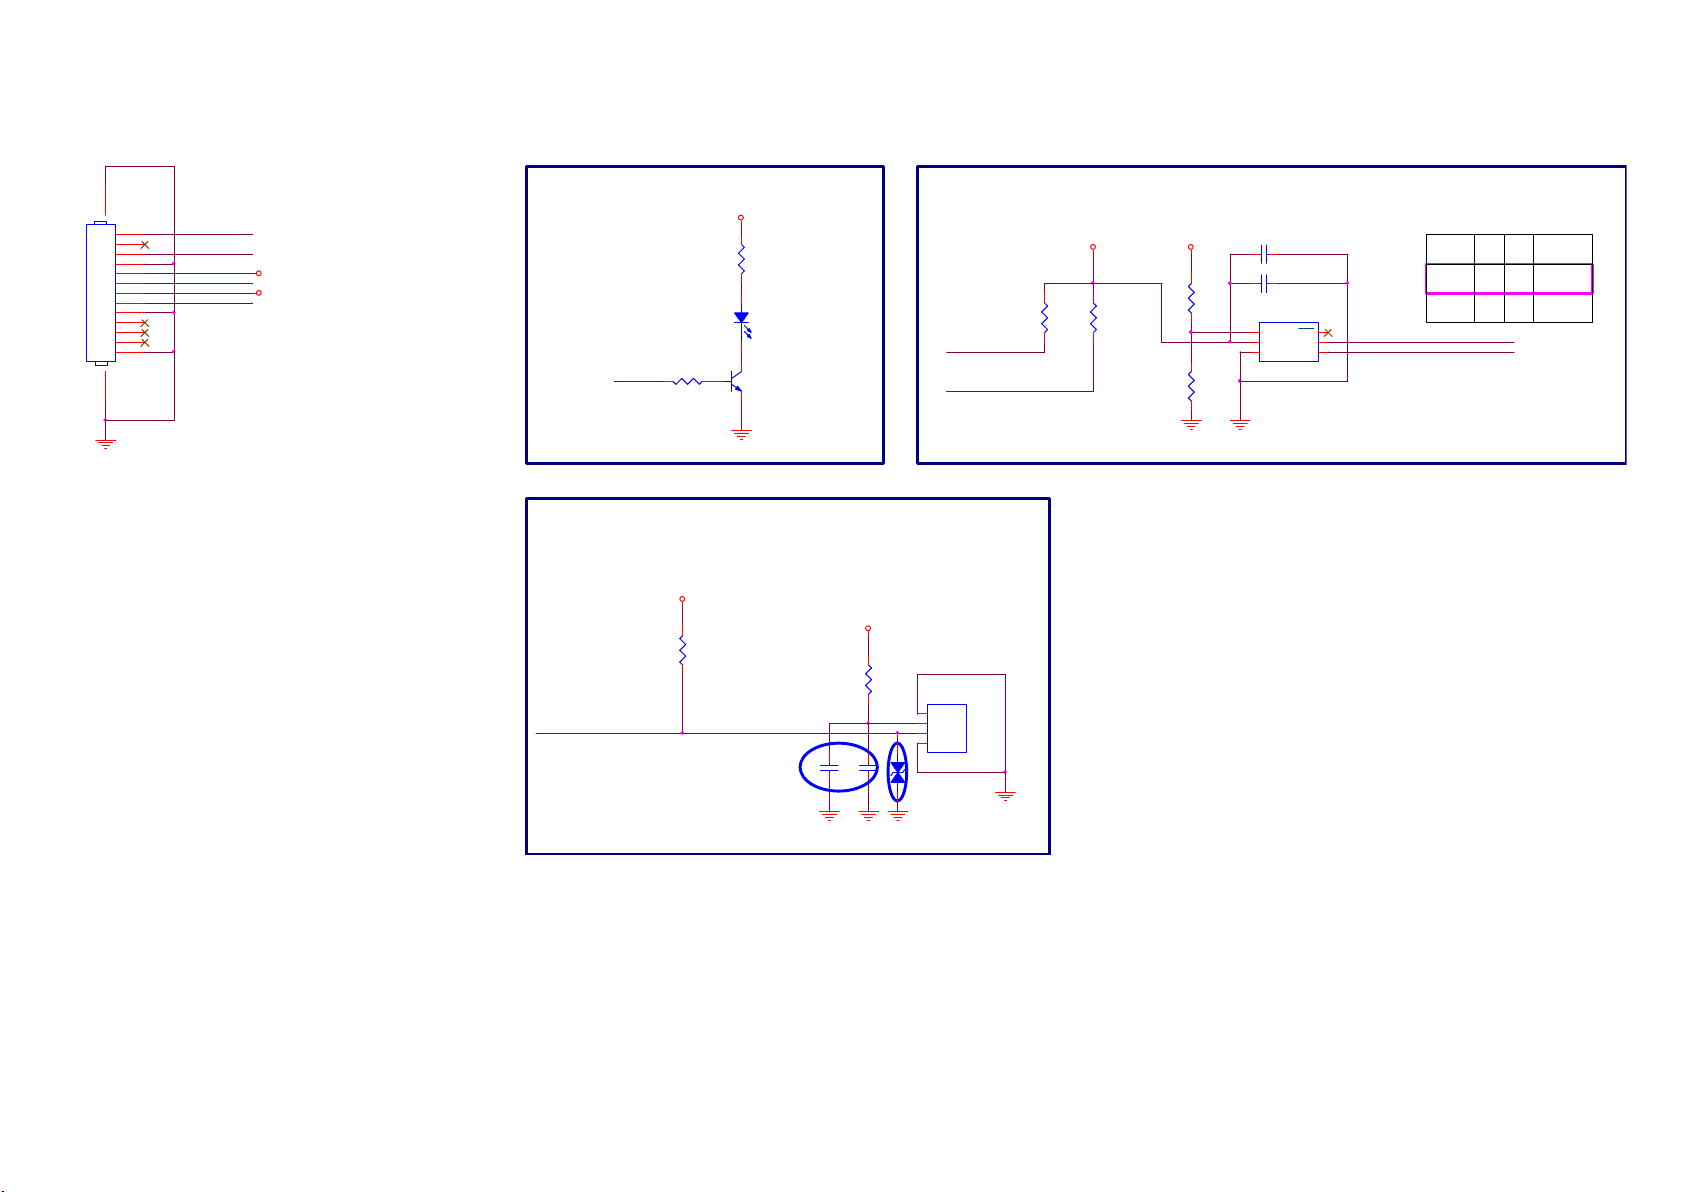
8.5 J 715G8010 IR/LED Panel (For 49” 5102 Series)
8-5-1 IR & LED & Light Sensor
CN201
1415
1
2
3
4
5
6
7
8
9
10
11
12
13
CONN
LED_R
RC-IR
LS_SCL
LS_SDA
3V3SB
DVD3V3
Standby LED
LED201
GPSS008RC4
R202
LED_R
1K 1/16W 5%
3V3SB
12
Red
Q201
BC847BW
R201
100R 1/ 16W 5%
Light Sensor
R221
LS_SCL
LS_SDA
NC/ 10K 1/16W 5%
DVD3V3
DVD3V3
R222
NC/ 10K 1/16W 5%
R223
NC/ 0R05 1/16W
R224
NC/ 0R05 1/16W
C222 N C/ 1uF 10V
C221 N C/ 100N 16V
U221
NC/ JSA-1130
1
ADDR
INT
2
VDD
SDA
GND3SCL
R224 R223
JSA-1130
6
5
4
JSA-1130NCNC 0 R
LS_SDA
LS_SCL
I2C addr
0R
0x44
0x45
Digital Light Sensor
IR Receiver
3V3SB
3V3SB
R203
NC/ 2K7 1/16W 5%
RC-IR
1uF 10V
C202
1uF 10V
Close to U201
C201
R204
100R 1/16W 5%
TSOP75436TR
1
2
3
4
12
ZD201
MLVG0402
Close to U201
GND
VCC
Vout
GND
U201
Page 44
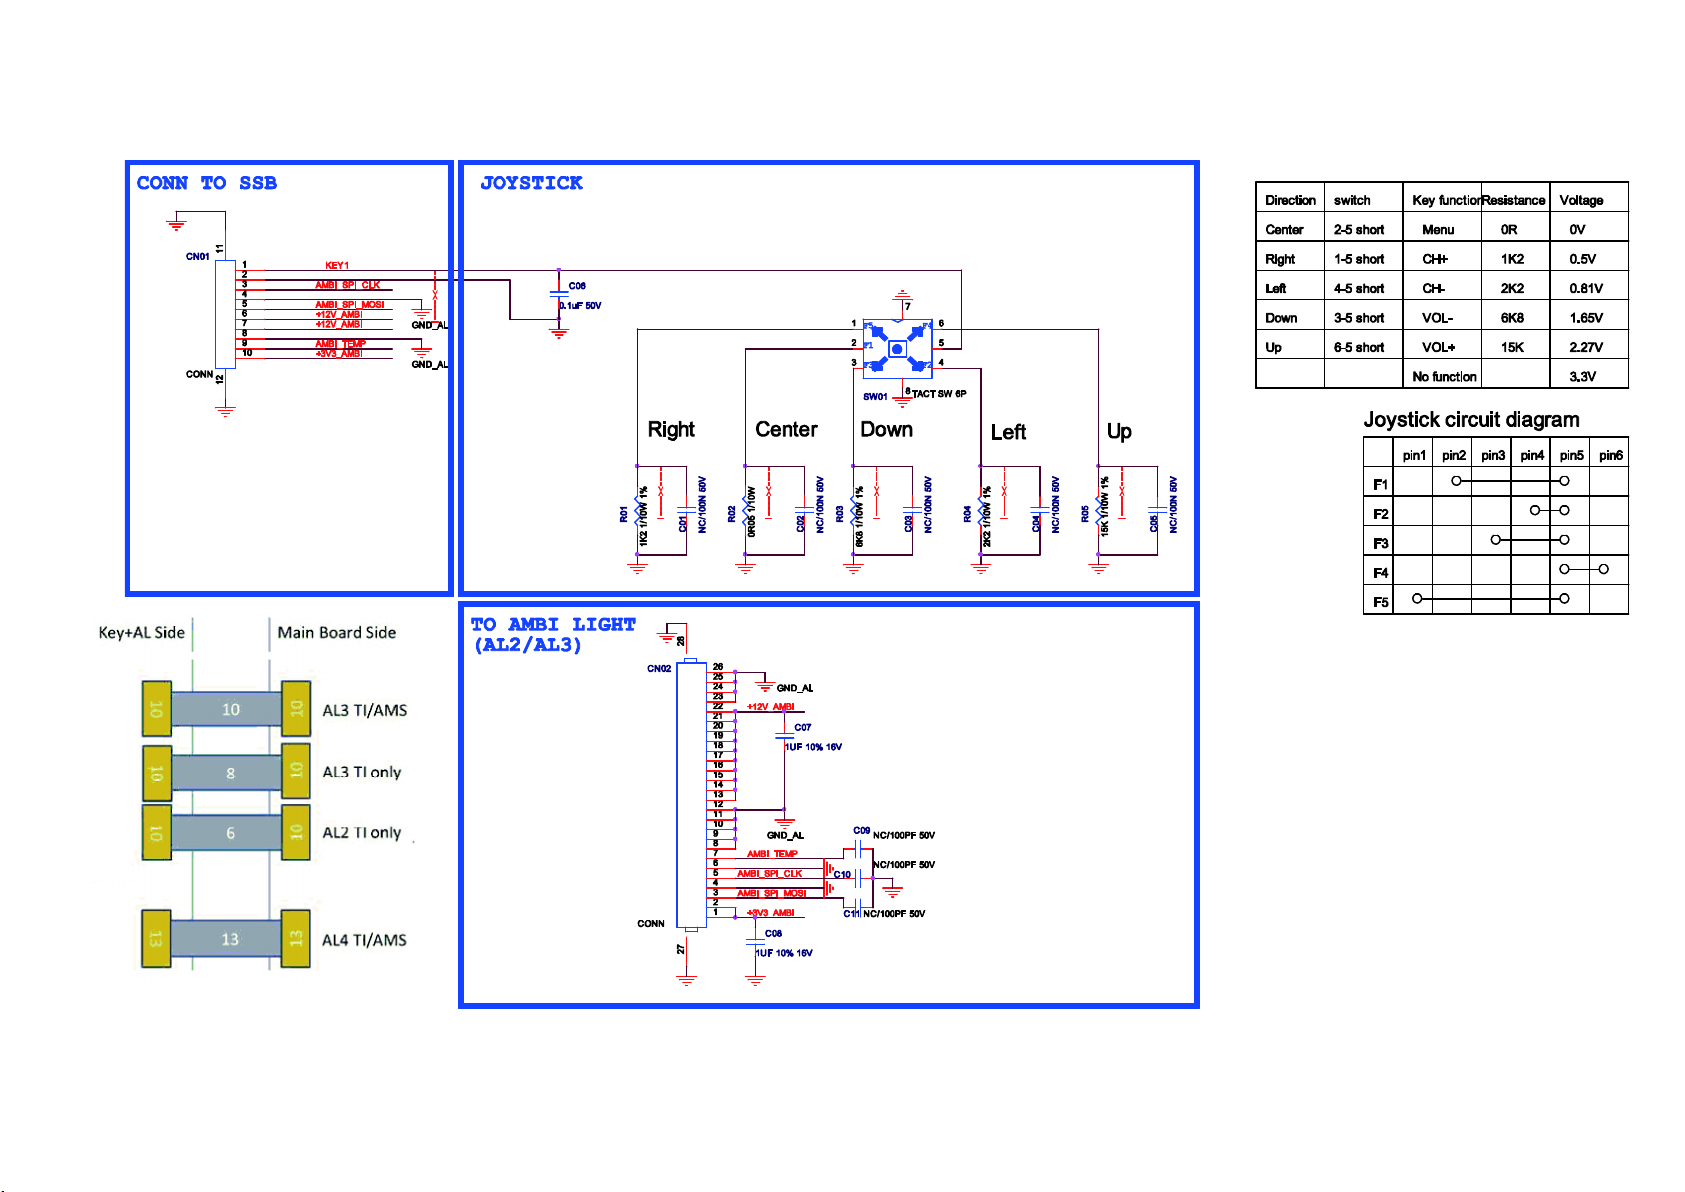
8.6 E 715G7088 Keyboard control panel
8-6-1 Key
Page 45
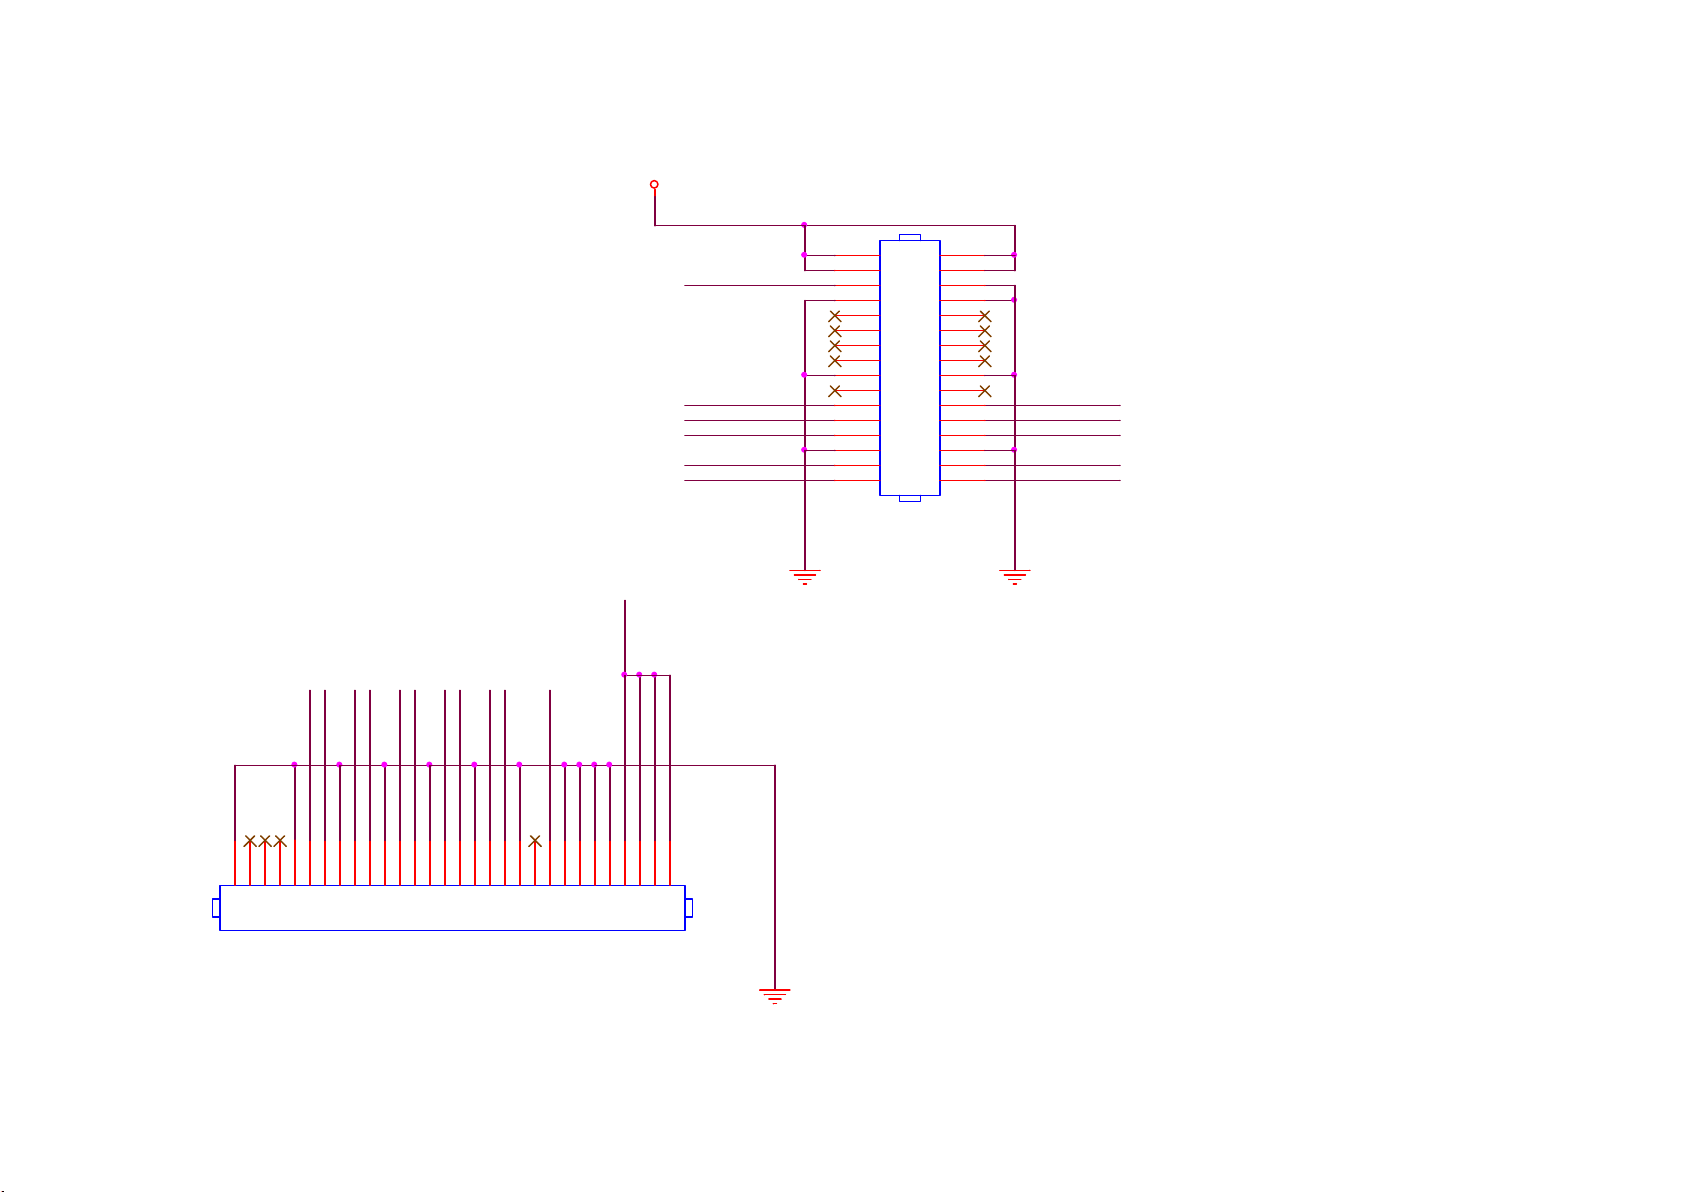
8.7 715G8728 Connection Panel (For 32” PHG5102 Series)
8-7-1 LVDS to FFC
Output
Input
RXO0-
RXO0+
RXO1-
RXO1+
RXO2-
RXO2+
RXOC-
RXOC+
RXO3-
RXO3+
PANEL_VCC
PANEL_VCC
PANEL_VCC
LVDS_CON _DET
RXO0RXO1RXO2-
RXOCRXO3-
31
29
27
25
23
21
19
17
15
13
11
9
7
5
3
1
CN201
CONN
32
30
28
26
24
22
20
18
16
14
12
10
8
6
4
2
RXO0+
RXO1+
RXO2+
RXOC+
RXO3+
1234567891011121314151617181920212223242526272829
CN202
CONN
LVDS_CON _DET
30
Page 46
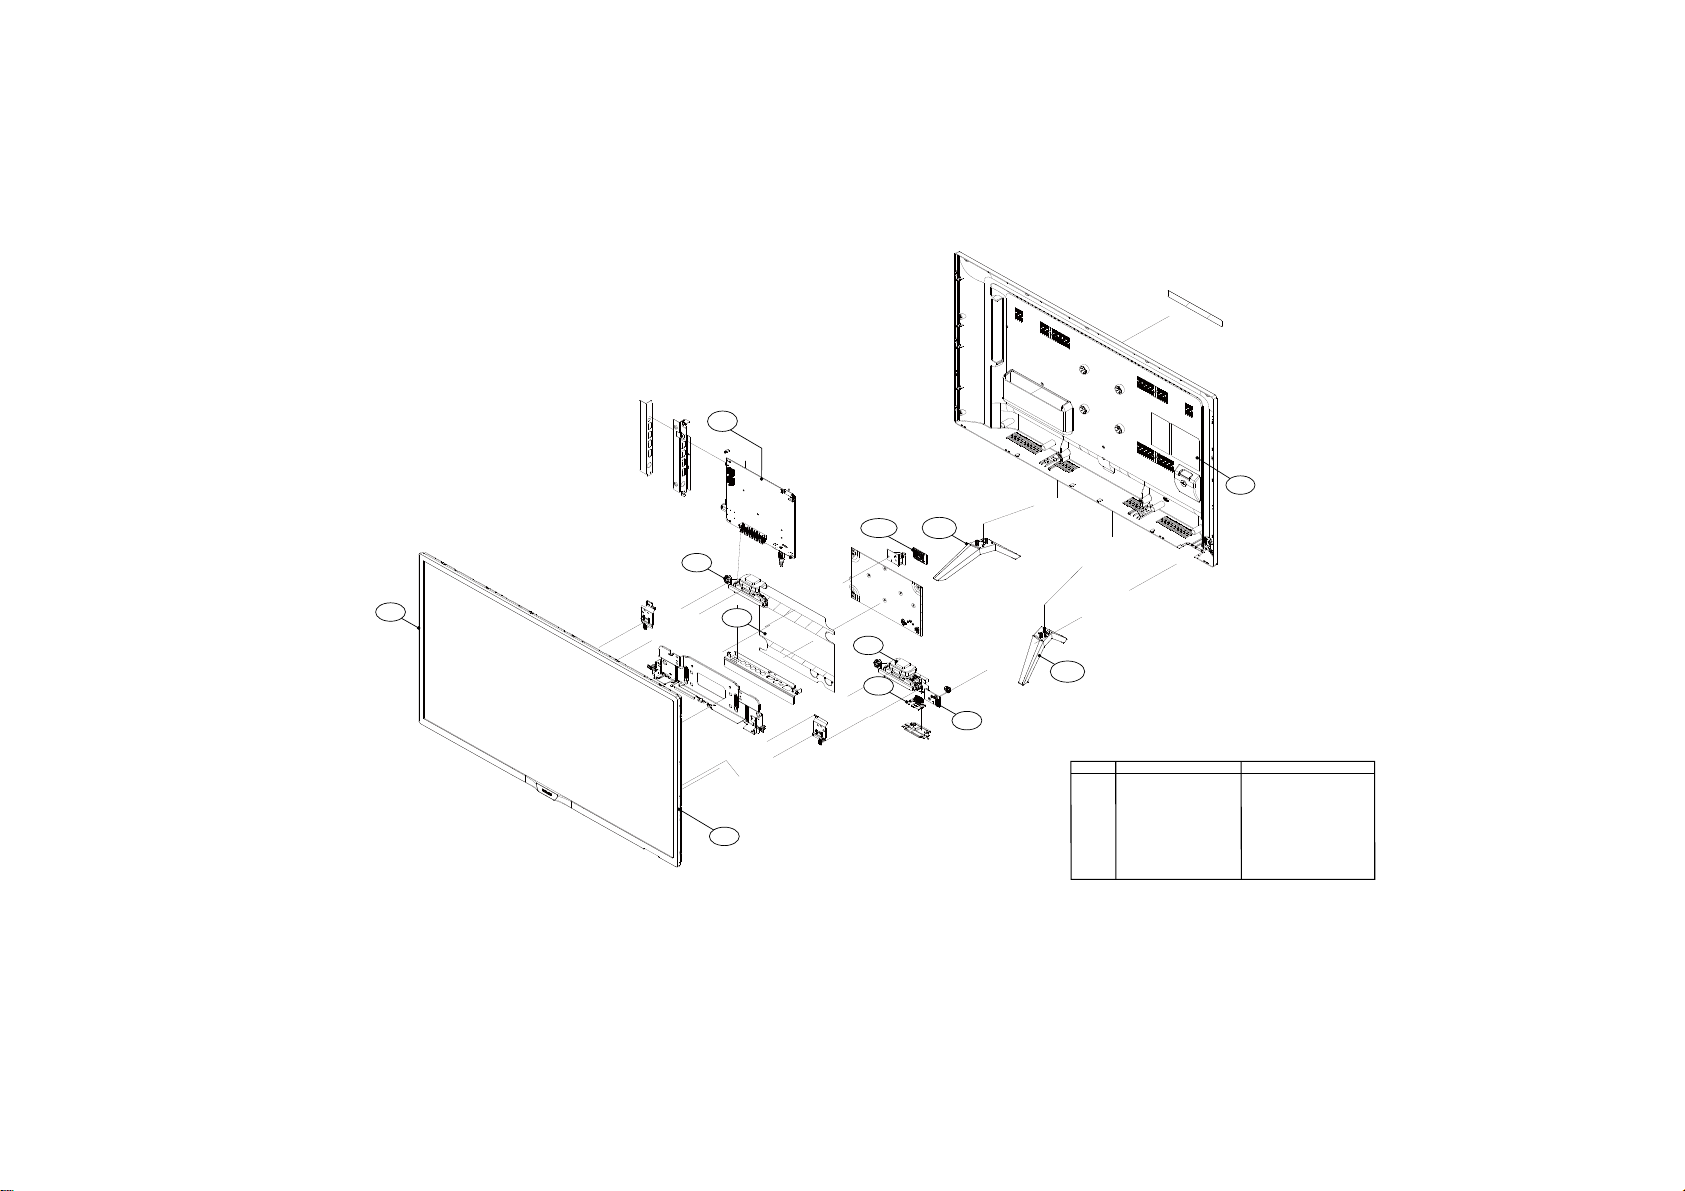
9. Styling Sheets
5102 series 32"
1053
0040
0030
1184
1050
0095
WIFI01
1184
1056
0050
1057
0050
Pos No. Description Remarks
0030 Bezel
0040 Rear cover
0050 Stands
0095 V0 SHEET
1050 Display panel
1053 Panel SSB
1054 Power Supply Unit
1056 IR/LED panel
1057 Keyboard control panel
1176 Remote control Not displayed
1184 Speakers
WiFi01 WiFi_USB
FOR ELECTRICAL PARTS/ASSEMBLIES SEE WIRING DIAGRAM CHAPTER 9
20050_800.eps
Page 47
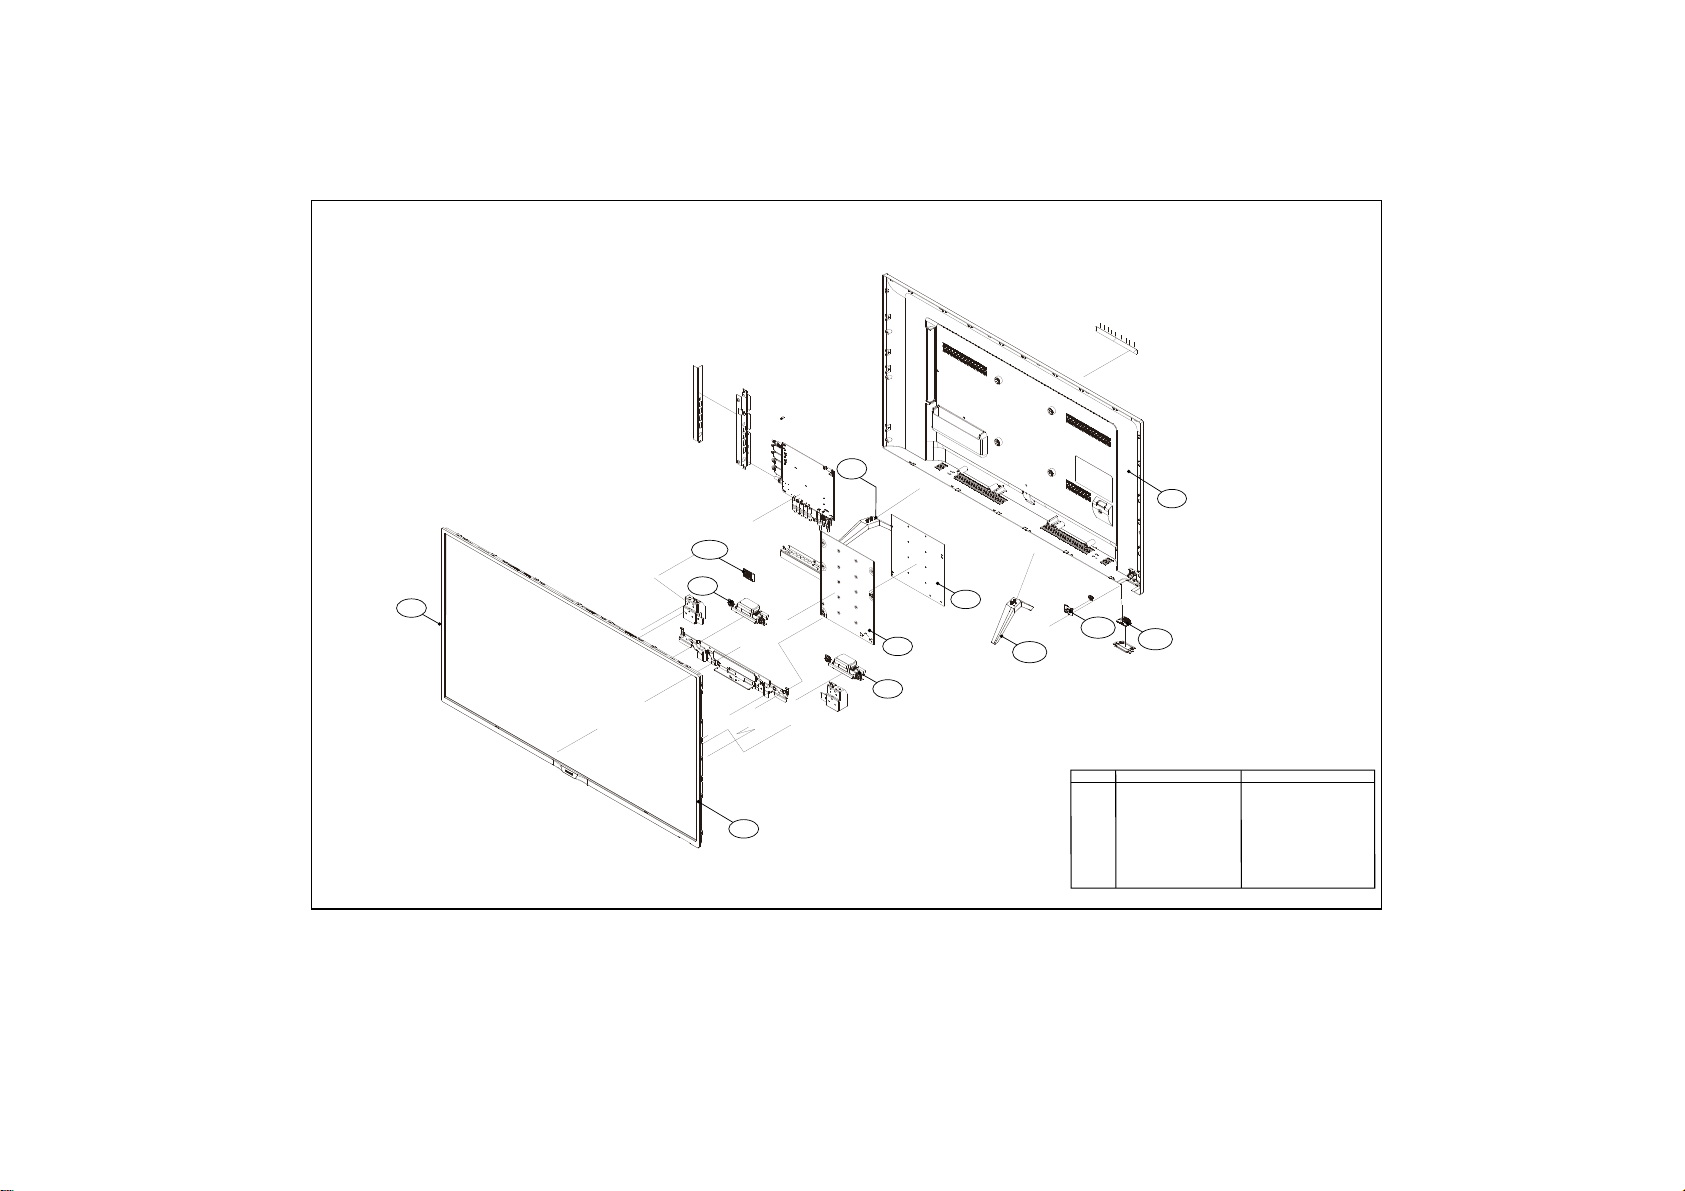
5102 series 43"
0050
0040
WIFI01
0030
1184
1050
1184
0095
1054
1057
0050
Pos No. Description Remarks
0030 Bezel
0040 Rear cover
0050 Stands
0095 V0 SHEET
1050 Display panel
1053 Panel SSB
1054 Power Supply Unit
1056 IR/LED panel
1057 Keyboard control panel
1176 Remote control Not displayed
1184 Speakers
WiFi01 WiFi_USB
1056
FOR ELECTRICAL PARTS/ASSEMBLIES SEE WIRING DIAGRAM CHAPTER 9
20050_800.eps
Page 48
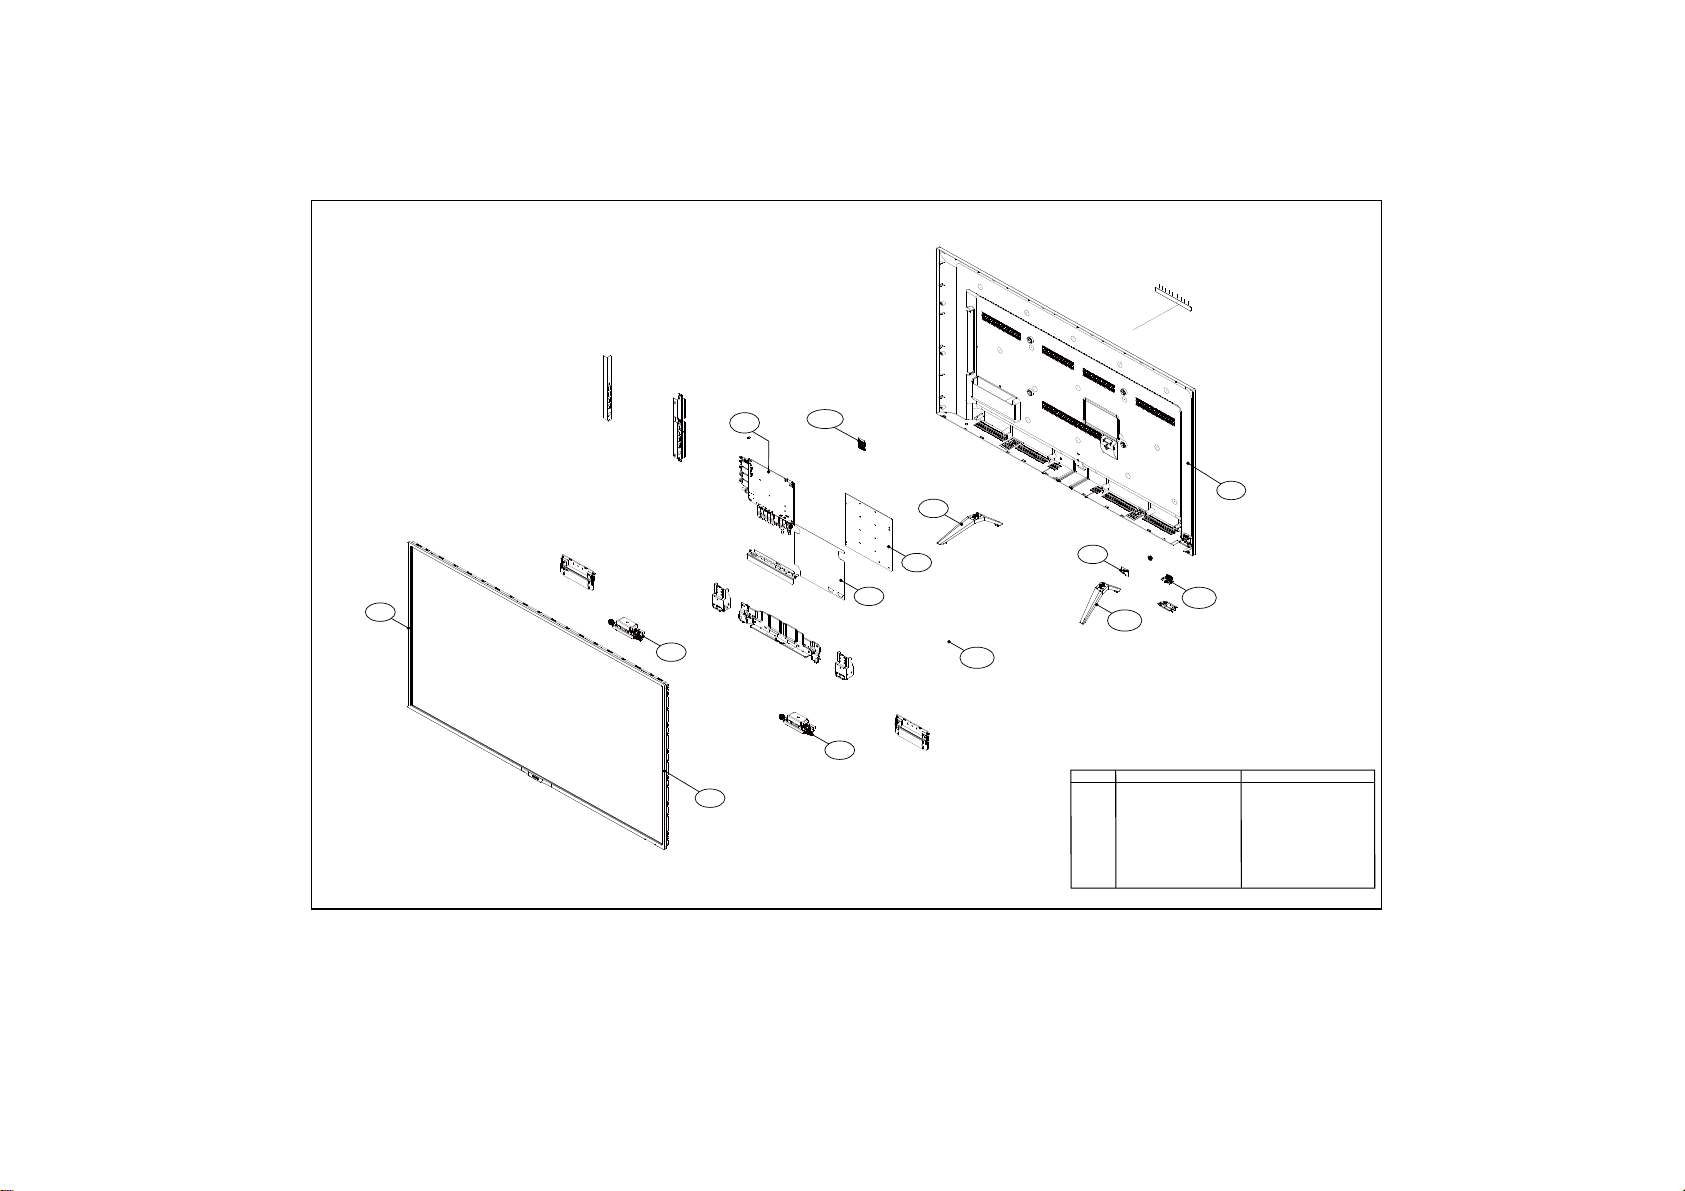
5102 series 49"
0030
1184
1050
1053
WIFI01
1184
0095
1054
0050
1057
0040
1057
1056
0050
Pos No. Description Remarks
0030 Bezel
0040 Rear cover
0050 Stands
0095 V0 SHEET
1050 Display panel
1053 Panel SSB
1054 Power Supply Unit
1056 IR/LED panel
1057 Keyboard control panel
1176 Remote control Not displayed
1184 Speakers
WiFi01 WiFi_USB
FOR ELECTRICAL PARTS/ASSEMBLIES SEE WIRING DIAGRAM CHAPTER 9
20050_800.eps
 Loading...