

Page 1

Register your product and get support at
www.philips.com/welcome
series
User Manual
4503
32PHD
Page 2

Contents
1 Get Support 3
1.1 Identify and Register your TV 3
1.2 TV Help and User Manual 3
1.3 On-line Help and User Manual 3
1.4 Consumer Care / Repair 3
2 Software 4
2.1 Update Software 4
2.2 Software Version 4
3 Quick Guide 5
3.1 Remote Control 5
3.2 IR sensor 6
3.3 Joysticker - Local Control 6
4 Setting Up 7
4.1 Read Safety 7
4.2 TV Placement 7
4.3 Turn on TV 8
5 Connections 9
5.1 Connectivity guide 9
5.2 Antenna 9
5.3 Video Device 9
5.4 Audio Device 9
5.5 Computer 10
5.6 USB Device 10
6 Switch Source 12
6.1 Source List 12
6.2 Rename Device 12
7 Channels 13
7.1 About Channels and Switch Channels 13
7.2 Install Channel 13
7.3 Channel List 15
7.4 Select Channel Filter 16
7.5 Favorite Channels 16
7.6 Closed Caption (CC) and Language 16
7.7 Ginga 17
8 TV guide 18
8.1 What You Need 18
8.2 Using the TV Guide 18
9 Recording and Pause TV 20
9.1 What You Need 20
9.2 Recording 20
9.3 Pause TV 21
10 Videos, Photos and Music 22
10.1 From a USB Connection 22
10.2 Photos 22
10.3 Videos 22
10.4 Music 23
11 Open TV Setting Menus 24
11.1 Home Menu Overview 24
11.2 Utilities Menu 24
11.3 Quick Settings and All Settings 24
11.4 All Settings 24
12 Environmental 31
12.1 End of Use 31
13 Specifications 32
13.1 Power 32
13.2 Reception 32
13.3 Display Resolution 32
13.4 Display Input Resolution 32
13.5 Sound 32
13.6 Multimedia 32
13.7 Connectivity 33
14 Troubleshooting 34
14.1 Tips 34
14.2 Switch On 34
14.3 Remote Control 34
14.4 Channels 34
14.5 Picture 35
14.6 Sound 35
14.7 HDMI 35
14.8 USB 35
15 Safety and Care 37
15.1 Safety 37
15.2 Screen Care 38
15.3 Terms of Use 38
16 Copyrights 39
16.1 HDMI 39
16.2 Dolby Audio 39
16.3 DTS 2.0 + Digital Out ™ 39
16.4 Other Trademarks 39
17 Open Source 40
17.1 Open Source Software 40
17.2 Open Source License 40
Index 43
2
Page 3

1
Get Support
1.1
Identify and Register your TV
On the support site you can find your country's
telephone number to contact us as well as answers to
frequently asked questions (FAQs). In some countries,
you can chat with one of our collaborators and ask
your question directly or send a question by email.
You can download new TV software or the manual to
read on your computer.
Identify your TV - TV model number and serial
number
You might be asked to provide the TV product model
number and serial number. Find these numbers on
the packaging label or on the type label on the back
or bottom of the TV.
Register your TV
Register your TV and enjoy a range of benefits
including full support (including downloads),
privileged access to information about new products,
exclusive offers and discounts, the chance to win
prizes and even participate in special surveys about
new releases.
Go to www.philips.com/welcome
1.2
TV Help and User Manual
Press SETUP > Help
In the Help menu, you can easily get software
updates, reset TV to default settings, and read the
user manual.
- Update software: Check available software updates.
- User manual: Read the user manual for TV
information.
- Troubleshooting: Find a solution for frequently
asked questions.
- Factory settings: Reset all settings to factory
settings.
- Reinstall TV: Reinstall and redo the complete TV
installation.
- Contact info: Show the telephone number or web
address for your country or region.
For more TV troubleshooting and frequently asked
questions (FAQs)...
Go
to http://philips-tvconsumercare.kxondemand.com/
portal/en/ModelSelect
TV Help on your tablet, smartphone or computer
To carry out extended sequences of instructions more
easily, you can download the TV Help in PDF format
to read on your smartphone, tablet or
computer. Alternatively, you can print the relevant
Help page from your computer.
To download the Help (user manual) go
to www.philips.com/TVsupport
1.4
Consumer Care / Repair
For support and repair, call the Consumer Care
hotline in your country. Our service engineers will take
care of a repair, if necessary.
Find the telephone number in the printed
documentation that came with the TV.
Or consult our
website www.philips.com/TVsupport and select
your country if needed.
TV model number and serial number
You might be asked to provide the TV product model
number and serial number. Find these numbers on
the packaging label or on the type label on the back
or bottom of the TV.
Warning
Do not attempt to repair the TV yourself. This may
cause severe injury, irreparable damage to your TV or
void your warranty.
1.3
On-line Help and User
Manual
To solve any Philips TV related problem, you can
consult our online support. You can select your
language and enter your product model number.
Go to www.philips.com/TVsupport.
3
Page 4

2
2.2
Software
2.1
Update Software
Search for Updates
(Home) > Settings > Update
software > Search for updates.
You need a computer and a USB memory device to
upload the software on the TV. Use a USB memory
device with 256MB free space. Make sure that write
protection is switched off.
1. Start the update on TV
- (Home) > Settings > Update
software > Search for updates.
2. Identify the TV
- Insert the USB memory into one of the USB
connections of the TV.
Select Start and press OK. An identification file is
written on the USB memory device.
Software Version
To view the current TV software version…
(Home) > Settings > Update
software > Current software Info
3. Download the TV software
- Insert the USB memory into your computer.
- On the USB memory device, locate the
file update.htm and double click it.
- Click on Send ID.
- Select your region
- If new software is available, download the .zip file.
After the download, unzip the file and copy the
file autorun.upg onto the USB memory device.
Do not place this file in a folder.
4. Update the TV software
Insert the USB memory into the TV again. The update
starts automatically.
The TV switches itself off for 10 seconds and then
back on again. Please wait.
Do not . . .
- use the remote control
- remove the USB memory device from the TV
If a power cut occurs during the update, never
remove the USB memory device from the TV. When
the power returns, the update will continue.
Local Updates
For dealers and expert users…
(Home) > Settings > Update software > Local
updates.
4
Page 5
3
Quick Guide
- Pause , to pause playback
- Stop , to stop playback
- Rewind , to rewind
- Fast forward , to go fast forward
3.1
Remote Control
Batteries and Cleaning
Replace batteries
If the TV does not react on a key press on the remote
control, the batteries might be empty.
To replace the batteries, open the battery
compartment on the back of the remote control.
1. Slide the battery door in the direction shown by the
arrow.
2. Replace the old batteries with 2
type AAA-R03-1.5V batteries. Make sure the + and ends of the batteries line up correctly.
3. Reposition the battery door and slide it back until it
clicks.
- Remove the batteries if you are not using the
remote control for a long time.
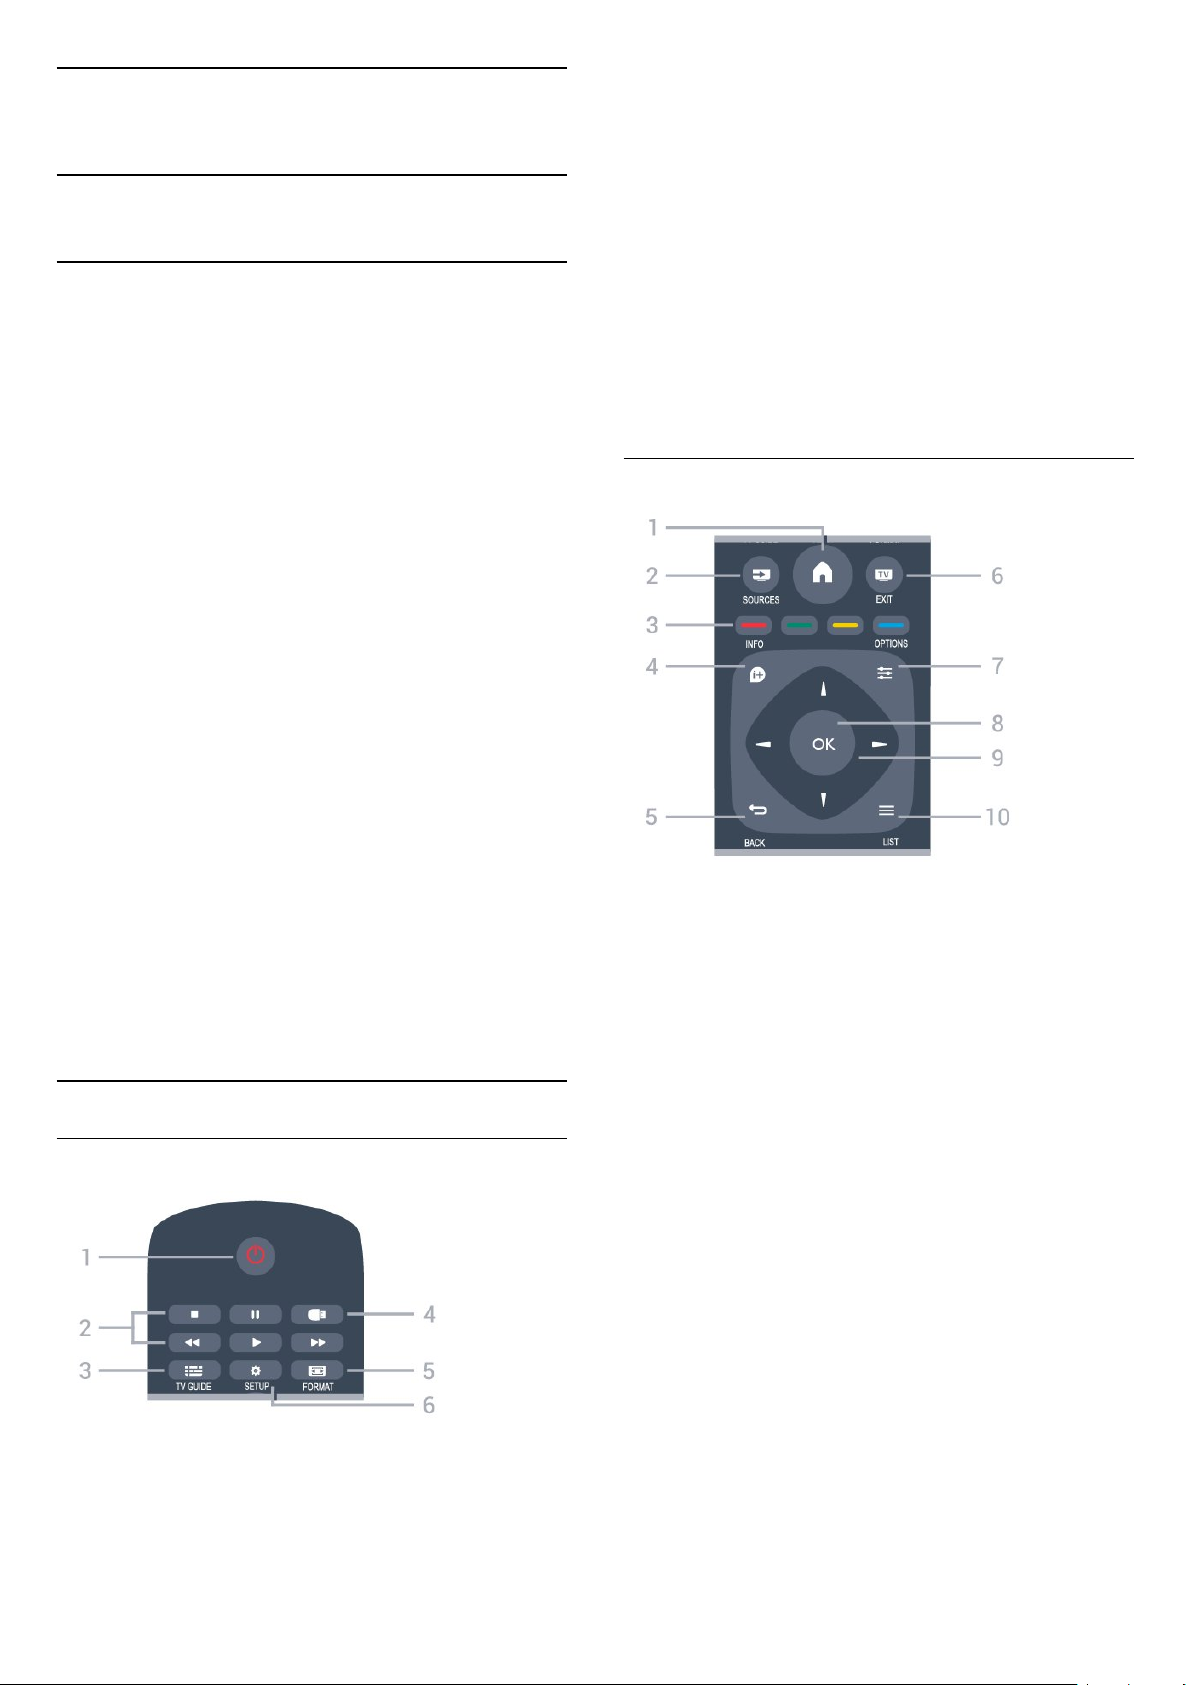
3. TV GUIDE
To open or close the TV Guide.
4. USB
To access USB storage device.
5. FORMAT
To open or close the Picture format menu.
6. SETUP
To open the Settings menu.
Middle
- Safely dispose of your old batteries according to the
end of use directions.
Cleaning
Your remote control is treated with a scratch-resistant
coating.
To clean the remote control, use a soft damp cloth.
Never use substances such as alcohol, chemicals or
household cleaners on the remote control.
Key Overview
Top
1. HOME
To open or close the home menu.
2. SOURCES
To open or close the Sources menu - the list of
connected devices.
3. Color keys
The buttons function follow the on-screen
instructions.
4. INFO
To open or close program infomation.
5. BACK
To switch back to the previous channel you selected.
To close a menu without changing a setting.
6. EXIT
To switch back to watching TV.
7. OPTIONS
To open or close the Options menu.
1. Standby / On
To switch the TV on or back to Standby.
2. Playback keys
- Play , to playback
8. OK key
To confirm a selection or setting.
9. Arrow / navigation keys
To navigate up, down, left or right.
10. LIST
To open or close the channel list.
5
Page 6
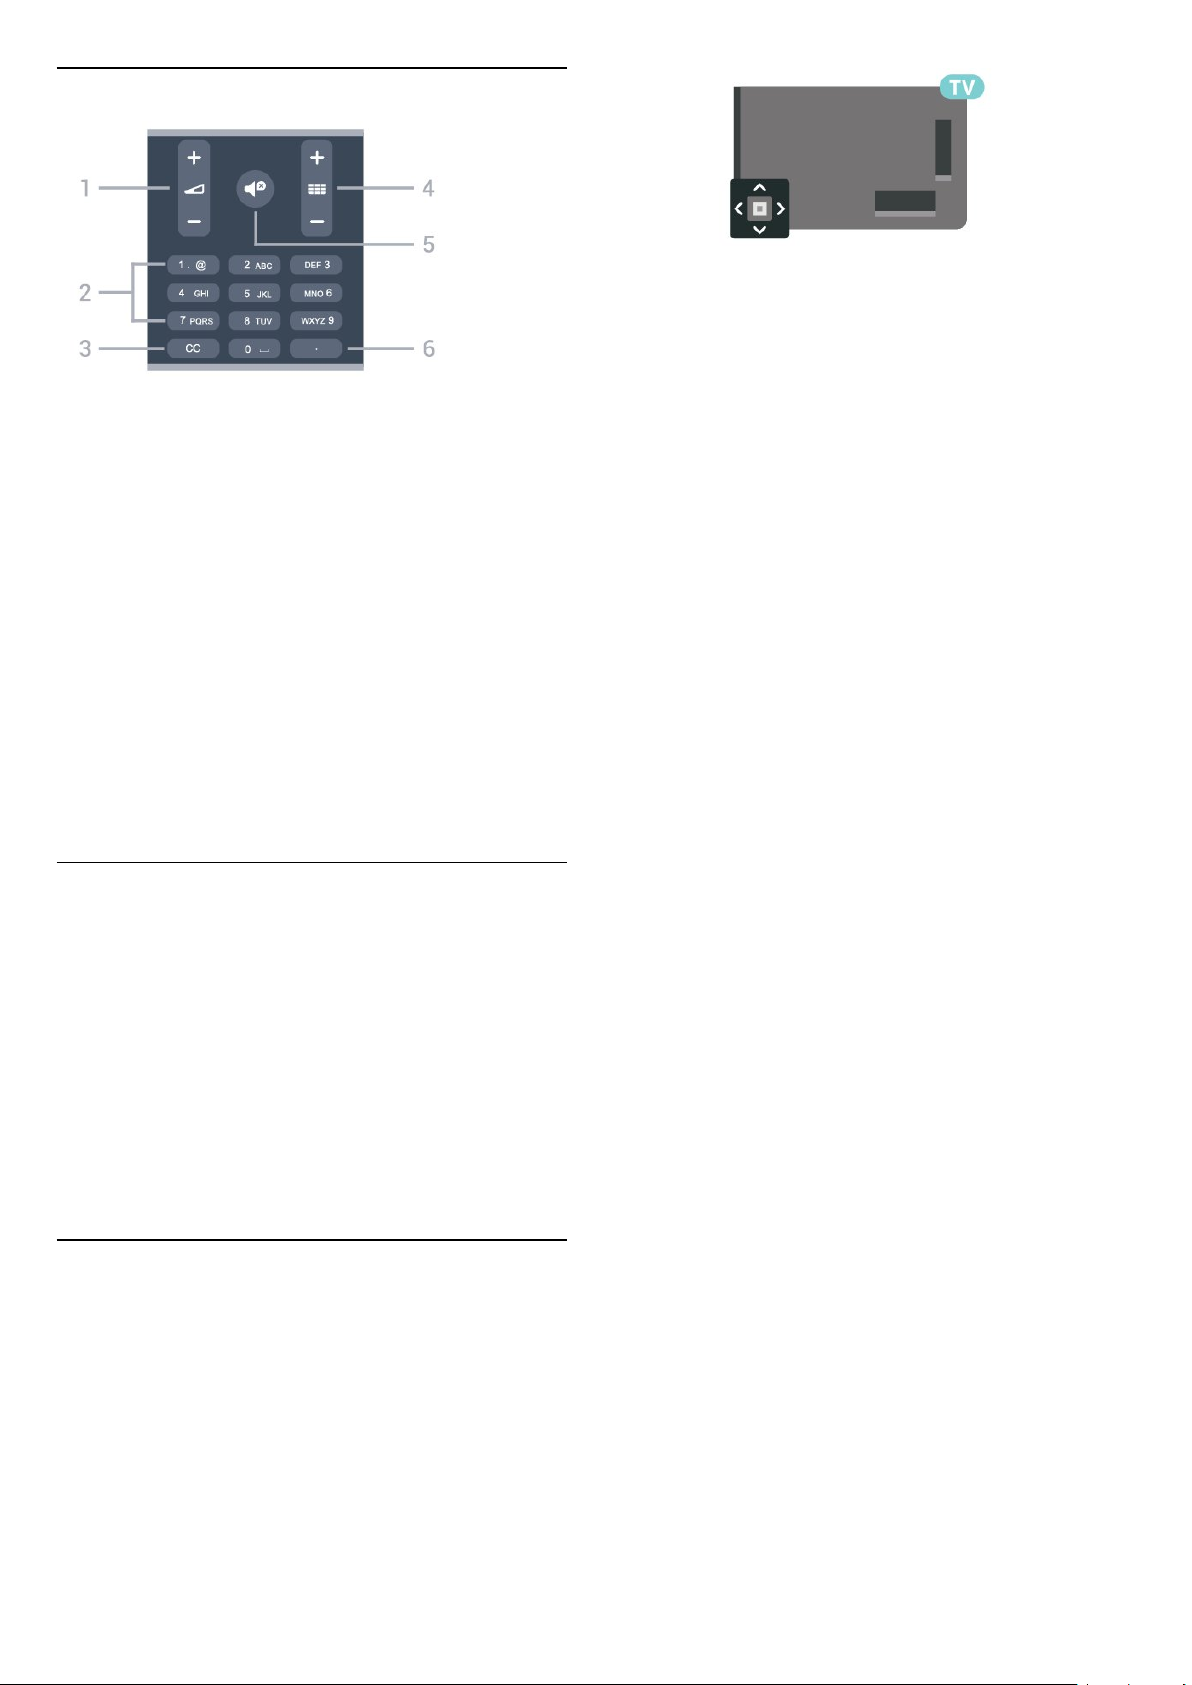
Bottom
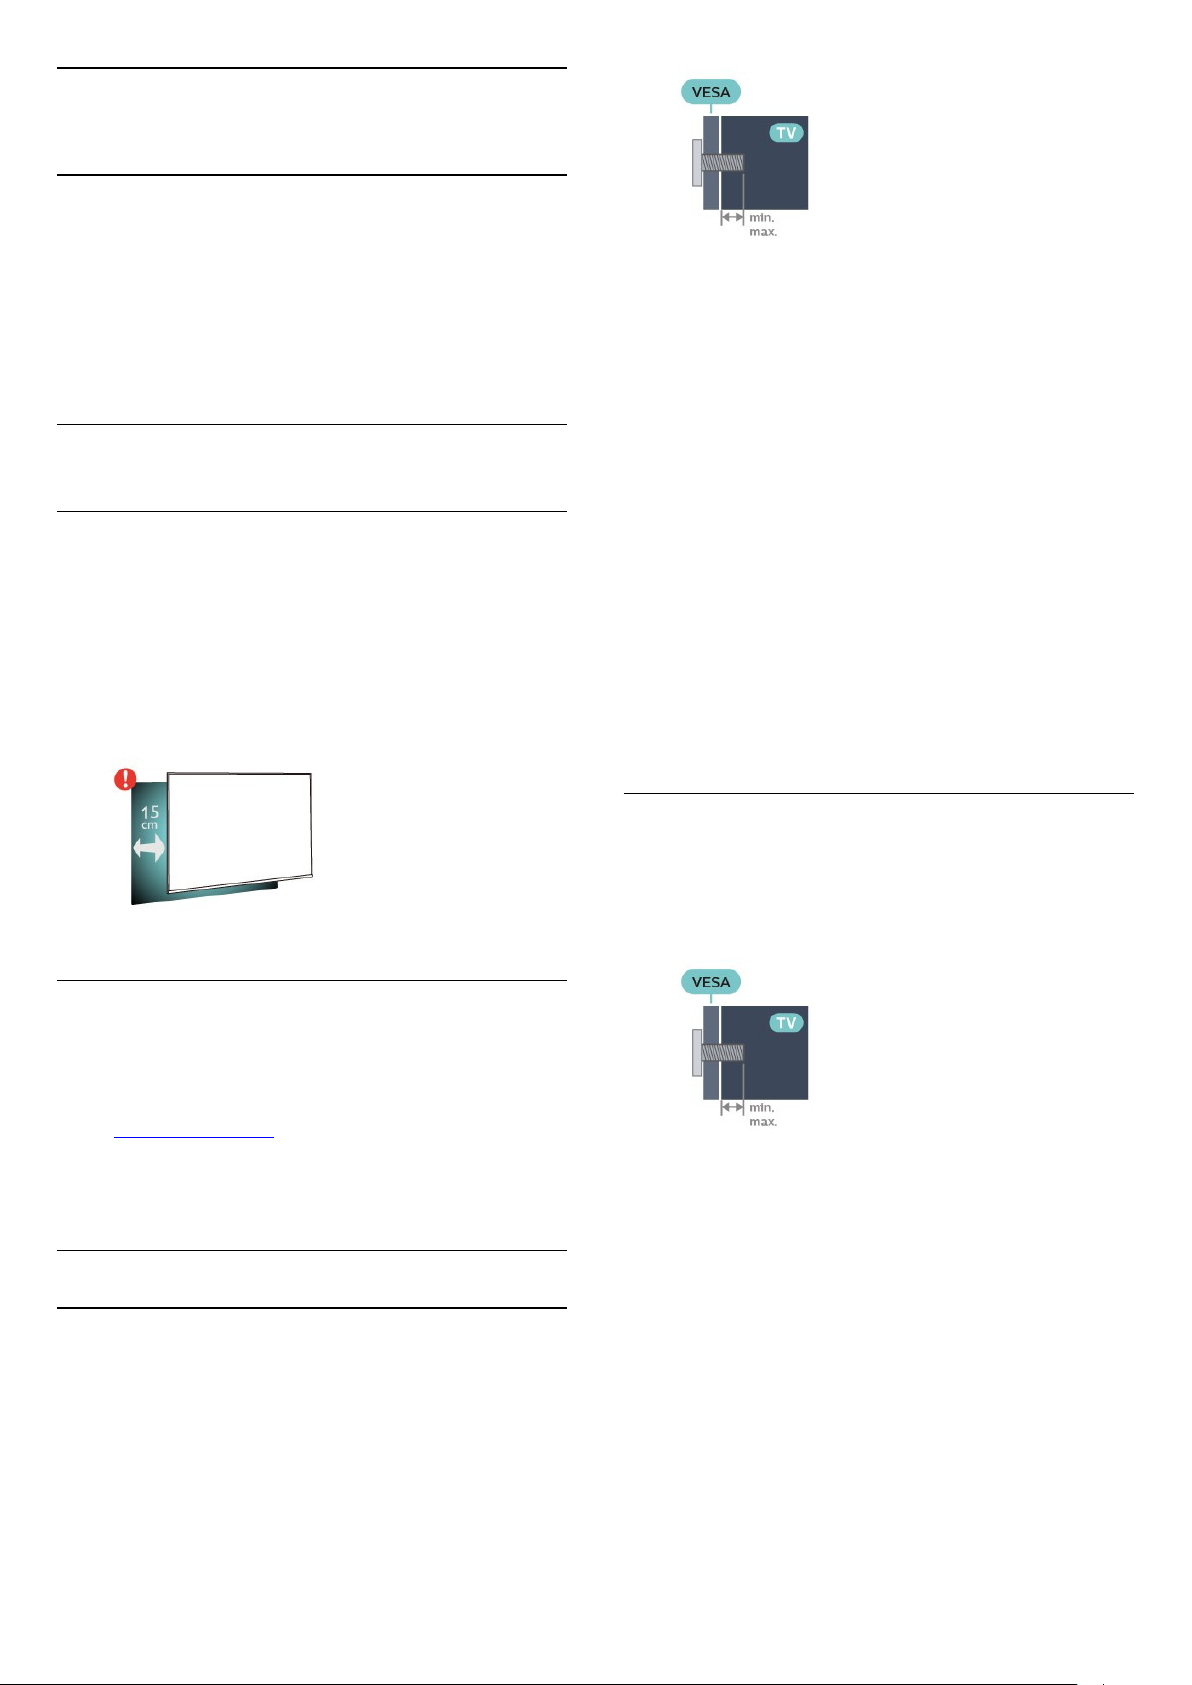
1. With the TV switched on, press the joystick key on
the back of the TV to bring up the basic menu.
2. Press left or right to select Volume,
Channel or Sources.
1. Volume
To adjust the volume level.
2. Number keys
To select a TV channel directly.
3. CC (Closed captions)
To switch Closed captions on, off or On during mute.
4. Channel
To switch to the next or previous channel in the
channel list. To start the next or previous chapter on a
disc.
5. Mute
To mute the sound or to restore it.
6. (Dot)
To enter digital sub-channels.
3.2
IR sensor
The TV can receive commands from a remote control
that uses infrared (IR) to send commands. If you use
this kind of remote control, always point it at the
infrared sensor on the front of the TV.
Press up or down to adjust the volume or tune to the
next or previous channel. Press up or down to go
through the list of sources, including the tuner
selection.
The menu will disappear automatically.
Warning
Do not put any objects in front of IR sensor of the TV
as it may block the IR signal.
3.3
Joysticker - Local Control
Keys on TV
If you lost the remote control or its batteries are
empty, you can still do some basic TV operations.
To open the basic menu…
6
Page 7
4
Setting Up
4.1
Read Safety
Read the safety instructions first before you use the
TV.
To read the instructions, in User manual, see
chapter Safety and Care.
4.2
TV Placement
Tips on Placement
- Position the TV where light does not shine directly
on the screen.
- Position the TV up to 6 inches away from the wall.
- The ideal distance to watch TV is 3 times its
diagonal screen size. When seated, your eyes should
be level with the center of the screen.
- 43PF
9 mm, Maximum 11 mm)
Preparation
First remove the 4 plastic screw caps out of the
threaded bushes on the back of the TV.
Make sure that the metal screws, to mount the TV to
the VESA-compliant bracket, go about 10mm deep
inside the threaded bushes of the TV.
Caution
Wall mounting the TV requires special skills and
should only be performed by qualified personnel. The
TV wall mounting should meet safety standards
according to the TVs weight. Also read the safety
precautions before positioning the TV.
TP Vision Europe B.V. bears no responsibility for
improper mounting or any mounting that results in
accident or injury.
4503 series TV
Your TV is also prepared for a VESA-compliant wall
mount bracket (sold separately).
Use the following VESA code when purchasing the
wall mount . . .
D5503 - VESA MIS-F 200x100, M6 (Minimum
TV Stand
You can find the instructions for mounting the TV
stand in the Quick Start Guide that came with the TV.
In case you lost this guide, you can download it
from www.philips.com.
Use the model number of the TV to look for
the Quick Start Guide to download.
Wall Mounting
5503 series TV
Your TV is also prepared for a VESA-compliant wall
mount bracket (sold separately).
Use the following VESA code when purchasing the
wall mount . . .
- 32PHD4503 - VESA MIS-F 100, M4 (Minimu
m 10mm, Maximum 14 mm)
Preparation
First remove the 4 plastic screw caps out of the
threaded bushes on the back of the TV.
Make sure that the metal screws, to mount the TV to
the VESA-compliant bracket, go about 10mm deep
inside the threaded bushes of the TV.
Caution
Wall mounting the TV requires special skills and
should only be performed by qualified personnel. The
TV wall mounting should meet safety standards
according to the TVs weight. Also read the safety
precautions before positioning the TV.
7
Page 8
TP Vision Europe B.V. bears no responsibility for
improper mounting or any mounting that results in
accident or injury.
4.3
Turn on TV
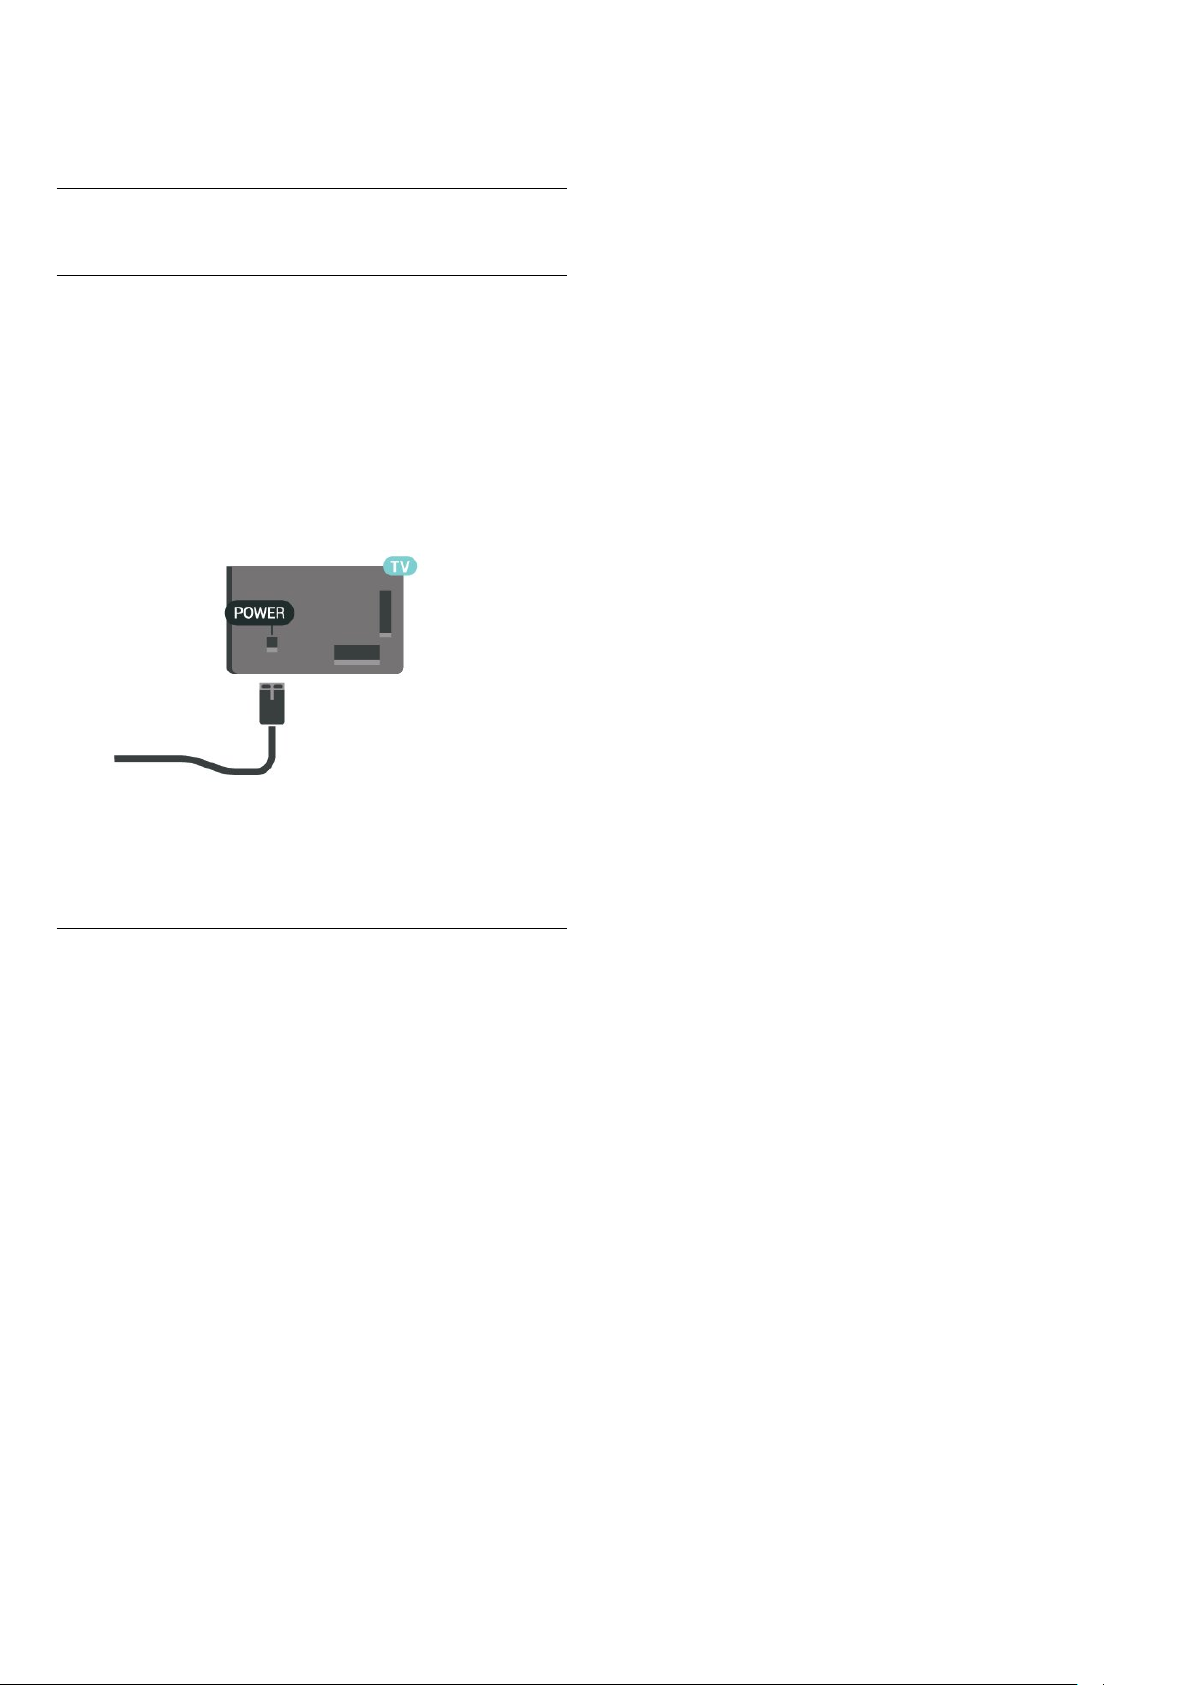
Connect Power Cable
- Insert the power cable into the POWER connector
on the back of the TV.
- Make sure the power cable is securely inserted in
the connector.
- Make sure that the power plug in the wall outlet is
accessible at all times.
- When you unplug the power cable, always pull the
plug, never pull the cable.
Although this TV has a very low standby power
consumption, unplug the power cable to save energy
if you do not use the TV for a long period of time.
Switch On or Standby
Before you switch on the TV, make sure you plugged
in the mains power in the POWER connector on the
back of the TV.
Switch On
Press the power button on the side or the back of the
TV.
Switch to standby
To switch the TV to Standby, press on the remote
control.
To switch off the TV completely, disconnect the
power plug.
When disconnecting the power plug, always pull the
power plug, never the cord. Ensure that you have full
access to the power plug, power cord and outlet
socket at all times.
8
Page 9
5
HDMI - DVI
Connections
5.1
Connectivity guide
Always connect a device to the TV with the highest
quality connection available. Also, use good quality
cables to ensure a good transfer of picture and
sound.
When you connect a device, the TV recognizes its
type and gives each device a correct type name. You
can change the type name if you wish. If a correct
type name for a device is set, the TV automatically
switches to the ideal TV settings when you switch to
this device in the Sources menu.
If you need help to connect several devices to the TV,
you can visit the Philips TV connectivity guide. The
guide offers information on how to connect and
which cables to use.
Go to www.connectivityguide.philips.com
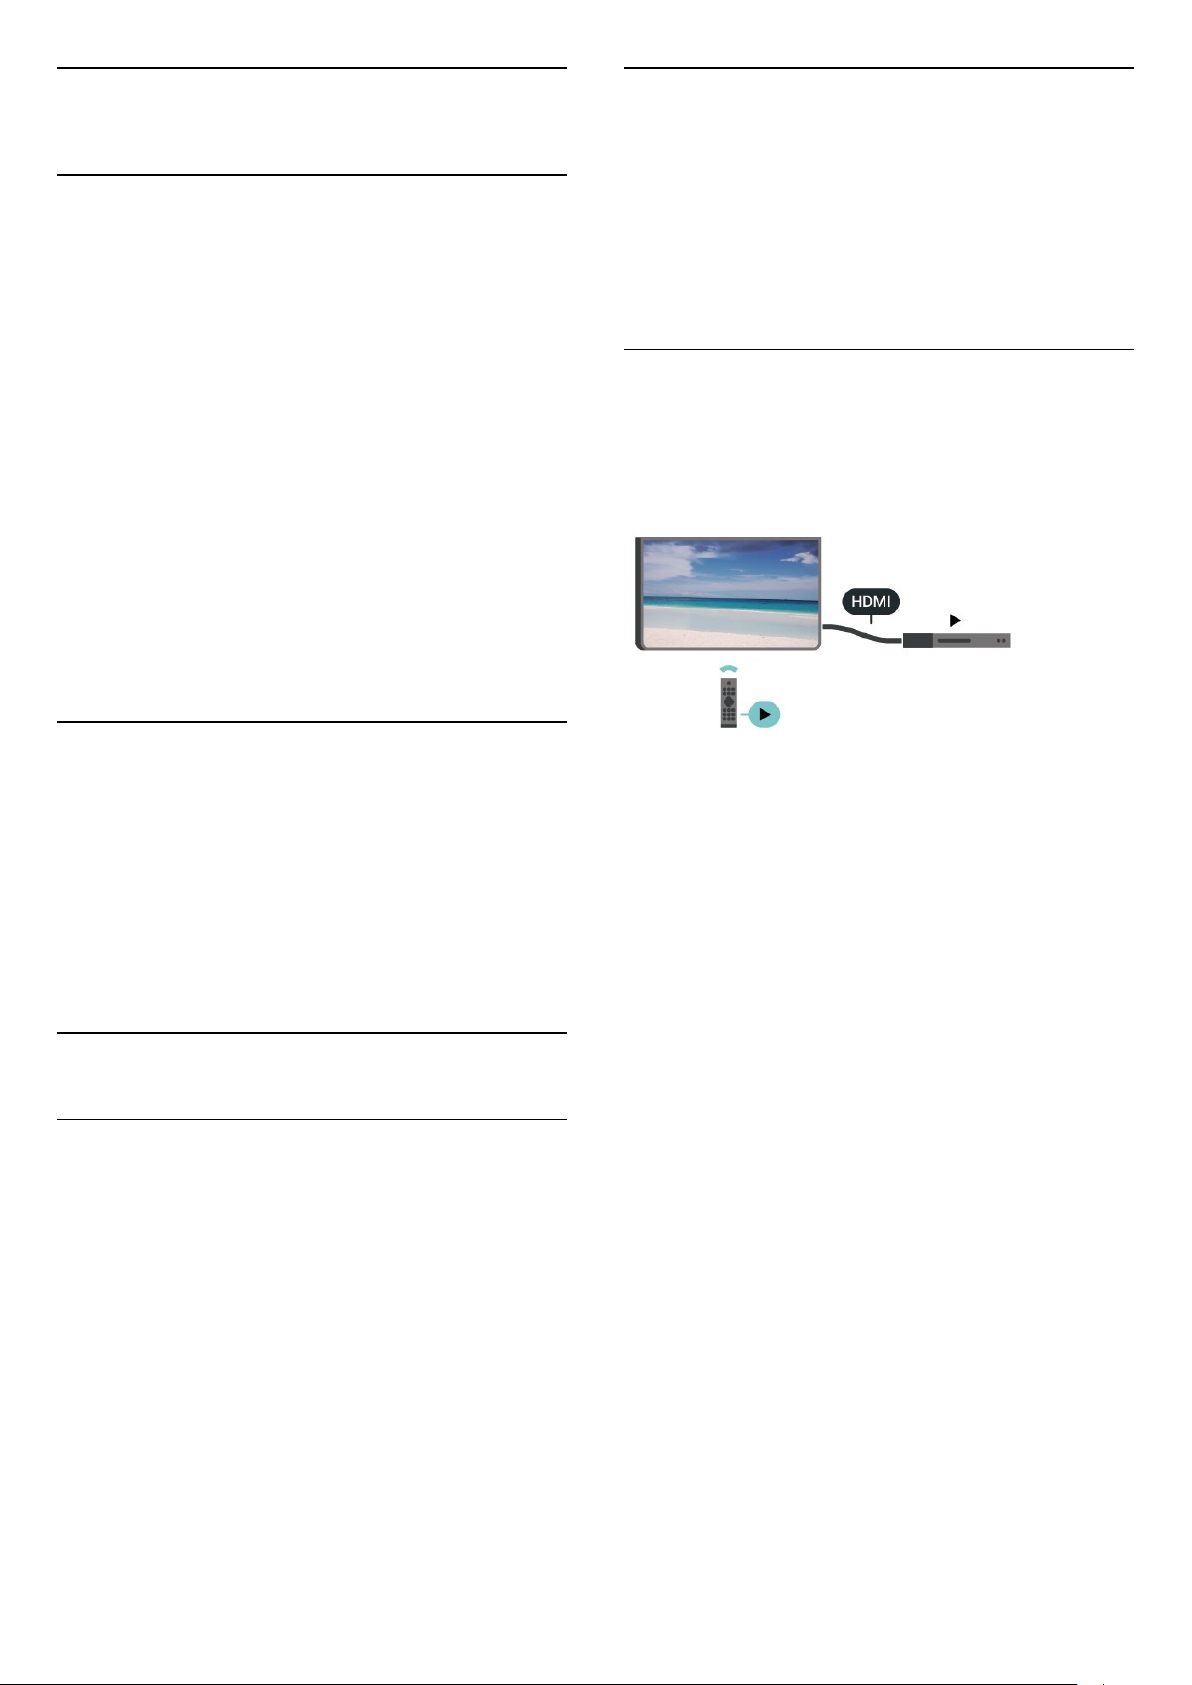
If you still own a device that only has a DVI
connection, you can connect the device to
HDMI connection with a DVI to HDMI adapter.
Use HDMI connection and add an Audio L/R cable
to Audio In for sound, on the back of the TV.
HDMI-CEC Connection - EasyLink
Connect HDMI CEC-compatible devices to your TV,
you can operate them with the TV remote
control. EasyLink HDMI CEC must be switched on on
the TV and the connected device.
5.2
Antenna
Insert the antenna plug firmly into
the Antenna socket at the back of the TV.
You can connect your own antenna or an antenna
signal from an antenna distribution system. Use an
IEC Coax 75 Ohm RF antenna connector.
5.3
Video Device
HDMI
For best signal quality transfer, use a High speed
HDMI cable and do not use an HDMI cable longer
than 5 m.
Copy protection
Switch on EasyLink
(Home) > Settings > General
settings > EasyLink > EasyLink > On
Operate HDMI CEC-compatible devices with TV
remote control
(Home) > Settings > General
settings > EasyLink > EasyLink remote
control > On
Note:
- EasyLink might not work with devices from other
brands.
- The HDMI CEC functionality has different names on
different brands. Some examples are: Anynet, Aquos
Link, Bravia Theater Sync, Kuro Link, Simplink and
Viera Link. Not all brands are fully compatible with
EasyLink. Example HDMI CEC branding names are
property of their respective owners.
HDMI cables support HDCP (High-bandwidth Digital
Content Protection). HDCP is a copy protection signal
that prevents copying content from a DVD disc or Bluray Disc. Also referred to as DRM (Digital Rights
Management).
9
Page 10

5.4
Audio Device
HDMI ARC
Ideal Settings
(Home) > Settings > Picture >
Advanced > Computer
Only HDMI 2 on the TV has HDMI ARC (Audio
Return Channel).
If the device, typically a Home Theater System (HTS),
also has the HDMI ARC connection, connect it
to HDMI 2 ARC connection on this TV. With the
HDMI ARC connection, you do not need to connect
the extra audio cable that sends the sound of the TV
picture to the HTS. The HDMI ARC connection
combines both signals.
Digital Audio Out - Optical
Audio Out - Optical is a high quality sound
connection.
This optical connection can carry 5.1 audio channels.
If your device, typically a Home Theater System
(HTS), has no HDMI ARC connection, you can use this
connection with the Audio In - Optical connection on
the HTS. The Audio Out - Optical connection sends
the sound from the TV to the HTS.
Set to On to have the ideal picture settings for using
your TV as a computer monitor.
* Only available for HDMI sources.
5.6
USB Device
USB Flash Drive
You can view photos or play your music and videos
from a connected USB flash drive. Insert a USB flash
drive in the USB connection on the TV while the TV
is switched on.
The TV detects the flash drive and opens a list
showing its content.
If the contents list does not appear automatically,
press SOURCES and select USB.
USB Hard Drive
Headphones
You can connect a set of headphones to
the connection on the side of the TV. The
connection is a mini-jack 3.5mm. You can adjust the
volume of the headphones separately.
5.5
Computer
HDMI - DVI
If you still own a device that only has a DVI
connection, you can connect the device
to a HDMI connection with a DVI to HDMI adapter.
Use a DVI to HDMI adapter if your device only has a
DVI connection. Use HDMI connection and add an
Audio L/R cable for sound on the back of the TV.
If you connect a USB Hard Drive, you can pause or
record digital TV broadcasts (ISDB broadcasts or
similar).
Minimum Disk Space
- To pause a broadcast, you need a USB compatible
Hard Drive with a minimum of 4GB disk space.
- To pause and record a broadcast, you need a
minimum of 32GB disk space.
Before you can pause or record a broadcast, you
must connect and format a USB Hard Drive.
Formatting removes all files from the USB Hard Drive.
To Pause
To pause a broadcast, you need a USB-compatible
Hard Drive with a minimum of 4GB of disk space.
To Record
To pause and record a broadcast, you need a
minimum of 32GB of disk space.
1. Connect the USB Hard Drive to one of
the USB connections on the TV. Do not connect
another USB device to the other USB ports when
formatting.
2. Switch on the USB Hard Drive and the TV.
3. When the TV is tuned to a digital TV channel,
10
Page 11

press (Pause). Trying to pause will start the
formatting.
Follow the instructions on screen.
When the USB Hard Drive is formatted, leave it
connected permanently.
Warning
The USB Hard Drive is formatted exclusively for this
TV, you cannot use the stored recordings on another
TV or PC. Do not copy or change recording files on
the USB Hard Drive with any PC application. This will
corrupt your recordings. When you format another
USB Hard Drive, the content on the former will be lost.
A USB Hard Drive installed on your TV will need
reformatting for use with a computer.
11
Page 12

6
Switch Source
6.1
Source List
- To open the sources menu, press SOURCES .
- To switch to a connected device, select the device
with the arrows (up) or (down) and press OK.
- To close the Source menu without switching to a
device, press SOURCES again.
6.2
Rename Device
- Only HDMI and AV IN sources can be renamed or
replace a device icon
1. Press SOURCES , and select HDMI or AV IN (if
available).
2. Press Edit and press OK.
3. Select one of the device icons and press OK, the
preset name appears in the typing field.
4. Select Rename, then enter new name using onscreen keyboard.
- Press (red) key to enter with lower-case
- Press (green) key to enter with upper-case
- Press (yellow) key to enter number and
symbol
- Press (blue) key to delete a character
5. Select Done when finished editing.
12
Page 13

7
Service Navigation
Channels
7.1
About Channels and Switch
Channels
To watch TV channels
- Press . The TV switches to the TV channel you
last watched.
- Press (Home) > Channels and press OK.
- Press + or - to switch channels.
- If you know the channel number, type in the
number with the number keys. Press OK after you
entered the number to switch channels.
- To switch back to the previously selected channel,
press BACK .
To switch to a channel from a channel list
- While watching a TV channel, press LIST to
open the channel lists.
- The channel list can have several pages with
channels. To view the next or previous page,
press + or -.
- To close the channel lists without switching
channels, press LIST again.
Channel icons
After an Automatic channel update of the channel list,
newly found channels are marked with a (star).
If you lock a channel, it will be marked with
a (lock).
(Home) > Settings > Antenna/cable
installlation > Service Navigation
- If the Service navigation is set to On, You can
browse the primary and secondary channels by
pressing channel and .
- If the Service navigation is set to Off, you can only
browse the primary channels using
channel and .
Digital: Reception Test
(Home) > Settings > Antenna/cable
installlation > Digital: Reception test
The digital frequency is shown for this channel. If the
reception is poor, you can reposition your antenna.
To check the signal quality of this frequency again,
select Search and press OK.
Alternatively, select frequency and check. To check
the frequency, select Search and press OK.
Antenna Connection
(Home) > Settings > Antenna/cable
installlation > Antenna Connection
1. Select Antenna or Cable, and press OK.
2. Press (left) and select Search for channels >
Update channels.
3. Select Start and press OK. This can take a few
minutes.
7.2
Install Channel
Antenna and Cable
Search for Channels
Update existing channel list
(Home) > Settings > Antenna/cable
installlation > Search for channels > Update
channels
Reinstall all channels
(Home) > Settings > Antenna/cable
installlation > Search for channels
1. Select Reinstall channels and press OK.
2. Select Start and press OK to update channels.
This can take a few minutes.
Channel List Copy
Introduction
Channel list copy is intended for dealers and expert
users.
With Channel list copy, you can copy the channels
installed on one TV onto another Philips TV of the
same range. With Channel list copy, you avoid the
time-consuming channel search by uploading a
predefined channel list on a TV. Use a USB flash drive
of minimum 1 GB.
Conditions
- Both TVs are from the same year range. Check the
TV model name with the last number. (For example:
xxPxx4xx3, 3 stands for 2018 product)
- Both TVs have compatible software versions.
13
Page 14

Copy a Channel List, Check Channel List Version
To copy a channel list…
1. Switch on the TV. This TV should have channels
installed.
2. Plug in a USB flash drive.
3. Press (Home) > Settings > General
settings > Channel list copy.
4. Select Copy to USB and press OK. You might be
asked to enter the Child Lock PIN code to copy the
channel list.
5. When copying is done, unplug the USB flash drive.
6. Press (left) repeatedly if necessary, to close the
menu.
Now you can upload the copied channel list onto
another Philips TV.
Check the current version of the channel list...
1. Press (Home) > Settings > General
settings > Channel list copy.
2. Select Channel list copy and select Current
version, then press OK.
3. Press (left) repeatedly if necessary, to close the
menu.
Upload a Channel List
To TVs that are not installed
Depending on whether your TV is already installed or
not, you must use a different method to upload a
channel list.
1. Verify the country setting of the TV. (To verify this
setting, see chapter Re-install channels. Start this
procedure until you reach the country setting.
Press BACK to cancel the installation.)
If the country is correct continue with step 2.
If the country is not correct, you need to start a
reinstallation. See chapter Re-install channels and
start the installation. Select the correct country and
skip the channels search. Finish the installation. When
done, continue with step 2.
2. Plug in the USB flash drive that holds the channel
list of the other TV.
3. To start the channel list upload,
press (Home) > Settings > General
settings > Channel list copy > Copy to TV and
press OK. Enter your PIN code if necessary.
4. The TV notifies you if the channel list is copied to
the TV successfully. Unplug the USB flash drive.
Channel Options
Open Options
While watching a channel, you can set some options.
Depending on the type of channel you are watching
(analog or digital) or depending on your TV settings,
some options are available.
To open the options menu…
1. While watching a channel, press OPTIONS.
2. Press OPTIONS again to close.
To a TV that is not yet installed
1. Plug in the power plug to start the installation and
select language and country. You can skip the
channel search. Finish the installation.
2. Plug in the USB flash drive that holds the channel
list of the other TV.
3. To start the channel list upload,
press (Home) > Settings > General settings
> Channel list copy > Copy to TV and press OK.
Enter your PIN code if necessary.
4. The TV notifies you if the channel list is copied to
the TV successfully. Unplug the USB flash drive.
To Installed TVs
Depending on whether your TV is already installed or
not, you must use a different method to upload a
channel list.
To an already installed TV
Closed Caption
Switch Closed Caption On or Off with this options.
Select On During Mute to show closed captions
only when the sound is muted with .
Caption Service
Select the correct type of closed-caption services.
Alternate Audio
If you have selected Alternate Audio for analog
channels, select between:
- Main: Primary audio language or
- SAP: Secondary audio language
14
Page 15

Audio Language
If none of the preferred audio languages are
available, you can select another audio language if
available. If no audio languages are available, you
cannot select this option.
DTVi Application
Display the list of Digital TV interactive applications.
Status
- Press (red) key to enter with lower-case
- Press (green) key to enter with upper-case
- Press (yellow) key to enter number and
symbol
- Press (blue) key to delete a character
7. Select Done when complete the editing.
8. Press LIST again to close the channel list.
Create or Edit Favorites Channel List
LIST > OPTIONS > Create favourites list
Select a channel then press OK to add in a favorites
channel list, once completed, press Done.
Select Status to view technical information on the
channel.
Clock
Display time on the corner of the TV screen.
7.3
Channel List
Open Channel List
To open the current channel list…
1. Press , to switch to TV.
2. Press LIST to open the current channel list.
3. Press LIST again to close the channel list.
Channel List Options
Open Option Menu
To open the channel list option menu...
LIST > OPTIONS > Edit favorites
Select a channel then press OK to add in or remove
from a favorites channel list, once completed, press
Done.
Select Channel Range
LIST > OPTIONS > Select channel range
Select a range of channels in a favorites channel list,
once completed, press OK.
Select Channel List
LIST > OPTIONS > Select channel list
Select one channel list you want to watch and
press OK.
Lock, Unlock Channel
LIST > OPTIONS > Lock channel, Unlock
channel
1. Press , to switch to TV.
2. Press LIST to open the current channel list.
3. Press OPTIONS , and select one of options.
4. Press LIST again to close the channel list.
Rename Channel
1. Press , to switch to TV.
2. Press LIST to open the current channel list.
3. Select one channel you want to rename.
4. Press OPTIONS > Rename channel, and press
OK.
5. In the typing field, press OK to open on-screen
keyboard, or select Hide to hide the on-screen
keyboard.
6. Use navigation keys to select a character, then
press OK.
To prevent children from watching a channel, you can
lock a channel. To watch a locked channel, you must
enter the 4 digit Child Lock PIN code first. You
cannot lock programs from connected devices.
The locked channel will have next to the channel
logo.
Search Channels
LIST > OPTIONS > Search channel
You can search for a channel to find it in a long list of
channels.
1. Press , to switch to TV.
2. Press LIST to open the current channel list.
3. Press OPTIONS > Search channel, and
15
Page 16

press OK.
In the typing field, press OK to open on-screen
keyboard, or press BACK to hide the on-screen
keyboard.
Use navigation keys to select a character, then
press OK.
- Press (red) key to enter with lower-case
- Press (green) key to enter with upper-case
- Press (yellow) key to enter number and
symbol
- Press (blue) key to delete a character
4. Select Done when finished editing.
5. Press LIST again to close the channel list.
7.4
Select Channel Filter
LIST > OPTIONS > Select channel filter
Select one of channel combinations showing in the
channel list.
7.5
Favorite Channels
About favorite Channels
You can create a favorite channel list that only holds
the channels you want to watch. With the Favorite
channel list selected, you will only see your favorite
channels when you switch through channels.
7.6
Closed Caption (CC) and
Language
Closed Caption
You can display closed captions at all times or only
when the TV is muted.
To open Closed Caption, press CC.
Note:
- Not all TV programs, commercials, and features
include closed captioning information. See your local
TV program listings for channels with
closed captions. The captioned programs
are typically listed with service marks, such as "CC,"
in the TV listings.
Switch on closed caption
1. While you watch TV, press OPTIONS.
2. Select Closed Caption > On and press OK.
- On: Closed captioning is always on.
- Off: Closed captioning is always off.
- On during mute: Closed captioning is on only when
the sound is muted with .
Note:
- When CC set to On or On during
mute, Ginga is Off.
- When Ginga set to On, CC is Off.
Select type of closed caption
1. While you watch TV, press OPTIONS.
2. Select Caption Service.
3. Select the correct type of closed captions and
press OK.
Create a favorites List
1. While watching a TV channel, press LIST to
open the channel list.
2. Select the channel, and press Mark as
favorites to mark as favorite.
3. The selected channel is marked with a .
4. To finish, press BACK . The channels are added
to the Favorites list.
Remove Channel from the Favorites
List
To remove a channel from the favorites list, select the
channel with , then press Unmark as
favorites again to unmark as favorites.
Audio Language
If the TV channel broadcasts multiple or dual audio
languages, you can select your preferred audio
language.
1 - While you watch TV, press OPTIONS.
2 - For digital channels, select Audio Language. For
analog channels, select Alternate Audio.
Press OK to confirm your selection.
3 - Select from the available languages, then
press OK.
Note:
If you have selected Alternate Audio for analog
channels, select between:
• Main: Primary audio language or
• SAP: Secondary audio language
16
Page 17

Menu Language
To change the language of the TV menus and
messages…
1. Press , select All settings > Region and
Language > Languages and press OK.
2. Select on the language you need and press OK.
3. Press (left) repeatedly if necessary, to close the
menu.
7.7
Ginga
You can set Ginga to On or Off.
1. Press , select All settings > General
settings > Ginga and press OK.
2. Select On or Off.
17
Page 18

8
Change Day
TV guide
8.1
What You Need
With the TV guide you can view a list of the current
and scheduled TV programs of your channels.
Depending on where the TV guide information (data)
is coming from, analog and digital channels or only
digital channels are shown. Not all channels offer TV
guide information.
The TV can collect TV guide information for the
channels that are installed on the TV (e.g. the
channels you watch with Watch TV). The TV cannot
collect the TV guide information for channels viewed
from a digital receiver.
8.2
Using the TV Guide
Open the TV Guide
To open the TV guide, press TV GUIDE.
Press TV GUIDE again to close.
If the TV guide information comes from the
broadcaster, you can press to view the
schedule of one of the next days. Press to go
back to the previous day.
Alternatively, you can press OPTIONS and
select Change day.
Set a Reminder
You can set a reminder for a program. A message will
alert you at the start of the program. You can tune to
this channel immediately.
In the TV Guide a program with a reminder is marked
with a (clock).
To set a reminder…
1. Press TV GUIDE and select an upcoming
program.
2. Press Set reminder.
To clear a reminder…
1. Press TV GUIDE and select a program with the
reminder, which is marked with a (clock).
2. Press Clear reminder, and select Yes, then
press OK.
The first time you open the TV guide, the TV scans all
TV channels for program information. This may take
several minutes. TV guide data is stored in the TV.
Tune to a Program
Switch to a program
From the TV guide, you can switch to a current
program.
To select a program, use the arrow keys to highlight
the program name.
Navigate to the right to view programs scheduled
later that day.
To switch to the program (channel), select the
program and press OK.
View program details
To call up the details of the selected program, press
INFO.
Search by Genre
If the information is available, you can look up
scheduled programs by genre like movies, sports, etc.
To search for programs by genre,
press OPTIONS and select Search by genre.
Select a genre and press OK. A list with the found
programs appears.
List of Reminders
You can view a list of the reminders you have set.
List of Reminders
To open the list of reminders…
1. Press TV GUIDE.
2. Press OPTIONS and select All reminders.
3. In the list of reminders, select the reminder you
want to remove, the selected reminder is marked
as .
4. Press , select Clear selected and press OK.
5. Select Close to close the list of reminders.
18
Page 19

Set a Recording
You can set a recording in the TV Guide.
In the TV Guide, a program set to be recorded is
marked with .
To see the recording list, press Recordings , a
program set to be recorded is marked with a (red
dot) before the program's name.
To record a program…
1. Press TV GUIDE and select a future or ongoing
program.
2. Press the color key Record .
To cancel a recording…
1. Press TV GUIDE and select the program set for
recording.
2. Press the color key Stop recording .
19
Page 20

9
9.2
Recording and
Pause TV
9.1
What You Need
If you connect a USB Hard Drive, you can pause or
record digital TV broadcasts.
Minimum Disk Space
- To pause a broadcast, you need a USB compatible
Hard Drive with a minimum of 4GB disk space.
- To pause and record a broadcast, you need a
minimum of 32GB disk space.
Before you can pause or record a broadcast, you
must connect and format a USB Hard Drive.
Formatting removes all files from the USB Hard Drive.
To Pause
To pause a broadcast, you need a USB-compatible
Hard Drive with a minimum of 4GB of disk space.
Recording
What You Need
You can record a digital TV broadcast and watch it
later.
To record a TV program you need…
- a connected USB Hard Drive formatted on this TV
- digital TV channels installed on this TV
- to receive channel information for the on screen TV
Guide
- a reliable TV clock setting. If you reset the TV clock
manually, recordings may fail.
You cannot record when you are using Pause TV.
In terms enforcement of copyright legislation, some
providers can apply different restriction by means of
DRM (Digital Right Management) technology. In case
of broadcasting protected channels, recording,
record validity or number of views may be restricted.
Recording may be completely prohibited. In case of
trying to record a protected broadcasting or play back
an expired recording, an error message can appear.
To Record
To pause and record a broadcast, you need a
minimum of 32GB of disk space.
1. Connect the USB Hard Drive to one of
the USB connections on the TV. Do not connect
another USB device to the other USB ports when
formatting.
2. Switch on the USB Hard Drive and the TV.
3. When the TV is tuned to a digital TV channel,
press (Pause). Trying to pause will start the
formatting.
Follow the instructions on screen.
When the USB Hard Drive is formatted, leave it
connected permanently.
Warning
The USB Hard Drive is formatted exclusively for this
TV, you cannot use the stored recordings on another
TV or PC. Do not copy or change recording files on
the USB Hard Drive with any PC application. This will
corrupt your recordings. When you format another
USB Hard Drive, the content on the former will be lost.
A USB Hard Drive installed on your TV will need
reformatting for use with a computer.
Record a Program
Record Now
To record the program you are watching right now,
follow the on-screen instructions.
To stop recording, press (Stop).
When TV Guide data is available, the program you are
watching will be recorded from the moment you
pressed the recording key until the program ends. If
no TV Guide data is available, the recording will only
last 30 minutes. You can adjust the end time of the
recording in the list of Recordings.
Schedule a Recording
You can schedule a recording of an upcoming
program for today or a few days from today
(maximum of 8 days away). The TV will use the data
from the TV Guide to start and end the recording.
To record a program…
1. Press TV GUIDE.
2. On the TV guide, select the channel and program
you wish to record. Press (Right) or (Left) to
scroll through the programs of a channel.
3. With the program highlighted, press the color
key Record . The program is scheduled for
recording. A warning will show automatically when
overlapping recordings are scheduled. If you plan to
20
Page 21

record a program in your absence, remember to leave
the TV switched to Standby and the USB Hard Drive
switched on.
List of Recordings
You can view and manage your recordings in the list
of recordings. Next to the list of recordings, there is a
separate list for scheduled recordings and reminders.
To open the list of recordings…
1. Press TV GUIDE.
2. Press the color key Recordings .
3. With a recording selected in the list, you can
remove the recording with the color
key Remove . You can rename a recording
with the color key Rename. Or you can
press the color key Adjust time to change the
recording start time and end time.
Pause a Program
To pause and resume a broadcast…
To pause a broadcast, press (Pause). A progress
bar at the bottom of the screen appears briefly.
To call up the progress bar, press (Pause) again.
To resume watching, press (Play).
With the progress bar on screen, press (Rewind)
or press (Forward) to select from where you want
to start viewing the paused broadcast. Press these
keys repeatedly to change speed.
You can pause a broadcast for a maximum time span
of 90 minutes.
To switch back to the live TV broadcast,
press (Stop).
Replay
Watch a Recording
To watch a recording…
1. Press TV GUIDE.
2. Press the color key Recordings .
3. In the list of recordings, select the recording you
need and press OK to start watching.
4. You can use the
keys (pause), (play), (rewind), (fast
forward) or (stop).
5. To switch back to watch TV, press EXIT.
9.3
Pause TV
What You Need
You can pause a digital TV broadcast and resume
watching later.
To pause a TV program you need…
Since the TV stores the broadcast you are watching,
you can replay the broadcast for a few seconds.
To replay a current broadcast…
1. Press (Pause)
2. Press (Rewind). You can press repeatedly
to select from where you want to start viewing the
paused broadcast. Press these keys repeatedly to
change speed. At one point you will reach the start of
the broadcast storage or the maximum time span.
3. Press (Play) to watch the broadcast again.
4. Press (Stop) to watch the broadcast live.
- a connected USB Hard Drive formatted on this TV
- digital TV channels installed on this TV
- to receive channel information for the on screen TV
Guide
With the USB Hard Drive connected and formatted,
the TV continuously stores the TV broadcast you are
watching. When you switch to another channel, the
broadcast of the former channel is cleared. Also
when you switch the TV to standby the broadcast is
cleared.
You cannot use Pause TV when you are recording.
21
Page 22

10
Photo Options
Videos, Photos and
Music
10.1
From a USB Connection
You can view your photos or play your music and
videos from a connected USB flash drive or USB Hard
Drive.
With the TV switched on, plug in a USB flash drive or a
USB Hard Drive to the USB connection.
Press SOURCES, then select USB, you can
browse your files in folder structure you have
organized on the USB Hard Drive.
Warning
If you try to pause or record a program with a USB
Hard Drive connected, the TV will ask you to format
the USB Hard Drive. This formatting will delete all
current files on the USB Hard Drive.
With a photo on screen, press OPTIONS to…
Start slideshow, Stop slideshow
Start or stop slideshow.
Slideshow transitions
Set the transition from one picture to the next.
Slideshow frequency
Select the display time for each photo.
Repeat, Play once
View the pictures repeatedly or once only.
Shuffle off, Shuffle on
View the pictures in sequential order, or at random.
Rotate image
Rotate photo.
10.3
Videos
10.2
Photos
View Photos
Open photo folder
1. Press SOURCES, select USB and
press OK.
2. Select USB Flash Drive and press (right) to
select the USB device you need.
3. Select Photos, you can press List to have
list view or press again Thumbnails for
thumbnail view.
View a photo file
1. Press SOURCES, select USB and
press OK.
2. Select USB Flash Drive and press (right) to
select the USB device you need.
3. Select Photos and select one of photos, you
can press OK to view the selected photo.
Play Videos
To play a video on the TV…
Select Videos , select the file name and
press OK.
- To pause the video, press OK. Press OK again to
continue.
- To rewind or go fast forward, press or . Press
the keys several times to speed up - 2x, 4x, 8x, 16x,
32x.
- To jump to the next or previous video in a folder,
press + or -.
- To stop the video playback, press (Stop).
- To go back to the folder, press .
Open video folder
1. Press SOURCES, select USB and
press OK.
2. Select USB Flash Drive and press (right) to
select the USB device you need.
3. Select Videos, you can press List to have list
view or press again Thumbnails for thumbnail
view.
Play a video file
1. Press SOURCES, select USB and
press OK.
2. Select USB Flash Drive and press (right) to
select the USB device you need.
3. Select Videos and select one of video, you
can press OK to play the selected video or
press Play all to play all video files in the video
22
Page 23

folder.
Video Options
During the video playback, press OPTIONS to…
Music Options
Options for playing music...
Repeat, Play once
Play songs repeatedly or once.
Subtitles
Display the subtitles if available, select On, Off,
or On during mute.
Subtitle language
Play the subtitle language if available.
Audio language
Play the audio language if available.
Shuffle on, Shuffle off
Play videos in sequence or at random.
Repeat, Play once
Play videos repeatedly or once.
Show info
Display file information, like sound mode.
Subtitle settings
Set subtitle color, font size, position, time sync offset
if available.
10.4
Shuffle on, Shuffle off
Play songs in sequence or at random.
Music
Play Music
Open music folder
1. Press SOURCES, select USB and
press OK.
2. Select USB Flash Drive and press (right) to
select the USB device you need.
3. Select Music, you can see music files in list.
Play a music file
1. Press SOURCES, select USB and
press OK.
2. Select USB Flash Drive and press (right) to
select the USB device you need.
3. Select Music and select one of music, you
can press OK to play the selected music or
press Play all to play all music files in the music
folder.
23
Page 24

11
11.3
Open TV Setting
Menus
11.1
Home Menu Overview
Press (Home) to select one of below menus, then
press OK.
Channels
This row contains all channels.
- Press OK to open TV guide.
- Press (right) to view channels with channel
logos, or select see all to view all channels.
Sources
This row contains available sources on this TV.
Utilities
This row contains TV functions available to the user.
Settings
This row contains settings available to the user.
Quick Settings and All
Settings
Quick settings menu:
Press SETUP key on the remote control to find
frequently used settings in Quick settings menu.
- Picture style: Select one of preset picture styles for
ideal picture viewing.
- Picture format: Select one of preset picture format
which fits the screen.
- Sound style: Select one of preset sound styles for
ideal sound settings.
- Headphone volume: Adjust the volume of a
connected headphone.
- Audio out: Set the TV to play the sound on TV or on
the connected audio system.
- Clock: Display clock on the right-top corner TV
screen.
- Sleep timer: Set the TV to switch to standby
automatically after a preset time.
- All settings: View all settings menu.
- Help: Easily get software updated, reset TV to
default settings, and read user manual.
11.2
Utilities Menu
TV guide
Open TV guide. For more information, in User
manual, see chapter TV Guide.
Recordings
For more information, in User manual, see
chapter Recording and Pause TV.
Browse USB
View USB storage device.
Channels
View channel list.
Update software
For more information, in User manual, see
chapter Software.
Demo Me
View Demo Me for demo on this TV.
Help
Use Help function to diagnose and get more
information about your TV.
All settings menu:
Press (home) key on the remote control,
select Settings, and press OK.
11.4
All Settings
Picture Settings
Picture Style
Select a style
For easy picture adjustment, you can select a preset
picture style.
(Home) > Settings > Picture > Picture style
The available Picture styles are ...
- Personal - The picture preferences you set during
the first start up
- Vivid - Ideal for daylight viewing
- Football - Ideal for watching sports
- Standard - Most energy efficient setting
24
Page 25

- Movie - Ideal for watching movies
- Game - Ideal for gaming
Customize a style
You can adjust and stored picture settings in in the
currently selected picture style,
like Color, Contrast or Sharpness.
Restore a style
To restore the style to its original setting, select back
to Picture style, then press Restore style.
Color, Contrast, Sharpness, Brightness
Adjust the picture color
(Home) > Settings > Picture > Color
Press the arrows (up) or (down) to adjust the
color saturation value of the picture.
Adjust the picture contrast
(Home) > Settings > Picture > Contrast
Press the arrows (up) or (down) to adjust the
contrast value of the picture.
You can decrease contrast value to reduce power
consumption.
Color Settings
(Home) > Settings > Picture >
Advanced > Color
Adjust the color enhancement
(Home) > Settings > Picture >
Advanced > Color > Color enhancement
Select Maximum, Medium, or Minimum to set the
level of the color intensity and the details in bright
colors.
Select the preset color temperature
(Home) > Settings > Picture >
Advanced > Color > Color temperature
Select Normal, Warm, or Cool to set the color
temperature for your preference.
Customize color temperature
(Home) > Settings > Picture >
Advanced > Color > Custom color temperature
Select Custom in Color temperature menu
to customize a color temperature yourself. Press the
arrows (up) or (down) to adjust the value.
Adjust the picture sharpness
(Home) > Settings > Picture > Sharpness
Press the arrows (up) or (down) to adjust the
sharpness value of the picture.
Adjust the picture brightness
(Home) > Settings > Picture > Brightness
Press the arrows (up) or (down) to adjust the
brightness value of the picture.
Advanced Picture Settings
Computer
(Home) > Settings > Picture >
Advanced > Computer
Contrast Settings
Contrast Modes
(Home)
Contrast
Settings
>
> Picture
> Contrast mode
>
Advanced
>
Select Normal, Optimized for picture, Optimized for
energy saving to set the TV automatically reduces
the contrast, for best power consumption or for best
picture experience, or select Off to switch off the
adjustment.
Dynamic Contrast
(Home) > Settings > Picture >
Advanced > Contrast > Dynamic contrast
Select Maximum, Medium, or Minimum to set the
level at which the TV automatically enhances the
details in the dark, middle and light areas of the
picture.
Set to On to have the ideal picture settings for using
your TV as a computer monitor.
* Only available for HDMI sources.
25
Page 26

Video Contrast, Gamma
Video contrast
(Home) > Settings > Picture >
Advanced > Contrast > Video contrast
Press the arrows (up) or (down) to adjust the
video contrast level.
(Home) > Settings > Picture > Format and
edges > Picture format
If black bars appear on top and bottom or on both
sides of the picture, you can adjust the picture format
to a format that fills the screen.
Screen Edges
Gamma
(Home) > Settings > Picture >
Advanced > Contrast > Gamma
Press the arrows (up) or (down) to set a nonlinear setting for picture luminance and contrast.
Super Resolution
(Home) > Settings > Picture > Advanced >
Sharpness > Super Resolution
Select On to have a superior sharpness in line edges
and details.
Picture Clean
(Home) > Settings > Picture > Advanced >
Picture clean
Noise reduction
(Home) > Settings > Picture >
Advanced > Picture clean > Noise reduction
(Home) > Settings > Picture > Format and
edges > Picture format > Screen edges
With Screen edges, you can slightly enlarge the
picture to hide distorted edges.
Sound Settings
Sound Style
Select a style
For easy sound adjustment, you can select a preset
sound style.
(Home) > Settings > Sound > Sound style
The available sound styles are ...
- Personal - The sound preferences you set during
the first start up.
- Original - Most neutral sound setting
- Movie - Ideal for watching movies
- Music - Ideal for listening to music
- Game - Ideal for gaming
- News - Ideal for speech
Select Maximum, Medium, Minimum to set the
level for removing the noise in video content.
Noise is mostly visible as small moving dots in onscreen picture.
MPEG Artifact Reduction
(Home) > Settings > Picture >
Advanced > Picture clean > MPEG artifact
reduction
Select On, to smoothen the digital transitions in the
picture.
MPEG artifacts are mostly visible as small blocks or
jagged edges in on-screen images.
Format and Edges
(Home) > Settings > Picture > Format and
edges
Picture format
Customize a style
You can adjust and stored sound settings in the
currently selected sound style, like Bass or Treble.
Restore a style
To restore the style to its original setting, select back
to Sound style, then press Restore style.
Bass, Treble
Bass
(Home) > Settings > Sound > Bass
Press the arrows (up) or (down) to adjust the
level of low tones in the sound.
Treble
(Home) > Settings > Sound > Treble
Press the arrows (up) or (down) to adjust the
26
Page 27

color level of high tones in the sound.
Headphone Volume
(Home) > Settings > Sound > Headphone
volume
always on.
With an audio device connected with HDMI CEC,
select HDMI sound system. The TV will switch off
the TV speakers when the device is playing the
sound.
Press the arrows (up) or (down) to adjust the
volume of a connected headphone separately.
Surround Sound
(Home)
>
Settings
>
Sound
>
Surround Sound
Select the surround sound effect for the internal TV
speakers.
TV Placement
(Home)
>
Settings
>
> TV placement
Sound
Select On a TV stand or On the wall to have best
sound reproduction according to the setting.
Advanced Sound Settings
Volume Control
Auto volume leveling
(Home) > Settings > Sound > Advanced >
Auto volume leveling
Select On to automatically level out sudden
volume differences. Typically when you are
switching channels.
Delta volume
(Home) > Settings > Sound >
Advanced > Delta volume
Press the arrows (up) or (down) to adjust the
delta value for TV speaker volume.
Clear Sound
(Home) > Settings > Sound >
Advanced > Clear sound
Select On to improve the sound for speech. Ideal for
news programs.
Digital Output Settings
Digital output settings are available for optical and
HDMI ARC sound signals.
Digital out format
(Home) > Settings > Sound >
Advanced > Digital out format
Set the audio out signal of the TV to fit the sound
capabilities of the connected Home Theater System.
- If you have a Home Theater System (HTS)
with multichannel sound processing capabilities,
set Digital out format to Multichannel. With
Multichannel, the TV can send the compressed
multichannel sound signal from a TV channel or
connected player to the Home Theater System.
- If you have a Home Theater System without
multichannel sound processing, select Stereo.
Digital out leveling
(Home) > Settings > Sound >
Advanced > Digital out leveling
Adjust the loudness level from device which is
connected to digital audio output (SPDIF) or HDMI.
- Select More to have louder volume.
- Select Less to have softer volume.
Audio Out Settings
(Home) > Settings > Sound >
Advanced > Audio out
Set the TV to play the sound on TV or on the
connected audio system.
You can select where you want to hear the TV sound
and how you want to control it.
- If you select TV speakers off, you permanently
switch off the TV speakers.
- If you select TV speakers, the TV speakers are
Digital out delay
(Home) > Settings > Sound >
Advanced > Digital out delay
For some Home Theater Systems you might need to
adjust the audio sync delay to synchronize the audio
to the video. Select Off if a sound delay is set on
your Home Theater System.
Digital out offset (Only available when Digital out
delay set to On)
27
Page 28

(Home) > Settings > Sound >
Advanced > Digital out offset
General Settings
If you cannot set a delay on the Home Theater
System, you can set the TV to sync the sound.
You can set an offset that compensates for the time
necessary for the Home Theater System to process
the sound of the TV picture.
You can set the value in steps of 5ms. Maximum
setting is 60ms.
Eco Settings
Set energy saving level
(Home) > Settings > Eco settings > Energy
saving
Select Minimum, Medium, or Maximum to have
different degrees for energy saving, or select Off to
switch off energy saving mode.
Set screen off to save energy consumption
(Home) > Settings > Eco settings > Screen off
Connection Related Settings
USB Hard Drive
(Home) > Settings > General settings > USB
Hard Drive
You need to set up and format a USB Hard Drive
before you record a channel.
HDMI-CEC Connection - EasyLink
Connect HDMI CEC-compatible devices to your TV,
you can operate them with the TV remote
control. EasyLink HDMI CEC must be switched on on
the TV and the connected device.
Switch on EasyLink
(Home) > Settings > General
settings > EasyLink > EasyLink > On.
Operate HDMI CEC-compatible devices with TV
remote control
Select Screen off, the TV screen is switched off, to
switch the TV screen back on, press any key on the
remote control.
Set TV switch off timer
(Home) > Settings > Eco settings > Switch off
timer.
Press the arrows (up) or (down) to adjust the
value. The value 0 (Off) deactivates the automatic
switch off.
Select Switch off timer, the TV switches off
automatically to save energy.
* TV switches off if receiving a TV signal but you don't
press a key on the remote control during a 4 hour
period.
* TV switches off if not receiving a TV signal nor a
remote control command for 10 minutes.
* If you use the TV as a monitor or use a digital
receiver to watch TV (a Set-Top Box - STB) and you
do not use the remote control of the TV, you should
deactivate this automatic switch off, to set the value
to 0.
(Home) > Settings > General
settings > EasyLink > EasyLink remote
control > On.
Note:
- EasyLink might not work with devices from other
brands.
- The HDMI CEC functionality has different names on
different brands. Some examples are: Anynet, Aquos
Link, Bravia Theater Sync, Kuro Link, Simplink and
Viera Link. Not all brands are fully compatible with
EasyLink. Example HDMI CEC branding names are
property of their respective owners.
Location - Home or Shop
Select the location of your TV
(Home) > Settings > General
settings > Location
Select Shop, the picture style is switched back
to Vivid, and can adjust shop settings.
Shop mode is for in-store promotion.
Set the Shop setting
(Home) > Settings > General settings > Shop
setup
28
Page 29

When the Location is set to Shop, you can set the
availablility of a specific demo for in store use.
language > Clock > Date, Time
Go to previous menu, and select Date and Time to
adjust the value.
Reset TV Settings and Reinstall TV
Reset all settings value to original TV settings
(Home) > Settings > General
settings > Factory settings
Redo full TV installation , and set TV status back to
the first time you switch on
(Home) > Settings > General
settings > Reinstall TV
Enter PIN code and select Yes, the TV will reinstall
completely. All settings will be reset and installed
channels will be replaced. The installation can take a
few minute
Region and Language Settings
Languages
Change the language of the TV menu and
messages
Note:
- If none of the automatic settings display the time
correctly, you can set the time manually.
Set time zone
(Home) > Settings > Region and
language > Clock > Time zone
Select one of the time zones.
Set the TV to switch to Standby automatically after a
preset time
(Home) > Settings > Region and
language > Clock > Sleep timer
Set the TV to switch to Standby automatically after a
preset time. With the slider bar you can set the time
to up to 180 minutes in increments of 5 minutes. If set
to 0 minutes, the sleep timer is switched off. You can
always switch off your TV earlier or reset the time
during the countdown.
(Home) > Settings > Region and
language > Languages > Menu language
Clock
(Home) > Settings > Region and
language > Clock
Correct clock automatically
(Home) > Settings > Region and
language > Clock > Auto clock mode
- The standard time setting for the TV clock
is Automatic. The time information comes from the
broadcasted UTC - Coordinated Universal Time
information.
- If the clock is not correct, you can set the TV clock
to Manual.
Correct clock manually
(Home) > Settings > Region and
language > Clock > Auto clock mode > Manual
(Home) > Settings > Region and
Universal Access Settings
(Home) > Settings > Universal access
With Universal Access switched on, the TV is
prepared for use for the blind or partially sighted
people.
Switch on universal access settings
(Home) > Settings > Universal
access > Universal access > On.
Universal access for blind or partially sighted
people
(Home) > Settings > Universal access > Audio
description > Audio description > On
Digital TV channels can broadcast special audio
commentary describing what is happening on
screen.
(Home) > Settings > Universal access > Audio
description > Audio description > Mixed volume,
Audio effects, Speech
- Select Mixed volume, you can mix the volume of
the normal audio with the audio commentary. Press
the arrows (up) or (down) to adjust the value.
- Set Audio effects to On for extra audio effects in
29
Page 30

the commentary audio, like stereo or fading sound.
- Select Speech to set speech
preference, Descriptive or Subtitles.
Lock Settings
Set Code and Change Code
Set new code or reset change code
(Home) > Settings > Child lock > Set
code, Change code
The child lock code is used to lock or unlock channels
or programs.
Note: If you forgot your PIN code, you can override
the current code use 8888 and enter a new code.
Age Ratings
(Home) > Settings > Child lock > Age ratings
lock
Set a minimum age to watch rated programs.
Content Ratings
(Home) > Settings > Child lock > Content
ratings lock
Set a content rating that will lock rated programs.
30
Page 31
12
Environmental
12.1
End of Use
Disposal of your old product and batteries
Your product is designed and manufactured with high
quality materials and components, which can be
recycled and reused.
When this crossed-out wheeled bin symbol is
attached to a product, it means that the product is
covered by European Directive 2012/19/EU.
Please inform yourself about the local separate
collection system for electrical and electronic
products.
Please act according to your local rules and do not
dispose of your old products with your normal
household waste. Correct disposal of your old
product helps to prevent potential negative
consequences for the environment and human
health.
Your product contains batteries covered by the
European Directive 2006/66/EC, which cannot be
disposed with normal household waste.
Please find out for yourself about the local rules on
separate collection of batteries because correct
disposal will help to prevent negative consequences
for the environment and human health.
31
Page 32

13
13.4
Specifications
13.1
Power
Product specifications are subject to change without
notice. For more specification details of this product,
see www.philips.com/TVsupport
Power
- Mains power : AC 110-240V +/-10%
- Ambient temperature : 5°C to 35°C
13.2
Reception
- Aerial input : 75 ohm coaxial (F-type)
- Tuner bands : Hyperband, UHF, VHF
- ISDBT
- Analog video playback : NTSC-M/PAL-M/PAL-N
- Digital video playback : MPEG2 SD/HD (ISO/IEC
13818-2), MPEG4 SD/HD (ISO/IEC 14496-10), HEVC*
- Digital audio playback (ISO/IEC 13818-3)
Display Input Resolution
For PHD series TV
Video formats
Resolution — Refresh rate
- 480i - 60 Hz
- 480p - 60 Hz
- 576i - 50 Hz
- 576p - 50 Hz
- 720p - 50 Hz, 60 Hz
- 1080i - 50 Hz, 60 Hz
- 1080p - 24 Hz, 25 Hz, 30 Hz
Computer formats
Resolutions (among others)
- 640 x 480p - 60 Hz
- 800 x 600p - 60 Hz
- 1024 x 768p - 60 Hz
- 1280 x 768p - 60 Hz
- 1360 x 768p - 60 Hz
For PFD
series TV
13.3
Display Resolution
For 5503 series
Diagonal screen size
- 108 cm / 43 inch
Display resolution
- 1920x1080
For 4503 series
Diagonal screen size
- 80 cm / 32 inch
Display resolution
- 1366x768
Video formats
Resolution — Refresh rate
- 480i - 60 Hz
- 480p - 60 Hz
- 576i - 50 Hz
- 576p - 50 Hz
- 720p - 50 Hz, 60 Hz
- 1080i - 50 Hz, 60 Hz
- 1080p - 24 Hz, 25 Hz, 30 Hz
Computer formats
Resolutions (among others)
- 640 x 480p - 60 Hz
- 800 x 600p - 60 Hz
- 1024 x 768p - 60 Hz
- 1280 x 768p - 60 Hz
- 1360 x 768p - 60 Hz
- 1280 x 1024p - 60 Hz
- 1920 x 1080p - 60 Hz
13.5
Sound
- Output power (RMS) : 10W
- Dolby Audio
- DTS 2.0+ Digital out ™
32
Page 33

13.6
Multimedia
Supported USB file systems
- USB (FAT / FAT 32 / NTFS): only connect USB
devices that consume 500 mA of power or less.
Playback formats
Image Codec: JPEG, GIF, PNG, BMP
- Audio Codec: MP3, WAV, WMA (v2 up to v9.2), AC3,
AAC, HE-AAC, DTS 2.0
- Video Codec: AVI, MKV, H.264/MPEG-4 AVC,
MPEG1, MPEG2, MPEG4, WMV9/VC1, HEVC
- Subtitle: SRT, SMI, SSA, SUB, ASS, TXT
13.7
Connectivity
TV Side
- USB
- Headphones: Stereo 3.5mm mini-jack
- TV ANTENNA: 75 ohm coaxial
TV Bottom
- HDMI 1
- HDMI 2
- SPDIF: Digital Audio Out - RCA
- AV : AV, Audio L/R
33
Page 34

14
Troubleshooting
- If the standby light on TV is on, the TV might not
respond to the remote control.
Creaking sound at startup or switch off
14.1
Tips
If you can't find a solution for your TV problem
in Troubleshooting, you can
press SETUP > Help > User manual to find the
information you are looking for.
If the User manual doesn't answer your question, you
can go to the support website of Philips.
To solve any Philips TV related problem, you can
consult our online support. You can select your
language and enter your product model number.
Go to www.philips.com/TVsupport.
On the support site you can find your country's
telephone number to contact us as well as answers to
frequently asked questions (FAQs). In some countries,
you can chat with one of our collaborators and ask
your question directly or send a question by email.
You can download new TV software or the manual to
read on your computer.
For more TV troubleshooting and frequently asked
questions (FAQs)...
Go
to http://philips-tvconsumercare.kxondemand.com/
portal/en/ModelSelect
TV Help on your tablet, smartphone or computer
When you are turning the TV on, off or to standby,
you hear a creaking sound from the TV chassis. The
creaking sound is due to the normal expansion and
contraction of the TV as it cools and warms up. This
does not affect performance.
The TV goes back to standby after showing the
Philips startup screen
When the TV is in standby, a Philips startup screen is
displayed, then the TV returns to standby mode. This
is normal behavior. When the TV is disconnected and
reconnected to the power supply, the startup screen
is displayed at the next startup. To switch on the TV
from standby, press (Standby / On) the remote
control or the TV.
The standby light keeps on blinking
Disconnect the power cable from the power outlet.
Wait 5 minutes before you reconnect the power
cable. If the blinking reoccurs, contact Philips TV
Consumer Care.
TV switches off by itself
If the TV switches off suddenly, the setting switch off
timer might be switched on. With switch off
timer the TV switches off after 4 hours if no remote
control signals were received. To avoid this automatic
switch off, you can deactivate this switch off.
Also, if the TV does not receive a TV signal nor a
remote control command for 10 minutes, the TV
switches off automatically.
To carry out extended sequences of instructions more
easily, you can download the TV Help in PDF format
to read on your smartphone, tablet or
computer. Alternatively, you can print the relevant
Help page from your computer.
To download the Help (user manual) go
to www.philips.com/TVsupport
14.2
Switch On
The TV does not switch on
- Disconnect the power cable from the power outlet.
Wait for one minute then reconnect it. Make sure that
the power cable is securely connected. Try switching
on again.
- Connect the TV to another wall mains socket and try
switching on.
- Disconnect all connected devices from the TV and
try switching on.
14.3
Remote Control
TV does not respond to the remote control
The TV requires some time to start up. During this
time, the TV does not respond to the remote control
or TV controls. This is normal behavior.
If the TV continues to be unresponsive to the remote
control, you can check if the remote control is working
by means of a mobile phone camera. Put the phone
in camera mode and point the remote control to the
camera lens. If you press any key on the remote
control and you notice the infra-red LED flicker
through the camera, the remote control is working.
The TV needs to be checked.
If you do not notice the flickering, the remote control
might be broken or its batteries are low.
This method of checking the remote control is not
possible with remote controls which are wirelessly
paired with the TV.
34
Page 35

14.4
Channels
- Picture signals from some devices may not fit the
screen correctly. Check the signal output of the
connected device.
No digital channels found during the installation
Make sure that all cables are properly connected and
that the correct network is selected.
Previously installed channels are not in the channel
list
Make sure that the correct channel list is selected.
14.5
Picture
No picture / distorted picture
- Make sure that the antenna is properly connected
to the TV.
- Make sure that the correct device is selected as the
display source.
- Make sure that the external device or source is
properly connected.
Sound but no picture
- Make sure that the picture settings are set correctly.
Poor antenna reception
- Make sure that the antenna is properly connected
to the TV.
- Loud speakers, unearthed audio devices, neon
lights, high buildings and other large objects can
influence reception quality. If possible, try to improve
the reception quality by changing the antenna
direction or moving devices away from the TV.
- If reception on only one channel is poor, fine-tune
this channel with Manual Installation.
Poor picture from a device
- Make sure that the device is connected properly.
- Make sure that the picture settings are set correctly.
Picture settings change after a while
- Make sure that Location is set to Home . You can
change and save settings in this mode.
A commercial banner appears
- Make sure that Location is set to Home.
Picture does not fit the screen
- Change to a different picture format.
Picture format keeps changing with different
channels
- Select a non "Auto" picture format.
Picture position is incorrect
Computer picture is not stable
- Make sure that your PC uses the supported
resolution and refresh rate.
14.6
Sound
No sound or poor sound quality
If no audio signal is detected, the TV automatically
switches the audio output off — this does not indicate
malfunction.
- Make sure that the sound settings are correctly set.
- Make sure that all cables are properly connected.
- Make sure that the volume is not muted or set to
zero.
- Make sure that the TV audio output is connected to
the audio input on the Home Theater System.
- Sound should be heard from the HTS speakers.
- Some devices may require you to manually enable
HDMI audio output. If HDMI audio is already enabled,
but you still do not hear audio, try changing the digital
audio format of the device to PCM (Pulse Code
Modulation). Refer to the documentation
accompanying your device for instructions.
14.7
HDMI
HDMI
- Note that HDCP (High-bandwidth Digital Content
Protection) support can delay the time taken for a TV
to display content from an HDMI device.
- If the TV does not recognize the HDMI device and
no picture is displayed, switch the source from one
device to another and back again.
- If there are intermittent sound disruptions, make
sure that output settings from the HDMI device are
correct.
- If you use an HDMI-to-DVI adapter or HDMI-toDVI cable, make sure that an additional audio cable is
connected to AUDIO IN, if available.
EasyLink does not work
- Make sure that your HDMI devices are HDMI-CEC
compatible. EasyLink features only work with devices
that are HDMI-CEC compatible.
No volume icon shown
- When a HDMI-CEC audio device is connected this
behavior is normal.
35
Page 36

14.8
USB
Photos, videos and music from a USB device do not
show
- Make sure that the USB storage device is set to
Mass Storage Class compliant, as described in the
storage device's documentation.
- Make sure that the USB storage device is
compatible with the TV.
- Make sure that the audio and picture file formats
are supported by the TV.
Choppy playback of USB files
- The transfer performance of the USB storage device
may limit the data transfer rate to the TV which
causes poor playback.
36
Page 37

15
care to avoid injury or damage.
Safety and Care
15.1
Safety
Important
Read and understand all safety instructions before
you use the TV. If damage is caused by failure to
follow instructions, the warranty does not apply.
Risk of Electric Shock or Fire
- Never expose the TV to rain or water. Never place
liquid containers, such as vases, near the TV.
If liquids are split on or into the TV, disconnect the TV
from the power outlet immediately.
Contact Philips TV Consumer Care to have the TV
checked before use.
- Never expose the TV, remote control or batteries to
excessive heat. Never place them near burning
candles, naked flames or other heat sources,
including direct sunlight.
- Never insert objects into the ventilation slots or
other openings on the TV.
Risk of damage to the TV!
Before you connect the TV to the power outlet,
ensure that the power voltage matches the value
printed on the back of the TV. Never connect the TV
to the power outlet if the voltage is different.
Risk of Injury to Children
Follow these precautions to prevent the TV from
toppling over and causing injury to children:
- Never place the TV on a surface covered by a cloth
or other material that can be pulled away.
- Ensure that no part of the TV hangs over the edge
of the mounting surface.
- Never place the TV on tall furniture, such as a
bookcase, without anchoring both the furniture and
TV to the wall or a suitable support.
- Teach children about the dangers of climbing on
furniture to reach the TV.
Risk of swallowing batteries!
The remote control may contain coin-type batteries
which can easily be swallowed by small children.
Keep these batteries out of reach of children at all
times.
- Never place heavy objects on the power cord.
- Avoid force coming onto power plugs. Loose power
plugs can cause arcing or fire. Ensure that no strain is
exerted on the power cord when you swivel the TV
screen.
- To disconnect the TV from the main power, the
power plug of the TV must be disconnected. When
disconnecting the power, always pull the power plug,
never the cord. Ensure that you have full access to
the power plug, power cord and outlet socket at all
times.
Risk of Injury or Damage to the TV
- Two people are required to lift and carry a TV that
weighs more than 25 kg or 55 lbs.
- If you mount the TV on a stand, only use the
supplied stand. Secure the stand to the TV tightly.
Place the TV on a flat, level surface that can support
the weight of the TV and the stand.
- When wall mounted, ensure that the wall mount can
safely bear the weight of the TV set. TP Vision bears
no responsibility for improper wall mounting that
results in accident, injury or damage.
Risk of Overheating
Never install the TV in a confined space. Always leave
a space of at least 10 cm or 4 inches around the TV
for ventilation. Ensure curtains or other objects never
cover the ventilation slots on the TV.
Lightning Storms
Disconnect the TV from the power outlet and antenna
before lightning storms.
During lightning storms, never touch any part of the
TV, power cord or antenna cable.
Risk of Hearing Damage
Avoid using earphones or headphones at high
volumes or for prolonged periods of time.
- Parts of this product are made of glass. Handle with
37
Page 38

Low Temperatures
If the TV is transported in temperatures below 5°C or
41°F, unpack the TV and wait until the TV temperature
reaches room temperature before connecting the TV
to the power outlet.
Humidity
In rare occasions, depending on temperature and
humidity, minor condensation can occur on the inside
of the TV glass front (on some models). To prevent
this, do not expose the TV to direct sunlight, heat or
extreme humidity. If condensation occurs, it will
disappear spontaneously while the TV is playing for a
few hours.
The condensation moisture will not harm the TV or
cause malfunction.
15.2
Screen Care
- Never touch, push, rub or strike the screen with any
object.
- Unplug the TV before cleaning.
- Clean the TV and frame with a soft damp cloth and
wipe gently. Never use substances such as alcohol,
chemicals, or household cleaners on the TV.
- To avoid deformations and color fading, wipe off
water drops as quickly as possible.
- Avoid stationary images as much as possible.
Stationary images are images that remain on screen
for extended periods of time. Stationary images
include on screen menus, black bars, time displays,
etc. If you must use stationary images, reduce screen
contrast and brightness to avoid screen damage.
15.3
Terms of Use
2018 © TP Vision Europe B.V. All rights reserved.
This product was brought to the market by TP Vision
Europe B.V. or one of its affiliates, hereinafter referred
to as TP Vision, which is the manufacturer of the
product. TP Vision is the warranter in relation to the
TV with which this booklet was packaged. Philips and
the Philips Shield Emblem are registered trademarks
of Koninklijke Philips N.V.
to adjust earlier supplies accordingly.
The written material packaged with the TV and the
manual stored in the memory of the TV or
downloaded from the Philips
website www.philips.com/TVsupport are believed to
be adequate for the intended use of the system.
The material in this manual is believed adequate for
the intended use of the system. If the product, or its
individual modules or procedures, are used for
purposes other than those specified herein,
confirmation of their validity and suitability must be
obtained. TP Vision warrants that the material itself
does not infringe any United States patents. No
further warranty is expressed or implied. TP Vision
cannot be held responsible neither for any errors in
the content of this document nor for any problems as
a result of the content in this document. Errors
reported to Philips will be adapted and published on
the Philips support website as soon as possible.
Terms of warranty - Risk of injury, damage to TV or
void of warranty!
Never attempt to repair the TV yourself. Use the TV
and accessories only as intended by the
manufacturer. The caution sign printed on the back of
the TV indicates risk of electric shock. Never remove
the TV cover. Always contact Philips TV Customer
Care for service or repairs. Find the telephone number
in the printed documentation that came with the
TV. Or consult our
website www.philips.com/TVsupport and select
your country if needed. Any operation expressly
prohibited in this manual, or any adjustments and
assembly procedures not recommended or
authorized in this manual, shall void the warranty.
Pixel characteristics
This LCD/LED product has a high number of color
pixels. Although it has effective pixels of 99.999% or
more, black dots or bright points of light (red, green or
blue) may appear constantly on the screen. This is a
structural property of the display (within common
industry standards) and is not a malfunction.
TP Vision is committed to developing, producing and
marketing products that cause no adverse health
effects. TP Vision confirms that, as long as its products
are handled properly for their intended use, they are
safe to use according to scientific evidence available
today. TP Vision plays an active role in the
development of safety standards, enabling TP Vision
to anticipate further developments in standardization
for early integration in its products.
Specifications are subject to change without notice.
Trademarks are the property of Koninklijke Philips N.V
or their respective owners. TP Vision reserves the right
to change products at any time without being obliged
38
Page 39

16
Copyrights
16.1
HDMI
The terms HDMI and HDMI High-Definition
Multimedia Interface, and the HDMI Logo are
trademarks or registered trademarks of HDMI
Licensing Administrator, Inc. in the United States and
other countries.
16.2
Dolby Audio
Manufactured under license from Dolby Laboratories.
Dolby, Dolby Audio, and the double-D symbol are
trademarks of Dolby Laboratories.
16.3
DTS 2.0 + Digital Out ™
For DTS patents, see http://patents.dts.com.
Manufactured under license from DTS Licensing
Limited. DTS, the Symbol, & DTS and the Symbol
together are registered trademarks, and DTS
2.0+Digital Out is a trademark of DTS, Inc. © DTS, Inc.
All Rights Reserved.
16.4
Other Trademarks
All other registered and unregistered trademarks are
the property of their respective owners.
39
Page 40

17
busybox (v1.23.2)
Open Source
17.1
Open Source Software
This television contains open source software. TP
Vision Europe B.V. hereby offers to deliver, upon
request, a copy of the complete corresponding
source code for the copyrighted open source
software packages used in this product for which such
offer is requested by the respective licenses.
This offer is valid up to three years after product
purchase to anyone in receipt of this information.
To obtain the source code, please write in English to .
. .
17.2
Open Source License
BusyBox combines tiny versions of many common
UNIX utilities into a single small executable. It
provides replacements for most of the utilities you
usually find in GNU fileutils, shellutils, etc. The utilities
in BusyBox generally have fewer options than their
full-featured GNU cousins; however, the options that
are included provide the expected functionality and
behave very much like their GNU counterparts.
BusyBox provides a fairly complete environment for
any small or embedded system.
Source: https://busybox.net/
libz (1.2.8)
zlib is designed to be a free, general-purpose, legally
unencumbered -- that is, not covered by any patents
-- lossless data-compression library for use on
virtually any computer hardware and operating
system. The zlib data format is itself portable across
platforms.
About Open Source License
README for the source code of the parts of TP Vision
Netherlands B.V. TV software that fall under open
source licenses.
This is a document describing the distribution of the
source code used on the TP Vision Netherlands B.V.
TV, which fall either under the GNU General Public
License (the GPL), or the GNU Lesser General Public
License (the LGPL), or any other open source license.
Instructions to obtain copies of this software can be
found in the Directions For Use.
TP Vision Netherlands B.V. MAKES NO WARRANTIES
WHATSOEVER, EITHER EXPRESS OR IMPLIED,
INCLUDING ANY WARRANTIES OF
MERCHANTABILITY OR FITNESS FOR A PARTICULAR
PURPOSE, REGARDING THIS SOFTWARE. TP Vision
Netherlands B.V. offers no support for this software.
The preceding does not affect your warranties and
statutory rights regarding any TP Vision Netherlands
B.V. product(s) you purchased. It only applies to this
source code made available to you.
Open Source
uboot loader
Source: http://www.denx.de/wiki/U-Boot
Source: http://www.zlib.net/
libcurl (7.49.1)
libcurl is a free and easy-to-use client-side URL
transfer library, supporting DICT, FILE, FTP, FTPS,
Gopher, HTTP, HTTPS, IMAP, IMAPS, LDAP, LDAPS,
POP3, POP3S, RTMP, RTSP, SCP, SFTP, SMTP,
SMTPS, Telnet and TFTP. libcurl supports SSL
certificates, HTTP POST, HTTP PUT, FTP uploading,
HTTP form based upload, proxies, cookies,
user+password authentication (Basic, Digest, NTLM,
Negotiate, Kerberos), file transfer resume, http proxy
tunneling and more.
Source: http://curl.haxx.se/libcurl/
log4c (1.2.1)
Apache log4cxx is a logging framework for C++
patterned after Apache log4j, which uses Apache
Portable Runtime for most platform-specific code
and should be usable on any platform supported by
APR. Apache log4cxx is licensed under the Apache
License, an open source license certified by the Open
Source Initiative.
Source:
https://logging.apache.org/log4cxx/latest_stable/
40
Page 41

libtinycompress (1.1)
libfreetype (2.6.3)
A library to handle compressed formats like MP3 etc.
Source: http://git.alsa-
project.org/?p=tinycompress.git;a=summary
Gstreamer (V1.0)
GStreamer is a plugin-based framework licensed
under the LGPL.
Source:
https://gstreamer.freedesktop.org/documentation/lic
ensing.html
mxml (2.8)
Source: http://michaelrsweet.github.io/mxml/
FreeType is a freely available software library to
render fonts.
It is written in C, designed to be small, efficient, highly
customizable, and portable while capable of
producing high-quality output (glyph images) of most
vector and bitmap font formats.
Source: http://www.freetype.org/
libglibc (2.19)
The GNU C Library project provides the core libraries
for the GNU system and GNU/Linux systems, as well
as many other systems that use Linux as the kernel.
Source: https://www.gnu.org/software/libc/
libstdc++ (6.0.20)
libiconv (1.14)
International text is mostly encoded in Unicode. For
historical reasons, however, it is sometimes still
encoded using a language or country dependent
character encoding.
Source: https://www.gnu.org/software/libiconv/
libavcodec, libavformat, libavutil
FFmpeg is the leading multimedia framework, able to
decode, encode, transcode, mux, demux, stream,
filter and play pretty much anything that humans and
machines have created. It supports the most obscure
ancient formats up to the cutting edge. No matter if
they were designed by some standards committee,
the community or a corporation. It is also highly
portable: FFmpeg compiles, runs, and passes our
testing infrastructure FATE across Linux, Mac OS X,
Microsoft Windows, the BSDs, Solaris, etc. under a
wide variety of build environments, machine
architectures, and configurations.
libc++ is a new implementation of the C++ standard
library, targeting C++11.
All of the code in libc++ is dual licensed under the MIT
license and the UIUC License (a BSD-like license).
Source: http://libcxx.llvm.org/
libfribidi (0.19.6)
GNU FriBidi is an implementation of the Unicode
Bidirectional Algorithm (bidi).
GNU FriBidi has no required dependencies. The list of
projects using GNU FriBidi is growing and they
provide a wealth of examples of using the various
APIs to learn from.
Source: https://fribidi.org/
libsqlite3 (3.8.5)
Source: https://www.ffmpeg.org/
SQLite is an in-process library that implements a selfcontained, serverless, zero-configuration,
transactional SQL database engine.
SQLite is an embedded SQL database engine. Unlike
most other SQL databases, SQLite does not have a
separate server process.
SQLite is a compact library. With all features enabled,
41
Page 42

the library size can be less than 500KiB, depending
on the target platform and compiler optimization
settings.
Source: https://sqlite.org/
libpng (1.6.16)
libpng is the official PNG reference library. It supports
almost all PNG features.
Source: http://libpng.org/pub/png/libpng.html
libstbci-openssl.a (1.0.2g)
OpenSSL is an open source project that provides a
robust, commercial-grade, and full-featured toolkit
for the Transport Layer Security (TLS) and Secure
Sockets Layer (SSL) protocols. It is also a generalpurpose cryptography library.
Source: https://www.openssl.org
libjpeg (v9a)
Libjpeg is a widely used C library for reading and
writing JPEG image files.
Source: http://libjpeg.sourceforge.net/
libdirectfb (directfb-1.7-1 )
DirectFB is a thin library that provides hardware
graphics acceleration, input device handling and
abstraction, integrated windowing system with
support for translucent windows and multiple display
layers, not only on top of the Linux Framebuffer
Device.
It is a complete hardware abstraction layer with
software fallbacks for every graphics operation that is
not supported by the underlying hardware. DirectFB
adds graphical power to embedded systems and sets
a new standard for graphics under Linux.
Source: http://www.directfb.net
42
Page 43

Index
A
Advanced Picture Contrast Settings 25
Advanced Picture Settings 25
Antenna Connection 9
Audio Description 29
Audio Effects 29
Audio Language 29
Auto Clock Mode 29
Auto Volume Leveling 27
B
Bass 26
Batteries 5
C
Change PIN Code 30
Channel, Channel Filter 16
Channel, Rename Channel 15
Channels 13
Child Lock 30
Color 25
Color Enhancement 25
Color Settings 25
Color Temperature 25
Computer Connection 10
Computer Picture Setting 25
Connect Device 9
Consumer Care 3
Contact Info 3
Contrast 25
D
Date 29
Daylight Saving 29
Delta Volume 27
Digital Audio Out 10
Digital Out Delay 27
Digital Out Format 27
Digital Out Leveling 27
Digital Out Offset 27
Dynamic Contrast 25
E
EasyLink 9
End of Use 31
Energy Saving 28
F
Favorite Channels 16
G
Gamma 26
H
HDMI - CEC Connection 9
HDMI - DVI connection 9
HDMI ARC 10
HDMI Connection 9
Headphone Connection 10
Headphone Volume 27
Hearing Impaired 29
Help Menu 3
Home Menu 24
I
Identify TV 3
Install Channel 13
Install Channel - Antenna 13
Install Channel - Cable 13
L
Language Settings 29
M
Menu Language 29
Mixed Volume 29
MPEG Artifact Reduction 26
N
Noise Reduction 26
O
On-line User Manual 3
Optical 10
P
Philips Support 3
Picture Clean 26
Picture Contrast Mode 25
Picture Format 26
Picture Style 24
Picture, Color 25
Picture, Contrast 25
Picture, Sharpness 25
Power Cable 8
Problems 34
Q
Quick Settings Menu 24
R
Register TV 3
Remote Control 5
Remote Control and Batteries 5
Rename Device 12
Repair 3
Reset TV Settings 29
S
Safety and Care 37
Search Channels 15
Set PIN Code 30
Sharpness 25
Sleep Timer 29
Software Version 4
Sound Settings 26
Sound Style 26
Source List 12
Speakers or Headphones 29
Standby Mode 8
Subtitle Language 29
Super Resolution 26
Surround Sound 27
Switching On 8
T
Text Language 29
Time 29
43
Page 44

Time Settings 29
Time Zone 29
Troubleshooting 34
TV placement 7
U
Universal Access 29
Update Software 4
Update Software - Local Updates 4
USB Flash Drive 10
USB Hard Drive 10
USB Hard Drive, Format 28
User Manual 3
Utilities Menu 24
V
Video Contrast 26
Videos, Photos and Music 22
Viewing Distance 7
W
Wall Mounting 7
44
Page 45

Powered by TCPDF (www.tcpdf.org)
45
 Loading...