

Page 1

32PHA4509
40PFA4509
50PFA4509
Register your product and get support at
www.philips.com/welcome
EN
User manual
Page 2

Page 3

English
1
EN
Contents
1 Caution 2
2 Important 3
Safety 3
3 Your TV 5
Control Panel 5
Remote Control 5
Remote control usage 6
4 Use your TV 7
Switch TV on or off 7
Switch channels 7
Watch connected devices 8
Adjust TV volume 8
5 Other uses of the TV 9
Accessing the TV menu 9
Change the picture and sound setup 9
Adjusting setup 10
Use timer 12
Adjusting VGA Setup 12
Playing media from USB devices 13
Updating the TV software 15
Restoring the factory setup 15
6 Setting up channels 16
Setting up channels automatically 16
Updating channels 16
Setting channels manually 16
Renaming channels 17
7 TV connections 18
Rearconnections 18
Side connections 18
Connecting to a computer 20
Use Philips EasyLink 21
8 Product information 22
Display resolutions 22
Multimedia 22
Sound power 22
Inherent resolution 22
Tuner / Reception / Transmission 22
Remote Control 22
Power Supply 22
Supported TV mounts 23
9 Troubleshooting 24
General issues 24
Channel issues 24
Picture issues 24
Sound issues 25
HDMI connection issues 25
Computer connection issues 25
Contact us 25
Page 4
2
EN
assembly procedures not recommended
or authorised in this manual shall void the
warranty.
Pixel characteristics
This LCD/LED product has a high number of
color pixels. Although it has effective pixels of
99.999% or more, black dots or bright points of
light (red, green or blue) may appear constantly
on the screen. This is a structural property of
the display (within common industry standards)
and is not a malfunction.
Mains fuse (/56)
This TV is fitted with an approved moulded
plug. Should it become necessary to replace
the mains fuse, this must be replaced with a
fuse of the same value as indicated on the plug
(example 10A).
1
Remove fuse cover and fuse.
2
The replacement fuse must comply with
BS 1362 and have the ASTA approval
mark. If the fuse is lost, contact your dealer
in order to verify the correct type.
3
Refit the fuse cover.
Copyright
®
Kensington and Micro Saver are registered US
trademarks of ACCO World corporation with
issued registrations and pending applications in
other countries throughout the world.
HDMI, the HDMI logo and High-Definition
Multimedia Interface are trademarks or
registered trademarks of HDMI licensing LLC in
the United States and other countries.
All other registered and unregistered
trademarks are the property of their respective
owners.
1 Caution
2014© TP Vision Europe B.V. All rights
reserved. Specifcations are subject to change
without notice. Trademarks are the property
of Koninklijke Philips N.V or their respective
owners. TP Vision Europe B.V. reserves the right
to change products at any time without being
obliged to adjust earlier supplies accordingly.
The material in this manual is believed
adequate for the intended use of the system.
If the product, or its individual modules or
procedures, are used for purposes other than
those specified herein, confirmation of their
validity and suitability must be obtained. TP
Vision Europe B.V. warrants that the material
itself does not infringe any United States
patents. No further warranty is expressed or
implied.
TP Vision Europe B.V. cannot be held
responsible neither for any errors in the
content of this document nor for any problems
as a result of the content in this document.
Errors reported to Philips will be adapted and
published on the Philips support website as
soon as possible.
Terms of warranty
•
Risk of injury, damage to TV or void of
warranty! Do not attempt to repair the TV
yourself.
•
Use the TV and accessories only as
intended by the manufacturer.
•
The caution sign printed on the back of
the TV indicates risk of electric shock.
Never remove the TV cover. Always
contact Philips Customer Support for
service or repairs.
•
Any operation expressly prohibited in
this manual, or any adjustments and
Page 5

English
3
EN
•
Avoid force coming onto power plugs.
Loose power plugs can cause arcing or fire.
Risk of injury or damage to the TV!
•
Two people are required to lift and carry a
TV that weighs more than 25 kg or 55 lbs.
•
When stand mounting the TV, use only the
supplied stand. Secure the stand to the TV
tightly. Place the TV on a flat, level surface
that can support the combined weight of
the TV and the stand.
•
When wall mounting the TV, use only a
wall mount that can support the weight
of the TV. Secure the wall mount to a wall
that can support the combined weight of
the TV and wall mount. TP Vision Europe
B.V. bears no responsibility for improper
wall mounting that results in accident,
injury or damage.
•
If you need to store the TV, disassemble
the stand from the TV. Never lay the TV on
its back with the stand installed.
•
Before you connect the TV to the power
outlet, ensure that the power voltage
matches the value printed on the back
of the TV. Never connect the TV to the
power outlet if the voltage is different.
•
Parts of this product may be made of
glass. Handle with care to avoid injury and
damage.
Risk of injury to children!
Follow these precautions to prevent the
TV from toppling over and causing injury to
children:
•
Never place the TV on a surface covered
by a cloth or other material that can be
pulled away.
•
Ensure that no part of the TV hangs over
the edge of the surface.
•
Never place the TV on tall furniture (such
as a bookcase) without anchoring both the
furniture and TV to the wall or a suitable
support.
•
Educate children about the dangers of
climbing on furniture to reach the TV.
2 Important
Read and understand all instructions before you
use your TV. If damage is caused by failure to
follow instructions, the warranty does not apply.
Safety
Risk of electric shock or fire!
•
Never expose the TV to rain or water.
Never place liquid containers, such as
vases, near the TV. If liquids are spilt on or
into the TV, disconnect the TV from the
power outlet immediately. Contact Philips
Consumer Care to have the TV checked
before use.
•
Never place the TV, remote control or
batteries near naked flames or other heat
sources, including direct sunlight.
To prevent the spread of fire, keep candles
or other flames away from the TV, remote
control and batteries at all times.
•
Never insert objects into the ventilation
slots or other openings on the TV.
•
When the TV is swivelled ensure that no
strain is exerted on the power cord. Strain
on the power cord can loosen connections
and cause arcing.
•
To disconnect the TV from the mains
power, the power plug of the TV must be
disconnected. When disconnecting the
power, always pull the power plug, never
the cord. Ensure that you have full access
to the power plug, power cord and outlet
socket at all times.
Risk of short circuit or fire!
•
Never expose the remote control or
batteries to rain, water or excessive heat.
Page 6

4
EN
•
Risk of damage to the TV screen! Never
touch, push, rub or strike the screen with
any object.
•
To avoid deformations and color fading,
wipe off water drops as soon as possible.
Recycling
Your product is designed and manufactured
with high quality materials and components,
which can be recycled and reused.
When this crossed-out wheeled bin symbol is
attached to a product it means that the product
is covered by the European Directive 2002/96/
EC. Please inform yourself about the local
separate collection system for electrical and
electronic products.
Please act according to your local rules and
do not dispose of your old products with your
normal household waste.
Correct disposal of your old product helps to
prevent potential negative consequences for the
environment and human health.
Your product contains batteries covered by the
European Directive 2006/66/EC, which cannot
be disposed of with normal household waste.
Please inform yourself about the local rules
on separate collection of batteries because
correct disposal helps to prevent negative
consequences for the environment and human
health.
Risk of swallowing batteries!
•
The product/remote control may contain a
coin-type battery, which can be swallowed.
Keep the battery out of reach of children
at all times!
Risk of overheating!
•
Never install the TV in a confined space.
Always leave a space of at least 4 inches
or 10 cm around the TV for ventilation.
Ensure curtains or other objects never
cover the ventilation slots on the TV.
Risk of injury, fire or power cord damage!
•
Never place the TV or any objects on the
power cord.
•
Disconnect the TV from the power outlet
and antenna before lightning storms.
During lightning storms, never touch any
part of the TV, power cord or antenna
cable.
Risk of hearing damage!
•
Avoid using earphones or headphones at
high volumes or for prolonged periods of
time.
Low temperatures
•
If the TV is transported in temperatures
below 5°C or 41°F, unpack the TV and
wait until the TV temperature matches
room temperature before connecting the
TV to the power outlet.
Screen care
•
Avoid stationary images as much as
possible. Stationary images are images that
remain on-screen for extended periods
of time. Example: on-screen menus, black
bars and time displays. If you must use
stationary images, reduce screen contrast
and brightness to avoid screen damage.
•
Unplug the TV before cleaning.
•
Clean the TV and frame with a soft, damp
cloth. Never use substances such as
alcohol, chemicals or household cleaners
on the TV.
Page 7
English
5
EN
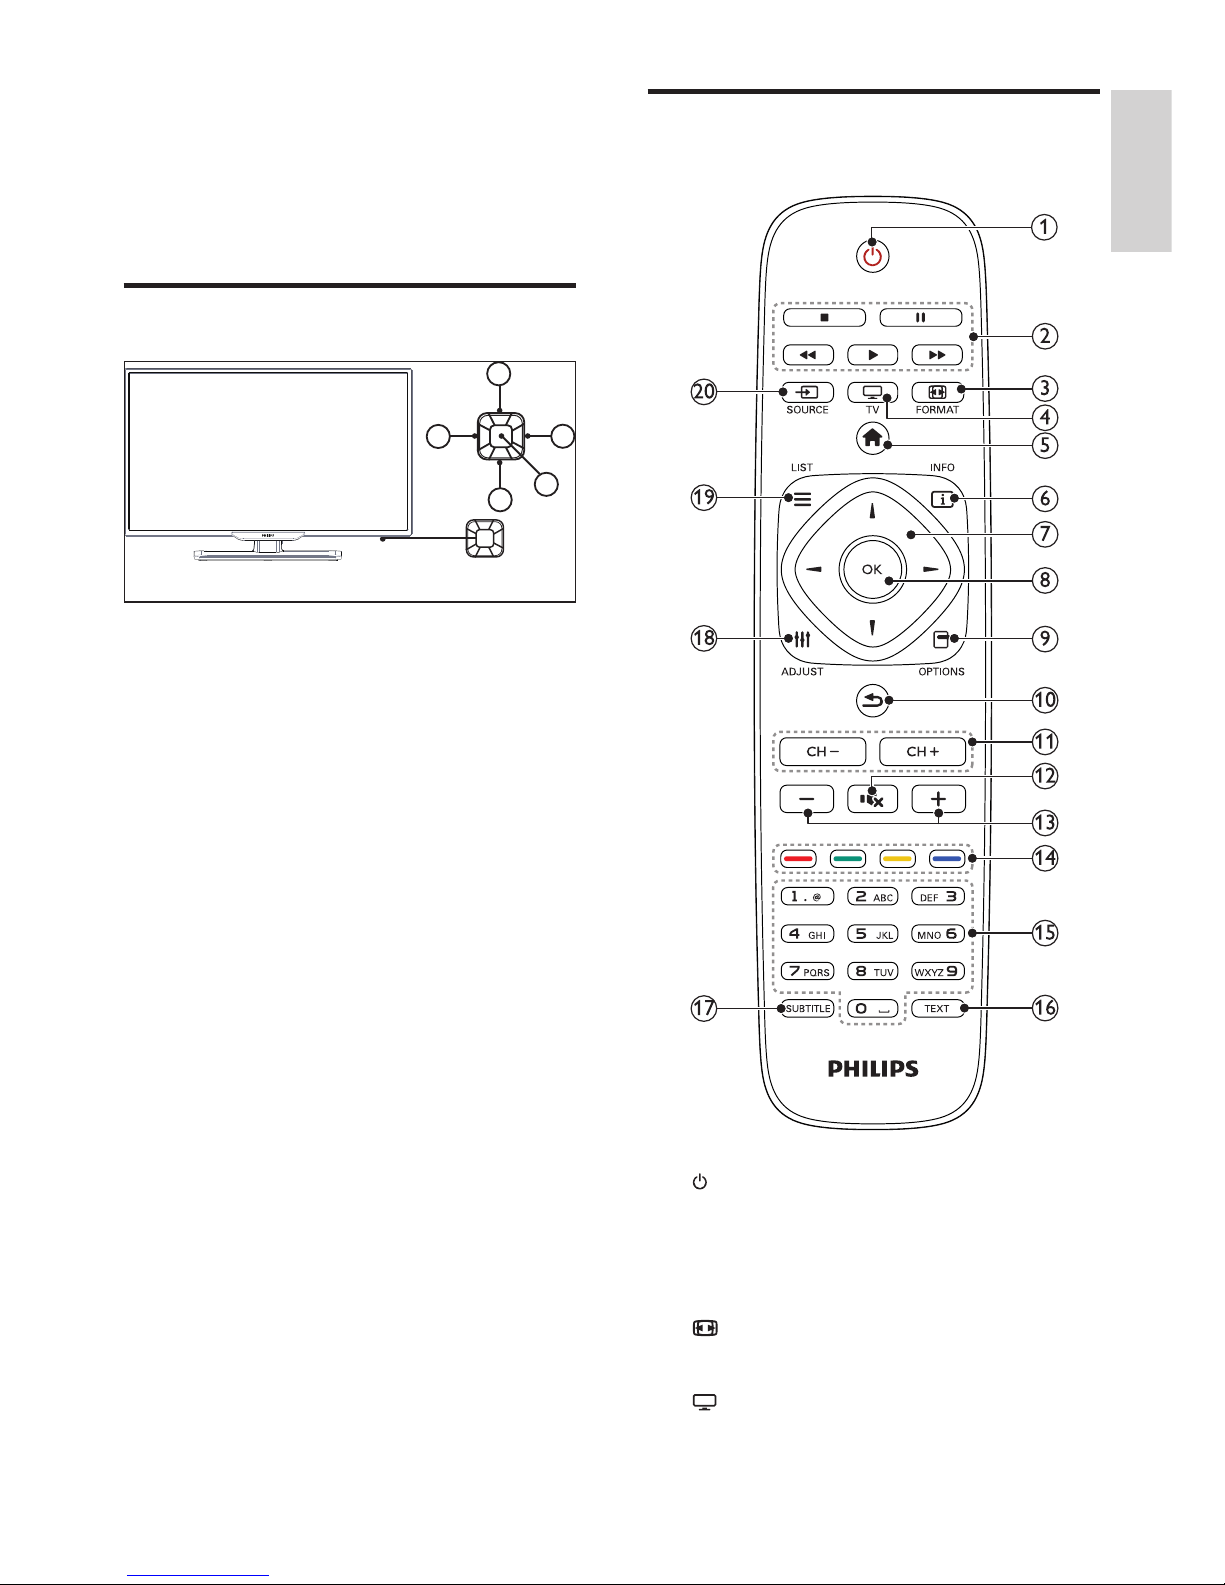
Remote Control
a
(Standby)
Switch the TV on or to standby.
b
Play buttons
Control video or music.
c
FORMAT
Change picture format.
d
TV
Switch source to watch TV.
3 Your TV
Congratulations on your purchase, and
welcome to Philips! To fully benefit from the
support that Philips offers, register your TV at
www.philips.com/welcome.
Control Panel
1
2
3
4
5
a
Volume-: When there is no keyboard
menu, lower the volume function;When
the keyboard menu appears, move the
appropriate options to the left / right.
b
Volume+: When there is no keyboard
menu, improve the volume function; when
the keyboard menu appears, move the
appropriate options to the left / right.
c
Channel+: When there is no keyboard
menu, switch to the next channel function;
when the keyboard menu appears, move
up and down the appropriate options.
d
Channel-: When there is no keyboard
menu, switch to the prior channel function;
when the keyboard menu appears, move
up and down the appropriate options.
e
Signal source/OK: In standby status,the
signal source / OK key is used as a power
key, press this key to boot.
After booting, the menu signal source /
OK is used to open the keyboard menu
functions.When the keyboard menu is
open, the signal source / OK is used as a
confirm key.
Note: The control panel on the smart TV
and the web browser has no effect,the
source / OK key under USBhas no effect.
Page 8
6
EN
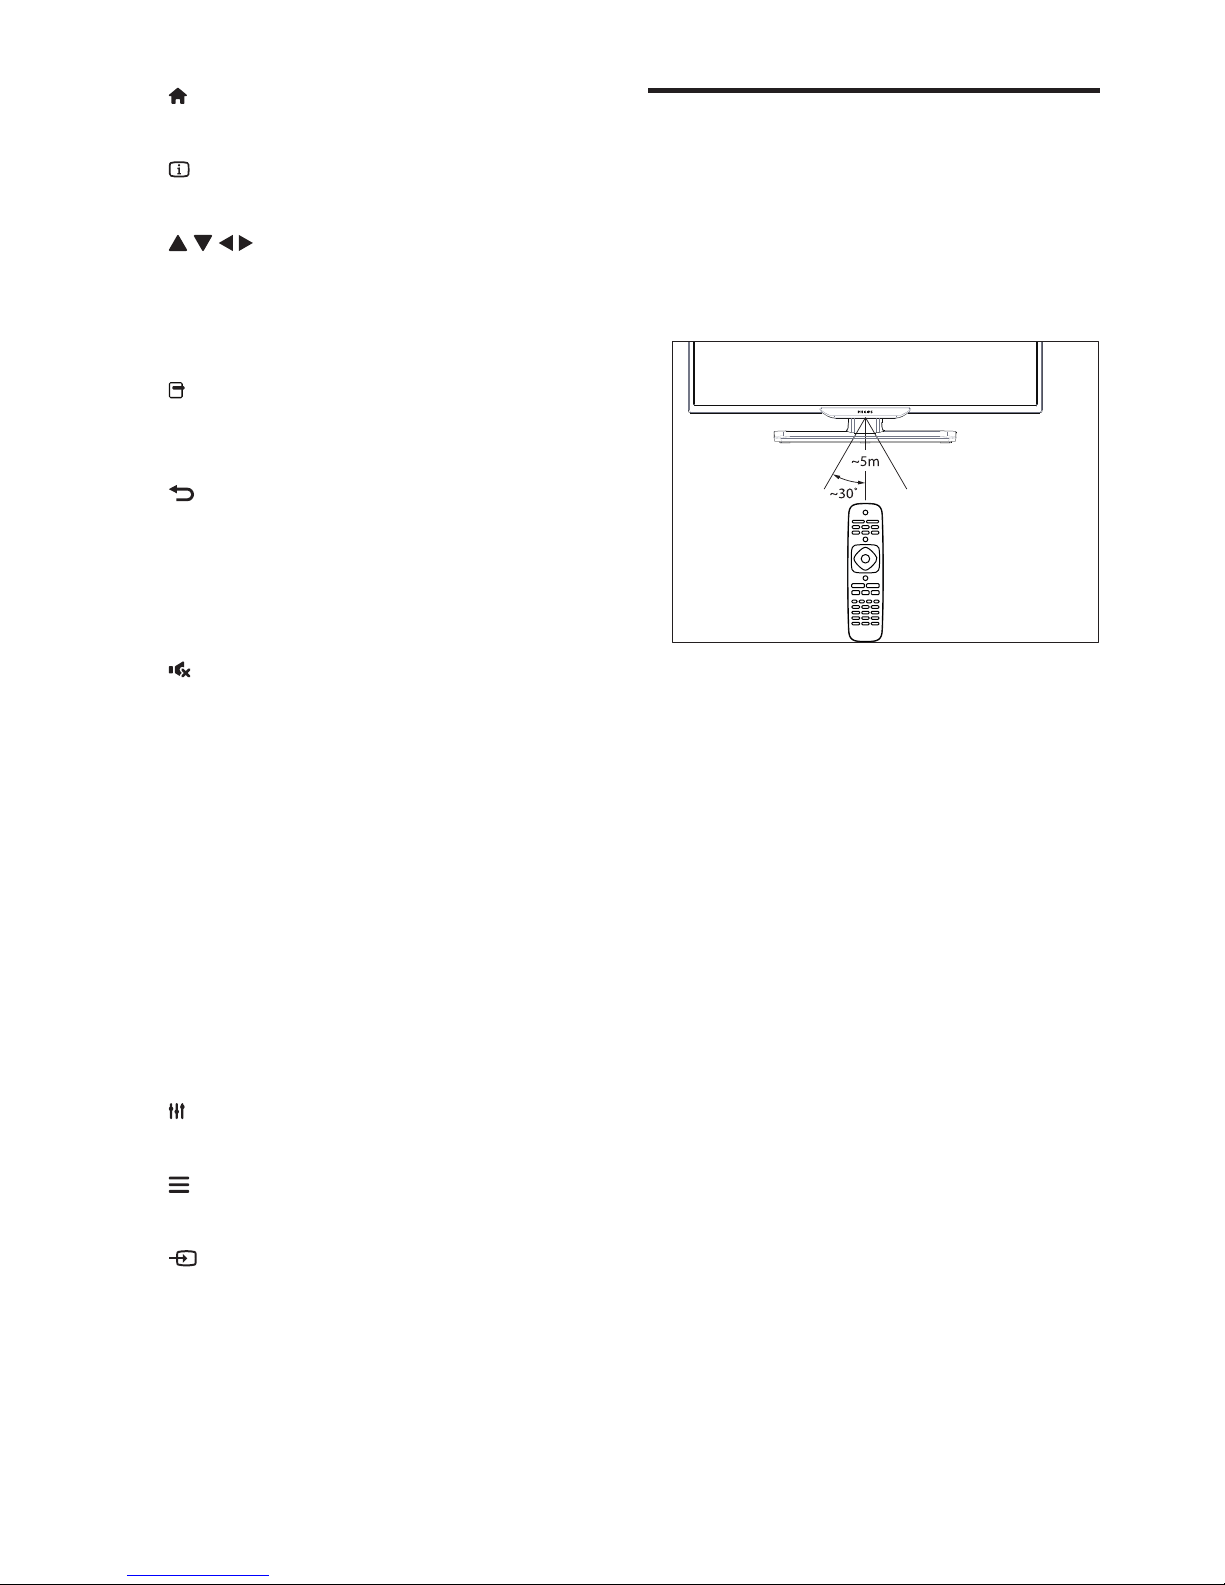
Remote control usage
When you use the remote control, hold it close
to the TV and point it at the remote control
sensor. Make sure that the line-of-sight between
the remote control and TV is not blocked by
furniture, walls or other objects.
e
(Home)
Access the home menu.
f
INFO
Display information about current activity.
g
(Navigation buttons)
Navigate through menus and select items.
h
OK
Confirm an entry or selection.
i
OPTIONS
Access options for the current activity or
selection.
j
(Back)
Return to the previous menu or exit a
function.
k
CH +/- (Channel +/-)
Switch channels.
l
(Mute)
Mute or restore audio.
m
+/- (Volume)
Adjust volume.
n
Color buttons
Select tasks or options.
o
0-9 (Numeric buttons)
Select channel.
p
TEXT
Enable or disable teletext.
q
SUBTITLE
Enable or disable subtitles.
r
ADJUST
Access the setup menu.
s
LIST
Access the TV channel list.
t
SOURCE
Select connected devices.
Page 9
English
7
EN
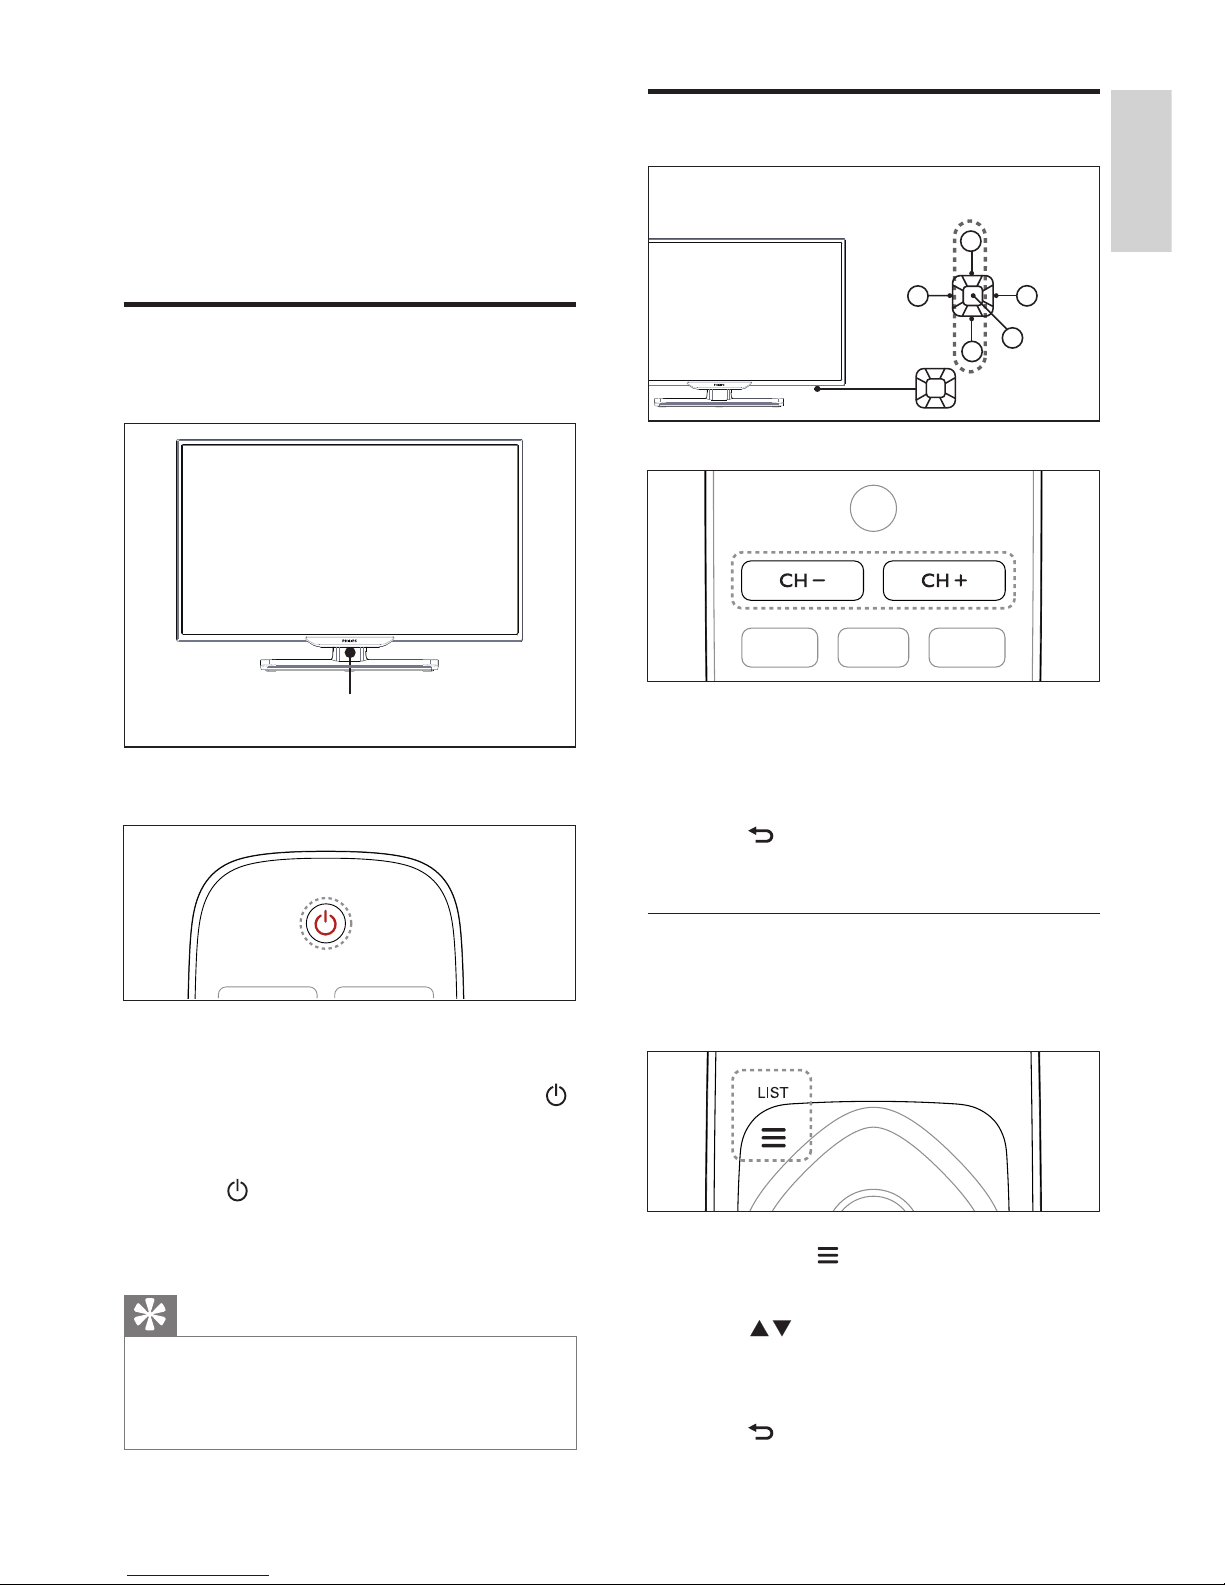
Switch channels
1
2
3
4
5
•
Press CH +/- on the remote control or
the lower right part of the TV.
•
Enter a channel number using the numeric
buttons on the remote control.
•
Press on the remote control to switch
and return to the previous channel.
View installed channel
You can view all available channels on the
channel list.
1
Press OK or LIST.
» The channel list appears.
2
Press to select a channel and browse
the channel list.
3
Press OK to watch the selected channel.
4
Press to switch to and resume the last
watched channel.
4 Use your TV
This section helps you perform basic TV
operations.
Switch TV on or off
Standby indicator
To switch on
•
Plug in the power plug.
»If the standby indicator is red, press
(Standby-On) on the remote control.
To switch to standby
•
Press (Standby-On) on the remote
control.
»The standby indicator switches to red.
Tip
•
Though your TV consumes very little power when in
standby mode, energy continues to be consumed. When
not in use for an extended period of time, disconnect the
TV power cable from the power outlet.
Page 10
8
EN
Adjust TV volume
1
2
3
4
5
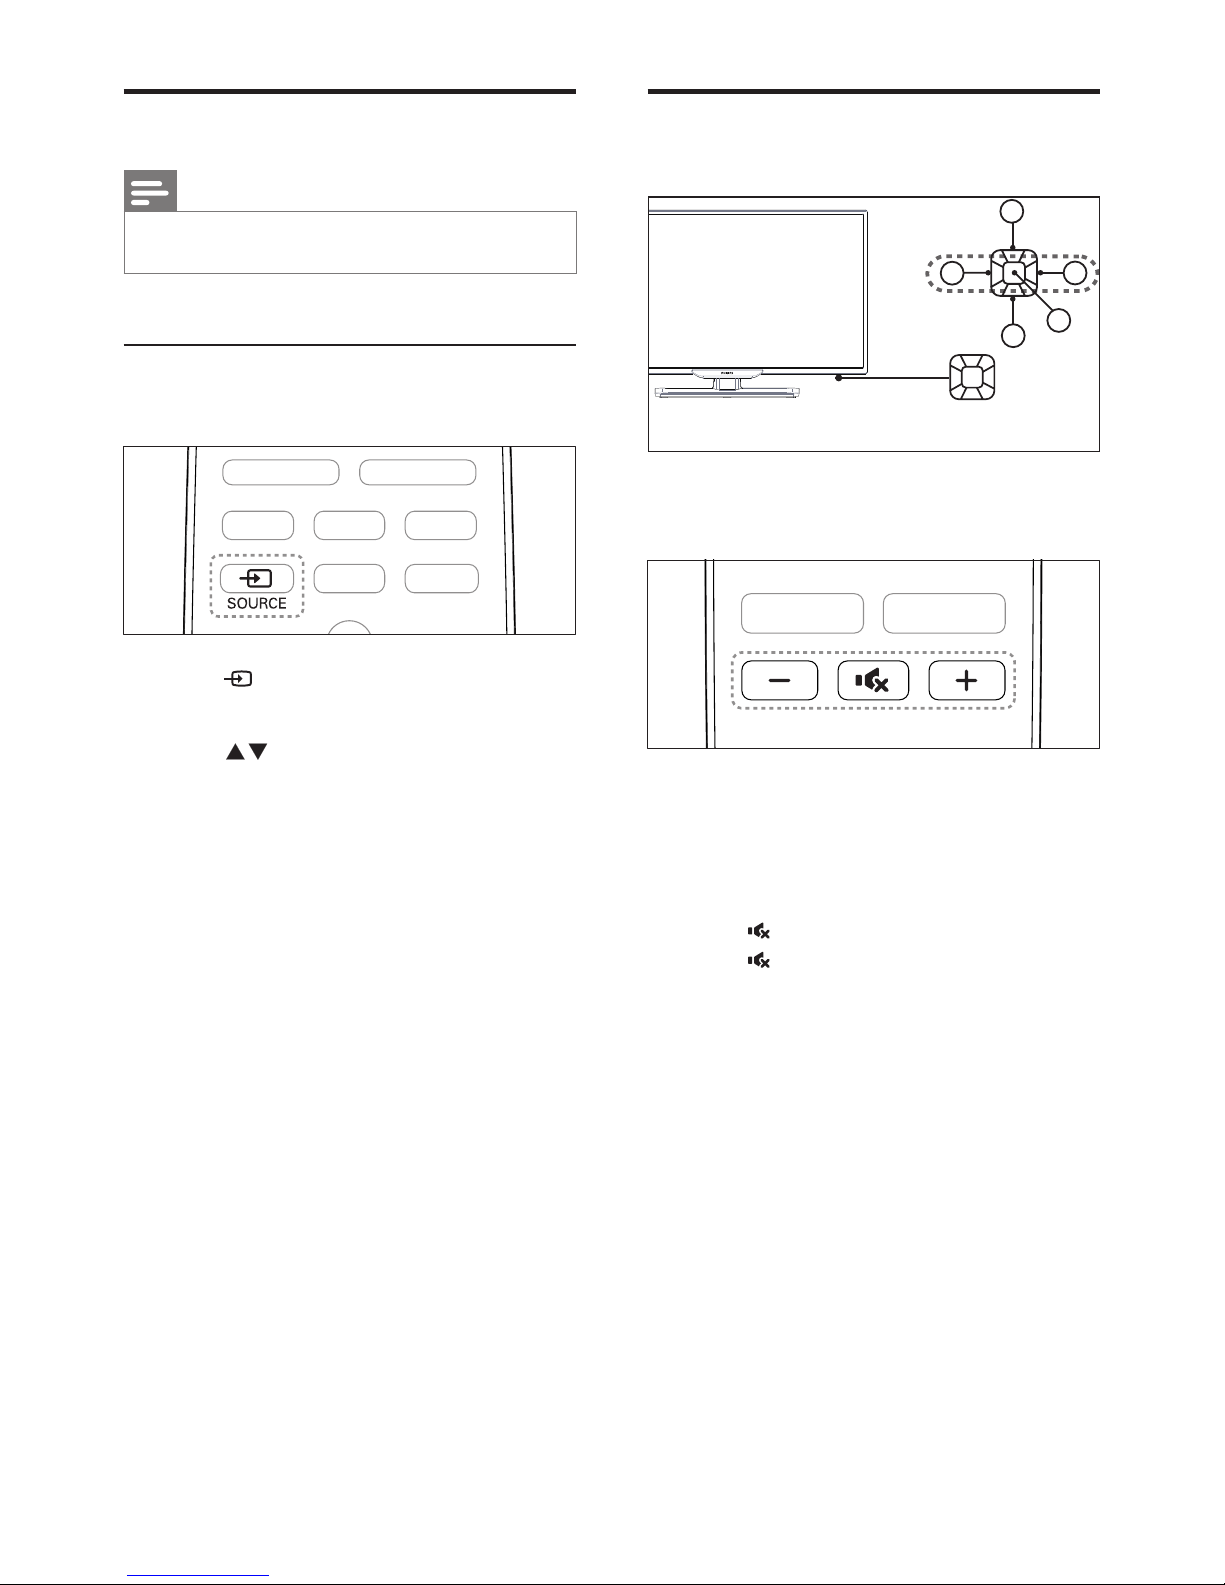
To increase or decrease volume
•
Press VOL +/-at the lower right part of
the TV or the Volume Control+/- on the
remote control.
To mute or unmute sound
•
Press (Mute).
•
Press again to restore the sound.
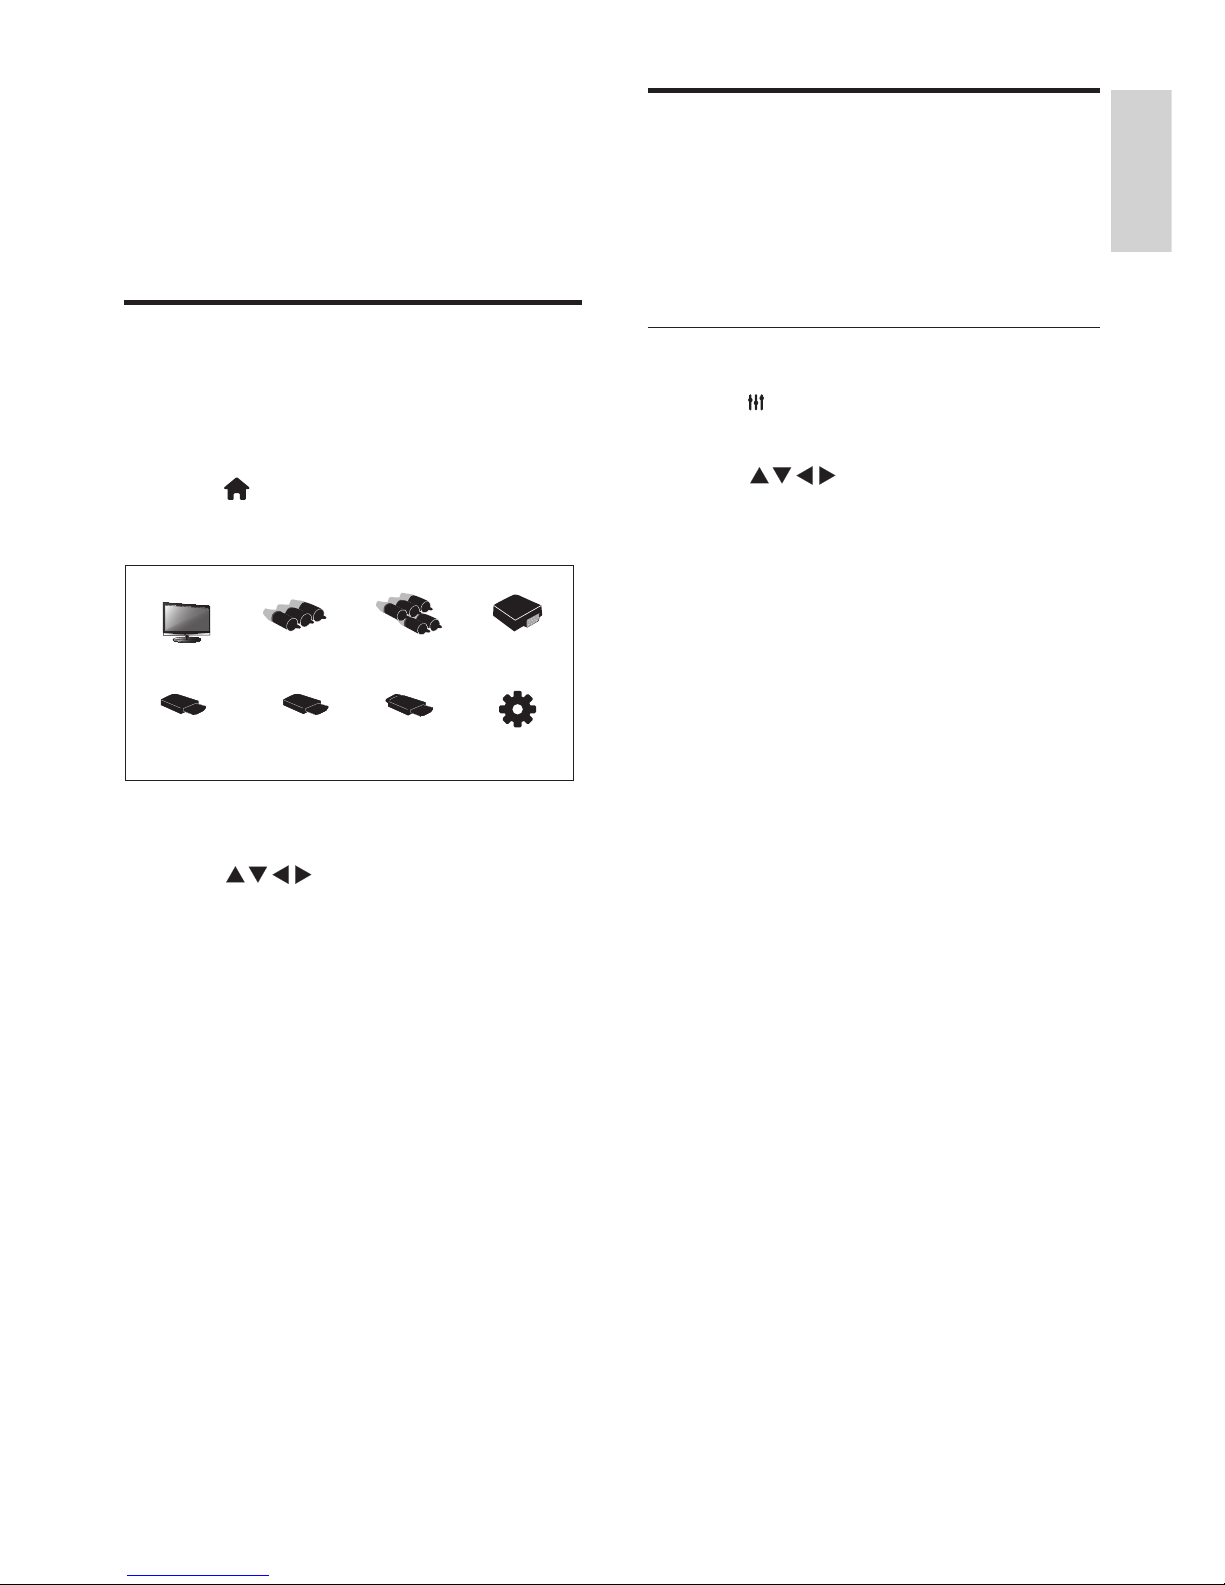
Watch connected devices
Note
•
Switch on the device before selecting it as an external
signal source.
Use the Source button
1
Press SOURCE.
»The source list appears.
2
Press to select a device.
3
Press OK to select.
»The TV switches to the selected
device.
Page 11
English
9
EN
Change the picture and
sound setup
Change the picture and sound setup to suit
your preferences. You can either use the
presets or manually change the setup.
Adjusting the picture setup
1
Press ADJUST
andselect
[Picture]
.
»
Displays the [Picture] menu.
2 Press Selecting/adjustingsetup:
•
[Smart picture]:
•
[Standard]: Normal picture
setup. Recommended for home
entertainment use.
•
[Eco]: Decreases the intensity of
the backlight to reduce power
consumption.
•
[Vivid]: Increases the contrast and
sharpness of the picture.
•
[Movie]: Applies setup for watching
movies, which works best in a theater
environment.
•
[Personal]: Users can customize setup
here.
•
[Brightness]: Adjusts the intensity and
detail of dark areas (adjustments made can
only be saved in personal setup).
•
[Video contrast]: Adjusts the intensity
and detail of bright areas, with dark areas
remaining unchanged (adjustments made
can only be saved in personal setup).
•
[Color]: Adjusts the color saturation
(adjustments made can only be saved in
personal setup).
•
[Tint]: Adjusts the level of green (this
option only appears when using the NTSC
standard).
•
[Sharpness]: Adjusts the sharpness of the
image (adjustments made can only be
saved in personal setup).
5 Other uses of
the TV
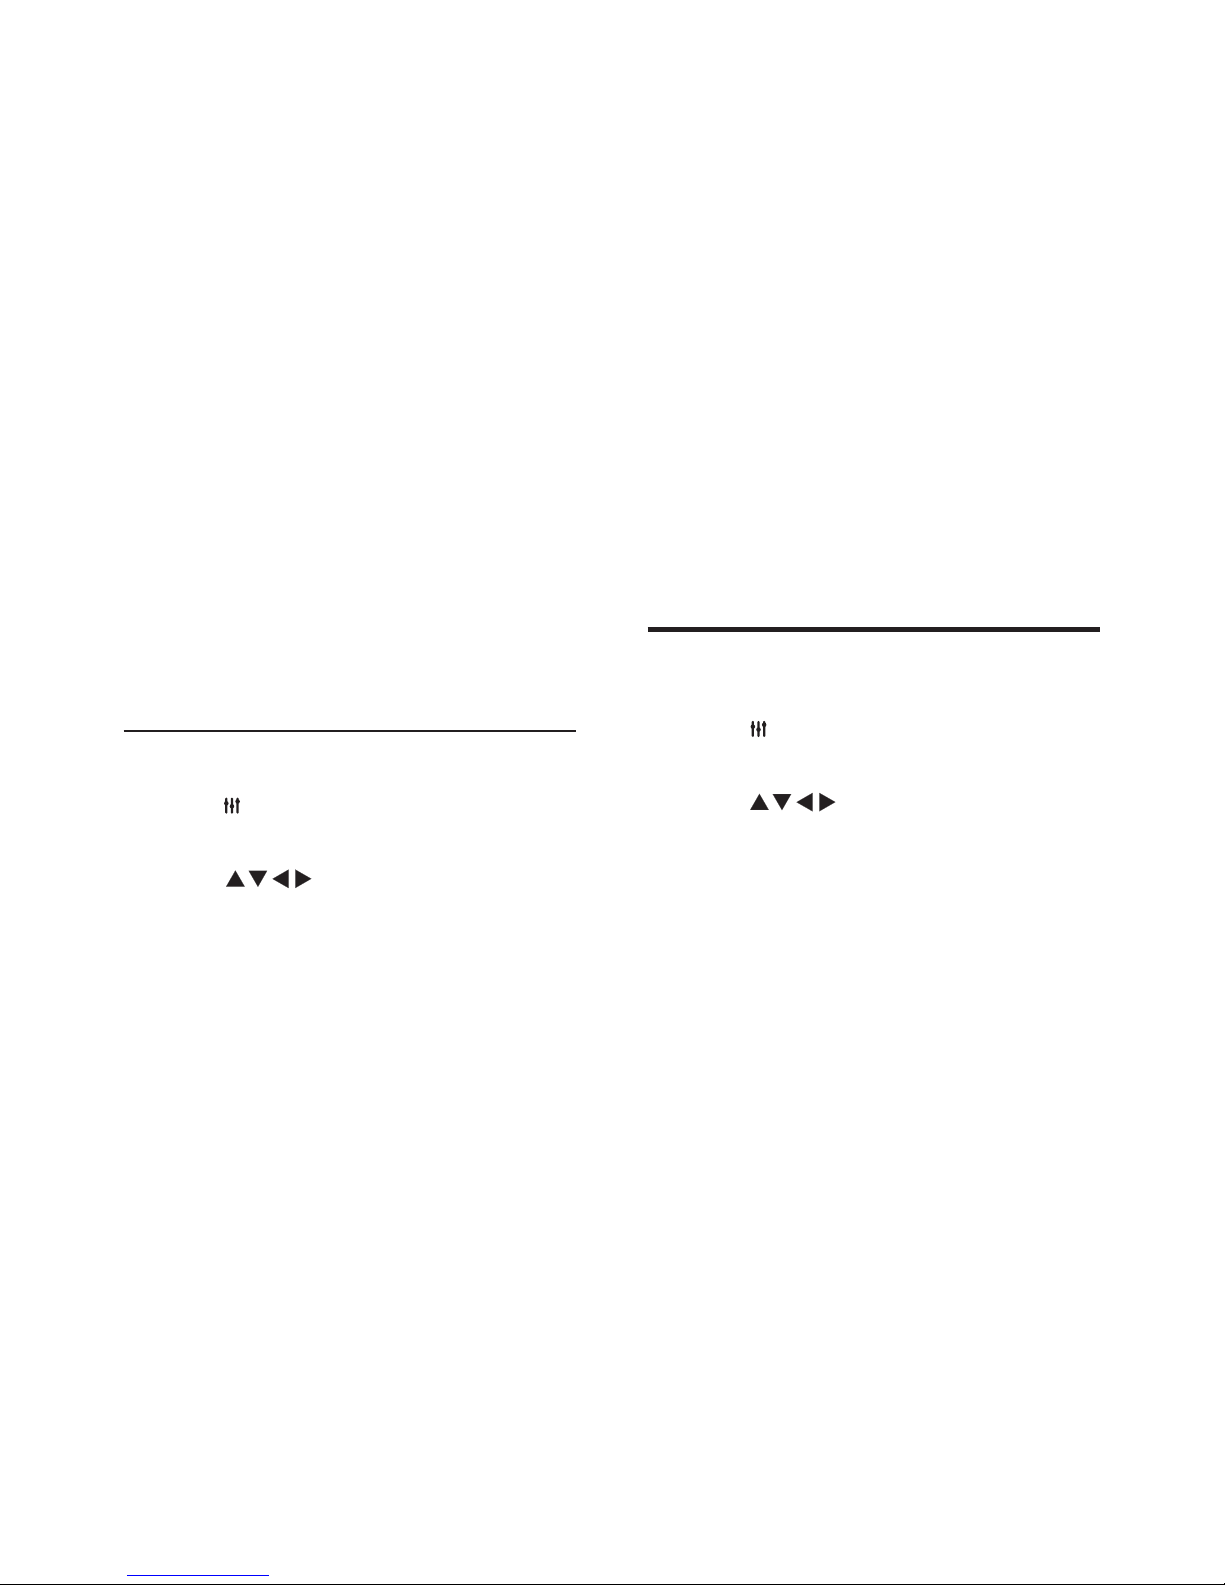
Accessing the TV menu
The menu can help you to set up channels,
change the picture and sound setup, and access
other functions.
1
Press (Home) .
»
Display menu screen.
2
Select [Setup].
3
Press Choose from the following
options:
•
[Picture] / [Sound] / [TV] (Can only be
used in TV mode)/ [Setup] / [Parental] /
[VGA setting](Can only be used in PC
mode) / [EasyLink].
4
Press OK to select.
5
Press Home
togoback
.
Page 12
10
EN
•
[Personal]: Provides user
customization functions in order
to optimize all sound effect
parameters and achieve the best
experience.
•
[Balance]: Adjusts the balance of the
left and right speakers.
•
[Bass]: Adjusts the bass level
(adjustments made can only be saved
in personal setup).
•
[Treble]: Adjusts the treble level
(adjustments made can only be saved
in personal setup).
•
[Virtual surround]: Turns virtual
surround sound on: Turn on or off.
•
[AVL]:Turns automatic volume
adjustment on.
Adjusting setup
1
Press ADJUST and select [Setup].
»
Displays the [Setup] menu.
2
Press Select and adjust the setup:
•
[Menu language]: Changes the TV’s
language setup.
•
[Picture Format]: The majority of
signals use 16:9, 4:3, Zoom 1 and
Zoom 2 formats; HDMI signal sources
use 16:9, 4:3, Point to Point, zoom
1 and zoom 2 formats; VGA signal
sources on PCs use 16:9, 4:3 and Point
to Point formats.
•
[Menu Timeout]: Sets the duration for
which the menu is displayed.
•
[Menu Transparency]: Sets the level of
transparency for the menu.
•
[Blue Screen]: Sets the screen color
for when the TV is not receiving
a signal (when the TV signal is not
functioning).
•
[Auto Sleep]: Sets the duration the
TV may be idle before it automatically
switches off.
•
[Color Temperature]:
•
[Cool]: Bluish white tint.
•
[Normal]: White tint. Users can
personalize the white tint inPCmode.
•
[Warm]: Reddish white tint.
•
[Advanced control]
:
•
[Noise Reduction]: Filters and
eliminates signal noise within the image.
•
[Backlight]: Adjusts the screen
brightness (when the backlight
brightness is set to a low value, a
momentary white flicker may be
visible when turning on the unit. This is
normal. When [Dynamic Backlight] is
turned on, this function will be hidden).
•
[Dynamic Contrast]: Sets the contrast
to maximum. (There are no advanced
contrast functions in PC mode.)
•
[Dynamic Backlight]: The contrast level
will change with the brightness of the
image.
Adjusting the sound setup
1
Press ADJUST and select[Sound]
.
»
Displays the [Sound]
menu.
2
Press Select and adjust the setup:
•
[Smart Sound]:
•
[Standard]: Gives balanced,
outstanding sound performance
in the treble, mid and bass ranges.
•
[Music]: Enhances treble and
bass, delivering bright, clear and
pure sound quality when listening
to piano or orchestral instrument
performances.
•
[Speech]: Enhances the
performance of sound ranges
involved in the voice spectrum.
Suitable for watching news or
arts programs.
Page 13
English
11
EN
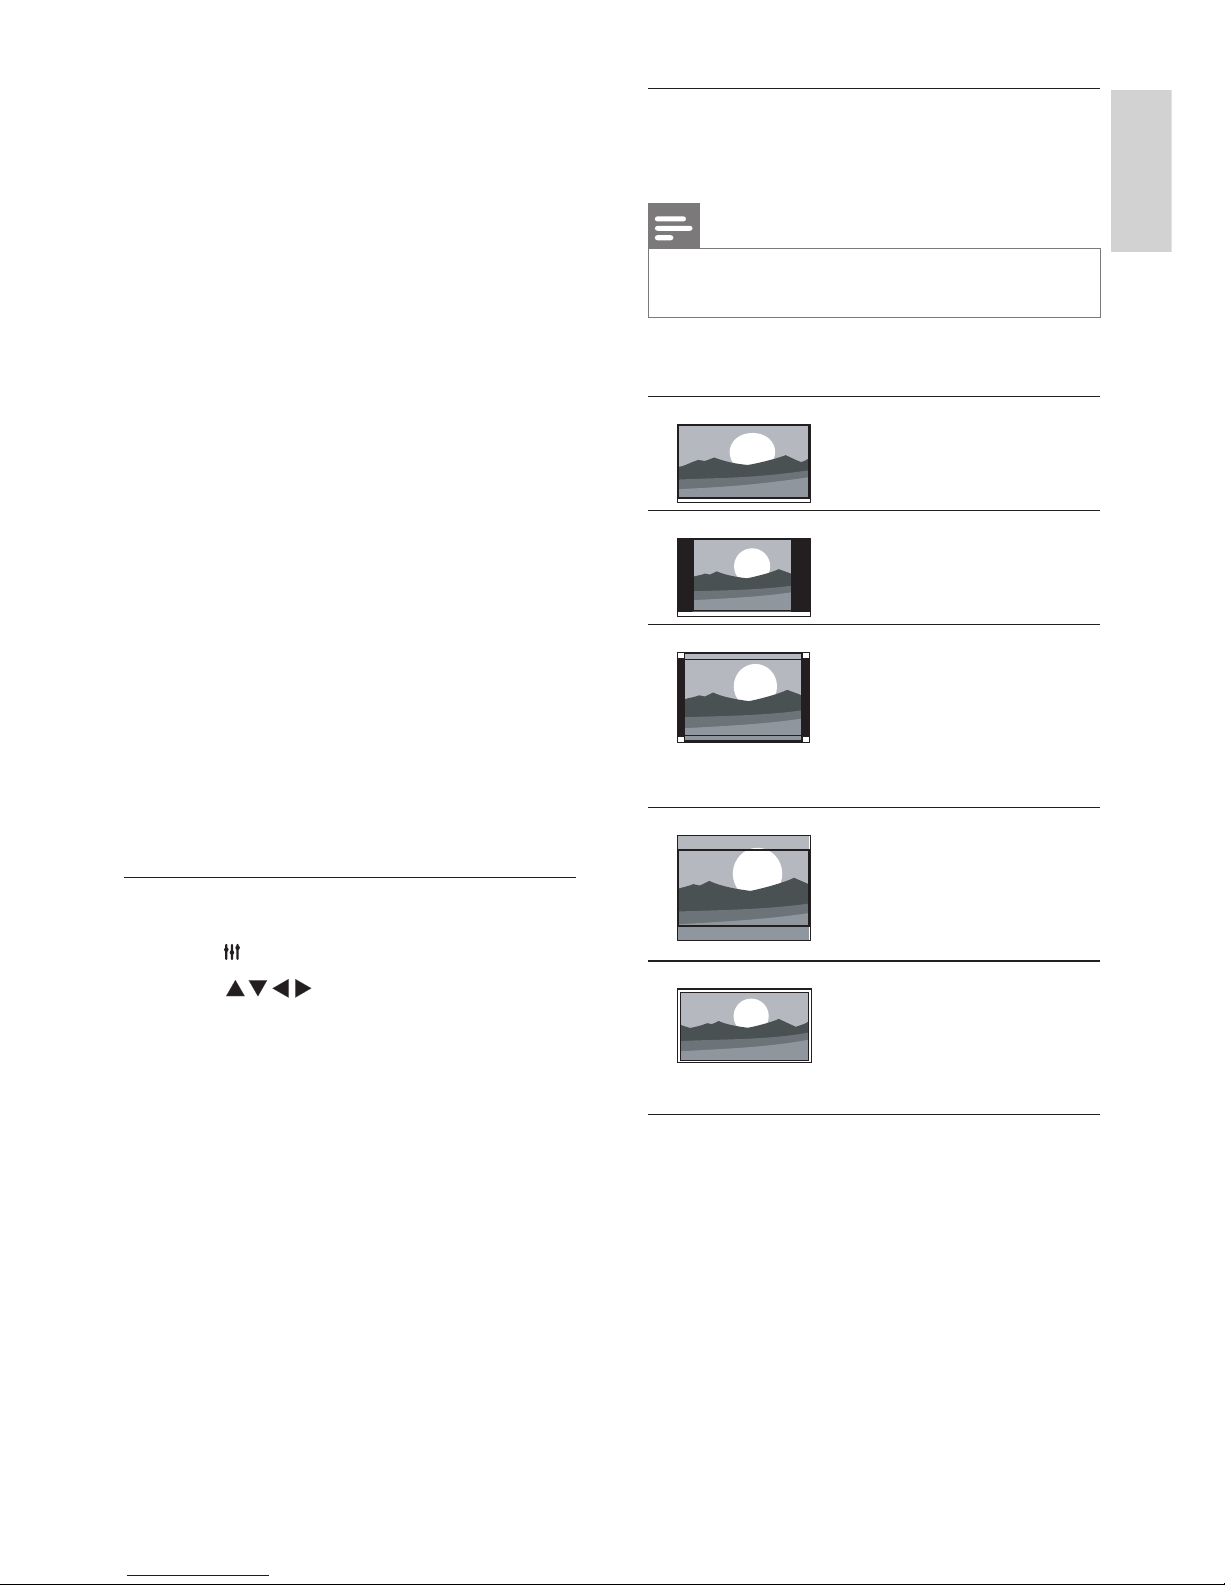
Summary of picture formats
Configuration of the picture setup listed below.
Notes
•
Some picture setups may be unavailable due to
differences between picture signal formats.
[16:9]: Change the normal
ratio to widescreen format.
[4:3]: The normal format.
[Zoom 1]: Horizontal
scaling of the widescreen
picture format. When this
format is used, the two
edges of the picture frame
will be partly cut off.
[Zoom 2]: Set the normal
ratio to widescreen format.
(PC mode only has options
for normal, widescreen and
Point to Point).
[Point to Point]: Used for
HDMI connections on PCs.
Will display the PC's full
screen in order to achieve
the best display effect.
•
[Sleep Timer]: Sets the duration the
TV remains idle before it automatically
enters standby mode. Adjust
the time with the sleep button
on the remote control. Options:
Off/10/20/30/60/90/120/180 minutes.
(Does not apply in PC mode)
.
•
[Power On Status]: Sets the TV’s status
when it is connected to an AC power
supply.
•
[Time Setup]: Sets the system time.
•
[Freeze Switch]: Sets the channel
freeze switch mode. (Only displayed in
TV mode)
•
[TTX Language]: Sets the TTX
language (Can only be used in TV
mode).
•
[Color System]: Sets the AV color
system. (Only displayed in AV mode)
•
[HDMI]: Sets the HDMI mode. (Only
displayed in 480p/576p/720p/1080p
HDMI modes.)
•
[Reset]: Restores the default setup.
(Excluding password setup and channel
information)
Changing picture format
1
Press ADJUST and select [Setup].
2
Press Select [Picture Format].
3
Select a picture format.
4
Press OK to confirm.
Page 14
12
EN
Locking channels
1
Press ADJUST and select [Parental].
2 Enterthepasswordandselect
[Channel
Lock].
3 Chooseachannel.Press
OK to lock or
unlock the channel.
4 Repeatthissteptolockorunlockmultiple
channels.
•
[Channel Lock]: When channels are
locked:
•
You need to enter the four digit
password to enter the channel
blocking menu.
•
You need to enter the four
digit password to watch locked
channels.
•
You need to enter the four digit
password to enter the parental
menu.
•
[Clear All]: This function will clear all
the locked channels and signal sources
that you have previously saved.
•
The default password is
“0000”
.
Users may change or set the
password themselves.
Notes
•
If you visit a locked channel, you will be prompted to
enter the password.
Adjusting VGA
Setup
1
Press ADJUST and select [VGA setting].
»
The [VGA setting] menu will be
displayed.
2
Press Select and adjust the setup:
•
[Auto adjust]: Automatically adjusts
the TV to synchronize its resolution
with that of the PC, so that programs
are displayed in full screen.
Use
timer
You can set the timer to switch the TV to standby
mode at a set time.
Tip
•
Before using the timer, please set the sleep timer.
Setting the sleep timer
Tip
•
You can turn the TV off earlier, or reset the sleep timer
before the TV switches off.
1
Press ADJUST and select [Setup].
2
Press Select [Sleep Timer]
.
3 Press Youcanselectatimeforthesleep
timertoturntheTVoff.
» Thelongesttimethatcanbesetforthe
sleeptimeris180minutes.
TV lock
BylockingtheTVremotecontrol,youcanprohibit
childrenfromwatchingspecicprogramsor
channels.
Setting or changing your password
1
Press ADJUST and select[Parental].
2
Select [Enter Password] or [Change
Password].
3
Use the number buttons on the remote
control to enter a password.
4
Create or change a password by following the
instructions on screen.
Page 15
English
13
EN
Viewing photos and playing audio and
video files
1
Turn on the TV.
2
Connect the USB storage device to the
USB port on the side of the TV.
3
Press (Home).
4
Select [USB] and press OK.
»The USB browser will open.
Viewing photos
1
In the USB browser, select [Photo] and
press OK.
2
Select a photo or folder, then press OK.
The photo will be enlarged to fill the
screen.
•
Press CH- or CH+ to see the previous
or next photo.
Starting slide shows
1
Select a photo or folder, then press OK.
The photo will be enlarged to fill the
screen.
»The slide show starts playing from the
selected photo.
2
Press the following buttons to control
photo playback:
•
or : Play or pause
•
CH- or CH+: See the last photo or
the next photo.
•
[H.Position]: Adjusts the horizontal
position.
•
[V.Position]: Adjusts the vertical
position.
•
[Phase]: Adjusts the phase frequency
of the VGA signal.
•
[Clock]: Adjusts the clock frequency of
the VGA signal.
Tip
•
The VGA menu is only visible when connected to a PC.
Playing media from USB
devices
If you have photos, music or video files stored
on a USB storage device, you can play the files
on your TV.
Video formats supported on USB:
•
Supported storage devices: USB (only
FAT or FAT 32 USB storage devices are
supported)
•
Supported media file formats:
•
Images: JPEG
•
Audio: MP3
•
Video: MPEG 2/MPEG 4, H.264
•
Text files: TXT
Note
•
TP Vision shall not be liable if a USB storage device is not
supported, or if the data in the device is damaged or lost.
Page 16
14
EN
Watching video
1
In the USB browser, select [Movie], then
press OK.
2
Press OK to play the video.
3
Use the following buttons to control the
movie:
•
or : Play or pause
•
: Search forward or backward.
Viewing a text file
1
In the USB browser, select [Text], then
press OK.
2
Press OK to read the text file.
3
Use the following buttons to control text
file playback:
•
or : Play or pause
•
: Search forward or backward.
Adjusting the text file view setup
When playing text files, press (Home) and
choose one of the following options, then press
OK.
•
[Pause/Play]: Start or stop displaying
text files.
•
[Repeat]: Sets the display mode.
•
[Shuffle]: Play text files in order or at
random.
•
[Show Info]: Show the name and size of
the text file.
Changing slide show playback setup
When you want to start playing a slide show, press
(Home) and select one of the following options,
then press OK.
•
[Pause/Play]: Start or stop playback
•
[Repeat]: Set the playback mode.
•
[Shuffle]: Play the slide show in order or at
random.
•
[Duration]: Set the length of time that the
slide show is played back.
•
[Effect]: Set special effects to show during
transitions between photos.
•
[Show Info]: Displays the photo name,
resolution, file size, date and time.
Listening to music
1
In the USB browser, select [Music] and press
OK.
2
Select a song or album, then press OK to start
playing.
Changing the music setup
When playing back music, press (Home) and
select one of the following options, then press OK.
•
[Pause/Play]: Start or stop playing music.
•
[Repeat]: Set the playback mode.
•
[Shuffle]: Play songs in order or at random.
•
[Show Info]: Displays the song name, artist, file
size, and other information.
•
[Show/Hide Spectrum]: Show or hide the
audio frequencies for the song.
•
[Smart Sound]: Set the play mode for sound.
•
[Lyric Option]: Choose whether lyrics are
turned on or off, and the encoding format
(cannot be selected if there are no lyrics).
•
[Audio Only]: Turns off the screen to save
energy (press any button to restore the
screen).
Page 17

English
15
EN
Removing USB storage devices
Note
•
In order to avoid damaging the USB storage device,
please follow the steps below.
1
Switch out of the USB browser by
following the steps in the menu.
2
Wait for approximately five minutes before
removing the USB storage device.
Updating the TV software
Philips constantly strives to improve its products,
so we recommend that you update your
TV software whenever an update becomes
available. Please visit the website at
www.philips.com/support to find out whether
there are updates available.
Restoring the factory setup
You can restore your TV’s default picture and
sound setup. Saved channel setup will not be
affected.
1 Press
ADJUST.
2
Press Select[Setup] > [Reset]
.
3
Select [Confirm] and press OK.
Ifyou
wanttocancel,pleaseselect
[Cancel] and
press OK.
Page 18
16
EN
3
Select [Start frequency (MHz) / End
Frequency (MHz)] and use the number
keys to enter
thethree-digitchannel
frequencies.
4 Select
[Start Search] and press OK.
5
Press (Home) Exit.
Skipping channels
1
Press
ADJUST.
2 Press Select
[TV] > [Channels]
> [Channel Edit].
» The
[Channel Edit] menu will be
displayed.
3
Press Select
thechannelyouwishto
skipandpressOK.
Select [Skip], then press
to make the change.
4
If you wish to confirm, please select [Save]
and press OK.
5
You can skip more channels by repeating
the steps above. Press OK to start finding
channels.
Tip
•
Use the number buttons on the remote control to access
channels that were skipped.
•
If you want to watch the channel, please repeat steps
1 to 4, thenpress OK Cancel them.
Swapping channels
1
Press ADJUST
.
2 Press Select
[TV] > [Channels]
> [Channel Edit].
» The
[Channel Edit] menu will be
displayed.
3
Press Select
thechannelyouwishto
swap,thenpresstheredbutton.
4
Press Selectthe channel you wish to
swap, then press the red button to confirm.
6 Setting up
channels
This chapter explains how to reconfigure and
fine-tune channels.
Setting up channels
automatically
Automatically finds and saves channels.
1
Press
ADJUST.
2
Press Select [TV] > [Channels] >
[Channel Scan].
3
Press OK.
»
The TV will automatically start searching
for channels.
Updating channels
1
Press
ADJUST.
2
Press Select [TV] > [Channels] >
[Update Scan]
.
3
Press OK
.
»
The TV will star t to update the channels.
Setting channels manually
You can manually find and save analog TV channels.
Finding and saving new TV channels
1
Press
ADJUST.
2 Press Select
[TV] > [Channels] >
[Search for Analog Channels] .
»The [Search for Analog Channels] menu
is displayed.
Page 19
English
17
EN
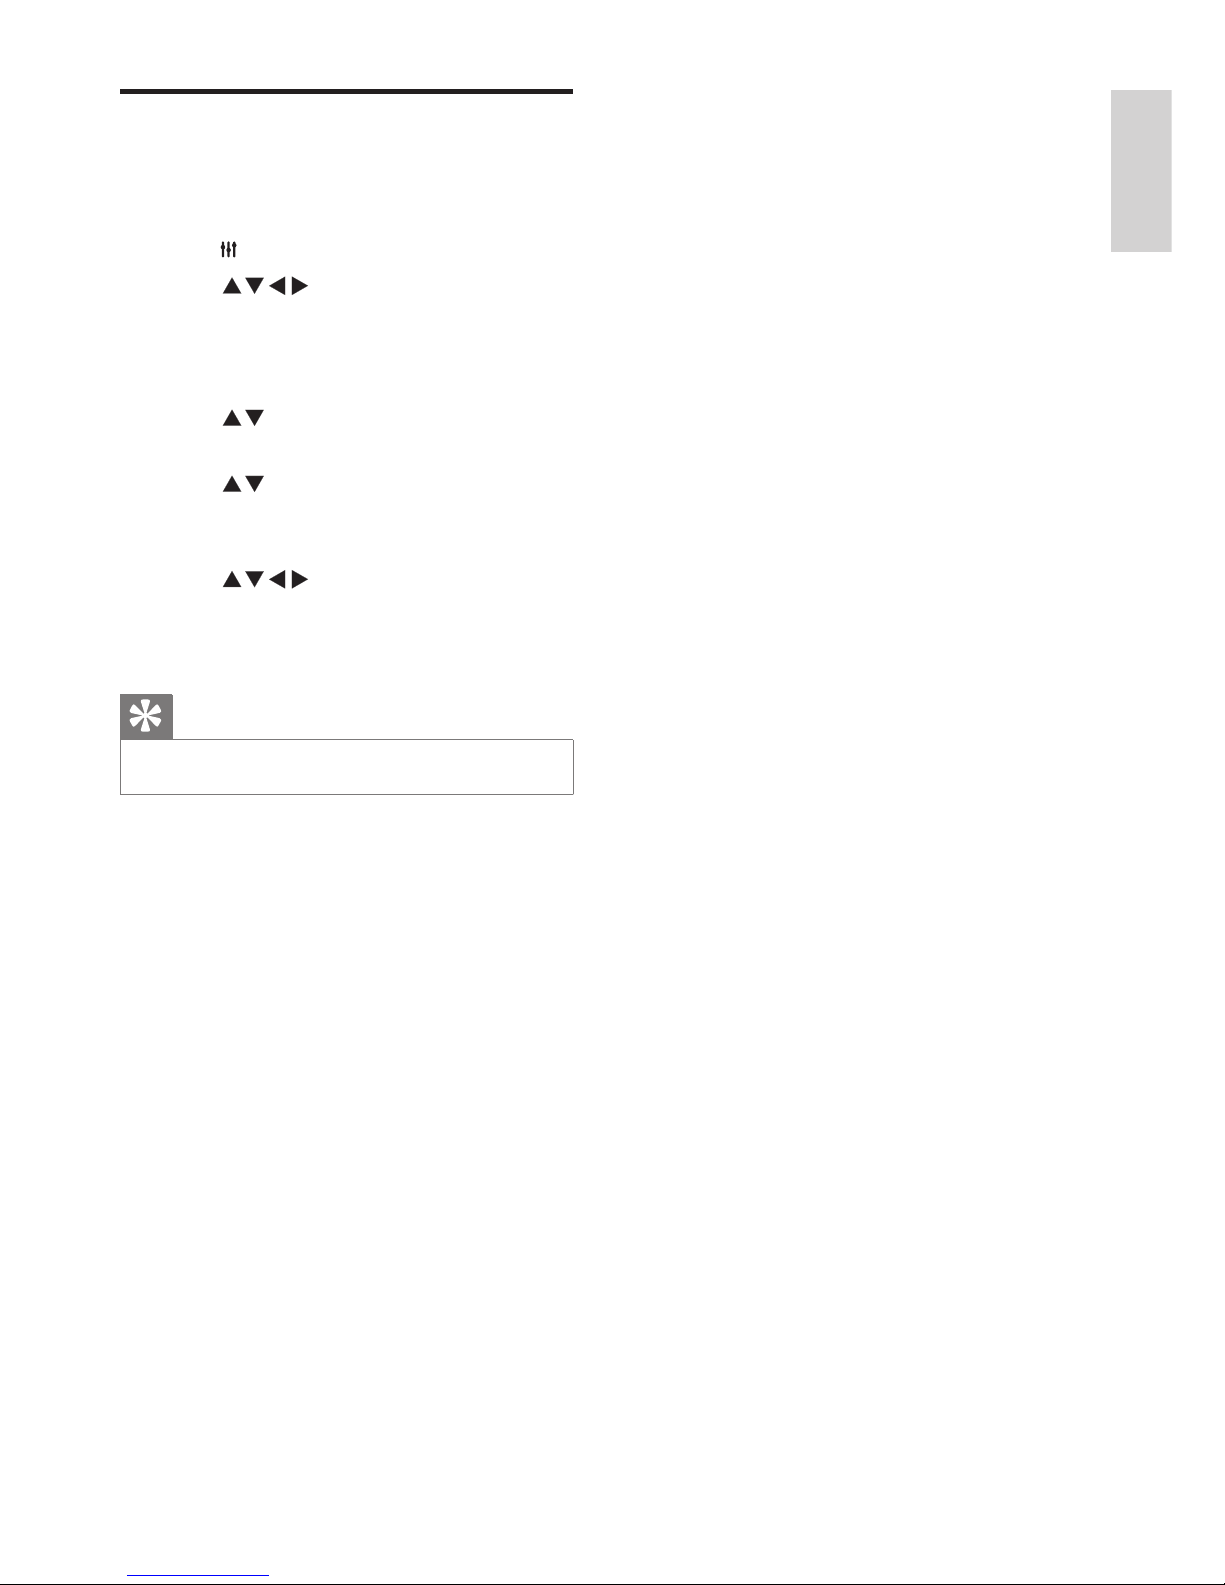
Renaming channels
You can rename channels. Selecting a channel
will display its name.
1 Press
ADJUST.
2
Press Select [TV] > [Channels]
> [Channel Edit].
»The [Channel Edit] menu will be
displayed.
3 Press Selectthechannelyouwishto
rename,thenpressthe
OK button.
4
Press Select the channel name, then
press the OK button to enter the editing
interface.
5
Press Type the new name.
6
Select [Confirm], then OK to finish
renaming the channel.
Tip
•
Channel names can include a maximum of 6 characters.
Page 20
18
EN
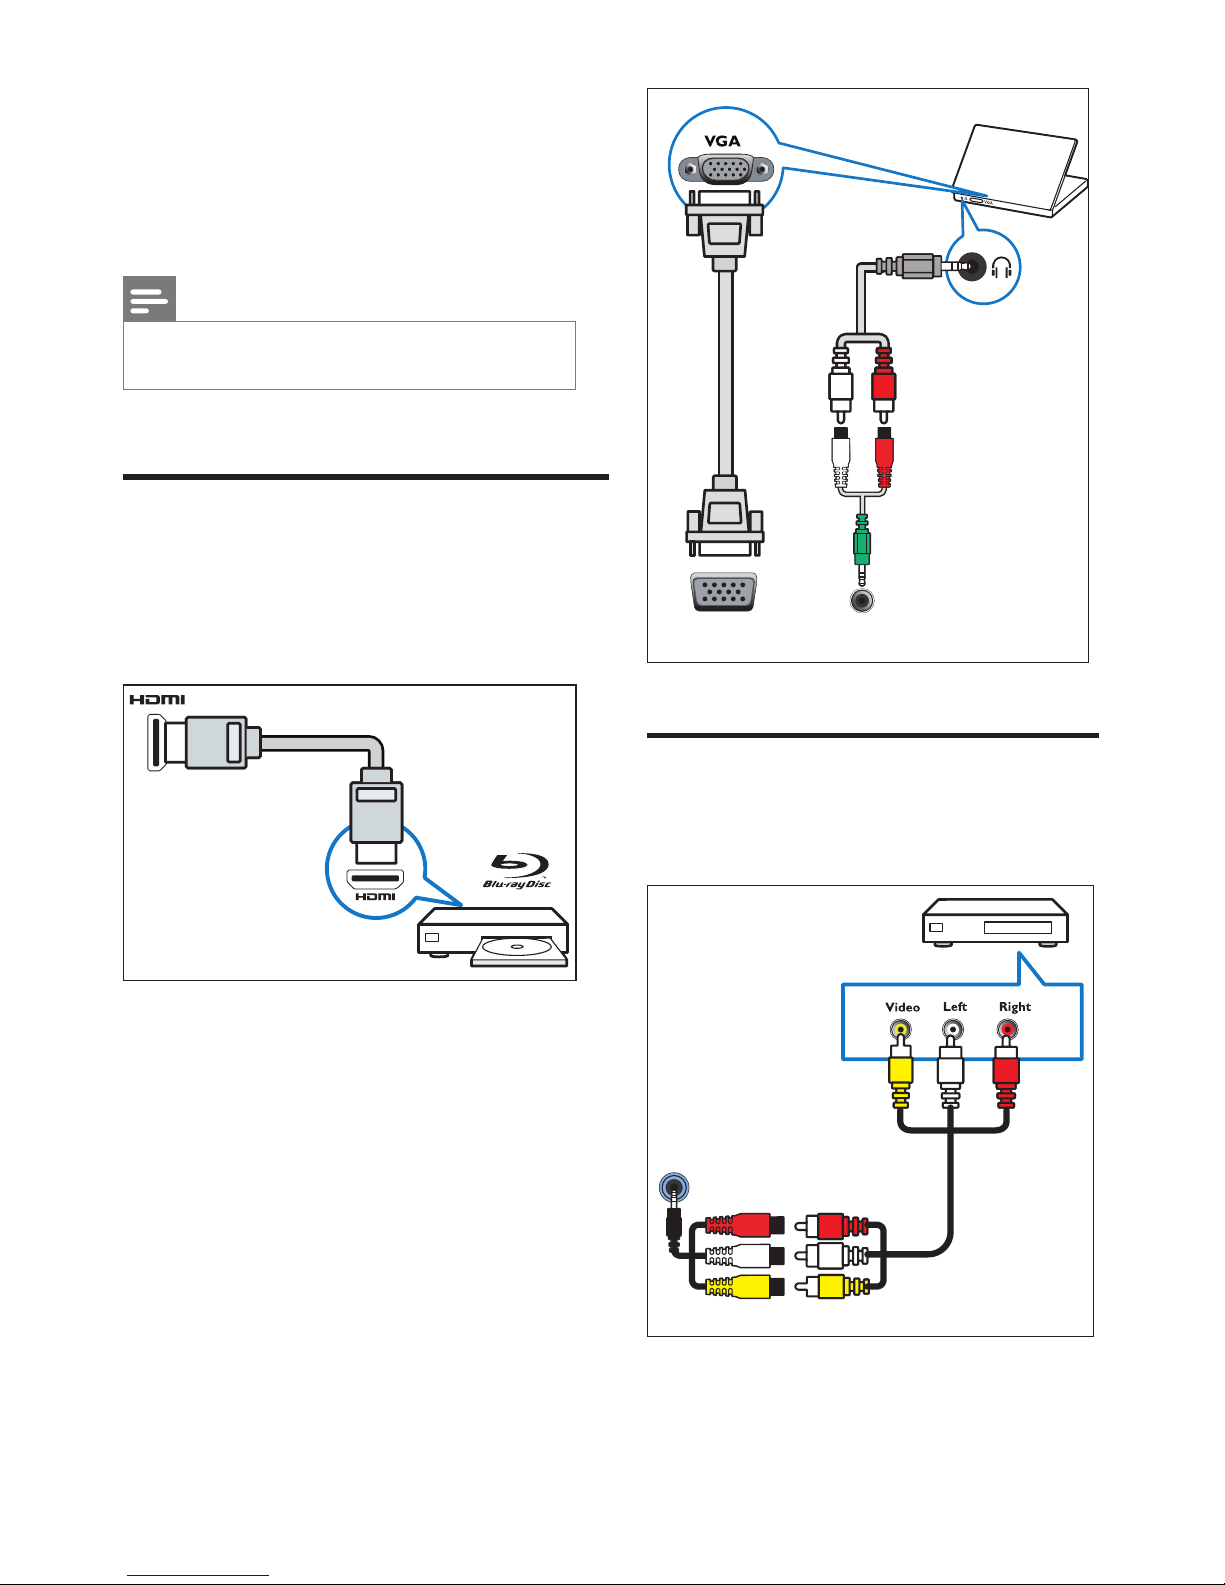
AUDIO L/RVGA
Side connections
a
AV input
AV
7 TV connections
This chapter explains how to connect devices with
different interfaces.
Note
•
You can use different connection types to connect
devices to the TV.
Rearconnections
a
HDMI
Digital audio and video input from Blu-ray
players and other high definition devices
b
PC inputs (VGA and audio)
Page 21
English
19
EN
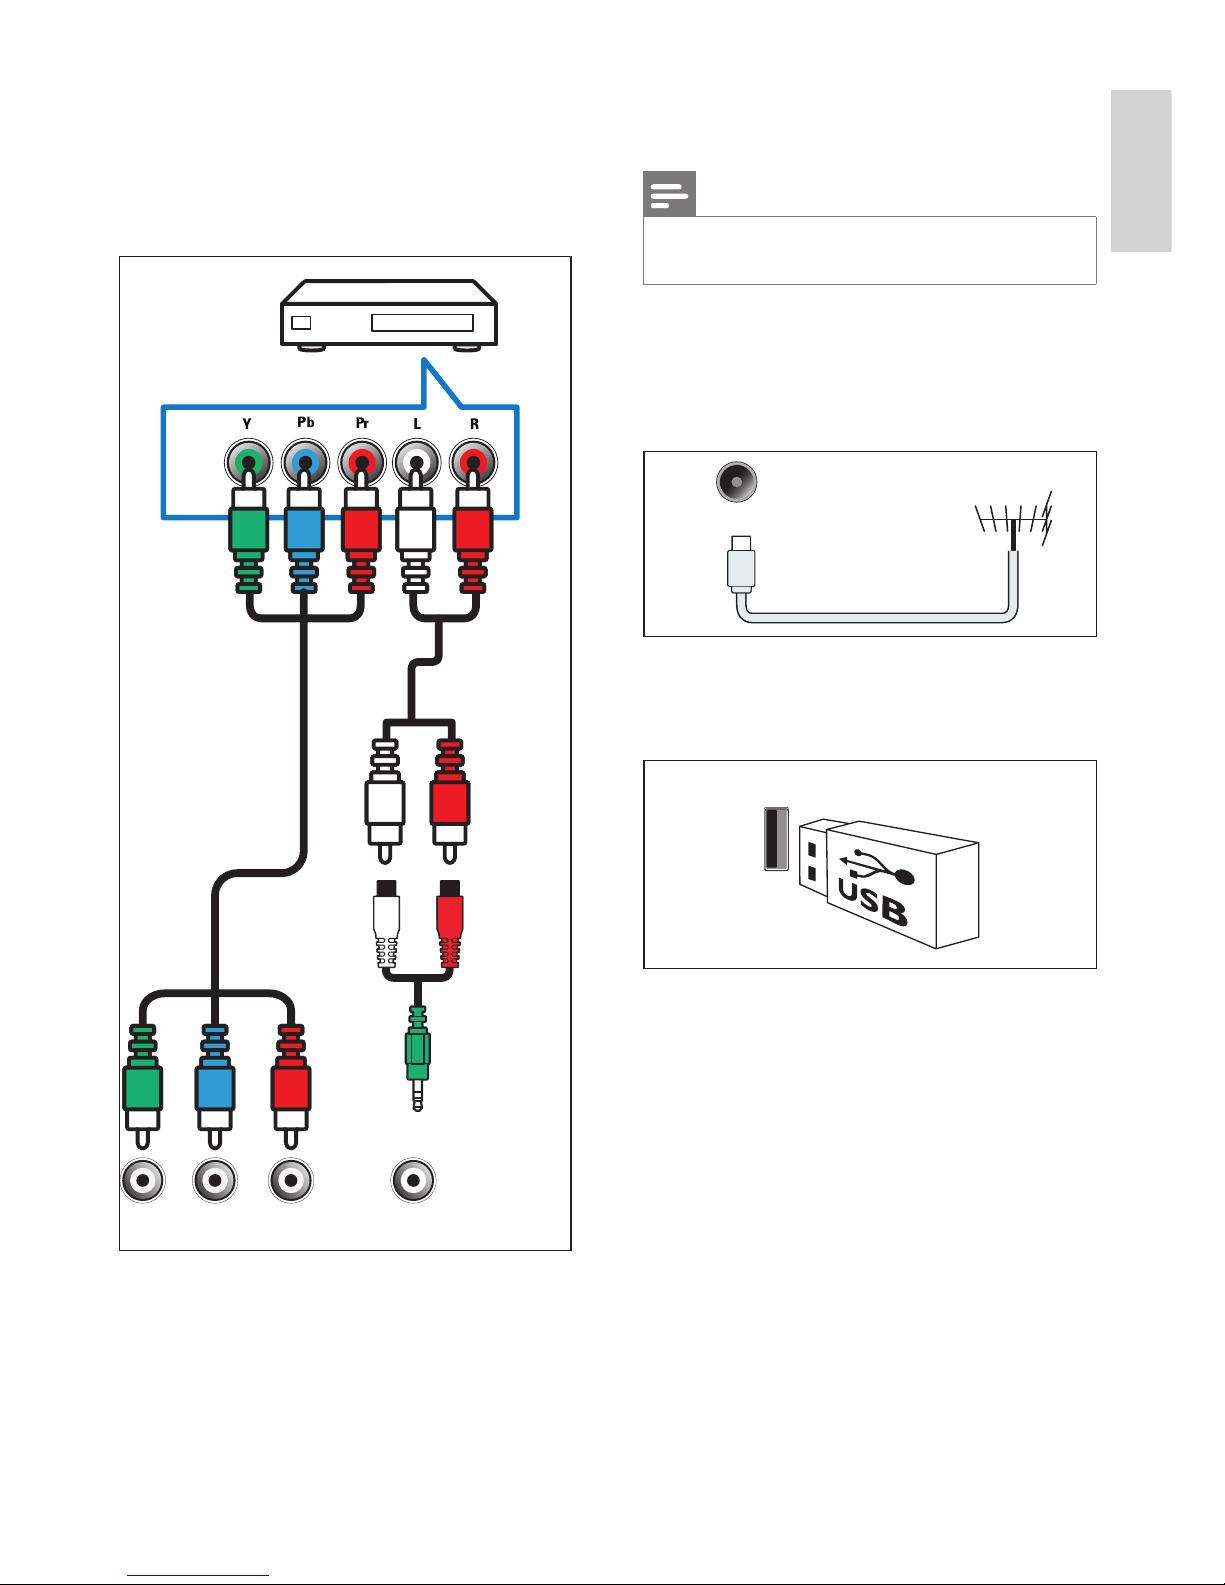
c
Headphones
q
Stereo sound output for headphones.
Note
•
The TV speakers will automatically be muted when
headphones are plugged in.
d
Antenna/cable TV
Input for an antenna, cable or satellite signal.
Antenna/cable TV
e
USB
Data input from a USB storage device.
USB
b
Component signal input
Audio and video input from DVD players,
game consoles and other analog or digital
devices
YPbPr
PC
AUDIO L/R
Page 22
20
EN
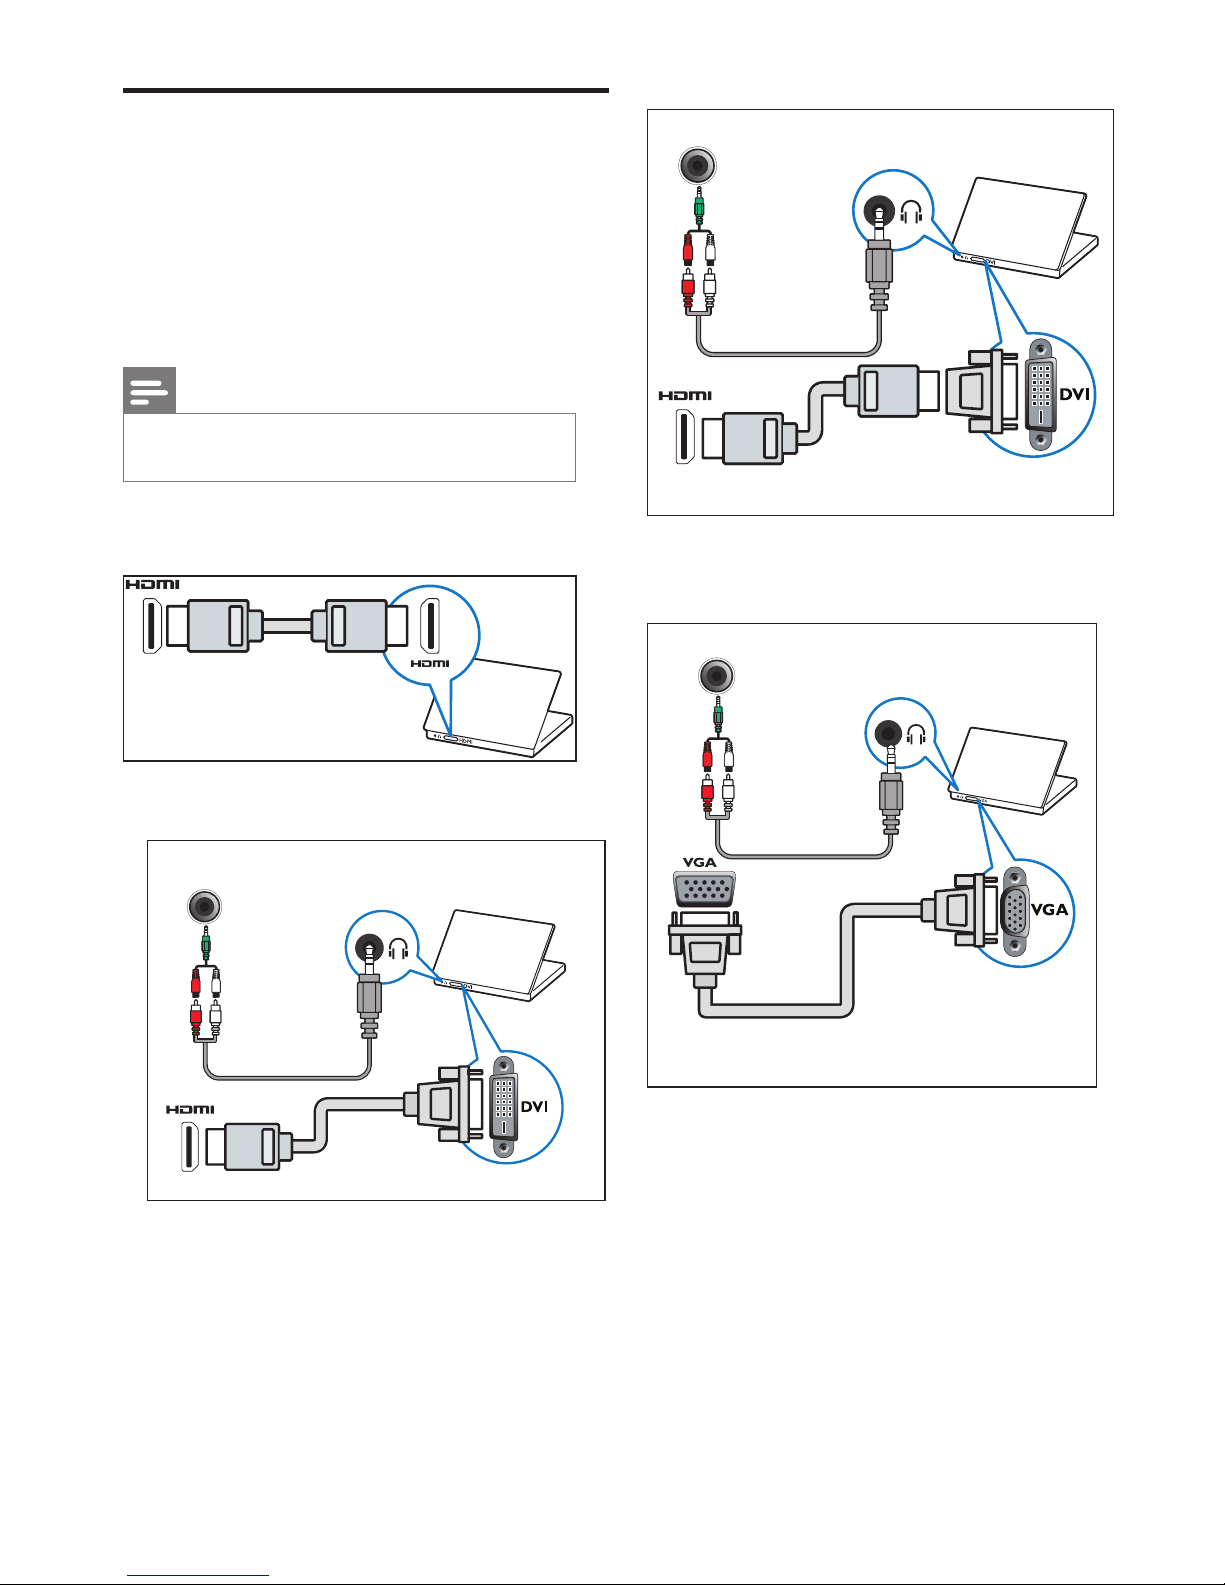
AUDIO L/R
•
VGA cable
AUDIO L/R
Connecting to a computer
Before connecting the computer to the TV:
•
Set the computer screen refresh rate to 60Hz.
•
Select a supported resolution on the
computer.
Connect to the computer using one of the
following connections:
Notes
•
A separate audio cable is required when connecting with
DVI or VGA.
•
HDMI cable
•
DVI-HDMI cable
AUDIO L/R
•
HDMI cable and HDMI-DVI adapter
Page 23
English
21
EN
Using Quick Play
1
After enabling EasyLink, press play on the
device.
»The TV will automatically switch to the
correct signal source.
Using Quick Standby
1
Press (Standby — On) on the remote
control.
»The TV and all connected HDMI
devices will automatically switch to
standby mode.
Use Philips EasyLink
Make full use of your Philips EasyLink HDMICEC-compatible device to improve the control
features and obtain the maximum benefit.
HDMI-CEC-compatible devices connected with
an HDMI connection can be controlled using
the TV remote control.
If you want to turn Philips EasyLink on, you must:
•
Connect two or more HDMI-CECcompatible devices using HDMI
connections.
•
Confirm that each HDMI-CEC-compatible
device is operating normally.
•
Switch to EasyLink.
Notes
•
The EasyLink-compatible devices must be switched on
and selected as signal sources.
•
Philips does not guarantee 100% interoperability with all
HDMI CEC devices.
Turning EasyLinkon or off
Once an HDMI-CEC-compatible device is
turned on, the TV will automatically turn on and
switch to the correct signal source.
Notes
•
If you do not want to use Philips EasyLink, please do not
turn this function on.
1
Press ADJUST.
2
Press Select [EasyLink].
3
Select [Off] or [On], then press OK.
Page 24

22
EN
Sound power
•
32PHA4509: 5W x 2
•
40PFA4509: 10W x 2
•
50PFA4509: 10W x 2
Inherent resolution
•
32PHA4509: 1366 x 768
•
40PFA4509: 1920 x 1080
•
50PFA4509: 1920 x 1080
Tuner / Reception /
Transmission
•
Aerial input: 75ohm coaxial (IEC75)
•
TV system: NTSC, SECAM, PAL
•
Video playback: NTSC, SECAM, PAL
Remote Control
•
Batteries: 2 x AAA (R03 type)
Power Supply
•
Mains power: 110-240V, 50-60Hz
•
Standby power: ≤ 0.5 W
•
Ambient temperature: 5 to 40 degrees
Celsius
•
Power consumption:
32PHA4509: 60W
40PFA4509: 80W
50PFA4509: 100W
8 Product
information
Product information is subject to change without
notice. For detailed product information, please visit
www.philips.com/support.
Display resolutions
Computer Formats
•
Resolution - refresh rate:
•
640 x 480 - 60Hz
•
800 x 600 - 60Hz
•
1024 x 768 - 60Hz
•
1360 x 768 - 60Hz
•
1920 x 1080 - 60Hz
(32 inches TV is not suppor ted)
Video Formats
•
Resolution - refresh rate:
•
480i - 60Hz
•
480p - 60Hz
•
576i - 50Hz
•
576p - 50Hz
•
720p - 50Hz, 60Hz
•
1080i - 50Hz, 60Hz
•
1080p - 50Hz, 60Hz.
Multimedia
•
Supported storage device: USB (only FAT or
FAT 32 USB storage devices are supported.
)
•
Compatible multimedia file formats:
•
Image: JPEG
•
Audio: MP3
•
Video: MPEG 2/MPEG 4 , H.264
•
Document: TXT
Page 25
English
23
EN
Supported TV mounts
To mount the TV, please purchase a Philips TV
mount or any TV mount compliant with the
VESA standard. To prevent damage to cables
and connectors, be sure to leave a clearance
gap of at least 2.2 inches or 5.5cm between the
back of the TV to the wall.
Warning
•
Please follow all instructions provided with the TV mount.
TP Vision Europe B.V. bears no responsibility for improper
TV mounting that results in accident, injur y or damage.
Model No.
Required Pixel
Pitch (mm)
Required
Mounting Screws
32PHA4509 100 x 100
4 x M4
(recommended
length: 15 mm)
40PFA4509 200 x 200
4 x M4
(recommended
length: 16 mm)
50PFA4509 400 x 200
4 x M6
(recommended
length: 22 mm)
Page 26

24
EN
Channel issues
Previously installed channels do not appear in
the channel list:
•Check that the correct channel list is
selected.
Picture issues
The TV is on, but there is no picture:
•Check that the antenna is properly
connected to the TV.
•Check that the correct device is selected
as the TV source.
There is sound but no picture:
•Check that the picture settings are
correctly set.
Poor TV reception from the antenna
connection:
•Check that the antenna is properly
connected to the TV.
•Loudspeakers, unearthed audio devices,
neon lights, high buildings and other large
objects can influence reception quality.
If possible, try to improve the reception
quality by changing the antenna direction
or moving devices away from the TV.
•If the reception on one particular channel
is poor, please fine tune this channel.
There is poor picture quality from connected
devices:
•Check that the devices are connected
properly.
•Check that the picture settings are
correctly set.
The TV did not save your picture settings:
•Check that the TV location is set to the
home setting. This mode offers you the
flexibility to change and save settings.
The picture does not fit the screen; it is too
big or too small:
•Try using a different picture format.
The picture position is incorrect:
•Picture signals from some devices may not
fit the screen correctly. Please check the
signal output of the device.
9 Troubleshooting
This section covers common problems and their
accompanying solutions.
General issues
The TV cannot be switched on:
•Disconnect the power cable from the
power outlet. Wait for one minute before
reconnecting it.
•Check that the power cable is securely
connected.
The remote control is not working properly:
•Check that the remote control batteries
are correctly inserted according to the +/orientation.
•Replace the remote control batteries if they
are flat or weak.
•Clean the remote control and TV sensor lens.
The standby light on the TV is red and blinking:
•Disconnect the power cable from the power
outlet. Wait for the TV to cool down before
reconnecting the power cable. If the light
continues to blink, please contact Philips
Customer Care Centre.
You forgot the code to unlock the TV lock feature
•Enter '3448'.
The TV menu is in the wrong language.
•Change the TV menu to your preferred
language.
When turning the TV On/Off or to Standby, you
hear a creaking sound from the TV chassis:
•No action is required. The creaking sound
comes from the normal expansion and
contraction of the TV as it cools down
and warms up. This does not impact its
performance.
Page 27
English
25
EN
Computer connection issues
The computer display on the TV is not stable:
•Check that your PC uses the supported
resolution and refresh rate.
•Set the TV picture format to unscaled.
Contact us
If you cannot resolve your problem, please refer
to the FAQs for this model at
www.philips.com/support.
If the problem remains unresolved, please
contact your local Philips Customer Service
Centre.
Warning
•
Do not attempt to repair the TV yourself. This may cause
severe injury, irreparable damage to your TV or void your
warranty.
Note
•
Please make a note of your TV model and serial number
before you contact Philips Customer Service Centre.
These numbers are printed on the back/bottom of the
TV and on the packaging.
Sound issues
The pictures are showing but sound quality is
poor:
Note
•
If no audio signal is detected, the TV automatically
switches the audio output off - this does not indicate
malfunction.
•Check that all cables are properly
connected.
•Check that the volume is not set to 0.
•Check that the sound is not muted.
•Check that the sound settings are correctly
set.
The pictures are showing but sound comes
from one speaker only:
•Verify that sound balance is set to the
centre.
HDMI connection issues
There are problems with HDMI devices:
•Please note that HDCP (High-bandwidth
Digital Content Protection) support can
delay the time taken for a TV to display
content from a HDMI device.
•If the TV does not recognise the HDMI
device and no picture is displayed, please
try switching the signal source to another
device before switching it back again.
•If there are intermittent sound disruptions,
please check that output settings from the
HDMI device are correct.
•If you are using a HDMI to DVI adapter or
cable, please check if the audio cable that
comes with the product is connected to
AUDIO (only for mini jacks).
Page 28

26
EN
Environmental Protection Use Period
This logo labelled on the product itself indicates that the Environmental Protection Use Period thereof
is 10 years.
The Environmental Protection Use Period of electrical information products refers to the time period
during which the toxic and hazardous substances or elements contained within the product will not
leak or suddenly spoil, and users of such products will not cause any serious environmental pollution or
serious damage to human and property.
During the Environmental Protection Use Period, please use this product according to the instructions
given in this user manual.
The Environmental Protection Use Period does not cover consumable parts: the battery.
Suggestive description of the Recycling Administrative Regulations for
Waste Electrical and Electronics Products
In order to care and protect the Earth in a better way, please adhere to the national and applicable laws
in relation to the recycling management of waste electrical and electronics products when the user no
longer needs to use this product, or when it has reached the end of its product life.
Page 29

Page 30

© 2014 TP Vision Europe B.V.
All rights reserved.
Document order number:
Philips and the Philips' shield emblem are registered trademarks of Koninklijke Philips N.V. and are used under
license from Koninklijke Philips N.V.
 Loading...