

Page 1
Colour Television Chassis
32PHA3052/71
32PHA3052S/70
Product Specification Sheet (Page1-13)
User Manuel Part(Page14-20)
Troubleshooting Procedure(Page21-26)
Factory Mode Adjustment (Page27-28)
Software Upgrades(After Service)(Page29-38)
Main Board Circuit Diagram (Page39-43)
Page 2
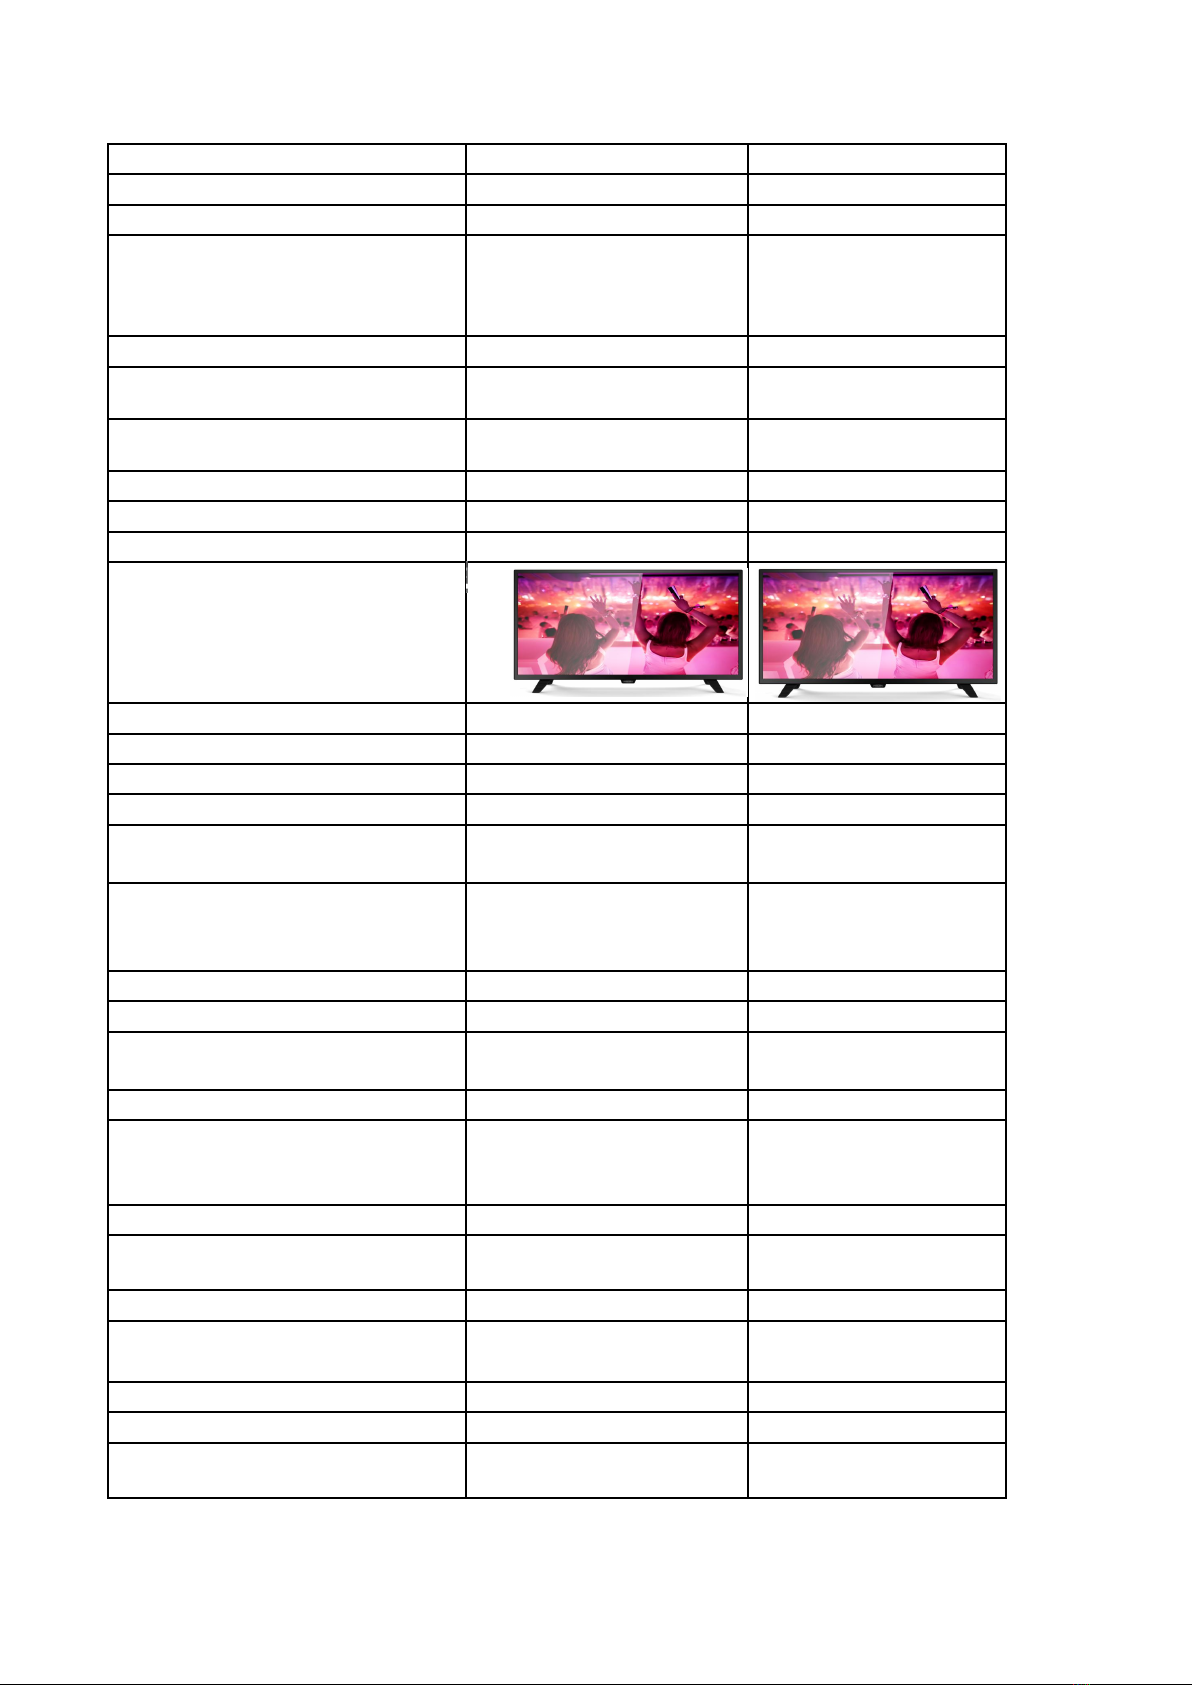
Product Specification Sheet
Country
Series
國家
系列
INDO PHP
3052 3052
Series name
Set Product Manager
Set Product Manager in outsourcing
company
E-mail address of main contact in
outsourcing company
Set Project Manager
Status
CR (yyyyww) of leading set
Picture/Display
RC Type
Platform/Chipset
CPU
中央处理器 N/A N/A
GPU
图形处理器
EMMC(Embedded Multi Media Card
入式存储
DDR (Double Data Rate
动态随机存储器
(random access memory))
型號
) (ROM
產品照片
產品芯片
只读内存镜像
双倍速率同步
) (RAM:
随机存取存储器
嵌
)
32PHA3052S/70 32PHA3052/71
7601-110002-0144FLP2 7601-110002-0144FLP2
T4C1-V56 T4C1-V56
N/A N/A
N/A N/A
32MB 32MB
PANEL
Diagonal Screen Size
Backlight Type (Panel Supplier)
型(面板供應商)
1st source (panel)
Perfect Motion Rate (PMR) (Perfect
Picture Index -PPI)
(
Panel Resolution
Panel Frequency (Native) (Panel
refresh rate)
Chasis Frequency
Brightness (Home Vivid Mode) cd/m²
亮度 (家用/鮮豔模式)
Panel contrast ratio
Aspect ratio
Response Time (ms) (G to G , typ. ms)
反应时间
面板
PMR
)(完美圖像索引
面板頻率(原生)(刷新率
寬高比
對角屏幕尺寸 31.5" 31.5"
背光類
第一來源(面板
完美運動速率
-PPI
面板解析度 1366*768 1366*768
頻率
面板的對比度
)
)
)
DLED DLED
Samsung Samsung
200 200
50HZ 50HZ
60HZ 60HZ
Min:200cd/m2,
Typ:240cd/m2
1200:1 1200:1
16:9 16:9
8ms 8ms
Min:200cd/m2,
Typ:240cd/m2
1
Page 3
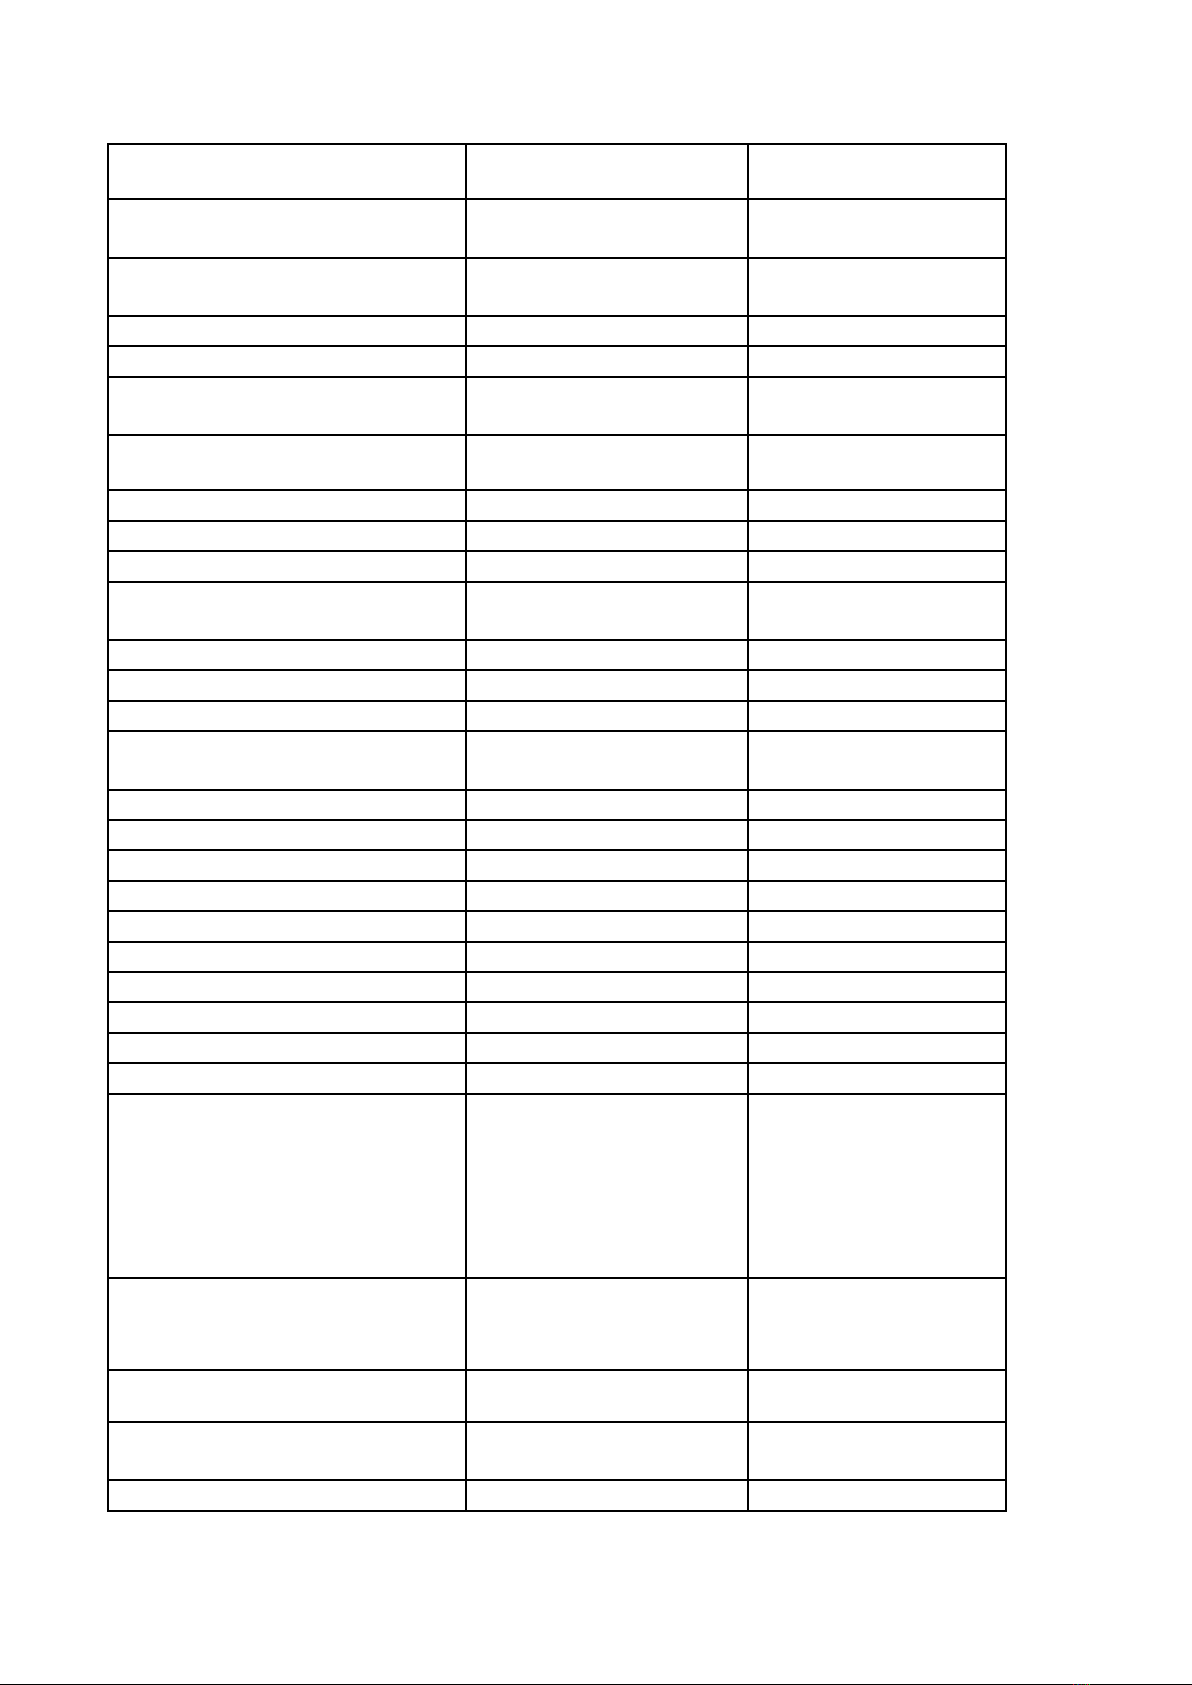
Viewing Angle - H (L+R) (typ.
Degree,CR≧20)
Viewing Angle - V (typ. Degree,CR
20)
可視角度 V
Anti Reflex Coated Glass
璃
Backlight Dimming
Scanning Segments (amount)
Analog + PWM dimming 類比+
理 調光
2D/3D Logic (2D/3D Active/3D
Passive ) 2D/3D
Color Gamut
PICTURE ENHANCEMENT
3D MA deinterlacing 3D MA
Dynamic backlight control
制
Local Dimming
Dynamic contrast
Color Temperature
Blue stretch/green enhance
/
綠色增強
PQ engine (philips 定義)
PQ Resolution
3D features3D :
Improved 3D Super Resolution
ISF Color Management
Digital Natural Motion (2D/3D )
Perfect Natural Motion (2D/3D )
2D to 3D Conversion
3D Depth adjustment (Auto/Offset)
Auto 3D Detection
Supported Display Resolution
(Computer Inputs) ( VGA 支援 格 式)
可視角度 H
防反射鍍膜玻
背光調光 PWM PWM
掃描段
能源管
轉換系統
色域
圖像增強 NTSC:65% NTSC:65%
去交錯 YES YES
動態背光控
局部調光
動態對比度 TBC TBC
色溫 Standard, Warm, Cool Standard, Warm, Cool
藍電平延伸
畫質 NA NA
畫質解析度
功能 NA NA
≧
176° 176°
176° 176°
NA NA
48.25--863.25MHZ 48.25--863.25MHZ
YES YES
2D 2D
NA NA
TBC TBC
Digital Crystal Clear Digital Crystal Clear
NA NA
NA NA
2D 2D
2D 2D
NA NA
NA NA
NA NA
NA NA
720*400@70HZ
640*480@60HZ
800*600@60HZ
1024*768@60HZ
1360*768@60HZ
720*400@70HZ
640*480@60HZ
800*600@60HZ
1024*768@60HZ
1360*768@60HZ
Supported Display Resolution (Video
Inputs)
HDMI
Brightness (Shop Vivid mode: 10%
boost)
Pixel Plus Link (I/II/III) -
強
Active Control (Shop mode
支援格式
外部設備畫素加
仍可
480i, 480p,576i,
576p,720p,1080i,1080p(24/25/
30/50/60Hz)
YES(1% boost) YES(1% boost)
NA NA
NA NA
2
480i, 480p,576i,
576p,720p,1080i,1080p(24/
25/30/50/60Hz)
Page 4
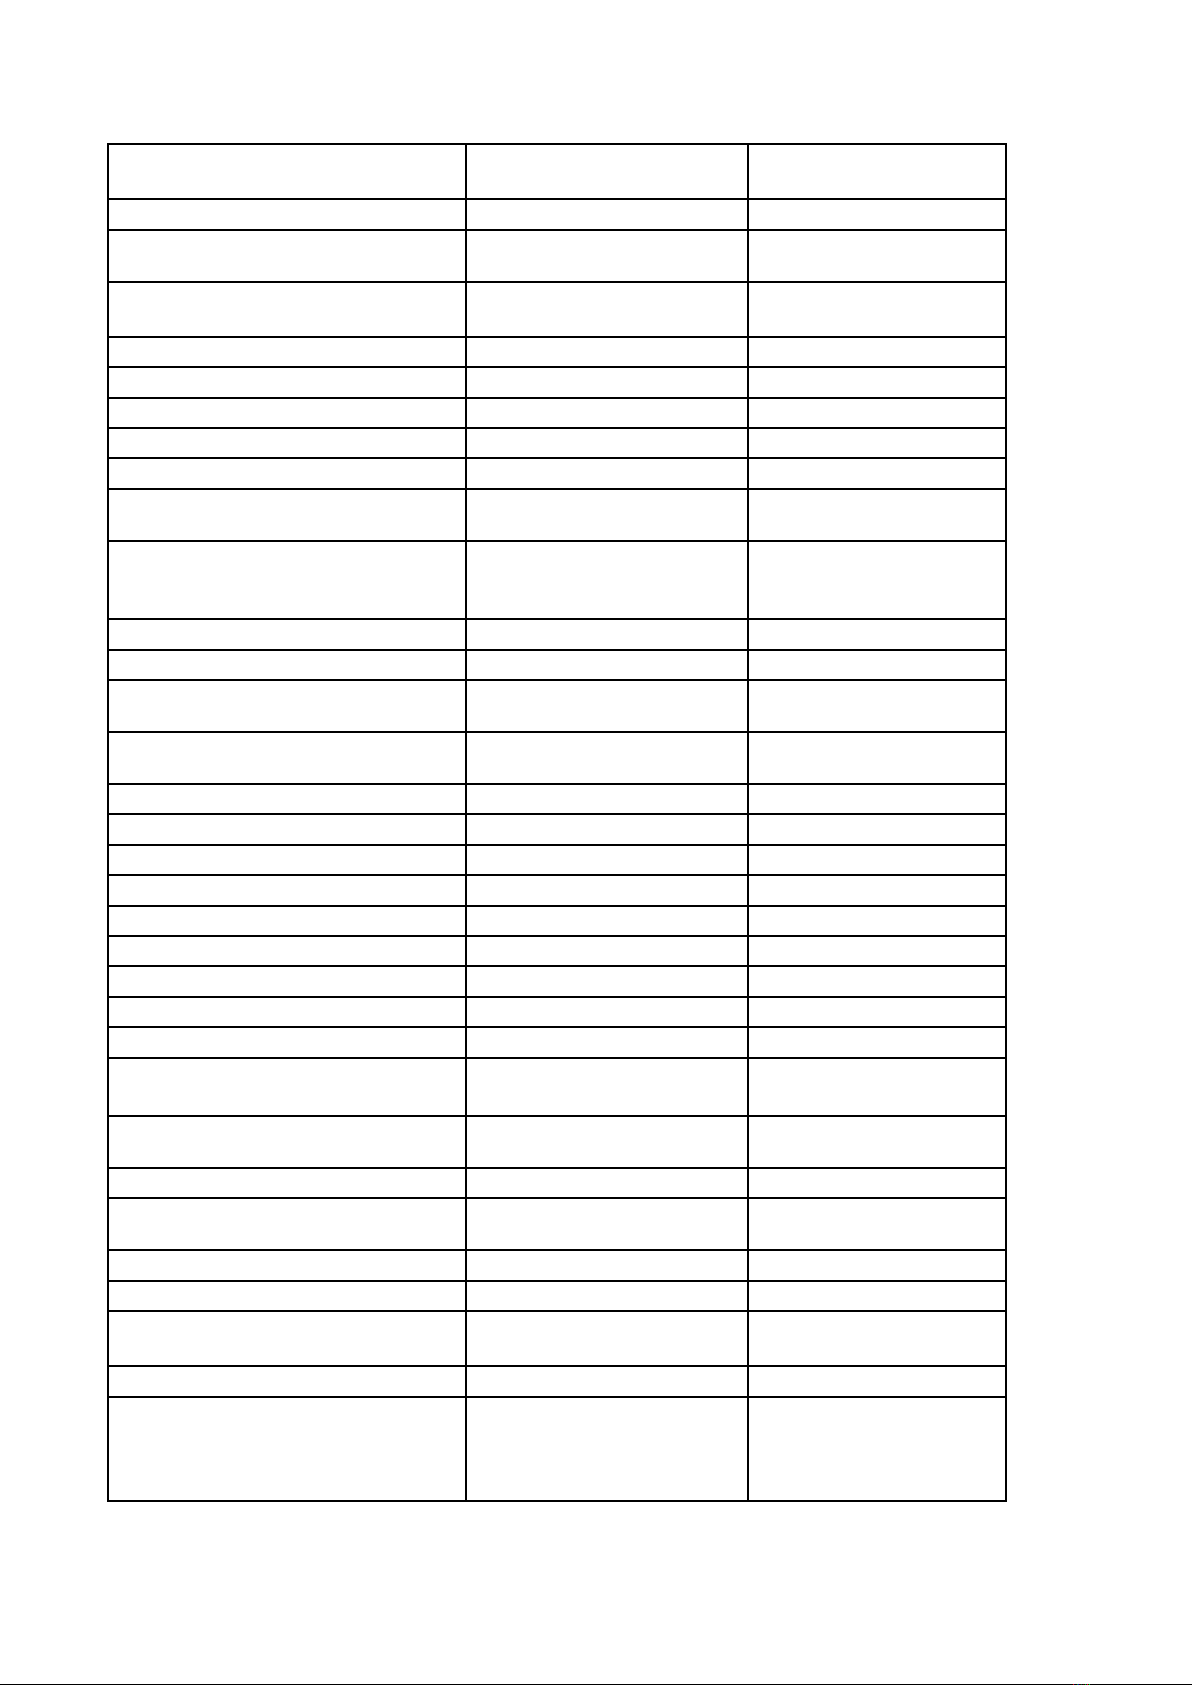
Natural Motion/Perfect Natural Motion
(
動態加強
"UHD Display" - logo (Industry)
"UHD Receiver" - logo (Industry) pending std
HDMI 2.0 4:4:4 @ 60(
@frame/sec)
10-bit color support(色階)
DAPQ
Ambilight
Ambilight Version
Pixels
Ambilight Performance (nit, no of
colors, halo length)
Ambilight Features (Wall colour
adaptive, Lounge Light Mode,
Ambilight Motion, Gaming Mode )
Ambilight for 3D
Ambilight for all TV Events
Ambilight Open Source via
JointSpaceApp
Wall Distance Adaptive (Stand vs
Mount)
Motion Adaptive
Built-in AL + Hue
TV as Lamp(s) in Hue ecosystem
In screen demo in mobile shop app
Ambi Wakeup (ref HTV)
Ambimusic
SOUND QUALITY
Sound (TV)
Sound (Internal)
Mono/Stereo/Virtual Surround (
)
場
Output Power (10% THD) RMS (RMS
Watts)
Speaker configuration
Speaker system (Number of on board
Speakers )
Woofer(
Speaker type (
Auto Volume Levelier / Auto Volume
Levelier +(
Speaker module detachable
Sound Claim (Incredible
Surround/Cinema Surround/Clear
Sound/AmbiwOOx/3D Movie/Incredible
Surround 3D)
)
低音喇叭
內置揚聲器
換台音量自動調整
色彩取樣
三種音
)
)
NA NA
NA NA
NA NA
NA NA
NA NA
NA NA
N/A N/A
N/A N/A
N/A N/A
N/A N/A
N/A N/A
N/A N/A
N/A N/A
N/A N/A
N/A N/A
N/A N/A
N/A N/A
N/A N/A
N/A N/A
N/A N/A
N/A N/A
YES YES
YES YES
NA NA
12W 12W
6W+6W 6W+6W
2.0 2.0
NA NA
built-in(normal) built-in(normal)
YES YES
NA NA
NA NA
3
Page 5
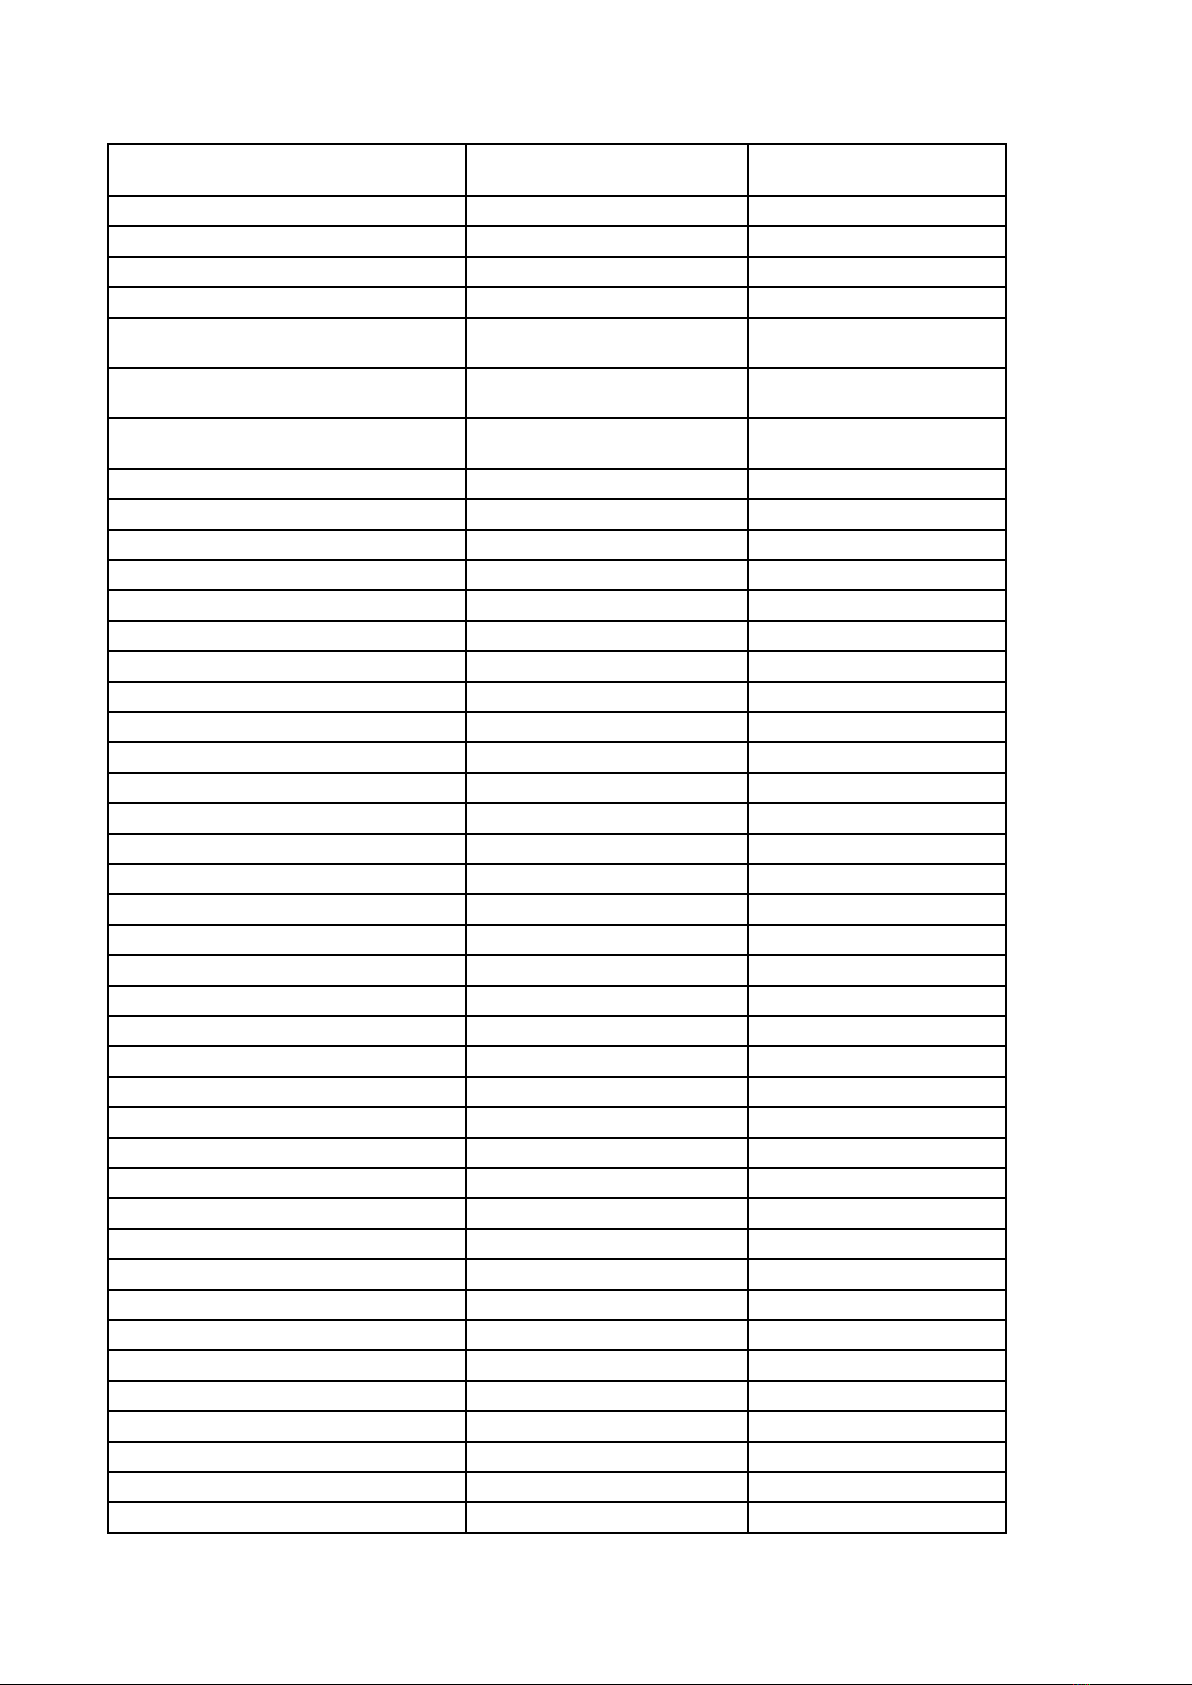
Bass (Bass control/DBE/Ultra
Bass/Ultra Bass II )
Wireless Sound Interface
Dolby Digital DecoderType
DTS Studio Sound
DTS 2.0+ Digital out
Acoustic Compensation Filters 主板滤
波补偿
Dynamic Treble Enhancement 动
态高音增强
Programmable Bass And Treble Curve
(可编程的低音和高音曲线)用户
Visible Sound
Sound (External)
External Sound device type
Output Power (10% THD) RMS
Hotel mode
Simple
INSTALLATION
Analog/Digital
PLL Digital Tuning
Presets Channels
Autostore
Fine Tuning
Direct Channel
EASE OF USE
Controls
RC suitable for
Auto picture modes
Auto sound modes
AVL
Video modes
Source detection
HDMI connections
PC modes
Child lock with code
Teletext
Teletext features
OSD
Menu
Sleep Timer
Program List
Alternate channel
EPG
OTA
3D tv (PR/SG)
2D/3D converter
外部揚聲器
NA NA
NA NA
NA NA
NA NA
NA NA
NA NA
NA NA
NA NA
NA NA
NA NA
NA NA
NA NA
YES YES
YES YES
YES YES
NA NA
TBC TBC
TBC TBC
TBC TBC
TBC TBC
YES YES
YES YES
YES YES
YES YES
TBC TBC
YES YES
TBC TBC
YES YES
YES YES
YES YES
NA NA
NA NA
YES YES
YES YES
YES YES
YES YES
YES YES
NA NA
NA NA
NA NA
NA NA
4
Page 6
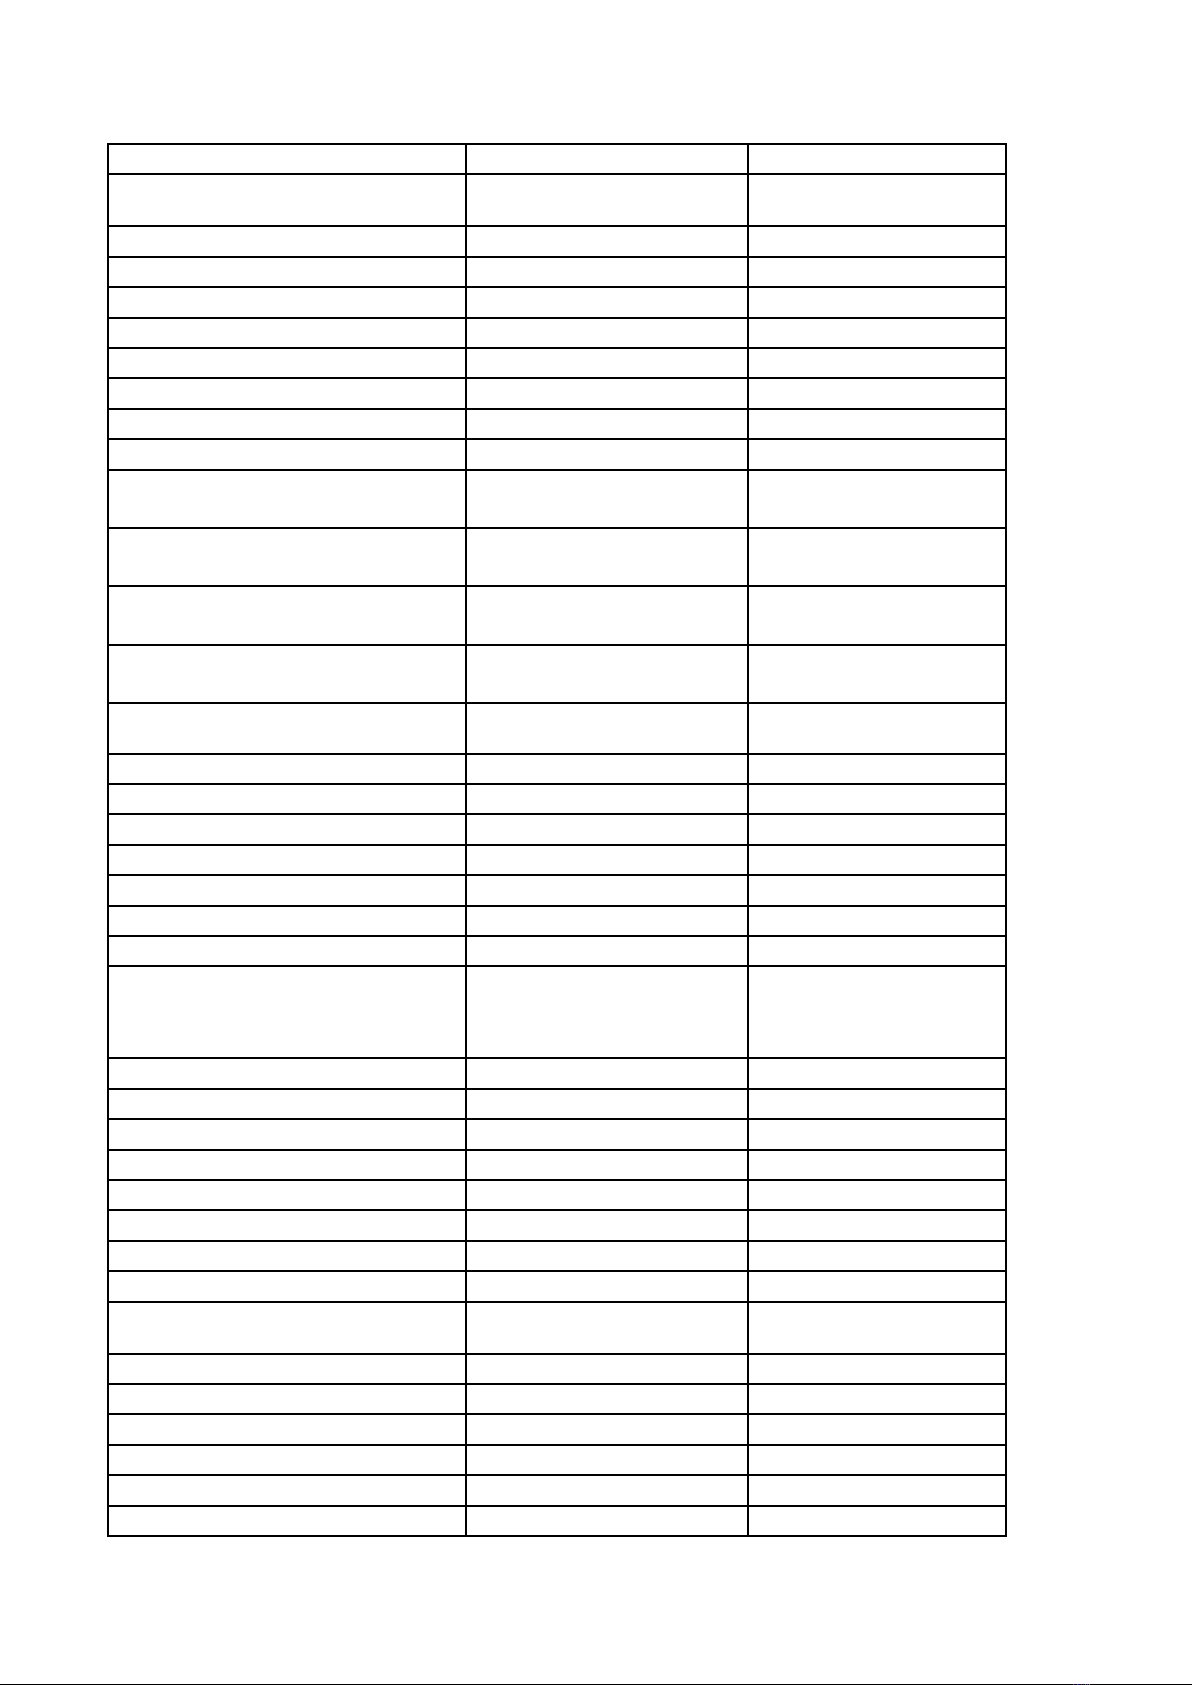
Dual View Gaming
NA
NA
RC APK _Myremote like
(for android phone,Tablet)
Wifi Display Miracast(小屏传大屏)
Ambi-Sphere
Initial setup OSD (OOBE)
Zapping OSD with EPG data
Channel Matrix with EPG data
Channel and source edit/skip channel
Last status
Multimedia Applications
Video Playback Formats
援格 式
Subtitles Formats Support
式
Music Playback Formats
播放支
字幕支援 格
音樂支援 格式 WMA,AAC WMA,AAC
NA NA
NA NA
NA NA
NA NA
NA NA
NA NA
NA NA
NA NA
MPEG-2/MPEG-4 /H.264 MPEG-2/MPEG-4 /H.264
SRT、ASS SRT、ASS
Picture Playback Formats
式
Pause TV/USB recording (PVR) 刻录
(錄影)
Time shift (
PIP/POP
USB
USB Harddisk Format (Power)
MHL
ARC
Connectivity (I/O) CONNECTIONS
I/O port to be clearly indicated (列接
口)
Playback
Reception
Sound system
SAP, MTS
Source list :-
Digital integrated
TV
Component video 1
Component video 2
(HD/SD)@24p/50/60 (integrated with
HDMI Number
HDMI 1 (video)@24p/50/60
HDMI 2 (Video)@24p/50/60
HDMI 3 (Video)@24p/50/60
HDMI 4 / 3840x2160@24p/30
HDMI 1.4a
時間瞬移
多屏 NA NA
圖片支援 格
)
JPEG、BMP、PNG JPEG、BMP、PNG
NA NA
NA NA
USB2.0(*1) USB2.0(*1)
FAT/NTFS (500mA) FAT/NTFS (500mA)
NA NA
YES (HDMI2) YES (HDMI2)
TV*1/USB*1/VGA*1
/HDMI*2/AV-IN&Audio*1
/Audio-OUT*1
NA NA
TBC TBC
YES YES
NA NA
YES YES
NA NA
YES YES
60P 60P
60P 60P
2 2
60P 60P
60P 60P
NA NA
NA NA
YES YES
TV*1/USB*1/VGA*1
/HDMI*2/AV-IN&Audio*1
/Audio-OUT*1
5
Page 7
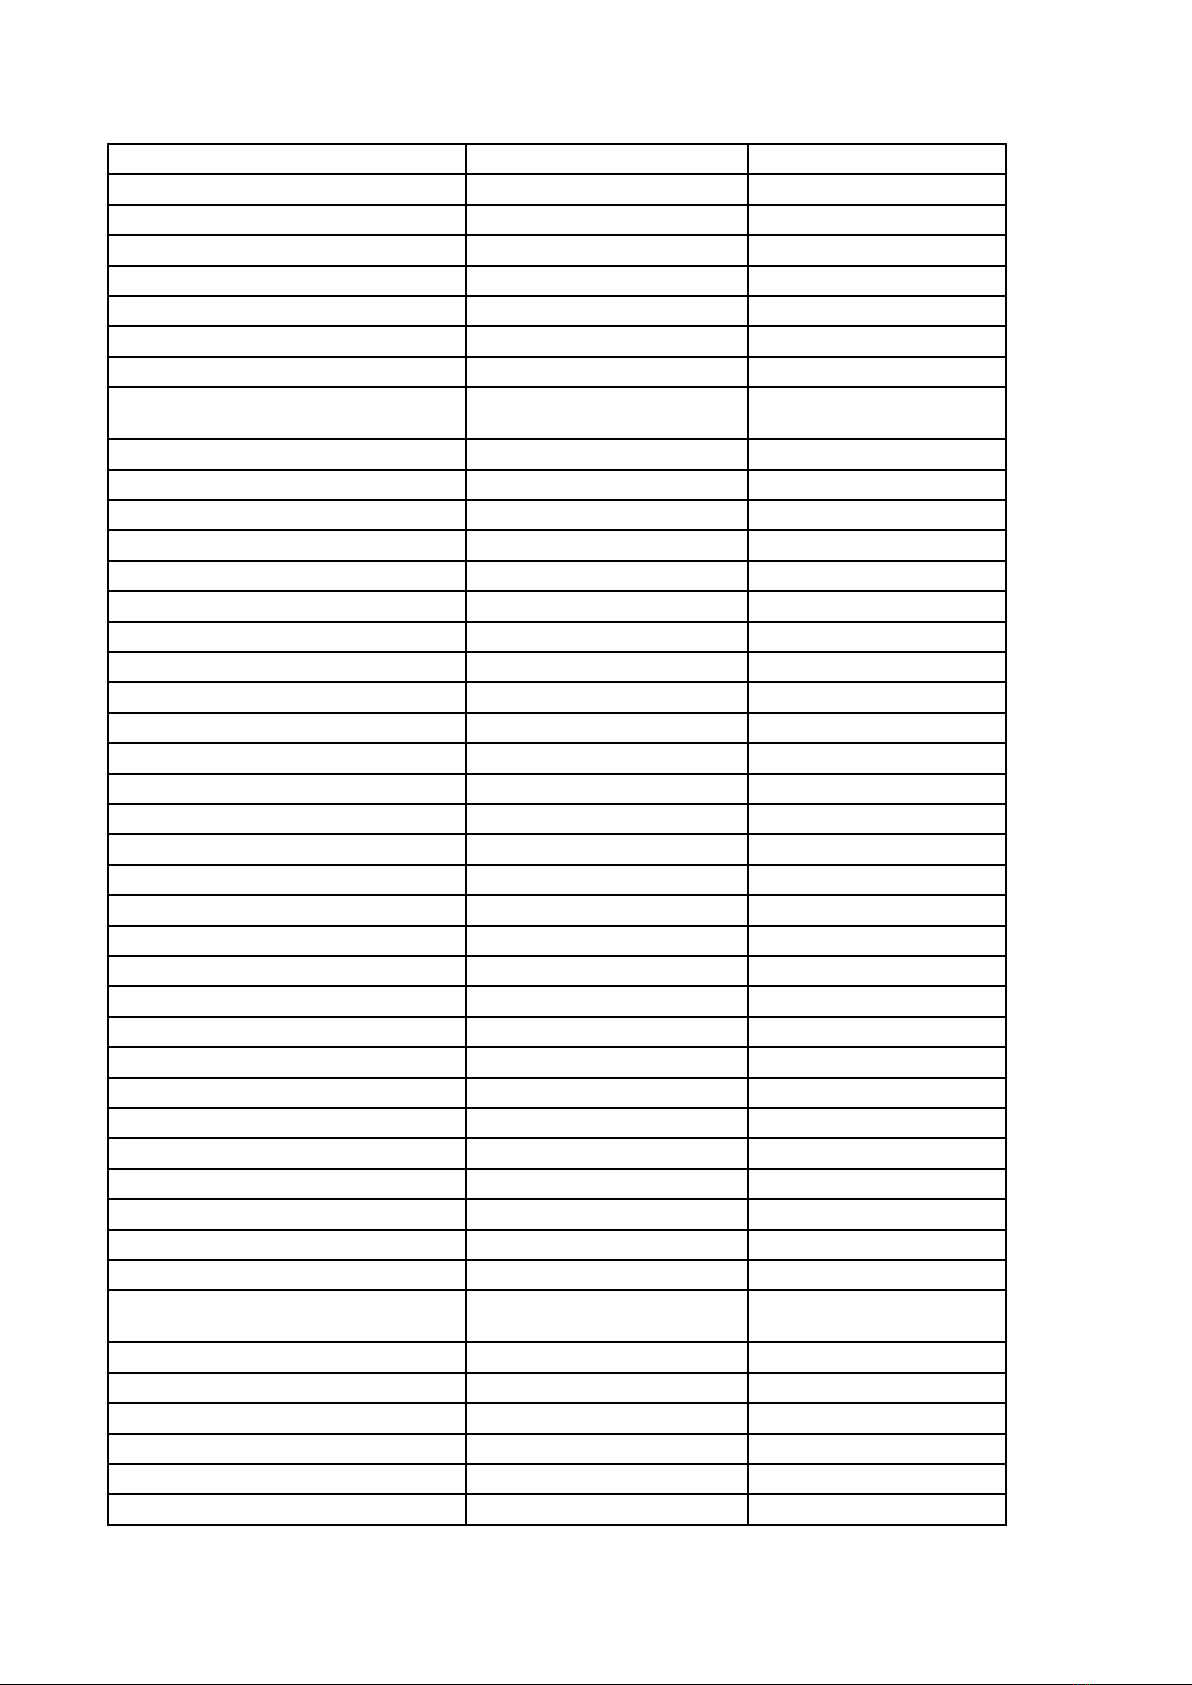
HDMI 2.0
NA
NA
HDMI/DVI
HDMI ARC
PC input /3.5mm min audio jack
AV 1(input)
AV 2(output)
Headphone
Video and Audio out
Digital audio out (SPDIF)
co-axial/Optical(Option)
RJ45
DLNA/ Certification
WiFi
CI
Smart card
SD card Slot
Mic in
Camera
USB
HDMI Number
EasyLink (HDMI-CEC)
Scart (EU) Connections
YPbPr/CVI (EU/Latam) Connections
CVBS (EU/Latam) Connections
Audio L/R in
CI+ slots
Antenna
Satellite (for K&S only)
VGA
USB Support
Digital audio out (SPDIF) N/A N/A
Headphone
Ethernet-LAN RJ-45
Service Connector
Wireless connections
Wi-Fi Band Concurrent
WoWLAN
WoLAN
Bluetooth for subwoofer/RC (do not
claim commercially)
Multichannel over BT
HDCP v2.2 (on HDMI 2.0 port)
MHL (HDMI+power+return channel)
MISCELLANEOUS
Operating power consumption
Standby power [Watt]
備用電源 [瓦]
運行功
FAT/NTFS (500mA) FAT/NTFS (500mA)
YES YES
HDMI-2 HDMI-2
YES YES
YES YES
N/A N/A
NA NA
Audio out Audio out
NA NA
NA NA
NA NA
NA NA
NA NA
NA NA
NA NA
NA NA
NA NA
USB2.0(*1) USB2.0(*1)
HDMI1.4(*2) HDMI1.4(*2)
YES YES
NA NA
NA NA
N/A N/A
YES YES
N/A N/A
*1 *1
N/A N/A
YES YES
NA NA
NA NA
VGA connectable VGA connectable
NA NA
NA NA
NA NA
NA NA
NA NA
NA NA
NA NA
NA NA
55W (max.) 55W (max.)
<o.5W <o.5W
6
Page 8
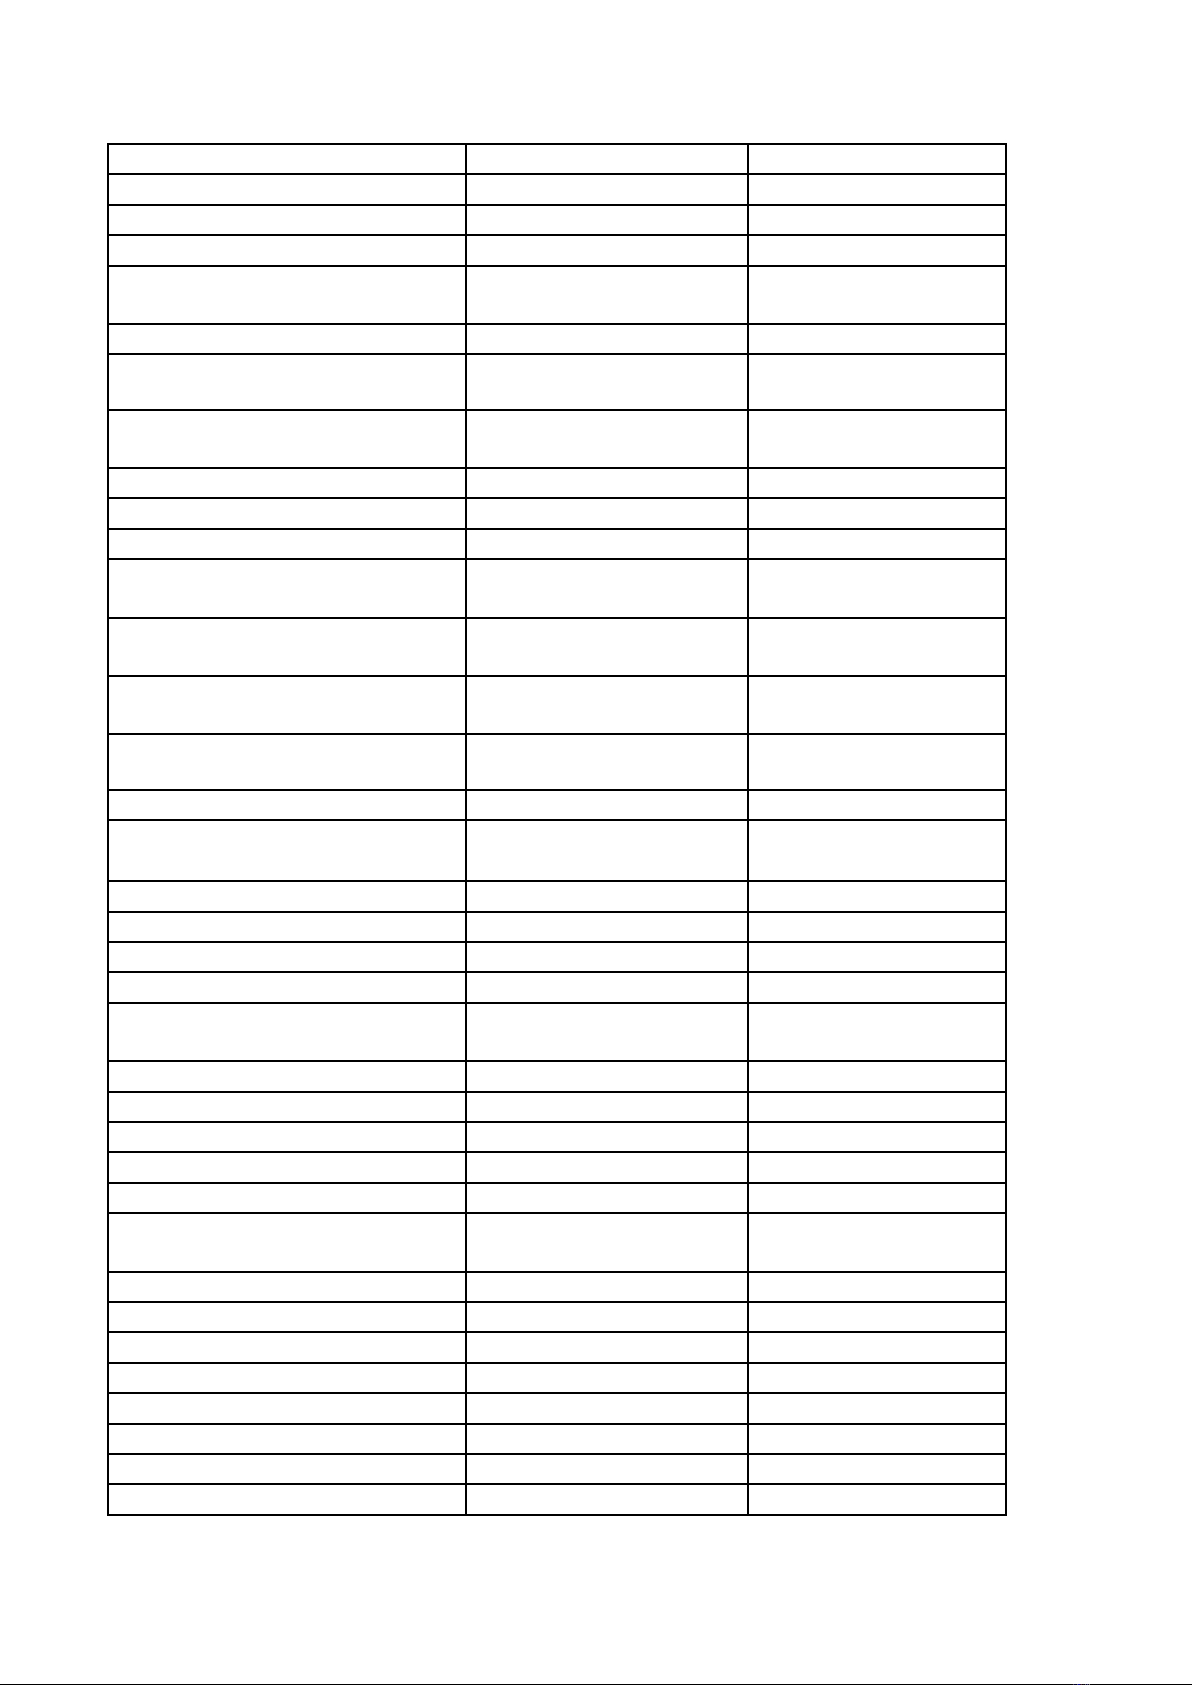
Switch off power [W att]
<o.5W
<o.5W
AC switch AC
EPA
Auto Standby
China Standard 240V/50Hz AC
準
Internal/external PSU
China energy label (mandatory
implement time?)
Product Manufacturing label
標籤
Ambient temperature
UPC code
EAN code
Net Weight (Product unit only)
體重量
Gross weight (Product in Packaging)
視+紙箱+配件包+所有包材
Dimensions (w, h, d) - unit with stand
電視含底座
Dimensions (w, h, d) - unit without
stand
電視不含底座
Box Dimensions (w, h, d) (Carton)
Container load 20"/40"/40"H (slipsheet)
裝櫃量
Colour -
Colour -下巴 (Leading edge)
Front graphics material (
Front graphics (
Wall mounting spec.
螺絲型號
Local Keyboard 按键板
Philips wordmark 商标logo
POS label POS
Kensington lock
Cable management (cable tie
Stand type (Swivel/non Swivel
)
旋轉
Table top stand
Speaker stand 喇叭/
Smart TV
Android OS Version
Linux OS Version
Customize Launcher
Customize Browser
Customize IME
開關 YES YES
自動待機 NA NA
(Front frame)
前框
边框
标签
安全鎖插槽
桌面支架 YES YES
切斷電源 [瓦]
中國標
內部/外部電源 Internal Internal
中國能效標識
產品製造
環境溫度
電視本
電
箱
装饰件 Black crystal Black crystal
边框材质
)
壁挂孔
揚聲器支架
)
/screw type
)
束線帶
旋轉/不
NA NA
NA NA
NA NA
YES YES
NA NA
NA NA
TBC TBC
3.8KG 3.8KG
4.9KG 4.9KG
730*472*193mm 730*472*193mm
730*430*71mm 730*430*71mm
825*128*514mm 825*128*514mm
532pcs(20") /1088pcs(40") /
1290pcs(40"HIGH)
L82 L82
Platsic Platsic
Platsic Platsic
100*100 100*100
YES YES
PHILIPS PHILIPS
NA NA
NA NA
NA NA
non Swivel non Swivel
NA NA
NA NA
NA NA
NA NA
NA NA
NA NA
532pcs(20") /1088pcs(40") /
1290pcs(40"HIGH)
7
Page 9
Customize Search Tool
NA
NA
Customize application for TV
APP store
LeTV 影视
Neflix
3rd party application install enable
Control via mobile device(Android)
OpenGL
Keyboard and Mouse support
Support USB Camera
QQ
Voice control
Gesture control
账户管理
(Face recognition & content
recommendation)
Portal
Help(e-manual)
Game in APP store
Wi-fi Miracast Certified (HDCP 2.2
supported)
GoogleCast Receiver
Tablet Screen Mirroring (Wi-Fi
TAD AppFTA channels (free app)
TAD Server, FTA channel
Indep. Watching (TV&PVR), FTA&CI+
SAT>IP Client, FTA
HEVC @ FHD 60Hz
HEVC @ UHD 60Hz
H264 @ UHD
VP9 @ UHD
UI & Interaction
Ux (Basic: without Dashboard,
Advanced: with Dashboard)
Animations 动画
Drag and drop 拖动
Remote Control Version (state if
include Keyboard/Pointer)
Sensor.accelerometer & sensor
gyroscope
Easy access to eDFU (Blue key) 电
子说明书
Text Entry (Basic : Text Entry via HID
and/or On-screen Keyboard)
Multi-view 多屏显示
Multi-task 多任务
Screen Format Adjustments 比例列
表
應用商城 NA NA
NA NA
NA NA
NA NA
NA NA
NA NA
NA NA
NA NA
NA NA
NA NA
NA NA
NA NA
NA NA
NA NA
NA NA
NA NA
NA NA
NA NA
N/A N/A
N/A N/A
N/A N/A
N/A N/A
N/A N/A
N/A N/A
N/A N/A
N/A N/A
N/A N/A
2K16 UI 2K16 UI
Basic Basic
N/A N/A
N/A N/A
N/A N/A
N/A N/A
YES YES
Basic Basic
N/A N/A
N/A N/A
4:3,16:9,film,PC Mode(HDMI) 4:3,16:9,film,PC
Mode(HDMI)
8
Page 10
Dual Screen (TV and TeleText) 图
文
e-Sticker
Priority Channel List
Channel Cloning via USB
Logo Editor (Channel Editor)
Channel Scanning (Australia/NZ)
Time Zone (Australia/NZ) 時
PC Sorting
Intelligent Source List
On-screen Remote (via HDMI)
Cold boot to broadcast
Cold boot to online dashboard
Warm boot to broadcast
Warm boot to online dashboard
Electronic Program Guide (IP &
Broadcast)
8 Days Electronic Program Guide
Live Setting Assistant (include PQ
level) 设置助手直播
Signal Strength Indication 信号
强度指示
Two simultaneous recordings in stdby
UI Languages
Memory Profile (DRAM)
Menu Layout Update 菜单更新
换UI
Wizards (Ease of Installation) 安
装工具(类似螺丝刀)
Single Sign On (google a/c only)
Personalized Dashboard(定制化UI)
Face recognition 面部识别
Shopmode 2015
CloudTV app content in search and
Dashboard (on TV)
Firmware Upgradeable 软件升级
Smart TV
Software Platform
Android Home Page
Android OS
UI Resolution
Google Voice Search
Google Hangouts
Remote Control
Gesture
區
後台掃 台
N/A N/A
YES YES
YES YES
N/A N/A
N/A N/A
N/A N/A
N/A N/A
N/A N/A
N/A N/A
N/A N/A
N/A N/A
N/A N/A
N/A N/A
N/A N/A
N/A N/A
N/A N/A
N/A N/A
N/A N/A
YES YES
English, Malaysia,
Indonesian, Thai,
Vietnamese,Chinese
128M 128M
N/A N/A
N/A N/A
N/A N/A
N/A N/A
N/A N/A
YES YES
N/A N/A
YES YES
N/A N/A
N/A N/A
N/A N/A
N/A N/A
720P 720P
N/A N/A
N/A N/A
N/A N/A
N/A N/A
English, Malaysia,
Indonesian, Thai,
Vietnamese,Chinese
9
Page 11
Pre-installed Google Apps (Google
Search, Google Hangouts, Google
Play Movies, Google Play Music,
Basic Performance Profile
Google Play
Memory size to install apps
Extendable USB storage for App
Download
Smart TV Experience
DLNA 1.5 - DMR, DMP
DLNA 1.5 - DMS
MultiRoom Client, FTA+Scrambled
Non-Copy Protected & CI+
MultiRoom Server, FTA+Scrambled
Non-Copy Protected & CI+
PVR Auto Recording (IP-EPG)
API - access control
xTV Support
Rich User Interaction
Smart Home
4k photo support in Android apps
4k photo support in Picture apps
4k photo support in USB/DLNA
UHD content playback from all sources
(USB,DLNA,web)
NextFlix UHD
Youtube UHD
Google Play UHD
Smart TV with Broadcast PIP; single
video
SMART TV offline content (cached)
MPEG-DASH (CENC & CFF)
HLS
Wake up from APP
Preinstalled Apps
Netflix *
YouTube Leanback (HTML5) *
Spotify *
BBC iPlayer *
Skype
Skype Cowatch (mix audio)
Cloud Explorer
Cloud TV
Smart TV Services
Social Apps
Game Dashboard in Google launcher
OpenGL Games
N/A N/A
N/A N/A
N/A N/A
N/A N/A
N/A N/A
N/A N/A
N/A N/A
N/A N/A
N/A N/A
N/A N/A
N/A N/A
N/A N/A
N/A N/A
N/A N/A
N/A N/A
N/A N/A
N/A N/A
N/A N/A
N/A N/A
N/A N/A
N/A N/A
N/A N/A
N/A N/A
N/A N/A
N/A N/A
N/A N/A
N/A N/A
N/A N/A
N/A N/A
N/A N/A
N/A N/A
N/A N/A
N/A N/A
N/A N/A
N/A N/A
N/A N/A
N/A N/A
N/A N/A
N/A N/A
N/A N/A
10
Page 12
Playstation Now App
N/A
N/A
OnLive App
STA 3.0 & 4.0 Clients
STA shared App store
Camera & Mic API
TV as an app (Verimatrix, etc)
Companion Apps
Philips TV Remote App
Sharing in Remote App
Ambilight TV App
Ambilight+Hue App
User Manual App
Channel Editor - PC Client App
Mobile app for in-shop (cover
MRA/Demo Me/Shop RC functions)
Proximity based shop app activation
(BTLE/NFC/QR tbc)
MyRemote App (Old TV Remote App)
Ambilight Lounge App
Broadcast/Certification
DVB-T/C
DVB-S/S2
DVB-T/T2
DVB-C2
ISDB-T
SBTVD-T (Brazil)
SATVD-T (Argentina)
Analog (LATAM/APMEA)
Nicam (APMEA)
Enhanced SSU
Italy HD Book 2.1.1 (GOLD)
HD-Book Italy 3.0 (HEVC@FHD)
UK D Book 7a
Freeview SD (UK)
Freeview HD (UK)
MHEG 5(只有HbbTV有)
TiVuON (IT)
TNT HD (FR)
Argentina Ginga - NCL
Brazil Ginga (A/B )
Video Playback
Dual Cam (CI+)
Dual Tuner
CI+ 1.4 Multistream CAM
CI+ 1.3 CAM
HBBTV 1.5
N/A N/A
N/A N/A
N/A N/A
N/A N/A
N/A N/A
N/A N/A
N/A N/A
N/A N/A
N/A N/A
N/A N/A
N/A N/A
N/A N/A
N/A N/A
N/A N/A
N/A N/A
N/A N/A
NA NA
NA NA
NA NA
NA NA
N/A N/A
NA NA
NA NA
PAL SECAM NTSC PAL SECAM NTSC
NA NA
NA NA
NA NA
NA NA
NA NA
NA NA
NA NA
NA NA
NA NA
NA NA
NA NA
NA NA
YES YES
N/A N/A
N/A N/A
N/A N/A
N/A N/A
N/A N/A
11
Page 13
HBBTV 2.0
N/A
N/A
MHP
Ziggo Interactief
3D DVB Phase 1
3D signaling bits in broadcast
Background update installation
Marlin/ Play ready
Sustainability/Power
PVC / BFR Free 无卤
Mercury Free 无汞
Cabinet Resin 面框材质
Eco-Flower Certified
ECO Mode
Mains Power
Standby Power
Quick Startup
Network Standby mode (max 6W)
Off Mode Power
On Mode Power (Consumption Power)
Auto Switch-Off Timer 休眠时间
Green packaging (Non-EPS) 绿
色包装
Light Sensor 光感应器
Picture Mute (For Radio) 单独听
EU Energy Label (A++/A+/A/B ) Requirement
non-EU Energy Label - Standby Label
(A/B/C)
Blauer Engel (Germany)
Certification
Dolby Digital/Dolby Digital Plus/Dolby
Pulse
DTS 2.0+ Digital out
DTS Premium Sound
DivX
WMA
Wi-Fi
DLNA Certified (DMR/DMP/DMS)
SKYPE
HDMI
ACCESSORIES
RC
遙控器
DFU (DFU / eDFU)
檔)
QSG
使用指南
USB
SD card
說明書(紙本/電子
N/A N/A
N/A N/A
N/A N/A
N/A N/A
N/A N/A
N/A N/A
YES YES
N/A N/A
ABS ABS
N/A N/A
YES YES
AC 100-240V 50/60Hz AC 100-240V 50/60Hz
<0.5W <0.5W
YES YES
NA NA
<0.5W <0.5W
55W (max.) 55W (max.)
YES YES
YES YES
NA NA
N/A N/A
NA NA
YES YES
NA NA
N/A N/A
N/A N/A
N/A N/A
N/A N/A
N/A N/A
N/A N/A
N/A N/A
N/A N/A
N/A N/A
RC0 RC0
eDFU eDFU
YES YES
NA NA
NA NA
12
Page 14
WiFi Dongle
NA
NA
YpbPr extension wire
L/R extension wire
AV extension wire
RF DC ISOLATED PROTECTOR
Connector guide
Service Contract Brochure and sticker
RC with Batteries
3D glasses
Microphone
Maincord (Power cord)
Antenna Cable
By-packed wallmount
Warranty card
Markets
Safety Legal Leaflet (EU) - 3D Health
Advise and Ukraine requirement(安规
小册子)
Philips Warranty Leaflet 保修卡
Optional accessories
Active Glasses (PTA509/529)
Passive Glasses (PTA419 )
Dual Gaming Glasses (PTA436)
Wi-Fi Adapter (PTA01/00/PTA127/55 )
Skype Camera (PTA317 )
Others
By-packed accessories
Active Glasses (509)
Active Glasses (529)
Passive Glasses (PTA417 )
Dual Gaming Glasses
Woofer (e.g. SWB50) with Soundbeam
Sound Bar
Detachable speaker base 可拆卸喇叭
Wireless audio adaptor
Wi-Fi Adapter (PTA01/00/PTA127/55 )
Skype Camera (PTA317 )
Table Stand 底座
Accessory Bag
Mains Cord (EU/UK/Brazil/APMEA ) 电
源线
Remote Control
Philips BatteriesX2
Printed QSG
NA NA
NA NA
NA NA
NA NA
NA NA
NA NA
NA NA
NA NA
NA NA
NA NA
NA NA
NA NA
YES YES
NA NA
N/A N/A
YES YES
N/A N/A
N/A N/A
N/A N/A
N/A N/A
N/A N/A
N/A N/A
N/A N/A
NA NA
NA NA
NA NA
NA NA
NA NA
NA NA
NA NA
NA NA
NA NA
NA NA
YES YES
YES YES
YES YES
YES YES
YES YES
YES YES
13
Page 15
14
Page 16
15
Page 17
16
Page 18
17
Page 19
18
Page 20
19
Page 21
20
Page 22
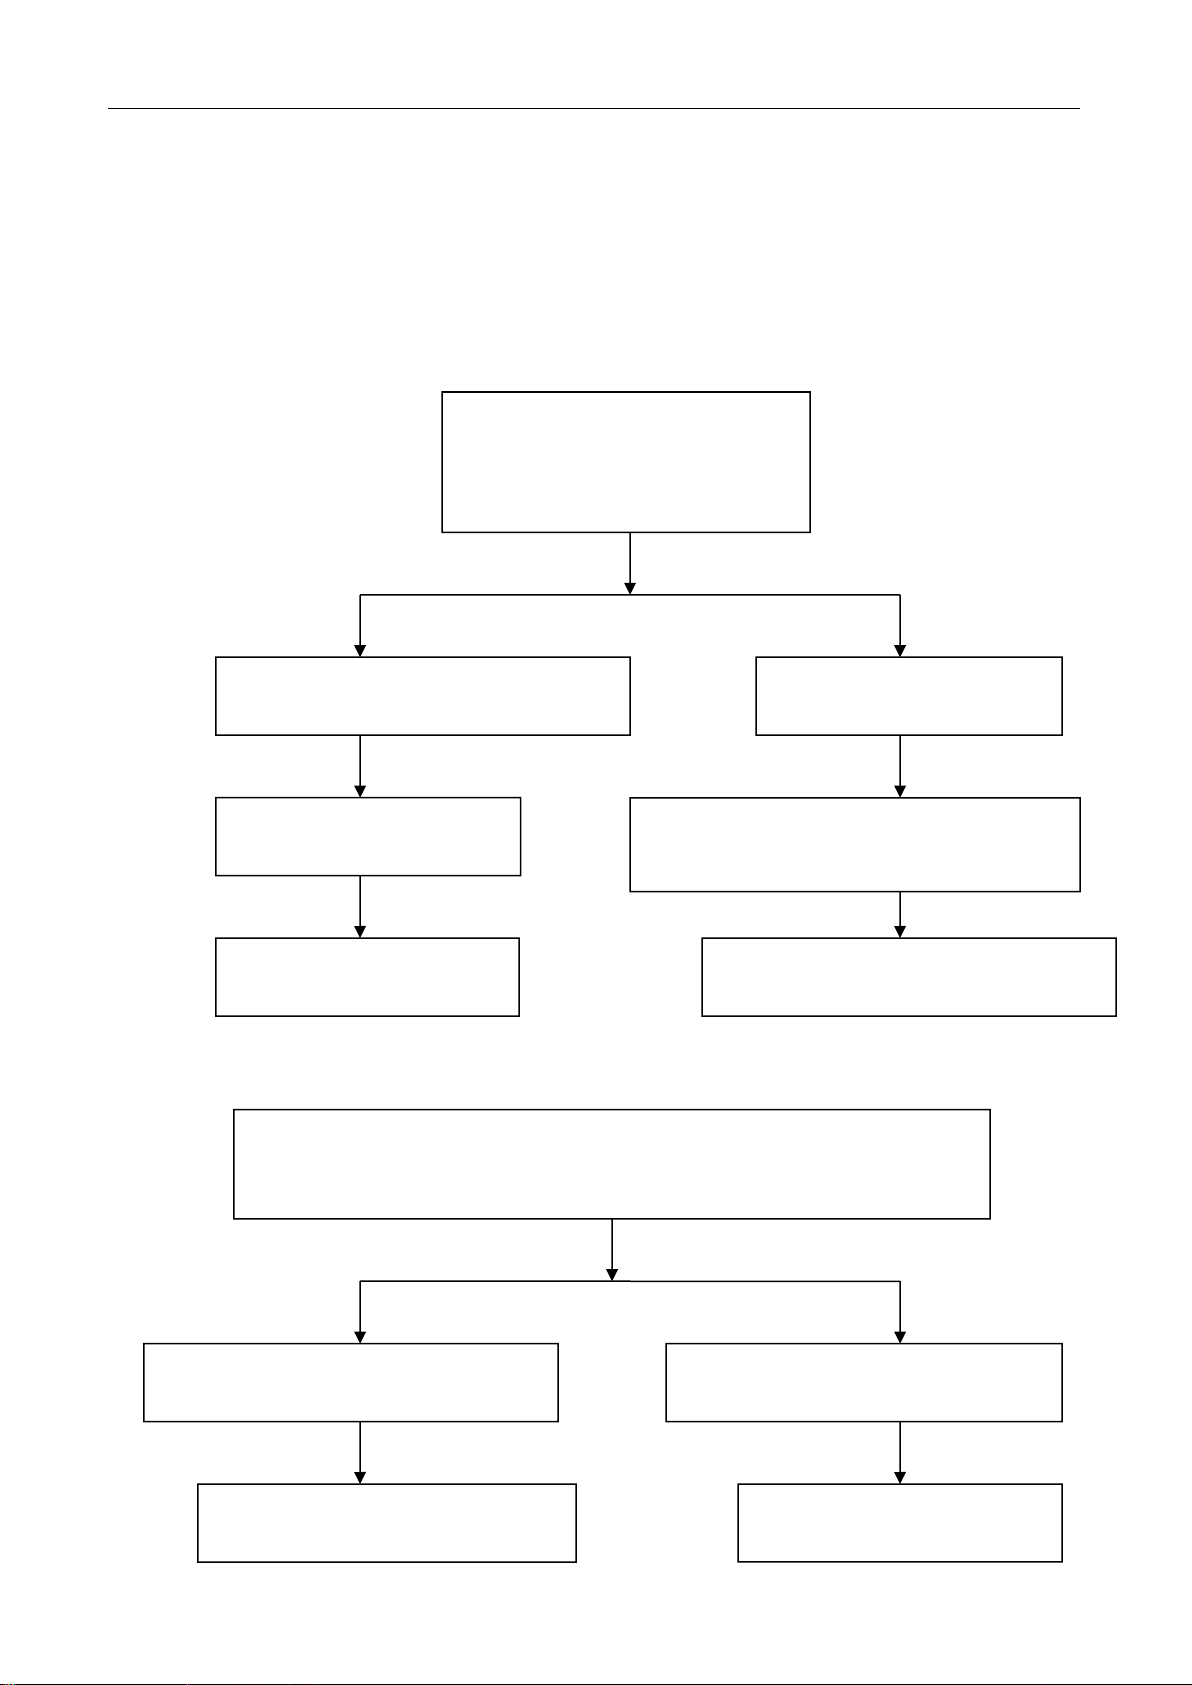
Document: After-sales Maintenance Service Manual No.: T7** Version: 3.0 Effective from: March15th, 2010
Page of 14 KTC
1
After-sales Maintenance Service Manual
Date: March 2010
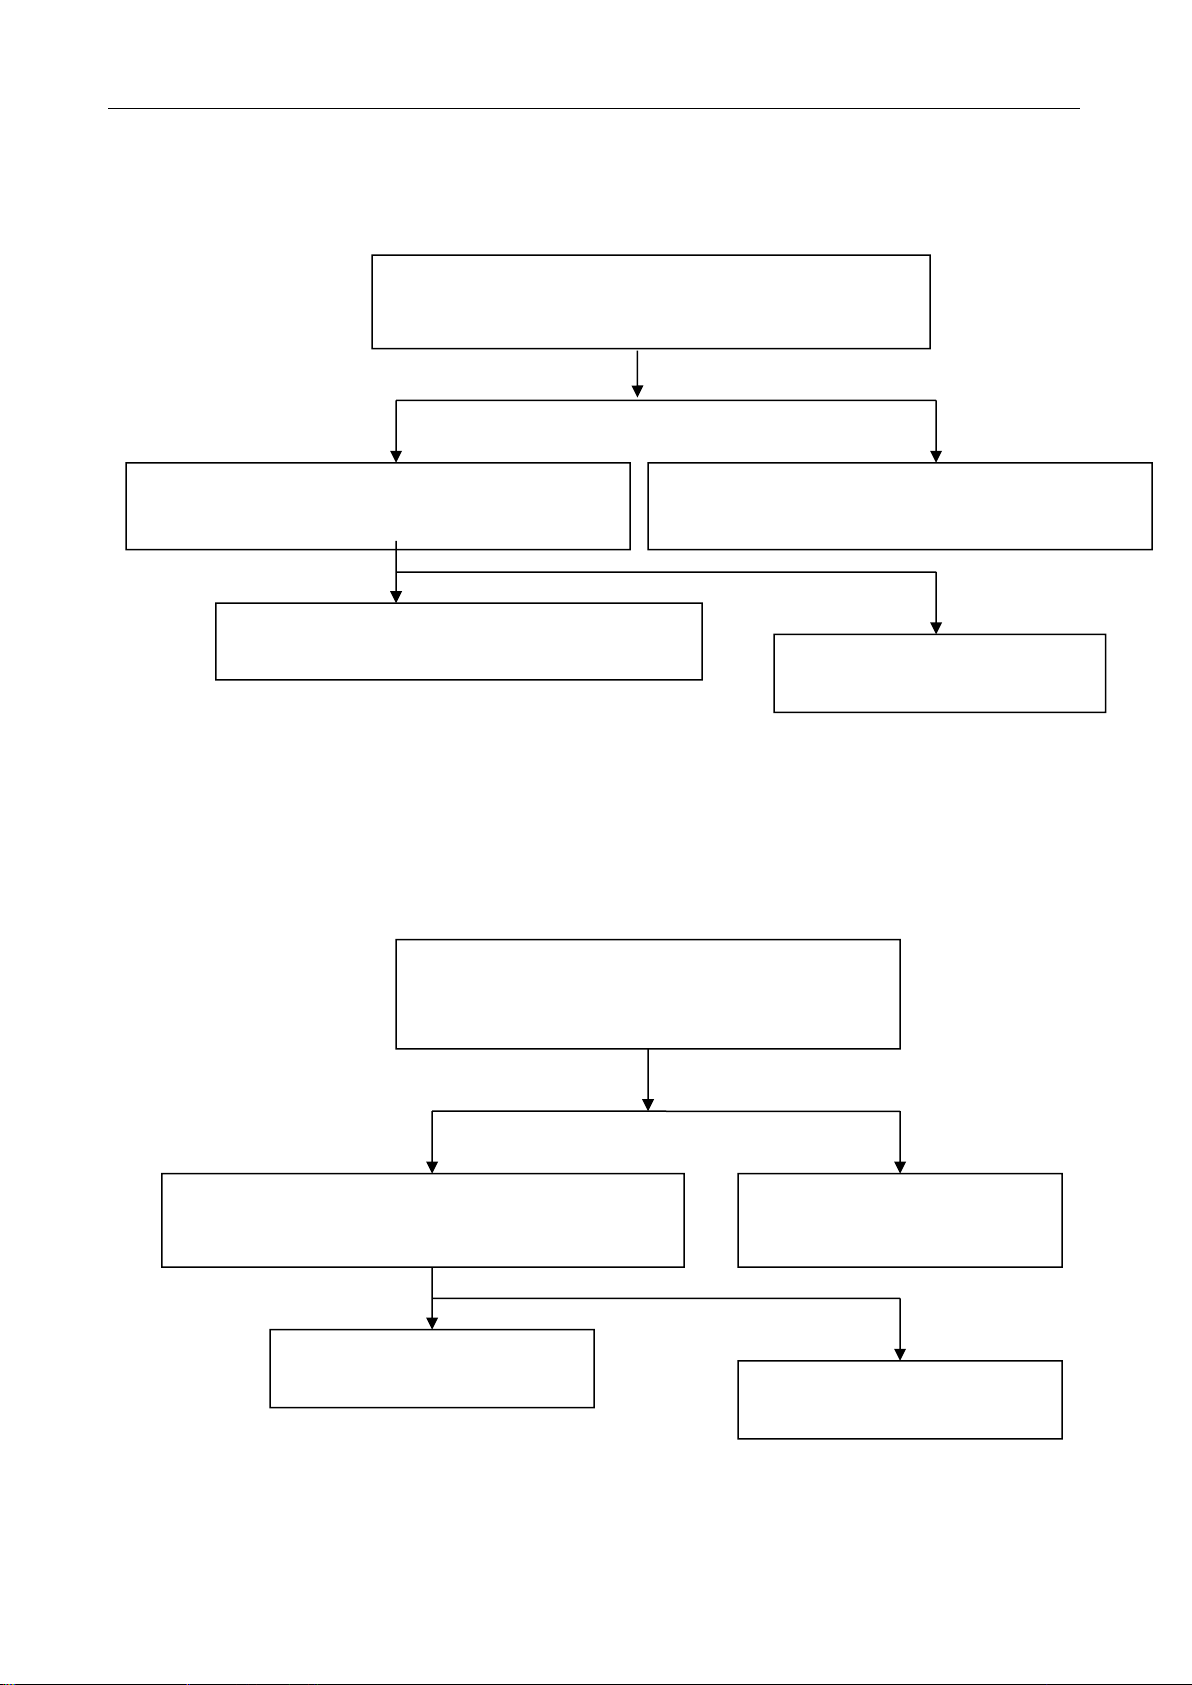
1. No power
2. Without light
Check 220V power supply voltage
and the contact of power socket
Check AC( 220V) voltage and the
contact of CN101 socket.
Check +5V and +12V output from
embedded power supply for abnormity
Check +5V and +12V on
main board for abnormity
Replace power cord or power
socket
Check for open-loop of fuse,
or replace main board
Check main board of power supply for
looseness, open-loop and poor contact
YES
NO
YES
NO
YES
NO
When the indicator is on but there is no display, check remote control for
power-off, minimum brightness, contrast ratio, check high-voltage switchboard
controlled by main board for abnormity
Check the fuse on high-voltage board for
the supply of 12V
Check each triode of control part for
abnormity or replace main board
Replace high-voltage switchboard
Check fuse
YES
YES
NO
NO
Abnormal output voltage +5V and +12V from
embedded power supply, replace embedded
power supply with the same model
Troubleshooting Procedure
21
Page 23
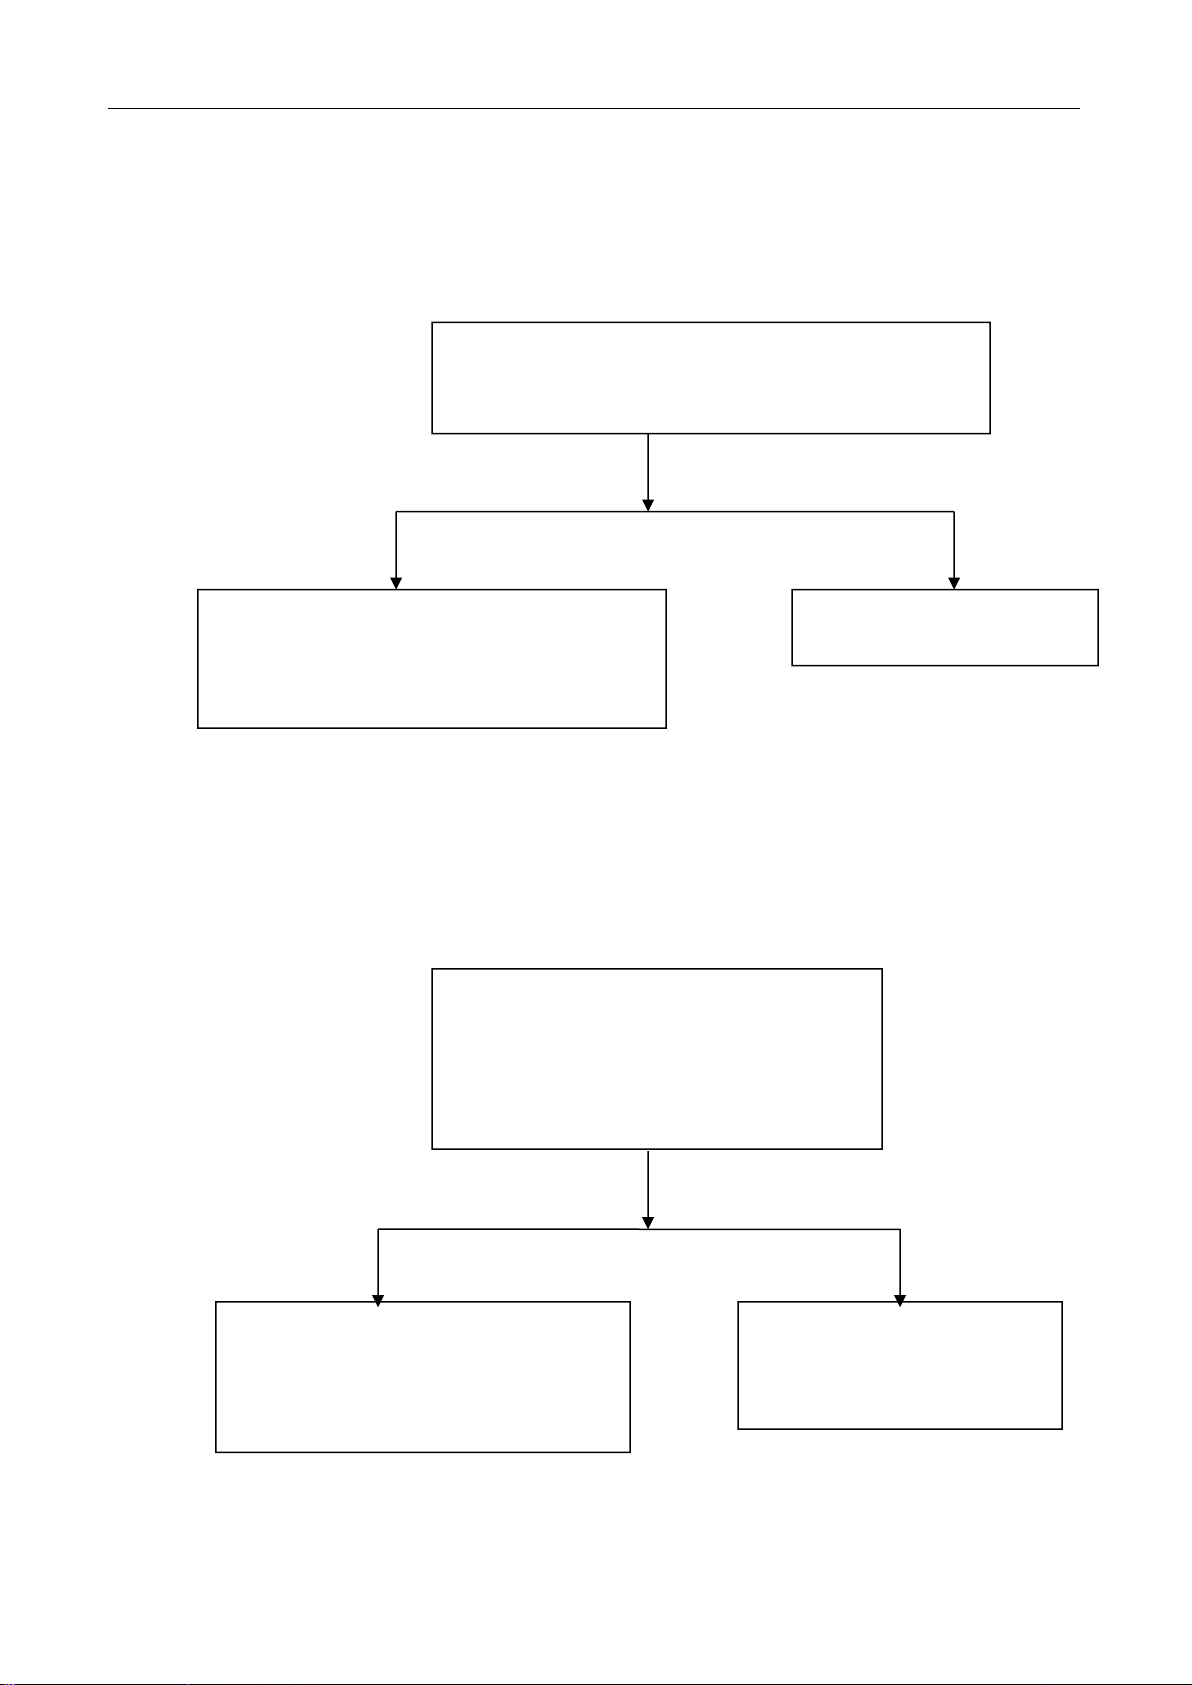
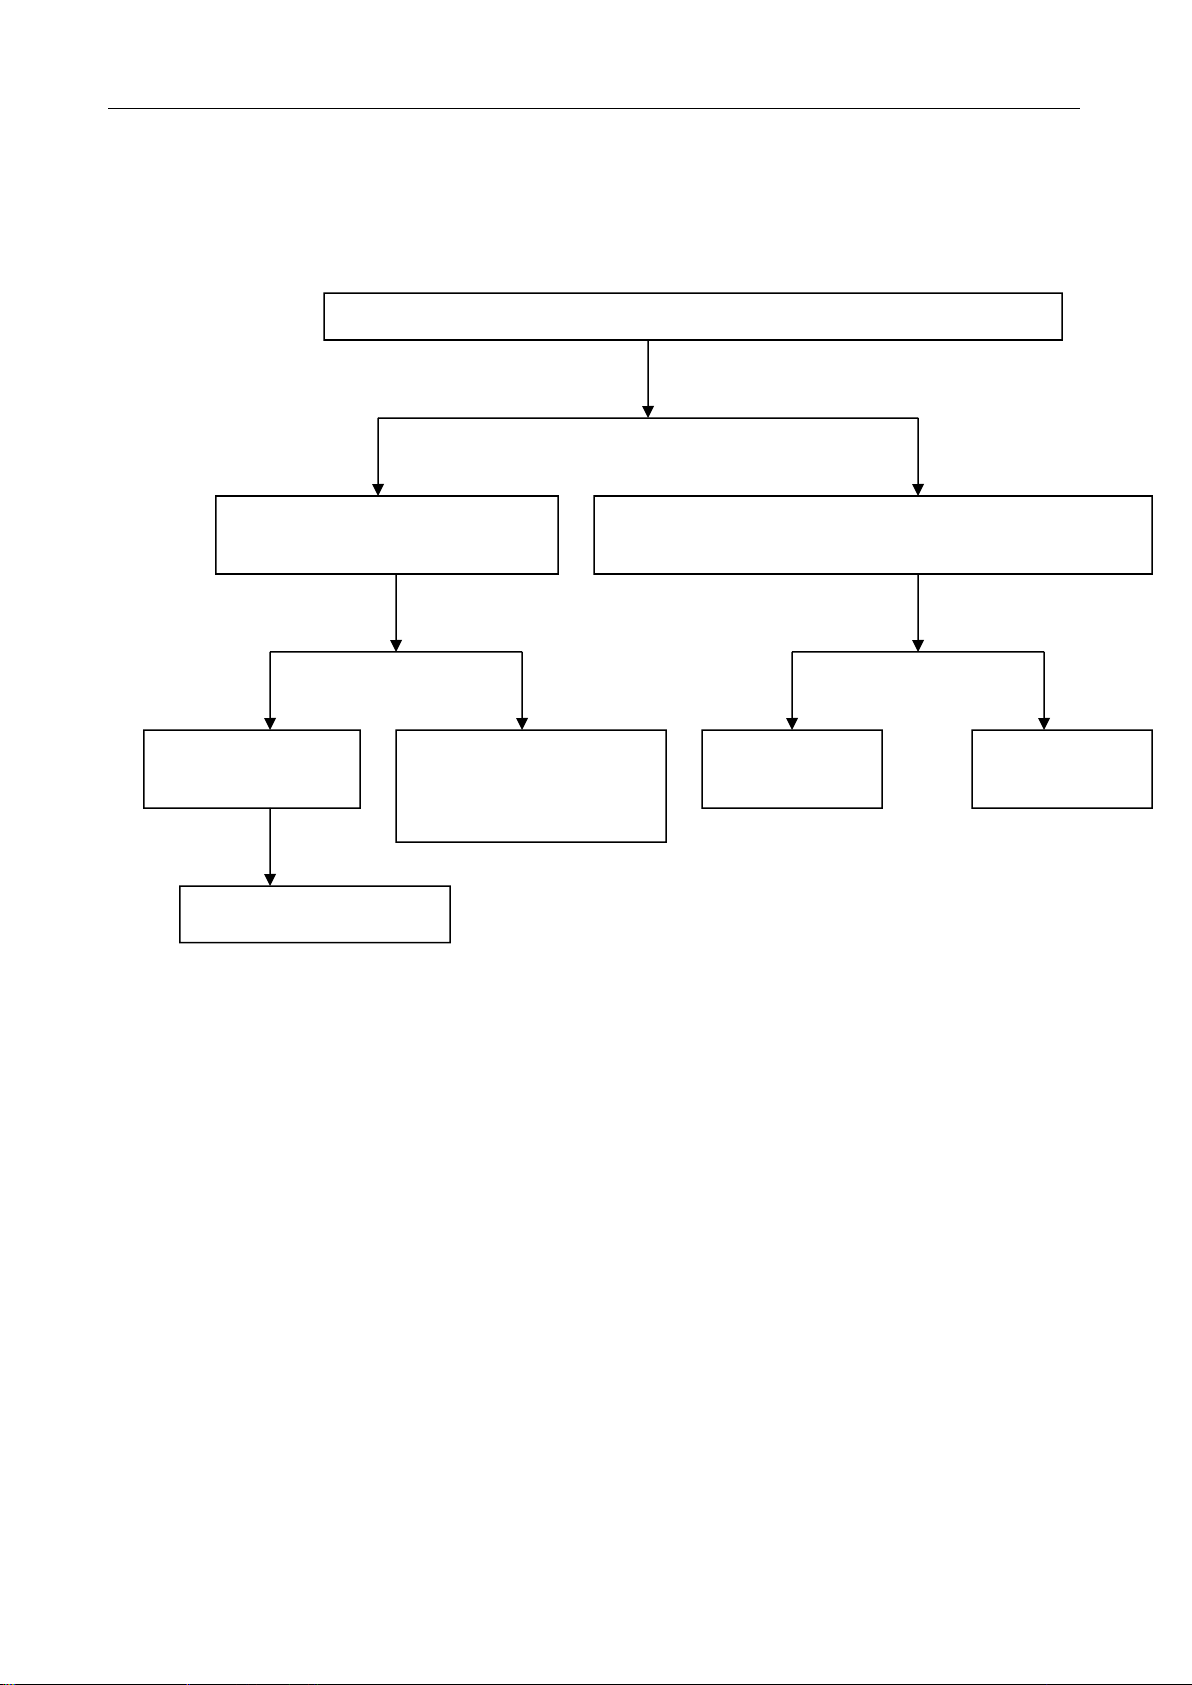
3. Protection or without light (refers to the disappearance of image several seconds
after the emergence of image)
4. White panel
The image disappeared immediately after the
emergence; check the plug of high-voltage switch board
for striking sparks and poor contact
No problems identified, replace high-voltage
board; if the fault remains, check the contact
line of back light of LCD for any damage, and
replace LCD board.
If there is spark striking,
replace high-voltage board
YES
NO
White panel refers to the back light works
without visible signal and just show white
screen. Check the voltage of socket for flat
cable connecting the main board to screen
for abnormality
Check the interface between main board
and connect line for any looseness,
shedding, if no abnormity existed,
replace LCD screen
Check the power supply chip of
control screen or replace main
board
YES
NO
22
Page 24
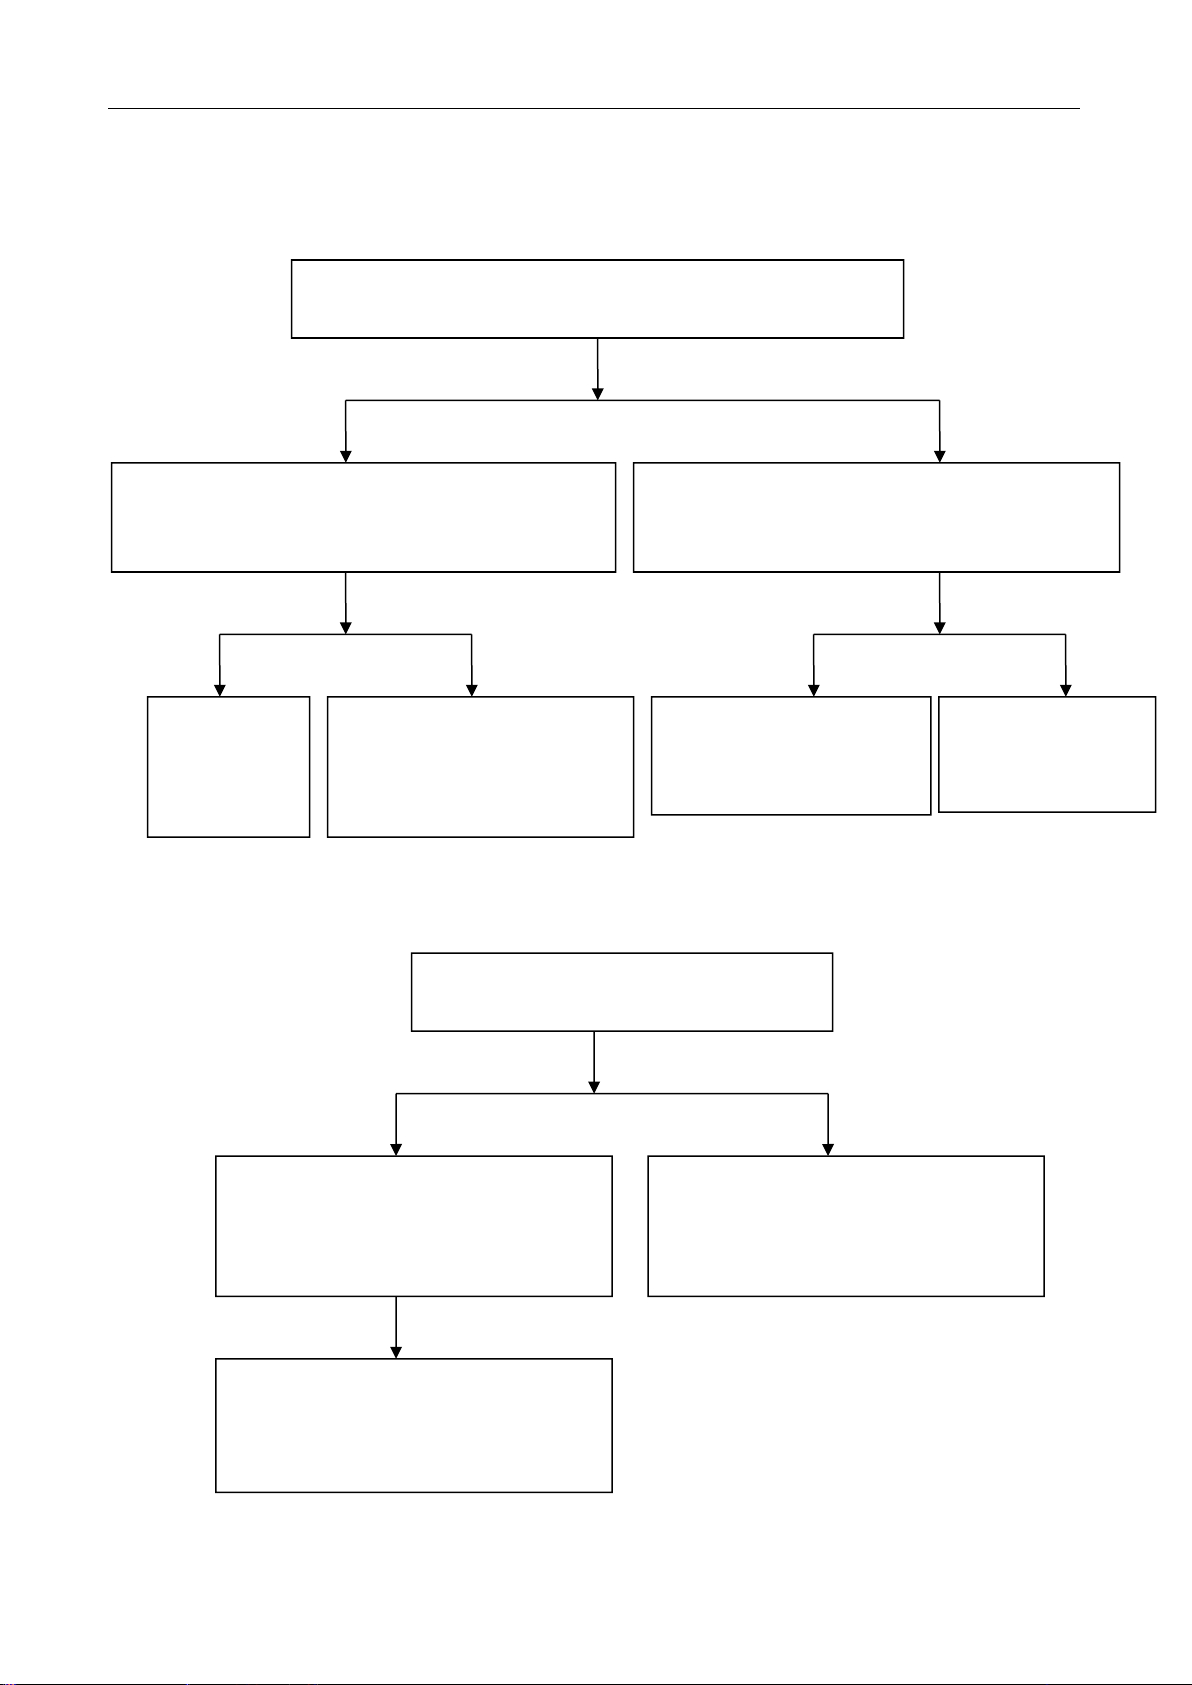
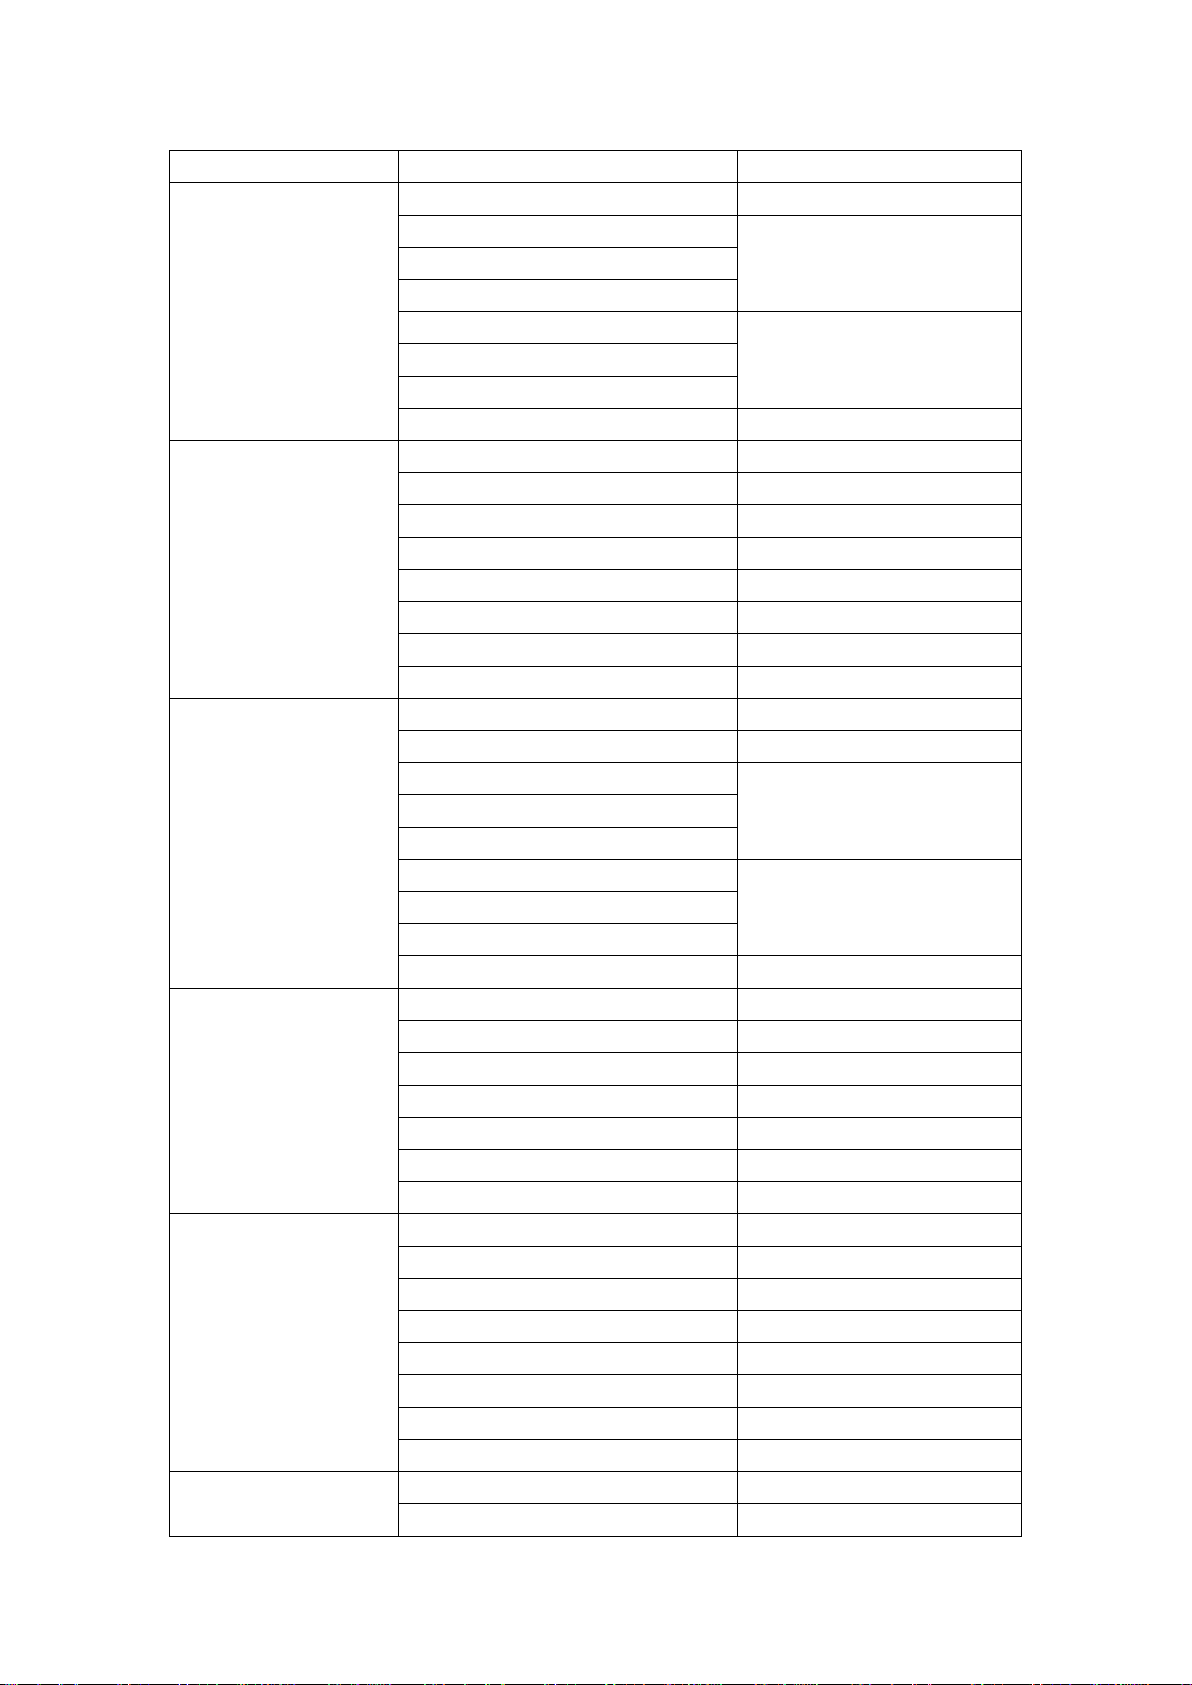
5. White screen after power-off (work normally when power on, but when power-off or
no signal input, the screen shows a white screen)
6. TV without channel or with color cast
Check whether there is change of voltage at the high voltage
board controlled by main board when power-on and power-off
Check whether the voltage change of the control pins on
the plug interface of high voltage board is normal when
power-on and power-off
Check whether the voltage of the pin on main chip
controlling the working voltage of high voltage board is
normal when power-on and power-off
YES
NO
The circuit
related to
high voltage
board is poor
Check whether the lines
between main board and high
voltage board is in open-loop
or poor contact
Check relevant circuits of
high voltage board
controlled by main board
Replace poor main
chips or recopy
software
Check TV antenna plug for looseness and
poor contact
If with color cast, check the setting of
color system under menu; and change
of color system to see whether it is
normal (Usually set to automatic)
Replace antenna plug
Check the antenna and its signal
source, if no problems exist, replace
tuner or control chips with the same
model
NO
YES
YES
YES
NO
NO
23
Page 25
7. Poor sound
8. No VGA input signal
Switch to other audio input, check whether DVD
input and PC main board input has sound
Poor sound refers to without sound or with noise; check
whether the selection of sound system is proper
No sound; check whether remote control mute is
selected and switch sound system
No sound for other inputs; check the sound
amplifier and the shared control circuit
There is sound for other inputs,
replace TV tuner or control chip
YES
YES
NO
NO
VGA signal input does not respond, the screen
prompts “Please input signal”, check whether PC
signal source and signal line is normal.
Check VGA signal input board and see whether the row
and field sync signal protection diode is broke down
Replace PC or signal line, check
display VGA plug for looseness
Replace the motherboard or
factory reset is normal
Replace the 5.6V Zener diode
on the motherboard
NO
YES
YES
NO
24
Page 26
9. Poor embedded power supply of TV
10. Common fault of LCD screen
10.1 Bright line or bright belt (BL): constant longitudinal or transverse illuminating line or
belt due to non-conformed connection between IC and glass
10.2 Dark line (DL): constant longitudinal or transverse illuminating line due to
non-conformed connection between IC and glass.
10.3 White panel (WP): only light tube illuminates owing to non-conformed drive plate of
the LCD, without any display signal in the display area, and the whole screen is white.
10.4 Screen breaking: (overflow of LCD): with damage or invisible damage of the liquid
crystal glass, irregular black defect occurs from liquid crystal body to glass and polarizer,
which can not be seen at any image. The overflow portion can not form image and does not
display.
10.5 Pressing Scrape (PS): after local display area at the front of LCD is heavily pressed,
Power on, check embedded power supply 5VSB in TV for 5V voltage output
High electrical level existed at
STB (higher than 2.5V)
Replace power supply
YES
YES
NO
NO
Check EC2 for 380-400V
voltage; if there is not,
replace power supply
Check +5V , +12V
for normal input
YES
Check power supply line for looseness, check indictor for
working and power supply socket for looseness
NO
NO
Replace power
supply
Fasten lines
and socket
25
Page 27

glass of the pressed portion is not damaged, the liquid crystal body can not display normally,
with spot or block black defect.
10.6 Screen mess: irregular color display arising from damage of driving plate in LCD.
26
Page 28
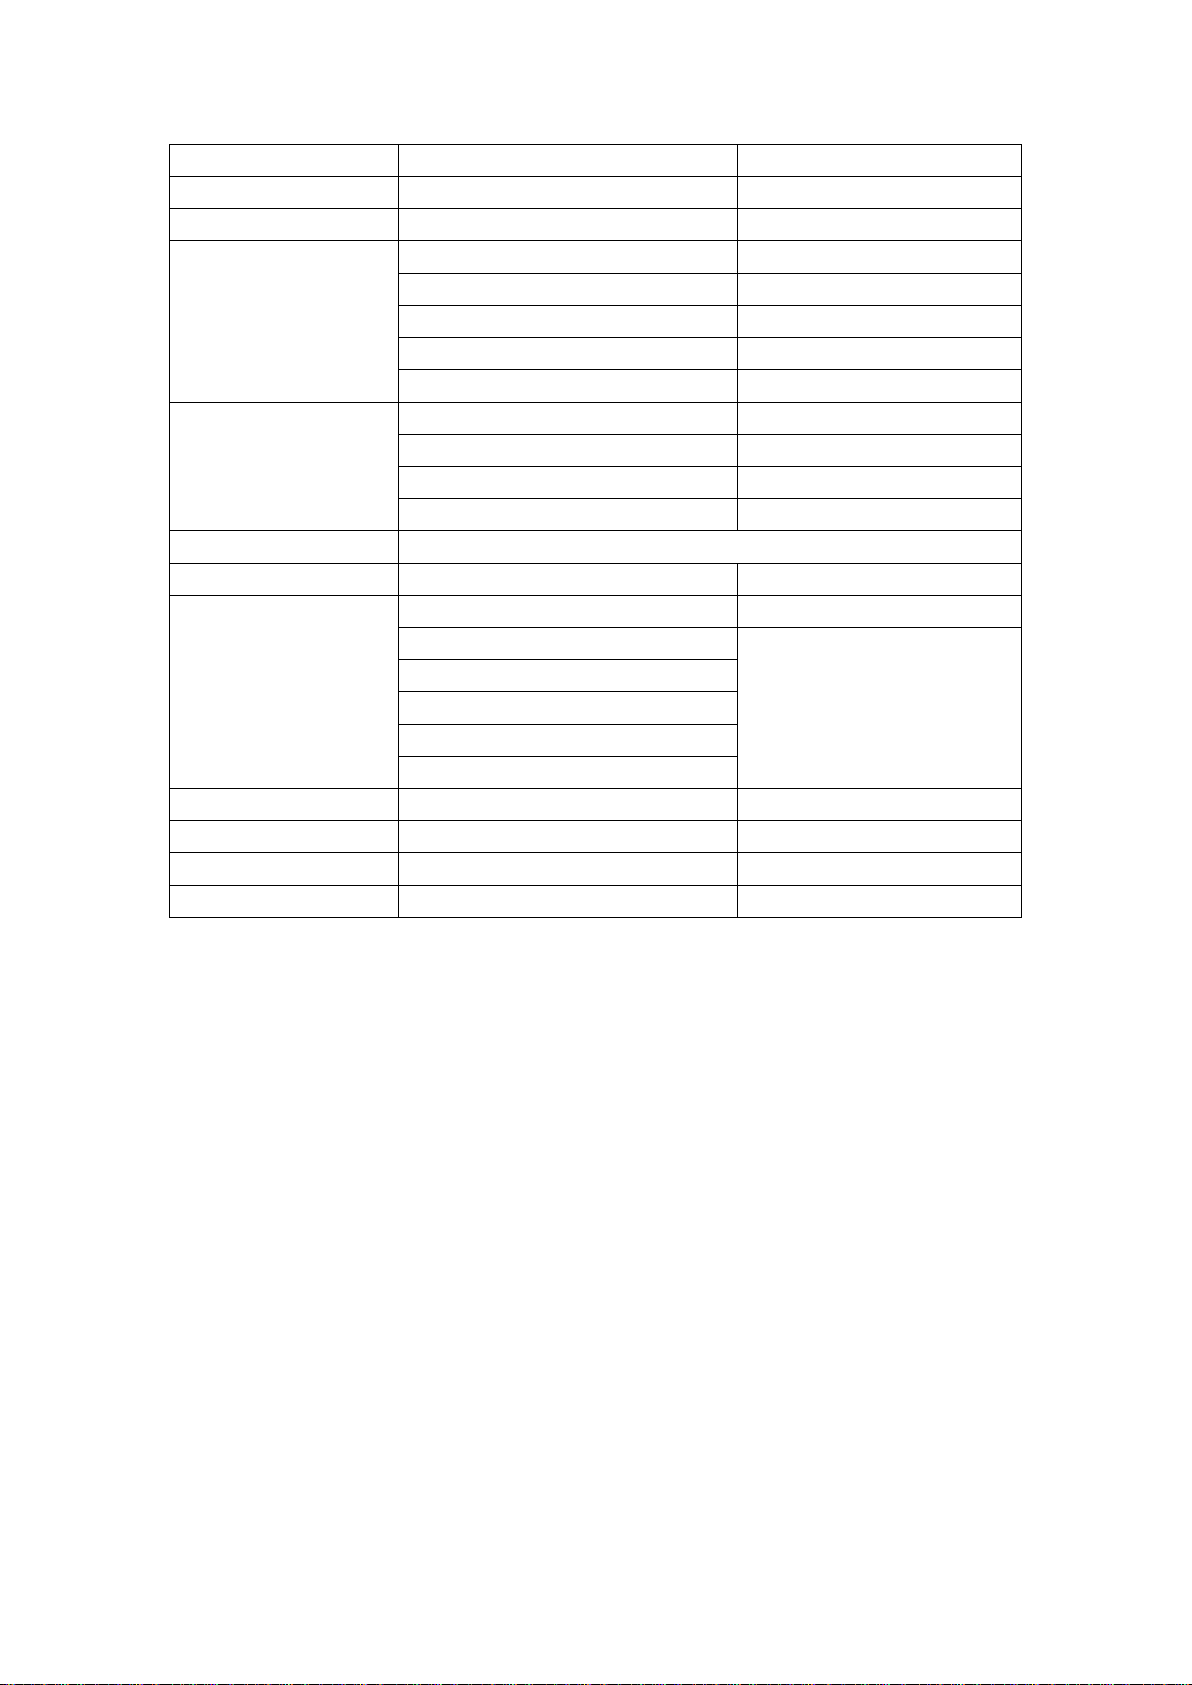
Factory menu entry: Press MENU, and then press 1999
Primary menu Secondary menu Value,remark
MDOE VGA,YPBPR,Selection
R-GAIN
G-GAIN
ADC ADJUST
PICTURE MODE
W/B ADJUST
SSC SETTING
Spectial set 2HOUR OFF 2hours power off enable
VIF Vif 1 Vif set
B-GAIN
R-OFFSET
G-OFFSET
B-OFFSET
AUTO ADC ADC automatically adjust
Input Source Source Selection
MODE Dynamic/Standard/Sotf/User
BRIGHTNESS BRIGHTNESS
CONTRAST CONTRAST
COLOR COLOR
SHARPNESS SHARPNESS
TINT TINT
Copy all No function
inputsource Source Selection
TEMPERATURE Cool, Stan dard, Warm
R-GAIN
G-GAIN
B-GAIN
R-OFFSET
G-OFFSET
B-OFFSET
Copy all No function
MIU Enable DDR spectrum enable
MIU0 Span Exhibition frequently wide
MIU Step Spread spectrum step
LVDS enable LVDS spectrum enable
LVDS Span Exhibition frequently wide
LVDS Step Spread spectrum step
LVDS swing LVDS swing
WDT Watch dog on/off
White pattern Whi te p att er n sel ect ion
Restore user default Factory reset
PVR_RECORDALL PVR Record on/off
Power Power mode selection
Mirror Mirror function selection
Ageing mode Ageing mode enable
Vif 2 Vif set
Front-end gain adjustment
Clamp level adjustment
White level adjustment
Black level adjustment
27
Page 29
Vif 3 Vif set
Qmap adjsut PQ setting
PEQ PEQsetting
OverScan Overscan_resolution Reselution select
Overscan_hsize Adjust overscan H size
Overscan_hposition Adjust overscan H position
Overscan_vsize Adjust overscan V size
Overscan_vposition Adjust overscal V position
other Test pattern
UART DEBUG DEBUG ON/OFF
HDMI CEC/ARC CEC/ARC ON/OFF
Backlight Adjust backlight
CI+ key usb upgrade CI+ key usb upgrade
SW information SW information
MODE Feature Selection
OSD 0
Non-linear
Channel table1 KTC factory Frequecy table set
CI factory setting No function
Channel table2 KTC factory Frequecy table set
Channel dvbt KTC factory Frequecy table set
OSD 25
OSD 50
OSD 75
OSD 100
Curve adjustment
28
Page 30
MST6M182/6E182/TSUV59MSXU/MSD3553/V56/U69/ software upgrades
(After Service)
1、Software upgrade tools and materials
* Personal computer (WINDOWS XP or WINDOW7 32 bit operating system,USB2.0)
* AC100~240V power supply and power cord
* ISP burning board
* ISP burning board driver
* ISP Tool V4.5.2.8.SZ.exe
* VGA wire
* USB flash disk(2.0 version,Capacity not more than 8G)
* Mainboard software
2、Preparatory work before the upgrade
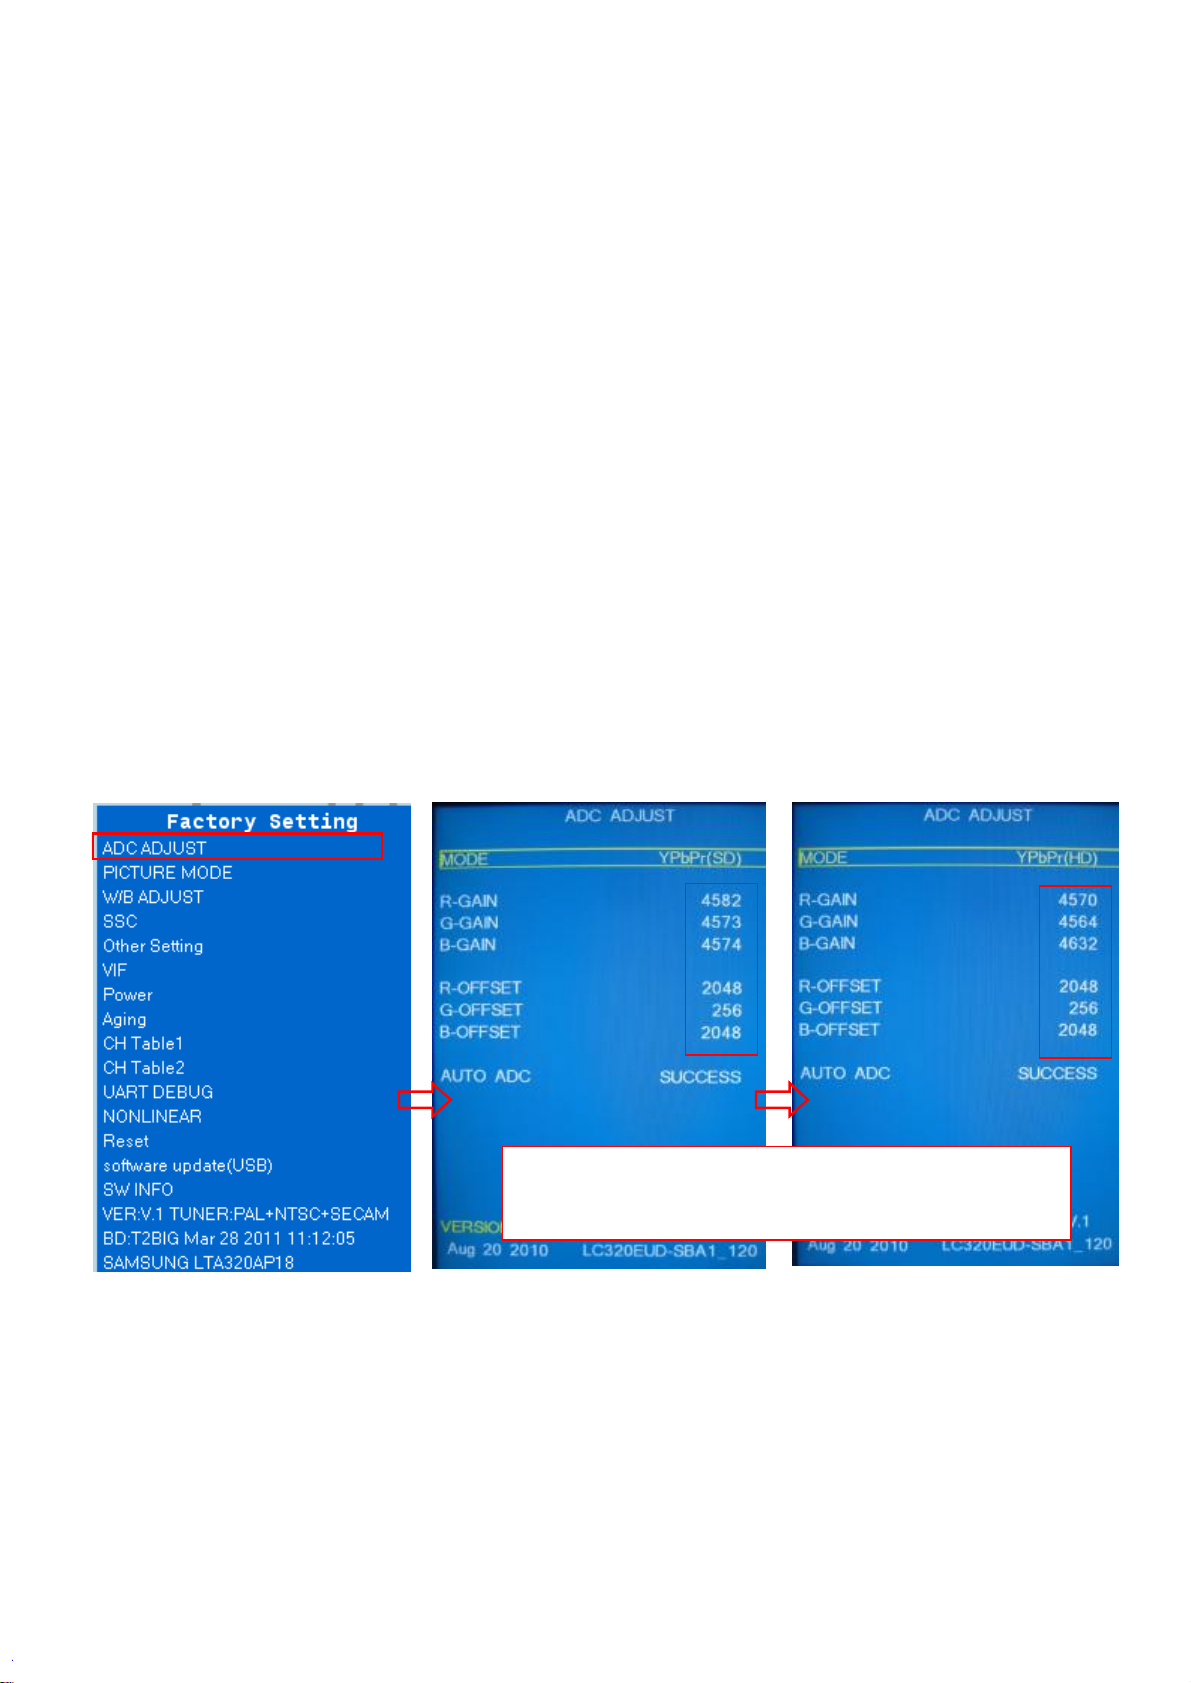
Recorded the white balance data of VGA/YPBPR signal source in factory menu before upgrading(FLASH initialization
may occur after the upgrade, flush color calibration data, then restore the data you have been recorded):
(1). In the condition of YPbPb message source, press the MENU button after appear the main menu, then
followed by 8202 number keys to enter the factory menu, select ADC ADJUST item, press the OK key to enter
the next level menu, move the cursor to the MODE item, press the left / right Moving button and move the
cursor selection in YPbPr (SD)item, record the R-GAIN/G-GAIN/B-GAIN value and
R-OFFSET/G-OFFSET/B-OFFSET value.
(2). In the ADC ADJUST item, press OK key to enter the next level menu, move the cursor to the MODE item,
press the left / right cursor keys to select YPbPr (HD) item, record R-GAIN/G-GAIN/B-GAIN value and
R-OFFSET/G-OFFSET/B-OFFSET value.
3、Operations and procedure of software upgrading:
(1). Changed the file name to "MERGE.bin", then store software in the FAT32 format blank U disk.
(2). Insert USB flash disk into the USB upgrade port, upgrade the software according to the following the operating
instructions::
Method 1(Method 1 will not erase the original EDID and HDCP KEY on mainboard. Easy operation, you only need
one U disk to upgrade. So we require customer use this way to upgrade.):
① . Start the machine and wait the normal picture display, press the MENU button on the remote control, will be
popping up the main menu, press the 8202 number keys and enter the Factory Setting menu.
②. Press up/down keys to move the cursor to "software update(USB)" function menu, then press right key to select
"YES", to implement USB upgrade command:
a. After prompt "File system init error", means that the machine have found USB device, but did not find the needing
Record the R/G/B-GAIN and R/B/G-OFFSET value under the
YPbPr(SD) and YPbPr(HD) mode, to be replaced the recorded value
after the machine software upgrade
29
Page 31
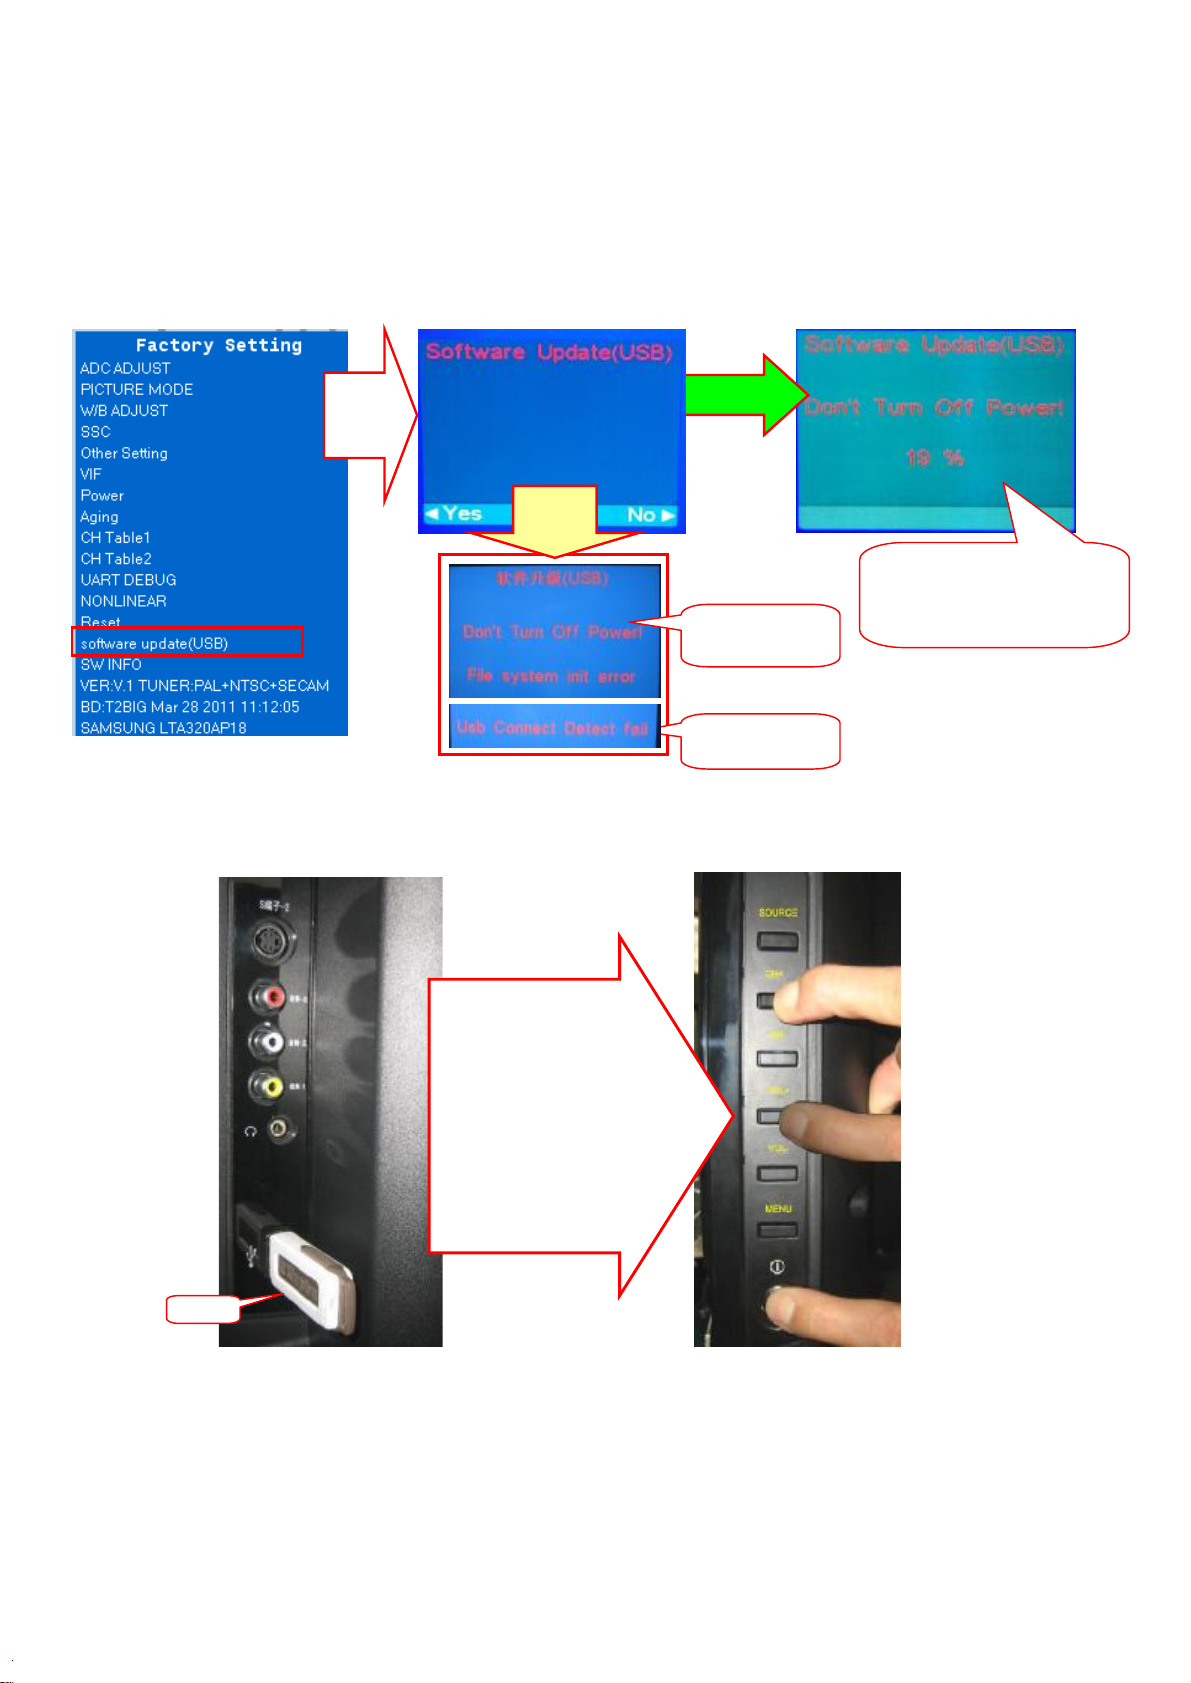
upgrade software, please check the software name is correct or format the U disk again and then copy software.
b. After prompt "USB Connect Detect fail", means that the machine does not find USB device, check if the USB device
has been inserted into, or change another U disk and try again.
③. Display percentage progress prompts and about 10 seconds later, the machine black screen and restart automatically,
means that the machine complete the upgrade process, turn off the machine first, then pull out the U disk.
Press
OK
key
升级
异常
Upgrading
Abnormal
Did not identify
upgrade file
When software upgrading
completed, the machine will
restart automatically, and then
display this menu
Did not identify
Method 2:Keep pressing VOL+ and CH+ keys on the machine panel, power on the machine, the standby light flashes
quickly after about 5 seconds, standby light goes out and turn into lighting after about a minute, means that upgrade is
completed.
Method 2:Keep pressing
VOL+ and CH+ keys on
the machine panel, power
on the machine, the
standby light flashes
quickly after about 5
seconds, standby light
goes out and turn into
lighting after about a
minute, means that
upgrade is completed.
U disk
(3). Notices:
①. When the machine Upgrading (U disk light flash), do not remove U disk or switch off the power, otherwise it will
destroy the software and lead can not upgrade.
②. The machine must be power off when inserted or pulled out U disk, to avoid damaging U disk or machine.
③. Because of compatibility between machine and U disk, some machines will not flicker during upgrading. Please
change U disk (The capacity of U disk is not more than 2G) or use method 1 to upgrade.
④. If the display screen can't display menu normally, it cannot use "method 1" to upgrade, you can use Mstar ISP Tools
to upgrade except method 1 and method 2.
30
Page 32
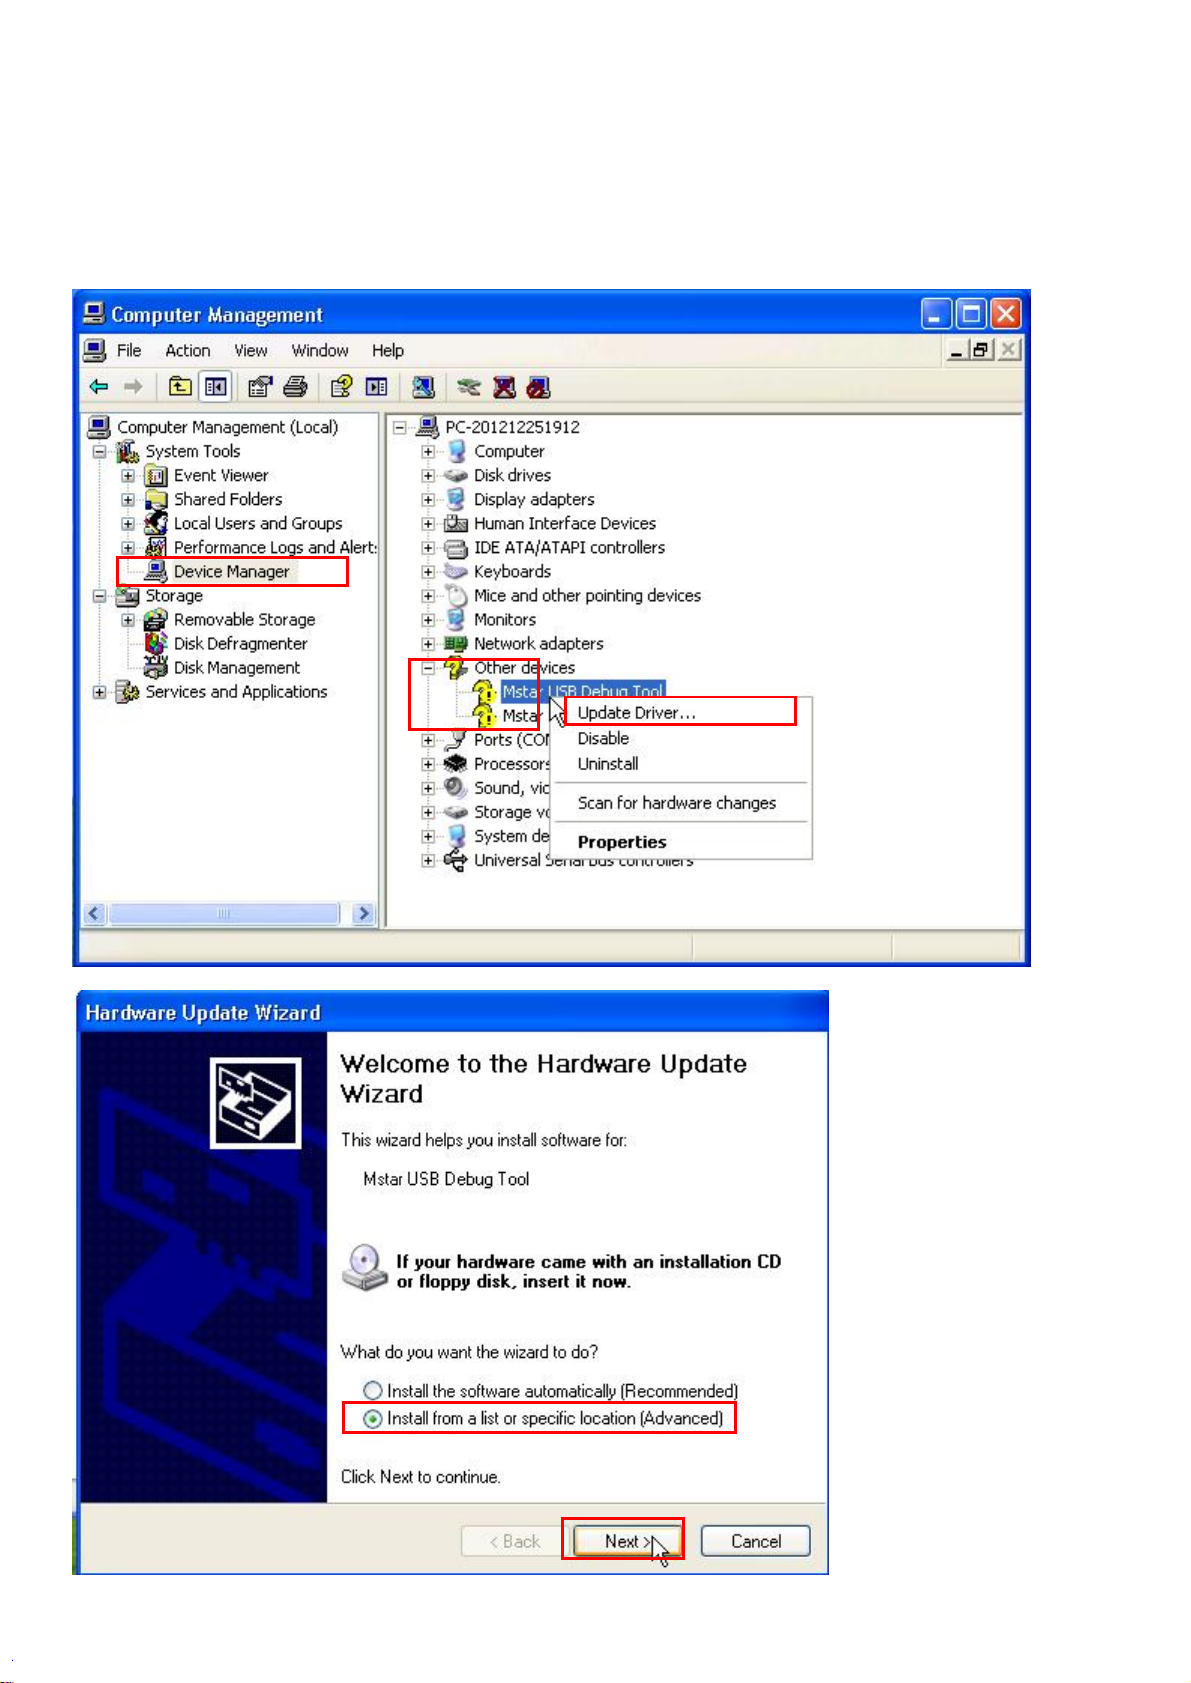
4、When cannot upgrade in accordance with the step two, or upgrade failed, can only ISP upgrade, please refer to the
following instructions.
(1). Connect the ISP burning board and TV VGA port with VGA cable.
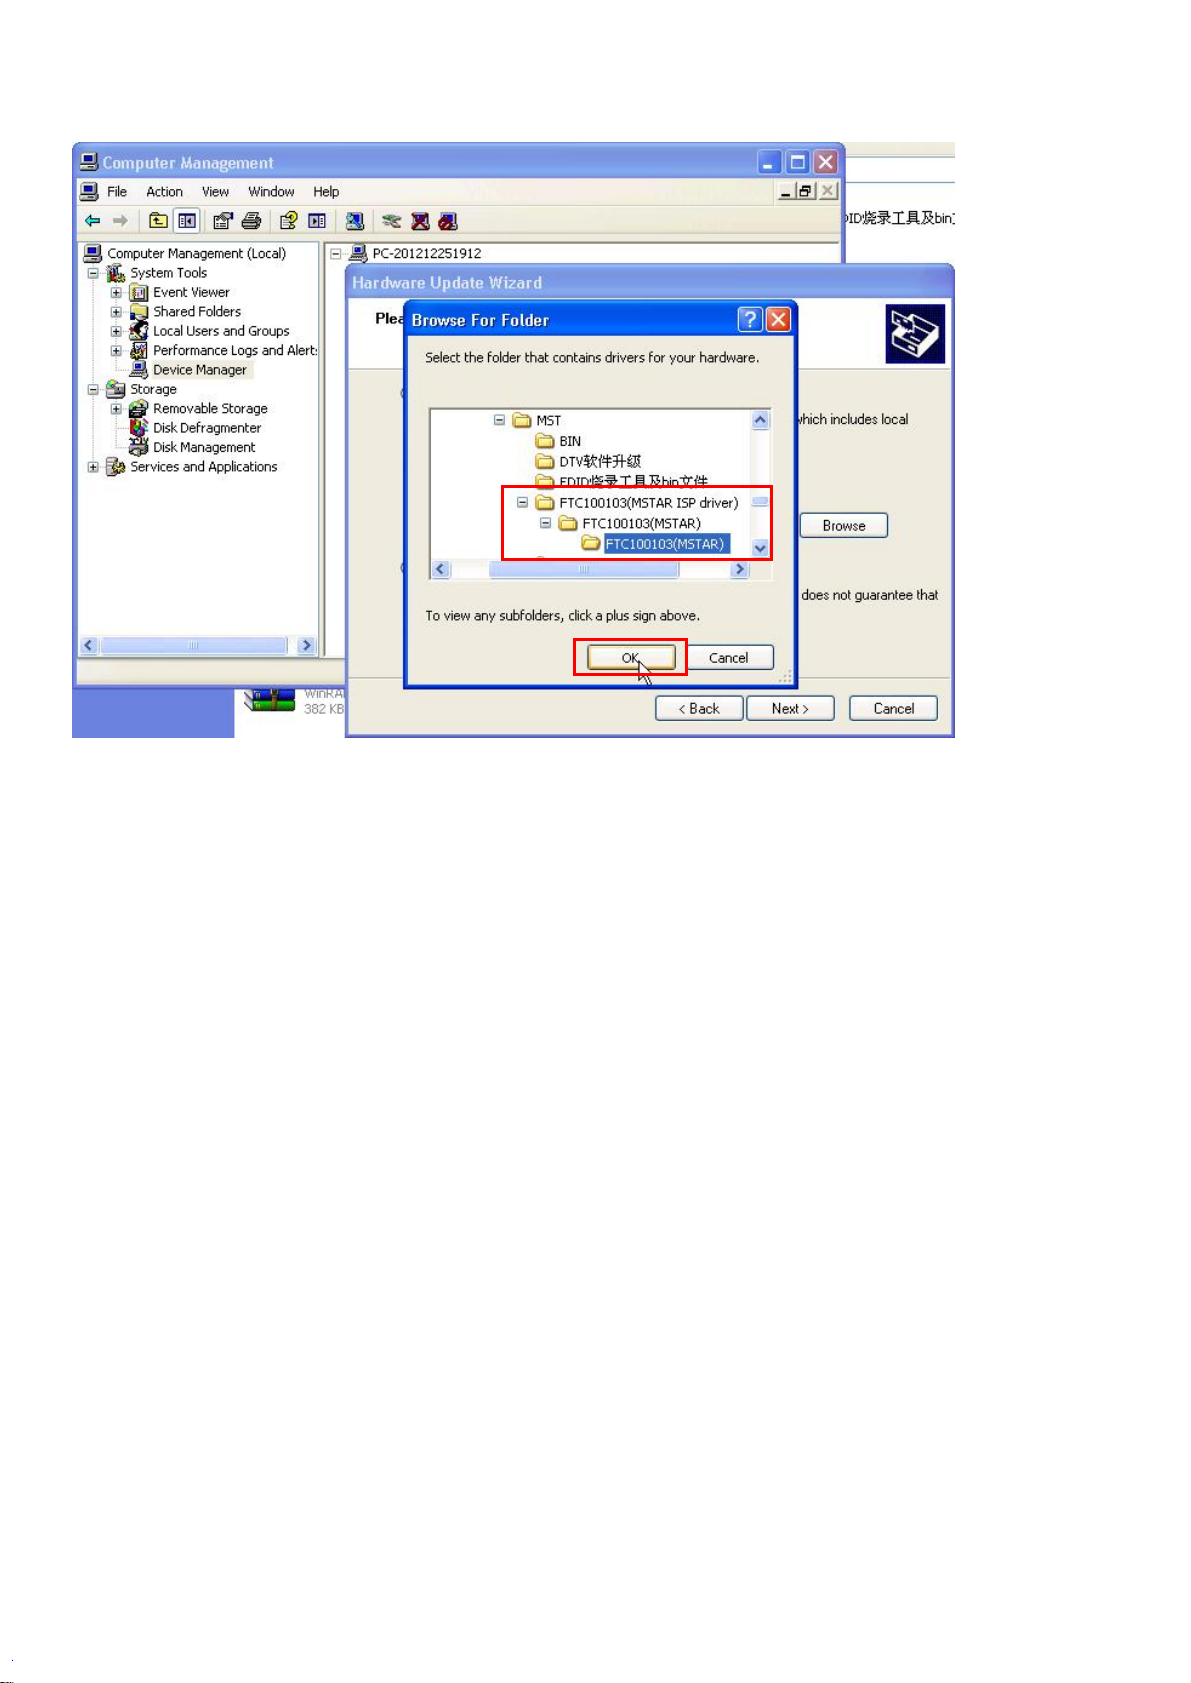
(2). Insert the Mstar USB Tool into the USB port of your PC. The PC can recognize the new device. You can choose to
install it in the list, or choose to install at a specified directory and specify the path to the drive file. See the figure below:
31
Page 33
32
Page 34
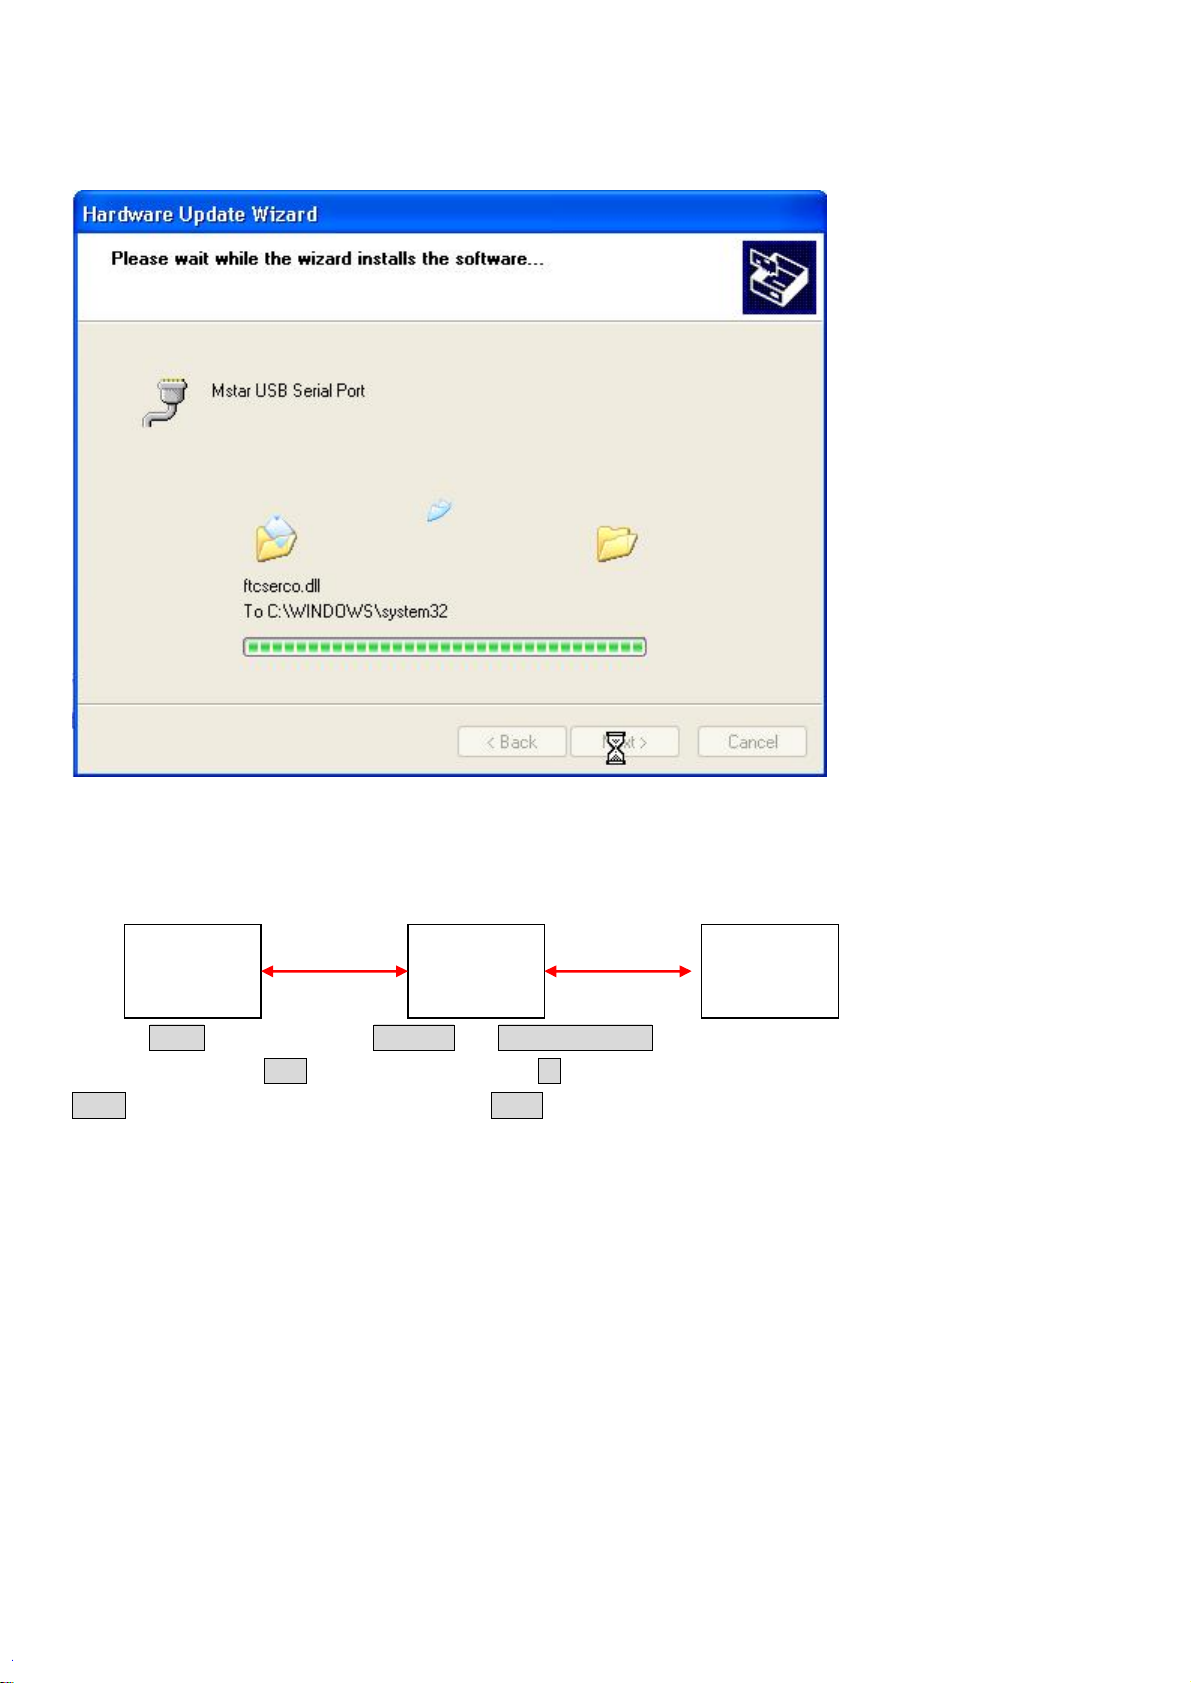
(3) When PC finds the drive file, it will give the prompts as in the figure below during the installation process. Please
click “Continue" to go ahead. The system will go through three drive installation processes, including Mstar USB Debug
Tool A, Mstar USB Debug Tool B, and Mstar USB SerialPort. They will be installed one by one.
C. Program burning
1. When the drives are installed, connect the Mstar USB Tool board to TV in such a way as specified below. Then,
connect the TV power cord and run the software ISP-Tool V4.5.2.8.SZ.exe to burn the program into the TV drive board..
2. In the config menu bar to select Use USB and Auto release USB, Communication Setting items corresponding to the
Port Type menu select USB。Set the burning speed of 48 in I2C Speed Setting item, ISP Slave Address item menu select
OX92,Serial Debug Slave Address menu select 0XB2。
Computer
USB cable
ISP burning
board
VGA cable
TV VGA
socket
33
Page 35
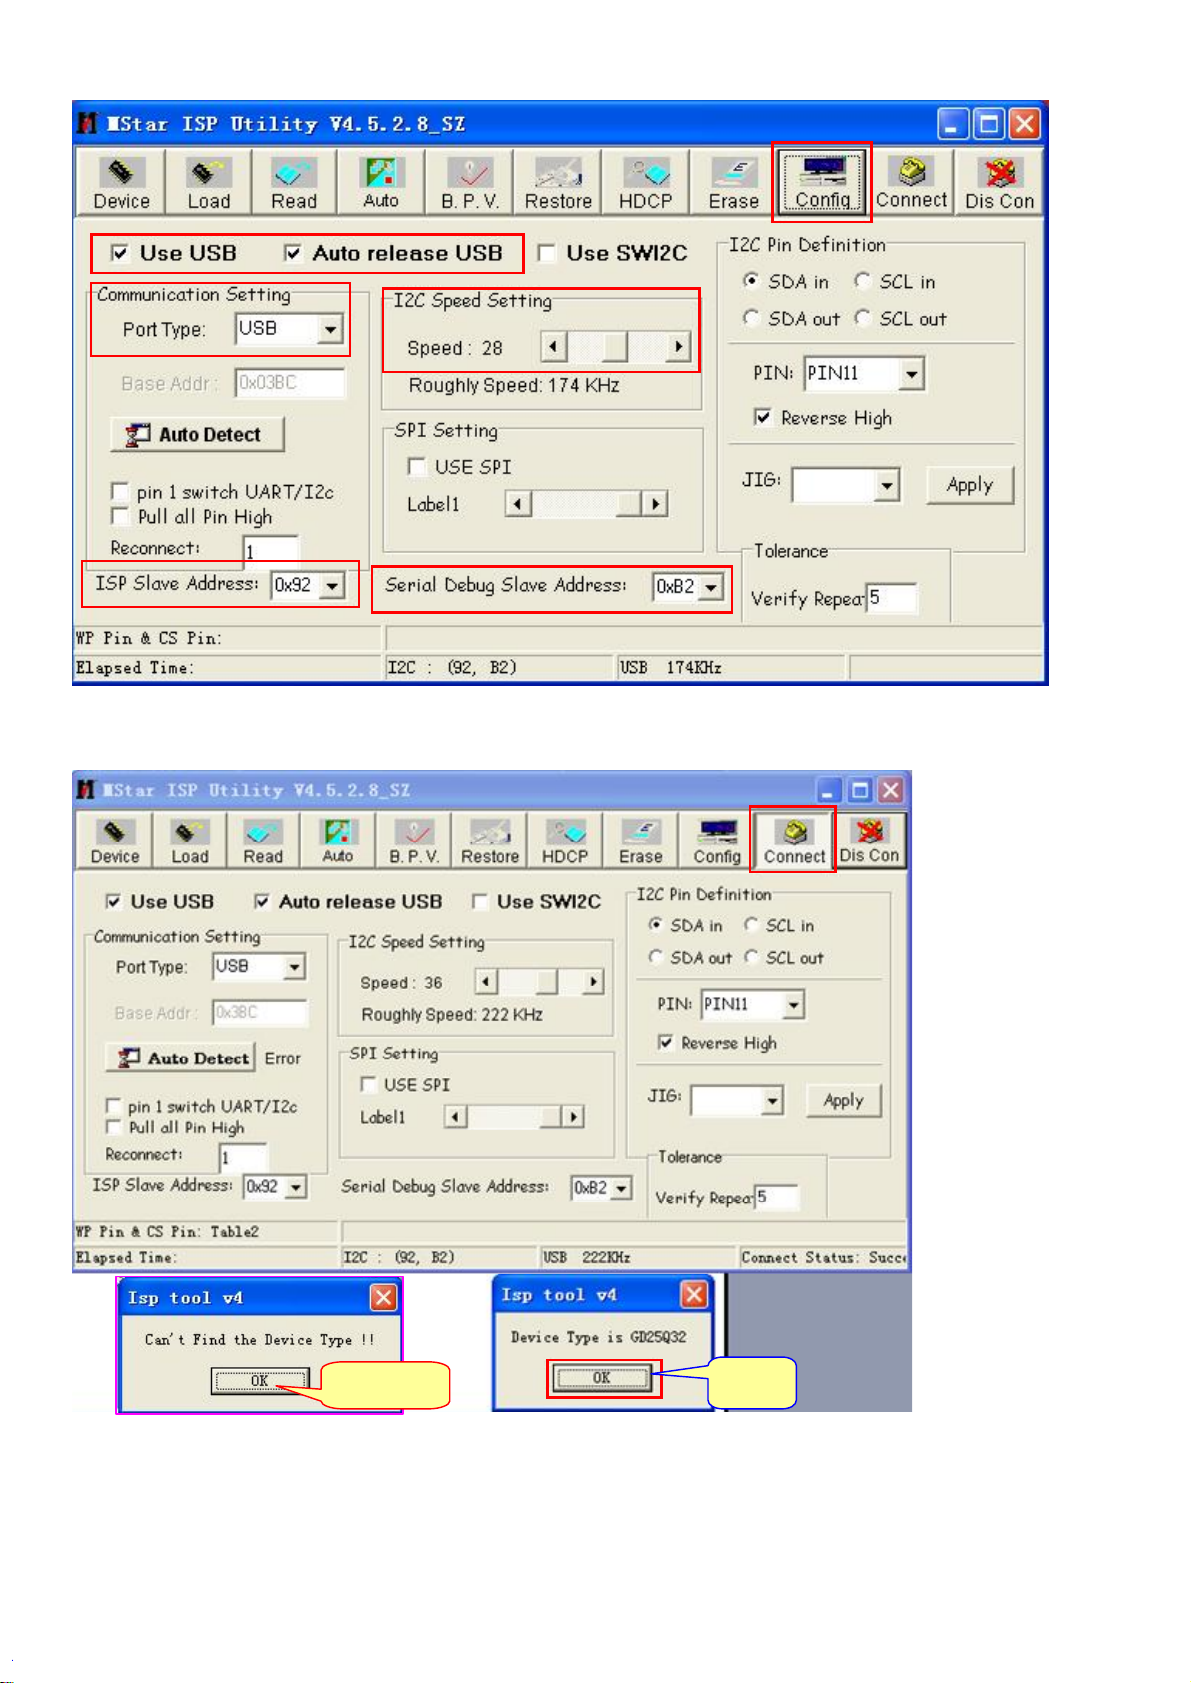
(3). Click Connect button to connect, if it prompts “Device Type is GD25Q32”, means that normal connecting; if it
prompts “Can't find the Device Type!” means that there is poor connecting, please have a check.
Abnormal
(4). Click "Read" button in tool bar, then click "Read" to load current software.
34
OK
Page 36
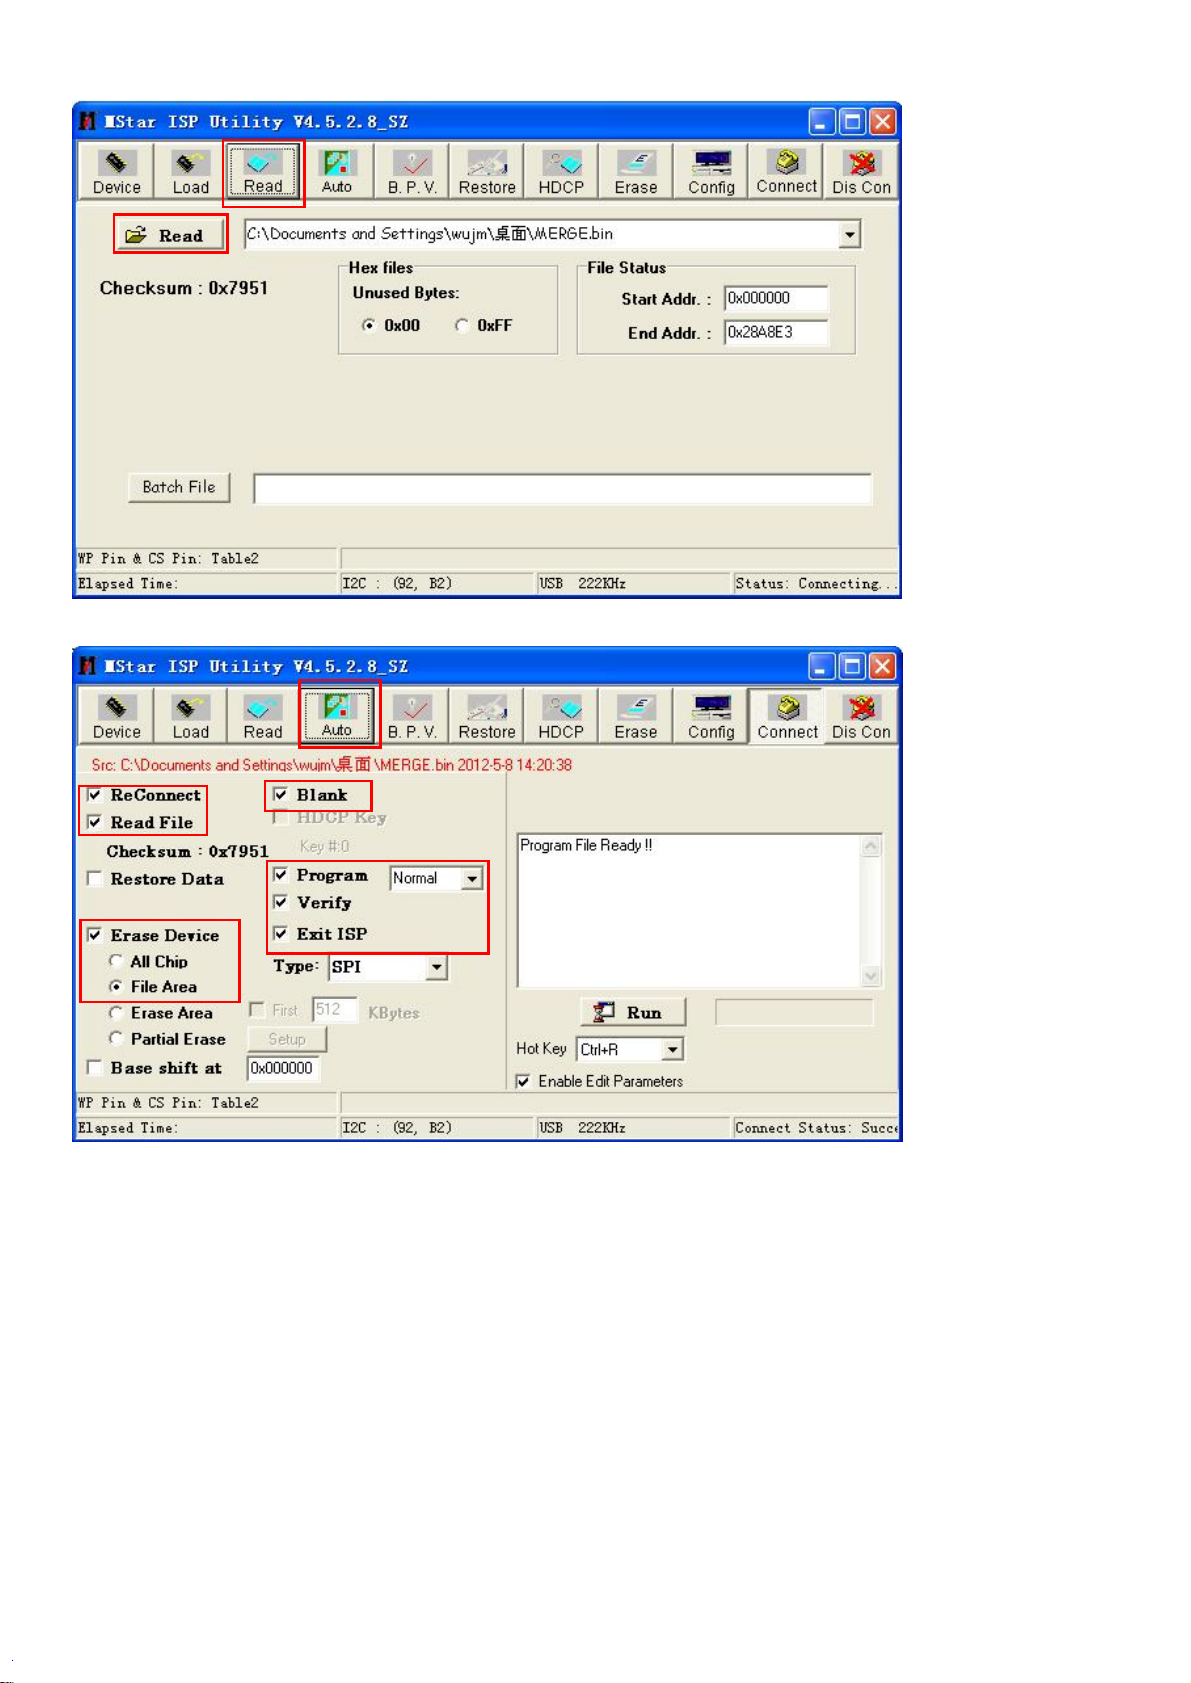
(5). Click "Auto" button in tool bar to set the corresponding settings.
Then click “RUN”button to burn software.
35
Page 37
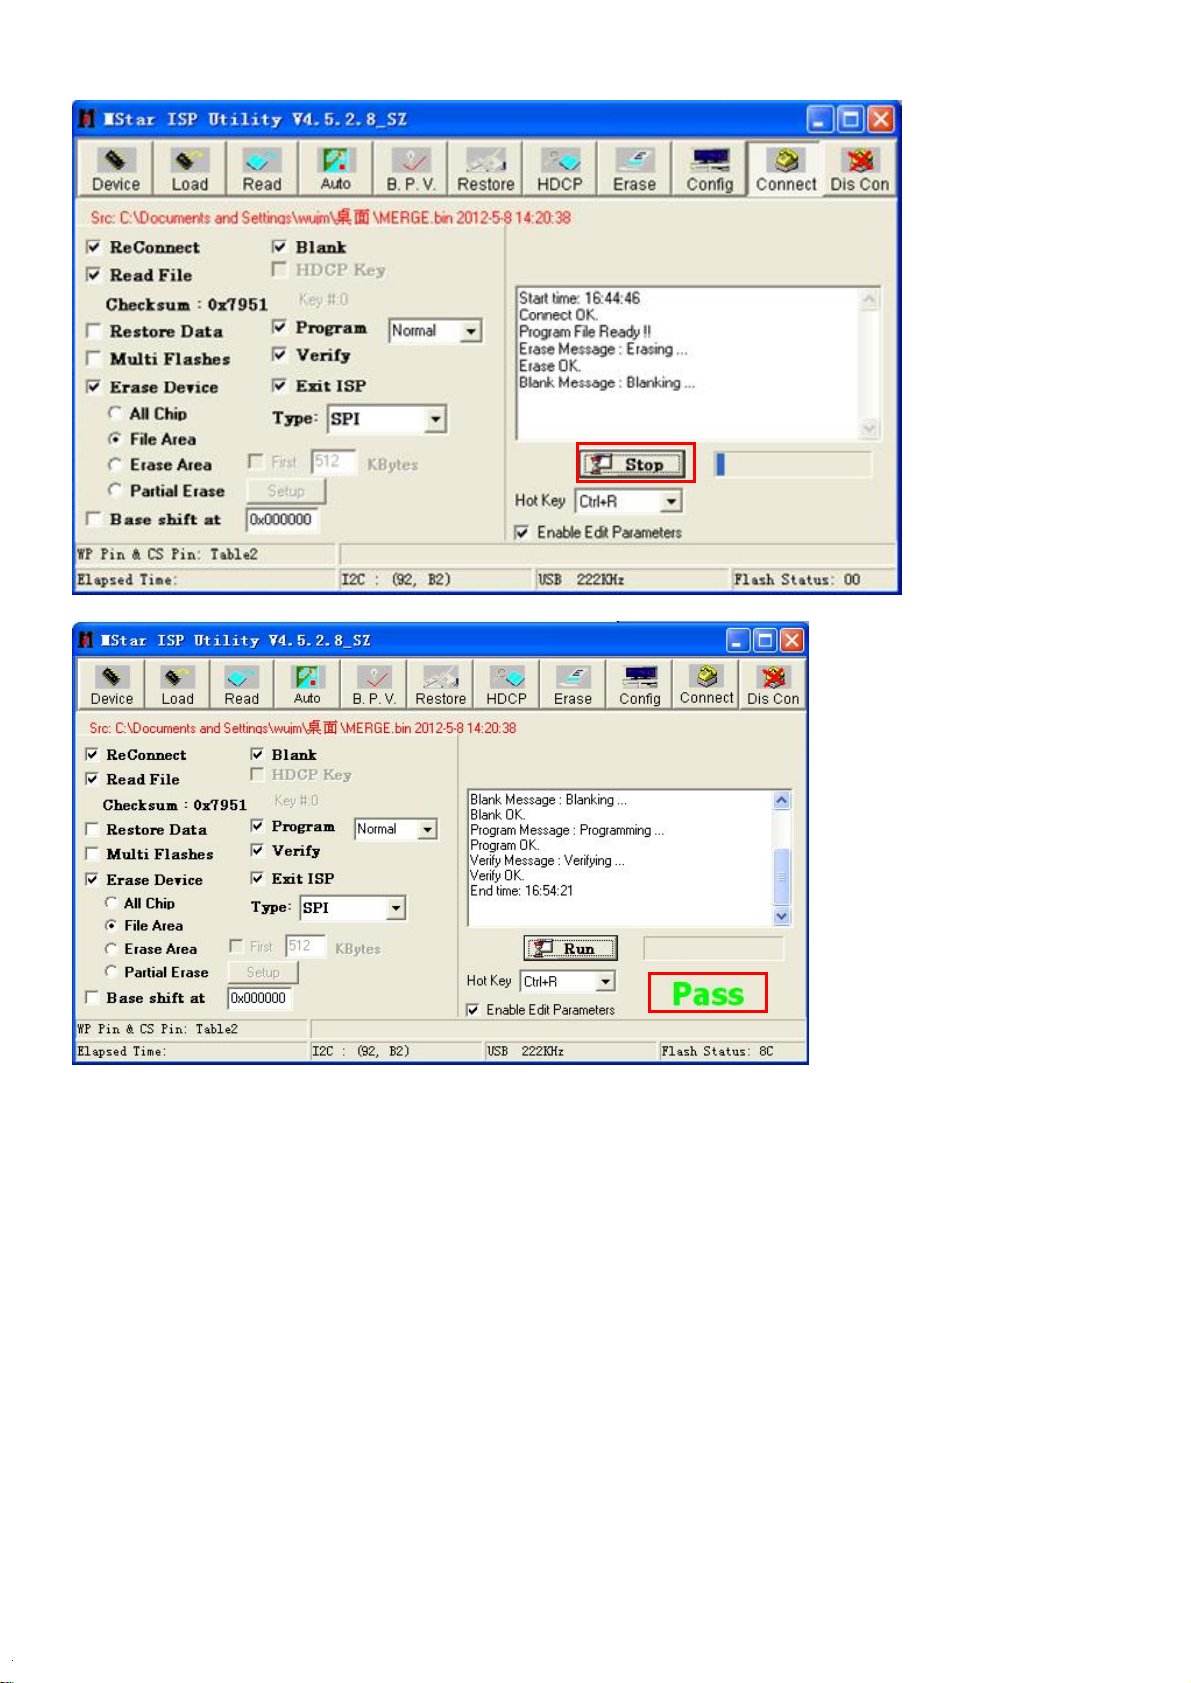
When display“PASS”, means that it succeed,then burn EDID according to the following instructions.
5、When upgrading complete, it must be adjusted before leave factory:
(1). Power to the machine, press MENU button on the remote control then press 8202 number keys and then will popping the factory menu
automatically, press the remote control up/down cursor keys to move to the "Reset" option press OK key to implement. After about 5 seconds
latter the machine implement clear command automatically. After about 5 seconds latter the screen will be black and it flashes blue lantern
panel display, it said that the order implement successfully.
36
Page 38
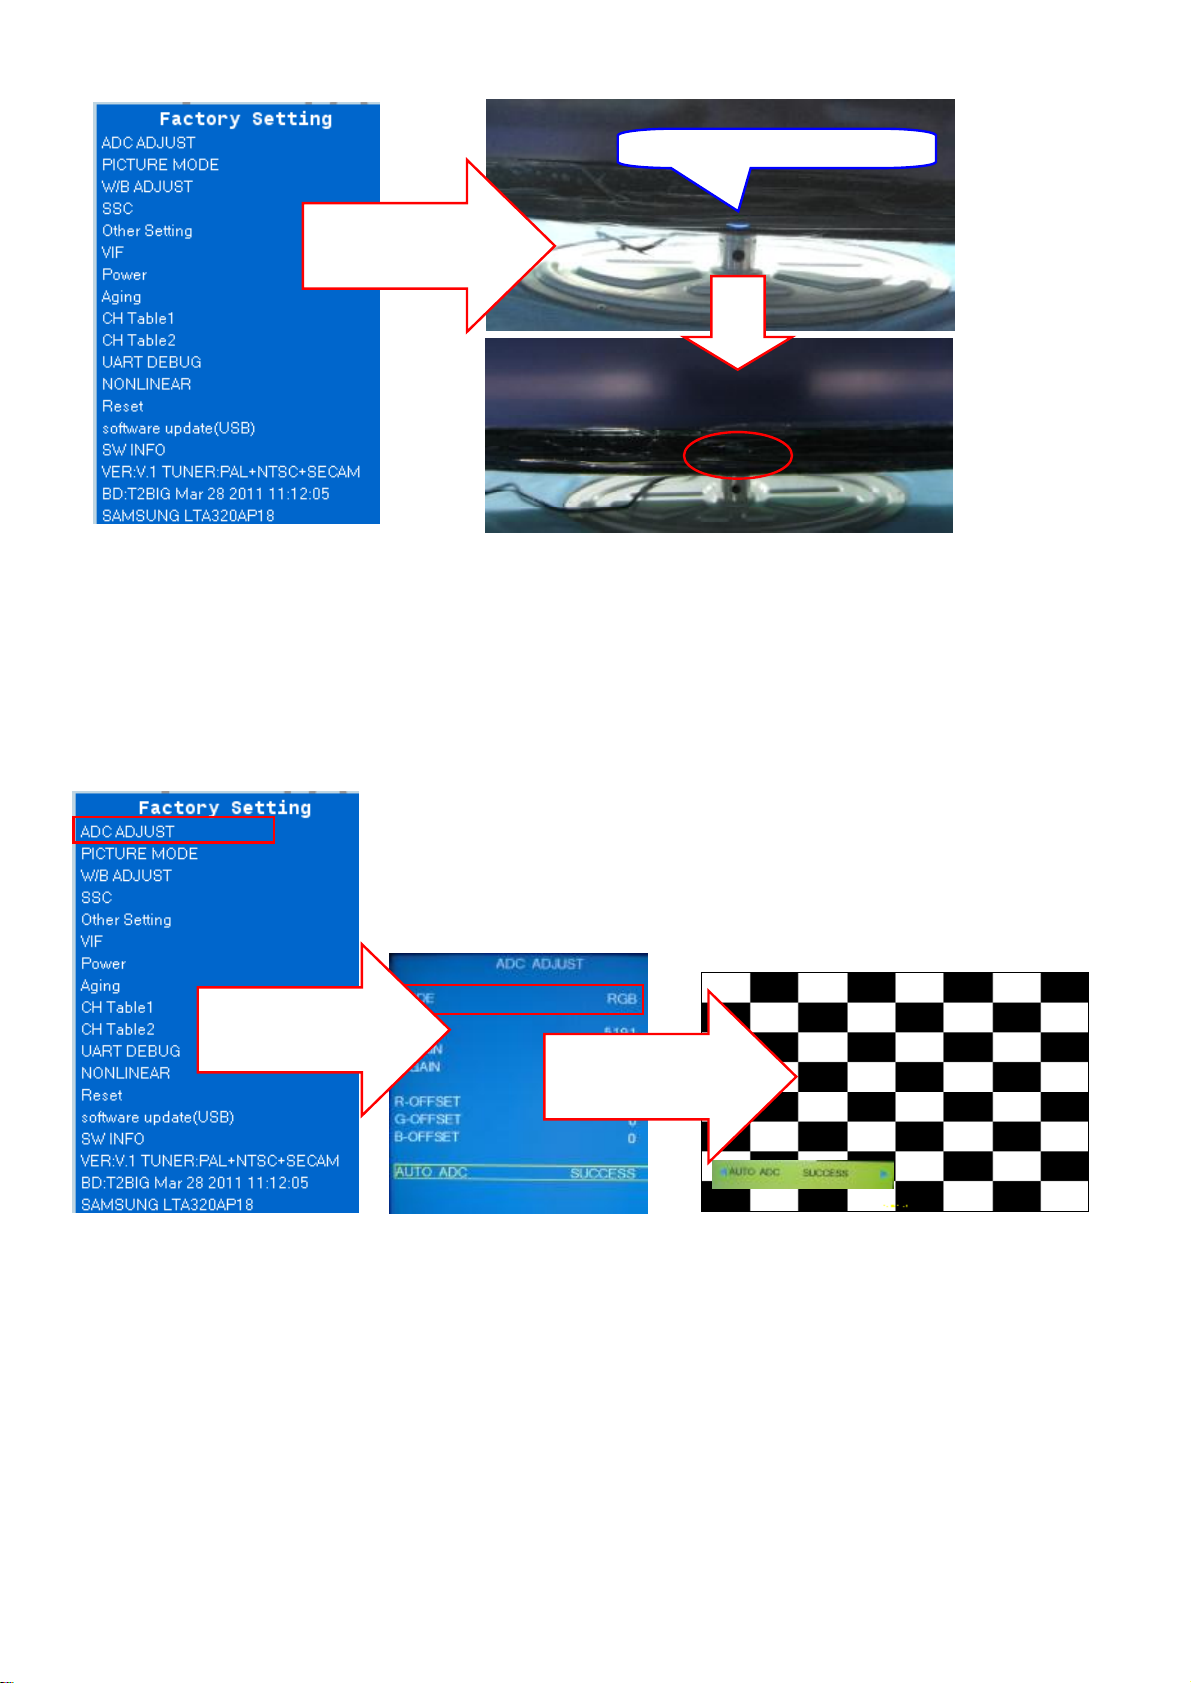
Panel standby light bright, resetting
Press OK key on remote
control to implement
factory reset
(2). Insert signal cable to the machine, switch to the PC message source.
(3). Run the KTC-LCD test software, switch to the mosaic picture and best resolution. Press MENU key to popup the
main menu, and then press 8202 number keys to enter the factory menu, press the shift douwn key to ADC ADJUST
option to press OK key to enter the next level menu. In the MODE option press left/right cursor keys to select RGB, and
then press shift douwn key to move the cursor to the Auto ADC option, press OK key to enter the next level menu, press
the left/right button to implement ADC action (The screen will flash and Auto ADC function menu prompt SUCCESS
means that debug success, prompt FAIL said that debug failed, try again), press the MENU button to exit factory menu
when debugging completed.
Press OK key on remote
control to implement
factory reset
Press OK key on remote
control to implement
factory reset
(4).Under the YPbPb message source, press the MENU button after popping the main menu, then press 8202 number
keys to enter the factory menu, select ADC ADJUST item, press the OK key to enter the next level menu, move the cursor
to the MODE item, press the left/right Moving key mover cursor to select YPbPr(SD)item, change the
R-GAIN/G-GAIN/B-GAIN value and R-OFFSET/G-OFFSET/B-OFFSET value of the machine after the upgrade to the
value before the upgrade.
37
Page 39
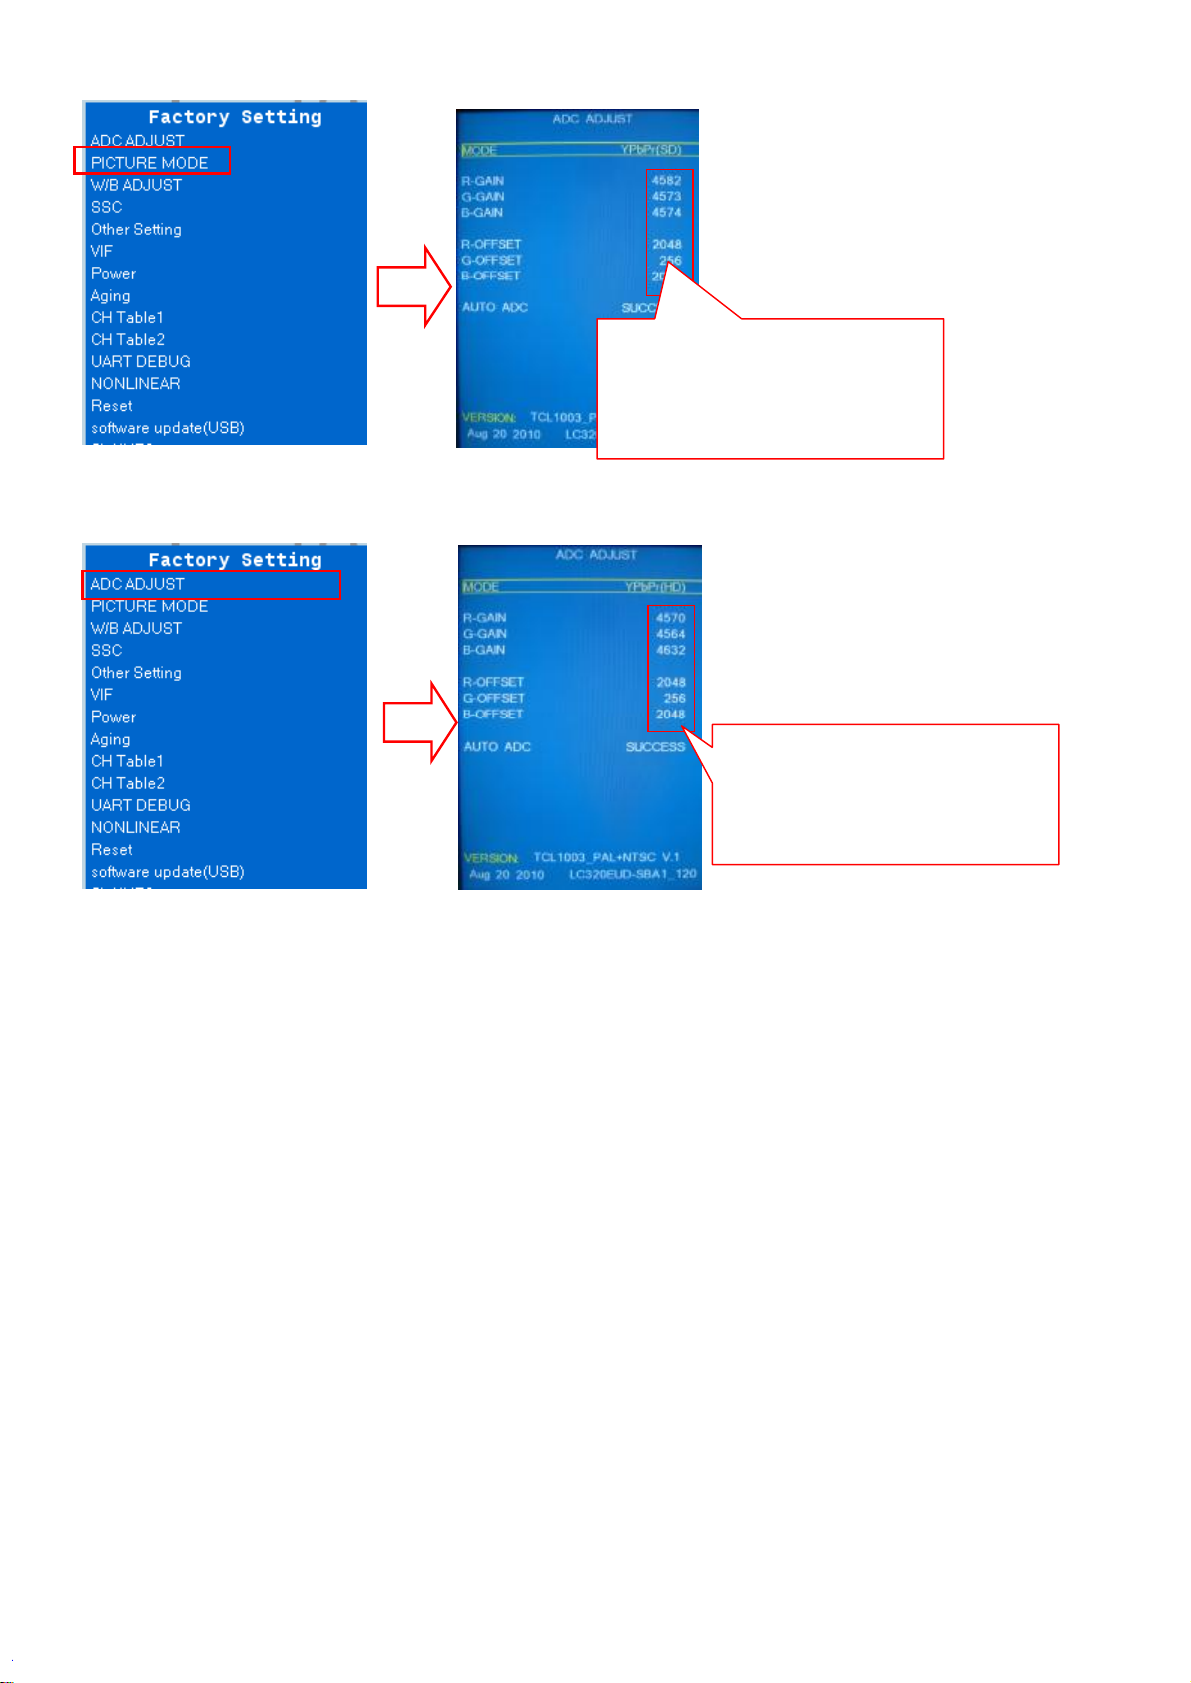
Change the
R-GAIN/G-GAIN/B-GAIN value and
R-OFFSET/G-OFFSET/B-OFFSET
value to the value before the upgrade
under the YPbPr(SD/HD) mode
(5).In the ADC ADJUST item, press OK key to enter the next level menu, move the cursor to the MODE item, press the
left/right keys tomove cursor select the YPbPr(HD)item, change the R-GAIN/G-GAIN/B-GAIN value and
R-OFFSET/G-OFFSET/B-OFFSET value of the machine after the upgrade to the value before the upgrade.
Change the
R-GAIN/G-GAIN/B-GAIN value and
R-OFFSET/G-OFFSET/B-OFFSET
value to the value before the upgrade
under the YPbPr(SD/HD) mode
6、Complete the ADC ADJUST debugging, press MENU key succession to exit the factory built-in menu to save the
adjusted data, and then restore the original packaging.
38
Page 40
5
4
3
2
1
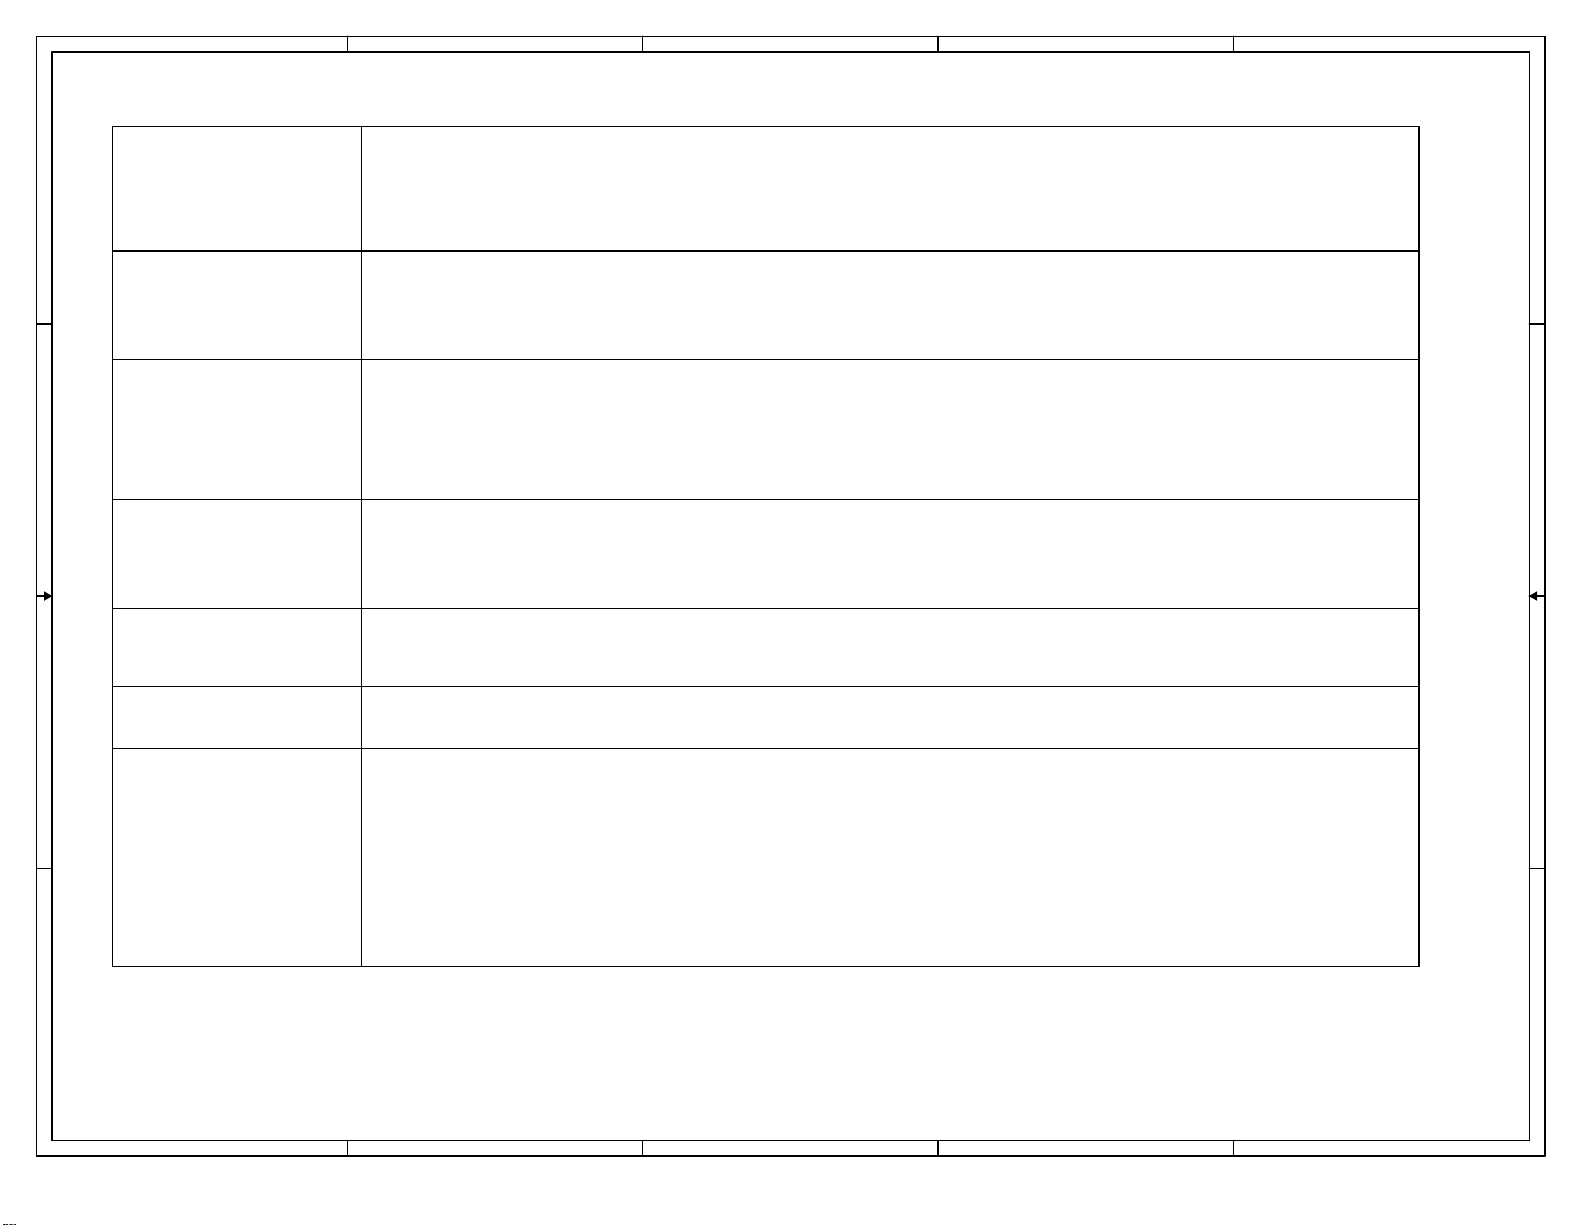
TSUMV56/MSD3553-T4C1
D D
C C
date change list
2016-11-21
V3.0
初版发行
主板模拟电视原理图
B B
A A
5
4
3
2
1
39
Page 41
5
4
3
2
1
+
+
1000uF/25V
1000uF/25V
470PF/200V
470PF/200V
PD1 ES1JPD1 ES1J
+
+
PR110RPR11
0R
PEC3
PEC3
PD10
PD10
SB5T100
SB5T100
PEC4
PEC4
+
+
+
+
1000uF/25V
1000uF/25V
PR13 22RPR13 22R
PR24
PR24
56K
56K
FB
PR18
PR18
10K
10K
PR55
PR55
36K
36K
PR562KPR56
2K
+12V
PC23
PC23
PC5
PC5
1UF/25V
1UF/25V
1UF/25V
1UF/25V
PR10RPR1
0R
PT1B
PT1B
2
3
EQ2514
EQ2514
VO=21V~~30.4V
IO=900MA
LED+
+
+
PC16
PC16
PEC6
PEC6
1UF/50V
1UF/50V
220uF/50V
220uF/50V
PC6
PC6
100nF/25V
100nF/25V
DC/DC
+12V
PC17
PC17
10uF/25V
10uF/25V
靠近
+5V_Normal
C59
C59
10uF
10uF
5V
TO MASTER CHIP
PWR-ON/OFF
2
12V TO 5V Power
PR57 100KPR57 100K
PC19
PC19
PC18
PC18
0.1uF
0.1uF
0.1uF
0.1uF
DC-DC
TUNER POWER
U800 AS1084-3.3VU800 AS1084-3.3V
3
VIN
C811
C811
C813
C813
0.1uF
0.1uF
2.2uF
2.2uF
+3.3V_Standby
R111
R111
4.7K
4.7K
PU3
PU3
2
5
IN
BST
6
EN/SYNC
3
SW
7
VCC
1
8
AAM
FB
GND
4
MP9495DJ
MP9495DJ
PC20
PC20
0.1uF
0.1uF
DCDC_EN
PR58
PR58
90.9K
90.9K
PR59
PR59
10K
10K
Vout=0.8V*(1+R1/R2)
+3.3V_TU
2
VOUT
4
VOUT
GND
1
+5V_Standby +5V_Normal
R198
R198
4.7K
4.7K
C814
C814
C78
C78
2.2uF
2.2uF
10uF
10uF
Q112
Q112
ME2325
ME2325
R221
R221
100K
100K
R222
R222
10K
10K
Q103
Q103
MMBT3904
MMBT3904
1
SOT23
C162
C162
1uf
1uf
100uF/16V
100uF/16V
PR60 10RPR60 10R
32
C1
C1
PC21
PC21
DCDC_FB
C802
C802
0.1uF
0.1uF
0.1uF
0.1uF
反馈电阻靠近
+
+
C2
0.1UC20.1U
PL6
PL6
PR6136.5K 1%PR6136.5K 1%
PR62
PR62
6.8K 1%
6.8K 1%
R2
DCDC,
5V MAX 3A
+5V_Standby
4.7uH/3A
4.7uH/3A
12
PCA6
PCA6
C87
C87
R1
+
+
10uF/10V
10uF/10V
470uF/16V
470uF/16V
靠近
DC-DC
敏感线,远离干扰源
+3.3V_Standby供电电路
4
U201
U201
AP1117-3.3
AP1117-3.3
ADJ
OUT
ADJ
OUT
IN
IN
321
+5V_Standby
C10
C10
C12
C12
C11
C11
0.1u
0.1u
10UF
10UF
10UF
10UF
1.15V 1A Max for VDDC
1.15V MAX 1A
+5V_Standby
C113
C113
10uF
10uF
R138 100KR138 100K
C108
C108
0.1uF
0.1uF
靠近
DC-DC
U1 SY8088/1AU1 SY8088/1A
4
1
C109
C109
0.1uF
0.1uF
1.8V Normal Power for DDR2
U10
U10
AS1117-1.8V
AS1117-1.8V
+5V_Normal
+3.3V_Standby
+3.3V_Normal
C14
C14
C15
C15
0.1u
0.1u
2.2u
2.2u
SW3VIN
L101 3.3uH/1.5AL101 3.3uH/1.5A
C110 33pFC110 33pF
R119 3.3KR119 3.3K
5
EN
FB
R1
GND
2
R120 3.6KR120 3.6K
R2
Vout=0.6V*(1+R1/R2)
4
ADJ
OUT
ADJ
OUT
IN
IN
321
C70
C70
C76
C76
2.2uF
2.2uF
0.1uF
0.1uF
C3
C4
22uFC322uF
10uFC410uF
靠近
SY8088 1A
C71
C71
0.1uF
0.1uF
+1.15V_VDDC
C112
C112
10uF
10uF
DC-DC
+1.8V_DDR2
C13
C13
2.2uF
2.2uF
C111
C111
0.1uF
0.1uF
C29
C29
10uF
10uF
SB5T100
SB5T100
PD6
2
PR5
PR5
33K
33K
BP
4
BP
PD1S
PR40 47RPR40 47R
PR52 470R/ncPR52 470R/nc
PR31
PR31
0.22Ω
0.22Ω
PD6
PD7
PD7
PD8
PD8
PR6
PR6
PR7 47ΩPR7 47Ω
2
FB
CP
3
PR26 390KPR26 390K
PC3
PC3
100PF/50V
100PF/50V
PL4
PL4
1 2
1
PR33
PR33
0.22Ω
0.22Ω
SB5T100
SB5T100
SB5T100
SB5T100
47Ω
47Ω
FB
47uH
47uH
PR53 10KPR53 10K
PQ2
PQ2
2907/nc
2907/nc
3 2
PR39
PR39
10R/nc
10R/nc
PR38
PR38
0.22Ω
0.22Ω
PC4
PC4
1nF/200V
1nF/200V
PC2
PC2
10NF/50V
10NF/50V
PR25 3.3KPR25 3.3K
PC1
PC1
0.47UF/25V
0.47UF/25V
PR8NCPR8
AGND
PEC1
PEC1
47uF/50V
47uF/50V
PL5
PL5
1 2
8UH
8UH
PQ3
PQ3
AOD4286
AOD4286
NC
470uF/25V
470uF/25V
PC28
PC28
1NF/200V
1NF/200V
100PF/50V
100PF/50V
PEC2
PEC2
PC8
PC8
PGND
OVP
PC15
PC15
1
!
2
- +
- +
4
D D
!
PCY1
PCY1
471/400Vac
471/400Vac
PL1
PL1
20mH
20mH
PRXD
PRXD
1MΩ
1MΩ
PRXB
PRXB
1MΩ
1MΩ
PGND
AGND
PCX1
PCX1
0.33UF/275V
0.33UF/275V
!
!
1
331
PCN1PCN1
C C
PJ2
PJ2
LED+
1
LED+
2
LED+
3
LED+
4
5
6
LED-
7
LED-
8
LED-
9
LED-
10
10Pin_2.0mm
10Pin_2.0mm
! !
PD3
PD3
+
+
PEC5
PEC5
406
406
68uF/450V
68uF/450V
3
!
PCY2
PCY2
471/400Vac
471/400Vac
AGND
13
!
PD4 NCPD4 NC
24
!
PRXC
PRXC
1MΩ
1MΩ
PRXA
PRXA
1MΩ
1MΩ
t
t
PNTC1
PNTC1
2.5Ω/5A
2.5Ω/5A
!
PF1
PF1
T2AL250Vac
T2AL250Vac
T2AH250Vac
PCY5
PCY5
!
AGND
100PF/400Vac
100PF/400Vac
PR15 10KPR15 10K
BL-ADJUST
PD16 1N4148PD16 1N4148
BL-ON/OFF
LED-
PR27
PR27
PD17M7PD17
3R3
3R3
M7
PC9
PC9
102/1kV
102/1kV
PGND
PCY4
PCY4
470pF/400Vac
470pF/400Vac
PR29
PR29
51K
51K
AGNDAGND
PR22
PR22
3R3
3R3
PWM#
PC13
PC13
100PF/50V
100PF/50V
PR21
PR21
1R5
1R5
PT1A
PT1A
4
PC22
PC22
470PF/1KV
470PF/1KV
PR17
PR17
300R
300R
PWM
OVP
FB
COMP
OB3350CP
OB3350CP
1nF/50V
1nF/50V
10
6 8
EQ2514
EQ2514
6
PU1
PU1
D
LNK6777
LNK6777
PR4
PR4
10R/1206
10R/1206
7
PC7
PC7
22pF/1206
22pF/1206
+12V
1
PU2
PU2
VIN
GATE
GND3CS
4
PR30 470RPR30 470R
PC14
PC14
PC12
PC12
100PF/50V
100PF/50V
PR3
PR3
51K
51K
PR2
PR2
51K
51K
PR14
PR14
PR16
PR16
300R
300R
300R
300R
PD2
PD2
RS07M
RS07M
PR12NCPR12
NC
BP
PR10NCPR10
NC
PQ1NCPQ1
1
NC
3 2
PR9
PR9
1K/NC
1K/NC
8
OVP
7
5
PR191KPR19
6
1K
PC11NCPC11
PR23
PR23
NC
20K
20K
PR20
PR20
PC10
PC10
1R5
1R5
47nF/50V
47nF/50V
B B
背光
BL-ADJUST
C9
NC/2.2uFC9NC/2.2uF
R8012KR801
2K
R61KR6
1K
R7
Q1
2 3
10K/NCR710K/NC
3904Q13904
BL-ON/OFF
1
3
BRI_ADJ-PWM0
R8
4.7KR84.7K
AGND
+5V_Normal+5V_Normal +5V_Normal
R21KR2
1K
BL-ON/OFF
Q2
1
3904Q23904
2 3
H2NCH2
1
5
4
3
2
R301
R301
4.7K
4.7K
POWER_DOWN
R11
R11
4.7K
4.7K
1
R9
4.7KR94.7K
Q3
2 3
3904Q33904
VBL_CTRL
R21
R21
4.7k
4.7k
NC
H4NCH4
1
5
4
3
2
NC
1
1
1
H12NCH12
H15NCH15
H14NCH14
NC
NC
NC
H8NCH8
9
8
7
6
9
8
7
6
1
NC
1
5
4
3
2
NC
H3NCH3
1
5
4
3
2
NC
1
H11NCH11
SMTNCSMT
NC
H1NCH1
1
5
9
8
7
6
9
8
7
6
1
SNNCSN
NC
9
4
8
3
7
2
6
NC
H6NCH6
1
5
9
4
8
3
7
2
6
NC
1
1
1
H19NCH19
H21NCH21
H20NCH20
NC
NC
NC
Test Point & MARK
A A
KTC ISO9001.ISO14001体系文件
KTC ISO9001.ISO14001体系文件
文件名称:
文件名称:
文件名称:
文件编号:
文件编号:
文件编号:
设计:
设计:
设计:
发行部门: 生效日期:
发行部门: 生效日期:
发行部门: 生效日期:
KTC ISO9001.ISO14001体系文件
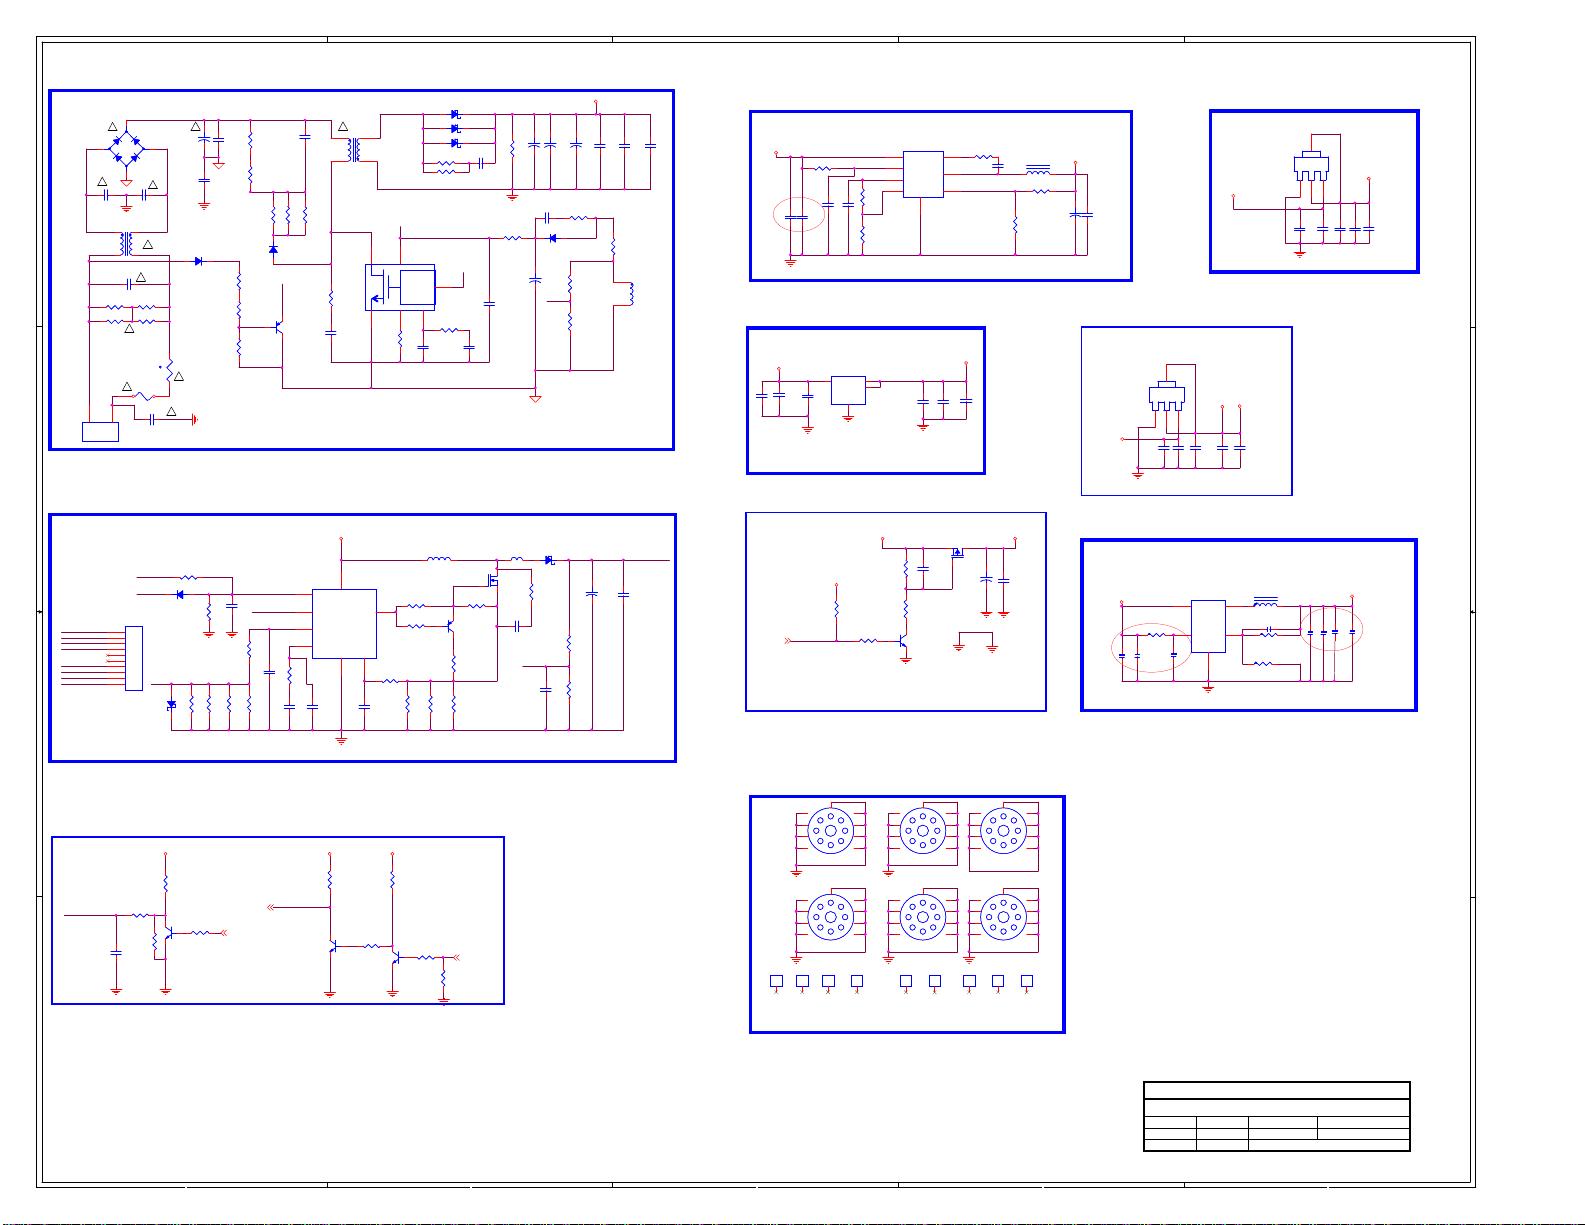
V56/MSD3553-T4C1 主板原理图
V56/MSD3553-T4C1 主板原理图
V56/MSD3553-T4C1 主板原理图
T4305
周杰
周杰
周杰
电气部
电气部
电气部
版本:3.0
版本:3.0
版本:3.0
李振乐
审核:
审核:
审核:
Monday, November 21, 2016
Monday, November 21, 2016
Monday, November 21, 2016
页数:
页数:
页数:
批准:
批准:
批准:
陈茂华
of
of
of
1 4
1 4
1 4
40
5
4
3
2
1
Page 42
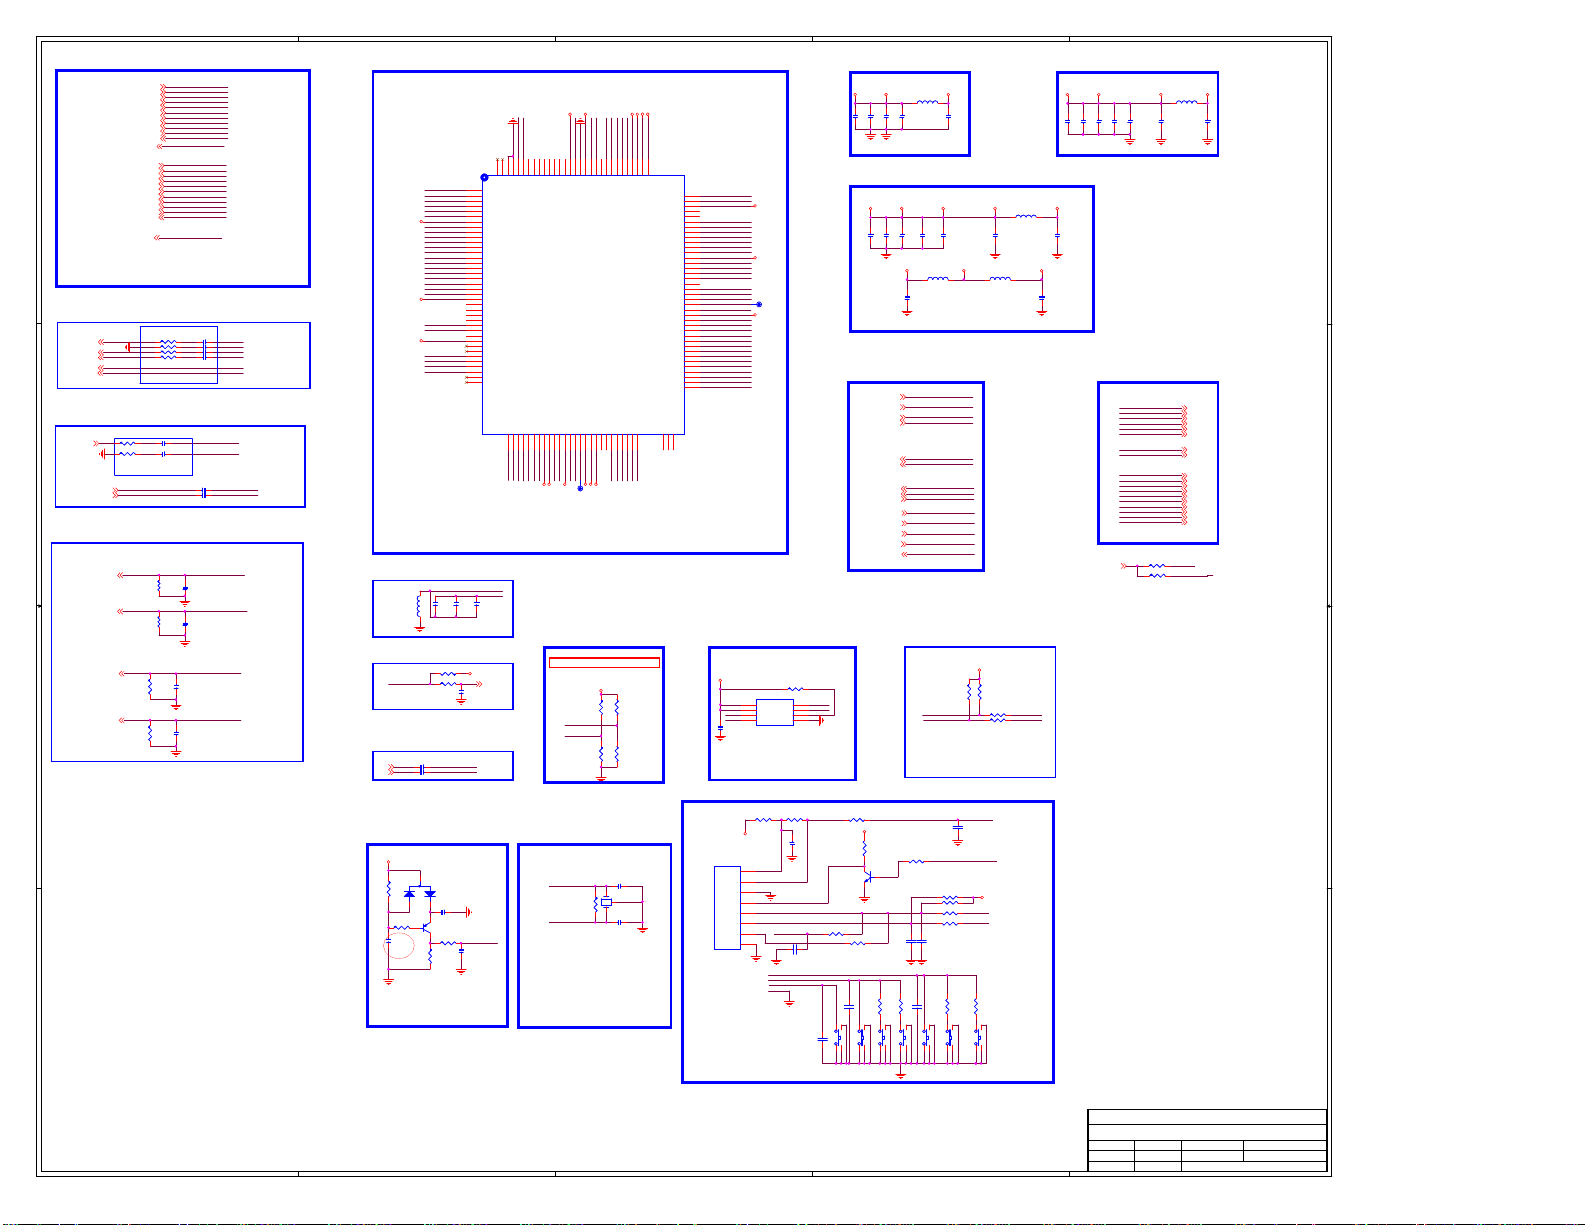
5
HDMI0_RX0N
4
HDMI0_RX0N
HDMI0_RX0P
4
HDMI0_RX0P
HDMI0_RX1N
HDMI0_RX1N
4
HDMI0_RX1P
HDMI0_RX1P
4
HDMI
D D
VGA
6
VGA-Rin7
6
VGA-Gin7
6
VGA-Bin7
VGA-HSYNC7
VGA-VSYNC
7
AV
R209 150RR209 150R
5
AV1
R210 180RR210 180R
AV1-Lin
AV1-Rin
LINEOUT_L6
LINEOUT_R6
LINEOUT_APML
LINEOUT_APMR
Close to MST IC
with wide trace
C C
B B
HDMI0_RX2N
4
HDMI0_RX2N
HDMI0_RX2P
HDMI0_RX2P
4
HDMI0_CLKN
4
HDMI0_CLKN
HDMI0_CLKP
HDMI0_CLKP
4
HDMI0_SCL
4
HDMI0_SCL
HDMI0_SDA
HDMI0_SDA
4
HDMI0_HPDIN
4
HDMI0_HPDIN
HDMI_CEC
4
HDMI_CEC
HDMI1_RX0N
4
HDMI1_RX0N
HDMI1_RX0P
4
HDMI1_RX0P
HDMI1_RX1N
HDMI1_RX1N
4
HDMI1_RX1P
HDMI1_RX1P
4
HDMI1_RX2N
HDMI1_RX2N
4
HDMI1_RX2P
HDMI1_RX2P
4
HDMI1_CLKN
4
HDMI1_CLKN
HDMI1_CLKP
HDMI1_CLKP
4
HDMI1_SCL
4
HDMI1_SCL
HDMI1_SDA
HDMI1_SDA
4
HDMI1_HPDIN
4
HDMI1_HPDIN
HDMI_ARC
HDMI_ARC
Close to MST IC
with wide trace
R201 33RR201 33R
C222 47nFC222 47nF
C250 47nFC250 47nF
R202 68RR202 68R
R203 33RR203 33R
C248 47nFC248 47nF
R204 33RR204 33R
C225 47nFC225 47nF
C238 47nFC238 47nF
C239 47nFC239 47nF
HD-LIN
C254 2.2uFC254 2.2uF
HD-RIN
C255 2.2uFC255 2.2uF
Audio Line Out
R156
R156
C173
C173
200K
200K
1nF
1nF
R855
R855
C879
C879
200K
200K
1nF
1nF
C236
C236
R224
R224
200K
200K
1nF
1nF
C237
C237
R228
R228
200K
200K
1nF
1nF
AMP-AUOUTL0
AMP-AUOUTR0
RIN0
GIN0N
GIN0P
BIN0
HSYNC0
VSYNC0
CVBS0P
VCOM0
LINEOUT_L
LINEOUT_R
HD_LIN
HD_RIN
AVDD_MOD
AVDD3P3_VIDEO
AVDD_AU33
FB201
FB201
150mA/1K
150mA/1K
VIF IN
VIFP+
VIFM-
4
U7
IFAGC
C2430.1uF C2430.1uF
C2440.1uF C2440.1uF
HDMI1_RX0N
1
HDMI1_RX0P
2
HDMI1_RX1N
3
HDMI1_RX1P
4
HDMI1_RX2N
5
HDMI1_RX2P
6
7
HDMI0_CLKN
8
HDMI0_CLKP
9
HDMI0_RX0N
10
HDMI0_RX0P
11
HDMI0_RX1N
12
HDMI0_RX1P
13
HDMI0_RX2N
14
HDMI0_RX2P
15
HSYNC0
16
BIN0
17
GIN0P
18
GIN0N
19
RIN0
20
VSYNC0
21
22
23
24
25
26
CVBS0P
27
VCOM0
28
29
30
31
32
AUVAG
33
AUVRM
34
HD_RIN
35
HD_LIN
36
37
38
C240
C240
C246
C246
C241
C241
2.2uF
2.2uF
0.1uF
0.1uF
2.2uF
2.2uF
Close to MSTAR IC
with width trace
R214 10KR214 10K
+3.3V_TU
R237 0RR237 0R
C242
22nF
22nF
VIFP#
VIFM#
U23
U23
RX0N_B
RX0P_B
RX1N_B
RX1P_B
RX2N_B
RX2P_B
AVDD_MOD
RXCN_A
RXCP_A
RX0N_A
RX0P_A
RX1N_A
RX1P_A
RX2N_A
RX2P_A
HSYNC0
BIN0P
GIN0P
GIN0M
RIN0P
VSYNC0
AVDD3P3_ADC
BIN1P
GIN1P
GIN1M
RIN1P
CVBS0
VCOM
CVBS_OUT1
AVDD_AU33
AUR0
AUL0
VAG
AUVRM
AUR4
AUL4
AUR5
AUL5
AUVRM
AUVAG
TAGC
HDMI1_CLKP
130
131
132
129
128
Test
Mark
Mark
E-PAD
LINEOUTR340LINEOUTL041LINEOUTL339IFAGC43LINEOUTR042VIFP
LINEOUT_R
LINEOUT_L
AMP-AUOUTL0
HDMI1_CLKN
121
123
125
120
127
119
122
124
126
RX0P_D
RX1P_D
RX2P_D
RX0N_D
RX1N_D
RX2N_D
RXCP_B
RXCP_D
RXCN_B
V56/MSD3553
V56/MSD3553
XOUT49XIN48AVDD3P3_DMPLL
VIFM
AVDD3P3_DADC
47
44
45
50
46
AMP-AUOUTR0
VIFM#
VIFP#
IFAGC
XTALI
XTALO
AVDD_DADC
AVDD_DMPLL
CHIP_CONFIG
{PAD_PWM1, PAD_PWM0}
2b 00/01/10:Boot from SPI
AVDDL_DVI
118
RXCN_D
VDDC
M_SDA
VDDC
HDMI_ARC
117
ARC
AVDDL_DVI_VDDC
M_SCL
PWM1
BRI_ADJ
AVDD5V_MHL_A
HDMI0_HPDIN
116
115
AVDD_5V
GND_EFUSE
GPIO46/I2S_OUT_WS
54
53
1
I2S_OUT_WS
TP4TP4
AVDD_DDR_CMD
+3.3V_Normal
NC/4.7K
NC/4.7K
114
VDDC
R225
R225
R218
R218
4.7K
4.7K
HDMI1_HPDIN
113
HOTPLUG_A
VDDC55GPIO44/TX151GPIO45/RX152VDDIO_CMD
56
HDMI_CEC
111
112
HOTPLUG_B
HOTPLUG_D
AVDD_MOD
57
AVDD_MOD
CEC
DP_P158DM_P1
HDMI0_SCL
110
DDCDA_CL
DM_P059DP_P0
USB0_DM
HDMI0_SDA
109
DDCDA_DA
60
USB0_DP
R217
R217
4.7K
4.7K
R223
R223
NC/4.7K
NC/4.7K
AVDD_DDR_CMD
AVDD_DDR_DATA
AVDD_MOD_1
HDMI1_SDA
HDMI1_SCL
108
106
107
105
104
DDCDB_CL
DDCDB_DA
AVDD_MOD
VDDIO_DATA
VDDIO_DRAM
MHL_VBUS/PWM1
SPDIF_OUT/GPIO0
I2S_OUT_SD/GPIO2
I2S_OUT_BCK/GPIO4
I2S_OUT_MCK/GPIO5
R_ODD[1]/LVB0-
R_ODD[0]/LVB0+
G_ODD[7]/LVB1-
G_ODD[6]/LVB1+
G_ODD[5]/LVB2-
G_ODD[4]/LVB2+
G_ODD[3]/LVB3-
G_ODD[2]/LVB3+
G_ODD[1]/LVA0-
G_ODD[0]/LVA0+
B_ODD[7]/LVA1B_ODD[6]/LVA1+
B_ODD[5]/LVA2B_ODD[4]/LVA2+
B_ODD[0]/LVA3+
B_ODD[1]/LVA3-
B_ODD[3]/LVACLK-
B_ODD[2]/LVACLK+
64
63
61
62
RXEC-
RXE3-
RXE3+
RXEC+
DVDD_DDR
103
DDCDD_CL
DDCDD_DA
DVDD_DDR_DATA
DDCA_CK
DDCA_DA
AVDD_MOD
MHL_DET
SPI_CZ
SPI_DO
SPI_CLK
RESET
3
AVDD_DDR_CMD
+1.8V_DDR2
C201
C201
C202
C202
2.2uF
2.2uF
2.2uF
2.2uF
KEY1_IN
102
SAR1
KEY0_IN
101
SAR0
100
VDDC
99
98
97
96
95
94
93
92
91
SPI_DI
90
VDDC
89
88
IRIN
87
86
PWM0
85
84
GPIO1
83
82
GPIO3
81
80
79
78
77
76
75
74
73
72
71
70
69
68
67
66
65
K1K1T2T2C3
C3
MHL_CABLE_DET
UART-RX
UART-TX
SPI_CSN
SPI_DO
SPI_CLK
SPI_DI
System_RST
IRIN
PWM1
PWM0
PWR_ON/OFF
VBL_CTRL0
PANEL_ON/OFF
I2S_OUT_BCK
RXO0RXO0+
RXO1RXO1+
RXO2RXO2+
RXO3RXO3+
RXE0RXE0+
RXE1RXE1+
RXE2RXE2+
VDDC
VDDC
1 3
1
TP2TP2
LED
AVDD_MOD
+3.3V_Standby
C214
C214
10uF
10uF
OTHER
3
PWR-ON/OFF
HDMI_CEC
4
6
UART_TX
UART_RX
6
USB0_DM
USB0_DP
SDA-T
SCL-T
MHL_VBUS_EN
BRI_ADJ-PWM0
PANEL_ON/OFF
MHL_CABLE_DET
VBL_CTRL
AMP_MUTE
C203
C203
0.1uF
0.1uF
C232
C232
0.1uF
0.1uF
FB203 0RFB203 0R
C204
C204
0.1uF
0.1uF
C220
C220
C217
C217
0.1uF
0.1uF
0.1uF
0.1uF
FB205 1A/600RFB205 1A/600R
C235
C235
0.1uF
0.1uF
PWR_ON/OFF
HDMI_CEC
UART_TX
UART_RX
USB0_DM
USB0_DP
M_SDA
M_SCL
MHL_VBUS_EN PWM1
BRI_ADJ PWM0
PANEL_ON/OFF
MHL_CABLE_DET
VBL_CTRL
PWM1
2
AVDD_DDR_DATA
C205
C205
0.1uF
0.1uF
C234
C234
0.1uF
0.1uF
+3.3V_Standby
AVDD_MOD_1AVDD_MOD AVDD3P3_VIDEO
C218
C218
0.1uF
0.1uF
FB206 1A/600RFB206 1A/600R
VDDC
+1.15V_VDDC DVDD_DDR
C230
C230
C233
C233
0.1uF
0.1uF
10uF
10uF
AVDD_DMPLL
FB202 1A/600RFB202 1A/600R
C219
C219
0.1uF
0.1uF
AVDD_DADCAVDD_AU33
C221
C221
0.1uF
0.1uF
AVDDL_DVI
C227
C227
C223
C223
C229
C229
0.1uF
0.1uF
0.1uF
0.1uF
0.1uF
0.1uF
LVDS
RXO0RXO0+
RXO1RXO1+
RXO2RXO2+
RXO3RXO3+
RXE0RXE0+
RXE1RXE1+
RXE2RXE2+
RXECRXEC+
RXE3RXE3+
R13 0R/NCR13 0R/NC
VBL_CTRL
R14 3553/0RR14 3553/0R
FB204 0RFB204 0R
C231
C231
0.1uF
0.1uF
RXO0RXO0+
RXO1RXO1+
RXO2RXO2+
RXO3RXO3+
RXE0RXE0+
RXE1RXE1+
RXE2RXE2+
RXECRXEC+
RXE3RXE3+
VBL_CTRL0
KEY1_IN
1
C228
C228
0.1uF
0.1uF
3
3
3
3
3
3
3
3
3
3
3
3
3
3
3
3
3
3
SPI NOR FLASH
UART_TX
UART_RX
R230
R230
4.7K
4.7K
DEBUG
+5V_Standby
R227
R227
4.7K
4.7K
R236 100RR236 100R
R231 100RR231 100R
UART-RX
+3.3V_Standby
SPI_CLK
SPI_DI
C251
C251
0.1uF
0.1uF
R226 10KR226 10KC242
U5
8
CE#
VDD
7
HOLD#
6
WP#
SCK
5
VSS4SI
MX25L3206EU5MX25L3206E
软件必须要做写保护
SPI_CSN
1
SPI_DO
2
SO
SPI_WP UART-TX
3
R219
R219
10K
10K
IR_5V
IR-in
KEY0-in
KEY1-in
KEY_POWER
C174 0.1uFC174 0.1uF
KEY0-in
KEY1-in
KEY_POWER
0.1uF
0.1uF
C212
C212
IR-in
R10 1KR10 1K
KEY_POWER2
C8174
C8174
0.1uF
0.1uF
POWER
POWER
R220 100RR220 100R
Q113
Q113
3904
3904
R194 1KR194 1K
C179
C179
0.1uF
0.1uF
C179、C154靠近座子放按键摆放
1
3
SW1
SW1
SW2
SW2
4
2
VOL-
VOL-
+5V_Standby
R2322KR232
2K
2 3
R3
2kΩR32kΩR46.8kΩR46.8kΩ
1
3
SW3
SW3
4
2
VOL+
VOL+
R233 10RR233 10R
+5V_Standby
1
+5V_IN
2
IR_IN
3
GND
4
LED
5
KEY0
6
KEY1
7
PWR
8
GND
8pin/2.0MM
8pin/2.0MM
CN103
CN103
IR&KEY Connector
C247
C247
1nF
1nF
System_RST
Crystal
XTALO
C253 33pFC253 33pF
12
R2391MR239
1M
24MHZ
24MHZ
XTALI
C249 33pFC249 33pF
NOTE:晶体频偏需要小于30PPM
删除1M电阻!
C1
Y201
Y201
3
C2
3
RESET
+5V_Standby
3
D201
D201
R229
R229
100K
100K
BAV99
BAV99
1
2
C245 2.2uFC245 2.2uF
Q202
Q202
R240 10KR240 10K
1
3906
3906
C252
C252
3 2
R235 100RR235 100R
2.2uF
2.2uF
根据实际电源
R238
R238
上电时序调整
100K
100K
A A
5
4
IRIN IRRX
C213
C213
33pF
33pF
R234 4.7KR234 4.7K
1
C8179
C8179
C8154
C8154
0.1uF
0.1uF
0.1uF
0.1uF
C154
C154
0.1uF
0.1uF
1
3
1
3
1
SW4
SW4
SW5
SW5
4
2
4
2
2
MENU
MENU
CH+
CH+
R159 4.7KR159 4.7K
R155 4.7KR155 4.7K
+3.3V_Standby
KEY0_in
R171 1KR171 1K
KEY1_in
R142 1KR142 1K/NC
C8179、C8154靠近CN103座子摆放
R5
R1
2kΩR52kΩ
6.8kΩR16.8kΩ
1
1
3
3
SW7
SW7
SW6
SW6
2
4
2
4
SOURCE
SOURCE
CH-
CH-
2
LED
3
4
KTC ISO9001.ISO14001体系文件
KTC ISO9001.ISO14001体系文件
文件名称:
文件名称:
文件名称:
文件编号:
文件编号:
文件编号:
设计:
设计:
设计:
发行部门: 生效日期:
发行部门: 生效日期:
发行部门: 生效日期:
KTC ISO9001.ISO14001体系文件
V56/MSD3553-T4C1 主板原理图
V56/MSD3553-T4C1 主板原理图
V56/MSD3553-T4C1 主板原理图
T4305
版本:3.0
版本:3.0
版本:3.0
审核:
审核:
审核:
周杰
周杰
周杰
电气部
电气部
电气部
李振乐
Monday, November 21, 2016
Monday, November 21, 2016
Monday, November 21, 2016
1
页数:
页数:
页数:
批准:
批准:
批准:
2 4
2 4
2 4
陈茂华
of
of
of
41
Page 43
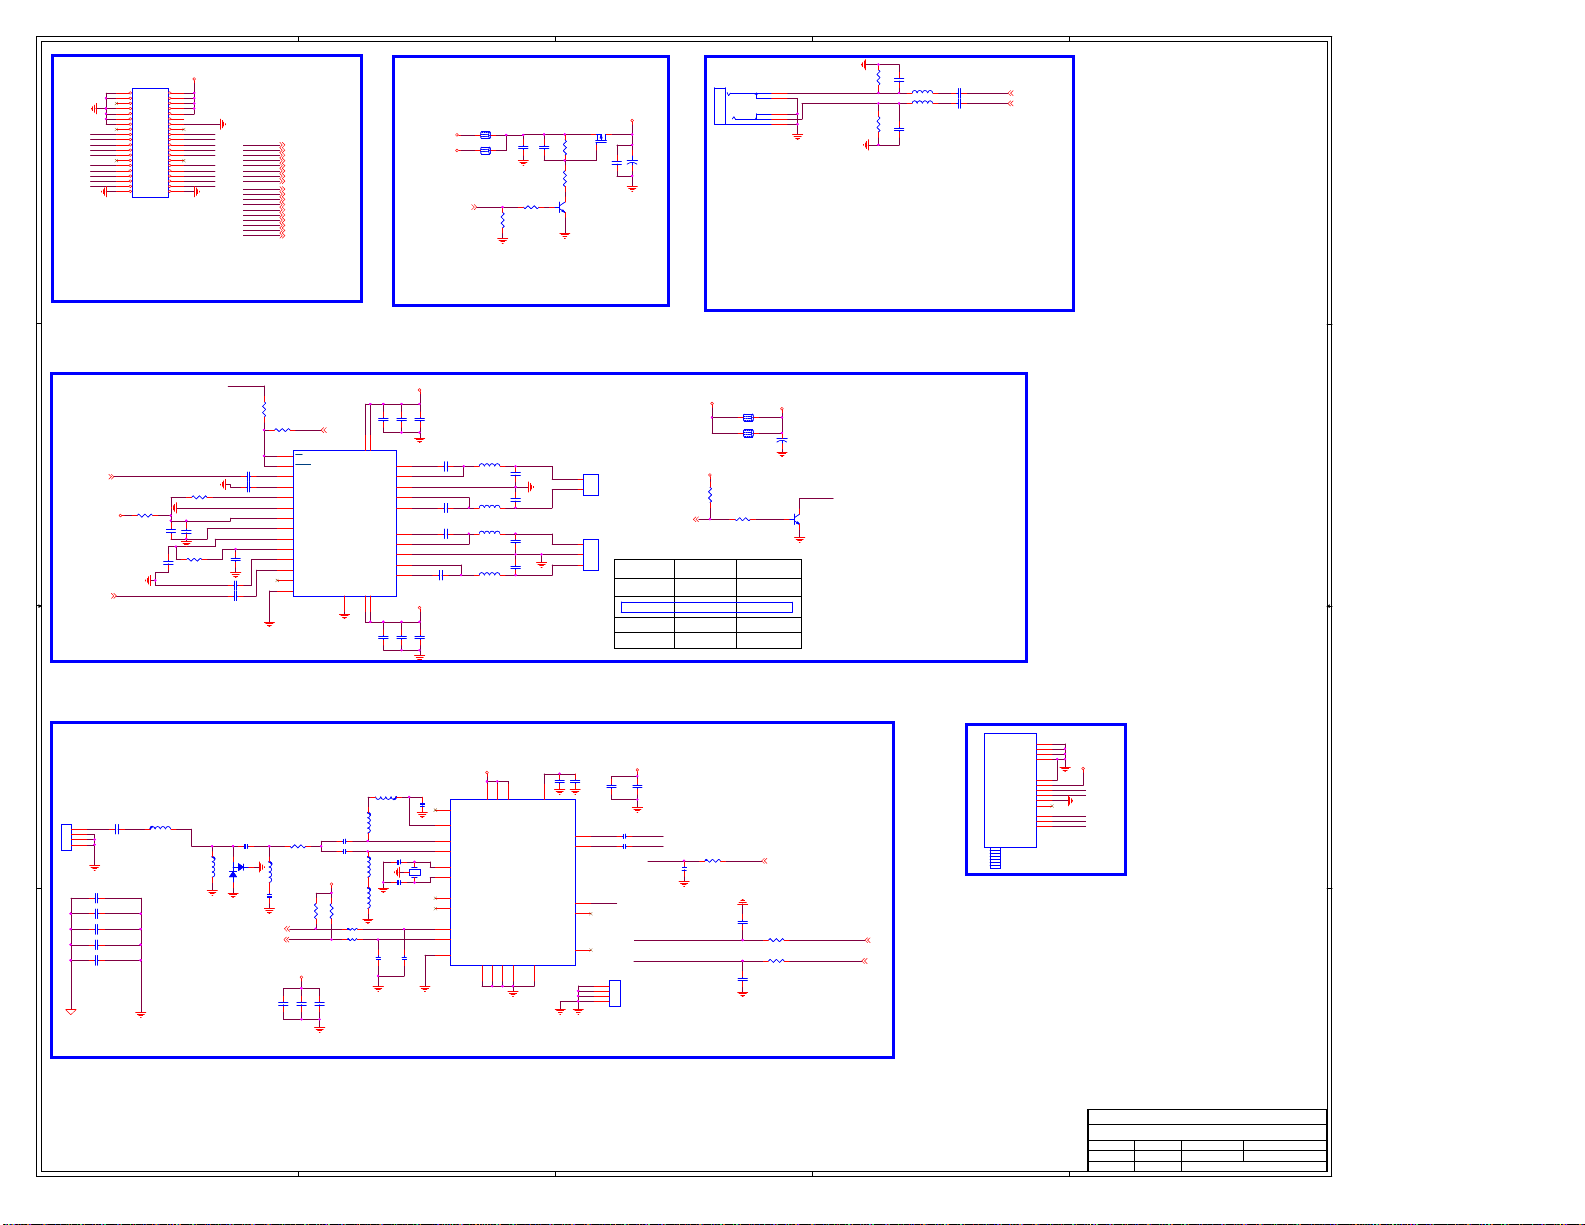
5
5
7
9
CN401
CN401
40PIN/2.0mm
40PIN/2.0mm
GND1VCC
GND3VCC
NC
GND
GND
GND
GND
E4E3ECE2E1E0O4O3OCO2O1O0GND
P_PWM
Panel_VCC
2
4
6
VCC
8
VCC
10
VCC
12
14
GND
16
E4+
18
E3+
20
EC+
22
E2+
24
E1+
26
E0+
28
O4+
30
O3+
32
OC+
34
O2+
36
O1+
38
O0+
40
GND
B2_RXE3+
B4_RXEC+
B6_RXE2+
G0_RXE1+
G2_RXE0+
G6_RXO3+
R2_RXO2+
R4_RXO1+
R6_RXO0+
Net to other page
R7_RXO0-
RXO0-
R6_RXO0+
RXO0+
R5_RXO1-
RXO1-
R4_RXO1+
RXO1+
R3_RXO2-
RXO2-
R2_RXO2+
RXO2+
G7_RXO3-
RXO3-
G6_RXO3+
RXO3+
G3_RXE0-
RXE0-
G2_RXE0+
RXE0+
G1_RXE1-
RXE1-
G0_RXE1+
RXE1+
B7_RXE2-
RXE2-
B6_RXE2+
RXE2+
B5_RXEC-
RXEC-
B4_RXEC+
RXEC+
B3_RXE3-
RXE3-
B2_RXE3+
RXE3+
LVDS
11
13
15
B3_RXE3-
17
B5_RXEC-
19
B7_RXE2-
21
G1_RXE1-
23
G3_RXE0-
25
27
G7_RXO3-
29
B5_RXEC- B4_RXEC+
31
R3_RXO2-
33
R5_RXO1-
35
R7_RXO0-
D D
37
39
4
Power for panel
L206
L206
+12V
0805_BEAD
0805_BEAD
L205
L205
+5V_Standby
0805_BEAD
0805_BEAD
PANEL_ON/OFF
PANEL_ON/OFF5
R25 4.7KR25 4.7K
R24
R24
10K
10K
3
Audio OUT
1
3
Panel_VCC
Q8
C21
C21
0.1uF
0.1uF
ME2325Q8ME2325
C77
C77
R30
R30
100K
100K
1uF
1uF
PANEL_ON
R20
R20
10K
10K
Q7
1
2 3
3904Q73904
+
C169
+
C169
C22
C22
100uF/16V
100uF/16V
0.1uF
0.1uF
CN1 PHONEJACKCN1 PHONEJACK
4
2
5
AGND
AGND
AGND
2
C224
C224
R215
R215
47k
47k
1nF
1nF
C1206 2.2uFC1206 2.2uF
FB1 600RFB1 600R
C1207 2.2uFC1207 2.2uF
FB2 600RFB2 600R
R216
R216
C226
C226
47k
47k
1nF
1nF
E_AMP-L
E_AMP-R
LINEOUT_L5
LINEOUT_R
5
1
R282 10kR282 10k
C194
C194
100nF
100nF
R267 10kR267 10k
TUNER
Si2151
屏蔽罩
C285 0.47UFC285 0.47UF
C284 0.47UFC284 0.47UF
RF-IN
TL3
TL3
270nH
270nH
SHUTDOWN
C288
C288
C289 0.47UFC289 0.47UF
C188
C188
1uF
1uF
3
TD2
TD2
BAV99
BAV99
1
0R/33pF
0R/33pF
TC6
TC6
R2771KR277
1K
100k
100k
R12
R12
BL-ON/OFF5
U18
U18
SD
1
SD
2
FAULT
LIN_P
0.47UF
0.47UF
3
LINP
LIN_N
4
LINN
GAIN0
5
GAIN0
GAIN1
6
GAIN1
AVCC
7
AVCC
8
AGND
GVDD
9
GVDD
PLMIT
10
PLIMIT
RIN_N
11
RINN
RIN_P
12
RINP
13
NC
14
PBTL
GND-PAD
TPA3020LD2
TPA3020LD2
29
TC5 33pF/39pFTC5 33pF/39pF
TR1 0RTR1 0R
TC8 33pF/39pFTC8 33pF/39pF
TL4
TL4
2
NC/180nH
NC/180nH
+3.3V_TU
TC13
TC13
NC/180pF
NC/180pF
R871
R871
R169
R169
4.7K
4.7K
4.7K
4.7K
SCL-T
TC1035
TC1035
1nF
1nF
SDA-T
+3.3V_TU
TC1034
TC1034
0.1uF
0.1uF
TC1036
TC1036
1nF
1nF
TR3 100RTR3 100R
TR2 100RTR2 100R
SCL-T6
SDA-T6
功放
C C
4
LINEOUT_APML
R268 10RR268 10R
AMP_12V
4
LINEOUT_APMR
TDA18275HN
B B
TUNER
RF SIGNAL INPUT
TUNER_CONNECTOR
TUNER_CONNECTOR
C902 1NF/2KVC902 1NF/2KV
ANT
ANT
1
2
3
4
C920 10NF/1KVC920 10NF/1KV
C921 10NF/1KVC921 10NF/1KV
C922 4.7NF/1KVC922 4.7NF/1KV
C923 4.7NF/1KVC923 4.7NF/1KV
C924 1NF/2KVC924 1NF/2KV
A A
C140
C140
10uF
10uF
C211
C211
1uF
1uF
TL70RTL7
RF-IN#
0R
28
PVCCR15PVCCR
16
PVCCL27PVCCL
TL2
TL2
270nH
270nH
TL5
TL5
270nH
270nH
TL6
TL6
270nH
270nH
OUTPL
OUTNL
OUTNR
OUTPR
TL1
TL1
C200
C200
1nF
1nF
BSPL
PGND
BSNL
BSNR
PGND
BSPR
C208
C208
1nF
1nF
270nH
270nH
TC72 8pF/ncTC72 8pF/nc
TC73
TC73
TC20
TC20
33pF
33pF
AMP_12V
C83
C83
C210
C210
10uF
10uF
100nF
100nF
L2922UHL2922UH
C290 0.22UFC290 0.22UF
26
OUTPL
25
24
OUTNL
23
22
21
OUTNR
20
19
OUTPR
18
17
AMP_12V
C198
C198
C209
C209
100nF
100nF
10uF
10uF
TC1
TC1
1nF
1nF
3
1 2
8pF/nc
8pF/nc
24MHZ/8pF
24MHZ/8pF
TC19
TC19
33pF
33pF
C278
C278
C279
C279
C280 0.22UFC280 0.22UF
TY2
TY2
I2C Addr:
0xC0
L3022UHL3022UH
0.22UF
0.22UF
0.22UF
0.22UF
18
NC
19
RF_REF
20
RF_IP
22
RF_IN
13
XTAL_I
14
XTAL_O
24
GPIO1
1
GPIO2
3
SCL
2
SDA
23
ADDR
0.47F
0.47F
L3222UHL3222UH
0.47uF
0.47uF
L3122UHL3122UH
C282
C282
0.47uF
0.47uF
+3.3V_TU
9
15
17
TU2
TU2
3.3V
3.3V
3.3V
Si2151
Si2151
GND8GND
GND21GND_EPAD
GND
6
16
CON602CON602
C283
C283
LOUT+
0.47uF
0.47uF
C287
C287
C281
C281
2
LOUT-
1
CON603
CON603
ROUT-
1
-
2
GND
ROUT+
3
+
3Pin/2.0mm
3Pin/2.0mm
0
1
+3.3V_TU
TC3
TC3
TC2
TC2
1uF
1uF
1nF
1nF
7
1.8V
IF_P
IF_N
AGC1
AGC2
XOUT
25
AGND GND
11
10
5
4
12
TC1031
TC1031
TC1030
TC1030
10uF/6.3V
10uF/6.3V
10uF/6.3V
10uF/6.3V
IF-
TC4 0.1uFTC4 0.1uF
IF+
TC7 0.1uFTC7 0.1uF
IF-AGC
BPF_IN
IFP
IFN VIFM
1
2
3
4
J325X21mm
屏蔽罩
J325X21mm
屏蔽罩
AMP_MUTE4
功放放大倍数调节
IFP
IFN
IF-AGC
GAIN0(PIN5)GAIN1(PIN6)
L:ON
H:MUTE
TC58
TC58
0.1uF
0.1uF
+12V
+3.3V_Standby
0
10
0
11
TR13 100RTR13 100R
Close Tuner
R38
R38
10k
10k
C367
L204
L204
L203
L203
R272 10kR272 10k
0805_BEAD
0805_BEAD
0805_BEAD
0805_BEAD
AMP GAIN(db)
20
26
32
36
C803
C803
100PF
100PF
R806 100RR806 100R
R815 100RR815 100R
C815
C815
100PF
100PF
AMP_12V
C216
C216
470uF
470uF
1
TAGC
AGC RC Filter
SHUTDOWN
Q28
Q28
3904
3904
2 3
SI2151
SI2151
13
GND
12
GND
11
GND
10
GND
+3.3V_TU
9
ANT_DC
8
3.3V
SCL-T
7
SCL
SDA-T
6
SDA
5
GND
4
CLK_OUT
IFN
3
DIFN
IFP
2
DIFP
IF-AGC
1
IF_AGC
ANT1
ANT1
SI2151高频头模组
VIFP
VIFP+
VIFM-
KTC ISO9001.ISO14001体系文件
KTC ISO9001.ISO14001体系文件
文件名称:
文件名称:
文件名称:
文件编号:
文件编号:
文件编号:
设计:
设计:
设计:
发行部门: 生效日期:
发行部门: 生效日期:
5
4
3
2
发行部门: 生效日期:
KTC ISO9001.ISO14001体系文件
V56/MSD3553-T4C1 主板原理图
V56/MSD3553-T4C1 主板原理图
V56/MSD3553-T4C1 主板原理图
T4305
版本:3.0
版本:3.0
版本:3.0
李振乐
审核:
审核:
审核:
周杰
周杰
周杰
电气部
电气部
电气部
Monday, November 21, 2016
Monday, November 21, 2016
Monday, November 21, 2016
1
页数:
页数:
页数:
批准:
批准:
批准:
陈茂华
3 4
3 4
3 4
of
of
of
42
Page 44
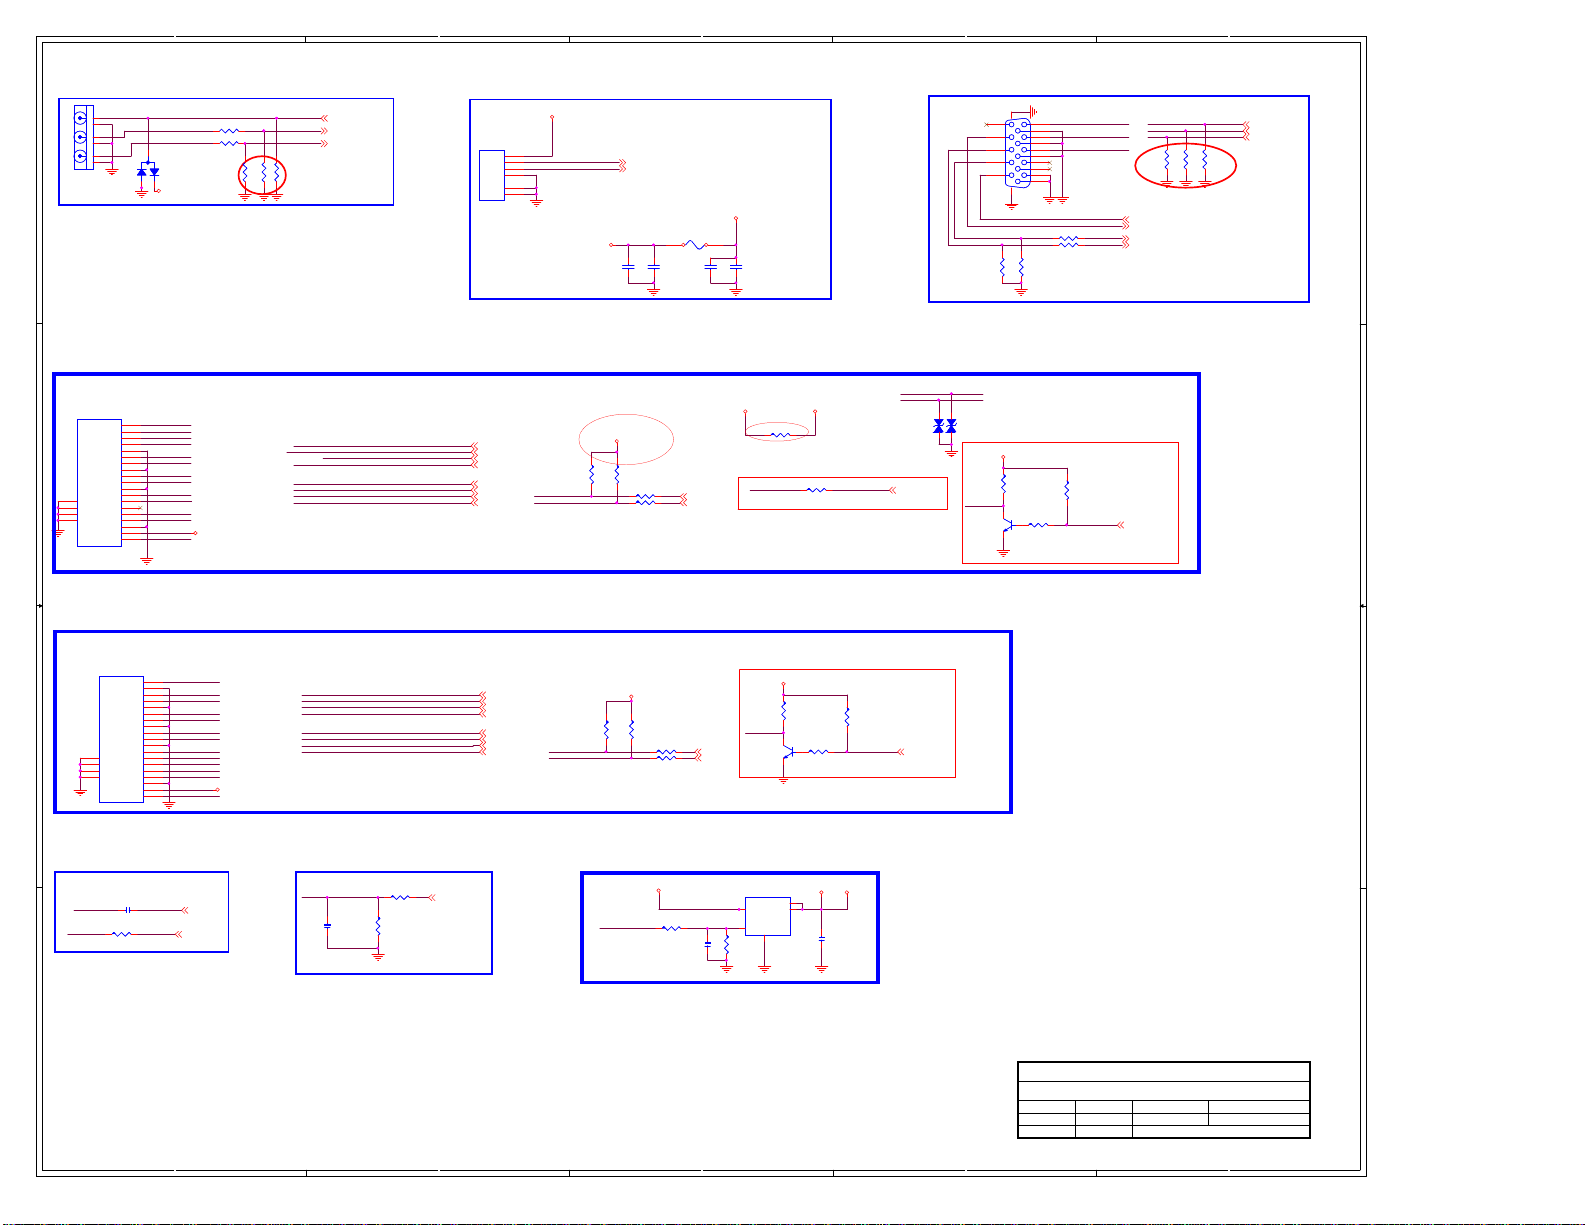
5
AV1
R529 10KR529 10K
AV1-AuLin
AV1-AuRin
AV1_IN
AV1_IN
CN307
CN307
D D
AV-IN
HDMI1(MSD3553有MHL)
P503
P503
DATA2 SHIELD
DATA1 SHIELD
C C
DATA0 SHIELD
CLK SHIELD
20
GND1
21
GND2
22
GND3
23
GND3
DDC/CEC GND
+5V POWER
DATA2+
DATA2-
DATA1+
DAT1A-
DATA0+
DATA0-
HOT PLUG
HDMI-W
HDMI-W
3
1
1
MHL-CD-SENSE
2
3
4
5
6
7
8
9
10
CLK+
11
12
CLK-
13
CEC
14
NC
15
SCL
16
SDA
17
18
19
TD1
TD1
NC/BAV99W
NC/BAV99W
2
+5V_Normal
HDMI0-RX2P
HDMI0-RX2N
HDMI0-RX1P
HDMI0-RX1N
HDMI0-RX0P
HDMI0-RX0N
HDMI0-CLKP
HDMI0-CLKN
CEC
HDMI0-SCL
HDMI0-SDA
HDMI0-HPD
R530 10KR530 10K
+5V_VBUS
R532
R532
R531
R531
12K
12K
12K
12K
MHL Signal:
CMR:24.57 ~35.54Ω
DMR:95.3~115
AV1 5
AV1-Lin 5
AV1-Rin 5
R533
R533
75R
75R
Close to Mstar IC
HDMI0-RX2P HDMI0_RX2P
HDMI0-RX2N HDMI0_RX2N
HDMI0-RX1P HDMI0_RX1P
HDMI0-RX1N HDMI0_RX1N
,
HDMI0-RX0P HDMI0_RX0P
HDMI0-RX0N HDMI0_RX0N
HDMI0-CLKP HDMI0_CLKP
HDMI0-CLKN HDMI0_CLKN
4
5V_USB1
USB_4P
USB_4P
1
CN317
CN317
SHIELD
SHIELD
VCC
2
D-
3
D+
4
GND
5
6
USB0_DM
USB0_DP
USB0_DM5
USB0_DP 5
USB
5V_USB1
C408
C408
C407
C407
0.1uF
0.1uF
10uF
10uF
HDMI0_RX2P
HDMI0_RX2N
HDMI0_RX1P
HDMI0_RX1N
HDMI0_RX0P
HDMI0_RX0N
HDMI0_CLKP
HDMI0_CLKN
2
2
2
2
2
2
HDMI0-SCL
2
HDMI0-SDA
2
R401
R401
10K
10K
+5V_Standby
R402
R402
10K
10K
R403 22RR403 22R
R404 22RR404 22R
3
C410
C410
0.1uF
0.1uF
HDMI0_SCL
HDMI0_SDA
+5V_Normal
L4026V/1.1A L4026V/1.1A
C409
C409
10uF
10uF
+5V_VBUS
R426 5.1RR426 5.1R
连接到有
IC支持MHL port供电pin,靠近IC
HDMI0-HPD HDMI0_HPDIN
2
2
AVDD5V_MHL_A
R405 33RR405 33R
此
HDMI port IC内置hotplug
2
CON601
CON601
D402
D402
HDMI0-HPD
V56:3904/3553:NC
V56:3904/3553:NC
Q503
Q503
11
12
13
14
15
R607
R607
10K
10K
+5V_VBUS
1617
VGA
VGA
R520
R520
V56:1K/3553:NC
V56:1K/3553:NC
32
1
1
6
2
7
3
8
4
9
5
10
R608
R608
10K
10K
R536
R536
V56:4.7K/3553:NC
V56:4.7K/3553:NC
DDC_SCL_D
DDC_SDA_D
R605100R R605100R
R606100R R606100R
R522
R522
V56:10K/3553:NC
V56:10K/3553:NC
HDMI0_HPDIN
VGA-Rin
VGA-Gin
VGA-Bin
VGA-Bin
VGA-Gin
VGA-Rin
R601
R601
75R
75R
Close to Mstar IC
UART_RX 5
UART_TX 5
VGA-VSYNC 5
VGA-HSYNC 5
HDMI0_HPDIN
2
VGA
HDMI0-RX0P
HDMI0-RX0N
D401
D401
NC/1pF
NC/1pF
NC/1pF
端
NC/1pF
HDMI0_HPDIN
1
VGA-Bin 5
VGA-Gin 5
R602
R602
75R
75R
VGA-Rin 5
R603
R603
75R
75R
HDMI2(ARC)
P502
P502
DATA2 SHIELD
DATA1 SHIELD
DATA0 SHIELD
B B
A A
CLK SHIELD
20
GND1
21
GND2
22
GND3
23
GND3
DDC/CEC GND
+5V POWER
HOT PLUG
HDMI-W
HDMI-W
CEC &ARC
C501 2.2uFC501 2.2uF
HDMI-ARC HDMI_ARC
CEC HDMI_CEC
R420 200RR420 200R
DATA2+
DATA2-
DATA1+
DAT1A-
DATA0+
DATA0-
HDMI1-RX2P
1
2
HDMI1-RX2N
3
HDMI1-RX1P
4
5
HDMI1-RX1N
6
HDMI1-RX0P
7
8
HDMI1-RX0N
9
HDMI1-CLKP
10
CLK+
11
HDMI1-CLKN
12
CLK-
CEC
13
CEC
HDMI-ARC
14
NC
HDMI1-SCL
15
SCL
HDMI1-SDA
16
SDA
17
18
19
HDMI1-HPD
HDMI_CEC
5
HDMI_ARC
HDMI1/5V
MHL-CD-SENSE
C402
C402
47nF
47nF
R422 100RR422 100R
R421
R421
300K
300K
HDMI1_RX2PHDMI1-RX2P
HDMI1_RX2NHDMI1-RX2N
HDMI1_RX1PHDMI1-RX1P
HDMI1_RX1NHDMI1-RX1N
HDMI1_RX0PHDMI1-RX0P
HDMI1_RX0NHDMI1-RX0N
HDMI1_CLKPHDMI1-CLKP
HDMI1_CLKNHDMI1-CLKN
MHL_CABLE_DET
MHL
HDMI1_RX2P
HDMI1_RX2N
HDMI1_RX1P
HDMI1_RX1N
HDMI1_RX0P
HDMI1_RX0N
HDMI1_CLKP
HDMI1_CLKN
2
4
HDMI1-SCL
HDMI1-SDA
HDMI1/5V
R523
R523
10K
10K
MHL_CABLE_DET
R525
R525
10K
10K
R528 22RR528 22R
R535 22RR535 22R
+5V_Normal
R424 1KR424 1K
HDMI1_SDA
C403
C403
NC/0.1uF
NC/0.1uF
3
R425
R425
NC/10K
NC/10K
3
4
HDMI1-HPD
U503
U503
IN
EN
Q502
Q502
3904
3904
2
VOUT
VOUT
GND
HDMI1/5V
SGM2554A
SGM2554A
R5191KR519
1K
32
R521
R521
10K
10K
R534
R534
HDMI1_HPDIN
1
4.7K
4.7K
HDMI0/5V
+5V_VBUS
5
1
C404
C404
10uF
10uF
HDMI1_HPDINHDMI1_SCL
KTC ISO9001.ISO14001体系文件
KTC ISO9001.ISO14001体系文件
KTC ISO9001.ISO14001体系文件
文件名称:
文件名称:
文件名称:
V56/MSD3553-T4C1 主板原理图
V56/MSD3553-T4C1 主板原理图
文件编号:
文件编号:
文件编号:
设计:
设计:
设计:
发行部门: 生效日期:
发行部门: 生效日期:
发行部门: 生效日期:
2
V56/MSD3553-T4C1 主板原理图
T4305
版本:3.0
版本:3.0
版本:3.0
李振乐
审核:
审核:
审核:
周杰
周杰
周杰
电气部
电气部
电气部
Monday, November 21, 2016
Monday, November 21, 2016
Monday, November 21, 2016
页数:
页数:
页数:
批准:
批准:
批准:
1
陈茂华
of
of
of
4 4
4 4
4 4
43
 Loading...