

Philips 32PFL7932 User Manual

FLAT TV
32PFL7332
32PFL7932
English
User Manual
42PFL7432
42PFL7932
52PFL7432
philips


Recycling
The packaging of this product is intended to
be recycled. Apply to the local authorities for
correct disposal.
Disposal of your old product
Your product is designed and manufactured
with highly quality material and components,
which can be recycled and reused. When this
crossed-out wheeled bin symbol is attached
to a product, it means the product is covered
by the European Directive 2002/96/EC.
Please inform yourself about the local
separate collection system for electrical and
electronic products. Please act according to
your local rules and do not dispose your old
products with your normal household waste.
The correct disposal of your old product will
help prevent potential negative consequences
for the environment and human health.
Disposal of batteries
The batteries supplied do not contain the
heavy metals mercury and cadmium. Please
check on how to dispose exhausted
batteries according to local regulations.
Left hand
underside of TV
Rear
of TV
• The Model and Serial number can be
found at the rear and the left hand
underside of your television set and
on the packaging.
• This TV consumes minimal energy in
standby mode to minimise environmental
impact.
• Power Consumption of the set can found
on the type plate at the rear of the TV.
• For more specifi cations of the product
see the product leafl et on www.philips.
com/support.
Note
Specifications and information are
subject to change without notice.
• If you need further assistance, please call
the customer support service in your
country. The corresponding telephone
numbers and addresses are given in the
supplied Worldwide guarantee booklet.
Important
• Some TV antennas require power from
the TV set. This set does not support such
a feature.
Electric, Magnetic and
Electromagnetic Fields (“EMF”)
• Royal Philips manufactures and sells many
products targeted at consumers, which,
like any electronic apparatus, in general
have the ability to emit and receive
electromagnetic signals.
• One of Philips’ leading Business
Principles is to take all necessary health
and safety measures for our products, to
comply with all applicable legal
requirements and to stay well within the
EMF standards applicable at the time of
producing the products.
• Philips is committed to develop, produce
and market products that cause no
adverse health effects.
• Philips confirms that if its products are
handled properly for their intended use,
they are safe to use according to scientific
evidence available today.
• Philips plays an active role in the
development of international EMF and
safety standards, enabling Philips to
anticipate further developments in
standardization for early integration in its
products.
English

Safety
English
•
•
•
•
•
•
•
General
Two people are required to lift and
carry a TV that weighs more than 25 kg.
Improper handling of the TV can cause
serious injury.
The surface on which the TV is placed
has to be level and able to withstand its
weight.
Air must be able to circulate freely
through the ventilation slots. Do not
place the TV in a confined place.
Do not place naked flame sources such
as lighted candles close to the TV.
Do not place a vase filled with water
near the TV. Spills can results in
electric shock. If water gets into the TV,
disconnect the TV from the mains and
have it checked by a qualified technician.
Do not expose the TV or the batteries
of the remote control to heat, direct
sunlight, rain or water.
During a thunderstorm, do not touch
any part of the TV, power cord or
antenna cable.
Do not leave the TV in standby mode
•
for an extended period of time. Instead
disconnect it from the mains.
Do not connect too many equipment
•
to the same mains socket because it can
result in fire or electric shock.
Wall mounting the TV
To wall mount the TV, please consult a
•
qualified technician. Improper mounting
of the TV can cause serious injury.
Please check that the structure of the
•
wall is suitable to carry the weight of
the TV.
Before mounting, all cables must be
•
inserted into the connectors of the TV.
connections can be done later.
Wherever you place or hang the TV,
•
ensure that air can circulate freely.
through the ventilation slots. Do not
position the TV in a confined space.
Caring and cleaning of the TV
Do not remove the protective sheet until you have completed the stand/wall mounting
•
and connections.
Use only the soft cloth provided to clean the glossy area of the TV. For the other parts
•
of the TV, use a soft dry cloth. Disconnect the TV from the mains before you clean the
TV.
Do not touch, push, rub or strike the screen with anything hard as this may scratch or
•
damage the screen permanently.

Contents
Getting started ....................................................................................... 1
Connecting the antenna .........................................................................................................1
Connecting / disconnecting from the mains ......................................................................1
Installing batteries into the remote control .....................................................................2
Switching on the TV ................................................................................................................2
Controls and connectors ....................................................................... 3
Side controls ............................................................................................................................. 3
Side connectors .......................................................................................................................3
Rear connectors ...................................................................................................................... 4
Remote control keys and functions ...................................................... 5
Selecting the menu languages .............................................................. 7
Searching and storing channels ........................................................... 8
Automatic searching ............................................................................................................... 8
Manual Searching ..................................................................................................................... 9
Selecting Colour or Sound System ..................................................................................9
Searching for your channels ...........................................................................................10
Fine Tuning your channels ...............................................................................................11
Sorting your channels .......................................................................... 12
Naming your channels ......................................................................... 13
Storing your favorite channels ............................................................ 14
Adjusting your picture settings ...........................................................15
Adjusting your sound settings ............................................................. 16
Setting the timer .................................................................................. 17
Setting the sleep timer .........................................................................................................17
Setting the clock ....................................................................................................................18
Displaying the clock permanently ......................................................................................18
Setting the time to switch channels ..................................................................................19
Setting the time to switch TV to standby.........................................................................20
Setting ways to activate the timer .....................................................................................20
Locking and unlocking the TV side control .......................................21
Activating the Child Lock ....................................................................................................21
Deactivating the Child Lock ................................................................................................21
Controlling TV program access ......................................................... 22
Accessing Parental Lock .......................................................................................................22
Changing the access code ....................................................................................................23
Locking all channels ...............................................................................................................24
Unlocking all channels ..........................................................................................................24
English

Contents
English
Switching on and off Active Control ................................................. 25
Switching on Active Control ...............................................................................................25
Switching off Active Control ...............................................................................................25
Ambilight ............................................................................................. 26
Switching on Ambilight .........................................................................................................26
Switching off Ambilight .........................................................................................................26
Settings for Ambilight .......................................................................... 27
Adjusting brightness ..............................................................................................................27
Selecting Ambilight modes ...................................................................................................27
Selecting Ambilight colour ...................................................................................................28
Using custom colours ...........................................................................................................29
Selecting Ambilight balance..................................................................................................29
Displaying Demo mode ....................................................................... 30
Displaying Demo mode ........................................................................................................30
Accessing Teletext ................................................................................ 30
Switching on/off Teletext ......................................................................................................30
Selecting a page ......................................................................................................................30
Fastext (only applicable when Fastext is in broadcast) .................................................30
Selecting index (contents) page ..........................................................................................30
Selecting subpage directly ....................................................................................................30
Enlarging a page ......................................................................................................................30
Page hold .................................................................................................................................30
Hidden information ...............................................................................................................30
Selecting picture formats .................................................................... 31
Selecting Smart picture and Smart sound settings .......................... 32
Smart sound settings ............................................................................................................32
Smart picture settings ...........................................................................................................32
Using the TV as a computer monitor ................................................33
Setting the picture, sound and features in VGA mode ..................................................33
Using the TV in High De nition (HD) mode ..................................... 34
Connecting the HD equipment ..........................................................................................34
Controlling the TV settings while in HD mode ..............................................................34
Mode Selection in Features menu .....................................................................................35
Display (native 1080) in Features menu ...........................................................................35
Connecting to other devices ............................................................... 37
Troubleshooting.................................................................................... 38
Symptom ..................................................................................................................................38
Possible solutions ..................................................................................................................38

Getting started
NOTE: If you intend to mount the TV on the wall, all cables must be inserted into the
connectors of the TV first.
Connecting the antenna
The antenna socket is located at the rear
panel (underside) of the TV.
& Insert the antenna connector into the
TV antenna socket.
é Insert the connector at the other end of
the cable into your wall antenna socket.
Connecting / disconnecting
from the mains
& Insert the power cord connector
(appliance coupler) into the socket located
at the rear (underside) of the TV.
é Insert the plug into the wall power
socket.
NOTE:
The appliance coupler of the power cord
on the TV is used as the disconnect device.
Ensure that the power cord is fully inserted
into the TV mains socket and the wall
socket. To disconnect from the mains,
remove the power cord from the TV
mains socket or the wall socket. Verify
that the mains supply voltage in your home
corresponds to the voltage information
printed on the sticker at the rear of the TV.
English
WARNING:
For TV mounted on a swivel base or arm,
please ensure that the power cord is not
strained during swivelling. Straining the
power cord will loosen connections. This
may cause arcing and result in fire.
1

Getting started
English
Installing batteries into the
remote control
& Remove the cover at the back of the
remote control.
é Insert the two supplied batteries with
the (+) and (-) ends lined up correctly.
Switching on the TV
The TV controls are located at the left side
of the set.
& Press the POWER button.
A blue indicator light comes on.
é Press CHANNEL + / - to change the
channels.
“ If the TV is in standby mode (red
indicator lights up), press the CHANNEL
+ / - to switch on the TV.
2

Controls and connectors
Side controls
The side controls are on the left side of the
TV set.
1 VOLUME + / -
To increase volume level, press VOLUME +,
to decrease level, press VOLUME -.
2 MENU
To display the on-screen menus or to exit
from the on-screen menus.
The CHANNEL + / - buttons can be used to
navigate the menu items.
The VOLUME + / - buttons can be used to
select the menu items.
3 CHANNEL + / -
To select the TV channel numbers upwards
or downwards.
4 POWER
To turn off or turn on the TV set.
Side connectors
English
The side connectors are on the left side of
the TV set.
1 Headphones
To connect to your headphones.
2 Audio / Video / S-Video
To connect your devices such as camera or
player.
3
Controls and connectors
English
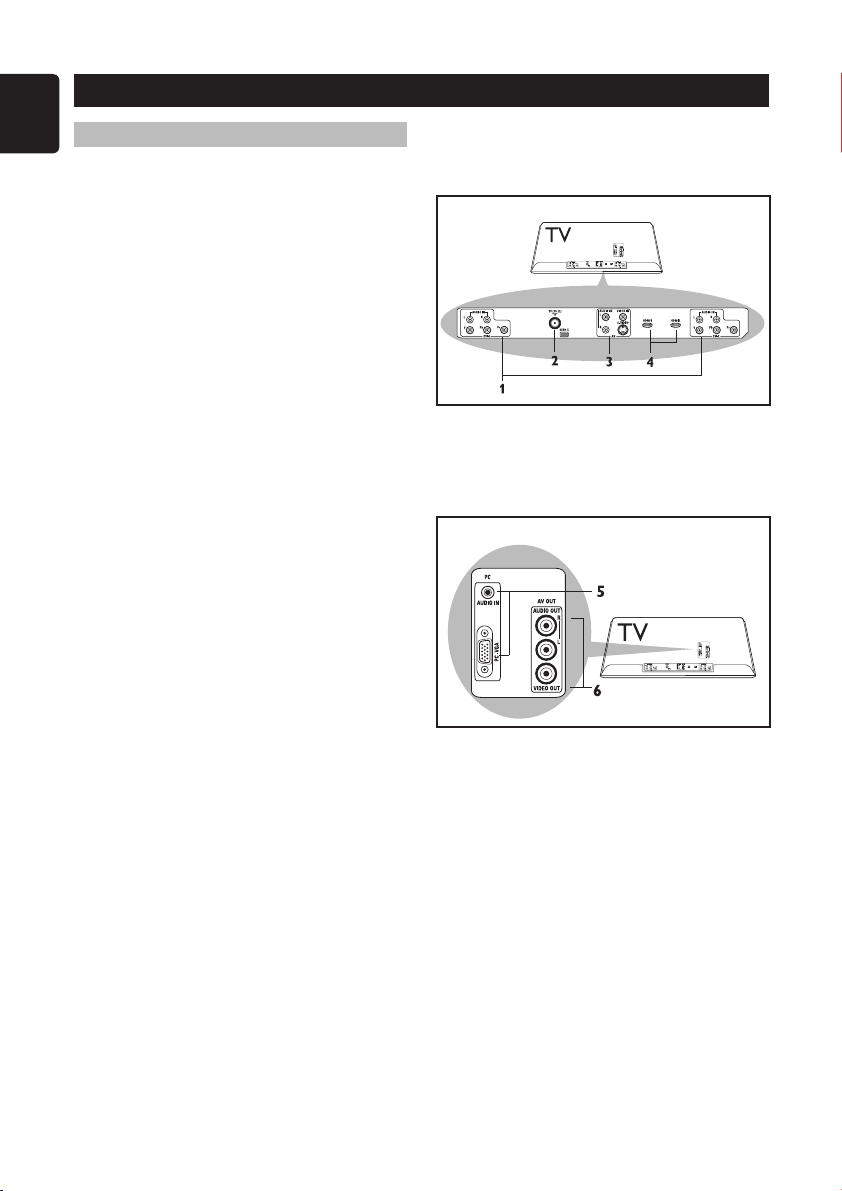
Rear connectors
The rear connectors are at the back
(underside) of the TV set.
1 CVI-1 / CVI-2
To connect to your devices such as DVD
players, decoders and Home Theatre systems.
2 Antenna
To connect to the antenna.
3 Audio / Video / S-Video
To connect your devices such as
camera, camcorder, or video player.
4 HDMI1 / HDMI2
To connect your devices such as
set-top box, DVD player/recorder, high de nition equipment or personal computer.
5 VGA / Audio for PC
To use the TV as a computer monitor. You
can view the computer’s content in the TV’s
different screen sizes and listen to the audio
content.
6 Audio / Video
To connect your devices such as
Home Theater systems and DVD recorders.
4
Remote control keys and functions
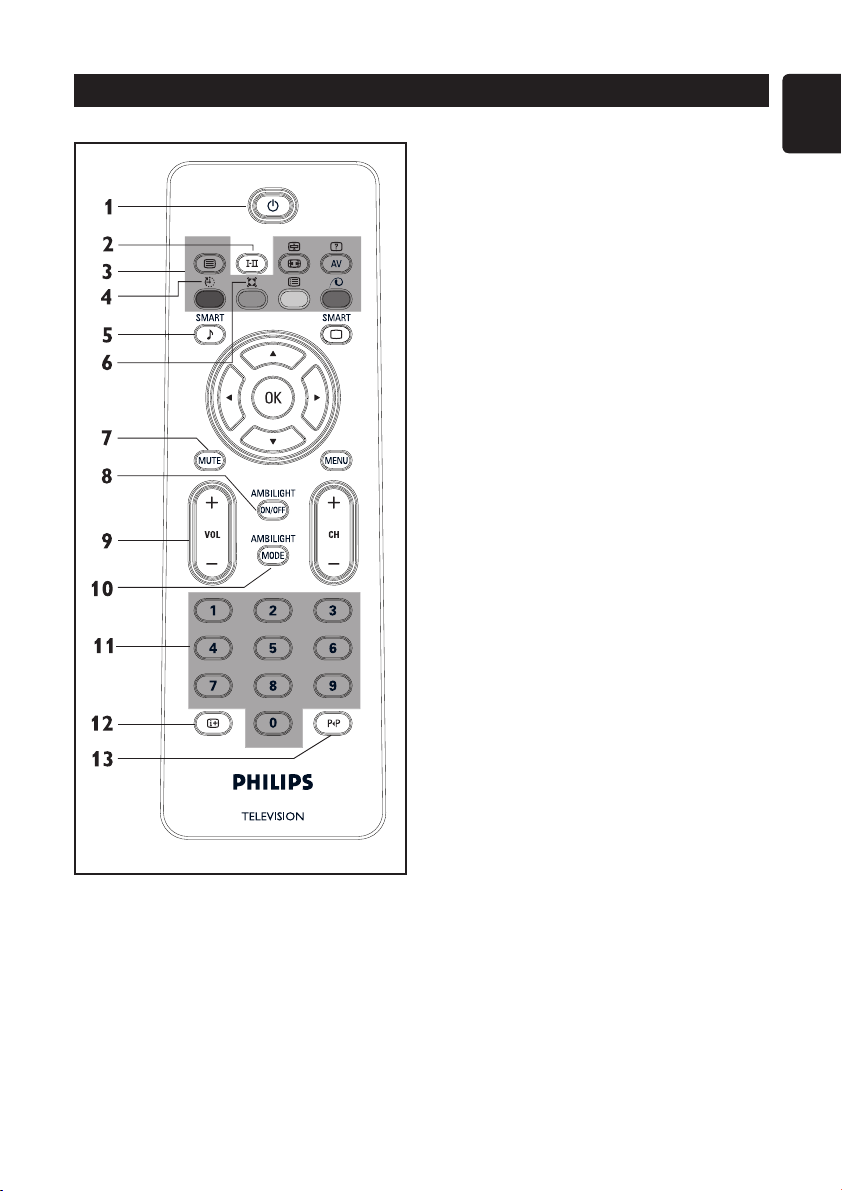
2 ù button
To select Stereo and forced Mono sound
effect.
3 Teletext *
* Applicable to selected models only.
(see page 30)
4 Sleeptimer
To switch off TV to standby at a
specified time (see page 17).
5 Smart Sound button
To select the pre-set Sound settings.
6 Incredible Surround button
To enable Incredible Surround in stereo
mode and Spatial in mono mode.
7 Mute button
To turn off or turn on sound.
8 Ambilight On/Off button
To switch on or off Ambilight.
9 Volume buttons
To turn up or turn down the sound level.
English
1 Standby button
To switch the TV to standby mode if it
is already turned on. Or to turn on TV
when it is in standby mode.
10 Ambilight mode button
To select the Ambilight mode set in
Features menu.
11 Number (0-9) buttons
To enter channel number, set time or
timer.
12 On screen information button
To display information on the current
channel or to exit on-screen menus.
13 Alternate Channel button
To display the last viewed channel.
5

Remote control keys and functions
English
14 Picture Format button
To cycle through list of available picture
formats.
15 AV button
To display AV source list or to cycle
through list of AV sources by pressing
the button repeatedly.
16 Pixel Plus Demo button
To turn on Pixel Plus Demo. One half
of screen will display image with Pixel
Plus enabled and the other half without.
17 Smart Picture button
To select the pre-set picture settings.
18 Program List button
To display the list of available channels
which you can scroll through using the
cursor buttons.
19 Cursor buttons
To navigating and selecting menu items
and adjusting individual settings.
20 OK button
To select menu items or confirm
selection.
21 Menu button
To display the on-screen menus and exit
menus from the screen.
22 Channel buttons
To select the higher or lower channel
number.
6
NOTE:
The u button is used to select menu items
or confirm your selection.
You can also press the Æbutton instead of
the u button. Either of the
button will work in the same context.
For brevity, only the u button will be
mentioned in the User Manual.

Selecting the menu languages
Before using the on-screen menus, select your
menu language.
& Press h button to display the on-screen
menus.
é Press ï button until Install is
highlighted.
“ Press u button to select Language.
The available languages for your TV will be
displayed on the right panel.
‘ Press u button to highlight the first
language or ï to select the other available
languages.
( Press u button to select the language.
§ Press h button to exit the on-screen
menus.
English
7

Searching and storing channels
English
When you are using the TV for the first
time, it is recommended that you run the
automatic or manual searching of channels.
Automatic searching
& Press h button to display the on-
screen menus.
é Press ï button until Install is
highlighted.
“ Press u button to select Install.
‘ Press ï button until Auto Store is
highlighted.
( Press u button to start Auto Store.
The TV will start scanning for channels
automatically. When it finds a channel, it
will assign the channel number 1 to it and
continue scanning for the next available
channel. When scanning has completed, the
progress bar display will exit from the screen.
The first channel found will be displayed on
the screen.
§ Press h button to exit the on-screen
menus.
TIP:
To cancel or interrupt auto searching, press
the h button. Only channels that were
found before interruption, will be stored.
8
Searching and storing channels
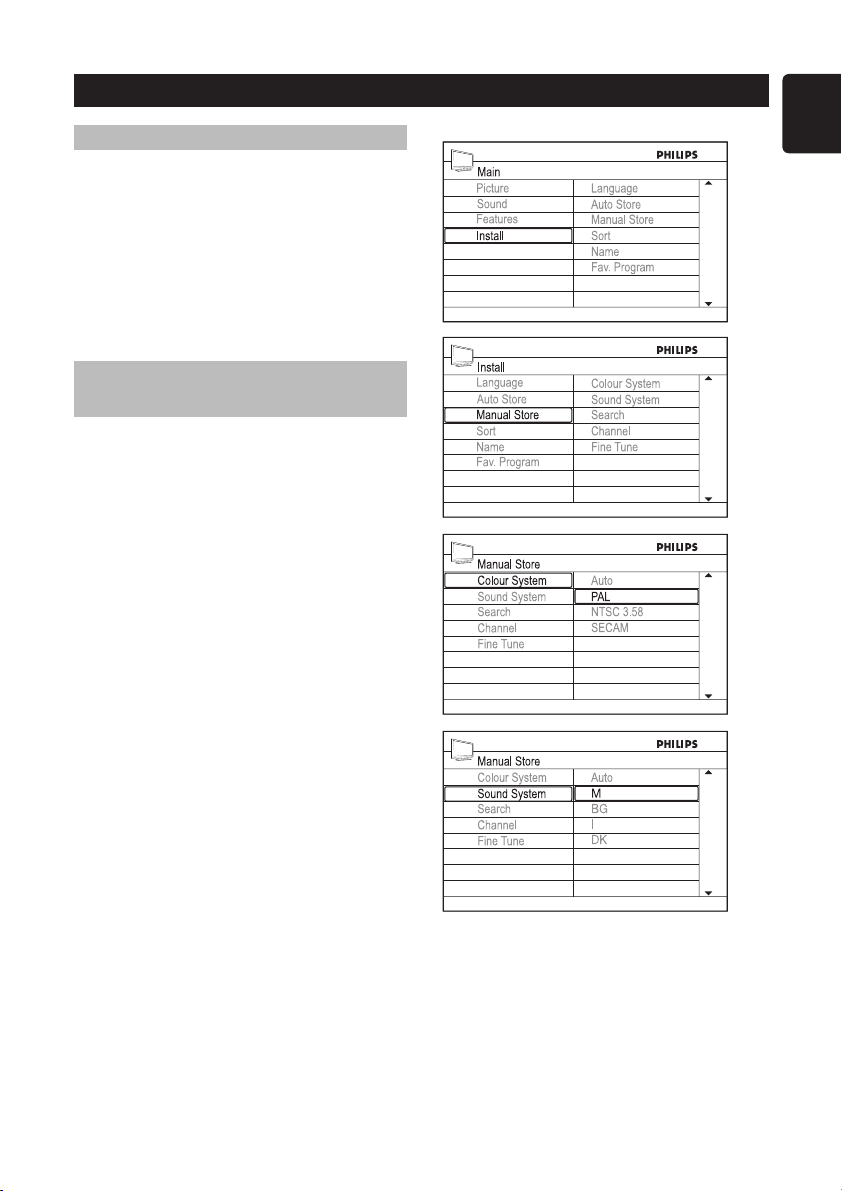
Manual Searching
In manual searching, you can select the
following items to tune for channels:
Colour System
Sound System
Search
Channel
Fine Tune
Selecting Colour or Sound
System
& Press h button to display the on-
screen menus.
é Press ï button to highlight Install.
“ Press u button to select Install.
‘ Press ï button to highlight Manual
Store.
( Press u button to enter the Manual
Store menu.
English
§ Press ï button to highlight Colour
System or Sound System.
è Press u button to enter the system
menu.
! Press Î or ï button to select the type
of system.
ç Press h button to exit the on-screen
menus.
9
 Loading...