

Philips 32PFL6704D, 32PFL7704D, 42PFL5603D, 42PFL6704D, 42PFL7704D User Manual
...
Regist:e__you__p_oduct and get st_ppo_t at
www_p _ilipSocolira/weIco lirae
52PFL7704D
47PFL7704D
42PFL7704D
32PFL7704D
52PFL6704D
47PFL6704D
42PFL6704D
32PFL6704D
EN User manual
For further assistance, call the customer support service in your country
" To obtain assistance in the US.A,, Puerto Rico, or the US.Virgin islands, contact Philips
Customer Care Center at 1 866 771 4018
" To obtain assistance in Canada, contact Philips Customer Care Center at:
" 1 800 661 6162 (French spealdn£)
" 1 866 771 4018 (English speaking)
Enter bdow the model and serial nurnbers Ioca±ed on the back and right side oftheTV cabinet,
Model:
Serial:
Contents
1 Notice 4
9 Connect devices
Connection overview
Select your connection quality
Label your connections
Connect your devices
28
28
29
29
3O
2 Important
Product information
Screen care
Environmental care
3 Your TV
Side controls and indicators
Remote control
Get started
Position the Tg
Insert the remote control batteries
Connect the antenna or cane
Connect the power cord
Manage cables
Switch on and set up theTV
Use your TV
Switch yourTV on/off or to standby
Switch channels
Adjust volume
Watch channels from a set-top box
Watch connected devices
Watch a DVD
12
1I
1I
1I
1I
12
12
12
5
5
5
5
6
6
6
8
10 Troubleshooting
11 Notes for the use of USB devices
12 Product information
13 Warranty
14 Index
33
34
35
36
37
8
8
8
9
9
Use more of yourTV
Use the quid< access menu
Change picture and sound settings
Use Auto Mode
Create and use lists of favorite channels
Set the dod<
Use child control and rating locks
View closed captions (subtitles)
View photos, play music, and watch videos on a USB device
Watch videos on a USB device
Use yourTV in HD mode
Use yourTV as a PC monitor
Use Philips EasyLink
Use the demo mode
Install channels
Select your menu language
Set your location to home
Automatically install channels
Optimize the signal quality from your antenna
Uninstall and reinstall channels
Return your settings to default values
Show emergency alerts (EAS)
Update your TV software
Check your current software version
Prepare for the software upgrade
Upgrade software
13
13
13
15
15
15
16
19
20
22
22
23
23
24
25
25
25
25
25
26
26
26
27
27
27
27
EN 1
Registering your model with PHlUPS makes you eligible for all of the valuable benefits listed below, so don't miss out.
Complete and return your Product Registration Card at once, or register online at www.philips.comlwelcome
to ensure:
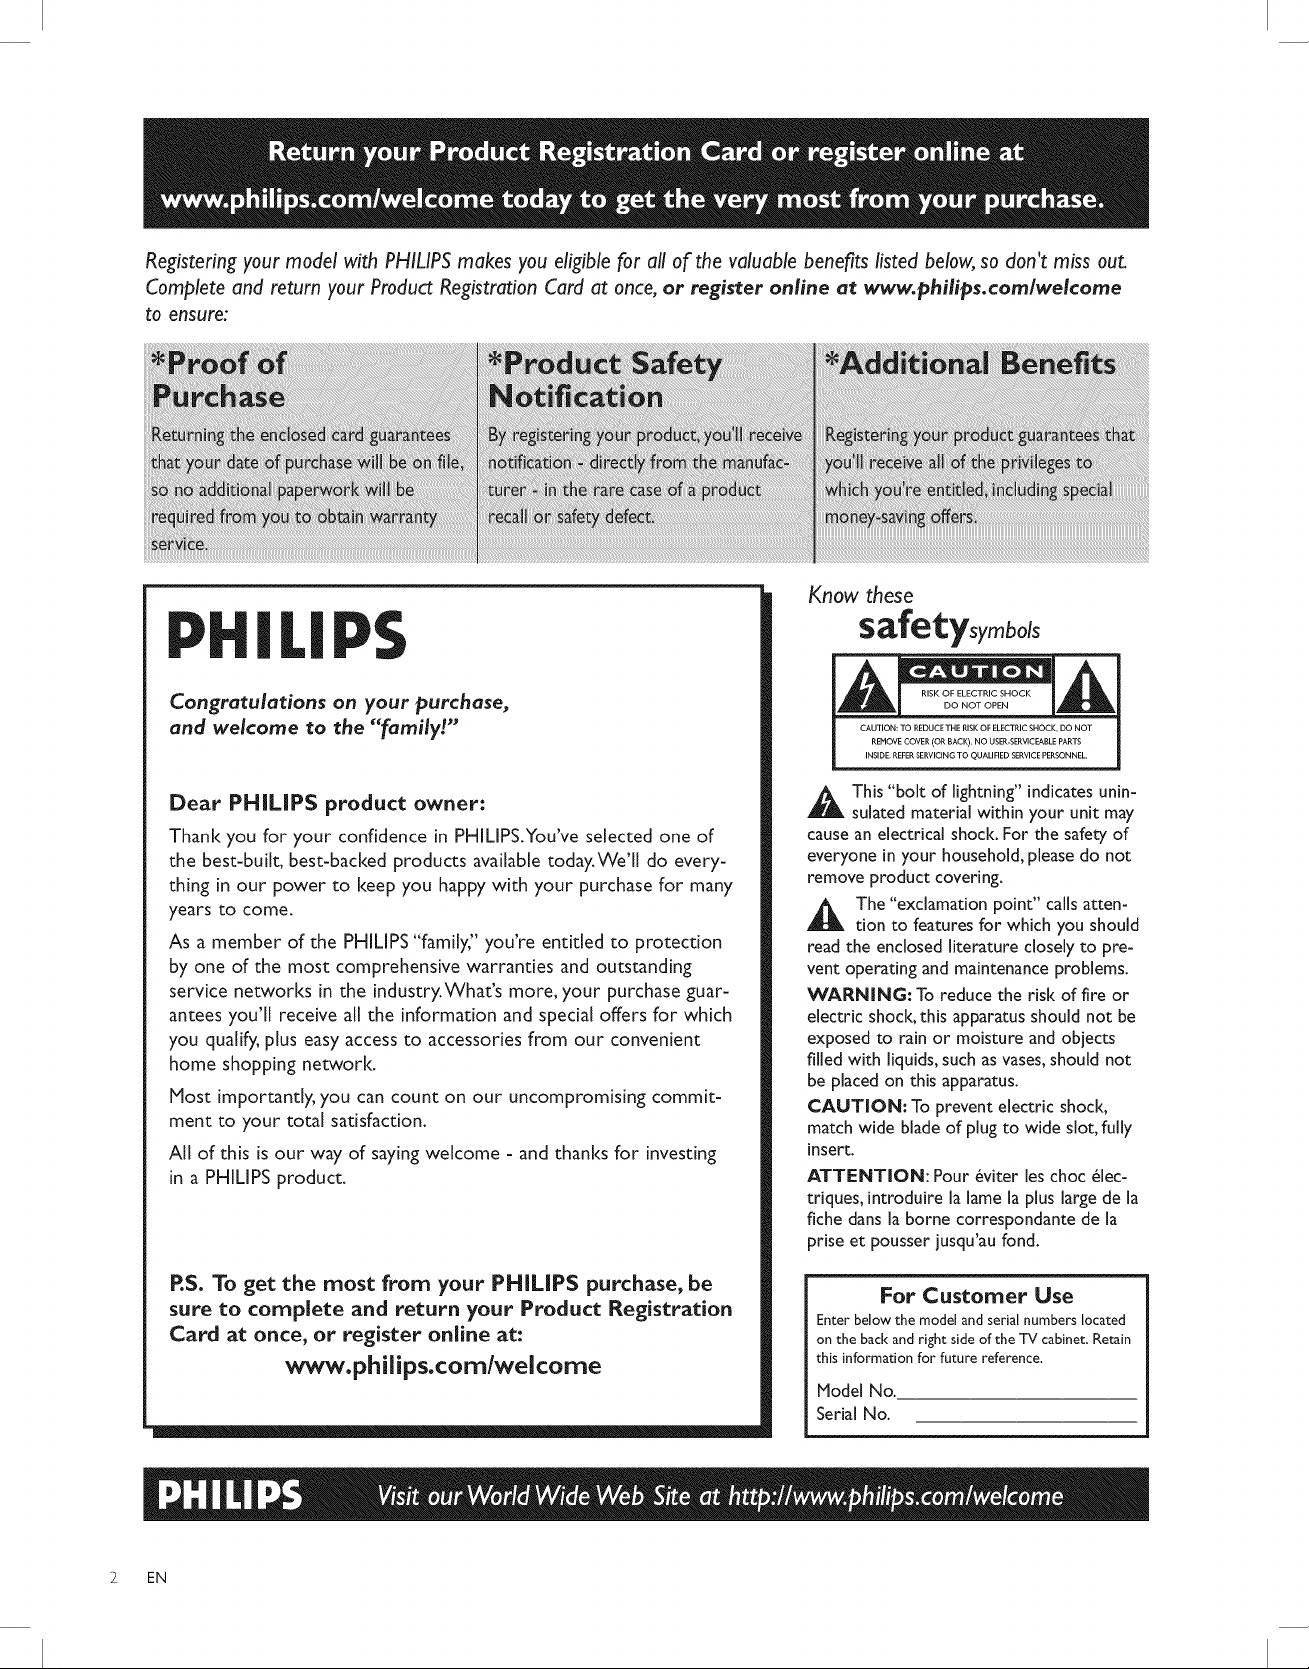
Know these
PHILIPS
Congratulations on your purchase,
and welcome to the "family!"
Dear PHILIPS product owner:
Thank you for your confidence in PHILIPS.You've selected one of
the best-built, best-backed products available today.We'll do every-
thing in our power to keep you happy with your purchase for many
years to come.
As a member of the PHILIPS "family," you're entitled to protection
by one of the most comprehensive warranties and outstanding
service networks in the industry.What's more, your purchase guar-
antees you'll receive all the information and special offers for which
you qualify, plus easy access to accessories from our convenient
home shopping network.
Host importantly, you can count on our uncompromising commit-
ment to your total satisfaction.
All of this is our way of saying welcome - and thanks for investing
in a PHILIPS product.
safetysymbols
CAUTION: TO REDUCE THE RISK OF ELECTRIC SHOCK, DO NOT
REHOVE COVER (OR BACK). NO USER-SERVICEABLE PARTS
INSIDE, REFER SERVICING TO QUALIFIED SERVICE PERSONNEL.
This "bolt of lightning" indicates unin-
sulated material within your unit may
cause an electrical shock. For the safety of
everyone in your household, please do not
remove product covering.
The "exclamation point" calls atten-
tion to features for which you should
read the enclosed literature closely to pre-
vent operating and maintenance problems.
WARNING: To reduce the risk of fire or
electric shock, this apparatus should not be
exposed to rain or moisture and objects
filled with liquids, such as vases, should not
be placed on this apparatus.
CAUTION: To prevent electric shod<,
match wide blade of plug to wide slot, fully
insert.
ATTENTION: Pour 6viter les choc 61ec-
triques, introduire la lame la plus large de la
fiche dans la borne correspondante de la
prise et pousser jusqu'au fond.
2 EN
P.S. To get the most from your PHILIPS purchase, be
sure to complete and return your Product Registration
Card at once, or register online at:
ww_.philips.com/welcome
For Customer Use
Enter below the model and serial numbers located
on the back and right side of the TV cabinet. Retain
this information for future reference.
Model No.
Serial No.
iMPORTANT SAFETY iNSTRUCTiONS
Read before operating equipment
#ii:ili_i!!!!!!!!!!!!!!!!!!!!iiiiii
:::ii_!!!!!!!!!!!!!!!!!i!!iiiiil
I. Read these instructions.
2. Keep these instructions.
3. Heed all warnings.
4. Follow all instructions.
5. Do not use this apparatus near water.
6. Clean only with a dry cloth.
7. Do not block any of the ventilation openings. Install in accordance with
the manufacturers instructions.
8. Do not install near any heat sources such as radiators, heat registers,
stoves, or other apparatus (including amplifiers) that produce heat.
9. Do not defeat the safety purpose of the polarized or grounding-type plug.
A polarized plug has two blades with one wider than the other. A
grounding type plug has two blades and third grounding prong. The wide
blade or third prong are provided for your safety. When the provided
plug does not fit into your outlet, consult an electrician for replacement
of the obsolete outlet.
10. Protect the power cord from being walked on or pinched particularly at
plugs, convenience receptacles, and the point where they exit from the
apparatus.
11. Only use attachments/accessories specified by the manufacturer.
12. Use only with a cart, stand, tripod, bracket, or table specified by
the manufacturer, or sold with the apparatus. When a cart is
used, use caution when moving the cart/apparatus combination
to avoid injury from tO-over.
13. Unplug this apparatus during lightning storms or when unused for long
periods of time.
14. Refer all servicing to qualified service personnel. Servicing is required
when the apparatus has been damaged in any way, such as power-supply
cord or plug is damaged, liquid has been spilled or objects have fallen
into apparatus, the apparatus has been exposed to rain or moisture,
does not operate normally, or has been dropped.
15. This product may contain lead or mercury. Disposal of these materials
may be regulated due to environmental considerations. For disposal or
recycling information, please contact your local authorities or the
Electronic Industries Alhance:www.eiae.org.
16. Damage Requiring Service - The appliance should be serviced by
qualified service personnel when:
A. The power supply cord or the plug has been damaged; or
B. Objects have fallen, or liquid has been spilled into the appliance; or
C. The appliance has been exposed to rain; or
D. The appliance does not appear to operate normally or exhibits a
marked change in performance; or
E. The appliance has been dropped, or the enclosure damaged.
17. Tilt/Stability - All televisions must comply with recommended
international global safety standards for tilt and stability properties of its
cabinets design.
• Do not compromise these design standards by applying excessive pull
force to the front, or top, of the cabinet which could ultimately
overturn the product.
• Also,do not endanger yourself, or children, by placing electronic
equipment/toys on the top of the cabinet. Such items could
unsuspectingly fall from the top of the set and cause product damage
and/or personal injury.
18. Wall or Ceiling Mounting - The appliance should be mounted to a
wall or ceiling only as recommended by the manufacturer.
19. Power Lines - An outdoor antenna should be located away from
power lines.
20. Outdoor Antenna Grounding - If an outside antenna is connected to
the receiver, be sure the antenna system is grounded so as to provide
some protection against voltage surges and built up static charges.
Section 810 of the National Electric Code, ANSI/NFPA No. 70-1984,
provides information with respect to proper grounding of the mats and
supporting structure grounding of the lead-in wire to an antenna-
discharge unit, size of grounding connectors, location of antenna-
discharge unit, connection to grounding electrodes and requirements for
the grounding electrode. See Figure below.
21. Objects and Liquid Entry - Care should be taken so that obiects do
not fall and liquids are not spilled into the enclosure through openings.
a) Warning: To reduce the risk of fire or electric shock, this apparatus
should not be exposed to rain or moisture and objects filled with
liquids, such as vases should not be placed on this apparatus.
22. Battery Usage CAUTION - To prevent battery leakage that may
result in bodily injury, property damage, or damage to the unit:
• Install all batteries correctly, with + and - alignment as marked on the
unit.
• Do not mix batteries (old and new or carbon and alkaline, etc.)
• Remove batteries when the unit is not used for a long time.
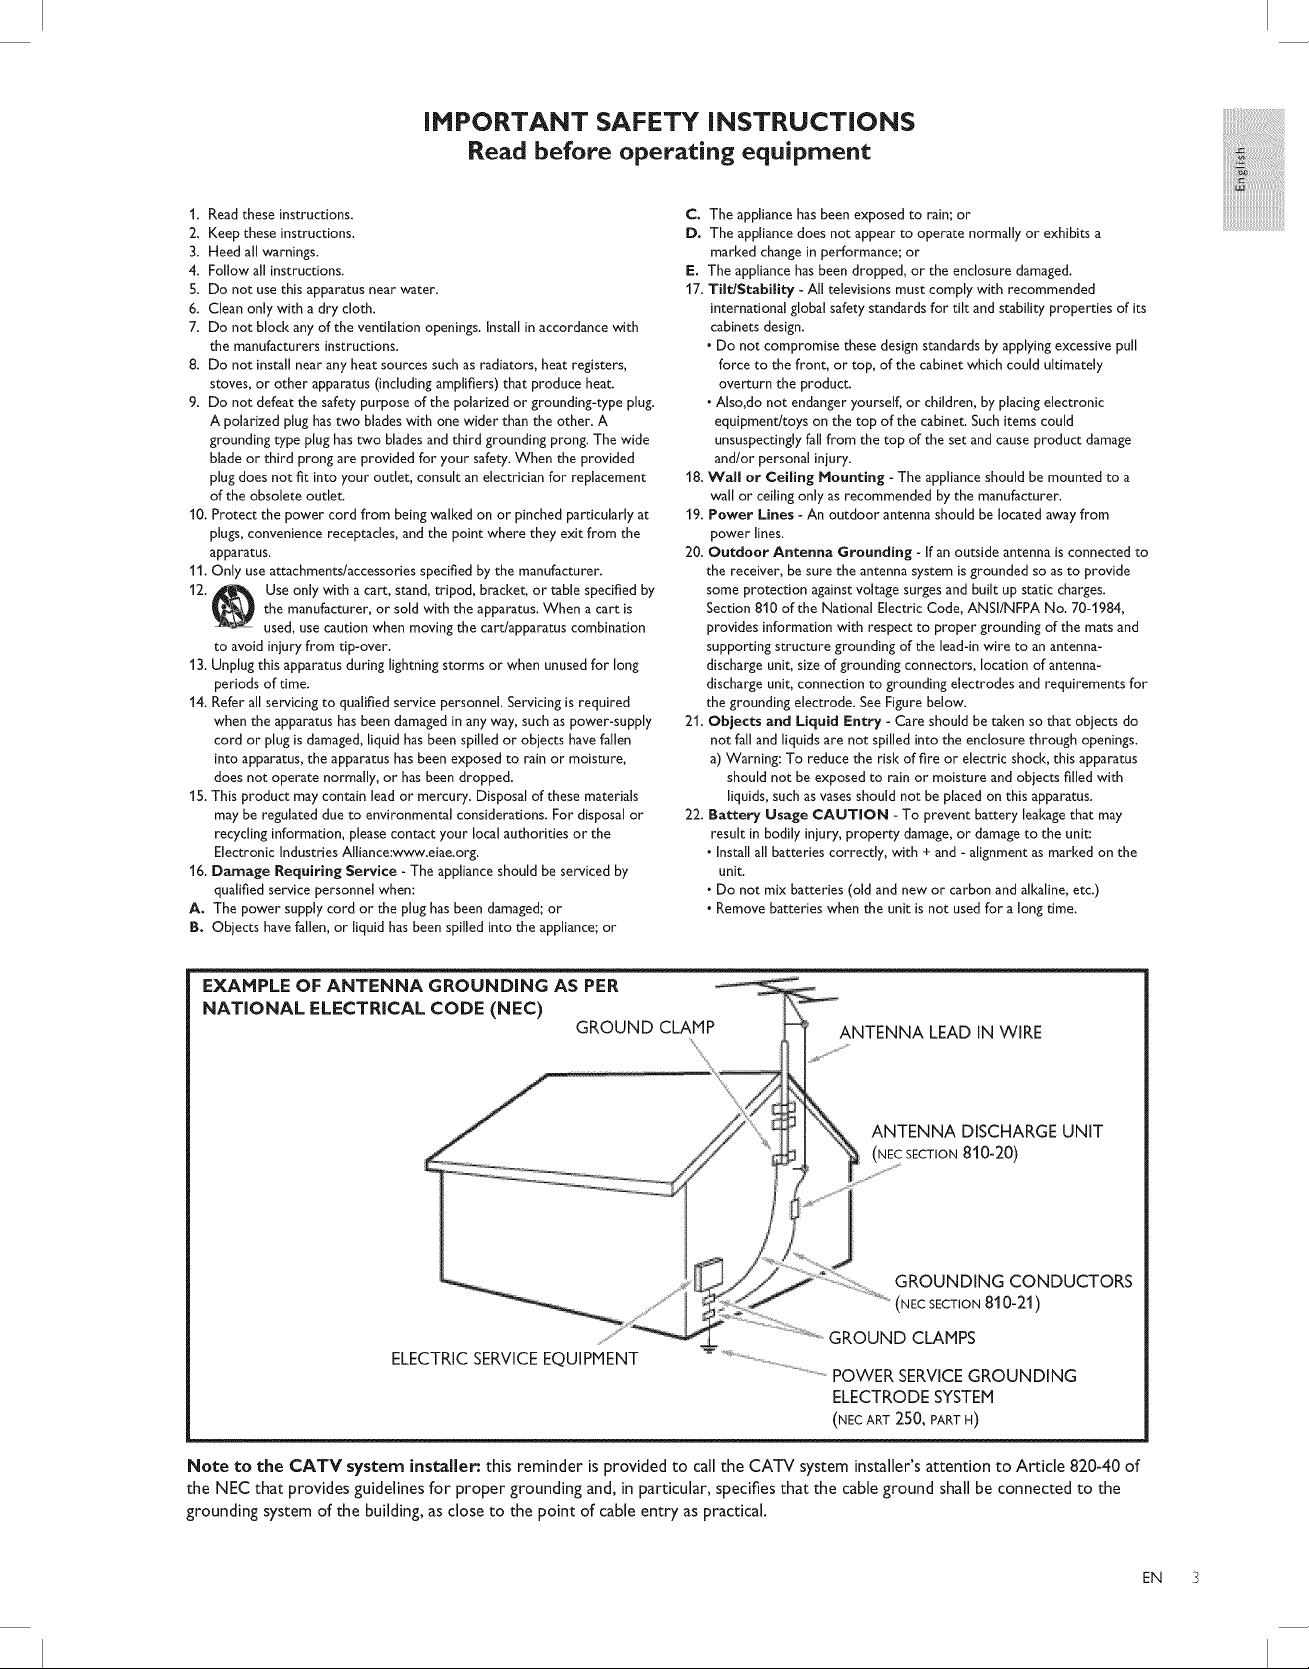
EXAMPLE OF ANTENNA GROUNDING AS PER
NATIONAL ELECTRICAL CODE (NEC)
GROUND CLAMP
ANTENNA LEAD IN WIRE
ANTENNA DISCHARGE UNIT
(NEC SECTION 810-20)
GROUNDING CONDUCTORS
(NEC SECTION 81 0-21)
GROUND CLAMPS
ELECTRICSERVICEEQUIPMENT
POWER SERVICEGROUNDING
ELECTRODE SYSTEM
(NEC ART 2S0, PARTFI)
Note to the CATV system installer." this reminder is provided to call the CATV system installer's attention to Article 820-40 of
the NEC that provides guidelines for proper grounding and, in particular, specifies that the cable ground shall be connected to the
grounding system of the building, as close to the point of cable entry as practical.
EN 3
1 Notice
2009 © Koninldijke Philips Electronics N.V.AII rights reserved.
Specifications are subject to change without notice.Trademarks are
the property of Koninldijke Philips Electronics N.V. or their respective
owners. Philips reserves the right to change products at any time
without being obliged to adjust earlier supplies accordingly.
The material in this manual is believed adequate for the intended use of
the system. If the product, or its individual modules or procedures, are
used for purposes other than those specified herein, confirmation of
their validity and suitability must be obtained. Philips warrants that the
material itself does not infringe any United States patents. No further
warranty is expressed or implied.
Philips cannot be held responsible neither for any errors in the content
of this document nor for any problems as a result of the content in this
document. Errors reported to Philips will be adapted and published on
the Philips support website as soon as possible.
Pixel characteristics
This LCD product has a high number of color pixeis.AIthough it has
effective pixels of 99.999% or more, black dots or bright points of light
(red, green or blue) may appear constantly on the screen.This is a
structural property of the display (within common industry standards)
and is not a malfunction.
Warranty
No components are user serviceable. Do not open or remove covers
to the inside of the product. Repairs may only be done by Philips
Service Centers and official repair shops. Failure to do so shall void any
warranty, stated or implied.
Any operation expressly prohibited in this manual, any adjustments, or
assembly procedures not recommended or authorized in this manual
shall void the warranty.
Cables
Connections to this device must be made with shielded cables with
metallic RFI/EMI connector hoods to maintain compliance with FCC
Rules and Regulations.
Canadian notice
This Class B digital apparatus meets all requirements of the Canadian
Interference-Causing Equipment Regulations.
Copyright
All other registered and unregistered trademarks are the property of
their respective owners.
DOLBY
DIGITAL J
Manufactured under license from Dolby Laboratories."Dolby" and the
double-D symbol are trademarks of Dolby Laboratories.
Federal Communications Commission Notice
This equipment has been tested and found to comply with the limits
for a Class B digital device, pursuant to part 15 of the FCC Rules.These
limits are designed to provide reasonable protection against harmful
interference in a residential installation.This equipment generates, uses,
and can radiate radio frequency energy and, if not installed and used
in accordance with the instructions, may cause harmful interference
to radio communications. However, there is no guarantee that
interference will not occur in a particular installation. If this equipment
does cause harmful interference to radio or television reception, which
can be determined by turning the equipment off and on, the user is
encouraged to try to correct the interference by one or more of the
following measures:
• Reorient or relocate the receiving antenna.
• Increase the separation between the equipment and the receiven
• Connect the equipment into an outlet on a circuit different from
that to which the receiver is connected.
• Consult the dealer or an experienced radio or television
technician for help.
Modifications
The FCC requires the user to be notified that any changes or
modifications made to this device that are not expressly approved by
Philips Consumer Electronics may void the user's authority to operate
the equipment.
VESA, FDll and theVESA Mounting Compliant logo are trademarks of
theVideo Electronics Standards Association.
® Kensin_on and Micro Saver are registered US trademarks of ACCO
World corporation with issued registrations and pending applications in
other countries throughout the world.
DivX® isa registered trademark of DivX, Inc., and is used under license.
Portions of this software are copyright © The FreeType Project (www.
freetype.org).
4 EN
2 Important
Registering your model with Phifips makes you eligible for all of the
valuable benefits listed below, so don't miss out.
Complete and return your Product Registration Card at once, or
register online at www.philips.com/welcome to ensure:
• Proof of Purchase
Returning the enclosed card guarantees that your date of
purchase is on file, so no additional paperwork is required from
you to obtain warranty service.
• Product Safety Notification
By registering your product you receive notification - directly
from the manufacturer - in the rare case of a product recall or
safety defect.
• Additional Benefits of Product Ownership
Registering your product guarantees that you receive all of the privileges
to which you're entitled, including special money-saving offers.
Environmental care
The packaging of this product is intended to be recycled. Contact your
local authorities for information about how to recycle the packaging,
End of life directives
ij3iiiiiiii!!!iiii
iliili{;i:i:i_122222211@i!
:::ii_!!!!!!!!!!!!!!!!!{i!!iiiiil
_####################/_
For further assistance
For further assistance, call the customer support service in your
country.
• To obtain assistance inthe U.S.A., Puerto Rico, or the U.S. Virgin
Islands, contact Philips Customer Care Center at 1-866-771-
40I 8
• To obtain assistance in Canada, contact Philfps Customer Care
Center at:
• 1-800-661-6162 (French speaking)
• 1-866-771-4018 (English speaking)
Product information
ThisTY consumes minimal energy in standby mode to minimize
environmental impact.The active power consumption is given on the
type plate at the back oftheTV.The model and serial number of your
TV can be found on the bad< and right side oftheTV as well as on the
packaging,
Screen care
• Avoid stationary images as much as possible. Stationary images
are images that remain on-screen for extended periods of time.
Examples include: on-screen menus, black bars and time displays.
If you must use stationary images, reduce screen contrast and
brightness to avoid screen damage.
• Unplug the TV before cleaning.
• Clean the TV screen and frame with a soft, damp cloth. Never
use substances such as alcohol, chemicals or household cleaners
on the TV screen.
• Risk of damage to the TV screen! Never touch, push, rub or
strike the screen with any object.
• To avoid deformations and color fading, wipe off water drops as
soon as possible.
X
Like all LCD products, this set contains a lamp with mercury; please
dispose of according to all local, state and federal laws.
Philfps pays a lot of attention to produce environment-friendly products
in green focal areas.Your newTV contains materials which can be
recycled and reused. At the end of its life, specialized companies can
dismantle the discarded TV to concentrate the reusable materials and to
minimize the amount of materials to be disposed of. Please ensure you
dispose of your oldTV according to local regulations.
Disposal of used batteries
The batteries supplied do not contain the heavy metals mercury and
cadmium. Nevertheless, in many areas, batteries may not be disposed
of with your household waste. Please ensure you dispose of batteries
according to local regulations.
EN 5
3 YourTV Remote control
Congratulations on your purchase, and welcome to Philips!To fully
benefit from the support that Philips offers, register your product at
www, philips,com/wefcome,
Side controls and indicators
VOLUME
Q-
AUTO
@
ACTIVE
SOU_ OPTIONS
@
@
®
Q_
@
5
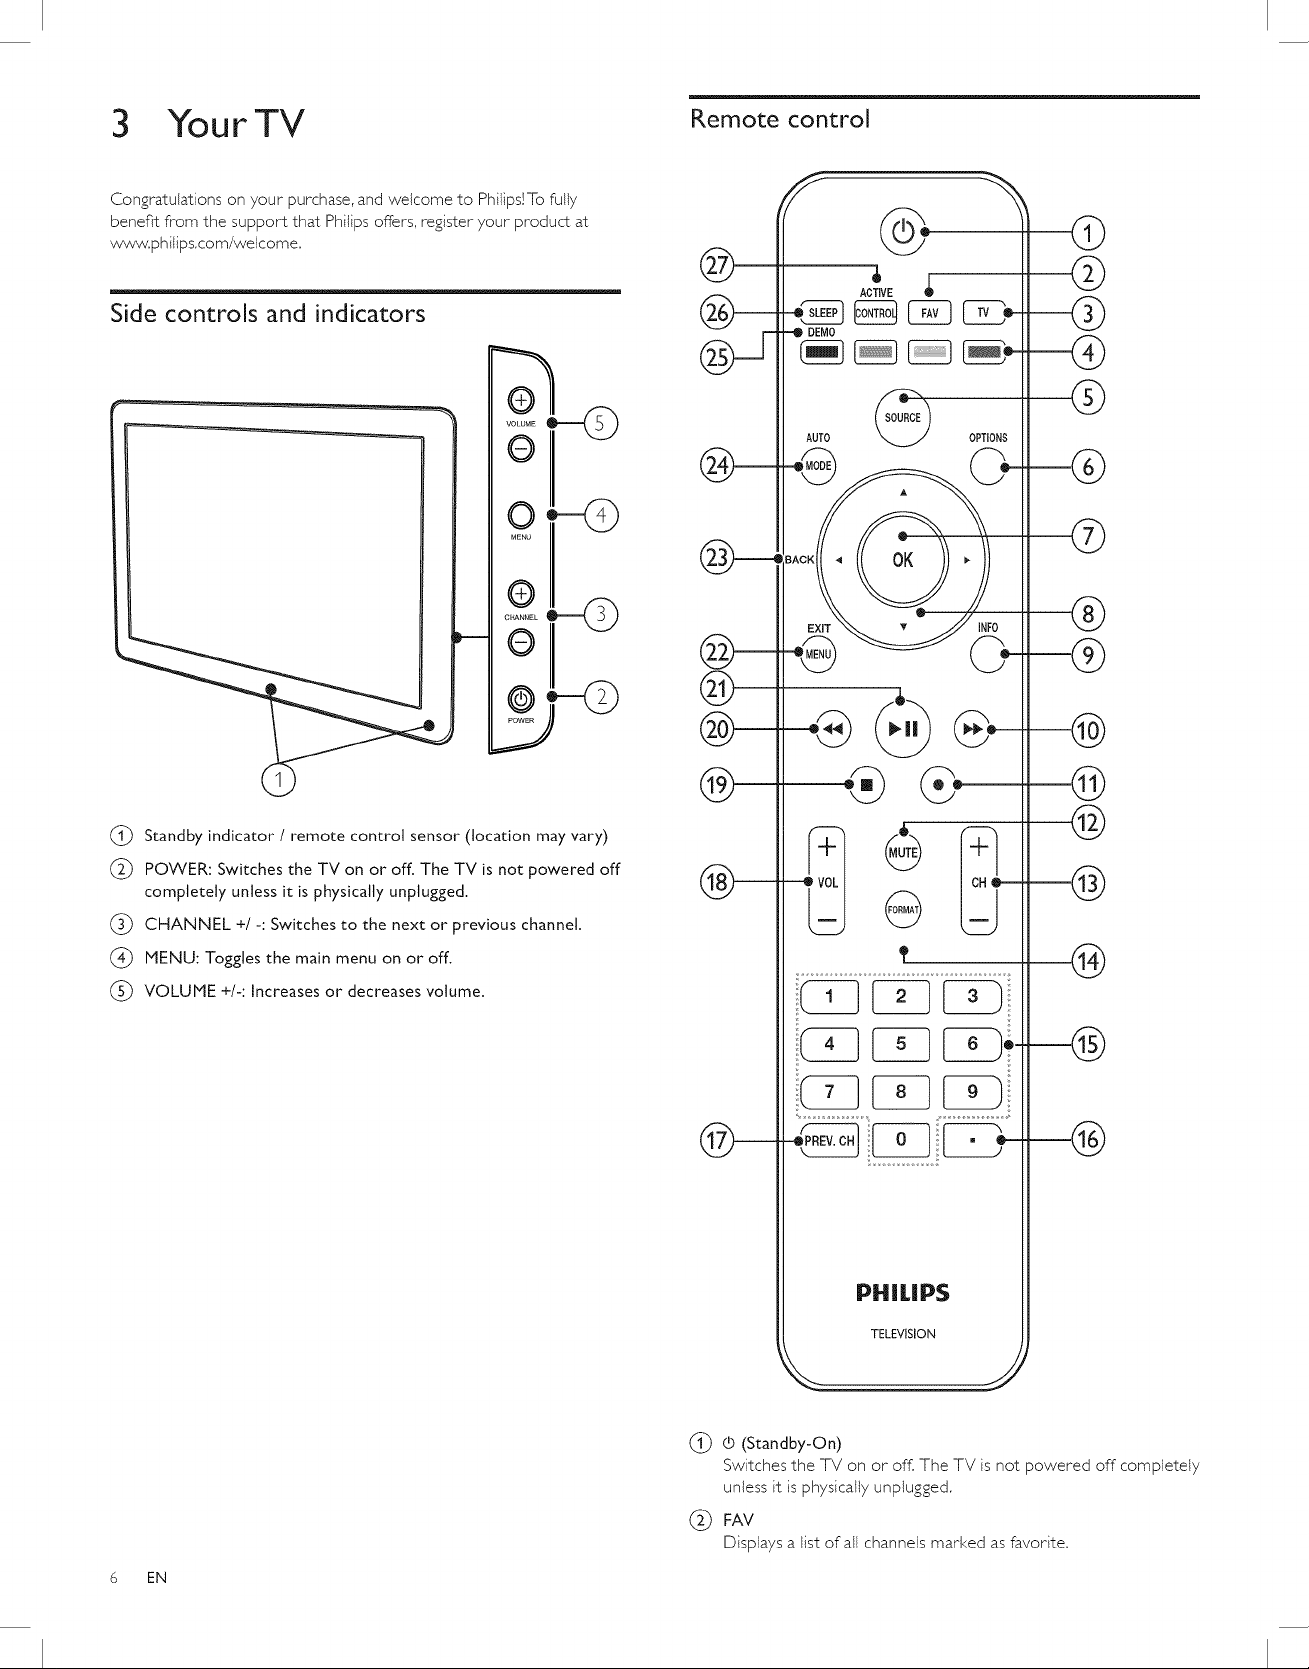
(_) Standby indicator / remote control sensor (location may vary)
(_ POWER: Switches the TV on or off. The TV is not powered off
completely unless it is physically unplugged.
CHANNEL +/-: Switches to the next or previous channel.
(_) MENU: Toggles the main menu on or off.
VOLUME +/-: Increases or decreases volume.
®
®
BACK l
EXF
_ @
NFO
..J
®
0-
--@
@
©
--@
®
6 EN
PHILlPS
TELEVISION
(_) (5 (Standby-On)
Switches the TV on or off. The TV is not powered off completely
unless it is physically unplugged,
(_) FAV
Displays a list of all channels marked as favorite,
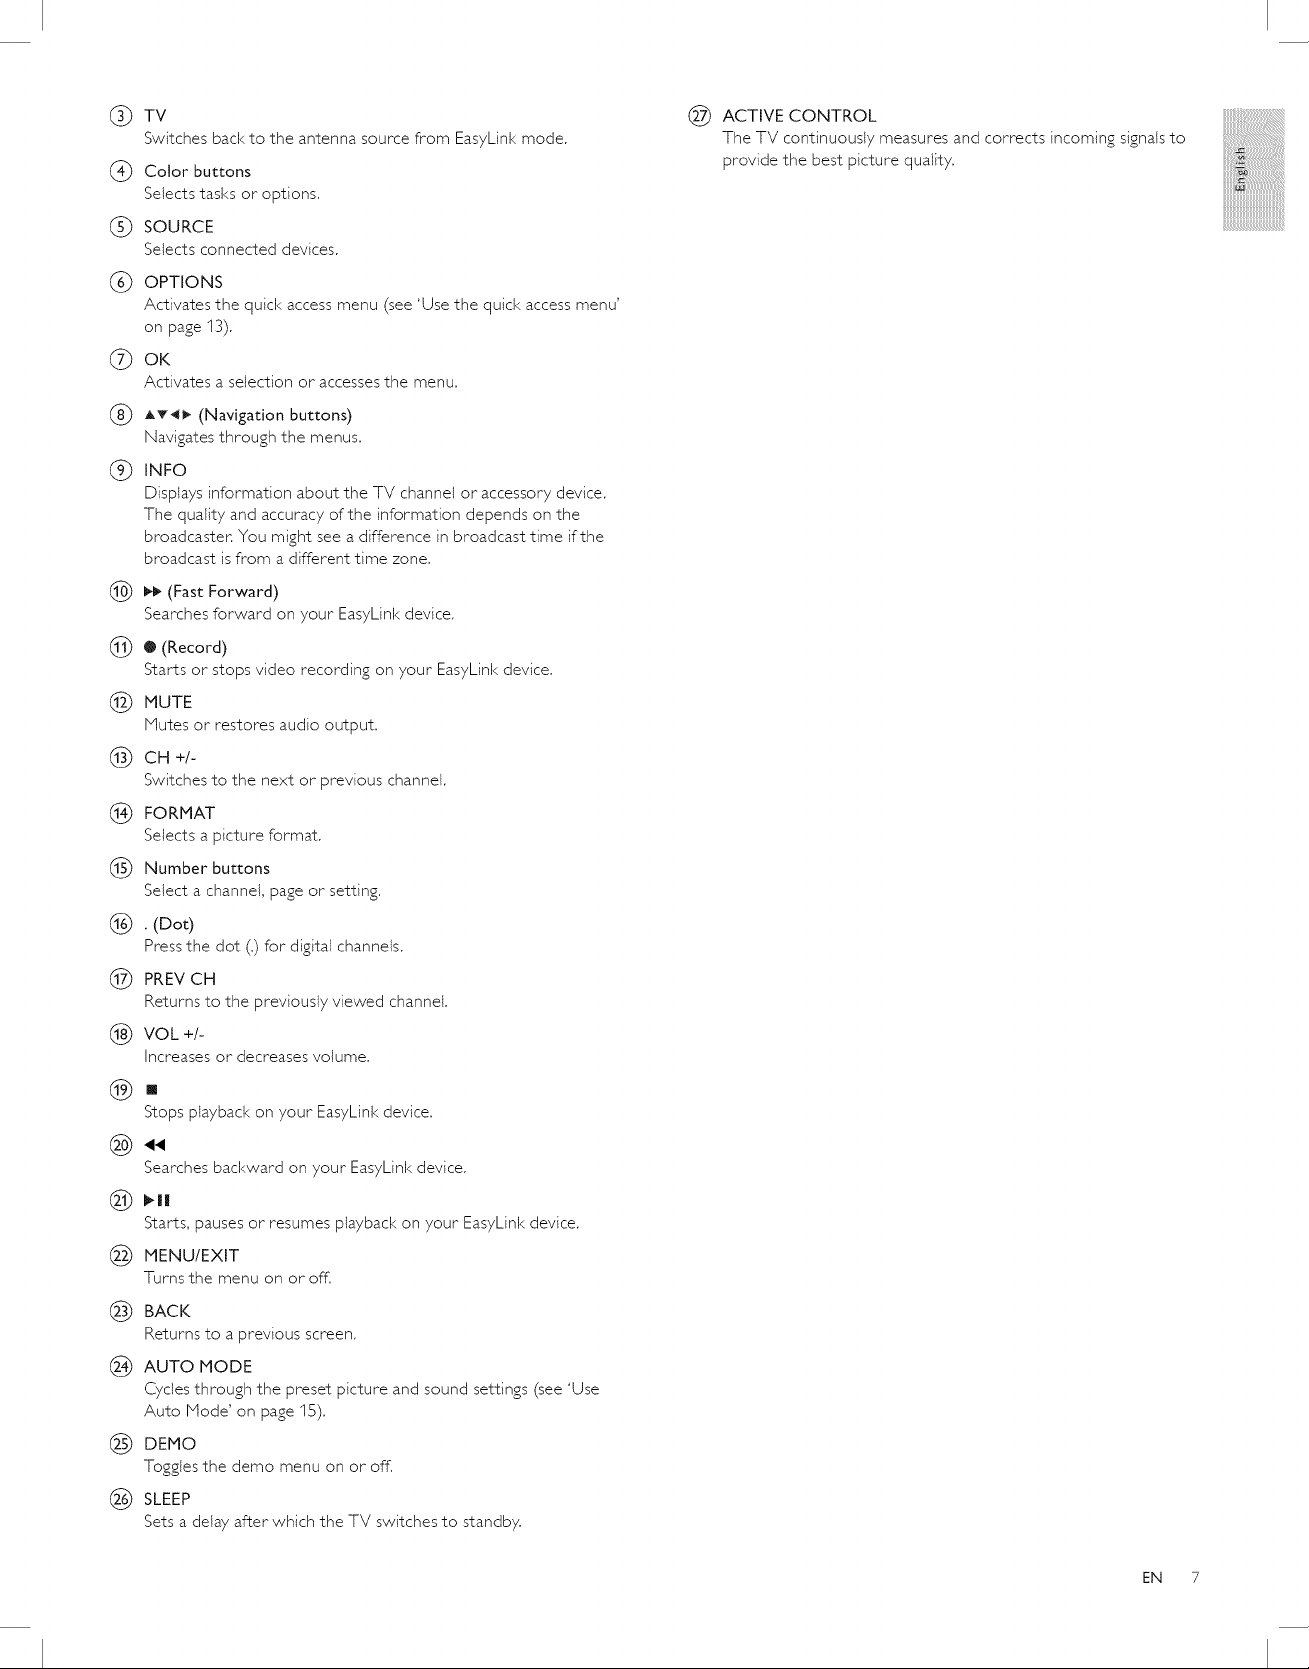
(_) TV
Switches back to the antenna source from EasyLink mode.
@ Color buttons
Selects tasks or options.
(_ SOURCE
Selects connected devices.
(_ OPTIONS
Activates the quick access menu (see 'Use the quick access menu'
on page 13).
(_) OK
Activates a selection or accesses the menu.
(_ AT_ (Navigation buttons)
Navigates through the menus.
(_) INFO
Displays information about the TV channel or accessory device.
The quality and accuracy of the information depends on the
broadcaster. You might see a difference in broadcast time if the
broadcast is from a different time zone.
(_ _ (Fast Forward)
Searches forward on your EasyLink device.
(_ O (Record)
Starts or stops video recording on your EasyLink device.
(_ MUTE
Nutes or restores audio output.
(_ CH+/-
Switches to the next or previous channel.
(_ FORMAT
Selects a picture format.
(_ Number buttons
Select a channel, page or setting.
1_ . (Dot)
Press the dot (.) for digital channels.
(_ PREV CH
Returns to the previously viewed channel.
(_ VOL +/-
Increases or decreases volume,
(_ ACTIVE CONTROL
The TV continuously measures and corrects incoming signals to
provide the best picture quality.
iliili{;i:i:i_122222211@i!
:::ii_!!!!!!!!!!!!!!!!!{i!!iiiiil
_####################:_
[]
Stops playback on your EasyLink device.
(@ "
Searches backward on your EasyLink device.
Starts, pauses or resumes playback on your EasyLink device.
MENU/EXIT
Turns the menu on or off.
(_ BACK
Returns to a previous screen.
1_ AUTO MODE
Cycles through the preset picture and sound settings (see 'Use
Auto Node' on page 15).
(_) DEMO
Toggles the demo menu on or off.
(_ SLEEP
Sets a delay after which the TV switches to standby.
EN 7

4 Get started Insert the remote control batteries
This section supplements information in the Quick Start. For
information about how to mount and install yourT_, refer to the Quick
Start.
Position the TV
Warning
" Do not insert the power plug into the wall socket before all the connections are
made,
" Large screen TVs are hea£y. Two people are required to carry and handle a large
screen TV.
• Before you move the TV, disconnect the cables to prevent breakage.
In addition to reading and understanding the safety instructions,
consider the following before positioning yourTV;
• Ensure that you always have easy access to the power cord or
plug to disconnect the TV from the power.
• If the TV is mounted on a swivel base, ensure that no strain is
placed on the power cord when the TV is swiveled. Strain on the
power cord can loosen connections.
• The ideal viewing distance for watching TV is three times its
screen SiZe.
• Position the TV where light does not fall on the screen,
• Connect your devices before you position the TV.
1 Slide the battery cover off the back of the remote control.
2 Insert the 2_supplied batteries (AAA). Be sure the + and - ends
of the batteries line up with the markings inside the case.
3 Slide the cover back into position.
" Remove the batteries if not using the remote control for an extended period of
time,
Connect the antenna or cable
Use a Kensington lock
There is a Kensington security slot on the back of the TV. Prevent
theft by looping a Kensington loci< between the slot and a permanent
object, such as a heavy table.
f o o
o o
t
Connect to an antenna
Any DTV programs that are broadcast in your area can be received for
free through an antenna connection.
Contact your local content provider or your local electronics retailer if
you are unsure about what HDTV programs are available in your area.
Broadcasters are transitioning from analog to digital TV.This means that
a given broadcaster can have channels available either in analog or in
digital, or both analog and digital at the same time.
The TV produces stereo sound only if a stereo signal is broadcast.
Connect to a cable
When yourTV is connected to the cable socket, you might receive free
digital and high definition programs (depending on your cable provider).
The channel number for digital and high definition channels includes a
dot "." For example, 11.1,46.30, 108.20I. Contact your cable provider
formore information.
Cable
8 EN
Connect to a Direct Broadcast Satellite (DBS)
There are two main DBS systems: DirecTV and DishNetwork,These
systems requirea separate, proprietaryset-top box to decode signals
and send them to the TV.The set-top box contains a digital TV tuner for
receiving off-air digital broadcasts.
Contact your local DBS provider for more information about the
connections and theTV channels.
Connect to a set-top box
A cable box or satellite set-top box can be connected to theTV
through the following connections:
• ANT
• A/V (Composite Video and Audio)
S-Video
• YPbPr (Component Video Input)
• HDNI
For information about how to connect a set-top box, see the Quick
Start provided.
Connect a set-top box through RF IN/OUT
IftheTV is connected to a cable box or satellite set-top box via a
coaxial connection, set theTV to channel 3 or 4, or to the channel
specified by the service provider.
O
Cable
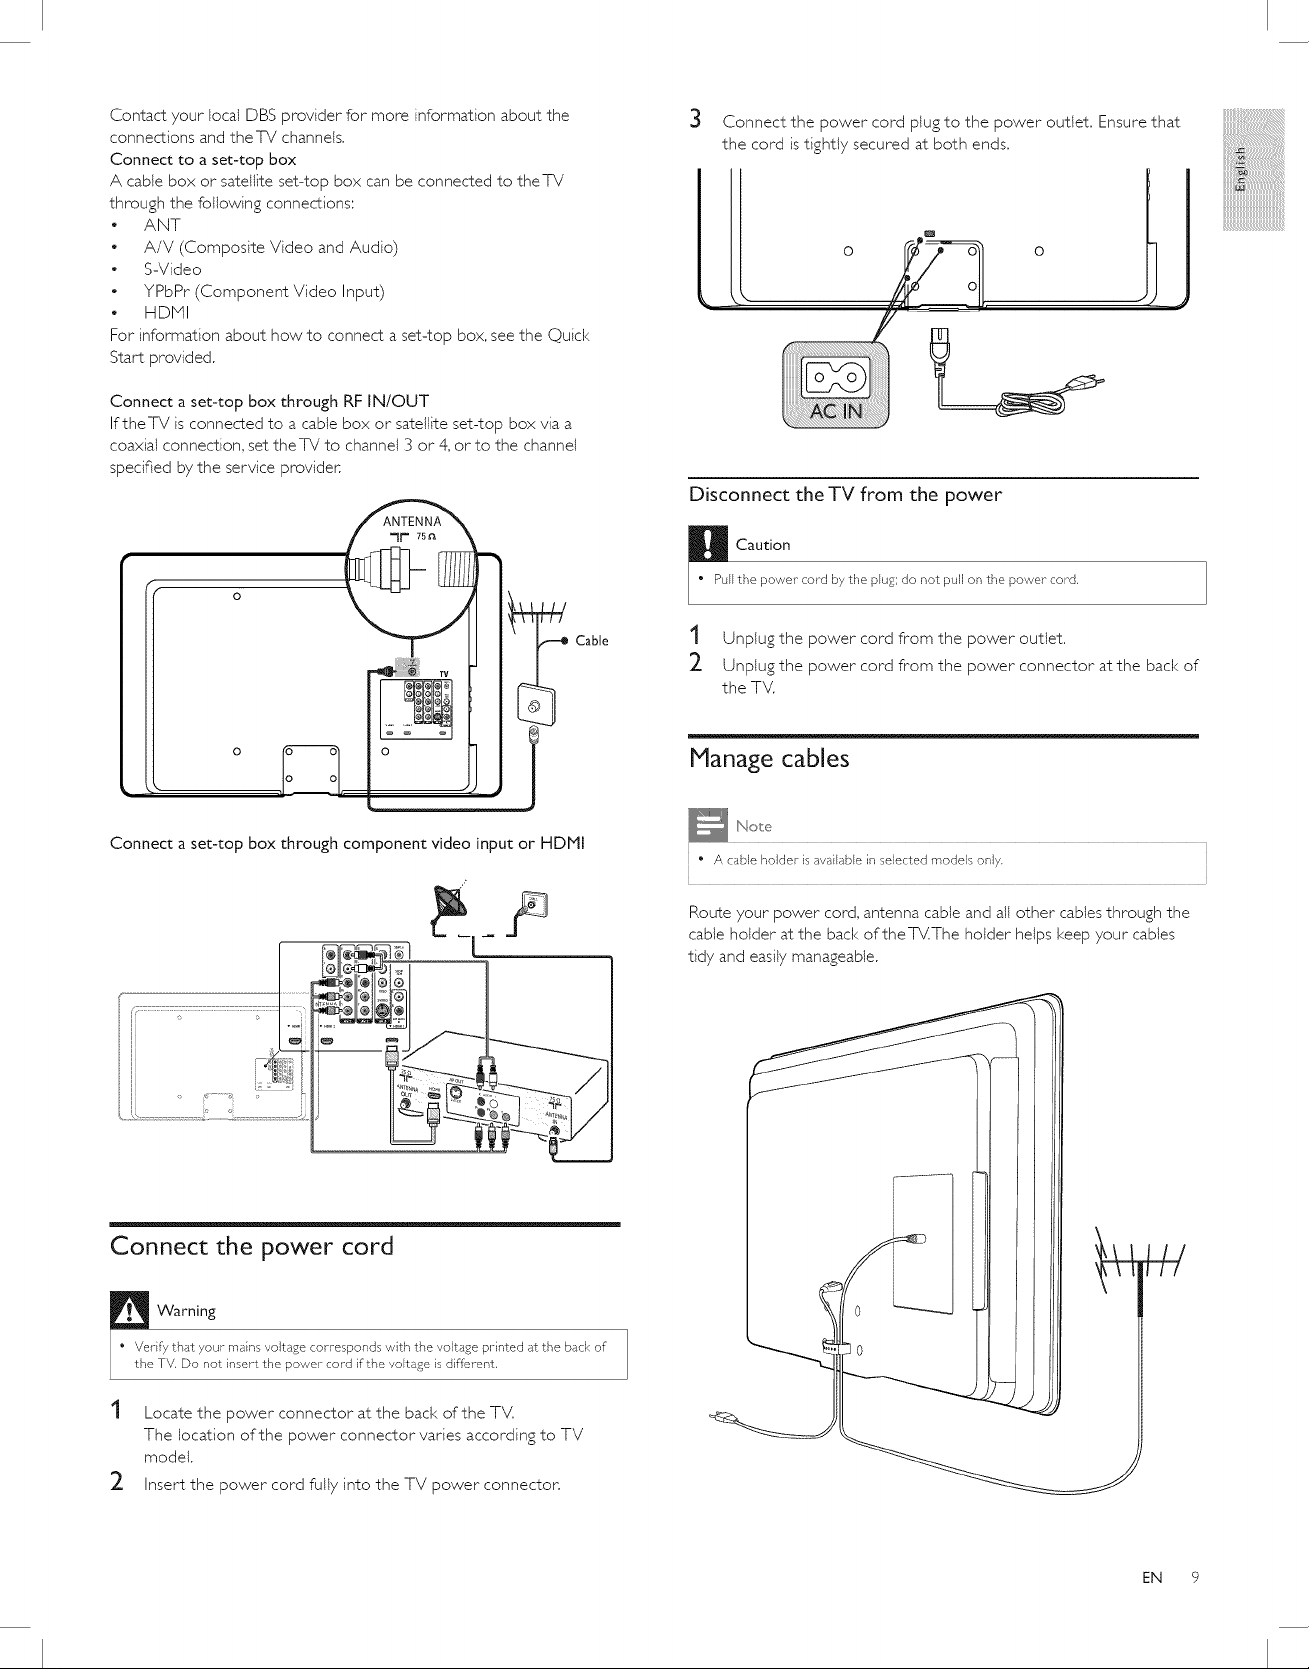
3 Connect the power cord plug to the power outlet. Ensure that
the cord istightly secured at both ends.
o -- o o
Disconnect the TV from the power
H Caution
" Pull the power- cord by the plug; do not pull on the power- cord,
1 Unplug the power cord from the power outlet.
2 Unplug the power cord from the power connector at the back of
the TV.
iiiiiiiiiii_i!!!!!!!!!!!!!!!!!!!!@i!
:::ii_!!!!!!!!!!!!!!!!!{iiiiiiill
_####################:_
O Sll
L
Connect a set-top box through component video input or HDMI
F
_<_.,................
Connect the power cord
Warning
Manage cables
" A cable holder is available in selected models only.
Route your power cord, antenna cable and all other cables through the
cable holder at the back oftheTV.The holder helps keep your cables
tidy and easily manageable.
• Verify that your mains voltage corresponds with the voltage printed at the back of
the TV, Do not insert the power cord if the voltage is different,
Locate the power connector at the back of the TV.
The location of the power connector varies according to TV
model.
2
Insert the power cord fully into the TV power connector.
EN 9

Switch on and set up the TV
TheTV turns on automatically after the power cord is inserted into the
power connector.The following screen appears;
@ Next
Press the GREEN button on your remote control to proceed.
Follow the on-screen instructions to select your language and complete
yourTV setup, Insta%tion takes approximately 10 minutes,
" If you connect your- TV to a cable box or- satellite set top box, you do not need to
install channeB,
Finish the setup by selecting your location:
• If you choose [Retail store] your settings are erased each time
you turn off the TV, Use this mode for retail store displays only.
• If you choose [Home] you are guided through a choice of picture
display options. Press the left or right cursor buttons to select
your preferred screen.
10 EN
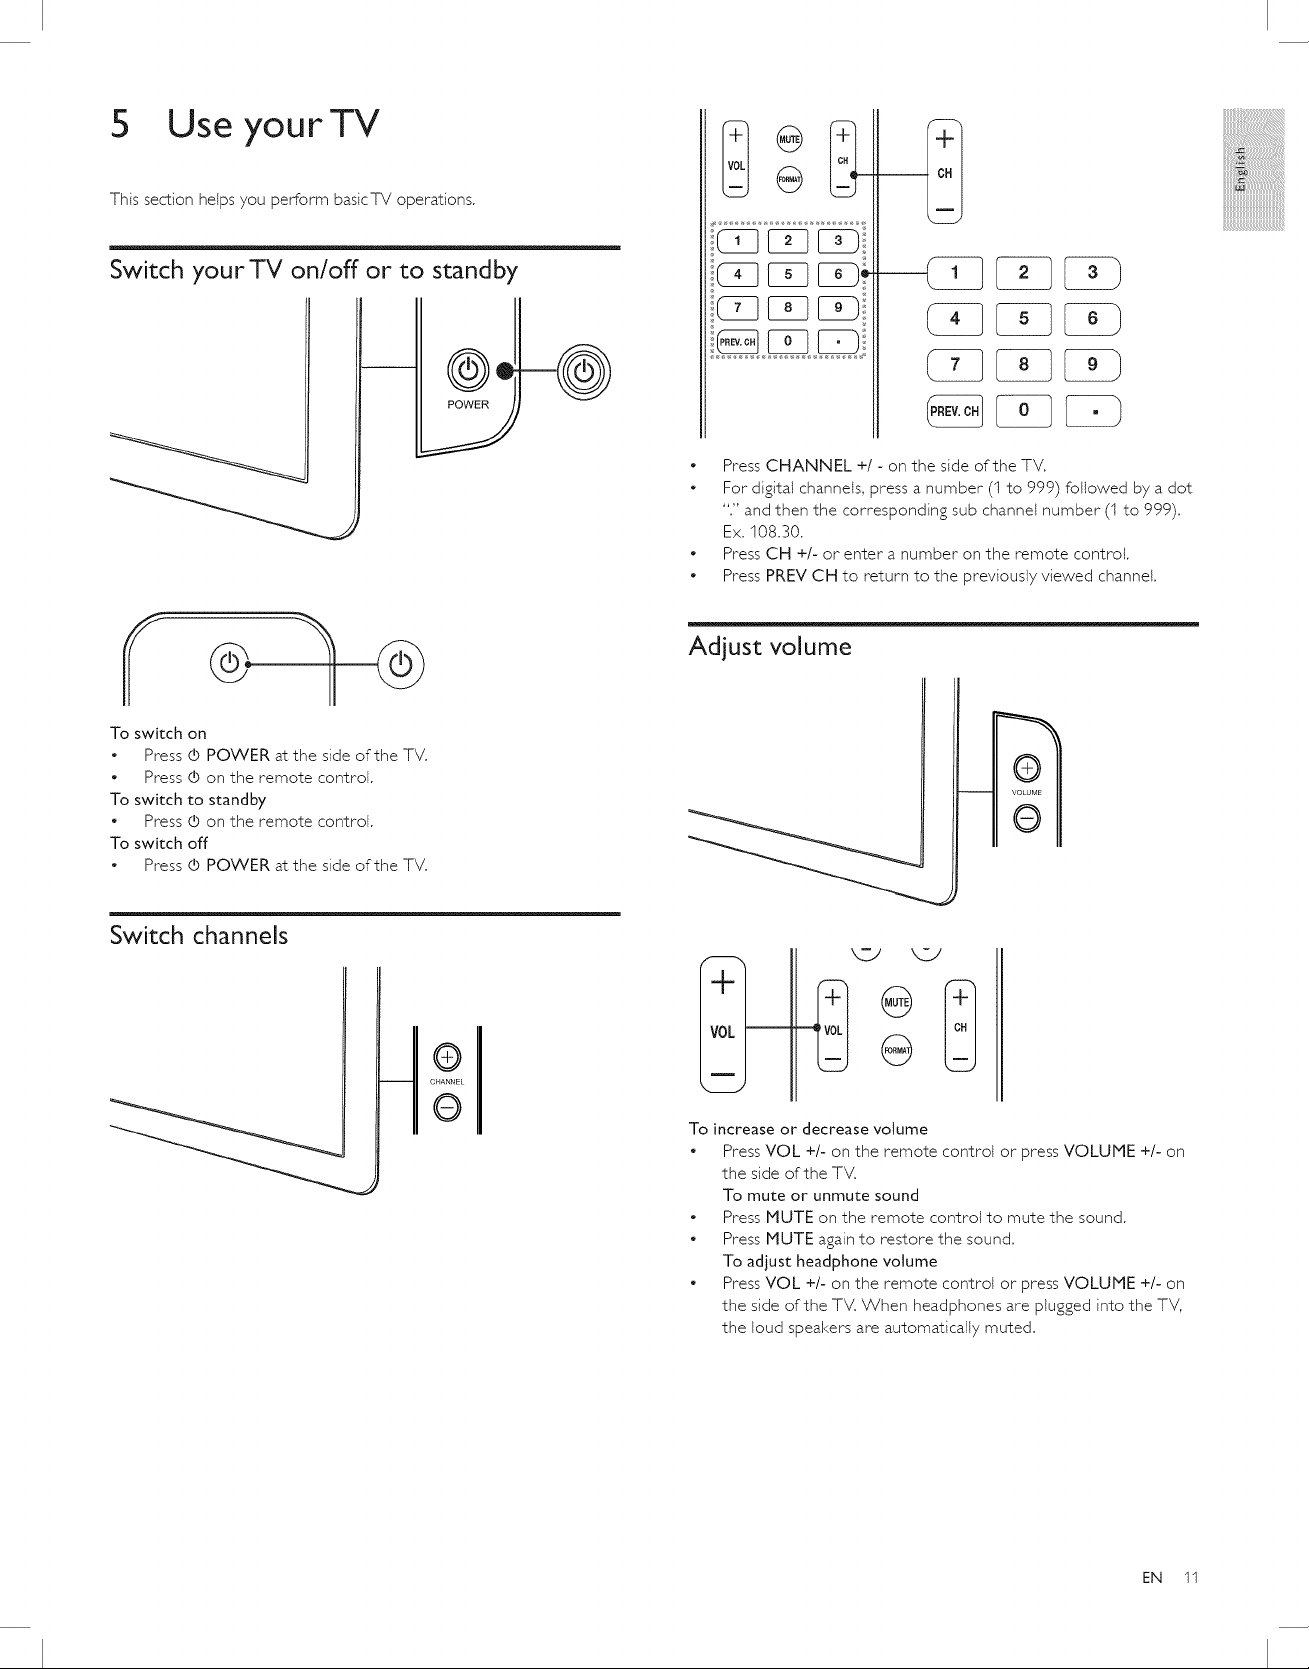
5 Use yourTV
This section helps you perform basicTV operations,
Switch your TV on/off or to standby
x:ii_!!!!!!!!!!!!!!!!!{i!!iiiiil
_####################?_
• Press CHANNEL +I - on the side of the TV.
• For digital channels, press a number (I to 999) followed by a dot
"." and then the corresponding sub channel number (1 to 999).
Ex. 108.30.
• Press CH +/- or enter a number on the remote control.
• Press PREV CH to return to the previously viewed channel.
Adjust volume
To switch on
• Press (5 POWER at the side of the TV,
Press d) on the remote control,
To switch to standby
Press O on the remote control,
To switch off
• Press d) POWER at the side of the TV,
Switch channels
q,
To increase or decrease volume
Press VOL +/- on the remote control or press VOLUME +/- on
the side of the TV.
To mute or unmute sound
• Press MUTE on the remote control to mute the sound.
• Press MUTE again to restore the sound.
To adjust headphone volume
• Press VOL +/- on the remote control or press VOLUME +/- on
the side of the TV. When headphones are plugged into the TV,
the loud speakers are automatically muted.
EN 11
 Loading...