

Page 1

Table of contents
1 About this User Manual ....................3
1.1 Digital Broadcasting ..................................... 3
1.2 Analogue Broadcasting ................................. 3
2 Important ...........................................4
2.1 General ............................................................ 4
2.2 Care of the screen ........................................ 4
2.3 Stationary images on the TV screen ......... 4
2.4 Electric, Magnetic and Electromagnetic
Fields ('EMF') .................................................. 4
3 Before you start .................................5
3.1 Overview of the rear connector panel .... 5
3.2 Common Interface Slot ............................... 5
3.3 Overview of the side connector panel .... 6
3.4 Keys at the side of the TV .......................... 6
3.5 Lights indicator on the TV .......................... 6
4 Getting started ..................................7
4.1 Connect the antenna .................................... 7
4.2 Connect the mains ........................................ 7
4.3 Remote control ............................................. 7
4.4 Switch on the TV .......................................... 7
4.5 First time installation .................................... 7
4.6 How to navigate through the menus ......10
5 Use of the remote control ..............12
5.1 Use of the option key ................................13
6 Use of the TV menu settings..........15
6.1 Adjust picture menu settings ....................16
6.2 Adjust sound menu settings ...................... 19
6.3 Adjust feature menu settings .................... 21
6.4 Search for and store TV channels ........... 25
6.5 Rearrange the rename the channel list ..29
6.6 Set your preferences .................................. 30
6.7 Select your connections ............................ 31
6.8 Select a Decoder channel number .......... 31
6.9 Reset the Factory settings ......................... 32
6.10 How to upgrade the TV software ........... 32
7 Create your favourite list ...............33
7.1 To select a channel from the displayed
favourite list .................................................. 33
7.2 To select another favourite channel
list ...................................................................33
7.3 To create a favourite list or to modify the
list ...................................................................33
7.4 To select only TV or only radio channels
on the All channels list ............................... 34
8 EPG (Electronic Programme Guide)
(Only with Digital TV channels) ....35
9 Multimedia Browser ........................37
9.1 To view content from a USB device....... 37
9.2 To insert a USB device ..............................37
9.3 To remove the USB device ....................... 37
9.4 Multimedia Browser menu ........................ 37
9.5 Function keys at the bottom of the
screen............................................................. 39
9.6 Multimedia function keys on the remote
control ........................................................... 39
10 Teletext ............................................40
11 To make video and audio
connections ......................................43
11.1 Side panel overview .................................... 43
11.2 Rear panel overview ................................... 44
11.3 Connect a DVD or VCR recorder ......... 45
11.4 Connect a decoder and a VCR ................ 45
11.5 Connect two VCRs or VCR and DVD
recorder ........................................................ 46
11.6 Connect a satellite receiver ...................... 46
11.7 Connect a DVD player, Cable box or
game console ................................................ 47
11.8 Connect a DVD player, satellite receiver
or Cable Box ............................................... 48
11.9 Connect a PC ............................................... 49
11.10 Connect a Home Cinema amplifier ........50
12 Troubleshooting ..............................51
ENGLISH
1
Page 2

13 Philips TV software upgrade with
portable memory ............................53
13.1 Automatic software upgrade
procedure .....................................................53
13.2 Manual software upgrade procedure ......54
14 Slideshow format with background
music .................................................56
15 Digital camera and USB issues .... 59
16 Issues referring to connected
peripherals with a HDMI
connector ....................................... 61
17 Index ............................................... 62
18 Recycling & Product
information .................................... 64
2
Page 3

3
ENGLISH
1 About this User Manual
This manual contains all information you will
need to initially install and operate your new TV.
Also read the help text which are being
displayed at the bottom of the screen.
If this instruction manual does not give an
answer or if ‘Troubleshooting’ does not
solve your TV problem, you can call your Local
Philips Customer or Service Centre. See the
supplied Worldwide guarantee booklet.
Please have the Model and Product number
(which you can find at the back or the bottom
of your television set or on the packaging)
ready, before calling the Philips customer
support service.
Model: ...........................................
Product No: .................................
1.1 Digital BroadcastingBroadcasting
Next to analogue broadcast reception, your TV
has a built-in TV tuner which receives, decodes
and displays digital terrestrial signals.
1.2 Analogue Broadcasting
When your area is not broadcasting digital
terrestrial signals, the TV will only receive
analogue channels.
When on a frequency where a DVB signal is
broadcasted, the tuner will try to decode an
analogue TV channel and hence will not show
video.
Digital TV and radio channels are only available
and reproduced:
• when Digital Video Broadcasting Terrestrial
(DVB-T) is applicable in your local area;
• and if DVB-T signal is supported by your TV
for the country you live in. See
www.philips.com/support for the list of
supported countries.
Page 4

2 Important
2.1 General
Do not insert the power plug in a wall
socket or hang the TV to the wall before
all connections are made.
• Place or hang the TV wherever you want, but
make sure that air can circulate freely through
the ventilation slots.
• Do not install the TV in a confined space such
as a book case or a similar unit.
• To prevent any fire hazards, no naked flame
sources, such as lighted candles, should be
placed near the TV.
• Avoid heat, direct sunlight and exposure to
rain or water.
2.2 Care of the screen
• Do not touch, push or rub or strike the
screen with anything hard as this may scratch
or damage the screen permanently.
• Do not touch the surface with bare hands or
greasy cloth (some cosmetics are detrimental
to the screen).
• Unplug the TV before cleaning the screen.
• When the surface becomes dusty wipe gentlyWhen the surface becomes dusty wipe gently
with absorbent cotton or other soft material
like chamois soaks.
• Do not remove the protective sheet until youDo not remove the protective sheet until you
have completed the stand/wall mounting and
connections. Please handle with care.
• Use only soft cloth provided to clean theUse only soft cloth provided to clean the
glossy black front of the TV.
• Wipe off water droplets as soon as possible.
Their long time contact with the screen
causes deformations and colour fading.
2.3 Stationary images on the TV
A characteristic of LCD and Plasma Panels is
that displaying the same image for a long time
can cause a permanent after-image to remain
on the screen. This is called phosphor burn
in. Normal use of the TV should involve the
showing of pictures that contain constantly
moving and changing images that fill the screen.
Examples of stationary images (this is not an
all-inclusive list, you may encounter others in
your viewing):
• TV and DVD menus: listings of DVD disk content;
• Black bars: when black bars appear at
the left and right side of the screen, it is
recommended to change to a picture format
so that the picture fills the entire screen;
• TV channel logo: present a problem if they are
bright and stationary. Moving or low-contrast
graphics are less likely to cause uneven aging
of the screen;
• Stock market stickers: presented at the
bottom of the TV screen;
• Shopping channel logos and pricing displays:
bright and shown constantly or repeatedly in
the same location on the TV screen.
Examples of still pictures also include logos,
computer images, time display, teletext and
images displayed in 4:3 mode, static images or
characters, etc.
Tip
Reduce contrast and brightness when viewing.
2.4 Electric, Magnetic and
Electromagnetic Fields (“EMF”)
• Philips Royal Electronics manufactures and
sells many products targeted at consumers,
which, like any electronic apparatus, in
general have the ability to emit and receive
electro magnetic signals.
• One of Philips’ leading Business Principles is to
take all necessary health and safety measures
for our products, to comply with all applicable
legal requirements and to stay well within
the EMF standards applicable at the time of
producing the products.
• Philips is committed to develop, produce and
market products that cause no adverse health
effects.
• Philips confirms that if its products are handled
properly for their intended use, they are safe
to use according to scientific evidence available
today.
• Philips plays an active role in the development
of international EMF and safety standards,
enabling Philips to anticipate further
developments in standardisation for early
integration in its products.
4
Page 5
5
ENGLISH
EXT3
EXT1EXT2
HDMI ANTENNA
COMMON INTERFACE
COMMON INTERFACE
3 Before you start
Warning
Do not insert the mains cord into the mains at
the bottom of the TV and in a wall socket or
hang the TV on the wall before all connections
are made.
Before you switch on your TV, connect all your
peripheral equipment. See 'To make video and
audio connections', p. 43.
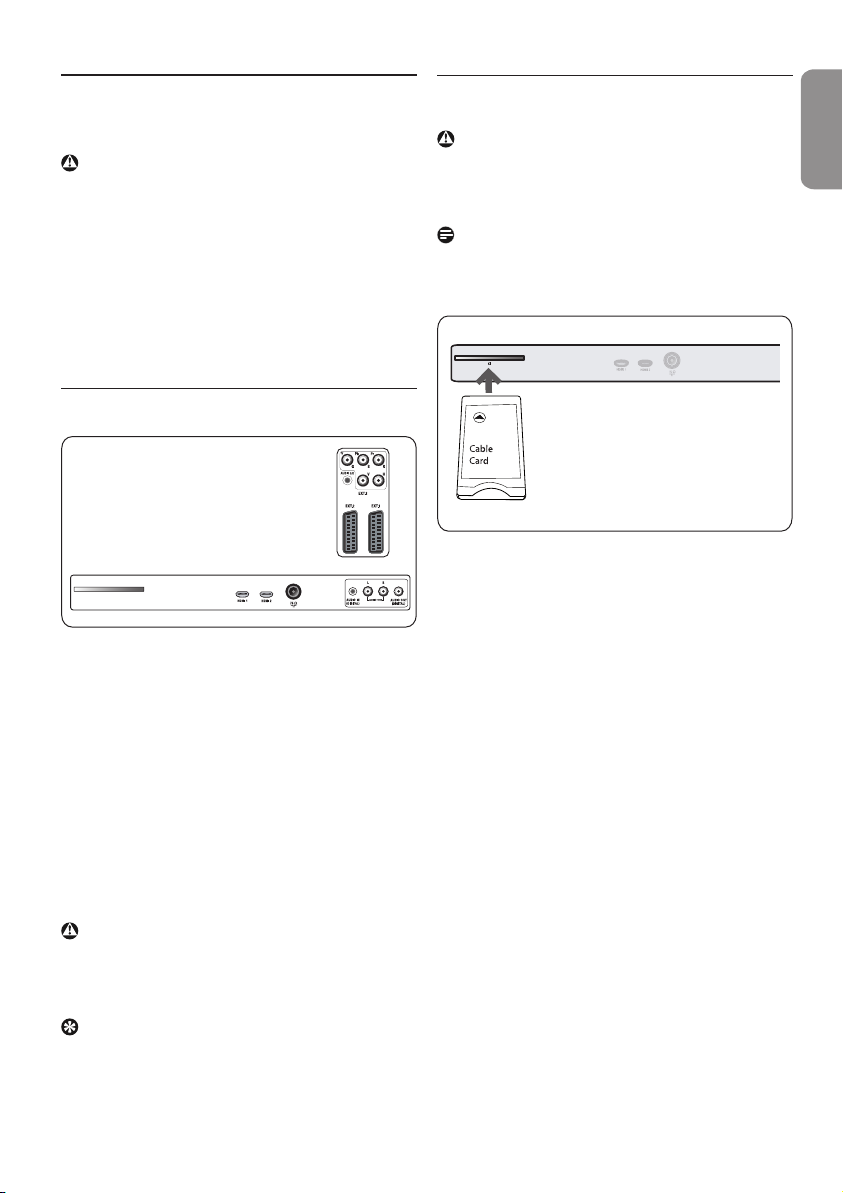
3.1 Overview of the rear connector panel
There is a wide range of audio and video
equipment that can be connected to your TV.
See 'To make video and audio connections', p. 43.
EXT1 can handle CVBS, RGB and Audio L/R;
EXT2 can handle CVBS, S-VIDEO, RGB and
Audio L/R;
EXT3 can handle YPbPr, RGB H/V and Audio L/R;
HDMI 1 and 2.
Supported video formats: 480i, 480p, 576i,
576p, 720p, 1080i.
Warning
Disconnect all power sources before making any
connections.
Tip
It is preferable to connect peripherals with RGB
output to EXT1 or EXT2 as RGB provides a
better picture quality.
3.2 Common Interface Slot
Warning
Switch off your TV before any module is
inserted in the Common Interface slot.
Note
This functionality is only available in certain
countries.
To receive scrambled DTV signals you will need
a CA (Conditional Access) module and a Smart
card provided by the service provider.
• A CA module can enable additional services,
for example Pay TV.
Contact your Common Interface service
provider to get more information about these
modules.
• Although CA module types may vary
dependent on the manufacturer, each one of
the CA modules supports a certain kind of
encryption system.
Your TV supports CA modules to work with
the DVB-T standard.
Note that a smart card may only be valid for a
single broadcast channel.
• CA modules and smart cards are neither
supplied nor optional accessories from Philips.
The CA module is responsible for the
messages and texts on screen. In case of
failure or strange behaviour, you must call
your CI service broadcaster.
Page 6
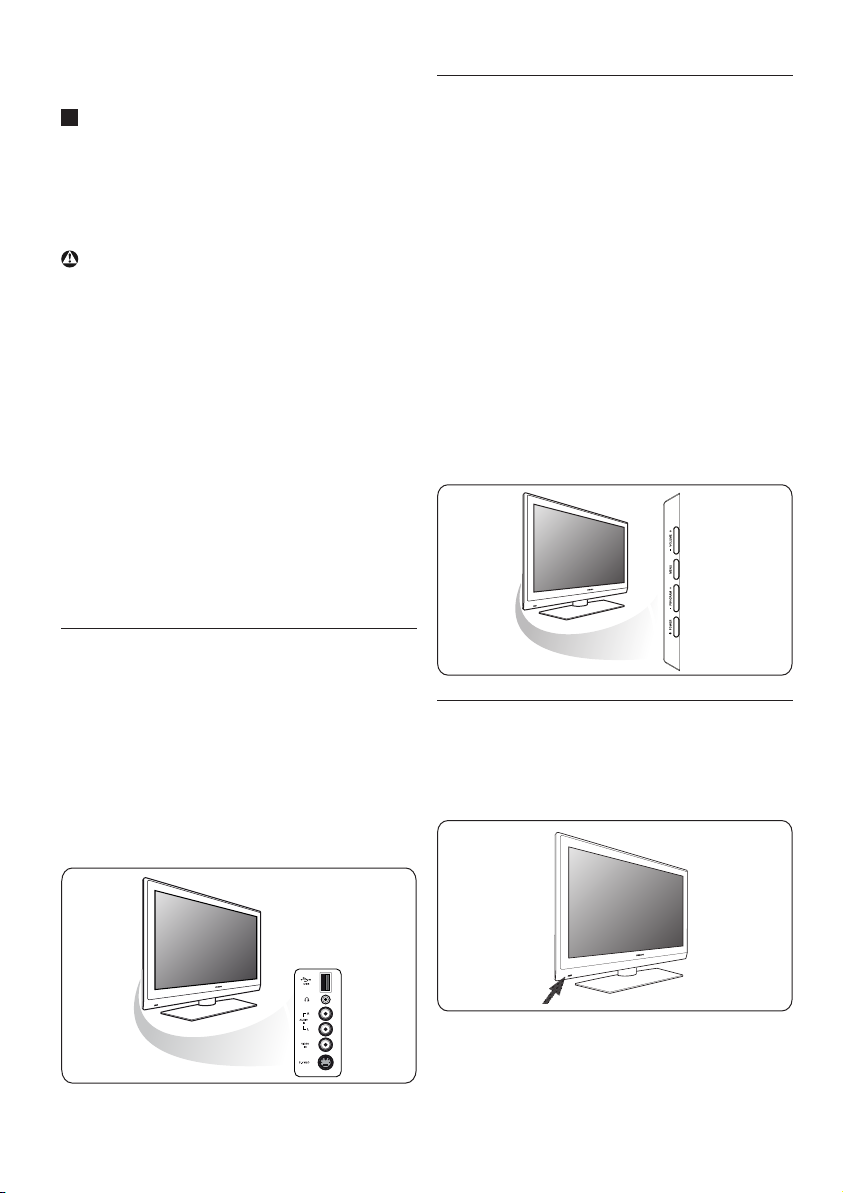
Insert a CA module
1
Insert the specified Conditional Access
module into the Common Interface slot as
far as it will go. It may take a few minutes
before the CA module is activated and
service information is downloaded.
3.4 Keys at the side of the TV
In case your remote control is lost or broken,
apart from channel selection and volume
adjustment, you can still change some of the
basic settings with the keys at the side of your
TV.
Warning
When you connect the CA module incorrectly,
it may damage the card and the TV. After
inserting a card, leave it in the slot permanently.
Do not remove it from the slot unless asked to
do so. For example, your card has to be in the
slot when your CI service broadcaster wants to
download new information to the smart card.
Once the CA module is removed, your TV
will no longer decode scrambled digital DVB-T
channels.
To access common interface applications,
see TV menu, Adjust feature menu settings,
Common Interface, p. 24.
3.3 Overview of the side connector
panel
• To connect a camera, camcorder or game,
see To make video and audio connections,
p. 43.
• To connect a headphone, see To make video
and audio connections, p. 43.
• To connect a USB device, see 'Multimedia
browser', p. 37.
• Press the power switch B to switch the TV
on or off.
The MENU key can be used to call up the TV
menu without the remote control.
• Use:
- the VOLUME - and + keys and the
PROGRAM - and + keys to select menu
items;
- the MENU key to confirm your selection.
3.5 Light indicator on the TV
The light indicator shows the status of the TV.
• Red means TV is on “standby”
• Blue means TV is “switched on”
6
Page 7
7
ENGLISH
4 Getting started
COMMON INTERFACE
75
HDMI 1 HD MI 2
AUDIO IN
DIGITAL
AUDIO OUT
L R
AUDIO OUT
(DIGITAL)
HDMI ANTENNA
COMMON INTERFACE
COMMON INTERFACE
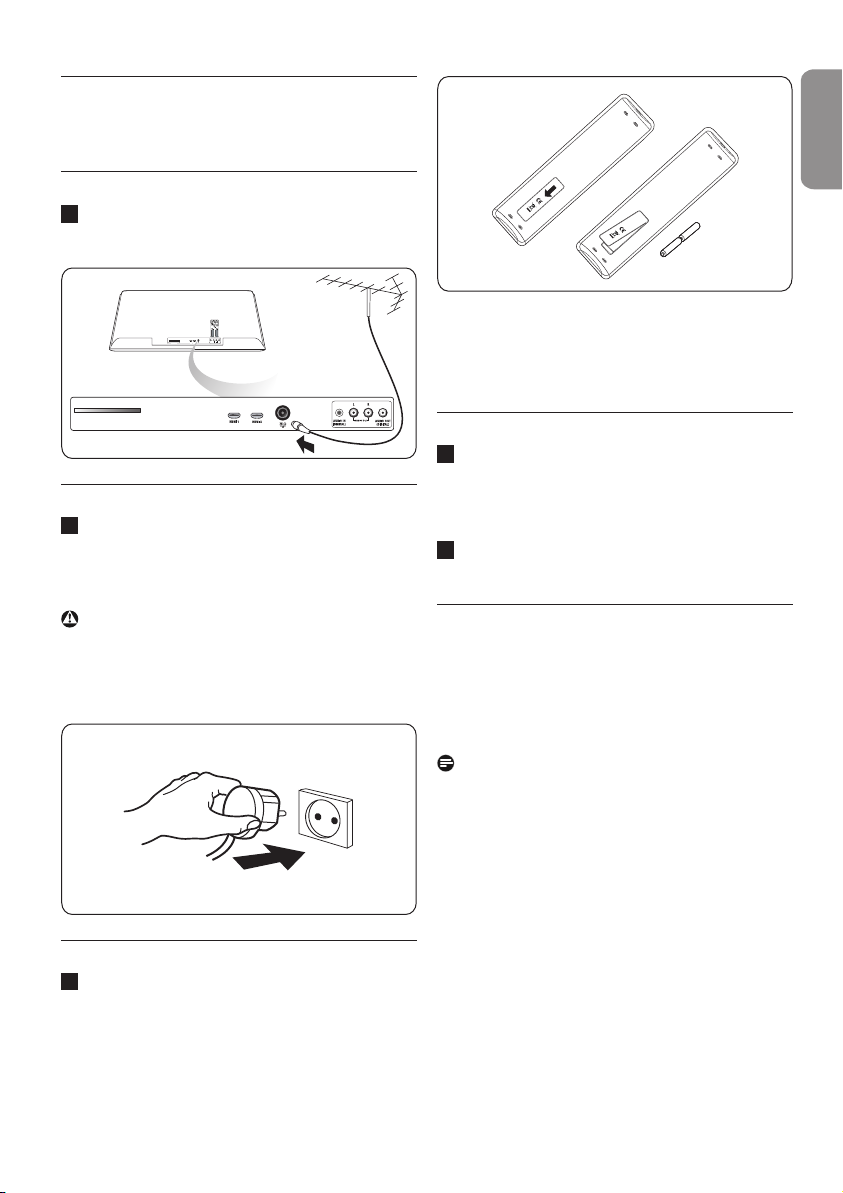
4.1 Connect the antenna
1
Insert the aerial plug firmly into the aerial
socket x at the bottom of the TV.
4.2 Connect the mains
1
Insert the mains cord supplied into the
mains at the bottom of the TV and in the
wall socket.
For most keys pressing a key once will activate
the function. Pressing a second time will
undo the action.
4.4 Switch on the TV
1
Press the power switch B at the side of
the TV.
An indicator on the front of the TV lights up
and the screen comes on.
2
If the TV is in standby mode, press the -P+
keys or the B key on the remote control.
Warning
Verify that the mains supply voltage corresponds
to the voltage printed on the sticker at the rear
of the TV.
4.3 Remote control
1
Insert the 2 batteries supplied.
Be sure the (+) and (-) ends of the batteries line
up correctly (markings are printed in the case)
4.5 First time installation
The installation procedure consists of a series
of screens that will guide you through the
installation of your TV.
Follow the instructions on the screen.
Note
If the TV has already been installed before and/
or you want to change the First time installation
settings, proceed with Use of the 'TV menu
settings', p. 15.
Page 8

Step 1: select your on-screen language
After the Welcome screen you are asked to
select a language of the TV's on-screen menus.
The text of the header and the info on screen
continuously change language. Also the digital
audio and subtitle language will be set to the
selected menu language.
Notes
• if you select a wrong country, the channel
numbering will not be according to the
standard for your country.
• in case the country selected is not DVB-T
supported by your TV, digital related menuitems will not be accessible.
1
Press the o or œ key to highlight your
language.
2
Press the OK key on the remote control.
3
Follow the instructions on the screen to
proceed.
Menu language
Please select your
language.....
PHILIPS
using cursor up and down
Next
English
Español
Français
Hrvatski
Italiano
Magyar
.............
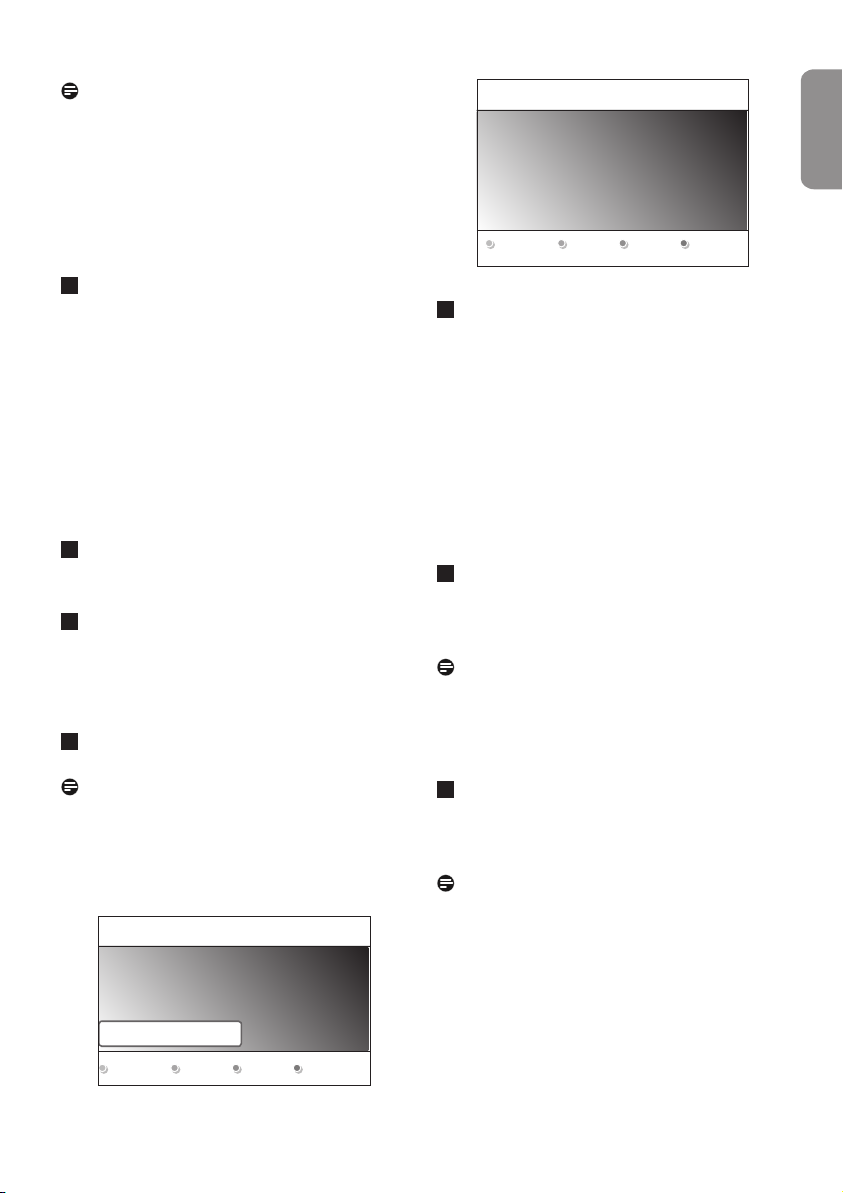
Step 2: complete the initial TV installation
procedure
1
Press the green colour key on your remote
control when Television is highlighted.
2
Select the country where you are now
located.
3
Press the green colour key on your remote
control to start the Automatic channel
installation.
PHILIPS Installation
This will help you to install the following sections:
Television
Settings assistant
Previous Next Skip Stop
PHILIPS Television
System searching: please wait..........
Digital channels found 16
Analogue channels found 22
Stop
Notes
All available digital TV and radio channels
and analogue TV channels are searched for
and stored automatically. This will take a few
minutes. When the search is complete, the
menu will indicate the number of digital and
analogue channels found.
8
Page 9
9
ENGLISH
Notes
- reception of digital terrestrial TV channels is
applicable dependent on the country selected;
- if you choose to install the channels at a later
time, select the Automatic installation in
the TV menu, Installation, Channels to scan
available channels.
Press the red colour key again when the
4
search is completed.
Step 3: Settings assistant: select your TV
settings
By means of several split screens/full screens
you are prompted to select your preferred
picture and sound to finally arrive at a complete
setting which satisfies you.
Press the green colour key on your remote
1
control to enter the Settings assistant
menu.
Select your Location with the o or œkey.
2
If you choose Shop it will skip the Settings
assistant.
The TV parameters for Picture and Sound
will then be set to predefined fixed settings.
Press the green colour key again to proceed.
3
PHILIPS Settings assistant
Please select your location before continuing:
Home
Shop
Press the green colour key to confirm your
4
selection each time and to jump to the next
screen.
The items will be presented sequentially.
In the header it is mentioned how many
screens have been completed and how many
screens there are in total.
The Settings assistant will step sequentially
through the following settings: Picture and
Sound.
Press the green colour key again to store
5
all the settings and to return to the TV
installation menu.
Note
When you skip or stop the Settings Assistant,
then the standard settings Philips selected for
you will be chosen.
Notes
If you choose Home it will display the Settings
assistant.
Use the p or π key to each time select your
preferred screen.
PHILIPS Installation
This will help you to complete the Settings
assistant.
Television
Settings assistant
Previous Next Skip Stop
Press the red colour key again to finish the
6
First time installation procedure and to
display the first stored TV channel.
Note
Any time you can change or reset your settings
or adjust individual settings for Picture and
Sound in the 'TV settings' menu. See p. 15, 'Use
of the TV menu settings'.
To control the settings of special TV functions,
features and accessory equipment, see p. 21,
'Adjust feature menu settings'.
Page 10
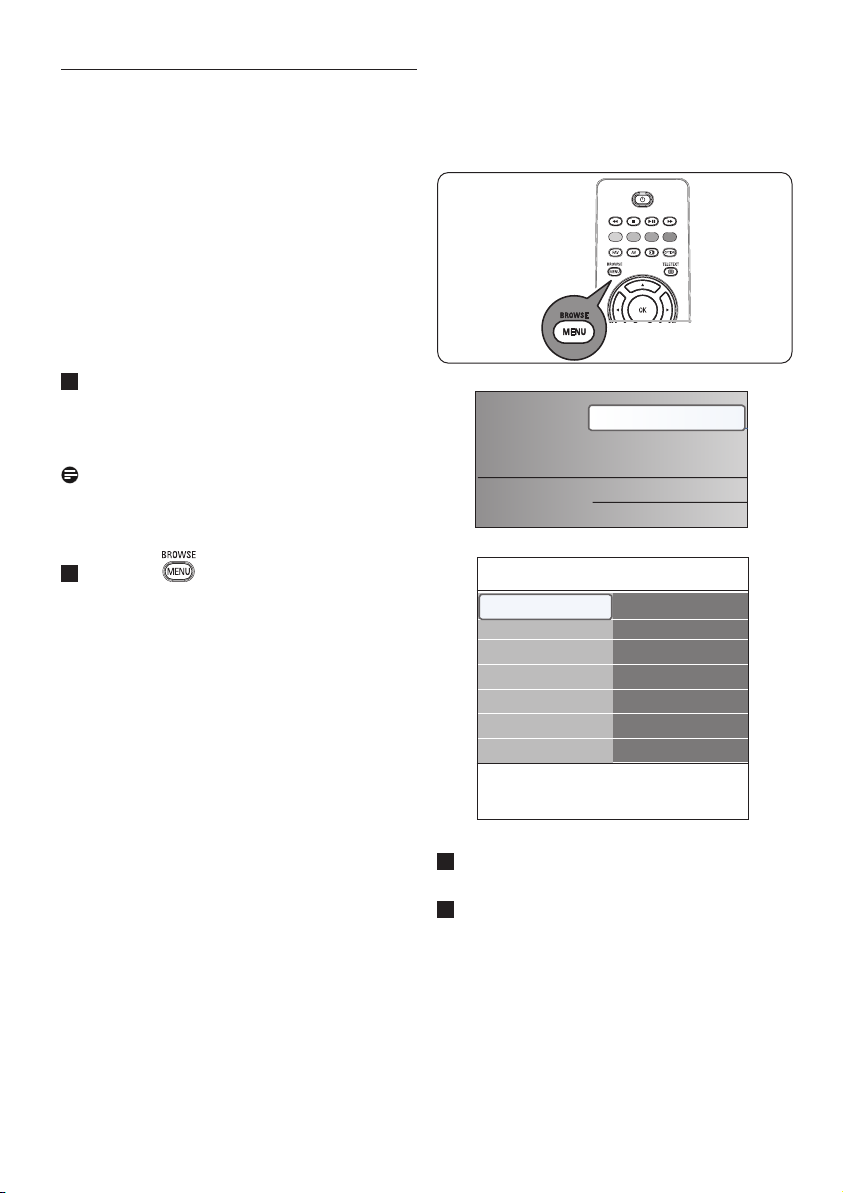
4.6 How to navigate through the menus
Introduction
A lot of guiding instructions, help texts and
messages will be display on your TV when you
use the menus or when you try to execute an
action.
• Read the help texts which are being displayed
on the specific item highlighted.
• The colour keys at the bottom of the screen
refer to the different actions which may be
executed.
Press the corresponding colour key on the
1
remote control to perform the required or
desired action.
Note
Digital related menu items will only be
accessible in case of digital TV broadcasting.
Press the key on the remote control.
1
The main menu appears on the screen.
• TV menu allows you to access the TV
menu. See below.
• TV channels allows you to access the
TV channel list and to create up to four
favourite lists with your preferred TV
channels and digital radio stations. See
Create your favourite channel list, p. 33.
• Programme guide allows you to access
detailed information about individual
digital TV programmes. According to the
type of Electronic Programme Guide,
it also allows you to access the table
of scheduled Digital TV programmes
and easily select and tune to a desired
programme.
See EPG, Electronic Programme Guide,
p. 35.
• Multimedia allows you to access the
Multimedia browser application. It lets
you display your personal multimedia files.
Multimedia is only present when a USB
device is connected.
See Multimedia browser, p. 37.
Television
Multimedia
TV menu
TV settings
Features
Installation
Exit
Info
Use the o or œ key to highlight and select
2
TV menu
TV channels
Programme guide
TV settings
Settings assistant
Reset to standard
Picture
Sound
a menu item.
Use the π key to enter the highlighted
3
menu item.
The right panel shows the content of the
highlighted menu item.
10
Page 11

11
ENGLISH
TV menu
TV settings
Features
Installation
Exit
Info
4
Use the o or œ key to select a menu item.
TV settings
Settings assistant
Reset to standard
Picture
Sound
• TV settings allows you to adjust your
preferred picture and sound settings
• Features allows you to control the
settings of special TV features
• Installation allows you
- to select your language preferences;
- to search for and store your TV
channels;
- to set or adjust various special functions;
- to select connected peripheral
equipment;
- to define one or more channel numbers
as decoder channel numbers;
- to reset your picture and sound settings
to the factory standard settings;
- to upgrade your TV software
away. When the p key is pressed, the hidden
menu items reappear and the highlight moves to
the left panel.
6
Press the key to exit the main menu.
5
Press the π key to enter the highlighted
menu item.
The content of the right panel is moved to
the left panel and the right panel now shows
the content of the newly highlighted item in
the left panel.
Note
In some cases it is important that the picture
can be watched while you adjust the settings.
This means that when the highlight is on the
right side panel, the other menu items hide
Page 12
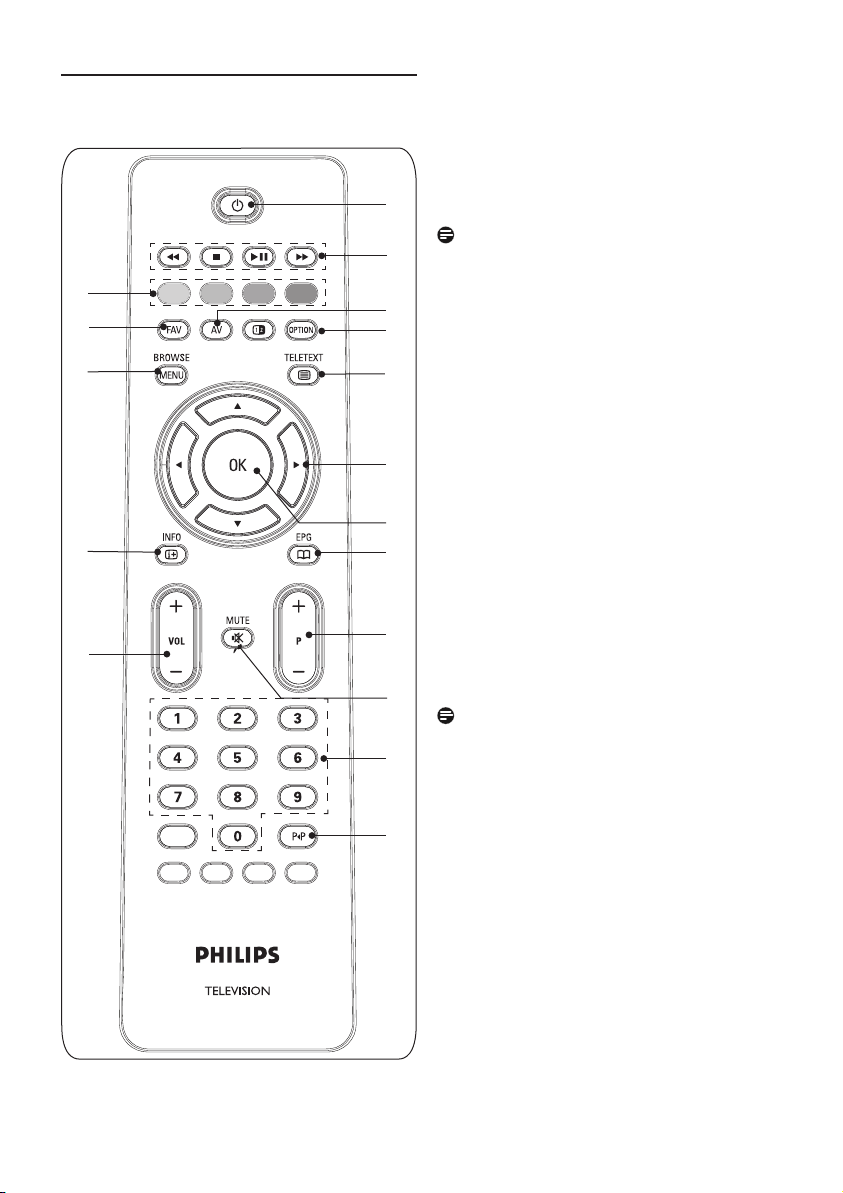
5 Use of the remote control
1
2
17
16
15
14
13
3
4
5
6
7
8
9
10
11
12
1
B Standby
Press to switch the TV from or to standby
mode.
When switched to standby, a red indicator
on the TV lights up.
Note
The TV is never powered off completely
unless it is physically unplugged.
2
Ò‡πº †
See Multimedia browser functional keys,
p. 37.
3
AV Audio Video
To display source list to select TV or other
equipment. Use the o or œ to select
source and the OK key to confirm selection.
4
OPTION
• To open and close the Quick access menu
which contains a few frequently used
options, like Picture format.
• When in teletext, press repeatedly to enlarge
the teletext page display. See Teletext, p. 40.
bTeletext On/Off
5
Press to switch teletext on. See
Teletext, p. 40. Only for UK: Digital text/
Interactive services.
Note
Not all channels transmit interactive television
applications at all times.
Cursor keys
6
Press the cursor keys oœpπ to
navigate through the menus.
OK
7
• To activate a setting
• Starts playing content in the Multimedia
Browser application.
a EPG
8
To open and close the Electronic
Programme Guide.
See EPG (Electronic Programme Guide), p. 35.
12
Page 13

13
ENGLISH
+P- Channel selection
9
• to browse through the TV channels and
sources stored and marked in the Favourite
channels list;
• to select a page in Teletext mode;
• to quickly browse through the lists in the
menus;
• to switch on the TV from standby mode.
¬ Mute key
10
To turn off or on sound.
0/9 Digit keys
11
To select a TV channel between 0 and 999.
Previous channel
12
Press to alternate between the currently
viewed and the previously viewed TV
channel.
13
VOL +/-
Press + or - to turn on sound louder
or softer.
14
i INFO
Press to display (when available) information
about the selected TV channel and
programme.
BROWSE/MENU
15
To open and close the main menu. See How
to navigate through the menus, p. 10.
16
FAV
To display the channels list. You can create
up to four favourite lists.
17
Colour keys
• When functions are attached to the colour
keys, the colour keys are shown on screen.
• To select a page in Teletext mode.
5.1 Use of the option key
The key allows you to display the Quick
access menu which will give you direct access to
some features and menu options.
Press the key.
1
The Quick access menu appears.
2
Press the o or œ key to select a menu
item.
3
Press the OK key to jump to the selected
menu item in the TV menu. (Except for the
Clock option).
4
Use the o or œ, p or πkey to make a
selection.
5
Press the key to exit.
Note
Digital related menu items will
only be accessible in case of digital TV
broadcasting.
Digital audio language:
See 'Adjust sound menu settings', p. 19.
Digital subtitle language:
See 'Adjust feature menu settings', p. 21.
Subtitles:
See 'Adjust feature menu settings', p. 21.
Page 14

Picture format:
See Use of the TV menu settings, Adjust picture
menu settings, p. 16.
Equalizer:
See Use of the TV menu settings, Adjust sound
menu settings, p. 19.
Clock:
Select to call up or remove the clock display on
the screen.
Quick access
Digital audio language
Digital subtitle language
Subtitles
Picture format
Equalizer
Clock
14
Page 15

15
ENGLISH
6 Use of the TV menu
settings
The TV menu allows you to access and change
settings and preferences in case you want to
change the First time installation settings and/or
you want to control the settings of special TV
functions, features and peripheral equipment.
Television
Multimedia
TV menu
TV settings
Features
Installation
Exit
Info
TV menu
TV channels
Programme guide
TV settings
Settings assistant
Reset to standard
Picture
Sound
A. Change settings in an easy-to-use
manner with the Settings assistant
Each time you've made a selection, press the
green key to confirm your selection.
Select Settings assistant and press the π
1
key.
By means of several split screens/full screens
you are prompted to select your preferred
picture and sound settings to finally arrive at
a complete setting which satisfies you.
See 'First time installation', Step 3: Settings
assistant: select your TV settings, p. 9.
Press the green colour key to return to the
2
TV menu again.
B. Use of the Standard settings (if present)
This allows you to reset your settings for
viewing and listening to predefined factory
settings.
TV menu
TV settings
Settings assistant
Reset to standard
Picture
Sound
Reset to standard
Current
Natural
Vivid
Subtle
Adjust viewing and listening settings
1
Press the key on the remote control.
The main menu appears on the screen.
2
Select TV menu and press the π key.
The TV menu appears on the screen.
Select TV settings and press the π key.
3
The TV settings menu moved to the left.
4
Press the key to exit the menu.
To make it easier to change the settings of
the TV, there are 3 ways of doing it.
Info
Page 16

1
Select Reset to standard and press the π
key.
• A menu appears which allows you to
select one of the standard settings for
viewing and listening.
• Current shows your current settings for
viewing and listening.
• If you select Natural, it allows you to
set your picture and sound settings to
the recommended standard values. In
most cases this will give the best balanced
viewing experience.
• If you select Vivid, it allows you to set
your picture and sound settings to rich
values, making use of the TV capabilities
to its full extend.
• If you select Subtle, it allows you to
set your picture and sound settings to
the purest representation of the original
source content.
2
Press the green colour key to store the
selected setting.
C. Individual settings for picture and sound
1
Select Picture and Sound press the πkey.
• A menu appears which allows you to fine
tune the picture and sound settings.
• To adjust the Picture settings, see 'Adjust
picture menu settings', p. 16.
• To adjust the Sound settings, see 'Adjust
sound menu settings', p. 19.
6.1 Adjust picture menu settings
The picture menu contains the settings that
affect the quality of the picture.
Press the key on the remote control.
1
The main menu appears.
2
Select TV menu and press the πkey.
The TV menu moved to the left.
3
Select TV settings and press the πkey.
The TV settings menu moved to the left
panel.
4
Select Picture and press the πkey.
The Picture menu moved to the left panel.
TV menu
TV settings
Features
Installation
Exit
Info
TV menu
TV settings
Settings assistant
Reset to standard
Picture
Sound
Info
5
Press the o or œ key to select the Picture
TV settings
Settings assistant
Reset to standard
Picture
Sound
Picture
Contrast
Brightness
Colour
Hue
Sharpness
Tint
..............
menu items.
6
Press the πkey to enter the selected
Picture menu item.
Note
All digital related menu items will only be
accessible in case of digital TV broadcasting.
Press the o or œ, p or πkey to adjust
7
the settings.
16
Page 17

17
ENGLISH
Press the p key to return to the Picture
8
menu.
Contrast
Adjusts the intensity of bright parts in the
picture but keep the dark parts unchanged.
Brightness
Adjusts the light output of the complete picture,
which will mainly affect the darker areas of the
picture.
Colour
Adjusts the saturation level of the colours to
suit your personal preference.
Hue
Compensates for the colour variations in NTSC
encoded transmissions.
Sharpness
Adjusts the sharpness of fine details in the
picture.
Tint
Increases or decreases Warm (red) and Cool
(blue) colours to suit personal preferences.
• Select
Cool to give the white colours a blue.
Normal to give the white colours a neutral.
Warm to give the white colours a red tint.
Custom to make a customised setting in the
Custom tint menu item.
TV menu
TV settings
Settings assistant
Reset to standard
Picture
Sound
Info
Picture
.............
Custom tint
Pixel Plus
Digital Natural Mo..
Dynamic contrast
DNR
.............
Custom tint (only when Tint is set to
Custom)
Fine tunes the white point (WP) and black level
(BL) of the picture.
Select Custom tint and press the πkey.
1
Use the o or œ, p or π keys to select
2
and adjust the settings of:
R-WP: allows you to customise the colour
tint by adjusting the red whitepoint of the
picture.
G-WP: allows you to customise the colour
tint by adjusting the green whitepoint of the
picture.
B-WP: allows you to customise the colour
tint by adjusting the blue whitepoint of the
picture.
R-BL: allows you to customise the colour
tint by adjusting the red blacklevel of the
picture.
G-BL: allows you to customise the colour
tint by adjusting the green blacklevel of the
picture.
Press the colour keys to reset to the
3
predefined settings.
Press the p key to return to the Picture
4
menu.
Page 18
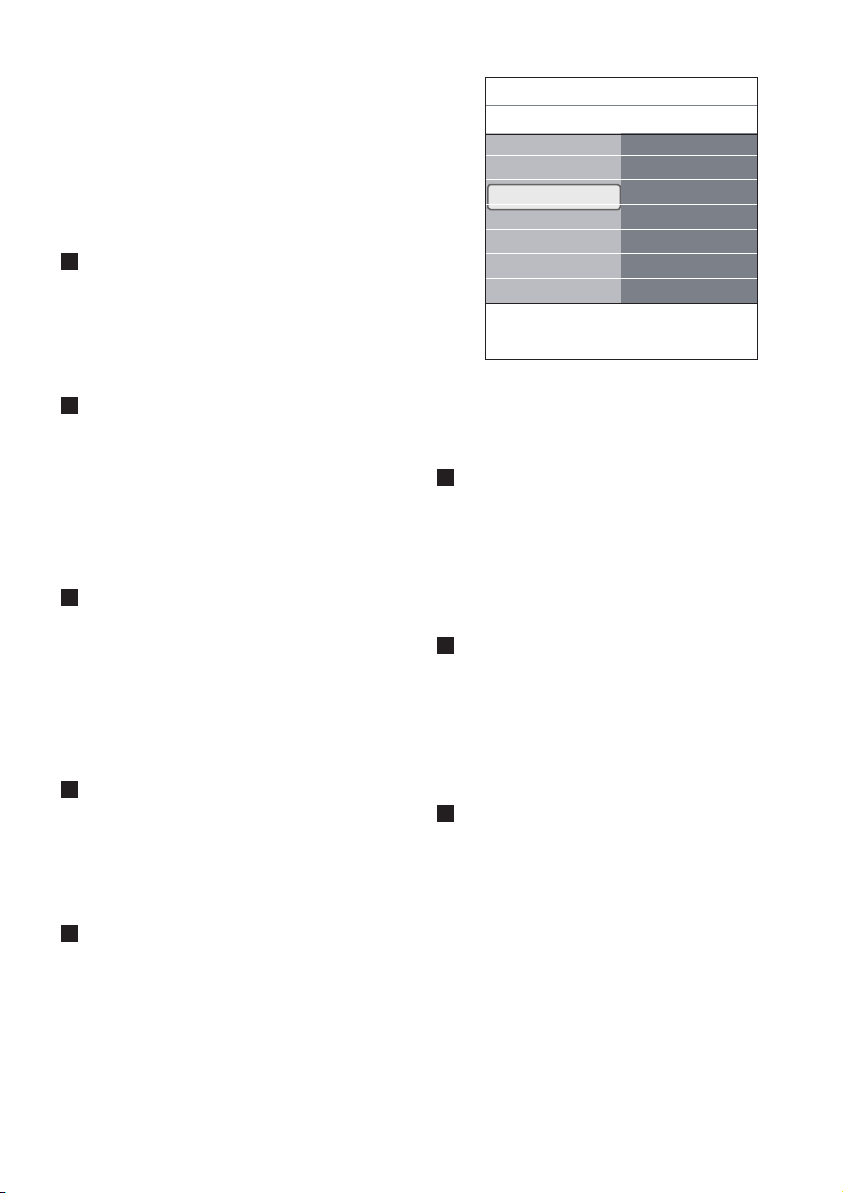
Pixel Plus
Pixel Plus is the most ideal setting, as it
fully processes the image to make every
single pixel the best it can be, improving
contrast, sharpness, picture depth, and colour
reproduction and brilliance from every source,
including High Definition.
Select On or Off to activate/de-activate
1
Pixel Plus.
TV menu
TV settings
Settings assistant
Reset to standard
Picture
Sound
Picture
.............
DNR
MPEG artefact red.
Colour enhancem..
Active control
Light sensor
Picture format
Digital Natural Motion
Reduces the field and line flicker and reproduces
smooth movement especially in movies.
Select Off, Minimum or Maximum in
1
order to really see the difference in picture
quality.
Dynamic contrast
Automatically makes the contrast in the darker
and the brighter picture areas more noticeable
as the image on the screen changes.
Normally select Medium. It may be
1
preferred to select Minimum, Maximum
or Off.
DNR (Dynamic Noise Reduction)
DNR automatically filters out and reduces the
image noise. This improves picture quality when
receiving weak signals.
Select Off, Minimum, Medium or
1
Maximum according to the image noise in
the picture.
MPEG artefact reduction
Smoothens the transitions on digital content.
Select On or Off.
1
Info
Colour enhancement
Automatically controls green enhancement and
blue stretch. It makes the colours more vivid.
Select Off, Minimum, Medium or
1
Maximum.
Active control
The TV continuously measures and corrects
all incoming signals in order to provide the
best picture possible.
Select On or Off to activate/de-activate
1
Active control.
Light sensor
Light sensor On automatically adjusts the
picture settings for best viewing dependent
on the lighting conditions in the room.
Select On or Off.
1
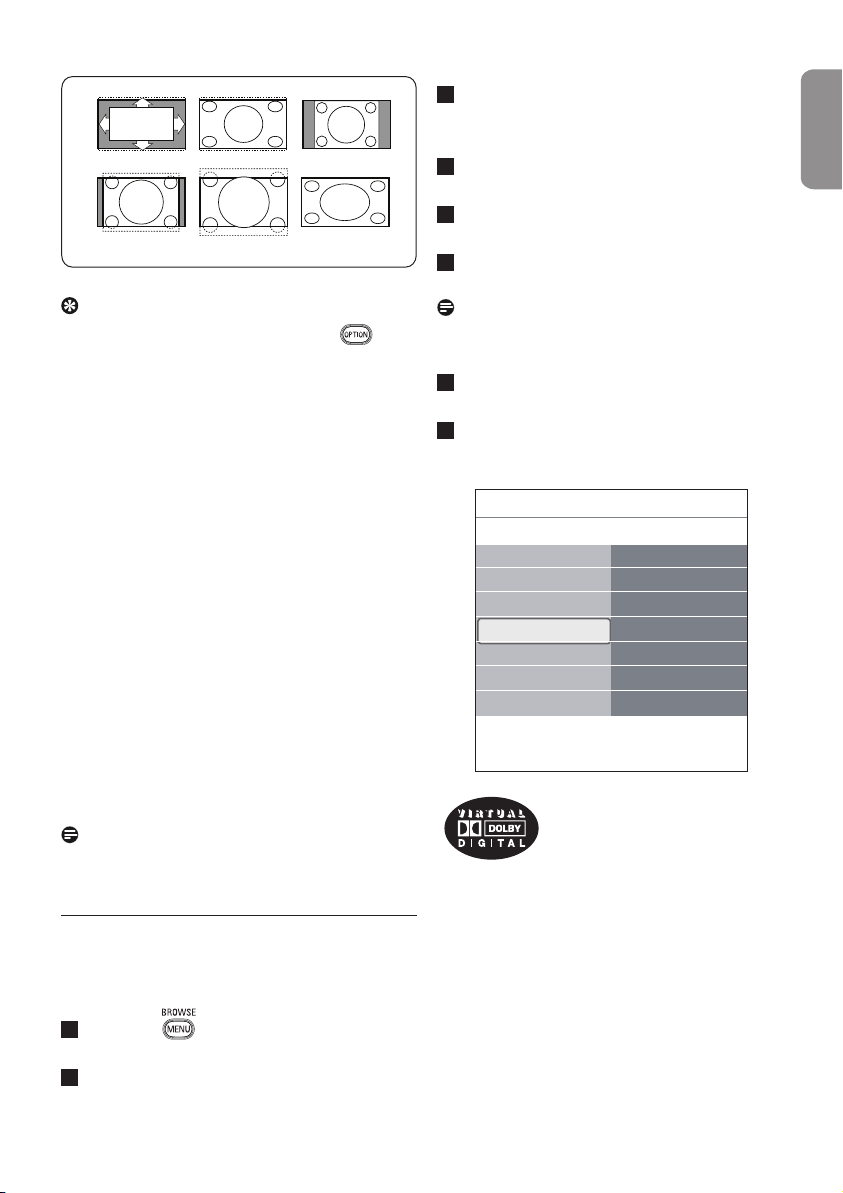
Picture format
This allows you to adjust the size of the
picture dependant on the broadcasted format
and your preferred setting.
18
Page 19
19
ENGLISH
Auto format Super zoom 4:3
Movie expand 14:9 Movie expand 16:9 Wide screen
Tip
This function is also accessible via the key
on the remote control.
Choose among the following picture formats:
Auto format, Super zoom, 4:3, Movie Expand
14:9, Movie Expand 16:9 or Wide screen.
Select TV settings and press the πkey.
3
The TV settings menu is moved to the left
panel.
Select Sound and press the πkey.
4
The Sound menu is moved to the left panel.
Use the o or œ key to select the Sound
5
menu items.
Press the πkey to enter the selected
6
Sound menu item.
Note
Dependent on the input signal, one or more
menu items may not be selectable.
Use the o or œ, p or π keys to adjust
7
the settings.
Press the p key to return to the Sound
8
menu.
Auto format makes the picture fill the screen
as much as possible.
In case of subtitles in the bottom black bar,
Auto format makes the subtitles visible.
In case of a broadcaster logo in the corner of
the top black bar, the logo disappears from the
screen.
Super zoom removes the black bars on the
sides of 4:3 programmes with minimal
distortion.
When in Movie Expand 14:9, Movie Expand
16:9 or Super zoom screen format, you can
make subtitles visible with the o or œ key.
Note
With HD sources not all picture formats will be
available.
6.2 Adjust sound menu settings
The sound menu contains the settings that affect
the quality of the sound.
1
Press the key on the remote control.
The main menu appears.
2
Select TV menu and press the πkey.
The TV Menu is moved to the left.
TV menu
TV settings
Settings assistant
Reset to standard
Picture
Sound
Info
Manufactured under license from Dolby Laboratories.
‘Dolby’ ‘Pro Logic’ and the double-D symbol are
trademarks of Dolby Laboratories.
Sound
Equalizer
Volume
Balance
Digital audio lang..
Dual I/II
Mono/Stereo
.............
Page 20

Equalizer
Allows you to change the frequency response
of the sound to match your personal taste.
Tip
This function is also accessible via the key
on the remote control.
Volume
Allows you to adjust the sound output level.
Balance
Allows you to adjust the output of the right
and left speakers to obtain the best stereo
reproduction for your listening position.
Surround mode
Allows you to select the modes for more spatial
or surround sound reproduction dependent on
the broadcasted signals or signals from external
inputs received.
Headphone volume
Allows you to control the level of sound
through the headphones.
AVL (Automatic Volume Leveler)
Automatically reduces the volume differences
between channels and programmes, providing
a more constant overall level. This will also
reduce the dynamics of sound.
Digital audio language (only with Digital TV
broadcasting)
Allows you to select an audio language out of
the list of the available broadcasted languages
for the current digital programme.
Note
If there is more than one variant for an audio
language, then select one of the variants.
To permanently change the audio language, use
the Language menu in the Installation menu.
Tip
This function is also accessible via the key
on the remote control.
Dual I/II
Allows you to select, per channel, Dual I or II,
when dual sound transmission is available.
Mono/Stereo
Allows you to select, per TV channel, Mono
or Stereo sound when stereo broadcasts are
available.
Delta volume
Allows you to correct for any permanent
volume differences between TV channels or
external sources.
Auto surround
When switched On, this allows the TV to
automatically switch to the best surround sound
mode the broadcaster transmits.
20
Page 21
21
ENGLISH
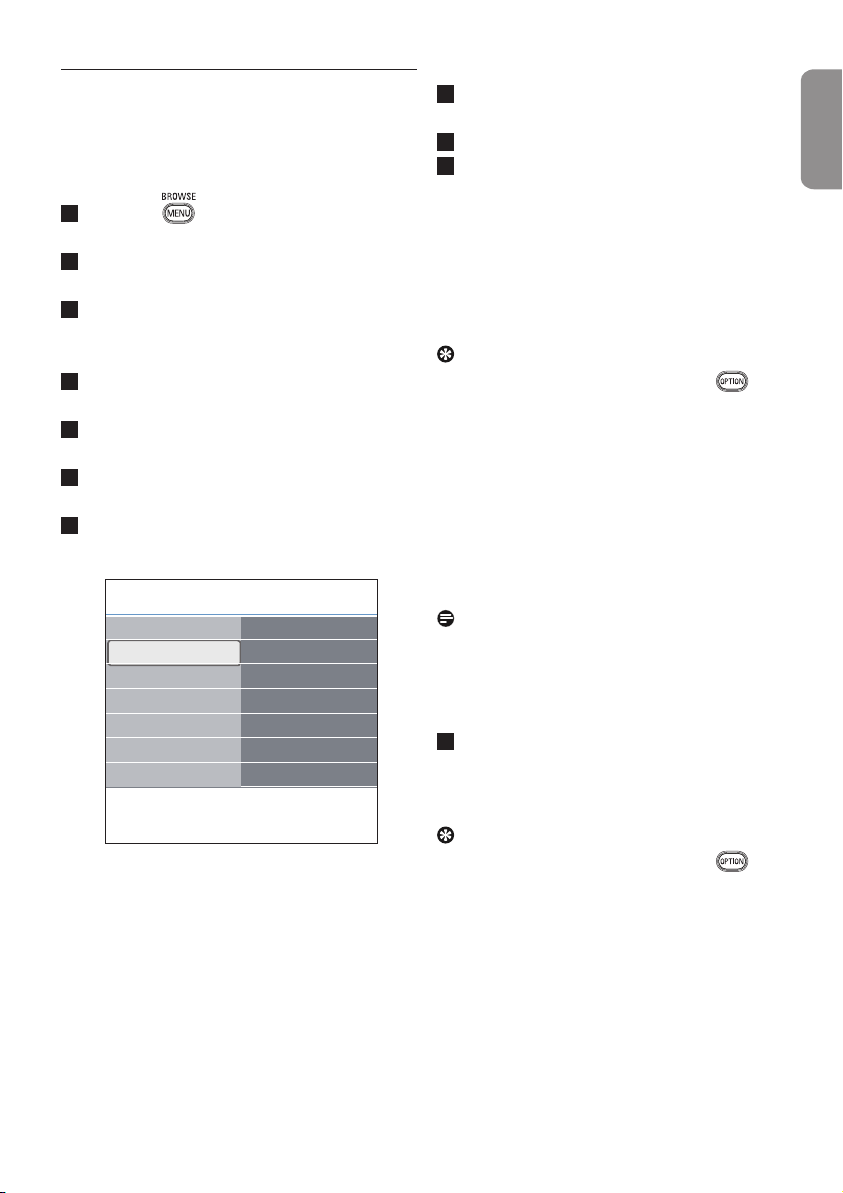
6.3 Adjust feature menu settings
The Features menu allows you to control the
settings of special TV functions, features and
accessory equipments.
1
Press the key on the remote control.
The main menu appears.
2
Select TV menu and press the πkey.
The TV Menu is moved to the left.
3
Select Features and press the πkey.
The Features menu is moved to the left
panel.
4
Press the o or œ key to select the
Features menu items.
5
Press the πkey to enter the selected
Features menu item.
6
Press the o or œ, p or π to adjust the
settings.
7
Press the p key to return to the Features
menu.
TV menu Features
TV settings
Features
Installation
Exit
Info
Subtitle
Digital subtitle lan..
Sleeptimer
Childlock
Set/Change code
On timer
.............
Subtitle
This displays Teletext and DVB-T subtitles from
the selected TV channel. It can be permanently
displayed, or only when mute is active. The
teletext subtitle page of analogue channels must
be stored for each TV channel.
Switch on teletext and select the proper
1
subtitle page from the index.
Switch off teletext.
2
Select
3
• Subtitle On to display the subtitles on
the selected TV channels.
• On during mute to automatically
display the subtitles only when the sound
has been muted with the ¬ key on the
remote control.
Tip
This function is also accessible via the key
on the remote control.
Digital subtitle language (only with Digital
TV broadcasting)
This allows you to temporarily select your
preferred subtitle language out of the list of
the broadcasted languages for the current
programme.
Note
To permanently change the subtitle languages,
use the Language menu in the Installation
menu.
1
Use the o or œ key to temporarily
overrule your permanent language selection
and confirm with the OK key.
Tip
This function is also accessible via the key
on the remote control.
Page 22
Sleeptimer
This sets a time period after which the TV
automatically switches to standby.
Select Sleeptimer.
1
Press the πkey.
2
Select a value with the o or œ key.
3
The list will have values from 0 to 180
minutes. When 0 is selected, the sleeptimer
is switched off.
Note
You can always switch off your TV earlier or
select another time set.
Childlock
With a 4-digit code, you are able to lock TV
channels and external sources to prevent
children from watching certain programmes.
Select Childlock.
1
Press the πkey to enter the Childlock
2
menu.
Enter your 4-digit code.
3
Note
You have to re-enter your code each time you
enter the Childlock menu.
Select one of the menu items of the
4
Childlock menu and press the πkey:
Lock to lock all channels and externals:
Custom lock to lock a specific channel or
channels or to lock all the channels from a
certain time.
• Lock after to lock all programmes from
a certain time onwards.
Press the πkey twice.
1
Select On to set the lock.
2
Press the p key.
3
Select Time and press the πkey.
4
Enter the time with the o or œ and
5
πkey.
• Channel lock to lock a certain TV or
external channel.
1
Press the OK key to activate
deactivate.
• Parental rating to set an age rating to a
digital programme if the programme is
parental rated. The ratings applied are
according the selected country in the
initial installation.
1
Press the πkey and select an age
rating with the o or œ key.
Unlock to undo all locks you have set.
Important: you have forgotten your code !
1
Select Change code and press the πkey.
2
Enter the overriding code 8-8-8-8.
3
Enter a new personal 4-digit code.
4
Confirm your new entered code.
The previous code is erased and the new
code is stored.
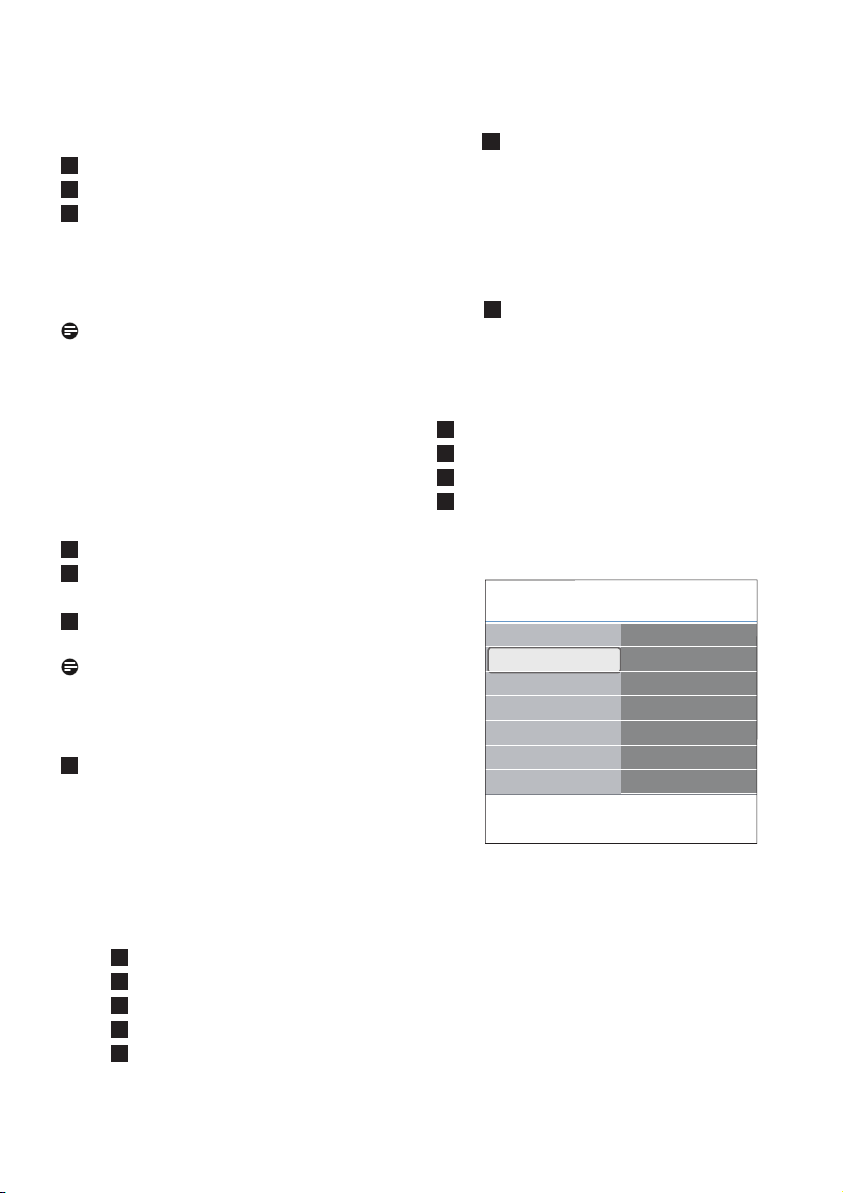
TV menu Features
TV settings
Features
Installation
Exit
Info
.............
Sleeptimer
Childlock
Set/Change code
On timer
Common interface
Demo
22
Page 23

23
ENGLISH
Set code/Change code
This allows you to set or change the personal
4-digit access code that is used in the different
lock functions of the TV.
1
Select Set or Change code.
• If no PIN-code exists yet, the menu
item is set to Set code. Follow the
instructions on screen.
• If a PIN-code has previously been
entered, the menu item is set to Change
code. Follow the instructions on screen.
2
Enter your code with the digit keys. All
number combinations from 0000 to 9999
are valid numbers.
• The Features menu reappears with a
message confirming that your PIN-code
has been created or changed.
On timer
From standby, this automatically switches
the TV to the specified channel number at a
specified time.
1
Select On timer.
2
Press the πkey to enter the On timer
menu.
3
Select Timer and press the πkey.
4
Select On.
5
Select Channel and then the TV channel
you want your TV to switch to on a
selected time and day
6
Select Day and then a day of the week or
select Daily.
7
Select Time and enter the time with the
digit keys or with the o or œ key.
8
Press the OK key to activate.
9
Press the p key to return to the Features
menu or press the key to switch off
the menu.
TV menu Features
TV settings
Features
Installation
Exit
Info
.............
Sleeptimer
Childlock
Set/Change code
On timer
Common interface
Demo
Note
From now on, every week, your TV will
automatically switch to the selected channel, on
the selected day, at the selected time, until the
On timer function is switched off again.
Note
Only one On timer can be set.
Page 24
Common interface
Note
This functionality is only available in certain
countries.
This allows you to access common interface
applications defined by the service provider of
the Common Interface (CI) module.
The Common Interface (CI) module can
contain one or more applications, which are
used to communicate with the CI service
provider and provide some additional facilities
to the user.
See Use the Common Interface slot, p. 5.
Note
This menu item and the common interface
applications are only selectable when an
authenticated Common Interface card is
present and some Common Interface card user
interface sessions are listed.
The CI service provider is responsible for the
messages and texts on screen. In case of failure
or strange behaviour, you must call your CI
service provider.
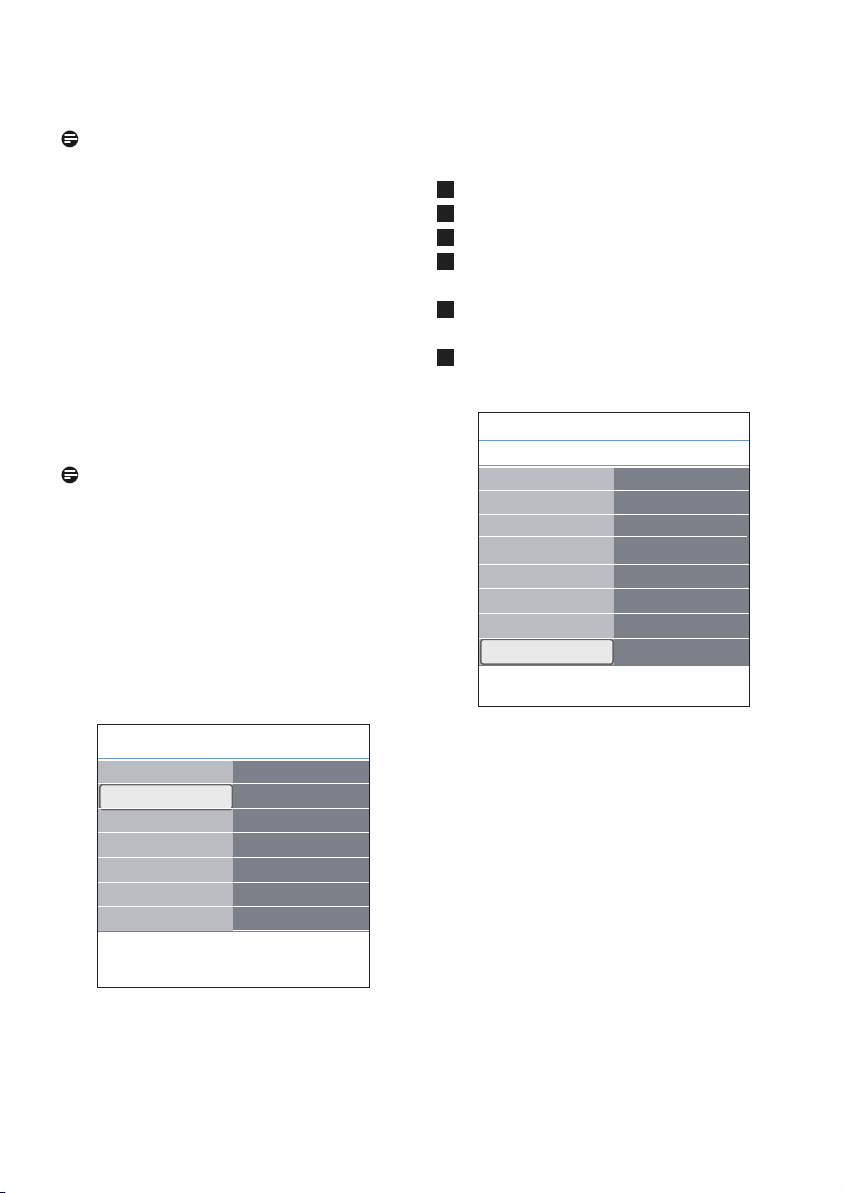
Demo
This allows you to get an idea of the features
that are part of the television.
Select Demo.
1
Press the πkey.
2
Select a desired demo.
3
Press the OK key to start the demo.
4
The selected demo is played once.
Press the red colour key to stop the demo
5
and to return to the demo menu.
Press the red colour key to exit the demo
6
menu.
TV menu
Features
Subtitle
Dig. subtitle langu.
Sleeptimer
Childlock
Set/Change code
On timer
Common interface
Demo
Info
Demo
Pixel Plus
Settings assistant
Active control
TV menu Features
TV settings
Features
Installation
Exit
Info
24
.............
Sleeptimer
Childlock
Set/Change code
On timer
Common interface
Demo
Page 25
25
ENGLISH
6.4 Search for and store TV channels
Tip
You will need this chapter only if you want to
change the installation settings.
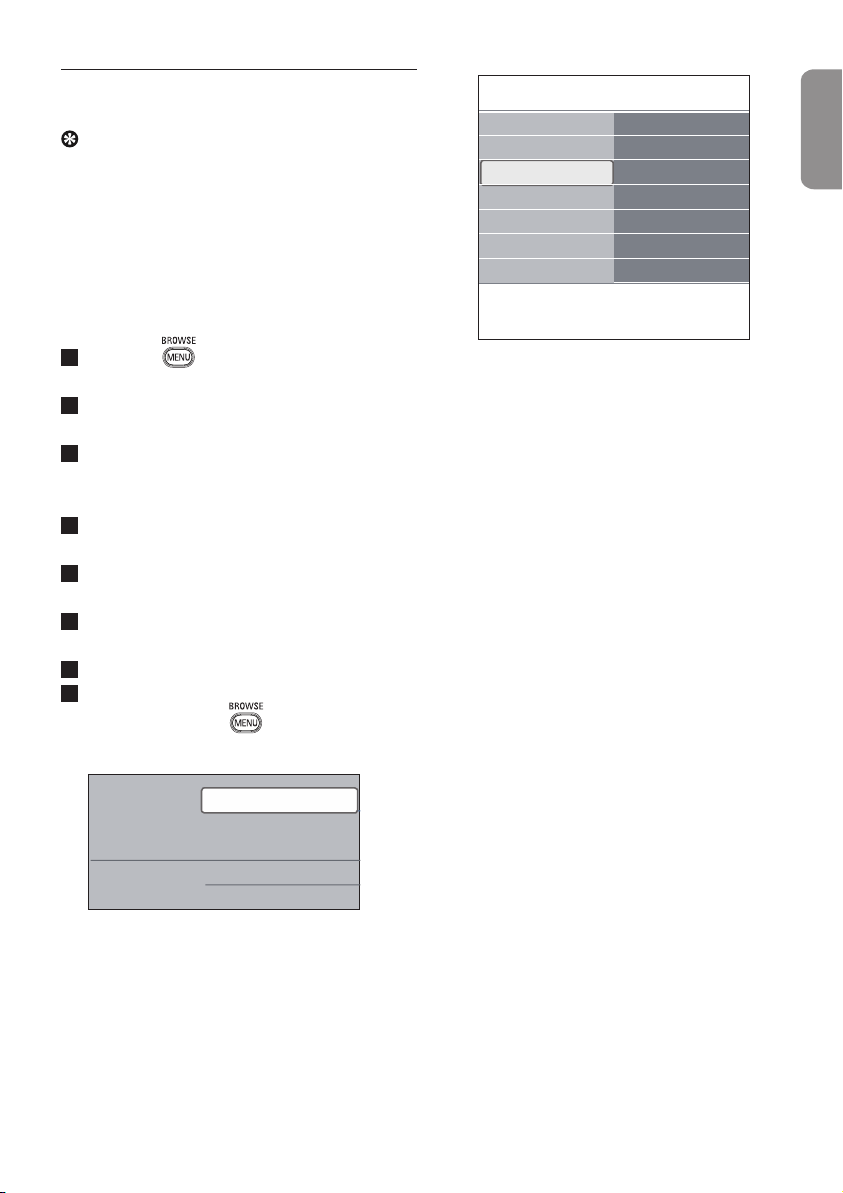
Installation menu
This menu will adjust settings related to the
installation of the TV channels, language and
country and to the initial installation of your TV.
1
Press the key on the remote control.
The main menu appears.
2
Select TV menu and press the πkey.
The TV Menu is moved to the left.
3
Select Installation and press the πkey.
The Installation menu is moved to the left
panel.
4
Press the o or œ key to select the
Installation menu items.
5
Press the πkey to enter the selected
Installation menu item.
6
Press the o or œ, p or π to make a
selection.
7
Press the OK key to activate or to confirm.
8
Press the p key to return to the Installation
menu or press the key to switch off
the menu.
Television
Multimedia
TV menu
TV channels
Programme guide
TV menu Installation
TV settings
Features
Installation
Exit
Info
Languages
Country
Time zone
Channels
Preferences
Connections
.............
Select your language preferences
This menu allows you to select your preferred
language for menu, audio and subtitle.
Menu language
This allows you to select your menu language
out of the list of the available languages.
Preferred audio language (only with Digital
TV broadcasting)
This allows you to select your audio language
preference in case several languages are
broadcasted.
Preferred subtitle language (only with
Digital TV broadcasting)
This allows you to select your subtitle language
preference in case several languages are
broadcasted.
Hearing impaired (only with Digital TV
broadcasting)
This allows you to select the hearing impaired
audio or subtitle language.
When set to On, the Hearing impaired version
of your preferred audio or subtitle language will,
if available, be reproduced.
When set to Off, the normal audio and subtitle
language behaviour will be applicable.
Page 26
TV menu
Installation
Languages
Country
Time zone
Channels
Preferences
Connections
Decoder
.............
Languages
Menu language
Preferred audio l...
Preferred subtitle...
Hearing impaired
This allows you to select your local time zone
so that the clock display shows the correct
time.
Store TV and radio channels
After language and country are set correctly,
you can now search for and store the TV
channels.
1
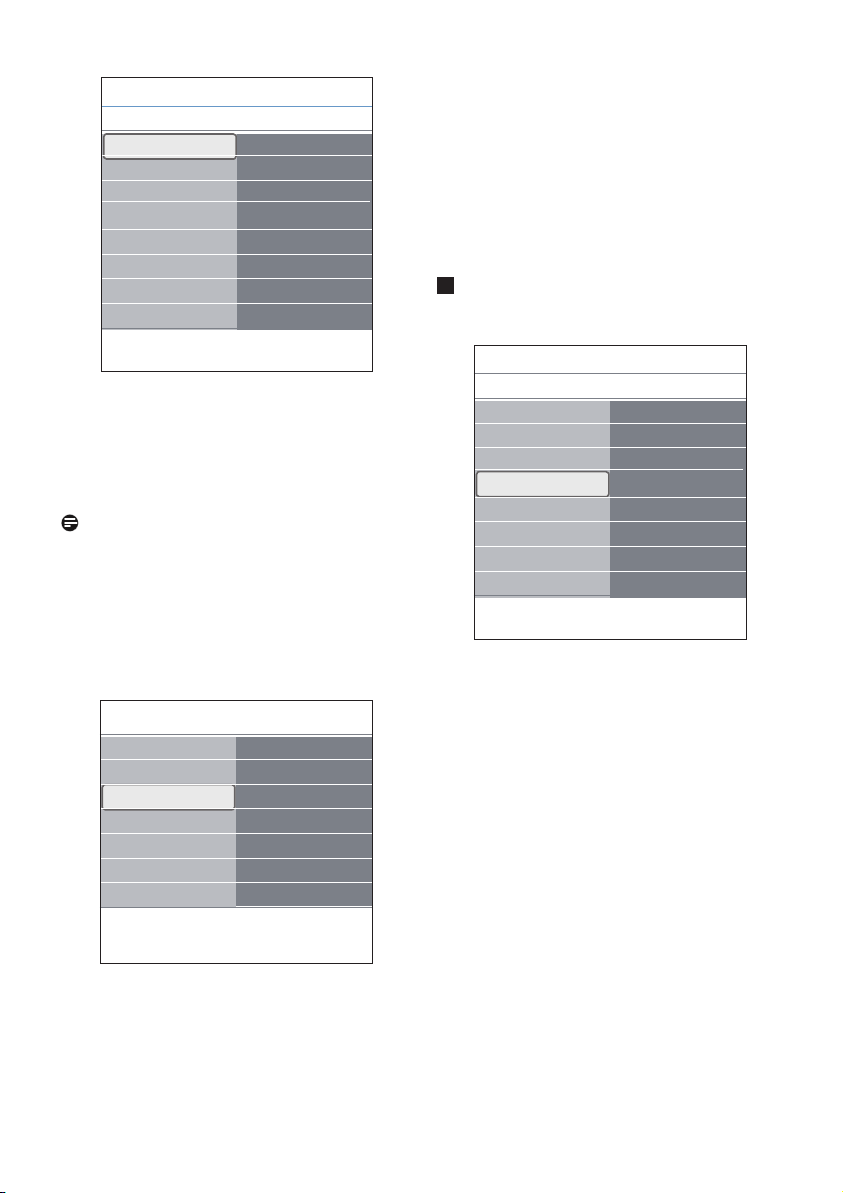
Select Channels in the TV Installation
menu.
Info
Select your country
This allows you to select the country where you
are now located.
Notes
• if you select a wrong country, the channel
numbering will not be according to the
standard for your country;
• in case the country selected is not DVB-T
supported by your TV, digital related menuitems will not be accessible.
TV menu Installation
TV settings
Features
Installation
Exit
Info
.............
Channels
Preferences
Connections
Decoder
Factory settings
Software upgrade
TV menu
Installation
Languages
Country
Time zone
Channels
Preferences
Connections
Decoder
.............
Info
Channels
Autom. installation
Installation update
Digital: test recept..
Analogue: manual..
Rearrange
Automatic installation
The TV will scan the entire frequency spectrum
based on the selected country.
• All available digital and analogue TV and digital
radio channels are searched for and stored
automatically.
This will take a few minutes.
• When the search is complete, the menu will
indicate the number of digital and analogue
channels found.
Select the time zone (only with digital TV
broadcasting)
Only applicable for certain countries and
dependent on the selected country.
26
Page 27

27
ENGLISH
Installation update (only with Digital TV
broadcasting)
This allows you to automatically tune to and
update all available digital channels without
altering the sorting of existing channels. For
example, the name of the channel is not altered.
Notes
• this will not reinstall uninstalled channels;
• digital channels that are not encountered any
longer will be removed;
• new channels found will not be added to any
favourite list;
• already installed channels will not be
renumbered.
• installation update happens automatically
when your TV is in standby mode.
Digital: test reception (only with Digital TV
broadcasting)
This allows you to see the quality and the
strength of the signal reception for a digital
frequency. This enables you to find the antenna
position that gives the best reception.
Select Digital: test reception and press
1
the πkey.
• You obtain an indication of the actual
channel frequency, the network name, the
signal quality and strength.
• If the signal quality and strength is poor,
you can try repositioning the aerial.
Tip
It is however advisable to contact a specialised
aerial installer in order to achieve the best
results.
You can also directly enter the frequency of the
digital channels you want to test.
Page 28
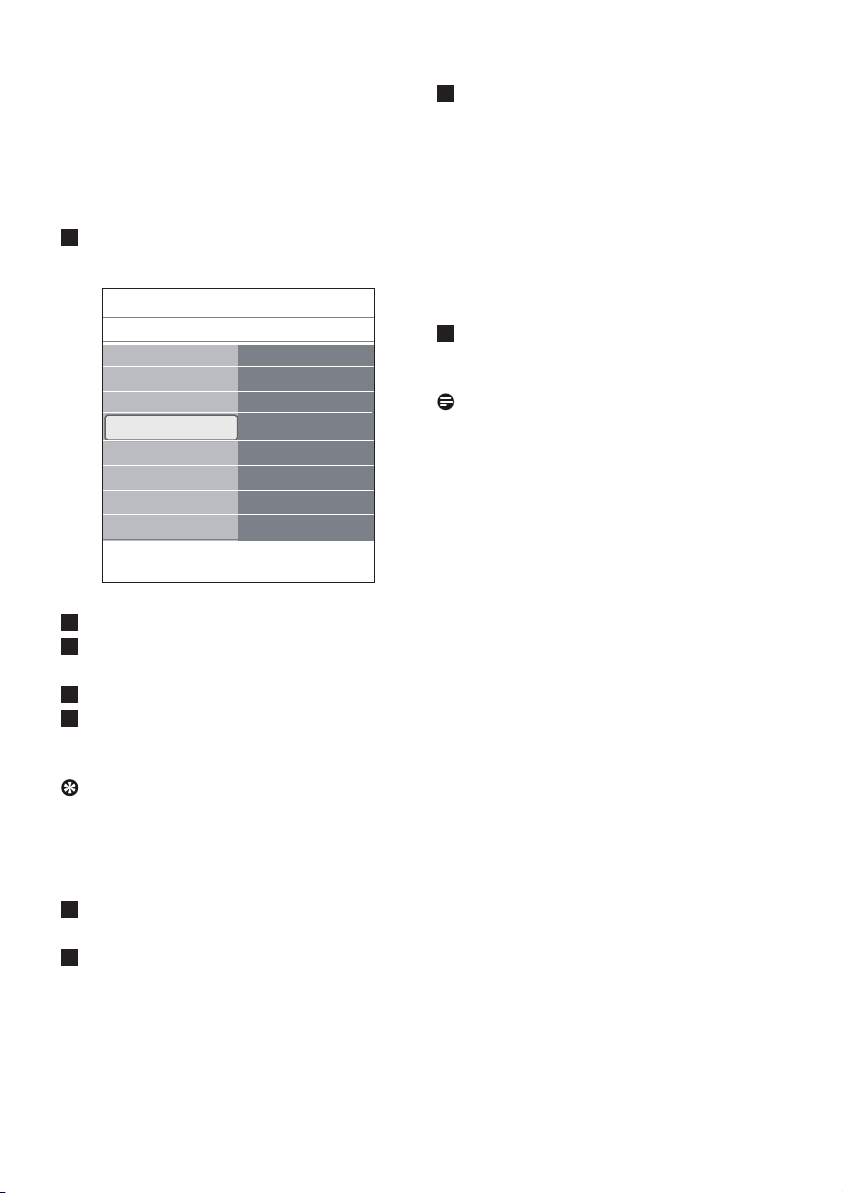
Analogue: manual installation
This gives you the possibility to manually
install (tuning-in channel by channel) analogue
channels. Manual installation will not find nor
store any DVB-T (digital) channels.
Select Analogue: manual installation
1
and press the πkey.
TV menu
Installation
Languages
Country
Time zone
Channels
Preferences
Connections
Decoder
.............
Info
Select System.
2
Select your country or part of the world
3
Channels
Autom. installation
Installation update
Digital: test recept..
Analogue: manual..
Rearrange
where you are now located.
Select Search and press the πkey.
4
Select the red or green colour key to
5
proceed.
Select Store current channel if you want
8
to store the (fine tuned) frequency under
the current channel number.
Press the πkey and confirm with the OK
key.
Select Store as new channel if you want
to store the (fine tuned) frequency under a
new channel number.
Press the πkey and confirm with the OK
key.
Use the rearrange menu to rename or
9
reshuffle the channels. See next page.
Note
When on a frequency where a DVB signal is
broadcasted, the tuner will try to decode an
analogue TV channel, and hence will not show
video.
Tip
If you know the frequency, enter the 3 digits
of the frequency with the digit keys 0 to 9 (For
example, 049).
6
Press the p key to store the channel found
or to search for another channel.
7
Select Fine tune and press the πkey.
Fine tuning can be useful when the
frequency has shifted a bit or when
interference of another frequency occurs.
Adjust the frequency with the o or œ key
in case of poor reception of the channel
found.
28
Page 29
29
ENGLISH
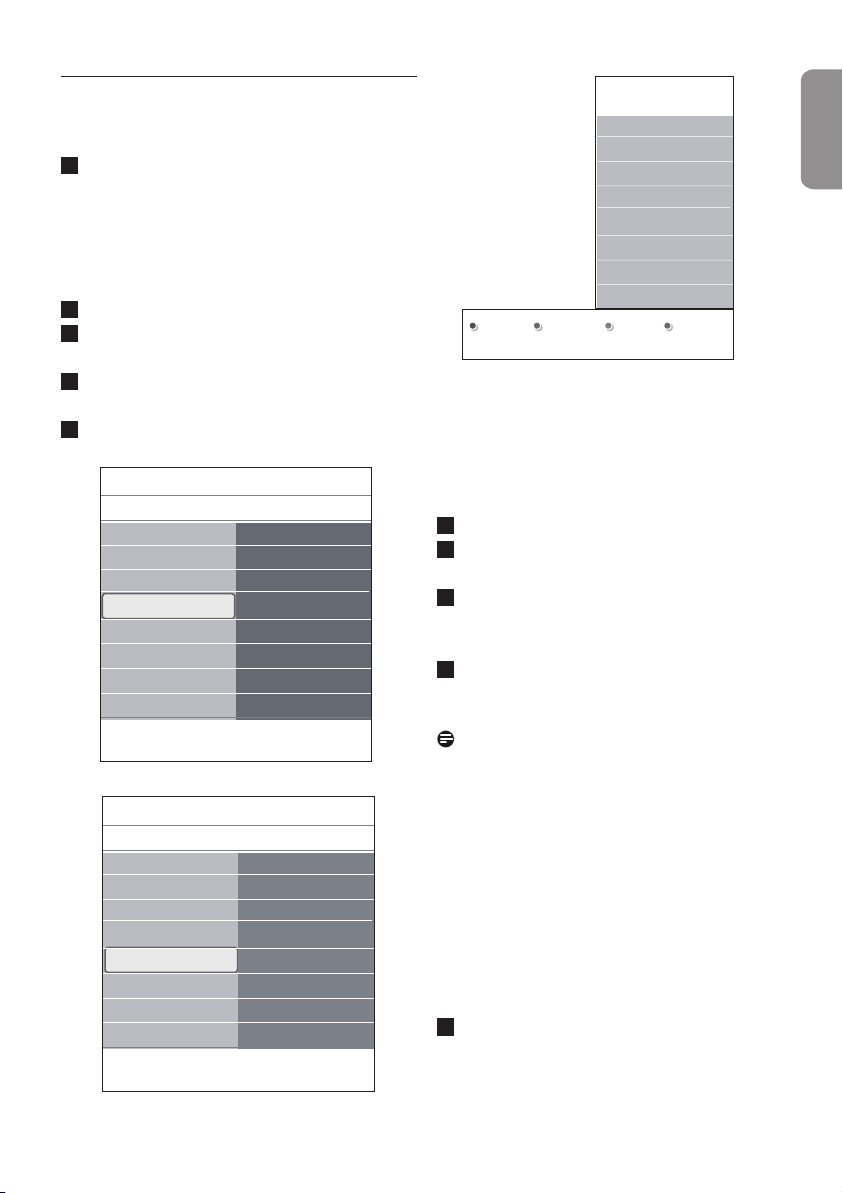
6.5 Rearrange the channel number list
This allows you to rename, to rearrange and to
uninstall or reinstall the stored channels.
1
Press the corresponding colour keys and
follow the on screen instructions.
Rearrange
This allows you to change the order of the
stored TV channels.
1
Select the channel you want to change place.
2
Press the yellow colour key to move up a
single position in the list.
3
Press the blue colour key to move down a
single position in the list.
4
Repeat to rearrange other TV channels.
TV menu
Installation
Languages
Country
Time zone
Channels
Preferences
Connections
Decoder
.............
Channels
Autom. installation
Installation update
Digital: test recept..
Analogue: manual..
Rearrange
Rearrange
0
1
2
3
4
5
6
7
Rename Uninstall
Move
up
Move
down
Rename
This allows you to change the name stored in
the memory or to assign a name to a channel
or external for which a name has not yet been
entered.
Select the channel you want to rename.
1
Press the red colour key on your remote
2
control.
Select the characters with the o or œ key.
3
Select the following position with the π
key.
Press the green colour key or the OK key
4
when finished.
Info
TV menu/Installation
Channels
Automatic instal...
Installation update
Digital: test rec....
Analogue: manual
Rearrange
Info
Rearrange
0
1
2
3
4
5
6
7
Notes
• press the yellow colour key to delete all
characters. The cursor is positioned at the
beginning again;
• press the blue colour key to delete the
character the cursor is positioned. Enter a
new character with the o or œ key;
• a name can be given to the channel numbers 0
to 999;
• space, numbers and other special characters
are located between Z and A.
5
Select another channel number and repeat
steps 2 to 4.
Page 30
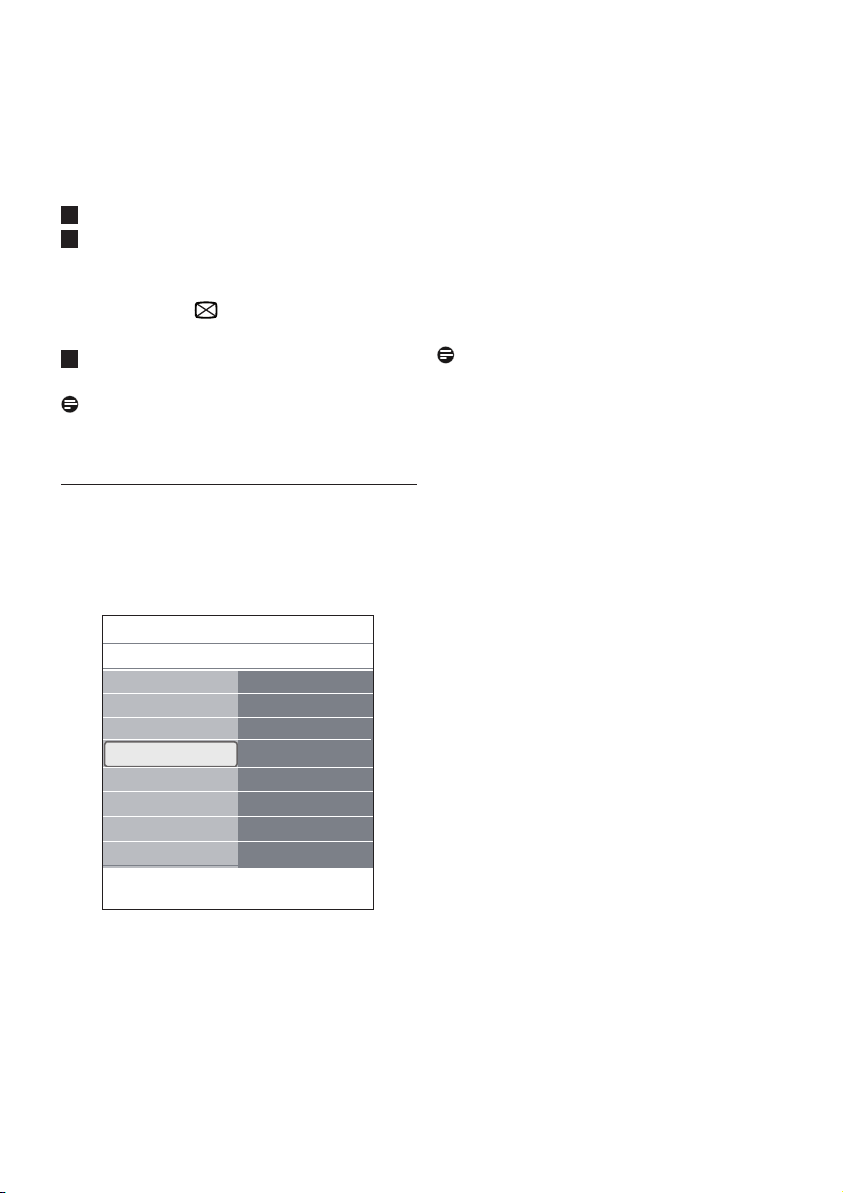
Uninstall - reinstall
This allows you to uninstall a stored channel
so that it is no longer possible to tune to. This
also allows you to reinstall an earlier uninstalled
channel.
Select the channel you want to uninstall.
1
Press the green colour key to uninstall the
2
selected channel.
The uninstalled channel is indicated in the
list by an icon in front of the uninstalled
channel.
Press the green colour key again to reinstall
3
the uninstalled channel.
Note
Uninstalled channels are not reinstalled during
an installation update.
6.6 Set your preferences
This menu contains items that can set or
adjust various special TV functions and that will
typically be accessed only occasionally.
TV menu
Installation
.............
Time zone
Channels
Preferences
Connections
Decoder
Factory settings
Software upgrade
Info
Preferences
Location
Teletext 2.5
OSD
Programme title
Select your location
This allows you to select the location of your TV.
If you choose for Shop it will result in fixed
settings of picture and sound.
The location Home will give full flexibility to
change any predefined settings for picture and
sound.
Select Teletext 2.5
Some broadcasters offer the opportunity to see
more colours, other background colours and
nicer pictures in the teletext pages.
• Select Teletext 2.5 On to take advantage
of this feature.
• Select Teletext Off if you like the more
neutral teletext layout.
The selection made is valid for all the
channels which broadcast Teletext 2.5.
Note
It may take a few seconds before teletext
broadcast switches over to Teletext 2.5.
Select the On Screen Display (OSD)
This allows you to select the display of the
volume bar and a reduced or extended on
screen display of programme and channel
information.
• Select Minimum to activate the display of
reduced channel information.
• Select Normal to activate the display
of extended channel and programme
information. For example, information
on the programme, input signal quality of
connected peripheral equipment, the screen
format and sound mode, selected audio
language, subtitle language, ratings, remaining
time of the sleeptimer setting.
Display a Programme title
This allows you, to display the programme title
according to the transmitted information.
• When selected Yes, after the selection of a
TV programme or after you press the i
key on the remote control, a programme
title will be displayed if transmitted.
30
Page 31
31
ENGLISH
6.7 Select your connections
This allows you to select the peripheral
equipment you have connected to the audio and
video connectors.
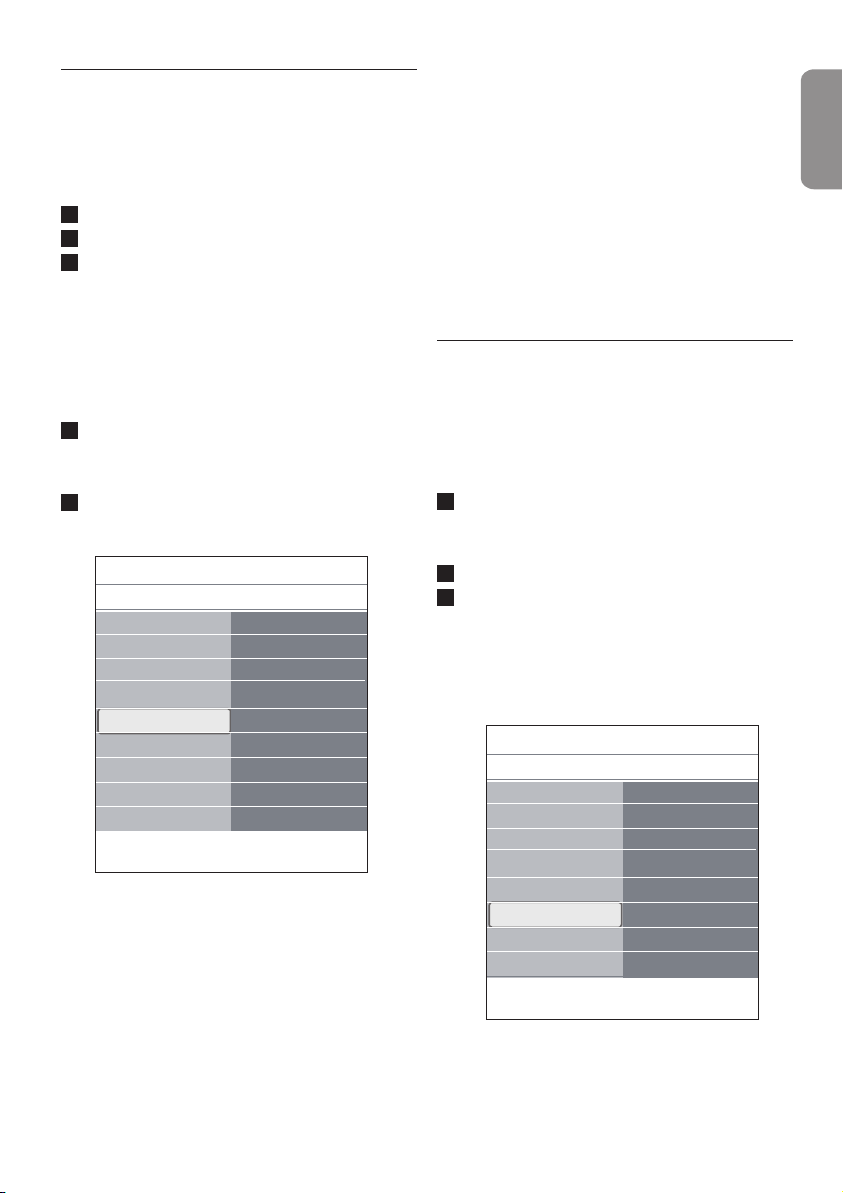
Select Connections.
1
Press the πkey.
2
Select the input to which the peripheral
3
equipment is connected.
• When you select EXT1, EXT2, EXT3,
HDMI 1, HDMI 2, Side or Digital
Audio In, a list appears which allows
you to identify which type of peripheral
equipment is attached to this input.
Press the πkey again to enter the list
4
of types of peripherals connected to the
selected input.
Select the peripheral equipment with the o
5
or œ key.
TV menu
Installation
.............
Time zone
Channels
Preferences
Connections
Decoder
Factory reset
Software upgrade
Info
Connections
EXT1
EXT2
EXT3
HDMI 1
HDMI 2
Side
Digital Audio In
Digital Audio In
If a peripheral equipment has a digital audio
output, you can connect this with a single cable
to the TV’s DIGITAL AUDIO IN connector.
In the Connections menu, assign the Digital
Audio In to the corresponding external
input to which your peripheral equipment is
connected.
In addition to accepting audio input via Digital
Audio In, the TV can output encoded Dolby
Digital audio via the DIGITAL AUDIO OUT
connector to an external amplifier or receiver.
If your amplifier or receiver has a matching
connector for Digital Audio In, you can connect
it with a single cable to the TV's DIGITAL
AUDIO OUT.
See 'To make video and audio connections',
Connect a Home Cinema amplifier, p. 50.
6.8 Select a Decoder channel number
This allows you to define one or more channel
numbers as decoder channel numbers when
a decoder or a descrambler is connected to
EXT1 or EXT2.
1
Select the channel number under which you
have stored the programme that comes
from your decoder or descrambler.
2
Select Status.
3
Select the input used to connect your
decoder: None, EXT1 or EXT2.
• Select None if you do not want the
selected channel number being activated
as a decoder channel number.
TV menu
Installation
.............
Time zone
Channels
Preferences
Connections
Decoder
Factory settings
Software upgrade
Info
Decoder
Channel
Status
Page 32
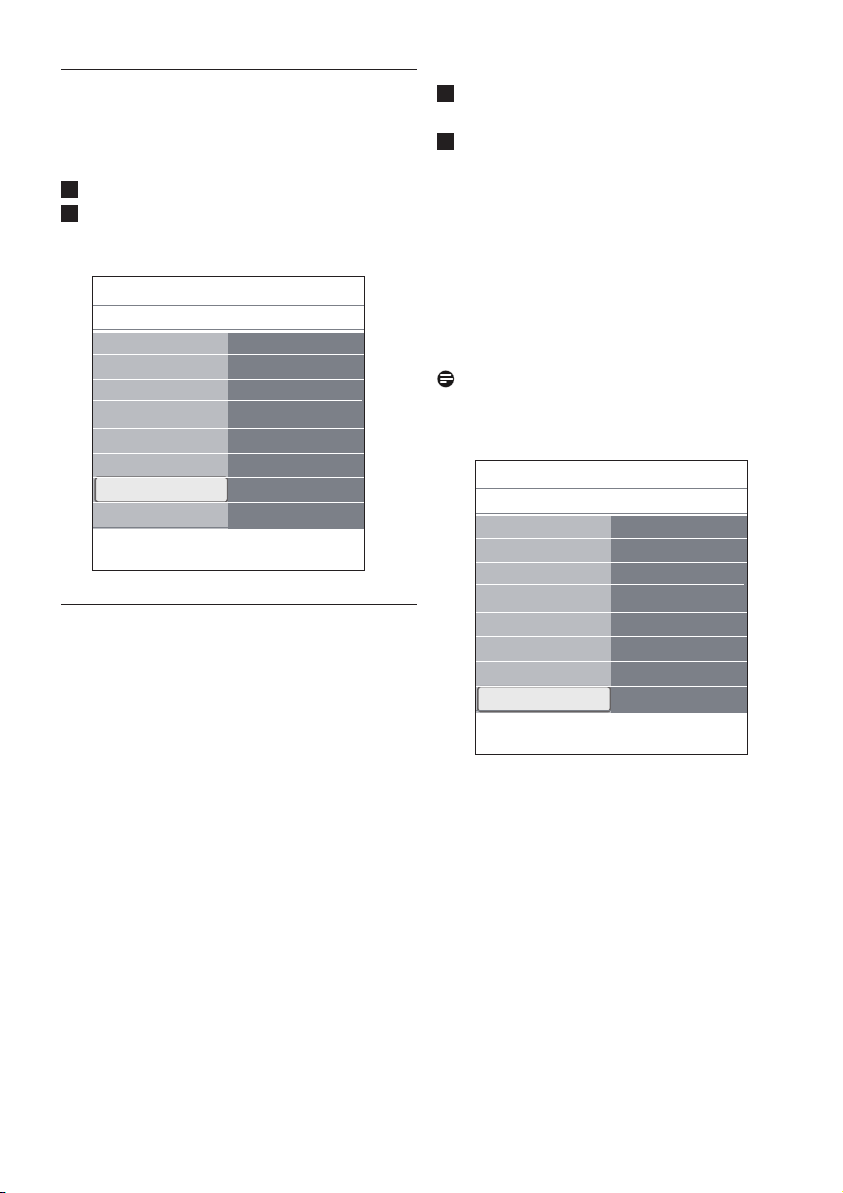
6.9 Reset the Factory settings
This allows you to reset most of the predefined
factory states.
1
Select and press the πkey.
2
Press the OK key to erase settings and
reset them to their default values.
TV menu
Installation
.............
Time zone
Channels
Preferences
Connections
Decoder
Factory settings
Software upgrade
Info
Factory settings
Reset
6.10 How to upgrade the TV software
This allows you to upgrade your TV software
using a USB device.
USB device upgrade
It is possible to initiate an upgrade procedure
from a USB device (before you start up the
TV). The memory device must be filled with
the appropriate upgrade image (and structure)
which can be found on the www. philips.com/
software website.
How to upload a new software version on
your memory device, see 'Philips TV software
upgrade with portable memory', p. 53.
Press the red colour key on your remote
1
control if you want to be reminded later on.
Press the green colour key on your remote
2
control to confirm you have read the
message.
• Once you have confirmed, the message
will not pop up again. If however, you
want to see the last broadcasted
announcement again, select
Announcement in the Software
upgrade menu.
Note
As long as the software upgrade has not been
executed, the message will be available.
TV menu
Installation
.............
Time zone
Channels
Preferences
Connections
Decoder
Factory settings
Software upgrade
Info
Software upgrade
Current softw. info
Local upgrades
Announcement
Automatic software announcement (if
present)
When you switch on your TV a message may
appear that a new software upgrade is available.
32
Page 33
33
ENGLISH
7 Create your favourite list
This allows you to create up to four favourite
channels lists with your preferred TV channels
and radio stations. For example, each member
of your family can create his/her own favourite
list.
Note
When this key is pressed the first time after you
have finished the installation, it will bring up the
full channel list. In other situations it will bring
up the last selected channel list.
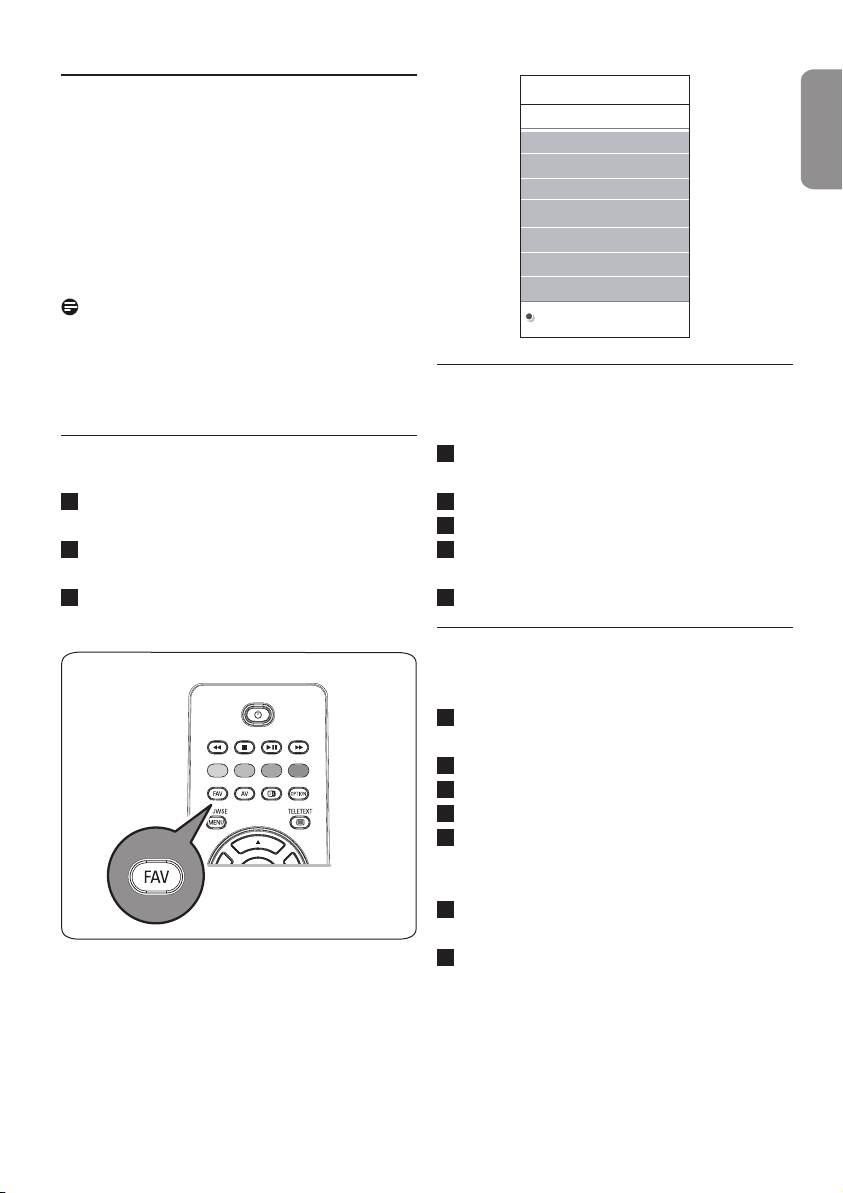
7.1 To select a channel from the
diplayed favourite list
1
Press the FAV key.
The last selected channel list appears.
2
Press the o or œ, p or π to select a
channel.
3
Press the OK key to display the selected
channel.
All channels
$ EXT1 HDD/DVDR
$ HDMI1 PC
$ 1 VRT
$ 2 CNN
$ 3 VTM
$ 5 BBC
6 .........
TV/Radio
7.2 To select another favourite channel
list
1
Press the FAV key.
The last selected channel list appears.
2
Press the p key.
3
Press the o or œ key to select a list.
4
Press the red colour key to rename the lists
if you want to.
5
Press the FAV key again to exit.
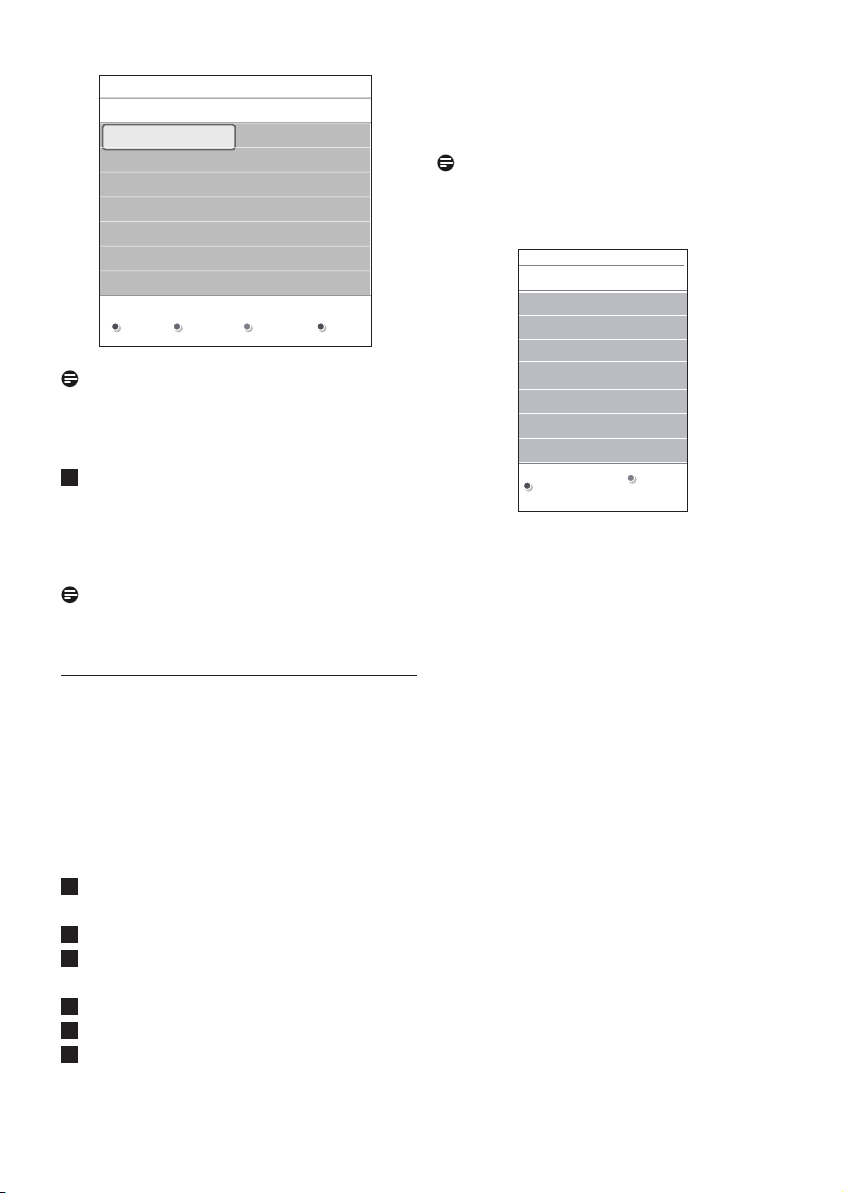
7.3 To create a favourite list or to
modify the list
1
Press the FAV key.
The last selected channel list appears.
2
Press the p key.
3
Select your desired channel list.
4
Press the πkey.
5
Press the red colour key to add channels.
All channels present in the list are displayed.
The favourite channels are marked.
6
Press the o or œ key to select the channel
you want to add to or skip from the list.
7
Press the green colour key to mark or
Unmark the highlighted channel and to
add it to or remove it from your selected
favourite list.
Page 34
Favourites
All channels
Favourite 1
Favourite 2
Favourite 3
Favourite 4
Rename
list
All channels
$ EXT1 HDD
$ HDM1 PC
$ 1 VRT
$ 2 CNN
$ 3 VTM
$ 4 BBC
5 ........
Note
Press the red colour key again to display the list
holding your favourites
Press the FAV key again to exit.
8
With the –P+ key you will be able to
browse through the TV channels of the
selected list.
Note
With the digit keys you can still select channels
which are not marked as favourite.
browse through the TV channels of the
filtered list.
Note
The filtering will not be remembered after the
TV is switched off or set to standby.
Favourite 1
$ 1 VRT
$ 2 CNN
$ 3 VTM
$ 5 BBC
6 .........
Add channels
7.4 To select only TV or only radio
channels on the All channels list
When the All channels list is displayed or
selected you may filter the list and select a list
with only the TV channels or a list with only the
radio channels.
1
Press the FAV key.
The last selected channel list appears.
2
Press the p key.
3
Select the All channels list and press the π
key.
4
Press the red colour key to filter.
5
Select your desired channels list.
6
Press the FAV key again to exit.
With the –P+ key you will be able to
34
Page 35
35
ENGLISH
8 EPG (Electronic
a
Programme Guide) (only
with Digital TV channels)
The Electronic Programme Guide shows
you detailed information about the current
programme and also about the next programme
(only for TV programmes that provide EPG
information).
Note
These instructions may differ according to the
type of Electronic Programme Guide.
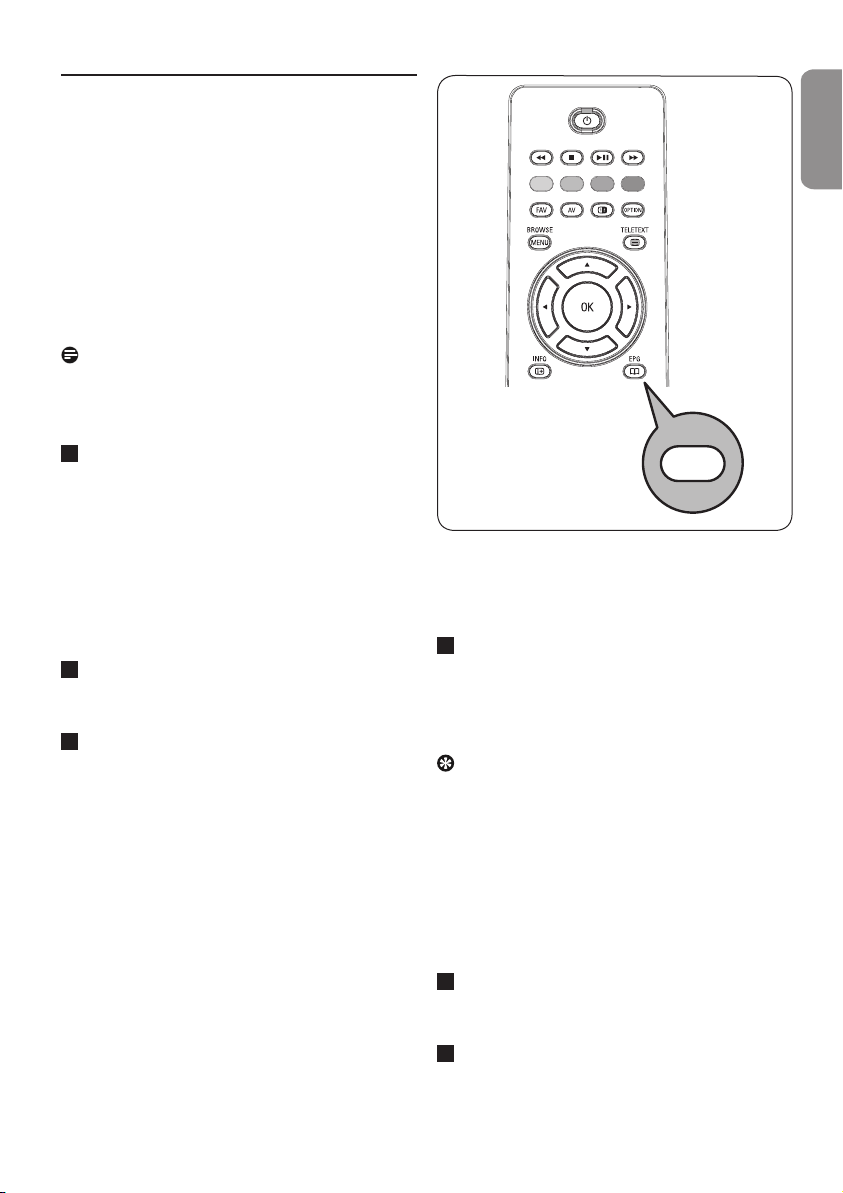
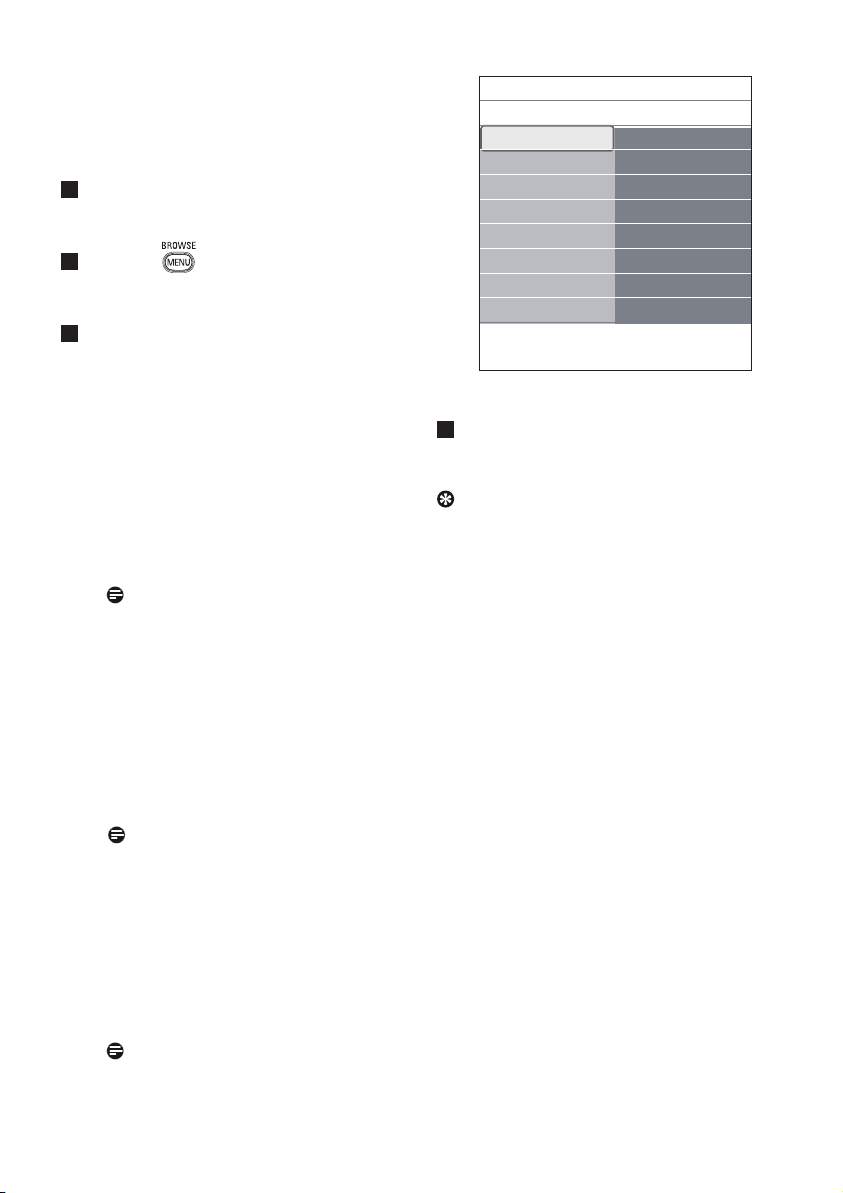
1
Press the a key.
• The EPG screen appears. Dependent on
conditions it may take some time to acquire
EPG data.
• The EPG screen updates automatically if the
EPG data is acquired successfully. If not, the
EPG screen remains blank.
• Information about the selected programme
appears.
2
Press the coloured keys to activate the
available EPG features displayed at the
bottom of the screen.
3
Press the a key again to quit.
When the type of Electronic Programme
Guide available, displays a list of TV
programmes:
1
Press the o or œ key to select a desired
TV programme.
Information about the selected programme
appears.
Tips
• the EPG screen will not include TV channels
which are not in the Preferred channel list or
which are uninstalled (See Rearrange menu).
• new added channels (via reinstallation or
installation) will have to be marked in the
preferred EPG channel list before you can see
EPG data.
2
Press the green colour key on the remote
control to watch/listen to the selected
programme currently on air.
3
Press the red colour key to mark/unmark a
reminder on the selected programme. You
can set up to a maximum of 10 reminders.
Page 36
The TV will wake up automatically or display
a message when the programme is about
to start. Follow the instructions on screen
to watch the programme.
4
Press the yellow colour key to jump to the
Next or the Previous day or back to
Today.
5
Press the key, while Programme Guide
is active, to activate the Programme Guide
main menu.
Press the o or œ key to highlight and
6
select a menu item.
• What's on allows you to browse
through the programme guide information
of your preferred EPG channels.
• Search by genre allows you to search
for the programmes according to a
selected genre.
• Scheduled reminders allows you to
view and change the reminders you have
set.
Note
The reminder(s) will wake up your TV
from standby only if you switched off
your TV with the B key on your remote
control.
• Preferred EPG channels are the
channels from which the EPG data is
currently being acquired. This menu
allows you to mark/unmark (up to 50)
preferred EPG channels.
Note
After the installation of your channels,
by default 40 channels with available
EPG data will automatically be marked as
preferred EPG channel.
• Acquire EPG data allows you to
update the information for the preferred
programme guide channels. Follow the
instructions on screen.
Note
Acquisition of EPG data is done
automatically while watching TV.
Programme Guide What’s on
What’s on
Search by genre
Scheduled reminders
Preferred EPG chann..
Acquire EPG data
Info
To quit the Electronic Programme Guide,
7
12:00 South today
13:30 Working lunch
12:30 Brainteaser
12:00 This is BBC THREE
.........
press the key again.
Tips
- the EPG screen will not include TV channels
which are not in the Preferred channel list or
which are uninstalled (See Rearrange menu).
- new added channels (via reinstallation or
installation) will have to be marked in the
preferred EPG channel list before you can see
EPG data.
36
Page 37
37
ENGLISH
9 Multimedia Browser
Remove the USB device.
2
The Multimedia browser lets you display
pictures, movies or play audio files stored on a
USB device. The Multimedia browser application
is invoked from the main menu.
• Following file formats can be reproduced:
for pictures: JPEG
for audio: MP3, MP3 Pro, LPCM
for video: MPEG1, MPEG2
• Only FAT/DOS-formatted memory devices
are supported.
• Philips can not be held responsible if your
USB device is not supported.
9.1 To view content from a USB device
Tip
If your USB device does not fit into the USB
connector at the side, use an USB extend cable
to connect the USB device to the USB port. Ask
your dealer for more information.
9.2 To insert a USB device
Note
USB devices are not supplied with this TV.
For the best connection, use a USB device
which is less than 25 mm wide.
In case of a USB-memory stick or a digital
camera, connect it to the USB connector
at the side. See 'To make video and audio
connections', Side panel overview, p. 43.
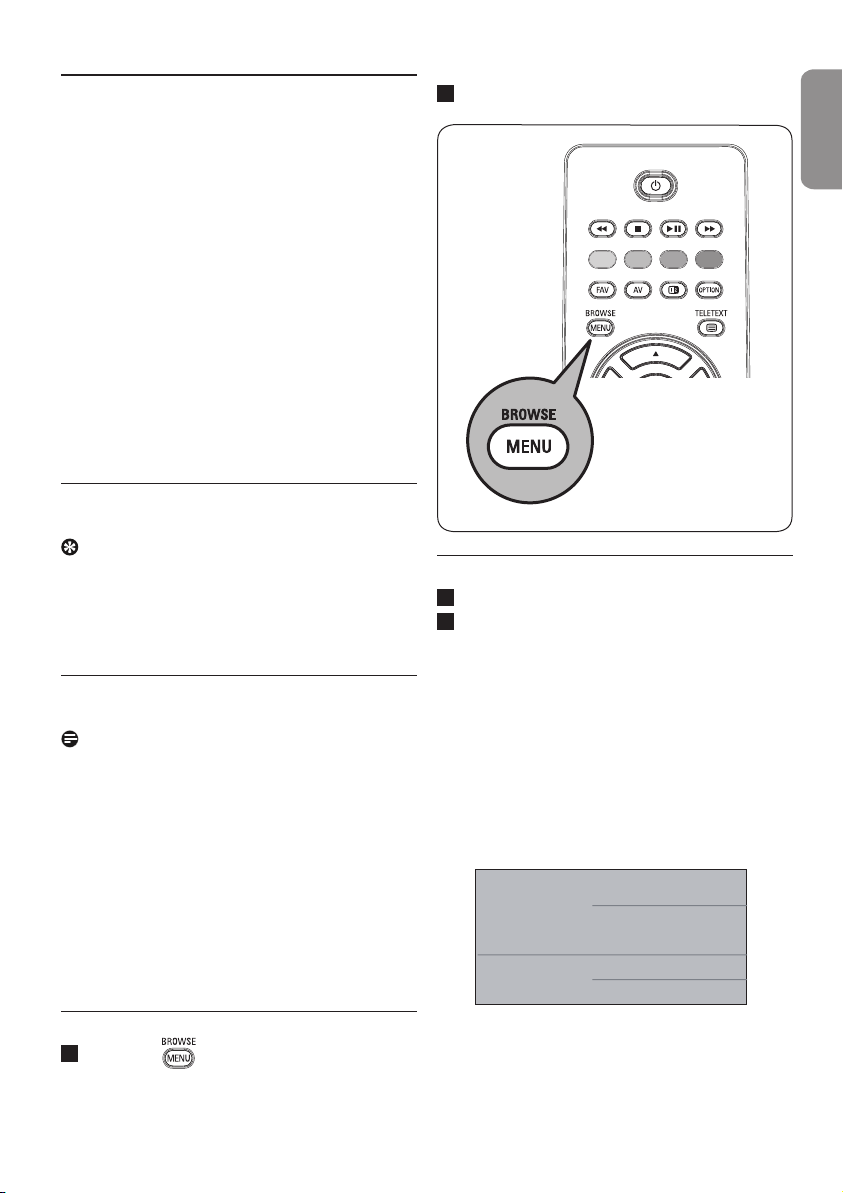
When a USB device is inserted, the Multimedia
browser menu is displayed automatically. See
further.
9.4 Multimedia Browser menu
1
Insert a USB device.
2
Select the USB device under Multimedia
with the o or œ key.
• The Multimedia browser allows you to
browse content stored on the inserted
USB device.
• The 2-panel browser will be shown with
the left panel containing the content
types (Music, Pictures, Movies).
• The right panel will display the content that
is available of the selected content type.
Television
Multimedia
TV menu
TV channels
Programme guide
9.3 To remove the USB device
Press the key on the remote control
1
to switch off the main menu.
Page 38
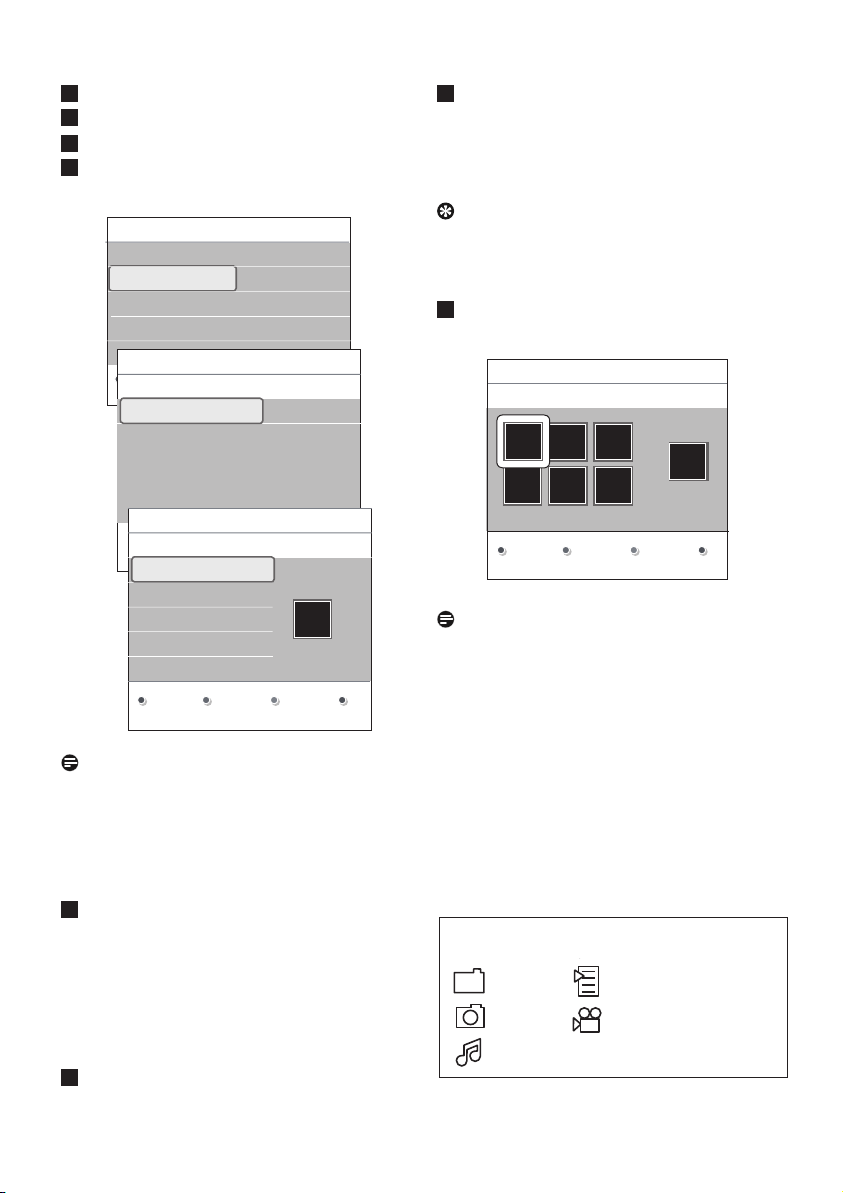
Press the πkey to enter the content.
3
Press the o or œ key to select a content.
4
Press the πkey to enter the content.
5
Press the o or œ key to select a file or a
6
directory.
USBDevice 1
Music
Picture
Movies
USBDevice 1
Picture
London2005
The Beatles
Xmas2004.alb
arnold.jpg
USBDevice 1/Picture/London2005
London2005
pic001.jpg
pic002.jpg
pic003.jpg
pic004.jpg
Picture
London 2005
The Beatles
Xmas2004.alb
arnold.jpg
London 2005
pic001.jpg
pic002.jpg
pic003.jpg
pic004.jpg
pic001.jpg
Note
Press the green colour key to display all the
image files in the current direcary as thumbnails
when browsing pictures. Press the green key
again to display the image files in a list.
7
In case a file is selected, press the OK key
to display a picture file or to play a video or
an audio file.
In case a directory, album or playlist is se-
lected, press the πkey to enter the content
or press the OK or πºkey to start a slide
show or a loop playback of the files present.
Press the p key to keep music playing and
8
switch back to the Multimedia menu.
Press one of the colour keys on the remote
9
control to perform the corresponding
function mentioned at the bottom of the
screen.
Tip
The blue colour key can, if necessary, be used
to let the colour keys reappear.
10
To stop playing content, press the Ê key on
the remote control.
USBDevice 1/Picture/London2005
London2005 pic001.jpg
pic001.jpg
Press OK to play.
Notes
• your TV supports slide shows with
background music.
See 'Slideshow format with background
music', p. 56;
• the playback will continue to play even if
temporarily switched to browser screens.
The audio will be stopped when another
song starts playing, or when the end has been
reached;
• more technical remarks can be found in
'Digital camera and USB issues', p. 59.
Following icons may appear:
folder self made playlist/album
pictures video
music
38
Page 39
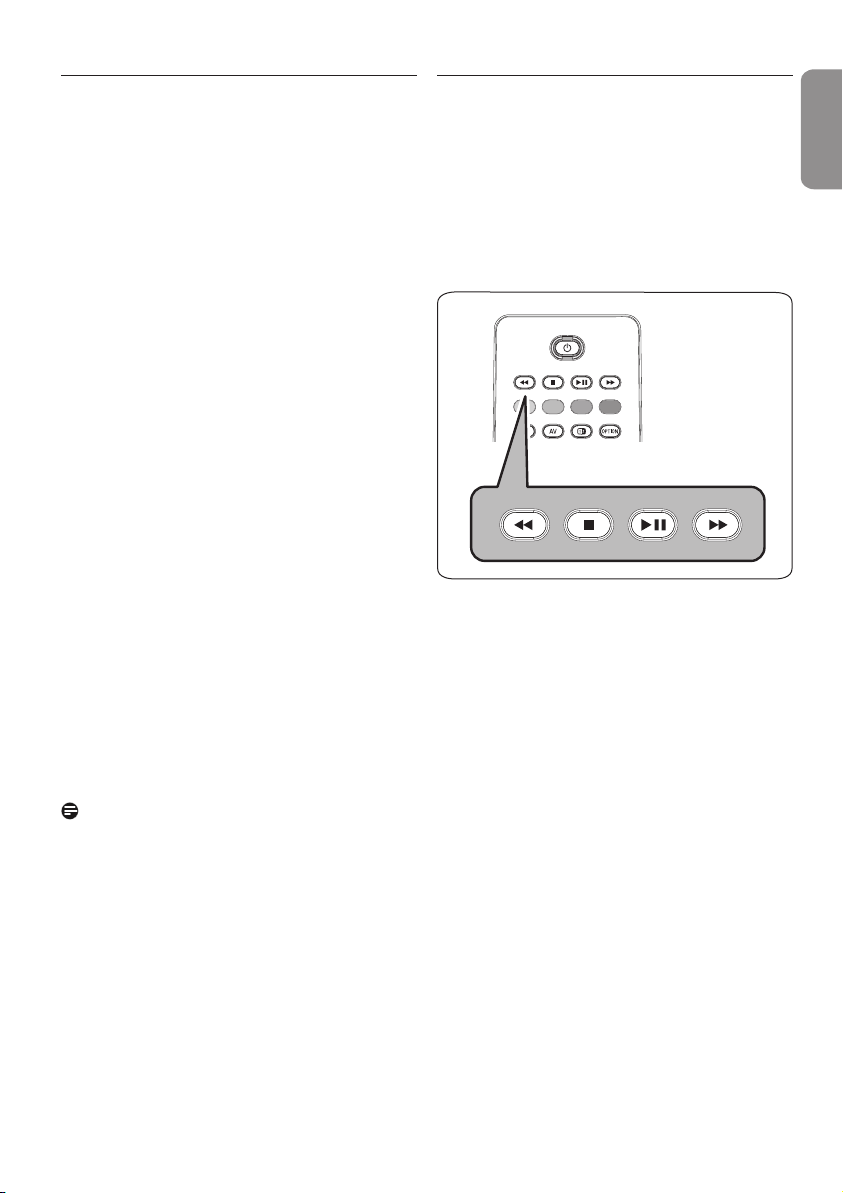
39
ENGLISH
9.5 Function keys at the bottom of the
screen
Details to display a description of the
selected file or directory
Transitions to select if you like to apply a
transition during a slide show
Slide time to select the duration a picture
will be displayed in a slide show
Rotate to rotate a picture
Repeat one/all to repeat the playback of a
music file
Shuffle to shuffle music collections in a
random way
Zoom to select one of the zoom
magnifications (x1, x2, x4) with
the o or œ keys.
Additionally you can shift the
selected zoom window over the
screen with the o or œ, p or
π keys.
9.6 Multimedia function keys on the
remote control
Ò to fast rewind displaying content.
‡ to stop playing content.
πº to play a single file, start a slide show,
playback of a folder or other collection
to pause playing content.
† to fast forward displaying content.
Full/small screen to toggle between a full or a
small screen
Note
To rotate a picture or to select one of the zoom
magnifications, first stop the slide show with the
OK key or the blue colour key.
Page 40
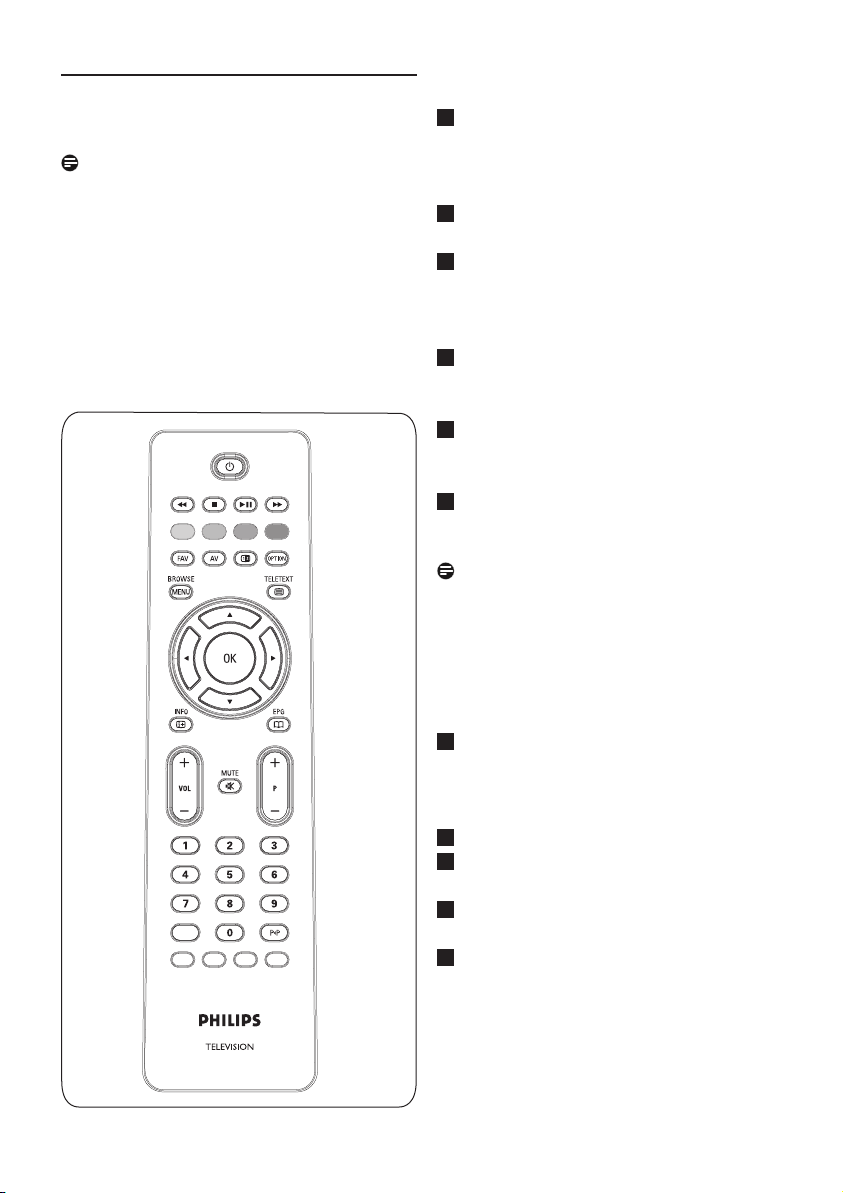
10 Teletext
Note
Teletext is not available via equipment
connected to the HDMI connector.
Most TV channels broadcast information via
teletext.
This TV has a 1200 pages memory that will
store most broadcasted pages and subpages
to reduce waiting time. After each programme
change, the memory is refreshed.
Select Teletext on
Press b to switch the teletext on.
1
The main index page appears on the screen.
Select a Teletext page
Enter the desired page number with the
1
digit keys or with the -P+ key.
Select the options at the bottom of the
2
screen with the colour keys.
Previous selected teletext page
Press the 0 key.
1
Select T.O.P. teletext broadcasts
Press i.
1
A T.O.P. overview of the teletext subjects
available is displayed.
Select with the o or œ, p or πkey.
2
the desired subject and press the OK key.
Note
Not all TV channels broadcast T.O.P. teletext.
Select subpages
When a selected teletext page consists of
different subpages, a list of available subpages
appears on the screen.
Press the p or πkey to select the next or
1
previous subpage.
40
Picture/Teletext
Press the b key.
1
Press the b key to show Teletext on the
2
right of the screen.
Press the b key to return to a full teletext
3
picture.
Press the b key to return to a full screen
4
picture.
Page 41
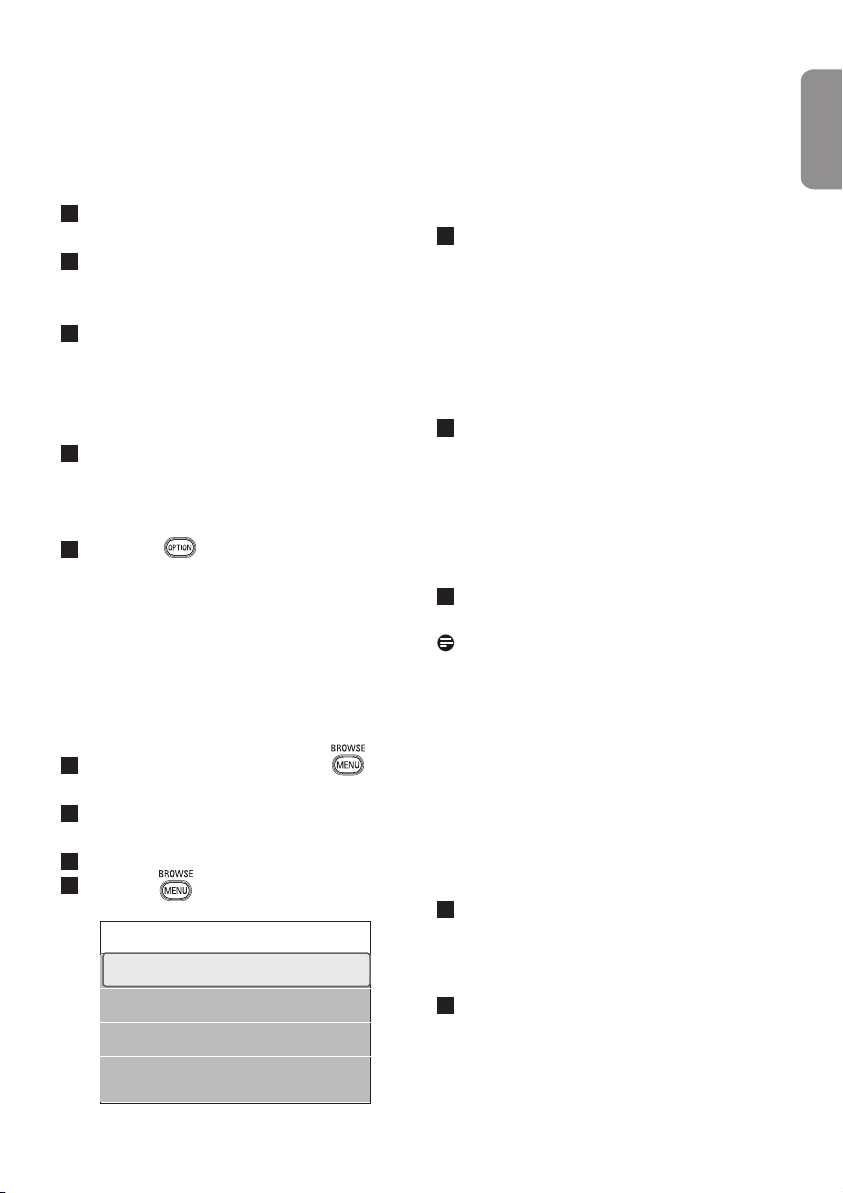
41
ENGLISH
Hypertext
With hypertext you can quickly jump to a
pagenumber or search for a specific word
shown on the current teletext page.
Press the OK key to highlight the first
1
word or a number on the page.
Press the o or œ, p or πkey to select
2
any other word or number you want to
search for.
Press the OK key to confirm. The search
3
starts.
A message appears at the bottom of the
screen to indicate the searching, or that
the word or page is not found.
Press the o key until the top of the page to
4
exit hypertext.
Enlarge a Teletext page
Press the key on the remote control
1
repeatedly to display the upper teletext
part, the lower teletext part and then to
return to the normal teletext page size.
Teletext menu
The Teletext menu offers various functions to
control teletext.
Reveal
Reveals/conceals hidden information on a page,
such as solutions to riddles and puzzles.
Cycle subpages (if subpages are available)
Makes the subpages cycle automatically.
1
Press the OK key to activate and to
deactivate again.
Language
If the displayed characters on screen do not
correspond with the characters used by the
teletext broadcaster, you can change the
language group here.
1
Select Group I or Group II with the OK
key.
Digital text (only for UK)
Some digital channels offer dedicated digital text
services (for example BBCi).
1
Press b to switch Digital text on.
Note
UK only: Digital text is displayed when
programmes are carrying digital text or
interactive services.
1
Switch teletext on and press the key to
activate the menu.
2
Press the o or œ key to select the menu
items.
3
Press the OK key to activate.
4
Press the key to leave the teletext menu.
Menu
Reveal Off
Cycle subpages Off
Language Gr. II
• To use the digital text, follow the instructions
on screen.
• Depending on the service, you may be
asked to use the o or œ, p or π keys, the
OK key, the coloured keys, the teletext key
and sometimes the digit keys.
2
When you have finished watching teletext,
select a different channel with the -P+ keys
or follow the instructions on screen to
return to picture.
3
Press ‡ to cancel digital text or interactive
services.
Page 42

Text info
Some digital channels also offer information
on the programme being broadcast. In that
case a message may appear at the bottom
of the screen for a few seconds. Follow the
instructions on screen and use the o or œ, p
or π keys to scroll through the next pages.
Note
Digital text will not be available when Subtitles
are set to On in the Features menu.
42
Page 43
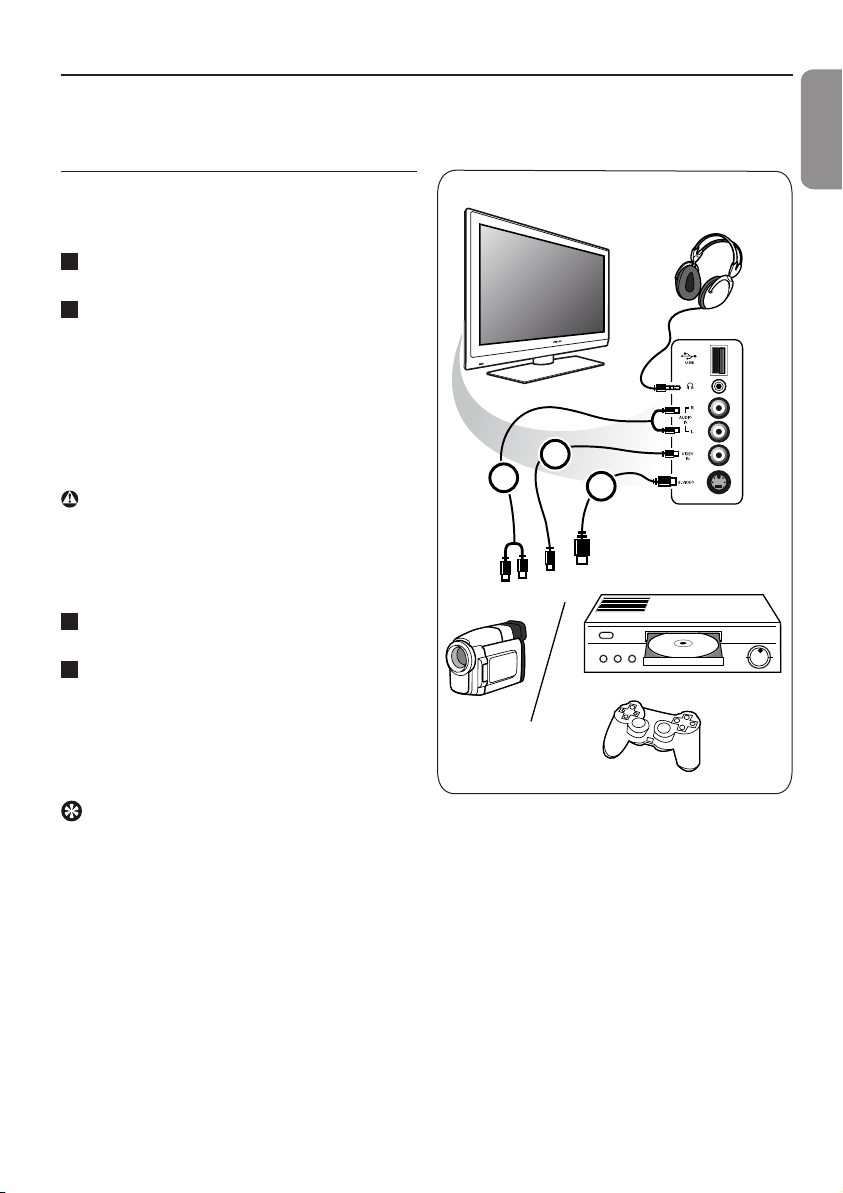
43
ENGLISH
11 To make video and audio connections
1
2
3
11.1 Side panel overview
Camera, Camcorder or Game
1
Connect your camera, camcorder or game
as shown.
2
Connect to VIDEO 2 and AUDIO L 3
for mono equipment. For stereo equipment
also connect AUDIO R 3.
S-VHS quality with an S-VHS camcorder is
obtained by connecting the S-VHS cables
with the S-VIDEO input 1 and AUDIO
inputs 3.
Warning
Do not connect cable 1 and 2 at the same
time. This may cause picture distortion !
Headphone
1
Insert the plug into the headphone socket
L as shown.
2
The headphone impedance must be between
8 and 4000 Ohm. The headphone socket
has a 3.5 mm jack.
In the Sound menu select Headphone
volume to adjust the headphone volume.
Tip
Press ¬ on the remote control to switch off
the internal loudspeakers of the TV.
USB
See 'Multimedia browser', p. 37.
Page 44
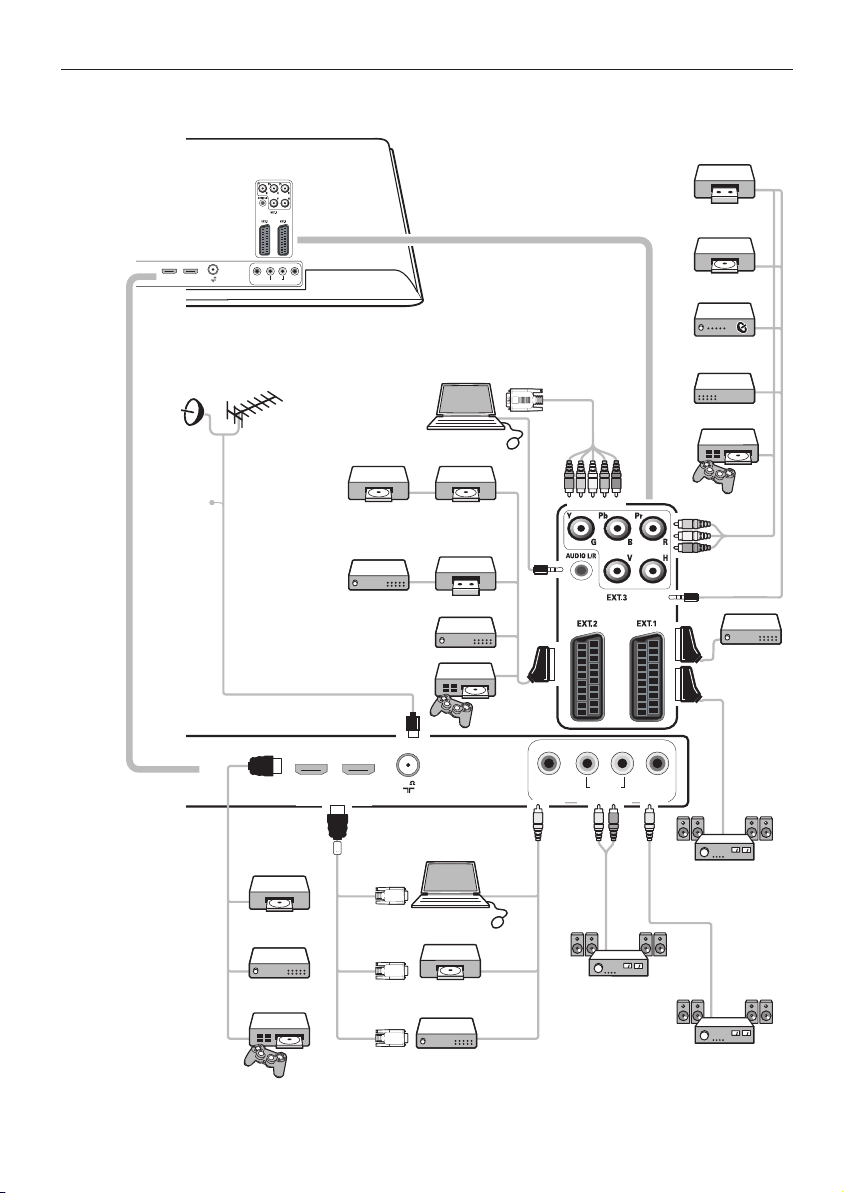
COMMON INTERFACE
AUDIO
OUT
DIGITAL
AUDIO
IN
75
HDMI 1 HDMI 2
AUDIO IN
DIGITAL
AUDIO OUT
L R
AUDIO OUT
(DIGITAL)
VGA
DVI
DVI
DVI
CABL E
75
HDMI 1 HDMI 2
AUDIO IN
DIGITAL
AUDIO OUT
L
R
AUDIO OUT
(DIGITAL)
11.2 Rear panel overview
VCR
DVD player
Satellite
receiver
Cable box
PC - VGA
1 DVD recorder - 1 VCR
Game console
2 DVD recorders
2 VCRs
VCR
Decoder
Decoder
Game console
DVD player
PC DVI
Analog
Home Cinema
amplifier
44
Cable box
Game console
DVD player
Cable box
Analog
Home Cinema
amplifier
Digital
Home Cinema
amplifier
Page 45
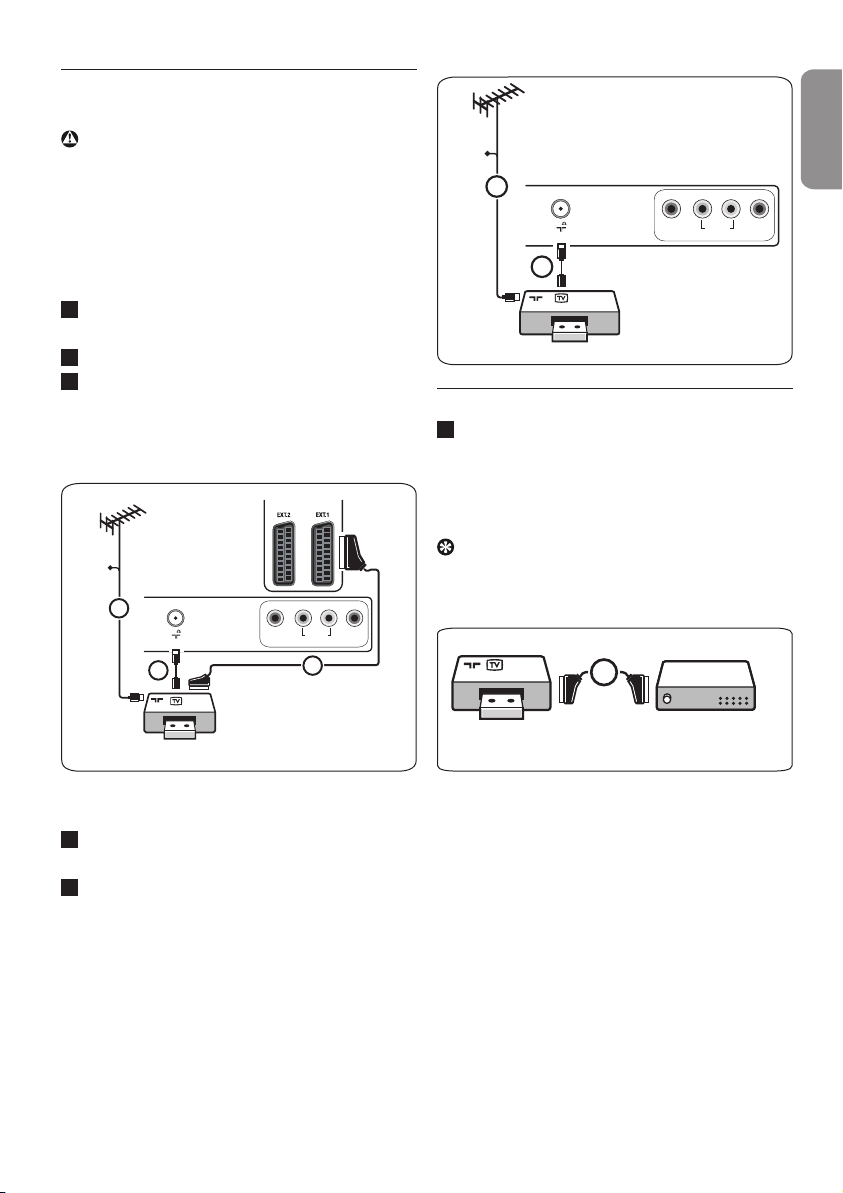
45
ENGLISH
11.3 Connect a DVD or VCR recorder
1
3
EXT
1 / 2
2
CABLE
RECORDER
75
AUDIO IN
DIGITAL
AUDIO OUT
L
R
AUDIO OUT
(DIGITAL)
75
AUDIO IN
DIGITAL
AUDIO OUT
L
R
AUDIO OUT
(DIGITAL)
RECORDER
1
CABL E
2
RECORDER DECODER
4
Warning
Do not place your recorder too close to the
screen as some recorders may be susceptible
for signals from the display. Keep a minimum
distance of 0.5 m from the screen.
With a eurocable
1
Connect the aerial cables 1 and 2 as
shown.
2
Connect the eurocable 3 as shown.
3
Make your selection of the source to which
the DVD or VCR has been connected in the
Installation menu, 'Select your connections',
p. 31.
11.4 Connect a decoder and a VCR
Connect a eurocable 4 to your decoder
1
and to the special euroconnector of your
recorder.
See also the handbook of your recorder.
Tip
You can also connect your decoder directly to
EXT1 or EXT2 with a eurocable.
With the aerial cable only
Connect the aerial cables 1 and 2 as
1
shown.
Tune in your recorder’s test signal and
2
store the test signal under programme
number 0.
See 'Analogue: manual installation', p. 28.
See also the handbook of your recorder.
Page 46
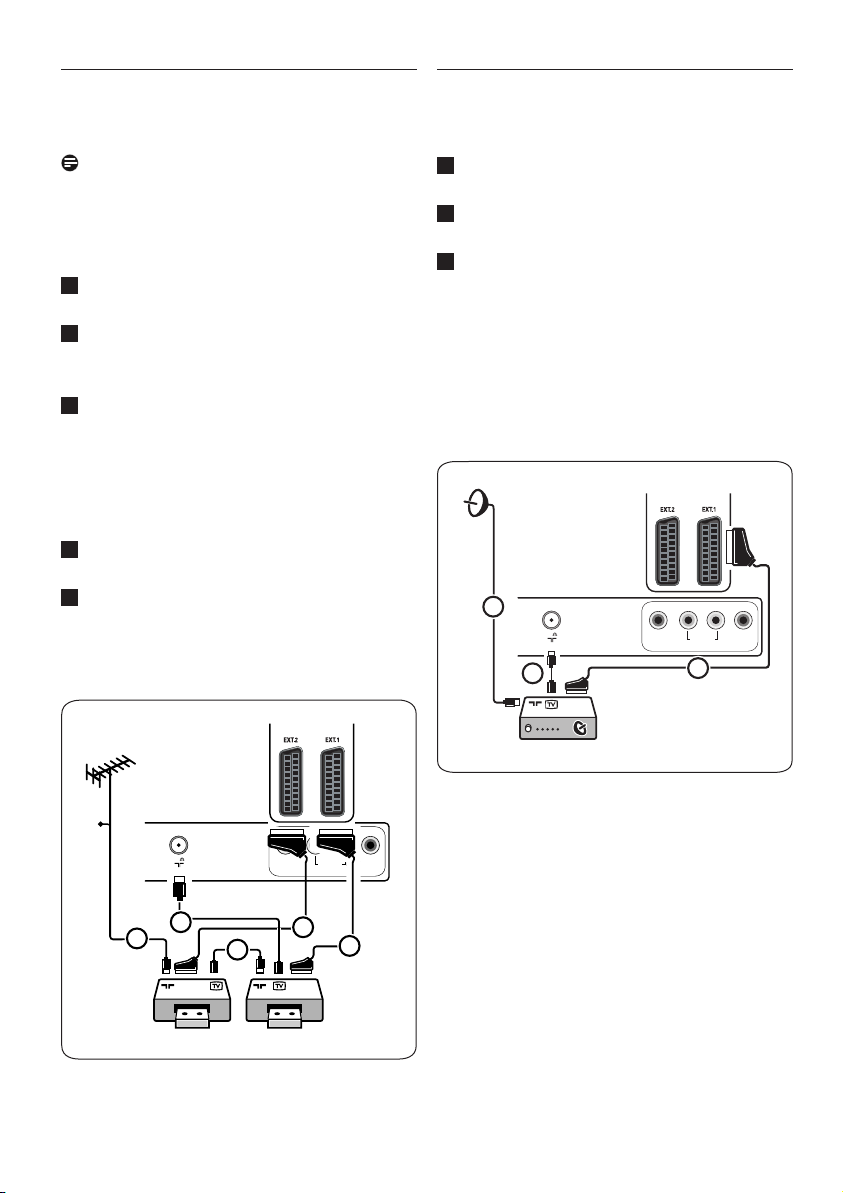
11.5 Connect two VCRs or VCR and DVD
DIGITAL
75
AUDIO IN
DIGITAL
AUDIO OUT
L
R
AUDIO OUT
(DIGITAL)
RECORDER
CABL E
1
2
RECORDER
3
5
4
EXT
1 / 2
EXT
1 / 2
75
AUDIO IN
DIGITAL
AUDIO OUT
L
R
AUDIO OUT
(DIGITAL)
1
3
2
recorder
Note
You can not record signals from equipment
connected to the YPbPr input.
With eurocables
1
Connect the aerial cables 1, 2 and 3
as shown.
2
Connect your VCRs or DVD-recorder to
EXT1 and EXT2 with the eurocables 4
and 5.
3
Select the equipment you have connected
in the Installation menu, 'Select your
connections', p. 31, and link it to EXT1 or
EXT2.
With aerial cables only
1
Connect the aerial cables 1, 2 and 3
as shown.
2
Tune in your recorder’s test signal and store
the test signal under programme number 0.
See 'Analogue: manual installation', p. 28.
See also the handbook of your recorder.
11.6 Connect a satellite receiver
With a eurocable
1
Connect the aerial cables 1 and 2 as
shown.
2
Connect your satellite receiver to EXT1
and EXT2 with a eurocable 3.
3
Select the equipment you have connected
in the Installation menu, 'Select your
connections', p. 31, and link it to EXT1 or
EXT2.
With Component Video connectors
See 'Connect a DVD player, a satellite receiver
or a cable box', p. 48.
46
Page 47
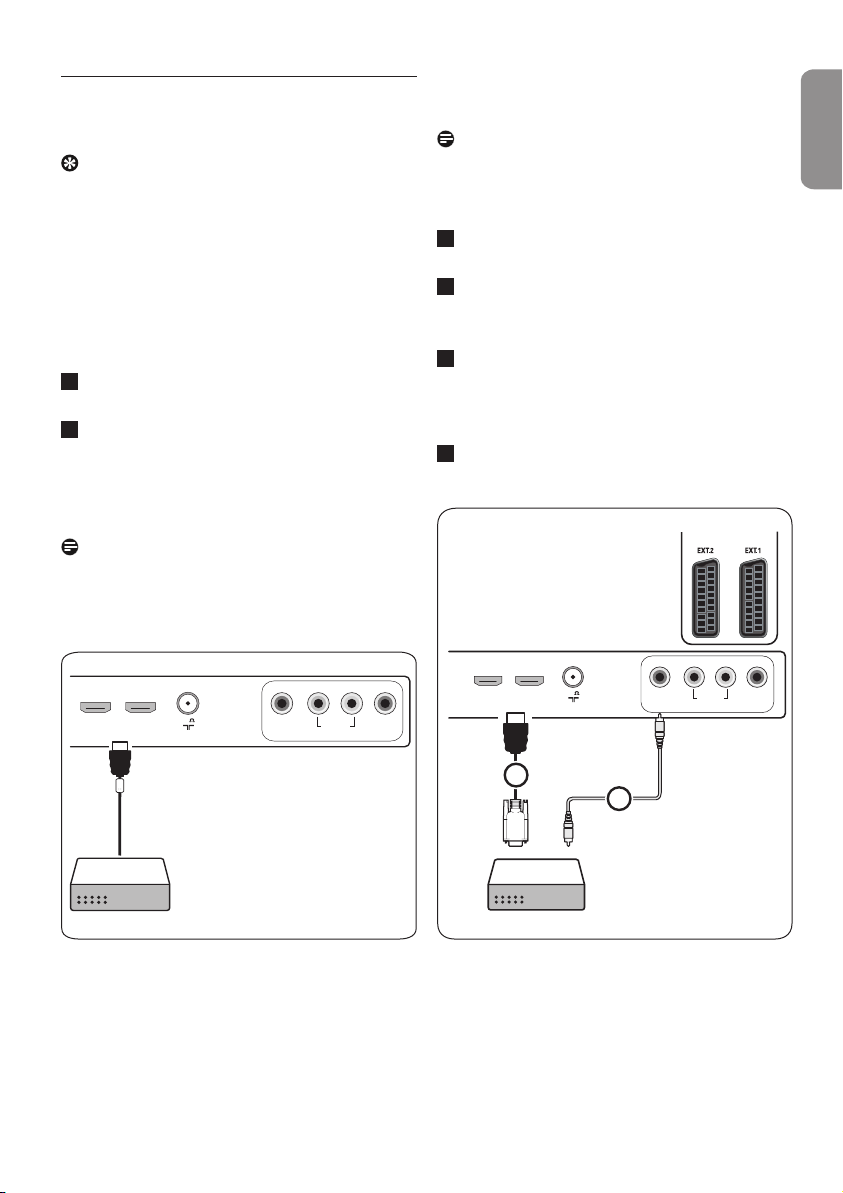
47
ENGLISH
11.7 Connect a DVD player, Cable box or
75
AUDIO IN
DIGITAL
AUDIO OUT
L R
AUDIO OUT
(DIGITAL)
HDMI
HDMI 1 HDMI 2
HDMI 1/2
75
AUDIO IN
DIGITAL
AUDIO OUT
L
R
AUDIO OUT
(DIGITAL)
HDM I
DVI
DIG ITA L
AUD IO
IN
1
2
HDMI 1 HDMI 2
game console
Tip
If necessary, you can adjust the picture position
to the centre of the screen with the cursor
keys.
With a HDMI connector
HDMI is the leading new standard for Digital
video and audio interconnection.
1
Connect your equipment with the HDMI
connector.
2
Select the equipment you have connected
in the Installation menu, 'Select your
connections', p. 31, and link it to HDMI1 or
HDMI2.
Note
In case of any problems, see 'Issues referring to
connected peripherals with a HDMI connector',
p. 61.
With a DVI connector
Note
Only a DVD player with DVI with digital sound
can be connected to the HDMI connector.
Connect the DVI to HDMI cable to one of
1
the HDMI connectors of your TV 1.
Connect the audio cable 2 to the
2
DIGITAL AUDIO IN connector of the
TV.
Select the equipment you have connected
3
in the Installation menu, 'Select your
connections', p. 31 and link it HDMI1 or
HDMI2.
4
Also select Digital audio in in the same
Connections menu.
Page 48
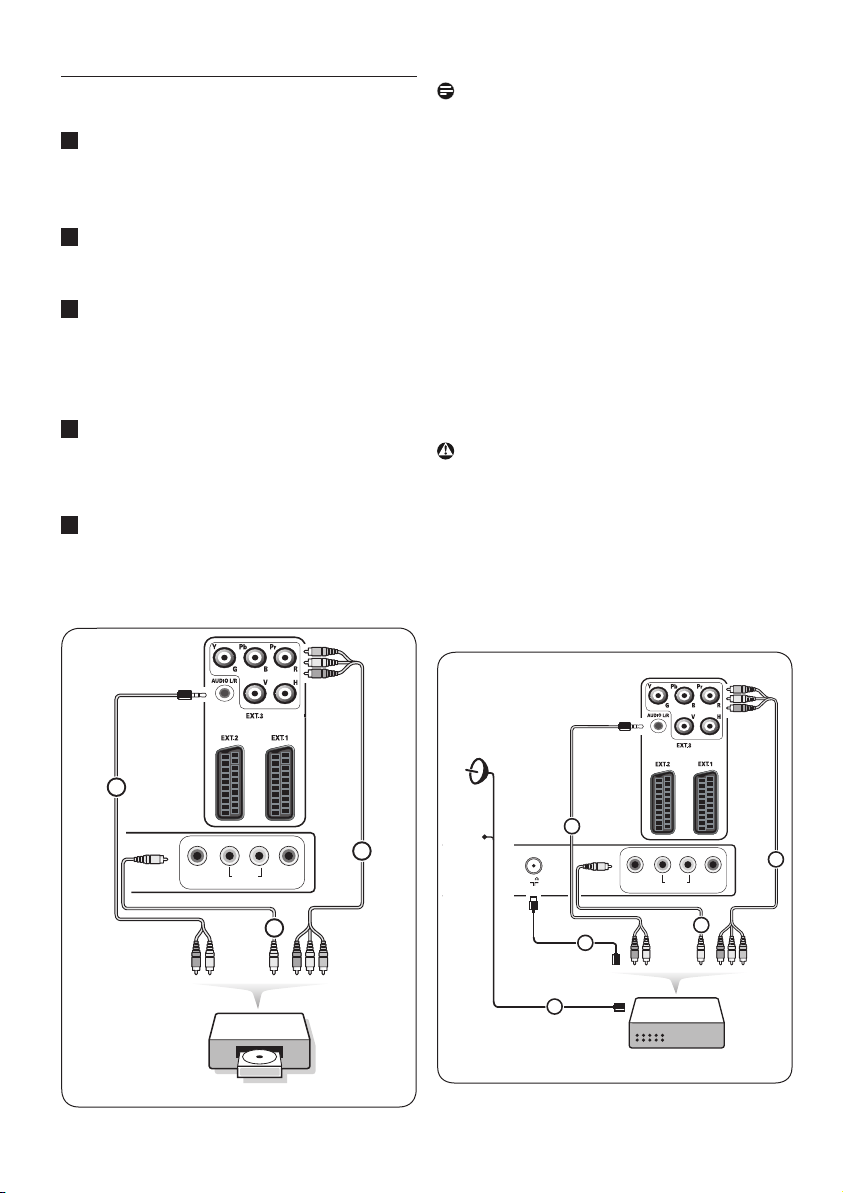
11.8 Connect a DVD player, satellite
AUDIO IN
DIGITAL
AUDIO OUT
L R
AUDIO OUT
(DIGITAL)
2
1
DIGITAL
AUDIO
IN
EXT3 :
YPbPr
3
EXT3 :
AUDIO L/R
DVD
HDMI 1/2
75
HDMI 1 HDMI 2
AUDIO IN
DIGITAL
AUDIO OUT
L R
AUDIO OUT
(DIGITAL)
2
1
DIGITAL
AUDIO
IN
EXT3 :
YPbPr
3
EXT3 :
AUDIO L/R
SAT / STB
CABLE
4
5
receiver or Cable Box
1
Connect the three separate component
video cables 1 to the YPbPr jacks on the
DVD player and to the Y, Pb and Pr jacks
of EXT3 on the TV.
2
Connect the audio cable 2 to the digital
out of the equipment and to the DIGITAL
AUDIO IN connector of the TV.
3
Select the equipment you have connected
in the Installation menu, 'Select your
connections', p. 31 and link it to EXT3.
Also select Digital audio in in the same
Connections menu.
4
In case of a DVD player with analogue
audio, connect the audio cable to the
DVD’s audio L and R jacks and to the L/R
AUDIO jack of EXT3 3.
5
In case of a cable box and/or a satellite
receiver also connect the cable TV cable
and/or the satellite antenna cable 4 and
the aerial cable 5.
Notes
• cables are often colour coded. Connect red
to red, white to white, etc..;
• the labels for the component video sockets
may differ depending on the DVD player
connected. Although the abbreviations may
vary, the letters B and R stand for the blue
and red component signals, respectively,
and Y indicates the luminance signal. Refer
to the DVD player’s instructions for use for
definitions and connection details;
• to get an optimal viewing, it is advised to
switch your equipment to the highest possible
supported display modes.
Warning
In case you notice scrolling images, wrong
colours or no colour, no picture, or even combinations of these on your screen, verify if the
connections are done in the correct way and
if the resolution and the signal standard of the
connected equipment are set in the right way.
See the handbook for your equipment.
48
Page 49
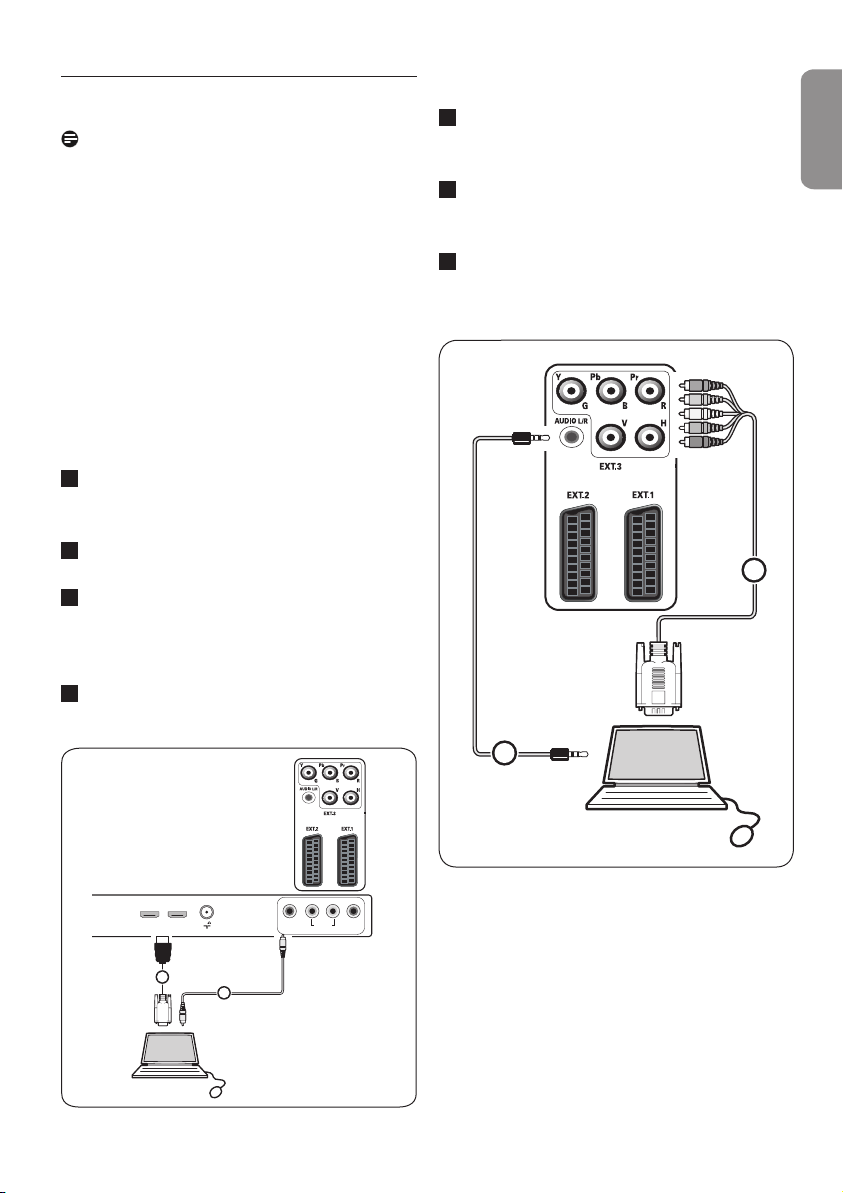
49
ENGLISH
HDMI 1/2
75
HDMI 1 HDMI 2
AUDIO IN
DIGITAL
AUDIO OUT
L R
AUDIO OUT
(DIGITAL)
HDMI
DVI
DIGIT AL
AUDIO
IN
1
2
11.9 Connect a PC
EXT3 :
RGB V/H
1
EXT3 :
AUDIO L/R
VGA
2
Notes
• only a PC with digital sound can be connected
to the HDMI connection;
• if your PC does not have digital sound output,
connect your PC via a VGA connector;
• before connecting your PC to the TV,
select your PC monitor settings to a refresh
frequency of 60 Hz;
• supported PC monitor modes:
VGA 640 x 480
SVGA 800 x 600
XGA 1024 x 768
PC equipped with a DVI connector:
Press a DVI to HDMI cable to connect to
1
one of the HDMI connectors of your TV
1.
Connect the audio cable 2 to the
2
DIGITAL AUDIO IN connector of the TV.
Select the equipment you have connected
3
in the Installation menu, 'Select your
connections', p. 31, and link it to HDMI1 or
HDMI2.
Also select Digital audio in the same
4
Connections menu.
PC equipped with a VGA connector:
1
Press a VGA to RGB H/V cable 1 to
connect to the RGB H/V connectors of
your TV.
2
Connect the audio cable 2 to the
AUDIO R (right) and L (left) inputs of the
TV.
3
Select the equipment you have connected
in the Installation menu, 'Select your
connections', p. 31.
Page 50
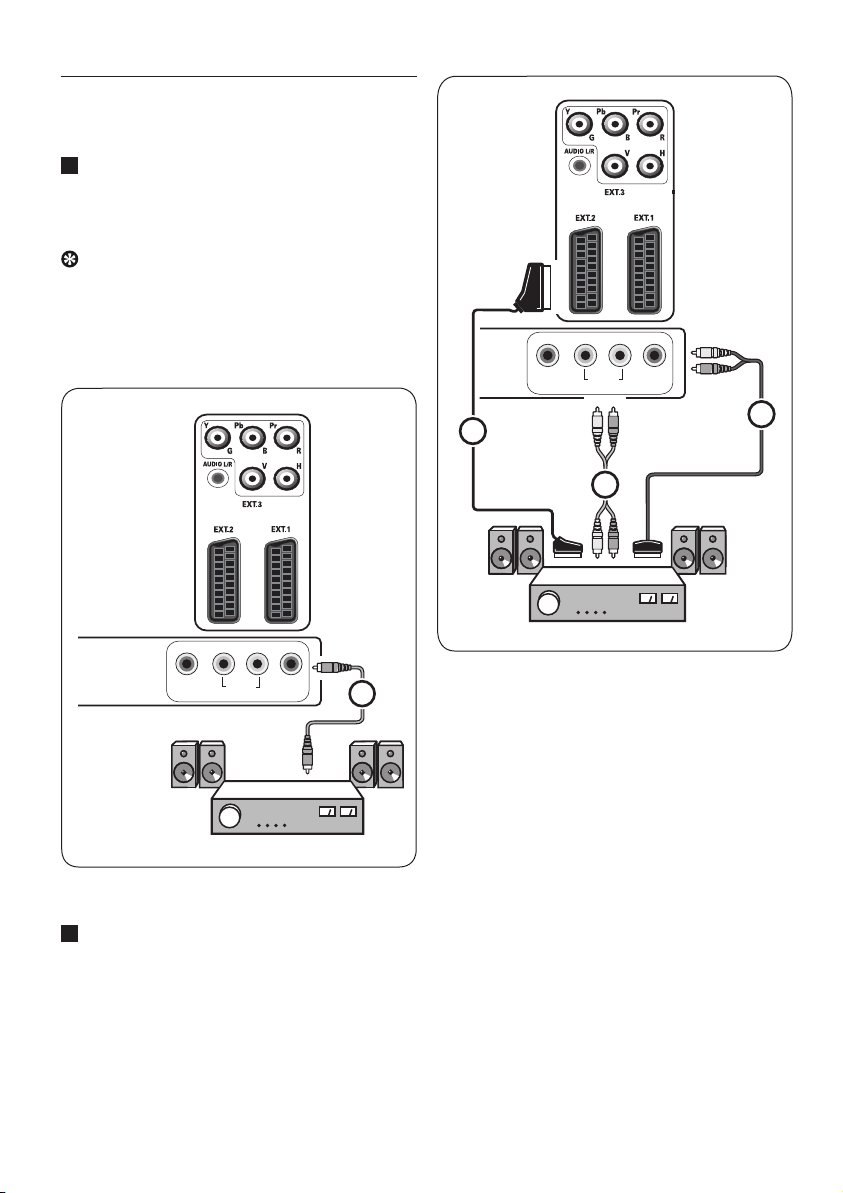
11.10 Connect a Home Cinema amplifier
AUDIO IN
DIGITAL
AUDIO OUT
L R
AUDIO OUT
(DIGITAL)
DIGI TAL
AUDI O
OUT
1
AUDIO IN
DIGITAL
AUDIO OUT
L R
AUDIO OUT
(DIGITAL)
EXT
1 / 2
3
AUD IO
OUT
AUD IO
OUT
1
2
Digital Home Cinema amplifier
1
Connect a digital Home Cinema amplifier to
the DIGITAL AUDIO OUT connector
1 at the bottom of the TV.
Tip
To avoid visible delay between picture and
sound, use this DIGITAL AUDIO OUT
connector to connect your Home Cinema
amplifier.
Analogue Home Cinema amplifier
According to the type of connector cables
1
and the connector input available on your
Home Cinema amplifier, connect your
receiver to the AUDIO OUT L and R
connectors 3 or to EXT1 or EXT2 2
at the bottom or the rear of the TV.
50
Page 51
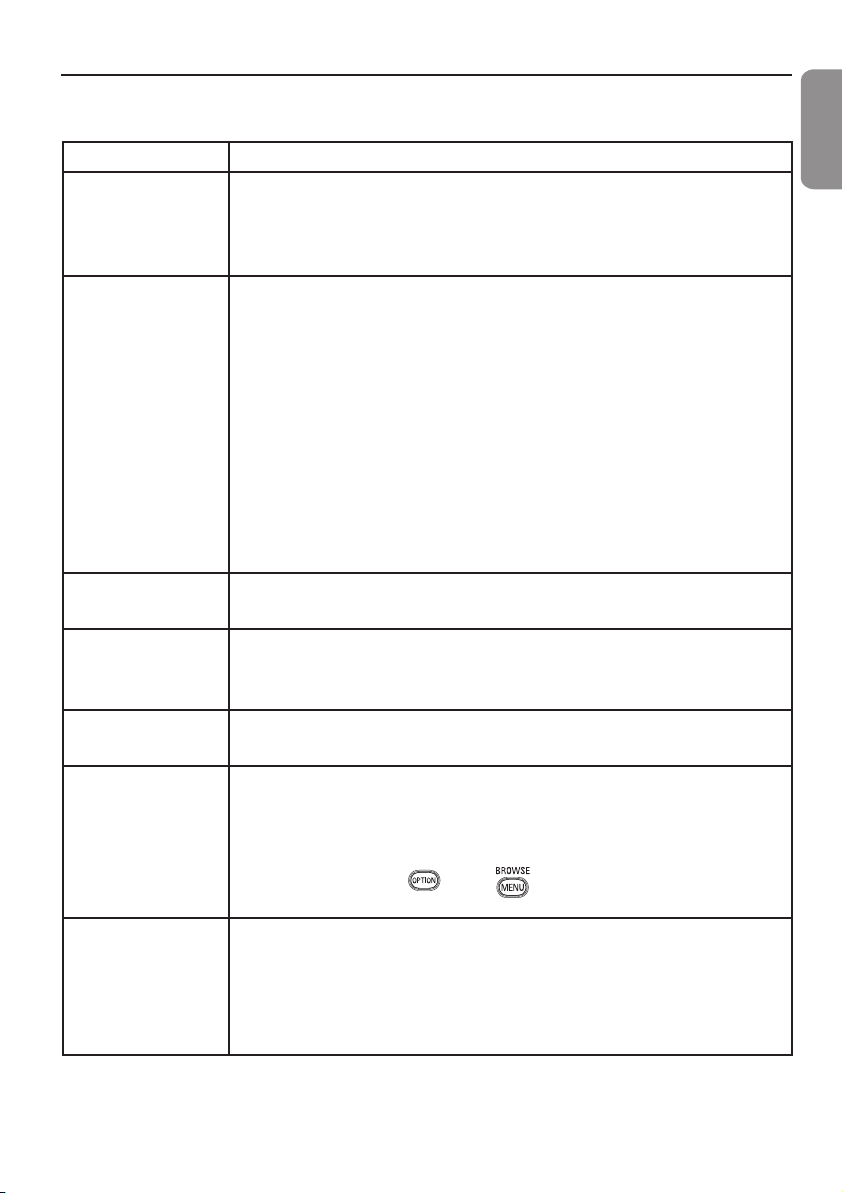
51
ENGLISH
12 Troubleshooting
Symptom Possible cause/Remedy
No picture
Poor picture
Poor colour
No sound
No digital
channels
No subtitles
(UK ONLY)
The remote
control does not
work
• Verify if the supplied cables are connected properly. (The aerial cable to
TV, the other aerial to your recorder, the power cables, ..)
• Verify if you selected the correct source.
• Verify if the child lock has been switched off.
• Verify in the Manual installation menu if you have selected the correct
TV system.
• Verify if your TV or house aerial isn't located too close to loudspeakers,
non-earthed audio equipment or neon lights, etc.
• Mountains or high buildings can cause double pictures or ghost images.
• Sometimes you can improve the picture quality by changing the direction
of the aerial.
• Is the picture or teletext unrecognisable or do you experience bad
teletext reception ? Verify if you have entered the correct frequency, or
fine tune the frequency for that specific channel or adjust the antenna
direction if the problem isn’t solved by finetuning. See Installation,
'Analogue: manual installation', p. 28.
• Select Factory settings in the Installation menu.
• Verify the connections between the optional equipment and the TV.
• Verify if the volume isn't at minimum.
• Verify if the sound hasn't been muted with the ¬ key.
• Verify the connections between the optional equipment and the TV.
• Contact your dealer about Digital Video Broadcasting Terrestrial signal
availability in your country.
• Under certain circumstances Digital text or interactive services may have
priority over subtitles. This can result in the subtitles not automatically
reappearing when leaving Digital text or interactive services on a channel
which is broadcasting subtitles. In these cases subtitles can be initialised,
either by toggling the or the key on the remote
control or by changing channel.
• Verify if the remote control is set correctly for the equipment your are
using.
• Verify if the batteries are not dead. Replace the batteries.
You can still use the keys at the left side of the TV.
Page 52

The remote
control of
connected
equipment does
not work well
Occasional
appearance of
red, blue, green,
and black spots
on screen
No photo or
music play or in
poor quality
Unstable or not
synchronised
VGA picture
No solution found
for your picture
or sound problem
Red blinking led
• The infrared signals of the screen may influence the reception sensibility
of other peripherals.
• Solution: replace the batteries of the remote of other peripheral
equipment.
• The sympton is not a problem.
The liquid crystal panel is built with very high precision technology giving
you the fine picture details. Occassionally a few non-active pixels may
appear on the screen as a fixed point of red, blue, green, or black. Note
that this does not affect the performance of the set.
• Verify if the source complies with a supported code.
• Verify if you have selected the correct VGA mode in your PC.
See Connect a PC, p. 49.
• Verify the connections between the TV and the PC.
• Switch off your TV off and then on again once.
Never attempt to repair a defective TV yourself. Verify with your dealer
or call a TV technician.
• Unplug the mains cord and insert it in again.
52
Page 53
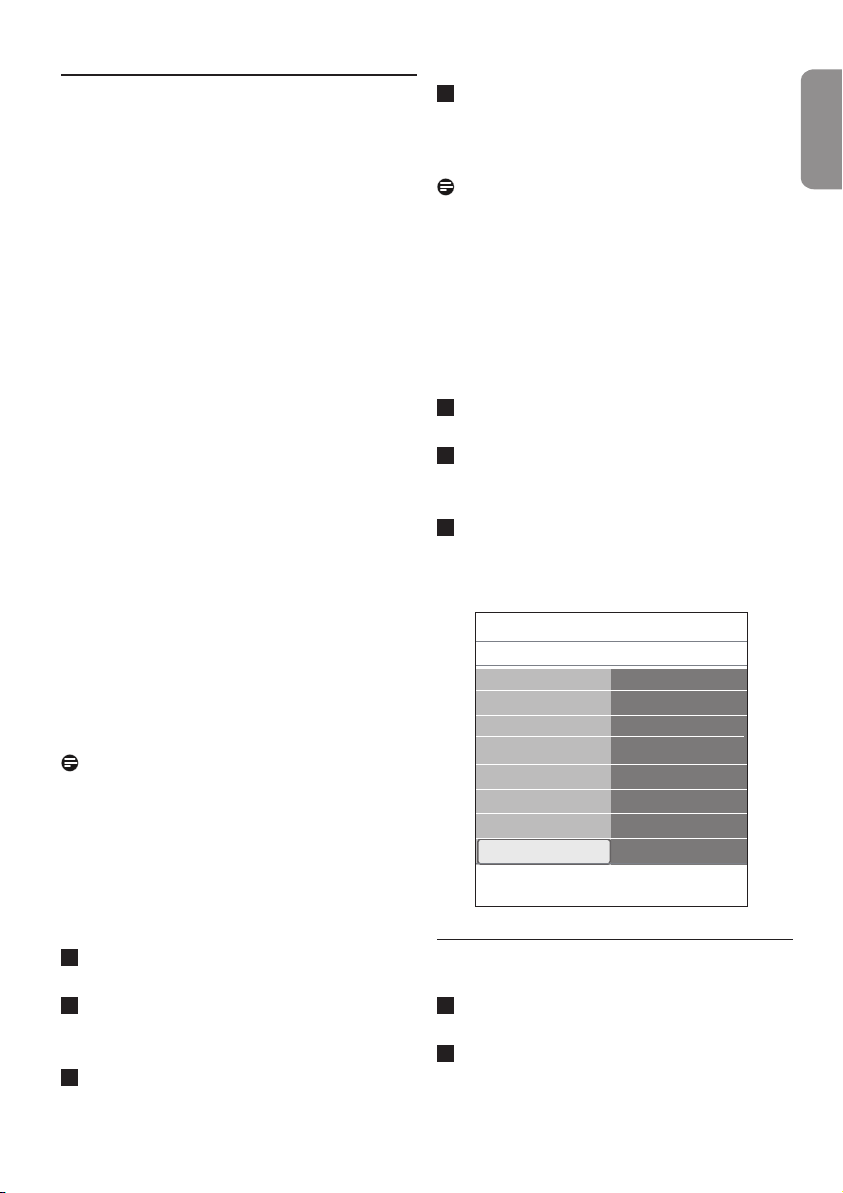
53
ENGLISH
13 Philips TV software
upgrade with portable
memory
Introduction
Philips offers software upgrade capability for
your TV using portable memory. After you have
completed a software upgrade, your TV will
typically perform better.
What improvements are made depends on the
upgrade software you are using as well as the
software your TV contained before the upgrade.
You can execute the software upgrade
procedure yourself.
Be aware that the content of this document is
addressing technical or software skilled users.
To prepare a portable memory for
software upgrade
For the procedure you will require:
• a personal computer with web browsing
capability;
• an archive utility that supports the ZIP-format
(e.g. WinZip for Windows or Stuffit for Mac
OS);
• a preferably empty USB memory stick.
Note
Only FAT/DOS-formatted portable memory is
supported.
New software can be obtained from your dealer
or can be downloaded from the www.philips.
com/support website:
4
Decompress the ZIP-file and copy the file
“autorun.upg” to the root directory of the
USB portable memory.
Note
Only use software upgrades that can be found
on the www.philips.com/support web site.
To verify the version of the TV software
Before you start the software upgrade
procedure, it is advised to check what the
current TV software is.
Select Software Upgrade in the TV menu,
1
Installation, Software upgrade.
Press the πkey.
2
The Software Upgrade menu moves to the
left panel.
Select Current Software Info to observe
3
the version and the description of the
current software.
TV menu
Installation
.............
Time zone
Channels
Preferences
Connections
Decoder
Factory settings
Software upgrade
Info
Software upgrade
Current softw. info
Local upgrades
Announcement
1
Go to www.philips.com/support using
the web browser on your PC.
2
Follow the procedure to find the
information and the software related to
your TV.
3
Select the latest software upgrade file and
download it to your PC.
13.1 Automatic software upgrade
procedure
1
Switch off your TV and remove all memory
devices.
2
Insert the USB portable memory that
contains the downloaded software upgrade.
Page 54
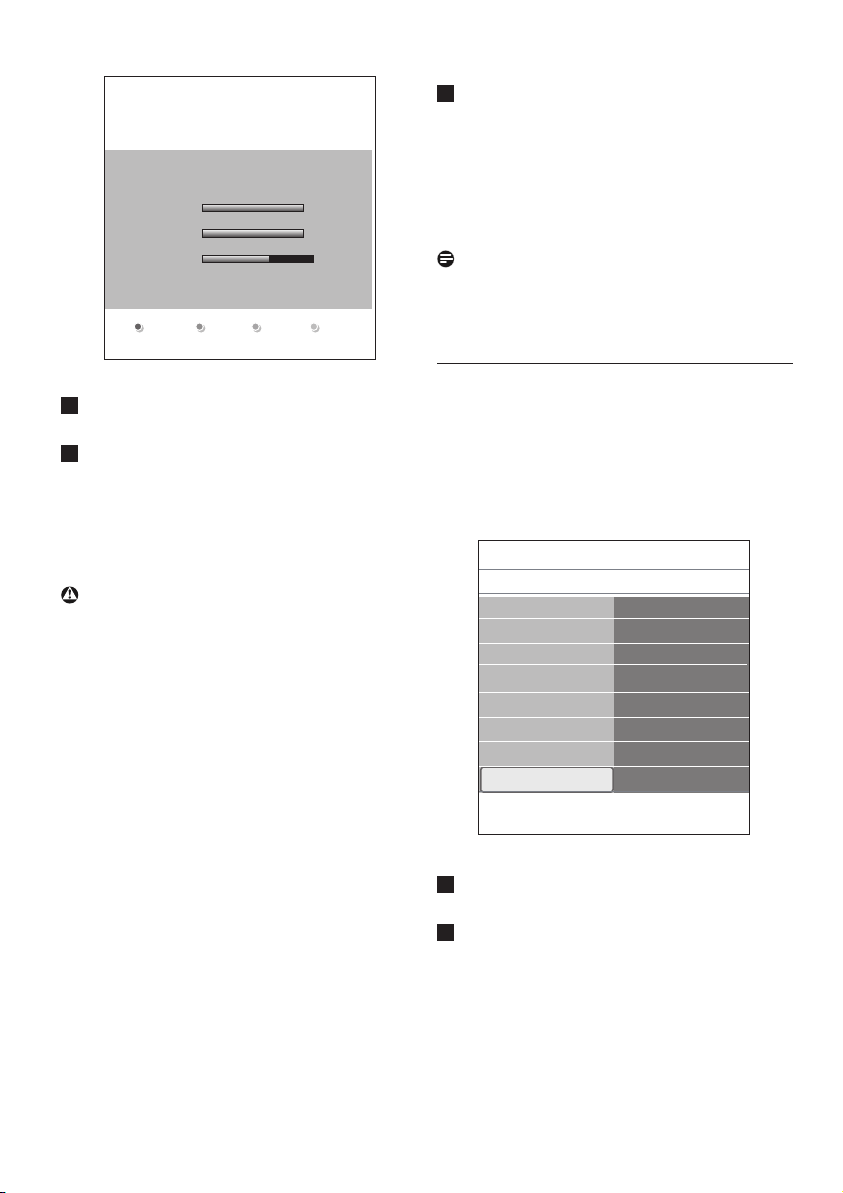
Software Upgrade Application
Upgrade busy...
Software Id: TL32E-234
Loading Done
Validating Done
Programming
3
Switch on your TV with the power key B
at the side of the TV.
4
At startup the TV will scan the USB portable
memory until it finds the update content.
The TV will automatically go to the upgrade
mode. After a few seconds it will display the
status of the upgrade procedure.
Warning:
• you are not allowed to remove the USB
portable memory during the software
upgrade procedure;
• in case of a power drop during the upgrade
procedure, don’t remove the USB portable
memory from the TV. The TV will continue
the upgrade as soon as the power comes
back;
• if you try to upgrade to a software
version lower than the current version, a
confirmation will be asked. Downgrading to
older software should only be done in case of
real necessity;
• if an error occurs during the upgrade you
should retry the procedure or contact your
dealer;
• the automatic software upgrade procedure
will only start if the version on the USB
portable memory is different from the one in
the TV.
When the software upgrade was successful,
5
remove the USB portable memory and
restart your TV with the power switch B
at the side of the TV.
Your TV will start up with the new
software.
Note
Once the upgrade is finished use your PC
to remove the TV software from your USB
portable memory.
13.2 Manual software upgrade procedure
For a manual software upgrade copy the
“autorun.upg” file in a directory called
“Upgrades” located in the root of the USB
portable memory. You can rename the file if
you like but keep the .upg extension.
TV menu
Installation
.............
Time zone
Channels
Preferences
Connections
Decoder
Factory settings
Software upgrade
Info
1
Insert the portable memory that contains
Software upgrade
Current softw. info
Local upgrades
Announcement
the downloaded software upgrade.
2
Select Software Upgrade in the
Installation menu. Go to Local upgrades.
The TV will list all compatible software
available on the USB portable memory
and display the data for each selected
upgrade version.
54
Page 55

55
ENGLISH
Select the correct upgrade version and
3
press the red colour key to start the
upgrade.
Your TV will restart and will automatically
go to the upgrade mode. After a few
seconds it will display the status of the
upgrade procedure.
Warning
If you try to upgrade to a software version
equal or lower than the current version, a
confirmation will be asked. Downgrading to
older software should only be done in case
of real necessity.
4
When the software upgrade was successful,
remove the USB portable memory and
restart your TV with the power switch B
at the side of the TV. Your TV will start up
with the new software.
Page 56

14 Slideshow format with
background music
Notes:
• the latest version of this document can be
found on the Philips support website (www.
philips.com/support).
Use the type number of your TV to find this
documentation and other related files.
• Philips can’t be held responsible for any
problems that may occur as a result of the
content in this document. Errors reported to
Philips will be adapted and published on the
Philips support website as soon as possible.
Introduction
This document explains how to make a Philips
slideshow file with background audio.
Be aware that the content of this document is
addressing technical or software skilled users.
To start the slideshow open the slideshow file in
the Multimedia browser of your TV.
Press the key on the remote
1
control after having inserted a USB device
and switched on the TV.
2
Go to where you stored the slideshow file
(.alb) on your portable memory.
3
Select the slideshow file and press the OK
key to start the slide show.
To stop a slide show, press the ‡ key.
4
• To maintain portability, a slideshow stored
on a PM should ONLY reference content on
the same PM. Referencing global addresses
can result in inconsistencies if the PM is
used on a non-networked CE device. The
latter is however not forbidden, it is only a
recommendation.
• It is preferable that URL’s referencing PM
content are based on a relative path starting
from the directory where the slideshow is
stored. This path includes the device or drive
name of the PM.
An absolute path to content will also be
supported.
• relative path: pictures\test1.jpg, tamper.jpg,
..\new\bird.jpg, …
• absolute path: USB1:\pictures1\foo_bar.jpg,
C:\f1.jpg, \organization.jpg, …
General Rules
• The slideshow will use plain ASCII XML
syntax to allow the creation and editing of the
slideshow files using simple tools.
• All references to network content must be
based on the global address of the content.
• Content on a Portable Memory (PM) doesn't
have a global address; as a result content
from a PM can never be referenced from a
slideshow not stored on the PM itself.
56
Page 57

57
ENGLISH
General Format
The format and syntax below will be used to
create the slideshow file (simple ascii text) with
the extension .alb (.ALB). Examples: slshow1.alb,
summer_holiday_2004.ALB, test.alb, …
The following syntax should be used to create
the text file:
<?xml version="1.0" encoding="ISO-
885h9-1" ?>
<philips-slideshow version="1.0" >
<title>Title of the slideshow</
title>
<audio>audio_url</audio>
<slide-duration>30</slide-dura-
tion>
<slides>
<slide>slide_1_url</slide>
<slide>slide_2_url</slide>
<slide>slide_3_url</slide>
<slide>slide_4_url</slide>
<slide>slide_5_url</slide>
<slide>slide_6_url</slide>
...
<slide>slide_N-1_url</slide>
<slide>slide_N_url</slide>
</slides>
</philips-slideshow>
Page 58

Supported XML-tags
The following table gives a description of the
XML syntax.
Tag Name Use Description
philips-slideshow
title
audio
slide-duration
slides
slide
mandatory Philips slideshow signature including the version.
optional The title of the playlist.
optional The audio-URL following this tag will define the music
playing in the background during the slideshow.
A single song or playlist (.m3u & .pls) are the only valid
audio references. Other reference will not result in
any audio playback. If a single song is referenced the
song will be repeated forever. If a playlist is referenced the playlist will be played in sequence with a
repeat at the end of the playlist.
optional The default display time (in 0,1 second) of a slide. The
TV application isn’t obliged to support this tag. The
TV application can force the use of one or multiple
predefined display times
mandatory Identifies the slides to show.
optional Identifies the URL of the individual slide.
58
Page 59

59
ENGLISH
15 Digital camera and USB
issues
Notes:
• the latest version of this document can be
found on the Philips support website (www.
philips.com/support);
• the software of your TV is upgradeable. If
you have problems first check if you have the
latest software installed on your TV. The
latest software, together with instructions,
can be found on the Philips support website.
Use the type number of your TV to find this
documentation and other related files.
• Philips can’t be held responsible neither for
any errors in the content of this document
nor for any problems as a result of the
content in this document. Errors reported to
Philips will be adapted and published on the
Philips support website as soon as possible.
Digital Camera Issues
If a USB connection between your digital
camera and the TV isn’t working, you can try
the solutions below to resolve your problem.
• Make sure your digital camera is switched on
and verify if the configuration of your digital
camera is correct (see the manual of your
digital camera for more information).
• Some digital cameras allow you to switch off
the USB interface. Make sure that the USB
interface is switched on before connecting to
the TV.
• If you have a digital camera with only internal
memory (no removable memory) you can
try to copy the content manually to a USB
memory device using a personal computer.
• Some digital cameras allow you to switch
between PTP (Picture Transfer Protocol) or
“PC Link” and USB Mass Storage. Make sure
that you select USB Mass Storage or “PC
Drive” on your digital camera.
• If your camera supports different interface
settings be sure to try them one by one or
contact the reseller of your camera to find
out the correct setting.
USB Memory Device Issues
• Devices connected to the USB port of your
TV must be “Mass Storage Class” compliant.
If your device (digital camera. MP3 player,
portable harddisk, …) is not “Mass Storage
Class” compliant it will not be detected by
the content browser of the TV.
• The following subsets of the Mass Storage
Class specification are supported:
The implementation of the TV is based on
the “Universal Serial Bus Mass Storage Class
Specification Overview” (v1.2, June 23, 2003)
including all documents referenced by the
document. The document can be found on
the USB standardisation website (www.usb.
org).
Full support of the USB Mass Storage Class
Bulk-Only Transport (bInterfaceProtocol =
50h).
Full support of SubClass Code = 05h; SFF-
8070i spec.
Full support of SubClass Code = 06h; SCSI
transparent command set.
• For large USB memory devices, when you are
in the Content Browser, it may take a long
time before you can access your files.
• When using a USB portable harddisk: Due to
the high power consumption of the harddisk,
it is advised to use the external power supply
of the portable harddisk to guarantee proper
working under all conditions.
Page 60

Digital Content Issues
• Only FAT (DOS) formatted (initialized)
portable memory is supported. Errors in this
formatting can result in unreadable content.
If such problems appear try to re-format the
card. Be aware that formatting the card will
also delete all the content on it (pictures,
music, …).
• The maximum size of any multimedia file
should never exceed 4Gbyte.
• Do not use a dot “.” in folder naming.
• If video streams are supporting multiple audio
tracks the first audio track will automatically
be selected, the other audio tracks can’t be
selected.
• External subtitle files (e.g. DivX.srt subtitle
files) are not supported.
60
Page 61

61
ENGLISH
16 Issues referring to
connected peripherals
with a HDMI connector
Note
Teletext will not be available via equipment
connected to a HDMI connector.
The HDMI IN connector allows the following
TV and monitor display modes:
HD Standard Definition TV (SDTV) 640x480i
720x480i
720x576i
Enhanced Definition TV (EDTV) 640x480p
720x480p
720x576p
High Definition TV (HDTV) 1920x1080i
1280x720p
PC VGA 640x480
SVGA 800x600
XGA 1024x768
• Proper working is only guaranteed with
HDMI compliant consumer products. Limit
the cable length to max. 5 m.
• Digital peripheral equipments from different
manufacturers have the possibility of differing
output standards which may cause difficulties
for the television to properly display.
• In case no signal is detected from your HDMI
equipment, switch off the HDMI equipment
and then on again.
To get an optimal viewing, it is advised to
switch your DVD player, Blu-Ray of HD
settop box to the highest possible supported
display modes.
• If necessary, you can adjust the picture
position to the centre of the screen with the
o or œ, p or π keys.
• Due to legal requirements, it is possible
that with certain copy protected PCM
audio qualities from a peripheral equipment
connected to the HDMI input, the Digital
audio output signal is muted.
• Your TV supports HDCP (High-bandwidth
Digital Content Protection). This is a system
for protecting DVD content outputted via
HDMI from being copied. It provides a secure
digital link between a video source (DVD, PC,
etc.) and your TV. Content is encrypted at
the source peripheral equipment to prevent
unauthorised copies from being made.
Page 62

17 Index
A
Active control 18
Analogue broadcasting 3
Analogue: manual installation 28
Antenna 7
Auto format 19
Automatic installation 26
AVL (audio volume leveller) 20
B
Balance 20
Batteries 7, 51
Brightness 17
C
Camera 43
Camcorder 43
Care of the screen 4
Change code 23
Channel list 10,34
Child lock 22
Clock 14
Colour 17
Colour enhancement 18
Colour keys 13
Common interface slot 5
Comp. video connectors 46,48
Connections 31,43
Contrast 17
Country selection 26
Cursor keys 12
Custom tint 17
D
Decoder 31,45
Delta volume 20
Demo 24
Digital audio language 20
Digital broadcasting 3
Digital natural motion 18
Digital subtitle language 21
Digital text 41
Digital: test reception 27
DNR 18
Dual I/II 20
DVB-T 3
DVD player 47
DVD recorder 45
DVI connector 47
Dynamic contrast 18
E
EPG 35
Equalizer 14
Euroconnector 45
F
Factory settings 32
Favourite key 33
Favourite channel list 33
Features adjustment menu 21
Fine tune 28
First time installation 7
G
Game 43,47
H
HDMI connector 47
Headphone 43
Headphone volume 20,43
Hearing impaired 25
Home cinema amplifier 50
Hue 17
Hypertext 41
I
Installation menu 25
62
Page 63

63
ENGLISH
L
Language preferences 25
Light sensor 18
Location 30
Reinstall 30
Remote control 7
Reset factory settings 32
Rename 29
M
Manual installation 28
Menu key 13
MPEG artefact reduction 18
Multimedia browser 37
Mute key 13
N
Navigate through the menus 10
O
On screen language 8
On screen information 13,30
On timer 23
Option key 12
OK key 12
P
PC 49
Picture adjustment menu 16
Picture format 18
PIN code 22
Pixel plus 18
Preferences menu 30
Preferred audio language 25
Preferred subtitle language 25
Previous channel 13
Programme title 30
Q
Quick access menu 13
R
Radio channels 26
Rear panel overview 44
Rearrange channel list 29
Recycling 64
S
Satellite receiver 46
Search for channels 25
Select your connections 31
Set code 23
Settings assistant 9
Side connectors 6
Sharpness 17
Sleeptimer 22
Slideshow format 56
Software upgrade 53
Sound adjustment menu 19
Standby key 12
Store channels 25
Subtitle 21
Surround mode 20
Switch on the TV 7
T
Teletext 40
Teletext menu 41
Teletext 2.5 30
Time zone selection 26
Tint 17
T.O.P. teletext pages 40
Troubleshooting 51
TV menu settings 15
U
Uninstall 30
USB 43
USB device 37
V
Volume 6
VCR 45
Page 64

Recycling
R The packaging of this product is intended
to be recycled. Apply to the local authorities for
correct disposal.
Disposal of your old product
Your product is designed and manufactured
with highly quality material and components,
which can be recycled and reused.
When this crossed-out wheeled bin
symbol is attached to a product, it means
the product is covered by the European
Directive 2002/96/EC.
Please inform yourself about the local
separate collection system for electrical and
electronic products. Please act according to
your local rules and do not dispose of your old
products with your normal household waste.
The correct disposal of your old product will
help prevent potential negative consequences
for the environment and human health.
Disposal of batteries
The batteries supplied do not contain the heavy
metals mercury and cadmium. Please check on
how to dispose of exhausted batteries according
to local regulations.
Product information
• Your TV consumes energy in standby mode.
Energy consumption contributes to air and
water pollution. Very low standby power
consumption.
• Specifications: see the product leaflet on www.
philips.com/support.
• If you need further assistance, please call the
customer support service in your country.
The corresponding telephone numbers and
addresses are given in the supplied Worldwide
guarantee booklet.
64
 Loading...