

Page 1

Brand Customer Model
32PFL5356/V7
Philips
32PFL5556/V7
42PFL5556/V7
46PFL5556/V7
1
!
Page 2

Revision List
Version Release Date Revision Instructions Customer Model TPV Model
32PFL5356/V7 E32B22NCAMPHNNX
32PFL5556/V7 E32BA2NCAMPANNX
A00 Jun.27.2011 Initial Release
42PFL5556/V7 E42B22NCAMPLNNX
46PFL5556/V7 E46BA2NCAMPANNX
2
!
Page 3

Table of Contents
1. Technical Specification ---------------------------------------------------------------------------------04
1.1 General Specification -----------------------------------------------------------------------------------04
1.2 Supported Display Resolutions-----------------------------------------------------------------------06
2. Operating Instructions ------------------------------------------------------------------------------07
2.1 Remote Control-------------------------------------------------------------------------------------------07
2.2 The Front Control Panel -------------------------------------------------------------------------------08
2.3 Connect Devices --------------------------------------------------------------------------------------08
2.4 Menu Operating ----------------------------------------------------------------------------------------14
3. Mechanical Instructions ----------------------------------------------------------------------------26
4. Factory Modes Adjustment ------------------------------------------------------------------------38
4.1 ADC Adjustment -------------------------------------------------------------------------38
4.2 WB Adjustment --------------------------------------------------------------------------38
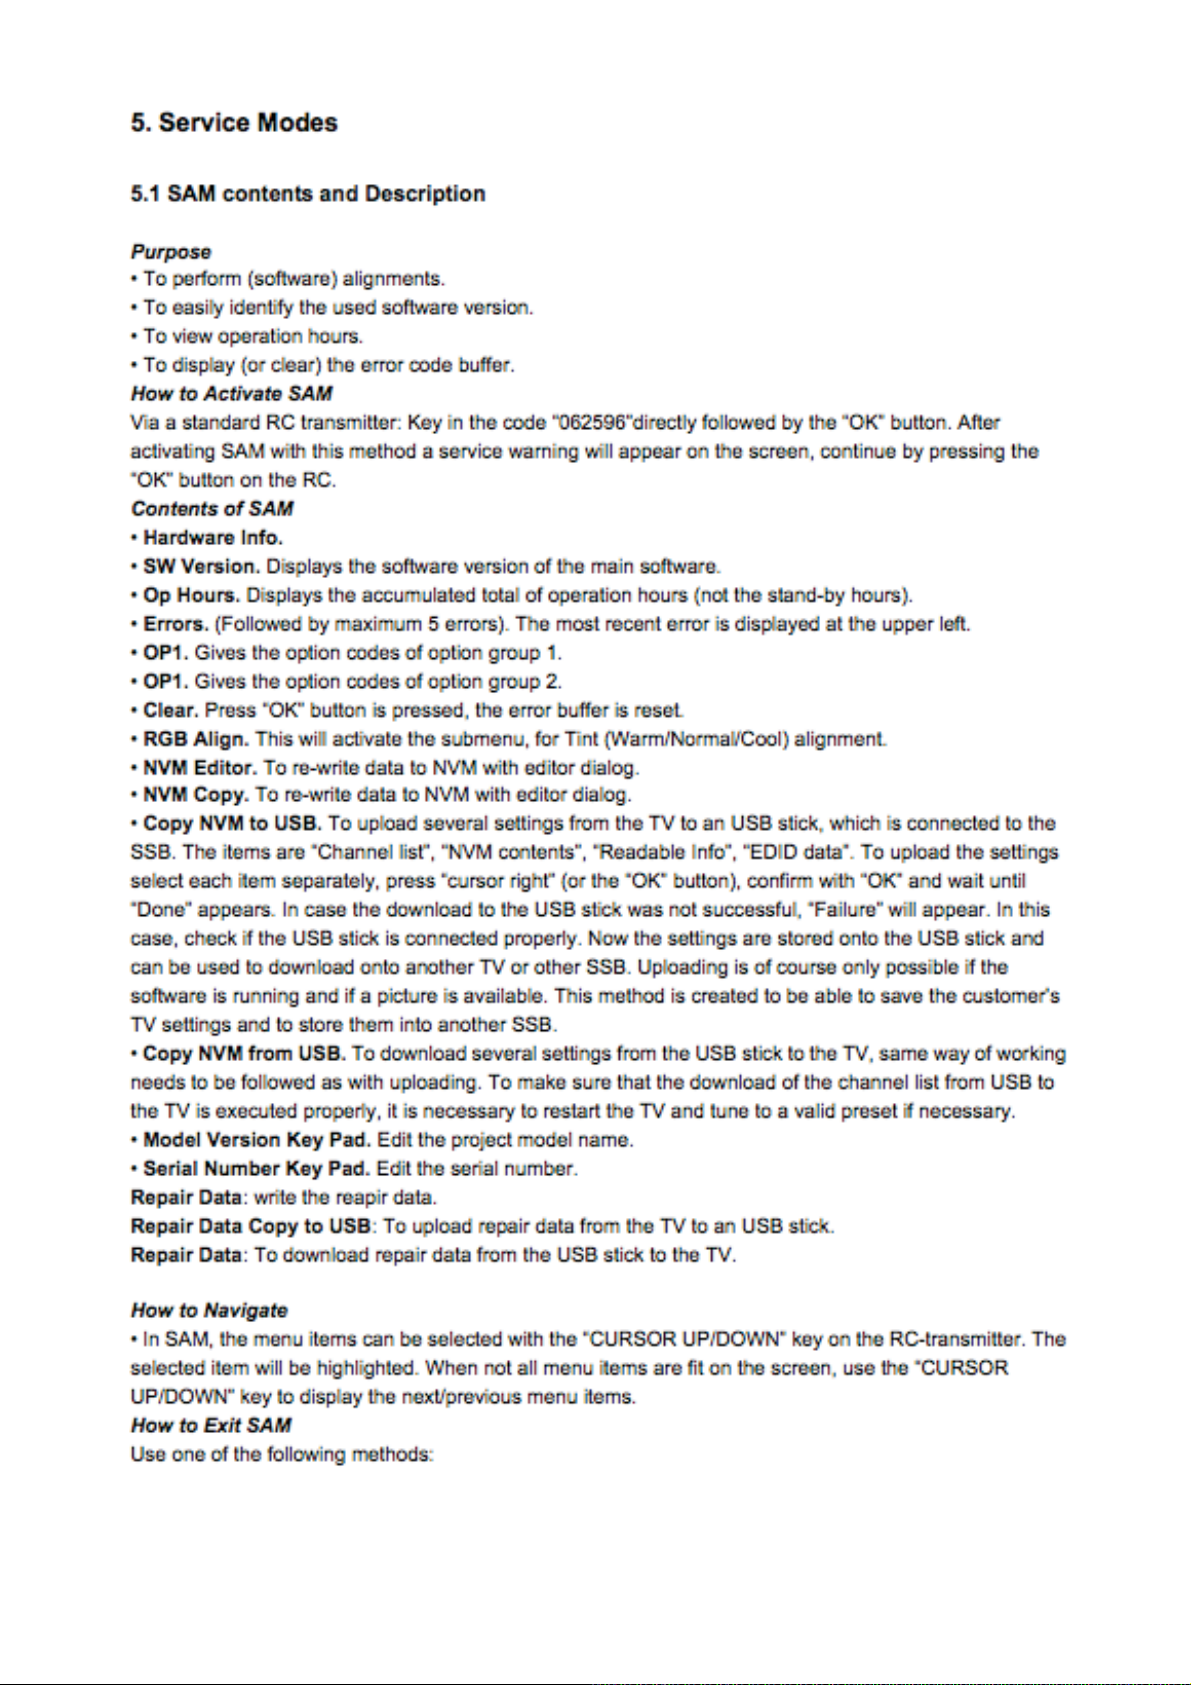
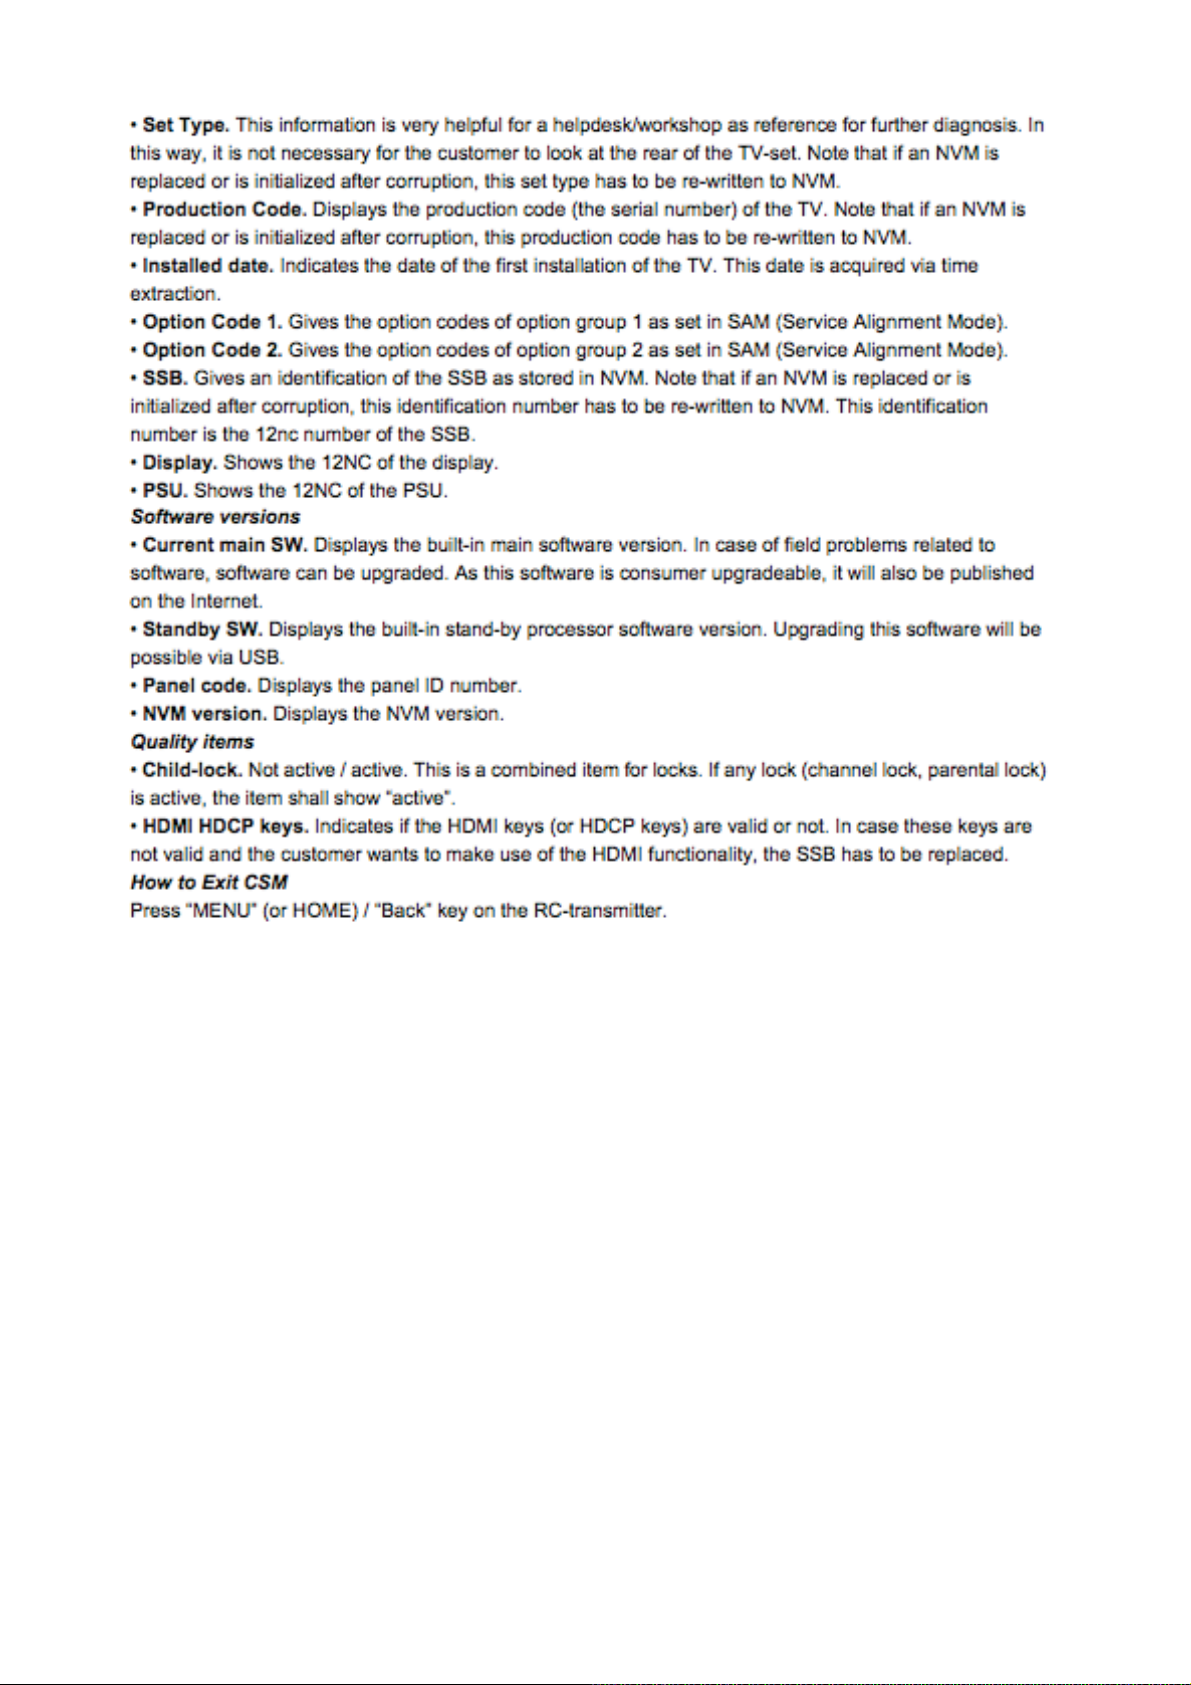
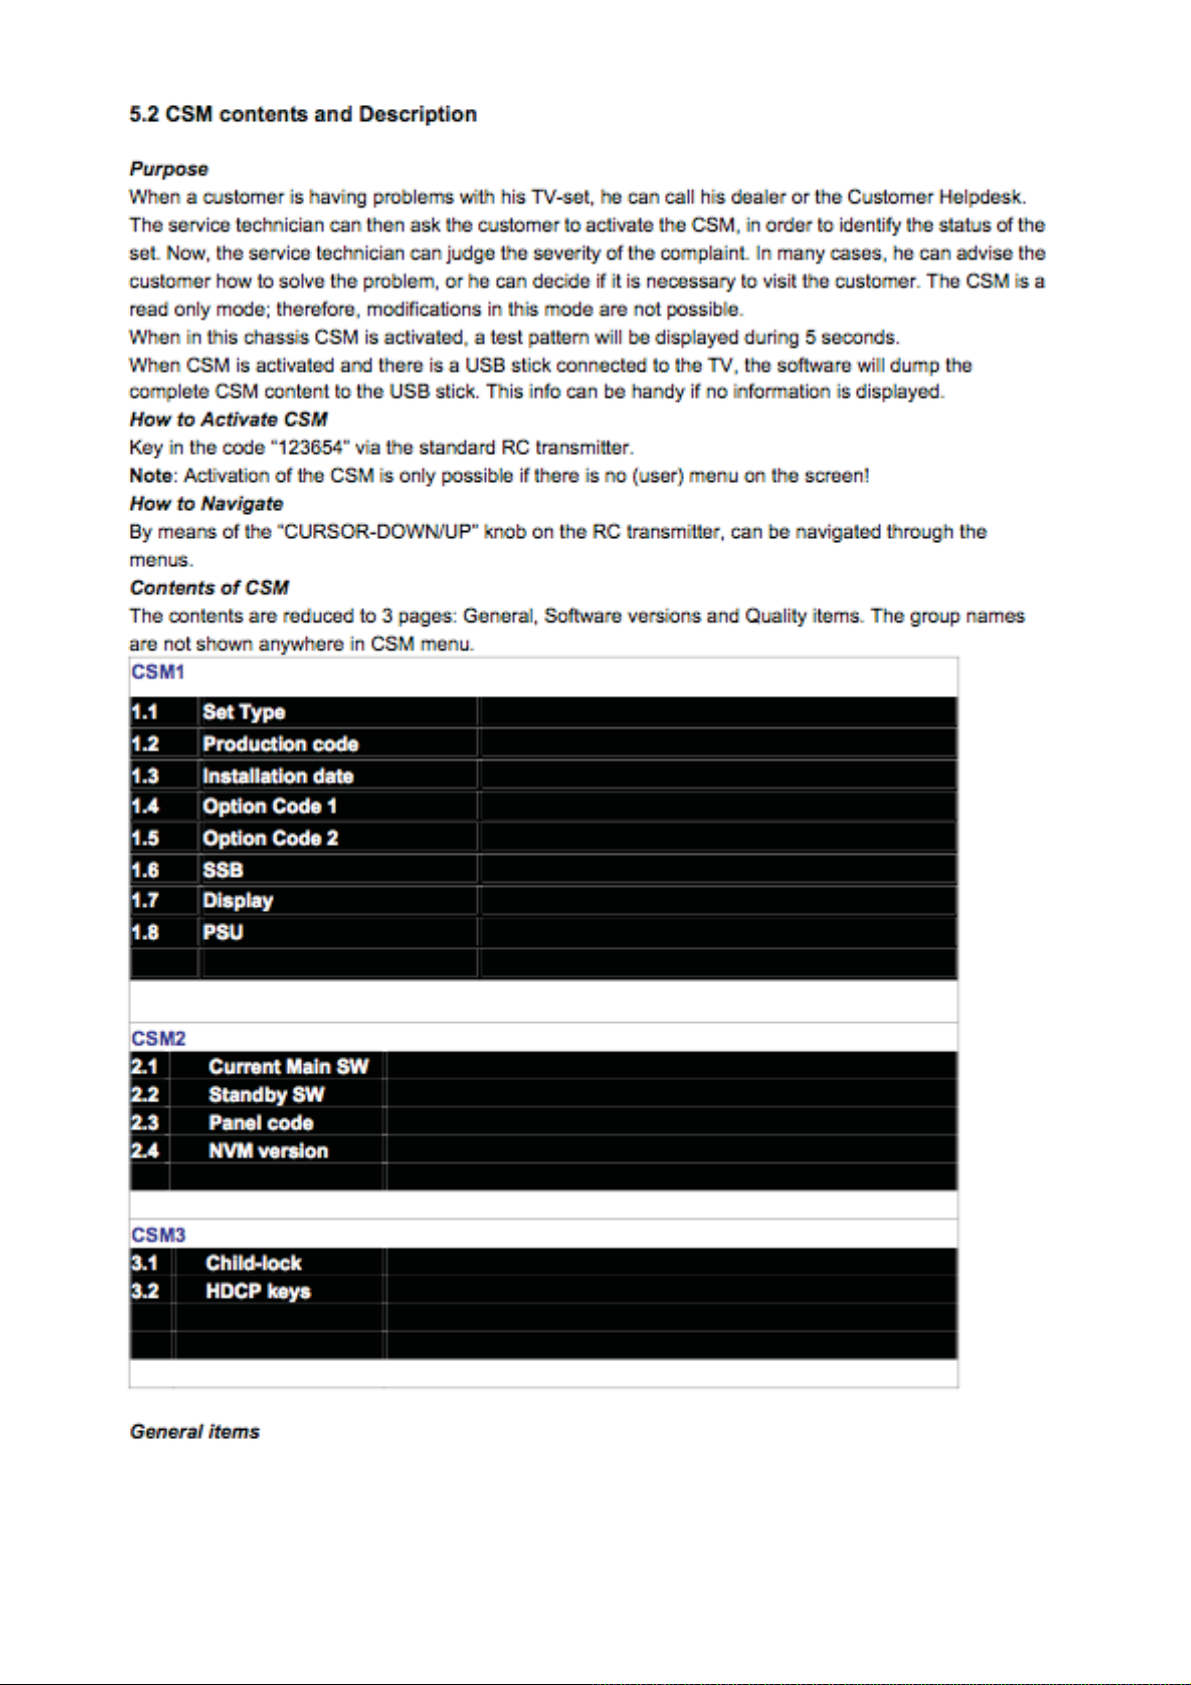
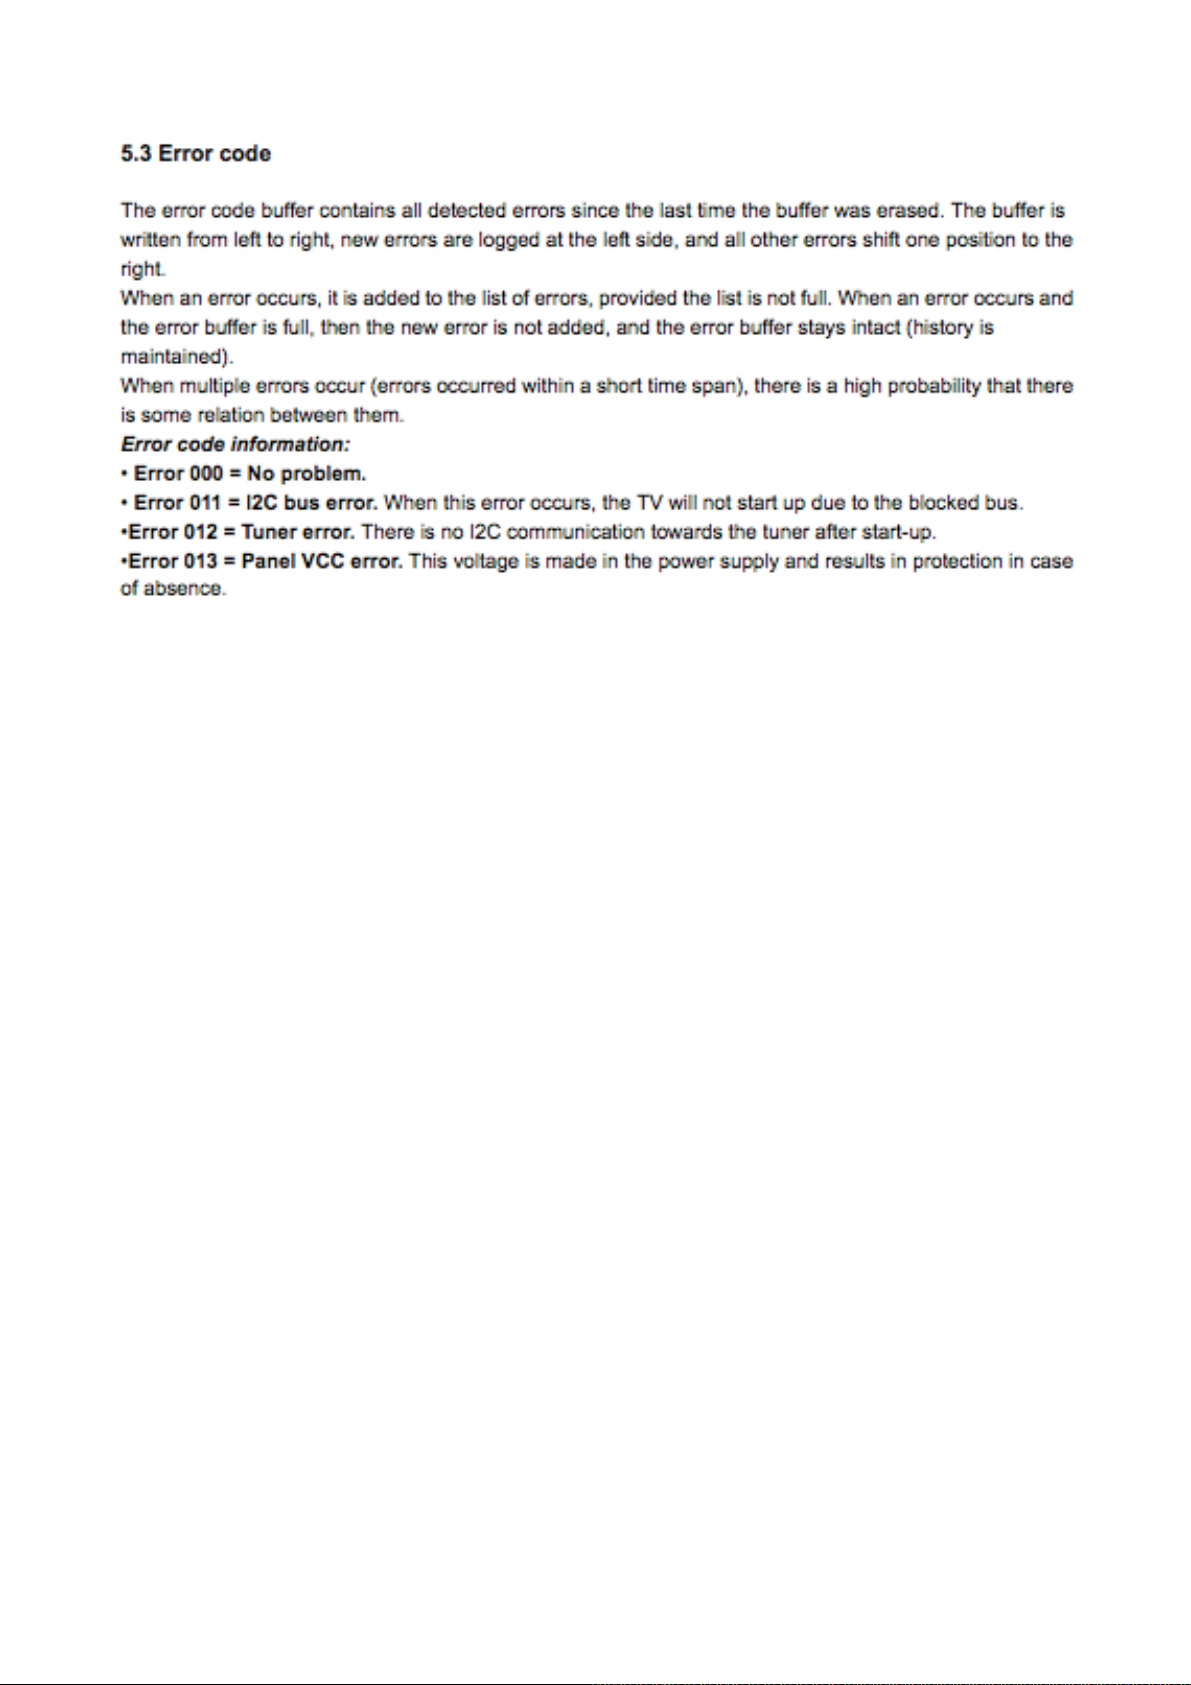
5. Service Modes--------------------------------------------------------------------------------------------39
5.1 SAM ---------------------------------------------------------------------------------------------------------39
5.2 CSM --------------------------------------------------------------------------------------------------------41
5.3 Error code--------------------------------------------------------------------------------------------------42
6. Block Diagram -----------------------------------------------------------------------------------------------43
7. Schematic Diagram ------------------------------------------------------------------------------------45
7.1 Main Board ----------------------------------------------------------------------------------------------45
7.2 Power Board --------------------------------------------------------------------------------------------64
7.3 MEMC Board --------------------------------------------------------------------------------------------83
7.4 Key Board ------------------------------------------------------------------------------------------------84
8.Firmware&EDID Upgrade---------------------------------------------------------------------------------85
8.1Firmware Upgrade --------------------------------------------------------------------------------------85
8.2 EDID Upgrade--------------------------------------------------------------------------------------------86
9. Trouble shooting ---------------------------------------------------------------------------------------94
10. IC Spec.------------------------------------------------------------------------------------------------------100
11. BOM List ------------------------------------------------------------------------------------------------110
3
!
Page 4

1. Technical Specification
1.1 General Specification
Product information is subject to change without notice. For detailed product information, go to
www.philips.com/support.
Multimedia
• Supported storage device: USB (Only FAT or FAT 32 USB storage devices are supported)
• Supported multimedia file formats:
• Images: JPEG
• Audio: MP3, WMA
• Video: MPEG 2/MPEG 4, H.264, WMV
Tuner/Reception/Transmission
• Antenna input: 75ohm coaxial (IEC75)
• TV system: PAL,B/G
• Video playback: NTSC, SECAM, PAL
• Tuner Bands: UHF, VHF
Remote control
• Type: YKF293-001
• Batteries: 2 x AAA (LR03 type)
Power
• Mains power: 110-240V, 50Hz-60Hz
• Standby power: 0.5W
• Ambient temperature: 5 to 40 degrees Celsius
• Power consumption• 32PFL5356/V7: 85W
• 32PFL5556/V7: 85W
• 42PFL5556/V7: 145W
• 46PFL5556/V7: 130W
Supported TV mounts
To mount the TV, purchase a Philips TV mount or a compatible TV mount. To prevent damage to cables and
connectors, leave a clearance of at least 2.2 inches or 5.5cm from the back of the TV.
Warning
•Follow all instructions provided with the TV mount. PE Electronics Ltd bears no responsibility for improper TV
mounting that results in accident, injury or damage.
4
!
Page 5

Product specification
Design and specifications are subject to change without notice.
32PFL5356/V7
• Without TV stand
• Dimension(WxHxD): 760.9 x 479.5 x 49.9 (mm)
• Weight: 7.36 kg
• With TV stand
• Dimension(WxHxD): 760.9 x 528.0 x 221.0 (mm)
• Weight: 9.19 kg
32PFL5556/V7
• Without TV stand
• Dimension(WxHxD): 760.9 x 479.5 x 49.9 (mm)
• Weight: 8.5 kg
• With TV stand
• Dimension(WxHxD): 760.9 x 528.0 x 221.0 (mm)
• Weight: 10.4 kg
42PFL5556/V7
• Without TV stand
• Dimension(WxHxD): 994.11 x 611.1 x 39.9(mm)/49.9(Speaker) (mm)
• Weight: 12.41 kg
• With TV stand
• Dimension(WxHxD):994.11 x 661.8 x 239.57 (mm)
• Weight 15.1 kg
46PFL5556/V7
• Without TV stand
• Dimension(WxHxD): 1081.41 x 659.57 x 39.9 (mm)/49.9 (Speaker) (mm)
• Weight: 14.89 kg
• With TV stand
• Dimension(WxHxD): 1081.41 x 710.4 x 239.57 (mm)
• Weight: 17.56 kg
5
!
Page 6

1.2 Supported display resolutions
Computer formats
• Resolution - refresh rate
• 640 x 480 - 60Hz
• 800 x 600 - 60Hz
• 1024 x 768 - 60Hz
• 1280 x 1024 - 60Hz
• 1360 x 768 - 60Hz
• 1920 x 1080 - R 60Hz ——(Limit FULL HD, R: reduced blanking time; addition 32PFL5356/V7 does not support
this resolution)
Video formats
• Resolution - refresh rate:
• 480i - 60Hz
• 480p - 60Hz
• 576i - 50Hz
• 576p - 50Hz
• 720p - 50Hz, 60Hz
• 1080i - 50Hz, 60Hz
• 1080p - 24Hz, 25Hz, 30Hz, 50Hz, 60Hz.
6
!
Page 7

2. Operating Instructions
2.1 Remote Control
(Standby-On)
1ˊSwitch the TV on or to standby.
2. Play buttons
• Control video or music.
3.
• Access the menu to select a TV channel list.
4.
• Access the home menu.
5.
• Switch channels or navigate through menu pages,
tracks, albums or folders.
6.
• Select connected devices.
FIND
(Home)
CH - / CH + (Previous/Next)
SOURCE
7.
• Mute or restore audio.
8.
• Adjust volume.
9 0-9 Numeric buttons
• Select channels.
10 . SUBTITLE
• No function.
11. TEXT
• No function.
12.
• Access options for the current activity or selection.
13.
• Return to the previous menu or exit a function.
14.
• Confirm an entry or selection.
15.
• Navigate through menus and select items.
OPTIONS
16. ADJUST
• Access the menu to adjust settings.
17. Colour buttons
• Select tasks or options
7
!
Page 8

2.2 The Front Control Panel
1. +/-: Adjust volume.
2.
3.
4ˊ
5. CH +/-: Switch channels.
(Power): Switch the TV on or off.
Standby indicator and remote controller sensor.
(Home): Access the home menu.
2.3 Connect devices
Back connections
1 .VIDEO OUTPUT
Video output from analogue devices such as VCRs.
2. DIGITAL AUDIO OUT
Digital audio output to home theatres and other digital audio systems.SPDIF OUT
!
8
Page 9

3. CVI/AV2 (Y Pb Pr and AUDIO L/R)
Analogue audio and video input from analogue or digital devices such as DVD players or game consoles.
4. SERV. U
For use by service personnel only.
5. PC IN (VGA and AUDIO IN) Audio and video input from a computer.(.Note: This machine is a 6 degree tilt VGA
Interface design, aimed at the interface when you plug insert)
Side connections
!
9
Page 10

1. HDMI Digital audio and video input from high-definition digital devices su ch as Blu-ray players.
2. AUDIO L/R Audio input from analogue devices connected to VIDEO.
3. VIDEO (AV1)Composite video input from analogue devices such as VCRs.
4. TV ANTENNA Signal i nput from an antenna, cable o r satellite.TV ANTENNAe (Headp hone) Stereo audio output
to headphones or earphones.
!
10
Page 11

Note• •Headphones plugged in, TV speakers will automatically mute
5. USB Data input from USB storage devices.
Connect a computer
Before you connect a computer to the TV
• Set the screen refresh rate on your computer to 60Hz
• Select a supported screen resolution on your computer. Connect a computer with one of the following connectors:
Note•
•Connections via DVI or VGA require an additional audio cable.
• HDMI cable
•
DVI-HDMI cable
• HDMI cable and HDMI-DVI adaptor
!
11
Page 12

• VGA cable
Use Philips EasyLink
Get the most out of your HDMI-Consumer Electronic Control (CEC) compliant devices with Philips EasyLink
enhanced control features. If your HDMI-CEC compliant devices are connected through HDMI, you can control them
at the same time with your TV remote control.
To enable Philips EasyLink, you need to:
• Connect at least two HDMI-CEC compliant devices through HDMI
• Configure each HDMI-CEC compliant device properly
• Switch on EasyLink
Switch on or off EasyLink
When you play an HDMI-CEC compliant device, the TV switches on from standby, and switches to the correct
source.
1 Press
2 Select [Setup] > [TV settings] > [EasyLink] > [EasyLink].
3 Select [On] or [Off], then press OK.
.
Use one-touch play
1 Af ter you switch on EasyLink, press play on your device.
The TV automatically switches to the correct source.
Use one-touch standby
1 When you press on the TV remote control, the TV and all HDMI-CEC compliant devices switch to standby mode.
The TV and all connected HDMI devices switch to st andby.
!
12
Page 13

Use a Kensington lock
There is a Kensington security slot at the back of the TV. Prevent theft by looping a Kensington lock between the slot
and a permanent object, such as a heavy table.
!
13
Page 14

2.4 Menus operating
Access TV menus
Menus help you to install channels, change picture and sound settings and access other features.
1 Press
2 Select one of the following, then press OK.
• [Watch TV]: If a source other than ante nna is selected, switch back to the antenna source
• [Add new device]: Add new devices to the home menu.
• [Setup]: Access menus to change picture, sound and other settings.
• [Scenea]: Switch on Scenea wallpaper .
• [Browse USB]: View photos and play music and movies cont ained in USB storage devices.
The menu screen appears.
!
14
Page 15

3 Add device to the home menu.After you connect a device, add it to the home menu.
• Press
• Select [Add new device].
• Follow the onscreen instructions to add the device to the home menu.
• To watch the device, switch it on, then select it in the home menu.
• You can also select the device with the source button (see ‘Select a device from the source list’ on p age 8).
.
The device is displayed in the home menu.
Rename devices from the home menu
After you add a new device to the home menu, you can rename it to your preference.
Note•
•The device name can be up to 16 characters long.
1 Press
2 Select a device to rename.
3 Press OPTIONS.
4 Select [Rename device], then press OK.
5 Select characters each character, then press OK to confirm
6 When the new name is complete, select [Done], then press OK.
.
The options menu appears.
A text input box appears.
Remove devices from the home menu
If a device is no longer connected to the TV, remove it from the home menu.
1 Press
2 Select a device to remove.
3 Press OPTIONS.
4 Select [Remove device], then press OK.
5 Select [Remove], then press OK.
.
The selected device is removed from the home menu.
Change picture and sound setting
Change picture and sound settings to suit your preferences. You can apply pre-defined settings or change settings
manually.
Note•
•While you watch TV or external devices, press ADJUST, then select [Smart picture] or [Smart sound] for quick
access to picture and sound settings.
•Hue-Active in NTSC channels Only.
Use settings assistant
Use the settings assistant to guide you through the picture and sound settings.
1 Press .
2 Select [Setup] > [Quick picture and sound settings], then press OK.
3 Select [Continue], then press OK.
!
15
Page 16

The [Settings assistant] menu appears.
4 Follow the onscreen instructions to choose your preferred picture settings.
Use smart picture
Use smart picture to apply pre-defined picture settings.
1 Press ADJUST.
2 Select [Smart picture], then press OK.
3 Select one of the following settings, then press OK.
• [Personal]: Apply your customised picture settings.
• [Vivid]: Rich and dynamic settings, ideal for daytime.
• [Natural]: Natural picture settings.
• [Cinema]: Ideal settings for movies.
• [Game]: Ideal settings for games.
• [Energy saving]: Settings that conserve the most energy.
• [Standard]: Default settings that suit most environments and types of video.
• [Photo]: Ideal settings for photos.
• [Custom]: Customise and store your personal picture settings.
Manually adjust picture setting
1 Press .
2 Select [Setup] > [TV settings] > [Picture], then press OK.
3 Select one of the following settings, then press OK.
• [Smart picture]: Access predefined smart picture settings.
• [Reset]: Reset to factory default settings.
• [Contrast]: Adjust the intensity of backlight areas, while the video contents are kept unchanged.
• [Brightness]: Adjust the intensity and det ails of dark areas.
• [Colour]: Adjust col our saturation.
• [Hue]: Compensate for colour variations.
• [Sharpness]: Adjust sharpness in the image.
• [Noise reduction]: Filter and reduce noise in an image.
• [Colour Temperature]: Adjust the colour balance in an image.
• [Custom Colour Temperature]: Customize Col our Temperature. (Only available if [Colour T e mperature] > [Custom]
is selected).
• [Pixel Plus HD]: Fine-tune each pixel to match surrounding pixels. This setting produces a brilliant, high-definition
image.
• [Advance sharpness]: Enable superior picture sharpness.
• [Dynamic contrast]: Enhance contrast. [Medium] setting is recommended.
• [Dynamic backlight]: Adjust brightness of the TV backlight to match lighting conditions.
• [Colour enhancement]: Make colours more vivid and improve the details in bright colours. You can switch this
feature on or off.
• [Gamma]: Adjust the midtone intensity in the picture. Black and white are not affected.
• [PC mode]: Adjust the picture when a PC is connected to the TV via HDMI or DVI.
• [Picture format]: Change the picture format.
• [Screen edges]: Adjust the viewing area. (when set to maximum, you may see noise or the rough edge of an
image).
!
16
Page 17

• [Picture shift]: Adjust the picture position for all picture formats except for [Unscale]ǃ[4˖3]and [Wide screen] in
antenna source.
Change picture format
1 Press ADJUST.
2 Select [Picture format], then press OK.
3 Select a picture format, then press OK.
Summary of picture formats
The following picture settings can be configured
.Note•
•Depending on the format of the picture source, some picture settings are not available.
Use smart sound
Use smart sound to apply pre-defined sound settings.
!
17
Page 18

1 Press ADJUST.
2 Select [Smart sound], then press OK.
3 Select one of the following settings, then press OK.
• [Personal]: Apply the settings that were customised in the sound menu.
• [Standard]: Settings that suit most environments and types of audio.
• [News]: Ideal settings for spoken audio, such as news.
• [Cinema]: Ideal settings for movies.
• [Game]: Ideal settings for games.
• [Drama]: Ideal settings for drama programmes.
• [Sports]: Ideal settings for sports programmes
Manually adjust sound settings
1 Press .
2 Select [Setup] > [TV settings] > [Sound], then press OK.
3 Select one of the following settings, then press OK.
• [Smart sound]: Access predefined smart sound settings.
• [Reset]: Reset to factory default settings.
• [Clear sound]: Enhance the sound clarity.
• [Bass]: Adjust the bass level.
• [Treble]: Adjust the treble level.
• [Surround]: Switch on spatial sound.
• [Auto volume levelling]: Automatically reduce sudden volume changes, for example when switching channels.
• [Balance]: Adjust the balance of the right and left speakers.
Use the Options menu
Visit options relevant to current action or selection.
1 While you watch TV, press OPTIONS.
The TV options menu appears.
2 Select one of the following options, then press OK.
• [Key beep]: Switch on audio feedback when buttons are pressed on the remote control or TV.
• [Clock]:Display time.
• [Status]: Display information concerni ng currently viewing channel.
• [Ecology]: Relevant setups.
Tip•
•Select the Option function by pressing the OPTION button on your remote controller.
Create and use lists of favourite channels
You can create a list of your preferred TV channels so that you can find those channels easily.
View only the list of favourite channels
1 While you watch TV, press FIND.
The channel matrix menu is displayed.
2 Press OPTIONS.
3 Select [Select list] > [Favourites], then press OK.
Only channels in the favourites list appear in the channel grid.
Note
!
18
Page 19

•The favourites channel grid is empty until you add channels into the favourites list.
View all channels
You can exit the favourites list, and view all installed channels.
1 While you watch TV, press FIND.
The channel matrix menu is displayed.
2 Press OPTIONS.
3 Select [Select list] > [All], then press OK.
All channels are displayed in the channel grid.
Note
•All favourite channels are marked by an asterisk when you view the channel grid.
Manage the favourites list
1 While you watch TV, press FIND.
The channel matrix menu appears.
2 Press OPTIONS.
3 Select [Mark favourite] / [Unmark favourite], then press OK.
The channel is marked or unmarked from the favourite list.
Display the TV clock
You can display a clock on the TV screen. Set the TV clock manually
1 Press
2 Select [Setup] > [TV settings] > [Preferences] > [Clock].
3 Select [Time] or [Date], then press OK.
4 Press the Navigation buttons to set the time or date.
5 Select [Done], then press OK.
6 Press to exit.
.
Display the TV clock
1 While you watch TV, press OPTIONS.
The options menu is displayed.
2 Select [Clock].
3 Press OK.
Note•
•To disable the clock, repeat the procedure.Use timersYou can set sleep timers to switch the TV to standby at a
specified time.
Tip•Set the TV clock before you
use timers
Automatically switch the TV to standby(sleep timer)
Sleep timer switches the TV to standby af ter a pre-defined duration.
Tip
•You can switch off your TV earlier or reset the sleep timer during the countd own.
1 Press
!
.
19
Page 20

2 Select [Setup] > [TV settings] > [Preferences] > [Sleep timer].
The [Sleep timer] menu appears.
3 Select a value between zero and 180 minutes.
If you select zero, the sleep timer switches off.
4 Press OK to switch on the sleep timer.
The TV switches to standby after the specified time.
Lock unsuitable content
You can prevent your children from watching certain programmes or channels by locking the TV controls.
Set or change code
1 Press
2 Select [Setup] > [Channel settings] > [Child lock].
3 Select [Set code] or [Change code].
The [Set code] / [Change code] menu appears.
4 Enter your code using the Numeric buttons.
Follow the on-screen instructions to create or change your PIN code.
Tip
•If you forget your code, enter ‘8888’ to override any existing codes.
.
Lock or unlock one or more channels
1 Press > [Setup] > [Channel settings] > [Child lock] > [Channel lock].
A list of channels is displayed.
2 Select the channel that you want to lock or unlock, then press OK.
The first time you lock or unlock a channel, you are prompted to enter your PIN code.
3 Enter your code and press OK.
If the channel is locked, a lock icon is displayed.
4 Repeat the process to lock or unlock more channels.
Note
•When you switch channels with CH - or CH +, the locked channels are skipped.
•When you access the locked channels from the channel grid, you are prompted to enter your PIN code.
View Scenea
You can display a default picture as the wall p aper on your TV. You can also load another pi cture as the wall p aper.If
the sleeptimer is off, the wallpaper is displayed for 240 minutes. Otherwise, it is displayed for the duration of the
sleeptimer.
Switch on Scenea
1 Press .
2 Select [Scenea], then press OK.
If no picture has been set, the default picture is displayed.
If a customised Scenea picture is loaded, that picture is displayed.
Note•
•Scenea feature is not available when the set is in Shop mode.Customise the Scenea pictureYou can load another
picture as the wallpaper.
!
20
Page 21

Note
•When you load a new Scenea picture, it overrides the current Scenea picture.
•To use another picture as t he wallpaper, you need a USB storage device that contains a picture that is less than 1
MB in size.
1 Load a picture smaller than 1MB in size into a USB storage device.
2 Connect the USB storage device to the TV.3
Press
4 Select [Browse USB], then press OK.
5 Select a picture, then press
OPTIONS.
6 Select [Set as Scenea], then press OK.
.
A confirmation message is displayed.
Play photos, music and videos on USB storage devices
Video file format supported by USB devices:
• Supported storage devices: USB (for FAT or FAT 32 format only)
• Supported multimedia file format
• Image: JPEG
• Audio:MP3
• Video: MPEG 2/MPEG 4 , H.264 , WMV
Caution
•Philips is not responsible if the USB storage device is not supported, nor is it responsible for damage or loss of dat a
from the device.
Note
•When USB is connected,TV set will go to USB source after every stand-by.
Connect a USB storage device to play photos,music or videos stored on it.
1 Switch on the TV.
2 Connect the USB device to the USB port on the side of your TV.
3 Press .
4 Select [Browse USB], then press OK.
The USB browser appears.
View photos
1 In the USB browser, sele ct [Picture], then press OK.
2 Select a photo or a photo album, then press OK to view the photo enlarged to fill the TV screen.
• To view the next or previous photo, press
View a slide show of your photos
1 When a full screen image of a photo is displayed, press OK.
A slide show begins from the selected photo
2 Press the following buttons to control play:
to play.
•
.
• to pause.
or to play the previous or next photo.
•
!
21
Page 22

to stop.
•
Change slide show settings
1 While you view a slide show, press
OPTIONS.
The slide show options menu is displayed.
2 Select one of the following, then press OK.
• [Start/Stop slideshow]: Start or stop slideshow.
• [Slideshow transitions]: Set the transition from one picture to the next.
• [Slideshow frequency]: Select the display time for each photo.
• [Repeat]/[Play once]: Play once or repeatedly.
• [Shuffle on]/[Shuffle off]: Play in sequence or at random.
• [Rotate image]: Rotate photo.
• [Set as Scenea]: Set this picture as wallpaper.
• [Show info]: Display the picture name, date, size and next picture in the slide show .
Listen to music
1 In the USB browser, select [Music], then press OK.
2 Select a music track or album, then press OK to play.
Change music settings
While you play music, press
OPTIONS to access one of the following settings, then press OK.
• [Stop playback]: Stop music play.
• [Repeat]/[Play once]: Play a song once or repeatedly.
• [Shuffle on] / [Shuffle off]: Play songs in sequen ce or at random.
• [Show info]: Display the file name.
• [Sound]: Change sound settings
.
Playing music while viewing slideshow.
You can view slideshow and play background musi c at the same time.1
1 Select one music album.
2 Press OK.
3 Press
4 Select one photo album.
5 Press OK to start playing the slideshow.
to go back to the USB browsing page.
Watch video
1 In the USB browser, sele ct [Video], then press OK.
2 Press OK to play.
3 To control play, press the play buttons:
•
to play.
•
to pause.
or to play the previous or next video.
•
!
22
Page 23

Change video settings
While you play video, pressOPTIONS to access one of the following settings, then press OK.
• [Stop playback]: Stop video play.
• [Repeat]/[Play once]: Play once or repeatedly.
• [Shuffle on] / [Shuffle off]: Play in sequence or at random.
• [Full Screen]/[Small Screen]: Select screen size for playing.
• [Show info]: Display the file name.
Disconnect a USB storage device
Caution•
•Follow this procedure to avoid damage to your USB storage device.
1 Press
2 Wait for five seconds, then disconnect the USB storage device.
to exit the USB browser.
Update the TV software
Philips continuously tries to improve its product s a nd we recommend that you u pdate the TV sof t ware when update s
are available.
Check www.philips.com/support for availability.Check the current software version
1 Press .
2 Select [Setup] > [Software update] > [Current software info].
The current software information is displayed.
Update with a USB device
1 Press .
2 Select [Setup] > [Software update].
3 Follow the on-screen instructions to complete the update.
Note•
•The TV restarts after the software update is complete.•
•This feature is available depending on model.
Manually updating with USB storage device
1 On your PC, open a web browser and go to www.philips.com/welcome.
2 Search for information and software relevant to your TV set.
3 Find the latest updated files.
4 Compare versions of the software.
• If the current software version matches the latest software update file, you do no t need to update your TV sof tware.
• If version number of the software currently in your TV set is smaller than the lat est one, please do wnlo ad the latest
software update file to your PC.
5 Decompress the ZIP-file.
6 Copy the file to the root directory of your USB storage device.
7 Connect your USB storage device to the TV.
8 Select [Setup] > [Software update] > [Local updates].9 Follow the on-screen instructions to complete the update.
Note
•The TV restarts after the software update is complete.•
•This feature is available depending on model.
!
23
Page 24

Change TV preferences
1 Press .
2 Select [Setup] > [TV settings] > [Preferences].
3 Select one of the following, then press OK.
• [Menu language]: Select a menu language.
• [Sleep timer]: Switch the TV to standby after a pre-defined duration.
• [Location]: Optimise TV settings for your location - home or shop.
• [E-sticker]: (For shop mode only) Switch the e-sticker on or off.
• [Volume bar]: Display the volume bar when you adjust the volume.
• [Auto switch off]: To conserve energy, set the TV to switch off automatically after a period of inactivity.
• [Channel information size]: Change the type of information that is displayed when you switch channels.
• [Key beep]: Enable audio feedback when you press buttons on the remote control or TV.
• [TV position]: Apply the best settings for your TV based on how it is mounted.
• [Clock]: Display or remove the time from the TV, and set clock options.
Start a TV demo
You can use demonstrations to better understand the features of your TV. Some demos are not available on certain
models. Available demos are displayed in the menu list.
1 While you watch TV, press .
2 Select [Setup] > [Watch demo], OK.
3 Select a demo and press OK to view it.
Reset the TV to factory settings
Y ou ca n restore the default picture and sound settings of your TV. The channel installation settings remain the same.
1 Press
2 Select [Setup] > [TV settings] > [Factory settings], then press OK.
3 Enter the PIN code(with a default value of 8888) select RESET, press OK to start resetting previous settings.
.
Reinstall the TV
You can reinstall the default settings of your TV. All the changed settings will reset.
1 Press
2 Select [Setup] > [TV settings] > [Reinstall TV], then press OK.
3 Enter the PIN code(with a default value of 8888) select Start Now , press OK to start reinstalling the TV settings.
.
6 Install channels
The first time you set up your TV, you are prompted to select a menu language and to install TV Afterwards, you can
re-install and fine tune channels.
Automatically install channels
1 Press
2 Select [Setup] > [Search for channel], then press OK.
Manually install channels
Step 1 Select your system
Note•
•Skip this step if your system settings are correct.
!
24
Page 25

1 Press
2 Select [Setup] > [Channel settings] > [Channel installation] > [Analogue: Manual antenna installation].
3 Select the correct [Colour system] and [Sound system].
Step 2 Search and store new TV channels
.
1 Press
2 Select [Setup] > [Channel settings] > [Channel installation] > [Analogue: Manual antenna installation] > *[Find
channel], then press OK.
• If you know the three-digit frequency of the channel, enter it.
• To search, select [Search], then press OK.
3 When the channel is found, select [Done], then press OK
.• To store the chan nel as a new number, select [Store as new channel], then press OK.
• To store the channel as the previously selected channel, select [Store current channel], then press OK.
Step 3 Fine-tune an alogue channels
1 Press
2 Select [Setup] > [Channel settings] > [Channel installation] > [Analogue: manual install] > [Fine-tune], then press
OK.
3 Press to fine-tune the channel.
4 When fine tune is complete,Select [Done],then press OK.
.
.
Rename channels
You can rename channels. The name appears when you select the channel.
1 While you watch TV, press FIND.
The channel matrix menu is displayed.
2 Select the channel to rename.
3 Press OPTIONS.
The channel options menu appears.
4 Select [Rename channel], then press OK.
A text input box appears
5 Press
6 When the name is complete, select [Done], then press OK.
to select each character, then press OK.
Rearrange channels
After you install channels, you can rearrange the order in which th ey appear.
1 While you watch TV, press FIND.
The channel matrix menu is displayed.
2 Press OPTIONS.
The channel options menu appears.
3 Select [Reorder], then press OK
4 Select the channel to rearrange, then press OK.
The selected channel is highlighted.
5 Move the highlighted channel to its new location, then press OK.
6 Press OPTIONS.
7 Select [Done reordering], then press OK.
!
25
Page 26

3.
Mechanical Instructions
32PFL5356/V7 & 32PFL5556/V7
Step1˖1. Unscrew the 4 screws in red to remove STAND
Step2
˖
Unscrew the12 screws in red to remove REAR COVER
!
26
Page 27

Step 3˖Disconnect the 8 WIRES in green
!
27
Page 28

Step4
:
Unscrew the 16 screws to in red to remove MAIN BOARD/POWER BOARD and SWITCH
!
28
Page 29

Step5˖Remove PANEL and BEZEL.
!
29
Page 30

42PFL5556/V7
Step1: Unscrew the 4 screws in red to remove STAND
Step2: Unscrew the 16 screws to in red to remove REAR COVER
!
30
Page 31
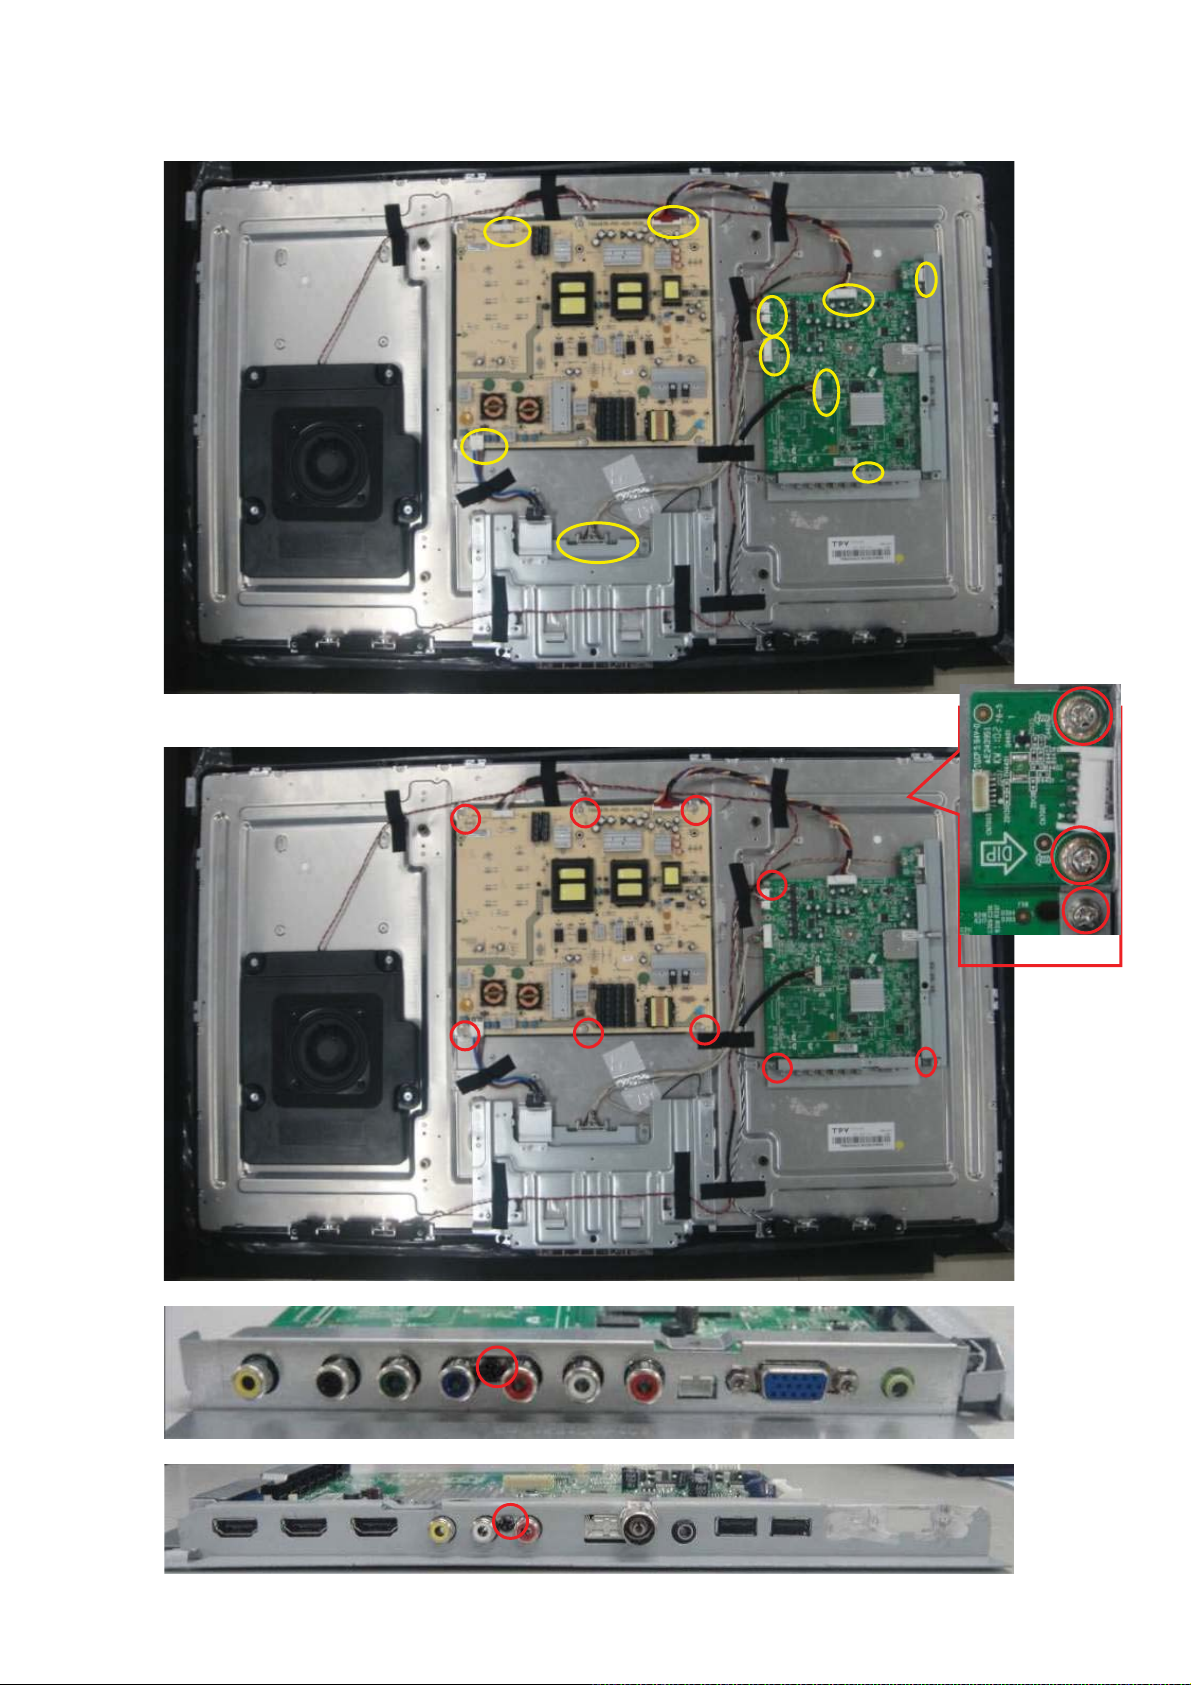
Step3: Disconnect the 14 WIRES in gre en and Unscrew 10 in red to remove MAIN BOARD/POWER
BOARD/INVERTER BOARD
!
31
Page 32
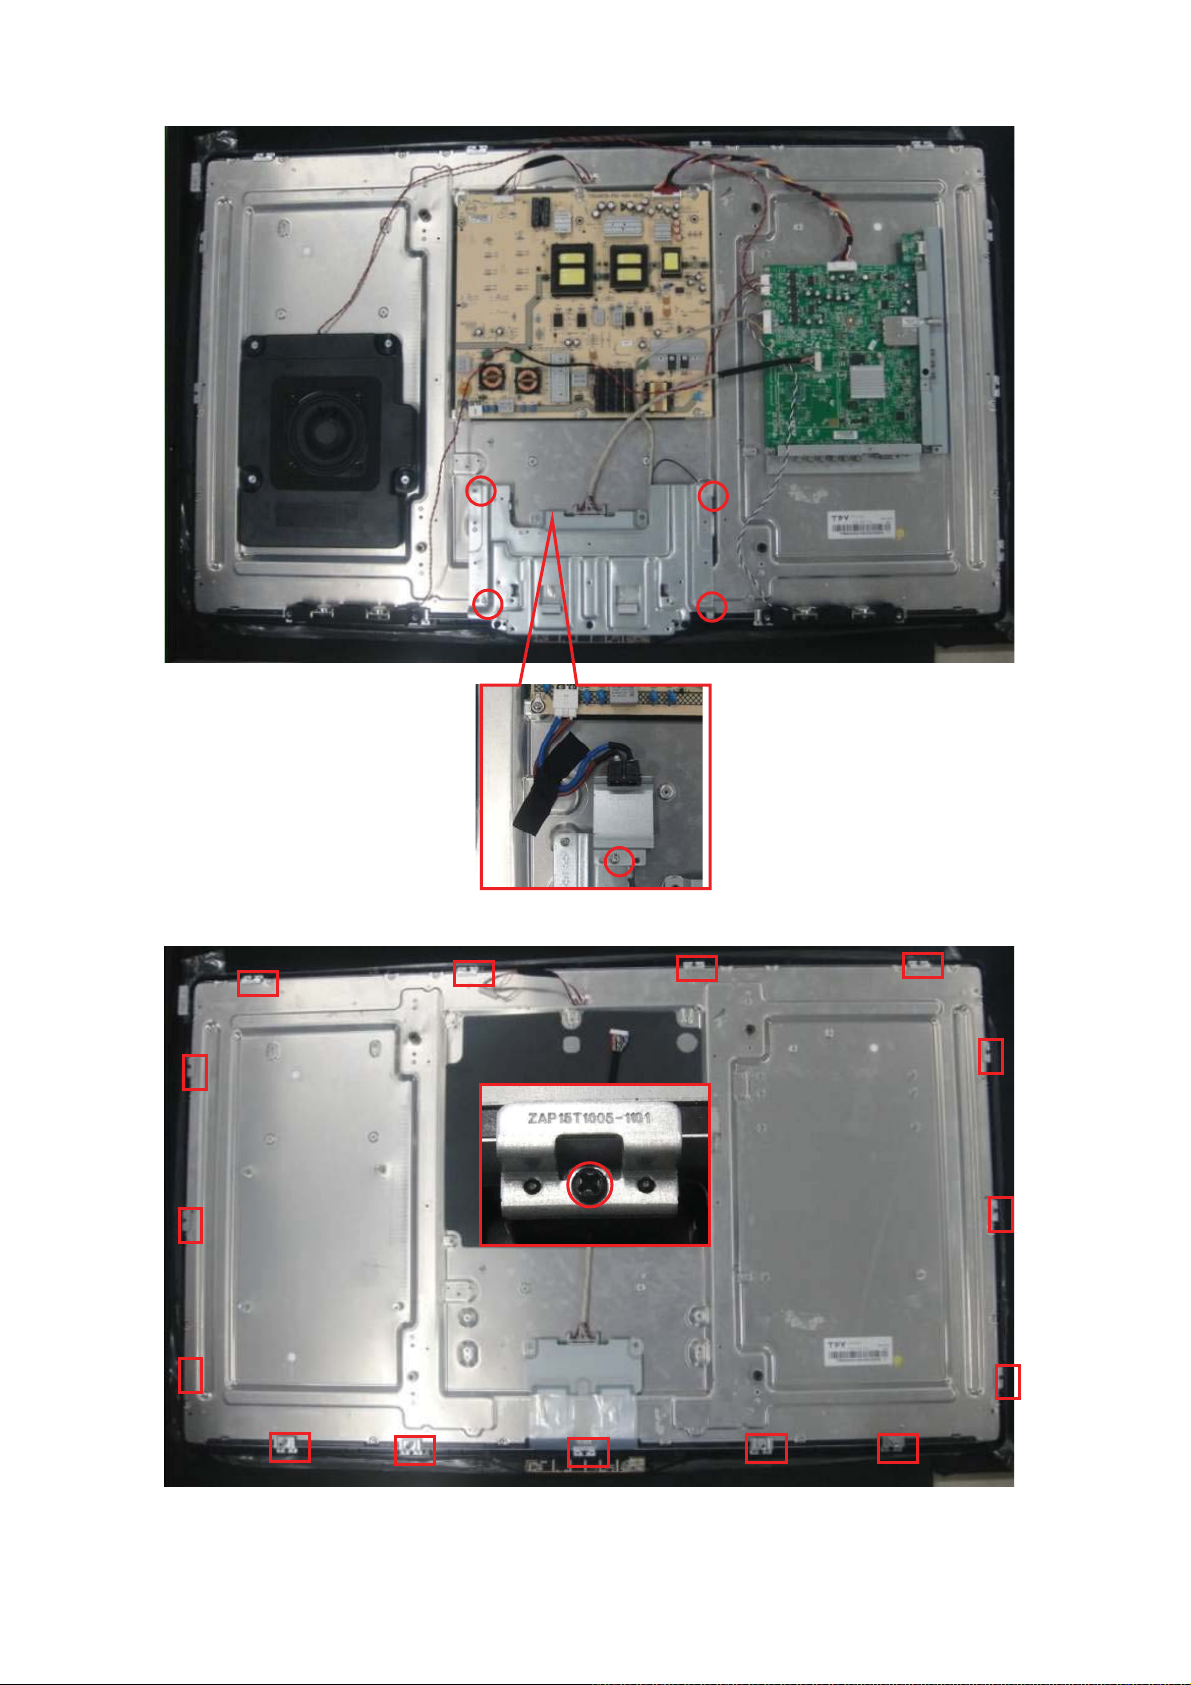
STEP4: Unscrew the 15 screws and 4 screws to remove BKT and SMLBKT
!
32
Page 33
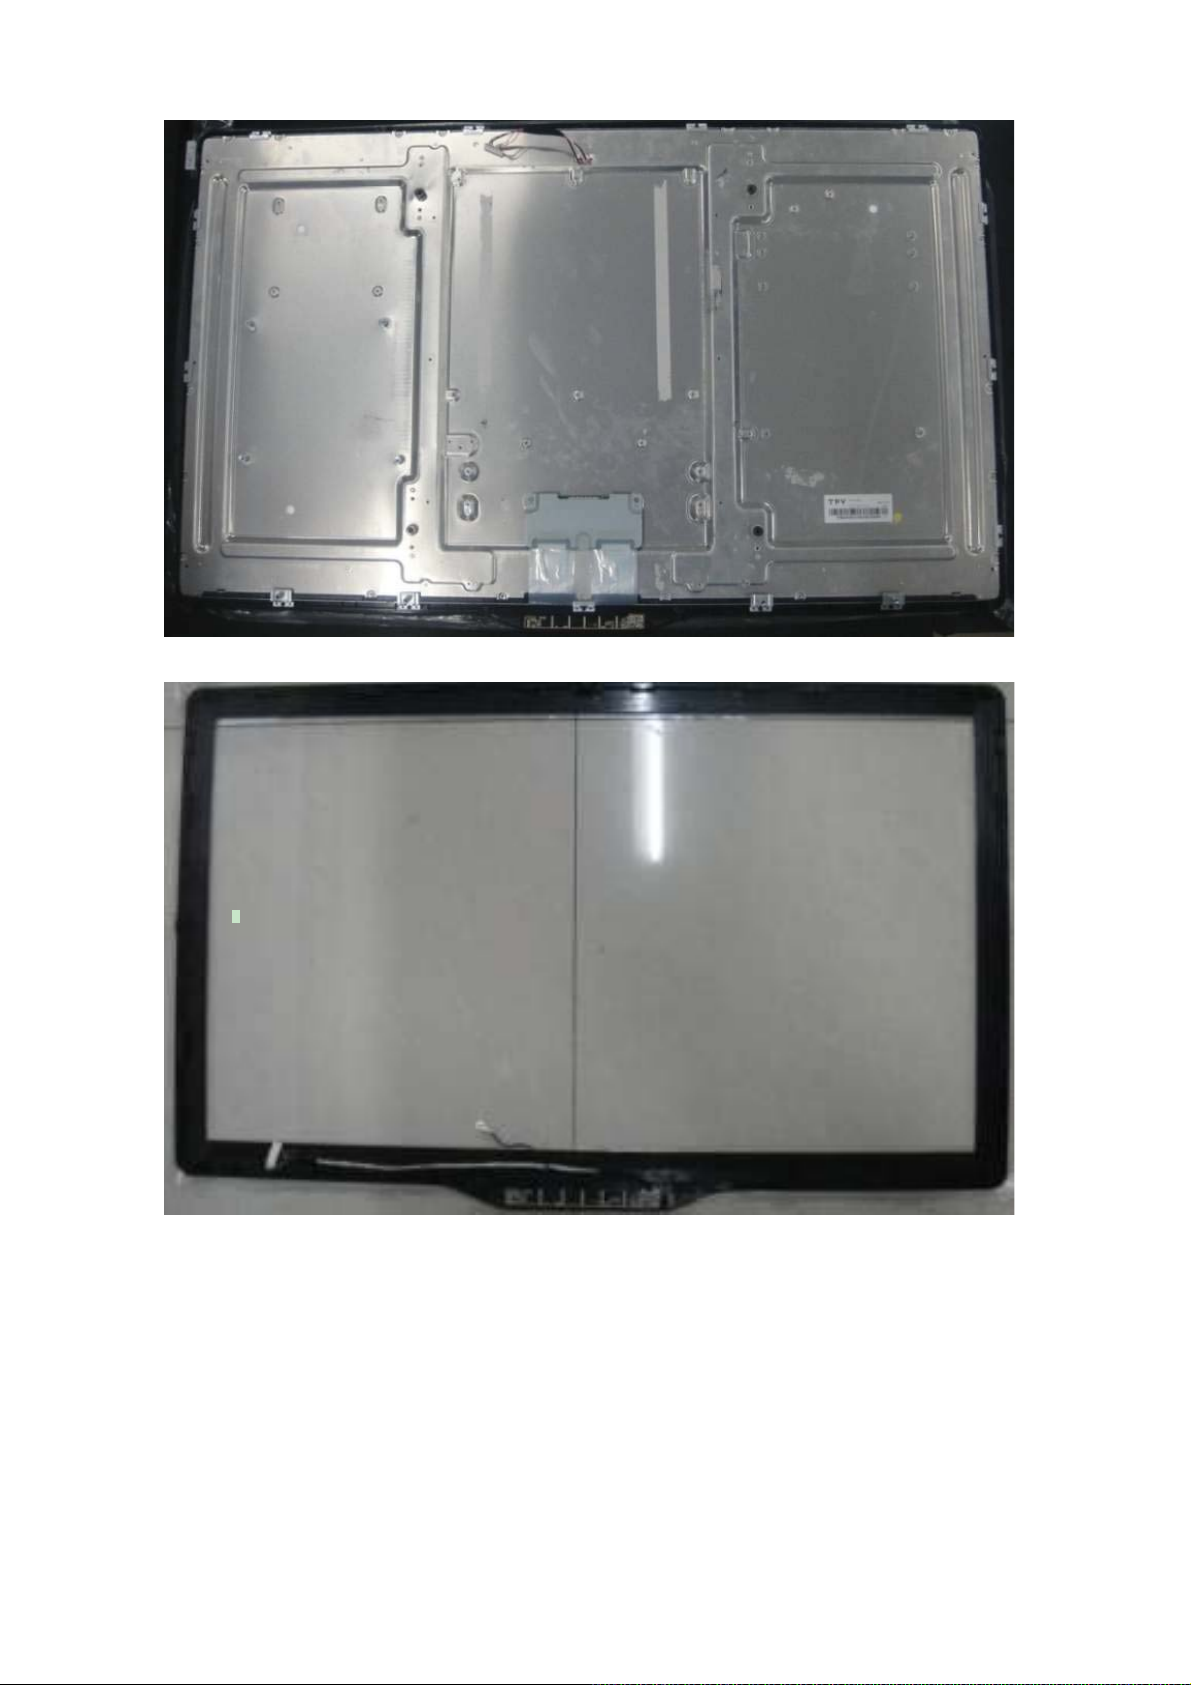
Step5:
Removing panel and BEZEL.
!
33
Page 34
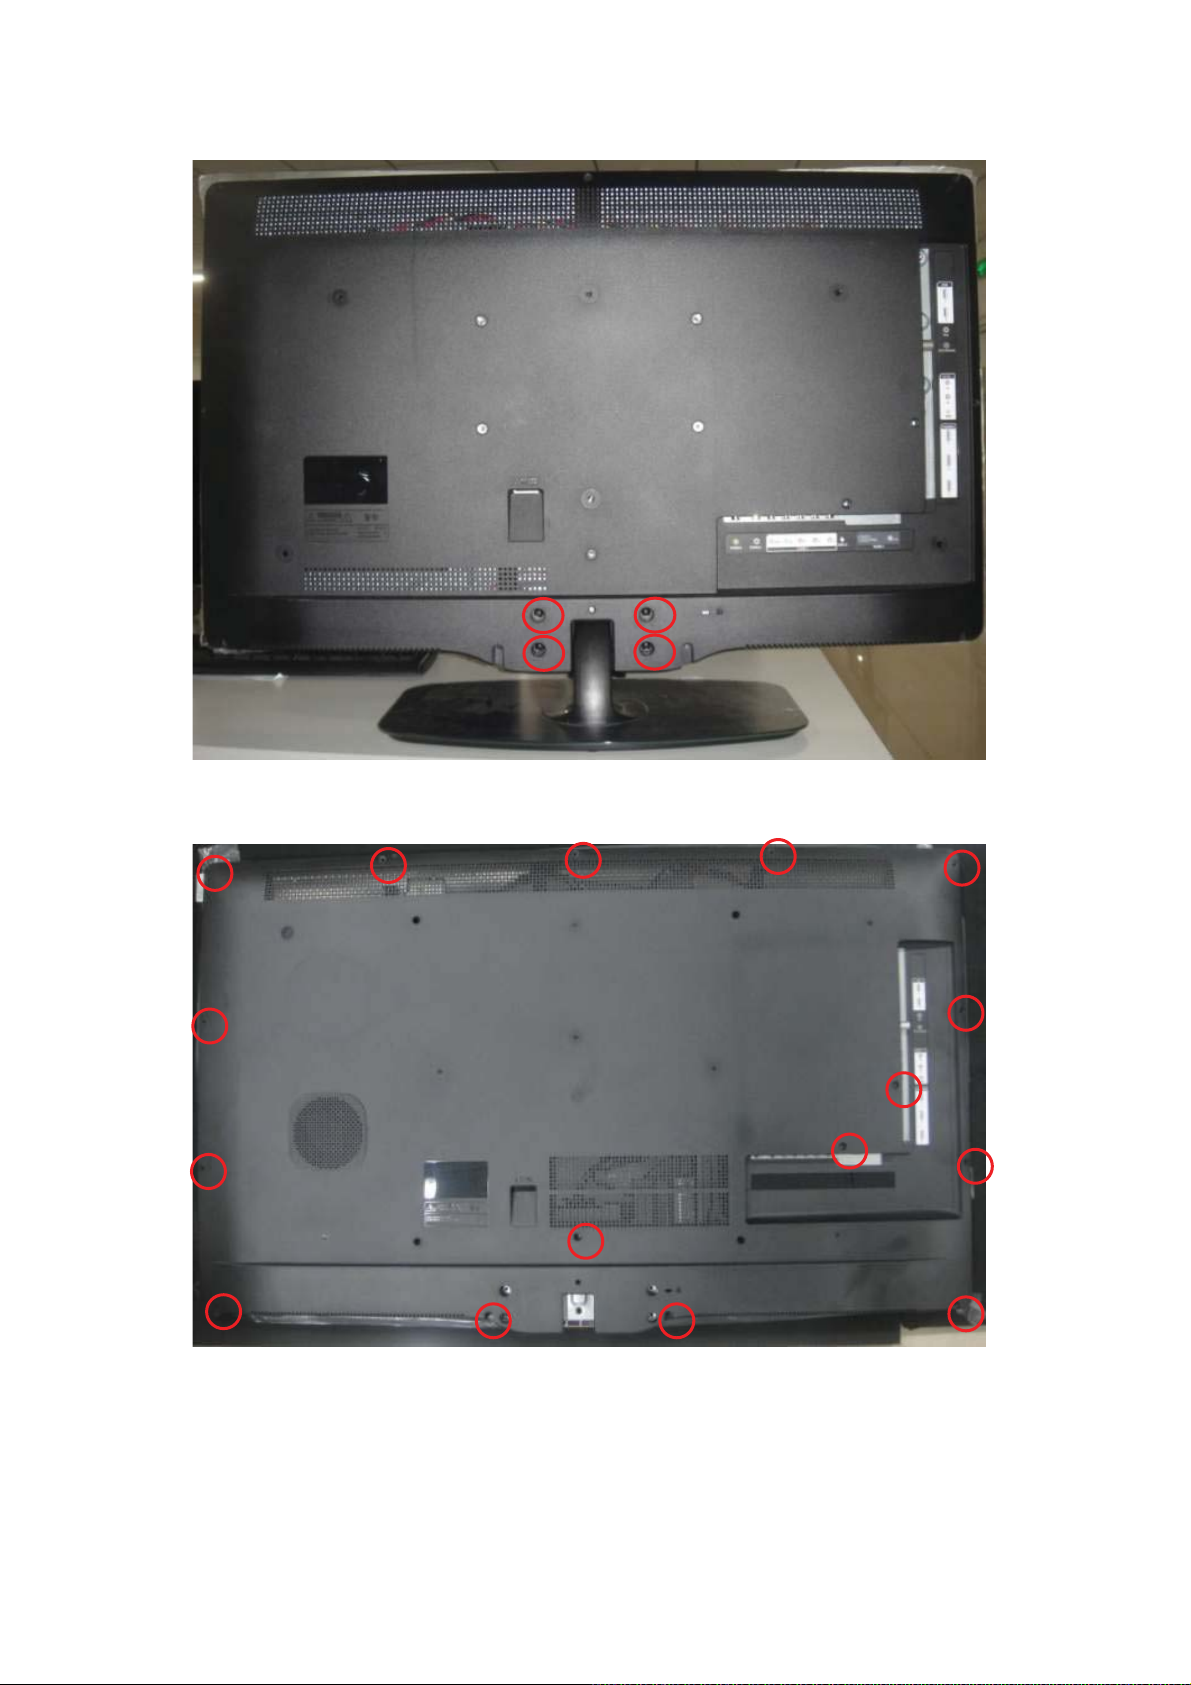
46PFL5556/V7
Step1: Unscrew the 4 screws to remove STAND
Step2: Unscrew the 16 screws to in red to remove REAR COVER
!
34
Page 35
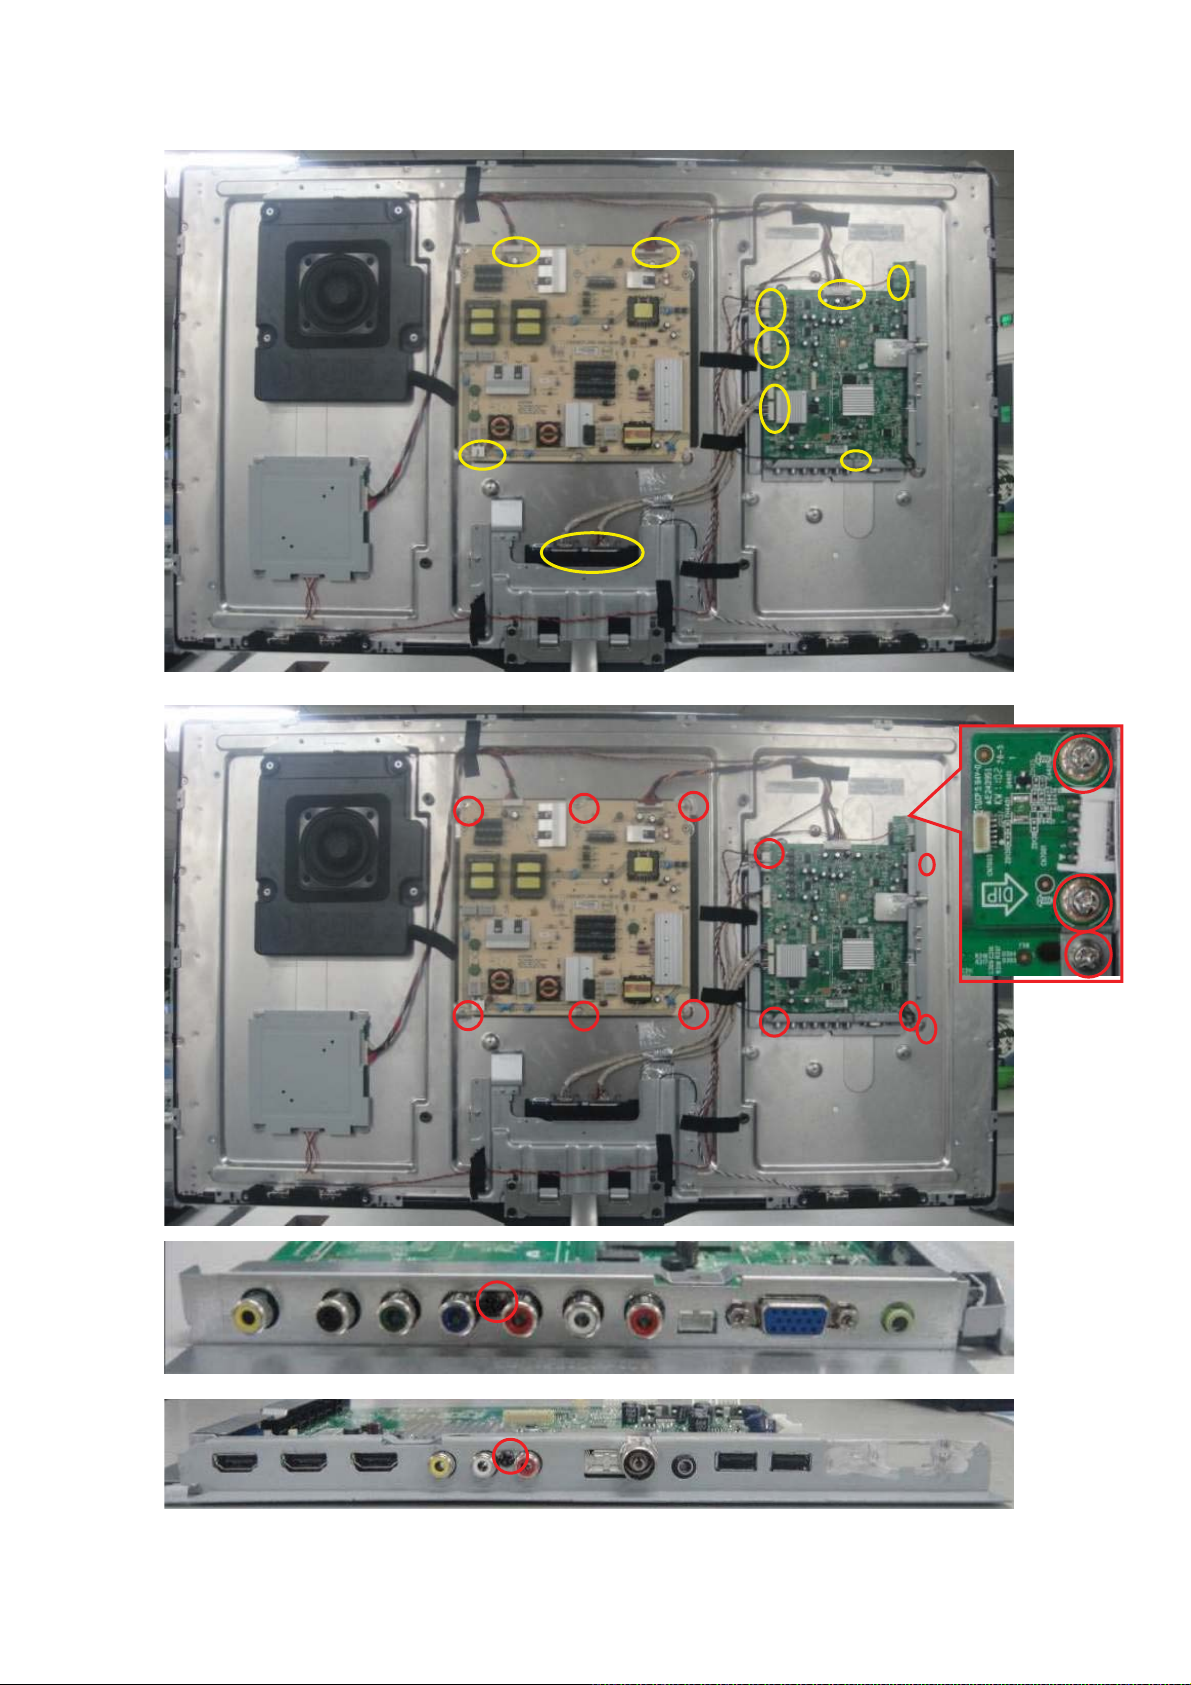
Step3: Disconnect the 14 WIRES in gre en and Unscrew 10 in red to remove MAIN BOARD/POWER
BOARD/INVERTER BOARD
!
35
Page 36
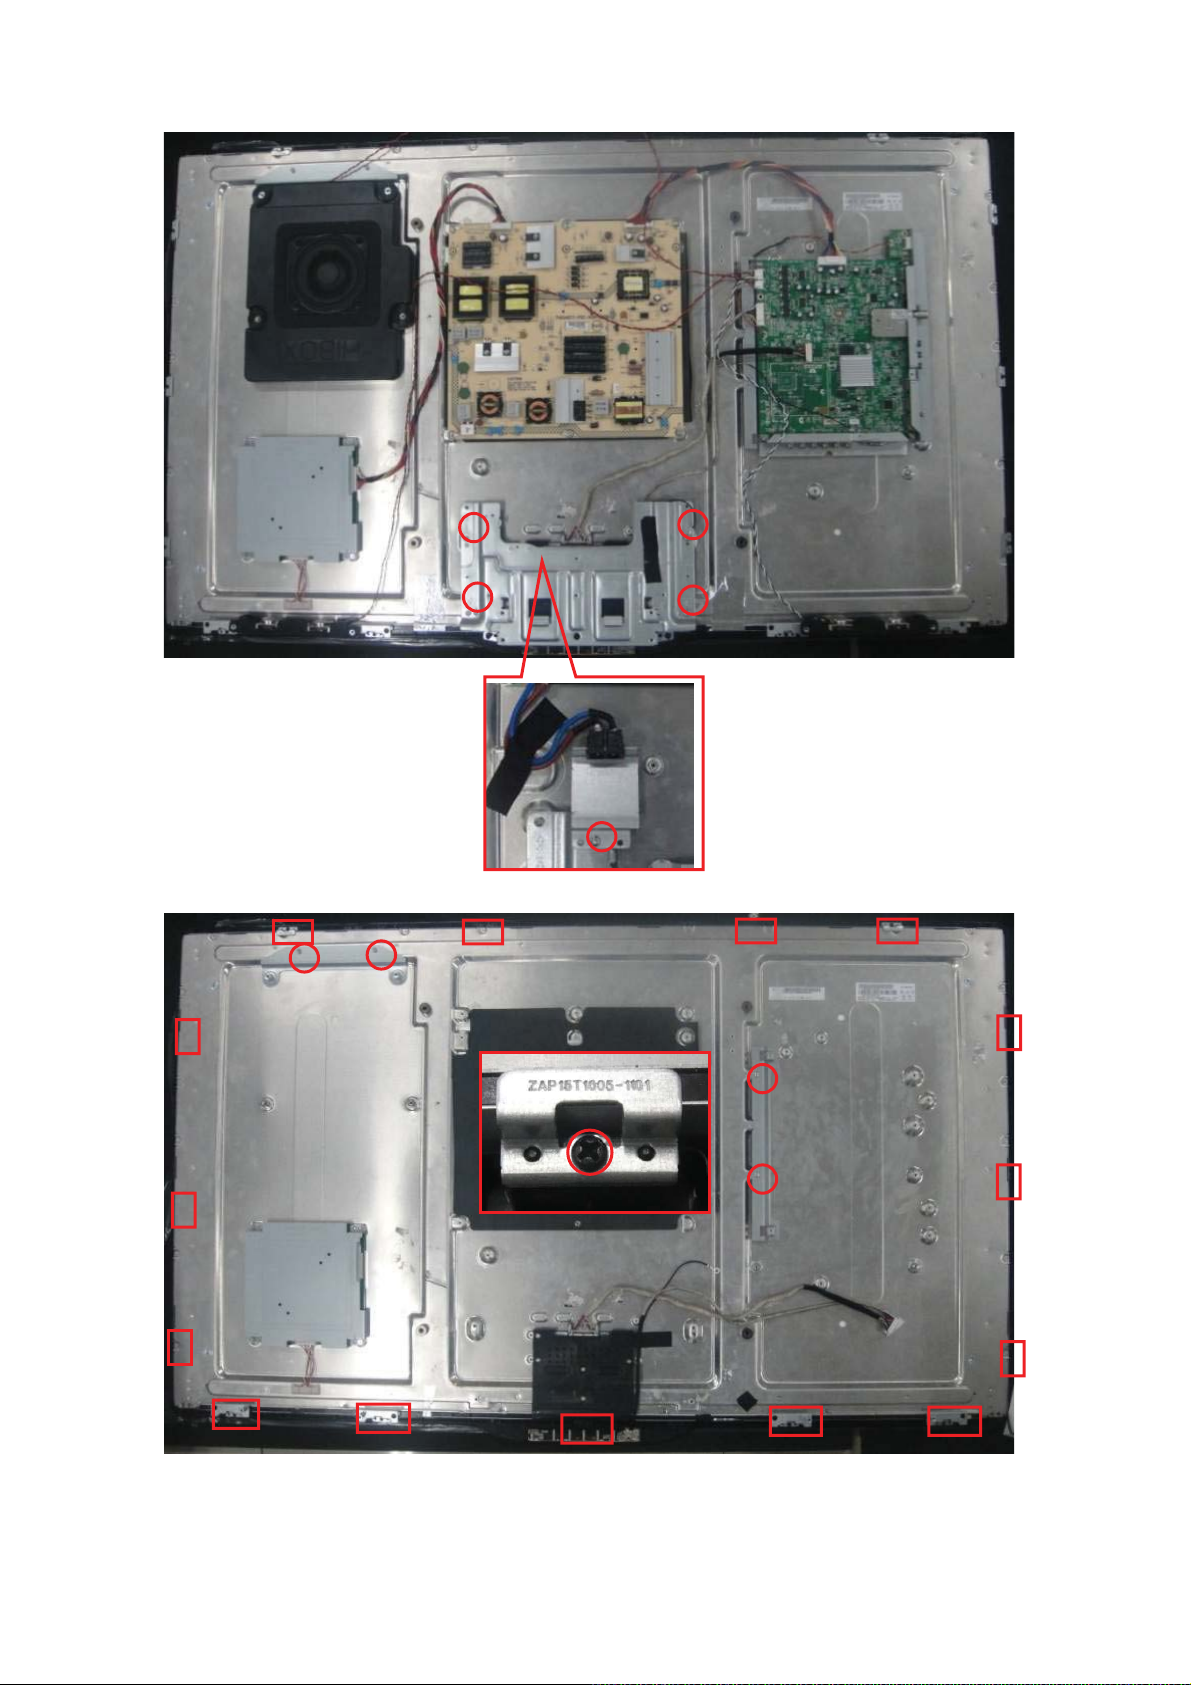
:
Unscrew the 15 screws and 4 screws to remove BKT and SMLBKT.
Step4
!
36
Page 37
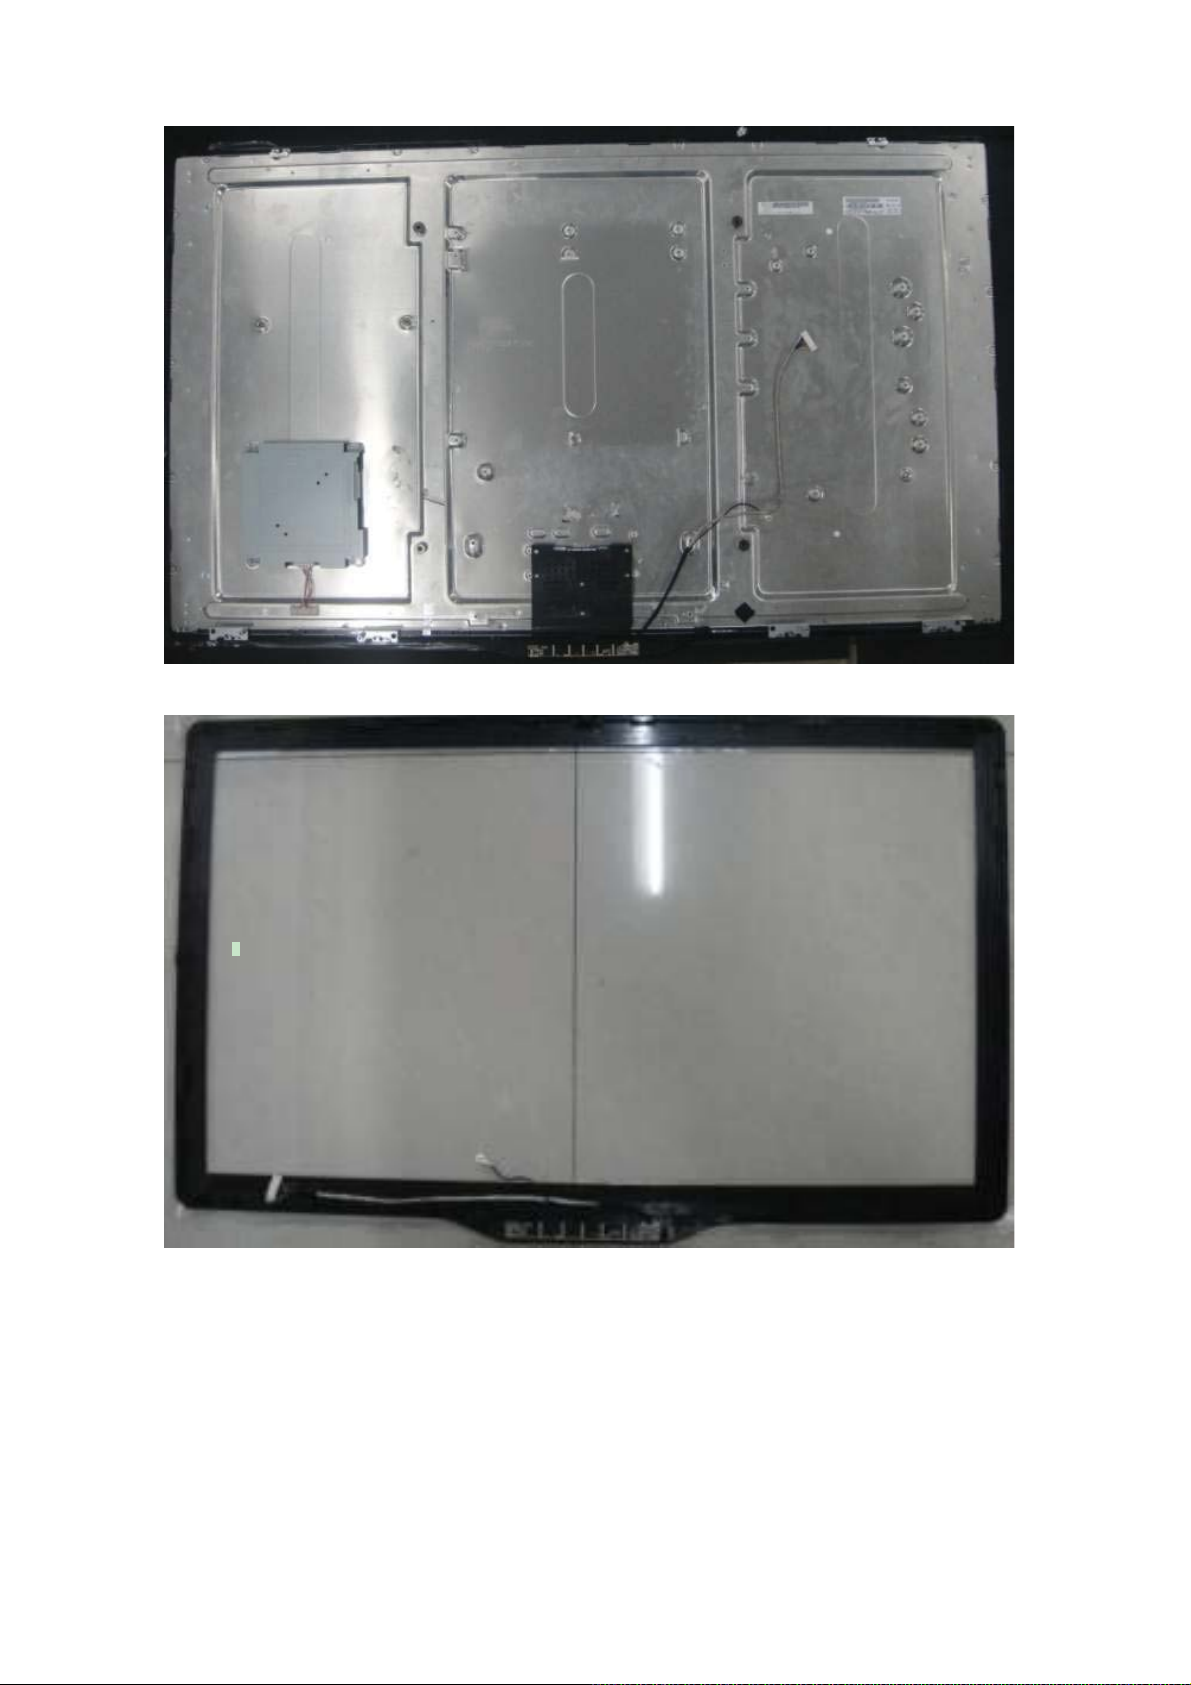
Step5: Removing panel and BEZEL.
!
37
Page 38
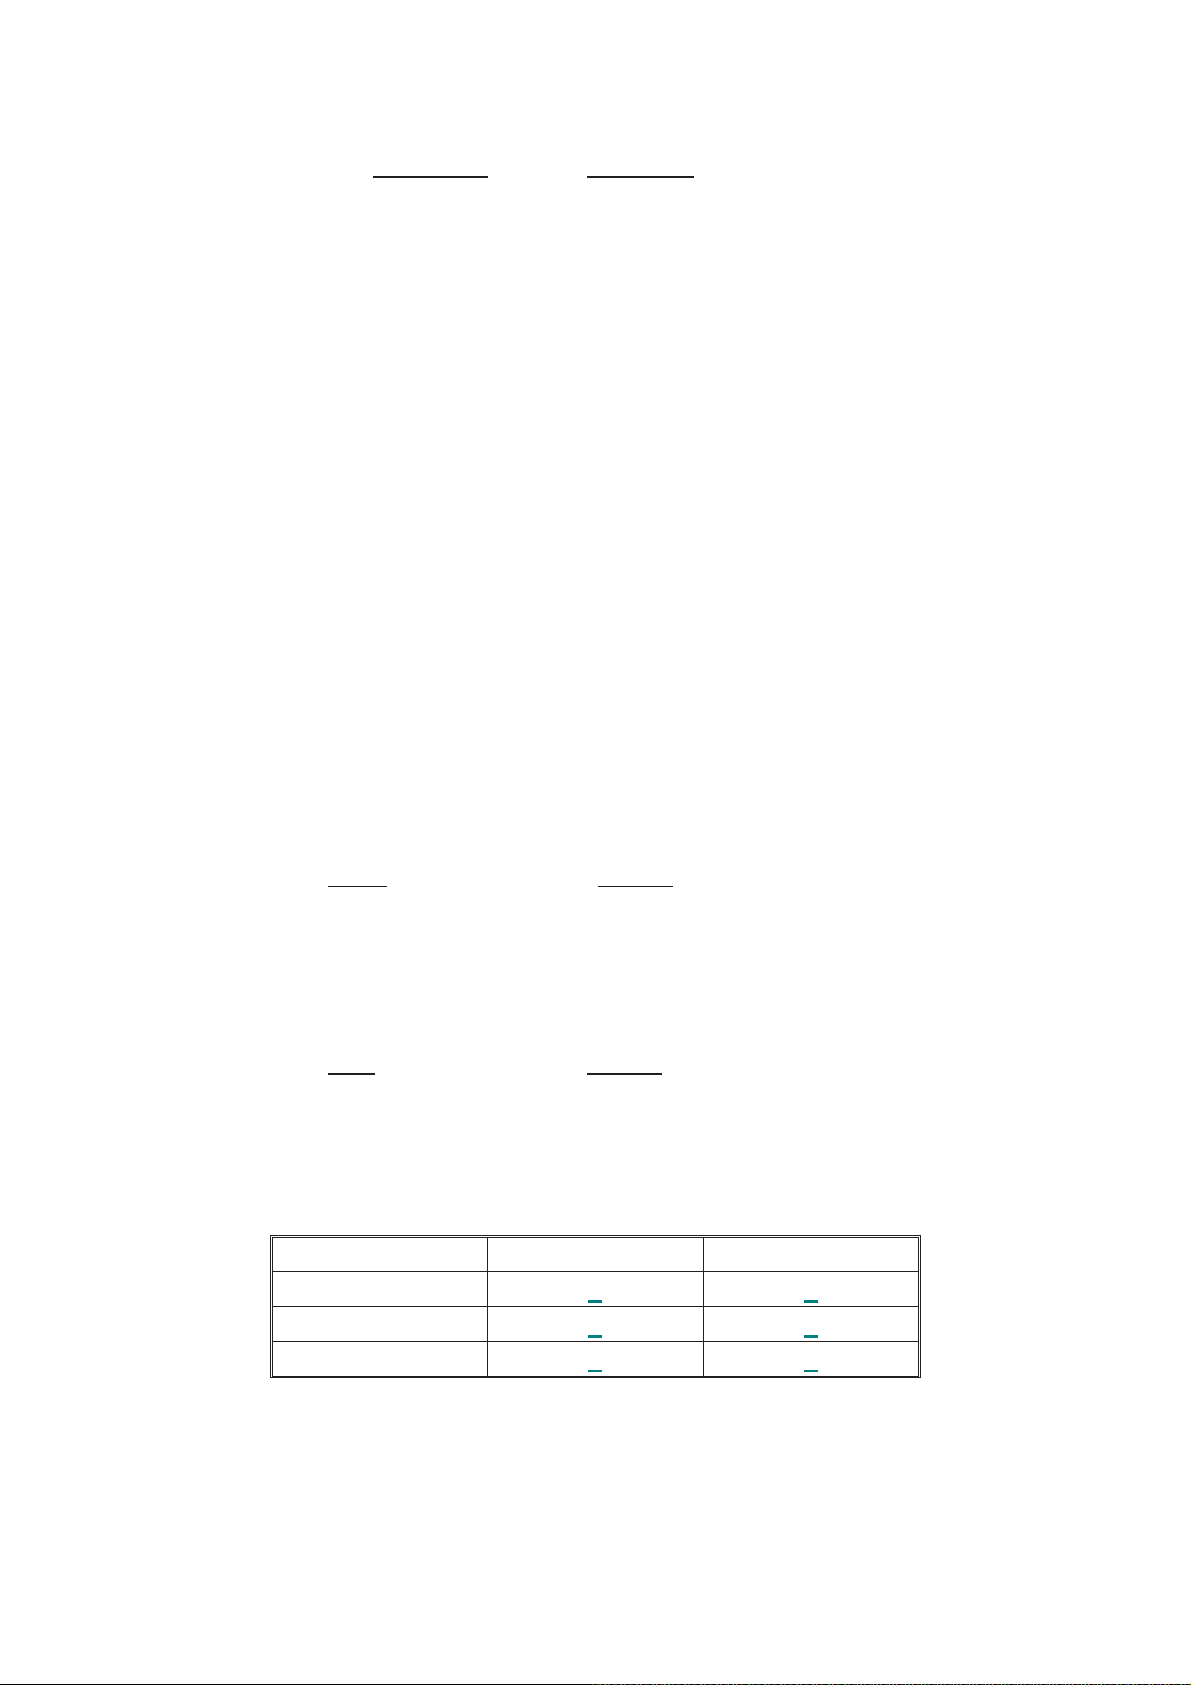
4. Factory Modes Adjustment
Introduction of adjust item:
They both need adjust ADC(Ypbpr&VGA
4.1 ADC Adjustment
1.Enter Factory Mode Method
Press RC key ‘menu’+’1’+’9’+’9’+’9’ or ‘menu’+’1’+’9’+’9’+’9’+’recall’.
2. ADC Adjustment Method
First of all: Enter factory mode(same as the above-mentioned).
Second : Select the Item of “Current Source”.
Third: Set Timing and Pattern of Source.
Finally : Press the item of “Auto Color” .
3. Set Timing and Pattern of Sources
1.They both need ADC adjust with two sources(YPbPr ,VGA).
2.Timing and Pattern Setting : YPbPr:Timing 314 pattern 185
VGA: Timing 137 pattern 42
) and WB( Ypbpr/VGA’s Normal/Warm/Cool ).
4.2 White Balance Adjustment
1. Enter into the factory mode:(same as the above-mentioned).
2.Take an example of adjust Ypbpr_Normal:
a.Select item”Source”: Ypbpr
b.Adjust gain of RGB to meet spec in the below setting of tim\pat.
(COMPONENT mode: TIM = 314; PAT = 141(80IRE))
3. Take an example of adjust VGA_Normal:
a.Select item”Source”: VGA
b.Adjust gain of RGB to meet spec in the below setting of tim\pat.
(VGA mode: TIM = 137; PAT = 141 (80IRE))
32PFL5356/V7&32&42&46PFL5556/V7 color Temp SpecΚ
and item “Color Temp”: Normal .
and item “Color Temp”: Normal .
Color Temp x y
Cool 0.272 + 0.010 0.278 + 0.010
Normal 0.285 + 0.010 0.293 + 0.010
Warm 0.305 + 0.010 0.315 + 0.010
!
38
Page 39
!
39
Page 40
!
40
Page 41
!
41
Page 42
!
42
Page 43
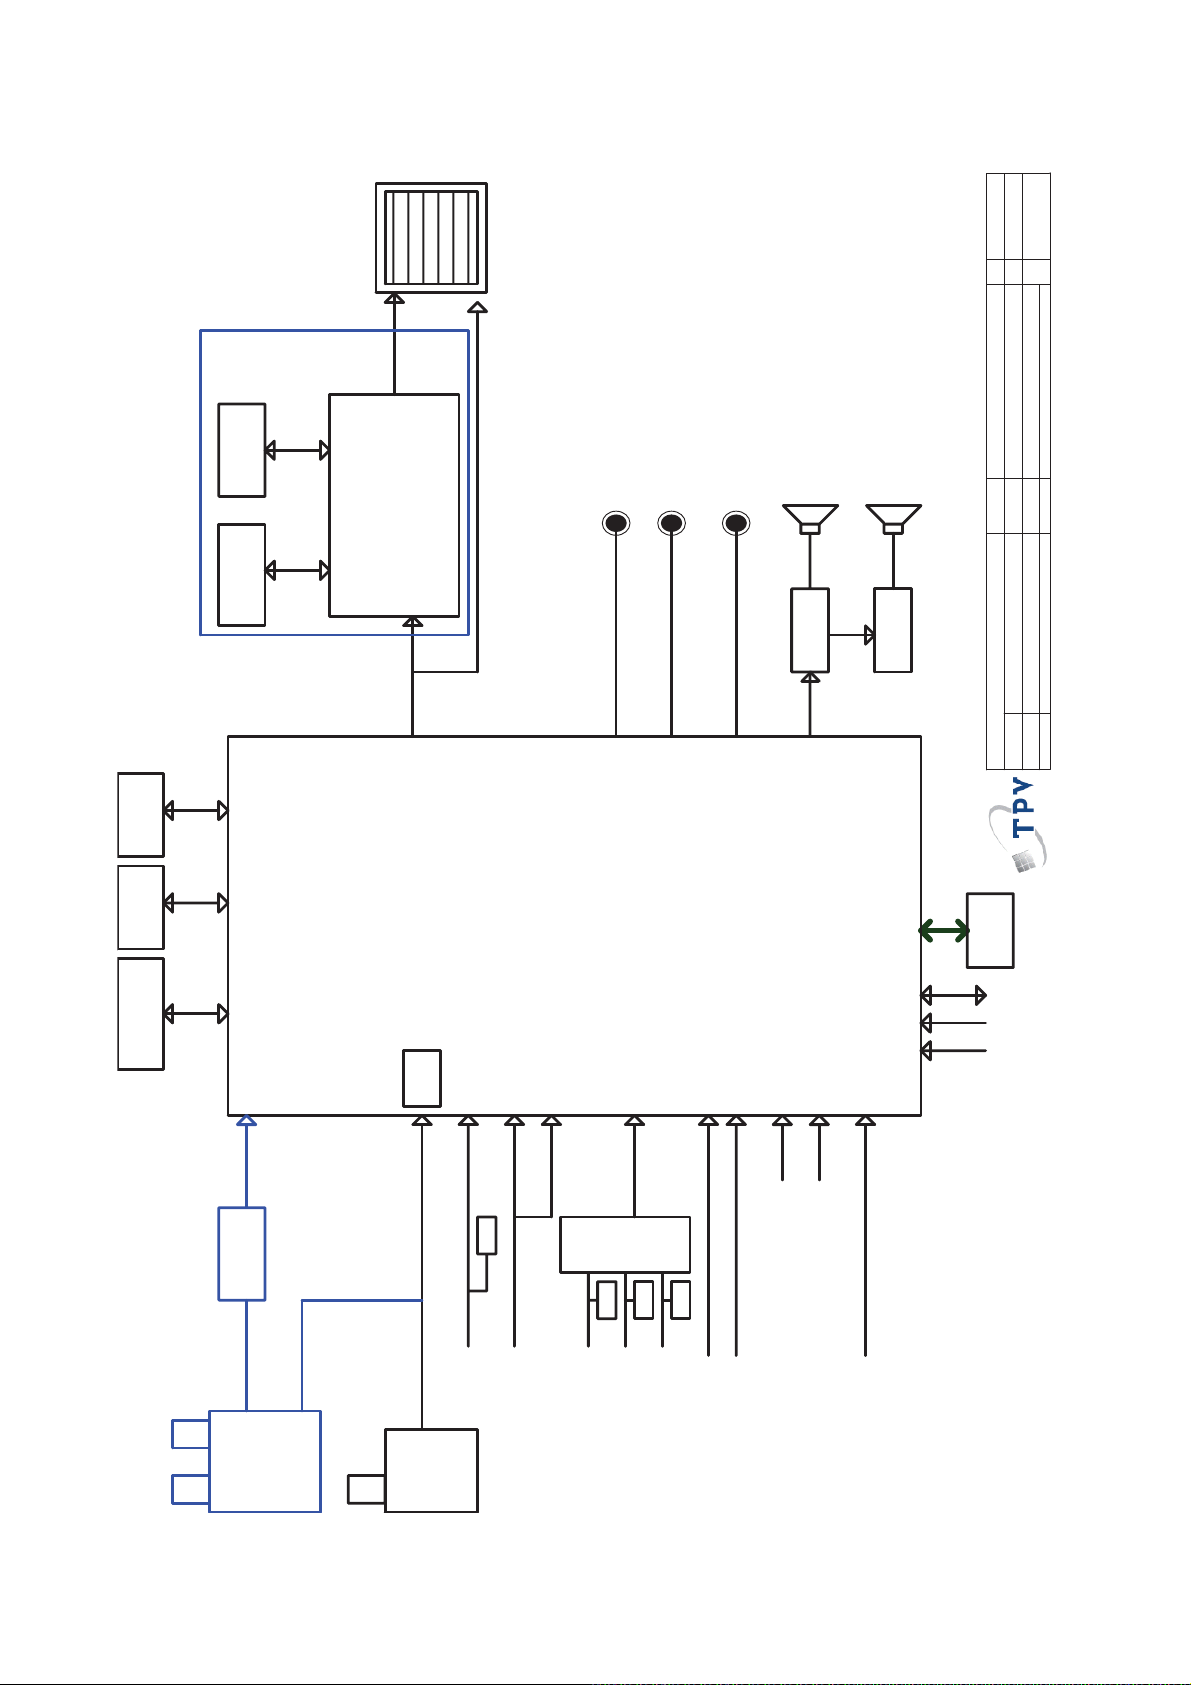
M0C
Custom
HW4
Size
Rev
LCD PA NE L T - CON
⿄⠍
LVDS ( 100/120 Hz)
NOR F LASH
4 Mb
MT8282
MEMC
DDR II X 2
1Gb / 1GHz
LVDS ( 50/60 Hz )
NAND FLA S H
256Mb
LVDS ( 50/60 Hz )
of
222Wednesday , March 02, 2011
SPK
CVB S / AV Out
H/Phone O ut
SPDIF
AUDIO AMP
Digital Audio Output(COIXI AL)
SPK
STA339BWTR
I2S
STA515W
WOOFER AMP
Sheet
PCB NAME
OEM MO D EL
TPV MOD EL
02. BLOCK DIAGR AM
㝍
㌾
⪰
T P V ( Top Victory Electronics Co . , Ltd. )
Date
䱨
㍀
Key Component
43
I2C
SPI FLASH
64Mb
NVM
24C32
MT5301B/D
1 Gb DDR2
ATV
DEMOD
24C02
DDC
CVBS
YPbPr
[RX0 : RX3]
TI
TMDS351
24C02
24C02
24C02
DDC
DDC
DDC
VIDEO ( By CVI Y connector)
CVI
HDMI1
HDMI2
HDMI3
AUDIO I N ( PC)
USB1
2.0
USB2
2.0
Side AV IN
Demodulator
TS (SERIAL)
ATBM8848
( RESERVE)
Analog IF+/-
Analog IF+/-
RGB
PC IN
Analog IF+/-
UARTKEY RC
HDMI 1.3
AUD IO R/L (CVI/CVBS)
ATV _RF
TUNER
ATV + DTV
RF TUNE R
TDTK-T052D
( RESERVE)
TDTK-G902D
6.Block Diagram
!
Page 44
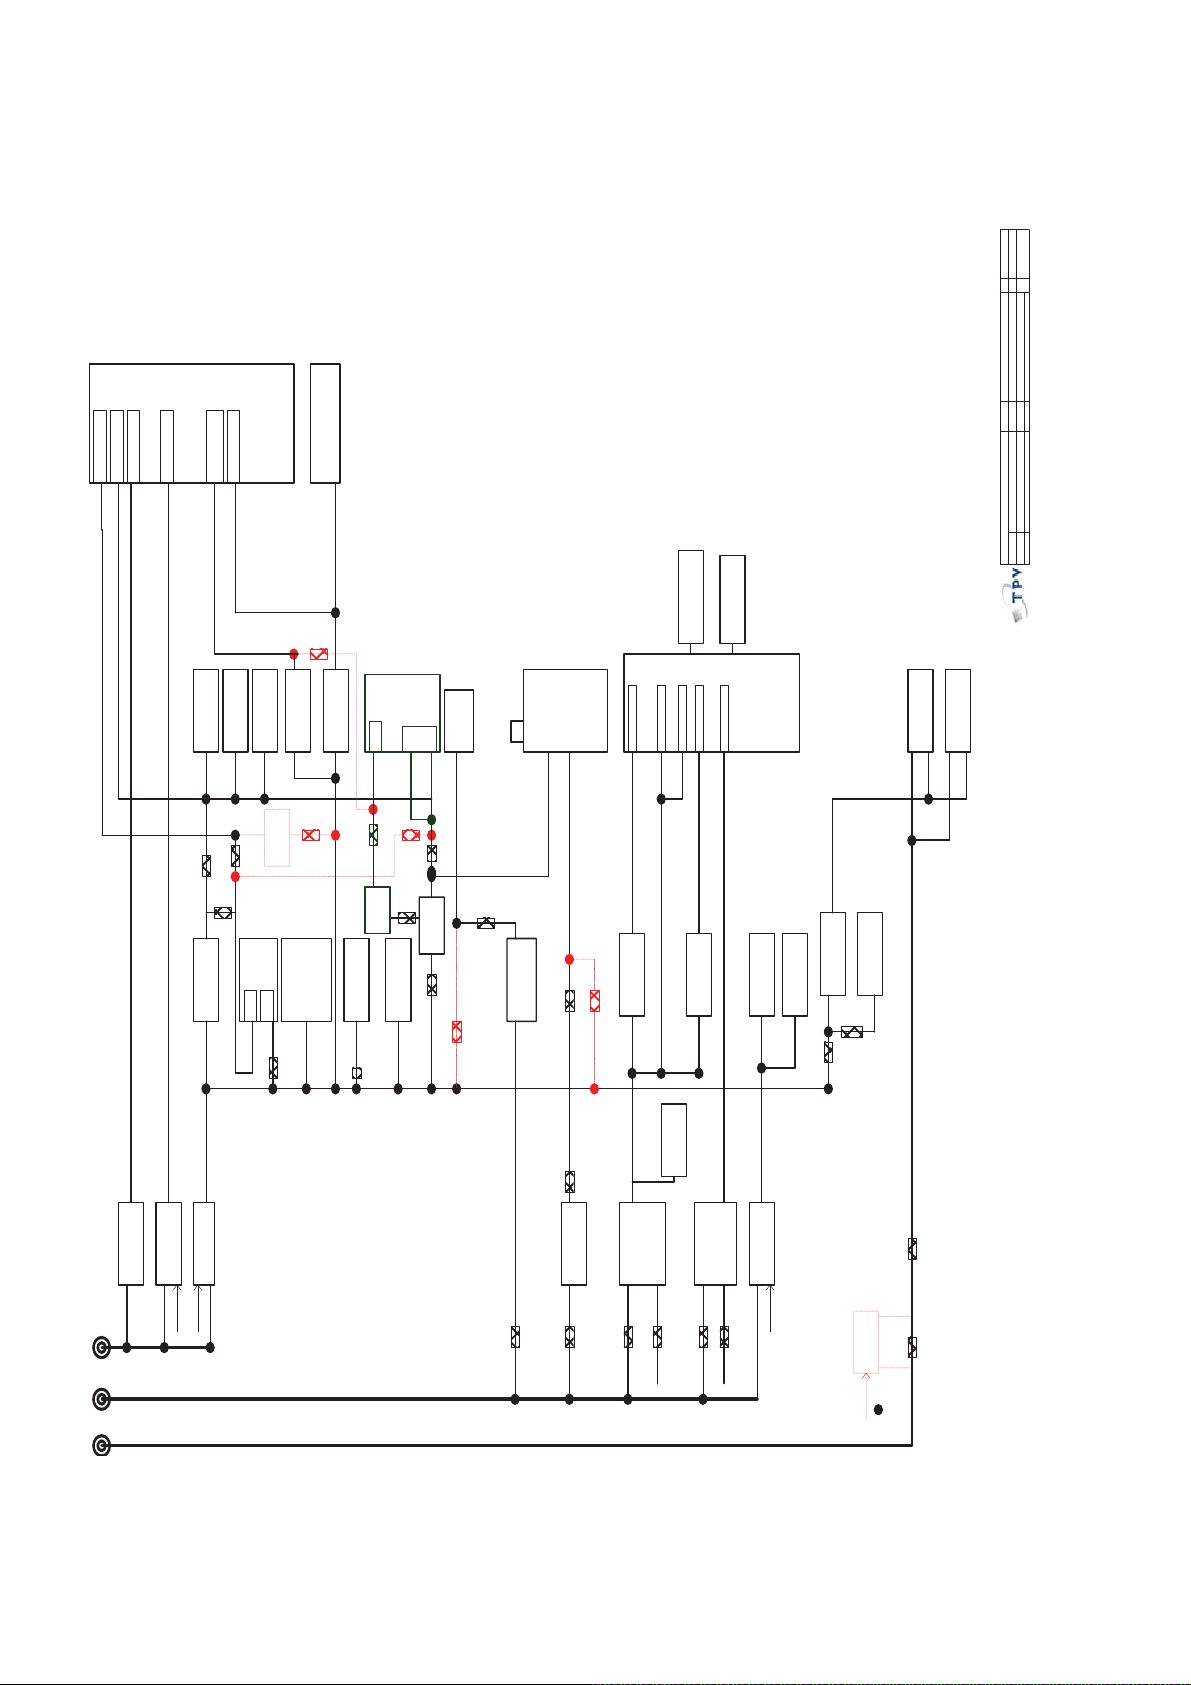
M0C
Custom
HW4
Size
Rev
⿄⠍
of
322Wednesday, March 02, 2011
Sheet
PCB NAME
OEM MODEL
TPV MODEL
U401
MT5301B/D
I AVDD33=540mA
I VCCK :2250 mA
I VCC3IO=200mA
I VCC3_STDBY=30mA
I VCC2IO=900mA
I AVDD12=400mA
DDR2
NT5TU64M16DG-BD
1Gb U402
DV33SB
DVDD3V3
VCCK (1.2V)
BUCK (1.5A)
SC189ASK
U706
BUCK (1.5A)
DDRV(1.5V)5V_SW5V_SW
SC189ASK
DDR2
NT5TU32M16CG-25C
512MB
DDR2
NT5TU32M16CG-25C
512MB
De_mod
ATBM8848
U101
USB Connect
CN103
U702
215mA
VDD1V2
CN104
83mA
VDD33
ASIC_3V3
VUSB_5V5V_SW
TU102
(ATV)
TU101
(A+D)
TUNER
+B_5V+12V
V3.3
I M82_AV12=65mA
I M82_AV33=155mA
M81_AV33
M82_AV12
AV12_PLL
I M82_DV33=27mA
M81_DV33
I M82_V10=928mA
I M82_DDRV=550mA
M81_DV11
M81_DDRV
U408
MT8282
STA339BWTR
+24_AMP
U6003
AUDIO AMP
Aud3V3
+24V_AMP
STA515W
U6005
DDRV(1V5)
AVDD1V2
NVRAM
M24C32
U405
Nor flash
MX25L6445
U404
NAND FLASH
HY27US08561A-TPCB
U403
DVDD3V3
DVDD3V3
ADAC_PWR
DVDD3V3
WOOFER AMP
Aud_3V3
02. BLOCK DIAGRAM
㝍
㌾
⪰
T P V ( Top Victory Electronics Co . , Ltd. )
Date
䱨
㍀
Key Component
M82_AV12_MEMPLL
44
3V3_BUCK
BUCK (1.5A)
SC189ASKTRT
5V_SW
G903T63UF
U709 (NC)
AVDD3V3
HDMI SW
TMDS351
U501
HDMI
EEPROM
M24C02
U502
5 mA
U701
200 mA
5VDD
5V_SW
DV33_TMDS
V1.2
V3.3
V3.3
G912T63U
U708
G903T63UF
U707
U505
U506
EEPROM
M24C02
U105
Audio in /SW
CD4052
U102
AMUX_5V
5V_SW
5V_SW
5V_USB
+B_5V
BUCK (3A)
AOZ1212AI
U703
5V_SW
M81_AV12
LDO
G1117T63UF
M81_AV33
M81_DDRV
U712
LDO
G1084-18
U713
120Hz
PANEL CON
M81_DV33
M81_DV33
PANEL_VCC
CN409
Aud3V3
LDO
G903T63UF
U607
MAX9728AETC+
U606
HP AMP
60Hz
PANEL CON
CN414
PANEL_VCC
5V_SW
+5V_TUNER
3V3SB5VSB LDO
VCCK(1.2V)
5V_SW DVDD3V3
FLASH
MX25L4005AMI
U4008
M81_DV33
M81_DV11
PANEL_VCC
+24_AMP
BUCK (2A)
G5657F12U
U711
Q709
+12V AO4449
LVDS_PWR_EN
NC/FB
5V_SW
+12V
G903T63UF
U705
BUCK (3A)
G5657F12U
5VSB
BUCK (2A)
G5657F12U
LDO
G9084TU3U
AO4449
Q707
U704
OPWRSB
5VSB
VCCK(1.2V)
U7007
+12V
U710
5V_SW
+12V
+12V 5VSB
AO4449
Q708
FB6003
+24_SW
D6003
+24
STANDBY
+24V
!
Page 45
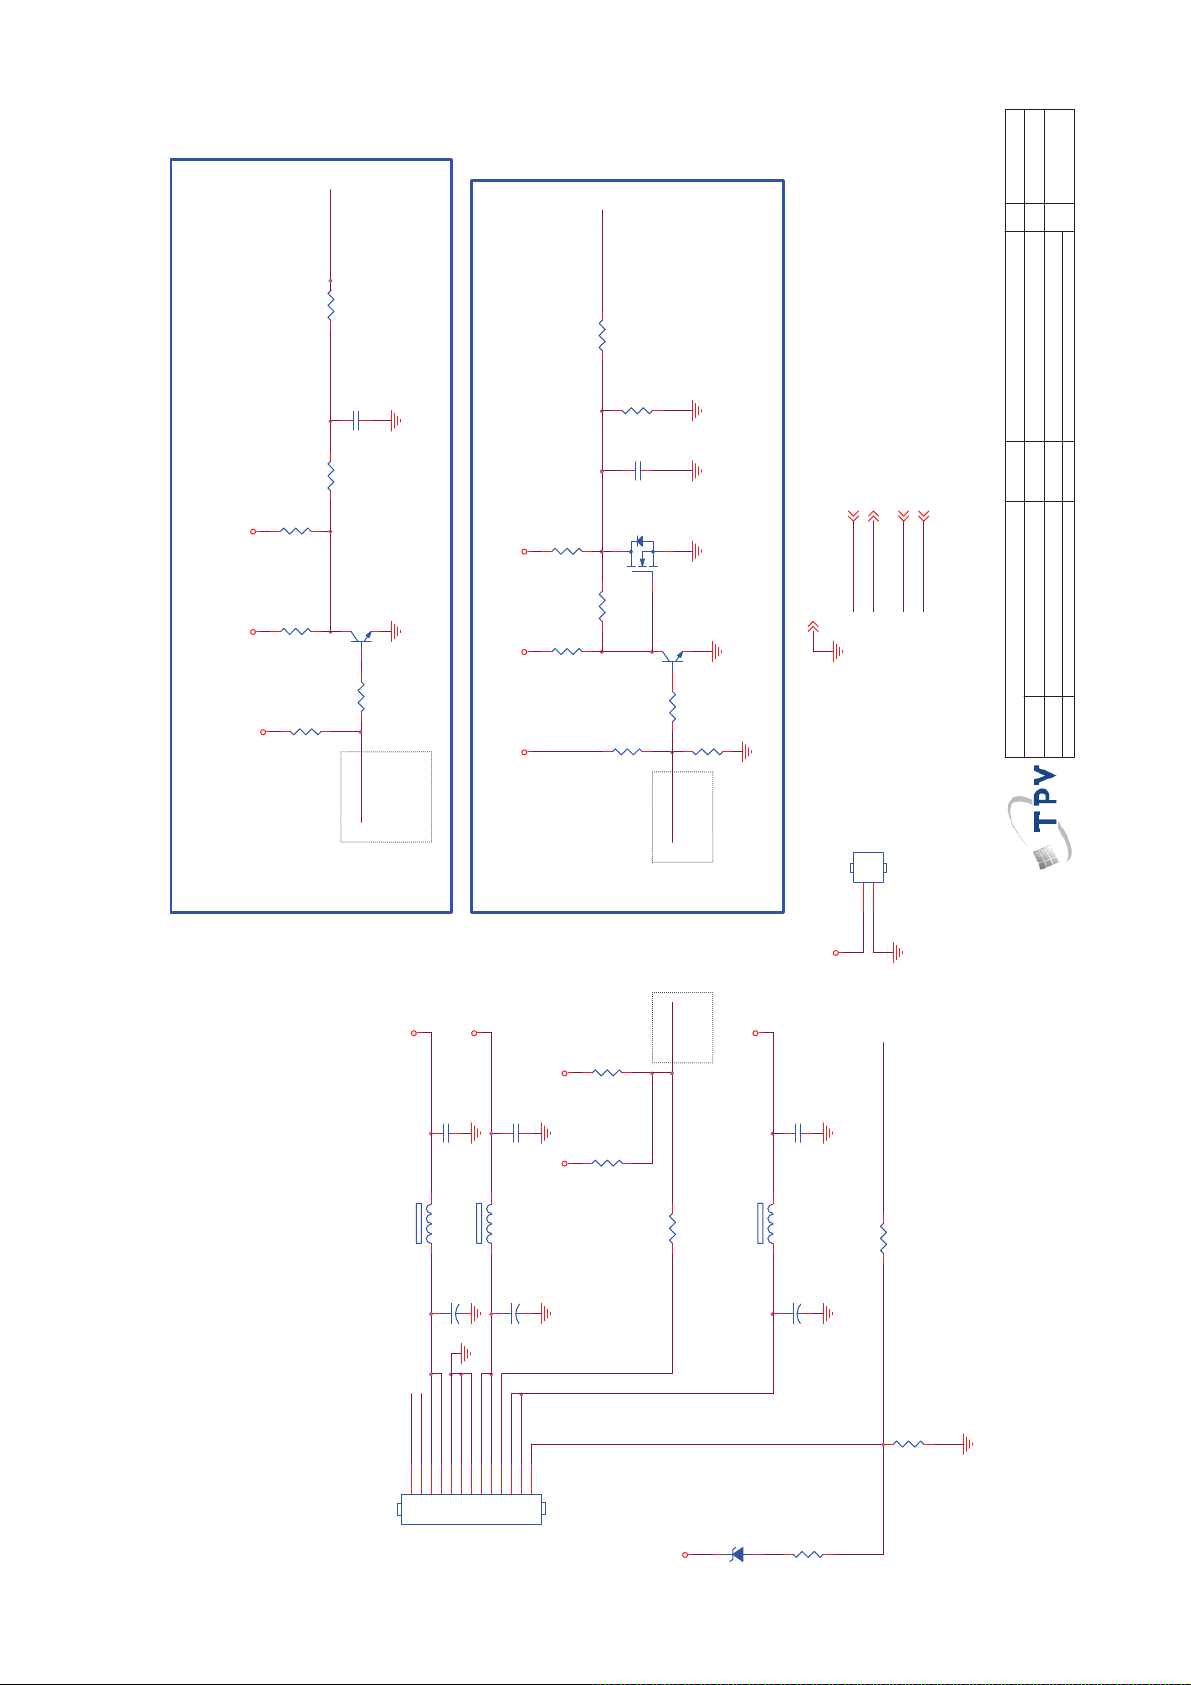
M0C
B
HW4
Rev
⿄⠍
BRI_ADJ
R752
0R05 1/10W
C708
NC/1UF 10V
R710
0R05 1/16W
R709
1K 1/16W 5%
3V3_BUCK
5V_SW
BL_CTRL
R751
0R05 1/10W
R711
47K 1/16W 5%
C707
100N 16V
BL_ON/OFF# 12
BL_DIM_PWM 12
PWR_OK 12
STANDBY 12,18
Q702
R706
2.2K 1/16W
NC\2N7002
of
422Wednesday , March 02, 2011
Sheet
PCB NAME
OEM MODEL Size
TPV MO DEL
R708
NC\2.2K 1/16W
5V_SW
Q703
PMBS3904
5VSB
R707
4K7 1/16W 5%
10K 1/16W 5%
R746
DVDD3V 3
R705
0R05 1/16W
R704
NC\2.2K 1/16W
Q701
PMBS3904
R703
10K 1/16W 5%
R702
R744
10K 1/16W 5%
NC\ 10K 1/ 16W 5%
STANDBY
GND 5,6,7,8,9,10,11,12,13,14,15,16,17,18,19,20,21,22
5VSB
BL_DIM_PWM
0% : Max Luma
99% : Min Luma
PWM Cont r ol
Brightness Adjust
Backlight On/Off
BL_ON/OFF#
H : BL_OFF
L : BL_ON
CN416
BL_ON/OFF#
BL_DIM_PWM
PWR_OK
04 PSU & Inverter I/F
㝍
㌾
⪰
T P V ( Top Victory Electronics Co . , Ltd. )
Date
䱨
㍀
Key Component
45
NC/CONN
1
2
+12V
+12V
+24V
R764
STANDBY
NC\1K 1/16W 5%
DVDD3V 3
C704
C702
100N 50V
100N 50V
R765
NC\1K 1/16W 5%
5V_SW
5VSB
H : ON
L : Standby
PWR_OK
C706
10U 10V
CN701
LIPS I nt e r face
7. Schematic Diagram
7.1 Main Board
715G4611M0E000004K
FB701
BL_CTRL
12345678910111213
FB702
120R/6000mA
1 2
BRI_ADJ
120R/6000mA
1 2
C701
100UF 25V
C703
+
100UF 35V
+
R712
0R05 1/10W
CONN
+12V
FB703
120R/6000mA
1 2
C705
100UF 25V
+
R769
1K2 1/10W 5%
ZD139
RLZ5.6B
1 2
R750
0R05 1/10W
R701
1.2K 1/16W
!
Page 46
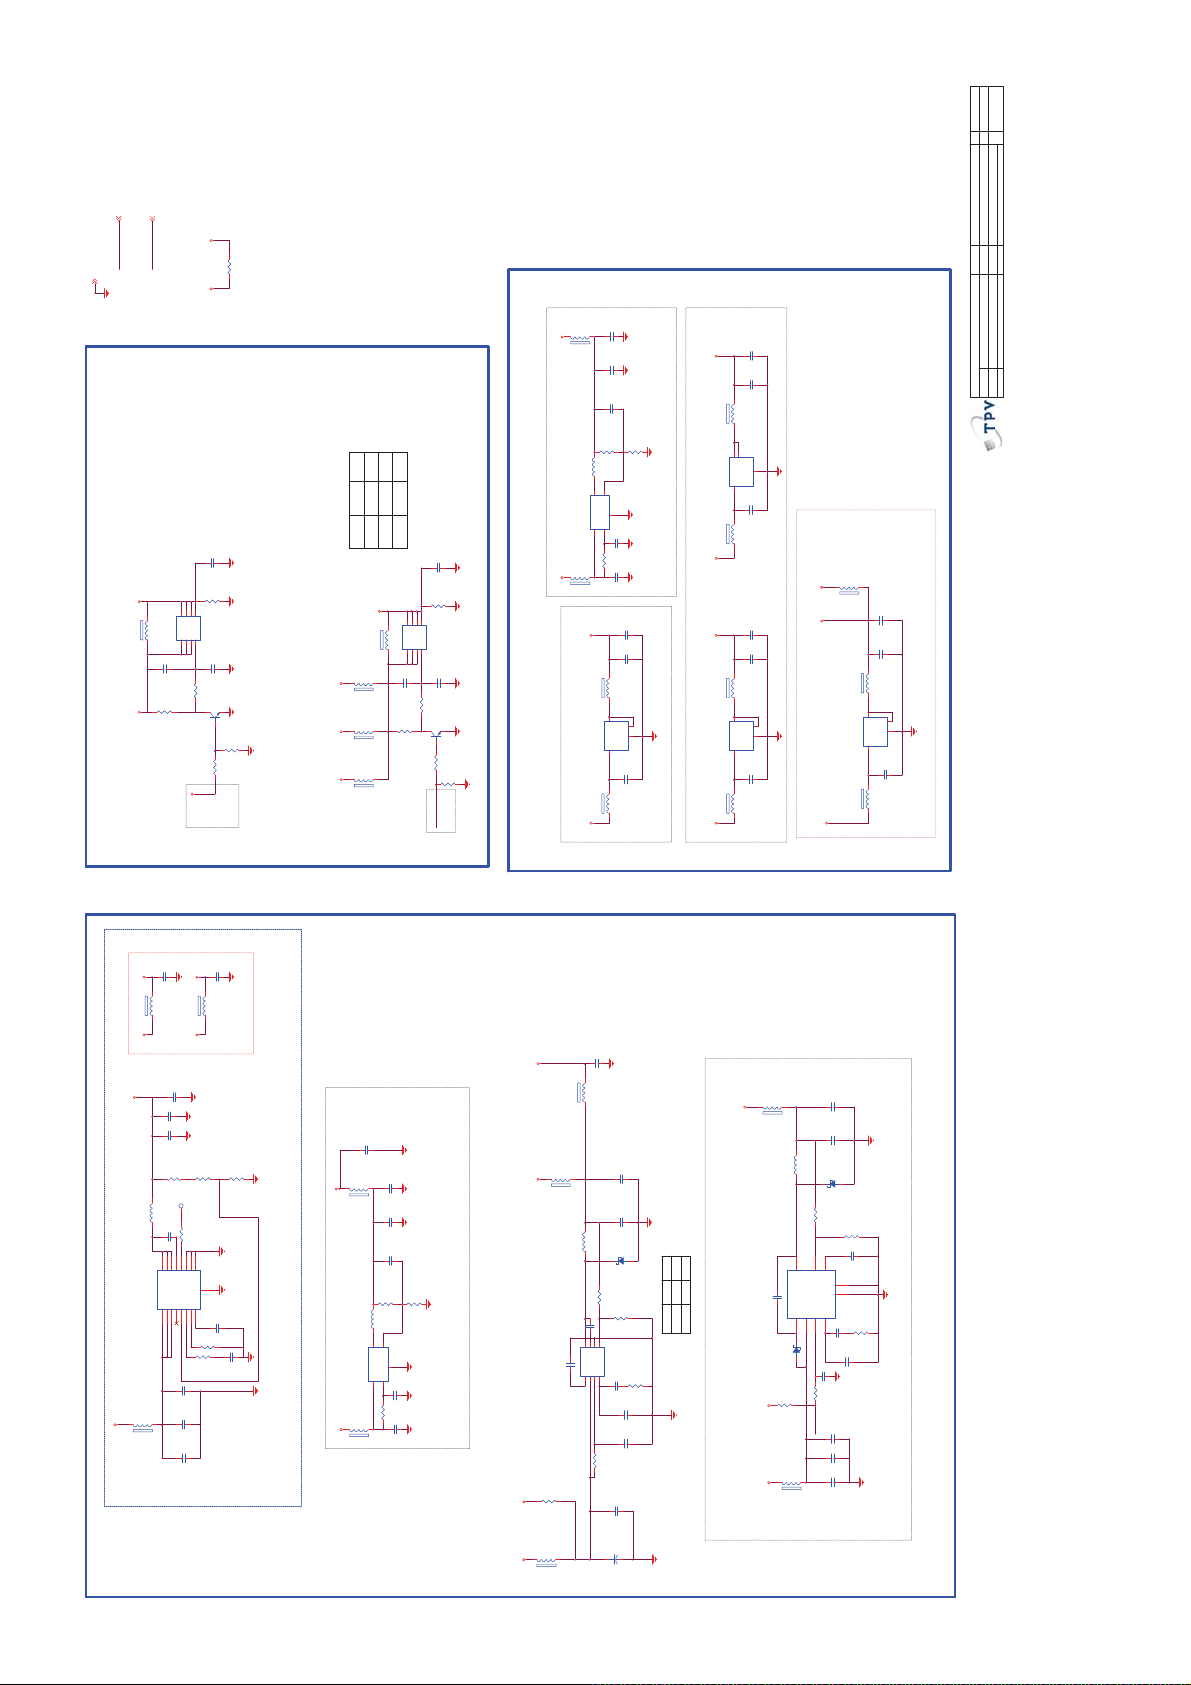
M0C
D
HW4
⿄⠍
Rev
OPWRSB 12
LVDS_PWR_EN 12
5VESD
LVDS_PWR_EN
OPWRSB
GND 4,6,7,8,9, 10,11,12,13,14,15, 16,17,18,19,20,21, 22
R753
10K +-1% 1/16W
5VSB
C766
10U 16V
FB730
120R/3000mA
1 2
AVDD1 V2
C765
10U 16V
SoC_A VDD1 V2 = 400 mA
C755
10nF50V
R748
10K +-1% 1/16W
R749
2K 1%
NC
YES
NCNC
12V panel5V panel
YES
NC
FB712
FB713
C710
100N 50V
R717
5V_SW
FB707
1 2
NC\120R/6000m A
5VSB
Power MOSFET Switch
System Power Control
10K 1/16W 5%
5
D8D7D6D
Q707
AO4449 -7A/-30V
S1S2S3G
4
C709
NC\470nF 16V
C762
R716
1UF16V
22K 1/16W 5%
Q704
R715
PMBS3904
10K 1/16W 5%
R714
10K 1/16W 5%
R713
1K 1/16W 5%
VCCK
1V2: ON
0V: STA NDBY
5V_BUCK5VSB +12V
Panel Logic Power Control
FB711
C716
100N 50V
R723
LVDSVDD
FB714
FB713
120R/6000mA
1 2
FB712
NC/120R/6000mA
1 2
FB711
NC\120R/6000m A
1 2
10K 1/16W 5%
5
D8D7D6D
Q709
S1S2S3G
AO4449 -7A/-30V
4
1 2
NC/120R/6000m A
C715
NC\220NF 25V
C714
220NF 25V
R726
56KOHM 1/16W
R725
56KOHM 1/16W
Q706
PMBS3904
R724
1K 1/16W 5%
R727
10K 1/10W
L: Off
H: On
LVDS_PWR_EN
LDO Regulator
L705
2.2uH
5
4
LX
VOUT
GND
2
VIN1EN
U706 SC189ASKTRT
3
Analog Power : AVDD1V2
C754
10nF50V
C753
10U 16V
R747
FB729
120R/3000mA
1K 1/16W 5%
1 2
5V_SW
3V3SB
FB728
U705
G903T63UF
FB727
5VSB
STBY Power : 3V3SB
V1 = 1+ (2/10) = 1.2
Vo = 1+ (R749/R748)
C752
10U 16V
C751
10U 16V
120R/3000mA
1 2
Vout=Fixed 3.3V
Total = 110 mA.
2
4
4
GND
VOUT
1
VIN
3
C750
1UF 10V
120R/3000mA
1 2
SoC_X'TAL = 80 mA; SoC_3V3_STBC = 30 mA;
C761
NC\10U 16V
V1.2
C760
NC\10U 16V
FB734
NC\120R/3000m A
1 2
Vout=Fixed 1.2V
2
4
4
VO
GND
1
U708
VI
G912T63U G903T63UF
3
C759
NC\1UF 10V
FB733
NC\120R/ 3000mA
1 2
V3.3
Demod 1V2 Power : V1.2
V3.3
5V_SW
Demod 3V3 Power : V3.3
Demod_1V2 = 210mA
C758
NC\10U 16V
C757
NC\10U 16V
FB732
NC\120R/3000m A
1 2
Vout=Fixed 3.3V
2
4
4
GND
VOUT
1
U707
VIN
3
C756
NC\1UF 10V
FB731
NC\120R/3000m A
1 2
Demod_3V3 = 85mA.
FB737
120R/3000mA
1 2
AVDD3V3
C767
ADAC_PWR
5V_SW
Reserved for ADAC_PWR
NC\10U 16V
C763
NC\10U 16V
FB735
NC\120R/3000m A
1 2
Vout=Fixed 3.3V
2
4
4
GND
VOUT
1
U709
NC/G903T63UF
VIN
3
C764
NC\1UF 10V
FB736
NC\120R/3000m A
1 2
of
522Wednesday, March 02, 2011
Sheet
PCB NAME
OEM MODE L Size
TPV MODE L
05. DC-DC BU CK & LDO Regulator
㝍
㌾
⪰
Date
T P V ( Top Victory Elect ronic s C o . , Ltd. )
䱨
㍀
Key Component
46
C723
C722
DVDD3V 3
FB716
120R/3000mA
1 2
3V3_BUCK
3V3_BUCK
C721
C720
L701
1.5UH
3V3 Main Power :
U701
TPS54319RTE
16
FB715
120R/6000mA
1 2
5V_SW
DC-DC Buck &Converter
1UF 10V
1UF 10V
AV DD3V3
AMP = ? mA
FB717
120R/3000mA
1 2
3V3_BUCK
HDMI_SW = 1 20 mA
SoC_AVDD3V3 = 74 0 mA
5V_USB
C7001
100N 16V
22uF 10V
22uF 10V
R730
300R 1/16W 1%
R767
100K 1%
R766
33K 1%
TP708
C799
0.1UF 16V
R772
100K 1/16W 5%
4
12
13
5
14
PH10PH11PH
GND3GND
BOOT
AGND
PwPd
PWRGD
17
VIN1VIN
VSNS6COMP7RT/CLK8SS
EN15VIN
2
9
C738
0.1UF 16V
180K 1%
R729
7K5 1/16W 5%
R728
C713
3.3nF 50V
C717
10uF 10V
C719
NC/22uF 10V
C718
100N 16V
Vout=0.827x (1+ 100.3K/33K) = 3. 34V for DVDD3V3 & AVDD3V3
DDRV
1V8 or 1V5 DDR Power : DDRV
5V_SW
C7003
22UF
C728
10uF 16V
FB719
120R/3000mA
1 2
C727
10U 16V
DDR2 = 650mA
DDR3 = 900mA
C726
10nF50V
R733
10K +-1% 1/16W
R732
8.2K 1%
R732 = 2.7K --> 8.2K
L702
2.2uH
5
4
LX
VOUT
GND
VIN1EN
U702 SC 189ASKTRT
3
R731
FB718
120R/3000mA
1K 1/16W 5%
1 2
R732 = 2.7K --> 5.2K
2
C725
10nF50V
C724
10U 16V
V1 = 1+ (8.2/10) = 1.82
V2 = 1+ (5.2/10) = 1.52
Vo = 1+ (R732/R733)
FB725
FB723
120R/3000mA
1 2
5V_BUCK
L703
C734 1uF 25V
U703 AOZ1212AI
12V5 or 5V2 Main Power (3A)
R768
NC\0.68 OHM +-5% 2WS
+24V_USB
FB721
120R/3000mA
1 2
+12V
MUX = ? mA
C739
1UF 10V
C749
120R/3000mA
1 2
USB2.0 = 1000mA
R736 = 220K
C737
10U 16V
C736
10uF 16V
10uH
D702
SX34
R736
82K 1/16W
R737
C735 100N 50V
4
1
2
3
LX
FB
BST
GND
COMP5EN6VIN7VBIAS
C733
1N 50V
8
C732
C731
R734
47K 1/16W 5%
C730
1uF 50V
C729
100UF 25V
+
R736 = 82K
Vo = 0.8 * (1+ R736/R737)
V1 = 0.8 * (1+ 220/15) = 12.5
V2 = 0.8 * (1+ 82/15) = 5.17
1 2
15K
220K82K
12V55V2
15K 1%
R736
R737 15K
R735
20K 1/16W
180pF 50V
1uF 50V
FB746
120R/3000mA
VCCK
Soc Core Power : 1.15V (3A)
C746 NC\10N 50V
U704
G5657F12U
3V3SB
5VSB
10U 16V
1 2
C748
10U 16V
SoC_1V2 = 2250mA
L704
47uH
D704
SX34
1 2
R743
2.7K 1/16W 1%
R742
10K +-1% 1/16W
R743 = 2.7K --> 2.43K
3
8
C747
LX
FB5SS
100N 16V
Thermal Pad
9
GND
4
IN2EN7COMP6NC
1
C745
2.2nF 50V
R741
12KOHM +-5% 1/16W
C744
D703
NC\RB160M-60TE25
R745
1K 1/16W 5%
FB726
120R/6000mA
180pF 50V
1 2
C743
R740 4K7 1/16W 5%
100N 16V
OPWRSB
C7002
NC\100N 16V
C742
10uF 16V
C741
10uF 16V
1 2
Vo = 0.925*(1+R743/R742) = 0.925*(1+2.43/10) = 1.15
!
Page 47
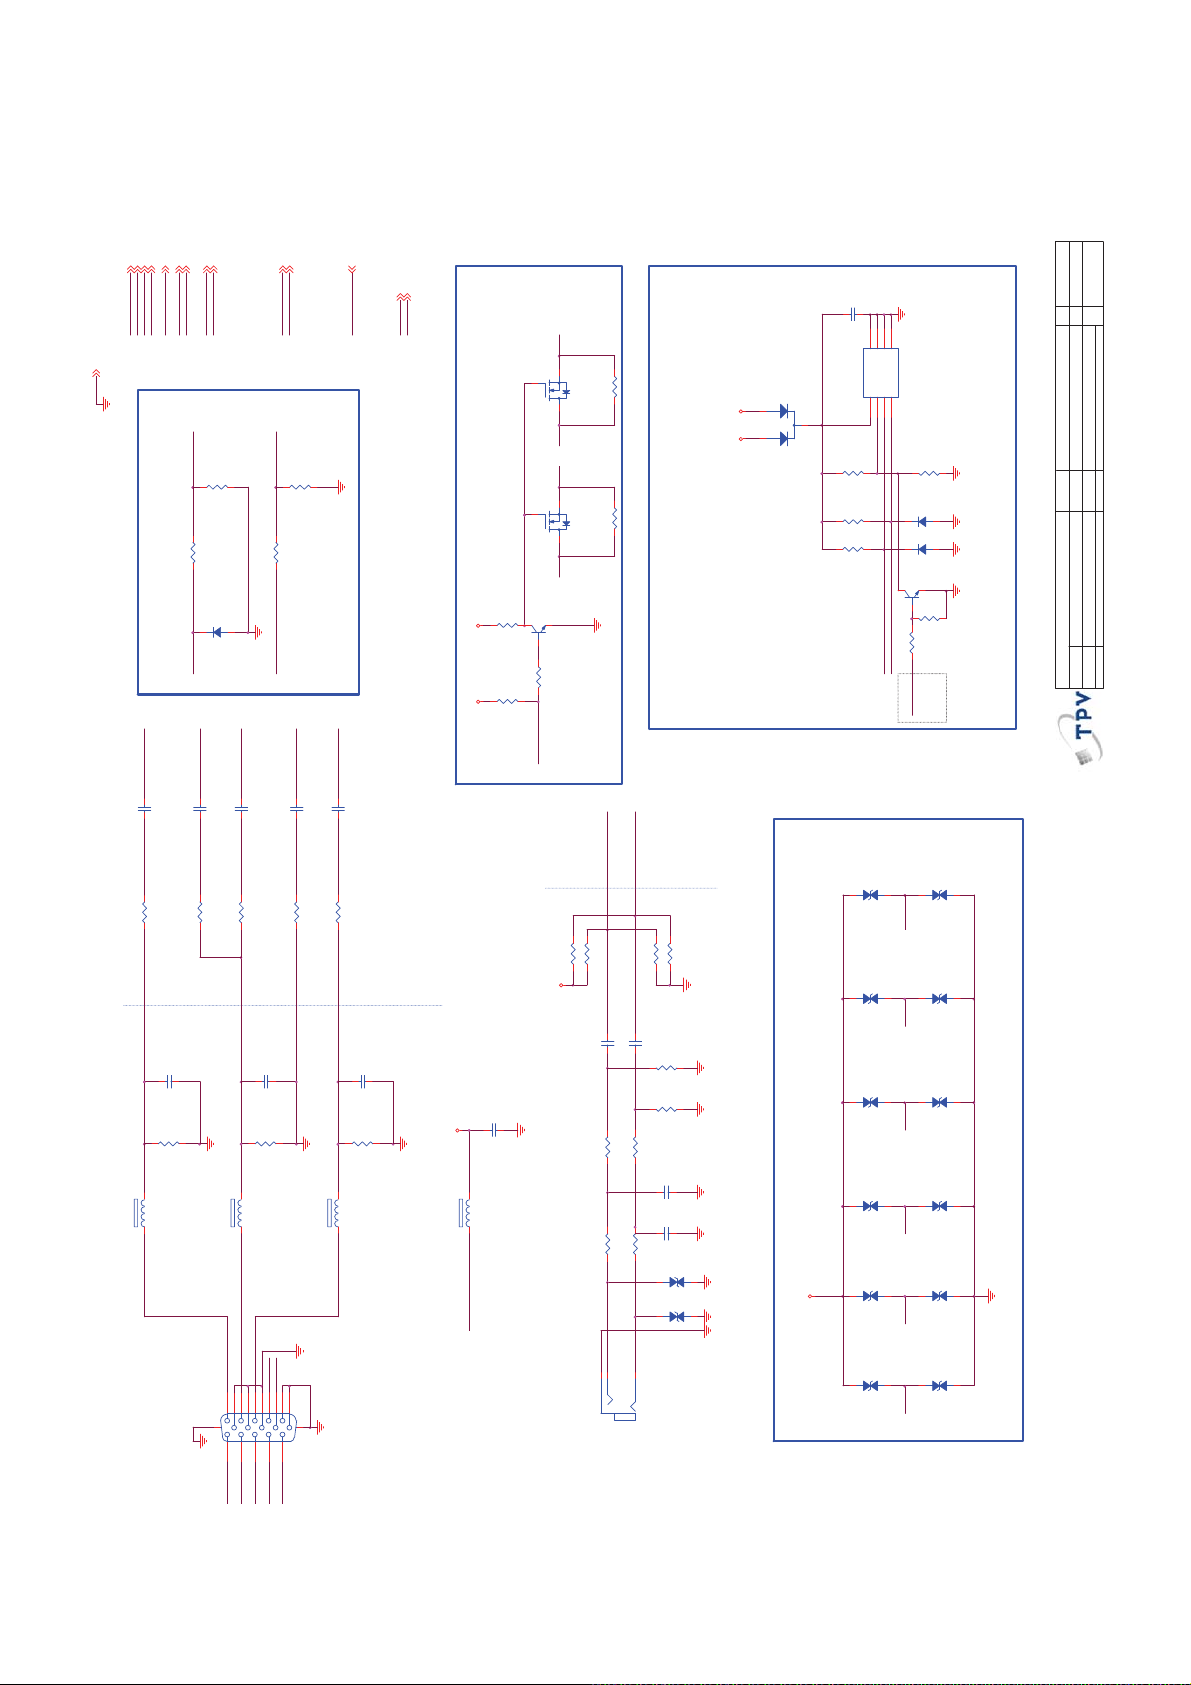
VGA_L_IN 7
GP 12
BP 12
RP 12
GP
RP
BP
GND 4,5,7,8,9,10,11,12,13,14,15,16,17,18,19,20,21,22
RP
C118 10nF50V
R158 68R 1/16W 5%
VGA_R_IN 7
HSYNC 12
VSYNC 12
VGACOM 12
SOG 12
VGACOM
SOG
HSYNC
VSYNC
VGA_R_IN
VGA_L_IN
VSYNC
R182
NC\2 K 1/ 16W
R165 0R05 1/16W
D106
NC\BAS316
A1K
2
VS
VGA SYNC S lice r
SOG
C119 1.5nF 50V
R160 0R05 1/16W
VGA_SCL 12
VGA_SDA 12
VGA_SCL
VGA_SDA
HSYNCHS
R166 0R05 1/16W
GP
C132 10nF50V
R161 68R 1/16W 5%
DDC_WP# 8,12
U0TX 12,15
U0RX 12,15
C140
DDC_WP#
U0TX
U0RX
R210
Q1009
NC 2N7002
100R 1/16W 5%
RX/TX E_SW
R184
NC\2 K 1/ 16W
R170
Q1008
NC 2N7002
100R 1/16W 5%
U0RX VGA_RX VGA_TXU0TX
Q106
NC BC847C
R169
NC 4K7 1/16W 5%
3
5V_SW
3V3SB
BP
VGACOM
C133 10nF50V
C134 10nF50V
R162 100R 1/16W 1%
R164 68R 1/16W 5%
2
1
R168
NC 100R 1/16W 5%
R167
NC 10K 1/ 16W 5%
URSW
MT530 1B suppor t Embedde d VGA EDID EEPROM
VGA_R_IN
VGA_L_IN
Close t o SoCClose to Jack
D101
BAT54C
5V_SWVGA_5V
100N 16V
A01A12A2
U105
8
R187
10K 1/16W 5%
R186
10K 1/16W 5%
R185
10K 1/16W 5%
ZD117
12
3
4
GND
CAT24 C02 YI -GT3
SDA5SCL6WP7VCC
R190
NC/1K1/16W
D103
NC\BAS316
A1K
2
NC\BAS316
D102
A1K
2
URSW
Q105
PMBS3904
R189
4K7 1/16W 5%
PC_SDA
PC_SCL
R188 1K 1/16W 5%
H : Wr ite
L : WP
DDC_WP#
ZD118
HS
12
NC\MLVG0402
NC\MLVG0402
M0C
Custom
HW4
Size
Rev
⿄⠍
of
622Wednesday , March 02, 2011
Sheet
PCB NAME
TPV MOD E L
OEM MOD EL
06. VGA & PC Line-in
㝍
㌾
⪰
T P V ( Top Victory Elec t ronic s C o . , Ltd. )
Date
䱨
㍀
Key Component
47
R177 470K 1/16W 5%
Clos e to SoC
C116
C115
NC\10P 50V
R157
75R 1/16W 1%
1 2
FB108 30R/700mA
CN101
VGA Input
NC\10P 50V
R159
75R 1/16W 1%
1 2
FB109 30R/700mA
VGA_R
VGA_B
VGA_G
VGA_TX
PC_5VI
162738495
1716
1112131415
VGA_RX
10
PC_SDA
VSHSPC_SCL
D-SUB 15P
C117
NC\10P 50V
Clos e to J ac k
C135
R163
75R 1/16W 1%
1 2
FB110 30R/700mA
100N 16V
VGA_5V
120R/3000mA
1 2FB107
PC_5VI
R178 470K 1/16W 5%
AMUX_5V
PC Audio-in
R179 470K 1/16W 5%
R180 470K 1/16W 5%
C136
10U 16V
C137
10uF 16V
R176
5.1K 1%
R175
5.1K 1%
R173 10K 1/16W 5%
R174 10K 1/16W 5%
C139
22P 50V
C138
22P 50V
R172 0R05 1/10W
R171 0R05 1/10W
123
CN102
NC\MLVG0402
ZD122
1 2
NC\MLVG0402
ZD121
1 2
PC_AU_INR
PHONEJ ACK
5VESD
ZD120
12
ZD129
12
ZD128
12
ZD126
12
ZD124
12
NC\MLVG0402
NC\MLVG0402
NC\MLVG0402
NC\MLVG0402
NC\MLVG0402
PC_SDA
VGA_B
VGA_G PC_SCL
VGA_R
ZD119
12
ZD130
12
ZD127
12
ZD125
12
ZD123
12
NC\MLVG0402
NC\MLVG0402
NC\MLVG0402
NC\MLVG0402
NC\MLVG0402
!
Page 48
M0C
Custom
HW4
Size
Rev
CVI_L_IN1
CVI_R_IN1
AIN_CTL1 12
AV2_CVBS 12
SOY1 12
Y1P 12
COM1 12
CVI_R_IN1
CVI_L_IN 1
SOY1
COM1
Y1P
CVI_R_IN1
CVI_L_IN1
GND 4,5,6,8,9,10,11,12,13,14,15,16,17,18,19,20,21,22
AV1_CVBS 12
PR1P 12
PB1P 12
PR1P
PB1P
AV1_CVBS
AV2_CVBS
R228 0R05 1/4W
R230 0R05 1/4W
R229 0R05 1/4W
AIN_CTL0 12
CVBS_COM 12
AIN0_L_AADC 12
AIN0_R_AADC 12
CVBS_COM
AIN0_R_AADC
AIN0_L_AADC
AIN_CTL10AIN_CTL0
R231 0R05 1/4W
R232 0R05 1/4W
11/19 ADD
VGA_R_IN 6
VGA_L_IN 6
CVI_L_IN1
CVI_R_IN1
VGA_R_IN
VGA_L_IN
C103
100N16V
AMUX_5V
C102
100N16V
FB101
120R/3000mA
C101
10U 10V
12
5V_SW
AIN0_L_AADC
AIN0_R_AADC
R102 0R05 1/10W
R101 0R05 1/10W
C104
10U 16V
C105
10U 16V
NoneX
3x, 3y1
0x, 0y0
2x, 2y0
AV1_RIN
VGA_R_IN
CVI_R_IN1
AUD_ROUT
MUX_CTLB
MUX_CTLA
AMUX_5V
16
10
13
11
14
15
X012X3
X1
X2
Xout
VDD
CTL_B9CTL_A
U102
CD4052BPW
Y22Y01VEE7INH
Yout
VSS8Y3
Y1
6
3
4
5
VGA_L_IN
CVI_L_IN1
AUD_LOUT
AV1_LIN
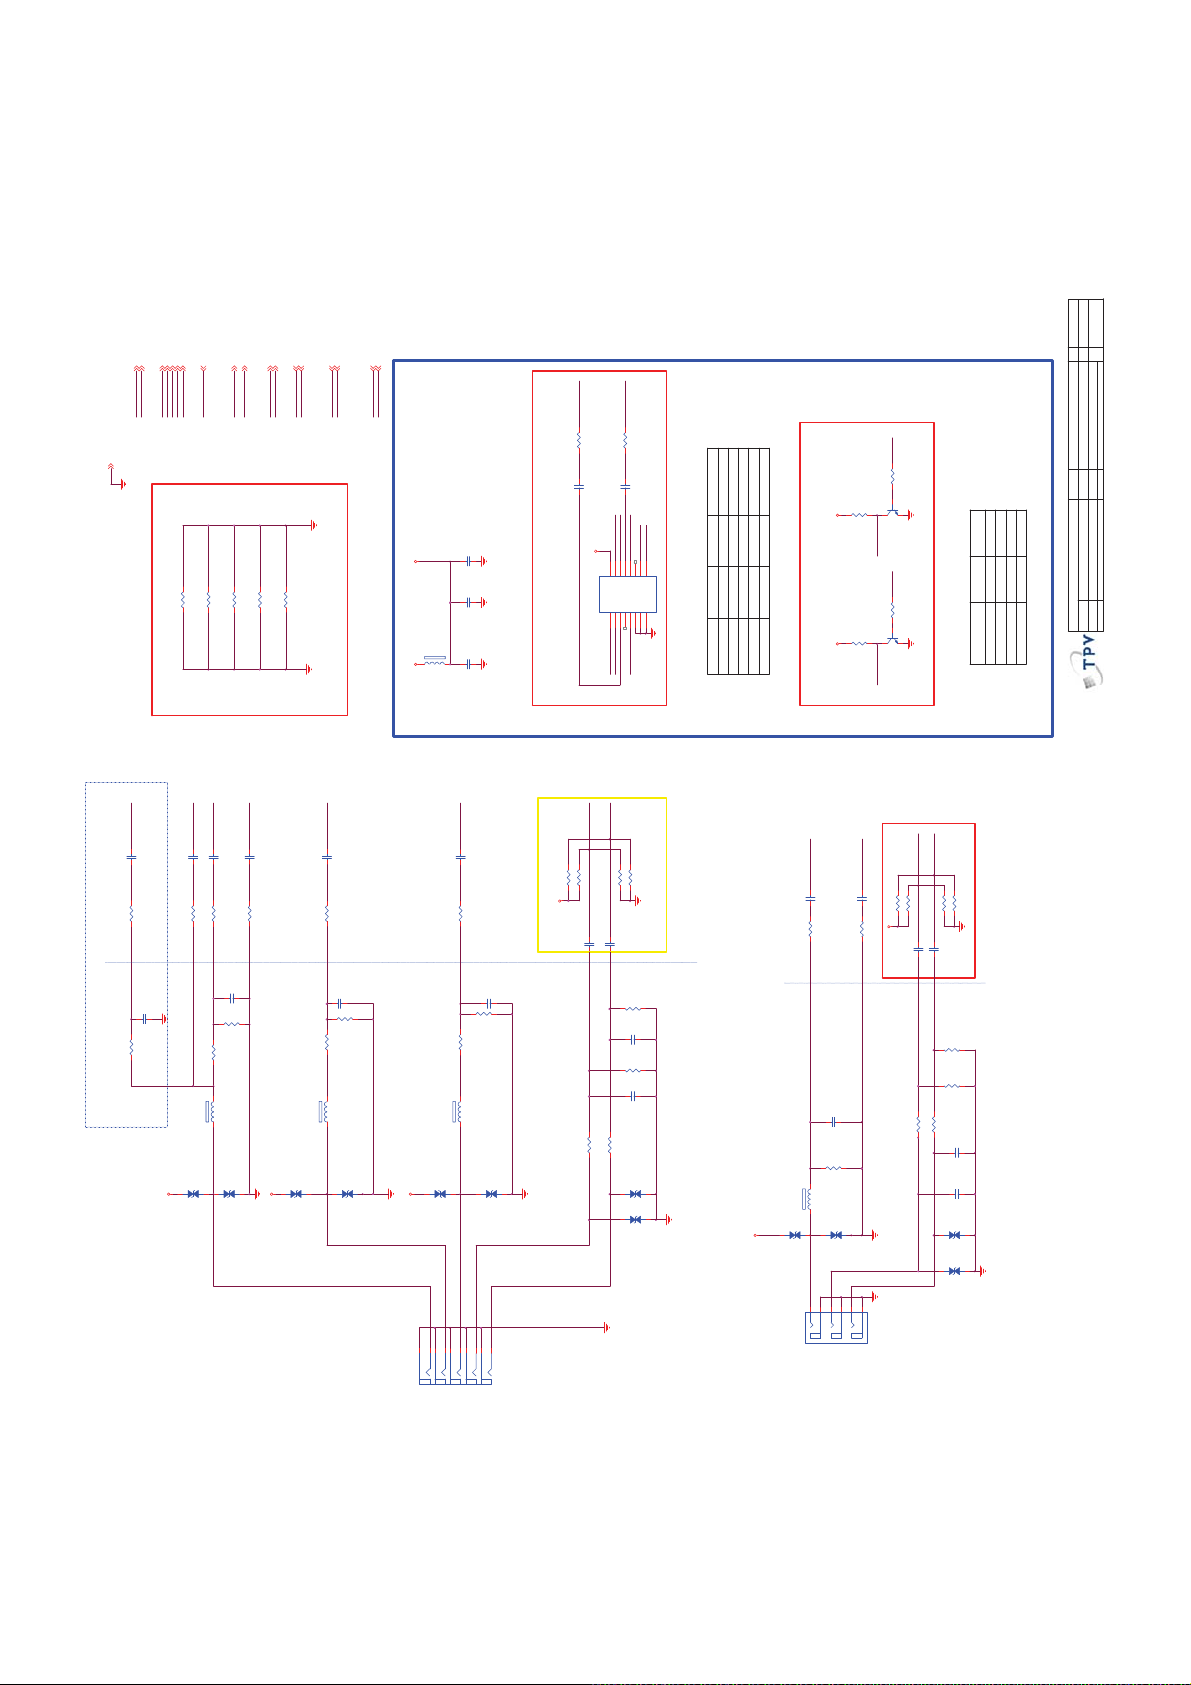
Audio-in M UX
1 1x, 1y
X
110
0
CTL_B CTL_A
0
0
0
1
INHIBIT
AMUX_5V AMUX_5V
Audio-in MUX CTRL
AIN_CTL0
R128
10K 1/16W 5%
R115
10K 1/16W 5%
Q102
PMBS3904
AIN_CTL1
R126
10K 1/16W 5%
R114
10K 1/16W 5%
Q101
PMBS3904
MUX_CTLB MUX_C TLA
0001111
0
AIN_CTL0AIN_CTL1
CVI & rear AV
Audio-in MUX Select Table
(Reserved)
PC Line-in
AV1 (Side)
⿄⠍
of
722Wednesday, March 02, 2011
Sheet
PCB NAME
OEM MODE L
TPV MODEL
07. AVI1 & AV2 & Audio-in MUX
㝍
㌾
⪰
T P V ( Top Victory Electronics Co . , Ltd. )
Date
䱨
㍀
Key Component
5VESD
ZD132
NC\MLVG0402
12
Video-in
PB1P
C157
10nF50V
R148 68R 1/ 16W 5%1 2
C152
15PF50V
R226
56R 1/16W 5%
R205 18R 1/16W 5 %
30R/700mA
FB111
ZD134
NC\MLVG0402
1 2
CVI (R ear)
12
5VESD
Y1
123456789
ABC
CN702
RCA JACK
PR1P
C158
10nF50V
R181 68R 1/ 16W 5%1 2
C159
15PF50V
R215
56R 1/16W 5%
R225 18R 1/16W 5 %
30R/700mA
FB112
ZD136
NC\MLVG0402
ZD133
NC\MLVG0402
12
PR1
PB1
R/L-in
10
E
D
CVI_L_IN1
CVI_R_IN1
AV1_LIN
CVBS_COM
AV1_CVBS
R218 470K 1/16W 5%
R223 470K 1/16W 5%
R224 470K 1/16W 5%
AMUX_5V
R227 470K 1/16W 5%
C148
10uF 16V
C150
10uF 16V
Close to IC
C107
47nF 16V
C108
47nF 16V
R105
0R05 1/16W
R104
68R 1/16W 5%
Close to SoC
R183
5.1K 1%
CVI1_L_IN
C147
Close t o RCA
22P 50V
CVI1_R_IN
R200
5.1K 1%
C146
22P 50V
R212 10K 1/16W 5%
R222 10K 1/16W 5%
NC\MLVG0402
ZD116
1 2
NC\MLVG0402
ZD114
1 2
Close to RCA
C106
NC\220pF 50V
R103
75R 1/16W 1%
120R/3000mA
FB106
1 2
ZD104
NC\MLVG0402
ZD105
NC\MLVG0402
1 2
21435
CVBS-in
CN121
1 2
6
ABC
5VESD
AV Input (Side)
AV1_RIN
R110 470K 1/16W 5%
R111 470K 1/16W 5%
R112 470K 1/16W 5%
R113 470K 1/16W 5%
C112
10U 16V
C111
10U 16V
AMUX_5V
R/L-in
RCA JACK 6P
Close to IC
AV1_R
AV1_L
R109
5.1K 1%
R108
5.1K 1%
R106 10K 1/16W 5%
R107 10K 1/16W 5%
C110
10N 50V
C109
10N 50V
NC\MLVG0402
ZD103
1 2
NC\MLVG0402
ZD102
1 2
48
COM1
SOY1
Y1P
AV2_CVBS
C155
47nF 16V
R213
68R 1/16W 5%
C156
47pF 50V
R214
0R05 1/16W
CVBS
CVBS
C151
10nF50V
C154
1.5nF 50V
C149
10nF50V
Close to SoC
R138 100R 1/16W 5%
R217 0R05 1/16 W
R219 68R 1/ 16W 5%
C153
15PF50V
Close t o RCA
R216
56R
R199 18R 1/16W 5%
30R/700mA
1 2
FB113
ZD115
NC\MLVG0402
ZD135
NC\MLVG0402
1 2
1 2
5VESD
!
Page 49
M0C
Custom
HW4
Size
Rev
SPDIF_OUT 12,17
DDC_WP# 6,12
PWR5V_C 12
M_RX1_CB 12
M_RX1_1B 12
M_RX1_0 12
M_RX1_0B 12
M_RX1_C 12
GND 4,5,6, 7,9,10,11,12, 13,14,15,16, 17,18,19,20,21, 22
RX1_CB
RX1_C
C502
M_RX1_2 12
M_RX1_2B 12
M_RX1_1 12
HDMI_CEC 12
HDMI_HPD1 12
DDC_WP# 6,12
HDMI_CEC
HDMI_HPD1
DDC_WP#
RX1_2
RX1_0B
RX1_0
RX1_1B
RX1_1
RX1_2B
C509
100N 16V
DV33_TMDSAVDD3V3
C508
100N 16V
C507
100N 16V
C506
100N 16V
C505
100N 16V
100N 16V
HDMI_SDA 12
PWR5V_A 12
HDMI_SCL 12
HDMI_S1 12
HDMI_S2 12
HDMI_S1
HDMI_S2
PWR5V_A
HDMI_SDA
HDMI_SCL
DV33_TMDS
DV33_TMDS
5VDD5V_SW
C504
100N 16V
5VDD
C501
10U 10V
12
FB501
120R/3000mA
DV33_TMDS
C503
10U 10V
FB502
120R/3000mA
1 2
PWR5V_B 12
ARC_ON 12
OSCL0 9,10,12,13, 18,20
OSDA0 9,10,12,13,18,20
SPDIF_O UT
PWR5V_C
DDC_WP#
PWR5V_B
OSCL0
OSDA0
ARC_ON
DV33_TMDS
DV33_TMDS
RXC_2-
RXC_1+
RXC_1-RXB_C+
RXC_0+RXB_0-
RXC_0-
RXC_2+
42
45
48
41
44
47
43
40
46
VCC
GND
D0-_1
D1-_1
D2-_1
D0+_1
D1+_1
D2+_1
LP
49
5VDD_LP#
HPD2
50
HPD_AHDMI_HPD1
SDA2
51
HDMIA_SDA
SCL2
52
HDMIA_SCL
CLK-_2
53
RXA_C-
CLK+_2
54
RXA_C+
VCC
55
D0-_2
56
RXA_0-
D0+_2
57
RXA_0+
GND
58
59
RXA_1-
60
RXA_1+
VCC
61
62
RXA_2-
63
RXA_2+
64
HPD_B
U501
D1-_2
D1+_2
D2-_2
D2+_2
HPD3
SDA31SCL32GND3CLK-_34CLK+_35VCC6D0-_37D0+_38GND9D1-_310D1+_311VCC12D2-_313D2+_314GND15VSadj
HDMIB_SDA
RXB_0+
HDMIB_SCL
RXB_C-
DV33_TMDS
TMDS361BPAGR
RX1_0B
RX1_CB
RX1_1B
RX1_2B
R559 NC\100R 1/ 16W 1%
R560 NC\100R 1/ 16W 1%
R557 NC\100R 1/ 16W 1%
R558 NC\100R 1/ 16W 1%
RX1_2
RX1_0
RX1_C
RX1_1
S2_SDA
EQ_I2C_SEL
RXC_C+
RXC_C-
HDMIC_SCL
HDMIC_SDA
HPD_C
34
38
35
36
37
33
39
VCC
SCL1
SDA1
HPD1
S1/SCL
CLK-_1
S2/SDA
CLK+_1
RXB_1-
RXB_1+
RXB_2-
DV33_TMDS
32
I2C_SEL
HPD_SINK
31
SDA_SIN K
30
SCL_SIN K
29
GND
28
CLK-_SINK
27
CLK+_SINK
26
VCC
25
D0-_SINK
24
D0+_SINK
23
GND
22
D1-_SINK
21
D1+_SINK
20
VCC
19
D2-_SINK
18
D2+_SINK
17
16
RXB_2+
VS_ADJ
R573
100K 1/10W 5%
ARC
NC
R532
R513
4.02K 1%
VS_ADJHDMI_HPD1
R534
4.7K1/16W
R532
5VDD
NC\10K 1/10W
5VDD_LP#
Near IC
Near HDMI s witch (U50 1 )
R512
10K 1/10W
S1_SCL
HDMI_SDA
HDMI_SCL
RX1_CB
RX1_C
DV33_TMDS
RX1_0B
RX1_0
RX1_1B
RX1_1
DV33_TMDS
RX1_2B
RX1_2
3V3SB
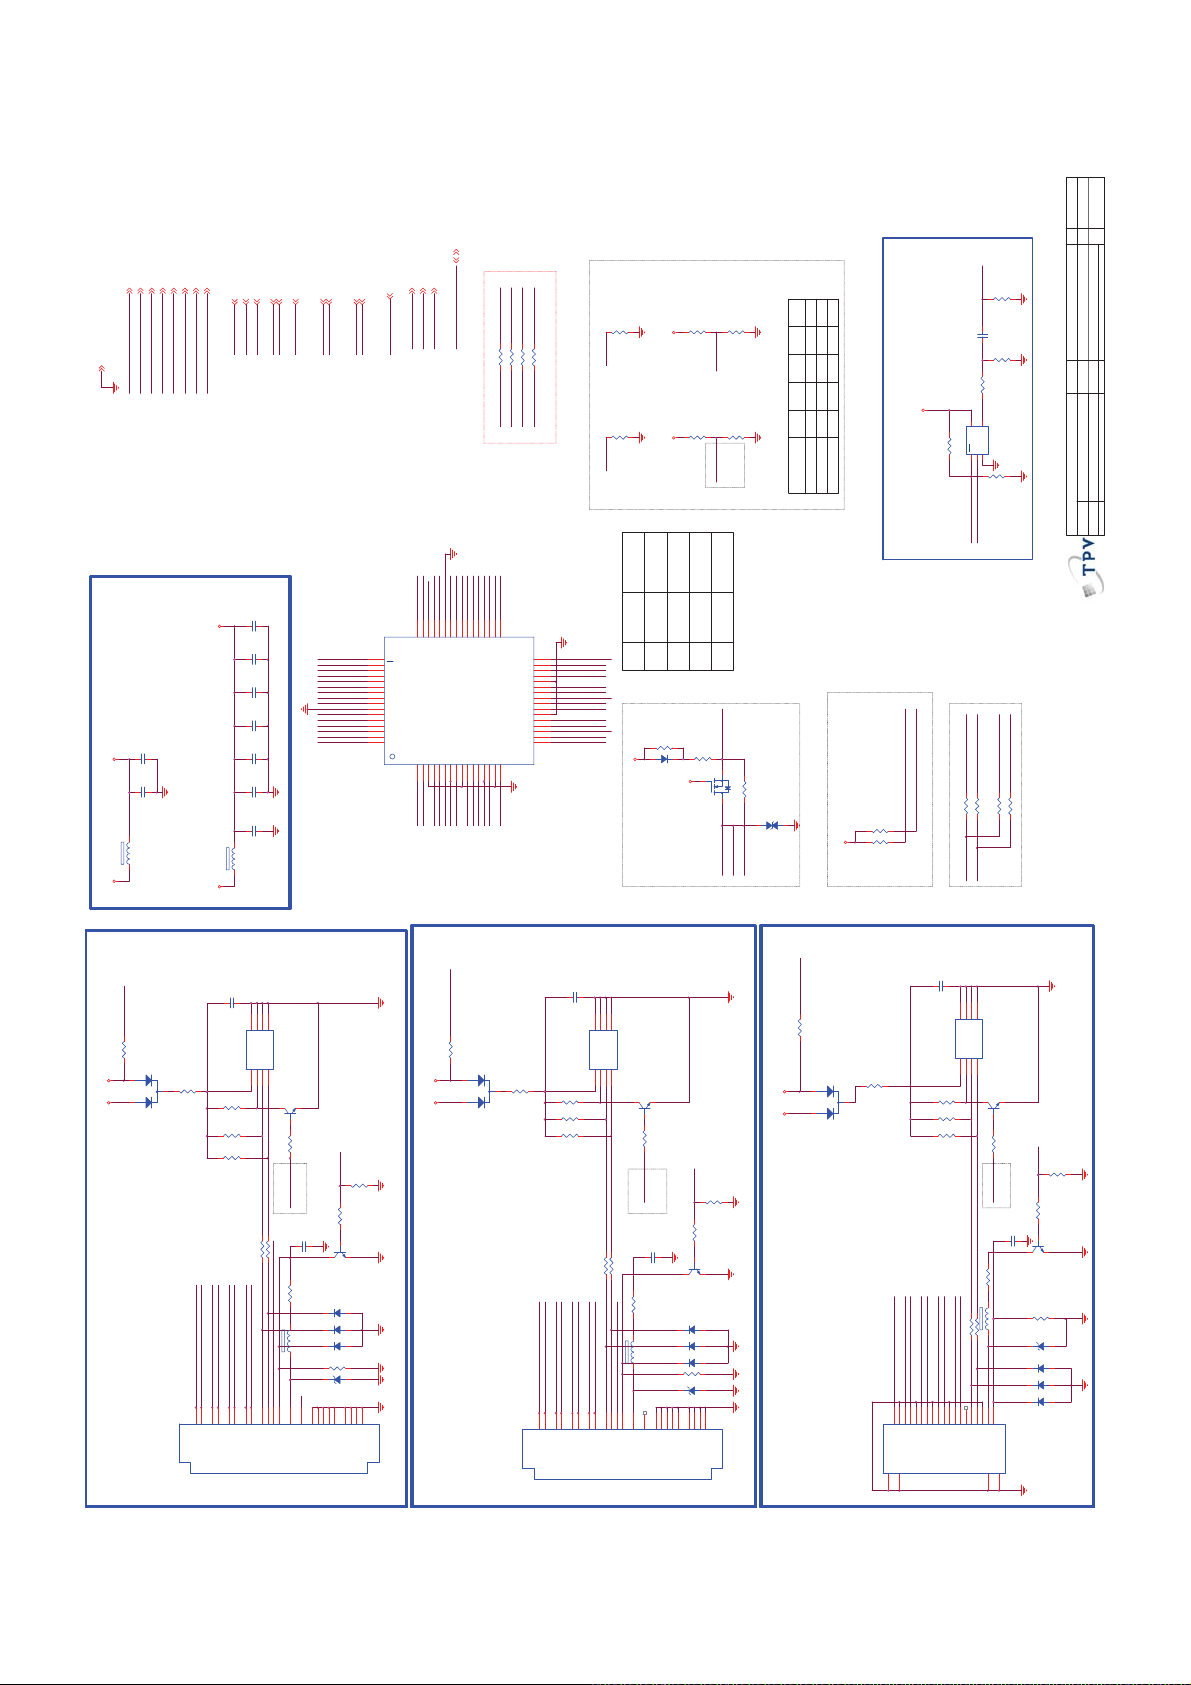
TMDS361B
TMDS351
U501
R511
NC 4.7K1/16W
R510
DV3 3_T MD S
SCL
SDA
S2
S1
PIN 33
PIN 32
R509
NC\0R05 1/ 16W
A1K
2
D504
BAS316
4.7K1/16W
EQ_I2C_SEL
H : GPIO
L : I2C
LP# H: normal mode
LP# L: low pwr state
I2C_SEL H: GPIO
I2C_SEL L: I2C
EQ H : 10m
EQ L: H DMI 1.3
VDD: HPD/DDC
pwr s upply
PIN 34
PIN 49
R508
27K 1/10W 5%
3V3SB
R507 0R05 1/ 16W
Q502
ZD502
NC\MLVG0402
NC\2N7002
12
CEC_B
CEC_A HDMI_CEC
CEC_C
NC
0R NC
0R
NC
R534
NC
R510
NC
4.7k
R511R513
4.7k
4.7k
NC
4.02k
4.02k
0R
TMDS351
TMDS361B
IT6633T
<10pF
R520
DV3 3_T M DS
R519
ARC
C511
1UF16V
R572
82R 1/10W 5%
R571
180OHM 1/10W
DVDD3V3
4
5
Y
VCC
U412
OE1A2GND
R570
NC\10K 1/16W 5%
SN74LVC1G125DBVR
3
R569
10K 1/16W 5%
SPDIF_OUT
ARC_ON
OSDA0
HDMI_SCL
HDMI_SDA
10K 1/10W
10K 1/10W
OSCL0
HDMI_S2
HDMI_S1
R522 NC 0R05 1/16W
R521 NC 0R05 1/16W
R531 0R05 1/16W
R530 0R05 1/16W
S1_SCL
S2_SDA
⿄⠍
of
822Wednesday , March 02 , 201 1
Sheet
PCB NAME
OEM MODEL
TPV MODEL
08. HDMI A & Switch 3:1
㝍
㌾
⪰
T P V ( Top Victory Electronics Co . , Ltd. )
Date
䱨
㍀
Key Component
49
C516
C515
C510
PWR5V_A
R514 1K 1/16W 5%
D505
BAT54C
HD5V _A
HDMI A EDID EEPROM
5V_SW
HDMI A
100N 16V
4
3
A01A12A2
GND
SDA5SCL6WP7VCC
U502
R526
CN506
8
0R05 1/10W
RXA_1+
RXA_1-
RXA_0-
RXA_0+
9
6
7
4
TMDSD0-
TMDSD 0+
TMDSD 1+
CAT24C02YI-GT3
10K 1/10W
R515
Q503
PMBS3904
4K7 1/10W 5%
R516
4K7 1/10W 5%
R518
R517
RXA_2+
RXA_2-
3
1
TMDSD1-
TMDSD2-
TMDSD 2+
1K 1/16W 5%
HPD_A
R506
DDC_WP#
HDMIA_SCL
HDMIA_SDA
H : Write
C512
R501 100R 1/16W 5%
R502 100R 1/16W 5%
SCL_A
SDA_A
R503 1K 1/16W 5%
RXA_C-
CEC_A
RXA_C+
12
FB503 120R/3000mA
HD5V_A
ARC
14
10
18
15
16
12
19
13
SCL
SDA
HPD
CEC
VCC5
TMDSC-
TMDSC+
4K7 1/16W 5%
L : WP
R505 1K 1/16W 5%
100N 16V
Q501
PMBS3904
D503NC\BAS316
A1K
2
D502NC\BAS316
A1K
2
D501NC\BAS316
A1K
2
R504470K 1/16W 5%
1 2
ZD501NC\BZX384-C5V6
5
11
2
8
17
23
NC
SHLD020SHLD121SHLD222SHLD3
DSHLD1
CSHLD0
DSHLD0
DSHLD2
DDC_GND
HDMI
PWR5V_B
HDMI B EDID EEPROM
R547 1K 1/16W 5%
D516
BAT54C
HD5V _B5V_SW
R528
HDMI B
100N 16V
4
3
A01A12A2
GND
SDA5SCL6WP7VCC
U505
0R05 1/10W
CN507
8
CAT24C02YI-GT3
10K 1/10W
R548
4K7 1/10W 5%
R549
4K7 1/10W 5%
R550
RXB_1+
RXB_1-
RXB_C+
RXB_2+
RXB_0+
RXB_0-
RXB_2-
7
4
1
9
6
3
TMDSD0-
TMDSD1-
TMDSD2-
TMDSD0+
TMDSD1+
TMDSD2+
Q507
PMBS3904
R551
1K 1/16W 5%
HPD_B
R538
4K7 1/16W 5%
H : Wr ite
L : WP
DDC_WP#
HDMIB_SCL
HDMIB_SDA
R537 1K 1/16W 5%
C513
100N 16V
R535 100R 1/16W 5%
R536 100R 1/16W 5%
R539 1K 1/16W 5%
CEC_B
RXB_C-
12
HD5V_B
10
12
18
19
13
15
16
SCL
SDA
HPD
CEC
VCC5
TMDSC-
TMDSC+
Q505
PMBS3904
D512NC\BAS316
A1K
2
D511NC\BAS316
A1K
2
D510NC\BAS316
A1K
2
R540470K 1/16W 5%
FB504 120R/3000mA
14
NC
1 2
ZD505NC BZX384-C5V6
17
5
11
2
8
23
SHLD020SHLD121SHLD222SHLD3
DSHLD1
CSHLD0
DSHLD0
DSHLD2
DDC_GND
HDMI
PWR5V_C
R552 1K 1/16W 5%
HDMI C EDID EEPROM
R533
0R05 1/10W
D604
BAT54C
HD5V _C5V_SW
CN508
HDMI C
100N 16V
4
3
A01A12A2
GND
SDA5SCL6WP7VCC
U506
8
CAT24C02YI-GT3
10K 1/16W 5%
R553
Q508
PMBS3904
4K7 1/10W 5%
R554
4K7 1/10W 5%
R555
R556
HPD_C
1K 1/16W 5%
DDC_WP#
HDMIC_SDA
HDMIC_SCL
R545 1K 1/16W 5%
RXC_1+
RXC_1-
RXC_2-
RXC_2+
RXC_0+
1
4
7
3
6
2
5
DSHLD0
DSHLD1
TMDSD2-
TMDSD1-
TMDSD 2+
TMDSD 1+
SHLD0
SHLD2
20
22
12
RXC_C-
RXC_C+
RXC_0-
CEC_C
R542 100R 1/16W 5%
R541 100R 1/16W 5%
HD5V_C
17
9
8
11
12
18
13
19
16
15
14
NC
SCL
SDA
CEC
VCC5
TMDSC-
DSHLD2
TMDSC+10CSHLD0
TMDSD0-
TMDSD 0+
DDC_GND
SHLD3
23
R544
H : Wr ite
L : WP
FB505 120R/3000mA
HPD
21
4K7 1/16W 5%
R543 1K 1/16W 5%
C514
100N 16V
Q506
PMBS3904
R546470K 1/16W 5%
1 2
ZD506NC\BZX384-C 5V6
D515NC\BAS316
A1K
2
D514NC\BAS316
A1K
2
D513NC\BAS316
A1K
2
HDMI
SHLD1
!
Page 50
M0C
Custom
HW4
Size
Rev
⿄⠍
OSCL0 8,10,12, 13,18,20
OSDA0 8, 10,12,13,18, 20
IF_AGC_D 2T 10
IF_AGC_S2T 12
RF_AGC_S2T 12
OSDA0
OSCL0
IF_AGC_S2T
IF_AGC_D 2T
RF_AGC_S2T
GND 4,5,6,7, 8,10,11,12, 13,14,15,16, 17,18,19,20, 21,22
OSCL0
TU_SC L
R1141 0R05 1/16W
R1142 NC\0R05 1/ 16W
DTMB_DVBC_SW 12
TU_SC L 10
TU_SD A 10
TU_S DA
TU_S CL
DTMB_DVBC_SW
TU_SD A
OSDA0
R1144 NC\0R05 1/ 16W
R1145 0R05 1/16W
T2D_TI F+ 10
T2S_TI F- 1 2
T2S_TI F+ 1 2
T2D_TI F-
T2D_TI F+
T2S_TI F-
T2S_TI F+
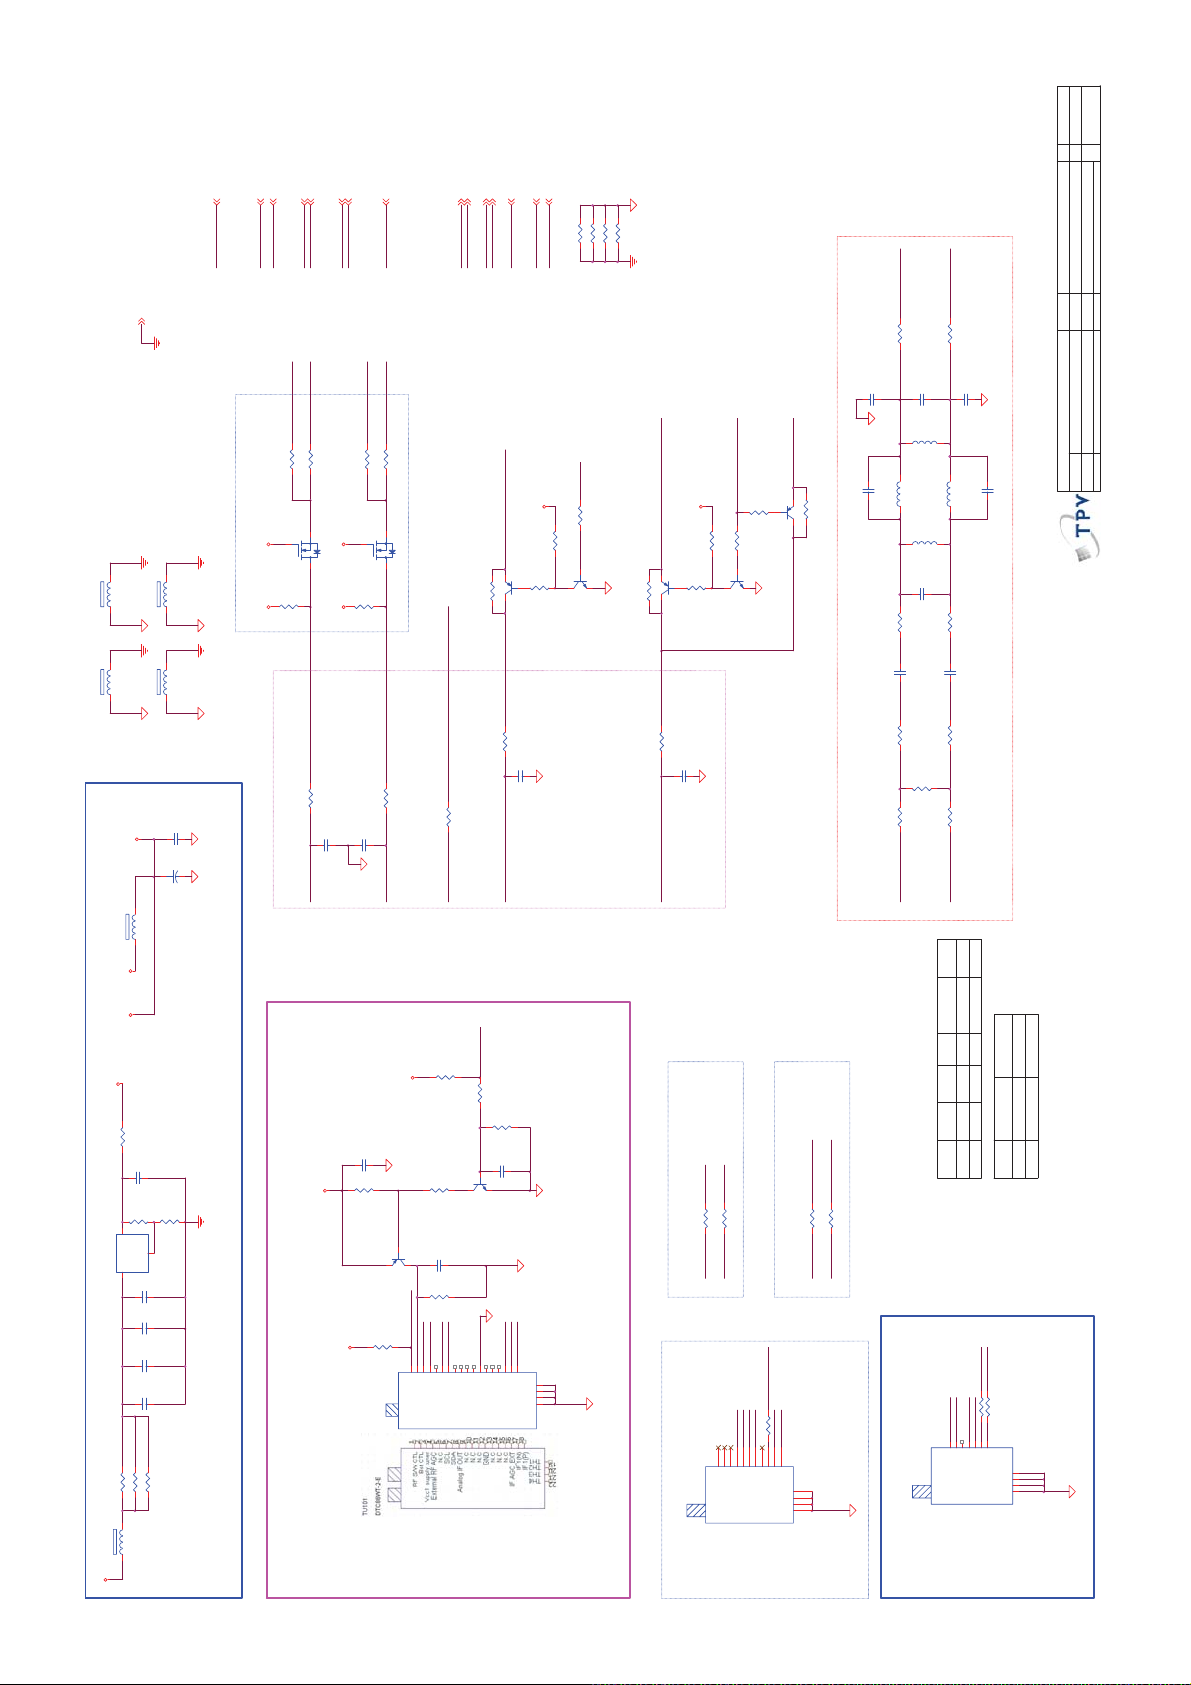
Tuner _I2C 3.3V to 5V
Q1102
2N7002
V3.3
R1140
FB724
NC\120R /3000mA
FB745
1 2
FB720
1 2
NC\120R /3000mA
1 2
FB744
NC\120R /3000mA
NC\120R /3000mA
1 2
C1140
10U 10V
+B_5V
+B_5V
C1139
220UF 16V
+
4K7 1/16W 5%
+B_5V
R1138 100R 1/16W 5%
TU_5V _SC L
Nea r T u n e r
Q1103
2N7002
V3.3
R1143
4K7 1/16W 5%
+B_5V
R1139 100R 1/16W 5%
C1143
22pF 50V
C1142
22pF 50V
TU_5V_SDA
R1151 0R05 1/16W
R1146 NC\0R05 1/16W
RFIN_CTL DTMB_DVBC_SW
RF_AGC_C TL 10
IF_AGC_SW 10
BST_CTL# 12
T2D_TI F- 10
RF_AGC_CTL
IF_AGC_SW
BST_CTL#
RF_AGC_S2T
+B_5V
R1168
NC\10K 1/ 16W 5%
23
Q1104
NC\PMBS3906
1
R1169
NC\10K 1/ 16W 5%
C1147
47nF 16V
R1152 10K 1/16W 5%
RFAGC_I
R1133 0R 05 1/ 16W
R1131 0R 05 1/ 16W
R1132 0R 05 1/ 16W
R1130 0R 05 1/ 16W
RF_AGC_C TL
GND GND_A
C1157
NC\100N 16V
IF_AGC_D2T
+B_5V
R1167
NC\10K 1/ 16W 5%
Q1105
R1150 NC\0R05 1/16W
NC\PMBS3904
R1166
10K 1/16W 5%
23
Q1106
PMBS3906
1
R1148
100K 1/16W 5%
R1149
1K 1/16W 5%
C1145
100N16V
IFAGC_T
Nea r T u n e r
IF_AGC_S2T
IF_AGC_SW
C1150
23
Q1108
PMBS3906
R1191
100K 1/16W 5%
1
R1147
NC\0R 05 1/ 16W
R1158
10K 1/16W 5%
Q1107
PMBS3904
100pF 50V
IF BPF
T2S_TI F-
T2S_TI F+
2010.06.23 added
R1159
51R 1/16W 5%
R1160
51R 1/16W 5%
C1154
100pF 50V
C1158
NC\100N 16V
L1104
0.22uH
L1105
0.12uH
0U10 H
L1103
C1155
220pF 50V
R1161
0R05 1/10W
C1152
10nF50V
R1155
33R 1/16W 5%
R1157
68R 1/16W 5%
R1153
33R 1/16W 5%
BPF_IF+
Modify date : 20101007
C1151
100pF 50V
L1106
0.12uH
R1162
0R05 1/10W
C1153
10nF50V
R1156
33R 1/16W 5%
R1154
33R 1/16W 5%
BPF_IF-
of
922Wednesday , March 02, 2011
Sheet
PCB NAME
OEM MOD E L
TPV MOD E L
09. Half NIM Tuner
㝍
㌾
⪰
Date
T P V ( Top Victory Elect roni c s C o . , Lt d. )
䱨
㍀
Key Component
50
L1102
NC\22uH
1 2
460R
R115 9 &
5V_SW
5V_TUNER
BST_CTL#
R1179
NC\4K7 1/ 16W 5%
5V_TUNER
R1176
0R05 1/4W
0.1UF50V
C1164
5V_TUNER
+B_5V
R1173
1K 1/10W 1%
R1174
3K 1/10W 1%
2
G9084TU3U
TO-263T
GND
VOUT
1
U7007
VIN
3
C1163
330N 25V
C1162
100N 16V
C1144
100N 16V
C1141
100N 16V
R1171 15 OHM +-5% 1/4W
R1172 15 OHM +-5% 1/4W
R1175 15 OHM +-5% 1/4W
FB1102
1 2
120R/3000mA
+12V
Vout=1.25(1+R1/R2)
Tuner = 450mA
V3.3
Tuner TU101 :
CCM :DTI8 - C4 0II( D+ A)
LG :TDTK-G902 D(D+A )
TCL : DTC86WT-2-E (D+A)
TCL :F86WT-2-E "094G PAL D 8L " (A only, )
V3.3
R1192
NC\20K 1/ 16W 5%
R1181
NC\10K 1/ 16W 5%
C1159
NC\100N 16V
R1178
R1136
NC\4K7 1/ 16W 5%
1
C1165
23
Q1109
NC\PMBS3906
RFIN_CTL
NC\4K7 1/ 16W 5%
R1137
+B_5V
RFAGC_I
3
2
5
4
N.C1N.C
External RF AGC
Vcc1 supply tuner
TU101
F86WT-2-E
C1166
NC\100N 16V
NC\4K7 1/ 16W 5%
Q1101
NC\PMBS3904
NC\100N 16V
NC\100K 1/ 16W 5%
R1177
TIF+
TIF-
TU_5V _SC L
6
N.C
IFAGC_T
TU_5V _SD A
7
12
18
17
11
16
TH1
N.C13N.C14N.C15N.C
19
TH2
20
IF 1(P)
IF 1(N)
TH3
21
TH4
22
N.C8N.C9N.C10N.C
SCL
SDA
GND
G702D
2010.07.01 added
BPF_IF-
BPF_IF+
R1183 0R05 1/ 16W
R1185 0R05 1/ 16W
TIF-
TIF+
For ATV o nly
+B_5V
RFAGC_I
TU_5V _SD A
6
5
3
4
N/C1N/C2N/C
+B(5V)
RF AGC
TU102
NC\TDTK-G902D
T2D_TI F+
T2D_TI F-
R1184 NC \ 0R 05 1/ 16W
R1186 NC \ 0R 05 1/ 16W
TIF+
TIF-
For DTV onl y
IFAGC_T
TIF-
TIF+
TU_5V _SC L
R1188NC\0R05 1/16W
10
7
11
9
N/C8N/C
SCL
SDA
AIF -
AIF +
TH4
15
TH3
14
TH2
13
TH1
12
A Tuner :
R116 0
NC / NC
C1155 / L1111
100R 50R220pF / 100uH
NC
R115 7
Scaler I C
MT5301D
MT5301B
27R27R
R115 5 &
R115 6
0R
0R
R1153 &
R115 4
Tuner
+B_5V
RFAGC_I
3
1
2
VCC1
RF AGC
TU103
NC\TAF16-C2I1LH
A Tuner :
G702D
TU_5V_S CL
Tu
4
SCL
T032D
TIF-
TU_5V_SDA
5
SDA
AIF16AIF2
NA
ATBM8848
Ext. Demod.
T032D
G702D
Tuner
TIF+
R1187 NC \ 0R 05 1/ 16W
R1189 NC \ 0R 05 1/ 16W
7
TH1
8
TH2
9
TH3
10
TH4
11
!
Page 51
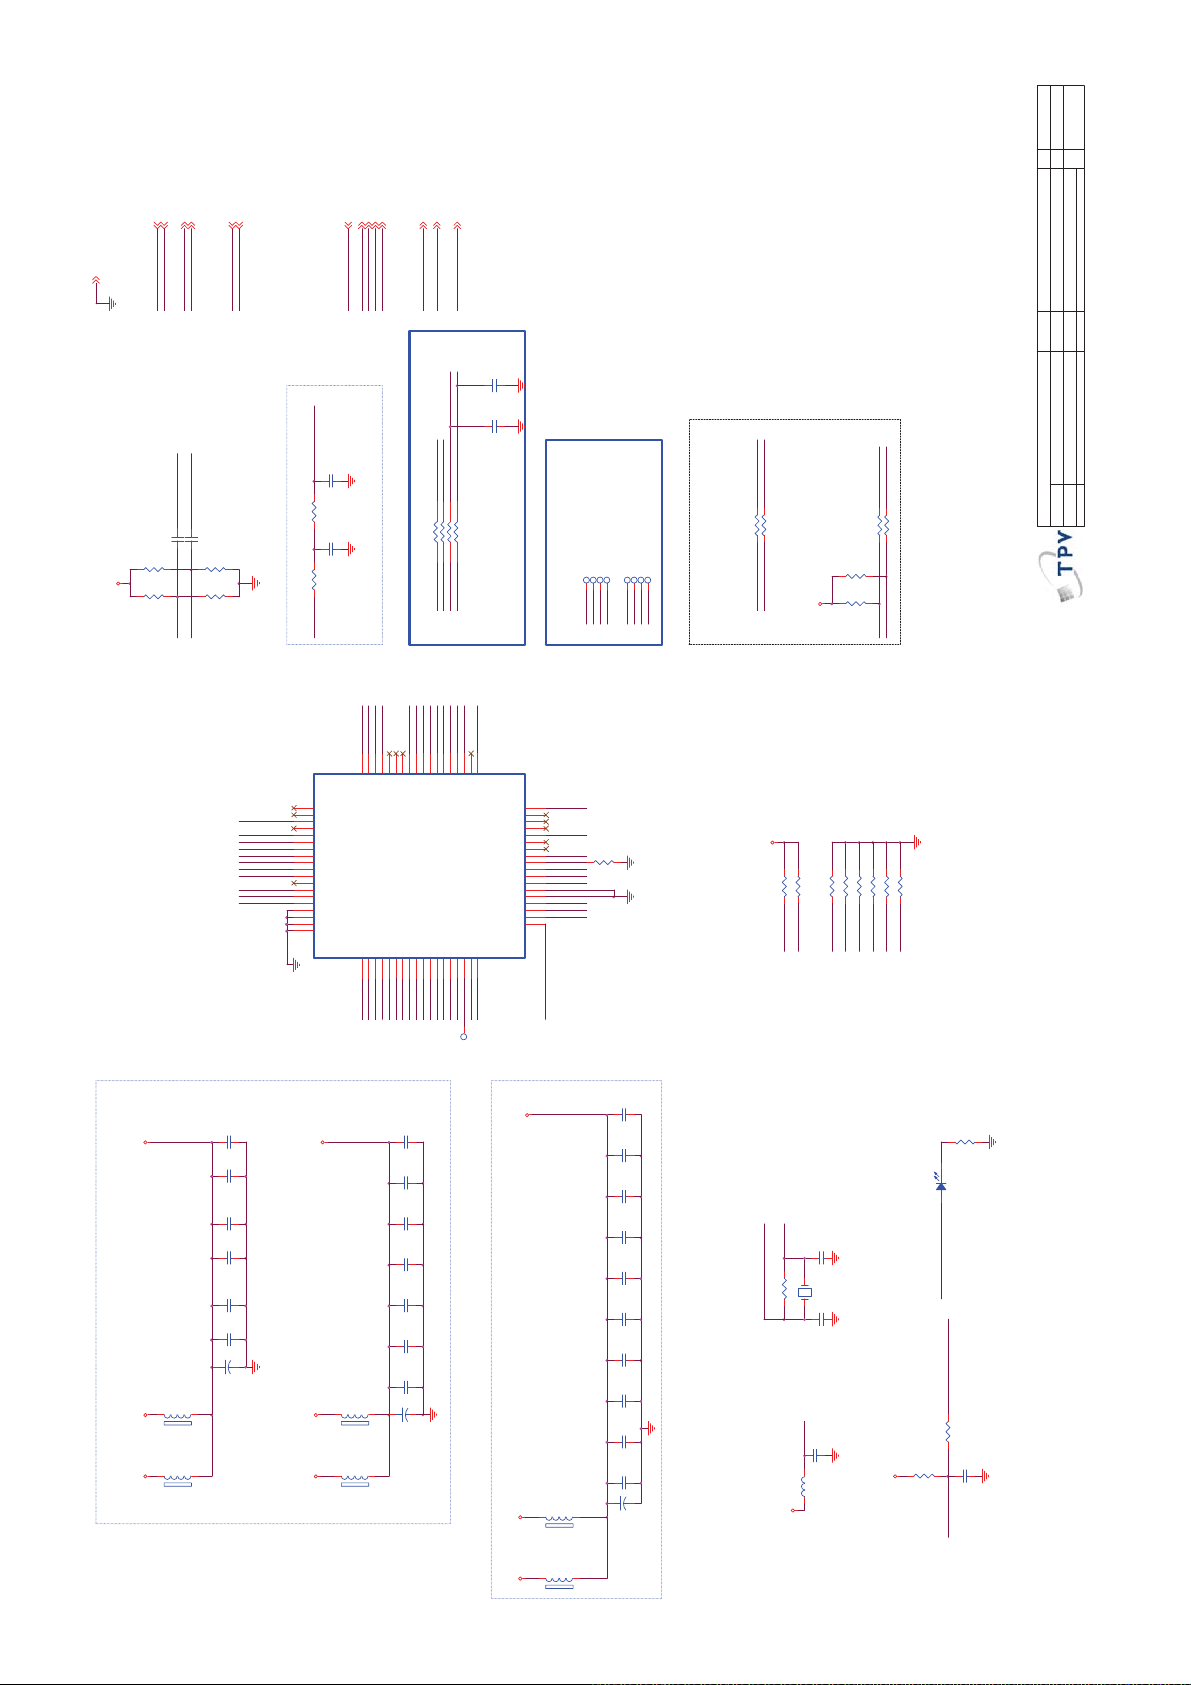
M0C
Custom
HW4
Size
Rev
⿄⠍
OSCL0 8,9,12,13,18,20
OSDA0 8,9,12,13,18,20
GND 4,5,6,7,8,9,11,12,13,14,15,16,17,18,19,20,21,22
OSCL0
OSDA0
T2D_TI F-
R1119
NC\10K +-1% 1 / 16W
C1137 NC\100N16V
T2D_TI F+ 9
T2D_TI F- 9
TU_S CL 9
TU_S DA 9
TU_SD A
TU_SC L
T2D_TI F-
T2D_TI F+
T2D_TI F+
C1138 NC\100N16V
R1121
NC\4.7K 1%
ASIC_3V3
R1118
NC\10K +-1% 1/16W
R1120
IVINP
IVINN
NC\4.7K 1%
VDD12
VDD33
VDD33
TESTIO22
TESTIO21
VDD33
TESTIO20
VDD33
VDD33
VDD12
DTMB_R ESETN
DEMOD_RESET 12
DEMOD_RESET
GPIOs from Demod IC
IF_AGC_D 2T
C1134
NC\100 N16V
R1126
NC\20 0R 1/ 16W 5 %
C1133
NC\100N16V
R1127
NC\10 K 1/ 16W 5 %
PWM0
NC
55
NC
56
VDD12
57
NC
58
VDD33
59
VDD33
60
DBGBUS12
61
DBGBUS11
62
VDD33
63
DBGBUS10
64
VDD33
65
PWM1
66
VDD33
67
VDD12
68
RESETN
69
DBGSEL
70
TEST0
71
TEST1
72
GND
73
DEMOD_TSVALID 12
DEMOD_TSSYNC 12
DEMOD_TSDATA0 12
DEMOD_TSVALID
DEMOD_TSSYNC
DEMOD_TSDATA0
DEMOD_TSCLK
IF_AGC_S W 9
IF_AGC_D 2T 9
DEMOD_TSCLK 12
IF_AGC _SW
RF_AGC_CTL
IF_AGC _D2T
DEMOD_TSDATA0
DEMOD_TSSYNC
DEMOD_TSVALID
DEMOD_TSCLK
123
4
876
5
TSCL K
TS0
TSSY NC
TSVAL ID
Serial TS
close to AT BM 8 848
VDD12
VDD33
VDD12
VDD33
SDAS
TESTIO23
TESTIO24
52
50
54
VDD3351VDD12
DBGBUS1453DBGBUS13
SDAM
TESTIO27
TESTIO26
TESTIO25
SCLS
43
41
45
40
42
44
47
SCLS
SDAS
VDD12
VDD33
TESTIO1748TESTIO1849TESTIO19
DBGBUS17
DBGBUS1646DBGBUS15
U101
NC\ATBM8848
TSBSYNC1TSBVLD2TSBCLK3TSB74TSB65VDD336TSB57TSB48TSB39VDD1210TSB211TSB112TSB013PWM014VDD1215CLK_REF_OUT16VDD_DI V17REFCLKI0
RF_AGC_CTL 9
of
10 2 2Wednesday , Marc h 02, 2 011
Sheet
PCB NAME
OEM MOD E L
TPV MODE L
C1136
NC\5P F 50V
C1135
NC\5PF 50V
OSDA0
OSCL0
Demod I2C
R1112 NC\0R05 1/16W
RP1101 NC \ 2 2oH M 1/ 16W
Near to AL BM8848
SCLM
RF_AGC_CTL
39
38
37
SCLM
SDAM
I2CINT
TESTIO11
TESTIO10
36
TESTIO12
35
TESTIO13
34
TESTIO14
33
VDD33
32
TESTIO15
31
TESTIO16
30
VDD12
29
REF_BIAS_EXT
28
AVDD_REF
27
IVINN
26
IVINP
25
QVINN
24
QVINP
23
ADVDD_AD C
22
DVDD_ADC
21
VDD_OSC
20
REFCLKI1
19
18
TP04
TP05
TP08
TP03
TP02
TP06
TP01
TP07
TS6
TS4
TS5
TS3
TS2
TS0
TS1
TS7
Parallel TS
IF_AGC_S W
VDD33
56k~59k 5%
R1102
NC\56K 1%
VDD12
ASIC_3V3
IVINN
IVINP
ASIC_3V3
VDD33
ASIC_3V3
SuNing
R1113 NC\0R05 1/16W
SDAS
SCLS
V3.3
VDD33
R1103 NC\ 100K 1 / 16W
R1104 NC\ 100K 1 / 16W
TESTI O20
TESTI O22
TU_SD A
Tuner I2C
R1115
R1114
TU_SC L
R1117 NC\0R05 1/16W
R1116 NC\0R05 1/16W
NC\2.7K 1/16W 1%
SDAM
SCLM
NC\2.7K 1/16W 1%
10. Demod (D TMB & DVB-T & PAL)
㝍
㌾
⪰
T P V ( Top Victory Electronics Co . , Ltd. )
Date
䱨
㍀
Key Component
51
R1124 NC\10 0K 1/ 16 W
R1105 NC\ 100K 1 / 16W
R1106 NC\ 100K 1 / 16W
R1107 NC\ 100K 1 / 16W
R1108 NC\ 100K 1 / 16W
R1109 NC\ 100K 1 / 16W
TESTI O21
TESTI O23
TESTI O24
TESTI O25
TESTI O26
TESTI O27
TSSYNC
TS3
TS4
TS5
TS6
TS7
TSCL K
TSVALID
C1107
NC\100N16V
C1104
NC\1uF 16V
C1106
NC\10 0N16V
C1103
NC\1u F 16V
C1105
NC\100N16V
C1102
NC\1u F 16V
+
ASIC_3V3
C1101
FB1108
120R/3000mA
AVDD3V3 ASIC_3V3
FB1107
120R/3000mA
V3.3
NC\220UF 16V
1 2
1 2
VDD1 2
FB1110
NC\120R/3000mA
AV DD1V 2
FB1109
V1.2
TS1
TS2
TS0
PWM0
REFCLK0
VDD_DIV
VDD12
VDD33
1 2
NC\120R/3000mA
1 2
VDD12
TP26
C1126
NC\100N16V
C1125
NC\100 N16V
C1124
NC\10 0N16V
C1123
NC\10 0N16V
C1122
NC\100N16V
C1121
NC\100N 16V
C1120
NC\100 N16V
+
C1119
NC\220 U F 16V
REFCLK1
C1118
VDD33
FB1112
NC\120R/3000mA
FB1111
V3.3 AVDD3V 3
NC\100 N16V
R1125
C1117
NC\10 0N16V
C1116
NC\10 0N16V
C1115
NC\100N 16V
C1114
NC\100N 16V
C1113
NC\100N16V
C1112
NC\100N16V
C1111
NC\10 0N16V
C1110
NC\10 0N16V
C1109
NC\100N16V
+
VDD33
1 2
C1108
NC\22 0U F 16V
NC\120R/3000mA
1 2
REFCLK0
REFCLK1
C1129
NC\18 pF 50V
X11 01
NC\27MHZ
30.4MHZ, using 27M HZ FP
1 2
R1101NC\1M 1/16W
C1128
NC\18pF 50V
VDD_DIV
C1127
NC\1uF 16V
V3.3
L1101
NC\2.2uH
VDD33
NC\330 R 1/ 16W 5%
LOCK
NC\LED
LED1101
1 2
TESTIO21
DEMOD_RESET
R1123 NC\0R05 1/16W
R1122
NC\10 K 1/ 16W 5 %
C1130
NC\1uF 16V
DTMB_RESETN
!
Page 52
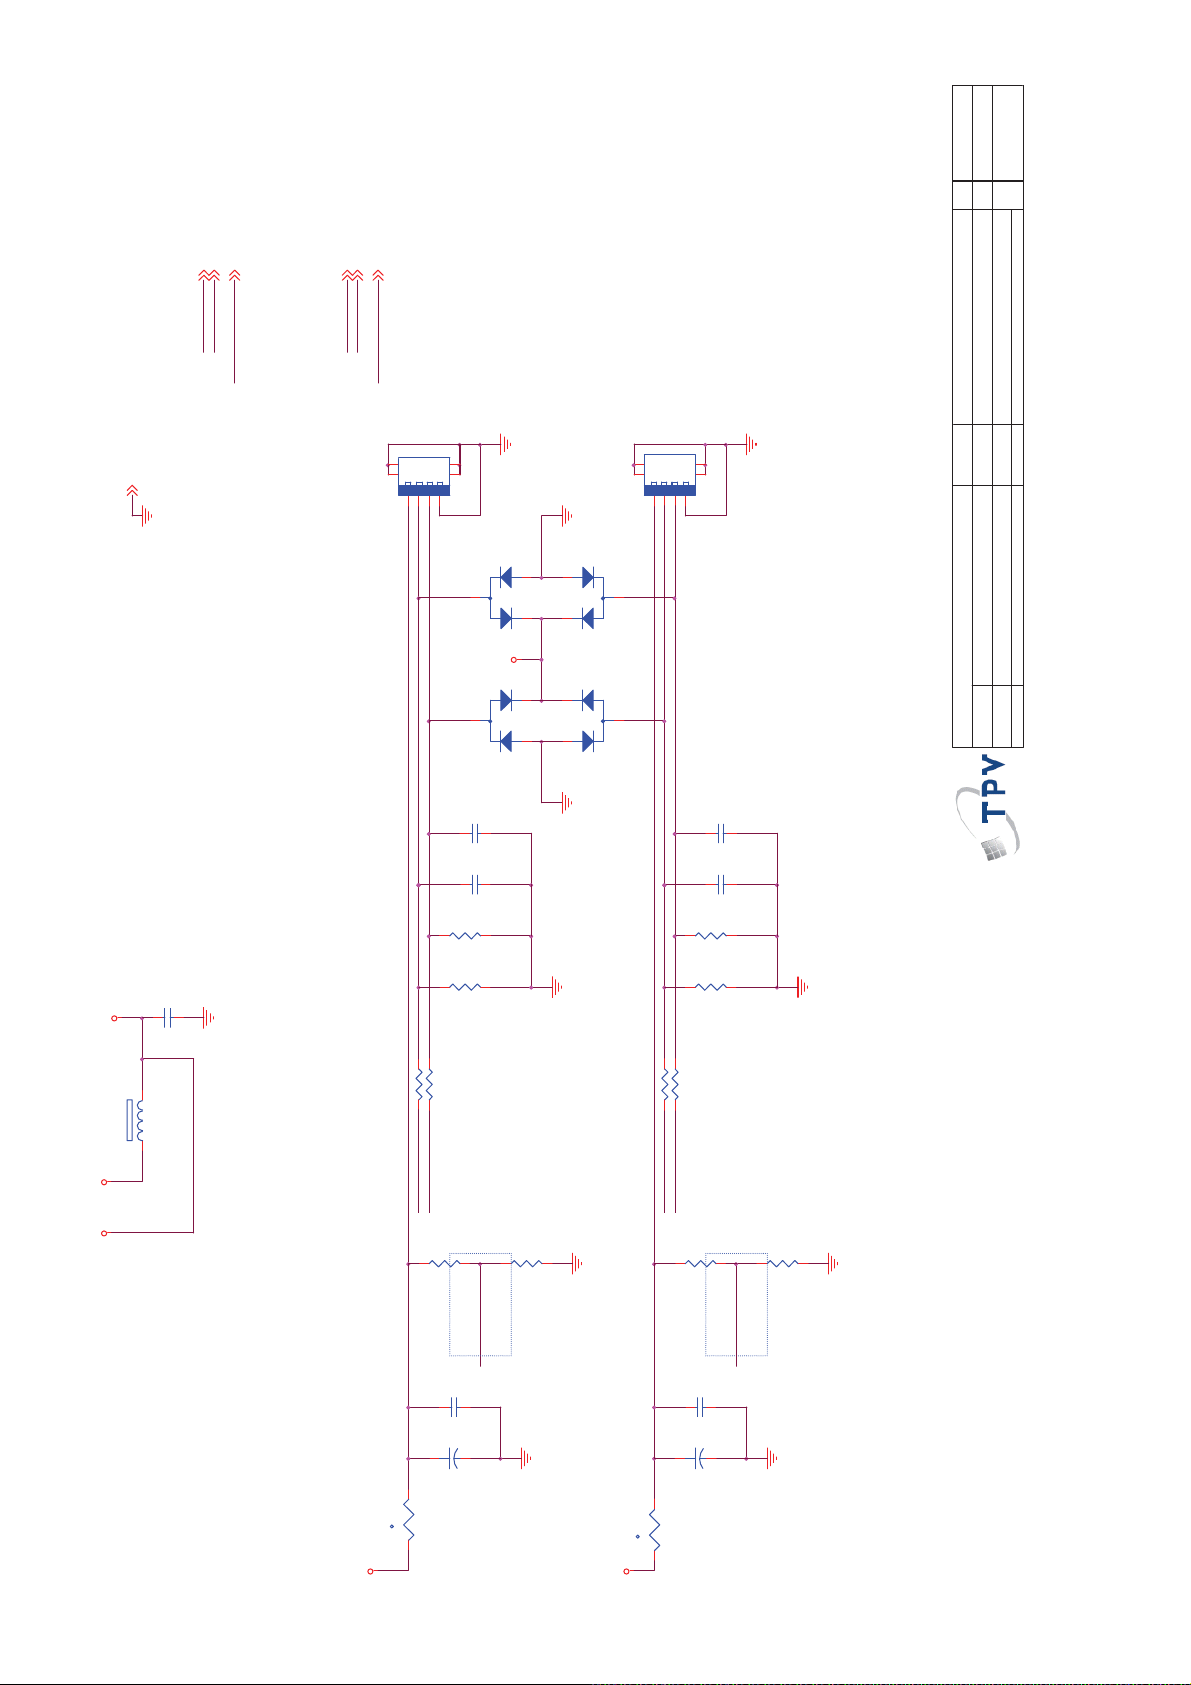
M0C
B
HW4
Size
Rev
⿄⠍
USB_DP1 12
USB_DM1 12
USB_PWR_OCP1 12
USB_DM1
USB_DP1
USB_PWR_OCP1
USB_PWR_OCP0 12
USB_DP0 12
USB_DM0 12
USB_DM0
USB_DP0
USB_PWR_OCP0
of
11 22Wednesday , March 02, 2011
VUSB_5V
NC\BAV99
D304
NC\BAV99
D303
78
56
USB2
3
3
1234
123
USB2_D+
USB2_D-
Sheet
PCB NAME
TPV MO D E L
OEM MO D EL
4
CN104
USB CONN
11. USB1 & U SB2
㝍
㌾
⪰
Date
T P V ( Top Victory Electronics Co . , Ltd. )
䱨
㍀
Key Component
NC\4P7 50V
C310
7 8
123
USB1_D-
5
USB CON N
4
CN103
D302
NC\BAV99
1
1
3
2
2
USB1_D+
5VESD
2
2
3
1
1
D301
NC\BAV99
C305
NC\ 4P7 50V
GND 4,5,6,7,8,9,10,12,13,14,15,16,17,18,19,20,21,22
6
USB1
52
C304
NC\4P7 50V
NC\15K 1/1 6W 5%
R310
NC\15K 1/1 6W 5%
C311
10U 16V
R309
C309
NC\4P7 50V
NC\ 15K 1/ 16W 5%
R320
NC\ 15K 1/ 16W 5%
R319
R307 0R05 1/16W
NC\120R/3000mA
1 2
FB307
5V_SW
5V_USB
R308 0R05 1/16W
EQUAL LENGTH & DIFFERENTIAL IMPEDANCE 90 Ohm
USB_DP0
USB_DM0
R304
22K
C303
+
C302
12
100N 16V
100uF/16V
R305
47K
H: OK
L: O.C.
USB_PWR_OCP0
t
TH301 PTCR
VUSB_5V
R317 0R05 1/16W
R318 0R05 1/16W
EQUAL LENGTH & DIFFERENTIAL IMPEDANCE 90 Ohm
USB_DP1
USB_DM1
R311
R306
22K
C308
100N 16V
+
C306
12
100uF/16V
47K
H: OK
L: O.C.
USB_PWR_OCP1
t
TH302 PTCR
VUSB_5V
!
Page 53
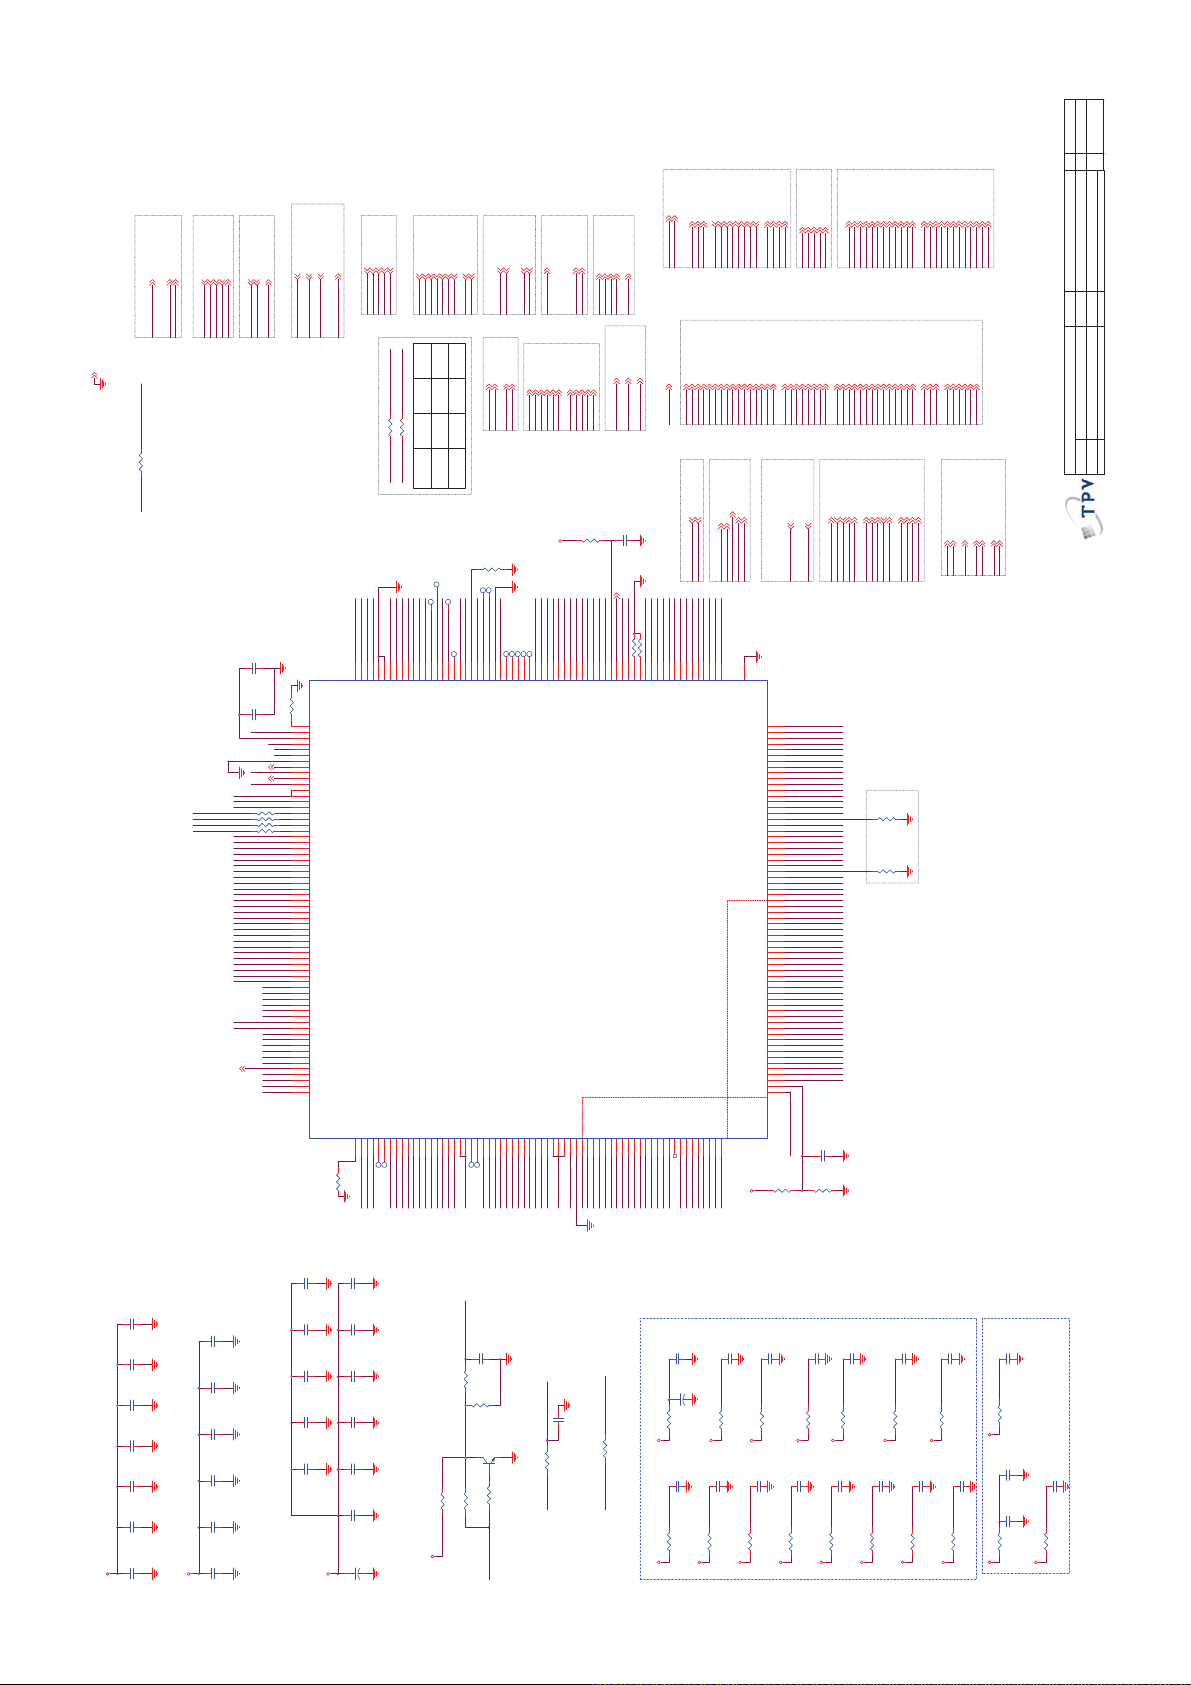
M0C
Custom
HW4
Rev
⿄⠍
HDMI
HDMI_S2 8
HDMI_S1 8
M_RX1_CB 8
M_RX1_1B 8
M_RX1_0 8
M_RX1_0B 8
M_RX1_C 8
M_RX1_1 8
PWR5V_C 8
PWR5V_B 8
AV3
AV1
AV2
STBY GPIO
Demod TS
Tuner-DIF
SPK_MUTE 18
DEMOD_TSVALID 10
DEMOD_TSCLK 10
DEMOD_TSDATA0 10
DEMOD_TSSYNC 10
OIRI 16
OPWRSB 5
DEMOD_RESET 10
OIRI
OPWRSB
SPK_MUTE
GND 4,5,6,7,8,9, 10,11,13,14, 15,16,17, 18,19,20,21,22
DEMOD_TSDATA0
DEMOD_TSSYNC
DEMOD_TSVALID
DEMOD_TSCLK
DEMOD_RESET
AV1_CVBS 7
T2S_TI F+ 9
T2S_TI F- 9
BST_CTL# 9
BST_CTL#
AV1_CVBS
T2S_TI F-
T2S_TI F+
CVI1
Y1P 7
SOY1 7
PB1P 7
COM1 7
AV2_CVBS 7
CVBS_COM 7
AV2_CVBS
CVBS_COM
PR1P 7
VSYNC 6
MONITOR_OUT 17
MONI TOR_OU T
HSYNC 6
HSYNCGPSOG
PB1P
Y1P
SOY1
PR1P
COM1
HDMI CHDMI A
HDMI_S1
HDMI_S2
HDMI B
STANDBY
R423 100R 1/16W 5%
R424 100R 1/16W 5%
VGA_SDA
R436 0R 05 1/ 16W
OPWRSB
C404
100N16V
VMID_AADC
C403
1uF 16V
R453
0R05 1/16W
17
17
AOUTL
AOUTR
VCCK
AOBCLK
AOMCLK
AOSDATA0
AOLRCK
DVDD3V3
VCCK
BST_CTL#
ARC_ON
MJC_RST
AIN_CTL0
PDD6
DVDD3V3
PDD7
POCE0#
POOE#
VCCK
DVDD3V3
17
AOUT_EN
LOUTP
193
194
AIN0_R_AADC
195
196
AIN0_L_AADC
197
AVDD33_AADC
198
AVDD33_DAC
199
AL0_ADAC
200
AL1_ADAC
201
AL1O
202
203
AR1O
VCCK
204
VCCK
205
ASPDIF
206
SPDIF_OUT
207
AOSDATA1
AOBCK
R489 0R 0 5 1/ 16W
208
AOMCLK
R488 0R 0 5 1/ 16W
209
R466 0R 0 5 1/ 16W
210
AOLRCK
R454 0R 0 5 1/ 16W
211
IF_AGC
212
IF_AGC
RF_AGC
213
RF_AGC
214
DEMOD_RESET
OSCL2
215
OSCL0
OSDA2
216
OSDA0
217
DEMOD_TSCLK
218
DEMOD_TSVALI D
219
DEMOD_TSSYN C
220
DEMOD_TSDATA0
VCC3IO
221
VCCK
222
SPI_CLK
223
SPI_DATA
224
SPI_CLE
225
CI_INT
226
PDD0
227
PDD0
PDD1
228
PDD1
PDD2
229
PDD2
PDD3
230
PDD3
PDD4
231
PDD4
PDD5
232
PDD5
PDD6
233
VCC3IO
234
PDD7
235
POCE0_
236
POOE_
237
PARB_
238
PARB#
POCE1_
239
POCE1#
PACLE
240
PACLE
PAALE
241
PAALE
POWE_
242
POWE#
GPIO13
243
A_Reset
VCCK
244
VCC3IO
245
GPIO0
246
DDC_WP#
GPIO1
247
USB_PWR_OCP0
GPIO2
248
USB_PWR_OCP1
GPIO10
249
HP_DET#
GPIO3
250
LVDS_PWR_EN
GPIO11
251
MUTE_CTL
GPIO6
252
GPIO_6
GPIO12
253
DTMB_DVBC _SW
GPIO7
254
SPK_MUTE
GPIO8
255
PWR_OK
GPIO4
256
BL_ON/OFF#
VGA_SCL
AVDD33_IFPGA
T2S_TI F+
AVDD33_CVBS
AV1_CVBS
CVBS_COM
T2S_TI F-
OXTALO
OXTALI
AVDD33_DEMOD
AVDD12_DEMOD
AVDD33_XTAL_STB
185
189
184
183
192
186
181
188
187
191
AIN0_R_AADC
AVDD33_XTAL_STB
VMID_AADC
AIN0_L_AADC
AVDD33_AADC
AVDD33_DAC
AVSS33_DAC
AR0_ADAC
AR1_ADAC
AOSDATA1
AOSDATA0
DEMOD_RST
DEMOD_TSCLK
DEMOD_TSVAL
DEMOD_TSSYN C
DEMOD_TSDATA0
180
182
190
XTAL I
XTALO
CVBS0P
CVBS_COM
AVDD33_CVBS
AVDD33_IFPGA
AVSS33_DEMOD
AVSS12_DEMOD
AVDD33_DEMOD
ADCINP_DEMOD
AVDD12_DEMOD
ADCINN_DEMOD
USB1 & 2
VGA
GP 6
RP 6
BP 6
VGACOM 6
SOG 6
VGA_SCL
VGA_SDA
BPRPVSYNC
VGA_SDA
VGA_SCL
VGACOM
HH
H
PDD6 13
L
PDD6
L
L
HDMI_S1
HDMI_S2
R486
TP23
TP32
TP33
TP22
TP24
VCCK
AVDD12_PLL
AV2_CVBS
AVDD33_VDAC
MONI TOR_OU T
TP35
SC0
VDAC_FS
SY1
SC1
174
179
171
178
177
176
175
170
169
172
173
SY0
SC0
SY1
SC1
VCCK
CVBS1P
FS_VDAC
VDAC_OUT1
VDAC_OUT2
AVDD12_PLL
AVDD33_VDAC
SPDIF_OUT 8,17
USB_DP1 11
USB_DM1 11
USB_DP0 11
USB_DM0 11
USB_DM0
USB_DP1
USB_DM1
USB_DP0
SPDIF_OUT
NOR
POOE# 13
POCE0# 13
PDD7 13
PDD7
560R 1%
AVDD12_RGB
168
167
AVSS12_RGB
PDD5 13
PDD2 13
PDD3 13
PDD4 13
PDD0 13
PDD1 13
POCE0#
POOE#
PDD1
PDD4
PDD3
PDD2
PDD0
PDD5
PR1P
COM1
Y1P
SOY1
PB1P
TP37
TP38
TP39
TP40
TP41
166
161
163
158
165
160
164
159
162
157
Y0P
Y1P
PB0P
PB1P
PR0P
PR1P
SOY0
SOY1
COM0
COM1
AVDD12_RGB
U401
MT5301B
I2S
ADAC
AL1O 18
AR1O 18
AOSDATA1 13
AOLRCK 18
AOSDATA0 18
AOMCLK 18
AOBCLK 18
AR1O
AL1O
AOLRCK
AOBCLK
AOMCLK
AOSDATA0
AOSDATA1
PWM
NAND
PAALE
3V3SB
VGACOM
156
155
RP
RF_AGC_S2T 9
BL_DIM_PWM 4
PACLE 13
PAALE 13
POWE# 13
PARB# 13
POCE1# 13
BL_DIM_PWM
PACLE
POWE#
PARB#
POCE1#
RF_AGC_S2T
C431
4.7UF 16V
R412
1.3K 1%
KEY2 16
KEY2
GP
HSYNC
VSYNCRPBP
SOG
ADC_KEY
LIT_SENSOR
AVDD33_REG_STB
R411 10K 1/16W 5%
147
146
145
144
151
154
149
150
153
152
148
BP
GP
SOG
COM
VSYNC
HSYNC
ADIN4_SRV
ADIN3_SRV
ADIN2_SRV
AVDD10_LDO
AVDD33_VGA_STB
PWR5V_A 8
HDMI_S2
PWR5V_B
PWR5V_C
HDMI_S1
PWR5V_A
M_RX1_C
M_RX1_1B
M_RX1_1
M_RX1_0B
M_RX1_0
M_RX1_CB
IF_AGC_S2T 9
MJC_RST 20
RDQ0 14
RDQ3 14
RDQ2 14
RDQ1 14
RDQ7 14
RDQ6 14
RDQ5 14
RDQ4 14
RDQ10 14
RDQ9 14
RDQ8 14
RDQ1
RDQ0
RDQ5
RDQ6
RDQ7
RDQ3
RDQ2
RDQ9
RDQ4
RDQ10
MJC_RST
IF_AGC_S2T
RDQ8
AADC
LED_WGB 16
Strappin g & GPIO
LED_RED_OFF# 16
AIN0_R_AADC 7
AIN0_L_AADC 7
ARC_ON 8
OPCTRL4 13
OPCTRL5 13
LED_WGB
AIN0_R_AADC
AIN0_L_AADC
LED_RED_OFF#
OPCTRL5
OPCTRL4
ARC_ON
VCCK
VGA_SCL
10K 1/16W 5%
R425
141
143
142
VCCK
ADIN1_SRV
ADIN0_SRV
PWR5V_B
VGA_SDA
140
VGA_SCL
OPCTRL5
U0TX
U0RX
LED_WGB
PWR5V_A
AIN_CTL1
OIRI
OPWRSB
AVDD33_PDM_STB
LED_RED_OFF#
138
137
132
131
130
129
133
257
134
135
136
139
OIRI
U0TX
U0RX
OPWRSB
OPCTRL1
OPCTRL0
OPCTRL2
OPCTRL4
OPCTRL3
VGA_SDA
OPCTRL5
EPAD_GND
AVDD33_PDM_STB
JTAG
M_RX1_2 8
M_RX1_2B 8
HDMI_SCL 8
HDMI_SDA 8
HDMI_CEC 8
HDMI_HPD1 8
HDMI_SDA
HDMI_SCL
HDMI_HPD1
HDMI_CEC
M_RX1_2B
M_RX1_2
RDQ13 14
RDQ12 14
RDQ11 14
RDQ15 14
RDQ14 14
RDQS0# 14
RDQS0 14
RDQS1
RDQS0
RDQS0#
RDQ13
RDQ14
RDQ15
RDQ11
RDQ12
ADC-in & GPIO
LIT_SENSOR 16
LIT_SENSOR
ORESET_
128
PWR5V
127
HDMI_HPD
126
HDMI_SCL
125
HDMI_SDA
124
HDMI_CEC
123
AVDD12_HDM I
122
RX_2
121
RX_2B
120
RX_1
119
RX_1B
118
RX_0
117
RX_0B
116
RX_C
115
RX_CB
114
AVDD33_HDM I
113
USB_2P_VRT
112
AVDD33_USB_2P
111
USB_2P_DP0
110
USB_2P_DM0
109
USB_2P_DP1
108
USB_2P_DM1
107
VCCK
106
VCC3IO
105
OPWM0
104
JTRST_
103
JTDI
102
JTMS
101
JTCK
100
JTDO
99
VCCK
98
RCLK0_//RCLK0_
97
RCLK0//RCLK0
96
VCC2IO
95
RDQ5//RDQ5
94
RDQ2//RDQ7
93
VCC2IO
92
RDQ0//RDQ3
91
RDQ7//RDQ1
90
RDQ13//RDQ8
89
RDQ10//RDQ10
88
VCC2IO
87
RDQ8//RDQ14
86
RDQ15//RDQ12
85
RDQS1_//RDQS1_
84
RDQS1//RDQS1
83
VCC2IO
82
RDQM0//RDQM0
81
RDQS0_//RDQS0_
80
RDQS0//RDQS0
79
VCCK
78
RDQM1//RDQM1
77
RDQ11//RDQ15
76
RDQ14//RDQ13
75
VCC2IO
74
RDQ9//RDQ9
73
RDQ12//RDQ11
72
RDQ6//RDQ0
71
RDQ1//RDQ2
70
VCC2IO
69
RDQ3//RDQ6
68
RDQ4//RDQ4
67
RVREF
66
VCCK
65
TX_AE0N 15
TX_AE0P 15
JTRST# 15
JTDI 15
JTMS 15
JTCK 15
JTDO 15
JTDI
JTCK
JTRST#
JTMS
JTDO
TX_AE0P
TX_AE0N
DDR2
RDQS1# 14
RDQS1 14
RDQM1 14
RDQM0 14
1_A0 14
1_A3 14
1_A2 14
1_A1 14
RCLK0# 14
RCLK0 14
RCLK0#
RCLK0
RDQS1#
RDQM1
1_A2
RDQM0
1_A0
1_A1
1_A3
Normal GPIO
DDC_WP# 6,8
USB_PWR_OCP1 11
USB_PWR_OCP0 11
LVDS_PWR_EN 5
BL_ON/OFF# 4
ADC_KEY 16
ADC_KEY
USB_PWR_OCP0
BL_ON/OFF#
USB_PWR_OCP1
DDC_WP#
LVDS_PWR_EN
ORESET#
PWR5V_C
HDMI_HPD1
HDMI_SCL
HDMI_SDA
HDMI_CEC
AVDD12_HDMI
M_RX1_2
M_RX1_2B
M_RX1_1
M_RX1_1B
M_RX1_0
M_RX1_0B
M_RX1_C
M_RX1_CB
AVDD33_HDMI
USB_VRT
AVDD33_USB_2P
USB_DP0
USB_DM0
USB_DP1
USB_DM1
VCCK
DVDD3V3
OPWM0_100HZ
JTRST#
JTDI
JTMS
JTCK
JTDO
VCCK
RCLK0#
RCLK0
DDRV
RDQ5
RDQ2
DDRV
RDQ0
RDQ7
RDQ13
RDQ10
DDRV
RDQ8
RDQ15
RDQS1#
RDQS1
DDRV
RDQM0
RDQS0#
RDQS0
VCCK
RDQM1
RDQ11
RDQ14
DDRV
RDQ9
RDQ12
RDQ6
RDQ1
DDRV
RDQ3
RDQ4
TX_AE1P
1_A4
LVDS
TX_AECKN 15
TX_AE1N 15
TX_AE4P 15
TX_AECKP 15
TX_AE3N 15
TX_AE2N 15
TX_AE1P 15
TX_AE3P 15
TX_AE4N 15
TX_AE2P 15
TX_AE1N
TX_AE4P
TX_AE4N
TX_AE3P
TX_AE2N
TX_AE3N
TX_AECKP
TX_AECKN
TX_AE2P
1_A7 14
1_A6 14
1_A5 14
1_A4 14
1_A10 14
1_A9 14
1_A8 14
1_A13 14
1_A12 14
1_A11 14
1_A11
1_A9
1_A12
1_A10
1_A13
1_A5
1_A6
1_A7
1_A8
TX_AO3N 15
TX_AO2P 15
TX_AO0P 15
TX_AO1N 15
TX_AO4N 15
TX_AOCK P 15
TX_AO3P 15
TX_AO1P 15
TX_AO2N 15
TX_AO4P 15
TX_AO0N 15
TX_AOCK N 1 5
TX_AO4N
TX_AOCKN
TX_AO3P
TX_AO4P
TX_AO3N
TX_AO1P
TX_AOCKP
TX_AO0P
TX_AO1N
TX_AO2P
TX_AO2N
TX_AO0N
1_BA2 14
1_BA1 14
1_BA0 14
1_WE# 14
1_CKE 14
1_RAS# 14
1_CAS# 14
1_ODT 14
1_CS# 14
1_CS#
1_RAS#
1_CKE
1_BA0
1_BA2
1_WE#
1_ODT
1_CAS#
1_BA1
of
12 22Wednes day , March 02, 20 11
Sheet
PCB NAME
OEM MOD E L Size
TPV MODEL
12. MT5310 QFP256
㝍
㌾
⪰
T P V ( Top Victory Electronics Co . , Ltd. )
Date
䱨
㍀
Key Component
System IO
HP_DET# 18
AIN_CTL1 7
MUTE_C TL 1 8
PWR_OK 4
AIN_CTL0 7
DTMB_DVBC_SW 9
STANDBY 4, 18
MEMORY _WP # 13
A_Reset 18
PWR_OK
MUTE_C TL
HP_DET#
MEMORY _WP #
STANDBY
AIN_CTL1
A_Reset
DTMB_DVBC_SW
AIN_CTL0
R410
5.1K 1%
R409
10K 1/16W 5%
OXTALI 13
U0TX 6,15
U0RX 6,15
OXTALO 13
OSCL0 8, 9,10,13,18, 20
OSDA0 8,9,10, 13,18,20
ORESET# 13
OSCL0
OSDA0
OXTALI
OXTALO
U0RX
U0TX
ORESET#
53
Close to MT5301
FSRC_WR1VCC3IO3GPIO142AVDD12_VPLL4AE5P5AE5N6AE4P7AE4N8AE3P9AE3N10AECKP11AECKN12AE2P13AE2N14AE1P15AE1N16AE0P17AE0N18AVDD33_LVDSA19AVDD33_LVDSA20AO5P21AO5N22AO4P23AO4N24AO3P25AO3N26AOCKP27AOCKN28AO2P29AO2N30AO1P31AO1N32AO0P33AO0N34VCCK35VCCK36VCCK37AVDD12_MEMPLL38AVSS12_MEMPLL39RODT//RCKE40RA8//RA1041RA13//RBA142RA11//RA443RA4//RA144RA6//RA645RA0//RA846RA2//RA1147RCAS_//RA1248RCS_//RRAS_49RRAS_//R CAS_50RA9//RWE_51VCC2IO52RA12//RA053RA7//RA1354RA5//RA955NC//R RESET_56RA3//RA757RA1//RA258RA10//RA559RBA1//RA360RBA0//RBA261RBA2//RBA062RWE_//R CS_63RCKE//R ODT
E-Fuse
C425
100N16V
C411
100N16V
C410
100N16V
C409
100N16V
C408
100N16V
C407
100N16V
C406
100N16V
DRAM IO Power (Close to SoC)
DDRV
C412
10U 10V
DDRV
C418
100N16V
C417
100N16V
C416
100N16V
C415
100N16V
C414
100N16V
3.3V IO Power (Close to SoC)
DVDD3V3
C413
10U 10V
DVDD3V 3
C424
100N16V
C423
100N16V
C422
100N16V
C421
100N16V
Core Power (Close to SoC)
TP28
TP27
TX_AE4P
TX_AE3N
TX_AE3P
TX_AE4N
MEMORY _WP #
R406 4K7 1/ 16W 5%
DVDD3V3
AVDD12_VPLL
C430
0.1uF 16V
C429
0.1uF 16V
C428
0.1uF 16V
C427
0.1uF 16V
C426
0.1uF 16V
C420
10U 10V
VCCK
C419
100uF/16V
+
VCCK
TP46
TP47
TX_AE0P
TX_AE1N
TX_AE1P
TX_AO4N
TX_AO4P
TX_AOCKN
TX_AO2P
TX_AO2N
TX_AOCKP
TX_AO3N
TX_AO3P
TX_AO0N
TX_AO0P
TX_AO1N
TX_AECKP
TX_AE0N
TX_AE2N
TX_AE2P
TX_AECKN
AVDD33_LVDSTX
RF_AGC_S2T
R429 10K 1/16W 5%
R405
R403 1K 1/16W 5%
5V_SW
TX_AO1P
VCCK
AVDD 12_MEMP LL
C401
47nF 16V
R487
4K3 1/16W 5%
0R05 1/16W
IF_AGC_S2T
Q402
NC\PMBS3904
R402
RF_AGC
C402 47nF 16V
R404 10K 1/16W 5 %
IF_AGC
NC\10K 1/ 16W 5%
1_RAS#
1_CS#
1_A13
1_ODT
1_A8
1_A12
1_A9
1_A0
1_A6
1_A11
R401
1_A7
1_CAS#
1_A2
1_A4
DDRV
BL_DIM_PWM
ADAC_PWR
0R05 1/16W
OPWM0_100HZ
R413
AVDD1V2
64
1_BA1
1_A1
1_WE#
1_CKE
1_A3
1_A10
1_BA0
1_A5
1_BA2
DDRV
C445
100N16V
C444
100N16V
C443
220UF 16V
AVDD33_DAC
+
R444
47 OHM 1/16W
C432
100N16V
AVDD12_PLL
0R05 1/16W
AVDD1V2
AVDD33_DEMOD
AVDD33_AADC
R446
R445
0R05 1/16W
AVDD3V3
AVDD3V3
C433
100N16V
C434
AVDD12_VPLL
AVDD 12_MEMP LL
R415
R414
0R05 1/16W
0R05 1/16W
AVDD1V2
C405
100N16V
VCCK
RVREF5
R407
R408
1K 1/16W 1%
1K 1/16W 1%
C450
C447
100N16V
C446
100N16V
C448
100N16V
100N16V
C449
100N16V
C451
100N16V
Standby Power
AVDD33_PDM_STB
AVDD33_IFPGA
R447
0R05 1/16W
0R05 1/16W
AVDD3V3
AVDD3V3
C435
100N16V
100N16V
AVDD12_DEMOD
AVDD12_HDMI
R417
R416
0R05 1/16W
AVDD1V2
AVDD1V2
AVDD33_USB_2P
AVDD33_HDMI
R449
R448
0R05 1/16W
0R05 1/16W
0R05 1/16W
AVDD3V3
C436
100N16V
C437
100N16V
AVDD12_RGB
AVDD33_CVBS
R418
R419
0R05 1/16W
AVDD1V2
AVDD3V3
Analo g No rm al P owe r
AVDD33_LVDSTX
R451
R450
AVDD3V3
C438
100N16V
0R05 1/16W
AVDD3V3
0R05 1/16W
0R05 1/16W
3V3SB
C440
100N16V
C439
100N16V
AVDD33_VDAC
R420
R421
0R05 1/16W
3V3SB
C442
100N16V
C441
10U 10V
AVDD33_XTAL_STB
AVDD33_REG_STB
R422
0R05 1/16W
0R05 1/16W
3V3SB
!
Page 54
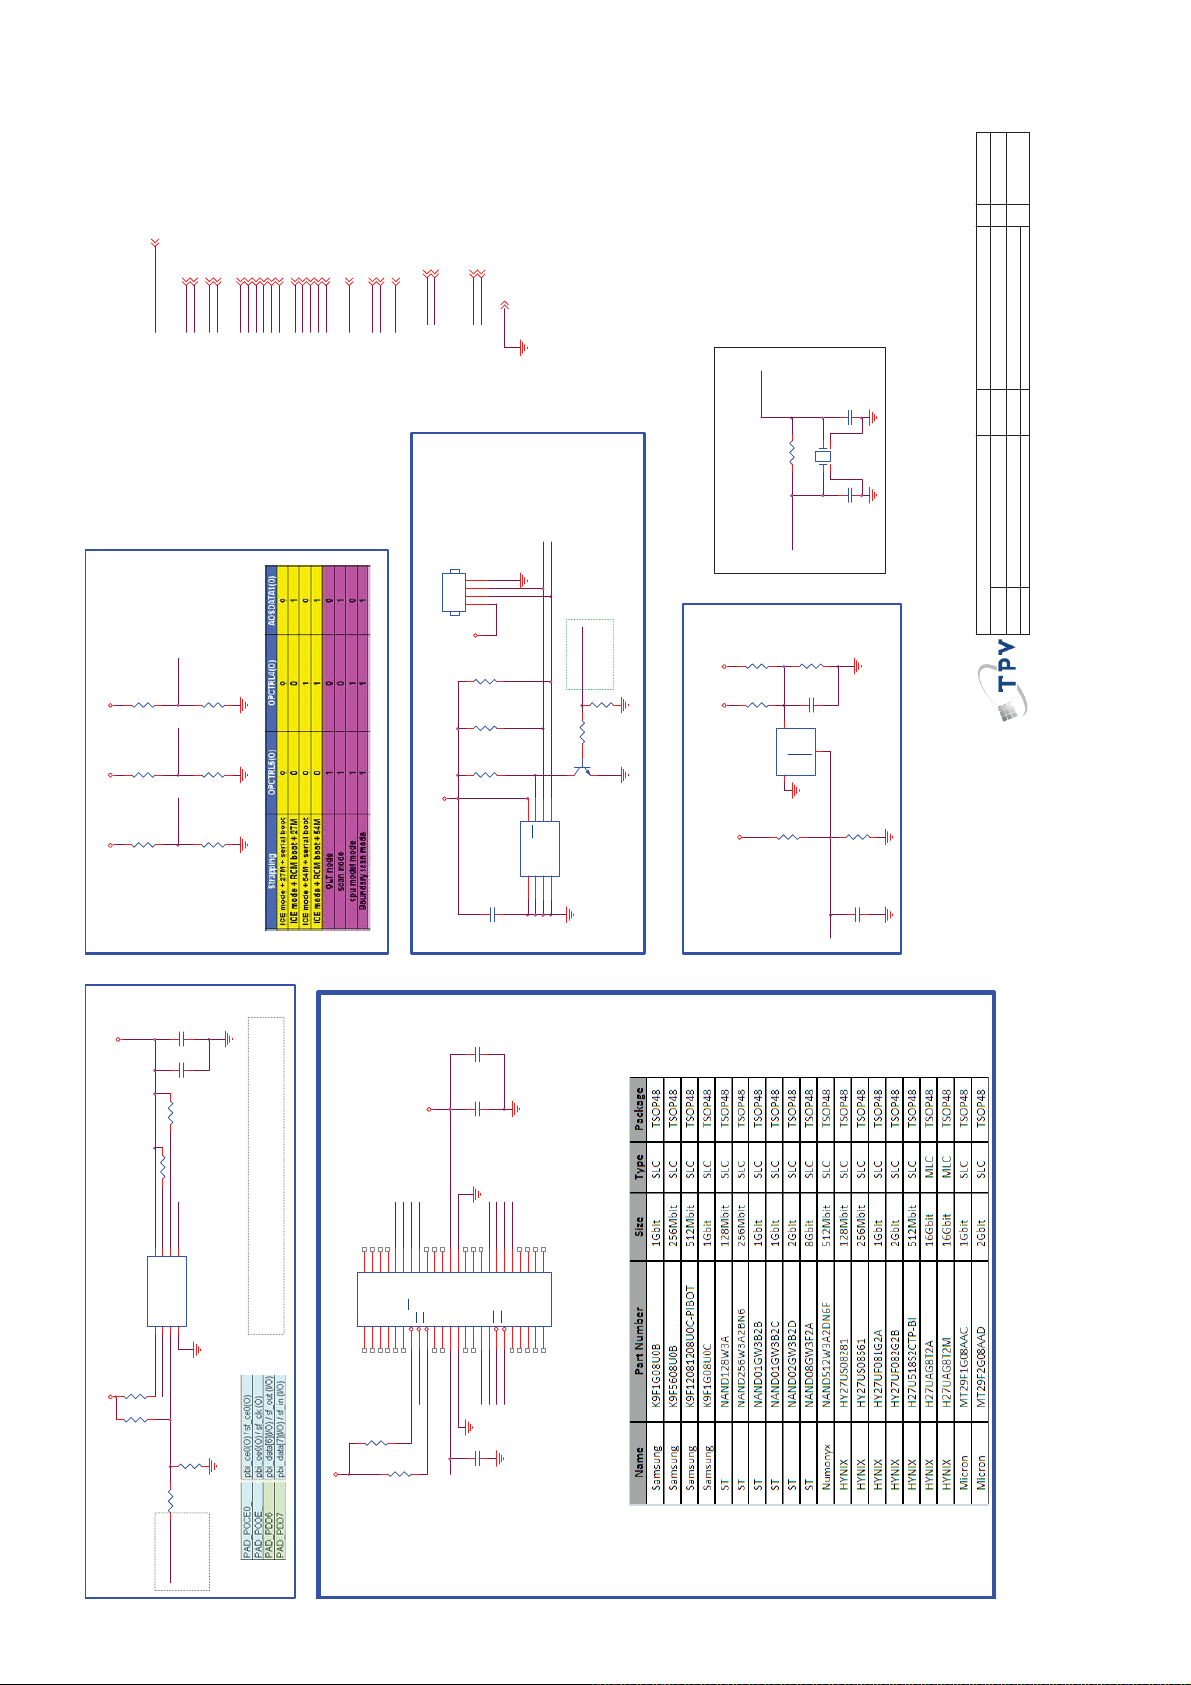
M0C
C
HW4
Size
Rev
MEMORY _W P# 12
OSCL0 8,9, 10,12,18,20
OSDA0 8,9,10,12,18,20
OXTALI 12
PDD3 12
PDD4 12
PDD5 12
PDD6 12
PDD7 12
POCE0# 12
POOE# 12
POOE#
POCE0#
MEMOR Y_WP #
PDD4
PDD5
PDD7
PDD6
PAALE 12
POWE# 12
PACLE 12
PDD0 12
PDD1 12
PDD2 12
PAALE
PACLE
PDD3
PDD2
PDD0
POWE#
PDD1
OPCTRL4 12
PARB# 12
POCE1# 12
ORESET# 12
OPCTRL4
ORESET#
PARB#
POCE1#
OXTALO 12
OPCTRL5 12
AOSDATA1 12
GND 4,5,6,7,8,9,10,11,12,14,15,16,17,18,19,20,21,22
OSCL0
OSDA0
OXTALO
OXTALI
OPCTRL5
AOSDATA1
OXTALO
C458
27PF 50V
1
2
X40 1
27MHz
3
4
R480 NC\1M 1/16W
C457
27PF 50V
OXTALI
STBC CRYSTAL
4
CN402
NC CONN
3
2
1
Close to SoC
R478
10K 1/16W 5%
AOSDATA1
R479
NC\10K 1/1 6W 5%
DVDD3V33V3SB
OPCTRL4
R476
NC\10 K 1/ 16W 5%
R477
3V3SB
R474
NC\1 0K 1/ 16W 5%
10K 1/16W 5%
OPCTRL5
R475
10K 1/16W 5%
5VSB
R463
R462
R461
DVDD3V3
NVRAM
Strapping
OSCL0
R471
4.7K 1%
4.7K 1%
10K 1/16W 5%
C454
OSDA0
MEMOR Y_WP #
H: Wr ite
L: Write Protect
R465
R464 2 . 2K 1/ 16W
10K 1/16W 5%
Q401
7
8
VCC
E01E12E2
U405
220N16V
PMBS3904
6
5
WC
SCL
SDA
VSS
CAT24C128YI
I2C address at A0
4
3
R470
5VSB
3V3SB
R469
0R05 1/16W
3V3SB
Reset IC
NC 6K8 1/10W 1%
NC 1K 1/10W 1%
C456
100N 16V
3
VCC
RESET
2
U406
GND
1
R467
MAX809STRG
R468
100K 1/16W
NC\5K1 1/16W 5%
C455
NC\100N 16V
ORESET#
⿄⠍
of
13 22Wednesday, March 02, 2011
Sheet
PCB NAME
TPV MOD E L
OEM MODEL
13. SoC Peripheral
㝍
㌾
⪰
Date
T P V ( Top Victory Electronics Co . , Ltd. )
䱨
㍀
Key Component
54
C453
NC\100N 16V
DVDD3V3
DVDD3V 3
NOR Flash
C452
NC\10U 10V
R460
NC\4K7 1/16W 5%
R459
NC\4K7 1/16W 5%
PDD7
PDD6
PDD5
46
45
47
48
NC26
NC27
NC28
NC11NC22NC33NC44NC5
SMD/0402
R473
4K7 1/16W 5%
R472
NC25
5
4K7 1/16W 5%
I/O744I/O643I/O542I/O4
SMD/0402
PDD4
41
RY/BY1
NC66NC7
7
8
PARB#
POOE#
PDD6
POOE#
5
8
6
7
VCC
SCLK
SI/SIO0
NC/SIO3
U404
CS#1SO/SIO12WP#/SIO23GND
PDD7
POCE0#
R455
NC\4K7 1/16W 5%
R456
4K7 1/16W 5%
R457
ATV :8MB MX25L6445B
DTMB: 16MB
If you download failed and no longer to do wnload again .
NC\MX25L6445EM2I-10G
4
FLASH_WP#
R458
NC\10K 1/16W
NC\0R 05 1/16W
MEMOR Y_WP #
H : Write Protect
L : Write Enable
Pult this jumper could stop flash an d then press RESET #.
U403
256Mbit Nand Flash
DVDD3V3
C462
10U 10V
C461
DVDD3V3
40
9
POCE1#
100N 16V
DVDD3V3
PDD3
PDD1
PDD0
36
39
33
35
32
37
38
I/O3
I/O231I/O130I/O0
PRE
VSS2
NC23
NC20
NC24
NC2134NC22
VCC2
ALE17CLE16WE
NC8
NC914NC10
VCC112RE
VSS1
CE1
11
15
13
10
18
19
PACLE
PAALE
POWE# PDD2
FLASH_WP#
DVDD3V3
C460
100N 16V
HY27US08561A-TPCB
26
28
25
29
NC17
NC1827NC19
NC16
WP
NC1120NC1221NC13
NC1423NC15
22
24
!
Page 55
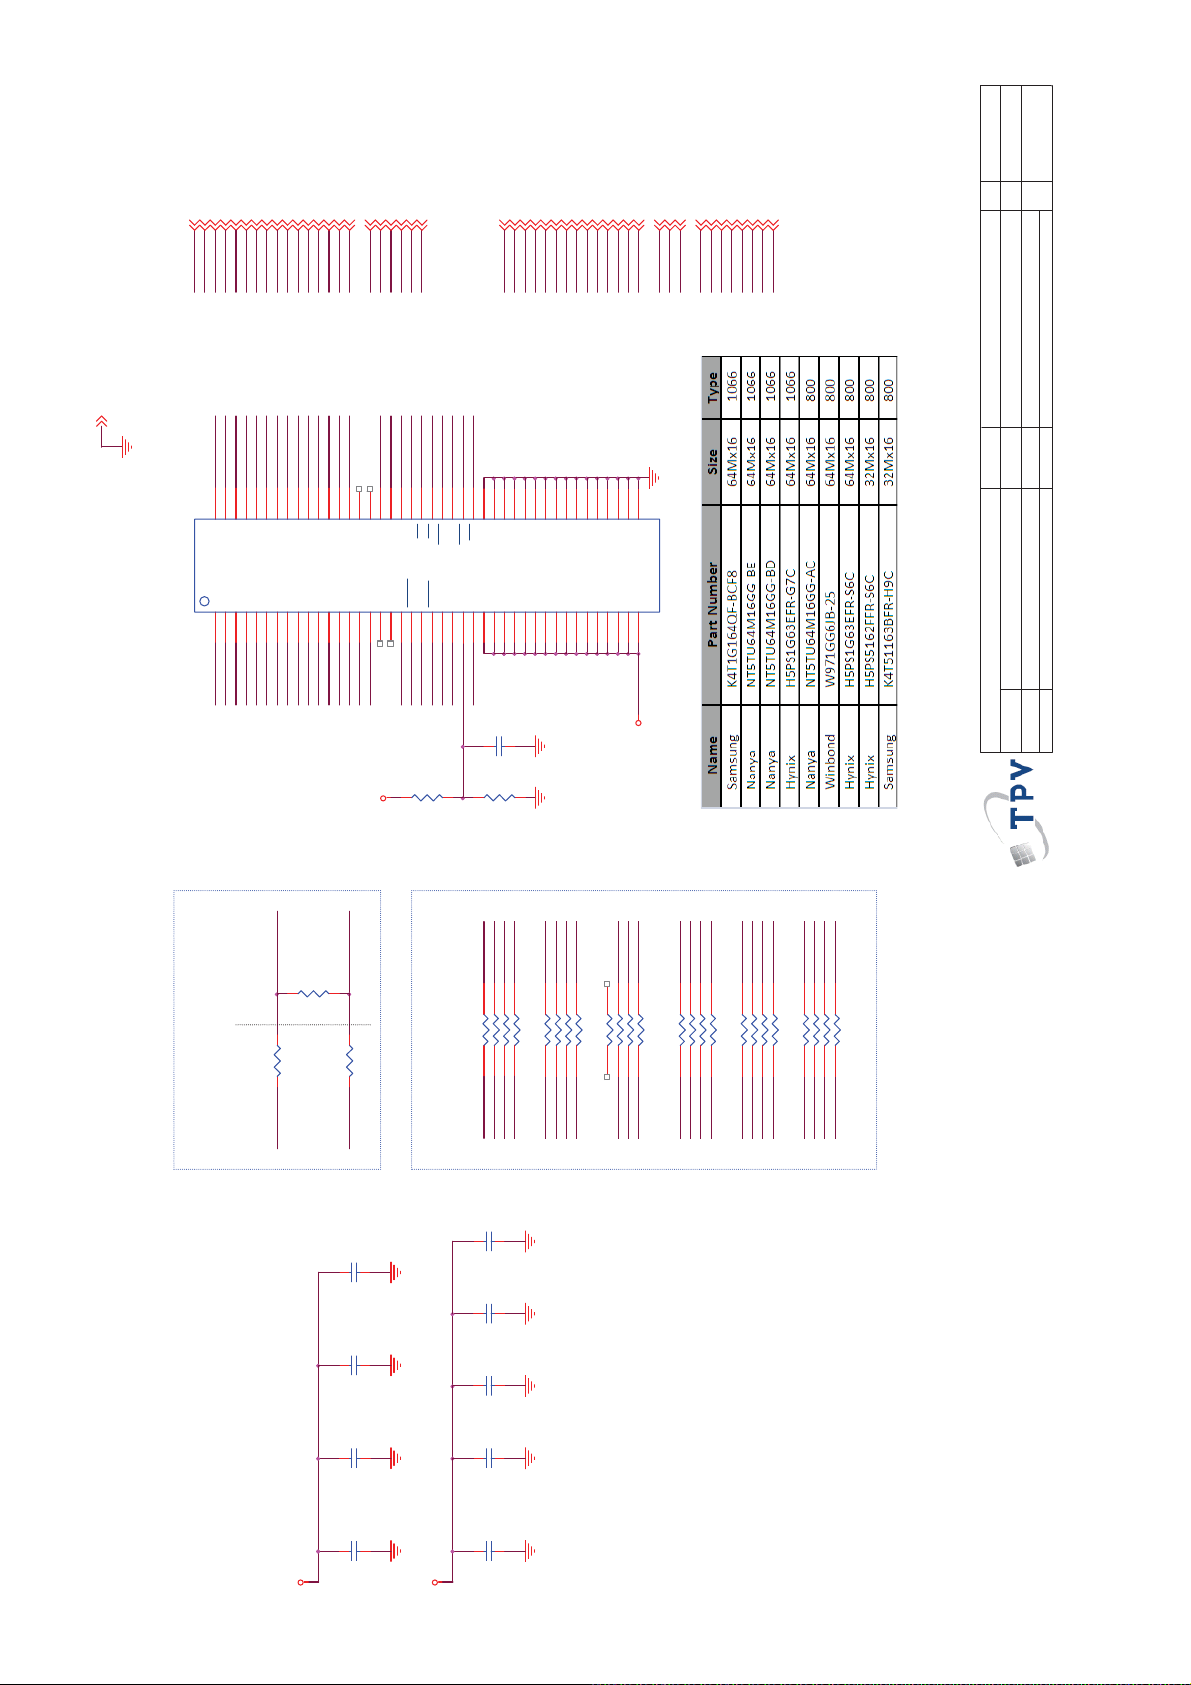
M0C
B
HW4
Size
Rev
RDQ2 12
RDQ3 12
RDQ4 12
RDQ5 12
RDQ6 12
RDQ7 12
RDQ8 12
RDQ9 12
RDQ10 12
RDQ11 12
RDQ12 12
RDQ14 12
RDQ13 12
RDQ15 12
RDQS1# 12
RDQS1 12
RDQS0 12
RDQ0 12
RDQ1 12
RDQ1
RDQ5
RDQ6
RDQ7
RDQ3
RDQ2
RDQ0
RDQ9
RDQ4
RDQ8
RDQ14
RDQ11
RDQ12
RDQ13
RDQ10
RDQS0# 12
RDQM1 12
RDQM0 12
RDQS1
RDQS0
RDQS0#
RDQS1#
RDQ15
RDQM0
RDQM1
1_A0
1_A0 12
1_A1 12
1_A1
1_A2
1_A2 12
1_A3
1_A3 12
1_A4
1_A4 12
1_A5 12
1_A5
1_A6 12
1_A6
1_A7 12
1_A7
1_A8 12
1_A8
1_A9 12
1_A9
1_A10 12
1_A11
1_A10
1_A11 12
1_A12
1_A12 12
1_A13
1_A13 12
1_BA1 12
RCLK0 12
1_BA0 12
1_BA2 12
1_BA0
1_BA2
1_BA1
RCLK0
1_WE# 12
1_CAS# 12
1_ODT 12
1_RAS# 12
RCLK0# 12
1_CS# 12
1_CKE 12
1_CKE
1_CS#
1_ODT
1_CAS#
1_RAS#
1_WE#
RCLK0#
⿄⠍
GND 4,5,6,7,8,9,10,11,12,13,15,16,17,18,19,20,21,22
B_A3
B_A1
B_A4
B_A6
B_A7
B_A5
B_A2
B_A0
M8
A1M3A2M7A0
A3N2A5N3A6N7A4N8A7P2A9
DQ1
DQ0
DQ4
DQ3H3DQ2
U402
DQ5
F1
G2
G8
H1
H7
H9
RDQ3
RDQ2
RDQ1
RDQ4
RDQ0
RDQ5
RDQ6
B_A12
B_A13
B_A8
B_A10
B_A11
B_A9
M2
P3
P8
A8
DQ9
DQ8
DQ6
DQ7
F9
C2
C8
D7
RDQ7
RDQ8
RDQ9
RDQ10
B_BA0
P7
R2
R8
NCR3NCR7NC
A11
A12
A10/AP
DQ14
DQ15
DQ12
DQ11D3DQ10
DQ13
A2
B1
B9
D1
D9
RDQ12
RDQ13
RDQ14
RDQ15
RDQ11
NC
DDRV
B_CAS#
B_WE#
CLK0#
CLK0
B_RAS#
B_ODT
B_CS#
B_BA2
B_BA1
K3
K7
K8
L7CSL8
K9
A7
B2
B8
D2
D8
VSSQ
VDDQ
C1
C472
VSSQ
VDDQ
100N16V
VSSQ
VSSQ
VDDQC3VDDQ
C7
C9
E3
VSSQ
VDDQ
E1
E7
VSS
VDD
E9
L3
J8
CK
BA2L1BA0L2BA1
UDQS
UDQS
NC
A8
B7
E2
F7
RDQS1
RDQS1#
RDQS0
R484
A3
CK
WE
VSS
RAS
ODT
CAS
VDD
UDM
LDQS
LDMF3LDQS
VREF
CKE
J2
E8
A1
A9
B3
K2
B_CKE
RDQS0#
RDQM0
RDQM1
RVREF1
R485
1.1KOHM +-1% 1/10 W
F2
VSSQ
VDDQ
G1
1.1KOHM +-1% 1/10W
F8
VSSQ
VDDQ
G3
H2
VSSQ
VDDQ
G7
H8
VSSQ
VDDQ
G9
J3
VSSQ
VDDQ
J1
VSS
VDDL
J7
N1
P9
VSS
VSS
VSSDL
VDD
VDD
VDD
W971GG6JB-18
J9
M9
R1
DDRV
of
14 22Wednesday , March 02, 2011
Sheet
PCB NAME
OEM MOD EL
TPV MO D EL
14. DDR2
㝍
㌾
⪰
Date
T P V ( Top Victory Electronics Co . , Ltd. )
䱨
㍀
Key Component
55
CLK0
CLK0#
R483
100R 1/16W 5%
B_RAS#
B_CS#
4
B_CAS#
B_A7
B_A5
B_A2
B_A12
4
123
B_A8
B_A9
B_A13
B_ODT
B_WE#
B_CKE
123
123
4
4
B_A10
B_BA1
B_BA0
B_BA2
B_A1
123
4
B_A4
B_A6
B_A0
B_A3
123
B_A11
123
4
RP401 100 OH M 1/16W
Damping for DDR2#1 ADDR/CMD
Damping & Termination for CLK
R481 0R05 1/ 16W
RCLK0
Close t o MT5310 Close to DDR2
R482 0R05 1/ 16W
RCLK0#
C466
100N16V
C465
100N16V
E1 R1
C464
100N16V
A1
CAPs Clos e t o DDR2#1
C463
100N16V
DDR2#1-64Mx16-1066MHz
DDRV
J1
DDRV
876
5
876
5
RP402 100 OH M 1/16W
1_A7
1_A9
1_A12
1_CS#
C471
C470
C469
C468
C467
1_CAS#
100N16V
100N16V
100N16V
100N16V
100N16V
1_A2
1_A5
J9
M9
C1
C3
G1
G3
A9C7C9
E9G7G9
1_RAS#
RP403 100 OH M 1/16W
876
5
1_A13
1_ODT
1_A8
RP404 100 OH M 1/16W
876
5
1_BA2
1_WE#
1_CKE
1_BA0
RP405 100 OH M 1/16W
876
5
1_A3
1_A10
1_BA1
1_A1
RP406 100 OH M 1/16W
876
5
1_A0
1_A4
1_A11
1_A6
!
Page 56
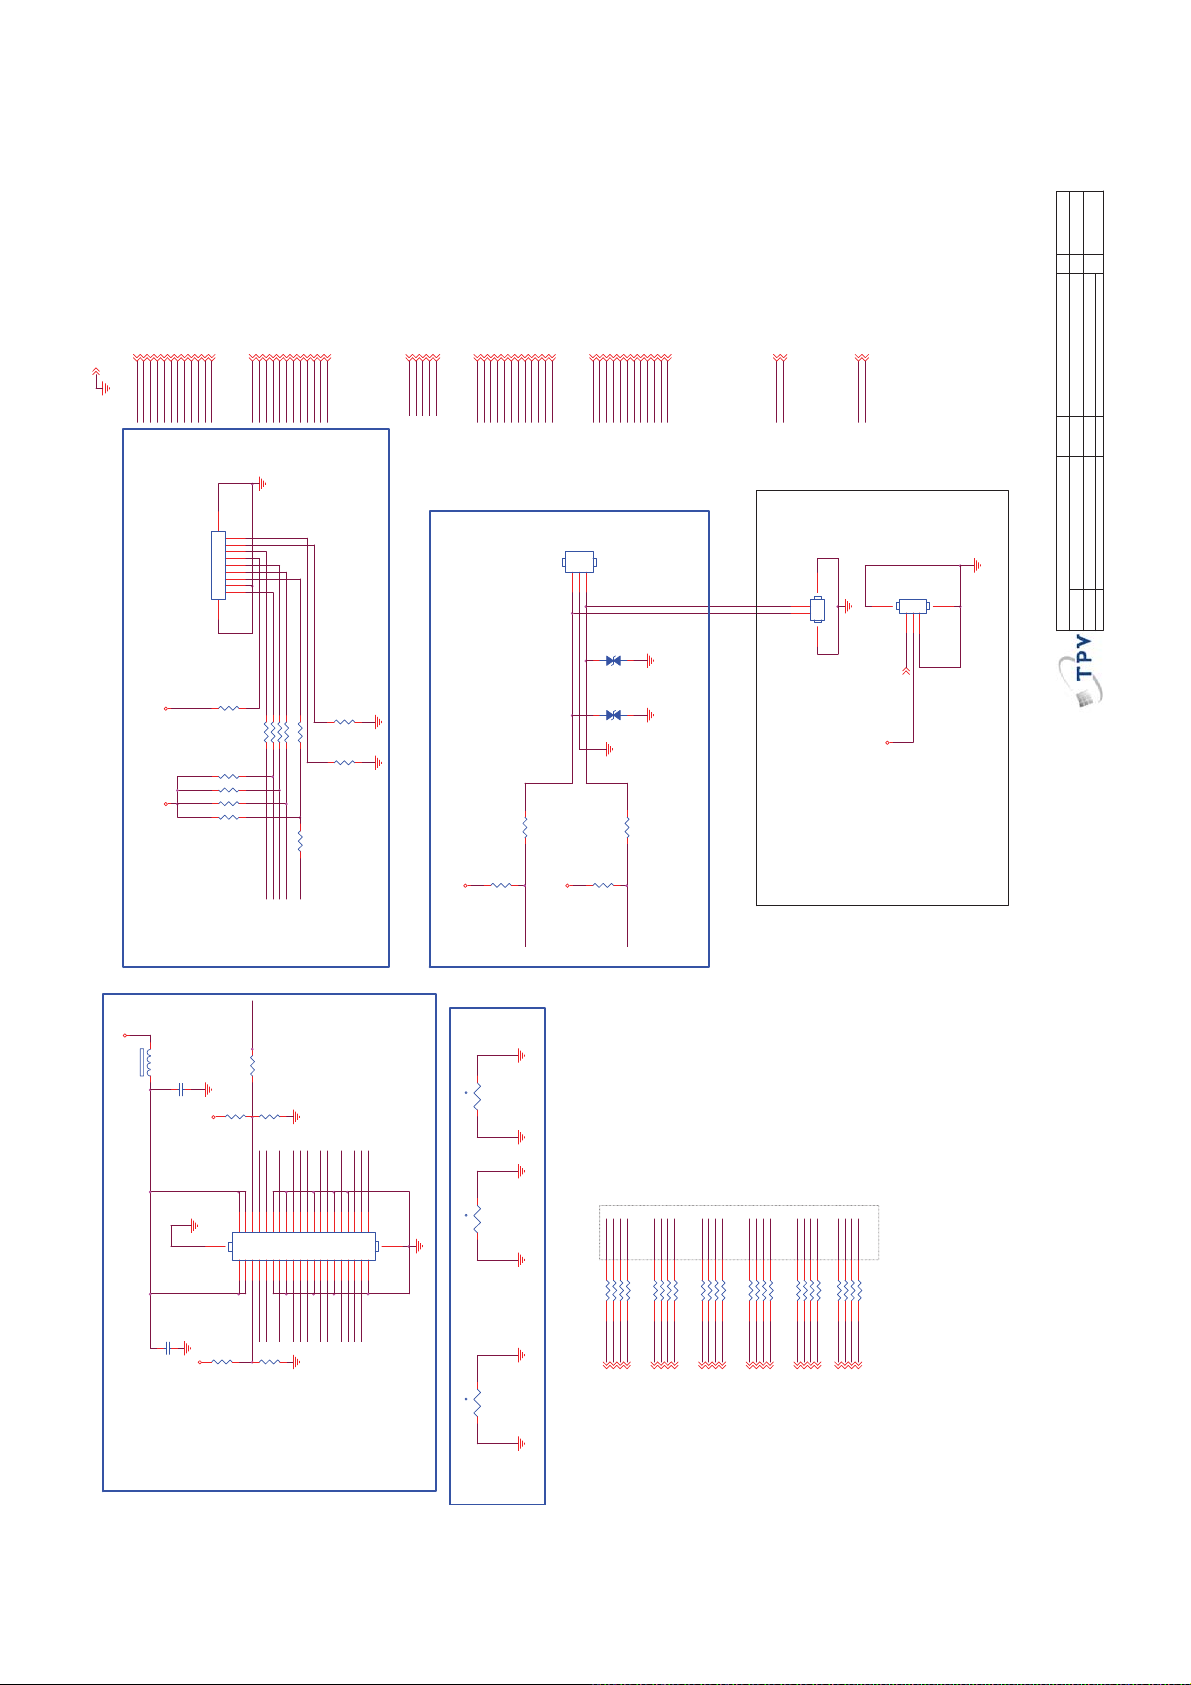
M0C
C
HW4
Size
Rev
⿄⠍
TX_AE3P 12
TX_AE4N 12
TX_AE4P 12
TX_AE3N 12
TX_AO0P 12
TX_AE0P 12
TX_AE1P 12
TX_AE0N 12
TX_AE2N 12
TX_AE2P 12
TX_AE1N 12
TX_AECKN 12
GND 4,5,6,7,8,9,10,11,12,13,14,16,17,18,19,20,21,22
TX_AECKP 12
TX_AE1P
TX_AE1N
TX_AE0P
TX_AE0N
TX_AE2P
TX_AECKN
TX_AECKP
TX_AE3N
TX_AE3P
TX_AE2N
DVDD3 V3DV DD3V3
TX_AO0N 12
TX_AE4P
TX_AO0N
TX_AO0P
TX_AE4N
9
8
7
6
5
4
3
2
1
CN415
NC\CONN
10 11
TVTRE F#1
R149
NC\1K 1/ 16 W 5%
TX_AO4P 12
TX_AO3N 12
TX_AO3P 12
TX_AO4N 12
TX_AO1N 12
TX_AO1P 12
TX_AOCKP 12
TX_AO2N 12
TX_AO2P 12
TX_AOC KN 12
TX_AO4N
TX_AO4P
TX_AO3N
TX_AO3P
TX_AO1P
TX_AO2N
TX_AO2P
TX_AOC KP
TX_AOC KN
TX_AO1N
N54124027
JTAG_DBGACK
JTAG_DBGRQ
R152
NC\10K 1/ 16W 5%
JTDO 12
JTRST# 12
JTDI 12
JTMS 12
JTCK 12
TX_AE0P 12
JTMS
JTDO
JTDI
JTCK
JTRST#
TX_AE0P
TX_AE3N 12
TX_AE3P 12
TX_AE4N 12
TX_AE0N 12
TX_AE0N
TX_AE4P 12
TX_AE1P 12
TX_AECKP 12
TX_AE2N 12
TX_AE2P 12
TX_AE1N 12
TX_AECKN 12
TX_AE1N
TX_AE1P
TX_AE3P
TX_AE4N
TX_AE4P
TX_AE2N
TX_AE2P
TX_AECKN
TX_AECKP
TX_AE3N
CN410
123
TX_AO1P 12
TX_AO0N 12
TX_AO0P 12
TX_AO1N
TX_AO1P
TX_AO0N
TX_AO0P
CONN
12
12
TX_AO3P 12
TX_AO4N 12
TX_AO4P 12
TX_AO3N 12
TX_AOCKP 12
TX_AO2N 12
TX_AO2P 12
TX_AO1N 12
TX_AOC KN 12
TX_AOC KN
TX_AO3N
TX_AO3P
TX_AO4N
TX_AO4P
TX_AO2N
TX_AO2P
TX_AOC KP
ZD138
MLVG04 02
ZD137
MLVG0402
U0TX 6,12
U0RX 6,12
U0RX
U0TX
2
1
CN703
OSCL0 8,9, 10,12,13, 18,20
OSDA0 8,9,10,12, 13,18,20
of
OSDA0
OSCL0
45
123
RC_IR_5V
CONN
CN704
3 4
CONN
15 2 2Wednesday , March 02 , 2011
Sheet
PCB NAME
OEM MOD E L
TPV MODEL
15. LVDS & JTAG & UAR T
㝍
㌾
⪰
T P V ( Top Victory Electronics Co . , Ltd. )
Date
䱨
㍀
Key Component
R198 NC\ 0R 05 1/ 16 W
R195 NC\ 0R 05 1/ 16 W
R196 NC\ 0R 05 1/ 16 W
R197 NC\ 0R 05 1/ 16 W
R194 NC\ 0R 05 1/ 16 W
R147NC\10 K 1/ 16W 5%
R146NC\10 K 1/ 16W 5%
R145NC\10 K 1/ 16W 5%
R144NC\10 K 1/ 16W 5%
JTMS
JTRST#
JTCK
JTDI
JTAG (I CE) Debug
Close to IC MT5301B (U401)
LVDSVDD
120R/6000m A
FB105
C114
1 2
BL_DIM_PWM
R233
10U 10V
NC\0R05 OHM
R143
0R05 1/16W
R142
NC\1K 1/ 1 6W 5%
DVDD3 V3
TX_AE4N
TX_AE3N
TX_AECKNTX_AECKP
ODSEL
Panel_12V_5V
C113
100N 50V
39
42
40
CONN
TX_AE4P
TX_AE3P
SELLVDS
R140
1K 1/16W 5%
DVDD3 V3
R141
NC\0R 05 1 / 16W
R151
NC\10 K 1/ 16W 5%
R154 100R 1/16W 5%
R150
NC\33R 1/ 16W 5%
JTDO
3V3SB
R153
4K7 1/16W 5%
U0RX
R156 100R 1/16W 5%
3V3SB
R155
4K7 1/16W 5%
U0TX
UART Debu g T oo l (STBY) nea r CN101
t
NC\MINISMDC075F-2
TH104
1 2
TX_AE2N
TX_AE1N
TX_AE1P
TX_AE2P
TX_AO1N
TX_AO3N
TX_AE0NTX_AE0P
TX_AO0N
TX_AO2N
TX_AO4N
t
NC\MINISMDC075F-2
135791113151719212325272931333537
41
246
8
101214161820222426283032343638
CN414
TX_AOCKP TX_AOC KN
TX_AO4P
TX_AO2P
TX_AO1P
TX_AO3P
TX_AO0P
TH10 3
1 2
t
NC\MINISMDC075F-2
TH10 2
1 2
TX_AE4P
TX_AE4N
TX_AE3P
TX_AE3N
TX_AECKP
TX_AECKN
TX_AE2P
TX_AE2N
123
4
5 RP101
M_TX_AE4P
M_TX_AE4N
M_TX_AE4P22
123
4
876
876
5 RP102
0OHM 1/16W
M_TX_AE3P
M_TX_AE3N
M_TX_AECKP
M_TX_AECKN
M_TX_AE2P
M_TX_AE2N
M_TX_AE4N22
M_TX_AECKP22
M_TX_AECKN22
M_TX_AE3N22
M_TX_AE3P22
M_TX_AE2P22
M_TX_AE2N22
TX_AO4P
TX_AO4N
TX_AO3P
TX_AO3N
TX_AOCKP
TX_AOCKN
TX_AO2P
TX_AE1P
TX_AE1N
TX_AE0P
4
123
4
5 RP104
876
5 RP103
0OHM 1/16W
0OHM 1/16W
M_TX_AO4P
M_TX_AO4N
M_TX_AE1P
M_TX_AE1N
M_TX_AE0P
M_TX_AE0N TX_AE0N
M_TX_AE1P22
M_TX_AE1N22
M_TX_AE0P22
M_TX_AE0N22
M_TX_AO4P22
TX_AO2N
123
123
4
876
876
5 RP105
0OHM 1/16W
M_TX_AO3P
M_TX_AO3N
M_TX_AOC KP
M_TX_AOC KN
M_TX_AO2P
M_TX_AO2N
M_TX_AO3N22
M_TX_AO4N22
M_TX_AO3P22
M_TX_AO2N22
M_TX_AOC KP22
M_TX_AOC KN22
M_TX_AO2P22
5VSB_2
56
TX_AO1P
TX_AO1N
TX_AO0P
TX_AO0N
near CN408
123
4
876
5 RP106
0OHM 1/16W
0OHM 1/16W
M_TX_AO1P
M_TX_AO1N
M_TX_AO0P
M_TX_AO0N
M_TX_AO1N22
M_TX_AO0P22
M_TX_AO0N22
M_TX_AO1P22
FHD 8/10-Bit LVDS Connect or > = 26"
EMI
!
Page 57
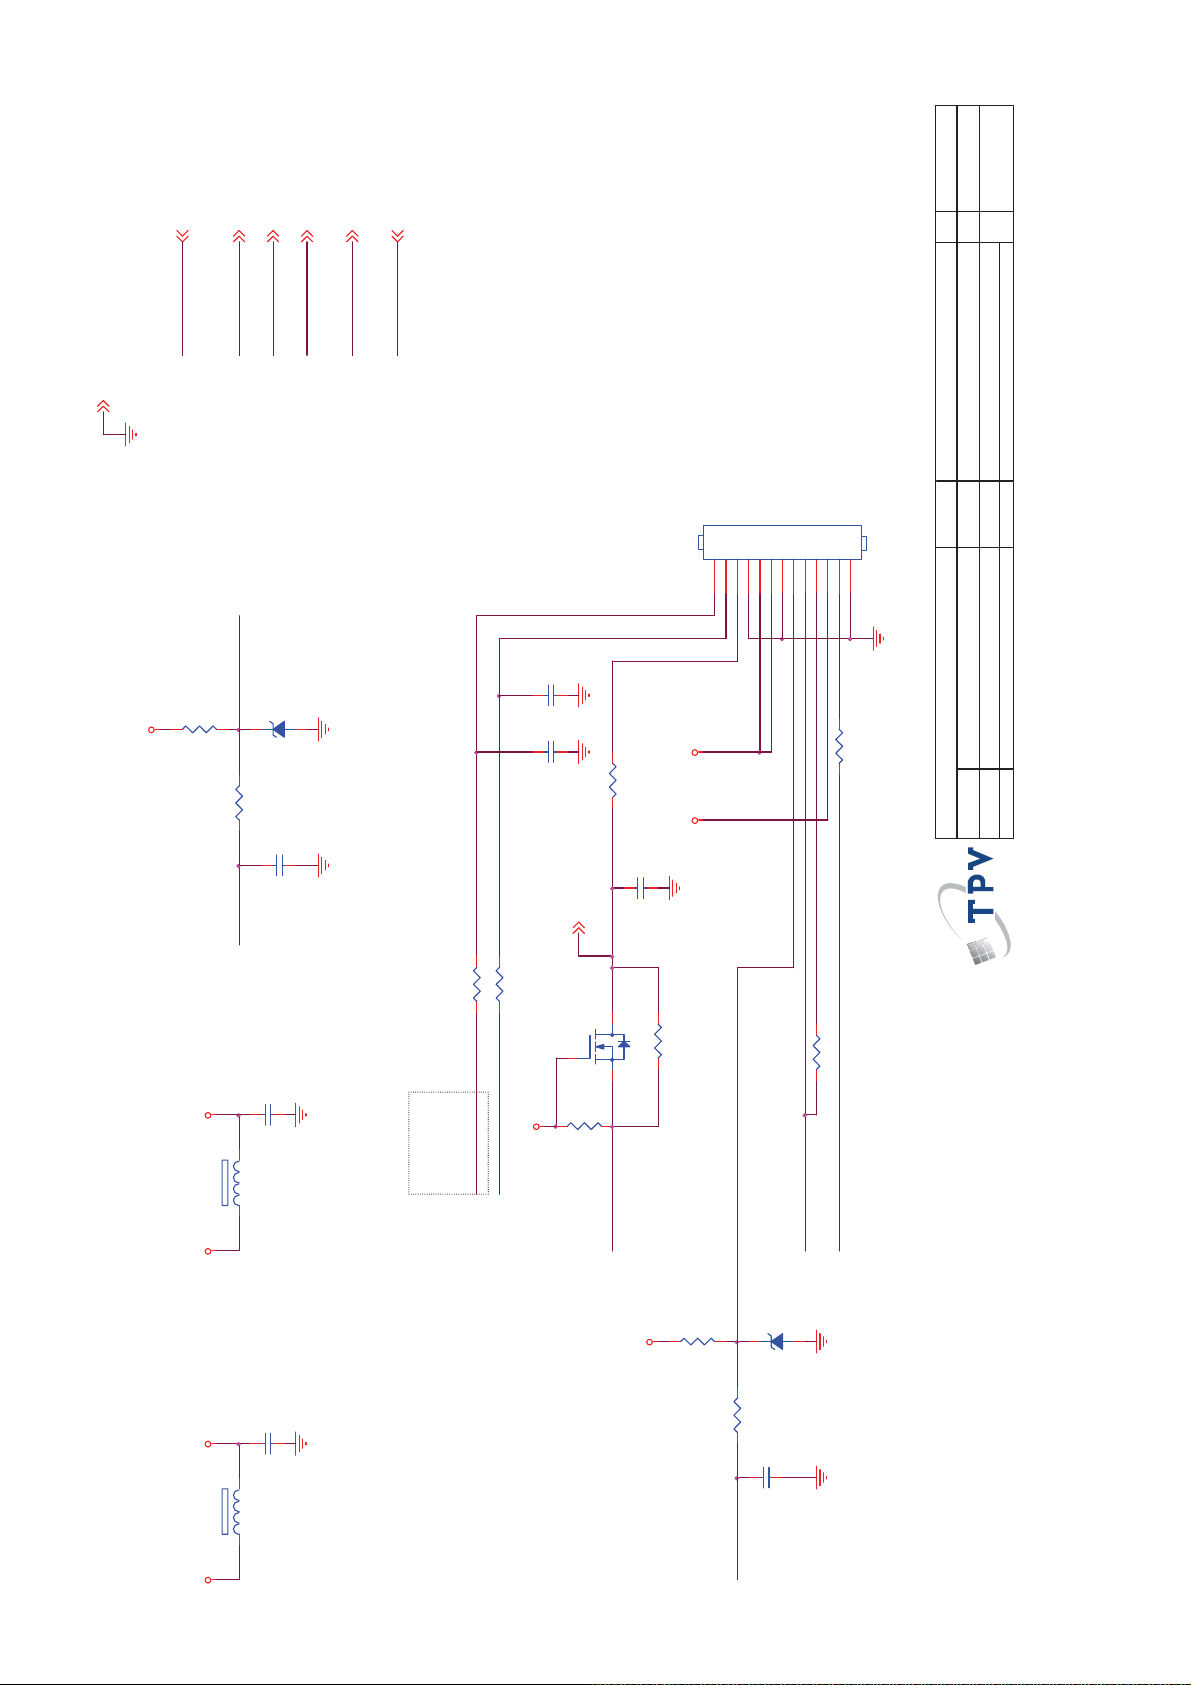
>
⿄⠍
M0C
<
ADC_KEY 12
OIRI 12
LED_RED_OFF# 12
LED_RED_OFF#
GND 4,5,6,7,8,9,10,11,12,13,14,15,17,18,19,20,21,22
ADC_KEY
LIT_SENSOR 12
KEY2 12
KEY2
LED_WGB 12
LIT_SENSOR
LED_WGB
Size
Rev
⿄⠍
22Wedn esda y , March 02, 2011
of
<Title> B
16
Link to IR/Keypad Bd.
Sheet
PCB NAME
TPV MODEL
CN401
123456789
KEY
101112
CONN
13
OEM MOD E L
LED_RED
R201
1MOHM 1/16W +/- 5%
ZD201
NC\BZX384-C5V6
1 2
3V3SB_2
R202
100R 1/16 W 5%
C203
100N 16V
ADC_KEY OIRI
R220 0R05 1/10W
C202
100N 16V
LED_RED_OFF#
H : OFF
L : ON
FB202
120R/3000mA
1 2
R221 0R05 1/10W
LED_WGB
C206
100N 16V
G4611-D-X-X -3-110127
C205
R208 0R 05 1/ 16W
100N 16V
3V3SB_2
R211 NC \ 0R 05 1/ 16W
5VSB_2
RC_IR_5V
C207
33P 50V
Q201
NC\2N7002
R207 0R05 1/16W
3V3SB_2
R206
NC\ 4K 7 1/ 16W 5%
OIRI
IR Receiver
R209 NC\0R05 1/16W
LIT_SENSOR
KEY
16: IR & Key p ad I nt erf ace
㝍
㌾
⪰
T P V ( Top Victory Electronics Co . , Ltd. )
Date
䱨
㍀
Key Component
57
3V3SB5VSB_2 3V3SB_2
R204
1MOHM 1/16W +/ -5%
ZD202
NC\BZX384-C5V6
1 2
3V3SB_2
C201
100N 16V
FB201
120R/3000mA
1 2
5VSB
R203
100R 1/1 6W 5%
C204
100N 16V
KEY2
!
Page 58
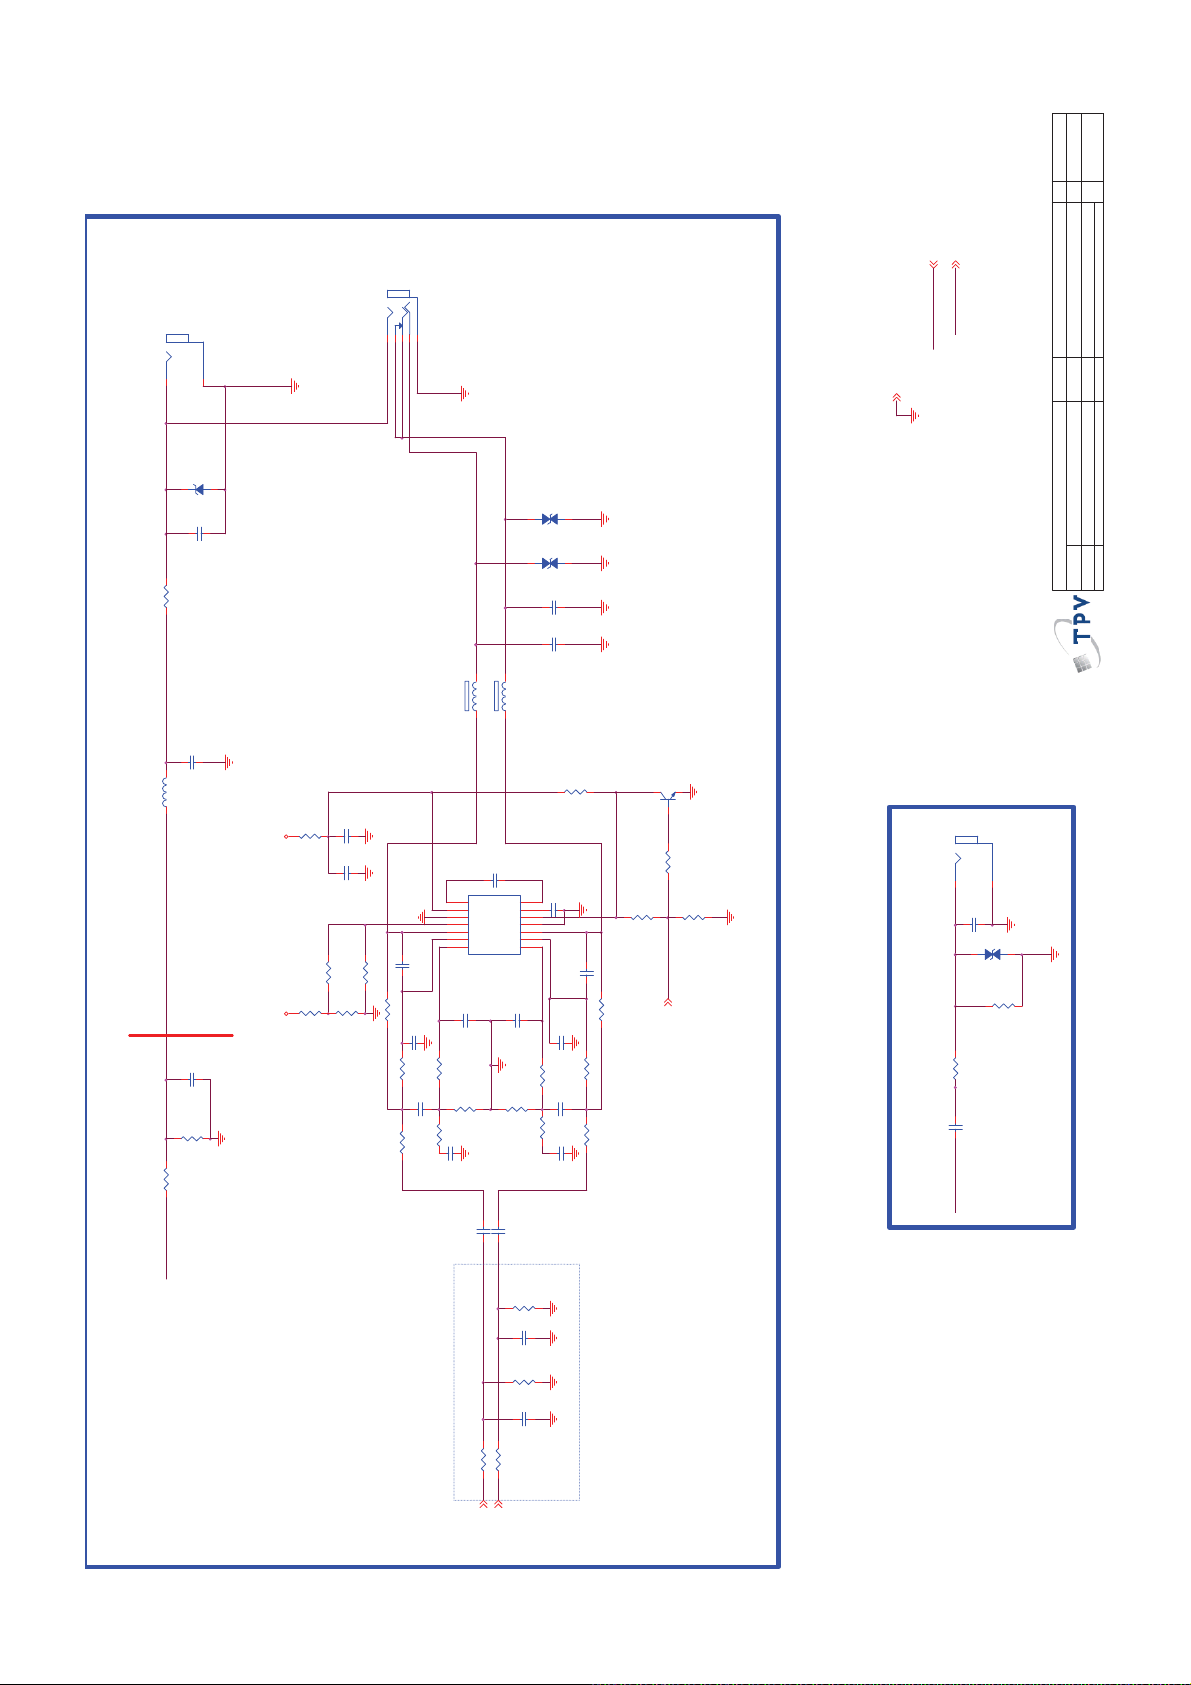
M0C
C
HW4
Size
Rev
⿄⠍
SPDIF_OUT 8, 12
MONITOR_OUT 12
CN106
NC\PHONEJACK
CN122
RCA JACK
1
2
CVBS OUT
ZD131
NC\UDZSNP5.6B
1 2
C143
NC\47pF 50V
R193 0R05 1/16W
C142
47pF 50V
L101
1.8 uH
C1317
NC\10UF 16V
R1322
NC\0R 05 1/ 10W
12453
NC\MLVG0402
AUD_ROUT
AUD_ROUT
FB1301
1 2
ZD1302
1 2
NC\MLVG0402
ZD1301
1 2
C1320
NC\10N 50V
AUD_LOUT AUD_LOUT
C1319
NC\10N 50V
FB1302
NC\30R/700mA
NC\30R/700mA
1 2
R1323
47K1/16W(NC)
Q1501
NC\BC847C(NC)
SPDIF_OUT
MONI TOR _OU T
GND 4, 5,6,7,8, 9,10,11,12,13, 14,15,16,18,19, 20,21,22
3V3 _BUCK5V_SW
C1316
NC\1UF16V
NC\51K 1/16W 5%
NC\0R05OHM1/16W(NC)
R1319
R1317
Nearly I/O CONNECTORNearly MT5301B/D
C141
47pF 50V
R192
75R 1/16W 1%
R191 0R05 1/ 16W
MONITOR_OUT
NC\2K OHM
C1313 NC\33P 50V
R1320
R1318
C1309
NC\33P 50V(NC)
R1315 NC \ 33K 1/16W
R1309
NC\1.02K 1/10W 1%
NC\47K1/16W
NC\470P 50V
C1307
R1305
NC\10K1/16W
C1318
NC\1UF16V
C1315
NC\1UF16V
CN
CP
8
10
11
12
13
14
C1310
R1310 NC\47K1/16W
R1311
R1306
NC\10K1/16W
C1305
NC\1UF16V
7
PVDD9PVSS
6
EN
PGND
5
UVP
SGND
4
OUTL
OUTR
3
-INR
-INL
2
+INR
+INL
1
U413
NC\DRV603PWR
C1311
NC\33P 50V
NC\33P 50V
R1312
NC\33K 1/16W
NC\33K 1/16W
NC\1UF16V
C1303 NC\1UF16V
C1304
R1304
NC\22K1/16W
C1314 NC\33P 50V
C1312
33P 50V(NC)
R1313
NC\ 47K1/16W
R1314 NC\47K1/ 16W
C1308
NC\470P 50V
R1307
NC\10K1/16W
C1306
NC\1UF16V
R1308
NC\10K1/16W
R1321 10K1/16W(NC)
R1324
NC\0R05 OH M
R1325
NC\10K1/16W
NC\33K 1/16W
R1316
AOUT_EN12
CN605
RCA JACK
1
2
C605
NC\100P 50V
NC\MLVG0402
1 2
ZD602
R605 100R 1/ 10W 5%
R604
240R 1/10W 1%
C604
100N 16V
SPDIF_OUT ESPO
SPDIF OUT
22
of
17
Sheet
PCB NAME
TPV MODEL
OEM MOD EL
Wednesday , March 02, 2011
17_Video Out & SPDIF OU T
㝍
㌾
⪰
Date
T P V ( Top Victory Electronics Co . , Ltd. )
䱨
㍀
Key Component
58
AV_OUT (CVBS+R/L)
C1302
NC\2. 2nF 50V
R1303
NC\22K1/16W
C1301
NC\2. 2nF 50V
CLOSE TO DRV603(U413)
PreAmp output for Audio Out
R1302 NC\100OHM1/16W
R1301 NC\100OHM1/16W
AOUTL12
AOUTR12
!
Page 59
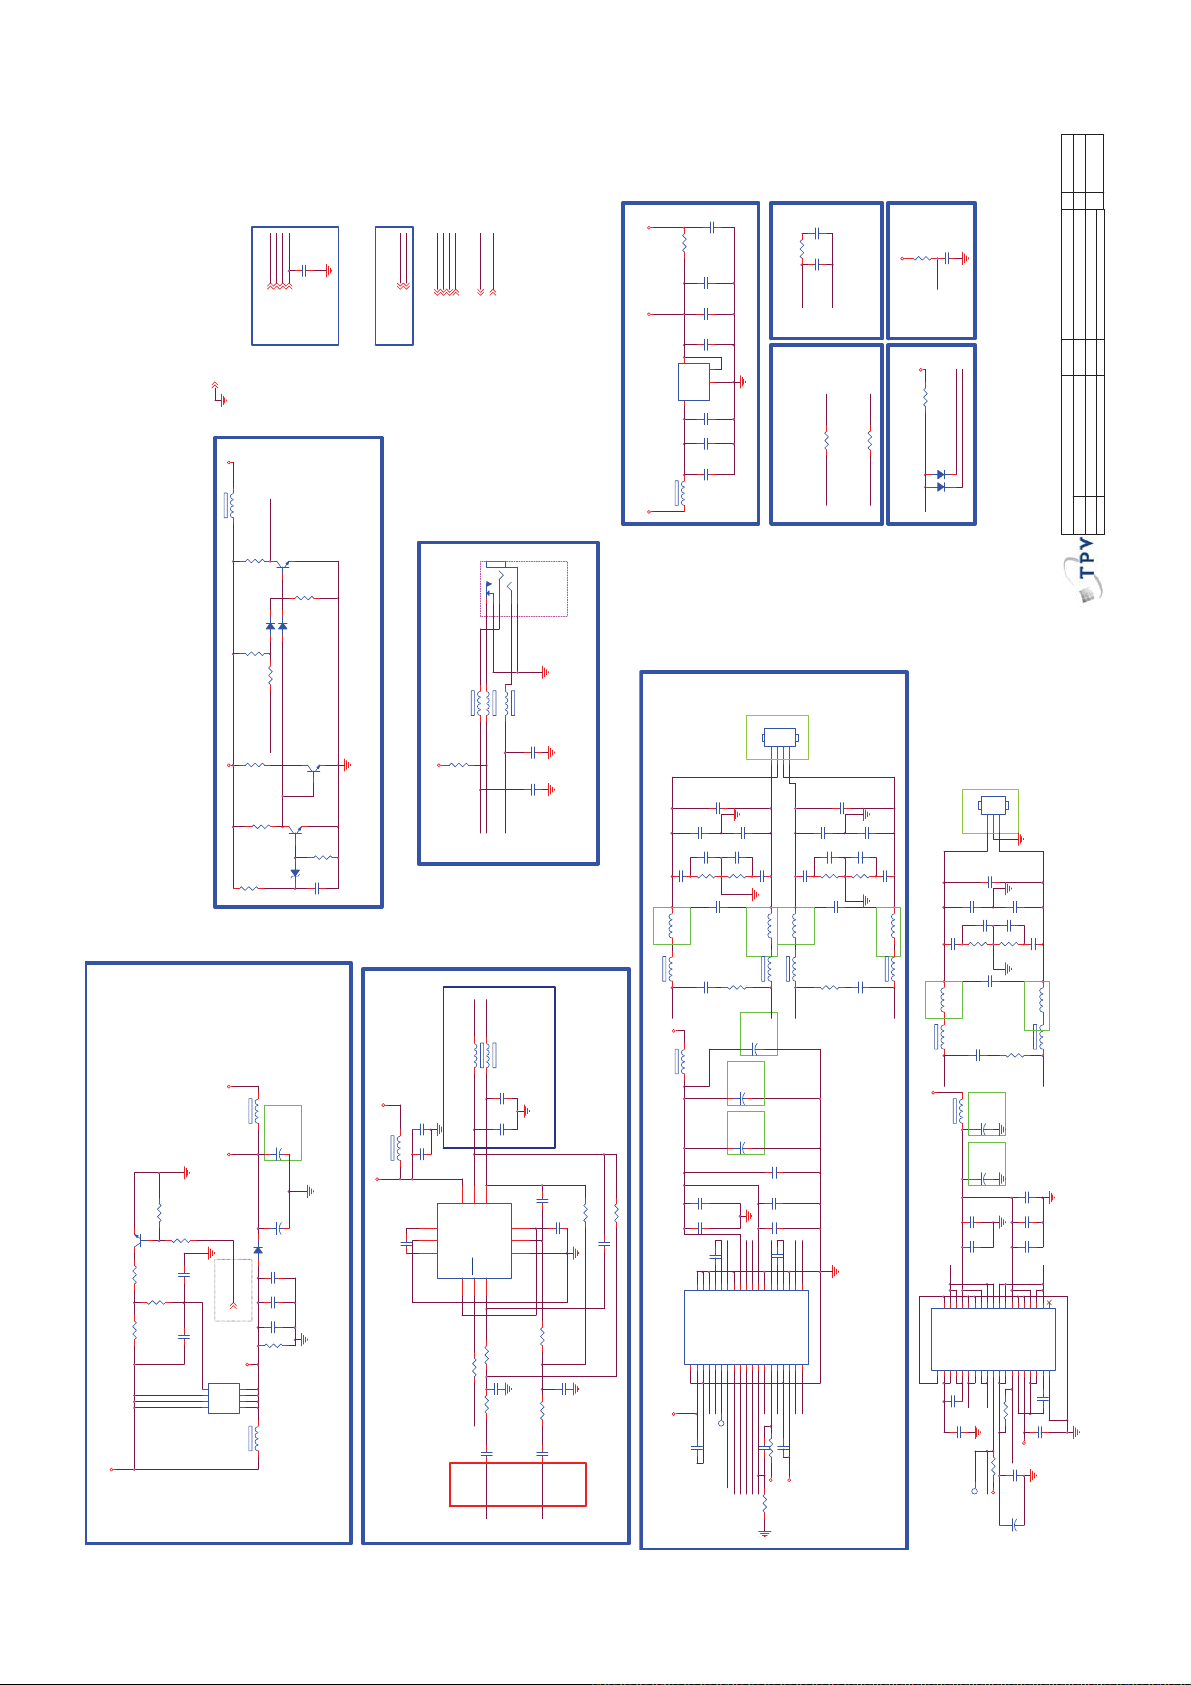
M0C
Custom
HW4 nh
Size
Rev
⿄⠍
C637
FB610
22uH
R628
U607
120R/300 0mA
ROUT+
12
OUT2A
+24V_AMP
FB609
Aud3V3
0.1uF 50V
CN602
L602
5.1mm
FB613
100UF 35V
8x7mm
8x7mm
11
VCC1
PLL_FILT
PLL_GND
R629
C655
4N7 50V
R633
2K2 +-1% 1/16W
C654
680pF 50V
PLL_FILT
PLL_GND
Connection to PLL filterIIC DIGITAL SW
OSDA0
OSCL0
R635
R636
0R05 1/16W
0R05 1/16W
Aud_SDA
Aud_SCL
CONN
123
4
LOUT+
ROUT-
C640
0.1uF 50V
C646
0.1uF 50V
6.2 OHM 1/4W
22uH
L603
22uH
SMD
5.1mm
12
12
120R/6000mA
120R/6000mA
FB614
OUT2B
OUT1A
C644
0.1uF 50V
C641
1U 50V
C643
0.1uF 50V
C642
OUT1A
DDX3A
DDX3B
0.1uF 50V
12
13
18
14
16
15
VDD
GND1
OUT1A
OUT3B17OUT3A
CONFIG
GND_REG
EAPD/OUT4B19TWARN/OUT4A20VDD_DIG21GND_DIG22PWRDN23VDD_PLL24FILTER_PLL25GND_PLL26XTI27BICKI28LRCKI29SDI30RESET31INT_LINE32SDA33SCL34GND_DIG35VDD_DIG36Therm al P a d
TW
EAPD
PWDN
C639
C645
R630
2R2 1/16W 5%
0.1uF 50V
0.1uF 50V
Aud3A3
Aud3V3
0R05 1/16W
CN6301/CN6302
changed to Xinya
1N 50V
C650
1N 50V
1N 50V
C648
C653
0.1uF 50V
0.1uF 50V
C647
C652
C656
6.2 OHM 1/ 4W
R634
R632
100N 50V
C649
L604
22uH
SMD
C651
330pF 50V
FB615
R631
22 OHM 1/8W
STA339BWTR
1R 1%
C683
10UF
C682
10UF
C636
0.1uF 50V
2
4
4
GND
VOUT
1
G903T63UF
VIN
3
C634
0.1uF 50V
C681
10UF
C680
10UF
12
C629 1N 50V
1N 50V
1N 50V
C627
C633
0.1uF 50V
0.1uF 50V
C626
C632
C620
0.1uF 50V
6.2 OHM 1/ 4W
R627
R625
100N 50V
C628
SMD
5.1mm
SMD
C624
330pF 50V
120R/6000mA
R626
22 OHM 1/8W
12
U602
37
C621
0.1uF 50V
C685
+
120R/6000mA
C631
100UF 35V
+
C630
100UF 35V
+
C625
1U 50V
C623
0.1uF 50V
OUT2B
OUT2A
OUT1B
C622
0.1uF 50V
2
7
4
6
10
8
1
5
3
SA
VSS
VCC2
GND2
OUT2B
OUT2A9OUT1B
GND_SUB
VCC_REG
TEST_MODE
Aud_SCL
Aud_SDA
TP45
AOLRCK
AOSDATA0
AOMCLK
A_Reset
AOBCLK
right-angle hook
LOUT-
0.1uF 50V
6.2 OHM 1/4W
12
5.1mm
OUT1B
Aud3V3
type
C669
1nF 100V
R640
10K 1/16W 5%
A_Reset
Reset (pull-up)
Aud3V3
SPK_MUTE
POP_MUTE
R639
1.8KOHM 1/10W
D605
LL4148
LL4148
D606
PWDN
Power down (pull-up)
CN603
CONN
123
of
18 22Wednesday , March 02, 2011
Sheet
PCB NAME
TPV MOD E L
OEM MOD E L
15. AUDIO AMP/H EAD PH ONE OUT
㝍
㌾
⪰
Date
T P V ( Top Victory Electronics Co . , Ltd. )
䱨
㍀
Key Component
59
1N 50V
C668
1N 50V
1N 50V
C665
C673
0.1uF 50V
0.1uF 50V
C672
C666
C659
0.1uF 50V
6.2 OHM 1/4W
120R/6000mA
L605
22uH
SMD
5.1mm
12
120R/6000mA
FB616
OUTB
+24V_AMP
FB611
120R/6000mA
C663
1 2
C662
C661
C660
OUTA
OUTA
3
1
6
4
OUT2B2OUT2B
VCC2B
GND2B5GND2A
GND-SUB
U603
37
DDX3B
C658
0.1uF 50V
C657
0.1uF 50V
TP44
C674
0.1uF 50V
6.2 OHM 1/4W
R642
R637
100N 50V
C667
L606
22uH
12
SMD
5.1mm
C664
330pF 50V
+
+
0.1uF 50V
1U 50V
7
OUT2A8OUT2A9OUT1B10OUT1B
VCC2A
DDX3A
TW
120R/6000mA
FB617
R643
OUTA
22 OHM 1/8W
8x7mm
100UF 35V
8x7mm
100UF 35V
C677
0.1uF 50V
C676
0.1uF 50V
C675
1U 50V
For C660/C661placement please
get closed to pin 4 (VCC2B)
OUTB
OUTB
11
17
14
18
12
15
NC
OUT1A16OUT1A
VCC1B
VCC1A
GND1B13GND1A
STA515W
GND-CLEAN19GND-REG20VDD21VDD22VL23CONFIG24PWRDN25TRI- STATE26FAULT27TH_W AR28IN1A29IN1B30IN2A31IN2B32VSS33VSS34VCCSIGN35VCCSIGN36GND
C6790.1uF 50V
R641
10K 1/16W 5%
C678
0.1uF 50V
EAPD
Aud3V3
R638 10K 1/16W 5%
C670
0.1uF 50V
Aud3V3
C671
100uF 10V
+
OSDA0
C686
NC\22pF 50V
AOBCLK
AOSDATA0
AOLRCK
AOMCLK
AOBCLK12
AOMCLK12
AOLRCK12
AOSDATA012
OSCL0
OSDA08,9,10,12,13,20
OSCL08,9,10, 12, 13,20
I2C Interface
I2S Interface
GND 4,5, 6,7,8,9,10, 11,12,13,14,15,16,17, 19,20,21,22
5V_SW
12
120R/600 0mA
FB601
POP_MUTE
R609
10K 1/16W 5%
Q602
BC847C
R610
4K7 1/16W 5%
D601 LL4148
R608
1.8KOHM 1/10W
D602 LL4148
R607
100R 1/16 W 5 %
MUTE_C TL
Q603
R602
NC 10K 1/16W 5%
+5V_ON
R603
R601
100K 1/10W 5%
+24V_AMP
FB603
120R/6000mA
1 2
+24V_SW
R719
NC\10K 1/16W 5%
R718
NC\10K 1/16W 5%
Q705
NC\PMBS3904
R721
NC\56KOHM 1/16W
C712
NC\330N 50V
R722
NC\180K
R720
C711 N C \ 330N 50V
NC\56KOHM 1/16W
+24V
2
D603
S3B
1
STANDBY
L: Off
H: On
STANDBY4,12
+24V_USB
Q708
NC\AO4449 -7A/-30V
G
D
4
5
S
D
3
6
S
D
2
7
S
D
1
8
FB602
120R/6000mA
1 2
NC PDTC114ET
3
2
1
1.8KOHM 1/10W
Q601
BC847C
R611
470KOHM +-5% 1/10W
13
ZD601
BZX84C3V6
C684
10uF 10V
+5V_ON
C609
C638
100UF 35V
8x7mm
+
C635
100UF 35V
+
K
A
C603
100N 50V
C610
1U 50V
C608
1U 50V
R612
10K 1/10W 5%
10uF 10V
FB604
120R/3000mA
1 2
C607
1U 25V
OPS_5V
C606
1UF 10V
A_Reset
HP_DET#
AL1O
AR1O
MUTE_C TL
SPK_MUTE
A_Reset12
AL1O12
AR1O12
HP_DET#12
MUTE_C TL12
SPK_MUTE12
CN601
12354
PHONE J ACK 5P
R606
10K+-5%1/16W
Aud3V3
HP_ROUT HPROUT
HP_LOUT
12
FB618 600R/200mA
Right-angle
type 6.2mm
HPLOUT
EARPDET
12
12
600R/200 mA
FB607 6 00R/200m A12FB606 600R/200m A
FB608
C618
1UF
C617
1UF
HP_LOUT
HP_DET#
HP_ROUT
12
FB619 600R /200mA
C687
1UF
C688
1UF
Main audio output deleted
11
12
10
C614
47pF 50V
C615
VDD
OUTL
OUTR
C1P
1
PGND
2
C1N
3
PVss
SHDN
IN_L
4
6
5
R617
10K 1/16W 5%
R614 10R 1/ 16W 5%
C612
POP_MUTE
R616
10K 1/16W 5%
C611
AL1O
1UF 10V
SVss
IN R
SGND
U606
NC/1N8 50V
1UF16V
R623
9
8
7
MAX9728AETC+
R620
10K 1/16W 5%
C616
R619
NC/1N8 50V
10K 1/16W 5%
C613
1UF16V
AR1O
Aud3A3
Aud3V3
G903T63UF
0.6A/3.3V
SOT-223
5V_SW
Head Pho ne OU T_Side Directio n
L601
FB612
R624
10K 1/16W 5%
10K 1/16W 5%
C619 47pF 50V
Headphone input from MT8222 AL2/AR2
!
Page 60
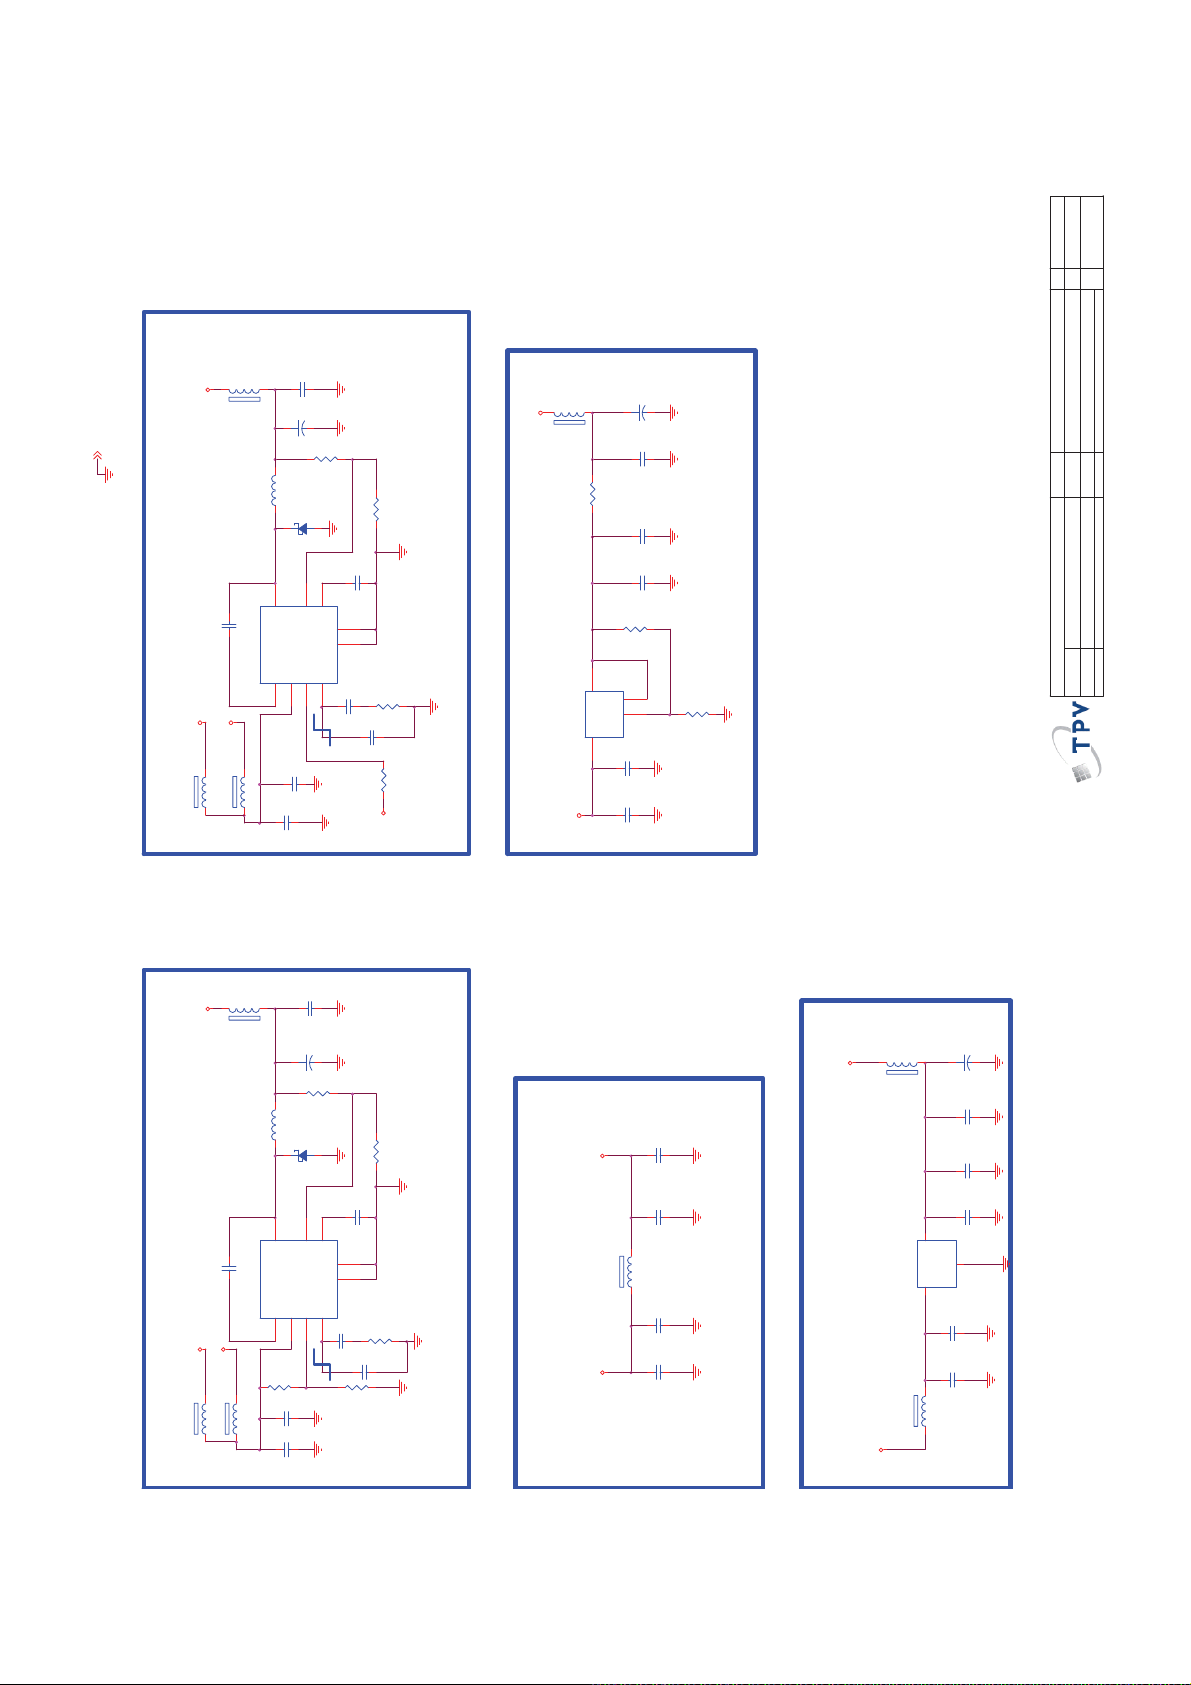
M0C
Custom
HW4 nh
Size
Rev
⿄⠍
FB739
120R/3000m A
GND 4,5,6,7,8,9,10,11,12,13,14,15,16,17,18,20,21,22
CORE POWER M81_DV11
C797
10nF50V
5V_SW
+12V
1 2
1 2
FB738 NC\ 120R/3000m A
FB722 120R/3000mA
100N16V
1 2
C798
220uF 16V
+
C796
L707
4.7uH 2A
D706
SS3P4
543
3
LX
FB5SS
G5657F12U
IN2EN7COMP
NC
U711
1
1
2
7
100N16V
C792
C791
R1
4.7K 1%
R763
R762
R2
1 2
8
8
6
6
10U 16V
18Kohm 1/16W +/ -1%
C795
100N16V
Thermal Pad
9
9
GND
4
C794
2.2nF 50V
R761
C793
100pF 50V
R760
M81_D V33
MP9403 Vout =0.8 X R2/(R1+R2) = 1.19V
G5657 Vout = 0. 92x (1+R1/ R2) = 0. 92 x ( 1 + 3. 9K/ 18K ) = 1. 19V
10K 1/16W 5%
10K 1/16W 5%
FB741
M81_AV12
POWER M81_AV12
120R/3000mA
C790
220UF 16V
+
1 2
C789
100N16V
R759
0R01 1/10W
C788
10uF 10V
C787
1uF 16V
R1
68K 1/16W 1%
R758
2
TH
4
R757
750R 1%
GND
VOUT
1
VIN
U712
G1117T63Uf
3
C786
100NF 25V
C785
10U 16V
M81_AV33
R2
Vout = 1.25 x ( 1+ [R2/R1] ) = 1.25 x (1 + 750/68K) = 1.2637V
of
19 22W ednesday , March 02, 2011
Sheet
PCB NAME
TPV MOD E L
OEM MODEL
19. MEMC DC CONVERTER
㝍
㌾
⪰
Date
T P V ( Top Victory Elect ronics C o . , Ltd. )
䱨
㍀
Key Component
60
POWER M81_DV33
FB706
120R/3000mA
M81_DV33 M81_D V11
C769
5V_SW
+12V
1 2
1 2
FB704 120R /3000mA
FB705 N C\120R /3000mA
C774
100N16V
1 2
C773
+
220uF 16V
62K 1/16W 1%
R756
L706
10nF50V
G5657F12U
U710
R1
10uH
D705
SS3P4
1 2
3
8
LX
FB5SS
Thermal Pad
GND
IN2EN7COMP
NC
6
1
R738
15K 1/16W 5%
OFF ON OFF ON
C768
100N16V
C740
10U 16V
R2
C778
10NF 50V
R755
24K 1%
C777
C772
100N16V
9
4
R754
0R05 1/16W
C771
180pF 50V
C770
100pF 50V
R739
10K 1/16W 5%
Vou t = 0.92x (1 + R1/R2) = 0 . 92 x ( 1 + 62K/ 24K ) = 3 . 3V
POWER M81_AV33
M81_D V33 M81_AV33
10U 16V
1 2
FB740 120R/3000mA
C776
10NF 50V
C775
1uF 16V
DRAM Power M81_DDRV
M81_DDRV
FB742
120R/3000m A
U713
G1084-18
FB743
M81_D V33
220uF 16V
+
1 2
C784
C783
10NF 50V
C782
100NF 25V
C781
1uF 16V
2
GND
VOUT
1
VIN
3
C780
100N16V
C779
10U 16V
1 2
120R/3000m A
!
Page 61
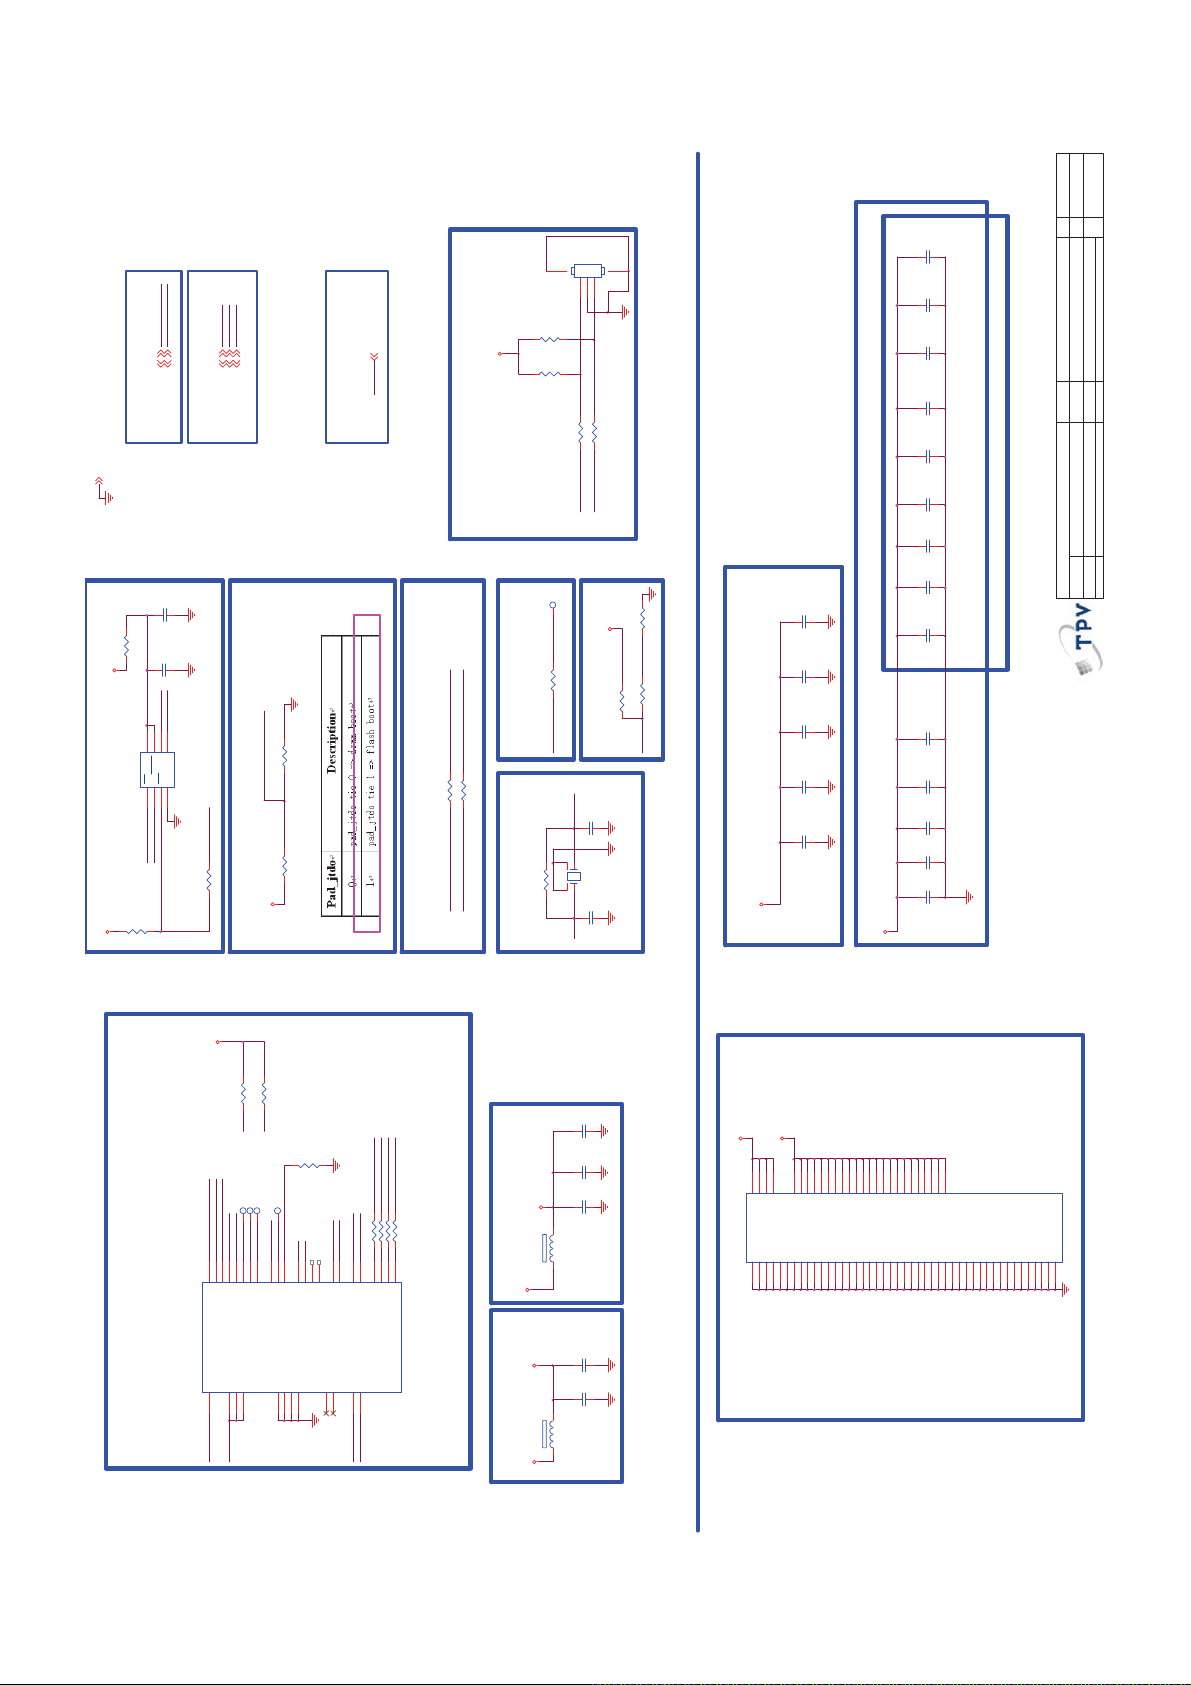
M0C
Custom
HW4 nh
Size
Rev
⿄⠍
C4130
45
3 Pin
1.0mm P itch
OSCL0
OSDA0
OSDA08,9,10,12,13,18
OSCL08,9,10,12,13,18
I2C to MT5363
GND 4,5,6,7,8,9,10,11,12,13,14,15,16,17,18,19,21,22
M82_G PIO 22
M82_G PIO 20
M82_G PIO 21
M82_G PIO 2222
M82_G PIO 2022
M82_G PIO 2122
GPIO control to Panel
MJC _RS T 12
MJC _RS T
M81_A V33
RESET from M T5363
123
Vertical Type
CN413
R4119
R4118
CONN
4K7 1/16W 5%
4K7 1/16W 5%
R41170R05 1/16W
R41220R05 1/16W
M82_U0TX
M82_U0RX
UART for code download and debug
OSD DMA ACK
Crystal
TP21
DMA_ACK_GP4
R4128
0R05 1/16W
M82_DMAACK
XTAL OXTAL I
1
2
X41 01
3
4
R4112 820K 1/16W 5%
R4136
M81_D V33
4K7 1/16W 5%
MJC _RS T
MT8282 RESET#
R4121
R4115
NC/4K7 1/16W
0R05 1/16W
M82_RS T#
C4109
30PF 50V
27MHz
C4108
30PF 50V
DV33 IO POWER
C4107
100N16V
R4107
0R05 1/10W
C4106
M81_D V33
Serial Flash 4 Mb
M81_D V33
10uF 10V
OSDA0M82_S DA
OSCL0
M82SPI_SCK
M82SPI_SO
7
8
5
6
SI
SCK
VCC
HOLD
MX25L4005AMI-12G
U411
CS1SO2WP3GND
4
M82SPI_CS#
WP#
M82SPI_SI
1K 1/16W 5%
R4105
M82_J TDO
R4109 NC/1K 1/16W
R4111 0R05 1/16W
M82_J TMS
R4106 0R05 1/16W
R4108 1K 1/16W 5%
M81_D V33
R4110 0R05 1/16W
I2C CONNECTION
M82_S CL
Trapping : Default Low when no configuration exte rnal
C4115
3.3nF 50V
C4114
3.3nF 50V
C4113
100N16V
C4112
100N16V
C4111
4.7UF 10V
M81_DV33
DV10 CORE POWER
330pF 50V
C4129
1.5nF 50V
C4128
1.5nF 50V
C4127
4N7 25V
C4126
4N7 25V
C4125
10NF 50V
C4124
10NF 50V
C4123
100N16V
C4122
10UF 6.3V X5R +-20%
C4121
100N16V
C4120
4.7UF 10V
C4119
4.7UF 10 V
C4118
4.7UF 10V
C4117
22uF 10V
M81_D V11
under 8282
of
20 22Wednesday, March 02, 2011
Sheet
PCB NAME
OEM MOD E L
TPV MO D EL
20. MEMC PERIPHERAL
㝍
㌾
⪰
T P V ( Top Victory Elect ronics C o . , Ltd. )
Date
䱨
㍀
Key Component
61
MT8282 Peripheral
M81_D V33
R4130
10K 1/16W 5%
R4129
10K 1/16W 5%
V3
Y3
R4137
NC\0R05 1/ 16W
M82SPI _SO
M82SPI _SI
M82SPI _CS#
M82SPI _SCK
TP20
TP19
TP17
TP18
M82_GPIO22
M82_GPIO21
M82_GPIO20
V3
M82_J TMS
M82_J TDO
U3
V2
V1
U2
T5
U4
JTDI
JTMS
JTCK
JTDO
JRTCK
AVDD12_SYSPLL
AVDD12_DMPLL
AVDD33_XTAL
U408C
V20
U13
U14
U15
AV12_PLL
AV33_XTAL
Y3
M82_S DA
M82_R ST#
M82_DMAACK
M82_E FU SE
W16
W1
Y16
JTRST
CLK_IN
CLK_OUT
RXDMA_ACK
AVDD12_MJCPLL
U11
Y2
V4
W3
Y3
W2
GPIO0V3GPIO3
GPIO2
GPIO1
PRST_
EFUSE
AVSS12_SYSPLL
AVSS12_DMPLL
AVSS12_MJCPLL
TP0
AVSS33_XTAL
V13
V14
V15
Y18
Y19
W18
R4104 0R05 1/ 16W
R4103 0R05 1/ 16W
R4101 0R05 1/ 16W
R4102 0R05 1/ 16W
M82_S CL
M82_U0RX
M82_U 0TX
Y17
B19
C20
W17
B20
C19
V11
SCL
SDA
TXD0
SFD0
SFD1
RXD0
SFCK
SFCS
TN0
XTAL O
XTAL I
NC\MT8282AGG
W20
W19
XTAL O
XTAL I
AV12 PLL POWER
FB4102
M81_AV12
AV33_XTAL
FB4101
AV33 XTAL POWER
M81_AV33
330pF 50V
C4105
100N16V
C4104
AV12_PLL
4.7UF 10 V
C4103
1 2
120R/3000mA
100N16V
C4102
4.7UF 10V
C4101
1 2
120R/3000mA
M81_D V33
M81_DV11
C18
U12
A18
A19
A20
B17
B18
C16
C17
D15
D16
E14
E15
H10
H12
J11
J13
L13
M12
N10
N13
N8
VCCK
VCCK
VCCK
VCCK
VCCK
VCCK
VCCK
VCCK
VCCK
VCCK
VCCK
VCCK
VCCK
VCCK
VCCK
VCCKJ9VCCK
VCCKL8VCCK
VCCKM9VCCK
VCCK
VCC3IO_3
VCC3IO_1R5VCC3IO_1T4VCC3IO_2
DVSSB2DVSS
DVSS
DVSS
DVSSC3DVSSC4DVSS
DVSSD4DVSS
DVSS
DVSSE5DVSSE6DVSS
DVSS
DVSS
DVSSH5DVSSH9DVSS
DVSS
U408A
E10
E11
C11
C12
C13
D11
DVSSJ3DVSSJ5DVSS
J10
J12
F16
H11
H13
VCCK
DVSS
DVSS
DVSS
DVSSK4DVSSK5DVSSK8DVSSK9DVSS
DVSS
DVSS
DVSSL3DVSSL9DVSS
DVSS
DVSS
L10
L11
K10
K11
L12
K12
K13
M10
M11
M13
NC\MT8282AGG
DVSSM8DVSS
DVSS
DVSSN3DVSSN9DVSS
DVSSU5DVSS
V5
T12
N11
N12
MT8282 POWER
!
Page 62
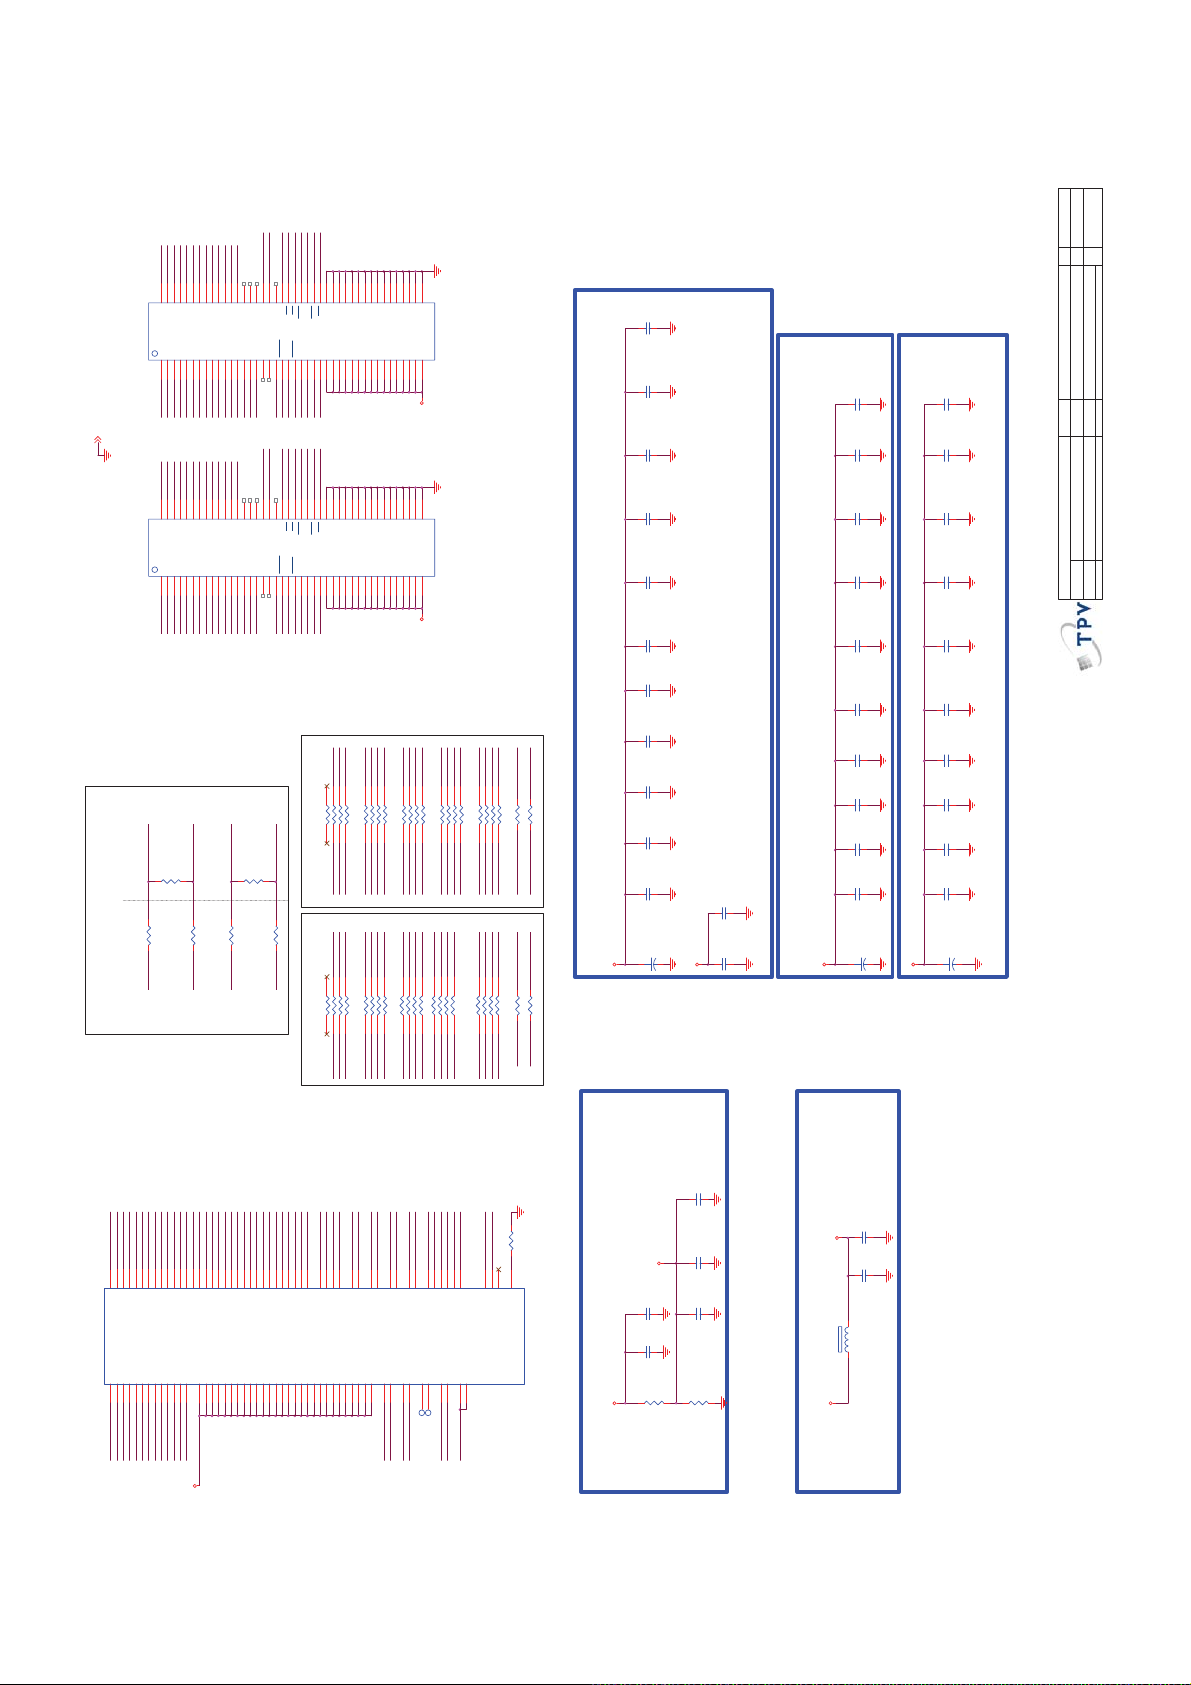
2_A0
2_A4
2_A3
2_A2
2_A1
2_A8
2_A7
2_A6
2_A5
M8
P8
A1M3A2M7A0
A3N2A5N3A6N7A4N8A7P2A9
A8
DQ8
DQ6
DQ7
DQ1
DQ0
DQ4
DQ3H3DQ2
DQ5
U410
F1
F9
C8
G2
G8
H1
H7
H9
RDQ17
RDQ16
RDQ19
RDQ18
RDQ22
RDQ23
RDQ20
RDQ21
RDQ24
GND 4,5,6,7,8,9,10,11,12,13,14,15,16,17,18,19,20,22
1_A1
1_A0
1_A4
1_A3
1_A2
1_A7
1_A6
1_A5
1_A8
M8
P8
A1M3A2M7A0
A3N2A5N3A6N7A4N8A7P2A9
A8
DQ8
DQ6
DQ7
DQ1
DQ0
DQ4
DQ3H3DQ2
DQ5
U409
F1
F9
C8
G2
G8
H1
H7
H9
RDQ2
RDQ1
RDQ4
RDQ0
RDQ5
RDQ6
RDQ7
RDQ3
RDQ8
CLK0
CLK0#
R4124
NC\100R 1/16W 5%
Close to DRAM
R4114
NC\22R 1/16W 5%
R4100
NC\22R 1/16W 5%
RCLK0
Close to MT8281
Damping and Termination for CLK
RCLK0#
M0C
Custom
HW4 nh
Size
Rev
2_BA1
2_BA0
2_WE#
2_RAS#
2_CAS#
2_CS#
2_A9
2_A12
2_A11
2_A10
P3
R8
M2
P7
R2
A11
A12
A10/AP
DQ9
DQ12
DQ11D3DQ10
DQ13
C2
D1
D7
D9
RDQ28
RDQ26
RDQ25
RDQ27
RDQ29
1_A12
1_A11
1_A10
1_A9
P3
R8
M2
P7
R2
A11
A12
A10/AP
DQ9
DQ12
DQ11D3DQ10
DQ13
C2
D1
D7
D9
RDQ10
RDQ13
RDQ9
RDQ11
RDQ12
CLK1
R4116
NC\22R 1/16W 5%
RCLK1
2_ODT
CLK1#
CLK1
A3
E3
J3
N1
K3
K7CKK8
L7CSL8
K9
L3
J8
A7
B2
B8
D2
CK
NCR3NCR7NC
BA2L1BA0L2BA1
NC
UDQS
DQ14
DQ15
NC
A8
E8
A2
B1
B7
B9
E2
F7
RDQS2#
RDQS3#
RDQ31
RDQ30
RDQS2
RDQS3
1_BA0
1_BA1
1_CS#
CLK0
CLK0#
L3
J8
CK
NCR3NCR7NC
BA2L1BA0L2BA1
NC
UDQS
DQ14
DQ15
NC
A2
B1
B7
B9
E2
F7
A8
E8
RDQS0#
RDQS1#
RDQS1
RDQS0
RDQ14
RDQ15
CLK1#
R4134
NC\100R 1/16W 5%
R4141
NC\22R 1/16W 5%
RCLK1#
D8
WE
VSS
RAS
ODT
CAS
VSSQ
VSSQ
VSSQ
VSSQ
VDD
VDDQ
UDMB3UDQS
VDDQ
VDDQC3VDDQ
LDQS
LDMF3LDQS
VREF
CKE
J2
A1
A9
K2
C1
C7
C9
2_CKE
RDQM3
RDQM2
1_WE#
1_RAS#
1_CAS#
1_ODT
A3
K3
K7CKK8
L7CSL8
K9
A7
B2
B8
D2
D8
WE
VSS
RAS
ODT
CAS
VSSQ
VSSQ
VSSQ
VSSQ
VDD
VDDQ
UDMB3UDQS
VDDQ
VDDQC3VDDQ
LDQS
LDMF3LDQS
VREF
CKE
J2
A1
A9
K2
C1
C7
C9
RDQM0
RDQM1
MEM_VREF MEM_VREF
1_CKE
RCKE
RBA0
RWE#
123
4
876
5
RP4014 NC\56R
2_WE#
2_BA0
2_CKE
Damping for DDR#2 ADDR/CMD
1_WE#
1_CKE
1_BA0
123
4
876
5
RP4013 NC\56R
Damping for DDR#1 ADDR/CMD
RBA0
RCKE
RWE#
P9
J7
E7
F2
F8
H2
H8
VSS
VSS
VSS
VSS
VSSQ
VSSQ
VSSQ
VSSQ
VSSQ
VSSQ
VDDQ
VDD
VDDQ
VDDQ
VDDQ
VDDQ
VDDQ
J1
E1
E9
G1
G7
G9
G3
E3
J3
E7
F2
F8
H2
H8
VSS
VSSQ
VSSQ
VSSQ
VSSQ
VSSQ
VSSQ
VDDQ
VDD
VDDQ
VDDQ
VDDQ
VDDQ
VDDQ
J1
E1
E9
G1
G7
G9
G3
RBA1
RA7
RA12
RA10
RA3
4
123
4
5
876
5
RP4016 NC\56R
2_A3
2_A10
2_A7
2_A12
2_BA1
DDR2-1066MHzDDR2-1066MHz
VSSDL
VDDL
VDD
VDD
VDD
NC\NT5TU32M16CG-BD
J9
M9
R1
DDR#2 MSB
M81_DDRV
N1
P9
J7
VSS
VSS
VSS
VSSDL
VDDL
VDD
VDD
VDD
NC\NT5TU32M16CG-BD
J9
M9
R1
DDR#1 LSB
M81_DDRV
RA9
RA1
RA5
RA2
RA6
RA11
RA8
123
4
123
876
5
876
RP4020 NC\56R
RP4018 NC\56R
2_A11
2_A2
2_A8
2_A6
2_A1
2_A5
2_A9
RA0
RA4
RODT2_ODT
RRAS#
RCAS#
RCS#
123
4
NC\56R 1/16W 5%
NC\56R 1/16W 5%
876
5
R4113
R4126
RP4022 NC\56R
2_A4
2_CAS#
2_A0
2_RAS#
2_CS#
C4149
NC\1. 5nF 50V
C4148
NC\1.5nF 50V
C4147
NC\1.5nF 50V
C4146
NC\330p F 50V
C4145
NC\330pF 50V
C4144
NC\330pF 50V
C4143
NC\6.8nF 50V
C4142
NC\6.8nF 50V
C4141
NC\100N16V
C4140
NC\100N16V
C4139
NC\10uF 10V
C4151
NC/10N 16V
CAPs for DRAM IO Power ( Beneath the DDR#1 )
C4162
NC/10N 16V
C4161
NC/10N 16V
C4160
NC\330p F 50V
C4159
NC\330pF 50V
C4158
NC\1.5nF 50V
C4157
NC\1.5nF 50V
C4156
NC\6.8nF 50V
C4155
NC\6.8nF 50V
C4154
NC\100N16V
C4153
NC\100N16V
C4173
NC/10N 16V
C4172
NC/10N 16V
C4171
NC\330p F 50V
C4170
NC\330pF 50V
C4169
NC\1.5nF 50V
C4168
NC\1.5nF 50V
C4167
NC\6.8nF 50V
C4166
NC\6.8nF 50V
C4165
NC\100N16V
C4164
NC\100N16V
CAPs for DRAM IO Power ( Beneath the DDR#2 )
CAPs for DRAM IO Power ( Beneath the MT8282 )
C4163
C4150
1_RAS#
1_CS#
1_A6
1_A2
1_A8
1_A11
1_ODT
1_BA1
1_A9
1_A1
1_A12
1_A7
1_A10
1_A3
1_A5
123
4
123
4
5
RA3
RA10
123
876
5
876
876
RP4017 NC\56R
RP4015 NC\56R
RA6
RA1
RA5
RA12
RA7
RBA1
RA9
1_CAS#
1_A0
1_A4
123
4
4
NC\56R 1/16W 5%
NC\56R 1/16W 5%
876
5
5
RA8
RA11
RA2
R4125
R4127
RP4021 NC\56R
RP4019 NC\56R
RA0
RA4
RCAS#
RCS#
RRAS#
RODT
+
C4138
NC\220uF 16V
M81_DDRV
NC/10N 16V
M81_DDRV
+
C4152
NC\220uF 16V
M81_DDRV
NC\100UF 16V
+
⿄⠍
of
21 22W ednesday , March 02, 2011
Sheet
PCB NAME
TPV MODE L
OEM MOD EL
21. MEMC DDRII
㝍
㌾
⪰
Date
T P V ( Top Victory Electronics Co . , Ltd. )
䱨
㍀
Key Component
62
C4135
NC\100NF 25V
C4137
R4120
RDQ1
RDQ6
RDQ2
RDQ4
RDQ3
RDQ5
RDQ10
RDQ7
RDQ13
RDQ12
RDQ11
RDQ8
RDQ9
RDQ15
RDQ14
RDQ17
RDQ16
RDQ18
RDQ21
RDQ20
RDQ19
RDQ26
RDQ25
RDQ24
RDQ23
RDQ22
RDQ31
RDQ30
RDQ29
RDQ28
RDQ27
RDQM0
RDQM3
RDQM2
RDQS0
RDQS1#
RDQS3#
RDQS3
RDQS1
RDQM1
RDQS0#
RDQS2#
RDQ0
A14
B10
B14
C10
D10
D12
G3
H3
H4
J4
RDQ22
RDQ24L4RDQ26M2RDQ29M3RDQ31
VCC2IOE7VCC2IOE8VCC2IOE9VCC2IOF1VCC2IOF2VCC2IO
RDQ27H1RDQ25H2RDQ28
F3
M4
RDQ30
VCC2IOG4VCC2IO
VCC2IOL5VCC2IO
G5
N5
D13
E12
RDQM0
VCC2IOP3VCC2IOP4VCC2IOP5VCC2IOR2VCC2IOR3VCC2IOR4VCC2IOT1VCC2IOT2VCC2IOT3VCC2IO
A10
A15
A16
A8
B13
B15
B9
C14
C8
D9
RDQ8
RDQ1
RDQ4
RDQ2
RDQ9
RDQ3
RDQ0
RDQ6
RDQ5
RDQ7
RDQ10
RA1A3RA2
RA9
RA5B3RA11B4RA6
RA7
RA0
U408B
C6
RA1
RA0
RA10
RA3D3RA4
A4
B1
B5
C1
C5
D2
D6
RA9
RA11
RA4
RA5
RA6
RA2
RA8
RA10
RA7
RA3
N4
RDQ12
RDQ11
RDQ13
RDQ15
RDQ14
RDQ17G1RDQ19G2RDQ20
RDQ16M5RDQ18N1RDQ23N2RDQ21
VCC2IO
VCC2IO
VCC2IO
VCC2IO
RA12C2RA8
VCC2IOC9VCC2IO
VCC2IOD8VCC2IO
B8
A17
B16
E13
C15
D14
RA12
M81_DDRV
RDQS2
A12
B11
A11
B12
K2
J2
K3
RDQS1
RDQS0
RDQM1
RDQM3
RDQM2
RDQS0_
RDQS1_
RCLK0
A7
B7
U1
RCLK0#
RCLK0
RODT
RCKE
RWE#
RCS#
RRAS#
K1
L2
A6
L1
C7
E3
E1
B6
RCS_
RCKE
RWE_
RRAS_
RDQS2
RDQS3
RDQS2_
RDQS3_
MEMTN
MEMTP
RCLK0_
AVDD12_MEMPLLH8AVSS12_MEMPLL
RCLK1_P1RCLK1
J8
A1
A2
P2
TP25
TP29
RCLK1#
RCLK1
AV12_MEMPLL
GND
NC\300R 1/16W 1%
RCAS#
RBA0
RBA1
D5
E2
E4
R1
D7
RBA1
RBA2
RBA0
RODT
RCAS_
REXTDN
RVREF0F4RVREF0
F5
MEM_VREF
NC\MT8282AGG
MEM_VREF for DRAM
M81_DDRV M81_DDRV
MEM_VR EF
C4134
NC\100N 16V
C4132
NC\4.7UF 10V
C4133
NC\100N16V
C4131
NC\100N16V
R4131
R4132
NC\1K 1/16W 1%
NC\1K 1/16W 1%
CAPs for AV12_MEMPLL
NC\100N16V
AV12_MEMPLL
C4136
NC\4.7UF 10V
FB4109
1 2
NC\120R /3000mA
M81_AV12
!
Page 63
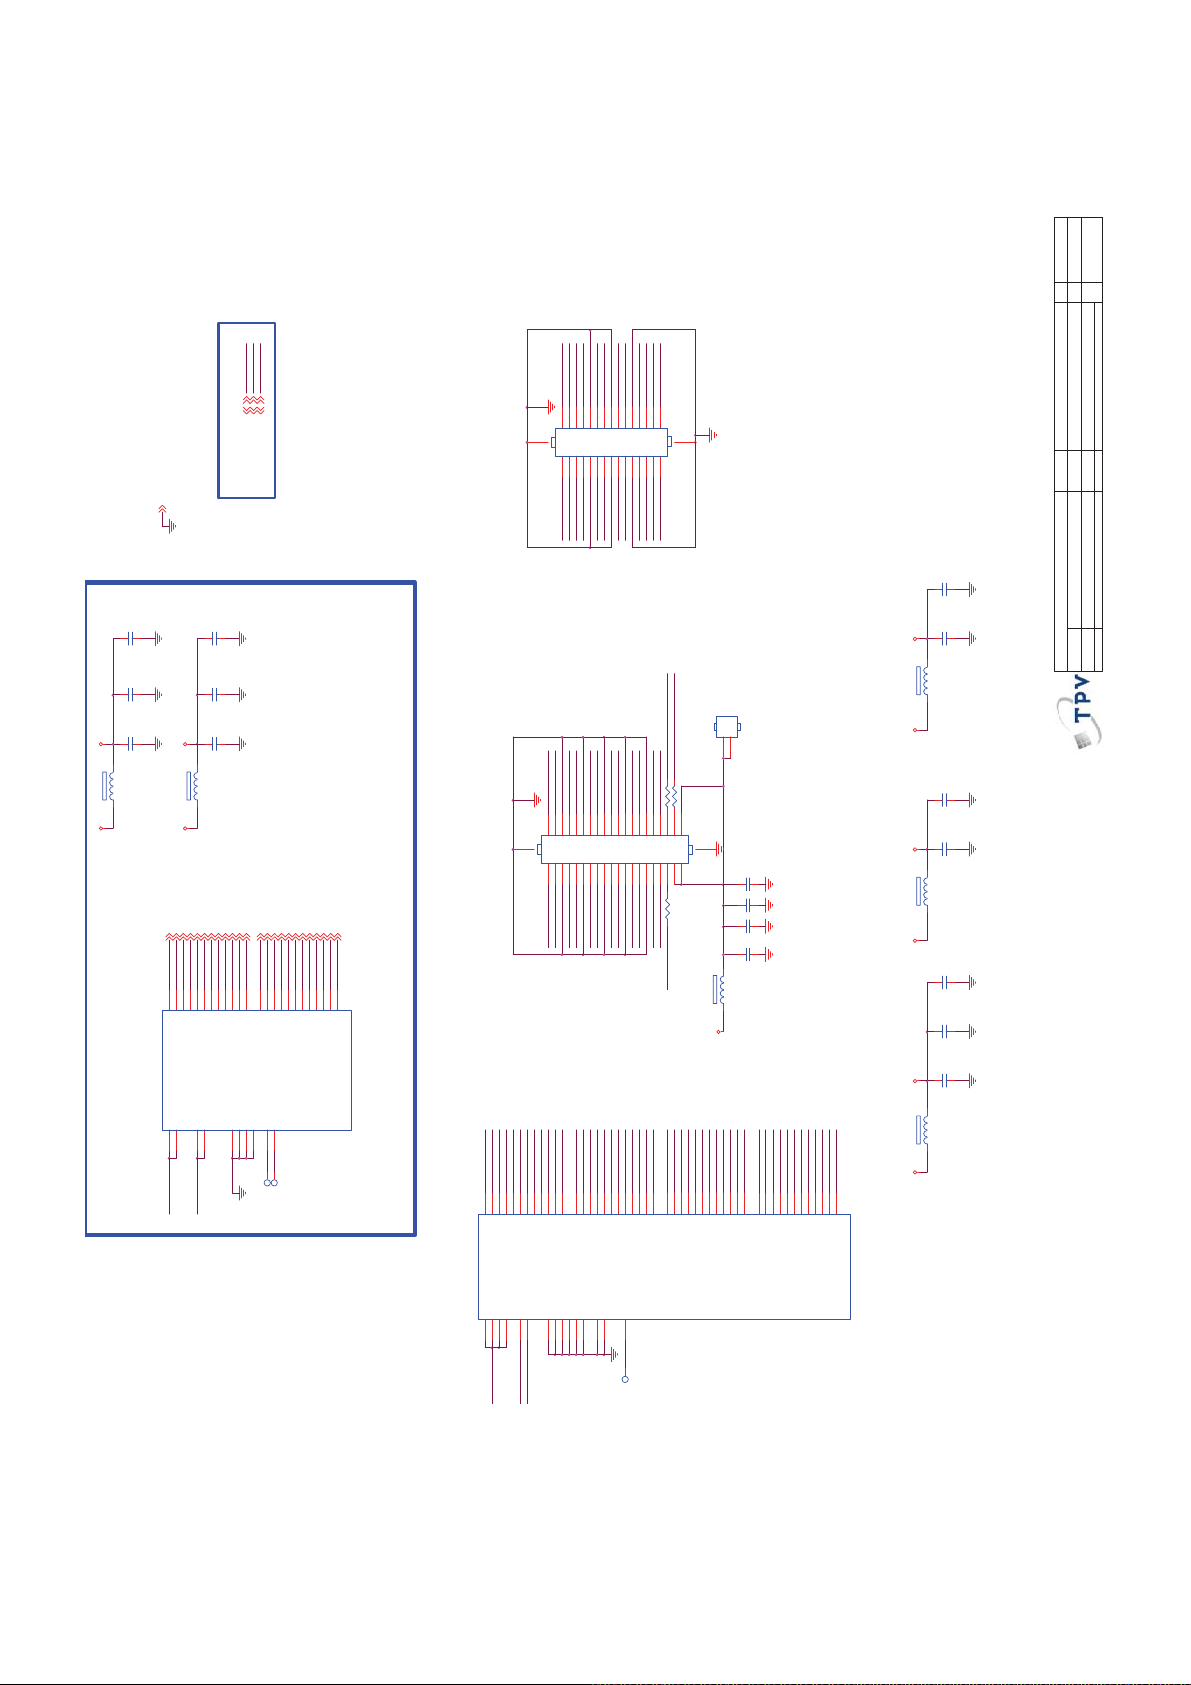
M0C
Custom
HW4 nh
Size
Rev
⿄⠍
M_BECKP
M_BE3P
M_BE1N
M_BE0N
M82_GPIO20
M82_GPIO22
M82_GPIO21
M_BE0P
M_BE3N
M_BE2P
M_BE2N
M_BE1P
M_BE4P
M_BE4N
M_BECKN
24681012141618202224262830
M_AE3N
M_AO3 N
31
29
NC\CONN
M_BO4P
M_BO3P
M_BO4N
M_BO3N
C4192
NC\100N16V
C4190
NC\100N16V
AV12_LVDSVPLL
AV12_LVDSVPLL
AV12_LVDSVPLLAV12_LVDSTX
FB4108
M82_GPIO20
M82_GPIO21
NC/CONN
CN412
1
2
M_AE3P
M_AE4N
M_AE4P
R4123 NC\0R05 1/16W
R4135 NC\0R05 1/16W
39
42
NC\100N 16V
NC\100N 16V
NC\10U 16V
40
NC\CONN
M_AO3 P
M_AO4 N
M_AO4 P
R4133
NC\0R05 1/16W
M82_GPIO22
NC\10U 16V
C4183
C4182
C4181
C4180
1 2
FB4105 N C\120R/ 3000mA
LVDSVDD
1 2
NC\120R /3000mA
M81_AV12M81_AV12
C4194
NC\100N16V
C4197
NC\100N 16V
AV12_LVDSTX
FB4107
1 2
NC\120R/3000mA
C4191
NC\100NF 25V
C4199
NC\100N F 25V
AV33_LVDSTX
C4188
NC\100N16V
LVDS PORT A
32
CN411
LVDS PORT B
M_AE0N
M_AE0P
135791113151719212325272931333537
41
246
CN409
M_AO0 N
M_AO0 P
13579
111315171921232527
M_BO0N
M_BO1N
M_BO1P
M_BO2N
M_BO2P
M_BO0P
M_BOC KP
M_BOC KN
M_AECKP
M_AE1N
M_AE1P
M_AE2N
M_AE2P
M_AECKN
8
101214161820222426283032343638
M_AO2 N
M_AO2 P
M_AO1 N
M_AO1 P
M_AOC KP
M_AOC KN
M82_G PIO2 220
M82_G PIO2 020
M82_G PIO2 120
AV12_LVDSRX
FB4104
M81_AV12
M_TX_AO1 P 15
M_TX_AO1 N 15
M_TX_AO0 N 15
M_TX_AO1 P
M_TX_AO1 N
RO0NY4RO1NY5RO2N
LVDS OUTPUT from MT5363
C4179
NC\330pF 50V
C4178
NC\100N 16V
C4177
NC\4.7UF 10V
AV12_LVDSRX
1 2
NC\120R /3000mA
M_TX_AE4P 15
M_TX_AE3P 15
M_TX_AE1P 15
M_TX_AE2P 15
M_TX_AE0P 15
M_TX_AO4 P 15
M_TX_AE0N 15
M_TX_AO3 P 15
M_TX_AO2 P 15
M_TX_AO4 N 15
M_TX_AO3 N 15
M_TX_AO2 N 15
M_TX_AOCKP 15
M_TX_AOC KN 1 5
M_TX_AE1 P
M_TX_AE0 P
M_TX_AO4 P
M_TX_AO3 P
M_TX_AO2 P
M_TX_AO2 N
W6
Y6
M_TX_AOC KN
M_TX_AOC KP
Y7
W7
ROCLKP
M_TX_AO4 N
M_TX_AO3 N
RO3PW8RO4PW9RE0N
RO3NY8RO4N
ROCLKN
M_TX_AE0N
Y10
Y9
W10
W11
RE0P
RE1P
M_TX_AE1N
Y11
M_TX_AE4N 15
M_TX_AE3N 15
M_TX_AE1N 15
M_TX_AE2N 15
M_TX_AECKP 15
M_TX_AECKN 15
M_TX_AE4 P
M_TX_AE3 P
M_TX_AE2 P
M_TX_AE3N
M_TX_AE4N
M_TX_AE2N
M_TX_AECKN
M_TX_AECKP
Y12
Y14
Y15
W13
W12
W14
W15
Y13
RE2P
RE3P
RE4P
RE1N
RE2N
RE3N
RE4N
RECLKP
RECLKN
GND 4,5,6,7,8,9,10,11,12,13,14,15,16,17,18,19,20,21
C4176
NC\330pF 50V
C4175
NC\100N 16V
C4174
NC\4.7UF 10V
AV33_LVDSRX
AV33_LVDSRX
FB4103
1 2
NC\120R /3000mA
M81_AV33
M_TX_AO0 P 15
M_TX_AO0 P
M_TX_AO0 N
RO0PW4RO1PW5RO2P
of
22 22Wednesday , March 02, 2011
Sheet
PCB NAME
OEM MOD EL
TPV MOD EL
22. MEMC RX/TX
㝍
㌾
⪰
Date
T P V ( Top Victory Electronics Co . , Ltd. )
䱨
㍀
Key Component
63
AVDD33_LVDSRXE
AVDD33_LVDSRXOU6AVDD12_LVDSRX_CKU7AVDD12_LVDSRX
U408D
U8
U10
AV33_LVDSRX
LVDS RX
AV12_LVDSRX
AVSS33_LVDSRX
AVSS33_LVDSRXV6AVSS12_LVDSRX_CKV7AVSS12_LVDSRXV8TP_VIPLL
V10
TN_VIPLL
V9
U9
TP30
TP31
NC\MT8282AGG
M_BO3P
M_BO4N
M_BO4P
M_BO2N
M_BO2P
M_BO3N
M_BO0N
M_BO0P
M_BO1N
M_AE0N
M_AO3N
M_AO3P
M_AO4N
M_AO4P
M_AO2P
M_AO0N
M_AO0P
M_AO1N
M_AO1P
M_AO2N
M_AOC KP
M_AOC KN
G17
D17
E17
F17
H17
J17
G18
D18
E18
F18
H18
AO0P
AO1P
AO2P
AO3P
AO0N
AO1N
AO2N
AO3N
AOCKP
AOCKN
AVDD33_LVDSA
U408E
K17
K18
AV33_LVDSTX
AVSS33_LVDSA
AVDD33_LVDSA
AVDD12_VPLL
AVDD12_LVDS
AVDD33_LVDSB
AVDD33_LVDSB
J16
L19
K19
V17
H16
U16
AV12_LVDSTX
AV12_LVDSVPLL
M_AECKP
M_AE1N
M_AE1P
M_AE2N
M_AE2P
M_AE0P
G20
D20
E20
F20
D19
E19
F19
J18
AE0P
AE1P
AE2P
AE0N
AE1N
AE2N
AO4P
AO4N
AVSS33_LVDSA
AVSS12_VPLL
AVSS12_LVDS
AVSS33_LVDSB
AVSS33_LVDSB
AVSS33_LVDSB
AVSS33_LVDSB
L17
L18
T16
V16
V19
R16
M_BO1P
M_AE3P
M_AE4N
M_AE4P
M_AE3N
M_AEC KN
G19
H20
J20
H19
AE3P
AE3N
AECKP
AECKN
TP_VPLL
K20
TP34
M_BOC KP
M_BOC KN
R19
J19
M19
N19
P19
T19
U19
R20
M20
N20
P20
T20
U20
AE4P
AE4N
BO0P
BO1P
BO2P
BO3P
BO0N
BO4P
BO1N
BO2N
BO3N
BO4N
BOCKP
BOCKN
M_BE3P
M_BE3N
M_BE4P
M_BE4N
M_BECKP
M_BE0P
M_BE1P
M_BE1N
M_BE2P
M_BE2N
M_BE0N
M_BEC KN
R18
R17
M18
N18
P18
T18
M17
BE0P
U18
N17
P17
T17
U17
BE1P
BE2P
BE3P
BE0N
BE4P
BE1N
BE2N
BE3N
BE4N
BECKP
BECKN
NC\MT8282AGG
FB4106
1 2
NC\120R /3000mA
M81_AV33 AV33_LVDSTX
LVDS TX
!
Page 64
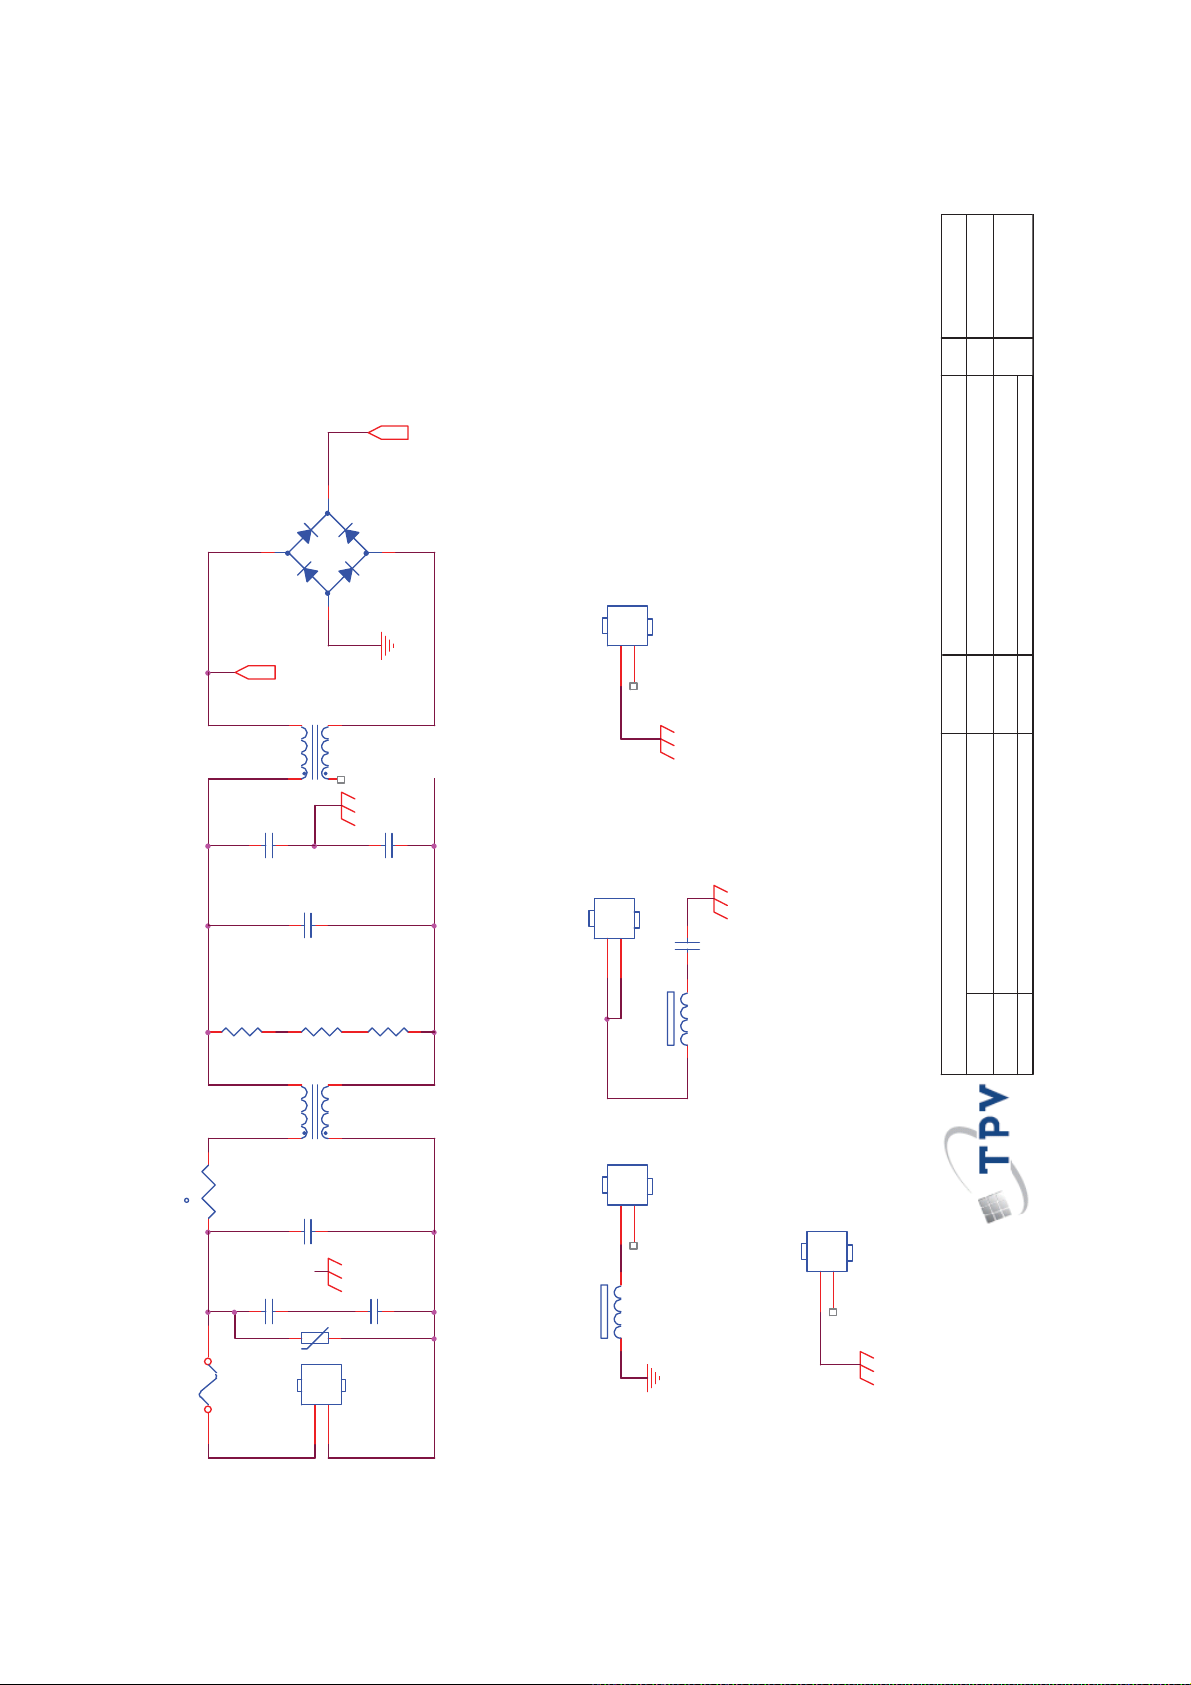
>
A
1
⿄⠍
<
Size
Rev
⿄⠍
R+
KBJ1008G-F
BD9901
1
+
3
-
4
BO
12MH
L9901
3
4
330PF 250V
C9911
470NF 275V
C9902
R9901
430K 1/4W
R9902
430K 1/4W
12MH
L9902
3
2
HS9301
1
2
HEAT SINK (D 9302)
2
1
330PF 250V
C9914
HS9801
3
4
HEAT SINK (Q9801,D 9802)
R9903
430K 1/4W
FB9803
2
C9812
680PF 250V
1 2
OEM MO DE L
T P V ( Top Victory Electronics Co . , Ltd. )
of
27
Sheet
PCB N AME
TPV MODEL
02.AC s ide 715G4581-P01-W3 0-0030
G4581-P01-W30-0030-2-110217
Friday, F ebruary 25, 2011
㝍
㌾
⪰
Date
䱨
㍀
Key Component
64
12
NR9901
t
7.2 Power Board
32PFL5356/V7
715G4581P02W30003S
2.5R 2. 4W
C9912
F9901
FUSE
CN9901
1
4
C9901
470NF 275V
100PF 250V
L1N
2
C9913
100PF 250V
Varistor
RV9901
HS9901
1
2
HEAT SINK (BD 9901)
12
FB9904 BEAD
HS9202
1
2
HEAT SIN K (D 92 01, D 9204 )
!
Page 65
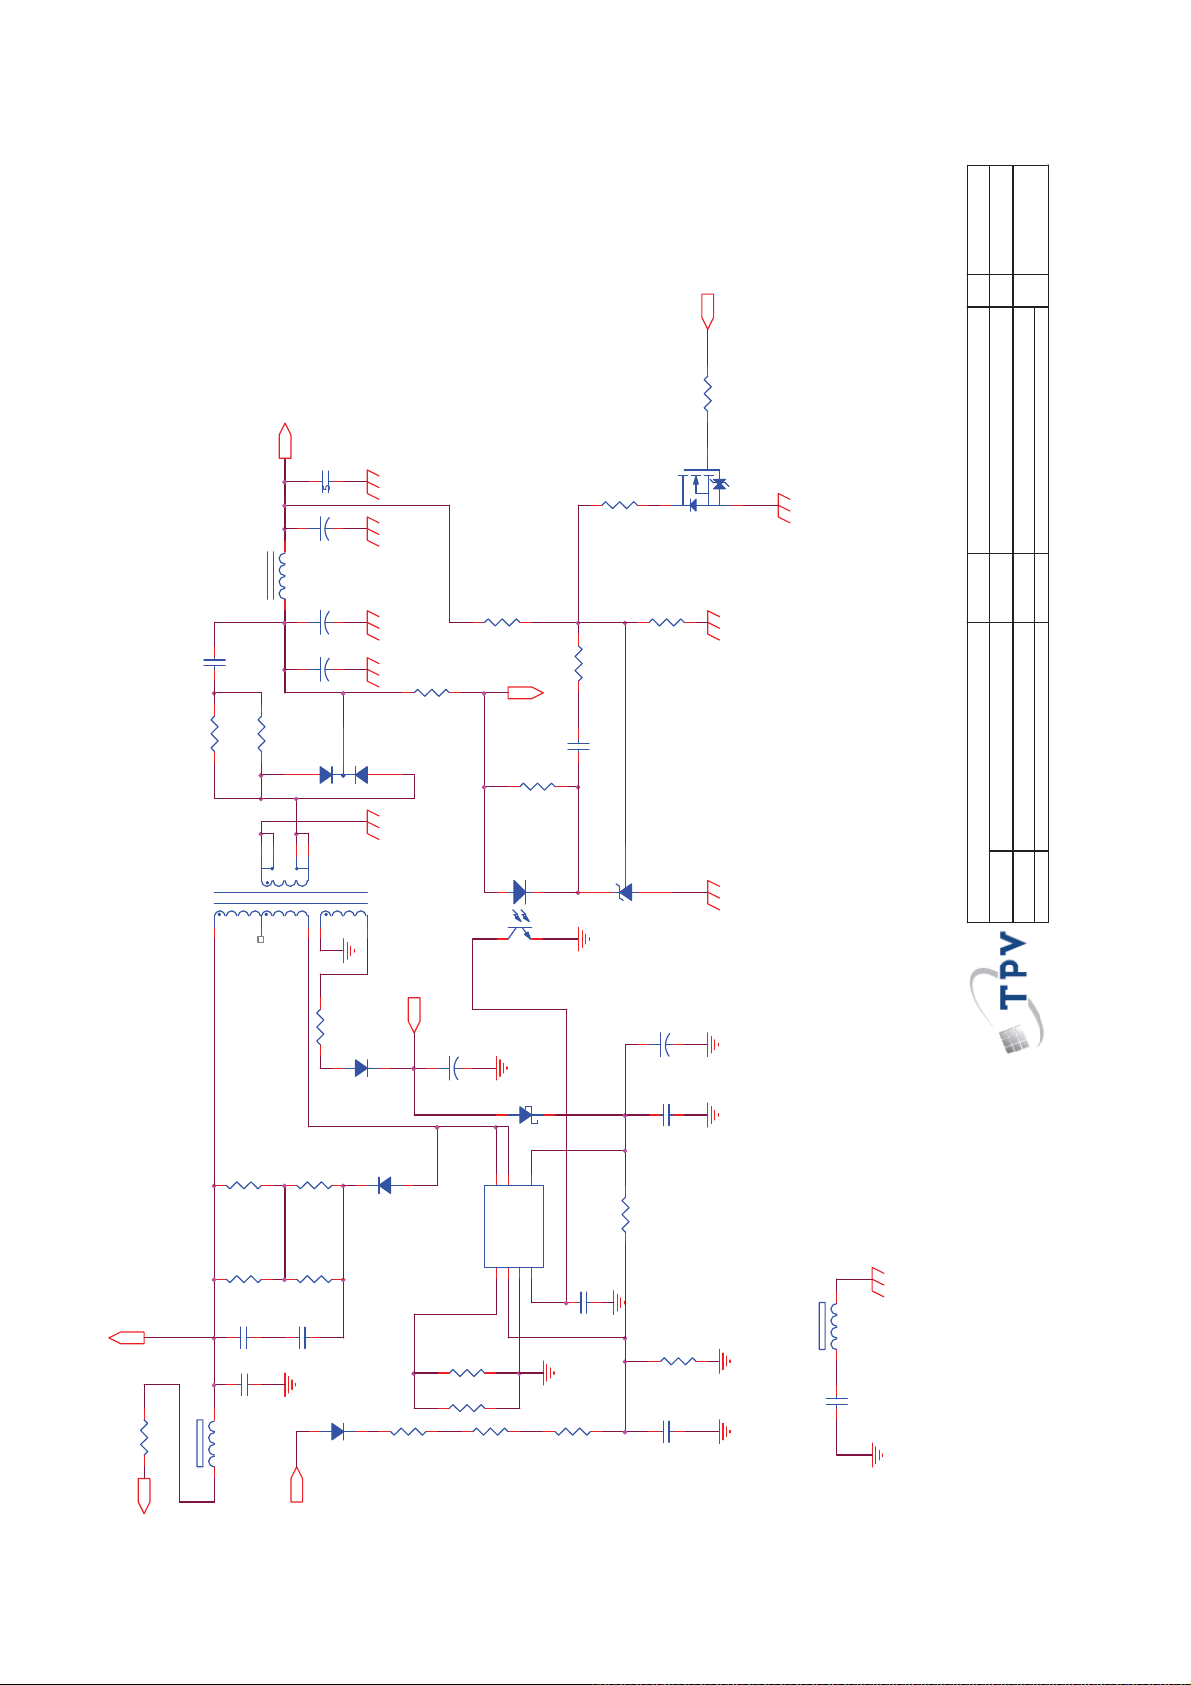
>
B
1
⿄⠍
<
R9302
C9303
47 OHM 1/4W
T9301
PS_ON
R9322
10K 1/8W
5.2VBO
C9306
100N 50V
R9321
C9305
470uF 10V
+
L9301
Coil
C9304
470uF 10V
+
C9315
470uF 10V
679
2
+
SBT15006JST
2
D9302
3
10
3
5
R9310
1
POWER X'FMR
4
2N2 500V
R9305
47 OHM 1/4W
1
R9314
2K4 1/8W 1%
220 OHM 1/4W
Protect
R9315
1K 1/8W
IC9302
12
43
R9317
2K 1/8W 5%
C9308
220N 50V
PC123X8YFZOF
Q9301
RK7002FD5T116
5K6 +-1% 1/8W
R9319
3K6 1/8W 1%
IC9303
AS431AN-E1
Size
Rev
⿄⠍
of
37
Sheet
PCB NAME
OEM MODEL
TPV MO DEL
03.Stand by 715G4581-P01-W30-0030
G4581-P01-W30-0030-2-110217
Friday , F ebruary 25, 2011
㝍
㌾
⪰
T P V ( Top Victory Electronics Co . , Ltd. )
Date
䱨
㍀
Key Component
65
VCC
C9310
4.7M OHM +-5% 1/4W
1N 50V
10UF 50V
+
C9312
100N 50V
R9320
560K 1/8W
C9311
220N 50V
FB9301
470PF 250V
BEAD
1 2
C9314
R9308
3.3 OHM 1/4W
D9303
R9304
100K 1/4W
R9307
100K 1/4W
R9303
100K 1/4W
R9306
100K 1/4W
B1+
C9302
C9301
2200pF630V
2200pF630V
D9301
C9313
10NF
R9301
0.47 OHM 1W
FB9302
BEAD
1 2
B+
PR1007
C9307
PR1007
D9304
100UF 35V
+
12
D9305
RB160M-60TE25
5
8
VCC
R9311
R9312
D/ST7D/ST
IC9301
S/OCP1BR2GND3FB/OLP
4
2.4 OHM 1/4W
R9313
1.5M 1/4W
PR1007
2.4 OHM 1/4W
R9309
1.5M 1/4W
A6069H
R9318
C9309
R9316
1.5M 1/4W
!
Page 66
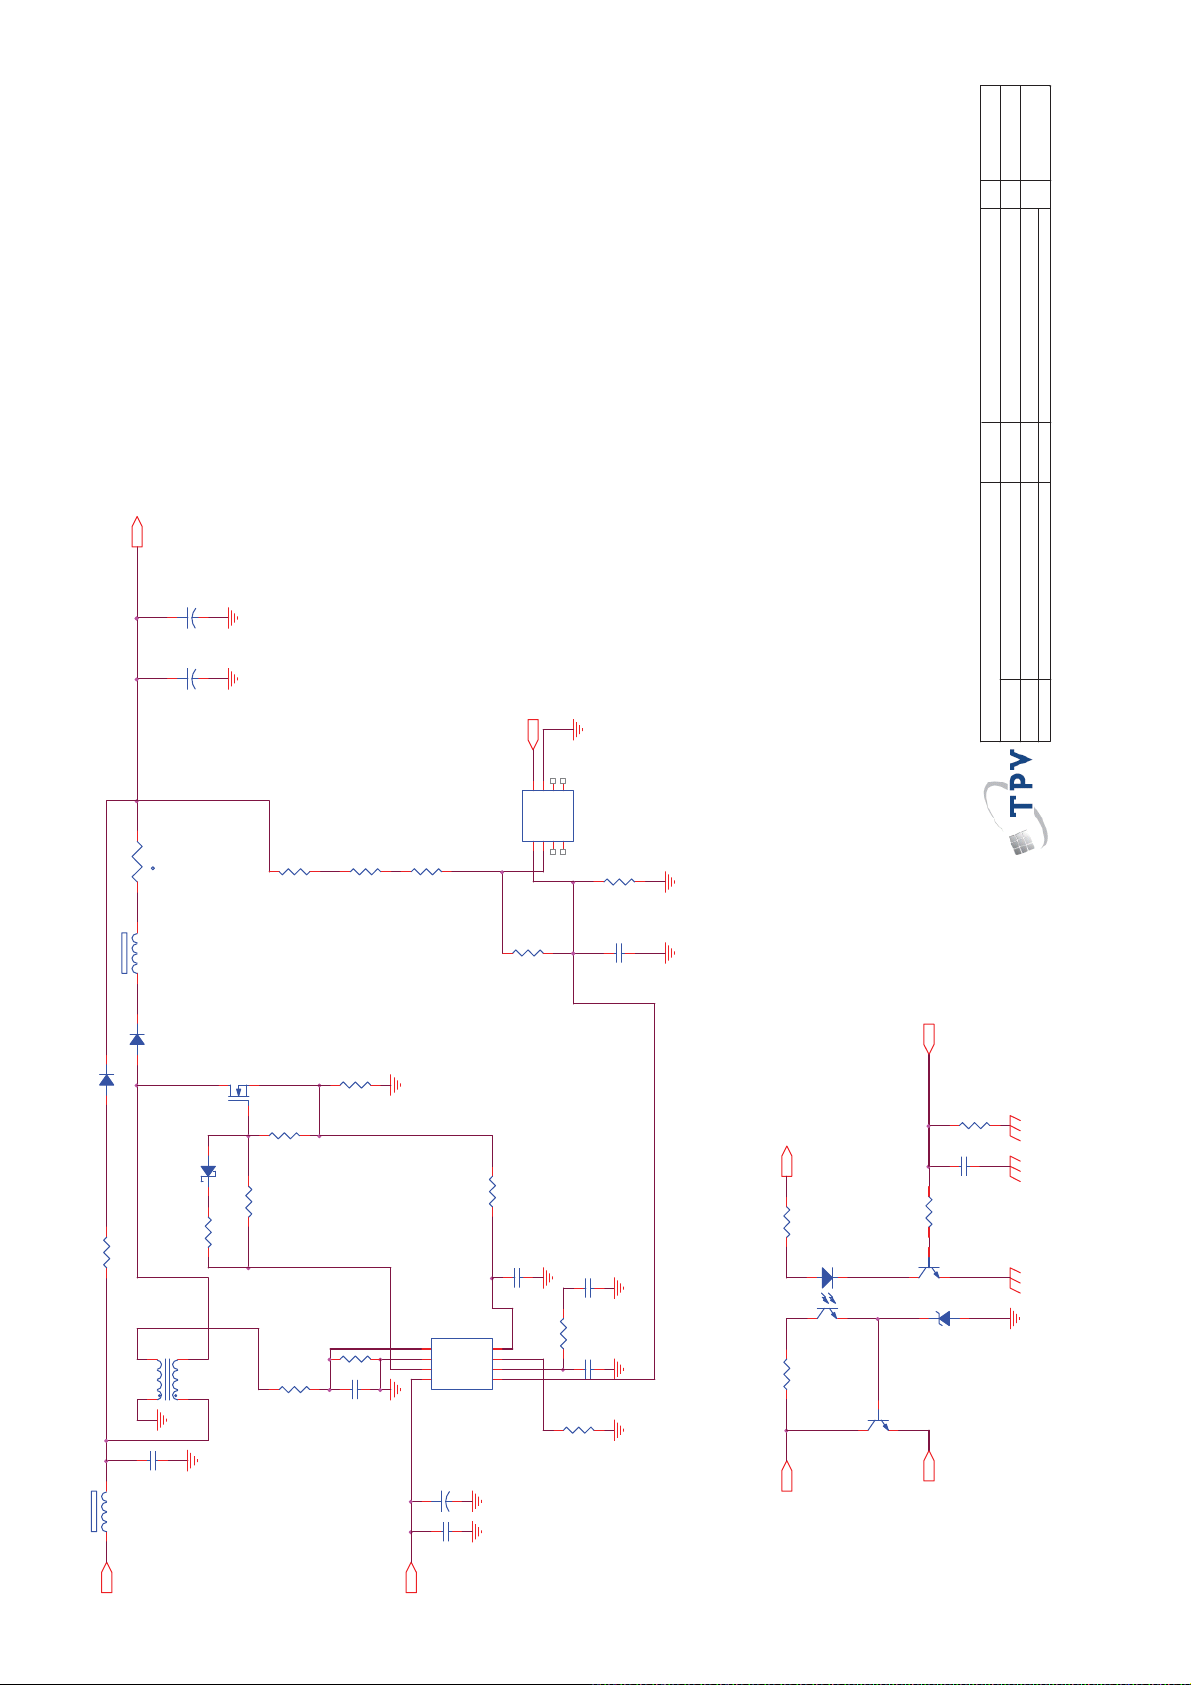
>
B
1
⿄⠍
<
Size
Rev
⿄⠍
of
47
Sheet
PCB NAME
OEM MODEL
TPV MODEL
B+
C9803
+
47UF 45 0V
C9802
+
47UF 4 50V
VCC1
7
5
6
8
G
D2
NC
VCC
S11D12NC3S2
0R05OHM1/8W
220pF 50V
SEN012DG
4
R9811
13K 1/8W 1%
C9808
47P 50V
PS_ON
R9817
5.2V
C9811
R9815
1K 1/8W
C9810
470N 25V
IC9802
PC123X8YFZOF
12
Q9803
2N3904S-RTK/PS
10K 1/8W
12
NR9801
2.5R 2. 4W
t
FB9802
BEAD
1 2
D9802
FMN-1106S
D98011N5408-11
R9801 10R
Q9801
12
D9803
RB160M-60TE25
R9802
51OHM +-5% 1/8W
680K OHM +-1% 1/4W
R9804
IPA60R190C6
R9806
10K 1/8W
R9803
51OHM +-5% 1/8W
680K OHM +-1% 1/4W
R9807
R9809
680K OHM +-1% 1/4W
R9808
0.1R
IC9803
R9127
R9810
470 OHM 1/8W
C9807
27K 1/8W 5%
100NF 50V
R9816
04.DC M PFC 715G4581-P01-W30-0030
G4581-P01-W30-0030-2-110217
Friday , F ebruary 25, 2011
㝍
㌾
⪰
Date
T P V ( Top Victory Electronics Co . , Ltd. )
䱨
㍀
Key Component
66
IC9801
270UH
L9801
3
5
1
4
C9801
680NF
FB9801
BEAD
1 2
R+
R9818
2K 1/8W
R9805
C9804
20K 1/4W
47P 50V
VCC1
LD7591GS
CS
ZCD
5
6
7
8
RAMP
GND
COMP
OUT
INV
VCC
C9805
10UF 50V
+
C9806
100N 50V
R9813
10K 1/8W
4
3
2
1
C9809
R9812
47N 50V
36K 1/8W
43
R9814
10K 1/8W
Q9802
2SD1624T-TD-E
VCC
1 2
ZD9801
MTZJ T-72 16B
VCC1
!
Page 67
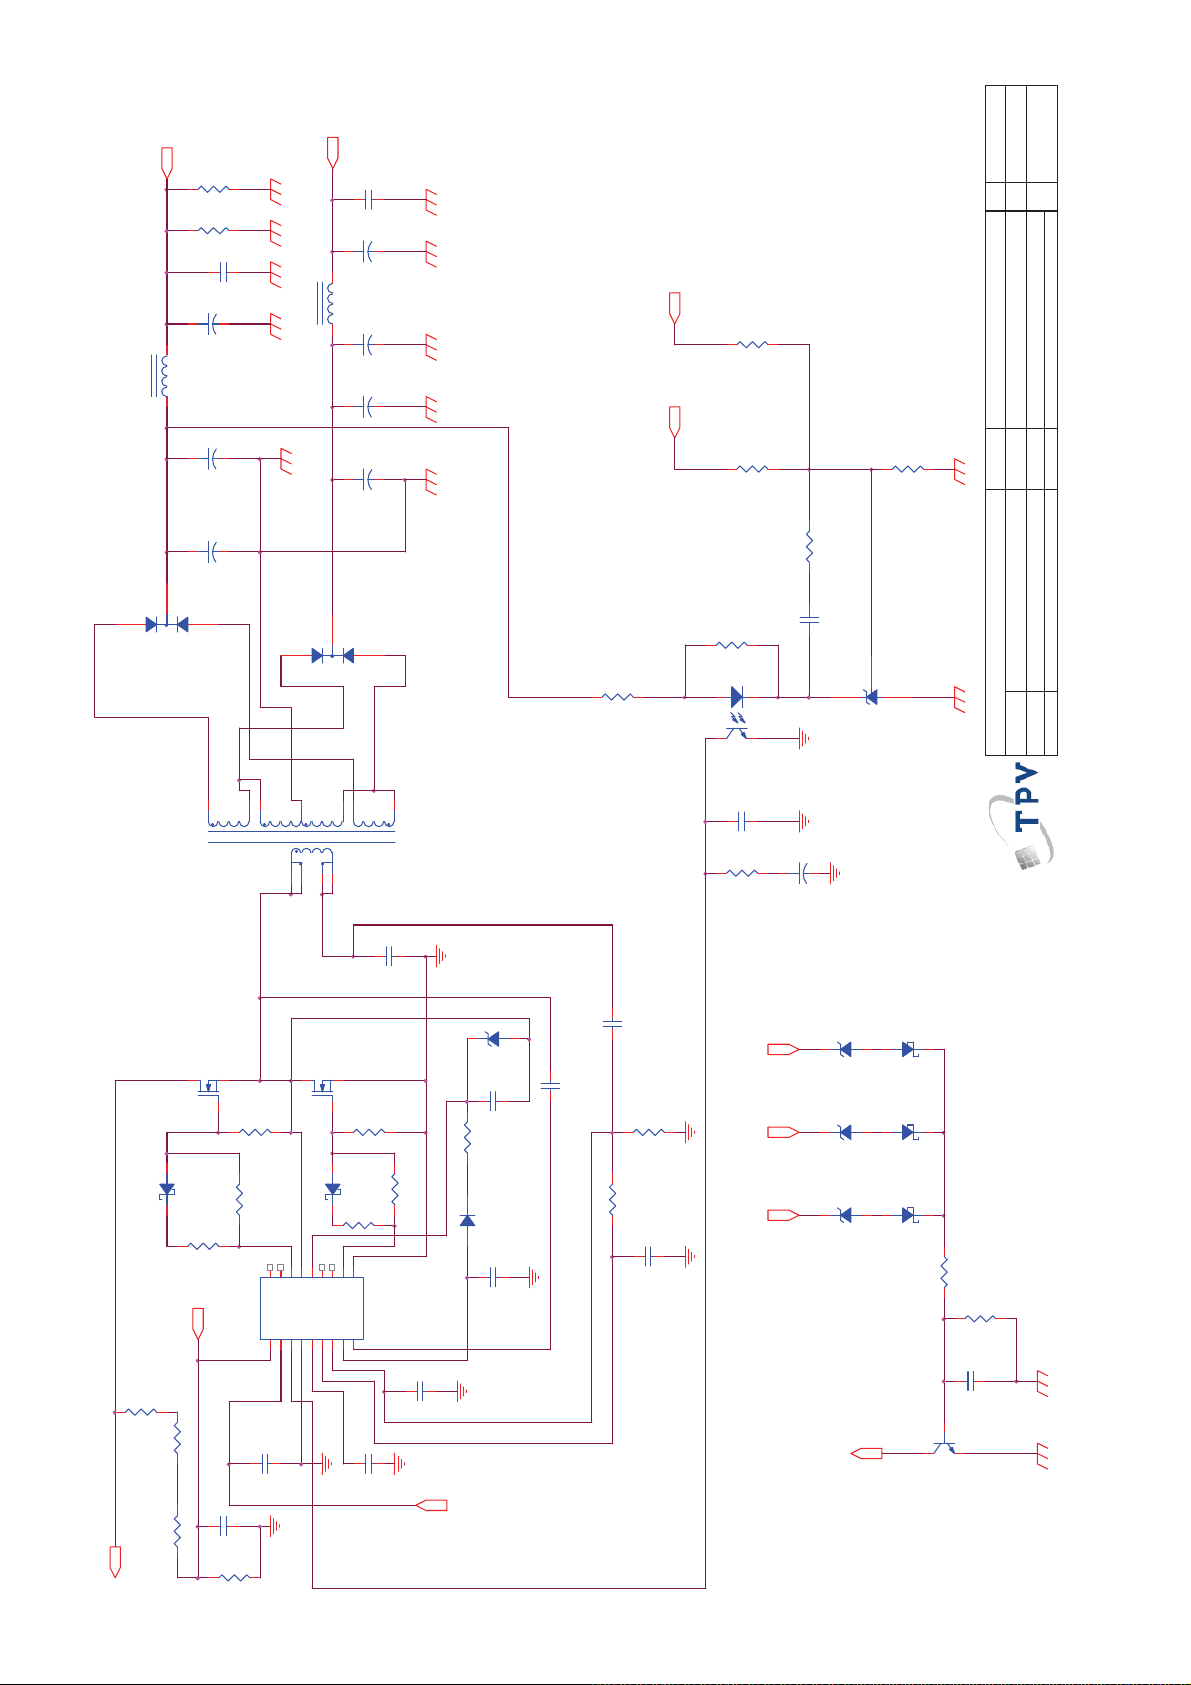
24V
>
B
1
⿄⠍
12V
R9201
5.6K 1/4W
R9202
5.6K 1/4W
C9201
100N 50V
C9206
100UF 35V
+
L9202Coil
C9203
100N 50V
C9207
+
150UF 25V
C9223
NC
+
12V24V
R9203
56K 1/8W +/-1%
<
Size
Rev
⿄⠍
C9205
L9201 Coil
C9224
NC
+
C9202
150UF 35V
+
FMWN-2308
2
D9204
1
R9214
3
6
T9201
Q9201
2SK4101FS-V
12
D9202
RB160M-60TE25
R9217
10 OHM 1/8W
Vsen
2Mohm 1/4W +/ -1%
R9216
2Mohm 1/4W +/ -1%
D9201
8
9
10
2
R9220
10K 1/8W
R9219
47OHM +-5% 1/8W
16
15
18
NC17NC
VGH
Vsen1Vcc2FB3GND4Css5OC6RC7Reg8RV
C9210
100N 50V
+
270UF 25V
R9212
KIA431A-AT/P
MTZJ27B
MTZJ T-72 18B
MTZJ T-72 30B
12
1 2
12
1 2
12
1 2
2K 1/8W
D9208
RB160M-60TE25
D9207
RB160M-60TE25
D9206
RB160M-60TE25
R9224
1K 1/8W
R9225
10K 1/8W
C9222
100N 50V
Q9203
2N3904S-RTK/PS
R9204
R9209
3K 1/8W +/ -1%
12
43
C9220
20.5KOHM +-1% 1/8W
100N 50V
R9210
+57V~77V
12V24V
R9211
5.1KOHM +-1% 1/8W
C9217
100N 50V
IC9203
+
C9221
4.7UF 50V
24KOHM +-1% 1/8W
ZD9202
ZD9204
ZD9203
Protect
C9204
270UF 25V
+
SBT15006JST
2
1
3
R9207
4.7KOHM +-1% 1/8W
IC9202
PC123X8YFZOF
7
11
12
POWER X'FMR
451
C9212
27NF
ZD9201
MTZJ T- 7 2 1 5 B
1 2
Q9202
2SK4101FS-V
R9222
10K 1/8W
12
D9203
RB160M-60TE25
R9221
10
11
13
VB14VS
NC12NC
VGL
9
R9223
10 OHM 1/8W
COM
47OHM +-5% 1/8W
IC9201
SSC9512S-TL
C9213
1N 50V
C9215
1U 50V
R9205
7.5 OHM 1/4 W
D9205
EG01A
C9214
C9216
10pF3KV
1uF 25V
100PF 2KV
C9218
R9208
270R
R9206
680OHM +-5% 1/8W
C9219
220pF 50V
OEM MOD E L
T P V ( Top Victory Electronics Co . , Ltd. )
of
57
Sheet
PCB NAME
TPV MODEL
05.Secondary power 715G4581-P01-W30-0030
G4581-P01-W30-0030-2-110217
Friday, February 25, 2011
㝍
㌾
⪰
Date
䱨
㍀
Key Component
67
B1+
C9211
C9209
1N 50V
R9215
2Mohm 1/4W +/ -1%
R9218
24K 1/8W
1U 50V
VCC1
!
Page 68
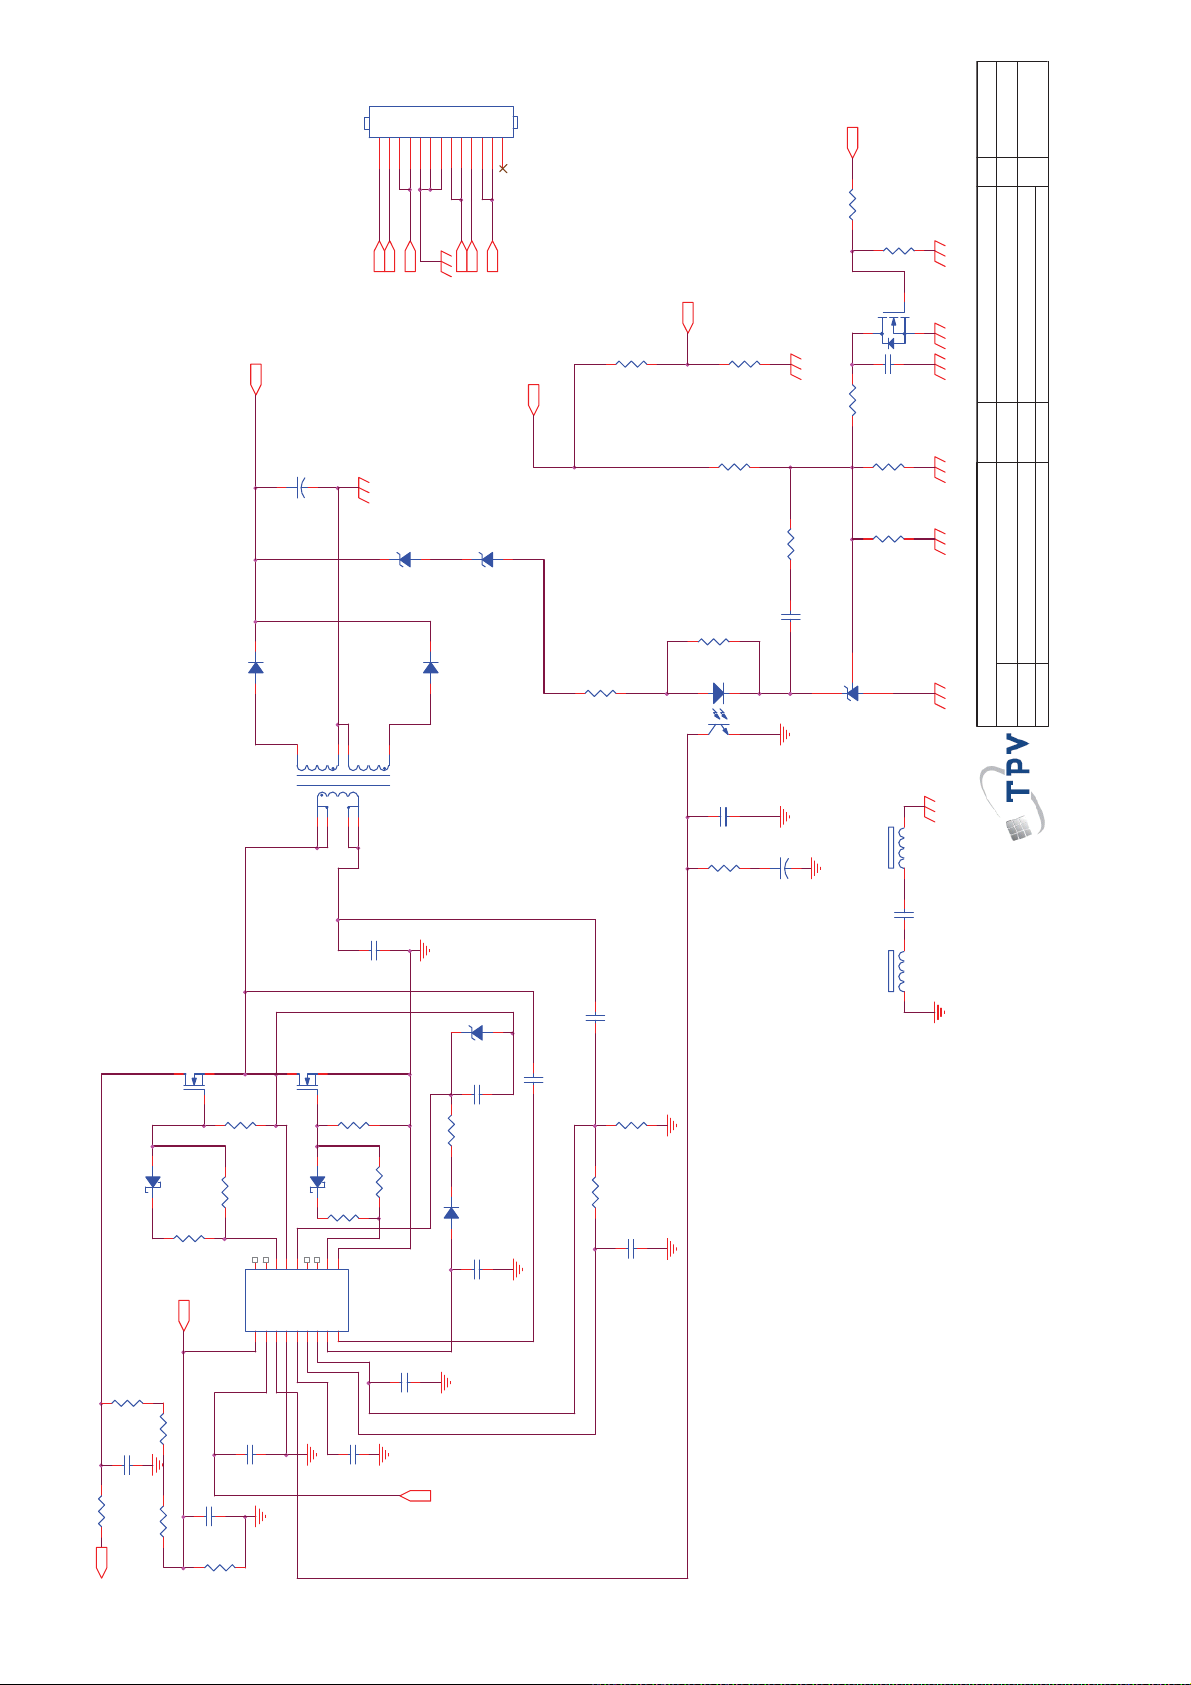
57V~77V
C9106
+
>
B
1
⿄⠍
Size
OEM MO D E L
<
Rev
⿄⠍
of
67
Sheet
PCB NA ME
TPV MO D EL
CN9401
101112
13
12V
DIM
ON/OFF
220UF 100V
24V
CONN
123456789
5.2V
PS_ON
R9110
57V~77V
+57V~77V
68KOHM +-1% 1/8W
R9104
R9114
36KOHM +-1% 1/8W
47K 1/4W
COMP1
R9102
10K 1/8W
R9101
10K 1/8W
Q9101
2N7002
0.22uF 50V
C9117
R9103
18K OHM 1%
R9113
2K OHM 1%
1 2
ZD9101
MTZJ T-72 18B
D9102
SF35G-06-X0
8
10
12
T9101
124
5
Q9102
2SK4097LS 9.5A/500V
R9122
12
D9103
RB160M-60TE25
R9119
R9121
10 OHM 1/8W
Vsen
Q9103
2SK4097LS 9.5A/500V
10K 1/8W
12
D9104
RB160M-60TE25
47OHM +-5% 1/8W
15
16
13
18
Vsen1Vcc2FB3GND4Css5OC6RC7Reg8RV
11
VB14VS
NC12NC
NC17NC
VGH
R9123
10 OHM 1/8W
10
VGL
COM
9
C9107
R9124
IC9101
D9101
6
POWER X'FMR
22NF
10K 1/8W
R9125
47OHM +-5% 1/8W
SSC9512S-TL
1 2
ZD9102
MTZJ T-72 18B
R9109
3K 1/8W +/-1%
R9107
SF35G-06-X0
ZD9104
MTZJ T-72 15B
1 2
C9110
1U 50V
R9105
7.5 OHM 1/4W
D9105
EG01A
C9109
1U 50V
6.2K 1/8W
100PF 2KV
C9113
C9111
10pF3KV
R9108
240R 1/8W 5%
R9106
470 OHM 1/8W
C9114
220pF 50V
12
43
IC9102
PC123X8YFZOF
C9115
100N 50V
R9111
24KOHM +-1% 1/8W
R9112
5.1KOHM +-1% 1/8W
R9126
43K 1/8W 1%
C9112
100N 50V
06.Main power 715G4581-P01-W30-0030
G4581-P01-W30-0030-2-110217
Friday, F ebruary 25, 2011
IC9103
KIA431A-AT/P
+
C9116
4.7UF 50V
FB9102
C9102
FB9101
BEAD
1 2
1000PF 250V
BEAD
1 2
㝍
㌾
⪰
Date
T P V ( Top Victory Electronics Co . , Ltd. )
䱨
㍀
Key Component
68
R9116
NC
C9108
1N 50V
C9104
C9101
R9115
0.1 ohm
B+
NC
10NF
R9118
C9103
1N 50V
R9117
NC
100N 50V
C9105
1U 50V
R9120
NC
VCC1
!
Page 69
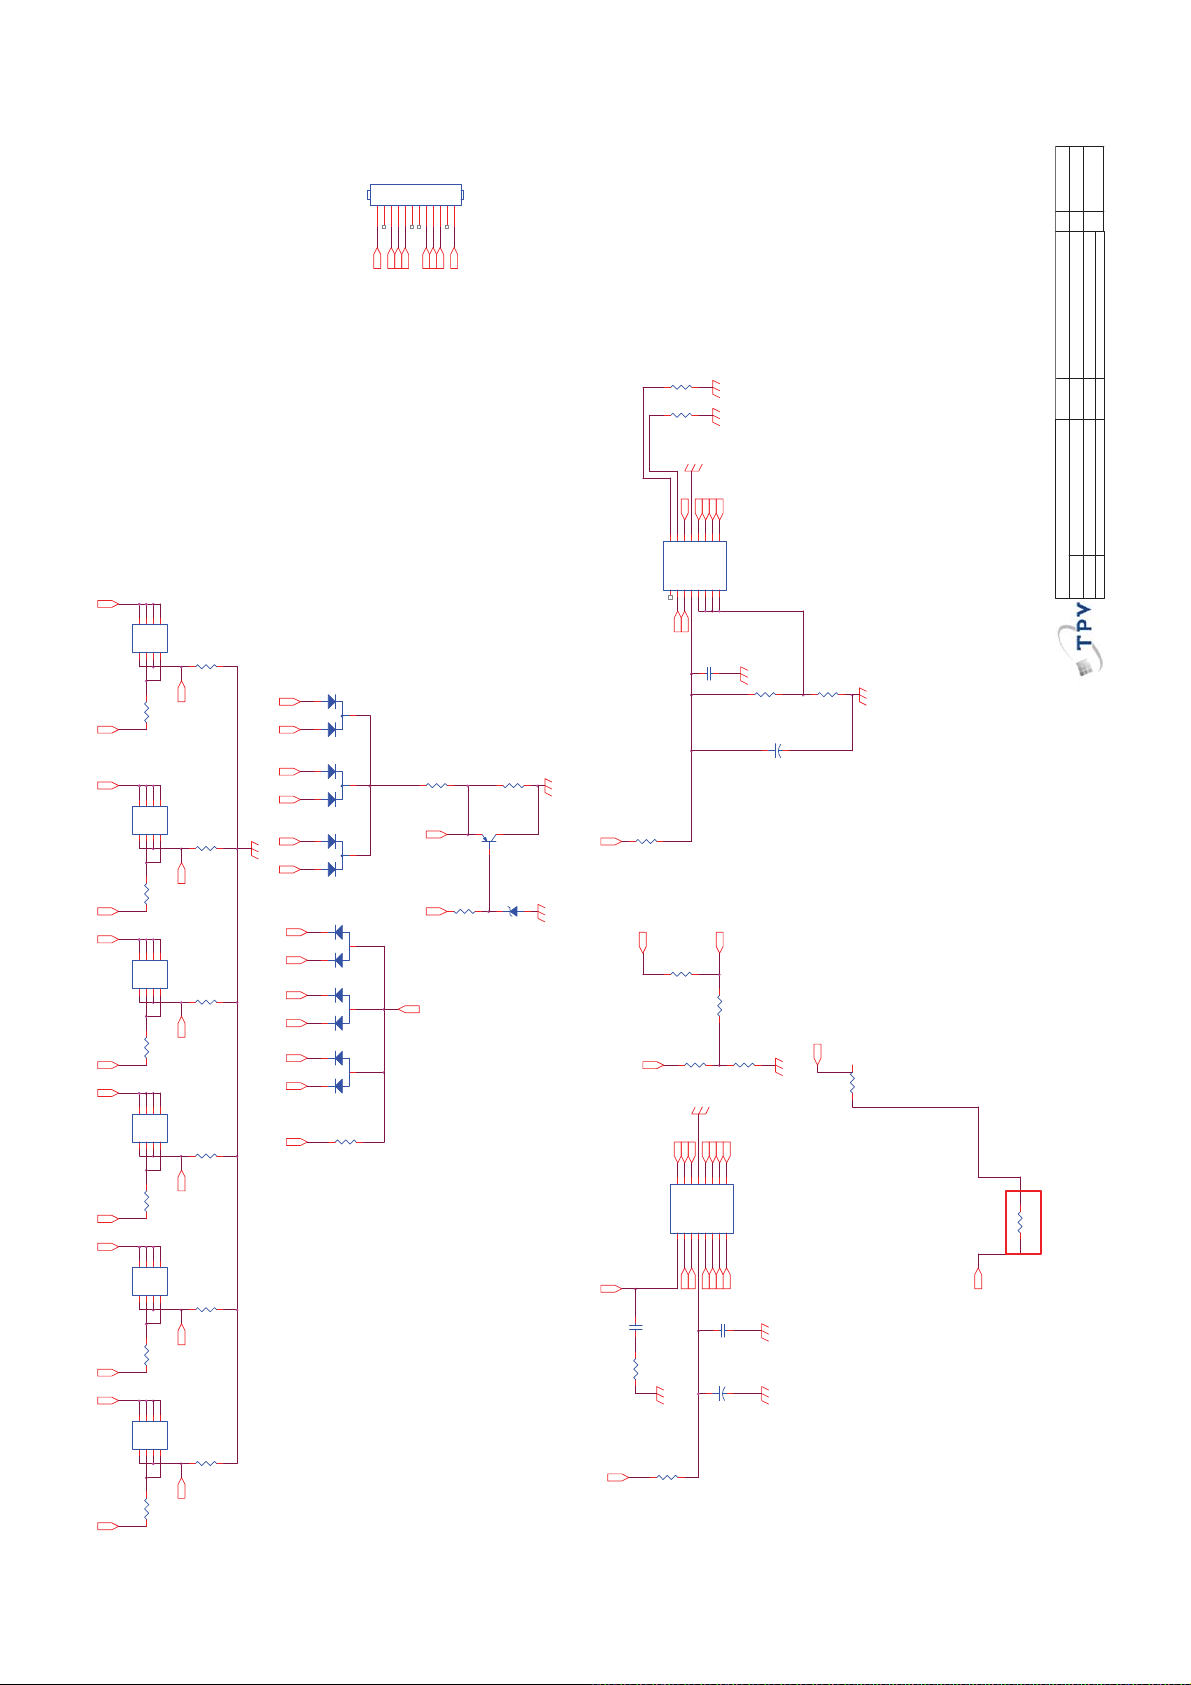
>
C
1
⿄⠍
Size
OEM MODEL
T P V ( Top Victory Electronics Co . , Ltd. )
<
Rev
⿄⠍
PCB NAME
TPV MODEL
07.LED driv er 715G4581-P01-W30-0030
G4581-P01-W30-0030-2-110217
㝍
㌾
⪰
䱨
㍀
Key Component
of
77
Sheet
Friday , February 25, 2011
Date
69
CN8101
101112
LED3
LED4
LED5
57V~77V
8
D15D16D27D2
AO4828L
Q8106
S21G22S13G1
R8106
5.1R 1%
4
BAV70
D8103
1
S6
R8116
G6
G5 LED5
G4 LED4
LED3
G3
LED2
G2 LED6
LED1G1
22 OHM 1/8W
8
D15D16D27D2
AO4828L
Q8105
S21G22S13G1
R8130
5.1R 1%
4
S5
R8115
22 OHM 1/8W
8
D15D16D27D2
AO4828L
Q8104
S21G22S13G1
R8104
5.1R 1%
4
S4
R8114
22 OHM 1/8W
8
D15D16D27D2
AO4828L
Q8103
S21G22S13G1
R8103
5.1R 1%
4
S3
R8113
22 OHM 1/8W
8
D15D16D27D2
AO4828L
Q8102
S21G22S13G1
R8102
5.1R 1%
4
S2
R8112
22 OHM 1/8W
8
D15D16D27D2
AO4828L
Q8101
S21G22S13G1
R8101
5.1R 1%
4
S1
R8111
22 OHM 1/8W
LED6LED5
LED3LED4LED1 LED2
LED5 LED6
LED2 LED4LED1 LED3
12V
3
2
BAV70
D8102
1
3
2
BAV70
D8101
1
3
2
1
3
2
BAW56
D8108
1
3
2
BAW56
D8107
1
3
2
BAW56
D8106
R8121
100K 1/8W
CONN
123456789
LED2
LED1
LED6
57V~77V
R8108
1K
R8105
1K
SLP
G6
S6G5S5
9
11
16
14
15
10
12
13
SLP
CS4
CS2
VFB
GND
VSET
OUT4
OUT2
EN
DIM
R8132
100KOHM +-5% 1/8W
R8123
10K 1/8W
SLPS4G3
VSET
VFB
12
16
15
14
13
SLP
VFB
GND
VSET
COMP1DIM2EN3VCC4OUT15CS16OUT37CS3
EN
DIM
510 oHM 1% 1/8W
PF7004
8
C8103
100N 50V
R8125
R8131
47K
C8101
+
VSET
R8128
10K 1/8W
R8126
1.2K 1/8W
G4
10
9
11
CS4
CS2
OUT4
OUT2
PF7004
8
S2S1G2S3G1
C8102
100N 50V
+
C8105
10UF 50V
10K
10UF 50V
EN
R8142 O OH M
R8141O OHM
ON/OFF
IC8101
COMP1DIM2EN3VCC4OUT15CS16OUT37CS3
R8140
R8109
1M 1/8W
12V SLP
VFB
200K 1/8W 1%
PMBS3906
Q8109
GDZJ4. 3B
ZD8106
R8139
3K 1/8W 5%
1 2
R8134
510 OHM
12V
COMP1
12V
IC8102
COMP1
1UF
C8106
R8118
100KOHM +-1% 1/8W
12V
R8133
!
Page 70
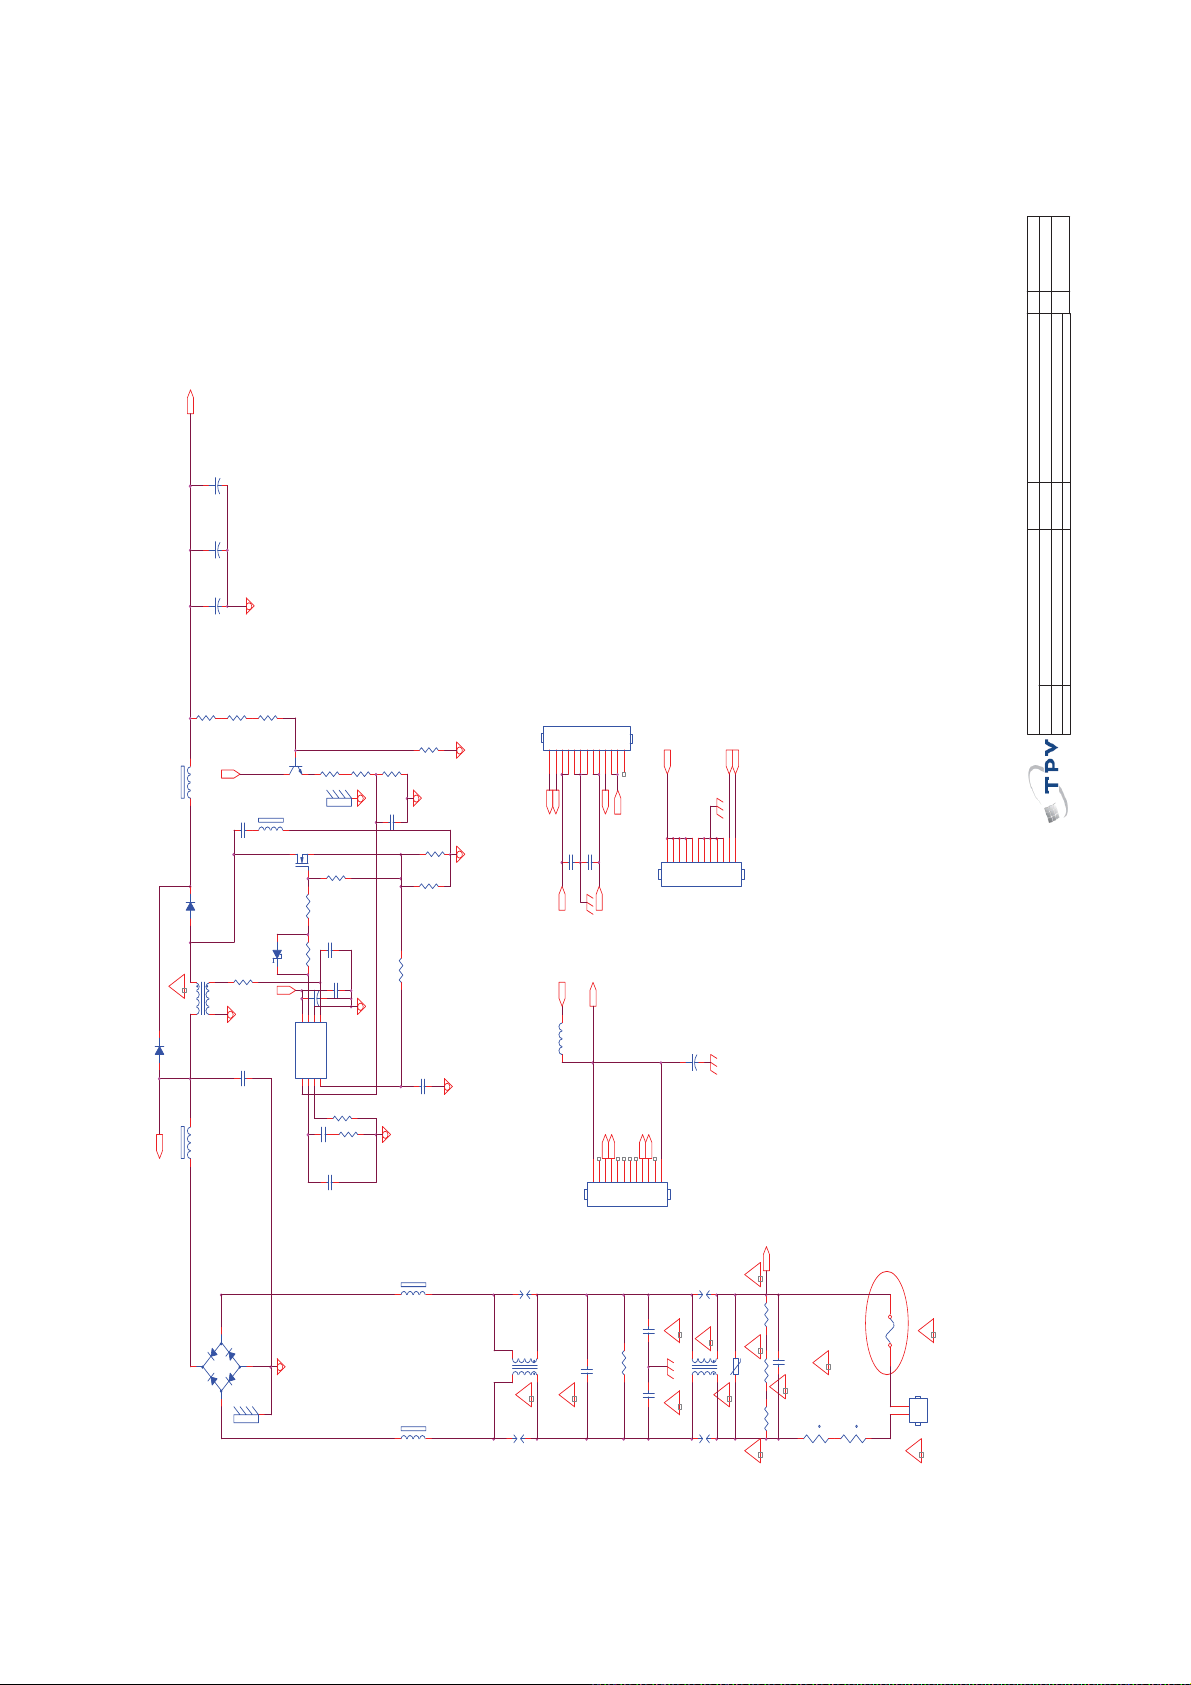
Custom
B
Ebony AUO Panel
Size
Rev
⿄⠍
400V
51
C9805
47UF 450V/N C
+
C9804
47UF 450V
+
C9803
47UF 450V
+
R9313
3M3 1%
R9314
R9312
3M3 1%
FB9811
BF-L25030W-768
1 2
D9811
SF38G-34X0
L9904
350UH
!
D9810
1N5408-11
FB9810
60R
B+
1 2
+
1
BD9910
3M3 1%
R9814
150K 1/8W +/-1%
R9815
750 OHM
R9816
6.8KOHM +-1% 1/8W
R9817
VCC
Q9810
HQ9801
BC847C
FB9812
BF-L25030W-768
C9812
100PF
12
Q9801
2SK4087LS
R9813
R9820
22 OHM 1/8W
C9810
12
D9812
RB160M-60TE25
R9811
R9810
6 5
7 1
2
-
3
HBD9910
TS6B06G-02
100R 1/8W 5%
68K +-5% 1/8W
C9801
680NF
C9817
10UF 50V
+
VCC
6
5
8
7
ZCD
VCC
GND
GATE
FAN6961SZ
IC9801
INV1COMP2MOT3CS
4
C9816
2U2 16V
C9815
4
2
6.8KOHM +-1% 1/8W
2
C9814
1N 50V
R9802
R9812
12
12
0.15R
R9801
0.15R-NC
330R 1/8W 5%
C9811
470P 50V
FB9901
BEAD
FB9902
BEAD
51K +-5% 1/8W
47pF 50V
C9813
100N 50V
R9819
18K 1/8W 5%
R9818
33K 1/8W 5%
330N 25V
CN9002
123456789
ฉስȘǂ
ฉ⣀
ɝ
ฉ
DIM
ENA
C9225
100N 50V
+12V
+LED
L8101
5uH
CN8001
DSPL201M-A21 F
SG9906
4
3
C9902
L9902
12MH
1
2
!
!
DSPL201M-A21 F
SG9905
101112
13
ስ
ǂ
STB
+5.2V
C9224
100N 50V
+24Vsnd
+VLED
LED1
LED2
LED3
1234567891011
C9911
330NF 305V
R9900
C9912
1MOHM +-5% 1/2W
CONN
+VLED
1234567891011
CN9003
LED4
12
470pF/250V
!!
470pF/250V
DIM
ENA
12
CONN
C8107
4.7UF 160V
+
CONN-NC
Vac
DSPL201M-A21 F
SG9901
!
R9903
3
12MH
1
2
SG9902
C9901
330NF 305V
RV9901 Varistor
L9901
R9902
300K 1/4W/N C
!
R9901
300K 1/4W/NC
DSPL201M-A21 F
!
!
TH99 01
SCK101R55LSY
12
!
t
12
TH99 02
SCK101R55LSY
t
300K 1/4W/N C
!
!
4
!
F9901
UDA-A004(PF)
T4.0AH/250V
L
1
N
CONN
2
CN9901
!
of
G4867-P0B-W21-0030
Sheet
PCB NAME
OEM MODEL
TPV MODEL
Thursday, May 26, 2011
01.COVER
G4867-P0B-W21-0030-2-1105 26
㝍
㌾
⪰
T P V ( Top Victory Electronics Co . , Ltd. )
Date
䱨
㍀
Key Component
70
32PFL5556/V7
715G4867P0AW210030
!
Page 71
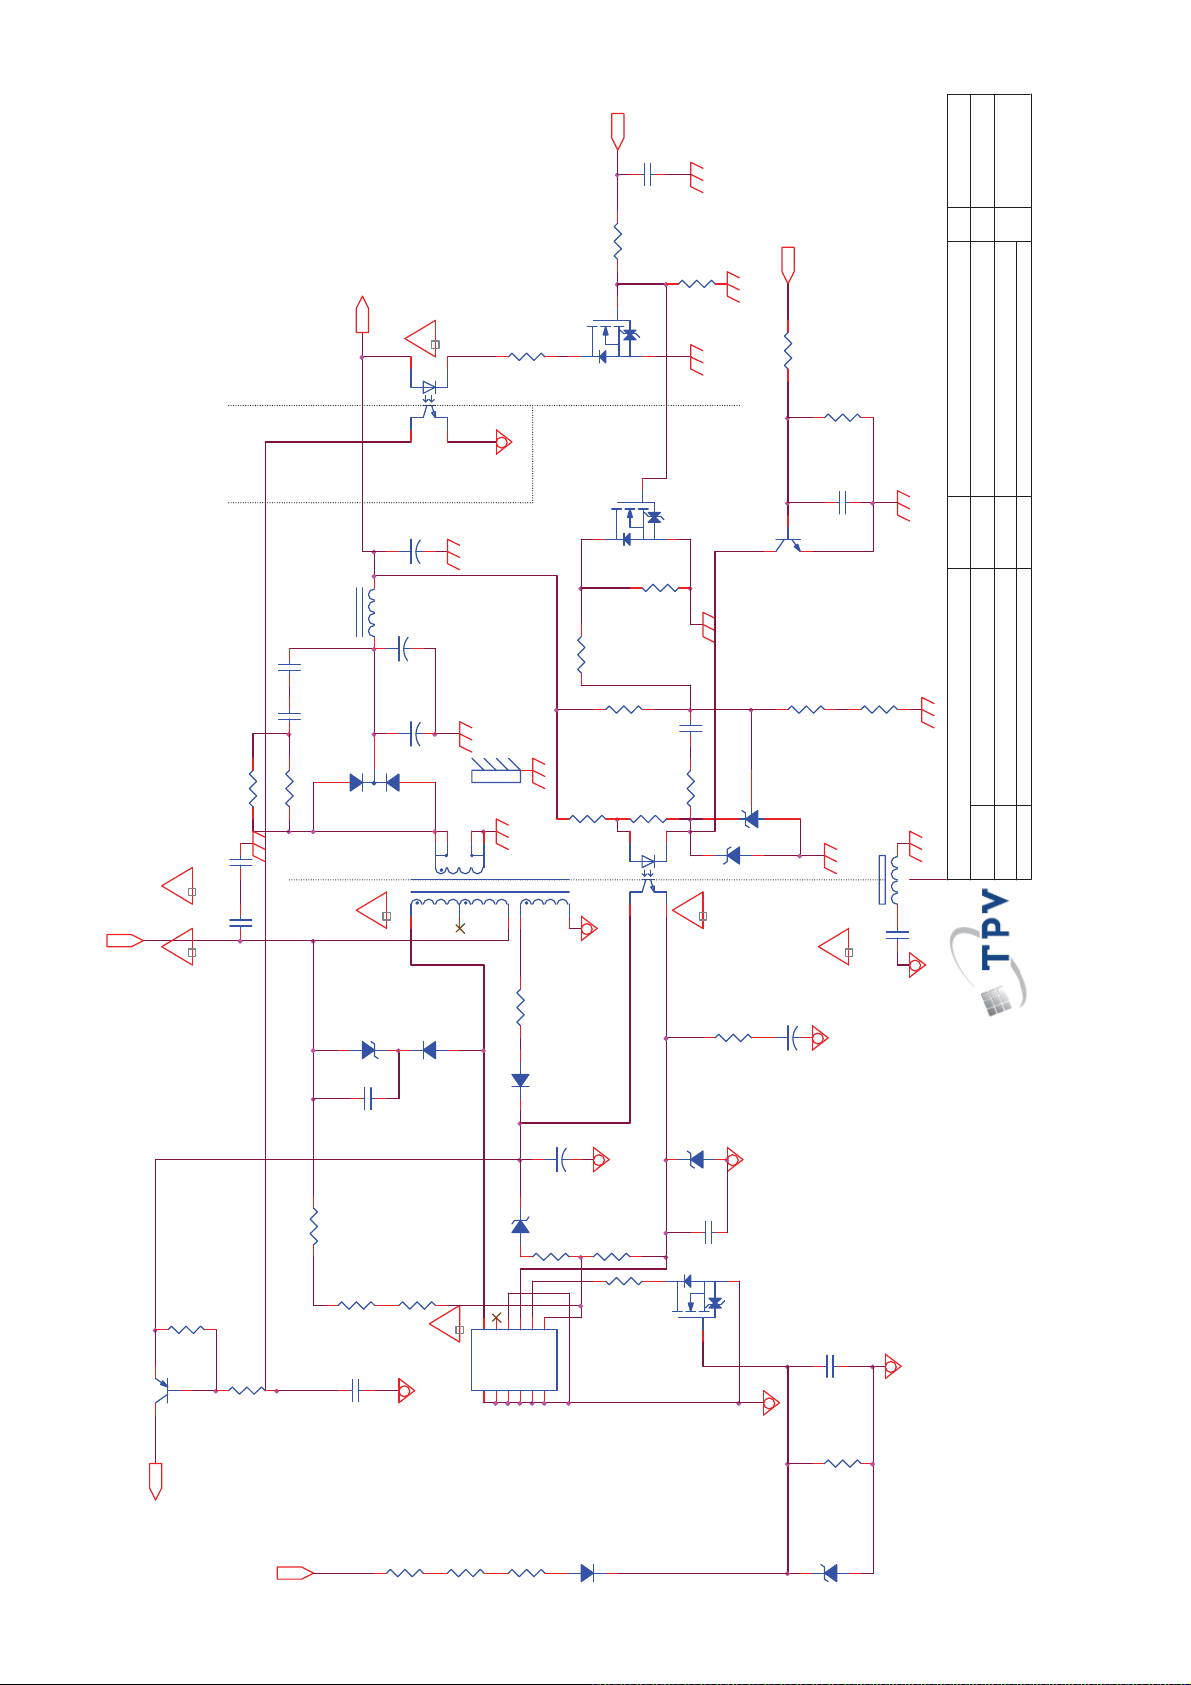
STB
Custom
B
Ebony AU O Panel
C9315
10N 50V
BZT52-B6V2
PROTEC
R9331
1K OHM +-5% 1/8W
R9332
10K OHM +-5% 1/8W
C9319
100N 50V
Q9314
BC847C
R9322
18K 1/8W 1%
IC9310
AS431AN-E1
1 2
R9333
0 OHM +-5% 1/8W
FB9300
1 2
C9921
!
R9330
100R 1/6W 5%
+5.2V
!
1
23
IC9312
EL817M(X)
4
C9303
470uF 16V
+
C9302
L9310
C9318
2N2 50V
C9317
2N2 50V
D9301
SRF1060
3
R9324
47 OHM 1/4W
R9323
47 OHM 1/4W
C9920
2.2NF 250V/ N C
!
C9925
2.2N F 2 50V-NC
400V
!
470uF 10V
Coil
+
C9301
470uF 10V
+
2
HD9301
1
124
5
T9301
POWER X'FMR
!
8
6
7
Q9312
R9328
1K5 1/8W 5%
RK7002FD5T116
Q9315/NC
RK7002FD5T116-NC
R9334
27K 1/8W 1%
R9321
12K 1/8W 1%
2
R9320
100R 1/6W 5%
1
IC9311
EL817M(X)
9
10
4
R9335
100KOHM +-5% 1/ 8W
R9326
0 OHM +-5% 1/8W
C9313
100N 50V
R9319
R9329
3K3 1/8W 5%
23
1K OHM +-5% 1/ 8W
!
ZD9311
BEAD
470pF/250V
Size
Rev
⿄⠍
51
of
G4867-P0B-W21-0030
Sheet
PCB N AME
OEM MODEL
TPV MO D E L
Thursday , May 26, 2011
01.COVER
G4867-P0B-W21-0030-2-110526
㝍
㌾
⪰
T P V ( Top Victory Electronics Co . , Ltd. )
䱨
㍀
Date
Key Component
71
C9320
R9325
ZD9314
5
4R7 1/4W 5%
D9311
FR103
C9316
100UF 35V
+
R9933
10K OHM +-5% 1/8W
R9934
82K +-5% 1/8W
R9303
22K 1/8W 1%
TOP264VG
D9303
BAV21
NC
MTZJ T- 7 2 2 4 B
1 2
3
1
4
2
X
V
F
C
12
R9308
2.2M 1/4W
D9310
ZD9312
P6KE120A
12
C9314
R9301
330K 1/4W-N C
R9302
330K 1/4W-N C
R9317
22K 1/8W 5%
C9311
R9315
10K OHM +-5% 1/8W
Q9311
MMBT2907A
VCC
Vac
10N 50V
UF4007
2.2NF
R9306
330K 1/4W-N C
6
HV
D
S7S8S9S10S11S
IC9301
R9307
R9300
2.2M 1/4W
2.2M 1/4W
R9305
ZD9301
BZT52-B9V1
1 2
C9312
100N 50V
Q9313
RK7002FD5T116
22UF 50V
6.8 OHM
+
C9300
0.47uF 50V
R9304
430K 5%
1 2
ZD9300
BZX79-C9V1
!
Page 72
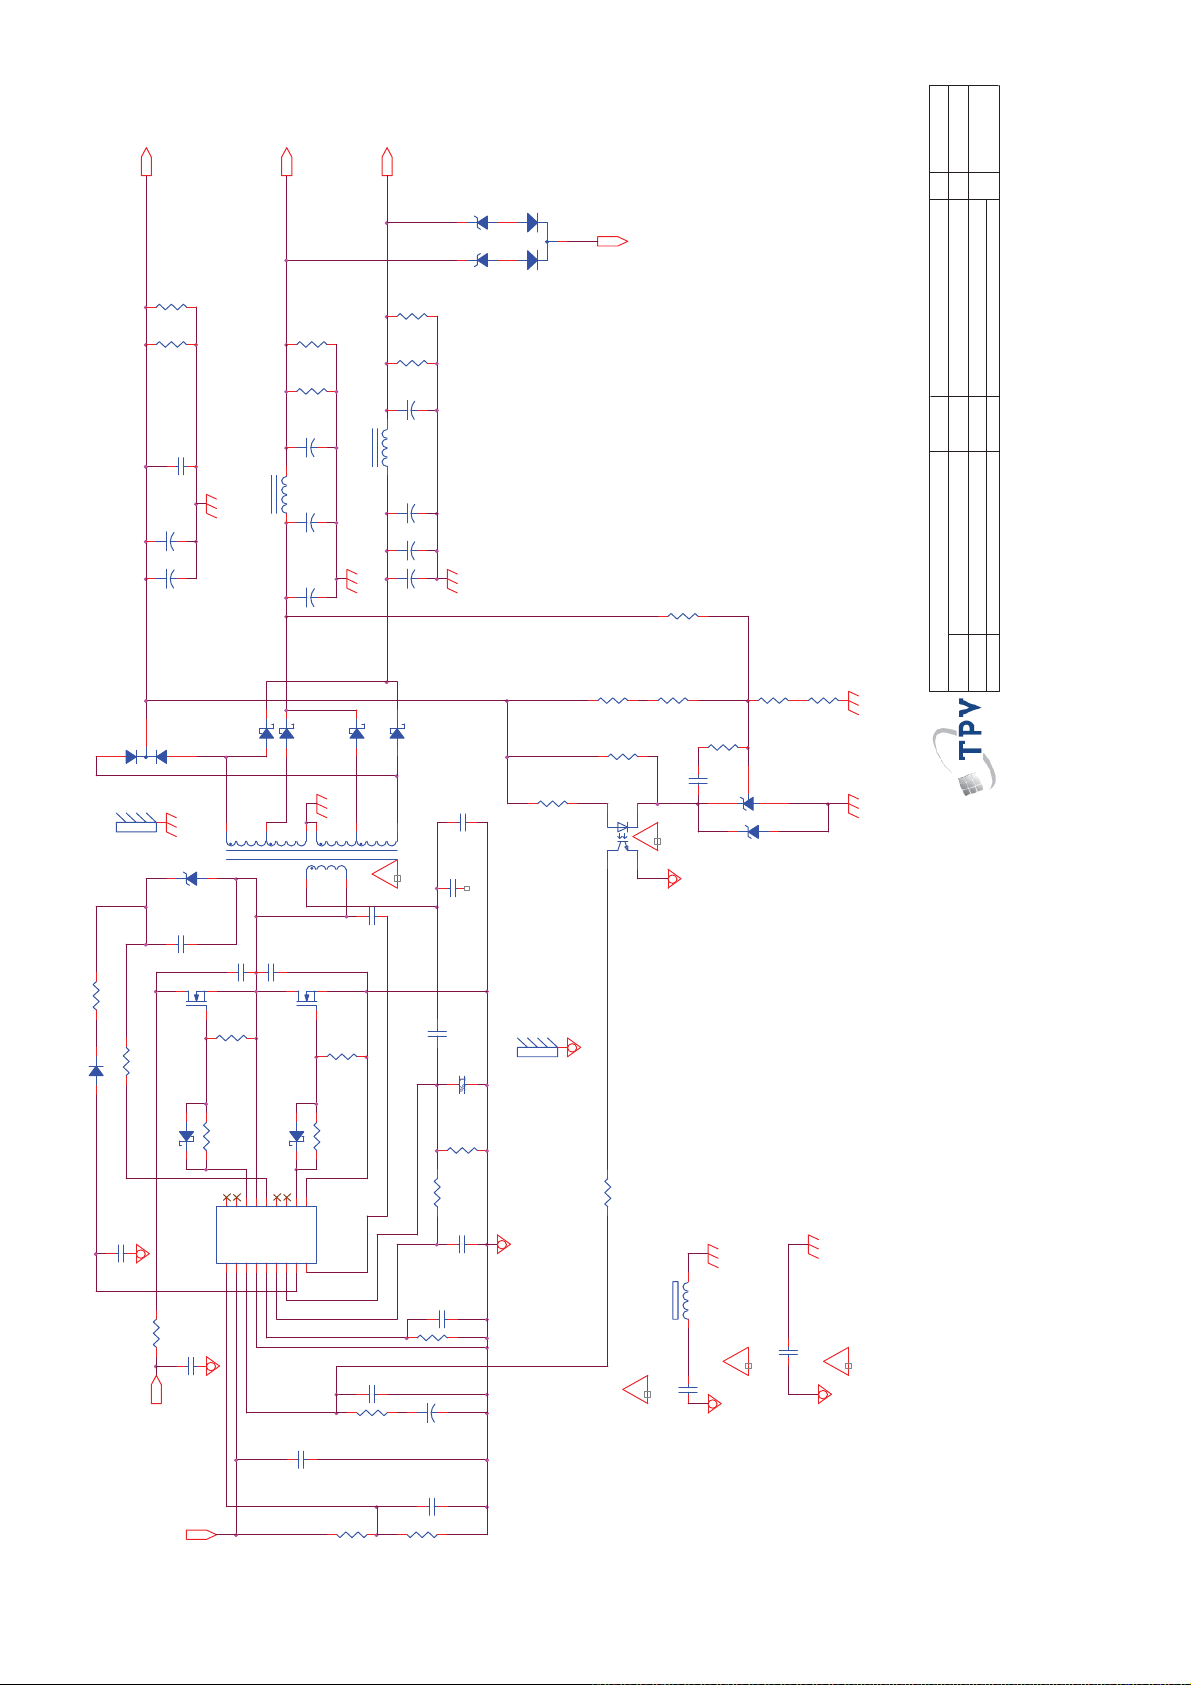
Custom
Size
OEM MO DEL
T P V ( Top Victory Electronics Co . , Ltd. )
B
Rev
G4867-P0B-W21-0030
PCB NAME
TPV MO D E L
01.COVER
G4867-P0B-W21-0030-2-110526
㝍
㌾
⪰
䱨
㍀
Key Component
Ebony AU O Panel
⿄⠍
51
of
Sheet
Thursday , May 26, 2011
Date
+24Vsnd
D9115
MTZJ T- 7 2 30 B
MTZJ T-72 15B
BAV70
1
1 2
1 2
3
2
ᢰ㙜
3/19 DIP
PROTEC
ᢰ㙜
3/19 DIP
R9188
18K 1/8W 1%
ᢰ㙜
R9165
0 OHM +-5% 1/8W
R9163
22K 1/8W 1%
R9166
2K 1/8W 1%
3/19 DIP
R9167
0 OHM +-5% 1/8W
ZD9132
100K
100K
C9120
C9118
ZD9131
100UF 50V
100UF 50V
R9158
R9157
C9145
100UF 50V
+
L9122
Coil
+
C9119
100UF 50V
+
+
L9121
+12V
R9149
100K
R9148
100K
C9114
270UF 25V
+
C9113
1000uF 25V/N C
Coil
+
C9112
1000uF 25V
+
+24V
R9145
100K
R9144
100K
C9143
2N2 500V
+
C9122
1000UF 50V
+
C9121
1000UF 50V
R9164
2
D9121
MBRF10100CT
1
3
2
HD9121R9141
ZD9130
C9141
10R 1/8W 5%
R9140
0 OHM +-5% 1/8W
D9130
UF4007
12
D9131
SS0520
C9140
1U 25V
R9142
0.1 ohm
400V
1U 25V
Q9121
C9147
7
T9111
MTZJ T-7 2 1 5 B
1 2
2SK4097LS 9.5A/500V
R9139
R9138
18
IC9121
1500PF-NC
D9113
C9124
10K OHM +-5% 1/8W
47OHM +-5% 1/8W
16
NC17NC
Vsen1Vcc2FB3GND4Css5OC6RC7Reg8RV
VGH
D9111
SR210
100PF 1KV/N C
15
SR206
1 2
1 2
8
C9125
100PF 1KV/N C
12
D9132
SS0520
13
11
VB14VS
NC12NC
C9130
100N 50V
1 2
9
10
11
3
5
Q9122
2SK4097LS 9.5A/500V
R9136
10K OHM +-5% 1/8W
R9137
47OHM +-5% 1/8W
10
VGL
COM
SSC9512S-TL
9
D9114
SR210
D9112
SR206
1 2
R9168
C9146
C9138
22NF
C9142
33NF-NC
100PF
C9137
1N 50V
R9135
200OHM +-5% 1/8W
680OHM +-5% 1/8W
C9136
100P 50V
C9135
1uF 16V
C9133
4.7UF 50V
+
C9131
100N 50V
12
POWER X'FMR
!
C9139
10pF3KV
R9134
C9134
100N 50V
R9132
2K43 1/8W 1%
4K7 1/4W +/-5%
HQ9121/NC
R9133
1K OHM +-5% 1/8W-N C
3.3K 1/4W
1
23
IC9112
2
HEAT SINK-N C
R9143
!
EL817M(X)
4
560 OHM 1/4W
!
FB9130
R9169
22K 1/8W 5%
IC9113
ZD9133
!
AS431AN-E1
1 2
RLZ27B-NC
C9929
1500PF 250V-NC
!
72
C9144
100N 50V
BEAD/NC
1 2
C9927
1000PF 250V
VCC
R9130
12K 1/8W 5%
R9131
3K 1/8W 5%
!
Page 73
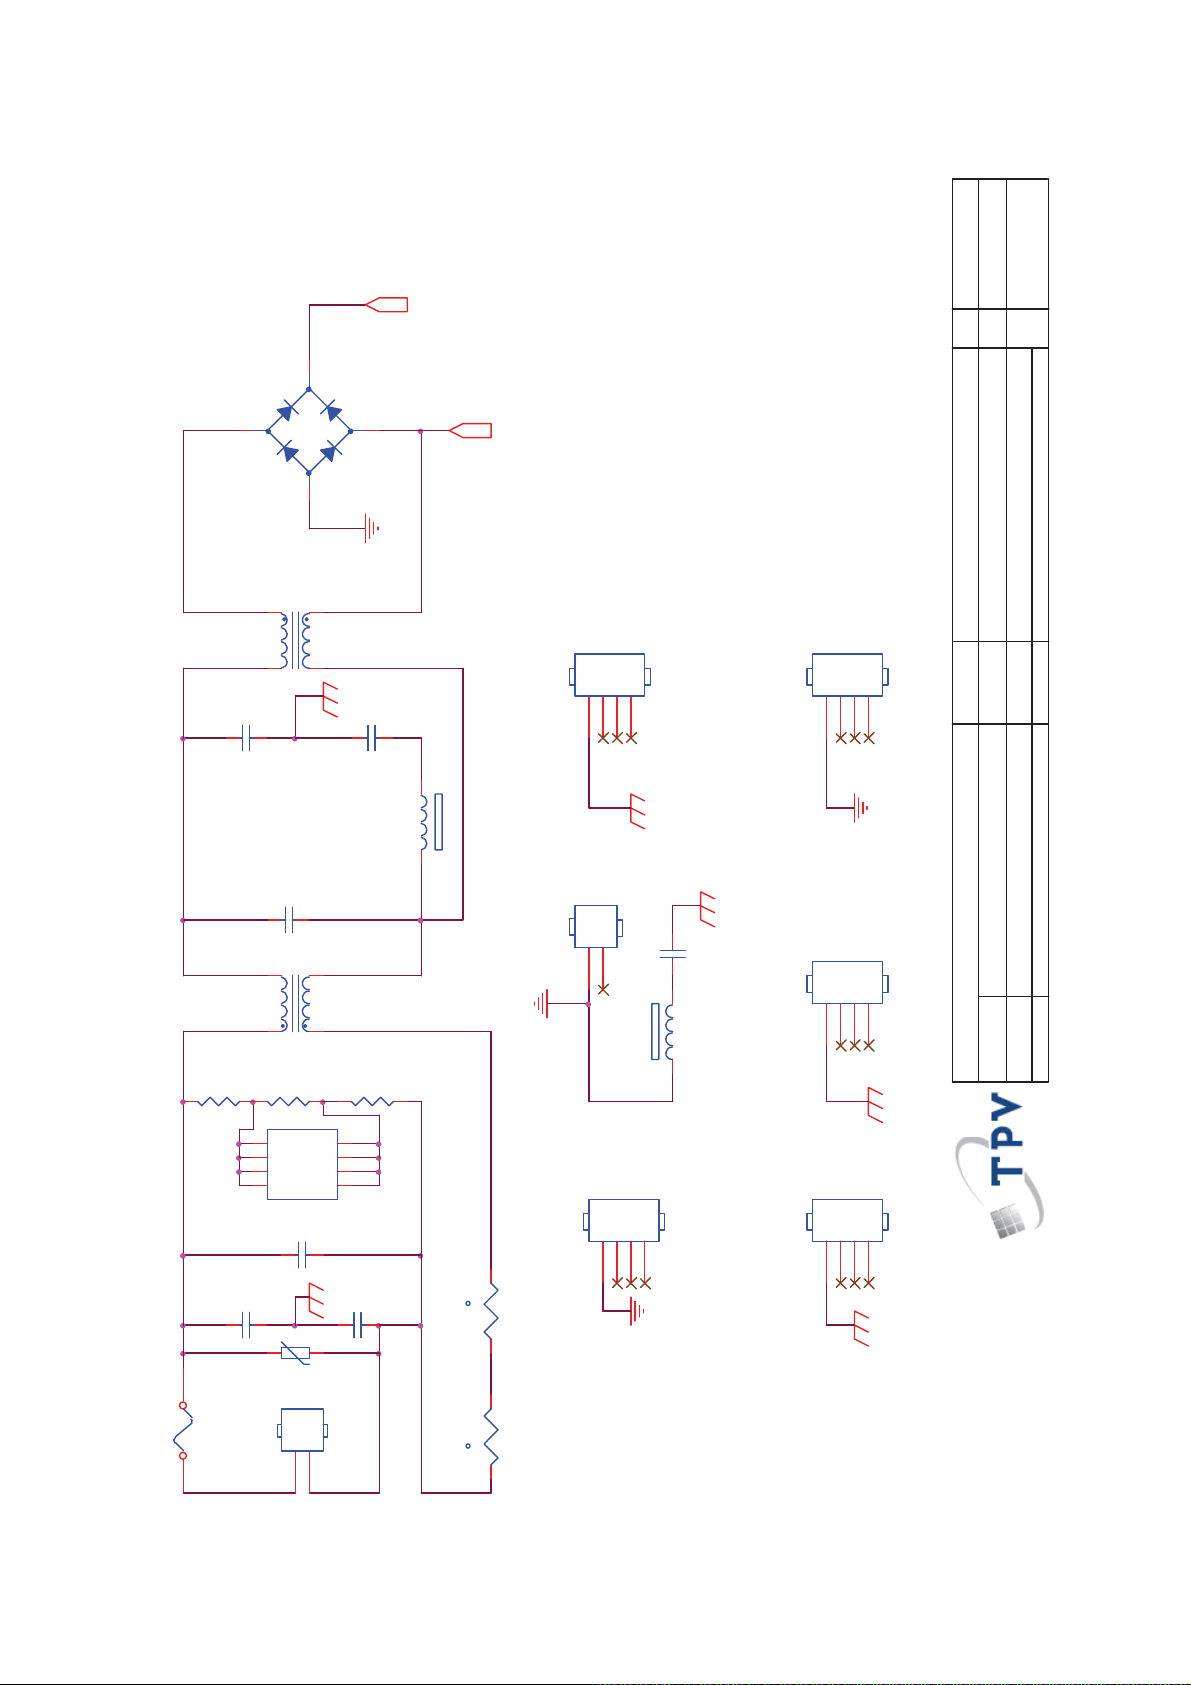
2
BD9901
C9911
A
R+
Size
1
TS10B06G-04
+
3
-
4
L9901
10MH
1
4
2
3
220PF
C9914
220PF
BEAD
BO
123
HEAT SIN K (D 9302)
HS9302
4
NC
123
HS9202
4
OEM MODEL
>
A
⿄⠍
<
Rev
⿄⠍
of
28
Sheet
PCB N AME
TPV MODEL
RV9901
FB9903
1 2
C9902
470NF 305V
1
L9902
10MH
2
3
1
4
R9901
430K 1/4W
R9902
430K 1/4W
NC
5
D2
6
D2
7
NC
8
C9901
NC
D1
D1
NC
470NF 305V
IC9901
4
3
2
1
NC
R9903
430K 1/4W
t
C9912
220PF
TVR14561KFC4FY
C9913
220PF
NR9902
NTCR
1 2
12
2
HS9801
HEAT SIN K (Q9801, D 9802)
123
HEAT SIN K(BD 9901)
C9814
1NF 250V
123
FB9803
1 2
HS9901
4
HEAT SINK (D9203,D9205)
123
HEAT SIN K (D 9102)
HS9201
4
HS9301
4
G4878-P0D-H20-0030-1-121710
㝍
㌾
⪰
T P V ( Top Victory Electronics Co . , Ltd. )
䱨
㍀
73
2.AC SI D E 715G4878-P0D-H 20-0030
Tuesday, March 15, 2011
Date
Key Component
CN9901
L1N
2
F9901
FUSE
42PFL5556/V7
715G4878P01H20003M
CONN
NR9901
t
NTCR
!
Page 74
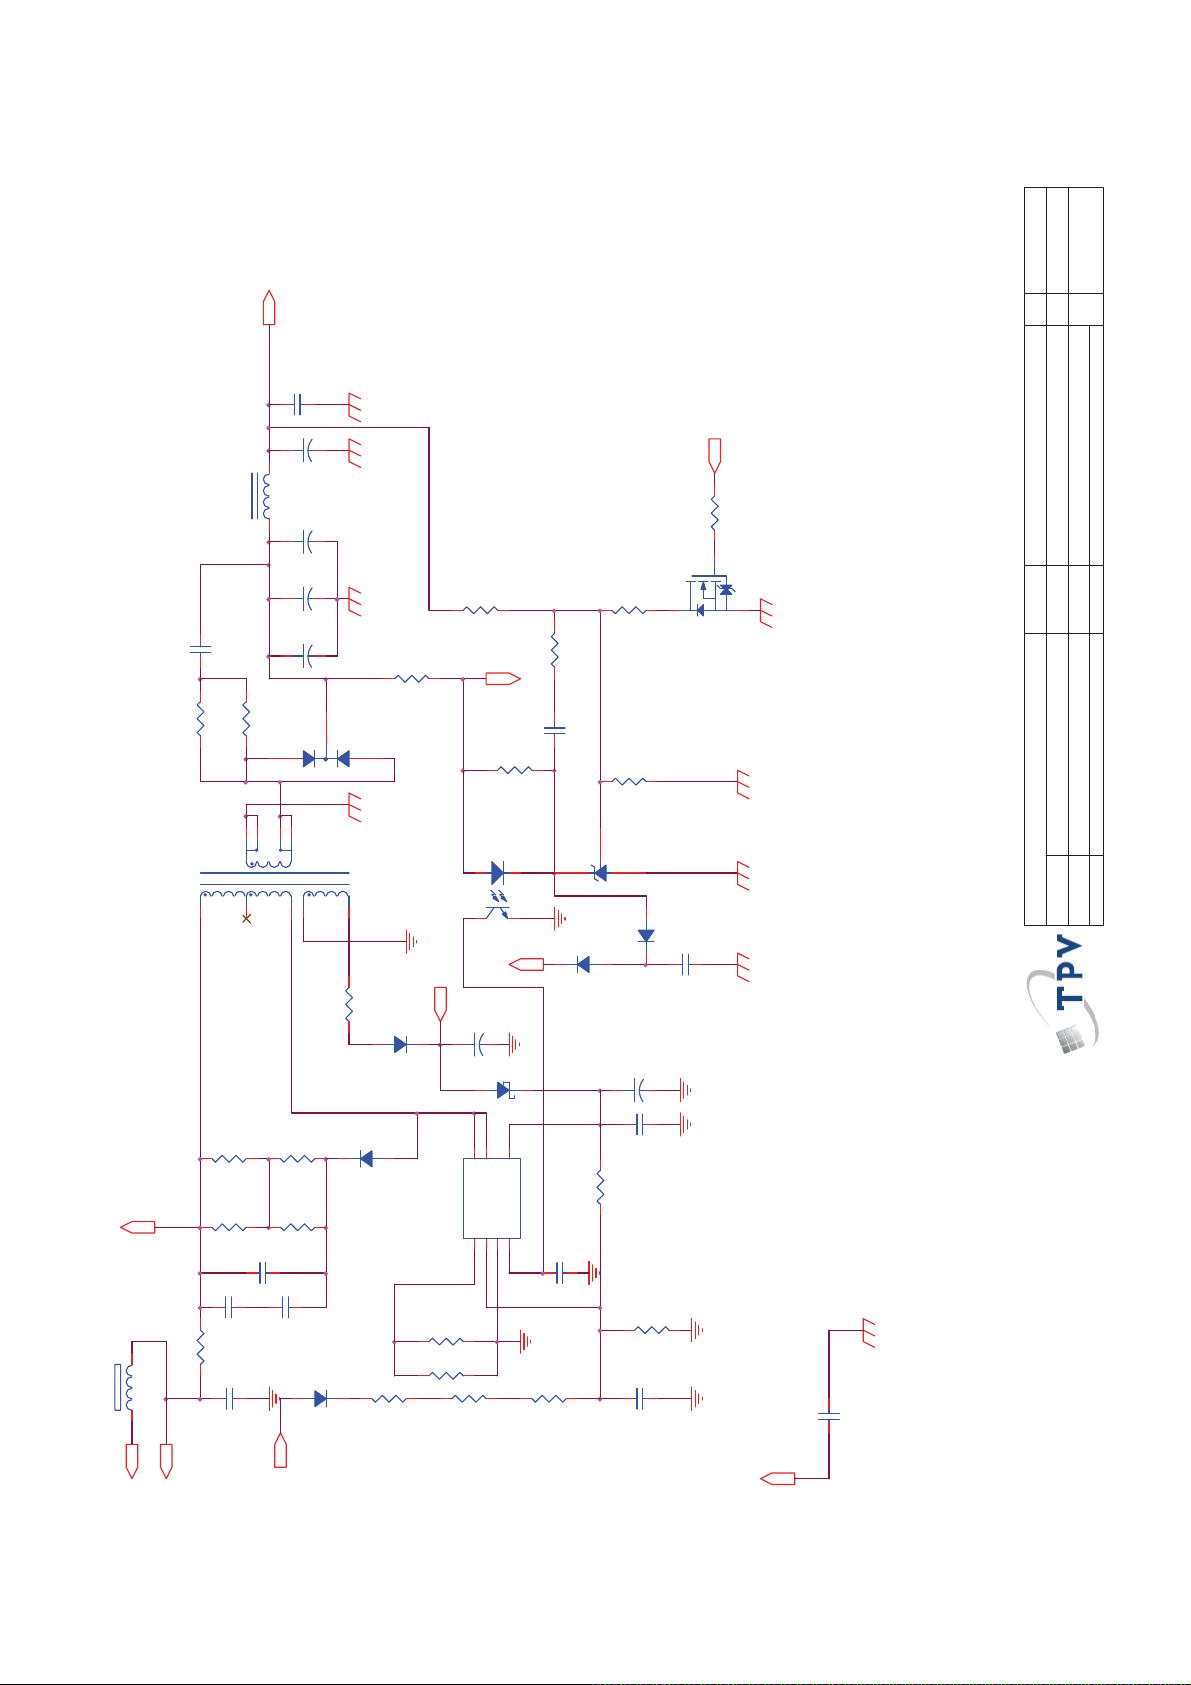
>
B
A
⿄⠍
<
Size
Rev
5.2VBO
C9306
100N 50V
⿄⠍
+
C9305
C9304
+
470UF 10V
C9315
+
470UF 10V
C9316
+
470UF 10V
D9302
FMW-2156
3
10
3
5
470uF 16V
NC
R9314
2K4 1/8W 1%
R9310
220 OHM 1/4W
2
1
POWER X'FMR
4
VCC
R9308
3.3 OHM 1/4W
D9303
PR1007
ProtectR9315
1K 1/8W
IC9302
12
43
Protect
C9307
100UF 35V
+
D9305
12
R9317
C9308
PC123X8YFZOF
RB160M-60TE25
R9321
1K OHM +-5% 1/8W
100N 50V
R9319
IC9303
2K2 1/8W 1%
AS431AN-E1
D9306
1N4148W
D9307
C9310
10UF 50V
+
L9301
Coil
C9303
2N2 500V
R9302
47 OHM 1/4W
R9305
47 OHM 1/4W
679
T9301
1
2
PS_ON
R9322
NC
Q9301
RK7002FD5T116(NC)
C9317
1uF 50V
1N4148W
OEM MODEL
T P V ( Top Victory Electronics Co . , Ltd. )
of
38
Sheet
PCB NAME
TPV MODEL
3.STAND BY 715G4878-P0D-H20-0030
G4878-P0D-H20-0030-1-121710
Tuesday , March 15, 2011
㝍
㌾
⪰
Date
䱨
㍀
Key Component
74
add_0110
BEAD
R9304
100K 1/4W
R9307
100K 1/4W
D9304
R9303
100K 1/4W
R9306
B1+
C9301
2N2 500V(NC)
R9301
0.1oH M 1W
FB9302
1 2
C9313
B2
B+
10NF
100K 1/4W
C9318
1NF
C9302
2N2 500V(NC)
PR1007
D9301
1N4007
R9309
1.5M 1/4W
8
5
VCC
D/ST7D/ST
IC9301
S/OCP1BR2GND3FB/OLP
4
R9312
2.4 OH M 1/4W
R9311
2.4 OH M 1/ 4W
R9313
1.5M 1/4W
R9318
A6069H
C9309
3.3nF 50V
R9316
1.5M 1/4W
C9312
100N 50V
4.7M OHM +-5% 1/4W
R9320
1N change to 3N3_0112
560K 1/8W
C9311
220N 50V
C9314
470pF/250V
B1+
!
Page 75
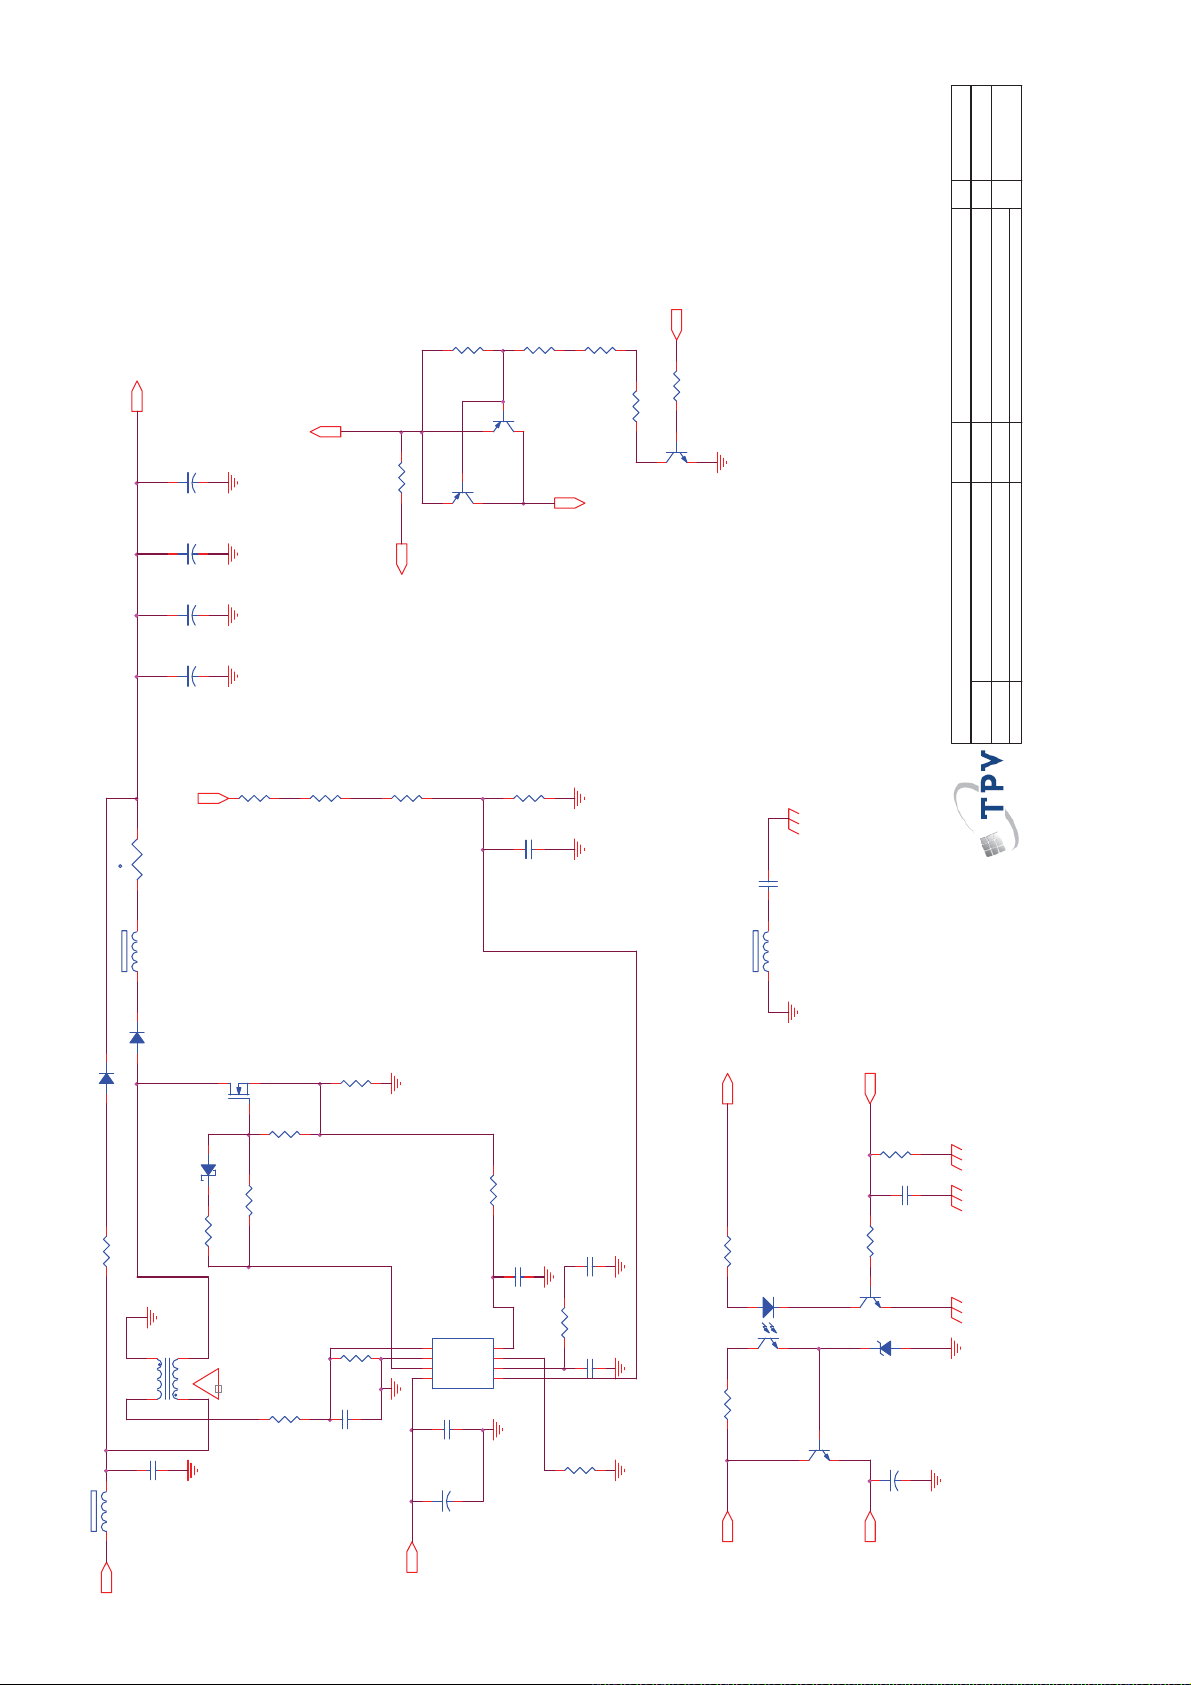
>
B
A
⿄⠍
<
Size
Rev
⿄⠍
VCC1
R9820
NC
R9821
R9819
NC
NC
NC
B+
B2
C9813
47UF 450V
+
C9803
+
47UF 45 0V
C9804
+
47UF 450V
C9802
+
47UF 450 V
R9804
680K OHM +-1% 1/4W
R9807
BO_DC
12
NR9801
NTCR
t
R9824
0R05
BO_DC
680K OHM +-1% 1/4W
R9809
680K OHM +-1% 1/4W
NC
Q9806
NC
Q9805
R9811
13K 1/8W 1%
C9809
BO_DC
47P 50V
R9823
NC
R9822
NC
Q9807
C9915
220PF
OEM MODEL
T P V ( Top Victory Electronics Co . , Ltd. )
PCB NAME
TPV MODEL
4.DC M PF C 715G4878-P0D-H 20- 0030
G4878-P0D-H20-0030-1-121710
㝍
㌾
⪰
䱨
㍀
Key Component
of
48
Sheet
Tuesday, March 15, 20 11
Date
75
FB9804
FB9802
BEAD
1 2
D9802
FMN-1106S
R9808
Q9801
TK15A60U
D9801
1N5408-11
12
D9803
RB160M-60TE25
R9802
R9801
10R
51OHM +-5% 1/8W
L9801
236UH
456
!
3
C9801
680NF
FB9801
BEAD
1 2
R+
R9806
R9803
51OHM +-5% 1/8W
R9805
68K 1/4W
0.05R
10K 1/8W
R9810
470 OHM 1/8W
C9811
C9808
220pF 50V
IC9801
R9818
6.8K 1/8W
C9805
47P 50V
VCC1
LD7591GS
10K 1/8W
CS
ZCD
5
6
7
8
C9807
+
C9815
4
RAMP
GND
3
COMP
OUT
2
INV
VCC
1
100N 50V
10UF 50V
470N 25V
R9813
C9810
47N 50V
R9812
36K 1/8W +/-5%
BEAD
1 2
5.2VVCC
R9815
1K 1/8W
R9814
IC9802
PC123X8YFZOF
12
43
10K 1/8W
Q9802
2SD1624T-TD-E
PS_ON
R9817
27K 1/8W 5%
C9812
100N 50V
R9816
10K 1/8W
Q9803
2N3904S-RTK/PS
1 2
ZD9801
MTZJ T- 7 2 1 6B
C9806
10UF 50V
+
VCC1
!
Page 76
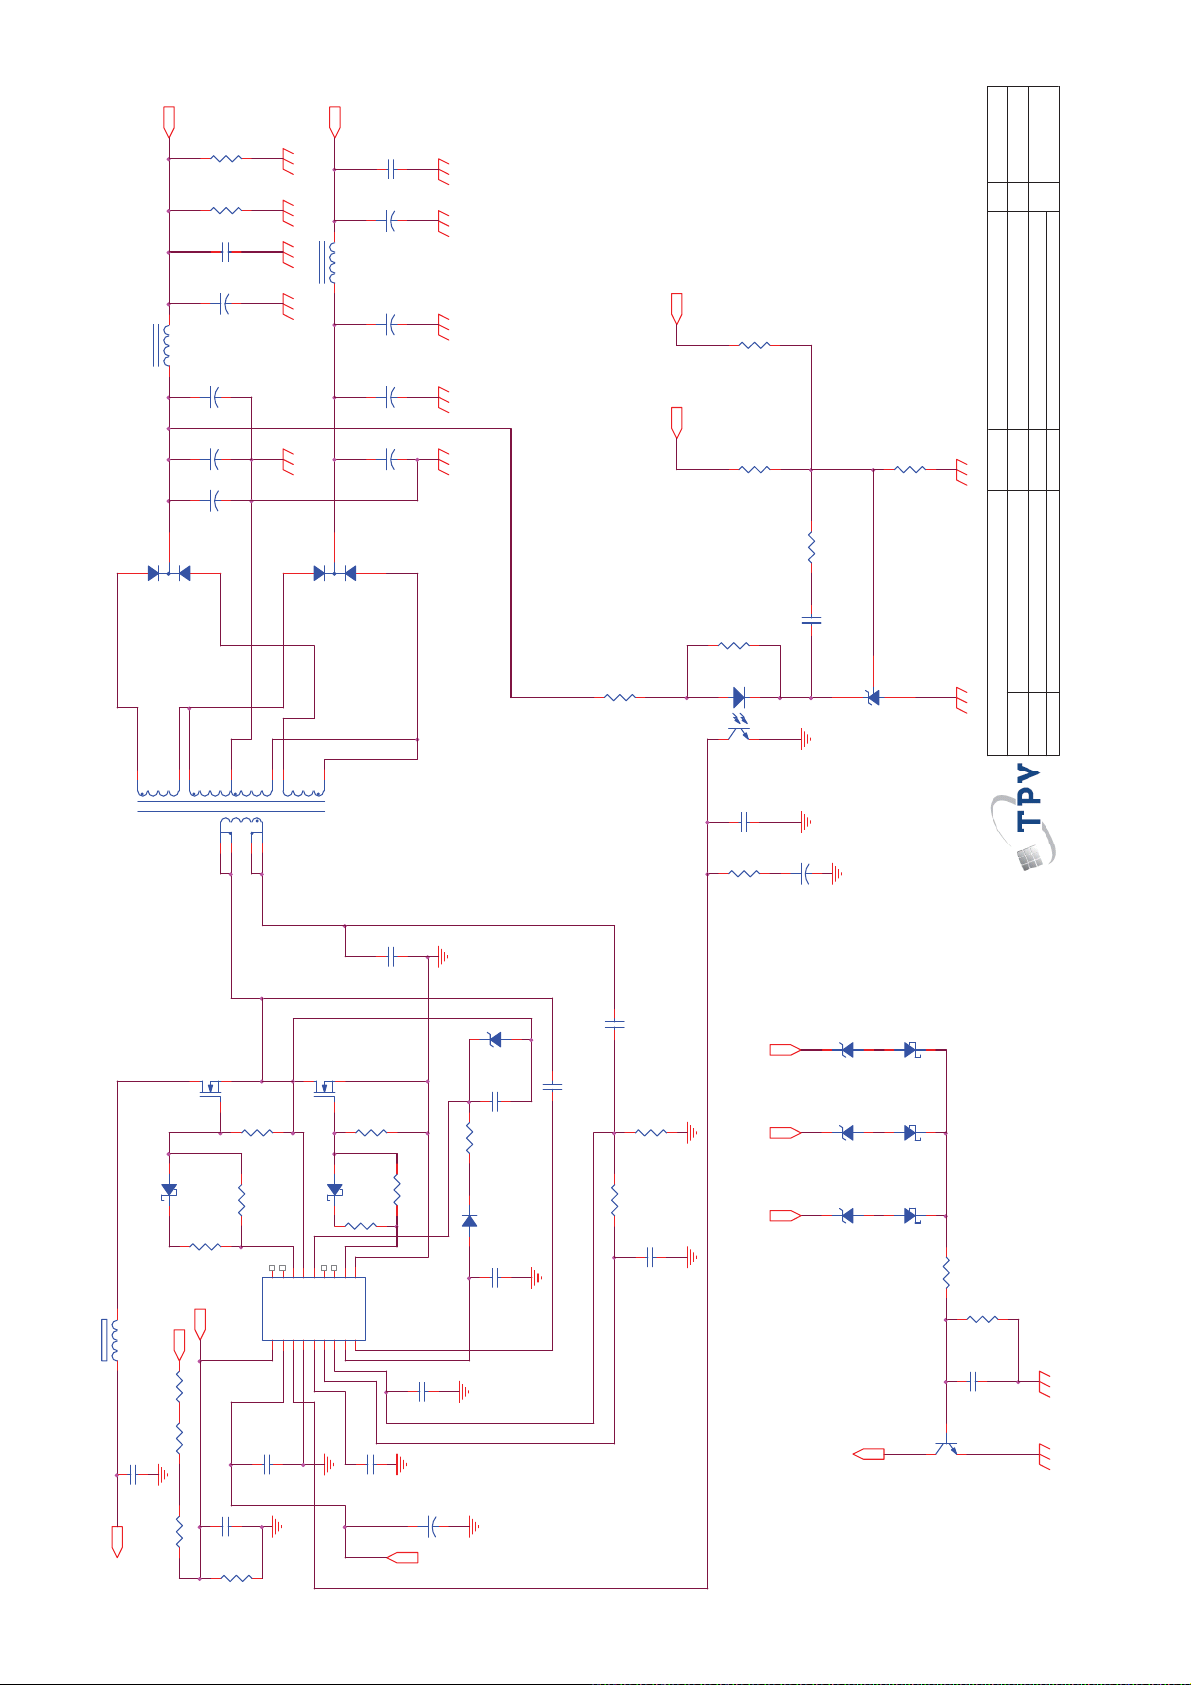
T9201
24V
R9201
5.6K 1/4W
R9202
5.6K 1/4W
C9201
100N 50V
C9207
100UF 35V
+
Coil
L9201
D9203
FMEN-220A
1
6
C9225
NC
+
+
C9203
150UF 35V
+
C9202
150UF 35V
2
3
8
9
10
124
5
12V
C9204
100N 50V
C9208
150UF 25V
+
L9202Coil
C9224
270UF 25V
+
C9206
270UF 25V
+
C9205
270UF 25V
+
2
D9205
FMW-2156
1
7
12
3
11
POWER X'FMR
12V24V
R9203
56K 1/8W +/ -1%
R9212
R9204
20.5KOHM +-1% 1/8W
R9211
5.1KOHM +-1% 1/8W
C9218
R9209
R9207
4.7KOHM +-1% 1/8W
12
43
IC9202
PC123X8YFZOF
100N 50V
3K 1/8W +/ -1%
IC9203
C9221
100N 50V
+
2K 1/8W
AS431AZTR-E1
B
Size
OEM MOD E L
T P V ( Top Victory Electronics Co . , Ltd. )
A
Rev
TPV MOD EL
G4878-P0D-H20-0030-1-121710
㝍
㌾
⪰
䱨
㍀
>
⿄⠍
<
PCB NAME
5.SECON D POWER 715G4878-P0D-H20-0030
Key Component
⿄⠍
of
58
Sheet
Tuesday , March 1 5, 2011
Date
76
R9210
C9222
VLED1
12V24V
4.7UF 50V
24KOHM +-1% 1/8W
ZD9202
MTZJ T-72 24B
12
1 2
D9208
RB160M-60TE25
ZD9203
MTZJ T-72 18B
12
1 2
D9207
RB160M-60TE25
ZD9204
MTZJ T-72 3 0 B
12
1 2
D9206
RB160M-60TE25
R9224
1K 1/8W
R9225
10K 1/8W
C9223
100N 50V
Q9203
2N3904S-RTK/PS
Protect
C9213
10NF
ZD9201
MTZJ T-72 15B
1 2
Q9201
2SK4097LS 9.5A/500V
R9219
12
D9201
RB160M-60TE25
R9223
BO_DC
FB9201BEAD
1 2
R9214
2Mohm 1/4W +/ -1%
R9216
2M 1% 1/4W
C9119
10NF
R9215
B1+
2M 1% 1/4W
R9226
10 OHM 1/8W
Vsen
C9210
1N 50V
R9217
24K 1/8W
Q9202
2SK4097LS 9.5A/500V
10K 1/8W
12
D9202
RB160M-60TE25
47OHM +-5% 1/8W
16
13
18
Vsen1Vcc2FB3GND4Css5OC6RC7Reg8RV
C9211
100N 50V
11
15
VB14VS
NC12NC
NC17NC
VGH
C9216
1U 50V
R9221
10K 1/8W
R9205
7.5 OHM 1/4W
R9220
10
VGL
9
R9222
10 OHM 1/8W
COM
47OHM +-5% 1/8W
IC9201
SSC9512S-TL
C9212
1U 50V
C9209
+
VCC1 C9214
1N 50V
10UF 50V
D9204
EG01A
C9215
C9217
10pF3KV
1U 25V
C9219
R9206
100PF 2KV
R9208
470 OHM 1/8W
120R 1/8W 1%
C9220
220pF 50V
!
Page 77
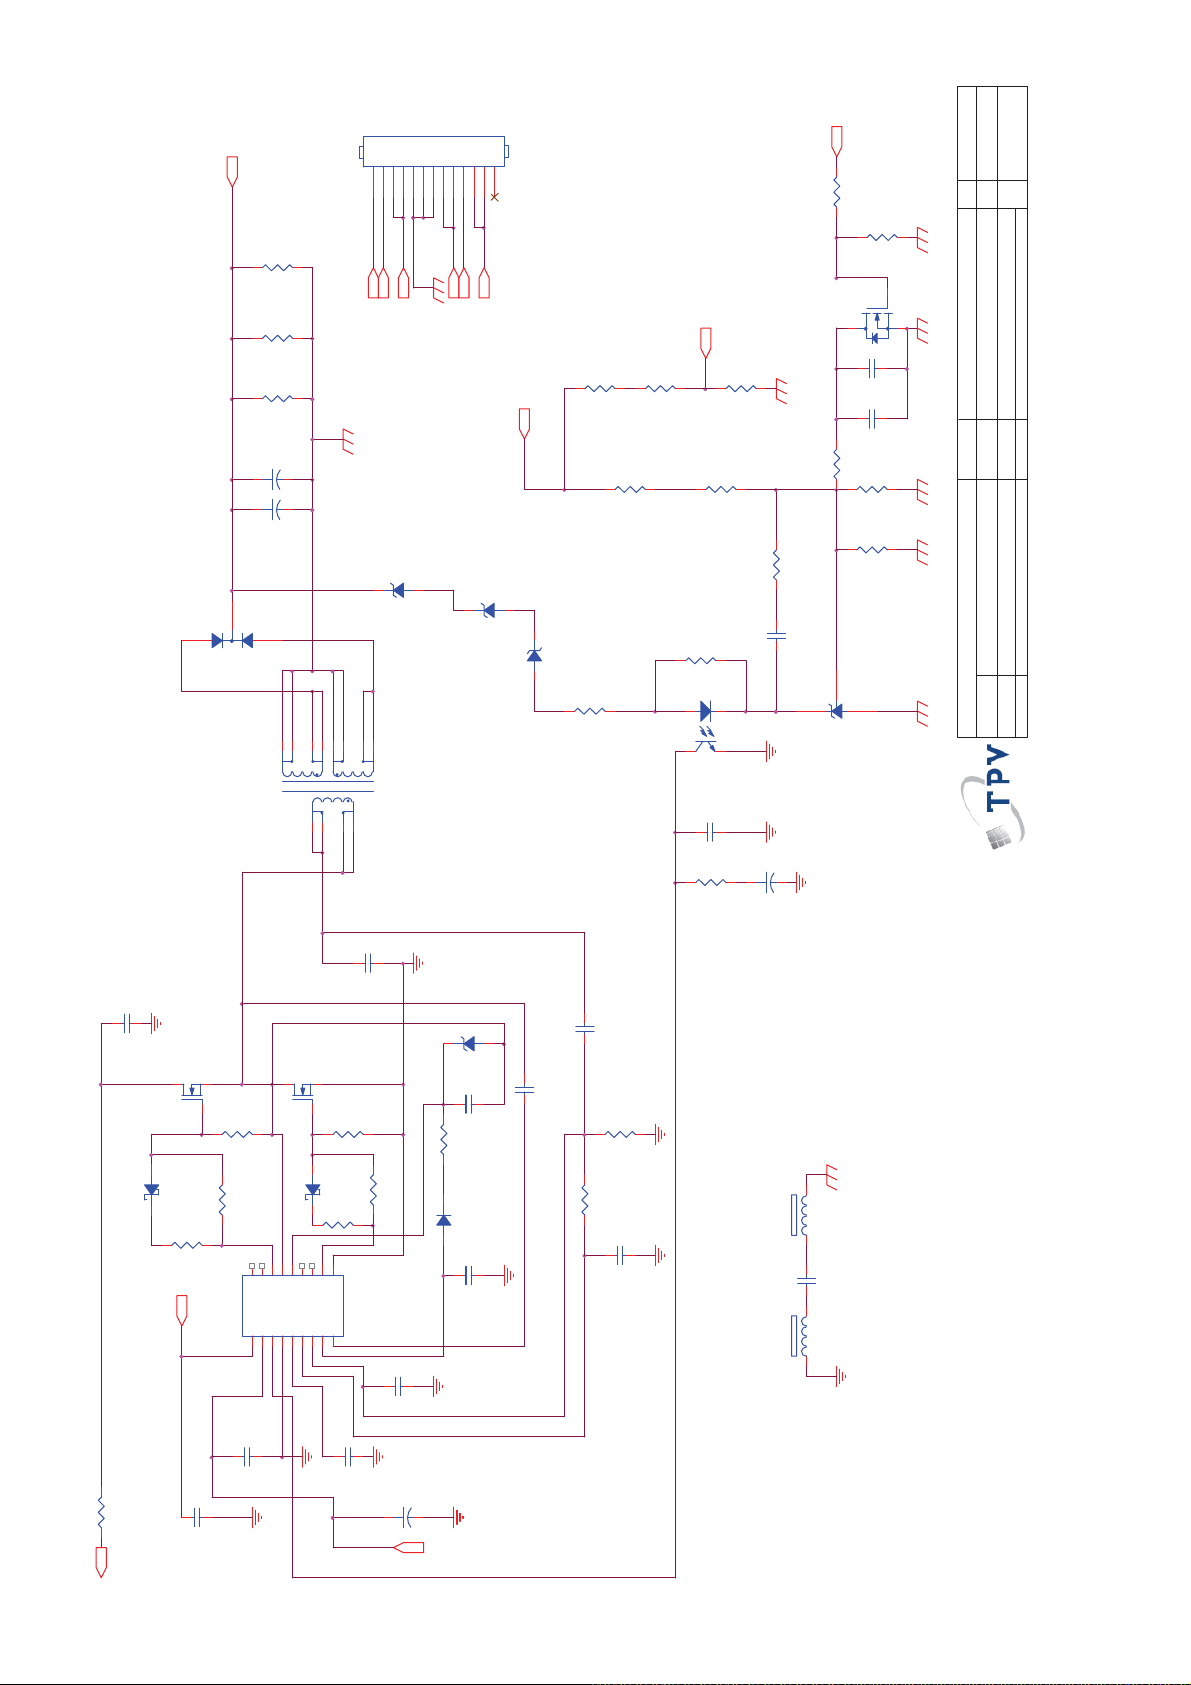
COMP1
VLED
R9114
100K(NC)
R9113
100K(NC)
R9112
100K(NC)
C9117
120UF 160V
+
+
C9106
120UF 160V
FMX-23S
2
D9102
1
3
8
9
T9101
CN9101
101112
13
12V
DIM
ON/OFF
24V
CONN
123456789
R9125
10K 1/8W
R9124
10K 1/8W
Q9103
R9123
20K 1/8W 1%
2N7002
C9120
C9121
R9110
100NF 50V
330nF(NC)
2K 1/8W 1%
5.2V
PS_ON
R9107
34K
VLED
R9101
30.9K
VLED1
R9127
34K
R9117
R9115
16K9 1/8W 1%
30.9K
add_0220
R9126
39K 1/8W 1%
ZD9101
MTZJ T-7 7 2 2 B
1 2
ZD9102
MTZJ T-7 7 2 2 B
1 2
R9106
3K 1/8W +/ -1%
ZD9103
MTZJ T-77 22B
1 2
R9104
4.7K 1/8W
1011121314
15
POWER X'FMR
126
7
12
43
IC9102
PC123X8YFZOF
C9115
100N 50V
100N 50V
R9109
5.1KOHM +-1% 1/8W
C9112
AS431AZTR-E1
IC9103
+
B
Size
OEM MO D EL
T P V ( Top Victory Electronics Co . , Ltd. )
>
A
⿄⠍
<
Rev
⿄⠍
of
68
Sheet
PCB NAME
TPV MO D EL
6.MAIN POW ER 715G4878-P0D-H 20-0030
G4878-P0D-H20-0030-1-121710
Tuesday , March 15, 2011
㝍
㌾
⪰
Date
䱨
㍀
Key Component
77
C9116
R9108
4.7UF 50V
C9107
22NF
MTZJ T-72 15B
ZD9104
R9102
D9104
1 2
C9110
1U 50V
C9111
7.5 OHM 1/4W
EG01A
C9109
1U 25V
C9101
10NF
Q9101
2SK4097LS 9.5A/500V
12
D9101
RB160M-60TE25
R9116
10 OHM 1/8W
Vsen
C9103
1N 50V
R9111
0.1 ohm
B+
Q9102
R9119
10K 1/8W
D9103
R9118
RB160M-60TE25
47OHM +-5% 1/8W
13
18
15
16
VB14VS
NC17NC
VGH
Vsen1Vcc2FB3GND4Css5OC6RC7Reg8RV
C9104
100N 50V
2SK4097LS 9.5A/500V
12
R9121
10K 1/8W
R9120
10
11
NC12NC
VGL
9
R9122
10 OHM 1/8W
COM
IC9101
C9105
SSC9512S-TL
1U 50V
47OHM +-5% 1/8W
C9108
1N 50V
C9118
10UF 50V
+
VCC1
100PF 2KV
C9113
10pF3KV
R9105
220R 1%
R9103
470 OHM 1/8W
C9114
220pF 50V
24KOHM +-1% 1/8W
FB9102
BEAD
1 2
C9102
470pF/250V
FB9101
BEAD
1 2
!
Page 78
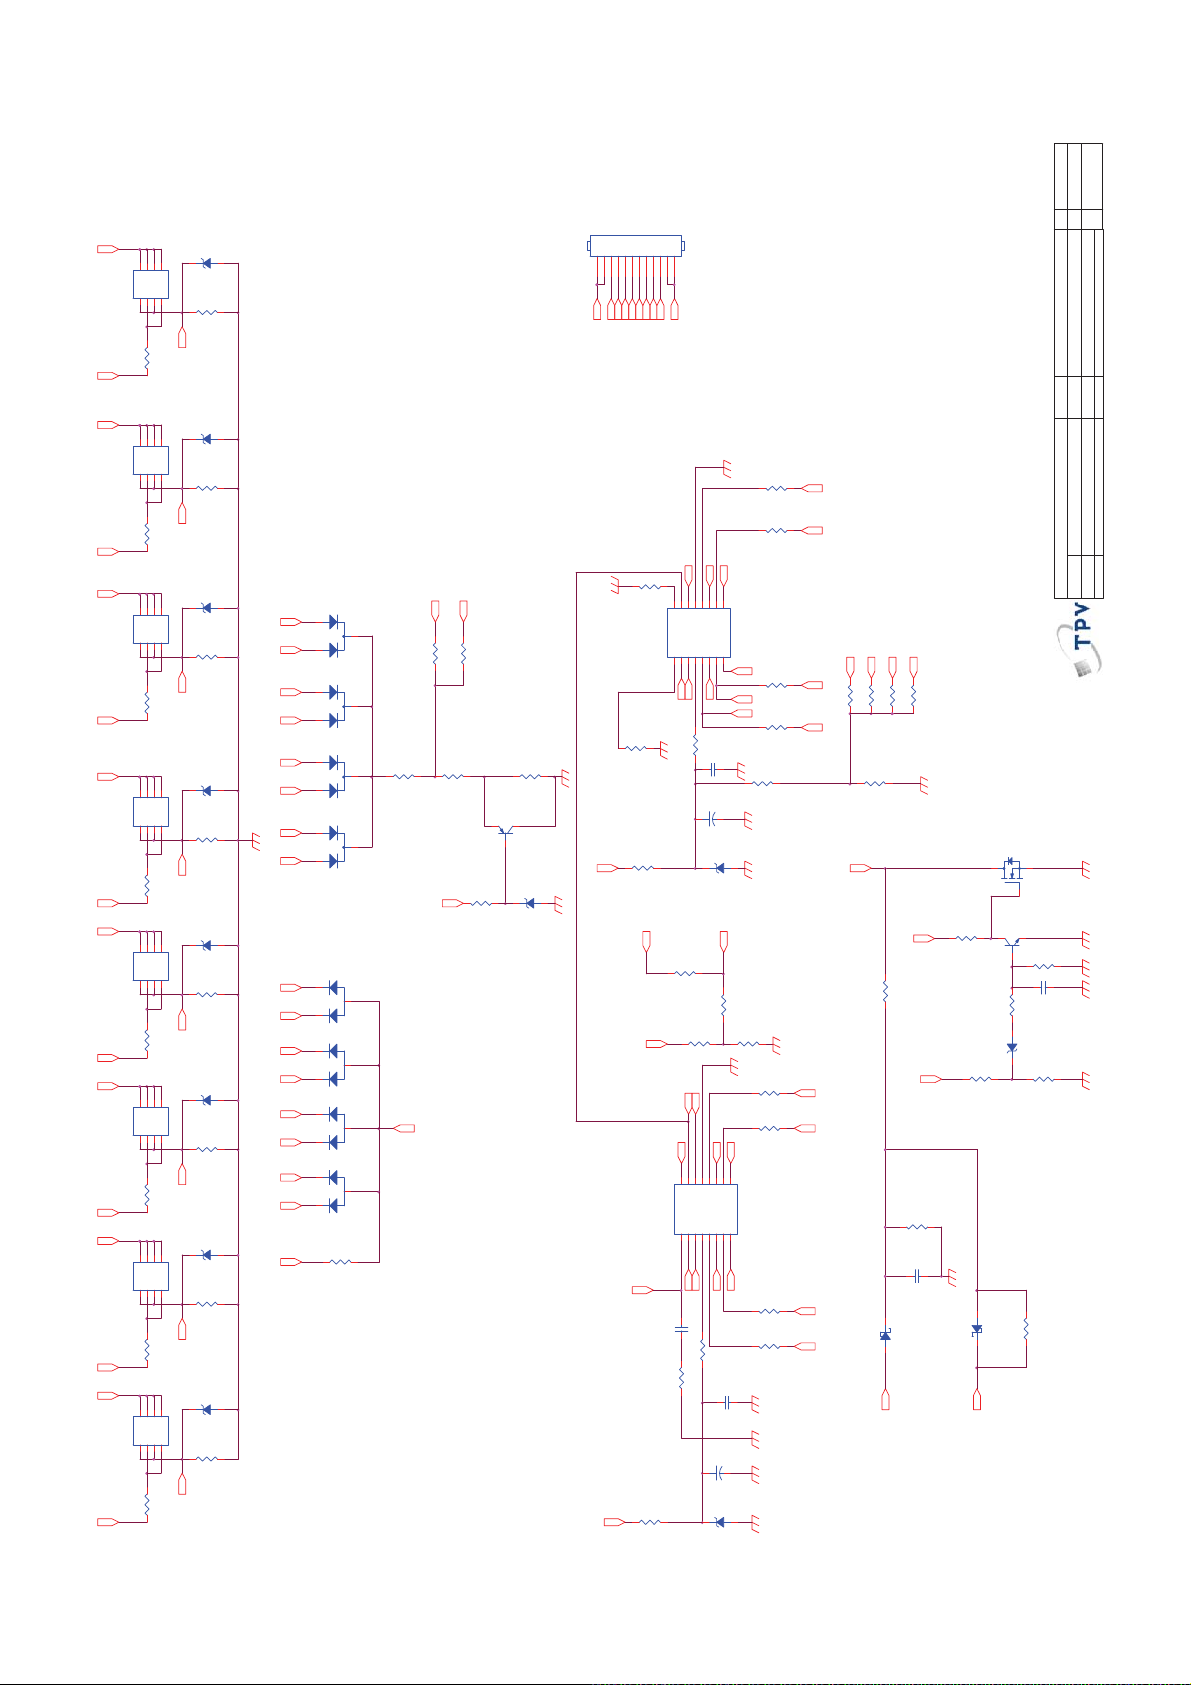
>
C
A
⿄⠍
<
Size
Rev
⿄⠍
ZD8115
LED7G8
8
Q8108
S21G22S13G1
R8118
LED6
8
Q8107
S21G22S13G1
R8117
G7
LED8
8
Q8106
S21G22S13G1
R8116
G6
LED5
8
Q8105
S21G22S13G1
R8115
G5
8
Q8104
S21G22S13G1
R8114
G4 LED 2
LED1
8
Q8103
S21G22S13G1
R8113
G3
LED3
8
Q8102
S21G22S13G1
R8112
G2
LED4
8
Q8101
S21G22S13G1
R8111
G1
MTZJ T-72(NC)
D15D16D27D2
4
12R 1%
D15D16D27D2
4
12R 1%
D15D16D27D2
4
12R 1%
D15D16D27D2
4
12R 1%
D15D16D27D2
4
12R 1%
D15D16D27D2
4
12R 1%
D15D16D27D2
4
12R 1%
D15D16D27D2
4
12R 1%
1 2
AO4828L
R8108
5.1R 1%
S8
ZD8114
MTZJ T - 7 2 (NC )
1 2
AO4828L
R8107
5.1R 1%
S7
ZD8113
MTZJ T - 7 2 (N C )
1 2
AO4828L
R8106
5.1R 1%
S6
ZD8112
MTZJ T-72(NC)
AO4828L
R8105
5.1R 1%
S5
ZD8111
MTZJ T-72(NC)
AO4828L
R8104
5.1R 1%
S4
ZD8110
MTZJ T-72(NC)
AO4828L
R8103
5.1R 1%
S3
ZD8109
MTZJ T-72(NC)
AO4828L
R8102
5.1R 1%
S2
ZD8108
MTZJ T-72(NC)
AO4828L
R8101
5.1R 1%
S1
LED8LED7
LED6
LED5
LED4LED3LED1 LED2
1 2
1 2
LED7LED8
LED5
LED6
1 2
LED2 LED4 LED 3LED1
1 2
12V
1 2
BAV70
D8104
1
3
2
BAV70
D8103
1
3
2
BAV70
D8102
1
2
BAV70
D8101
1
2
1
2
D8109
1
2
D8108
1
2
D8107
1
2
D8106
R8121
R8127
3
3
3
BAW56
3
BAW56
3
BAW56
3
BAW56
100K 1/8W
SLB2
SLB1
R8124
R8125
0R05 1/4W
0R05 1/4W
1MOHM +-5% 1/4W
R8122
0R05OHM1/8W
PMBS3906
Q8111
R8120
3K 1/8W 5%
12V
VFB
CN8104
101112
LED4
LED8
LED3
LED6
VLED
R8135
R8119
75K +-5% 1/8W
MTZJ 4.3 B
ZD8102
12V
1 2
COMP1
12V
LED7
LED5
R8134
10K 1/8W(N C )
R8141
COMP1
12V
LED2
LED1
10K 1/8W
IC8101
51OHM +-5% 1/8W
R8148
51OHM +-5% 1/8W
123456789
VLED
SLB1
15
16
14
SLP
VFB
VSET
COMP1DIM2EN3VCC4OUT15CS16OUT37CS3
EN
DIM
R8161
1K 1/8W
R8132
100K OHM 1/4W
VSET
VFB
16
15
VFB
VSET
IC8102
COMP1DIM2EN3VCC4OUT15CS16OUT37CS3
DIM
1UF(NC)
C8106
R8160
R8136
100KOHM +-1% 1/4W(NC )
CONN
of
78
Sheet
PCB NAME
OEM MOD EL
TPV MODEL
R8156
12R 1%
G5
R8157
12R 1%
G7
S7
S5
13
9
11
10
12
CS4
CS2
GND
OUT4
OUT2
PF7004
8
R8155
12R
S8
G81
S6
R8154
12R
G61
C8103
100N 50V
R8131
NC
C8101
10UF 50V
+
ZD8103
MTZJ T - 7 2
1 2
VSET
R8128
10K 1/4W
R8123
10K 1/4W
R8126
1.2K 1/8W
R8152
SLB2
12
14
13
SLP
GND
OUT2
EN
1K 1/8W
12R 1%
R8153
12R 1%
S4S2
S3S1
9
11
10
CS4
CS2
OUT4
PF7004
8
R8151
12R
R8150
12R
C8102
100N 50V
C8105
10UF 50V
+
ZD8106
MTZJ T- 7 2
1 2
G8
G6
G4
G2
G1
G81
R8143NCR8145NCR8146
EN
S8G3G61
R8142
NC
R8159
D8110
1 2
DIM
S6
NC
R8147
NC
Q8109
2N7002(NC)
Q8110
PMBS3904(NC)
R8139
5.2V
0R05OHM1/8W
R8110
RB160M-60TE25(NC)
10K 1/8W(NC )
R8138
1K 1/8W(NC)
12
ZD8105
MTZJ12B(NC)
R8140
VLED
51K 1/4W(N C )
C8104
150K 1/8W +/-1%( N C )
0.22uF 50V(N C )
12
R8149
D8111
RB160M-60TE25(NC)
ON/OFF
7.LED DR IVER 715G4878-P0D-H20-00 30
G4878-P0D-H20-0030- 1-121710
Tuesday , Marc h 1 5, 2 011
㝍
㌾
⪰
T P V ( Top Victory Electronics Co . , Ltd. )
Date
䱨
㍀
Key Component
78
R8158
1K OHM +-5% 1/8W(NC )
C8109
10nF 50V(NC )
36K OHM(NC)
R8137
0R05 1/4W
!
Page 79
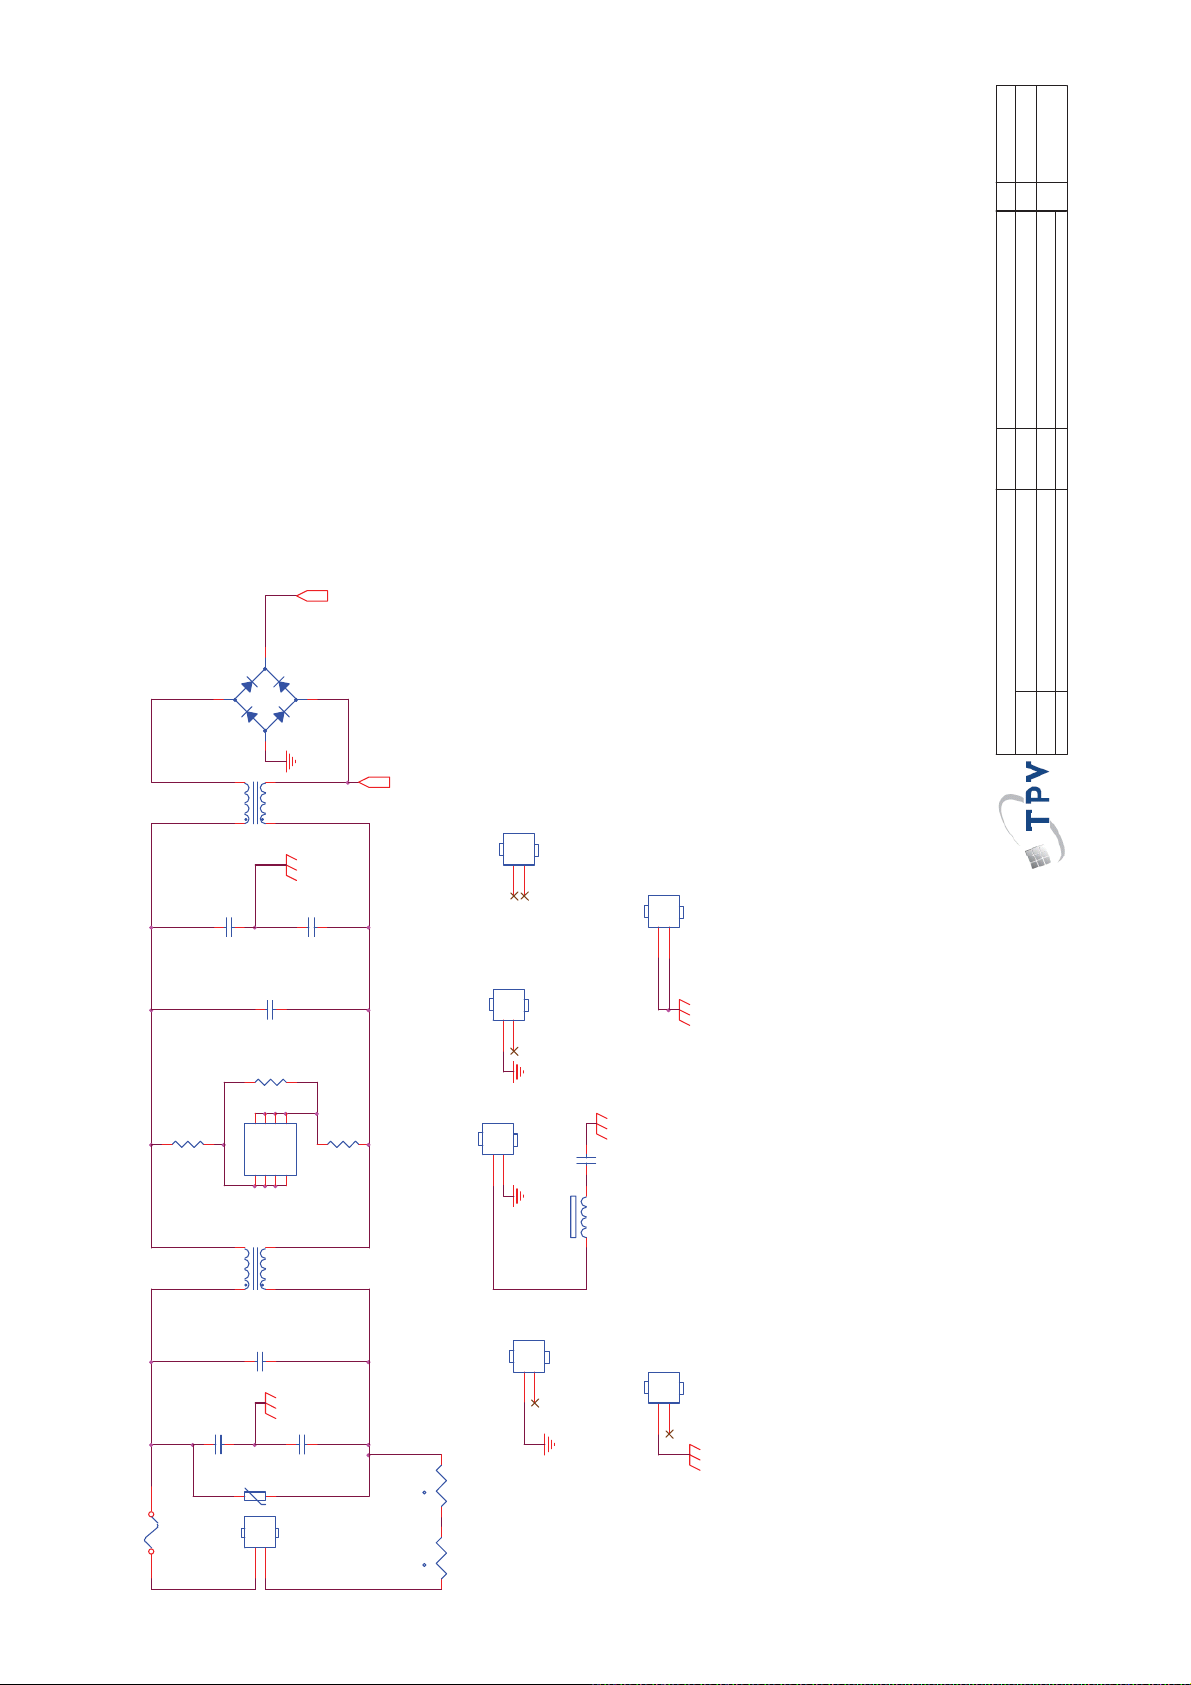
>
B
C
⿄⠍
<
Size
Rev
⿄⠍
of
26
Sheet
PCB N AME
OEM MODEL
TPV MODEL
R+
1
BD9901
+
TS10B06G-06-X 0
2
10MH
-
4
L9901
3
3
BO
2.AC s ide 715G4877-P0D-H20-0030
G4877-P0D-H20-0030-1-101215
Tuesday , March 15, 2 011
㝍
㌾
⪰
Date
T P V ( Top Victory Electronics Co . , Ltd. )
䱨
㍀
Key Component
124
C9905
220PF 250V
C9906
220PF 250V
CN9901
8
IC9901
10MH
124
RV9901
R9901
430K 1/4W
F9901
FUSE
46PFL5556/V7
715G4877P01H20003M
C9902
470NF 305V
R9902
430K 1/4W
5
7
D26D2
NC
NC1D12D13NC
4
L9902
3
C9901
470NF 305V
TVR14561KFC4FY(NC)
L1N
2
C9908
220PF 250V
NC
CAP004DG(NC)
C9907
220PF 250V
R9903
HS9302
1
2
HEAT SINK (IC9301)(NC)
HS9103
1
2
HEAT SINK (D 9102, D 9103)
HS9101
1
2
HEAT SINK (Q9101, Q9102)
430K 1/4W
C9915
1NF 250V
FB9803
1 2
1
2
HS9301
1
2
HEAT SINK (D9302)
NR9902
NR9901
1
2
HS9801
HEAT SINK (Q9801, D 9802)
HS9901
HEAT SINK (BD9 01)
12
NTCR
t
12
NTCR
t
79
!
Page 80
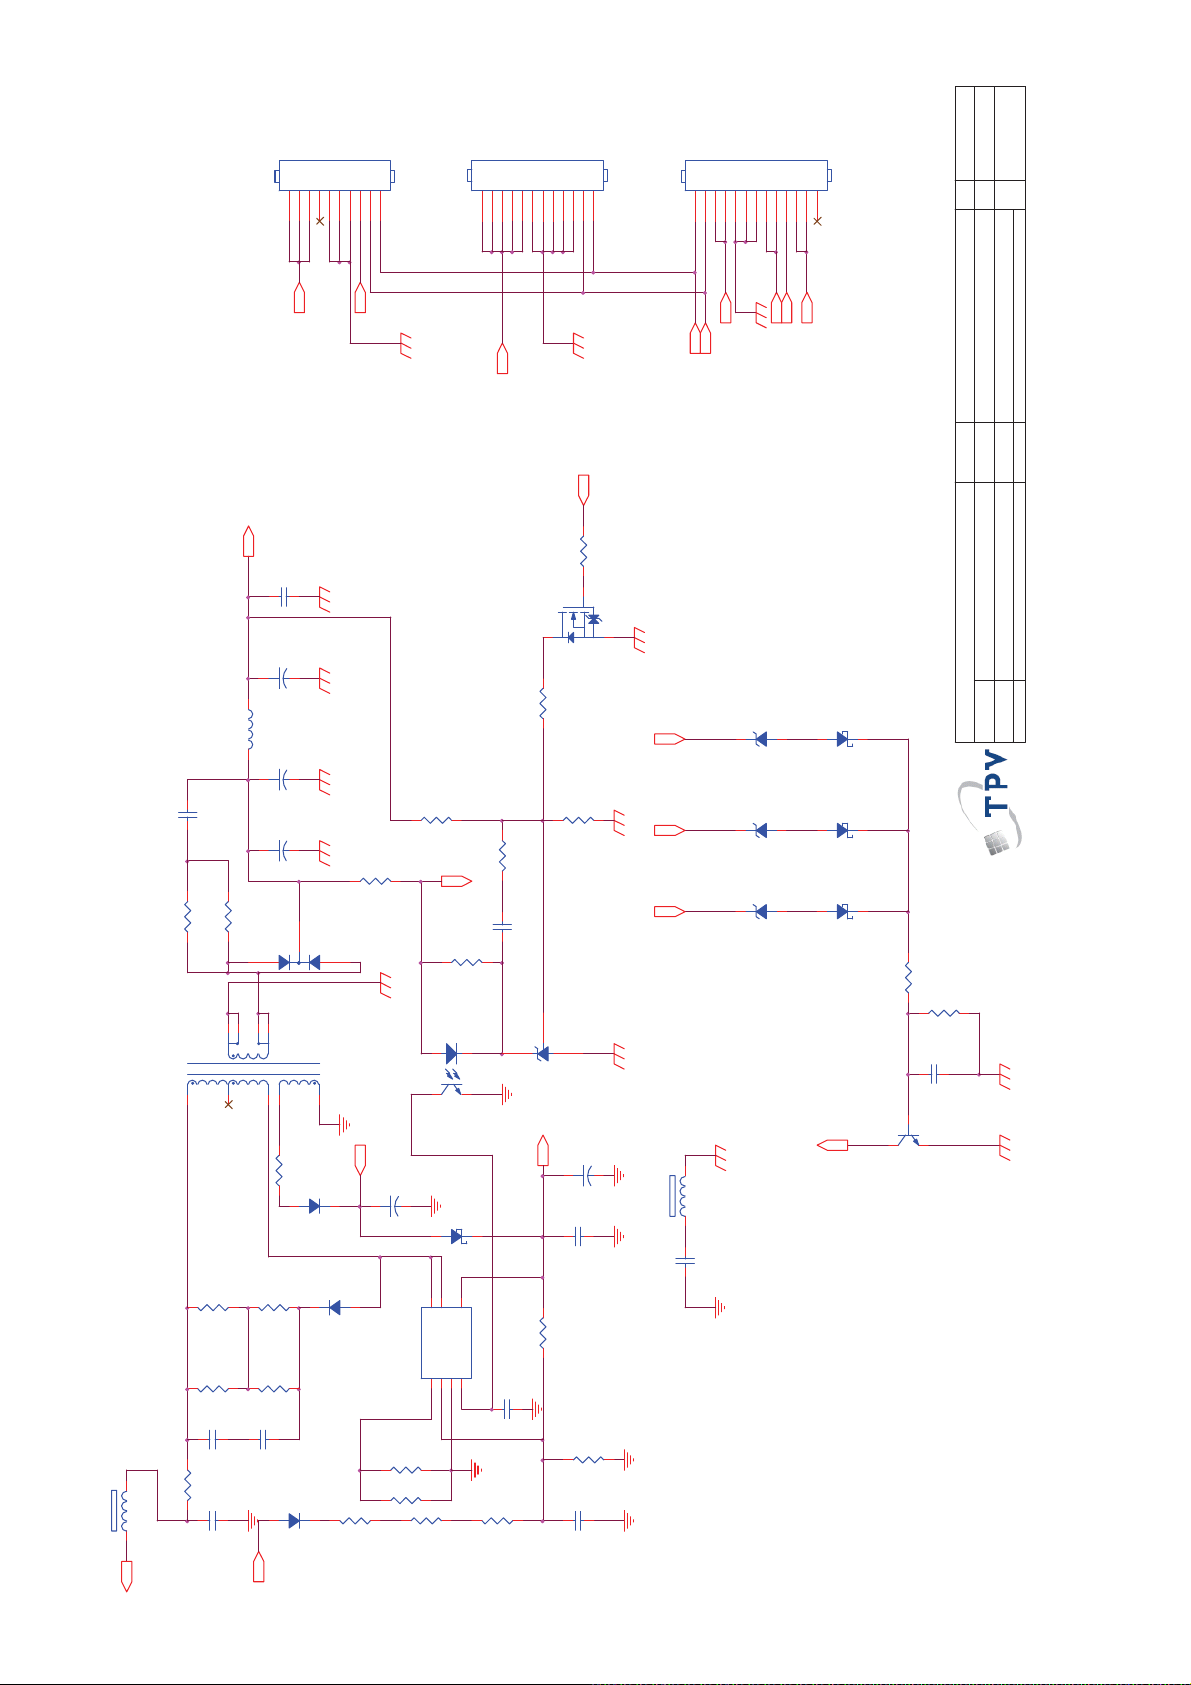
>
B
C
⿄⠍
<
100UF 35V
CONN(NC)
R9314
2K4 1/8W 1%
12
43
12
CN9401
1K 1/8W
IC9302
Protect
R9315
PC123X8YFZOF
D9305
RB160M-60TE25
101112
24V
R9322
22K 1/8W 5%(N C )
R9321
22K 1/8W 5% (N C )
R9319
R9317
2K 1/8W 5%
C9308
220N 50V
IC9303
AS431AN-E1
VCC_1
CN9403
10
24V1
5.2VBO
C9306
100N 50V
C9305
270UF 25V
+
L9301
3.5uH
C9315
470UF 10V
+
C9303
2N2 500V
R9302
47 OHM 1/4W
R9305
47 OHM 1/4W
679
T9301
POWER X'FMR
1
2
C9304
470UF 10V
+
2
D9302
MBRF2060CT
3
10
3
4
5
R9308
3.3 OHM 1/ 4W
123456789
12V
R9310
220 OHM 1/4W
1
VCC
D9303
C9307
PR1007
+
Q9301
2K2 1/8W 1%
C9310
+
CONN
24V
12V5.2V
CN9402
101112
13
12V
24V
DIM
ON/OFF
MTZJ27B
ZD9404
ZD9403
MTZJ T-72 15B
ZD9402
MTZJ T- 7 2
FB9301
BEAD
1 2
123456789
PS_ON
RK7002FD5T116(NC)
10UF 50V
PS_ON
1 2
1 2
1 2
123456789
5.2V
D9404
RB160M-60TE25
12
12
12
Protect
CONN
D9403
RB160M-60TE25
D9402
RB160M-60TE25
R9407
3.3K +-5%1/8W
Q9401
2N3904S-RTK/PS
Size
Rev
⿄⠍
of
36
Sheet
PCB NAME
OEM MODEL
TPV MODEL
3.Standy by 715G4877-P0D-H20-0030
G4877-P0D-H20-0030-1-101215
Tuesday, March 15, 2011
㝍
㌾
⪰
T P V ( Top Victory Electronics Co . , Ltd. )
Date
䱨
㍀
Key Component
80
R9408
1KOHM +-1% 1/8W
C9410
100N 50V
BEAD
C9312
R9304
100K 1/4W
R9307
100K 1/4W
D9304
PR1007
R9303
100K 1/4W
R9306
100K 1/4W
C9302
C9301
2N2 500V
2N2 500V
R9301
4.7 OHM 1W
FB9302
1 2
B+
C9313
10NF
D9301
PR1007
R9309
1.5M 1/4W
8
5
VCC
D/ST7D/ST
IC9301
S/OCP1BR2GND3FB/OLP
4
R9312
2.4 OHM 1/ 4W
R9311
2.4 OHM 1/ 4W
R9313
1.5M 1/4W
R9318
4.7M OHM +-5% 1/4W
A6069H
C9309
10N 50V
R9316
1.5M 1/4W
100N 50V
R9320
C9311
220N 50V
C9314
470PF 250V
560K 1/8W
!
Page 81
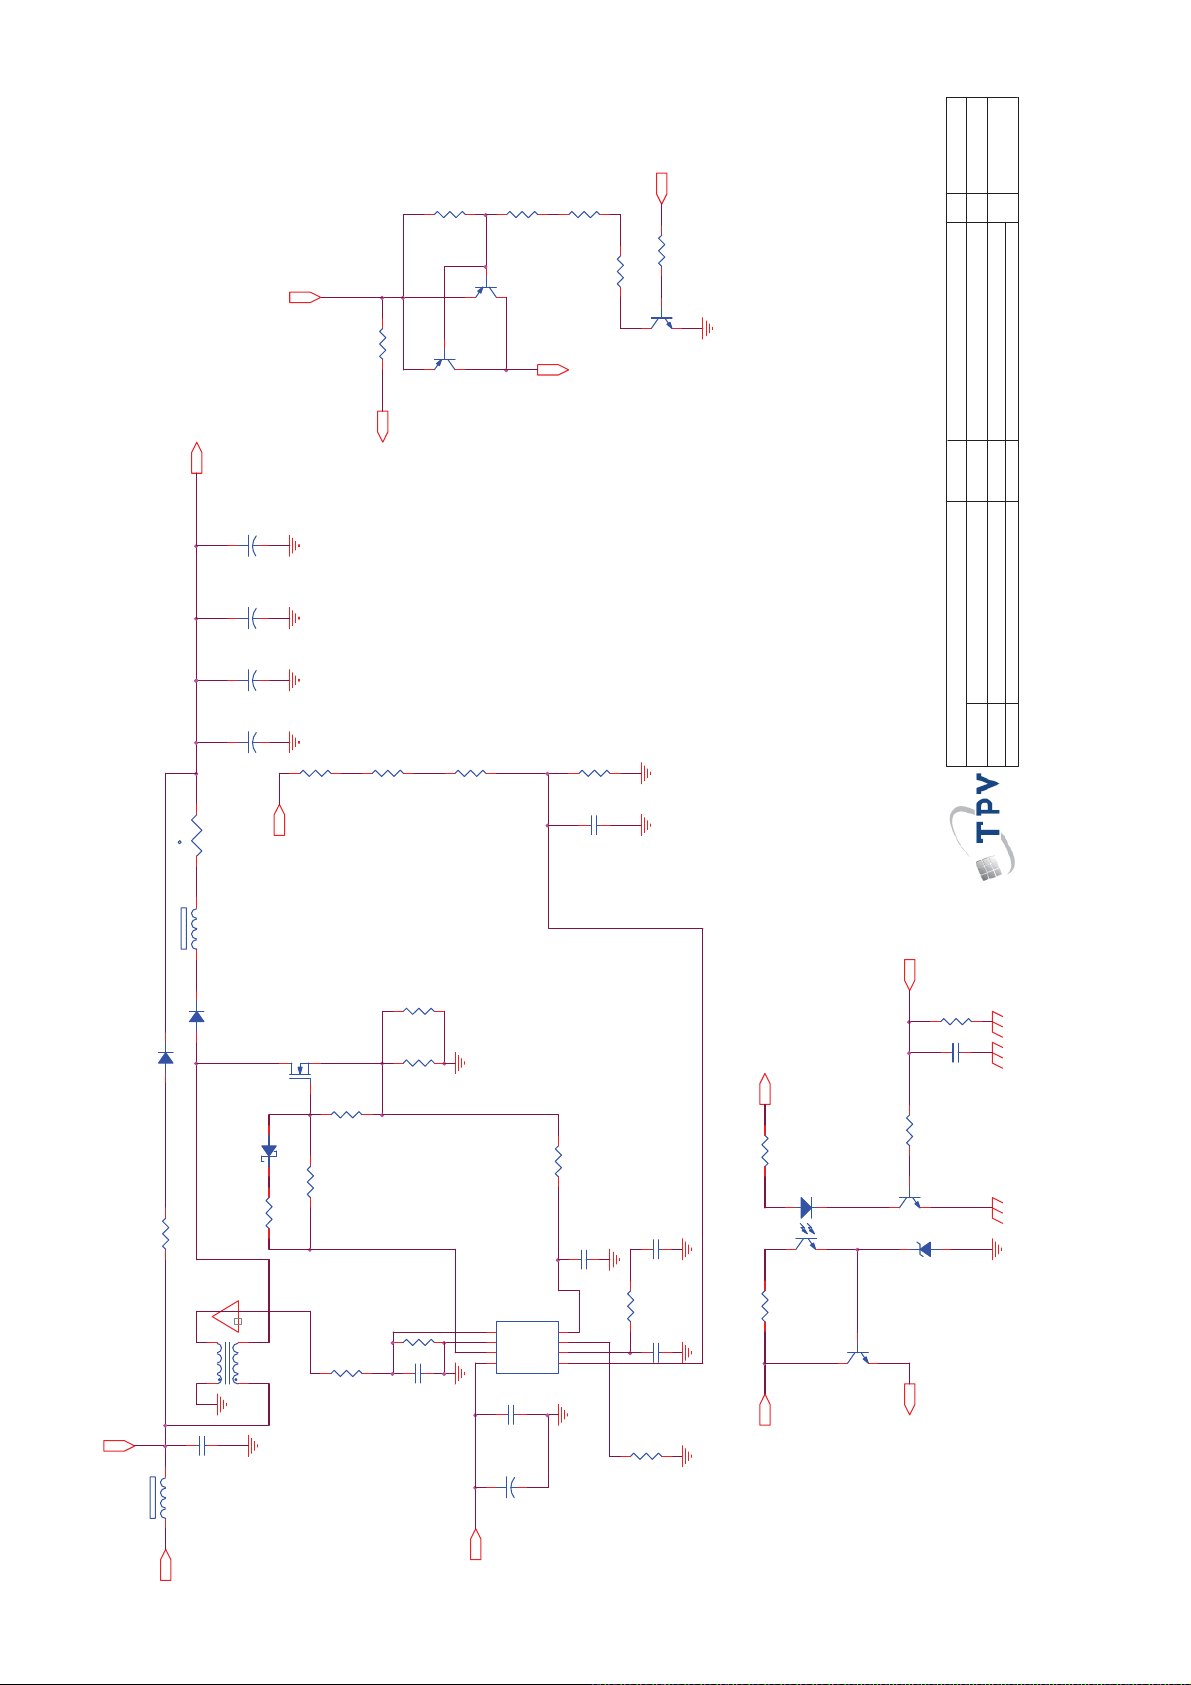
>
B
C
⿄⠍
Size
<
Rev
⿄⠍
of
46
VCC1
R9820
NC/ 3. 3M 1/4W
R9821
R9819
NC/ 100K 1/ 8W
B+
Q9802
R9824
0R05 1/4W
Q9801
B+
NC/KTA733P
NC/PBHV9050T
NC/ 3. 3M 1/4W
R9823
NC/33K 1/4W
R9822
NC/ 3. 3M 1/ 4W
Q9803
BO_DC
NC/PMBTA45
NR9801
BO_DC
C9812
47UF 450V
+
C9803
+
47UF 450V
C9805
+
47UF 450V
C9802
+
47UF 450V
R9811
R9804
680K OHM +-1% 1/4W
R9807
680K OHM +-1% 1/4W
12
NTCR
t
FB9802
1 2
D9802
BEAD
FMN-1106S
BO_DC
Q9804
TK15A60U
R9825
R9808
R9809
680K OHM +-1% 1/4W
0.1R
0.1R
13K 1/8W 1%
C9809
220P 50V
PS_ON
R9818
Sheet
PCB N AME
TPV MODEL
OEM MOD EL
4.DC M PFC 715G4877-P0D-H 20-0030
G4877-P0D-H20-0030-1-101215
Tuesday , March 15, 2011
㝍
㌾
⪰
Date
T P V ( Top Victory Electronics Co . , Ltd. )
䱨
㍀
Key Component
81
27K 1/8W
D9801 1N5408-11
12
D9803
RB160M-60TE25
R9802
R9801 10 OHM +-5% 3WS
51OHM +-5% 1/8W
!
1
6
L9801
236UH
3 4
LV
C9801
680NF
FB9801
BEAD
1 2
R+
R9803
R9806
10K 1/8W
51OHM +-5% 1/8W
R9814
6.8K 1/8W
5
6
7
8
R9805
68K 1/4W
C9806
47P 50V
C9807
100N 50V
+
C9813
10UF 50V
VCC1
R9810
470 OHM 1/4W
C9811
C9808
220pF 50V
IC9801
LD7591GS
ZCD
GND
OUT
VCC
R9813
CS
4
RAMP
3
COMP
2
INV
1
1uF
10K 1/8W
C9810
100NF 50V
R9812
47K 1/8W
5.2V
R9816
1K 1/8W
IC9802
PC123X8YFZOF
12
43
R9815
10K 1/8W
VCC
Q9805
Q9806
2SD1624T-TD-E
C9804
100N 50V
R9817
10K 1/8W
2N3904S-RTK/PS
1 2
ZD9801
MTZJ T-72 16B
VCC1
!
Page 82
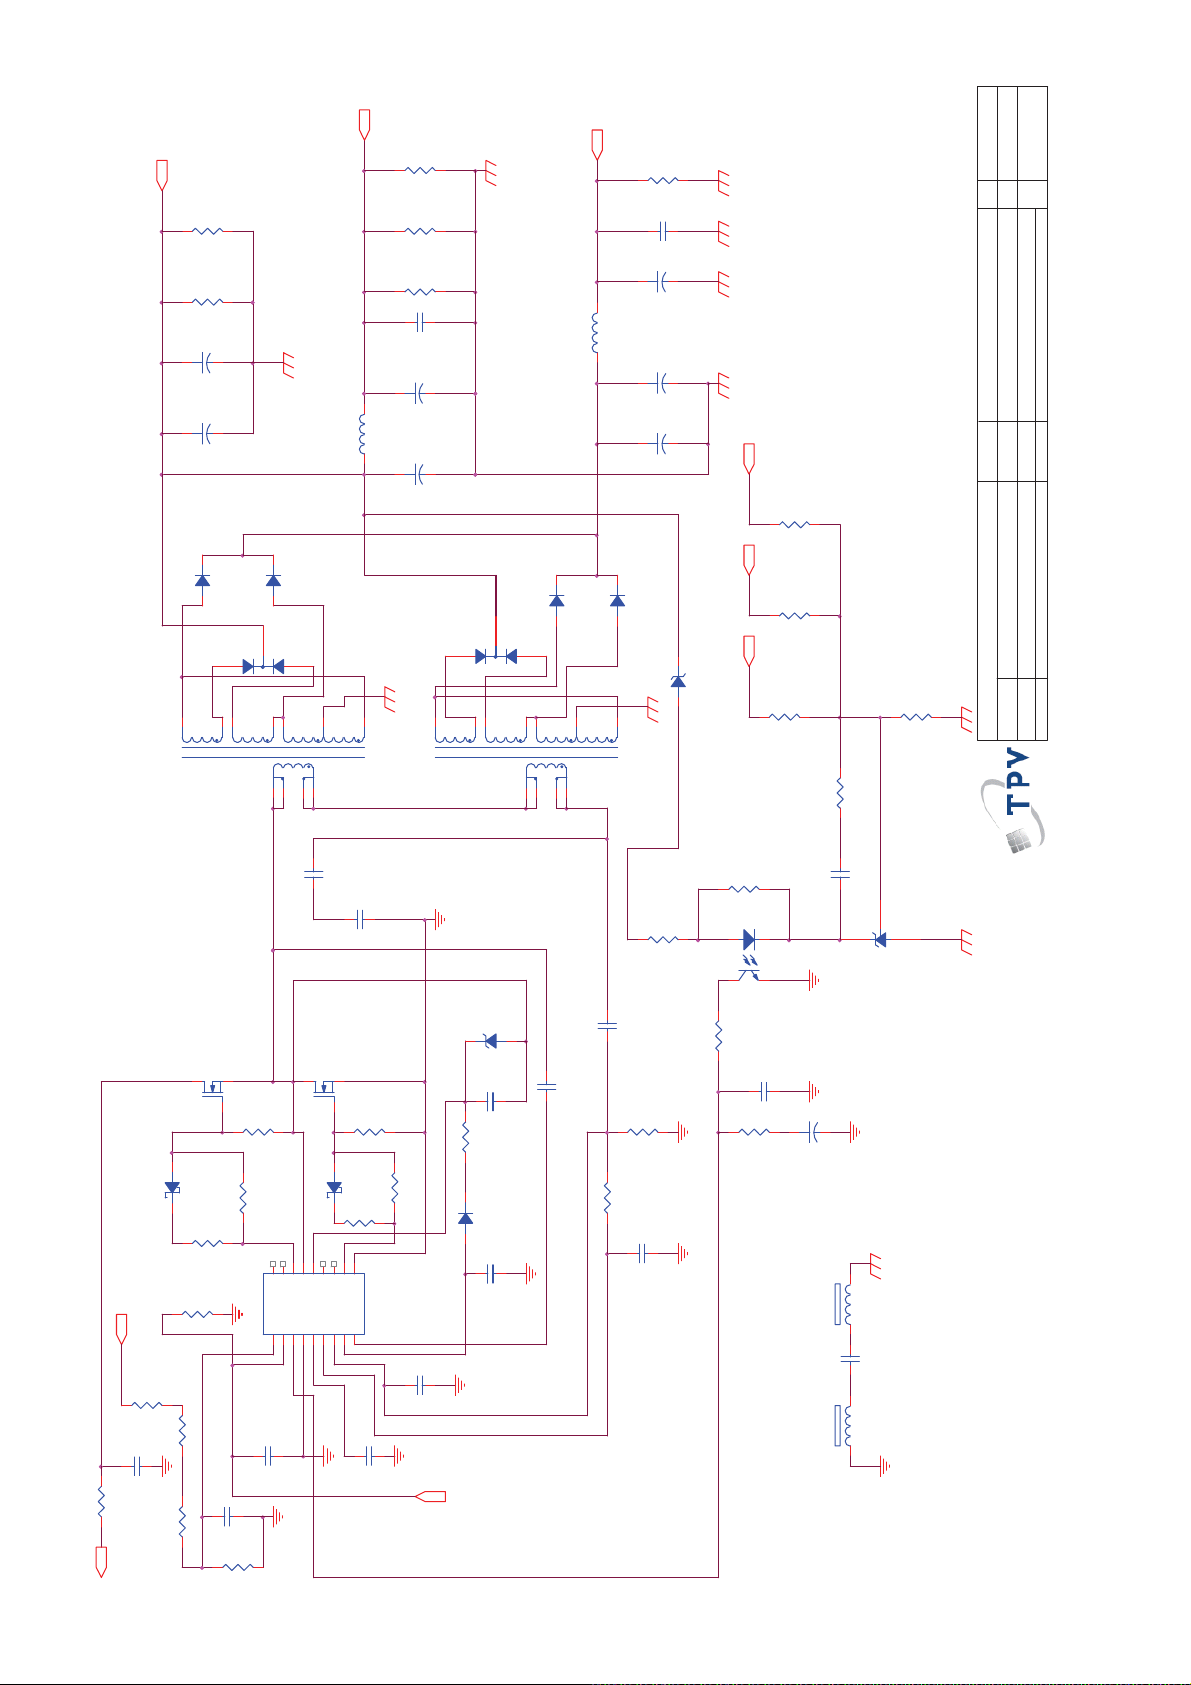
24V1
+
+
D9107
678
T9102
24V
R9128
5.1K 1/4W
R9124
NC
R9123
NC
C9120
1000uF 35V
C9101
1000uF 35V
SR506
D9106
SR506
2
D9103
FMWN-2308
1
3
9
10
11
12
124
5
L9101
200UH
3.5uH
R9127
R9126
C9110
+
C9108
+
C9102
5.1K 1/4W
5.1K 1/4W
100N 50V
150UF 35V
1000uF 35V
678
T9101
2
D9102
FMWN-2308
1
3
9
10
12V
R9130
1.5K 1/4W
C9122
100N 50V
C9123
270UF 25V
+
L9102
3.5uH
C9124
1000uF 35V
+
C9125
1000uF 35V
+
24V1
R9129
NC
24V
R9125
12V
30K 1/8W 1%
R9110
R9101
18K 1/8W 1%
R9109
10K OHM +-5% 1/8W
2K 1/8W
D9108
D9109
SR506
11
12
124
5
SR506
ZD9102
MTZJ27B(NC)
1 2
200UH
B
Size
OEM MODEL
T P V ( Top Victory Elec t roni c s C o . , Ltd. )
>
C
⿄⠍
<
Rev
⿄⠍
PCB N AME
TPV MODEL
5.LLC POW ER 715G4877-P0D-H20 -0030
G4877-P0D-H20-0030-1-101215
㝍
㌾
⪰
䱨
㍀
Key Component
of
56
Sheet
Tuesday , March 15, 2011
Date
82
C9121
47NF
47NF
C9109
R9104
6.2K 1/4W
ZD9101
MTZJ T-7 2 15 B
1 2
Q9101
2SK4097LS 9.5A/ 500V
R9119
12
D9101
RB160M-60TE25
R9116
R9115
BO_DC
R9112
C9103
2K 1/4W
2Mohm 1/4W +/ -1%
R9114
10NF
R9118
10 OHM 1/8W
2M 1% 1/4W
Q9102
2SK4097LS 9.5A/ 500V
10K 1/8W
12
D9104
RB160M-60TE25
47OHM +-5% 1/8W
15
13
18
16
VB14VS
NC12NC
NC17NC
VGH
Vsen1Vcc2FB3GND4Css5OC6RC7Reg8RV
C9106
100N 50V
C9113
1U 50V
R9121
10K 1/8W
R9102
7.5 OHM 1/4W
R9120
10
11
VGL
9
R9122
10 OHM 1/8W
47OHM +-5% 1/8W
COM
IC9101
SSC9512S-TL
C9111
D9105
EG01A
C9112
1N 50V
C9114
10pF3KV
1uF 25V
C9115
R9103
100PF 2KV
R9105
120R 1/8W 1%
470 OHM 1/8W
C9116
CAP(NC)
R9106
1K2 1/8W 5%
12
IC9102
PC123X8YFZOF
43
R9107
560 OHM 1/4W
C9119
220N 50V
IC9103
AS431AN-E1
C9117
100N 50V
+
C9118
R9108
4.7UF 50V
24KOHM +-1% 1/8W
FB9102
BEAD
1 2
C9104
680PF 250V
FB9101
BEAD
1 2
C9107
C9105
R9111
0.1 ohm
B+
100N 50V
R9113
R9117
2M 1% 1/4W
24K 1/8W
1U 50V
VCC1
!
Page 83
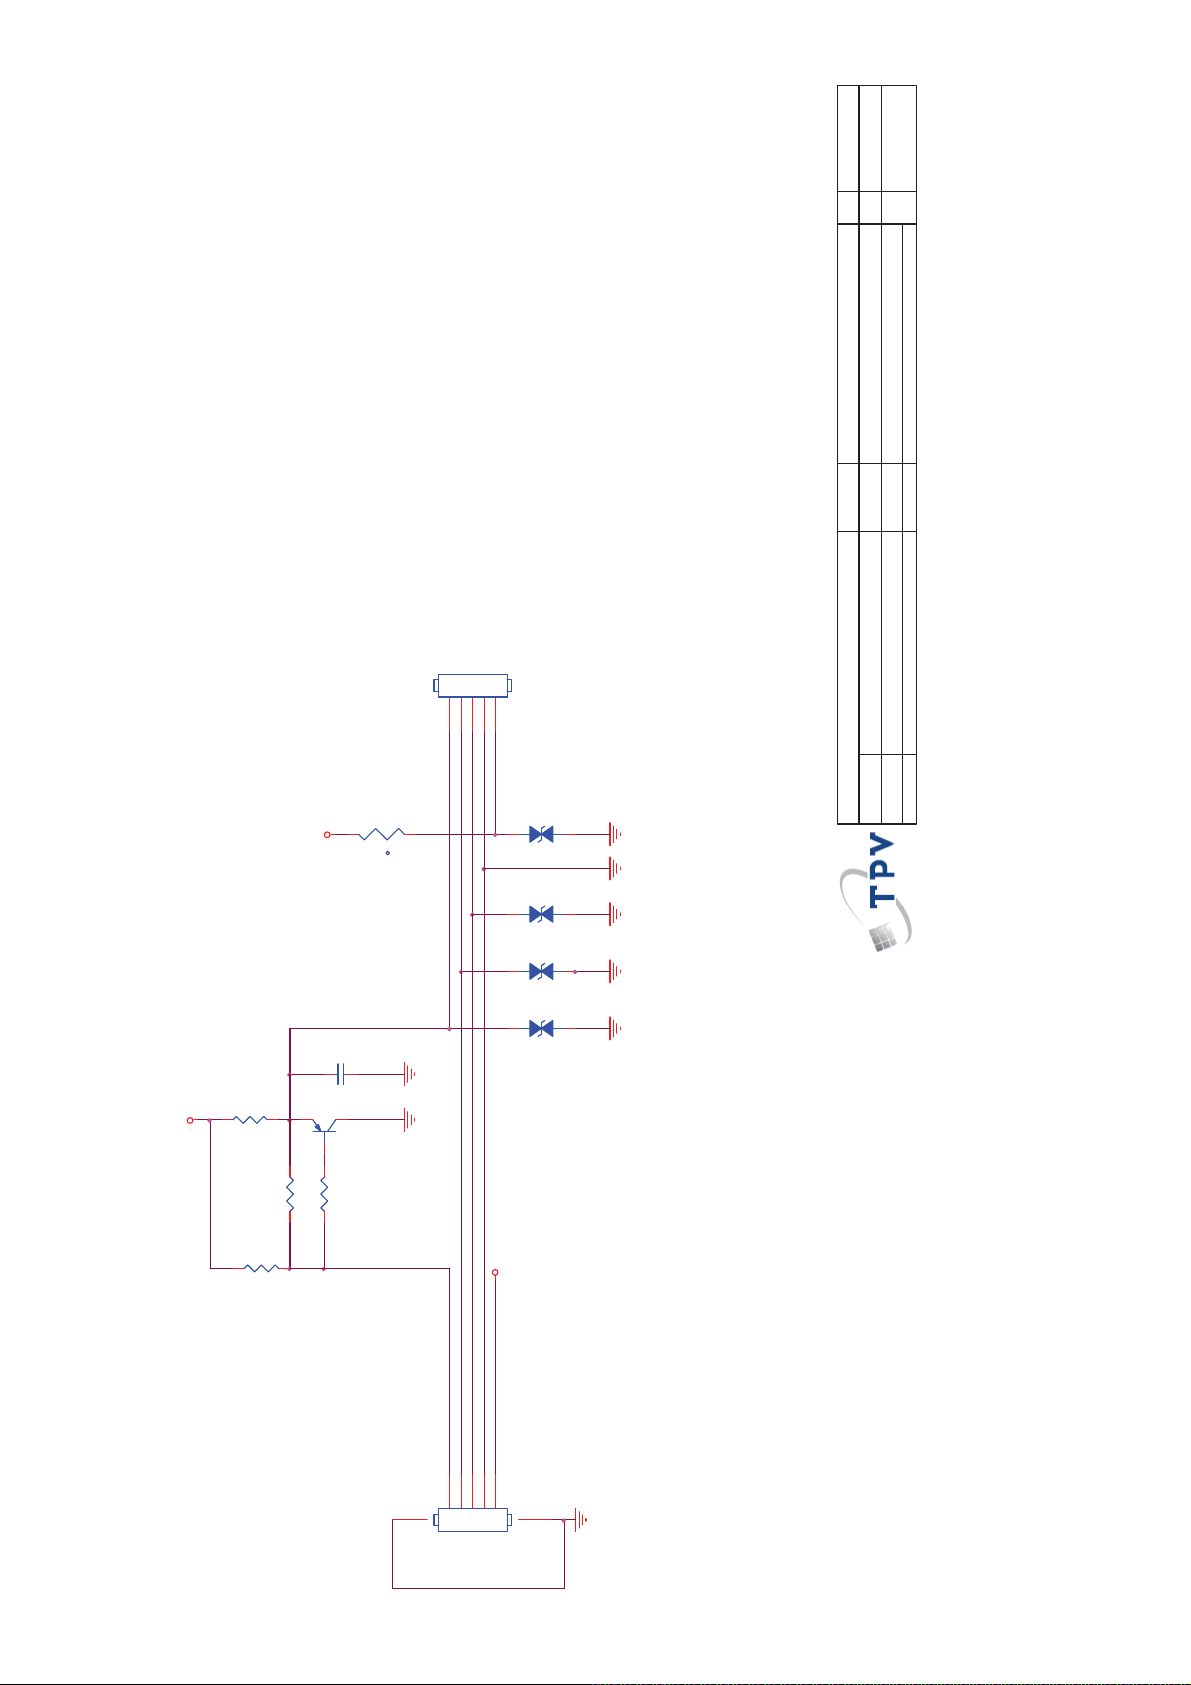
A
Custom
HW4
Size
Rev
⿄⠍
of
11Saturday , March 12, 2011
Sheet
PCB NAME
OEM MODEL
TPV MODEL
CONN
12345
CN7001
RC_IR_OUT
TXD1
RXD1
TH4401
8V 0R4
12
ITV_VDD
C4401 100N 16V
10K 1/16W 5%
Q4401
2N3906S-RTK/PS
23
1
R4414
0R05OHM1/16W(NC)
R4401
100R 1/16W 5%
R4403
ITV_VDD
t
311GW250B05BBX
ITV_VDD_C
ZD138 NC\MLVG0402
1 2
ZD137 NC\MLVG0402
1 2
ZD136 NC\MLVG0402
1 2
ZD135 NC\MLVG0402
1 2
01. C OVER
G4858-A-X-X-1-101220
㝍
㌾
⪰
T P V ( Top Victory Electronics Co . , Ltd. )
Date
䱨
㍀
Key Component
83
ITV_VDD
R4402
10K 1/16W 5%
7.3 MEMC Board
715G4858T0C000004S
12345
67
CONN
CN7003
!
Page 84
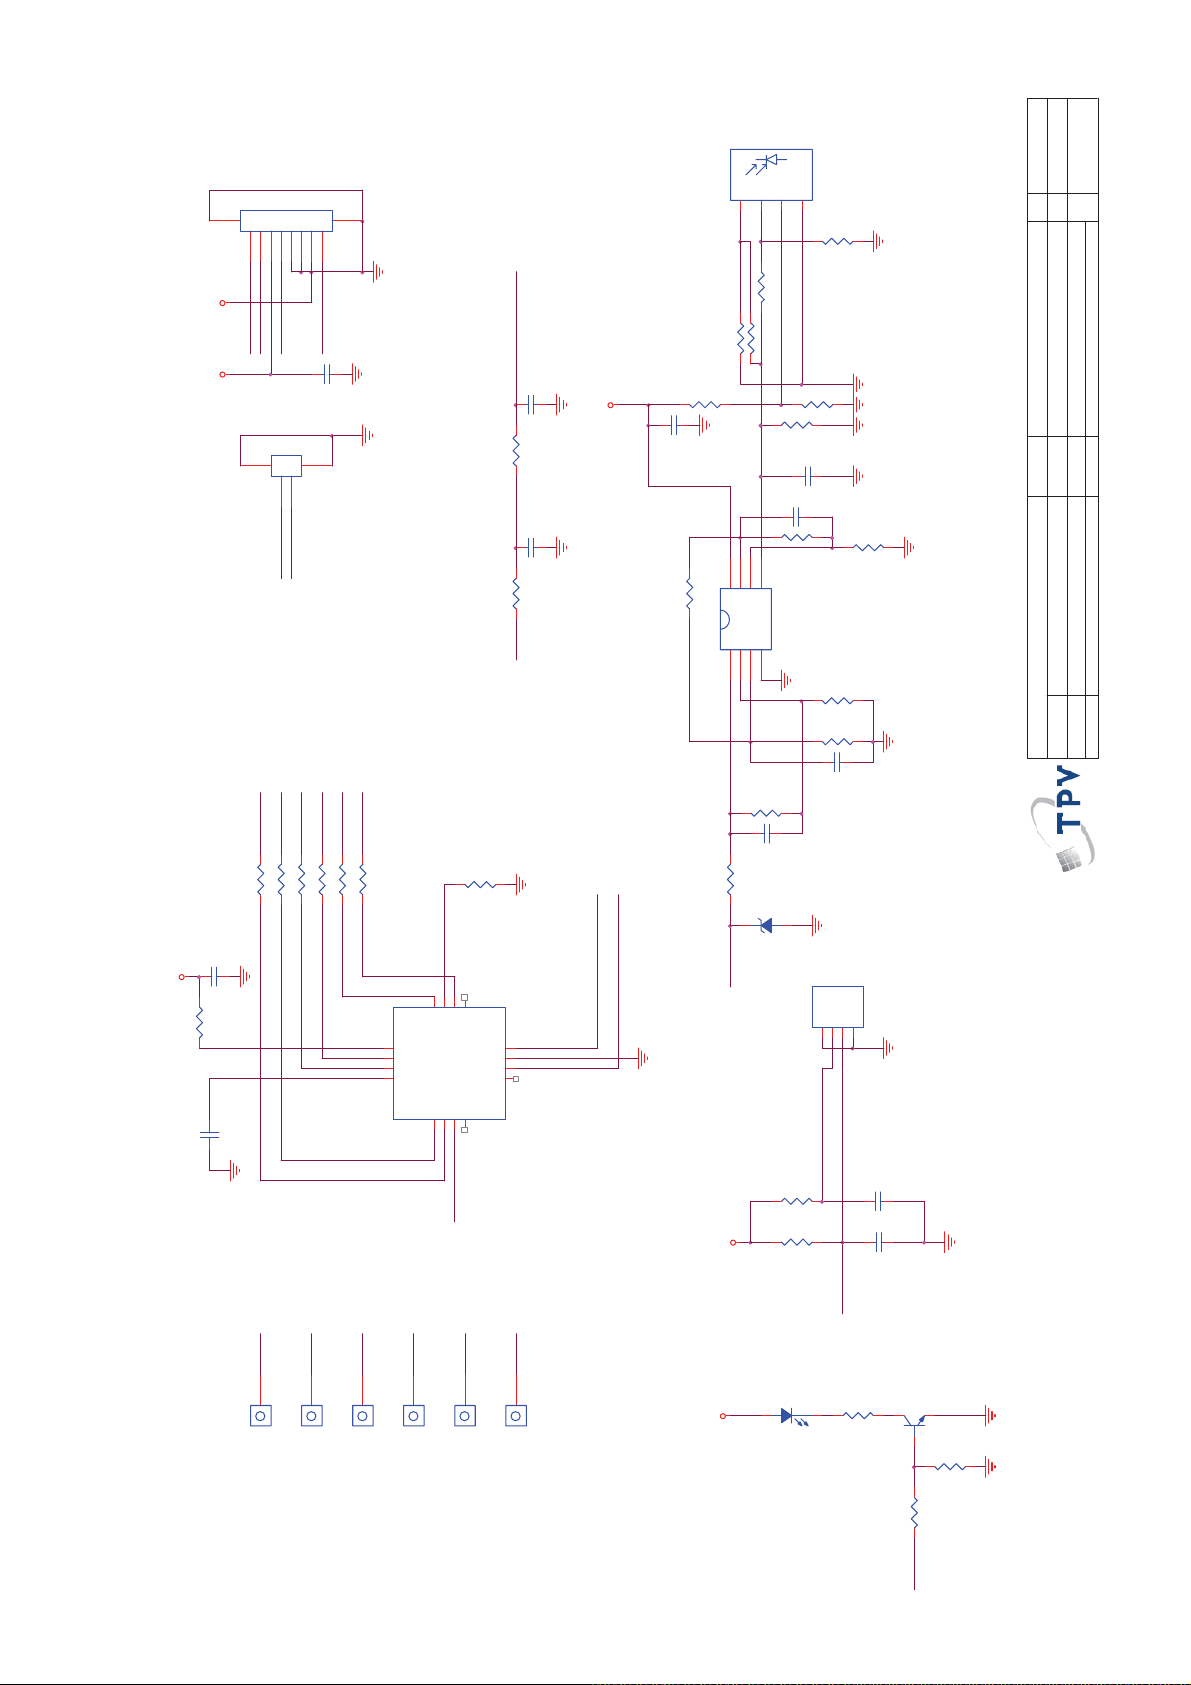
910
1234567
CN201
8
>
B
C
⿄⠍
U203
GND3OUT1VCC2GND
CONN
NC ALS-PD I C 17-55C -TR8
4
R238
NC/ 2 M O H M 1/ 16 W 5%
<
Size
Rev
⿄⠍
+5V_SW
KEY1
34
1
2
CN202
SDA
SCL
R202 560R 1/16W 5%
R203 560R 1/16W 5%
VOL+
POWER
LIGHT_SENSOR
C210
10uF 10V
CONN
R204 560R 1/16W 5%
R208 560R 1/16W 5%
R205 560R 1/16W 5%
HOME
CH-
CH+
LED_R
RC6
3V3SB
R201 560R 1/16W 5%
VOL-
KEY1
C204
0.47UF 10V
+5V_SW
R213 10K+-5%1/16W
C203
0.47UF 10 V
R212 10K+-5%1/16W
PWM0
R210
0R05 1/ 16W
R239
C209
NC 1UF16V
NC 470R
R230
R237 N C 0R 05 1/ 16W
R235
NC 0R 05 1/ 16W
R236 NC / 0R 05 1/ 16W
NC 0R 05 1/ 16W
8
6
5
7
2IN-
2OUT
VCC+
1OUT11IN-21IN+3VCC-
U205
NC LM358APWR
4
R233
R240
NC/0R05 1/16W
R224
C211
NC 4. 7U F 10 V
NC 15K 1/16W 5%
C212
NC 100P 50V
R229
2IN+
NC 100K
R227
NC 100K
NC 22K
R232
NC 18K 1/16W
R231
NC 15K 1/ 16W
C213
NC 100P 50 V
of
22Saturday , Marc h 12, 2011
715G4496-K0C
Sheet
PCB NAME
OEM MODEL
TPV MODEL
G4496 -C-X- X-1- 110 127
2.0.IR/Key
㝍
㌾
⪰
Date
T P V ( Top Victory Electronics Co . , Ltd. )
䱨
㍀
Key Component
84
C214
NC 100P 50V
SDA
SCL
C201
100nF 25V
3V3SB
R226 39R 1%
CH+
CB203
U201
CH+
1
C202
1N50V
CH-
HOME
CH-
HOME
1
1
CB201
CB202
13
14
15
16
CB204
VOL-
VOL-
RESET
11
10
12
CG7216AM
P1[2]9P1[4]
P0[4]
XRES
2
6
PWM0
VOL+
CB205
P1[5]
4
Vss
7
P1[7]
3
P1[3]
5
P1[1] I2C_SCL
P1[0] I2C_SDA
8
POWER
VOL+
POWER
1
1
CB206
Vdd
P0[7]
P0[3]
P0[1]
P2[5]1P2[1]
1
R234 NC 100R
Light_sensor
3V3SB
3V3SB
1 2
ZD201
NC UDZSNP3.3B
U202
R223
100R
R222
2K7 1/16W 5%
Red
LED201
LED
12
GND1Vs2OUT3GND
TSOP75236W
4
--------><----|
----><----|
RC6
R220
1K
C208
1UF16V
C207
NC/100P 50V
Q201
BC847C
TOUCH PAD 9X15
7.4 Key Board
715G4496K01000004M
TOUCH PAD 9X15
TOUCH PAD 9X15
TOUCH PAD 9X15
TOUCH PAD 9X15
TOUCH PAD 9X15
R228
R225
2.2K 1/16W
4K3 1/16W 5%
LED_R
!
Page 85
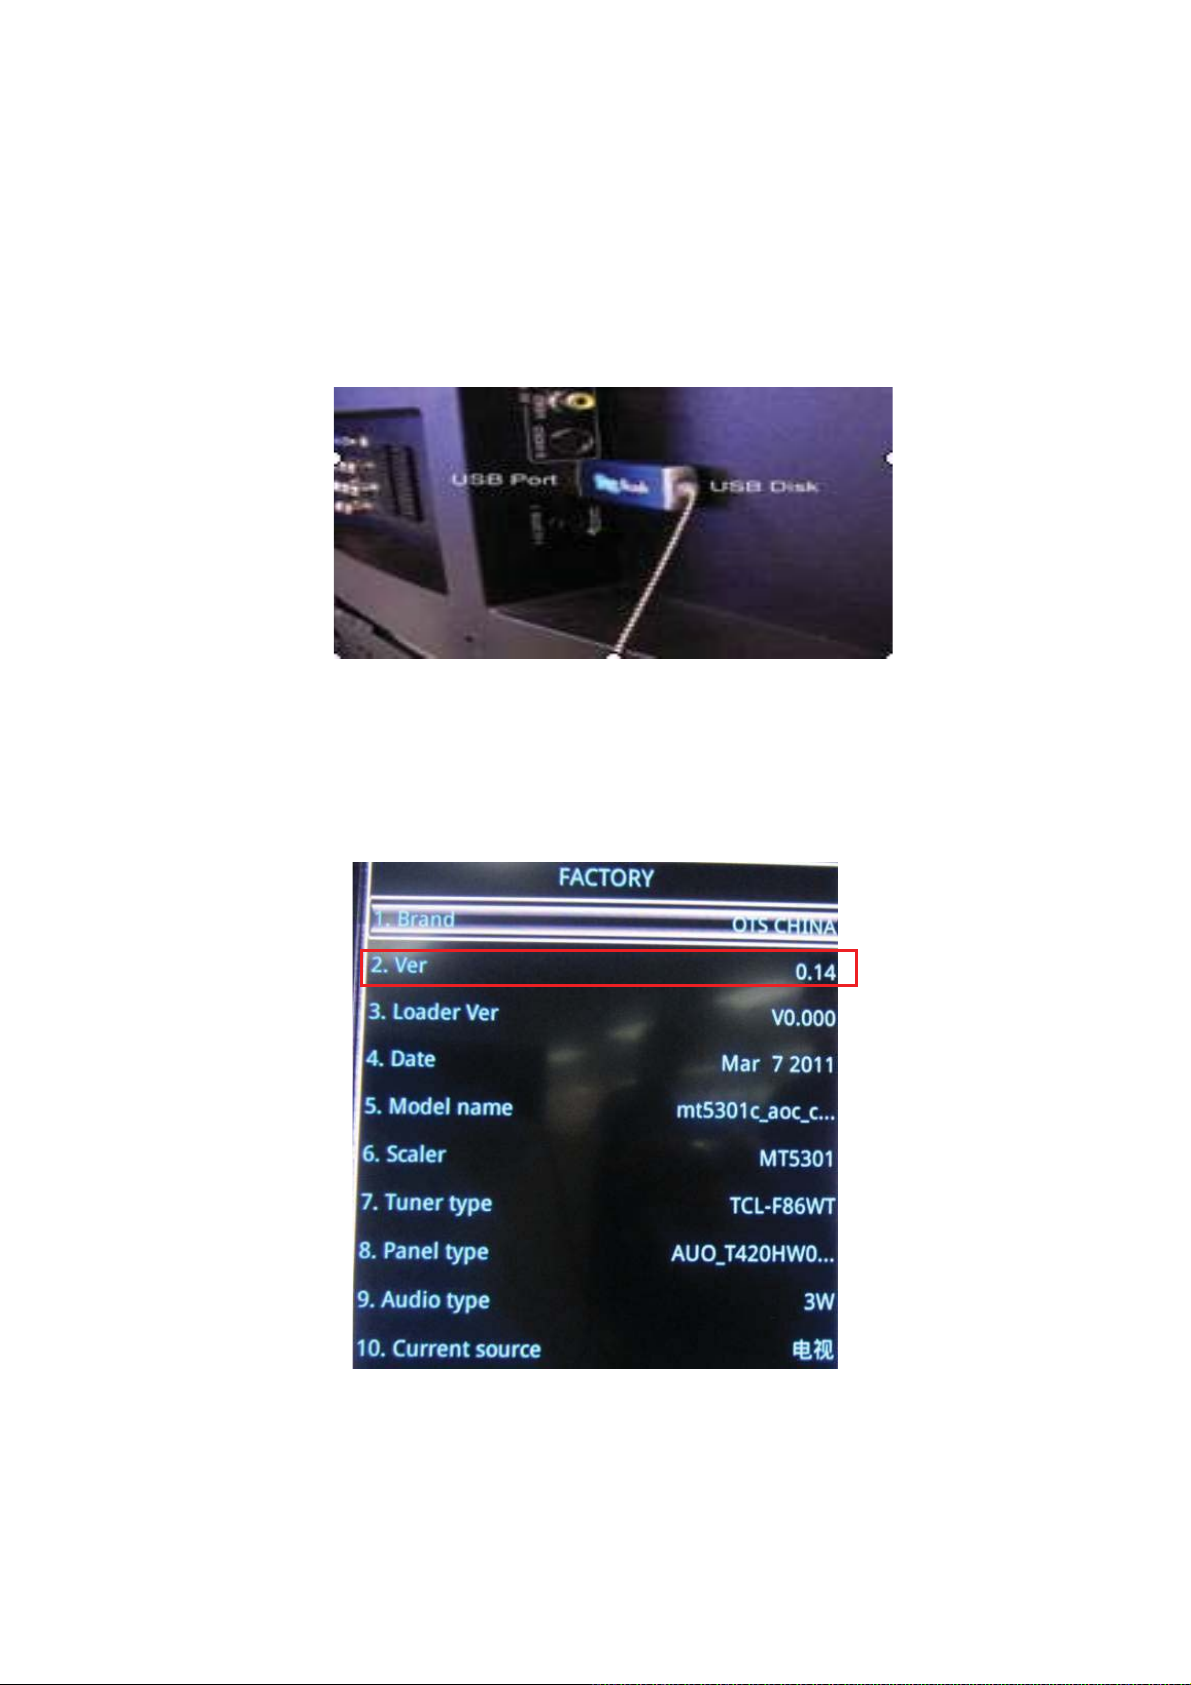
8.Firmware & EDID Upgrade
8.1 Firmware Upgrade
Note: Take the other models for example.
Attention˖
1. Prepare a U-disk, the file system of FAT is the best ch oice.
2. Change the “.pkg” software file name to “upgrade_loader.pkg” and copy it to U-disk root directory.
3. TV AC off, and insert the U-disk with F/W changed to the USB port of TV as below figure.
4. After TV AC on, TV will detect s the F/W in the U-disk to upgrade au tomatically. During this process, it is forbid to
AC off TV and unplug the U-diskDŽTV will restart after upgrade.
5. Unplug the U-disk and restart TV.
6. Press “menu+1999” by RC to open factory menu and check the software version as below figure. If the version
information is not the same as the F/W in U-disk, please redo upgrade.
!
85
Page 86
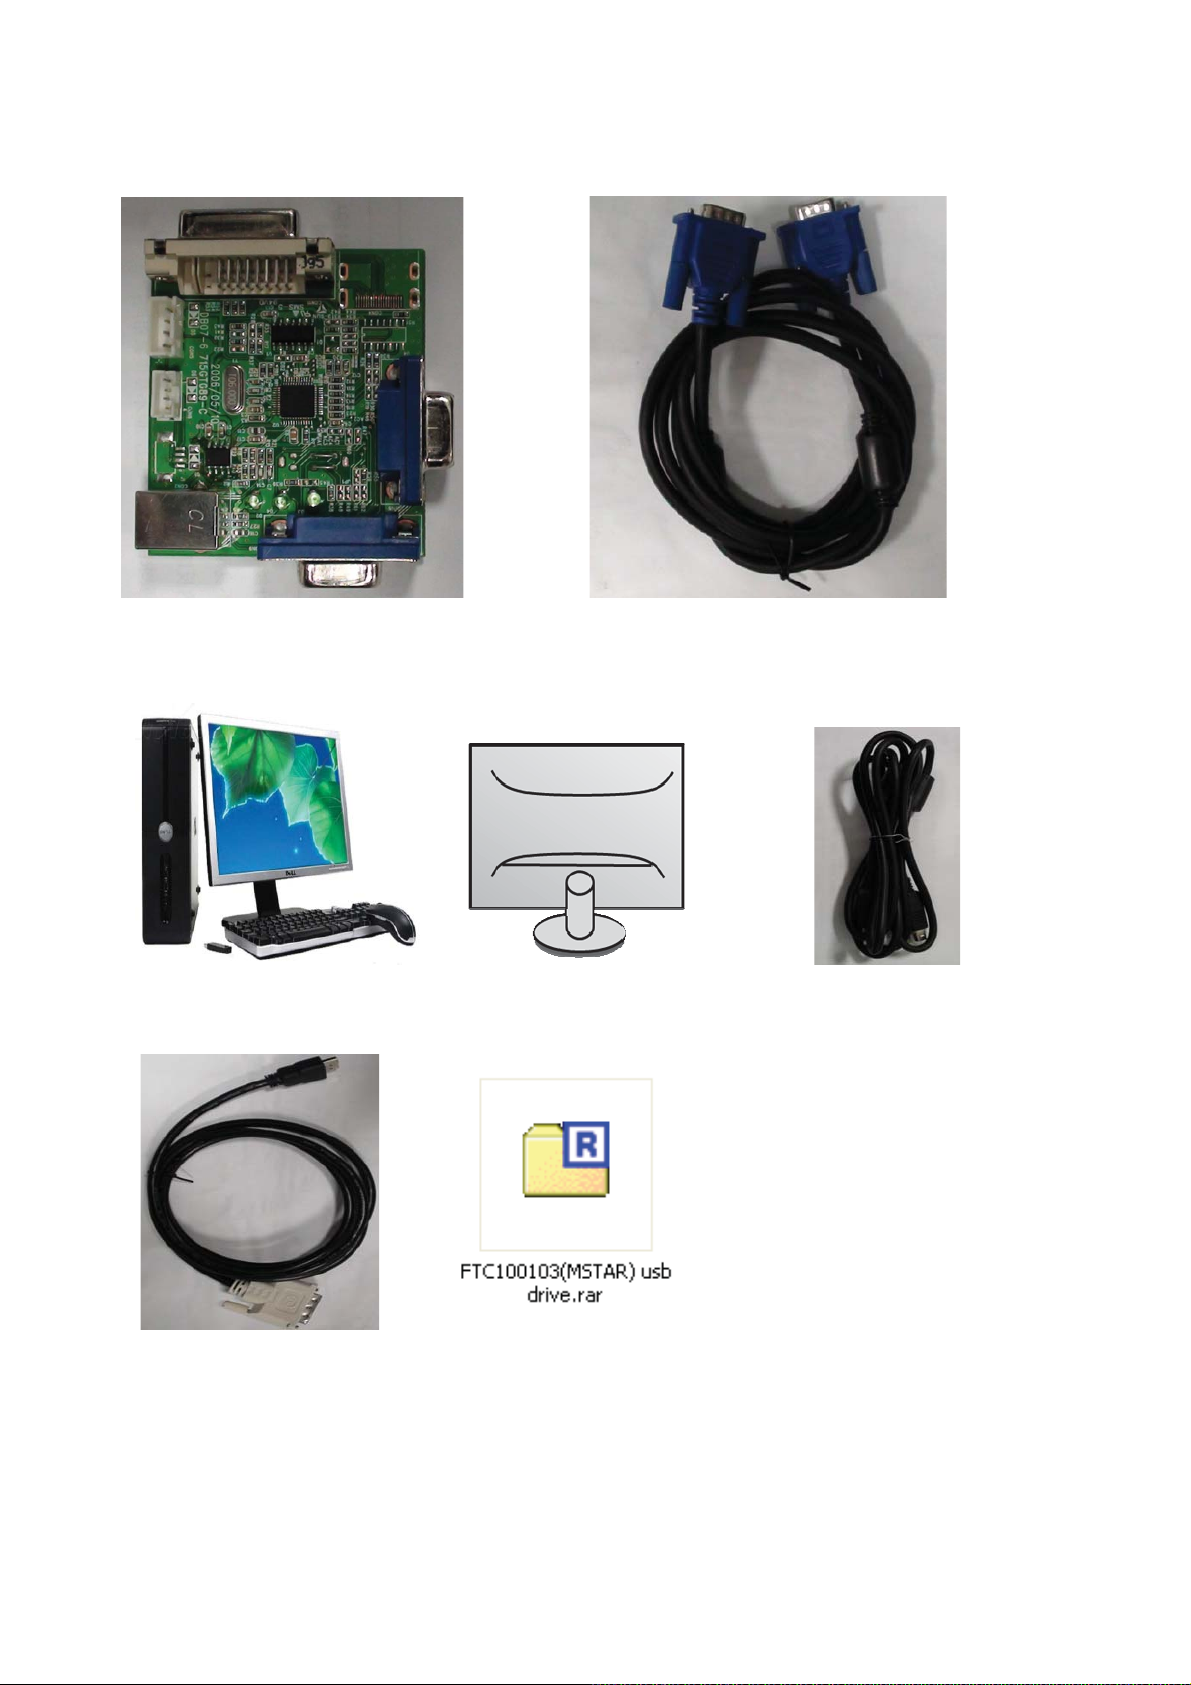
8.2 EDID Upgrade
(
Take
Philip_201T1
for example.
)
1. Ready for writing EDID
ISP JIG: 715GT089-B/C
TPV P/N: N/A TPV P/N: 089G728 GAA DB
VGA cable
PC TV USB cable
TPV P/N: 089G1758 X
DVI to HDMI USB port driver
!
86
Page 87
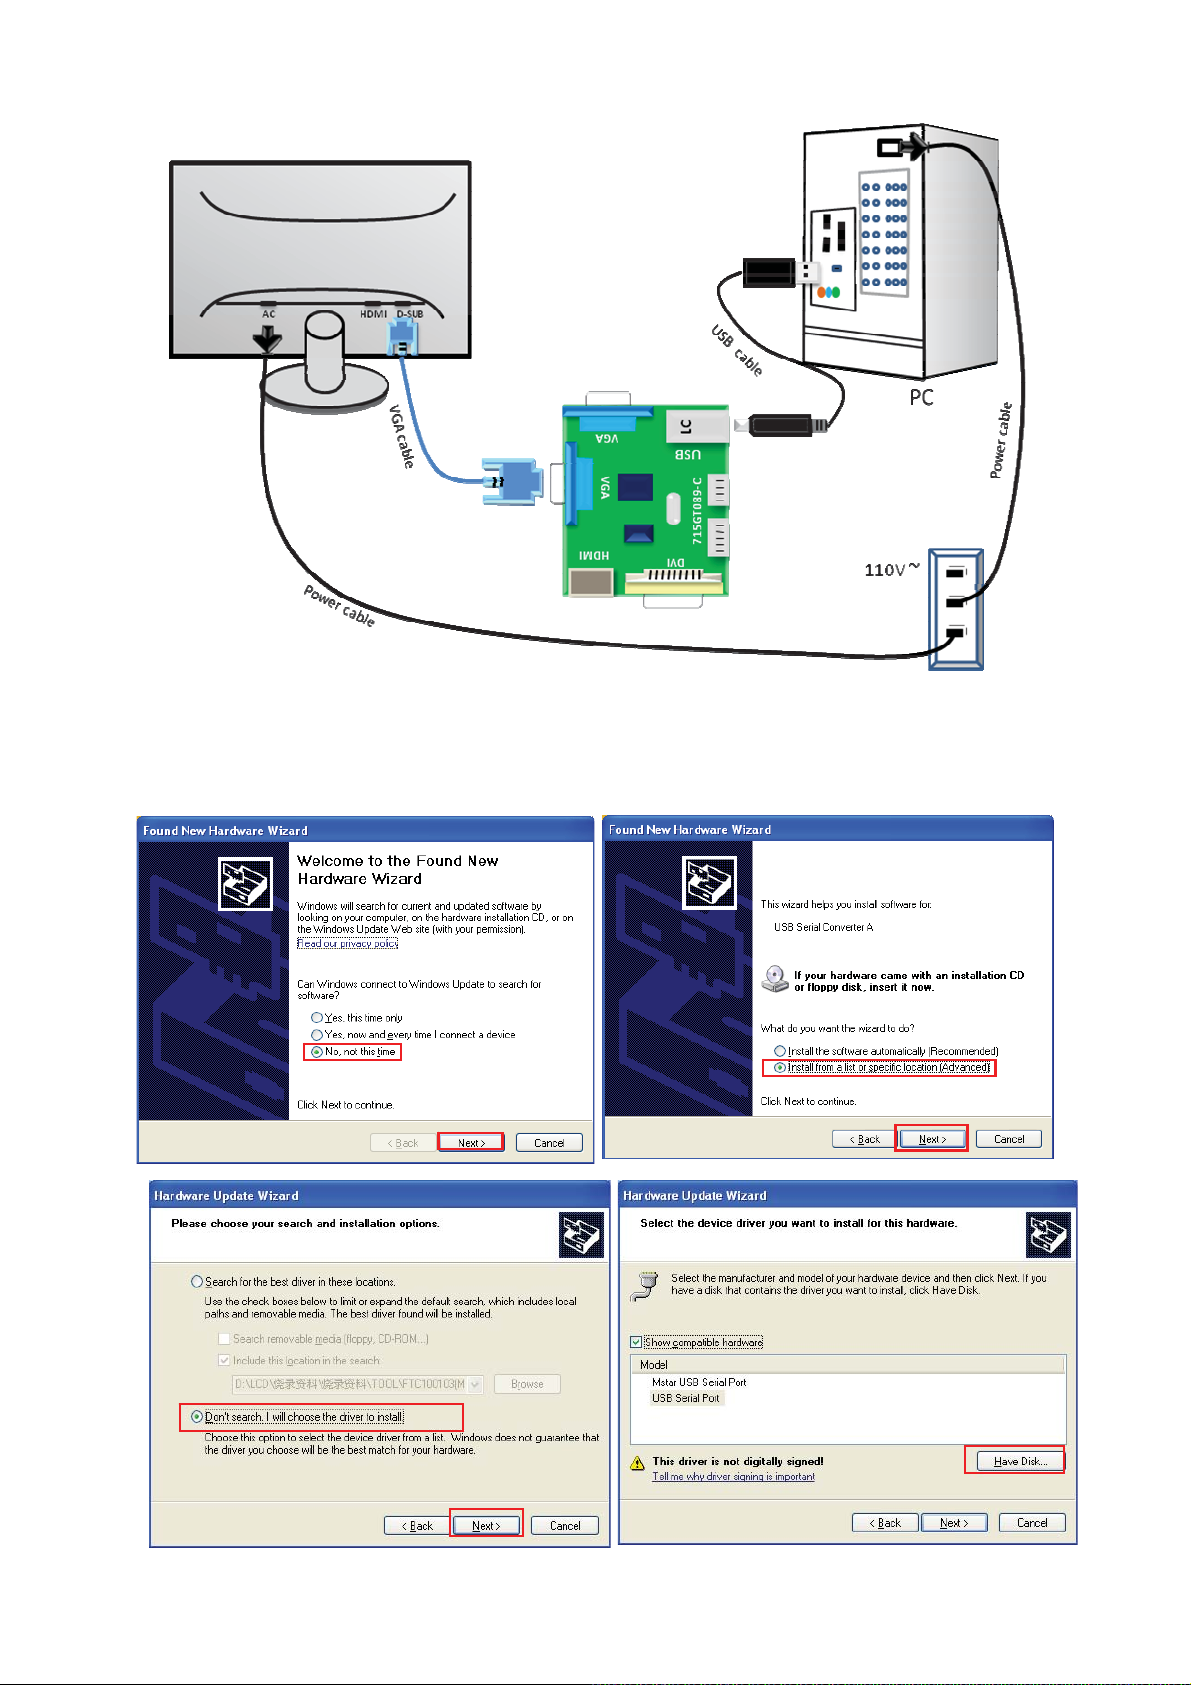
2. Connection for writing VGA EDID.
3.Install USB Driver
3.1. When insert the USB cable to PC USB port, will pop up a Hardware Wizard to help you install the USB driver if
you use this ISP board first time. You can install it successfully as the below instruction step by step.
Remark: The USB driver files path: D:\FTC100103(Mstar)\FTCUSB.INF
!
87
Page 88
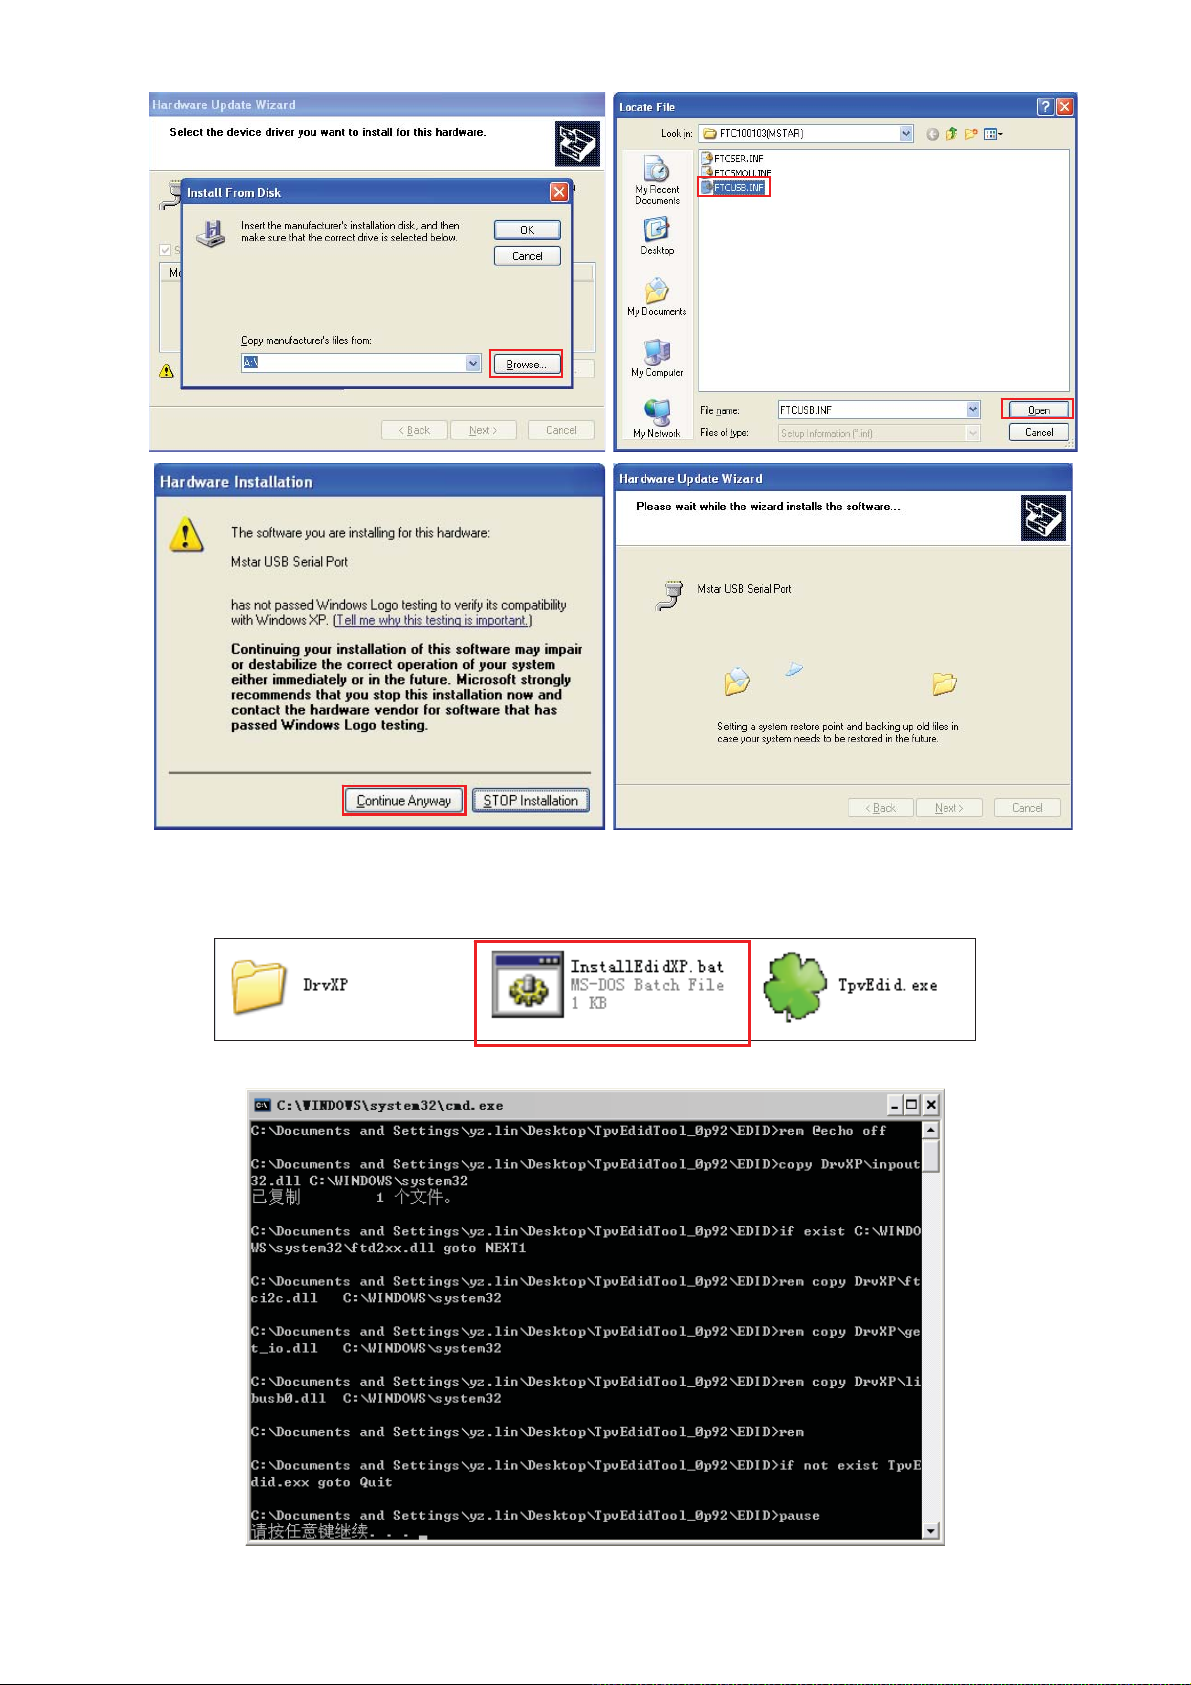
4. Install TPVedidTool.
4.1. Run the “InstallEdidXP.bat” firstly by double-click it icon. And press any key to finish it.
!
88
Page 89
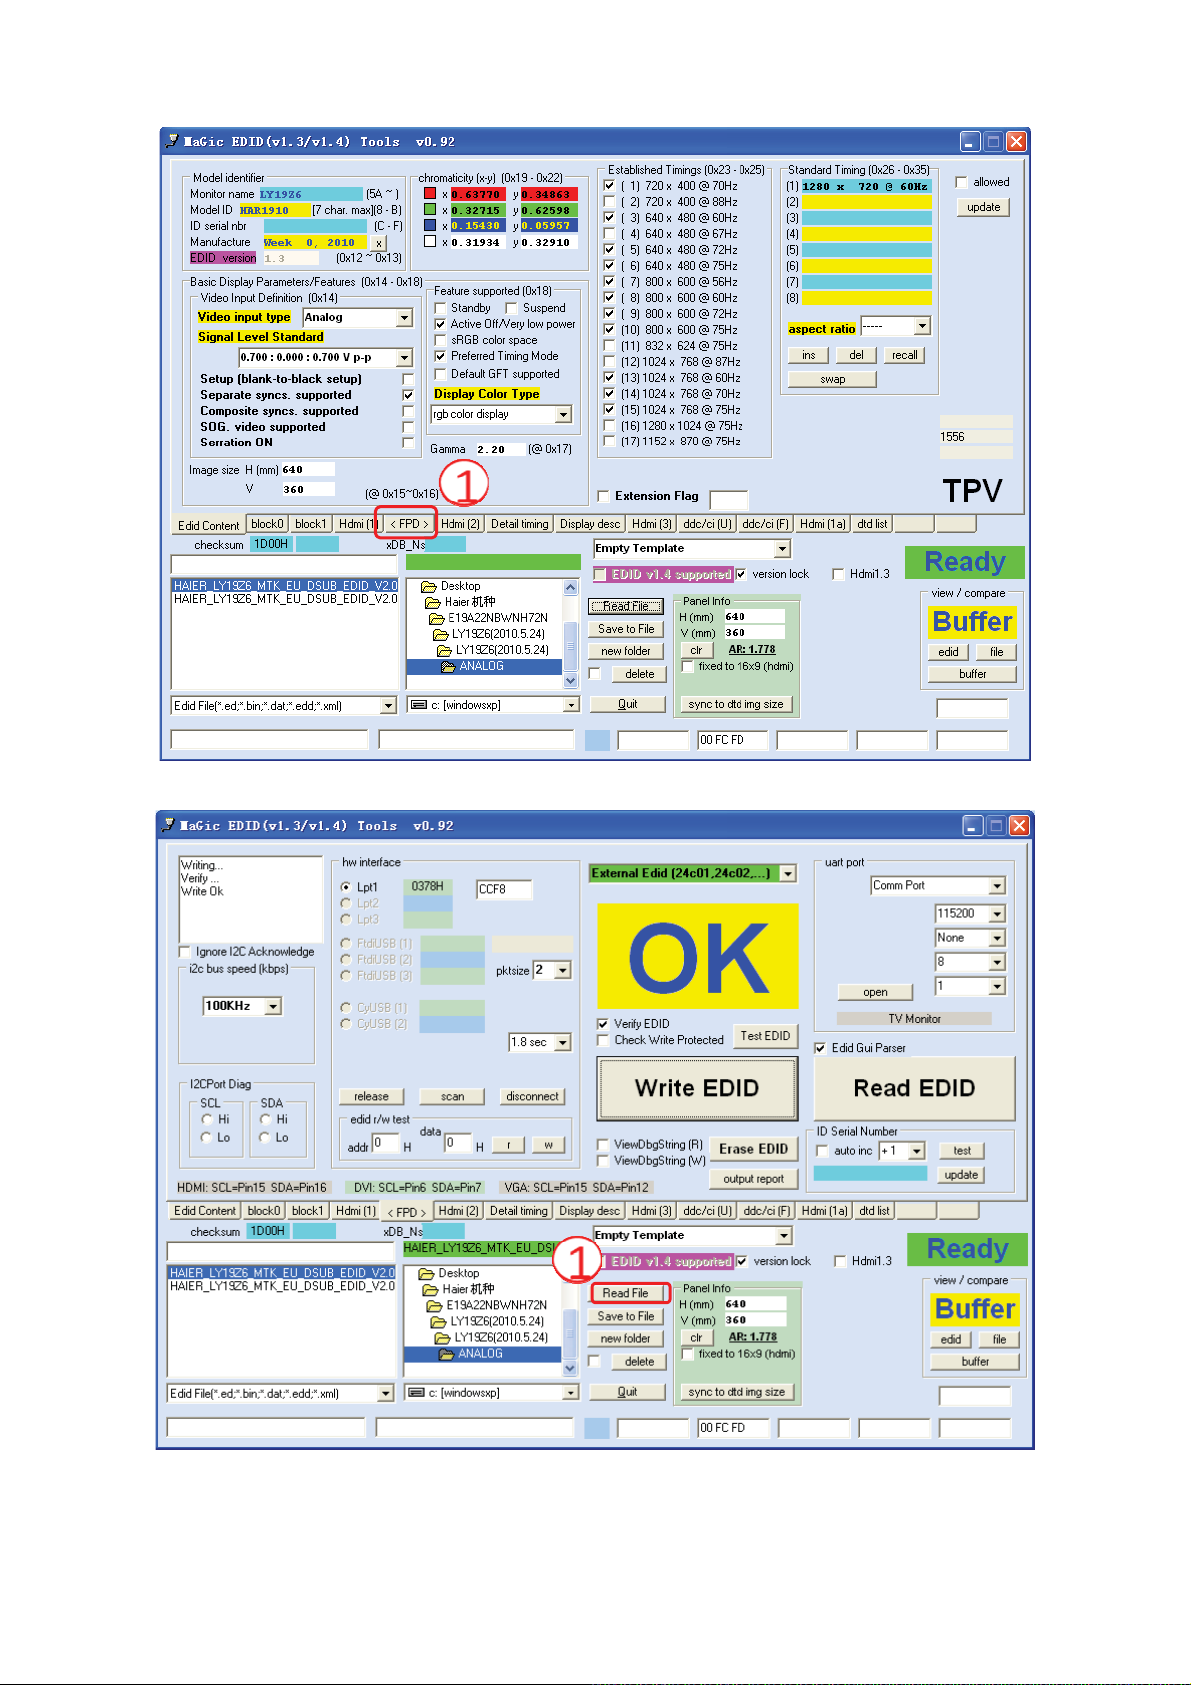
4.2. Double-click “TpvEdid.exe” to open the EDID tool.
4.3. Click “FPD” to open another interface.
4.4. Click “Read File” to load the correct EDID file.
!
89
Page 90
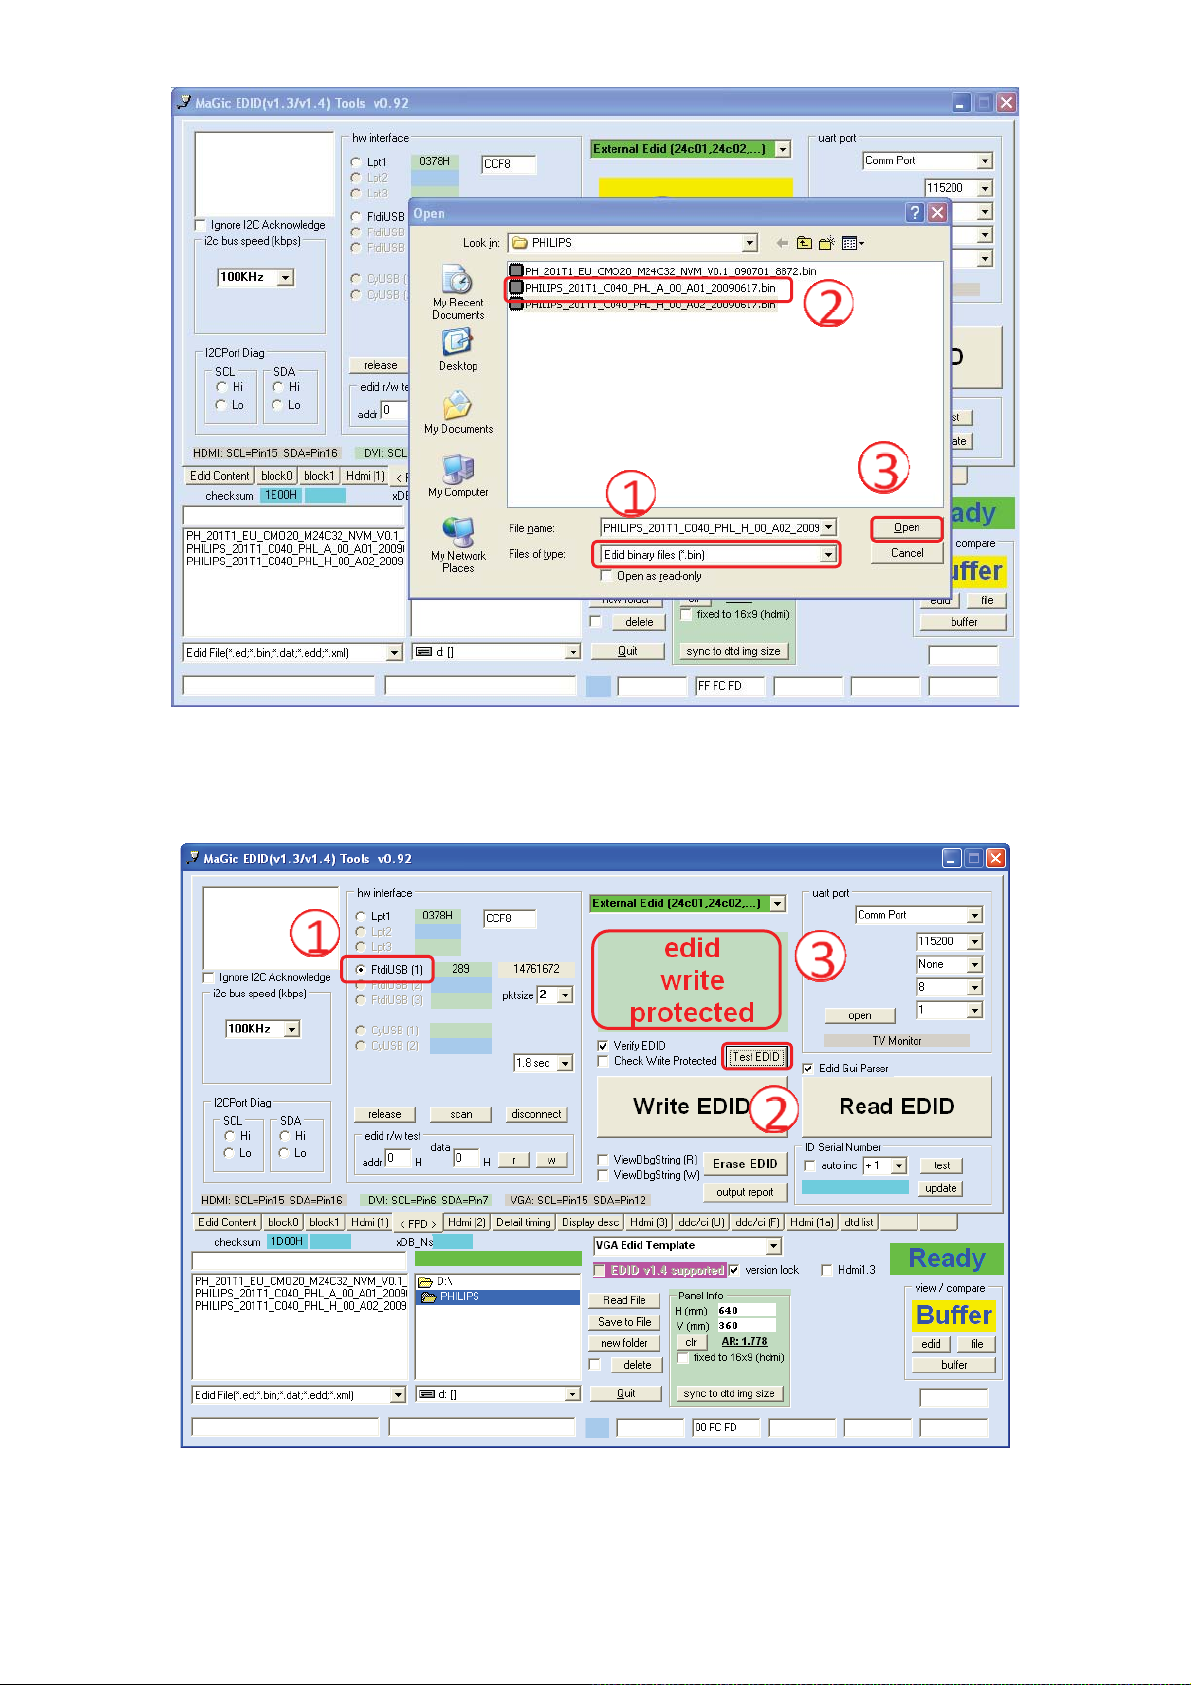
4.5. After loading the VGA EDID file, AC on the TV and click “Test EDID” to check the communication between TV
and PC. When there is “edid write protected” letters appearing as below figure, we can click “Write EDID” to
program.
4.6. Click “Write EDID” to start writing.
!
90
Page 91
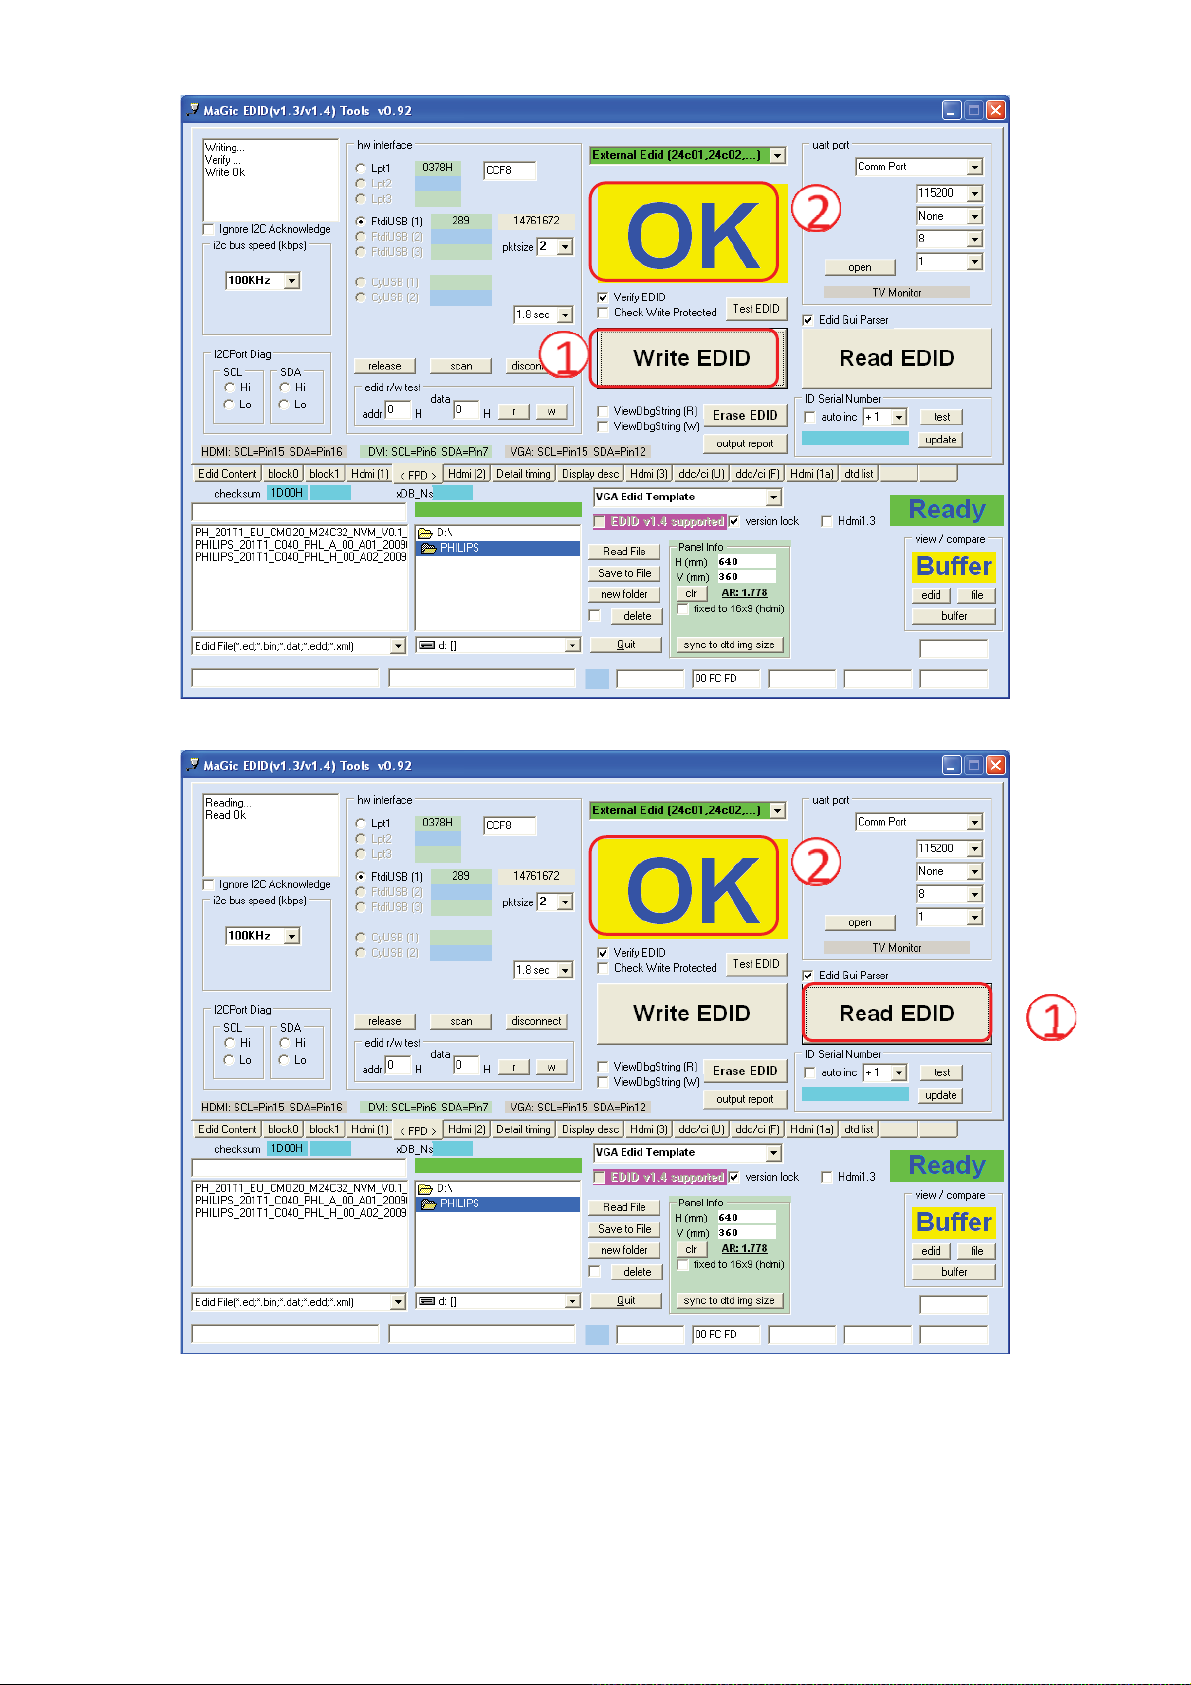
4.7. Click “Read EDID” to read the EDID information from TV.
4.8. Click “Edid Content” to check whether the EDID read from TV is correct or not. If the EDID information is the
same as what you have written, EDID write successfully.
!
91
Page 92
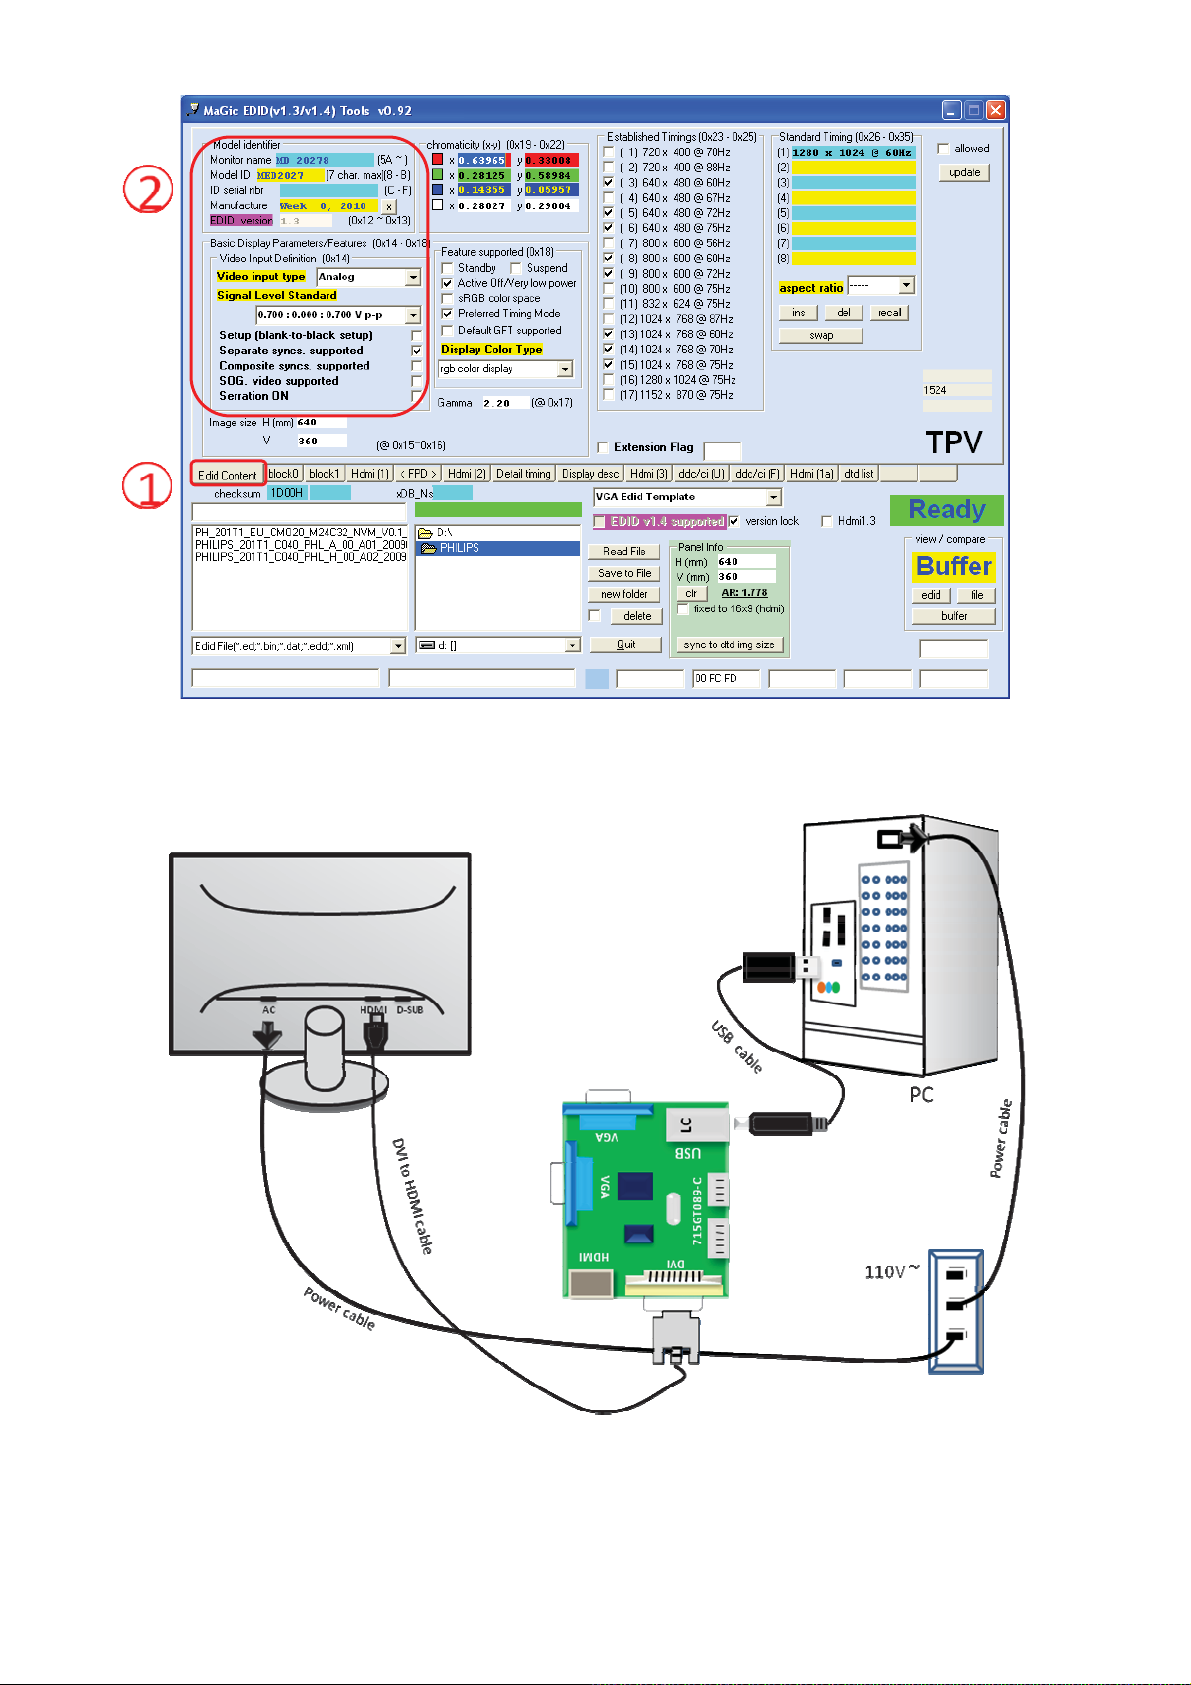
5. Write HDMI EDID.
5.1 Connection for write HDMI1 EDID.
5.2. For the other steps, please refer to the writing VGA EDID steps.
5.3. Write the EDID for other HDMI ports EDID one by one as the VGA EDID writing steps.
!
92
Page 93
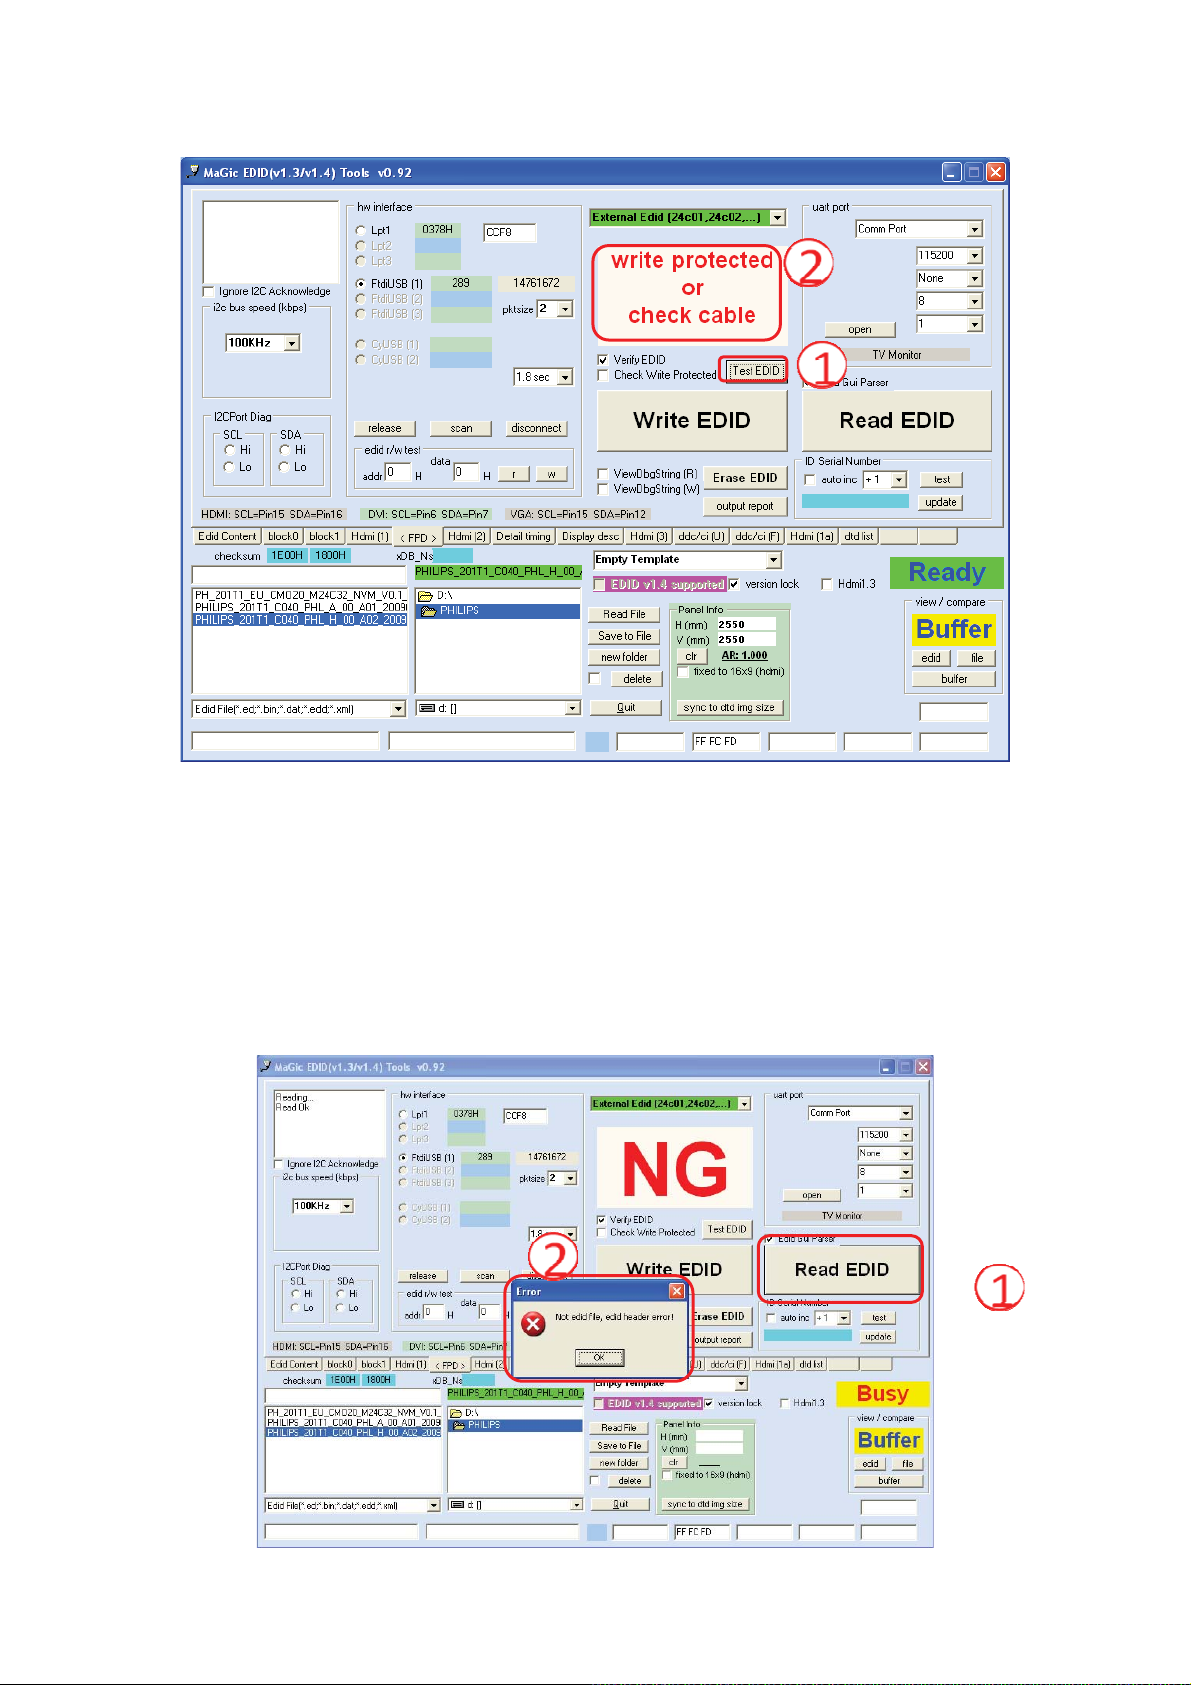
6. Troubleshooting.
6.1. “Write protected or check cable” error.
6.2. Methods: (1). Check the connection of cable and JIG.
(2). Turn on or off the Burn in mode to try.
(3). Some TV has DDC write disable protection item in factory mode. As to these TV, please turn on
it before writing EDID.
(4). Do reset on user menu after F/W upgrade.
(5). Disassemble the TV and connect the 7pin of EEPROM which contains EDID to GND for disable
write protection, this way can promise to write successfully 100%.
6.3.”Not edid file, edid header error!”. When click “Read EDID”, pop up below error. If you ignore “Test EDID” and
click “Write EDID” directly, some time you can also seen“OK” message. But actually the EDID is not written.
6.4. Method: (1) Make sure the “Test EDID” is “edid write protected” referring to 6.2 step.
!
93
Page 94
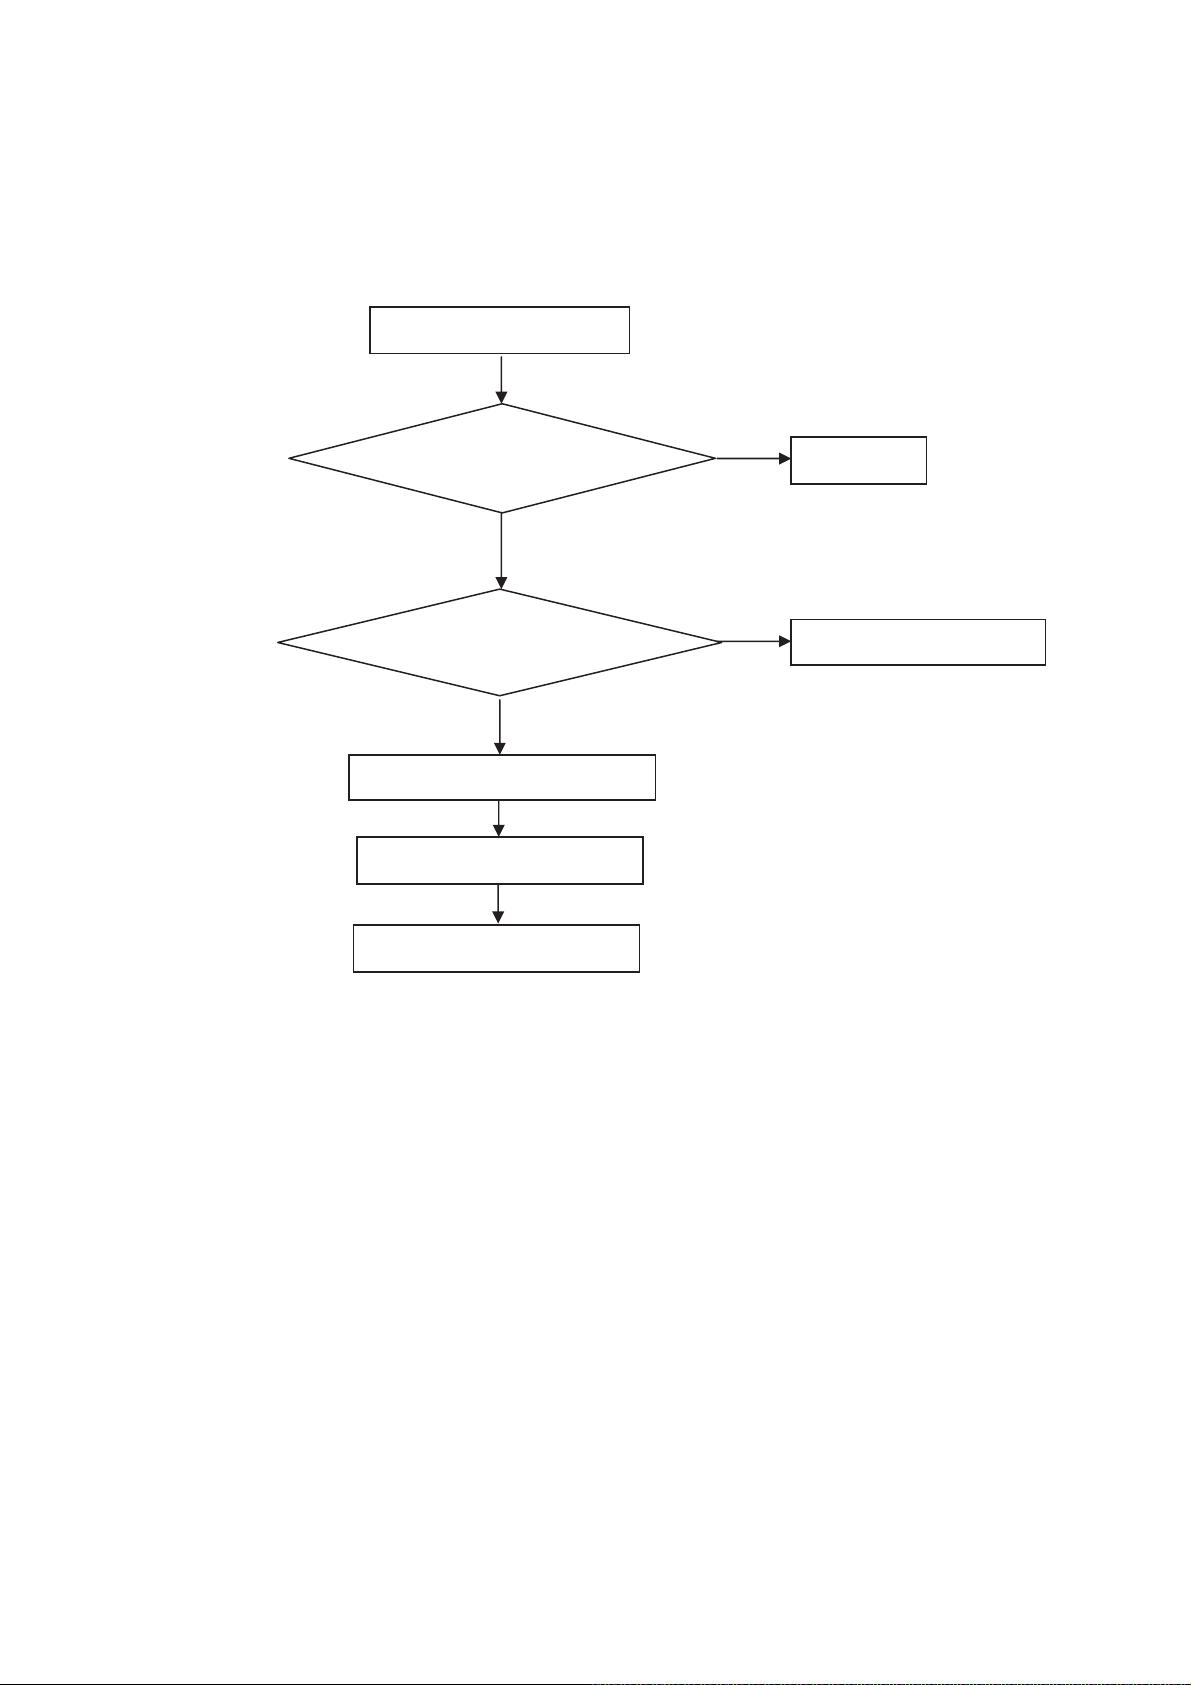
9. Trouble shooting
p
p
9.1 No power
No power (LED “Off”)
Check the AC input and
the
ower is “ON”?
Yes
Power board
out
ut=5.2V?
Yes
Check the key board and LED
Replace the key board
No
Replace the main board
No
Power “On”
No
Replace the power board
!
94
Page 95
9.2 Can’t start
Can’t startΰLED redα
Power board output᧹24V᧻
Yes
Check the power key is under control?
No
Replace the main board
No
Replace the power board
Yes
Replace the key board
No
Replace the Power board
!
95
Page 96
9.3
No display
No display (LED green)
Check TV is under control and power
on/off by remote control and power key?
Yes
Check the LVDS cable
Yes
Yes
Check the backlight is
“On”?
No
Reinsert or replace the
LVDS cable
No
No
Check the B/L
signal is available?
Yes
Replace the main board
No
Replace main board
Panel Vcc = 12 V?
Yes
Replace the Panel
No
Replace the main board
Power board output᧹24 V᧻
Yes
Replace the Panel
Replace the power board
No
!
96
Page 97
9.4
Sound problem
No sound or sound abnormal
Check the audio source connection
and the TV system are correctΛ
Yes
Check the TV is muted, adjust the
volume or enter the menu to reset?
No
Check the cable between the
speakers and main board is ok?
No
Reinsert the audio cable or
change the TV system
No
Yes
Check the speaker resistance value is in spec
(Remark: The value is marked on the speaker)?
Yes
Replace the speaker
Replace the main board
Replace the cable
No
!
97
Page 98
9.5. Remote Control malfunction
Remote Control malfunction
Check the remote control battery is
not properly placed or no power?
Use the other remote controls
Yes
Replace the battery
No
Yes
Replace the remote control
No
Whether the key board
is abnormal?
No
Replace the main board
Yes
Replace the key board
!
98
Page 99
9.6
OSD is unstable or can’t work normally
OSD is unstable or can’t work normally
Key board connected properly?
Yes
Buttons are ok?
Yes
Key board is ok?
Yes
Replace the main board
No
Reconnect the key board
No
Replace the button function
No
Replace the key board
!
99
Page 100
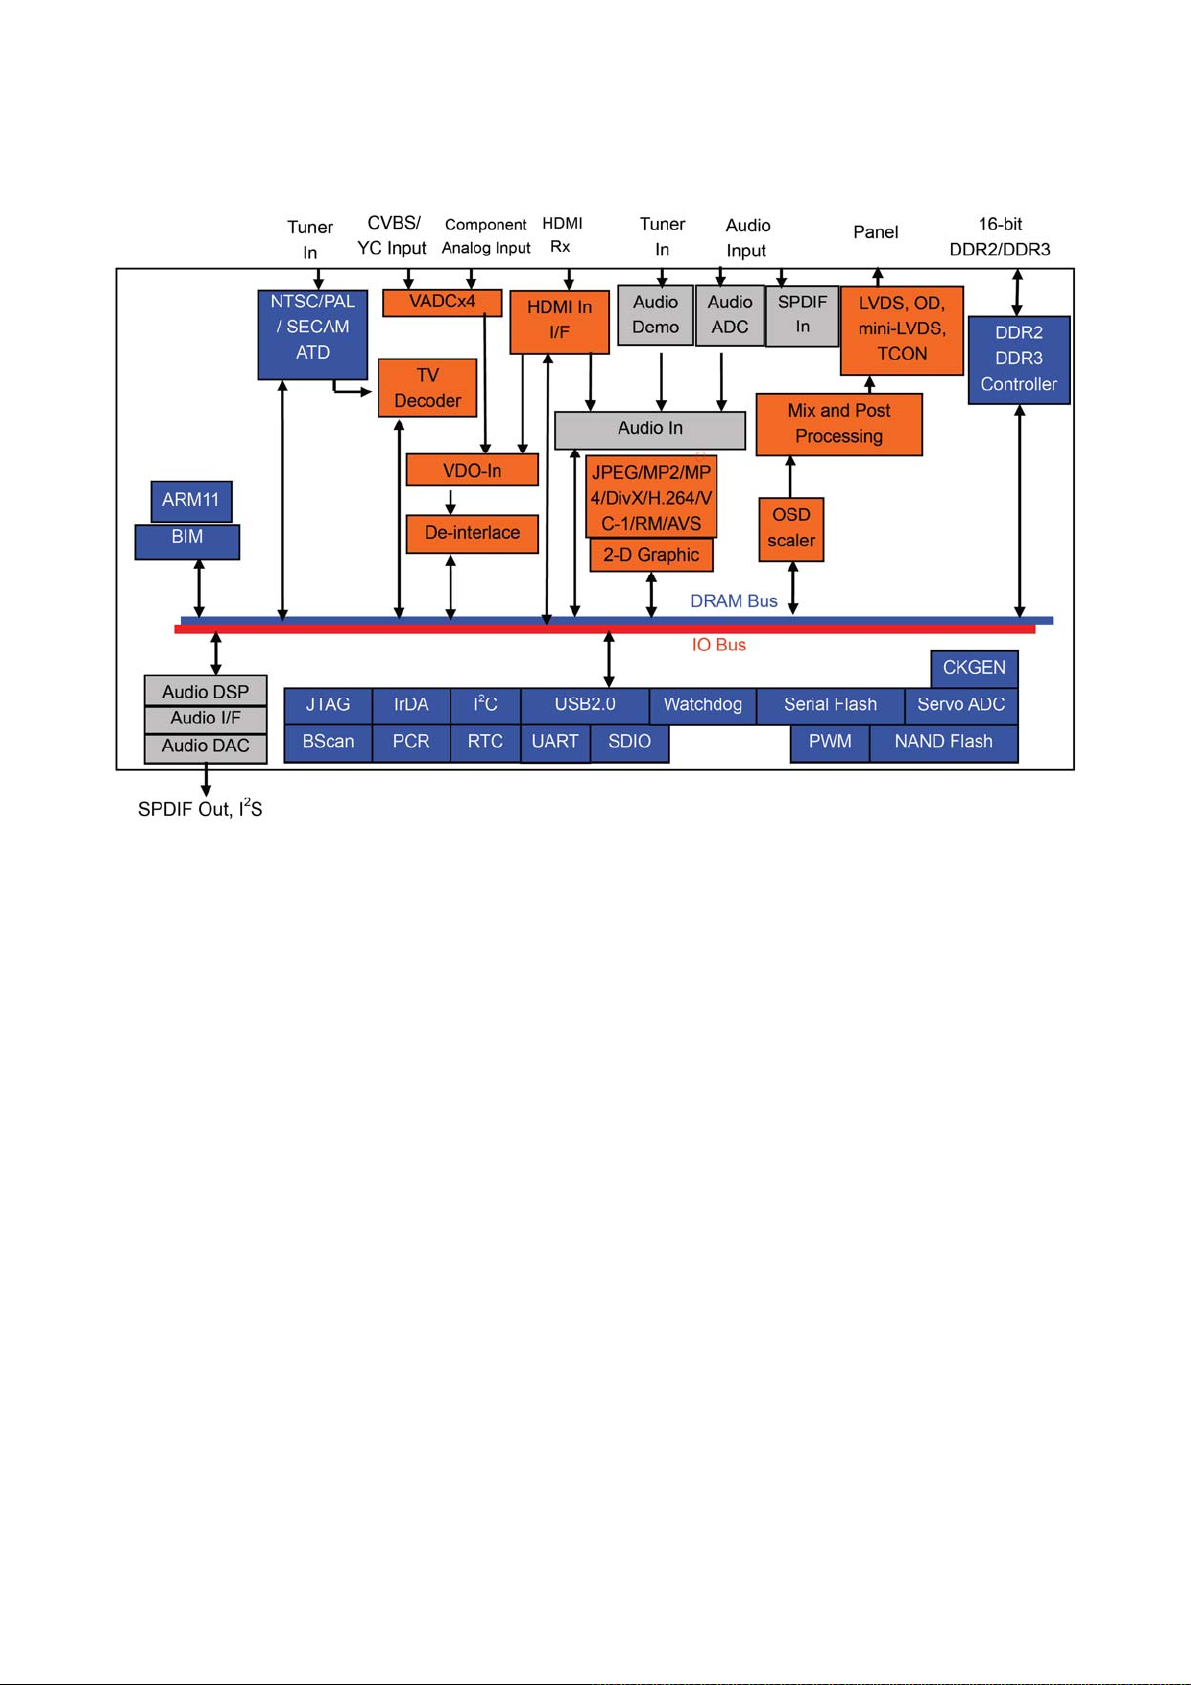
10. IC SPEC.
Scaler IC
Block Diagram
MT5301BGMU
!
100
 Loading...