

Page 1
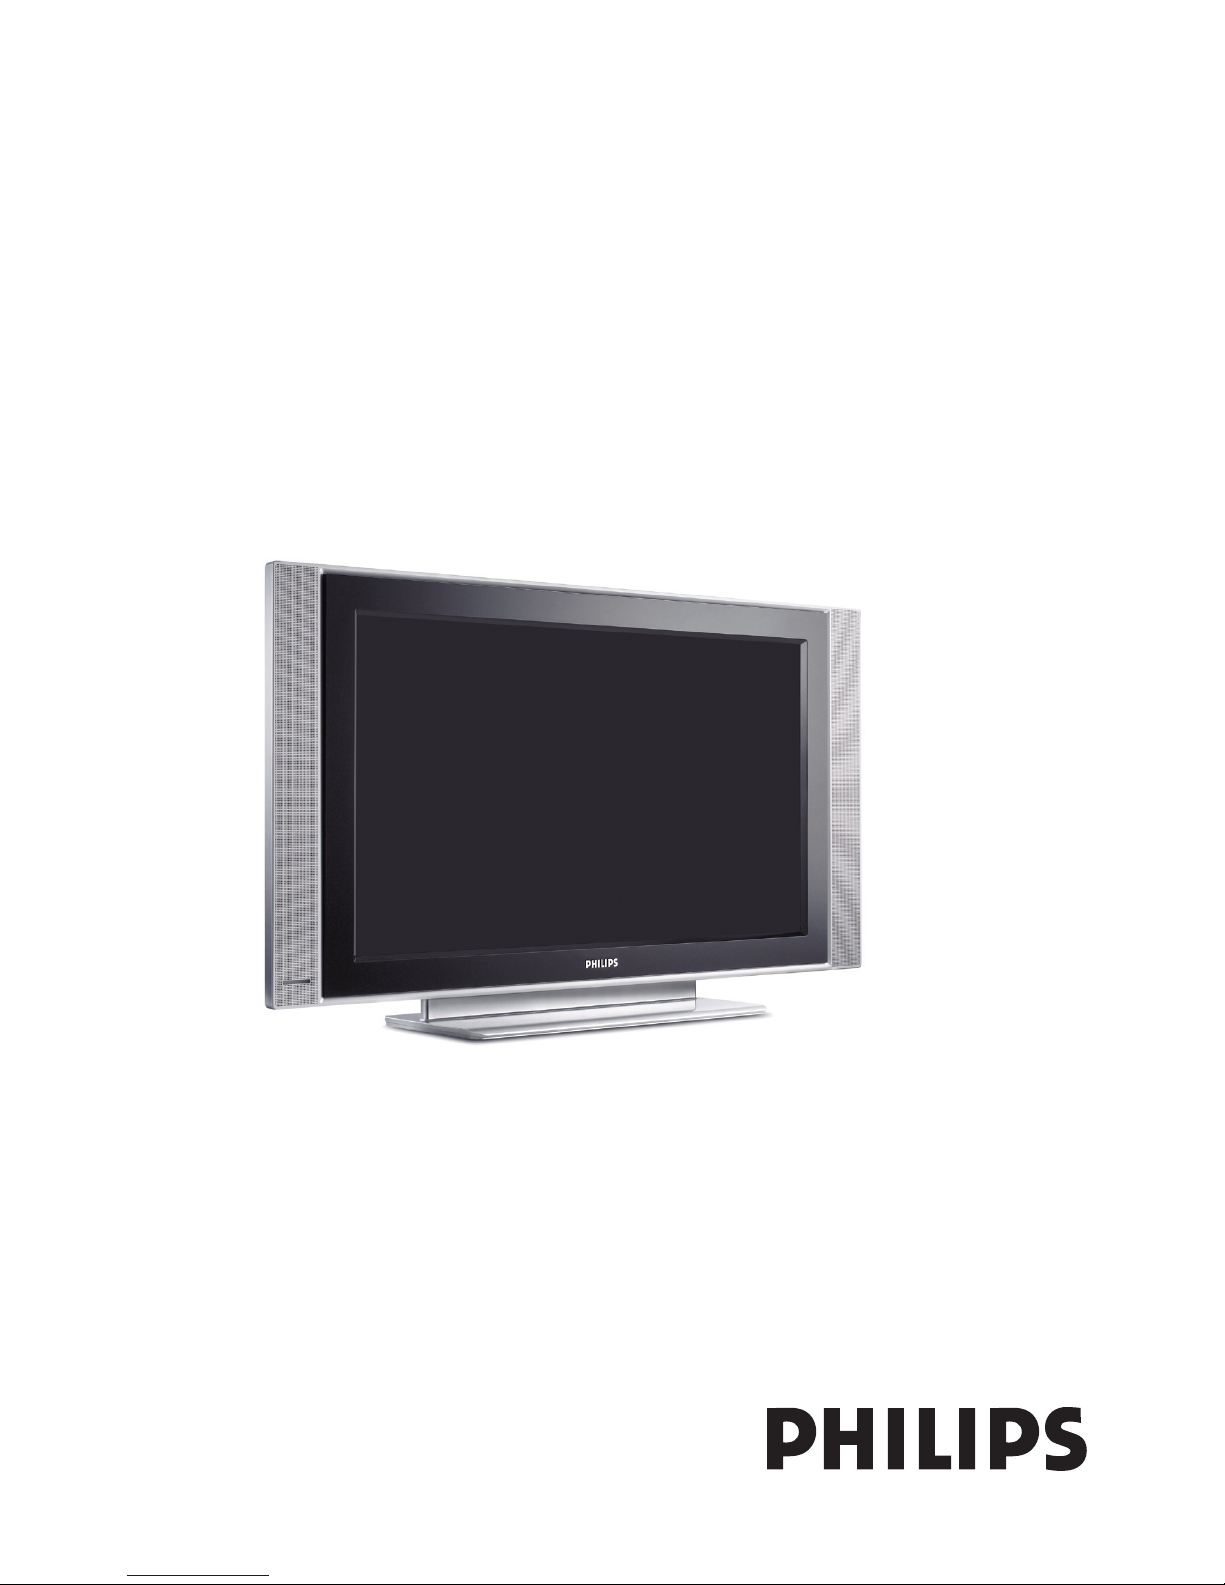
LCD TV
32PF5320
32PF7320
Page 2

Page 3

1
Contents
Thank you for purchasing this television set.
This handbook has been designed to help you install and operate your TV set.
We would strongly recommend that you read it thoroughly.
Table of Contents
Important information
Safety Information . . . . . . . . . . . . . . . . . . . . . . . . . . . . . . . . . . . . . . . . . . . . . . . . . . . . . . . . . . . . .
2
Installation
Presentation of the LCD TV
. . . . . . . . . . . . . . . . . . . . . . . . . . . . . . . . . . . . . . . . . . . . . . . . . . . .3
Remote Contol Buttons for LCD TV Functions . . . . . . . . . . . . . . . . . . . . . . . . . . . . . . . . . .
4-5
Installing your LCD TV . . . . . . . . . . . . . . . . . . . . . . . . . . . . . . . . . . . . . . . . . . . . . . . . . . . . . . . .
6
Remote Contol . . . . . . . . . . . . . . . . . . . . . . . . . . . . . . . . . . . . . . . . . . . . . . . . . . . . . . . . . . . . . .
6
Selecting the Menu Language . . . . . . . . . . . . . . . . . . . . . . . . . . . . . . . . . . . . . . . . . . . . . . . . . . . .
7
Automatic Installation of TV programmes
. . . . . . . . . . . . . . . . . . . . . . . . . . . . . . . . . . . . . . . . .7
Sorting of Programme . . . . . . . . . . . . . . . . . . . . . . . . . . . . . . . . . . . . . . . . . . . . . . . . . . . . . . . . .
7
Naming of Channel . . . . . . . . . . . . . . . . . . . . . . . . . . . . . . . . . . . . . . . . . . . . . . . . . . . . . . . . . . . .
8
Editing of Channel . . . . . . . . . . . . . . . . . . . . . . . . . . . . . . . . . . . . . . . . . . . . . . . . . . . . . . . . . . . . .
8
Manual Store . . . . . . . . . . . . . . . . . . . . . . . . . . . . . . . . . . . . . . . . . . . . . . . . . . . . . . . . . . . . . . . . .
9
Operation
Picture Settings . . . . . . . . . . . . . . . . . . . . . . . . . . . . . . . . . . . . . . . . . . . . . . . . . . . . . . . . . . . . . .
10
Sound Adjustments . . . . . . . . . . . . . . . . . . . . . . . . . . . . . . . . . . . . . . . . . . . . . . . . . . . . . . . . . . .
10
Feature Settings
. . . . . . . . . . . . . . . . . . . . . . . . . . . . . . . . . . . . . . . . . . . . . . . . . . . . . . . . . . . . .10
Timer Feature . . . . . . . . . . . . . . . . . . . . . . . . . . . . . . . . . . . . . . . . . . . . . . . . . . . . . . . . . . . . . . .
11
Child Lock Feature . . . . . . . . . . . . . . . . . . . . . . . . . . . . . . . . . . . . . . . . . . . . . . . . . . . . . . . . . . .
11
Using the Active Control Feature . . . . . . . . . . . . . . . . . . . . . . . . . . . . . . . . . . . . . . . . . . . . . . .
12
PIP Feature
. . . . . . . . . . . . . . . . . . . . . . . . . . . . . . . . . . . . . . . . . . . . . . . . . . . . . . . . . . . . . . . . .12
Screen Formats . . . . . . . . . . . . . . . . . . . . . . . . . . . . . . . . . . . . . . . . . . . . . . . . . . . . . . . . . . . . . .
13
Smart Picture and Sound Feature
. . . . . . . . . . . . . . . . . . . . . . . . . . . . . . . . . . . . . . . . . . . . . . .14
Using the TV as a PC Monitor . . . . . . . . . . . . . . . . . . . . . . . . . . . . . . . . . . . . . . . . . . . . . . . . .
15
Using in HD (High Definition) Mode . . . . . . . . . . . . . . . . . . . . . . . . . . . . . . . . . . . . . . . . . . . . .
16
Practical information
Tips . . . . . . . . . . . . . . . . . . . . . . . . . . . . . . . . . . . . . . . . . . . . . . . . . . . . . . . . . . . . . . . . . . . . . . .17
Specifications . . . . . . . . . . . . . . . . . . . . . . . . . . . . . . . . . . . . . . . . . . . . . . . . . . . . . . . . . . . . . . . . 18
Page 4
2
Safety Information
• Disconnect mains plug when:
– the red light below the TV screen is flashing continuously.
– cleaning the TV screen. Never use abrasive cleaning agents.
– there is a lightning storm.
– the set is left unattended for a prolonged period of time.
• No naked flame sources, such as lighted candles, should be placed on top of the TV or in
the vicinity.
• Do not place your TV set under direct sunlight or heat.
• Leave at least 5 cm around each side of TV set to allow for proper ventilation.
• Avoid placing your set (e.g. near the window) where it is likely to be exposed to rain or
water.
• No objects (such as vases) filled with liquids should be placed on top the TV so as to
avoid dripping or splashing of liquids on the set.
• Do not shift or move the set around when it is switched on.
• Do not touch, push or rub the surface with hard object.
• When the surface becomes dusty, wipe gently with absorbent cotton or other soft
materials like chamois. Do not use acetone, toluene and acohol as it causes chemical
damage to the polarizer.
• Wipe off saliva or water droplets as soon as possible. Long time contact with polarizar
causes deformations and colour fading.
• Be careful of condensation at sudden temperature change. Condensation does damage to
polarizar or electrical contact parts. After condensation fades, smear or spot will occur.
• Installation of the LCD TV on the wall should be carried out by qualified servicemen.
Improper and incorrect installation may render the set unsafe,
Recycling
The materials used in your set are either reusable or can be recycled.
To minimise environmental waste, specialist companies collect used
appliances and dismantle them after retrieving any materials that can be
used again (ask your dealer for further details).
Page 5
3
Presentation of the LCD TV
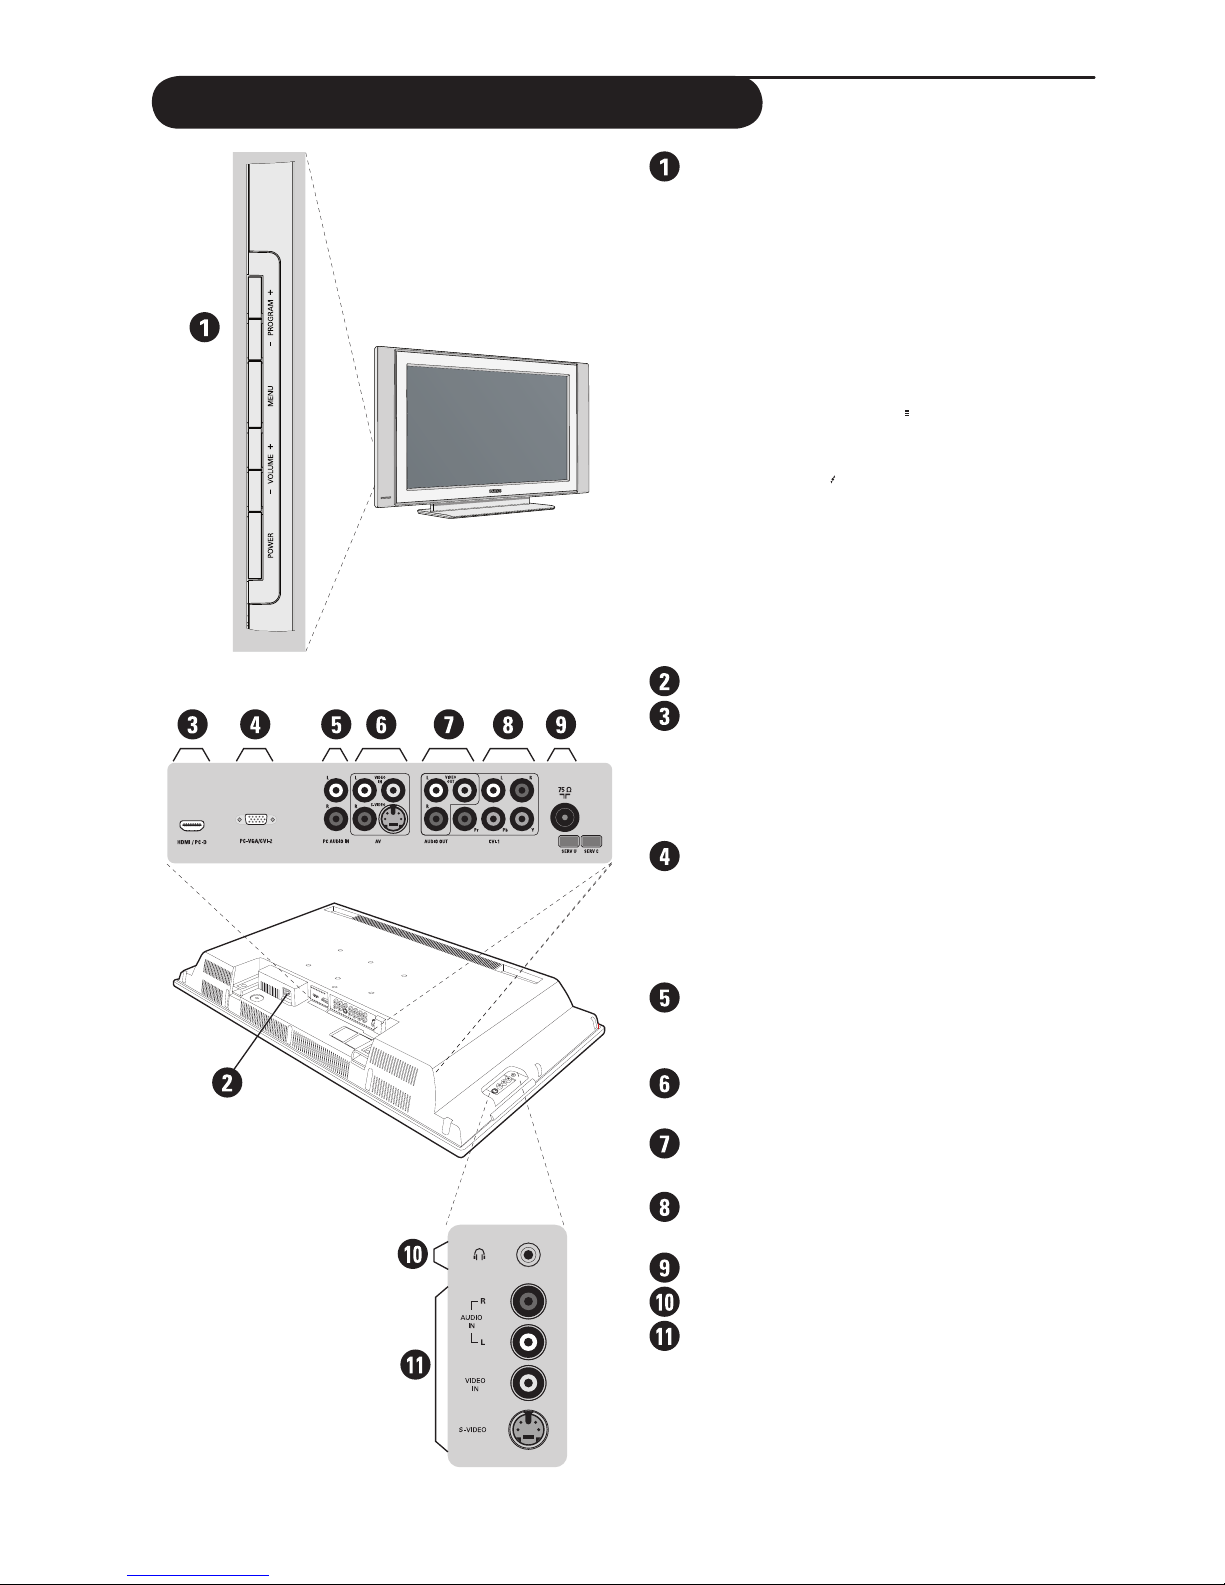
LCD TV buttons:
• POWER: to switch the TV on or off.
• VOLUME –/+: to adjust sound level.
• MENU: to access or close menus.
The PROGRAM –/+ buttons can be
used to select an adjustment and the
VOLUME –/+ buttons to make that
adjustment.
• PROGRAM –/+: to select
programmes.
Rear of set
The main connections are made at the
bottom and the rear of the LCD TV.
For more details on connections see Quick Use
Guide.
Power socket
HDMI/PC-D*: HDMI input for
connecting a HD (high definition)
equipment or computer (equipped with
DVI output connected with a DVI to
HDMI cable).
PC-VGA/CVI-2*: VGA for connecting
to a computer with VGA output. You
can also use a Component Video to
VGA adaptor to connect to a HD (high
difinition) equipment.
PC AUDIO IN: Audio input for
connecting computer/equipment with
audio output.
AV*: AUDIO VIDEO IN and SVHS
sockets.
AUDIO OUT and VIDEO OUT
sockets.
CVI-1*: for connecting equipment with
Component Video and Audio output.
TV aerial socket.
L Headphone jack.
REAR/SVHS*: allow for connections
for items such as cameras or gaming
stations.
*Press the
AV button on the remote control to
display the Source List menu and select TV or
connected peripheral equipment.
Page 6
4
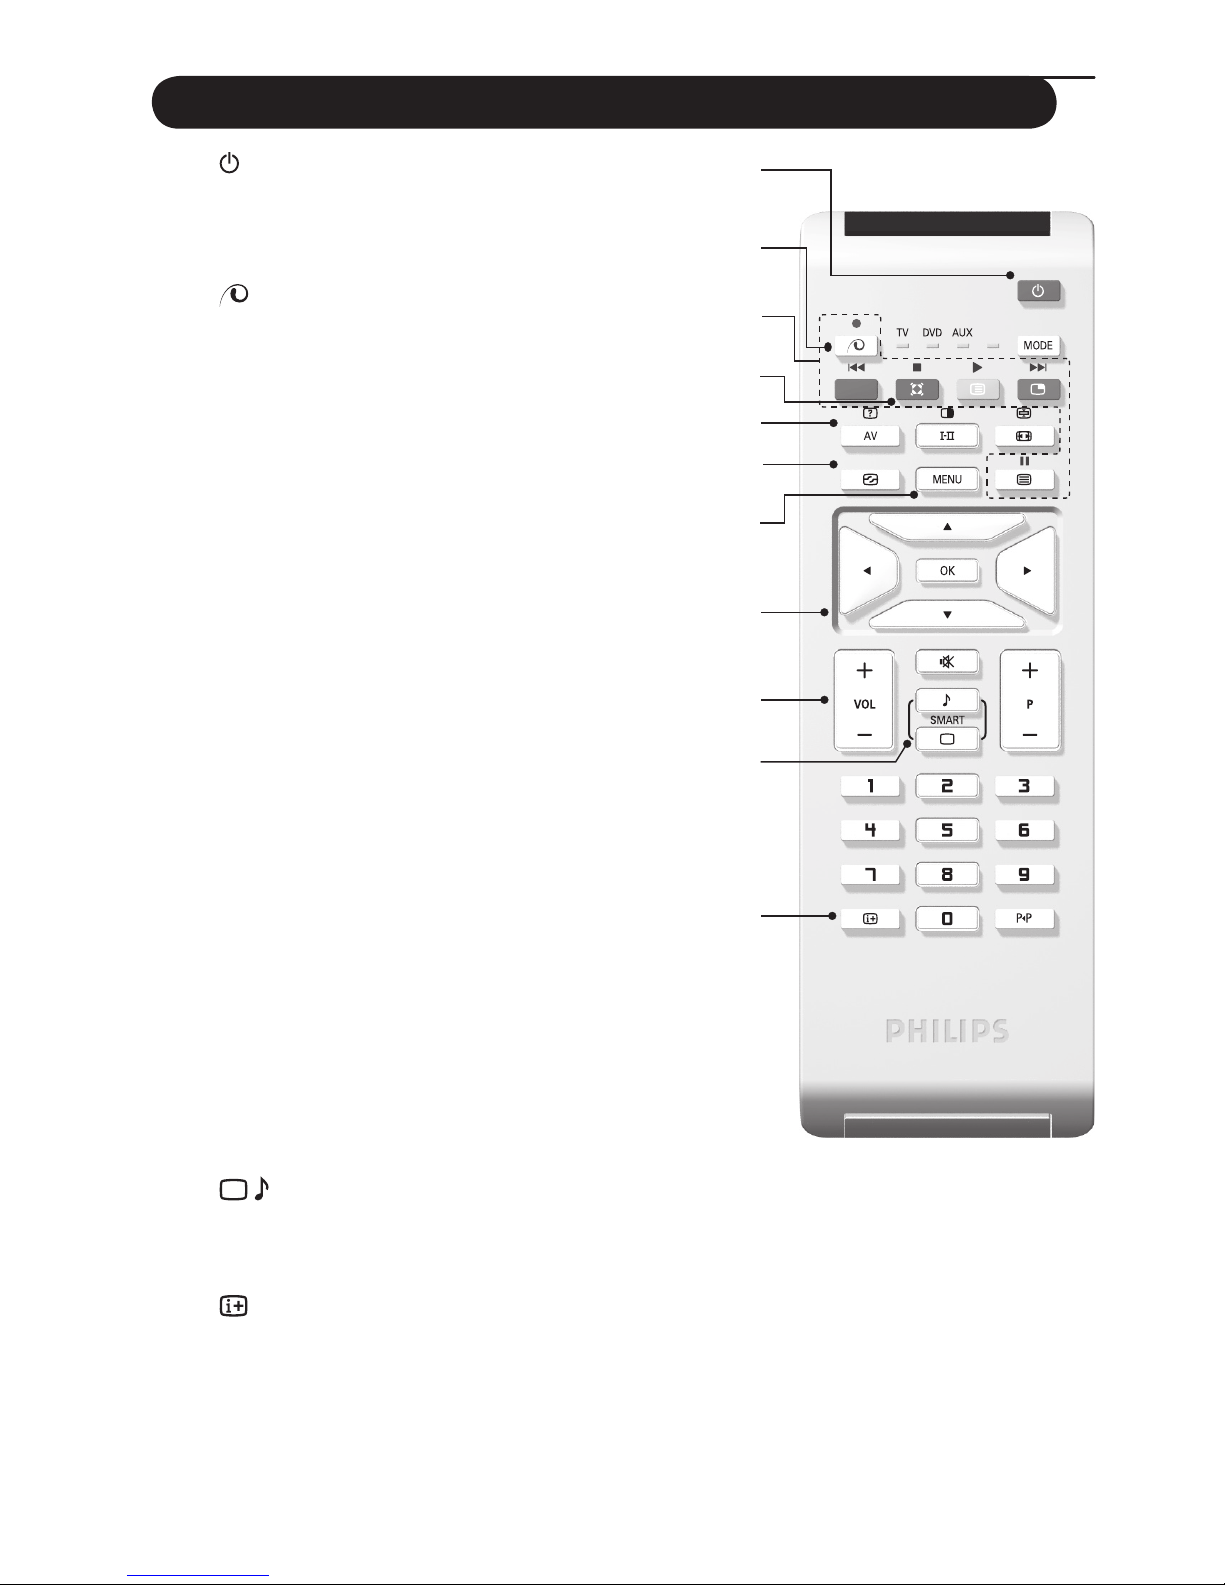
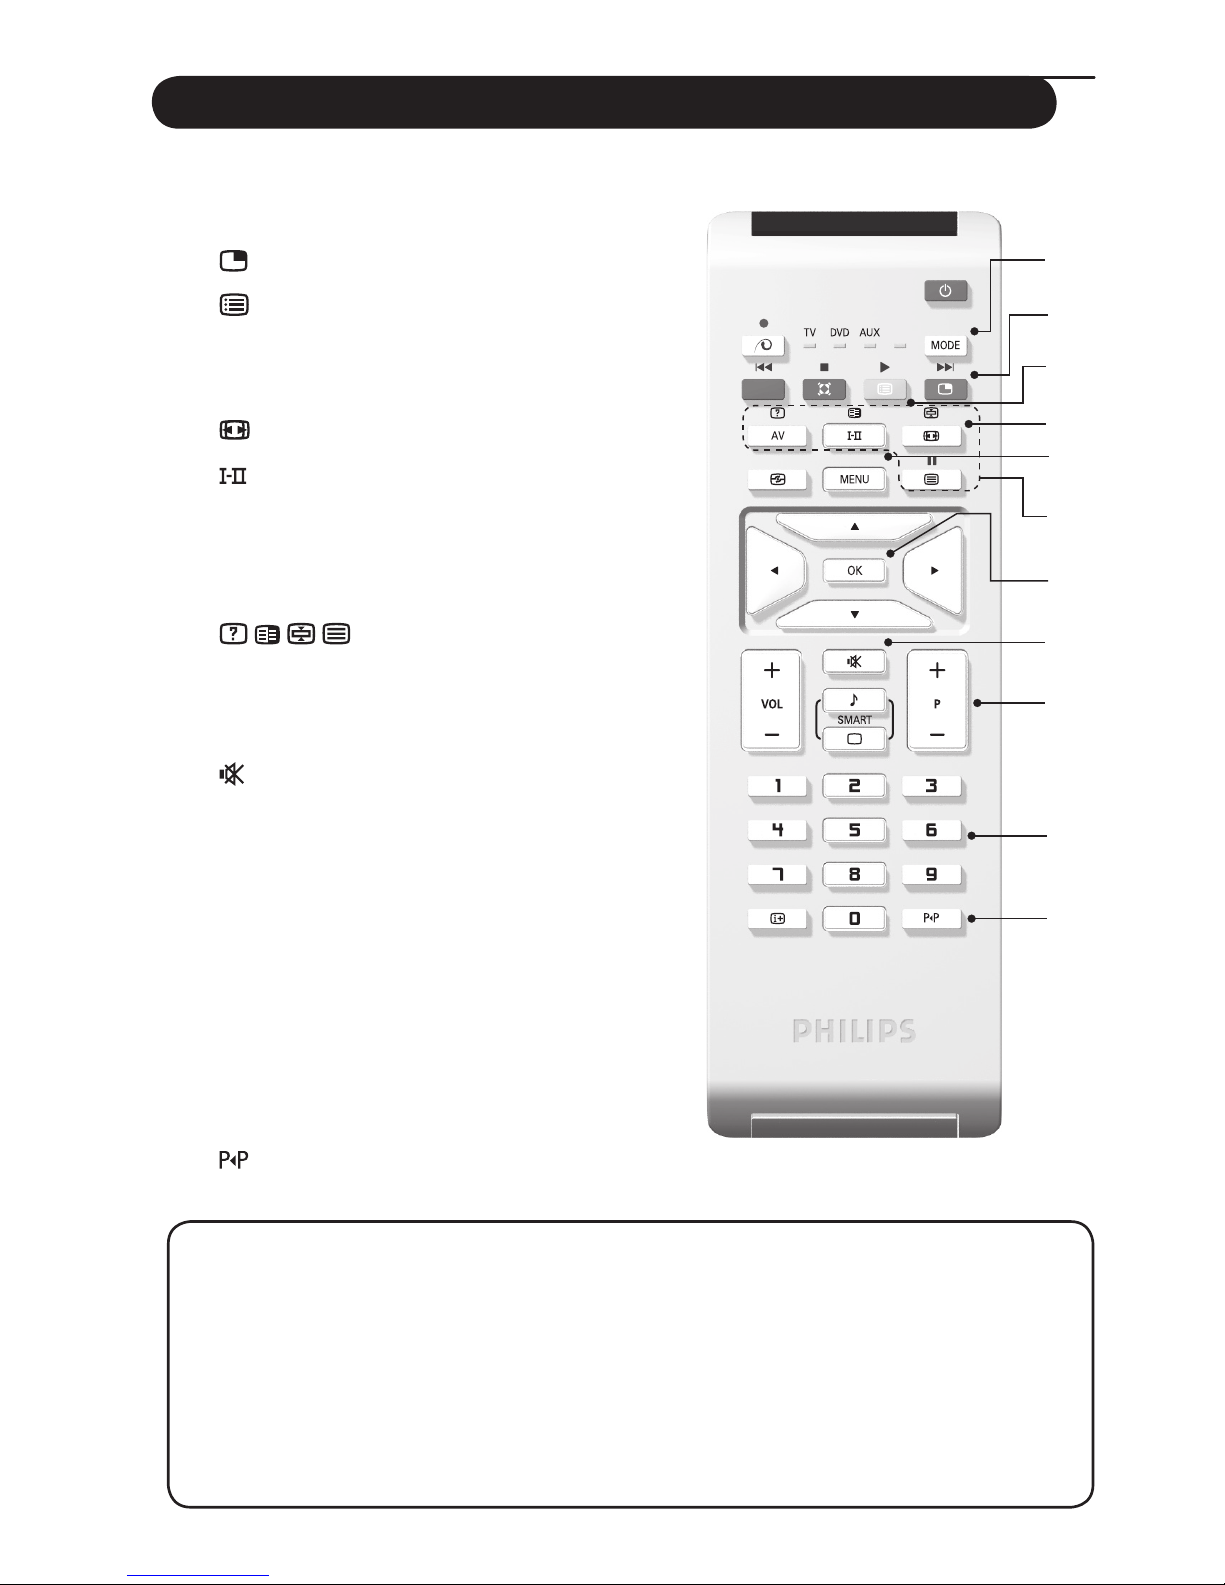
Remote Control Buttons for LCD TV Functions
1)
(STANDBY)
To set the TV to standby mode. To switch the TV
set on again, press P –/+ or 0 to 9 buttons or AV
button.
2) Pixel + (only available on certain models/
versions)
Switches the Pixel + demonstration mode on or off.
3) ®
I
Ò ‡ π †
I
º
Peripheral device buttons
(Refer to “Mode selector” on page 5)
4) Q Surround mode
To activate / deactivate the surround sound effect.
In stereo, this gives the impression that the speakers
are further apart. For models equipped with Virtual
Dolby Surround*, you can experience Dolby
Surround Pro Logic sound effects.
5) AV
To display Source List to select TV or peripheral
equipment connected to TV, AV, REAR/SVHS,
CVI-1(SD/HD), CVI-2(SD/HD), HDMI, PC-VGA, or
PC-D (Quick Use Guide).
6) h Active control
Optimizes the picture quality depending on the
quality of the incoming signal and the ambient light
conditions.
7) MENU
To call up or exit the TV menus.
8) Cursor
These 4 buttons are used to navigate around the
menus ( ÎïÍÆ ).
9) Volume
To adjust the sound level.
10) Smart picture and sound
Used to access a series of predefined picture and
sound settings.
11) Screen information
To display/remove the programme number, the time,
the sound mode and the time remaining on the timer.
Hold down for 5 seconds to permanently display the
programme number on the screen.
*Manufactured under license from Dolby Laboratories. “Dolby” and the double-D symbols are
trademarks of Dolby Laboratories.
1)
2)
3)
4)
5)
6)
7)
8)
9)
10)
11)
Page 7
5
Remote Control Buttons for LCD TV Functions
12) Mode*
Press this button to switch between TV, DVD or
AUX.
13) PIP on/off (refer to page 12)
14) List of programmes
To display / clear the list of programmes. Use
the buttons Îï to select a programme and the
button Æ to display it.
15) Screen Format (refer to page 13)
16) Sound mode
Used to force programmes in Stereo and Nicam
Stereo to Mono or, for bilingual programmes, to
choose between Dual5or Dual6.
The
Mono indication is red when in forced position.
17) Teletext
(Not available.)
18) OK
Confirms selection (For DVD/AUX mode only)
19)
(Mute)
Press to mute or restore sound.
20) P –/+ Selecting TV programme
To move up or down a programme. The number
and the sound mode are displayed for a few
seconds.
For some TV programmes the title of the programme
appears at the bottom of the screen.
21) 0/9 Numerical buttons
For direct access to programmes. For a 2 digit
programme number, the 2nd digit must be entered
before the dash disappears.
22) Previous Programme
To access the previously viewed programme.
*Mode selector
The remote control allows you to control the main functions of SOME Philips DVD or VCR
models only. Note : Not available to Philips DVD-R
Press the
MODE button to select the required mode: DVD or AUX.
The remote control indicator lights up to display the selected mode. It switches off automatically
after 20 seconds if left idle. The remote control automatically returns to TV mode.
The following buttons are operational, depending on the equipment:
B X
® IÒ ‡ π †I º OK MENU ÎïÍÆ (cursor) P –/+ 0/9 Ë Á
(12
(13
(14
(15
(16
(17
(18
(19
(20
(21
(22
Page 8
6
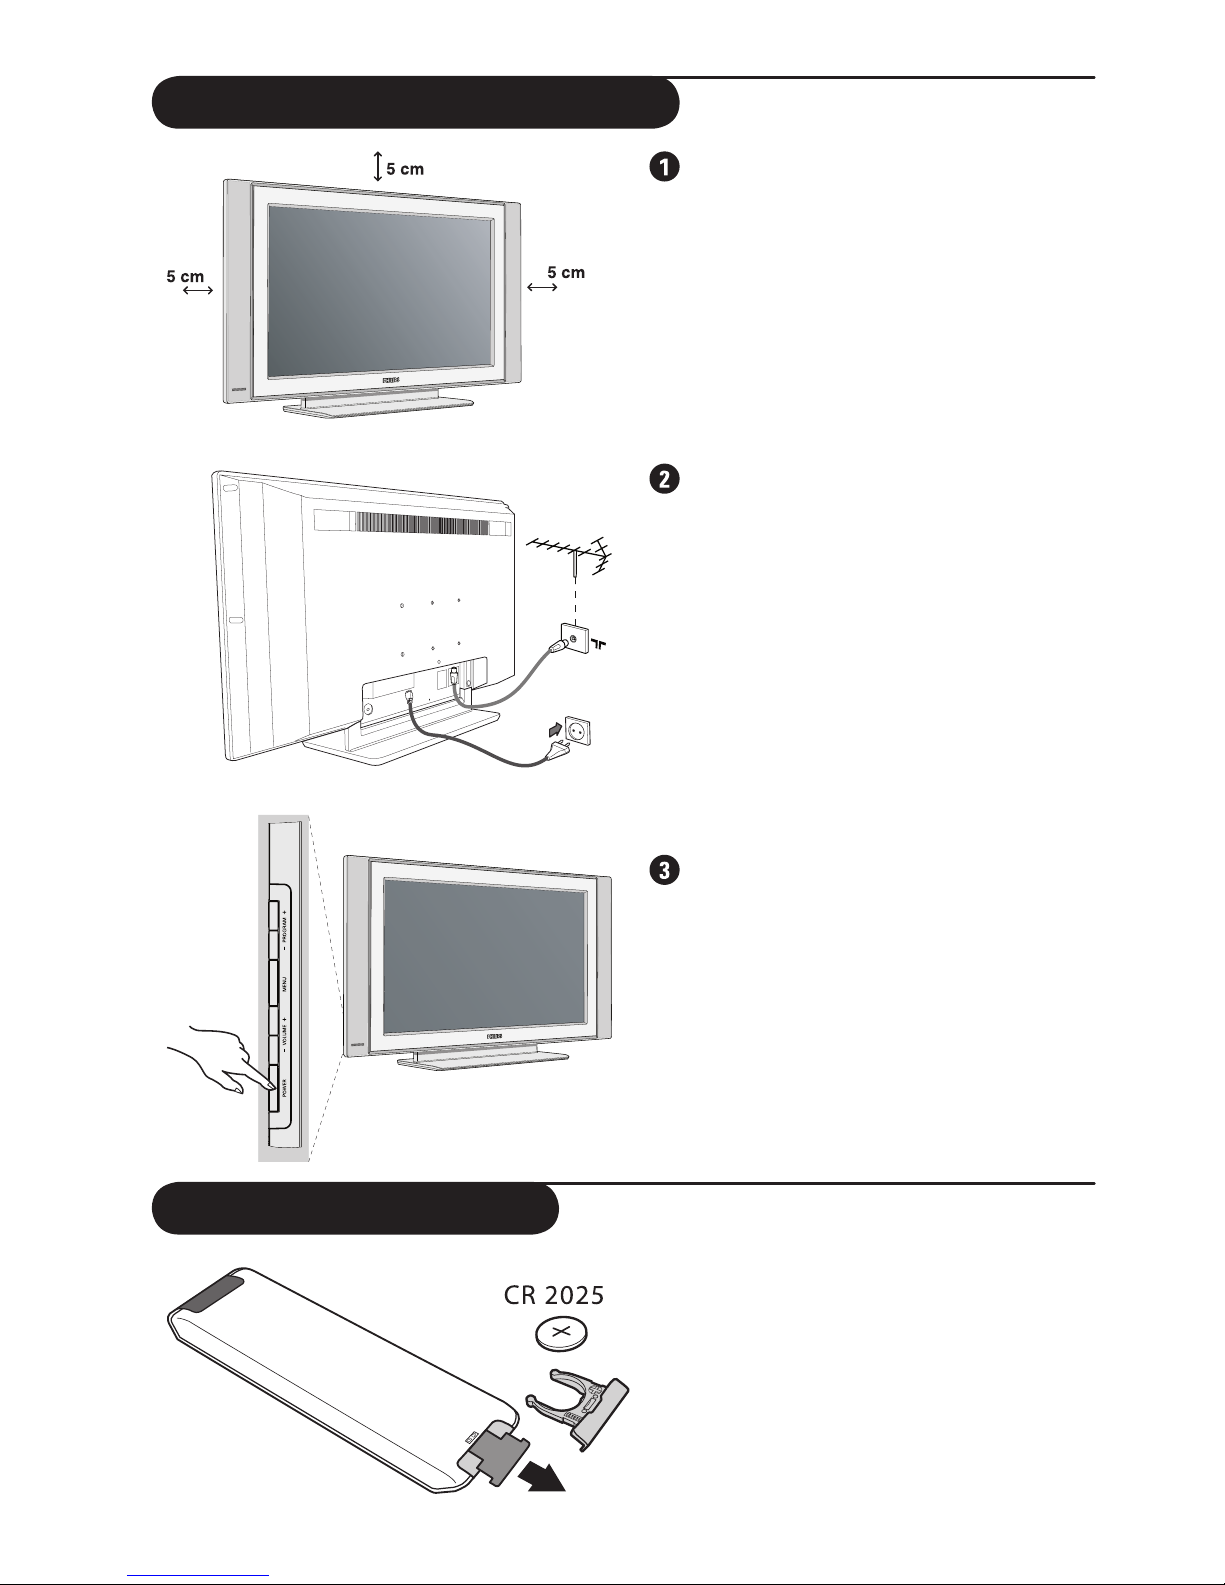
Installing your LCD TV
Positioning the television set
Place your TV on a solid stable surface.
To avoid danger do not expose the TV
to water, or heat source (e.g. lamp,
candle, radiator). Do not obstruct the
ventilation grid at the rear.
Connecting the aerials
• Use the aerial connection lead and
connect the
: socket situated at
the bottom of the TV to your aerial
socket.
• Connect the power lead to the
television and the mains plug into the
wall socket (220-240 V 50/60 Hz).
For connecting other appliances see page
Quick Use Guide.
Switching on
To switch on the set, press the
POWER button. A green indicator
comes on and the screen lights up. Go
straight to the Quick Installation chapter.
If the TV remains in standby mode
(red indicator), press the P –/+ on the
remote control.
The indicator will flash when you use the
remote control.
Remote Control
Pull out the plastic insulation sheet from the
battery, this will activate the remote control.
The battery supplied with the appliance does
not contain mercury or nickel cadmium so
as to protect the environment. Please do
not discard your used batteries, but use the
recycling methods available (consult your
distributor).
Page 9
7
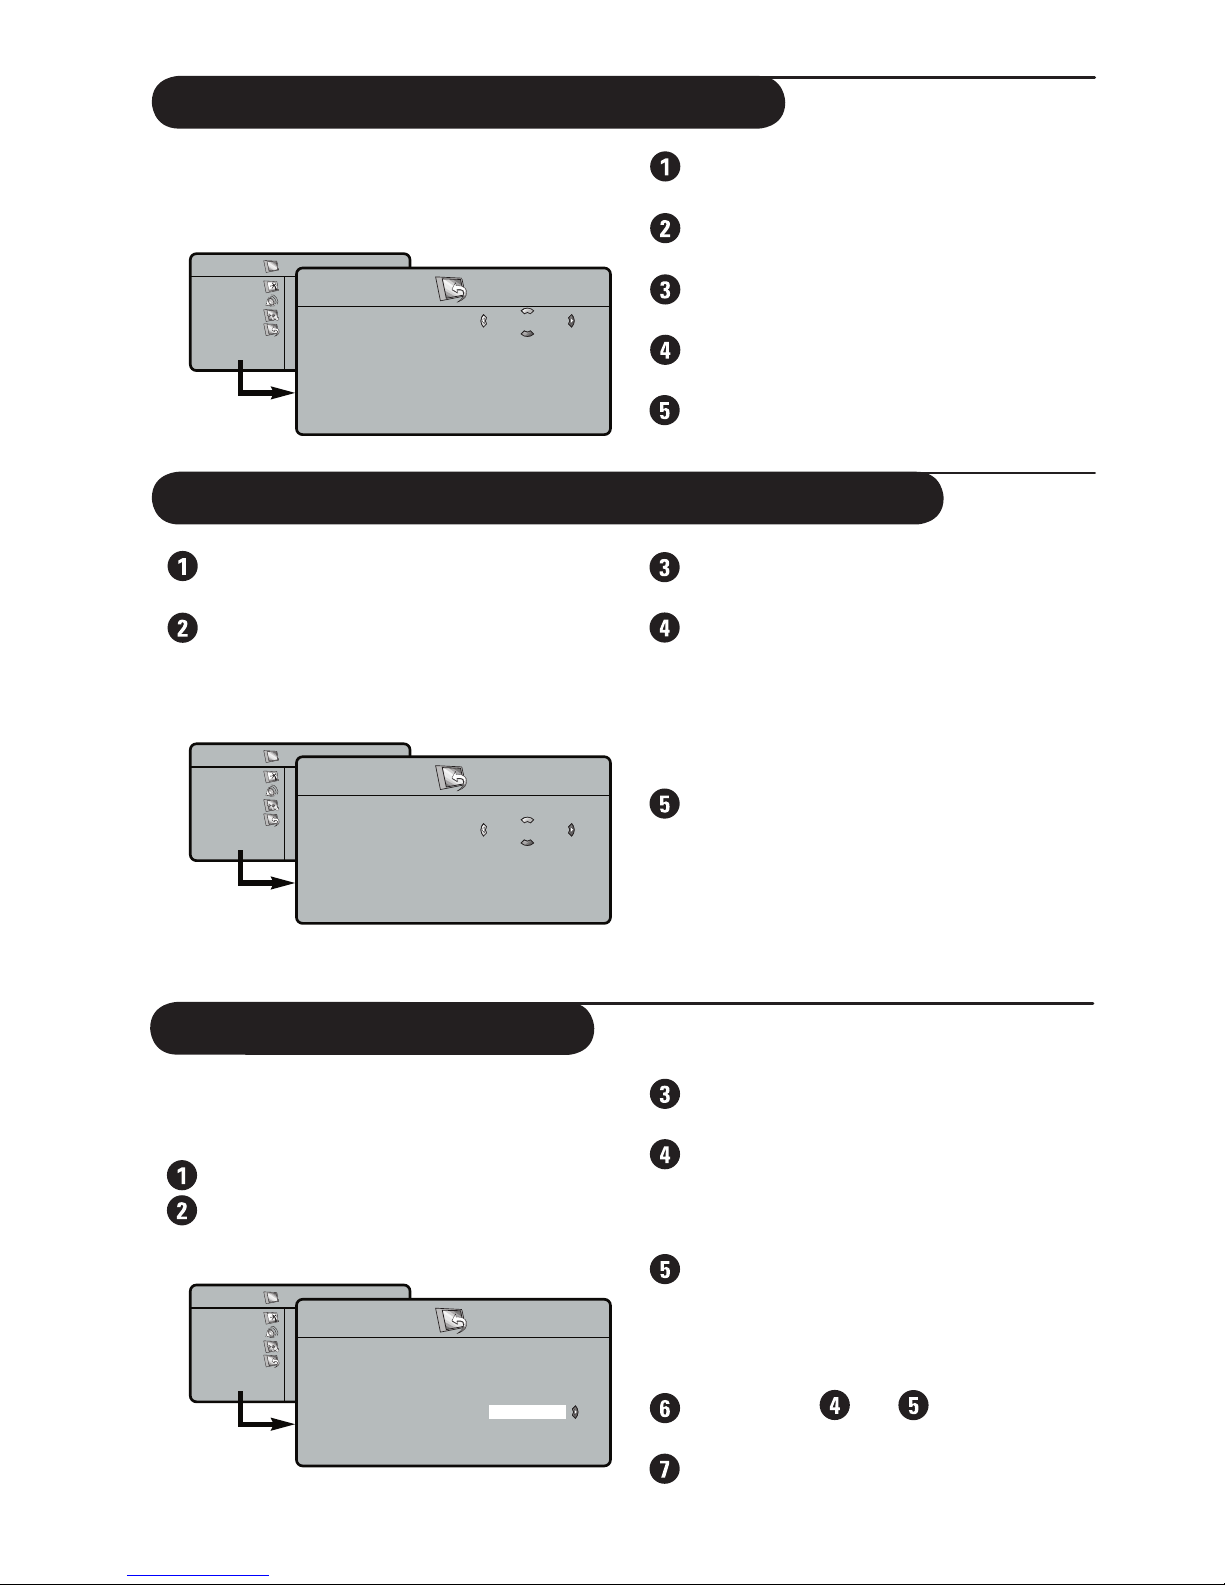
Sorting of Programme
Sort feature allows you to change the
channel number to another channel number
for a particular TV station.
Press the MENU button.
Use the Î/ï button on the remote
control to select
Install and press the Æ
button to access
Install menu.
Before you proceed to do the
Automatic
Installation of TV Programmes, select
the menu
Language of your choice.
Press the MENU button. The TV Menu
is displayed on the screen.
Use the Î/ï button on the remote
control to select the
Install.
Press the Æ button to access the Install
menu (
Language is highlighted).
Select your language using the Í/Æ
button.
To exit the menu, press
Ë button.
TV Menu
Picture
Sound
Features
Install
Install
Language
Auto Store
Manual Store
Sort
Name
Channel Edit
0
1
2
4
5
Æ
Æ
Æ
Æ
Æ
Æ ·
·
·
·
·
·
3
TV Menu
Picture
Sound
Features
Install
Install
Language
Auto Store
Manual Store
Sort
Name
Channel Edit
English
Æ
Æ
Æ
Æ
Æ
TV Menu
Picture
Sound
Features
Install
Install
Language
Auto Store
Manual Store
Sort
Name
Channel Edit
Start?
Æ
Æ
Æ
Æ
Æ
Selecting the Menu Language
Press the MENU button. The TV Menu
is displayed on the screen.
Use the Î/ï button on the remote
control to select the
Install and press Æ
button to access Install menu.
Press ï button repeatedly until Auto
Store is selected.
Press Æ button to start automatic tuning
of TV programmes. When the automatic
tuning is completed, the Install menu is
displayed.
To exit or interrupt the search, press
MENU.
To exit the menu, press
Ë button.
Automatic Installation of TV Programmes
Press ï button repeatedly until Sort is
selected.
Select the programme you want to sort
using the
Î/ï button and press Æ to
enter sorting mode (the arrow points to
the left).
Then use the cursor Î/ï button to
select the new number and press the
Í button to activate sorting mode (the
arrow how points to the right and
sorting is completed).
Repeat steps and for each
program you wish to re-number.
To exit the menus, press
Ë button.
Page 10
8
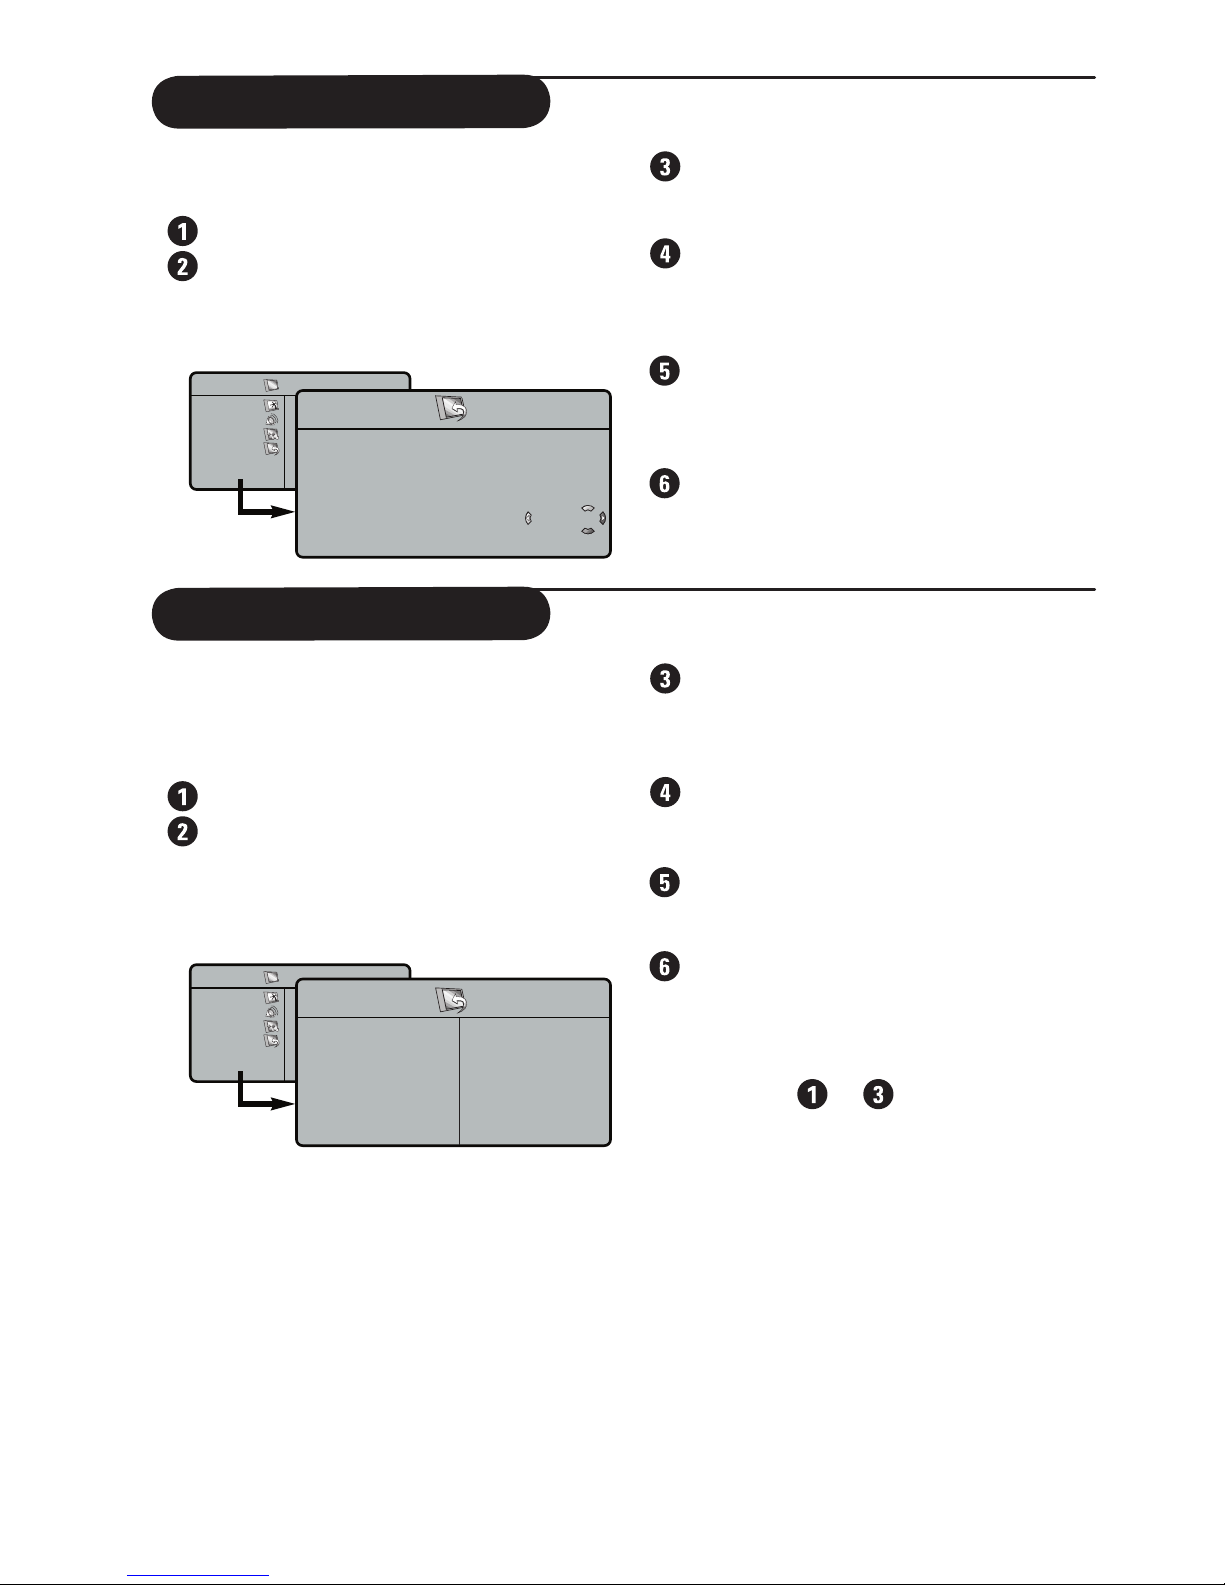
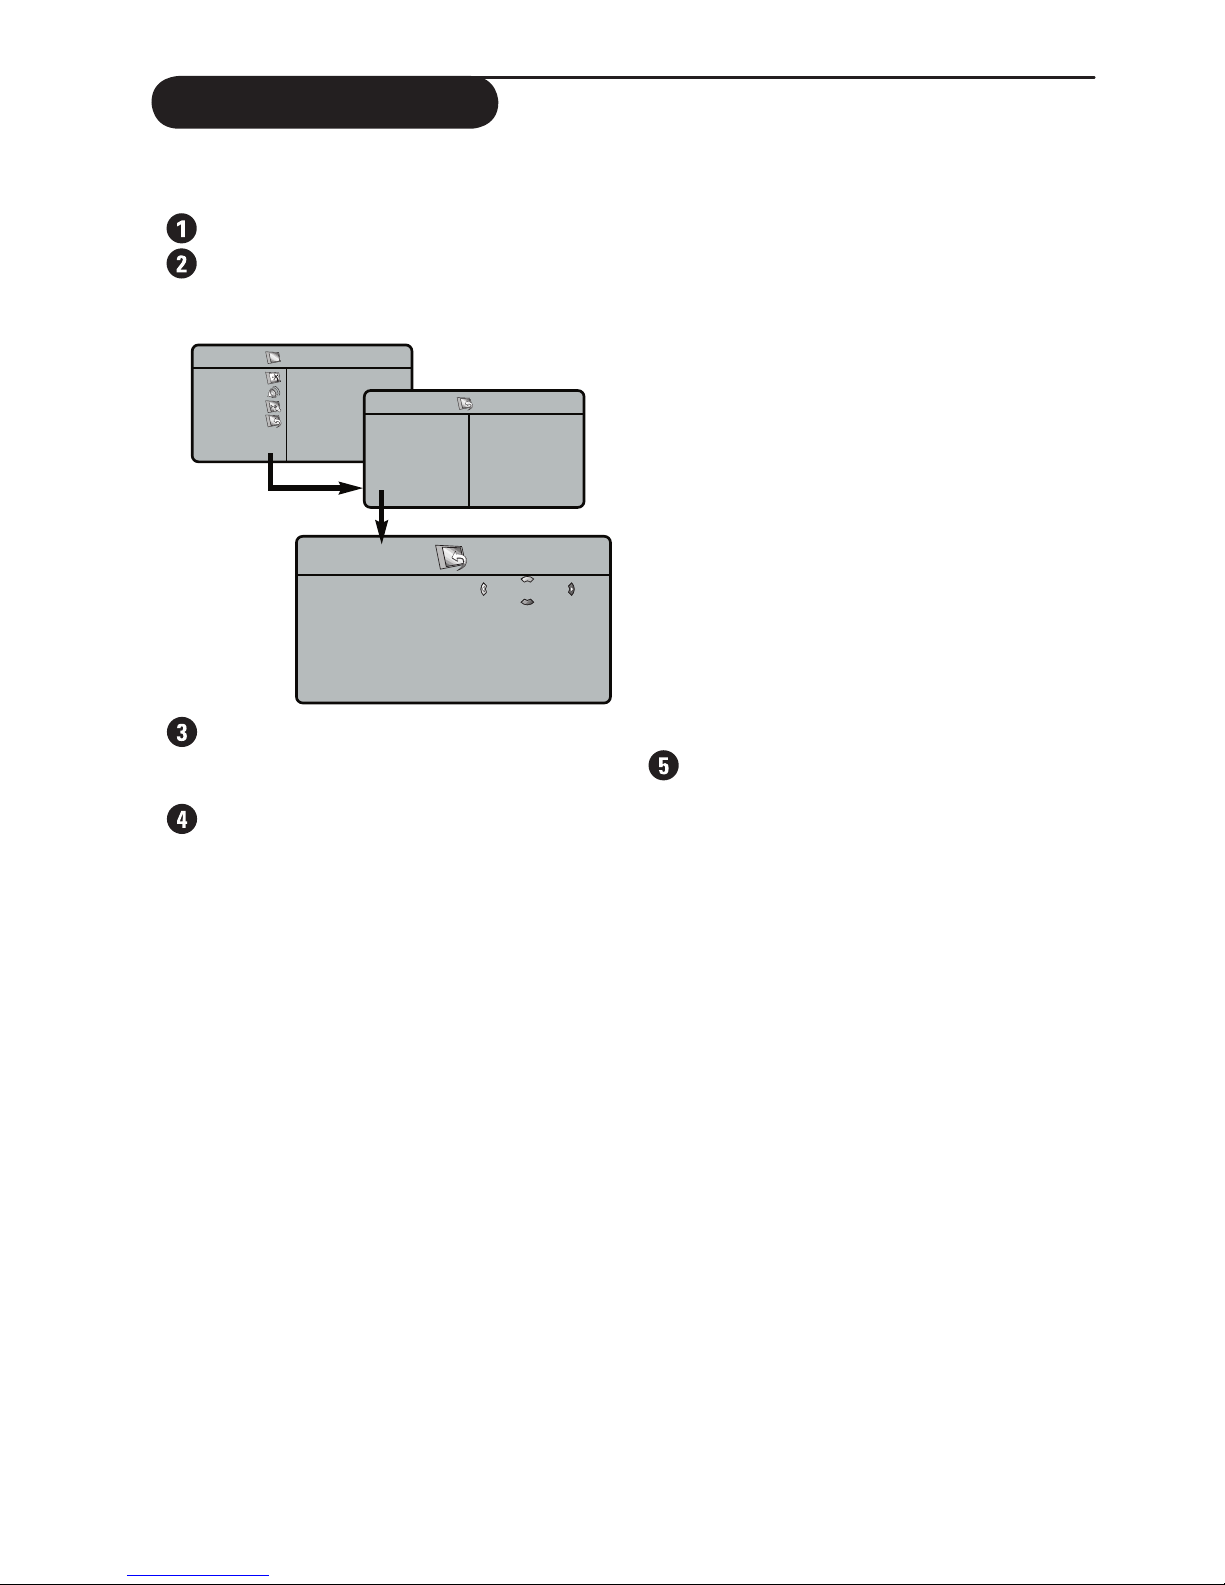
Name feature allows you to enter a name
for any channel you select.
Press the MENU button.
Use the Î/ï button on the remote
control repeated until
Install is selected
and press the
Æ button to access Install
menu.
Press ï button repeatedly until Name
is selected and press
Æ button to access
name mode.
Use the Î/ï button to key in first
character. Use the
Æ button to move to
next character slot. (You can key up to a
maximum of 5 characters).
To store name, press the
Æ button
repeatedly until you exit name mode.
The name is now indicated at the top left
hand corner of the screen.
To exit the menu, press
Ë button.
TV Menu
Picture
Sound
Features
Install
Install
Language
Auto Store
Manual Store
Sort
Name
Channel Edit
E L L I E
Æ
Æ
Æ
Æ
Æ
2
Naming of Channel
Channel Edit feature allows you to edit or
skip programmes which have bad or weak
TV signal or programme that you do not
watch often.
Press the MENU button.
Use the Î/ï button on the remote
control repeated until
Install is selected
and press the
Æ button to access Install
menu.
Press ï button repeatedly until
Channel Edit is selected and press
Æ button to access the Channel Edit
menu.
Use the Í/Æ button or Digit (0 - 9)
button to select channel you want to
skip.
Press the
ï button to select skipped and
use the
Í/Æ button to select On option
to activate skipping of channel.
To exit the menu, press
Ë button.
Restoring skipped channels
To restore skipped channels :
- Repeat steps
to
and select the
channel you want to restore by the
Î/ï
button.
- Press
Í/Æ button to select Off option to
restore the skipped channel.
Editing of Channel
TV Menu
Picture
Sound
Features
Install
Install
Language
Auto Store
Manual Store
Sort
Name
Channel Edit
Æ
Æ
Æ
Æ
Æ
Æ
Channel
·
Skipped
·
Page 11
9
Manual Store
Manual Store feature allows you to store the
programmes one at a time.
Press the MENU button.
Use the Î/ï button repeatedly until
Install is selected and press Æ button to
access Install menu.
- Colour System:
use the
Í/Æ button to select Auto
(automatic detection),
PAL, NTSC 3.58,
NTSC 4.43 or
SECAM.
- Sound System:
use the
Í/Æ button to select Auto
(automatic detection), BG, I, DK or M.
- Search:
press
Æ button to start manual search.
Searching stops once a transmitting channel
is found. If you know the frequency of
the required channel, you can key in
directlythe frequency using the
Digit (0 to
9) buttons.
- Channel:
enter the required number with the Í/Æ
or 0 to 9 buttons.
- Fine Tune:
if the reception is not satisfactory, adjust
using the
Í/Æ button.
- Store:
press
Æ button to store channel.
To exit the menus, press Ë button.
Press ï button repeatedly until Manual
Store is selected and press Æ button to
enter Manual Store menu.
Use the Î/ï button to select a setting:
TV Menu
Picture
Sound
Features
Install
·
Language
·
Auto Store
·
Manual Store
·
Sort
·
Name
Manual Store
Colour System
Sound System
Search
Channel
Fine Tune
Store
Auto
Æ
Æ
Æ
Æ
Æ
Install
Language
Auto Store
Manual Store
Sort
Name
Channel Edit
Æ
Æ
Æ
Æ
Æ
Æ
·
Colour System
·
Sound System
·
Search
·
Programme
·
Fine Tune
Page 12
10
Picture Settings
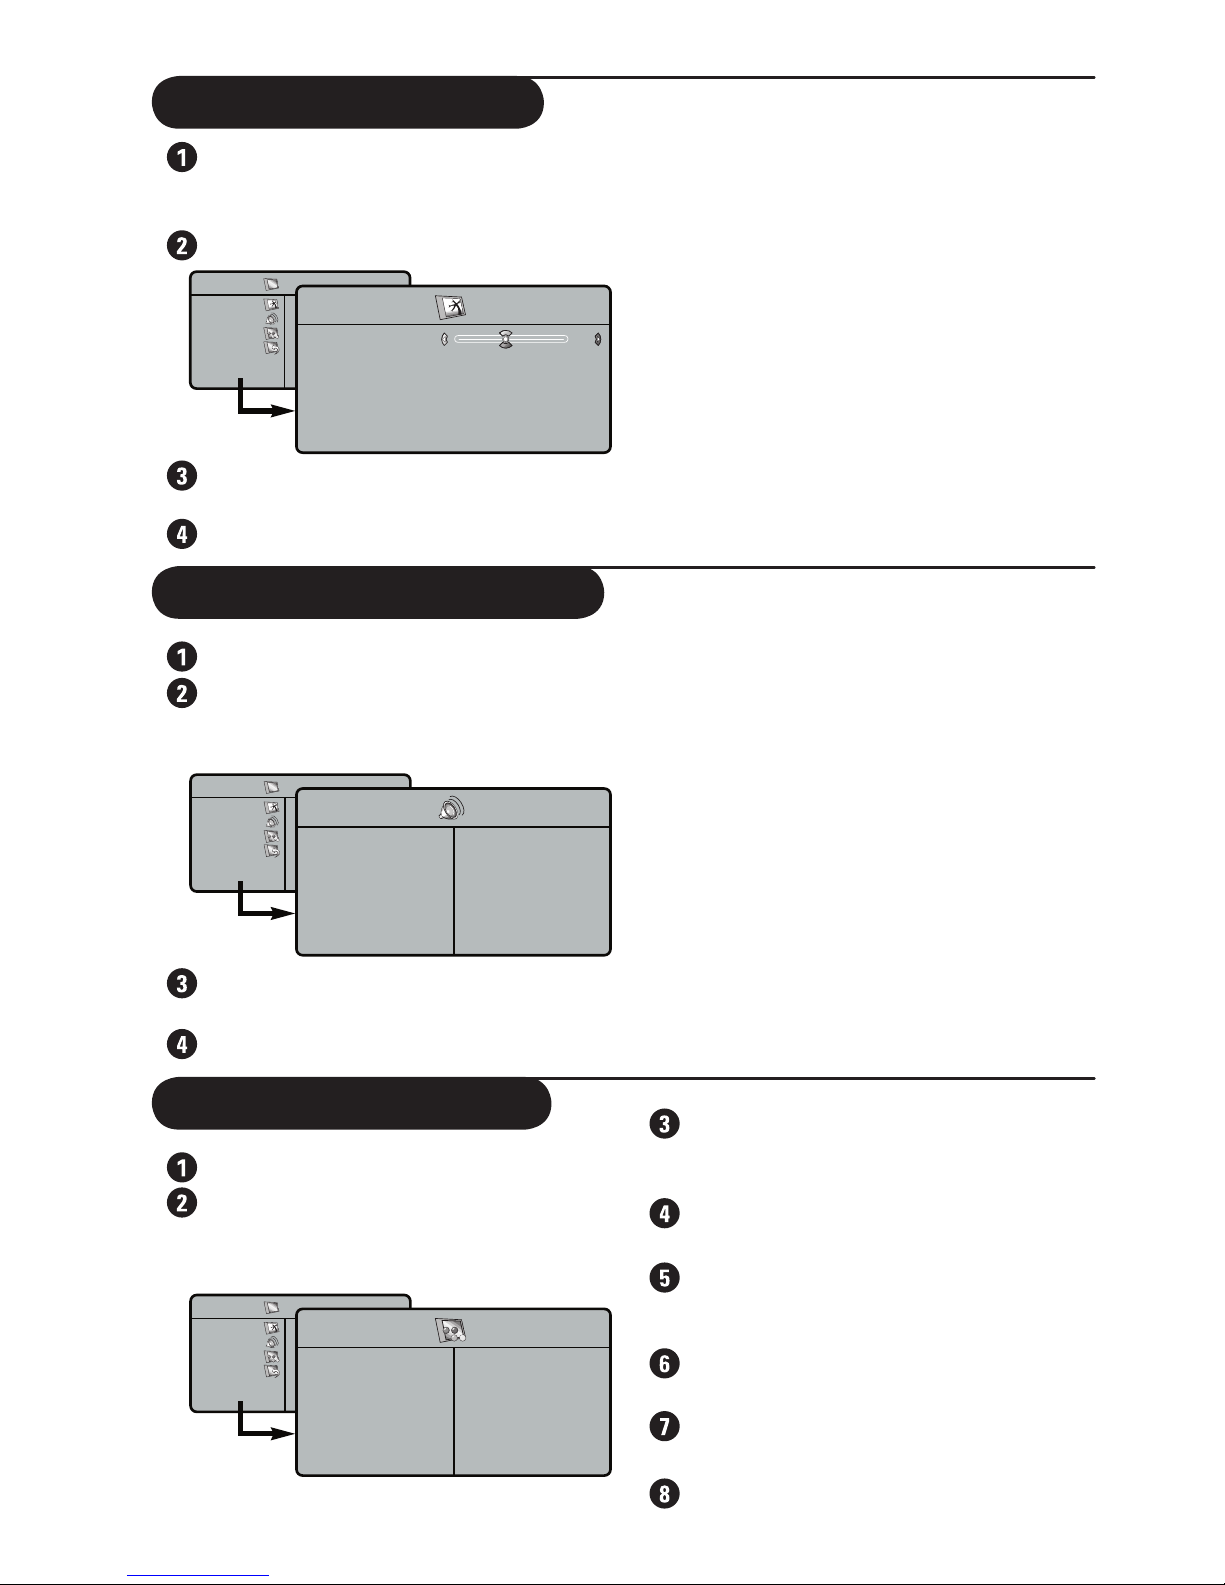
Press the MENU button. The TV
Menu is displayed on the screen (Picture
is highlighted).
Press Æ button to access Picture menu.
Use the Î/ï button to select a setting
and the
Í/Æ button to adjust.
To exit the menu, press
Ë button.
Description of the adjustments:
• Brightness: this changes picture brilliance.
• Colour: this changes the intensity of the
colour.
• Contrast: this changes the difference
between the light and dark tones.
• Sharpness: this changes the picture
definition.
• Hue (available for NTSC programmes only):
to increase or decrease colour intensity.
• ColourTemp.: this changes the colour
rendering: Cool (more blue), Normal
(balanced) or Warm (more red).
Sound Adjustments
Press the MENU button.
Press ï button repeatedly until Sound
is selected and press
Æ button to access
the Sound menu.
Use the Î/ï button to select a setting
and the
Í/Æ button to adjust.
To exit the menu, press
Ë button.
Description of the settings:
• Equalizer: to adjust the sound tone (from
bass: 120 Hz to treble: 10 kHz).
• Balance: this balances the sound on the
left and right speakers.
• AVL (Automatic Volume Leveller): this is
used to limit increases in sound, especially
on program change or advertising slots.
This is not available when Dolby Virtual is
activated.
• Dolby Virtual: to activate / deactivate
the surround sound effect.
You can also access these settings with the
button k.
Feature Settings
Press the MENU button.
Press ï button repeatedly until
Features is selected and press Æ button
to access
Features menu.
Timer: allows you to set the timer
to switch to another programme at a
specified time. (refer to page 11).
Child Lock: allows you to lock
programmes. (refer to page 11).
Contrast+: automatic adjustment of the
picture contrast which permanently sets
the darkest part of the picture to black.
NR: attenuates picture noise (snow) in
difficult reception conditions.
PIP: to adjust the size and position of
the PIP screen.
To exit the menus, press Ë.
TV Menu
Picture
Sound
Features
Install
Sound
Equalizer
Balance
AVL
Dolby Virtual
Æ
120 Hz
·
Æ
500 Hz
·
Æ
1500 Hz
·
Æ
10 KHz
·
·
5 KHz
TV Menu
Picture
Sound
Features
Install
Picture
Brightness
Colour
Contrast
Sharpness
Hue
ColourTemp.
Æ
Æ
Æ
Æ
39
TV Menu
Picture
Sound
Features
Install
Features
Timer
Child Lock
Contrast+
NR
PIP
Æ
Time
·
Æ
Start Time
·
Æ
Stop Time
·
Æ
Æ
Activate
·
·
Channel
Page 13
11
Timer Feature
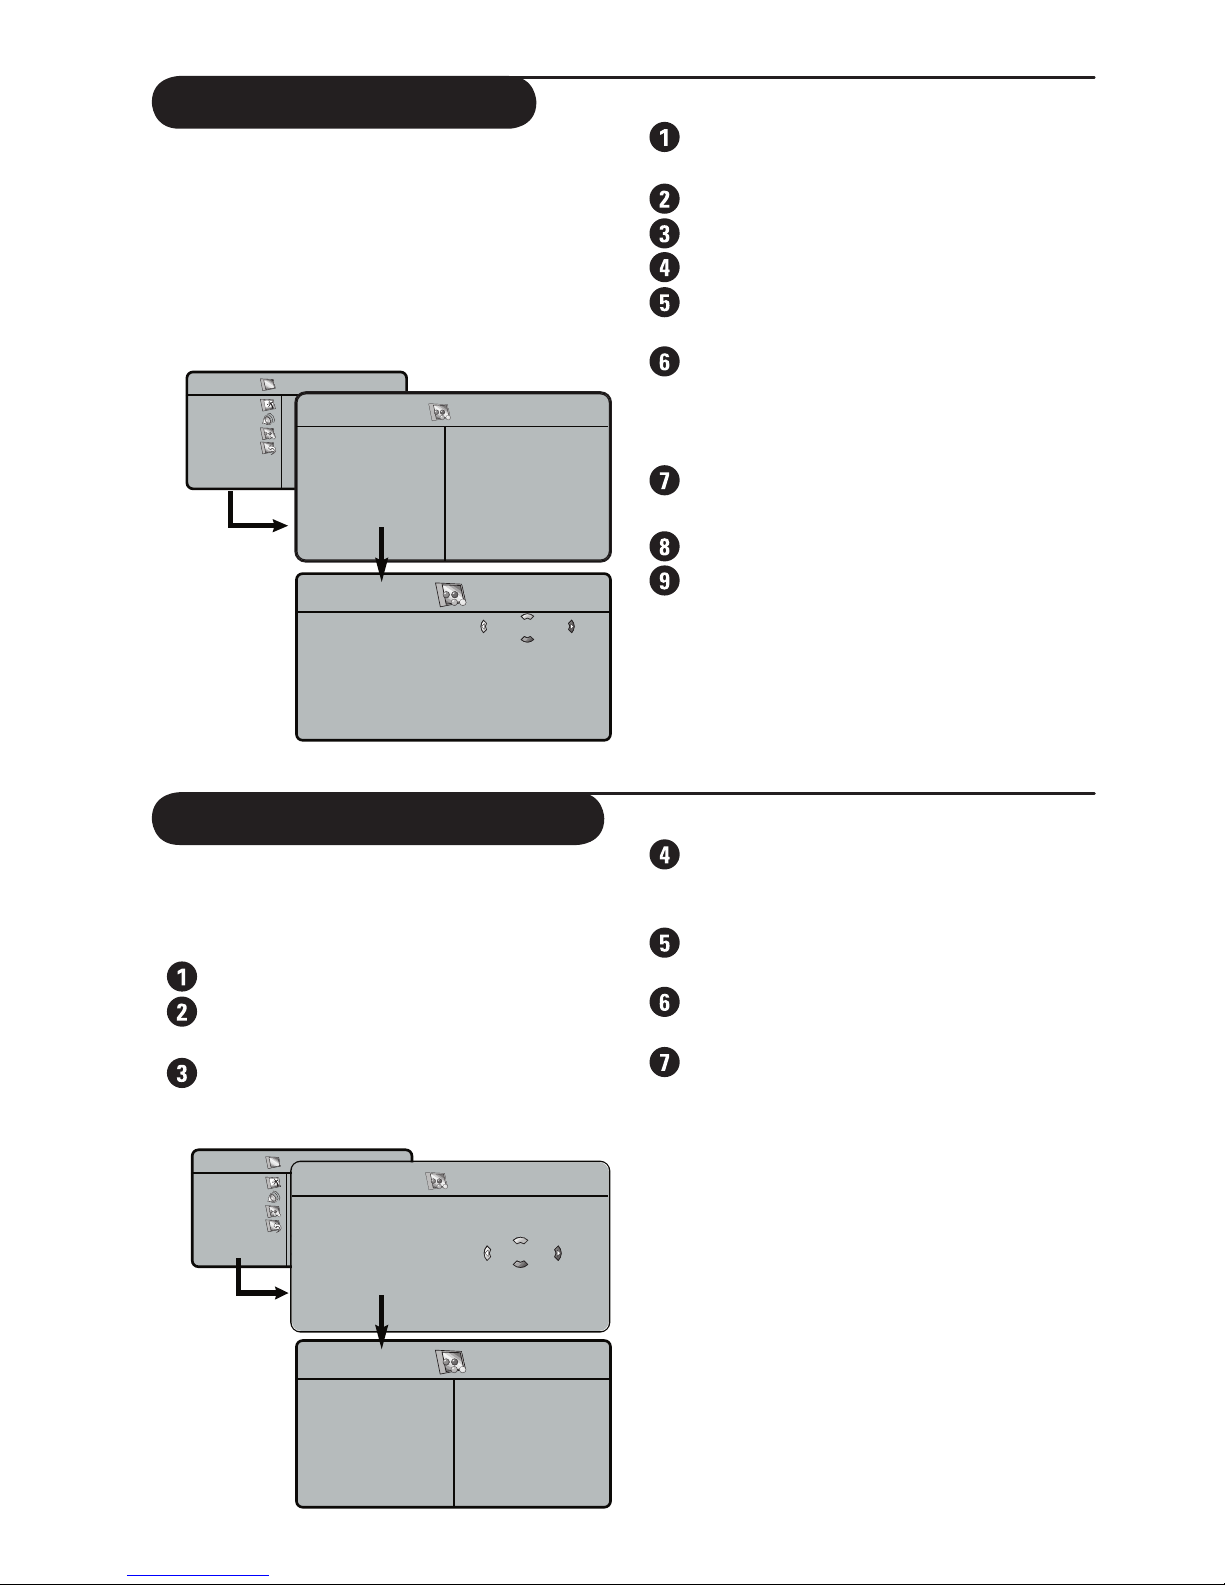
The Timer feature allows you to set the
timer to switch to another programme at
a specified time when you are watching
another programme or from standby mode.
For the timer to function, the set must not
be switched off. Once the set is switched off,
the timer is disabled.
Press MENU, select Features (ï) and
press Æ. The Timer menu is displayed.
Time: enter the current time.
Start Time: enter the start time.
Stop Time: enter the standby time.
Channel: enter the channel number that
you want to switch to by the Timer.
Activate: the settings include:
• Once for one time activation,
• Daily for each day,
• Off to deactivate Timer.
Display: to activate / deactivate the
current time display on screen.
To exit the menu, press Ë button.
Press . to put the TV set in standby
mode. It will automatically come on at
the time set. If you leave the TV set on,
it will just change programme at the time
entered (and will go to standby mode at
the Stop Time).
Timer
Time
Start Time
Stop Time
Channel
Activate
Display
- - : - -
Æ
Æ
Æ
Æ
Æ
TV Menu
Picture
Sound
Features
Install
·
Timer
·
Child Lock
·
Contrast+
·
NR
·
PIP
Features
Timer
Child Lock
Contrast+
NR
PIP
Æ
Æ
Æ
Æ
Æ
·
·
·
·
·
Time
Start Time
Stop Time
Channel
Activate
Child Lock Feature
The Child Lock feature allows you to lock
programmes to prevent your children from
watching programmes you deem undesirable.
Press the MENU button.
With the cursor, select the Feature
menu then Child Lock
menu.
Enter the access code 0711. A message
Incorrect will appear. Enter the access
code 0711 again.
It will prompt you to Change Code.
Enter your own four-digit code using the
0-9 buttons and confirm the new code.
Once the new code is confirmed, the
Child Lock menu will appear.
Use the Î/ï button to select a setting
and the
Í/Æ button to adjust.
To exit the menu, press Ë button.
Description of the settings:
• Lock Channel: to lock individual
programme. A keylock symbol
+ appears
beside the locked programme number
or the symbol
? for an unlocked
programme.
• Change Code: enter your new four-digit
code using the
0-9 buttons and confirm by
entering the new four-digit again.
• Clear All: allows you to unlock all locked
programmes.
• Lock All: allows you to lock all
programmes.
Child Lock
Lock Channel
Change Code
Clear All
Lock All
Æ +
5
Æ
Æ
Æ
TV Menu
Picture
Sound
Features
Install
·
Timer
·
Child Lock
·
Contrast+
·
NR
·
PIP
Features
Timer
Child Lock
Contrast+
NR
PIP
Æ
Æ
Æ
Æ
Æ
Access Code
- - - -
Page 14
12
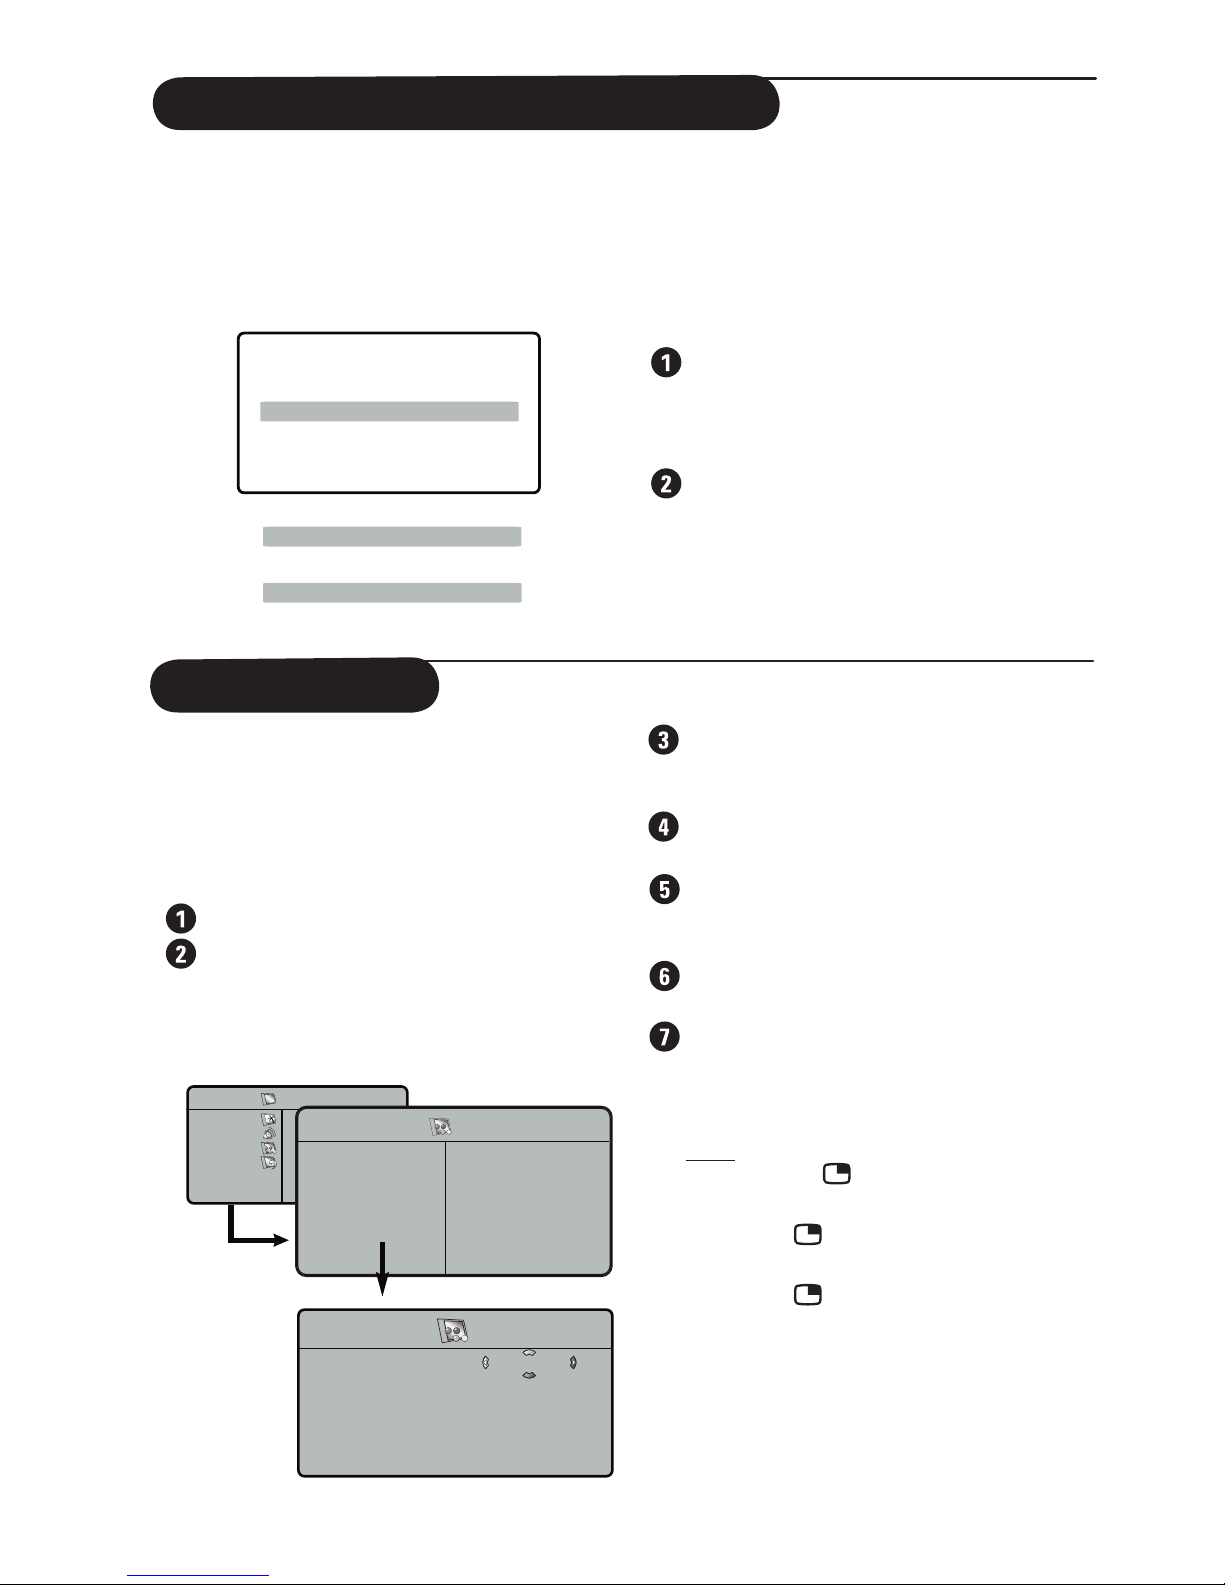
This feature allows you to call up a PIP
(Picture-in-Picture) window on the screen.
For the
PIP to function, the HDMI input of
the TV must be connected to digital output
of AV device, e.g. PC / DVD-R (See Quick
Guide for connection).
Press the MENU button.
Press the ï button repeatedly until
Features is selected and press Æ button
to access
Features menu.
Press the ï button repeatedly until PIP
is selected and press
Æ button to access
PIP menu. (PIP Size is highlighted).
Press Í/Æ button to select your desired
PIP size options.
If you want to move the PIP window
horizontally or vertically, press
ï button
to select horizontal or vertical.
Press
Í/Æ button to move PIP window
horizontally or vertically.
To exit PIP window from screen, press
Î button until PIP size is selected. Press
Í/Æ button repeatedly until Off option
is selected.
Note: you can also access the PIP window
directly via the
(PIP) button on the
remote control.
• Press the button to display the PIP
window.
• Press the button repeatedly to toggle
through the various PIP window sizes and
select your desired size.
• Use the P -/+ buttons to change the
programme on the PIP screen.
PIP Feature
TV Menu
Picture
Sound
Features
Install
·
Timer
·
Child Lock
·
Contrast+
·
NR
·
PIP
Features
Timer
Child Lock
Contrast+
NR
PIP
Æ
Æ
Æ
Æ
Æ
·
·
·
·
·
Time
Start Time
Stop Time
Channel
Activate
PIP
PIP Size
Horizontal
Vertical
Off
Æ
Æ
This feature automatically adjust the
picture setting for optimal picture quality
continuously under any signal conditions.
You can select the Active Control On
mode or the Active Control ON With
Sensor mode.
If Control On With Sensor mode is
selected, the sensor will sense and adjust
picture setting according to the lighting
conditions of the room.
You can also select to Active Control Off
mode to switch off Active control function.
Press h button repeatedly to
cycle through the various
Active
Control modes and select your desired
mode.
To exit the menu, press Ë.
Using the Active Control Feature
Active Control ON With Sensor
OR
OR
Active Control Off
Active Control On
Page 15
13
Screen Formats
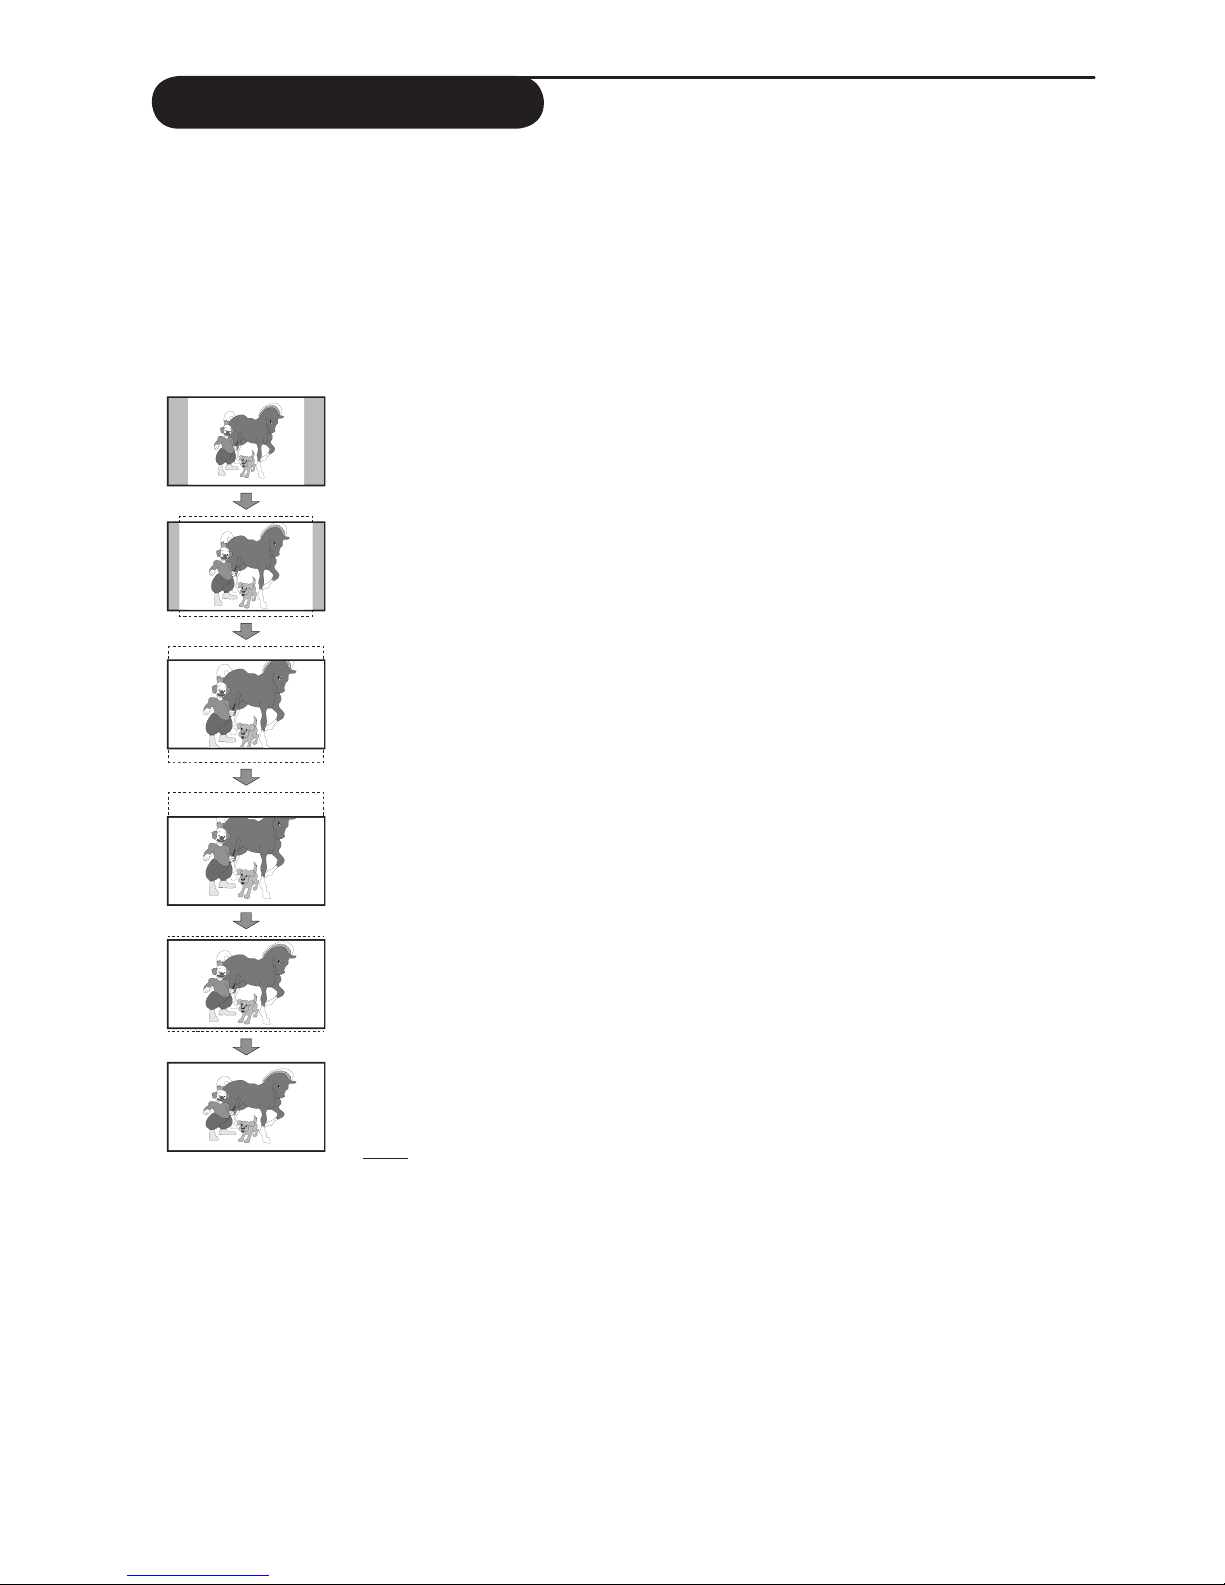
The pictures you receive may be transmitted in 16:9 format (wide screen) or 4:3 format
(conventional screen). 4:3 pictures sometimes have a black band at the top and bottom of the
screen (letterbox format). This function allows you to optimise the picture display on screen.
Press the ∏ button or Í/Æ button to select the different modes:
This TV set is also equipped with automatic switching which will select the
correct-screen format, provided the specific signals are transmitted with the
programmes.
4:3
The picture is reproduced in 4:3 format and a black band is displayed on
either side of the picture.
Movie Expand 14:9
The picture is enlarged to 14:9 format, a thin black band remains on both
sides of the picture.
Movie Expand 16:9
The picture is enlarged to 16:9 format. This mode is recommended
when displaying pictures which have black bands at the top and bottom
(letterbox format).
Subtitle Zoom
This mode is used to display 4:3 pictures using the full surface of the
screen leaving the sub-titles visible.
Super Zoom
This mode is used to display 4:3 pictures using the full surface of the
screen by enlarging the sides of the picture.
Widescreen
This mode restores the correct proportions of images transmitted in 16:9.
Note: If you display a 4:3 picture in this mode, it will be enlarged horizontally.
Page 16
14
Smart Picture and Sound Feature
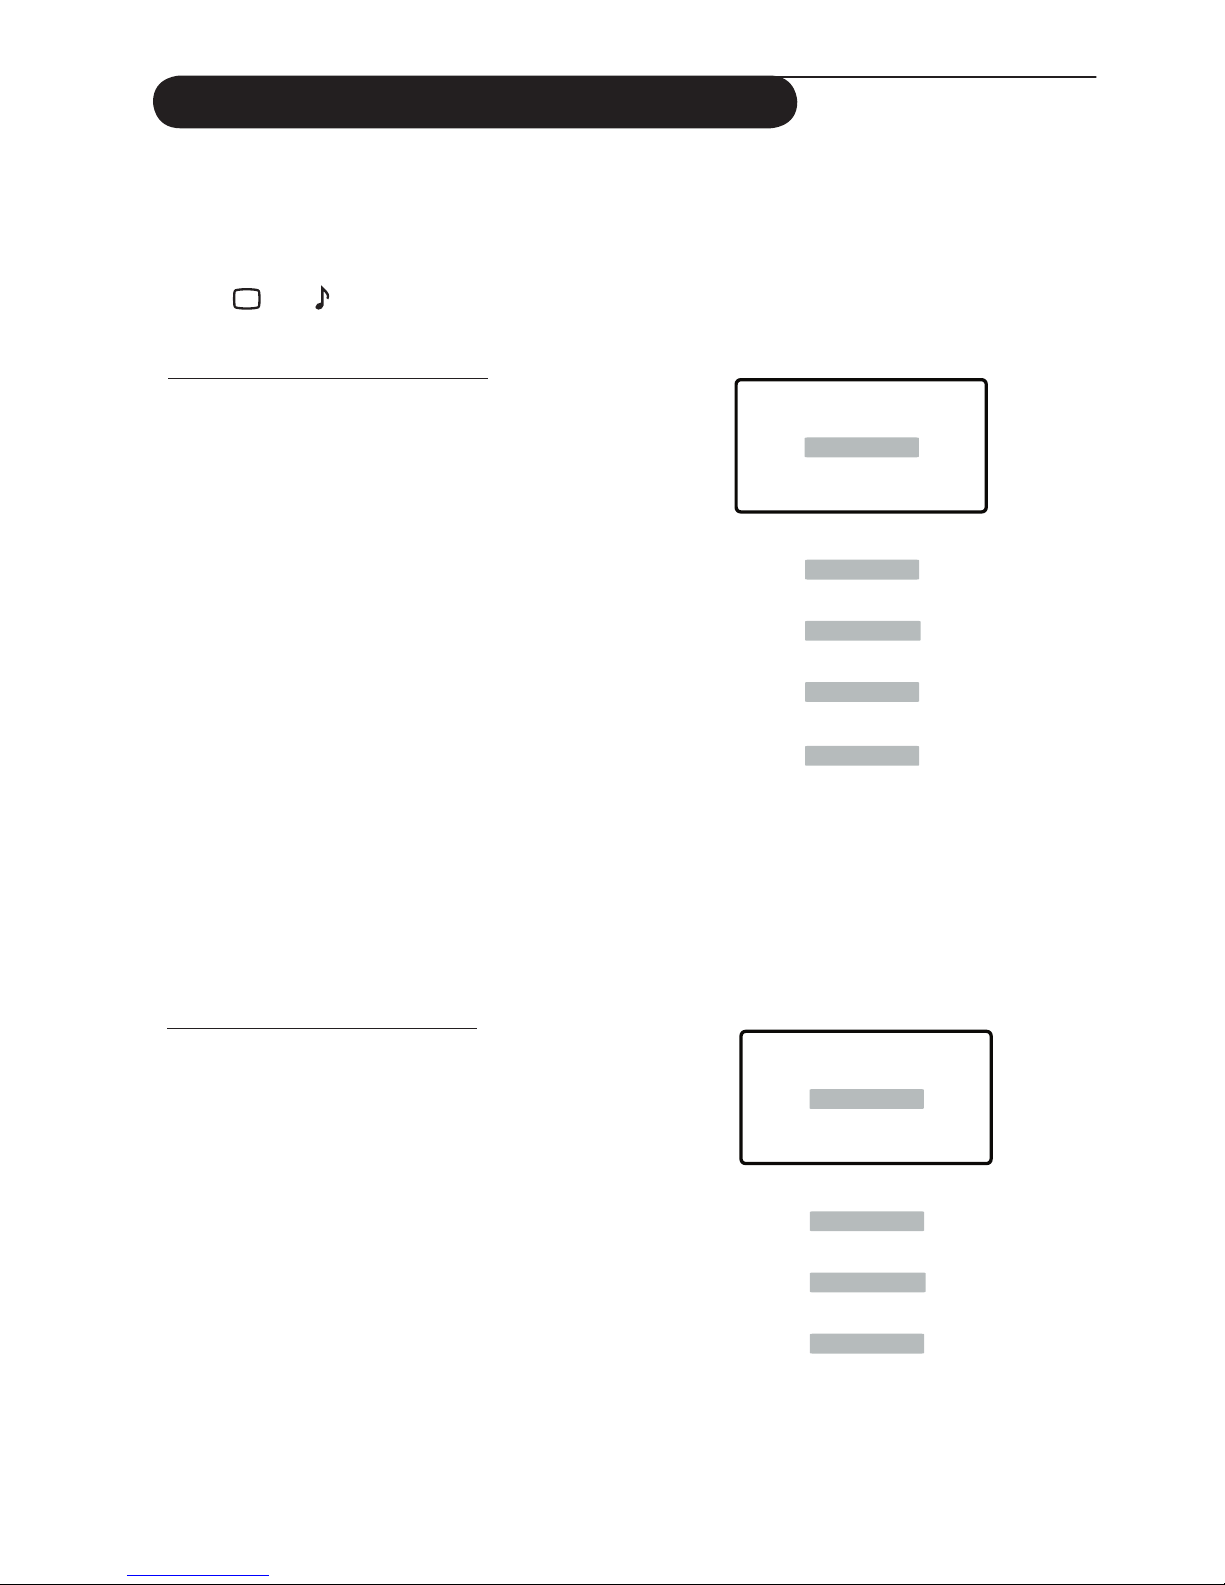
Smart Picture feature offers you a choice of 5 picture settings, namely, Rich, Natural, Soft,
DVD/VCD and Personal.
Smart Sound feature offers you a choice of 4 sound settings namely, Theatre, Music,
Voice and Personal.
Press or button repeatedly to cycle through the settings to select your desired mode.
Defintion of Picture Settings
Personal : Picture settings are set to your
preference.
Rich : Emphasize very vibrant colours.
(Suitable for AV mode in brightly-lit
room)
Natural : Emphasize original colours.
Soft : Emphasize “ warm” colours. (Suitable
for dimly-lit room condition and gives
cinema-like effect when light is
switched off).
DVD/VCD : Emphasize “soft” colours.
(Suitable for playing computer
games, surfing, etc.)
Defintion of Sound Settings
Personal : Sound settings are set to your
preference.
Theatre : Emphasize sensation to action.
(Bass and Treble boosted)
Music : Emphasize low tone. (Bass boosted)
Voice : Emphasize high tone. (Treble
boosted)
Personal
Rich
Natural
Soft
DVD/VCD
OR
OR
OR
OR
Personal
Theatre
Music
Voice
OR
OR
OR
Note : The Personal setting is the setting that you set up using the Picture menu in the main
menu. This is the only setting in the Smart Picture settings that can be changed. All the other
settings are pre-set at the factory.
Page 17
15
Using the TV as a PC Monitor
Choosing PC-VGA mode
Press the AV button on the remote
control to display the Source List
.
Use the Î/ï button to select PC-VGA
and then press the
Æ button to switch the
TV to PC-VGA mode.
To return to TV mode, press the
AV
button, select TV and confirm with
Æ
button.
Choosing PC-D mode
Press the AV button on the remote
control to display the Source List
.
Use the Î/ï button to select PC-D and
then press the
Æ button to switch the TV
to PC-D mode.
To return to TV mode, press the
AV
button, select TV and confirm with
Æ
button.
Using the PC menus
Press the MENU button to display the
PC Menu
.
Use the Î/ï/Í/Æ button to select,
adjust or activate PC Menu items
namely: Picture, Audio Selection,
Features, Reset to Factory
.
• Picture Menu
:
– Brightness / Contrast: to adjust the
brightness and contrast.
– Horizontal / Vertical*: to adjust the
horizontal and vertical placing of the
image.
– Colour Temp: to adjust the colours
(cool, normal or warm).
• Audio Selection: to choose the sound
reproduced on the TV (PC/HD or TV).
• Feature Menu:
– Phase/Clock*: eliminates the
horizontal (
Phase) and vertical
(Clock) interfering lines.
– Format: to choose between
Widescreen or Native format of the
PC screens.
– PIP: to adjust the size and position of
the PIP screen.
– Auto Adjust*: position is set
automatically.
• Reset To Factory Setting: to return
to the factory settings (default settings).
*These adjustments are not available in
PC-D
mode.
NOTE
– When using the LCD TV as a PC monitor, slight diagonal interference lines may be
observed when it is operated under electromagnetic interference environment but
will not affect the performance of this product.
– For better performance, good quality HDMI/DVI/VGA cable with good noise
isolation filter is recommended.
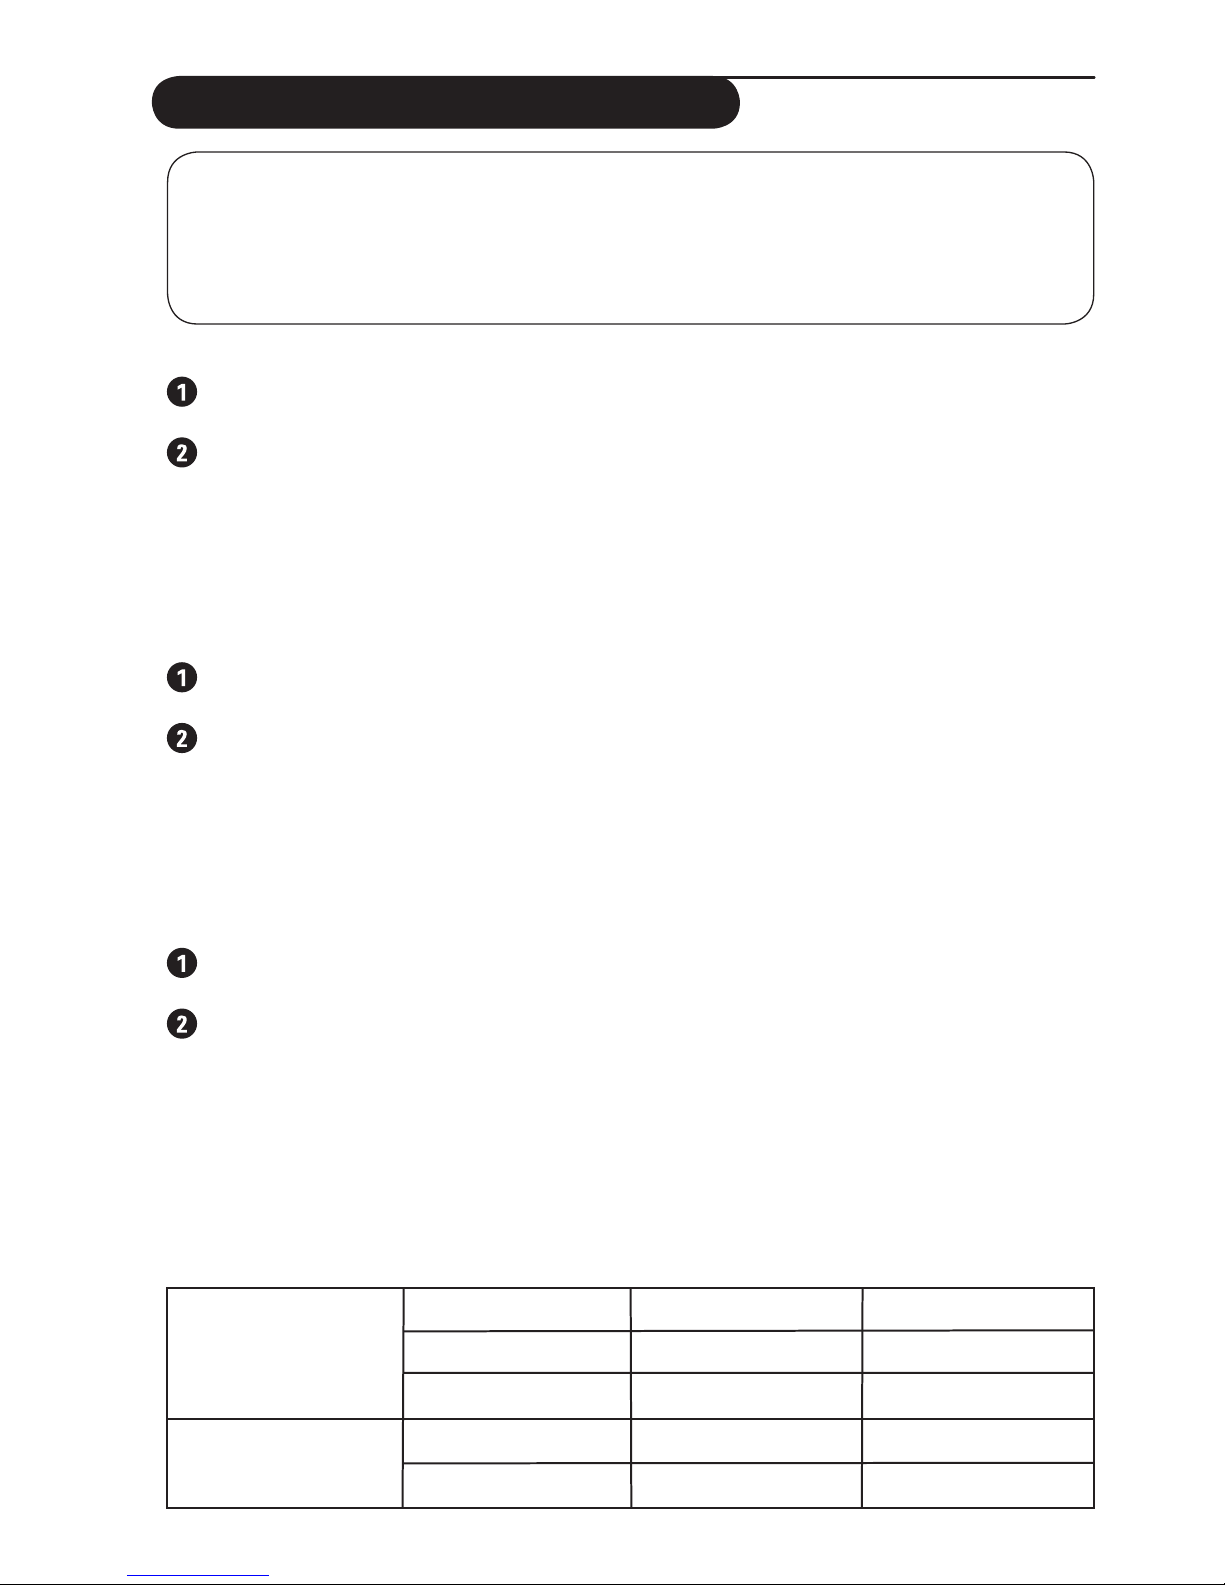
Here is a list of different display resolutions available on your TV.
1152 x 864 p
1280 x 960 p
1280 x 1024 p
832 x 624 p
1024 x 768 p
800 x 600 p
832 x 624 p
1024 x 768 p
720 x 400 p
800 x 600 p
640 x 350 p
640 x 480 p
720 x 400 p
640 x 350 p
640 x 480 p
Digital PC (DVI-I)
Analogue PC (YPbPr)
Page 18
16
Using in HD (High Definition) Mode
HD Mode
The HD (High Definition) mode allows
you to enjoy clearer and sharper pictures
through the CVI-1, CVI-2 or HDMI input
if you are using a HD receiver/equipment
that can transmit high definition
programming.
You must connect the HD equipment (see
Quick Use Guide).
Choosing HD mode
Press the AV button on the remote
control to display the Source List
.
Depending on the connections, use the
cursor Î/ï button to select CVI-1
(SD/HD)*, CVI-2(SD/HD)* or HDMI
and then press the cursor
Æ button to
switch the TV to the selected mode.
To return to TV mode, press the
AV
button, select TV and press
Æ button to
enter selected mode.
*SD - Standard Definition
*HD - High Definition
Using the HD menus
Press the MENU button to access the
HD menu.
Use Î/ï/Í/Æ button to selesct, adjust
or activate menu items (the settings are
automatically saved):
• Picture/Sound Menus:
The HD Picture/Sound setting are the
same as the TV Picture/Sound settings
and function exactly the same way as in
the TV Picture/Sound menu.
• Features Menu:
– PIP: to adjust the size and position of
the PIP screen.
– Horizontal Shift: to adjust the
horizontal placing of the image.
– Vertical Shift: to adjust the vertical
placing of the image.
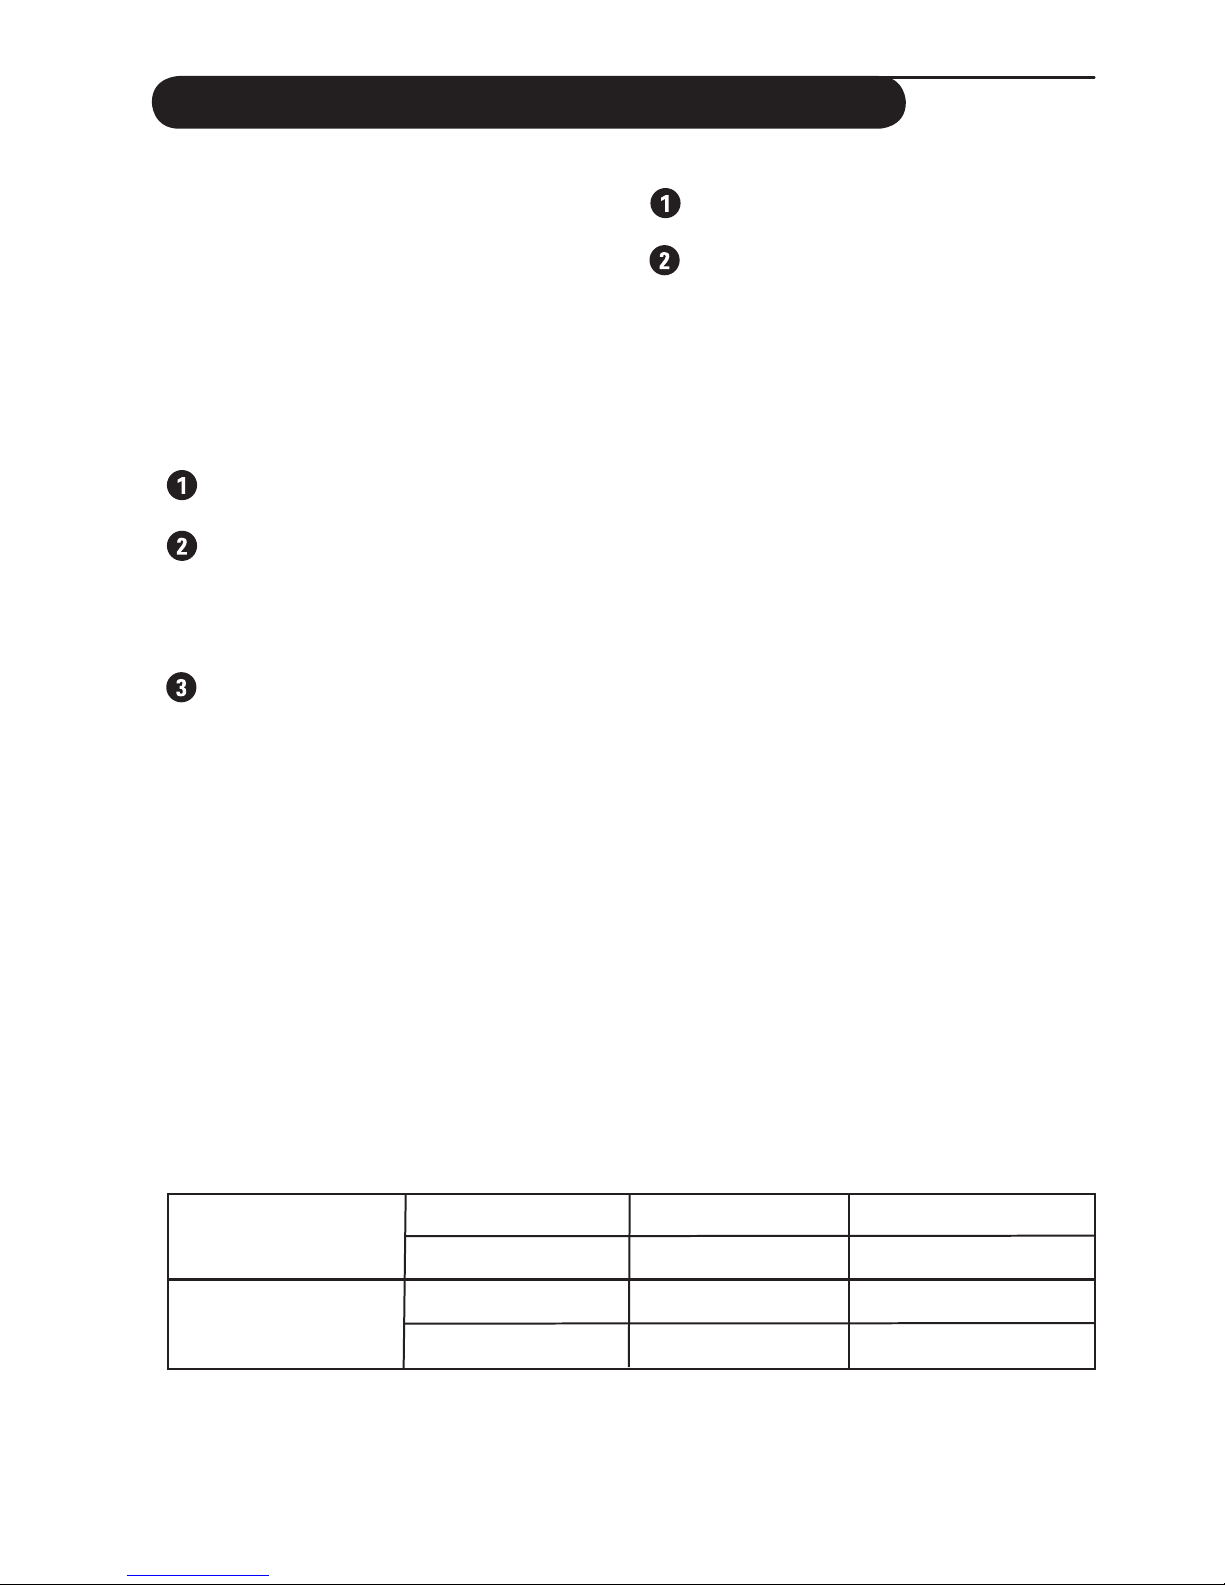
Here is a list of different display resolution available on your TV.
HDTV 1080 i
720 p
1080 i
HDTV 720 p
480 p
576 p
EDTV 480 p
EDTV 576 p
480 i
576 i
Digital HD (DVI-I)
Analogue PC (YPbPr)
Page 19
17
Tips
No power
Poor reception
No picture
Good picture but no
sound
Good sound but poor
colour or no picture
Snowish picture and
noise
Horizontal dotted
line
Double images or
“Ghost” images
TV not responding
to remote control
handset
Incorrect Display
position (PC mode)
No Video Input (PC
Mode)
Vertical flicker
appears (PC Mode)
Horizontal flicker
appears (PC Mode)
Screen too bright or
dark (PC Mode)
• Check the TV’s AC power cord is plugged into the mains socket. If there
is still no power, disconnect plug. Wait for 60 seconds and re-insert plug.
Switch on the TV again.
• The proximity of mountains or high buildings may be responsible for
ghost pictures, echoing or shadows. In this case, try manually adjusting
your picture: refer to “Fine Tune” on page 9 or modify the orientation
of the outside aerial. If you are using an indoor aerial, reception may be
difficult in certain conditions.You can improve reception by rotating the
aerial. If the reception remains poor, you will need to use an external aerial.
• Check the antenna connection at the rear of the TV.
• Try another programme to confirm whether it is a particular TV station
problem or otherwise.
• Try increasing the volume.
• Check that the sound is not muted. If it is muted, press the
Mute button
on the remote control to restore sound.
• Try increasing the contrast and brightness setting.
• Check antenna connection at the rear of the TV.
• Possible electrical interference e.g. hairdryer, vacuum cleaner, etc. Switch
off appliances.
• Possible poor positioning of antenna. Using a highly directional antenna
may improve reception.
• Aim remote control handset directly at remote control sensor lens on
the TV.
• If there is no response, check whether plastic insulation sheet is removed
and the battery is placed correctly
(words on battery should be facing you).
• Try changing the battery.
• If the set receives no signal for 15 mins, it automatically goes into standby
mode.
• Adjust the image position using the Horizontal Position and/or Vertical
Position in the PC Mains Controls menu.
• Make sure the monitor cable is properly connected to the PC input
(VGA/DVI) at the bottom of the TV.
• Check whether the monitor cable has bent pins.
• Try eliminating the vertical bars by using the Clock Adjustment of Video
Noise in the Main PC Menu.
• Try eliminating the horizontal bars by using the Phase. Adjustment of
Video Noise in the Main PC Menu.
• Try adjusting the contrast and brightness in the Main Menu.
Page 20
18
Tips
PC and PIP modes
don’t work?
Standby
• Check that you have configured the computer on a compatible display
resolution (refer to page 15).
• If the set receives no signal for 15 minutes, it automatically goes into
standby mode. To save power, your set is fitted with components that
give it a very low power consumption when in standby mode (less than 1 W).
• Only use a clean, soft and lint-free cloth to clean the screen and the
casing of your set. Do not use alcohol-based or solvent-based products.
• Disconnect the mains plug of the TV for 30 seconds then reconnect it.
• If your TV set breaks down, never attempt to repair it yourself: contact
your dealer’s after-sales service.
32PF5320 32PF7320
Visible screen size 800 mm 800 mm
Audio Output : 2 x 15 W 2 x 15 W
TV System NTSC M (3.58 – 4.5)
NTSC (4.43 – 5.5)
PAL B/G
PAL D/K
PAL I
SECAM B/G
SECAM D/K
SECAM K1
Playback System NTSC 3.58, NTSC 4.43, PAL 60
Set Dimensions with stand:
Width 924 mm 924 mm
Depth 222 mm 222 mm
Height 550 mm 550 mm
Net Weight of set with 18.2 kg 18.2 kg
stand (approximate )
Note
For Operating Voltage, Frequency, Power Consumption and Version Number, refer to the
type number at the rear of the set.
Specifications
Cleaning the set
Still no results?
Page 21

Specifications are subject to change without notice.
Trademarks are the property of Koninklijke Philips Electronics N.V. or their respective owners.
2005 © Ko
ninklijke Philips Electronics N.V. All rights reserved.
www.philips.com
3141 045 20051
 Loading...