

Page 1

Page 2

I n formation for users in the UK
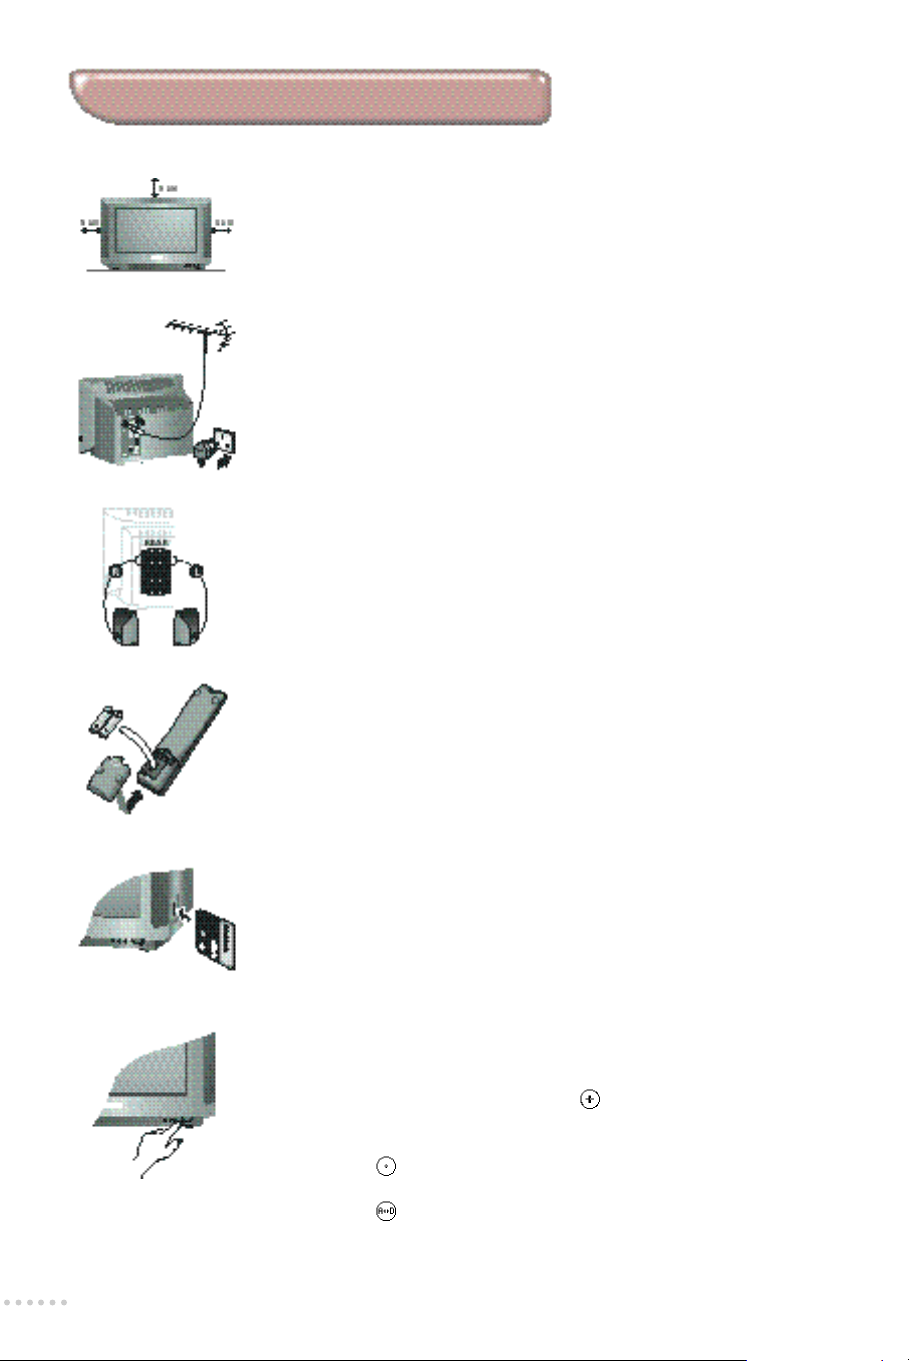
Positionin g the TV
For the best re s u l t s ,choose a position where light does not fall dire c t ly on the scre e n ,
and at some distance aw ay from radiators or other sources of heat.L e ave a space of at
least 5 cm all around the TV for ventilation,making sure that curtains,cupboards etc.
cannot obstruct the air flow through the ventilation apertures.
The TV is intended for use in a domestic env i ronment only and should never be
operated or stored in excessively hot or humid atmospheres.
General Points
Please take note of the section entitled 'Tips' at the end of this booklet.
Interference
The Department of Trade and Industry operates a Radio Interfe rence Investigation Service to
help TV licence holders improve reception of BBC and IBA programmes where they are being
spoilt by interfe re n c e.
If your dealer cannot help,ask at a main Post Office for the booklet "How to Improve
Television and Radio Reception".
Mains connection
B e fo re connecting the TV to the mains,check that the mains supply voltage corre s p o n d s
to the voltage printed on the type plate on the rear panel of the T V.If the mains vo l t a g e
is diffe re n t ,consult your dealer.
Important
This apparatus is fitted with an ap p roved moulded 13 Amp plug.To change a fuse in this
type of plug proceed as follows:
1.Remove fuse cover and fuse.
2.Fit new fuse which should be a BS1362 5A,A.S.T.A. or BSI approved type.
3.Refit the fuse cover.
In order to maintain conformity to the EMC directive,the mains plug on this product
must not be removed.
(Not applicable outside the UK)
ß
Connecting the aerial
The aerial should be connected to the socket marked M at the back of the set.An
i n ferior aerial is like ly to result in a poor,p e r h aps unstable picture with ghost images on
analogue channels. M a ke-shift loft or set-top aerials may not give best re s u l t s .Yo u r
dealer will know from experience the most suitable type for your locality.
Should you wish to use the set in conjunction with other equipment,which connects
to the aerial socket such as TV games,or a video camera it is recommended that these
be connected via a combiner unit to avoid repeated connection and disconnection of
the aerial plug.
Fitting the stand (if provided)
Use only the stand provided with the set, making sure that the fixings are properly
t i g h t e n e d .A diagram showing how to assemble the stand is packed with the stand.N eve r
use a make-shift stand,or legs fixed with woodscrews.
Recycling directive
Your TV set uses materials which are reusable or which can be recycled.
To minimise the amount of waste in the environment,specialist companies recover
used sets for dismantling and collection of reusable materials (consult your dealer).
Page 3

Introduction
Thank you for purchasing this digital television which benefits from the latest advances in
technology.
This handbook has been designed to help you install and operate your TV set.
We would strongly advise you read it thoroughly.
For a quick start up,we advise you to read the Easy installation guide first.
Table of contents
Presentation
Presentation of the TV set . . . . . . . . . . . . . . . . . . . . . . . . . . . . . . . . . . . . . . . . .2
The remote control keys . . . . . . . . . . . . . . . . . . . . . . . . . . . . . . . . . . . . . . . . . .3
Overview of the menus . . . . . . . . . . . . . . . . . . . . . . . . . . . . . . . . . . . . . . . . . . .4
Installation
Installing the television set . . . . . . . . . . . . . . . . . . . . . . . . . . . . . . . . . . . . . . . .6
Tuning in the Digital channels . . . . . . . . . . . . . . . . . . . . . . . . . . . . . . . . . . . . . .7
To use the digital menus . . . . . . . . . . . . . . . . . . . . . . . . . . . . . . . . . . . . . . . .7
Store channels,change channel numbers . . . . . . . . . . . . . . . . . . . . . . . . . . .7
Channels list,add channels . . . . . . . . . . . . . . . . . . . . . . . . . . . . . . . . . . . . . .8
Viewing preferences:digital & modem settings, . . . . . . . . . . . . . . . . . . . . .8
Technical info r m a t i o n :signal stre n g t h ,m a nu f a c t u rer data,s t a rt dow l o a d
Tuning in the analogue channels . . . . . . . . . . . . . . . . . . . . . . . . . . . . . . . . . . .10
To call-up the ANALOGUE SETUP menu . . . . . . . . . . . . . . . . . . . . . . . . .10
Automatic & manual store . . . . . . . . . . . . . . . . . . . . . . . . . . . . . . . . . . . . .10
Favourite channels,Give names,Sort . . . . . . . . . . . . . . . . . . . . . . . . . . . . .11
Operation
Using the basic functions . . . . . . . . . . . . . . . . . . . . . . . . . . . . . . . . . . . . . . . . .12
16:9 formats . . . . . . . . . . . . . . . . . . . . . . . . . . . . . . . . . . . . . . . . . . . . . . . . . . .14
Teletext . . . . . . . . . . . . . . . . . . . . . . . . . . . . . . . . . . . . . . . . . . . . . . . . . . . . . .16
Adjusting the settings . . . . . . . . . . . . . . . . . . . . . . . . . . . . . . . . . . . . . . . . . . .18
Picture and sound menus . . . . . . . . . . . . . . . . . . . . . . . . . . . . . . . . . . . . . .18
Features menu:Childlock,Store PP . . . . . . . . . . . . . . . . . . . . . . . . . . . . . .19
Timer, Cordless, Picture Tilt . . . . . . . . . . . . . . . . . . . . . . . . . . . . . . . . . . . .20
Additional digital functions . . . . . . . . . . . . . . . . . . . . . . . . . . . . . . . . . . . . . . .21
Setting the timer (for videorecording) . . . . . . . . . . . . . . . . . . . . . . . . . . . .21
Parental lock . . . . . . . . . . . . . . . . . . . . . . . . . . . . . . . . . . . . . . . . . . . . . . . .22
Choosing favourite channels . . . . . . . . . . . . . . . . . . . . . . . . . . . . . . . . . . .23
Subscription information:smartcard data,check your postbox . . . . . . . .23
Peripherals
Connecting peripheral equipment . . . . . . . . . . . . . . . . . . . . . . . . . . . . . . . . .24
Video recorder and other equipment connected to the scart . . . . . . . . .24
Amplifier, Headphone, Side connections,Telephone & Computer . . . . . .25
External & Surround loudspeakers . . . . . . . . . . . . . . . . . . . . . . . . . . . . . .26
To select connected equipment . . . . . . . . . . . . . . . . . . . . . . . . . . . . . . . . . . .24
Practical information
Tips . . . . . . . . . . . . . . . . . . . . . . . . . . . . . . . . . . . . . . . . . . . . . . . . . . . . . . . . .27
Glossary . . . . . . . . . . . . . . . . . . . . . . . . . . . . . . . . . . . . . . . . . . . . . . . . . . . . . .28
Index . . . . . . . . . . . . . . . . . . . . . . . . . . . . . . . . . . . . . . . . . . . . . . . . . . . . . . . .28
. . . . . . .9
1
Page 4
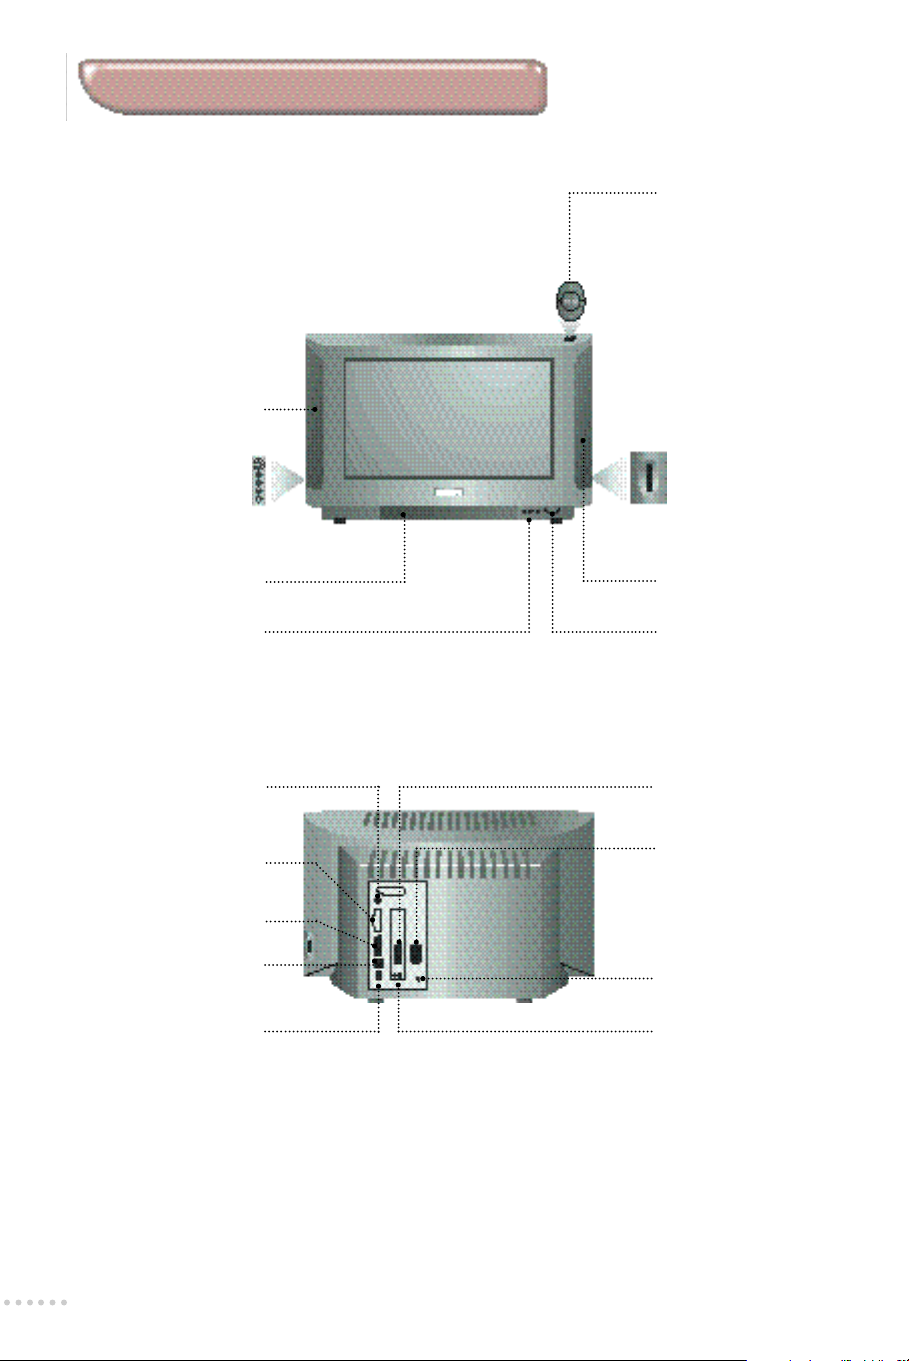
Presentation of the TV set
Front
Left speaker (L)
Side connections
To connect
headphones and
c a m c o rder (see p.2 5 )
Center speaker (C)
Power indicator and
infrared receiver
Rear
TV keys:MENU,- and +.
The MENU key is used to
select the function to be
a l t e re d .The - and + key s
a re used select
p rogrammes or modify
the selected MENU item.
N o t e :when the CHILDLOCK
function is activa t e d ,t h e s e
keys are unava i l a ble (refer to
F E ATURES menu,page 19).
Card reader.
To access ONdigital
channels or others
special digital serv i c e s
Right speaker (R)
Power button.
To switch TV on/off.
RF input for aerial
connector
Common interface for
type II or III module
E u roconnector EXT1 fo r
videocassette recorder
Modem output RJ11
(Telecommunications
Network Voltage)
Serial I/O RS232
connector socket
( Ve ry Low Safety Vo l t a g e )
For further details about the connections see page 24.
2
Euroconnector EXT2
for other equipment.
S u rround (S) and External
(L) and (R) loudspeake r
connections
To switch the internal
left and right
loudspeakers on/off.
Audio R-L outputs for
Hi-fi system.
Page 5
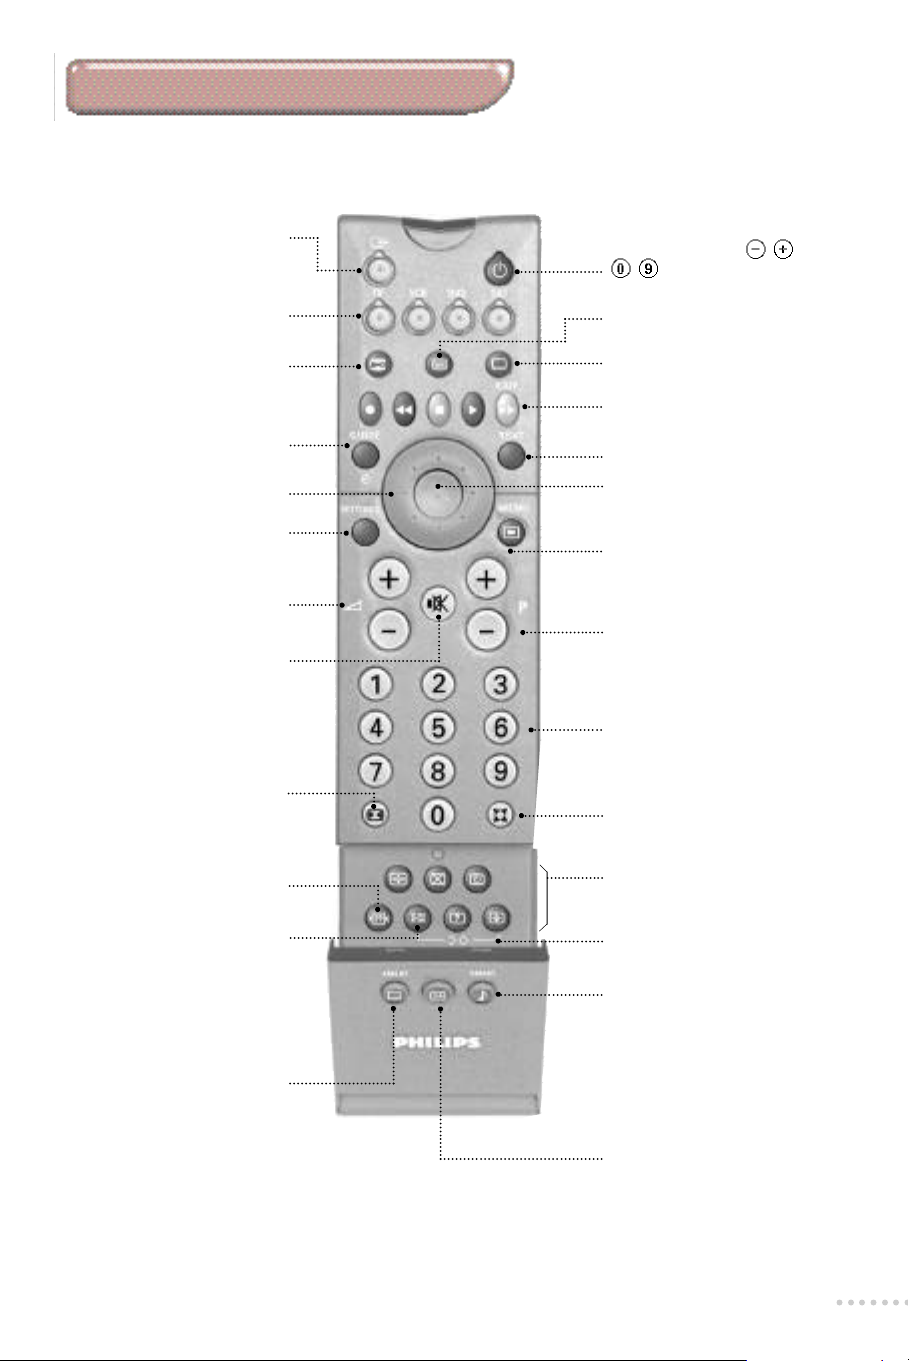
The remote control keys
Select EXT sockets
Press several times to select E1
(EXT1),E2 (EXT2) and E2 Y/C.
T V ,V C R ,DVD or SAT operation
Press one of these keys to use the
remote control directly in the
corresponding mode (see p.13)
Analogue or Digital mode
To switch the television in
analogue or digital mode (p.12)
Guide (for future use)
Cursor keys
To select a menu item.See (p.4)
Settings Menus (p.18)
To display or exit the settings menu s .
Volume
To adjust the sound level
Mute
To disable or enable the sound.
16:9 formats
To select one the 6 screen
formats (p.14).
Personal Preferences
To restore the settings stored in
the feature menu (p.19).
Sound select
To switch from STEREO to
MONO or to choose between
different languages (DUAL I,
DUAL II,...).
When the sound mode is switched
to MONO,the on screen display is
in blue.
Smart picture controls
To access a series of settings:
RICH,SOFT,NATURAL and
return to MANUAL.
The values corresponding to these
presets are given in the PICTURE
menu (see p.18)
Standby
To set the television on or off.
You can also press P or
to switch the TV set on.
Switch teletext on/off (p. 16)
Subtitles on/off (p.16)
Coloured keys
For teletext (p.1 6 ) ,m e nu (p.7 - 1 0 )
or peripheral use (p.13)
Digital text (for future use)
Select
To activate a menu item (p.7) or
to call-up the channel list (p.12)
Menu (p. 7)
To call-up the digital menu
(when TV is in digital mode).
Selecting TV programmes ( p.1 2 )
To move up or down a pro g r a m m e.
Numerical keys
For direct access to programmes
(p.12), teletext pages (p.16) or
digital menu options (p.7).
Sound modes (p. 18)
To select the different Dolby
Surround modes.
Teletext features (p. 16)
Analogue setup menu
Press the e and
s i mu l t a n e o u s ly to call-up the menu .
Smart sound controls
To access a series of settings:
CONCERT, CLASSIC,JAZZ,
POP, STADIUM, and return to
MANUAL
The values corresponding to these
presets are given in the SOUND
menus (see p.18)
Screen information (p.13)
To display on screen info r m a t i o n s .
( p.1 0 )
π key s
3
Page 6
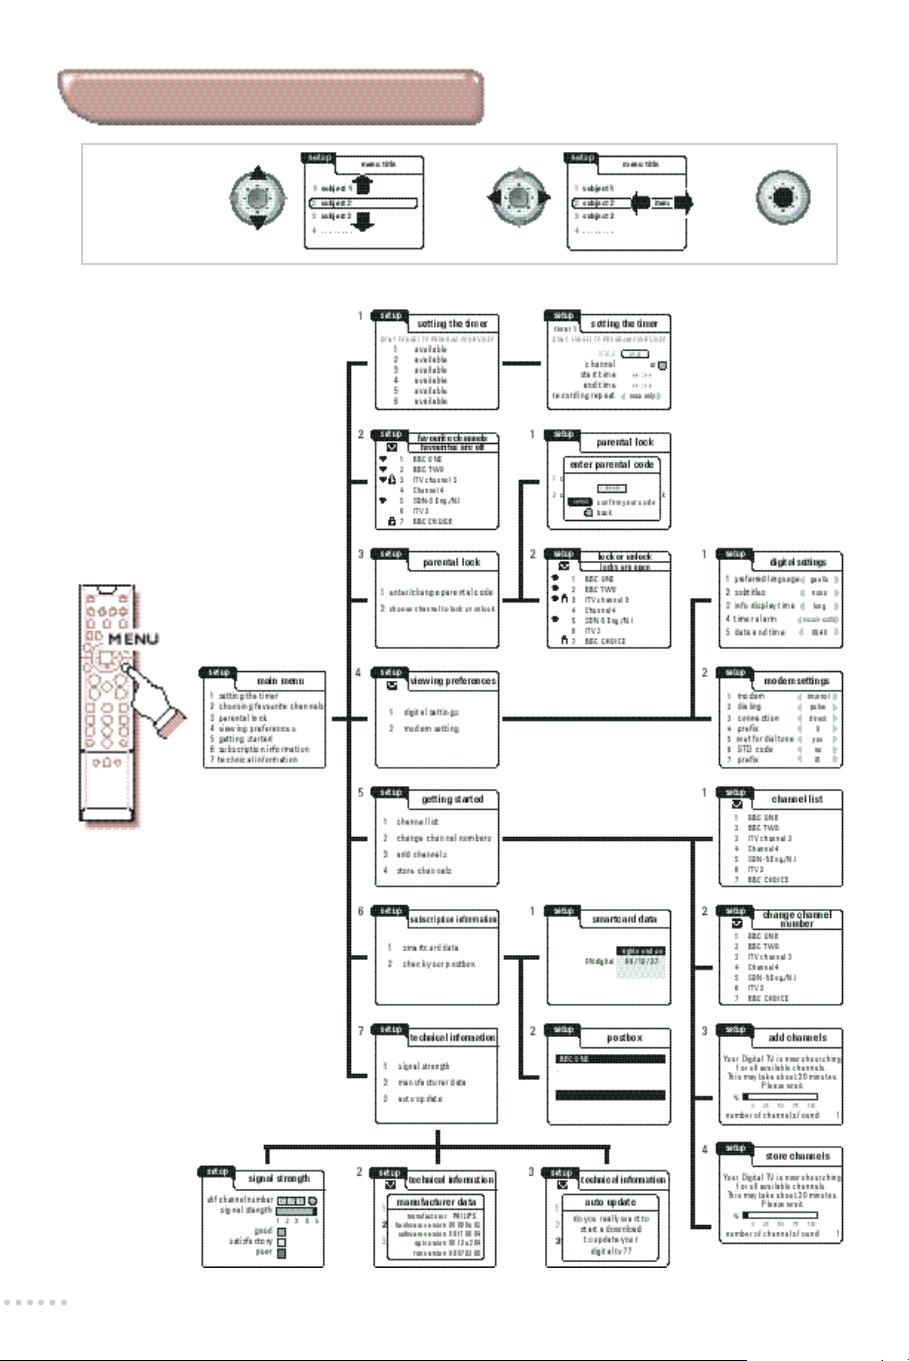
Overview of the menus
Cursor keys
to move
within
the menus
To select
4
Page 7
5
Page 8
Installing the television set
For a first time installation,we would recommend you use the quick start guide provided.
æ Positioning the television set
Place your TV on a solid,stable surface.
To avoid any dangerous situations and operating fault,do not place anything
on the TV set and leave a space of at least 5cm around the appliance.
 Connections
• Insert the aerial plug into the M socket at the rear of the set.
You can improve the picture quality by using the suppressor aerial cable supplied.
• Insert the mains plug into a wall socket (220-240 V / 50 Hz).
For the modem connection,please refer to page 25 (connection not yet required).
ê Surround loudspeakers
If your TV is fitted with FM cordless surround speake r s ,please re fer to page 26.
Connect the 2 Surround loudspeakers as illustrated opposite.
The loudspeakers should be located at the rear or on either side of the
listener (always connect 2 loudspeakers).The positive wire (the one with
the black line) to the red loudspeaker connection,the negative wire to the
black loudspeaker connection.
® Remote control
• Insert the two R6-type batteries (supplied) making sure they are the right
way round.
• Press the TV key of the remote control to be sure it is in the TV mode.
A green indicator lights-up around the TV key.
In an effo rt to help protect the env i r o n m e n t ,the batteries supplied with this telev i s i o n
do not contain mercury or nickel cadmium.Please do not discard your used batteri e s
if you have access to a recycling facility (if in doubt,consult your dealer).
† Card reader
If you have a Smartcard for ONdigital channels,insert it in the slot as
indicate opposite,making sure it is the right way round (gold chip facing
you,arrow pointing to the slot).
Ú Switching on
• Press the on/off key to switch on the television.
A green indicator comes on and the screen lights up.If the television
remains in standby mode,press the P key on the remote control.
• The first time the TV set is switched on,it will generate the following
message;‘Welcome.Press select on your remote to get started’.
Press the key in the centre of the cursor to activate.
If the message does not appear,the television is in analogue mode.
Press the key on the remote control to switch the TV from analogue
to digital mode.
The TV indicator flashes when you use the remote control.
6
Page 9
Tuning-in the digital channels
To use the digital menus
This menu enables you to make all the adjustments required to
receive digital channels.
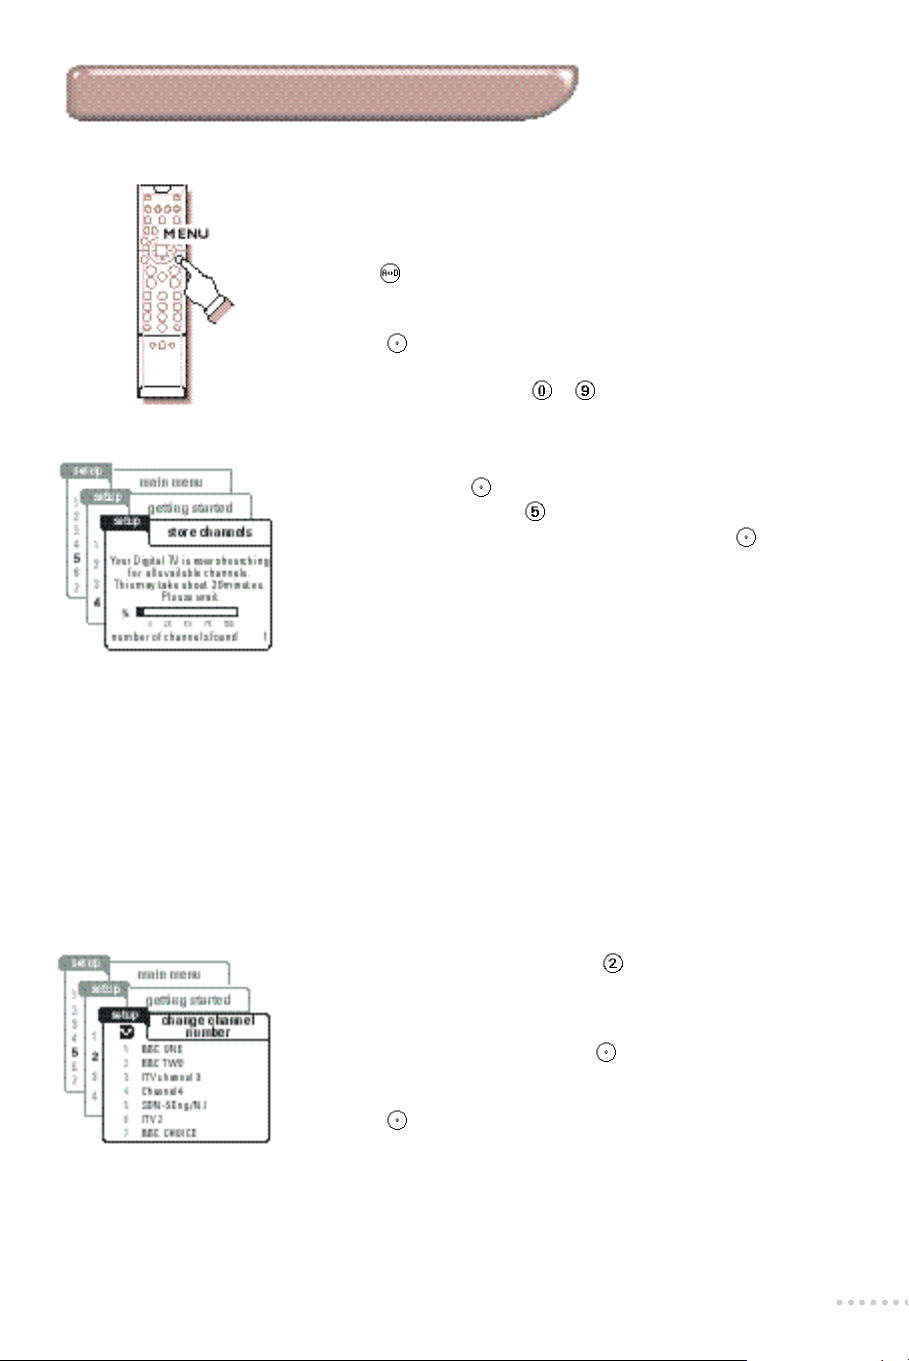
æ Press the MENU key on the remote control to display the main menu.
If the main menu does not appear,the television is in analogue mode.
Press the key on the remote control to switch the TV in digital mode.
 Use the cursor key in the up/down,left/right direction (xyÏq) to
select a menu item.For more information see page 4.
ê Press the key in the centre of the cursor to activate.
® Use the RED key or the EXIT key to return or to switch menu off.
You can also use the digital keys to for direct access to the menu item
Store channels
æ From the main menu,use the y key to highlight the getting started
option and press the key in the centre of the cursor to select.
Alternatively,you can press the key for direct access to this option.
 Now select the store channels option (y key) and press .
The television begins to search for all available channels.The search
operation takes approximativaly 20 minutes.The display on screen will
indicate the number of channels that have been found and the
percentage of the installation that has been completed.
When complete,the channel list menu is automatically displayed.
ê You can check what channels have been found by using the xy keys
to consult the list displayed on the screen.
® Press the EXIT key.The television then displays the current programme
being broadcast on channel 1.
If no picture is found, refer to the chapter entitled Tips on page 27.
If you want to stop the search, press the EXIT key.
Change channel number
This menu enables you to choose the order in which your channels
a re stored fo l l owing initial installation.You can exchange a channel fro m
i t ’s current position to an alternative position.
æ Within the getting started menu,press to select change channel
numbers.A menu with a complete list of channels currently available
is displayed.
 To move a channel to an alternative location,firstly highlight the
channel using the xy keys and press to select.
ê Now select the new channel location using the xy keys to highlight
the channel number where you want to move the channel to.
® Press the key to move the channel to it’s new location.
† Repeat operations  to ® to move further channels or press the
EXIT key to return to a normal TV picture.
7
Page 10
Channel list
Add channels
Technical information
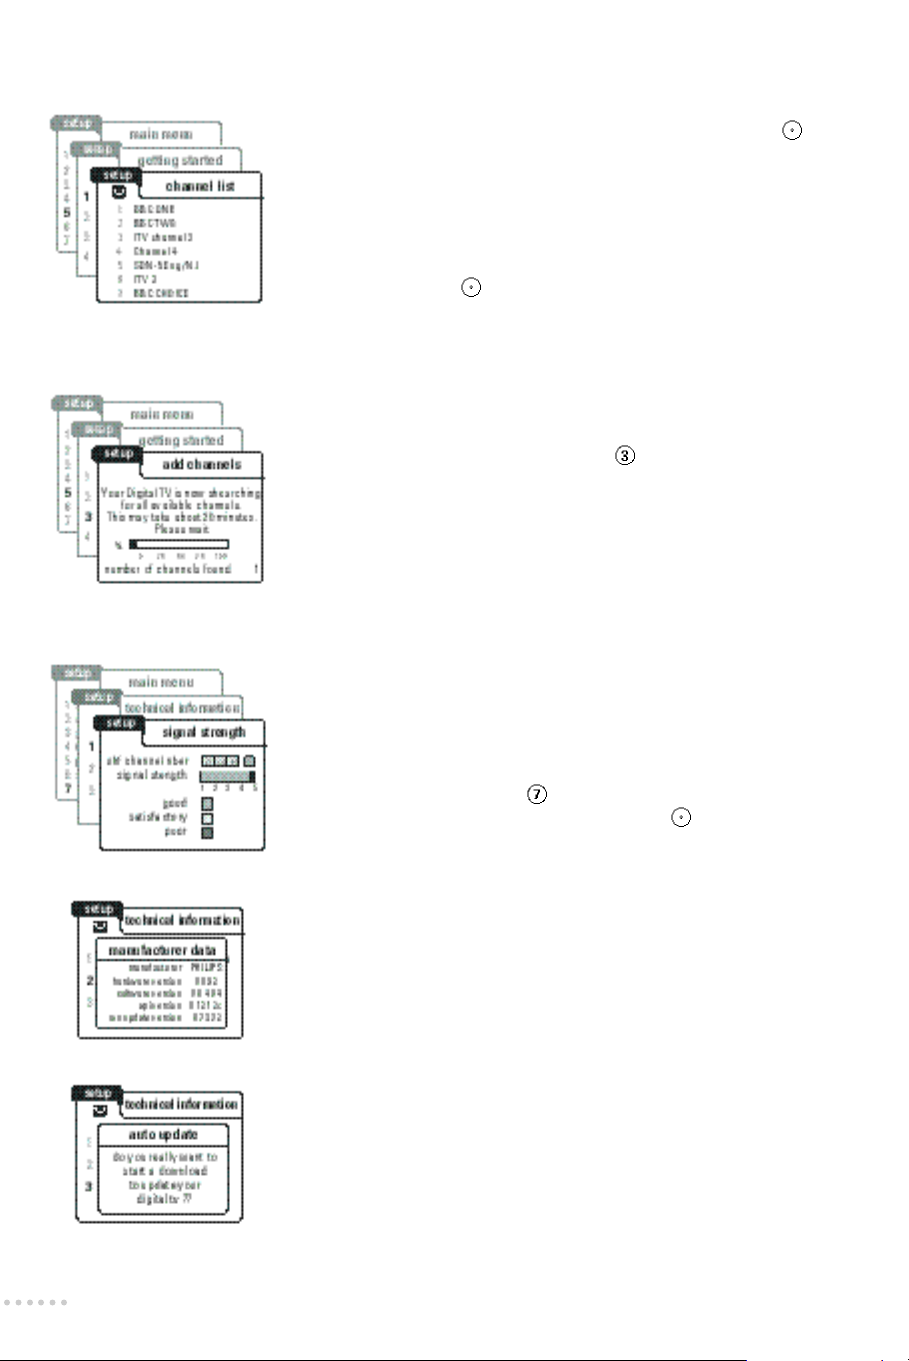
This menu enables you to consult the list of all the available channels.
æ Within the getting started menu,select channel list and press .
A complete list of channels currently available is displayed.
Alongside these channels will be symbols to indicate whether they
have been selected as your favourite channels (heart symbols) or as
locked channels (padlock symbols).
 Use the xy keys to move through the channel list.
Use the Ïq keys to move a whole page at a time.
ê Lastly,press press to view the channel selected in the list or press
the RED key to return to the getting started menu.
This function is normally only used when first installing your television
or to search for new digital channels that may have subsequently been
launched by the broadcasters.
æ Within the getting started menu,press to select add channels.
The search begins.The search operation takes a few minu t e s .O n ly new
channels will be stored and added into the channel list.You can check
what channels have been added by looking at the channel list.
 When the search is complete,press the EXIT key to return to a
normal TV picture.
The options contained within the technical information menu enable
you to check the status of your telev i s i o n .This is not something yo u
should need to do,ap a rt from in the unlike ly event of a pro b l e m
o c c u rring with your telev i s i o n .
In this instance,it will help the customer services people to understand
the problem and re s o l ve it as quickly as possible.
æ F rom the main Menu,p ress to select technical inform a t i o n.
 Use the xy keys to choose a menu item and to select :
• signal strength:This option allows you to check the strengh of the
signal you are receiving through your aerial.
• manufacter data:This option shows various information about your
television,such as it’s manufacturer and the versions of hardware and
software that it contains.
• auto update:This option can update the software used in your digital
TV. This may update certain menus or functions of your TV,as well as
add new features,but the general way in which the TV operates will
not change.Normally this type of update will be broadcast to your
television like any normal programme.You may be asked to start this
update process by a member of the Ondigital customer services team.
A message will be displayed asking you to confirm that you want to go
ahead,as it may change some of the personal settings you have made
on your TV, such as locked or favourite channels.
ê Follow the on screen instructions.
If you experience difficulties with this function and are a current ONdigital
subscriber,please contact ONdigital customer services on 0870 600 9696.
If you are not a subscriber but have difficulties, please call the Philips Digital
help line on 0870 606 0117.
8
Page 11

Viewing preferences
Digital settings
This menu enables you to adjust the digital settings.
æ F rom the main Menu,p ress to select viewing pre f e re n c e s.
 P ress to select digital settings.
ê Use the xy keys to select a menu item and Ï q to adjust :
• p re f e rred language:You can select English, Welsh or Gaelic for yo u r
p re fe rred audio language.This adjustment is also available with the
key on the remote contro l .
If your chosen language is not available, the default will be English.
• subtitles: You can select English,Welsh,Gaelic or none. If any of the
languages are selected,subtitles will always be displayed when they are
available.You will know if subtitles are available for a programme when
you look at the on screen channel information.
You can also use the key to switch the subtitles on and off.
This option also includes a setting for hard of hearing people, indicated by a
symbol next to the language.This means that the subtitles will also include
descriptive text,such as telling the viewer when there is laughter or applause.
• info display time: You can set the length of time that on-screen
information is displayed:off,normal or long.
IMPORTANT:If this option is set to Off,certain menus, including the channel
list,will no longer appear on-screen at all.
• timer alarm :You can choose either v i s u a l or audio & visual.The alarm
g i ves a warning when a programme is about to start for which the timer
has been prev i o u s ly set.The TV will display ‘RED’ and will ‘ b e e p ’ .
A l t e r n a t i ve ly,to continue watching the current channel,p ress the E X I T key.
• date and time: Your television will automatically set the current time and
date by taking information from bro a d c a s t e r s .If you wish to adjust these
s e t t i n g s ,you can do so manu a l ly using this menu .
® Press the RED key to return to the viewing pre f e re n c e s menu.
Modem settings
This menu enables you to adjust the modem settings.
æ F rom the Viewing pre f e re n c e s m e nu ,p ress to select modem settings.
 Use the xy keys to select a menu item and Ï q to adjust.
Normaly the default values do not need to be changed.Your service
provider will give you more details if necessary.
ê Press the EXIT key to leave the menus.
9
Page 12

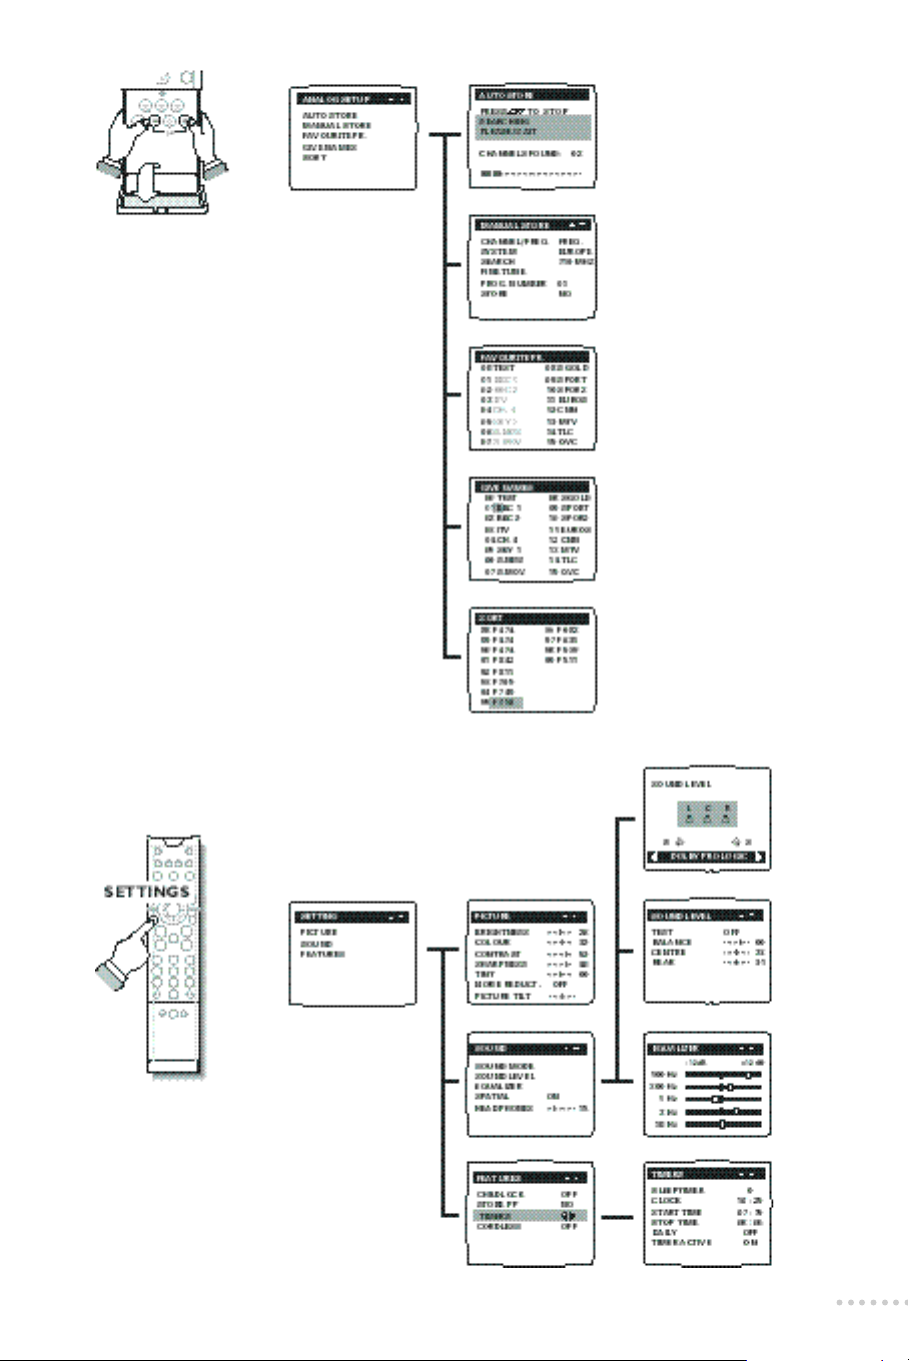
Tuning-in the analogue channels
To call up the ANALOGUE SETUP menu:
æ Use the key on the remote control to switch the TV to analogue
m o d e.
 Open the door of the remote control and press the and keys at
the same time.The ANALOGUE SETUP menu appears on the screen.
There are two ways the analogue channels can be tuned in :
automatic store or manual store (tuning - in channel by channel).
Automatic store
Carry out the above operations,then:
ê Select AUTO STORE (y key) and press in the centre of the cursor.
The search begins.The search operation takes a few minu t e s .
When the search is complete,the ANALOGUE SETUP m e nu re ap p e a r s
a u t o m a t i c a l ly.
If the transmitter or cable network broadcasts an automatic sort signal,
the programmes are correctly numbered.If this is not the case, the TV
channels have been numbered in the order in which they were found.
Use the SORT menu to re-number the programmes.
To exit or interrupt the search,press the red ke y.
If no picture is fo u n d ,r e fer to the chapter entitled Tips on p.2 7 .
Manual store
This menu allows you to store each programme manually.
From the ANALOGUE SETUP menu ( and keys)
æ Select MANUAL STORE (y key) and press .
The MANUAL STORE menu appears.
 Select C H A N N E L / F R E Q U E N C Y.Use the Ï q keys to select the tuning
mode :F R E Q . ( f requency search) or CHAN.C a n dC H A N . S (channel searc h
if you know the channel numbers on which the programmes are bro a d c a s t ) .
ê Select S Y S T E M (y) .Use Ï q to select E U R O P E,E U R,W,EUR. E,or U K.
Selecting E U R O P E guarantees automatic detection, with the exception
of certain cases of poor reception where E U R,W (BG), EUR. E (DK) or
U K (I) should be selected.
For more information see glossary on p.28.
® Select SEARCH (y) and press .The search begins.As soon as a
programme is found,the search will stop.If you know the frequency (or
the channel) of the programme required,enter its number directly
using the keys and go to chapter †.
If no programme is fo u n d ,r e fer to the Tips chapter on page 27).
† If reception is un-satisfactory,select FINE TUNE and hold down key
Ï or q.
Ú Select PR. NUMBER (y) and use the Ï q or to keys to enter
the desired channel number.
º Select STORE (y) and press . The OK message appears.
The programme and its name (if it has one) are stored.
Repeat operations ®,Ú, º for each programme to be stored.
To exit: press the red key twice.
10
Page 13

Favourite channels
This menu allows you to choose which analogue channels can be accessed using the P keys
on the remote control.
From the ANALOGUE SETUP menu ( and keys):
æ Select FAVOURITE PRG(y) and press in the centre of the cursor.
The FAVOURITE PR. menu appears.All programmes found during
the search are automatically included in the menu and appear in green.
 Use the yx keys to select any programme you wish to remove from
the list of favourites.
ê P ress to de-select (or select) a pro g r a m m e.The de-selected
p rogrammes appear in white,the selected programmes appear in gre e n .
Only the programmes and EXT sockets that are displayed in green in
this menu can be accessed using the P keys.
Wa rn i n g :If all programmes are de-selected,the P keys will cease to function.
To return to the ANALOGUE SETUP m e nu : p ress the red key once.
To exit: press the red key twice.
Give names
This menu allows you to name and modify names for analogue channels and EXT sockets.
æ
F rom the ANALOGUE SETUP m e nu ,select GIVE NAMES (y) and press .
The GIVE NAMES menu appears with the list of analogue channels
found automatically during installation.Certain channels may not be
named (the signal needed for identification is not alw ays transmitted) or
may be inappropriately named (only 5 characters are displayed).
 Use the P keys to select the required channel.
ê Use the Ï q keys to move to the area in which the channel name ap p e a r s
(up to 5 characters).A ye l l ow rectangle appears in the chosen are a .
® Use the yx keys to select or modify the character.
† Use the P keys to move to the next channel.
To return to the ANALOGUE SETUP m e nu : p ress the red key once.
To exit: press the red key twice.
Sort
This menu allows you to re-number the analogue channels in the order you prefer.
æ From the ANALOGUE SETUP menu,select SORT (y) and press .
The S O RT m e nu ap p e a r s .The menu provides a list of all the pro g r a m m e
numbers with their names (where prov i d e d ) ,or fre q u e n c i e s / c h a n n e l s .
 Using the yx keys,select the programme to be re-numbered.
If,for example,you want to re-number programme 12 as 8:Select 12
using yx keys (or type ).
The number chosen (12) will appear in blue in the list.
ê Press the key to select.A yellow rectangle appears on the name of
the programme (or on its frequency or channel).
® Enter the new number using keys to .
In our example,type . Programme 08 appears.The number (08)
appears in blue in the list.
† Press the key to select.
The exchange is now complete.In our example,p rogramme No.12 has
become No. 08 (and programme No.08 has become No.1 2 ) .
Repeat operations  to † for as many programmes as you wish
to re-number.
To exit from the ANALOGUE SETUP menu: Press the red key twice.
11
Page 14

Using the basic functions
Analogue or Digital mode
To receive TV channels,your television is equipped with 2 different
receivers,one is for digital channels,the other is for analogue channels.
The key of the remote control enables you to switch the TV
between analogue or digital mode.‘DIGITAL’ appears briefly on the
screen when you switch to digital mode.
For more information, see glossary page 28.
Selecting analogue channels
To select an analogue channel,you can either use the number keys t o
or the P keys .You have acces to 100 channels (0 to 99).For a 2
digit nu m b e r,the second digit must be entered befo re the dash disap p e a r s .
IMPORTANT:only channels activated in the FAVOURITE PRGS menu can be
accessed with the P keys (see p.11).
Selecting digital channels
There are three ways to select digital channels on your television.
In all cases,the receiver will wait approximately 1 second before
changing channels after the selection has been made.
Using number keys
When using the number keys,a channel number of up to 3 digits can
be entered.To select a multiple digit channel number,simply press the
other number keys immediately after the first.
Important: Using the number keys will enable you to select ALL channels,
regardless of whether they have been selected as your favourite channels.
Using the channel list
The channel list is an alternative way of viewing what channels are
available on your digital receiver.The list will be displayed over the
programme you are currently watching and will also indicate which
channels have been selected as your favourites or have been locked.
æ To display the Channel list,press the key whilst viewing any channel.
The display will show a total of 6 channels at a time,along with symbols that
identify the status of particular channels,such as favourite and/or locke d
c h a n n e l .The channel you are curre n t ly viewing will be highlighted on the list.
Â
To move through the Channel list,p ress the x y keys indicated on scre e n .
The selected channel will be highlighted.When you reach the bottom of
one screen,continue to press the xy key to scroll to the next screen.
Alternatively, press the Ïq keys to move a whole page at a time.
ê At any stage,you can press the EXIT key to remove the channel list
from the screen,or alternatively,with the required channel highlighted,
you can change to that channel by pressing the key.
Using the P / P keys
• In normal viewing mode,pressing P or P selects the next or
previous channel to the one you are currently watching.
• In favourite channel mode,pressing P or P selects the next or
previous channel to the one you are currently watching only from
those channels in the favourite list,for more information see page 23.
12
Page 15

Screen information
Analogue channels
Pressing the key enables you to display the channel number,name,
16:9 mode and sound mode for a few seconds.
Digital channels
Press the key to display or exit the on-screen tv guide.
The top half of the screen shows the channel number,channel name,
the name of the current programme and the time.
The bottom half of the screen initially shows the same information and
additionally,the name and start time of the current and next
programme.It also shows options to view more information.
•
The x y or to keys give access to programme information for other
c h a n n e l s ,without changing the channel you are watching.The top part of the
s c reen will continue to display information for the channel you are watching.
• The Y E L L O W or B L U E key give access to additional information about
the current or next programme.Press the same coloured key a second
time to remove it.
• If you want to change the channels whilst these menus are displayed,
press the S E L E C T key when the bottom half of the screen is
showing programme information that you want to watch.
Note:The channel cannot be changed however if you are viewing information
for the next programme.
The lower section of the on-screen tv guide also indicates whether subtitles
are available on a particular programme,whether it is broadcast in mono or
stereo and also the type of programme.(such as film, drama or comedy.)
TV,VCR,DVD or SAT operation
The remote control enables you to operate other equipments like a
v i d e o re c o rd e r, a digital versatile disk driver (DVD) or a satellite re c e i ve r.
æ Press the T V, VCR, DVD or S AT key to switch the remote control to the
corresponding mode.Each time a key is pressed,the T V, VCR, DVD or
S AT key lights up in green reminding you which mode is selected.
 Press one of the following key to access the desired function (when
available on the device) :
X external selection,
standby,
L teletext,
^ subtitles,
v record,
s rewind,
u stop,
q play,
r fast forward,
G programming,
S E T T I N G S
C u r s o r
K screen format,
These keys function with devices from our ra n g e of products which use the
RC5 signalling standard.
to call a menu,
to select a menu item,
S E L E C T
or
O K
feature (in the center of the cursor),
P
programme selection,
/ enter a number or a programme number,
/ screen information.
13
Page 16

16:9 Formats
The pictures you re c e i ve may be transmitted in 16:9 format (wide screen) or 4:3 format (conve n t i o n a l
s c re e n ) .4:3 pictures sometimes have a black band at the top and bottom of the screen (letterbox fo r m a t ) .
This function allows you to optimise the picture display on screen.
Automatic switching
This TV set is also equipped with automatic switching which will select the correct-screen format,
provided the specific signals are transmitted with the programmes.
This automatic format can also be modified manually.
Using the different screen formats
Press the key to select the different modes:
4:3,ZOOM 14:9, ZOOM 16:9,SUBTITLE ZOOM,SUPER ZOOM
4:3 Mode
The picture is reproduced in 4:3 format and a black band
is displayed on either side of the picture.
ZOOM 14:9 Mode
The picture is enlarged to 14:9 format,a thin black band
remains on both sides of the picture.
and
WIDE SCREEN.
14
ZOOM 16:9 Mode
The picture is enlarged to 16:9 format.This mode is
recommended when displaying pictures which have black
bands at the top and bottom (letterbox format).
SUBTITLE ZOOM Mode
This mode is used to display 4:3 pictures using the full
surface of the screen leaving the sub-titles visible.
SUPER ZOOM Mode
This mode is used to display 4:3 pictures using the full
surface of the screen by enlarging the sides of the picture.
WIDE SCREEN Mode
This mode restores the correct proportions of pictures
transmitted in 16:9 using full screen display.
Note:If you display a 4:3 picture in this mode,it will be enlarged
horizontally.
Page 17

Selecting the correct mode
Different modes can be selected to suit different picture formats,
use the following diagrams as a guide to which mode to use.
æ 4:3 Picture
There are 4 possible modes for this type of picture
Subtitle
 4:3 Picture Letterbox
ê 16:9 Picture
x2
x5
15
Page 18

Teletext
Teletext is an information system broadcast on certain TV channels which can be used like a newspaper.
It can also provide subtitles for people with hearing difficulties or those unfamiliar with the programme
language.This service is available on digital and analog channels in a numer of different ways.
When a TV channel has teletext embedded in the video information,the following controls can be used
to access the teletext irrespective of whether it is an analogue or a digital channel.
Switch teletext on / off
To call up or exit from teletext.The main index page
presents a list of items to which you have access.Each item
has a corresponding 3 digit page number.
If the channel selected does not broadcast teletext,the message
P100 is displayed and the screen stays black (in this case, exit
from teletext and select another channel).
Subtitles (teletext must be switched off)
To directly display or cancel the subtitles (if available).
For the language choice, refer to the receiver settings menu (p.9).
Direct access to an item
Coloured zones are displayed at the bottom of the screen.
The 4 coloured keys are used to access the items or their
corresponding pages.
The coloured zones flash when the page or the subject are not
yet available
Selecting a teletext page
Use keys P or to to enter the page number
required.E.g.: page 120,type .The number is
displayed in the top left-hand corner of the screen,the page
counter starts searching and then the page is displayed.
Repeat the procedure to consult another page.
If > xxx < flashes briefly or the counter continues searching, this
means that the selected page is not broadcast.If this is the case,
choose another number.
Stop the sequence of sub-pages
Certain pages have sub-pages which follow on automatically.
Pressing this key to disable and enable the sequence of
sub-pages.The message I appears in the top left-hand
corner of the screen when the sequence is disabled.
Time display (teletext must be switched off)
To display the time in the top right-hand corner of the scre e n .
This function only exists if the programme broadcasts teletext.
Enlarging a page
Press this key to display the upper part,the lower part and
then to return to the normal page size.
Reveal
To reveal / conceal hidden information (solutions to games).
Temporary interruption of the display
To stop or return to the teletext display.The L symbol is
displayed and the TV programme reappears on the screen.
This function allows you to wait when the search for a page
takes a long time.
16
Page 19

Selection of digital teletext
In addition to the teletext already described digital terrestrial
television also gives access to a new and vastly improved digital
teletext service, which includes high quality text and graphics as well
as advanced navigation options.
These services will become available in two ways depending on
whether the digital channel is dedicated to providing a digital text
service, or the digital channel provides digital teletext with digital
programmes.
Dedicated Digital Teletext
These dedicated teletext services will appear on their own dedicated
channel numbers which you select like any other channel.
Check the channel list to see which channels these services are on.
æ To view a digital teletext service,select a dedicated teletext channel.
 Individual teletext pages may now be selected by using the numeric,
coloured or cursor keys.
ê When you have finished watching teletext,select a different channel
in the normal way.
Digital Programmes with Digital Text
To view digital teletext that is transmitted with digital programmes;
æ Select a channel that is broadcasting digital text.
 Press the digital TEXT button on your remote.
ê Use the numeric and coloured keys to select the different text pages.
® Press the digital TEXT button to return to watching the programme.
17
Page 20

Adjusting the settings
To display a settings menu using the cursor keys
Select the PICTURE,SOUND or
Press SETTINGS.
Use the y x keys to select an adjustment and Ï q to make that adjustment.
The red key is used to exit from the menu displayed.
FEATURES.
Press .The menu appears.
Picture menu
You can adjust BRIGHTNESS,COLOUR,CONTRAST and :
• SHARPNESS:modifies the clarity of the picture,
• TINT:adjusts the colour temperature of the picture from COOL (blue white) to
WARM (red white),
• NOISE REDUCT.:useful in case of poor reception to reduce the picture noise.
• PICTURE TILT (only on certain models) :this adjustment compensates for regional
variations in the earth's magnetic field.
Sound menu
You can select SOUND MODE,SOUND LEVEL,EQUALIZER, SPATIAL and
HEADPHONE.
Sound mode
This menu allows you to select the different Dolby Surround modes.
æ Select SOUND MODE (y key) and press .
 Use the Ï q keys to select the NORMAL,DOLBY PRO LOGIC,
DOLBY 3 STEREO or HALL SURROUND sound modes.
For each setting,the active loudspeakers are displayed on screen.
The sound modes may also be accessed using the key on the remote control.
Normal
Dolby Pro Logic
Dolby 3 Stereo
Hall Surround
18
• NORMAL:The left (L) and right (R) channels are reproduced on the left and
right loudspeakers of the TV set.
• DOLBY PRO LOGIC* (with Dolby Surround sound sources):as well as the left
(L) and right (R) channels,a centre channel (C) and a rear channel comprising
2 loudspeakers (S),re p roduce the Dolby Pro Logic sound.
This mode is used when a film or programme has been recorded or encoded
in Dolby Surround sound.These films or programmes are always indicated by
the symbol .
• DOLBY 3 STEREO (with Stereo sources):Dolby 3 Stereo sound is produced
only on the left (L),right (R) and centre (C) channels.
• HALL SURROUND (with mono or Stereo sources):The left (L) and right (R)
channels are reproduced on the left and right loudspeakers of the TV set and
on the rear channel (S),creating a "Hall Surround" ambient effect.This mode
is recommended for broadcasts that are not encoded in Dolby Surround if
you wish to use a rear channel.
To exit from the menu :Press the red key.
Dolby Pro Logic and Dolby 3 Stereo modes are not recommended for mono
transmissions (only the central channel is used).
Manufactured under license from Dolby Laboratories Licensing Corporation.
*
”Dolby” ”Pro Logic” and the double-D symbol are trademarks of Dolby Laboratories Licensing Corporation.
Page 21

Sound level
This menu is used to balance the volume between the loudspeakers.
æ Select SOUND LEVEL (y key) and press .
The SOUND LEVEL menu appears.
 Select TEST (y key) and press .A continuous sound is emitted from
each channel in turn:left,right, centre and rear channel.
ê Use the Ï q keys to adjust the level of each channel independently:
BALANCE,CENTRE and REAR.The sequence stops while the level is being
changed and then automatically starts up again.
To stop the test :Press the red key.
Levels may also be adjusted without using the test signal.
Equalizer
æ Select EQUALIZER (y key) and press .
The EQUALIZER menu appears.
 Use the yx keys to select each frequency
(from bass:100 Hz to treble:10 kHz)
ê Use the Ï q keys to adjust the level.
You can view the presets corresponding to the smart sound controls by pressing
the key on the remote control.
To exit from the menu: Press the red key.
Spatial
This setting increases the stereo effect giving the impression that the
loudspeakers are spaced further apart.
Headphones
This setting allows the volume of the headphones to be adjusted
independently from the TV set.
To exit from the menu: Press the red key.
Features menu
You can select CHILDLOCK,STORE PP,TIMERS and CORDLESS (only
applicable to some sets)
C h i l d l o c k
Set to ON to lock the television key s .Switch off the TV and hide the re m o t e
c o n t ro l .The TV cannot now be used
to switch the TV on).
To cancel: reset the CHILDLOCK to OFF.
S t o r e PP
This function allows you to store your own picture and sound adjustments.
The adjustments are restored every time your set is switched on,or by
pressing the key on your remote control.
( o n ly the remote control will enable yo u
æ First carry out your PICTURE and SOUND adjustments and adjust
the volume and then:
 Display the FEATURES menu, select STORE PP (y key) and press .
The message OK appears.All the PICTURE and SOUND menu adjustments
as well as the volume are stored.
19
Page 22

Features menu (continuation)
Timers
Select TIMERS (y key) and press .The TIMERS menu appears.
Sleeptimer
Use the Ï q keys to enter the length of time after which the TV will
switch to standby mode (up to 180 mins).
To cancel:Switch SLEEPTIMER back to 0.
Press the key to display the length of time remaining.
Programmed Switch on
The following adjustments allow you to program the TV to automatically
switch on with the last viewed channel.
Select the adjustments using y key:
æ CLOCK:to view the current clock (it is not possible to adjust it in this menu).
If you want to modify the clock,please refer to the digital settings menu, page 9.
 START TIME:enter the time at which you wish the TV to switch on.
ê STOP TIME:enter the stop time (automatic stop).
® D A I LY:Set this option to O Nif you want the programming to ap p ly eve ry day.
† TIMER ACTIVE Set this option to ON to activate the timer.
Ú Press to set the TV to standby.It will automatically switch on at the time
programmed.
To cancel: Switch TIMER ACTIVE back to OFF.
N.B.:For programming to function correctly do not use the on/off key on the front
of the TV set to switch the TV off.
The combination of the CHILD LOCK and TIMERS functions may be used to
limit the length of time your television is in use,for example,by your children.
20
Cordless (only available on certain versions)
To make use of the wireless surround loudspeakers,use the Ï q key to
select the same channel as you selected on the active loudspeakers
(channel 6 has been selected as the factory default).
If you should get interferences from external RF (wireless) equipment such
a headphone,RF audio,remote controls for light,... it may be necessary to
shift to another channel.In practice,only 3 or 4 channels are available
because a step of at least 2 channels are necessary to have enough
separation.
Always be sure that the active speakers and the cordless setting are switched to
the same channel.Otherwise no sound or only distorted sound will be heard.
Page 23

Additional digital functions
Setting the timer (for video recording)
This function enables you to program the television to provide a digital
channel for recording.Your video recorder can then record a digital
program.
Important: The VCR must be connected to EXT1.
Please note that it is NOT possible to record from one digital channel and
watch an alternative digital channel at the same time.You can how ever record
a digital channel and watch an analogue channel on your T V,or vice vers a .
æ Press the MENU key to display the Main Menu.
 Press to select setting the timer.The screen show a list of 8
program slots,each one indicating that it is either free for
programming,or that it has a programme already stored in it.
ê Select a free row using the xy keys and press .
The timer screen is diplayed.
® Use the xy keys to select each option:
• date: Use the numeric keys to enter the date (4 digits),for example to
enter 8th February,press 0802.
• channel number: enter the channel number you want to record
from.Alternatively,if you do not know the number of the channel you
want to record,you can choose from the channel list by pressing the
GREEN key as indicated.The channel list will then be displayed over the
setting the timer menu. Use the xy keys to find the channel you
require and press .
• start time: enter the start time,preferably several minutes before you
set your video recorder to start recording (e.g.: for 8.25pm enter
2025).You can correct the time with the Ïq keys.
• end time: enter the time you want your receiver to switch off,
preferably after your video will have stopped recording.
There is a 5 minute overlap on the start and stop times for example a start
time of 16:30 will start at 16:25 to allow for a broadcasting margins.
• recording repeat: use the xy keys to select the frequency of when
you want the television to switch on.You can choose Once only (one
off programme),daily (every weekday) or weekly.
† With all the details entere d ,p ress the s e l e c t key to save the settings.
Please remember you still need to program your video re c o rd e r.
Ú If you have finished watching television,you must leave it in standby in
order for the timer settings to be activated.The red standby indicator
will then flash when a timer recording is in progress.
• If you wish to continue watching another digital channels after setting
a timer,you can do so by changing channels in the normal way.
• If you are watching another digital channel when the timer is due to
start,the timer alarm will sound and present you with the option of
switching channels or continuing to watch the current channel.
• You can also watch analogue channels while recording digital channels.
P ress the key on the remote control to switch the TV to analogue mode.
For full details on the alarm options, see page 9.
21
Page 24

Parental lock
22
This feature enables you to limit the access to any particular channel
by blocking it.Your unique code must then be entered before you can
watch a locked channel.
R e m a rk: this function is only accessible with a smartcard.
Entering your parental code for the first time
æ Press the MENU key to display the Main menu.
Please ensure your smartcard is inserted in the slot.
 P ress to select the p a rental lock option then to select the
enter parental lock m e nu .The first time this option is selected,you will
be prompted to choose your own code befo re you can lock a channel.
ê Input your 4 digit code,using the numeric keys / (e.g.for code
1234,type ).If you enter an incorrect number, you can use
the Ï key to move back one space and make an amendment.
I m p o rt a n t : please keep a note of the number you select for future refe r e n c e.
® Press the key to store the code then the RED key to return to the
p a rental lock menu.The parental lock menu is now available.
To lock or unlock channels
æ
F rom the p a rental Lock m e nu ,p ress then enter your parental code.
P ress and a complete list of all available channels is displaye d .
ê Use the xy keys to highlight the channels that you wish to lock or
unlock and press .
A ‘closed padlock’ symbol appears alongside the locked channels.
® Pressing the GREEN key as indicated on-screen will open or close the
locks.The top of the screen will indicate whether the channels are
locked or not.
† Finally,press the EXIT key to return you to a normal TV picture.
To temporarily unlock all channels:
If you temporarily want to unlock all your locked channels,this can be
done from the choose channels to lock or unlock menu.
æ
Press MENU then key followed by key.
Â
Enter your current code when requested.
ê
With the channel list displayed press the GREEN key,this will open all
the padlocks.Pressing this key again will close the padlocks again.
I m p o rt a n t : don’t forget to lock your channels again after unlocking them all
in this manner
Watching your locked channels
When selecting a channel that has been locke d ,the current channel
remains displayed and you will be prompted to press and enter yo u r
chosen code.Enter your 4 digit code and press to view the channel.
To change your parental code
In order to change your parental code,you will need to enter the
current code before a new code can be entered.
æ F rom the P a rental lock m e nu ,p ress to select Change parental code.
 Enter your current code and press to confirm.If you entered the
code corre c t ly,it will be cleared and the screen will prompt the entry of
a new code.
ê Enter your new code in the same way and press to confirm.
Remember to make a note of your new code as you enter it.
® Lastly,press the EXIT key to return to normal operation.
Page 25

Choosing favourite channels
This function enables you to select channels that become yo u r
f avo u r i t e s ,and are there fo re easier and faster to access.
When using the P keys to change channels when the favo u r i t e
mode is on,o n ly those identified as your favourite channels will be
available for selection.You can view a list of your chosen favo u r i t e
channels by selecting the channel list or the favourite channels m e nu .
æ Press the MENU key to display the main menu.
 P ress the key to select the choosing favourite channels o p t i o n .
ê To add channels into your list of favourites highlight the channel you
want to select using the xy keys.Then press the key to display
the favourite channel symbol alongside the channel name.
® Repeat these steps for any other channel that you wish to select as a
favourite.
Note: In the diagram channels 1,2, 3 and 5 have been selected as favourites.
With the fa v o u rite mode on,the x y keys will only select your fa v o u rite channels.
† To re m ove any of these channels from your favourites list,use the x y
keys to highlight the channel that you want to re m ove,and press .
Ú After you have selected or de-selected all your favourites,press the
GREEN key as indicated to activate the favourite mode.
The favourite mode status is displayed on the right top part of the
menu as “favourites are on” or “favourites are off”.
The TV must now be put into stanby to memorise the favourite
channels you have set.
Subscription information
Smartcard data
æ From the main menu,press to select subscription information.
 Press to select the smartcard data option.
ê To exit, press the MENU key or the RED key to step backwards
Check your postbox
æ From the main menu,press to select subscription information.
 Press to select the check your postbox option.
ê If you want to check previous messages,you can scroll around the
® To exit, press the MENU key or the RED key to step backwards
This option enables you to display the current expiry date of your
subscription account.
The current expiry date of your subscription account is displayed.
through the menu.
Your television has the ability to display messages that have been sent
to you by a broadcaster,perhaps about a special offer or your current
subscription package.You will be advised when a message is waiting
to be read by the indication ‘Post’ appearing on the screen when
switching the television to digital mode.
The current messages is displayed,the most recent message appears
at the top of the screen,with previous messages below.
screen by pressing the xy keys.
through the menu.
NOTE:Messages cannot be manually deleted, but the oldest messages are
automatically removed as new messages are received.
23
Page 26

Connecting peripheral equipment
The television has 2 external sockets situated at the back of the set (EXT1 and EXT2).
The EXT1 socket has audio and video inputs/outputs and RGB inputs.
The EXT2 socket has audio and video inputs/outputs and S-VHS inputs.
Video recorder
Video recorder (only)
Carry out the connections featured opposite.Use a good
quality euroconnector cable.
If your video recorder does not have a euroconnector socke t ,t h e
only connection possible is via the aerial cabl e.You will therefo r e
need to tune in your video recorder's test signal and assign it
p r o g ramme number 0 (refer to manual store,p.5 ) .
To reproduce the video recorder picture,press .
Important: if your video recorder does not have A/V connections,
It will not be possible to record digital channels.
Other equipment connected to the scart
Satellite receiver, decoder,CDV,games,etc.
Carry out the connections featured opposite.
Connecting your equipment to EXT2.
24
To select connected equipment
Press the X key to select E1 (EXT1),E2 (EXT2) or E2 Y/C for
S-VHS or Hi-8 equipment
Most equipment (decoder,video recorder) carries out the switching itself.
Page 27

Amplifier
To connect to a hi-fi system,use an audio connection cable
and connect the “ L” and “R” outputs on the TV set to the
“ AUDIO IN” “ L” and “R” input on your hi-fi amplifier.
Headphones
Side connections
Modem
The headphones socket is situated on the left-hand side
of the TV set.
To adjust headphone volume,use the HEADPHONE
setting in the SOUND menu (p.7).
Carry out the connections featured opposite.
Using the X key,select E2 (EXT2) for a VHS or 8mm
camcorder and E2 Y/C for an S-VHS or Hi-8 camcorder.
For a mono sound camcorder,connect the sound signal to the
AUDIO L.input. Use the e key on the remote control to
reproduce the sound on the left and right loudspeakers of the
television.
Your television is equiped with an integrated modem for
digital information transfer via your telephone line.
Connect a telephone cable as illustrated opposite.
It is not necessary to make this connection until notified by
your service provider.
Integrated telephone modem type V22bis, error correction
V42 and dialing mode DTMF or pulse.
Common interface
A common interface is available for future use.
Your service provider will notify you when new services
or options become available.
25
Page 28

External loudspeakers
For improved sound,you can connect 2 external L and R
loudspeakers in the place of the left and right loudspeakers
on the TV set.
Connect as shown opposite and then switch off the internal
loudspeakers on the TV set.(button in the c position)
The impedance of the loudspeakers must be between 8 and 16
Ohms.
Surround loudspeakers
Connect the 2 Surround loudspeakers as illustrated opposite.
The loudspeakers should be located at the rear or on either
side of the listening zone (always connect 2 loudspeakers).
FM cordless surround speaker system (only available on certain models)
Certain models are equipped with 2 FM cordless surround
speakers:
• one is the active loudspeaker,including the RF receiver,a
power switch,the mains supply, a channel selector,a
connector clip and a cinch connector.
• the other is passive and has to be connected to the active
loudspeaker.
æ Set the slide channel switch (1) to channel 6 (default value).
 Set the CORDLESS item of the FEATURE menu to channel
6 (see page 20).
ê Connect the active to the passive loudspeaker with the
supplied speaker cable (2).The Surround speakers should
always be located behind or to either side of the listener.
Remark: people moving around close to the TV may disturb the
sound transmission.The maximum distance between the TV and
the surround speakers should not exceed 15 m (and 6 m
between the active and the passive speakers). In case the
wireless transmission is disturbed or not possible,you can make
a wired connection between the TV and the active speaker.
® Connect the active speaker to the mains with the supplied
cable (3).
† Switch on the active speaker with the POWER switch (4).
The green LED of the active speaker shows that there is a
t r a n s m i s s i o n .The red LED is on when the speaker is in standby.
26
Page 29

Tips
Poor reception (in analogue mode)
The proximity of high buildings may be
responsible for ghost pictures,echoing or
shadows.In this case, try manually adjusting
your picture:see "fine tuning" (p.6) or change
the orientation of the outside aerial.In the
event of difficult reception (snowy picture)
switch the NOISE.REDUCT on the FEATURES
menu to ON.(p.7).
Bad picture (in digital mode)
If the picture freezes a lot,or in cases of block
effect,there is a problem of poor reception.
Please check with the signal strenght menu
(see p.8).
Depending on the strength of digital terre s t r i a l
signals available in your are a ,s t a n d a rd aerials used
for analogue transmissions will in most cases
p rovide satisfactory reception of digital signals.I n
g e n e r a l ,set top and communal aerials will not
g i ve satisfactory re s u l t s ,best performance and
stability of digital signals can be achieved if a highquality aerial and wiring is installed.
If reception problems are experienced with a
s t a n d a rd aerial,a good quality,n a rrow beam
antenna should be pro fe s s i o n a l ly installed outside
the pro p e rty and aligned to cap t u re the maximu m
digital signal stre n g t h .Loft antenna's can be used
w h e re an outside installation is not possible,
h oweve r,c a re should be taken to mount the loft
antenna as high as possible and as far aw ay fro m
house wiring as possible.Aerial amplifiers should
o n ly be used when absolutely necessary.D o u b l e
s c reen coaxial cable should be installed betwe e n
the aerial and television re c e i ver and positioned to
avoid close proximity to house wiring.T h e
t e l evision re c e i ver should be connected dire c t ly to
the coaxial cable,rather than routing the signal
first through other pro d u c t s .
No picture
H ave you connected the aerial socket pro p e r ly ?
H ave you chosen the right system? (p. 6)
Is the
contrast or the brightness badly adjusted?
Press È to select one of the smart control
presets.
Po o r ly connected euroconnector cables or aerial
s o c kets are often the cause of picture or sound
p roblems (sometimes the connectors can
become half disconnected if the TV set is move d
or turned).Check all connections.
Picture adjustment
If the picture is not adjusted properly or if you
have trouble obtaining a clear picture,select
one of the smart control presets È (p.8) and
store using the STORE PP ALL function in the
FEATURES menu.
The picture is too blue or too red! Adjust the
TINT (p. 12).
In the event of difficult reception (snowy
picture) switch the NOISE.REDUCT on the
PICTURE menu to ON. (p.12).
Peripheral equipment gives a black and
white picture
You have not selected the right socket with the
X key: E2 instead of E2 Y/C.
To play a video cassette, check that it has been
recorded under the same standard (PAL,
SECAM,NTSC) which can be re p l ayed by the
video re c o rd e r.
No sound (in analogue mode)
If on certain channels you re c e i ve a picture but no
s o u n d ,this means that you do not have the corre c t
TV system.Modify the SYSTEM setting (p.6 ) .
The left and right loudspeakers on the TV set do
not work? Check that the external loudspeake r s
switch has not been activated by mistake (p. 2 0 ) .
The Surround Sound loudspeakers do not wo r k ?
For them to function corre c t ly it is essential that
both loudspeakers are connected:c h e c k
c o n n e c t i o n s .
If in doubt,use the SOUND LEVEL menu (p.13)
to check each channel.
Remote control
The TV set does not react to the remote
control;the indicator on the set no longer
flashes when you use the remote control?
Replace the batteries.
Press the TV key to be sure your remote
control is in the TV mode
Standby
When you switch the TV set on it remains in
s t a n d by and the indication LOCKED is displaye d
when you use the keys on the TV set? The
CHILD LOCK function is switched on (p.7).
If the set receives no signal for 15 mins,it
automatically goes into standby mode.
The set consumes energy when it is switched
on.To save electricity,we recommend that you
switch the TV set off using the ON/OFF key.
Still no results?
If your TV set breaks down, never attempt to
repair it yourself:contact your dealer's aftersales service.
27
Page 30

Glossary
16:9: Refers to the ratio between the length and height of the screen.
Wide screen televisions have a ratio of 16/9,conventional screen TV sets have a ratio of 4/3.
Digital receiver :The television is equiped with an integrated digital tuner which enables you to
receive a digital transmission with a terrestrial antenna.The tuner is able to received Digital Video
Broadcast compliant with MPEG-2,up to Main profile @ Main level
Modem :modulator-demodulator.An electronic device built into TV to allow communication between
the TV and your service provider via the telephone line. Fitted to the TV for future applications.
NICAM sound: Process by which digital sound can be transmitted.
RGB Signals: These are 3 Red,Green and Blue video signals which directly drive the red,green and
blue emitters in the cathode ray tube.Using these signals provides better picture quality.
Serial I/O port RS232: a connection for serial transmission/reception of data according to a
standardized protocol.Fitted to the TV for dealer’s repair services.
Smart Card: a card,containing an integrated electronic circuit,which together with electronics in the
TV, allows you to access ONdigital channels or special services from the provider.
S-VHS Signals: These are 2 separate Y/C video signals from the S-VHS and Hi-8 recording standards.
The luminance signals Y (black and white) and chrominance signals C (colour) are recorded
separately on the tape.This provides better picture quality than with standard video (VHS and 8
mm) where the Y/C signals are combined to provide only one video signal.
System: Television pictures are not broadcast in the same way in all countries.There are different
standards:BG,DK,I,and L L’.The SYSTEM setting (p.10) is used to select these different standards.
This is not to be confused with PAL or SECAM colour coding. Pal is used in the majority of
European countries,Secam in France, the CIS and the majority of African countries.
The United States and Japan use a different system called NTSC.
Index
16/9 formats............................................................14
Analogue mode/channels.....................................12
Card reader...........................................................2-6
Channel list,channel selection............................12
Child lock ................................................................19
Connections............................................................24
Decoder,
Dolby Surround......................................................18
Digital mode/channels...........................................12
Digital menu........................................................7-21
Digital teletext........................................................17
External loudspeakers...........................................26
Favourite programmes....................................11-23
Features menu........................................................19
Fine tuning...............................................................10
FM cordless surround speakers..........................26
Headphones............................................................25
Language used for menus.......................................8
Menus..........................................................................4
Modem.................................................................9-25
Picture (adjustments)............................................18
28
DV D
........................................................24
Programmes............................................................12
Remote control........................................................3
Screen information................................................13
Selecting EXT sockets..........................................24
Settings menu..........................................................18
Sleeptimer................................................................20
Smart controls..........................................................3
Sort .......................................................................7-11
Sound (adjustments) .............................................18
Sound choice.............................................................3
Storing adjustments...............................................19
Store channels.....................................................7-10
Surround loudspeakers.........................................26
System......................................................................10
Teletext ....................................................................16
Timer..................................................................20-21
Tuning in digital channels........................................7
Tuning in analog channels.....................................10
TV keys.......................................................................2
TV,VCR, DVD or SAT keys..................................13
VCR...........................................................................24
Page 31

Page 32

ß
 Loading...