

Page 1

Page 2

Page 3

ANALOGUE
MENUS
1
Introduction
Ta b le of Contents
Thank you for purchasing this television set.
This handbook has been designed to help you install and operate your TV set.
We would strongly recommend that you read it thoroughly.
We hope this new television meets entirely with your satisfaction.
Installing your television set . . . . . . . . . . . . . . . . . . . . . . . . . . . . . . . . . . . . . . . . . .2
The keys on the TV set . . . . . . . . . . . . . . . . . . . . . . . . . . . . . . . . . . . . . . . . . . . . . .2
The remote control keys . . . . . . . . . . . . . . . . . . . . . . . . . . . . . . . . . . . . . . . . . . . .3
Digital or Analogue channels ? . . . . . . . . . . . . . . . . . . . . . . . . . . . . . . . . . . . . . . . . .3
Switching on for the first time . . . . . . . . . . . . . . . . . . . . . . . . . . . . . . . . . . . . . . . .4
Understanding the information on the banner . . . . . . . . . . . . . . . . . . . . . . . . . . .4
Rearrange services . . . . . . . . . . . . . . . . . . . . . . . . . . . . . . . . . . . . . . . . . . . . . . . . .5
View or Listen to new TV services . . . . . . . . . . . . . . . . . . . . . . . . . . . . . . . . . . . .5
Add new services . . . . . . . . . . . . . . . . . . . . . . . . . . . . . . . . . . . . . . . . . . . . . . . . . .5
Reinstall all services . . . . . . . . . . . . . . . . . . . . . . . . . . . . . . . . . . . . . . . . . . . . . . . .6
Test reception . . . . . . . . . . . . . . . . . . . . . . . . . . . . . . . . . . . . . . . . . . . . . . . . . . . . .6
Language and location preferences . . . . . . . . . . . . . . . . . . . . . . . . . . . . . . . . . . . .7
Access restrictions . . . . . . . . . . . . . . . . . . . . . . . . . . . . . . . . . . . . . . . . . . . . . . . . .7
Setting up your favourite list . . . . . . . . . . . . . . . . . . . . . . . . . . . . . . . . . . . . . . . . .8
Information menu . . . . . . . . . . . . . . . . . . . . . . . . . . . . . . . . . . . . . . . . . . . . . . . . . .8
Downloading new software . . . . . . . . . . . . . . . . . . . . . . . . . . . . . . . . . . . . . . . . . . .8
Using the Options menu . . . . . . . . . . . . . . . . . . . . . . . . . . . . . . . . . . . . . . . . . . . .9
TV guide . . . . . . . . . . . . . . . . . . . . . . . . . . . . . . . . . . . . . . . . . . . . . . . . . . . . . . . . .9
Recording function . . . . . . . . . . . . . . . . . . . . . . . . . . . . . . . . . . . . . . . . . . . . . . . .10
Automatic tuning of analogue programmes . . . . . . . . . . . . . . . . . . . . . . . . . . . . .11
Sorting analogue programmes . . . . . . . . . . . . . . . . . . . . . . . . . . . . . . . . . . . . . . .11
Manual tuning of analogue programmes . . . . . . . . . . . . . . . . . . . . . . . . . . . . . . . .12
Naming analogue programmes . . . . . . . . . . . . . . . . . . . . . . . . . . . . . . . . . . . . . . .12
Picture settings . . . . . . . . . . . . . . . . . . . . . . . . . . . . . . . . . . . . . . . . . . . . . . . . . . .13
Sound adjustments . . . . . . . . . . . . . . . . . . . . . . . . . . . . . . . . . . . . . . . . . . . . . . . .13
Feature settings . . . . . . . . . . . . . . . . . . . . . . . . . . . . . . . . . . . . . . . . . . . . . . . . . . .13
Analogue Teletext . . . . . . . . . . . . . . . . . . . . . . . . . . . . . . . . . . . . . . . . . . . . . . . . .14
Digital text . . . . . . . . . . . . . . . . . . . . . . . . . . . . . . . . . . . . . . . . . . . . . . . . . . . . . . .15
16:9 Formats . . . . . . . . . . . . . . . . . . . . . . . . . . . . . . . . . . . . . . . . . . . . . . . . . . . . .15
Connecting peripheral equipment . . . . . . . . . . . . . . . . . . . . . . . . . . . . . . . . . . . .16
To select connected equipment . . . . . . . . . . . . . . . . . . . . . . . . . . . . . . . . . . . . .16
VCR / DVD mode selector . . . . . . . . . . . . . . . . . . . . . . . . . . . . . . . . . . . . . . . . .17
Tips . . . . . . . . . . . . . . . . . . . . . . . . . . . . . . . . . . . . . . . . . . . . . . . . . . . . . . . . . . . .18
Centre Frequencies Table (in KHz) . . . . . . . . . . . . . . . . . . . . . . . . . . . . . . . . . . . .18
DIGITAL
MENUS
°
Recycling
The materials used in your set are either reusable or can be recycled.
To minimise environmental waste, specialist companies collect used appliances
and dismantle them after retrieving any materials that can be used again (ask
your dealer for further details).
English
The digital menus
of this product
use the latest
Java
™
technology
from Sun
Microsystems Inc.
FrançaisEspañolItalianoSvenskaSuomi
Page 4

The television set has 4 keys which are
located on the front or the top of the set
depending on the model.
The VOLUME - + (-
” +) keys are used to
adjust sound levels.
The PROGRAM - + (- P +) keys are used to
select the required programmes.
To access the menus, simultaneously hold
down the
” - and ” + keys.The
PROGRAM - + keys may then be used to
select an adjustment and the -
” + keys to
make that adjustment.
To exit from the menus, hold down
the 2
” - and ” + keys.
PROGRAMVOLUME
--
++
2
&
Positioning the television set
Place your TV on a solid, stable surface, leaving
a space of at least 5 cm around the appliance.
To avoid accidents, do not put anything on the
set such as a cloth or cover, a container full of
liquid (vase) or a heat source (lamp).The set
must not be exposed to water.
é
Connections
• Insert the aerial plug into the : socket at
the rear of the set.
• Insert the mains plug into a wall socket (220-
240 V / 50 Hz).
“
Remote control
Insert the two R6-type batteries (supplied)
making sure that they are the right way round.
The batteries supplied with this appliance do not
contain mercury or nickel cadmium. If you have
access to a recycling facility,please use this facility
(if in doubt, consult your dealer).When the batteries
are replaced, use the same type.
‘
Switching on
To switch on the set, press the on/off key.
A red indicator comes on and the screen lights
up. Go straight to the chapter Switching on
for the first time, on page 4.
If the television remains in standby mode,
press P
# on the remote control.
The indicator will flash when you use the remote
control.
5 cm
5 cm
5 cm
Installing your television set
The keys on the TV set
Page 5

3
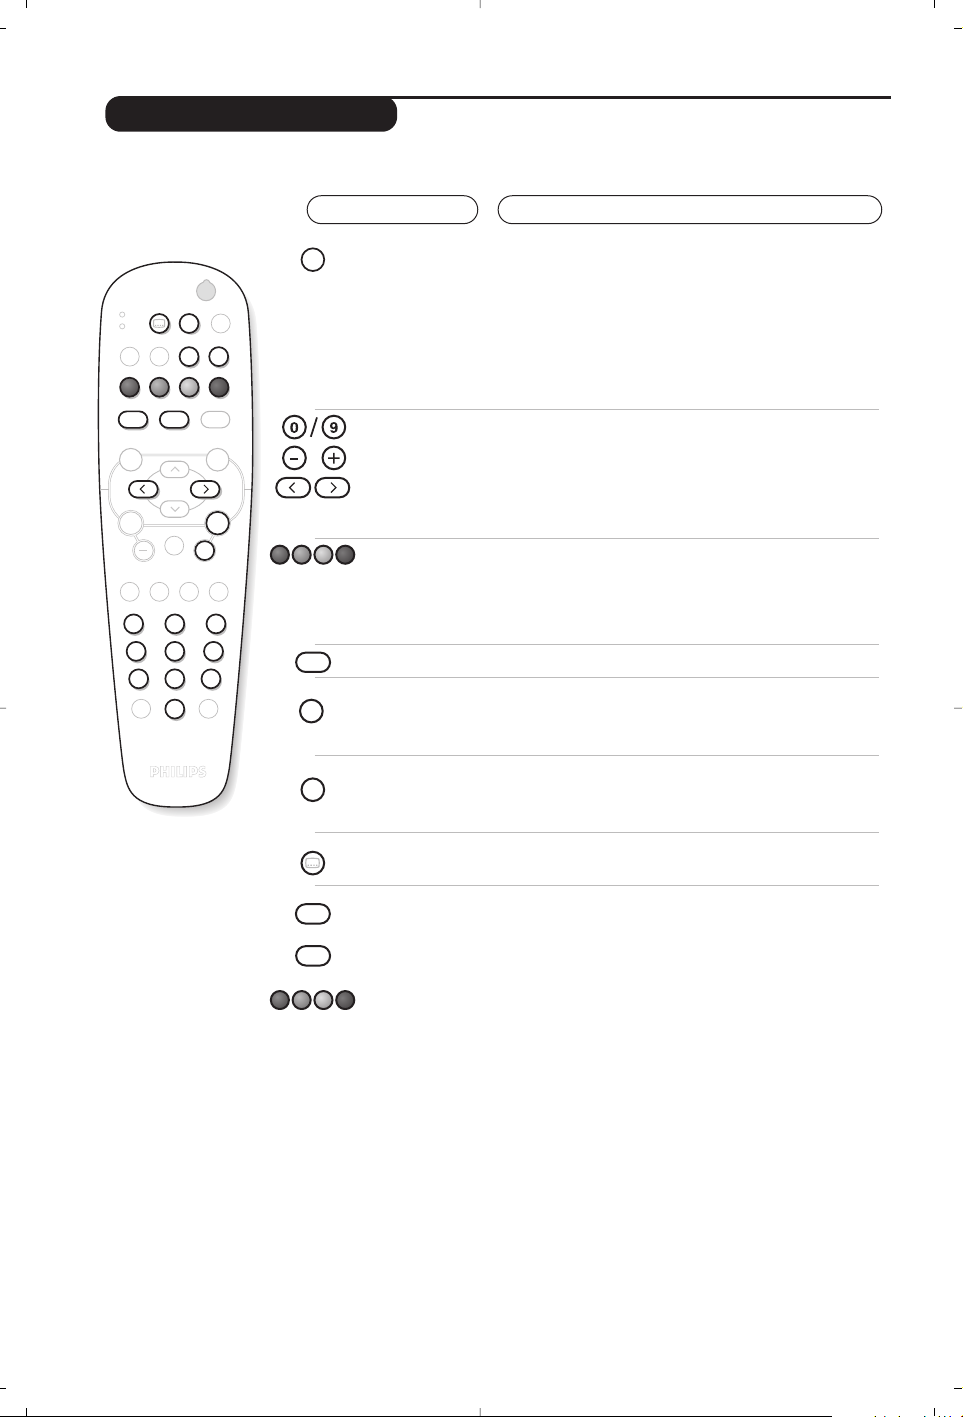
The remote control keys
Screen information
In digital mode, press once to display the
information banner, a 2ndtime to get
more information on the programme
and a 3rd time to remove it (see p. 4).
In analogue mode, this displays /
removes the programme
informations(number, name, sound
mode). Hold down for 5 seconds to
permanently display the analogue
programme number on the screen.
TV guide
(see p.9).
Select EXT sockets
(see p.16).
Mode selector
To activate the remote control in
VCR or DVD mode (see p.17).
TV Menu
To display or exit from the analogues
menus
Select
In digital mode this displays / clears the
programme list.Use the
îÏ keys to
select a programme and
u to display it.
Volume
To adjust the sound level
16:9 formats (p.15)
Mute
To disable or enable the sound.
Picture and sound settings
Accesses a series of picture and
sound settings.
The position Personal corresponds to the
settings stored in the menus.
Standby
To set the TV to standby mode.To
switch the TV set on again, press b,
P @#or 09.
Options menu
(see p.9).
Teletext features (p.14)
and VCR/DVD keys (p.17).
Digital Menu
To display or exit from the digital
menus (when TV is in digital mode).
Analogue or Digital mode
To switch the television between
analogue and digital mode.
Cursor
These 4 keys are used to move
within the menus or to directly access
the 16:9 screen formats (p 15).
Previous programme
To access the previously viewed
programme.
Numerical keys
For direct access to programmes.For a
2 (3) digit programme number, the 2
nd
(3rd)digit must be entered before the
dash disappears.
The number, the name
(and the sound
mode, in analogue
mode) are displayed for a few seconds.
Sound mode
To switch from
Stereo to Mono or
to choose between different
languages (Dual I, Dual II, ...).
When the sound mode is switched to
Mono, the indication is displayed in red.
Surround sound
To activate / deactivate the Virtual
Dolby Surround * effect.In stereo,
you can obtain Dolby Surround
Pro Logic sound quality. In mono,a
stereo spatial effect is simulated.
*
Manufactured under license from Dolby
Laboratories. ”Dolby””Pro Logic” and the double-D
symbol are trademarks of Dolby Laboratories.
Programme selection
To access the next or previous
programme (or page in digital menus).
Subtitle mode
To activate/deactivate the subtitle mode
To receive TV channels, your television is equipped with 2 tuners. One is for digital channels, the other
is for analogue channels. Use the
v key of the remote control to switch the TV between analogue
and digital mode.Then use the
P @#or 09keys to select channels.
Digital or Analogue channels ?
MODE
VCR
DVD
Ø
.
¤Ÿ
OPTIONS
∫
¢
›Ó
CANCEL
Œ
·
MENU
TV
SELECT
OK
Ê Æ
∆
MENU
DIGITAL
Ë
A/D
++
†
P(age)
-
”
BACK
Á
[
∏ù
12
3
564
879
SMART
-
SMART
ª
0
Page 6

4
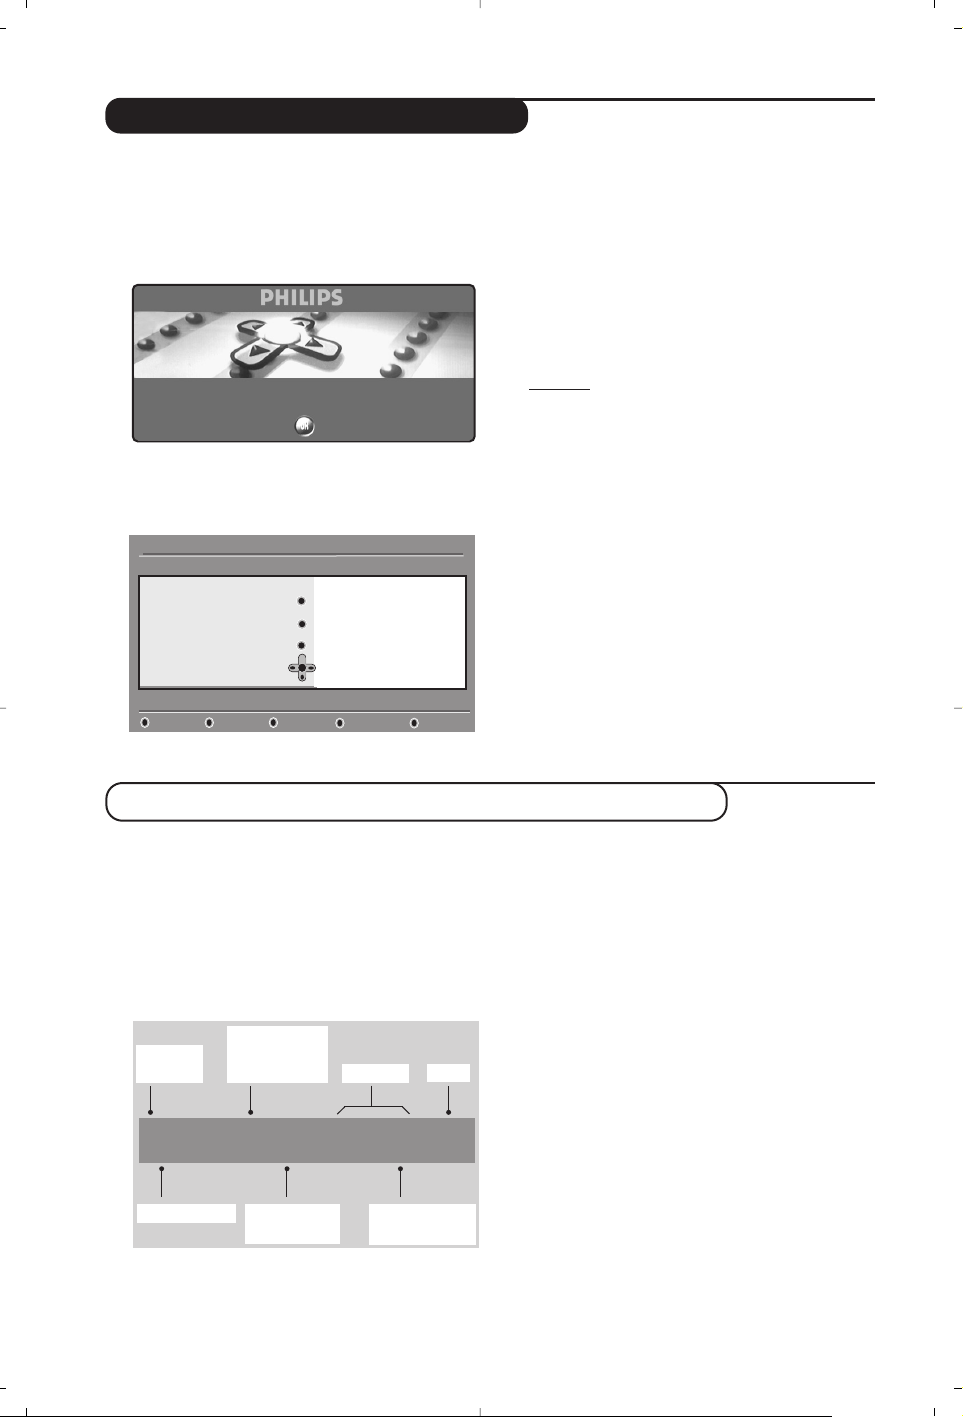
The first time the TV set is switched on, a
congratulation message will appear on screen.
The language of which changes every 5 seconds.
If the menu is not displayed, press and hold down
the
”- and ”+ keys on the TV set for 5
seconds to display the menu.
&
Press the u key on the remote control,the
moment your prefered language is visible
on the screen.The
Setup
menu is displayed :
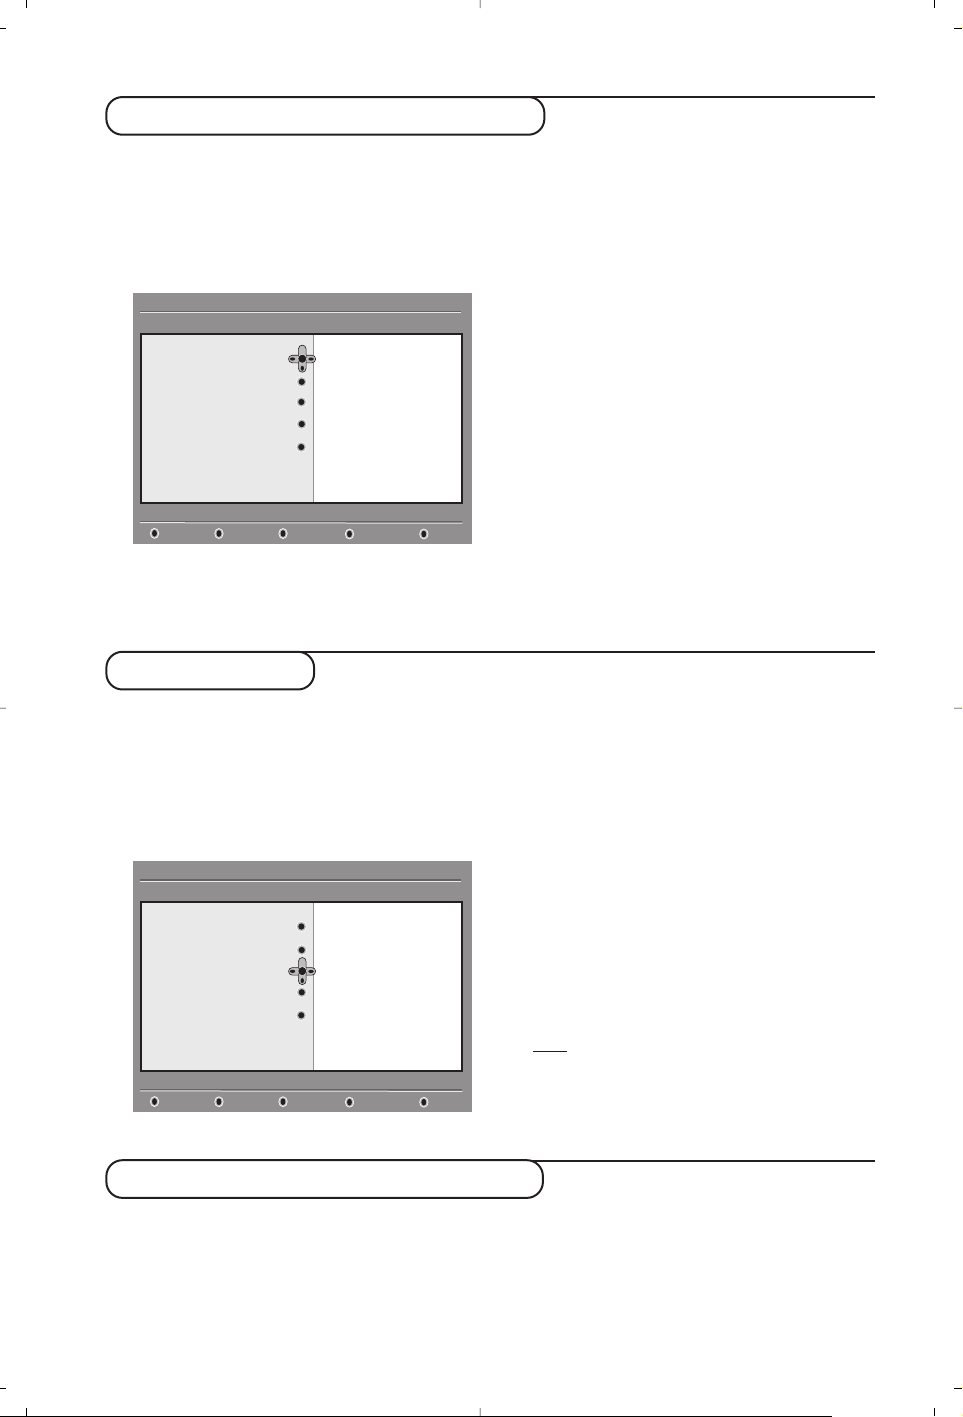
é The Language, corresponding Country and
Time zone is now preselected according to the
opening screen. However, you can still change
your preferences before you start a service scan.
“ With the cursor keys, select
Language,
Country or Time zone and check if the
adjustment is according to your preferences. If
necessary,use the cursor keys to make your
adjustment and press
u to exit.
Caution: if you select a wrong country, the channel
numbering will not be according to the standard
for your country.
‘ Select
Service Scan from the menu and
press
u to start the installation.The Service
Scan
menu is displayed.
All the digital and analogue programmes are
searched for and stored automatically.When
the search is complete, the menu will indicate
the number of digital services and analogues
programmes found.
( Press the
u key twice to start watching TV.
The television then displays the current
programme.The installation is now complete.
When you select a digital programme, an
information banner is displayed for a few
seconds at the top of the screen.
You can also use the
∂ key of the remote control
to display this banner.A second press displays more
information about the programme (when available).
The banner contains information on the
preset number, channel name,programme
duration, transmission clock, programme title
and the time remaining of the current
programme.
Switch on for the first time
Understanding the information on the banner
Banner description:
Congratulations for selecting this Philips television.
Press OK to start enjoying your digital television.
Setup
Set options and start a service scan
Language
Country
Time Zone
Service Scan
11:46
English
United Kingdom
(GMT) Lisbon, London
Please press OK to start
2 11:06 - 11:09
BBC2 Snooker
11:46
Minutes left : 14
u
ù
i
ß
preset
number
symbols
clock
programme
start and end
time
remaining time
of programme
programme titlechannel name
Symbols description :
i
more information about this programme is available :
press the ∂key to display or remove it.
ß subtitling is available : if you want to display
them, press the ß key or the
OPTIONS key to
access the
options menu and select subtitles.
ù other audio languages are availables and can be
selected in the
options menu.
u the selected Favourite list is displayed in the
colour of the activated list.
Page 7

5
Rearrange services
This menu allows you to change the order of
the stored digital channels and radio stations.
& From the digital mode, press the
‹ MENU
key
to display the setup menu.
é Use the
Ï key to select installation and press
¬ twice to select the Service lists menu.
“ Use the
îÏ keys to select Rearrange
services
and press ¬.
‘ Use the
îÏ keys to select the channel you
want to exchange.
( Press
u to activate.
If you want to uninstall the selected channel, press
the red key.
§ Select (
îÏ) the new channel number you
want to exchange it with.
è Press
u to confirm.The exchange is done.
! Repeat the operations ‘ to è until all the
channels are in the required order.
ç Press the
‹ MENU
key to leave the menu.
This menu allows you to check the availability
of new TV channels or new radio stations that
have been launched by the broadcaster after
the initial installation.
& From the digital mode, press the
‹ MENU
key
to display the setup menu.
é Use the
Ï key to select installation and press
¬ twice to select the Service lists menu.
“ Use the
îÏ keys to select View new TV
channels
or Listen to new Radio station.
‘ If new services are availables, press
¬ to
enter into the list and use the îÏ keys to
move through the list.
( Press the
‹ MENU
key to leave the menu.
View or Listen to new services
Setup
Installation
Manage service lists
Close
Service lists
Service setup
Test reception
11:46
Rearrange services
View new TV channels
Listen to new Radio stations
Add new services
This menu allows you to search for new TV
channels or radio stations that have been launched
by the broadcaster after the initial installation.
& From the digital mode, press the
‹ MENU
key
to display the setup menu.
é Use the
Ï key to select installation and press
¬.
“ Select
Service setup (Ï) and press ¬.
‘ Press
¬ to select Add new services and
press
u to activate the installation.
The search begins and only new channels will
be stored and added to the
channel list menu.
The percentage of the installation that has
been completed and the number of channels
found is displayed.
( When the search is complete, select store and
press
u to accept the new services.
§ Press the
‹ MENU
key to leave the menu.
Setup
Installation
Install and manage services
Close
Service lists
Service setup
Test reception
11:46
Add new services
Reinstall all services
Page 8

6
This menu allows you to reinstall all the digital
TV channels and radio stations.
& From the digital mode, press the
‹ MENU
key
to display the setup menu.
é Use the
Ï key to select installation and press
¬.
“ Select
Service setup (Ï) and press ¬.
‘ Select
Reinstall all services (Ï) and press ¬.
( Press
u to start the installation.
A search is then made for all digital services
which are then stored automatically.
When the search is completed, the menu will
indicate the number of digital services found.
§ When the search is complete, press
u to
store the services.
è Press the
‹ MENU
key to leave the menu.
This menu allows you to check the strengh of
the signal you are receiving through your aerial.
& From the digital mode, press the
‹ MENU
key
to display the setup menu.
é Use the
Ï key to select installation and press
¬ to display the installation menu.
“ Use
Ï to select Test reception and press ¬.
You obtain an indication of the actual
programme frequency, the network name, the
signal quality and strength.
‘ You now have to enter the frequency of the
digital channel you want to test.
Your Tv magazine can provide the list of digital
channel numbers. Use the table on page 18 to get
the frequency.
( If the signal quality and strength is poor, a
message appears at the bottom of the menu
prompting you to enter the frequency between
the lower and the higher limit. If after keying
the frequency, the reception is still poor, you
can try improving, renewing,adjusting or
updating the aerial. It is however advisable to
contact a specialised aerial installer in order to
achieve best results.
Reinstall all services
Test reception
Setup
Installation
Test signal quality
Close
Service lists
Service setup
Test reception
11:46
Frequency
Network name
Signal quality
Signal strength
Setup
Installation
Install and manage services
Close
Service lists
Service setup
Test reception
11:46
Add new services
Reinstall all services
Page 9

7
Language and location preferences
This menu allows you to select your prefered
language for audio,subtitle, teletext and menu
and make changes to the location (country
and time zone).
& From the digital mode, press the
‹ MENU
key
to display the setup menu.
é Use the
Ï key to select preferences and
press
¬.
“ Select
Languages, Location or Digital Audio
Output
(Ï) and press ¬.
‘ Use the
Ïî keys to select a setting and
press
¬ to enter into the sub-menu. Make
your adjustment and press
u or È to exit.
Language default settings:
•
Audio: to select the audio sound language.
•
Subtitle/Teletext: to select the
subtitle/teletext language.
•
Subtitling mode: off, on or auto
(subtitle only
displayed in case of original audio transmission)
.
•
Subtitles for hearing impaired
: to activate or
deactivate the specific subtitle for hearing
impaired (if made available by the broadcaster).
• System: to select the menu language.
Location settings:
•
Country: to select the country where you are
located.
•
Time zone: to select the time zone where
you are located.
Digital Audio Output settings:
To select
AC3 (if the amplifier supports the
Dolby Digital format) or
PCM (if it doesn’t
support Dolby Digital format).
( Press the
‹ MENU
key to leave the menu.
This menu allows you to setup the access
restrictions of the digital channels.
& From the digital mode, press the
‹ MENU
key
to display the setup menu.
é Use the
Ï key to select Access restriction
and press ¬.
“ Press the
¬ key to enter into the Set pin
code protection
menu.
‘ Use the
Ȭ keys to set to on and press
u to exit.You can then access the other
adjustments :
W
arning: the moment you use any kind of access
restriction, you need to fill in the pin code when you
schedule a program for recording.
•
Maturity rating: select your prefered rating to
lock the channel.
Maturity rating will only block certain programmes if
the broadcaster provides data with the programme.
•
TV channels: select the TV channel you want
to lock and press
u.
•
Radio station: select the radio station you
want to lock and press
u.
•
Change pin code:press ¬ to enter in the
menu. Follow the on-screen instruction to
change your access code.
The default pin code is 1234. If you have forgotten
your personal code, you can reset to the default pin
code (1234) by enter the universal code 0711.
( Press the
‹ MENU
key to leave the menu.
The TV is equipped with a Common Interface (CI)
slot (see p.17).A CI module can enable additional
services, for example Pay TV.The Access
Restrictions menu will show the CI Access
Restrictions when a CI module is installed.The CI
module is responsible for the messages and texts
on screen. In case of failure or strange behaviour,
you must call your CI service provider.
Access restrictions
Setup
Preferences
Select your prefered language
Close
Languages
Location
Digital Audio Output
11:46
Audio
Subtitle / Teletext
Subtitling mode
Subtitling for hearing impaired
System
Setup
Access restrictions
Switch pin code protection “on” or “off”
Close
Set pin code protection
Maturity rating
TV channels
Radio stations
Change pin code
11:46
On Off
Page 10
8
Setting up your favourite list
This menu enables you to create a favourite
list with your prefered TV channels and radio
stations. For example, each member of your
family can create his/her own favourite list.
& From the digital mode, press the
‹ MENU
key
to display the setup menu.
é Press
¬ to enter into the favourites list
menu.You have the choice to create 4 different
favourite lists.
“ Use the
Ïî keys to select your favourite
list :
List 1, List 2,List 3 or List 4 and press ¬.
‘ Use the
Ïî keys to select a setting and
press
¬ to enter into the sub-menu.
•
Name: use the Ȭ keys to move around
the name display area (16 characters) and the
@P# keys to select the characters.When
the name has been entered, press
u to exit.
•
Select TV channels: use the Ïî keys to
select your favourite TV channels and confirm
with
u.Press È to exit.
•
Select radio stations: use the Ïî keys to
select your favourite radio station and
confirm with
u.Press È to exit.
•
Add all services:press u if you want to add
all the service into your favourite list.
•
Remove all services:press u if you want to
remove all the service from your favourite list.
( Press the
‹ MENU
key to leave the menu.
§ Your favourite list can be selected using the
options menu (see next page).
This menu provides informations about the
software version and the installation of new
software.
& From the digital mode, press the
‹ MENU
key
to display the setup menu.
é Use the
Ï key to select information and
press
¬ twice.
The software version is displayed.
“ You can activate the menu to automatically
accept any software update of your digital TV.
Normally the product will detect if an update is
available while it is in standby mode.Next time
the television is turned on a banner will appear
at the bottom of the screen indicating new
software is available.Selecting
u
activates the
software download.The software download
menu will give a description of the software
together with the date and time of the
download.This may update certain menus,
functions or add new features,but the general
way in which the TV operate will not change.
Once accepted the download will take place at
the designated time and date.
Note
:The TV must be put into standby when the
download is due in order for it to take place.
‘ Press the
‹ MENU
key to leave the menu.
Information
Downloading new software
Setup
Make changes to your lists of favourite services
Close
Favourites
Preferences
Information
Access restrictions
Installation
11:46
List 1
List 2
List 3
List 4
Setup
Provides information on problem reports and ...
Close
Favourites
Preferences
Information
Access restrictions
Installation
11:46
System software
Whenever a new software is available, it is advisable to always accept and download the software.
In case new software is available,you will see a message when you switch on the TV.
Page 11

9
Using the Options menu
This menu gives you direct access to the:
favourite list,the language selection and some
other selections.
& From the digital mode, press the white
OPTIONS
key to display the options menu.
é Use the
Ïî keys to select a setting and
press
¬ to enter the sub-menu.
• Favourites: use the Ïî keys to select your
favourite list and confirm with
u.
The “none” option deactivate any favourite list.
To create your own favourite list, see page 8.
•
Subtitle language: use the Ïî keys to
temporarily change the language and confirm
with
u.
•
Audio language:to temporarily change the
audio sound language.
To permanetly change the audio and subtitle
languages, use the Preferences menu (p. 7).
•
Mode:you can choose to only have radio
stations, TV channels or services without audio
or video
.
Remar
k:for the UK only, the TV list will contain
both radio stations and TV channels.
• banner duration: to select the duration for
which the banner is visible.
“ Press the white
OPTIONS
key to leave the menu.
The TV guide is an Electronic Service Guide
that allows you to look up digital programmes
as you would in a newspaper or TV magazine.
You can navigate through the list of digital
programmes and obtain detailed information
on the programmes.You can also program the
TV to provide a digital channel to be recorded.
& From the digital mode, press the
o
key to
display the TV guide :
A list of all the digital programmes in the
currently selected favourite list is displayed.
é Use the Ï key to enter into the
Preset/service list or press ¬ to access
Today list.
“ Use the îÏ keys to select a programme.
‘ The TV guide features are displayed at the
bottom of the screen. Use the coloured keys red,
green, yellow,blue or white to activate them :
• Record (red key) : this feature enables you to
record a digital channel even the TV is in
standby mode.You will still have to program
your video recorder.
• Record list (green key) : this menu gives the
list of recording schedules.You can check,
modify, delete or add a new schedule by using
the cursor or coloured keys as indicated on
the screen.
•
To p
(yellow key)
: to go directly to the top of the
list.
• Close (blue key) : to exit from the TV guide.
• Options (white ∫ key) : with this menu, you
can select your favourite list,mode or themes.
Themes are areas of interest,you can for
example decide to display only :drama, news,
movie, ...
( Press the
∂
key if you want to dislay more
information about the selected programme (if
available).
§ Press the
o
key to leave the menu.
TV guide
Options
Selects the active favourite list
Exit
Favourites
Subtitle language
Audio language
Mode
None
List 1
List 2
List 3
List 4
OptionsCloseTo pRecord listRecord
1 BBC ONE
2 BBC TWO
3 ITV Channel 3
4 Channel 4
5ITV 2
6 BBC CHOICE
See It Saw
Snooker
Tr isha
-
Gmtv2
Oakie Doke
Microsoap
Ice Skating
This morning
-
This afternoon
Bodger & Badger
1 17:15-17:25 17:24
BBC ONE See It Saw
Now/Next Today
Preset/service Now Next
Page 12

10
Recording function
This feature enables you to record a digital
channel while the TV is in standby mode.You
will still have to program your video recorder.
Important:The video recorder must be connected
to EXT2. Please note that it is NOT possible to record
one digital channel and watch another digital channel
at the same time.You can however record a digital
channel and watch an analogue channel on your TV, or
vice versa.
& From the digital mode, press theokey to
display the TV guide.
é Use the Ï
key to enter into the Preset/service
list or press ¬ to access Today list.
“ Press the
RED key to call the Record menu.
‘ Use the
Ïî keys to select a setting and
press
¬ to enter into the sub-menu. Make
your adjustment and press
u or È to exit.
• Name : the selected programme will be
displayed here.
• Service : you can change the number of the
programme you want to record. Press
u to
confirm.
Note
: it is only possible to change to a number
that is in the currently selected favourite list.
• Enter your pin code if locked : enter your
secret code only if you have activated the
access restriction feature (see p.7). Press
u
to confirm.
•Day & Month : enter the date by using the
09
or @ P #keys. Press u to exit
• Start time : enter the start time.
• End time : enter the end time.
• Audio language : select your language and
confirm with
u.
• Subtitle language : make your selection and
confirm with
u.
• Subtitles for hearing impaired : select
Yes
or No and confirm with u.
• Occurrence : select
Once, Daily or Weekly
and confirm with u.
( Press the
RED key to store your recording.
The TV guide reappears.
You can press the
GREEN key to display the list of
recordings you have set.
§ If you have finished watching television,you must
leave it in standby in order for the recording
program to be activated.
Important:never switch off the TV with the power
button when a recording has been programmed,
but use the standby key on the remote control.
è If you wish to continue watching another
digital channel after setting a timer, you can do
so by changing channels in the normal way.
! If you are watching another digital channel when
the timer is due to start, the timer alarm will sound
and present you with the option of switching
channels or continuing to watch the current
channel.
ç You can also watch analogue channels while
recording digital channels. Press the
v key to
switch the TV to analogue mode.
2 BBC 2
CloseCancelStore
Name
Service
Enter your pin code if locked
Day & Month
Start time
End time
Audio language
11:46
See it saw
2 BBC 2
16/02
12:15
12:30
English
Page 13

11
Automatic tuning of analogue programmes
Sorting analogue programmes
This menu allows you to automatically search
for all the analogue programmes available in
your region.
& From analogue mode, press the
W MENU
key
to display the main menu.
é With the cursor,select the
Install menu then
the
Auto Store menu and press ¬.The
search begins.After several minutes, the
Install
menu reappears automatically.
“ If the transmitter or the cable network
broadcasts the automatic sort signal, the
programmes will be correctly numbered.
‘ If this is not the case, the programmes found
will be numbered in descending order starting
at 99, 98, 97, etc.
Use the
Sort menu to renumber them.
Some transmitters or cable networks broadcast
their own sort parameters (region, language,etc.).
Where this is the case, make your choice using the
îÏ keys and confirm with ¬.
To exit or interrupt the search, press the
W MENU
key.
If no picture is found, refer to the chapter entitled
Tips on p. 18.
( To exit from the menus, press
∂.
& Press the
W MENU
key to display the main menu.
é With the cursor,select the Install menu
followed by the
Sort menu.
“ Select the programme you want to move using
the
îÏ keys and press ¬.
‘ Then use the
îÏ keys to select the new
number and validate with
È.
( Repeat steps “ and ‘ for each program you
wish to renumber.
§ To quit the menus, press
∂.
Auto Store
• Program 2
• TV 470 MHz
• ••••••••••••••••••••••••••••••••
Mainge
• Picture
• Sound
• Features
$ Install
Î
ï
Install
• Auto Store
• Manual Store
$
Sort
Æ
• Name
000
001 BBC1
002 BBC2
003ÆANGLI
004 CH4
005 CH5
Page 14

12
Manual tuning of analogue programmes
Naming analogue programmes
This menu allows you to store the analogue
programmes one at time.
& Press
W MENU
.
é With the cursor,select the
Install menu then
Manual Store :
“
System : select Europe (automatic detection*)
or
West Europe (BG standard), East Europe
(DK standard), UK (I standard) or France (LL'
standard).
* Except for France (standard LL'): in this case
select the option FRANCE.
‘
Search : If you know the frequency of the
programme required,enter its number directly
using the
09keys.Alternatively press ¬.
The search begins.As soon as a programme is
found, the search will stop.
If no programme is found, refer to the Tips chapter
on page 18).
(
Program No. : enter the required number with
the
Ȭ or 0 to 9 keys.
§
Fine Tune : if the reception is not satisfactory,
try adjusting the frequency using the
Ȭ
keys.
è
Store :press ¬.The programme is stored.
! Repeat steps ‘ to è for each programme to
be stored.
ç To quit the menus, press
∂.
If required,you can give a name to the analogue
programmes and external connectors.
& Press
W MENU
.
é With the cursor,select the
Install menu, then
Name :
“ Select the programme you wish to name using
the keys 09or @ P #.
Note: on installation, the programmes are named
automatically when the correct information is
transmitted by the broadcaster.
‘ Use the
Ȭ keys to move within the name
display area (5 characters) and the
îÏ keys
to choose the characters.
( When the name has been entered, press
È.
The name is stored.
§ Repeat steps “ to ( for each programme to
be named.
è To exit from the menus, press
∂
.
Mainge
• Picture
• Sound
• Features
$ Install
Manual Store
Î
$
System Europe Æ
• Search
• Program No.
• Fine Tune
• Store
ï
Mainge
• Picture
• Sound
• Features
$ Install
Î
ï
Install
• Auto Store
• Manual Store
• Sort
$
Name
Æ
000
001 BBC1
002 BBC2
003ÆANGLI
004 CH4
005 CH5
Page 15

13
Picture settings
Sound adjustments
& Press
W MENU
then ¬.The Picture menu is
displayed:
é Use the
îÏ keys to select a setting and
the
Ȭ keys to adjust.
Note: during the picture adjustment, only the
selected line remains displayed. Press
îÏ to
display the menu again.
“ Once the adjustments have been made, select
Store and press ¬ to store them. Press ∂
to exit.
Description of the adjustments:
• Brightness: this changes picture brilliance.
• Colour: this changes the intensity of the colour.
• Contrast: this changes the difference
between the light and dark tones.
•
Sharpness: this changes the picture definition.
• Colour Temp.: this changes the colour
rendering:
Cool (bluer), Normal (balanced)
or
Warm (redder).
• Store: to store the picture adjustments and
settings (as well as the settings for
Contrast +
and NR in the Features menu).
& Press
W MENU
, select Sound (Ï) and
press
¬.The Sound menu is displayed:
é Use the
îÏ keys to select a setting and
the
Ȭ keys to adjust.
“ Once the adjustments have been made, select
Store and press
¬ to store these changes.
‘ To quit the menus, press
∂.
Description of the settings:
• Tr e ble: this alters the high frequency sounds.
• Bass: this alters the low frequency sounds.
• Balance: this balances the sound on the left
and right speakers.
• Delta Volume: this is used to compensate
any volume discrepancies between the
different programs or EXT sockets.This
setting is available for programs 0 to 40 and
the EXT sockets.
• AVL (Automatic Volume Leveller): this is
used to limit increases in sound, especially on
program change or advertising slots.
• Store: this is used to store the sound settings.
Feature settings
& Press
W MENU
, select Features (Ï) and
press
¬.You can adjust:
é Rotation (only available on very large screen
sets): large screen sets are sensitive to
terrestrial magnetic field variations.This setting
is used to compensate for this by adjusting the
picture rotation.
“ Contrast +: automatic adjustment of the
picture contrast which permanently sets the
darkest part of the picture to black.
‘ NR: attenuates picture noise (snow) in difficult
reception conditions.
Caution:
to store the Contrast + and NR
settings, use the Store choice in the Picture
menu.
( To quit the menus, press
∂.
Mainge
$ Picture
• Sound
• Features
• Install
Mainge
• Picture
$ Sound
• Features
• Install
Î
ï
Picture
$
BrightnessÍ --I------ 39
Æ
• Colour
• Contrast
• Sharpness
• Colour Temp.
• Store
Î
ï
Sound
$
Treble
Í
-----I---- 56
Æ
• Bass
• Balance
• Delta Volume
• AVL
• Store
Page 16
14
Analogue Teletext
Teletext is an information system, broadcast by most analogue TV channels. It also provides subtitles
for people with hearing difficulties.
Press :
You will obtain:
Teletext call
Selecting a
page
This is used to call teletext, change to transparent mode
and then exit.The summary appears with a list of items
that can be accessed. Each item has a corresponding 3 digit
page number.
Some digital programmes may also include analogue
teletext. If this is the case, it can be accessed by pressing the
teletext key for 3 seconds.
If no teletext is available, 100 will appear and the screen will remain
blank (in this case, exit from teletext and choose another channel).
Use the 0 to 9 or @ P # or Ȭ keys to enter the page
number required .Example: page 120,enter
120.The
number is displayed top left,the counter turns and then the
page is displayed.Repeat this operation to view another page.
If the counter continues to search, this means that the page is
not transmitted. Select another number.
Direct access
to the items
Coloured areas are displayed at the bottom of the
screen.The 4 coloured keys are used to access the items
or corresponding pages.
The coloured areas flash when the item or the page is not yet
available.
Contents
This returns you to the contents page (usually page 100).
Stop sub-page
acquisition
Certain pages contain sub-pages which are automatically
displayed successively.This key is used to stop or resume
sub-page acquisition.The indication
_ appears top left.
Double height
teletext
Hidden
information
Favourite
pages
Press this key several times to display the upper, then the
lower part of the screen and then return to the normal
size teletext page. Cursor up/down key can also be used.
To display or hide the concealed information (games
solutions).
For teletext programs 0 to 40,you can store 4 favourite
pages which can then be accessed directly using the
coloured keys (red, green, yellow, blue).
& Press the
W MENU
key to change to favourite
pages mode.
é Display the teletext page that you want to store.
“ Press the coloured key of your choice for 3 seconds.
The page is now stored.
‘ Repeat the operation with the other coloured keys.
( You can now consult teletext and your favourite
pages will appear in colour at the bottom of the
screen.To retrieve the standard items, press
W MENU
.
To clear everything, press d for 5 seconds.
¤Ÿ
VCR
¢
DVD
MODE
SELECT
›Ó
Ø
Œ
MENU
TV
Ë
OK
+ +
”
[
BACK
Á
∏ù
†
12
564
879
SMART
-
0
.
-
SMART
ª
OPTIONS
MENU
DIGITAL
CANCEL
A/D
∫
3
P(age)
¤
¢
P
Ë
Ó
CANCEL
›
Œ
Ÿ
MENU
TV
Ë
Page 17

15
16:9 Formats
Digital Text
The pictures you receive may be transmitted in 16:9 format (wide screen) or 4:3 format
(conventional screen).4:3 pictures sometimes have a black band at the top and bottom of the screen
(letterbox format).This function allows you to optimise the picture display on screen.
Automatic switching
This TV set is also equipped with automatic switching which will select the correct-screen format,
provided the specific signals are transmitted with the programmes.
Using the different screen formats
Press the p key to select the different modes:
4:3, Zoom 14:9,Zoom 16:9, Subtitle Zoom,Super Wide and WideScreen.
With analogue programs only, you can access directly these settings with the
È and ¬ key.
Some digital channels, which you select like any other channel, offer dedicated teletext services
(for instance BBCTEXT). Some digital channels also offer information on the programme being
broadcast (a message may appear at the bottom of the screen).
& To use the digital teletext, follow the instructions on screen.
é Depending on the service, you can be asked to use the cursor and
SELECT keys (u), the coloured
keys, the
TEXT key (c) and sometimes the numerical keys.
“ When you have finished watching teletext,select a different channel with
@ P #
keys or follow the
on screen instructions to return to picture.
4:3 Mode
The picture is reproduced in 4:3 format and a black band is
displayed on either side of the picture.With analogue programs only,
the picture may be progressively enlarged using the
îÏ keys.
Zoom 14:9
The picture is enlarged to 14:9 format, a thin black band remains on
both sides of the picture.With analogue programs, the
îÏ keys
allow you to compress vertically the image to view the top or the
bottom of the picture (subtitles).
Zoom 16:9
The picture is enlarged to 16:9 format.This mode is recommended
when displaying pictures which have black bands at the top and
bottom (letterbox format).With analogue programs, use the
îÏ
keys if you wish to display the top or the bottom of the picture.
Subtitle Zoom
This mode is used to display 4:3 pictures using the full surface of the
screen leaving the sub-titles visible.With analogue programs, use the
îÏ keys to increase or decrease the section at the bottom of
the picture.
Super Wide
This mode is used to display 4:3 pictures using the full surface of the
screen by enlarging the sides of the picture.With analogue programs,
the
îÏ keys allow you to move the image up or down.
Widescreen
This mode restores the correct proportions of pictures transmitted
in 16:9 using full screen display.
Note:
If you display a 4:3 picture in thid mode, it will be enlarged horizontally.
++
”
--
Á
12
SMART SMART
-
P
[
ù
∏
3
564
879
0
ª
(age)
Page 18
16
VCR
DVD
¢
∫
.
EXIT/OPTIONS
›Ó
¤Ÿ
Œ
Ø
MODE
CANCEL
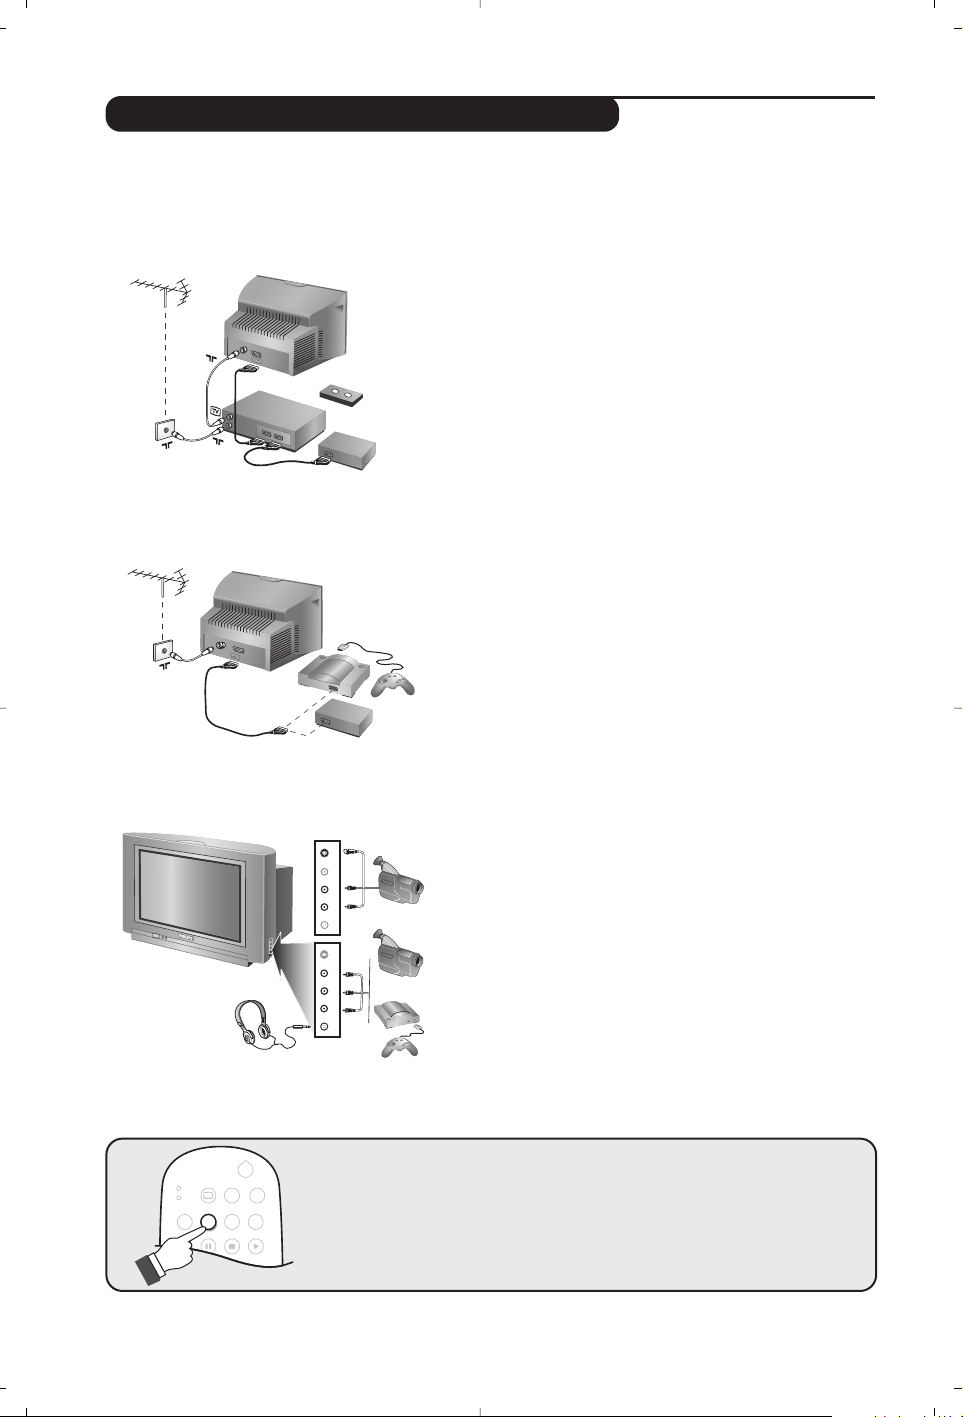
Connecting peripheral equipment
The television has 2 external sockets situated at the back of the set (EXT1 and EXT2).
The EXT1 socket has audio and video inputs/outputs and RGB inputs.
The EXT2 socket has audio and video inputs/outputs and S-VHS inputs.
Video recorder (only)
Carry out the connections featured opposite.To record digital
programmes from your TV, the VCR must be connected to EXT2.
If your video recorder does not have a euroconnector socket, the
only connection possible is via the aerial cable.You will therefore
need to tune in your video recorder's test signal and assign it
programme number 0 (refer to manual store, p. 12).
To reproduce the video recorder picture, press 0.In this case it
will not be possible to record digital channels.
Video recorder with decoder
Connect the decoder to the second euroconnector socket
of the video recorder.You will then be able to record
scrambled transmissions.
Video recorder
Satellite receiver, decoder, DVD, games, etc.
Carry out the connections featured opposite.
To optimise picture quality, connect the equipment which
produces the RGB signals (digital decoder, games,etc.) to
EXT1, and the equipment which produces the S-VHS
signals (S-VHS and Hi-8 video recorders, certain DVD
drives) to EXT2 and all other equipment to either EXT1
or EXT2.
Carry out the connections featured opposite.
With the
n key, select AV / S-VHS.
For a monophonic device, connect the audio signal to the
AUDIO L input. Use the e key to reproduce the sound on the
left and right speakers of the TV set.
Headphones
When headphones are connected, the sound on the TV set
will be cut.The
@”# keys are used to adjust the volume
level.
The headphone impedance must be between 32 and 600 Ohms.
Other equipment
Side connections
To select connected equipment
Press the n key to select EXT1, EXT2 / S-VHS2 (S-VHS signals
from the EXT2 socket) and AV / S-VHS for the side connections.
Most equipment (decoder, video recorder) carries out the switching itself.
EXT 2
VCR
EXT 1
S-VHS
Video
R Audio L
S-VHS
Video
R Audio L
**
S-VHS, Hi-8
VHS, 8 mm
Page 19

17
VCR / DVD mode selector
To connect to a hi-fi system, use an audio connection cable
and connect the “L” and “R” outputs on the TV set to the
“AUDIO IN” “L” and “R” input on your hi-fi amplifier.
Use a digital audio connecting cable and connect the
television’s “SPDIF” output (only available on certain versions) to
a “DIGITAL IN” input on the amplifier (amplifier with coaxial
digital input).
A common interface is available to connect a CAM
(conditional access module) and a smartcard. Please contact
your service provider to get more information about these
modules.
Note
: the television should always be switched off before any module
is inserted in the common interface slot.
Amplifier
Common interface
standby
· record *,
∆ pause,
Ê stop,
Æ play,
¢ rewind,
∫ fast forward,
bring up a menu *
select (
îÏ) and set (Ȭ) *
u confirm*
select programme,
enter a number
* Some programming functions are not available on all models
(cursors, menu, OK key,etc.).
The remote control is compatible with all the video recorders in our
range as well as models which use the RC5 signalling standard.
The remote control allows you to control the main functions of your video recorder or DVD.
& Press the
MODE key to select the required mode : VCR (video recorder) or DVD.
A green indicator lights up to show the selected mode. It returns automatically (TV mode) after
20 seconds without action.
é Then press one of the following keys :
SPDIF
¤Ÿ
VCR
¢
DVD
›Ó
MODE
Ø
Œ
MENU
TV
Ë
SELECT
OK
+ +
”
[
BACK
Á
∏ù
†
12
564
879
SMART
-
0
.
-
SMART
ª
DIGITAL
OPTIONS
CANCEL
MENU
A/D
3
∫
P(age)
Page 20

18
Tips
Poor reception (in analogue mode)
The proximity of mountains or high buildings
may be responsible for ghost pictures, echoing
or shadows. In this case, try manually adjusting
your picture:see "fine tuning" (p.12) or modify
the orientation of the outside aerial. Does your
antenna enable you to receive broadcasts in
this frequency range (UHF or VHF band)?
In the event of difficult reception (snowy
picture) switch the
NR on the Feature analogue
menu to
ON.(p. 13).
Bad picture (in digital mode)
If the picture freezes a lot,or in cases of block
effect, there is a problem of poor reception. Please
check with the signal strength menu (see p.6).
Depending on the strength of digital terrestrial
signals available in your area, standard aerials
used for analogue transmissions will in most
cases provide satisfactory reception of digital
signals. If it is not the case, a good quality
narrow beam antenna should be professionally
installed outside the property and aligned to
capture the maximum digital signal strength.
No picture
Have you connected the aerial socket properly?
Have you chosen the right system? (p. 12).
Poorly connected euroconnector cables or
aerial sockets are often the cause of picture or
sound problems (sometimes the connectors
can become half disconnected if the TV set is
moved or turned). Check all connections.
No sound (in analogue mode)
If on certain channels you receive a picture but no
sound, this means that you do not have the correct
TV system. Modify the
SYSTEM setting (p. 12).
The remote control no longer works.
The TV set does not react to the remote
control; the indicator on the set no longer
flashes when you use the remote control?
Replace the batteries.
Standby
If the set receives no signal for 10 mins,it
automatically goes into standby mode.
To save power, your set is fitted with components
that give it a very low power consumption when in
standby mode.
Cleaning the set
Only use a clean, soft and lint-free cloth to clean
the screen and the casing of your set.Do not use
alcohol-based or solvent-based products.
Still no results?
If your TV set breaks down, never attempt to repair
it yourself:contact your dealer's after-sales service.
Centre Frequencies Table (in KHz)
Digital Frequency Nominal Centre
Channel Frequency KHz
21 . . . . . . . . . . . . . . . . .474 000
22 . . . . . . . . . . . . . . . . .482 000
23 . . . . . . . . . . . . . . . . .490 000
24 . . . . . . . . . . . . . . . . .498 000
25 . . . . . . . . . . . . . . . . .506 000
26 . . . . . . . . . . . . . . . . .514 000
27 . . . . . . . . . . . . . . . . .522 000
28 . . . . . . . . . . . . . . . . .530 000
29 . . . . . . . . . . . . . . . . .538 000
30 . . . . . . . . . . . . . . . . .546 000
31 . . . . . . . . . . . . . . . . .554 000
32 . . . . . . . . . . . . . . . . .562 000
33 . . . . . . . . . . . . . . . . .570 000
34 . . . . . . . . . . . . . . . . .578 000
35 . . . . . . . . . . . . . . . . .586 000
36 . . . . . . . . . . . . . . . . .594 000
37 . . . . . . . . . . . . . . . . .602 000
38 . . . . . . . . . . . . . . . . .610 000
39 . . . . . . . . . . . . . . . . .618 000
40 . . . . . . . . . . . . . . . . .626 000
41 . . . . . . . . . . . . . . . . .634 000
42 . . . . . . . . . . . . . . . . .642 000
43 . . . . . . . . . . . . . . . . .650 000
44 . . . . . . . . . . . . . . . . .658 000
45 . . . . . . . . . . . . . . . . .666 000
Digital Frequency Nominal Centre
Channel Frequency KHz
46 . . . . . . . . . . . . . . . . .674 000
47 . . . . . . . . . . . . . . . . .682 000
48 . . . . . . . . . . . . . . . . .690 000
49 . . . . . . . . . . . . . . . . .698 000
50 . . . . . . . . . . . . . . . . .706 000
51 . . . . . . . . . . . . . . . . .714 000
52 . . . . . . . . . . . . . . . . .722 000
53 . . . . . . . . . . . . . . . . .730 000
54 . . . . . . . . . . . . . . . . .738 000
55 . . . . . . . . . . . . . . . . .746 000
56 . . . . . . . . . . . . . . . . .754 000
57 . . . . . . . . . . . . . . . . .762 000
58 . . . . . . . . . . . . . . . . .770 000
59 . . . . . . . . . . . . . . . . .778 000
60 . . . . . . . . . . . . . . . . .786 000
61 . . . . . . . . . . . . . . . . .794 000
62 . . . . . . . . . . . . . . . . .802 000
63 . . . . . . . . . . . . . . . . .810 000
64 . . . . . . . . . . . . . . . . .818 000
65 . . . . . . . . . . . . . . . . .826 000
66 . . . . . . . . . . . . . . . . .834 000
67 . . . . . . . . . . . . . . . . .842 000
68 . . . . . . . . . . . . . . . . .850 000
69 . . . . . . . . . . . . . . . . .858 000
Page 21

1
MENUS
ANALOGIQUES
Introduction
Sommaire
Vous venez d’acquérir ce téléviseur,merci de votre confiance.
Nous vous conseillons de lire attentivement les instructions qui suivent pour
mieux comprendre les possibilités offertes par votre téléviseur.
Nous espérons que notre technologie vous donnera entière satisfaction.
Installation du téléviseur . . . . . . . . . . . . . . . . . . . . . . . . . . . . . . . . . . . . . . . . . . . . . 2
Les touches du téléviseur . . . . . . . . . . . . . . . . . . . . . . . . . . . . . . . . . . . . . . . . . . . . 2
Les touches de la télécommande . . . . . . . . . . . . . . . . . . . . . . . . . . . . . . . . . . . . . . 3
Programmes numériques ou analogiques ? . . . . . . . . . . . . . . . . . . . . . . . . . . . . . . .3
Première mise sous tension . . . . . . . . . . . . . . . . . . . . . . . . . . . . . . . . . . . . . . . . . .4
Comprendre les informations du bandeau . . . . . . . . . . . . . . . . . . . . . . . . . . . . . .4
Réorganiser les chaînes . . . . . . . . . . . . . . . . . . . . . . . . . . . . . . . . . . . . . . . . . . . . .5
Regarder ou écouter les nouvelles chaînes . . . . . . . . . . . . . . . . . . . . . . . . . . . . . .5
Ajouter de nouveaux programmes . . . . . . . . . . . . . . . . . . . . . . . . . . . . . . . . . . . .5
Réinstaller toutes les chaînes . . . . . . . . . . . . . . . . . . . . . . . . . . . . . . . . . . . . . . . . .6
Test de réception . . . . . . . . . . . . . . . . . . . . . . . . . . . . . . . . . . . . . . . . . . . . . . . . . .6
Langue et pays préférentiels . . . . . . . . . . . . . . . . . . . . . . . . . . . . . . . . . . . . . . . . . .7
Restrictions d’accès . . . . . . . . . . . . . . . . . . . . . . . . . . . . . . . . . . . . . . . . . . . . . . . . .7
Organiser vos listes de favoris . . . . . . . . . . . . . . . . . . . . . . . . . . . . . . . . . . . . . . . . .8
Informations . . . . . . . . . . . . . . . . . . . . . . . . . . . . . . . . . . . . . . . . . . . . . . . . . . . . . . .8
Téléchargement d’un nouveau logiciel . . . . . . . . . . . . . . . . . . . . . . . . . . . . . . . . . .8
Utilisation des options du menu . . . . . . . . . . . . . . . . . . . . . . . . . . . . . . . . . . . . . . .9
Guide TV . . . . . . . . . . . . . . . . . . . . . . . . . . . . . . . . . . . . . . . . . . . . . . . . . . . . . . . . .9
Fonction d’enregistrement . . . . . . . . . . . . . . . . . . . . . . . . . . . . . . . . . . . . . . . . . .10
Mémorisation auto. des programmes analogiques . . . . . . . . . . . . . . . . . . . . . . . .11
Classement des programmes analogiques . . . . . . . . . . . . . . . . . . . . . . . . . . . . . .11
Mémorisation manuel des programmes analogiques . . . . . . . . . . . . . . . . . . . . . .12
Nom des programmes analogiques . . . . . . . . . . . . . . . . . . . . . . . . . . . . . . . . . . .12
Réglages de l’image . . . . . . . . . . . . . . . . . . . . . . . . . . . . . . . . . . . . . . . . . . . . . . . .13
Réglages du son . . . . . . . . . . . . . . . . . . . . . . . . . . . . . . . . . . . . . . . . . . . . . . . . . .13
Réglages des options . . . . . . . . . . . . . . . . . . . . . . . . . . . . . . . . . . . . . . . . . . . . . . .13
Télétexte analogique . . . . . . . . . . . . . . . . . . . . . . . . . . . . . . . . . . . . . . . . . . . . . .14
Télétexte numérique . . . . . . . . . . . . . . . . . . . . . . . . . . . . . . . . . . . . . . . . . . . . . .15
Formats 16:9 . . . . . . . . . . . . . . . . . . . . . . . . . . . . . . . . . . . . . . . . . . . . . . . . . . . . .15
Raccordement d’autres appareils . . . . . . . . . . . . . . . . . . . . . . . . . . . . . . . . . . . . .16
Pour sélectionner les appareils connectés . . . . . . . . . . . . . . . . . . . . . . . . . . . . .16
Sélecteur de mode VCR / DVD . . . . . . . . . . . . . . . . . . . . . . . . . . . . . . . . . . . . . .17
Conseils . . . . . . . . . . . . . . . . . . . . . . . . . . . . . . . . . . . . . . . . . . . . . . . . . . . . . . . . .18
Tableau des fréquences (en KHz) . . . . . . . . . . . . . . . . . . . . . . . . . . . . . . . . . . . . .18
MENUS
NUMÉRIQUES
°
Directive pour le recyclage
Votre téléviseur utilise des matériaux réutilisables ou qui peuvent être recyclés.
Pour minimiser les déchets dans l'environnement,des entreprises spécialisées
récupèrent les appareils usagés pour les démonter et concentrer les matières
réutilisables (renseignez-vous auprès de votre revendeur).
Les menus de
l’interface numérique
de ce produit utilisent
la dernière technologie
Java
™
de Sun
Microsystems Inc.
Français
Page 22

2
Le téléviseur est équipé de 4 touches qui sont
situées, selon les versions,à l’avant ou sur le
dessus du coffret.
Les touches VOLUME - + (-”+) permettent
de régler le niveau sonore.
Les touches PROGRAM - + (- P +)
permettent de sélectionner les programmes.
Pour accéder aux menus,appuyez simultanément
sur les 2 touches
”
- et ”+. Ensuite, les
touches P - + permettent de sélectionner un
réglage et les touches
”
- + de régler.
Pour quitter le menu affiché, maintenez
appuyées les 2 touches ” - et ” +.
PROGRAMVOLUME
--
++
& Positionnement du téléviseur
Placez votre téléviseur sur une surface solide
et stable. Pour prévenir toute situation
dangereuse, ne rien poser dessus tel qu’un
objet couvrant (napperon), rempli de liquide
(vase) ou dégageant de la chaleur (lampe).
De plus, le téléviseur ne doit pas être exposé
à des projections d’eau.
é Raccordements
• Introduisez la fiche d'antenne dans la prise
: située à l’arrière.
• Branchez le cordon d’alimentation sur le
secteur (220-240 V / 50 Hz).
“ Télécommande
Introduisez les 2 piles de type R6 fournies en
respectant les polarités.
Les piles livrées avec l’appareil ne contiennent ni
mercure ni cadmium nickel, dans un souci de
préserver l’environnement.Veillez à ne pas jeter vos
piles usagées mais à utiliser les moyens de recyclage
mis à votre disposition (consultez votre revendeur).
‘ Mise en marche
Pour allumer le téléviseur, appuyez sur la
touche marche arrêt. Un voyant s’allume en
rouge et l’écran s’illumine.Allez directement
au chapitre installation rapide,page 4.
Si le téléviseur reste en veille, appuyez sur la
touche P
# de la télécommande.
Le voyant clignote lorsque vous utilisez la
télécommande.
5 cm
5 cm
5 cm
Installation du téléviseur
Les touches du téléviseur
Page 23

3
Pour la réception des chaînes TV, votre téléviseur est équipé de 2 tuners; l’un pour les programmes
numériques, l’autre pour les programmes analogiques.Utilisez la touche
v de la télécommande pour
commuter le TV en mode analogique ou numérique. Ensuite,utilisez les touches
P @#ou 09
pour sélectionner le programme désiré.
Programmes numériques ou analogiques ?
Les touches de la télécommande
Info.d’écran
En mode numérique, appuyez un fois pour
afficher le bandeau d’informations, une 2
ème
fois pour obtenir plus d’informations sur le
programme et une 3
ème
fois pour l’effacer
(voir p.4). En mode analogique, cette touche
permet d’afficher/effacer les informations sur
le programme (numéro, nom, mode son).
Appuyez pendant 5 secondes pour
obtenir l’affichage permanent du numéro
de programme analogique sur l’écran.
Guide TV
(voir p.9).
Sélection prises EXT
(voir p.16).
Sélecteur de mode (p.17)
Pour activer la télécommande en
mode VCR (magnétoscope) ou DVD.
Menu TV
Pour appeler ou quitter les menus
analogiques.
Select: En mode numérique,
permet d’afficher / effacer la liste des
programmes.Utilisez les touches
îÏ pour sélectionner un
programme et
u pour l’afficher.
Volume
Pour ajuster le niveau sonore.
Formats 16:9 (p.15)
Coupure son
Pour supprimer ou rétablir le son.
Préréglages image et son
Permet d’accéder à une série de
préréglages de l’image et du son.
La position Personnel correspond aux
réglages effectués dans les menus.
Veille
Permet de mettre en veille le
téléviseur. Pour l’allumer,appuyez
sur b,P @#ou 09.
Menu Options
(voir p.9).
Fonctions télétexte (p.14)
et touches VCR/DVD (p.17).
Menu Digital (numérique)
Pour afficher/effacer les menus (lorsque
le TV est en mode numérique).
Mode Analogique ou Digital (numérique)
Pour commuter le téléviseur en mode
analogique ou numérique.
Curseur
Ces 4 touches vous permettent de naviguer
dans les menus ou d’avoir un accès direct
aux différents formats 16:9 (p 15).
Programme précédent
Pour accéder au programme
précédemment visualisé.
Touches numériques
Accès direct aux programmes.Pour un
programme à 2 (ou 3) chiffres,il faut
ajouter le 2
ème(3ème
) chiffre avant que le
trait ne disparaisse. Le numéro,le nom
(et le mode son, en analogique)
s’affichent quelques instants.
Mode son
Permet de forcer les émissions
Stéréo
en Mono ou pour les émissions
bilingues de choisir entre les
différentes langues (Dual I, Dual II, ...).
L’indication Mono est rouge lorsqu’il s’agit
d’une position forcée.
Son Surround
Pour activer / désactiver l’effet
Virtual
Dolby Surround *.En stéreo,
vous
obtenez les effets sonores arrières du
Dolby Surround Pro Logic.En mono,
vous obtenez un effet spatial pseudo
stéréo
.
*
Fabriqué
sous licence de Dolby Laboratories
.
”Dolby” et le symbole double-D
sont des marques
de Dolby Laboratories
.
Sélection des programmes
Pour accéder au programme (ou
page) inférieur ou supérieur.
Mode sous-titres
Pour activer/désactiver le mode sous-titres.
.
¤Ÿ
VCR
DVD
MODE
·
MENU
TV
SELECT
OK
Ø
∆
¢
›Ó
Œ
Ê Æ
Ë
OPTIONS
∫
CANCEL
MENU
DIGITAL
A/D
++
†
-
SMART
ª
P(age)
3
”
BACK
Á
[
∏ù
12
564
879
SMART
-
0
Page 24
4
La première fois que vous allumez le téléviseur,
un message de
félicitations apparaît à l’écran. La
langue d’affichage change toutes les 5 secondes.
Si le menu n’apparaît pas, maintenez appuyées
pendant 5 secondes les touches ”- et ”+ du
téléviseur, pour le faire apparaître.
&
Appuyez sur la touche u de la télécommande,
à l’instant ou votre langue est visible à
l’écran. Le menu d’
installation apparaît :
é La langue, le pays et le fuseau horaire est
présélectionné en accord avec l’écran ouvert.
Vous avez toujours la possibilité de modifier
vos préférences avant de démarrer la
recherche.
“ Avec le curseur,sélectionnez la
langue, le pays
ou le fuseau horaire et vérifiez si le réglage
correspond à vos préférences.Si nécessaire,
utilisez le curseur pour modifier less réglages
et appuyez sur
u.
Attention
: si vous sélectionnez un mauvais pays, la
numérotation des programmes ne sera pas celle
habituellement utilisée dans votre pays.
‘ Sélectionnez le choix
Recherche des stations et
appuyez sur
u pour démarrer l’installation.
Le menu
Recherche des stations s’affiche.
Tous les programmes numériques et
analogiques sont mémorisés automatiquement.
A la fin de la recherche, le menu indique le
nombre de programmes numériques et
analogiques trouvés.
( Appuyez sur la touche
u pour commencer à
regarder les programmes TV.L’installation est
terminée.
Quand vous sélectionnez un programme
numérique, un bandeau d’informations s’affiche
quelques secondes en haut de l’écran.
Vous pouvez aussi utiliser la touche
∂
de la
télécommande pour afficher le bandeau.
Un 2
ème
appui sur cette touche affiche plus
d’informations sur le programme (si disponible).
Le bandeau d’informations donne le numéro et
le nom de la chaîne TV, l’heure de début et de
fin du programme, son titre et le temps restant
du programme courant.
Première mise sous tension
Comprendre les informations du bandeau
Description du bandeau :
2 11:06 - 11:09
FR2 Billard
11:46
Minutes restantes : 14
u
ù
i
ß
numéro
de chaîne
symboles
heure
heure de
début et de fin
du programme
durée restante
du programme
titre du
programme
nom de chaîne
Description des symboles :
i plus d’informations sont disponibles sur ce
programme :appuyez sur la touche
∂ pour les
afficher ou les effacer.
ß des sous-titres sont disponibles : pour les afficher,
appuyez sur la touche ß ou la touche
OPTIONS
et sélectionner le sous-titre dans le menu options.
ù d’autres langues audio sont disponibles et
peuvent être sélectionnées dans le menu
options.
u ce logo apparaît dans la couleur de la liste des
programmes favoris sélectionné.
Félicitations pour avoir acheté ce téléviseur Philips.
Appuyez sur OK pour la première mise en route de votre téléviseur
numérique
Installation
Définir les options et lancer la recherche
Langue
Pays
Fuseau horaire
Recherche des stations
11:46
Français
France
(GMT+1:00) Paris, Rome
Appuyez sur la toucheOK
pour démarrer la recherche
Page 25

5
Réorganiser les chaînes
Ce menu vous permet de modifier l’ordre des
chaînes TV ou radio numériques mémorisés.
& En mode numérique, appuyez sur la touche
‹ MENU
pour afficher le menu principal.
é Utilisez la touche
Ï pour sélectionner
Installation et appuyez 2 fois sur ¬ pour
sélectionner le menu
Liste des chaînes.
“ Utilisez les touches îÏ pour sélectionner
Modifier les programmes et appuyez sur ¬.
‘ Utilisez les touches
îÏ pour sélectionner
la chaîne que vous souhaitez échanger.
( Appuyez sur
u pour activer.
Si vous souhaitez désinstaller la chaîne
sélectionnée, appuyez sur la touche rouge.
§ Sélectionnez (
îÏ
) le nouveau numéro de
chaîne désiré.
è Appuyez sur
u pour confirmer l’échange.
! Répétez les opérations ‘ à è autant de fois
qu’il y a de chaîne à renuméroter.
ç Appuyez sur la touche
‹ MENU
pour quitter
les menus.
Ce menu vous permet de vérifier si de
nouvelles chaînes TV ou radio ont été lancées
depuis l’installation initiale.
& En mode numérique, appuyez sur la touche
‹ MENU
pour afficher le menu principal.
é Utilisez la touche
Ï pour sélectionner
Installation et appuyez 2 fois sur ¬ pour
sélectionner le menu
Liste des chaînes.
“ Utilisez les touches
îÏ pour sélectionner
Regarder les nouvelles chaînes TV ou Ecouter
les nouveaux émetteur radio
.
‘ Si de nouveaux services sont disponibles,
appuyez sur
¬ pour entrer dans la liste et
utilisez les touches
îÏ pour vous
déplacer dans la liste.
( Appuyez sur
‹ MENU
pour quitter les menus.
Regarder ou écouter les nouvelles chaînes
Installation
Installation
Gérer les listes de chaînes
Fermer
Liste des chaînes
Installation des Services
Test de réception
11:46
Modifier les programmes
Regardez les nouvelles
chaînes TV
Ecoutez les nouveaux
émetteurs radio
Ajouter de nouveaux programmes
Ce menu permet de rechercher les nouvelles
chaînes TV ou radio qui ont été lancées depuis
l’installation initiale.
& En mode numérique, appuyez sur la touche
‹ MENU
pour afficher le menu Installation.
é Utilisez la touche
Ï pour sélectionner
Installation et appuyez sur ¬.
“ Sélectionnez
Installation des services (Ï) et
appuyez sur
¬.
‘ Appuyez sur
¬ pour sélectionner Ajouter de
nouveaux programmes
et appuyez sur u pour
démarrer l’installation. La recherche
commence et seules les nouvelles chaînes sont
mémorisées et ajoutées dans le menu
Liste des
chaînes
. Le pourcentage de la recherche et le
nombre de programmes trouvés s’affichent.
( Quand la recherche est terminée, sélectionnez
mémoriser et appuyez sur u pour accepter
les nouveaux programmes.
§ Appuyez sur
‹ MENU
pour quitter les menus.
Installation
Installation
Installation et gestion des services
Fermer
Listes des chaînes
Installation des Services
Test de réception
11:46
Ajouter de nouveaux
programmes
Réinstaller toutes les
chaînes
Page 26

6
Ce menu permet de réinstaller toutes les
chaînes numériques TV et radio.
& En mode numérique, appuyez sur la touche
‹ MENU
pour afficher le menu Installation.
é Utilisez la touche
Ï pour sélectionner
Installation et appuyez sur ¬.
“ Sélectionnez
Installation des services (Ï) et
appuyez sur
¬.
‘ Sélectionnez
Réinstaller toutes les chaînes (Ï)
et appuyer sur
¬.
( Appuyez sur
u pour démarrer l’installation.
La recherche démarre et tous les programmes
numériques sont mémorisés.A la fin de la
recherche, le menu indique le nombre de
programmes trouvés.
§ Appuyez sur
u pour valider l’installation.
è Appuyez sur
‹ MENU
pour quitter les menus.
Ce menu permet de vérifier la qualité du signal
reçu par votre antenne.
& En mode numérique, appuyez sur la touche
‹ MENU
pour afficher le menu Installation.
é Utilisez la touche
Ï pour sélectionner
Installation et appuyez sur ¬ pour afficher le
menu installation.
“ Utilisez la touche Ï pour sélectionner Test de
réception
et appuyez sur ¬.Vous obtenez une
indication sur la fréquence du programme actuel,
le nom du réseau, la qualité et le niveau du signal.
‘ Vous devez à présent entrer la fréquence de la
chaîne numérique que vous souhaitez tester.
Votre magazine tv peut vous fournir la liste des
canaux des programmes numériques. Utilisez le
tableau de la page 18 pour obtenir la
correspondance en fréquence.
( Si le niveau et la qualité du signal est médiocre,
un message apparaît, en bas du menu, vous
demandant d’entrer une fréquence entre la
limite haute et basse. Si après avoir entré la
fréquence, la réception reste médiocre, vous
pouvez essayer de l’améliorer en modifiant
l’orientation de l’antenne ou en la remplaçant.
Il est néanmoins conseillé de contacter un
spécialiste en installation d’antenne qui vous
garantira le meilleur résultat.
Réinstaller toutes les chaînes
Test de réception
Installation
Installation
Test de qualité du signal
Fermer
Listes des chaînes
Installation des Services
Test de réception
11:46
Fréquence
Nom du réseau
Qualité du signal
Niveau de signal
Installation
Installation
Installation et gestion des services
Fermer
Listes des chaînes
Installation des services
Test de réception
11:46
Ajouter de nouveaux programmes
Réinstaller toutes les chaînes
Page 27

7
Langue et pays préférentiels
Ce menu permet de sélectionner votre langue
préférentielle pour l’audio,le sous-titre, le télétexte,
les menu, ainsi que le pays et le fuseau horaire.
& En mode numérique, appuyez sur la touche
‹
MENU
pour afficher le menu principal.
é Utilisez la touche
Ï pour sélectionner
Préférences et appuyez sur ¬.
“ Sélectionnez
Langues, Pays ou Sortie
numérique
(Ï) et appuyez sur ¬.
‘ Utilisez les touches
Ïî pour sélectionner
un réglage et appuyez sur
¬ pour entrer dans
le sous-menu. Effectuez vos réglage et appuyez
sur
u ou È pour sortir.
Réglage de la langue par défaut :
•
Audio : choix de la langue du son.
•
Sous-titres/Télétexte :choix de la langue des
sous-titres et du télétexte.
•
Mode sous-titres : Arrêt, Marche ou Auto
(affichage des sous-titres uniquement lors des
diffusions en VO).
•
Sous-titres pour malentendants
: pour activer ou
désactiver les sous-titres spécifiques pour les
malentendants (si rendu disponible par le
diffuseur).
• Système : choix de la langue des menus.
Réglages du pays :
•
Pays : sélectionner le pays ou vous êtes situé.
•
Fuseau horaire : choix de votre fuseau horaire.
Réglage de la sortie numérique :
Sélectionner
AC3 (si votre amplificateur est
compatible avec le format Dolby Digital) ou
PCM (s’il ne l’est pas).
( Appuyez sur
‹ MENU
pour quitter les menus.
Ce menu vous permet d’activer des restrictions
d’accès pour les chaînes numériques.
& En mode numérique, appuyez sur la touche
‹
MENU
pour afficher le menu principal.
é Utilisez la touche
Ï pour sélectionner
restrictions d’accès et appuyez sur ¬.
“ Appuyez sur
¬ pour entrer dans le menu
Activer la protection par code personnel.
‘ Utilisez les touches
Ȭ pour positionner
sur
Activer et appuyez sur u pour sortir.Vous
pouvez maintenant accéder aux réglages suivants:
Impor
tant: dès l’instant que vous utilisez une
restriction d’accès, vous devez entrer le code d’accès à
chaque fois que vous programmez un enregistrement.
•
Catégorie de programme: permet de
verrouiller l’accès aux programmes en
fonction d’une classification par age.
Cette fonction n’est opérationnelle que si le
diffuseur transmet le signal d’identification.
•
Programmes TV : sélectionnez la chaîne à
verrouiller et appuyez sur
u .
•
Programmes Radio : sélectionnez la station
radio à verrouiller et appuyez sur
u .
•
Changez votre code personnel :appuyez sur ¬
pour accéder au menu. Suivez les instructions
pour changer votre code personnel.
Le code d’accès par défaut est 1234. Si vous avez
oublié votre code personnel, taper le code universel
0711 pour rétablir le code d’accès par défaut (1234).
( Appuyez sur la touche
‹
MENU
pour quitter le
menu.
Un connecteur Common Interface est disponible sur
votre téléviseur (voir p.17).Vous pouvez brancher un
lecteur de module universel offrant d’autres services
comme l’accès à des chaînes cryptées. Le menu
Restrictions d’accès du téléviseur vous permettra
d’accéder aux restrictions d’accès du lecteur de
module lorsque celui-ci est connecté. Le lecteur de
module universel pilote les messages qui s’affichent
à l’écran. En cas de panne, contactez votre opérateur.
Restrictions d’accès
Installation
Préférences
Sélectionnez la langue souhaitée
Fermer
Langues
Pays
Sortie numérique
11:46
Audio
Sous-titres/Télétexte
Mode sous-titres
Sous-titres pour malentendants
Système
Installation
Restrictions d’accès
Commuter la protection code personnel entre “oui”ou”non”
Fermer
Activer la protection par
code personnel
Catégorie de programme
Programmes TV
Programmes Radio
Changez votre code personnel
11:46
Marche Arrêt
Page 28

8
Organiser vos listes de Favoris
Ce menu vous permet de créer une liste avec
vos chaînes et stations radio préférées.
Par exemple chaque membre de votre famille
peut créer sa propre liste de favoris.
& En mode numérique, appuyez sur la touche
‹
MENU
pour afficher le menu principal.
é Appuyez sur la touche ¬ pour accéder aux
listes du menu
Favoris.Vous pouvez créer jusqu’à
4 listes différentes.
“ Utilisez les touches
Ïî pour choisir une
liste et validez avec la touche
¬.
‘ Utilisez les touches
Ïî pour sélectionner
un réglage et appuyez sur
¬ pour accéder au
sous-menu.
•
Nom: utilisez les touches Ȭ pour déplacer
le curseur dans la zone de nom (16 caractères
maximum) et les touches
@P# pour
sélectionner les caractères. Quand le nom est
défini appuyez sur
u pour quitter.
•
Sélection des chaînes TV: utilisez les touches
Ȭ pour sélectionner vos chaînes
préférées et validez en appuyant sur
u.
Appuyez sur la touche
È pour quitter.
•
Sélectionner les émetteurs radio: utilisez les
touches
Ȭ pour sélectionner vos stations
radio préférées et validez en appuyant sur
u.
Appuyez sur la touche È pour quitter.
• Ajouter tous les programmes:appuyez sur u
pour ajouter toutes les chaînes à la liste.
•
Supprimer toutes les chaînes:appuyez sur u
pour supprimer toutes les chaînes de la liste.
( Appuyez sur la touche
‹
MENU
pour quitter le
menu.
§ Vous pouvez sélectionner votre liste favorite
depuis les
Options du menu (voir page suivante).
Ce menu fournit des informations sur la version
du logiciel et l’installation d’une nouvelle version.
& En mode numérique, appuyez sur la touche
‹
MENU
pour afficher le menu Installation.
é Utilisez la touche Ï pour accéder au menu
Information et appuyez deux fois sur ¬.
“ Vous pouvez configurer le menu pour qu’il
accepte automatiquement la dernière mise à
jour du logiciel de votre téléviseur.
Normalement
le module détecte automatiquement la mise à jour
quand il est en mode veille. Dès que vous
rallumerez votre téléviseur, un bandeau apparaîtra
en bas de l’écran vous signalant que la mise à jour
du logiciel est disponible.Appuyez sur
u pour
valider le téléchargement. Le menu du
téléchargement vous donnera une description du
nouveau logiciel, la date et le temps de
téléchargement. La mise à jour peut entraîner des
changements sur certains menus, certaines
fonctions ou ajouter de nouvelles caractéristiques
mais la navigation générale du téléviseur reste la
même.Une fois accepté, le téléchargement aura lieu
à l’heure et à la date indiquée.
Note: Le téléviseur doit être mis en veille pour
permettre le téléchargement.
‘ Appuyez sur la touche
‹
MENU
pour quitter le
menu.
Informations
Téléchargement d’un nouveau logiciel
A chaque fois qu’une mise à jour du logiciel du téléviseur est disponible, il est conseillé de toujours
accepter le téléchargement. Dans ce cas, un message apparaîtra dès que vous allumez le téléviseur.
Installation
Effectuer des changements dans vos programmes favoris
Fermer
Favoris
Préférences
Information
Restrictions d’Accès
Installation
11:46
Liste 1
Liste 2
Liste 3
Liste 4
Installation
Renseigne sur les rapports de pannes et
l’installation de nouveaux logiciels
Fermer
Favor is
Préférences
Information
Restrictions d’Accès
Installation
11:46
Logiciel système
Page 29

9
Utilisation des options du menu
Ce menu vous permet d’accéder directement
à vos listes de favoris, langue des sous-titres et
à d’autres fonctions.
& En mode numérique, appuyez sur la touche
blanche OPTIONS
pour afficher le menu Options.
é Utilisez les touches Ïî pour sélectionner
une fonction et appuyez sur
¬ pour accéder
au sous-menu.
•
Liste des Favoris: Utilisez les touches Ïî
pour choisir votre liste de favoris et validez en
appuyant sur
u.
Le choix “aucun” désactive toutes les listes.
Pour créer une liste de favoris, voir p. 8.
•
Langue des sous-titres: Utilisez les touches
Ïî pour changer provisoirement de
langue et validez en appuyant sur
u.
•
Langue audio:Pour changer provisoirement la
langue audio.
Pour changer la langue audio de manière
permanente, utilisez le menu Préférences (p.7).
•
Mode:vous pouvez choisir d’avoir uniquement
les stations radio ou les chaînes TV.
Remar
que:Au Royaume-Uni, la liste TV regroupe les
stations radio et les chaînes TV.
•
Durée d’affichage bandeau: pour définir la
durée d’affichage du bandeau à l’écran.
“ Appuyez sur la touche blanche
OPTIONS
pour
quitter le menu.
Le Guide TV est un guide de service
électronique vous permettant de consulter vos
programmes numériques comme un journal ou
un magazine TV.Vous pouvez naviguer dans ce
guide et obtenir des informations détaillées sur
les programmes.Vous pouvez aussi programmer
le téléviseur pour désigner une chaîne à
enregistrer.
& En mode numérique, appuyez sur la touche
o
pour afficher le guide TV :
Une liste de chaînes numériques s’affiche
d’après la liste de favoris sélectionnée.
é Utilisez la touche Ï pour accéder à la liste
Préréglages/Services ou appuyez sur ¬ pour
accéder à la liste
Aujourd’hui.
“ Utilisez les touches îÏ pour sélectionner
une chaîne.
‘ Les fonctions du guide TV s’affichent en bas de
l’écran. Utilisez les touches colorées rouge,vert,
jaune, bleu ou blanc pour activer les fonctions :
• Enregistrer (touche rouge) : Cette fonction
vous permet d’enregistrer un programme
numérique lorsque le téléviseur est en
veille.Vous devez quand même programmer
votre magnétoscope.
• Enregistr. (touche verte) : ce menu vous
donne le planning d’enregistrement.Vous pouvez
vérifier, modifier, supprimer ou ajouter un
nouvel enregistrement en utilisant les touches
du curseur ou les touches colorées comme
indiqué sur l’écran.
•
Haut
(touche jaune)
: pour retourner directement
au début de la liste.
•Fermer (touche bleue) : pour quitter le guide
TV.
• Options (touche blanche) : ce menu vous
permet de sélectionner vos liste de favoris, le
mode ou les thèmes. La fonction
Thèmes
regroupe différents genres, vous pouvez par
exemple décider de n’afficher que les drames,
journaux, films...
( Appuyez sur la touche
∂
pour afficher plus
d’informations sur le programme sélectionné
(si disponible)
§ Appuyez sur la touche
o
pour quitter le menu.
Guide TV
Options
Sélectionner la liste de favoris à activer
Quitter
Liste des Favoris
Langue des sous-titres
Langue Audio
Mode
Durée d’affichage bandeau
Aucun
Philips 1
Philips 2
Philips 3
Philips 4
OptionsCloseTo pRecord listRecord
1 BBC ONE
2 BBC TWO
3 ITV Channel 3
4 Channel 4
5ITV 2
6 BBC CHOICE
See It Saw
Snooker
Tr isha
-
Gmtv2
Oakie Doke
Microsoap
Ice Skating
This morning
-
This afternoon
Bodger & Badger
1 17:15-17:25 17:24
BBC ONE See It Saw
Now/Next Today
Preset/service Now Next
Page 30

Cette fonction vous permet d’enregistrer un
programme numérique lorsque le téléviseur est
en veille.Vous devez quand même programmer
votre magnétoscope.
Important: Le magnétoscope doit être connecté à
la prise EXT2. Il est impossible d’enregistrer un
programme numérique et d’en regarder un autre en
même temps.Toutefois vous pouvez enregistrer un
programme numérique et regarder un programme
analogique sur votre téléviseur et inversement..
& En mode numérique, appuyez sur la touche
o
pour afficher le guide TV.
é Utilisez la touche Ï pour accéder à la liste
Préréglages/Services ou appuyez sur ¬ pour
accéder à la liste
Aujourd’hui.
“ Appuyez sur la touche ROUGE pour afficher le
menu
ENREGISTREMENT.
‘ Utilisez les touches
Ïî pour sélectionner
un réglage et appuyez sur la touche
¬ pour
accéder au sous-menu.Ajustez vos réglages et
appuyez sur
u ou È pour quitter.
• Nom : affiche le nom du programme à
enregistrer.
• Service : vous pouvez changer le numéro de
programme à enregistrer.Appuyez sur
u pour
confirmer.
Note
: vous ne pouvez changer un programme que
s’il figure dans la liste de favoris sélectionnée.
• Entrer le mot de passe en cas de
verrouillage : tapez votre code personnel si
vous avez activé la fonction de restrictions
d’accès (voir p.7).Appuyez sur
u pour
confirmer.
•Jour & Mois : entrez la date en utilisant les
touches
09
ou @ P #.Appuyez sur u
pour quitter.
• Heure de début : entrez l’heure de début.
• Heure de fin : entrez l’heure de fin.
• Langue audio : sélectionnez la langue voulue
et confirmez en appuyant sur
u.
• Langue des sous-titres : sélectionnez la
langue voulue et confirmez en appuyant sur
u.
• Sous-titres pour malentendants :
sélectionnez
Oui ou Non et confirmez en
appuyant sur
u.
• Evénement : sélectionnez
Une fois, Quotidien
ou Hebdomadaire et confirmez en appuyant
sur
u.
( Appuyez sur la touche
ROUGE pour mémoriser
votre enregistrement. Le guide TV réapparaît.
Vous pouvez appuyer sur la touche
VERTE pour
afficher la liste des enregistrements que vous avez
programmé.
§ Si vous avez fini de regarder la télévision,vous
devez laisser le téléviseur en mode veille afin que
l’enregistrement programmé puisse s’activer.
Important: ne jamais éteindre votre téléviseur avec
la touche marche/arrêt quand un enregistrement
est programmé mais utiliser la touche veille de la
télécommande.
è Si vous souhaitez continuer à regarder une
chaîne numérique après la programmation d’un
enregistrement,vous pouvez le faire en opérant
de manière habituelle.
!
Si vous regardez un programme numérique
alors qu’un enregistrement est sur le point de
débuter, une alarme sonore vous avertira et
vous aurez le choix entre changer de
programme ou continuer à regarder ce
programme.
ç Vous pouvez aussi regarder un programme
analogique pendant l’enregistrement d’un
programme numérique .
Appuyez sur la touche
v pour basculer le
téléviseur en mode analogique.
10
Fonction d’enregistrement
2 BBC 2
FermerAnnulerMémoriser
Nom
Service
Entrer le mot de passe en
cas de verrouillage
Jour & Mois
Heure de début
Heure de fin
Langue audio
11:46
See it saw
2 BBC 2
16/02
12:15
12:30
Français
Page 31

11
Mémorisation auto.des programmes analogiques
Classement des programmes analogiques
Ce menu permet de lancer une recherche
automatique de tous les programmes
disponibles dans votre région.
& En mode analogique, appuyez sur la touche
W MENU
.
é
Avec le curseur, sélectionnez le menu Installation
puis Mémo. Auto et appuyez sur ¬.
La recherche démarre automatiquement.
Tous les programmes TV disponibles sont
mémorisés.A la fin, le menu disparaît.
“ Si l’émetteur ou le réseau câblé transmet le
signal de classement automatique, les
programmes seront correctement numérotés.
L’installation est terminée.
‘ Si ce n’est pas le cas, les programmes trouvés
seront numérotés en ordre décroissant à
partir du numéro 99, 98, 97, ...Vous devez alors
utiliser le menu
Classement pour les
renuméroter.
Certains émetteurs ou réseaux câblés diffusent leurs
propres paramètres de classement (région, langage...).
Dans ce cas, vous devez indiquer votre choix avec les
touches
îÏ puis valider avec ¬.
Pour sortir ou interrompre la recherche, appuyez
sur
W MENU
. Si aucun programme n’est trouvé,
reportez vous au chapitre conseils p. 18.
( Pour quitter le menu, appuyez sur
∂.
& Appuyez sur la touche
W MENU
pour afficher le
menu principal.
é Avec le curseur,sélectionnez le menu
Installation puis le menu Classement .
“ Sélectionnez le programme que vous
souhaitez déplacer avec les touches
îÏ et
appuyez sur
¬.
‘ Utilisez ensuite les touches
îÏ pour
choisir le nouveau numéro et validez avec
È.
( Recommencez les étapes “ et ‘ autant de
fois qu’il y a de programmes à renuméroter.
§ Pour quitter le menu, appuyez sur
∂.
Menu Principal
• Image
• Son
• Options
$ Installation
Mémo. Auto.
• Prog 2
• TV 470 MHz
• ••••••••••••••••••••••••••••••••
Î
ï
Installation
• Mémo. Auto.
• Mémo Manuel.
$
Classement
Æ
• Nom du Prog.
000
001 TF1
002 FR2
003ÆFR3
004 C +
005 ARTE
Page 32

12
Mémorisation manuelle des programmes analogiques
Nom des programmes analogiques
Ce menu permet de mémoriser les
programmes un par un.
& Appuyez sur la touche
W MENU
.
é Avec le curseur,sélectionnez le menu
Installation puis Mémo Manuelle :
“
Système : sélectionnez Europe (détection
automatique*) ou
Europe Ouest (norme BG),
Europe Est (norme DK), Royaume-Uni
(norme I) ou France (norme LL’).
* Sauf pour la France (norme LL’), il faut
sélectionner impérativement le choix France.
‘
Recherche :appuyez sur ¬. La recherche
commence. Dès qu’un programme est trouvé,
le défilement s’arrête et le nom du programme
s’affiche (si disponible).Allez à l’étape suivante.
Si vous connaissez la fréquence du programme
désiré, composez directement son numéro
avec les touches
0 à 9.
Si aucune image n’est trouvée, voir conseils (p. 18).
(
No De Prog. : entrer le numéro souhaité avec
les touches
Ȭ ou 0 à 9.
§
Ajust. Fin : si la réception n’est pas
satisfaisante, réglez avec les touches
Ȭ.
è
Mémoriser :appuyez sur ¬. Le programme
est mémorisé.
! Répétez les étapes ‘ à ! autant de fois qu’il
y a de programmes à mémoriser.
ç Pour quitter les menus, appuyez sur
∂.
Vous pouvez, si vous le souhaitez, donner un
nom aux programmes analogiques et prises
extérieures.
& Appuyez sur la touche
W MENU
.
é Avec le curseur,sélectionnez le menu
Installation, puis Nom De Prog.
“ Utilisez les touches îÏ pour choisir le
programme à nommer ou à modifier.
‘ Utilisez les touches
Ȭ pour vous
déplacer dans la zone d’affichage du nom
(5 caractères) et les touches
îÏ pour
choisir les caractères.
( Lorsque le nom est entré, utilisez la
touche
È pour sortir. Le nom est mémorisé.
§ Recommencez les étapes “ à ( pour chaque
programme à nommer.
è Pour quitter les menus, appuyez sur
∂.
Menu Principale•
• Image
• Son
• Options
• Installation
Mémo. Manuel
Î
$
Système
Æ
France
Æ
• Recherche
• No. De Prog.
• Ajust. Fin
• Mémoriser
ï
Menu Principal
• Image
• Son
• Options
$ Installation
Î
ï
Installation
• Mémo. Auto.
• Mémo Manuel.
•Classement
Æ
$
Nom du Prog.
Æ
00
01 TF1
02 FR2
03ÆFR3
04 C +
05 ARTE
Page 33

13
Réglages de l’image
Réglages du son
& Appuyez sur la touche
W MENU
puis sur ¬.
Le menu
Image apparaît :
é Utilisez les touches
îÏ pour sélectionner
un réglage et les touches
Ȭ pour régler.
Remarque : pendant le réglage de l’image, seule la
ligne sélectionnée reste affichée.Appuyez sur
îÏ pour faire ré-apparaître le menu.
“ Une fois les réglages effectués, sélectionnez le
choix
Mémoriser et appuyer sur ¬ pour les
enregistrer.Appuyez sur
∂ pour quitter.
Description des réglages :
•
Lumière : agit sur la luminosité de l’image.
•
Couleur : agit sur l’intensité de la couleur.
•
Contraste : agit sur la différence entre les
tons clairs et les tons foncés.
•
Définition : agit sur la netteté de l’image.
•
Temp. Couleur : agit sur le rendu des
couleurs :
Froide (plus bleue), Normale
(équilibrée) ou Chaude (plus rouge).
•
Mémoriser : pour mémoriser les réglages de
l’image (ainsi que les réglages
Contrast + et
Réduct. Bruit situés dans le menu Options).
& Appuyez sur
W MENU
, sélectionner Son (Ï)
et appuyez sur
¬. Le menu Son apparaît :
é Utilisez les touches
îÏ pour sélectionner
un réglage et les touches
Ȭ pour régler.
“ Une fois les réglages effectués, sélectionnez le
choix
Mémoriser et appuyer sur ¬ pour les
enregistrer.
‘ Pour quitter les menus, appuyez sur
∂.
Description des réglages:
•
Aigus : agit sur les fréquences hautes du son.
•
Graves : agit sur les fréquences basses.
•
Balance : pour équilibrer le son sur les haut-
parleurs gauche et droit.
•
Delta Volume:permet de compenser les
écarts de volume qui existent entre les
différents programmes ou les prises EXT.
Ce réglage est opérationnel pour les
programmes 0 à 40 et les prises EXT.
• AVL (Automatic Volume Leveler): contrôle
automatique du volume qui permet de limiter
les augmentations du son, en particulier lors des
changements de programmes ou des publicités.
• Mémoriser : pour mémoriser les réglages du
son.
Réglages des options
& Appuyez sur
W MENU
, sélectionner Options
(Ï) et appuyez sur ¬.Vous pouvez régler :
é
Déplac. Image: les grandes tailles d’écran sont
sensibles aux variations du champ magnétique
terrestre. Ce réglage permet de compenser
son influence en ajustant l’inclinaison de
l’image.
“
Contraste + : réglage automatique du
contraste de l’image qui ramène en
permanence la partie la plus sombre de
l’image au noir.
‘
Réduct. Bruit : atténue le bruit de l’image (la
neige), en cas de réception difficile.
Attention : pour mémoriser les réglages
Contraste+ et Réduct. Bruit , il faut utiliser le
choix
Mémoriser du menu Image.
( Pour quitter les menus, appuyez sur
∂.
Menu Principal
$ Image
• Son
• Options
• Installation
Menu Principal
• Image
$ Son
• Options
• Installation
Î
ï
Image
$
Lumière
Í
--I------ 39
Æ
• Couleur
• Contraste
• Définition
• Temp. Couleur
• Mémoriser
Î
ï
Son
$
Aigus
Í
-----I---- 56
Æ
• Graves
• Balance
• Delta Volume
• AVL
• Mémoriser
Page 34

14
Télétexte analogique
Le télétexte est un système d'informations, diffusé par certaines chaînes, qui se consulte comme un
journal. Il permet aussi d'accéder aux sous-titrages pour les personnes malentendantes ou peu
familiarisées avec la langue de transmission (réseaux câblés,chaînes satellites,...).
Appuyez sur:
Vous obtenez :
Appel télétexte
Sélection
d’une page
Permet d’appeler le télétexte, de passer en mode
transparent puis de quitter. Le sommaire apparaît avec la
liste des rubriques auxquelles vous pouvez accéder. Chaque
rubrique est repérée par un numéro de page à 3 chiffres.
Certaines chaînes numériques peuvent aussi diffuser le
télétexte. Si c’est le cas,vous pouvez y accéder en
maintenant la touche pendant 3 secondes.
Si la chaîne sélectionnée ne diffuse pas le télétexte, l'indication
100 s'affiche et l'écran reste noir (dans ce cas, quittez le
télétexte et choisissez une autre chaîne).
Composer le numéro de la page désiré avec les touches
0 à 9 ou @ P # ou
Ȭ
.Exemple: page 120,
tapez
120
. Le numéro s’affiche en haut à gauche, le
compteur tourne, puis la page est affichée.Renouvelez
l'opération pour consulter une autre page.
Si le compteur continue à chercher, c’est que la page n'est pas
transmise. Choisissez un autre numéro.
Accès
direct aux
rubriques
Des zones colorées sont affichées en bas de l’écran. Les 4
touches colorées permettent d’accéder aux rubriques ou
aux pages correspondantes.
Sommaire
Pour revenir au sommaire (généralement la page 100).
Arrêt de
l'alternance des
sous-pages
Certaines pages contiennent des sous-pages qui se
succèdent automatiquement. Cette touche permet
d’arrêter ou reprendre l'alternance des sous-pages.
L'indication _ apparaît en haut à gauche.
Agrandissement
d'une page
Pour afficher la partie supérieure, inférieure, puis revenir à
la dimension normale.
Informations
cachées
Pages
préférées
Pour faire apparaître ou disparaître les informations
cachées (solutions de jeux).
Pour les programmes télétexte 0 à 40,vous pouvez
mémoriser 4 pages préférées qui seront ensuite directement
accessibles avec les touches colorées (rouge,verte, jaune,
bleue).
& Appuyez sur la touche
W MENU
pour passer en mode
pages préférées.
é Affichez la page télétexte que vous souhaitez mémoriser.
“ Appuyez ensuite pendant 3 secondes sur la touche
colorée de votre choix.La page est mémorisée.
‘ Renouvelez l’opération avec les autres touches colorées.
( À présent, dès que vous consultez le télétexte, vos
pages préférées apparaissent en couleur en bas de
l’écran. Pour retrouver les rubriques habituelles, appuyez
sur
W MENU
.
Pour tout effacer, appuyez sur d pendant 5 secondes.
¤Ÿ
VCR
¢
DVD
MODE
SELECT
›Ó
Ø
Œ
MENU
TV
Ë
OK
+ +
”
[
BACK
Á
∏ù
†
12
564
879
SMART
-
0
.
-
SMART
ª
OPTIONS
CANCEL
MENU
DIGITAL
A/D
3
∫
P(age)
¤
¢
P
Ë
Ó
CANCEL
›
Œ
Ÿ
MENU
TV
Ë
Page 35

15
Formats 16:9
Télétexte numérique
Les images que vous recevez peuvent être transmises au format 16:9 (écran large) ou 4:3 (écran
traditionnel). Les images 4:3 ont parfois une bande noire en haut et en bas (format cinémascope).
Cette fonction permet d’éliminer les bandes noires et d’optimiser l’affichage des images sur l’écran.
Commutation automatique
Le téléviseur est équipé d’une commutation automatique qui décode le signal spécifique émis par
certains programmes et sélectionne automatiquement le bon format d’écran.
Vous avez toujours la possibilité de changer manuellement le format.
Utilisation des différents formats d’écran
Appuyez sur la touche p pour sélectionner les différents modes :
4:3, Zoom 14:9,Zoom 16:9, Sous-Titres,Super 4:3 et Plein Ecran.
Vous avez également accès à ces réglages avec les touches È et ¬
Certaines chaînes numériques, que vous sélectionnez comme n’importe quelle autre chaîne, peuvent
proposer un service télétexte. D’autres chaînes numériques peuvent proposer des informations sur
le programme en cours (un message apparaît en bas de l’écran).
& Pour utiliser le télétexte numérique, suivez les instructions à l’écran.
é Selon les chaînes, vous pouvez être amené à utiliser le curseur et la touche
SELECT (u), les touches
colorées, la touche
Télétexte (c) et parfois les touches numériques.
“ Quand vous avez fini de regarder le télétexte numérique, sélectionner une autre chaîne avec les
touches
@ P #
ou suivez les instructions à l’écran pour retourner à l’image.
4:3
L’image est reproduite au format 4:3,une bande noire apparaît
de chaque côté de l’image.Vous pouvez agrandir progressivement
l’image en utilisant les touches
îÏ
.
Zoom 14:9
L’image est agrandie au format 14:9, une petite bande noire
subsiste de chaque côté de l’image. Les touches
îÏ
permettent de comprimer l’image verticalement pour faire
apparaître le haut ou le bas de l’image (sous-titres).
Zoom 16:9
L’image est agrandie au format 16:9. Ce mode est recommandé
pour visualiser les images avec bande noire en haut et en bas
(format cinémascope). Utilisez les touches
îÏ si vous voulez
faire apparaître le haut ou le bas de l’image.
Sous-Titres
Ce mode permet de visualiser les images 4:3 sur toute la
surface de l’écran en laissant visibles les sous-titres. Utilisez les
touches
îÏ
pour faire descendre ou remonter le bas de
l’image.
Super 4:3
Ce mode permet de visualiser les images 4:3 sur toute la surface
de l’écran en élargissant les côtés de l’image. Utilisez les touches
îÏ
pour compresser l’image verticalement.
Plein Écran
Ce mode permet de restituer les bonnes proportions des
images transmises en 16:9 en les affichant en plein écran.
Attention
: si vous visualisez une image 4:3 comme représentée ici;
elle sera élargie sur le plan horizontal.
++
”
--
Á
12
SMART SMART
-
P
[
ù
∏
3
564
879
0
ª
(age)
Page 36

16
VCR
DVD
¢
∫
.
EXIT/OPTIONS
›Ó
¤Ÿ
Œ
Ø
MODE
CANCEL
Raccordement d’autres appareils
Le téléviseur est équipé de 2 prises péritel EXT1 et EXT2 situées à l’arrière.
La prise EXT1 possède les entrées/sorties audio vidéo et les entrées RVB.
La prise EXT2 possède les entrées/sorties audio vidéo et les entrées S-VHS.
Magnétoscope (seul)
Effectuez les raccordements ci-contre.
Pour enregistrer les
programmes numériques depuis votre téléviseur, le
magnétoscope doit être branché à la prise EXT2.
Si votre magnétoscope ne possède pas de prise péritel, seule la
liaison par le câble antenne est possible.Vous devez accorder le
programme numéro 0 du téléviseur sur le signal de test du
magnétoscope. Ensuite pour reproduire l’image du magnétoscope,
appuyez sur 0. Dans ce cas il est impossible d’enregistrer un
programme numérique.
Magnétoscope avec Décodeur
Connectez le décodeur sur la deuxième prise péritel du
magnétoscope.Vous pourrez ainsi enregistrer les émissions
cryptées.
Magnétoscope
Récepteur satellite, décodeur, DVD, jeux,...
Effectuez les raccordements ci-contre.
Pour optimiser la qualité de l’image, connectez à EXT1 les
équipements délivrant les signaux RVB (décodeur
numérique, lecteurs DVD, jeux,...), à EXT2 les équipements
délivrant les signaux S-VHS (magnétoscopes S-VHS et
Hi-8, ...) et indifféremment à EXT1 ou EXT2 les autres
équipements.
Effectuez les raccordements ci-contre.
Avec la touche
n, sélectionner AV
/ S-VHS
.
Pour un appareil monophonique, connectez le signal son sur
l’entrée AUDIO L. Utilisez la touche
e pour reproduire le son sur
les haut-parleurs gauche et droit du téléviseur.
Casque
Lorsque le casque est connecté, le son du téléviseur est coupé.
Les touches @ ” # permettent de régler le volume.
L'impédance du casque doit être comprise entre 32 et 600 ohms.
Autres appareils
Connexions latérales
Pour sélectionner les appareils connectés
Appuyez sur la touche npour sélectionner EXT1, EXT2 / S-VHS2
(signaux S-VHS de la prise EXT2) et AV / S-VHS pour les connections
latérales (si disponible).
La plupart des appareils réalisent eux-mêmes la commutation (décodeur,
magnétoscope).
EXT 2
VCR
EXT 1
S-VHS
Video
R Audio L
S-VHS
Video
R Audio L
**
VHS, 8 mm
S-VHS, Hi-8
Page 37

17
Sélecteur de mode VCR / DVD
Pour le raccordement à une chaîne Hi-fi,utilisez un cordon de
liaison audio et connectez les sorties “L” et “R” du téléviseur à
une entrée “AUDIO IN” “L” et “R” de l’amplificateur.
Utilisez un cordon de liaison audio et connectez la sortie
“SPDIF” du téléviseur (disponible suivant les versions) à l’entrée
“DIGITAL IN” de l’amplificateur. (amplificateur avec entrée
numérique coaxial).
Votre téléviseur est équipé d’un connecteur permettant de
raccorder un lecteur de module universel CAM (Conditional
Access Module) pouvant accueillir une carte d’abonnement
pour les chaînes cryptées telles que TPS, CanalSat...
Contactez votre opérateur pour plus de renseignements.
Note
: Le téléviseur doit toujours être éteint avant l’insertion du
lecteur de module dans le connecteur.
Amplificateur
Lecteur de module universel Common Interface
mise en veille
· enregistrement *,
∆ pause,
Ê stop,
Æ lecture,
¢ retour rapide,
∫ avance rapide,
appel du menu *
sélection (
îÏ) et réglage (Ȭ) *
u validation*
sélection des programmes,
composer un numéro
*Certaines fonctions ne sont pas disponibles suivant les modèles
(curseur, menu, touche OK, etc.). La télécommande est compatible
avec tous les appareils de notre marque ainsi que tous les modèles
utilisant le standard RC5.
La télécommande vous permet de piloter les fonctions principales du magnétoscope ou du DVD.
& Appuyez sur la touche
MODE pour sélectionner: VCR (magnétoscope) ou DVD.
Une diode verte s’allume pour vous indiquer le mode sélectionné.Après 20 secondes sans action,
la télécommande bascule en mode TV..
é Appuyez ensuite sur une des touches suivantes :
SPDIF
¤Ÿ
VCR
¢
DVD
›Ó
MODE
Ø
Œ
MENU
TV
Ë
SELECT
OK
+ +
”
[
BACK
Á
∏ù
†
12
564
879
SMART
-
0
.
-
SMART
OPTIONS
CANCEL
∫
MENU
DIGITAL
A/D
P(age)
3
ª
Page 38

18
Conseils
Mauvaise réception
(en mode analogique)
La proximité de montagnes ou de hauts
immeubles peut être la cause d'image dédoublée,
d'écho ou d'ombres. Dans ce cas, essayez
d’ajuster manuellement l’accord de l’image: voir
Ajust.Fin (p. 12) ou modifiez l'orientation de
l'antenne extérieure.Vérifiez également que
votre antenne permet de recevoir les émissions
dans cette bande de fréquences (bande UHF ou
VHF) ? En cas de réception difficile (image
neigeuse), positionnez le réglage
Reduc. Bruit du
menu
Options sur MARCHE (p. 13).
Mauvaise qualité d’image
(en mode numérique)
L’image qui se fige ou l’apparition “d’effets de
blocs” sont synonymes de mauvaise réception.
Veuillez vérifier avec le menu
Test de réception
(p.6). Selon l’intensité du signal digital terrestre
qui est dans votre zone, les câbles d’antennes
utilisés pour les transmissions analogiques vous
fourniront dans la plupart des cas une réception
correcte en mode numérique. Si ce n’est pas le
cas, une antenne extérieure de bonne qualité
doit être installé par un professionnel et aligné
pour capturer une intensité de signal maximum.
Absence d'image
Avez-vous bien branché l'antenne ?
Avez-vous choisi le bon système ? (p.12)
Une prise péritel ou une prise d'antenne mal
connectée est souvent la cause de problèmes
d'image ou de son (il arrive que les prises se
déconnectent légèrement lorsque l'on déplace
ou que l'on tourne le téléviseur).Vérifiez toutes
les connexions.
Absence de son
Si certains programmes sont dépourvus de son,
mais pas d’image, c’est que vous n’avez pas le bon
système TV. Modifiez le réglage
Système (p. 12).
La télécommande ne fonctionne plus ?
Vérifier que le sélecteur de mode, situé sur le
coté de la télécommande, est bien en position
TV. Le voyant du téléviseur ne clignote plus
lorsque vous utilisez la télécommande ?
Remplacez les piles.
Veille
Si le téléviseur ne reçoit pas de signal pendant 10
mn, il passe automatiquement en veille. Pour
faire des économies d’énergie, votre téléviseur
est équipé de composants permettant une très
faible consommation en veille.
Nettoyage du téléviseur
Le nettoyage de l’écran et du coffret doit être
effectué uniquement avec un chiffon propre,
doux et non pelucheux. Ne pas utiliser de
produit à base d’alcool ou de solvant.
Toujours pas de résultats ?
En cas de panne, n’essayez jamais de réparer
vous même le téléviseur, mais consultez le
service après vente.
Ta b leau des fréquences (en KHz)
Fréquence numérique
Fréquence centrale
programme nominale KHz
21 . . . . . . . . . . . . . . . . . 474 000
22 . . . . . . . . . . . . . . . . . 482 000
23 . . . . . . . . . . . . . . . . . 490 000
24 . . . . . . . . . . . . . . . . . 498 000
25 . . . . . . . . . . . . . . . . . 506 000
26 . . . . . . . . . . . . . . . . . 514 000
27 . . . . . . . . . . . . . . . . . 522 000
28 . . . . . . . . . . . . . . . . . 530 000
29 . . . . . . . . . . . . . . . . . 538 000
30 . . . . . . . . . . . . . . . . . 546 000
31 . . . . . . . . . . . . . . . . . 554 000
32 . . . . . . . . . . . . . . . . . 562 000
33 . . . . . . . . . . . . . . . . . 570 000
34 . . . . . . . . . . . . . . . . . 578 000
35 . . . . . . . . . . . . . . . . . 586 000
36 . . . . . . . . . . . . . . . . . 594 000
37 . . . . . . . . . . . . . . . . . 602 000
38 . . . . . . . . . . . . . . . . . 610 000
39 . . . . . . . . . . . . . . . . . 618 000
40 . . . . . . . . . . . . . . . . . 626 000
41 . . . . . . . . . . . . . . . . . 634 000
42 . . . . . . . . . . . . . . . . . 642 000
43 . . . . . . . . . . . . . . . . . 650 000
44 . . . . . . . . . . . . . . . . . 658 000
45 . . . . . . . . . . . . . . . . . 666 000
Fréquence numérique
Fréquence centrale
programme nominale KHz
46 . . . . . . . . . . . . . . . . . 674 000
47 . . . . . . . . . . . . . . . . . 682 000
48 . . . . . . . . . . . . . . . . . 690 000
49 . . . . . . . . . . . . . . . . . 698 000
50 . . . . . . . . . . . . . . . . . 706 000
51 . . . . . . . . . . . . . . . . . 714 000
52 . . . . . . . . . . . . . . . . . 722 000
53 . . . . . . . . . . . . . . . . . 730 000
54 . . . . . . . . . . . . . . . . . 738 000
55 . . . . . . . . . . . . . . . . . 746 000
56 . . . . . . . . . . . . . . . . . 754 000
57 . . . . . . . . . . . . . . . . . 762 000
58 . . . . . . . . . . . . . . . . . 770 000
59 . . . . . . . . . . . . . . . . . 778 000
60 . . . . . . . . . . . . . . . . . 786 000
61 . . . . . . . . . . . . . . . . . 794 000
62 . . . . . . . . . . . . . . . . . 802 000
63 . . . . . . . . . . . . . . . . . 810 000
64 . . . . . . . . . . . . . . . . . 818 000
65 . . . . . . . . . . . . . . . . . 826 000
66 . . . . . . . . . . . . . . . . . 834 000
67 . . . . . . . . . . . . . . . . . 842 000
68 . . . . . . . . . . . . . . . . . 850 000
69 . . . . . . . . . . . . . . . . . 858 000
Page 39

MENÚS
ANALÓGICOS
1
Introducción
Indice
Gracias por comprar este aparato de televisión.
Este manual se ha sido pensado para ayudarle a instalar y manejar su televisor.
Le recomendamos firmemente que lo lea atentamente.
Esperamos que este nuevo aparato de televisión le resulte absolutamente
satisfactorio.
Instalando su equipo de televisión . . . . . . . . . . . . . . . . . . . . . . . . . . . . . . . . . . . . .2
Botones del equipo de TV . . . . . . . . . . . . . . . . . . . . . . . . . . . . . . . . . . . . . . . . . . .2
Los botones del mando a distancia . . . . . . . . . . . . . . . . . . . . . . . . . . . . . . . . . . . .3
¿Canales analógicos o digitales? . . . . . . . . . . . . . . . . . . . . . . . . . . . . . . . . . . . . . . .3
Encendido del equipo por primera vez . . . . . . . . . . . . . . . . . . . . . . . . . . . . . . . . .4
Entender las ventanas de información . . . . . . . . . . . . . . . . . . . . . . . . . . . . . . . . . .4
Ordenación de los servicios . . . . . . . . . . . . . . . . . . . . . . . . . . . . . . . . . . . . . . . . . .5
Ver o escuchar nuevos servicios de TV . . . . . . . . . . . . . . . . . . . . . . . . . . . . . . . . .5
Añadir nuevos servicios . . . . . . . . . . . . . . . . . . . . . . . . . . . . . . . . . . . . . . . . . . . . .5
Reinstalar todos los servicios . . . . . . . . . . . . . . . . . . . . . . . . . . . . . . . . . . . . . . . . .6
Prueba de recepción . . . . . . . . . . . . . . . . . . . . . . . . . . . . . . . . . . . . . . . . . . . . . . . .6
Preferencias de idioma y dirección . . . . . . . . . . . . . . . . . . . . . . . . . . . . . . . . . . . . .7
Restricciones de acceso . . . . . . . . . . . . . . . . . . . . . . . . . . . . . . . . . . . . . . . . . . . . .7
Configuración de su lista de favoritos . . . . . . . . . . . . . . . . . . . . . . . . . . . . . . . . . .8
Información . . . . . . . . . . . . . . . . . . . . . . . . . . . . . . . . . . . . . . . . . . . . . . . . . . . . . . .8
Descargando nuevo software . . . . . . . . . . . . . . . . . . . . . . . . . . . . . . . . . . . . . . . . .8
Utilización del menú de opciones . . . . . . . . . . . . . . . . . . . . . . . . . . . . . . . . . . . . .9
Guía de TV . . . . . . . . . . . . . . . . . . . . . . . . . . . . . . . . . . . . . . . . . . . . . . . . . . . . . . .9
Función de grabación . . . . . . . . . . . . . . . . . . . . . . . . . . . . . . . . . . . . . . . . . . . . . .10
Sintonización automática de programas analógicos . . . . . . . . . . . . . . . . . . . . . . .11
Ordenando los programas analógicos . . . . . . . . . . . . . . . . . . . . . . . . . . . . . . . . .11
Sintonización manual de los programas analógicos . . . . . . . . . . . . . . . . . . . . . . .12
Dando nombre a los programas analógicos . . . . . . . . . . . . . . . . . . . . . . . . . . . . .12
Ajustes de la imagen . . . . . . . . . . . . . . . . . . . . . . . . . . . . . . . . . . . . . . . . . . . . . . .13
Ajustes del sonido . . . . . . . . . . . . . . . . . . . . . . . . . . . . . . . . . . . . . . . . . . . . . . . .13
Ajuste de varios . . . . . . . . . . . . . . . . . . . . . . . . . . . . . . . . . . . . . . . . . . . . . . . . . .13
Teletexto analógico . . . . . . . . . . . . . . . . . . . . . . . . . . . . . . . . . . . . . . . . . . . . . . . .14
Teletexto digital . . . . . . . . . . . . . . . . . . . . . . . . . . . . . . . . . . . . . . . . . . . . . . . . . .15
Formatos 16:9 . . . . . . . . . . . . . . . . . . . . . . . . . . . . . . . . . . . . . . . . . . . . . . . . . . .15
Conexión de equipos periféricos . . . . . . . . . . . . . . . . . . . . . . . . . . . . . . . . . . . . .16
Para elegir el equipo conectado . . . . . . . . . . . . . . . . . . . . . . . . . . . . . . . . . . . . . .16
Selector de modo VCR / DVD . . . . . . . . . . . . . . . . . . . . . . . . . . . . . . . . . . . . . .17
Consejos . . . . . . . . . . . . . . . . . . . . . . . . . . . . . . . . . . . . . . . . . . . . . . . . . . . . . . . .18
Tabla de Frecuencias Centrales (en KHz) . . . . . . . . . . . . . . . . . . . . . . . . . . . . . . .18
MENÚS
DIGITALES
°
Reciclado
Los materiales usados en su aparato son reutilizables o pueden reciclarse.
Con el fin de minimizar el vertido de residuos en el medio ambiente, existen
empresas especializadas en la recogida de aparatos usados,que los desguazan
después de recuperar todos aquellos materiales que pueden usarse de nuevo
(pregunte a su distribuidor para obtener más detalles al respecto).
Los menús digitales
de este producto
utilizan la última
tecnologÍa Java
™
de
Sun Microsystems Inc.
Español
Page 40

El equipo de televisión tiene 4 botones que
encontrará situados en la parte frontal o en la
parte superior del mismo, dependiendo del
modelo.
Con los botones VOLUME - + (- ”+) se ajusta
el volumen del sonido.Los botones
PROGRAM - + (- P +) sirven para seleccionar
el programa.
Para acceder a los menús, pulse
simultáneamente los botones ”- y ”+.
A continuación use los botones PROGRAM + para seleccionar qué desea ajustar y los
botones - ”+ para realizar dicho ajuste.
Para salir de los menús, pulse los botones
”- y ”+ simultáneamente.
PROGRAMVOLUME
--
++
2
&
Ubicando el equipo de televisión
Coloque su TV sobre una superficie sólida y
estable, asegurándose de dejar un espacio libre
de al menos 5cm alrededor del aparato.
Para evitar accidentes, no sitúe sobre el equipo
fundas o cubiertas de tela, recipientes con
líquido (jarrones) o fuentes de calor (lámparas).
El equipo no debe entrar en contacto con el
agua.
é
Conexiones
• Introduzca la clavija proveniente de la antena
en la toma que encontrará en la parte trasera
del equipo
:.
• Introduzca el cable de red del equipo en una
toma de corriente (220-240 V / 50 Hz).
“
Mando a distancia
Coloque las dos pilas de tipo R6 (suministradas
con el equipo) asegurándose de respetar la
polaridad indicada.
Las pilas suministradas con este aparato no
contienen ni mercurio ni níquel cadmio. Si tiene
acceso a un punto de reciclaje, por favor no tire en
cualquier lugar sus pilas usadas (si tiene alguna
duda consulte con su vendedor). Cuando reponga
las pilas usadas use otras del mismo tipo.
‘
Encendiendo el equipo
Para encender el equipo pulse el botón on/off.
Aparecerá un indicador luminoso de color rojo
y se encenderá la pantalla.Vaya directo al
capítulo Encendido del equipo por primera vez,
en la página 4. En el caso de que la televisión
permaneciera inactiva pulse el botón P # del
mando a distancia.
El indicador luminoso parpadeará cada vez que
utilice el mando a distancia.
5 cm
5 cm
5 cm
Instalando su equipo de televisión
Botones del equipo de TV
Page 41

3
¿Canales analógicos o digitales?
Para recibir los canales de TV, su televisor está equipado con dos sintonizadores. Uno es para los canales
digitales y el otro para los canales analógicos. Utilice el botón
v de su mando a distancia para hacer que
la TV alterne entre el modo analógico y el modo digital.A continuación, emplee los botones
P @#o
09para seleccionar un canal.
Los botones del mando a distancia
Información por pantalla
En el modo digital, pulse una vez para mostrar
por pantalla la ventana de información, dos
veces para obtener más información acerca
del programa y una tercera vez para hacer
desaparecer toda la información de la pantalla.
En el modo analógico, este botón muestra /
oculta la información del programa (número,
nombre, modo de sonido). Si desea que el
número de programa analógico aparezca de
forma permanente en la pantalla, mantenga
pulsado el botón durante 5 segundos.
Guía de TV
(lea p.9).
Elegir entradas EXT
(see p.16).
Selector de modo
Activa el modo VCR o DVD del
mando a distancia (vea p.17).
Menú TV
Para entrar y salir de los menús
analógicos
Select
En el modo digital, este botón muestra
/ oculta la lista de programas.
Seleccione un programa con los
botones
îÏ y pulse u
Volumen
Ajusta el volumen del sonido
Formatos 16:9 (p.15)
Silenciar
Habilita o deshabilita el sonido.
Ajustes de la imagen y el sonido
Da acceso a una serie de ajustes de la
imagen y el sonido.
La posición Personal corresponde a los
ajustes almacenados en los menús.
Standby
Pone la TV en estado de standby.
Para encenderla de nuevo pulse b,
P @#o 09.
Menú de opciones
(lea p.9).
Elementos del Teletexto (p. 14)
y botones VCR/DVD (p.17).
Menú digital
Entra y sale de los menús digitales
(cuando la TV está en modo digital).
Modo Analógico o digital
Alterna entre el modo analógico y el
modo digital.
Cursor
Estos 4 botones sirven para moverse
por los menús o para acceder de forma
directa a los formatos 16:9 (p 15).
Programa anterior
Vuelve al programa que se estuviera
viendo anteriormente.
Botones numéricos
Da acceso directo a los programas.
Cuando el número de programa sea de
2 (3) dígitos, el segundo (tercer) dígito
se debe introducir antes de que la rayita
desaparezca.Durante unos segundos se
mostrará por pantalla el número y el
nombre (así como el modo de sonido,
en modo analógico) del programa.
Modo de sonido
Para cambiar entre
Estéreo y Mono
o elegir otros idiomas (Dual I, Dual II,
...).
Cuando está seleccionado el modo de
sonido MONO, el indicador se muestra
en rojo.
Sonido envolvente
Activa / desactiva el efecto Virtual
Dolby Surround *.En estéreo, la
calidad de sonido que se obtiene es
la de Dolby Surround Pro Logic.En
mono, se simula un efecto espacial
estéreo.
*
Fabricado bajo licencia de Dolby Laboratories.
”Dolby” ”Pro Logic”y el símbolo doble-D son
marcas comerciales de Dolby Laboratories.
Selección de programa
Da acceso al programa anterior o al
siguiente (o a la página en los menús
digitales).
Modo subtítulos
Para activar/desactivar el modo subtítulos .
.
¤Ÿ
VCR
DVD
MODE
·
MENU
TV
SELECT
OK
Ø
∆
¢
›Ó
Œ
Ê Æ
Ë
OPTIONS
∫
CANCEL
MENU
DIGITAL
A/D
++
†
-
SMART
ª
P(age)
3
”
BACK
Á
[
∏ù
12
564
879
SMART
-
0
Page 42

4
La primera vez que encienda su TV, aparecerá
por pantalla un mensaje de enhorabuena en
12 idiomas (cada 5 segundos):
Si no aparece el menú, mantenga pulsadas por 5
segundos las teclas
”- y ”+ del televisor, para
hacerlo aparecer.
&
Pulse el botón u del mando a distancia en el
momento en que aparezca su idioma por la
pantalla.A continuación se visualizará el menú:
é Las opciones Idioma, País y Zona horaria han sido
preseleccionadas de acuerdo con la pantalla de
inicio.De cualquier modo, usted tiene todavía la
opción de cambiar sus preferencias antes de
realizar la búsqueda de servicios.
“ Con los botones del cursor,elija Idioma, País o
Zona horaria y compruebe que las opciones
seleccionadas se ajustan a sus preferencias.Si
es necesario, utilice los botones del cursor
para realizar sus ajustes y pulse
u para salir.
Precaución: si selecciona un país distinto del suyo la
numeración de los canales no coincidirá con el
estándar de su país.
‘ Seleccione el elemento
Búsqueda de servicios
y pulse u para comenzar la instalación.El
menú servicios scan aparecerá en la pantalla.
La búsqueda y almacenamiento de todos los
programas, tanto analógicos como digitales, es
automática. Una vez terminada la búsqueda,en
el menú se indicará el total de servicios
digitales y programas analógicos encontrados.
( Pulse el botón
u para empezar a ver la TV. El
televisor mostrará en ese momento el programa
actual. La instalación se puede dar por concluida.
Cuando se selecciona un programa digital, en la
parte superior de la pantalla aparecerá, durante
unos pocos segundos, una ventana de información.
También es posible pulsar el botón
∂
del mando
a distancia para desplegar esta ventana. Pulsando
una segunda vez, se muestra más información
acerca del programa (cuando esta está disponible).
La ventana contiene información sobre el
número de la presintonía,número del canal,
duración del programa, horario de la
transmisión, título del programa,y el tiempo
que le resta al programa para su finalización.
Encendido del equipo por primera vez
Entender las ventanas de información
Enhorabuena por elegir este television Philips.
Pulse OK para empezar a disfrutar de su TV digital.
Instalación
Localizados otros servicios
Idioma
País
Zona horaria
Búsqueda de servicios
11:46
Español
España
(GMT+1:00) Amsterdam, Madrid
Pulse OK para empezar
Descripción de los símbolos:
i
hay disponible más información sobre este programa:
pulse el botón
∂ para mostrarla u ocultarla.
ß hay subtítulos disponibles: si desea verlos, pulse el
botón ß o pulse el botón
OPTIONS para mostrar
el menú opciones y selecciónelo.
ù hay disponible sonido en otros idiomas que se
puede seleccionar en el menú
opciones.
u el color del símbolo lista activada indica la lista de
Favoritos que está seleccionada en ese momento.
2 11:06 - 11:09
TVE2 Los coches
11:46
Minutos restantes : 14
u
ù
i
ß
número
del canal
símbolos
reloj
horario de
inicio y final
del programa
tiempo restante
del programa
título del
programa
nombre del
canal
Page 43

5
Ordenación de los servicios
Este menú le permite cambiar el orden de los
canales y las emisoras de radio digitales
almacenados.
& Desde el modo digital, pulse el botón
‹ MENU
para mostrar el menú instalación.
é Utilice el botón
Ï para seleccionar
instalación y pulse dos veces ¬ para
seleccionar el menú
Listas de servicios.
“ Utilice los botones
îÏ para seleccionar
Reorganizar servicios y después pulse ¬.
‘ Utilice los botones
îÏ para seleccionar el
canal que desea intercambiar.
( Pulse
u para activarlo.
Si desea desinstalar el canal seleccionado, pulse el
botón rojo.
§ Seleccione (
îÏ) el número del canal con
el que desea intercambiarlo.
è Pulse
u para confirmar.Ya está hecho el
intercambio de canales.
! Repita los pasos ‘ hasta è hasta que todos
los canales estén en el orden que usted desea.
ç Pulse el botón
‹ MENU
para salir del menú.
Esté menú le permite comprobar la
disponibilidad de nuevos canales de TV o
emisoras de radio que su proveedor de
servicios de TV haya podido añadir desde que
usted realizó la instalación inicial.
& Desde el modo digital, pulse el botón
‹ MENU
para mostrar el menú de configuración.
é Utilice el botón
Ï para elegir instalación y
pulse
¬ dos veces para seleccionar el menú
Listas de servicios.
“ Utilice los botones
îÏ para elegir Vea los
nuevos canales de TV
o Escuche las nuevas
emisoras de radio
.
‘ En el caso de que haya nuevos servicios
disponibles, pulse
¬ para acceder a la lista y
muévase por ella con los botones îÏ.
( Pulse el botón
‹
MENU
para salir del menú.
Ver o escuchar nuevos servicios de TV
Instalación
Instalación
Gestionar listas de servicios
Cerrar
Listas de servicios
Instalación de servicios
Prueba de recepción
11:46
Reorganizar servicios
Vea los nuevos canales de TV
Escuche las nuevas emisoras
de radio
Añadir nuevos servicios
Esté menú le permite buscar nuevos canales de
TV o emisoras de radio que su proveedor de
servicios de TV haya podido añadir desde que
usted realizó la instalación inicial.
& Desde el modo digital, pulse el botón
‹ MENU
para mostrar el menú de Instalación.
é Utilice el botón
Ï para elegir instalación y
pulse
¬.
“ Elija
Instalación de servicios (Ï) y pulse ¬.
‘ Pulse
¬ para elegir Añadir nuevos servicios y
pulse
u para iniciar la instalación.La búsqueda
comienza y sólo se memorizarán y añadirán al
menú
Lista de canales aquellos canales que
sean nuevos.Durante el proceso, la pantalla
muestra el porcentaje de la instalación
realizada así como el número de canales
encontrados hasta el momento.
( Cuando finalice la búsqueda, pulse
u para
salir.
§ Pulse el botón
‹ MENU
para salir del menú.
Instalación
Instalación
Instalación y control de servicios
Cerrar
Listas de servicios
Instalación de servicios
Prueba de recepción
11:46
Añadir nuevos servicios
Reinstalar todos los servicios
Page 44

6
Este menú le permite reinstalar todos los
canales de TV y emisoras de radio digitales.
& Desde el modo digital, pulse el botón
‹ MENU
para mostrar el menú de configuración.
é Utilice las teclas
Ï para elegir instalación y
pulse
¬.
“ Elija
Instalación de servicios (Ï) y pulse ¬.
‘ Elija
Reinstalar todos los servicios (Ï) y pulse ¬.
( Pulse
u para iniciar la instalación.Comienza la
búsqueda y todos los programas digitales y
analógicos encontrados son almacenados de
forma automática.Al finalizar la búsqueda, el
menú indicará el número de servicios digitales
y programas analógicos que se han encontrado.
§ Una vez finalizada la búsqueda, pulse
u para
salir.
è Pulse el botón
‹ MENU
para abandonar el
menú.
Este menú le permite comprobar la intensidad
de la señal que usted recibe en su zona.
& Desde el modo digital, pulse el botón
‹ MENU
para mostrar el menú de configuración.
é Utilice el botón
Ï para elegir instalación y
pulse
¬ para mostrar el menú.
“ Utilice
Ï para elegir Prueba de recepción y
pulse
¬. Se le indicará la frecuencia de
programa actual, el nombre de la red, así como
la calidad y la intensidad de la señal.
‘ A continuación debe teclear la frecuencia del
canal digital sobre el que desea hacer la prueba.
Puede encontrar la lista de los números de los canales
digitales en su revista de Tv. Utilice la tabla que
encontrará en la página 18 para obtener la frecuencia.
( Si la calidad y la intensidad de la señal son
pobres, aparecerá un mensaje en la parte
inferior del menú indicándole que introduzca la
frecuencia intermedia entre los límites inferior
y superior. Si después de teclear dicha
frecuencia la recepción sigue siendo pobre,
puede probar a mejorar, renovar, ajustar o
actualizar la antena. De cualquier forma,es
recomendable que contacte con un servicio
técnico especializado para que lo vea.
Reinstalar todos los servicios
Prueba de recepción
Instalación
Instalación
Prueba de calidad de señal
Cerrar
Listas de servicios
Instalación de servicios
Prueba de recepción
11:46
Frecuencia
Nombre de la red
Calidad de señal
Intensidad de señal
Instalación
Instalación
Instalación y control de servicios
Cerrar
Listas de servicios
Instalación de servicios
Prueba de recepción
11:46
Añadir nuevos servicios
Reinstalar todos los servicios
Page 45

Preferencias de idioma y dirección
Este menú le permite elegir el idioma del audio,
de los subtítulos, del teletexto y del menú, así
como realizar cambios de su dirección (país y
zona horaria).
& Desde el modo digital, pulse el botón
‹ MENU
para mostrar el menú de Instalación.
é Utilice el botón
Ï para elegir Preferencias y
pulsar
¬.
“ Elija
Idiomas, Dirección o Digital Audio (Ï) y
pulse
¬.
‘ Utilice los botones
Ïî para elegir una
configuración y pulse
¬ para acceder al
submenú. Realice los ajustes que crea
convenientes y pulse
u o È para salir.
Configuración del idioma:
•
Audio: para elegir el idioma del sonido.
•
Subtítulo/Teletexto: para elegir el idioma de los
subtítulos y del teletexto.
•
Modo de subtitulación: Desactivar, Activar o
Auto
(para visualizar los subtítulos unicamente
cuando los programas estén en versión origínal)
.
•
Subtítulos para sordos:
para activar o desactivar
los subtítulos específicos para sordos (en el
caso de que la emisora lo proporcione).
• Sistema: para elegir el idioma del menú.
Configuración de la dirección:
•
País: para elegir el país en el que se encuentra.
•
Zona horaria: para elegir la zona horaria en la
que se encuentra.
Configuración del Digital Audio:
Para elegir AC3 (en el caso de que el
amplificador acepta el formato Dolby Digital) o
PCM (si no acepta el formato Dolby Digital).
( Pulse el botón
‹ MENU
para salir del menú.
Este menú le permite configurar las
restricciones de acceso a los canales digitales.
& Desde el modo digital, pulse el botón
‹ MENU
para mostrar el menú de Instalación.
é Utilice el botón
Ï para elegir Restricciones
de acceso
y pulse ¬.
“ Pulse el botón
¬ para acceder al menú
Configurar código de protección.
‘ Utilice los botones
Ȭ para configurarlo
como
activado y pulse u u para salir.
A continuación tiene la opción de realizar otros
ajustes:
A
viso: desde el momento en que usted establezca
cualquier clase de restricción de acceso, deberá
introducir el código pin cuando desee programar
una grabación.
•
Nivel de clasificación: elija la edad mínima por
debajo de la cual se bloqueará el canal.
La clasificación por edades sólo bloqueará un programa
en el caso de que la emisora facilite esta información.
•
Canales de TV: elija el canal de TV que desea
bloquear y pulse
u.
•
Emisora de radio: elija la emisora de radio que
desea bloquear y pulse
u.
•
Cambiar código personal: pulse ¬ para
acceder al menú. Siga las instrucciones que
aparecerán por pantalla para cambiar su
código de acceso.
El código por defecto es el 1234.Si ha olvidado su
código personal puede restablecer el código pin por
defecto (1234) introduciendo el código universal 0711.
( Pulse el botón
‹ MENU
para salir del menú.
La televisión está equipada con una ranura de Interfaz Común
(CI) (vea p.17). Un módulo CI puede habilitar ser vicios
adicionales, como por ejemplo televisión de pago.El menú de
Restricciones de Acceso mostrará las restricciones al CI en el
caso de que haya instalado un módulo CI.El módulo CI es el
responsable de los mensajes y del texto que aparece por
pantalla.En caso de fallo o comportamiento anómalo consulte
con su proveedor de servicios CI.
Restricciones de acceso
Instalación
Preferencias
Seleccione un idioma
Cerrar
Idiomas
Dirección
Digital Audio
11:46
Audio
Subtitulo/Teletexto
Modo de subtitulación
Subtitulos para sordos
Sistema
Instalación
Restricciones de acceso
Activar o desactivar el código de protección
Cerrar
Configurar código
Nivel de clasificación
Canales de TV
Emisoras de radio
Cambiar código personal
11:46
Activar Desactivar
7
Page 46

8
Configuración de su lista de favoritos
Este menú le permite crear su lista de favoritos
con sus canales de televisión y emisoras de radio
preferidas.Por ejemplo,cada miembro de su familia
puede crear su propia lista de favoritos.
& Desde el modo digital, pulse el botón
‹ MENU
para mostrar el menú de Instalación.
é Pulse
¬ para acceder al menú favoritos.
Tiene la posibilidad de crear hasta 4 listas de
favoritos diferentes.
“ Utilice los botones
Ïî para elegir su lista de
favoritos:
Lista 1,Lista 2, Lista 3 o Lista 4 y pulse ¬.
‘ Utilice los botones
Ïî para elegir una
opción y pulse
¬ para acceder al sub-menú.
•
Nombre: utilice los botones Ȭ para
desplazarse por la zona de visualización del
nombre (16 caracteres) y los botones
@P#
para elegir los caracteres. Una vez introducido
el nombre, pulse
u para salir.
•
Seleccionar canales de TV: utilice los botones
Ïî para elegir sus emisoras de radio
preferidas y confirme pulsando
u. Pulse È
para salir.
•
Seleccionar emisoras de radio: utilice los
botones
Ïî para seleccionar su emisora
de radio favorita y confirme con
u.Pulse È
para salir.
•
Añadir todos los servicios: Pulse u si desea
añadir todos los servicios a su lista de favoritos.
•
Borrar todos los servicios: Pulse u si desea
eliminar todos los servicios de su lista de
favoritos.
( Pulse el botón
‹ MENU
para salir del menú.
§ Usted puede seleccionar su lista de favoritos
desde el menú
opciones (vea la página siguiente).
Este menú le proporciona información acerca de
la versión del software y la instalación de nuevo
software.
& Desde el modo digital, pulse el botón
‹ MENU
para mostrar el menú de Instalación.
é Utilice el botón
Ï para seleccionar
Información y pulse ¬ dos veces.
Se mostrará la versión del software.
“ Usted puede activar el menú para aceptar o no la
actualización del software de su TV digital.
Normalmente es desde el modo standby desde
donde el producto detectará si existe alguna
actualización disponible. En caso de que exista,la
próxima vez que encienda el televisor aparecerá
una ventana en la parte inferior de la pantalla
indicando que hay nuevo software disponible.
Pulsando
u
se inicia la descarga del software. El
menú de descarga de software dará una descripción
del software junto con la fecha y la hora de la
descarga. Es posible que esto actualice
determinados menús, funciones y que añada nuevas
características, pero no cambiará la forma general
en que la TV funciona. Una vez aceptado,la descarga
tendrá lugar en la fecha y hora establecidas.
Nota
: Es preciso que la televisión esté en stanby durante
la descarga para que ésta se pueda llevar a cabo
‘ Pulse el botón
‹ MENU
para salir del menú.
Información
Descargando nuevo software
Instalación
Realice cambios en su lista de servicios favoritos
Cerrar
Favoritos
Preferencias
Información
Restricciones de acceso
Instalación
11:46
Lista 1
Lista 2
Lista 3
Lista 4
Instalación
Información sobre problemas e instalación de nuevo software
Cerrar
Favoritos
Preferencias
Información
Restricciones de acceso
Instalación
11:46
Software de sistema
Cada vez que haya nuevo software disponible, es recomendable aceptar siempre y descargar el
software. En caso de que haya nuevo software disponible, verá un mensaje cuando encienda la TV.
Page 47

9
Utilización del menú de opciones
Este menú le da acceso a su lista de favoritos,la
selección de idioma y algunas otras opciones.
& Desde el modo digital, pulse el botón blanco
OPTIONS para mostrar el menú de opciones.
é Utilice los botones
Ïî para elegir una
opción y pulse
¬ para acceder al sub-menú.
•
Favoritos: utilice los botones Ïî para elegir
su lista de favoritos y pulse
u para confirmar.
La opción “ninguno” desactiva cualquier lista de
favoritos. Para crear su propia lista de favoritos,
mire arriba.
•
Idioma de subtítulos: utilice los botones
Ïî para cambiar el idioma de forma
temporal y pulse
u para confirmar.
•
Idioma de audio: para cambiar temporalmente
el idioma del audio.
Para cambiar el idioma del audio y de los
subtítulos de forma permanente, utilice el menú
de Preferencias (p.7).
•
Modo: Usted puede elegir tener solamente
emisoras de radio, canales de TV o servicios
sin audio
o video.
Observación: únicamente para el Reino Unido,la
lista de TV contendrá tanto canales de TV como
emisoras de radio.
•
Información en pantalla: para elegir durante
cuanto tiempo se visualizará la ventana.
“ Pulse el botón blanco
OPTIONS para
abandonar el menú.
La guía de televisión es una Guía Electrónica
que le permite buscar programas digitales tal y
como lo haría en un periódico o en una revista
de TV. Usted puede navegar por la lista de
programas digitales y obtener información
detallada sobre los mismos. Usted también
puede programar la TV para que facilite la
grabación de un programa digital.
& Desde el modo digital, pulse el botón
o
para
mostrar la guía de TV:
Se mostrará una lista con todos los programas
digitales de la lista de favoritos seleccionada.
é Utilice el botón Ï para entrar en la lista
Presintonia/Servicio o el botón ¬ para acceder en
la lista
Hoy.
“ Utilice los botones îÏ para elegir un programa.
‘ Los elementos de la guía de TV se visualizarán en
la parte inferior de la pantalla. Utilice los botones
de colores rojo, verde,amarillo, azul o blanco
para activarlos:
•Grabar (botón rojo):Esta característica le
permite grabar un canal digital cuando el
televisor está en modo standby. Usted deberá
todavía programar su grabador de vídeo.
• Lista de grabaciones (botón verde):
Este menú muestra la lista con el horario de las
grabaciones. Usted puede comprobar, cambiar,
borrar o añadir una grabación utilizando el
cursor o los botones de colores tal y como se
indica en la pantalla.
•
Arriba
(botón azul): para volver directamente
al principío de la lista.
• Cerrar (botón azul): para salir de la guía de TV.
• Opciones (botón blanco tecla ∫) : con este
menú, usted puede elegir su lista de favoritos,
modo o temas. El tema indica un área de interés
de su agrado.Puede optar por mostrar
únicamente: drama,noticias, película,...
( Pulse el botón
∂
para visualizar más
informaciónes sobre el programa seleccionado.
( Pulse el botón
o
para abandonar el menú.
Guía de TV
Opciones
Seleccione la lista de favoritos deseada
Salir
Favoritos
Idioma de subtitulos
Idioma de audio
Modo
Ninguno
Lista 1
Lista 2
Lista 3
Lista 4
OptionsCloseTo pRecord listRecord
1 BBC ONE
2 BBC TWO
3 ITV Channel 3
4 Channel 4
5ITV 2
6 BBC CHOICE
See It Saw
Snooker
Tr isha
-
Gmtv2
Oakie Doke
Microsoap
Ice Skating
This morning
-
This afternoon
Bodger & Badger
1 17:15-17:25 17:24
BBC ONE See It Saw
Now/Next Today
Preset/service Now Next
Page 48

10
Función de grabación
Esta característica le permite grabar un canal
digital cuando el televisor está en modo
standby. Usted deberá en ese caso programar
su grabador de vídeo.
Importante: El grabador de vídeo debe estar conectado
a EXT2. Por favor,tenga en cuenta que no es posible
grabar un canal digital y visualizar otro canal digital
distinto al mismo tempo. De todas formas, usted sí
puede grabar un canal digital y visualizar un canal
analógico en su TV, o viceversa.
& Desde el modo digital, pulse el botón
o
para
mostrar la guía de TV.
é Utilice el botón Ï para entrar en la lista
Presintonia/Servicio o el botón ¬ para acceder
en la lista
Hoy.
“ Pulse el botón ROJO para llamar al menú de
Grabación.
‘ Utilice los botones
Ïî para elegir un
parámetro y pulse
¬ para acceder al sub-
menú. Realice sus ajustes y pulse
u o È
para salir.
• Nombre: muestra el programa selectionado.
• Servicios: puede cambiar el número del
programa que desea grabar. Pulse
u para
confirmar.
Nota
: sólo puede cambiar a un número que esté
en la lista de favoritos seleccionada.
• Introduzca su código PIN si esta
bloqueado: introduzca su código secreto
únicamente en el caso de que haya activado la
función de restricción de acceso (vea p.7).
Pulse
u para confirmar.
• Día y mes: introduzca la fecha utilizando los
botones
09o @ P #
. Pulse u para
salir.
• Hora de inicio: introduzca la hora de inicio.
• Hora de finalización: introduzca la hora de
finalización.
• Idioma de Audio: elija su idioma y pulse
u
para confirmar.
• Idioma de subtítulos: realice su elección y
confirme pulsando
u.
• Subtítulos para sordos: elija
Sí o No y
confirme con
u.
• Frecuencia: elija
Una vez, Diariamente o
Semanalmente y confirme con u.
( Pulse el botón
ROJO para memorizar los
horarios de sus grabaciones. La guía de
televisión vuelve a aparecer.
Puede pulsar el botón
VERDE para visualizar la lista
con los horarios de las grabaciones.
§ Si ha terminado de ver la televisión, debe dejarla
en estado de standby para que se active la
grabación del programa.
Importante: nunca apague la televisión haciendo
uso del botón de la corriente cuando se han
programado grabaciones. Use en su lugar el botón
de standby del mando a distancia.
è Si desea continuar viendo otros canales
digitales después de configurar un
temporizador, puede hacerlo cambiando los
canales de forma normal.
! Si usted está viendo otros canales en el momento
en el que el temporizador va a empezar, la alarma
del temporizador sonará y le mostrará la opción de
cambiar de canal o de continuar viendo el canal
actual.
ç Usted también puede ver canales analógicos
mientras graba canales digitales. Pulse el botón
v para cambiar la televisión al modo
analógico.
2 BBC 2
CerrarCancelarAlmacenar
Nombre
Servicio
Introduzca su côdigo PIN si
estã bloqueado
Día y mes
Hora de inicio
Hora de finalización
Idioma de audio
11:46
See it saw
2 BBC 2
16/02
12:15
12:30
Español
Page 49

11
Sintonización automática de programas analógicos
Ordenando los programas analógicos
Este menú le permite buscar automáticamente
todos los programas analógicos disponibles en
su zona.
& Desde el modo analógicos, pulse el botón
W MENU
para visualizar el menú principal.
é Con el cursor,elija el menú
Instalación luego
el menú
Autostore y pulse ¬.
La búsqueda comienza.Transcurridos algunos
minutos, el menú
Instalación vuelve a aparecer
automáticamente.
“ Si la emisora o la red cable difunde la señal de
ordenación automática, los programas estarán
numerados correctamente.
‘ Si no es éste el caso, los programas
encontrados estarán numerados en orden
descendente, empezando por el 99, 98, 97, etc.
Utilice el menú
Ordenar para renumerarlos.
Algunas emisoras o redes de cable difunden sus
propios parámetros de ordenación (zona, idioma,
etc.). Cuando éste sea el caso, realice su elección
utilizando los botones îÏ y confirmando
con
¬.
Para salir o interrumpir la búsqueda, pulse el botón
W MENU
. Si no se encontrara ninguna imagen,
consulte el capítulo titulado Consejos en la p.18.
( Para salir de los menús, pulse
∂.
& Pulse el botón
W MENU
para mostrar el menú
principal.
é Con el cursor,seleccione el menú Instalación y
luego el menú
Clasificación.
“ Seleccione el programa que desee desplazar
con las teclas
îÏ y pulse en ¬.
‘ Utilice luego las teclas
îÏ para elegir el
nuevo número y valide con
È.
( Vuelva a iniciar las etapas “ y ‘ tantas veces
como haya programas por renumerar .
§ Para salir de los menús, pulse en
∂.
Auto Store
• Programa 2
• TV 470 MHz
• ••••••••••••••••••••••••••••••••
Menu Generalge
• Imagen
• Sonido
• Varios
$ Instalacion
Î
ï
Instalacion
• Idioma
• Pais
• Autostore
• Sinto. Manual
$
Ordenar
Æ
• Nombre
000
001 TVE1
002 TVE2
003ÆA3
004 CAN+
005 TV5
Page 50

12
Sintoniza
ción
manual de los programas analógicos
Dando nombre a los programas analógicos
Este menú le permite almacenar los
programas analógicos uno a uno.
& Pulse
W MENU
.
é Con el cursor,elija el menú
Instalación y luego
Sinto.Manual :
“
Sistema: elija Europa (detección automática*)
o bien
Eur. Oriental (estándar BG), Eur.
Occiental
(estándar DK), UK (estándar I) o
Francia (estándar LL').
* Excepto para Francia (estándar LL'): elija la
opción FRANCE..
‘
Búsqueda: Si conoce la frecuencia del
programa, introduzca directamente el número
utilizando los botones
09. Pulse ¬ en
caso contrario. La búsqueda comienza.
Tan pronto como se encuentra un programa la
búsqueda de detiene.
Si no se encontrara ningún programa consulte el
capítulo Consejos, en la página 18.
(
Sint. Fina: si la recepción no es satisfactoria,
ajústela usando los botones
Ȭ.
§
Núm. Programa: introduzca el número
correspondiente con los botones
Ȭ o
0 hasta 9.
è
Memorizar: pulse ¬. El programa se
memoriza.
! Repita los pasos del ‘ al è para cada
programa que desee memorizar.
ç Para salir de los menús, pulse
∂.
Si lo desea, usted puede dar un nombre a los
programas analógicos y conectores externos.
& Pulse
W MENU
.
é Con el cursor,seleccione el menú
Instalación,y
luego
Nom De Prog.
“ Utilice las teclas
îÏ para elegir el
programa por nombrar o modificar.
‘ Utilice las teclas
Ȭ para desplazarse en la
zona de visualización del nombre (5
caracteres) y las teclas
îÏ para elegir los
caracteres.
( Una vez introducido el nombre, utilice la tecla
È para salir. El nombre se ha memorizado.
§ Vuelva a comenzar las etapas “ a ( para
cada programa por nombrar.
è Para salir de los menús, pulse en
∂.
Menu Generalge
• Imagen
• Sonido
• Varios
$ Instalacion
Sinto. Manual
Î
$
Sistema Europa Æ
• Búsqueda
• Núm. Programa
• Sint. Fina
• Memorizar
ï
Menu Generalge
• Imagen
• Sonido
• Varios
$ Instalacion
Î
ï
Instalacion
• Idioma
• Pais
• Autostore
• Sinto. Manual
•Ordenar
$
Nombre
Æ
000
001 TVE1
002 TVE2
003ÆA3
004 CAN+
005 TV5
Page 51

13
Ajustes de la imagen
Ajustes del sonido
& Pulse la tecla
W MENU
y luego en ¬.El
menú
Imagen aparece:
é Utilice las teclas
îÏ para seleccionar un
ajuste y las teclas
Ȭ para ajustar.
Observación: durante el ajuste de la imagen, sólo
permanece visualizada la línea seleccionada. Pulse
en îÏ para hacer reaparecer el menú.
“ Una vez efectuados los ajustes, seleccione la
opción
Memorizar y pulse en ¬ para
grabarlos. Pulse en
∂ para salir.
Descripción de los ajustes:
•
Brillo: actúa sobre la luminosidad de la imagen.
•
Color: actúa sobre la intensidad del color.
•
Contraste: actúa sobre la diferencia entre los
tonos claros y los tonos oscuros.
•
Definición: actúa sobre la nitidez de la imagen.
•
Te mp. Color: actúa sobre la calidad de los
colores:
Frío (más azul), Normal (equilibrado)
o
Caliente (más rojo).
•
Memorizar: para memorizar los ajustes de la
imagen (así como los ajustes
Contraste + y
Reduc. Ruido situados en el menú Varios).
& Pulse en
W MENU
, seleccionar Sonido (Ï) y
pulse en
¬.Aparece el menú Sonido:
é Utilice las teclas
îÏ para seleccionar un
ajuste y las teclas
Ȭ para ajustar.
“ Una vez efectuados los ajustes, seleccione la
opción
Memorizar y pulse en ¬ para
grabarlos.
‘ Para salir de los menús, pulse en
∂.
Descripción de los ajustes:
•
Agudos: actúa en las frecuencias altas del sonido.
• Graves: actúa en las frecuencias bajas.
•
Balance: para equilibrar el sonido en los
altavoces izquierdo y derecho.
•
Delta Volumen: permite compensar las
diferencias de volumen que existen entre los
diferentes programas o las tomas EXT. Este
ajuste sólo funciona para los programas 0 a
40 y las tomas EXT.
•
AVL (Automatic Volume Leveler): control
automático del volumen que permite limitar
los aumentos de sonido,en particular durante
los cambios de programas o publicidades.
• Memorizar: para memorizar los ajustes de sonido.
Ajuste de varios
& Pulse en
W MENU
, seleccionar Varios (Ï) y
pulse en
¬. Puede ajustar:
é
Despl. Imagen: las pantallas de gran tamaño son
sensibles a las variaciones del campo
magnético terrestre. Este ajuste permite
compensar su influencia ajustando la
inclinación de la imagen.
“
Contraste +: ajuste automático del contraste de
la imagen que lleva en permanencia la parte
más oscura de la imagen al negro.
‘
Reduc. Ruido: atenúa el ruido de la imagen (la
nieve), en caso de recepción difícil.
Atención: para memorizar los ajustes
Contraste+ y
Reduc. Ruido , se debe utilizar la opción
Memorizar del menú Imagen.
( Para salir de los menús, pulse en
∂.
Menu Generalge
$ Imagen
• Sonido
• Varios
• Instalacion
Menu Generalge
• Imagen
$ Sonido
• Varios
• Instalacion
Î
ï
Imagen
$
Brillo
Í
--I------ 39
Æ
• Color
• Contraste
• Realce
• Matiz
• Memorizar
Î
ï
Son
$
Agudos
Í
-----I---- 56
Æ
• Graves
• Balance
• Delta Volumen
• AVL
• Memorizar
Page 52

14
Teletexto analógico
El teletexto es un sistema de información, difundido por la mayoría de los canales de TV analógicos.
Además proporciona subtítulos para personas con dificultades auditivas.
Pulse:
Obtendrá:
Llamada al
teletexto
Elección de
una página
Permite llamar al teletexto,pasar a modo transparente y luego
salir.Aparece el índice con la lista de las secciones a las que
puede acceder. Cada sección está identificada por un número
de página de 3 cifras.
Algunos programas digitales pueden incluir
también teletexto analógico. Si este es el caso, es posible acceder a
él pulsando el botón de teletexto durante 3 segundos.
Si el teletexto no está disponible, aparecerá el número 100 y la pantalla
permanecerá en blanco (en este caso, salga del teletexto y elija otro canal).
Utilice los botones 0 hasta 9 o @ P # o Ȭ para introducir el
número de la página correspondiente.Ejemplo: página 120, introduzca
120. El número se visualiza arriba a la izquierda, el contador va
cambiando y luego se muestra la página.Repita esta operación para
ver otra página.
Si el contador continúa buscando, esto significa que la
página no se está transmitiendo. Elija otro número.
Acceso
directo a los
elementos
En la parte inferior de la pantalla se muestran zonas de
colores. Los 4 botones de colores se utilizan para acceder a
los contenidos de las páginas correspondientes.
Las zonas de colores parpadean cuando el elemento o la página no
están disponibles todavía.
Contenidos
Esto le lleva de nuevo a la página de contenidos (normalmente
la página 100).
Parada de la
alternancia de
las sub-páginas
Algunas páginas contienen sub-páginas que se suceden
automáticamente. Esta tecla permite parar o reanudar la
alternancia de las sub-páginas. La indicación
_ aparece en la
parte superior izquierda.
Teletexto de
doble altura
Información
oculta
Páginas
favoritas
Pulse este botón repetidas veces para mostrar primero la
parte superior,luego la parte inferior de la pantalla y por
último volver al tamaño normal de la página del teletexto.
Para mostrar o esconder la información oculta (soluciones de
juegos).
Para los programas de teletexto 0 a 40,puede memorizar 4
páginas preferidas que luego serán directamente accesibles con
las teclas de color (roja,verde, amarilla,azul).
& Pulse la tecla
W MENU
para pasar a modo páginas
preferidas.
é Haga aparecer la página de teletexto que desee memorizar.
“ Luego pulse durante 3 segundos la tecla de color de su
elección. Se memoriza la página.
‘Vuelva a efectuar la operación con las otros teclas de color.
( A partir de ahora, en cuanto consulte el teletexto,sus páginas
preferidas aparecerán en color en la parte inferior de la
pantalla. Para encontrar las secciones habituales, pulse en
W MENU
.
Para borrar todo,pulse en
d durante 5 segundos.
¤Ÿ
VCR
¢
DVD
MODE
SELECT
›Ó
Ø
Œ
MENU
TV
Ë
OK
+ +
”
[
BACK
Á
∏ù
†
12
564
879
SMART
-
0
.
-
SMART
ª
OPTIONS
MENU
DIGITAL
CANCEL
A/D
3
∫
P(age)
¤
¢
P
Ë
Ó
CANCEL
›
Œ
Ÿ
MENU
TV
Ë
Page 53

15
Formatos 16:9
Teletexto Digital
Es posible que las imágenes que reciba estén siendo transmitidas en formato 16:9 (pantalla ancha) o en
formato 4:3 (pantalla convencional).Las imágenes en 4:3 a veces tienen una banda negra en la parte
superior e inferior de la pantalla (formato buzón). Esta función le permite optimizar la visualización de la
imagen por pantalla.
Cambio automático
Este televisor está también equipado con cambio automático el cual elegirá el formato de pantalla
correcto,cuando las señales específicas que se necesitan estén siendo transmitidas con el programa.
Utilización de los diferentes formatos de pantalla
Pulse p para elegir entre los distintos modos:
4:3, Expand 14:9, Expand 16:9, Zoom con Subtítulos, Super Ancha y Señal 16:9.
Con los programas analógicos únicamente, puede acceder directamente a estas configuraciones con los botones Èy ¬.
Algunos canales digitales, que usted selecciona como cualquier otro canal,ofrecen servicios de
teletexto dedicados (por ejemplo BBCTEXT en el Reino Unido).Algunos canales digitales también
ofrecen información del programa que se está emitiendo (deberá aparecer un mensaje en la parte
inferior de la pantalla).
& Para utilizar el teletexto digital, siga las instrucciones de la pantalla.
é Dependiendo del servicio, se le indicará que utilice los botones del cursor y
SELECT (
u
), los botones
de colores, el botón
TEXT (
c
) y, a veces,el teclado numérico.
“ Cuando haya terminado de ver el teletexto,elija un canal diferente con los botones
@ P #
o siga las
instrucciones de la pantalla para volver a la imagen.
4:3 Modo
La imagen se reproduce en formato 4:3 y una banda negra se visualiza a
ambos lados de la imagen. Con los programas analógicos únicamente, la
imagen puede ampliarse progresivamente utilizando los botones
îÏ.
Expand 14:9
Se amplía la imagen a formato 14:9, una delgada línea negra permanecerá a
ambos lados de la imagen. Con los programas analógicos los botones
îÏ
le permiten comprimir verticalmente la imagen para ver la parte superior o
inferior de la misma (subtítulos).
Expand 16:9
Se amplía la imagen a formato 16:9. Este es el modo recomendado para
ver películas que tienen bandas negras arriba y abajo (formato buzón).
Con los programas analógicos, utilice los botones îÏ si desea
visualizar la parte superior o inferior de la imagen.
Zoom con Subtítulos
Este es el modo que se utiliza para visualizar imágenes 4:3 utilizando toda
la superficie de la pantalla dejando los subtítulos visibles. En programas
analógicos, utilice los botones
îÏ para aumentar o reducir la sección
en la parte inferior de la imagen.
Super Ancha
Este modo se emplea para visualizar imágenes 4:3 utilizando toda la superficie
de la pantalla ampliando los lados de la imagen. Con programas analógicos, los
botones îÏ le permiten mover la imagen arriba y abajo.
Señal 16:9
Este modo restablece las proporciones correctas de las imágenes
transmitidas en 16:9 utilizando visualización de pantalla completa.
Nota: Si visualiza una imagen 4:3 en este modo, esta se ampliará horizontalmente.
++
”
--
Á
12
SMART SMART
-
P
[
ù
∏
3
564
879
0
ª
(age)
Page 54

16
VCR
DVD
¢
∫
.
EXIT/OPTIONS
›Ó
¤Ÿ
Œ
Ø
MODE
CANCEL
Conexión de equipos periféricos
La televisión tiene 2 tomas externas situadas en la parte trasera del equipo (EXT1 y EXT2).
La toma EXT1 tiene entradas/salidas de audio y video y entradas RGB.
La toma EXT2 tiene entradas/salidas de audio y video y entradas S-VHS.
Grabador de vídeo (sólo)
Lleve a cabo las conexiones que se muestran al lado. Para
grabar programas digitales desde su TV, el VCR debe estar
conectado a EXT2.
Si su video no tiene una toma de euroconector, la única conexión
posible es por medio de un cable de antena. En consecuencia,
deberá sintonizar la señal de test de su grabador de vídeo y
asignarle el programa 0 (consulte memorizado manual, p.12).
Para reproducir la imagen del grabador de vídeo, pulse
0
.
En este caso no será posible grabar canales digitales.
Grabador de vídeo con decodificador
Conecte el decodificador a la segunda toma de
euroconector del grabador de vídeo.Así ya podrá grabar
transmisiones codificadas.
Grabador de vídeo
Receptor satélite, decodificador, DVD, juegos, etc.
Lleve a cabo las conexiones que se muestran al lado.
Para optimizar la calidad de la imagen, conecte el equipo
que genera las señales RGB (decodificador digital, juegos,
etc.) a EXT1, y el equipo que produce señales S-VHS
(grabadores S-VHS y Hi-8, algunos DVD ) a EXT2 y
cualquier otro equipo a EXT1 o EXT2 indistintamente.
Lleve a cabo las conexiones que se muestran al lado.
Con la tecla
n, seleccionar AV / S-VHS.
Para un aparato monofónico, conecte la señal de sonido en la
entrada de AUDIO L. Utilice la tecla e para reproducir el
sonido en los altavoces izquierdo y derecho del televisor.
Auricular
Cuando el auricular está conectado, el sonido del televisor
se corta. Las teclas
@”#permiten ajustar el
volumen.
La impedancia del auricular debe estar comprendida entre 32 y
600 ohmios.
Otros equipos
Conexiones laterales
Para seleccionar los aparatos conectados
Pulse la tecla n para seleccionar EXT1,
EXT2 / S-VHS2 (señales S-VHS
de la toma EXT2) y
AV / S-VHS
para las conexiones laterales (si están
disponibles).
La mayoría de los equipos (decodificador, vídeo) realizan ellos mismos la
conmutación.
EXT 2
VCR
EXT 1
S-VHS
Video
R Audio L
S-VHS
Video
R Audio L
**
S-VHS, Hi-8
VHS, 8 mm
Page 55

17
Selector de modo VCR / DVD
Para conectarlo a un sistema de alta fidelidad, utilice un cable
de conexión de audio y conecte las salidas “L” y “R” del equipo
de TV con las entradas “AUDIO IN” “L” y “R” de su
amplificador hi-fi.
Utilice un cable de audio digital y conecte la salida “SPDPIF”
(disponible sólo en ciertas versiones) a una entrada “DIGITAL IN”
en el amplificador (amplificador con entrada digital coaxial).
Hay disponible una interfaz común para conectar un CAM
(módulo de acceso condicional) y una tarjeta inteligente.
Por favor, consulte a su proveedor de servicios para obtener
más información sobre estos módulos.
Nota: La televisión debe estar siempre desconectada antes de
insertar cualquier módulo en la ranura de la interfaz común..
Amplificador
Interfaz común
standby
· grabar *,
∆ pausa,
Ê parar,
Æ reproducir,
¢ rebobinar,
∫ avance rápido,
desplegar un menú *
elegir (
îÏ) y configurar (Ȭ) *
u confirmar*
elegir programa,
introducir un número
* Algunas funciones de programación no están disponibles en todos
los modelos (cursores, menú, botón OK, etc.).
El mando a distancia es compatible con todos los grabadores de
vídeo de nuestra línea de productos así como con los modelos que
utilizan códigos de control del estándar R5.
El mando a distancia le permite controlar las principales funciones de su grabador de video o DVD.
& Pulse el botón
MODO para elegir el modo preciso :VCR (grabador de video) o DVD.
Un indicador verde lucirá para señalar el modo elegido.Pasados 20 segundos de inactividad, se
apaga automáticamente (modo TV).
é A continuación pulse cualquiera de los botones siguientes:
SPDIF
¤Ÿ
VCR
¢
DVD
›Ó
MODE
Ø
Œ
MENU
TV
Ë
SELECT
OK
+ +
”
[
BACK
Á
∏ù
†
12
564
879
SMART
-
0
.
OPTIONS
∫
CANCEL
DIGITAL
MENU
A/D
P(age)
-
3
SMART
ª
Page 56

18
Consejos
Recepción pobre (en modo analógico)
La proximidad con montañas o edificios altos
puede ser la responsable de imágenes fantasma,
ecos o sombras. En este caso trate de ajustar
manualmente la imagen: vea "sintonía fina" (p.12)
o cambie la orientación de la antena exterior.
¿Le permite su antena recibir emisiones en este
rango de frecuencias (banda UHF o VHF)? En el
caso de una mala recepción (imagen con niebla)
ponga en ON la opción NR en el menú
analógico
Varios (p.13).
Mala imagen (en modo digital)
Si la imagen se congela mucho,o existe efecto
bloque, hay un problema de recepción pobre. Por
favor, compruébelo con el menú intensidad de
señal (vea p.6). Dependiendo de la intensidad de
las señales digitales terrestres en su zona,las
antenas estándar empleadas para transmisiones
digitales proporcionarán,en la mayoría de los
casos, una recepción satisfactoria de señales
digitales. Si no fuera este el caso,un profesional
deberá instalar una antena de haz estrecho de
buena calidad fuera del inmueble para capturar la
mayor intensidad de señal digital posible.
Sin imagen
¿Ha conectado la toma de la antena
correctamente? ¿Ha elegido el sistema adecuado?
(p.12). En muchas ocasiones,cables euroconectores
o tomas de antena mal conectados son la causa de
problemas en la imagen o el sonido (algunas veces,
los conectores pueden medio soltarse si se mueve
o gira el equipo). Compruebe todas las conexiones.
Sin sonido (en modo analógico)
Si en determinados canales usted recibe imagen pero
no sonido,significa que no tiene asignado el sistema de
TV correcto.Modifique la configuración
Sistema (p. 12).
El mando a distancia ya no funciona
Compruebe que el selector de modo en el lado
del mando a distancia está asignado a TV.
¿La televisión no reacciona al mando a distancia?
¿El indicador en el equipo ya no parpadea cuando
usted usa el mando a distancia? Cambie las pilas.
Standby
Si el equipo no recibe señal durante 10 minutos,
pasará automáticamente al estado standby. Para
ahorrar energía, su equipo está compuesto por
componentes que tienen un consumo de energía
muy bajo en estado de standby.
Limpieza del equipo
Utilice únicamente un trapo liso,suave y limpio para
limpiar la pantalla y la carcasa de su equipo.No
utilice productos con base de alcohol o disolventes.
¿No ha resuelto el problema?
Si su TV se avería,no trate de repararla usted mismo:
contacte con su servicio de atención post venta.
Ta b la de Frecuencias Centrales (en KHz)
Frecuencia central Frecuencia de
nominal digital Canal KHz
21 . . . . . . . . . . . . . . . . . 474 000
22 . . . . . . . . . . . . . . . . . 482 000
23 . . . . . . . . . . . . . . . . . 490 000
24 . . . . . . . . . . . . . . . . . 498 000
25 . . . . . . . . . . . . . . . . . 506 000
26 . . . . . . . . . . . . . . . . . 514 000
27 . . . . . . . . . . . . . . . . . 522 000
28 . . . . . . . . . . . . . . . . . 530 000
29 . . . . . . . . . . . . . . . . . 538 000
30 . . . . . . . . . . . . . . . . . 546 000
31 . . . . . . . . . . . . . . . . . 554 000
32 . . . . . . . . . . . . . . . . . 562 000
33 . . . . . . . . . . . . . . . . . 570 000
34 . . . . . . . . . . . . . . . . . 578 000
35 . . . . . . . . . . . . . . . . . 586 000
36 . . . . . . . . . . . . . . . . . 594 000
37 . . . . . . . . . . . . . . . . . 602 000
38 . . . . . . . . . . . . . . . . . 610 000
39 . . . . . . . . . . . . . . . . . 618 000
40 . . . . . . . . . . . . . . . . . 626 000
41 . . . . . . . . . . . . . . . . . 634 000
42 . . . . . . . . . . . . . . . . . 642 000
43 . . . . . . . . . . . . . . . . . 650 000
44 . . . . . . . . . . . . . . . . . 658 000
45 . . . . . . . . . . . . . . . . . 666 000
Frecuencia central Frecuencia de
nominal digital Canal KHz
46 . . . . . . . . . . . . . . . . . 674 000
47 . . . . . . . . . . . . . . . . . 682 000
48 . . . . . . . . . . . . . . . . . 690 000
49 . . . . . . . . . . . . . . . . . 698 000
50 . . . . . . . . . . . . . . . . . 706 000
51 . . . . . . . . . . . . . . . . . 714 000
52 . . . . . . . . . . . . . . . . . 722 000
53 . . . . . . . . . . . . . . . . . 730 000
54 . . . . . . . . . . . . . . . . . 738 000
55 . . . . . . . . . . . . . . . . . 746 000
56 . . . . . . . . . . . . . . . . . 754 000
57 . . . . . . . . . . . . . . . . . 762 000
58 . . . . . . . . . . . . . . . . . 770 000
59 . . . . . . . . . . . . . . . . . 778 000
60 . . . . . . . . . . . . . . . . . 786 000
61 . . . . . . . . . . . . . . . . . 794 000
62 . . . . . . . . . . . . . . . . . 802 000
63 . . . . . . . . . . . . . . . . . 810 000
64 . . . . . . . . . . . . . . . . . 818 000
65 . . . . . . . . . . . . . . . . . 826 000
66 . . . . . . . . . . . . . . . . . 834 000
67 . . . . . . . . . . . . . . . . . 842 000
68 . . . . . . . . . . . . . . . . . 850 000
69 . . . . . . . . . . . . . . . . . 858 000
Page 57

MENU
ANALOGICI
1
Introduzione
Sommario
La ringraziamo per aver acquistato questo televisore. Il presente manualetto è stato
concepito per aiutarla ad installare e utilizzare il suo televisore. Le consigliamo vivamente di
leggerlo fino in fondo.Ci auguriamo che la nostra tecnologia la soddisfi pienamente.
Dichiarazione di conformità
Si dichiara che l’apparecchio televisore a colori (vedere indicazioni sull’etichetta
applicata nell’ultima pagina di copertina) risponde alle prescrizioni dell’art.2 comma
1 del D.M. 28 Agosto 1995 n. 548.
Fatto a Dreux, il Febbraio 2004 P. E.G.P. 1, rue de Réveillon
28104 Dreux France
Installazione del televisore . . . . . . . . . . . . . . . . . . . . . . . . . . . . . . . . . . . . . . . . . . .2
I tasti del televisore . . . . . . . . . . . . . . . . . . . . . . . . . . . . . . . . . . . . . . . . . . . . . . . . .2
Tasti del telecomando . . . . . . . . . . . . . . . . . . . . . . . . . . . . . . . . . . . . . . . . . . . . . . .3
Canali digitali o analogici ? . . . . . . . . . . . . . . . . . . . . . . . . . . . . . . . . . . . . . . . . . . . .3
Prima accensione . . . . . . . . . . . . . . . . . . . . . . . . . . . . . . . . . . . . . . . . . . . . . . . . . .4
Informazioni sul banner . . . . . . . . . . . . . . . . . . . . . . . . . . . . . . . . . . . . . . . . . . . . .4
Riordino dei programmi . . . . . . . . . . . . . . . . . . . . . . . . . . . . . . . . . . . . . . . . . . . . .5
Visualizzazione o Ascolto di nuovi programmi . . . . . . . . . . . . . . . . . . . . . . . . . . . .5
Aggiungi nuovi programmi . . . . . . . . . . . . . . . . . . . . . . . . . . . . . . . . . . . . . . . . . . .5
Reinstalla tutti programmi . . . . . . . . . . . . . . . . . . . . . . . . . . . . . . . . . . . . . . . . . . .6
Prova ricezione . . . . . . . . . . . . . . . . . . . . . . . . . . . . . . . . . . . . . . . . . . . . . . . . . . . .6
Preferenze lingua e località . . . . . . . . . . . . . . . . . . . . . . . . . . . . . . . . . . . . . . . . . . .7
Protezione . . . . . . . . . . . . . . . . . . . . . . . . . . . . . . . . . . . . . . . . . . . . . . . . . . . . . . . .7
Elenco programmi preferiti . . . . . . . . . . . . . . . . . . . . . . . . . . . . . . . . . . . . . . . . . .8
Informazioni . . . . . . . . . . . . . . . . . . . . . . . . . . . . . . . . . . . . . . . . . . . . . . . . . . . . . .8
Scaricamento di nuovo software . . . . . . . . . . . . . . . . . . . . . . . . . . . . . . . . . . . . . .8
Uso del menu Opzioni . . . . . . . . . . . . . . . . . . . . . . . . . . . . . . . . . . . . . . . . . . . . . .9
Guida TV . . . . . . . . . . . . . . . . . . . . . . . . . . . . . . . . . . . . . . . . . . . . . . . . . . . . . . . .9
Funzione Registrazione . . . . . . . . . . . . . . . . . . . . . . . . . . . . . . . . . . . . . . . . . . . . .10
Sintonizzazione automatica dei programmi analogici . . . . . . . . . . . . . . . . . . . . . .11
Ordinamento dei programmi analogici . . . . . . . . . . . . . . . . . . . . . . . . . . . . . . . .11
Sintonizzazione manuale dei programmi analogici . . . . . . . . . . . . . . . . . . . . . . . .12
Assegnazione del nome ai programmi analogici . . . . . . . . . . . . . . . . . . . . . . . . . .12
Regolazioni dell’immagine . . . . . . . . . . . . . . . . . . . . . . . . . . . . . . . . . . . . . . . . . . .13
Regolazioni dell’audio . . . . . . . . . . . . . . . . . . . . . . . . . . . . . . . . . . . . . . . . . . . . . .13
Regolazione delle speciali . . . . . . . . . . . . . . . . . . . . . . . . . . . . . . . . . . . . . . . . . . .13
Televideo analogico . . . . . . . . . . . . . . . . . . . . . . . . . . . . . . . . . . . . . . . . . . . . . . . .14
Televideo digitale . . . . . . . . . . . . . . . . . . . . . . . . . . . . . . . . . . . . . . . . . . . . . . . . . .15
Formati 16:9 . . . . . . . . . . . . . . . . . . . . . . . . . . . . . . . . . . . . . . . . . . . . . . . . . . . . .15
Collegamento ad apparecchi periferici . . . . . . . . . . . . . . . . . . . . . . . . . . . . . . . . .16
Selezione degli apparecchi collegati . . . . . . . . . . . . . . . . . . . . . . . . . . . . . . . . . . . .16
Tasti VCR/DVD . . . . . . . . . . . . . . . . . . . . . . . . . . . . . . . . . . . . . . . . . . . . . . . . . . .17
Consigli . . . . . . . . . . . . . . . . . . . . . . . . . . . . . . . . . . . . . . . . . . . . . . . . . . . . . . . . .18
Tabella delle frequenze centrali (in KHz) . . . . . . . . . . . . . . . . . . . . . . . . . . . . . . .18
MENU
DIGITALI
°
Direttive per il riciclaggio
Il vostro televisore si compone di materiali riutilizzabili o riciclabili. Per ridurre
al minimo la dispersione di rifiuti nell’ambiente, alcune imprese specializzate
ritirano gli apparecchi usati per smontarli e recuperare i pezzi riutilizzabili
(informarsi presso il rivenditore).
I menu digitali di
questo prodotto
utilizzano la
tecnologia Java
™
di
Sun Microsystems
Inc. più aggiornata
Italiano
Page 58

Il televisore dispone di 4 o 5 tasti, situati sulla
parte frontale o in alto, a seconda del modello.
I tasti VOLUME - + (-
” +) servono a
regolare il suono. I tasti PROGRAM - + (- P +)
servono a cercare i programmi desiderati.
Per accedere ai
menu, premere
contemporaneamente i tasti
” -
e ” + (o
il tasto
MENU).I tasti PROGRAM - + possono
venir usati anche per selezionare una
regolazione, e i tasti
” - + per eseguire tale
regolazione. Per uscire dai menu, premere
contemporaneamente i tasti
” - e ” +
(o il tasto
MENU).
PROGRAMVOLUME
--
++
2
&
Posizionamento del televisore
Mettere il televisore su una superficie solida e
stabile, lasciando uno spazio di almeno 5 cm
attorno all’apparecchio.Per evitare situazioni
pericolose, non posare nulla sul televisore, e
soprattutto nè oggetti coprenti (centrini),o
contenenti sostanze liquide (vaso) o irradianti
calore (lampada).Verificare inoltre che il televisore
non venga esposto ad eventuali schizzi d’acqua.
é
Collegamenti
• Introdurre il connettore dell’antenna nella
presa : situata dietro al televisore.
• Inserire la spina principale nella presa murale
(220-240 V / 50 Hz).
“
Telecomando
Inserire le due pile di tipo R6 (fornite) facendo
attenzione alla polarità.Verificare che il
selettore di modo sia sulla posizione TV.
Per la protezione dell’ambiente, le pile fornite con
l’apparecchio non contengono mè mercurio nè
nichel-cadmio. Si prega di non gettare le pile usate
ma di utilizzare i mezzi di riciclaggio messi a vostra
disposizione (consultate il vostro rivenditore). In caso
di sostituzione, utilizzare delle pile dello stesso tipo.
‘
Accensione
Per accendere il televisore, premere
l’interruttore di accensione e spegnimento.Una
spia rossa si accende e lo schermo si illumina.
Vedere direttamente il capitolo Installazione
rapida, pagina 4.
Se il televisore rimane in stato di attesa,
premere il tasto P
# del telecomando.
Quando usate il telecomando, la spia lampeggia.
5 cm
5 cm
5 cm
Installazione del televisore
I tasti del televisore
Page 59

3
Tasti del telecomando
Informazioni sul video
In modalità digitale, premere una volta per
visualizzare il banner delle informazioni,una
2a volta per avere ulteriori informazioni sul
programma e un’altra volta ancora per
cancellarle (p.4). In modalità analogica,
visualizza / cancella le informazioni sul
programma (numero, nome, modalità
audio).Tenere premuto per 5 secondi per
visualizzare permanentemente il numero di
programma analogico a video.
Guida TV (vedere p. 9).
Selezionare fonti EST (p.16).
Selettore modalità
Per attivare il telecomando in
modalità VCR o DVD (p.17).
Menu TV
Per visualizzare o uscire dai menu analogici
Selezione
In modalità digitale visualizza / cancella
l’elenco dei programmi. Servirsi dei
tasti îÏ per selezionare un
programma e u per visualizzarlo.
Volume
Per regolare il livello di volume
Formati 16:9 (p.15)
Mute
Per abilitare o disabilitare l’audio.
Impostazioni immagini e audio
Accede ad una serie di impostazioni
immagini e audio.
La posizione Personal corrisponde alle
impostazioni memorizzate nei menu.
Standby
Per commutare la TV in modalità
standby. Per riaccendere il TV
premere b,P @#o 09.
Menu Opzioni (vedere p.9).
Funzioni Televideo (p. 14)
e tasti VCR/DVD (p.17).
Menu digitale
Per visualizzare o uscire dai menu
digitali (con la TV in modalità digitale).
Modalità analogica o digitale
Per commutare il televisore dalla
modalità analogica a quella digitale.
Cursore
Questi 4 tasti vengono utilizzati per
spostarsi nei menu o per accedere
direttamente ai formati video 16:9 (p 15).
Programma precedente
Per accedere al programma
visualizzato in precedenza.
Tasti numerici
Per accesso diretto ai programmi.Per
un numero di programma a 2 (3) cifre,
la 2a(3a) cifra deve essere digitata
prima che scompaia il trattino. Il
numero,il nome (e la modalità audio,
in modalità analogica) vengono
visualizzati per alcuni secondi.
Modalità audio
Per commutare da Stereo a Mono e
per scegliere tra diversi linguaggi
(Dual I, Dual II, ....).
Se la modalità audio è impostata su Mono,
l’indicazione è visualizzata in rosso.
Audio surround
Per attivare / disattivare l’effetto
Virtual Dolby Surround *. In stereo,
è possibile avere audio di qualità
Dolby Surround Pro Logic.In
mono, viene simulato un effetto
stereo spaziale.
* Prodotto su licenza di Dolby
Laboratories. ”Dolby” ”Pro Logic” e il simbolo
della doppia D sono marchi di fabbrica di Dolby
Laboratories.
Selezione programmi
Per accedere al programma
successivo o precedente (o alle
pagine nei menu digitali).
Modalità Sottotitoli
Per attivare/disattivare la modalità Sottotitoli
Il televisore è dotato di 2 sintonizzatori per la ricezione dei canali TV, uno per i canali digitali,l’altro
per quelli analogici. Per passare dalla modalità analogica a quella digitale utilizzare il tasto
v.
Per selezionare i canali utilizzare i tasti
P @#or 09.
Canali digitali o analogici ?
.
¤Ÿ
VCR
DVD
MODE
·
MENU
TV
SELECT
OK
Ø
∆
¢
›Ó
Œ
Ê Æ
Ë
OPTIONS
∫
CANCEL
MENU
DIGITAL
A/D
++
†
-
SMART
ª
P(age)
3
”
BACK
Á
[
∏ù
12
564
879
SMART
-
0
Page 60

4
Alla prima accensione del TV, sul video appare
un messaggio di
congratulazioni, la lingua del
quale cambia ogni 5 secondi.
Se il menu non appare, premere e tenere premuti i
tasti
”- e ”+ sul TV per 5 secondi per
visualizzare il menu.
&
Premere il tasto u sul telecomando, nel
momento in cui è visualizzata la lingua
preferita.Viene visualizzato il menu Installazione:
é
Sulla base della schermata d’apertura sono ora
preselezionati
Lingua, Paese e Fuso orario
corrispondenti.Tuttavia, è ancora possibile modificare
le preferenze prima di avviare una ricerca.
“ Con i tasti cursore selezionare Lingua, Paese o
Fuso orario e verificare che la regolazione
corrisponda alle preferenze selezionate.Se
necessario, utilizzare i tasti cursore per
effettuare le regolazioni e premere
u per
uscire.
Attenzione
: se si seleziona un paese sbagliato la
numerazione dei canali non corrisponde allo
standard nazionale.
‘ Selezionare
Scansione programmi dal menu e
premere
u per avviare l’installazione.Viene
visualizzato il menu
Scansione programmi.
Tutti i programmi digitali e analogici vengono
cercati e memorizzati automaticamente.Al
termine della ricerca il menu indica il numero di
programmi digitali e analogici trovati.
( Premere due volte il tasto
u per avviare la
programmazione.
Sul televisore viene visualizzato il programma in
corso.A questo punto l’installazione è
completa.
Quando si seleziona un programma digitale
per alcuni secondi appare un banner di
informazioni sulla parte alta dello schermo.
Per visualizzare il banner è anche possibile
utilizzare il tasto
∂ del telecomando. Una
seconda pressione consente di visualizzare
ulteriori informazioni sul programma (se
disponibili). Il banner contiene informazioni sul
numero preimpostato, il nome del canale, la
durata del programma, l’ora di trasmissione, il
titolo del programma e il tempo che manca
alla fine del programma in corso.
Prima accensione
Informazioni sul banner
Descrizione del banner:
Congratulazioni per avere scelto questo televisore Philips
Premere OK per cominciare a usuare il vostro televisore digitale
Installazione
Imposta opzioni e avvia una scansione programmi
Lingua
Paese
Fuso orario
Scansione programmi
11:46
Italiano
Italia
(GMT+1:00) Paris, Rome
Premere OK per iniziare
2 11:06 - 11:09
BBC2 Snooker
11:46
Minuti rimanenti : 14
u
ù
i
ß
numero
programmazione
simboli
orologio
orario inizio e
fine programma
tempo
programmazione
residuo
titolo
programma
nome canale
Descrizione dei simboli:
i sono disponibili ulteriori informazioni sul
programma: premere il tasto
∂ per
visualizzarle o cancellarle.
ß sono disponibili i sottotitoli: per visualizzarli
premere il tasto ß oppure il tasto OPZIONI
per accedere al menu Opzioni e selezionare
sottotitoli
ù sono disponibili altri linguaggi audio,selezionabili
nel menu
opzioni.
u viene visualizzato l’elenco Preferiti selezionato
nel colore dell’elenco attivato.
Page 61

5
Riordino dei programmi
Questo menu consente di modificare l’ordine
del canali digitali e stazioni radio memorizzati.
& Dalla modalità digitale premere il tasto
‹ MENU
per visualizzare il menu di
installazione.
é Con il tasto
Ï selezionare Installazione e
premere due volte
¬ per selezionare il
menu
Elenchi programmi.
“ Con i tasti
îÏ selezionare Riordino dei
programmi
e premere ¬.
‘ Con i tasti
îÏ selezionare il canale da
spostare.
( Premere
u per attivare.
Per disinstallare il canale selezionato premere il
tasto rosso.
§ Selezionare (
îÏ) il numero del nuovo
canale da memorizzare al posto dell'altro.
è Premere
u per confermare. Il canale è stato
sostituito.
! Ripetere le operazioni da ‘ a è finché tutti i
canali non sono nell’ordine definito.
ç Premere il tasto
‹ MENU
per uscire dal
menu.
Questo menu consente di verificare la
disponibilità di nuovi canali TV o nuove
stazioni radio mandati in onda dall’emittente
successivamente all’installazione iniziale.
& Dalla modalità digitale premere il tasto
‹
MENU
per visualizzare il menu di installazione.
é Con il tasto Ï selezionare Installazione e
premere due volte
¬ per selezionare il
menu Elenchi programmi.
“ Con i tasti
îÏ selezionare Visualizza nuovi
canali TV
oppure Ascolta le nuove stazioni
radio
.
‘ Se sono disponibili nuovi programmi, premere
¬ per accedere all’elenco ed utilizzare i tasti
îÏ per spostarsi all’interno di esso.
( Premere il tasto
‹ MENU
per uscire dal
menu.
Visualizzazione o Ascolto di nuovi programmi
Installazione
Installazione
Gestione elenchi programmi
Chiudi
Elenchi programmi
Configurazione del programma
Prova ricezione
11:46
Riordino dei programmi
Visualizza nuovi canali TV
Ascolta le nuove stazioni radio
Aggiungi nuovi programmi
Questo menu consente di cercare nuovi canali TV
o stazioni radio mandati in onda dall’emittente
successivamente all’installazione iniziale.
& Dalla modalità digitale premere il tasto
‹
MENU
per visualizzare il menu di installazione.
é Con il tasto
Ï selezionare Installazione e
premere due volte ¬.
“ Selezionare
Configurazione del programma
(Ï) e premere ¬.
‘ Premere
¬ per selezionare Aggiungi nuovi
programmi
e u per attivare l’installazione.
La ricerca ha inizio.Solo i nuovi canali
verranno memorizzati e aggiunti al menu
elenco programmi.A video appaiono la
percentuale di installazione completata e il
numero di canali trovati.
( Al termine della ricerca, selezionare
Memorizza e premere
u per accettare i
nuovi programmi.
§ Premere il tasto
‹ MENU
per uscire dal
menu.
Installazione
Installazione
Installazione e gestione dei programmi
Chiudi
Elenchi programmi
Configurazione del programma
Prova ricezione
11:46
Aggiungi nuovi programmi
Reinstalla tutti programmi
Page 62

6
Questo menu consente di reinstallare tutti i
canali TV digitali e le stazioni radio.
& Dalla modalità digitale premere il tasto
‹
MENU
per visualizzare il menu di installazione.
é Con il tasto
Ï selezionare installazione e
premere
¬.
“ Selezionare Configurazione del programma
(Ï) e premere ¬.
‘ Selezionare Reinstalla tutti programmi (Ï) e
premere
¬.
( Premere
u per avviare l’installazione.
Viene effettuata una ricerca per tutti i
programmi digitali che erano stati memorizzati
automaticamente.Al termine della ricerca, il
menu indicherà il numero di programmi digitali
trovati.
§ Al termine della ricerca premere
u per
memorizzare i servizi.
è Premere il tasto
‹ MENU
per uscire dal menu.
Questo menu consente di verificare la qualità
del segnale ricevuto attraverso l'antenna.
& Dalla modalità digitale premere il tasto
‹
MENU
per visualizzare il menu di installazione.
é Con il tasto
Ï selezionare installazione e
premere ¬ per visualizzare il menu di
installazione.
“ Con
Ï selezionare Prova ricezione e
premere
¬.Appariranno le indicazioni
relative alla frequenza effettiva del programma,
nome della rete, qualità e chiarezza del
segnale.
‘ Inserire la frequenza del canale digitale da
provare.
Sul Tv magazine è possibile trovare l’elenco dei
numeri di canali digitali. Cercare la frequenza nella
tabella di pagina 18.
( Se la qualità e la chiarezza del segnale sono
scarse, appare un messaggio nella parte
inferiore del menu che chiede di inserire la
frequenza compresa tra i limiti inferiore e
superiore. Se la ricezione continua ad essere
scarsa, si può provare a migliorare, rinnovare,
regolare o cambiare l’antenna. Per ottenere
buoni risultati è tuttavia consigliabile rivolgersi
ad un antennista.
Reinstalla tutti programmi
Prova ricezione
Installazione
Installazione
Test qualità segnale
Chiudi
Elenchi programmi
Configurazione del programma
Prova ricezione
11:46
Frequenza
Nome rete
Qualità segnale
Chiarezza segnale
Installazione
Installazione
Installazione e gestione dei programmi
Chiudi
Elenchi programmi
Configurazione del programma
Prova ricezione
11:46
Aggiungi nuovi programmi
Reinstalla tutti programmi
Page 63

7
Preferenze lingua e località
Questo menu consente di selezionare la lingua
preferita per audio,sottotitoli, televideo e
menu e di apportare modifiche alla località
(paese e fuso orario).
& Dalla modalità digitale premere il tasto
‹
MENU
per visualizzare il menu di installazione.
é Con il tasto
Ï selezionare preferenze e
premere ¬.
“ Selezionare
Lingua, Località o Digital Audio
(Ï) e premere ¬.
‘ Con i tasti îÏ selezionare un’opzione e
premere
¬ per inserirla nel sottomenu.
Effettuare le opportune regolazioni e premere
u o È per uscire.
Impostazioni lingua predefinite:
•
Audio: per selezionare la lingua del sonoro.
•
Sottotitoli/Televideo: per selezionare la lingua
di sottotitoli/televideo.
•
Modalità Sottotitoli: off, on o auto (sottotitoli
visualizzati solo in caso di trasmissione audio
originale).
•
Sottotitoli per non udenti: per attivare o
disattivare i sottotitoli per non udenti (se
trasmessi dall'emittente).
•
Sistema: per selezionare la lingua dei menu.
Impostazioni località:
•
Paese: per selezionare il paese in cui viene
utilizzato il televisore.
•
Fuso orario: per selezionare il fuso orario di
residenza.
Impostazioni Digital Audio:
Per selezionare AC3 (se l’amplificatore
supporta il formato Dolby Digital) o
PCM
(se non lo supporta).
( Premere il tasto o per uscire dal menu.
Questo menu consente di impostare
limitazioni di accesso ai canali digitali.
& Dalla modalità digitale premere il tasto
‹
MENU
per visualizzare il menu di installazione.
é Con il tasto
Ï selezionare Access restriction
e premere ¬.
“ Premere il tasto
¬ per accedere al menu
Imposta protezione codice pin.
‘ Con i tasti
Ȭ impostare acceso e
premere u per uscire. È possibile accedere
anche alle altre regolazioni:
A
vvertenza: se si decide di utilizzare un qualsiasi
tipo di protezione, sarà necessario inserire il codice
pin quando si programma una registrazione.
•
Limite di età selezionare il limite da utilizzare
per bloccare il canale.
L'impostazione funziona solo se l'emittente
trasmette i dati corrispondenti col programma.
• Canali TV:selezionare il canale TV da
bloccare e premere
u.
• Stazioni radio:selezionare la stazione radio
da bloccare e premere
u.
• Modifica codice pin:premere
¬ per
accedere al menu. Seguire le istruzioni a
video per modificare il codice d’accesso.
Il codice pin predefinito è 1234. Nel caso in cui si
sia dimenticato il codice personale è possibile
resettare il codice pin predefinito (1234) inserendo
il codice universale 0711.
( Premere il tasto
‹ MENU
per uscire dal menu.
Il TV è dotato di slot Common Interface (CI)
(vedere p. 17). Un modulo CI può abilitare ulteriori
programmi, ad esempio la Pay TV. Quando è
installato un modulo CI il menu Protezione
indicherà la. Protezione CI. Il modulo CI è
responsabile dei messaggi e del testo a video. In
caso di guasti o di comportamento anomalo
rivolgersi all’assistenza tecnica.
Protezione
Installazione
Preferenze
Selezionare la lingua desiderata
Chiudi
Lingua
Località
Digital Audio
11:46
Audio
Sottotitoli/Televideo
Modalità Sottotitoli
Sottotitoli per non udenti
Sistema
Installazione
Protezione
Commuta protezione codice pin “si” o “no”
Chiudi
Imposta protezione codice pin
Limite di età
Canali TV
Stazioni radio
Modifica codice pin
11:46
Acceso Spento
Page 64

8
Elenco programmi preferiti
Questo menu consente di creare un elenco di
canali TV e stazioni radio preferiti.Ad esempio,
ogni componente della famiglia può creare un
elenco personalizzato.
& Dalla modalità digitale premere il tasto
‹
MENU
per visualizzare il menu di installazione.
é Premere
¬ per accedere al menu dei
programmi preferiti, con il quale è possibile
creare 4 diversi elenchi.
“ Utilizzare i tasti
îÏ per selezionare
l'elenco dei programmi preferiti:
Elenco 1,
Elenco 2, Elenco 3 o Elenco 4 e premere ¬.
‘ Con i tasti
îÏ selezionare un’opzione e
premere
¬ per inserirla nel sottomenu.
•
Nome: utilizzare i tasti Ȭ per spostarsi
attorno all’area di visualizzazione del nome
(16 caratteri) e i tasti
@P# per selezionare
i caratteri. Una volta inserito il nome
premere
u per uscire.
• Seleziona canali TV: utilizzare i tasti îÏ
per selezionare i canali TV preferiti e
confermare con
u.Premere È per uscire.
• Seleziona stazioni radio:
utilizzare i tasti îÏ
per selezionare le stazioni radio preferite e
confermare con u.Premere È per uscire.
• Aggiungi tutti i programmi:
premere
u per
aggiungere tutti i programmi all’elenco dei
preferiti.
• Cancella tutti i programmi:premere u per
cancellare tutti i programmi dall’elenco dei
preferiti.
( Premere il tasto
‹ MENU
per uscire dal menu.
§ Per selezionare l’elenco dei programmi
preferiti utilizzare il menu opzioni (vedere
pagina successiva).
Questo menu fornisce informazioni sulla
versione del software e l’installazione di nuovo
software.
& Dalla modalità digitale premere il tasto
‹
MENU
per visualizzare il menu di installazione.
é Con il tasto Ï selezionare informazioni e
premere
¬ due volte per visualizzare la
versione di software.
“ È possibile attivare il menu per accettare
automaticamente gli aggiornamenti software
del TV digitale. Normalmente il prodotto
rileva se vi sono aggiornamenti disponibili
quando è in modalità standby.Alla successiva
accensione del televisore apparirà un banner
nella parte bassa dello schermo con
l’indicazione del nuovo software disponibile.
Selezionando
u si attiva il download del
software. Il menu di download del software
fornirà una descrizione del software oltre che
data e ora del download. In questo modo è
possibile aggiornare alcuni menu e funzioni o
aggiungerne di nuove, ma di massima il
funzionamento del TV non sarà modificato.
Una volta accettato,il download avrà luogo
alla data e ora indicate.
Nota
: perché il download possa essere eseguito il
TV deve essere in standby.
‘ Premere il tasto
‹ MENU
per uscire dal menu.
Informazioni
Scaricamento di nuovo software
Installazione
Apportare modifiche all’elenco dei programmi preferiti
Chiudi
Programmi preferiti
Preferenze
Informazioni
Protezione
Installazione
11:46
Elenco 1
Elenco 2
Elenco 3
Elenco 4
Installazione
Fornisce le informazioni sui rapporti dei problemi e l’installazione del nuovo
Chiudi
Programmi preferiti
Preferenze
Informazioni
Protezione
Installazione
11:46
Software di sistema
Ogniqualvolta ne è disponibile uno nuovo, è sempre consigliabile accettare e scaricare il software.
All’accensione del TV appare un messaggio che indica la presenza di nuovo software disponibile.
Page 65

9
Uso del menu Opzioni
Questo menu consente di accedere
direttamente a: elenco preferiti, selezione lingua
ed altre opzioni.
& Dalla modalità digitale premere il tasto bianco
OPZIONI per visualizzare il menu corrispondente.
é Con i tasti
îÏ selezionare un’opzione e
premere
¬ per inserirla nel sottomenu.
•
Preferiti: con i tasti îÏ selezionare
l’elenco dei preferiti e confermare con
u.
L’opzione “nessuno” disabilita qualsiasi elenco.
Per creare un elenco di preferiti vedere pagina 8.
•
Lingua sottotitoli: utilizzare i tasti îÏ per
cambiare temporaneamente la lingua e
confermare con
u.
•
Lingua audio: per selezionare la lingua del
sonoro.
Per cambiare permanentemente la lingua del
sonoro e dei sottotitoli utilizzare il menu Preferenze
(p. 7).
•
Modalità: È possibile scegliere di avere solo
stazioni
radio, canali TV o servizi senza audio o
video
.
Nota
: solo per il RU, l’elenco TV conterrà sia
stazioni radio sia canali TV.
•
Durata banner: per selezionare il tempo in cui
il banner è visibile.
“ Premere il tasto bianco
OPZIONI per uscire dal
menu.
La guida TV è una Electronic Service Guide che
consente di guardare programmi digitali come
se fossero giornali o TV magazine. È possibile
spostarsi nell'elenco dei programmi digitali ed
ottenere informazioni dettagliate su di essi. È
anche possibile programmare il TV in modo da
registrare un canale digitale.
& Dalla modalità digitale premere il tasto
o
per
visualizzare la guida TV:
Verranno visualizzati tutti i programmi digitali
dall’elenco preferiti selezionato al momento.
é Utilizzare il tasto Ï per accedere all’elenco
Preselezione/Programma o premere ¬ per
accedere all’elenco
Oggi.
“ Utilizzare i tasti îÏ per selezionare un
programma.
‘ Nella parte bassa dello schermo vengono
visualizzate le funzioni della guida TV. Utilizzare
i tasti colorati di rosso,verde, giallo, blu o
bianco per attivare:
•
Registra (tasto rosso): la funzione consente di
registrare un canale digitale anche se il TV è in
modalità standby. Dev'essere ancora
programmato il videoregistratore.
•
Elenco (tasto verde): il menu presenta l’elenco
delle registrazioni programmate. Con il cursore
o i tasti colorati è possibile verificare,
modificare, cancellare o aggiungere una nuova
programmazione, come indicato a video.
•
Alto (tasto giallo): per andare direttamente
all’inizio dell’elenco.
•
Chiudi (tasto blu): per uscire dalla guida TV.
• Opzioni (tasto bianco ∫): da questo menu è
possibile selezionare elenco preferiti,modalità
o temi. I temi sono aree d'interesse;ad
esempio è possibile decidere di visualizzare
solo: commedie, notiziari, film, ...
( Premere il tasto
∂ per visualizzare ulteriori
informazioni sul programma selezionato (se
disponibili).
§ Premere il tasto
o
per uscire dal menu.
Guida TV
Opzioni
Selezionare elenco preferiti attivo
Esci
Preferiti
Lingua sottotitoli
Lingua audio
Modalità
Nessuno
Elenco 1
Elenco 2
Elenco 3
Elenco 4
OpzioniChiudiAltoElenco
Registra
1 BBC ONE
2 BBC TWO
3 ITV Channel 3
4 Channel 4
5ITV 2
6 BBC CHOICE
See It Saw
Snooker
Tr isha
-
Gmtv2
Oakie Doke
Microsoap
Ice Skating
This morning
-
This afternoon
Bodger & Badger
1 17:15-17:25 17:24
BBC ONE See It Saw
Ora/Prossimo
Oggi
Preselezione/Programa Adesso A seguire
Page 66

10
Funzione Registrazione
La funzione consente di registrare un canale
digitale anche se il TV è in modalità standby.
Dev'essere ancora programmato il
videoregistratore.
Impor
tante: Il videoregistratore dev'essere
collegato a EXT2. Si tenga presente che NON
è possibile registrare un canale digitale e
guardarne un altro contemporaneamente, mentre
è possibile registrare un canale digitale e
guardarne uno analogico sul TV e viceversa.
& Dalla modalità digitale premere il tasto
o
per
visualizzare la guida TV.
é Utilizzare il tasto
Ï per accedere all’elenco
Preselezione/Programma o premere ¬ per
accedere all’elenco
Oggi.
“ Premere il tasto
ROSSO per richiamare il
menu
Registra.
‘ Con i tasti
îÏ selezionare un’opzione e
premere
¬ per inserirla nel sottomenu.
Effettuare le opportune regolazioni e premere
u o È per uscire.
• Nome: il programma selezionato viene
visualizzato qui.
•Programma: è possibile modificare il
numero del programma da registrare. Premere
u per confermare.
Nota
:è possibile solamente passare ad un canale
presente nell'elenco dei canali preferiti selezionato
al momento.
• Digitare il vostro codice pin se bloccato:
inserire il codice segreto solo se è stata
attivata la funzione di protezione (vedere p. 7).
Premere
u per confermare.
• Giorno e mese: inserire la data con i tasti
09o @P #
.Premere u per uscire.
• Orario di inizio: inserire l’ora di inizio.
• Orario fine: inserire l’ora di fine.
• Lingua audio: selezionare la lingua e
confermare con
u.
• Lingua sottotitoli: effettuare la selezione e
confermare con
u.
• Sottotitoli per non udenti: selezionare
So
No
e confermare con u.
• Frequenza: selezionare
Una volta, Giornaliero
o Settimanale e confermare con u.
( Premere il tasto ROSSO per memorizzare la
registrazione.
Viene visualizzata di nuovo la guida TV.
Per visualizzare l'elenco delle registrazioni
programmate è possibile premere il tasto
VERDE.
§ Quando si finisce di guardare la televisione si
deve lasciare il TV in standby per poter
attivare il programma di registrazione.
Impor
tante: non spegnere mai il TV col pulsante di
alimentazione quando è stata programmata una
registrazione, ma servirsi del tasto standby del
telecomando.
è Se si vuole continuare a guardare un altro
canale digitale dopo aver impostato un timer, è
possibile farlo cambiando canale nel modo
consueto.
! Se si sta guardando un altro canale digitale
quando il timer è programmato per partire,
l'allarme del timer suona e viene data la
possibilità di cambiare canale o di continuare a
guardare quello corrente.
ç È anche possibile guardare canali analogici
mentre si stanno registrando canali digitali.
Premere il tasto
v per commutare il TV in
analogico.
2 BBC 2
ChiudiAnnulla
Memorizza
Nome
Programma
Digitare il vostro codice pin se
bloccato
Giorno e mese
Orario di inizio
Orario fine
Lingua audio
11:46
See it saw
2 BBC 2
16/02
12:15
12:30
Italiano
Page 67

11
Sintonizzazione automatica dei programmi analogici
Ordinamento dei programmi analogici
Questo menu consente di effettuare la ricerca
automatica dei programmi analogici disponibili
nella regione.
& Dalla modalità analogica premere il tasto
W
MENU
per visualizzare il menu principale.
é Col cursore selezionare il menu Installazione
e quindi il menu
Memorizzazione automatica e
premere
¬. La ricerca si avvia.
Dopo alcuni minuti, il menu
Installazione
apparirà automaticamente.
“ Se il centro di telediffusione o la rete via cavo
trasmette il segnale di riordino automatico,i
programmi saranno numerati nell’ordine.
‘ In caso contrario, i programmi trovati saranno
numerati per ordine decrescente a partire dal
numero 99, 98, 97.
Per rinumerarli dovrete utilizzare il menu
Riordinare.
Determinati centri di telediffusione o reti via cavo
trasmettono i propri parametri di riordino (regione,
lingua, ...). In questo caso dovete indicare la vostra
scelta con i tasti îÏ e convalidare con ¬.
Per uscire o interrompere la ricerca, premere il
tasto
W MENU
.
Se non appare nessuna immagine, consultare il
capitolo Consigli a pag. 18.
( Per uscire dai menu, premere
∂.
& Premere il tasto
W MENU
per visualizzare il
menu principale.
é Con il cursore, selezionare il menù
Installazione e quindi il menù Riordinare .
“ Selezionate il programma che intendete
spostare con i tasti
îÏ e premete su ¬.
‘ Utilizzate successivamente i tasti
îÏ per
scegliere il nuovo numero e confermate
con
È.
( Ricominciate le tappe “ e ‘ tante volte
quanti sono i programmi da rinumerare.
§ Per uscire dai menù, premere su
∂.
Mem. Auto.
• Programma 2
• TV 470 MHz
• ••••••••••••••••••••••••••••••••
Menuee
• Immagine
• Suono
• Speciali
$ Predispos.
Î
ï
Predispo.
• Mem. Auto.
• Mem. Manuale
$
Riordinare
• Nome
000
001 RAI1
002 RAI2
003ÆRAI3
004 RETE4
005 CANAL
Page 68

12
Sintonizzazione manuale dei programmi analogici
Assegnazione del nome ai programmi analogici
Questo menu consente di memorizzare i
programmi analogici uno alla volta.
& Premere sul tasto
W MENU
.
é Con il cursore, selezionate il menù
Installazione e quindi Mem. manuale :
“ Sistema: selezionate Europa (rilevazione
automatica *) o Europa Occidentale (norma
BG), Europa Orientale (norma DK),Regno
Unito (norma I) o Francia (norma LL’).
* Salvo che per la Francia (norma LL’), occorre
assolutamente selezionare la scelta Francia.
‘ Ricerca: premere su
¬. La ricerca comincia.
Una volta trovato un programma, si ferma la
progressione e viene visualizzato il nome del
programma (se disponibile). Passate alla tappa
successiva. Se conoscete la frequenza del
programma desiderato,digitatela direttamente
con i tasti da
0 a 9.
Se non si trova alcuna immagine, vedere i consigli (p. 10).
( N° di Prog.: inserite il numero desiderato con
i tasti
Ȭ o da 0 a 9.
§ Sintonia fine: se la ricezione non è
soddisfacente, regolate con i tasti
Ȭ.
è Memorizzare : premere su
¬.
Il programma è memorizzato.
! Ripetete le tappe ‘ a ! tante volte quanti
sono i programmi da memorizzare.
ç Per uscire, premere sul tasto
∂.
All'occorrenza è possibile assegnare un nome ai
programmi analogici ed ai connettori esterni.
& Premere sul tasto
W MENU
.
é Con il cursore, selezionate il menù
Installazione, quindi Nome.
“ Utilizzate i tasti
îÏ per scegliere il
programma da nominare o modificare.
Osser
vazione: durante l’installazione, se è trasmesso
il segnale di identificazione, viene attribuito un nome
ai programmi in modo automatico.
‘ Utilizzate i tasti
Ȭ per spostarvi nella
zona di visualizzazione del nome (5 caratteri) e
i tasti
îÏ per scegliere i caratteri.
( Una volta inserito il nome, utilizzate il tasto
È
per uscire. Il nome è memorizzato.
§ Ricominciate le tappe da “ a ( per ogni
programma da nominare.
è Per uscire dai menù, premere su
∂.
Menuee
• Immagine
• Suono
• Speciali
$ Predispos.
Predispo. -
Î
$
Sistema Europe Æ
• Ricerca
• Nr.Programma
• Sintonia Fine
• Memorizzare
ï
Menuee
• Immagine
• Suono
• Speciali
$ Predispos.
Î
ï
Predispo.
• Mem. Auto.
• Mem. Manuale
• Riordinare
$
Nome
000
001 RAI1
002 RAI2
003ÆRAI3
004 RETE4
005 CANAL
Page 69

13
Regolazioni dell’immagine
Regolazioni dell’audio
& Premere sul tasto
W MENU
e quindi su ¬.Il
menù Immagine appare:
é Utilizzate i tasti
îÏ per selezionare una
regolazione e i tasti
Ȭ per effettuare la
regolazione.
Osservazione : durante la regolazione dell’immagine,
resta selezionata solo la riga selezionata. Premere su
îÏ per fare apparire il menù.
“ Una volta effettuate le regolazioni,selezionate
la scelta Memorizzare e premere su
¬ per
registrarle. Premere su
∂ per uscire.
Descrizione delle regolazioni:
• Luce : agisce sulla luminosità dell’immagine.
• Colore : per agire sull’intensità del colore.
• Contrasto : per agire sulla differenza tra
toni chiari e toni scuri.
• Nitidezza : per agire sulla qualità
dell’immagine.
• Temp. Col.: per agire sulla resa dei colori.
Fredda (più blu), Normale (equilibrata) o
Calda (più rossi).
• Memorizzare : per memorizzare le
regolazioni dell’immagine (oltre alle
regolazioni Contrasto + e Riduz. rumore
situati nel menù Opzioni).
& Premere su
W MENU
, selezionare Suono
(
Ï) e premere su ¬.Il menù Suono
appare:
é Utilizzate i tasti
îÏ per selezionare una
regolazione e i tasti
Ȭ per regolare.
“ Una volta effettuate le regolazioni, selezionate
la scelta Memorizzare e premere su
¬ per
registrarle.
‘ Per uscire dai menù, premere su
∂.
Descrizione delle regolazioni:
•
Toni alti: per agire sulle frequenze alte del
suono.
• Toni bassi : per agire sulle frequenze basse.
• Bilanciamento : per equilibrare il suono
sull’altoparlante sinistro e quello destro.
• Delta Volume : permette di compensare gli
scarti di volume esistenti tra i diversi
programmi o le prese EXT. Questa
regolazione è operativa per i programmi da 0
a 40 e per le prese EXT.
• AVL (Automatic Volume Leveler): limitazione
automatica del volume, per limitare
l’improvviso aumento di livello sonoro,
soprattutto al momento di cambiare canale o
durante gli spot pubblicitari.
• Memorizzare : per memorizzare la
regolazione del suono.
Regolazione delle speciali
& Premere su
W MENU
, selezionate Speciali
(
Ï) e premere su ¬.Si può regolare:
é Spost. immagine (disponibile unicamente sugli
schermi di grandi dimensioni) : gli schermi di grandi
dimensioni sono sensibili alle variazioni del
campo magnetico terrestre.Questa regolazione
permette di compensare queste influenze
aggiustando l’inclinazione dell’immagine.
“ Contrasto + : regolazione automatica del
contrasto dell’immagine, che riporta
continuamente la parte più scura dell’immagine
sul livello del nero.
‘ NR : consente di attenuare il rumore
dell’immagine (effetto neve),in caso di
ricezione difficile.
Attenzione: per memorizzare la regolazione
Contrasto+ e NR , occorre utilizzare la scelta
Memorizzare dal menù Immagine.
( Per uscire dai menù, premere su
∂.
Menuee
$ Immagine
• Suono
• Speciali
• Predispos.
Menuee
• Immagine
$ Suono
• Speciali
• Predispos.
Î
ï
Immagine
Î
$
LuminositaÍ --I------ 39
Æ
• Colore
• Contrasto
• Nitidezza
• Temp. Colore
• Memorizzare
Î
ï
Suono
Î
$
Toni Alti
Í
-----I--- 56
Æ
• Toni Bassi
• Balanciamento
• Delta Volume
• Limit. Volume
• Memorizzare
Page 70

14
Televideo analogico
Il televideo è un sistema informativo diffuso dalla maggior parte dei canali TV analogici. Il servizio
fornisce anche sottotitoli per le persone con deficit auditivo.
Premere su:
Avrete :
P
¢
¤
Ë
Ó
CANCEL
Ë
TV
MENU
Ÿ
›
Œ
12
BACK
VCR
DVD
MENU
OK
A/D
”
P(age)
564
879
0
¢
∫
†
Á
ª
-
3
-
+ +
.
DIGITAL
TV
[
OPTIONS
›Ó
¤Ÿ
Œ
Ë
MENU
SELECT
∏ù
SMART
SMART
Ø
MODE
CANCEL
Attivazione
televideo
Selezione di
una pagina
Permette di attivare il televideo, di passare in modo
sovraimpressione su immagine TV e di uscire. Il sommario
appare con la lista delle rubriche alle quali potete accedere.
Per ogni rubrica viene indicato un numero di pagina a 3 cifre.
Anche alcuni programmi digitali trasmettono il televideo
analogico. In tal caso è possibile accedervi premendo il
tasto del televideo per 3 secondi.
Se il televideo non è disponibile viene visualizzato 100 e lo schermo
resta vuoto (per uscire dal televideo scegliere un altro canale).
Comporre il numero della pagina desiderata con i tasti da
0 a 9 o @ P #,îÏ. Esempio: pagina 120, digitare
120. Il numero viene visualizzato in alto a sinistra, il
contapagine inizia la ricerca, la pagina viene visualizzata. Per
consultare un’altra pagina, ripetere l’operazione.
Se il contapagine continua la ricerca, la pagina richiesta non è
trasmessa. Scegliete un altro numero.
Accesso
diretto alle
rubriche
In fondo allo schermo vengono visualizzate delle zone
colorate. I 4 tasti colorati servono ad accedere alle
rubriche o alle pagine corrispondenti.
Le zone colorate lampeggiano quando la rubrica o la pagina non
è disponibile.
Sommario
Per tornare al sommario (generalmente a pagina 100).
Arresto
dell’alternanza
delle sotto-pagine
Alcune pagine contengono delle sotto-pagine che si
succedono automaticamente. Questo tasto permette di
arrestare o riprendere l’alternanza delle sotto-pagine. In
alto a sinistra appare l’indicazione
_.
Ingrandimento
di una pagina
Informazioni
nascoste
Pagine
favorite
Per visualizzare la parte superiore, la parte inferiore, e
ritornare alle dimensioni normali.
Per fare apparire o scomparire le informazioni nascoste
(soluzioni di giochi).
Per i programmi televideo da 1 a 40,si possono
memorizzare 4 pagine favorite,le quali saranno poi
direttamente accessibili per mezzo dei tasti colorati (rosso,
verde, giallo,blu).
& Premere sul tasto
W MENU
.
per passare in modo
pagine favorite.
éVisualizzare la pagina di televideo che si intende
memorizzare.
“ Successivamente, premere per 3 secondi sul tasto
colorato di vostra scelta. La pagina viene memorizzata.
‘ Ripetere l’operazione con gli altri tasti colorati.
( Ora, non appena consulterete il televideo, le vostre
pagine preferite appariranno a colori in fondo allo
schermo. Per consultare le rubriche abituali, premere
W
MENU
.
.
Per cancellare tutto,premere su ∂ per 5 secondi.
Page 71

15
Formati 16:9
Televideo digitale
Le immagini che ricevete possono essere trasmesse in formato 16:9 (schermo largo) oppure 4:3 (schermo
tradizionale). Le immagini 4:3 hanno talvolta una banda nera in alto e in basso (formato cinemascope).Questa
funzione consente di eliminare le bande nere e di ottimizzare la visualizzazione delle immagini sullo schermo.
Commutazione automatica
Il televisore è dotato di una commutazione automatica che decodifica il segnale specifico emesso da
alcuni canali e seleziona il formato giusto per lo schermo.
Utilizzo dei vari formati dello schermo
Premere i tasto p per selezionare i diversi modi:
4:3, Zoom 14:9, Zoom 16:9,Titoli Zoom, Super Immagine e Schermo Largo
Potete accedere a queste regolazioni anche con il tasto Ȭ.
Alcuni canali digitali, selezionabili come qualsiasi altro canale, trasmettono servizi televideo dedicati
(ad esempio BBCTEXT). Inoltre alcuni canali digitali trasmettono informazioni sui programmi in onda
(messaggio visualizzato nella parte inferiore dello schermo).
& Per utilizzare il televideo digitale seguire le istruzioni a video.
é A seconda del servizio può essere necessario utilizzare il cursore e i tasti
SELEZIONE (u), i tasti
colorati, il tasto
TESTO (c) e in alcuni casi i tasti numerici.
“ Quando si è finito di guardare il televideo selezionare un altro canale con i tasti
@ P #
o seguire le
istruzioni a video per visualizzare l'immagine.
4:3
L’immagine è riprodotta in formato 4:3,una banda nera appare da
ogni lato dell’immagine. Solo con programmi analogici l'immagine
può essere progressivamente ingrandita con i tasti
îÏ
.
Zoom 14:9
L’immagine è ingrandita con il formato 14:9, una piccola banda
nera rimane in entrambi i lati dell’immagine. Con i programmi
analogici utilizzare i tasti
îÏ per visualizzare la parte
superiore o inferiore dell'immagine
.
Zoom 16:9
L’immagine è ingrandita con il formato 16:9. Questo modo è
raccomandato per visualizzare le immagini con una banda nera
in alto e in basso (formato cinemascope). Con i programmi
analogici utilizzare i tasti
îÏ per visualizzare la parte
superiore o inferiore dell'immagine
.
Titoli Zoom
Questo modo consente di visualizzare le immagini in formato 4:3
su tutta la superficie dello schermo lasciando visibili i sottotitoli.
Con i programmi analogici utilizzare i tasti
îÏ per aumentare
o diminuire la sezione nella parte inferiore dell'immagine
.
Super Immagine
Questo modo consente di visualizzare le immagini in formato
4:3 su tutta la superficie dello schermo allargando l’immagine
ai lati. Con i programmi analogici utilizzare i tasti
îÏ per
visualizzare la parte superiore o inferiore dell'immagine
.
Schermo Largo
Questo modo consente di restituire le giuste proporzioni
delle immagini trasmesse in formato 16:9 visualizzandole sullo
schermo intero.Attenzione :
se visualizzate un’immagine 4:3, sarà
allargata sul piano orizzontale.
++
”
--
Á
12
SMART SMART
-
P
[
ù
∏
3
564
879
0
ª
(age)
Page 72

16
VCR
DVD
¢
∫
.
EXIT/OPTIONS
›Ó
¤Ÿ
Œ
Ø
MODE
CANCEL
Collegamento ad apparecchi periferici
Il televisore dispone di 2 prese scart, EXT1 e EXT2, situate sul retro del televisore stesso.
La presa EXT1 ha l’ingresso / uscita audio e video e l’ingresso RGB.
La presa EXT2 ha l’ingresso / uscita audio e video e l’ingresso S-VHS.
Eseguire i collegamenti necessari. Utilizzare un cordone di
collegamento (presa scart) di tipo europeo di buona qualità.
Se il vostro videoregistratore non ha una presa scart, l’unico
collegamento possibile rimane quello per mezzo dell’antenna.
Bisognerà quindi cercare il segnale di prova del vostro
videoregistratore e attribuirgli il numero di programma 0
(vedi capitolo “ memorizzazione manuale” a pag.5).
Per far apparire l’immagine del videoregistratore, premere
0.
Videoregistratore con decodificatore
Collegare il decodificatore alla seconda presa scart del
videoregistratore. Potrete così registrare le trasmissioni
criptate.
Videoregistratore
Ricevitore via satellite,decodificatore, DVD,giochi,
ecc.
Eseguire i collegamenti necessari.
Per una qualità d’immagine ottimale, collegare gli
apparecchi che funzionano con i segnali RGB
(decodificatore digitale, giochi, alcuni lettori DVD,ecc.) alla
presa EXT1, e gli apparecchi che funzionano con i segnali SVHS (videoregistratori S-VHS e Hi-8) alla presa EXT2 e
tutti gli altri apparecchi ad una o all’altra delle prese EXT1
e EXT2.
A seconda delle versioni, le prese sono situate
anteriormente (talvolta sotto uno sportellino) o sul lato
destro del televisore.
Eseguire i collegamenti di cui a lato.
Con il tasto
∂, selezionare AV / S-VHS.
Con un apparecchio monofonico, collegare il segnale suono
sull’ingresso AUDIO L. Utilizzare il tasto e per riprodurre il
suono sugli altoparlanti sinistro e destro del televisore.
Cuffie
A cuffie collegate, viene eliminato l’audio del televisore. I
tasti
@”#permettono di regolare il volume.
L’impedenza delle cuffie deve essere compresa tra 32 e 600
ohm.
Altri apparecchi
Collegamenti laterali
Selezione degli apparecchi collegati
Premere il tasto n per selezionare EXT1, EXT2 / S-VHS2 (segnali SVHS della presa EXT2) e
AV / S-VHS per i collegamenti laterali.
Alcuni apparecchi (decodificatore, videoregistratore) realizzano la
commutazione da soli.
EXT 2
VCR
EXT 1
S-VHS
Video
R Audio L
S-VHS
Video
R Audio L
**
S-VHS, Hi-8
VHS, 8 mm
Page 73

17
Tasti VCR/DVD
Per il collegamento ad un sistema hi-fi, utilizzare un cordone di
collegamento audio e collegare le uscite “L” e “R” del
televisore agli ingressi “AUDIO IN” “L” e “R” del vostro
amplificatore hi-fi.
Utilizzare un cavo di connessione audio digitale e collegare
l'uscita "SPDIF" del TV (presente solo su alcuni modelli)
all'ingresso "DIGITAL IN" dell'amplificatore (amplificatore con
ingresso digitale coassiale).
Una common interface è disponibile per collegare un CAM
(conditional access module) ed una smartcard. Per
informazioni su questi moduli rivolgersi al rivenditore.
Nota
: Il TV dev'essere sempre spento prima di inserire un modulo
nello slot common interface.
Amplificatore
Common interface
stato di attesa,
· registrazione*,
∆ pausa,
Ê stop,
Æ lettura,
¢ riavvolgimento rapido,
∫ avanzamento rapido,
richiamo del menu *
selezione (
îÏ) e regolazione (
Ȭ
) *
u conferma*
selezione dei programmi,
digitare un numero
* Alcune funzioni di programmazione non sono disponibili su tutti i
modelli (cursori, menu, tasto OK, ecc.).
Il telecomando è compatibile con tutti i videoregistratori che utilizzano
lo standard RC5 e tutti i DVD che utilizzano lo standard RC6.
Il telecomando vi permette di comandare le funzioni principali del videoregistratore e DVD.
& Premere sul tasto MODE per selezionare il modo desiderato:VCR o DVD.
La spia del telecomando si accende per indicare il modo selezionato.Si spegne automaticamente
dopo 20 secondi di inattività (ritorno al modo TV).
é In funzione dell’apparecchio, sono operativi i tasti seguenti:
SPDIF
¤Ÿ
VCR
¢
DVD
›Ó
MODE
Ø
Œ
MENU
TV
Ë
SELECT
OK
+ +
”
[
BACK
Á
∏ù
†
12
564
879
SMART
-
0
.
-
SMART
ª
DIGITAL
OPTIONS
CANCEL
MENU
A/D
3
∫
P(age)
Page 74

18
Consigli
Immagine scadente
(in modalità analogica)
La vicinanza di montagne o di edifici molto alti
può essere all’origine di immagini sdoppiate, di
presenza di eco o di ombre. In questo caso,
cercare di regolare manualmente l’immagine:
vedi "sintonia fine" (pag. 12) oppure modificare
l’orientamento dell’antenna esterna. La vostra
antenna è atta a ricevere delle trasmissioni in
questa frequenza (banda UHF o VHF)? Se
l’immagine é disturbata (immagine con effetto
neve), porre la regolazione NR del menu
Speciali su Accesso (p. 13).
Cattiva qualità dell'immagine (in modalità digitale)
Se l'immagine si blocca per qualche istante, o se si
blocca completamente, si tratta di un problema di
cattiva ricezione. Utilizzare il menu di verifica della
qualità del segnale (p.6).A seconda della potenza dei
segnali digitali terrestri disponibile in zona,le antenne
standard utilizzate per le trasmissioni analogiche in
molti casi consentono una buona ricezione anche dei
segnali digitali.Altrimenti occorre far installare da un
antennista un'antenna a fascio stretto di buona
qualità sul balcone ed allinearla in modo da catturare
la massima potenza del segnale digitale possibile.
Assenza di immagine
La presa dell’antenna è collegata correttamente
? Avete selezionato il sistema giusto? (pag. 12).
Se mal inserite, la presa scart e la presa
dell’antenna sono spesso all’origine di problemi
legati all’immagine e al suono
(a volte, se il televisore viene rimosso o girato,
le prese possono fuoriuscire dalla presa
murale).Verificare le altre connessioni.
Assenza di suono
(in modalità analogica)
Se un canale TV ha l’immagine ma non l’audio,
significa che non avete selezionato il sistema TV
adeguato. Modificare la regolazione del
Sistema (pag. 12).
Il telecomando non funziona
Verificare che il selettore di modo, situato sul
lato del telecomando, si trovi in posizione TV.
La spia luminosa del televisore non lampeggia
quando utilizzate il telecomando, provate a
cambiare le pile.
Stato di attesa
Per economizzare energia,il vostro televisore è
dotato di componenti che consentono un basso
consumo in stato di attesa (inferiore a 3 W).
Pulizia del televisore
Per pulire lo schermo e la cassa del televisore
utilizzare esclusivamente un panno pulito,
morbido e che non faccia peli. Non utilizzare
prodotti a base di alcool o di solventi.
Non si ottiene nessun risultato?
Se il vostro televisore è guasto,non cercate di
ripararlo da soli: rivolgetevi al servizio assistenza.
Tabella delle frequenze centrali (in KHz)
Canale Frequenza Frequenza Centrale
Digitale Nominale KHz
21 . . . . . . . . . . . . . . . . .474 000
22 . . . . . . . . . . . . . . . . .482 000
23 . . . . . . . . . . . . . . . . .490 000
24 . . . . . . . . . . . . . . . . .498 000
25 . . . . . . . . . . . . . . . . .506 000
26 . . . . . . . . . . . . . . . . .514 000
27 . . . . . . . . . . . . . . . . .522 000
28 . . . . . . . . . . . . . . . . .530 000
29 . . . . . . . . . . . . . . . . .538 000
30 . . . . . . . . . . . . . . . . .546 000
31 . . . . . . . . . . . . . . . . .554 000
32 . . . . . . . . . . . . . . . . .562 000
33 . . . . . . . . . . . . . . . . .570 000
34 . . . . . . . . . . . . . . . . .578 000
35 . . . . . . . . . . . . . . . . .586 000
36 . . . . . . . . . . . . . . . . .594 000
37 . . . . . . . . . . . . . . . . .602 000
38 . . . . . . . . . . . . . . . . .610 000
39 . . . . . . . . . . . . . . . . .618 000
40 . . . . . . . . . . . . . . . . .626 000
41 . . . . . . . . . . . . . . . . .634 000
42 . . . . . . . . . . . . . . . . .642 000
43 . . . . . . . . . . . . . . . . .650 000
44 . . . . . . . . . . . . . . . . .658 000
45 . . . . . . . . . . . . . . . . .666 000
Canale Frequenza Frequenza Centrale
Digitale Nominale KHz
46 . . . . . . . . . . . . . . . . .674 000
47 . . . . . . . . . . . . . . . . .682 000
48 . . . . . . . . . . . . . . . . .690 000
49 . . . . . . . . . . . . . . . . .698 000
50 . . . . . . . . . . . . . . . . .706 000
51 . . . . . . . . . . . . . . . . .714 000
52 . . . . . . . . . . . . . . . . .722 000
53 . . . . . . . . . . . . . . . . .730 000
54 . . . . . . . . . . . . . . . . .738 000
55 . . . . . . . . . . . . . . . . .746 000
56 . . . . . . . . . . . . . . . . .754 000
57 . . . . . . . . . . . . . . . . .762 000
58 . . . . . . . . . . . . . . . . .770 000
59 . . . . . . . . . . . . . . . . .778 000
60 . . . . . . . . . . . . . . . . .786 000
61 . . . . . . . . . . . . . . . . .794 000
62 . . . . . . . . . . . . . . . . .802 000
63 . . . . . . . . . . . . . . . . .810 000
64 . . . . . . . . . . . . . . . . .818 000
65 . . . . . . . . . . . . . . . . .826 000
66 . . . . . . . . . . . . . . . . .834 000
67 . . . . . . . . . . . . . . . . .842 000
68 . . . . . . . . . . . . . . . . .850 000
69 . . . . . . . . . . . . . . . . .858 000
Page 75

ANALOGA
MENYER
1
Inledning
Innehållsförteckning
Tack för att du köpt din TV-apparat just hos oss.
Handboken har tagits fram för att hjälpa dig att installera och använda din TVapparat på bästa sätt.Vi råder dig att läsa igenom den noggrant.Vi hoppas att vår
teknologi kommer att passa dig.
Installation av TV-apparaten . . . . . . . . . . . . . . . . . . . . . . . . . . . . . . . . . . . . . . . . . .2
TV-apparatens knappar . . . . . . . . . . . . . . . . . . . . . . . . . . . . . . . . . . . . . . . . . . . . . .2
Fjärrkontrollens knappar . . . . . . . . . . . . . . . . . . . . . . . . . . . . . . . . . . . . . . . . . . . .3
Digitala eller analoga kanaler ? . . . . . . . . . . . . . . . . . . . . . . . . . . . . . . . . . . . . . . . .3
Koppla på TV:n för första gången . . . . . . . . . . . . . . . . . . . . . . . . . . . . . . . . . . . . . .4
Förstå informationen på textremsan . . . . . . . . . . . . . . . . . . . . . . . . . . . . . . . . . . .4
Ordna om tjänster . . . . . . . . . . . . . . . . . . . . . . . . . . . . . . . . . . . . . . . . . . . . . . . . .5
Titta på eller lyssna på nya tjänster . . . . . . . . . . . . . . . . . . . . . . . . . . . . . . . . . . . .5
Lägg till nya tjänster . . . . . . . . . . . . . . . . . . . . . . . . . . . . . . . . . . . . . . . . . . . . . . . .5
Installera om alla tjänster . . . . . . . . . . . . . . . . . . . . . . . . . . . . . . . . . . . . . . . . . . . .6
Testmottagning . . . . . . . . . . . . . . . . . . . . . . . . . . . . . . . . . . . . . . . . . . . . . . . . . . . .6
Val av önskat språk och plats . . . . . . . . . . . . . . . . . . . . . . . . . . . . . . . . . . . . . . . . .7
Åtkomstbegränsningar . . . . . . . . . . . . . . . . . . . . . . . . . . . . . . . . . . . . . . . . . . . . . .7
Skapa din favoritlista . . . . . . . . . . . . . . . . . . . . . . . . . . . . . . . . . . . . . . . . . . . . . . . .8
Information . . . . . . . . . . . . . . . . . . . . . . . . . . . . . . . . . . . . . . . . . . . . . . . . . . . . . . .8
Nedladdning av ny programvara . . . . . . . . . . . . . . . . . . . . . . . . . . . . . . . . . . . . . . .8
Använda Alternativ-menyn . . . . . . . . . . . . . . . . . . . . . . . . . . . . . . . . . . . . . . . . . . .9
TV-guide . . . . . . . . . . . . . . . . . . . . . . . . . . . . . . . . . . . . . . . . . . . . . . . . . . . . . . . . .9
Inspelningsfunktionen . . . . . . . . . . . . . . . . . . . . . . . . . . . . . . . . . . . . . . . . . . . . . .10
Automatisk inställning av analoga program . . . . . . . . . . . . . . . . . . . . . . . . . . . . .11
Sortera analoga program . . . . . . . . . . . . . . . . . . . . . . . . . . . . . . . . . . . . . . . . . . .11
Manuell inställning av analoga program . . . . . . . . . . . . . . . . . . . . . . . . . . . . . . . .12
Namnge analoga program . . . . . . . . . . . . . . . . . . . . . . . . . . . . . . . . . . . . . . . . . . .12
Bildinställningar . . . . . . . . . . . . . . . . . . . . . . . . . . . . . . . . . . . . . . . . . . . . . . . . . . .13
Ljudinställningar . . . . . . . . . . . . . . . . . . . . . . . . . . . . . . . . . . . . . . . . . . . . . . . . . .13
Lagring av alternativ . . . . . . . . . . . . . . . . . . . . . . . . . . . . . . . . . . . . . . . . . . . . . . .13
Analog text-TV . . . . . . . . . . . . . . . . . . . . . . . . . . . . . . . . . . . . . . . . . . . . . . . . . . .14
Digital text . . . . . . . . . . . . . . . . . . . . . . . . . . . . . . . . . . . . . . . . . . . . . . . . . . . . . .15
Format 16/9 . . . . . . . . . . . . . . . . . . . . . . . . . . . . . . . . . . . . . . . . . . . . . . . . . . . . .15
Anslutning av andra apparater . . . . . . . . . . . . . . . . . . . . . . . . . . . . . . . . . . . . . . .16
Hur man kopplar in de anslutna apparaterna . . . . . . . . . . . . . . . . . . . . . . . . . . . .16
VCR- och DVD . . . . . . . . . . . . . . . . . . . . . . . . . . . . . . . . . . . . . . . . . . . . . . . . . . .17
Tips . . . . . . . . . . . . . . . . . . . . . . . . . . . . . . . . . . . . . . . . . . . . . . . . . . . . . . . . . . . .18
Mittfrekvenstabell (i KHz) . . . . . . . . . . . . . . . . . . . . . . . . . . . . . . . . . . . . . . . . . .18
DIGITALA
MENYER
°
Direktiv om återanvändning
Din TV-apparat är tillverkad av material som kan återanvändas.
Var rädd om miljön ! Det finns speciella företag som tar hand om utslitna
apparater, monterar ned dem och tar vara på det material som kan återvinnas
(kontakta din återförsäljare).
Den här produktens
digitala menyer
använder den
senaste Java
™
teknologin från Sun
Microsystems Inc.
Svenska
Page 76

TV-apparaten har 4 eller 5 knappar på
framsidan eller ovansidan beroende på modell.
VOLUME - + (-
” +) används för att ställa in
ljudnivån. PROGRAM - + (- P +) används för
att välja önskat program.
Ta fram menyerna genom att hålla kvar de
bägge
” - och ” + (eller på knappen
MENU) i nedtryckt läge. PROGRAM - + kan
nu användas för att välja en inställning och
” - + används för att utföra inställningen.
Lämna menyerna genom att hålla kvar de
bägge
” - och ” + (eller på knappen
MENU) i nedtryckt läge.
PROGRAMVOLUME
--
++
2
&
Placering av TV-apparaten
Ställ TV-apparaten på ett stadigt och jämnt
underlag, och lämna ett fritt utrymme på minst
5 cm runt den. Placera av säkerhetsskäl
ingenting på apparaten, dvs inget föremål som
täcker den (duk), som innehåller vatten (vas)
eller som alstrar värme (lampa). Dessutom får
TV-apparaten inte utsättas för vatten.
é
Anslutningar
• Anslut antennkontakten i uttaget : som
finns på baksidan.
•
Anslut nätsladden till nätet (220-240 V / 50 Hz).
“
Fjärrkontroll
Sätt i de 2 medföljande batterierna av typ R6
och var noga med att vända dem rätt.
De batterier som levereras med apparaten är
miljövänliga och innehåller varken kvicksilver eller
kadmium/nickel. Kasta inte begagnade batterier i
soptunnan – lägg dem i särskilt avsedda behållare
för återanvändning (kontaka återförsäljaren om du
inte vet var du skall göra av dem).Använd vid byte
batterier av samma typ.
‘
Påslagning
Tr yck på knappen Till/Från för att sarta TVapparaten, En röd kontrollampa lyser rött och
skärmen lyser upp.Gå direkt till kapitlet om
snabb installation på sida 4.
Om TV-apparaten förblir i beredskapsläge,
tryck på knappen P
# på fjärrkontrollen.
Kontrollampan blinkar när du använder
fjärrkontrollen.
5 cm
5 cm
5 cm
Installation av TV-apparaten
TV-apparatens knappar
Page 77

3
Fjärrkontrollens knappar
Information på bildskärmen
I digitalt läge: tryck en gång för att visa
textremsan med information,tryck en 2
:a
gång för att få mer information om
programmet och en 3:e gång för att
annullera textremsan (se sid.4). I analogt
läge: det visar resp. tar bort
programinformationen(s nummer, namn,
ljudläge). Håll ned knappen i 5 sekunder
för att visa det analoga programmets
nummer på bildskärmen.
TV-guide
(se sid. 9).
Välj EXT-uttag
(se sid. 16).
Välja läge
För att aktivera fjärrkontrollen i VCR-
eller DVD-läget (se sid.17).
TV-meny
För att visa eller lämna de analoga
menyerna:
Välj
I digitalt läge: visar / tar bort
programlistan.Använd îÏ-
knapparna för att välja ett program och
u-knappen för att visa programmet.
Vo ly m
För att ställa in ljudnivån.
16:9-format (sid. 15)
Inget ljud
För att avaktivera eller aktivera ljudet.
Bild- och ljudinställningar
Ger åtkomst till ett antal bild- och
ljudinställningar.
Läget Personliga inställningar motsvaras
av de inställningar som lagrats i menyerna.
Stand-by
För att sätta TV:n i standby-läge. För
att koppla på TV:n igen trycker du på
b,P @#eller 09.
Alternativ-menyn
(se sid. 9).
Te xt-TV-funktioner (sid.14) och
VCR/DVD-knappar (sid.17).
Digital-menyn
För att visa eller lämna de digitala
menyerna (när TV:n är i digitalt läge).
Analogt eller digitalt läge
För att växla mellan TV:ns analoga
och digitala läge.
Markör
De här 4 knapparna används för att flytta
inom menyerna,eller för att komma åt
16:9-bildskärmsformaten direkt (sid.15).
Föregående program
För att komma till det program man
tittade på tidigare.
Sifferknappar
För direkt åtkomst till program.Till ett
programnummer med 2 (3) siffror måste
den 2:a(3:e) siffran anges innan strecket
försvinner.
Nummer,namn (och ljud
läget, i
analogt läge) visas i någon sekund.
Ljudläge
För att koppla om från
Stereo till
Mono eller för att välja mellan olika
språk (Dual I, Dual II, ...).
När ljudläget kopplas om till
Mono,är
indikationen röd.
Surround-ljud
För att aktivera / avaktivera Virtual
Dolby Surround *-effekten.I stereo
kan du erhålla Dolby Surround Pro
Logic-ljudkvalitet. I mono-läget
simuleras en stereorumseffekt
*
Tillverkad på licens från Dolby
Laboratories. ”Dolby””Pro Logic” och dubbelD-symbolen är varumärken som ägs av
Dolby Laboratories.
Välja program
För att komma åt nästa eller föregående
program (eller sida i digitala menyer).
Undertextläge
För att aktivera/avaktivera undertextläget
För att ta emot TV-kanaler har TV-apparaten utrustats med 2 tuners.Den ena är för digitala kanaler
och den andra för analoga kanaler.Tryck på
v-knappen på fjärrkontrollen för att växla mellan TV:ns
analoga och digitala läge.Använd sedan knapparna
P @#eller 09för att välja kanaler.
Digitala eller analoga kanaler ?
.
¤Ÿ
VCR
DVD
MODE
·
MENU
TV
SELECT
OK
Ø
∆
¢
›Ó
Œ
Ê Æ
Ë
OPTIONS
∫
CANCEL
MENU
DIGITAL
A/D
++
†
-
SMART
ª
P(age)
3
”
BACK
Á
[
∏ù
12
564
879
SMART
-
0
Page 78

4
Första gången TV:n kopplas på visas ett
gratulationsmeddelande på bildskärmen.
Meddelandet visas på olika språk var 5
:e
sekund.
Om inte menyn visas, håll då ned TV-apparatens
”- och ”+ -knappar i 5 sekunder för att visa
menyn.
&
Tr yck på u-knappen på fjärrkontrollen i
samma ögonblick som önskat språk visas
på skärmen. Menyn
Inställning
visas :
é
Språk
, motsvarande
Land
och
Tidszon
förinställs nu enligt öppningsskärmen. Du kan
emellertid fortfarande ändra dina inställningar
innan du startar en tjänstesökning.
“ Välj (med markörknapparna)
Språk,Land
eller
Tidszon
och kontrollera om inställningen är den
du önskar.Vid behov kan du använda
markörknapparna för att ändra någon inställning.
Tr yck sedan på
u för att avsluta inställningen.
Se upp! Om du väljer fel land, följer inte
kanalnumreringen standarden i ditt land.
‘ Välj
Tjänstesökning på menyn och
tryck på
u för att påbörja installationen.
Menyn
Tjänstesökning öppnas.
Alla digitala och analoga program söks efter
och lagras automatiskt. När sökningen är klar,
visas hur många digitala tjänster och analoga
program som hittades på menyn.
( Tr yck på
u-knappen två gånger så kan du
börja titta på TV.
På TV-skärmen visas därefter aktuellt program.
Installationen är nu slutförd.
När du väljer ett digitalt program, visas en
informationstextremsa i någon sekund överst
på bildskärmen.
Du kan även använda
∂-knappen på
fjärrkontrollen för att visa den här textremsan. trycker
du en gång till på samma knapp, visas mer
information om programmet (om sådan finns).
Textremsan innehåller information om
kanalens förinställda nummer, namn,
programmets längd, utsändningsklockan,
programmets titel och hur många minuter
som är kvar av aktuellt program.
Koppla på TV:n för första gången
Förstå informationen på textremsan
Beskrivning av textremsa:
Gratulerar ar till valet av denna TV från Philips
Tr yck OK för att börja använda din digital-TV
Inställning
Ställ in alternativ och starta en tjänstesökning
Språk
Land
Tidszon
Tjänstesökning
11:46
Svenska
Sverige
(GMT+1:00) Oslo, Stockholm
Please press OK to start
2 11:06 - 11:09
BBC2 Snooker
11:46
Minuter kvar : 14
u
ù
i
ß
förinställt
nummer
symboler
klocka
programmets
start- och
sluttid
minuter kvar av
programmet
programmets
titel
kanalens
namn
Beskrivning av symboler:
i
mer information om det här programmet finns
tillgänglig :
tryck på knappen ∂ för att visa den
eller annullera den.
ß undertext är tillgänglig : om du vill se dem
trycker du på ß-knappen eller på
OPTIONS-
knappen för att komma till
alternativ-menyn och
välja undertext.
ù andra ljudspråk finns tillgängliga och kan väljas på
alternativ-menyn.
u den valda favoritlistan visas i samma färg som
den aktiverade listan.
Page 79

5
Ordna om tjänster
Den här menyn ger dig möjlighet att ändra
ordningsföljden för de lagrade digitala
kanalerna och radiostationerna.
& Från digitalt läge: tryck på
‹ MENU-knappen
för att visa inställningsmenyn.
é Använd Ï-knappen för att välja
inställning och
tryck på
¬ två gånger för att välja menyn för
Listor över tjänster.
“ Använd knapparna
îÏ för att välja Ordna
om tjänster
och tryck på ¬.
‘ Använd knapparna
îÏ för att välja den
kanal som du vill byta ut.
( Tr yck på
u för att aktivera inställningen.
Om du vill avinstallera vald kanal, tr ycker du på
den röda knappen.
§ Välj (
îÏ) det nya kanalnumret som du vill
byta ut den med.
è Tr yck på
u för att bekräfta inställningen.
Bytet är nu klart.
! Upprepa de här åtgärderna ‘ till è tills alla
kanaler är i önskad ordningsföljd.
ç Tr yck på
‹ MENU-knappen för att lämna
menyn.
I den här menyn kan du kontrollera om det
finns några nya TV-kanaler eller radiostationer
som utsändaren har startat efter din första
installation.
& Från digitalt läge: tryck på
‹ MENU-knappen
för att visa inställningsmenyn.
é Använd Ï-knappen för att välja
inställning och
tryck på
¬ två gånger för att välja menyn för
Listor över tjänster.
“ Använd
îÏ-knapparna för att välja Titta på
nya TV-kanaler
eller Lyssna på en ny
radiostation
.
‘ Om det finns nya tjänster tillgängliga, tryck på
¬ för att komma in i listan och använd
îÏ-knapparna för att förflytta dig i listan.
( Tr yck på
‹ MENU-knappen för att lämna
menyn.
Titta på eller lyssna på nya tjänster
Inställning
Installation
Hantera listor över tjänster
Stäng
Listor över tjänster
Tjänsteinställning
Testmottagning
11:46
Ordna om tjänster
Titta på nya TV-kanaler
Lyssna på nya radiostationer
Lägg till nya tjänster
I den här menyn kan du söka efter nya TVkanaler eller radiostationer som utsändaren har
startat efter din första installation.
& Från digitalt läge: tryck på
‹ MENU-knappen
för att visa inställningsmenyn.
é Använd Ï-knappen för att välja
inställning och
tryck på
¬.
“ Välj
Tjänsteinställning (Ï) och tryck på ¬.
‘ Tr yck på
¬ för att välja Lägg till nya tjänster
och tryck på u för att aktivera inställningen.
Sökningen påbörjas och endast nya kanaler
kommer att lagras och läggas till i menyn för
kanallistan. Hur många procent av
installationen som är slutförd och hur många
kanaler som hittades visas på bildskärmen.
( När sökningen är klar,välj lagra och tryck på
u för att godkänna de nya tjänsterna.
§ Tr yck på
‹ MENU-knappen för att lämna
menyn.
Inställning
Installation
Installera och hantera tjänster
Stäng
Listor över tjänster
Tjänsteinställning
Testmottagning
11:46
Lägg till nya tjänster
Installera om alla tjänster
Page 80

6
I den här menyn kan du installera om alla
digitala TV-kanaler och radiostationer.
& Från digitalt läge: tryck på
‹ MENU-knappen
för att visa inställningsmenyn.
é Använd Ï-knappen för att välja
inställning och
tryck på
¬.
“ Välj
Tjänsteinställning (Ï) och tryck på ¬.
‘ Välj
Installera om alla tjänster (Ï) och tryck
på
¬.
( Tr yck på
u för att påbörja installationen.
Det sker nu en sökning efter alla digitala
tjänster, som därefter lagras automatiskt.
När sökningen är klar, visas antalet digitala
tjänster som hittades på menyn.
§ När sökningen är klar,tryck på
u för att lagra
tjänsterna.
è Tr yck på
‹ MENU-knappen för att lämna menyn.
I den här menyn kan du kontrollera hur stark
mottagningssignalen är, som du tar emot via
antennen.
& Från digitalt läge: tryck på
‹ MENU-knappen
för att visa inställningsmenyn.
é Använd
Ï-knappen för att välja
inställning och
tryck på
¬ för att visa inställningsmenyn.
“ Välj Ï för att välja Testmottagningoch tryck
på
¬. Du erhåller information om det
aktuella programmets frekvens,nätverksnamn,
signalkvalitet och signalstyrka.
‘ Nu måste du ange frekvensen för den digitala
kanal som du vill testa.
TV-tidningen kan tillhandahålla listan med de
digitala kanalernas nummer.Använd tabellen på
sidan 18 för att ta reda på frekvensen.
( Om signalkvaliteten och signalstyrkan är dålig,
visas ett meddelande nederst på menyn, där du
uppmanas ange frekvensen mellan den undre
och övre gränsen. Om mottagningen
fortfarande är dålig efter att du har knappat in
frekvensen,kan du försöka förbättra, förnya,
justera eller uppdatera antennen.Vi
rekommenderar emellertid, att du kontaktar en
auktoriserad antenninstallatör för att få så god
mottagning som möjligt.
Installera om alla tjänster
Testmottagning
Inställning
Installation
Testaa signalkvaliteten
Stäng
Listor över tjänster
Tjänsteinställning
Testmottagning
11:46
Frekvens
Nätverksnamn
Signalkvalitet
Signalstyrka
Inställning
Installation
Installera och hantera tjänster
Stäng
Listor över tjänster
Tjänsteinställning
Testmottagning
11:46
Lägg till nya tjänster
Installera om alla tjänster
Page 81

7
Val av önskat språk och plats
I den här menyn kan du välja önskat språk för
ljud, undertext, text-TV och menyer samt göra
ändringar för aktuell plats (land och tidszon).
& Från digitalt läge: tryck på
‹ MENU-knappen för
att visa inställningsmenyn.
é Använd
Ï-knappen för att välja
inställningar
och tryck på ¬.
“ Välj
Språk, Plats ellerDigitalt ljud (Ï) och
tryck på
¬.
‘ Använd
Ïî-knapparna för att välja en
inställning och tryck på
¬ för att komma till
undermenyn. Utför dina justeringar och tryck
på
u eller È för att avsluta inställningen.
Standardinställning för språk:
•
Ljud: för att välja ljudspråk.
•
Undertext/Text-TV: för att välja språk för
undertext/text-TV.
•
Undertextläge: av, på eller auto
(undertext
visas endast vid original ljudutsändningar)
.
•
Undertext för personer med nedsatt hörsel
: för att
aktivera eller avaktivera den särskilda undertext
som tillhandahålls för personer med nedsatt
hörsel (om utsändaren tillhandahåller sådan).
•
System
: för att välja menyspråk.
Platsinställningar:
•
Land: för att välja det land där du befinner dig.
•
Tidszon: för att välja tidszon för ditt land.
Inställningar av digitalt ljud:
För att välja
AC3 (om förstärkaren ger stöd åt
formatet Dolby Digital) eller
PCM (om den inte
ger stöd åt formatet Dolby Digital).
( Tr yck på
‹ MENU-knappen för att lämna menyn.
I den här menyn kan du ange
åtkomstbegränsningar för de digitala kanalerna.
& Från digitalt läge: tryck på
‹ MENU-knappen för
att visa inställningsmenyn.
é Använd Ï-knappen för att välja
Åtkomstbegränsningar och tryck på ¬.
“ Tr yck på
¬-knappen för att komma till menyn
för
Ställ in pinkodsskydd.
‘ Använd
Ȭ-knappen för att ställa in den till
på och tryck på u för att lämna inställningen.
Du kan därefter komma åt de övriga
inställningarna :
V
arning: så snart du använder någon slags
åtkomstbegränsning måste du skriva in pinkoden
när du planerar inspelning av ett program.
•
Åldersgräns: välj önskad åldersgräns för att
spärra kanalen.
Inställningen av åldersgräns kommer endast att
spärra vissa program, om utsändaren tillhandahåller
information tillsammans med programmet.
•
TV-kanaler:välj den TV-kanal som du önskar
spärra och tryck på
u.
•
Radiostationer: välj den radiostation som du
önskar spärra och tryck på
u.
•
Ändra pinkod:tryck på ¬ för att öppna
menyn. Följ anvisningarna på skärmen för att
ändra åtkomstkoden.
Standardpinkoden är 1234. Om du har glömt din
egen kod, kan du återställa koden till standardkoden
(1234) genom att ange den universella koden
0711.
( Tr yck på
‹ MENU-knappen för att lämna menyn.
TV-apparaten är utrustad med ett Common
Interface (CI; allmänt gränssnitt)-fack (se sid. 17).
En CI -modul kan aktivera ytterligare tjänster,till
exempel Betal-TV. Menyn för Åtkomstbegränsningar
kommer att visa CI -åtkomstbegränsningarna när
en CI-modul har installerats. CI-modulen ansvarar
för meddelandena och texterna på bildskärmen.
Om ett fel eller något underligt inträffar med TV:n,
måste du kontakta CI-tjänsteleverantören.
Åtkomstbegränsningar
Inställning
Personliga inställningar
Välj önskat språk
Stäng
Språk
Plats
Digitalt ljud
11:46
Ljud
Undertexer/Text-TV
Textremsa
Textremsor på
System
Inställning
Åtkomstbegränsningar
Koppla “på” eller “av” pinkodsskydet
Stäng
Ställ in pinkodsskydd
Åldersgräns
TV-kanaler
Radiostationer
Ändra pinkod
11:46
Aktivera Avaktivera
Page 82

8
Skapa din favoritlista
I den här menyn kan du skapa en favoritlista
med alla dina favorit-TV-kanaler och
radiostationer.Varje familjemedlem kan till
exempel skapa hans/hennes egen favoritlista.
& Från digitalt läge: tryck på
‹ MENU-knappen
för att visa inställningsmenyn.
é Tr yck på
¬ för att komma till menyn för
favorit-listan. Du kan skapa fyra olika
favoritlistor.
“ Använd
Ïî-knapparna för att välja din
favoritlista:Lista 1, Lista 2, Lista 3 ellerLista 4
och tryck på ¬.
‘ Använd
Ïî-knapparna för att välja en
inställning och tryck på
¬ för att komma till
undermenyn.
•
Namn:använd Ȭ-knapparna för att flytta
det visade namnfältet (16 tecken) och
@P-
# knapparna för att välja tecken.När du
skrivit in namnet, tryck på
u för att avsluta.
•
Välj TV-kanaler:använd Ïî-knapparna för
att välja dina favorit-TV-kanaler och bekräfta
med
u.Tryck på È för att avsluta.
•
Välj radiostationer:använd Ïî-knapparna
för att välja dina favoritradiostationer och
bekräfta med
u.Tryck på È för att avsluta.
•
Lägg till alla tjänster:tryck på u om du vill
lägga till alla tjänsterna i din favoritlista.
•
Annullera alla tjänster:tryck på u om du vill
annullera alla tjänsterna från din favoritlista.
( Tr yck på
‹ MENU-knappen för att lämna menyn.
§ Du kan välja din favoritlista från
alternativ
-menyn
(se nästa sida).
I den här menyn ges information om
programvaruversion och installation av ny
programvara.
& Från digitalt läge: tryck på
‹ MENU-knappen
för att visa inställningsmenyn.
é Använd Ï-knappen för att välja
information
och tryck på ¬ två gånger.
Programvaruversionen visas nu.
“ Du kan aktivera menyn så att den automatiskt
godtar alla uppdateringar av programvaran för
digital-TV:n.I standby-läge upptäcks oftast
automatiskt, om det finns en uppdatering
tillgänglig. Nästa gång TV:n kopplas på, visas en
textremsa nederst på skärmen, som anger att ny
programvara finns tillgänglig.Genom att välja
u
aktiveras nedladdningen av programvara. Menyn
för nedladdning av programvara ger en
beskrivning av programmet jämte datum och
tidpunkt för nedladdningen. Det nedladdade
programmet kan uppdatera vissa menyer,
funktioner eller lägga till nya funktioner, men hur
TV:n fungerar rent allmänt påverkas inte.Om
nedladdningen godtas, sker denna vid en bestämd
tidpunkt och datum.
OBS! TV:n måste vara i standby-läge när det är
dags för nedladdning för att sådan ska kunna ske.
‘ Tr yck på
‹ MENU-knappen för att lämna
menyn.
Information
Nedladdning av ny programvara
Inställning
Göra ändringar till din lista med favorittjänster
Stäng
Favoriter
Personliga inställningar
Information
Åtkomstbegränsningar
Installation
11:46
Lista 1
Lista 2
Lista 3
Lista 4
Inställning
Tillhandahåller information om problemrapporter och installation av ny
Stäng
Favoriter
Personliga inställningar
Information
Åtkomstbegränsningar
Installation
11:46
Systemmjukvara
Så snart ny programvara finns tillgänglig, rekommederar vi att programvaran alltid godtas och laddas
ned.
Om ny programvara är tillgänglig,visas ett meddelande på skärmen när du kopplar på TV:n.
Page 83

9
Använda Alternativ-menyn
Från den här menyn har du direkt åtkomst till:
favoritlistan,val av språk och några andra
funktioner.
& Från digitalt läge: tryck på den vita
OPTIONS–knappen för att visa alternativmenyn.
é Använd
Ïî-knapparna för att välja en
inställning och tryck på
¬ för att komma till
undermenyn.
• Favoriter:använd Ïî-knapparna för att
välja din favoritlista och bekräfta med
u.
Alternativet ”Ingen” avaktiverar alla favoritlistor.
Information om hur du skapar din egen favoritlista
finns på sidan 8.
•
Språk på textremsor:använd Ïî-
knapparna för att ändra språket tillfälligt och
bekräfta med
u.
•
Ljudspråk: för att tillfälligt ändra ljudspråket.
För att ändra ljudspråk och/eller språk på
textremsor permanent använder du menyn
Inställning (sid. 7)..
•
Läge: du kan välja om du endast vill ha radio-
stationer,
TV –kanaler eller tjänster utan ljud
och/eller bild
.
Anmär
kning: endast för Storbrittanien:TV-listan
innehåller både radiostationer och TV-kanaler.
•
textremsa på: här väljer du hur länge
textremsan visas på skärmen.
“ Tr yck på den vita
OPTIONS–knappen för att lämna
menyn.
TV-guiden är en elektronisk guide över alla
tjänsterna, som gör att du kan se vilka digitala
program som ska sändas, precis som i en
dagstidning eller i en TV-tidning.Du kan rulla
genom listan med digitala program och erhålla
detaljerad information om programmen. Du
kan även programmera TV:n för inspelning av
en digital kanal.
& Från digitalt läge: tryck på
o-knappen för att
visa TV-guiden :
Nu visas en lista över alla digitala program i den
aktiva favoritlistan.
é Använd Ï-knappen för att gå till
Förval/kanal-
listan eller tryck på ¬ för att komma till
Idagz-listan.
“
Använd îÏ-knapparna för att välja ett program.
‘ TV-guidens funktioner visas nederst på skärmen.
Använd de färgade knapparna (röd, grön, gul,blå
eller vit) för att aktivera dem :
• Spela in (röd knapp) : med den här
funktionen kan du spela in en digital kanal även
när TV:n är i standby-läget. Du behöver
fortfarande programmera videobandspelaren.
• Inspelningslista (Insp.lista) (grön knapp) : i
den här menyn finns en lista över planerade
inspelningar. Du kan kontrollera, ändra, radera
eller lägga till ett nytt schema med
markörknapparna eller de färgade knapparna,
enligt vad som anges på skärmen.
•
Överst
(gul knapp)
: för att gå direkt till listans
översta del.
• Stäng (blå knapp) : för att lämna TV-guiden.
• Alternativ (vit ∫ knapp) : på den här menyn
kan du välja din favoritlista,läge eller teman.
Teman är intresseområden; du kan exempelvis
bestämma att endast följande ska visas : drama,
nyheter, filmer, ...
( Tr yck på
∂-knappen om du vill visa mer
information om det valda programmet (om sådan
finns).
§ Tr yck på
o-knappen för att lämna menyn.
TV-guide
Alternativ
Väljer aktiv favoritlista
Avsluta
Favoriter
Språk pä textremsor
Ljudspråk
Läge
Inga
Lista 1
Lista 2
Lista 3
Lista 4
AlternativStängÖverstInsp. lista
Spela In
1 BBC ONE
2 BBC TWO
3 ITV Channel 3
4 Channel 4
5ITV 2
6 BBC CHOICE
See It Saw
Snooker
Tr isha
-
Gmtv2
Oakie Doke
Microsoap
Ice Skating
This morning
-
This afternoon
Bodger & Badger
1 17:15-17:25 17:24
BBC ONE See It Saw
Nu/Nästa
Idag
Förval/Kanal Nu Nästa
Page 84

10
Inspelningsfunktionen
Med den här funktionen kan du spela in en
digital kanal medan TV:n är i standby-läge. Du
behöver fortfarande programmera
videobandspelaren.
Viktigt
:Videobandspelaren måste anslutas till
EXT2.Var god observera att det INTE går att spela in
en digital kanal och titta på en annan digital kanal
samtidigt. Du kan emellertid spela in en digital kanal
och titta på en analog kanal på TV:n, eller tvärtom.
& Från digitalt läge: tryck på
o-knappen för att
visa TV-guiden.
é Använd Ï
-knappen för att komma till
Förval/Kanal
-listan eller tryck på ¬ för att
komma till
Idag-listan.
“ Tr yck på den
RÖDA knappen för att öppna
Spela in-menyn.
‘ Använd Ïî-knapparna för att välja en
inställning och tryck på
¬ för att komma till
undermenyn. Utför dina justeringar och tryck
på
u eller È för att avsluta inställningen.
• Namn : här visas det valda programmet.
• Kanal : du kan ändra numret på det program
som du vill spela in.Tryck på
u för att
bekräfta inställningen.
OBS!
det går bara att ändra numret som finns i
den aktiva favoritlistan.
• Knappa in pinkod om låst : ange din
hemliga kod om du har aktiverat
åtkomstbegränsningsfunktionen (se sid. 7).
Tr yck på
u för att bekräfta inställningen.
•Dag & månad : ange datumet med hjälp av
knapparna
09 eller @P #.Tryck på u
för att avsluta.
• Starttid : ange starttiden.
• Sluttid : ange sluttiden.
• Ljudspråk : välj önskat språk och bekräfta med
u.
• Språk på textremsor : välj önskat språk och
bekräfta med
u.
• Undertexter för personer med nedsatt
hörsel : välj
Ja eller Nej och bekräfta med u.
• Hur ofta: välj
En gång, Varje dag eller Varje
vecka
och bekräfta med u.
( Tr yck på den
RÖDA knappen för att lagra
inspelningen.
TV-guiden visas på nytt.
Du kan trycka på den
GRÖNA knappen för att visa
den inspelningslista som du har ställt in.
§ Om du har slutat att titta på TV, måste du lämna
TV:n i standby-läget för att
inspelningsprogrammet ska aktiveras.
Viktigt: stäng aldrig av TV:n med strömknappen när
du har programmerat en inspelning, utan använd
fjärrkontrollens standby-knapp.
è Om du vill fortsätta att titta på en annan
digital kanal efter att timern ställts in, kan du
göra detta genom att byta kanal på vanligt sätt.
! Om du tittar på en annan digital kanal när timern
ska starta, ljuder ett timeralarm.Då kan du antingen
byta kanal eller fortsätta att titta på aktuell kanal.
ç Du kan även titta på analoga kanaler medan du
spelar in digitala kanaler.Tryck på
v-knappen för
att koppla om TV:n till analogt läge.
2 BBC 2
StängAnnullera
Lagra
Namn
Kanal
Knappa in din pinkod om låst
Dag & månad
Starttid
Sluttid
Ljudspråk
11:46
See it saw
2 BBC 2
16/02
12:15
12:30
Svenska
Page 85

11
Automatisk inställning av analoga program
Sortera analoga program
I den här menyn kan du göra en automatisk
sökning efter alla de analoga program som är
tillgängliga inom ditt område.
& Från analogt läge: tryck på
W MENU-knappen
för att visa huvudmenyn.
é Välj menyn
Installera
med markören och därefter
menyn
Lagra automatiskt
och tryck på ¬.
“ Om sändaren eller kabelnätet överför signalen
för automatisk sortering numreras
programmen korrekt.
‘ Om så inte är fallet numreras de hittade
programmen i sjunkande ordning från nummer
99, 98, 97, osv.
Använd menyn
Sortera
för att numrera om
programmen.
Vissa sändare eller kabelnät överför sina egna
sorteringsparametrar (region, språk). I så fall skall
du ange ditt val via knapparna
îÏ och
bekräfta valet med ¬.
Lämna eller avbryt sökningen genom att trycka på
knappen
W MENU
. Se kapitlet « Tips » på s. 16
om ingen bild hittas.
Se även EasyLink-funktionen, s. 4.
( Lämna menyerna genom att trycka på
∂.
& Tr yck på
W MENU
–knappen för att visa
huvudmenyn.
é Välj menyn Installera och sedan menyn Sortera.
“ Välj det program du önskar numrera om med
hjälp av knapparna
îÏ och tryck på ¬.
‘ Använd knapparna
îÏ för att välja ett nytt
önskat nummer och bekräfta med
È.
( Upprepa punkt “ och ‘ för varje program
som skall lagras.
§ Lämna menyerna genom att trycka på
knappen
∂.
Auto. Lagring
• Program 2
• TV 470 MHz
• ••••••••••••••••••••••••••••••••
Huvud Menye
• Bild
• Ljud
• Egenskaper
$ Installera
Î
ï
Installera
• Auto. Lagring
• Man. Lagring
$
Sortera
Æ
• Namn
000
001 STV1
002 STV2
003ÆTV4
004 TV3
005 TV1000
Page 86

12
Manuell inställning av analoga program
Namnge analoga program
I den här menyn kan du lagra ett analogt
program i taget.
& Tr yck på knappen
W MENU
.
é Välj menyn
Installera och sedan Manuell lagring.
“
System: Välj mellan Europe (automatisk sökning)
West Eur (norm BG= Sverige), East Eur (norm
DK)
Storbritannien (norm I) eller Frankrike
(norm LL’).
* För Frankrike (norm LL’): välj alternativet
France.
‘
Sökning: tryck på ¬. Sökningen börjar. Så
snart ett program hittas avbryts sökningen och
programnamnet visas (om sådant finns). Gå
vidare till efterföljande punkt. Om du känner till
det önskade programmets frekvens kan du
skriva in dess frekvensnummer direkt med
knapparna
0 till 9.
Se kapitlet Tips (s. 10) om inget program hittas.
(
Programnummer : använd knapparna Ȭ eller
0 till 9 för att skriva in önskat nummer.
§
Fininställning. : om mottagningen är
otillfredsställande kan du justera bilden med
hjälp av knapparna
Ȭ.
è
Lagring: tryck på ¬.Programmet har lagrats.
! Upprepa punkt ‘ till è för varje program som
skall lagras.
ç
Lämna menyn: genom att trycka på knappen ∂.
Om du vill kan du ge namn åt de analoga
programmen och de externa uttagen.
& Tr yck på knappen
W MENU
.
é Välj menyn
Installera och sedan Programnamn.
“ Använd knapparna
îÏ för att välja den
kanal som ska namnges eller ändras.
‘ Använd knapparna
Ȭ för att förflytta dig i
fältet där namnet visas (5 bokstäver), och
knapparna
îÏ för att välja bokstäver.
( Tr yck på knappen
È för att lämna menyn när
namnet är inskrivet. Kanalens namn har lagrats.
§ Gör om stegen “ till ( för varje kanal som du
vill namnge.
è
Lämna menyerna genom att trycka på knappen ∂.
Huvud Menye
• Bild
• Ljud
• Egenskaper
$ Installera
Man. Lagring
Î
$
System Europe Æ
• Sökning
• Pr. Nummer
• Fininställ.
• Lagring
ï
Huvud Menye
• Bild
• Ljud
• Egenskaper
$ Installera
Î
ï
Installera
• Auto. Lagring
• Man. Lagring
• Sortera
$
Namn
Æ
000
001 STV1
002 STV2
003ÆTV4
004 TV3
005 TV1000
Page 87

13
Bildinställningar
Ljudinställningar
& Tr yck på knappen
W MENU
och sedan på ¬.
Menyn
Bild visas:
é Använd knapparna
îÏ för att välja en
inställning och knapparna
Ȭ för att utföra
inställningen.
Anm.:
Medan bilden justeras visas endast den
markerade linjen.Tryck på îÏ för att visa
menyn igen.
“ När inställningarna är gjorda, välj alternativet
Lagring och tryck på ¬ för att lagra dem.
Tr yck på
∂ för att lämna menyn.
Beskrivning av inställningarna:
•
Ljus: Inverkar på hur ljus bilden är.
•
Färg: inverkar på färgens intensitet.
•
Kontrast: inverkar på skillnaden mellan ljusa
och mörka toner.
•
Skärpa: inverkar på bildens tydlighet.
•
Färg ton (färgtemperatur) : ställer in bildens
färgton :
Kall (blåare) Normal (balanserad)
eller
Varm (rödare).
•
Lagring: för lagring av bildinställningarna (samt
lagring av
Kontrast + och Volym Begränsning
placerad i menyn Egenskaper).
& Tr yck på
W MENU
och välj Ljud (Ï)och
tryck sedan på
¬. Menyn Ljud visas:
é Använd knapparna
îÏ för att välja en
inställning och knapparna
Ȭ för att utföra
inställningen.
“ Då inställningarna är gjorda väljer du
alternativet
Lagring och trycker på ¬ för att
lagra dem.
‘
Lämna menyerna genom att trycka på knappen ∂.
Beskrivning av inställningarna:
•
Diskant: inverkar på de höga ljudfrekvenserna.
•
Bas: inverkar på de låga ljudfrekvenserna.
•
Balans: ger jämvikt i ljudet mellan vänster och
höger högtalare.
•
Delta V (volymskillnad): används för att jämna
ut volymskillnaderna som kan existera mellan
de olika kanalerna eller EXT-uttagen. Denna
inställning kan användas för programmen 1
till 40 och EXT-uttagen.
•
AVL (Automatisk ljudbegränsning): används
för automatisk kontroll av ljudstyrkan för att
undvika plötsliga ljudhöjningar, exempelvis vid
kanalbyte eller reklam.
•
Lagring: för att lagra ljudinställningarna.
Lagring av alternativ
& Tr yck på
W MENU
och välj Egenskaper (Ï)
och tryck på
¬. Du kan ställa in:
é
Flytta bild (endast tillgänglig på stora bildskärmar).
Stora skärmar är känsliga för variationer i
jordens magnetfält. Genom denna inställning
kan man motverka dess inflytande.
“
Kontrast +: relaterar oavbrutet den mörkaste
delen av bilden till svart.
‘
Volym begränsning: används för att minska brus
(snö). Denna inställning är värdefull vid dålig
mottagning.
Obser
vera: Om du vill lagra inställningarna
Kontrast + och Volym begränsning använder du
alternativet Lagring på menyn Bild.
(
Lämna menyerna genom att trycka på knappen ∂.
Huvud Menye
$ Bild
• Ljud
• Egenskaper
• Installera
Huvud Menye
• Bild
$ Ljud
• Egenskaper
• Installera
Î
ï
Bild
Î
$
Ljus
Í
--I------ 39
Æ
• Färg
• Kontrast
• Skärpa
• Färgtemp.
• Lagring
Î
ï
Ljud
Î
$
Diskant
Í
-----I--- 56
Æ
• Bas
• Balans
• Delta V.
• Volymbegräns.
• Lagring
Page 88

14
Analog text-TV
Text-TV är ett informationssystem som de flesta analoga TV-kanalerna sänder.Text-TV sänder även
undertext för människor med nedsatt hörsel.
Tr yck på:
Du får fram:
12
BACK
VCR
DVD
MENU
OK
A/D
”
P(age)
564
879
0
¢
∫
†
Á
ª
-
3
-
+ +
.
DIGITAL
TV
[
OPTIONS
›Ó
¤Ÿ
Œ
Ë
MENU
SELECT
∏ù
SMART
SMART
Ø
MODE
CANCEL
P
Ë
Ó
CANCEL
Ë
TV
MENU
Ÿ
›
Œ
¢
¤
Inkoppling av
text-TV
Val av en sida
Tar in eller lämnar text-TV.En innehållsförteckning med
lista över tillgängliga rubriker visas.Varje rubrik betecknas
med ett sidnummer (alltid 3-siffrigt).
Även vissa digitala program kan innehålla analog text-TV.
Om så är fallet blir den åtkomlig om du trycker på text-TVknappen i 3 sekunder.
Om text-TV inte är tillgänglig, är sidan 100 blank och den förblir
blank (stäng i så fall av text-TV och välj en annan kanal).
Skriv in önskat sidnummer med knapparna 0 till 9 eller
@ P #,îÏ.Exempel: för sidan 120 knappar du in 120
120. Numret visas högst upp till vänster på skärmen,
sidräknaren letar och sidan visas. Upprepa momentet när
du vill se en annan sida.
Om räknaren fortsätter att söka är sidan inte tillgänglig eller
sänds inte.Välj ett annat nummer.
Direktval av
rubrik
Färgade zoner visas i skärmens nederkant. De 4 färgade
knapparna gör det möjligt att ta fram rubriker eller
motsvarande sidor.
Innehållsförteckning
För att gå tillbaka till innehållsförteckningen (i allmänhet sidan 100)
.
Stopp för
delsideväxling
Vissa sidor består av delsidor som automatiskt rullas upp.
I så fall kan du stoppa eller starta växlingen med denna
knapp.Texten
_ visas högst upp till vänster.
Förstoring av
en sida
Dold
information
Favoritsida
Visar först den övre, sedan den undre delen av sidan och
går till sist tillbaka till normalläge.
Tar fram/tar bort dold information (lösningar på spel eller
frågor/svar).
För varje text-TV-program mellan 1 och 40 kan du lagra 4
favoritsidor som du kan nå med de färgade knapparna
(röd, grön, gul och blå).
& Tr yck på knappen
W MENU
för att ställa in favoritsidor.
&Visa först den favoritsida som du vill lagra.
& Håll sedan ned valfri färgad knapp under 3 sekunder.
Sidan lagras.
& Upprepa dessa steg för de andra färgknapparna.
& Sidan kommer nu att automatiskt visas längst ned på
skärmen var gång text-TV kopplas in. För att gå tillbaka
till de vanliga rubrikerna trycker du på
W MENU
.
Om du vill radera allting trycker du på
∂ i 5 sekunder.
Page 89

15
Format 16/9
Digital text
De bilder du tar emot kan överföras till format 16:9 (bred skärm) eller 4:3 (traditionell skärm).Bilder
i 4:3 har ibland svarta band längst ned och längst upp (brevlådeformat).
Denna funktion gör det möjligt att ta bort de svarta banden och optimera bildvisningen på skärmen.
Automatisk omkoppling.
TV-apparaten är utrustad med automatisk omkoppling som styrs av den kod som skickas ut med vissa
program och som ger rätt skärmformat.
Du kan givetvis också byta format manuellt.
Användning av olika skärmformat
Tr yck på tangenten p för att välja olika lägen:
4:3, Zoom 14:9, Zoom 16:9,Text Zoom, Superbred ochWide Screen.
Om du tittar på ett analogt program (enbart), kan du komma direkt till dessa inställningar med knapparna È och ¬.
Vissa digitala kanaler, som du väljer precis som andra digitala kanaler, erbjuder speciella text-TVtjänster (exempelvis BBCTEXT).Vissa digitala kanaler erbjuder även information om programmet
som sänds (ett meddelande visas eventuellt nederst på bildskärmen).
& Följ anvisningarna på skärmen för att använda den digitala text-TV-funktionen.
é Beroende av tjänst kan du uppmanas att använda markör- och
SELECT-knapparna (u), de färgade
knapparna,
TEXT-knappen (c) och ibland sifferknapparna.
“ När du är färdig med att titta på text-TV, välj då en annan kanal med
@ P #-knapparna eller följ
anvisningarna på skärmen för att få tillbaka bilden.
4:3
Bilden visas i format 4:3 och ett svart band syns på båda sidor
om bilden. Endast i analoga program kan bilden förstoras med
hjälp av
îÏ-knapparna.
Zoom 14:9
Bilden förstoras till format 14:9. Ett smalt svart band blir kvar
på sidorna. I analoga program använder du
îÏ-knapparna
för att visa bildens översta resp.understa del.
Zoom 16:9
Bilden förstoras upp till format 16:9. Detta läge rekommenderas
för bilder med svarta band upptill och nedtill (brevlådeformat). I
analoga program använder du
îÏ-knapparna för att visa
bildens översta resp.understa del.
Te xt Zoom
Läge som gör det möjligt att visa bilder i 4:3 över skärmens hela
yta med synlig text. I analoga program använder du
îÏ-
knapparna för att förstora resp.förminska bildens understa del.
Superbred
Läge som gör det möjligt att visa bilder i 4:3 över skärmens hela
yta genom att bredda bildens sidor.I analoga program använder du
îÏ-knapparna för att visa bildens översta resp. understa del.
Wide Screen
Läge som ger rätt proportioner för bilder som sänd i fullstor
16:9 utan svarta band över/under bilden.
++
”
--
Á
12
SMART SMART
-
P
[
ù
∏
3
564
879
0
ª
(age)
Page 90

16
VCR
DVD
¢
∫
.
EXIT/OPTIONS
›Ó
¤Ÿ
Œ
Ø
MODE
CANCEL
Anslutning av andra apparater
TV-apparten är utrustad med 2 uttag, EXT1 och EXT2, vilka placerats på apparatens baksida.
Uttag EXT1 har in- och utgångar för audio och video samt RGB-ingångar.
Uttag EXT2 har in- och utgångar för audio och video samt S-VHS-ingångar.
Gör anslutningarna som på bilden.Använd en eurokabel av
god kvalitet.
Om din videobandspelare inte utrustats med ett uttag för
eurokabel kan videon endast anslutas via antennuttaget.
I så fall måste du ställa in videobandspelarens testsignal och ge
den ett programnummer (se manuell lagring, s. 5).
För att visa videobandspelarens bild, tryck på knappen
0.
Videobandspelare med dekoder
Anslut dekodern till videobandspelarens andra uttag för
eurokabel. På så sätt kan du ta in kodade sändningar.
Videobandspelare
Satellitmottagare, dekoder,CDV, spel, o.s.v.
Gör anslutningarna som på bilden.
För bästa bildkvalitet skall de apparater som avger RGBsignaler (digital dekoder, spel,vissa CDV, o.s.v.) anslutas till
EXT1 och de apparater som avger S-VHS-signaler
(S-VHS och Hi-8 videobandspelare) skall anslutas till EXT2.
Öch övriga apparater ansluts antingen till EXT1 eller
EXT2.
Beroende på modell är uttagen placerade på TV-apparatens
framsida (ibland under en lucka) eller på sidan av
apparaten.
Anslut enligt figuren.Välj
AV / S-VHS med knappen n.
Om du har en Mono-apparat ska ljudsignalen kopplas till
uttaget audio L.Använd knappen
e för att koppla ljudet till TV-
apparatens vänstra och högra högtalare.
Hörlurar
När du kopplar in hörlurarna bryts ljudet i TV-apparaten.
Justera hörlurarnas ljudstyrka med hjälp av knapparna
@”#.
Hörlurarnas impedans ska vara mellan 32 och 600 ohms.
Ytterligare apparater
Frontanslutning
Hur man kopplar in de anslutna apparaterna
Tr yck på knappen n för att välja EXT1, för modeller med 2
scartkontakter:
EXT2 / S-VHS2 (S-VHS-signaler i EXT2-uttaget) och
AV / S-VHS för dubbel anslutning (om sådana finns).
Flertalet apparater (dekoder, videobandspelare) sköter omkopplingen
automatiskt.
EXT 2
VCR
EXT 1
S-VHS
Video
R Audio L
S-VHS
Video
R Audio L
**
S-VHS, Hi-8
VHS, 8 mm
Page 91

17
VCR- och DVD
Om TV-apparaten skall anslutas till en hifi-anläggning används
en ljudkabel.Anslut uttagen « L » och « R » på TV-apparaten
till « AUDIO IN » « L » och « R » på hifi-anläggningen.
Använd en digital ljudanslutningskabel mellan TV-apparatens
”SPDIF”-utgång (finns endast på vissa versioner) och en
”DIGITAL IN”-ingång på förstärkaren (förstärkare med koaxial
digitalingång).
Ett anpassat gränssnitt är tillgängligt för anslutning av en CAM
(conditional access-modul) och ett kort (smartcard). Kontakta
din servicegivare om du önskar mer information om de här
modulerna.
OBS!
TV-apparaten bör alltid stängas av innan någon modul sätts in i
det anpassade gränssnittets fack.
Förstärkare
Anpassat gränssnitt
beredskapsläge
· inspelning *,
∆ paus
Ê stopp,
Æ uppspelning,
¢ snabbspolning bakåt,
∫ snabbspolning framåt,
ta fram menyn*
val (îÏ) och inställning (Ȭ) *
u bekräftelse *
val av kanal,
skriv in ett nummer
* Vissa programmeringsfunktioner finns inte på alla modeller
(markör, meny, OK-knappen, o.s.v.).
Fjärrkontrollen passar till alla Philips videobandspelare samt till
andra modeller som använder fjättkontrollsystemet RC5.
Med hjälp av fjärrkontrollen kan du styra huvudfunktionerna i videobandspelaren eller DVD.
&
Tr yck på MODE -knappen för att välja önskat läge: VCR (videobandspelare)
eller DVD .
Kontrollampan på fjärrkontrollen tänds och visar valt läge. Efter 20 sekunder utan åtgärd släcks
lampan (återgång till TV-läge).
é Förutsatt att utrustningen medger det, kan följande knappar användas:
SPDIF
¤Ÿ
VCR
¢
DVD
›Ó
MODE
Ø
Œ
MENU
TV
Ë
SELECT
OK
+ +
”
[
BACK
Á
∏ù
†
12
564
879
SMART
-
0
.
-
SMART
ª
DIGITAL
OPTIONS
CANCEL
MENU
A/D
3
∫
P(age)
Page 92

18
Tips
Dålig bild (i analogt läge)
Närhet till berg eller höghus kan ge upphov till
dubbla bilder, eko eller skuggor. Försök i så fall
att ställa in bilden manuellt: se
Fininställning
(s. 12) eller ändra utomhusantennens riktning.
Är du säker på att din antenn kan ta in
sändningar på den här frekvensen (UHF- eller
VHF-band)?
Vid svåra mottagningsförhållanden (flimrig bild)
skall
NR i menyn Egenskaper ställas på Till (s. 13).
Dålig bild (i digitalt läge)
Om bilden ofta fryser,eller vid blockeringseffekter,
beror felet på dålig mottagning.Kontrollera menyn
för signalstyrka (se sid. 6).
Beroende på styrkan hos de tillgängliga digitala
marksignalerna inom ditt område, ger
standardantennerna för analoga utsändningar
oftast tillräckligt god mottagning av digitala
signaler Om så ej är fallet bör en antenn med
liten strålbredd och av god kvalitet installeras
av någon auktoriserad installatör på/utanför
fastigheten och den bör riktas så, att den
uppfångar maximal digital signalstyrka.
Ingen bild
Om TV-mottagaren inte startar, tryck två
gånger på standbyknappen på fjärrkontrollen.
Du har väl inte glömt att ansluta antennen? Har
du valt rätt system (s. 12)? Dåligt anslutna
eurokablar eller antennuttag är ofta orsaken till
bild- och ljudproblem (det händer att
anslutningssladdarna dras ut till hälften när du
flyttar eller vänder TV-apparaten). Kontrollera
samtliga anslutningar.
Inget ljud (i analogt läge)
Om du på vissa kanaler får in bild men inget
ljud innebär det att du inte har rätt TV-system.
Förändra inställningen
System (s. 12).
Om fjärrkontrollen inte längre fungerar:
kontrollera att inställningen på sidan av
fjärrkontrollen är i
På TV-läge.
TV-apparaten reagerar inte på fjärrkontrollen och
kontrollampan blinkar inte när du använder
fjärrkontrollen? Dags att byta batterier.
Beredskapsläge
För att spara el är TV-apparaten försedd med
delar som möjliggör en mycket låg förbrukning i
beredskapsläge (mindre än 3 W).
Rengöring av TV-apparaten
Skärmen och TV-höljet bör endast rengöras
med en ren och mjuk duk som inte luddar.
Använd inte produkter baserade på alkohol
eller lösningsmedel.
Händer det fortfarande ingenting?
Försök aldrig reparera TV-apparaten själv när
något är fel.Ta alltid kontakt med din
återförsäljare.
Mittfrekvenstabell (i KHz)
Digital Nominell
frekvenskanal
mittfrekvens KHz
21 . . . . . . . . . . . . . . . . .474 000
22 . . . . . . . . . . . . . . . . .482 000
23 . . . . . . . . . . . . . . . . .490 000
24 . . . . . . . . . . . . . . . . .498 000
25 . . . . . . . . . . . . . . . . .506 000
26 . . . . . . . . . . . . . . . . .514 000
27 . . . . . . . . . . . . . . . . .522 000
28 . . . . . . . . . . . . . . . . .530 000
29 . . . . . . . . . . . . . . . . .538 000
30 . . . . . . . . . . . . . . . . .546 000
31 . . . . . . . . . . . . . . . . .554 000
32 . . . . . . . . . . . . . . . . .562 000
33 . . . . . . . . . . . . . . . . .570 000
34 . . . . . . . . . . . . . . . . .578 000
35 . . . . . . . . . . . . . . . . .586 000
36 . . . . . . . . . . . . . . . . .594 000
37 . . . . . . . . . . . . . . . . .602 000
38 . . . . . . . . . . . . . . . . .610 000
39 . . . . . . . . . . . . . . . . .618 000
40 . . . . . . . . . . . . . . . . .626 000
41 . . . . . . . . . . . . . . . . .634 000
42 . . . . . . . . . . . . . . . . .642 000
43 . . . . . . . . . . . . . . . . .650 000
44 . . . . . . . . . . . . . . . . .658 000
45 . . . . . . . . . . . . . . . . .666 000
Digital Nominell
frekvenskanal
mittfrekvens KHz
46 . . . . . . . . . . . . . . . . .674 000
47 . . . . . . . . . . . . . . . . .682 000
48 . . . . . . . . . . . . . . . . .690 000
49 . . . . . . . . . . . . . . . . .698 000
50 . . . . . . . . . . . . . . . . .706 000
51 . . . . . . . . . . . . . . . . .714 000
52 . . . . . . . . . . . . . . . . .722 000
53 . . . . . . . . . . . . . . . . .730 000
54 . . . . . . . . . . . . . . . . .738 000
55 . . . . . . . . . . . . . . . . .746 000
56 . . . . . . . . . . . . . . . . .754 000
57 . . . . . . . . . . . . . . . . .762 000
58 . . . . . . . . . . . . . . . . .770 000
59 . . . . . . . . . . . . . . . . .778 000
60 . . . . . . . . . . . . . . . . .786 000
61 . . . . . . . . . . . . . . . . .794 000
62 . . . . . . . . . . . . . . . . .802 000
63 . . . . . . . . . . . . . . . . .810 000
64 . . . . . . . . . . . . . . . . .818 000
65 . . . . . . . . . . . . . . . . .826 000
66 . . . . . . . . . . . . . . . . .834 000
67 . . . . . . . . . . . . . . . . .842 000
68 . . . . . . . . . . . . . . . . .850 000
69 . . . . . . . . . . . . . . . . .858 000
Page 93

ANALOGISET
VALIKOT
1
Johdanto
Sisällys
Tämä ohjekirja neuvoo television asennuksessa ja käytössä ja se kannattaa lukea
läpi huolellisesti.
Uskomme, että tuote vastaa täysin laatuvaatimuksianne.
Television asennus . . . . . . . . . . . . . . . . . . . . . . . . . . . . . . . . . . . . . . . . . . . . . . . . . .2
Television näppäimet . . . . . . . . . . . . . . . . . . . . . . . . . . . . . . . . . . . . . . . . . . . . . . . .2
Kaukosäätimen näppäimet . . . . . . . . . . . . . . . . . . . . . . . . . . . . . . . . . . . . . . . . . . .3
Miten siirrytään digitaalisille ja analogisille kanaville? . . . . . . . . . . . . . . . . . . . . . . .3
Television avaaminen ensimmäisen kerran . . . . . . . . . . . . . . . . . . . . . . . . . . . . . . .4
Palkissa olevien tietojen lukeminen . . . . . . . . . . . . . . . . . . . . . . . . . . . . . . . . . . . .4
Järjestä palvelut . . . . . . . . . . . . . . . . . . . . . . . . . . . . . . . . . . . . . . . . . . . . . . . . . . . .5
Uusien palveluiden katselu tai kuuntelu . . . . . . . . . . . . . . . . . . . . . . . . . . . . . . . . .5
Lisää uudet palvelut . . . . . . . . . . . . . . . . . . . . . . . . . . . . . . . . . . . . . . . . . . . . . . . . .5
Asenna uudelleen kaikki palvelut . . . . . . . . . . . . . . . . . . . . . . . . . . . . . . . . . . . . . .6
Testaa vastaanotto . . . . . . . . . . . . . . . . . . . . . . . . . . . . . . . . . . . . . . . . . . . . . . . . .6
Kielen ja käyttöpaikan omat asetukset . . . . . . . . . . . . . . . . . . . . . . . . . . . . . . . . . .7
Pääsyn rajoitukset . . . . . . . . . . . . . . . . . . . . . . . . . . . . . . . . . . . . . . . . . . . . . . . . . .7
Suosikkiluettelon määrittäminen . . . . . . . . . . . . . . . . . . . . . . . . . . . . . . . . . . . . . .8
Informaatio . . . . . . . . . . . . . . . . . . . . . . . . . . . . . . . . . . . . . . . . . . . . . . . . . . . . . . .8
Ohjelmistopäivityksen lataaminen . . . . . . . . . . . . . . . . . . . . . . . . . . . . . . . . . . . . .8
Vaihtoehdot-valikon käyttö . . . . . . . . . . . . . . . . . . . . . . . . . . . . . . . . . . . . . . . . . . .9
TV guide (TV-opas) . . . . . . . . . . . . . . . . . . . . . . . . . . . . . . . . . . . . . . . . . . . . . . . . .9
Tallentaminen . . . . . . . . . . . . . . . . . . . . . . . . . . . . . . . . . . . . . . . . . . . . . . . . . . . .10
Automaattinen analogisten kanavien virittäminen . . . . . . . . . . . . . . . . . . . . . . . .11
Analogisten kanavien lajittelu . . . . . . . . . . . . . . . . . . . . . . . . . . . . . . . . . . . . . . . .11
Manuaalinen analogisten kanavien virittäminen . . . . . . . . . . . . . . . . . . . . . . . . . .12
Analogisten kanavien nimeäminen . . . . . . . . . . . . . . . . . . . . . . . . . . . . . . . . . . . .12
Kuva-asetukset . . . . . . . . . . . . . . . . . . . . . . . . . . . . . . . . . . . . . . . . . . . . . . . . . . .13
Ääniasetukset . . . . . . . . . . . . . . . . . . . . . . . . . . . . . . . . . . . . . . . . . . . . . . . . . . . .13
Toiminnot-valikon käyttö . . . . . . . . . . . . . . . . . . . . . . . . . . . . . . . . . . . . . . . . . . .13
Analoginen tekstitelevisio . . . . . . . . . . . . . . . . . . . . . . . . . . . . . . . . . . . . . . . . . . .14
Digitaalinen tekstitelevisio . . . . . . . . . . . . . . . . . . . . . . . . . . . . . . . . . . . . . . . . . .15
16:9-toiminto . . . . . . . . . . . . . . . . . . . . . . . . . . . . . . . . . . . . . . . . . . . . . . . . . . . .15
Oheislaitteiden liittäminen . . . . . . . . . . . . . . . . . . . . . . . . . . . . . . . . . . . . . . . . . .16
Liitettyjen laitteiden valitseminen . . . . . . . . . . . . . . . . . . . . . . . . . . . . . . . . . . . . .16
VCR- ja DVD . . . . . . . . . . . . . . . . . . . . . . . . . . . . . . . . . . . . . . . . . . . . . . . . . . . .17
Vihjeitä . . . . . . . . . . . . . . . . . . . . . . . . . . . . . . . . . . . . . . . . . . . . . . . . . . . . . . . . .18
Keskitaajuustaulukko (KHz) . . . . . . . . . . . . . . . . . . . . . . . . . . . . . . . . . . . . . . . . .18
DIGITAALISET
VALIKOT
°
Kierrätysohjeet
Tässä televisiovastaanottimessa on käytetty raaka-aineita, joita voidaan käyttää
uudelleen tai kierrättää.Ympäristöhaittojen ehkäisemiseksi erikoisliikkeet
huolehtivat käytettyjen laitteiden purkamisesta ja niiden sisältämien
kierrätyskelpoisten materiaalien talteenotosta (tiedustele jälleenmyyjältä).
Tuotteen digitaalisissa
valikoissa käytetään
viimeisintä
SunMicrosystems
IncinJava
™
-
teknologiaa.
Suomi
Page 94

Televisiossa on 4 tai 5 näppäintä, jotka sijaitsevat
joko laitteen päällä tai etuosassa mallista riippuen.
VOLUME -+ (- ” +) näppäimillä säädetään
äänenvoimakkuutta.
PROGRAM -+ (- P +) näppäimillä valitaan
ohjelmat.Valikkoihin päästään pitämällä
painettuna molempia näppäimiä
” - ja ” +
(tai
näppäintä
MENU).
PROGRAM -+ näppäimillä voidaan nyt valita
säätö ja
” -+ näppäimillä säädetään.
Kun haluat pois valikoista, pidä painettuna
molempia näppäimiä
” - ja ” +
(tai
näppäintä
MENU).
PROGRAMVOLUME
--
++
2
&
Television paikka
Aseta televisio tukevalle alustalle ja jätä
vähintään 5 cm: n ilmatila laitteen ympärille. Jotta
vaaratilanteita ei pääsisi syntymään, älä aseta
television päälle mitään esineitä, esimerkiksi
peittäviä esineitä (pöytäliinaa), vedellä täytettyjä
astioita (maljakoita) tai lämpöä säteileviä esineitä
(valaisimia).Televisiota ei myöskään saa jättää
alttiiksi roiskevedelle.
é
Liitännät
• Työnnä antennijohto television takana
olevaan liitäntään :.
•
Liitä verkkojohto pistorasiaan (220-240 V / 50 Hz).
“
Kaukosäädin
Asenna kaukosäätimeen kaksi R6-tyyppistä
paristoa ja varmista, että ne ovat oikeinpäin.
Varmista, että tilanvalitsin on asetettu tv-asentoon.
Laitteen mukana toimitetut paristot ovat
ympäristöystävällisiä eivätkä sisällä elohopeaa,
nikkeliä tai kadmiumia. Älä heitä paristoja roskiin
vaan vie ne kierrätyspisteisiin (kysy neuvoa
myyjältä). Kun vaihdat paristot, käytä
samantyyppisiä paristoja.
‘
Käynnistäminen
Paina virtakytkintä. Punainen merkkivalo syttyy ja
kuvaruutuun tulee kuva. Siirry suoraan sivulle 4
kohtaan
Pikaviritys.Jos televisio jää valmiustilaan,
paina kaukosäätimen näppäintä P
#.
Merkkivalo vilkkuu, kun käytät kaukosäädintä.
5 cm
5 cm
5 cm
Television asennus
Television näppäimet
Page 95

3
Kaukosäätimen näppäimet
Tiedot ruudulla
Paina digitaalisessa tilassa näppäintä
kerran saadaksesi tiedotuspalkin
näkyviin, toisen kerran saadaksesi
lisätietoja kanavasta ja kolmannen kerran
poistaaksesi tiedotuspalkin (katso s. 4).
Analogisessa tilassa näppäimen avulla
näytetään / poistetaan kanavatiedot
(numero,nimi ja äänitila). Pidä näppäintä
alhaalla viisi sekuntia, jotta analogisen
kanavan numero on pysyvästi näkyvissä.
TV guide (TV-opas)
(katso s. 9).
Valitse EXT-liitännät
(katso s. 16).
Toimintovalitsin
Toimintovalitsimella aktivoit
kaukosäätimen videonauhuri- tai
DVD-tilassa (katso s.17).
TV-valikko
TV-valikon avulla näytät analogiset
valikot tai poistut niistä.
Valitse
Näyttää tai poistaa kanavaluettelon
digitaalitilassa.Valitse kanavaîÏ-
näppäimellä ja näytä kanava
u-näppäimellä.
Äänenvoimakkuus
äänen voimakkuustason säätö
16:9-kuvakoot (s. 15)
äänen vaimentaminen
äänen poistaminen tai palauttaminen
Kuva- ja ääniasetukset
Näppäimen avulla voidaan ottaa
käyttöön kuva- ja ääniasetuksia.
Personal-kohta vastaa valikoihin
tallennettuja asetuksia.
Valmiustila
Näppäimellä televisio säädetään
valmiustilaan. Jos haluat avata
television uudelleen, painab,P @#
tai 09.
Vaihtoehdot-valikko
(katso s. 9).
Teksti-tv-ominaisuudet (s. 14)
ja video- tai DVD-näppäimet (s.17)
Digitaalinen valikko
Näppäimellä siirryt digitaalisiin
valikoihin tai poistut niistä,(kun
televisio on digitaalisessa tilassa).
Analoginen tai digitaalinen tila
Näppäimellä siirryt analogisesta
tilasta digitaaliseen ja päinvastoin.
Kohdistin
Näillä neljällä näppäimellä liikutaan
valikoiden sisällä tai siirrytään suoraan
16:9-kuvakokoihin (s.15).
Edellinen kanava
viimeksi katsotulle kanavalle siirtyminen
Numeronäppäimet
Numeronäppäimillä voit siirtyä kanaville
suoraan. Kun haluat valita 2- tai 3-
numeroisen kanavanumeron,toinen tai
kolmas numero on painettava,ennen kuin
viiva häviää näkyvistä. Kanavan numero,nimi
(ja äänitila analogisessa tilassa) ilmestyvät
ruutuun muutamaksi sekunniksi.
Äänitila
Näppäimellä siirryt
Stereo-äänestä
Mono-ääneen tai voit valita kielen (mm.
Dual I ja Dual II).
Kun äänitila on säädetty
Mono-ääneksi,
ilmoitus näkyy punaisena ruudulla.
Surround-ääni
Näppäimellä aktivoidaan tai
poistetaan käytöstä Virtual Dolby
Surround * -efekti.Dolby Surround
Pro Logic -äänenlaatu on saatavilla
stereoääneen. Mono-äänessä
jäljitellään stereo-äänen
tilatehostetta.
* Kehitetty Dolby Laboratoriesin lisenssillä.
Dolby, Pro Logic ja kaksois-D-symboli ovat
Dolby Laboratoriesin tuotemerkkejä.
Kanavien valinta
Tällä näppäimellä siirryt seuraavalle tai
edelliselle kanavalle (tai sivulle
digitaalisissa valikoissa).
Tekstitystoiminto
Näppäimellä aktivoidaan tekstitystoiminto
tai poistetaan se käytöstä.
TV-vastaanottimessa on kaksi viritintä, joiden avulla televisio vastaanottaa kanavia.Toinen virittimistä on
tarkoitettu digitaalisille ja toinen analogisille kanaville.Siirry analogisesta tilasta digitaaliseen ja
päinvastoin kaukosäätimen
v-näppäimellä.Valitse kanava näppäimillä P @#tai 09.
Miten siirrytään digitaalisille ja analogisille kanaville?
.
¤Ÿ
VCR
DVD
MODE
·
MENU
TV
SELECT
OK
Ø
∆
¢
›Ó
Œ
Ê Æ
Ë
OPTIONS
∫
CANCEL
MENU
DIGITAL
A/D
++
†
-
SMART
ª
P(age)
3
”
BACK
Á
[
∏ù
12
564
879
SMART
-
0
Page 96

4
Kun avaat TV-vastaanottimen ensimmäisen
kerran, ruutuun ilmestyy
onnittelut-viesti.
Viestin kieli muuttuu joka viides sekunti.
Jos viestivalikko ei ilmesty näytölle, pidä
vastaanottimen
”- ja ”+-näppäimiä alhaalla
viisi sekuntia, jolloin valikko tulee näkyviin.
&
Paina kaukosäätimenu-näppäintä, kun
haluamasi kieli näkyy ruudulla.
Asennus
-
valikko ilmestyy ruudulle.
é
Kieli
sekä sitä vastaava
Maa
ja
Aikavyöhyke
ovat
nyt valittuna aloitusruudun mukaisesti.Voit
kuitenkin vielä muuttaa omia asetuksia ennen
palvelujen selausta.
“ Valitse kohdistinnäppäimillä
Kieli,Maa
tai
Aikavyöhyke
ja tarkista, ovatko säädöt omien
asetustesi mukaisia. Muuta tarvittaessa säätöjä
kohdistinnäppäimillä ja poistu painamalla
u-
näppäintä.
Varoitus
: Jos valitset väärän maan,
kanavanumerointi ei ole maassasi käytettävän
standardin mukainen.
‘ Valitse valikosta
Palvelujen selaus ja aloita
asennus
u-näppäimellä. Palvelujen selaus -
valikko ilmestyy ruudulle.
Kaikki digitaaliset ja analogiset kanavat haetaan
ja tallennetaan automaattisesti. Kun haku on
saatu päätökseen, valikossa ilmoitetaan
löydettyjen digitaalisten palvelujen ja
analogisten kanavien lukumäärä.
( Aloita television katselu painamalla
u-
näppäintä kahdesti.
Kanava, joka on valittu viimeksi, avautuu
televisiossa.Asennus on valmis.
Kun valitset digitaalisen kanavan, ruudun
yläreunaan ilmestyy tiedotuspalkki muutamaksi
sekunniksi.
Saat palkin näkyviin myös kaukosäätimen
∂-
näppäimellä. Kun painat näppäintä toisen kerran,
saat lisätietoja ohjelmasta (jos tietoja on saatavilla).
Palkki sisältää seuraavat tiedot: esiasetettu
numero,kanavan nimi, ohjelman kesto,
lähetysaika, ohjelman nimi ja meneillään olevan
ohjelman jäljellä oleva kesto.
Te levision avaaminen ensimmäisen kerran
Palkissa olevien tietojen lukeminen
Palkin kuvaus
Onnittelut tämän Philips-television valinnasta.
Aloita digitaalitelevision käyttö painamalla OK.
Asennus
Aseta vaihtoehdot ja aloita palvelujen selaus
Kieli
Maa
Aikavyöhyke
Palvelujen selaus
11:46
Suomi
Suomi
(GMT+2:00) Helsinki
Aloita painamalla OK
2 11:06 - 11:09
BBC2 Snooker
11:46
Minuuttia jäljellä : 14
u
ù
i
ß
esiasetettu
numero
symbolit
kellonaika
ohjelman
aloitus- ja
päättymisaika
jäljellä oleva
kesto
ohjelman nimi kanavan nimi
Symbolien kuvaus
i
Tästä ohjelmasta on saatavilla lisätietoja.
Näytä tai
poista tiedot ∂-näppäimellä.
ß Tekstitys on saatavilla.Jos haluat tekstityksen
näkyviin, paina ß- tai
OPTIONS-näppäintä ja
siirry
Vaihtoehdot-valikkoon ja valitse
tekstityskieli.
ù Muita puhekieliä on saatavilla,ja ne voidaan
valita
Vaihtoehdot-valikosta.
u Valittu suosikkiluettelo näytetään aktivoidun
luettelon värisenä.
Page 97

5
Järjestä palvelut
Tämän valikon avulla voit muuttaa
tallennettujen digitaalisten kanavien ja
radioasemien järjestystä.
& Näytä asennusvalikko painamalla digitaalisessa
tilassa
‹ MENU-näppäintä.
é
Valitse Asennus Ï-näppäimellä, paina
¬-näppäintä kahdesti ja valitse
Palveluluettelot-valikko.
“ Paina
îÏ-näppäimiä valitaksesi Järjestä
palvelut
ja paina ¬-näppäintä.
‘ Paina
îÏ-näppäimiä ja valitse kanava, jonka
haluat vaihtaa.
( Aktivoi painamalla
u-näppäintä.
Jos haluat purkaa valitun kanavan asetukset, paina
punaista näppäintä.
§ Valitse (
îÏ) sen kanavan numero, johon
haluat vaihtaa kanavan.
è Vahvista vaihto painamalla
u-näppäintä.Vaihto
on tehty.
! Toista kohdat ‘–è, kunnes kaikki kanavat
ovat halutussa järjestyksessä.
ç Poistu valikosta painamalla
‹ MENU-näppäintä.
Palvelun tarjoaja on alkanut lähettää
alkuasennuksen jälkeen uusia tv-kanavia ja
radioasemia.Tässä valikossa voit tarkistaa,
mitkä kanavat ja asemat saatavilla.
& Näytä asennusvalikko painamalla digitaalisessa
tilassa
‹ MENU-näppäintä.
é Valitse
Asennus Ï-näppäimellä, paina ¬-
näppäintä kahdesti ja valitse
Palveluluettelot-valikko.
“ Paina
îÏ-näppäimiä, valitse Uusien TV-
palvelujen katselu
tai Uusien radiopalvelujen
kuuntelu
.
‘ Jos uusia palveluita on saatavilla,siirry
luetteloon painamalla
¬-näppäintä ja selaa
luetteloa painamalla îÏ-näppäimiä.
( Poistu valikosta painamalla
‹ MENU-näppäintä.
Uusien palveluiden katselu tai kuuntelu
Asennus
Asennus
Palveluluetteloiden hallinta
Sulje
Palveluluettelot
Palveluasetukset
Testaa vastaanotto
11:46
Järjestä palvelut
Vusien tv-palvelujen katselu
Vusien radiopalvelujen kuuntelu
Lisää uudet palvelut
Palvelun tarjoaja on alkanut lähettää
alkuasennuksen jälkeen uusia TV-
kanavia ja
radioasemia.Tässä valikossa voit hakea uudet TVkanavat tai radioasemat.
& Näytä asennusvalikko painamalla digitaalisessa
tilassa
‹ MENU-näppäintä.
é Valitse
Asennus painamalla Ï-näppäintä ja
paina sitten
¬-näppäintä.
“ Valitse
Palveluasetukset (Ï) ja paina ¬-
näppäintä.
‘ Paina
¬-näppäintä, valitse Lisää uudet
palvelut
, paina u-näppäintä ja aktivoi asennus.
Haku alkaa ja ainoastaan uudet kanavat
tallennetaan ja lisätään valikon
Kanavaluetteloon.Asennuksen
etenemisprosentti ja haettujen kanavien
lukumäärä näytetään ruudulla.
( Kun haku on saatu päätökseen, valitse tallenna
ja hyväksy uudet palvelut
u-näppäimellä.
§ Poistu valikosta painamalla
‹ MENU-näppäintä.
Asennus
Asennus
Asenna ja ohjaa palveluja
Sulje
Palveluluettelot
Palveluasetukset
Testaa vastaanotto
11:46
Lisää uudet palvelut
Asenna uudelleen kaikki palvelut
Page 98

6
Tässä valikossa voit asentaa kaikki digitaaliset
TV-kanavat ja radioasemat uudelleen.
& Näytä asennusvalikko painamalla digitaalisessa
tilassa
‹ MENU-näppäintä.
é Valitse
Asennus painamalla Ï-näppäintä ja
paina sitten
¬-näppäintä.
“ Valitse
Palveluasetukset (Ï) ja paina ¬-
näppäintä.
‘ Valitse
Asenna uudelleen kaikki palvelut (Ï) ja
paina
¬-näppäintä.
( Aloita asennus painamalla
u-näppäintä.
Kaikki digitaaliset palvelut haetaan ja
tallennetaan automaattisesti.
Kun haku on saatu päätökseen,valikkoon tulee
ilmoitus löydettyjen digitaalisten palveluiden
lukumäärästä.
§ Kun haku on saatu päätökseen,tallenna palvelut
u-näppäimellä.
è Poistu valikosta painamalla
‹ MENU-näppäintä.
Tässä valikossa voit tarkistaa antennin
välityksellä vastaanotetun signaalin
voimakkuuden.
& Näytä asennusvalikko painamalla digitaalisessa
tilassa
‹ MENU-näppäintä.
é Valitse
Asennus painamalla Ï-näppäintä ja
näytä asennusvalikko
¬ -näppäimellä.
“ Paina Ï-näppäintä, valitse Testaa vastaanotto
ja paina ¬-näppäintä. Saat ilmoituksen
todellisesta kanavan taajuudesta, verkon
nimestä, signaalin laadusta ja voimakkuudesta.
‘ Seuraavaksi sinun on annettava testaamasi
digitaalisen kanavan taajuus.
Luettelo digitaalisten kanavien numeroista löytyy TVlehdestä. Määritä taajuus sivulla 18 olevan
taulukon avulla.
( Jos signaalin laatu ja voimakkuus ovat heikkoja,
valikon alareunaan ilmestyy viesti,jossa
kehotetaan antamaan matalimman ja
korkeimman rajan väliin sijoittuva taajuus.Jos
vastaanotto on vielä taajuuden muuttamisen
jälkeenkin huono,voit kokeilla antennin
uusimista, säätämistä tai päivittämistä. Parhaan
tuloksen saavuttamiseksi kannattaa kuitenkin
ottaa yhteys erikoistuneeseen
antenninasentajaan.
Asenna uudelleen kaikki palvelut
Testaa vastaanotto
Asennus
Asennus
Testaa signaalin laatu
Sulje
Palveluluettelot
Palveluasetukset
Testaa vastaanotto
11:46
Taajuus
Ver kon nimi
Signaalin laatu
Signaalin voimakkuus
Asennus
Asennus
Asenna ja ohjaa palveluja
Sulje
Palveluluettelot
Palveluasetukset
Testaa vastaanotto
11:46
Lisää uudet palvelut
Asenna uudelleen kaikki palvelut
Page 99

7
Kielen ja käyttöpaikan omat asetukset
Tässä valikossa voit valita haluamasi kielen
äänelle, tekstitykselle, teksti-tv:n lle ja valikoille
sekä muuttaa käyttöpaikan asetuksia (maa ja
aikavyöhyke).
& Näytä asennusvalikko painamalla digitaalisessa
tilassa
‹ MENU-näppäintä.
é Valitse
Omat asetukset painamalla Ï-
näppäintä ja paina sitten
¬-näppäintä.
“ Valitse Kieli, Maa tai Digitaalinen ääni (Ï) ja
paina
¬-näppäintä.
‘ Valitse asetus
Ïî-näppäimillä ja siirry
alivalikkoon painamalla
¬-näppäintä Tee
haluamasi säädöt ja poistu painamalla
u- tai
È-näppäintä.
Kielen oletusasetukset
•
Ääni:äänen kielen valinta
•
Tekstitys/teksti-tv: tekstityksen ja teksti-tv:n
kielen valinta
•
Tekstitystoiminto:
Katkaistu
, Kytketty tai auto
(Automaattinen)
(tekstitys saatavilla ainoastaan
silloin, kun on kyseessä alkuperäinen äänilähetys).
•
Tekstitys huonokuuloisille
:Valikosta aktivoidaan
tai poistetaan käytöstä erityisesti
huonokuuloisille tarkoitettu tekstitys (jos
palvelun tarjoaja mahdollistaa sen).
• Järjestelmä: valikon kielen valinta
Käyttöpaikan asetukset
•
Maa: asuinmaasi valinta
•
Aikavyöhyke: asuinpaikkasi aikavyöhykkeen
valinta
Digitaalisen äänen asetukset
Valitse
AC3
(jos vahvistin tukee Dolby Digitalia)
tai
PCM
(jos vahvistin ei tue Dolby Digitalia).
( Poistu valikosta painamalla
‹ MENU-näppäintä.
Tässä valikossa voit asettaa digitaalisille
kanaville pääsyn rajoituksia
& Näytä asennusvalikko painamalla digitaalisessa
tilassa
‹ MENU-näppäintä.
é Paina Ï-näppäintä,valitse
Pääsyn rajoitukset ja
paina
¬-näppäintä.
“ Paina
¬-näppäintä ja siirry Pin-koodin käytön
asetus
-valikkoon.
‘ Käytä
Ȭ-näppäimiä, säädä Kytketty-
asentoon ja poistu painamalla
u-näppäintä.
Pääset siten tekemään muita säätöjä.
V
aroitus: käyttöoikeusrajoituksia käytettäessä sinun
on annettava pin-koodi ohjelman ajastettua
tallentamista varten.
•
Ikäluokitus: lukitse kanava valitsemalla
haluamasi luokitus.
Ikäluokitus estää ainoastaan joidenkin ohjelmien
katselun silloin, kun tarvittavat tiedot on liitetty
ohjelman yhteyteen.
•
TV-palvelut:valitse lukittava TV-kanava ja paina
sitten
u.
•
Radiopalvelut: valitse lukittava radiokanava ja
paina sitten
u.
•
Muuta pin-koodi: siirry valikkoon painamalla
¬.Vaihda käyttöoikeuskoodi toimimalla
näytön ohjeiden mukaan.
Oletusarvoinen pin-koodi on 1234. Jos olet
unohtanut henkilökohtaisen koodin, pin-koodi
voidaan palauttaa oletukseksi (1234) antamalla
yleiskoodi 0711.
( Poistu valikosta painamalla
‹ MENU-näppäintä.
TV:ssä on paikka yhteisliittymää (Common
Interface, CI) varten (katso sivu 17). CI -moduulin
avulla voidaan ottaa käyttöön lisäpalveluita,
esimerkiksi vastaanottaa maksu-TV-lähetyksiä. Kun
CI-moduuli on asennettu, Pääsyn rajoitukset valikossa näkyy CI Pääsyn rajoitukset -vaihtoehto.
CI-moduuli vastaa näytöllä näkyvistä viesteistä ja
teksteistä. Mikäli järjestelmä ei toimi
moitteettomasti, ota yhteys CI-palveluntarjoajaan.
Pääsyn rajoitukset
Asennus
Omat asetukset
Valitse haluamasi kieli
Sulje
Kieli
Maa
Digitaalinen ääni
11:46
Ääni
Tekstitys/teksti-tv
Tekstitystoiminto
Tekstitys huonokuuloisille
Järjestelmä
Asennus
Pääsyn rajoitukset
Kytke tai katkaise pin-koodin suojaus
Sulje
Pin-koodin käytön asetus
Ikäluokitus
Tv-palvelut
Radiopalvelut
Muuta pin-koodi
11:46
Kytketty Katkaistu
Page 100

8
Suosikkiluettelon määrittäminen
Tämän valikon avulla voidaan luoda
suosikkiluettelo, joka sisältää käyttäjän
haluamat TV-kanavat ja radioasemat. Kullakin
perheenjäsenellä voi olla oma
suosikkiluettelonsa.
& Näytä asennusvalikko painamalla digitaalisessa
tilassa
‹ MENU-näppäintä.
é Avaa
Suosikit-luettelovalikko painamalla ¬.
Voit luoda neljä erilaista suosikkiluetteloa.
“ Valitse haluamasi suosikkiluettelo
Ïî-
näppäinten avulla:
Luettelo 1, Luettelo 2,
Luettelo 3 tai Luettelo 4 ja paina sitten ¬.
‘ Valitse asetus
Ïî-näppäimillä ja siirry
alivalikkoon painamalla
¬-näppäintä
•
Nimi: siirry nimikentässä (16 merkkiä)
käyttämällä
Ȭ-näppäimiä ja valitse
kirjaimet
@P#näppäimillä. Nimen
kirjoittamisen jälkeen poistu valitsemalla
u.
•
TV-palvelujen valitseminen:valitse haluamasi
TV-kanava
Ïî-näppäimillä ja vahvista
valitsemalla
u.Poistu valitsemalla È.
•
Radiopalvelujen valitseminen: valitse
haluamasi radioasema
Ïî-näppäimillä ja
vahvista valitsemalla
u.Poistu valitsemalla
È.
•
Lisää kaikki palvelut: paina u,jos haluat lisätä
kaikki palvelut suosikkiluetteloosi.
•
Poista kaikki palvelut: paina u, jos haluat
poistaa kaikki palvelut suosikkiluettelostasi.
( Poistu valikosta painamalla
‹ MENU-näppäintä.
§ Suosikkiluettelo voidaan valita
Vaihtoehdot-valikosta
(katso seuraava sivu).
Tämä valikko sisältää ohjelmistoversiota ja uuden
ohjelmiston asentamista koskevat tiedot.
& Näytä asennusvalikko painamalla digitaalisessa
tilassa
‹ MENU-näppäintä.
é Valitse
Informaatio käyttämällä Ï-näppäintä ja
valitsemalla kahdesti
¬ .
Näyttöön tulee järjestelmäohjelma.
“ Valikon avulla voit hyväksyä
digitaalivastaanottimen kaikki
ohjelmistopäivitykset automaattisesti.
Ta vallisesti järjestelmä havaitsee valmiustilassa
ollessaan, kun uusi päivitys tulee valittavaksi.
Seuraavan kerran vastaanottimen
käynnistämisen yhteydessä ruudun alaosassa
näkyy palkki, joka ilmoittaa, että uusi
ohjelmistopäivitys on ilmestynyt. Lataa
ohjelmisto valitsemalla
u.Ohjelmiston
kuvauksen lisäksi ohjelmiston latausvalikko
näyttää lataamisen päivämäärän ja kellonajan.Osa
valikoista tai toiminnoista saattaa päivittyä
käytettävien ominaisuuksien lisääntyessä, mutta
pääpiirteissään vastaanottimen toiminta ei muutu.
Hyväksymisen jälkeen lataaminen käynnistyy
ilmoitettuun aikaan.
Huomautus: ohjelmistopäivityksen lataaminen
tapahtuu ainoastaan vastaanottimen ollessa
valmiustilassa.
‘ Poistu valikosta painamalla
‹ MENU-näppäintä.
Informaatio
Ohjelmistopäivityksen lataaminen
Asennus
Tee muutoksia suosikkipalveluihin
Sulje
Suosikit
Omat asetukset
Informaatio
Pääsyn rajoitukset
Asennus
11:46
Luettelo 1
Luettelo 2
Luettelo 3
Luettelo 4
Asennus
Antaa tietoa virheraporteistaja uuden ohjelman asentamisesta
Sulje
Suosikit
Omat asetukset
Informaatio
Pääsyn rajoitukset
Asennus
11:46
Järjestelmäohjelma
Kun päivitys on saatavana, on aina suositeltavaa hyväksyä ohjelmisto ja ladata se.
Päivityksen ollessa saatavilla näet sitä koskevan ilmoituksen vastaanottimen käynnistämisen
yhteydessä.
 Loading...