

Philips 3115 116 15961 User Manual
User Manual
Safety information Connecting peripherai equipment Before Calling Service
Congraiu[ations I
on Becoming
the proud ozvner
ofa
^hiCips
Colour 4z[evision
Congratulations on becoming the proud owner of a Philips CTV.
Your television set has been designed, engineered and tested to very high
standards to provide superior quality Picture and Sound for your enjoyment
Philips Colour Television means that the best design, reliability and quality
are ensured with every set manufactured. In addition, your set complies
with International Safety Standards - lEC 65.
Your television set has a host of features. Please read this 'Operating
Instructions' booklet carefully and get to know about your set.
We wish you a very enjoyable viewing on your new Philips Colour Television.
icture
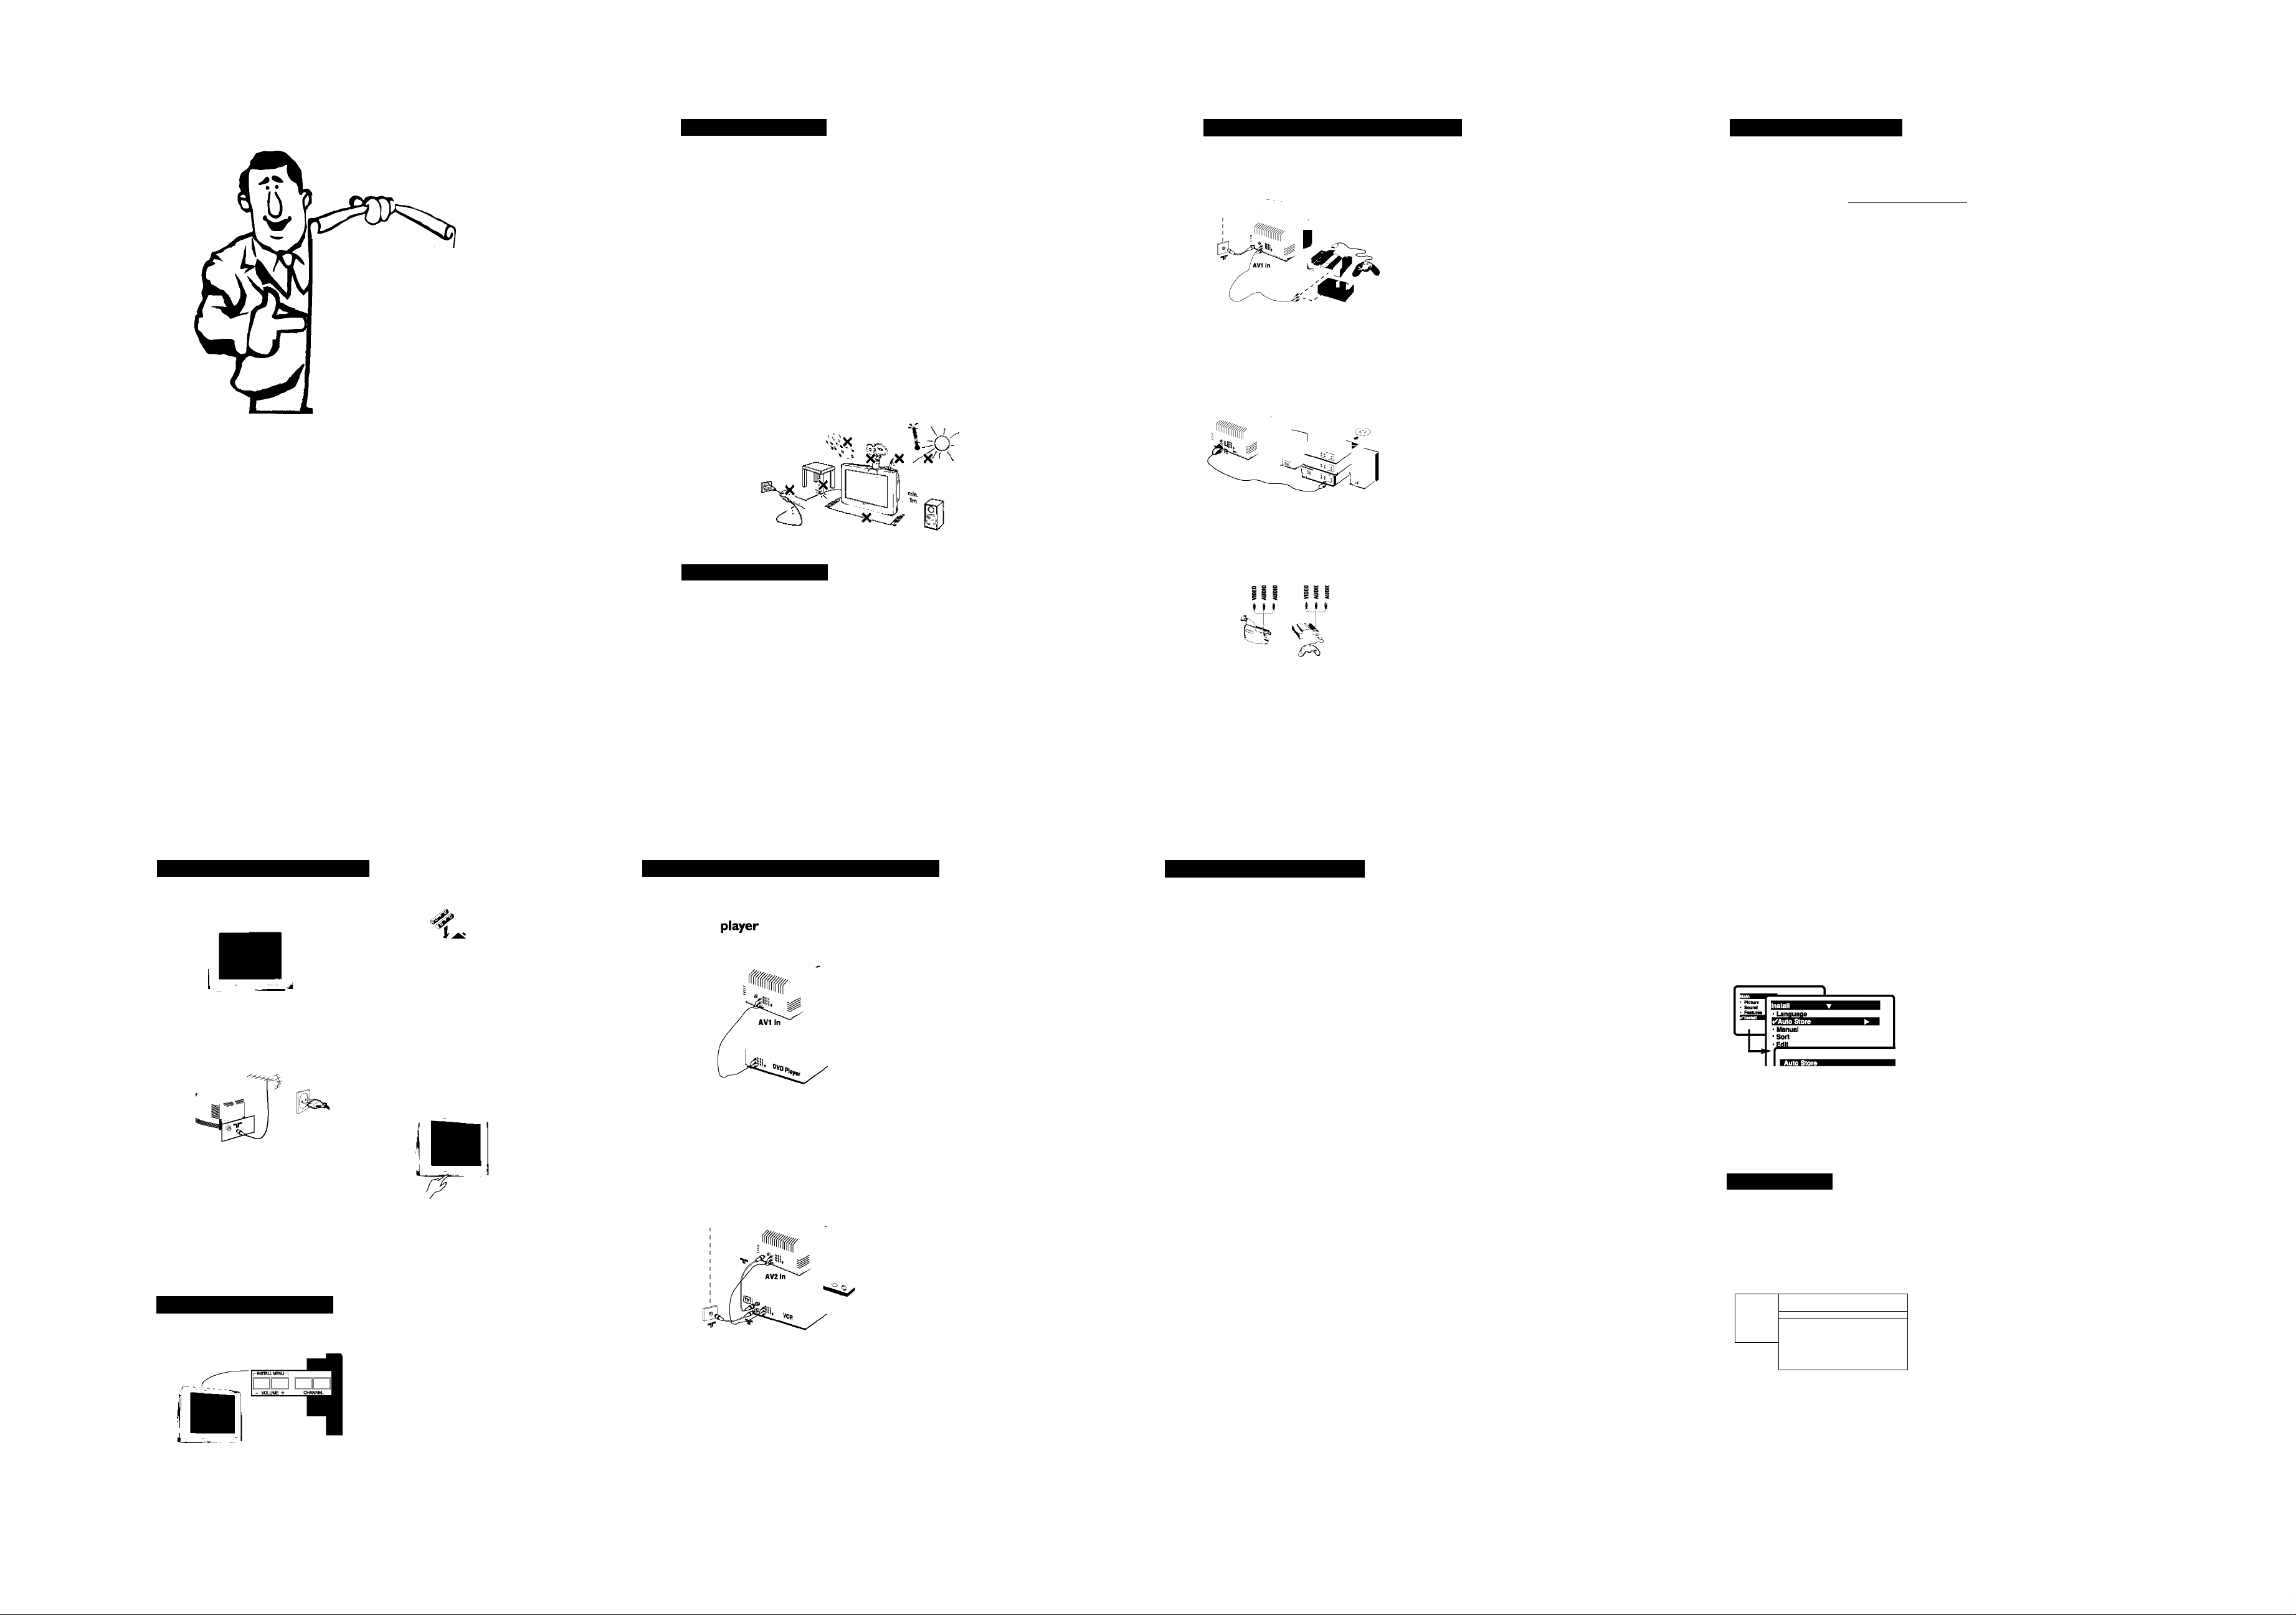
Disconnect mains piug when :
the indicator iight beiowtheJV screen is flashing continuously,
a bright white line is displayed across the screen,
there is a lightning storm.
the set is left unattended for a prolonged period of time.
cleaning the TV screen. Never use abrasive cleaning agents. Use a slight damp chamois
leather or soft cloth.
No naked flame sources, such as lighted candles, should be placed on top of the TV or in
the vicinity.
Do not place your TV set under direct sunlight or heat.
Leave at least 10 cm around each side ofTV set to allow for proper ventilation.
Avoid placing your set (e.g. near the window) where it is likely to be exposed to rain
or water.
No objects filled with liquids should be placed on top the TV so as to avoid dripping
or splashing of liquids on the set.
Useful information
Do not leave your set on standby mode for a prolonged period of time. Switch off set
to allow it to be demagnetised. A demagnetised set supports good picture quality.
Do not shift or move the set around when it is switched on. Uneveness in colour in
some parts of the screen may occur.
Never attempt to repair a defective TV yourself. Always consult a skilled service
personnel.
Other equipment
Amplifier
Side connections
©
00 0
S-VIDEO УШЕОШ L AUDIO R
O Carry out the connections as shown.
Q To optimise picture quality, connect the
equipment which produces the video signals
(digital decoder, games, etc) to AVI in and
equipment which produces the S-Video signals
S-Video and Hi-8 video recorders, certain DVD
drives to AV2 in and all other equipment to
either AVI in or AV2 in.
O To connect to a hi-fi system, use an audio
connection cable and connect the “L” and
“R” outputs on the TV set to the “AUDIO
IN”“L” and“R” input on your hi-f! amplifier.
Make the connections as shown.
With the GB key, select the channel Side.
For a monophonic device, connect the audio
signai to the AUDIO L input Use the key to
reproduce the sound on the left and right
speakers of the TV set
Headphones
When headphones are connected, the sound
on the TV set will be cutTheVOL + or keys are used to adjust the volume level.
The headphone impedance must be between
32 and 600 Ohms.
Below is a list of frequently occurred symptoms. Before you call for service, make these simple
checks. Some of these symptoms can easily be rectified if you know what to do.
Symptom
Colour patch
(uneveness)
What you should do
• Switch off the TV by the mains power button. Wait for 20
minutes before switching on again.
• Check the TV is not placed too near speakers or magnetic
objects.
No power
• Check the TV’s AC power cord is plugged into the mains
socket. If there is still no power, disconnect plug. Wait for
60 seconds and re-insert plug. Switch on the TV again.
No picture
• Check the antenna connection at the rear of the TV.
• Possible TV station problem.Try another channel.
Good picture
but no sound
• Try increasing the volume.
« Check that the sound is not muted. If it is muted, press the
Mute button on the remote control to restore sound.
Good sound but poor
• Try increasing the contrast and brightness setting.
colour or no picture
Snowish picture and
• Check antenna connection at the rear of the TV.
noise
Horizontal dotted lines
• Possible electrical interference e.g. hairdryer, vacuum
cleaner, etc. Switch off appliances.
Double images or
“Ghost” images
TV not responding to
remote control handset
• Possible poor positioning of antenna. Using a highly
directional antenna may improve reception.
• Check life span of batteries of remote control handset.
• Aim remote control handset directly at remote control
sensor lens on the TV.
No colour in picture
• Select your desired colour system manually if reception is
poor in Auto mode.
One white line across
• Switch-off the TV immediately and call for after-sales service
Features depends on specific to t/pe no. of modei.
Specification are subject to change without notice.
Installing your television set
Positioning the television set
I 10 cm
10 cm 10 cm
Piace yourTV on a soiid, stabie surfoce,
ieaving a space of at ieast 10 cm around the
appiiance.
Connections
insert the aeriai piug into the T socket
at the rear of the set.
If you are using an indoor aerial, reception
may be difficult in certain conditions. You
can improve reception by rotating the
aerial. If the reception remains poor, you
will need to use an external aerial.
insert the mains piug into a waii socket.
The keys on the TV set
The teievision set has 4 keys which are
iocated at the top or front.
PHILIPS
3115 116 15961
Remote control
insert the two R6-type batteries making sure
that they are the right way round.
If remote control is not used for a long period of
time remove the batteries and store it in a cool,
dry place.
Switching on
To switch on the set, press the on/off key.
A red indicator means that the television is on
standby mode. Refer to the next page on 'Remote
Control keys'for the various keys that you could
use to switch on the set An indicator light will
flash when it is receiving signal from the remote
control.
The Volume +/- keys are used to adjust the
sound ieveis. The Channel +/- keys are used to
select channels.
To access or exit the main menu, press down
the Volume +/- keys, simultaneously.
To select an item in the main menu, press the
Channel +/- key.
To select an adjustment, press down the
Volume +/- key.
C к Connecting peripheral equipment
DVD
Q Connect the TV’s green, blue and redY Pb Pr
Q Connect the TV’s red and white (R and L)
Q Turn on theTV and DVD player. Set the TV to
Video recorder
О Connect the TV’s yellow, white and red (AV2
Q Connect the TV’s red and white (R and L)
Q Turn on theTV andVCR player. Set theTV to
(AVI in) jacks to the corresponding
COMPONENTVIDEO OUT jacks on the
player.
AUDIO IN jacks to the corresponding
AUDIO OUT jacks on the player. Match the
cable colour to the jacks’ colour.The red jack
is the Right audio channel and the white jack
is the Left audio channel.
CVI and DVD background screen will come
on the screen.You can now play your disc.
Note: You need to select the channel CVI
manually to playback DVD disc.
in) jacks to the corresponding Video and
Audio jacks on the player.
AUDIO IN jacks to the corresponding
AUDIO OUT jacks on the player. Match the
cable colour to the jacks’ colour.The red jack
is the Right audio channel and the white jack
is the Left audio channel.
channel AV2.You can now play your video
cassette tape.
Connection is also possible via the aerial cable.
You will therefore need to tune in your video
recorder's test signal and assign a channel
number 0. Select channel 0 to playback.
E Ш Remote control keys
Personal Zapping
You can surf up to 10 personal
channels for each key
Sleeptimer
Selects a period of time after
which theTV will go into standby
mode automatically.
Add Personal Zapping list
Adds and stores channels into
Personal Zapping list
Smart Sound
Used to access a series of stored
settings: Theatre, Music, Voice,
Hall, Indipop, Raga, Orchestra,
Bhajan, Disco, Opera, Bhangra,
Gazal, Personal.
Menu
To call up or exits menus.
Cursor
These 4 keys are used to move
around the menus or provide direct
access to the different picture
formats
Volume
To adjust the sound level.
Digit keys
Direct access to the channels. For
a 2-digit channel, enter the 2nd
digit before the dash disappears.
Alternate channel
Switched between the current
and the previous channel.
»o
^ Ф d) 0
О 0 01
о 0 о!
0 0 ©^
©TOj 0
Standby
Lets you place theTV set on standby.
To turn on theTV, press CH + or
(!) ,AV,A/CH or digit keys.
AV channel selection
Press several times to select AVI,
CVI,AV2,YPbPr or Side.
Delete Personal Zapping list
Deletes stored channels from
Personal Zapping list
Smart Picture
Used to access a series of stored
settings: Rich, Natural, Soft, DVD/
VCD or Personal.
Incredible Surround
To activate/disable the Incredible
Surround feature. In stereo, the
speakers appear further apart In
:и_1
mono, a pseudo-spatial effect is
obtained.
i-n
During stereo transmission (in AV
mode), to switch from Stereo to
Mono. During dual sound
transmission, to switch betwen
language 1 or n.
Channel selection
To access the next or previous
channel.The number and sound
mode are displayed for a few
moments whenever you select a
new channel.
Mute
To mute or restore sound.
On screen display
To display/clear the on screen
information. Press the key for 3
seconds to activate permanent
display of channel number.This key
is also used to exit from the menu.
Doming
• A prolonged view of very bright static picture can lead to
devlopment of uneven colour patches in some portions of the
screen. This is not a defect and will disappear in few minutes
after moving picture resumes
СЖ1Ж1
This menu is used to store all available
channels automatically.
O Press the 0 key.
Q With the cursor, select the Install menu
and follow by the Auto Store.
’ Channel 2
TV 470 MHz
.
................►................
Manual Store
This menu is used to store channels one at a
time.
O Press the g key.
Q With the cursor, select the Install menu
and follow by the Manual.
• Sound
O Colour Sys(tem): use the or
key to select the desired colour system;
Auto, PAL, NTSC 3.58 or NTSC 4.43.
1
u
■ Sound Sys
■ Search
• Channel
■ Store
O Use the key to start auto store.
All the available TV channels will be stored
automatically.
This operation takes a few mlnutes.The display
shows the progress of the search and the
number of channels found.
OTo quit the menus, press @ .
Q Sound Sys(tem): use the U or
key to select the desired sound system;
BG, I, DKorM.
Q Search: Press gj.The search starts.
Once a channel is found, the scanning
stops. Go to the next step.
Q Channel: enter the required channel
with the^9,^S or digit keys.
Q Fine Tune: If the reception Is not
satisfactory, adjust using the W or W
keys.
@ Store: Press .The channel Is stored.
Q Repeat steps Q to Q for each channel
you wish to store.
(^To quit the menus, press @.
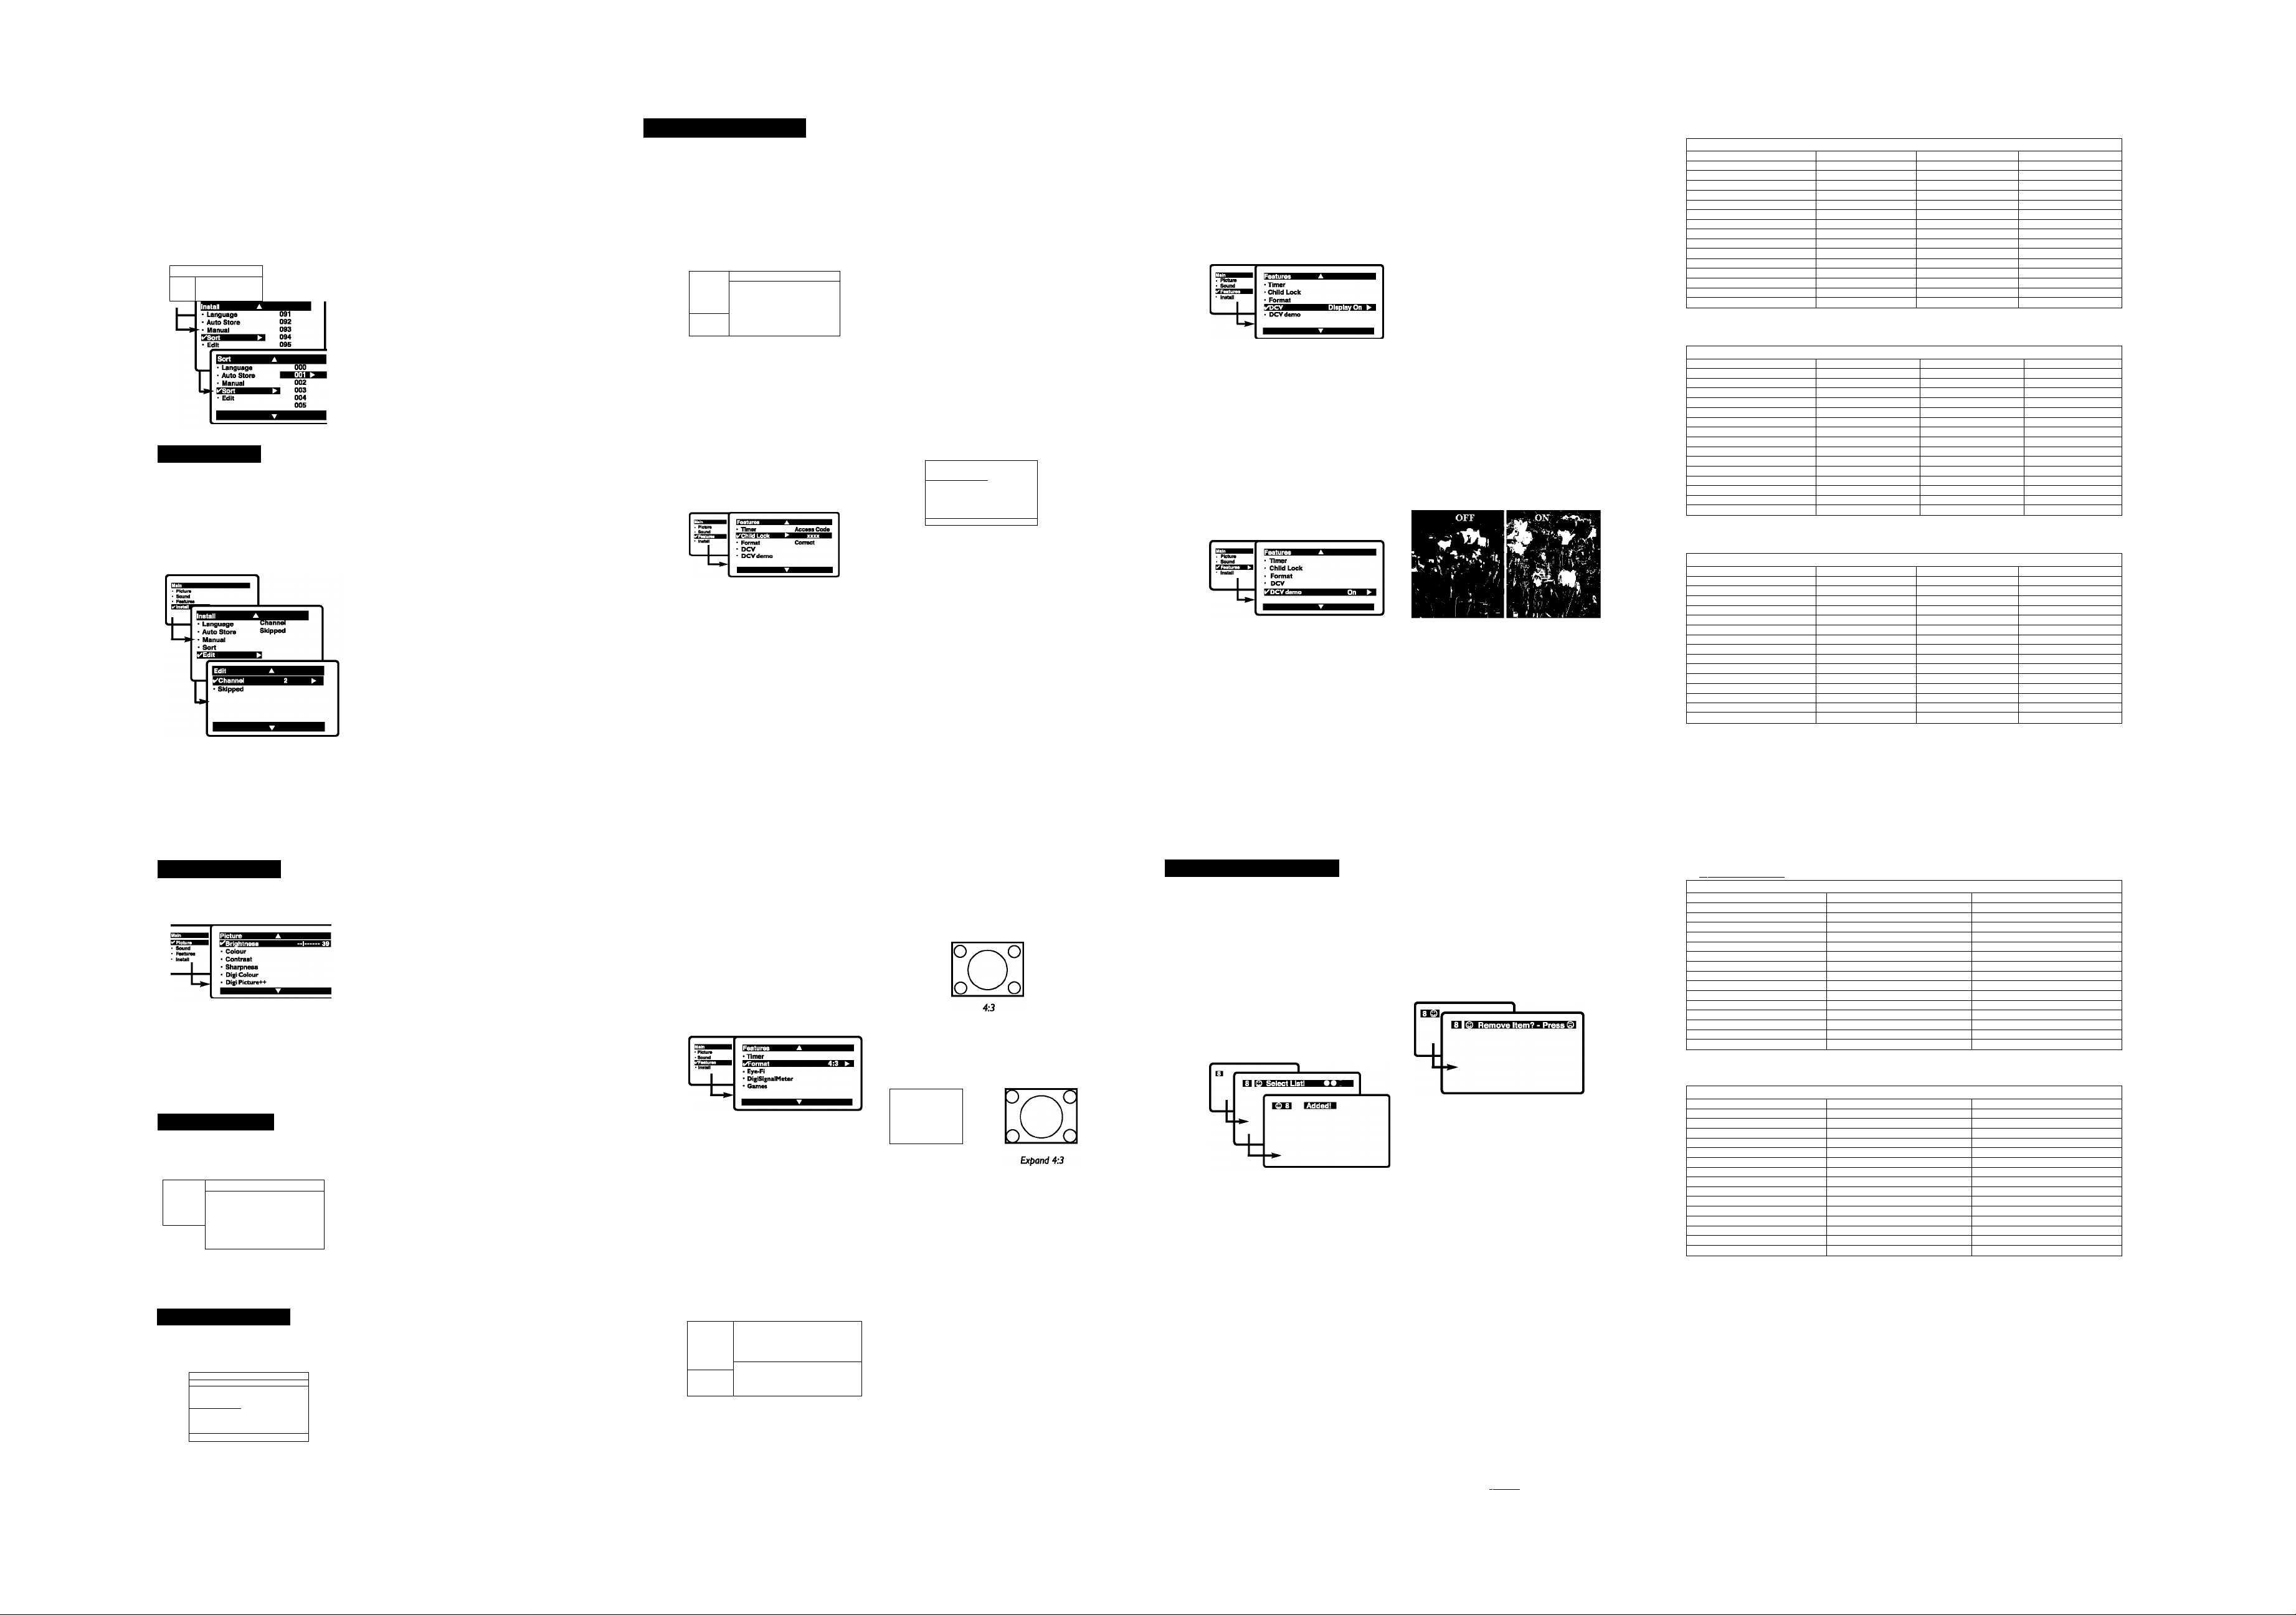
This feature allows you to rearrange channels
according to your preference.
O Press the Q key.The Main menu is
displayed on the screen.
Q With the cursor, select the Install menu
followed by the Sort menu,
e Use the or key to select the
channel number you want to change
• Picture
• Sound
Channel edit
This feature allows you to skip or edit
channels which have bad or weak TV signal or
channels you do not watch often.
Once a channel is skipped, you cannot have
access to it by the Channel + or- key.You can
only access the channels by the digit (0-9) keys.
from (e.g. 001) and confirm selection with
the ^B key.
Q Use the ^B or ^B key to select the
channel number you want to change to
(e.g. 004) and confirm selection with the
^B key.
The change is done. Channel 4 will move up to
channel 3 and channel 3 will move up to channel
Z
Q Repeat steps Q and Q for each
channel you wish to change.
O To quit the menus, press @ .
O Press the jp key.The Main menu is
displayed on the screen.
0 With the cursor, select the Install menu
followed by the Edit menu.
0 Enter into the menu and select the
channel number you wish to skip by the
digit keys.
0 Then use the ^B key to select Skipped.
Use the ^B key to select On.
0 Repeat steps e and 0 for each
channel you wish to skip.
0 To quit the menus, press 0.
To restore skipped channels
0 Repeat steps 0 to 0 above.
0 Use the ^B key to select Skipped and
the CB key to select Off.
0 Repeat steps 0 and 0 for each
channel you wish to skip.
0 To quit the menus, press 0.
J [ Timer Function
This feature allows you to set the timer to
switch to a channel at a specified time while
you are watching another channel or when the
TV is on standby mode.
Note; Timer will be disabled once the set is
switched off.
0 Press 0, use the key to select
Features and press the ^B key.
The Features menu is displayed.
. Pleure
' initall
1 MB
■ Format Start Time
* DigiSignalMeter Stop time
* Eye-Fi Channel
1
* Games Activate
u
0 Use the ^B key to select Timer.
GSEIS9
You can block certain channels or inhibit use
of the TV set completely.
Note:You can only access the locked channels via
the remote control. Keep the remote control in a
safe place.
0 Press 0, use the key to select
Features and press the ^B key.
The Features menu is displayed.
0 Use the ^B key to select Child Lock
and press the ^B key to enter,
e Key in the 4-digit access code, for the
first time or if you have forgotten the
code, enter 0711 twice.
There will be a prompt to key in the
New Code.
0 Key in your preferred code once and
again to confirm.
Display
Description of function:
Time; enter the current time.
Start Time: enter the time for the TV to
switch on or to switch channel.
Stop Time: enter the time to switch to
standby.
Note: If Stop Time is not keyed in. Tv will go to
standby mode after 4 hours.To switch on the TV
from standby, press Channel + or - digit or
Power key.
Channel: enter the channel to switch to.
Activate: enter mode of activating timer;
Once, Daily or Off.
Display: select On to display the time on the
TV screen.
0 Press the 0 key to exit.
The Child Lock menu is displayed.
0 Use the ^B or ^9 key to select a function
and the ^B key to enter or confirm
selection.
* Change Code 003
• Clear All 004
• Lock All
002
oos
006
007
Description of function:
Lock Channel: use the ^B or ^B key
to select a channel number to lock and
press the ^B key to confirm. The S
symbol will display next to the channel
that was locked.
Change Code: enter a new code and
again to confiorm.
Clear All: use to unlock all locked
channels. Select On to activate.
Lock All: use to lock all TV and external
channels. Select On to activate.
0 Press 0 to exit.
The DCV monitors and adjusts incoming
video signals to help provide the best picture
quality.When you choose to turn the
DCV to On or Display On, the Brightness,
Colour, Contrast, Sharpness, Dig! Contrast
and Digi Picture++ features are controlled
0 Enter Features menu as described in
“Features settings” on the previous page.
o Use the ^B key to select DCV and
press the ^B key to select Off, On
or Display On.
0 Press the 0 key to exit.
automatically. DCV adjusts these picture
settings continuously and automatically.
Description of option:
Offi the DCV will not be activated.
On: the DCV will work to give the viewer
the best possible picture, but will not
display the monitoring screen when
channels are changed.
Display On: an DCV monitoring screen will
be shown for a few seconds whenever
a channel is changed.
Light Sensor On: The picture get's adjusted
to ambient room light.
Note : Intelligent TV On-Off allows for further improvement in picture quality
(switch off Intelligent TV if it interferes with the picture).
The split screen display shows the image
performance before and after enhancements
to present clearly the effects of the picture
enhancement features.
0 Enter Features menu as described in
“Features settings” on the previous page.
0 Use the ^B key to select Demo and
press the ^B key to select On or Off.
The screen is split to dramatically show the
comparative images side by side.
without picture
enhancements
with picture
enhancements
Specifications
1 Specifications 1
Model Tvoe
Picture tube screen size (Diagonal)
Picture tube visible size (Diagonal) 35.7 cm 50.3 cm 52.7 cm
Audio Output (PMPO)
TV System
Colour System NTSC 4.43,3.58 Piayback NTSC 4.43, 3.58 Playback NTSC 4.43, 3.58 Playback
Sound System B/G 5.5 B/G 5.5 B/G 5.5
Antenna Input 75 Ohms coaxial 75 Ohms coaxial 75 Ohms coaxial
Externai connections Rear AV IN & OUT Rear AV IN & OUT Rear AV IN & OUT
Operating Voitage / Freguenev
Power consumption (normal) 38W+/-10% 50W+/-10% 60W+/-10%
standby Power
Set Dimensions: Width 36 cm
Net Weight (apgx.only) 9.5 Kg 18 Kg 22 Kg
Model Type 14 Vardaan DS & 14PT220420 Vardaan DS & 20PT220421RF Vardaan
Picture tube screen size (Diagonal) 36 cm 51 cm 53 cm
Picture tube visible size (Diagonal)
Audio Output (PMPO) 100 W 200 W 200 W
TV System PALB/G PALB/G, ECO AV Stereo PAL B/G, ECO AV Stereo
Colour System
Sound System B/G 5.5 B/G 5.5 B/G 5.5
Antenna Input 75 Ohms coaxial 75 Ohms coaxial 75 Ohms coaxial
External connections Rear AV IN & our & Front AV INRear AV IN & OUT Rear AV IN & OUT
Operating Voltage / Freguenev 150-276 Volts/50Hz 150 - 276 Volta/50Hz 150-276 Volta/50Hz
Power consumption (normal)
Standby Power <3W <3W <3W
Set Dimensions: Width 45.5 cm 59 cm 60 cm
Net Weight (appx.only) 10 Kg 19 Kg 25 Kg
Model Type 21PT2216 21PT2443
Picture tube screen size (Diagonal)
Picture tube visible size (Diagonal) 52.7 cm 51.6 cm 52.3 cm
Audio Output (PMPO)
TV System PAL B/G, ECO AV Stereo
Colour System NTSC 4.43, 3.58 Playback NTSC 4.43, 3.58 Playback NTSC 4.43,3.58 Playback
Sound System B/G 5.5 B/G 5.5 B/G 5.5
Antenna Input 75 Ohms coaxial 75 Ohms coaxial 75 Ohms coaxial
External connections
Operating Voltage / Freguenev 150-276 Volts/50Hz 150-276 Volts/50Hz 150-276 Volts/50Hz
Power consumption (normal) 55W+/-10% 55W+/-10% 60W+/-10%
standby Power
Set Dimensions: Width 52.2 cm 60 cm 62.7 cm
Net Weight (appx.only)
Depth 38 cm 48.5 cm 49 cm
Height
Depth
Height 35.5 cm 47 cm 46 cm
Depth 47.9 cm 52 cm 50.5 cm
Height
14Vardaan &14PT1415
36 cm
SOW SOW 200 W
PALB/G PALB/G
150-276 Volts/50Hz 150-276 Volts/50Hz 150-276 Volts/50Hz
<3W <3W <3W
35 cm
Specifications
35.7 cm
NTSC 4.43, 3.58 Playback NTSC 4.43,3.58 Playback NTSC 4.43, 3.58 Playback
38W+/-10% 60W+/-10%
38.5 cm 45 cm
Specifications
53 cm 53 cm 53 cm
200 W
RearAV IN & OUT
<1W < 1W <1W
46.1 cm 46 cm 46.5 cm
23.5 Kg
20 Vardaan & 20PT2015
51 cm
49.5 cm
45.5 cm
50.6 cm
200 W
PAL B/G, AV Stereo
RearAV IN & OUT RearAV IN & OUT
25 Kg 25 Kg
21 Vardaan & 21PT2104
53 cm
PAL B/G, ECO AV Stereo
60 cm
47 cm
51.6cm
55W+/-10%
52 cm
21PT3442
400 W
PAL B/G, AV Stereo
Picture settings
0 Press 0 then ^B. The Picture menu
will be called up.
0 Use the ^B or ^B keys to select a
setting and the ^9 or ^B ke
Note: during the picture adjustment, only
the selected line remains displayed. Press
^B or ^B to display the menu again.
0 Press 0 to exit.
Sound settings
0 Press
0
, select Sound (^B) and press
^B. The Sound menu will be called up.
______
• PIctur«
• rtrejat
0 Use the ^B or C
• Baee
• AVL
j
* Digi Bass
and the ^B or C
I key to select a setting
I key to adjust
0 Press 0 to exit
Features settings
0 Press
0
, select Features (^B) and press
^B. The Features menu will be called up.
. Picture
• Sound
* Install DigiSignalMeter
Timer
Power Saver
13 Format
Eye-Fi
Games
Description of the adjustments:
* Brightness: this changes picture brillance.
* Colour this changes the intensity of the
colour.
■ Contrast: this changes the difference
between the light and dark tones.
* Sharpness: this changes the picture
definition.
* Hue: this adjusts the skin colour tone in
NTSC channel.
■ Digi Color +: this changes the colour
rendering: Cold(bluer), Normal(balanced) or
Warm (redder).
■ Digi Picture++: attenuates picture noise
(snow) in difficult reception conditions.
« Digi Contrast: automatic adjustment of the
picture contrast which permanently sets the
darkest part of the picture black.
Description of the adjustments:
• Treble: this alters the high frequency sounds.
■ Bass: this alters the low frequency sounds.
’ Balance: this balances the sound on the left
and right speakers.
■ AVL (Automatic Volume Leveller): this Is used
to limit increases in sound, especially on
channel change or advertising slots.
■ Digi Real Audio (Incredible Surround):
this boost the effect of stereo sound.
* Digi Bass: this is used to enhance bass
output.
Description of the features:
• Timer, Child Lock, Format, Eye-Fi, Dev,
Dev demo. Power Saver, DigiSignalMeter,
Game: see explanation on the next few pages.
This feature enhances your viewing pleasure
by providing you with a choice of two picture
formats:- 4:3 and Expand 4:3.
0 Press 0, use the ^B or ^B key to select
Description of function:
4:3 - select this format if you want to display
a conventional picture using the full surface of
the screen.
Features and press the ^B key.
The Features menu is displayed.
0 Use the ^B key to select Format and
press the ^B key to select 4:3 or
Expand 4:3.
0 Press the 0 key to exit.
Expand 4:3 - select this format if you want
to expand pictures transmitted in a
‘letterbox’ format (black horizontal bars at
the top and bottom of the screen) to fill up
the entire screen.
°r Y
Letterbox
The Eye-Fi monitors and adjusts incoming
video signals to help provide the best picture
quality.When you choose to turn the
Eye-Fi to On or Display On, the Brightness,
Colour, Contrast, Sharpness, Digi Contrast
and Digi Picture++ features are controlled
automatically. Eye-Fi adjusts these picture
settings continuously and automatically.
. PIcturs
• Sound
■ UJ 111,1
* Install
1
L
• Timer
• Format
• DigiSignalMeter
■ Games
DigiSignalMeter is an intelligent feature which measures the incoming signai and
graphically represents the signal strength on your TV screen.
Note : Default mode for Intelligent TV(visible under Picture sub-menu only when
Eye-Fi isswitched On) is either Auto/OfF depending upon the signal condition. It can
be switched On (if defeult Off) for further improvement in picture quality (switch off
Intelligent TV if it interferes with the picture, status is stored per channel).
0 Enter Features menu as described in
“Features settings” on the previous page.
0 Use the ^9 key to select Eye-Fi and
press the ^B key to select Off, On
or Display On.
0 Press the 0 key to exit.
Description of option:
Offi the Eye-Fi will not be activated.
On: the Eye-Fi will work to give the viewer
the best possible picture, but will not
display the monitoring screen when
channels are changed.
Display On: an Eye-Fi monitoring screen
will be shown for a few seconds
whenever a channel is changed.
M K Personal Zapping
A list or series of favourite TV programs can
be selected and stored in the 4 coloured keys
with the Personal Zapping feature.With this
feature you can easily viewed up to a total of
10 preferred channels for each coloured key.
To add channels:
0 Select a channel with the digit keys.
0 Press ® to display list.
0 Press your favourite colour key to store
the channel in step 0.
0 Repeat steps 0to 0 to store more
channels.
0 Press 0 to exit.
Power Saver is an environmentally
friendly feature which reduces power
consumption of your TV by switching
to optimal settings for picture and
sound.
Select Power Saver on or
Select steps of 30 minutes
(upto 180 minutes).
Select Game
(Toggle Between Super Race<^
Power Ludo<-> Cricket<->Power Word)
Select Play to start playing
or Help-Line for Rules
To delete channels:
0 Select and press a colour key that has
stored channels repeatedly to select the
channel you want to delete.
0
Press 0 to display list.
0 Press 0 to remove channel.
0 Repeat steps0to0delete more channels.
0 Press 0 to exit.
To view channels:
Select and press a colour key that has stored
channels repeatedly to select the channel you
want to view.
Picture Tiler
■ Sound Power Saver
✓ Features k Fornat
I Install OigiSignalNeter
Tiler
✓ Power Saver
■ Foriat
Tiler
✓ Power Saver
IFornat
■ DigiSignalMeter
■ Eye-Fi
a Ganes.
Picture Tiner
■ Sound Chi Id Lock
✓ Features ^ Format
■ Install D.C.V
I Timer
i Child Lock
i Fornat
■ D.C.V
■ DigiSignalMeter
✓ Ganes. k
✓ Gane
■ Play
■ Help-line
Gane
Play
Help-line
H Specifications
Specifications
Model Type
Picture tube screen size (Diagonal) 53 cm 53 cm
Picture tube visible size (Diagonal) 52.3 cm 52.3 cm
Audio Output (PMPO) 400 W 1000W
TV System Multi System, AV Stereo Multi System, AV Stereo
Colour System
Sound System B/G, 1, DK, M B/G, 1, DK, M
Antenna Inout 75 Ohms cpaxial 75 Ohms coaxial
External connections
Operating Voltage / Freguenev 150-276 Volts/50Hz 150 - 276 Volts/50Hz
Power consumption (normal)
Standby Power <1W < 1W
Set Dimensions: Width 62.7 cm 62.7 cm
Net Weight (appx.only) 25 Kg 28 Kg
Model Type 29PT2204 29PT2452
Picture tube screen size (Diagonal) 72 cm 72 cm
Picture tube visible size (Diagonal)
Audio Output (PMPO) 1000W 400 W
TV System Multi System, AV Stereo Multi System, AV Stereo
Colour System
Sound System B/G, I, DK, M B/G, 1, DK, M
Antenna Input 75 Ohms coaxial 75 Ohms coaxial
External connections Rear AV IN & OUT & YUV, Side AV IN Rear AV IN & OUT & YUV, SVHS IN
Coeratino Voltage / Freguenev 150-276 Volts/50Hz 150 - 276 Volts/50Hz
Power consumption (normal) 114W-F/-10%
Standby Power <1W < 1W
Set Dimensions: Width 75.7 cm 78 cm
Net Weight (appx.only) 45.5 Kg 46 Kg
Depth
Height 46.5 cm 48.7 cm
Depth
Height 58.2 cm 59 cm
21PT2304 21PT2404
PAL, NTSC 3.58, NTSC 4.43, SECAM PAL, NTSC 3.58, NTSC 4.43, SECAM
Rear AV IN & OUT & YUV, Side AV IN Rear AV IN & OUT & YUV. Side AV IN
60W+/-10%
50.5 cm 50.5 cm
Specifications
69 cm
PAL, NTSC 3.58, NTSC 4.43. SECAM PAL. NTSC 3.58, NTSC 4.43, SECAM
49.3 cm 53 cm
84W4-/-10%
69 cm
85W+/-10%
 Loading...