

Philips 30PW862H, 34PW862H Owner’s Manual

Directions for Use
3121 235 20911

Once your PHILIPS purchase is registered, you're eligible to receive all the privileges
of owning a PHILIPS product. So complete and return the Warranty Registration
Card enclosed with your purchase at once. And take advantage of these important benefits.
Congratulations on your purchase,
and welcome to the "family!"
Dear PHILIPS product owner:
Thank you for your confidence in PHILIPS. You've selected one of the best-built, best-backed products
today. And we'll do everything in our power to keep you happy with your purchase for many years to come.
As a member of the PHILIPS "family," you're entitled to protection by one of the most comprehensive war-
ranties and outstanding service networks in the industry.
What's more, your purchase guarantees you'll receive all the information and special offers for which you quali-
fy, plus easy access to accessories from our convenient home shopping network.
And most importantly you can count on our uncompromising commitment to your total satisfaction.
All of this is our way of saying welcome-and thanks for investing in a PHILIPS product.
Sincerely,
Lawrence J. Blanford
President and Chief Executive Officer
PHILIPS
P.S. Remember, to get the most from your
PHILIPS product, you must return your
Warranty Registration Card within 10
days. So please mail it to us right now!
Know these
safetysymbols
_, This "bolt of lightning"indicatesuniasulatedmaterial within your unit may causean elec-
trical shock. For the safety of everyone inyour household, pleasedo not remove product cov-
_'The "exclamationpoint" calls attention to features for which you should read the
enclosed literature closely to prevent operating and maintenanceproblems.
WARNING: TO PREVENT FiRE OR SHOCK HAZARD, DO NOT EXPOSETHIS EQUIP-
MENT TO RAIN OR MOISTURE.
CAUTION: To prevent electric shock, match wide blade of plug to wide slot, andfully insert.
ATTENTION: Pour _viter leschocs _lectriques, introduirela lame la pluslarge de lafichedarts
la borne correspondante de la prise et pousser iusqu'au fond.
IMPORTANT SAFETY INSTRUCTIONS
Read before operating equipment
1. Read these instructions.
2. Keep these instructions.
3. Heed all warnings.
4. Follow all instructions.
g. Do not use this apparatus near water.
6. Clean only with a dry cloth. 17.
7. Do not Mock any of the ventilation openings. Install in accordance
with the manufacturers inslructions.
8. Do not install near any heat sources such as radiators, heat regis-
ters, stoves, or other apparatus (including amplifiers) that produce
heat.
9. Do not defeat the safety purpose of the polarized or grounding-
type plug. A polarized plug has two blades with one wider than
the other. A grounding type plug has two blades and third ground-
ing prong. The wide Made or third prong are provided for your
safety. When the provided plug does not fit into your outlet, con- 18.
sult an eleclrician for replacement of the obsolele outlet.
10. Protect the power cord from being walked on or pinched particu- 19.
larly at plugs, convenience receptacles, and the point where they
exit from the apparatus. 20.
11. Only use attachments/accessories specified by the manufacturer.
12. _ Use only with a cart, stand, tripod, bracket, or table
_[_,_ specified by the manufacturer, or sold with the app-
the Tart/apparatus combination to avoid injury from tip-over.
13. Unplug this apparatus during lightning storms or when unused for
long periods of time.
14. Refer all servicing to qualified service personnel. Servicing is
required when the apparatus has been damaged in any way, such
as power-supply cord or plug is damaged, liquid has been spilled 21.
or objects have fallen into apparatus, the apparatus has been
exposed to rain or moisture, does not operate normally, or has
been dropped. 22.
15. This product may contain lead and mercury. Disposal of these
materials may be regulated due to environmental considerations.
For disposal or recycling information, please contact your local
authorities or the Electronic Industries Alliance: www.eiae.org
16. Damage Requiring Service - The appliance should be serviced
by qualified service personnel when:
A. The power supply cord or the plug has been damaged; or
aratus. When a cart is used, use caution when moving
B. Objects have fallen, or liquid has been spilled into the appli-
ance; or
C. The appliance has been exposed to rain; or
D. The appliance does not appear to operale normally or
exhibits a marked change in performance; or
E. The appliance has been dropped, or the enclosure damaged.
Tilt/Stability - All televisions must comply with recommended
international global safety standards for tilt and stabilily properties
of its cabinet design.
• Do not compromise these design standards by applying exces-
sive pull force to the front, or top, of the cabinet which could ulti-
malely overturn the product.
• Also, do not endanger yourself, or children, by placing electron-
ic equipment/toys on the top of the cabinet. Such ilems could
unsuspectingly fall from the top of the set and cause product dam-
age and/or personal injury.
Wall or Ceiling Mounting - The appliance should be mounted to
a wall or ceiling only as recommended by the manufacturer.
Power Lines - An outdoor antenna should be located away from
power lines.
Outdoor Antenna Grounding - If an outside antenna is connect-
ed to the receiver, be sure the antenna system is grounded so as to
wovide some prolection against voltage surges and built up static
charges.
Section 810 of the National Electric Code, ANSI/NFPA No. 70-
1984, provides information with respect to proper grounding of
the mast and supporting structure, grounding of the lead-in wire to
an antenna discharge unit, size of grounding connectors, location
of antenna-discharge unit, connection to grounding electrodes, and
requirements for the grounding electrode. See Figure below.
Object and Liquid Entry - Care should be taken so that objects
do not fall and liquids are not spilled into the enclosure through
openings.
Battery Usage CAUTION - "Ik_wevent battery leakage that may
result in bodily injury, property damage, or damage to the unit:
• Install all batteries correctly, with + and - aligned as marked on
the unit_
• Do not mix batleries (old and new or carbon and alkaline, etc.).
• Remove batteries when the unit is not used for a long time.
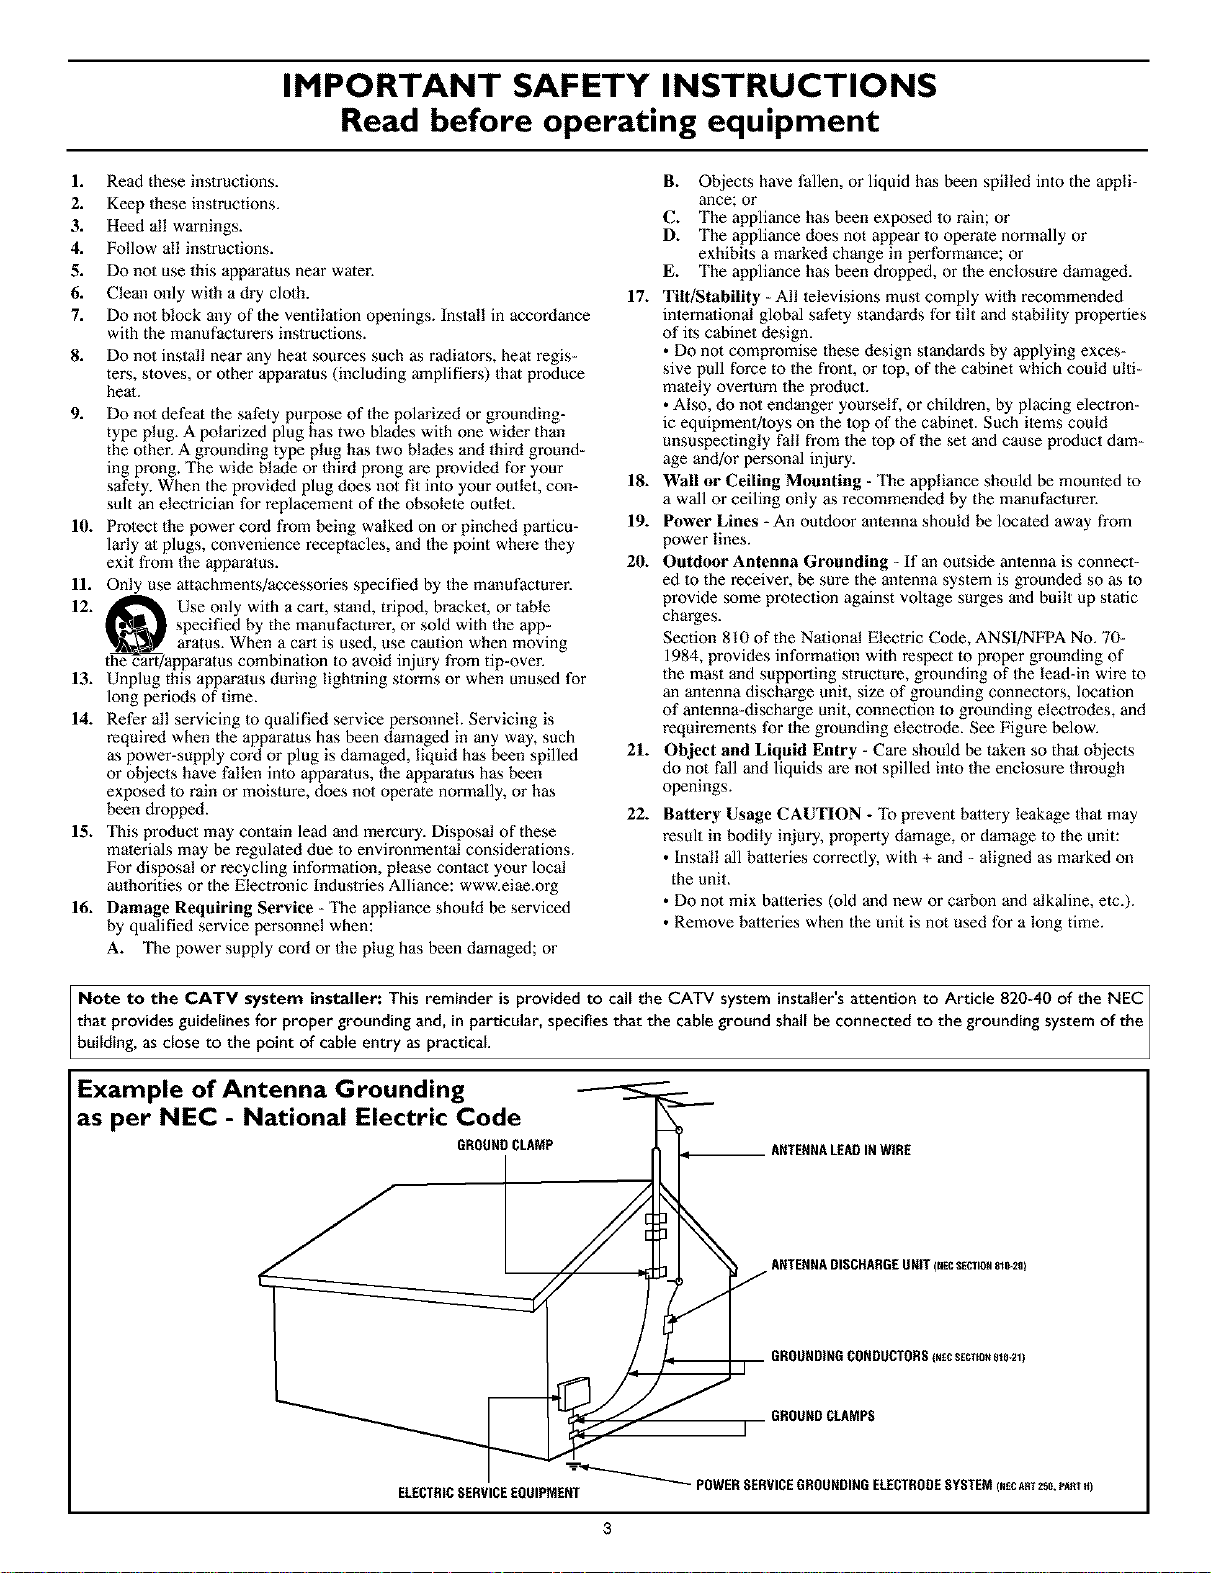
Note to the CATV system installer: This reminder is provided to call the CATV system installer's attention to Article 820-40 of the NEC]
that provides guidelines for proper grounding and, in particular, specifies that the cable ground shall be connected to the grounding system of the /
building, as close to the point of cable entry as practical. ]
Example of Antenna Grounding
as per NEC - National Electric Code
GROUNDCLAMP ANTENNALEADINWIRE
ELECTRICSERVICEEQUIPMENT
POWERSERVICEGHOUNDINGELECTRODESYSTEM (NECART258,PA_TH)
INTRODUCTION
Welcome/Regislration of Your TV ..................... 2
Safety/Precautions ............................... 2-3
Features .......................................... 5
_ INSTALL MENU CONTROLS
How to use the Language Control ............... 6
How to use the Tuner Mode Control ................... 7
How to use the AutoProgram Control .................. 8
How to Add or Delete Channels (Channel Edit) .......... 9
How to use the Name Control (Channel Label) .......... i0
How to see the TV Clock using the AutoChron "fMControl ,11
PICTURE MENU CONTROLS
Adjusting the Brightness Control ............... 12
Adjusting 1he Color Control ......................... 12
Adjusting 1he Picture Control ........................ 12
Adjusting 1he Sharpness Control ..................... 12
Adjusting the Tint Control .......................... 12
How to set the Color Temp Control ................... 12
How to use the Digital Options Control ................ 12
How to set the Dyn(amic) Contrast Control ............ 12
SOUND MENU CONTROLS
Adjusting the Treble Control .................. 13
Adjusting 1he Bass Control .......................... 13
Adjusting the Balance Control ....................... 13
How to use the AVL control ......................... 14
How to use the Incr,(edible) Surround Control .......... 15
How to set the Stereo Control ....................... 16
How to set the TV to receive Secondary Audio
Programming, also known as the SAP Control .......... 16
How to set the Audio Out Control .................... 17
How to turn lhe TV speakers on or off using
the Speaker Control ............................... 18
D FEATURE MENU CONTROLS
How to use the Timer controls:
Setting the TV Clock using the Time Control .......... 19
Setting a time for the TV to turn itself on using
the Start Time Control ............................ 20
Setting a time for the TV to turn itself off using
the Slop Time Control ............................ 21
Setting the TV to start on a specific channel using
the Channel Control .............................. 22
How to activate the controls using the Activale Control , ,23
How to view the time using the Display Control ....... 24
How to activate the Active Control rM ................. 25
How to use the AutoLock TMControls:
Understanding 1he AutoLock 'rMFeature .............. 26
Setting up an AuloLock 'rMAccess Code .............. 27
How to Block Channels ........................... 28
Blocking programming based on Movie Ratings ....... 29
Blocking programming based on TV Ratings .......... 30
AutoLock 'rMBlocking Options - Blocking Control ...... 31
AutoLock 'rMBlocking Options - No Rating Control ..... 32
How to review 1he AutoLock 'rMControl Status ......... 33
How to use the Closed Captioning Control ............. 34
How to change the screen (size) format using
1he Format Control ................................ 35
How to use the Rotation Control ..................... 36
How to use the Blue Mute Control ................... 37
_ REMOTE CONTROL RELATED FEATURES
How to set the Sleep Timer Control ............ 38
How to Use the Freeze Control ...................... 39
Using the AutoPicmre "fMControl ..................... 40
Using the AuloSound 'rMControl ...................... 41
Using the Surf Control (and Alternate Channel) ......... 42
Using 1he Remote Control with accessory devices
Direct Access Melhod ............................ 43
Code-Entry Method .............................. 44
Search Method .................................. 45
Direct-Entry Code list for accessory devices ........ 46-47
Accessory Specific Remote Control Buttons ........... 48
_PIP (PICTURE-IN-PICTURE)
Selecting the PIP Signal Source ............... 49
PIP Features (Remote Control Buttons) ................ 50
Window Size and Double Window PIP ................ 51
Adjusting the PIP Color and Tint ..................... 52
GENERAL INFORMATION
Troubleshooting ............................ 53
Care and Cleaning ................................ 54
Glossary of terms ................................. 55
Index ........................................... 56
Factory Service Locations ........................ 57-58
Notes ........................................... 59
Limited Warranty ................................. 60
Refer to the simple Quick Use and
Setup Guide (supplied with your TV)
for details on the following:
• Basic TV connections
• Advanced TV connections
• Basic TV operation
• Basic Remote Control operation
• Remote Control Button Descriptions
4
Active ControlTM continuously measures and corrects all incom-
ing signals to help provide the best picturequality.This feature
monitors andcorrectsboth the sharpness control and noise
reduction control.
Audio/Video Jack Panel allows direct connections with VCRs,
DVDs, or otherdevices, providing quality TV pictureand sound
playback.
Audio Volume Leveler (AVL) Control keeps the TV sound at
an even level. Peaks and valleys that occur during program
changes or commercial breaks are reduced, making for a more
consistent, comfortable sound.
AutoChron TM automatically sets the fight time of day anti
maintains it with digital precision through brownouts, power
failures, and even Daylight Savings Time adjustments.
AutoLoek TM allows you to block the viewing of certain chan-
nels or programs with certain ratings if you do not want your
children to view inappropriate materials.
Auto Programming scans (when activated) for all available
channels from regular antenna or cable signals and stores only
active broadcast stations in the TV's memory.
AutoPicture TM allows you to change the picture settings (color,
tint, contrast, etc.) for various types of programming, such as
sports, movies, multimedia (games), or weak signals with the
push of one button.
AutoSound TM allows you to select from three factory-set con-
trois and a personal control that you set according to your own
preferences through the onscreen Sound menu. The three facto-
ry-set controls (Voice, Music, and Theatre) enable you to tailor
the TV sound so as to enhance the particular programming you
are watching.
Channel Edit allows you to add or delete channels from the list
stored in the TV's memory. Channel Edit makes it easy to limit
or expand the number of channels that are available to you when
you press the Channel (+) or (-) buttons on your remote control.
Closed Captioning allows the viewer to read TV program dia-
logue or voice conversations as onscreen text.
Dynamic Contrast helps to sharpen the picture quality by
improving the contrast between the darkest and bfightest parts of
the picture.
Eye Fidelity (also know as Digital Options) give a choice of
two different scanning technics - Progressive Scan orInterlaced.
Progressive Scan doubles the numberof visible lines per field by
displaying all picture frame lines atonce, eliminating any picture
flicker. The Interlacedmode provides a double verticaldisplay
scan, which reduces annoying motion sweeps. The Interlaced
mode will also smooth out the jagged lines sometimes seen on
the edges of curved or angled surfaces.
Infrared Remote Control works your TV andother remote-
controlled devices, such as VCRs, DVD players, cable convert-
ers, and satellite receivers.
Onscreen Menu shows helpful messages and instructions for
setting TV feature controls (can be viewed in English, French, or
Spanish).
Sleep Timer automatically turns the TV OFF after a set amount
of time that you choose.
Standard Broadcast (VHF/UHF) or Cable TV (CATV) chan-
nel capability allows for viewing by antennaorcable.
Stereo capability,including a built-in audio amplifierand twin-
speaker system, allows for the reception of TV programsbroad-
cast in stereo sound.
Surf Button allows you to easily switch among only the chan-
nels thatare of interestto you (the ones that you have
programmed intothe TV's Surf control through the onscreen
menu),
Timer allows you to set your TV to turnitself ON andOFF
once ordaily like analarm clock.
As you unpack your TV, please note that this Directions
,for Use manual contains safety-tip information and
Factory Service Center locations, as well as a Warranty
Registration Card, remote control, and batteries for use
with the remote control.
Please take a few minutes to complete your registration
card. The serial number for lhe TV is on the rear of lhe set.
Refer to the back of this manual for instructions in the
cleaning and care of the TV.
Your new television and its packing contain materials thai
can be recycled and reused. Specialized companies can recy-
cle your product to increase the amount of reusable materials
and minimize the amounts that need to be properly disposed.
Your product also uses batteries that should not be thrown
away when depleted, but should be handed in and disposed of
as small chemical waste.
When you replace your existing equipment, please find out
about the local regulations regarding disposal of your old lel-
evision, batteries, and packing materials.
As an Energy Star® Parmer, Philips Consumer
Electronics has determined this product meets
the Energy Star® guidelines for energy efficien-
cy. Energy Star® is a U.S. registered mark. Using products
with the Energy Star® label can save energy. Saving energy
reduces air pollution and lowers utility bills.
Active Control, APAC, AutoPicture, AutoSound, AutoChron,
and Incredible Surround are trademarks of Philips Consumer
Electronics Company. Copyright 2001 Philips Consumer
Electronics.
*Manufactured under license from Dolby Laboratories.
"Dolby" and the double-D symbol are lrademarks of Dolby
Laboratories.
5
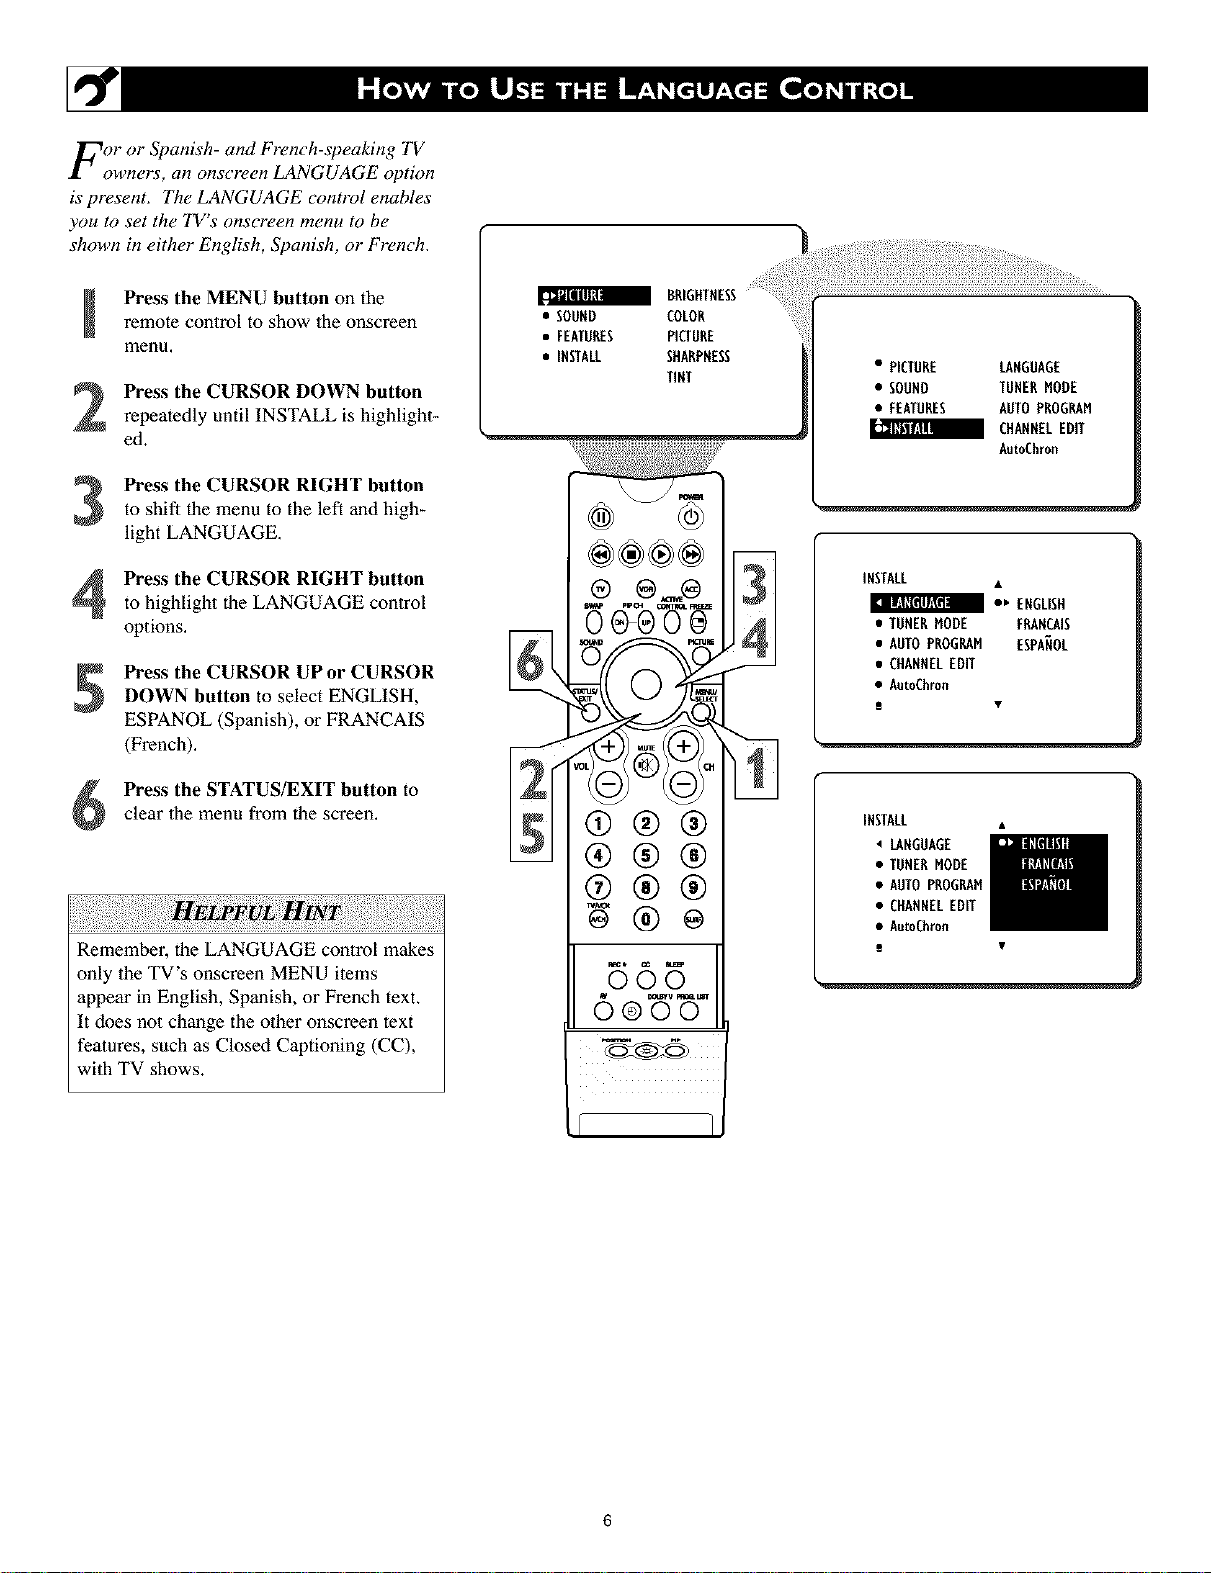
For or Spanish- and French-speaking TV
owners, an onscreen LANGUAGE option
is present. The LANGUAGE control enables
you to set the TV's onscreen menu to be
shown in either English, Spanish, or French.
remote control to show the onscreen
Press the MENU button on the
menu,
Press the CURSOR DOWN button
repeatedly until INSTALL is highlight-
ed.
Press the CURSOR RIGHT buttonto shift the menu to the left and high-
light LANGUAGE.
Press the CURSOR RIGHT button
to highlight the LANGUAGE control
options.
Press the CURSOR UP or CURSOR
DOWN button to select ENGLISH,
ESPANOL (Spanish), or FRANCAIS
(French).
a BRIGHTNESS
• SOUND COLOR
• FEATURES PICTURE
• INSTALL SHARPHESS
TINT
gt0- g
]
• PICTURE LAHGUAGE
• SOUHD TUHEBMODE
• FEATURES AUTOPROGRAM
CHANNELEDIT
AutoChron
IHSTALL
:' EHGL,SH
• TUNERHODE FRAHCAIS
• AUTOPROGRAM ESPANOL
• CHANNELEDIT
• AutoChron
i •
Press the STATUS/EXIT button to
clear 1he menu from 1hescreen.
Remember, the LANGUAGE control makes
only the TV's onscreen MENU items
appear in English, Spanish, or French text.
It does not change the other onscreen text
features, such as Closed Captioning (CC),
with TV shows.
®®®
®®®
565
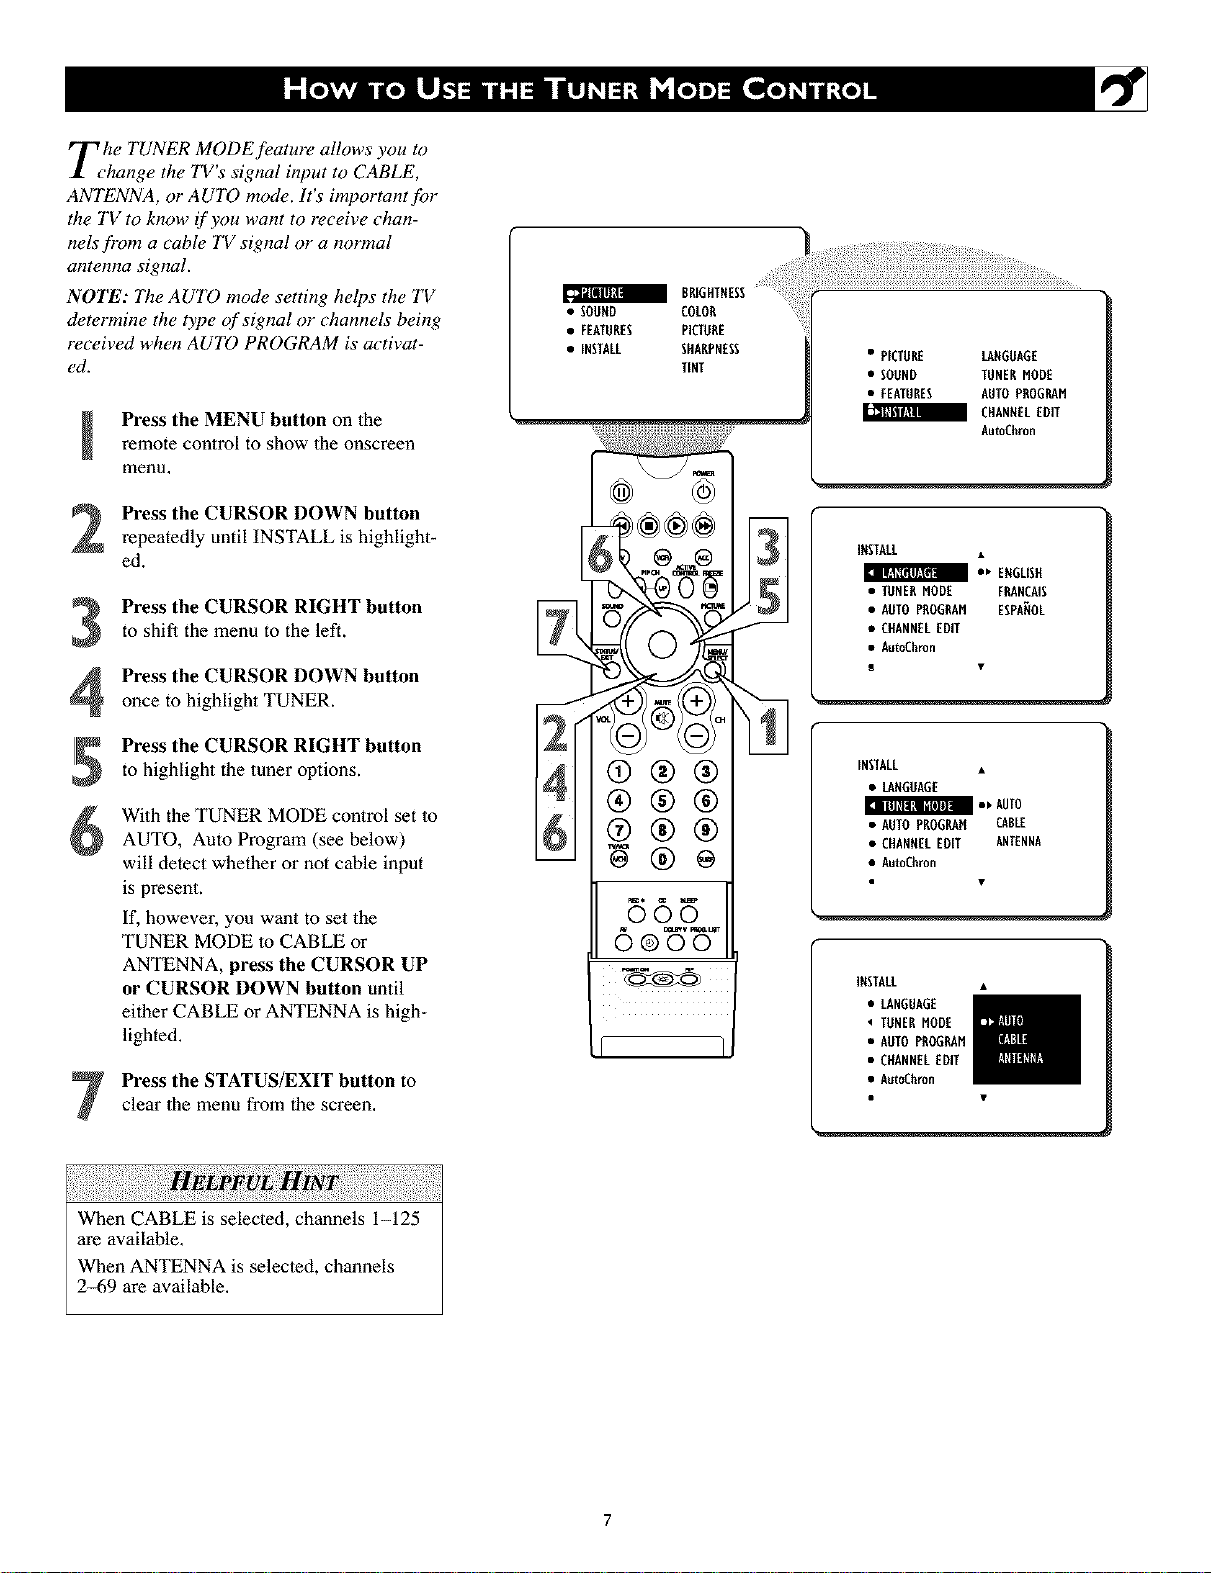
The TUNER MODE feature allows you to
•hange the TV s signal input to CABLE,
ANTENNA, or AUTO mode. It's important fi)r
the TV to know if you want to receive chan-
nelsJ)'om a cable TV signal or a normal
antenna signal.
NOTE: The AUTO mode setting helps the TV
determine the type of signal or channels being
received when AUTO PROGRAM is activat-
ed.
Press the MENU button on theremote control to show the onscreen
menu,
a BR[ HTNESS
• SOUND COLOR ....
• FEATURES PICTURE
• INSTALL SHARPNESS
TINT
• PICTURE LANGUAGE
• SODND TUNERMODE
• FEATURES AUTOPROGRAM
CHANNELEDIT
AutoChron
Press the CURSOR DOWN button
repeatedly until INSTALL is highlight-
ed.
Press the CURSOR RIGHT button
to shift the menu to the left.
Press the CURSOR DOWN button
once to highlight TUNER.
Press the CURSOR RIGHT button
to highlight the tuner options.
With the TUNER MODE control set to
AUTO, Auto Program (see below)
will detect whether or not cable input
is present.
If, however, you want to set the
TUNER MODE lo CABLE or
ANTENNA, press the CURSOR UP
or CURSOR DOWN button until
either CABLE or ANTENNA is high+
lighted.
Press the STATUS/EXIT button to
clear the menu from the screen,
4®®®
®®®
®®®
INSTALL
*_ ENGLISH
• TUNERMODE FRANCAIS
• AUTOPROGRAM ESPANOL
• CHANNELEDIT
• AutoChron
INSTALL •
• LANGUAGE
mr, AUTO
• AUTOPROGRAHCABLE
• CHANNELEDIT ANTENNA
• AutoChron
INSTALL •
• LANGUAGE
TUNERMODE
• AUTU PROGRAM
• CHANNELEDIT
• AutoChron
When CABLE is selected, channels 1-125
are available,
When ANTENNA is selected, channels
2_69 are available,
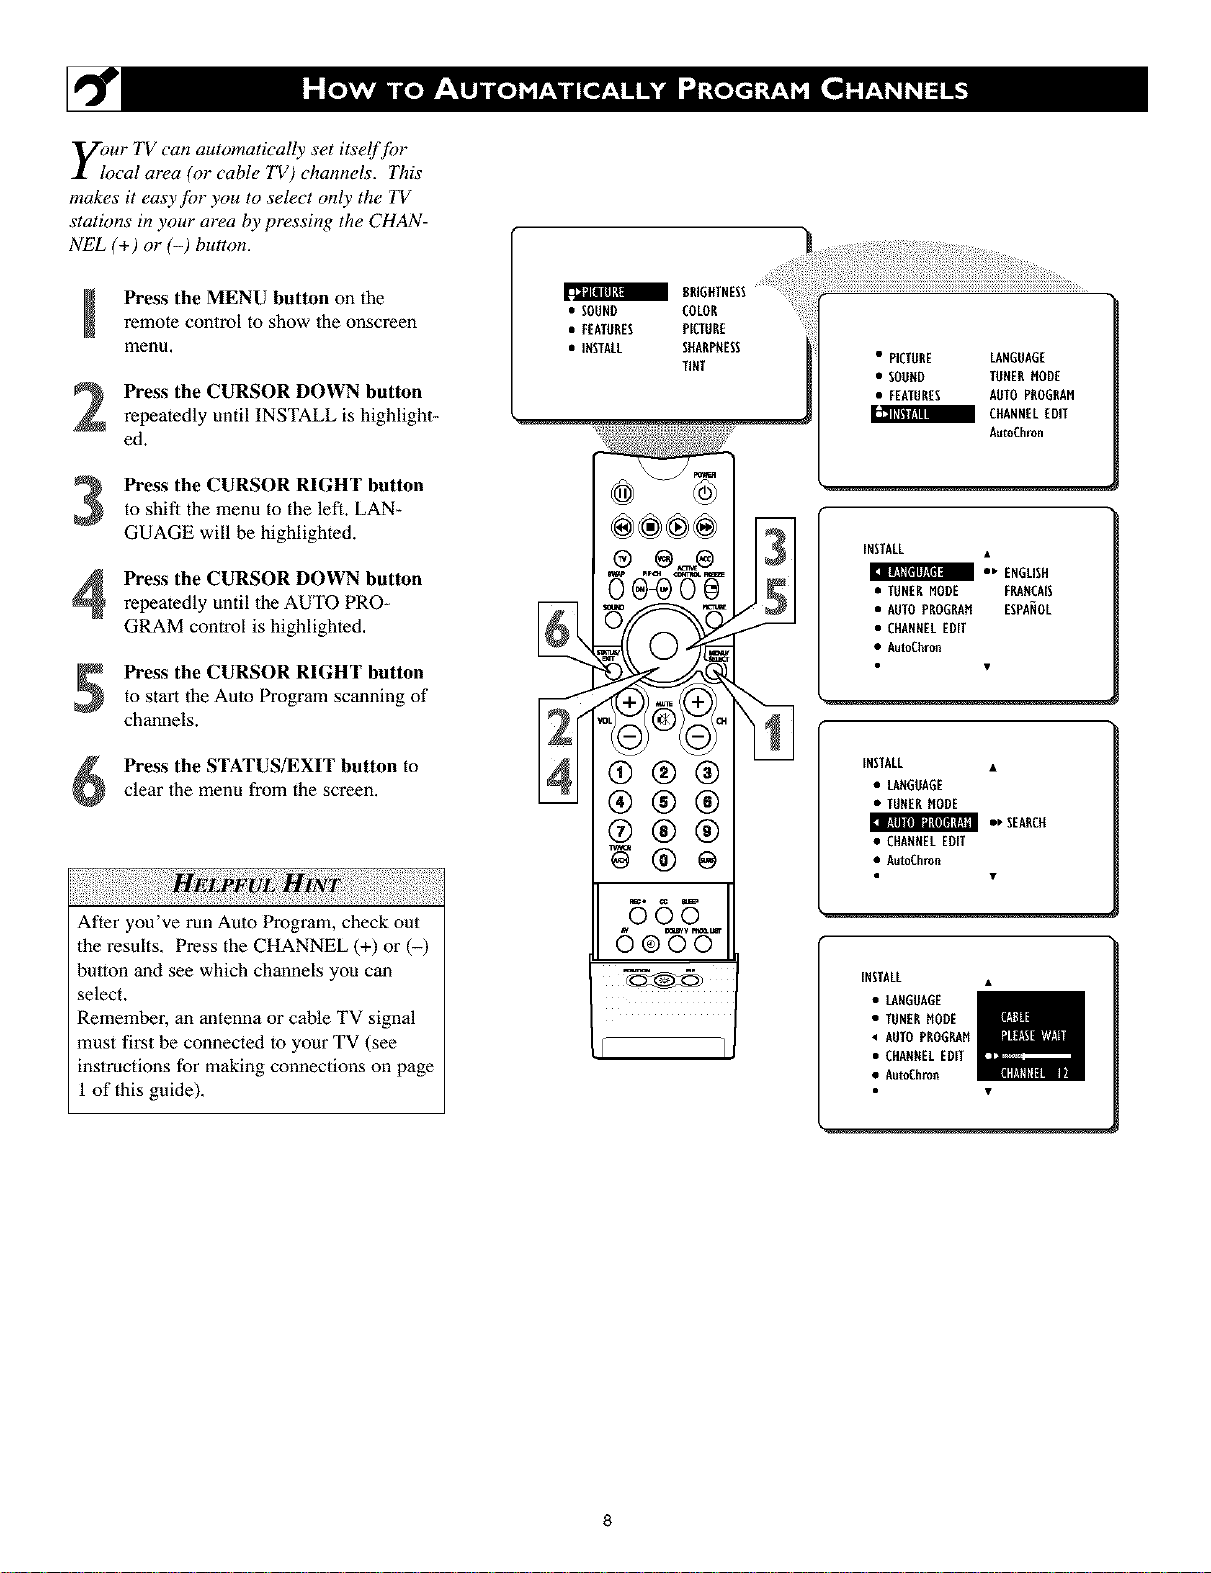
Vour TV can automatically set itself fbr
$_ local area (o1"cable TV) channels. This
makes it easy fin" you to select only the TV
stations in your area by pressing the CHAN-
NEL (+) or (-) button.
remote control to show the onscreen
Press the MENU button on the
menu.
Press the CURSOR DOWN button
repeatedly until INSTALL is highlight-
ed.
to shift the menu to the left. LAN-
Press the CURSOR RIGHT button
GUAGE will be highlighted.
Press the CURSOR DOWN button
repeatedly until the AUTO PRO-
GRAM control is highlighted.
Press the CURSOR RIGHT button
to start the Auto Program scanning of
channels.
a 8RIGFITNESS
• SOUND COLOR
• FEATURES PICTURE
• INSTALL SffARPRESS
TINT
®®®÷
®
• PICTURE LANGUAGE
• SOORD TORERMODE
• FEATURES AOTOPROGRAM
_ CItANNELEDIT
AutoChron
INSTALL •
• ' ENGLISH
• TUNERMODE FRARCA[S
• AUTOPROGRAM ESPANOL
• CHANNELEDff
• AutoChron
Press the STATUS/EXIT button to
clear the menu from the screen.
After you've run Auto Program, check out
the results. Press the CHANNEL (+) or (-)
button and see which channels you can
select.
Remember, an antenna or cable TV signal
must first he connected to your TV (see
instructions for making connections on page
1 of this guide).
®®®
®®®
595
6e 'W
INSTALL •
• LANGUAGE
• TUNERMODE
• ' SEARCH
• CHANNELEDIT
• AutoChron
INSTALL •
• LANGOAGE
• TUNERMODE
• AUTOPROGRAM
• CHANNELEDIT
• AutoChron
8
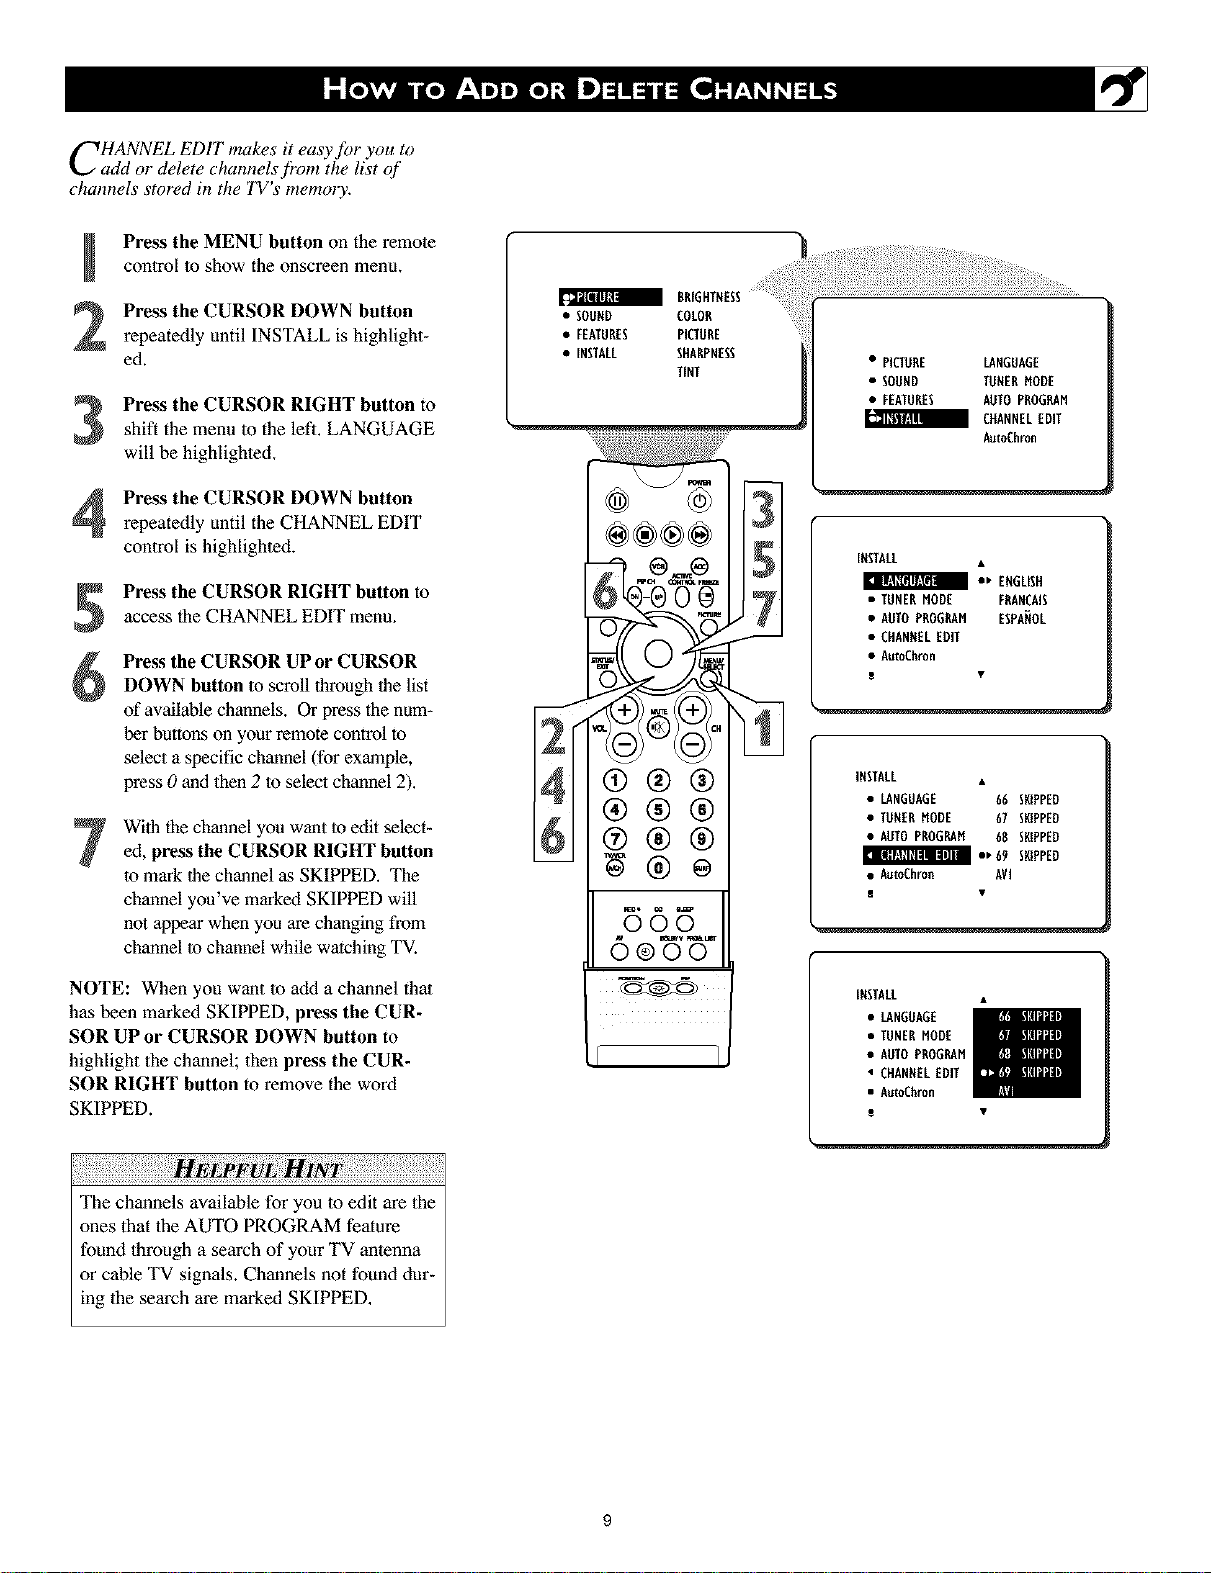
CHANNEL EDIT makes it easy for you to
add or delete channels j?om the list of
channels stored in the TV's memory.
control to show the onscreen menm
Press the MENU button on the remote
Press the CURSOR DOWN button
repeatedly until INSTALL is highlight-
ed.
Press the CURSOR RIGHT button toshift the menu to the left. LANGUAGE
will be highlighted.
Press the CURSOR DOWN button
repeatedly until the CHANNEL EDIT
control is highlighted.
Press the CURSOR RIGHT button to
access the CHANNEL EDIT menu.
Press the CURSOR UP or CURSOR
DOWN button lo scroll through the list
of available channels. Or press the num-
ber buttons on your remote control to
select a specific channel (for example,
press 0 and then 2 to select channel 2).
With the channel you want to edit select-ed, press the CURSOR RIGHT button
lo markthe channel as SKIPPED. The
channel you've marked SKIPPED will
not appearwhenyou are changing from
channel lo channel while watching TV.
a BRIGHTNESS
• SOUND COLOR
• FEATURES PICTURE
• INSTALL SHARPNESS
TENT
÷®®÷
®®®
®®®
@ ®®®
]
• PICTURE LANGUAGE
• SOUND TUNERHODE
• FEATURES AUTOPROGRAN
CItANNELEDIT
AutoChron
INSTALL •
m •' ENGLISH
• TUNERNODE FRANCAIS
• AUTOPROGP_N ESPANOL
• CHANNELEDIT
• AutoChron
INSTALL
• LANGUAGE 66 SLIPPED
• TUNERHODE 67 SNIPPED
• AUTO PROGRAH 68 SKIPPED
t, 69 SKIPPED
• AutoChron AVI
NOTE: When you want to add a channel that
has been marked SKIPPED, press the CUR-
SOR UP or CURSOR DOWN button to
highlight the channel; then press the CUR-
SOR RIGHT button to remove the word
SKIPPED.
The channels available for you to edit are the
ones that the AUTO PROGRAM feature
found lbrough a search of your TV antenna
or cable TV signals. Channels not found dur-
ing the search are marked SKIPPED.
INSTALL •
• LANGUAGE
• TUNERNODE
• AUTO PROGRAN
• CHANNELEDIT
• AumChron
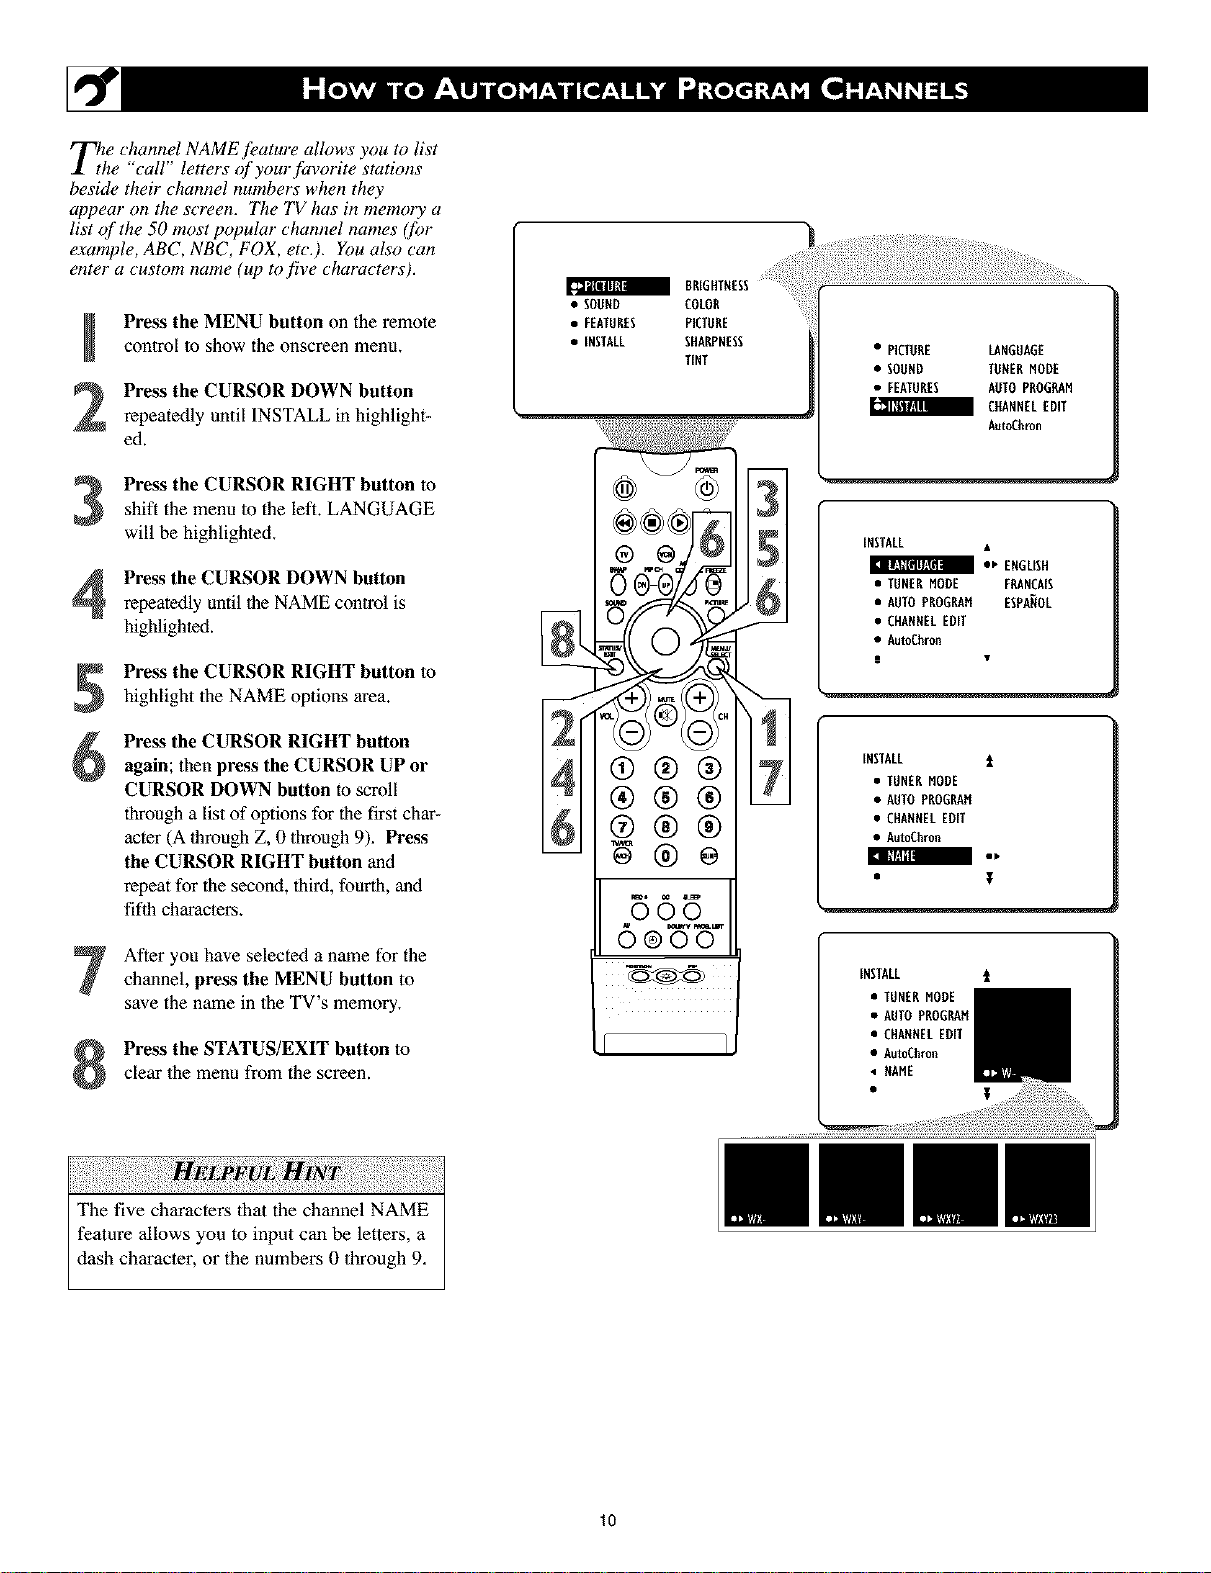
TlThe channel NAME feature allows you to list
e call letters ofyourfisvorite stations
beside their channel numbers when they
appear on the screen. The TV has in memory a
list of the 50 most popular channel names (for
example, ABC, NBC, FOX, etc.). You also can
enter a custom name (up to five characters).
Press the MENU button on the remotecontrol to show the onscreen menm
Press the CURSOR DOWN button
repeatedly until INSTALL in highlight-
ed.
shift the menu to the lefL LANGUAGE
Press the CURSOR RIGHT button to
will be highlighted.
Press the CURSOR DOWN button
repeatedly until 1he NAME control is
highlighted.
Press the CURSOR RIGHT button to
highlight the NAME options area.
a BRIGHTNESS
• SODND COLOR
• FEATURES PICTORE
• INSTALL STIHNAfPNES_
• PICTORE LANGUAGE
• SODND TONERMODE
• FEATURES AOTO PROGRAM
CHANNELEDIT
AutoCl_ron
INSTALL •
• _ ENGLISH
• TUNERMODE FRANCAIS
• AUTOPROGRAH ESPANOL
• CHANNELEDIT
• AutoChron
S •
Press the CURSOR RIGHT buttonagain; then press the CURSOR UP or
CURSOR DOWN button to scroll
through a list of options for the first char-
acter(A lhrough Z, 0 through9). Press
the CURSOR RIGHT button and
repeat for the second, third, fourth,and
fifth characters.
After you have selected a name for the
channel, press the MENU button to
save the name in the TV's memory.
Press the STATUS/EXIT button to
clear the menu from the screen.
The five characters that the channel NAME
feature allows you to input can be letters, a
dash character, or the numbers 0 through 9,
®®®
®®®
565
6
INSTALL i
• TUNERMODE
• AUTOPROGRAH
• CHANNELEDIT
• AutoChron
INSTALL i
• TUNERMODE
• AUTO PROGRAH
• CHANNELEDIT
• AutoChron
• NAME
T
10
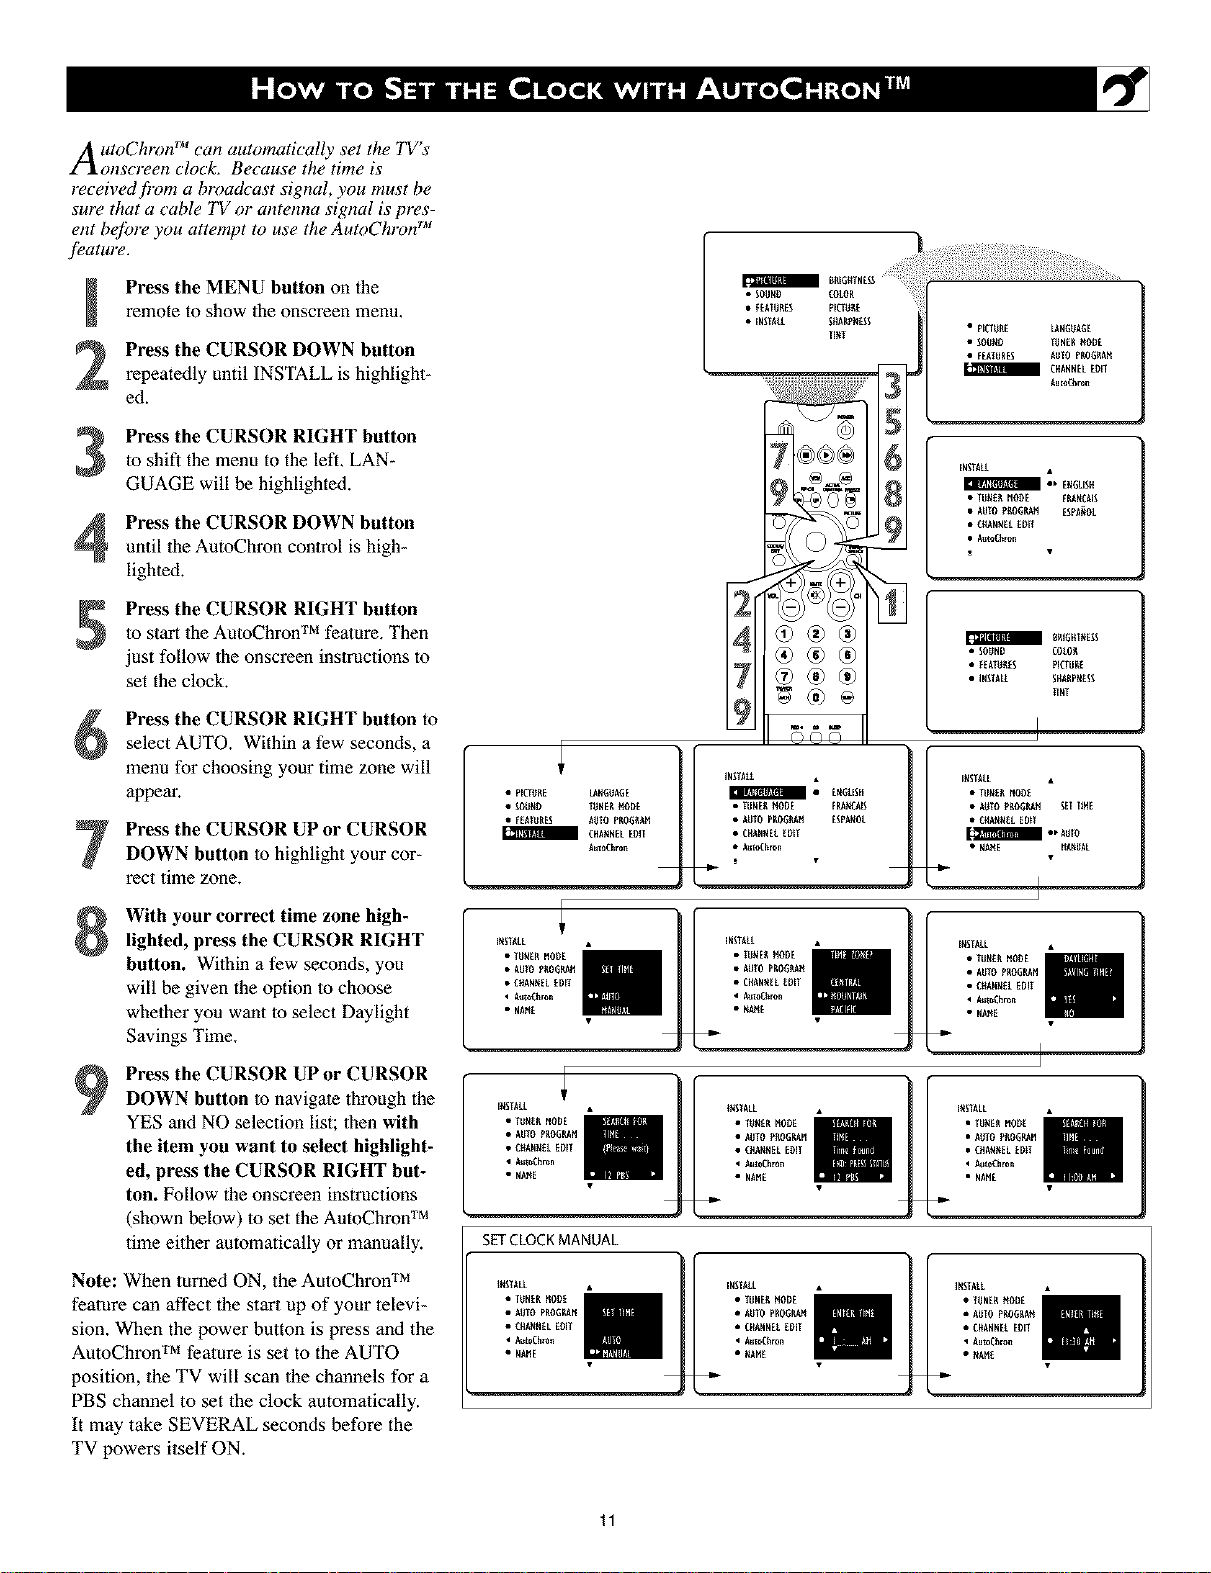
A utoChron TM can automatically set the TV's
onscreen clock. Because the time is
received fivm a broadcast signal, you must be
sure that a cable TV or antenna signal is pres-
ent bejbre you attempt to use the AutoChlvn TM
f_atul"e.
Press the MENU button on theremote to show the onscreen menu.
Press the CURSOR DOWN button
repeatedly until INSTALL is highlight-
ed.
Press the CURSOR RIGHT button
to shift the menu to the left. LAN-
3
GUAGE will be highlighted.
Press the CURSOR DOWN button
4
until the AutoChron control is high-
lighted.
Press the CURSOR RIGHT buttonto start the AutoChron TM feature. Then
just follow the onscreen instructions to
set the clock.
Press the CURSOR RIGHT button to
select AUTO. Within a few seconds, a
menu for choosing your time zone will
appear.
Press the CURSOR UP or CURSOR
DOWN button to highlight your cor-
rect time zone.
• pICT_i_E LANGUAGE
• SOUND T_NERgODE
• FEATURES AUTO PROGRAM
/ CHA_NEL EDIT
A_0Chro_
INSTALL •
• AUIO pF,O_I_ ESPA_OL
• CleAN,EL EDll
• AutoChron
• TUNE_ MODE FRAHCAIS
• E_EiSH
[_SIA[L
• T_SEE MOI)E
• A_lO _EOGRAH lET TIHE
• CEA_EL EDII
• NAME _Ni_AL
With your correct time zone high-
lighted, press the CURSOR RIGHT
button. Wflhin a few seconds, you
will be given the option lo choose
whether you want lo select Daylight
Savings Time.
Press the CURSOR UP or CURSOR
DOWN button to navigate through the
YES and NO selection list; 1hen with
the item you want to select highlight-
ed, press the CURSOR RIGHT but-
ton. Follow the onscreen instructions
(shown below) to set the AutoChroff TM
time ebher automatically or manually.
Note: When turned ON, the AutoChron TM
feature can affect the start up of your televi-
sion. When the power button is press and the
AutoChron TM feature is set to the AUTO
position, the TV will scan the channels for a
PBS channel to set the clock automatically.
It may take SEVERAL seconds before the
TV powers itself ON.
i_STAEL
• TU_EEMODE
• AUTOPEOGP_H
• CEAN_EEEDIT
A_i_Chron
• HANE
I_STAL[
• TU_EE MODE
• AUTOP_OG_H
• CEAN_EEEDIT
• A_oChron
• NAME
SETCLOCKMANUAL
iNStALL
• TUftERMODE
• AUTOP_OG_AM
• _HANNELENT
Au_Chro_
• NAME
i_STALL
• T_EE MO_E
• A_TOPEOGP_H
A_t_Chron
• NA_E
• C_AN_ELEDIT
• TUNEE_IODE
• C_ANNELEDIT
AutoC_ro_
• _AME
I INSTALL
11
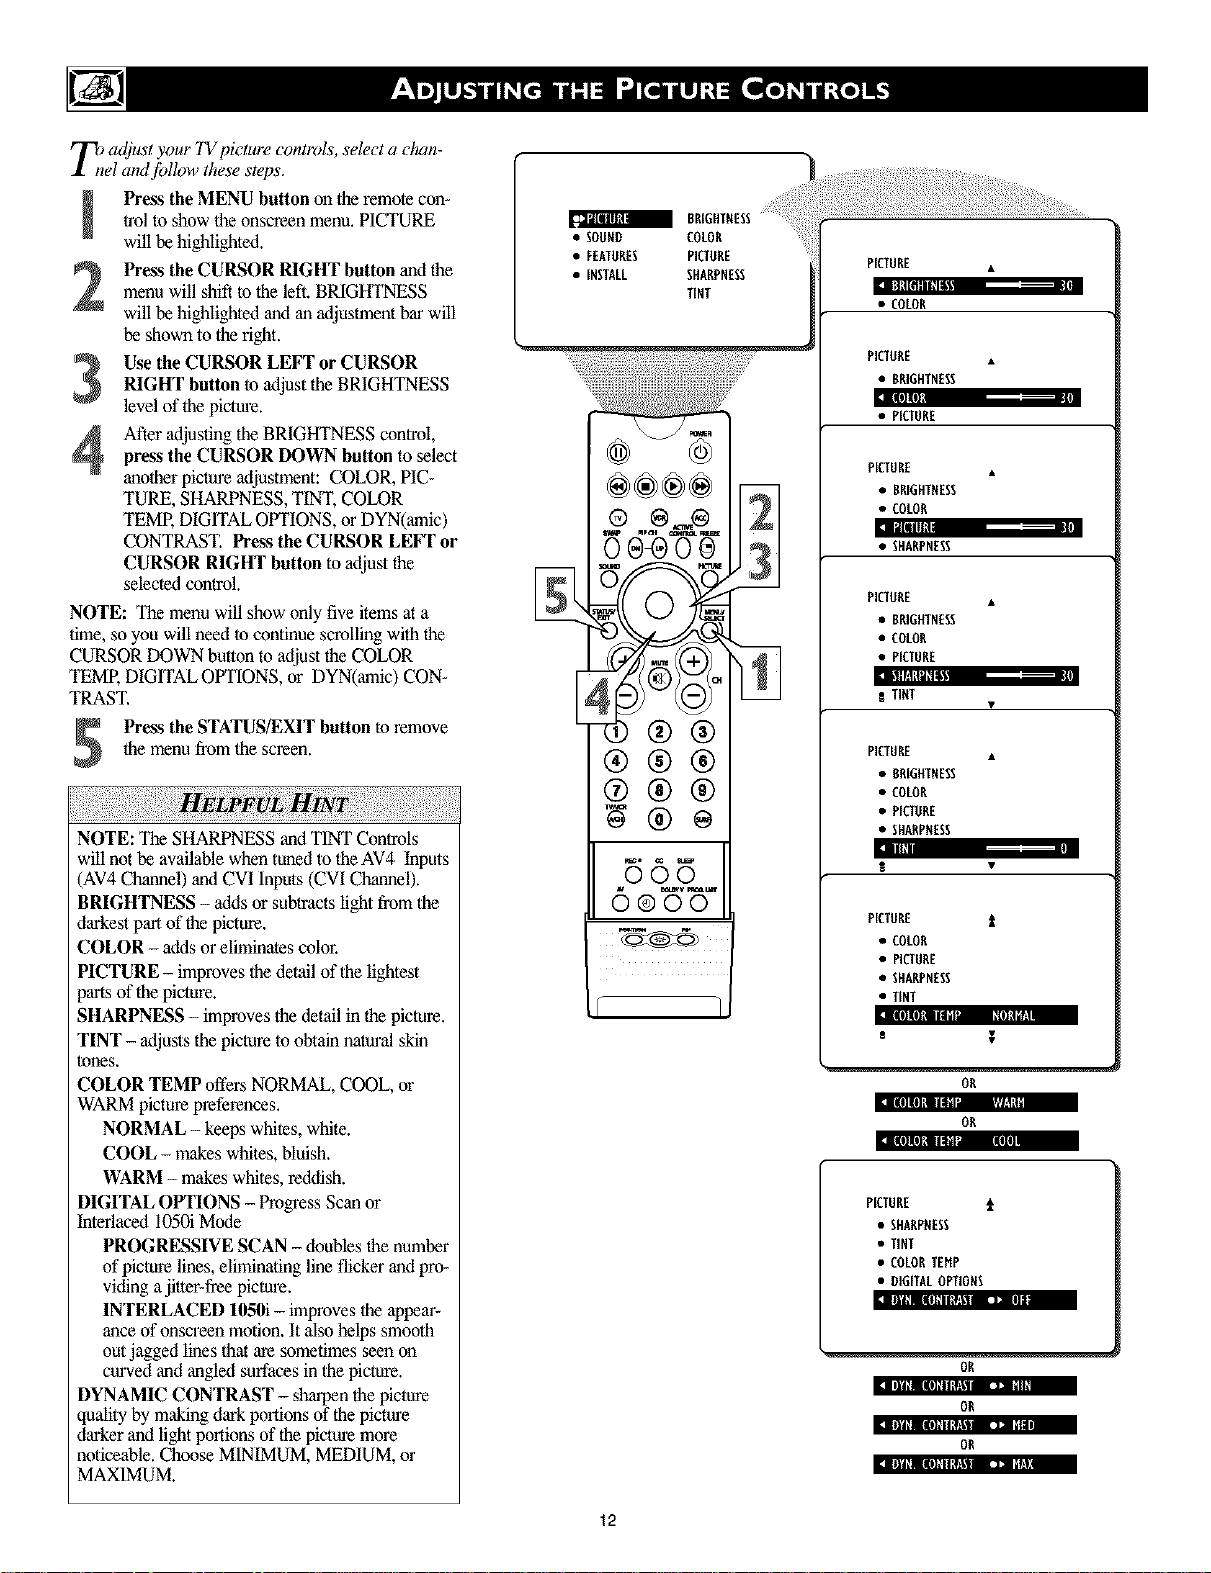
T/adjust your 7Vpicture controls, select a c&sn-
el and jbllow these steps.
trol to show tlle onscrcen menu. PICTURE
Press the MENU button on the remote con*
will be highlighted.
Press the CURSOR RIGHT button and the
menu will shift to the left. BRIGHTNESS
will be highlighted and an Miustment bar will
be shown to the fight.
Use the CURSOR LEFT or CURSOR
RIGHT button to Mjust the BRIGHTNESS
level of the picture.
After adjusting the BRIGHTNESS control,press the CURSOR DOWN button to select
another picture adjustment: COLOR, P1C*
TURE, SHARPNESS, TINT, COLOR
TEME DIGITAL OPTIONS, or DYN(amic)
CONTRAST. Press the CURSOR LEFT or
CURSOR RIGHT button to adjust the
selected control.
NOTE: The menu will show only five items at a
time, so you will need to continue scrolling with the
CURSOR DOWN button to adjust the COLOR
TEME DIGITALOPTIONS, or DYN(amic) CON*
TRAST.
Press the STATUS/EXITbutton to remove
the menu from the screen.
NOTE: The SHARPNESS and TINT Controls
will not be available when tuned to the AV4 Inputs
(AV4 Channel) and CVI Inputs (CVI Channel).
BRIGHTNESS - adds or sublracts light from the
darkest part of |he picture.
COLOR - adds or eliminates color.
PICTURE - improves the detail of the lightest
parts of the picture.
SHARPNESS - improves the detail in the picture.
TINT - Miusts the picture to obtain natural skin
tones.
COLOR TEMP offers NORMAL, COOL, or
WARM picture preferences.
NORMAL - keeps whites, white.
COOL - makes wl'fltes, Nuish.
WARM - makes whites, reddish.
DIGITAL OPTIONS - Progress Scan or
Interlaced 1050i Mode
PROGRESSIVE SCAN - doubles the number
of picture lines, eliminating line flicker and pro-
viding a jitter*free picture.
INTERLACED 105ff] - improves the appear*
ance of onscreen motion. It also helps smooth
out jagged lines that are sometimes seen on
curved and angled surfaces in the picture.
DYNAMIC CONTRAST - sharpen the picture
quality by malting dark poNons of the picture
darker and light portions of the picture more
noticeable. Choose MINIMUM, MEDIUM, or
MAXIMUM.
[_13{Nllgtl
• SOOND COLOR
• FEATORES PICTORE
• INSTALL SHARPNESS
TENT
os÷o 31
/11
®®®
®®®
rs(sg
PICTURE •
lalt[filli?ll
• COLOR
PICTORE •
• BRIGHTNESS
i|ll[I
• PICTURE
PICTURE .
• BRIGHTNESS
• COLOR
:n 3lllll
• SHARPNESS
PICTORE •
• BRIGETNESS
• COLOR
• PICTURE
ilI[!l[|h_
N TINT
PICTURE •
• BBIGItTNESS
• COLOR
• PICTORE
• SHARPNESS
Illllllll
PICTORE t
• COLOR
• PICTUBE
• SHARPNESS
• TINT
ll| ill Jlllllllilll I01511t_1!
s
oR
:1 :ill Ill[! III;;_ _;;1_1:_1
OR
:t [l[J|l[J|d IIIlld _[lII]l
PICTURE t
• SHARPNESS
• TINT
• COLORTEHP
• DIGITALOPTIONS
nm'lmlgOgg_l r_ InN1
OR
OR
:]1t|1[I [lll[ll[hllJ • nm
OR
|ttl[I [lll[ll[hllJ • ll_[_ !
12
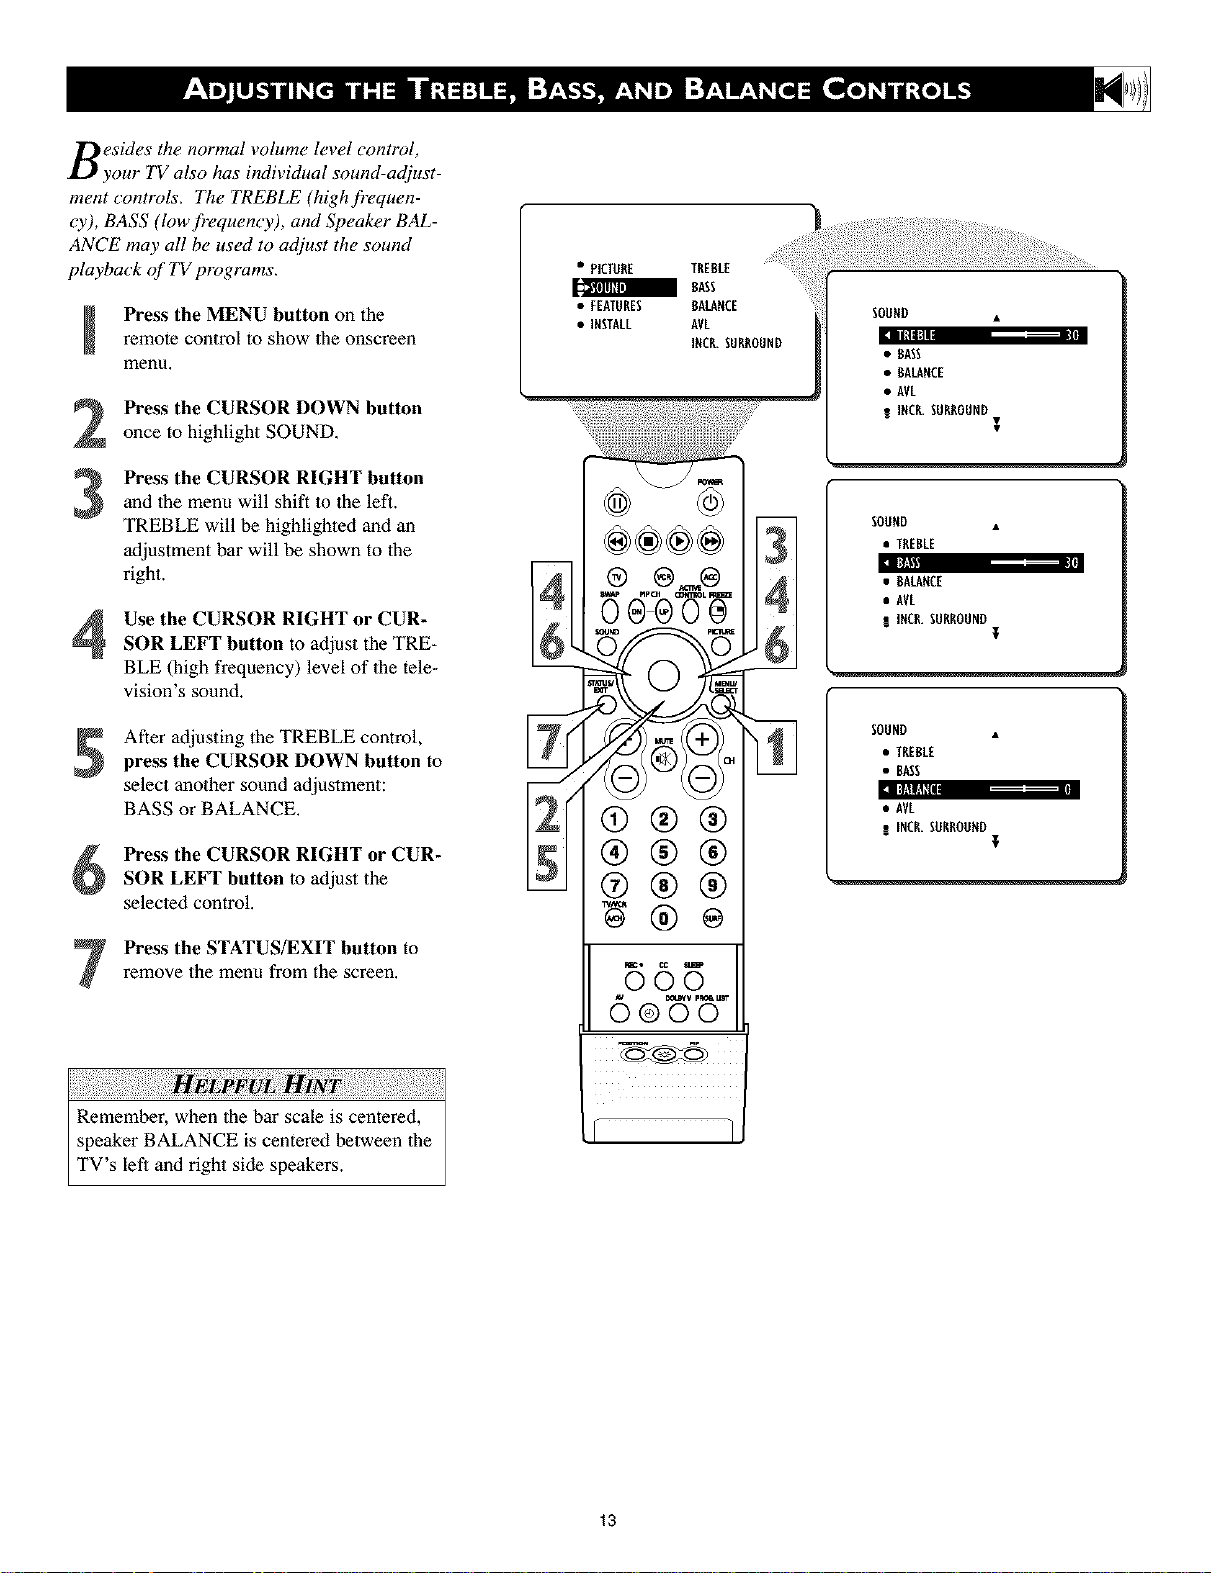
Besides the normal volume level control,
your TV also has individual sound-adjust-
ment controls. The TREBLE (high frequen-
Cy), BASS (low frequency), and Speaker BAL-
ANCE may all be used to adjust the sound
playback of TV programs.
Press the MENU button on theremote control to show the onscreen
menu,
Press the CURSOR DOWN button
2
once to highlight SOUND,
Press the CURSOR RIGHT button
and 1he menu will shift to the left.
3
TREBLE will be highlighted and an
adjustment bar will be shown to 1he
right.
Use the CURSOR RIGHT or CUR-
SOR LEFT button to adjust the TRE-
BLE (high frequency) level of the tele-
vision's sound.
• PICTURE TREBLE
a RASS
• FEATURES RALARCE
• IRSTALL AVL
]RCR.SURROUND
• BASS
• BALANCE
• AVL
I INCR.SURROUND•
SOOND •
• TREBLE
After adjusting the TREBLE control,
press the CURSOR DOWN button to
select another sound adjustment:
BASS or BALANCE.
Press the CURSOR RIGHT or CUR-
SOR LEFT button to adjust the
selected control.
Press the STATUS/EXIT button to
remove the menu from the screen,
SOUND •
• TREBLE
• BASS
13
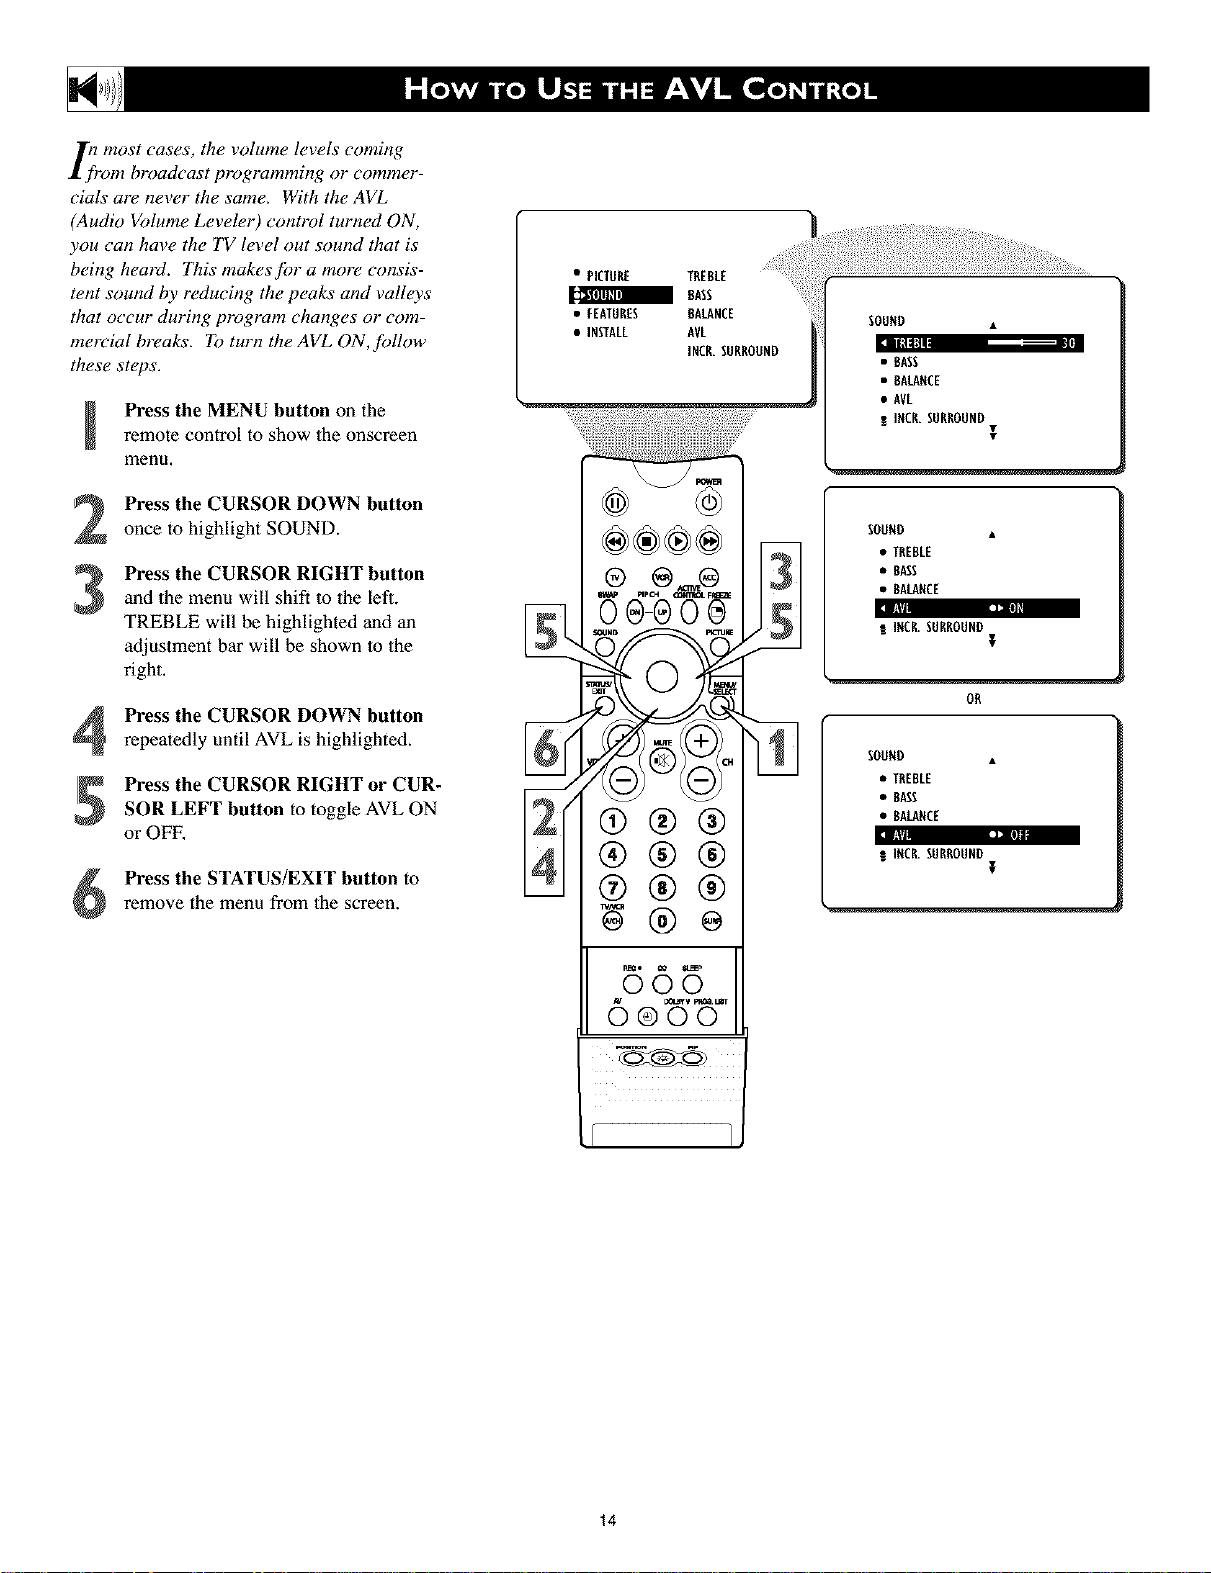
}1lmost cases, the volume levels coming
"om broadcast programming or commer-
cials are never the same. With the AVL
(Audio Volume Leveler) control turned ON,
you can have the TV level out sound that is
being heard. This makes]br a more consis-
tent sound by reducing the peaks and valleys
that occur during program changes or com-
mercial breaks. To turn the AVL ON,follow
these steps.
Press the MENU button on theremote control to show the onscreen
menu.
Press the CURSOR DOWN button
once to highlight SOUND.
Press the CURSOR RIGHT button
and the menu will shift to the left.
TREBLE will be highlighted and an
adjustment bar will be shown lo the
right.
• PICTURE TREBLE
RASS
• FEATURES BALANCE
• INSTALL AVL
INCR.SURROUND
SOUND •
• BASS
• BALANCE
• AVL
RINCR.SURROUND
SOUND •
• TREBLE
• RASS
• BALANCE
la i: %1
! INCR.SURROUND
OR
I
I
;
Press the CURSOR DOWN button
repeatedly until AVL is highlighted.
Press the CURSOR RIGHT or CUR-
SOR LEFT button to toggle AVL ON
or OFF,
Press the STATUS/EXIT button to
remove the menu from the screen.
®®®
®®®
B65
6®t5
SOUND .
• TREBLE
• RASS
• BALANCE
INCR.SURROUND
;
14
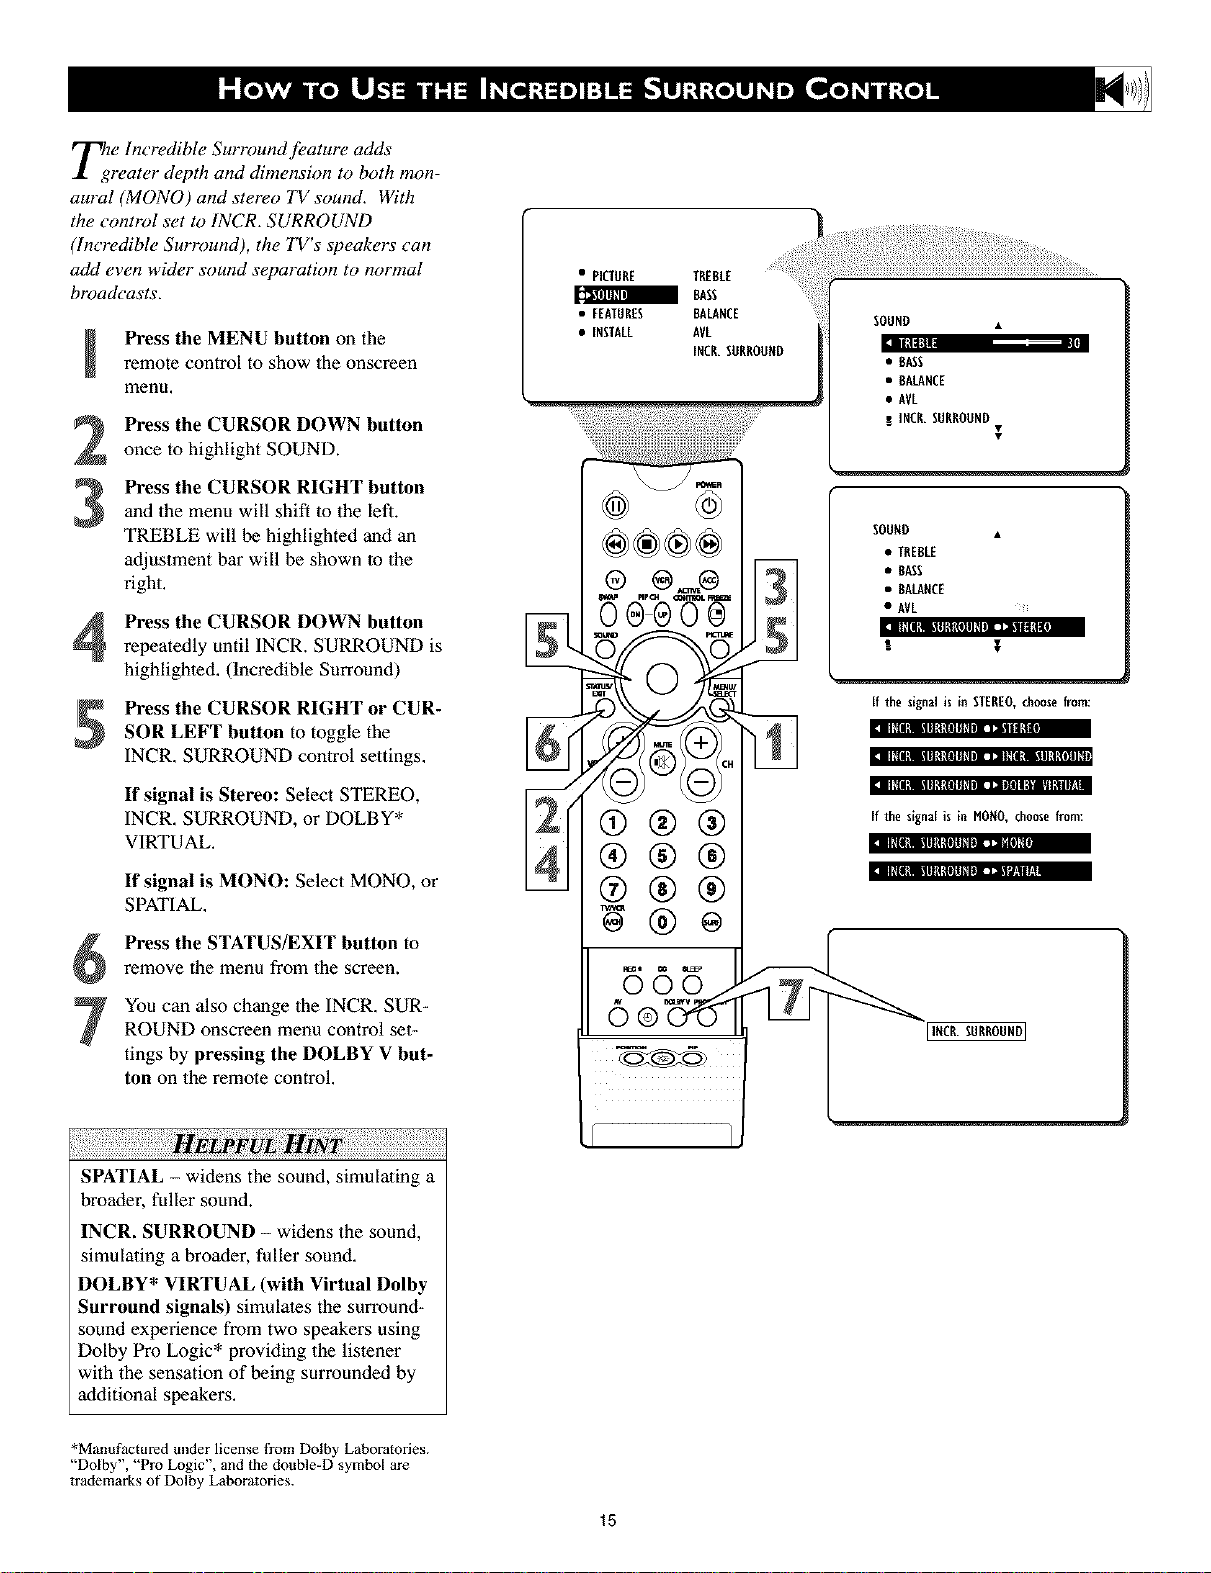
h?eIncredible Surround feature adds
reater depth and dimension to both mon-
aural (MONO) and stereo TV sound. With
the control set to INCR. SURROUND
(Incredible Surround), the TV's speakers can
add even wider sound separation to normal
broad_'asts.
Press the MENU button on theremote control to show the onscreen
menu.
Press the CURSOR DOWN button
once to highlight SOUND.
Press the CURSOR RIGHT button
and the menu will shift to the left.
3
TREBLE will be highlighted and an
adjustment bar will be shown lo the
right.
Press the CURSOR DOWN button
repeatedly until INCR. SURROUND is
highlighted. (Incredible Surround)
Press the CURSOR RIGHT or CUR-
SOR LEFT button to toggle the
INCR. SURROUND control settings.
If signal is Stereo: Select STEREO,
INCR. SURROUND, or DOLBY*
VIRTUAL.
If signal is MONO: Select MONO, or
SPATIAL.
• PICTURE TREBLE
BASS
• FEATURES BALANCE
• INSTALL AVL
INCR.SORROORD
00®00
®®®
®®®
@®®
SOUND •
• BAss
• BALANCE
• AVL
! INCR.SURROUND
SOURD •
• TREBLE
• BASS
• BALARCE
e AVL !
lll;[lI!lilllL!lllllll_llltl,_, ..1!1]
R T
If the signal is in STEREO, choose from:
:ill_lll!lilllB_H]lllllI]lll|
m:_II_llRlmlllU_OltllllIllll_[_!llllllall_
mrnII_lll_IlilN 1!lOltllllIlll IItl I'._'11'11ItIq.tI
If the signa[ is in HONO, choosefrom:
:1 I]|l_!llRI{tlllllll'llnlll?l
Press the STATUS/EXIT button to
remove the menu from the screen.
You can also change the INCR. SUR-
ROUND onscreen menu control set-
tings by pressing the DOLBY V but-
ton on the remote control.
vL
SPATIAL - widens the sound, simulating a
broader, fuller sound.
INCR. SURROUND - widens the sound,
simulating a broader, fuller sound.
DOLBY* VIRTUAL (with Virtual Dolby
Surround signals) simulates the surround-
sound experience from two speakers using
Dolby Pro Logic* providing the listener
with the sensation of being surrounded by
additional speakers.
*Manufactured under license i]'om Dolby Laboratories.
"Dolby', "Pro Logic". and the double-D symbol are
trademarks of Dolby Laboratories.
15
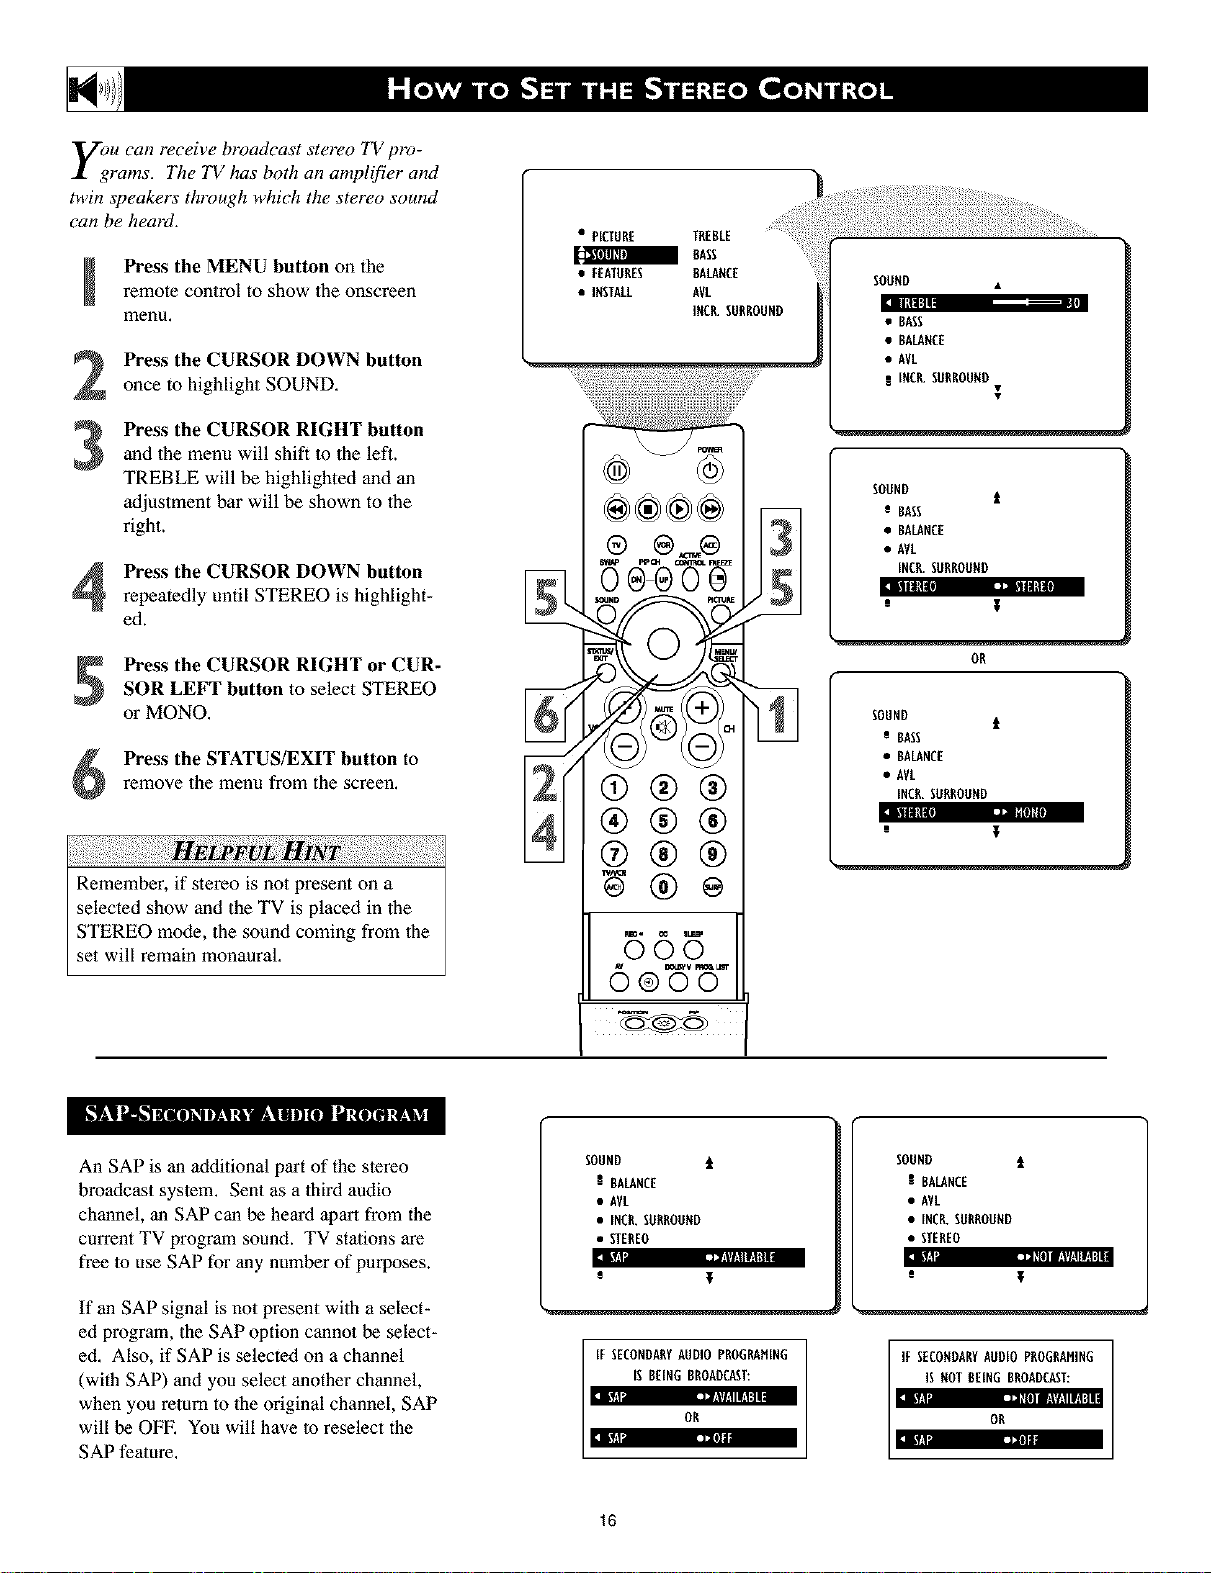
u can receive broadcast stereo TV pro-
rams. The TV has both an amplifier and
twin speakers through which the stereo sound
can be heard.
Press the MENU button on theremote control to show the onscreen
menu,
Press the CURSOR DOWN button
2
once to highlight SOUND,
Press the CURSOR RIGHT button
and 1he menu will shift to the left.
3
TREBLE will be highlighted and an
adjustment bar will be shown to 1he
right.
Press the CURSOR DOWN button
repeatedly until STEREO is highlight-
ed.
• PICTURE TREBLE
BASS
• FEATURES BALANCE
• INSTALL AVL
INCR.SURROUND
®®®÷
oe®oo 51
SOOND •
1111111:
• BASS
• BALANCE
• AVL
t INCR.SORROBND
SOOND
e BASS
• BALANCE
• AVL
INCR.SORROOND
]till ]: --_:::
s
I
t
Press the CURSOR RIGHT or CUR-
SOR LEFT button to select STEREO
or MONO,
Press the STATUS/EXIT button to
remove the menu from the screen,
Remember, if stereo is not present on a
selected show and the TV is placed in the
STEREO mode, the sound coming from the
set will remain monaural.
An SAP is an additional part of the stereo
broadcast system. Sent as a lhird audio
channel, an SAP can be heard aparl from the
current TV program sound. TV stations are
free to use SAP for any number of purposes.
If an SAP signal is not present with a select-
ed program, the SAP option cannot be select-
ed. Also, if SAP is selected on a channel
(with SAP) and you select another channel,
when you return to the original channel, SAP
will be OFF. You will have to reselect the
SAP feature.
®®®
®®®
56 3
6 ®'8'W
SOUND t
S BALANCE
• AVL
• INCR.SURROORD
• STEREO
e
IF SECONDARYAUDIOPROGP_HiNG
iS BEINGBROADCAST:
OR
OR
SOUND t
BASS
• BALANCE
• AVL
INCR.SORROOND
I_llllllll¢! t]_ IIIOREQ
SOUND i
BALANCE
• AVL
• INCR.S_RROOND
• STEREO
iv,I ,_,'l|] |!WIll!If
e
It SECONDARYA_D[O PBOGBANING
IS NOTBEING BROADCAST:
|_! Ii Illl |_.lIllll_
OR
16
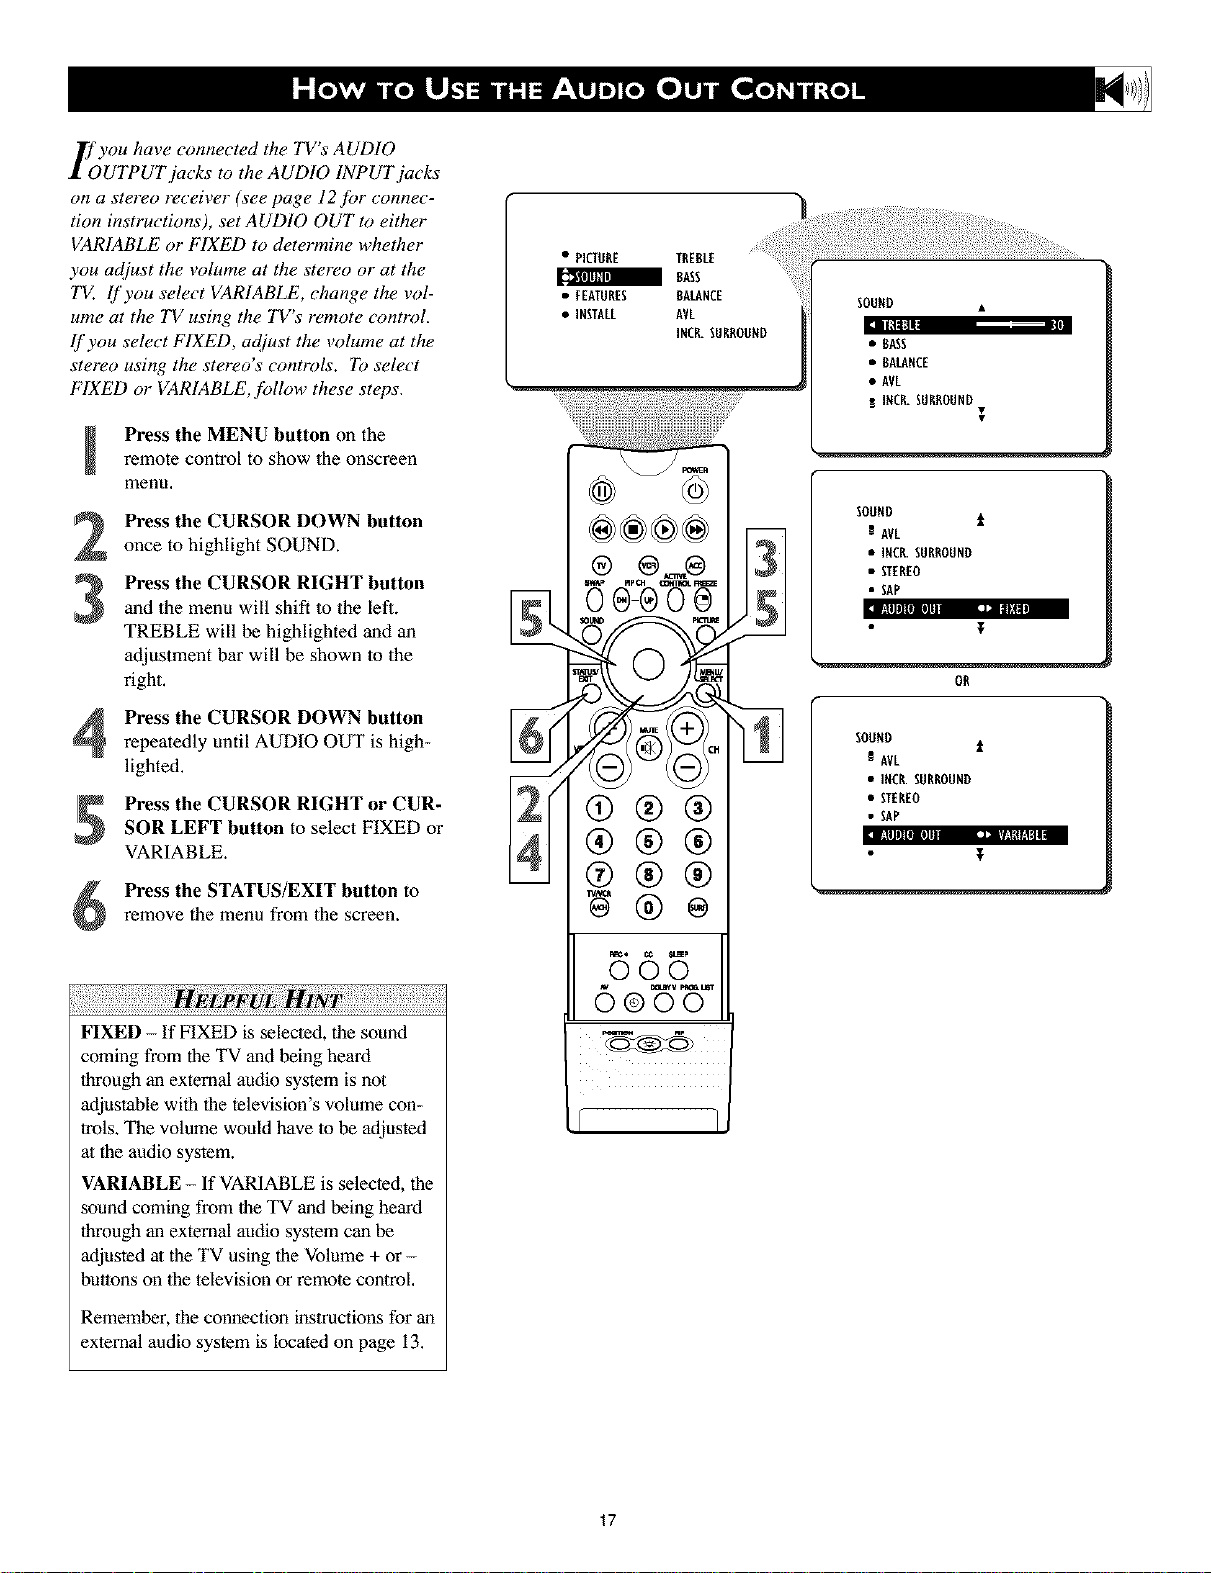
If you have connected the TV's AUDIO
UTPUTjacks to the AUDIO INPUT jacks
on a stereo receiver (see page 12for connec-
tion instructions), set AUDIO OUT to either
VARIABLE or FIXED to determine whether
you adjust the volume at the stereo or at the
TV. lf you select VARIABLE, change the vol-
ume at the TV using the TV's remote control.
lf you select FIXED, adjust the volume at the
stereo using the stereo's controls. To select
FIXED or VARIABLE, Jbllow these steps.
Press the MENU button on theremote control to show the onscreen
menu.
Press the CURSOR DOWN button
once to highlight SOUND.
Press the CURSOR RIGHT button
and the menu will shift to the left.
3
TREBLE will be highlighted and an
adjustment bar will be shown lo the
right,
• PICTURE TREBLE
RASS
• FEATURES RALANCE
• INSTALL AVL
INCR.SURROUND
oo®oo
3/
-N
I
SOUND •
• 8ASS
• BALANCE
• AVL
RINCR.SURROUND
SOUND t
AVL
• INCR.SURROUND
• STEREO
• SAP
I_l_lll][lllllll LJ: I|UNI]
T
OR
I
Press the CURSOR DOWN button
repeatedly until AUDIO OUT is high-
lighted.
Press the CURSOR RIGHT or CUR-
SOR LEFT button to select FIXED or
VARIABLE.
Press the STATUS/EXIT button to
remove the menu from the screen.
FIXED - If FIXED is selected, the sound
coming from the TV and being heard
through an external audio system is not
adjustable with the television's volume con-
trols. The volume would have lo be adjusted
al the audio system.
VARIABLE- If VARIABLE is selected, the
sound coming from the TV and being heard
through an external audio system can be
adjusted at the TV using the Volume + or -
buttons on the television or remote control,
®®®
@®®
fill
SOUND
NAVL
• INCR.SURROUND
• ffEREO
• SAP
l_llllitil] ,_ _'l*lIII!ll
t
Remember, the connection instructions for an
external audio system is Locatedon page 13.
17
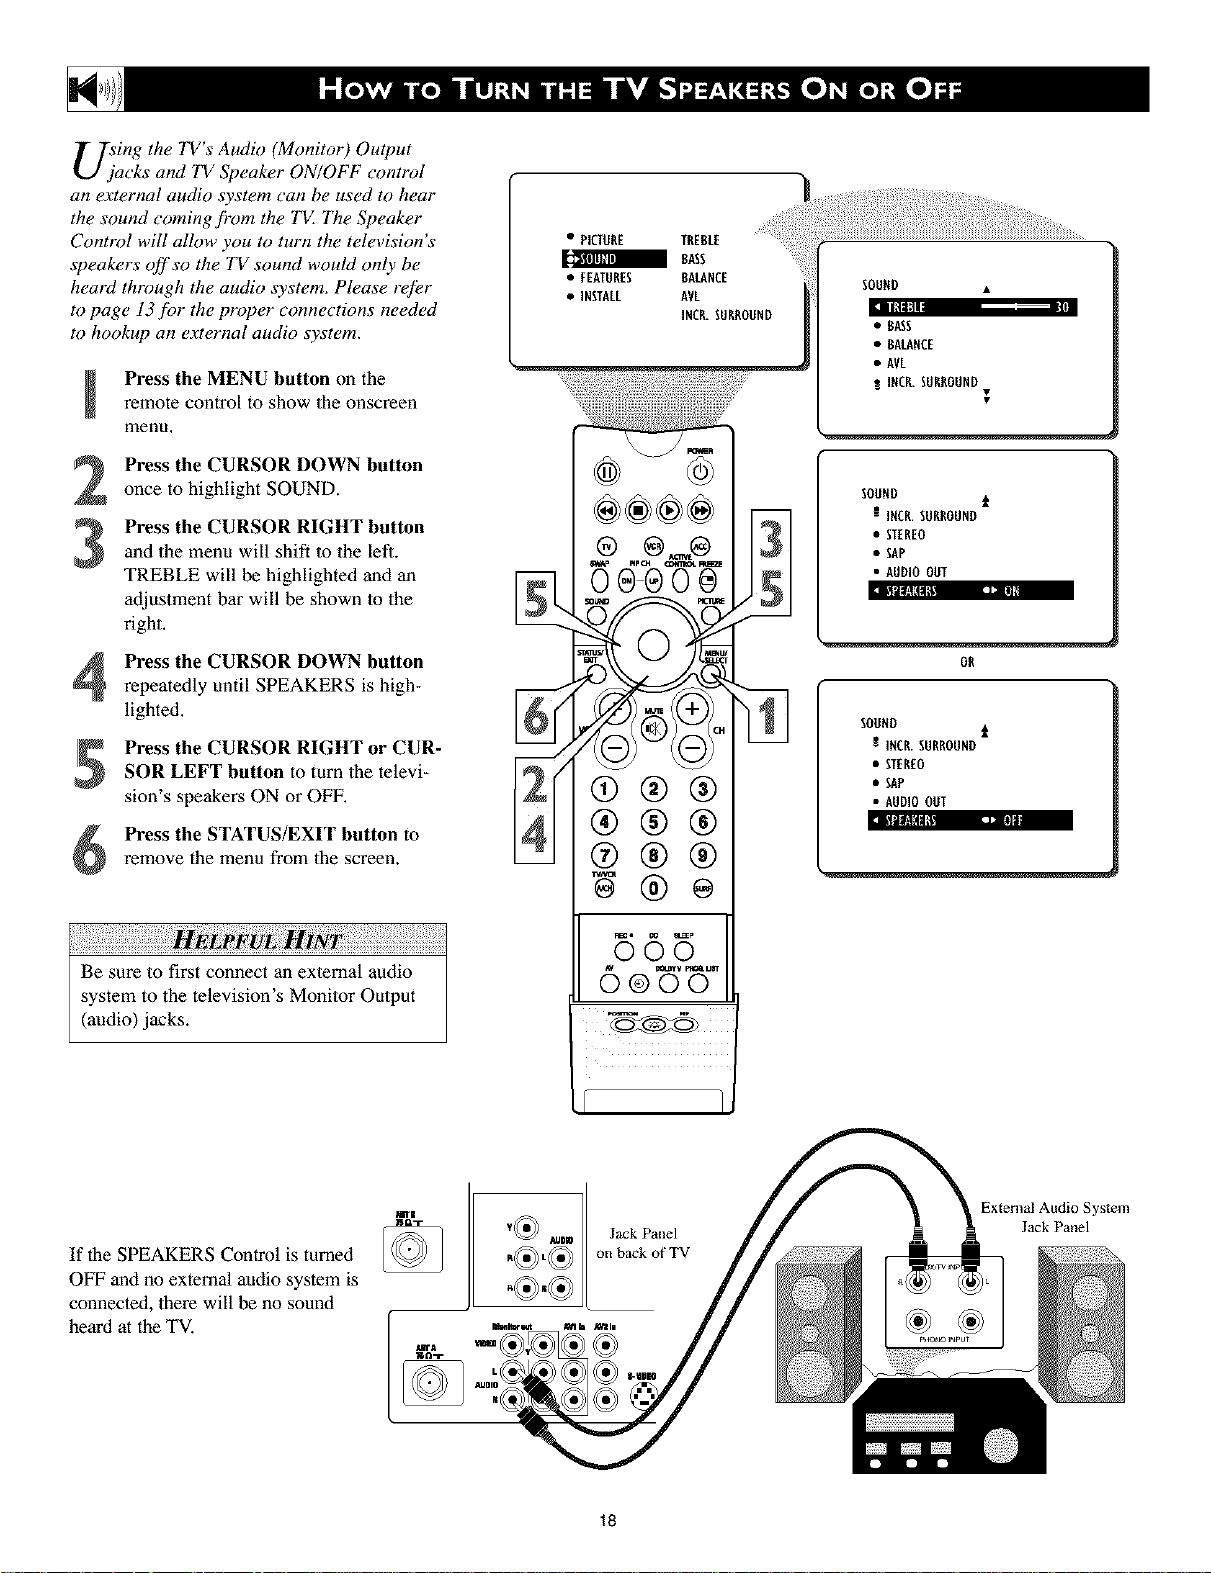
U;ing the TV's Audio (Monitor) Output
acks and TV Speaker ON/OFF control
an external audio system can be used to hear
the sound coming fi'om the T_Z The Speaker
Control will allow you to turn the television's
speakers off so the TV sound would only be
heard through the audio _vstem. Please refer
to page 13/br the proper connections needed
to hookup an external audio system.
Press the MENU button on theremote control to show the onscreen
menu.
Press the CURSOR DOWN button
once to highlight SOUND.
Press the CURSOR RIGHT button
and the menu will shift to the left.
3
TREBLE will be highlighted and an
adjustment bar will be shown lo the
right.
Press the CURSOR DOWN button
repeatedly until SPEAKERS is high-
lighted.
Press the CURSOR RIGHT or CUR-
SOR LEFT button to turn the televi-
sion's speakers ON or OFF.
Press the STATUS/EXIT button to
remove the menu from the screen.
• PICTURE TREBLE
RASS
• FEATURES RALANCE
• INSTALL AVL
INCR.SURROON[*
--
N --
®®®
®®®
SO0[*[* i
N INCR.SURROUN[*
• ffEREO
•SAP
• AU[*IOOOT
OR
SO0[*[* t
R INCR.SURROUN[*
• STEREO
• SAP
• AU[*IOOOT
BI_U_:4B_I [aJ P]R|
vL
Be sure to first connect an external audio
system to the television's Monitor Output
(audio) jacks.
If the SPEAKERS Control is turned
OFF and no external audio system is
connected, there will be no sound
heard at the TV.
r5(55
Jack Panel
on back of TV
18
External Audio System
Jack Panel
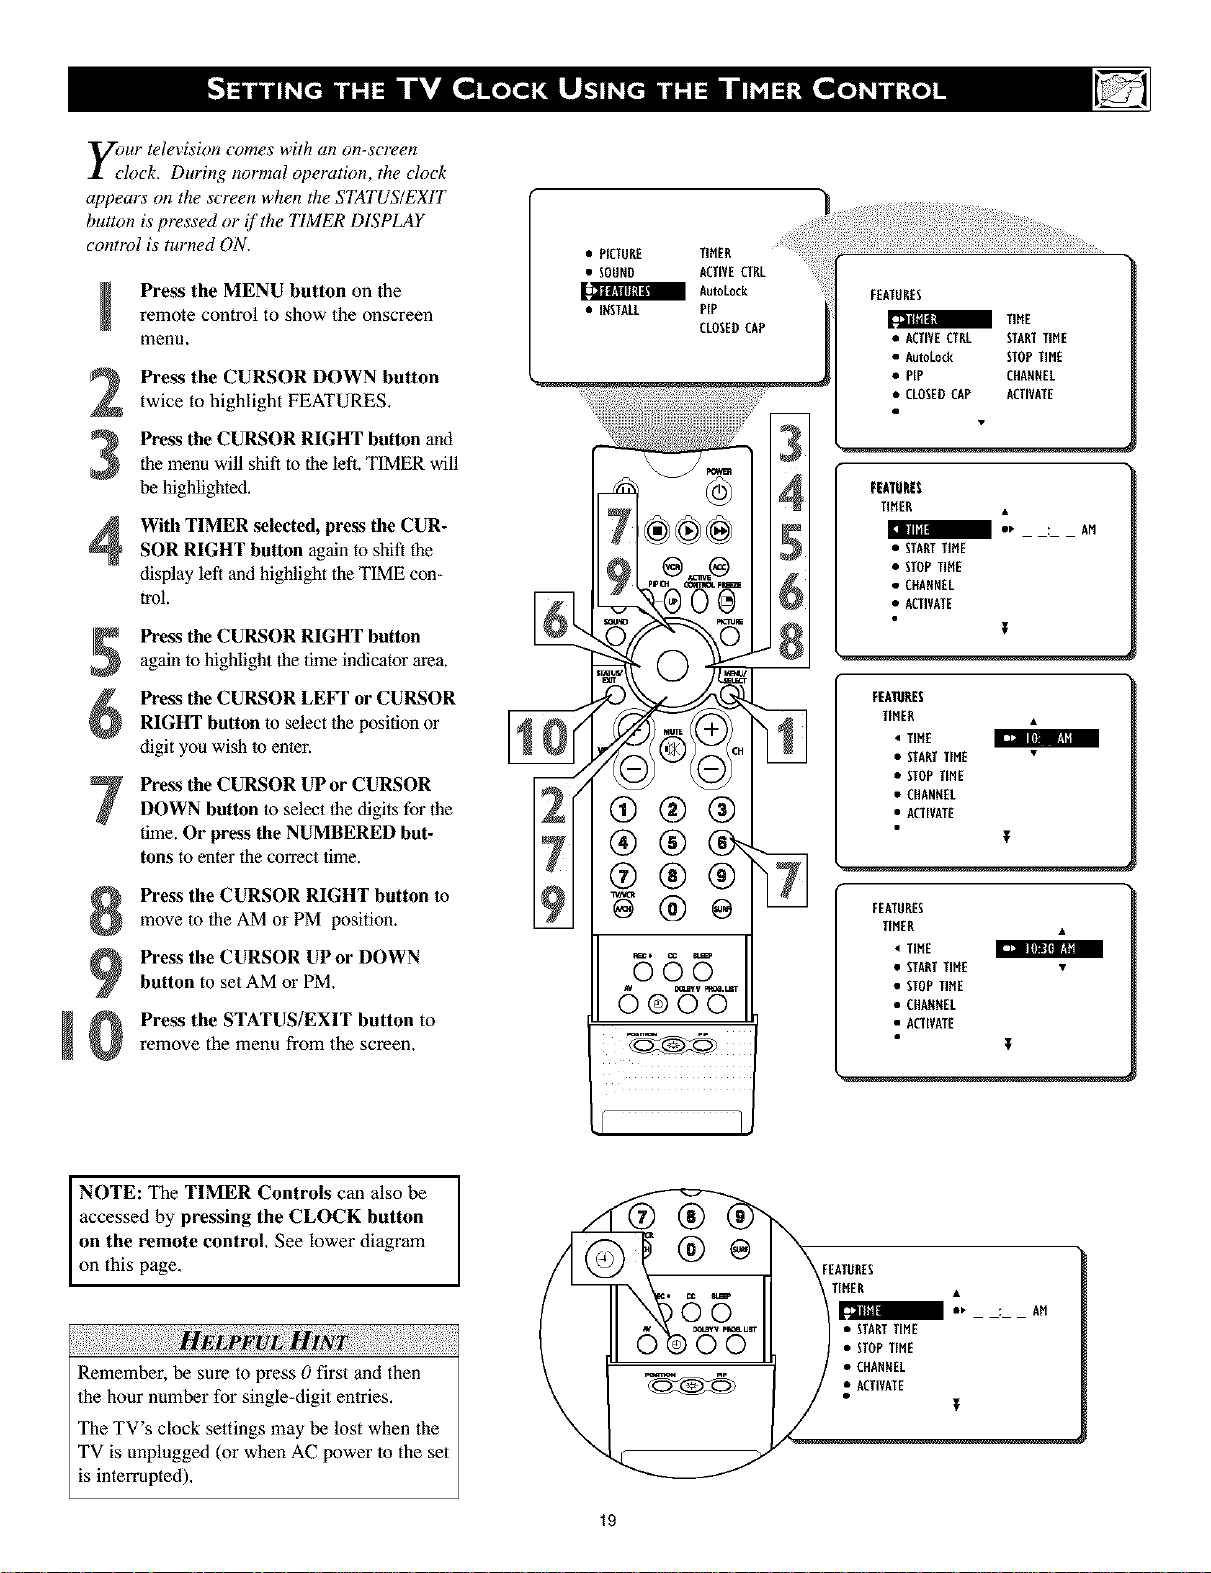
y_)ur television comes with an on-screen
•lock. During normal operation, the clock
appears on the screen when the STATUS/EXIT
button is pressed or if the "ITMER DISPLAY
control is turned ON.
Press the MENU button on theremote control to show the onscreen
menu.
Press the CURSOR DOWN button
twice to highlight FEATURES.
Press the CURSOR RIGHT button and
the menu will shift to the left. TIMER will
3
be highlighted.
With TIMER selected, press the CUR-
4
SOR RIGHT button again to shift the
display left andhighlight the TIMEcon-
trol.
Press the CURSOR RIGHT button
again to highlight thetime indicator area.
Press the CURSOR LEVI" or CURSOR
RIGHT button to select the position or
digit yon wish to enter.
Press the CURSOR UP or CURSOR
DOWN button to select the digits for the
time. Or press the NUMBERED but-
tons to enter lhe correct time.
• PICTURE TIMER
• SOUND ACTIVECTRL
a AutoLock
• INSTALL PIP
CLOSEDCAP
Q®®
®®0
FEATURES
a TIHE
• ACTIVECTRL STARTTIHE
• AutoLock STOPTIME
• PIP CHARNEL
• CLOSEDCAP ACTIVATE
FEATURES
TIHER
:, : AM
• STARTTIHE
• STOPTIHE
• CffANNEL
• ACTIVATE
EEATUEES
TIMER •
• TIME
• STARTTIME •
• STOPTiME
• CHANNEL
• ACTIVATE
[]] I[_l W_lll
T
Press the CURSOR RIGHT button to
move to the AM or PM position.
Press the CURSOR UP or DOWN
button to set AM or PM.
Press the STATUS/EXIT button to
!
remove the menu from the screen.
NOTE: The TIMER Controls can also be
accessed by pressing the CLOCK button
on the remote control. See lower diagram
on this page,
vL
Remember, be sure to press 0 first and then
lhe hour number for single-digit entries.
The TV's chock settings may be lost when the
TV is unplugged (or when AC power to the set
is interrupted),
@
® e
FEATURES
TIMER •
TIME
• STARTTIHE •
• STOPTIME
• CHARNEL
• ACTIVATE
• STARTTIME
• STOPTIME
• CHANNEL
I r:|_l
T
19
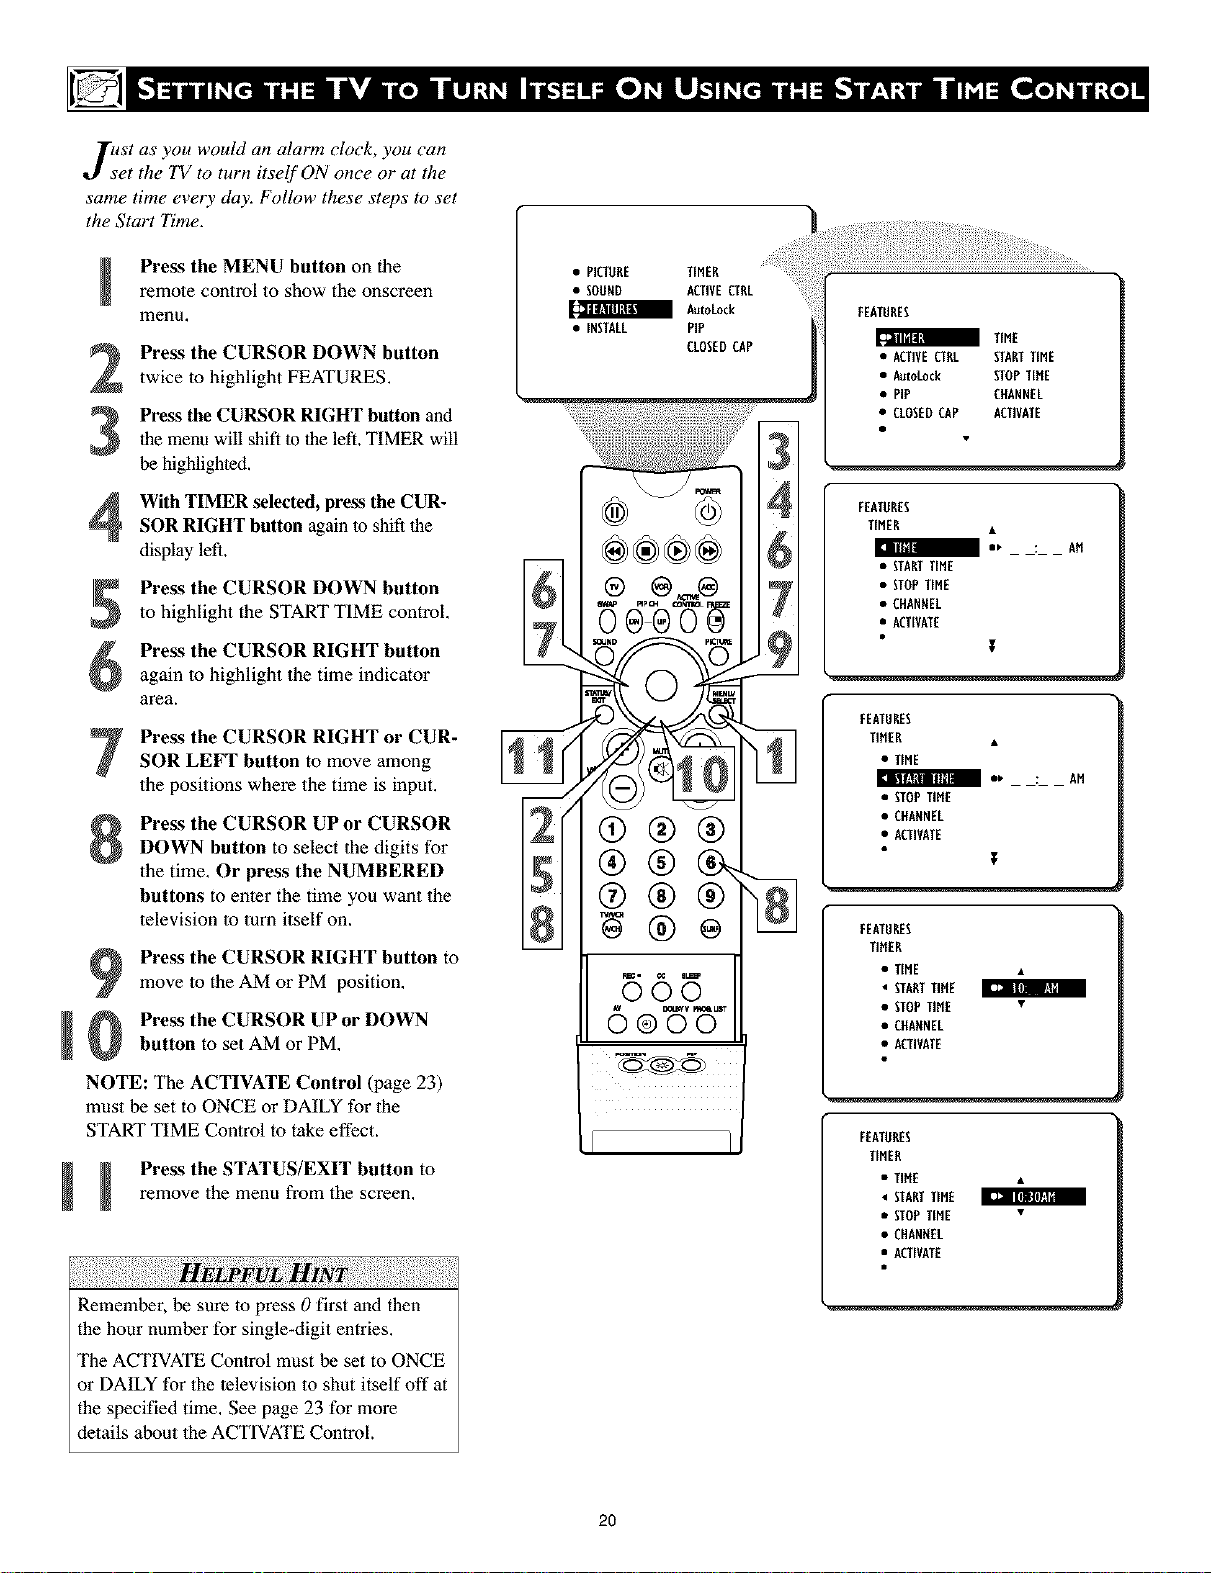
Just as you would an alarm clock, you can
et the TV to turn itself ON once o1"at the
same time every day. Follow these steps to set
the Start Time.
Press the MENU button on theremote control to show the onscreen
menu,
Press the CURSOR DOWN button
twice to highlight FEATURES.
Press the CURSOR RIGHT button and
the menu will shift to the left. TIMER will
3
be highlighted.
• PICTURE TIMER
• SOUND ACTIVECTRL
a AutoLock
• INSTALL PiP
CLOSEDCAP
FEATURES
TIME
• ACTIVECTRL STARTTIME
• AutoLock STOPTIHE
• PIP CHANNEL
• CLOSEDCAP ACTIVATE
With TIMER selected, press the CUR-
4
SOR RIGHT button again to shift the
display left.
Press the CURSOR DOWN button
to highlight the START TIME control,
Press the CURSOR RIGHT button
again to highlight the time indicator
area.
Press the CURSOR RIGHT or CUR-
SOR LEFT button to move among
the positions where the time is input,
Press the CURSOR UP or CURSOR
DOWN button to select the digits for
the time. Or press the NUMBERED
buttons to enter the time you want the
television lo turn itself on.
Press the CURSOR RIGHT button to
move to the AM or PM position,
Pre_ the CURSOR UP or DOWN
!
button to set AM or PM,
NOTE: The ACTIVATE Control (page 23)
must be set to ONCE or DAILY for the
START TIME Control to take effect.
remove the menu from the screen,
_ Press the STATUS/EXIT button to
®_JND r_
/
'z ®®@
FEATURES
TIMER •
• STARTTIME
• STOPTIME
• CHANREL
• ACTIVATE
FEATURES
TIHER •
• TIME
E LNf_Lllllll|
• STOPTIME
• CHARNEL
• ACTIVATE
FEATURES
TIMER
• TIME •
• STARTTIME
• STOPTIME •
• CHARNEL
• ACTIVATE
FEATURES
TIMER
• TIER •
• STARTTIME
• fl0P TIME •
• CHANNEL
• ACTIVATE
•, : AH
T
: AM
T
tl: Rill IA_I
Remember, be sure to press 0 first and then
the hour number for single-digit entries.
The ACTIVATE Control must be set to ONCE
or DAILY for the television to shut itself off at
the specified time, See page 23 for more
details about lhe ACTIVATE ControL.
2O
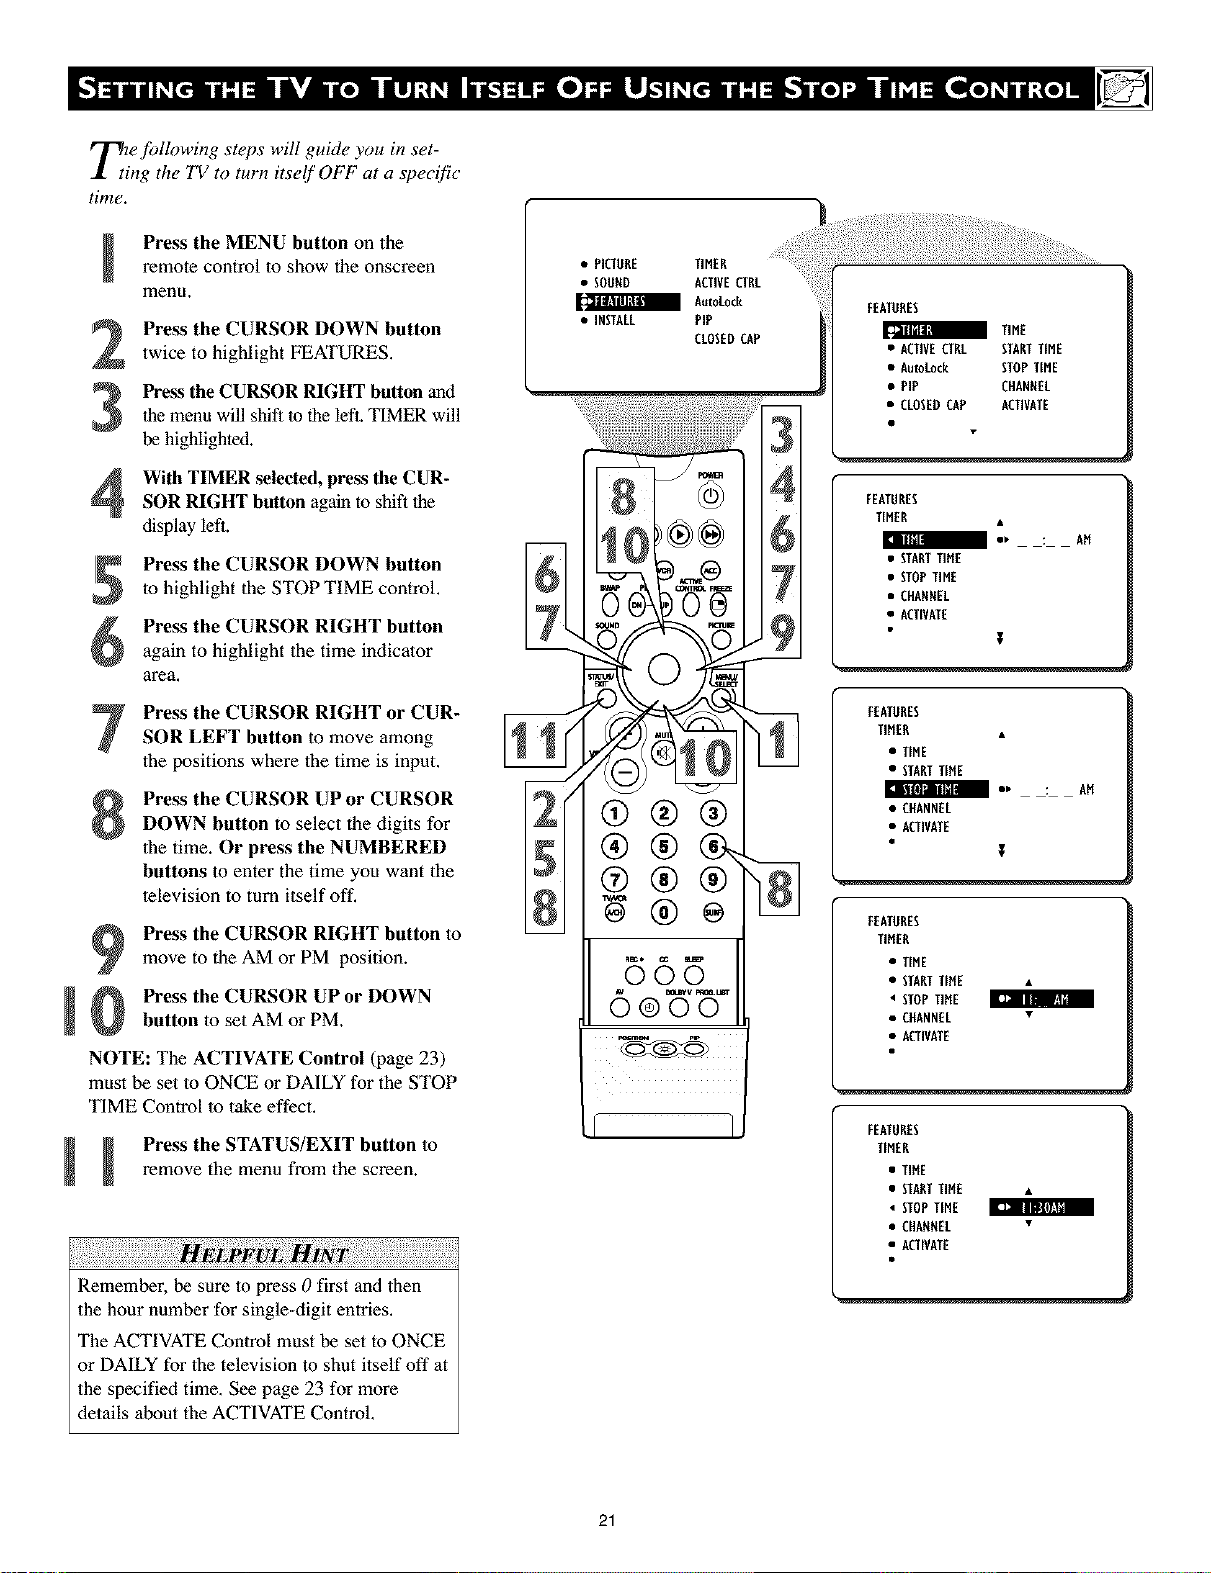
_]ie following steps will guide you in set-
ng the TV to turn itself OFF at a specific
time.
Press the MENU button on theremote control to show the onscreen
menu,
Press the CURSOR DOWN button
twice to highlight FEATURES,
Press the CURSOR RIGHT button and
the menu will shift to the left. TIMER will
3
be highlighted.
With TIMER selected, press the CUR-
4
SOR RIGHT button again to shift the
display left.
Press the CURSOR DOWN button
5
to highlight the STOP TIME control.
Press the CURSOR RIGHT button
6
again to highlight the time indicator
area.
Press the CURSOR RIGHT or CUR-
SOR LEFT button to move among
the positions where the time is input.
Press the CURSOR UP or CURSOR
DOWN button to select the digits for
1he time. Or press the NUMBERED
buttons to enter the time you want the
lelevision to turn itself off,
Press the CURSOR RIGHT button to
move to the AM or PM position.
Press the CURSOR UP or DOWN
!
button to set AM or PM.
NOTE: The ACTIVATE Control (page 23)
must be set to ONCE or DAILY for the STOP
TIME Control to take effect,
remove the menu from the screen.
_ Press the STATUS/EXIT button to
! ii!iii !i!!i7711!i 77i!!17i!7i!171i!17!iii!i ii!iii! i 71i!i717!ilii!17: ilii!ii ii!¸i¸7!7i7!iii!i 71i!171i!i iili
Remember, be sure to press 0 first and then
the hour number for single*digit entries,
The ACTIVATE Control must be set to ONCE
or DAILY for the television to shut itself off at
the specified time, See page 23 for more
details about the ACTIVATE Control,
• PICTURE TIMER
• SOUND ACTIVECTRL
AutoLock
• iNSTALL PIP
CLOSEDCAP
--ioL+?
(9®®
N®÷
5(5
FEATURES
• ACTIVECTRL STARTTIME
• Autokock STOPTIME
• PIP CHANNEL
• CLOSEDCAP ACTIVATE
FEATURES
TIMER •
I IIIll|
• STARTTIHE
• STOPTIME
• CHANNEL
• ACTIVATE
FEATURES
TIHER •
• TIME
• STARTTIHE
m 1' : AH
• CHANNEL
• ACTIVATE
FEATURES
TIHER
• TIME
• STARTTIHE *
• STOPTIHE
• CHANNEL •
• ACTIVATE
FEATURES
TIMER
• TIHE
• STARTTIHE *
4 STOPTIME
• CHANNEL •
• ACTIVATE
TIME
: AM
T
T
[1] Ill I:Ul
I_- lliBlff_l_l
21
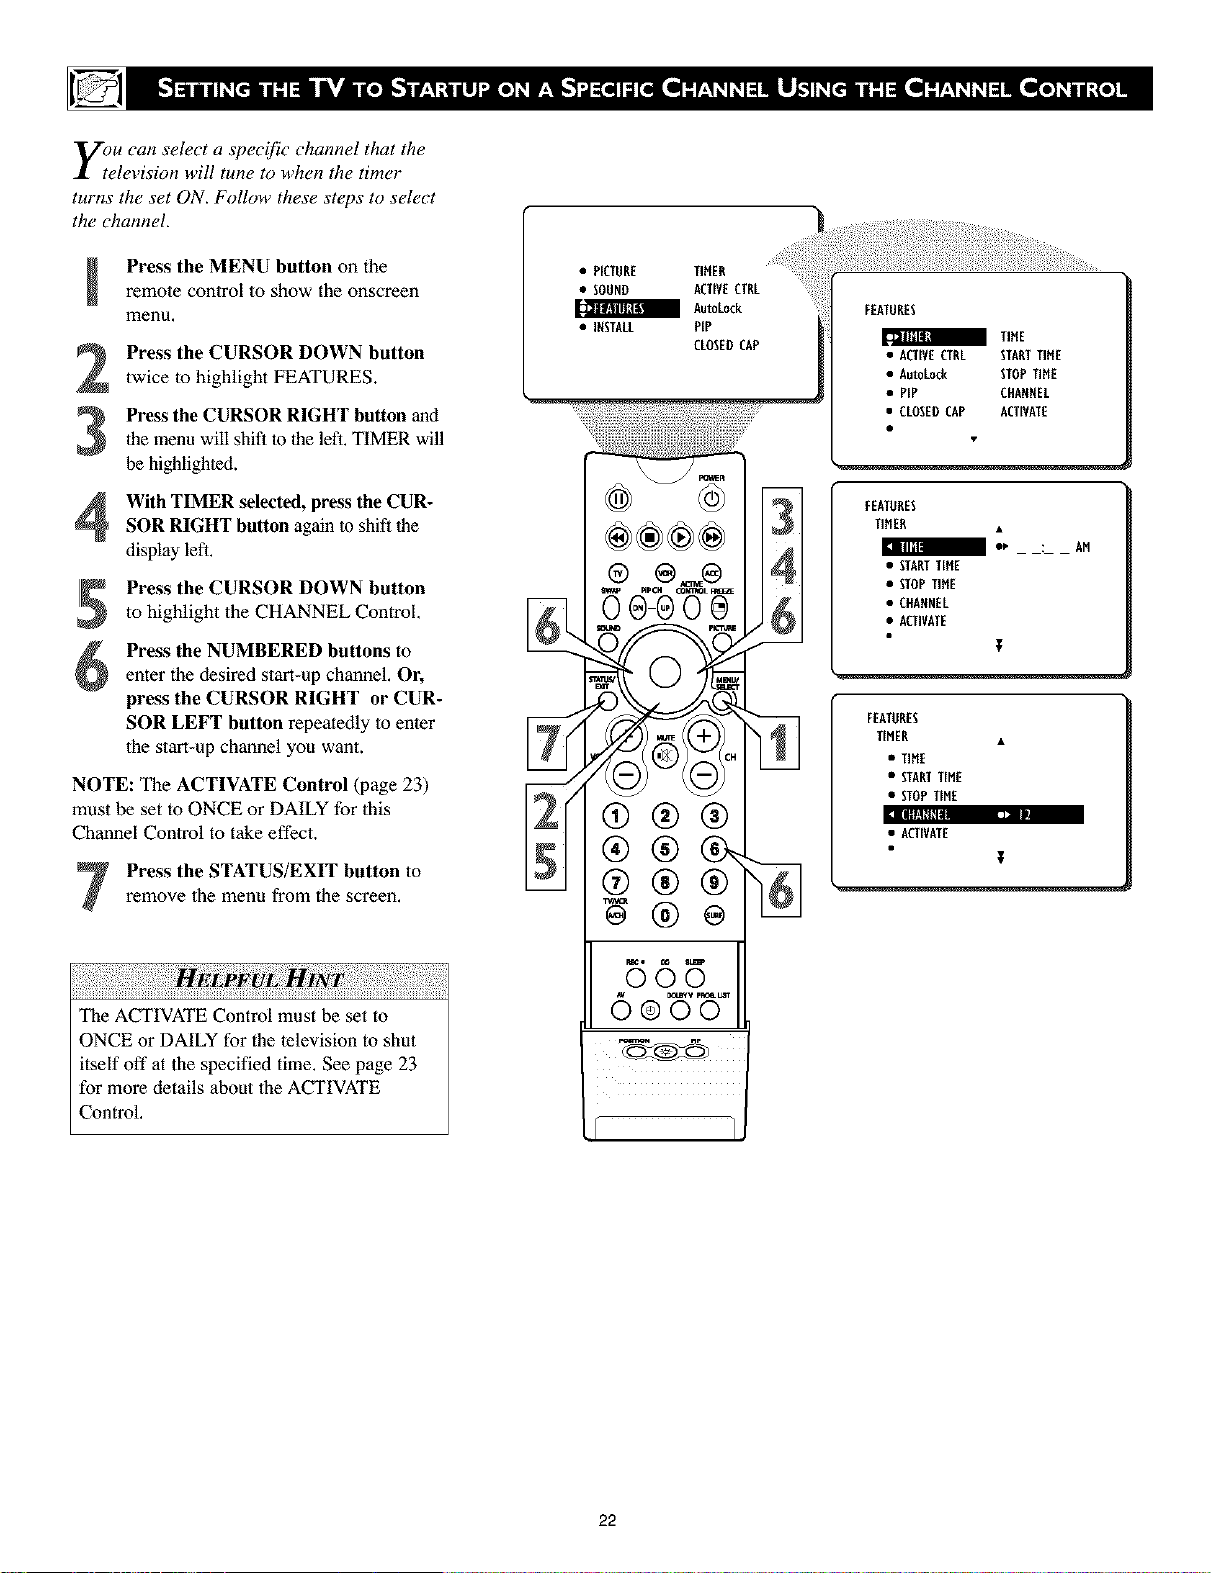
y;u can select a specific channel that the
elevision will tune to when the timer
turns the set ON. Follow these steps to select
the channel.
Press the MENU button on theremote control to show the onscreen
menu,
Press the CURSOR DOWN button
twice to highlight FEATURES.
Press the CURSOR RIGHT button and
the menu will shift to the left. TIMER will
be highlighted.
With TIMER selected, press the CUR-
SOR RIGHT button again to shift the
display left.
Press the CURSOR DOWN buttonto highlight the CHANNEL Control,
Press the NUMBERED buttons to
enter the desired start-up chamlel, Or,
press the CURSOR RIGHT or CUR-
SOR LEFT button repeatedly to enter
the start-up channel you want.
NOTE: The ACTIVATE Control (page 23)
must be set to ONCE or DAILY for this
Channel Control to take effect.
Press the STATUS/EXIT button to
remove the menu from the screela.
• P[CTURE TIMER
• SOUND ACTIVECTRL
AutoLock
• INSTALL PIP
CLOSEDCAP
FEATURES
TIBE
• ACTIVECTRL STARTTIME
• AutoLock STOPTiME
• PEP CHAENEL
• CLOSEDCAP ACTIVATE
FEATURES
TIHER •
m e_ . AM
• STARTTIHE
• _OP TIHE
• CffRNNEL
• RUIVRTE
FEATURES
TIMER •
• TIME
• STARTTIHE
• fl0P TIME
• ACTIVATE
T
The ACTIVATE Control must be set to
ONCE or DAILY for the television to shut
itself off at the specified time. See page 23
for more details about the ACTIVATE
Control,
22

eryoo ,,eset,he ,ne,S,ort ,ne,
Stop Time, and Start Channel, the timer
must be set to come on ONCE o1"DALLY, or
turned OFF through the ACTIVATE Control.
Press the MENU button on theremote control to show the onscreen
menu.
Press the CURSOR DOWN button
twice to highlight FEATURES.
Press the CURSOR RIGHT button and
the menu will shift to the left. TIMER will
3
be highlighted.
With TIMER selected, press the CUR-
4
SOR RIGHT button again to shift the
display left.
Press the CURSOR DOWN button
to highlight the ACTIVATE Control.
Press the CURSOR RIGHT or CUR-
SOR LEFT button repeatedly to select
ONCE, DAILY or OFE
Press the STATUS/EXIT button to
remove the menu from file screen.
!i!iiiiiii!!ii!iii¸ili!!i!!!!i
With tile ACTIVATE Control set to ONCE,
tile START TIME, STOP TIME, and
START CHANNEL Controls will only be
activated one time,
With tile ACTIVATE Control set to DAILY,
tile START TIME, STOP TIME, and
START CHANNEL Controls will be acti-
vated every day of the week until it is
turned OFF or set to ONCE.
• PICTURE TIMER
• SOUND ACTIVECTRL
a AutoLock
• INSTALL PIP
CLOSEDCAP
®®®2
® @,..,.®
gt0 "g
®®®
@®®
B6 5
FEATURES
a TIME
• ACTIVECTRL STARTTIME
• AutoLock STOPTIHE
• PIP CHARNEL
• CLOSEDCAP ACTIVATE
FEATURES
TIHER •
/ •' : AM
• STARTTIME
• STOPTIHE
• CHARNEL
• ACTIVATE
FEATURES
TIMER •
• TIME
• STARTTIME
• STOPTINt
• CHANREL
al_lll|_l ,= •
• T
OR
141U|_1 ,= ml{
OR
_:i:i!ii!!i!i!_ii_:!i!iii!i!!iiilli!i!i!i_il'i!i!:_!:ii!!i_ii!!ii!!i!_i!ili_i_i_i!!_!!i!!! _]i!,ii¸ _i_!ii!i_iill!ii!!i!ii!i_iii_!!i_!iii_i_i_i!!_!!i!_i!i_!i_i!!!i_!ii!ii!ii!!i_i_iii_i?il
Remember, before setting the TIMER con-
frols, the TV's clock must be set to the cor-
rect time manually (see page 19) or by
using the AutoChron TM feature described on
page 11.
23
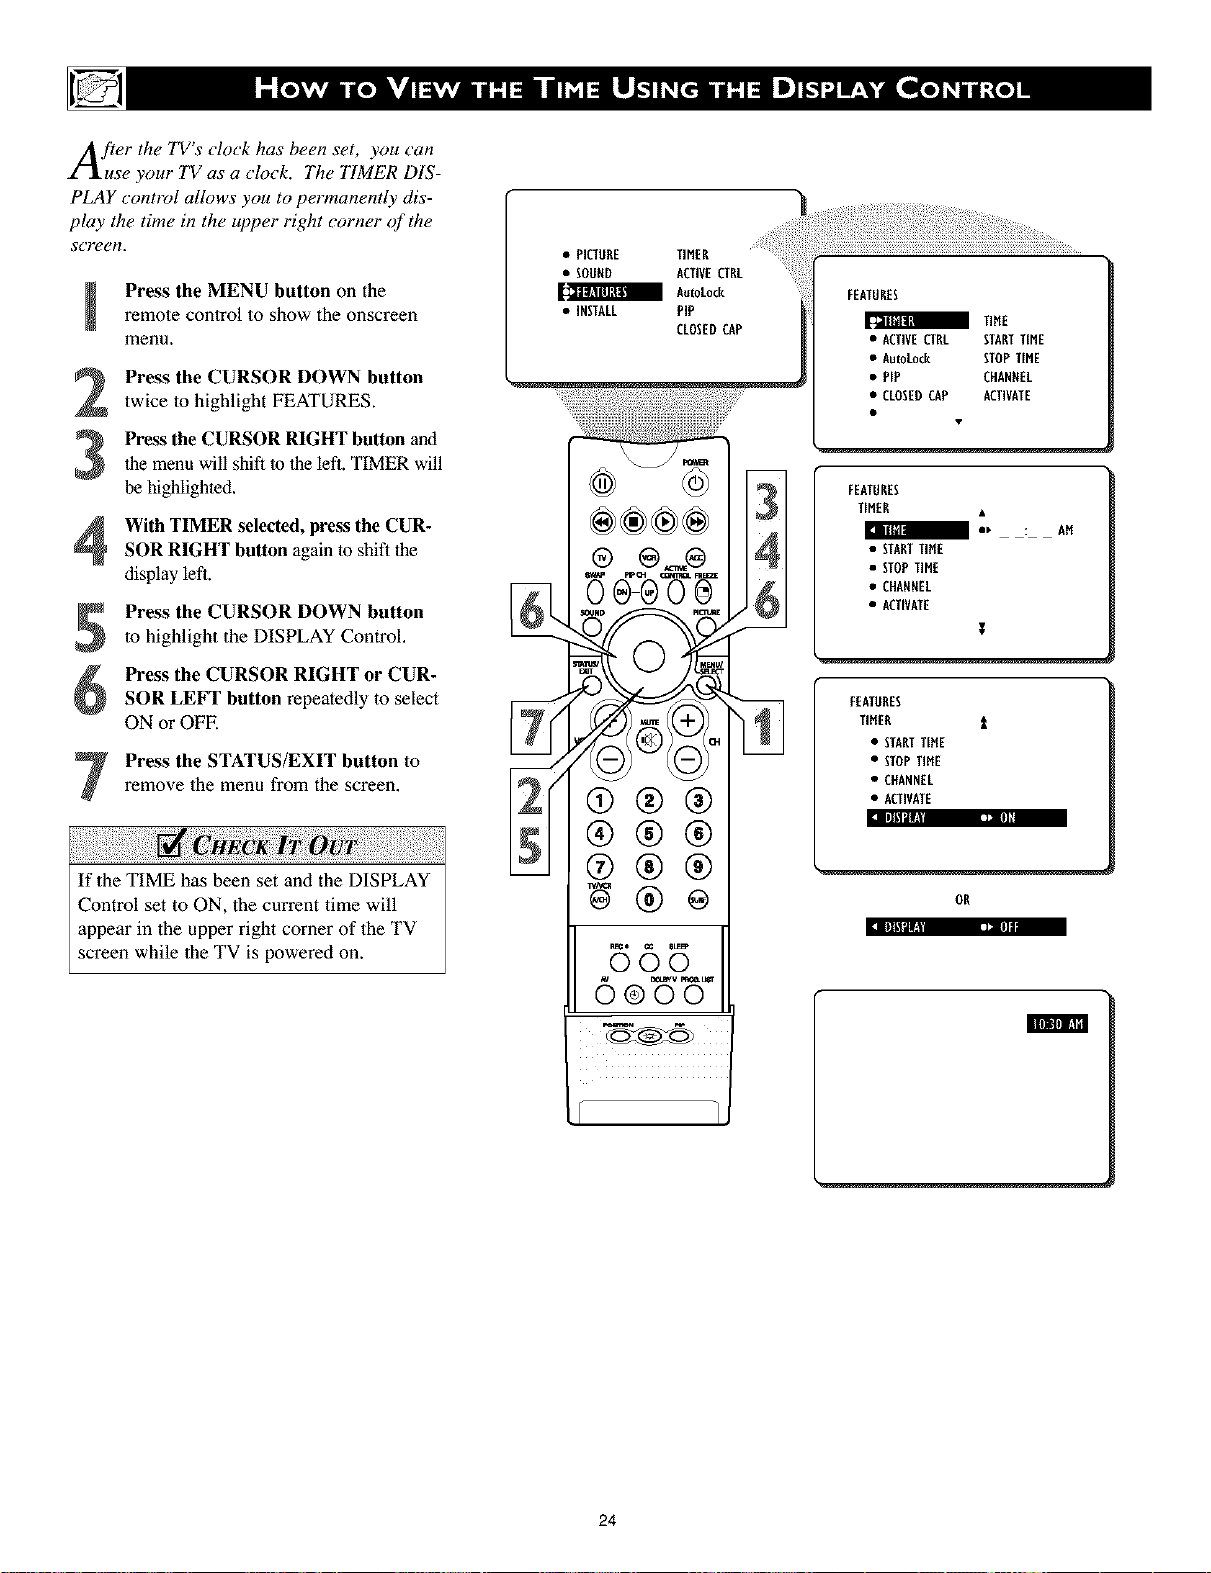
After theTV'sclock has been set, you can
use your TV as a clock. The TIMER DIS-
PLAY contrd allows you to permanently dis-
play the time in the upper right corner of the
screen.
Press the MENU button on theremote control to show the onscreen
menu,
Press the CURSOR DOWN button
twice to highlight FEATURES.
the menu will shift to the left. TIMER will
Press the CURSOR RIGHT button and
be highlighted.
With TIMER selected, press the CUR-
SOR RIGHT button again to shift the
display left.
Press the CURSOR DOWN button
to highlight the DISPLAY Control.
Press the CURSOR RIGHT or CUR-
SOR LEFT button repeatedly to select
ON or OFE
Press the STATUS/EXIT button to
remove the menu from the screen.
!i!iiiiiii!!ii!iii
If the TIME has been set and the DISPLAY
Control set to ON, the current time will
appear in the upper right corner of the TV
screen while 1he TV is powered on.
• PICTURE TIMER
• SOUND ACTIVECTRL
a AutoLo¢k
• INSTALL PIP
CLOSEDCAP
m
®®®2
®
N N
®®®
@®®
B65
FEATURES
TIME
• ACTIVECTRL STARTTIME
• AutoLock STOPTIME
• PIP CHANNEL
• CLOSEDCAP ACTIVATE
FEATURES
TIMER •
: AM:l frill|
• STARTTIME
• fl0P TIME
• CHANNEL
• ACTIVATE
FEATURES
TIMER t
• STARTTIME
• STOPTIME
• CHANNEL
• ACTIVATE
Ill[_l'[! Iln
OR
24
 Loading...