

Philips 30PW850H Owner’s Manual

Directions for Use
Need help?
Call us!
Philipsrepresentatives are ready to help you with any ques-
tions about your new product. We can guide you through
Connections,First-time Setup, or any of the Features.
We want you to start enjoyingyour new product right away_.
O0
00
00
CALL US BEFORE YOU CONSIDER
RETUNING THE PRODUCT.
1-800-531-0039
or
Visit us on the web at
w_r_.philips.com
3121 235 20991
Model No.:
Serial No.:

Once your PHILIPS purchase is registered, you're eligible to receive all the privileges
of owning a PHILIPS product. So complete and return the Warranty Registration
Card enclosed with your purchase at once. And take advantage of these important benefits.
Congratulations on your purchase,
and welcome to the "family!"
Dear PHILIPS product owner:
Thank you for your confidence in PHILIPS. You've selected one of the best-built, best-backed products
today. And we'll do everything in our power to keep you happy with your purchase for many years to come.
As a member of the PHILIPS "family," you're entitled to protection by one of the most comprehensive war-
_nties and outstanding service networks in the industry.
What's more, your purchase guarantees you'll receive all the information and special offers for which you quali-
fy, plus easy access to accessories from our convenient home shopping network.
And most importantly you can count on our uncompromising commitment to your total satisfaction.
All of this isour way of sayingwelcome_and thanks for investing in a PHILIPS product.
Sincerely,
Lawrence J. Blanford
President and Chief Executive Officer
PHILIPS
P.S. Remember, to get the most from your
PHILIPS product, you must return your
Warranty Registration Card within 10
days. So please mail it to us right now!
Know these
safetysymbols
_L This "bolt of lightning" indicates uninsulated material within your unit may cause an elec-
trical shock, For the safety of everyone in your household, please do not remove product cor-
m'The "exclamation point" calls attention to features for which you should read the
enclosed literature closely to prevent operating and maintenance problems.
WARNING: TO PREVENT FIRE OR SHOCK HAZARD, DO NOT EXPOSETHIS EQUiP-
MENT TO RAiN OR MOISTURE.
CAUTION: To prevent electric shock, match wide blade of plug to wide slot, and fully insert,
ATTENTION: Pour _viter les chocs _lectriques, introduire la lame la plus large de la fiche dans
la borne correspondante de la prise et pousser jusqu'au fond,

IMPORTANT SAFETY INSTRUCTIONS
Read before operating equipment
1. Read these instructions.
2. Keep these instructions.
3. Heed all warnings.
4. Follow all instructions.
5. Do not use this appara/us near water.
6. Clean only with a dry cloth. 17.
7. Do not block any of the ventilation openings. Install in accordance
with the manufacturers instructions.
8. Do not install near any heat sources such as radiators, heal regis-
ters, stoves, or other apparatus (including amplifiers) that produce
heat.
9. Do not defeat the safety purpose of the polarized or grounding-
type plug. A polarized plug has two blades with one wider than
the other. A grounding type plug has two blades and third ground-
ing prong. The wide blade or third prong are provided for your
safety. When the provided plug does not fit into your outlet, con- 18.
suit an electrician for replacement of the obsolete outlet.
10. Protect tbe power cord from being walked on or pinched particu- 19.
larly at plugs, convenience receptacles, and the point where they
exit fi-om the apparatus. 20.
11. Only use attachments/accessories specified by the manufacturer.
12. _ Use only with a cart, stand, tripod, bracket, or table
_ specified by the manufacturer, or sold with the app-
the cart/- apparatus combination to avoid injury from tip-over.
13. Unplug this apparalus during lightning storms or when unused for
long periods of time.
14. Refer all servicing to qualified service personnel. Servicing is
required when the apparatus has been damaged in any way, such
as power-supply cord or plug is damaged, liquid has been spilled 21.
or objects have fallen into apparatus, the apparatus has been
exposed to rain or moisture, does not opera/e normally, or has
been dropped. 22.
15. This product may contain lead and mercury. Disposal of these
materials may be regula/ed due to environmental considerations.
For disposal or recycling information, please contact your local
authorities or the Electronic Industries Alliance: www.eiae.org
16. Damage Requiring Service - The appliance should be serviced
by qualified service personnel when:
A. The power supply cord or the plug has been damaged; or
aratus. When a carl is used, use caution when moving
B. Objects have fallen, or liquid has been spilled into the appli-
ance; or
C. The appliance has been exposed to rain; or
D. _le appliance does not appear to operate normally or
exhibits a marked change in performance; or
E. The appliance has been dropped, or the enclosure damaged.
Tilt/Stability - All televisions must comply with recommended
international global safety standards for tilt and stability properties
of its cabinet design.
• Do not compromise these design standards by applying exces-
sive pull force to the front, or top, of the cabinet which could ulti-
mately overturn the product.
• Also, do not endanger yourself, or children, by placing electron-
ic equipment/toys on the top of the cabinet. Such items could
unsuspectingly fall fiom the top of the set and cause product dam-
age and/or personal injury.
Wall or Ceiling Mounting - The appliance should be moun/ed to
a wall or ceiling only as recommended by the manufacturer.
Power Lines -An outdoor antenna should be located away from
power lines.
Outdoor Antenna Grounding - If an outside antenna is connect-
ed to the receiver, be sure the antenna system is grounded so as to
provide some protection against voltage surges and built up static
charges.
Section 810 of the National Electric Code, ANSI/NFPA No. 70-
1984, provides information with respect to proper grounding of
the mast and supporting structure, grounding of the lead-in wire to
an antenna discharge unit, size of grounding connectors, location
of antenna-discharge unit, connection to grounding electrodes, and
requirements for the grounding electrode_ See Figure below_
Object and Liquid Entry - Care should be taken so that objects
do not fall and liquids are not spilled into the enclosure through
openings.
Battery Usage CAUTION - 'Ib prevent bmtery leakage that may
result in bodily injury, property damage, or damage to the unit:
• Install all batteries correctly, with + and - aligned as marked on
the unit.
• Do not mix batteries (old and new or carbon and alkaline, etc.).
• Remove batteries when the unit is not used for a long time.
Note to the CATV system installer: This reminder is provided to call the CATV system installer's attention to Article 820-40 of the NEC]
that provides guidelines for proper grounding and, in particular, specifies that the cable ground shall be connected to the grounding system of the /
building, as close to the point of cable entry as practical ]
Example of Antenna Grounding
as per NEC - National Electric Code
GROUNDCLAI_dP ANTENNALEADINWIRE
ANTENNADISCHARGEUNIT(NECSECTmN8lingo)
GROUNDINGCONDUCTORS(NECSECTmNa_o-zl)
GROUNDCLAMPS
ELECTRICSERVICEEQUIPMENT _ POWERSERVICEGROUNDINGELECTRODESYSTEM(NECA_T2SO,PABTH)
INTRODUCTION
Welcome/Registration of Your TV ..................... 2
Safety/Precautions ............................... 2 3
Features .......................................... 5
INSTALL MENU CONTROLS
How to use the Language Control ............... 6
How to use the Tuner Mode Control ................... 7
How to use the AutoFrogram Control .................. 8
How to Add or Delete Channels (Channel Edit) .......... 9
How to use the Name Control (Channel Label) .......... 10
How to se the TV Clock using the AutoChron 'jM Control ,, 11
PICTURE MENU CONTROLS
Adjusting the Brightness Control ............... 12
Adjusting Ihe Color Control ......................... 12
Adjusting Ihe Picture Control ........................ 12
Adjusting the Sharpness Control ..................... 12
Adjusting the Tint Control .......................... 12
How to set the Color Temp Control ................... 12
How to use the Digital Options Control ................ 13
How to set the Dyn(amic) Contrast Control ............ 14
SOUND MENU CONTROLS
Adjusting the Treble Control .................. 15
Adjusting the Bass Control .......................... 15
Adjusting Ihe Balance Control ....................... 15
How to use the AVL control ......................... 16
How to use the Incr,(edible) Surround Control .......... 17
How to set the Stereo Control ....................... 18
How to set the TV to receive Secondary Audio
Programming, also known as the SAP Control .......... 18
How to set the Audio Out Control .................... 19
How to turn the TV speakers on or off using
the Speaker Control ............................... 20
FEATURE MENU CONTROLS
How to use the Timer controls:
Setting the TV Clock using the Time Control .......... 21
Setting a time for the TV to turn itself on using
the Start Time Control ............................ 22
Setting a time tbr the TV to mm itself off using
the Stop Time Control ............................ 23
Setting the TV to start on a specific channel using
the Channel Control .............................. 24
How to activale the controls using the Activa/e Control , ,25
How to view the time using the Display Control ....... 26
How to activale the Active Control "rM ................. 27
How to use the AutoLock vM Controls:
Understanding Ihe AntoLock 'jM Feature .............. 28
Setting up an AntoLock 'jMAccess Code .............. 29
How to Block Channels ........................... 30
How to Clear All blocked channels at the same time ,, ,31
Blocking programming based on Movie Ratings ...... 32
Blocking programming based on TV Ratings ......... 33
AntoLock 'jM Blocking Options - Blocking Control ..... 34
AntoLock 'jM Blocking Options - No Rating Control .... 35
How to review the AutoLock 'jMControl Status ........ 36
How to use the Closed Captioning Control ............. 37
How to change the screen (size) format using
the Format Control ................................ 38
How to use the Rotation Control ..................... 39
How to activale the Blue Mule Control ................ 40
[] REHOTE CONTROL RELATED FEATURES
How to set the Sleep Timer Control ............ 41
How to Use the Freeze Control ...................... 42
Using Ihe AntoPicture "rMControl ..................... 43
Using Ihe AntoSound 'jM Control ...................... 44
Using the Surf Control (and Alternate Channel) ......... 45
Using the Remote Control with accessory devices
Direct Access Method ............................ 46
Code-Entry Method .............................. 47
Search Method .................................. 48
Direct-Entry Code list for accessory devices ......... 49-50
Remote Control VCR Specific Button ................. 51
GENERAL INFORMATION
Troubleshooting ............................ 52
Care and Cleaning ................................ 52
Glossary of lerms ................................. 53
Index ........................................... 53
Factory Service Locations ........................ 54-55
Limited Warranty ................................. 56
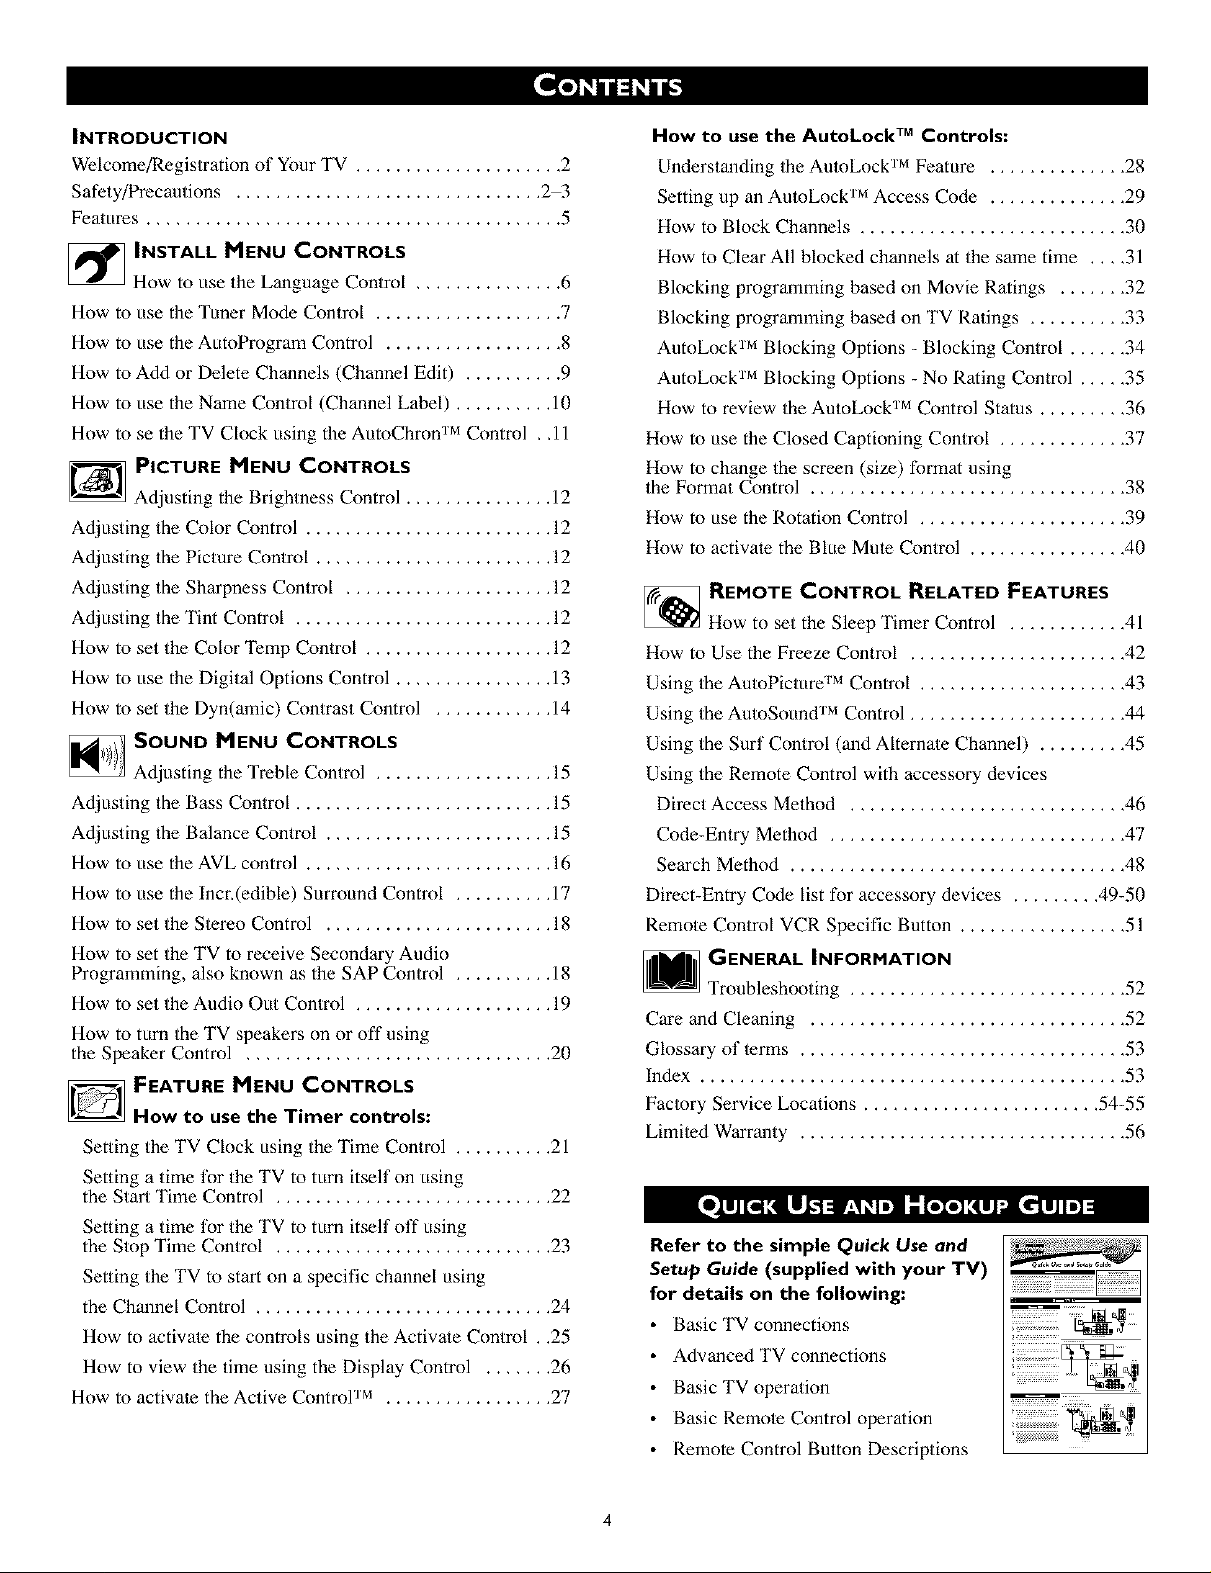
Refer to the simple Quick Use and
Setup Guide (supplied with your TV)
for details on the following:
• Basic TV connections
• Advanced TV connections
• Basic TV operation
• Basic Remole Control operation
• Remote Control Button Descriptions
!9>>>_ ....
Active Control TM conrinuonsly measures and corrects all incom-
ing signals to help provide the best picture quality, _l_is feature
monitors and corrects both the sharpness control and noise
reduction control,
Audio/Video Jack Panel allows direct connections with VCRs,
DVDs, or other devices, providing quality TV picture and sound
playback,
Audio Volume Leveler (AVL) Control keeps the TV sound at
an even level, Peaks and valleys that occur during program
changes or commercial breaks are reduced, making for a more
consistent, comfortable sound.
AutoChron TM automatically sets the right time of day and
maintains it with digital precision through brownouts, power
failures, and even Daylight Savings Time adjustments,
AutoLock TM allows you to block the viewing of certain chain
nels or programs with certain ratings if you do not want your
children to view inappropriate materials,
Auto Programming scans (when activated) for all available
channels from regular antenna or cable signals and stores only
active brnadcast stations in the TV's memory,
AutoPicture TM allows you to change the picture settings (colol;
tint, contrast, etc,) for various types of programming, such as
sports, movies, multimedia (games), or weak signals with the
push of one bntton,
AutoSound TM allows you to select from three factory_set con-
trols and a personal control that you set according to your own
preferences through the onscreen Sound menu, The three facto-
ry-set controls (Voice, Music, and _l_eatre) enable yon to tailor
the TV sound so as to enhance the parlicular programming you
are watching.
Channel Edit allows you to add or delete channels from the list
stored in the TV's memory. Channel Edit makes it easy to limit
or expand the number of channels that are available to you when
you press the Channel (+) or () buttons on your remote control.
Closed Captioning allows the viewer to read TV program dia-
logue or voice conversations as onscreen text,
Dynamic Contrast helps to sharpen the picture quality by
improving the contrast between the darkest and brightest parts of
the picture,
Eye Fidelity (also know as Digital Options) give a choice of
two difl:erent scanning technics - Progressive Scan or interlaced,
Progressive Scan doubles the number of visible lines per field by
displaying all picture frame lines at once, eliminating any picture
flicker, ]_e Interlaced mode provides a double vertical display
scan, which reduces annoying motion sweeps, The interlaced
mode will also smooth oat the jagged lines sometimes seen on
the edges of curved or angled surfaces,
Infrared Remote Control works your TV and other remote-
controlled devices, such as VCRs, DVD players, cable convert-
ers, and satellite receivers,
Onscreen Menu shows helpful messages and instructions for
setting TV featnre controls (can be viewed in English, French, or
Spanish).
Sleep Timer automatically turns the TV OFF after a set amonnt
of time that yon choose,
Standard Broadcast (VHF/UHF) or Cable TV (CATV) chan_
nel capability allows for viewing by antenna or cable,
Stereo capability, including a beih-in audio amplifier and twim
speaker system, allows for the reception of TV programs broad_
cast in stereo sound,
Surf Button allows yon to easily switch among only the chan-
nels that are of interest to you (the ones that you have
wogrammed into the TV's Surf control throngh the onscreen
nmnu),
Timer allows you to set your TV to turn itself ON and OFF
once or daily like an alarm clock,
As you unpack your TV, please note that this Directions
,for Use manual contains _fety-tip information and
Factory- Service Center locations, as well as a Warranty
Registration Card, remote control, and batteries for use
with the remote control.
Please take a few minules to complete your registration
card, The serial number for the TV is on the rear of the set.
Ret?r to the back of this manual for instructions in the
cleaning and care of the TV.
Your new television and its packing contain ma/erials that
can be recycled and reused, Specialized companies can recy-
cle your product to increase the amount of reusable materials
and minimize the amounts that need to be properly disposed.
Your product also uses batteries thai should not be thrown
away when depleted, but should be handed in and disposed of
as small chemical was/e,
When you replace your existing equipment, please find out
about the local regula/ions regarding disposal of your old lel-
evision, bat/cries, and packing malerials,
As an Energy Star@ Partner, Philips Consumer
Electronics has determined this product meets
the Energy Star@ guidelines for energy efficien-
cy. Energy Star@ is a U,S. registered mark. Using products
with the Energy Star@ label can save energy. Saving energy
reduces air pollution and lowers utility bills,
Active Control, APAC, AutoPicture, AutoSound, AutoChron,
and Incredible Surround are trademarks of Philips Consumer
Electronics Company, Copyright 2001 Philips Consumer
Electronics,
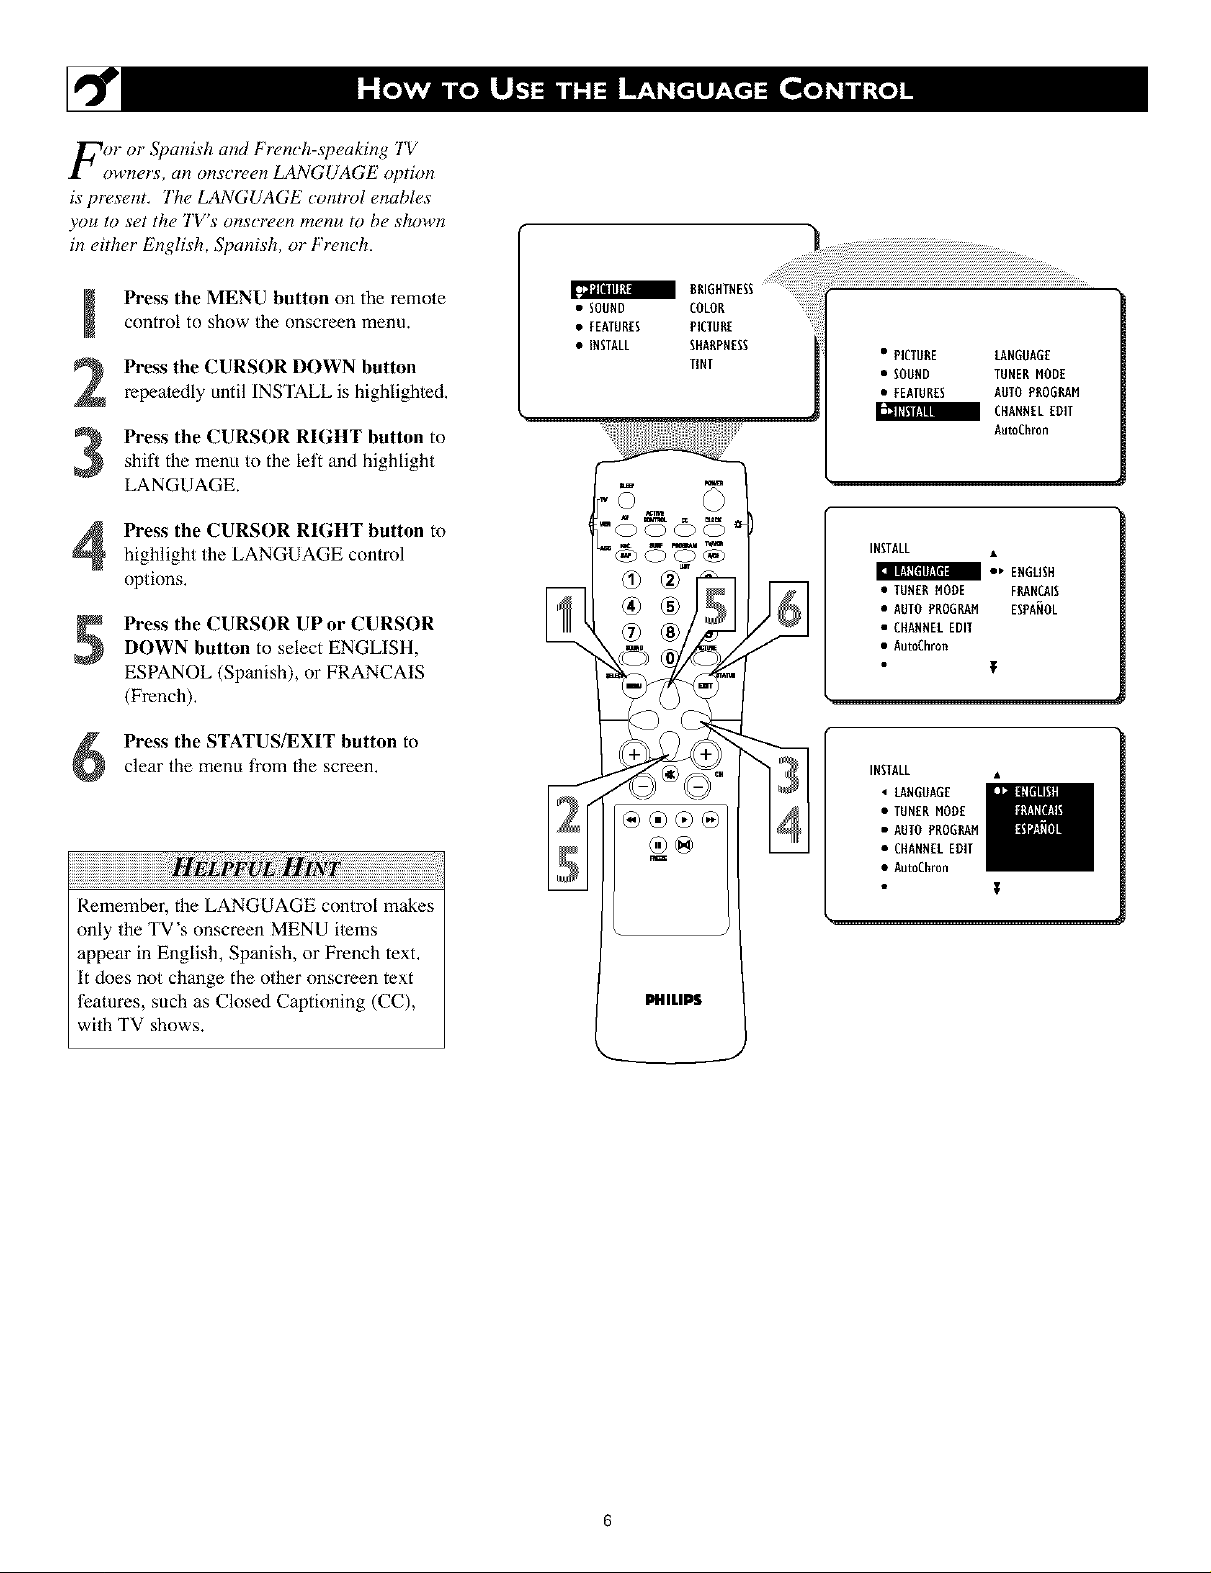
For or SpalHsh and French-speaking TV
owners, an onscreen LANGUAGE option
is present. The LANGUAGE comrol enables
you to set the TV's o#_screen menu to be show#_
in either English, Spanish, or French.
control to show the onscreen menu.
Press the MENU button on the remote
Press the CURSOR DOWN button
repeatedly until INSTALL is highlighted.
Press the CURSOR RIGHT button to
shift the menu to the left and highlight
LANGUAGE.
Press the CURSOR RIGHT button to
highlight the LANGUAGE control
options.
Press the CURSOR UP or CURSORDOWN button to select ENGLISH,
ESPANOL (Spanish), or FRANCAIS
(French),
a BRIGHTNESS
• SOUND COLOR
• FEATURES PICTURE
• INSTALL SHARPNESS
TINT
'© 0
"(Z) C? (Z) C?
• PICTURE LANGUAGE
• SOUND TUNERMODE
• FEATURES AUTOPROGRAM
a CHANNELEDIT
AutoChron
INSTALL
• TUNERMODE F_NCAIS
• AUTOPROGRAM ESPANOL
• CHANNELEDIT
• AutoChron
clear the menu from the screen,
Press the STATUS/EXIT button to
®®®®
iiiiiiiiiiiiiiiiiiiiiiiiiiiiiiiiiiiiiiiiiiiiiiiiiiiiiiiiiiiiiiiiiiiiiiiiiiiiiiiiiiii7 7i! !ii!ii!ii!ii!ii!ii!ii!ii!ii!ii!ii!ii!ii!ii!ii!ii!ii!ii!ii!ii!ii!ii!ii!ii!ii!ii!ii!ii!ii!ii!ii!ii!ii!ii!ii!ii!ii!ii!ii!ii!ii!ii!
INSTALL •
4 LANGUAGE
• TUNERMODE
• AUTOPROGRAM
• CHANNELEDIT
• AutoChron
Remember, the LANGUAGE control makes
only the TV's onscreen MENU items
appear in English, Spanish, or French text,
it does not change the other onscreen text
features, such as Closed Captioning (CC),
PHILIPS
with TV shows.
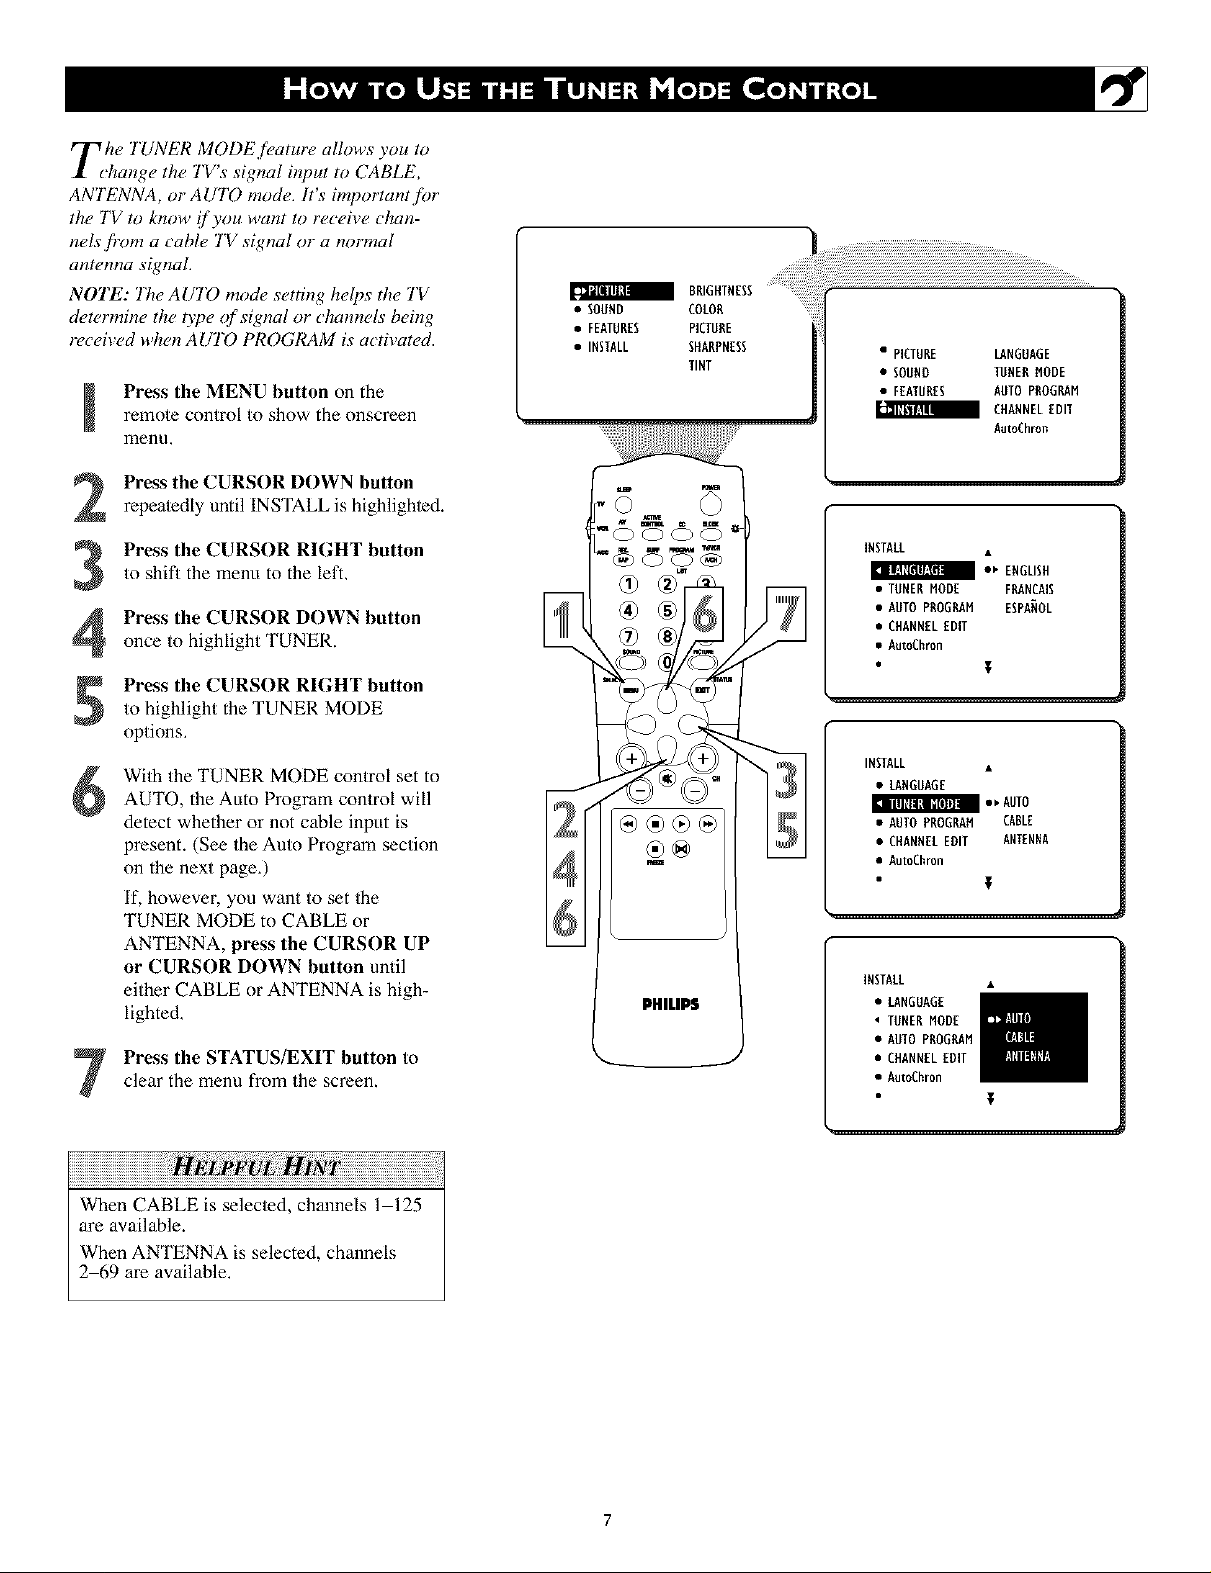
Tche TUNER M()DE f!,ature allows you to
*hange the TV s signal input to CABLE,
ANTENNA, or AUTO mod_,. It's imporTant f!Jr
the TV to know if you want to receive chan-
nels,f!_)m a cable TV signal or a normal
al_t_l_Ha sig!lal_
NOTE: The AUTO moch, setting helps the TV
d_t_,rmine the type of signal or _hannels being
receA ed when AUTD PROGRAM is a_ tivated.
remote control to show the onscreen
Press the MENU button on the
menu,
Press the CURSOR DOWN buttonrepeatedly until INSTALL is highlighted.
to shill the menu to the left,
Press the CURSOR RIGHT button
Press the CURSOR DOWN button
once to highlight TUNER.
Press the CURSOR RIGHT buttonto highlight the TUNER MODE
options,
Wfih the TUNER MODE control set to
6
AUTO, the Auto Program control will
detect whether or not cable input is
present. (See the Auto Program section
on the next page,)
If, however, you want to set Ihe
TUNER MODE to CABLE or
ANTENNA, press the CURSOR UP
or CURSOR DOWN button until
either CABLE or ANTENNA is high-
lighted,
clear the menu fi'om the screen.
Press the STATUS/EXIT button to
• SOUND COLOR
BRIGHTNESS
• FEATURES PICTURE
• INSTALL SHARPNESS
TINT
PHILIP$
J
• PICTURE LANGUAGE
• SOUND TONERNODE
• FEATURES AUTOPROGRAN
CHANNELEDIT
AatoChron
INSTALL
• TUNERNODE FRANCAIS
• AUTOPROGRAN ESPAHOL
• CHANNELEDIT
• AutoChron
T
INSTALL •
•LANGUAGE
• b AUTO
• AUTOPROGRAN CABLE
• CHANNELEDIT ANTENBA
• AutoChron
T
INSTALL •
• LANGUAGE
TUNERNODE
• AUTOPROGRAM
• CHANNELEDIT
• AutoChron
When CABLEis selec/ed, channels 1 125
are available.
When ANTENNA is selected, channels
2 69 are available.
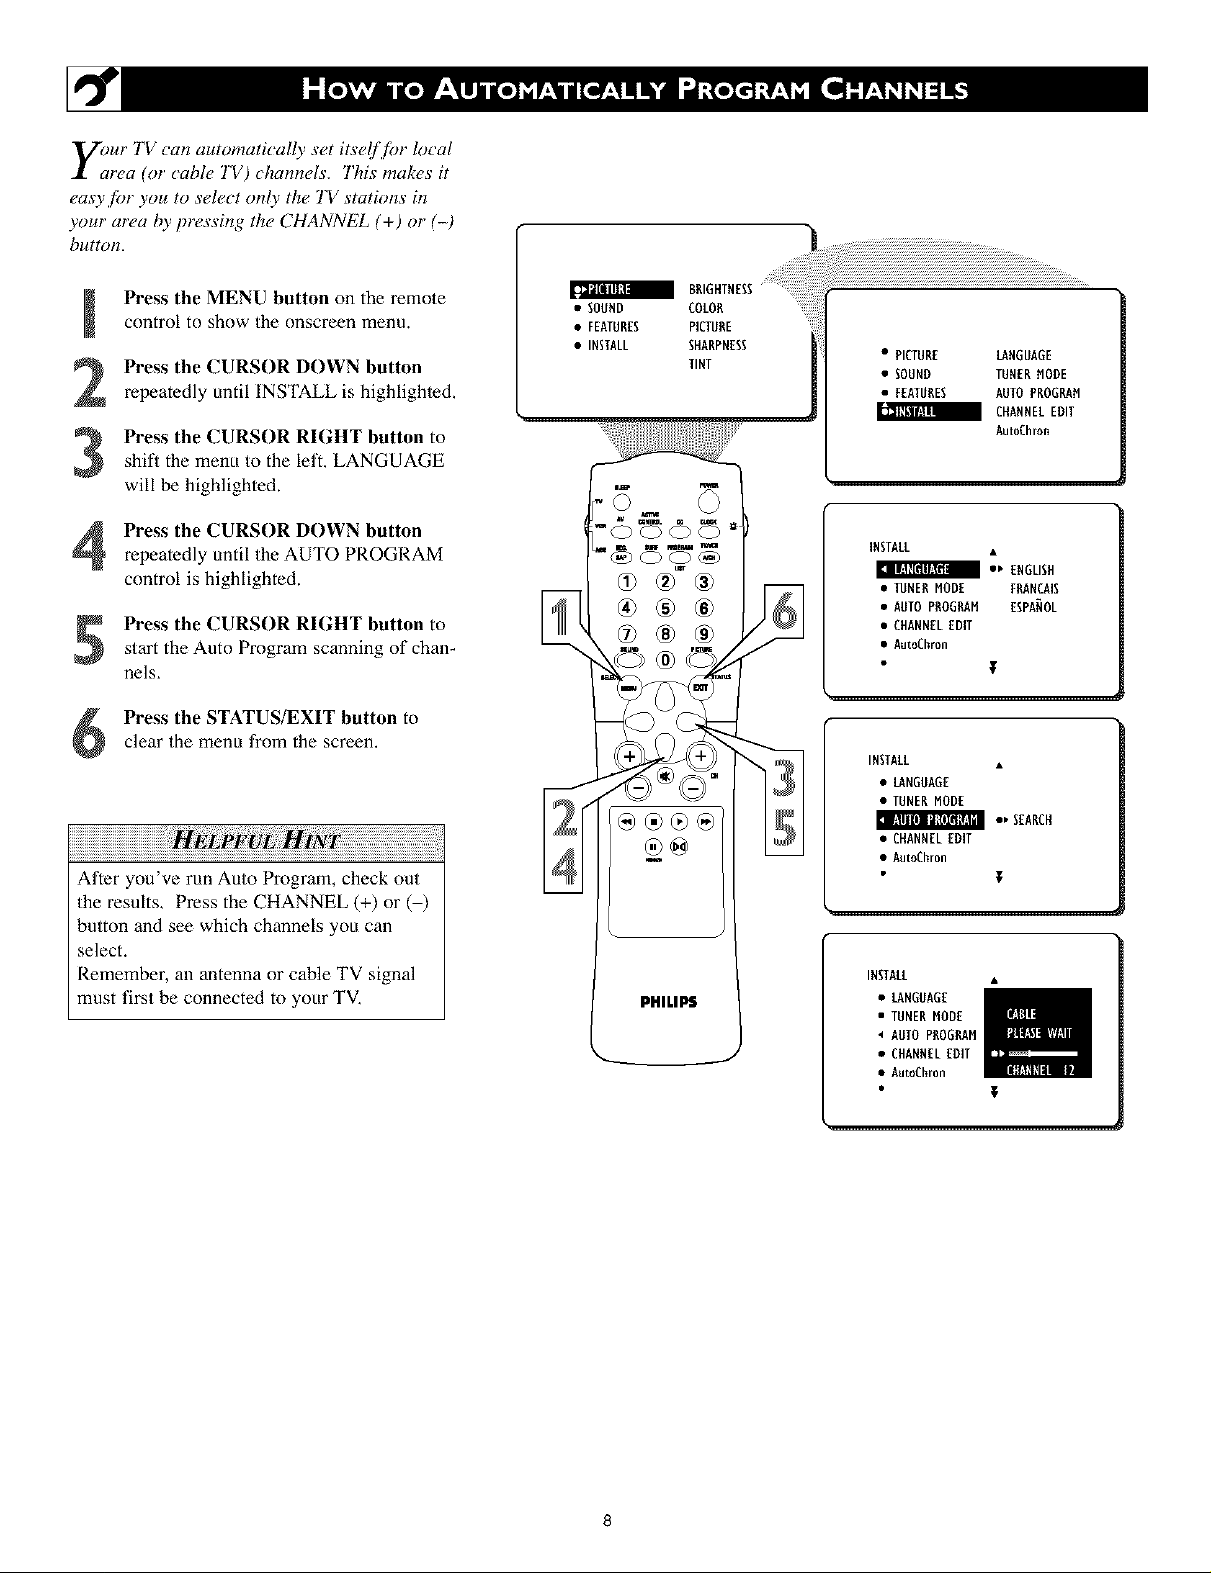
y_;ur TV can automatically set itse!f for local
tea (or cable TV) chamwls. This makes it
easy.flit you to select only the TV stations in
your area by pressing the CHANNEL (+) or (-)
button.
control to show the onscreen menu.
Press the MENU button on the remote
Press the CURSOR DOWN button
repeatedly until INSTALL is highlighted.
Press the CURSOR RIGHT button toshill the menu to the left. LANGUAGE
will be highlighted.
a BRIGHTNESS
• SOUND COLOR
• FEATURES PICTURE
• INSTALL SHARPNESS
TINT
¸//2¸¸
J
• PICTURE LANGUAGE
• SOUND TUNERMODE
• FEATURES AUTOPROGRAM
a CHANNELEDIT
AutoChron
Press the CURSOR DOWN button
repeatedly until the AUTO PP, OGP, AM
control is highlighted.
Press the CURSOR RIGHT button to
start the Auto Program scanning of chan-
nels,
clear the menu from the screen,
Press the STATUS/EXIT button to
evvL
After you've run Auto Program, check out
the results. Press the CHANNEL (+) or ( )
button and see which channels you can
select.
P,emember, an antenna or cable TV signal
must first be connected to your TV.
@®®®
PHILIPS
INSTATE
_) EROLISH
• TUNERMODE FRANCAIS
• AUTOPROGRAM ESPANOL
• CHANNELEDIT
• AutoChron
INSTALL •
• LANGUAGE
• TUNERMODE
• ) SEARCH
• CHANNELEDIT
• AutoChron
T
INSTALL •
•LANGUAGE
• TUNERMODE
4 AUTOPROGRAM
• CHANNELEDIT
• AutoChron

CHANNEL ED1T makes it easy ¢br you to
add o1"delete channels firm the list qf chan-
nels stored in the TV's memory.
control to show the onscreen menu.
Press the MENU button on the remote
Press the CURSOR DOWN button
repeatedly until INSTALL is highlighted.
Press the CURSOR RIGHT button toshift the menu to the lefL LANGUAGE
will be highlighted.
Press the CURSOR DOWN button
repeatedly until the CHANNEL EDIT
control is highlighted.
Press the CURSOR RIGHT button to
access the CHANNEL EDIT menu.
Press the CURSOR UP or CURSOR
DOWN button to scroll lhroagh 1helist
of available channels. Or press the num-
ber buttons on your remote control to
select a st_cific channel (for example,
press 0 and then 2 lo select channel 2).
Wilh the channel you want lo edit select-
7
ed, press the CURSOR RIGHT button
lo mark lhe channel as SKIPPED. The
channel you've marked SKIPPED will not
appear when you are changing from chan-
nel lo channel while watching TV.
• SOUND COLOR
BRIGHTNESS ...................................................................................................................
• FEATURES PICTOEE
• iNSTALL SHARPNESS
TINT
_/!_!_!_!_!_!_!_!_!_!_!_!_!_!_!_!_!_!_:_;;IIIIIIIIIIIIIIIIIIIIIIIIIIIIIIIIIIIIIIIIIIIIIIIIIIIIIIIIIIIIIIIIIIIIIIIIIIIIIIIIIIIIIIIIIIIIIII_!_
• PICTOEE LANGUAGE
• SOHND TONERMODE
• FEATURES AUTO PROGRAM
CHANNELEDIT
AutoChron
INSTALL
_ ENGLISH
• TUNERMODE FRANCAIS
• AUTOPROGRAM ESRANOL
• CHANNEL EDIT
• AutoChron
INSTALL
• LANGUAGE 66 SKIPPED
• TONERMODE 67 SKIPPED
• AOTO PROGRAM 68 SKIPPED
• A_toChron KVI
T
NOTE: When you want to add a channel thai
has been marked SKIPPED, press the CUR-
SOR UP or CURSOR DOWN button to high-
light the channel; then press the CURSOR
RIGHT button to remove the word SKIPPED.
The channels available for you to edit are the
ones thaT the AUTO PP, OGRAM thamre
found while performing a search of your TV
antenna or cable TV signals. Channels not
found during the search are marked
SKIPPED.
PHILIPS
INSTALL •
• LANGUAGE
• TUNERMODE
• AUTOPROGRAM
• CHANNELEDIT
• AutoChron
!
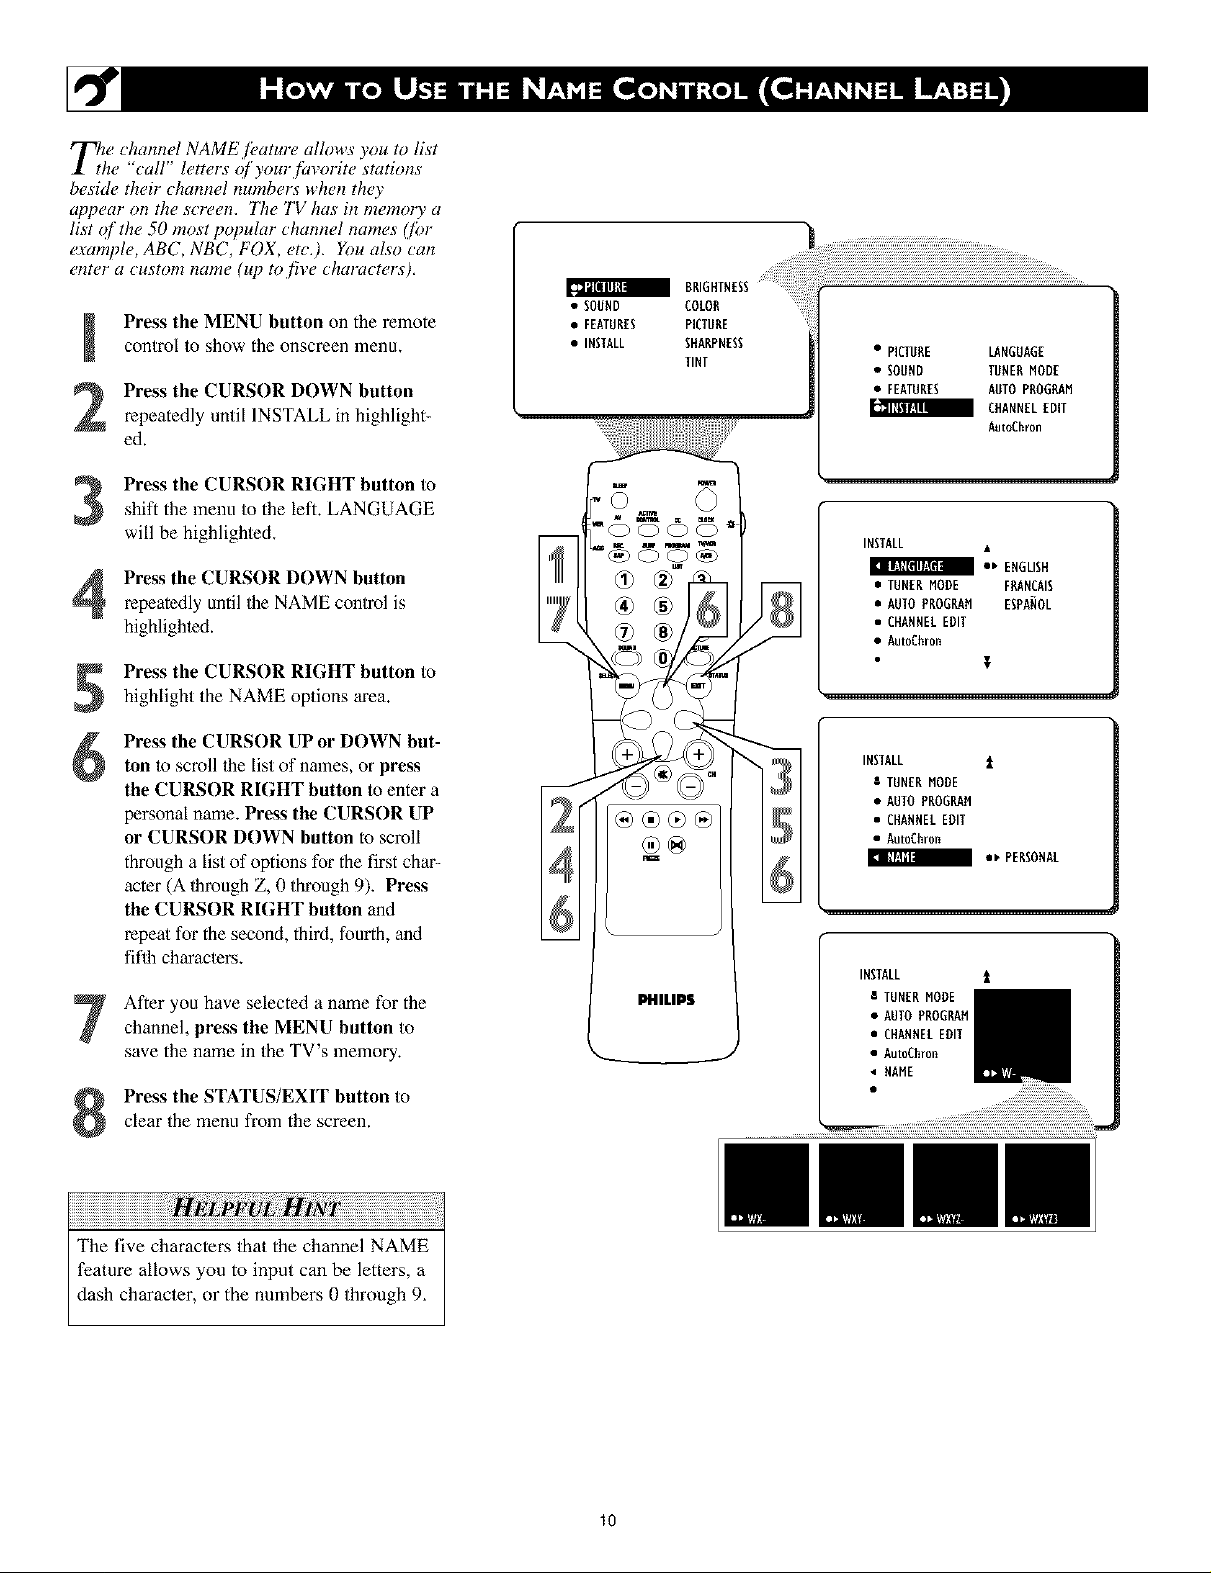
T_w channel NAME iFature allows you to list
he "call" letters qi'your fin,orite stations
beside their channel numbers when the)"
appear on the screen. 77w TV has in memo13, a
list qf the 50 most popular channel names (/br
example, ABC, NBC, FOX, etc.). Ybu also can
enter a custom name (up m five characters).
Press the MENU button on the remotecontrol to show the onscreen menu.
Press the CURSOR DOWN button
repeatedly until INSTALL in highlight-
ed.
shift the menu to the left. LANGUAGE
Press the CURSOR RIGHT button to
will be highlighted.
Press the CURSOR DOWN button
repeatedly until rite NAME conlrol is
highlighted.
Press the CURSOR RIGHT button to
highlight the NAME options area.
• SOUND COLOR
• FEATURES PICTURE
• INSTALL SHARPNESS
TINT
• PICTORE LANGUAGE
• SOOND TONERMODE
• FEATURES AOTOPROGRAM
m CHANNELEDIT
AatoChr0n
INSTALL
• _ ENGLISH
• TUNERNODE FRANCAIS
• AUTOPROGRAM ESPANOL
• CHANNELEDIT
• AutoChron
Press the CURSOR UP or DOWN but-
ton to scroll Ihe list of names, or press
the CURSOR RIGHT button to enter a
personal name. Press the CURSOR UP
or CURSOR DOWN button to scroll
through a list of options for the first char-
acter (A lhroagh Z, 0 through 9). Press
the CURSOR RIGHT button and
repeal for the second, third, fourth, and
fifth characlers.
After you have selected a name For thechannel, press the MENU button to
save the name in the TV s nemory.
Press the STATUS/EXIT button to
clear the menu from the screen.
®®®®
INSTALL t
8 TUNERMODE
• AUTOPROGRAM
• CHANNELEDIT
• AutoChron
/ •_ PERSONAL
INSTALL t_
8 TUNERMODE
• AUTOPROGRAM
• CHANNELEDIT
• AutoChron
• flAME
_//////////////////////////////////////////////////////////////////////////////////////////////
lo
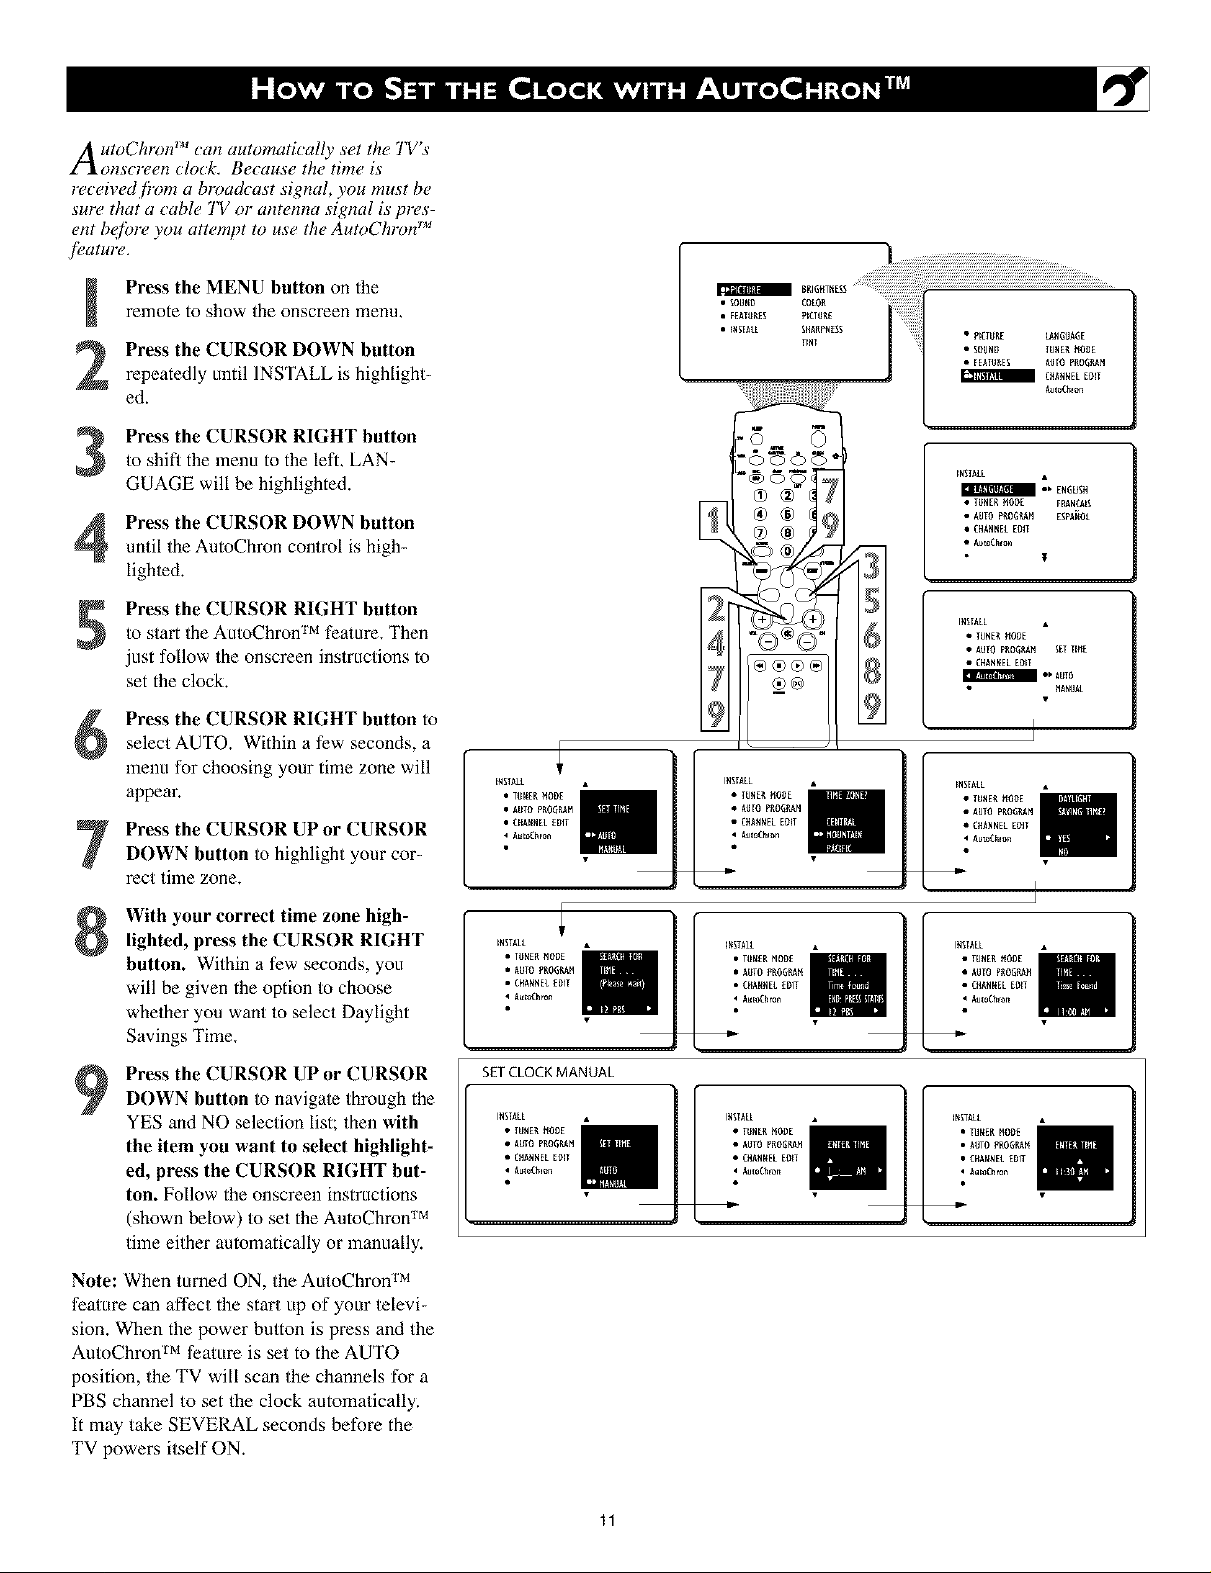
A utoChron TM can automatically set the TV's
onscreen clock. Because the time is
rc_ceived ii'om a broadcast signal, you must be
surc_that a cable TV or antenna signal is prc_s-
ent be_bre you attempt to use the AutoChron TM
Press the MENU button on theremote to show the onsoreen menu,
Press the CURSOR DOWN button
repeatedly until INSTALL is highlight-
ed.
Press the CURSOR RIGHT button
to shift the menu to the left+ LAN-
3
GUAGE will be highlighted.
Press the CURSOR DOWN button
4
until the AutoChron control is high-
lighted+
Press the CURSOR RIGHT buttonto start the AutoChron TM feature, Then
just follow the onscreen instructions to
set the clock,
Press the CURSOR RIGHT button toselect AUTO. Within a few seconds, a
menu for choosing your time zone will
appear.
Press the CURSOR UP or CURSOR
DOWN button to highlight your cor-
rect time zone+
INITALL
• TU_ER MODE
• AUTO PR0_RkM
• _ffA_NELEDIT
• kut_Chr0n
• _0lJ_t3 COL0i_ iiiiiiiiiiiiil TM
• _NgTALL IffAKPNESI i i • piCl_lE L_GIIAGE
• FEkTU_*EI kO[O p_OG,'_a_4
O_A_EL EDIT
_toChlen
• SOu_B TU_ET__OgE
INSI_LL
m 1_ ENGLISH
• TUNER _ODE F_NU_IS
• CHAN_EL EOIT
INSTkLL
• TUNE_ _09E
• CHA_EL EDIT
m l_A[gO
_ANU_
I
With your correct time zone high-
lighted, press the CURSOR RIGHT
button. Within a few seconds, you
will be given the option to choose
whelher you want to select Daylight
Savings Time,
Press the CURSOR UP or CURSOR
DOWN button to navigale through the
YES and NO selection list; then with
the item you want to select highlight-
ed, press the CURSOR RIGHT but-
ton. Follow the onscreen instructions
(shown below) to set the AutoChron TM
time either automatically or manually.
Note: When turned ON, the AutoChron TM
feature can affect the start up of your televi-
sion. When the power button is press and the
AntoChron TM feature is set to the AUTO
position, the TV will scan the channels For a
PBS channel to set Ihe clock automatically;
It may take SEVERAL seconds before the
TV powers itself ON.
INSTALL I_ITALL INSTALL
• TU_K T4OB_ • TU_EK MOB_ • TUNET¢ _OgE
• AUTO PR0_Rk_ • AUTO PR0_Rk_ • AUTOPEOGR_
• CffA_NELEBIT
4 ku_Chron 4 ku_Chron _ _teChlon
SET CLOCK MANUAL
• TU_ET__ODE • TU_ET__ODE • TU_EK 14OBE
• k_IO PRO&&M • AUTO P_O&&M • A_TO PRO_EkM
• O_I_,NEL E_IT • O_I_NEL E_IT • CffA_NEL EBIT
• k_teChlon 4 _teChlon _ AetoChron
• CffA_EL EDIT • CHA_EL EDIT
Lj
.
11
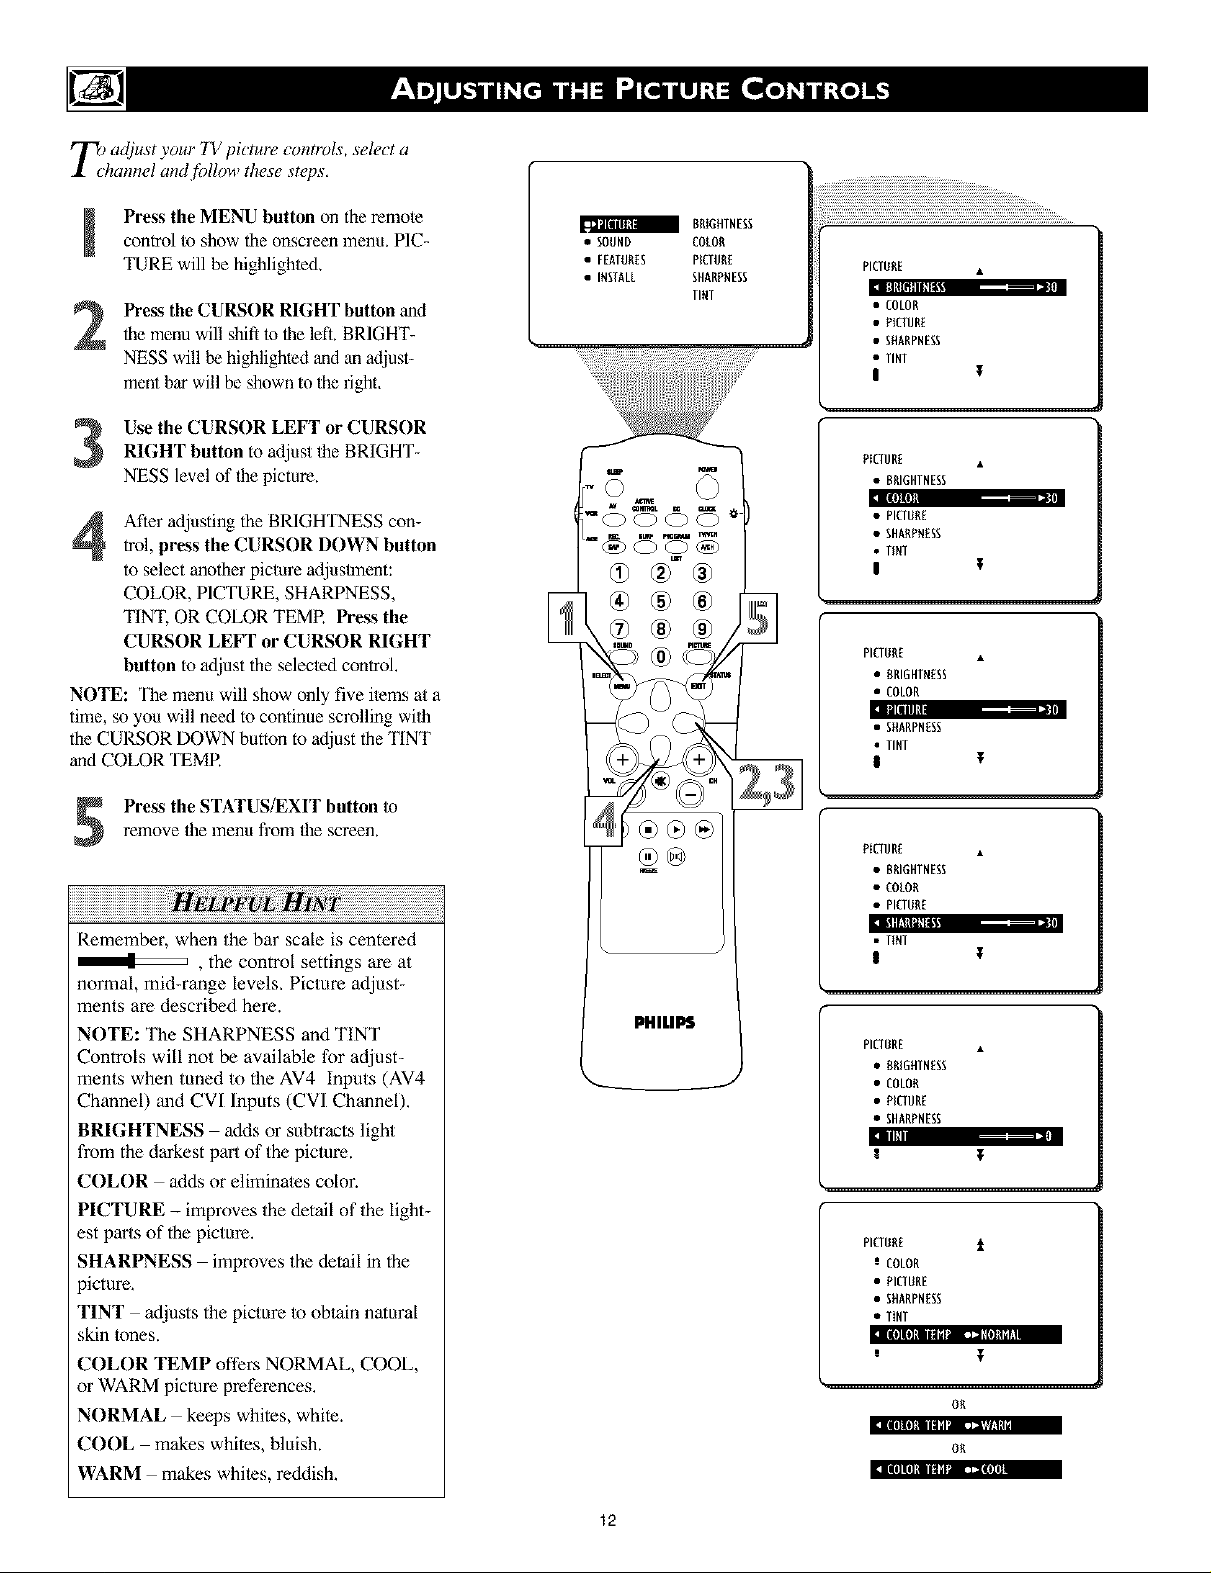
r_) ad/ust your TV picture controls, select a
X chamwl andfi_llow these steps,
Press the MENU button on the remotecontrol to show the onscreen lnena. PIC-
TURE will be highlighted,
the menu will shift to the left. BRIGHT-
Press the CURSOR RIGHT button and
NESS will be highlighted and an adjust-
ment bar will be shown to the right.
Use the CURSOR LEFT or CURSORRIGHT button to adjust lhe BRIGHT-
NESS level of flae picture.
After adjusting the BRIGHTNESS con-
trol, press the CURSOR DOWN button
to select another piclare adjaslment:
COLOR, PICTURE, SHARPNESS,
TINT, OR COLOR TEMR Press the
CURSOR LEFT or CURSOR RIGHT
button to adjust the selecled control.
NOTE: "l_e menu will show only five ilems a/a
time, so you will need to continue scrolling wilh
the CURSOR DOWN button to adjust the TINT
and COLOR TEMP.
• SOUND COLOR
BRIGHTNESS
• FEATURES PICTURE
• INSTALE SHARPNESS
TINT
PICTURE •
Ill!ItlNIIIL - --..
• COLOR
• PICTURE
• SHARPNESS
• TINT
I
PiCTURE •
• BRIGHTNESS
Illllll m. 3
• PICTURE
• SHARPNESS
• TINT
PICTURE •
• BRIGHTNESS
• COLOR
;]IU[III j --- •
• SHARPNESS
• TINT
!
remove the menu fl'om the screen.
Press the STATUS/EXIT button to
Remember, when the bar scale is centered
, the control settings are at
normal, mid-range levels, Picture adjust-
ments are described here.
NOTE: The SHARPNESS and TINT
Controls will not be available for adjust-
ments when tuned to the AV4 Inputs (AV4
Channel) and CVI Inputs (CVI Channel),
BRIGHTNESS adds or subtracts light
from the darkest part of the picture.
COLOR adds or eliminates color.
PICTURE - improves the detail of the light-
est parts of the picture.
SHARPNESS improves the detail in the
9icture,
TINT adjusts the picture lo obtain natural
skin tones.
COLOR TEMP ofPers NORMAL, COOL,
or WARM picture preferences,
NORMAL keeps whites, white.
COOL makes whites, bluish.
WARM makes whiles, reddish,
®@
®®@/
PHILIPS
PICTURE ,
• BRIGHTNESS
• COLOR
• PICTURE
]1_'!: Idll_ i,,, m- 3
• TINT
PICTONE •
• BRIGHTNESS
• COLOR
• PICTURE
• SHARPNESS
R
PICTURE t
e COLOR
• PICTURE
• SHARPNESS
• TINT
llllllll!mn_P- rrlllllll_..
OR
_]lllllllllll I I +1+ [Tlh+lil'l
OR
[l[ll[lllIIl_t_ II]lll
12
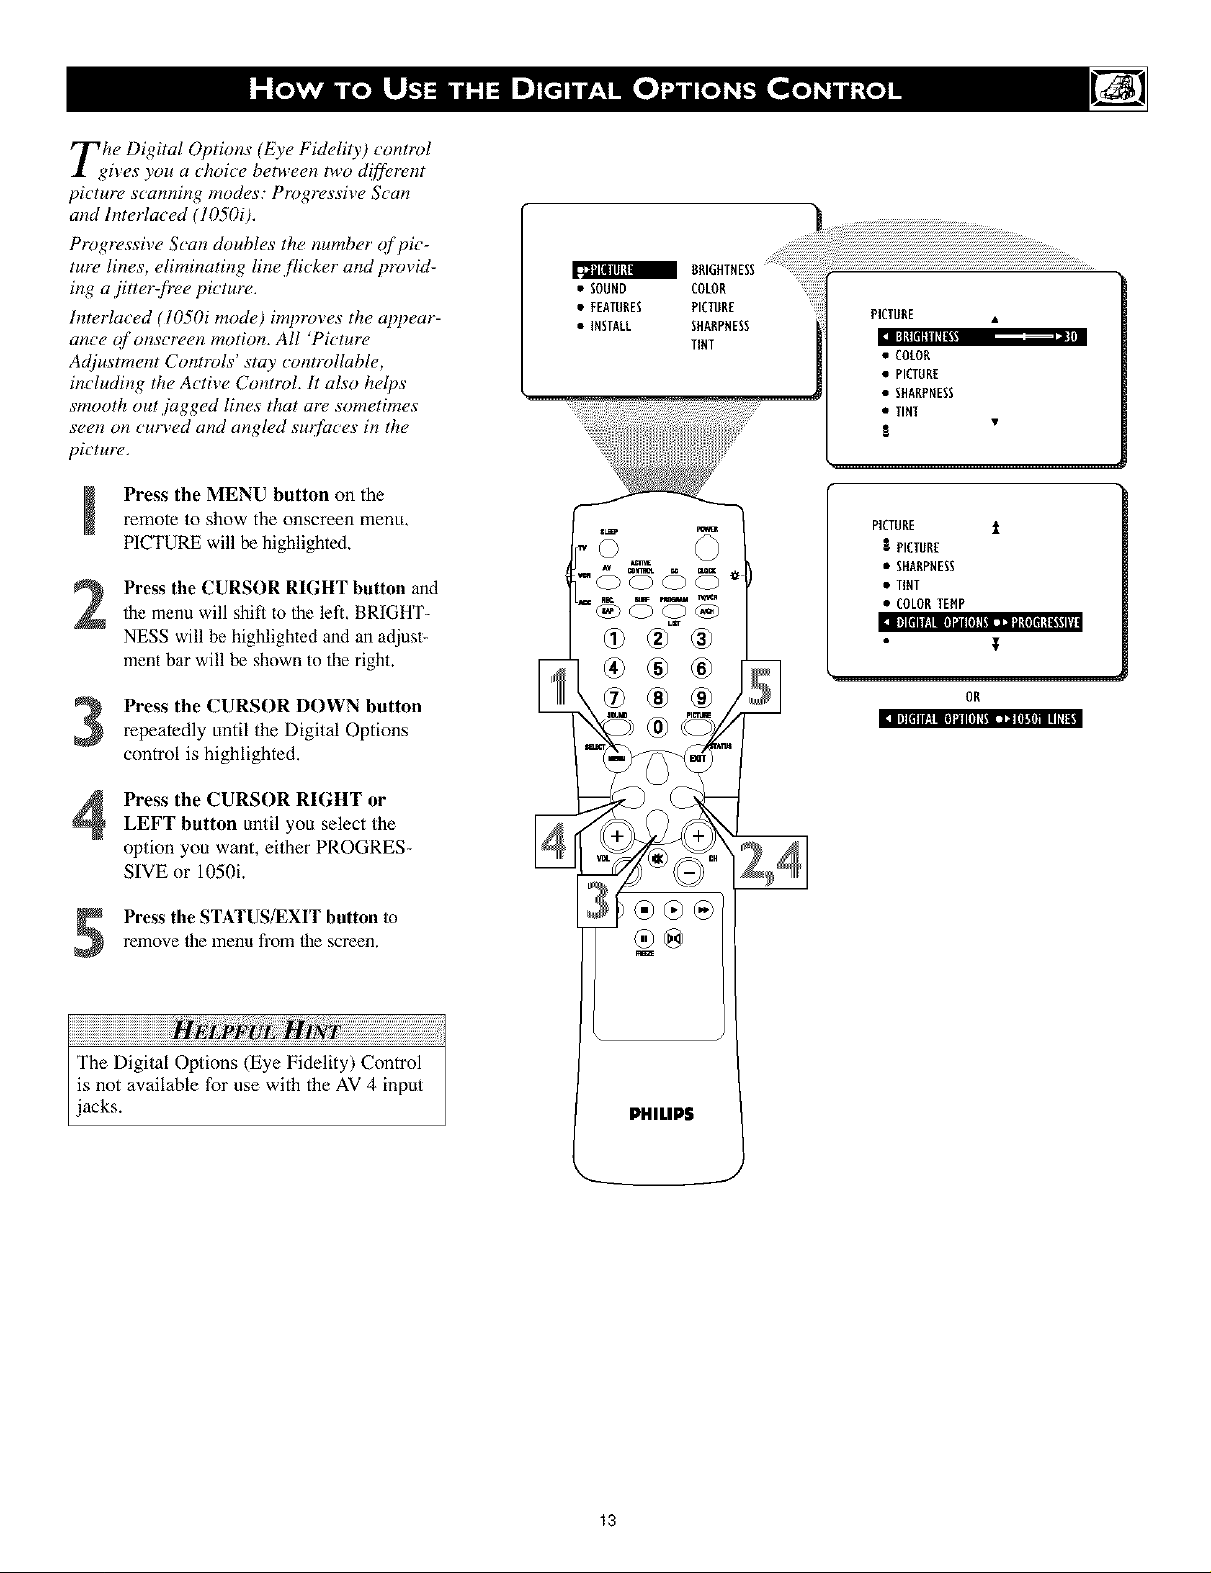
The Digital Options (Eye Fidelity) control
ires you a choice between two dilf_,rent
picture, scanning modes," Progr_,ssive S_an
and Interlaced (1050i).
Progr_ssive Scan doubles the number of pic-
ture lines, eliminating line flicker and provid-
ing a jitterzfr_,e picture,
bm, rlaced (1050i mod_O improves the appear-
ance of onscreen motion, All 'Picture
Adjustment Controls' stay _ontrollable,
including the Active Control, It also helps
smooth out jagged lines that arc, sometimes
seen on _m ved and angled smfa_ es in the
picture,
TINT
PICTURE •
I:t[t[rll|ll[_--
•(OLOR
• PICTURE
• SHARPNESS
• lINT
s
I mf
Press the MENU button on theremote to show the onscreen menu.
PICTURE will be highlighted.
Press the CURSOR RIGHT button andthe menu will shift to the left. BRIGHT-
NESS will be highlighted and an adjust-
ment bar will be shown to the right.
Press the CURSOR DOWN button
repeatedly until the Digital Options
control is highlighted.
Press the CURSOR RIGHT or
LEFT button until you select the
option you want, either PROGRES-
SIVE or 1050i.
remove 1be menu fl'om 1be screen.
Press the STATUS/EXIT button to
The Digital Options (Eye Fidelity) Control
is not available for use with the AV 4 input
jacks.
PICTURE t
PICTURE
• SHARPNESS
• TINT
• COLORTEHP
OR
PHILIPS
13
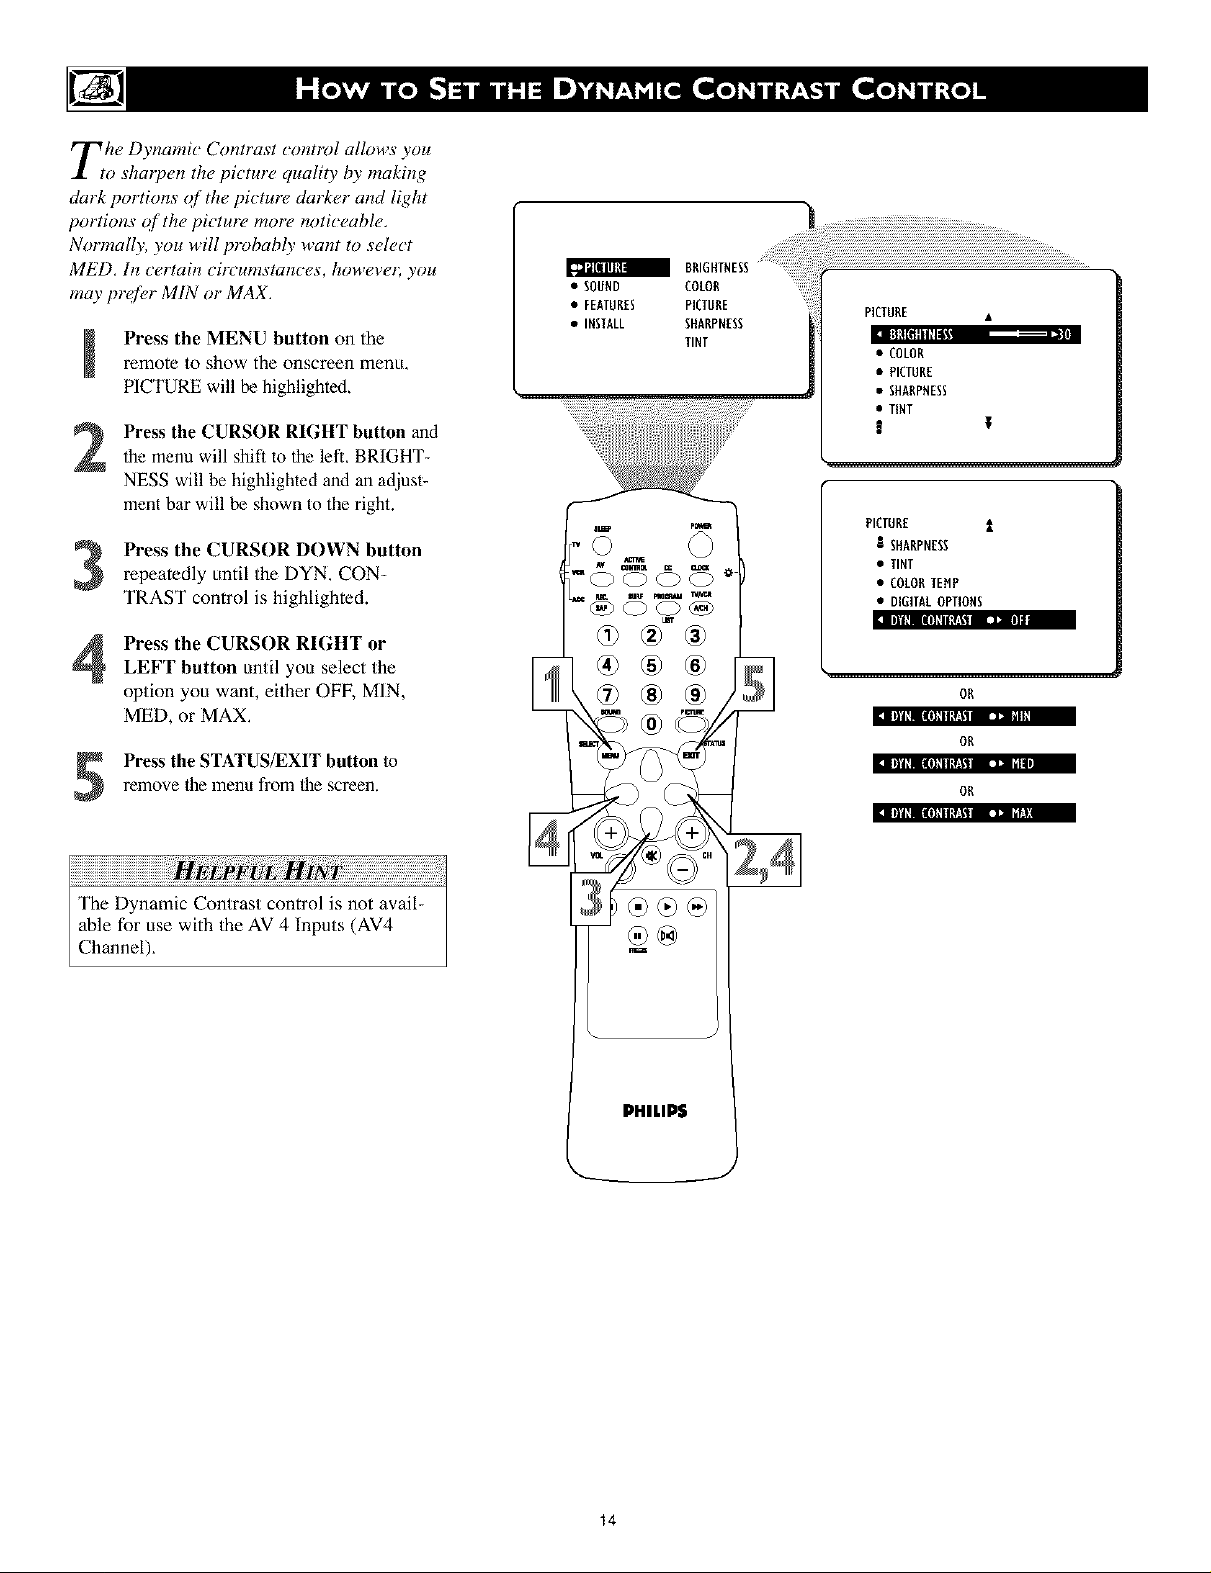
Tthe Dynamic Contrast control allows you
o shar?en the picture quality by making
clark portions of the pk ture darker and light
portions qf the picture more noticeable.
Normally, you will probabl_, want to select
MED. In certain circumstances, howe_ e_; you
may prefer MIN or MAX.
Press the MENU button on theremote to show the onscreen menu.
PICTURE will be highlighted.
Press the CURSOR RIGHT button andthe menu will shift to the left. BRIGHT-
NESS will be highlighted and an adjust-
ment bar will be shown to the right.
Press the CURSOR DOWN button
repeatedly until the DYN, CON-
TRAST control is highlighted.
Press the CURSOR RIGHT or
LEFT button until you select the
option you want, either OFF, MIN,
MED, or MAX,
• SOUND COLOR
• FEATURES PICTURE
• INSTALL SHARPNESS
D
®
TINT
1
PICTURE •
l;|tl[f1111+_+
• COLOR
• PICTURE
• SHARPNESS
• TINT
PICTURE t_
II SHARPNESS
• TINT
• COLORTENP
• DIGITALOPTIONS
llnIlllll]_l|_(:'lll [ ]] ii
OR
OR
Press the STATUS/EXIT button toremove file menu fl'om file screen.
OR
]l|'l+llllll+lltl++_a,, • ]_._N
PHILIPS
14
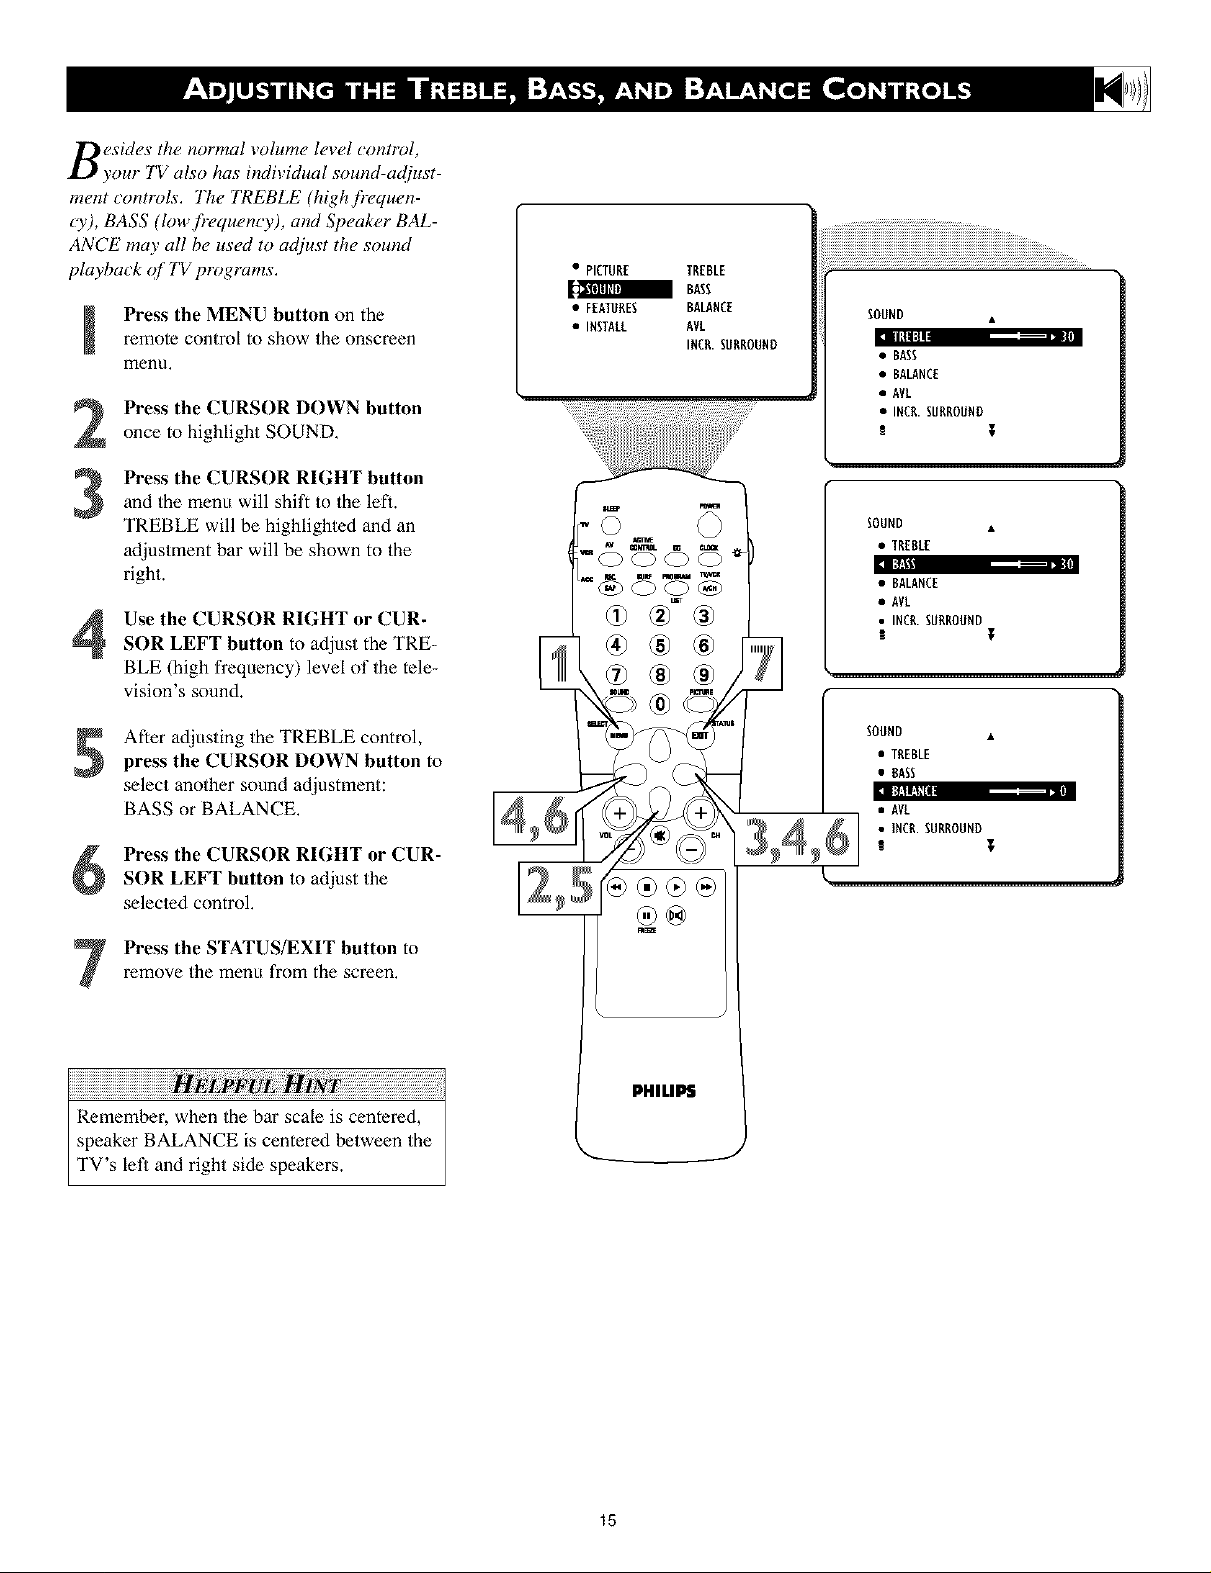
Besides the normal volume level control,
your TV also has individual sound-acliust-
ment controls. The TREBLE (high fr_,quen-
cy), BASS (Iow fr_,queno'), and Speaker BAL-
ANCE" may all be used to acliust the sound
playback qf TV programs.
Press the MENU button on theremote control to show the onscreen
menu,
Press the CURSOR DOWN button
2
once to highlight SOUND.
Press the CURSOR RIGHT button
and the menu will shift to the lefl.
3
TREBLE will be highlighted and an
adjustment bar will be shown to the
right.
• PICTURE TREBLE
a BASS
• FEATURES BALANCE
• INSTALL AVL
INCR.SURROUND
u
__ SOUND •
SOUND •
_lll[t|l
• BASS
• BALANCE
• AVL
• INCR.SURROUND
• TREBLE
D:I .....
Use the CURSOR RIGHT or CUR-
SOR LEFT button to adjust the TRE-
BLE (high frequency) level of the tele-
vision's sound.
After adjusting the TREBLE control,press the CURSOR DOWN button to
select another sound adjustment:
BASS or BALANCE.
Press the CURSOR RIGHT or CUR-
SOR LEFT button to adjust the
selected control,
remove the menu from the screen,
Press the STATUS/EXIT button to
Remember, when the bar scale is centered,
speaker BALANCE is centered between the
TV s letl a ld right side speakers.
_ INCR.SURROUND
;;__(:i;h I•BALANCEAVL
• TREBLE
• BASS
• AVL
c. 4 _ ; INCR'SURROUND
PHILIPS
J
15
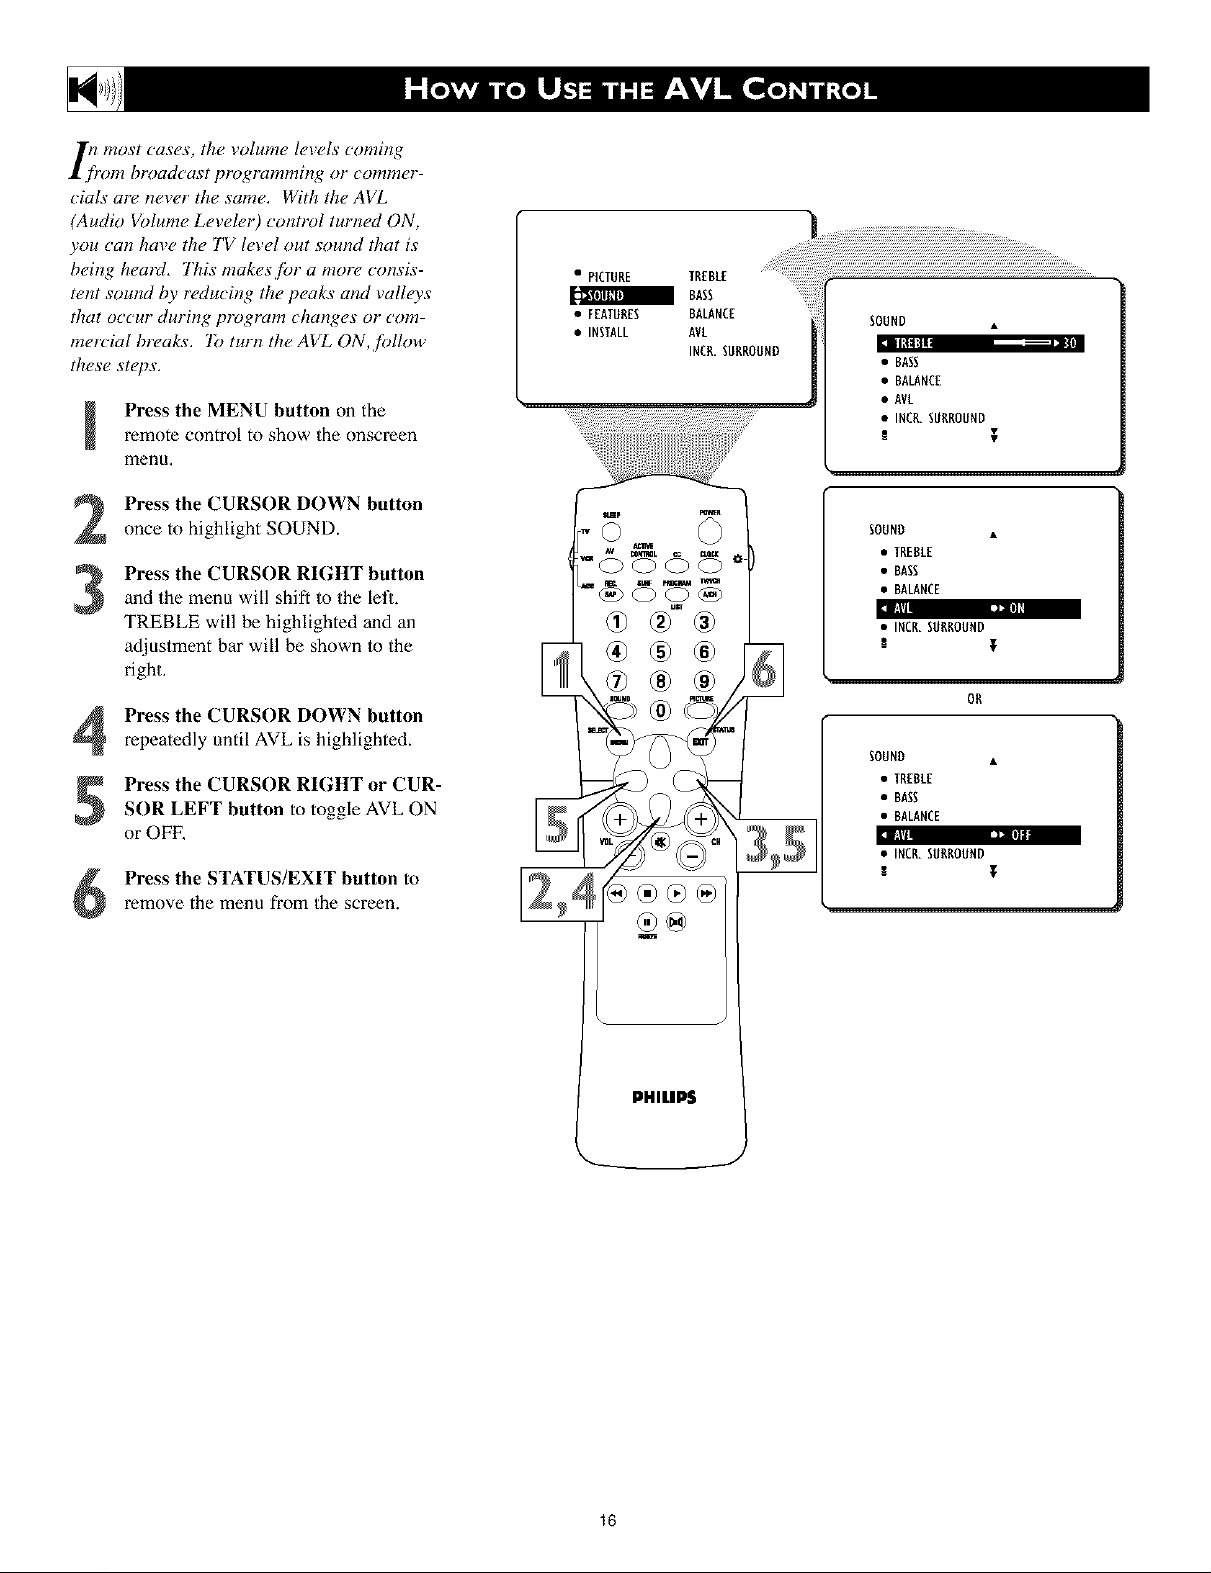
I_)+ most cases, the volume levels coming
"ore broadcast programming or commer-
cials arc, never the same. With the AVL
(Audio Volume Le_el_,r) control turned ON,
you can have the TV level out sound that is
being heard, "l'his makes,f!)r a more _onsis-
t_mt sound by reducing the peaks and valleys
that occur during program _hanges or _om-
inertial br(_aks. "lb turn the AVL ON, follow
these str,ps,
Press the MENU button on theremote control to show the onscreen
men[t,
Press the CURSOR DOWN button
2
once to highlight SOUND.
Press the CURSOR RIGHT button
and the menu will shift to the letL
3
TREBLE will _ highlighted and an
adjustment bar will be shown to the
right,
• PICTURE TREBLE
BASS
• FEATURES BALANCE
• INSTALL AVE _
INCR.SURROUND
-0
+J
J
SOUND •
Iltli
• BASS
• BALANCE
• AV[
• INCR.SURROUND
B
SORNU •
• TRERL[
• BASS
• BALANCE
_1 [.'!r i_zll
• INCR.SURROUND
OR
--ii
Press the CURSOR DOWN button
repeatedly until AVL is highlighted.
Press the CURSOR RIGHT or CUR-
SOR LEFT button to toggle AVL ON
SORNU •
• TRERLE
• BASS
• BALANCE
or OFF, :t L'I+ .....
• INCR.SURROUND
B T
Press the STATUS/EXIT button toremove the menu from the screen.
PHILIPS
J
16
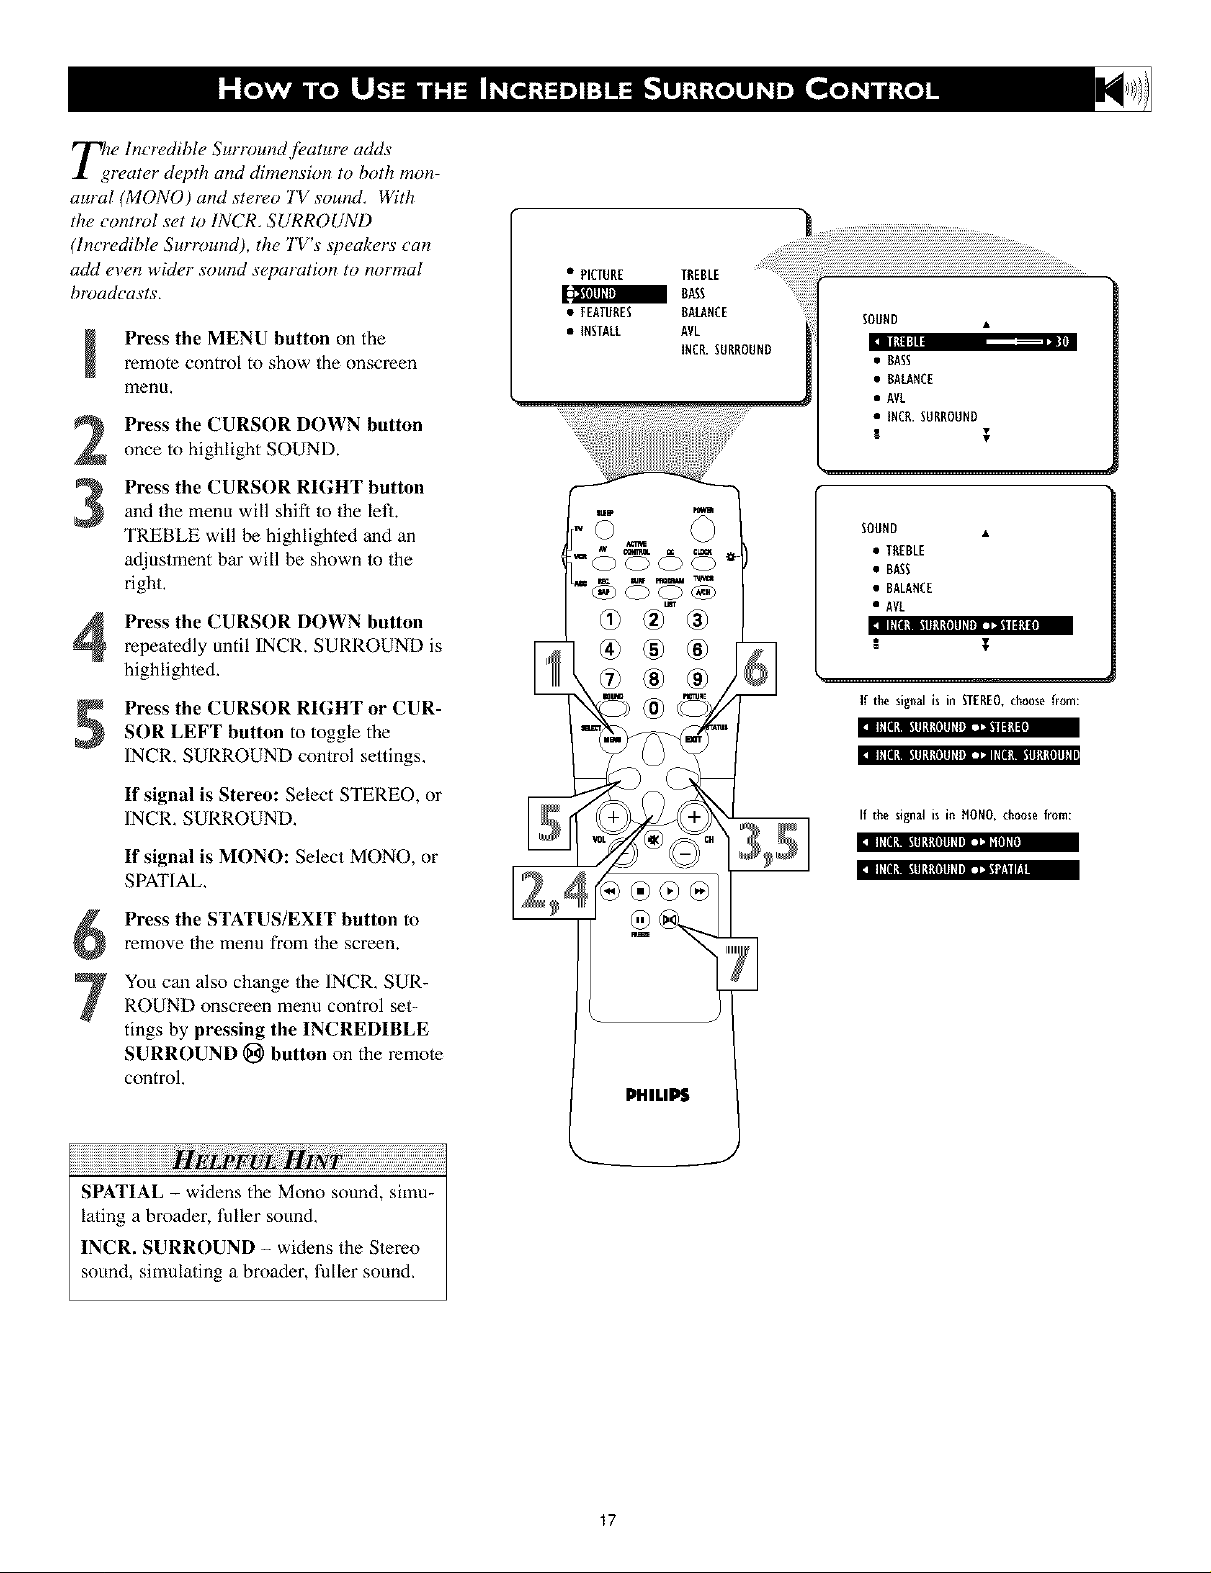
l_e Incredible Surround f(,ature adds
rearer dcT)th and dimension to both mon-
aural (MONO) and stereo TV sound, With
the control set to INCR. SURROUND
(lncrc_dible Surround), the TV's speakers can
add e_en wider sound scT)aration to normal
broadcasts,
Press the MENU button on theremote control to show the onscreen
menu,
Press the CURSOR DOWN button
2
once to highlight SOUND.
Press the CURSOR RIGHT button
and the menu will shift to the letL
3
TREBLE will _ highlighted and an
adjustment bar will be shown to the
right,
Press the CURSOR DOWN button
repeatedly until INCR. SURROUND is
highlighted,
Press the CURSOR RIGHT or CUR-
SOR LEFT button to toggle the
INCR, SURROUND control settings,
• PICTURE TREBLE
BASS
• FEATURES BALANCE
• INSTALL AVL
INCR.SURROUND
-©
SOUND •
• BASS
• BALANCE
• AVE
• INCR.SUBBOUND
B I
SOUND •
• TREBLE
• BASS
• BALANCE
• AVE
ill llttlll'llltlt(llll II IIl]il Illtt I
If thesignal is in STEREO,choose from:
:1 ill [llllldlJlt 7111111II"l]llt III
If signal is Stereo: Select STEI_.EO, or
INCR, SURROUND,
If signal is MONO: Select MONO, or
SPATIAL,
Press the STATUS/EXIT button to
remove the menu from the screen.
You can also change the INCR, SUR-
ROUND onscreen menu control set-
tings by pressing the INCREDIBLE
SURROUND _ button on the remole
control,
SPATIAL - widens the Mono sound, simu-
lating a broader, fuller sound,
INCR. SURROUND - widens the Stereo
sound, simulating a broader, fuller sound,
lll[llillllt_llllllllI]l]li[lll[
lll[llillRt_lllllllii l.llllil I_
PHILII_
17
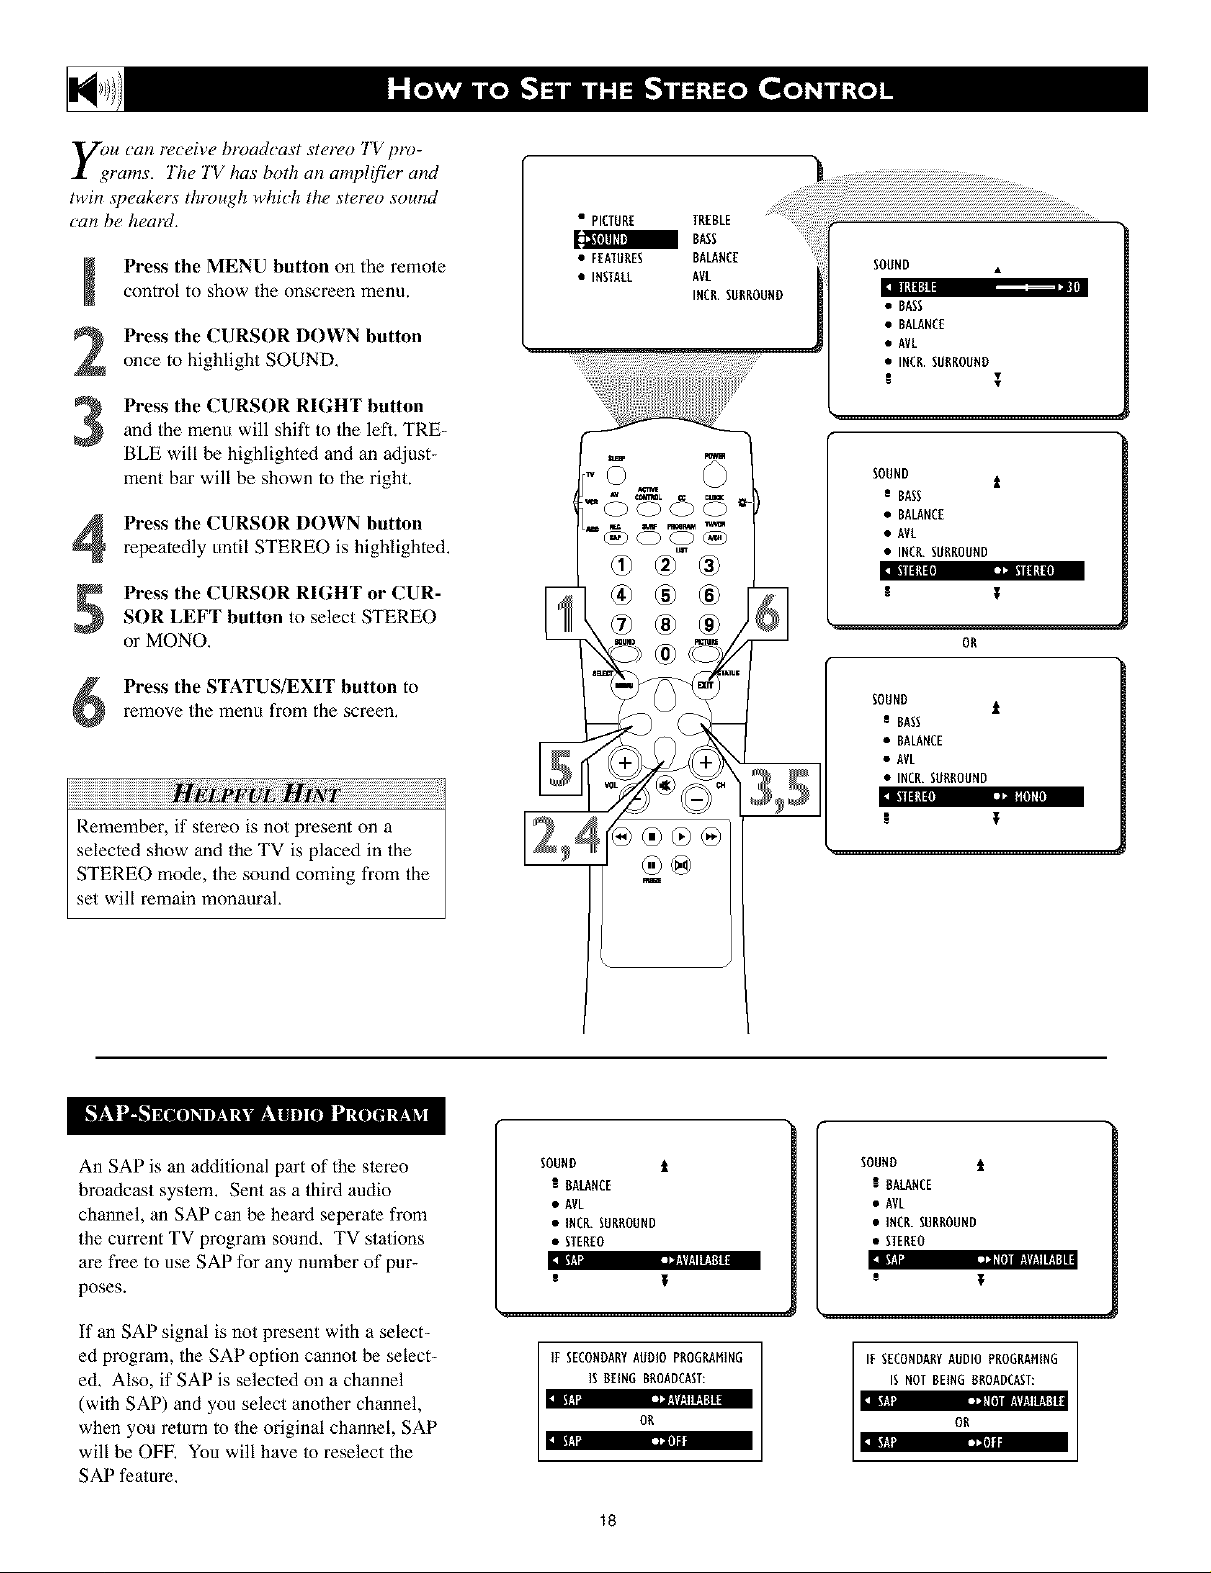
u can receive broadcast stereo TV pro-
rams, The TV has both an amplifier and
twin sT)eakers thl-ough which the stereo sound
can be healzl,
Press the MENU button on the remote
m
control to show the onscreen menu.
Press the CURSOR DOWN button
2
once to highlight SOUND,
Press the CURSOR RIGHT button
and the menu will shift to the lefL TRE-
3
BLE will be highlighted and an adjust-
ment bar will be shown to the right.
Press the CURSOR DOWN button
repeatedly until STEREO is highlighted.
SOR LEFT button to select STEREO
Press the CURSOR RIGHT or CUR-
or MONO,
",CTUNETNEBLE......<ii!iiiiill
a BASS
• FEATURES BALANCE SOUND •
• INSTALL AVL
INCR.SUBNOUND '"
:]Bill|:
• BASS
• BALANCE
• AVL
iiiii , ;
.....ililiiiiiiii!i;
SOUND t
e BASS
• BALANCE
• AVL
• INCR.SURROUND
BtJ_ nml|itti
]i,t i II ]_ tll|[ti
OR
Press the STATUS/EXIT button toremove the menu from the screen,
Remember, if stereo is not present on a
selected show and the TV is placed in the
STEREO mode, the sound coming from the
set will remain monaural,
An SAP is an additional part of the slereo
broadcast syslem. Sent as a third audio
channel, an SAP can be heard seperate from
the current TV program sound, TV stations
are free to use SAP for any number of pur-
poses.
SOUND t_
e BASS
• BALANCE
• AVL
c_ 3 5 "INCB. SURBOUND
II_n]l_[i] tll [_1]_1]
Z @ ' '
SOUND t
BALANCE
e AVL
• INCR.SURROUND
• STEREO
e IF
SOUND i
BALANCE
• AVL
• INCR.SURROUND
• STEREO
|$1 ,=,_lll I [!l(l!| IIr:l:
e
If an SAP signal is not present with a select-
ed program, the SAP option cannot be select-
ed, Also, if SAP is selected on a channel
(with SAP) and you select another channel,
when you return to Ihe original channel, SAP
will be OFE You will have to reselect the
SAP feature,
IFSECONDARYAUDIO PBOGBAMING
ISBEING BROADCAST:
i 'fa __'_*1!|11!|a,
OR
]z, I
18
IFSECONDARYAUDIO PBOGBAHING
ISNOT BEINGBROADCAST:
OR
i|iii'y4 ]ii,I
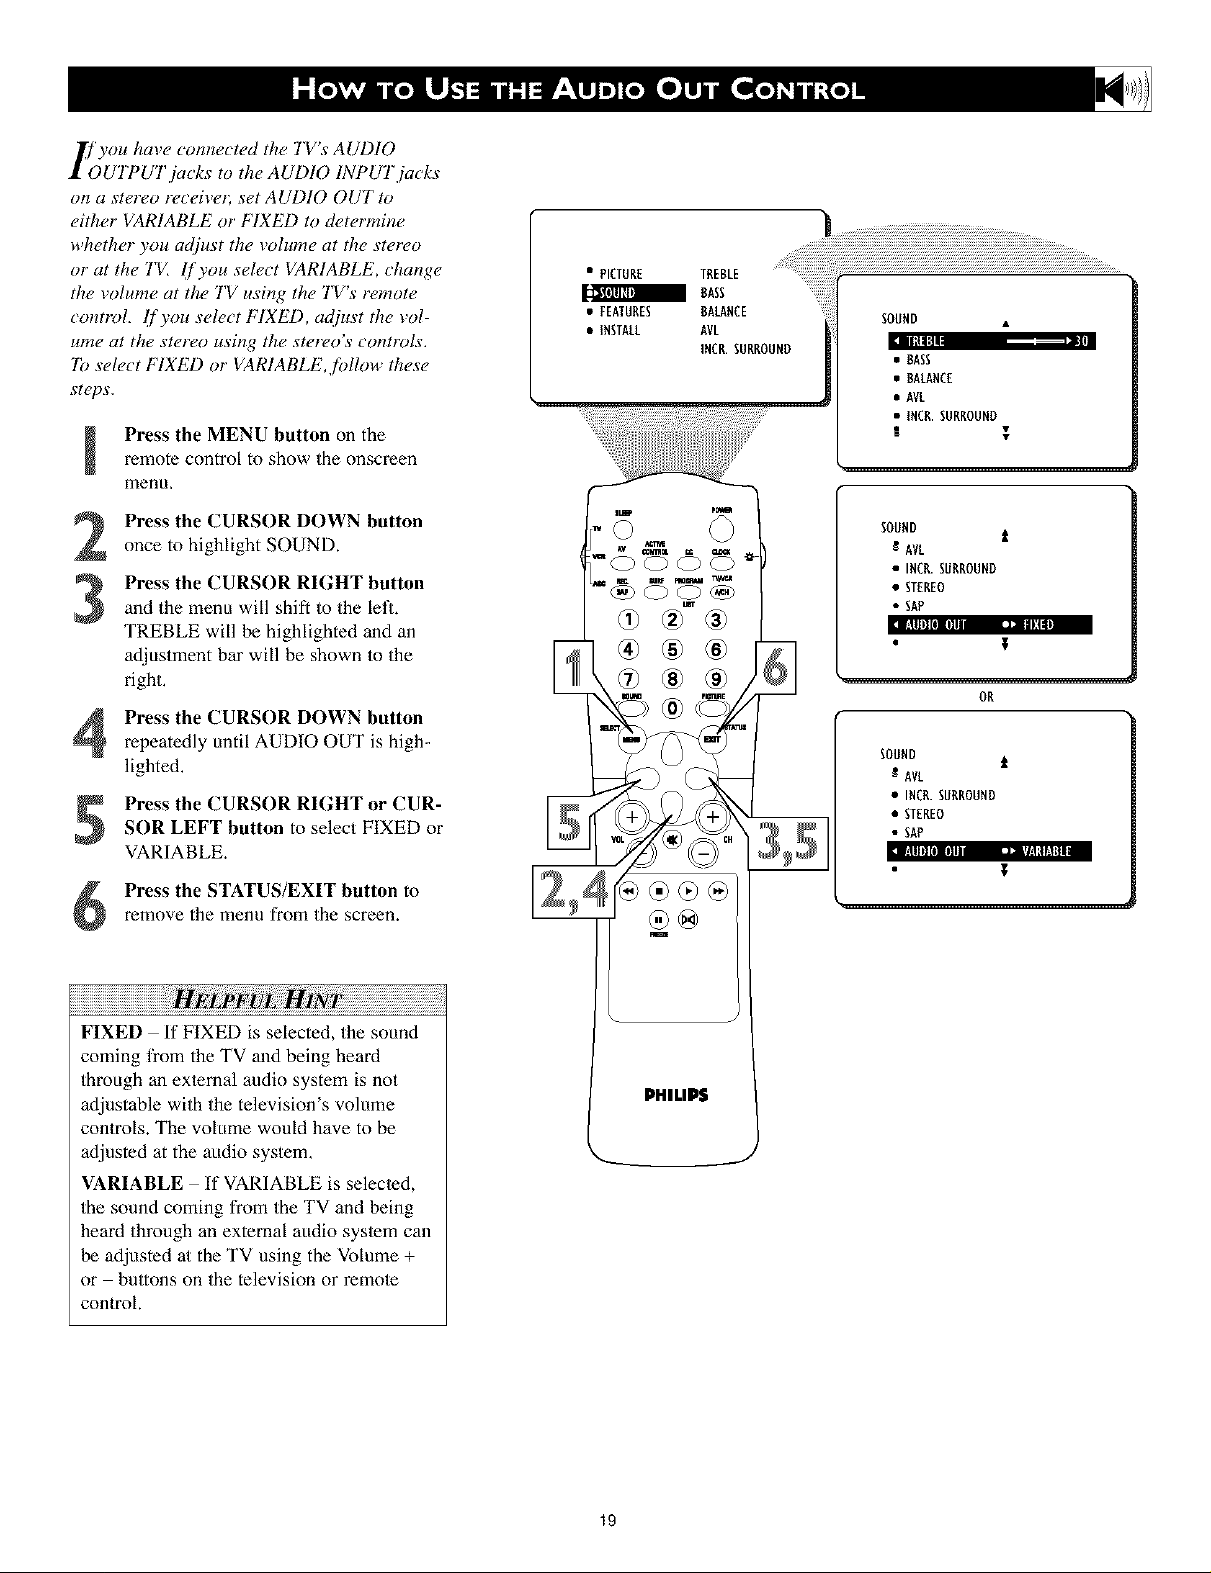
_f you have cmmected the TV's AUDIO
1'OUTPUT jacks to the AUDIO INPUT jacks
on a stereo receiver; set AUDIO OUT to
either VARIABLE or' FIXED to ch,termine
whether you acljust the volume at the ster_o
or at the TVI lf you select VARIABLE, change
the _olume at the TV using the TV's remote
control. If you select FIXED, acljust the _ol-
ume at the sterc_o using the ster_o's controls.
1b select FIXED or VARIABLE, follow these
stu)s.
Press the MENU button on theremote control to show the onscreen
menu,
• PICTURE TREBLE
BASS
• FEATURES BALANCE
• INSTALL AVL
INCR.SURROUND
SOUND •
Press the CURSOR DOWN button
2
once to highlight SOUND.
Press the CURSOR RIGHT button
and the menu will shift to the left.
3
TREBLE will _ highlighted and an
adjustment bar will be shown to the
right,
Press the CURSOR DOWN button
repeatedly until AUDIO OUT is high-
lighted.
SOR LEFT button to select FIXED or
Press the CURSOR RIGHT or CUR-
VARIABLE.
Press the STATUS/EXIT button toremove the menu from the screen.
iiiiiiiiiiiiiiiiiiiiiiiiiiiiiiiiiiiiiiiiiiiiiiiiiiiiiiiiiiiiiiiiiiiiiiiiiiiiiiiiiiiiiiii i i! i! ! i¸
FIXED If FIXED is selected, the sound
coming from the TV and being heard
through an exmmal audio system is not
adjustable with the television's volume
controls. The volume would have to be
adjusted at the attdio system,
VARIABLE If VARIABLE is selecmd,
the sound coming from the TV and being
heard through an external audio sysmm can
be adjusted a/the TV using the Volume +
or buttons on the television or remole
control.
PHILIPS
SOUND
R AVE
• INCR.SURROUND
• STEREO
• SAP
ON
SOUND i
R AVE
• INCR.SURROUND
• STEREO
• SAP
t
19
 Loading...