

Page 1

User Manual
26PW 8402/37
30PW 8402/37
34PW 8402/37
30PW 8502/37
34PW 8502/37
Model No.:_
Serial No.:
Thank you for choosing Philips
Need help fast?
Read your User Manual first for quick tips that make
usngyour Philips product more enjoyable. If you have
read your instructions and still need asastance you may
access our online help at
www.p4c.philips com
or
call 1-800-531-0039
while with your product.
PHILIPS
3121 235 21791
Page 2

Return your Product Registration Card today
to get the very most from your purchase.
Festering your rrxxM with PHILIPS makes you eligble fa all of the valu^e ben^its listed below, so don't niss out.
Cbnpete and return your Roduct Fbgstration Card at once to ensure:
* Proof of Purchase
Fteturning the enclosed card guarantees
that your date of purchase will be on file,
30 no additional paperwork will be required
from you to obtain warranty service.
* Product Safety Notification
By regsteringyour product, you'll receive
notification - directly from the manufac
turer - in the rare case of a product
recall or safety defect.
PHILIPS
Cong^tulationson your purchase,
and welcome to the “family!”
Dear PHILIPS product owner:
Thank you for your confidence in PHILIPS You’ve selected one of the
best-built, best-backed products a/ailable todsy.We’ll do everything in
our power to keep you happy with your purchase for many years to
come.
As a member of the PHILIPS“family,” you’re entitled to protection by
one of the most comprehensive warranties and outstanding service
networks in the industry.What’s more, your purchase guarantees
you’ll receive all the information and special offers for which you
qualify, plus easy access to accessories from our convenient home
shopping network.
Most importantly you can count on our uncompromising commit
ment to your total satisfaction.
All of this is our wey of saying welcome - and thanks for investing in
a PH I LI PS product.
*Additional Benefits of Product Ownership
Ftegstering your product guarantees that
you'll receive all of the privileges to
which you're entitled, including special
money-sa/ing offers.
Knew these
SSfOt yg^mbo/s
CAUTION
A
CAUTION; TO REDUCE THE RISK OF ELECTRIC SHOCK, DO NOT
REM OVE COVER (OR BACK). N 0 USER-SERVICEABLE PARTS
INSIDE. REFER SERVICIN G TO QUALIFIED SERVICE PERSONNEL.
This“bolt of liÿitning” indicates
A
uninsulated material within your unit
m^ cause an electrical shock. For the safe
ty of everyone in your household, please
do not remove product covering.
The “exclamation point” calls atten
A
tion to features for which you
should read the enclosed literature closely
to prevent operating and maintenance
problems
CAUTION :To prevent electric shock,
match wide blade of plug to wide slot, fully
insert.
ATTENTION : Fbur éviter les choc élec
triques, introduire la lame la plus large de
lafiche dans la borne correspondante de la
prise et pousser jusqu’au fond.
'A
RS. To get the most from your PHILIPS purchase, be
sure to complete and return your Product Registration
Card at once.
i
PHILIPS
Wai our Wald Wide Web Ste at httpy/www.philips.com
For Customer Use
Biter below the ferial No. which is
located on the rear of the cabinet. Fietain
this information for future reference.
Model No._________________________
ferial No.
Page 3
IMPORTANT SAFETY INSTRUCTIONS
Read before operating equipment
Read these instructions.
Keep these instructions.
Heed all warnings.
Follow all instructions.
Do not use this apparatus near water.
Clean only with a dry cloth.
Do not block any of the ventilation openings. Install in accordance
with the manufacturers instructions.
8. Do not install near any heat sources such as radiators, heat regis
ters, stoves, or other apparatus (including amplifiers) that produce
heat.
9. Do not defeat the safety purpose of the polarized or groundingtype plug. A polarized plug has two blades with one wider than
the other. A grounding type plug has two blades and third ground
ing prong. The wide blade or third prong are provided for your
safety. When the provided plug does not fit into your outlet, con
sult an electrician for replacement of the obsolete outlet.
10.
Protect the power cord from being walked on or pinched particu
larly at plugs, convenience receptacles, and the point where they
exit from the apparatus.
11.
Only use attachments/accessories specified by the manufacturer.
12.
the cart/apparatus combination to avoid injury from tip-over.
Unplug this apparatus during hghtning storms or when unused for
13.
long periods of time.
14.
Refer all servicing to qualified service personnel. Servicing is
required when the apparatus has been damaged in any way, such
as power-supply cord or plug is damaged, hquid has been spilled
or objects have fallen into apparatus, the apparatus has been
exposed to rain or moisture, does not operate normally, or has
been dropped.
15.
This product may contain lead and mercury. Disposal of these
materials may be regulated due to environmental considerations.
For disposal or recychng information, please contact your local
authorities or the Electronic Industries Alliance:
Damage Requiring Service - The apphance should be serviced
16.
by qualified service personnel when:
A. The power supply cord or the plug has been damaged; or
Use only with a cart, stand, tripod, bracket, or table
specified by the manufacturer, or sold with the app
aratus. When a cart is used, use caution when moving
www.eiae.org
B. Objects have fallen, or hquid has been spihed into the apph
ance; or
C. The apphance has been exposed to rain; or
D. The apphance does not appear to operate normahy or
exhibits a marked change hi performance; or
E. The apphance has been dropped, or the enclosure damaged.
17.
Tilt/Stability - Ah televisions must comply with recommended
international global safety standards for tht and stabihty properties
of its cabhiet design.
• Do not compromise these design standards by applyhig exces
sive puh force to the front, or top, of the cabhiet which could ulti
mately overturn the product.
• Also, do not endanger yourself, or children, by plachig electron
ic equipment/toys on the top of the cabhiet. Such items could
unsuspecthigly fah from the top of the set and cause product dam
age and/or personal hijury.
18.
Wall or Ceiling Mounting - The apphance should be mounted to
a wah or ceihng only as recommended by the manufacturer.
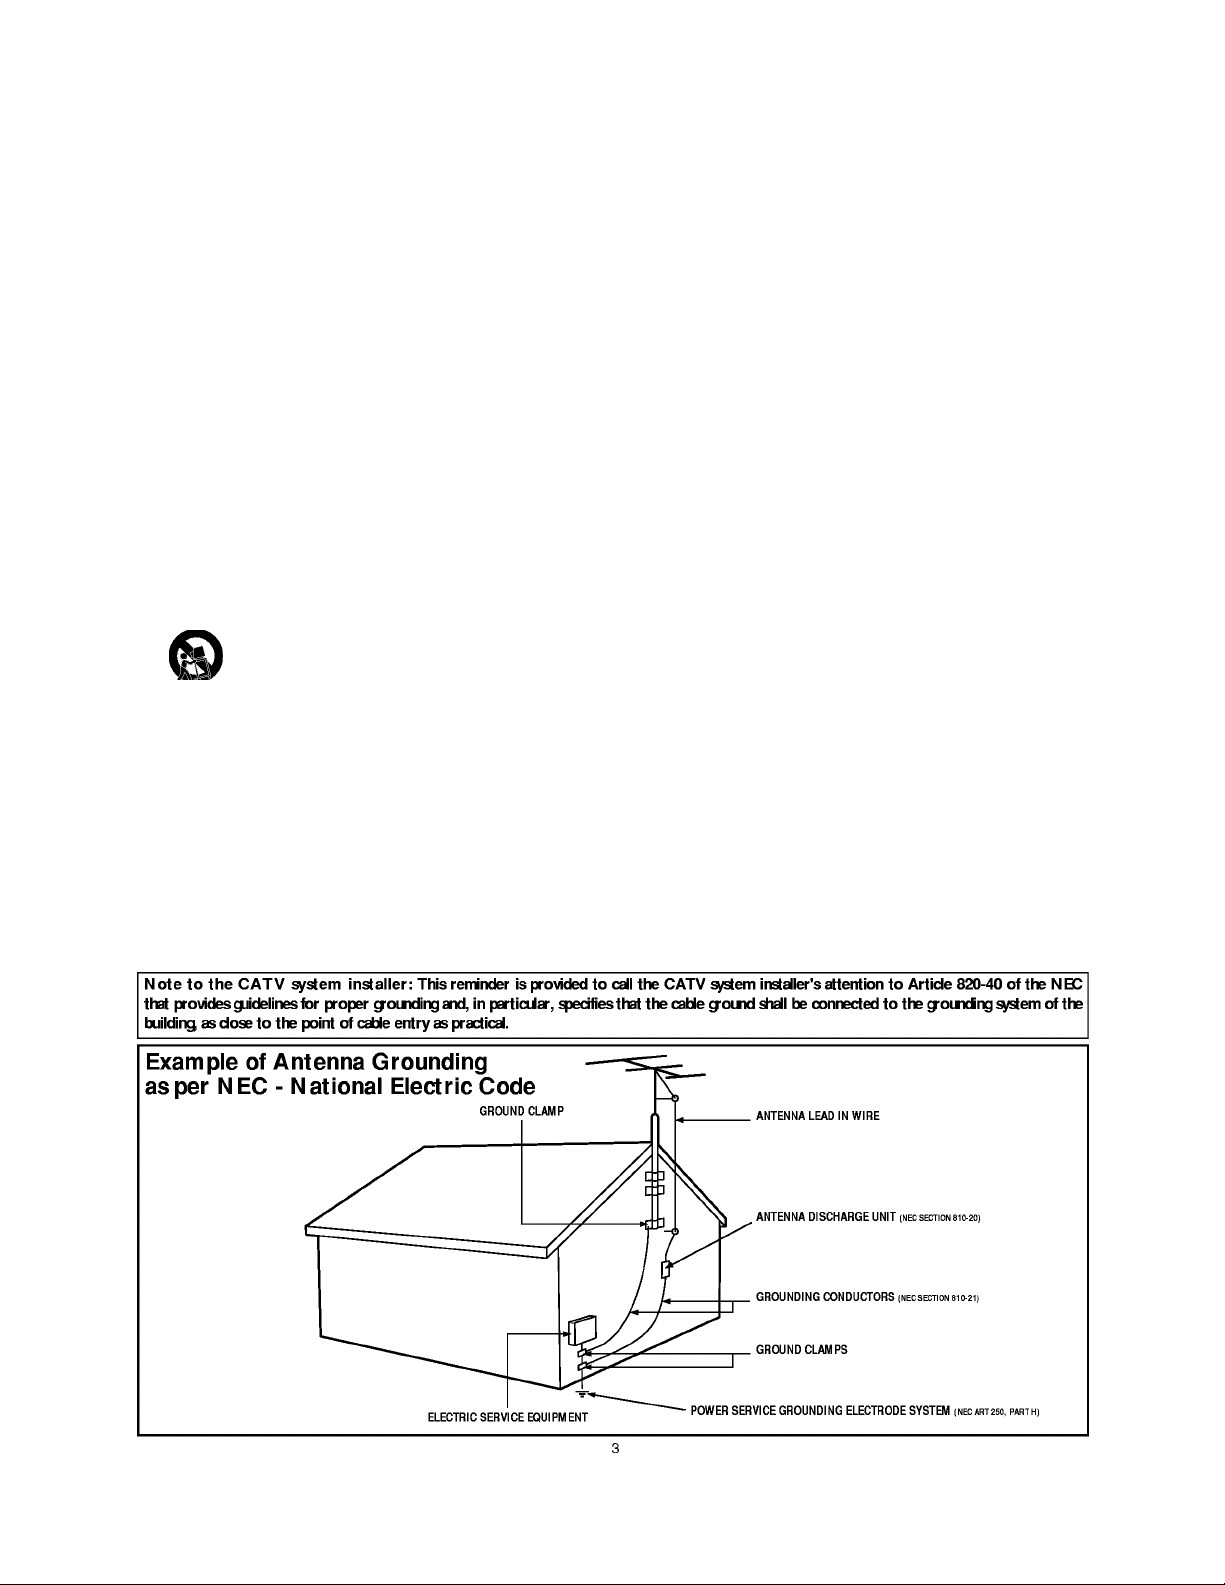
Power Lines - An outdoor antenna should be located away from
19.
power hues.
20.
Outdoor Antenna Grounding - If an outside antenna is connected to
the receiver, be sure the antenna system is grounded so as to provide
some protection agahist voltage suiges and buht up static chaiges.
Section 810 of the National Electric Code, ANSI/NFPA No. 70-
1984, provides information with respect to proper groundhig of
the mast and supporthig structure, grounding of the lead-hi whe to
an antenna discharge umt, size of groundhig connectors, location
of antenna-discharge unit, connection to groundhig electrodes, and
requhements for the groundhig electrode. See Eigure below.
Object and Liquid Entry - Care should be taken so that objects
21.
do not fall and liquids are not spihed hito the enclosure through
openhigs.
a) Warnhig: To reduce the risk of fhe or electric shock, this appa
ratus should not be exposed to rahi or moisture and objects filled
with hquids, such as vases, should not be placed on this apparatus.
Battery Usage CAUTION - To prevent battery leakage that may
22.
result hi bodhy hijury, property damage, or damage to the umt:
• histah ah batteries correctly, with -i- and - ahgned as marked on
the miit.
• Do not mix batteries (old and new or carbon and alkahne, etc.).
• Remove batteries when the miit is not used for a long time.
Page 4

Contents
Introduction
Welcome/Registration of Your TV ...............................................2
Safety/Precautions
.................................................................
2—3
Features......................................................................................... 4
Installation Menu
^ How to use the Language Controls...........................................5
How to use the Tuner Mode Controls
How to use the Auto Program Controls
How to use the Channel Edit Controls
How to use the Name Controls
Picture Menu Controls
............................................
........................................
..........................................
..................................................
7-8
How to use the Picture Menu Controls..............................9
^ Sound Menu Controls
How to use the Sound Menu Controls
Feature Menu Controls
How to use the Timer Menu Controls
...........................
...........................
10
11
How to use the AutoChron^“ Control..........................................12
Understanding the AutoLock^“ Controls ....................................13
Setting up an AutoLock^“ Access Code
......................................
14
How to lock channels using AutoLock^“ ....................................15
How to clear all locked channels at the same time
.....................
16
How to block programming using the Movie Ratings Controls .17
How to block programming using the TV Ratings Controls .18
Other AutoLock™ Blocking options
Using the AutoLock^“ Review screen
How to use the Widescreen Format Control
..........................................
........................................
..............................
19
20
21
How to use the Closed Captioning Controls............................22
How to use the Rotation Control
How to use the Dynamic NR Control
............................................
......................................
23
24
How to use the Permanent OSD...............................................24
How to use the QuadraSurF“ Controls
How to use the Program List Control
How to use the Active Control feature
How to use the Sleeptimer Controls
...............................
25-26
......................................
......................................
........................................
27
27
28
How to use the Freeze Control.................................................28
How to use the AutoPicture^“ Control
How to use the AutoSound^“ Control
Remote Control Related Features
.......................................
........................................
29
29
Using the Remote Control with accessory devices
Mode Selection ........................................................................30
Code-Entry Method .................................................................31
Direct-Entry Code list for accessory devices
...................
32-34
Remote Control Accessory Device Specific Buttons..................35
Important Ineormation
lllkdllll Troubleshooting ............................................................36
IIBMi Care and Cleaning ...........................................................36
Index ...........................................................................................37
Factory Service Locations
.....................................................
38-39
Limited Warranty........................................................................40
Features
Active ControF” continuously measures and corrects all incoming
signals to help provide the best picture quality. This feature moni
tors and corrects both the sharpness control and noise reduction con
trol.
Audio/Video Jack Panel allows direct connections with VCRs,
DVDs, or other devices, providing quality TV picture and sound
playback.
5
Audio Volume Leveler (AVL) Control keeps the TV sound at an
6
even level. Peaks and valleys that occur during program changes or
6
commercial breaks are reduced, making for a more consistent, com
fortable sound.
AutoLock'''” allows you to block the viewing of certain channels or
programs with certain ratings if you do not want your children to
view inappropriate materials.
AutoPicture'''” allows you to change the picture settings (color, tint,
contrast, etc.) for various types of programming, such as sports,
movies, multimedia (games), or weak signals with the push of one
button.
AutoSound^” allows you to select from four factory-set controls
and a personal control that you set according to your own prefer
ences through the onscreen Sound menu. The four factory-set con
trols (Speech, Movie, Music, and Multimedia) enable you to tailor
the TV sound so as to enhance the particular programming you are
watching.
Channel Edit allows you to add or delete channels from the list
stored in the TV’s memory. Channel Edit makes it easy to limit or
expand the number of channels that are available to you when you
press the Channel (-I-) or (-) buttons on your remote control.
Closed Captioning allows the viewer to read TV program dialogue
or voice conversations as onscreen text.
Infrared Remote Control works your TV and other remote-con
trolled devices, such as VCRs, DVD players, cable converters, and
satellite receivers.
Onscreen Menn shows helpful messages and instructions for set
ting TV feamre controls (can be viewed in English, French, or
Spanish).
Sleep Timer automatically turns the TV OFF after a set amount of
time that you choose.
Timer allows you to set your TV to mm itself ON and OFF once or
daily like an alarm clock.
As an Energy Star® Partner, Philips Consumer
Electronics has determined this product meets the
’ Energy Star® guidelines for energy efficiency.
Energy Star® is a U.S. registered mark. Using
products with the Energy Star® label can save energy. Saving
energy reduces air pollution and lowers utility bills.
_____________
Active Control, AutoPicture, AutoSound, AutoChron, and
Incredible Surround are trademarks of Philips Consumer
Electronics Company. Copyright 2001 Philips Consumer
Electronics.
*Manufacmred under license from Dolby Laboratories. “Dolby”
and the double-D symbol are trademarks of Dolby Laboratories.
Quick Use and Setup Guide
Refer to the simple Quick Use and Setup
Guide (supplied with your TV) for details on
making Connect ions and Remote Control
Operation.
Page 5
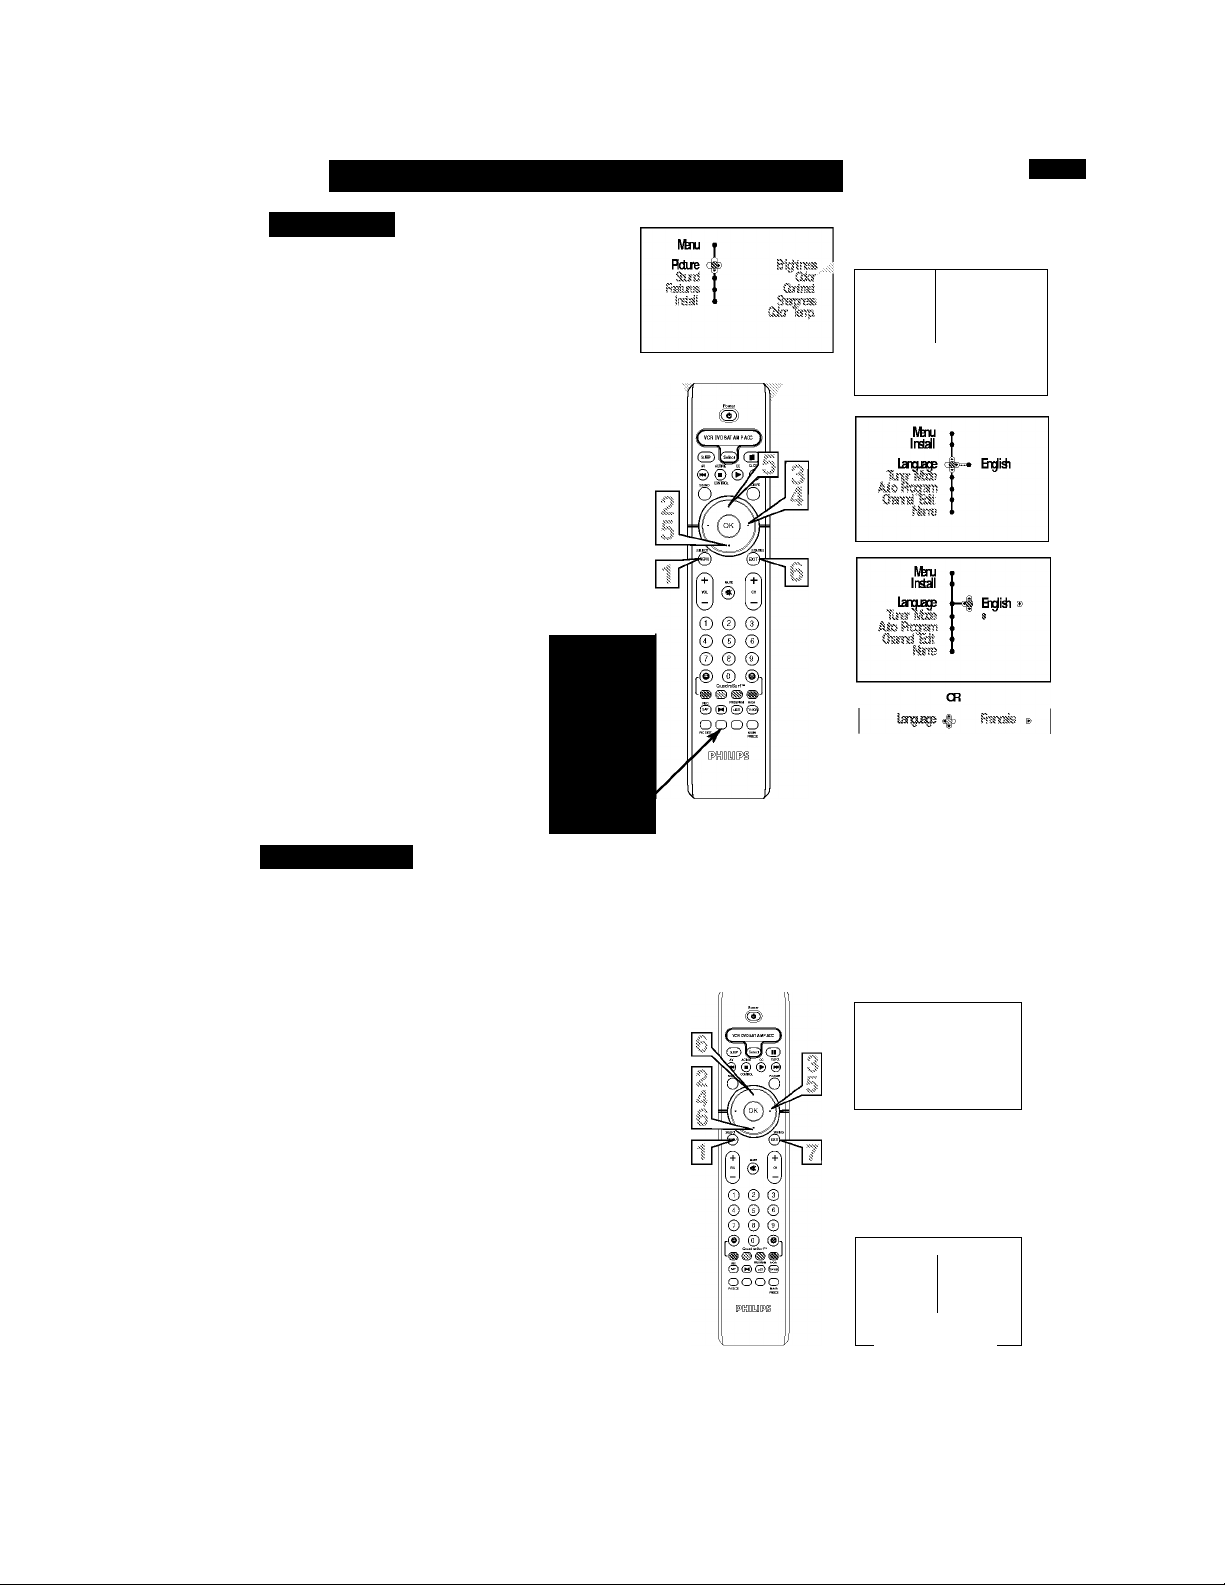
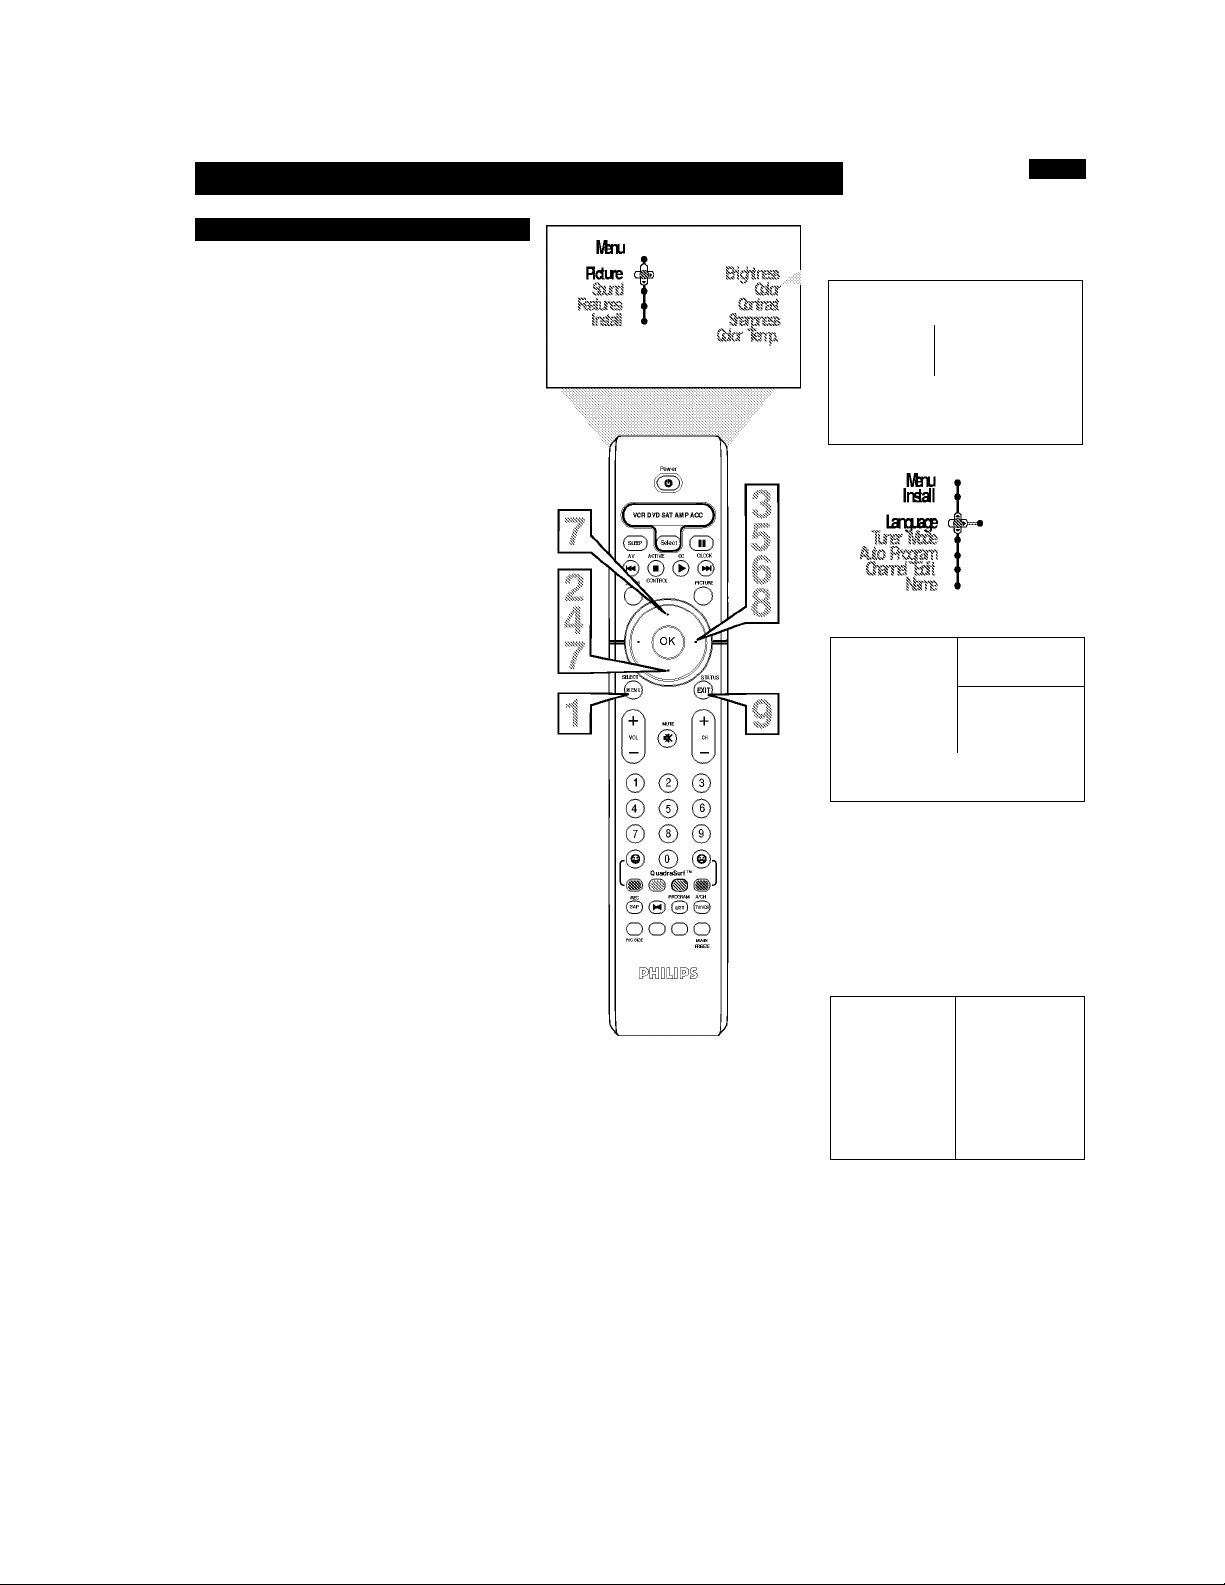
How TO Use the Installation Features
Language
or our Spanish and French-speaking TV own
ers, an onscreen LANGUAGE option is pres
F
ent. The LANGUAGE control enables you to set
the TV’s onscreen menu to be shown in either
English, Spanish, or French.
^ Press the MENU/SELECT button on the
^ remote control to show the onscreen menu.
Press the CURSOR DOWN button repeatedly
until Install is highlighted.
Press the CURSOR RIGHT button to shift
the menu to the left and highlight Language.
Press the CURSOR RIGHT button to high
light the Language Control options.
Press the CURSOR DOWN or CURSOR UP
button to select English, Español (Spanish), or
Erancais (Erench).
Press the STATUS/EXIT button to remove the
menu from the screen.
IIelei LL Him
Remember, the LANGUAGE control makes only the
TV’s onscreen MENU items appear in Enghsh, Spanish,
or Erench text. It does not change the other onscreen
text features, such as Closed Captioning (CC), with TV
shows.
Tuner Mode
rp
'he Tuner Mode allows you to change the Tv’s
signal input to Cable, Antenna, or Auto Mode.
J. i
It’s important for the TV to know what type of sig
nal is connected, either Antenna or Cable.
Press the MENU/SELECT button on the
^ remote control to show the onscreen menu.
Press the CURSOR DOWN button repeated
ly untU INSTALL is highlighted.
Press the CURSOR RIGHT button to shift
the menu to the left.
Press the CURSOR DOWN button to select
the Tuner Mode control.
Press the CURSOR RIGHT button to high
light the tuner options.
Press the CURSOR UP or CURSOR DOWN
to select Cable, Antenna, or Auto.
If Tuner Mode is set to Auto, Auto Program
win detect whether or not cable input is present.
Press the STATUS/EXIT button to remove the
menu from the screen.
Note: Some
models may
show the
remote control
with the PIP
feature buttons
labeled, there
is no need to
call the
Customer Call
Center or to
return the
product to the
store.
№n
l№m
Itidall c|
№n
InÉ^I
Instil 1
A__
№n
\r áá \
№n •
■ B^iil
Ato
s
Alto S'
*
Helpi L I. Him
When Cable is selected, channels 1-125 are available.
When Antenna is selected, channels 2-69 are available.
CR
Itet Mxte ^
CR
iTErMxte#)
Page 6
________
How TO Use the Installation Features
Auto Program
'XZour TV can automatically set itself for local
i area (or cable TV) channels. This makes it
easy for you to select only the TV stations in your
area by pressing the CHANNEL (+) or (-) button.
^ Press the MENU/SELECT button on the
I remote control to show the onscreen menu.
Press the CURSOR DOWN button repeatedly
until Install is highlighted.
^ Press the CURSOR RIGHT button to enter the
Install menu. Language will he highlighted.
^ Press the CURSOR DOWN button repeatedly
until Auto Program is selected. “Search ?” will
appear.
g Press the CURSOR RIGHT button to start the
Auto Programming process.
g Press the STATUS/EXIT button to remove the
menu from the screen when the Auto program-
^ ming process has finished.
HIII.Pi l l. l/i.M
After you’ve run Auto Program, check out the
results. Press the CHANNEL (+) or (-) button and
see which channels you can select.
Rememher, an antenna or cable TV signal must first
be connected to your TV, see Quick-Use Guide for
making connections.
№u
Rdue (
llitni
Rto I
Instil c|)
AioRxgam
1
№u «
Install j
1^
T*
\ N N
Bifidi
9Ea^
^ №t№it
Oismel Soed 12
Channel Edit
hannel Edit makes it easy for you to add or delete
channels from the list of channels stored in the
C
TV’s memory.
Press the MENU/SELECT button on the remote
control to show the onscreen menu.
Press the CURSOR DOWN button repeatedly
until Install is highhghted.
Press the CURSOR RIGHT button to enter the
Install menu. Language will be highlighted.
Press the CURSOR DOWN button repeatedly
until Channel Edit is selected.
Press the CURSOR RIGHT button to enter the
Channel Edit mode.
Press the CURSOR UP or CURSOR DOWN
buttons to scroll though the hst of available chan
nels, you can also press the CH-I- or CH- to scroll
through the hst of channels. Or, press the numbered
buttons to select a specific numbered channel.
With the channel you want to edit selected, press the
I CURSOR RIGHT button to activate the “skip-
ping” of the channel. The skipped channel wOl not
appear when changing channels.
Press the STATUS/EXIT button to remove the
onscreen menu from the screen.
8
Note: When you want to add a channel that has been
skipped, repeat steps 1-4. By pressing the CURSOR
RIGHT button skipped is deactivated.
llitni
Rd-sSSJ \
indi Elt
tern
T*
Mo R-ecì'ìSTj
OistteTM
OhteI Bit ^ 3 Sipped >
Bifidi
1^
jX
-!§ 3 B
Page 7
_________
How TO Use the Installation Features
Name Control (Pick List)
'he channel NAME feature allows you to list
the “call” letters of your favorite stations
r
beside their channel numbers when they appear
on the screen. The TV has in memory a list of the
50 most popular channel names (for example:
ABC, CBS, FOX, NBC, etc.). You can also enter
a custom name (up to five characters) see next
page for details.
Tune to the specific channel you want to name, then follow the steps helow.
ss^ Press the MENU/SELECT button on the
^ remote control to show the onscreen menu.
Press the CURSOR DOWN button repeatedly
until Install is highlighted.
^ Press the CURSOR RIGHT button to enter
the Install menu. Language will he highlighted.
Press the CURSOR DOWN button repeatedly
until Name is selected.
Press the CURSOR RIGHT button to move
to enter the Name menu.
№u
Rdre '
№u
№1
iSS
Ms Roth '
Qimflat -
№tTE
ItiB” Mite
Install A OB'rt Bit
.410 ftiiran
With Pick List highlighted, press the CURSOR
RIGHT button to enter the “Pick List” selec
tions.
Press the CURSOR UP or CURSOR DOWN
buttons to scroll through a list of options.
After you have selected a name for the channel,
press the CURSOR RIGHT button to save
the name in the TV’s memory, it will appear in
the upper left hand comer of the screen.
Press the STATUS/EXIT button to remove the
menu from the screen.
11 III.Pill. f/l.M
The five characters that the channel NAME feature
allows you to input can he letters, a dash (-), or the
numbers 0 to 9.
The Channel Label or Name will appear when a
channel change is made or when the STATUS/EXIT
button is pressed.
Install
№tre
Hck Ui
№C
ftreanai
Install
№tre
Hck Ust /BC
•
I
Page 8

Ed
_________
Name Control (Personal)
How TO Use the Installation Features
he channel NAME feature allows you to list
the “call” letters of your favorite stations
T
beside their channel numbers when they appear
on the screen. You can enter a custom name (up
to five characters) for each channel.
Tune to the specific channel you want to name, then follow the steps helow.
ss^ Press the MENU/SELECT button on the
^ remote control to show the onscreen menu.
Press the CURSOR DOWN button repeatedly
until Install is highlighted.
^ Press the CURSOR RIGHT button to enter
the Install menu. Language will he highlighted.
Press the CURSOR DOWN button repeatedly
until Name is selected.
Press the CURSOR RIGHT button to move
to enter the Name menu.
№u
Rdre
ItiEtall
№u
№1
,Aio RfciBTi '
Chmi'lilt '
fe'TB '
№u
№1
.Afe
OBi'iiSil
felB
ci
Press the CURSOR DOWN button to select
Personal.
Press the CURSOR RIGHT button again;
then press the CURSOR UP or CURSOR
DOWN buttons to scroll through a list of
options for the first character (A through Z, 0
through 9). Press the CURSOR RIGHT but
ton, and repeat for the second, third, fourth, and
fifth characters.
Press the STATUS/EXIT button to remove the
menu from the screen.
I/Ei.ri I I. Him
The five characters that the channel NAME feature
allows you to input can he letters, a dash (-), or the
numbers 0 to 9.
The Channel Label or Name will appear when a
channel change is made or when the STATUS/EXIT
button is pressed.
Ato Rtian
№tTE cj
Page 9
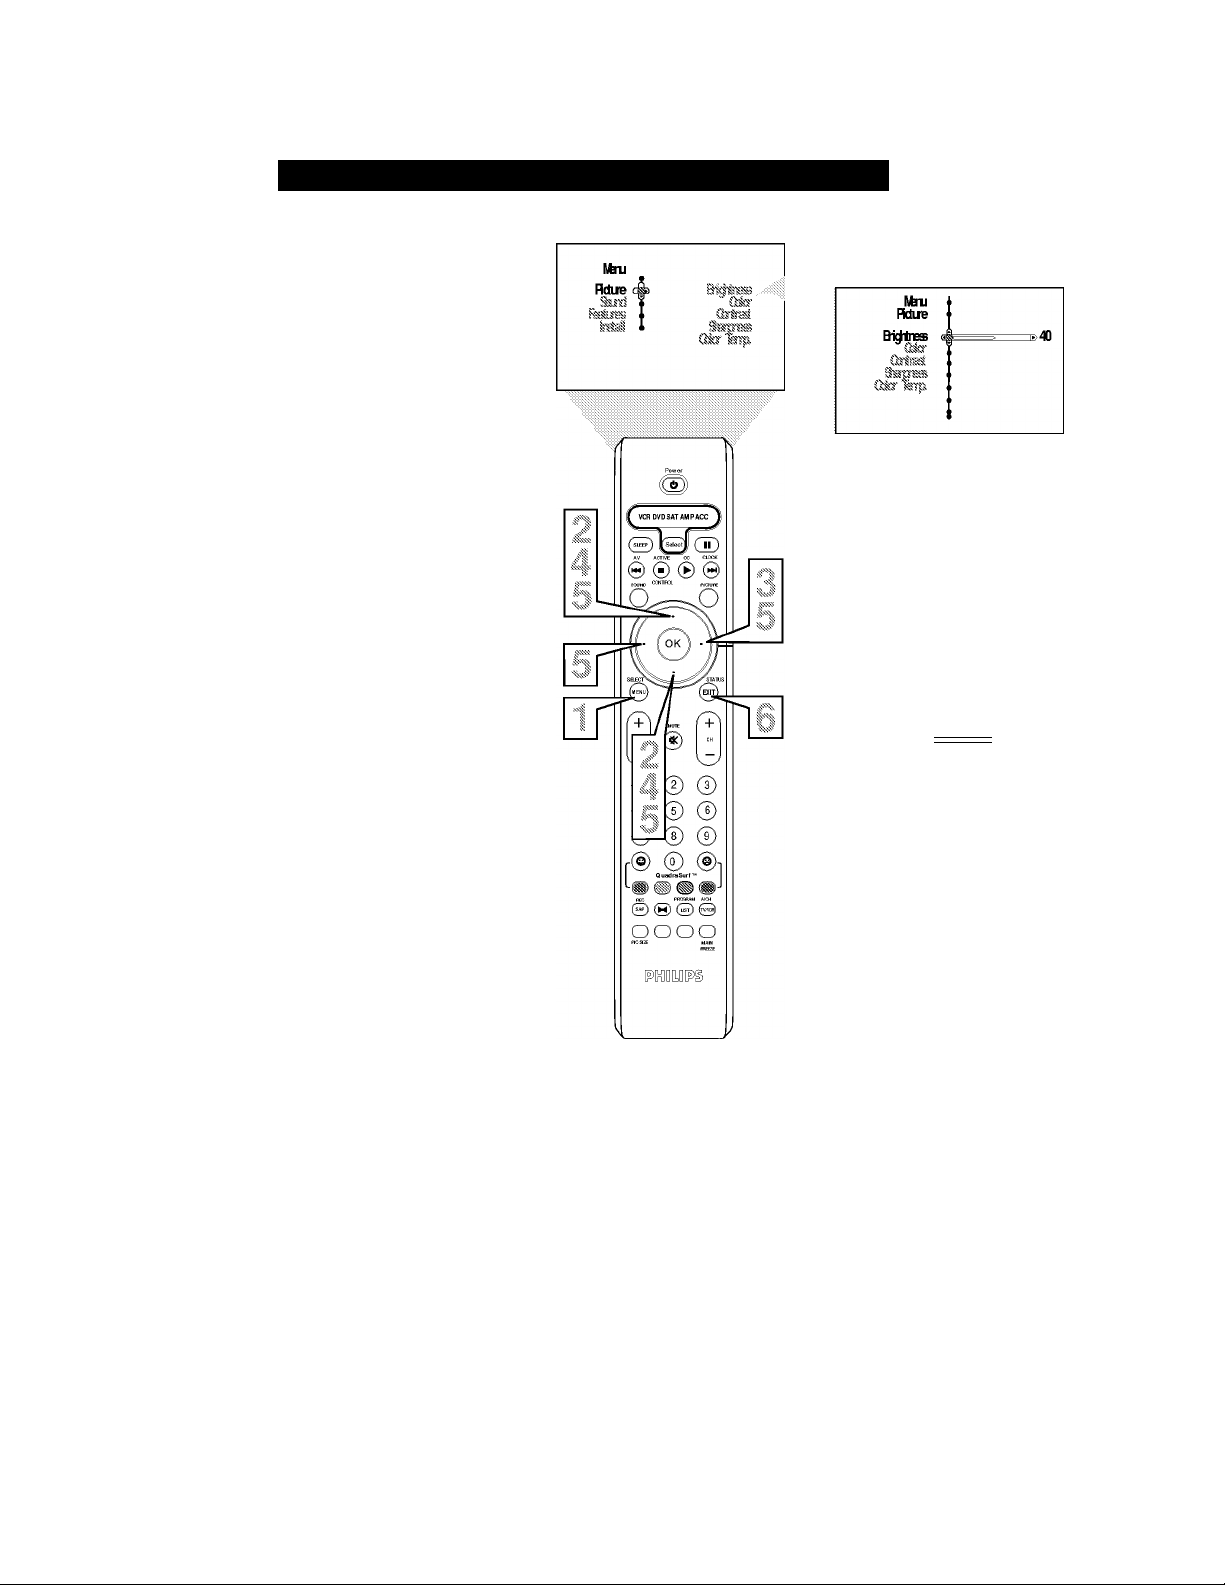
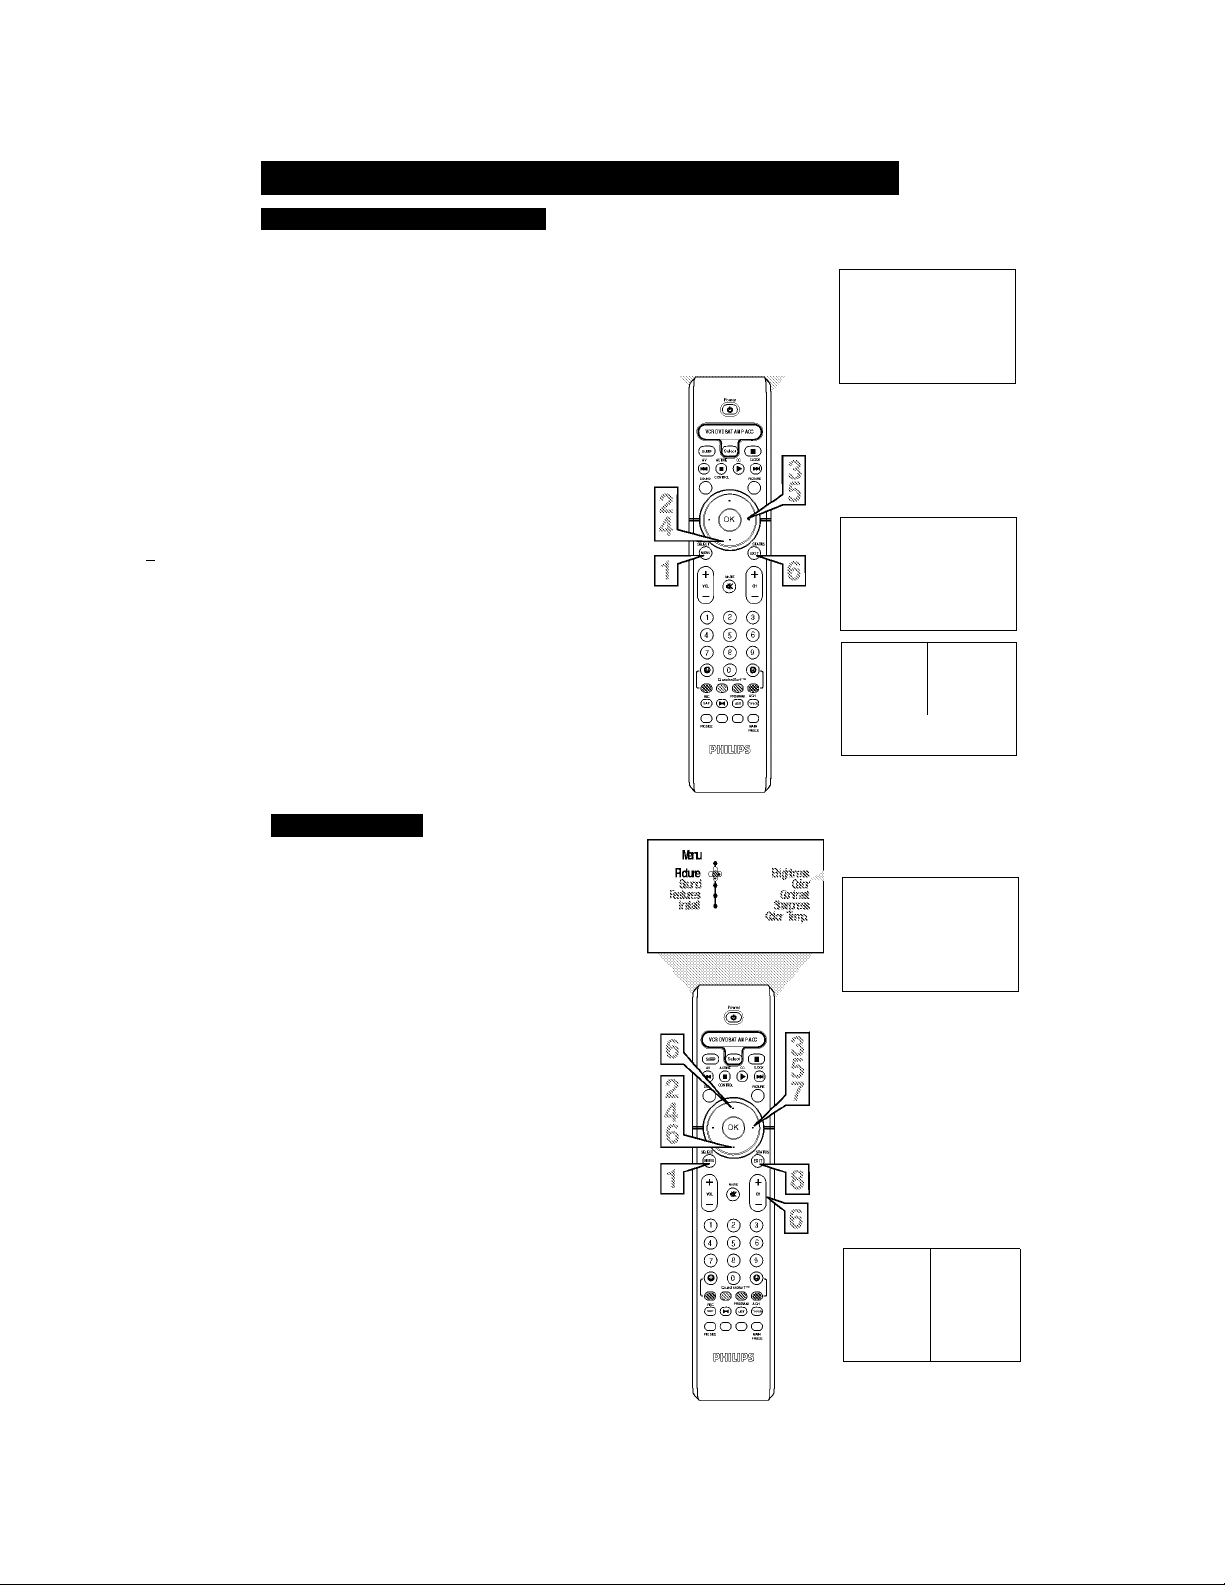
How TO Use the Picture Adjustment Controls
adjust your TV picture controls, select a channel and
follow these steps.
Press the MENU/SELECT button on the remote
control to show the onscreen menu.
Press the CURSOR UP or CURSOR DOWN but
ton to highlight PICTURE.
Press the CURSOR RIGHT button to enter the
Picture menu.
^ Press the CURSOR UP or CURSOR DOWN
button to select the picture adjustment you want to
change: Brightness, Color, Contrast, Sharpness,
Color Temp., Tint, Dyn. Contrast, or Color Enh.
NOTE: The menu wUl show only five items at a time, so
you will need to continue scrolling with the CURSOR
DOWN button to adjust the Tint, Dyn. Contrast, or Color
Enh.
C Press the CURSOR UEET or CURSOR RIGHT
button to adjust the selected control. OR, if Color
Temp, or Dyn. Contrast is chosen, press the CUR
SOR UP or CURSOR DOWN to select the pre
ferred mode. If Color Enh. is selected press the
CURSOR RIGHT button repeatedly to toggle the
various modes.
Press the STATUS/EXIT button when finished to
M 1 remove the menu from the screen.
Hi:u'i I I. Him
NOTE: The Tint Controls will not be available for
adjustments when tuned to the AV1/AV2/AV3
Inputs.
Brightness - adds or subtracts fight from the darkest
part of the picture.
Color — adds or eliminates color.
Contrast - improves the detail of the lightest parts of
the picture.
Sharpness - improves the detail in the picture.
Color Temp, offers NORMAL, COOL, or WARM
picture preferences. (Normal will keep the whites,
white; Cool will make the whites, bluish; and Warm
will make the whites, reddish.)
Tint — adjusts the picture to obtain natural skin tones.
Dyn(amic) Contrast - helps to “sharpen” the picture
quality by making the dark portions of the picture
darker and the light portions more noticeable. You can
select from the various modes: Off, Min, Med, and
Max.
Color Enh(ancement) - increases the intensity of the
color when “On” is selected.
CR
Gdcr $38
CR
Gbrbad
CR
s41
CR
GbkrlaTp cfs-» Gbd
CR
Tit 4 ^ bo
CR
[^t Cbrbast №i
CR
(McrBti *1 Qi a ®
Page 10
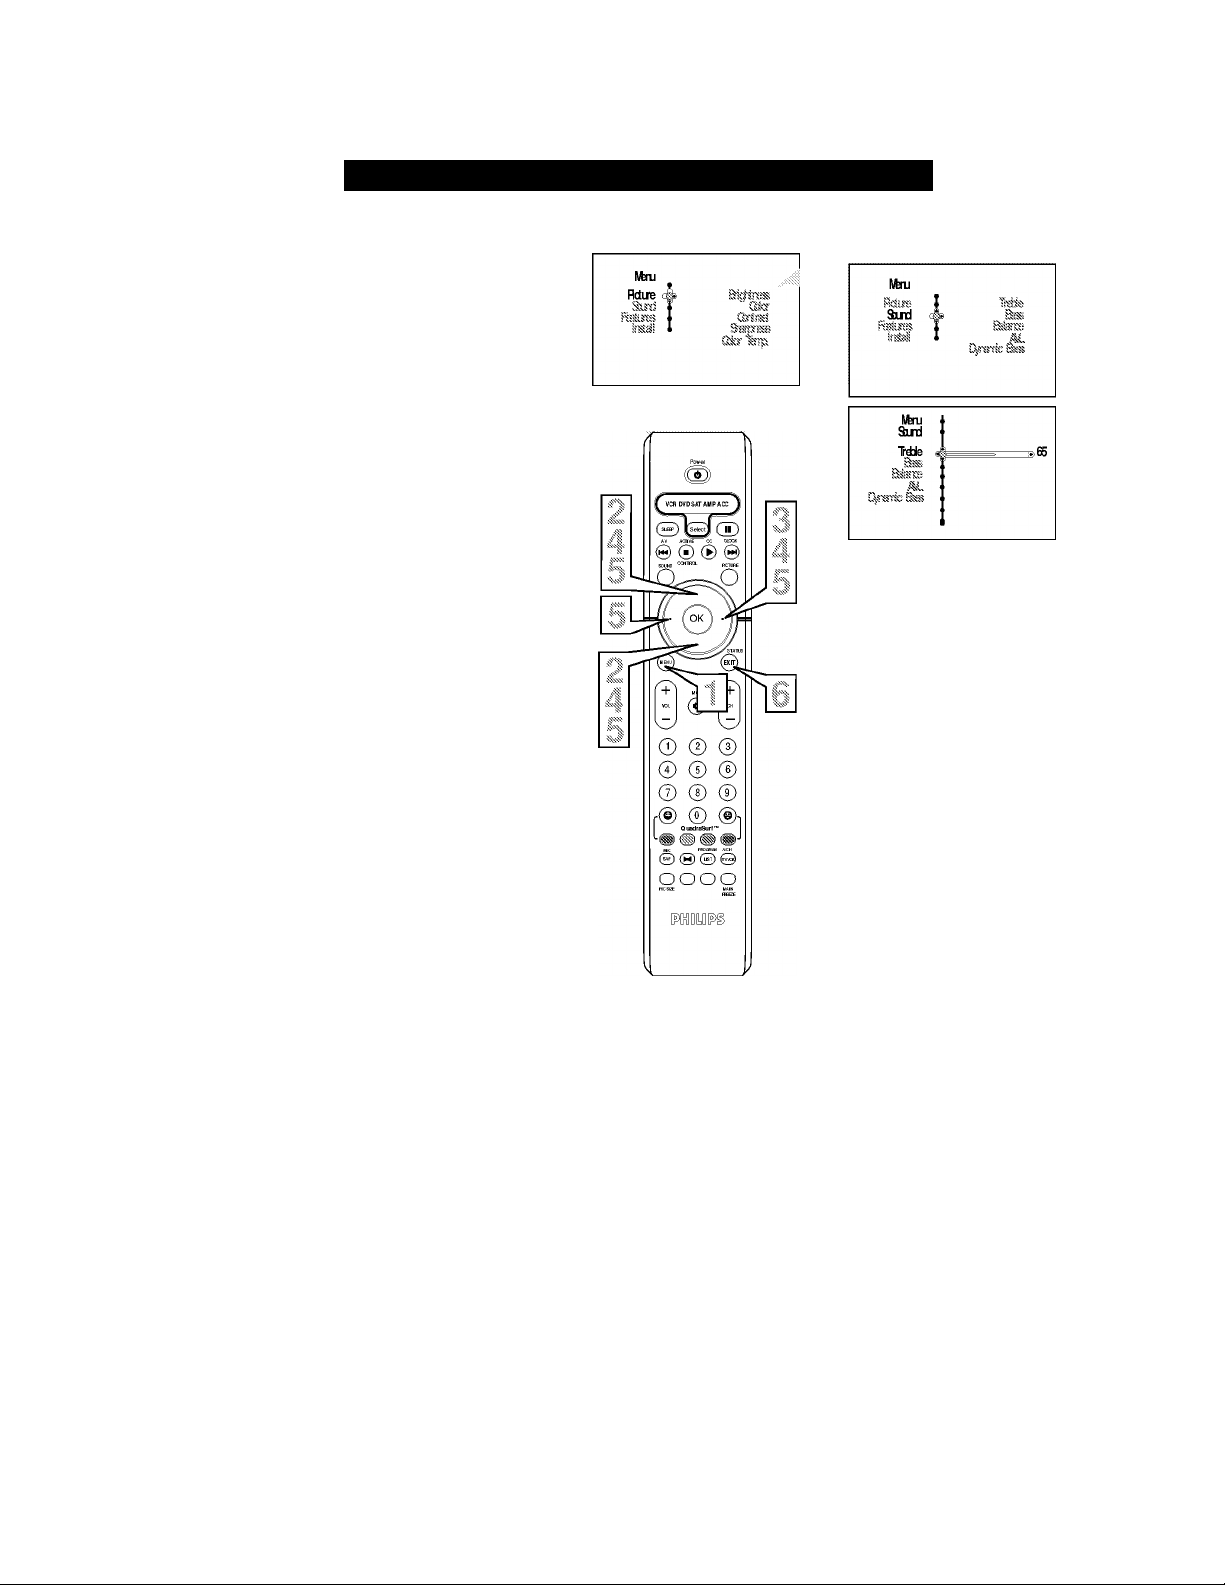
B
adjust your TV sound controls, select a channel and
follow these steps.
Press the MENU/SELECT button on the remote
control to show the onscreen menu.
Press the CURSOR UP or CURSOR DOWN but
ton to highlight Sound.
Press the CURSOR RIGHT button to enter the
Picture menu.
Press the CURSOR UP or CURSOR DOWN
button to select the sound adjustment you want to
change: Treble, Bass, Balance, AVL, Dynamic
Bass, Incr. Surround, Stereo, SAP, Audio Out, and
Speaker. NOTE: The menu wUl show only five
items at a time, so you will need to continue scroll
ing with the CURSOR DOWN button to adjust the
Incr. Surround, Stereo, SAP, Audio Out, or Speaker.
Press the CURSOR UEET or CURSOR RIGHT
button to adjust the selected control. Or, if Incr.
Surround is chosen, press the CURSOR UP or
CURSOR DOWN to select the preferred mode. If
AVL, Stereo, SAP, Audio Out, or Speaker is select
ed press the CURSOR RIGHT button repeatedly to
toggle the various modes.
Press the STATUS/EXIT button when finished to
remove the menu from the screen.
How TO Use the Sound Adjustment Controls
CR
CR
CR
AL ^ Gf Qi !i’
CR
Cynerric &SB ^ Cff Ch
CR
Itrr. SrroLTd №tn »
Hiii.ri I I. Him
Treble — enhances the high frequency sounds.
Bass — enhances the low frequency sounds.
Balance — adjusts the level of sound coming from the
left and right speakers.
AVL (Auto Volume Leveler) - when On, AVL will
level out the sound being heard when sudden changes
in volume occur during commercial breaks or channel
changes.
Dynamic Bass - enhances the low frequency sounds.
Incr. Surround - adds greater depth and dimension to
TV sound. Select from Incr. Surrourd, Dolby Virtual or
Stereo sound (if Stereo) or Dolby Virtual, Spatial or
Mono (if Mono).
SAP (Secondary Audio Programming) sent as a
third audio channel, a SAP signal can be heard apart
from the current TV program sound. Note: If SAP is
not available, “Not Available” will appear on the
screen.
Audio Out - select from Variable or Fixed. When
Variable is selected, change the volume at the TV using
the TV’s remote control. If fixed is selected, change
the volume at the external device’s audio controls.
Speaker -turn the TV speaker On or Off. When a HiFi system is used, turn the TV speaker Off to hear the
sound from the Hi-fi system instead of the TV’s speak
ers. When no external audio system is connected. On
must be selected to hear sound coming from the TV.
CR
Sereo ^ Sereo №) s>
CR
SP Of Qi »
CR
ArioQt 4* RscHWtt»
CR
10
Page 11
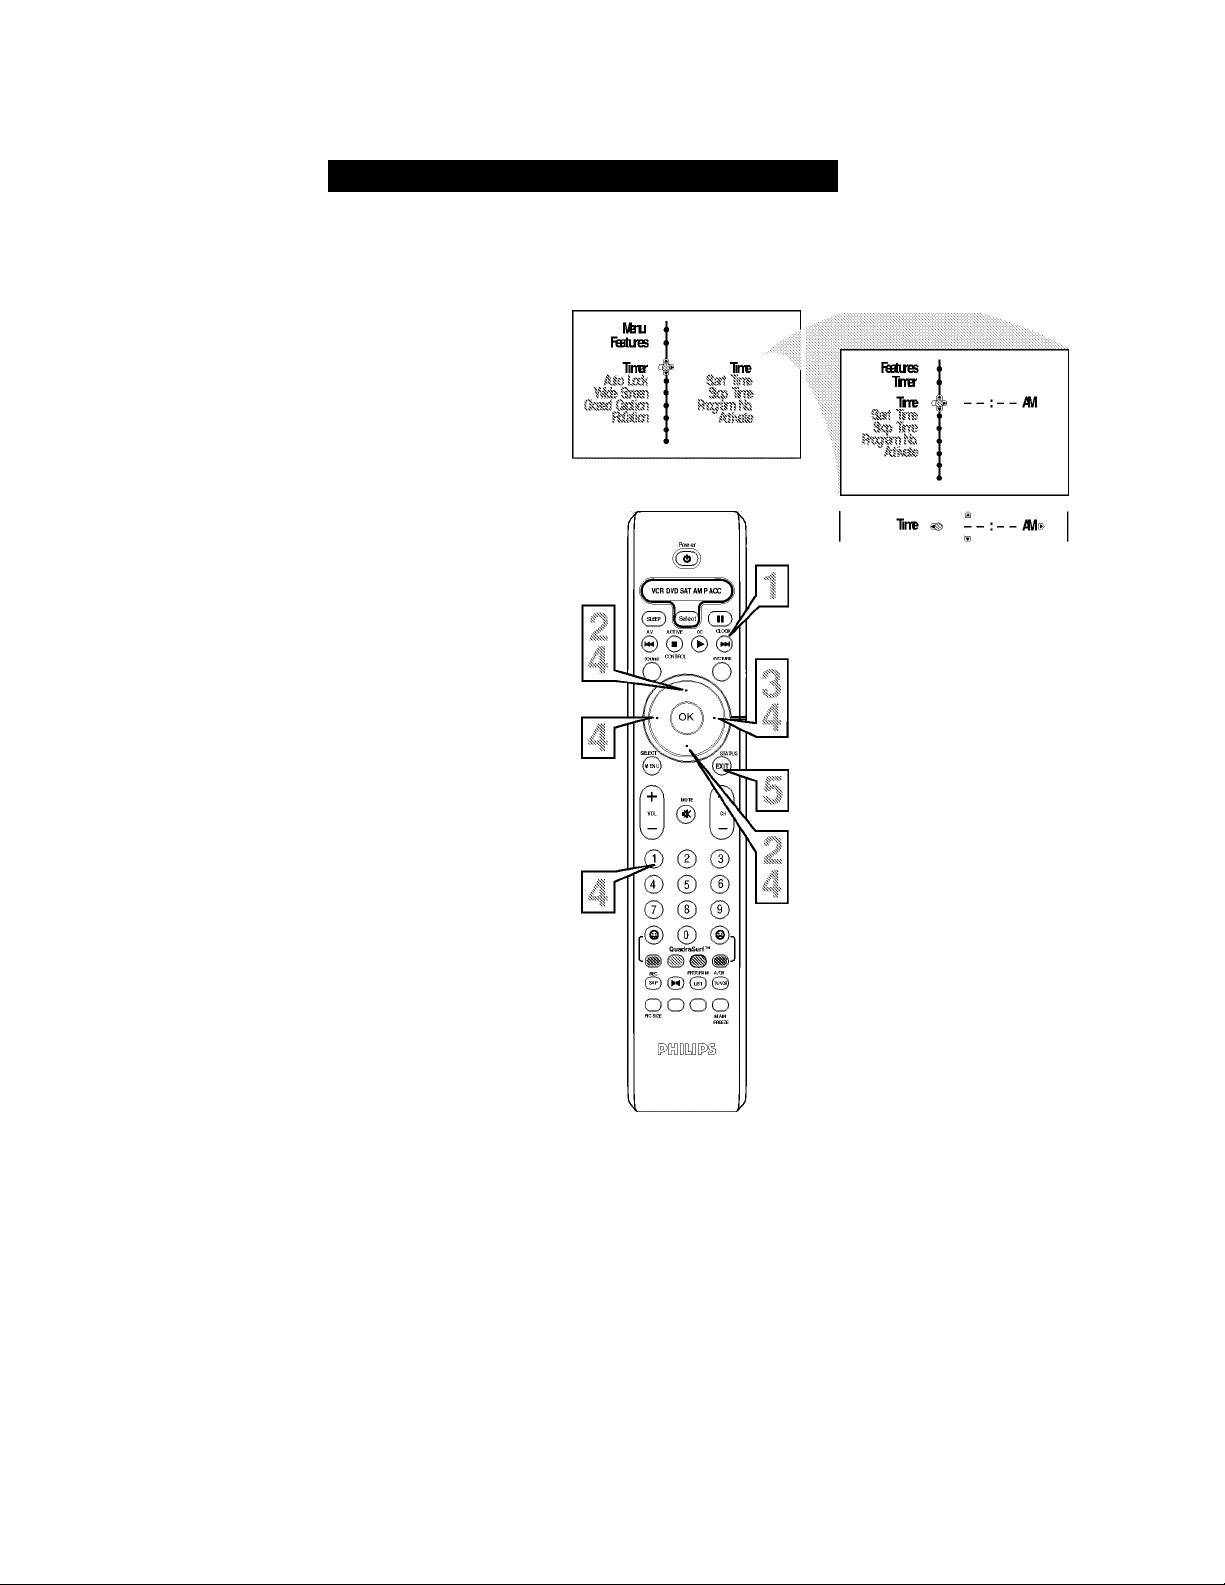
How TO Use the Timer Menu Controls
~\Zour television comes with an onscreen clock. The
A. TV can also be set to turn on or ojf at a specific
time and tune to a specific channel when it powers
itself on.
ss^ Press the CLOCK button on the remote con-
^ trol to display the Timer onscreen menu.
Press the CURSOR UP or CURSOR DOWN
button to highlight one of the Timer controls.
These controls are Time, Start Time, Stop Time,
Program No., Activate, Display, and AutoChron.
Press the CURSOR RIGHT button to display
t.'! M the menu for the selected item.
Make adjustments to the selected items hy fol
lowing the steps helow.
Time: Enter the current time using the
Numbered buttons. Use the CURSOR UP and
CURSOR DOWN buttons to toggle the AM and
PM setting.
Start Time: Use the numbered buttons to enter
the time you want the TV to turn itself On. Use
the CURSOR UP and CURSOR DOWN but
tons to toggle the AM and PM setting.
Stop Time: Use the numbered buttons to enter
the time you want the TV to turn itself Off. Use
the CURSOR UP and CURSOR DOWN but
tons to toggle the AM and PM setting.
Program No.: Use the NUMBERED buttons or
the CH -I- or CH- buttons to enter the desired
start-up channel. You can also press the CUR
SOR RIGHT or CURSOR LEET buttons to
enter the desired start-up channel.
Activate: Set the timer to turn itself On (Once
or Daily) or Off. Press the CURSOR UP or
CURSOR DOWN buttons to select Once, Daily,
or Off.
Display: Press the CURSOR RIGHT or CUR
SOR LETT to toggle between On or Off. If On
is selected, the time will be displayed all the
time when the TV is on. When Off is selected,
the time will only appear when the
STATUS/EXIT button is pressed.
AutoChron: Eor use of the AutoChron feature,
refer to the section on “How to Use the
AutoChron Control” see next page.
CR
3at line
CR
3q) litre ^
' A/l
CR
Rpganlh g§ 12 i®
CR
Alnete Of
AlKele «-G§ ^
CR
^ Cff Ot ®
CR
AioOrcn l№
Refer to the next page for
details about how to use
the AutoChron control.
TrreZre
OhteI
CET
Press the STATUS/EXIT button to remove the
menu from the screen.
Page 12
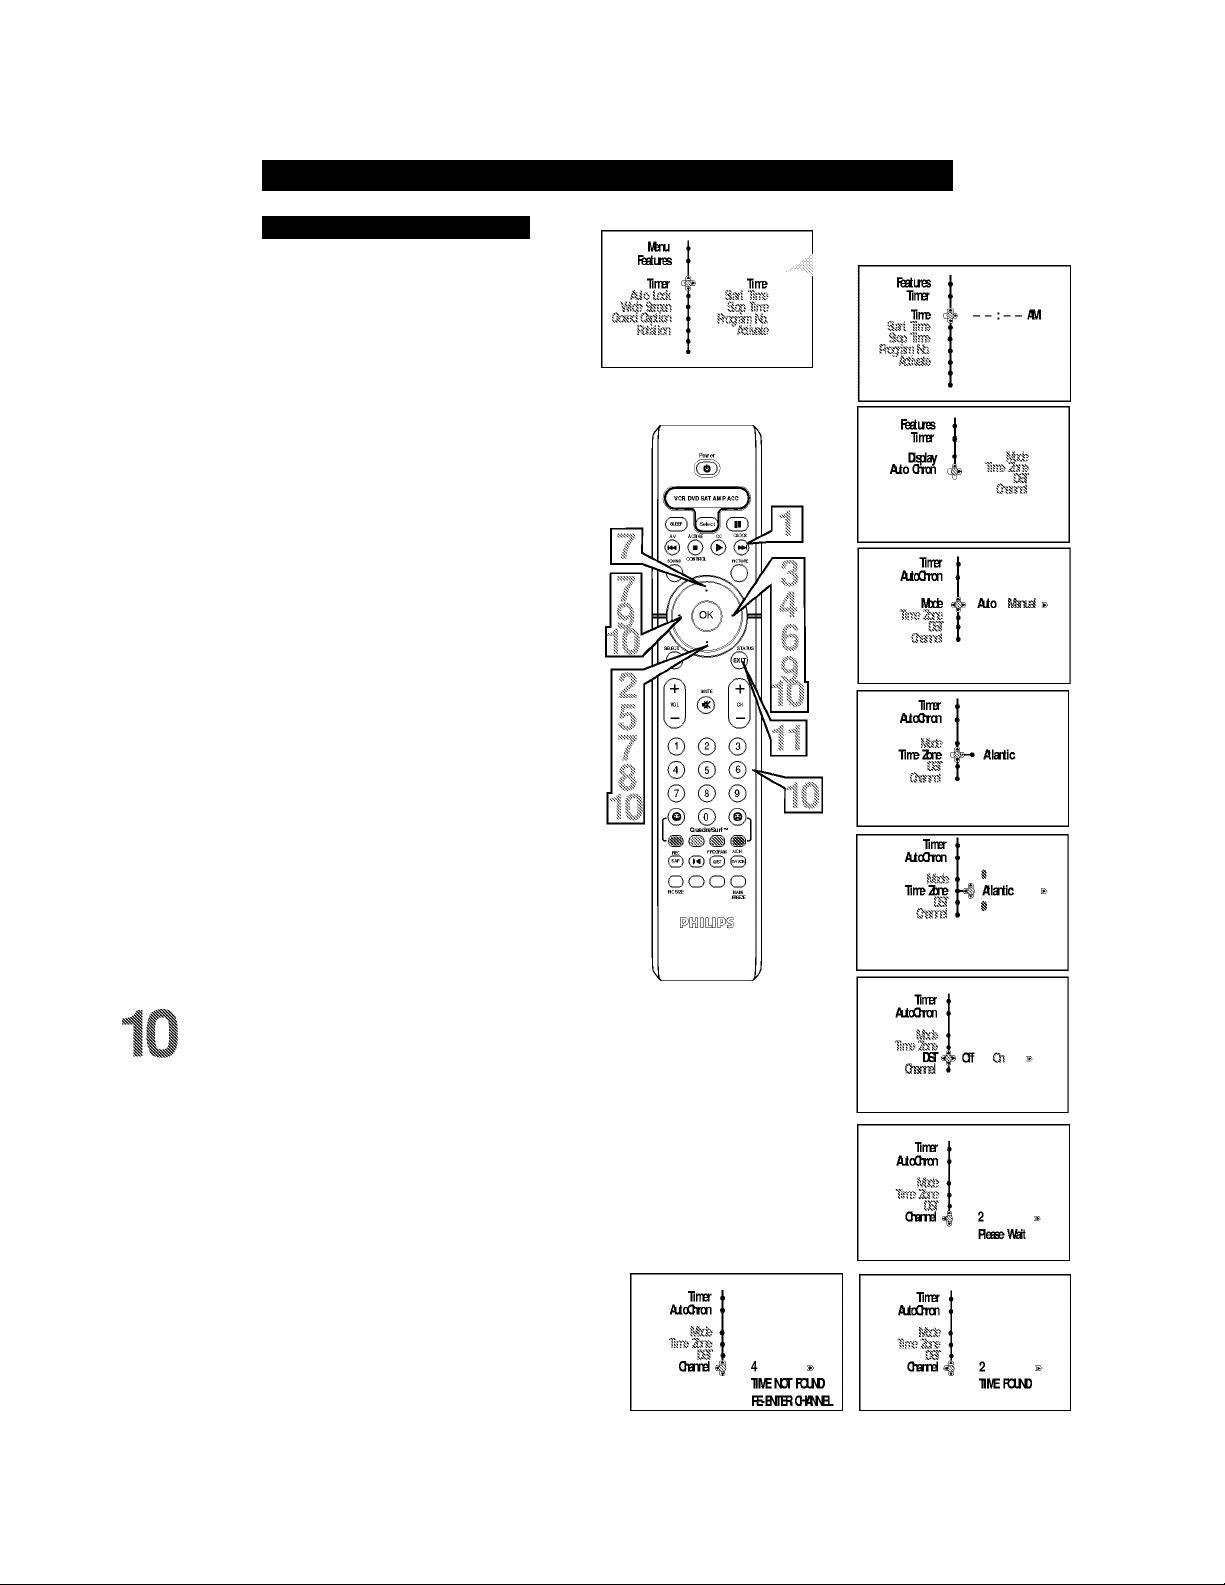
How TO USE THE Timer Menu Controls (Cont’d)
Auto Chron
utoChron™ can automatically set the TV’s onscreen
A
clock. Since the time is received from a broadcast
signal, you must be sure that a cable TV or Antenna
signal is present before you use the AutoChron™ fea
ture.
Press the CLOCK button on the remote control
I to display the Timer onscreen menu.
Press the CURSOR DOWN button untU
AutoChron is selected.
Press the CURSOR RIGHT button to display
the AutoChron menu. Mode will he highlighted.
^ Press the CURSOR RIGHT button to display
toggle between Manual and Auto.
Press the CURSOR DOWN button to select
Tune Zone.
^ Press the CURSOR RIGHT button to enter the
Time Zone menu.
^ Press the CURSOR UP or CURSOR DOWN
buttons to select the correct Time Zone. To
activate the Time Zone, press the CURSOR
LEFT button.
Press the CURSOR DOWN button to select
DST (Daylight Savings Time).
If your time zone uses Daylight Savings Time,
press the CURSOR RIGHT or CURSOR
LEFT button to toggle between Off or On, and
select On.
Press the CURSOR DOWN to select Channel.
Then use the NUMBERED buttons to enter
your local PBS channel or any local channel
that transmits the current time. You can also use
the CURSOR RIGHT or CURSOR LEFT but
tons to change channels one at a time. If TIME
FOUND appears,the process is finished. If not,
follow the onscreen instructions, and try another
channel.
Press the STATUS/EXIT button when finished to
remove the onscreen menu from the TV screen.
NOTE: If the AutoChron^“ control is unable to find
the time being transmitted on any channels, you may
have to enter the time manually. Refer to the previous
page for details.
12
Page 13

Understanding the AutoLock™ Controls
he AutoLock™ feature receives and
processes data sent by broadcasters or
other program providers that contain pro
gram content advisories. When programmed
by the viewer, a TV with AutoLock™ can
respond to the content advisories and block
program content that may be found objection
able (such as offensive language, violence,
sexual situations, etc.). This is a great feature
to censor the type of programming children
may watch.
In the AutoLock^“ section, you’ll leam how
to block channels and programming that is
not rated, is unrated, or has no rating. You
win also find out how to turn these hlocking
features ON or OFF. Following are brief
explanations of some terms and ratings relat
ed to the AutoLock^“ feature.
AutoLock’'^“ offers various Blocking Options from which to choose:
BLOCKING: The BLOCKING control is
what can be thought of as the “master switch”
for AutoLock^“. This control affects the set
tings you have chosen for blocking programs
according to movie ratings or TV ratings, or
for blocking programs that have no rating or
are unrated. When the BLOCKING control is
OFF, the blocking or censoring of programs is
disabled. When the BLOCKING control is
ON, blocking win occur according to the set
tings you have chosen.
NO RATING: ALL programming with no
content advisory data can be blocked if NO
RATING is set to ON.
Programming that has No Rating is not
encoded with any rating information from the
MPAA or the Parental Guidelines. Any pro
gramming could fall into this category.
You also can block individual channels or
block programming based on ratings of the
MPAA and TV broadcasters. (See a descrip
tion of the ratings on this page.)
lUMe RÉings
AtoLok
Of Ch »
Movie Ratings
(Motion Picture Association of America)
G: General Audience - All ages admitted.
Most parents would find this programming
suitable for all ages. This type of program
ming contains httle or no violence, no
strong language, and httle or no sexual dia
logue or sexual situations.
PG: Parental Guidance Suggested- This
programming contains material that parents
may find unsuitable for younger children. It
may contain one or more of the following:
Moderate violence, some sexual situations,
infrequent coarse language, or some sugges
tive dialogue.
PG-13: Parents Strongly Cautioned- This
programming contains material that parents
may find unsuitable for children under the
age of 13. It contains one or more of the fol
lowing: violence, sexual situations, coarse
language, or suggestive dialogue.
R: Restricted -This programming is specifi
cally designed for adults. Anyone under the
age of 17 should view this programming
only with an accompanying parent or adult
guardian. It contains one or more of the fol
lowing: intense violence; intense sexual situ
ations; strong, coarse language; or intensely
suggestive dialogue.
NC-17: No one under the age of 17 will be
admitted. - This type of programming should
be viewed by adults only. It contains graphic
violence; exphcit sex; or cmde, indecent lan
guage.
X: Adults Only - This type of programming
contains one or more of the following: very
graphic violence, very graphic and explicit or
indecent sexual acts, very coarse and intense
ly suggestive language.
TV Parental Guidelines
(TV Broadcasters)
TV-Y: (All children — This program is
designed to he appropriate for all chil
dren.) Designed for a very young audi
ence, including children ages 2-6. This type of
programming is not expected to frighten
younger children.
ly^Tj
*** ages 7 and above.) It may be more
appropriate for children who have acquired the
development skills needed to distinguish
between make-believe and reality. This pro
gramming may include mild fantasy and comic
violence (FV).
contains litde or no violence, no strong lan
guage, and little or no sexual dialogue or sexual
situations.
able for younger children.) This type of pro
gramming contains one or more of the follow
ing: Moderate violence (V), some sexual situa
tions (S), infrequent coarse language (L), or
some suggestive dialogue (D).
m
for children under 14 years of age) This type
of programming contains one or more of the
following: intense violence (V); intense sexual
situations (S); strong, coarse language (L); or
intensely suggestive dialogue (D).
he unsuitable for children under 17.) This type
of programming contains one or more of the
following: graphic violence (V); explicit sexual
situations (S); or cmde, indecent language (L).
TV-Y7\ (Directed to Older Children -
This program is designed for children
TV-G: (General Audience — Most par
ents would find this program suitable for
all ages.) This type of programming
TV-PG'. (Parental Guidance
Suggested — This program contains
material that parents may find unsuit
TV-14: (Parents Strongly Cautioned -
- This program contains some material
that many parents would find unsuitable
TV-MA: (Mature Audience Only -
i| This program is specifically designed to
' be viewed by adults and therefore may
13
Page 14

Setting Up an AutoLock™ Access Code
utoLock™ allows parents to block out or
“censor” any channels they think children
A
should not watch. A channel blocked by the
AutoLock™ control cannot be viewed until a cor
rect access code is used to unlock the channel
for viewing. First, let’s set your AutoLock access
code.
Press the MENU/SELECT button on
1 the remote control to show the onscreen
^ menu.
Press the CURSOR UP or CURSOR
DOWN button to highlight Features.
2
Press the CURSOR RIGHT button to
display the Features menu.
Press the CURSOR DOWN button to
highlight the AutoLock control.
Press the CURSOR RIGHT button to
enter the AutoLock mode. “Access Code
—” will appear.
Using the numbered buttons on the
remote control, enter the access code. If
you do not know your code, 0,7,1;I is the
default code. After you have entered the
code once.
Incorrect will appear on the
screen. Enter the code a second time.
Correct win appear. When “Correct”
appears, the AutoLock menu is accessible
and you can proceed to change the access
code.
Press the CURSOR DOWN button to
highlight Change Code.
Press the CURSOR RIGHT button to
enter the Change Code menu, “Enter
New Code —” will appear. Enter a new
four-digit code using the number but
tons, “Confirm Code—” will appear on
the screen.
Using the numbered buttons, re-enter
your new four-digit code, “Confirm
•1
Code” will appear. After re-entering
your new code,”Correct” will flash on
the screen briefly and the highlight bar
goes back to AutoLock.
Press the STATUS/EXIT button to
remove the menu from the screen.
NOTE TO PARENTS: It isn’t possible for
your child to unblock a channel without know
ing your access code or changing it to a new
one. If your code has been changed without
your knowledge, then you will become aware
that blocked channels may have been viewed.
№u
FfEtuts
IMS'
AioL^ I
Wit? EstBi
et» (Mss?
itess?
№ii
FfEtues
AIoLok
Wit? Mb'?
(Mi C^tb'?
Rta’iai
№ii
FfEtUIES
AJoLodÈ I
SsB?!'?
(Mri (M'ksi
№m
FëtUES
UxkOHTEl
TV
№ii
FËetuiES
takOart
me Mm
WFMiri
№ii
FËetuiES
latOwrt
Mm mm
WMrg
№ii
FËetuiES
(l?sM
OHTpGbdB i
M* FMiiB
WrM'ii
AxESBGbdB
AxesbQxIb
xxxx
llXXXTEd
AxesbQxIb
xxxx
Orred
BtET
№wQx1b
I
№wQx1b
I
xxxx
Qrfitm
QxlB
Ilr:i.ri I I. Him
Remember that 0711 is the default
AutoLock™ code. If your access code has
been changed by someone other than you (a
child, for example) or you have forgotten the
code, you can always get in by inputting the
default code.
14
Page 15

How TO Lock Channels using AutoLock™
A fter your personal access code has been
liset (see the previous page), you are ready
to select the channels or inputs you want to
block out or censor.
5s^ Press the MENU/SELECT button on
^ the remote control to show the
onscreen menu.
Press the CURSOR UP or CURSOR
^ , DOWN button to highlight Features.
Press the CURSOR RIGHT button
to display the Features menu.
3
Press the CURSOR DOWN button
to highlight the AutoLock^“ control.
4
Press the CURSOR RIGHT button
again display the AutoLock menu.
5
Enter your four-digit ACCESS
CODE. Correct will flash very hriefly
6
and the AutoLock^“ will he accessible.
^ Press the CURSOR RIGHT to enter
^ the Lock Channel menu.
Using the numbered buttons or the
CH+ or CH- buttons enter the chan
nel you wish to lock. You can also use
the CURSOR UP or CURSOR DOWN
buttons to scroll to the channel you
wish to block.
Press the CURSOR RIGHT buttons
to activate the locking of a channel.
A padlock image appears to the right
of the channel number.
Repeat steps 8 and 9 for any channels you
want to lock.
I ^Press the STATUS/EXIT button to
i remove the menu from the screen.
NOTE TO PARENTS: It isn’t possible for
your child to unblock a channel without know
ing your access code or changing it to a new
one. If your code has been changed without
your knowledge, then you wUl become aware
that blocked channels may have been viewed.
№ni t
FfEtuts i
IMr i AxESBGbde
Aio lrd< c®
Aio Lrk ^ xxxx
UxkOHTEl d
UMeFRirq
UxkOHTEl
itsie Mira
UxkOEHEl
OHffiQsfe
UMeFRirq
OBmel 3
EmOG} Bf AJIOOK
OWI'B.ELOKNGI
Otml J
№m t
FfEtues I
ItB i AxesbQxIb
iHilt teB 1 Qrrect
№ii
F^ues
OHttQsfe
Cw A!
WFttiil
№ni
FEEtlTES
WWitI
№ni
FEEtUES
WMiil
-----------------
^ 3
I
■A 3 B
A3 Ib
•
t
i
///././7 1/. Him
Remember that 0711 is the default
AutoLock™ code. If your access code has
been changed by someone other than you (a
chUd, for example) or you have forgotten the
code, you can always get in by inputting the
default code.
If your access code is entered on a blocked channel, the current channel
along with all other blocked channels will become unblocked until the TV
is powered off. Blocked channels will not appear when the Channel -I- or —
buttons are pressed.
15
Page 16

How TO Clear all Locked Channels at the Same Time
T Jarious onscreen messages will appear
V when someone tries to view blocked pro
gramming. The message is determined by how
the current programming is blocked. You may
view the blocked programming and turn OFF
the AutoLock™ feature by using the Clear All
control or by entering your access code.
is4 Press the MENU/SELECT button on
J the remote control to show the
onscreen menu.
Press the CURSOR UP or CURSOR
DOWN button to highlight Features.
^ Press the CURSOR RIGHT button
to display the Features menu.
Press the CURSOR DOWN button to
select the AutoLock^“ control.
Press the CURSOR RIGHT button
again to highlight ACCESS CODE.
Enter your four-digit Access Code,
“Correct” will briefly appear on the
screen and the AutoLock menu will he
accessible.
Press the CURSOR RIGHT button
to enter the AutoLock menu.
Press the CURSOR DOWN button to
select Clear All. Clear? will appear on
8
the screen.
Press the CURSOR RIGHT button
to activate the clearing of all channels.
i
I Press the STATUS/EXIT button to
I remove the menu from the screen.
11 III.ri LI. lIl.M
If you tune to a specific channel that has
been blocked by BLOCK CHANNEL or
any of the AutoLock^“ RATING options,
simply enter your four-digit access code to
view the channel.
NOTE: This will unblock ALL channels
until the TV is shut OFF. When powered
back ON, all previously blocked channels
will be blocked again.
16
Page 17

Blocking Programs Based on Movie Ratings
A fter your personal access code has been
liset, you can select specific movie ratings
that you want to censor.
Press the MENU/SELECT button on
^ the remote control to show the
onscreen menu.
Press the CURSOR UP or CURSOR
^ , DOWN button to highlight Features.
Press the CURSOR RIGHT button
to display the Features menu.
№m
.Afo Lsk
№ii
iedires
AJoLi^ I
Sts?!
AxEssOxh
Press the CURSOR DOWN button to
highlight the AutoLock^“ control.
Press the CURSOR RIGHT button
again to highlight Access Code.
Enter your four-digit Access Code.
Correct will flash very briefly and the
menu will move to the left with the
AutoLock menu now accessible.
Press the CURSOR RIGHT button
to display the AutoLock menu.
Press the CURSOR DOWN repeated
ly until Movie Rating is highlighted.
8
Press the CURSOR RIGHT button
Q
and the Rating menu shifts to the left
with G highlighted.
^ Press the CURSOR UP or DOWN
i buttons to highlight each rating you
want.
I Press the CURSOR RIGHT button
I to turn the rating ON or OFF. Turning
the rating ON will block programs with
that rating from being seen.
I Press the STATUS/EXIT button to
* remove the menu from the screen.
© ©
© © ©
© © ©
[
eoe©
oooo
№ii
Fedues
AioL^
№ii
Fedues
UxkOHTEl
№m& Mm
TV Mil
Fedues
AJoUxk
AloUrk
MMeFditig
AxESBGbde
xxxx
Ghred
///././7 17. I/IM
When a rating is turned ON, aU higher ratings
also win be turned on automatically. For
example, if the
17 and X ratings also will be turned on.
All Movie Ratings can be turned ON or OFF.
Refer to page 13 for Movie Rating defini
tions.
R rating is turned on, the NC-
AJoUxk i
It/buie Fditig 1
_ G A Ch Of B
17
AJoUxk i
It/buie Fditig 1
X ¿3 Qi Cl B
Page 18

Blocking Programs Based on TV Ratings
■b« can select specific TV ratings that you
Y
J. V
want to censor by following these steps.
I Press the MENU/SELECT button on
I the remote control to show the
onscreen menu.
^ Press the CURSOR UP or CURSOR
DOWN button to highlight Features.
^ Press the CURSOR RIGHT button
^ to display the Features menu.
^ Press the CURSOR DOWN button to
^ highlight the AutoLock^“ control.
“ Press the CURSOR RIGHT button
^ again to highlight Access Code.
^ Enter your four-digit Access Code.
^ Correct win flash very hriefly and the
menu will move to the left with the
AutoLock menu now accessible.
Press the CURSOR RIGHT button
to display the AutoLock menu.
Press the CURSOR DOWN button
repeatedly until TV Rating is highlight
ed.
№m
Fedues
llB'
AJoLrdt <
St®
(Mil
R.sMk^'5
№u
ledires
AJoLoi
St®
№ii
Feduts
hxkOHTEl
AxESBGbde
AxEsaOxh
xxxx
Ghred
Press the CURSOR RIGHT button
to enter the TV RATING menu.
Press the CURSOR UP or DOWN to
select a desired rating (TV-Y, TV-Y7,
TV-G, TV-PG, TV-14, orTV-MA) .
I ^ Press the CURSOR RIGHT or LEFT
I I to turn the block on the rating ON or
OFF.
NOTE: More specific subratings (for violence,
sexual content, dialogue, or fantasy violence)
are avaUable for TV-Y7, TV-PG, TV-14, and
TV-MA. (Refer to page 13 for definitions.)
^ To access these subratings, with the
I main rating selected, press the CUR
k k'« soR RIGHT. Then, repeat steps 8
and 9 to turn the sub-ratings ON or
OFF.
Press the STATUS/EXIT button to
remove the menu from the screen.
ni:i.ri I I. Him
When a rating is turned ON, aU higher ratings
also will be turned on automatically. For
example, if the TV-Y7 rating is turned on, the
TV-14 and TV-X ratings also will be turned on.
© © ©
© ©
© © ©
r@ © @1
I OuadraSurf" I
REC PRXRW A/04
oooo
MDlDPg)
AioUxk i
IVFRing 1
^
1
1
A Ch Of B
AJoUxk I
WFding 1
IVY 4
TYG ]
IVRs \
AJoUxk I
WFding 1
F^ues r
AJoLxk 1
(te i
TViditig &
1
*
IVY?
WRS
h Of Ss B
TVI» A Ch Cl B
18
Page 19

Other AutoLock™ Blocking Options
’! 'he AutoLock™ control offers the viewer
J. other blocking options as well! With
Block Options, the censoring can be turned
On or Off.
55^ Press the MENU/SELECT button on
^ the remote control to show the
^ onscreen menu.
Press the CURSOR UP or CURSOR
DOWN button to highlight Features.
Press the CURSOR RIGHT button
to display the Features menu.
^ Press the CURSOR DOWN button to
highlight the AutoLock^“ control.
^ Press the CURSOR RIGHT button
again to highlight Access Code.
Enter your four-digit Access Code.
Correct win flash very hriefly and the
menu win move to the left with the
AutoLock menu now accessible.
Press the CURSOR RIGHT button
to display the AutoLock menu.
Press the CURSOR DOWN button
repeatedly until Block Options is high
lighted.
Press the CURSOR RIGHT button
to enter the Block Options menu.
Press the CURSOR UP or DOWN
buttons to select the desired block
option.
Blocking: Might be caUed the “master
switch” for AutoLock^“. When On,
ALL blocking/censoring wdl take place.
When Off, ALL blocking is disabled.
Block Unrated: ALL unrated programs
based on the Movie Ratings or
Parental (TV) Guidelines can be
blocked if this feature is set to On and
the Blocking feature is set to OFF.
No Rating: ALL programming with
NO content advisory data can be
blocked if set to On and the Blocking
feature is set to OFF.
Press the CURSOR RIGHT or
LEFT to toggle BLOCKING ON or
OFF.
Press the STATUS/EXIT button to
remove the menu from the screen.
® © ©
7) © ©
■ ® ® @1
QuadrsSurf"
&&&&
goog
№u
ieehjies
AioirA i
№u
i^ue
UxkOHTEl
ieehjies t
AioUxk i
EkxkQlicns A
Gbnal
Bisk Iha'aJ
Hrii.ri I I. Him
Remember, when the BLOCKING control is
OFF, the blocking or censoring of programs is
disabled. When the BLOCKING control is
ON, blocking win occur according to the set
tings you have chosen.
19
Page 20

Using the AutoLock™ Review Screen
'I 'o remind you wich rating you have locked
J. and which Block Options you have selected,
a review screen is available to review your
AutoLock™ settings. To access this screen follow
the steps below.
Press the STATUS/EXIT button on the
I remote control TWICE. Your
^ AutoLock^“ settings wUl appear on the
screen.
NOTE: If you have blocked specific suhratings,
such as V for violence in the TV-PG category,
these blocked subratings will not appear in the
review. The subratings however are stiU blocked
according to your selections.
After a few seconds, the settings will
leave the screen automatically, or you can
press the STATUS/EXIT button a third
time to remove them from the screen.
Mmb Fhtirg
Bock Urated
-
-
R
NG17
X
hb Fhtirg
® 0) CjD
0® ® ©
CCMTFCt PICT!«
W№ting
Of
Of
.
Y7
TVG
TVPG
1V14
-N-m
llr:i.ri L I. l/i.M
The AutoLock^“ status screen will only
appear if the Block option is set to On. See
previous page for details.
AutoLock is set to Off by default.
This display will appear after Step One
(above) is completed if the AutoLock^“
Block Option is set to On.
lUtue Fhtirg
-
-
R TVPG
N317 1V14
X m
Bcxk Urated
№ Fhling
WFhtirg
Of
Of
20
oooo
This display will appear after Step One
(above) is completed if the AutoLock^“
Block Option is set to Off.
.
1VY7
TVG
Page 21

How TO USE THE Wide screen Format Controls
ou can change the screen format size to
y
match the type of program you’re watch
ing. Select the normal 4:3, Zoom 14:9, and
Subtitle aspect ratios. There also is 16:9,
Superwide, and Wide Screen aspect ratios,
which allows movies to be viewed in their full
width (known as letter-box style).
5s^ Press the MENU/SELECT button on
^ the remote control to show the on
screen menu.
Press the CURSOR UP or CURSOR
DOWN twice to highlight Features.
Press the CURSOR RIGHT and the
menu will shift to the left.
Press the CURSOR DOWN repeated
ly until the Wide Screen control is
highlighted.
Press the CURSOR RIGHT button
to enter the Wide Screen menu.
Press the CURSOR UP or CURSOR
DOWN repeatedly to toggle among the
screen format sizes — 4:3, Zoom 14:9,
Zoom 16:9, Subtitle Zoom, Superwide,
Wide Screen, or Auto.
Press the STATUS/EXIT button to
remove the menu from the screen.
OR
№nu
'S
F«etLies c
© © ©
© ® ®
© ® ©
r® © ®i
............
! Ocssss sMici!
Oi«jraSurf~
® *) »J
©oee
ooo
№nu
FMres
„Wide,3iOT
^4:3 s>
%
CR
CR
:9 ®
CR
CR
CR
CR
You can toggle the screen format hy
repeatedly pressing the PIC SIZE
8
button on the remote control.
Helpful Hint
The FORMAT control is not available for
use with the AV 4 Inputs (AV4 Channel) if
lOSOi signal is detected.
IMPORTANT NOTE:
Some DVD Discs are encoded with as much
as 30% more video information to give the
viewer the best possible picture quality. With
the DVD Player in the 16:9 picture format,
the playback of this type of disc (containing
extra video information), can produce a num
ber of small white lines in the upper portion
of the black letterbox area. With some of
these discs, this situation is unavoidable and
it does not require a service call.
Zoom 14:9
Superwide
Page 22

How TO USE THE Closed Caption Controls
losed Captioning (CC) allows you to
read the voice content of television pro
C
grams on the TV screen. Designed to help the
hearing impaired, this feature uses onscreen
“text boxes” to show dialogue and conversa
tions while the TV program is in progress.
^ Press the MENU/SELECT button on
^ the remote control to show the on
screen menu.
^ Press the CURSOR UP or CURSOR
DOWN twice to highlight Features.
Press the CURSOR RIGHT button,
the menu will shift to the left.
^ Press the CURSOR DOWN repeated-
ly until the Closed Caption control is
highlighted.
^ Press the CURSOR RIGHT again.
The menu will shift to the left and
Caption Mode will be highlighted.
^ Press the CURSOR RIGHT to high-
light Caption Modes.
^ Press the CURSOR UP or DOWN to
^ select a Caption Mode: CCl, CC2,
CCS, CC4, TEXTl, TEXT2, TEXTS,
or TEXT4. CC Display turns text OFF
or ON if the TV station broadcasting
on the channel is making Closed
Captioning available. With CC Display
highlighted, press the CURSOR
RIGHT to toggle Closed Captioning
ON, OFF, or CC Mute.
NOTE: You also can press the CC button on
the remote control to turn the CC Text option
On or Off.
Press the STATUS/EXIT button to
remove the menu from the screen.
CAPTION Mode
Example Display
fMi # as
CR
^ CO
CR
Ms ^ OS
CR
CR
CR
CR
c^iCT! Msfe 4)
NOTE: When Closed Captioning is turned
On, the screen will automatically change to
the Wide screen format to allow text to fit on
NOTE: Not all TV programs and product
commercials are broadcast with Closed
Captioning (CC). Nor are aU Closed
Captioning MODES (CAPTION 1^ or
TEXT 1^) necessarily being used by broad
cast stations during the transmission of a pro
gram offering Closed Captioning. Refer to
your area’s TV program listings for the sta
tions and times of shows being broadcast
with Closed Captioning.
TEXT Mode Example Display -
The TV screen will be
blocked from viewing.
22
CR
Page 23

How TO USE THE Rotation Controls
h rare cases the video supplied to the TV
/
screen might show slightly tilted one way or
another. The Tilt Adjust control will allow you
to correct the problem by adjusting the screen
in a clockwise or counterclockwise direction.
ss^ Press the MENU/SELECT button on
J the remote control to show the on
screen menu.
Press the CURSOR UP or CURSOR
DOWN twice to highlight Features.
Press the CURSOR RIGHT and the
menu will shift to the left.
Press the CURSOR DOWN repeated
ly until the ROTATION control is
highlighted.
Press the CURSOR RIGHT or
LEFT to rotate the picture on the
screen clockwise or counter clockwise.
Please note that the amount of rotation
win he very minimal.
Press the STATUS/EXIT button to
remove the menu from the screen.
Picture tilted to the left
23
Page 24

How TO USE THE Dynamic NR (Noise Reduction) Control
he Dynamic Noise Reduction feature can
T
help eliminate slightly “speckled” pic
tures (an indication of signal noise in the pic
ture).
Press the MENU/SELECT button on
I the remote control to show the
onscreen menu.
Press the CURSOR UP or CURSOR
fc DOWN twice to highlight Features.
Press the CURSOR RIGHT button
to display the Features menu.
№xi
№xi
Ratires
Trrer ? Trre
Mai «
ReEiBS 1
$
Cff ®
$
Press the CURSOR DOWN button
repeatedly until the Dynamic NR con
trol is highlighted.
Press the CURSOR RIGHT button
to enter the Dynamic NR menu.
Press the CURSOR UP or CURSOR
DOWN button repeatedly to select the
desired Dynamic NR mode (Off, Min,
Med, or Max).
Press the STATUS/EXIT button to
remove the menu from the screen.
How TO USE THE Permanent OSD (Onscreen Display) Control
'The Permanent Osd control will store the
-L TV’s channel number in the upper left
corner of the TV while the TV is on. Follow
the steps to turn the feature On or Off.
^ Press the MENU/SELECT button on
^ the remote control to show the
onscreen menu.
Press the CURSOR UP or CURSOR
DOWN button repeatedly to highlight
Features.
№xi
[yenic№^
[yisrric№ ^
[VaiichR i
(
(
^ Press the CURSOR RIGHT button
to display the Features menu.
Press the CURSOR DOWN button
repeatedly until the Permanent Osd
control is highlighted.
Press the CURSOR RIGHT button
to enter the Permanent Osd menu and
toggle the On or Off selection.
Press the STATUS/EXIT button to
remove the menu from the screen.
[yisrric№
№nkieitCkl
Setting the Permanent OSD control to
ON, win display the current channel
number in the upper left of the screen.
24
Page 25

How TO Use The Quadrasurf Controls
“list” or series of previously viewed
A
channels can be selected with the
QuadraSurf^ (colored) buttons on your
remote control. With this feature you can easi
ly switch between different TV programs that
currently Interest you. The QuadraSurf^ con
trol allows you set up four different personal
Surf lists using the colored buttons (on the
remote control), each holding up to ten chan
nels in its quick viewing“list.”
Press the CHANNEL (+) or (-) but-
I tons (or the NUMBER buttons) to
select a channel to add to one of the
SURF lists.
Press the SMILEY © button on the
^ remote control to ADD the channel to
one of the SURF lists.
Press the corresponding COLORED
(Red, Green, Yellow or Blue) button
to add the channel to that button’s Surf
list. (Up to ten channels per button can
be stored.)
Repeat steps 1 through 3 to add additional
channels (up to 10) to each of the the SURF
lists.
To remove a channel from one of the SURF lists;
Press the COLORED QuadraSurF“
button until the desired channel
appears. The screen will display the
channel number with a colored
“Smiley” face to indicate the Colored
button it relates to.
While the “Smiley” face channel
™ M indicator is displayed, press the
FROWNIE © face button. The
screen will read, “Remove item? Press © .”
Press the FROWNIE © face button
again to confirm your decision to
remove the channel from the Surf list.
Repeat steps 4-6 to remove other channels
from Surf lists.
a
Alternate Channel
Your remote also has an A/CH
(Alternate Channel) button. Pressing
this button win toggle between the
Current and one previously selected
channel.
Page 26

How TO Use The Quadrasurf Controls
he QmdraSurf^ buttons on your remote
control allow you to store up to 10 chan
r
nels per button (40 total). This is a great fea
ture if you want to store all your favorite
Sports channels, Movie channels, or News
channels in one surf list. Family members can
have there own favorite list of channels. You
can even program the external AIV Input
jacks for one of the buttons making it a
“source" button for your external accessory
devices.
Assuming channels have now been added to
the four QuadraSurf^ lists (the four colored
buttons on the remote, see the previous page),
let’s review how the feature works.
^ Press one of the pre-programmed
I COLORED buttons on the remote
(Red, Green, Yellow or Blue). The
screen will display a smiley face with the
first programmed channel for that surf
list.
While the colored “smiley” face still
appears on the screen, press the same
COLORED button on the remote to
tune the second channel programmed for
that specific surf hst.
Repeatedly pressing the same COL
ORED button while the “smiley” face
appears will tune aU the programmed
channels for that specific surf list. After
the last channel is tuned, pressing the
COLORED button again will return
you to the first channel in the list.
Repeat steps 1-3 for the other three
COLORED buttons (Surf lists) if
desired.
Pressing the “frownie” face button
win allow you to remove it from the
list (see the previous page for more
details).
141
V
i39 _
128
>35
26
Page 27

How TO USE THE Program List Control
he Program List Control will allow you to
quickly overview all the programmed
channels that have been placed into the tele
r
visions memory (see the Auto Programming
section of this manual for more details). pro
gram List will display the channel number,
the name of the channel if you have given it
one, and where it will have AutoLock turned
On or Off.
5^ Press the PROGRAM LIST button on
I the remote control to show the current
list of installed channels (the current
channel will be highlighted).
Press the CURSOR UP or DOWN
buttons to scroll the list of channels,
highlighting the one you want to acti
vate.
Press the CURSOR RIGHT button to
activate the channel. The TV will tune
to that channel.
Press the STATUS/EXIT button to
remove the menu from the screen.
How TO USE THE Active Control
he Active Control monitors and adjusts
incoming video signals to help provide the
best picture quality.
T
When you choose to turn the Active Control
ON, the picture sharpness and noise reduc
tion are controlled automatically. Active
Control adjusts these picture settings continu
ously and automatically.
NOTE: Active Control is not available for
signals connected to the AV4 inputs.
ssj Press the ACTIVE CONTROL but-
J ton on the remote control to toggle the
control options (Off, On, Display
Logo, or Display On) and select the
option that you want.
Press the STATUS/EXIT to remove
the menu from the screen.
11 El.PIT I. Hint
If Display On is selected, a display screen
win appear when the channel is changed
showing the picture setting. If Display
Logo is selected, the Active Control logo
win be displayed during channel changes.
27
Page 28

How TO USE THE Sleeptimer Control
Have you ever fallen asleep in front of the TV,
only to have it wake you up at two in the
morning with a test pattern sound screech
ing in your ears? Well, your TV can
enable you to avoid that discomfort hy
automatically turning itself off. With the
Sleep Timer feature, you can set a timer to
automatically switch the TV OFF after a
period of time you choose (15-minute
mcrements up to 60 minutes, then 30-
minute increments up to 90 minutes, then
60-minute increments up to 240 minutes).
^ Press the SLEEP button on the
i remote control. The SLEEP timer
ft onscreen display will appear in the
upper part of the screen.
Within five seconds, press the
SLEEP button repeatedly to pick the
amount of time (15-minute increments
up to 60 minutes, then 30-minute
increments up to 90 minutes, then 60minute increments up to 240 minutes)
before the TV will turn itself off.
An onscreen countdown will appear during
the last minute before the TV shuts itself off.
l/i:i.ri I I. Ili.vr
To see how many minutes remain before the TV
shuts itself off, press the STATUS/EXIT button.
A Sleep Timer setting can be cancelled by press
ing any button during the last minute of the oper
ation.
During the last minute of a
SLEEP timer setting, an onscreen
countdown will be displayed.
During the last 10 seconds of a
SLEEP timer setting, an onscreen
display will read GOOD BYE.
)15
Sop 30
)45
Seep 60
Seep 90
>120
>180
>240
How TO USE THE Freeze Control
T Tavfi you ever wished you could freeze the
TT picture on the television broadcast to
write down a special telephone number or to
capture a needed address? Your television
will allow you to do just that with the press of
just one button on the remote control.
With a signal on the television screen,
i simply press the FREEZE button on
ft the remote control to stop the picture
at any given moment.
Press the FREEZE button on the
remote control again to resume normal
viewing.
Illli.ri 11. l/l.M
After freezing a picture on the screen, when the
FREEZE control is turned OEE, the nonnal sig
nal programming will be shown at it’s present
time. The signal that was being shown while the
picture was frozen will not be viewable.
28
Page 29

How TO USE THE AutoPicture™ Control
hether you’re watching a movie or a video
game, your TV has automatic video con
trol settings that will match with your current
W
program source or content. AutoPicture'^^
quickly resets your TV’s video controls for a
number of different types of programs and
viewing conditions that you may have in your
home. The Movies, Sports, Weak Signal, and
Multimedia AutoPicture"^^ controls have been
preset at the factory to automatically adjust the
TV’s brightness, color, picture, sharpness, tint,
and color temperature levels. The Personal
AutoPicture"^^ settings are the ones that you
made through the PICTURE options within the
onscreen menu
^ Press the PICTURE button on the
remote control. The current
^ AutoPicture™ setting will appear in the
middle of the screen.
Press the PICTURE button repeatedly
to select either Personal, Movies, Sports,
Weak Signal, or Multimedia picture set
tings.
NOTE: The PERSONAL setting and the PIC
TURE options within the onscreen menu are
the same. This is the only option in
AutoPicture™ that can he changed. To adjust
these settings, use the PICTURE options within
the onscreen menu. AH other settings are set up
at the factory during production and cannot he
adjusted.
How TO USE THE AutoSound™ Control
utoSoumU’* allows you to select from four
factory-set controls and a personal control
that you set according to your own preferences
A
through the onscreen Sound menu. The four
factory-set controls (Multimedia, Speech,
Music, and Movies) enable you to tailor the TV
sound so as to enhance the particular program
you are watching. You can change the Personal
setting to your preference. Follow these steps to
select any of the options.
Press the SOUND button on the
^ remote control. The current
^ AutoSound™ setting will appear in the
middle of the screen.
Press the SOUND button repeatedly
to toggle among the four settings:
Personal, Multimedia,Speech, Music, or
Movies.
Remember, only the PERSONAL control can
he changed hy the viewer. This changes the
settings in the main onscreen menu’s SOUND
controls.
Hr:i.pi i L Him
AutoSound™works only with the programs
coming through the ANTENNA/CABLE
(ANT) input on the rear of the TV (RE
audio). It win not control the sound levels
for the external connections.
Page 30

Setting the Remote Control to Operate Accessory Devices
Mode Selection
he remote control that is supplied with your tele
vision may also work with a variety of infrared
T
controlled accessory devices such as VCRs, Cable
Boxes, DVD Players, Satellite Receivers, etc. The
following instructions explain how to change the
remote mode for the type of accessory device you
are using.
Press and release the SELECT button on
I the remote control. The last used mode before
TV-MODE will lit up for 2 seconds. After 2
seconds, the LED for that MODE will begin
to flash.
Press and release the SELECT button on
the remote control within 2 seconds to move
to the next MODE, the new MODE’S LED
win lit for 2 seconds, then begin to flash.
Repeat the steps above to continue through
jgg,^ the MODES until the desired MODE is
selected.
MODETIMEOUT SETTINGS:
When the remote MODE times out, the remote con
trol win revert to the TV MODE. Timeout length
occurs from the last command or button press in any
of the MODES. The length of time before a MODE
timeout occurs can be changed.
To change the length of the timeout duration, fol
low the steps below:
^ Simultaneously, press the SELECT button
and the NUMBERED button from the list
below to reset the desired amount of timeout
length.
Digit 1 = 15 seconds before timeout
Digit 2 = 30 seconds before timeout
Digit 3 = 60 seconds before timeout
Digit 4 = 120 second before timeout
(Example: You want the MODE timeout
to be 60 seconds, you would need to
press the SELECT button and the
NUMBER 3 button at the same time.)
I!El.PI LI. l/l.M
It is recommended that you use Phnips
brand external accessory devices with your
Philips television to insure proper remote
control functions. If you are using Philips
brand accessory devices, your remote con
trol should be ready to use with these
devices.
30
Page 31

Setting the Remote Control to Operate Accessory Devices
Code Entry Method
' I 'he remote control supplied with your TV can
J. also be programmed by entering a specific code
for your type of accessory device. Follow the
instructions below to program the remote using one
of the codes listed on pages 32-34.
Look up the codes for your brand of acces-
I sory device.
Once you have the codes, simultaneously
press the SELECT and OK buttons.
Press the NUMBER button that corresponds
to the type of accessory device you are using.
Digit 1 = Cable
Digit 2 = VCR
Digit 3 = DVD
Digit 4 = SAT
Digit 5 = AMP
^ Press the NUMBERED button to enter the
4 digit code number from pages 32-34.
Codes from
page 32-34
SateUite Receiver
VCR
Cable Converter
Be sure the remote is in the correct MODE
(see previous page) and press the POWER
button. If the accessory device powers ON
your finished. If it does not power ON, repeat
the procedure with another code listed. If aU
codes faU, the remote will not control your
specific accessory device.
(Example: You have a Cable Box from Archer and
want to program the remote. It’s code is 0049. Press
the SELECT and STANDBY button simultaneously.
Press the NUMBER 1 for Cable, then enter the list
ed four digit code; i.e.; 1,0,0, 4, 9.)
llEi.ri I I. Him
It is recommended that you use Philips
brand external accessory devices with your
Philips television to insure proper remote
control functions. If you are using Philips
brand accessory devices, your remote con
trol should be ready to use with these
devices.
31
Page 32

Remote Control Direct Entry Codes for Accessory Devices
VCR CODES
Admiral
.....................................
Adventura...........................................2001
Aiko
...................................................
Aiwa
..........
2001, 2017, 2062, 2070, 2072
Akai
...........
2021, 2029, 2038, 2060, 2063
Akiba
.................................................
Alba 2011, 2034, 2052, 2059, 2063, 2072
Ambassador .......................................2011
American Action
American High
Amstrad
Anam
........................................
...............
Anam National
Anitech................................................2034
Asa ............................................2017,2035
Asha....................................................2057
Asuka .................................................2017
Audiovox
Baird
...................
Basic Line
Beaumark............................................2057
Bell & Howell
Blaupunkt
. . . 2041, 2042, 2048, 2054, 2055, 2075
Brandt .............................2047, 2064, 2065
Brandt Electronic
Broksonic .2002, 2040, 2046, 2052, 2078
Bush......................2034, 2052, 2059, 2072
Calk.....................................................2017
Canon..................................................2015
Capehart
Carver
.................................................
Catron.................................................2011
CCE
..........................................
CGE ...................................................2001
Crmlrne...............................................2034
Cineral
...............................................
Citizen
.......................................
Clatronic.............................................2011
Colt
.....................................................
Combitech
Condor ...............................................2011
Craig
____
Crown .............................2011, 2034, 2059
Curtis Mathes . . .2015, 2021, 2032, 2042
Cybemex.............................................2057
Cyrus
.................................................
Daewoo . .2011, 2024, 2025, 2059, 2083
Dansai
.................................................
Daytron...............................................2011
DeGraaf
Decca ........................................2001,2035
Denon
.................................................
Dual
...................................................
Dumont
...........................
................................
..................................
...............
.....................................
2001, 2059, 2067, 2068
2054, 2057, 2059, 2082, 2084
.................
...........................................
2001, 2021, 2037, 2039
......................
....................................
............
2003, 2005, 2010, 2014,
..............................
............................................
..........................................
2017, 2026, 2034, 2057, 2058
2027, 2052
2059
2034
2059
2015
2017,2042,
2042, 2054, 2087
2017
2011, 2034, 2059
2037
2021
2011
2035
2034,2059
2059
2017, 2059
2034
2072
2035
2034
2022,2043
2022
2021
2001, 2035, 2037
Dynatech.............................................2001
Elbe ....................................................2018
Elcatech
Electrohome
Electrophonic
Emerex................................................2012
Emerson .2001, 2002, 2017, 2023, 2040,
ESC......................................................2057, 2059
Eerguson
Eidelity
Einlandia..............................................2035, 2037
Einlux
Eirstiine . .2017, 2023, 2024, 2034, 2052
Eisher
Erontech .............................................2011
Euji......................................................2015
Eunai...................................................2001
Garrard................................................2001
GE
GEC
General
Go Video
Goldhand
Goldstar..................2017, 2018, 2053, 2079
Goodmans 2001, 2017, 2034, 2059, 2075
Gradiente
Graetz
Granada
Grandin ...........................2001, 2017, 2034
Hanseatic
Harley Davidson.................................2001
Harman/Kardon...................................2018, 2035
Harwood
HCM
Headquarter
Hinari
Hi-Q
Hitachi 2001, 2004, 2021, 2022, 2M3, 2057
Hughes Network Systems
Hypson................................................2034
Imperial
Ingersol
Interfunk
ITT
ITV.......................................................2017, 2059
lensen..................................................2021
IVC
Kaisui..................................................2034
KEC
Kendo ........................................2038, 2052
Kenwood
KLH
.............................................
......................................
....................................
___
2046, 2051, 2052, 2059, 2078, 2083
..............
...............................................
.....................
.....................
..........................
...................................................
...............................................
.............................................
.............................................
..................
............................
Grundig . .2003, 2005, 2007, 2010, 2034,
.2035, 2048, 2050, 2054, 2069, 2071, 2075
.............................................
...................................................
.....................
...................................................
.............................................
...............................................
.............................................
.................................
.............................
.................................
.............................
..........................................
..........................
....................................................
2021, 2039, 2064, 2065
2001, 2022, 2035, 2037
2025, 2026, 2030, 2037
2015, 2027, 2032, 2057
...........................................
2005, 2021, 2037, 2057
2025, 2035, 2037
...........................................
........................................
2004, 2034, 2057, 2072
.................
2005, 2021, 2025,
2037, 2038, 2057, 2074
2008,2021,2033,
2049, 2050, 2074, 2080
2018, 2021, 2033
32
2034
2017
2017
2001
2035
2011
2077, 2081
2034
2001, 2008
2017
2034
2034
2025
2026
2022
2001
2004
2035
2017, 2059
2034
Kodak
........................................
Korpel
.................................................
Layco
.................................................
Lenco
.................................................
LG ......................................................2079
Lloyd's
.......................................
Loewe
..................
Logik
................................
Luxor
____
LXI......................................................2017
M Electronic
Magnasonic.........................................2059
Magnavox
Magnrn................................................2057
Manesth
.....................................
Marantz
Marta ..................................................2017
Matsui .2004, 2016, 2036, 2052, 2070, 2072
Matsushita
Mei......................................................2015
Melectronic.........................................2018
Memorex
Memphis
Metz.................2003,2005,2017,
MGA..........................................2023, 2057
MGN Technology ..............................2057
Minerva ..............................................2048
Minerva
Minolta................................................2022
Mitsubishi .2023, 2027, 2033, 2035, 2045
Motorola
MTC
Multitech....................................2001, 2034
Murphy
NAD
National ..............................................2054
NEC
Neckermann .......................................2035
Nesco
Nikko..................................................2017
Nikon..................................................2014
Noblex ...............................................2057
Nokia......................2025, 2037, 2038, 2057
Nokia
Nordmende .2021, 2061, 2064, 2065, 2074
Oceanic
Okano........................................2063, 2070
Olympus....................................2015, 2054
Optimus
Orion
Osaki...............................2001, 2017, 2034
................
.......................
...............
___
2052, 2057, 2062, 2085, 2087, 2088
.............................................
...........................
............................
....................................
.........................................
...............................................
...................................................
...........
.................................................
____
.....................................
........................
. . . 2037, 2042, 2077, 2086, 2087, 2088
..............................
___
2036, 2046, 2052, 2070, 2072, 2078
2004, 2005, 2017, 2035
2023, 2025, 2027, 2037, 2038
.......................................
............
2001, 2015, 2019, 2035
2003, 2005, 2015, 2035
........................
2019, 2025, 2026, 2027, 2037,
2042, 2048, 2055, 2069
2018, 2020, 2021, 2033, 2037
2021, 2025, 2037, 2038, 2057
2015,2017
2034
2034
2059
2001, 2051
2004, 2034, 2057
2001
2024, 2034
2015, 2042, 2055
2001, 2015, 2017,
2034
2005, 2010, 2048
2015,2027
2001,2057
2001
2031
2034
2001, 2021
2017, 2027, 2031,
2002,2004,2016,
Page 33

Remote Control Direct Entry Codes for Accessory Devices
VCR Codes Cont’d
Otto Versand......................................2035
Palladium
Panasonic.................................2015, 2042,
Pathe Cinema
Pathe Marconi
Penny 2015, 2017, 2018, 2020, 2022, 2057
Pentax.................................................2022
Perdio.................................................2001
Philco
Philips . . .2015, 2035 (DEFAULT VCR),
Phonola
PUot
Pioneer
Portland .............................................2011
Profex.................................................2066
Profitronic
Proline ...............................................2001
ProScan
Protec..................................................2034
Pulsar..................................................2019
Pye......................................................2035
Quarter
Quartz.................................................2025
Quasar.......................................2015, 2042, 2087
Quelle.................................................2035
Radio Shack
Radiola
Radix
RCA2015, 2022, 2027, 2032, 2038, 2057
Realistic...................................2001, 2015,
REX...........................................2021,2074
RET ...................................................2075
Ricoh
Roadstar
Runco
Saba
...........................
Saisho
Salora
Samsung
Sanky
Sansui ......................................2001,2021,
Sanyo.....................2025, 2026, 2037, 2057
SavOle ...............................................2072
SBR ...................................................2035
Schaub Lorenz . .2001, 2005, 2021, 2037
Schneider
Scott
Sears ........................................2001,2015,
SEG ..........................................2057,2066
..............
...........................2053, 2054, 2055, 2087
..................
................................................
.............................................
..................................................
...........................
..............................................
...............................................
...............................................
.................................................
...............
.................................................
..............
.................................................
...............................
..................
..............................
..............
.......................................
...........................2033, 2052, 2058, 2078
....................
...............
2005, 2017, 2021, 2034
.....................................
...................................
2015, 2018, 2052, 2078
2074, 2075
2031, 2033, 2035
.........................................
.............................
2017, 2025, 2026, 2027, 2037
2017, 2034, 2057, 2059
2061, 2064, 2065, 2074
2004, 2016, 2036, 2052
2024, 2057, 2076, 2077
.......................
2023, 2024, 2040, 2046
2017, 2022, 2025, 2026, 2037
2001,2085
2021, 2049, 2050,
2023,2025,2038
2019,2027
2001, 2034, 2035
2016
2021
2035
2017
2057
2032
2025
2035
2017
2014
2019
SEI
............................................
Seleco.................................................2021
Semp ..................................................2024
Sentra
.................................................
Sharp
........................................
Shintom
Shogun
Shorai
Siemens....................................2003, 2005,
Silva
Singer
Sinudyne....................................2004, 2035
Solavox
Sonolor...............................................2025
Sontec.................................................2017
Sony
STS ....................................................2022
Sunkai ................................................2070
Sunstar
Suntronic ...........................................2001
Sylvania
Symhonic
Tashiko...............................................2001
Tatung..............................2001, 2021, 2035
Teac ..........................................2001,2021
TEC ...................................................2011
Technics
Teknika
Teleavia
Telefunken2021, 2047, 2058, 2064, 2074
Tenosal
Tensai
Thomas...............................................2001
Thomson
Thom
TMK
Toshiba . .2021, 2023, 2024, 2035, 2074
Totelevision
Towada...............................................2066
Uher....................................................2057
Unitech
Universum
Vector.................................................2024
Vector Research
Victor
Video Concepts
Videosonic
Wards............................2001, 2015, 2022,
White Westinghouse
XR-1000 ............................................2001
XR-1001 ............................................2015
XR-1002 ............................................2034
Yamaha
....................................
..............................................
.................................................
___
2010, 2017, 2030, 2035, 2037, 2048
...................................................
........................................
..............................................
..........
2001, 2012, 2013, 2014, 2015
...............................................
...............
...............
..............................................
...............................................
........................................
..........................
...............................
..........................................
...............................................
___
2017, 2035, 2038, 2048, 2057, 2067
..............................
___
2026, 2027, 2032, 2034, 2035, 2057
..............................................
2001, 2015, 2023, 2035
...........................................
.........................
2001, 2015, 2007, 2017
..............................
...................
.......................
.........................
........................................
................
2004,2035
2011
2027,2073
2034,2037
2057
2004
2017
2024, 2034
2011
2001
2001
2015, 2042, 2054
2021
2034
2001, 2066
2021, 2064, 2074
2016,2021,2037
2051, 2057
2017, 2057
2057
2001, 2006, 2010,
2018,2020
2008,2021,2033
2020, 2024
2057
2052, 2059
2018
Yamishi
Yokan
Yoko
Zenith . . .2001, 2014, 2019, 2052, 2078
DVD Codes
Akai....................................................5316
Harman/Kardon .................................5314
JVC
Kenwood
Magnavox...........................................5302
Mitsubishi
Onkyo...............................5302,5317,5319
Panasoni
PhUips . . .5302, 5308 (DEFAULT DVD)
Pioneer
ProScan
RCA....................................................5304
Samsung.............................................5313
Sharp
Sony
Technics
Theta Digital
Thomson.............................................5310
Toshiba...............................................5302
Yamaha
Cable Box Codes
ABC
Andover..............................................3037
Bed&Howed
Bitginingham Cable Communication . . .3020
British Telecom
Cabletime
Clyde .................................................3011
Contec
Cryptovision
Daehan
Daeryung ...........................................3003
Decsat.................................................3027
Everquesst .........................................3007
Fihnnet
France Telecom .................................3030
GEC
Gemini................................................3007
General Instrument . .3004, 3020, 3031, 3046
Goldstar ....................................3014,3047
Grundig
Hitachi
Jasco...................................................3007
Jerrold
LG Alps .............................................3044
Memorex ...........................................3001
Mnet....................................................3009, 3028
Now....................................................3041
.............................................
.................................................
...................................
.....................................................
...........................................
..........................................
..............................................
...........................
..............................................
.................................................
...................................................
.............................................
......................................
...............................................
...........
3002, 3003, 3004, 3006, 3008
.....................................
..................................
............
3016, 3019, 3025, 3029
...............................................
......................................
...............................................
...............................................
...................................................
.............................................
...............................................
............................
...............
3006, 3007, 3020, 3031, 3046
2011,2057
5305, 5312, 5321
3002,3004,3005,
2034
2034
5311, 5318
5307
5303
5301, 5322
5304
5320
5306
5301
5312
5301, 5309
3006
3002, 3012
3009
3038
3043
3028
3011
3035
3004
33
Page 34

Remote Control Direct Entry Codes for Accessory Devices
Cable Box Codes
Now.......................
Oak........................
Pacific
Panasonic ..................................3001, 3013
Paragon
Pioneer
Pulsar
PVP Stereo Visual Matrix
Quasar ...............................................3001
Radio Shack
Rembrandt .........................................3004
Runco.................................................3001
Salora
Samsung..............................................3014, 3040
Satbox
Scientific
Scientific Atlanta
Seawoo...............................................3045
Signal
Signature
Starcom...............................................3002, 3007
Stargate
Starquest.............................................3007
STS ....................................................3015
Taihan
Tele+1
Teleservice
Tocom
Tongkook
Toshiba...............................................3001
Tudi ...................................................3023
Tusa ...................................................3007
United Cable
Videoway
Visicable+
Westminster
Wolsey Gene .....................................3037
Zenith
Satellite Receiver Codes
Absat
Alba
Aides
Amstrad....................................4003, 4016,
..........................
Ankard
Anttron................................................4009, 4034
Armstrong
AST ...................................................4027
Astra...................................................4005
Astro
Avalon
Axis ..........................................4030,4046
Веко
Best ....................................................4030
........................................
........................................
...............................................
.............................................
......................................
.................................................
.......................................
.................................................
...............................................
........................
...........
.................................................
...........................................
.............................................
................................................
...............................................
........................................
...............................................
.................................
......................................
...........................................
..........................................
......................................
..................................................
.................................................
....................
.................................................
................
................................
..............................................
...................................................
4029, 4034, 4037, 4052
4025, 4038, 4039, 4042
4013, 4019, 4030, 4044
.........................................
3014,3036
.................
3003, 3032, 3049
3003, 3008, 3021
3042,3048
4008,4039,4045
3041
3009
3039
3001
3001
3002
3007
3026
3024
3007
3004
3007
3043
3028
3022
3005
3002
3017
3033
3012
3001, 3034
4006
4019
4015
4031
4010
Blaupunkt...........................................4008
Boca
.........................................
Brain Wave
British Sky Broadcasting
BT
Bush
Cambridge .........................................4024
Canal SateUite
Canal+
Channel Master
CNT....................................................4045
Comlink..............................................4019
Connexions
Crown.................................................4015
Cyrus .................................................4011
D-Box.................................................4054
DDC
DNT
EchoStar
Emanon
Eerguson ..............4002, 4009, 4010, 4023
Fidelity
Finlux
Fracarro .............................................4061
Freecom..............................................4034
FTEHumax ........................................4060
Fube .................................4030,4031,4034
Galaxis
General Instrument
Gold Box ...........................................4059
Gooding
Goodmans
Grundig
G-sat...................................................4009
Hinari..................................................4009
Hbschimann . .4008, 4032, 4039,4(M0,4(M9
Hitachi................................................4037
Houston
Huth .....................4013, 4015, 4019, 4026
Intervision
Invideo
ITT
lohansson............................................4022
IVC ....................................................4048
Kathrein .4001,4006,4008, 4011,4035,4011
Kreisehneyer
Kyostar
La Sat
Lenco..................................................4034
Lennox................................................4050
Lupus..................................................4030
Luxor ........................................4005,4049
Manhattan
Marantz
Maspro
Matsui
........................................
.....................................................
...................................................
..................................
...............................................
..................................
........................................
...................................................
.........................................
.........................
.............................................
...............................................
..................
............................
............................................
..........................
.............................................
...............................................
.....................................................
...............................................
.......................................
.............................................
.....................................
......................................
4005, 4024, 4032, 4037
............................
.........................................
.........................................
.....................................
........................
4015,4043
4022
..................
4031,4036,4061
4019,4057,4060
4008, 4010, 4048
4037,4045,4050
4058
4053
4002
4059
4059
4029
4031
4029
4011,4031
4034
4016
4012
4048
4010
4053
4050
4061
4005
4008
4034
4043,4045
4011
4004,4023
4024, 4048
Mediamarkt
Mediasat
Minerva
Morgan's
Navex
Neuhaus .............................................4039
Neusat ................................................4057
Newhaus.............................................4013
Nokia .4005, 4032, 4037, 4049, 4054, 4063
Nordmende.........................................4029
Orbitech..............................................4039
Oxford
Pace
...........................4023, 4037, 4055, 4058
Palladium
Palsat
Panda..................................................4037
PhUips .....................................4007,4011,
...........................4020, 4037, 4048, 4059
Phonotrend
Pioneer
Planet..................................................4061
Promax
Prosai..................................................4019
Quadrai
Radiola
Radix
RFT................................4011, 4013, 4019
Saba ..........................................4023,4045
Sabre ..................................................4037
Sagem.................................................4056
Salora
SAT...........................................4027, 4038
Satcom ......................................4026, 4051
Satec...................................................4009
Sabnaster
Satpartner
Schwaiger
Seemann
SEG
Siemens .............................................4008
Skymaster
Sony..........................................4017,4018
Sb-ong
Sunstar
Tantec
Techniland .........................................4026
Technisat...................................4001, 4039
Telefunken .........................................4034
Teleka
.......................................
.............................................
.............................................
...................................
.................................................
...............................................
.................................
...........................................
.................................................
...............................
......................................
...............................................
.....................................
...............................................
........................................
.................................................
...........................................
............
.................................
...................................
..........................................
......................
................................................
...............................................
.......................................
.......................................
4002,4009,4014,
4022, 4034, 4040, 4045
4019, 4044, 4051
4015
4059
4048
4015, 4043
4022
4024
4048
4039
4019, 4050
4021,4059
4037
4029, 4044
4011
4031,4064
4005
4026
4009, 4041
4031,4046
4030,4034
4062
4043
4023,4037
4015, 4052
34
Page 35

Remote Control Accessory Device Related Buttons
T X Then using the TV remote control with an
V V external accessory device, first make
certain the proper mode is selected and the
remote has been programmed to control the
device (see pages 30-31).
Press the SELECT button repeatedly
to highlight the proper accessory mode
(VCR, DVD, SAT, AMP, or ACC).
Point the top of the remote toward the
front of the accessory device’s remote
sensor window when pressing buttons.
External Accessory Mode Indicator
when the Select button is repeatedly pressed,
the indicator wiU highlight what mode the
remote control is in.
Select Button
Press repeatedly to highlight and select one of
the accessory modes within the Mode Indicator.
Rewind Button (Fast Reverse)
Press to rewind tapes or fast rewind DVD
discs. For some accessory devices, the STOP
button may have to be pressed first, then
REWIND. In playback mode, hold down the
button to view the picture moving rapidly in
reverse.
Stop Button ■ --------------------------------------
Press to stop the playback of a tape or disc
in playback, rewind, fast forward, and so on.
Record Button -----------------------------------
Hold the REC(ord/Sap) and PLAY ^ buttons
down to begin a VCR recording.
---------------------------------------
O © ©
© ©
© © ©
® © ®
s
PROGRAM A/CH
® ©
oooo
Power Button
Press to turn the accessory device ON and
OFF.
Pause Button II
Press to temporarily stop the videotape,
DVD disc, etc., during a playback or
recording. Press again to release Pause.
Fast Forward Button (Wind Forward) ►►
Press to rapidly advance a videotape, DVD
disc, etc. For some devices, you may need
to press the STOP button first, then the
FAST FORWARD button. In playback
mode, hold the button down to view the
picture moving rapidly in the forward
direction.
■ Play Button ^
Press to begin playback of a videotape or
DVD disc, etc.
Channel + and - Buttons
Press to scan up or down through the chan
nel numbers using the external accessory
devices tuner (some accessory devices do
not have channel tuners).
Number Buttons
Press buttons for the direct selection of
external device channels if the unit is
equipped with a tuner.
TV/VCR Button
Press while in the VCR mode (the VCR indi
cator on the front of the unit wiU light) to view
the playback of a tape. Press again to place in
the TV position (the VCR indicator light wiU
go off) to view one program whUe recording
another program.
Ili:i.ri L I. Him
Remember, the VCR buttons on the remote wiU
not operate your VCR if those features are not
found on your VCR remote control.
NOTE: AU VCR functions (particularly
Search, Rewind, Fast Forward, etc.) wiU oper
ate the same as with the original VCR remote
control provided with the VCR.
35
Page 36

il
Troubleshooting Tips
No Power
• Check the TV power cord. Unplug the TV, wait 10 seconds,
then reinsert the plug into the outlet and push the POWER
button again.
• Check that the outlet is not on a wall switch.
• Be sure the fuse is not blown on the AC power strip, if one is
being used.
No Picture
• Check antenna connections. Are they properly secured to the
TV's ANT 75Q plug?
• Check the TUNER MODE control for the correct tuner set
ting.
• Try running the Auto Program feature to find all available
channels.
• Press the AV button on the remote to make sure the correct
signal source is selected (ERONT, AVI, AV2, Current
Channel, etc.).
No Sound
• Check the VOLUME buttons.
• Check the MUTE button on the remote control.
• If you’re attempting to hook up auxiliary equipment, check
the audio jack connections located on the front of the TV.
Remote Does Not Work
• Check the batteries. If necessary, replace them with AA
Heavy Duty (Zinc Chloride) or Alkaline batteries.
ii
WARNING Concerning Stationary Images on the TV Screen:
Do not leave stationary or letterbox images on screen for
extended periods of time. This can cause uneven picturetube aging.
Normal use of the TV should involve the showing of pictures
that contain constantly moving and changing images that fill the
screen. Be careful not to leave nonmoving images on screen for
extended periods of time, or to display the same images on
screen too frequently, because subtle ghost images can be left
on the picture tubes. Sources of stationary images may be DVD
disks, laser disks, video games, CD-i disks, videotapes, digital
television boxes, broadcast channels, cable channels, satellite
channels, and others. Here are some examples of stationary
images (this is not an all-inclusive list; you may encounter
others in your viewing):
• DVD menus—^listings of DVD disk content
• Letterbox black bars—shown at the top and bottom of the
TV screen when a wide screen (16:9) movie is viewed on a
TV with standard (4:3) aspect ratio.
• Video-game images and scoreboards
• Television station logos—present a problem if they are
bright and stationary; moving or low-contrast graphics are
less likely to cause uneven aging of the picture tube
• Stock-market tickers—presented at the bottom of the TV
screen
• Shopping channel logos and pricing displays—^bright and
shown constantly or repeatedly in the same location on the
TV screen.
Cleaning and Care
Remote Does Not Work Continued
• Clean the remote control and the remote control sensor win
dow on the TV.
• Check the TV power cord. Unplug the TV, wait 10 seconds,
then reinsert the plug into the outlet and push the POWER
button again.
• Be sure the fuse is not blown on the AC power strip, if one is
being used.
• Check to be sure the TV outlet is not on a wall switch.
TV Displays Wrong Channel or No Channels Above 13
• Repeat channel selection.
• Add the desired channel numbers (using the CHANNEL
EDIT control) into the TV’s memory.
• Check to be sure the TUNER MODES are set to the CABLE
option and run the Auto Program feature to find aU available
channels.
TV Displays white lines in letterbox when viewing a DVD
disc
• Some DVD Discs are encoded with as much as 30% more
video information to give the best possible picture quality.
With the DVD Player in the 16:9 picture format, the play
back of this type of disc with extra video information, can
produce a number of small white lines in the upper portion
of the black letterbox area. With some of these discs, this sit
uation is unavoidable and it does not require a service call.
Placement of the TV
• To avoid cabinet warping, cabinet color changes, and
increased chance of set failure, do not place the TV where
temperatures can become excessively hot; for example, in
direct sunlight or near a heating appliance.
• Be sure to allow a free flow of air to and from the perforated
back cover of the set.
Cleaning
• To avoid possible shock hazard, be sure the TV is unplugged
from the electrical outlet before cleaning.
• Regularly dust the TV with a dry, nonscratching duster to
keep the TV clean.
• When cleaning the TV, take care not to scratch or damage the
screen surface. Avoid wearing jewelry or using anything
abrasive. Do not use household cleaners. Wipe the front
screen with a clean cloth dampened with water. Use even,
easy, vertical strokes when cleaning.
• Gently wipe the cabinet surfaces with a clean cloth or sponge
dampened in a solution of cool, clear water and a mUd soap
or detergent. Use a clean, dry cloth to dry the wiped surfaces.
• Occasionally vacuum the ventilation holes or slots in the back
cover of the set.
• Never use thinners, insecticide sprays, or other chemicals on
or near the cabinet, as they might cause permanent marring
of the cabinet finish.
36
Page 37

Index
________________
11
Active ControF“
Alternate Channel Control
Audio Out Control ......................................................................10
AutoChron™ Controls
AutoLock^“ Controls
Access Code
AutoLock^“ Review Screen.....................................................20
Blocking Programs based on Movie Ratings
Blocking Programs based on TV Ratings
Locking Channels
Clearing All Locked Channels.................................................16
Understanding the AutoLock^“ Features
AutoPicture^“ Control ................................................................29
Auto program Controls..................................................................6
AutoSound^“ Control..................................................................29
AVL (Automatic Volume Leveler) Control ...............................10
Balance Control ..........................................................................10
Bass Control
Brightness Control ........................................................................9
Care and Cleaning Information...................................................36
Channel Edit Cotnrols
Closed Captioning ......................................................................22
Color Control.................................................................................9
Color Temperature (Color Temp) Control....................................9
Dynamic Bass..............................................................................10
Dyn(amic) Contrast Control .........................................................9
Dynamic NR (Nosie Reduction)
Factory Service Locations .....................................................38-39
Feature Highlights
Freeze Control ............................................................................28
Incr.(edible) Surround Control
Index ...........................................................................................37
Language Control..........................................................................5
.........................................................................
.........................................................
...............................................................
............................................................................
.........................
...............................
...................................................................
...............................
................................................................................
...................................................................
.................................................
........................................................................
...................................................
27
25
12
14
17
18
15
13
Name Conrol..............................................................................7-8
Permanent OSD ..........................................................................24
Picture Control...............................................................................9
Program List Control ..................................................................27
QuadraSurF“ Controls
Registration of TV Information.....................................................2
Remote Control Use with Accessory Devices
Code-Entry Method of Identification
Mode Selection.........................................................................30
Direct-Entry Code List
Accessory Device Specific Buttons ........................................35
Rotation Control..........................................................................23
Safety Information ........................................................................3
SAP (Secondary Audio Programs) Control
Sharpness Control..........................................................................9
Sleep Timer Control....................................................................28
Stereo/Mono Control ..................................................................10
Timer Controls
10
Activate Control.......................................................................11
Clock, Time Control ............................................................... 11
6
24
4
10
Display Control........................................................................11
Progam No. Control.................................................................11
Start Time Control...................................................................11
Stop Time Control
Tint Control
Treble Control .............................................................................10
Troubleshooting ..........................................................................36
Tuner Mode Controls
TV Speaker Control ....................................................................10
Warranty (Limited)......................................................................40
Wide Screen Format Controls.....................................................21
..................................................................................
..........................................................
......................................
.......................................................
...............................
...................................................................
...................................................................
25-26
31
32-34
10
11
9
5
37
Page 38

n
Factory Service Locations
NOTE:
If you reside in one of our Phiiips Facfory Service Branch areas (see direcfory on back), you can confacf fhe nearesf Service Branch fo obfain
efficienf and expedienf repair for your producf. If your producf is In-Warranfy, you shouid have proof-of-purchase fo ensure No Charge Service. For
Ouf-of-Warranfy service, caii fhe iocafion nearesf you.
NOTA:
Si vous résidez dans une des régions desservies par une succursaie de service après venfe du fabricanf Phiiips (voir iisfe ci-dessous), vous
pourrez confacfer ia branche de service après venfe ia pius près de chez vous pour obfenir un service après venfe rapide ef efficace. Si ie produif esf
sous garanfie, ii suffira de présenfer une preuve d'achaf pour bénéficier d'un service sans frais. Pour ies produifs non couverfs par ia garanfie, confacfez ie cenfre ie pius près de chez vous.
NOTA:
Si Ud. reside en una de nuesfras zonas para sucursaies Phiiips de servicio ai de fábrica (ver direcforio más abajo), Ud. puede comunicarse con
ia sucursai de servicio más cercana para obfener una reparación oporfuna y eficaz de su producfo. Si su producfo esfá fodavía bajo garanfía, Ud.
debe presenfar comprobanfe de compra para no ocasionar ningunos cargos por servicio. Para servicio después dei vencimienfo de ia garanfía, iiame
ai iugar más cercano de ios abajo indicados.
In Canada
Flow you can obfain efficienf and expedienf carry-in, maii-in, or in-home service for your producf
Piease confacf Phiiips af 1-800-661-6162 (French speaking)
1-800-363-7278 (Engiish or Spanish speaking)
Au Canada
Commenf obfenir ie service après-venfe pour ies produifs apporfés ou envoyés par ia posfe à nofre cenfre de service ou ie service àdomiciie
Veuiiiez confacfer phiiips á: 1-800-661-6162 (Francophone)
1-800-363-7278 (Angiais ou Espagnoi)
En el Canada
Cómo recibir servicio efficienfe para su producfo, en persona, por correo o adomiciiio
Favor de comunicarse con Phiiips ai: 1-800-661-6162 (francòfono)
1-800-363-7278 (Ingiés o Españoi))
MAC2929 Rev. DD - 1/1/2002
EL4482-3 Rev. DD
3135 015 07541
38
Page 39

Factory Service Locations
Quauty service is as close as your telephone! Simply look over the ust below for the number of a Factory Service Center
NEAR YOU. Your product will recbve efroent and expedient carry-in, mail-in, or in-home service, and you will recqve peace of mind,
COMMENT OBTENIR NOTRE SERVICE APRÈS VENTE RAPIDE ET EFFICACE SOIT PAR COURRIER, À DOMIOLE, OU EN SE PRÉSENTANTÀ UN CENTRE DE SERVICE PHILIPS. PLUS DE 600 CENTRES DE
RÉCEPTION DE PRODUITS À RÉPARER À TRAVERS LE PAYS: CONTACTER LE CENTRE DE SERVICE AUX CONSOMMATEURS LE PLUS PROCHE POUR SAVOIR L’EMPLACEMENT DE CES DÉPÔTS DANS
CÓMO OBTENER UN SERVICIO OPORTUNO Y EFIOENTE POR CORREO, EN CASA O EN PERSONA PARA SU PRODUCTO A TRAVÉS DE UN CENTRO PHILIPS DE SERVICIO. MAS DE 600 SITIOS POR
TODO EL PAIS PARA LA RECEPCION DE PRODUCTOS NECESITADOS DE REPARACIONES: COMUNICARSE CON EL CENTRO DE SERVICIO DE FABRICA MAS CERCANO PARA ESTOS LUGARES DENTRO
ATLANTA CLEVELAND CHICAGO
Philips Factory Service Philips Factory Service Philips Factory Service
550 Franklin Road., Suite F 950 Keynote Circle 1279 W. Hamilton Pkwy.
Marietta, GA 30067
800-273-1501 800-331-7037 800-531-2922
TAMPA DETROIT KNOXVILLE
Philips Factory Service Philips Factory Service Philips Factory Service
1911 US Flighway 301 North 25173 Dequindre 6700 D Papermill Rd.
Tampa, FL 33619 Madison Heights, Ml 48071 Knoxville, TN 37919
800-442-2027 800-438-1398 800-821-1767
SAN FRANCISCO DALLAS PHILADELPHIA
Philips Factory Service Philips Factory Service Philips Factory Service
681 East Brokaw Rd. 415 N. Main Street, #107 352 Dunks Ferry Rd.
San Jose, CA 95112 Euless, TX 76040 Bensalem, PA 19020
800-300-9013
HOUSTON
Philips Factory Service
1110 N. Post Oak Rd., Suite 100
Houston, TX 77055
800-952-3254
KNOWING YOUR PRODUCT IS BQNG GIVEN THE EXPERT ATTENTION OF PHIUPS’ FACTORY SERVICE.
UN RAYON DE 50 À 75 MILES (80 KM À120 KM) DU CENTRE DE SERVICE LOCAL.
DE UN RADIO DE 80 A120 KM (50 A 75 MILLAS) DEL CENTRO DE SERVICIO LOCAL.
Brooklyn Heights, OH 44131
800-952-3254 800-847-9320
Itasca, IL 60143
MAC2929 1/1/2002
39
Page 40

LI MI TED W AR RAN TY
CO LO RTE LE VI SIO N
90 Days Free Labor
One Year Free Replaoement of Parts (Two Years Free Fieplaoement on Color Future TiJae)
This product can be repaired in-home.
WHO iSCOVERED?
You must have proof of pirchase to receive warranty service. A saies
receipt or other document showing that you purchased the product is
considered proof of pirchase.
WHAT iSCOVERED?
Warranty coverage begnsthe day you txiy yoir product. Rr90 chjs
thereeiter, ati parts wiii be repaired or repiaced free, and iabor is free.
Rom 90 days to one year from the day of pirchase, ati parts wiii be
repaired or repiaced free, but you pay for ati tabor charges Rom one
to two yearsfrom the day of purchase, you pay for the repiaoement or
repair of ait parts except the picture tUbe, and for ait tabor charges
After two years from the day of purchase, you pay for the repiaoement
or repair of ait parts« and for ait tabor charges
Ait parts« induding repaired and repiaced parts« are covered onty for
the orignat warranty period. W hen the warranty on the product
expires« the warranty on ait repiaced and repaired parts atso expires
WHAT iS EXCLUDED?
Your warranty does not cover:
• tabor charges for instattation or setif) of the product, ac|ustment of
customer controts on the product, and instattation or repair of
antenna systems outside of the product.
• product repair and/or part reptacement because of misuse, acci
dent, mauthorized repair or other cause not within the controt of
Riitips Consumer Bectronics Company.
• reception probtems caused by sigiat conditions or cabte or antenna
systems outside the mit.
• a product that requires modification or adaptation to enabte it to
operate in any country other than the cointry for which it was
desigied, manufactired, approved and/or authorized, or repair of
products damaged by these modifications
• inddentai or consequentiai damages resdting from the product.
(Same states do not atiow the exdusion of inddentai or consequentiai damages« so the above exdusion may not appiy to you This
indude^ but is not iimited to, prerecorded materiat, whether copyri^ed or not copyri^ed.)
• a product used for commerdat or institutionat pirposes
MAKE SU RE YOU KEEP...
Rease keep yoir sates receipt or other document showing proof of
pirchase. Attach it to this owner’s manuat and keep both nearby.
Atso keep the orignat box and packing materiat in case you need to
return your produd.
BEFORE REQUESTING SERVICE...
Rease check yoir owner’s manuat before requesting service.
Adjustments of the controts discussed there may save you a service
cdt.
TO GET WARFIANTY SERVICE IN U.S.A.,
PUEFTTO RICO OR U.S. VIRGIN ISLANDS...
Contad a Riitips fadory service center (see endosed tist) or author
ized service center to arrange repair.
(in U.SA., Rjerto Rico and U.S Virgn tstands« ait imptied warranties«
induding imptied warranties of merchantabitity and fitness for a partic-
utar pirpose, are iimited in duration to the diration of this express
warranty. But, because some states do not atiow timitations on how
tong an imptied warranty may tast, this timitation may not appiy to
you.)
FOR WARFIANTY COVERAGE IN CANADA...
Note: Rodud Warranty coverage may wry between countries where
produd is distributed by Ritips Consuner Bedroiics Company, in
order to receive flit and specific warranty detaits for produds sotd and
serviced in Canada, ptease contad Ritips at:
1 -800-661-6162 (from Canada - Rench Speaking
1-800-531-0039 (Bluish and Spanish Speaking
REMEMBER...
Rease record the modet and sériai nimbers found on the produd
betow. Atso, ptease fitt out and mait you warranty regstration card
promptty. it wiii be easier for us to notify you if necessary.
W H ERE IS SERVICE AVAILABLE?
Warranty service isaraiiabie in aii countries where the product isoffi-
datiy distributed by Riitips Consuner Bectronics Company, in coun
tries where Ritips Consuner Bectronics Company does not distribute
the product, the tocai Ritips service organization wiii attempt to pro
vide service (atthou^ there may be a detay if the appropriate spare
parts and techiicat manuat(^ are not readity avaitabte).
TliswanrartygvBsyau specific leg^n^is Ycu nay hax ether ri^tswh(tt}Bryfrcm stalepmrice to stalepmrKSL
Phitips, P.O. Box 520890, Miami, FL 33152, (402) 536-4171
Printed in U.S.A.
MODB.#
SEFIIAL#
40
 Loading...