

Philips 26PW6341, 26PW6337, 30PW6337, 30PW6341, 26PW6341/37 User Manual
...
User Manual
26PW6341/37
30PW6341/37
Thank you for choosing Philips.
Need help fast?
Read your User Manual first for quick T_s that
your using your Philips product more enjoyable. If
you have read your instructions and still need
assisTance you may access or our online help at
w_.p4c.philips.com
or
call 1-800-531-0039
while with your producT.
Model No.:
Seria No.:
PHILIPS
3121 235 21501

¢ongro_lotions on your purchase, and welcome to the"family!"
Dear PHILIP$ product owner:
Thank you for your cor_denea in Pl-liLIPS,You_e selected one of the best-built_ best-
backed p_Ddusts available toda>_We'll do everything in our power to keep you happy
with your purchase for many years to come,
As a member of the PHILIPS'_amiI_,' you're endded m protection by one o[the most
comprehensive warranties and outstanding service networks in the industry.Wha_s
more, your purchase guaranteea you'll receive all the inforceadon and special offers for
which you qualify, plus easyaccess to accessories from our convenient home shopping
networl_
Host impor_ndy, you can count on our uncompromising commitment to your total
satisfaction.
All el this is our way of sayingwelcome - and thanks for investing in a PHtLIPS produc_
P.$. To get the most from your PHILIP$ purchase, be sure to complete and
return your Product Registration Card at once.
_& This"bolt of lightning" indicates uninsulated material within your unit
may cause an electrical shock. For the safety of everyone in your house-
hold, please do not remove product covering.
_The"exclamation point" calls attention to features for which you should
read the enclosed literature closely to prevent operating and mainte-
nance problems.
CAUTION: To prevent electric shock, match wide blade of plug to wide slot.
fully insert.
ATTENTION: Pour _viter les choc _lectriques, introduire la lame la plus large
de la fiche dans la borne correspondante de la prise et pousser iusqu'au fond.

IMPORTANT SAFETY INSTRUCTIONS
Read before operating equipment
L Read tlae_ i:t_m:cfiol_
2. Keep Ibese in_n:crior_
3. Iteed ail warnings
4. Follow _dlinsln_ms
_. Do nl_ti_ dlls ap_!r_!_L$l_e_r_,_:_!_er.
7. Do nl_tblock _myof die ventilafitm opel_il_gs
[l_ll in _!_r(_!llCe _.ith the mal_l_!c_re's
Do nl'l ins_!ll near any heat sollrces _h as r_!di_!-
_rs_ l_e;!_regis, _to_'es,or olher _!_..]_a_i_t_q
(il_cludil_gmnpiifi_) lhat pmd_:e heat¸
9. l)o n_t del_a fl_esafel_ p_wpose oflhe poi_zed
or gr_t_(fing-ty _e _lug A polmlz_d piug has t_o
b_!des wltil on_ w_der _!n il_eoliver.A _oandlng
_e plug l_s I_vobl_!des_!nd fl_irdgrounding
i._bng I_e _ide blade or third i_eng _re previded
_r your sa fel_ Wl_en fi_eprodded _l,agdoes not
_i)inte your dutte_ _nad_ m_elec_cim _r
_lacemenl of fi_eobsolete oa_lel
11). Protect Ihe power cord _m being _alked o1_or
_.qnciledlY_ical_!rly al p]_s, ¢o1_:¸enien_;er_-
_les_ m_dII_e_il_l wi_ere II_eye_il from lhe
_!_;lytrdtas.
IL Oniy use _t_chme_l_acces_es _ec_fied by fl_e
12. _. Use only wifi_acmt _mcL In _ocLbrock-
or soM _ilh'ti_e _y_as. Wl_en a cm_ is
a_ed, use ¢_ualm__he_: mo_]_g fin ¢_aPi"_ a_
ccnnbilaafi<mto avod i:!jar? rt)m ui.,-evec
13. Unplug lhs ;_. _a_t_ dunn', lighrnil_g sk)nns or
when m_md :_r king p_-(_s of time
14. Refer _ll serv ¢ing to qa_difl_! ser_ ice _ers(m_el.
_rvicing is req_:ired whe_ _Eeapi.'_n__ lugs I_e_
&!mag_l in any w_!_,sach _*_i_o__-sa __[_cord
o ph:g is clangored, iiq_d h_*4:_een s?ill_i or
Oi_leCL_lxavehlen mo _ppa_t_% Ibe _q_paratus
g!s _i1 exposed to g!ill or mois are, does 1lot
_e_te nor_aily, or i_s _en dropped.
1_ Ills l.'reduct may co_:lain iead _mdme_ m_.
Ds 1 _sai o1"_1_ m aeri ds n_v oe _gal _1 iae
_y¢lilag i_ffonnatioL pie_e c_ct your k_d
_!,athondes or file i lectronic IIx[_rri_ \11ance:
16. l_mag¢ Requiring Service - lee apF,lim_oe
should _e se_iced _y qaalified stance per_xmnel
when:
A, lhe powe- s_pi_ly _t_rdor lhe plug has been dan_-
_ge¢_ or
B, ()_ect_ have fi!llei_,or Iquid has been sp 1ledinto
_laeapplimace; or
C, lhe _q_pii_mcehas been exN_s_i lo nfin; or
I), llle appliance (_es nl'l _q:___e_ to o_tte l:Cn_l_al-
ly or exlfiblts a marked chm:ge in _lbm:_mce; or
to _e CATV _t_sm [n_t_llem This I
remMdev is prowded to r_[[ the CA'I'V $ys_
i_*laller's a_e_t_n _o Articl_ 820-40 o_ th_ NEC
Ihat provi_ g_ideli_e_ _or pro_r grounding and,
as ¢lc_e _o _ pc_ of ca_ _t_ _ practical
i_ p_-_¢_lar, s_:i_es tha_.Ihe cable ground shall be
ccmr_:_d to the gr_mdi_ system o_ the buildi_
E, [he appl ance has been _hl_pped or _laeeiaclosare
&tm_!ge_L
17, _l_flt,_;taICrlRy- All I_ie_s_s mt_ comply w_th
tecommend_ intemal_ai glob_ _ _e_)"slan-
(hrd_ _ fi_ _d s_NI_ im_perties _ as _binet
• 1)_not ¢<m_mnnise these desig_ s_n&_ls
_q_py ng exce_ _'e p_ _rce to lhe l}_at, or _p,
of _ caNre_ _i_ coald _finmtely o_ ermn. Ihe
pr_hlcl
•A s_, do no en&_a_ge__oarmL. orcl_ldren. b_
placing elec_nic _uipmenlAoy s _ the _ o_
ii_e_binet Such items could uns_ts_dng|y _iI
from lhe t_p oflhe set _mdc_msepro&_ danmge
_mdiorper_ai i_y.
18, _;all or Ceiliag Mounling - '[he _li_nce
sho_id be mop,ted _ a w_ll or ceilh_gon)y
]oc_tted;:wa_ from p_ver lilies
21), Outrl_r Anlenna G_unding - ll'_m oa_ide
antenna is _onlle_teAIto rl_"re¢_iv_'k be slat_"the
antenna _m _sg'rolmd_i so as to i.'i_'i(le s_ne
protc_tlon _!_!i_ : olla_ stages _!1_[b_ll]tlai_slat-
ic clu_es.
_tm 810oflhe Natk_d Eleclrlc C_,
ANSI/NI_PAN<_7_L198_ _des inf_lior
_ilh _ _ _1_ _omding ol'fl_em_q and
_fling slra_tare, g._l_ng o_ _e I_d-il_ wire
_4to_s, k_ti_ m of_wana4k_ge unil, c_ec-
ti_ to g__mding ele_"t'_les__d requ_remen_
21, Ob'ect ana Lk vid Entry - Ca_ should be lake_
so i{u_ol_ie_41s({Iono) lhli m:d Iq_ds are not
s_illed inlo the. et,'clo_ure t _roagh.openln_s_.
a) W;!m_ng: [o _lu_>e It_er_k ol fire or eleclnc
_ocl< tfis a_ms sk<_ d _:<>tI_eexposed o mn
v;:se%_o_ld to) I_epl_cezlor mis app._m_s.
22, INtler_ Usage (A[ I'ION - Ib _evem _:_y
le_kage t_a ma3 result in N_iily qiurv, property
dam;_ge, or &!mage Io the unt:
• lns_dl al b;_:_ies con-ectl), wit_ ) ;rod -
ali_ed _:sma_ed <mlhe unit.
• 1)_)noI mix bal_el_es(ok_ard lSe_.or c;!r_ al_l
alkalire, etc 1.
• Ren_o_e b_edes _en _;_em_i s not _ed _b- a
I_rg tirae
Example Of AIItellll_l G 1"011lldillg _1_Ilef
NEC - National Electric Code
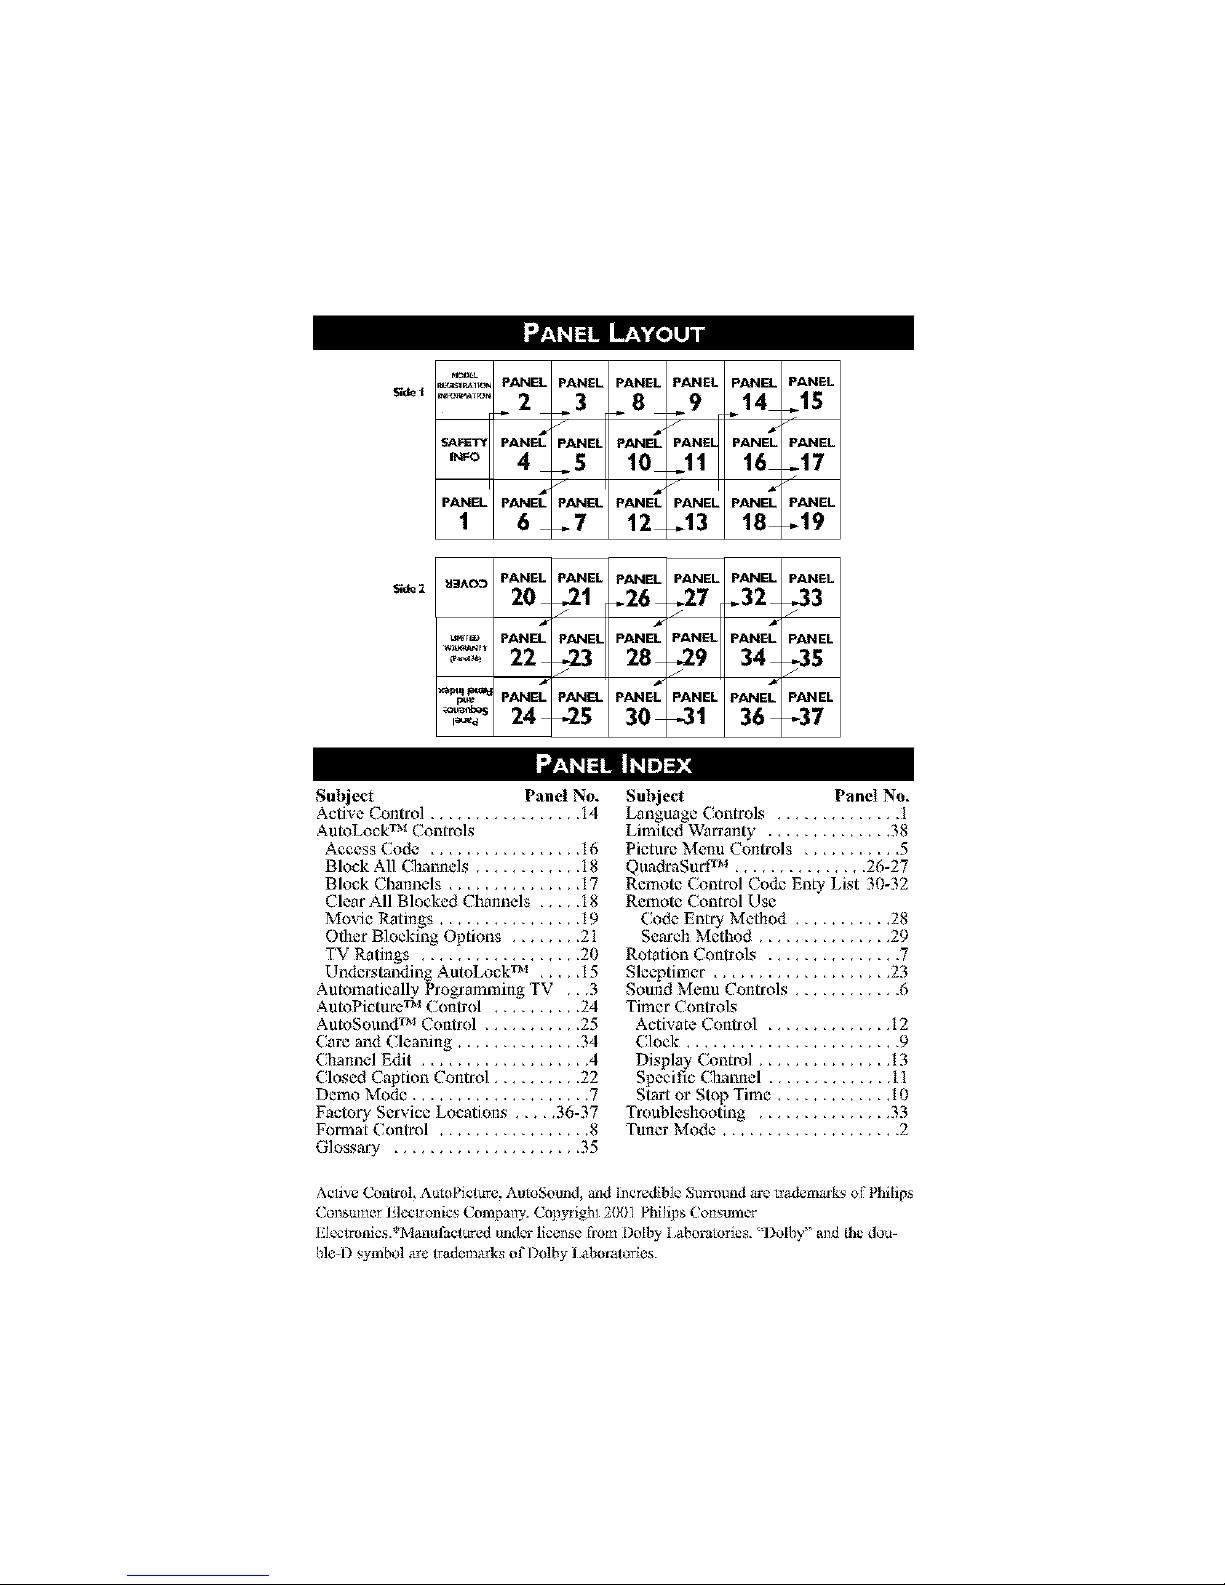
_:_r_T_ PANEL PANEL PANEL PANEL PANEL PANEL
_l ...... _8 _9
SAFET_ PANE_ PANEL
,_o 10 _11
/
PANEL PANEL PANEL
1
2 +3 14 +15
PANEL PANEL PANEL PANEL
4 +5 16 _17
/
PANEL PANEL PAN PANEL
6 ÷7 12 d3 18 _19
_i_AO_ PANEL PANEL PANEL PANEL PANEL PANEL
20 _.1 .-26 +27 .32 _3
J f J
_*_ PANEL PANEL PANEL PANEL PANEL PANEL
S;de2
_,'_w-_'222 -23 28 -29 34 _-35
_qW-_ PANEL PANEL P_4EL PANEL PANEL PANEL
_"_;_,.*.24 _.5 30 _31 36 _37
Subject Pand No.
Active C(mtrol ................. 14
AutoLock TM Controls
Access Code ................. 16
Block All Channels ............ 18
Block Channels ............... 17
Clear All Blocked Channels ..... 18
Movie Ratings ................ 19
Other Blocking Options ........ 21
TV Ratings .................. 20
Understanding AutoLock TM ..... 15
Automatically Programming TV . •.3
AutoPictureTM C(mtrol .......... 24
AutoSound TM Control ........... 25
Care aud Cleaning .............. 34
Channel Edit ................... 4
Closed Caption Control .......... 22
Dcmo Mode .................... 7
Factory Service Locations ..... 36-37
F(zrmat (kmtrol ................. 8
Glossary ..................... 35
Subject Panel No,
Language Controls .............. 1
Limited Warranty .............. 38
Picture Menu C(mtrols ........... 5
QuadraSucff _ ............... 26-27
Remote Control C(_Ic Enty List 30-32
Remote Control Use
Code Entry Method ........... 28
Search Method ............... 29
Rotation Controls ............... 7
Slceptiraer .................... 23
Sound Menu Controls ............ 6
Timer Controls
Activate Control ............ 12
Clock ...................... 9
Display Control ............. 13
Specific Channel ............ 11
Start (_rStop Time ........... 10
Troubleshooting ............. 33
Tuner Mode .................. 2
Active Control, AutoPicture, AutoSound, and Incredible Surrmmd arc tradenrar ks of Philips
Consumer I leclronics (ompaw. Copytigbl 21X)l Philips Cot_sumer
Elcctronics.*M_mufac!urcd undo- license fzom l)o[h_ Laboratories. '-l)olby" and the dou-
bled) symbol ,-a'etrademarks of Dolby 1,aboralories.

I ress the MENU button onthe remote control to show the
onscreen menu.
Press the CUIZSOR UP P"or
I)OWN • buttons to scroll
though the onscroen menu until
the word hx_tal] is highlighted,
Press the CURSOR RIGHT
t_ button to display the
Install menu fbatares.
Press the CUIZSOR UP I_ or
I)OWN • buttons to scroll
through the hx_tal] featur_ until
the word Language is high-
lighted.
Press the CURSOR RIGHT
button repeatedly to select
English, Francais IFrench), or
Espafiol (Spanish).
@ooo
@®®
@@@
@@@
®@@
[ w i
illllllli_illllllll
When finished, press the
i STATUS/EXIT button to
remove the mena from the
TV*s screen_
The Language control only
makes the TV's or_croen Menu
items appear in English, Spanish,
or French text.
It does not change the other
o_x_croentext features such as
Closed Caption |CC) TV shows.
I _ iII - [olVdJll n'oll [,.I_I i"1_11 !11 _.1:1:i _ [o] Dl:lL.qlU[o]_./ i _.To]II
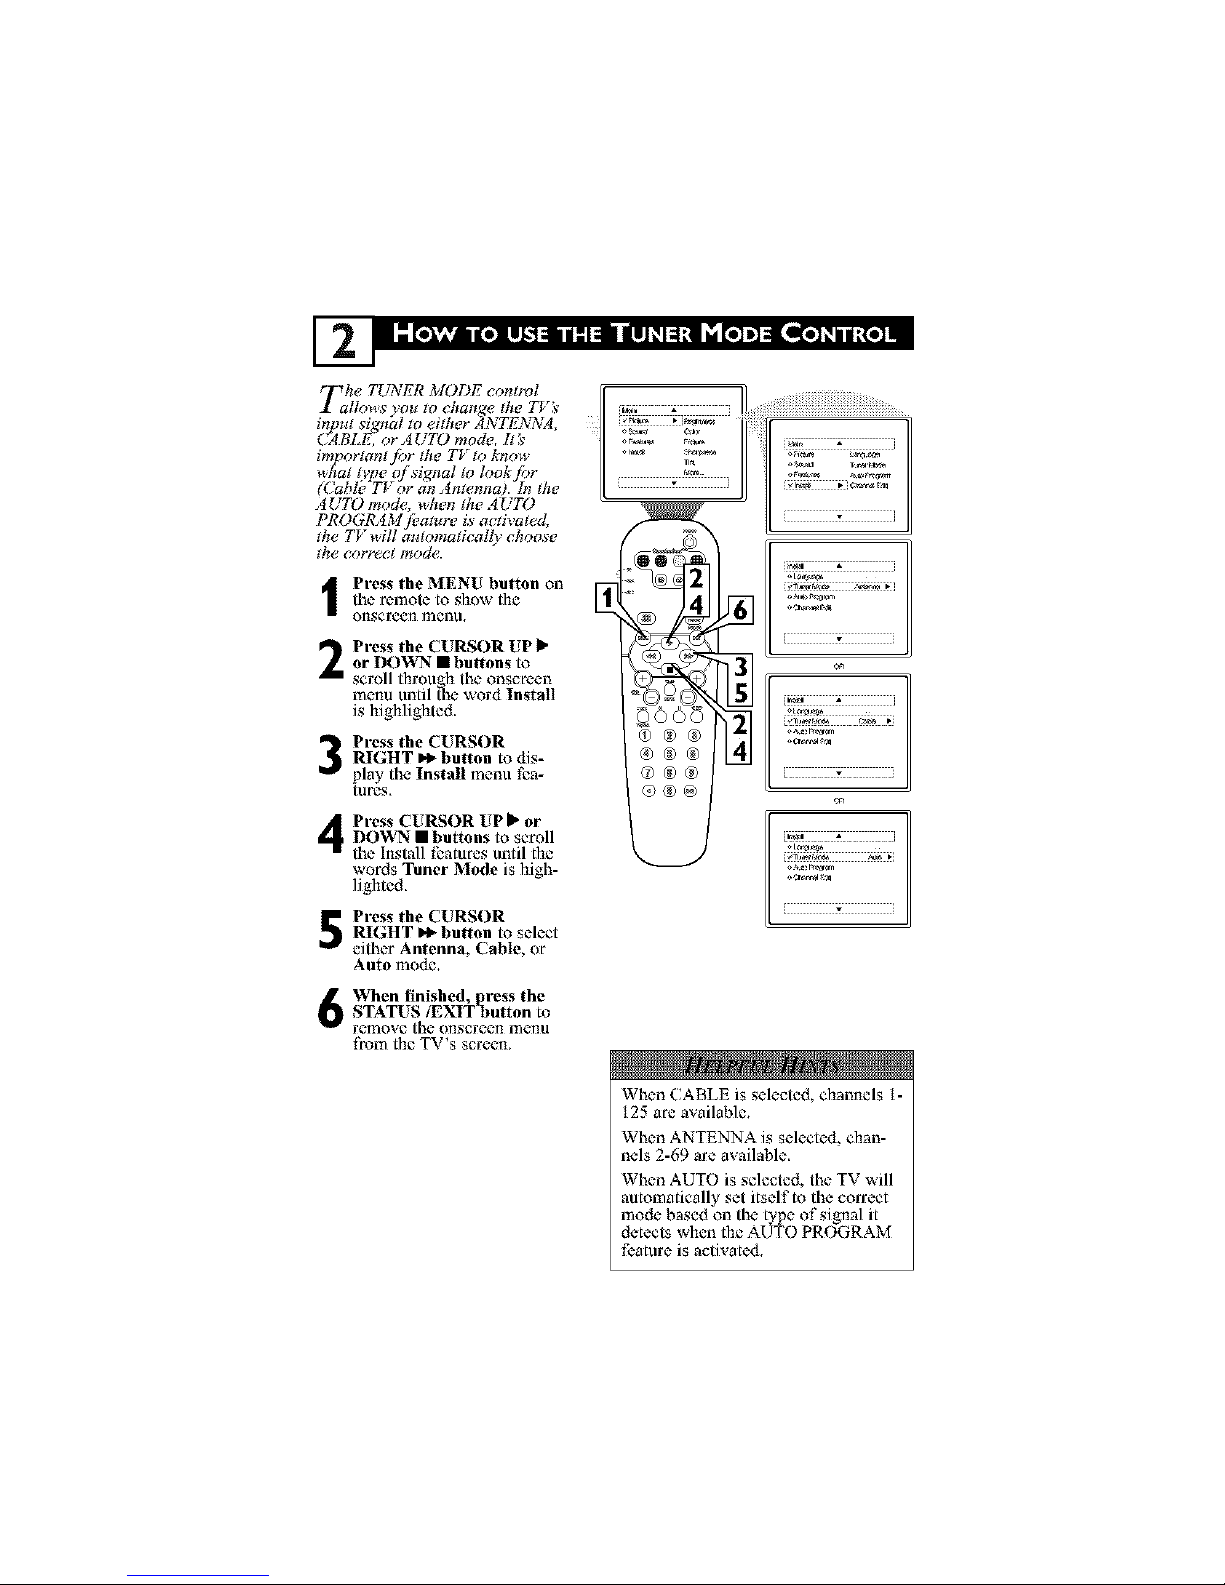
r_he TE NER MODE c mlml
I allo_s vcm tochange the TV_' _,_ .
input signhl to either ,4NTE_W,4, oz.,._, _,,
CABLE. orAUTO mode, It_ o_,_ _*,,
it_ortant /br the TV to know °_ ,_
_ hat tl,pe of si:4nal to look jbr
(Cable-TT or an Amenna). In the
AUTO mode, _hen the AUTO
PROGRAM fi_ature is a_Uvated,
the TV _ ill automatically choose
the corr(_ [ mode.
I Press the MENU button on
the remote to show the
onscreen mcl*aL
Pn'ess the CURSOR UP
or _)_ • buHons to
scroll through the onscreen
menu until the word Install
is highlighted.
Press the CURSOR
RIGHT I_ button to dis-
play the Install menu fea-
tures.
Pn'ess CURSOR UP lP or
DOWN • buttons to scroll
the Install thatures until the
words Tuner Mode is high-
lighted.
Press the CURSOR
RIGHT I_ button to select
either Antenna, Cable, or
Auto mode.
®®®
EZZZZZKZZZZZ7
om_ r>_
L _ i
1 7 }
When finished, press the
STATUS IEXlTbutton to
rewlove the onscreen Foenu
tram the TV's screen.
When CABLE is selected, channels t -
t25 areavailable.
When ANTENNAis selected, chan-
nels 2-69 are available.
When AUTO is selected, the TV will
automatically set itself to the correct
mode based on the type of signal it
detects when the AUTO PROGRAM
feature is activated.
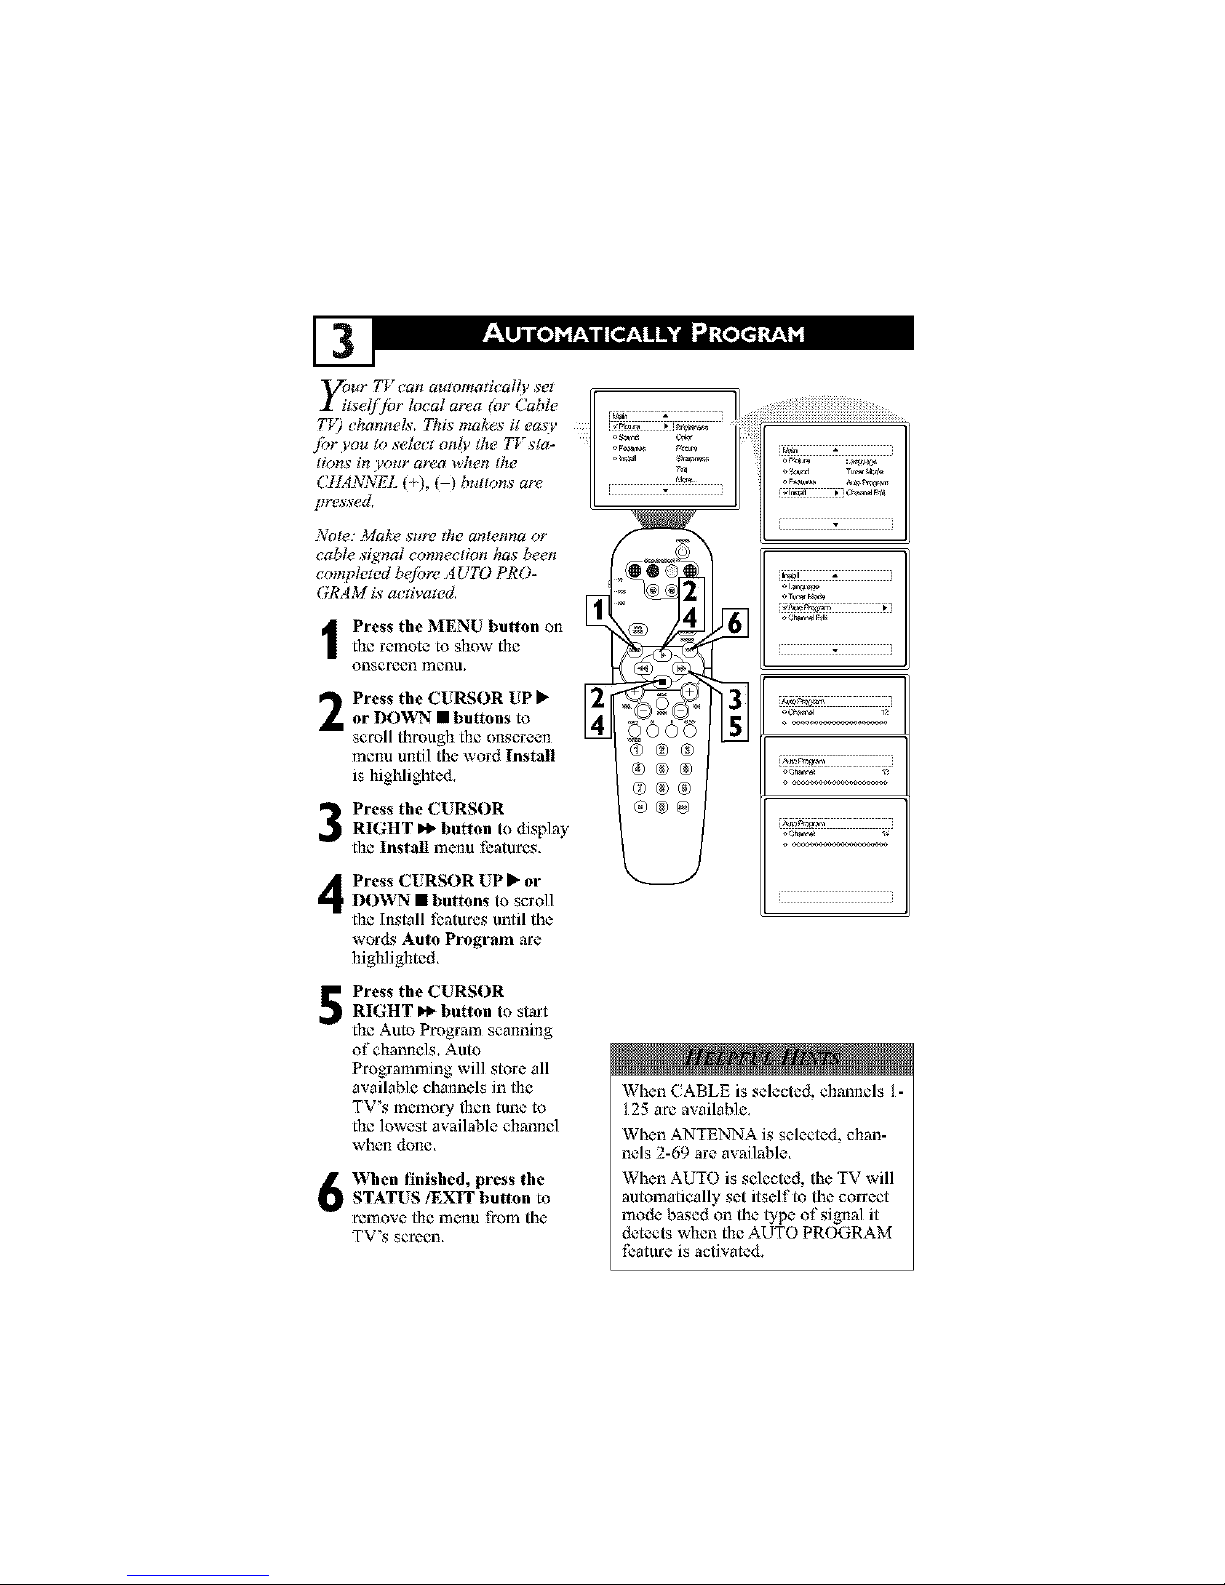
jbr l,ou to ,sele_tloMl, the TV sta- _f,_ '_.,_
lions in l,ot_r area _hen fhe °_ _ _
C1L4NNEL i+), i-) buttons are , _[_,
pressed,
:Vote: ._lake sure the antenna or
cable signal connection has been
complewd be)bre ,4UTO PRO-
()RAM Lsactivmed,
I Press the MENU button onthe remote to show the
onsereen menu.
Press the CURSOR UP _ _42
or DOWN • buttons to
scroll through the onscreen
menu until the word Install
is highlighted.
Press the CURSOR
RIGHT _ button to display
the Install mc-nu features,
Press CURSOR UP _" orIR)WN • buttons to scroll
the Install features until the
wor&_Auto Program are
highlighted.
®®®
®®®
o®®
®®®
L ', i
*__'_777777777_
ii
Press the CURSOR
RIGHT I_ button to start
the Aura Program scanning
of channels.Auto
Programming will store all
available channels in the
TV's memory then tune to
the lowest available channel
when d(me.
When finished, press the
STATUS/EXIT button to
remove- the menu from the
TV's se rc-en,
When CABLE is selected, channels t -
t 25 are available.
When ANTENq',:Ais selected, chan-
nels 2-69 are available.
When AUTO is selected, the TV will
automatically set itself to the correct
mode based on the type of signal it
detects when the AUTO PROGRAM
feature is activated.
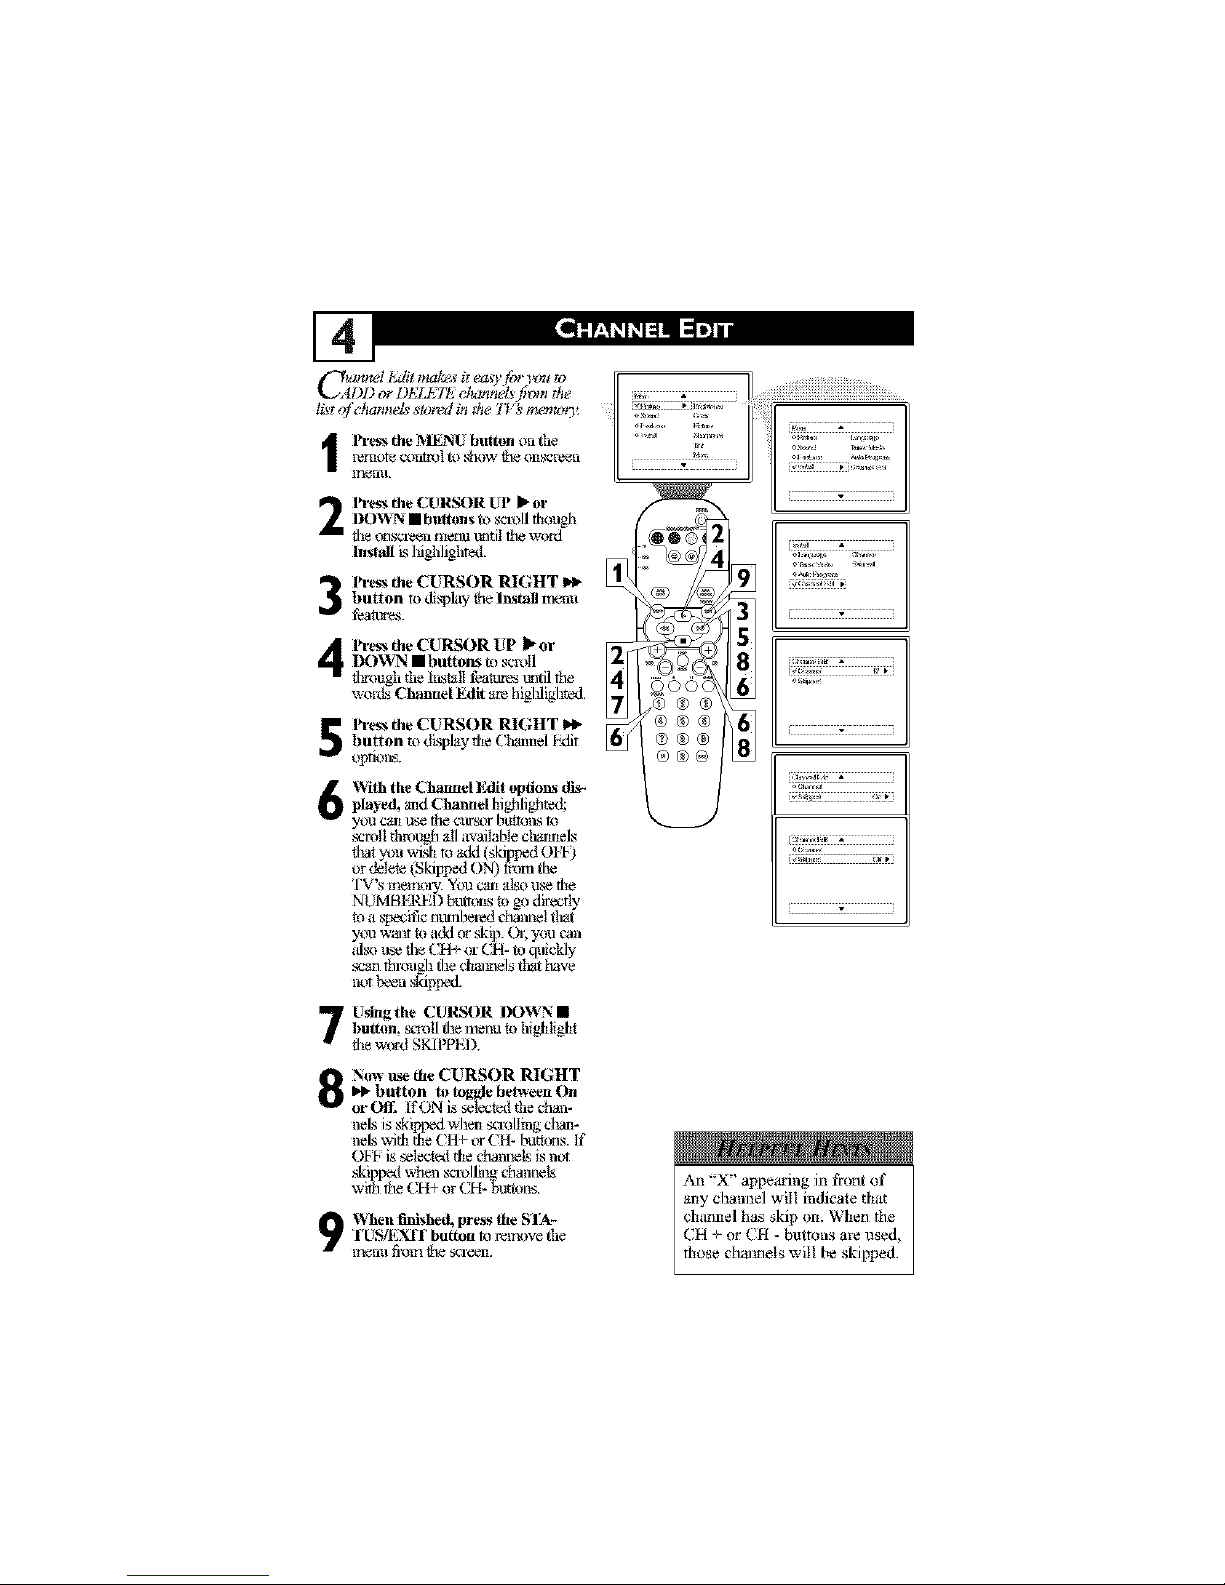
C ummI t,Mitma_ it e_z_yfor Ix_*_o [ _
DD or I)ELI:7_,_ cl_mnel_ l_mt the
li_tof channel_ s_Jred itt _he I'_ _ memor)¢ ........
remote c_m_l to _low Ne onscve_n illli_i illli
l_q_nlL
2
3
4
lh.ess the CURSOR UP I_or
DOWN • buRons to sc.a_ollthough
fi_e_gl_.a'e_nr_lentt_lfi] the word
Install L_Ifighlighted.
lh.ess the CURSOR RIGHT
button to disTdaythe Install n_nu
fea_.
lh.ess the C7U_qtSORUP _ or
DOV_N • buttore_ t_ scroll
tl¢ough rl_eInstall f_a_e_ tmtil the
words Channel Edit are higlfligl_ted.
lh.essthe CURSOR RIGHT I_
button to dLqpl@,theCt_mel hdit
opfitms,
1
Wi|h the Channel liMi| options dis_
pla_ed,aridChanttdhighlighte_
you cartuse the _trsor butto_x4to
_rotl through 'MIavailable ctramels
fl_atyou wish to add (skipped 0 FI-)
or del_ (Skipped ON) t?om the
'IV' S t_(l,_lYl( )1%,. YOU 12_t[1 'diS() LI_ [_fl_
NUMBKI_D buttons to go directly
t_ a s'pecific m_nlxa'ed channel tlr_t
you Wallt to add (_"skip. Or, you can
ida) ltse file CH+ or CH- to quickly
mart through the cMimels tlr_thave
not been skipped.
Usingthe CURSOR DOWN •
button, sm_|l the melm to hi#dight
fl_ew_gd SKI]_PEI),
]]]]]]]]f]]]]]]]]]
[i] G; []_ ;
o
r
Now use the CURSOR RIGHT
I_ button to toggle be|ween On
or Ofll If ON is selectexl the chan-
neb;is skiplxxt wl_ _rolling cl'a_-
01-I-is selectexl the channels is not
ski _xxl ,.vh_n sca_)llil_ channels
w t_ the CH+ or CH- _utt_ns.
9 VChen finished, press the SIA-
"l_USq_YdI"button m r_lIuwe the
ff',_nl!fi'offl fl'le SCI'e_L
An "X" api_iu'ing in front of
arty chain]el will indicate that
channel has skip on, When the
CH + or CH - buttons are used,
those channels will be skipped.
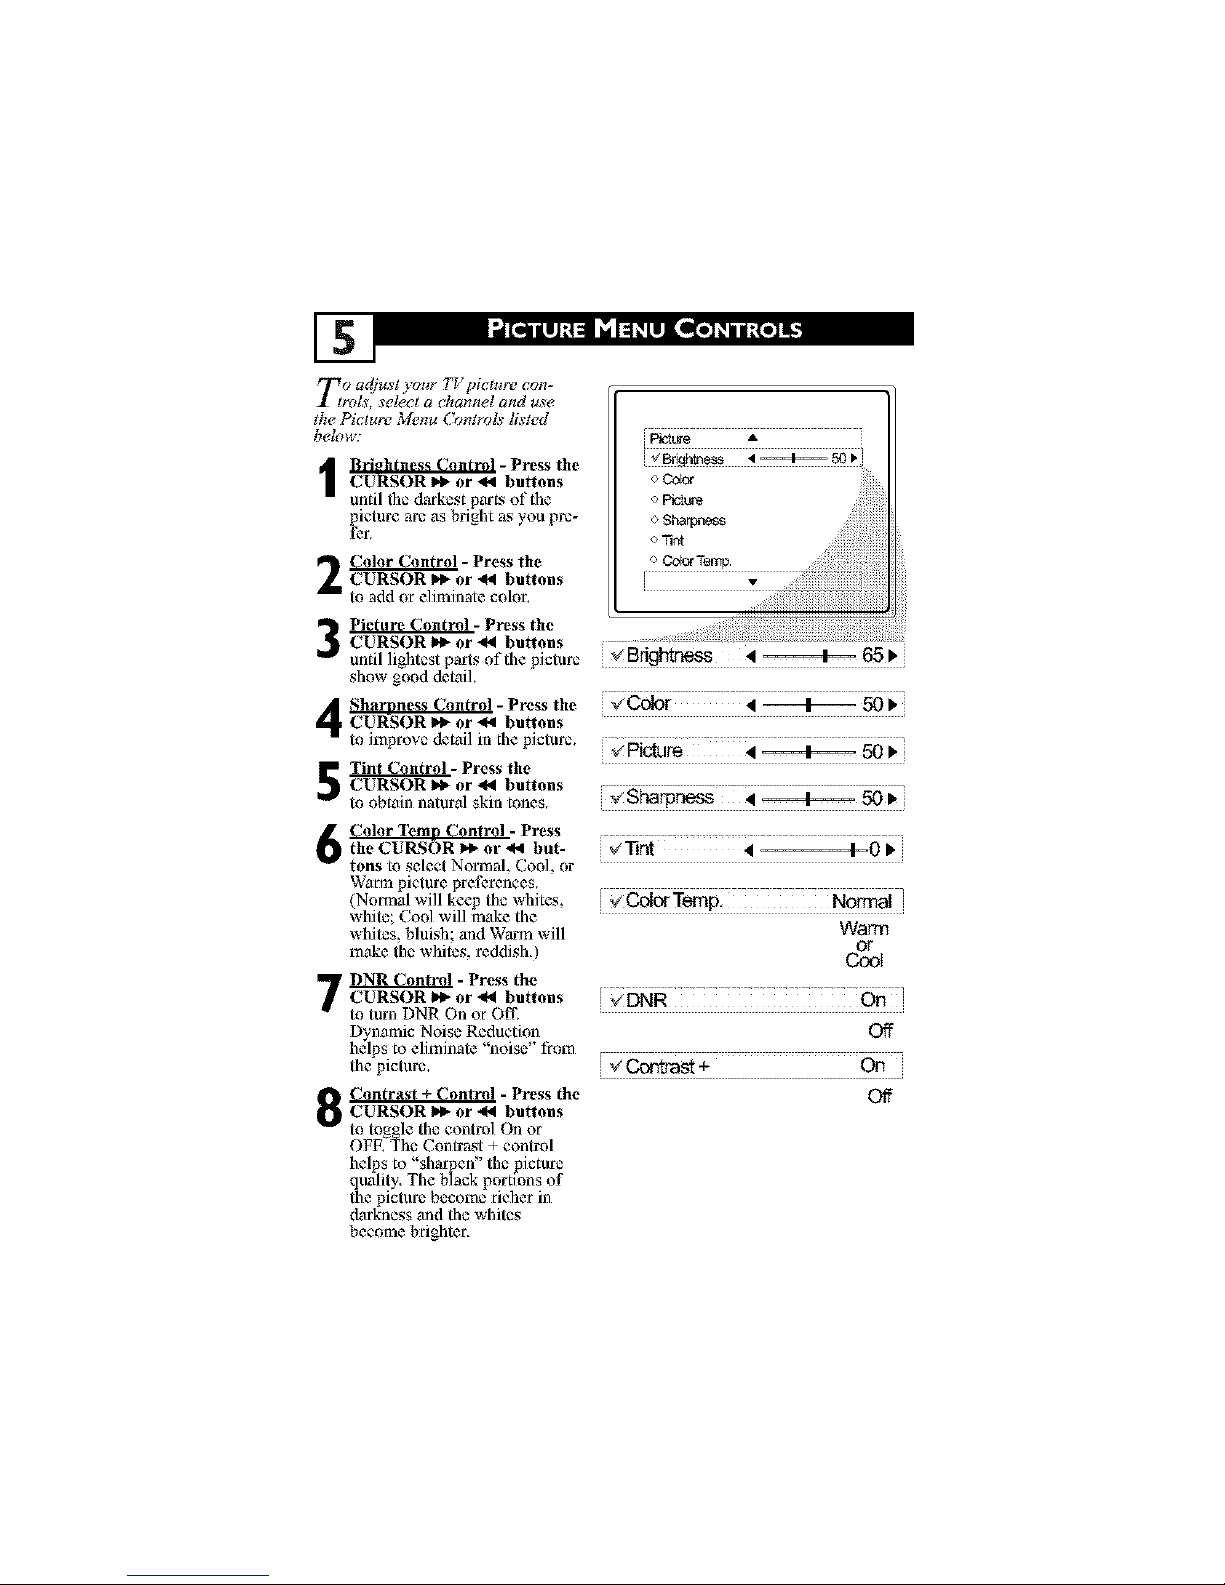
Eo adjust your TV picture con-
_, sel_cl a _hannel and use
the Picture Menu (bntmls listed
belm_:
I rDhtness Control - Press the
CURSOR _ or _ buttons
until the darkest parL_ of the
picture arc as bright as )ou pre-
fer.
_- Press the
CURSOR _1. or 4_1 buttons
to add or e]iminate color.
i_t_ A
o Color
o $ha_ss
o 71nt
o ColorTemp.
Picture Control - Press the
CURSOR I_ or -_l buttons
until lightcst parts of the picture
show good detail.
Sharnness Control - Press the "_ Color 4 + 50 _'
CURSOR I_ or €_1 buttons
to improve detail in the picture. _ _tl_ 4 + 50 l,
_- Press the
CURSOR I_ or _I buttons
to obtain natural skin tones. _ _}'la_rl_ss 4 ========4_ .50 •
,_Bfightaess • =====4=== 65 •
Color Temn Control - Press
the CUI_SOR I_ or €,4 but- _'[]rit • 4=-0 •
tons toselect Normal, Cool, or
Warmpicture preferences.
(Norma!will keepthe whites, _ O___ClgTwclp. Normal
white;,:7oolwill make the
whites, bluish and Warm will Warm
make the whites, reddish.) ____t
' _ - Press theCURSOR I_ or -_ buttons _ DNR On
to turn DNR On or Off.
DynamicNoise Reduction Off
helps to eliminate "noise' from
the picture. V _ +
_1_ Contrast Control - Press the Of_
O CURSOR _1_ or -_ buttons
to to_ole the control On or
OFE_Z_hc Contrast + control
helps to "sharpen" the picture
qtmlity. The black portmns of
the picture become richer in
darkness and the whites
become brighter,

T_ adjust four TVsound, ,sde_ t
ml use tT_ ,_mml Menu C?mtmL_
listed t_elow:
I Treble: Pre_s the CURSOR _ Main •or _ buttons to adjust the con- .o _ . T:eblo
troh The control will enhance v'Soup.d • Bass
the high fi'equency souncL_, <>Features Balac_o
: Press the CUI_NOR I_ o Install AVL :} )er ,_1 buttons to adjust the con- Incr.
troh The control will enhance
the low frequency sounds,
R ._ •
Balance: Pres, the CURSOR .....il :i :il :i :il :i :il
or _ buttons to adjust the .... :::
level of sound coming from the .......
left and eight speakers, €Treble 4 =====I_ 50 I_
AVI......_:IAuto Volume Leveler!
Press the CURSOR _1_or ,la ......
buttons to turn the control On _ Bass 4 =====1_ 50 I_
or OtE When On, AVL will level
out the sound being heard when ,
sudden changes in volttme occur _ Balance I L ===+=== R I_
during commercial break_ or
channel ch_mges,
eAVL On
Incr. gurround: Press the
CURSOR I_ or _ buttons to or Off
select betveeen Dolby Virtual or
Stereo settings (If Stereo), or
select Spatial or Mono IIf ¢ Incr.Surround Spatial ,
Mono), Or Merle
SAP: Press the CURSOR
or _ buttons to toggle this ¢ Incr. Surround Dolby Virtual
control to On or OtE SAP is
short for Secondary Audio Or Stereo
Programming and is sent as a :
third audio channel, a SAP sig-
nal c_m be heard apart from the gSAP Oft l
current TV progrmn sound,Note:
If SAP is not present on a select- or Off
show No SAP will _Opeeu"on
the screen,
7_: Press the CURSOR I_
or 4_I buttons to select betveeen
Stereo or Mono settings, Note: It"
Stereo is not present ¢ma select-
shove and the TV is placed in
the Sterc'o mode, the sound com-
ing from the TV will remain in
the Mono mude.
v Sound Mono
OrStereo

_trare c_s'ex the video ,sutg_liedto
tilted o_ way or at_ot:t_27_771(
Ad/ust _omr6l will allow you to c,or-
rect ttu_problem bl:ad]u_ting t:_
,s'c_en fi_a clcmkdise or c,ota_R_rclock-
_£s'edim_tion.
I Press the MENU button on the
remote control to show tl_
onscrccn menu.
Press the CURSOR DOWN •
bultons tmti] Fcattw_ is high-
li_tcd.
Press the CURSOR RIGHT
It_ button za'..dthe menu will
shift to the leth
Press the CURSOR IR)WN •
bultons rc_eatedly tmtil tl_
Rotation control ishi,lighted.
Press the CURSOR RIGHT
I,_ or CURSOR LEFT._I
buttons to rotate the pictttre or.
the scrcvn clockwise or ca'_tmter
clock_qse. PlezL_enot_ that tl_
zmaotmtof rotalion will be veo_
minimal,
Press the STATU_EXqT but-
ton to remove the menu frol-n
the scroen,
_i_ _ _
J_ ; g;:
N
®®®
®®®
®®@
.__.;
_,_h 5)emc_Mc_e On; a ,split
'_rrcen&¢mo will 12_¢st*Swn on
the ,s'_r_en. The Demo Mode will
,s'hm_tt_ rigtu side _ith show a
shaq_er image _ith more _tatural
_tlOllOn.
I Press the DEMOiMUTE but-ton on the remote approximate-
ly 3-4 seconds. The s_lit screen
demo appezasl After z0 see-
oru:ls,theTV will automatically
retrtm to normal opc-ralion,
Note: You can also turn the Digital
Pictare Demo On or Offby using
On screen menu,
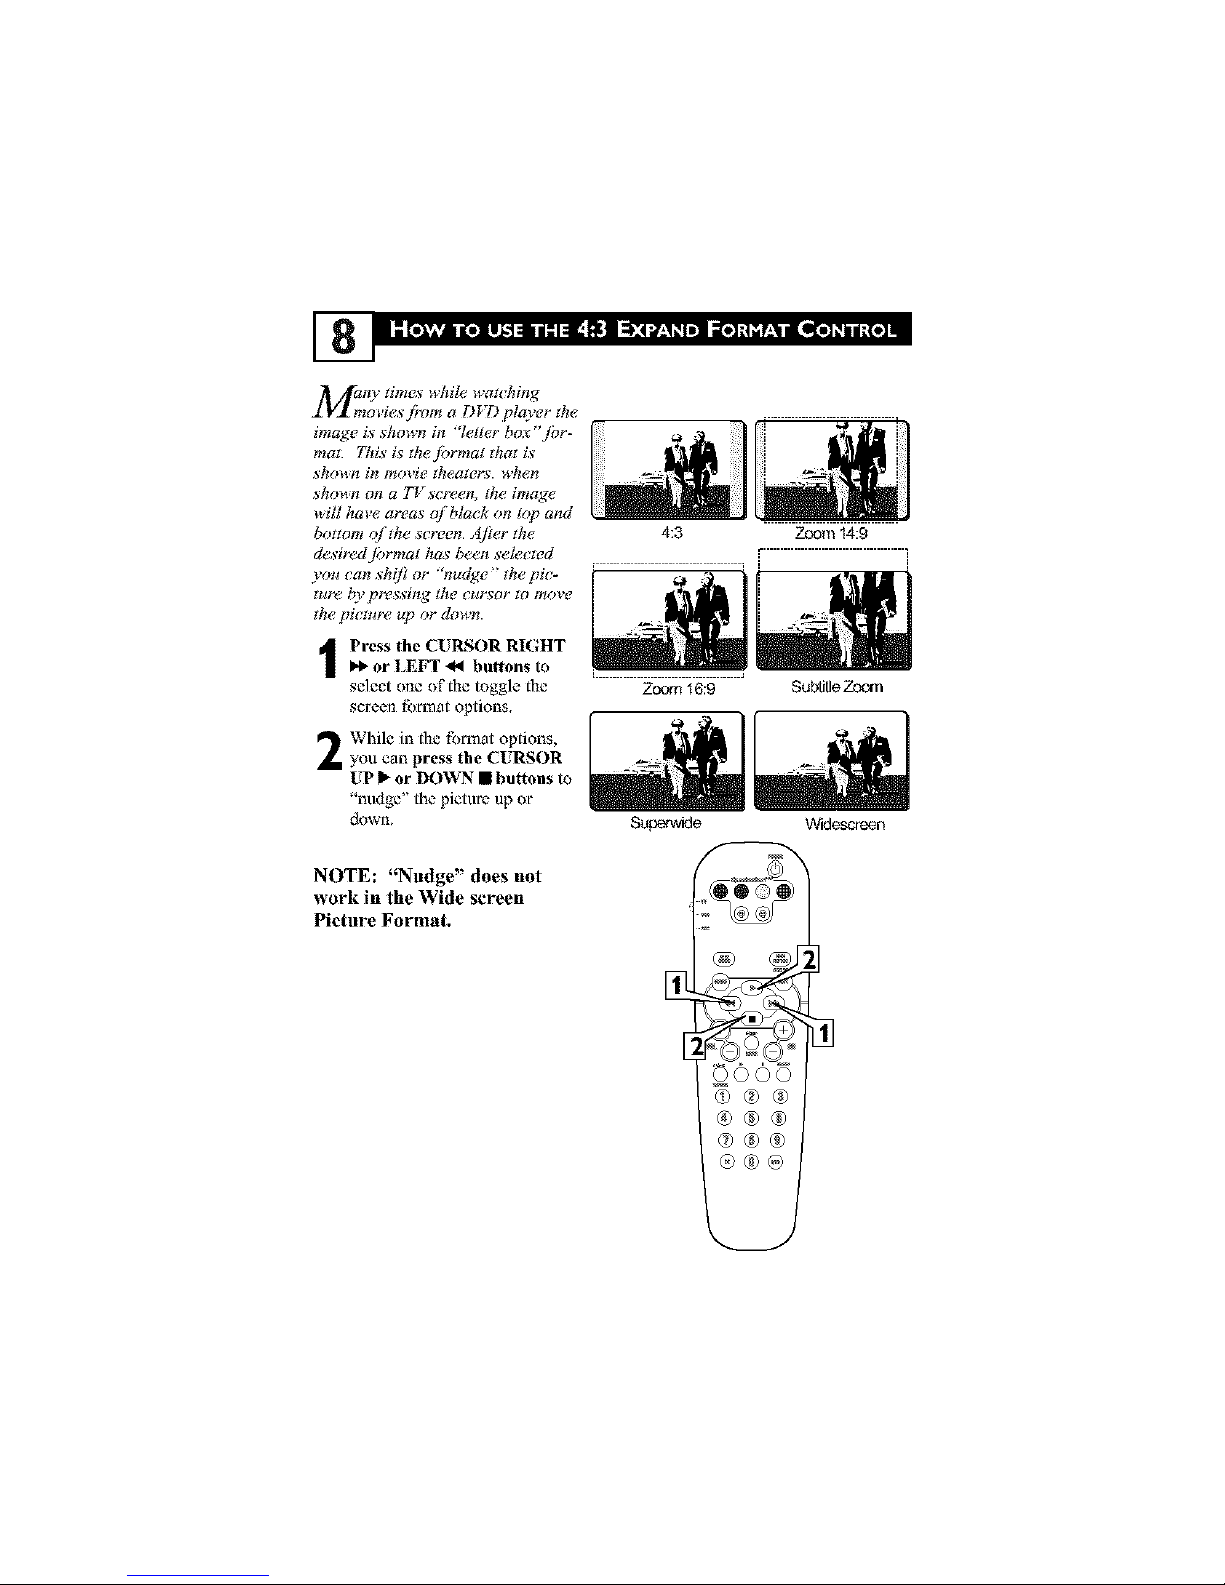
mlany times while watching
nol'ies j_'_m a DVD player the
image i,s shown in "letter box'jbr-
mat. This i_ thej?_rmat that i,s
sho_,n in movie theaw_, when
SltO_4_ 01_ a T_,scr_l_, fltc iITtag_
_ill hal'e areas c_'black on top and
bottom eftthe screen. After the
de,sired f>rmat has been selecwd
you can shift or "nudge' the pic-
rare hy pressing the cursor to move
the picn_re up or down.
I Press the CURSOR RIGHTl._ or LEFT "44 buttons to
select one of the toggle the
screen fbta_natoptions.
While in the fbtTnat options,
you can press the CURsoR
UP I1_or DOWN • buttons to
"nudge" the picture up or
down.
NOTE: "Nudge" does not
work in the Wide screen
Picture Formal
, J
Zoom 16:9
Subtitle Zorn
Superwide _,hdescreen
®®®
®®®
®®®
®®@
.J
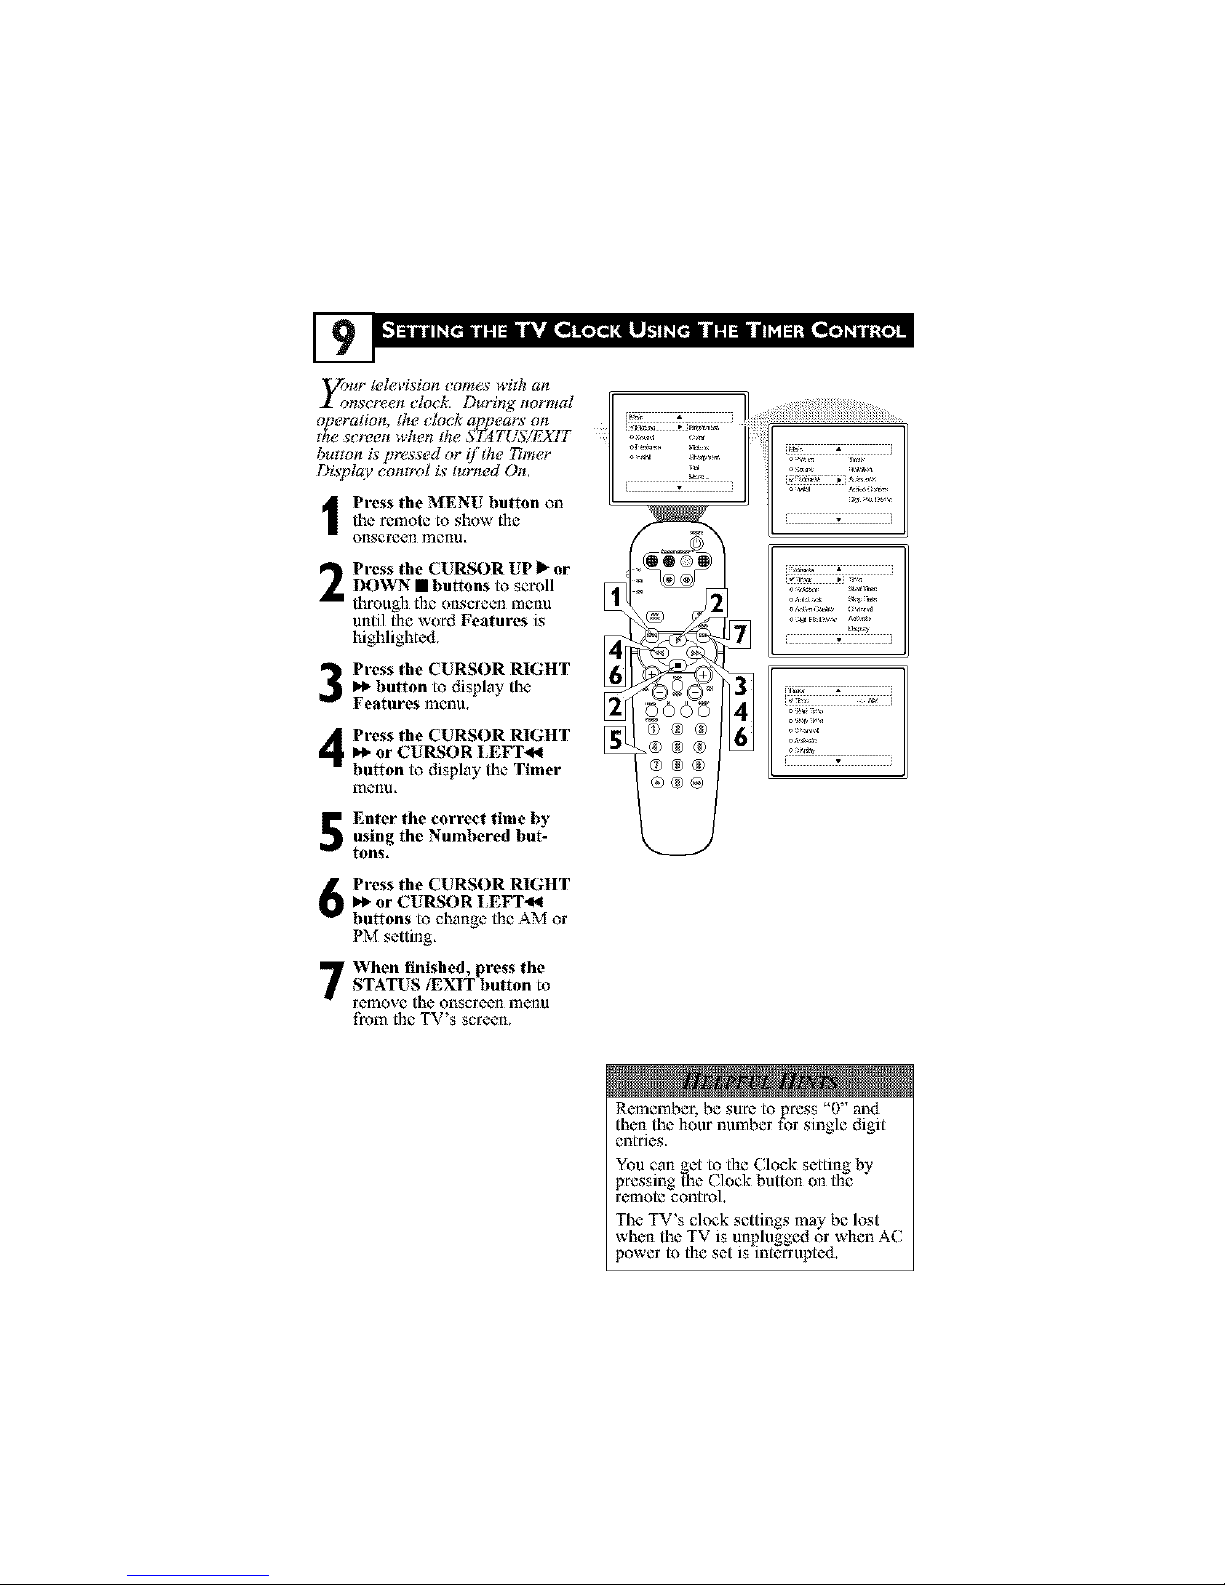
y_/_r teleriMon _omes with an
nSCF_!CI__[ock. D_ring I_oFIvta[ [_
o[)era[iolL [he clock appea_s ol_
I
the s_ reen when the SZ4TUS/F_TT
button is pressed or if the Timer
Displal, control is turned On,
I ress the MENU button on
the remote to show the
onscreen menu,
Press the CURSOR UP i_ or
DOWN • buttons to scroll
through the onscreen menu
until the word Features is
highlighted,
Press the CURSOR RIGHTbutton to display the
Features menu.
4 ress the CURSOR RIGHT
I_ or CURSOR LEFT_I
button to display the Timer
l_enl.l,
Enter the correct time by
using the Numbered but-
tons,
Press the CURSOR RIGHT
I_ or CURSOR LEFT,_I
buttons to change the AM or
PM setting,
When finished, press the
STATUS/EXIT button to
remove the onscreen rneml
tmm the TV's screen,
oooo
@)@@
illlllli"illlllll
fh&¥ ._ i
i
f _ j
Remember. be,ure topre, s 0 and
then• the hour number for single digit
entries.
You can get to the Clock setting by
pressing the Clock button on the
remote control,
The TV's clock settings may be lost
when the TV is unplugged or when AC
power to the set is interrupted.
 Loading...