

Page 1

cover 2355.4Rev1 02-11-2004 14:16 Pagina 1
Page 2

cover 2355.4 02-11-2004 14:16 Pagina 2
Page 3
Return your Warranty Registration card today to ensure
you receive all the benefits you’re entitled to
Registering your model with PHILIPS makes you eligible for all of the valuable benefits
listed below, so don’t miss out. Complete and return your Product Registration Card at
once to ensure:
* Proof of Purchase
Returning the enclosed card
guarantees that your date of
purchase will be on file, so no
additional paperwork will be
required from you to obtain
warranty service.
* Product Safety
Notification
By registering your product
you’ll receive notification directly from the
manufacturer - in the rare
case of a product recall or
safety defect.
* Additional Benefits
of Product Ownership
Registering your product
guarantees that you’ll receive
all of the privileges to which
you’re entitled, including
special money-saving offers.
Congratulations on your purchase, and
welcome to the “family!”
Dear PHILIPS product owner:
Thank you for your confidence in PHILIPS.You’ve
selected one of the best-built, best-backed
products available today.We’ll do everything in
our power to keep you happy with your
purchase for many years to come.
As a member of the PHILIPS “family,” you’re
entitled to
protection by one of the most comprehensive
warranties and outstanding service networks in
the industry.
What’s more, your purchase guarantees you’ll
receive all the information and special offers for
which you qualify, plus easy access to accessories
from our convenient home shopping
network.
Most importantly, you can count on our
uncompromising commitment to your total
satisfaction.
All of this is our way of saying welcome - and
thanks for investing in a PHILIPS product.
P.S. To get the most from your PHILIPS
purchase, be sure to complete and
return your Product Registration
Card at once.
For Customer Use
Enter below the Serial No., which is
located on the rear of the cabinet. Retain
this information for future reference.
Model No. __________________________
Serial No. __________________________
Know these
safety symbols
This “bolt of lightning” indicates
uninsulated material within your unit
may cause an electrical shock. For the safety
of everyone in your household, please do not
remove product covering.
The “exclamation point” calls attention
to features for which you should read
the enclosed literature closely to prevent
operating and maintenance problems.
WARNING:To reduce the risk of fire or
electric shock, this apparatus should not be
exposed to rain or moisture and objects
filled with liquids, such as vases, should not
be placed on this apparatus.
CAUTION: To prevent electric shock,
match wide blade of plug to wide slot, fully
insert.
ATTENTION :Pour éviter les choc
électriques, introduire la lame la plus large de
la fiche dans la borne correspondante de la
prise et pousser jusqu’au fond.
CAUTION
RISK OF ELECTRIC SHOCK
DO NOT OPEN
CAUTION: TO REDUCE THE RISK OF ELECTRIC SHOCK, DO NOT
REMOVE COVER (OR BACK). NO USER-SERVICEABLE PARTS
INSIDE. REFER SERVICING TO QUALIFIED SERVICE PERSONNEL.
t
s
Visit our World Wide Web Site at http://www.philips.com
2355.4 en 02-11-2004 14:19 Pagina 1
Page 4
1. Read these instructions.
2. Keep these instructions.
3. Heed all warnings.
4. Follow all instructions.
5. Do not use this apparatus near water.
6. Clean only with a dry cloth.
7. Do not block any of the ventilation openings. Install in
accordance with the manufacturers instructions.
8. Do not install near any heat sources such as radiators, heat
registers, stoves, or other apparatus (including amplifiers) that
produce heat.
9. Do not defeat the safety purpose of the polarized or
grounding-type plug. A polarized plug has two blades with one
wider than the other. A grounding type plug has two blades
and third grounding prong.The wide blade or third prong are
provided for your safety. When the provided plug does not fit
into your outlet, consult an electrician for replacement of the
obsolete outlet.
10. Protect the power cord from being walked on or pinched
particularly at plugs, convenience receptacles, and the point
where they exit from the apparatus.
11. Only use attachments/accessories specified by the
manufacturer.
12. Use only with a cart, stand,tripod, bracket, or
table specified by the manufacturer, or sold with
the apparatus.When a cart is used, use caution
when moving the cart/apparatus combination to avoid injury
from tip-over.
13. Unplug this apparatus during lightning storms or when unused
for long periods of time.
14. Refer all servicing to qualified service personnel. Servicing is
required when the apparatus has been damaged in any way,
such as power-supply cord or plug is damaged, liquid has been
spilled or objects have fallen into apparatus, the apparatus has
been exposed to rain or moisture, does not operate normally,
or has been dropped.
15. This product may contain lead or mercury. Disposal of these
materials may be regulated due to environmental
considerations. For disposal or recycling information, please
contact your local authorities or the Electronic Industries
Alliance: www.eiae.org.
16. Damage Requiring Service - The appliance should be
serviced by qualified service personnel when:
A. The power supply cord or the plug has been damaged; or
B. Objects have fallen, or liquid has been spilled into the
appliance; or
C. The appliance has been exposed to rain; or
D. The appliance does not appear to operate normally or
exhibits a marked change in performance; or
E. The appliance has been dropped, or the enclosure damaged.
17. Tilt/Stability - All televisions must comply with
recommended international global safety standards for tilt and
stability properties of its cabinets design.
• Do not compromise these design standards by applying
excessive pull force to the front,or top, of the cabinet
which could ultimately overturn the product.
• Also, do not endanger yourself, or children, by placing
electronic equipment/toys on the top of the cabinet. Such
items could unsuspectingly fall from the top of the set and
cause product damage and/or personal injury.
18. Wall or Ceiling Mounting - The appliance should be
mounted to a wall or ceiling only as recommended by the
manufacturer.
19. Po wer Lines - An outdoor antenna should be located away
from power lines.
20. Outdoor Antenna Grounding - If an outside antenna is
connected to the receiver, be sure the antenna system is
grounded so as to provide some protection against voltage
surges and built up static charges.
Section 810 of the National Electric Code, ANSI/NFPA No.
70-1984, provides information with respect to proper
grounding of the mats and supporting structure grounding of
the lead-in wire to an antenna-discharge unit, size of
grounding connectors, location of antenna-discharge unit,
connection to grounding electrodes and requirements for the
grounding electrode. See Figure below.
21. Objects and Liquid Entry - Care should be taken so that
objects do not fall and liquids are not spilled into the
enclosure through openings.
a) Warning:To reduce the risk of fire or electric shock, this
apparatus should not be exposed to rain or moisture and
objects filled with liquids, such as vases should not be placed
on this apparatus.
22. Battery Usage CAUTION - To prevent battery leakage
that may result in bodily injury, property damage, or damage
to the unit:
• Install all batteries correctly, with + and - alignment as
marked on the unit.
• Do not mix batteries (old and new or carbon and alkaline,
etc.)
• Remove batteries when the unit is not used for a long time.
IMPORTANT SAFETY INSTRUCTIONS
Read before operating equipment
Note to the CATV system installer: this reminder is provided to call the CATV system installer’s attention to Article 820-40
of the NEC that provides guidelines for proper grounding and,in particular, specifies that the cable ground shall be connected to
the grounding system of the building, as close to the point of cable entry as practical.
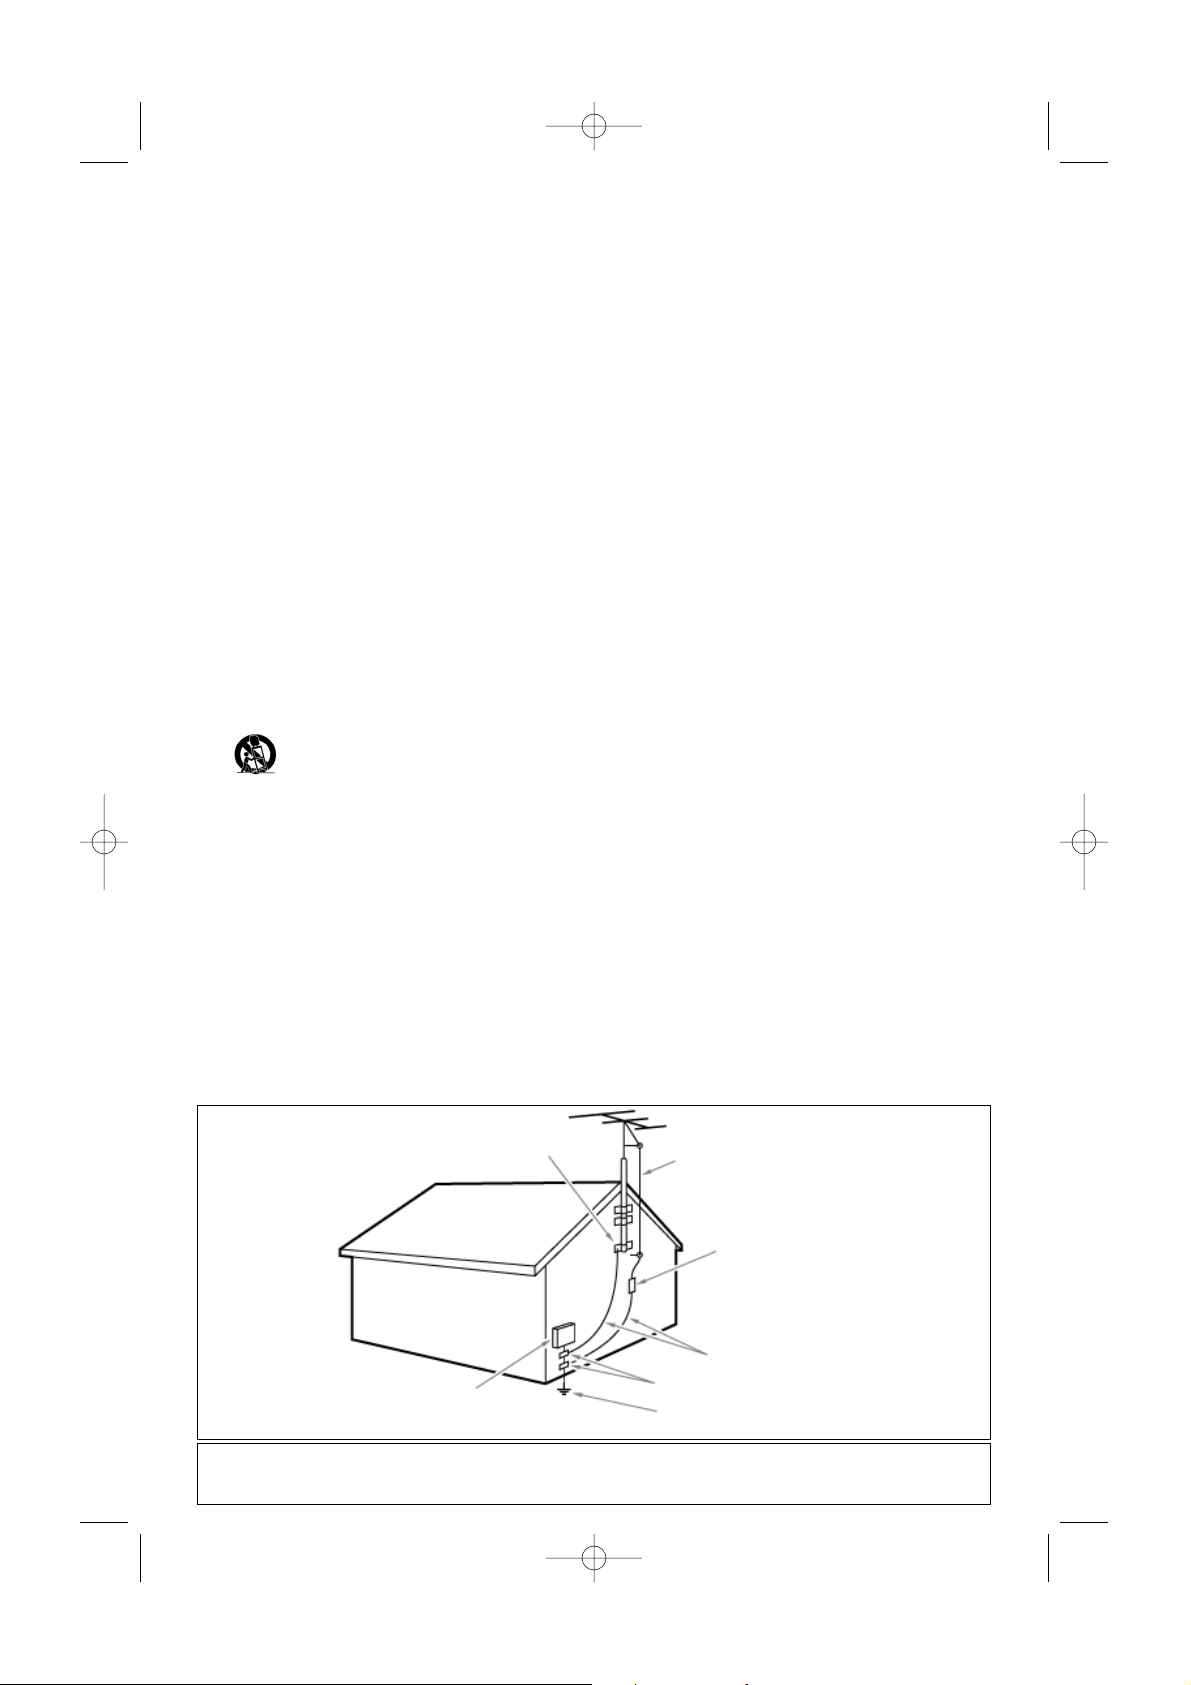
EXAMPLE OF ANTENNA GROUNDING AS PER
NATIONAL ELECTRICAL CODE (NEC)
GROUND CLAMP
ANTENNA LEAD IN WIRE
ANTENNA DISCHARGE UNIT
(
NEC SECTION 810-20)
GROUNDING CONDUCTORS
(NEC SECTION 810-21)
GROUND CLAMPS
POWER SERVICE GROUNDING ELECTRODE SYSTEM
(NEC ART 250, PART H)
ELECTRIC SERVICE EQUIPMENT
2355.4 en 02-11-2004 14:19 Pagina 2
Page 5
1
Help?
If this instruction manual does not give an answer or if ‘Tips’ do not solve your TV problem, you can call your
Local Philips Customer or Service Centre. See the supplied World-wide guarantee booklet.
Please, have the Model and Product number which you can find at the back of your television set or on the
packaging, ready, before calling the Philips helpline.
Model: 30PF9946D/37; 37PF9936/37; 42PF9936D/37 Product No:
Care of the screen
Do not touch, push or rub or strike the screen with anything hard as this may scratch, mar or damage the
screen permanently. Do not rub with dust clothes with chemical treatment. Do not touch the surface with bare
hands or greasy cloth (some cosmetics are detrimental to the screen). Unplug the TV before cleaning the
screen.When the surface becomes dusty, please wipe gently with absorbent cotton or other soft materials like
chamois soaks. Do not use acetone, toluene and alcohol because they cause chemical damage.
Do not use liquid cleaners or aerosol cleaners. Wipe off saliva or water drops as soon as possible.Their long
time contact with the screen causes deformations and colour fading.
Warning concerning stationary images on the TV screen
A characteristic of Plasma Display Panels is that displaying the same image for a long time can cause a
permanent after-image to remain on the screen.This is called phosphor burn in.
Normal use of the TV should involve the showing of pictures that contain constantly moving and changing
images that fill the screen.
Preparation
& Wall mounting instructions/Table stand
How to mount the supplied stand and/or wall
mount bracket, see the supplied separate
leaflet. Make sure that the wall mount is being
fixed securely enough so that it meets safety
standards.
The weight of the TV (excl. packaging) is about
40 Lbs (30PF9946); 66 Lbs (37PF9946);
92 Lbs (42PF9946).
Note: Other (not supplied) stands are optional
accessories. Consult your dealer.
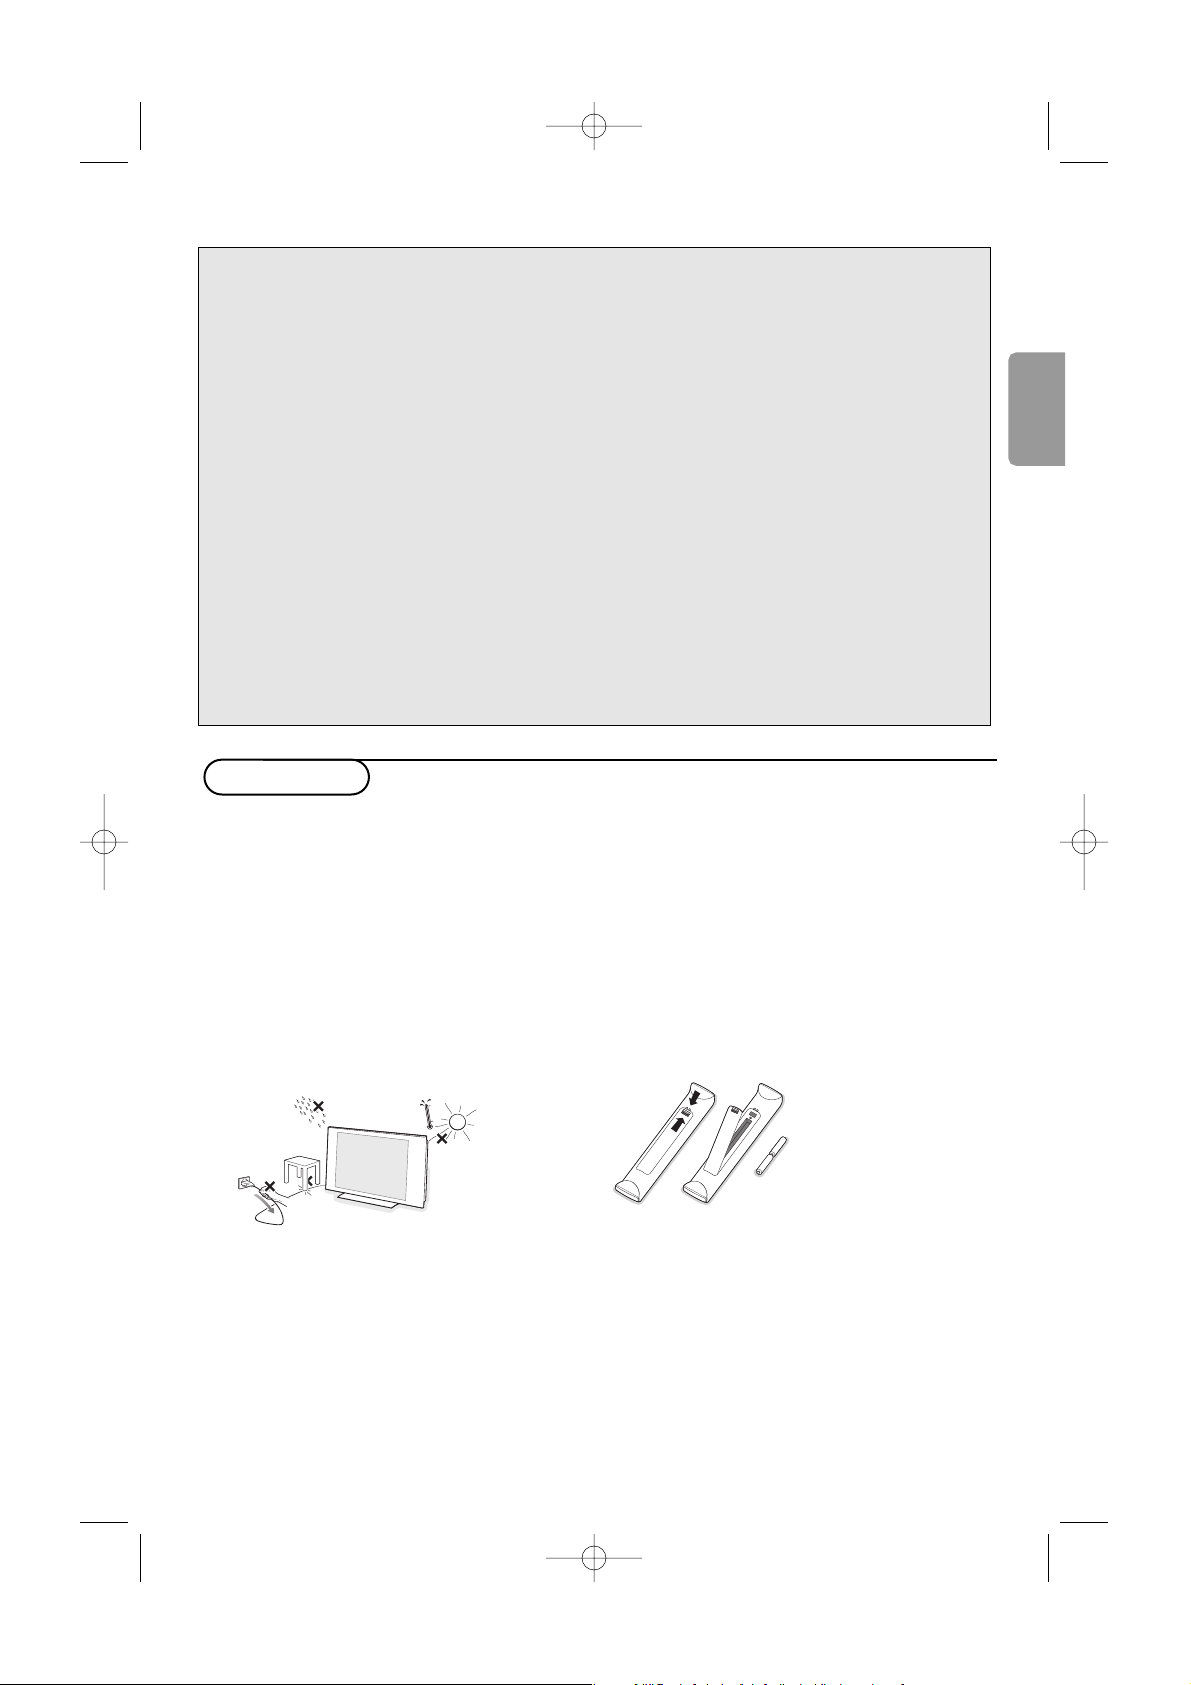
é Make sure that air can circulate freely through
the ventilation slots.
To prevent any unsafe situations, no naked
flame sources, such as lighted candles, should
be placed on or in the vicinity.Avoid heat,
direct sunlight and exposure to rain or water.
The equipment shall not be exposed to
dripping or splashing.
“ Insert the aerial plug firmly into the aerial
socket x at the bottom of the TV. For best
picture quality use the suppressor-aerial cable
supplied.
‘ Insert the power plug supplied into the mains
at the bottom of the TV and in the wall socket
having a mains voltage of 96-140V.
To prevent damaging the power (AC) cord
which could cause a fire or electric shock, do
not place the TV on the cord.
( Remote control: Insert the 2 batteries
supplied (Type R6-1,5V).
The batteries supplied do
not contain the heavy
metals mercury and
cadmium. Please check on
how to dispose of
exhausted batteries
according to local
regulations.
§ Turn the TV on :Press the power switch B
at the right side of the TV.
An indicator on the front of the TV lights up.
Press the
-P+ keys or the B key on the
remote control.
English
2355.4Rev1 en 02-11-2004 14:19 Pagina 1
Page 6
2
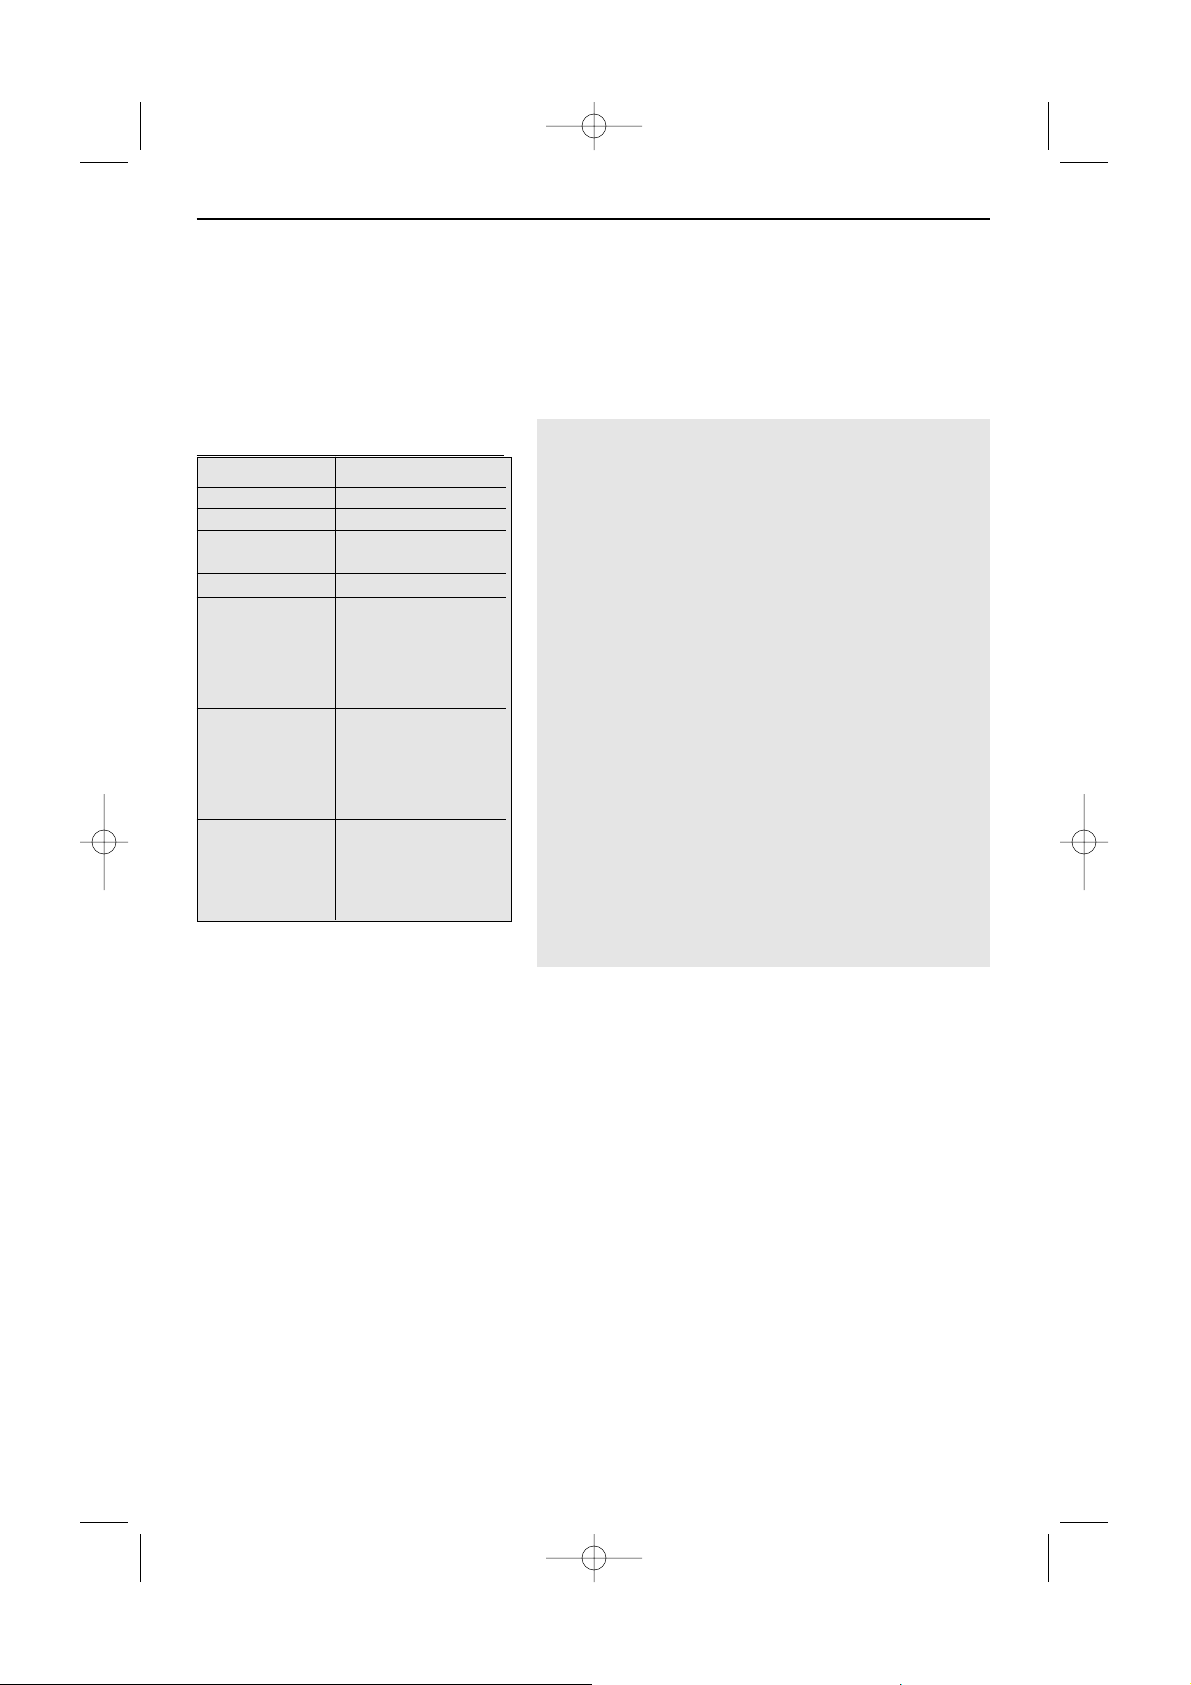
Features
Timer π Time
AutoLock Start Time
Contrast+ Stop Time
DNR Channel No
PIP Activate
Display
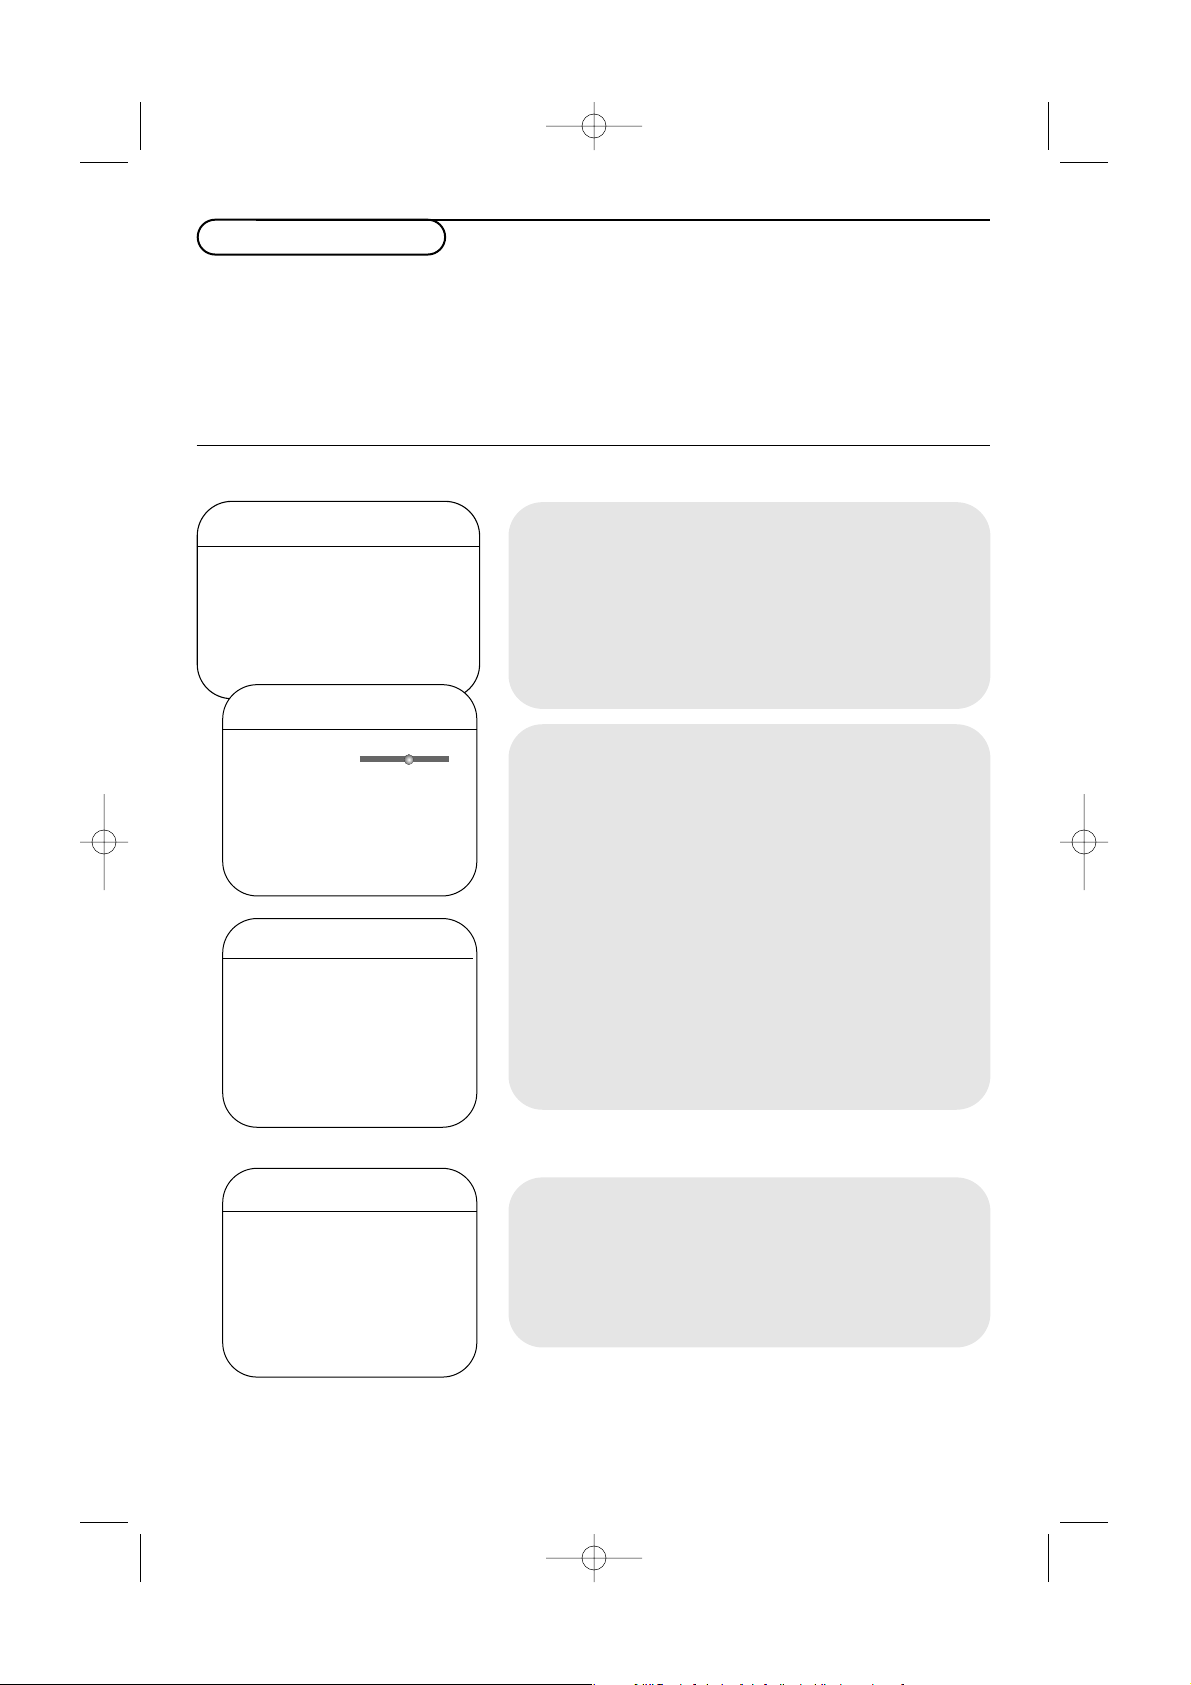
Features menu:
•
Timer,AutoLock
and PIP: see p. 10-13.
•
Contrast+
: automatic adjustment of the picture contrast
which permanently sets the darkest part of the picture to
black.
•
DNR: attenuates picture noise (snow) in difficult reception
conditions.
To use the menus
& Press the MENU button on the remote control
to summon the main menu.At any moment you
can exit the menu by pressing the
MENU
button again.
é Use the cursor up/down to select Picture,
Sound, Features, Install or Mode.
“ Use the cursor in the right direction to select
the menu item.
‘ Use the cursor up/down again to select the
control you want to select or to adjust.
( Press the OK button to activate.
Note: Items temporary not available or not relevant are
displayed in a light grey color and cannot be selected.
TV Menu
Picture π Brightness
Sound Color
Features Picture
Install Sharpness
Mode Tint
Color Tem
Picture
Brightness π
Color
Picture
Sharpness
Tint
Color Temp
pπ
Sound
Equalizer π 120 Hz
Balance 500 Hz
AVL 1500 Hz
Dolby Virtual
....
SAP
Sound
TV menu
Picture menu:
•
Brightness: this changes picture brilliance.
•
Color: this changes the intensity of the color.
•
Picture: this improves the detail of the lightest parts of the
picture.
•
Sharpness: this changes the picture definition.
•
Tint
: this adjusts the picture to obtain natural skintones.
•
Color Temp: this changes the color rendering: Cool (bluer),
Normal (balanced) or Warm (redder).
Sound menu:
•
Equalizer: to adjust the sound tone (from bass 120 Hz to
treble 10 kHz).
•
Balance: this balances the sound on the left and right
speakers.
•
AVL (Automatic Volume Leveller): this is used to limit
increases in sound, especially on program change or
advertising slots.
•
Dolby Virtual
: simulates the surround sound experience from
2 speakers using Dolby Pro Logic* providing the listener with
the sensation of being surrounded by additional speakers.
•
SAP
: is an additional part of the stereo broadcast system;
Sent as a third audio channel, an SAP can be heard apart from
the current TV program sound.TV channels are free to use
SAP for any number of purposes. (Not available if not present
with a selected program).
•
Sound
: this allows you to toggle between
Stereo
or
Mono
sound (if stereo is present on a selected TV program).
2355.4 en 02-11-2004 14:19 Pagina 2
Page 7
3
How to search for TV channels
Store TV channels
If you want to re-install your TV proceed as
follows:
& Press the MENU button on the remote
control.
é Use the cursor up/down to select Install.
“ Press the cursor right to enter the Install
menu.
Select the menu language
& Use the cursor left/right.
é Press the cursor up/down to select your
language.
Select the Tuner mode
Allows you to change the TV’s signal input to cable,
antenna or auto mode.The auto mode setting
helps the TV determine the type of signal or
channels being received when auto program is
activated.
& Select Tuner Mode in the Install menu.
é Press the cursor right.
Note: It is recommended to keep the predefined
Automatic way of autoprogramming. In case of
difficulties in autoprogramming with the automatic
method, choose for Antenna or Cable whether
antenna or cable signals are present.
When
Auto is selected, the TV will
automatically detect whether or not cable
signal input is present.
When
Antenna is selected, the TV will detect
antenna signals and will search for all antenna
TV channels available in your local area.
When
Cable is selected, the TV will detect
cable signals and will search for all cable TV
channels available in your local area.
TV Menu
Picture Language
Sound Tuner Mode
Features Auto Program
Install π Channel edit
Mode
Auto Program
& Select Auto Program in the Install menu.
Note: All channels must be unlocked in order to
autoprogram. If requested, enter your code to unlock
all channels. (See TV, Features,AutoLock, p. 11.)
é Press the cursor right.
The autostore option label
Start ? appears.
“ Press the cursor right.
‘ The progress of autoprogramming is displayed.
Editing of channels
This feature allows you to edit or skip channels
from the channel list which have bad of weak
signals or channels which you do not watch often.
Note: Once a channel is skipped, you cannot select it
with the
-P+ button; you can only access the channel
with the digit buttons.
& Select Channel Edit in the Install menu;
é Press the cursor right to enter the channel list.
“ Select the channel you want to skip with the
cursor left/right.
‘ Press the cursor down.
Select
On or Off.
( Press the cursor up/down to select another
channel and repeat steps
“ - ‘.
§ Press the MENU button to return to the Install
menu.
Note:To add back channels to the list, repeat steps
& to ‘.
Auto Program
Channel ..........
o
p π
œ
Channel Edit
Channel π
Skipped On/Off
2355.4 en 02-11-2004 14:19 Pagina 3
Page 8
4
Use of the remote control RC4334
Note: For most buttons pressing a button once will activate the function. Pressing a second time will de-activate it.
Remark: in VGA mode only some buttons are valid.
* Manufactured under license from Dolby Laboratories.
‘Dolby’‘Pro Logic’ and the double-D symbol are trademarks of Dolby Laboratories.
INFO Display information
To display the channel number,the
name (if it exists), the time, the sound
mode and the time remaining on the
timer.
Press again to display the ratings
selected.The volume level and the
smart control adjustments are then
displayed each time they are used.
®ºÒ‡π†
Audio and Video equipment buttons.
TV / PC
Press one of these buttons to switch
the television between TV or PC
mode.
SURR Sound mode
Incredible surround
With stereo transmission, and when
Incredible surround is selected, it
seems as though the loudspeakers
are spread further apart from one
another.
Virtual Dolby Surround
Optimal with Dolby surround *
signals. Enables you to experience the
effect of Dolby Surround Pro Logic,
reproducing a rear sound effect. See
Sound menu, Dolby Virtual p. 2.
Note:You can make the same selection in
the Sound menu, Dolby Virtual, p. 2.
HD Press this button to use the
remote control directly in the HD
mode for HD devices (eg. Set Top
box).
Press 1x for
HD-A mode,
press 2x for
HD-D mode.
OK Press this button to display the
program list or to activate your
choice or to confirm when in the
menus.
MENU Main menu on/off. See p. 2.
CC Closed Caption
On/Off/On during mute
V To adjust the volume.
¬ Interrupt the sound or restore it.
P Channel selection
To browse through the TV channels
or sources stored.
0/9 Digit buttons
To select a TV channel.
For a two digit program number,
enter the second digit before the
dash disappears.To switch
immediately to a selected one digit
TV channel, keep the digit button
pressed a bit longer.
AV+ To select connected devices,
see p. 9.
-To type the digital seperator for
digital channels.
SLEEP TIMER
To select the length of time before
the set automatically turns off (from
15 to 240 minutes).
PIP When in VGA or HDMI Mode,
pressing the
PIP button will bring up
a smaller second window within your
main screen enabling you to watch a
TV channel and a picture from a
device connected to
AV3 , at the
same time.
¬
+
-
V
+
-
P
VCR DVD TV SAT AMP
CCMENU
123
456
789
0
ACTIVE SLEEP
B
POWER
OK
®
®
®
®
AUTO AUTO
aM
Ò®‡π
º
†
INFO
TV PC
SURF
FORMAT
HD
SURR
SELECT
CONTROL
PIP
TIMER
SAP
-
AV+
VCR DVD TV SAT AMP
Press the SELECT button repeatedly
to select one of the system modes in
which the remote control can be
used. If no action is being undertaken
within 2 seconds, the remote control
returns to TV mode. After an action
in the selected system mode the
remote control will remain in this
mode for 60 seconds and will then
return to TV mode.
POWER B
Press to turn the TV on or off.
The TV is never powered off completely
unless it is physically unplugged.
2355.4 en 02-11-2004 14:19 Pagina 4
Page 9
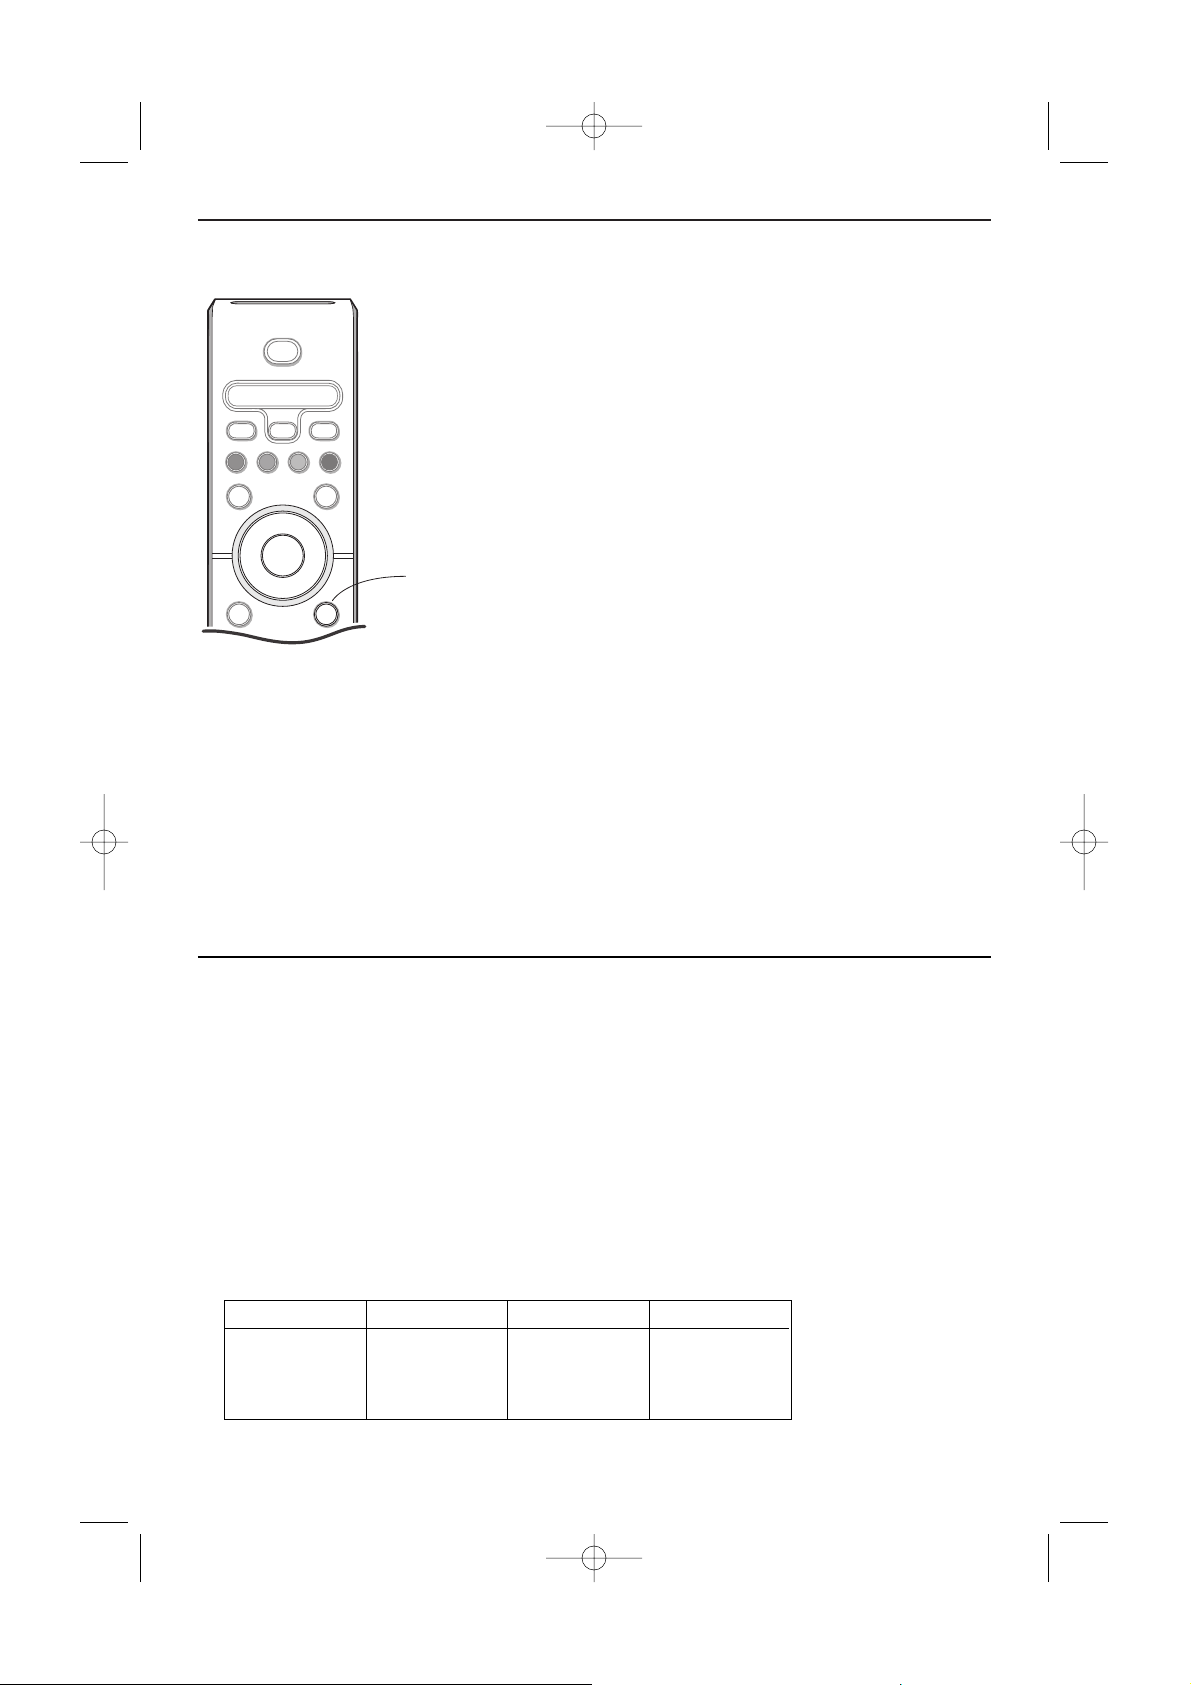
SURF
With this feature you can easily switch between different TV channels/
sources that currently interest you.
Press the
SURF button. A list appears at the left side of the screen. On top,
the most recently channel is displayed.
Press cursor up/down to immediately select the desired TV channel or
source of the list.
To add a new channel or source to the 8 channels list: tune to the channel
or source you wish to add.
Press the
SURF button. Press the cursor right to add.
If there are already eight channels/sources in the list, the one at the bottom
of the list will be removed.
To r emove a channel or source: select the channel number you want to
remove.
Press the
SURF button. Press the cursor right to remove.
Press the
SURF button or wait for the time out to dismiss the Surf display.
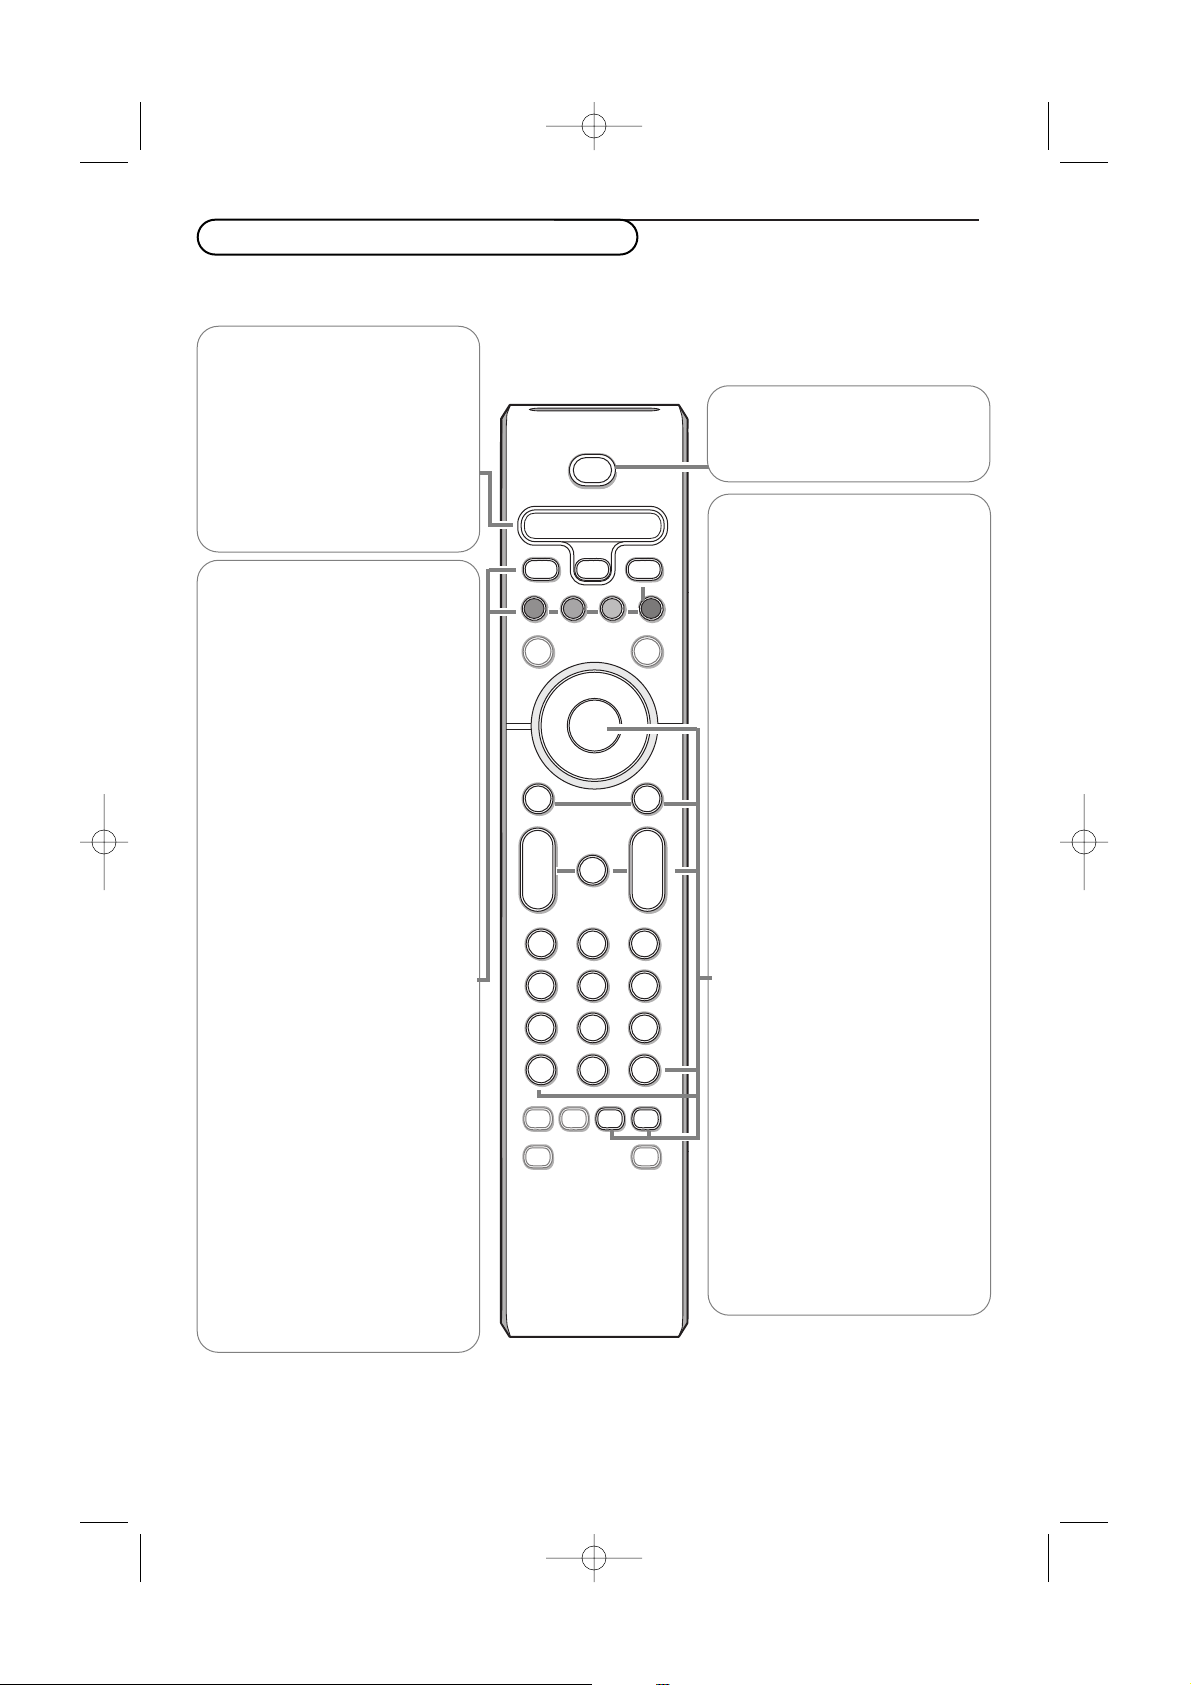
FORMAT
Press this button to summon a list of available display formats for showing
video images in the traditional 4:3 proportions.
Press this button repeatedly or press the cursor left/right to select another
picture format: Super Zoom, 4:3, Zoom 14:9, Zoom 16:9,Subtitle Zoom,
Fullscreen or Widescreen (30PF9946 only).
Super Zoom removes the black bars on the sides of 4:3 programs with minimal
distortion.
Note: in HDMI mode press the FORMAT button to switch between a 16:9 or a
Wide screen picture format.
SAP When you tune a channel where SAP (Second Audio Program) is available,
you can toggle between Main and
SAP. If not available only Main can be
selected.
ACTIVE CONTROL On/Off/On with Sensor
Optimizes the quality of the picture according to the quality of reception.
Ma Auto Sound/Picture
To select predefined picture and sound settings.
Personal refers to the personal preference settings selected in the sound and
picture menu.
Note:This Philips TV has been set at the factory to look best in bright store
environments which use fluorescent lighting.As your home will likely not be as well lit as
a store, we recommend you that you cycle through the various Smart picture modes to
find the one that best suits your own viewing conditions.
5
Super Zoom 4:3
Zoom 14:9 Zoom 16:9
Subtitle Zoom
Fullscreen Widescreen (30PF9946 only)
2355.4 en 02-11-2004 14:19 Pagina 5
POWER
B
VCR DVD TV SAT AMP
INFO
Ò®‡π
TV PC
SURF
®
º
SELECT
†
HD
SURR
FORMAT
®
®
OK
®
CCMENU
¬
+
P
-
+
V
-
123
456
789
AV+
SAP
AUTO AUTO
-
0
ACTIVE SLEEP
CONTROL
PIP
TIMER
aM
Page 10
6
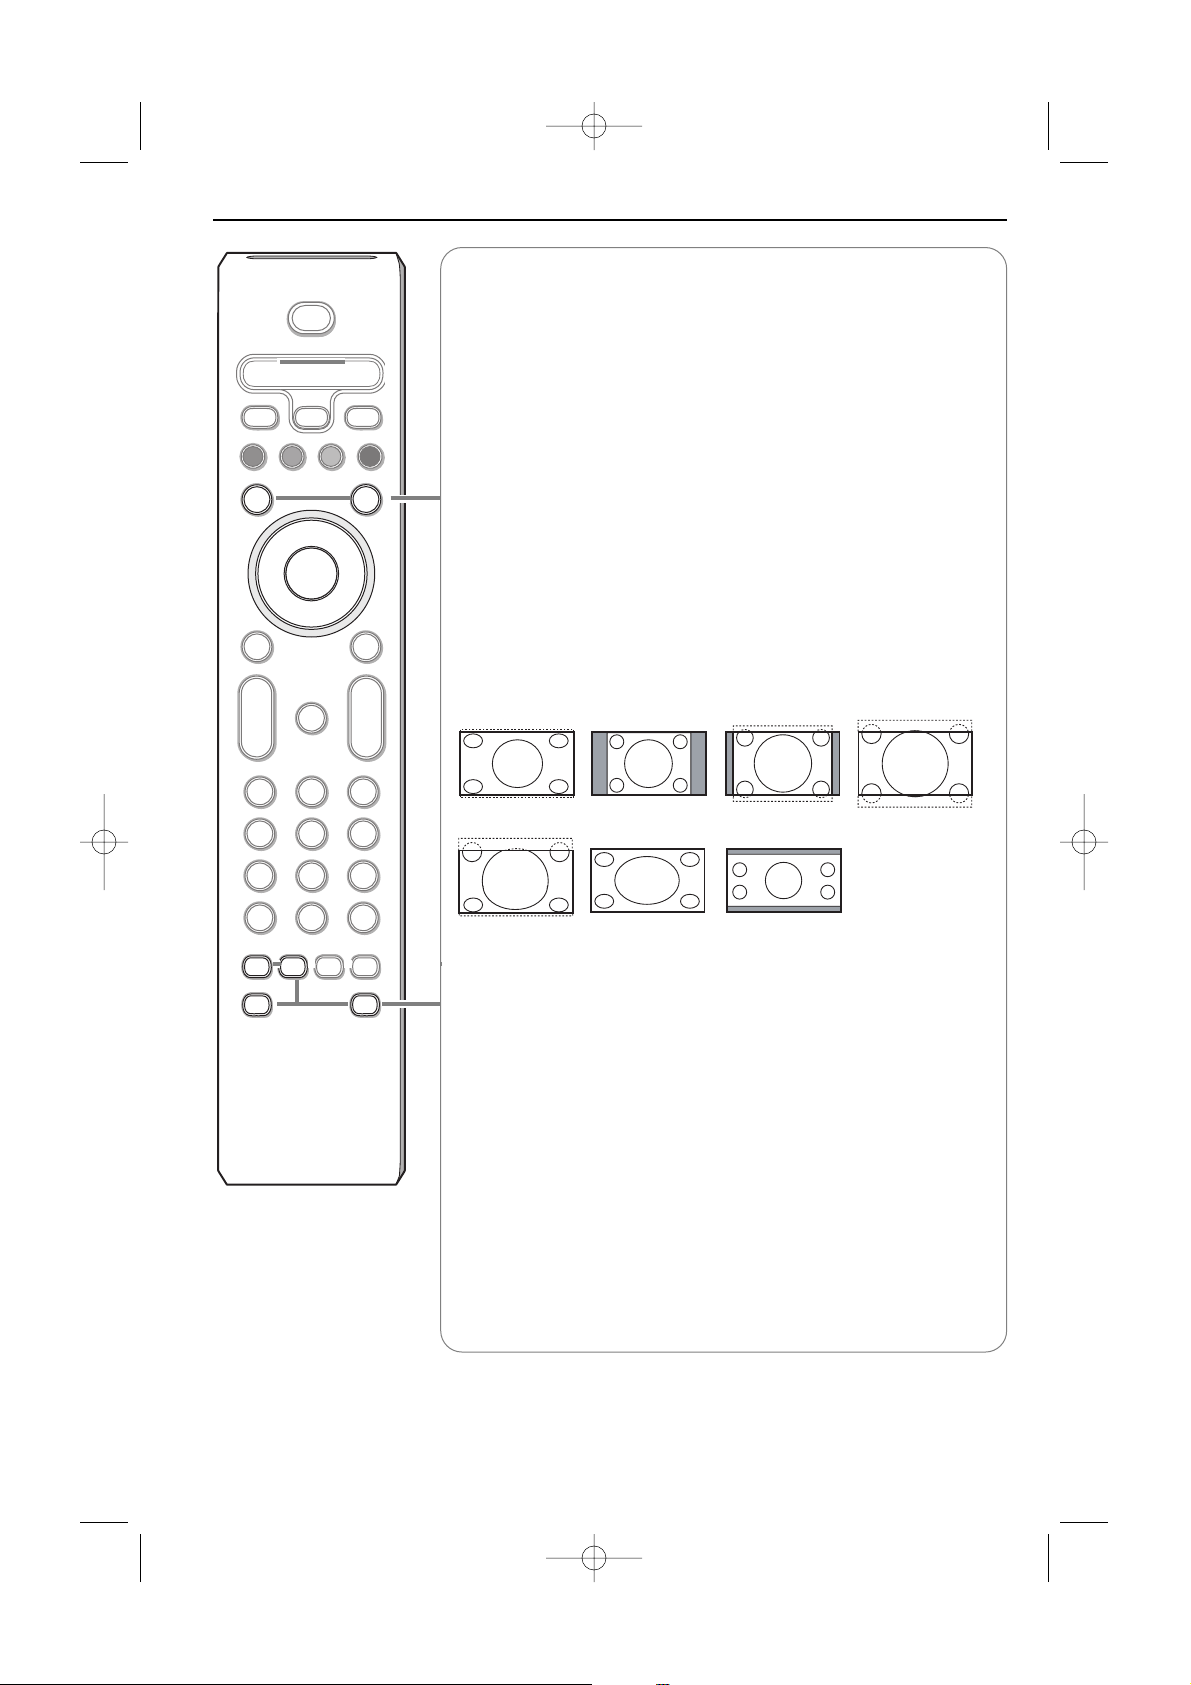
Camcorder, video games, headphone
Buttons on top of the TV
Should your remote be lost or broken you can still
change some of the basic settings with the buttons
on top of your TV.
Press:
• the - V + button to adjust the volume;
• the
- P/CH + button to select the TV channels or
sources.
Press the
MENU/OK button to summon the main
menu without the remote control.
Use:
• the V
+ button and the - P/CH + button to
select menu items in the directions as shown;
• the
MENU/OK button to confirm your selection.
Press the
MENU/OK button again to turn off the
menu.
MENU/OK - V + - P/CH +
Camera, Game or Camcorder
& Connect your camera, game or camcorder as shown.
é Connect to VIDEO 2 and AUDIO L 3 for mono
equipment. For stereo equipment also connect
AUDIO R 3.
S-VHS quality with an S-VHS camcorder is obtained by
connecting the S-VHS cables with the
S-VIDEO input
1 and
AUDIO inputs 3.
Do not connect cable 1 and 2 at the same time. This
may cause picture distortion !
Headphone (only for 30PF9946)
& Insert the plug into the headphone socket L as shown.
é Press ¬ on the remote control to turn off the internal
loudspeakers of the TV.
The headphone impedance must be between 8 and 4000
Ohm.The headphone socket has a 3.5 mm jack.
L
R
S-VIDEOS-VIDEOS-VIDEO
VIDEO IN
VIDEO INVIDEO
AUDIO
S•VHS
VHS
AUDIO AUDIO
VIDEO INVIDEO IN
S•VHS
AUDIO
VIDEO IN
L
L
R
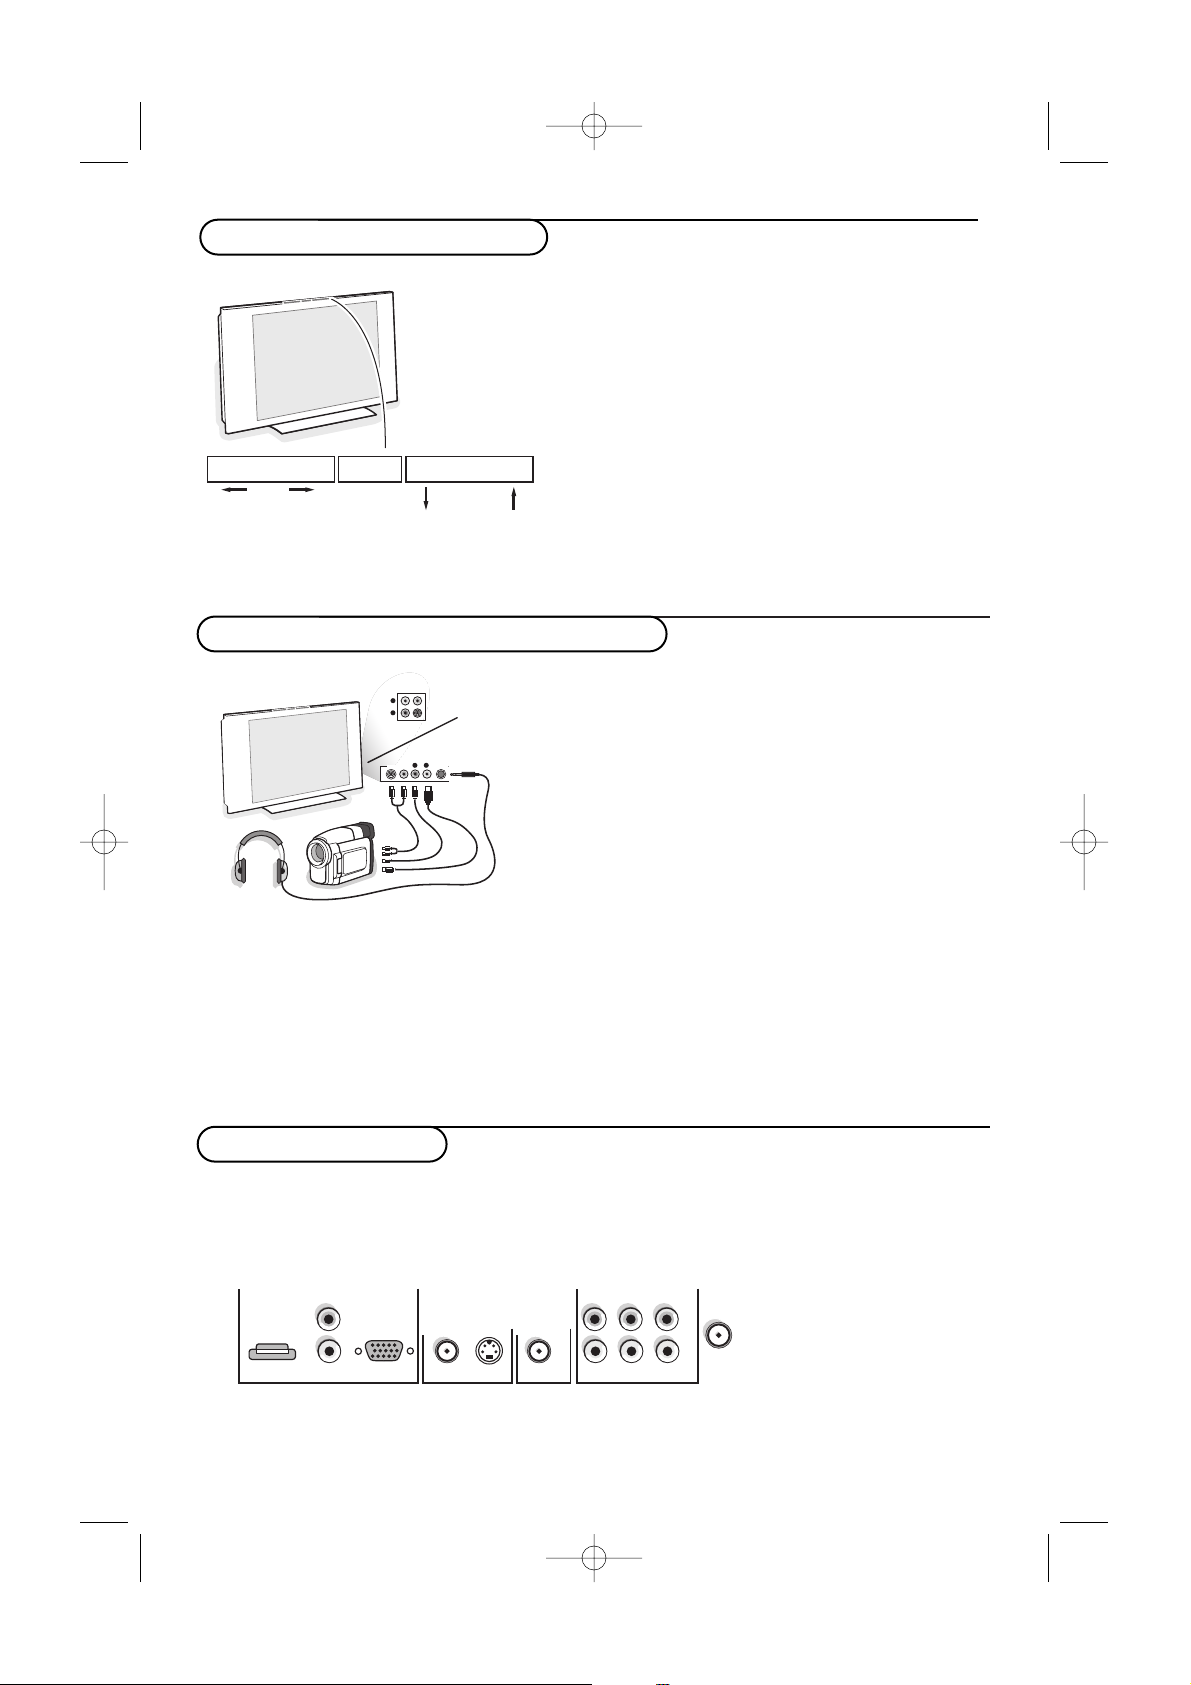
Rear connections
There is a wide range of audio and video devices that can be connected to your TV. The following
connection diagrams show you how to connect them to the TV.
AV1 can handle YPbPr and CVBS; AV2 CVBS and Y/C; AV3 HDMI and VGA - VGA can handle VGA, SVGA (and if
30PF9946 also XGA) and 480p, 576p, 720p and 1080i.
AV1 (1Fh)
AV2
MON.OUT
AV3
L
R
VIDEO/AUDIO VIDEO/AUDIO
S-VIDEO
HDMI
VGA
Y/Pb/Pr (2Fh)
Pr
AUDIO
Pb Y
RLCVBS
x ANTENNA
AUDIO
2355.4 en 02-11-2004 14:19 Pagina 6
Page 11
7
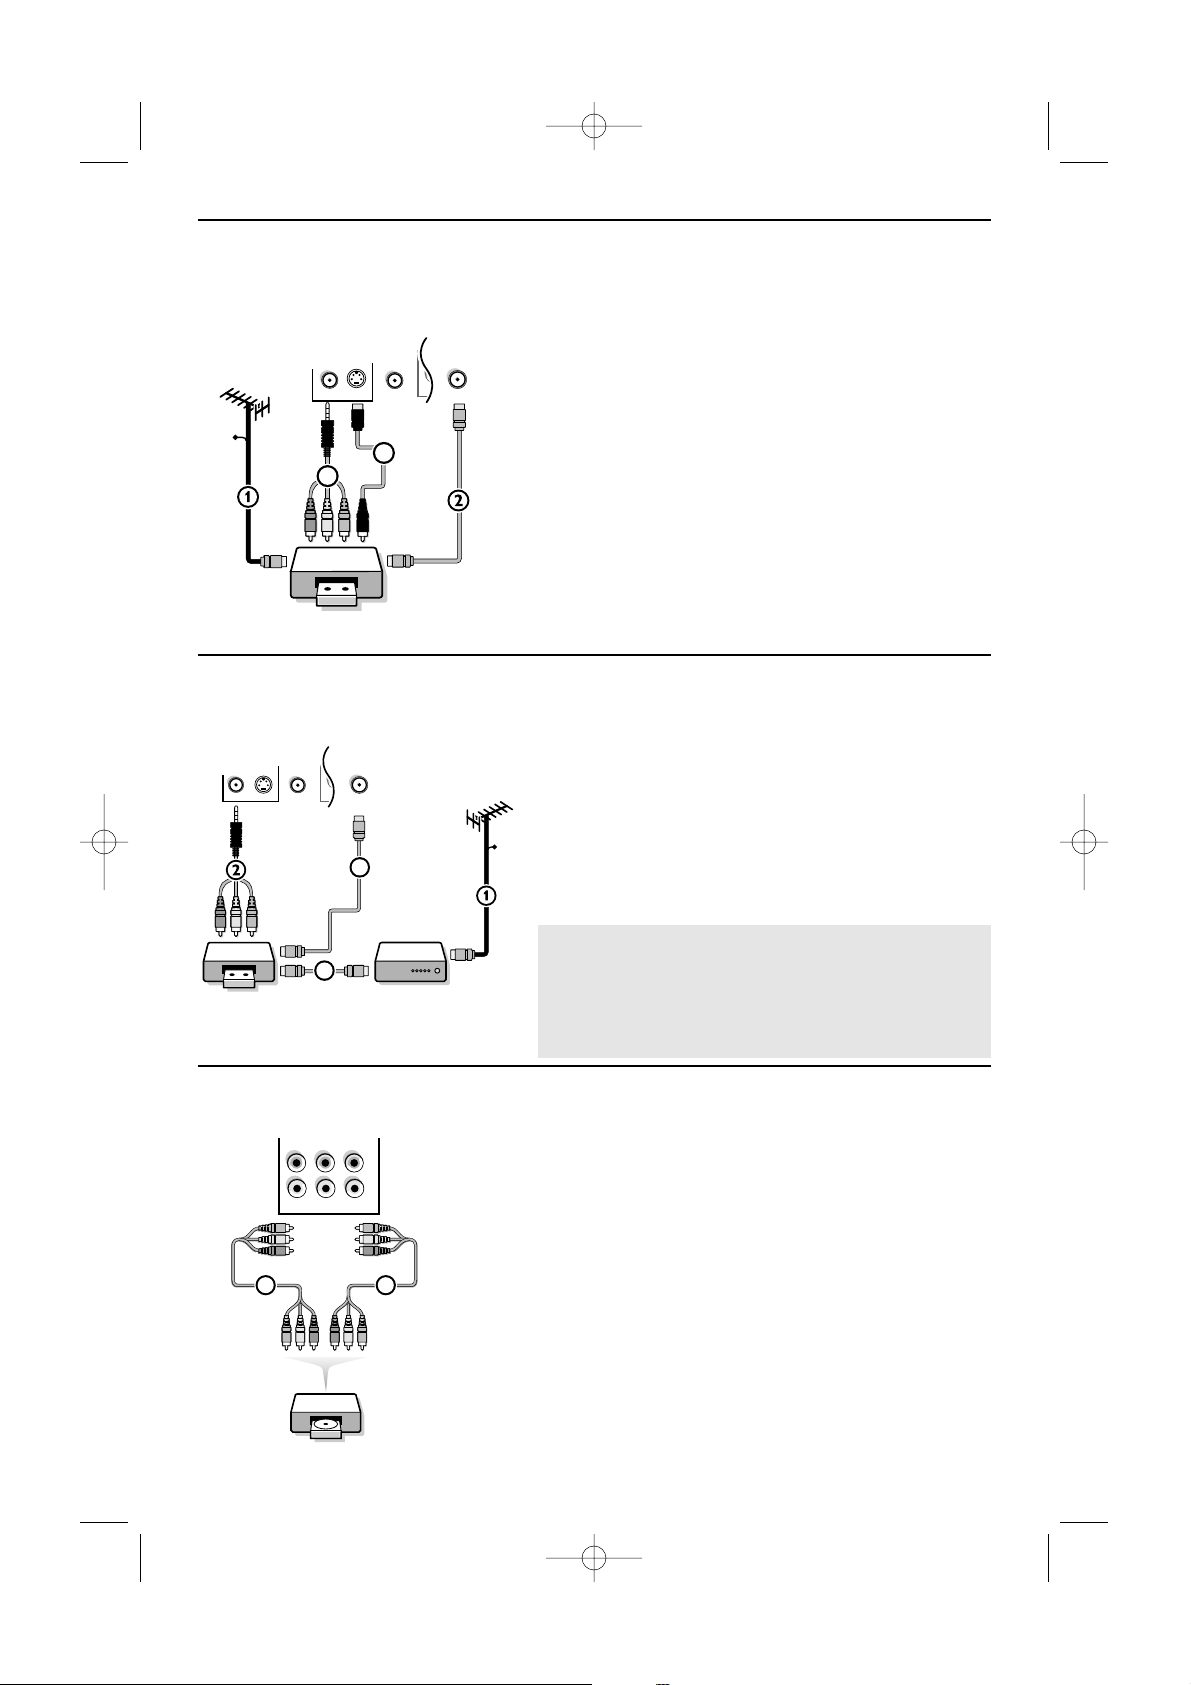
Recorder (VCR-DVD+RW)
Note: Do not place your recorder too close to the screen as some recorders may be susceptible for signals from the
display. Keep a minimum distance of 20” from the screen.
Recorder and other A/V devices
AV2 MON.OUT
VIDEO/AUDIO VIDEO/AUDIO
S-VIDEO
R
x ANTENNA
CABLE
RECORDER
IN OUT
4
3
AV2 MON.OUT
VIDEO/AUDIO VIDEO/AUDIO
x ANTENNA
S-VIDEO
R
RECORDER
CABLE
3
4
OUT IN
x
TV
& Connect the RF Antenna or Cable TV cable 1
(eventually via an optional two-way signal splitter and/or
Cable TV convertor box) to the
RF IN socket of your
recorder.
é Connect another RF cable 2 from the output OUT of
your recorder to the TV’s input x
ANTENNA jack.
“ Connect the supplied adapter cable mini-jack to cinch
3 to the
VIDEO/AUDIO input jack of AV 2.
If your recorder has an S-VHS video jack:
For improved picture quality, connect an S-video cable
4 with the
S-VIDEO input.
S-VHS does not provide audio, so the mini-jack to cinch
cable must still be connected to provide sound.
& Connect the RF Antenna or Cable TV cable 1 to the
RF IN socket of your other A/V device.
é Connect the supplied adapter cable mini-jack to cinch
2 to the
VIDEO/AUDIO input jack of AV 2.
“ Connect the RF output of the A/V device to the RF
input on the recorder 3.
‘ Connect another RF cable 4 from the output OUT of
your recorder to the TV’s input x
ANTENNA jack.
If your recorder has an S-VHS video jack: see above.
Devices with Component Video Output Connectors (YPbPr)
& Connect the three separate component video cables 1 to the
device having component video outputs (YPbPr), such as DVDplayers, laser-disc players, videogame players, satellite receivers, or
other equipment and to the
Y, Pb and Pr jacks of AV 1 on the TV.
é Connect the audio cable 2 to the device’sAUDIO L and R jacks
and to the
L and R audio YPbPr jacks of AV1.
“ For reproduction of CVI (Component Video Input) also connect to
the
CVBS jack of AV 1. See the handbook of your DVD player.
Note: the labels for the component video sockets may differ depending on
the DVD player or the device connected. Although the abbreviations may
vary the letters B and R stand for blue and red component signals,
respectively, and Y indicates the luminance signal. Refer to the DVD
player’s or device’s instructions for use for definitions and connection
details.
AV1 (1Fh)
Pr
AUDIO
Pb Y
RLCVBS
VIDEO
L/Mono
AUDIO
1
VIDEO
L/Mono
AUDIO
DVD
2
The
MON. OUT
connector can be used for a daisy
chaining or to record programs from your TV. Only when
a recorder is connected to
MON. OUT
it is possible to
record a program from other devices connected to the
TV.
See Record with your recorder, p. 15.
2355.4 en 02-11-2004 14:19 Pagina 7
Page 12
8
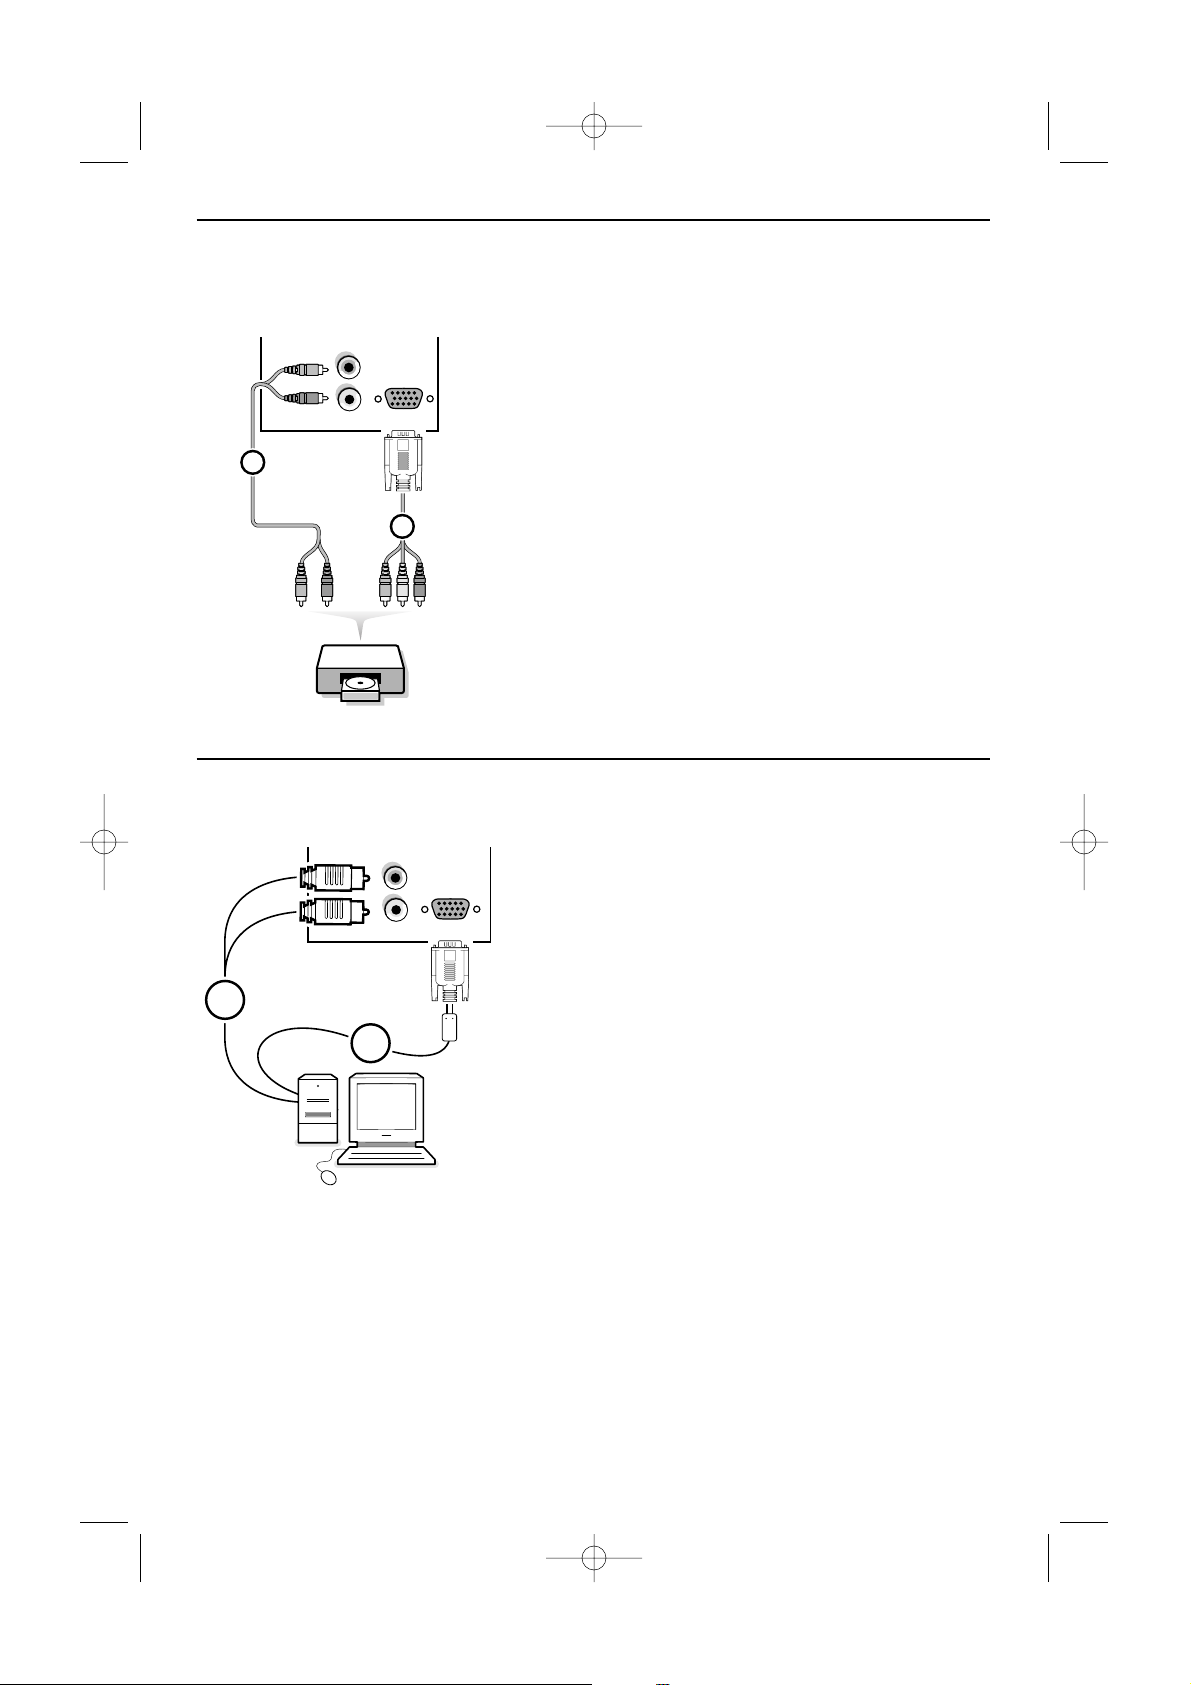
Devices with Progressive scan output
(e.g. a digital Set Top box, a video game console or
Progressive scan DVD player (480p, 576p, 720p or 1080i)
Connect the device with 2Fh YPbPr output to the VG A
connector 1 (with the supplied adapter cable VGA to
cinch) and to the
L and R AUDIO jacks 2 of AV3.
See also the manual of your High Definition device.
Note:This television is designed to accept high definition signal
standards 480p, 576p, 720p and 1080i as specified by the
Electronic Industries Association standard EIA770.3.
Digital devices from different manufacturers have the possibility of
differing output standards which may cause difficulties for the
television to properly display.
Warning: In case you notice scrolling images, wrong colors or no
colour, no picture, or even combinations of these on your screen,
check if the connections are done in the correct way or move
your digital device further away from your TV.
AV3
L
AUDIO
RHDMI
VGA
Y/Pb/Pr (2Fh)
1
DVD
2
Connect your computer
1
2
HDMI
AV3
L
UADIO
R
VGA
Y/Pb/Pr (2Fh)
You may connect your computer to the VGA connector of
AV3 or to the HDMI connector (see further).
& Connect one end of a VGA cable 1 to the video card
of the computer and the other end to the
VGA
Y/Pb/Pr
2Fh
1 connector at the bottom of the TV.
Fix the connectors firmly with the screws on the plug.
é In case of a Multimedia computer, connect the audio
cable 2 to the audio outputs of your Multimedia
computer and to the
AUDIO R (right) and L (left)
inputs.
The
VGA connector allows the following TV and
monitor display modes:
VGA 640 x 480 60 Hz
SVGA 800 x 600 60 Hz
XGA 1024 x 768 60 Hz (30PF9946 only)
Note:
If possible, use the XGA1024x768@60Hz video mode to
obtain the best image quality for your 30PF9946 LCD
monitor.
2355.4 en 02-11-2004 14:19 Pagina 8
Page 13
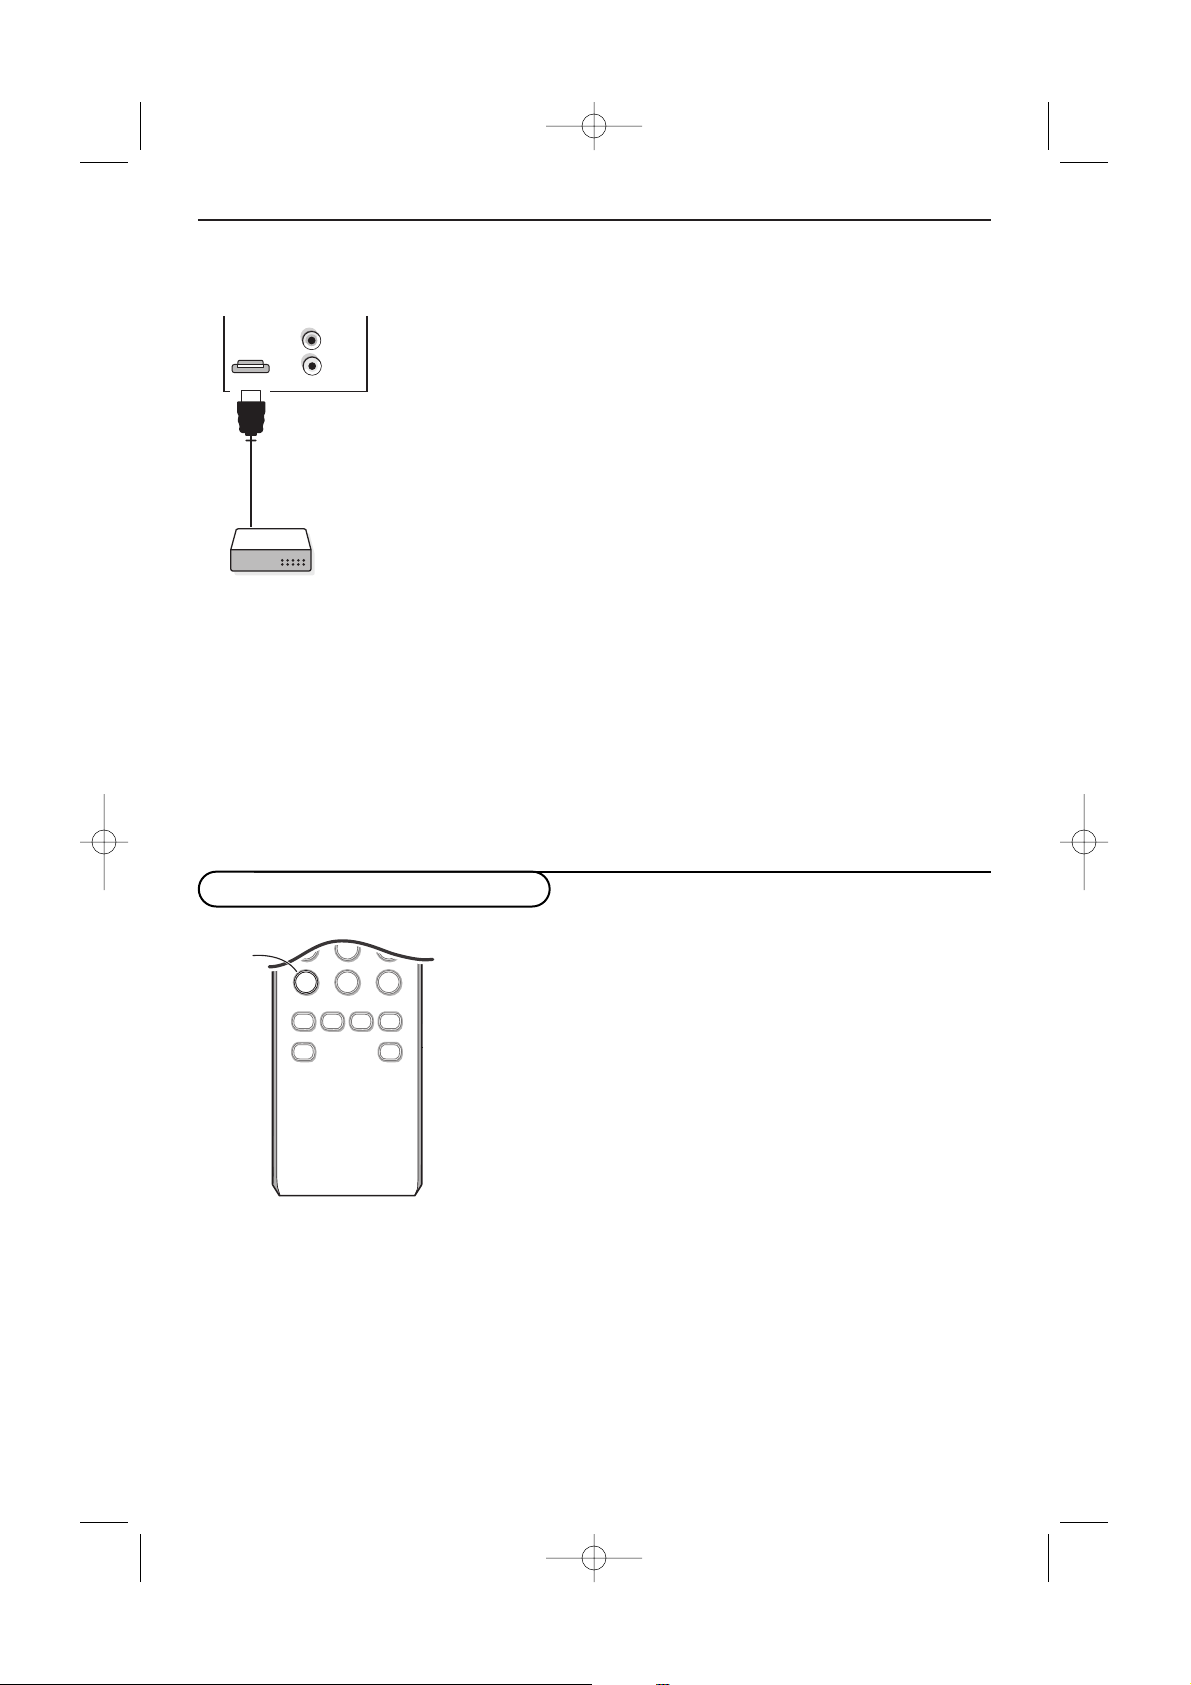
9
AV3
L
AUDIO
R
HDMI
HDMI (High Definition Multimedia Interface) connector
Connect the digital HDMI output of your HD device (e.g. DVD player, Set Top Box..) to the HDMI
connector of your TV.
Notes:
-Proper working is only guaranteed with HDMI compliant consumer products.
-Digital devices from different manufacturers have the possibility of differing output standards which may cause
difficulties for the television to properly display;
- If the set is cold, there may be a small “flicker” when the set is turned on.This is normal, there is nothing wrong
with the set.
HDMI is the leading new standard for Digital High Definition video
and audio interconnection. Eg. with a Digital Set top box, with
HDMI-equipped devices like a DVD-R,AV receiver...
Note:The HDMI connector does
NOT support DVI devices with analogue
audio.
The
HDMI connector allows
- the following TV and monitor display modes:
EDTV 640/720 x 480p
720 x 576p
HDTV 1920 x1080i
VGA 640 x 480 60 Hz
SVGA 800 x 600 60 Hz
XGA 1024 x 768 60 Hz
- uncompressed HD content
- encrypted or non encrypted signals.
According to where you connected the accessory devices, press
•
AV+ followed by digit ‘1’ to select AV 1
• AV+ followed by digit ‘2’ to select AV 2
• AV+ followed by digit ‘3’ to select REAR for a device connected
to the rear or to the side (according to the type of TV you've
purchased), see p. 6
•
AV+ followed by digit ‘4’ to select HD-A for a HD-A device
connected to
AV3 , see p. 8
• AV+ followed by digit ‘4’ again to select HD-D for a HD-D device
connected to
AV3 , see p. 9
•
AV+ followed by digit ‘5’ to select PC-A for a PC connected to
AV3 , see p. 8
•
AV+ followed bij digit ‘1’ and followed by P+ to select CVI.
Note:When in HD or PC mode, first press the
TV button to return to TV
mode or to select
AV1, AV2 or REAR again.
789
0
ACTIVE SLEEP
AUTO AUTO
aM
CONTROL
PIP
TIMER
SAP
AV+
-
AV+
To select connected devices
2355.4 en 02-11-2004 14:19 Pagina 9
Page 14
10
Features menu
Timer
This menu lets you use the TV set as an alarm.
& Press the MENU button.
é With the cursor, select Features, then Timer.
“ Time: enter the current time with the digit
buttons.
Use the cursor left/right to select and to toggle
AM or PM.
‘ Start Time: enter the start time.
( Stop Time: enter the standby time.
§ Channel No: enter the number of the channel
for the wake-up alarm.
è Activate: the settings include:
•
Once for a single alarm;
•
Daily for each day,
•
Off to cancel.
!
Display:press the cursor right to select On or
Off, according to if you want to display the
current time on the TV screen or not.
ç Press the B button on the remote control to
put the TV set in standby. It will automatically
come on at the time programmed. If you leave
the TV set on, it will just change programs at
the time entered (and will go to standby mode
at the Stop Time).
Note: by combining the AutoLock and Timer
functions, you can restrict the period during which
the TV set is used, for example by your children.
AutoLock
The AutoLock feature receives and processes data
sent by broadcasters or other program providers
that contain program content advisories.When
programmed by the viewer, the TV can respond to
the content advisories and block program content
that may be found objectionable.
AutoLock allows parents to block out or “censor”
any channels they think children should not watch.
A channel blocked cannot be viewed until a correct
access code is used to unlock the channel for
viewing.
& Press the MENU button.
é With the cursor, select Features, then
AutoLock.
“ Press the cursor right to enter the AutoLock
menu.
‘ You are asked to enter your Access Code.
•Press 0,7,1,1 on the remote control.
Incorrect will appear on the screen.
•Press 0,7,1,1 on the remote control again.
New Code will appear on the screen.
• Enter a new 4-digit code using the number
buttons.
Confirm Code will appear on the
screen.
• Enter your new 4-digit code again.
Confirmed will flash on the screen briefly
and the highlight bar goes back to Block
Channel.
Features
Timer Sleep
AutoLock π Time
Contrast+ Start Time
DNR
PIP
AutoLock
Block Channel Unrated
Lock HD No rating
Change Code Blocking
Clear All
Block All
Movie Rating
TV Rating
Block Options π
Important: you have forgotten your
Access code
Remember that 0,7,1,1 is the default
AutoLock™code. If your access code has
been changed by someone other than you (a
child, for example) or you have forgotten the
code, you can always get in by inputting the
default code.
2355.4 en 02-11-2004 14:19 Pagina 10
Page 15

11
AutoLock features
Block channel
Select the TV channel you want to block. Press the cursor right to block the channel.
Repeat for any channels you want to block from viewing.
Lock HD
To block the devices connected to
AV3 .
Change Code
To change your block Access Code. Enter your current access code or the overriding code 0,7,11 and
enter a new personal access code.The previous code is erased and the new code is stored.
Clear all
To unblock all blocked channels and programming until the TV is shut off. When powered back on, all
previously blocked channels will be blocked again.
Block all
To block all channels and programming at once. In the
OFF mode, you go back to the individual
blocked channels.
Movie rating
Allows you to control access to individual movies bases on their MPAA ratings (Motion Picture
association of America).
Select a movie rating and press the cursor right to turn the rating
ON or OFF.
Note:When a rating is turned
ON, all higher ratings also will be turned on automatically. All Movie ratings can
be turned on or off.
G movies with a mild content, suitable for all ages
PG movies for which parental guidance is
recommended.
They may contain a few racy or violent scenes or
maybe some bad language
PG-13 movies for which parental guidance may be
recommended if under age 13
R restricted.The movies usually contain offensive
sex or bad language and may be unsuitable for
children under the age of 17.
Parental guidance or permission needed.
NC-17 even with parental permission, forbidden under
age 17.
More offensive sex, violence or bad language.
X movies which generally focus on sex, violence
and/or bad language.Also known as pornography.
2355.4 en 02-11-2004 14:19 Pagina 11
Page 16
12
TV rating
Allows you to toggle individual TV Ratings.
Select an age-based TV rating with the cursor up/down, and enter, if present, the list with contentbased ratings with the cursor right, and select one content-based rating.
When Block all has been selected, all items in the contents-based list are blocked.
Press the cursor right again to turn the block on the rating
ON or OFF.
Note:When a rating is turned on, all higher ratings also will be turned on automatically.
Block options
There are 3 block options:
•
Unrated:
When Block Options Unrated is set to ON,movie and TV programs with a rating of None are
blocked. Sports, News and Weather forecast programs are categorized as None rating programs.
•
No Rating:
All programming with no content advisory data can be blocked if No Rating is set to ON.Any
programming could fall into this category.
•
Blocking
The blocking control is what can be thought of as the “master switch” for AutoLock™.This control
affects the settings you have chosen for blocking programs according to movie ratings or TV ratings,
or for blocking programs that have no rating or are unrated.
When the blocking control is
OFF, the blocking or censoring of programs is disabled.When the
blocking control is
ON, blocking will occur according to the settings you have chosen.
Age-based Rating Content-based Rating
No rating on/off
TV-Y on/off
TV-Y7 Block all
(FV) Fantasy Violence
TV-G on/off
TV-PG Block all
(D) Dialog
(L) Language
(S) Sex
(V) Violence
TV-14 Block all
(D) Dialog
(L) Language
(S) Sex
(V) Violence
TV-MA Block all
(L) Language
(S) Sex
(V) Violence
TV-Y appropriate for children of all ages with themes
and elements suitable for children aged 2-6
TV-Y7 programs designed for children age 7 and older
TV-Y7-FV programs include fantasy violence more intense
than other programs in the TV-Y7 category
TV-G programs suitable for all ages.These programs
contain little or no violence, no strong language
and little or no sexual dialogue or situations
TV-PG programs contain elements that some parents
may find unsuitable for younger children and
which may need parental guidance.
The program may contain moderate violence,
sexual dialogue and/or situations and some strong
language.
TV-14 programs contain elements that may not be
suitable for children under 14 years of age.These
programs include one or more of the following:
intense violence, intense sexual
situations,suggestive dialogue and strong language.
TV-MA programs are designed to be viewed by adults
and may be unsuitable for children under the age
of 17.These programs may contain graphic
violence, explicit sexual activity and/or crude or
indecent language.
2355.4 en 02-11-2004 14:19 Pagina 12
Page 17
13
Closed Captioning allows you to read the voice content of
television programs on the TV screen assuming that the service is
available in the broadcast. Designed to help the hearing impaired,
this feature uses on-screen ‘text boxes’ to show dialogue and
conversations while the TV program is in progress. Captions will
appear on the screen during captioned broadcasts.
& Press the CC button repeatedly to select Off, CC-1, CC-2 or
CC-MUTE.
When
Off is selected, the TV will not display Closed Captions
information;
When
CC-MUTE is selected the TV will automatically display
CC-1 when the mute function is active.When the mute function
is not active, the TV will not display Closed Captions
information.
Usually
CC-1 is the most used, CC-2 may be used for alternated
languages if they are being transmitted, Dialogue (and
descriptions) for the action on the captioned TV programs
shown on screen.
Note:The captions do not always use correct spelling and grammar.
Not all TV programs and product commercials are made for
broadcast with Closed Caption information included. Refer to your
area’s TV program listings for the TV channels and times of Closed
Caption shows.The captioned programs are usually noted in the TV
listings with service marks such as ‘CC’.
This television provides display of television closed captioning
conforming with the EIA-608 standard and in accordance with
Sections 15.119 of the FCC rules.
Closed Captions
The Picture In Picture feature allows you to call
up a smaller second window within your main
screen enabling you to watch a TV channel and
a picture from a digital device connected to
HDMI (AV3) (Digital High Definition device), at
the same time.
& Press the MENU button.
é With the cursor, select Features, then PIP.
“ Press the cursor right to select the available
PIP sizes:
Off, Small, Medium, Large or Side-
by-side
.
When having selected a size, and a device is
connected to HDMI (AV3) and switched on,
the PIP window automatically appears. Press
the
P- or P+ button or the digit buttons to
select other TV channels or to display the
HDMI (AV3) device window in the main
screen.
‘ Select Horizontal or Ve r tical to move the PIP
window to another corner of the main screen.
PIP (Picture in Picture )
PIP Combinations:
Mode:
Main screen
PIP screen
TV
TV
HDMI
HD
HDMI
TV/A-HD/VGA
PC
VGA
HDMI
OK
®
®
®
®
VCR DVD TV SAT AMP
CCMENU
B
Ò®‡π
º
†
INFO
TV PC
SURF
FORMAT
HD
SURR
SELECT
CC
2355.4 en 02-11-2004 14:19 Pagina 13
Page 18

14
TV Menu
Picture TV
Sound PC
Features HD
Install
Mode π
Your TV can be used as a computer monitor.
You must first of all connect the computer and adjust the resolution (see p. 8).
Choosing PC mode
Press the PC button on the remote control to switch the TV to PC mode.
Press the
TV button to return to TV mode.
If there is no PC signal for more than five seconds, the TV automatically goes into standby mode.
Using the PC menus
PC mode
Picture π Brightness
Audio selection Picture
Features Horizontal
Reset to Factory Vertical
Mode Color Temp.
Features
Phase
Clock
Format
PIP
Auto Adjust
Using in PC monitor mode
Press the MENU button to access the specific settings of
the PC monitor mode. Use the cursor buttons to adjust
them (the settings are automatically saved).
Picture
•
Brightness/Picture: to adjust the brightness and
contrast.
•
Horizontal/Vertical: to adjust the horizontal and
vertical placing of the image.
•
Color Temperature: to adjust the colors (cool, normal
or warm).
Audio selection
To choose the sound reproduced on the TV
(
PC/HD or TV).
Note:
- You must choose TV mode before going to TV/HD mode.
- To listen to the sound from a HD device in PC mode, take
care you also connected the audio cables to the HD device.
Features
•
Phase/Clock: eliminates the horizontal (Phase) and
vertical (
Clock) interfering lines.
•
Format: to choose between large screen (Fullscreen)
or the original (
Native) format of the PC screens.
•
PIP: change the Size and Position of the PIP window on
the screen when the
PIP button is used.
•
Auto adjust:Position is set automatically.
Reset to Factory
To r eturn to the factory settings
Mode
To come back to TV mode.
2355.4 en 02-11-2004 14:19 Pagina 14
Page 19

15
Record with your recorder
To r ecord S-VHS quality, connect an S-VHS
peripheral directly to the recorder.
Record a TV program
You can record a TV program using your recorders
tuner without affecting your TV.
& Select the channel number on your recorder.
é Set your recorder to record.
See the handbook for your recorder.
Switching channel numbers on your TV does not
disturb recording !
Record a recorder from
MONITOR OUT
You can record a program on your recorder from
the TV tuner via
MONITOR OUT.
& Switch on the device.
é Select the correct channel on your TV and the
correct input on your recorder.
“ Set your recorder to record.
You record the tuner channel of the TV, even
when you switch to an AV input using the
AV+
button on the remote control.
Do not switch channels or turn off your TV when
you are recording through
MONITOR OUT.
Note:When a TV channel or AV source is blocked
because of a rating set via the Channels menu (see
p. 12), also the record output picture and sound are
muted.
This equipment has been tested and found to comply
with the limits for a Class B digital device, pursuant to
part 15 of the FCC Rules.These limits are designed to
provide reasonable protection against harmful
interference in a residential installation.This
equipment generates, uses, and can radiate radio
frequency energy and, if not installed and used in
accordance with the instructions, may cause harmful
interference to radio communications. However, there
is no guarantee that interference will not occur in a
particular installation. If this equipment does cause
harmful interference to radio or television reception,
which can be determined by turning the equipment off
and on, the user is encouraged to try to correct the
interference by one or more of the following
measures:
Reorient or relocate the receiving antenna.
Increase the separation between the equipment and
the receiver.
Connect the equipment into an outlet on a circuit
different from that to which the receiver is connected.
Consult the dealer or an experienced radio or
television technician for help.
Modifications The FCC requires the user to be notified that any
changes or modifications made to this device that are
not expressly approved by Philips Consumer
Electronics may void the user’s authority to operate
the equipment.
Cables Connections to this device must be made with
shielded cables with metallic RFI/EMI connector hoods
to maintain compliance with FCC Rules and
Regulations.
Canadian notice This Class B digital apparatus meets all requirements
of the Canadian Interference-Causing Equipment
Regulations.
Avis Canadien Cet appareil numérique de la classe B respecte toutes
les exigences du Règlement sur le matériel brouilleur
du Canada.
Regulatory Notices - Federal Communications Commission Notice
2355.4 en 02-11-2004 14:19 Pagina 15
Page 20
16
Power Your TV consumes energy in the standby mode. Energy consumption contributes
to air and water pollution. Power consumption: 2 W.
Miscellaneous • Ambient temperature: +5~ +40°C
• Mains: 50/60 Hz - Auto voltage ranging from 96 to 140V.
•Power consumption: around 160W
• Standby consumption: < 2 W
•Weight (excl. packaging): 30PF9946: 40 Lbs; 37PF9946: 66 Lbs; 42PF9946: 92 Lbs
• Dimensions (wxhxd):
30PF9946: 895 x 490 x 110
37PF9946: 1130 x 600 x 85
42PF9946: 1215 x 660 x 90
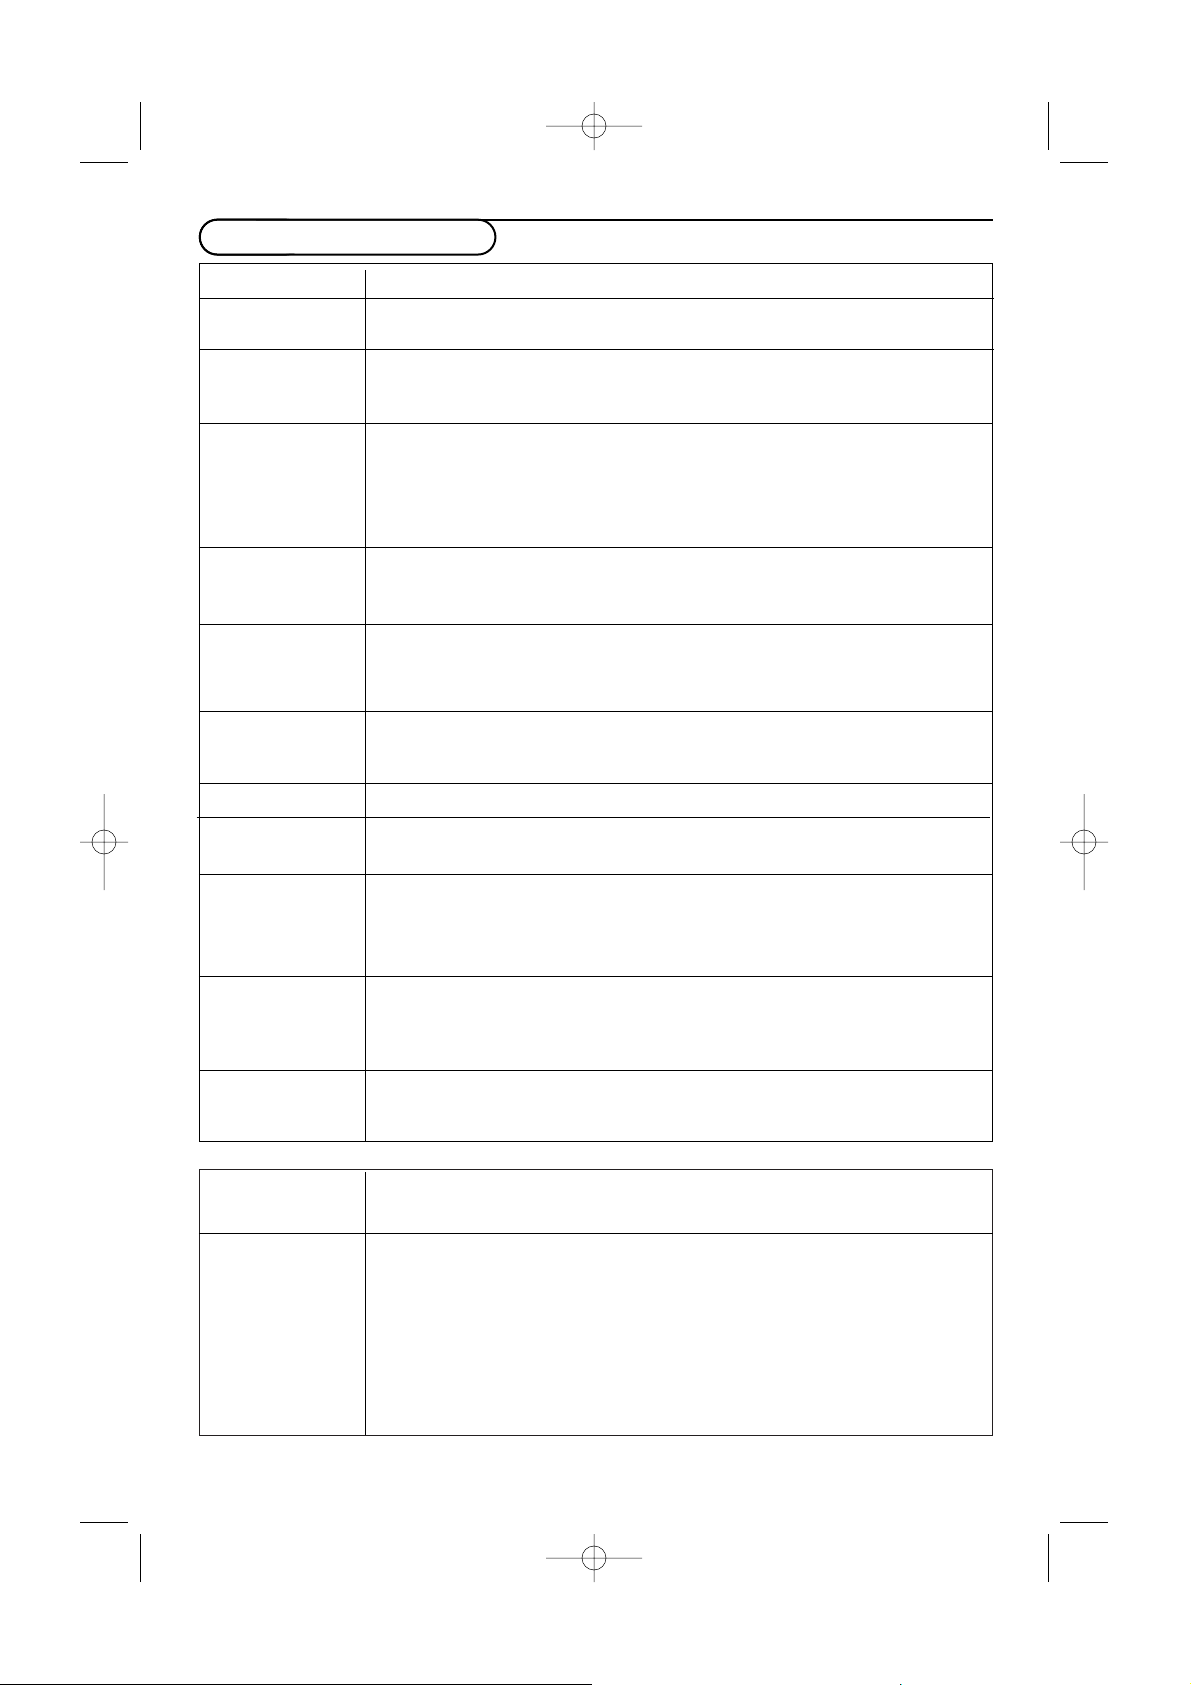
Tips
Symptoms Items to Check and Actions to follow
“Ghost” or • This may be caused by obstruction to the antenna due to high rise buildings or hills.
double images Using a highly directional antenna may improve the picture.
No power • Check that the TV’s AC power cord is plugged into the mains socket.
• Unplug the television, wait for 60 seconds.
The re-insert plug into the mains socket and turn on the television again.
No picture • Check antenna connections at the bottom of the TV to see if it properly connected
to the TV.
•Possible broadcast station trouble.Try another channel.
• Adjust the contrast and brightness settings.Try another auto picture setting.
• Check the Closed Captions control. Some TEXT modes could block the screen.
• Switch your HDMI-source to a correct display mode.
No picture and •Your TV has a protective mode in case there is too much heat build-up.
power switched on Check the clearance around the vents of the device to be certain there are no
blocking walls or cabinets which would limit the air flow.
No sound • Increase the VOLUME.
• Check that the TV is not muted, press the
¬
button on the remote control.
• When no signal is detected, the TV automatically switches off the sound.
This is proper operation and does not indicate a malfunction.
Good sound but • Adjust the contrast, color, tint and brightness setting.
poor color or Tr y another auto picture setting.
no picture
Poor picture • Check the HDMI connection.
Snowish picture • Check the antenna connection.
and noise
Television not • Check whether the batteries are working. Replace if necessary.
responding to • Clean the remote control sensor lens on the TV.
remote control • Operating range between TV and the remote control should not be > 240”.
•You can still use the buttons on the top side of your TV.
• Check if the remote control is in the correct mode.
Control of • The infrared signals of the screen may influence the reception sensibility of
accessory devices other peripherals.
Solution: replace the batteries of the remote control of other devices.
E.g. keep away a wireless headphone from within a radius of 50”.
No stable or not
Check if you have selected the correct VGA mode in your PC.
synchronized VGA
picture
Before Calling Service
2355.4 en 02-11-2004 14:19 Pagina 16
Page 21

17
Tips
How to dispose of batteries?
The batteries supplied do not contain the heavy metals mercury and cadmium. Nevertheless in many
areas batteries may not be disposed of with your household waste. Please ensure you dispose of
batteries according to local regulations.
If your problem is not solved
Turn your TV off and then on again once.
Never attempt to repair a defective TV
yourself.
Check with your dealer or call a TV technician.
Telephone number Philips Customer
Care Center: 1-888-PHILIPS (744-5477)
Warning concerning stationary images on the TV screen
A characteristic of Plasma Display Panels is that displaying the same image for a long time can
cause a permanent after-image to remain on the screen.This is called phosphor burn in.
Normal use of the TV should involve the showing of pictures that contain constantly moving and
changing images that fill the screen.
Examples of stationary images (this is not an all-inclusive list, you may encounter others in your
viewing):
•
TV menus;
•
Black bars: when black bars appear at the left and right side of the screen, it is recommended
to change to a picture format so that the picture fills the entire screen;
•
TV channel logo:present a problem if they are bright and stationary. Moving or low-contrast
graphics are less likely to cause uneven aging of the screen;
•
Stock market stickers:presented at the bottom of the TV screen;
•
Shopping channel logos and pricing displays: bright and shown constantly or repeatedly in
the same location on the TV screen.
Examples of still pictures also include logos, computer images, time display, teletext and images
displayed in 4:3 mode, static images or characters, etc.
Notes:
- reduce contrast and brightness when viewing
- once burn-in occurs it will never disappear completely.
2355.4 en 02-11-2004 14:19 Pagina 17
Page 22

18
LIMITED WARRANTY
WHO IS COVERED?
You must have proof of purchase to receive
warranty service. A sales receipt or other
document showing that you purchased the
product is considered proof of purchase.
WHAT IS COVERED?
Warranty coverage begins the day you buy
your product. For one year thereafter, all parts
will be repaired or replaced and labor is free.
After one year from the day of purchase, you
pay for the replacement or repair of all parts,
and for all labor charges.
All parts, including repaired and replaced parts,
are covered only for the original warranty
period.When the warranty on the product
expires, the warranty on all replaced and
repaired parts also expires.
WHAT IS EXCLUDED?
Your warranty does not cover:
• labor charges for installation or setup of the
product, adjustment of customer controls on
the product, and installation or repair of
antenna systems outside of the product.
•product repair and/or part replacement
because of misuse, accident, unauthorized
repair or other cause not within the control of
Philips Consumer Electronics Company.
•reception problems caused by signal conditions
or cable or antenna systems outside the unit.
•a product that requires modification or
adaptation to enable it to operate in any
country other than the country for which it
was designed, manufactured, approved and/or
authorized, or repair of products damaged by
these modifications.
• incidental or consequential damages resulting
from the product. (Some states do not allow
the exclusion of incidental or consequential
damages, so the above exclusion may not apply
to you.This includes, but is not limited to,
prerecorded material, whether copyrighted or
not copyrighted.)
•a product used for commercial or institutional
purposes.
WHERE IS SERVICE AVAILABLE?
Warranty service is available in all countries
where the product is officially distributed by
Philips Consumer Electronics Company. In
countries where Philips Consumer Electronics
Company does not distribute the product, the
local Philips service organization will attempt to
provide service (although there may be a delay
if the appropriate spare parts and technical
manual(s) are not readily available).
MAKE SURE YOU KEEP ...
Please keep your sales receipt or other
document showing proof of purchase.Attach it
to this owner’s manual and keep both nearby.
Also keep the original box and packing material
in case you need to return your product.
Please check your owner’s manual before
requesting service. Adjustments of the controls
discussed there may save you a service call.
TO GET WARRANTY SERVICE....
Repair must be performed by an authorized
service center or a factory service center. If
you do not live near a factory service center,
contact your dealer. If your dealer is an
authorized service center, he will arrange
repair. If your dealer is not an authorized
service center he will direct you to the
authorized service center engaged by him to
service the products he sells.
(In U.S.A., Puerto Rico and U.S.Virgin Islands, all
implied warranties, including implied warranties
of merchantability and fitness for a particular
purpose, are limited in duration to the duration
of this express warranty. But, because some
states do not allow limitations on how long an
implied warranty may last, this limitation may
not apply to you.)
(In Canada, this warranty is given in lieu of all
other warranties. No other warranties are
expressed or implied, including any implied
warranties of merchantability or fitness for a
particular purpose. Philips is not liable under
any circumstances for any direct, indirect,
special, incidental or consequential damages,
howsoever incurred, even if notified of the
possibility of such damages.)
IF YOU HAVE QUESTIONS IN CANADA
Please contact Philips at:
1-800-661-6162 (French speaking)
1-800-363-7278 (English speaking)
REMEMBER...
Please record the model and serial numbers
found on the product below.Also, please fill out
and mail your warranty registration card
promptly. It will be easier for us to notify you if
necessary.
MODEL #
SERIAL #
One Year Free Labor
One Year Free Service on Parts
This warranty gives you specific legal rights.You may have other rights which vary from state/province to state/province.
Philips, P.O. Box 671539,Marietta, GA 30006-0026,1-888-PHILIPS (744-5477)
2355.4 en 02-11-2004 14:19 Pagina 18
Page 23

Retournez rapidement votre carte d’enregistrement de
garantie pour profiter pleinement de votre achat.
L’enregistrement de votre modèle auprès de PHILIPS confirme votre éligibilité à tous les
bénéfices mentionnés ci-dessous. N’oubliez donc pas de remplir votre carte
d’enregistrement de garantie et de nous la retourner le plus tôt possible afin d’assurer :
*Preuve d‘achat
Retournez la carte
d’enregistrement ci-incluse afin de
garantir que la date d’achat de
votre produit sera classée dans
nos dossiers et éviter ainsi le
besoin de remplir d’autres
formulaires afin d’obtenir votre
service de garantie.
*Avis sur la sécurité
des produits
En enregistrant votre produit, vous
serez avisé - directement par le
fabricant - de toutes défectuosités
compromettant la sécurité ou de
tout retrait du produit du
marché.
*Bénéfices additionnels
de l’enregistrement du
produit
L’enregistrement de votre produit
garantit que vous bénéficierez de
tous les privilèges auxquels vous
avez droit y compris des offresrabais spéciales.
Nous vous félicitons de votre achat et vous
souhaitons la bienvenue dans la “famille!”
Cher propriétaire d'un produit
PHILIPS:
Merci de votre confiance en PHILIPS.Vous avez
choisi un produit de fabrication et de garantie
supérieures parmi les meilleurs disponibles sur le
marché. Et nous ferons tout en notre pouvoir pour
que vous soyez pleinement satisfait de votre achat
pour des années à venir.
En tant que membre de la "famille" PHILIPS, vous
avez droit à une protection inégalée par l'une des
garanties les plus complètes de l'industrie ainsi qu'à
des réseaux de service sans pareil.
De plus, votre achat garantit que vous recevrez
toutes les informations et offres spéciales auxquelles
vous avez droit, ainsi qu'un accès facile à toute une
gamme d'accessoires disponibles via notre réseau de
téléachat.
Mais ce qui est encore plus important, vous pouvez
compter sur notre engagement total quand il s'agit
de votre entière satisfaction.C'est notre façon de
vous souhaiter la bienvenue et de vous remercier de
votre investissement dans un produit PHILIPS
.
P.S. Pour bénéficier au maximum de
votre produit PHILIPS, assurez-vous
de remplir et de retourner votre
carte d’enregistrement de garantie
le plus tôt possible.
A l’usage du client
Entrez ci-dessous le numéro de série qui
se trouve à l’arrière du boîtier du
dispositif. Conservez ces informations pour
référence ultérieure.
No. de modèle: ______________________
No. de série: ________________________
Sachez reconnaître ces
symboles de sécurité
Ce symbole "d'éclair" s'applique aux
matériaux non isolés présents dans
votre appareil et pouvant causer un choc
électrique. Pour assurer la sécurité des
membres de votre famille, veuillez ne pas
enlever le couvercle de votre produit.
Les "points d'exclamation" ont pour but
d’attirer votre attention sur des
caractéristiques à propos desquelles vous
devez lire soigneusement la documentation
accompagnant l’appareil afin d’éviter tout
problème d’exploitation ou d’entretien.
CAUTION: To prevent electric shock,
match wide blade of plug to wide slot, fully
insert.
ATTENTION: Pour éviter les chocs
électriques, introduire la lame la plus large de
la fiche dans la borne correspondante de la
prise et pousser jusqu’au fond
CAUTION
RISK OF ELECTRIC SHOCK
DO NOT OPEN
CAUTION: TO REDUCE THE RISK OF ELECTRIC SHOCK, DO NOT
REMOVE COVER (OR BACK). NO USER-SERVICEABLE PARTS
INSIDE. REFER SERVICING TO QUALIFIED SERVICE PERSONNEL.
t
s
Visitez notre site sur le Web à http://www.philips.com
2355.4 fr 02-11-2004 14:17 Pagina 1
Page 24

1. Lire les instructions.
2. Conserver les instructions.
3. Obéir à tous les avertissements.
4. Suivre toutes les instructions.
5. Eviter d’utiliser cet appareil à proximité d’une source d’eau.
6. Nettoyer à l’aide d’un linge sec seulement.
7. Ne pas nuire à la circulation des orifices de ventilation.
Effectuer l’installation selon les instructions du fabricant.
8. Ne pas installer près d’une source de chaleur comme un
radiateur, un registre de chaleur, une cuisinière ou tout autre
appareil (y compris les amplificateurs) qui dégage de la chaleur.
9. Ne pas contourner la mesure de sécurité de la fiche polarisée
ou de mise à la terre. Une fiche polarisée dispose de deux
lames dont l’une est plus large que l’autre. Une fiche avec mise
à la terre est dotée de deux lames ainsi que d’une troisième
broche de mise à la terre. La lame plus large ou troisième
broche est fournie pour votre sécurité.Lorsque la fiche fournie
ne correspond pas à votre prise, consulter un électricien pour
qu’il effectue le remplacement de la prise périmée.
10. Protéger le cordon d’alimentation en évitant de marcher dessus
ou de le coincer particulièrement au niveau de la fiche, des
prises de courant et à l’endroit où il sort de l’appareil.
11. N’utiliser que l’équipement ou les accessoires spécifiés par le
fabricant.
12. L’appareil ne doit être utilisé avec le chariot,socle,
trépied, support ou table spécifié par le fabricant ou
vendu avec l’appareil. Un appareil utilisé en
combinaison avec un chariot doit être déplacé avec soin afin
d’éviter les risques de blessures occasionnées par le
renversement de l’appareil.
13. Débrancher cet appareil durant les orages électriques ou
lorsqu’il n’est pas utilisé pour une période de temps prolongée.
14. L’entretien ou la réparation de l’appareil doit être effectué par
un personnel qualifié seulement. Il faut faire réparer l’appareil
dès que celui-ci a été endommagé, qu’il s’agisse du cordon ou
de la fiche d’alimentation, si du liquide a été renversé ou des
objets sont tombés dans l’appareil, s’il a été exposé à la pluie
ou à une humidité excessive, s’il ne fonctionne pas
normalement ou s’il a subi un choc.
15. Ce produit peut contenir du plomb ou du mercure. La mise au
rebut de ces substances peut être réglementée par suite de
considérations environnementales. Pour de plus amples
informations concernant la mise au rebut ou le recyclage de
l’appareil, communiquer avec les autorités locales ou avec la
Electronic Industries Alliance: www.eiae.org.
16. Dommages nécessitant des réparations - L’appareil doit
être réparé par un personnel qualifié lorsque:
A. Le cordon ou la fiche d’alimentation est endommagé;ou
B. Des objets sont tombés dans l’appareil ou du liquide a été
renversé dans l’appareil; ou
C. L’a ppareil a été exposé à la pluie;ou
D. L’ appareil semble ne pas fonctionner correctement ou
affiche un changement marqué dans le performance; ou
E. L’ appareil a subi un choc ou le boîtier est endommagé.
17. Inclinaison/stabilité Tous les postes de télévision doivent
répondre aux normes de sécurité internationales globales
recommandées, relativement aux propriétés d’inclinaison et de
stabilité du boîtier.
• Il ne faut pas compromettre ces normes de construction par
une utilisation excessive de force sur la partie avant ou
supérieure du boîtier afin d’éviter de faire renverser l’appareil.
• De plus, ne pas mettre vos enfants ou vous-même en danger,
en plaçant des dispositifs électroniques ou des jouets sur le
dessus du poste. Ces objets pourraient tomber du téléviseur
sans qu’on s’y attende et entraîner des dommages ou des
blessures.
18. Montage mural ou montage au plafond - Si l’appareil doit
être monté au mur ou au plafond, l’installation doit être
effectuée selon les recommandations du fabricant.
19. Lignes électriques - Une antenne extérieure doit être
installée loin des lignes électriques.
20. Mise à la terre d’une antenne extérieure - Si une antenne
extérieure est connectée au récepteur, s’assurer que le système
d’antenne est mis à la terre de façon à fournir une protection
contre les surcharges de courant et les charges statiques
accumulées.
L’article 810 du Code national de l’électricité, ANSI/NFPA
No. 70-1984, offre des informations relatives à la mise à la terre
correcte du mât et des structures de support, la mise à la terre
de la descende d’antenne vers un dispositif de décharge, la taille
des connecteurs de mise à la terre, l’emplacement du dispositif
de décharge d’antenne, le raccordement des conducteurs de
terre ainsi qu’aux exigences relatives au conducteur de terre.
Voir la figure ci-dessous.
21. Pénétration d’objet et de liquide - Prendre tous les soins
nécessaires pour éviter que des objets tombent ou que des
liquides coulent dans le boîtier à travers les orifices.
a) Avertissement:Afin de réduire les risques d’incendie ou de
choc électrique, ne pas exposer cet appareil à la pluie ou à
l’humidité et les objets remplis de liquide, comme les vases, ne
doivent pas être placés sur le dessus de l’appareil.
22. MISE EN GARDE concernant les piles - Pour prévenir la
fuite des piles pouvant entraîner des blessures, des dégâts
matériels ou endommager l’appareil:
• Installer toutes les piles de façon à ce qu’elles correspondent
aux bornes + et -, tel qu’indiqué sur le dispositif.
• Ne pas mélanger les piles (neuves et usagées ou carbone et
alcaline, etc.).
• Retirer les piles du boîtier lorsque la télécommande n’est pas
utilisée pour une période de temps prolongée.
CONSIGNES DE SÉCURITÉ IMPORTANTES
Veuillez lire ces consignes avant de faire fonctionner cet appareil
Remarque pour les installateurs de système de câble : Ce rappel est à l’intention des installateurs de système de câble afin
d’attirer leur attention sur l’article 820-40 du code NEC fournissant les marches à suivre en ce qui a trait à une mise à la terre
adéquate et en particulier spécifie que le câble de masse doit être raccordé au système de mise à la masse du bâtiment, aussi près
que possible du point d’entrée du câble.
EXEMPLE DE MISE À TERRE D’UNE
ANTENNE SUIVANT LES
RECOMMANDATIONS DU NATIONAL
ELECTRICAL CODE (NEC)
ATTA CHE DE TERRE
FIL D’ENTRÉE DE L’ANTENNE
APPAREIL DÉCHARGE/ANTENNE
(
NEC SECTION 810-20)
CONDUCTEURS DE MISE À TERRE
(
NEC SECTION 810-21)
ATTA CHES DE TERRE
ÉLECTRIQUES MATÉRIEL DE SERVICE
SYSTÈME ÉLECTRODE DE TERRE POUR SOURCE ÉLECTRIQUE
(
NEC ART 250, PART H)
2355.4 fr 02-11-2004 14:17 Pagina 2
Page 25

1
Aide ?
Si dans le mode d'emploi vous n'avez pas la réponse à votre question ou si les ‘Conseils’ donnés ne vous ont
pas aidé à résoudre votre problème de TV, vous devez téléphoner au service consommateur de votre pays, voir
le document 'World-wide guarantee' fourni sur le CD.
Avant de téléphoner au Service Consommateurs de Philips, notez le modèle et le numéro de série complet de
votre TV, lesquels sont inscrits sur une étiquette collée au dos de l'appareil, ou bien vous trouverez ces
informations sur une étiquette collée sur 2 cotés au bas de l'emballage.
Modèle: 30PF9946/37 37/42PF9936/37 N° de série
:
Entretien de l’écran
Ne pas toucher, frapper, frotter l’écran avec quoi que ce soit de dur, ce qui pourrait rayer et abîmer l’écran de
façon permanente. Ne pas frotter l’écran avec un tissus poussiéreux contenant un produit chimique.
Ne pas toucher l’écran à mains nues ou avec un tissus gras (certains cosmétiques sont dangereux pour l’écran).
Débrancher le TV avant tout nettoyage. Lorsque la surface devient poussiéreuse, essuyer légèrement avec du
coton absorbant ou un autre matériaux doux. Ne pas utiliser d’acétone, toluene ou alcool sous peine de
dommages chimiques. Ne pas utiliser de nettoyant liquide ou en aérosol. Essuyer toutes gouttes (eau...)
éventuellement projetées sur l’écran aussi vite que possible. Un contact prolongé peut provoquer des
déformations et des taches.
Avertissement concernant les images fixes sur l’écran du TV
Une caractéristique des écrans plasma (PDP) est que l’affichage d’une même image pendant une longue
durée peut entraîner une image fantôme persistante à l’écran. Il s’agit du marquage du phosphore à
l’écran. Lors d'une utilisation normale, le téléviseur doit afficher des images en perpétuel mouvement et en
perpétuel changement qui remplissent l’écran.
Préparation
& Instructions de montage mural/support
table
.
Pour l’accrochage du produit sur un mur, suivre
les étapes décrites sur le gabarit fourni.
Assurez-vous que le support mural est
correctement fixé de façon à assurer une
sécurité maximale. Le poids du TV (sans
emballage) est approximativement:
40 Lbs (30PF9946);
66 Lbs (37PF9936); 92 Lbs (42PF9936).
Remarque:Tout autre pied n’est fourni qu’en
accessoire optionnel. Consultez votre revendeur.
é Veillez à ce que l’air puisse circuler librement à
travers les fentes de ventilation.
Afin d’éviter tout danger, écartez toute flamme
nue (bougies…) de l’appareil. Evitez également
de le mettre directement en contact avec de la
pluie ou de l’eau.
Veillez à préserver l’équipement de tout
égouttement ou de toute éclaboussure.
“ Introduisez la fiche d'antenne dans l'entrée
d'antenne x située au bas du téléviseur. En cas
de perturbation (points blancs sur l’image) lors
de la réception d’émetteurs VHF Bande 1 il est
conseillé de brancher le câble d’antenne antiparasite fourni.
‘ Insérer le cordon d’alimentation fourni dans la
prise située au bas du TV et dans une prise
murale avec un voltage de 96-140V. Afin
d’éviter tout dommage du cordon
d’alimentation (AC) qui pourrait entraîner des
risques d’incendie ou (et) d’électrocution, ne
jamais placer le téléviseur sur le câble.
( Télécommande: Introduisez les deux piles
fournies (Type R6-1,5V).
Les piles livrées avec la
télécommande ne
contiennent pas de métaux
lourds tels que le mercure
ou le cadmium. Informezvous pour connaître les
dispositions en vigueur dans
votre pays.
§ Mise en service du téléviseur:Appuyez sur le
bouton B situé sur le côté droit du téléviseur.
Un voyant s’allume en face avant du téléviseur.
Appuyez sur le bouton B sur la
télécommande.
Français
2355.4 fr 02-11-2004 14:17 Pagina 1
Page 26

2
Caractér.
Minuterie π Heure
Verr. intell. Heure Début
Contraste+ Heure Fin
Réduct. bruit No. de prog.
PIP Activer
Affichage
Menu Caractéristiques
•
Minuterie,
Verr. intell.
et
PIP
:Voir p. 10-13.
• Contraste+: Réglage automatique du contraste de l’image qui
ramène en permanence la partie la plus sombre de l’image au
noir.
•
Réduct. bruit:Atténue le bruit de l’image (la neige), en cas de
réception difficile.
Utilisation des menus
& Appuyez sur le bouton MENU de la
télécommande pour faire apparaître le menu
principal. À tout moment, vous pouvez sortir
du menu en appuyant à nouveau sur le bouton
MENU.
é Utilisez le curseur haut/bas pour sélectionner
le menu
Image, Son, Caractér., Installation
ou Mode.
“ Sélectionnez l’élément de menu à l’aide du
curseur gauche/droit.
‘ A l’aide du curseur haut/bas, choisissez la
commande que vous souhaitez sélectionner ou
ajuster.
( Appuyez sur le bouton OK pour activer.
Note: Les éléments temporairement non disponibles
ou non pertinents sont affichés en gris clair et ne
peuvent être sélectionnés.
Menu TV
Image π Lumière
Son Couleur
Caractér. Image
Installation Teinte
Mode Définition
Image
Lumière π
Couleur
Image
Définition
Teinte
Temp. Couleur
pπ
Son
Égalisation π 120 Hz
Équilibre 500 Hz
AVL 1500 Hz
Dolby Virtual
....
SAP
Son
TV menu
Menu Image:
•
Lumière
:Agit sur la luminosité de l’image.
•
Couleur
:Agit sur l’intensité de la couleur.
•
Image
:Améliore le détail des parties les plus claires de
l’image.
•
Définition
:Agit sur la netteté de l’image.
•
Teinte
:Pour régler l’image à obtenir des tonalités de peau
plus naturelles.
•
Temp. Couleur
:Agit sur le rendu des couleurs:
Froide
(plus
bleue),
Normale
(équilibrée) ou
Chaude
(plus rouge).
Menu Son:
•
Égalisation
:Pour régler la tonalité du son (de grave: 120 Hz
à aigus: 10 kHz).
•
Équilibre
:Pour équilibrer le son sur les haut-parleurs gauche
et droit.
•
AVL
(Automatic Volume Leveler): Contrôle automatique du
volume qui permet de limiter les augmentations du son, en
particulier lors des changements de programmes ou des
publicités.
•
Dolby Virtual
: Simule un son surround issu de 2 hautparleurs en utilisant Dolby Pro Logic* en donnant à l'auditeur
l'impression d'être entouré de haut-parleurs supplémentaires.
•
SAP
ou voie audio secondaire fait partie du système de
diffusion stéréophonique.Transmise comme troisième canal
audio, une SAP peut être entendue séparément de l’audio du
programme de télévision en cours Les stations de télévision
peuvent utiliser cette voie audio secondaire à toutes sortes
de fins. (Si un signal SAP n’est pas offert par le programme
sélectionné, l’option SAP ne peut pas être sélectionnée).
•
Son
:Vous permet de sélectionner son mono ou stéréo
(lorsque le son stéréo est disponible dans le programme
sélectionné).
2355.4 fr 02-11-2004 14:17 Pagina 2
Page 27

3
Comment rechercher les chaînes de télévision
Si vous voulez réinstaller votre téléviseur,procédez
comme suit:
& Appuyez sur le bouton MENU de la
télécommande.
é Utilisez le curseur haut/bas pour sélectionner
Installation.
“ Appuyez sur le curseur droit pour entrer dans
le menu Installation.
Sélectionnez la langue des menus
& Utilisez le curseur gauche/droit.
é Appuyez sur le curseur haut/bas pour
sélectionner votre langue.
Sélectionner le mode de syntonisation
Vous permet de modifier l’entrée des signaux de votre
TV en mode câble, antenne ou auto.La configuration
en mode auto aide le téléviseur à déterminer le type
de signaux ou de chaînes qu’il reçoit lorsque
programmation automatique est activée.
& Sélectionnez Mode synt. dans le menu
Installation.
é Appuyez sur le curseur droit.
Note: Il est recommandé d’utiliser l’option d’installation
Automatique. En cas de difficulté d’installation par la
méthode Automatique, choisir Antenne ou Câble selon le
type de signal qui est présent.
Lorsque:
• Automatique est sélectionnée, le téléviseur
détectera automatiquement si un signal câble
est présent;
•
Antenne est sélectionnée, le téléviseur
détectera le signal d’antenne et cherchera tous
les programmes disponibles localement:
•
Câble est sélectionnée, le téléviseur détectera
le signal et cherchera tous les programmes
disponibles localement sur le câble.
Menu TV
Image Langue
Son Mode synt.
Caractér. Progr. auto
Installation π Éditer progr.
Mode
Mémoriser les chaînes de télévision
Programmation automatique
& Sélectionnez Progr. auto dans le menu
Installation.
Note:Toutes les chaînes doivent être déverrouillées
afin d’être autoprogrammées. A l’invite, entrez votre
code pour déverrouiller toutes les chaînes. (Voir
menu TV, Caractéristiques, Verr. intell., p. 11.)
é Appuyez sur le curseur droit.
Le message
Start ? s’affiche.
“ Appuyez sur le curseur droit.
‘ La progression de l’autoprogrammation est
affichée.
Éditer programmes
Cette option vous permet de modifier ou de sauter
dans la liste de chaînes celles qui ont une réception
faible ou mauvaise ou celles que vous regardez
rarement.
Note: Une fois que vous avez sauté une chaîne, vous ne
pouvez plus la sélectionner avec le bouton
-P+; vous pouvez
seulement y accéder en utilisant les boutons chiffrés.
& Sélectionnez Éditer progr. dans le menu
Installation.
é Appuyez sur le curseur droit pour entrer dans la
liste des programmes.
“ Sélectionnez la programme que vous voulez
éliminer avec le curseur gauche/droit.
‘ Appuyez sur le curseur bas.
Sélectionnez
Marche ou Arrêt.
( Utilisez le curseur haut/bas pour sélectionner un
autre programme et répétez
“ - ‘.
§ Appuyez sur le bouton MENU pour retourner
au menu Installation.
Note: Pour rajouter des programmes à la liste, répétez
& à ‘.
Progr. auto
Progr. ..........
o
p π
œ
Éditer progr.
Progr. π
Passé Marche/Arrêt
2355.4 fr 02-11-2004 14:17 Pagina 3
Page 28

4
Utilisation de la télécommande RC4334
Note: Pour la plupart des boutons, vous activerez la fonction en appuyant une fois sur le bouton. Si vous appuyez
une seconde fois, la fonction sera désactivée.
Note: Seules quelques boutons peuvent être utilisés en mode VGA.
* Fabriqué sous licence de Dolby Laboratories.
‘Dolby’‘Pro Logic’" et le symbole double-D sont des marques de commerce
de Dolby Laboratories.
¬
+
-
V
+
-
P
VCR DVD TV SAT AMP
CCMENU
123
456
789
0
ACTIVE SLEEP
B
POWER
OK
®
®
®
®
AUTO AUTO
aM
Ò®‡π
º
†
INFO
TV PC
SURF
FORMAT
HD
SURR
SELECT
CONTROL
PIP
TIMER
SAP
-
AV+
POWER B
Appuyez pour allumer/éteindre le TV.
Un téléviseur n'est jamais complètement hors tension à moins qu'il ne soit
débranché de la prise murale.
OK Appuyez sur ce bouton pour
afficher la liste des programmes ou
pour activer/confirmer le choix que
vous avez effectué dans les menus.
MENU Menu principal M/A
Voir p. 2.
CC Sous-titres codés
Marche/Arrêt/Actif sans son.
V Pour régler le volume.
¬ Pour supprimer/rétablir le son.
CH Sélection de chaîne
Pour naviguer dans les chaînes de
télévision ou les sources mémorisées.
0/9 Boutons numériques
Choix direct d’une chaîne de
télévision. Si le n° de programme est
à deux ou à trois chiffres, introduisez
le second chiffre avant que le trait ne
disparaisse. Pour appeler une chaîne
de 0 à 9 appuyez sur le bouton à
chiffre un peu plus longtemps.
AV+ Pour sélectionner les
périphériques.Voir p. 9.
-Tapez le point pour les chaînes
numériques.
SLEEP TIMER
Pour sélectionner la période de
temps avant que le téléviseur ne
s’éteigne (de 15 à 240 minutes).
PIP En mode HDMI, appuyez sur le
bouton
PIP et une seconde petite
fenêtre apparaîtra sur votre écran
principal, vous permettant de
regarder simultanément une chaîne
de télévision et une image provenant
d’un appareil branché sur
HDMI
(AV3).
INFO Affichage d’info à l’écran
Pour afficher le numéro de
programme, l'heure, le mode son et
le temps qui reste sur la minuterie.
Appuyez à nouveau pour afficher les
qualifications sélectionnées. Le niveau
de volume et les réglages smart
control sont ensuite affichés chaque
fois qu'ils sont utilisés.
®ºÒ‡π†
Boutons pour les appareils A/V.
TV / PC
Appuyez sur un de ces boutons pour
commuter le téléviseur en mode TV
ou PC.
SURR Son Surround
Incredible surround
Lorsque Incredible Surround est mise
en marche en mode son Stéréo, vous
avez l’impression que les hautparleurs sont plus éloignés l’un de
l’autre.
Virtual Dolby Surround *
Optimal avec les signaux Dolby
Surround.Vous permet de faire
l’expérience de l’effet de Dolby Pro
Logic Surround, qui reproduit un effet
de son à l’arrière.Voir Menu Son,
Dolby Virtual, p. 2.
Vous pouvez faire la même sélection
dans le menu Son, Dolby Virtual, p. 2.
HD Appuyez sur ce bouton pour
utiliser la télécommande directement en mode HD pour les
appareils HD (p.ex. le Set Top Box).
Appuyez 1x pour mode
HD-A,
appuyez 2x pour mode
HD-D.
VCR DVD TV SAT AMP
Appuyez plusieurs fois sur le bouton
Select pour sélectionner un des
modes système dans lequel la
télécommande peut être utilisée.
Si aucun bouton n’est enfoncé dans
les 2 secondes, la télécommande se
remet en mode TV. Si un bouton est
enfoncé dans le mode système, la
télécommande restera dans ce mode
pendant 60 secondes.Après la
télécommande se remet en mode TV.
2355.4 fr 02-11-2004 14:17 Pagina 4
Page 29

5
SURF
Grâce à cette fonction, vous pouvez basculer facilement entre les différentes
chaînes/sources TV qui vous intéressent le plus.
Appuyez sur le bouton
SURF. Une liste est affichée dans la partie gauche de
l'écran de télévision. Le dernier élément ajouté apparaît en premier sur la
liste.
Appuyez sur le curseur haut/bas pour sélectionner immédiatement la chaîne
TV désirée de la liste.
Pour ajouter une nouvelle chaîne ou source à la liste de huit canaux:
Syntoniser sur la chaîne ou la source que vous voulez ajouter.
Appuyez sur le bouton
SURF. Appuyez sur le curseur vers la droite pour
ajouter. S'il y a déjà huit chaînes/sources dans la liste, celle du bas est
supprimée. Pour
supprimer une chaîne ou source: Sélectionnez le numéro de chaîne que vous
voulez supprimer.
Appuyez sur le bouton
SURF. Appuyez sur le curseur vers la droite pour
supprimer.
Appuyez sur le bouton
SURF ou attendez le dépassement du délai imparti
pour effacer l'affichage Surf.
FORMAT
Appuyez sur ce bouton pour une liste de formats d'affichage disponibles
pour afficher des images vidéo dans les proportions traditionnelles 4:3.
Appuyez sur ce bouton plusieurs fois ou appuyez sur le curseur gauche/droit
pour sélectionner un autre format d'affichage: Zoom Super, 4:3, Zoom 14:9,
Zoom 16:9, Zoom Sous-titres, Plein écran ou Plein écran 16:9 (30PF9946
uniquement).
Zoom Super supprime les barres noires sur les côtés des programmes 4:3
avec une distorsion minimale.
Note: Dans le mode HDMI, appuyez sur le bouton FORMAT pour sélectionner le
format Ext. image 16:9 ou un format d’image Plein écran.
SAP Lorsque vous syntonisez une chaîne où SAP (Second Audio Program)
est disponible, vous pouvez faire basculer entre Principal et SAP. Si SAP n'est
pas disponible, seul Principal peut être sélectionné.
ACTIVE CONTROL Marche/Arrêt/Activé avec Capteur
Optimise la qualité de l’image en fonction du signal reçu.
Ma Auto Son/Image
Pour sélectionner des paramètres définis de l’image et du son.
Personnel renvoie aux réglages personnels de l’image et du son
sélectionnés dans le menu image et son.
Note: Ce TV Philips a été configuré en usine pour donner un résultat optimal
dans un environnement de magasin équipé typiquement d’un éclairage
fluorescent. Comme à domicile on dispose généralement d’un éclairage moins
puissant, nous vous recommandons d’essayer les différents préréglages Smart
image pour trouver le plus adapté à votre propre environnement.
Zoom Super 4:3
Zoom 14:9 Zoom 16:9
Zoom sous-titres
Plein écran Plein écran 16:9 (30PF9946 uniquement)
2355.4 fr 02-11-2004 14:17 Pagina 5
POWER
B
VCR DVD TV SAT AMP
INFO
Ò®‡π
TV PC
SURF
®
º
SELECT
†
HD
SURR
FORMAT
®
®
OK
®
CCMENU
+
V
-
123
456
789
+
¬
P
-
AV+
ACTIVE SLEEP
CONTROL
SAP
AUTO AUTO
-
0
PIP
TIMER
aM
Page 30

6
Caméra, jeu, casque
Les boutons en haut du téléviseur
Si votre télécommande est perdue ou cassée, vous
pouvez toujours modifier quelques réglages de
base avec les boutons situés sur le dessus du
téléviseur.
Appuyez sur:
• Les boutons - ou + V pour régler le volume;
• Les boutons
P/CH- P/CH+ pour sélectionner les
chaînes TV ou les sources.
Le bouton
MENU/OK est utilisé pour appeler le
menu principal sans utiliser la télécommande.
Utilisez:
• Le bouton + (Menu Gauche) V et les boutons
P/CH- et P/CH+ (Menu Haut/Bas) pour
sélectionner des éléments du menu dans les
directions indiquées;
• Le bouton
MENU/OK pour supprimer le menu.
MENU/OK - V + - P/CH +
Caméra, Caméscope ou Jeu
& Branchez votre caméra, caméscope ou jeu comme
indiqué.
é Branchez l'installation sur VIDEO 2 et AUDIO L 3
pour un appareil mono. Branchez également sur
AUDIO
R 3 pour un appareil stéréo.
Vous obtiendrez la qualité S-VHS avec un caméscope
S-VHS en branchant les câbles S-VHS sur
S-VIDEO 1
et sur
AUDIO 3.
Attention: Ne pas brancher les câbles 1 et 2 en même
temps. Cela peut produire des distorsions dans l’image !
Casque (uniquement pour 30PF9946)
& Insérez la fiche dans la prise du casque L comme
indiqué.
é Appuyez sur ¬ sur la télécommande pour mettre hors
service les HP de votre téléviseur.
La prise du casque a une impédance de 8 à 4000 Ohm et
est du type 3,5 mm.
L
R
S-VIDEOS-VIDEOS-VIDEO
VIDEO IN
VIDEO INVIDEO
AUDIO
S•VHS
VHS
AUDIO AUDIO
VIDEO INVIDEO IN
S•VHS
AUDIO
VIDEO IN
L
L
R
Connexions arrière
Vous pouvez brancher une large gamme d’appareils électroniques sur votre TV. Les diagrammes de
connexion suivants vous décrivent le mode de connexion à l’arrière de votre TV.
AV1 fonctionne avec YPbPr et CVBS; AV2 fonctionne avec CVBS et Y/C; AV3 fonctionne avec HDMI et VGA;
VGA fonctionne avec VGA, SVGA (et, si 30PF9946, avec XGA) et 480p, 576p, 720p et 1080i.
AV1 (1Fh)
AV2
MON.OUT
AV3
L
R
VIDEO/AUDIO VIDEO/AUDIO
S-VIDEO
HDMI
VGA
Y/Pb/Pr (2Fh)
Pr
AUDIO
Pb Y
RLCVBS
x ANTENNA
AUDIO
2355.4 fr 02-11-2004 14:17 Pagina 6
Page 31

7
Enregistreur (VCR-DVD+RW)
Note: Éviter de placer votre enregistreur trop près de l’écran étant donné que certains enregistreurs sont sensibles
aux signaux de l’image. Gardez une distance minimale de 20” avec l’écran.
Enregistreur avec d’autres périphériques A/V
AV2 MON.OUT
VIDEO/AUDIO VIDEO/AUDIO
S-VIDEO
R
x ANTENNA
CABLE
RECORDER
IN OUT
4
3
AV2 MON.OUT
VIDEO/AUDIO VIDEO/AUDIO
x ANTENNA
S-VIDEO
R
RECORDER
CABLE
3
4
OUT IN
x
TV
& Connectez l’Antenne RF ou le câble de câblodistribution
(éventuellement via un séparateur de signaux à deux
directions – optionnel – et/ou un boîtier convertisseur pour
télévision par câble) 1 à la prise
RF IN de votre
enregistreur.
é Connectez un autre câble RF 2 de la sortie OUT de votre
enregistreur à l’entrée de x
ANTENNA du téléviseur.
“ Connectez le câble d’adaptation mini-jack à cinch fourni 3
à l’entrée
VIDEO/AUDIO d’AV2.
Si votre enregistreur dispose d'une prise vidéo S-VHS:
Pour une meilleure qualité d'image, connectez un câble
S-Vidéo à l'entrée
S-VIDEO 4. S-VHS ne fournissant pas
d'audio, il faut donc brancher le câble mini-jack à cinch pour
obtenir du son.
& Connectez l’Antenne RF ou le câble de câblodistribution
à la prise
RF IN de votre autre périphérique.
é Connectez le câble d’adaptation mini-jack à cinch fourni
2 à l’entrée
VIDEO/AUDIO de AV 2.
“ Branchez la sortie RF de l'appareil AV à l’entrée RF de
l’enregistreur 3.
‘ Branchez un autre câble RF 4 provenant de la sortie
OUT de votre enregistreur à l’entrée x ANTENNA
jack du téléviseur.
Si votre enregistreur dispose d'une prise vidéo S-VHS:
Voir ci-dessus.
Appareils munis de connecteurs Component Video Output (YPbPr)
& Branchez les trois câbles vidéo multiples 1 sur les appareils
possédant des sorties vidéo multiples (
YPbPr), tels que lecteurs
DVD, lecteurs de disques laser, lecteurs de jeux vidéo, récepteurs
satellite et autres, et sur les jacks
Y, Pb et Pr d’AV 1 sur le
téléviseur.
é Connectez les câbles audio aux jacks AUDIO L et R 2 de
l’appareil et aux jacks
L audio et R YPbPr AV1 ou AV2.
“ Pour la reproduction de CVI (Component Video Input) branchez
également sur le CVBS jack d’AV 1.Voir le manuel de votre lecteur
de DVD.
Notes: Les indicateurs pour les cavités composant vidéo peuvent différer
selon le lecteur DVD ou l’appareil branché. Bien que les abréviations
puissent varier, les lettres B et R représentent les signaux composant
bleus et rouges, respectivement, et Y indique le signal de la luminance.
Faites référence aux directives du lecteur DVD pour les définitions et les
détails de branchement.
AV1 (1Fh)
Pr
AUDIO
Pb Y
RLCVBS
VIDEO
L/Mono
AUDIO
1
VIDEO
L/Mono
AUDIO
DVD
2
Le connecteur MON. OUT peut être utilisé pour une connexion en guirlande ou pour enregistrer des
programmes à partir de votre TV. Ce n’est que lorsqu’un enregistreur est branché sur
MON. OUT qu’il
est possible d’enregistrer un programme à partir d’autres périphériques connectés à votre TV.
Voir
Enregistrer avec votre enregistreur, p. 15.
2355.4 fr 02-11-2004 14:17 Pagina 7
Page 32

8
Appareils dotés d’une sortie Progressive Scan (balayage progressif)
(p.ex. un boîtier décodeur, un lecteur DVD progressif..) - 480p, 576p, 720p ou 1080i
Connectez l’appareil avec sortie 2Fh YPbPr au connecteur
VGA 1 (avec le câble d’adaptation VGA à cinch fourni) et
aux jacks
AUDIO L et R 2 d’AV3.
Voir également le manuel de votre appareil haute définition.
Note: Cette télévision est conçue pour accepter des normes de
signaux haute définition 480p, 576p, 720p et 1080i telles que
spécifiées par la norme EIA7703 de l'Electronic Industries
Association.
Les appareils numériques de divers fabricants peuvent avoir
différentes normes de sortie, ce qui peut causer des problèmes
d'affichage.
Avertissement: Au cas où vous remarquez des images instables,
des mauvaises couleurs ou pas de couleur, aucune image ou
toute combinaison de celles-ci sur votre écran, assurez-vous que
vos connexions ont été effectuées correctement ou éloignez
davantage votre appareil numérique de votre téléviseur.
AV3
L
AUDIO
RHDMI
VGA
Y/Pb/Pr (2Fh)
1
DVD
2
Raccordez votre ordinateur
1
2
HDMI
AV3
L
UADIO
R
VGA
Y/Pb/Pr (2Fh)
Vous pouvez relier votre ordinateur au connecteur VGA
d’AV3 ou au connecteur HDMI (voir plus loin).
& Connectez par un câble VGA 1 la carte vidéo de votre
ordinateur avec la prise
VGA
Y/Pb/Pr (2Fh)
du bas du
TV. Serrez les vis de fixation de chaque prise.
é Dans le cas d’un ordinateur multimédia, connectez le
câble audio 2 entre la sortie audio de votre PC et les
entrées
AUDIO R (droite) et AUDIO L (gauche) du
côté du TV.
L’entrée
VGA du TV permet l’affichage des modes
suivants:
VGA 640 x 480 60 Hz
SVGA 800 x 600 60 Hz
XGA 1024 x 768 60 Hz (uniquement 30PF9946)
Note:
Si possible, utilisez le mode XGA1024x768@60 Hz pour
obtenir la meilleure qualité d’image possible pour votre
moniteur LCD (30PF9946)
2355.4 fr 02-11-2004 14:17 Pagina 8
Page 33

9
Connecteur HDMI (High Definition Multimedia Interface)
Reliez la sortie numérique HDMI de votre appareil HD (par ex. lecteur DVD, Set Top Box …) au
connecteur
HDMI de votre téléviseur.
Notes :
- Le bon fonctionnement est uniquement garanti avec des produits HDMI compatibles.
- Il est possible que les appareils numériques de fabricants différents possèdent d’autres standards de sortie, ce qui
peut engendrer des difficultés en ce qui concerne l’affichage correct de la TV.
- Si l’appareil est froid, il peut y avoir une petite “étincelle” lorsque l’on allume l’appareil. C’est normal, l’appareil
n’est pas défectueux.
HDMI est la nouvelle norme pour l’interconnexion vidéo et audio
numérique haute définition. Par ex. avec un Set top box numérique,
avec des appareils HDMI tels qu’un lecteur DVD, récepteur AV...
Note: Le connecteur HDMI
NE SUPPORTE PAS les appareils DVI avec
son analogique.
Le connecteur
HDMI permet:
- Les modes d’affichage TV et moniteur suivants:
EDTV 640/720 x 480p
720 x 576p
HDTV 1920 x1080i
VGA 640 x 480 60 Hz
SVGA 800 x 600 56 Hz
XGA 1024 x 768 60 Hz
- Un volume HD non comprimé
- Des signaux codés ou non codés.
Selon le branchement de vos périphériques
,appuyez sur
• AV+ suivi du bouton ‘1’ pour sélectionner AV1
• AV+ suivi du bouton ‘2’ pour sélectionner AV2
• AV+ suivi du bouton ‘3’ pour sélectionner REAR pour un
périphérique connecté à l’arrière ou sur le côté (selon le type de
téléviseur que vous avez acheté), voir p. 6
•
AV+ suivi du bouton ‘4’ pour sélectionner HD-A pour un appareil
HD-A connecté à
AV3 ,voir p. 8
•
AV+ suivi du bouton ‘4’ de nouveau pour sélectionner HD-D
pour un appareil HD-D connecté à AV3 ,voir p. 9
•
AV+ suivi du bouton ‘5’ pour sélectionner PC-A pour un
ordinateur connecté à
AV3 ,voir p. 8
•
AV+ suivi du bouton ‘1’ et alors par le bouton P+ pour
sélectionner
CVI.
Note: Lorsque le mode est HD ou PC, appuyez d’abord sur le bouton
TV
pour retourner au mode TV ou pour sélectionner de nouveau AV1, AV2
ou REAR.
789
0
ACTIVE SLEEP
AUTO AUTO
aM
CONTROL
PIP
TIMER
SAP
AV+
-
AV+
Pour sélectionner les périphériques
AV3
L
AUDIO
R
HDMI
2355.4 fr 02-11-2004 14:17 Pagina 9
Page 34

10
Menu Caractér.
Minuterie
Ce menu vous permet d’utiliser le téléviseur
comme un réveil.
& Appuyez sur le bouton MENU.
é A l’aide du curseur, sélectionnez Caractér.,
puis
Minuterie.
“ Heure: Entrez l’heure courante avec les
boutons numérotés.
Utilisez le curseur gauche/droit pour
sélectionner AM ou PM.
‘ Heure Début: Entrez l’heure de début.
( Heure Fin: Entrez l’heure de mise en veille.
§ No. de chaîne.: Entrez le numéro de la chaîne
pour le réveil.
è Activer:Vous pouvez régler:
•
Une fois pour un réveil unique;
•
Quotidien pour tous les jours,
•
Arrêt pour annuler.
!
Affichage: Utilisez le curseur de direction
droite pour sélectionner Marche ou Arrêt,
selon que vous voulez afficher l’heure actuelle
sur l’écran du téléviseur ou non.
ç Appuyez sur le bouton B pour mettre en
veille le téléviseur. Il s’allumera
automatiquement à l’heure programmée. Si
vous laissez le téléviseur allumé, il changera
uniquement de programme à l’heure indiquée
(et se mettra en veille à l’heure de fin).
Note: La combinaison des fonctions Verrou intell. et
Minuterie permet de limiter la durée d’utilisation, à
vos enfants par exemple.
Verr. intell.
La fonction Verr. intell.effectue le traitement des
données envoyées par les diffuseurs ou autres
fournisseurs de programmes contenant des
directives sur le contenu. Une fois Verr. intell.
programmé, un téléviseur doté d’une telle fonction
peut répondre aux directives de contenu et
bloquer les programmes dont le contenu vous
semble douteux.
Verr. intell. permet aux parents de bloquer ou de
“censurer” tout programme ne convenant pas aux
enfants. Il est impossible de regarder une chaîne
bloquée par la commande Verr. intell. à moins de
saisir le code d’accès correct pour déverrouiller la
chaîne.
& Appuyez sur le bouton MENU.
é A l’aide du curseur, sélectionnez Caractér.,
puis
Verr. intell.
“ Appuyez sur le curseur droit pour entrer dans
le menu Verr. intell.
‘ Vous devez entrer votre code d’accès.
• Appuyez sur les boutons 0,7,1,1 de la
télécommande.
Incorrect est affiché à l’écran.
• Appuyez de nouveau sur les boutons 0,7,1,1
de la télécommande.
Nouv(eau) code est
affiché à l’écran.
• Entrez u nouveau code à quatre chiffres à
l’aide des boutons numérotés.
Confirmer
code
est affiché.
• Entrez de nouveau votre code à quatre
chiffres.
Confirmé clignote brièvement à
l’écran et Verr. intell. est mis en surbrillance.
Caractér.
Minuterie Heure
Verr. intell. π Heure Début
Contraste+ Heure Fin
Réduct. Bruit No. de prog.
PIP Prog. activée
Display
Verr. intell.
Bloquer prog. Non classé
Lock HD Sans classem.
Changer Code Blocage
Tout effacer
Tout bloquer
Films/class.
TV/Classement
Opt. blocage. π
Important:Vous avez oublié votre code:
Rappelez-vous que 0,7,1,1 est le code Verr. Intell. par défaut. Si votre code d’accès a été modifié par
quelqu’un d’autre (un enfant, par exemple) ou si vous ne vous en souvenez plus, vous pouvez quand
même accéder au menu en utilisant ce code par défaut.
2355.4 fr 02-11-2004 14:17 Pagina 10
Page 35

11
Fonctions Verr. intell.
Bloquer chaîne
Sélectionnez le programme que vous voulez bloquer.Appuyez sur le curseur droit pour bloquer.
Effectuez de nouveau pour chaque programme que vous désirez bloquer.
Verrouiller HD (Lock HD)
Afin de bloquer les périphériques connectés à
AV3 .
Changez Code
Pour modifier votre code d’accès. Entrez votre code d’accès actuel or bien le code déterminant
0,7,1,1 et entrez un nouveau code d’accès personnel. Le code précédent est remplacé.
Tout effacer
Pour débloquer tous les canaux et programmes bloqués jusqu’à la mise hors tension du téléviseur.
Lorsque le téléviseur est allumé de nouveau, tous les canaux bloqués précédemment seront bloqués
de nouveau.
Tout bloquer
Pour bloquer tous les canaux et programmes à la fois. Dans le mode
ARRÊT,vous retournez vers les
canaux bloqués individuels.
Qualification Cinéma
Vous permet de contrôler l’accès aux films individuels selon leur qualification MPAA (Motion Picture
association of America).
Sélectionnez une qualification cinéma et appuyez le curseur droit pour mettre chaque qualification en
MARCHE ou en ARRÊT.
Note: Lorsqu’une classe de films est bloquée, toutes les classes plus élevées seront bloquées automatiquement.
G films au contenu modéré, appropriés à tous les âges
PG films pour lesquels une surveillance parentale est
recommandée.
Ceux-ci peuvent contenir certaines scènes corsées ou
violentes ou quelquefois une mauvaise langue
PG-13 films pour lesquels une surveillance parentale est
recommandée dans le cas de jeunes de moins de 13 ans
R réservé aux adultes. Ces films contiennent généralement
des scènes sexuelles offensives ou une mauvaise langue et
peuvent être inappropriés aux jeunes de moins de 17 ans.
Surveillance ou permission parentale obligatoire.
NC-17 même avec la permission parentale, défendu aux jeunes
de moins de 17 ans. Plus de scènes sexuelles offensives, de
violence ou de mauvaise langue.
X films qui se concentrent généralement sur le sexe, la
violence et/ou une mauvaise langue. Connu également sous
le nom de pornographie.
2355.4 fr 02-11-2004 14:17 Pagina 11
Page 36

12
Verrou des qualification TV
Vous permet de parcourir vos qualifications télé personnelles.
Sélectionnez une qualification TV selon l'âge avec le curseur haut/bas, et entrez dans la liste, si elle est
présente, avec qualification selon le contenu à l'aide du curseur droit puis sélectionnez une
qualification selon le contenu.
Lorsque
Tout bloquer est sélectionné, tous les éléments de la liste selon le contenu et selon l'âge
sont verrouillés.
Appuyez de nouveau sur le curseur droit pour mettre chaque classement en
MARCHE ou en ARRÊT.
Note: Lorsqu’une classe de films est bloquée, toutes les classes plus élevées seront bloquées automatiquement.
Options de blocage:
Il y a 3 options de blocage:
•
Non classé:
Lorsque l’option de blocage Non classé est activée, les programmes cinéma et TV sans qualification
sont bloqués. Les programmes de sports, d’actualités et de prévisions météo sont classés dans la
catégorie des programmes sans qualification.
•
Sans classement:
Tous les programmes sans données de directives sur le contenue peuvent être bloqués si l’option
Sans classem. est réglée à MARCHE. N’importe quel programme peut entrer dans cette catégorie.
•
Blocage
La commande de blocage est en réalité le “sélecteur maître” de Verr. Intell. Cette commande modifie
les paramètres que vous avez choisis pour le blocage des programmes selon le classement des films
ou des émissions de télévision ou pour bloquer les programmes manquant d’informations ou non
classifiés.
Lorsque la commande Bloquer est en
ARRÊT, le blocage ou la censure des programmes est
désactivé. Lorsque la commande est en
MARCHE, le blocage s’effectue selon les paramètres que
vous avez choisis.
Qualification selonQualification selon
l'âge le contenu
Pas de qualificat. marche/arrêt
TV-Y marche/arrêt
TV-Y7 tous
(FV) Violence imaginaire
TV-G marche/arrêt
TV-PG tous
(D) Dialogue
(L) Langage
(S) Sexe
(V) Violence
TV-14 tous
(D) Dialogue
(L) Langage
(S) Sexe
(V) Violence
TV-MA tous
(L) Langage
(S) Sexe
(V) Violence
TV-Y approprié pour les jeunes de tout âge avec des
thèmes et des éléments qui conviennent à des jeunes
de 2 à 6 ans
TV-Y7 programmes conçus pour les jeunes de 7 ans et plus
TV-Y7-FV programmes contenant de la violence imaginaire
plus intense que dans les programmes de la catégorie
TV-Y7
TV-G programmes appropriés à tous les âges. Ces
programmes contiennent peu ou pas de violence, pas
de langage offensif et peu ou pas de dialogue ou
situation sexuelle
TV-PG programmes contenant des éléments que certains
parents jugent inappropriés pour les enfants plus
jeunes et pouvant nécessiter une surveillance
parentale. Le programme peut contenir des situations
de violence et des dialogue sexuel modérés ainsi
qu'un langage offensif.
TV-14 programmes contenant des éléments pouvant ne pas
être appropriés à des enfants de moins de 14 ans.
Ces programmes comportent un ou plusieurs des
éléments suivants:Violence intense, situations
sexuelles intenses, dialogues suggestifs et langage
offensif.
TV-MA programmes à l'intention des adultes et pouvant être
inappropriés aux jeunes de moins de 17 ans. Ces
programmes peuvent contenir de la violence
graphique, des activité sexuelles explicites et/ou un
langage indécent ou grossier.
2355.4 fr 02-11-2004 14:17 Pagina 12
Page 37

13
Les sous-titres codés vous permettent de lire le contenu vocal des
programmes de télévision sur votre écran TV lors de la
transmission d’un programme offrant des sous-titres. Cette
fonction, à l'intention des malentendants, utilise des ‘boîtes de texte’
à l'écran pour afficher les dialogues et les conversations en même
temps que le programme de télévision. Les sous-titres codés
apparaissent à l'écran durant les télédiffusions à sous-titres.
& Appuyez plusieurs fois sur le bouton CC pour sélectionner
STC-Arrêt, STC-1, STC-2 ou STC/Sourdine.
Lorsque
STC-Arrêt est sélectionné, le téléviseur n'affiche pas
de sous-titres;
Lorsque
STC/Sourdine est sélectionné, le téléviseur affiche
automatiquement
STC-1 lorsque la fonction Arrêt est active.
Lorsque la fonction Arrêt est désactivée, le téléviseur n'affiche
pas de sous-titres.
STC-1 est le mode le plus utilisé, STC-2 peut être utilisé pour
des langues alternatives si elles sont transmises, Dialogue (et
descriptions) des actions d'un programme de télévision à soustitrés codés à l'écran.
Note: Les sous-titres n'emploient pas toujours une grammaire et une
orthographe correctes. Les programmes de télévision et les commerciaux
publicitaires ne sont pas toujours conçus pour la diffusion avec les
informations de sous-titres incluses. Consultez le guide des programmes
de télévision de votre région pour les chaînes de télévision et les heures
des spectacles sous-titrés codés. Les programmes sous-titrés codés sont
généralement indiqués dans l'horaire de télévision accompagnés de
marques de service comme ‘CC’.
Note: Ce poste de télévision fournit des fonctions de sous-titrage codé
répondant aux normes EIA-608 et selon les articles 15.119 des
règlements de la FCC.
Sous-titres codés
L’option PIP vous permet de faire apparaître
une seconde fenêtre plus petite sur votre écran
principal, vous permettant de regarder
simultanément une chaîne de télévision et une
image provenant d’un appareil numérique
branché sur
HDMI (AV3) (appareil Haute
Définition Numérique).
& Appuyez sur le bouton MENU.
é A l’aide du curseur, sélectionnez Caractér.,
puis
PIP.
“ Utilisez le curseur de direction droite pour
sélectionner les formats PIP disponibles:
Arrêt,
Petit, Moyen, Grand ou Côte à côte.
Lorsque le format est sélectionné, et lorsqu’un
appareil est branché sur
HDMI (AV3) et
allumé, l’écran PIP apparaîtra automatiquement.
Enfoncez le bouton
P- ou P+ ou les touches
chiffrées pour sélectionner d’autres chaînes TV
ou pour afficher la fenêtre de l’appareil
HDMI
(AV3) sur l’écran principal.
‘ Sélectionnez Horizontal ou Ve r tical pour
déplacer l’écran PIP vers un autre coin de
l’écran principal.
PIP (Picture in Picture )
OK
®
®
®
®
VCR DVD TV SAT AMP
CCMENU
B
Ò®‡π
º
†
INFO
TV PC
SURF
FORMAT
HD
SURR
SELECT
CC
Combinaisons PIP:
Mode:
Écran principal
Écran PIP
TV
TV
HDMI
HD
HDMI
TV/A-HD/VGA
PC
VGA
HDMI
2355.4 fr 02-11-2004 14:17 Pagina 13
Page 38

14
Menu de TV
Image TV
Son PC
Caractér.
Installation
Mode π
Votre téléviseur peut être utilisé comme un moniteur d’ordinateur.
Vous devez d’abord effectuer les raccordements de l’ordinateur et ajuster la résolution (voir p. 8).
Choix du mode PC
Appuyez sur le bouton PC de la télécommande pour commuter le téléviseur en mode PC. Appuyez
sur
TV pour revenir en mode tv. En cas d’absence de signal PC pendant plus de 5 secondes, le
téléviseur passe automatiquement en veille.
Utilisation des menus PC
PC Menu
Image π Lumière
Sélection Audio Contraste
Caractér. Horizontal
Réglages usine Vertical
Mode Temp. Couleur
Caractér.
Phase
Horloge
Format
PIP
Ajustement auto
Utilisation en mode moniteur PC
Appuyez sur le bouton MENU pour accéder aux réglages
spécifiques au mode moniteur PC. Utilisez le curseur pour
régler (les réglages sont mémorisés automatiquement).
Image
•
Lumière/Contraste:Pour régler la lumière et le
contraste.
•
Horizontal/Vertical:Pour ajuster le positionnement
horizontal et vertical de l’image.
•
Température couleur:Pour régler la teinte des
couleurs (froide, normale ou chaude).
Sélection Audio
Pour choisir le son qui est reproduit sur le téléviseur
(
PC/HD ou TV).
Notes:
- Vous devez choisir le mode TV avant de passer au mode
TV/HD.
- Pour l’écoute de sons provenant d’un appareil HD en mode
PC, assurez-vous d’avoir également connecté les câbles
audio à l’appareil HD.
Caractér.
•
Phase/Horloge:Permet d’éliminer les lignes parasites
horizontales (
Phase) et verticales (Horloge).
•
Format:Pour choisir entre écran large (plein écran) ou
le format original (native) des écrans PC.
•
PIP:Vous permet de modifier la taille et la position de la
fenêtre PIP à l’écran lorsque le bouton
PIP est utilisé.
•
Ajustement audio: Le positionnement est réglé
automatiquement.
Réglages usine
Pour revenir aux réglages d’usine (réglages par défaut).
Mode
Pour revenir en mode TV.
2355.4 fr 02-11-2004 14:17 Pagina 14
Page 39

15
Enregistrement avec enregistreur
Pour enregistrer à une qualité S-VHS, branchez un
périphérique S-VHS directement sur le
enregistreur.
Enregistrement d'un programme de
télévision
Vous pouvez enregistrer un programme de
télévision à l'aide du syntoniseur de votre
enregistreur sans affecter votre téléviseur.
& Sélectionnez le numéro de chaîne sur votre
enregistreur.
é Réglez votre enregistreur pour enregistrer.
Consultez le manuel de votre enregistreur.
Vous n'affectez pas l'enregistrement lorsque vous
changez de numéro de chaîne !
Enregistrement d’un programme par
MONITOR OUT
Vous pouvez enregistrer un programme de
télévision à l'aide du syntoniseur de votre
téléviseur par
MONITOR OUT.
& Mettez l'appareil en service.
é Sélectionnez la chaîne correcte sur votre
téléviseur et l’entrée correcte sur votre
enregistreur.
“ Réglez votre enregistreur pour enregistrer.
Vous enregistrez le canal sélectionné de la
télévision, même si vous passez à une entrée
AV, en utilisant le bouton
AV+ sur la
télécommande.
Vous ne devez pas changer de chaînes ou éteindre
votre téléviseur lorsque vous enregistrez par
MONITOR OUT.
Note: Lorsqu'un canal du téléviseur ou une source
AV se trouvent bloqués du fait de l'instruction
donnée via le menu Canaux (voir p. 12), l'image et
le son de sortie deviennent également muets.
This equipment has been tested and found to comply
with the limits for a Class B digital device, pursuant to
part 15 of the FCC Rules.These limits are designed to
provide reasonable protection against harmful
interference in a residential installation.This
equipment generates, uses, and can radiate radio
frequency energy and, if not installed and used in
accordance with the instructions, may cause harmful
interference to radio communications. However, there
is no guarantee that interference will not occur in a
particular installation. If this equipment does cause
harmful interference to radio or television reception,
which can be determined by turning the equipment off
and on, the user is encouraged to try to correct the
interference by one or more of the following
measures:
Reorient or relocate the receiving antenna.
Increase the separation between the equipment and
the receiver.
Connect the equipment into an outlet on a circuit
different from that to which the receiver is connected.
Consult the dealer or an experienced radio or
television technician for help.
Modifications The FCC requires the user to be notified that any
changes or modifications made to this device that are
not expressly approved by Philips Consumer
Electronics may void the user’s authority to operate
the equipment.
Cables Connections to this device must be made with
shielded cables with metallic RFI/EMI connector hoods
to maintain compliance with FCC Rules and
Regulations.
Canadian notice This Class B digital apparatus meets all requirements
of the Canadian Interference-Causing Equipment
Regulations.
Avis Canadien Cet appareil numérique de la classe B respecte toutes
les exigences du Règlement sur le matériel brouilleur
du Canada.
Regulatory Notices - Federal Communications Commission Notice
2355.4 fr 02-11-2004 14:17 Pagina 15
Page 40

Avant de téléphoner au service à la clientèle
16
Veille Votre TV consomme de l'énergie en veille. Cette consommation contribue a la
pollution de l'air et de l'eau. Consommation : 2 W.
Divers .Température ambiante: + 5~ + 40°C
. Alimentation: 50/60 Hz Voltage auto de 96 V à 140 V
. Consommation: Environ 160 W
. Consommation en position de veille: < 2 W
.Poids (sans l’emballage): 30PF9946: 40 Lbs; 37PF9946: 66 Lbs; 42PF9946:92 Lbs
. Dimensions ((lxhxp):
30PF9946: 895x490x110;37PF9946: 1130x600x85; 42PF9946: 1215x660x90
Symptômes Vérifications et corrections à effectuer
Images "fantômes"
•Peut être causé par une obstruction à l'antenne comme un gratte-ciel ou des
ou doubles collines. L'utilisation d'une antenne à grande directivité peut améliorer l'image.
Pas d'alimentation • S'assurer que le cordon d'alimentation c.a. est branché dans la prise murale.
• Débrancher le téléviseur et attendre 60 secondes. Rebrancher la fiche dans la
prise murale et remettre le téléviseur sous tension.
Pas d'image • Vérifier les connexions de l'antenne au bas du téléviseur et s'assurer qu'elles
sont branchées correctement.
•Problème pouvant venir de la station de diffusion. Essayer une autre chaîne.
• Régler les réglages de contraste et de lumière. Essayer un autre réglage de auto
image.
• Vérifier les commandes de sous-titrage. Certains modes TEXTE pourraient
bloquer l'écran.
• Réglez votre source HDMI sur un mode d’affichage correct.
Pas d'image et •Votre téléviseur possède un mode protection en cas de surchauffe.
alimentation Vérifiez l'espace libre autour des sorties de l'appareil pour vous assurer qu'aucun
activée mur ou meuble ne puisse entraver la circulation d'air.
Pas de son • Augmenter le VOLUME.
• S'assurer que le téléviseur n'est pas en arrêt, appuyer sur le bouton ¬ de la
télécommande.
• Lorsque aucun signal n'est détecté, le téléviseur coupe le son automatiquement.
Il ne s'agit pas là d'un mauvais fonctionnement mais d'une fonction du système.
Bonne sonorité • Régler le contraste et la lumière.
mais couleurs Essayer un autre réglage de auto image.
médiocres ou
pas d'image
Image médiocre
• Vérifier la connexion du HDMI.
Image à effet • Vérifier la connexion d'antenne.
neige et bruits
Le téléviseur ne
• Vérifier que les piles fonctionnent correctement. Les remplacer au besoin.
répond pas à la • Nettoyer la lentille du capteur du téléviseur.
télécommande • La distance de fonctionnement entre le téléviseur et la télécommande ne doit
pas dépasser 240”.
•Vous pouvez toujours utiliser les boutons en haut du téléviseur.
• Vérifiez que la télécommande soit en mode correct.
Contrôle de • Les signaux infrarouge de l'écran peuvent influencer la sensibilité de réception
l'équipement d'autres périphériques.
périphérique Solution: Remplacez les piles de la télécommande ou changez la position des
autres appareils. P. ex. gardez les écouteurs sans fil hors d'un rayon de 50".
Image VGA pas Vérifiez si vous avez sélectionné le mode VGA correct dans votre ordinateur.
stable ou pas
synchronisée
2355.4 fr 02-11-2004 14:17 Pagina 16
Page 41

17
Trucs et astuces
Comment mettre les batteries au rebut?
Les batteries fournies ne contiennent pas de mercure ou de cadmium. Néanmoins, dans un grand
nombre de localités, il est interdit de mettre les batteries au rebut avec les déchets ménagers.Veuillez
vous assurer de mettre les batteries au rebut selon les règlements locaux.
Toujours pas de résultats ?
Mettez vote téléviseur hors service. Remettezle en service.
N'essayez jamais de réparer vous-même
une panne de téléviseur.
Consultez votre revendeur ou un technicien.
Numéro de téléphone Philips Customer
Care Centre:
1-888-PHILIPS (744-5477)
Avertissement concernant les images fixes sur l’écran du TV
Une caractéristique des écrans plasma (PDP) est que l’affichage d’une même image pendant une
longue durée peut entraîner une image fantôme persistante à l’écran. Il s’agit du marquage du
phosphore à l’écran.
Lors d'une utilisation normale, le téléviseur doit afficher des images en perpétuel mouvement et
en perpétuel changement qui remplissent l’écran.
Exemples d’images fixes (cette liste n’est pas exhaustive, vous pouvez en rencontrer d’autres):
•
Menus TV;
•
Barres noires: Lorsque des barres noires apparaissent sur la gauche et sur la droite de l’écran, il
est recommandé de passer à un format image dans lequel l’image remplisse l’écran;
•
Logos des chaînes de télévision:Posent un problème s’ils sont lumineux et immobiles. Il est
moins probable que les graphiques animés ou de faible contraste entraînent un vieillissement
non uniforme de l’écran;
•
Informations boursières: Présentées en bas de l’écran TV;
• Logos des chaînes de shopping et affichage des prix: Lumineux et affichés en permanence ou
fréquemment au même endroit sur l’écran TV.
Parmi les exemples d’arrêts sur image figurent les logos, les images de synthèse, l’affichage de
l’heure, les informations télétexte et les images affichées en mode 4:3, les images ou
personnages statiques, etc.
Notes:
- Réduisez le contraste et la luminosité pendant le visionnage
- Le marquage du phosphore à l’écran ne disparaît jamais complètement.
2355.4 fr 02-11-2004 14:17 Pagina 17
Page 42

18
GARANTIE LIMITEE
QUI EST COUVERT ?
Vous devez disposer d'une preuve d'achat pour
bénéficier du service de garantie. Un reçu ou tout
autre document faisant preuve de votre achat du
produit est considéré comme une preuve d'achat.
QU’EST-
CE QUI EST COUVERT ?
La protection offerte par la garantie commence le
jour où vous avez acheté votre produit. Pour une
période d'un an, nous nous engageons à réparer ou
remplacer toute pièce défectueuse et la main d'œuvre
est à nos frais.Après un an suivant l'achat du produit,
les frais de remplacement ou de réparation ainsi que
la main d'œuvre seront à votre charge.
Toutes les pièces, y compris les pièces réparées ou de
rechange, ne sont couvertes que pour la période de
garantie originale. Lorsque la garantie du produit
arrive à son terme, la garantie sur toutes les pièces
remplacées ou réparées expire également.
CE QUI N’EST PAS COUVERT:
Votre garantie ne couvre pas :
• les frais de main d'œuvre pour l'installation ou la
configuration du produit, le réglage des commandes
sur le produit du client ainsi que l'installation ou la
réparation du système d'antennes extérieur au
produit.
• réparation du produit et/ou remplacement des pièces
à cause d'une utilisation abusive, d'un accident, d'une
réparation non autorisée ou de toute autre cause non
contrôlable par Philips Consumer Electronics
Company.
•problèmes de réception causées par la qualité des
signaux ou par le système d'antennes extérieur au
dispositif.
• un produit nécessitant une modification ou adaptation
afin de permettre l'utilisation dans tout pays autre que
celui auquel il était désigné, fabriqué, approuvé et/ou
autorisé ou toute réparation du produit endommagé
par ces modifications.
• dommages accessoires ou indirects résultant du
produit. (Certains états ne reconnaissent pas
l'exclusion de la responsabilité pour dommages
indirects, il est possible que cette clause soit sans effet
dans votre cas. Ceci inclut, mais ne se limite pas, au
matériel préenregistré, qu'il dispose ou non des droits
d'auteur.)
• un produit utilisé pour des raisons commerciales ou
institutionnelles.
ENDROIT OU LE SERVICE EST DISPONIBLE:
Le service de garantie est disponible dans tous les
pays où le produIt est distribué officiellement par
Philips Consumer Electronics Company. Dans le cas
de pays où Philips Consumer Electronics Company ne
distribue pas le produit, le centre de service local
Philips tentera de vous offrir le service (un délai est
possible si les pièces de rechange et les manuels
appropriés ne sont pas disponibles tout de suite).
S’ASSURER DE GARDER...
toute preuve d'achat ou autre document faisant
preuve de l'achat. Conservez ce reçu avec les manuels
de l'utilisateur et gardez-les à portée de la main. Il est
recommandé également de conserver la boîte
d'expédition originale ainsi que son matériel
d'emballage au cas où vous avez besoin de renvoyer le
produit.
COMMENT OBTENIR LE SERVICE DE GARANTE
Les réparations doivent être effectuées par un centre
de service agréé ou un centre de service à l'usine. Si
vous n'habitez pas à proximité d'un centre de service
à l'usine, contactez votre représentant. Si votre
représentant est un centre de service agréé, il pourra
autoriser la réparation. Si votre représentant n'est pas
un centre de service agréé, il pourra vous référer au
centre de service autorisé engagé par lui pour
effectuer le service des produits qu'il vend.
(Aux Etats-Unis, Puerto Rico et Iles Vierges des EtatsUnis, toute garantie implicite, y compris les garanties
implicites de qualité loyale et marchande et d'utilité
particulière se limitent à la durée de cette garantie
expresse. Certains états ne reconnaissent pas de
limitation sur la durée d'une garantie implicite, il est
donc possible que cette limitation soit sans effet dans
votre cas.)
(Au Canada, cette garantie est offerte au lieu de toute
autre garantie. Exclusion de toute autre garantie,
expresse ou implicite, y compris toute garantie
implicite de qualité loyale et marchande et d'utilité
particulière du produit. Philips ne saurait en aucun cas
être tenu responsable pour dommages directs,
indirects, secondaires ou accessoires, découlant de
l'utilisation de ce produit même si Philips aurait été
prévenu de la possibilité de tels dommages.)
SI VOUS AVEZ DES QUESTIONS AU CANADA:
Veuillez contacter Philips au:
1-800-661-6162 (en langue française)
1-800-363-7278 (en langue anglaise)
NE PAS OUBLIER....
de prendre en note les numéros de série et de modèle
indiqués sur votre produit dans l'espace ci-dessous. De
plus, n'oubliez pas de remplir et de nous renvoyer
votre carte d'enregistrement par la poste, le plus tôt
possible. Cela nous facilite la tâche, lorsque nous avons
des informations à communiquer.
No. de modèle #
No. de série #
Un an gratuit sur la main d'oeuvre - Un an de service gratuit sur les pièces
Cette garantie vous donne des droits spécifiques. Il se peut que vous bénéficiez d’autres droits qui varient d’un état/d’une province à l’autre
Philips, P.O. Box 671539,Marietta, GA 30006-0026,1-888-PHILIPS (744-5477)
2355.4 fr 02-11-2004 14:17 Pagina 18
Page 43

Devuelva su tarjeta de registro de producto hoy mismo
y obtenga lo mejor de su compra
Al registrar su modelo con PHILIPS usted cumplirá con los requisitos para obtener
todos los valiosos beneficios que se indican a continuación, ¡no se los pierda! Llene y
devuelva su tarjeta de registro del producto ahora mismo para garantizar :
*Comprobante de
Compra
La devolución de la tarjeta incluida
garantiza que se archive la fecha de
compra, de modo que no
necesitará más papeleo para
obtener el servicio de garantía.
*Seguridad del producto
Notificación
Al registrar su producto, recibirá la
notificación (directamente del
fabricante) en el raro caso de un
retiro de productos o de defectos
en la seguridad.
*Beneficios adicionales
de la propiedad del
producto
Registrar su producto garantiza que
recibirá todos los privilegios a los
cuales tiene derecho, incluyendo las
ofertas especiales para ahorrar
dinero.
¡Felicitaciones
por su compra,y bienvenido a la
“familia!”
Estimado propietario de un producto
PHILIPS:
Gracias por su confianza en PHILIPS. Usted ha escogido uno de
los productos mejor construidos y con mejor respaldo disponible
hoy en día. Haremos todo lo que esté a nuestro alcance por
mantenerle satisfecho con su compra durante muchos años.
Como miembro de la "familia" PHILIPS, usted tiene derecho a
estar protegido con una de las garantías más completas y redes de
servicio más sobresalientes de la industria. Lo que es más: su
compra le garantiza que recibirá toda la información y ofertas
especiales a las que tiene derecho,además de un fácil acceso a los
accesorios desde nuestra cómoda red de compra desde el hogar.
Y lo que es más importante: usted puede confiar en nuestro
irrestricto compromiso con su satisfacción total.
Todo esto es nuestra manera de decirle bienvenido y gracias por
invertir en un producto PHILIPS
.
P.S. Con el fin de obtener lo mejor de su compra
PHILIPS, asegúrese de llenar y de devolver
inmediatamente su tarjeta de registro del producto.
Sólo para uso del cliente
Escriba a continuación el N° de
serie, el cual se ubica en la
parte posterior del gabinete.
Guarde esta información para
futura referencia.
N° de modelo. ____________
N° de serie. ______________
Conozca estos símbolos
de seguridad
Este "relámpago"indica
material no aislado dentro
de la unidad que puede causar
una descarga eléctrica. Para la
seguridad de todos en su hogar,
por favor no retire la cubierta del
producto.
El "signo de exclamación"
llama la atención hacia
funciones sobre las que debería
leer con atención en la literatura
adjunta para evitar problemas
operativos y de mantenimiento.
PRECAUCIÓN: Para evitar
descargas eléctricas, haga que la
paleta ancha del enchufe coincida
con la ranura ancha e
introdúzcala hasta el fondo.
ATTENTION: Pour éviter les
chocs électriques, introduire la
lame la plus large de la fiche dans
la borne correspondante de la
prise et pousser jusqu’au fond.
AVISO
RIESGO DE CHOQUE ELÉCTRICO
NO ABRIR
Atención: Para reducir el riesgo de choque eléctrico,
no quite la tapa (o el panel posterior).
En su interior no hay piezas que el usuario pueda reparar.
Para servicio dirijase a personel calificado.
t
s
Visite nuestro sitio en el World Wide Web en http://www.philips.com
2355.4 es 02-11-2004 14:18 Pagina 1
Page 44

1. Lea estas instrucciones.
2. Guarde estas instrucciones.
3. Preste atención a todas las advertencias.
4. Siga todas las instrucciones.
5. No use este aparato cerca del agua.
6. Límpielo solamente con un paño seco.
7. No bloquee ninguno de los orificios de ventilación. Instálelo de
acuerdo con las instrucciones de los fabricantes.
8. No lo instale cerca de fuentes de calor, tales como radiadores,
compuertas de tiro (registros) de calor, estufas u otros
aparatos (incluidos amplificadores) que generen calor.
9. No anule el objetivo de seguridad del enchufe polarizado o de
conexión a tierra. Un enchufe polarizado tiene dos paletas, una
más ancha que la otra. Un enchufe de conexión a tierra tiene
dos paletas y una tercera espiga de conexión a tierra. La paleta
más ancha o la tercera espiga es entregada para su seguridad.
Si el enchufe suministrado no se ajusta a su tomacorriente,
consulte a un electricista que reemplace el tomacorriente
obsoleto.
10. Evite pisar o apretar el cable de suministro eléctrico,
especialmente en los enchufes, tomacorrientes y el punto en
que salen del aparato.
11. Sólo use aditamentos o accesorios especificados por el
fabricante.
12. Utilice sólo con un carro, soporte, trípode, repisa o
mesa especificados por el fabricante o que se
vendan junto con el aparato. Si usa el carro, tenga
precaución cuando mueva la combinación carro/aparato para
evitar lesiones si éste se vuelca.
13. Desenchufe este aparato durante las tormentas eléctricas o
cuando no se use durante largos períodos.
14. Deje que personal calificado realice todo el servicio. Es
necesario que el aparato reciba servicio si se ha dañado en
algún modo, como cuando se daña el cable o enchufe de
suministro de corriente, se ha derramado líquido u objetos han
caído dentro él, cuando el aparato ha estado expuesto a lluvia o
humedad, no opera bien o se ha caído.
15. Es posible que este producto contenga plomo y mercurio. La
eliminación de estos materiales podría estar regulada debido a
consideraciones medioambientales. Para obtener información
acerca de la eliminación o del reciclaje, póngase en contacto
con sus autoridades locales o con la Alianza de Industrias
Electrónicas: www.eiae.org.
16. Daños que requieran servicio - El aparato debe recibir
servicio de personal de servicio calificado cuando:
A. Se ha dañado el cable de alimentación o el enchufe; o
B. Han caído objetos o se ha derramado líquido dentro del
aparato; o
C. El aparato ha quedado expuesto a la lluvia; o
D. El aparato parece no funcionar normalmente o su
rendimiento ha cambiado notoriamente; o
E. Se ha dejado caer el aparato o se ha dañado la caja.
17. Inclinación/estabilidad - Todos los televisores deben cumplir
con las normas de seguridad generales recomendadas
internacionalmente en cuanto a las propiedades de inclinación y
estabilidad del diseño de su gabinete.
• No comprometa estas normas de disenõ aplicando una fuerza
de tracción excesiva a la parte delantera o superior del
gabinete lo que finalmente puede hacer que el producto se
vuelque.
• Además, no se ponga en peligro usted mismo o a sus niños
colocando equipos electrónicos o juguetes sobre el gabinete.
Dichos artículos pueden caer inesperadamente desde la parte
superior del producto y dañar el producto y/o causar lesiones
personales.
18. Montaje en la pared o cielorasso - El aparato se debe
montar en una pared o cielorraso únicamente como lo
recomienda el fabricante.
19. Líneas de energía eléctrica - Una antena exterior se debe
ubicar lejos de las líneas de energía.
20. Conexión a tierra de la antena exterior - Si se conecta
una antena exterior o un sistema de cable al producto,
asegúrese de que la antena o el sistema de cable estén
conectados a tierra para proporcionar cierta protección contra
sobrevoltajes y acumulación de cargas electrostáticas.
En la Sección 810 del Código Eléctrico Nacional, ANSI/NFPA
No. 70-1984, se proporciona información sobre la adecuada
conexión a tierra de las esteras y estructuras de apoyo,
conexión a tierra del alambre de acometida a una unidad de
descarga de antena, tamaño de los conectores de conexión a
tierra, ubicación de la unidad de descarga de antena, conexión a
los electrodos y sus requerimientos del electrodo de conexión
a tierra.Vea la Figura que aparece más abajo.
21. Entrada de objetos y líquidos - Se debe tener cuidado de
que no caigan objetos dentro de los orificios de la caja ni se
derramen líquidos a través de ellos.
a) Advertencia: Para reducir el riesgo de incendios o de
descarga eléctrica, este aparato no se debe exponer a la lluvia
ni a la humedad, y no se le deben colocar encima objetos llenos
de líquidos de como jarrones.
22. Uso de las baterías PRECAUCIÓN - Para evitar escapes
de las baterías que pueden resultar en lesiones corporales,
daño a la propiedad o a la unidad:
• Instale correctamente todas las baterías, con los polos + y alineados como está marcado en la unidad.
• No mezcle las baterías (nuevas con antiguas o de carbone
con alcalinas, etc.)
• Retire las baterías cuando no use la unidad por un largo
tiempo.
INSTRUCCIONES DE SEGURIDAD IMPORTANTES
Lea antes de operar el equipo
Nota para el instalador del sistema CATV: Se hace este recordatorio para llamar la atención del instalador del sistema de CATV
sobre el Artículo 820-40 de donde se proporcionan instrucciones para la apropiada conexión a tierra y, en particular, se especifica que
la tierra de los cables se conectará al sistema de conexión a tierra del edificio tan cerca del punto de entrada como sea posible.
EJEMPLO DE CONEXIÓN A TIERRA
DE LA ANTENA SEGÚN NEC,
CÓDIGO ELÉCTRICO NACIONAL
ABRAZADERAS DE TIERRA
CONDUCTOR DE ENTRADA DE LA ANTENA
UNIDAD DE DESCARGA DE LA ANTENA
(
NEC SECTION 810-20)
CONDUCTOR DE TIERRA
(
NEC SECTION 810-21)
ABRAZADERAS DE TIERRA
SISTEMA DE ELECTRODO DE PUESTA A TIERRA DEL
SUMINISTRO ELECTRICO (
NEC ART 250, PART H)
CAJA DE LA ENTRADA DEL SUMINISTRO ELECTRICO
2355.4 es 02-11-2004 14:18 Pagina 2
Page 45

1
¿Ayuda?
Si este manual de instrucciones no le facilita respuesta a su pregunta, o si los ‘Consejos’ no le solucionan su
problema con el TV, puede llamar al Servicio de Atención al Consumidor de su país o al la central de Servicio.
Búsquelos en el libro de 'World-wide guarantee' que le hemos entregado. Por favor, tenga a mano antes de
llamar a la Línea de ayuda, el Modelo del aparato y su Número de fabricación, ambos los encontrará en la
tapa posterior del aparato o en el embalaje.
Model: 30PF9946/37 32/42PF9936/37 Product No:
Cuidado de la pantalla
No la toque, oprima o raye la pantalla con ningún producto duro, esto podría rayar, marcar o dañar
permanentemente la pantalla.Y por favor no la limpie con bayetas antipolvo que lleven productos químicos.
No toque la superficie con manos sucias o paños grasientos (algunos cosméticos pueden actuar en detrimento de
la pantalla). Desconecte el TV antes de limpiar la pantalla. Cuando la pantalla tenga polvo, por favor límpiela de
manera suave con un paño de algodón absorbente o material suave.No use acetona, tolueno o alcohol porque
puede causar un daño químico.No use líquidos o aerosoles limpiadores. En último extremo salpique con agua
limpia lo antes posible. El contacto con esos productos durante mucho tiempo puede causar deformaciones de
imagen y desvanecimiento de color.
Alerta concerniente a las imágenes que se pueden quedar marcadas en la pantalla del TV.
Es característico de las Pantallas de Plasma que cuando se muestra una imagen fija durante mucho
tiempo se puede quedar la imagen marcada en la pantalla. Esto se llama quemado del fósforo.
El uso normal de los TV supone reproducir imágenes que contienen constantes movimientos e
imágenes cambiantes que rellenan la pantalla.
Preparación
& Instrucciones de montaje en pared/
Soporte de mesa
Para realizar el montaje en la pared siga las
instrucciones que aparecen, en forma de
dibujos, en una hoja aparte.Asegúrese de que el
montaje en pared se fija lo suficientemente
seguro para asegurar que se cumplen las
normas de seguridad. El peso de la tele (exc. el
embalaje) está alrededor de los
40 Lbs (30PF9946); 66 Lbs (37PF9936);
92 Lbs (42PF9936);
Para saber cómo montar el soporte que se
incluye, mire la hoja que se entrega aparte.
Nota: Otro tipo de soportes (no incluidos) son
accesorios opcionales.Consulte a su distribuidor.
é Asegúrese de que el aire pueda circular
libremente por las ranuras de ventilación.
Con el fin de evitar situaciones poco seguras,
no se deben colocar fuego, como velas
encendidas, junto al equipo. Evite calor y
exposición directa a la luz solar, a la lluvia o al
agua en general. El equipo no se debe exponer
a objetos que goteen o que salpiquen.
“ Inserte firmemente el enchufe de la antena
macho en la toma x que se encuentra en la
parte inferior del TV. Usted puede mejorar la
calidad de ésta utilizando el cable de reducción
de interferencias suministrado.
‘ Introduzca el cable suministrado en la toma de
red situado en la parte inferior del TV y en la
toma de red de la pared (voltaje 96-140V).
Para evitar daños al cable eléctrico (CA) que
podrían causar un incendio o descarga
eléctrica, no coloque el televisor sobre el
cable.
( Control remoto: Coloque las dos pilas (Tipo
R6-1.5V) que se entregan junto con el aparato.
Las pilas incluidas con el
control remoto de su
televisor no contienen los
metales pesados de
mercurio y cadmio.
Infórmese acerca de las
regulaciones locales para el
desecho de pilas
descargadas.
§ Encendido del TV : Oprima el botón B
situado en la parte superior de su TV. Una
lamparita se ilumina.
Pulse los botones
-P+ o el botón B del mando
a distancia
Español
2355.4 es 02-11-2004 14:18 Pagina 1
Page 46

2
Funciones
Temporizador π Hora
AutoLock Hora de Inicio
Contraste+ Hora de Paro
Reducir Ruido No. Canal.
PIP Activar
Mostrar
Menú Funciones:
•
Te mporizador,
AutoLock
y
PIP
:Vease p. 10-13.
•
Contraste+:Ajuste automático del contraste de la imagen
que lleva en permanencia la parte más oscura de la imagen al
negro.
•
Reducir Ruido
:Atenúa el ruido de la imagen (la nieve), en
case de recepción difícil).
Para usar los menús
& Presione el botón MENU del control remoto
para ir al menú principal. Podrá salir del menú
en cualquier momento pulsando otra vez el
botón
MENU.
é Use el cursor hacia arriba/abajo para
seleccionar el menú de
Imagen, Sonido,
Funciones, Instalación o Modo.
“ Use el cursor hacia la izquierda/derecha para
seleccionar la opción del menú.
‘ Vuelva a usar el cursor hacia arriba/abajo para
seleccionar el control que desee seleccionar o
ajustar.
( Presione el botón OK desee activar.
Observación: Las opciones que temporalmente no están
disponibles o no son relevantes son visualizadas de
color gris claro y no podrán ser seleccionadas.
Menú del TV
Imagen π Brillo
Sonido Color
Funciones Imagen
Instalar Nitidez
Modo Tinte
Imagen
Brillo π
Color
Imagen
Nitidez
Tinte
Temp de color
pπ
Sonido
Ecualizador π 120 Hz
Balance 500 Hz
AVL 1500 Hz
Dolby Virtual
....
SAP
Sonido
Menú de TV
Menú Imagen:
•
Brillo
:Actúa sobre la luminosidad de la imagen.
•
Color
:Actúa sobre la intensidad del color.
•
Imagen
: Mejora el detalle de las partes más claras de la
imagen.
•
Nitidez
: Mejora el detalle en la imagen.
•
Tinte
:Ajusta la imagen para obtener tonos de piel naturales.
•
Temp de color
:Actúa sobre la calidad de los colores:
Fresco
(más azul),
Normal
(equilibrado) o
Cálido
(más rojo).
Menú Sonido:
•
Ecualizador
: Para ajustar la tonalidad del sonido (de graves:
120 Hz a agudos: 10 kHz).
•
Balance
: Para equilibrar el sonido en los altavoces izquierdo
y derecho.
•
AVL
(Automatic Volume Leveler): Control automático del
volumen que permite limitar los aumentos de sonido, en
particular durante los cambios de programas o publicidades.
•
Dolby Virtual
: Simula la sensación surround usando sólo 2
altavoces, y partiendo de una señal Dolby Pro Logic*,
proporcionando al oyente la sensación de que está siendo
rodeado por altavoces adicionales.
•
SAP
es una parte adicional del sistema de emisión estéreo.
Enviado como un tercer canal de audio, un SAP se puede
escuchar aparte del sonido del programa de TV que se ve en
ese momento. Las estaciones de TV son libres de usar SAP
para varios propósitos. (Si no hay una señal SAP presente con un
programa seleccionado, no se puede seleccionar la opción SAP).
•
Sonido
: Lo permite alternar los ajustes de control en Estéreo
o Mono (si estéreo es presente en un programa
seleccionado)
2355.4 es 02-11-2004 14:18 Pagina 2
Page 47

3
Como buscar canales de TV
Si quiere reinstalar su TV proceda como sigue:
& Presione el botón MENU en el control remoto.
é Use el cursor arriba/abajo para seleccionar
Instalación.
“ Presione el cursor derecho para entrar el
menú Instalar.
Seleccionar su Idioma del menú
& Use el cursor izquierdo/derecho.
é Presione el cursor arriba/abajo para seleccionar
su idioma.
Seleccionar el Modo Sintonía
Le permite cambiar la entrada de señal de TV a
cable, antena o modo auto. El ajuste de modo auto
ayuda al TV a determinar el tipo de señal o los
canales que están siendo recibidos cuando el
autoprograma se activa.
& Seleccione Sintonía en el menú Instalar.
é Presione el cursor derecho.
Nota: se recomienda elegir el método Automático
para la autosintonización. Si hay dificultades para
hacer la autosintonización con el método
Automático, elija Antena o Cable, si antena o
cable estuvieran disponibles.
Cuando se elige
•
Automático, el televisor detecta
automáticamente si la señal de cable está o
no presente;
•
Antena, el televisor detecta la presencia de
señales de antena y realizará la búsqueda de
todas las emisoras disponibles en su zona;
•
Cable, el televisor detecta las señales de
cable y busca todos los canales de cable
disponibles en su zona.
Menú del TV
Imagen Idioma
Sonido Sintonía
Funciones Auto Programa
Instalar π Editar Canal
Modo
Memorización de canales de TV
Autoprogramación
& Seleccione Auto Programa en el menú
Instalar.
Nota: Para la autoprogramación, todos los canales
deben estar desbloqueados. Si se solicita, introduzca
su clave para desbloquear todos los canales. (Véase
menú TV, Funciones, AutoLock, p. 11.)
é Presione el cursor derecho.
Aparece el mensaje
Start ?.
“ Presione el cursor derecho.
‘ Se muestra el avance de la autoprogramación.
Editar canales
Esta característica le permite editar o saltar
programas de la lista de programas que tienen mala
o débil señal o canales que no se ven
frecuentemente.
Nota: Una vez que se salta un programa, no se puede
seleccionar con el botón
–P+; sólo puede acceder al
programa marcando los botones de dígitos.
& Seleccione Editar Canal en el menú Instalar.
é Presione el cursor derecho para entrar en la lista
de canales.
“ Seleccione el cana que quiere editar con el
cursor izquierdo/derecho.
‘ Presione el cursor abajo.
Seleccione
Sí o No.
( Utilice el cursor arriba/abajo para seleccionar
otro canal y repita “ - ‘.
§ Presione el botón MENU para volver al menú
Instalar.
Nota: Para agregar canales a la lista, repita
& - ‘.
Auto Programa
Canal ..........
o
p π
œ
Editar Canal
Canal π
Borrado Sí/No
2355.4 es 02-11-2004 14:18 Pagina 3
Page 48

4
Uso del control remoto RC4334
Observación: La mayoría de los botones se activarán pulsándolos una vez y se desactivarán pulsándolas una segunda
vez. Cuando un botón permita varias opciones, se mostrará una pequeña lista.
Advertencia: En modo VGA sólo algunos botones son válidos.
* Fabricado bajo licencia de Dolby Laboratories.
‘Dolby’‘Pro Logic’ y el símbolo con una doble D son marcas comerciales
de Dolby Laboratories.
¬
+
-
V
+
-
P
VCR DVD TV SAT AMP
CCMENU
123
456
789
0
ACTIVE SLEEP
B
POWER
OK
®
®
®
®
AUTO AUTO
aM
Ò®‡π
º
†
INFO
TV PC
SURF
FORMAT
HD
SURR
SELECT
CONTROL
PIP
TIMER
SAP
-
AV+
VCR DVD TV SAT AMP
Presione repetidamente el botón
Select para seleccionar el modo que
desee operar con este control
remoto.Si no ha efectuado ninguna
acción en 2 segundos, el control
remoto vuelve al modo TV. Después
de una acción en el modo escogido el
control remoto permanecerá en este
modo por 60 segundos y entonces
volverá al modo TV.
POWER B
Presione este botón para encender/
apagar el televisor
en el modo de
espera.
El televisor nunca queda desconectado
de la corriente salvo cuando se le
desenchufe físicamente.
OK Presione este botón para visualizar
la lista de programas o para activar su
elección o para confirmar cuando está
en los menús.
MENU Menú principal Enc./Apag
Véase p. 2.
CC Closed Caption (Subtítulos)
Encender, Apagar o Pantalla sin sonido.
V Para ajustar el volumen.
¬ Interrumpe el sonido o lo
restablece.
P Selección de canales
Para explorar los canales y fuentes
almacenados.
0/9 Botones numéricos
Para seleccionar un canal de TV.Para
un número de programa de dos o de
tres dígitos, introduzca el segundo
dígito antes de que desaparezca el
guión. Para cambiar inmediatamente
hacia un canal de TV seleccionado a
través de un solo dígito,mantenga el
botón del dígito apretado durante unos
momentos.
AV+ Para seleccionar equipos
periféricos conectados.Véase p. 9.
- Marque el punto para canales digitales.
SLEEP TIMER
Para elegir la cantidad de tiempo antes
de que se apague el TV (de 15 hasta
240 minutos).
PIP Cuando en Modo HDMI, se pulsa
el botón
PIP aparecerá una segunda
pantalla más pequeña sobre la pantalla
principal, que le permite ver
simultáneamente la imagen principal y
el dispositivo conectado a
HDMI
(AV3).
INFO Información en pantalla
Para mostrar números de programas,
la hora, el modo de sonido y el
tiempo restante en el temporizador.
Presione otra vez para mostrar las
clasificaciones. La información del
ajuste nivel de volumen y de
controles inteligentes se verá cada
vez que se usen.
®ºÒ‡π†
Botones de equipos de Audio y de
Vídeo.
TV / PC
Presione uno de estos botones para
conmutar el televisor en modo TV o
PC.
SURR Modo sonido
Incredible surround
Cuando se ha seleccionado Incredible
Surround Encender en el modo
sonido estéreo, parecerá que los
altavoces se encuentran más
distanciados uno del otro.
Virtual Dolby Surround *
Optimo resultado con señales Dolby
Surround. Le permite experimentar el
efecto del Dolby Surround Pro Logic,
reproduciendo un efecto de sonido
trasero.Véase Menú Sonido, Dolby
Virtual, p. 2.
Observación: Podrá hacer la misma
selección en el menú Sonido, Dolby
Virtual,p.2.
HD Presione este botón para usar el
control remoto directamente en el
modo HD para dispositivos HD
(p.e. Set Top Box).
Presione 1x para el modo
HD-A,
presione 2x para el modo
HD-D.
2355.4 es 02-11-2004 14:18 Pagina 4
Page 49

5
SURF
Con esta función, usted puede cambiar fácilmente entre diferentes
canales/fuentes de TV que actualmente le interesen.
Presione este botón
SURF. Aparece una lista al lado izquierdo de la
pantalla. En la parte superior está el último en ser agregado.
Presione el cursor arriba/abajo para seleccionar inmediatamente el canal o
fuente de TV deseado desde la lista.
Para agregar un nuevo canal o fuente a la lista de ocho canales: sintonice el
canal o fuente que desea agregar.
Presione el botón
SURF. Para agregar,presione el cursor derecho.
Si ya hay ocho canales/fuentes en la lista, se eliminará el que está al final de la
lista. Para eliminar un canal o fuente: seleccione el número del canal que
quiere
eliminar.
Presione el botón
SURF. Para eliminarlo, presione el cursor derecho.
Presione el botón
SURF o espere a que desaparezca la pantalla Surf.
FORMAT
Presione este botón para invocar una lista de los formatos de pantalla
disponibles para mostrar imágenes de vídeo en las proporciones
tradicionales 4:3.
Presione este botón repetidamente u presione el cursor izquierdo/derecho
para seleccionar otro formato de pantalla: Super zoom, 4:3,Zoom 14:9, Zoom
16:9, Zoom Subtítulos 16:9, Pantalla Completa o Imagen ancha (solo 30PF9946).
Super zoom elimina las barras negras a los lados de los programas 4:3, con
una distorsión mínima.
Nota: en modo HDMI, presione el botón
FORMAT para conmutar entre los
formatos de pantalla 16:9 o Super ancha.
SAP Cuando usted sintoniza un canal en que hay un SAP (Segundo programa
de audio) disponible, usted puede alternar entre Principal y
SAP. Si no está
disponible, sólo se puede seleccionar Principal.
ACTIVE CONTROL Encender/Apagar/Activar con Sensor
Mejora la calidad de imagen en función de la calidad de recepción.
Ma Auto Sonido/Imagen
Para seleccionar preajustes del imagen y del sonido.
Personal se refiere a los ajustes personales de imagen y sonido
seleccionados en el menú Imagen e Sonido
Observación: Este Flat de Philips ha sido ajustado en la fábrica para conseguir los
mejores resultados en un ambiente de iluminación fluorescente. Como en su casa
no suele haber el mismo tipo de iluminación de un almacen, le recomendamos que
dé una pasada por los diferentes modos de controles inteligentes de imagen para
elegir aquel que mejor se ajuste a sus condiciones de visualización.
Super Zoom 4:3
Zoom 14:9 Zoom 16:9
Zoom Subtítulos
Pantalla Completa Imagen ancha (solo 30PF9946)
2355.4 es 02-11-2004 14:18 Pagina 5
POWER
B
VCR DVD TV SAT AMP
INFO
Ò®‡π
TV PC
SURF
®
º
SELECT
†
HD
SURR
FORMAT
®
®
OK
®
CCMENU
+
V
-
+
¬
P
-
123
456
789
AV+
SAP
AUTO AUTO
-
0
ACTIVE SLEEP
CONTROL
PIP
TIMER
aM
Page 50

6
Videocámara, juego, auriculares
Los botones de la parte superior de su televisor
Si se ha roto o extraviado el control remoto,
siempre será posible modificar determinados
ajustes con los botones de la parte superior de su
televisor.
Presione:
• el botón V - o + para ajustar el volumen;
• los botones
-P/CH+ para seleccionar los canales
de TV o fuentes.
Se podrá usar el botón
MENU/OK para ver el
menú principal sin el control remoto.
Use:
• el botón V + y los botones
P/CH- y P/CH+
para seleccionar opciones del menú en las
direcciones tal y como se muestra;
• el botón
MENU/OK para quitar el menú.
MENU/OK - V + - P/CH +
Videocámara, juego
& Conecte la cámara, la videocámara, el juego tal como se
muestra.
é Conecte el equipo a la entrada VIDEO 2 y AUDIO L
3 para equipos mono. Para equipos estéreo conecte
también
AUDIO R 3. Para obtener la máxima calidad
de nuestra cámara S-VHS, conecte los cables S-VHS a la
entrada
S-VIDEO 1 y a las entradas de AUDIO 3.
Atención: No conecte a la vez el cable 2 y 2.¡Puede
causar distorsión de imagen!
Auriculares
& Introduzca el enchufe en el enchufe hembra L del
auricular tal como se muestra.
é Presione el botón ¬ para desconectar los altavoces
internos de su TV.
La toma para auriculares tiene una impedancia comprendida
entre 8 y 4000 Ohm y sirve para los conectores de
auriculares tipo 3,5 mm.
L
R
S-VIDEOS-VIDEOS-VIDEO
VIDEO IN
VIDEO INVIDEO
AUDIO
S•VHS
VHS
AUDIO AUDIO
VIDEO INVIDEO IN
S•VHS
AUDIO
VIDEO IN
L
L
R
Conexiones posteriores
Hay una amplia gama de equipos de audio y vídeo que se pueden conectar a su televisor. Los siguientes
diagramas de conexión le indican la forma de conectarlos.
Nota:
AV1 puede soportar la señales YPbPr y CVBS; AV2 CVBS y Y/C; AV3 HDMI y VGA; VGA VGA, SVGA (y si
30PF9946 también XGA) y 480p, 576p, 720p i 1080i.
AV1 (1Fh)
AV2
MON.OUT
AV3
L
R
VIDEO/AUDIO VIDEO/AUDIO
S-VIDEO
HDMI
VGA
Y/Pb/Pr (2Fh)
Pr
AUDIO
Pb Y
RLCVBS
x ANTENNA
AUDIO
2355.4 es 02-11-2004 14:18 Pagina 6
Page 51

7
Videograbador (VCR+DVD+RW)
Advertencia: No coloque su aparato de vídeo demasiado cerca de la pantalla ya que algunos vídeos pueden ser
sensibles a radicaciones de la pantalla. Guarde una distancia mínimo de 20” de la pantalla.
Videograbador con otros periféricos AV
AV2 MON.OUT
VIDEO/AUDIO VIDEO/AUDIO
S-VIDEO
R
x ANTENNA
CABLE
RECORDER
IN OUT
4
3
AV2 MON.OUT
VIDEO/AUDIO VIDEO/AUDIO
x ANTENNA
S-VIDEO
R
RECORDER
CABLE
3
4
OUT IN
x
TV
& Conecte la Antena RF o el cable de la TV por Cable
(finalmente a través de un divisor de señal bidireccional
opcional y/o una caja de conversor de TV por Cable) 1 al
enchufe hembra
RF IN de su videograbador.
é Conecte otro cable RF 2 desde la salida OUT de su video-
grabador a la conexión de entrada de x
ANTENNA del
televisor.
“ Conecte el cable adaptador de mini-jack a enchufe hembra
suministrado 3 a la conexión de entrada
VIDEO/AUDIO de
AV2.
Si su videograbador tiene un enchufe de vídeo S-VHS:
Para una mejor calidad de imagen, conecte un cable de
S-Video con la entrada de
S-VIDEO 4. S-VHS no ofrece
audio, de modo que el cable de mini-jack a enchufe hembra
debe seguir conectado para proporcionar sonido.
& Conecte la Antena RF 1 del enchufe hembra RF IN de
los otros periféricos AV.
é Conecte el cable adaptador de mini-jack a enchufe
hembra suministrado 2 a la conexión de entrada
VIDEO/AUDIO de AV 2.
“ Conecte la salida RF del dispositivo de AV a la entrada
de RF del videograbador 3.
‘ Conecte otro cable RF 4 de la salida OUT de su
videograbador a la entrada de x
ANTENNA jack de TV.
Si su videograbador tiene un enchufe de vídeo S-VHS:
Vea arriba.
Dispositivos con Salidas de Video por Componentes (YPbPr)
& Conecte los tres cables de componentes de video 1 al dispositivo
que tiene salida de componentes de video (YPbPr), así como
reproductores de DVD, reproductores de Láser Disc, video juegos,
receptores de satélite u otros equipos y a los jacks
Y, Pb y Pr de
AV1 en su TV.
é Conecte los cables del audio a las conexiones AUDIO L y R 2 de
los dispositivos y a las conexiones
L y R AUDIO YPbPr de AV 1.
“ Para la reproducción de CVI (Entrada de Video por Componentes)
también conectar al jack
CVBS de AV1 . Mire las Instrucciones de
manejo de su reproductor de DVD.
Nota: Las etiquetas para los conectores de vídeo pueden ser diferentes
dependiendo del reproductor de DVD o del dispositivo conectado. Incluso las
abreviaturas pueden cambiar, las letras B y R suelen ir en azul y rojo,
respectivamente, e Y indica la señal de luminancia.Acuda a las instrucciones
del DVD para conocer más detalles sobre definiciones y conexiones.
AV1 (1Fh)
Pr
AUDIO
Pb Y
RLCVBS
VIDEO
L/Mono
AUDIO
1
VIDEO
L/Mono
AUDIO
DVD
2
El conector de MON. OUT se puede usar como unidad de una cadena o para grabar desde el programa
TV. Sólo cuando se conecta un videograbador a la salida de
MON. OUT se puede grabar un programa del
televisor. Mire Grabar con su grabadora, p. 15.
VIDEOGRABADOR
VIDEOGRABADOR
2355.4 es 02-11-2004 14:18 Pagina 7
Page 52

8
Dispositivos con salida de escaneo progresivo (e.a. a Set Top box digital, reproductor de DVD
escaneo progresivo... (480p, 576p, 720p o 1080i)
Conecte el dispositivo con salida 2Fh YPbPr al conector
VGA 1 (con el cable adaptador de VGA a cinch
suministrado) y a los conectores de
L y R de AUDIO 2
de
AV3 .
Mire también el manual de su dispositivo de Alta Definición.
Nota: Este televisor ha sido diseñado para aceptar estándares de
señales de alta definición 480p, 576p, 720p y 1080i tal y como
especifica el "Electronic Industries Association standard EIA770.3.
Dispositivos digitales de diferente fabricación pueden causar
diferentes estándares de salida y esto puede causar problemas
para que el televisor muestre las imágenes debidamente.
Advertencia: en caso de que advierta imágenes en
desplazamiento, colores equivocados o falta de color, falta de
imagen, o incluso combinaciones de éstos en su pantalla,
compruebe que las conexiones estén hechas de manera correcta
o mueva su dispositivo digital lejos de su TV.
AV3
L
AUDIO
RHDMI
VGA
Y/Pb/Pr (2Fh)
1
DVD
2
Conecte su ordenador
1
2
HDMI
AV3
L
UADIO
R
VGA
Y/Pb/Pr (2Fh)
Usted puede conectar su ordenador al conector VGA de
AV3 o al conector HDMI (ve aún más).
& Conecte uno de los extremos del cable VGA 1 a la
tarjeta de video del ordenador y el otro extremo al
conector
VGA Y/Pb/Pr (2Fh) que está en la parte de
abajo del TV. Fije los conectores firmemente con
tornillos en la conexión.
é En caso de un ordenador Multimedia, conecte el cable
de audio 2 a las salidas de audio de su ordenador
Multimedia y las entradas
AUDIO R (derecha) y L
(izquierda) en el panel lateral.
El conector
VGA permite los siguientes modo de
visualización:
VGA 640 x 480 60 Hz
SVGA 800 x 600 60 Hz
XGA 1024 x 768 60 Hz (solo 30PF9946)
Nota: Use el modo de video XGA 1024x768@60 Hz para
conseguir la mejor calidad de imagen en su monitor LCD
(30PF9946).
2355.4 es 02-11-2004 14:18 Pagina 8
Page 53

9
Conector HDMI (High Definition Multimedia Interface)
Conecte la salida digital HDMI de su equipo HD (p.e. reproductor de DVD , Set Top Box..) al conector de
entrada de
HDMI de su TV.
Notas:
- El funcionamiento correcto solo se garantiza para productos HDMI de Electrónica de Consumo.
- Los equipos digitales de diferentes marcas pueden ofrecer diferentes normas de salida, lo que puede provocar
dificultades a la hora de velas en el TV.
- Si el equipo está frío, puede haber un ligero “parpadeo” cuando se enciende, en esta situación esto es normal, no
hay nada incorrecto en su funcionamiento.
HDMI es el nuevo standard para interconexión de audio y video
Digital de Alta Definición. Por ejemplo con Set Top Box digitales,
dispositivos con HDMI como DVD-R, Receptores AV.
Nota: El conector HDMI
NO SOPORTA los dispositivos DVI con audio
analógico.
El conector
HDMI permite
- los siguientes formatos de visualización en TV y monitor:
EDTV 640/720 x 480p
720 x 576p
HDTV 1920 x1080i
VGA 640 x 480 60 Hz
SVGA 800 x 600 56 Hz
XGA 1024 x 768 60 Hz
- contenido HD sin comprimir
- señales encriptadas y no encriptadas.
De acuerdo a como haya conectado sus equipos,presione
•
AV+ seguido por dígito ‘1’ para seleccionar AV1
• AV+ seguido por dígito ‘2’ para seleccionar AV2
• AV+ seguido por dígito ‘3’ para seleccionar REAR por un dispositivo
conectado
en la parte posterior o a la parte derecha (en función
del tipo de su TV), véase p. 6
•
AV+ seguido por dígito ‘4’ para seleccionar HD-A por un
dispositivo HD-A conectado a
AV3 , véase p. 8
• AV+ seguido por dígito ‘4’ nuevamente para seleccionar HD-D por
un dispositivo HD-D conectado a
AV3 , véase p. 9
•
AV+ seguido por dígito ‘5’ para seleccionar PC-A por un
ordenador conectado a
AV3 , véase p. 8
•
AV+ seguido por dígito ‘1’ y seguido por P+ para seleccionar CVI.
Note: Cuando en modo HD o PC, presione primero el botón
TV para
retornar al modo TV o para seleccionar nuevamente
AV1, AV2 o REAR.
789
0
ACTIVE SLEEP
AUTO AUTO
aM
CONTROL
PIP
TIMER
SAP
AV+
-
AV+
Seleccionar equipos periféricos conectados
AV3
L
AUDIO
R
HDMI
2355.4 es 02-11-2004 14:18 Pagina 9
Page 54

10
Menú Funciones
Función Temporizador
Este menú le permite utilizar el televisor como
un despertador.
& Presione el botón MENU.
é Con el cursor, seleccione Funciones,y luego
Te mporizador.
“ Hora: Introduzca la hora actual con los
botones numéricos.
Use el cursor hacia la izquierda/derecha para
seleccionar AM o PM.
‘ Hora de Inicio: Introduzca la hora de inicio.
( Hora de Fin: Introduzca la hora de puesta en
modo de espera.
§ No. de canal: Introduzca el numero del canal
deseado para el temporizador.
è Prog.Activada Puede ajustar:
•
Una vez para un temporizador único;
•
Cotidiano para todos los diás;
•
Parada para anular.
!
Mostrar:Presione el cursor derecho para
elegir Activar o Desactivar en función de que
se quiera ver la hora actual en la pantalla del
TV o no.
ç Presione el botón B para poner en modo de
espera el televisor. Se encenderá
automáticamente en la hora programado. Si deja
encendido el televisor, cambiará únicamente de
programa en la hora indicada (y se pondrá en
modo de espera en la Hora de Fin).
Nota: La combinación de las funciones AutoLock y
Temporizador permite limitar la duración de
utilización del televisor, para sus niños por ejemplo).
AutoLock
La función AutoLock recibe y procesa datos
enviados por la emisoras u otros proveedores de
programas que contienen orientaciones de
contenido de los programas. Cuando el espectador
lo programa, un TV con AutoLock puede responder
a las orientaciones de contenido y bloquear
programas con contenido que se pueda considerar
objetable.
AutoLock permite a los padres bloquear o
“censurar” los canales que consideran que los
niños no deben ver. Un canal bloqueado mediante
el control AutoLock no puede ser visto hasta que
se use la clave de acceso correcta para
desbloquearlo.
& Presione el botón MENU.
é Utilice el cursor para seleccionar Funciones,
seguidamente
AutoLock.
“ Presione el cursor derecho para entrar en el
menú de AutoLock.
‘ Le pedirán que introduzca su clave de acceso.
•Presione 0,7,1,1 en el control remoto.
En pantalla aparece
Incorrecto.
•Presione nuevamente 0,7,1,1 en el control
remoto. En pantalla aparecerá
Nueva Clave.
• Introduzca una nueva clave de cuatro dígitos
usando los botones de número.
Confirme
Código
aparecerá en pantalla.
• Introduzca nuevamente su nueva clave de
cuatro dígitos.
Confirmado destellará
brevemente en la pantalla y la barra de resalte
volverá a AutoLock.
Funciones
Temporizador Hora
AutoLock π Hora Inicio
Contraste+ Hora Fin
Reducir Ruido Num. progr.
PIP Activar
Display
AutoLock
Bloquear Canal Ninguna/Clasif.
Lock HD No Clasificada
Cambiar Código Bloqueo
Borrar Todo
Bloquear Todo
Clasif. Película
Clasificación TV
Tipo de Bloqueo π
Importante: Ha olvidado su clave de acceso:
Recuerde que 0,7,1,1 es la clave predeterminada de AutoLock. Si su clave de acceso ha sido cambiada
por alguien que no es usted (un niño, por ejemplo), o usted ha olvidado la clave, siempre puede entrar
introduciendo la clave predeterminada.
2355.4 es 02-11-2004 14:18 Pagina 10
Page 55

11
Opciones de Auto Lock
Bloqueo Canal
Seleccione el canal TV que desee bloquear. Presione el cursor derecho para bloquear el canal.
Repita para cualquier canal que desee bloquear.
Bloquear HD
Permite bloquear los equipos periféricos a la entrada
AV3 .
Cambiar Instal.
Para alternar su clave de acceso. Entrar su clave de acceso o introduzca el clave predominante 0,7,1,1
e introduzca un nuevo clave personal de 4 dígitos. Se borra el clave anterior y se graba el nuevo clave.
Borrar todo
Para borrar todos los programas bloqueados hasta que se apague el TV. Al encenderse nuevamente,
todos los canales previamente bloqueados se volverán bloquear.
Bloquear todo
Para bloquear todos los canales y programas de una vez.
Clasificación de película
Le permite controlar el acceso a películas individuales sobre la base de sus clasificaciones de la MPAA
(Motion Picture association of America).
Seleccione una clasificación de película y presione el cursor derecho para
ACTIVAR o DESACTIVAR
la clasificación seleccionada.
Nota: Cuando se configura una clasificación en Sí, todas las clasificaciones más altas también quedan
automáticamente bloqueadas.Todas las clasificaciones de películas se pueden configurar en Sí o en No.
G películas con un contenido moderado, adecuado para
todas las edades
PG películas para las que se recomienda guía paterna.
Pueden contener algunas escenas atrevidas o violentas
o quizá algo de lenguaje depravado
PG-13 películas para las que se puede recomendar guía paterna
si las verán menores de 13 años
R restringido. Las películas comúnmente contienen sexo
ofensivo o lengua depravado y pueden ser inadecuadas
para niños menores de 17 años.
Se necesita guía o permiso paterno.
NC-17 incluso con permiso paterno, prohibidas para menores de
17 años. Más sexo ofensivo, violencia o lengua depravado.
X películas que en general se enfocan en el sexo, violencia
y/o lengua depravado.
También se conocen como pornografía.
2355.4 es 02-11-2004 14:18 Pagina 11
Page 56

12
Niveles bloqueo TV
Le permite camprobar los ajustes personales del TV.
Seleccione una clasificación de TV basada en la edad con el cursor arriba/abajo y entre, de haber
alguna, en la lista de clasificaciones basadas en el contenido con el cursor derecho. Luego seleccione
una clasificación basada en el contenido.
Cuando se ha seleccionado
Todo, se bloquean todos los elementos en la lista basada en el contenido.
Presione el cursor hacia la derecha para configurar el bloqueo de la clasificación en
SÍ o en NO.
Nota: Cuando se configura una clasificación en Sí, todas las clasificaciones más altas también quedan
automáticamente bloqueadas.
Opciones de bloqueo:
Hay 3 bloques de opciones:
•
No Clasificada:
Cuando el Bloque de Opciones de No Clasificados está en SÍ, las películas y los programas de TV
que tienen indicación de Ninguno están bloqueados. Los deportes, las noticias y la información
meteorológica se clasifican.
•
Ning cla:
Si se activa el control Ning Cla, se puede bloquear todos los programas sin datos de orientación de
contenido. Cualquier programación puede entrar en esta categoría.
•
Bloqueo:
El control Bloqueo se puede considerar el “interruptor maestro” de AutoLock. Este control afecta
las configuraciones que usted ha escogido para bloquear programas de acuerdo a las clasificaciones
de las películas o clasificaciones de TV, o para bloquear programas que no tienen ninguna clasificación
o están desclasificados.
Cuando el control Bloqueo está en
NO, el bloqueo o censura de los programas está inactivo.
Cuando el control Bloqueo está en
SÍ, el bloqueo ocurrirá de acuerdo a las configuraciones que
usted haya elegido.
Clasificación Clasificación basada
basada en la edad en el contenido
Ninguno encender/apagar
TV-Y encender/apagar
TV-Y7 todos
(FV)
Fantasía Violenc
TV-G Fantasía Violenc
TV-PG todos
(D) Diálogo
(L)
Lengua
(S) Sexo
(V) Violencia
TV-14 todos
(D) Diálogo
(L) Lengua
(S) Sexo
(V) Violencia
TV-MA todos
(L) Lengua
(S) Sexo
(V) Violencia
TV-Y apropiado para niños de todas las edades con temas
y elementos adecuados para niños de 2 a 6 años
TV-Y7 programas destinados a niños de 7 años y más
TV-Y7-FV programas que incluyen violencia de fantasía más
intensa que otros programas en la categoría TV-Y7
TV-G programas adecuados para todas las edades. Estos
programas contienen poca o ninguna violencia, ningún
lenguaje violento y poco o ningún diálogo o escenas
sexuales
TV-PG programas que contienen elementos que algunos
padres pueden encontrar inadecuados para niños
pequeños y que pueden necesitar guía paterna. El
programa puede contener violencia, diálogos y/o
escenas sexuales moderados y algún grado de
lenguaje violento.
TV-14 programas que contienen elementos que pueden no
ser adecuados para niños menores de 14 años de
edad. Estos programas incluyen uno o más de los
siguientes componentes: mucha violencia, escenas
sexuales intensas, diálogo sugestivo y lenguaje
violento.
TV-MA programas destinados para ser vistos por adultos y
que pueden ser inadecuados para niños menores de
17. Estos programas pueden contener violencia
gráfica, actividad sexual explícita y/o idioma crudo u
obsceno.
2355.4 es 02-11-2004 14:18 Pagina 12
Page 57

13
Subtítulos le permite leer el contenido de voz de los programas de
televisión en la pantalla del televisor, suponiendo que el servicio
esté disponible en la transmisión. Diseñada para ayudar al público
con problemas de audición, esta función usa 'cuadros de texto' en
pantalla para mostrar diálogo y conversaciones mientras el
programa de TV está en curso. Las leyendas aparecerán en la
pantalla durante transmisiones subtituladas.
Presione el botón
MENU repetidamente para seleccionar CC No,
CC-1, CC-2 o CC-mudo.
Cuando se selecciona
CC No, el televisor no mostrará información
sobre Subtítulos Encapsul;
Cuando se selecciona
CC-mudo, el televisor mostrará
automáticamente
CC-1 cuando esté activa la función sin sonido.
Cuando la función sin sonido no esté activa, el televisor no
mostrará información sobre Subtítulos
Generalmente
CC-1 es el más usado. CC-2 se puede usar para
idiomas alternativos, si se están transmitiendo. En la pantalla
aparecen el diálogo (y descripciones) de la acción del programa de
TV subtitulado.
Nota: Las leyendas no siempre usan una ortografía y gramática correctas.
No todos los programas de TV y anuncios de productos están hechos para
ser transmitidos con información sobre Subtítulos. Para conocer los canales
de TV y programaciones con Subtítulos, consulte la programación de los
canales de TV de su área. Los programas subtitulados normalmente se
indican en los listados de TV con marcas de servicio como ‘CC’.
Nota: Este receptor de televisión proporciona visualización de Subtítulos
de televisión que cumple con la norma EIA-608 y las Secciones 15.119
de las normas de la FCC.
Subtítulos
La característica de Imagen En Imagen (PIP) le
permite activar una segunda pantalla más
pequeña que le permite ver simultáneamente
un programa de TV y el dispositivo digital
conectado a
HDMI (AV3) (dispositivo de Alta
Definición Digital).
& Presione el botón MENU.
é Con el cursor, seleccione Funciones,y luego
PIP.
“ Presione el cursor a la derecha para
seleccionar los tamaños de PIP disponibles:
No,
Pequeño, Mediano, Grande o de Lado a
Lado
.
Cuando se elige un tamaño, y un dispositivo se
conecta a
HDMI (AV3) y se enciende, la
ventana PIP aparece automáticamente. Pulse el
botón
P+ ó P- o el botón de número para
seleccionar otros canales de TV o para mostrar
el dispositivo
HDMI (AV3) en la pantalla
principal.
‘ Seleccione Horizontal o Ve r tical para mover
la pantalla a las diferentes esquinas de la
pantalla principal.
PIP (Picture in Picture )
OK
®
®
®
®
VCR DVD TV SAT AMP
CCMENU
B
Ò®‡π
º
†
INFO
TV PC
SURF
FORMAT
HD
SURR
SELECT
CC
PIP combinaciones:
Modo:
Pantalla principal
Pantalla PIP
TV
TV
HDMI
HD
HDMI
TV/A-HD/VGA
PC
VGA
HDMI
2355.4 es 02-11-2004 14:18 Pagina 13
Page 58

14
Menú del TV
Imagen TV
Sonido PC
Funciones
Instalación
Modo π
Este televisor se puede utilizar como un monitor de ordenador. Primero tendrá que efectuar las
conexiones del ordenador y ajustar la resolución (consulte la p 8).
Selección del modo PC
Presione el botón PC del control remoto para conmutar el televisor a modo PC. Presione TV para
volver al modo TV. En caso de ausencia de señal PC durante más de 5 segundos, el televisor pasa
automáticamente a modo en espera.
Utilización de los menús de PC
Menú del PC
Imagen π Brillo
Selec. Audio Imagen
Funciones Horizontal
Ajustes de fábrica Vertical
Modo Temp.de Color
Funciones
Fase
Reloj
Formato
PIP
Auto ajuste
Utilización en modo monitor PC
Presione el botón MENU para acceder a la configuración
específica del modo monitor de PC. Utilice el cursor para
ajustar (los ajustes se memorizan automáticamente).
Imagen
•
Brillo/Imagen: Para ajustar la iluminación y el contraste.
•
Horizontal/Vertical: Para ajustar el posicionamiento
horizontal y vertical de la imagen.
•
Temp. de Color: Para ajustar el tono de los colores
(Fresco, Normal o Cálido).
Selección Audio
Para seleccionar el sonido que se reproduce en el
televisor (
PC/HD o TV).
Nota:
- Debe elegir el modo de TV antes de ir al modo TV/HD.
- Para oir el sonido de un dispositivo HD en modo PC, preste
atención también a conectar los cables de audio del
dispositivo HDD.
Funciones
•
Fase/Reloj:Permite eliminar las líneas parásitas
horizontales (
Fase) y verticales (Reloj).
•
Formato: Para seleccionar entre pantalla grande o el
formato original de las pantallas de PC.
•
PIP: Para cambiar el tamaño y la posición de la ventana
PIP en la pantalla cuando se usa el botón
PIP.
•
Auto ajuste:Ajustará automáticamente el control según
la señal que se reciba para entregar la mejor imagen
posible.
Ajustes de fábrica
Para volver a los ajustes de fábrica.
Modo
Para volver al modo TV.
2355.4 es 02-11-2004 14:18 Pagina 14
Page 59

15
Grabación con su videograbador
Para grabar con calidad S-VHS, conecte un
periférico S-VHS directamente al videograbador.
Grabación de un programa de TV
Usted puede grabar un programa de TV usando el
sintonizador de su videograbador sin afectar a su
televisor.
& Seleccione el número de canal en su
videograbador.
é Ajuste su videograbador en grabar.
Vea el manual de su videograbador.
¡El cambio de números de canal en su televisor no
perturba la grabación!
Grabación un programa desde
MONITOR OUT
Usted puede grabar un programa en su
videograbador del sintonizador del televisor vía
MONITOR OUT.
& Encienda el equipo.
é Seleccione el canal correcto en su televisor y la
entrada correcta en su videograbador.
“ Ajuste su videograbador en grabar.
Mediante el botón
AV+ en el control remoto,
usted graba el canal sintonizado del televisor,
incluso modificándolo a una entrada AV.
No cambie de canal ni apague el televisor mientras
esté grabando a través de
MONITOR OUT.
Nota: Cuando esté bloqueado un canal de TV o
fuente AV debido a la clasificación ajustada a través
del menú Canales (véase p. 12), también se
bloquearán la salida para grabar imagen y sonido.
This equipment has been tested and found to comply
with the limits for a Class B digital device, pursuant to
part 15 of the FCC Rules.These limits are designed to
provide reasonable protection against harmful
interference in a residential installation.This
equipment generates, uses, and can radiate radio
frequency energy and, if not installed and used in
accordance with the instructions, may cause harmful
interference to radio communications. However, there
es no guarantee that interference will not occur in a
particular installation. If this equipment does cause
harmful interference to radio or television reception,
which can be determined by turning the equipment off
and on, the user es encouraged to try to correct the
interference by one or more of the following
measures:
Reorient or relocate the receiving antenna.
Increase the separation between the equipment and
the receiver.
Connect the equipment into an outlet on a circuit
different from that to which the receiver es
connected.
Consult the dealer or an experienced radio or
television technician for help.
Modifications The FCC requires the user to be notified that any
changes or modifications made to this device that are
not expressly approved by Philips Consumer
Electronics may void the user’s authority to operate
the equipment.
Cables Connections to this device must be made with
shielded cables with metallic RFI/EMI connector hoods
to maintain compliance with FCC Rules and
Regulations.
Canadian notice This Class B digital apparatus meets all requirements
of the Canadian Interference-Causing Equipment
Regulations.
Avis Canadien Cet appareil numérique de la classe B respecte toutes
les exigences du Règlement sur le matériel brouilleur
du Canada.
Regulatory Notices - Federal Communications Commission Notice
2355.4 es 02-11-2004 14:18 Pagina 15
Page 60

16
Espera Su TV consume energía en el modo de espera. El consumo de energía contribuye a
la contaminación del aire y del agua.Consumo de energía: 2 W.
Varios puntos
.Temperatura ambiental:+ 5~ + 40°C
. Corriente: 50/60 Hz Aulto Voltage de 96 V a 140 V
. Consumo de potencia: aprox. 160 W
. Consumo en modalidad de espera: 1 W
.Peso (excluye el embalaje): 30PF9946: 40 Lbs; 37PF9946: 66 Lbs; 42PF9946:92 Lbs
. Dimensiones (wxhxd):
30PF9946: 895x490x110;37PF9946: 1130x600x85; 42PF9946: 1215x660x90
Tips
Síntomas Elementos que hay que revisar y las medidas aplicables
"Fantasma" o
• Esto se puede deber a la obstrucción de la antena debido a la presencia de
imágenes dobles
edificios en altura o cerros. El uso de una antena altamente direccional puede
mejorar la imagen.
No enciende
• Compruebe que el cable eléctrico CA del televisor esté enchufado en el toma
de la red eléctrica.
• Desenchufe el televisor y espere 60 segundos. Luego, reinserte el enchufe en el
tomacorriente y vuelva a encender el televisor.
No hay imagen
• Controle las conexiones de la antena en la parte inferior del televisor para ver si
queda bien conectado con el televisor.
•Posibles dificultades en la estación emisora. Intente con otro canal.
• Ajuste la programación de contraste y brillo. Pruebe otra configuración del auto
imagen.
•Revise el control de Subtítulos.Algunos modos de TEXTO pueden bloquear la
pantalla.
• Coloque su fuente HDMI en una modalidad correcta.
Sin imagen y
• Su TV tiene un modo protector en caso de exceso de calor acumulado.
aparato conectado
Compruebe que las aperturas de ventilación del aparato estén despejadas para
asegurarse que no haya paredes o armarios que pudieran limitar el flujo del aire.
No hay sonido
• Aumente el volumen.
•Averigüe que el televisor no está mudo, presione el botón ¬ en el control
remoto.
• Cuando no detecta ninguna señal, el televisor apagará automáticamente el
sonido. Esto es una operación normal y no indica un mal funcionamiento del
aparato.
Buen sonido,
• Ajuste la configuración de contraste, color, tono y brillo. Pruebe otra
pero el color es
configuración del auto imagen.
deficiente o no
hay imagen
Imagen deficiente
• Controle la conexión de HDMI.
Imagen nevada y
• Controle la conexión de la antena.
ruido
El televisor no
•Averigüe que las baterías están funcionando. Sustitúyalas si es necesario.
responde al
• Limpie el sensor del control remoto en el monitor.
controlo remoto
• La distancia entre el televisor y el control remoto no debería superar los 240”.
• Siempre puede utilizar los botones en la parte superior y al lado derecho del
televisor.
• Si su TV no responde al control remoto, las pilas pueden estar agotadas, o se
ha seleccionado el modo de funcionamiento incorrecto.
Control del equipo
• Las señales infrarrojas de la pantalla pueden tener influencia en la sensibilidad de
periférico
recepción de otros periféricos.
Solución: sustituya las baterías del control remoto o cambie la posición del resto
del equipo. Por ejemplo, no use unos cascos inalámbricos en un radio de 50".
Imagen VGA no Asegúrese que se ha seleccionado el modo VGA correcto en el ordenador.
estable o no
sincronizada
Antes de llamar al servicio
2355.4 es 02-11-2004 14:18 Pagina 16
Page 61

17
Consejos
¿Cómo eliminar las baterías?
Las baterías suministradas no contienen los metales pesados cadmio y mercurio. No obstante, en
muchas áreas no se pueden eliminar baterías junto con los desechos domésticos. Por favor, asegúrese
de eliminar las baterías en conformidad con las regulaciones locales.
¿No hay solución?
Apague una vez su televisor y vuelva a
encenderlo.
Jamás trate de reparar Ud. mismo un TV
defectuoso.
Contacte con su distribuidor o bien llame a un
técnico autorizado.
Número de teléfono Philips Customer
Care Centre
1-888-PHILIPS (744-5477)
Alerta concerniente a las imágenes que se pueden quedar marcadas en la pantalla del
tel TV.
Es característico de las Pantallas de Plasma que cuando se muestra una imagen fija durante mucho
tiempo se puede quedar la imagen marcada en la pantalla. Esto se llama quemado del del fósforo.
El uso normal de los TV supone reproducir imágenes que contienen constantes movimientos e
imágenes cambiantes que rellenan la pantalla.
Algunos ejemplos de imágenes fijas son (no es una lista exclusiva, puede encontrar otros ejemplos
en sus hábitos de visualización):
• Menús de TV;
• Las barras negras :
Cuando aparecen las barras negras a la izquierda y a la derecha de la
pantalla, es recomendable cambiar el formato de la imagen, así la imagen rellenará la pantalla
completa.
•
El logo de un canal de TV: Puede suponer un problema si es brillante y además se mantiene
fijo. Gráficos en movimiento o con bajo contraste es menos probable que puedan producir un
envejecimiento irregular de la pantalla.
• Indicaciones de cotizaciones en Bolsa que suelen aparecer en la parte inferior de la pantalla.
• Logotipos de las tiendas y precios de los productos mostrados en las pantallas:brillante y
mostrado constantemente en el mismo punto de la pantalla.
Ejemplos de de imágenes fijas también incluyen logos, imágenes de ordenador, mostrar la hora,
Teletexto e imágenes mostradas en formato 4:3, imágenes o caracteres estáticos, etc.
Notas:
- Reducir el contraste y el brillo en caso de que se reproduzcan imágenes de este tipo.
- Una vez quemado, este efecto nunca desaparece totalmente.
2355.4 es 02-11-2004 14:18 Pagina 17
Page 62

18
GARANTÍA LIMITADA
¿QUIENES ESTÁN CUBIERTOS?
Usted debe presentar un comprobante de su
compra para recibir servicio cubierto por la
garantía. Se considera comprobante de compra un
recibo de venta u otro documento que demuestre
que usted compró el producto.
¿QUÉ ESTÁ CUBIERTO?
La cobertura de La garantía comienza el día en que
usted compra su producto. Durante un año a
contar de esa fecha, se repararán o reempla-zarán
gratuitamente todas las piezas y la mano de obra
será gratuita. Después de un año a contar del día
de la compra, usted pagará por el reemplazo o
reparación de todas las piezas y por todos los
cargos por mano de obra.
Todas las piezas, incluidas las piezas reparadas y
reemplazadas, sólo quedan cubiertas durante el
período original de la garantía. Cuando expira la
garantía del producto, también expira la garantía
sobre todos las piezas reemplazadas y reparadas.
¿QUÉ SE EXCLUYE?
Su garantía no cubre:
• cargos de mano de obra por la instalación o
configuración del producto, ajuste de controles del
cliente en el producto e instalación o reparación
de sistemas de antena externas al producto.
•reparación y/o reemplazo de piezas del producto
dañadas a causa de un mal uso, accidente,
reparación no autorizada u otra causa que no esté
dentro del control de Philips Consumer
Electronics Company.
•problemas de recepción causados por condiciones
de la señal o sistemas de cable o antena externos a
la unidad.
• un producto que requiera modificación o
adaptación para permitir su operación en algún
país ajeno al país para el que se diseñó, fabricó,
aprobó y/o autorizó, o reparación de productos
dañados por estas modificaciones.
• daños incidentales o indirectos que sean resultado
del producto. (Algunos estados no permiten la
exclusión de daños incidentales o indirectos, de
modo que la anterior exclusión puede no aplicarse
a usted. Esto incluye, sin limitarse a él, el material
pregrabado, ya sea que esté cubierto o no por
derechos de propiedad intelectual).
• un producto usado para propósitos comerciales o
institucionales.
¿DÓNDE HAY SERVICIO DISPONIBLE?
Se dispone de servicio de garantía en todos los
países donde Philips Consumer Electronics
Company distribuye oficialmente el producto. En
los países donde Philips Consumer Electronics
Company no distribuye el producto, la organización
de servicio Philips local intentará proporcionar el
servicio (aunque puede haber un retardo si no es
fácil disponer de los repuestos y manual(es)
técnico(s) apropiado(s)).
ASEGÚRESE DE GUARDAR ...
Sírvase guardar su recibo de venta u otro
documento que sirva como comprobante de su
compra.Adhiéralo a este manual del propietario y
mantenga ambos a la mano.También guarde la caja
original y el material de empaque, en caso de que
necesite devolver su producto.
Sírvase revisar su manual del propietario antes de
solicitar servicio. El ajuste de los controles que allí
se analiza le puede ahorrar una llamada de servicio.
PARA OBTENER SERVICIO DE GARANTÍA....
La reparación debe ser realizada por un centro de
servicio autorizado o un centro de servicio de
fábrica. Si usted no vive cerca de un centro de
servicio de fábrica, comuníquese con su
distribuidor. Si su distribuidor es un centro de
servicio autorizado, se encargará de su reparación.
Si su distribuidor no es un centro de servicio
autorizado, él lo remitirá al centro de servicio
autorizado que da servicio a los productos que él
vende.
(En los EE.UU., Puerto Rico e Islas Vírgenes de los
EE.UU., todas las garantías implícitas, incluidas las
garantías implícitas de comerciabilidad y
adecuación para un propósito determinado, se
limitan en duración a la duración de esta garantía
expresa. Pero, puesto que algunos estados no
permiten limitar la duración de una garantía
implícita, esta limitación quizás no se aplique a
usted).
(En Canadá, esta garantía reemplaza todas las
demás garantías. No hay otras garantías expresas o
implícitas, incluida cualquier garantía implícita de
comerciabilidad o adecuación para un propósito
determinado. Philips no se hace responsable, bajo
circunstancia alguna, por ningún daño directo,
indirecto, especial o incidental, cualquiera sea la
manera en que se produzca, aún cuando haya sido
notificado de la posibilidad de dicho daño.)
SI TIENE PREGUNTAS EN EL CANADÁ
Comuníquese con Philips en el:
1-800-661-6162 (francófono)
1-800-363-7278 (anglófono)
RECUERDE...
No olvide registrar a continuación los números de
modelo y serie que se encuentran en el producto.
Además, sírvase llenar y enviar oportunamente su
tarjeta de registro de garantía. Será más fácil para
nosotros notificarle si es necesario.
Nº DE MODELO #
Nº DE SERIE #
Un año de mano de obra gratuita - Un año de servicio gratuito en repuestos
Esta garantía le cubre específicos derechos legales. Usted quizás tenga otros derechos que pueden variar en diferentes estados/provincias
Philips , P.O. Box 671539,Marietta, GA 30006-0026,1-888-PHILIPS (744-5477)
EnglishFrançais
Español
3104 315 2355.4
2355.4 es 02-11-2004 14:18 Pagina 18
Page 63

cover 2355.4 02-11-2004 14:16 Pagina 3
Page 64

Printed in Belgium
cover 2355.4 02-11-2004 14:16 Pagina 4
 Loading...