

Page 1
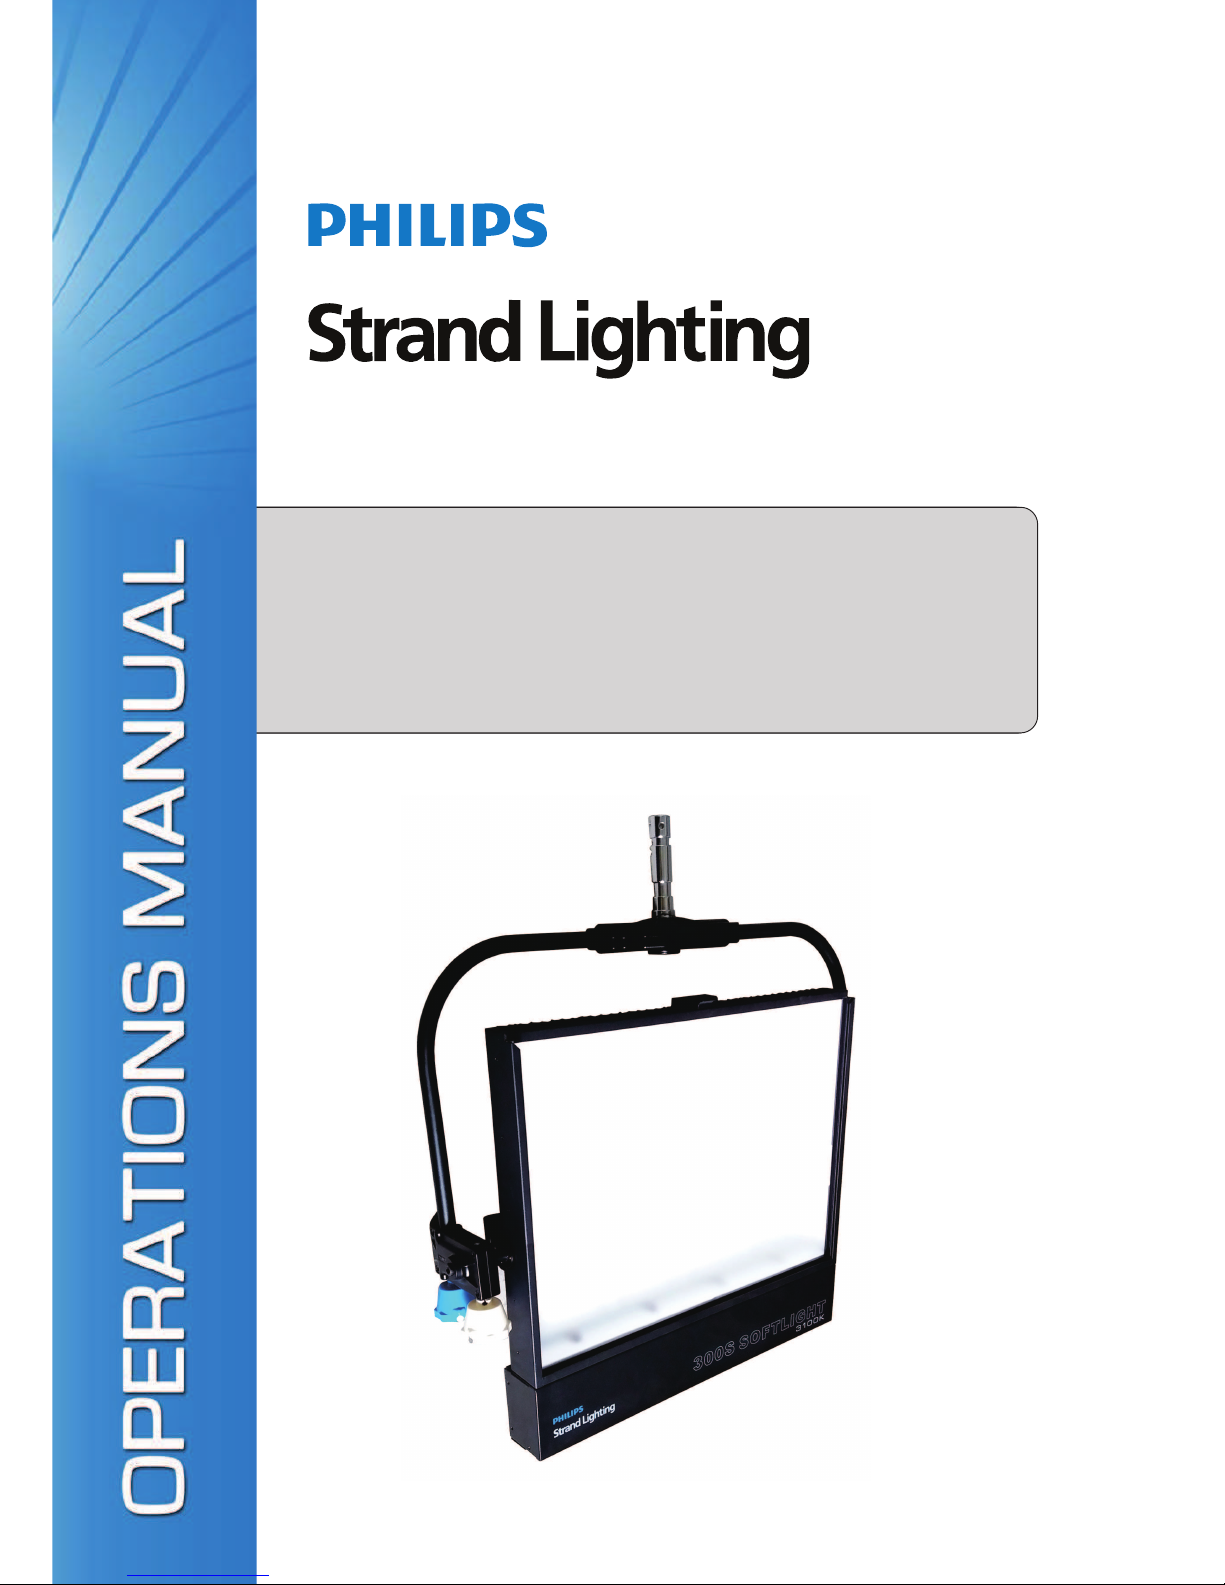
300S Softlight 3100K/5600K
LED Luminaire
Page 2
©2016 Philips Group. All rig hts reser ved.
Document Number: 300S Softlight Lumi naires UsersLED
Version as of: 24-004-3801-01 Rev1.1
300S Softlight Luminaire Installation & U ser ’s ManualLED
Strand Lighting Offices
Strandlighting
Strandlighting
Strandlighting
Strandlighting
Strandlighting
Strandlighting
The material in this manual is for information purposes only and is subjectto change without notice.Strandlighting
assumes no responsibility for any errors or omissions which may appear in this manual. For comments and
suggestions regarding corrections and/or updates to this manual, please contact your nearest Strandlighting office.
2. If the external flexible cable or cord of this lminiare is damaged, it shall be replaced by a special cord or cord
exclusively available from the manufacturer or his service agent.
3. The light source contained in this luminaire shall only be replaced by the manufacturer or his service agent or a similar
qualified person.
4. For controllable luminaires the classification of insulation that has been maintained between LV supply and control
conductors shall be provided. E.g. basic insulation, reinforced insulation.
5. Terminal block not included. Installation may require advice from a qualified person.
Note s:
1. Information contained in this document may not be duplicated in full or in part by any person without prior written
approval of Strandlighting. its sole purpose is to provide the user with conceptual information on the equipment
mentioned. The use of this document for all other purposes is specifically prohibited.
Page 3
1
IMPORTANT INFORMATION
Warnings and Notices
WARNING! Remove all power from luminaire before installing lamp or performing any service THE.
LUMINAIRE PRODUCES EXTREME HEAT AND CAN BURN IF TOUCHED WITH BARE HANDS Allow unit.
to cool before servicing Only use specified approved lamps at the correct voltage with luminaire. / .
When using electrical equipment basic safety precautions should always be followed including the following:,
a. READ AND FOLLOW ALL SAFETY INSTRUCTIONS.
b Do not use outdoors. .
c Do not mount near gas or electric heaters. .
d Equipment should be mounted in locations and at heights where it will not readily be subjected to.
tampering by unauthorized personnel.
e The use of accessory equipment not recommended by the manufacturer may cause an unsafe.
condition.
f Do not use this equipment for other than intended use. .
g Refer service to qualified personnel. .
SAVE THESE INSTRUCTIONS.
WARNING
: You must have access to a main circuit breaker or other power disconnect device
before installing any wiring Be sure that power is disconnected by removing fuses or turning the.
main circuit breaker off before installation Installing the device with power on may expose you to.
dangerous voltages and damage the device A qualified electrician must perform this installation. .
WARNING: .Refer to National Electrical Code and local codes for cable specifications Failure to®
use proper cable can result in damage to equipment or danger to personnel.
WARNING: This equipment is intended for installation in accordance with the National Electric
Code and local regulations It is also intended for installation in indoor applications only Before® . .
any electrical work is performed disconnect power at the circuit breaker or remove the fuse to avoid,
shock or damage to the control It is recommended that a qualified electrician perform this installation. .
300S Softlight LED Luminaires
Installation & User’s Manual
Additional Resources for DMX512
For more information on installing DMX512 control systems the following publication is available for purchase,
from the United States Institute for Theatre Technology USITT Recommended Practice for DMX512 A Guide( ), " :
for Users and Installers 2nd edition ISBN 9780955703522 USITT Contact Information, " ( : ). :
USITT
6443 Ridings Road
Syracuse NY 13206-1111 USA,
1-800-93USITT
www usitt org. .
Philips Strand Lighting Limited Two Year Warranty-
Philips Strand Lighting offers a two year limited warranty of its luminaires against de fects in materials or workmanshipfrom the date of delivery A copy of Philips Strand Lighting two year limited warranty containing specific terms and conditions can be. obtained from the Philips Strand Lighting web site at or by contacting your local Philips Strand Lighting office.
www.strandlighting.com
Page 4

2 TABLE OF CONTENTS
TABLE OF CONTENTS
Safety Information Inside Front Cover...................................................................................................
IMPORTANT INFORMATION
Warnings and Notices.......................................................................................................................
TABLE OF CONTENTS
PREFACE
About this Manual ...................................................................................................................... .....
Product Descriptions....................................................................................................................... ..
3 Softlight .........00S LED Luminaires...................................................................................................
ACCESSORIES............................................................................................................................. ..
300S Softlight LED LUMINAIRE OVERVIEW
300S Softlight LED LUMINAIRE LCD Display/Menu System
Major Components..........................................................................................................................
LCD Display/Menu System...............................................................................................................
INSTALLATION AND SET UP
Power Requirements........................................................................................................................
Connecting Power...........................................................................................................................
Connecting LED Luminaires to AC Power300S Softlight ........................................................................ .
Connecting to the DMX512 Network .................................................................................................. ....
Mounting Luminaires.........................................................................................................................
OPERATION AND PROGRAM
LCD Display and Menu System .........................................................................................................................
LCD Display and Menu System Operation .........................................................................................................
Menu Structure ....................................................................................................................................................
Button Functions ................................................................................................................................................
Dimming Curve Selection...............................................................................................................
Simplify 8-bit .....................................................................................................................................
300S 5600k ....... .... ......LED Luminaire RDM Parameter IDs .... ........................................... ....... . ............... ....
300S 3100k ....... .... ......LED Luminaire RDM Parameter IDs .... ........................................... ....... . ............... ....
Basic 8-bit .......................................................................................................................................
Basic 16-bit .....................................................................................................................................
MAINTENANCE AND CARE
DMX Control
300S Softl ght LED Luminaire RDM Parameter IDsi
Special Cleaning Care Instruction ....................................................................................................
Front s CleaningDiffuser ................................................................................................................
Service and Maintenance ................................................................................................................
Accessories .................................................................................................................................. ....
Installation of Accessories ...............................................................................................................
FEATURES AND SPECIFICATIONS
300S Softlight Technical Specification ................................................................................ .............
300S Softlight Dimensions ................................................................................................ .............
1
3
3
3
3
4
5
6
6
7
8
9
10
10
11
12
13
14
14
14
15
19
23
23
23
24
25
26
27
Installation & User’s Manual
300S Softlight LED Luminaires
Page 5
About this Manual 3
PREFACE
1 About this Manual.
The document provides installation and operation instructions for the following products:
2 Product Descriptions.
3 Accessories.
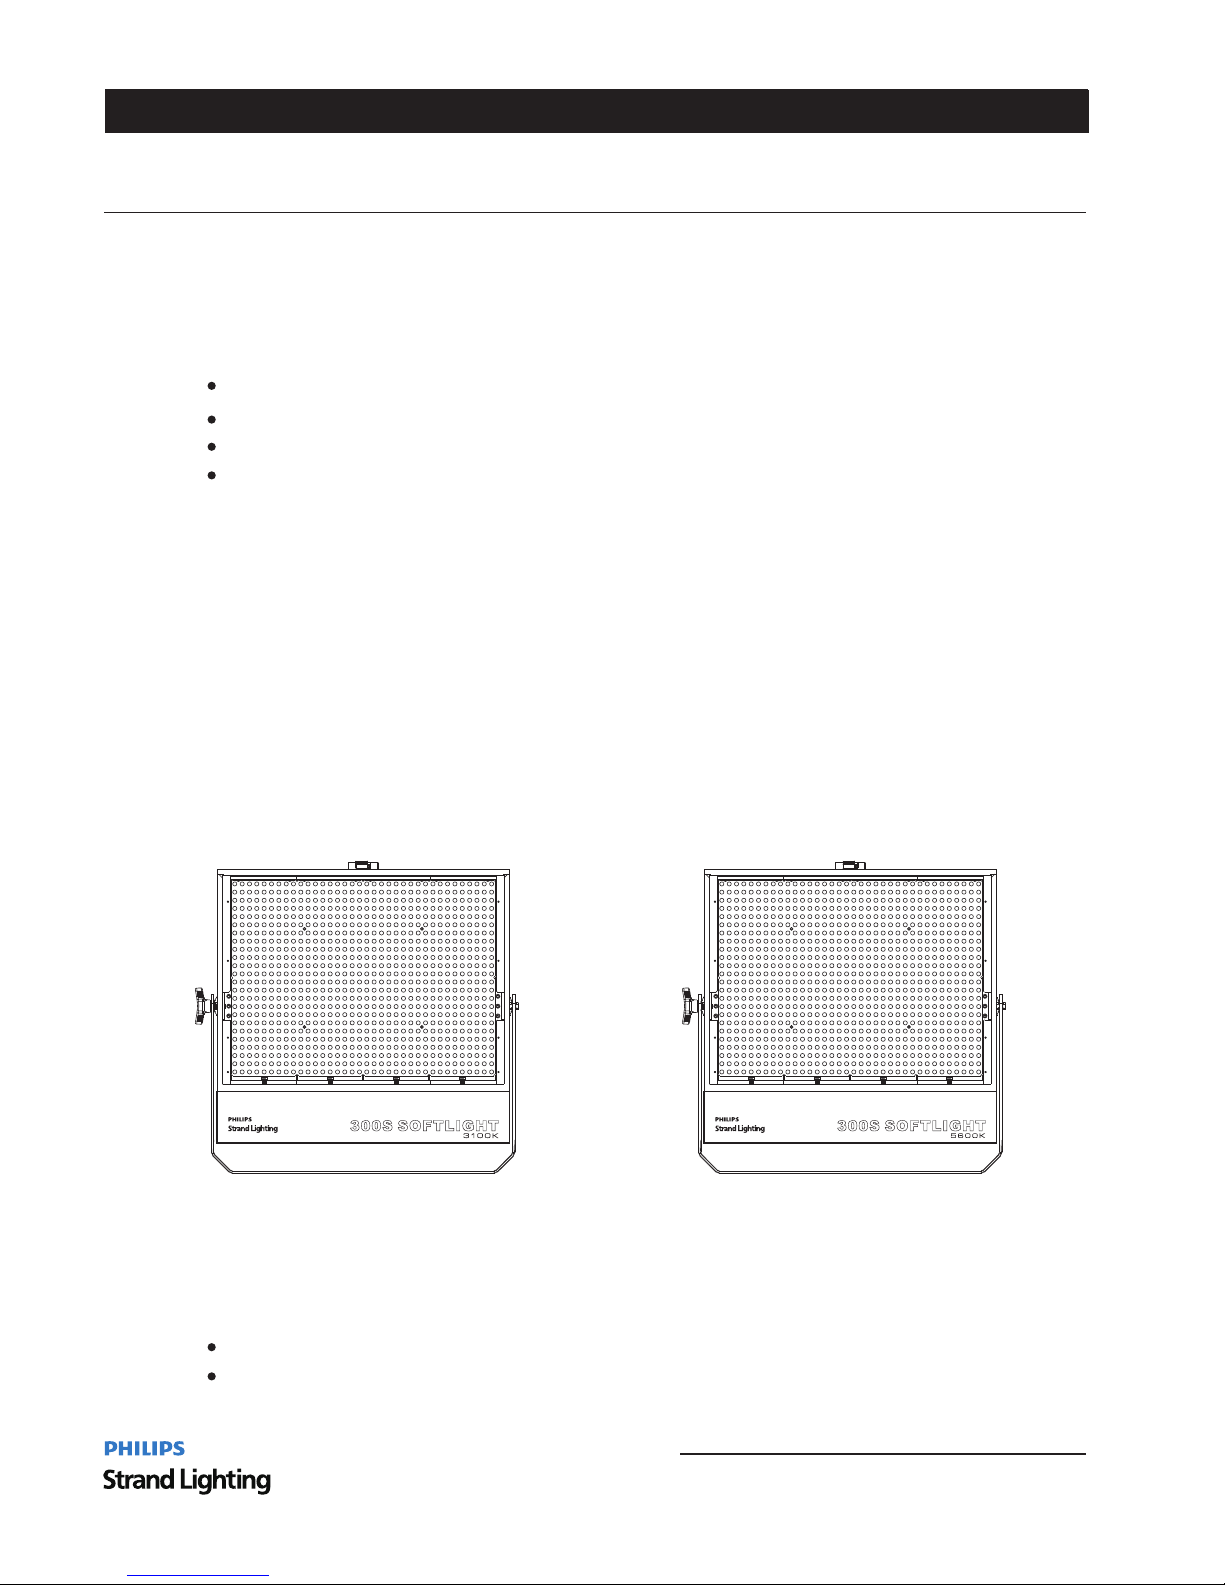
This manual covers the following 300S SOFTLIGHT LED Luminaire models:
300S SOFTLIGHT 3100K with MO Yoke
300S SOFTLIGHT 3100K with PO Yoke
300S SOFTLIGHT 5600K with MO Yoke
300S SOFTLIGHT 5600K with PO Yoke
User Manual(this document)
1.5m PowerCon Powercord with bare end
Please read all instructio ns before i nstalli ng or using t his product. Retain this manual f or future r eferenc e.
Additional product infor mation an d descrip tions may b e downloaded at www.stran dlighti ng.com.
300S Softlight LED Luminaires
Installation & User’s Manual
300S SOFTLIGHT 3100K AC100-240V/DC23-36V MO
300S SOFTLIGHT 3100K AC100-240V/DC23-36V PO
300S SOFTLIGHT 5600K AC100-240V/DC23-36V PO
300S SOFTLIGHT 5600K AC100-240V/DC23-36V MO
Page 6
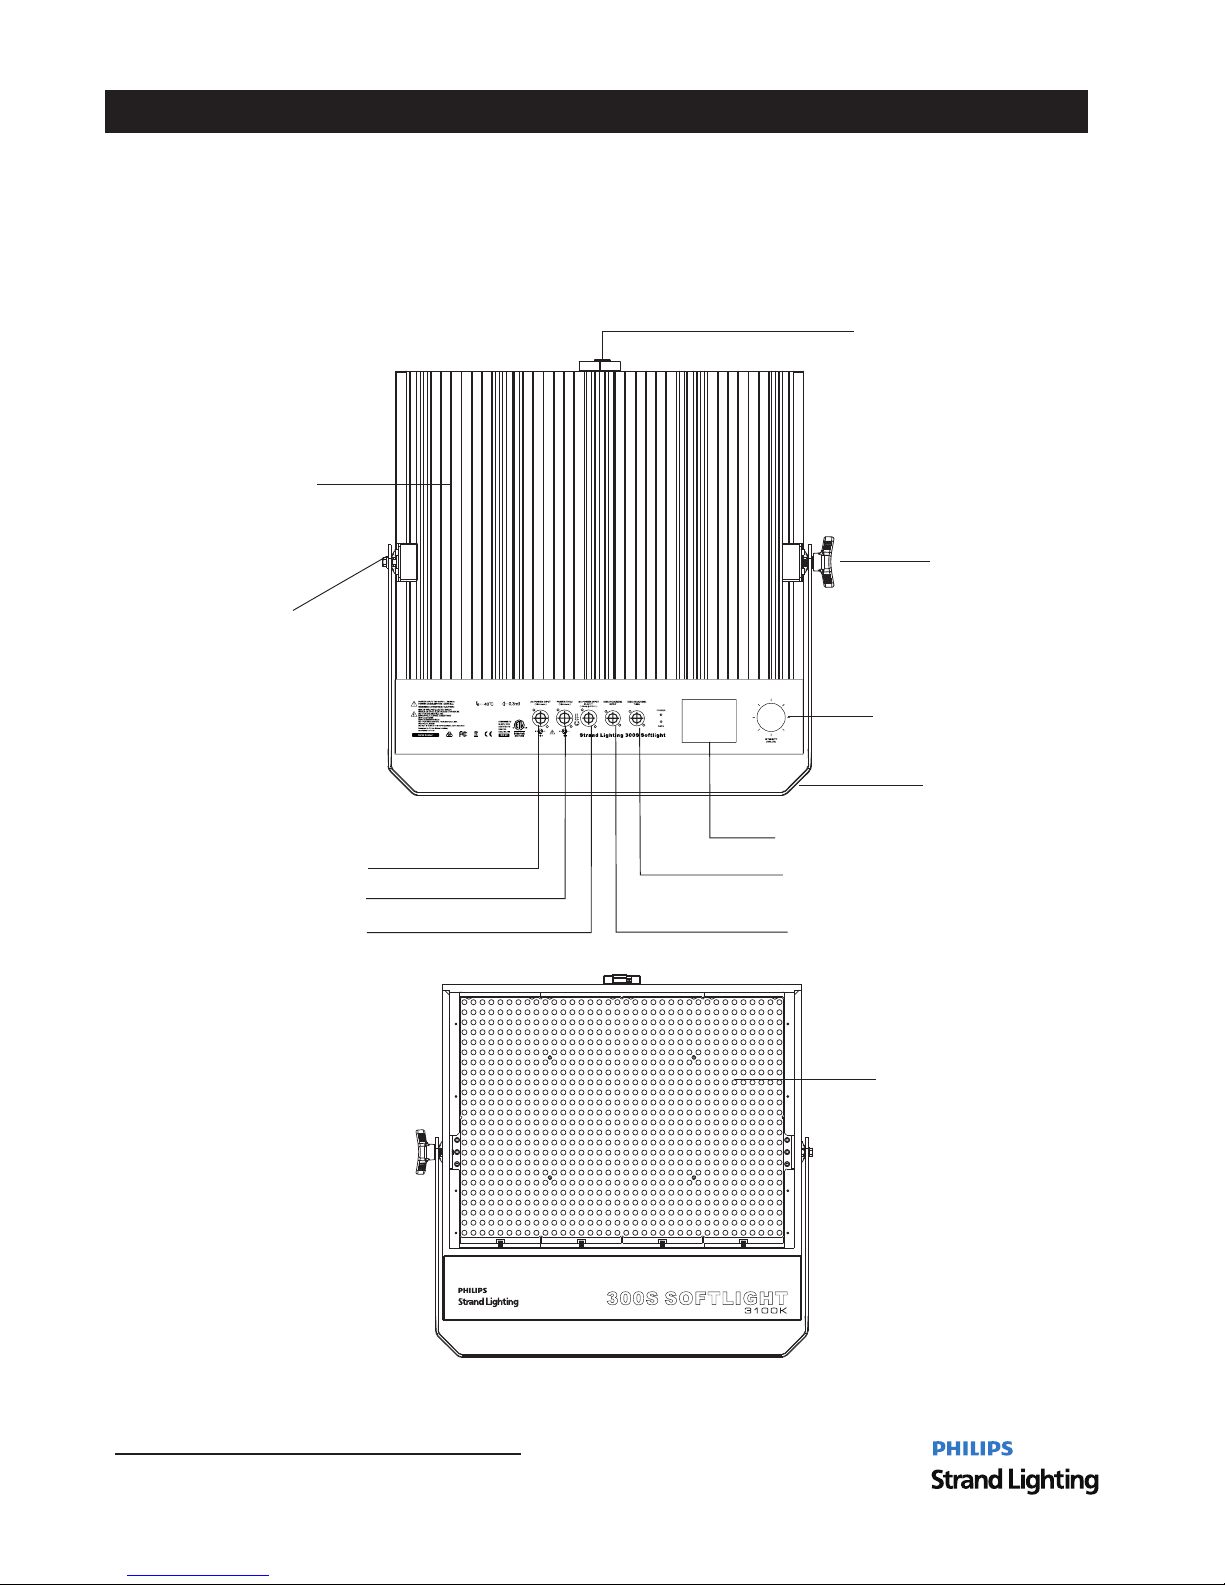
300S Softlight LED LUMINAIRE OVERVIEW
1. 300S Softlight LED Luminaire Components
Majo r Lumi naire Compo nents
Figu re 1: 30 0S Softli ght LED Lum inaire Comp onents
4 300S Softlight LED LUMINAIRE OVERVIEW
High Power LED array
Front of Uni t
Installation & User’s Manual
300S Softlight LED Luminaires
Locking knob
Power Input (AC)
Heat Sink
Safety Cable
anchor point
Barn door anchor point
Power THR U (A C)
Yoke
DMX-512A(RDM) IN
DMX-512A(RDM) THR U
Value turn / Push to co nf ir m
Color LCD Display/ Operation ke yp ad
Rear of Unit
Power Input (DC)
Page 7
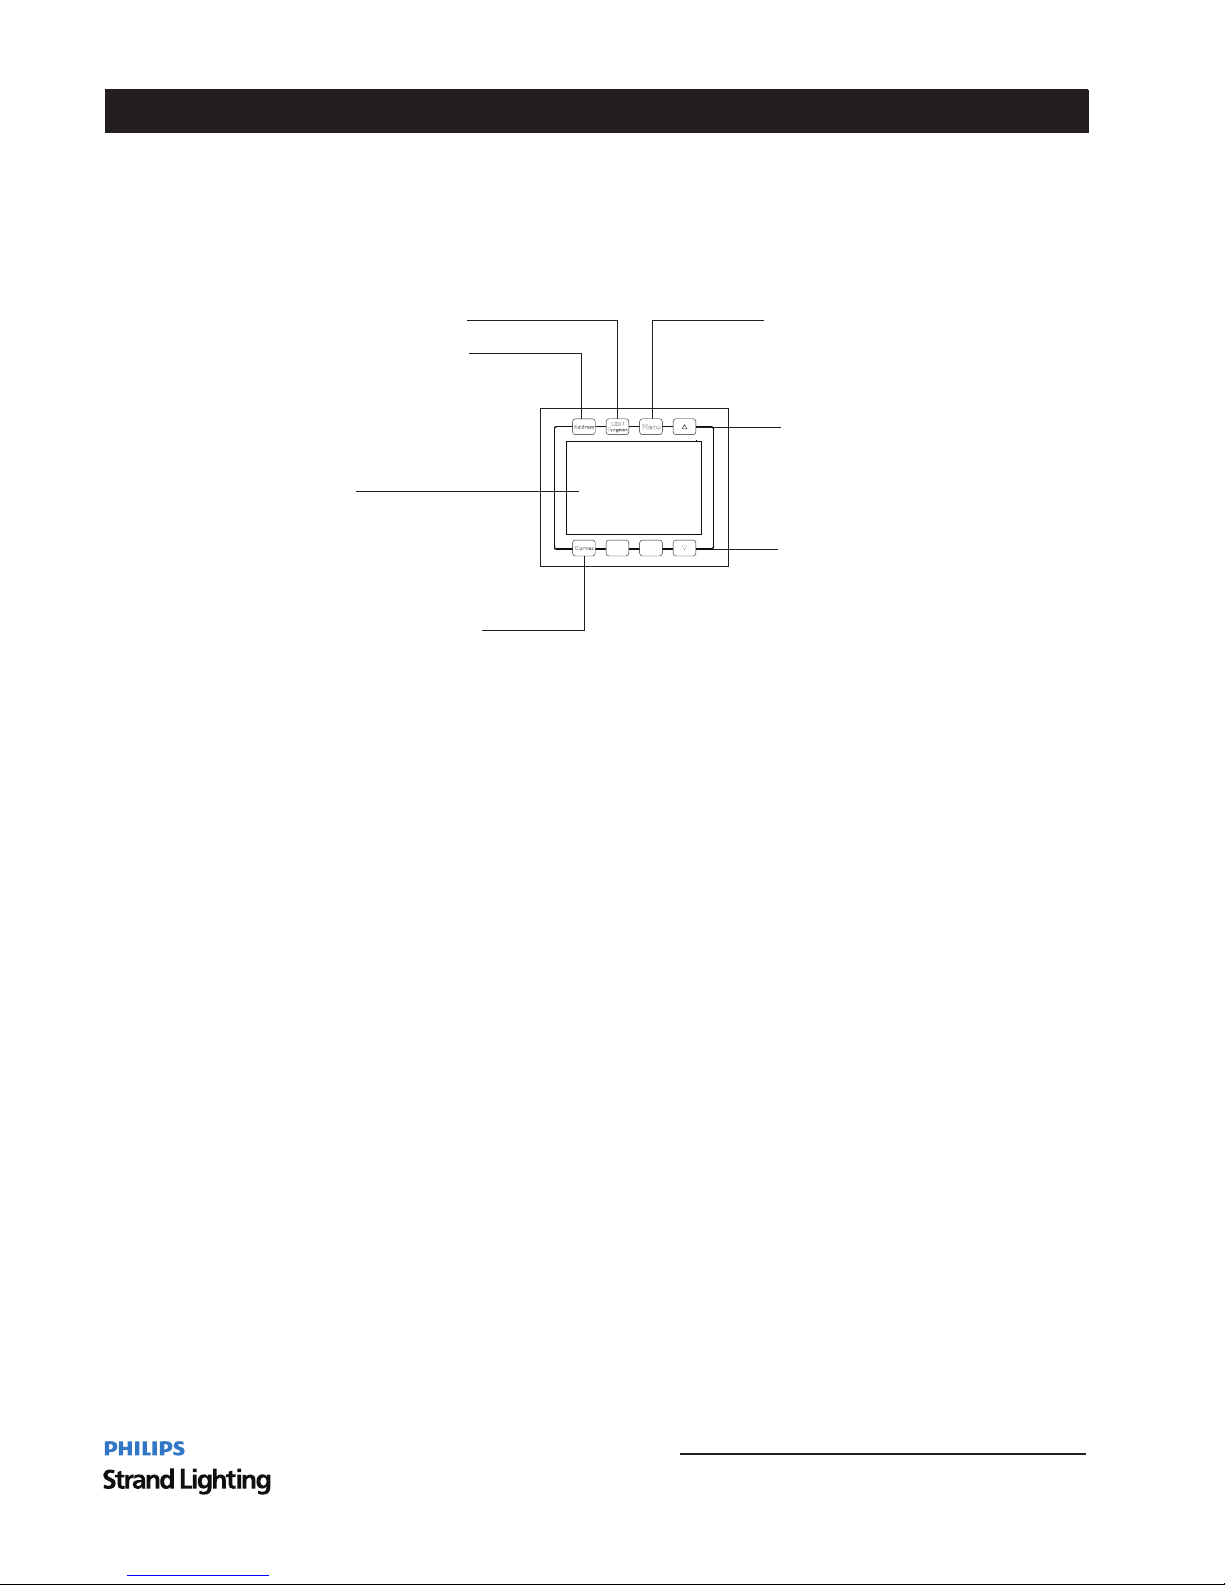
LCD Display/Menu System
Address Address settings( )
LED/Tungsten
Menu
UP Arrow Button
Curves
DOWN Arrow Button
LCD Display
DMX Address
406
Int ensit y
27
%
5600
K
CCT
PL-C urve
LED
90 CRI
500 0 cd
LCD Display/Menu System
5
Figu re 2: 30 0S Softli ght LED Lum inaire LCD Di splay/M enu Syste m
300S Softlight LED Luminaires
Installation & User’s Manual
Page 8
6 INSTALLATION AND SET UP
Installation & User’s Manual
300S Softlight LED Luminaires
INSTALLATION AND SET UP
1 Power Requirements.
WARNING! This unit does not contain an ON OFF switch Always disconnect power input cable to completely/ .
remove power from unit when not in use.
AC Power Operation
When connected to an AC source the unit operates on 100 to 240 volts AC 10 auto ranging The, (+/- %, - ).
luminaire contains an auto ranging power supply Each luminaire can draw up to 320 Watts- . .
WARNING! Maxim um 3 units in 1 00 - 120VAC or 8 units of 2 20 - 240VAC operation can be connected.
Note: For wiring of AC input connector refer to, " "Connecting 300S Softlight LED Luminaires to AC Power
on page 7.
2 Connecting Power.
Units can be powered in one of two ways:
Direct connection to a AC power source using an AC input cable For wiring of AC input connector refer to. ,
" -Con
necting 300S Softlight LED Luminaires to AC Power on page 7"
.
Connection from the AC output of another 300S Softlight LED Luminaire. When using this method, it is very
.important not to connect any other type of equipment device
WARNING! Power THRU connect is only for next 300S Softlight devices loop though.
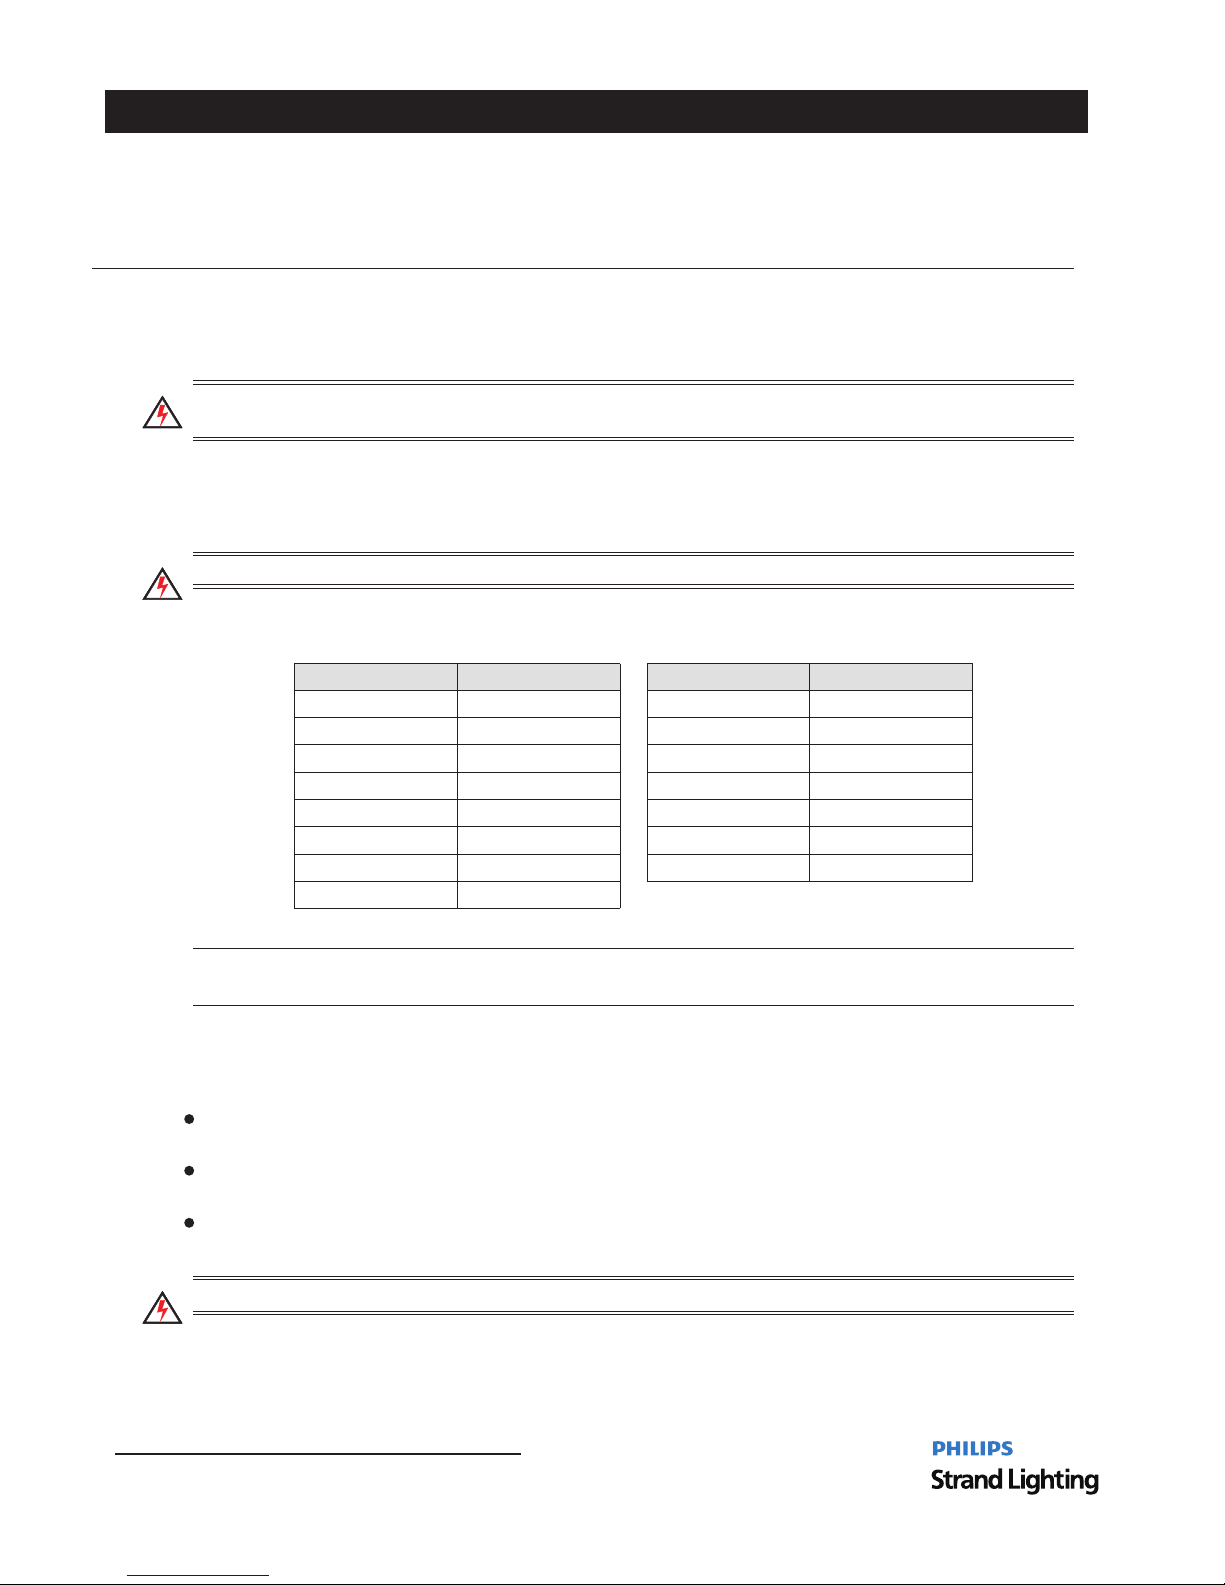
Table 1 300S Softlight LED Luminaire Voltage VAC vs Current: ( ) . *
Voltage AC( )
Total Current A( )
Voltage AC( )
Total Current (A)
100 180
110 190
160 240
150 230
140 220
130 210
120 200
170
3.20A 1.78A
2.90A 1.69A
2.00A 1.34A
2.14A 1.40A
2.29A 1.46A
2.46A
1.53A
2.67A 1.60A
1.88A
The 300S Softlight LED Lumin aire oper ates on AC input voltages from 100 to 24 0VAC or 2 3 to 36 VD C.
Connection from the DC power source using a DC input cable.
Page 9
3. Connecting 300S Softlight LED Luminaires to AC Power
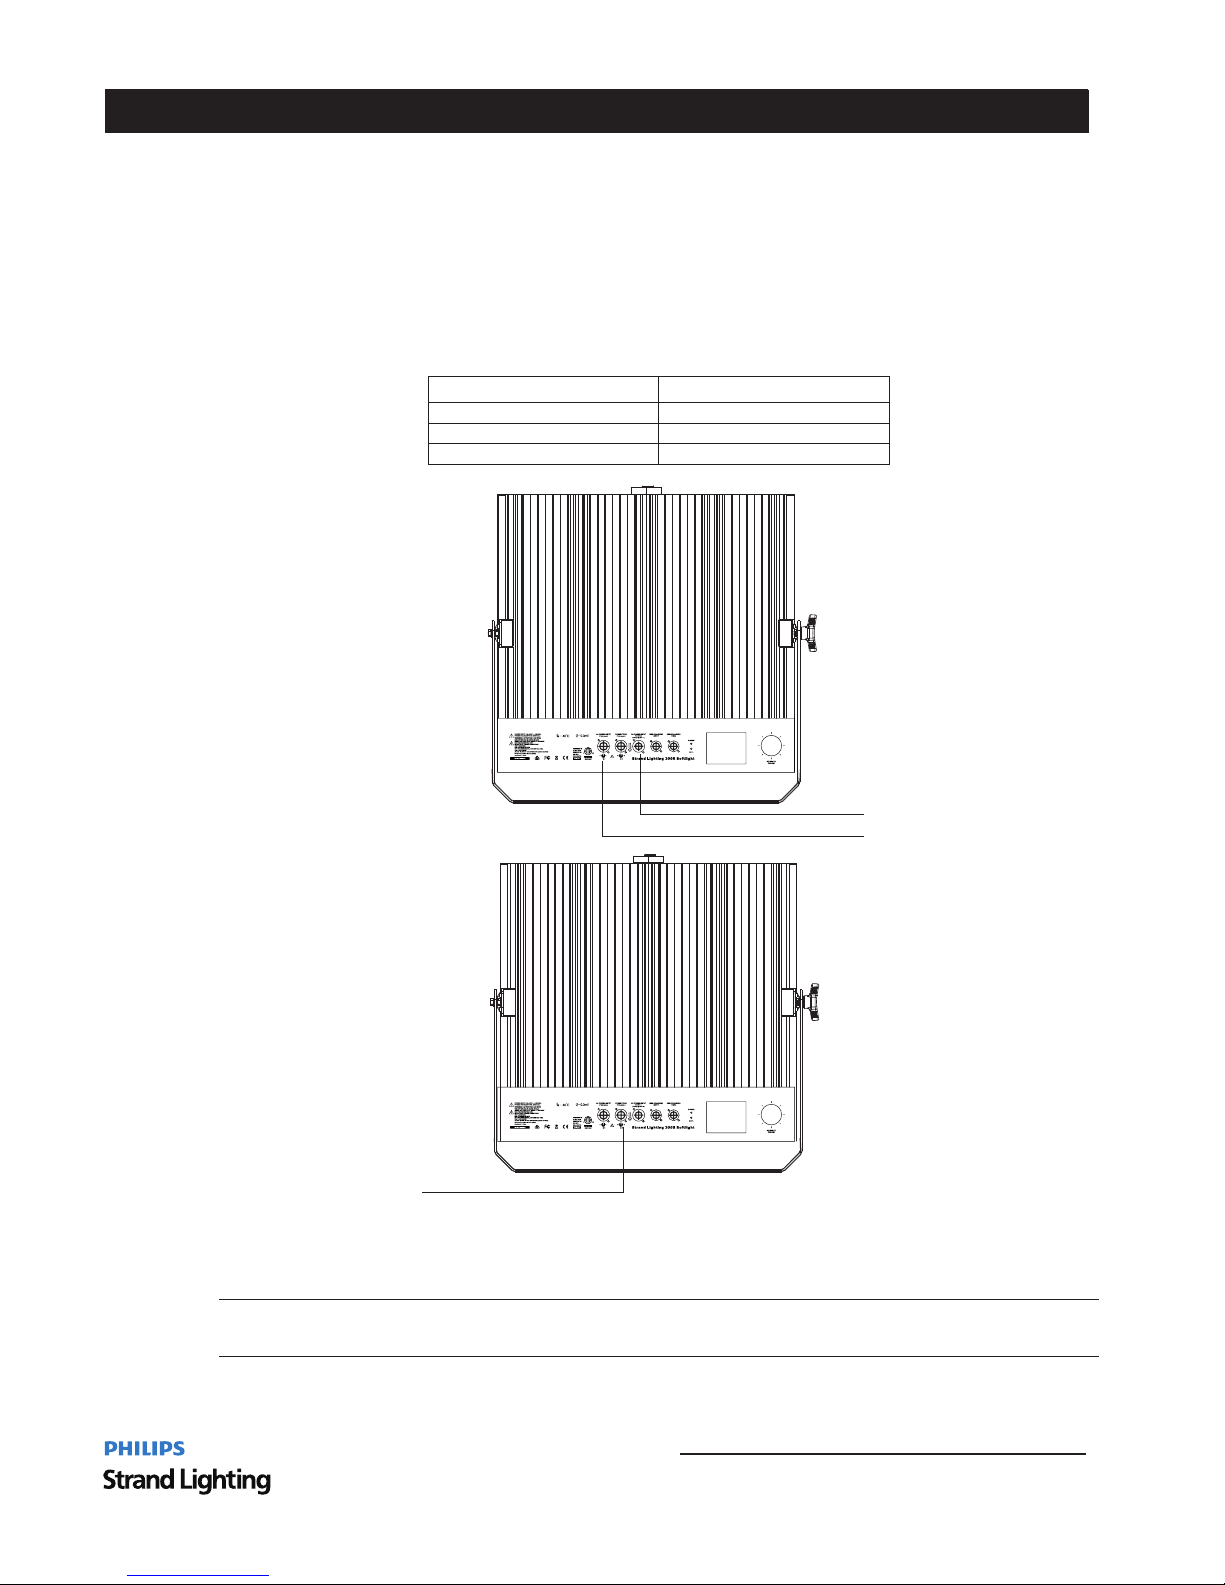
The unit is supplied with an AC input cable Input connector is a user supplied accessory to fit your-in bare end.
Table2 describes how to connect power to your 300S Softlight LED Luminaire Field wiring of the. 300S Softlight
.LED Luminaire is straight forward A total of 3 wires conductors is supplied from the unit/ .
The following wiring scheme is used:
Table 2: ( )LED Luminaire IP20 Rated Models AC Input Connections300S Softlight
Figure 3 300S Softlight LED Luminaire AC Input & Output Connections:
CAUTION: In the event the AC input cable ofthis luminaire is damaged it must be replaced with an approved,
.cable through an Authorized Strandlighting Dealer or Service Center
Wire Color Purpose
Brown Mai n/ LIVE ( 100 to 24 0VA C)
Blue Neutral
Green Yellow/ Ground (Earth)
Rear of Unit
Connecting 300S Softlight LED Luminaires to AC Power 7
300S Softlight LED Luminaires
Installation & User’s Manual
application.
AC Input
AC Output
DC Input
Page 10
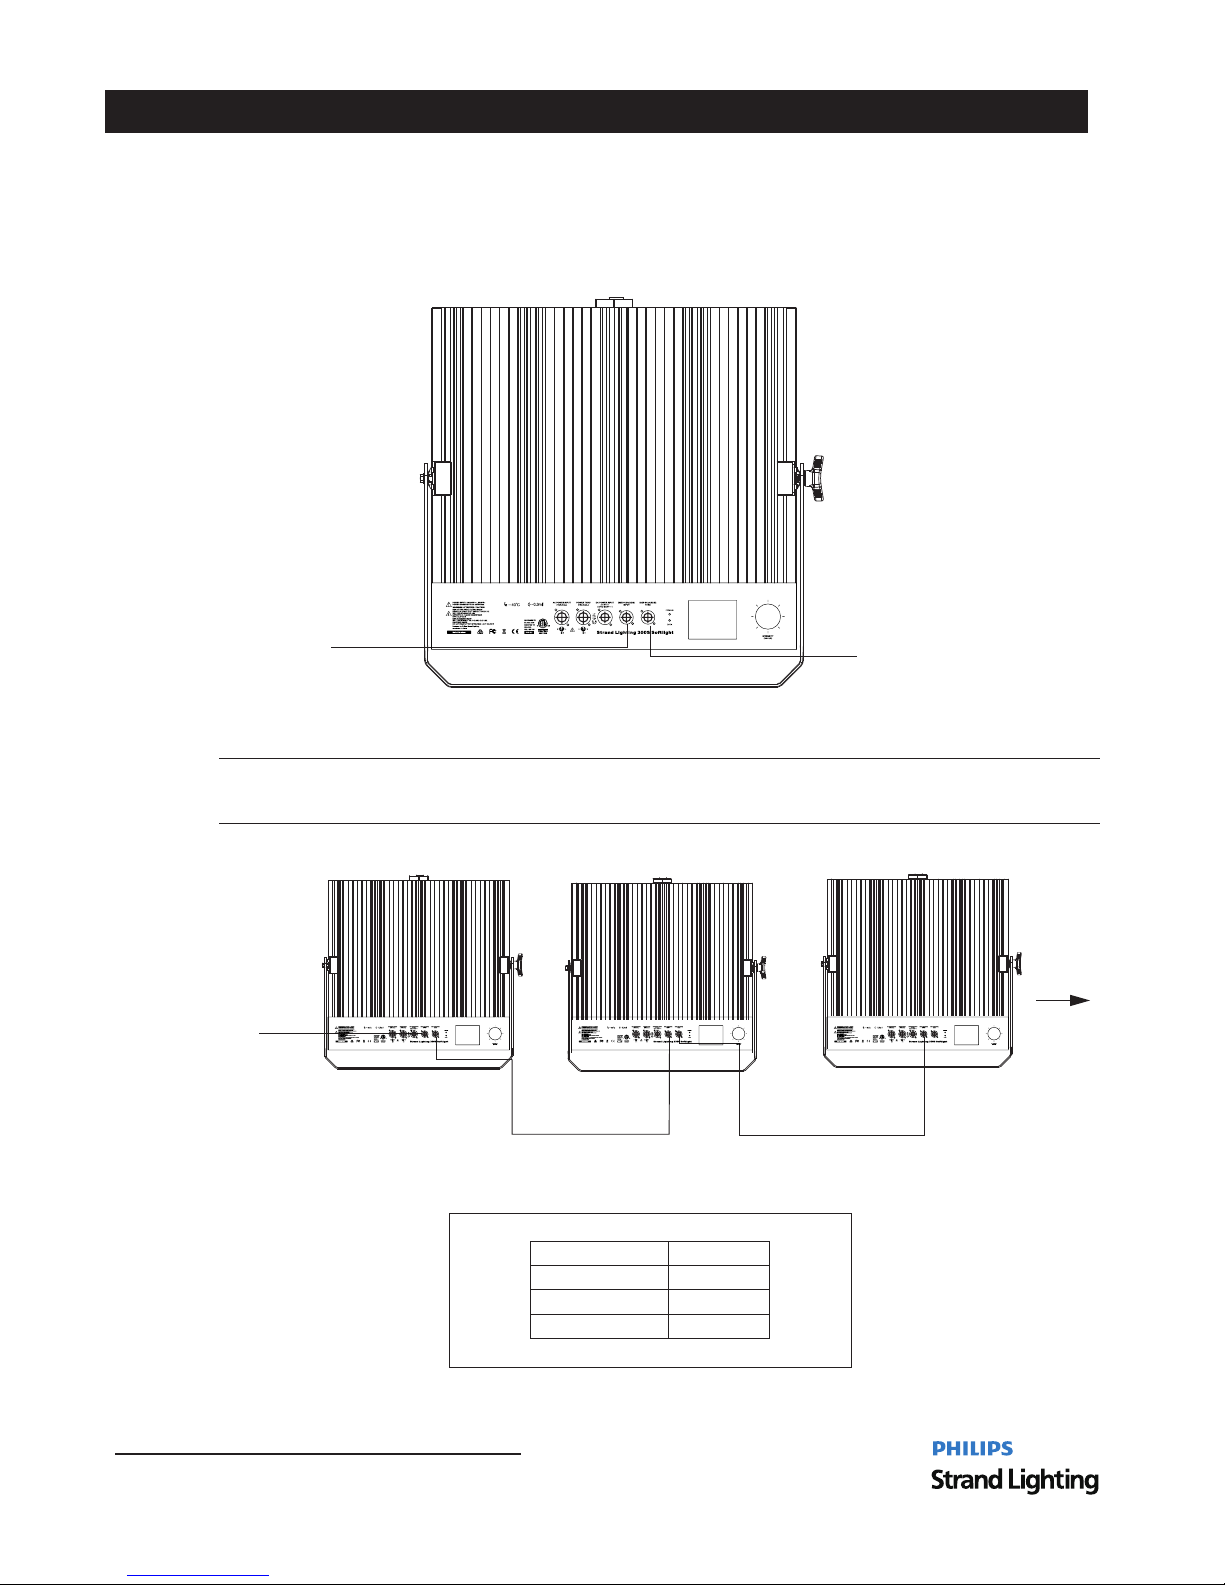
8 Connecting to the DMX512 Network
Installation & User’s Manual
300S Softlight LED Luminaires
4. Connecting to the DMX512 Network
DMX-512 network allow maximum of 32 uni ts of on a single segment of DMX-512 cables300S Softlight
loop though in daisy - chain. A cable runs from the c ontrol co nsole (or D MX512 con trol sour ce) to the DMX
connector on the first LED Lu minaire. Ano ther cabl e runs from t he other DM X connector300S Softlight
first unit to a DMX connector on t he next LED Luminaire.300S Softlight
Figure 4 300S Softlight LED Luminaire DMX512 Input Output Connections: /
Note: For more information on DMX512 networking and systems refer to, " "Additional Resources for DMX512 on
page 1. DMX CONTROL on page 14." "For LED Luminaire DMX Mapping refer to,300S Softlight
Figure 5 300S Softlight LED Luminaire DMX512 Connections: -
RearofUnit
DMX512(RDM) In
DMX512( RDM) THRU
300S Softlight LED Luminaires
DMX512 Connections
Note Remaining pins on each connector are not used: .
DMX512 Signal XLR Pin
Com mon(S hield ) 1
DMX512 - 2
DMX512 + 3
DMX512
DMX512(out from first to
DMX512 (out to the next luminaire
or DMX512 controlled device)
(from console or
control device)
second luminaire)
Page 11
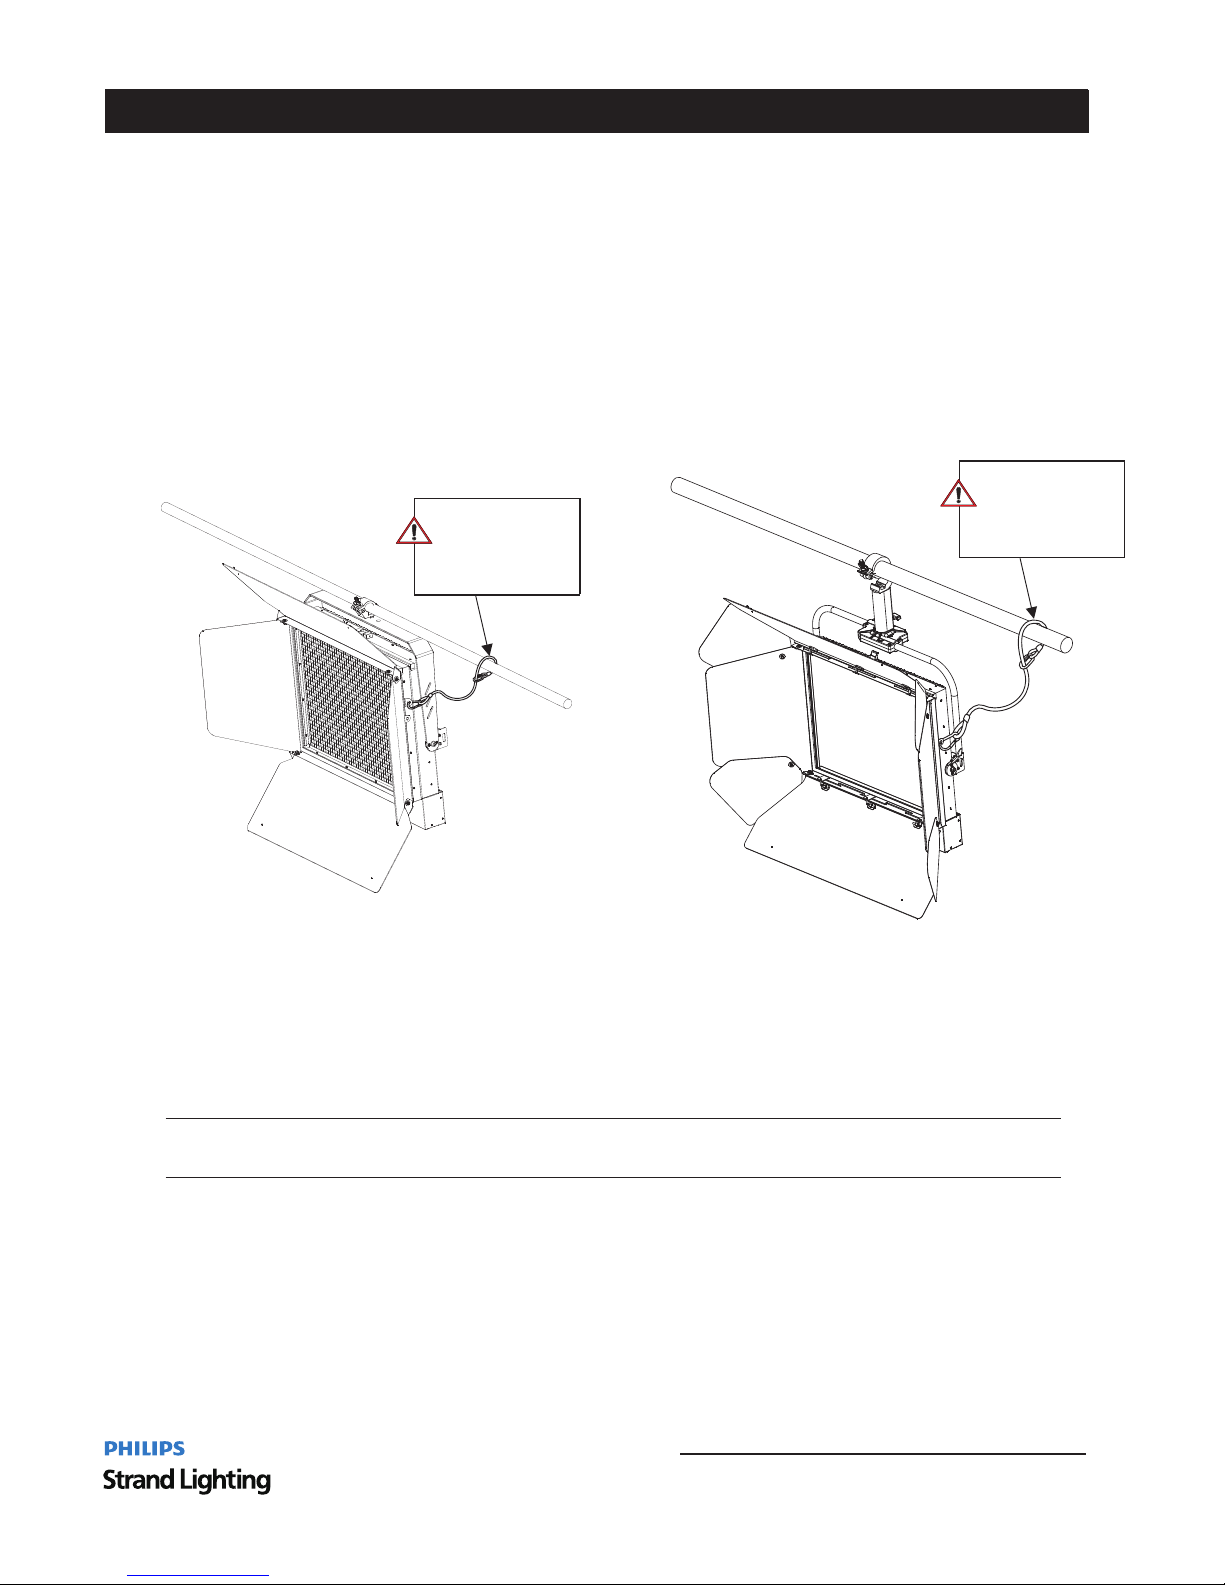
Mounting Luminaire
Refer to for detailed mounting informationFigure 6 .
Figure 6 Mounting Luminaire Hanging Applications: -
Mounting Luminaire 9
300S Softlight LED Luminaires
Installation & User’s Manual
The 300S Softlight is provid ed with one m ount and tw o safety ca ble anchor points, with one on the body and
the other on the barn door assem bly. The luminaire i s designe d to accept a v ariety of m ounting hooks, clamps,
etc. Simply attach hook, cla mp, etc. to t he 300S Sof tlight LED Luminaire mount assembly in the M 13 hole.
SAFETY CABLE:
SAFETY CABLE:
Is sold
Is sold
separately and recommended
separately and recommended
for all hanging installation and
for all hanging installation and
may be required by national
may be required by national
and local codes. Use enclosure
and local codes. Use enclosure
handles for safety cable anchor
handles for safety cable anchor
points for this fixture.
points for this fixture.
Note A ll optional acces sories including the honey comb and barndoor a re sold separately please refer: .
.to the detail on page 24 o f this manual
5.
300S S oftligh t with MO Yoke 300S S oftligh t with PO Yoke
Page 12
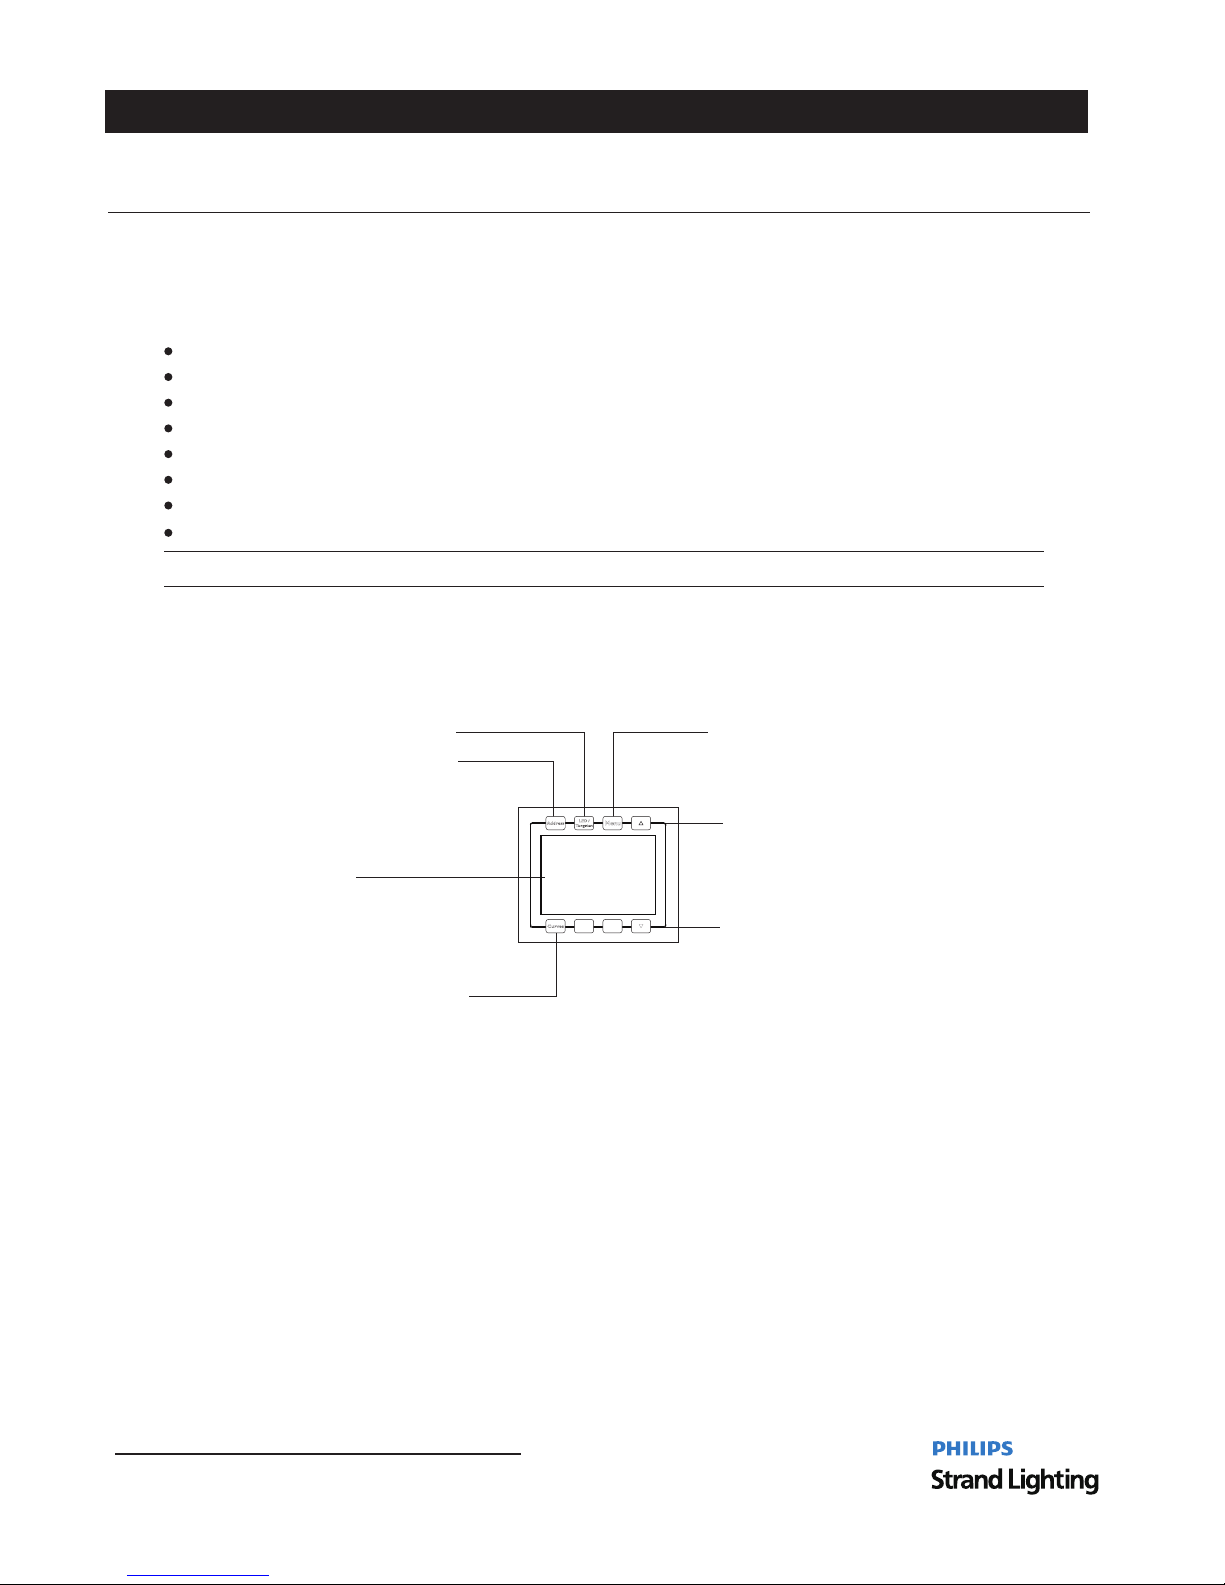
OPERATION AND PROGRAMMING
1. LCD Display and Menu System
The 300S Softlight LED Luminaire’s LCD Display and Menu System provides local control for accessing the
following fixture’s settings:
Note: If there are multiple luminaires ina system changes would need to be made at each LCD Menu as desired, .
Upon power up the LCD will display the main screen If DMX is enabled the programmed address will, . ,
Figure 7 LCD Display and Menu System:
2. LCD Display and Menu System Operation
The LCD Display Menu system consists of several categories Use the Menu Buttons to access and make changes to.
the menu items When the desired menu item is reached press the desired Menu Button to display the menu options. ,
and to navigate and configure the menu options as required.
To navigate and access menu settings selections/ :
Step 1 Make sure unit is powered and turned on. .
Step 2 Press the desired button as shown in to access menu categories. ( ) .Figure 7
Step 3 Use UP DOWN arrow buttons to navigate through the various options and settings. | .
Step 4 Make changes as desired via the Function Toggle. .
Step 5 Press the Function Toggle button to accept changes. .
Auto Lock
Set Factory Default
RDM UID
When No DMX
Firmware Vers ion
DMX Map
Fixture Control
Intensity Format
Address Address settings( )
LED/Tungsten
Menu
UP Arrow Button
Curves
DOWN Arrow Button
LCD Display
DMX Address
406
Inte nsity
27
%
5600K
CCT
PL-C urve
LED
90CRI
5600 c d
appear after power up.
10
OPERATION AND PROGRAMMING
Installation & User’s Manual
300S Softlight LED Luminaires
Page 13
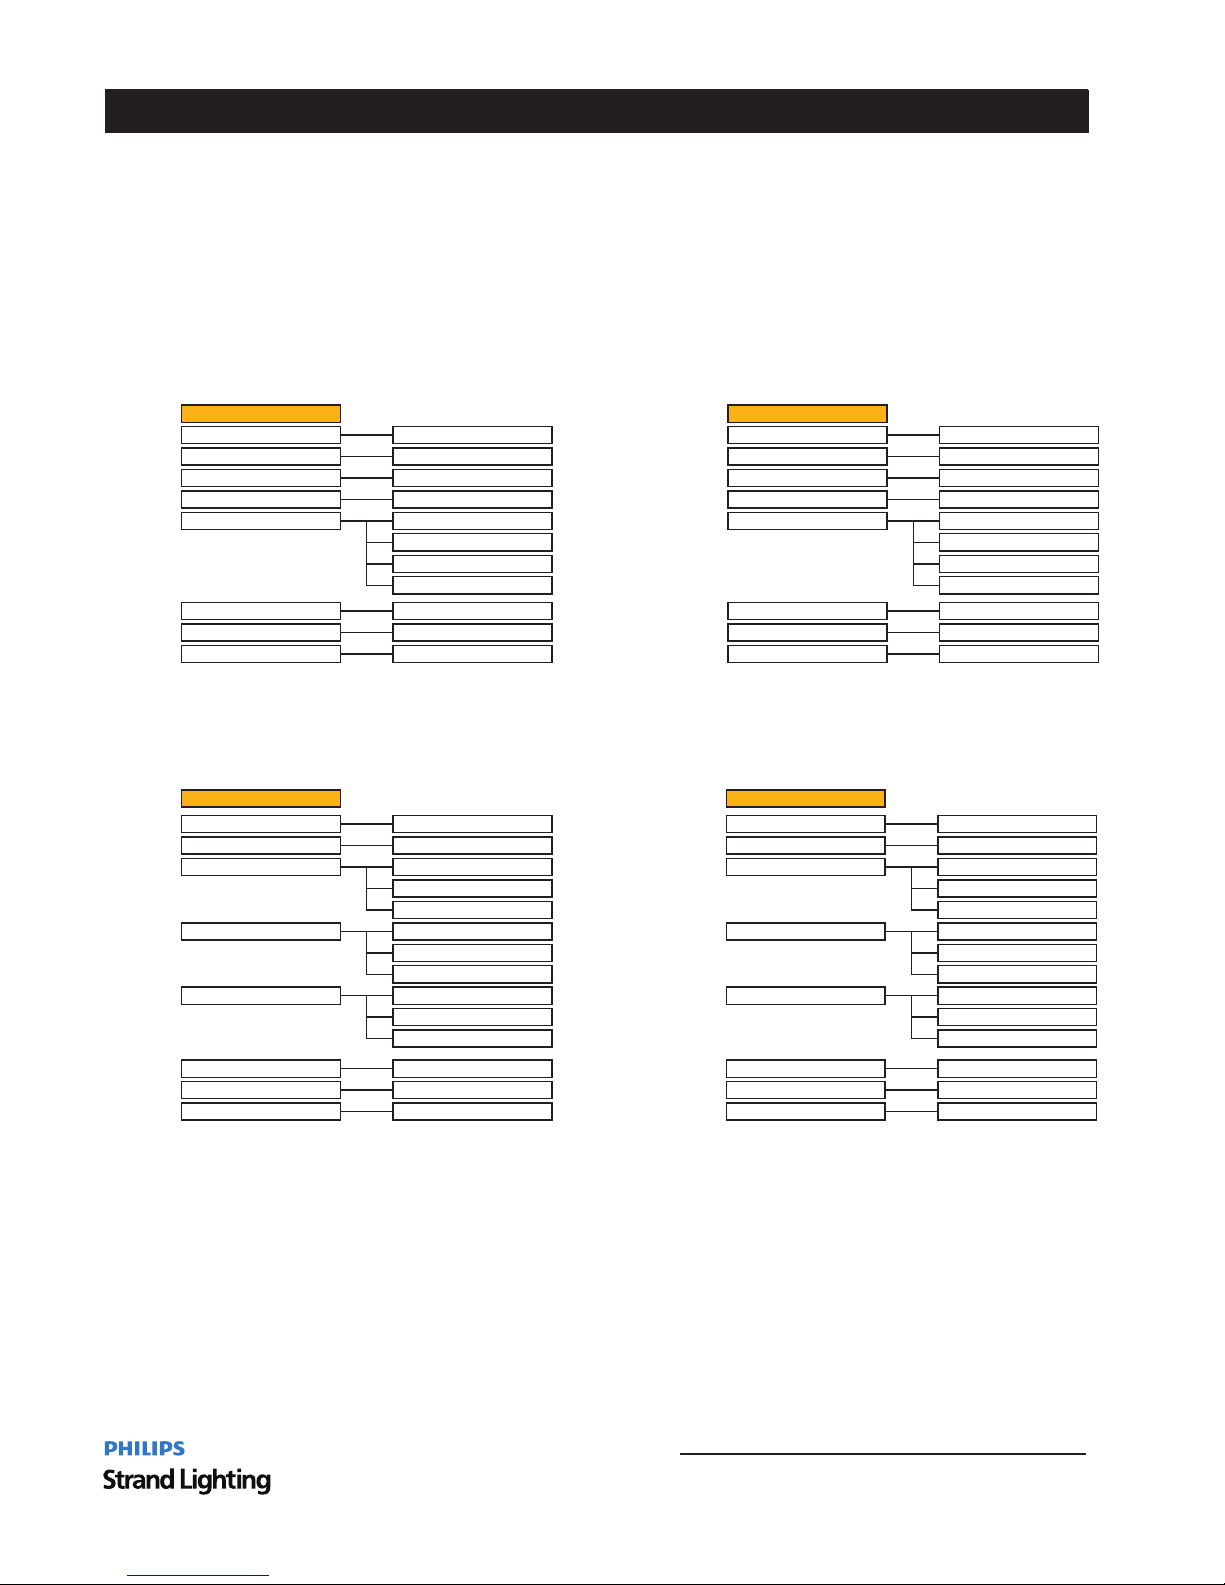
3 Menu Structure.
Figu re8: 3 00S Softl ight LED Lu minaire Men u Structu re
Menu Tree 11
300S Softlight LED Luminaires
300S Softlight 3100K 300S Softlight 5600K
Installation & User’s Manual
Mai n Menu:
Int ensit y
CCT
DMX Ad dr ess
Dim ming Cu rve
Temp eratu re
Out put lum en
CRI R ate
Res ponse Ti me
560 0k
1-5 12
Lin ear
Squ are
XX Ce lsius d egree
S-C urve
274 84lm
PL- Curve
93
LED /Tung ste n
0-1 00%/0 -255
Mai n Menu:
Int ensit y
CCT
DMX Ad dr ess
Dim ming Cu rve
Temp eratu re
Out put lum en
CRI R ate
Set ting Me nu: Set ting Me nu:
1. Aut o Lo ck 1. Aut o Lo ck
Off /1min , 3min, 1 0min Off /1min , 3min, 1 0min
%/0 -255 %/0 -255
Ext .&Loc al Ext .&Loc al
Ext .only Ex t.onl y
Loc al only Loc al only
Bas ic 8 bit Ba sic 8 bit
Bas ic 16 bit Basic 16 b it
Sim ple 8 bit Simp le 8 bit
LTP LTP
Off Off
Las t Hold Las t Hold
Yes/N o Yes/N o
Rev x .xx Rev x .xx
xxx xxxxx x xxx xxxxx x
2. In tensi ty Form at 2. In tensi ty Form at
3. Fi xture C ontro l 3. Fi xture C ontro l
4. DM X Map 4. DM X Map
5. Wh en No DMX 5. Wh en No DMX
6. Se t facto ry defa ult 6. Se t facto ry defa ult
7. Fi rmwar e Versi on 7. Fi rmwar e Versi on
8. RD M UID 8. RD M UID
Res ponse Ti me
310 0k
1-5 12
Lin ear
Squ are
XX Ce lsius d egree
S-C urve
247 00lm
PL- Curve
95
LED /Tung ste n
0-1 00%/0 -255
Page 14
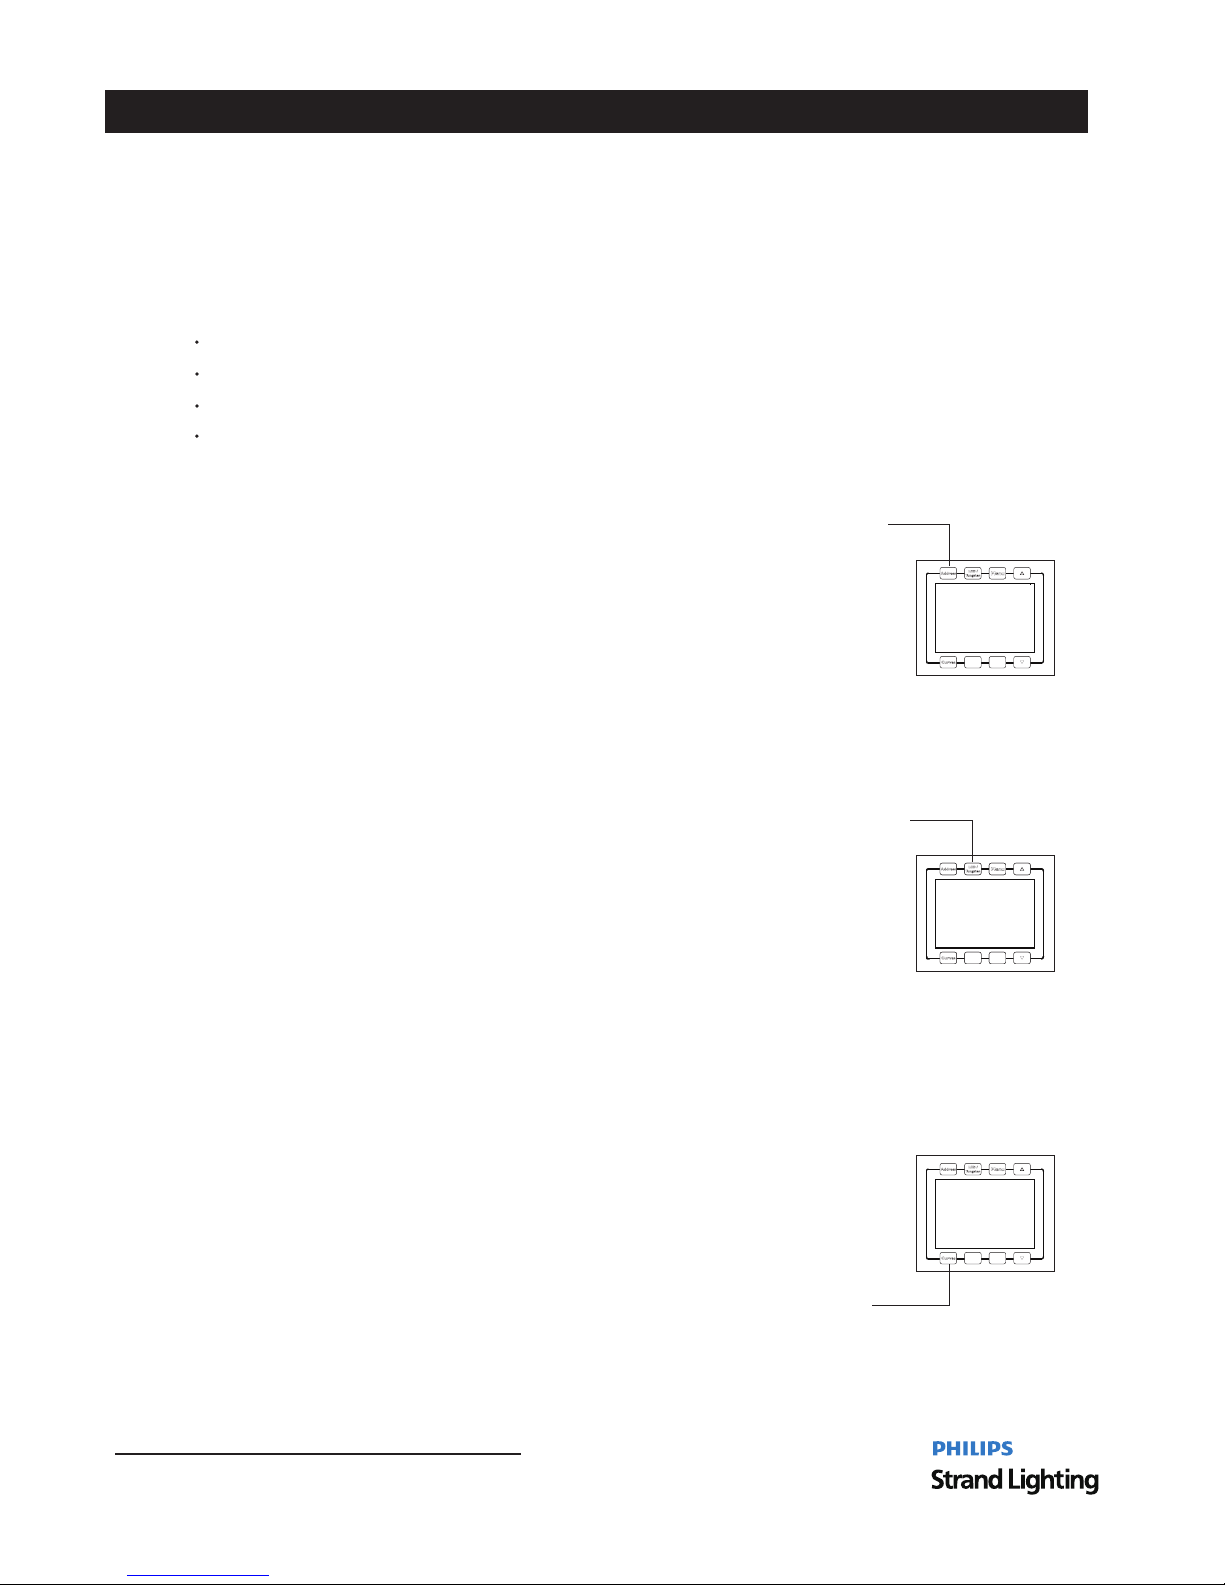
4 Button Functions
When in Manual Mode the 300S Softlight LED Luminaire’s features can be accessed via the on board LCD, menu system or via the select buttons:
Address
LED/Tungsten
G+/-M(NULL)
Curves
Address Button
LED/Tungsten Button
To edit and save an Address:
To edit and save LED/Tungsten:
Step 1 Press Address button. .
Step 1 Press LED/Tungsten button. .
Step 1 Press Curves button. .
Step 2 Use theValue Turn to choose between LED or Tungsten..
Step 2 Rotate theValue Turn to choose the curve between.
Step 3 Once the choice is made, push the Value Turn to confirm..
Step 3 Once the choice is made, push the Value Turn to confirm..
Step 4 LED/Tungsten choice is now saved..
Step 4 Curves choice is now saved..
Step 2 Rotate the Value Turn to increase/descrease the value..
Step 3 Once at desired Address, push the Value Turn to confirm..
Step 4 Address is now saved..
Curves Button
To edit and save a Curve:
Address Setting
DMX Address
406
Inte nsity
27
%
560 0
K
CCT
PL-Cu rve
LED
90CRI
5000 c d
DMX Address
406
Inte nsity
27
%
560 0
K
CCT
PL-Cu rve
LED
90CRI
5000 c d
DMX Address
406
Inte nsity
27
%
560 0
K
CCT
PL-Cu rve
LED
90CRI
5000 c d
DMX Address
406
Inte nsity
27
%
560 0
K
CCT
PL-Cu rve
LED
90CRI
5000 c d
Choose between
LED/Tungsten
Curve Selection
PL-Curve, S-Curve, Square and Linear.
12
Button Functions
Installation & User’s Manual
300S Softlight LED Luminaires
Page 15
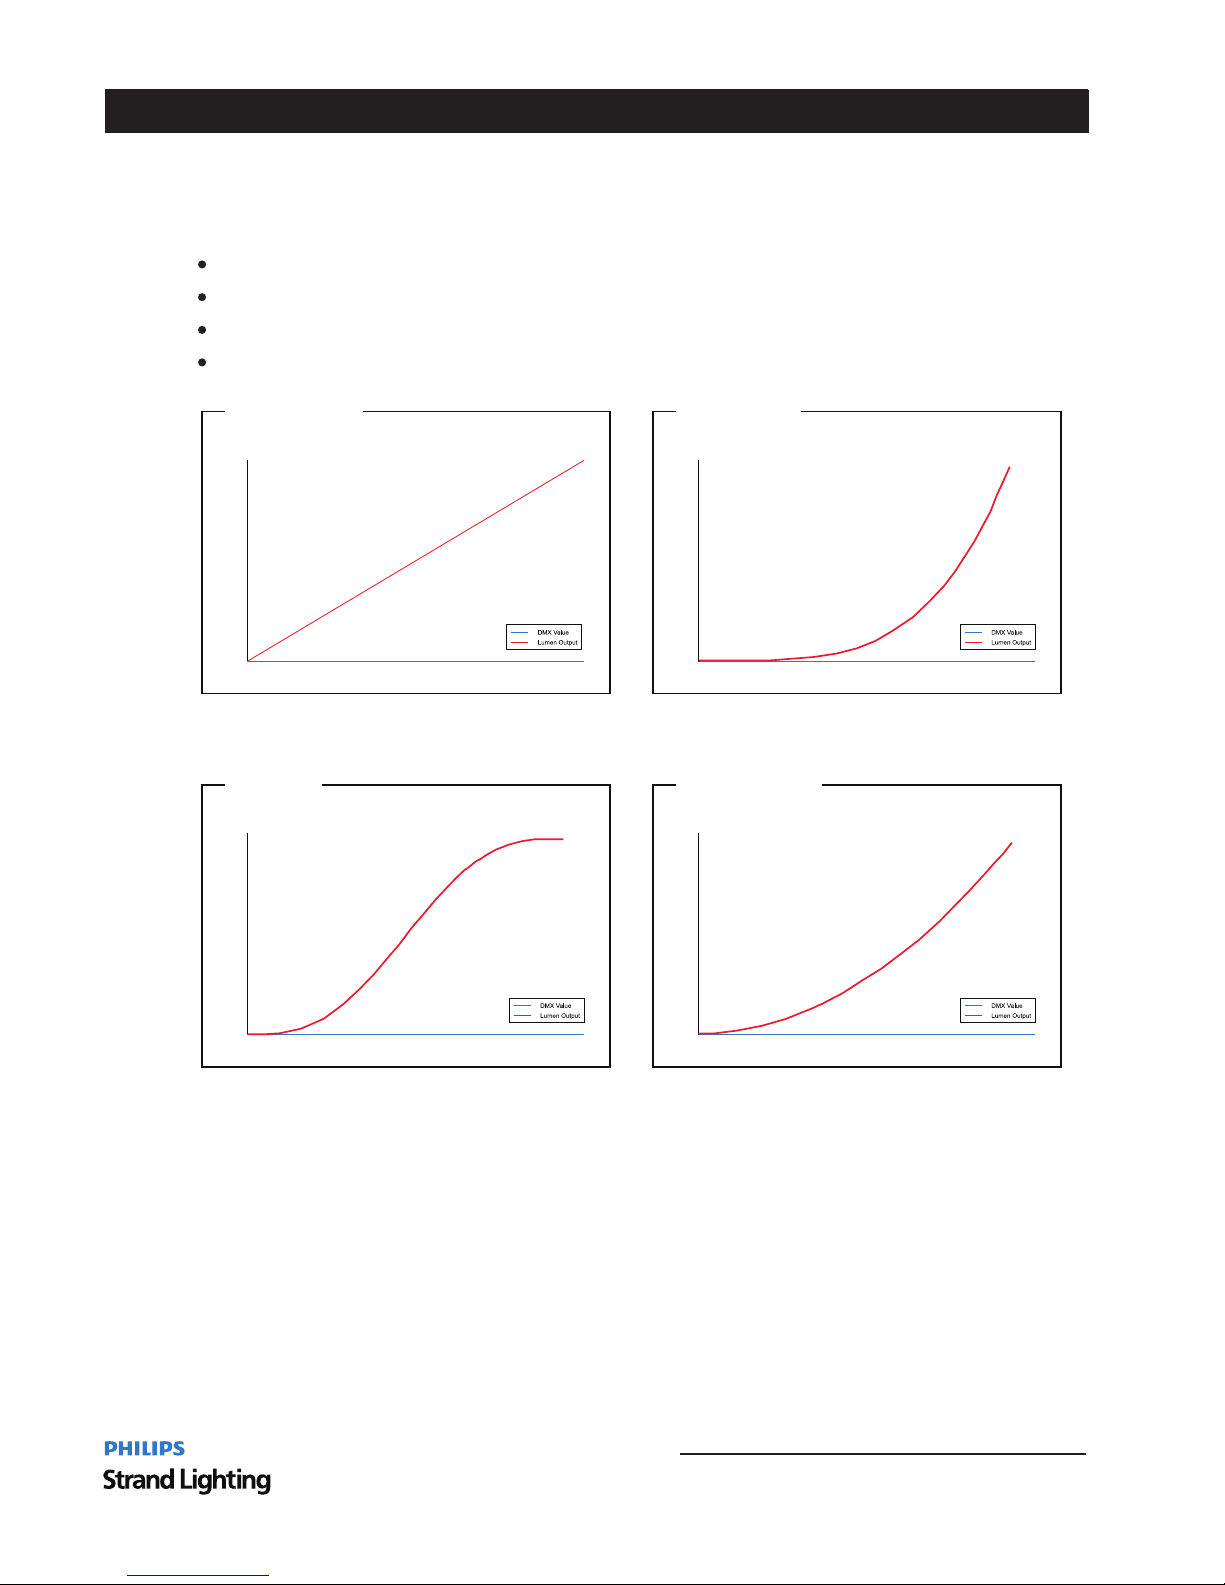
5 Dimming Curve Selection.
Through the menu you are able to select one of four dimming curves, :
Linear Curve
S Curve_
Square Curve
Figure 9 300S Softlight LED Luminaire Dimmer Curves:
*PL Cu rve foll ows th e d imm ing c urv e o f P hilip s S eleco n P L
ser ies LED lumina ries.
DMX Value
Lumen Output
0
Linear Curve
DMX Value
Lumen Output
0
S Curve_
DMX Value
Lumen Output
0
Square Curve
DMX Value
Lumen Output
0
PL Curve_ *
PL_Curve
Dimming Curve Selection 13
300S Softlight LED Luminaires
Installation & User’s Manual
Page 16
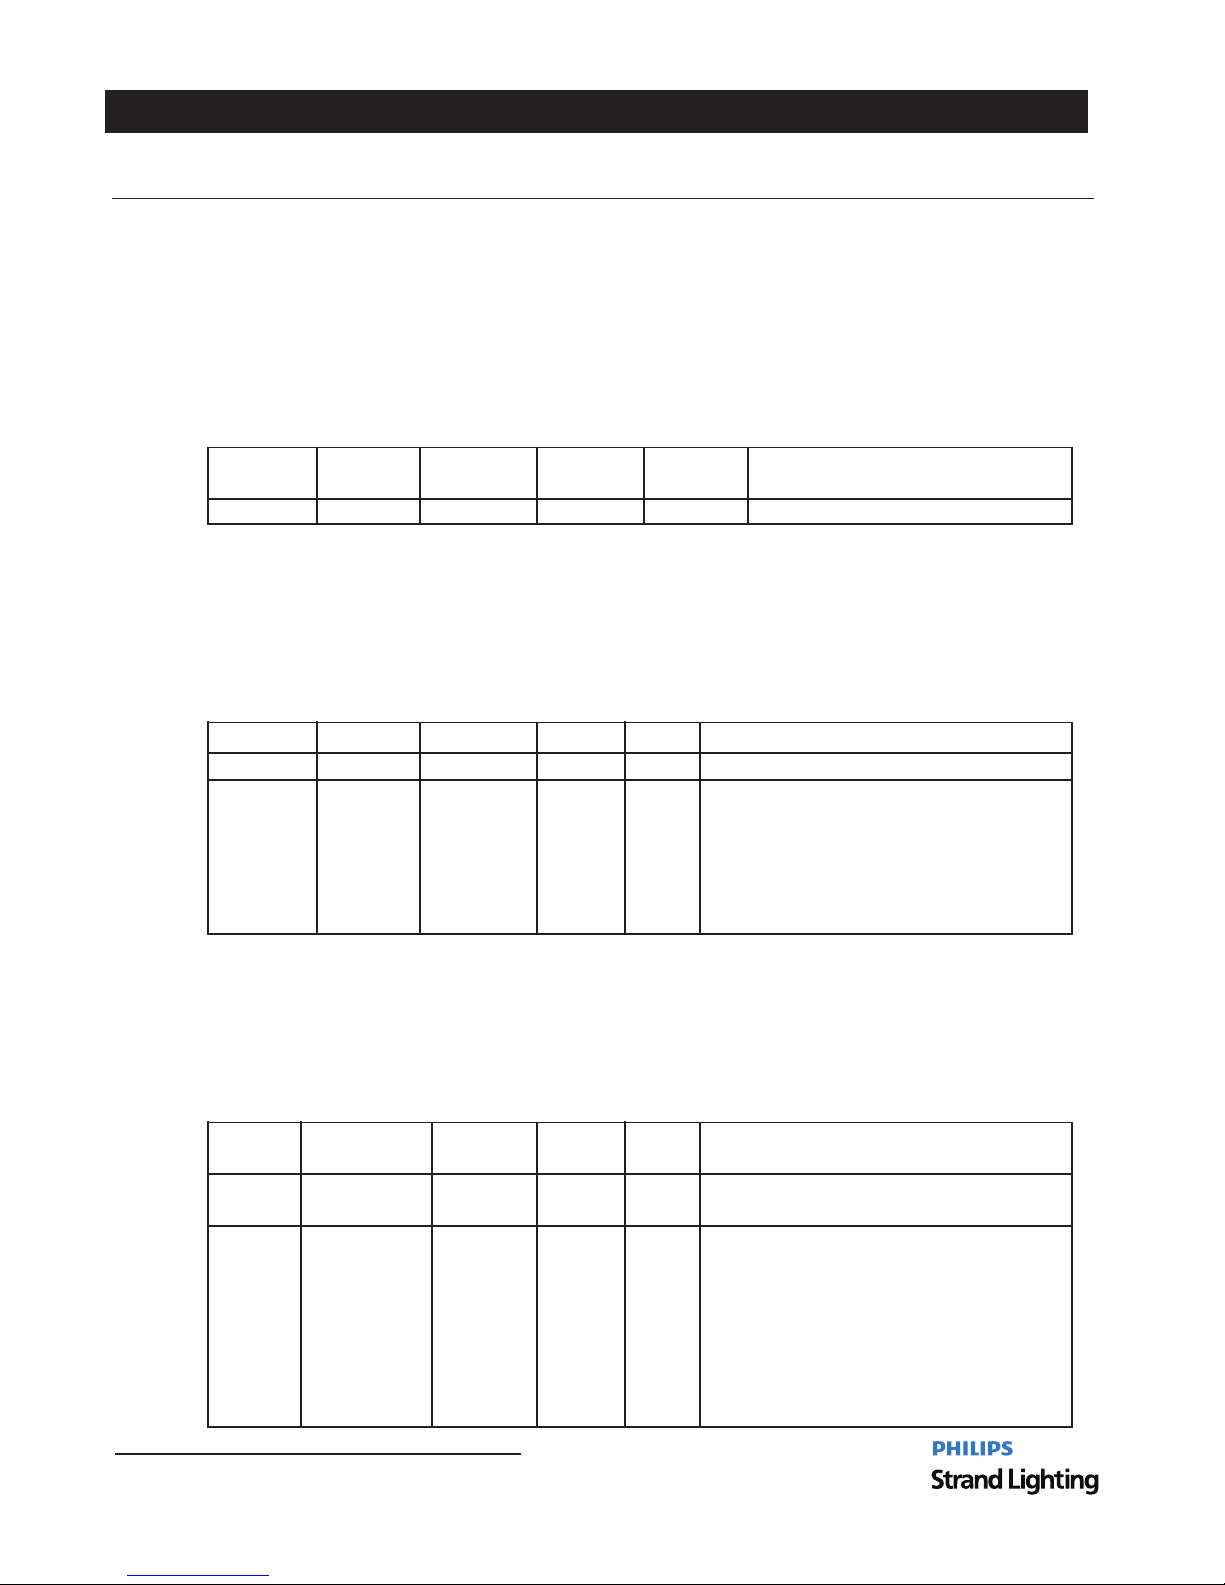
DMX CONTROL
This section contains information for operating the luminaire using DMX control in Simplify 8 bit Basic 8 Bit- , - ,
or Basic 16-bit modes For Menu options and detailed information see. , " "LCD Display and Menu System on
1 Simplify 8 bit. -
2 Basic 8 bit. -
3 Basic 16 bit. -
Table 3 provides DMX channel mapping of all DMX512 control values when the 300S Softlight LEDLuminaire
Table 4 provides DMX channel mapping of all DMX512 control values when the 300S Softlight LED Luminaire
Table 5 provides DMX channel mapping of all DMX512 control values when the 300S Softlight LED Luminaire
is in Simple 8-bit mode (as set by the luminaire’s menu system).
is in Basic 8-bit mode (as set by the luminaire’s menu system).
is in Basic 16-bit mode (as set by the luminaire’s menu system).
Table 3 300S Softlight LED Luminaire DMX Channel Mapping 8 Bit Mode: ( - )
Table 4 300S Softlight LED Luminaire DMX Channel Mapping Basic 8 Bit Mode: ( - )
Table 5 300S Softlight LED Luminaire DMX Channel Mapping Basic 16 Bit Mode: ( - )
DMX Channel
DMX Channel
DMX Channel
Parameter
Parameter
Parameter
Default
Default
Default
Description
Description
Description
Range%
Range%
Range%
Range DMX
Range DMX
Range DMX
page 10.
2
3
Tim ing
Tim ing
Tim ing c ontro l of inte nsity, C CT, an d pre se t.
Tim ing c ontro l of inte nsity, C CT, an d pre se t.
0% (I nstan t)
0% (I nstan t)
1% (1 s ec)
1% (1 s ec)
2% (2 s ec)
2% (2 s ec)
3% (3 s ec)
3% (3 s ec)
100 % (100 se c)
100 % (100 se c)
...
...
Int ensit y High
Int ensit y Low
14
DMX CONTROL
Installation & User’s Manual
300S Softlight LED Luminaires
1
1
1
2
0
0
0
0
0
8 bit c ontro l for Int ensit y of LED se tting s
8 bit c ontro l for Int ensit y of LED se tting s
16 bi t contr ol for In tensi ty of LED s ettin gs
Int ensit y
Int ensit y
0-2 55
0-2 55
0-2 55
0-2 55
0-6 5535
0-1 00%
0-1 00%
0-1 00%
0-1 00%
0-1 00%
Page 17
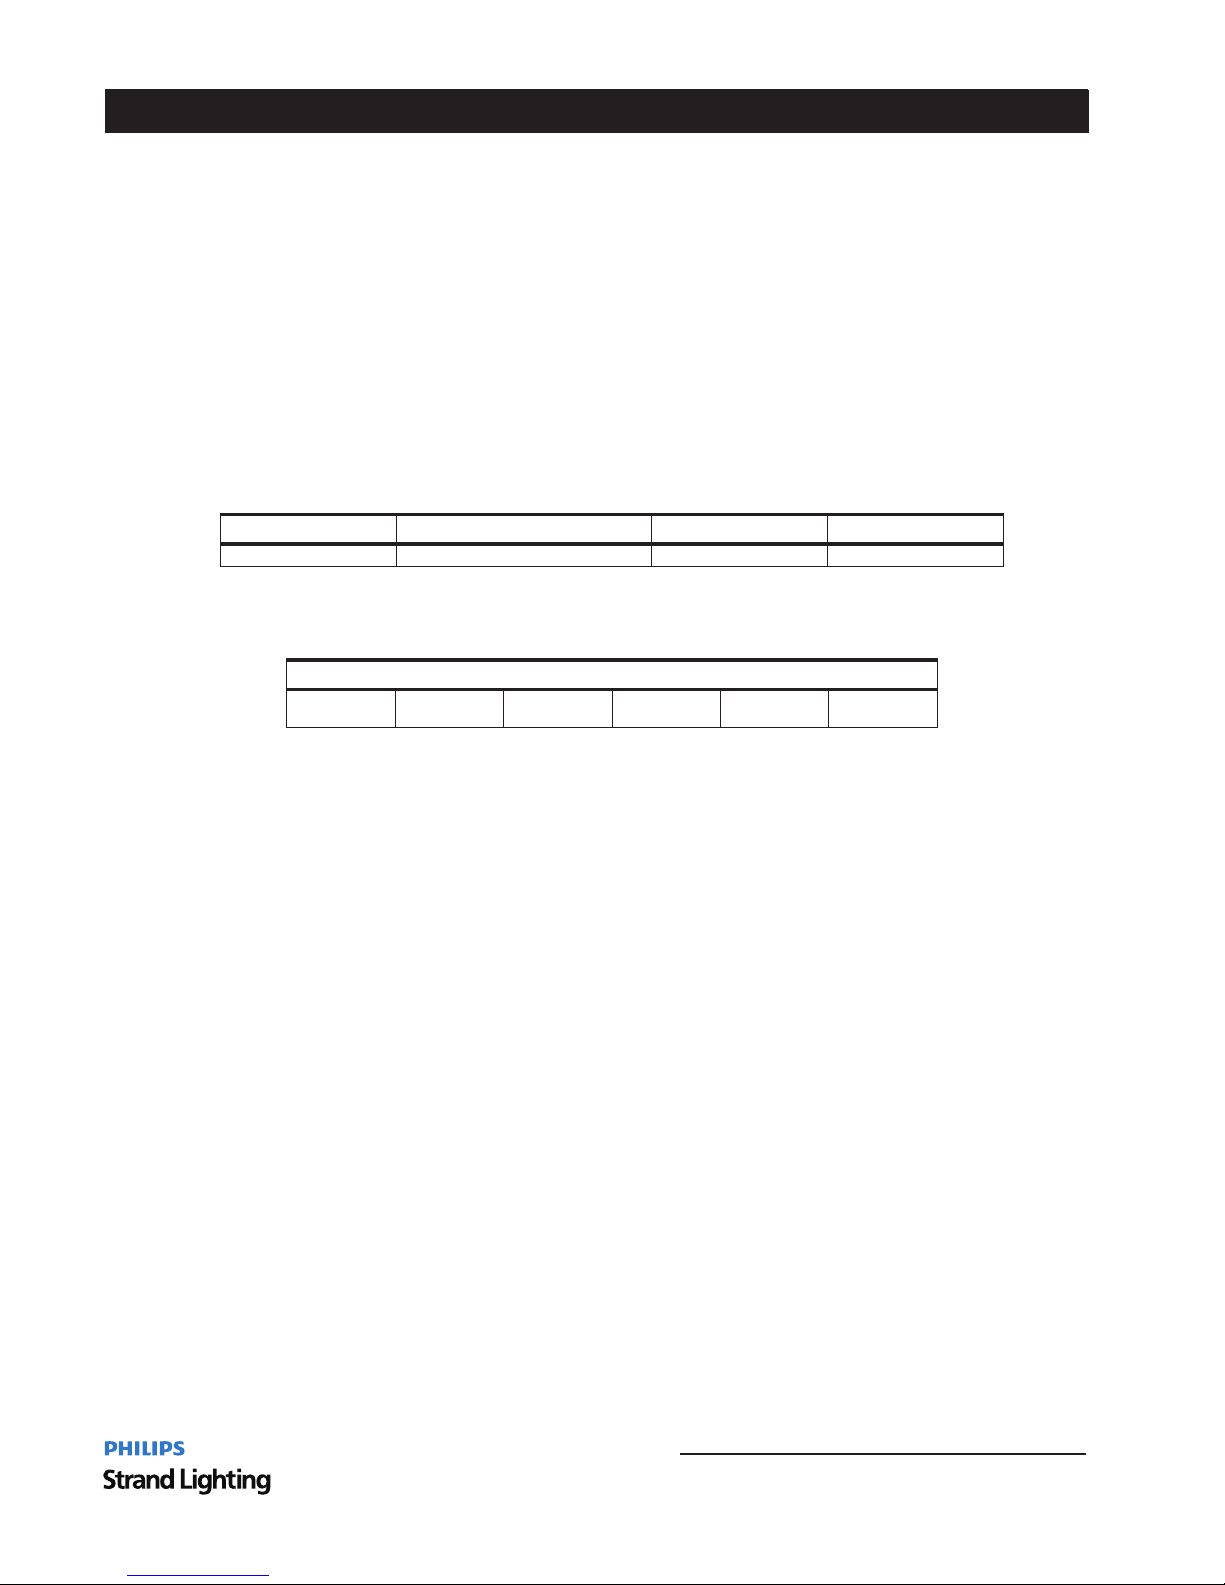
8 300S Softlight 5600K LED Luminaire RDM Parameter IDs.
The following tables outline and describe all the RDM parameters IDs associated with 300S Softlight 5600K
LED Luminaires.
Table 6 300S Softlight 5600K LED Luminaire RDM Product Parameters Ids:
Model ID
0x1110
Table 7 300S Softlight 5600K LED Luminaire RDM UID:
UID
MSB of ESTA
73H
LSB of ESTA
6CH
MSB of
Unique Seq.
MSB of
Unique Seq.
MSB of
Unique Seq.
LSB of
Unique Seq.
300S Softlight 5600K LED Luminaire RDM Parameter IDs
15
300S Softlight LED Luminaires
Installation & User’s Manual
Table 9 300S Softlight 5600K LED Luminaire RDM Manufacturer Specific PIDs for Root Device on page 18, " ,"
Table 8 300S Softlight 5600K LED Luminaire RDM Parameters IDs on page 16, " ,"
Table 7 300S Softlight 5600K LED Luminaire RDM UID, " "
" "Table 6 300S Softlight 5600K LED Luminaire RDM Product Parameters IDs,
Product Category
Model Description
Manufacturer
0x0509
300S 5600K
Philips Strand Lighting Ltd.
Page 18
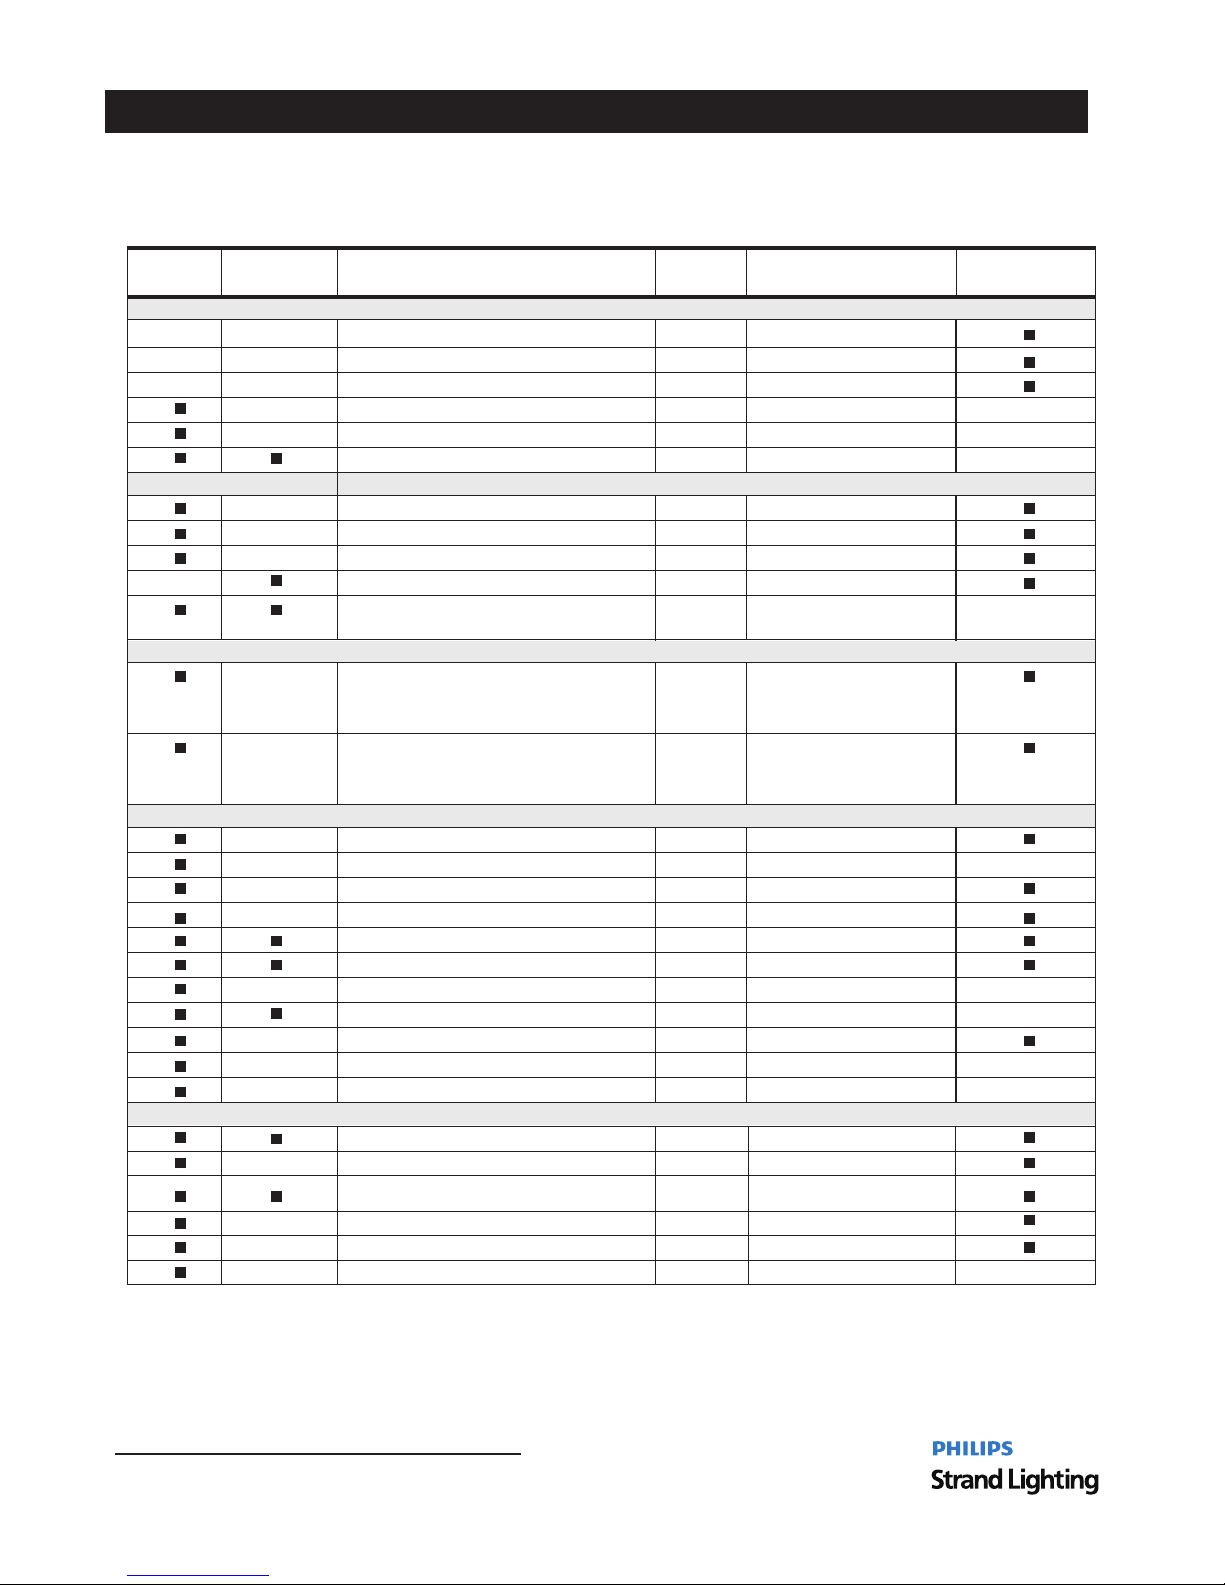
Table 8 LED Luminaire RDM Parameters Ids: 300S Softlight 5600K
Get
Allowed
Set
Allowed
RDM Parameter IDs Value Comment Implemented
Category Network Management-
Category Status Collection-
Category RDM Information-
Category Product Information-
Category DMX512 Setup-
16 300S Softlight 5600K LED Luminaire Parameters IDs
Installation & User’s Manual
300S Softlight LED Luminaires
DISC U NI QUE BRAN CH_ _
DISC M UT E_
COMMS_S TATUS
QUEUED_ ME SSAGE
STATUS_MESSAG ES
STATUS_ID_DES CR IPTION
CLEAR_S TATUS_ ID
SUPPORTE D_PARAMETERS
PARAMETER_D ES CRIPTION
PARAMET ER_DE SCRIP TION
* Required if device uses a DMX Slot
DMX_PER SONALITY
DMX_PER SONALITY_DESCRIPTION
SLOT_IN FO
DMX_START_ADDRESS
SLOT_DE SCRIPTION
DEFAULT_SLOT_VALUE
PRO DUCT_ DETAIL _ID _L IST
DEV ICE_M ODEL_ DESCR IPTIO N
MAN UFACTU RER_L ABEL
DEV ICE_L ABEL
FACTORY_ DEFAULTS
LAN GUAGE _CAPABILI TIES
LAN GUAGE
SOF TWA RE_VE RSION _LABE L
BOO T_SOF TWA RE_VE RSION _ID
BOO T_SOF TWA RE_VE RSION _LABE L
- Sup port re quire d for Man ufact urer-
Spe cific P IDs exp osed in S UPPORT ED_
PARAM ETERS m essag e.
* Sup port re quire d only of s uppor ting
Par amete rs beyo nd the mi nimum r equir ed
set
SUB_DEVICE_STATUS_REPORT_THRESHOLD
DISC U N MUTE_ _
PROXIED _D EVICES
PROXIED _D EVICES_CO UN T
0x0001
0x0020
0x0060
0x00E0
0x0090
0x0122
0x0011
0x0033
0x0082
0x0121
0x00C1
0x00C2
0x0051
0x0010
0x0032
0x0081
0x0120
0x00C0
0x0050
0x0003
0x0031
0x0080
0x00F0
0x00B0
0x0002
0x0030
0x0070
0x00E1
0x00A0
0x0015
Page 19
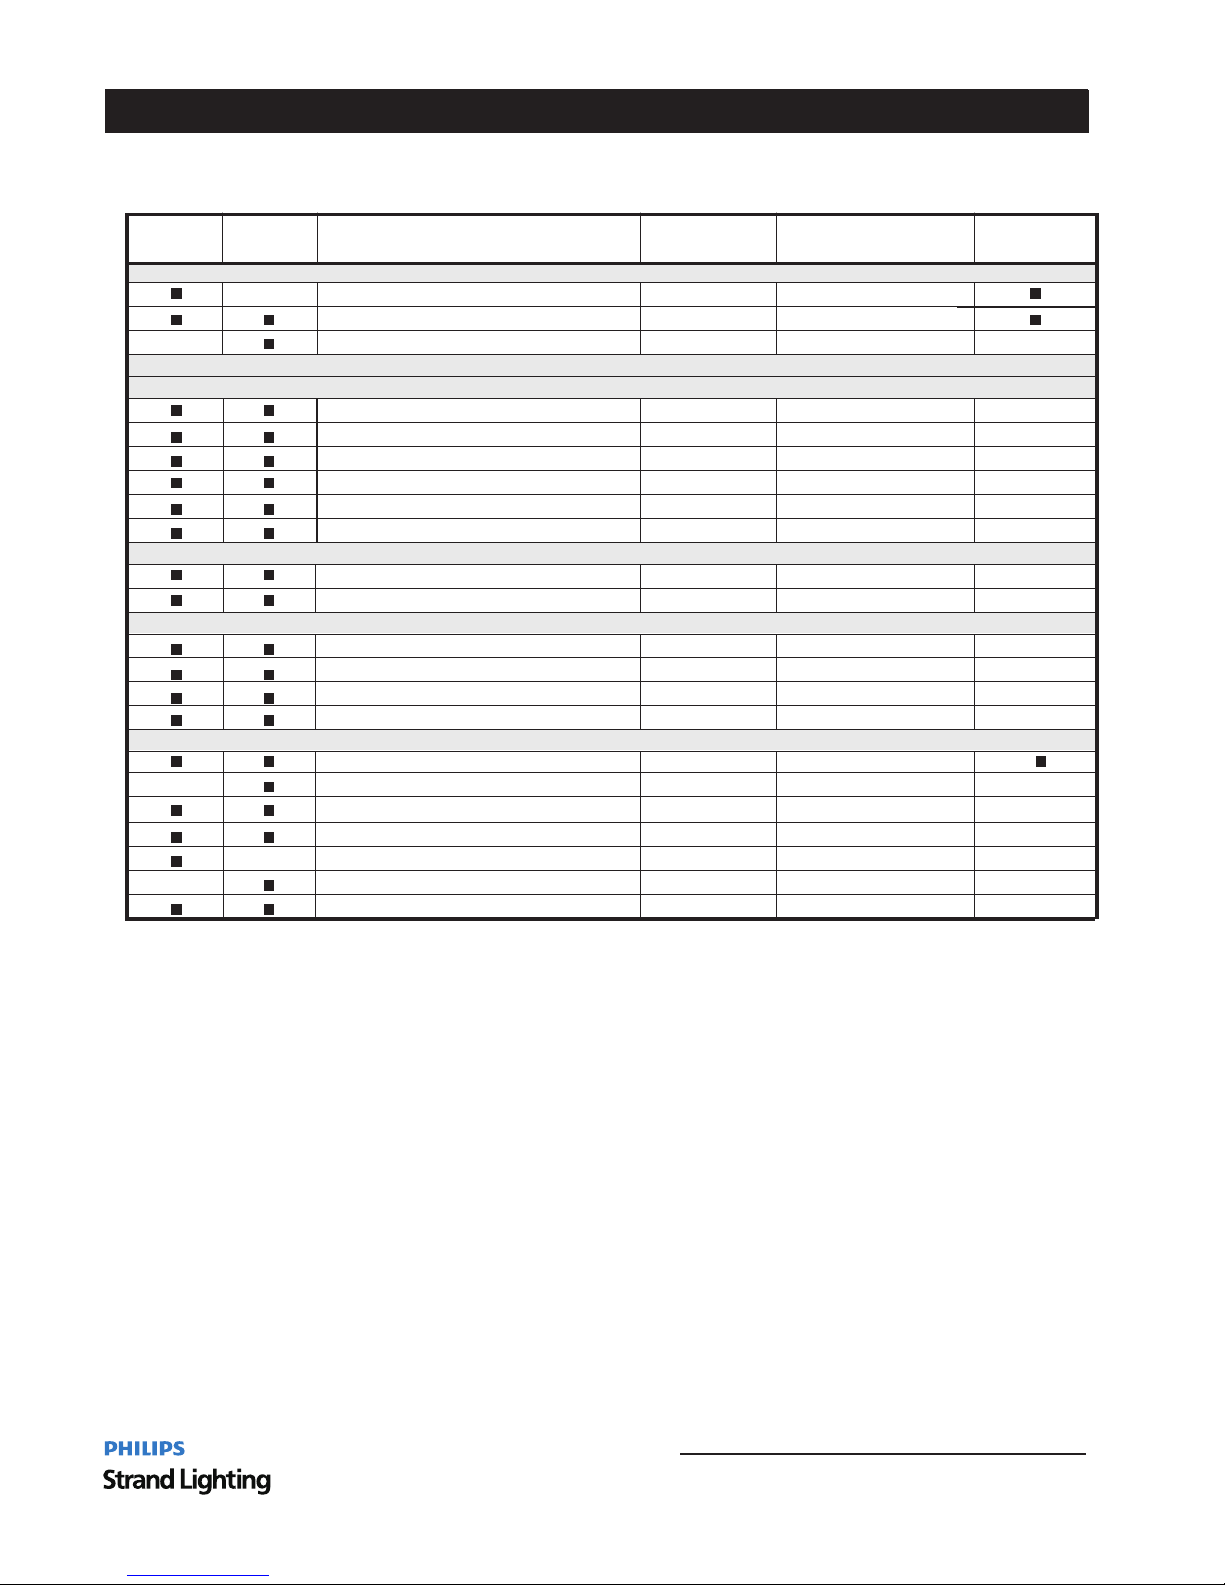
Table 8 300S Softlight 5600K LED Luminaire RDM Parameters Ids:
Get
Allowed
Set
Allowed
RDM Parameter IDs Value Comment Implemented
300S Softlight 5600K LED LUMINAIRE RDM PARAMETERS
17
300S Softlight LED Luminaires
Installation & User’s Manual
SENSOR_ DE FINITION
0x0400
0x0200
0x1000
IDENTIF Y_ DEVICE
0x0600
PAN_INVERT
0x0500
DISPLAY_INV ERT
DEVICE_ HO URS
0x0403
0x0603
REAL_TI ME _CLOCK
LAMP_STATE
SENSOR) VALUE
0x0401
0x0201
0x1001
RESET_D EV ICE
0x0601
TILT_INVERT
0x0501
DISPLAY_LEV EL
LAMP_HO UR S
0x0404
0x1020
PERFORM _S ELFTEST
0x1030
CAPTURE _P RESET
LAMP_ON _M ODE
RECORD_ SE NSORS
0x0402
0x0202
0x1010
POWER_S TATE
0x0602
PAN_TILT_SWAP
LAMP_ST RI KES
0x0405
0x1021
SELF_TE ST _DESCRIPT IO N
0x1031
PRESET_ PL AYBA CK
DEVICE_ PO WER_CYCLE S
Category Sensors 0x02xx-
Category Dimmer Settings 0x03xx Future-
Category Power/Lamp Settings 0x04xx-
Category Display Settings 0x05xx-
Category Configuration 0x06xx-
Category Control 0x10xx-
Page 20
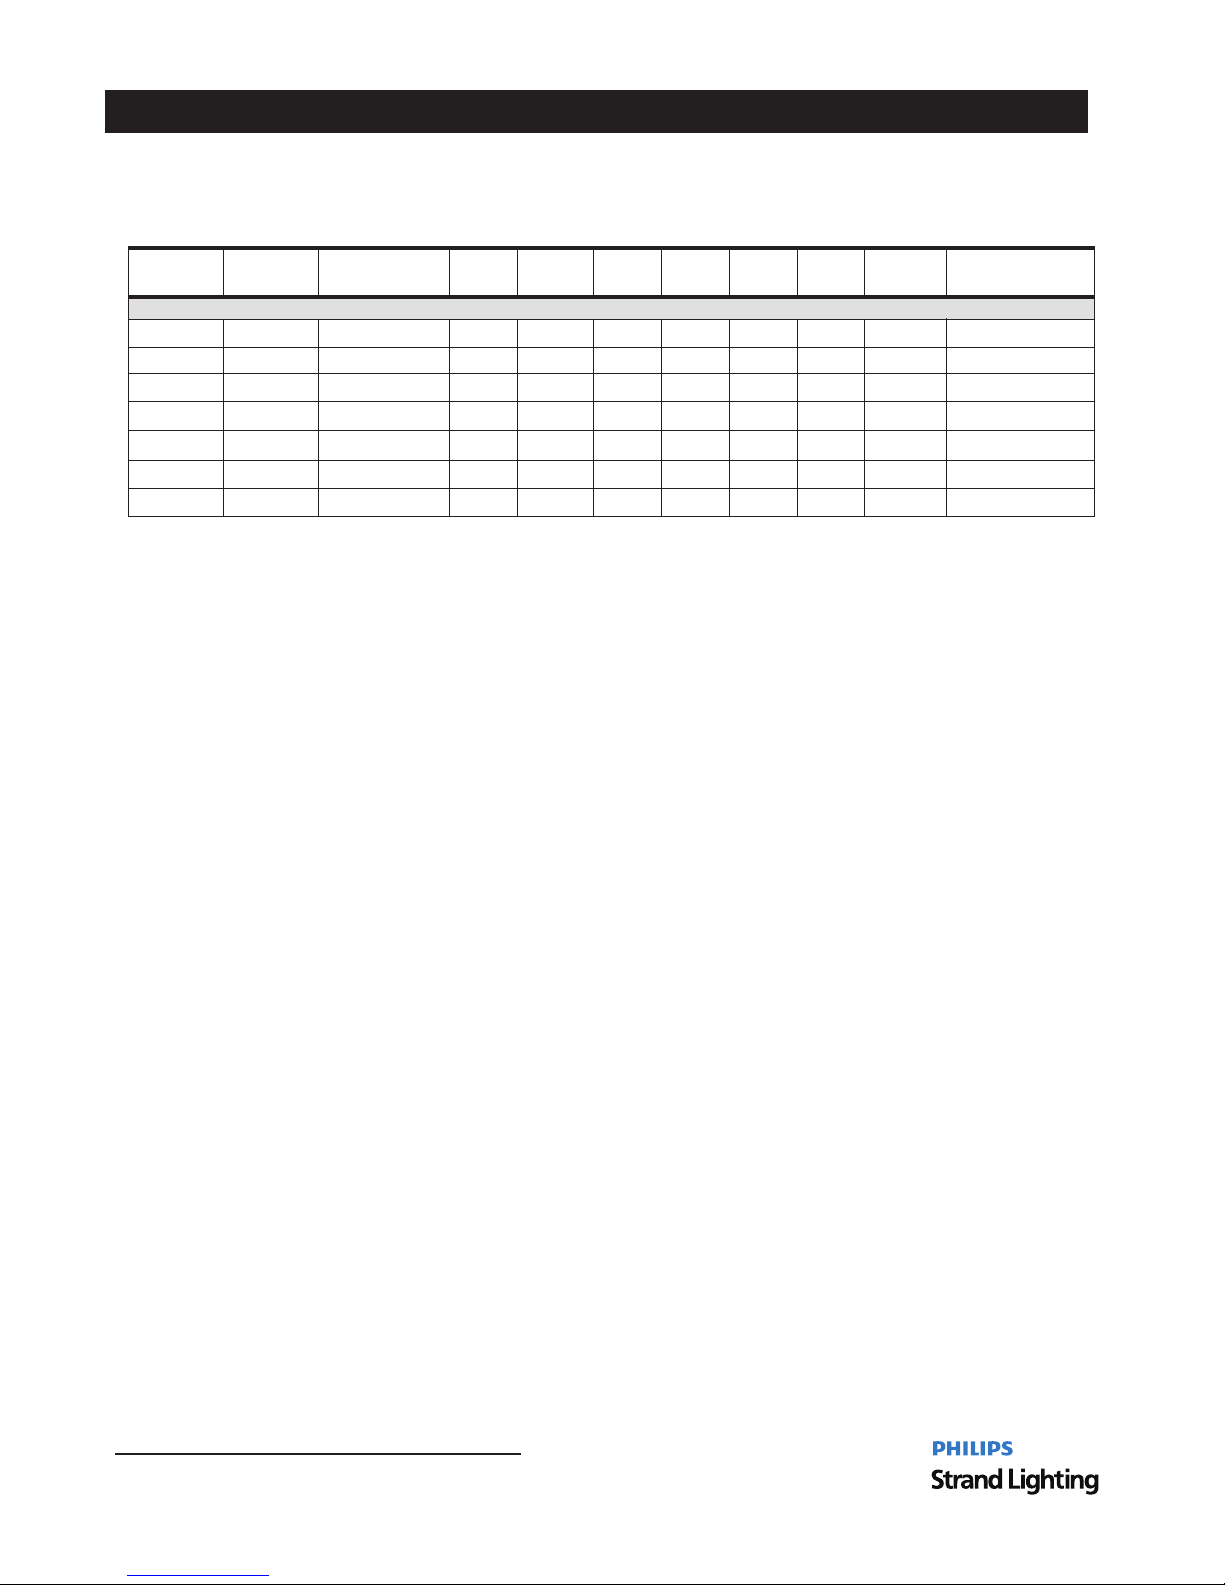
Table 9 300S Softlight 5600K LED Luminaire RDM Manufacturer Specific PIDs for Root Device:
Get
Allowed
Set
Allowed
RDM
Parameter IDs
Type Length Unit Prefix Min Max Default Description
Category Manufacturer Defined PIDs Range is 0x8000 0xffdf See ANSI E1.20 2010 Standard Table A 3- - - ( - , - )
■ ■
0x8106
■
■
■
■
0x810A
0x8A41
■
■
■
■
0x8A00
0x8A42
■
■
■
■
0x8A0C
0x8AA1
Intensity Format
Auto Lock
DMX FAIL MODE
Dimming Curve
Dimmer
Response Time
Fixture Control
18
300S 5600K LED Luminaire RDM Parameter IDs
2
3
0
0
0
0
2
3
100
1
1
1
0
0
0
0
0
0
0
2
100
None
None
None
None
None
None
None
None
None
None
None
None
NoneNone
1
1
1
1
1
1
1
U8
U8
U8
U8
U8
U8
U8
Installation & User’s Manual
300S Softlight LED Luminaires
Page 21
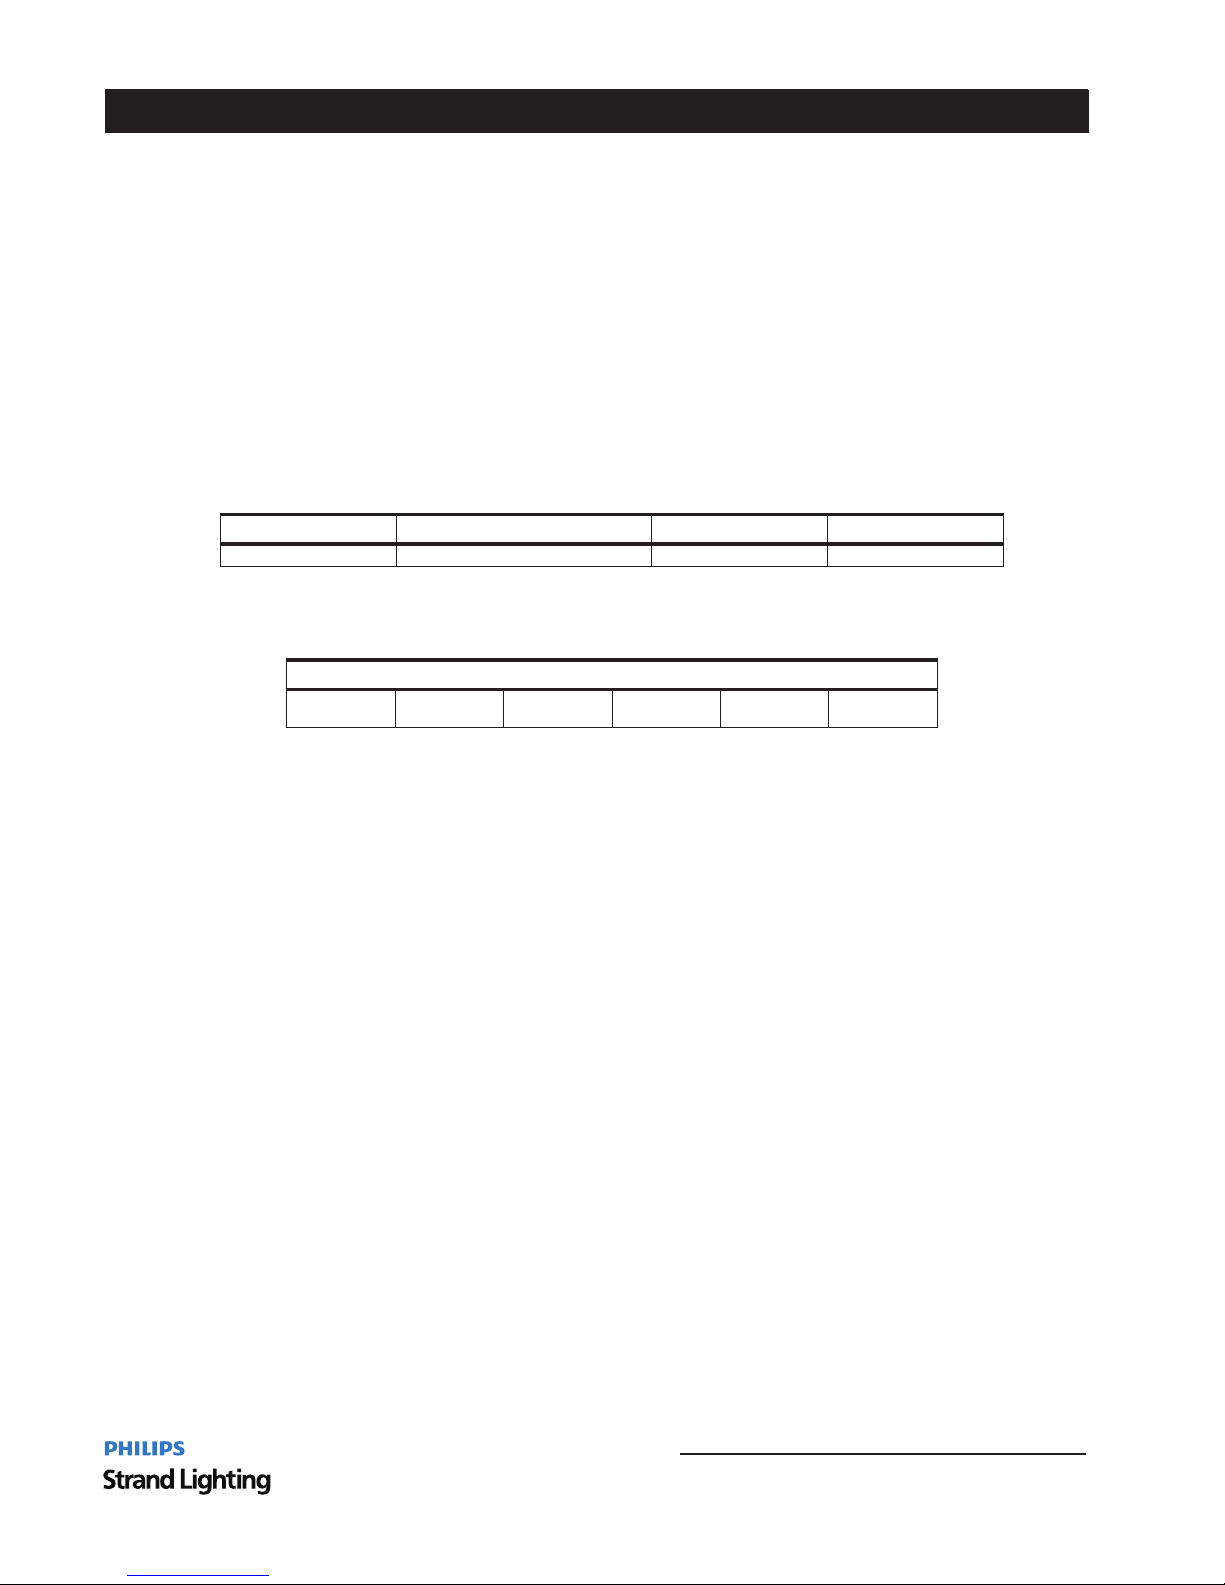
9 300S Softlight 3100K LED Luminaire RDM Parameter IDs.
The following tables outline and describe all the RDM parameters IDs associated with 300S Softlight 3100K
LED Luminaires.
Table 10 300S Softlight 3100K LED Luminaire RDM Product Parameters Ids:
Model ID
0x1111
Table 11 300S Softlight 3100KLED Luminaire RDM UID:
UID
MSB of ESTA
73H
LSB of ESTA
6CH
MSB of
Unique Seq.
MSB of
Unique Seq.
MSB of
Unique Seq.
LSB of
Unique Seq.
300S 3100K LED Luminaire RDM Parameter IDs
19
300S Softlight LED Luminaires
Installation & User’s Manual
Table 13 300S Softlight 3100K LED Luminaire RDM Manufacturer Specific PIDs for Root Device on page 22, " ,"
Table 12 300S Softlight 3100K LED Luminaire RDM Parameters IDs on page 20, " ,"
Table 11 300S Softlight 3100K LED Luminaire RDM UID, " "
" "Table 10 300S Softlight 3100K LED Luminaire RDM Product Parameters IDs,
Product Category
Model Description
Manufacturer
0x0509
300S 3100K
Philips Strand Lighting Ltd.
Page 22
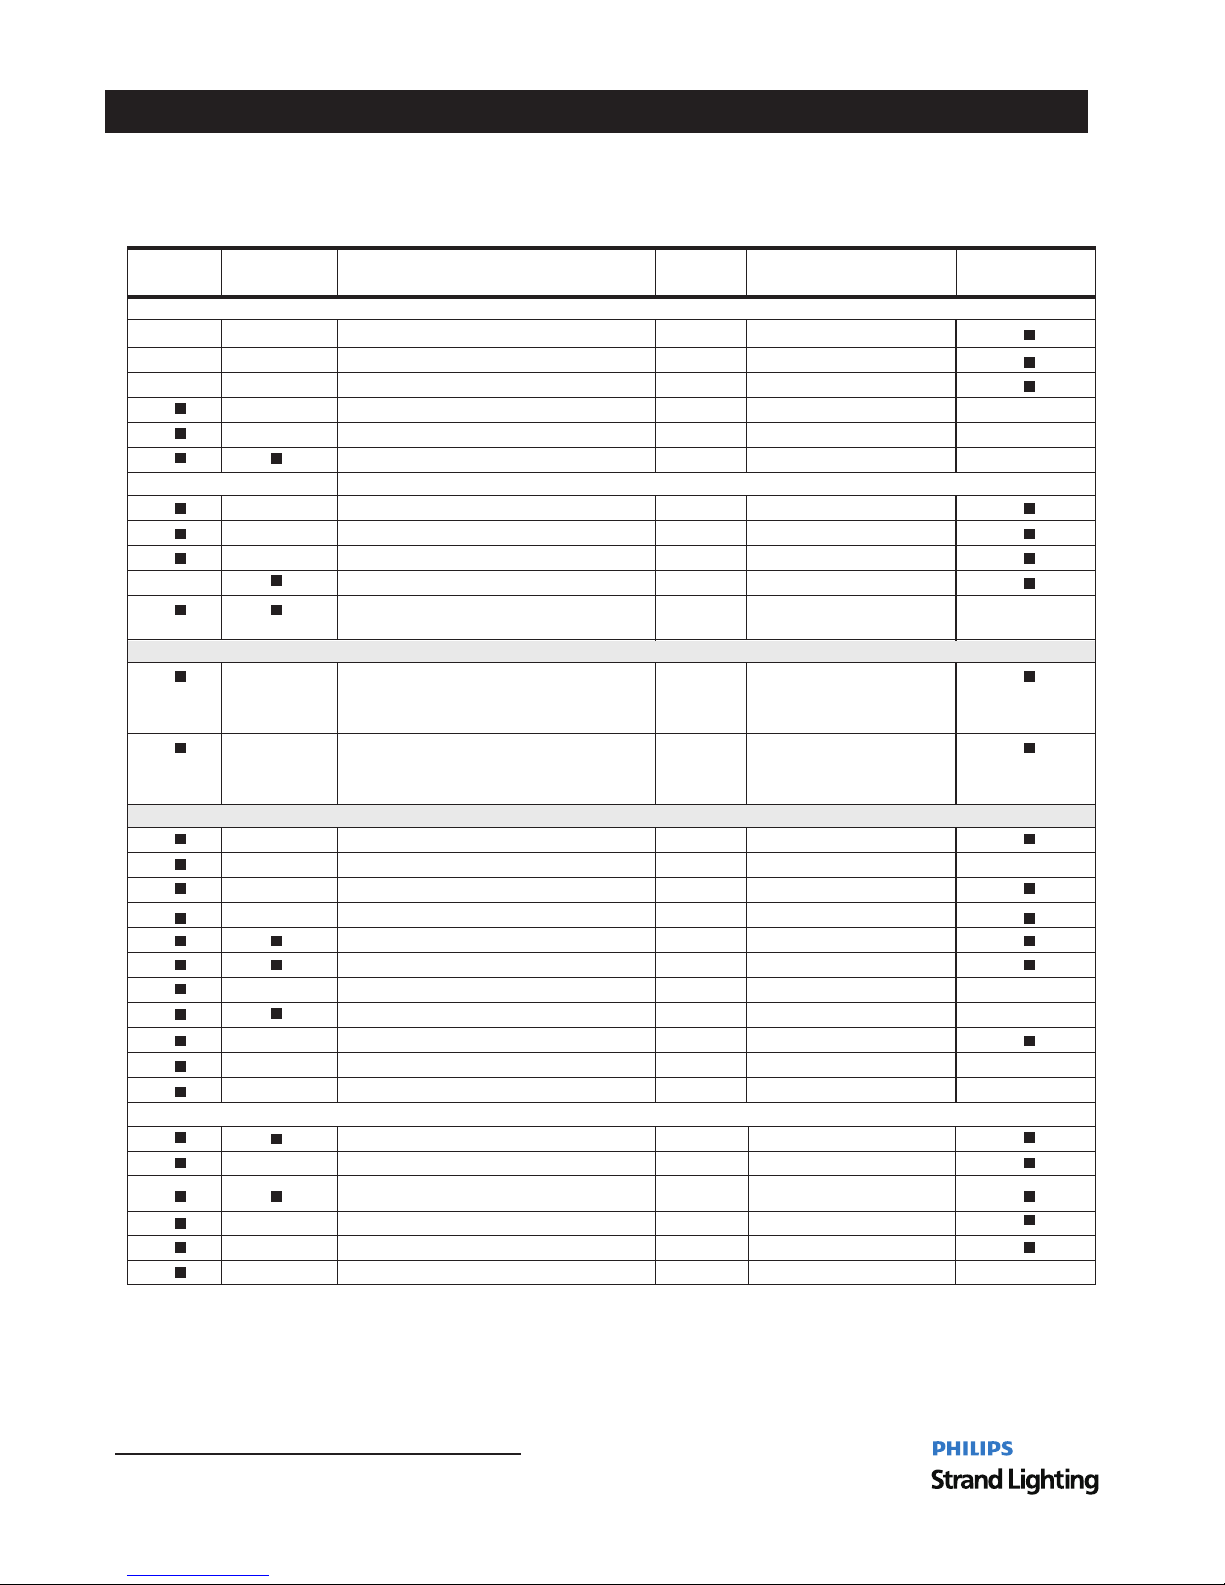
Table LED Luminaire RDM Parameters Ids:12 300S Softlight 3100K
Get
Allowed
Set
Allowed
RDM Parameter IDs Value Comment Implemented
Category Network Management-
Category Status Collection-
Category RDM Information-
Category Product Information-
Category DMX512 Setup-
20 300S Softlight 3100K LED Luminaire Parameters IDs
Installation & User’s Manual
300S Softlight LED Luminaires
DISC U NI QUE BRAN CH_ _
DISC M UT E_
COMMS_S TATUS
QUEUED_ ME SSAGE
STATUS_MESSAG ES
STATUS_ID_DES CR IPTION
CLEAR_S TATUS_ ID
SUPPORTE D_PARAMETERS
PARAMETER_D ES CRIPTION
PARAMET ER_DE SCRIP TION
* Required if device uses a DMX Slot
DMX_PER SONALITY
DMX_PER SONALITY_DESCRIPTION
SLOT_IN FO
DMX_START_ADDRESS
SLOT_DE SCRIPTION
DEFAULT_SLOT_VALUE
PRO DUCT_ DETAIL _ID _L IST
DEV ICE_M ODEL_ DESCR IPTIO N
MAN UFACTU RER_L ABEL
DEV ICE_L ABEL
FACTORY_ DEFAULTS
LAN GUAGE _CAPABILI TIES
LAN GUAGE
SOF TWA RE_VE RSION _LABE L
BOO T_SOF TWA RE_VE RSION _ID
BOO T_SOF TWA RE_VE RSION _LABE L
- Sup port re quire d for Man ufact urer-
Spe cific P IDs exp osed in S UPPORT ED_
PARAM ETERS m essag e.
* Sup port re quire d only of s uppor ting
Par amete rs beyo nd the mi nimum r equir ed
set
SUB_DEVICE_STATUS_REPORT_THRESHOLD
DISC U N MUTE_ _
PROXIED _D EVICES
PROXIED _D EVICES_CO UN T
0x0001
0x0020
0x0060
0x00E0
0x0090
0x0122
0x0011
0x0033
0x0082
0x0121
0x00C1
0x00C2
0x0051
0x0010
0x0032
0x0081
0x0120
0x00C0
0x0050
0x0003
0x0031
0x0080
0x00F0
0x00B0
0x0002
0x0030
0x0070
0x00E1
0x00A0
0x0015
Page 23
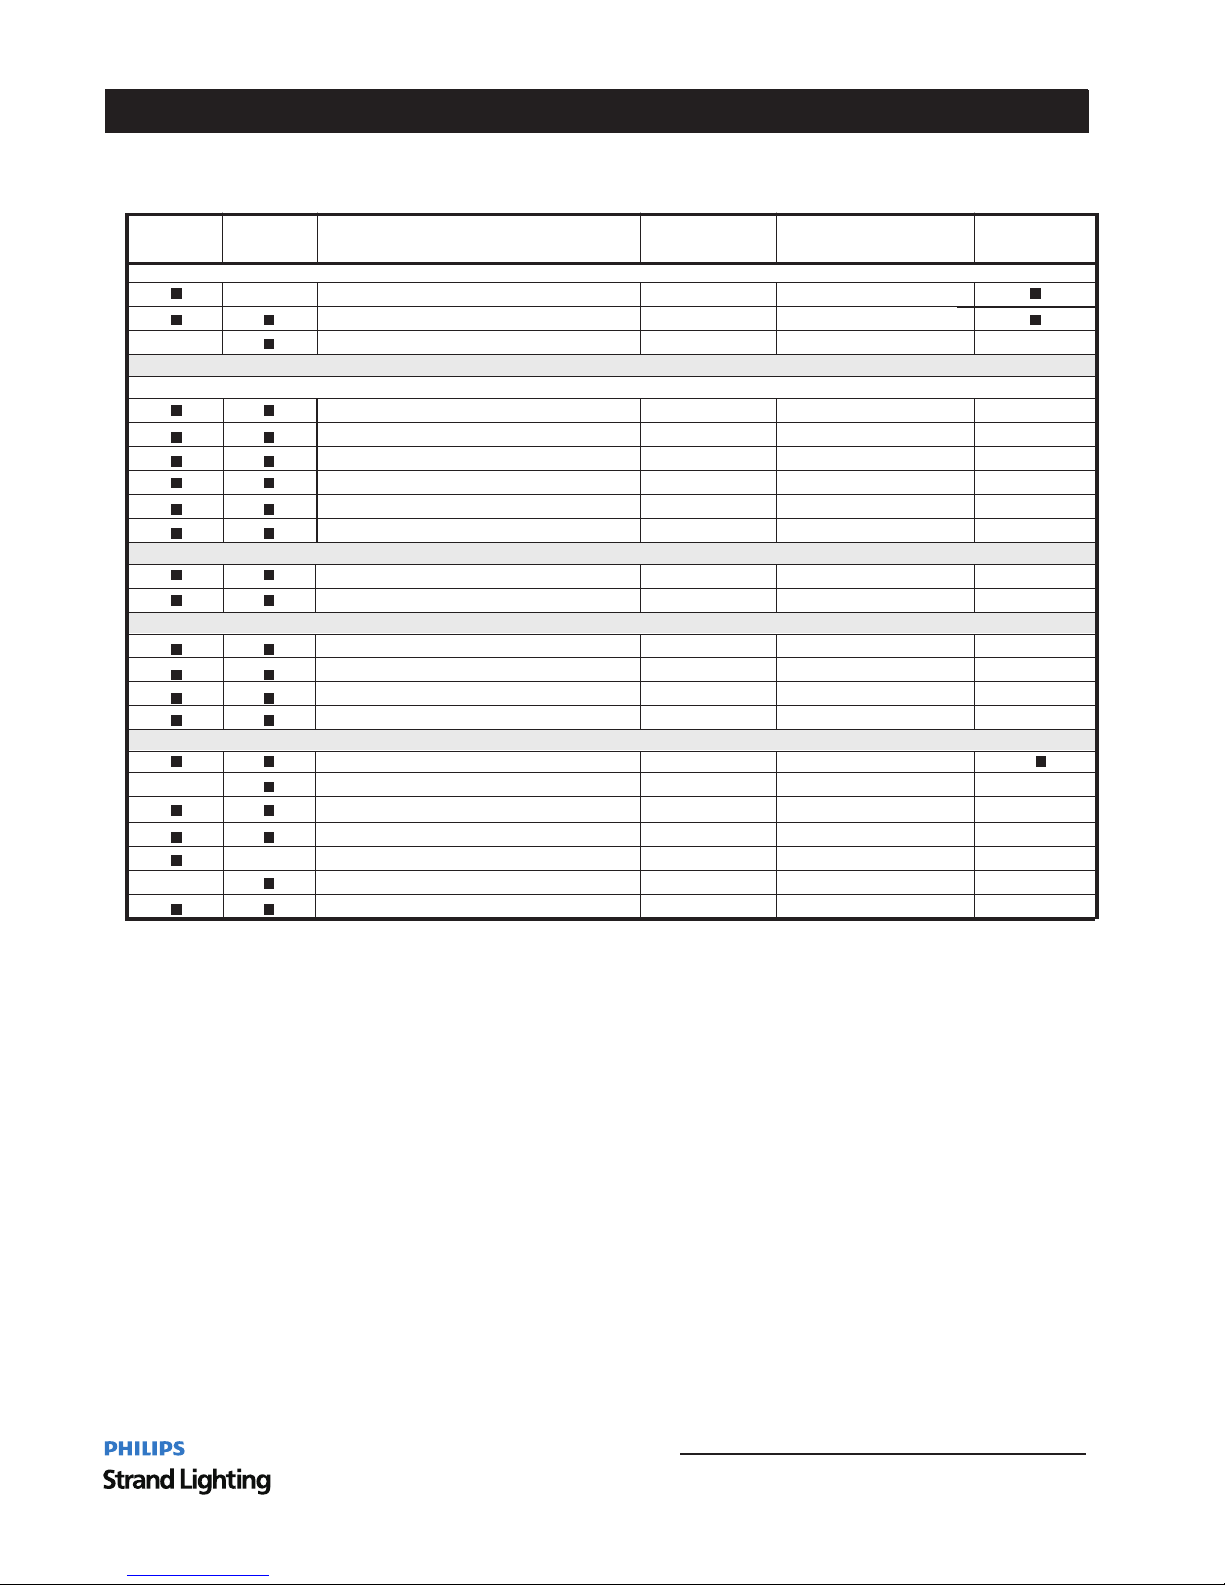
Table 12 300S Softlight 3100K LED Luminaire RDM Parameters Ids:
Get
Allowed
Set
Allowed
RDM Parameter IDs Value Comment Implemented
300S 3100K LED LUMINAIRE RDM PARAMETERS
21
300S Softlight LED Luminaires
Installation & User’s Manual
SENSOR_ DE FINITION
0x0400
0x0200
0x1000
IDENTIF Y_ DEVICE
0x0600
PAN_INVERT
0x0500
DISPLAY_INV ERT
DEVICE_ HO URS
0x0403
0x0603
REAL_TI ME _CLOCK
LAMP_STATE
SENSOR) VALUE
0x0401
0x0201
0x1001
RESET_D EV ICE
0x0601
TILT_INVERT
0x0501
DISPLAY_LEV EL
LAMP_HO UR S
0x0404
0x1020
PERFORM _S ELFTEST
0x1030
CAPTURE _P RESET
LAMP_ON _M ODE
RECORD_ SE NSORS
0x0402
0x0202
0x1010
POWER_S TATE
0x0602
PAN_TILT_SWAP
LAMP_ST RI KES
0x0405
0x1021
SELF_TE ST _DESCRIPT IO N
0x1031
PRESET_ PL AYBA CK
DEVICE_ PO WER_CYCLE S
Category Sensors 0x02xx-
Category Dimmer Settings 0x03xx Future-
Category Power/Lamp Settings 0x04xx-
Category Display Settings 0x05xx-
Category Configuration 0x06xx-
Category Control 0x10xx-
Page 24
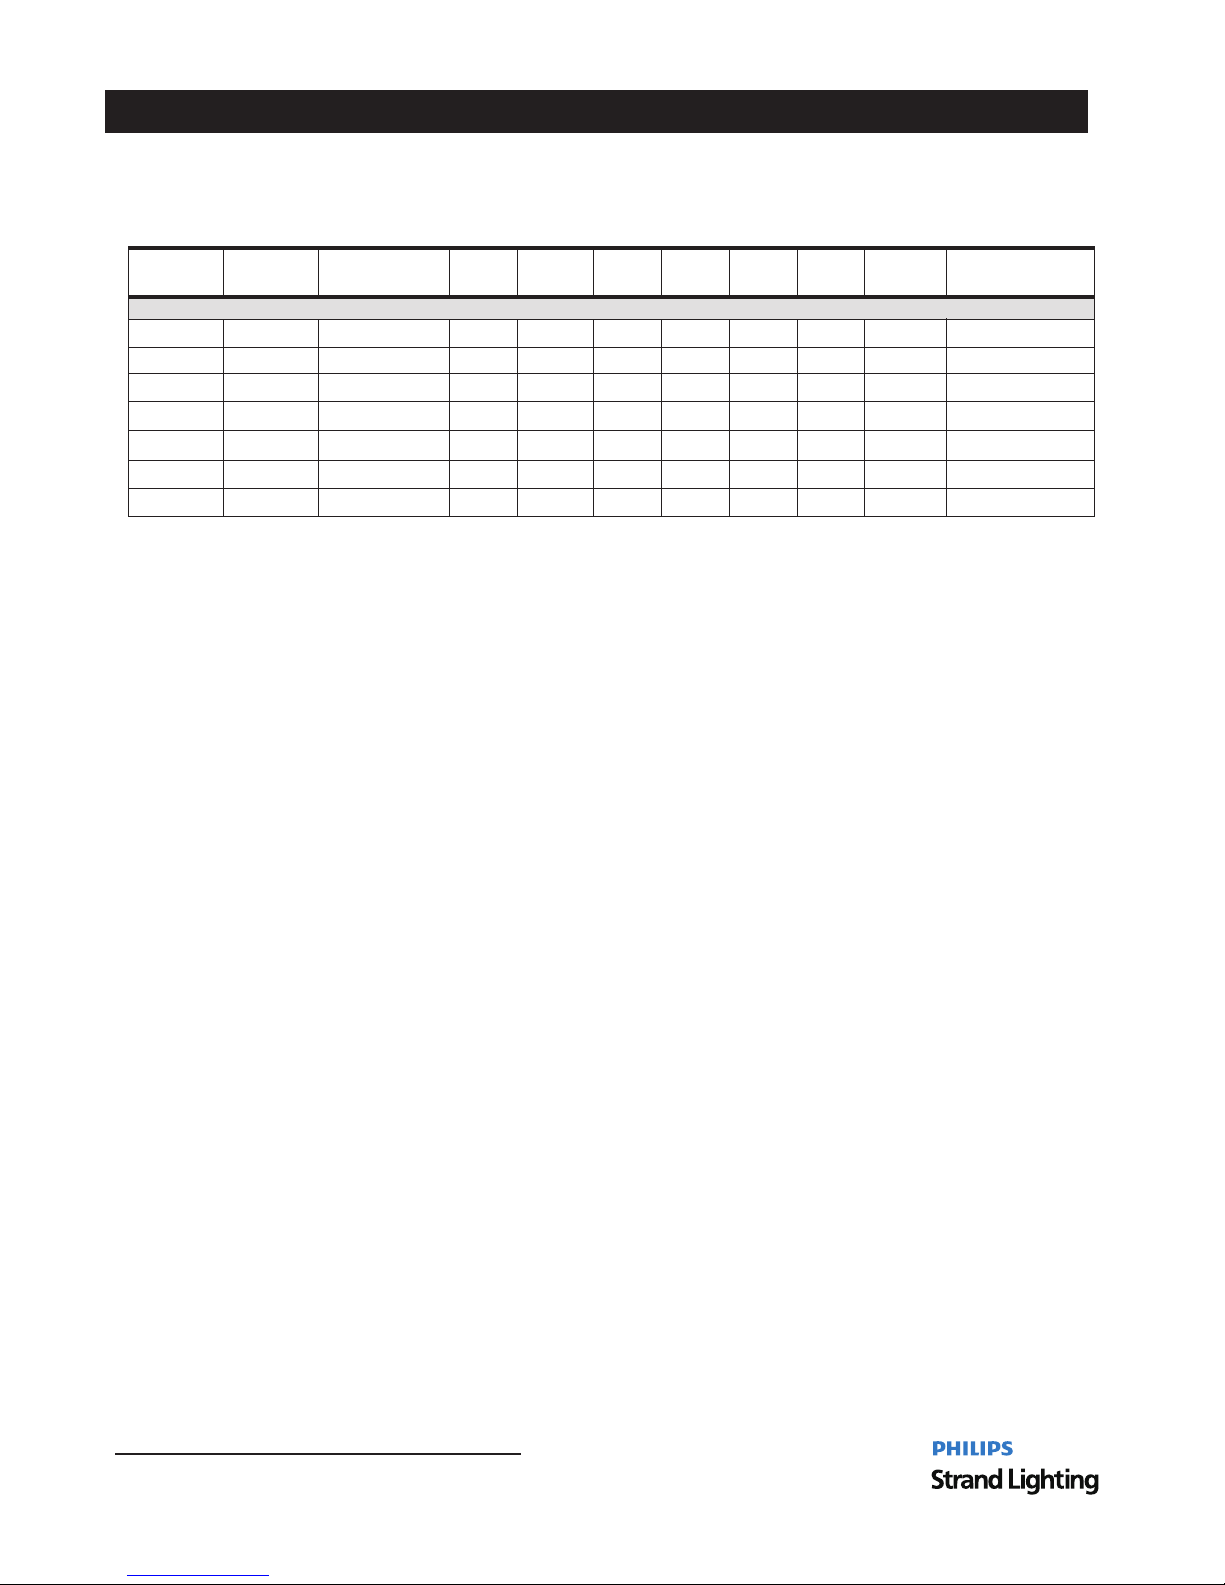
Table 13 300S Softlight 3100K LED Luminaire RDM Manufacturer Specific PIDs for Root Device:
Get
Allowed
Set
Allowed
RDM
Parameter IDs
Type Length Unit Prefix Min Max Default Description
Category Manufacturer Defined PIDs Range is 0x8000 0xffdf See ANSI E1.20 2010 Standard Table A 3- - - ( - , - )
■ ■
0x8106
■
■
■
■
0x810A
0x8A41
■
■
■
■
0x8A00
0x8A42
■
■
■
■
0x8A0C
0x8AA1
Intensity Format
Auto Lock
DMX FAIL MODE
Dimming Curve
Dimmer
Response Time
Fixture Control
22
300S 3100K LED Luminaire RDM Parameter IDs
2
3
0
0
0
0
2
3
100
1
1
1
0
0
0
0
0
0
0
2
100
None
None
None
None
None
None
None
None
None
None
None
None
NoneNone
1
1
1
1
1
1
1
U8
U8
U8
U8
U8
U8
U8
Installation & User’s Manual
300S Softlight LED Luminaires
Page 25
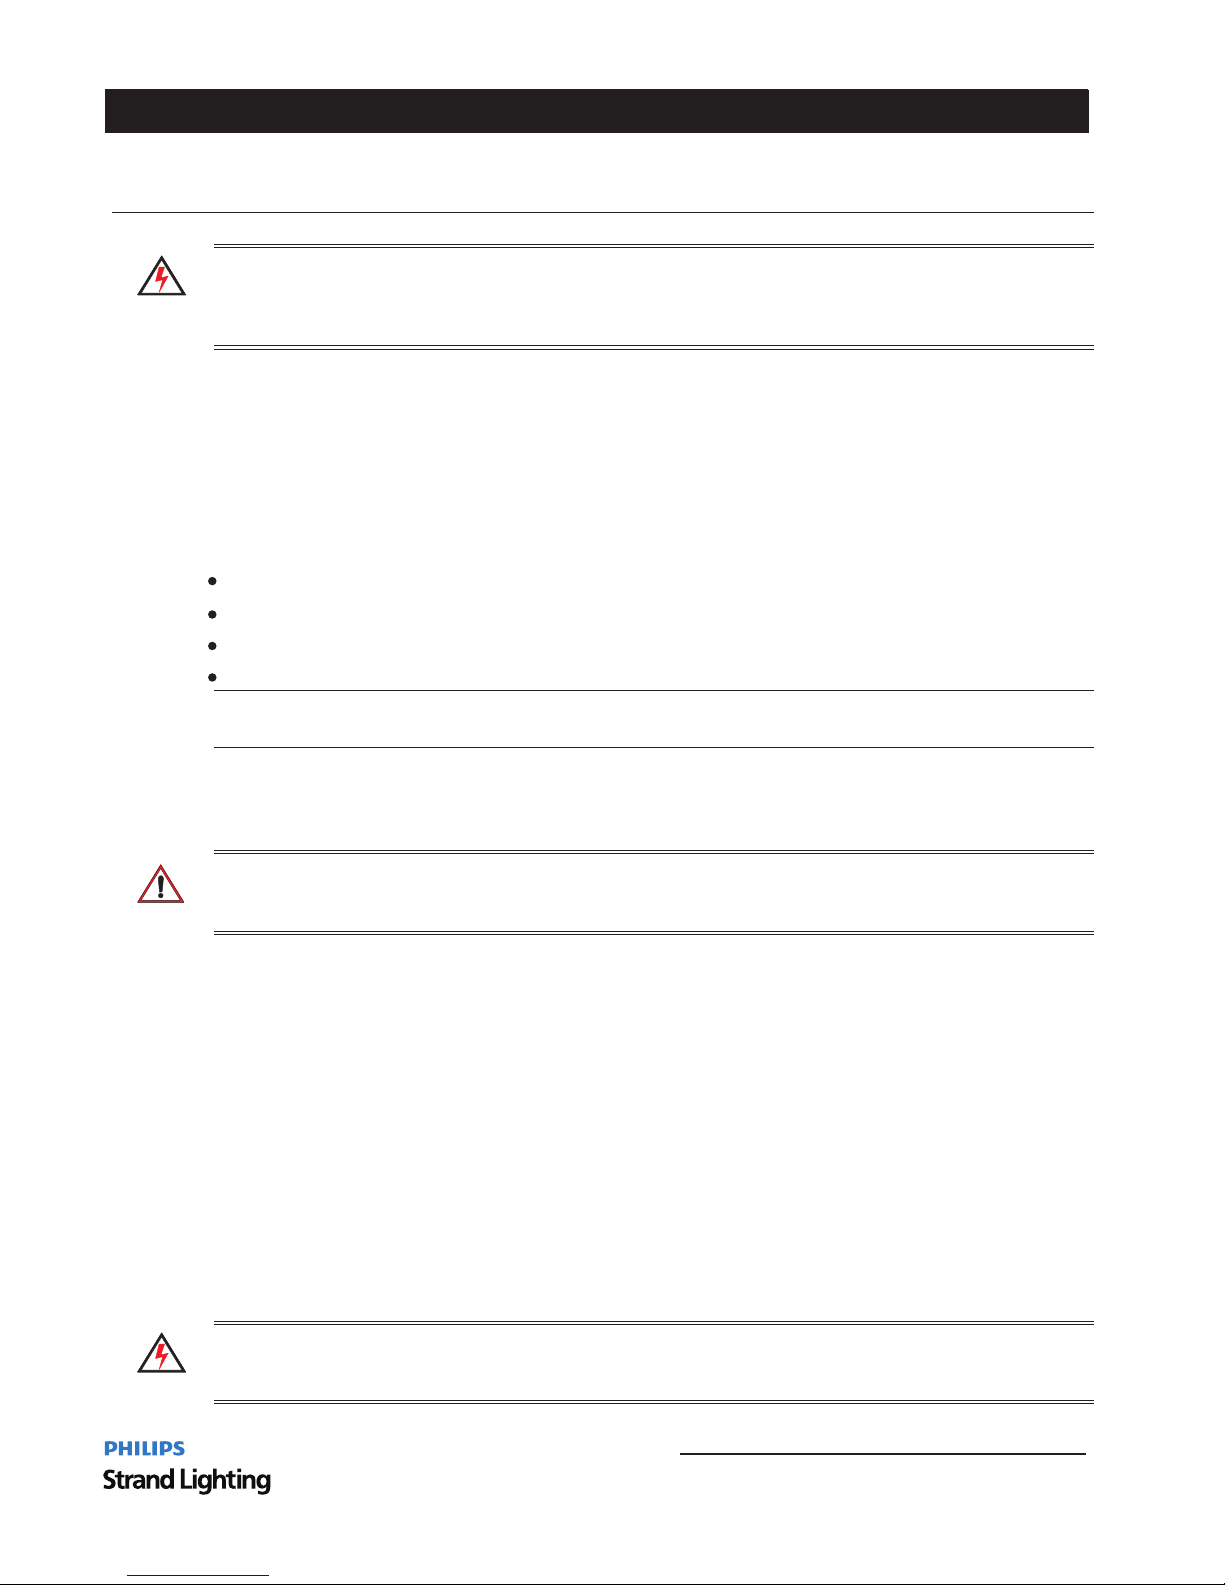
CLEANING AND CARE
WARNING! Under no circumstances should ammonia based cleaners acetone or other harsh solvents be used on or- , ,
near the 300S Softlight LED Luminaire These types of cleaners or solvents can permanently damage the.
optics or housings of the fixture.
If you have any questions regarding the use or care of your 300S Softlight LED Luminaire please contact,
Strandlighting technical support or your local Authorized Dealer.
2. Front Diffusers Cleaning
To clean the front diffusers:
Step 1 Disconnect luminaire from power and allow to cool completely. .
Step 2 Apply a small amount of reagent grade. isopropyl alcohol to lint free lens tissue- .
Step 3 Wipe all debris dirt fingerprints etc from diffusers. , , , . .
Step 4 Using a second lint free lens tissue wipe off any alcohol residue. - , .
3. Service and Maintenance
For all other service and maintenance issues please contact your local Strandlighting office or an Authorized,
Service Center.
WARNING! Disassembly other than as described herein alterations unauthorized service etc will void the( ), , , .
product warranty Contact your local Strandlighting office or an Authorized Service Center for technical support and.
service.
CLEANING AND CARE
23
300S Softlight LED Luminaires
Installation & User’s Manual
WARNING! A ll cleaning should be performed w ith power c omplete ly remove d from the luminaire. Never
removeprotective cover s when lumi naire is po wered. Wear a ppropri ate protective eye wear and glove s when
cleaning the fixture. All ser vice and maintenance, other tha n describ ed herein , should be p erformed by a qualified
technician or Auth orized Se rvice Center.
1. Special Cleaning and Care Instructions
Being a solid-state fixtur e, and unli ke most fix tures, th e 300S Softlight LED Luminaire requires ve ry little
routine maintenance by the u ser. Th is sectio n covers po rtions of t he luminaire that can be removed fo r cleanin g.
The 300S Softlight LED Lumin aire spec ial care wh en it comes to cleaning front lens assembly. Additional care
needs to be taken with the plast ic compon ents beca use they ar e much easier to scratch or damage th an glass.
The following is a list of clean ing mater ials requ ired to care for your 300S Softlight LED Lumin aire:
Lint free lens tissue
Lint or powder free gloves
Reagent grade isopropyl al cohol*
A mild soap s olution .
Note : *Reagent grade isopr opyl alco hol is good t o use on the 30 0S Softlight LED Luminaire plastic optic s with
anti-reflection coatin gs.
if the lens is still dirty after u sing isop ropyl alc ohol, for i nstance if fingerprints or oil is just redis tribute d and not
cleaned off the optic , then a mild soap and water solution can be used to g ently was h the lens. R epeat the cleaning
with isopropyl alcohol to el iminate s treaks an d soap resi due.
Page 26
24 300S 3100K LED Luminaire Accessories
Installation & User’s Manual
300S Softlight LED Luminaires
4 Accessories.
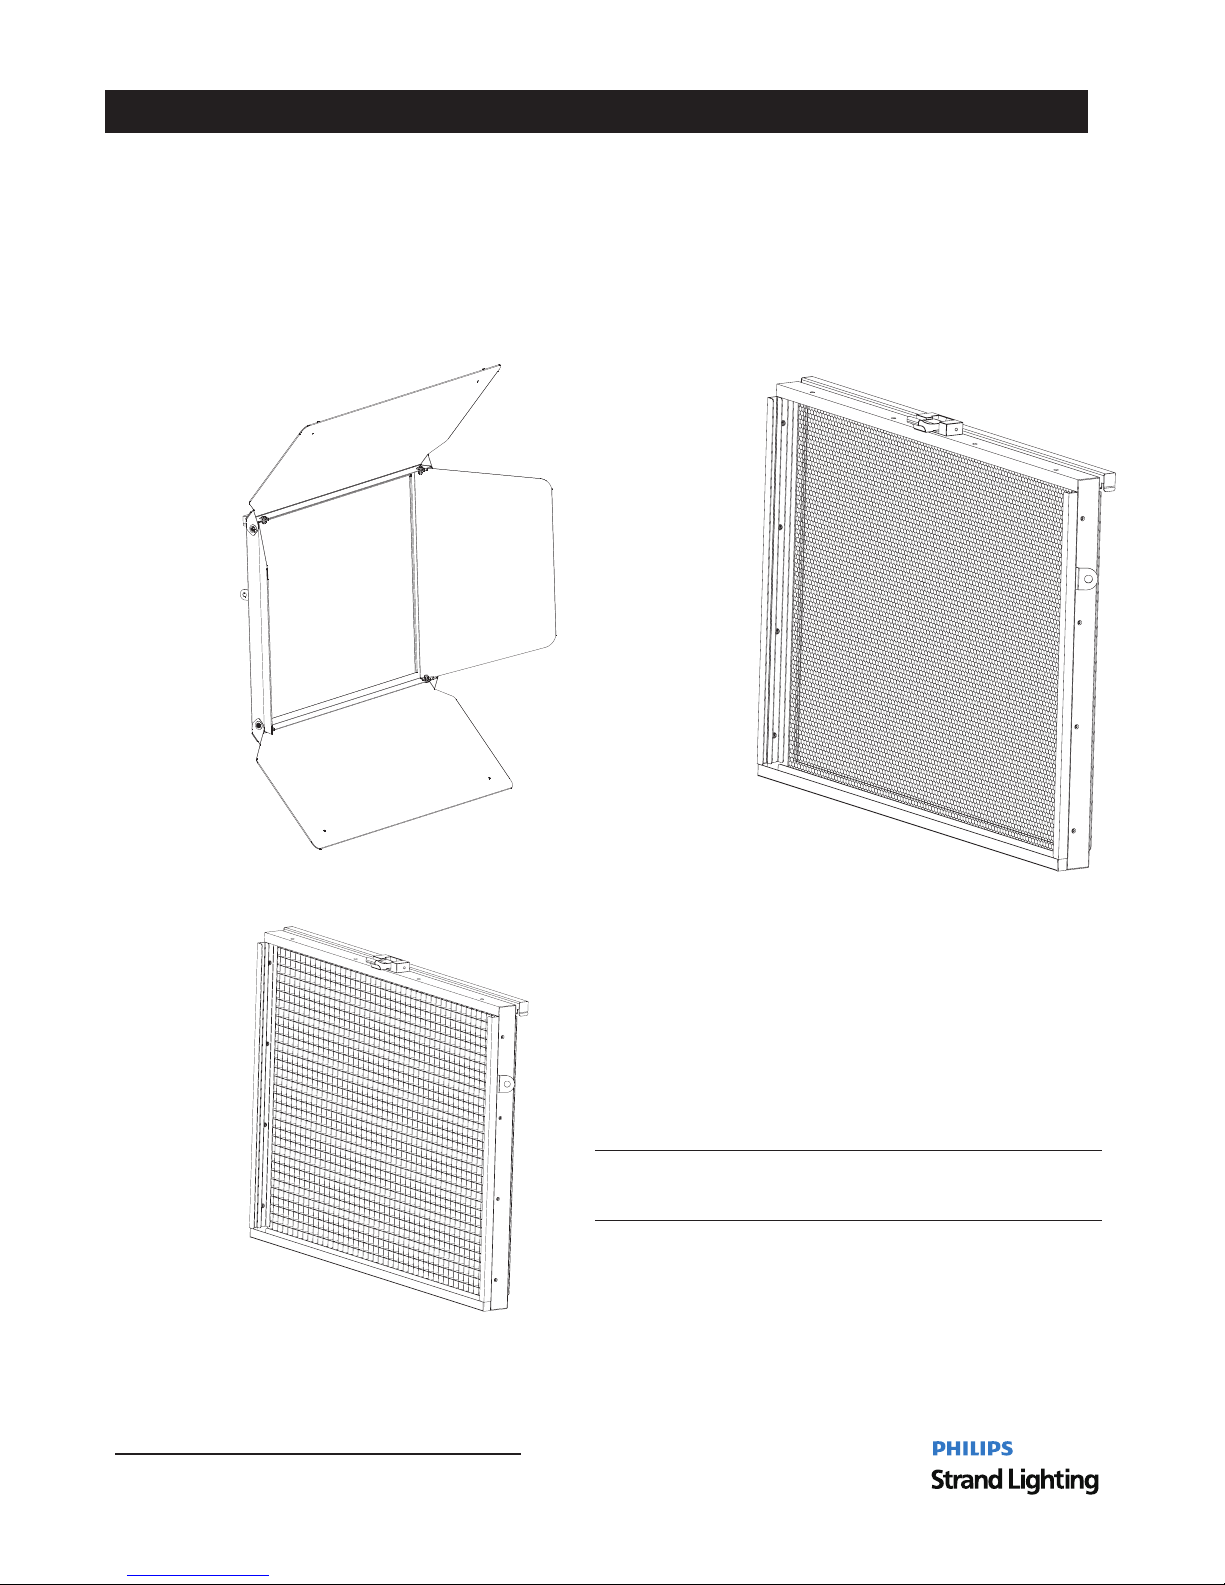
The 300S Softlight series wi ll have 3 opt ional acc essorie s including a barndoor with filter clip, a 20 de gree
honeycomb, and a 36 degree hon eycomb. All these accessories can be equipp ed with the l uminair e sololy or
via a combination. For examp le, a 20 degr ee honeyc omb and the barndoor and a 36 degree honeycomb p lus
the barndoor. See il lustrat ion as below for more information.
Barndoor
20 degree Honeycomb
36 degree Honeycomb
Note: All these accessories will be sold separately
Page 27
5 Installation of the accessories.
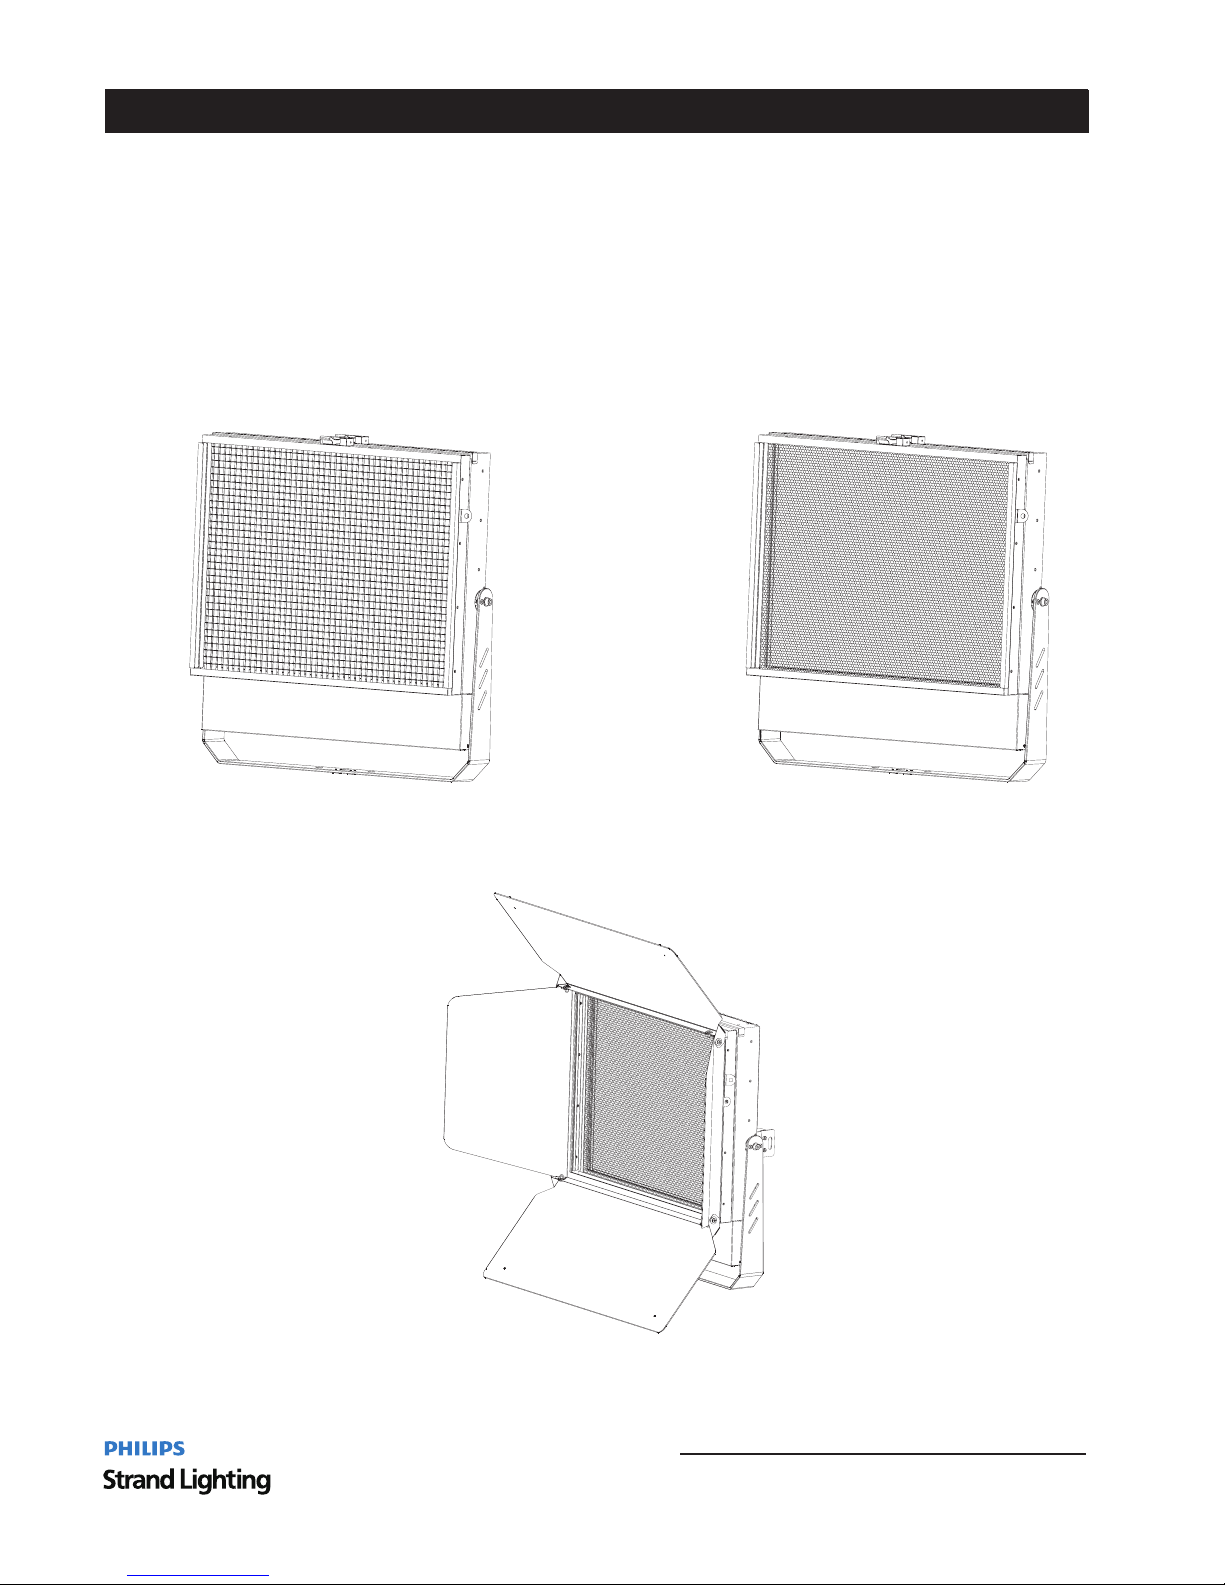
Installation of the accessories
All accessories can be equipped to the 300S Softlight luminaire, whether individually or a combin ation.
See the illustration below for more information.
300S S oftlight with 36 degree honeyco mb on 300S S oftlight with 20 degree honeyco mb on
300S S oftlight with 20 degree honeyco mb and the ba rndoor on
25
300S Softlight LED Luminaires
Installation & User’s Manual
Page 28
TECHNICAL SPECIFICATIONS
1. 300S Softlight LED Luminaire Operational Specifications
Beam Angle:
Light Output:
Color Temperature:
Current AC( ):
Frequency:
Control:
Ambient Temperature:
Humidity:
Weight:
Housing:
IP Rating:
Listing:
Note: Common model specifications shown.For specific model specifications features and accessories refer to the, , ,
product specification sheet for more details.
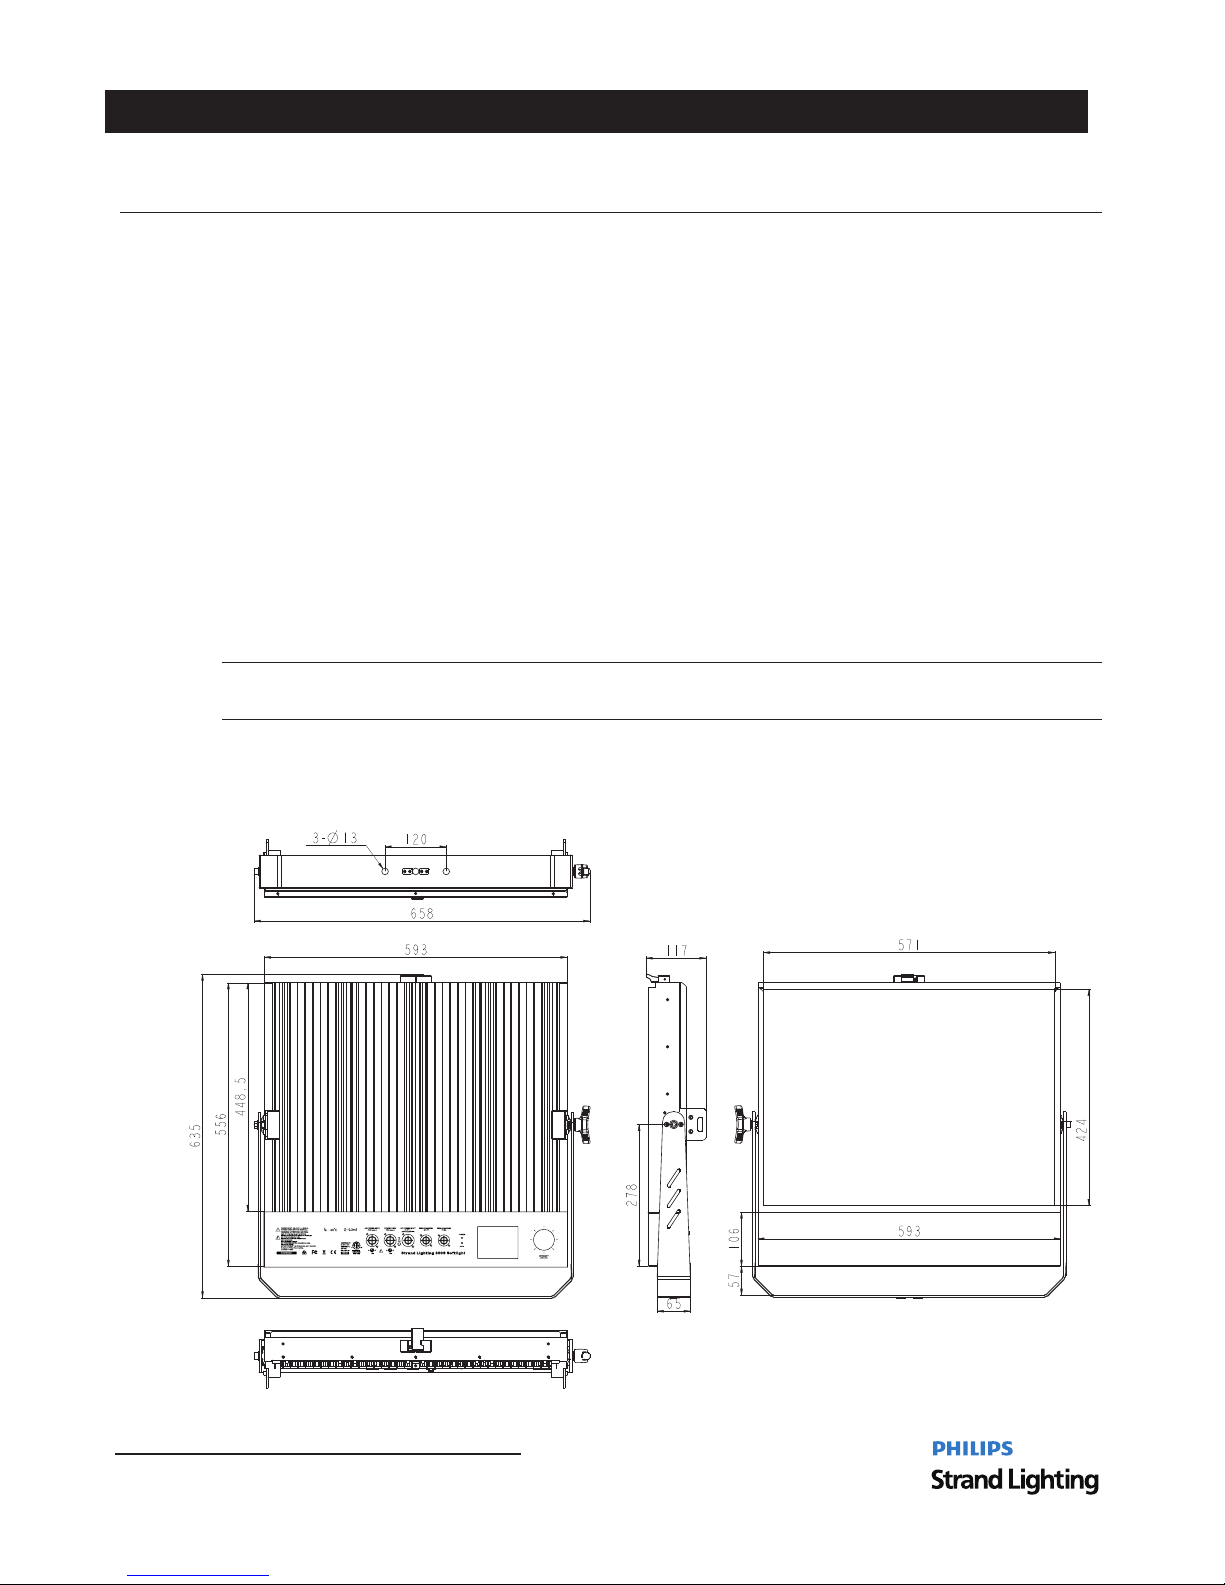
2 300S Softlight LED Luminaire Dimensions.
50 Degrees
27,484 lumens for 5600K
5600K+/-300K
100V to 240V 10 auto ranging(+/- %, - )
1.5 Amps 100V 0.63 Amps 240V( ) / ( )
50 60Hz/
DMX512 1990 DMX512A RDM On Board Menu( ) / ( ) / -
- (- )20 to 40 Degrees C 4 to 104 Degrees F
5 95 Non condensing%- %
( ) - ( )11.7 kg 25.74 lbs Luminaire only no accessories
Aluminum Extrusion with Powder Coat
IP20
CE/cETL
26 TECHNICAL SPECIFICATIONS
Installation & User’s Manual
300S Softlight LED Luminaires
24700 lumens for 3100K
3100K+/-100K
23V to 36V 10 auto ranging(+/- %, - )
Input Voltag e( AC ):
Input Voltag e( DC ):
Page 29

NOTE
NOTE
27
300S Softlight LED Luminaires
Installation & User’s Manual
Page 30
Stra nd Lighting
Dallas
10911 Petal Street
Dalls, TX 75238
Tel: 214-647-7880
Fax: 2 14-647-8031
Stra nd Lighting
New York
267 5th Ave, 4th Floor,
New York, NY 10016
Tel: 212-213-8219
Fax: 2 12-532-2593
Stra nd Lighting Asia Lim ited
Unit C, 14/F, Roxy Industrial Cent re
No.41-49 Kwai Cheong Ro ad
Kwai Chung, N.T., Hong Kong
Tel: +852 2796 9786
Fax: + 852 2798 6545
Stra nd Selecon
Auckland
19-21 Kawana Street
Northcote, Auckland 0627
New Zealand
Tel: +64 9 481 0100
Fax: +64 9 481 0101
Stra nd Lighting
Europe
Marssteden 152
Enschede 7547 TD
The Netherlands
Tel: +31 53 4500424
Fax: +31 53 4500425
www.strandl ighting.com
©2016 Philips Group
 Loading...