

Page 1

Page 2

Conformity, Environment & Safety
Safety information : This equipment is not designed to make emergency calls when power
fails.An alternative should be made available for access to emercgency calls.
Conformity : See page 9.A copy of the original certificate can be obtained on request to the
customer care centre.
Power requirements : This product requires an electrical supply of 220-240 volts, alternating
monophased current, excluding IT installations defined in standard EN 60-950.
WARNING ! The electrical network is classified as dangerous according to criteria in the
standard EN 60-950. The only way to power down this product is to unplug the power supply
from the electrical outlet. Ensure the electrical outlet is located close to the apparatus and is
always easily accessible.
Telephone connection : The voltage on the network is classified as TNV-3 (Telecommunication
Network Voltage as defined in the standard EN 60-950)
Safety precautions : Do not allow the handset to come into contact with water.Do not open
the handset.You could be exposed to high voltages. Do not allow charging contacts or batteries
to come into contact with conductive materials.
Environmental care : Please remember to observe the local regulations regarding the disposal
of your packaging materials, exhausted batteries and old phone and where possible promote
their recycling.
Using GAP standard compliance
The GAP standard guarantees that all DECTTMGAP handsets and base stations comply with a
minimum operating standard irrespective of their make.Your handset is GAP compliant, which
means the minimum guaranteed functions are : take the line, receive a call and dial.
Using Philips base stations
If you register the additional handset to a Philips Onis 300 or Onis 380 base station, the handset
will have all the features described in the corresponding complete set user guide.
If you register the additional handset to a Philips Onis 200 or Zenia base station, only a limited
number of menus will be available. Please refer to the corresponding complete set user guides.
Using a non-Philips GAP base station
To register the Philips additional handset to a non-Philips base station, follow the base station
instructions described by the other manufacturer.Then follow the instructions on page 4 to
register the Philips additional handset. There will be only a few menus availble.
English
Philips has marked the battery and packaging with standard symbols designed to promote the
recycling and appropriate disposal of your eventual waste.
The labelled packaging material is recyclable.
A financial contribution has been paid to the associated national recovery & recycling system.
DECTTMis a trade mark of ETSI registered for the benefit of the implementers of the DECT technology
Conformity,Environment & Safety
1
Page 3
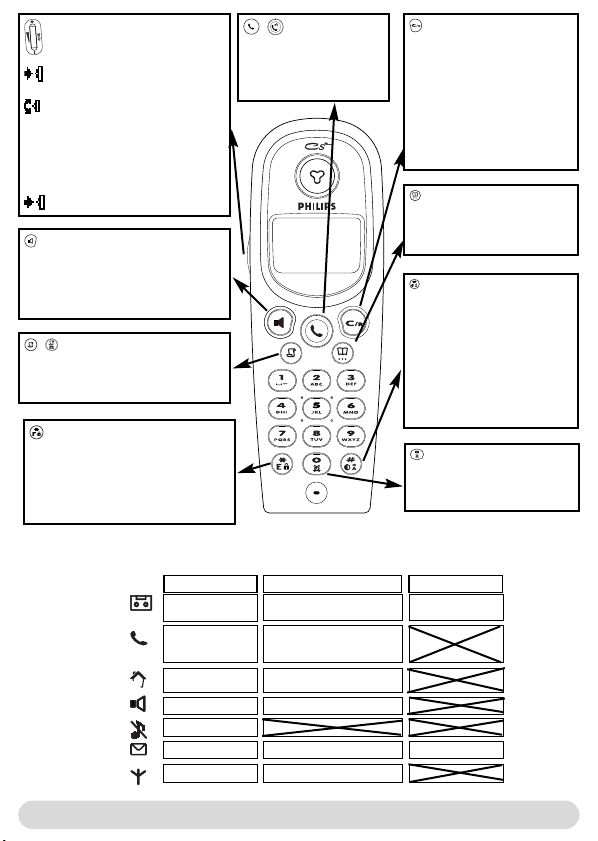
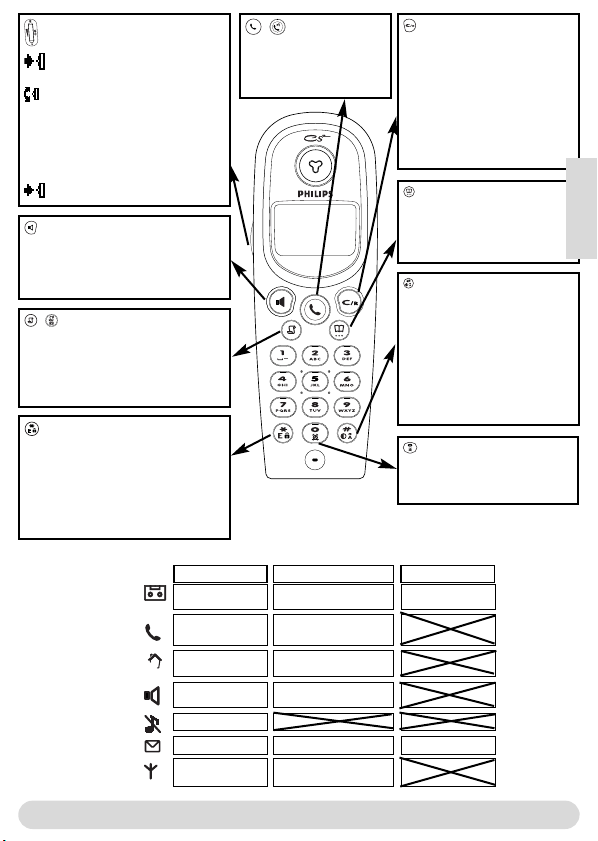
Pilot key
Press to enter the carousel or
validate a menu or an option
Scroll to navigate in the menus &
options or move the cursor
Scroll up to reach Intercom from
idle mode
Scroll down to reach Cheapest
rates prefix from idle mode
Press to unlock the keypad
Loudpeaker
- Press to take the line or activate the
handset loudspeaker during a call
- A long press to activate the base
lloudspeaker
/ Call log
- A short press to access the call log
- A long press to directly access the
messages list (Onis 300 Vox & Onis 380)
Keypad lock & Edition
- A short press to insert *
- A long press to lock/unlock the keypad
- A long press to insert (R) when dialling
- Press to enter multitap mode or
®
Eatoni
editor when editing
Icons
Answer machine ON
(Onis 300 Vox)
External call in
progress
Internal call in
progress
Loudspeaker ON
Ringer OFF
SMS function ON
Registered & in range
/ Line key
- Press to take the line,
answer a call or hang up.
- Long press to activate Voice
dial
Earpiece
Microphone
Onis 300/380 Handset
Blinking
New message on answering.
machine or voice mail
Incoming external call in
progress
Line is already busy
Internal incoming call
Base loudspeaker ON
New SMS
Not registered
Correct key
- To correct a digit when
predialling or a character when
editing
- A short press to go back one
menu
- A long press to return to idle
mode when navigating
- To insert R for operator
services when on line
Phonebook
- A short press to access the
phonebook
- A long press to add a new entry
Do Not Disturb & case
mode
- A short press to insert # when
dialling.
- A long press to activate the Do
Not Disturb mode
- A long press to insert a pause
(P) when dialling
- Press to switch case mode
when editing
Alarm clock
- A short press to dial 0
- A long press to activate/
deactivate the alarm clock
Fast blinkingSteady ON
Answerphone full
SMS memory full
2
The handset
Page 4
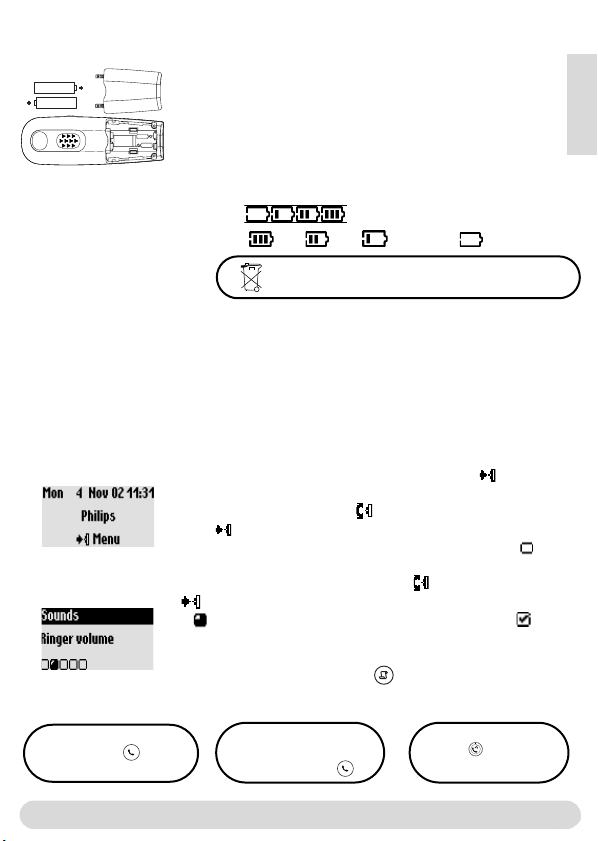
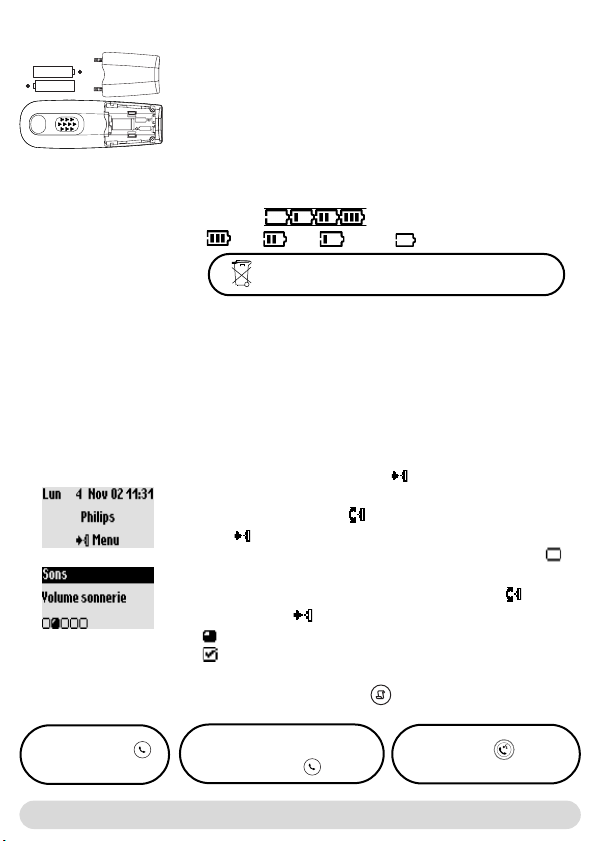
Installing and replacing the batteries
To insert the batteries, open the battery cover, place the batteries
as indicated and put the cover back.When the handset is placed
on the charger, the 3 battery bars scroll (if charge is needed). On
first use it may be necessary to wait for a few minutes before
seeing symbols on the display.Allow the handset to charge for 24
h. In case you need to change the batteries, use R03/AAA NiMh of
600/650 mAh.
Warning :The base station must always be plugged into the mains supply.
when charging. Always use rechargeable batteries. Please promote recycling.
The battery bars scroll when charging .When charged the icon changes
according to the remaining charge : full , 2/3 , 1/3 and empty .
English
Battery life and range
The batteries should not be disposed of with general household waste .
The battery life is about 250 hours in stand by time (when the handset is in idle mode & ready
to receive a call) and around 16 hours in communication. A battery low alert will inform you that
the handset has to be recharged, if this is during a call, it will end shortly after the alert.
Optimal battery life is reached after 3 cycles of full charge/discharge.
Under ideal conditions, the range is up to 50 m indoors and 300 m outdoors. When reaching the
range limit, the conversation will become crackly, get closer to the base station otherwise you
will be cut off. To reach optimal range place the base station far from electrical appliances.
Understanding the menu system
From idle screen, to access the carousel menu press
The carousel represents a loop of icons that gives access to the first
menu level. Scroll up or down to reach the desired menu.
Press to validate and enter the menu.
The sub menus are listed and represented by little squares at the
bottom of the display.
To reach one particular sub menu scroll and validate your choice
A shows the sub-menu or option you are browsing. A shows
the selected sub-menu or option.
Note : Certain menus are directly accessible via a dedicated key on
the keypad (example the Call log )
Direct dialling
1- Take the line
2- Dial on the keypad
Predialling
1- Dial on the keyad
2- Take the line
The menu system
Voice dialling
1- Press
2- Say the voice tag
3
Page 5
Handset
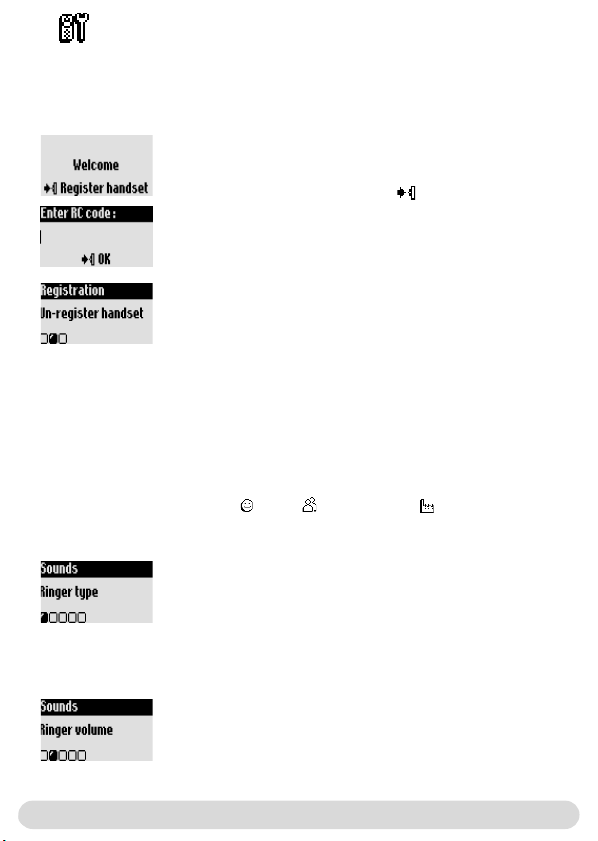
Registering/un-registering an additional handset
The additional handset will get full capability when it is registered to the base station*.You can
register up to 8 handsets to the Onis 300 & 380 base stations.
To register an additional handset
Place the base station in Registration mode as follows :
1- Unplug and plug back in the mains lead
2- With the additional handset press to start the registration
3- Enter the 4-digit RC code written on the sticker placed under
the base station.
To un-register the handset
1- Go to Handset, validate
2- Scroll to Registration, validate
3- Scroll to Un-register handset, validate
4- Choose from the list the handset to un-register, validate
5- Enter the RC code (4-digit code) and validate
* See page 1
Setting the handset sounds
The ringers can be set for :
- The external standard ringer for callers whose number is not stored in the phonebook or
stored with no VIP settings.
- The internal ringer for the intercom (if there are at least 2 handsets).
To set the 3 VIP ringer types : Friends , Family and Professional :See manual Onis
300/300 Vox. Subscription to the Caller Line Identification service (CLI) needed.
To set the ringer type
1- Go to Handset, validate
2- Select Sounds, validate
3- Select Ringer type, validate
4- Choose External Std ringer/Internal ringer, validate
5- Select the ringer from the list and validate
To set the ringer volume on the handset
There are 5 ringer volume levels.
1- Go to Handset, validate
2- Select Sounds, validate
3- Select Ringer volume, validate
4- Choose the appropriate volume level and validate
NB :The vibration call Alert is only available for Onis 380
4
Handset
Page 6
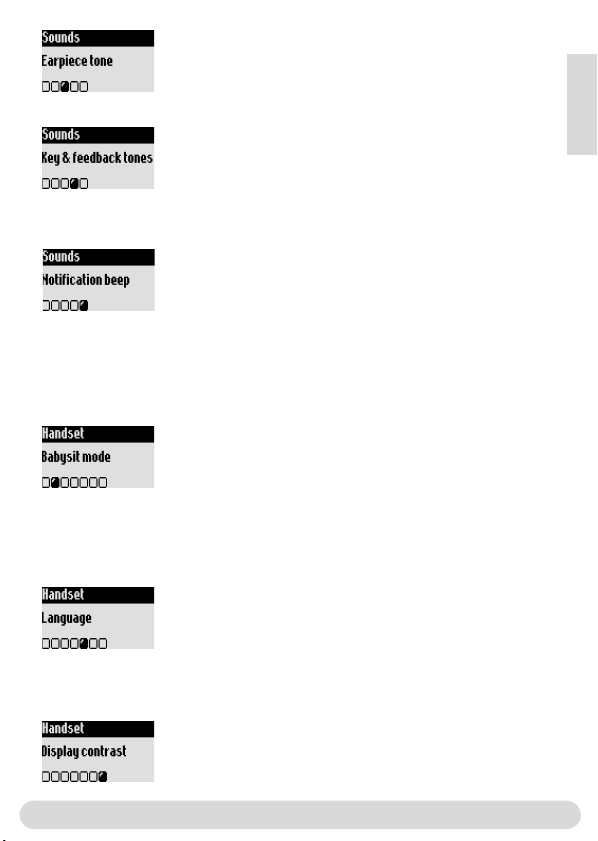
To set the earpiece tone
1- Go to Handset, validate
2- Select Sounds, validate
3- Scroll to Earpiece tone, validate
4- Select Standard, Trebble or bass and validate
To set the key tones & feedback tones
Audio feedback heard when pressing the keys & validating a
setting
Resume from step 1-2 above
3- Scroll to Key and feedback tones, validate
4- Select ON/OFF and validate
To set the notification beep
Audio indicators heard when there is new SMS or a new message
Resume from step 1-2 above
3- Scroll to Notification beep, validate
4- Select ON/OFF and validate
The babysit mode
This feature allows to monitor the babys room. Place the handset in the room to be monitored
and you will hear the noise on the additional handset.
To activate/deactivate the babysit mode
1- Go to Handset, validate
2- Scroll to Babysit mode, validate
3- Select ON/OFF and validate
Note : An intercom is necessary to monitor the room (See page 6).
Changing the language
The additional handset default language is English.
To change the language
1- Go to Handset, validate
2- Scroll to Language, validate
3- Select the language and validate
Warning : Changing the language will not alter the voice prompts of the
answer machine (Onis 300 Vox/Onis 380 or non-Philips base stations).
English
Setting the display contrast
To set the contrast
1- Go to Handset, validate
2- Scroll to Display contrast, validate
3- Select the appropriate level and validate
Handset
5
Page 7

Setting the backlight (Onis 380 only)
To set the backlight
1- Go to Handset, validate
2- Scroll to Backlight, validate
3- Select 10 sec, 20 sec or OFF, validate
6
Handset
Page 8
Intercom
Using the intercom (if there are at least 2 handsets)
This feature allows to make internal calls, activate babysit or transfer external calls from one
handset to the other.The intercom is possible with handsets registered to the same base
station.
Internal call or room monitoring activation
1- Go to Intercom, validate
2- If there is only one handset it rings automatically.Otherwise select
from the list the handset/base you want to call and Call
The called handset/base rings
3- Take the line on the called handset/base.
The intercom conversation or the babys room monitoring can start.
Mute is also available.
Note :You can access the Intercom with the pilot key.In idle mode
scroll up.
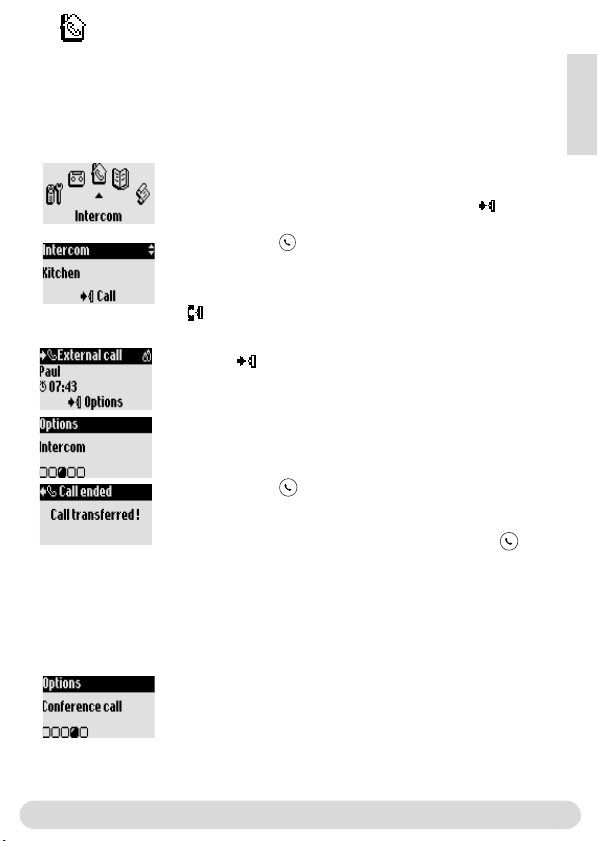
During an external call you can transfer the call to another handset
1- Press to enter the options
2- Scroll to Intercom, validate
3- If there is only one handset it rings automatically. Otherwise select
from the list the handset/base you want to call
The called handset/base rings. The external call is put on hold.
If there is no answer from the second handset you can resume the
call on the first handset. Use the End Intercom option.
4- Take the line on the other handset/base
Both internal callers can talk together.
5- Use the Transfer option.The call is ended on the first handset.
Note : You can also hang up on the first handset with .
While the call is put on hold the correspondant hears the music (if
music on hold is activated) or beeps.
Switch (between call 1 & 2) and Mute (microphone) are other
options available in the contextual menu.
To share a conference call
Conference call allows one external call to be shared with 2
handsets (in intercom).The 3 people can share the conversation
(no operator subscription is needed).
Resume from step 1-4 above
5- Select Conference call, validate
English
Intercom
7
Page 9
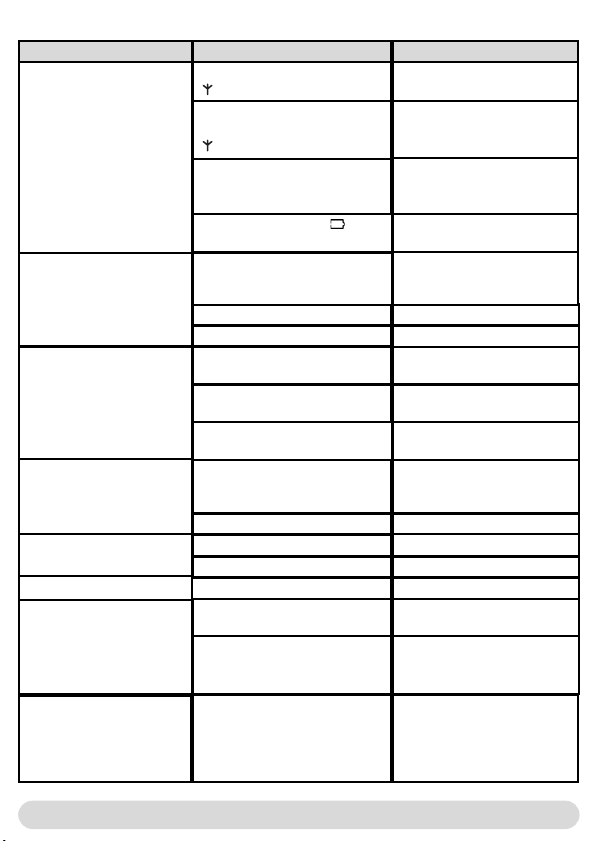
Troubleshooting
Problem
No dial tone.
When the handset is placed
on the charging unit, no
beep is heard.
The batteries remain low
although they have charged
for 12 hours.
An error beep is heard from
the handset when trying to
make a call.
An error beep is heard
during a call.
There is no ringer.
When adding a handset to
the base station, a failure
message is displayed.
Cause Solution
The handset is out of range,
( is not displayed).
The handset has not been
registered to the base station
( is not displayed).
The base station is not
properly connected to the mains
or the telephone line.
The batteries are low ( is
displayed).
The charging unit is not properly
connected to the mains.
Charging contacts are dirty.
Key tones are deactivated.
The charging unit is not properly
connected to the mains.
Handset not registered to base
The batteries are defective or
too old.
Another call is already in
progress from another handset
or the base station.
The base is being consulted
The handset is out of range.
The handset batteries are low
The ringer is deactivated
The procedure has failed
The maximum number of
handset has been reached.
Move closer to the base
station and try again
Register the handset to the
base station (page 4)
Check the connections
Charge batteries (page 3)
Check the connection between
charging unit and mains.
Clean with a clean & dry cloth.
Activate them (page 5)
Check the connection
Register handset to base (page
4)
Contact your dealer.
Purchase new batteries
Retry when the current call is
finished.
Wait until it is available
Move closer to the base
Charge the batteries.
Activate it (page 5).
Try again the procedure again
(page 4).
Un-register a handset (page 4)
Interference during call.
8
You are too far from the base.
The base station is too close to
electrical appliances, reinforced
concrete walls or metal door
frames
Troubleshooting
Get closer to the base station.
Move the base station to find a
better place (the higher the
better).
Page 10

DECLARATION OF CONFORMITY
We,
PHILIPS Consumer, Electronics
DECT & Home Telephony
Route dAngers
72081 Le Mans Cedex 9
France
Declare that the products Onis 300 (TU5321), Onis 300 Vox (TU5351 & TU5352)
and the additional handset Onis 300 (TU 5350) are in compliance with ANNEX III of
the R&TTE-Directive 1999/5/EC and then with the following essential requirements :
Article 3.1.a : (protection of the health & the safety of the user) : EN 30950 (2000)
Article 3.1.b : (protection requirements with respect to electromagnetic
compatibility) ETSI EN 301 489-6 V1.1.1 (09/2000) & ETSI EN 301 489-1 V1.3.1
(09/2001)
Article 3.2 : (effective use of the radio spectrum) : EN 3001 406 (2001)
The presumption of conformity with the essential requirements regarding Council
Directive 1999/5/EC is ensured.
Date : 16/12/02 Le Mans
Vice President & General Manager
DECT & Home Telephony
English
Declaration of Conformity
9
Page 11

Conformité, Sécurité et Environnement
Sécurité : Cet équipement na pas été conçu pour passer desappels durgence en cas de panne
dalimentation secteur.Vous devez donc disposer dune alternative dans ce cas.
Conformité : Voir page 8. En cas de besoin une copie du certificat original peut être demandée
auprès du service consommateurs.
Raccordement électrique : Alimentation sur réseau 230 volts, courant alternatif monophasé, à
lexclusion des installations à schéma IT définies dans la norme EN 60-950.
ATTENTION : Lalimentation secteur est classifiée au niveau sécurité Tension dangereuse, tel
que défini par la norme EN 60-950. Cet appareil ne peut être mis complètement hors tension
quen débranchant le bloc dalimentation secteur de la prise murale. La prise doit être située à
proximité de lappareil et facilement accessible.
Connection du téléphone : La tension du réseau est classée TRT-3 (Tension de Réseau de
Télecommunication), comme définie dans la norme EN 60-950.
Précautions dutilisation : Ne pas mettre le combiné au contact de leau. Ne pas ouvrir le
combiné ni la base.Vous risquez de vous exposer à des tensions élevées.Toujours contacter
votre service après-vente pour des réparations. Eviter de mettre en contact les plots de
chargements ou les batteries avec des objets conducteurs.
Protection de lenvironnement : Veuillez vous conformez aux réglementations locales
lorsque vous jetez les emballages, les batteries usagées ou votre ancien téléphone. Dans la
mesure du possible, tentez de promouvoir le recyclage.
Utiliser la norme GAP
La norme GAP garantit un fonctionnement minimum à tout combiné et à toute base DECT
TM
GAP de marques différentes déclarés ensemble. Le combiné est GAP. Les fonctions minimales
garanties sont : prendre la ligne, recevoir un appel et numéroter.
Utiliser des bases Philips*
Si vous associez le combiné supplémentaire à la base Philips Onis 300 ou Onis 380, le combiné
bénéficiera de toutes les fonctions (décrites dans le manuel Onis 300 ou Onis 380).
Si vous souscrivez le combiné supplémentaire à la base Philips Onis 200 ou Zenia, certains menus
seront manquants. Référez-vous aux manuels de ces produits.
Utiliser une base GAP non-Philips
Pour souscrire le combiné supplémentaire Philips à une base non Philips, suivez les instructions
dans le manuel du constructeur de la base. Puis suivez les instructions page 4 (depuis létape 4)
pour associer le combiné supplémentaire Philips. Seuls certains menus seront disponibles.
Philips a marqué de symboles standards les batteries et lemballage. Ces symboles sont conçus pour promouvoir
leur recyclage.
Lemballage et le manuel sont recyclables.
Une contribution financière a été payée pour favoriser le recyclage du manuel et de lemballage.
1
Conformité, Sécurité et Environnement
Page 12
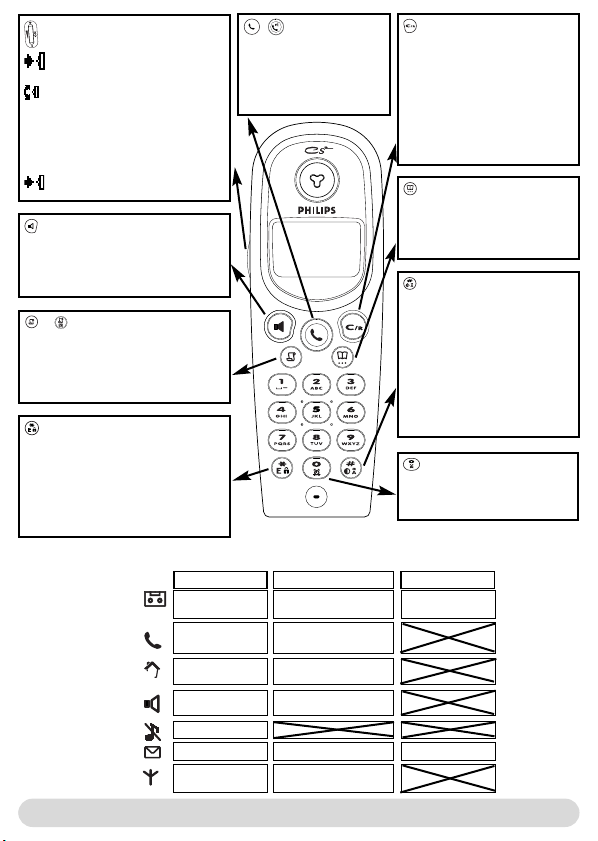
Touche de navigation
Appuyez pour entrer dans le
carousel ou valider un menu/option
- Défilez pour se déplacer dans les
menus & options, ou déplacer le curseur
- Vers le haut pour accéder à
Intercom depuis le mode veille
- Vers le bas pour accéder à
Moindre coût depuis le mode veille
Appuyez pour débloquer le clavier
Haut-parleur
- Appuyez pour prendre la ligne ou
activer le haut-parleur combiné
- Un appui long pour activer le hautparleur de la base
/ Journal des appels
- Un appui court pour accéder au journal
des appels
- Un appui long pour accéder
directement à la liste des messages
(Onis 300 Vox & Onis 380)
Blocage clavier & Edition
- Un appui court pour insérer *
- Un appui court pour entrer le mode
multitap ou léditeur Eatoni
- Un appui long pour bloquer/débloquer
le clavier
- Un appui long pour insérer (R) en
numérotant
®
Les icones
Répondeur allumé
Appel externe en
cours
cours
Haut-parleur activé
Sonnerie désactivée
Fonction SMS activée
Souscrit & à portée
de la base
/ Touche de ligne
- Appui court pour prendre
la ligne, ou raccrocher
- Appui long pour activer la
commande vocale
Ecouteur
Touche de correction
- Pour corriger un chiffre en prenumérotation ou une lettre en
mode édition
- Un appui long/court pour
retourner au mode veille ou
remonter dun niveau de menu
- Pour insérer R dans lutilisation
des services opérateur en cours
dappel
Répertoire
- Un appui court pour accéder
au répertoire
- Un appui long pour ajouter un
nouveau nom
Le mode Do Not Disturb
& le mode dédition
- Un appui court pour insérer # en
composant
- Un appui long pour activer le
mode Do Not Disturb
- Un appui long pour insérer une
pause (P) en composant
- Pour changer le mode
majuscule/minuscule
Réveil
- Un appui court pour composer 0
Microphone
- Un appui long pour
activer/désactiver le réveil
Combiné Onis 300/380
Clignotante
Nouveau message sur
répondeur ou boîte vocale
- Appel entrant en cours.
- La ligne est occupée
Appel interne entrant Appel interne en
Haut-parleur base activé
Nouveau SMS
Non souscrit
Le combiné
Clignote viteAllumée
Répondeur plein
Mémoire SMS pleine
Français
2
Page 13
Installer et remplacer les batteries
Pour insérer les batteries, ouvrez la trappe batterie, placez les
batteries comme indiqué et replacez la trappe. Quand le combiné est
placé sur le chargeur, les 3 barres déroulent (si une charge est
nécessaire). Lors de la première charge il est possible ques les
symboles napparaissent sur lécran quaprès quelques minutes.
Laissez charger 24h.
Si vous avez besoin de changer les batteries, merci de nutiliser que le
modèle R03/AAA NiMh de 600/650 mAh.
Attention : Pour assurer le bon chargement des piles, branchez toujours
votre base. Utilisez toujours des batteries rechargeables.
Licône batterie défile en cours de charge . En se déchargeant, la batterie
montre différents états : pleine , 2/3 , 1/3 et vide .
Autonomie et portée
Les batteries doivent être jetées dans les containers prévus à cet effet.
Lautonomie est denviron 250
heures en mode veille (quand le combiné est prêt à recevoir/émettre un appel) et denviron 16
heures en communication. Un signal dalerte vous informe que le combiné doit être chargé, si
cela arrive en communication, elle sera bientôt coupée. Lautonomie maximale est atteinte
après 3 cycles de charge/décharge des batteries.
Dans les conditions idéales, la portée peut atteindre 50 m à lintérieur et 300 m à lextérieur.
Quand vous atteignez la limite de portée, la conversation devient hachée, rapprochez-vous de la
base sinon la communication sera coupée. Pour obtenir une portée maximale éloignez la base
dappareils électriques.
Comprendre le système des menus
Depuis lécran de veille, appuyez sur pour accéder au caroussel
Le carrousel est une boucle dicônes qui donne accès aux menus du
premier niveau. Faîtes défiler pour atteindre le menu désiré.
Appuyez pour valider et entrer dans le menu.
Les sous menus sont listés et représentés par des petits carrés
en bas de lécran.
Pour atteindre un sous-menu en particulier faîtes défiler et
validez votre choix .
Un montre le menu où vous êtes.
Un montre le sous-menu ou loption choisi.
NB : Certains menus sont accessibles directement par un appui
touche (ex. le journal des appels )
Appel direct
1- Prenez la ligne
2- Numérotez
3
Appel pré-numéroté
1- Numérotez
2- Prenez la ligne
Le système des menus
Appel vocal
1- Appuyez sur
2- Dites lempreinte vocale
Page 14
Combiné
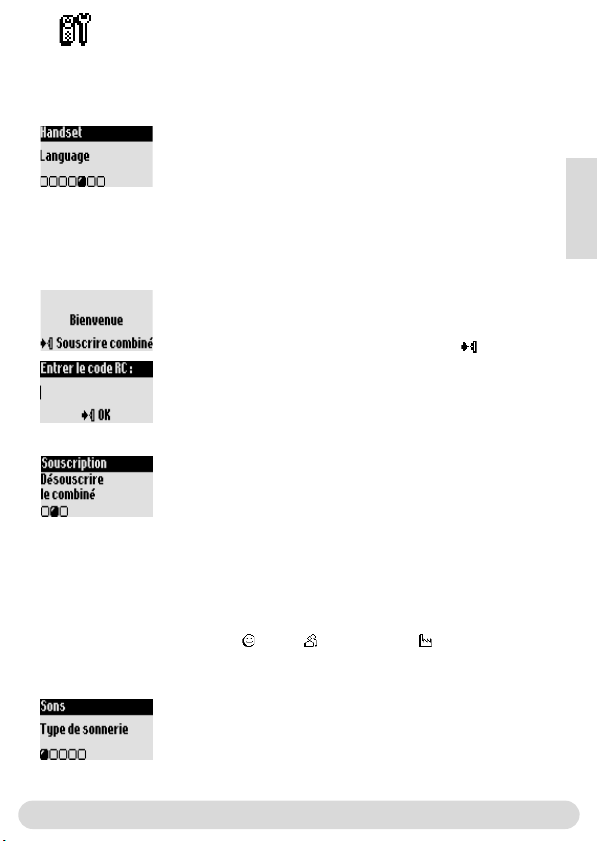
Changer la langue
La langue du combiné supplémentaire est par défaut langlais.
Pour changer la langue
1- Allez à Handset, validez
2- Sélectionnez Language, validez
3- Sélectionnez la langue désirée et validez
Attention : Changer la langue ne modifie pas la langue de laide
vocale du répondeur (Onis 300 Vox / Onis 380 ou autre base nonPhilips).
Souscrire/dé-souscrire un combiné supplémentaire à la base
Le combiné supplémentaire doit être associé à la base afin de pouvoir fonctionner
correctement*.Vous pouvez associer jusquà 8 combinés à la base Onis 300 et 8 à l Onis 380.
Pour souscrire un combiné supplémentaire
1- Mettez la base en mode souscription en débranchant/rebranchant
sa prise électrique
2- Avec le combiné supplémentaire appuyez sur
3- Entrez le code RC à 4 chiffres inscrit sous la base, validez
* Voir page 1
Pour dé-souscrire un combiné
1- Allez à Combiné, validez
2- Sélectionnez Souscription, validez
3- Choisissez Désouscrire le combiné, validez
4- choisissez un combiné dans la liste, validez
5- Entrez le code RC (code à 4 chiffres inscrit sous la base)et validez
Régler les sons du combiné
Régler les sonneries pour :
- Appel externe standard, pour les correspondants inconnus au répertoire ou sans réglages VIP.
- Appel interne, pour linterphonie (sil y a au moins deux combinés)
Pour les régler les sonneries VIP (Ami , famille et Professionnel ) voir le manuel de
lOnis 300/Onis300 Vox.Abonnement au service de présentation du numéro (CLI) nécessaire.
Pour choisir la sonnerie
1- Allez à Combiné, validez
2- Sélectionnez Sons, validez
3- Sélectionnez Type de sonnerie, validez
4- Sélectionnez Sonnerie externe Std/Sonnerie interne, validez
5- Choisissez une sonnerie dans la liste et validez
Attention : Seul lOnis 380 dispose du vibreur.
Combiné
Français
4
Page 15
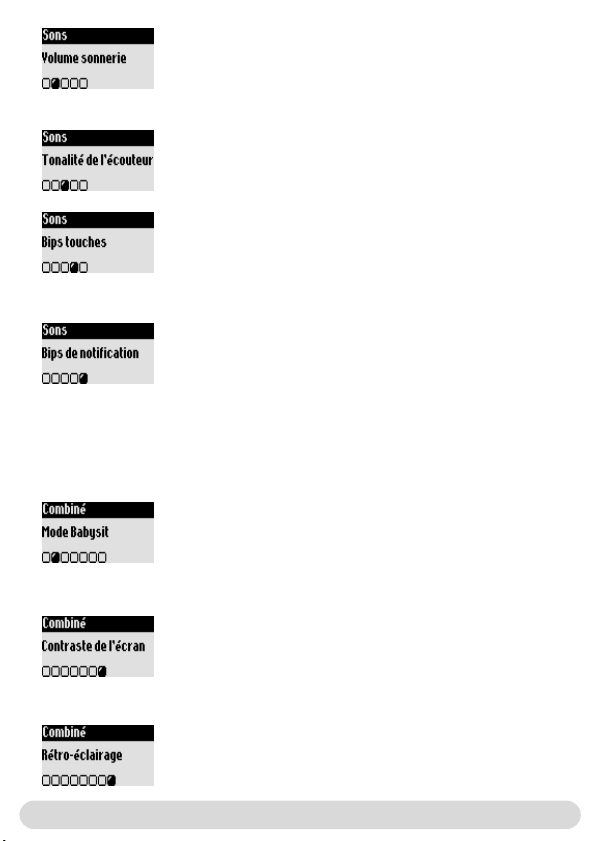
Pour choisir le volume de la sonnerie
5 niveaux de sonnerie sont disponibles.
Reprenez les étapes1&2 précédentes
3- Sélectionnez Volume sonnerie, validez
4- Choisissez le volume approprié et validez
Pour choisir la tonalité de lécouteur.
Reprenez les étapes 1&2 précédentes
3- Sélectionnez Tonalité de lécouteur, validez
4- Choisissez Normal, Aigu ou Grave et validez
Pour activer/désactiver les bips touches
Indications sonores de réglages effectués et dappui touches.
Reprenez les étapes 1&2 précédentes
3- Sélectionnez Bips touches, validez
4- Sélectionnez Activer/Désactiver et validez
Pour activer/désactiver les bips de notification
Indications sonores de nouveaux SMS et message sur boîte vocale
Reprenez les étapes 1&2 précédentes
3- Sélectionnez Bips de notification, validez
4- Sélectionnez Activer/Désactiver et validez
Le mode babysit
Cette fonction permet de surveiller la chambre denfant. Placez le combiné dans la pièce à
surveiller et vous entendrez les bruits sur le combiné supplémentaire.Un appel interne est
nécessaire pour surveiller la pièce.
Pour activer/désactiver le mode babysit
1- Allez à Combiné, validez
2- Sélectionnez Mode Babysit, validez
3- Sélectionnez Activer/Désactiver
Régler le contraste de lécran
Pour régler le contraste
1- Allez à Combiné, validez
2- Sélectionnez Contraste de lécran, validez
3- Sélectionnez le niveau approprié et validez
Régler le rétro-éclairage (Onis 380 uniquement)
Pour régler le rétro-éclairage
1- Allez à Combiné, validez
2- Sélectionnez Rétro-éclairage, validez
3- Sélectionnez 10 sec, 20 sec, Désactiver, validez
5
Combiné
Page 16

Interphonie
Utiliser linterphonie (si vous avez au moins 2 combinés)
Linterphonie permet de passer des appels internes, dactiver le babysit ou de transférer des
appels externes d1 combiné à 1 autre. Linterphonie nest possible quentre combinés associés à
une même base.
Faire un appel interne ou activer la surveillance de la pièce
1- Allez à Interphonie, validez
2- Sil ny a quun combiné supplémenataire il sonne
automatiquement, sinon sélectionnez dans la liste le combiné/la
base à appeler. Le combiné/la base désigné(e) sonne
3- Prenez la ligne sur ce combiné/cette base.
La conversation interne ou lécoute à distance commence.
Couper microph. est disponible dans le menu contextuel.
Pendant un appel externe vous pouvez transférer la communication
à un autre combiné.
1- Appuyez sur
2- Sélectionnez Interphonie, validez
3- Sil ny a quun combiné supplémenataire il sonne
automatiquement, sinon sélectionnez dans la liste le combiné/la base
à appeler. Le combiné/la base désigné(e) sonne. Lappel externe est
mis en attente.
4- Prenez la ligne sur lautre combiné/la base
Si le combiné appelé ne répond pas, vous pouvez reprendre lappel
sur le combiné initial en utilisant loption Terminer l intercom.
Les 2 correspondants internes peuvent parler ensemble.
5- Choisissez loption Transfert dans le menu contextuel.
Lappel est coupé sur le combiné dorigine et le correspondant est
transféré.
NB : Le transfert direct est possible depuis le combiné dorigine,
appuyez .
Pendant la mise en attente du correspondant il entend la musique
dattente (si activée) ou des bips.
Va & vient (entre appel 1 & 2) et Couper microph. sont
dautres options disponibles dans le menu contextuel.
Pour faire une conférence interne
Loption conférence interne permet qu1 appel externe soit partagé
par 2 combinés (en interphonie). Les 3 personnes peuvent participer
à la conversation (aucun abonnement opérateur nest nécessaire).
Reprenez les étapes 1 à 4 précédentes
5- Sélectionnez Conférence interne, validez
Interphonie
Français
6
Page 17

Téléphone, un problème...
Problème
Pas de tonalité
Quand le combiné est placé
sur le chargeur, il ny a pas
de bip
Les batteries ne se chargent
pas correctement après une
charge de 12 heures.
Jentends un bip derreur sur
le combiné quand je veux
appeler
Jentends un bip derreur
pendant un appel
Il ny a pas de sonnerie
Quand jassocie un combiné
à la base, un message
derreur apparaît
Il y a des interferences
quand je téléphone
Cause Solution
Le combiné est hors portée
de la base ( a disparu)
Le combiné na pas été associé à
la base
( napparaît pas).
La base nest pas correctement
branchée à la prise électrique ou
à la ligne téléphonique
Les batteries sont déchargées
( apparaît).
Le chargeur nest pas
correctement branché à la prise
électrique
Les contacts charge sont sales Nettoyez-les avec un tissu sec
Les bips touches sont désactivés
Le chargeur nest pas
correctement branché à la prise
électrique
Les batteries sont défectueuses
ou trop anciennes
Le combiné nest pas souscrit
Un appel externe est déjà en
cours depuis un autre combiné
La base est occupée
Le combiné est hors de portée
Les batteries sont déchargées
La sonnerie est désactivée
La procédure a échoué
Le nombre maximum de combiné
est atteint
Vous êtes trop loin de la base.
La base est trop prêt dappareils
électriques, de mur en béton armé
ou darmatures en métal
Rapprochez vous de la base et
réessayez
Associez le combiné à la base
(Voir page 4)
Vérifiez les branchements
Chargez les batteries (Voir
page 3)
Vérifiez les branchements
Activez-les (Voir page 5).
Vérifiez les branchements
Contactez votre revendeur.
Achetez de nouvelles batteries.
Souscrivez-le (voir page 4)
Réessayer quand cet appel est
terminé
Réessayez quand la
consultation est terminée
Rapprochez le de la base
Chargez les batteries.
Activez-la (Voir page 5)
Débranchez et rebranchez la
prise électrique de la base et
réessayez la procédure
Désouscrivez un combiné
(Voir page 4)
Rapprochez-vous de la base
Déplacez la base pour trouver
une meilleure place (en
hauteur si possible)
7
Problèmes/Solutions
Page 18

DECLARATION OF CONFORMITY
We,
PHILIPS Consumer, Electronics
DECT & Home Telephony
Route dAngers
72081 Le Mans Cedex 9
France
Declare that the products Onis 300 (TU5321), Onis 300 Vox (TU5351 & TU5352)
and the additional handset Onis 300 (TU 5350) are in compliance with ANNEX III of
the R&TTE-Directive 1999/5/EC and then with the following essential requirements :
Article 3.1.a : (protection of the health & the safety of the user) : EN 30950 (2000)
Article 3.1.b : (protection requirements with respect to electromagnetic
compatibility) ETSI EN 301 489-6 V1.1.1 (09/2000) & ETSI EN 301 489-1 V1.3.1
(09/2001)
Article 3.2 : (effective use of the radio spectrum) : EN 3001 406 (2001)
The presumption of conformity with the essential requirements regarding Council
Directive 1999/5/EC is ensured.
Date : 16/12/02 Le Mans
Vice President & General Manager
DECT & Home Telephony
Français
Certificat de conformité
8
Page 19

9
Notes
Page 20

Konformität, Sicherheit und Umwelt
Sicherheitsinformation: Diese Geräteausstattung kann bei einem Stromausfall nicht für einen
Notruf eingesetzt werden.Verwenden Sie im Notfall ein alternatives Gerät, z.B. ein Handy.
Konformität: Siehe Seite 9. Eine Kopie der Konformitätserklärung kann bei Bedarf beim Ersatz-
teil-Kundendienst angefordert werden.
Stromversorgung: Dieses Produkt benötigt eine 230 Volt Stromversorgung mit Einphasen-
Wechselstrom, ausgenommen IT-Installationen gemäß Norm EN 60-950.
Achtung! Das elektrische Netz wird gemäß der Norm EN 60-950 als gefährlich eingestuft. Das
Gerät kann nur durch Ziehen des Netzsteckers von der Stromversorgung getrennt werden.
Verwenden Sie daher eine gut zugängliche Wandsteckdose.
Telefonanschluss: Die Spannung im Telefonnetz wird als TNV-3 (Telecommunication Network
Voltages) gemäß Definition in der Norm EN 60-950 eingestuft.
Sicherheitshinweise: Halten Sie das Mobilteil von Flüssigkeiten fern. Zerlegen Sie weder das
Mobilteil noch die Basisstation. Sie könnten mit gefährlichen Spannungen in Berührung
kommen. Lassen Sie Reparaturen immer vom autorisierten Kundendienst ausführen. Die
Ladekontakte und die Akkus dürfen nicht mit leitenden Gegenständen in Berührung kommen.
Umweltschutz: Bitte beachten Sie bei der Entsorgung des Verpackungsmaterials, der
verbrauchten Akkus und eines ausgedienten Telefons unbedingt die örtlichen Vorschriften und
Recyclingmöglichkeiten.
Anforderungen des GAP-Standards
Durch den GAP-Standard wird sichergestellt, dass alle DECTTM- und GAP-fähigen Mobilteile und
Basisstationen die Mindestanforderungen des Standards erfüllen, unabhängig von der Produktmarke. Das Mobilteil Onis 300 entspricht den GAP-Anforderungen, d.h. die Funktionalität nachfolgender Funktionen wird garantiert: Leitung belegen, Anrufe erhalten und Rufnummern wählen.
Bei Einsatz von Philips Basisstationen
Wenn Sie das zusätzliche Mobilteil Onis 300 an der Basisstation Onis 300 oder Onis 380
betreiben, können Sie den gesamten, beschriebenen Leistungsumfang nutzen (siehe Bedienungsanleitung Onis 300 oder Onis 380).
Wenn Sie das zusätzliche Mobilteil an einer Basisstation Onis 200 oder Zenia anmelden, stehen
einige Menüs nicht zur Verfügung. Bitte sehen Sie in der entsprechenden Dokumentation nach.
Bei Einsatz anderer Basisstationen (keine Philips Produkte)
Befolgen Sie zum Anmelden des zusätzlichen Mobilteils an einer Basisstation anderer Marke (kein
Philips Produkt) die Anweisungen in der Herstellerdokumentation. Führen Sie dann die in der
vorliegenden Anleitung angegebenen Bedienschritte für das Anmelden aus, siehe Seite 4 (ab
Schritt 4). Beachten Sie, dass nicht alle Menüfunktionen zur Verfügung stehen.
Philips hat die Batterien/Akkumulatoren und die Geräteverpackungen mit Standardsymbolen gekennzeichnet, um
die ordnungsgemäße Entsorgung zu fördern.
Das Verpackungsmaterial und die Bedienungsanleitung können dem Recycling zugeführt werden.
Es wurde ein finanzieller Beitrag geleistet zur Förderung der Wiederaufbereitung und des Recyclings.
Deutsch
DECTTMist ein eingetragenes Warenzeichen von ETSI zu Gunsten der Benutzer der DECT-Technologie.
Konformität, Sicherheit und Umwelt
1
Page 21
Pilot-Taste
Drücken: Karussellaufruf oder
Bestätigen von Menüs/Optionen
- Blättern in den Menüs und Optio-
nen oder Cursor positionieren
- Nach oben für den Zugriff auf
Interner Ruf im Ruhemodus
- Nach unten für den Zugriff auf die
Günstigste Vorwahl-Funktion
Drücken:Tastensperre deaktivieren
Lautsprecher
- Drücken:Verbindungsaufbau oder
Mobilteillautsprecher aktivieren
- Lange drücken: Lautsprecher der Basis
aktivieren
/ Anrufliste
- Drücken:Anrufliste aufrufen und
anzeigen
- Lange drücken: Liste der gesprochenen
Nachrichten aufrufen (Onis 300 und Onis
380)
Tastensperre und Eingabe
- Kurz drücken zur Eingabe von * (Stern)
- Lange drücken:Tastensperre aktivieren/
deaktivieren
- Lange drücken (R) bei der
Rufnummernwahl eingeben
- Lange drücken: Standard- oder Eatoni
Texteingabe
Symbole
Anrufbeantworter
(Onis 300 Vox)
Aktiver,externer Ruf
Mobilteil-Laut-
sprecher aktiviert
Rufton deaktiviert
SMS-Funktion aktiv
Angemeldet und in
Reichweite der Basis
2
/
Telefonieren-Taste
- Drücken:Verbindungsaufbau, Gespräch annehmen
oder beenden
- Lange drücken: Sprachwahl
aktivieren
Mikrofon
®
-
Mobilteil Onis 300/380
Neue Nachricht auf AB
EIN
oder Voice mail
-
Ankommender,externer Ruf
- Leitung belegt
Ankommender,interner RufAktiver,interner Ruf
Basis-Lautsprecher aktiviert
Neue SMS
Nicht angemeldet
Mobilteil
Blinkt
Lösch-/Abbruch-Taste
- Ziffer bei Rufnummerneingabe
oder Zeichen bei Texteingabe
löschen
- Eine Menüebene zurückgehen
- Lange drücken: Beim Navigieren
in den Ruhemodus zurückkehren
- Während einer Verbindung die RFunktion aktivieren (für Netzbetreiberdienste)
Hörer
Telefonbuch
- Kurz drücken: Das Telefonbuch
aufrufen
- Lange drücken: Einen neuen
Eintrag hinzufügen
Nicht stören Modus und
Umschalttaste
- Drücken: # bei der
Rufnummernwahl eingeben
- Lange drücken:Nicht stören
Modus aktivieren/deaktivieren
- Lange drücken Pausezeichnen
(P)bei der Rufnummernwahl
eingeben
- Von Klein- auf Großbuchstaben
schalten und umgekehrt
Wecker
- Kurz drücken, um die 0 zu wählen
- Lange drücken: Den Wecker ein-/
ausschalten
Blinkt schnellKonstant EIN
AB-Speicher voll
SMS-Speicher voll
Page 22

Akkus einsetzen und wechseln
Öffnen Sie die Akkuabdeckung, setzen Sie die Akkus wie abgebildet
ein und schließen Sie die Abdeckung wieder. Wenn das Mobilteil in
die Ladeschale der Basis gestellt wird (zum Akkuladen), bewegen sich
die 3 Balken des Akkusymbols. Bei der Erstinbetriebnahme kann es
einige Minuten dauern, bis die Displaysymbole erscheinen.Akkus 24
Stunden laden.
Für den Akkuwechsel sind folgende Akkutypen vorgeschrieben:
R03/AAA NiMh oder 600/650 mAh.
Achtung:Während des Ladevorgangs muss die Basis am Stromnetz
angeschlossen sein. Nur wiederaufladbare Akkus verwenden.
Während des Ladevorgangs verändern sich die Balken des Akkusymbols: .
Der Status der Akkus wird angezeigt: Voll , 2/3 , 1/3 und Akku leer .
Akkuleistung und Reichweite
Voll aufgeladene Akkus bieten Ihnen 250 Stunden Betriebsbereitschaft (Mobilteil im Ruhemodus und gesprächsbereit) und ca. 16 Stunden Gesprächsdauer.Ein Beepton informiert Sie, wenn die Akkus
aufgela-den werden müssen.Tritt dies während eines Gespräches ein, wird das Gespräch kurz
nach dem Signal beendet.
Lade-/Entladevorgängen erreicht.
Bei günstigen Bedingungen beträgt die Reichweite in geschlossenen Räumen 50 Meter und 300
Meter im Freien. Bei Überschreiten der Reichweite hören Sie ein Knistern, gehen Sie näher zur
Basis sonst wird das Gespräch unterbrochen. Halten Sie die Basis von elektrischen Geräten fern,
um die optimale Reichweite zu nutzen.
Die optimale Akkuleistungsfähigkeit wird nach 3 kompletten
Akkus nicht im Hausmüll entsorgen.
Menüstruktur und Bedienung
Im Ruhemodus rufen Sie das Menü-Karussell mit der Taste auf.
Im Karussell sind in einer Ringschaltung angeordnete Symbole für den
Zugriff auf die erste Menüebene. Blättern Sie vor-/rückwärts mit ,
um das gewünschte Menü zu erreichen. Bestätigen Sie mit für den
Einstieg in das Menü. Die Untermenüs werden als kleine Quadrate
im unteren Displaybereich dargestellt.
Mit erreichen Sie das gewünschte Untermenü, bestätigen Sie dann
Ihre Auswahl mit .
Das Symbol zeigt die Option an, in der Sie gerade blättern. Das
ausgewählte Untermenü/die Option wird mit einem Häkchen
gekennzeichnet.
Hinweis: Manche Menüs können über eigene Tasten direkt aufgerufen
werden (z.B.Anrufliste )
Direktwahl
1- Leitung belegen .
2- Rufnummer eingeben.
Vorbereitete Wahl
1- Rufnummer eingeben,
2- Leitung belegen .
Menüstruktur und Bedienung
Sprachwahl
1- Taste drücken.
2- Sprachbefehl sprechen
3
Deutsch
Page 23

Mobilteil
Sprache ändern
Im Lieferzustand ist die englische Sprache auf Ihrem Mobilteil eingestellt.
Displaysprache ändern
1- Gehen Sie zu Handset, bestätigen Sie.
2- Scrollen Sie zu Language, bestätigen Sie.
3- Wählen Sie die gewünschte Sprache aus und bestätigen Sie.
Achtung: Das Ändern der Displaysprache hat keinen Einfluss auf die
Ansagetexte des Anrufbeantworters (Onis 300 Vox/Onis 380 oder andere
Basisstationen, nicht von Philips).
Anmelden/Abmelden eines zusätzlichen Mobilteils an der Basis
Das zusätzliche Mobilteil muss an der Basis angemeldet sein damit der komplette Leistungsumfang
genutzt werden kann*.An der Basis Onis 300/380 können Sie bis zu 8 Mobilteile anmelden.
Zusätzliches Mobilteil anmelden
Versetzen Sie die Basis wie folgt in den Anmeldemodus:
1- Den Netzstecker der Basis ziehen und wieder anschließen.
2- Drücken Sie am Mobilteil auf , um das Anmelden einzuleiten.
3- Geben Sie den RC-Code ein (4-stelliger Code, auf dem Aufkleber
an der Unterseite der Basis vermerkt), bestätigen Sie.
Ein Mobilteil abmelden
1- Gehen Sie zu Mobilteil, bestätigen Sie.
2- Scrollen Sie zu Anmeldung und bestätigen Sie.
3- Wählen Sie Mobilteil abmelden und bestätigen Sie.
4- Wählen Sie das abzumeldende Mobilteil in der Liste aus, bestätigen Sie.
5- Geben Sie den RC-Code ein (4-stelliger Code, unter der Basis
vermerkt), bestätigen Sie.
* Siehe Seite 1
Die Töne des Mobilteils einstellen
Sie können die Ruftonmelodien einstellen für:
- Den externen Standardrufton für Anrufer, die nicht im Telefonbuch oder ohne VIP-Einstellungen
gespeichert sind.
- Den internen Rufton (wenn mindestens zwei Mobilteile vorhanden sind).
Zum Einstellen der VIP-Ruftonmelodien (Freunde , Familie und Arbeit ) siehe Anleitung
Onis 300/300 Vox. Für diese Funktion benötigen Sie die Rufnummernübermittlung (CLIP).
Rufton einstellen
1- Gehen Sie zu Mobilteil, bestätigen Sie.
2- Wählen Sie Töne, bestätigen Sie.
3- Wählen Sie Ruftonmelodie, bestätigen Sie.
4- Wählen Sie Externer Standard Rufton/Interner Rufton,
bestätigen Sie.
5- Wählen Sie den gewünschten Rufton aus und bestätigen Sie.
4
Mobilteil
Page 24

Ruftonlautstärke des Mobilteils einstellen
Es stehen 5 Einstellungen für die Ruftonlautstärke zur Verfügung.
1- Gehen Sie zu Mobilteil, bestätigen Sie.
2- Wählen Sie Töne, bestätigen Sie.
3- Scrollen Sie zu Ruftonlautstärke, bestätigen Sie.
4- Wählen Sie die gewünschte Lautstärke und bestätigen Sie.
Hinweis: Die Vibrationsfunktion ist nur mit dem Onis 380 möglich.
Hörerklang einstellen
1- Gehen Sie zu Mobilteil, bestätigen Sie.
2- Scrollen Sie zu Töne, bestätigen Sie.
3- Scrollen Sie zu Hörerklang, bestätigen Sie.
4- Wählen Sie Standard, Hoch oder Bass und bestätigen Sie.
Tastenton aktivieren/deaktivieren
Tastenbetätigungen und Änderungen der Einstellungen können
durch einen Beepton bestätigt werden.
Wiederholen Sie die zuvor angegebenen Bedienschritte 1-2.
3- Scrollen Sie zu Tastenton, bestätigen Sie.
4- Wählen Sie EIN/AUS und bestätigen Sie.
Bestätigungston aktivieren/deaktivieren
Der Bestätigungston informiert Sie, wenn eine neue SMS oder eine
gesprochene Nachricht für Sie angekommen ist.
Wiederholen Sie die zuvor angegebenen Bedienschritte 1-2.
3- Scrollen Sie zu Bestätigungston, bestätigen Sie.
4- Wählen Sie EIN/AUS, bestätigen Sie.
Babysitter Modus
Zum Überwachen des Kinderzimmers. Legen Sie das Mobilteil in den zu überwachenden Raum;
über das zusätzliche Mobilteil können Sie alle Geräusche im Raum hören.
Babysitter Modus aktivieren/deaktivieren
1- Gehen Sie zu Mobilteil, bestätigen Sie.
2- Scrollen Sie zu Babysitter Modus, bestätigen Sie.
3- Wählen Sie EIN/AUS, bestätigen Sie.
Hinweis: Für die Raumüberwachung ist ein interner Ruf nötig (siehe
Seite 6).
Deutsch
Displaykontrast einstellen
Displaykontrast einstellen
1- Gehen Sie zu Mobilteil, bestätigen Sie.
2- Scrollen Sie zu Kontrast, bestätigen Sie.
3- Wählen Sie die gewünschte Kontrasteinstellung und bestätigen
Sie.
Mobilteil
5
Page 25

Hintergrundbeleuchtung einstellen (nur Onis 380)
Hintergrundbeleuchtung einstellen
1- Gehen Sie zu Mobilteil, bestätigen Sie.
2- Scrollen Sie zu Beleuchtung, bestätigen Sie.
3- Wählen Sie die gewünschte Dauer 10 Sek., 20 Sek. oder
AUS, bestätigen Sie.
6
Mobilteil
Page 26

Interner Ruf
Interner Ruf (wenn mindestens 2 Mobilteile zur Verfügung stehen)
Mit dieser Funktion können Sie interne Gespräche führen, die Babysitter-Funktion (Raumüberwachung) nutzen und externe Gespräche an ein anderes Mobilteil weiterverbinden. Der Internruf
funktioniert nur zwischen Mobilteilen, die an der gleichen Basisstation angemeldet sind.
Intern anrufen oder Raumüberwachung aktivieren
1- Gehen Sie zu Interner Ruf, bestätigen Sie.
2- Wenn es nur ein Mobilteil gibt, klingelt dieses automatisch.
Andersfalls wählen in der Liste das gewünschte Mobilteil/die Basis
aus und für Anruf drücken. Das gerufene Mobilteil/die Basis
klingelt.
3- Auf dem gerufenen Mobilteil/der Basis mit das Gespräch
annehmen. Das interne Gespräch/die
Raumüberwachung kann beginnen. Stumm ist ebenfalls möglich.
Hinweis: Die Funktion Interner Ruf kann auch mit der PilotTaste aufgerufen werden. Scrollen Sie im Ruhemodus mit nach
oben.
Sie können ein externes Gespräch an ein anderes Mobilteil
weiterverbinden.
1- Drücken Sie auf , um die Optionen aufzurufen.
2- Scrollen Sie zu Interner Ruf, bestätigen Sie.
3- Wenn es nur ein Mobilteil gibt, klingelt dieses automatisch.
Andersfalls, wählen Sie in der Liste das gewünschte Mobilteil/die
Basis aus. Das gerufene Mobilteil/die Basis klingelt. Das externe
Gespräch wird gehalten.Wenn sich das 2. Mobilteil nicht meldet,
können Sie das Gespräch am 1. Mobilteil wieder übernehmen indem
Sie die Option Interner Ruf beenden aufrufen.
4- Nehmen Sie das Gespräch mit am anderen Mobilteil/an der
Basis an. Beide interne
Gesprächspartner können miteinander sprechen.
5- Wählen Sie die Option Verbinden. Das Gespräch wird am 1.
Mobilteil beendet. Hinweis: Sie können das Gespräch am 1. Mobilteil
auch mit beenden.
Während das Gespräch gehalten wird, hört der Anrufer die Wartemelodie (wenn sie aktiviert ist) oder Beeptöne.
Die Optionen Umschalten ([Makeln] zwischen Gesprächspartner
1 und 2) und Stumm (Mikrofon) stehen im Kontextmenü ebenfalls
zur Verfügung.
Konferenzgespräch
Mit der Funktion Konferenzgespräch kann ein externer Anrufer mit
2 Mobilteilen (mit dem Internen Ruf) verbunden werden. Die 3
Gesprächspartner können dann miteinander sprechen (diese Konferenzgespräche sind nicht vertragsabhängig).
Wiederholen Sie die zuvor angegebenen Bedienschritte 1-4.
5- Rufen Sie die Option Konferenzgespräch auf, bestätigen Sie.
Interner Ruf
7
Deutsch
Page 27

Selbsthilfe bei der Fehlersuche
Problem
Kein Wählton
Kein Beepton, wenn das
Mobilteil in die Ladeschale
gestellt wird.
Nach einer Ladedauer von
12 Stunden sind die Akkus
immer noch nicht aufgeladen.
Wenn Sie mit Ihrem Mobilteil anrufen möchten, hören
Sie einen Fehlerton.
Während eines Gespräches
hören Sie einen Fehlerton.
Kein Rufton.
Beim Anmelden eines Mobilteils erscheint eine Fehlermeldung.
Störgeräusche in der Leitung
beim Telefonieren.
Mögliche Ursache Abhilfe
Das Mobilteil ist außerhalb der
Reichweite der Basis ( fehlt)
Das Mobilteil ist nicht an der
Basis angemeldet.
(Symbol erscheint nicht).
Die Basis ist nicht korrekt an der
Stromversorgung oder am
Telefonanschluss angeschlossen.
Die Akkus sind entladen (das
Symbol erscheint).
Die Ladeschale ist nicht korrekt
an der Stromversorgung angeschlossen.
Verschmutzte Ladekontakte.
Der Tastenton ist deaktiviert.
Die Ladeschale ist nicht korrekt
an der Stromversorgung angeschlossen.
Die Akkus sind beschädigt oder
zu alt.
Das Mobilteil ist nicht angemeldet.
Auf einem anderen Mobilteil wird
ein externes Gespräch geführt.
Die Basisstation ist gerade belegt.
Mobilteil außerhalb der
Die Akkus sind schwach.
Der Rufton ist deaktiviert.
Das Anmelden ist gescheitert.
Die maximale Anzahl von Mobilteilen ist erreicht.
Entfernung zur Basis zu groß.
Die Basis befindet sich in der Nähe von elektrischen Geräten, Stahlbetonwänden oder
Reichweite.
Metalltüren.
Nähern Sie sich der Basis und
versuchen Sie es erneut.
Das Mobilteil an der Basis
anmelden (siehe Seite 4).
Steckverbindungen prüfen.
Akkus laden (siehe Seite 3).
Steckverbindungen prüfen.
Mit trockenem Tuch reinigen.
Tastenton aktivieren (Seite 5).
Steckverbindungen prüfen.
Kaufen Sie neue Akkus bei
Ihrem Fachhändler.
Melden Sie es an (Seite 4).
Erneut versuchen, wenn das
Gespräch beendet ist.
Erneut versuchen, wenn die
Basis wieder verfügbar ist.
Nähern Sie sich der Basis.
Akkus laden.
Rufton aktivieren (Seite 5).
Netzstecker der Basis ziehen
und wieder anschließen. Mobilteil nochmals anmelden.
Ein Mobilteil abmelden (siehe
Seite 4).
Nähern Sie sich der Basis.
Aufstellort der Basis wechseln
(je höher umso besser).
8
Fehlerbehebung
Page 28

DECLARATION OF CONFORMITY
We,
PHILIPS Consumer, Electronics
DECT & Home Telephony
Route dAngers
72081 Le Mans Cedex 9
France
Declare that the products Onis 300 (TU5321), Onis 300 Vox (TU5351 & TU5352)
and the additional handset Onis 300 (TU 5350) are in compliance with ANNEX III
of the R&TTE-Directive 1999/5/EC and then with the following essential
requirements :
Article 3.1.a : (protection of the health & the safety of the user) : EN 30950 (2000)
Article 3.1.b : (protection requirements with respect to electromagnetic
compatibility) ETSI EN 301 489-6 V1.1.1 (09/2000) & ETSI EN 301 489-1 V1.3.1
(09/2001)
Article 3.2 : (effective use of the radio spectrum) : EN 3001 406 (2001)
The presumption of conformity with the essential requirements regarding Council
Directive 1999/5/EC is ensured.
Date : 16/12/02 Le Mans
Vice President & General Manager
DECT & Home Telephony
Deutsch
Konformitätserklärung
9
Page 29

Conformiteit, veiligheid en milieu
Veiligheidsinformatie: Deze apparaatuitvoering kan tijdens een stroomstoring niet worden ge-
bruikt voor het bellen van een alarmnummer. Gebruik in geval van nood een ander apparaat,
bijv. een mobiele telefoon.
Conformiteit: Zie pagina 9. U kunt desgewenst een kopie van de conformiteitsverklaring
aanvragen bij het klantenservicecentrum.
Voeding: Dit product heeft een voeding nodig van 230 Volt met eenfasige wisselstroom, met
uitzondering van IT-installaties overeenkomstig de norm EN 60-950.
Let op! Het elektrische net wordt overeenkomstig de norm EN 60-950 als gevaarlijk geclassificeerd. De stroomvoorziening naar het apparaat kan alleen worden onderbroken door de netstekker uit het stopcontact te trekken. Gebruik daarom een goed bereikbare wandcontactdoos.
Telefoonaansluiting: De spanning in het telefoonnet wordt als TNV-3 (Telecommunication
Network Voltages) overeenkomstig de bepaling in de norm EN 60-950 geclassificeerd.
Veiligheidsinstructies: Houd de handset verwijderd van vloeistoffen. Demonteer noch de
handset noch het basisstation. U zou met gevaarlijke spanningen in aanraking kunnen komen.
De oplaadcontacten en de accu's mogen niet met geleidende voorwerpen in aanraking komen.
Milieubescherming: Let bij het verwijderen van het verpakkingsmateriaal, de verbruikte accu's
en een uitgediende telefoon altijd op de plaatselijke voorschriften en recyclingmogelijkheden.
Eisen van de GAP-standaard
De GAP-standaard is een garantie voor het feit, dat alle handsets en basisstations die geschikt
zijn voor DECT en GAP voldoen aan de minimumeisen van de standaard, ongeacht het merk.
De handset Onis 300 voldoet aan de GAP-eisen, d.w.z. de werking van de volgende functies
wordt gegarandeerd: lijn bezetten, gesprekken ontvangen en telefoonnummers kiezen.
Bij gebruik van Philips basisstations
Wanneer u de extra handset Onis 300 op het basisstation Onis 300 of Onis 380 gebruikt, kunt u
gebruik maken van alle beschreven mogelijkheden (zie gebruiksaanwijzing Onis 300 of Onis 380).
Wanneer u de extra handset aanmeldt op een basisstation Onis 200 of Zenia, staan enkele
menu's niet ter beschikking. Dit dient u in de desbetreffende documentatie na te kijken.
Bij gebruik van andere basisstations (geen producten van Philips)
Volg voor het aanmelden van de extra handset op een basisstation van een ander merk (geen
product van Philips) de aanwijzingen in de technische gegevens van de fabrikant.Voer vervolgens
de stappen die in deze handleiding staan aangegeven voor het aanmelden uit, zie pagina 4 (vanaf
stap 4). Let erop, dat niet alle menufuncties ter beschikking staan.
Philips heeft de batterijen/accumulatoren en de verpakkingen van de apparatuur gemerkt met standaardsymbolen
om te bevorderen dat deze volgens de milieuvoorschriften worden verwijderd.
Het verpakkingsmateriaal en de gebruiksaanwijzing kunnen worden gerecycled.
Er werd een financiële bijdrage geleverd ter stimulering van hergebruik en recycling.
DECT is een geregistreerd handelsmerk van ETSI ten gunste van de gebruikers van de DECT-technologie.
1
Conformiteit, veiligheid en milieu
Page 30

Pilot-key
- Indrukken: carrousel-oproep of
bevestigen van menu's/opties
- Bladeren in de menu's en opties of
cursor positioneren
- Naar boven voor toegang tot
Intern gesprek in stand-by modus
- Naar beneden voor toegang tot
Laagste Kosten-functie
Indrukken: toetsblokkering deactiveren
Luidspreker
- Indrukken: Luidspreker handset
activeren of verbinding maken
- Lang indrukken: luidspreker van de
basis activeren
/ Bellijst
- Indrukken: bellijst oproepen en
weergeven
- Lang indrukken: lijst van
ingesproken berichten oproepen
(Onis 300 en Onis 380)
Toetsblokkering en invoer
- Lang indrukken: toetsblokkering
activeren/deactiveren
- Lang indrukken: standaard- of Eatoni
tekstinvoer
ummeringave:
Tijdens n
- Kort indrukken: Invoeren * (sterretje)
- Lang indrukken: Invoegen R
Symbolen
Antwoordapparaat
AAN (Onis 300 Vox)
Actief, extern gesprek
Luidspreker handset
geactiveerd
Belmelodie UIT
SMS-functie actief
Aangemeld en binnen
reikwijdte van de basis
/
Telefoneren-toets
- Indrukken: verbinding
maken, gesprek aannemen of
beëindigen
- Lang indrukken:Voice Dial
activeren
®
-
Microfoon
Handset Onis 300/380
Nieuw bericht op het AA of
voice mail
-
Inkomend, extern gesprek
- Lijn bezet
Inkomend, intern gesprekActief, intern gesprek
Luidspreker basisstation
geactiveerd
Nieuw SMS-bericht
Niet aangemeld
Handset
Knippert
Reset-/ afbreken-toets
- Getal bij telefoonnummerinvoer
of teken bij tekstinvoer wissen
- Een menuniveau teruggaan
- Lang indrukken:Tijdens het
navigeren naar de stand-by modus
terugkeren
- Tijdens een verbinding de
R-functie activeren (voor
operator type)
Hoorn
Telefoonboek
- Kort indrukken: telefoonboek
oproepen
- Lang indrukken: een nieuwe
notitie toevoegen
'Niet storen' modus en
overschakeltoets
- Lang indrukken: 'Niet storen'
mode activeren/deactiveren
- Van kleine naar grote letters
overschakelen en omgekeerd
Tijdens nummeringave:
- Kort indrukken: Invoegen #
- Lang indrukken: Invoegen
pause (P)
Alarmklok
- Kort indrukken om de 0 te
selecteren
- Lang indrukken: de alarmklok
in-/uitschakelen
Knippert snelConstant AAN
Geheugen AA vol
SMS-geheugen vol
Nederlands
2
Page 31

Accu's plaatsen en vervangen
Open het deksel van het accuvakje, plaats de accu's zoals afgebeeld en
sluit het vakje weer.Wanneer de handset in de oplader van de basis
wordt geplaatst (voor het opladen van de accu), bewegen de 3 balken
van het accusymbool. Wanneer het apparaat voor de eerste keer in gebruik wordt genomen kan het enkele minuten duren voordat de symbolen op het display verschijnen. Laad de accu's 24 uur op.
Voor het ver vangen van de accu's worden de volgende types
voorgeschreven: R03/AAA NiMh 600/650 mAh.
Let op: tijdens het opladen moet de basis op het elektriciteitsnet zijn
aangesloten. Gebruik alleen oplaadbare accu's.
Tijdens het opladen van de accu's veranderen de balken van het accusymbool: .
De status van de accu wordt weergegeven: vol , 2/3 , 1/3 en accu leeg .
NL
Niet
weggooien,
maar inleveren
Accu's mogen niet bij het huisvuil
Accucapaciteit en reikwijdte
Accu's die volledig zijn opgeladen, zijn gereed om 250
uur te kunnen worden gebruikt (handset in stand-by
modus en gereed voor het voeren van een gesprek) en bieden ca. 16 uur gesprekstijd. Een
waarschuwingssignaal laat weten, wanneer de accu's moeten worden opgeladen. Wanneer dit
tijdens een gesprek gebeurt wordt het gesprek kort na het signaal beëindigd.
accucapaciteit wordt bereikt nadat de accu 3 maal volledig is opgeladen/ontladen.
Onder gunstige omstandigheden bedraagt de reikwijdte in afgesloten ruimtes 50 meter en buiten
300 meter.Wanneer de reikwijdte wordt overschreden hoort u gekraak, ga dan dichter naar de
basis toe, anders wordt het gesprek onderbroken. Houd de basis verwijderd van elektrische
apparaten om de optimale reiktwijdte te benutten.
als KCA.
worden gegooid.
De optimale
Menustructuur en bediening
In de stand-by modus roept u het carrousel-menu op met de toets
. In de carrousel zijn symbolen in een ringschakeling gerangschikt
om toegang te krijgen tot het eerste menuniveau. Blader voor-/
achteruit met om het gewenste menu te bereiken. Bevestig met
voor de toegang tot het menu. Onderin het display worden de
submenu's in de vorm van kleine vierkantjes weergegeven.
Met bereikt u het gewenste submenu. Bevestig vervolgens uw
keuze met .
Het symbool geeft de optie weer,waarin u op dat moment
bladert. Het geselecteerde submenu/de optie wordt met een 'vinkje'
aangeduid.
Aanwijzing: Sommige menu's kunnen door middel van eigen toetsen
rechtstreeks worden opgeroepen (bijv. bellijst ).
Rechtstreeks kiezen
1- Lijn bezetten .
2- Telefoonnummer invoeren.
3
Voorkiezen
1- Telefoonnummer invoeren,
2- Lijn bezetten .
Menustructuur en bediening
Voice Dial
1- Toets indrukken.
2- Commando spreken.
Page 32

Handset
Taal wijzigen
Bij levering is de Engelse taal op uw handset ingesteld.
Taal op het display wijzigen
1- Ga naar Handset en bevestig.
2- Scroll naar Language en bevestig.
3- Selecteer de gewenste taal en bevestig.
Let op: Het wijzigen van de taal op het display heeft geen invloed op
de meldteksten van het antwoordapparaat (Onis 300 Vox/Onis 380 of
andere basisstations, niet van Philips).
Een extra handset aanmelden / afmelden op de basis
De extra handset dient op de basis aangemeld te zijn, zodat er van alle mogelijkheden gebruik kan
worden gemaakt*. Op de basis Onis 300/380 kunt u max. 8 handsets aanmelden.
Extra handset aanmelden
Zet de basis op de volgende manier in de aanmeldmodus:
1- Trek de netstekker uit het basisstation en sluit deze weer aan om.
2- Begin met aanmelden door de
3- Voer de RC-code in (4 cijferige code die op de sticker aan de
onderzijde van de basis staat genoteerd) en bevestig.
Een handset afmelden
1- Ga naar Handset en bevestig.
2- Scroll naar Aanmelding en bevestig.
3- Selecteer Afmelden handset en bevestig.
4- Selecteer de handset die moet worden afgemeld uit de lijst en
bevestig.
5- Voer de RC-code in (code van 4 cijfers die onder de basis staat
vermeld) en bevestig.
-toets op de handset in te drukken.
*Zie pagina 1
Het geluid van de handset instellen
U kunt de belmelodieën instellen voor:
- De externe standaard-belmelodie voor bellers die niet in het telefoonboek of zonder
VIP-instellingen zijn opgeslagen.
- De interne belmelodie (wanneer er ten minste twee handsets aanwezig zijn).
Voor het instellen van de VIP-belmelodieën (Vrienden , Familie en Werk ) zie de
handleiding Onis 300/300 Vox. Voor deze functie heeft u de nummerweergave (CLIP) nodig.
Belmelodie instellen
1- Ga naar Handset en bevestig.
2- Selecteer Geluid en bevestig.
3- Selecteer Belmelodie
4- Selecteer Externe belmelodie groep standaard /
Interne belmelodie en bevestig.
5- Selecteer de gewenste belmelodie en bevestig.
Handset
ë
n en bevestig.
4
Nederlands
Page 33

Volume belmelodie van de handset instellen
U heeft de beschikking over 5 instellingen om het volume van de
belmelodie te regelen.
1- Ga naar Handset en bevestig.
2- Selecteer Geluid en bevestig.
3- Scroll naar Volume belmelodie en bevestig.
4- Selecteer het gewenste volume en bevestig.
Aanwijzing: De trilfunctie is alleen mogelijk met de Onis 380.
Hoornvolume instellen
1- Ga naar Handset en bevestig.
2- Scroll naar Geluid en bevestig.
3- Scroll naar Hoornvolume en bevestig.
4- Selecteer Standaard, Hoge tonen of Lage tonen en bevestig.
Toetstonen activeren/deactiveren
Het indrukken van de toetsen of het wijzigen van instellingen kan
door middel van een pieptoon worden bevestigd.
Herhaal de bovenstaande stappen 1-2.
3- Scroll naar Toetstonen en bevestig.
4- Selecteer AAN / UIT en bevestig.
Waarschuwing activeren/deactiveren
De waarschuwing laat u weten, wanneer er een nieuwe SMS of
een gesproken bericht voor u is binnengekomen.
Herhaal de bovenstaande stappen 1-2.
3- Scroll naar Waarschuwing en bevestig.
4- Selecteer AAN / UIT en bevestig.
Babyfoon mode
Voor het bewaken van de kinderkamer. Leg de handset in de ruimte die u wilt bewaken; via de
extra handset kunt u alle geluiden in de ruimte horen.
Babyfoon mode activeren/deactiveren
1- Ga naar Handset en bevestig.
2- Scroll naar Babyfoon mode en bevestig.
3- Selecteer AAN / UIT en bevestig.
Aanwijzing: Om de ruimte te bewaken is een intern gesprek nodig
(zie pagina 6).
Displaycontrast instellen
Displaycontrast instellen
1- Ga naar Handset en bevestig.
2- Scroll naar Contrast scherm en bevestig.
3- Selecteer de gewenste contrastinstelling en bevestig.
5
Handset
Page 34

Achtergrondverlichting instellen (alleen Onis 380)
Achtergrondverlichting instellen
1- Ga naar Handset en bevestig.
2- Scroll naar Verlichting en bevestig.
3- Selecteer de gewenste duur 10 seconden, 20 seconden of
UIT en bevestig.
Nederlands
Handset
6
Page 35

Intern gesprek
Intern gesprek (wanneer men de beschikking heeft over ten minste 2 handsets)
Met deze functie kunt u interne gesprekken voeren, de babyfoonfunctie (ruimtebewaking)
gebruiken en externe gesprekken naar een andere handset doorverbinden. Het interne gesprek
functioneert alleen tussen handsets die op hetzelfde basisstation zijn aangemeld.
Intern bellen of ruimtebewaking activeren
1- Ga naar Intern gesprek en bevestig.
2- Als U één andere handset heeft, gaat deze nu over.In alle andere
gevallen, kiest U de gewenste handset/basis uit de lijst en druk op
voor Bellen. Het belsignaal van de gebelde handset/basis klinkt.
3- Neem met het gesprek op de gebelde handset/basis aan.
Het interne gesprek/de ruimtebewaking kan beginnen. Mute is
eveneens mogelijk.
Aanwijzing: De functie 'Intern gesprek' kan ook met de Pilot-key
worden opgeroepen. Scroll in de stand- by mode met naar boven.
U kunt een extern gesprek naar een andere handset doorverbinden.
1- Druk op op de opties op te roepen.
2- Scroll naar Intern gesprek en bevestig.
3- Als U één andere handset heeft, gaat deze nu over.In alle andere
gevallen, kiest U uit de lijst de gewenste handset/basis.
Het belsignaal van de gebelde handset/basis klinkt. Het externe
gesprek wordt vastgehouden.Wanneer de 2
meldt kunt u het gesprek op de 1
de optie Be
ë
indig intercom op te roepen.
e
e
handset zich niet
handset weer overnemen door
4- Neem het gesprek met aan op de andere handset/op de
basis. Beide interne gesprekspartners kunnen met elkaar spreken.
5- Selecteer de optie Doorverbinden. Het gesprek wordt
beëindigd op de 1
e
1
handset ook beëindigen met .
e
handset. Aanwijzing: U kunt het gesprek op de
Terwijl het gesprek wordt vastgehouden, hoort de beller de muziek
in wacht (wanneer deze is geactiveerd) of pieptonen. De opties
Wisselgesprek ([ruggespraak houden] tussen gesprekspartner 1
en 2) en Mute (microfoon) staan in het Contextmenu eveneens ter
beschikking.
Groepsgesprek
Met de functie groepsgesprek kan een externe beller worden
verbonden met 2 handsets (met de functie Intern gesprek). De 3
gesprekspartners kunnen dan met elkaar spreken (deze groepsgesprekken zijn niet abonnementsafhankelijk).
Herhaal de eerder beschreven stappen 1-4.
5- Roep de optie Groepsgesprek op en bevestig.
7
Intern gesprek
Page 36

Zelf fouten opsporen en verhelpen
Probleem
Geen kiestoon
Geen pieptoon, wanneer de
handset in de oplader wordt
geplaatst.
Na een oplaadduur van 12
uur zijn de accu's nog steeds
niet opgeladen.
Wanneer u met uw handset
wilt bellen, hoort u een valse
toon.
Tijdens een gesprek hoort u
een valse toon.
Geen belsignaal.
Bij het aanmelden van een
handset verschijnt een
foutmelding.
Storende geluiden in de lijn
tijdens het telefoneren.
Mogelijke oorzaak
De handset is buiten reikwijdte
van de basis ( ontbreekt)
De handset is niet op de basis
aangemeld.
( -symbool verschijnt niet).
De basis is niet correct op het
elektrische net of op de
telefoonaansluiting aangesloten.
De accu's zijn leeg
(het symbool verschijnt).
De oplader is niet correct op het
elektrische net aangesloten.
Vervuilde oplaadcontacten.
De toetstonen zijn gedeactiveerd.
De oplader is niet correct op het
elektrische net aangesloten.
De accu's zijn beschadigd of te
oud.
De handset is niet aangemeld.
Op een andere handset wordt
een extern gesprek gevoerd.
Het basisstation is net bezet.
Handset buiten de reikwijdte.
De accu's zijn zwak.
Het belsignaal is gedeactiveerd.
Het aanmelden is mislukt.
Het maximale aantal handsets is
bereikt.
Afstand tot de basis is te groot.
De basis bevindt zich in de buurt
van elektrische apparatuur, muren
van gewapend beton of metalen
deuren.
Problemen oplossen
Oplossing
Ga dichter naar de basis toe
en probeer het opnieuw.
Meld de handset aan op de
basis (zie pagina 4).
Controleer de
steekverbindingen.
Laad de accu's op
(zie pagina 3).
Controleer de
steekverbindingen.
Reinig met een droge doek.
Activeer de toetstonen (pag.5).
Controleer de
steekverbindingen.
Koop nieuwe accu's bij uw
vakhandelaar.
Meld deze aan (pagina 4).
Probeer opnieuw, wanneer
het gesprek beëindigd is.
Probeer opnieuw, wanneer de
basis weer beschikbaar is.
Ga dichter naar de basis toe.
Laad de accu's op.
Activeer het belsignaal (pag.5).
Trek de netstekker van de
basis uit het stopcontact en
sluit deze weer aan. Meldt de
handset nogmaals aan.
Meld een handset af
(zie pagina 4).
Ga dichter naar de basis toe.
Verander de plaats van het
basisstation (hoe hoger, hoe
beter).
8
Nederlands
Page 37

DECLARATION OF CONFORMITY
We,
PHILIPS Consumer, Electronics
DECT & Home Telephony
Route dAngers
72081 Le Mans Cedex 9
France
Declare that the products Onis 300 (TU5321), Onis 300 Vox (TU5351 & TU5352)
and the additional handset Onis 300 (TU 5350) are in compliance with ANNEX III of
the R&TTE-Directive 1999/5/EC and then with the following essential requirements :
Article 3.1.a : (protection of the health & the safety of the user) : EN 30950 (2000)
Article 3.1.b : (protection requirements with respect to electromagnetic
compatibility) ETSI EN 301 489-6 V1.1.1 (09/2000) & ETSI EN 301 489-1 V1.3.1
(09/2001)
Article 3.2 : (effective use of the radio spectrum) : EN 3001 406 (2001)
The presumption of conformity with the essential requirements regarding Council
Directive 1999/5/EC is ensured.
Date : 16/12/02 Le Mans
Vice President & General Manager
DECT & Home Telephony
9
Conformiteitsverklaring
Page 38

Conformità, sicurezza e ambiente
Informazioni sulla sicurezza: Questo apparecchio non dispone di un equipaggiamento per
effettuare chiamate di emergenza in caso di caduta di corrente. In caso di emergenza utilizzate un
altro apparecchio, ad esempio un telefono cellulare.
Conformità: Vedi pag. 9. In caso di necessità è possibile richiedere una copia della dichiarazione di
conformitá al servizio clienti - parti di ricambio.
Alimentazione elettrica: Questo prodotto richiede un'alimentazione elettrica di 230 volt con
corrente alternata monofase, salvo le installazioni IT ai sensi della normativa EN 60-950.
Attenzione! Secondo la normativa EN 60-950 la rete elettrica è classificata come pericolosa.
L'apparecchio può essere staccato dall'alimentazione elettrica soltanto estraendo la spina dalla
presa.Utilizzate pertanto una presa da parete ben accessibile.
Allacciamento telefonico: La tensione della rete telefonica è classificata come TNV-3
(Telecommunication Network Voltages) secondo la definizione della normativa EN 60-950.
Avvertenze di sicurezza: Tenete il ricevitore lontano da liquidi. Non smontate nè il ricevitore
nè la base. Potreste venire a contatto con tensioni pericolose. Fate eseguire eventuali riparazioni
solo dal servizio clienti autorizzato. I contatti di ricarica e le batterie non devono venire a
contatto con oggetti con buone caratteristiche di conduttività.
Tutela dell'abiente: Si prega di osservare le disposizioni locali e di utilizzare le strutture di
riciclaggio per lo smaltimento del materiale della confezione, delle batterie usate e dei telefoni
non più utilizzati.
I requisiti delle norme GAP
Con le norme GAP si garantisce che tutte le unità mobili e le basi che rispondono alle norme
DECTTMe GAP soddisfano i requisiti minimi di tali norme, indipendentemente dalla marca del
prodotto. Il ricevitore Onis 300 soddisfa i requisiti GAP,cioè vengono garantite le seguenti
funzioni: prendere la linea, ricevere chiamate e selezionare numeri telefonici.
Usando delle basi Philips
Se utilizzate il ricevitore supplementare Onis 300 sulla base Onis 300 o Onis 380 potete
impiegare tutte funzioni descritte (vedi istruzioni per l'uso di Onis 300 o di Onis 380).
In caso di registrazione del ricevitore supplementare su una base Onis 200 o Zenia alcuni
menu non sono disponibili. Si prega di fare riferimento alla relativa documentazione.
Usando altre basi (non di produzione Philips)
In caso di registrazione del ricevitore supplementare su una base di un'altra marca (non di
produzione Philips) seguite le indicazioni contenute nella documentazione del produttore.
Attenetevi poi alle presenti istruzioni per eseguire la registrazione; si veda pag. 4 (dal punto 4).
Tenete presente che non tutte le funzioni dei menu sono diponibili.
Philips ha contrassegnato le batterie/accumulatori e le confezioni delle apparecchature con dei simboli standard
per agevolarne l'adeguato smaltimento.
Il materiale della confezione e le istruzioni per l'uso possono essere riciclati.
Un certa somma è stata devoluta per la promozione del riutilizzo e del riciclaggio.
Italiano
DECTTMè un marchio registarto di ETSI a favore di chi utilizza la tecnologia DECT.
Conformità, sicurezza e ambiente
1
Page 39

Tasto navigazione
Premere per richiamare il menu a
carosello o confermare opzioni/menu
- Sfogliare i menu e le opzioni o
posizionare il cursore
- Verso l'alto per l'accesso alla
chiamata interna in modalità di stand-by
- Verso il basso per l'accesso alla
funzione di gestione prefissi
Premere per disattivare blocco
tastiera
Vivavoce
- Premere per realizzare un collegamento
o attivare vivavoce del ricevitore
- Premere a lungo per attivare vivavoce
della base
/ Elenco chiamate
- Premere per richiamare e
visualizzare la lista chiamate
- Premere a lungo per richiamare la
lista dei messaggi vocali (Onis 300 e
Onis 380)
Blocco tastiera e inserimento
- Premere brevemente per inserire
* (asterisco)
- Premere a lungo per attivare/disattivare
blocco tastiera
- Premere a lungo: per inserire il segnale
di richiama (R)
- Premere a lungo per inserimento
standard del testo o con Eatoni
®
Simboli
Segreteria ON
(Onis 300 Vox)
Chiamata esterna
attiva
attiva
Vivavoce ricevitore
attivato
Attivato muto
Funzione SMS attiva
Registrato e entro la
portata della base
2
/
Tasto per telefonare
- Premere per realizzare un
collegamento, accettare o
porre fine a una chiamata
- Premere a lungo per
attivare la selezione vocale
Ricevitore
Microfono
Ricevitore Onis 300/380
Lampeggia
Nuovo messaggio su
segreteria o voice mail
- Chiamata esterna in entrata
- Linea occupata
Chiamata interna in entrataChiamata interna
Vivavoce della base attivato
Nuovo messaggio
Non registrato
Ricevitore
Tasto di cancella/annulla
- Per cancellare cifre nell'inserire
un numero telefonico o caratteri
nell'inserire testo
- Per ritornare al livello precedente
di menu
- Premere a lungo durante la navigazione per ritornare in stand-by
- durante un collegamento per
attivare la funzione R (per servizi
dell'operatore di rete)
Rubrica
- Premere brevemente per
richiamare la rubrica
- Premere a lungo per aggiungere
una nuova voce
Modalità "Non disturbare"
e tasto commutazione
- Premere brevemente per aggiunger il cancelletto "#" nell'inserire il
numero telefonico
- Premere a lungo per aggiungere il
carattere di pausa (P) nell'inserire il
numero telefonico
- Premere alungo perattivare/disattivare la modalità"Non disturbare"
- Per passare da minuscole a
maiuscole e viceversa
Allarme
- Premere brevemente per
selezionare 0
- Premere a lungo per
aittivare/disattivare l'allarme
Lampeggia rapidamenteRimane ON
Memoria segreteria piena
Memoria messaggi piena !
Page 40

Inserimento e sostituzione delle batterie
Aprite il coperchio dello scomparto batterie, inserite le batterie
come indicato nell'illustrazione e richiudete il coperchio. Quando il
ricevitore viene posto nella cavità di ricarica della base (per ricaricare
le batterie), si muovono le 3 barrette del simbolo della batteria.Alla
prima messa in esercizio può darsi che ci vogliano alcuni minuti fino a
quando appaiono i simboli sul display. Caricare le batterie per 24 ore.
Per sostituire le batterie si devono usare i tipi seguenti: R03/AAA
NiMh da 600/650 mAh.
Attenzione: la base deve rimanere collegata alla rete elettrica durante il
processo di ricarica. Usare solo batterie ricaricabili.
Durante il processo di ricarica cambiano le barrette del simbolo delle batterie: .
Viene visualizzato lo stato di carica delle batterie: cariche , 2/3 , 1/3 e batterie
scariche .
Durata delle batterie e portata
Le batterie completamente cariche vi offrono 250 ore di
stand-by (ricevitore in stand-by e pronto per l'uso) e ca. 16
ore di conversazione. Un segnale acustico vi informa quando le batterie devono essere ricaricate.
Se ciò si verifica durante una conversazione, questa viene terminata poco dopo il segnale.
La massima funzionalità delle batterie viene raggiunta dopo 3 processi completi di
carica/scarica.
In condizioni favorevoli la portata é di 50 metri in locali chiusi e 300 metri all'aperto. Se viene
superata la portata si sentono dei disturbi, avvicinatevi subito alla base altrimenti viene interrotta
la conversazione.Tenete lontana la base da apparecchiature elettriche per raggiungere la portata
ottimale.
Non gettare le batterie nei comuni
rifiuti domestici.
Struttura dei menu e funzionamento
Nella modalità di stand-by richiamate il menu a carosello con il tasto .
Il carosello rappresenta una serie continua di simboli per accedere al
primo livello del menu. Sfogliate avanti/indietro con per andare al
menu desiderato. Con confermate ed entrate nel menu. I sottomenu
vengono rappresentati come piccoli quadrati nella parte inferiore del
display.
Con giungete al sottomenu desiderato, confermate poi la selezione
con .
Il simbolo indica l'opzione nella quale vi trovate. Il sottomenu/-
l'opzione selezionata viene contrassegnata da un "prompt" .
Avvertenza: ad alcuni menu si può accedere direttamente tramite i
rispettivi tasti (per es. la lista chiamate )
Italiano
Selezione diretta
1- Prendere la linea .
2- Inserire il numero telefonico.
Struttura dei menu e funzionamento
Chiamata preparata
1- Inserire il numero telefonico,
2- Prendere la linea .
Selezione vocale
1- Premere il tasto .
2- Dare il comando vocale
3
Page 41

Ricevitore
Modifica della lingua
Il ricevitore quando viene fornito ha impostata la lingua inglese.
Modifica della lingua del display
1- Andate a Handset e confermate.
2- Andate a Language e confermate.
3- Selezionate la lingua desiderata e confermate.
Attenzione: la modifica della lingua del display non influisce in alcun
modo sui messaggi della segreteria (Onis 300 Vox/Onis 380 o altre basi
non della Philips).
Registrazione/rimozione di un altro ricevitore dalla base
L'ulteriore ricevitore deve essere registrato alla base in modo da potere utilizzare tutte le
funzioni disponibili*.Alla base Onis 300/380 si possono registrare fino a 8 ricevitori.
Registrazione di un ulteriore ricevitore
Portate la base nella modalità di registrazione nel modo seguente:
1- Disinserite la spina di alimentazione della base e reinseritela.
2- Premete sul ricevitore per avviare la registrazione.
3- Inserite il codice RC (codice a 4 cifre, stampato sull'etichetta sulla
parte inferiore della base) e confermate.
Rimozione del ricevitore
1- Andate a Ricevitore e confermate.
2- Passate a Registrazione e confermate.
3- Selezionate Rimuovi ricevitore e confermate.
4- Selezionate nella lista il ricevitore da rimuovere e confermate.
5- Inserite il codice RC (codice a 4 cifre, stampato sotto la base) e
confermate.
* Vedi pag.1
Impostazione dell'audio del ricevitore
Potete impostare le suonerie per:
- Ie chiamate esterne standard provenienti da numeri non presenti nella rubrica o senza
impostazioni VIP.
- Ie chiamate interne (in caso siano disponibili almeno due ricevitori).
Per impostare le suonerie VIP (amici , famiglia e lavoro ) si vedano le istruzioni per Onis
300/300 Vox. Per questa funzione deve essere attivato il servizio CLIP.
Impostazione squilli
1- Andate a Ricevitore e confermate.
2- Selezionate Audio e confermate.
3- Selezionate Suoneria e confermate.
4- Selezionate Chiamate esterne standard/chiamate
interne e onfermate.
5- Selezionate la suoneria desiderata e confermate.
4
Ricevitore
Page 42

Impostazione del volume della suoneria del ricevitore
Sono disponibili 5 impostazioni per il volume della suoneria.
1- Andate a Ricevitore e confermate.
2- Selezionate Audio e confermate.
3- Andate a Volume suoneria e confermate.
4- Selezionate il volume desiderato e confermate.
Avvertenza: la funzione vibra è disponibile solo per il modello Onis 380.
Impostazione toni auricolare
1- Andate a Ricevitore e confermate.
2- Andate a Audio e confermate.
3- Andate a Toni auricolare e confermate.
4- Selezionate standard, alti o bassi e confermate.
Attivazione/disattivazione toni tasto
L'attivazione dei tasti e la modifica delle impostazioni possono essere confermate da un segnale acustico.
Ripetete le operazioni 1-2 sopra descritte.
3- Passate a Toni tasto e confermate.
4- Selezionate Attivare /Disattivare e confermate.
Attivazione/disattivazione tono di notifica
Il tono di notifica vi informa quando è arrivato un nuovo SMS o un
nuovo messaggio vocale.
Ripetete le operazioni 1-2 sopra descritte.
3- Andate a Tono di notifica e confermate.
4- Selezionate Attivare /Disattivare e confermate.
Modalità babysitter
Per sorvegliare la stanza dei bambini. Posizionate il ricevitore nella stanza da sorvegliare;
tramite il ricevitore supplementare potete udire tutti i rumori nella stanza.
Attivazione/disattivazione della modalità babysitter
1- Andate a Ricevitore e confermate.
2- Andate a Modalità babysitter e confermate.
3- Selezionate Attivare /Disattivare e confermate.
Avvertenza: Per la funzione di sorveglianza di un ambiente è
necessaria l'interfonia (vedi pag. 6).
Italiano
Impostazione del contrasto del display
Impostazione del contrasto del display
1- Andate a Ricevitore e confermate.
2- Passate a Contrasto schermo e confermate.
3- Selezionate il livello desiderato e confermate.
Ricevitore
5
Page 43

Regolazione della retroilluminazione (solo Onis 380)
Regolazione della retroilluminazione
1- Andate a Ricevitore e confermate.
2- Passate a Retrolluminazione e confermate.
3- Selezionate la durata desiderata di 10 secondi, 20 secondi o
Disattivare e confermate.
Interfonia
Interfonia (se ci sono a disposizione almeno 2 ricevitori)
Con questa funzione potete condurre delle conversazioni interne, usare la funzione babysitter
(monitoraggio di un locale) e trasferire chiamate esterne ad un altro ricevitore. La funzione di
Interfonia funziona solo fra ricevitori che siano registrati alla stessa base.
Esecuzione di chiamate interne o attivazione del
montoraggio ambiente
1- Andate a Interfonia e confermate.
2- Se c'è solo un ricevitore supplementare, questo squilla
automaticamente.Altrimenti selezionate nella lista il ricevitore/la
base desiderata e premete per eseguire una chiamata.
Il ricevitore/la basa chiamata squilla.
3- Accettare la chiamata sul ricevitore/sulla base chiamata.
La conversazione interna/il monitoraggio dell'ambiente può iniziare.
È possibile anche la funzione di muto.
Avvertenza: la funzione "Interfonia" può essere richiamata anche con
il tasto navigazione: Nella modalità di stand-by sfogliate verso l'alto
con .
Potete anche trasferire una chiamata esterna ad un altro ricevitore.
1- Premete per richiamare le opzioni.
2- Passate a Interfonia e confermate.
3- Se c'è solo un ricevitore supplementare, questo squilla
automaticamente.Altrimenti selezionate nella lista il ricevitore/la
base desiderata.
Il ricevitore/la basa chiamata squilla.
La chiamata esterna vien posta in attesa. Se il 2° ricevitore non
risponde, potete riprendere la conversazione sul 1° ricevitore
richiamando l'opzione Termina interfonia.
4- Accettate la conversazione con l'altro ricevitore/alla base.
Tutti e due gli interlocutori interni possono parlare l'uno con l'altro.
5- Selezionate l'opzione Trasferimento. Sul 1° ricevitore vien
posto fine alla conversazione. Avvertenza: potete anche porre fine
alla conversazione sul 1° ricevitore anche con .
6
Ricevitore / Interfonia
Page 44
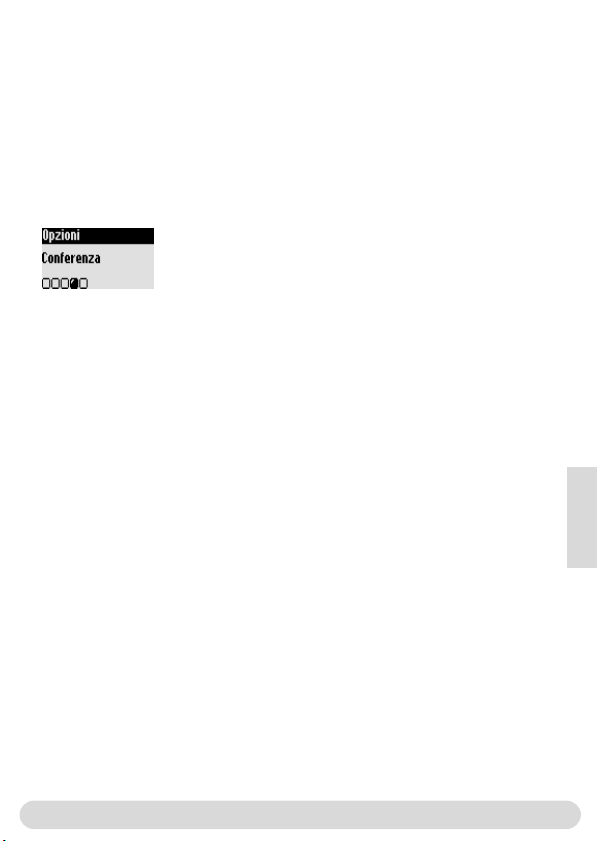
Mentre la conversazione viene posta in attesa, il chiamante ascolta la
melodia di attesa (se è attivata) o segnali acustici.
Nel menu contestuale sono disponibili anche le opzioni Commuta
(per passare da interlocutore 1 a interlocutore 2) e Muto
(microfono).
Conferenza
Con la funzione Conferenza si può collegare un interlocutore
esterno con 2 ricevitori (con interfonia). I 3 interlocutori possono
quindi conversare (queste conversazioni non dipendono dal tipo di
contratto).
Ripetete le operazioni 1-4 sopra descritte.
5- Richiamate l'opzione Conferenza e confermate.
Italiano
Interfonia
7
Page 45

In caso di piccoli problemi
Problema
Manca tono di selezione.
Manca il segnale acustico
quando il ricevitore viene
messo nel carica-batteria.
Dopo un periodo di ricarica
di 12 ore le batterie non
sono ancora cariche.
Quando volete chiamare con
il ricevitore, udite un segnale
di errore.
Durante una conversazione
udite un segnale di errore.
Nessuno squillo.
Nel registrare un ricevitore
appare una segnalazione di
errore.
Disturbi nella linea mentre si
telefona.
8
Il ricevitore è al di fuori della
portata della base ( non è
visualizzato).
Il ricevitore non è registrato alla
base.
(Simbolo non appare).
La base non è collegata correttamente all'alimentazione di corrente oppure alla presa telefonica.
Le batterie sono scariche (appare
il simbolo ).
Il carica-batteria non è collegato
correttamente all'alimentazione di
corrente.
Contatti di ricarica sporchi.
I toni tasto sono disattivati.
Il carica-batteria non è collegato
correttamente all'alimentazione di
corrente.
Le batterie sono danneggiate o
troppo vecchie.
Il ricevitore non è registrato.
È in corso una conversazione
esterna da un altro ricevitore.
La base è occupata.
Ricevitore al di fuori della portata.
Le batterie sono quasi scariche.
Gli squilli sono disattivati.
La registrazione non è riuscita.
È stato raggiunto il numero
massimo di ricevitori.
Troppo lontani dalla base. La base
si trova nelle vicinanze di apparecchiature elettriche, pareti in cemento armato o porte metalliche.
Possibile causa
Eliminazione errori
Avvicinatevi alla base e provate
Rimedio
di nuovo.
Registrate il ricevitore alla base
(vedi pag. 4).
Verificare le connessioni.
Ricaricate le batterie
(vedi pag. 3).
Verificare le connessioni.
Puliteli con un panno asciutto.
Attivate i tonitasto (vedipag. 5).
Verificare le connessioni.
Acquistate nuove batterie
presso il vostro ricevditore
specializzato.
Registratelo (pagina 4).
Provate di nuovo quando la
conversazione è terminata.
Provate di nuovo quando la
base è di nuovo disponibile.
Avvicinatevi alla base.
Ricaricare le batterie.
Attivate gli squilli (vedi pag. 5).
Disinserite la spina di
alimentazione della base e
reinseritela. Registrate di
nuovo il ricevitore.
Rimuovete un ricevitore
(vedi pag. 4).
Avvicinatevi alla base. Cambiare
l'ubicazione della base (meglio
se in posizione elevata).
Page 46

DECLARATION OF CONFORMITY
We,
PHILIPS Consumer, Electronics
DECT & Home Telephony
Route dAngers
72081 Le Mans Cedex 9
France
Declare that the products Onis 300 (TU5321), Onis 300 Vox (TU5351 & TU5352)
and the additional handset Onis 300 (TU 5350) are in compliance with ANNEX III of
the R&TTE-Directive 1999/5/EC and then with the following essential requirements :
Article 3.1.a : (protection of the health & the safety of the user) : EN 30950 (2000)
Article 3.1.b : (protection requirements with respect to electromagnetic
compatibility) ETSI EN 301 489-6 V1.1.1 (09/2000) & ETSI EN 301 489-1 V1.3.1
(09/2001)
Article 3.2 : (effective use of the radio spectrum) : EN 3001 406 (2001)
The presumption of conformity with the essential requirements regarding Council
Directive 1999/5/EC is ensured.
Date : 16/12/02 Le Mans
Vice President & General Manager
DECT & Home Telephony
Dichiarazione di conformitá
9
Page 47

I
 Loading...