

Philips 21PT5402, 2IPT542I User Manual [en, de, fr, it]

21PT5402
2IPT542I
tv
PHILIPS

MODEL:
PROD. NO :
GB Please note the reference numbers
for your TV set located on the
packaging or on the back of the set
FR Veuillez noter les références de
votre téléviseur situées sur
remballage ou au dos de l’appareil.
NL Let op de references van uw
televisietoestel die op de
verpakking of op de achterkant
van het toestel staan.
Country Number Tariff
Austria 0820 901 114 €0.20/min
Belgium
Denmark 3525 8759 local
Finland 09 231 1 3415 local
France 08 9165 0005 €0.23/min
Germany
Greece 0 0800 3122 1280 free
Ireland 01 601 1777 local
Italy
Luxemburg 40 6661 5644 local
Netherlands 0900 8407 €0.20/min
Norway 2270 81 11 local
Portugal 2 1359 1442 local
Spain 902 888 784 €0.15/min
Sweden
Switzerland 0844 800 544 local
UK 0906 I0 I00I6 £0.15/min
070 222 303 €0.17/min
0180 5 356 767
199 404 041
08 5792 9100 local
DE Notieren Sie die
Referenznummern
Ihres Fernsehgeräts, die sich auf der
Verpackung bzw. auf der
Rückseite des Geräts befinden.
IT Notare i riferimenti del vostro
televisore situati sull’imballaggio о
sul retro dell’apparecchio.
GR 1г|р£1ыате oòriyic^ ХРЛ^Л?
тг|д тг|Л£0раог|д oog пои
ppioKOVTai атг| auoK£uaaia r\
ото niocj pépog тг|д аиок£и1^д
€0.12/min
€0.25/min

Thank you for purchasing this television set.
This handbook has been designed to help you install and operate your TV set.
We would strongly recommend that you read it thoroughly.
We hope our technology meets entirely with your satisfaction.
Note: Specification and information subject to change without notice.
Table of Contents
Installation
Installing your television set .............................................................................................2
The keys on the TV set.....................................................................................................2
Safety Information.............................................................................................................3
The remote control keys ...................................................................................................4
Quick installation...............................................................................................................5
Programme sort................................................................................................................ 5
Other settings in the Install menu......................................................................................5
Manual store ....................................................................................................................6
Operation
Picture settings .................................................................................................................7
Sound adjustments............................................................................................................7
Timer function................................................................................................................... 8
TV lock..............................................................................................................................8
Teletext.............................................................................................................................9
Peripherals
Connecting peripheral equipment....................................................................................10
Video recorder ................................................................................................................10
Other equipment............................................................................................................. 10
Amplifier ...........................................................................................................................10
Side connections.............................................................................................................10
To select connected equipment........................................................................................10
Practical information
Glossary............................................................................................................................II
Safety Information: Electric, Magnetic and Electromagnetic Fields
Tips...................................................................................................................................12
..................................
II
Recycling
This packaging of this set can be recovered or recycled.Apply to the local authorities in
order to minimise environmental waste.
Disposal of your old product.
Your product is designed and manufactured with high quality materials and components,
which can be recycled and reused.
When this crossed-out wheeled bin symbol is attached to a product it means the product
is covered by the European Directive 2002/96/EC. Please inform yourself about the local
separate collection system for electrical and electronic products.
Please act according to your local rules and do not dispose of your old products with
your normal household waste. The correct disposal of your old product will help prevent
potential negative consequences for the environment and human health.
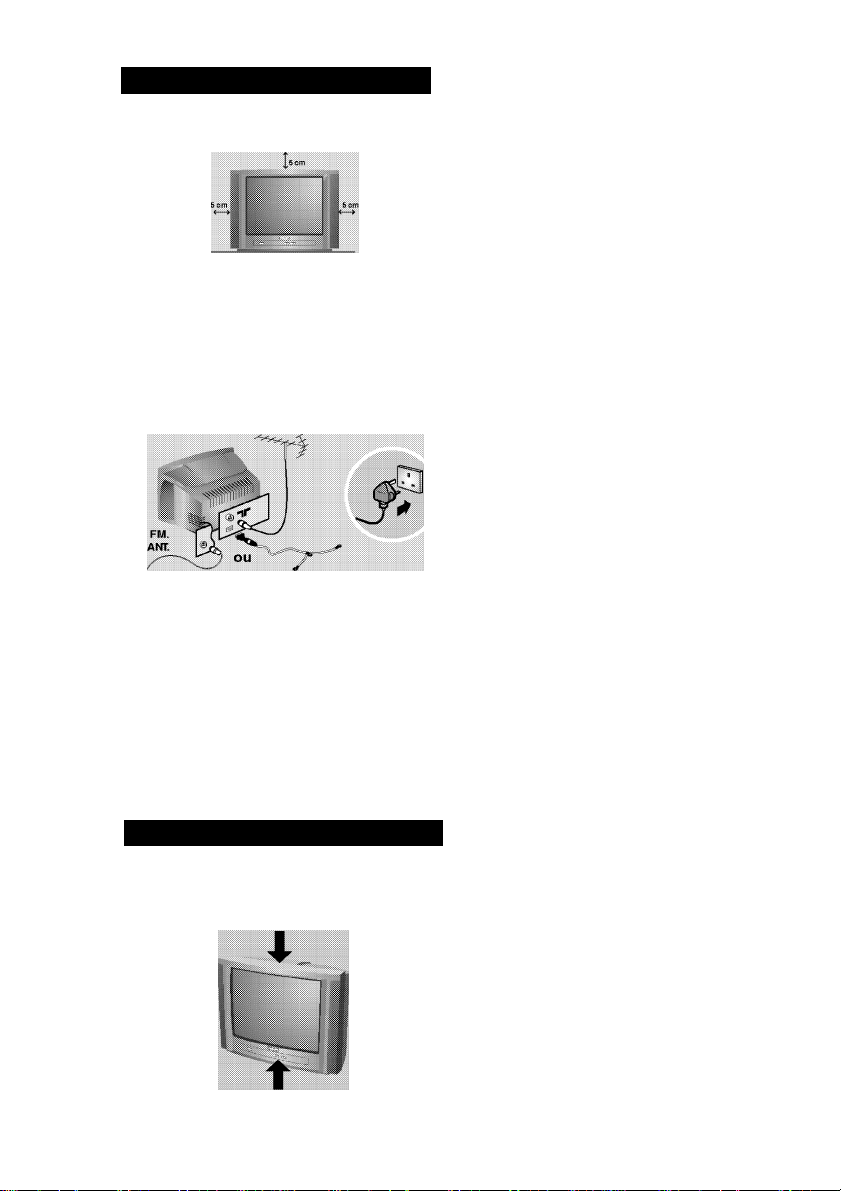
Installing your television set
O Positioning the television set © Remote control
./S'
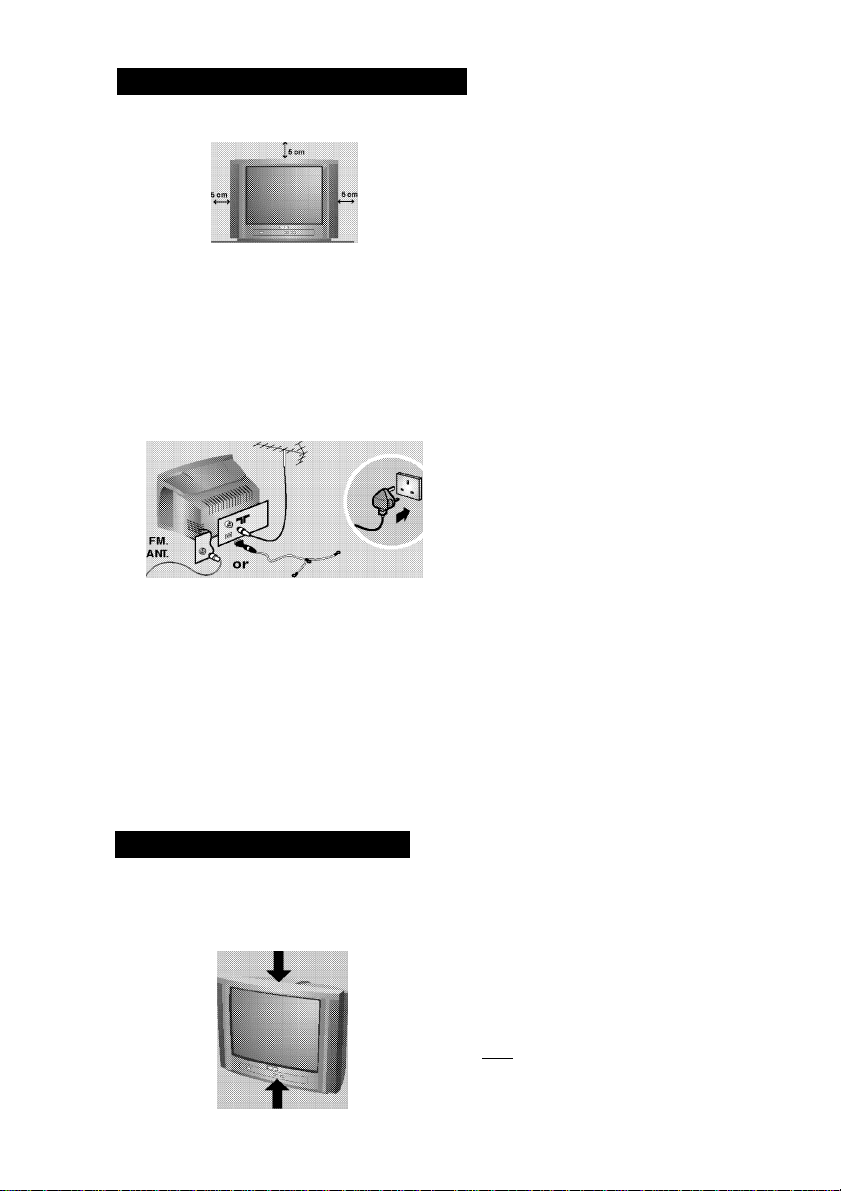
Place your TV on a solid, stable surface,
leaving a space of at least 5 cm around the
appliance. To avoid accidents, do not put
anything on the set such as a cloth or cover,
a container full of liquid (vase) or a heat
source (lamp). The set must not be exposed
to v/ater.
© Connections
• Insert the aerial plug into the nr socket at
the rear of the set.
• For the versions equipped with a radio:
insert the radio aerial socket into the FM
ANT socket using the adapter supplied.
if you are using an indoor aeriai, reception may
be diffcuit in certain conditions. You can improve
reception by rotating the aeriai. if the reception
remains poor, you wiii need to use an externai
aeriai.
• Insert the mains plug into a wall socket (220240 V / 50 Hz).
The keys on the TV set
The television set has 5 keys which are located
on the front or the top of the set depending
on the model. The on/off key switches the TV
set on/off.
Insert the two R6-type batteries (supplied)
making sure that they are the right way round.
Check that the mode selector is set to TV.
The batteries suppiied with this appiiance do not
contain mercury or nickei cadmium, if you have
access to a recyciing faciiity piease do not discard
your used batteries (if in doubt, consuit your
deaier). When the batteries are repiaced, use the
some type.
O Switching on
To switch on the set, press the on/off key.
A red indicator comes on and the screen
lights up. Go straight to the chapter Quick
installation on page 5.
If the television remains in standby mode,
press P © on the remote control.
The indicator wiii fash when you use the remote
controi.
The VOLUME - + keys are used to adjust sound
levels. The PROGRAM A V keys are used to
select the required programmes. To access the
menus, simultaneously hold down the VOLUME
- + keys. The PROGRAM A V keys may
then be used to select an adjustment and the
VOLUME - + keys to make that adjustment.
To exit from the menus, hold down the 2
VOLUME - + keys.
Note: when the Child Lock function is activated,
these keys are unavaiiabie (refer to Features
menu on page 8).
Safety Information
• Plug the TV into a 220V - 240V AC, 50 Hz supply.
• Disconnect mains plug when :
- the red light below the TV screen is flashing continuously.
- a bright white line is displayed across the screen.
- there is a lightning storm.
- the set is left unattended for a prolonged period of time.
• Cleaning the TV screen. Never use abrasive cleaning agents. Use a slight damp chamois leather or
soft cloth.
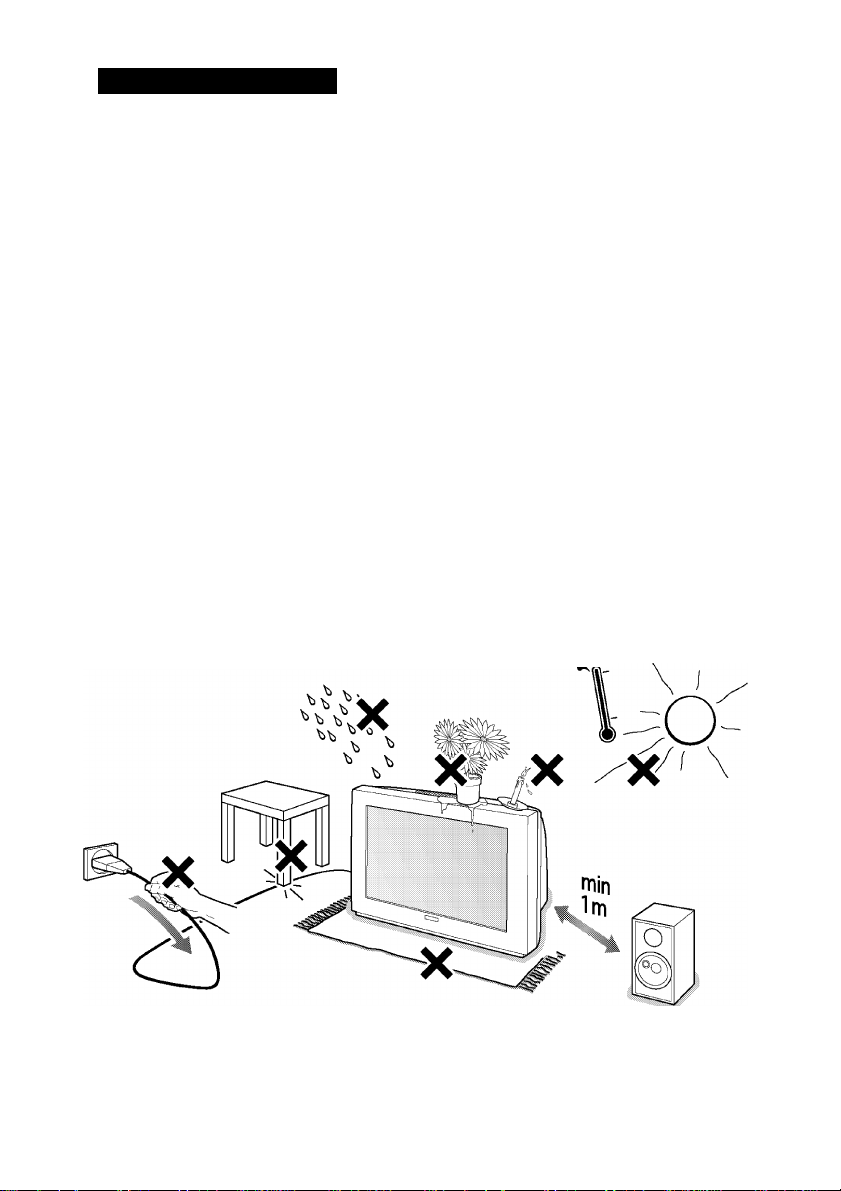
• No naked flame sources, such as lighted candles, should be placed on top of the TV or in the vicinity.
• Do not place your TV set under direct sunlight or heat.
• Do not cover or block the TV as it could lead to overheating.
• Leave at least 5 cm around each side of TV set to allow for proper ventilation.
• Avoid placing your set (e.g. near the window) where it is likely to be exposed to rain or water.
• Battery Usage CAUTION - To prevent battery leakage that may result in bodily injury, property
damage, or damage to the unit:
- Install all batteries correctly, with + and - aligned as marked on the unit.
- Do not mix batteries (old and new or carbon and alkaline, etc.).
- Remove batteries when the unit is not used for a long time.
• The apparatus must not be exposed to dripping or splashing and no objects filled with liquids, such as
vases, shall be placed on the apparatus.
Useful Tips
• Do not leave your set on standby mode for a prolonged period of time. Switch off set to allow it to
be demagnetised. A demagnetised set supports good picture quality.
• Do not shift or move the set around when it is switched on. Uneveness in colour in some parts of
the screen may occur.
• Never attempt to repair a defective TV yourself. Always consult a skilled service personnel.
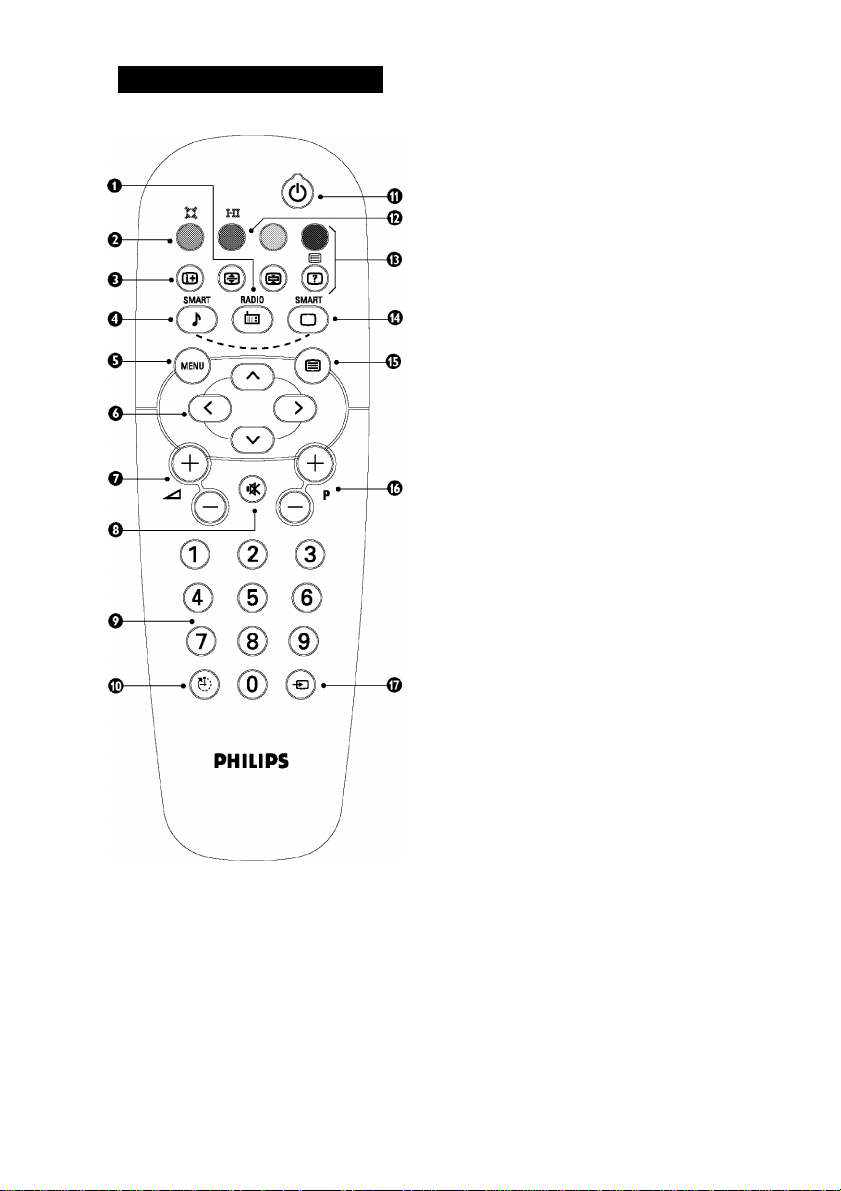
Remote control keys
(Only available in certain versions - Addendum p.4)
Radio / TV mode
o
To switch the TV set to radio or TV mode (for
versions equipped with radio).
Surround Sound (only available on certain versions).
o
To activate / deactivate the surround sound effect.
In stereo, this gives the impression that the
speakers are further apart. For models equipped
with Virtual Dolby Surround*, you can experience
Dolby Surround Pro Logic sound effects. In mono, a
stereo spatial effect is simulated.
Screen information / permanent no.
To display / clear the program number, name (if it
exists), time, audio mode and time remaining for the
sleep feature. Press the key for 5 seconds to activate
permanent display of the number.
Pre-set sound
Used to access a series of stored settings: Voice,
Music, Theatre and return to Personal.
Menu
e
To call up or exit the menus.
Cursor / Format
o
These 4 keys are used to navigate through the
menus. The (3(3 keys are used to enlarge or
compress the picture vertically.
Volume
o
To adjust the sound level.
Mute
o
To mute or restore the sound.
Number keys
o
Direct access to the programmes. For a 2 digit program,
enter the 2nd digit before the dash disappears.
Sleep
To select an automatic standby after a preset time
(from 0 to 180 minutes).
Standby
o
Lets you place the TV set on standby. To turn on the
TV, press P-0 ©, ® to ® (or (M)).
Sound mode
0
Used to force programmes in Stereo to Mono or,
for bilingual programs, to choose between Dual I or
Dual-ll. For TV sets equipped for Nicam reception,
depending on the programmes, you can force the
Stereo Nicam sound to Mono or select between
Nicam Dual I, Nicam Dual-ll and Mono.
The Mono indication is red when in forced position.
Teletext keys (p. 9)
Pre-set image
Used to access a series of stored settings: Rich,
Natural, Soft, Multimedia and return to Personal.
Teletext (p. 9)
Program selection
To access the next or previous programme. The
number, (name) and sound mode are displayed for a
few moments.
For some programs, the title of the program will be displayed
at the bottom of the screen.
Selection of EXT socket
Press several times to select EXT and AV.

Quick installation
^lUQ & Ploy
When you turn on the TV set for the first
time, a menu is displayed on screen. This
menu prompts you to select the country and
language for the menus :
WELCOME
Country
JL
If the menu is not displayed, press and hold down
the and keys on the TV set for 5
seconds to display the menu.
Language
ENGLISH
A
Programme sort
This menu lets you to change the numbering
of programmes.
O Press the © key. The MAIN MENU is
displayed on the screen.
PICTURE
E^ninini^H
______1_____
LANGUAGE ENGLISH
Country
Auto Store
Manual Store
u
O Use the OO keys on the remote control
to select your country and validate with CE).
If your country does not appear In the list, select
choice
0
Next select your language using the (ZDCED
keys and validate with CE).
O The search starts automatically.
Finally the INSTALLATION menu appears
automatically.
If the programmes found have not been
correctly numbered, use the Sort menu to
renumber them.
If no picture Is found see Tips (p. 12).
O If you want to exit the menus, press ©
several times.
0
Highlight INSTALLATION and press the
cursor right key.
O Highlight SORT and press the cursor right
key.
O Select the programme you want to move with
the OO keys and press CE).
© Then use the OO keys to choose the new
number and confirm with CD.
O Repeat steps O and © as many times as
required to move the programmes.
©To exit the menus, press © several times.
Other settings in the Install menu
Highlight INSTALLATION and press the
cursor right key. The following items will be
displayed:
• Language : to change the display
language for the menus.
• Country : to select your country (GB for
Great Britain).
This setting Is used for the search,
automatic programme sort and teletext
display. If your country does not appear in
the list, select “.. ."
Auto Store : to start automatic search
for all programmes available in your
region.
Finally the INSTALLATION menu
appears automatically.
If the programmes found have not been
correctly numbered, use the Sort menu to
renumber them.
If no picture is found see Tips (p. 12).
If you want to exit the menus, press ©
several times.

Manual store
This menu is used to store the programmes
one at a time or to add a programme to the
existing list.
O Press the MENU key to display the Main
Menu.
Q Highlight INSTALLATION and press the
cursor right key.
O Highlight MANUAL STORE and press the
cursor right key.
PICTURE
Name
System EUROPE
Search 671 MHz
1
Fine Tune
Store
u
System : select Europe (automatic
detection"^) or according to the versions
Western Europe (BG standard), Eastern
Europe (DK standard), United Kingdom
(I standard) or France (LL’ standard).
* Except for France (LL' standard), you must select
the choice France.
Search : press O. The search starts.
Once a programme is found, the scanning
stops. Go to the next step. If you know the
frequency of the required programme,
enter its number directly with the (o) to (9)
keys.
if no picture is found, consult the possible solutions
(p. 12).
Fine tuning : if the reception is not
satisfactory, adjust using the OOkeys.
Programme : enter the desired number with
the keys ClDO or ® to @.
Name : use the G3CD keys to move
around the name display area (5 characters)
and the OO keys to select the characters.
When the name has been entered press the
CD key to exit.
Store : press CD. The programme is stored.
Repeat steps O to O fot each programme to
be stored.
To exit the menus press @ several times.

Picture settings
O From the MAIN MENU, Highlight
PICTURE and press the cursor right key.
SOUND
FEATURES
INSTALLATION
Use the OO keys to select a setting and
0
Colour
Contrast
Sharpness
Colour Temp.
NR
Contrast+
Store
OFF
Oh
OCE) keys to adjust.
Once the adjustments have been made select
o
Store and press CD to store them.
Press ft several times to exit the menus.
o
Sound adjustments
O Press ft, select Sound (O) and press CD.
The Sound menu is displayed:
1
1—
• B ass
• B alan ce
• D elta Volume
• AV L
• Store
•Install
Use the CDCD keys to select a setting and
e
the CDCD keys to adjust.
Once the adjustments have been made, select
€)
Store and press CD to store these changes.
Press several times to exit the menus.
o
Description of the adjustments :
• Brightness : this changes the picture brilliance.
• Colour : this changes the intensity of the
colour.
• Contrast : this changes the difference
betv/een the light and dark tones.
• Sharpness : this changes the picture
definition.
• Colour Temp. : this changes the colour
rendering: Cold (bluer), Normal (balanced)
or Warm (redder).
• NR (Noise Reduction) : reduces picture
noise (snow), in the case of difficult
reception.
• Contrast+ : automatically adjusts contrast of
the picture by making the darkest part of the
picture permanently black.
• Store : to store the picture adjustments.
Description of the settings:
• Treble: this alters the high frequency sounds.
• Bass: this alters the low frequency sounds.
• Balance: this balances the sound on the left
and right speakers.
• Delta Volume*: this is used to compensate
any volume discrepancies between the
different programs or EXT sockets.This
setting is available for programs 0 to 40 and
the EXT sockets.
• AVL* (Automatic Volume Leveller): this is
used to limit increases in sound, especially on
program change or advertising slots.
• Store: this is used to store the sound settings.
* Only available on certain versions.

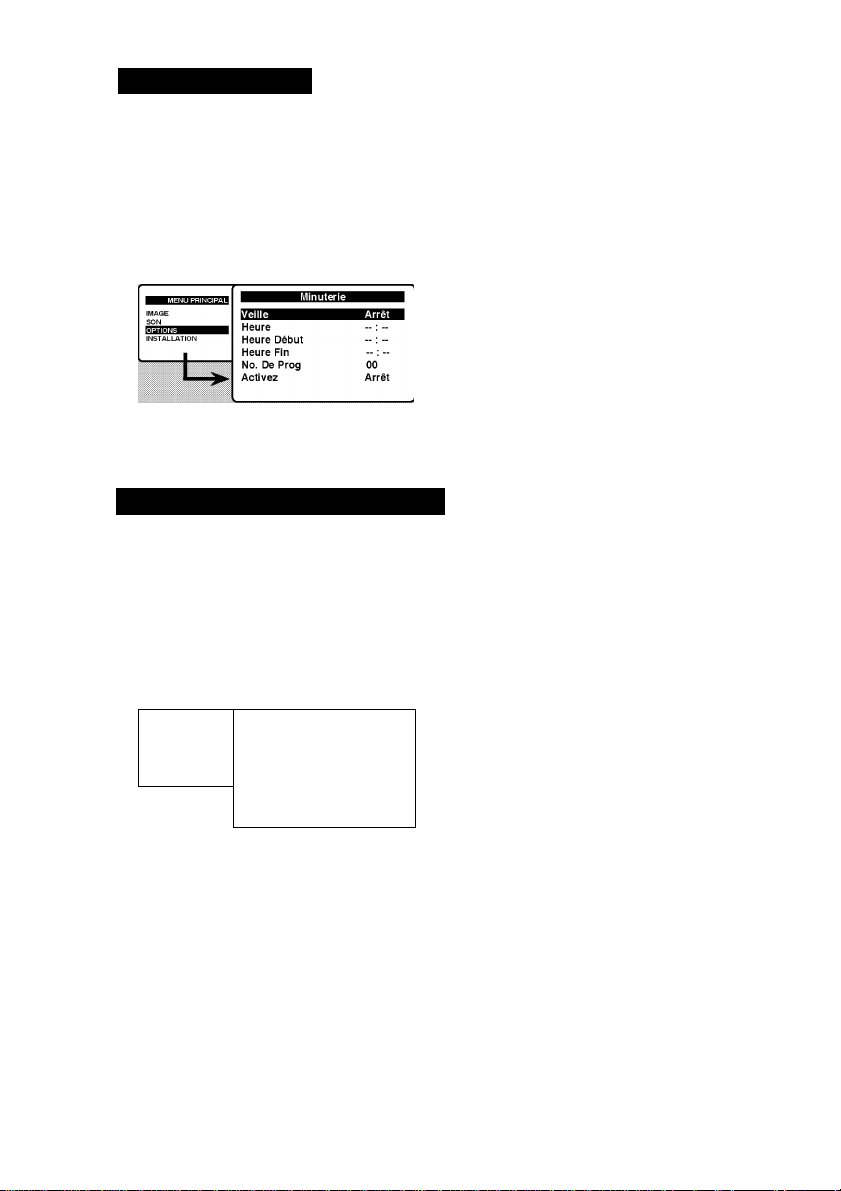
Timer function
This menu lets you use the TV set as an alarm Q
clock. 0
From the MAIN MENU, Highlight Q
FEATURES and press the cursor right key. 0
Highlight TIMER and press the cursor right
key. ©
The following items will be displayed:
INSTALLATION
© Sleep: to select an automatic standby period.
Time --: -Start Time - : Stop Time - : Pr Nr 00
Activate OFF
This menu lets you block use of the TV set.
O From the MAIN MENU, Highlight
FEATURES and press the cursor right key.
Q Highlight CHILDLOCK and press the cursor
right key.
INSTALLATION
Time : enter the current time.
Start Time : enter the start time.
Stop Time : enter the stop time.
Program No.: enter the number of the
desired programme for the wake-up alarm.
Activate : you can set:
• Once for a single alarm,
• Daily for each day,
• Off to cancel.
Press @) to put the TV set in standby.
It will automatically come on at the time
programmed. If you leave the TV set on, it will
just change programmes at the time entered
(and go into standby mode at the Stop Time).
O The next time you switch on the TV set, you
must enter your secret access code to access
the programmes.
© To cancel switch Child Lock to OFF.
©To change the code select New Code and
enter a new 4 figure code. Confirm by
entering a second time.
¡f you hove forgotten your secret code, enter the
universal code 0711.
O Press m several times to exit the menus.
0
You must enter your secret access code.
The first time, key the code 0711.
The menu is displayed.

Teletext is an information system broadcast by certain channels which can be consulted like a
newspaper. It also offers access to subtitles for viewers with hearing problems or who are not familiar
with the transmission language (cable networks, satellite channels, etc.).
Q Press : ^ You will obtain:
Teletext call
0
®/®
••OO Direct access
to the items
Enlarge a page
Stop sub-page
0
0
information
Selecting a
Contents
acquisition
Hidden
This is used to call teletext, change to transparent mode
and then exit. The summary appears with a list of items
that can be accessed. Each item has a corresponding 3
digit page number.
If the channel selected does not broadcast teletext, the
indication 100 will be displayed and the screen will remain
blank. (In this case, exit teletext and select another channel).
Enter the number of the page required using the (o) to
page
@ or 0 P (+) keys. Example: page 120, enter 0 @ 0.
The number is displayed top left, the counter turns and
then the page is displayed. Repeat this operation to view
another page.
If the counter continues to search, this means that the page is
not transmitted. Select another number.
Coloured areas are displayed at the bottom of the
screen. The 4 coloured keys are used to access the items
or corresponding pages.
The coloured areas fash when the item or the page is not yet
available.
This returns you to the contents page (usually page 100).
This allows you to display the top or bottom part of the
page and then return to normal size.
Certain pages contain sub-pages which are automatically
displayed successively. This key is used to stop or resume
sub-page acquisition. The indication
left.
To display or hide the concealed information (games
solutions).
STOP appears top
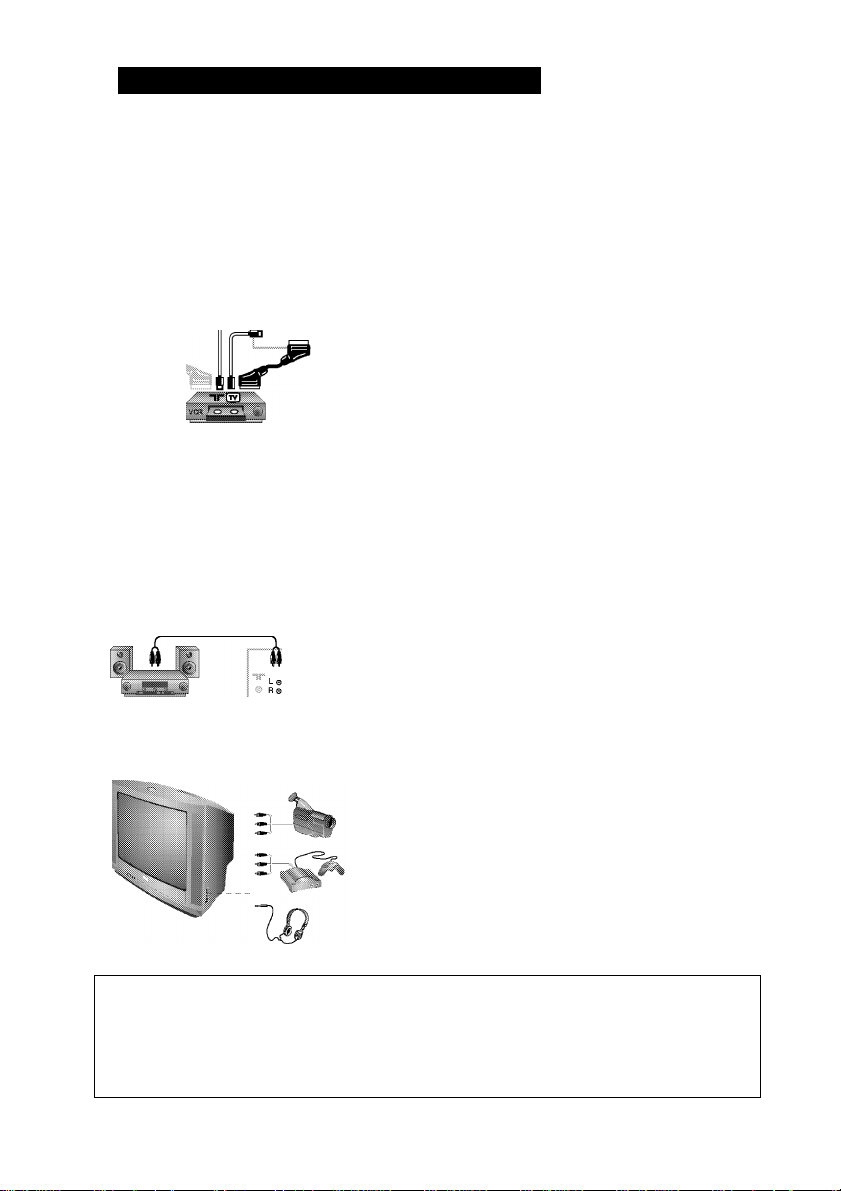
Connecting peripheral equipment
Depending on the models, the TV is equipped with either one or two scant connectors at the back of
the set, labelled as EXT 1 and EXT 2. The EXT1 connector has audio, CVBS/RGB input and audio,
CVBS output. The EXT2 connector (if available) has audio, CVBS/S-VHS input and audio, CVBS output.
Only EXT1 has built-in picture format auto detection. For EXT2, use the
control to adjust the picture format.
Video recorder
© SHHi EXT1
Other equipment
Amplifier (only available on certain versions)
Carry out the connections shown opposite, using a good
quality euroconnector cable.
If your video recorder does not have a euroconnector socket, the
only connection possible is via the aerial cable. You will therefore
need to tune in your video recorder's test signal and assign it
programme number 0 (refer to manual store, p. 6).
To reproduce the video recorder picture, press (o).
Video recorder with decoder
Connect the decoder to the second euroconnector socket
of the video recorder.You will then be able to record
scrambled transmissions.
Satellite receiver, decoder, CDV, games, etc.
For TV sets with 2 SCART connectors, preferably connect
the equipment delivering RGB signals (digital decoders, DVD
players, games consoles, etc.) to EXT1 and the equipment
delivering S-VHS signals (S-VHS and Hi-8VCRs) to EXT2.
To connect to a hi-fi system, use an audio connection cable
and connect the“L” and “R” outputs on the TV set to the
“AUDIO IN”“L” and“R” input on your hi-fi amplifier.
Side Connections
Make the connections as shown opposite.
Headphones
When headphones are connected, the sound on the TV set will
be cutThe Q ^ (±) keys are used to adjust the volume level.
The headphone impedance must be between 32 and 600 Ohms.
key on the remote
P|^rf|p7|n
V J
lO
I To select connected equipment
^ Press the0 key to select EXT (and AV) for the side connections.
■ M'.m CiiUii^n-eui (d('U/d(‘:. Viden lOu.adt':) O-a !i-(' swiid-ii-g ils(T
--------
N

RGB Signals :
These are 3 Red, Green and Blue video signals which directly drive the red, green and blue
emitters in the cathode ray tube.
Using these signals provides better picture quality.
NICAM sound :
Process by which digital sound can be transmitted.
System :
Television pictures are not broadcast in the same way in all countries. There are different standards:
BG, DK, I, and L L’. The SYSTEM setting (p. 6) is used to select these different standards. This is not
to be confused with PAL or SECAM colour coding. Pal is used in most countries in Europe, Secam
in France, Russia and most African countries. The United States and Japan use a different system
called NTSC.
Safety Information: Electric, Magnetic and Electromagnetic Fields (“EMF")
1. Philips Royal Electronics manufactures and sells many products targeted at consumers, which, like
any electronic apparatus, in general have the ability to emit and receive electro magnetic signals.
2. One of Philips’ leading Business Principles is to take all necessary health and safety measures for
our products, to comply with all applicable legal requirements and to stay well within the EMF
standards applicable at the time of producing the products.
3. Philips is committed to develop, produce and market products that cause no adverse health
effects.
4. Philips confirms that if its products are handled properly for their intended use, they are safe to
use according to scientific evidence available today.
5. Philips plays an active role in the development of international EMF and safety standards, enabling
Philips to anticipate further developments in standardization for early integration in its products.

Poor reception The proximity of mountains or high buildings may be responsible for ghost
No picture Have you connected the aerial socket properly ?
Peripheral
equipment gives
a black and white
picture
Remote control The TV set does not react to the remote control ; the indicator on the set
No sound If on certain channels you receive a picture but no sound, this means that
Teletext Are certain characters not displayed correctly ? Check that the Country
Standby When you switch the TV set on it remains in standby mode and the
Still no results ? If your TV set breaks down, never attempt to repair it yourself : contact
Cleaning the set Only use a clean, soft and lint-free cloth to clean the screen and the casing
pictures, echoing or shadows. In this case, try manually adjusting your
picture : see Fine Tuning (p.6) or modify the orientation of the outside
aerial.
Does your antenna enable you to receive broadcasts in this frequency
range (UHFor VHF band) ?
In the event of difficult reception (snowy picture) switch the NR on the
Picture menu to ON (p. 7).
Have you chosen the right system ? (p. 6). Poorly connected euroconnector
cables or aerial sockets are often the cause of picture or sound problems
(sometimes the connectors can become half disconnected if the TV set is
moved or turned). Check all connections.
To play a video cassette, check that it has been recorded under the
same standard (PAL, SECAM, NTSC) which can be replayed by the video
recorder.
no longer flashes when you use the remote control ? Replace the batteries.
you do not have the correct TV system. Modify the System setting (p. 6).
setting has been positioned correctly (p.5).
indication Locked is displayed when you use the keys on the TV set ?
The Child Lock function is switched On (p. 8).
If the set receives no signal for 10 mins, it automatically goes into standby
mode.
In standby mode, your TV consumes less than 5W depending on model. In order
to be more environmentally friendly, please use the on/off (power) switch to
turn the set off completely.
your dealer's after-sales service.
of your set. Do not use alcohol-based or solvent-based products.
12

Vous venez d’acquérir ce téléviseur, merci de votre confiance.
Nous vous conseillons de lire attentivement les instructions qui suivent pour
mieux comprendre les possibilités offertes par votre téléviseur.
Remarque : les spécifications et informiations fournies peuvent faire l'objet de
modif cations sans préavis.
Installation
Installation du téléviseur...................................................................................................2
Les touches du téléviseur.................................................................................................2
Informations sur la sécurité
..............................................................................................
Les touches de la télécommande.....................................................................................4
Installation rapide..............................................................................................................5
Classement des programmes...........................................................................................5
Autres réglages du menu Installation................................................................................5
Recherche manuelle.........................................................................................................6
Utilisation
Réglages de l’image.........................................................................................................7
Réglages du son...............................................................................................................7
Fonction réveil...................................................................................................................8
Verrouillage du téléviseur..................................................................................................8
Télétexte...........................................................................................................................9
Raccordements
Magnétoscope................................................................................................................. 10
Autres appareils............................................................................................................... 10
Amplificateur....................................................................................................................10
Connexions latérales......................................................................................................10
Pour sélectionner les appareils connectés
.....................................................................
10
Informations pratiques
Glossaire..........................................................................................................................Il
Informations sur la sécurité : champs électriques, magnétiques et
électromagnétiques (EMF, ElectroMagnetic Fields).........................................................Il
Conseils........................................................................................................................... 12
3
Directive pour le recyclage
L'emballage de cet appareil peut être recyclé. Conformez-vous aux règles en vigueur dans
votre localité pour une élimination appropriée.
Elimination de votre ancien produit.
Votre téléviseur est conçu et fabriqué avec des matériaux et composants de haute qualité
qui peuvent être recyclés et réutilisés.
La directive européenne 2002/96/EC s'applique à tous les appareils marqués de ce logo
(poubelle barrée). Renseignez-vous sur les systèmes de collecte mis à votre disposition
pour les appreils électriques et électroniques.
Conformez-vous aux règles en vigueur dans votre localité et ne jetez pas vos anciens
appareils avec les déchéts ménagers. L'élimination appropriée de votre ancien appareil aidera
à prévenir les effets négatifs sur l'environnement et la santé humaine.
Installation du téléviseur
O Positionnement du téléviseur O Télécommande
Placez votre téléviseur sur une surface solide
et stable. Pour prévenir toute situation
dangereuse, ne pas exposer le téléviseur à des
projections d’eau et ne rien poser dessus tel
qu’un objet couvrant (napperon), rempli de
liquide (vase) ou dégageant de la chaleur (lampe).
O Raccordements
• Introduisez la fiche d'antenne TV dans la
prise nr située à l’arrière.
• Pour les versions équipées de la radio:
introduisez la fiche d'antenne radio dans la
prise FM ANT avec l’adaptateur fourni.
Avec les antennes d'intérieur, la réception peut
dons certaines conditions être difficile. Vous pouvez
l'améliorer en faisant tourner l'antenne. Si la
réception reste médiocre, il fout utiliser une antenne
extérieure.
• Branchez le cordon d’alimentation sur le
secteur (220-240 V / 50 Hz).
Les touches du téléviseur
Le téléviseur est équipé de 5 touches qui sont
situées, selon les versions, à l’avant ou sur le
dessus du coffret.
Introduisez les 2 piles de type R6 fournies en
respectant les polarités.
Les piles livrées avec l’appareil ne contiennent
ni mercure ni cadmiiumi nickel, dans un souci de
préserver ¡'environnement Veillez à ne pas jeter vos
piles usagées mais à utiliser les moyens de recyclage
mis O votre disposition (consultez votre revendeur).
O Mise en marche
k-
Pour allumer le téléviseur, appuyez sur la
touche marche arrêt. Un voyant s’allume en
rouge et l’écran s’illumine. Allez directement
au chapitre installation rapide, page 5.
Si le téléviseur reste en veille, appuyez sur la
touche P @ de la télécommande.
Le voyant clignote lorsque vous utilisez la
télécommande.
Les touches VOLUME - + permettent de
régler le niveau sonore.
Les touches PROGRAM AV permettent de
sélectionner les programmes.
Pour accéder aux menus, appuyez
simultanément sur les 2 touches VOLUME - +
permettent. Ensuite, les touches PROGRAM
AV permettent de sélectionner un réglage et
les touches VOLUME - + permettent de régler.
Pour quitter le menu affiché, maintenez
appuyées les 2 touches VOLUME - +
permettent.
Remarque: lorsque la fonction Verrou enfant est
en service, les touches sont inactivées (voir p. 8).

Informations de sécurité
• Branchez la TV sur une prise électrique 220 - 240V, 50 Hz (courant alternatif)
• Otez la prise lorsque :
- la lumière rouge au bas de l'écran clignote continuellement ;
- une ligne blanche, brillante apparaît au milieu de l'écran ;
- un orage éclate ;
- la télévision est laissée sans surveillance pour une longue durée.
• Pour nettoyer l'écran de télévision, n'utilisez jamais de produits abrasifs. Utilisez une peau de chamois
légèrement humide ou un chiffon doux.
• Ne placez jamais de flammes directes sur la télévision ou à proximité (bougies, par exemple).
• Ne placez pas la télévision sous la lumière directe du soleil ou une source de chaleur.
• Ne couvrez ni ne bloquez la télévision afin d'éviter une surchauffe.
• Laissez au minimum 5 cm autour de chaque côté de la télévision pour une bonne aération.
• Evitez de placer la télévision à un endroit où elle pourrait être exposée à la pluie ou à l'eau (près
d'une fenêtre par exemple).
• PRECAUTIONS quant à l'utilisation des piles - Afin d'éviter que les piles coulent et provoquent des
blessures ou des dommages matériels ou endommagent l'appareil :
- placez les piles correctement en respectant les polarités (+ et -) indiquées sur l'appareil ;
- ne mélangez pas les piles (nouvelles avec usagées ou carbone avec alcalines, etc.) ;
- ôtez les piles lorsque l'appareil ne sera pas utilisé durant une longue période.
• Cet appareil sera préservé des gouttes d’eau et des éclaboussures. Ne placez pas d’objets remplis de
liquide, tels que des vases, sur l’appareil.
Informations de sécurité
• Ne laissez jamais la télévision en mode veille (stand-by) durant une longue période. Eteignez-la pour
lui permettre de se démagnétiser. Une télévision correctement démagnétisée produit des images de
meilleure qualité.
• Ne déplacez ni ne faites glisser la télévision lorsqu'elle est allumée, vous pourriez provoquer une
déséquilibre des couleurs dans certaines parties de l'écran.
• N'essayez jamais de réparer vous-même un poste TV défectueux. Consultez toujours un technicien.

Les touches de la télécommande
(Disponible uniquement sur certaines versions - Addendum p.4)
O Mode radio / tv
Pour permuter le téléviseur en mode radio ou tv (pour les
versions équipés de la radio).
O Son Surround (disponible uniquement sur certaines versions)
Pour activer / désactiver l’effet d’élargissement du son. En stéréo,
les haut-parleurs paraissent plus espacés. Pour les versions
équipés du Virtual Dolby Surround vous obtenez les effets
sonores arrières du Dolby Surround Pro Logic. En mono, on
obtient un effet spatial pseudo stéréo.
O Info, d'écran / n° permanent
•1® W.
SMART RADIO SMART
•®® O
Pour afficher / effacer le numéro de programme, le nom (s’il
existe), l’heure, le mode son, et le temps restant de la minuterie.
Appuyez pendant 5 secondes pour activer l’affichée permanent
du numéro.
Préréglage du son
Permet d’accéder à une série de préréglages: Parole,
Musique, Théâtre et retour à Personnel.
Menu
Pour appeler ou quitter les menus.
Curseur / Format
Ces 4 touches permettent de naviguer dans les menus.
Les touches OCE) permettent d’agrandir ou de compresser
image verticalement.
Volume
Pour ajuster le niveau sonore.
Coupure son
Pour supprimer ou rétablir le son.
Touches numériques
Accès direct aux programmes. Pour un programme à 2
chiffres, il faut ajouter le 2ème chiffre avant que le trait ne
disparaisse.
Minuterie
Pour sélectionner une durée de mise en veille automatique
(de 0 à 180 minutes).
Veille
Permet de mettre en veille le téléviseur. Pour l’allumer,
appuyez sur P
Mode son
Permet de forcer les émissions Stéréo en Mono ou pour les
émissions bilingues de choisir entre Dual I ou Dual II. Pour
les téléviseurs équipés de la réception Nicam, vous pouvez,
selon les émissions, forcer le son Nicam Stéréo en Mono
ou choisir entre Nicam Dual I, Nicam Dual II et Mono.
L'indication Mono est rouge lorsqu'il s'agit d'une position forcée.
Touches télétexte (p. 9)
Pre-set image
Used to access a series of stored settings: Rich, Natural,
Soft, Multimedia and return to Personal.
Appel télétexte (p.9)
Sélection des programmes
Pour accéder au programme inférieur ou supérieur.
Le numéro, (le nom) et le mode son s’affichent quelques
instants.
Pour certains programmes le titre de l'émission apparaît en bas de
l'écran.
Ф Sélection des prises EXT
Appuyez plusieurs fois pour sélectionner EXT et AV.
0
(±), (S), ® à (g) (ou ($)).

Installation rapide
Plug & Ploy
La première fois que vous allumez le
téléviseur, un menu apparaît à l’écran.
Ce menu vous invite à choisir le pays ainsi que
la langue des menus :
WELCOME
Country Language
- ... ENGLISH ^
A A
Si ie menu n’opporoît pas, maintenez appuyées
pendant 5 secondes les touches et du
téléviseur, pour le faire apparaître.
Classement des programmes
Ce menu permet de changer la numérotation
des programmes.
Appuyez sur la touche @. Le MENU
PRINCIPAL s’affiche à l’écran.
Langage FRANÇAIS
Pays
Rec. Auto
Rec. Manuelle
O Utilisez les touches QQ de la télécommande
pour choisir votre pays, puis validez avec Œ).
SI votre pays n'apparaît pas dans la liste,
sélectionnez le choix
0
Sélectionnez ensuite votre langue avec les
touches OO puis validez avec Œ).
© La recherche démarre automatiquement.
A la fin, le menu INSTALLATION apparaît
automatiquement. Si les programmes trouvés
n’ont pas été numérotés correctement,
utilisez le menu
renuméroter (voir ci-dessous).
SI aucune Image n'est trouvée, voir conseils (p. 12).
O Si vous souhaitez quitter les menus, appuyez
plusieurs fois sur
0
Mettez l’option INSTALLATION en
surbrillance et pressez la touche curseur droit.
© Mettez l’option SORT (Classement) en
surbrillance et pressez la touche curseur droit.
Classement pour les
quit
O Sélectionnez le programme que vous
souhaitez déplacer avec les touches OCE) et
appuyez sur Œ).
0
Utilisez ensuite les touches OO pour
choisir le nouveau numéro et validez avec
Ш.
O Recommencez les étapes O 0 autant de
fois qu’il y a de programmes à renuméroter.
O Pour quitter les menus, appuyez plusieurs fois
sur fi.
Autres réglages du menu Installation
Mettez l’option INSTALLATION en
surbrillance et pressez la touche curseur droit.
Les rubriques suivantes s’affichent :
• Langage : pour modifier la langue d’affichage
des menus.
• Pays : pour choisir votre pays (F pour
France).
Ce réglage Intervient dans la recherche, le
classement automatique des programmes
et l'affichage du télétexte. Si votre pays
n 'apparaît pas dans la liste, sélectionnez le
choix “. . ."
Mémo. Auto : pour lancer une recherche
automatique de tous les programmes
disponibles dans votre région. A la fin,
le menu INSTALLATION apparaît
automatiquement. Si les programmes
trouvés n’ont pas été numérotés
correctement, utilisez le menu
Classement pour les renuméroter.
SI aucune Image n 'est trouvée, voir conseils
(p. 12).
Si vous souhaitez quitter les menus,
appuyez plusieurs fois sur fi.

Recherche manuelle
Ce menu permet de mémoriser les
programmes un par un ou d’ajouter un
programme à la liste existante.
O Pressez la touche MENU pour afficher le
menu principal.
0
Mettez l’option INSTALLATION en
surbrillance et pressez la touche curseur droit.
O Mettez l’option MANUAL STORE
(mémorisation manuelle) en surbrillance et
pressez la touche curseur droit.
Système : sélectionnez Europe (détection
automatique"^) ou selon les versions Europe
Ouest (norme BG), Europe Est (norme DK),
Royaume-Uni (norme I) ou France (norme
LL').
* Sauf pour ia France (norme LL'), il faut
sélectionner Impérativement le choix France.
Recherche : appuyez sur O. La recherche
commence. Dès qu’un programme est trouvé,
le défilement s’arrête. Allez à l’étape suivante.
Si vous connaissez la fréquence du programme
désiré, composez directement son numéro
avec les touches ® à (9).
SI aucune Image n'est trouvée, voir conseils
(p. 12).
Réglage Fin : si la réception n’est pas
satisfaisante, réglez avec les touches OŒ).
Programme : entrer le numéro souhaité avec
les touches (HDŒ) ou (Ô)à(9).
Nom : utilisez les touches GDŒ) pour vous
déplacer dans la zone d’affichage du nom
(5 caractères) et les touches OO pour
choisir les caractères. Lorsque le nom est
entré, utilisez la touche ® pour sortir.
Mémoriser : appuyez sur Œ). Le programme
est mémorisé.
Répétez les étapes 0 à O autant de fois qu’il
y a de programmes à mémoriser.
Pour quitter les menus, appuyez plusieurs fois

Réglages de l’image
Dans le menu principal (MAIN MENU),
mettez l’option PICTURE (Image) en
surbrillance et pressez la touche curseur droit.
Contraste
Définition
Temp. Couleur
Reduct. Bruit
Contraste +
Mémoriser
0
Utilisez les touches OO pour sélectionner
un réglage et les touches Œ)Œ) pour régler.
© Une fois les réglages effectués, sélectionnez le
choix Mémoriser et appuyer sur O pour les
enregistrer.
O Pour quitter les menus, appuyez plusieurs fois
sur ft.
Réglages du son
O Appuyez sur sélectionner Son (O) et
appuyez sur Œ). Le menu Son apparaît :
Utilisez les touches QQ pour sélectionner
0
un réglage et les touches Œ)0 pour régler.
Une fois les réglages effectués, sélectionnez le
0
choix Mémoriser et appuyer sur Œ) pour les
enregistrer.
Pour quitter les menus, appuyez plusieurs fois
sur ft.
Description des réglages :
• Lumière : agit sur la luminosité de l’image.
• Couleur : agit sur l’intensité de la couleur.
• Contraste : agit sur la différence entre les
tons clairs et les tons foncés.
• Définition : agit sur la netteté de l’image.
• Temp. Couleur : agit sur le rendu des
couleurs : Froide (plus bleue), Normale
(équilibrée) ou Chaude (plus rouge).
• Réduct. Bruit : atténue le bruit de l’image
(la neige), en cas de réception difficile.
• Contraste + : réglage automatique du
contraste de l’image qui ramène en
permanence la partie la plus sombre de
l’image au noir.
• Mémoriser : pour mémoriser les réglages de
l’image.
Description des réglages:
• Aigus :agit sur les fréquences hautes du son.
• Graves : agit sur les fréquences basses.
• Balance : pour équilibrer le son sur les hautparleurs gauche et droit.
• Delta Volume * : permet de compenser les
écarts de volume qui existent entre les
différents programmes ou les prises EXT.
Ce réglage est opérationnel pour les
programmes 0 à 40 et les prises EXT.
• AVL* (Automatic Volume Leveler): contrôle
automatique du volume qui permet de limiter
les augmentations du son, en particulier lors des
changements de programmes ou des publicités.
• Mémoriser : pour mémoriser les réglages du
son.
• Disponible uniquement sur certaines versions
Fonction réveil
Ce menu vous permet d’utiliser le téléviseur
comme un réveil.
Dans le menu principal (MAIN MENU),
mettez l’option FEATURES (Options) en
surbrillance et pressez la touche curseur droit.
Mettez l’option TIMER (Minuterie) en
surbrillance et pressez la touche curseur droit.
Les rubriques suivantes s’affichent :
© Veille : pour sélectionner une durée de mise
en veille automatique.
Verrouillage du téléviseur
Ce menu vous permet d’interdire l’utilisation
du téléviseur.
O Dans le menu principal (MAIN MENU),
mettez l’option FEATURES (Options) en
surbrillance et pressez la touche curseur droit.
0 Mettez l’option CHILDLOCK (Verrou
Enfant) en surbrillance et pressez la touche
curseur droit:
IMAGE
SON
INSTALLATION
1
Timer
O Heure : entrez l’heure courante.
0 Heure Début : entrez l’heure de début.
O Heure Fin : entrez l’heure de mise en veille.
O No. de Prog : entrez le numéro du
programme désiré pour le réveil.
© Activez : vous pouvez régler :
• Une fois pour un réveil unique,
• Quotidien pour tous les jour,
• Arrêt pour annuler.
O Appuyez sur pour mettre en veille le
téléviseur. Il s’allumera automatiquement
à l’heure programmée. Si vous laissez le
téléviseur allumé, il changera uniquement de
programme à l’heure indiquée (et se mettra
en veille à l’Heure de Fin).
© Vous devez entrer votre code confidentiel
d’accès. La première fois, tapez le code 0711.
Le menu apparaît.
O La prochaine fois que vous allumerez votre
téléviseur, vous devrez introduire votre code
d’accès secret pour pouvoir visionner les
programmes.
0
Pour annuler: positionnez Verrou Enfant sur
ARRÊT.
O Pour changer de code, sélectionnez Nouveau
Code et entrez un nouveau code à 4 chiffres.
Confirmez en le tapant une deuxième fois.
Si vous avez oublié votre code conpdentiel, entrez
le code universel 0711.
O Pour quitter les menus, appuyez plusieurs fois
sur ft.

Le télétexte est un système d'informations, diffusé par certaines chaînes, qui se consulte comme
un journal. Il permet aussi d'accéder aux sous-titrages pour les personnes malentendantes ou peu
familiarisées avec la langue de transmission (réseaux câblés, chaînes satellites,...).
(^Appuyez sur : ^ Vous obtenez :
Appel
Permet d’appeler le télétexte, de passer en mode
transparent puis de quitter. Le sommaire apparaît avec
la liste des rubriques auxquelles vous pouvez accéder.
Chaque rubrique est repérée par un numéro de page à 3
chiffres.
Si h chaîne sélectionnée ne diffuse pas le télétexte, l'Indication
100 s'affiche et l'écran reste noir (dans ce cas. quittez le
télétexte et choisissez une autre chaîne).
Composer le numéro de la page désiré avec les touches
(¿) à @ ou Ç) P (+). Exemple: page 120, tapez @
(^. Le numéro s’affiche en haut à gauche, le compteur
tourne, puis la page est affichée. Renouvelez l'opération
pour consulter une autre page.
Si le compteur continue à chercher, c'est que la page n'est pas
transmise. Choisissez un autre numéro.
Des zones colorées sont affichées en bas de l’écran. Les 4
touches colorées permettent d’accéder aux rubriques ou
aux pages correspondantes.
Les zones colorées clignotent lorsque la rubrique ou la page
n'est pas encore disponible.
Pour revenir au sommaire (généralement la page 100).
Pour afficher la partie supérieure, inférieure, puis revenir
à la dimension normale.
Certaines pages contiennent des sous-pages qui se
succèdent automatiquement. Cette touche permet
d’arrêter ou reprendre l'alternance des sous-pages.
L'indication STOP apparaît en haut à gauche.
Pour faire apparaître ou disparaître les informations
cachées (solutions de jeux).
®/©
lOOO ^
(g)
(§)
®
télétexte
d’une page
direct aux
rubriques
Sommaire
Agrandissement
d'une page
Arrêt de
l'alternance
des sous-pages
Informations
cachées
J
 Loading...