

Page 1

USB HUB
TABLE OF CONTENTS
1. INTRODUCTION.....................................................................2
2. THE CONTENT OF THE PACKAGE..................................2
3. CONFIGURATION...................................................................3
4. APPLICATION............................................................................4
5. INSTALLATION..........................................................................5
OTHER LANGUAGE VERSION
French(Français)................................................................................6
Spanish(Español)..............................................................................11
German(Deutch).............................................................................16
Italian(Italiano).................................................................................21
1
Page 2
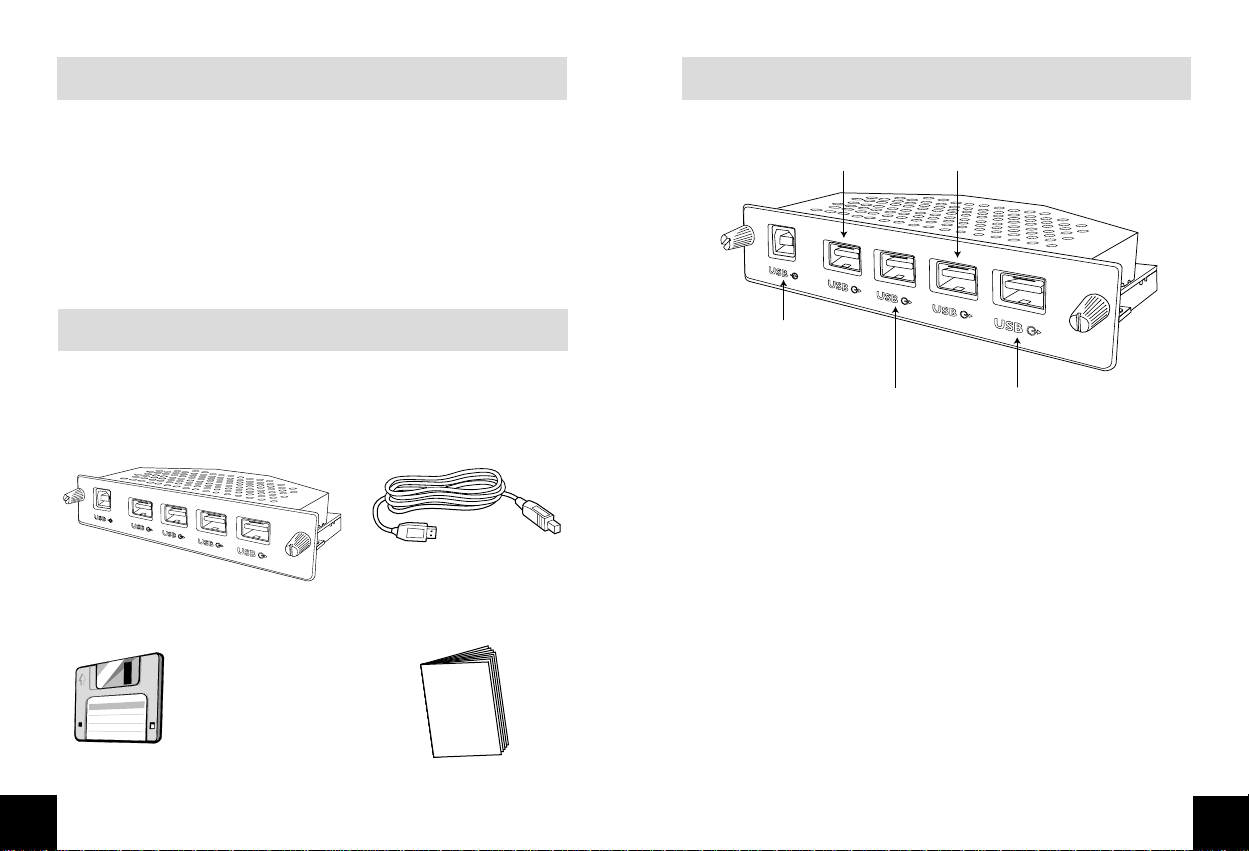
upstream port
downstream
port 4
downstream
port 2
downstream
port 3
downstream
port 1
INTRODUCTION
15L5082Q USB Hub supports four down stream ports and
one upstream port. With its 12 Mbps; 15L5082Q USB Hub
supplement the full-speed and low-speed PC desktop
peripherals with plug-and-play capability and user-friendly
interface.
THE CONTENT OF THE PACKAGE
In the package you should find
CONFIGURATION
The USB module
The disk with USB device driver The user’s manual
2
The USB cable
3
Page 3

R
=14
7
253
6
8 9
#0
*
SEKRSEKR
R
=14
7
253
6
8 9
#0
*
SEKR
keyboard
mouse
joystick
scanner
printer
phone / PBX
USB HUB
APPLICATION
INSTALLATION
System requirements
Hardware: a PC which supports the USB function and has a USB
outlet
Software: Windows system which supports USB
(OSR2.1 or higher).
Installation of USB module
1. Turn off the monitor and unplug the power card
2. Remove the cover of “USBAY” at the back of the
monitor.
3. Insert USB module into the slot
4. Fix the USB module to the monitor by screwing
5. Do not tighten the fixing nut excessively (use fingers
to tighten screws) If screwed too right, the unit may
not connect properly!
6. Plug-in the power cord and turn on the monitor.
To establish the USB connection
7. Insert disk.
8. The two ends of USB cable attached are different.
Plug-in the flat end into the “upstream” outlet of the
USB module.
9. Plug-in the other end into the USB outlet of the PC.
10. Windows recognises two new pieces of hardware
-philips USB hub
-USB Human Interface Device
This last item is presented through a wizard.
Follow the “next” steps on screen (choose the
“recommended” options) until installation has been
finished.
4
5
Page 4

CONCENTRATEUR USB
TABLE DES MATIÈRES
1. INTRODUCTION . . . . . . . . . . . . . . . . . . . . . . . . . . .2
2. CONTENU DE L’EMB ALLAGE . . . . . . . . . . . . . . . . .2
INTRODUCTION
Le concentrateur USB 15L5082Q accepte quatre ports en
aval et un port en amont. Avec ses 12 Mbits/s., il permet
d’ajouter des périphériques PC de bureau à vitesse rapide et
lente, prêts à l’emploi (fonction Plug and Play) et dotés
d’interface conviviale.
3. CONFIGURATION . . . . . . . . . . . . . . . . . . . . . . . . . .3
4. APPLICATION . . . . . . . . . . . . . . . . . . . . . . . . . . . . . .4
5. INSTALLATION . . . . . . . . . . . . . . . . . . . . . . . . . . . . .5
AUTRES LANGUES
Angais . . . . . . . . . . . . . . . . . . . . . . . . . . . . . . . . . . . . . . . . .1
Español . . . . . . . . . . . . . . . . . . . . . . . . . . . . . . . . . . . . . . .11
Deutsch . . . . . . . . . . . . . . . . . . . . . . . . . . . . . . . . . . . . . . .16
Italiano . . . . . . . . . . . . . . . . . . . . . . . . . . . . . . . . . . . . . . . .21
6
CONTENU DE L’EMBALLAGE
Vous trouverez dans l’emballage
Le module USB
La disquette avec pilote USB Le mode d’emploi
Le câble USB
7
Page 5

CONFIGURATION
port en
amont
port en
aval 4
port en
aval 2
port en
aval 3
port en
aval 1
R
=14
7
253
6
8 9
#0
*
SEKRSEKR
R
=14
7
253
6
8 9
#0
*
SEKR
clavier
souris
manette
scanner
imprimante
téléphone/
autocommutateur
privé
CONCENTRATEUR USB
APPLICATION
8
9
Page 6

INSTALLATION
Configuration minimum
Matériel : PC acceptant la fonction USB et muni d’une prise USB
Logiciel : système Windows acceptant USB (OSR2.1 ou supérieur)
Installation du module USB
1. Mettez le moniteur hors tension et débranchez le
cordon d’alimentation.
2. Ôtez le capot de la “Baie USB” à l’arrière du moniteur.
3. Insérez le module USB dans le logement prévu.
4. Fixez le module USB au moniteur en le vissant.
5. Ne serrez pas l’écrou de fixation de manière excessive
(serrez les vis à l’aide de vos doigts). Si vous serrez trop
fort, il est possible que la connexion de l’unité ne
s’effectue pas correctement !
6. Rebranchez le cordon d’alimentation et mettez le
moniteur sous tension.
Pour établir la connexion USB
7. Introduisez la disquette.
8. Les deux extrémités du câble USB fourni sont différentes.
Enfichez l’extrémité plate dans la prise “amont” du module
USB.
9. Introduisez l’autre extrémité dans la prise USB du PC.
10. Windows reconnaît deux nouveaux éléments de matériel :
- le concentrateur USB Philips
- l’interface USB Human Interface Device.
Ce dernier élément est présenté par le biais d’un Assistant.
Suivez les étapes “next”(=suivantes) à l’écran (choisissez les options
“recommended”) jusqu’à ce que l’installation soit terminée.
CONCENTRADOR USB
ÍNDICE
1. INTRODUCCIÓN . . . . . . . . . . . . . . . . . . . . . . . . . . 2
2. EMBALAJE . . . . . . . . . . . . . . . . . . . . . . . . . . . . . . . . .2
3. CONFIGURACIÓN . . . . . . . . . . . . . . . . . . . . . . . . . .3
4. APLICACIÓN . . . . . . . . . . . . . . . . . . . . . . . . . . . . . .4
5. INSTALACIÓN . . . . . . . . . . . . . . . . . . . . . . . . . . . . . .5
OTROS IDIOMAS
Inglés . . . . . . . . . . . . . . . . . . . . . . . . . . . . . . . . . . . . . . . .1
Françés . . . . . . . . . . . . . . . . . . . . . . . . . . . . . . . . . . . . . . .6
Deutsch . . . . . . . . . . . . . . . . . . . . . . . . . . . . . . . . . . . . . .16
Italiano . . . . . . . . . . . . . . . . . . . . . . . . . . . . . . . . . . . . . .21
10
11
Page 7

INTRODUCCIÓN
puerto de salida
puerto de
entrada 4
puerto de
entrada 2
puerto de
entrada 3
puerto de
entrada 1
El concentrador USB I5L5082Q soporta cuatro puertos de
entrada y uno de salida. Con sus 12 Mbps, la unidad sirve de
complemento para los periféricos de sobremesa, tanto de
alta como de baja velocidad, con capacidad “plug-and-play”
(conectar y usar) y un sencillo interfaz de usuario.
EMBALAJE
En el embalaje deberá encontrar:
CONFIGURACIÓN
El módulo USB
El disco con el controlador del El
12
El cable USB
manual de uso
13
Page 8

R
=14
7
253
6
8 9
#0
*
SEKRSEKR
R
=14
7
253
6
8 9
#0
*
SEKR
teclado
ratón
palanca de mando
escáner
impresora
teléfono/
centralita
CONCENTRADOR USB
APLICACIÓN
INSTALACIÓN
Requisitos de sistema
Equipo: un ordenador que soporte la función USB y disponga de
la toma correspondiente
Programa: sistema operativo Windows que soporte el sistema USB
(OSR2.1 o superior).
Instalación del módulo USB
1. Apague el monitor y desconecte el cable de alimentación.
2. Retire la tapa del terminal “USBAY” en el panel posterior del
monitor.
3. Inserte el módulo USB en la ranura.
4. Asegure el módulo al monitor con tornillos.
5. No apriete demasiado la tuerca de sujeción (utilice los dedos
para apretar los tornillos). Si se aplica demasiada presión, la
unidad podría funcionar incorrectamente.
6. Conecte el cable de alimentación y encienda el monitor.
Para establecer la conexión USB
7. Inserte el disco.
8. Los dos extremos del cable USB son diferentes. Conecte el
extremo plano al terminal de salida del módulo USB.
9. Conecte el otro extremo al terminal USB del ordenador.
10. Windows reconoce dos nuevos dispositivos
- el concentrador USB de Philips
- el interfaz de usuario USB
Este último dispositivo se presenta a través de un asistente. Siga el
procedimiento indicado en la pantalla (eligiendo las opciones
recomendadas) hasta completar la instalación.
14
15
Page 9

USB-HUB
INHALTSANGABE
1. EINLEITUNG . . . . . . . . . . . . . . . . . . . . . . . . . . . . . . .2
2. VERPACKUNGSINHALT . . . . . . . . . . . . . . . . . . . . . .2
EINLEITUNG
Der USB-Hub 15L5082Q unterst¸tzt vier Downstream-Ports
und einen Upstream-Port. Dank seiner ‹bertragungsgeschwindigkeit von 12 Mbps bietet der USB-Hub 15L5082Q
Plug-and-Play-F‰higkeiten und eine benutzerfreundliche
Schnittstelle f¸r Hochgeschwindigkeits- und
Niedriggeschwindigkeitsperipherieger‰te.
3. KONFIGURATION . . . . . . . . . . . . . . . . . . . . . . . . . . .3
4. ANWENDUNG . . . . . . . . . . . . . . . . . . . . . . . . . . . . .4
5. INSTALLATION . . . . . . . . . . . . . . . . . . . . . . . . . . . . .5
ANLEITUNG IN ANDEREN SPRACHEN
Englisch (English) . . . . . . . . . . . . . . . . . . . . . . . . . . . . . . . .1
Franzˆsisch (FranÁais) . . . . . . . . . . . . . . . . . . . . . . . . . . . .6
Spanisch (EspaÒol) . . . . . . . . . . . . . . . . . . . . . . . . . . . . .11
Italienisch (Italiano) . . . . . . . . . . . . . . . . . . . .21
16
VERPACKUNGSINHALT
Die Verpackung sollte folgendes enthalten:
Das USB-Modul
Die Diskette mit dem
USB-Ger‰tetreiber
Die Bedienungsanleitung
Das USB-Kabel
17
Page 10

KONFIGURATION
Upstream-Port
Downstream
-Port 4
Downstream
-Port 2
Downstream
-Port 3
Downstream
-Port 1
R
=14
7
253
6
8 9
#0
*
SEKRSEKR
R
=14
7
253
6
8 9
#0
*
SEKR
Tastatur
Maus
Joystick
Scanner
Drucker
Telefon/
PBX-Nebenstellanlage
USB Hub
ANWENDUNG
18
19
Page 11

INSTALLATION
Systemanforderungen
HUB USB
Hardware: Ein PC, der die USB-Funktion unterst¸tzt und mit
einem USB-Anschlufl ausgestattet ist.
Software: Windows-System, das USB unterst¸tzt (OSR2.1
oder hˆher).
Installation des USB-Moduls
1. Schalten Sie den Monitor aus und ziehen Sie den Netzstecker.
2. Entfernen Sie die Abdeckung der ìUSBAYî auf der R¸ckseite
des Monitors.
3. F¸hren Sie das USB-Modul in den Steckplatz ein.
4. Schrauben Sie das USB-Modul fest.
5. Ziehen Sie die Befestigungsschrauben nicht zu fest an (ziehen
Sie die Schrauben mit der Hand fest). Wenn die Schrauben zu
fest angezogen werden, kˆnnte es zu Fehlfunktionen kommen.
6. Stecken Sie den Netzstecker in die Steckdose und schalten Sie
den Monitor ein.
Herstellen der USB-Verbindung
7. Legen Sie die Diskette ein.
8. Das Kabel ist mit zwei unterschiedlichen Steckern versehen.
Stecken Sie den flachen Stecker in den ìUpstreamî-Anschlufl
des USB-Moduls.
9. Schlieflen Sie den anderen Stecker an den USB-Ausgang am
PC an.
10. Windows sollte zwei neue Hardware-Ger‰te erkennen:
- Philips USB-Hub
- USB Human Interface Device
Letzteres wird in Form eines Assistenten-Men¸s pr‰sentiert.
Befolgen Sie die Anweisungen, die jeweils nach dem Anklicken der
Schaltfl‰che ìWeiterî erscheinen (w‰hlen Sie die ìempfohlenenî
Optionen), bis die Installation abgeschlossen ist.
INDICE
1. INTRODUZIONE . . . . . . . . . . . . . . . . . . . . . . . . . . . .2
2. CONTENUTO DELL’IMBALLO . . . . . . . . . . . . . . . . .2
3. CONFIGURAZIONE . . . . . . . . . . . . . . . . . . . . . . . . .3
4. APPLICAZIONE . . . . . . . . . . . . . . . . . . . . . . . . . . . . .4
5. NSTALLAZIONE . . . . . . . . . . . . . . . . . . . . . . . . . . . .5
ALTRE LINGUE
Inglese (English) . . . . . . . . . . . . . . . . . . . . . . . . . . . . . . . .1
Francese (FraVais) . . . . . . . . . . . . . . . . . . . . . . . . . . . . . . .6
Spagnolo (Espanol) . . . . . . . . . . . . . . . . . . . . . . . . . . . . .11
Tedesco (Deusch) . . . . . . . . . . . . . . . . . . . . . . . . . . . . . .16
20
21
Page 12

INTRODUZIONE
Porta a monte
Porta a
valle 4
Porta a
valle 2
Porta a
valle 3
Porta a
valle 1
Lo hub USB I5L5082Q supporta quattro porte a valle e una
porta a monte. Con la sua velocità di 12 Mbps, lo hub USB
I5L5082Q mette a disposizione delle periferiche per PC
desktop ad alta e bassa velocità funzioni Plug-and-Play e di
interfaccia user-friendly.
CONTENUTO DELL’IMBALLO
L’imballo contiene
APPLICAZIONE
Il modulo USB
Il dischetto con il driver dell’unità USB Il manuale utente
22
Il cavo USBThe disk
23
Page 13

R
=14
7
253
6
8 9
#0
*
SEKRSEKR
R
=14
7
253
6
8 9
#0
*
SEKR
Tastiera
Mouse
Joystick
Scanner
Stampante
Telefono/centralino
telefonico
USB HUB
APPLICAZIONE
INSTALLAZIONE
Requisiti del sistema
Hardware: Un PC che supporti la funzione USB e che sia dotato di
presa USB
Software: Sistema Windows che suppor ti l’USB (OSR2.1 o
superiore).
Installazione del modulo USB
1. Spegnere il modulo e scollegare la scheda di alimentazione.
2. Rimuovere il coperchio “USBAY” sul retro del monitor.
3. Inserire il modulo USB nello slot.
3. Fissare il modulo USB al monitor mediante le viti.
5. Non serrare eccessivamente i dadi di fissaggio (è sufficiente
serrare le viti con le dita). L’eccessivo serraggio delle viti può
compromettere il corretto collegamento dell’unità.
6. Collegare il cavo di alimentazione e accendere il monitor.
Per stabilire il collegamento USB
7. Inserire il dischetto.
8. Le due estremità del cavo USB sono diverse . Collegare
l’estremità piatta a una presa “a monte” del modulo USB.
9. Collegare l’altra estremità alla presa USB del PC.
10. Windows riconosce automaticamente le due nuove unità
hardware
- Hub USB Philips
- Unità di interfaccia uomo-USB
Quest’ultima voce è presentata da un mago.
Attenersi alle successive indicazioni che compaiono sullo schermo
(scegliere le opzioni “raccomandate”) fino al termine dell’installazione.
24
25
 Loading...