

Page 1

tv
Page 2

Page 3

Help?
If this instruction manual does
not give an answer or if ‘Tips’ do
not solve your TV problem, you
can call your Local Philips
Customer or Service Centre. See
the supplied World-wide
guarantee booklet.
Please, have the Model and
Product number which you can
find at the back of your
television set or on the
packaging, ready, before calling
the Philips helpline.
Model: 29PT9221/93
Product No: ...........................................
Due to continuous product
improvements this manual is subject
to change without notice.
R End of life directives
Philips is paying a lot of attention to
producing environmentally-friendly in
green focal areas.Your new TV contains
materials which can be recycled and
reused. At the end of its life specialised
companies can dismantle the
discarded TV to concentrate the
reusable materials and to minimise
the amount of materials to be
disposed of.
Your TV contains a (tolerated) small
amount of mercury. Please ensure you
dispose of your old TV according to
local regulations.
Contents
Preparation. . . . . . . . . . . . . . . . . . . . . . . . . . . . . . . . . . . . . 2
Keypad on top of the TV. . . . . . . . . . . . . . . . . . . . . . . . . . . 2
Use of the remote control RC4301 . . . . . . . . . . . . . . . . . . 3
To use the menus . . . . . . . . . . . . . . . . . . . . . . . . . . . . . . . . 5
Installation . . . . . . . . . . . . . . . . . . . . . . . . . . . . . . . . . . . . . 5
Select the menu language . . . . . . . . . . . . . . . . . . . . . . . . . 5
Store TV channels. . . . . . . . . . . . . . . . . . . . . . . . . . . . . . . . 6
Automatic installation 6
Manual installation 6
Give name 7
Reshuffle the programme list 7
Select Favourite TV channels 7
TV Setup. . . . . . . . . . . . . . . . . . . . . . . . . . . . . . . . . . . . . . . 8
General 8
Source 8
Demo . . . . . . . . . . . . . . . . . . . . . . . . . . . . . . . . . . . . . . . . . 8
TV menu. . . . . . . . . . . . . . . . . . . . . . . . . . . . . . . . . . . . . . . 9
Picture menu 9
Sound menu 10
Features menu 10
Teletext . . . . . . . . . . . . . . . . . . . . . . . . . . . . . . . . . . . . . . . 11
Switch Teletext on and off 11
Select a Teletext page 11
Previously selected teletext page 12
Select the index teletext page 12
Select subpages 12
Special teletext functions 12
Hypertext 12
Select continuous subtitles 12
Teletext menu. . . . . . . . . . . . . . . . . . . . . . . . . . . . . . . . . . 13
Connect Peripheral Equipment . . . . . . . . . . . . . . . . . . . . 14
Recorder (vcr-dvd+rw) 14
Side connections 16
To select connected equipment 17
Video equipment keys . . . . . . . . . . . . . . . . . . . . . . . . . . . 17
Record with your recorder . . . . . . . . . . . . . . . . . . . . . . . 18
Before calling service . . . . . . . . . . . . . . . . . . . . . . . . . . . . 19
Tips . . . . . . . . . . . . . . . . . . . . . . . . . . . . . . . . . . . . . . . . . . 20
English
1
Page 4
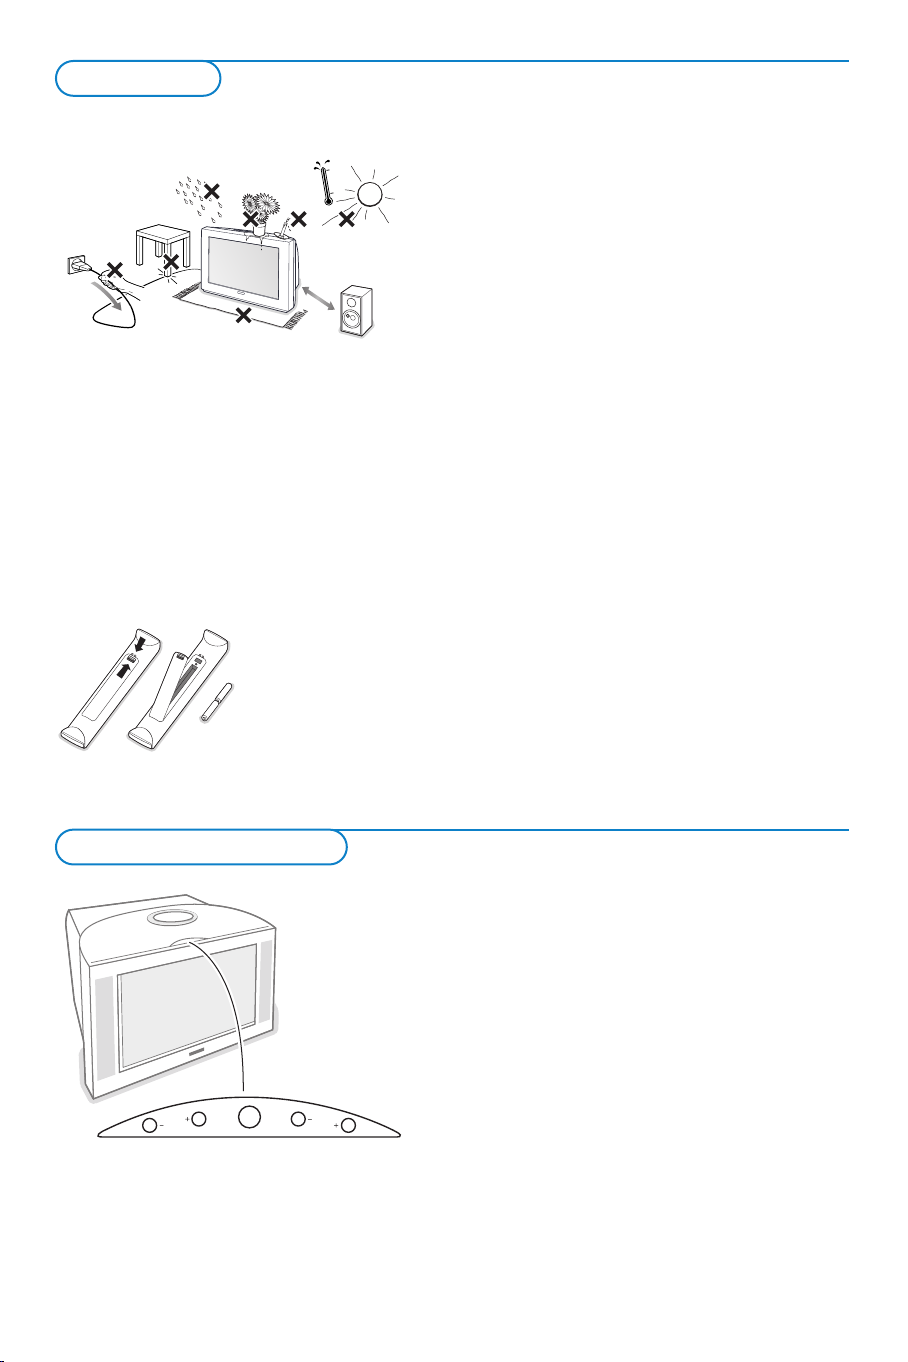
Preparation
1m
min.
V
CH
M
& Place the TV on a solid surface.
For ventilation, leave at least 5 cm free all
around the TV.
Do not place the TV on a carpet.
To prevent any unsafe situations, do not place
any objects on top of the TV.Avoid heat, direct
sunlight and exposure to rain or water. Keep
mobile telephones at a safe distance to avoid
disturbances in picture and sound.
é Insert the aerial plug firmly into the aerial
socket x at the back of the TV. For best
picture quality use the suppressor-aerial cable
supplied.
“ Remote control: Remove the cover of the
battery compartment.
Insert the 2 batteries supplied (Type R6-1,5V).
The batteries supplied do
not contain the heavy
metals mercury and
cadmium. Nevertheless in
many countries exhausted
batteries may not be
disposed of with your
household waste.
Please check on how to dispose of exhausted
batteries according to local regulations.
Note: this remote control functions with TVs and
other equipment which use the RC6 signalling
standard.
‘ Insert the mains plug of the TV in the wall
socket having a mains voltage of 220V-240V.
To prevent damaging the mains (AC) cord
which could cause a fire or electric shock, do
not place the TV on the cord.
( Switch the TV on:Press the power switch A
on the front of your TV.
A green indicator on the front of the TV lights
up and the screen comes on.
If the indicator is red, press the
-P+ keys on the
remote control.
The green lamp blinks every time you press a key
on the remote control.
When you switch on your set for the first time, the
menu
Language automatically appears on the
screen.The explanation appears in different
languages one at a time.
Choose your own language and press the
OK key
on the remote control.
Keys on top of the TV
2
Should your remote be lost or broken you can still
change some of the basic settings with the keys on top
of your TV.
Press
• the V - or + key to adjust the volume.
• the
CH- and + key to browse through the TV
channels or sources stored and to select them.
• the
M key to summon the main menu.
Use
• the V - and + keys to select the menu items in the
horizontal axis.
• the
CH- and + keys to select submenu items in the
vertical axis.
Note:
- Sometimes not all the menu items are visible on the
screen. Press the
-
Exit lets you dismiss the menu.
Select
Exit and press the M key.
CH- key to reveal all items.
Page 5
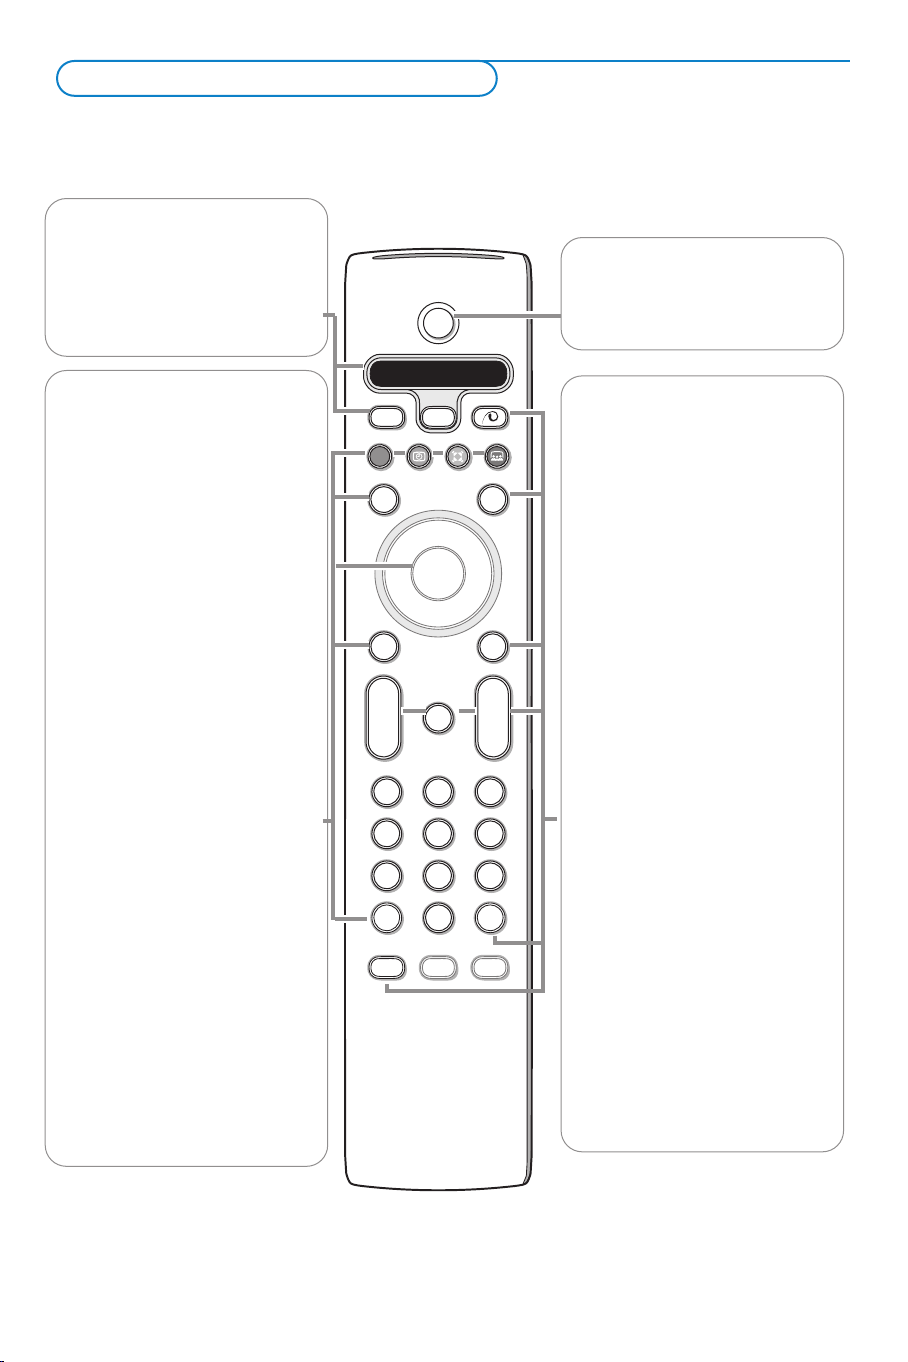
Use of the remote control RC4301
B
b
¬
+
-
V
+
-
P
v
b
i
0
h
q
Select
VCR DVD SAT AMP CD
MENU
OK
123
456
789
0
Ò®‡π
†
Active Control
S
®
®
®
®
æ
Note: For most keys pressing a key once will activate the function. Pressing a second time will de-activate it.
When a key enables multiple options, a small list will be shown. Press repeatedly to select the next item in the list.
The list will be removed automatically after 6 seconds or press
VCR DVD SAT AMP CD
See ‘Video equipment keys’, p. 17.
v Select peripherals
See p. 17.
OK to remove immediately.
B Standby
Press to switch the TV on or off.
When switched off, a red indicator on
the TV lights up.
®Ò‡π†
Video equipment keys,
see p. 17.
U Time display
The time is displayed on the
screen.
Q Surround mode
Incredible surround
With stereo transmission, and
when Incredible surround is
selected, it seems as though the
loudspeakers are spread further
apart from one another.
Virtual Dolby surround
Optimal with Dolby surround
signals. Enables you to
experience the effect of Dolby
surround Pro Logic, reproducing
a rear sound effect. See Sound
menu, 3D effect, p. 10.
Note:You can make the same
selection in the Sound menu,
surround mode, p. 10.
Ì no function
æ no function
OK Press this key
• to activate your choice, when in
the menus.
• to display the channel list.
S Freeze
To activate/de-activate the frozen
picture and to hold a teletext
page (see p. 12).
x Pixel Plus 2 demo on/off
In the right part of the screen
Pixel Plus 2 and Digital Natural
Motion are switched on.
b Teletext On/Off see p. 11
MENU Main menu on/off see p. 5
V To adjust the volume.
¬ Interrupt the sound or restore it.
PChannel selection
To browse through the TV
channels and sources stored.
Only those channels which are in
the favourite list can be selected
with the
-P+ keys.
0/9 Digit keys
To select a TV channel.
For a two digit programme
number, enter the second digit
within 2 seconds.
To s witch immediately to a
selected one digit TV channel,
keep the digit key pressed a bit
longer.
no function
b
i On Screen information
Press to display (when available)
information about the selected
TV channel and programme and
the strength of the signal you are
receiving through your aerial.
33
Page 6
B
b
¬
+
-
V
+
-
P
v
b
i
0
h
q
Select
VCR DVD SAT AMP CD
MENU
OK
123
456
789
0
Ò®‡π
†
Active Control
S
®
®
®
®
æ
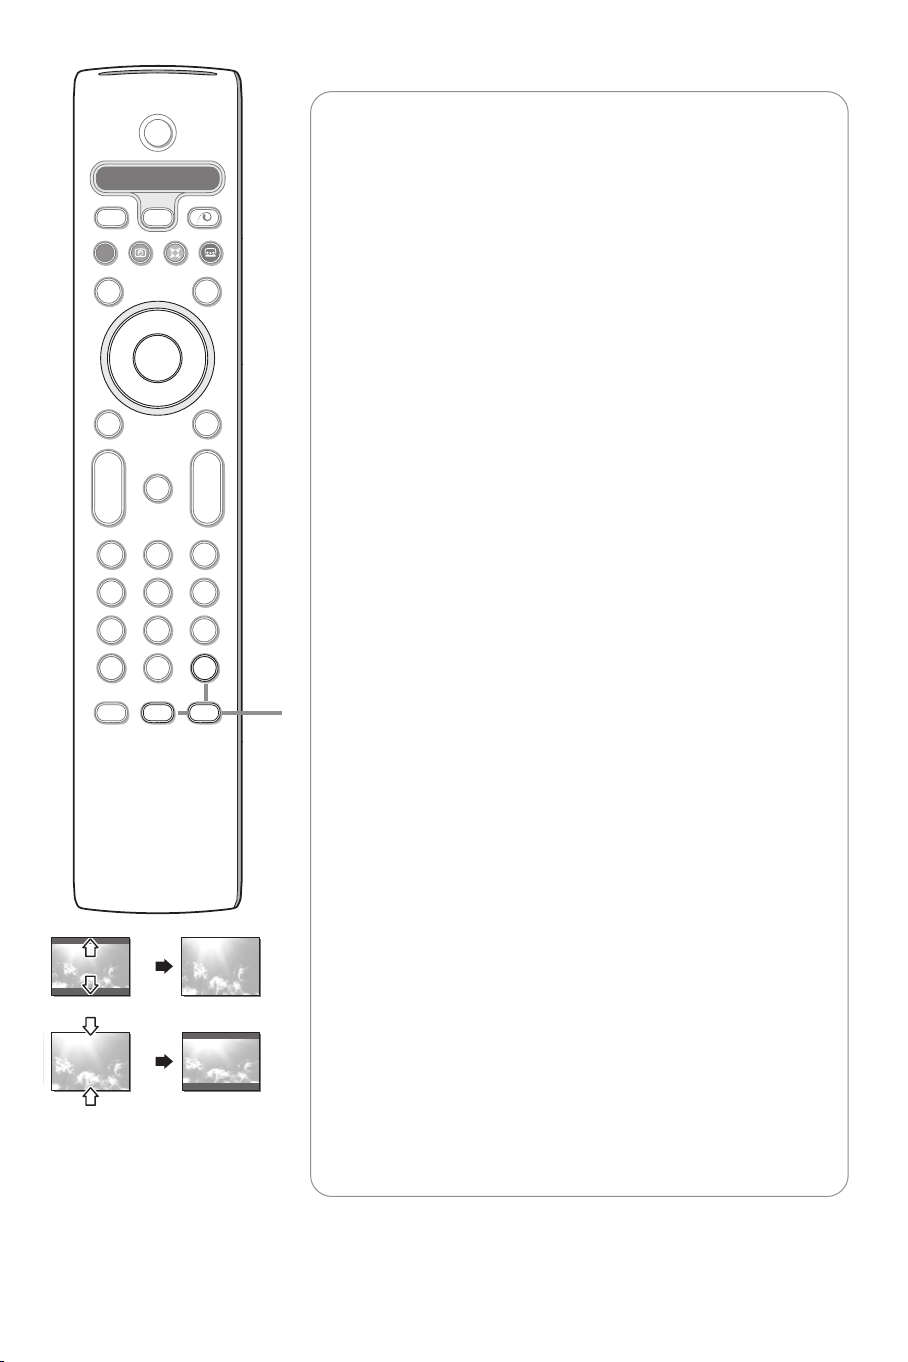
Auto format
Ver tical squeeze
h Active control
Active control is a pro-active and automatic system.The TV
continuously measures and corrects all incoming signals in order to
provide the best picture possible.Thanks to the Ambient Light
Sensor which measures the light conditions of the room, the
contrast, dynamic contrast, brightness and colour picture settings are
adjusted automatically. The light sensor is active when the Active
control function is switched to Medium or Maximum.
Press the h key repeatedly to select the Active Control values Off,
Minimum, Medium (recommended) or Maximum.
Off Sharpness and Dynamic Contrast are controlled automatically.
Minimum Sharpness, Dynamic Contrast and Noise Reduction are
controlled automatically.
Medium Sharpness, Dynamic Contrast, Noise reduction and
Colour are controlled automatically.
Maximum Sharpness, Dynamic Contrast, Noise reduction, Colour
and Contrast are controlled automatically.
Press the cursor right to select INFO+.
The Active Control demo menu appears.
The picture settings are being adapted continuously and
automatically.
The menu items cannot be selected.
The sliders will be moving, showing how the TV is tweaking the
current picture. None of the sliders is user controllable.
Press the OK key to switch off the Demo.
0 Smart surf
With this feature you can easily switch between up to 9 different TV
channels/sources.
In the menu system, you can set Smart surf to 2- or 9-programme.
Press this key to select the previously viewed TV channel or source in
case of a 2 programme surf, or to select the surf ring in case of a 9
programme surf.
In case of a 9 programme surf, a list appears at the right side of the
screen. On top, the most recent programme is displayed.The puck is
on the channel number currently viewed.
Press the
0 key to turn to the next channel in the list or press
cursor up/down to immediately select the desired TV channel of the
list.
To add a new channel or source: tune to the channel or source
you wish to add.
Press the
0 key. Press the cursor right to add.
If there are already nine channels/sources in the list, the one at the
bottom of the list will be removed.
To r emove a channel or source: select the channel number you
want to remove.
Press the
Press the
0 key. Press the cursor right to remove.
OK key or wait for the time out to dismiss the Smart surf
display.
q Picture format
Press this key repeatedly to select another picture format:Auto
format, 4:3 or Vertical squeeze.
Auto format makes the picture fill the screen as much as possible.
Ver tical squeeze squeezes the picture to a wide screen picture
format.
4
Page 7
To use the menus
B
b
++
v
Select
VCR DVD SAT AMP CD
MENU
OK
Ò®‡π
†
S
®
®
®
®
æ
cursor to select
adjustments
OK key to
activate
return or switch
main menu on/off
Press the i key to get
information about the selected
menu item.
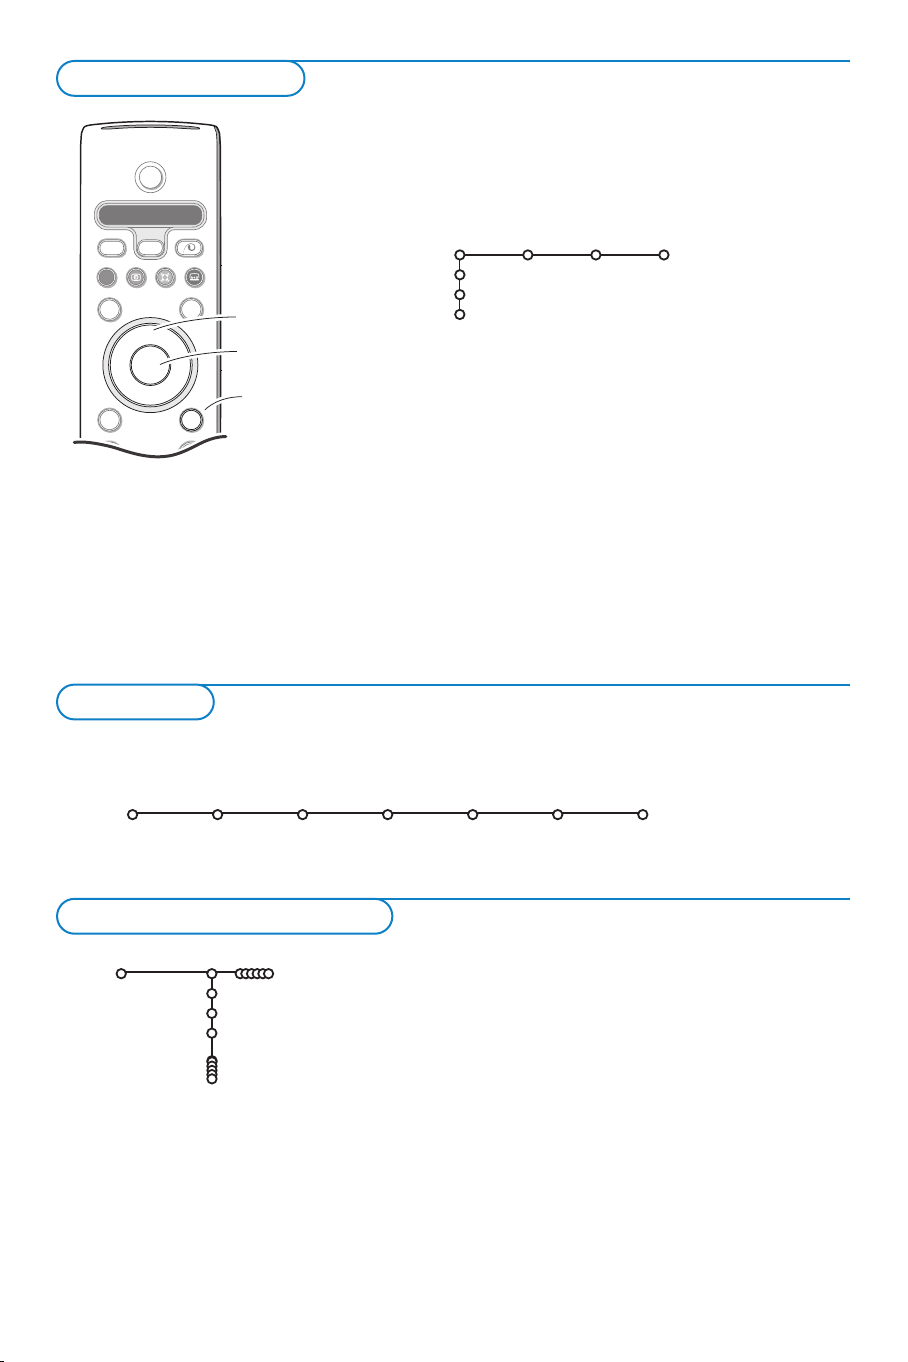
& Press the MENU key on the remote control to summon the
main menu.At any moment you can exit the menu by
pressing the
MENU key again.
Note: Should your remote control be lost or broken you can still
use the keys on top of the TV. See p. 2.
Picture Sound Features
TV
Setup
Demo
Install
é Use the cursor in the up/down direction to select the TV,
Setup, Demo or Install menu.
Use the cursor left/right to select
Picture, Sound or
Features.
Note: Sometimes not all the menu items are visible on the screen
(indicated by a cluster of blue balls). Use the cursor down or right
to reveal all items.
“ Use the cursor in the left/right direction to select the menu
item.
‘ Use the cursor up/down again to select the control you
want to select or to adjust.
Note: Items temporary not available or not relevant are displayed in a
light grey colour and cannot be selected.
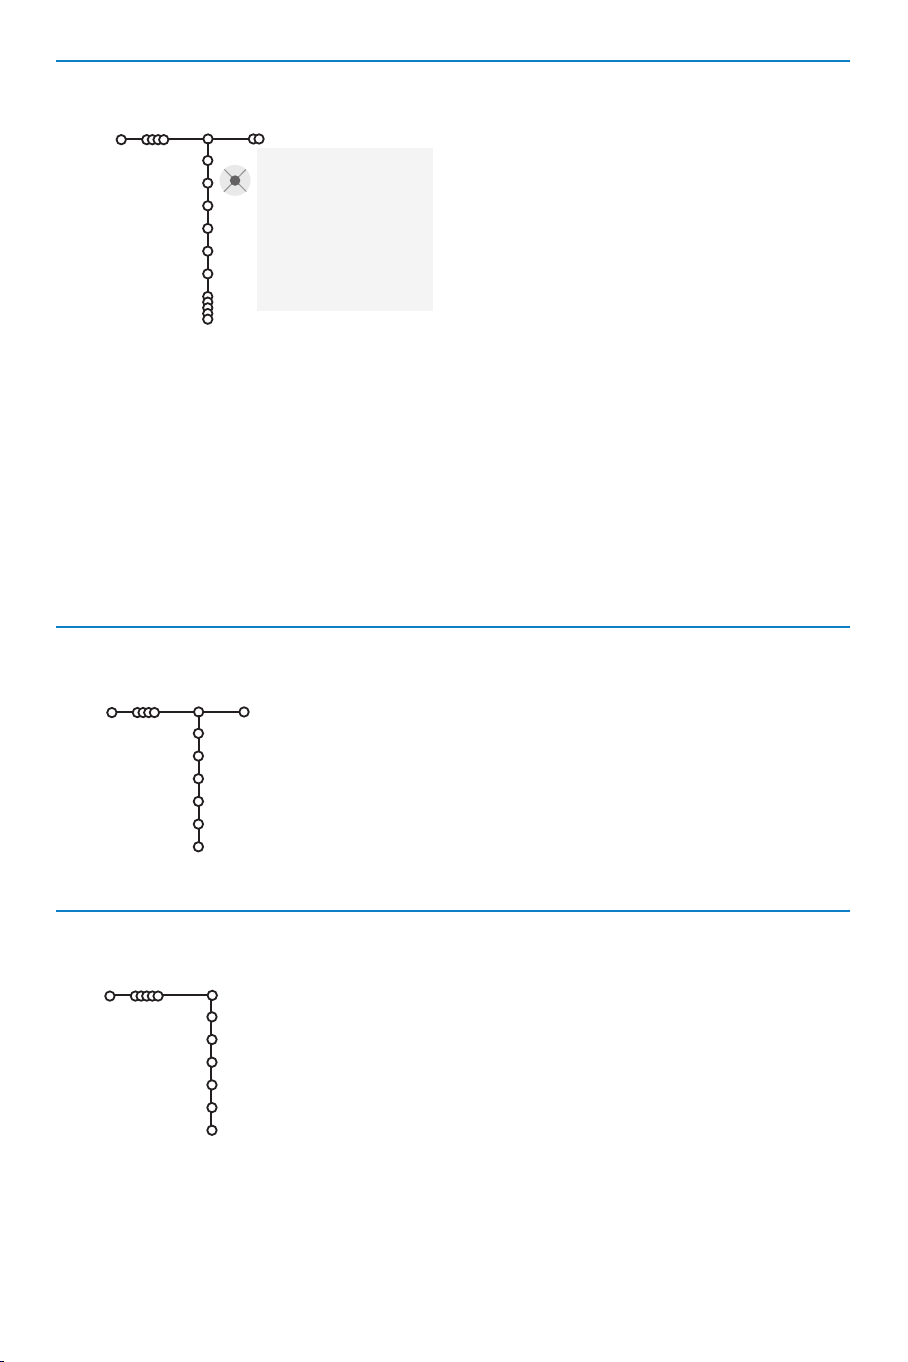
Installation
The installation menu contains the following items:
Language Automatic Manual Give name Reshuffle Favourite
install install channels
Install
Select the menu language
Install
Language
English
.....
.....
& Press the MENU key on the remote control.
é Use the cursor down to select Install.
“ Use the cursor right to select Language.
‘ Use the cursor up/down to select your preferred language
( Proceed with the Install menu.
Follow the instructions on screen.
and press the OK key to confirm your selection.
5
Page 8

Store TV channels
After language is set correctly, you can now search for and store the TV channels in two different ways:
using Automatic Installation or Manual Installation (tuning-in channel by channel).
Select your choice with the cursor right.
Automatic installation
Automatic install
Install
Install Start
Manual installation
Manual install
Install
System
Channel
Search
Fine tune
Store
& Select Automatic install in the Install menu.
Note: All channels must be unlocked in order to autoprogram. If
requested, enter your code to unlock all channels. (See TV,
Features menu, Childlock, p. 10.)
é Press the cursor down.
The autoprogramming option label
“ Press the cursor right.
‘ The message Searching appears and the progress of
Start appears.
autoprogramming is displayed.
When the Automatic installation is complete, the puck navigates
to Install again.
The channel list is automatically filled with all the channel
numbers of the TV channels transmitted.
Note: Channel numbers and names will always be written in Latin
characters, even when a language has been selected which uses other
characters..
Searching for and storing TV channels is done channel by
channel.You must go
through every step of the Manual
Installation menu.
& Select Manual install in the Install menu.
é Press the cursor down.
Follow the instructions on screen.
Note: Search or direct selection of a TV channel.
If you know the frequency, the C- or S-channel number, enter the
3 or 2 digits of the frequency or the channel number directly with
the digit keys 0 to 9 (e.g. 048).
Repeat to search for another TV channel after you have
stored the selected TV channel.
6
Page 9
Give name
Install
It is possible to change the name stored in the
memory or to assign a name to a TV channel or
external for which a name has not yet been
entered.A name with up to 5 letters or numbers
can be given to the channel numbers 0 to 99 and
to the externals.
Give name
VCR1
BBC1
BBC2
CNN
TVE
.....
® Space ® Delete
pπ
ABCDEFG 123
HIJKLMN 456
OPQRSTU 789
VWXYZ 0
® Shift ® Special
Reshuffle the channel list
Install
Reshuffle
BBC1
BBC2
TV1
CNN
ARD
NED 1
You can change the order of the stored TV channels.
& Select Reshuffle in the Installation menu.
é Follow the instructions on screen.
& Select Give Name in the Install menu and
press the cursor down.
é Select the channel number.
Note: keep the cursor up/down pressed to scroll
through the channel list quickly.
“ Press the cursor right.
A keyboard appears on the screen.
Press the cursor right to enter the keyboard.
Press the cursor up/down, left/right to select
the first character and press
OK. Repeat for
every character you want to enter.
Select
Space to enter a space; Delete to erase
the highlighted character in the name entered;
Shift to display upper- or lowercase characters
on the keyboard;
characters on the keyboard. Press
Special to display special
OK to
confirm.
‘ Press the cursor left repeatedly when you have
finished the name giving.
( Select another channel number and repeat steps
“ to ‘.
Select Favourite TV channels
Install
Favourite channels
BBC1
BBC2
NED 1
TV1
CNN
ARD
Ye s
Ye s
No
Ye s
Ye s
No
& Select Favourite channels in the Install menu.
é Select your channel number with the cursor up/down.
“ Select Ye s or No with the cursor right.
‘ Repeat é and “ for every TV channel or external you want
to make a favourite or a non-favourite TV channel or external.
7
Page 10
Install TV Setup
General
General
Setup
Menu background
Smart surf
Factory settings
Tilt adjust
OSD
Programme title
Teletext 2.5
Auto surround
Set/Change code
Colour
PLL
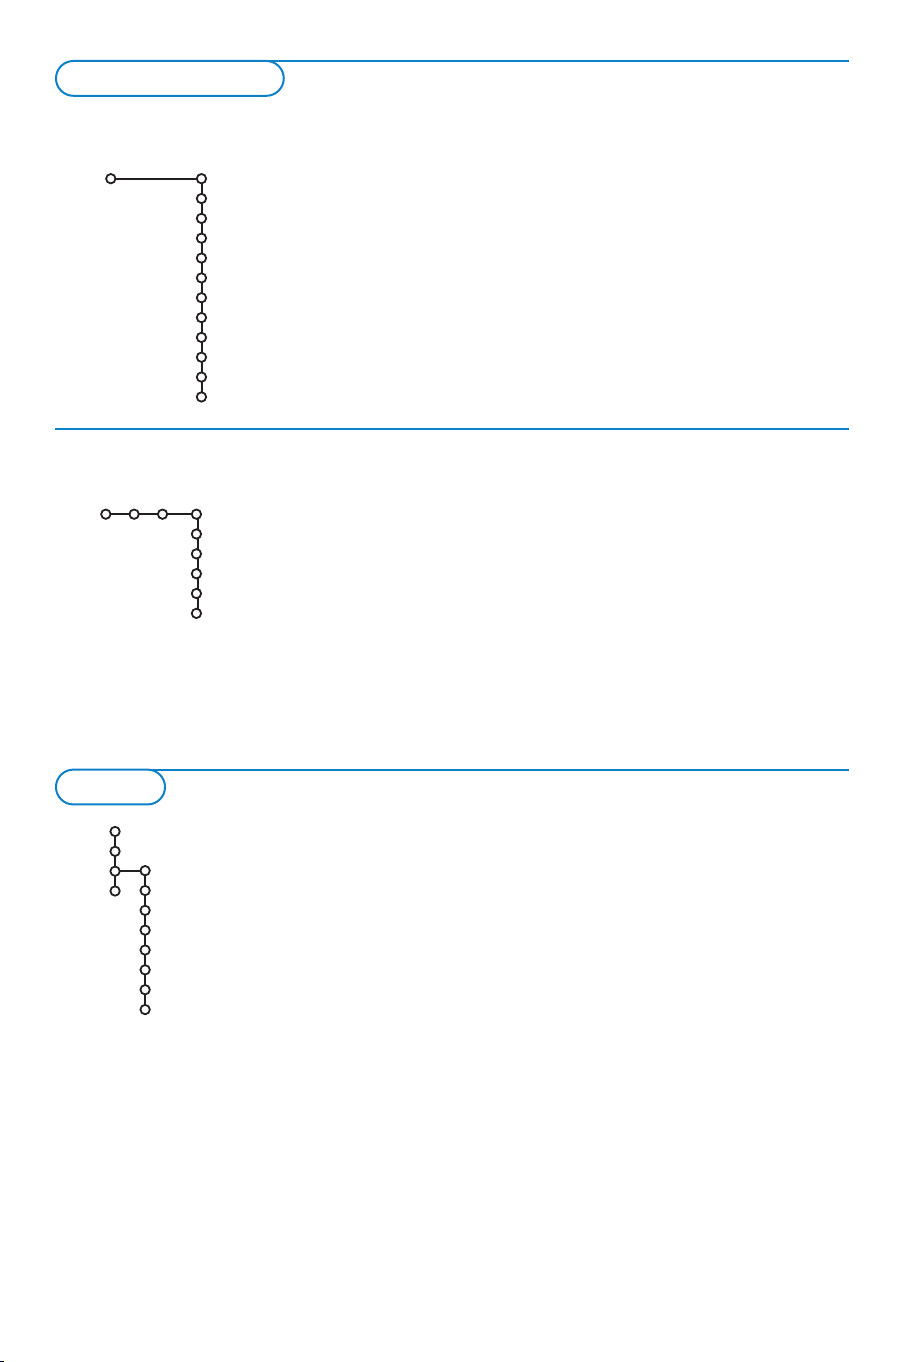
This menu allows you to change various settings that are
presumably adjusted less frequently than most other settings.
Press the i key on the remote control to get information
about the selected menu item.
Set/Change code
& Select Set or Change code with the cursor down.
é If no code exists yet, the menu item is set to Set code.Follow
the instructions on screen.
If a code has previously been entered, the menu item is set to
Change code.Follow the instructions on screen.
All number combinations from 0000 to 9999 are valid numbers.
Source
Setup
This menu allows you to select the peripheral you
connected to one of the external inputs.
Source
AV1
AV2
AV3
AV4
Side
& Select Source with the cursor right.
é Press the cursor down to select one of the
external inputs.
“ Press the cursor right to enter the list of
names of peripherals attached to the selected
input.
‘ Select the peripheral device with the cursor
up/down.
Once you have selected the source, e.g.VCR, this
AV-input will automatically be selected when your
remote control is in VCR mode and when you
press the v key on the remote control. See p. 17.
Demo
TV
Setup
Demo
Install
8
Auto demo
Teletext
Install
Main menu
Picture
Speakers
Active control
Dealer demo - Digital processing
- Light sensor
- 3D Y/C Comb filter
The Demo menu allows to demonstrate the TV features
separately or in a continuous loop.
& Select Demo in the Main menu with the cursor down.
é Select Auto demo or one of the features with the
cursor right and press the
OK key on the remote
control.
If
Auto demo has been selected the demo will
automatically present all the features sequentially in a
loop.
Press one of the cursor keys to stop the Auto demo.
If one of the features has been selected, this particular
feature demo will run one time only, until activated
again, and the Demo menu will reappear.
Select Dealer Demo
Select
Digital processing, Light sensor and 3D Y/C
Comb filter On
or Off to really see the difference in
picture quality.
In Dealer Demo mode it is possible to change channels
with
-P+ and to adjust the volume.
Note: the Dealer Demo is not part of the automatic
sequence and can only be activated separately.
Page 11

TV menu
Press the MENU key on the remote control to summon the main menu.
Press the i key on the remote control to get information about the selected menu item.
Picture
TV
Smart picture
Contrast
Brightness
Colour
Sharpness
Digital options
Dynamic contrast
DNR
Colour enhancement
(Hue)
Picture format
Tint
Picture
& Press the cursor right to select Picture.
é Select the menu items in the Picture menu with the cursor
up/down.
“ Adjust the settings with the cursor left/right or enter the list of
submenu items with the cursor right. Select a submenu item
with the cursor up/down.
Note:To remove the menu background before adjusting the picture
settings, see Select TV setup, General, p. 9.
Smart picture
Select Smart picture to display a list of predefined picture
settings, each corresponding with specific factory settings.
Personal refers to the personal preference settings of picture in
the picture menu.
Note:This Philips TV has been set at the factory to look best in bright
store environments which use fluorescent lighting. As your home will
likely not be as well lit as a store, we recommend that you cycle
through the various Smart Picture modes to find the one that best
suits your own viewing conditions. Most consumers will find that
Natural is the correct choice. In case of weak RF/AV signals, please
select Soft.
Digital options
Pixel Plus 2 is the most ideal setting, doubles the horizontal
resolution and increases the number of lines by 33%.
You may consider to select Movie Plus in case a halo effect
should disturb you. Dependent on your own preference, select
100 Hz Dig. Scan.
•
100 Hz Dig. Scan = 100 Hz + Dig. Scan (Field and line flicker
reduction) without motion compensation.
•
x
Pixel Plus 2 = creates near High Definition performance
inside the Tv on the basis of a regular input signal.
The number of lines are increased and the number of pixels
on a line are doubled in combination with Digital Natural
Motion.As such Pixel Plus 2 enhances both regular broadcast
signals and DVD or Digital Tv input towards unparalleled
sharpness and depth, near High Definition and natural detail.
Notes:
-Pixel Plus 2 is not active when Teletext (except when subtitling is
activated) is selected.
-When having selected Pixel Plus 2, the size of the menus on screen is
reduced.This is a normal behaviour.
-Interference, caused by fluorescent lights just above the TV, may occur
when having selected Pixel Plus 2.
The modified adjustments for Contrast, Brightness, Colour,
Sharpness,Tint, Digital options and Dynamic Contrast are
automatically stored.
Select
Factory settings in the Setup menu, General, to restore
the predefined factory settings, see p. 8.
9
Page 12

Sound
TV
Smart sound
Volume
Equalizer
Balance
(Loudness)
Headphone volume
Surround mode
(Dual I-II)
(Mono/Stereo)
(Digital/Analogue)
(3D effect)
Delta volume
Sound
AVL
& Press the cursor right to select Sound.
é Select the menu items in the Sound menu with the cursor
up/down and adjust the settings with the cursor
left/right.Remember, control settings are at normal mid-range
levels when the bar scale is centred.
Smart sound
Select Smart sound to display a list of predefined sound settings,
each corresponding with specific factory settings of Treble and
Bass.
Personal refers to the personal preference settings of
sound in the sound menu.
Notes:
- Dual X is only selectable with dual sound transmission.
-Mono/Stereo is only selectable in case of analogue stereo
transmission.
-Digital/Analogue is only selectable in case of Digital transmission.
-Surround modes can not be modified when a headphone has been
connected.
-You can also select one of the Surround modes with the Q key on
the remote control. See p. 3.
Features menu
TV
Channel list
Sleeptimer
Child lock
& Press the cursor right to select Features.
é Select the menu items with the cursor
up/down and adjust the settings with the
cursor left/right.
Use the on-screen Menu-Info i for more
information about the menu items.
Channel list
Press the
TV channel or external.
Select subtitles
The subtitle page must be stored for each TV
channel:
Switch on teletext and select the proper subtitle
page from the index. Switch off teletext.
Subtitle On will automatically display them on the
selected TV channels if subtitles are in the
transmission.A symbol will indicate that the mode
is on.
Select
the subtitles automatically displayed only when the
sound has been muted with the ¬ key on the
remote control.
Features
Subtitle
Lock
Custom lock
On timer
OK key to switch over to the selected
On during mute when you want to have
Unlock
Channel lock
Child lock
& Select Child lock.
é Press the cursor right to enter the Child lock
menu.You’re summoned to enter your code.
Note:You have to re-enter your code each time you
enter the child lock menu.
Important:You have forgotten your code !
• Select Cancel with the cursor down.
• Select Set/Change code in the Setup
menu. See General menu, Set/Change
code, p. 8.
• Press OK.
• Press the cursor right and enter the
overriding code 8-8-8-8.
• Press the cursor again and enter a new
personal 4-digit code.The previous code is
erased and the new code is stored.
Note:The overriding code only works in the
Set/Change code menu.
“ Select one of the menu items of the child lock
menu:
•
Lock if you want to lock all channels and
externals.
•
Custom lock and press the cursor right.
Select:
-
Channel lock if you want to lock a certain
TV channel or external;
•
Unlock to disable all locks you have set.
10
Page 13
On timer
B
b
¬
+
V
+
P
v
Select
VCR DVD SAT AMP CD
MENU
OK
Ò®‡π
†
S
®
®
®
®
æ
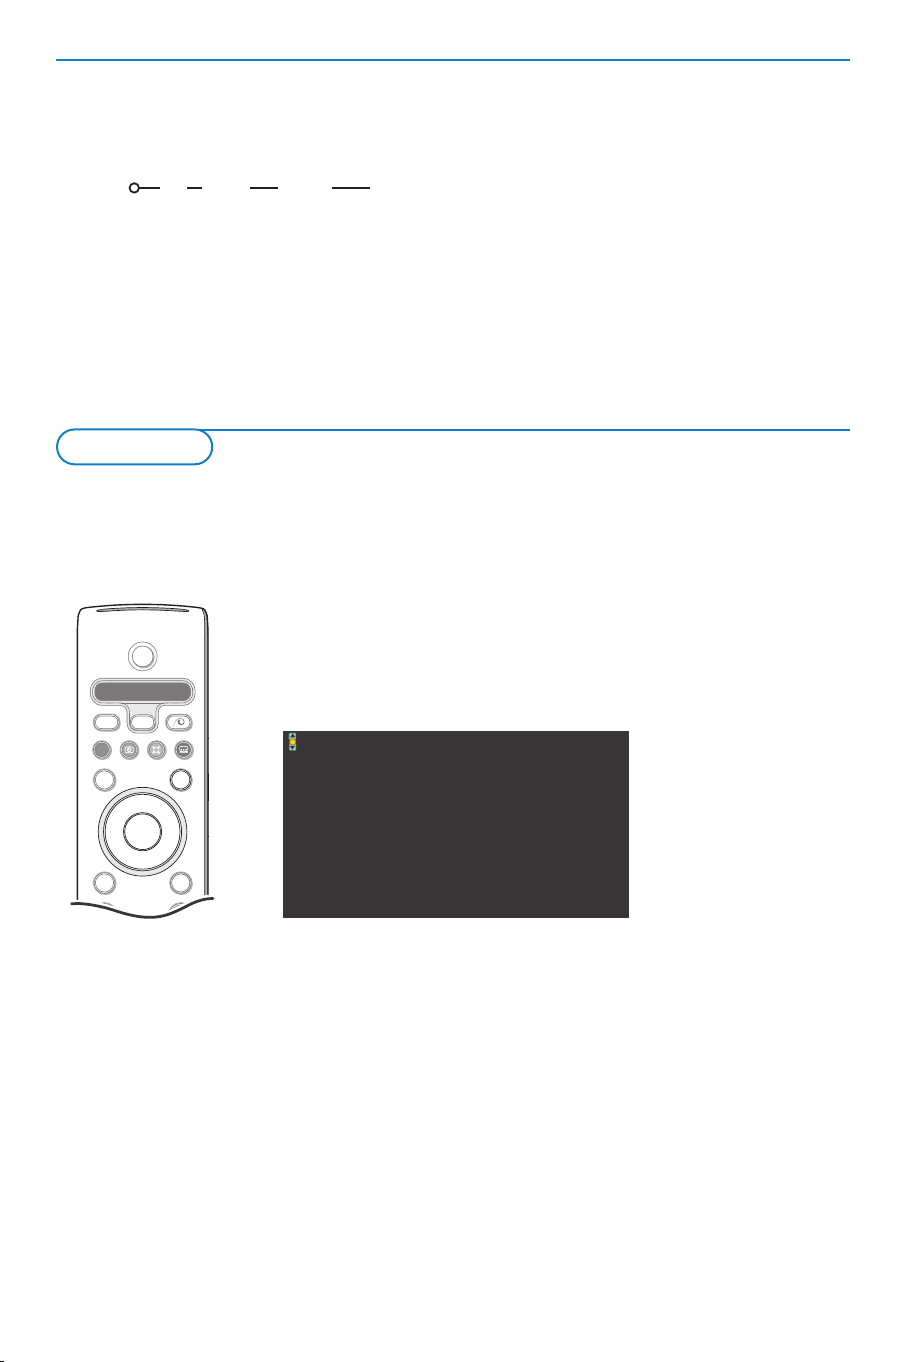
& Select On timer with the cursor down.
On timer
Off
On
VCR1
BBC2
CNN
TVE
Sunday
Monday
.......
Daily
15:45
π.....
é Select On with the cursor right.
“ Press the cursor right again to enter the
channel list.
‘ Select the TV channel or external you want
your TV to switch to on a selected time and
day.
( Press the cursor right again to select a day of
the week or to select
Daily.
Select Daily to set the On timer for daily
operation on the selected TV channel or
source.
§ Press the cursor right once again to enter the
time.
è Enter the time with the digit keys or with the
cursor up/down/left/right.
! Press the OK key to activate.
ç Press the
MENU key to turn off the menu.
Note:To check your timer settings, press the i
key.
Teletext
(only English teletext supported)
Most TV channels broadcast information via teletext.This TV has a 1200 pages memory that will store
most broadcasted pages and subpages to reduce waiting time.After each programme change, the memory
is refreshed. It may take some time for all pages to load.
Depending on the TV channel, teletext is transmitted in different systems.The colours used in the bottom
line of the teletext page correspond with the colour keys of your remote control.
Switch Teletext on and off
Press the b key to switch teletext on or off.
The main index page appears on the screen.
It shows an information line at the top, an option line at the bottom and a
puck in the top left corner of the screen.
102 «03 04 05 06 07 08 09 10 11 12»
BBC CEEFAX 102 Mon 05 Feb 16.35.22
BBC CEEFAX
LIONS RECORD ANOTHER WIN 430
Index 100 News 300
BBC Info 110 Headlines 305
Children 120 Weather 400
Cookery 150 Sports 415
Education 200 Radio 500
Lottery 230 Travel 550
Finance 240 Subtitling 888
Music 280 TV Listings 600
Red Green Yellow Blue
Select a Teletext page
With the digit keys
Enter the desired page number with the digit keys.
The page counter seeks the page or the page appears immediately
when the page number has been stored in the memory.
A message appears when you have entered a non existent or incorrect
page number. Page numbers beginning with 0 or 9 do not exist. Choose
another number.
With the option line
Select with the colour keys, corresponding to the coloured options at
the bottom of the screen, the desired subject.
11
Page 14

Quickly run through the teletext
pages
Press the cursor up/down or the - P + key to
run through the previous or the following
pages.
Select the previously selected page
Press the 0 key.
Note: Only possible when teletext pages are active,
not when the Teletext menu is displayed.
Select the index teletext page
Press the grey colour key † to display the
main index (usually p.100).
Select subpages
When a selected teletext page consists of
different subpages, one of the subpages appears
on the screen.
Press the cursor right to highlight the
subpagenumber. Press the cursor up/down to
select the next or previous subpage or enter
the subpagenumber with the digit keys.
Special teletext functions
Hold
Press S to stop the automatically rotating of
the subpages or to stop the page counter from
seeking when you have entered a wrong page
number or when the page is not available.
Enter another page number.
Hypertext
With hypertext you can select and search for
pages containing any word or number on the
current teletext page.
& Make sure you are not in the teletext menu
and that the puck is in the upper left corner of
the screen.
é Press the cursor key down to highlight the first
word or a number on the page.
“ Use the cursor up/down, left/right to select the
word or number you want to search for.
‘ Press the OK key to confirm.
A message appears at the bottom of the screen
to indicate that the searching is going on or
that the word or page is not found.
Select Continuous Subtitles
TV channels with teletext often transmit
programmes with subtitling. For each TV
channel you can store a subtitle page.
Switch on teletext and select the proper
subtitle page from the index.
Switch off teletext. Now the subtitle page is
stored for the selected TV channel.
Select
Subtitle On or Off in the Features
menu, see p. 10.
The subtitle symbol j appears when
is selected.
On
Subtitle
12
Page 15

Teletext menu
& Press the MENU key to activate the menu.
é Press the cursor up/down to select the menu
items.
Favourite
You may create a list of eight favourite teletext
pages in total, selected from various TV
channels.
To add a favourite page to the list:
& Select a favourite teletext page.
é Select Favourite in the teletext menu and
press the cursor right to enter the list.
“ Press the cursor right again to add the page.
‘ Press the MENU key to watch the current
page.
To watch a favourite page from the list:
When in Teletext, use the 0 key to browse
through the favourite pages of the TV channel
actually selected.
Note: only the pages of the current channel can be
selected.
Search
On the keyboard on screen you can type in a word
you want to search for in the teletext pages.
Whether upper- or lowercase is used has no
influence. Searching for pagenumbers is not
possible.
102 mo 08 may 17:08:39
BBC1
WORD
NAME
FOOTBALL
Shift to
puck
& Press the cursor left/right, up/down to select
Cancel Accept
Space Delete
ABCDEFG 1 2 3
HIJKLMN 4 5 6
OP QRSTU 7 8 9
V W X Y Z 0
Shift Special
Red Green Yellow Blue
TELETEXT
the characters, words or functions.
é Press the OK key to confirm each character
selected.
“ Select Cancel to cancel the word or character
selected;
Space to enter a space; Delete to
delete the last character selected;
switch between undercast or capital characters;
Special to display special characters on the
keyboard.
‘ Press the cursor left repeatedly to return to
the Teletext menu again.
Searching a word
& Type in the word on screen or select a word
from the history list on the right and press
é Select Accept and press OK again. The
message
Searching appears.When the word is
found, it is highlighted in the teletext page.
“ To continue the search, press the OK key
twice.When a word is not found, a message
appears.
‘ To search for a new word, select Keyboard
and press OK. Select the new word.
Reveal
Reveals/conceals hidden information on a page,
such as solutions to riddles and puzzles. Press
the
OK key to activate. Press OK again to
return to the Teletext menu.
Cycle subpages
Makes the subpages cycle automatically. Press
the
OK key to activate and to de-activate again.
Window text
A limited amount of text is displayed at the
bottom of the screen.
Press the
OK key to activate.
Use the cursor up/down to scroll and press the
cursor left to go back to the teletext menu.
Timed page
To display a specific page at a certain time.
& Press the cursor right to select Ye s or No.
é Enter the time and pagenumber with the
cursor keys or the digit keys.
Note:Teletext does not have to remain switched on.
It is not possible to display a timed page when the
TV is switched to standby.
Press the
MENU key to leave the Teletext menu.
OK.
13
Page 16
Connect Peripheral Equipment
CABLE
REC
75
OUT
OUT IN
AV 2
in
AV 1
in
Monitor
out
VIDEO
L/Mono
R
Y
Pb
Pr
AUDIO
S-VIDEO
3
75
CABLE
VCR
AV 2
in
AV 1
in
Monitor
out
VIDEO
L/Mono
R
Y
Pb
Pr
AUDIO
S-VIDEO
OUT
OUT
OUT IN
TV
x
4
1
3
SAT
≈
SAT
IN
OUT
AV 2
in
AV 1
in
Monitor
out
COMPONENT VIDEO INPUT
VIDEO
L/Mono
R
Y
Pb
Pr
AUDIO
S-VIDEO
2
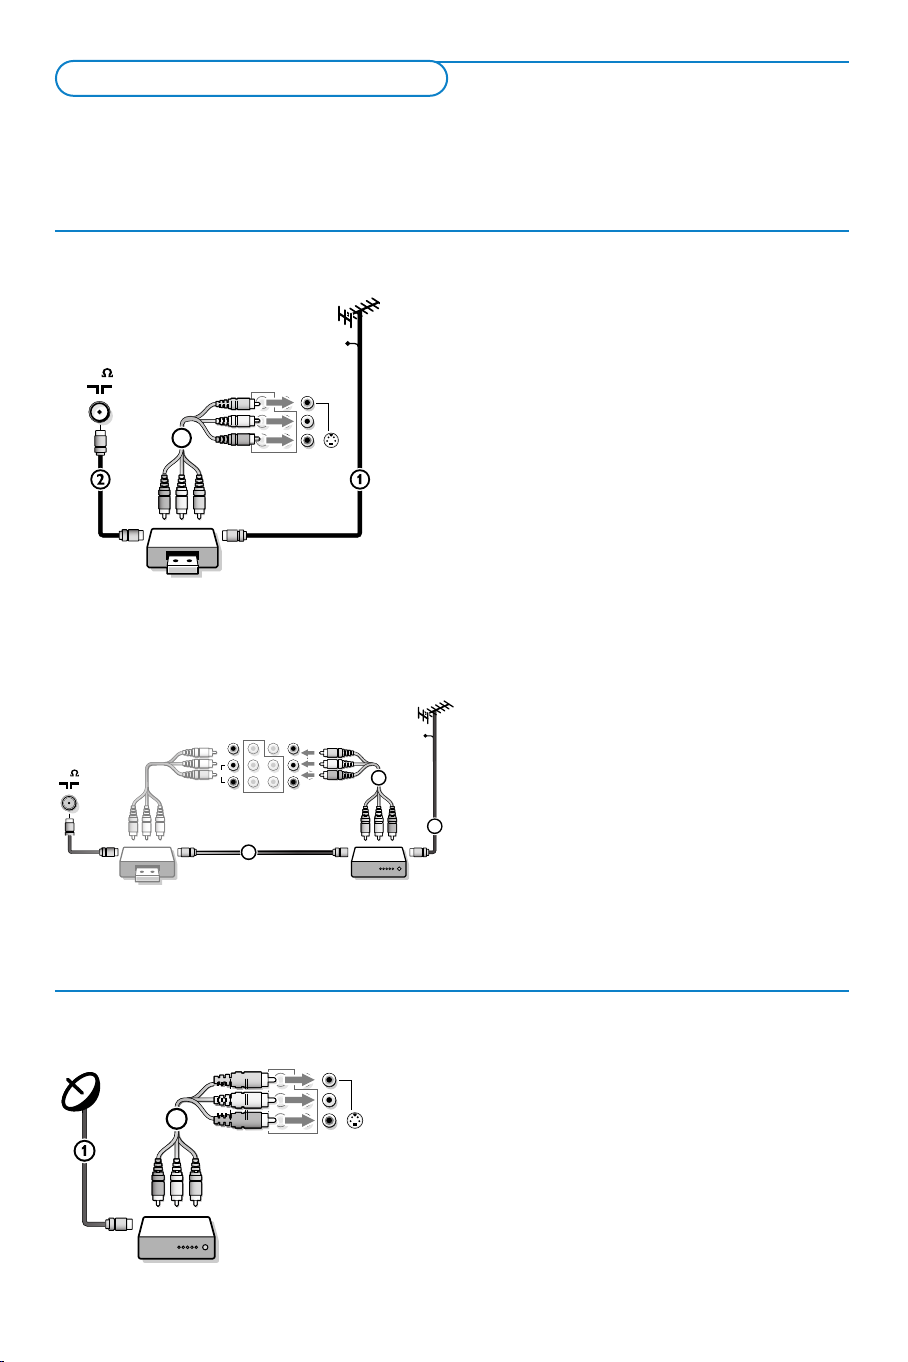
There is a wide range of audio and video equipment that can be connected to your TV.The following
connection diagrams show you how to connect them to the back or the right side of the TV.
AV1 IN can handle CVBS and YPbPr; AV2 IN CVBS and Y/C; AV3 and AV4 IN digital signals of a e.g. digital HD
receiver or Progressive scan DVD; SIDE: CVBS and Y/C.
Recorder
& Connect the RF Antenna 1 to the RF IN socket of
é Connect another RF cable 2 from the output OUT of
“ Better playback quality can be obtained if you also
Recorder and other A/V peripherals
your recorder.
your recorder to the TV’s input 75 ø x jack.
connect the Video,Audio Left and Right (only for stereo
equipment) AV cables 3 to the
R input jacks of AV2 IN.
The
MONITOR OUT connectors can be used to record
VIDEO, AUDIO L and
programmes from your TV. See Record with your
recorder, p. 18.
If your recorder has an S-VHS video jack:
For improved picture quality, connect an S-video cable
with the
recorder to the video jack of
S-VIDEO input instead of connecting the
AV2 IN.
S-Video does not provide audio, so audio cables must still
be connected to provide sound.
& Interconnect your video recorder with extra
RF cables 3.
é To obtain better picture quality, also connect
the Video,Audio left and Audio right (only
for stereo equipment) cables to the
AUDIO L and R input of AV2 IN jacks 4.
VIDEO,
Note: in case of mono equipment, only the left
loudspeaker reproduces sound. Use a mono to
stereo adaptor (not supplied) for sound
reproduction via all internal loudspeakers.
When a video recorder is not connected to
MONITOR OUT you can only record a
programme from the aerial or from the cable
system.
Satellite Receiver
14
& Connect the satellite antenna cable 1 to the
satellite receiver’s
é Connect the Video, Audio left and right (only for
stereo equipment),AV cables 2 to the
and R AUDIO input AV 2 in jacks.
If your satellite receiver has an S-VHS video jack:
For improved picture quality, connect an S-VHS video
cable with the
the satellite receiver to the video jack of
SATELLITE IN jack.
VIDEO, L
S-VIDEO input instead of connecting
AV2 IN.
Page 17
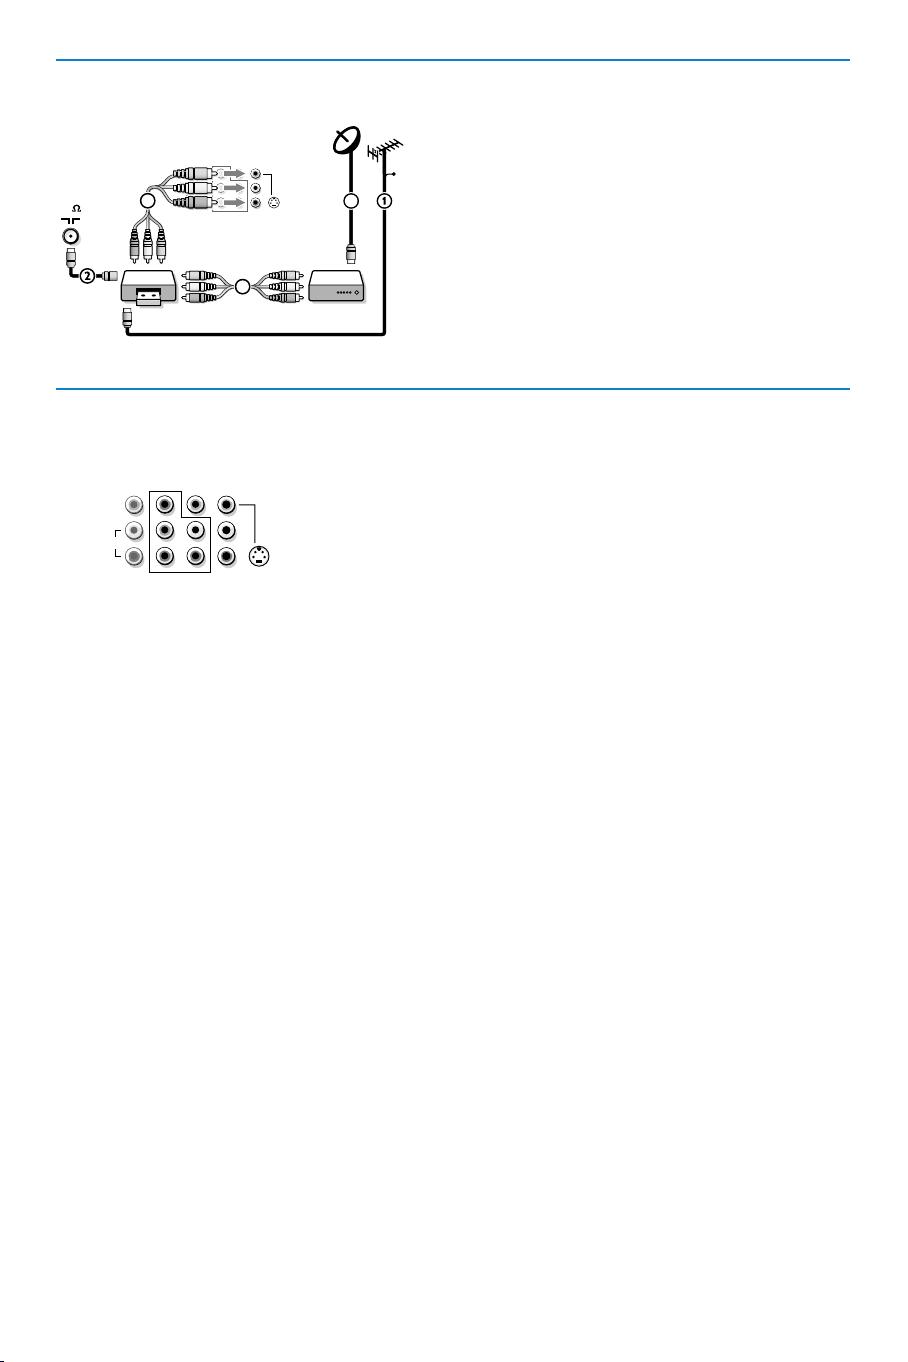
Satellite Receiver with a recorder
AV 2
in
AV 1
in
Monitor
out
VIDEO
L
R
Y
Pb
Pr
AUDIO
S-VIDEO
REC
CABLE
SAT
≈
IN OUT
SAT
IN
OUT
IN
OUT
AV 2
in
AV 1inMonitor
out
VIDEO
L/Mono
R
Y
Pb
Pr
AUDIO
S-VIDEO
5
75
3
4
& Connect the RF Antenna or Cable TV cable 1 to
the
RF IN socket of your recorder.
é Connect another RF cable 2 from the output of
your recorder to the TV’s 75 ø x jack.
“ Connect the satellite antenna cable 3 to the
satellite receiver’s
SATELLITE IN jack.
‘ Connect the AV cables 4 to the satellite receiver’s
AV OUT jacks and to the VCR’s AV I N jacks.
( Connect the recorder’s AV OUT jacks 5 to the TV’s
AV2 IN jacks.
DVD player or other accessory digital source equipment
With Component Video Output Connectors
& Connect the cables of your YPbPr equipment
Equipment with AV connectors only
& Connect the video cables to the equipment’s
AV OUT jacks and to the TV’s AV1 or AV2 IN
jacks.
é Connect the audio cables to the equipment’s
AUDIO L and R jacks and to the L AUDIO and
R AUDIO AV1 or AV2 jacks on the TV.
(According to where you connected the video
cables, to
AV1 or AV2.)
1 to the
TV.
Note:The YPbPr sockets on the TV are compatible
with 480i (interlaced, 1 Fh) output signals only, not
480p (progressive scan, 2 Fh).
é For reproduction of CVI (Component Video
Input) and in order to have correct picture
reproduction, also connect a video cable to
video of
Note:This connection is used for
“ Connect the Audio left and right (only for
stereo devices) cables 2 to the
R input of AV 1.
Remark: Equipment may also be connected to the
AV IN jacks (SIDE) at the right side of the TV.
YPbPr input AV1 IN sockets on the
AV1 2.
AV1 (CVBS).
AUDIO L and
Equipment with an
S-VIDEO connector
& Connect an S-video cable the AV 2
S-VIDEO input.
Note: When using the s-video connector do not
connect any device to the video input.
é Connect the audio cables to the equipment’s
AUDIO L and R jacks and to the L AUDIO and
R AUDIO AV2 jacks on the TV.
Warning: Never connect a signal to the Y-input
and video-input at the same time.This may
cause picture distortion !
Equipment with Progressive scan output
(480p or 1080i 2 Fh)
Connect the equipment to the
AV4 IN jacks on
the TV.
See
AV3 or AV4 Digital HD input, next page.
Note:The labels for the component video sockets
may differ depending on the DVD player.Although
the abbreviations may vary, the letters B and R
stand for the blue and red component signals,
respectively, and Y indicates the luminance signal.
Refer to the DVD player’s instructions for use for
definitions and connection details.
15
Page 18
AV 3
IN
AV 4
IN
VIDEO 2Fh
480p/1080i
Y
PbPrL
R
RGB
AUDIO
Y
PbPrL
R
AUDIO
AUDIO
VIDEO
S•VIDEO
1 2 3
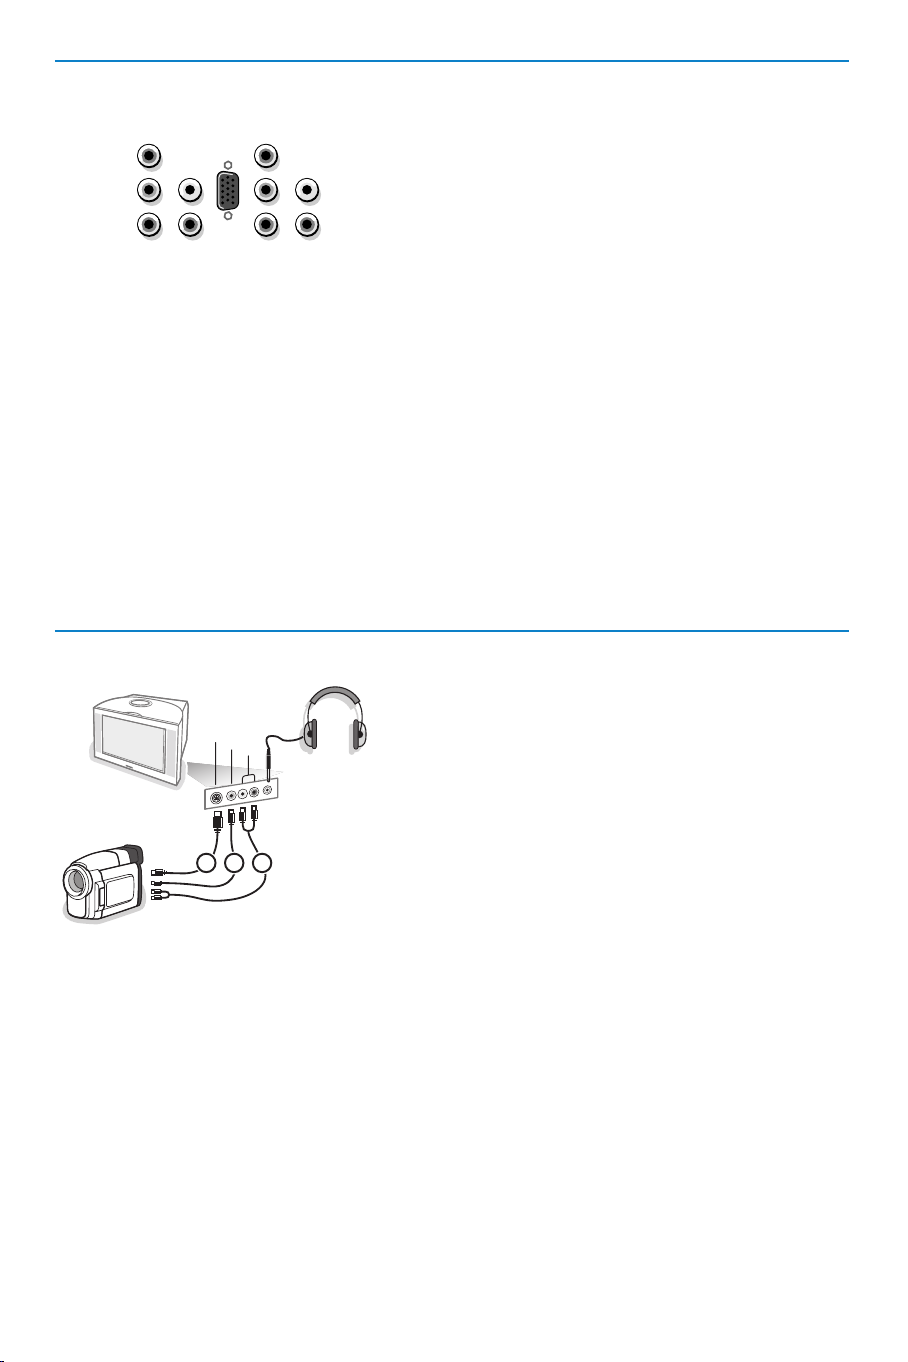
AV3/AV4 Digital High Definition input
When you have a digital equipment with a 480p or
1080i output (e.g. a digital Set Top Box or
Progressive DVD player), connect it to the
AV4 IN VIDEO 2 Fh 480p/1080i input.
AV3 or
Connect the equipment with 2 Fh RGB output to
the
RGB, Y, Pb and Pr jacks and to the L and R
AUDIO jacks of AV 3.
Connect the equipment with 2Fh YPbPr output to
the
Y, Pb and Pr jacks and to the L and R AUDIO
jacks of AV4 . See also the manual of your High
Definition equipment.
Note:This television is designed to accept high definition
signal standards 1080i and 480p as specified by the
Electronic Industries Association standard EIA770.3.
Digital devices from different manufacturers has the
possibility of differing output standards which may
cause difficulties for the television to properly display.
Warning: in case you notice scrolling images, wrong
colours or no colour, no picture, or even combinations of
these on your screen, check if the connections are done
in the right way.
The
AV3 input can not be used to connect a computer
or any other VGA device.
Side connections
16
Camera or camcorder
& Connect your camera or camcorder to sockets at the
right side of your TV.
é Connect the equipment to VIDEO 2 and AUDIO L
3 for mono equipment. For stereo equipment also
connect
AUDIO R 3.
S-Video quality with an S-VHS, Hi-8 or Digital
camcorder is obtained by connecting the
S-Video cables with the
VIDEO 2) and AUDIO inputs 3.
S-VIDEO input 1 (instead of
Note: If you prefer, you can also connect the camcorder to
one of the TV’s rear
AV IN jacks.
Headphone
& Insert the plug into the headphone socket L at the
right side of the TV.
é Press ¬ on the remote control to switch off the
internal loudspeakers of the TV.
The headphone impedance must be between 8 and 4000
Ohm.The headphone socket has a 3.5 mm jack.
In the
Sound menu select Headphone volume to
adjust the headphone volume.
Page 19
B
b
¬
+
-
V
+
-
P
v
b
i
0
h
q
Select
VCR DVD SAT AMP CD
MENU
OK
123
456
789
0
Ò®‡π
†
Active Control
S
®
®
®
®
æ
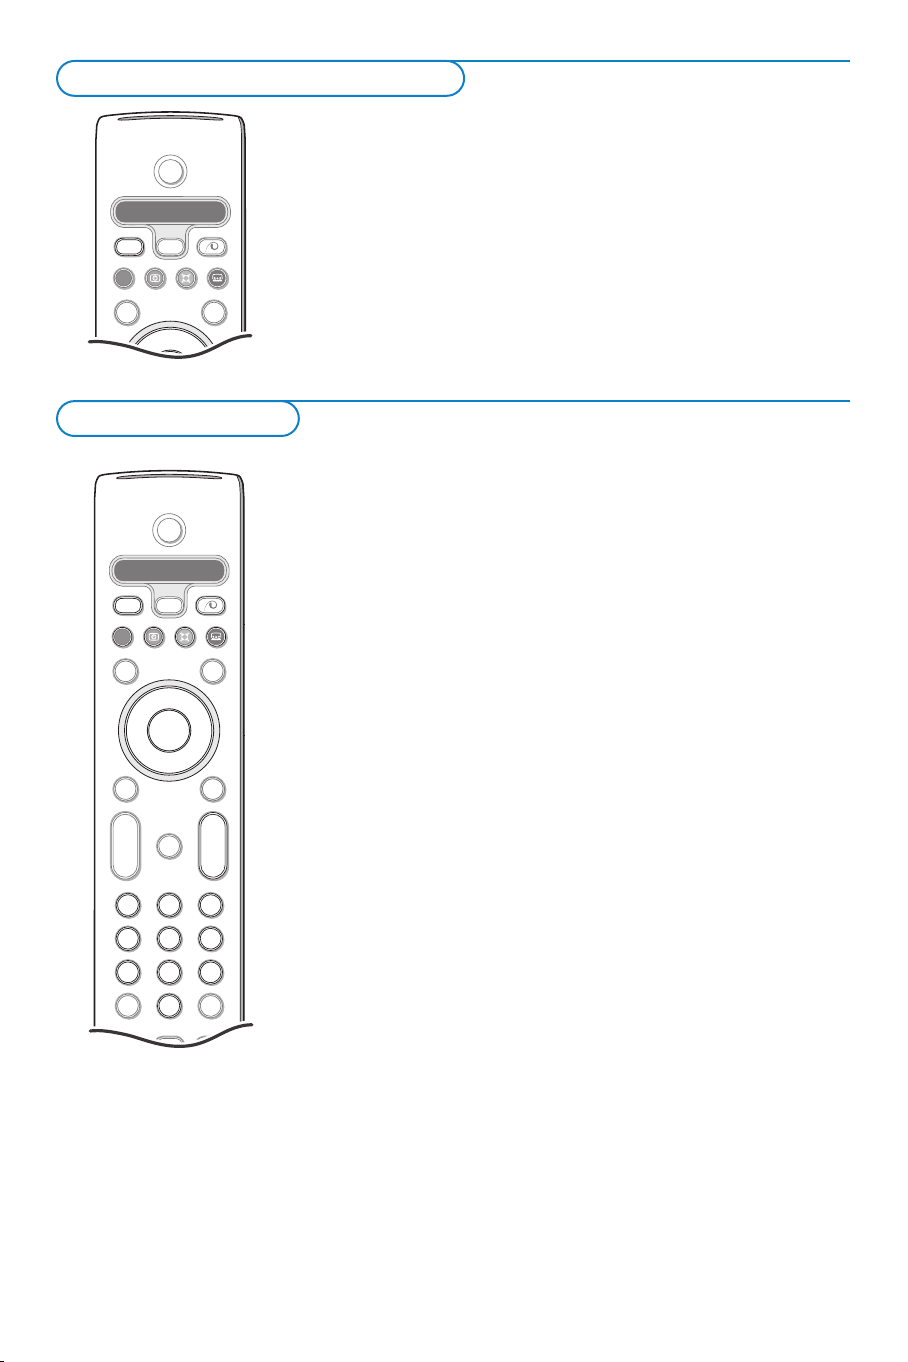
To select connected equipment
Equipment connected to the rear or on the right side of
B
VCR DVD SAT AMP CD
Select
v
Ò®‡π
æ
®
®
OK
†
b
®
the TV
& Press the v key to select AV1 , AV2, AV3, AV4 or Side,
according to where you connected your equipment at the rear
or on the right side of your TV.
é Press the cursor up/down.
“ Press OK.
If you want to change to TV channels?
Enter the channel number of the TV channel which you want to
watch with the digit keys.
VCR Control keys
Most of the audio and video equipment from our range of products
can be operated with the remote control of your TV.
Press the
VCR, DVD, SAT, AMP or CD key according to the
equipment you want to operate with this remote control. See Use
of the remote control, p. 3.
VCR keys
After you pressed the
VCR key, press one of the VCR keys of the
remote control:
® for record,
Ò for rewind,
‡ for stop,
π for play,
† for fast forward,
-
P+ for sequential channel selection from the videorecorder
tuner,
0 to 9 to select a channel number from your video recorder tuner,
These keys function with devices that uses the RC5 signalling standard.
17
Page 20

Record with your recorder
To r ecord S-VHS quality, connect an S-VHS peripheral directly to
the recorder.
Record a TV programme
& Select the channel number on your recorder.
é Set your recorder to record.
You can record a TV programme using your recorder’s tuner
without affecting your TV.
See the handbook for your recorder.
Switching channel numbers on your TV does not disturb recording !
Record from
MONITOR OUT
You can record a programme on your recorder from the TV
tuner via
& Switch on the equipment.
é Select the correct channel on your TV and the correct input on
MONITOR OUT.
your recorder.
“ Set your recorder to record.
You record the tuner channel of the TV or the selected device
(AV1 or AV2).Via AV3 or AV4 you record the tuner channel.
Do not switch channels or switch off your TV when you are recording
through
MONITOR OUT.
18
Page 21

Before Calling Service
Please make these simple checks before calling service.These tips may save you time and money since charges for
television installation and adjustments of customer controls are not covered under your warranty.
Symptoms Items to Check and Actions to follow
“Ghost” or double • This may be caused by obstruction to the antenna due to high rise buildings or
images hills. Using a highly directional antenna may improve the picture.
No power • Check that the television’s AC power cord is plugged into the mains socket.
• Unplug the television, wait for 60 seconds, then re-insert plug into the mains
socket and switch on the television again.
No picture • Check antenna connections at the rear of the television to see if it properly
connected to the television input terminal. Is it properly secured to the
appropriate antenna plug on the TV ?
•Possible broadcast station trouble.Try another channel.Try running the
Automatic installation.
• Adjust the contrast and brightness settings. Try another smart picture setting.
• Check the v key on the remote control to make sure the correct signal
source is selected.
Good picture but • Increase the volume.
no sound • Check that the television is not muted, press the ¬ key on the remote
control.
• When no signal is detected, the television automatically switches off the sound.
This is proper operation and does not indicate a malfunction.
• If you have attempted to hookup peripheral equipments, check the audio jack
connections.
• Check if the headphone is not plugged in.
• Check if the channel is broadcasting good quality sound.
Good sound but poor Adjust the contrast and brightness settings.
colour or no picture Tr y another smart picture setting.
Poor picture Sometimes, poor picture quality occurs when having activated an S-VHS camera
or camcorder, connected ot the right side of your TV and another device is
connected to
AV1 or AV2 at the same time. In this case, switch off one of the
other equipments.
Snowish picture and Check the antenna connection.
noise
Disturbed picture
on AV3 or AV4 disturbed behaviour.This is completely normal and should not to be worried
When selecting AV3 or AV4 and no signal is detected, the picture shows a
about.
Horizontal dotted • This may be caused by electrical interference (hairdryer, nearby neon lights, etc.)
line • Switch off the equipment.
One white line Switch off the television immediately and consult a qualified service personnel.
across the screen
Television not
responding to • Clean the remote control sensor lens on the television.
remote control • Operating range between television and remote control should not be > 240”.
• Check whether the batteries are working. Replace if necessary.
•You can still use the
M key and the -/+ keys at the top of the TV.
•Press the v key to be sure your remote control is in the TV mode.
If your problem is not solved:
Turn your TV off and then on again.
Never attempt to repair a defective TV yourself.
Check with your dealer or call a TV technician.
19
Page 22

Tips
Care of the screen
Clean the TV with a slightly damp soft cloth.
Do not use abrasive solvent as it can damage
the TV screen.
End of life directives
We are paying a lot of attention to using
environmentally-friendly production methods.
Your new TV contains materials which can be
recycled and reused.
At the end of its life specialized companies
can dismantle the discarded TV to
concentrate the reusable materials and to
minimize the amount of materials that must
be disposed.
Please ensure that you dispose of your old TV
according to local regulations.
Glossary
Active Control
Measures and corrects incoming signals in
order to provide the best picture quality
settings.
AVL
Automatically controls the volume level to
avoid too large level differences, especially
during commercial breaks.
Display
An on screen message or graphics that help
the user operate and adjust TV feature
controls. See On Screen Displays (OSD).
How to dispose of batteries?
The batteries supplied do not contain the
heavy metals mercury and cadmium.
Nevertheless in many areas batteries may not
be disposed of with your household waste.
Please ensure you dispose of batteries
according to local regulations.
Picture Freeze
TV mode which allows you to “freeze” a
certain image in order to study a specific detail
at ease, e.g. to make notes of certain
programme information like phone numbers.
Programming
The procedure of adding or deleting channel
numbers into the TV’s memory circuits. In this
way the TV ‘remembers’ only the locally
available or desired channel numbers and skips
over any unwanted channel numbers.
DNR (Digital Noise Reduction)
By encoding signals digitally in 100 Hz sets, it is
possible to clean up picture noise.This is
especially beneficial in poor signal areas and
when viewing poor quality video tapes.
Hue
TV-function to modify the general colour
balance between cool and warm and to adjust
it according to your personal preference.
Menu
An on-screen listing of feature controls shown
on the TV screen that are made available for
user adjustments.
20
Page 23

Specifications
29PT9221
Picture tube size
Picture visible area
TV system
Playback system
Antenna input
Operating voltage,
Frequency
Power consumption
Audio Output
Dimension:
Width
Height
Depth
Nett weight
(aprrox. only)
International guarantee conditions
This product is guaranteed by Philips for a period of one year after the date of purchase against
defects due to faulty workmanship or materials.The guarantee covers both parts and labor.
29” (740 mm)
27” (680 mm)
3,58
3,58
75 ohms - co-axial
Refer to the specifications at the
back of the TV
Refer to the specifications at the
back of the TV
2 x 15 W (left, right)
785 mm
587 mm
493 mm
47 kg
Service under guarantee is only provided upon presentation of reasonable evidence (e.g.
completed guarantee card or purchase receipts) that the date of the claim is within the guarantee
period.
The guarantee is not valid if the defect is due to accidental damage (including in transport),
misuse of neglect and in case of alterations or repair carried out by unauthorized persons.
The guarantee may not apply if the product requires modification or adaptation to enable it to
operate in any country other than the country for which it was designed, manufactured, approved
and/or authorized or if any damage results from these modifications.
Service (during and after guarantee) is available in all countries where this product is officially
distributed by Philips. In countries where Philips do not distribute the product, the local Philips
Service organization will also provide Service although there may be a delay if the appropriate
spare parts and technical manual are not readily available.
These statements do not affect your statutory rights as a consumer.
In the event of difficulty please contact the Philips Information Centre in any country (see
enclosed addresses).
21
Page 24

Page 25

Page 26

 Loading...