

Page 1
Colour Television
29PT6961
Instructions for use
3139 125 28821
Page 2
LASER SAFETY
CLASS 1
LASER PRODUCT
LASER SAFETY
This unit employs a laser. Due to possible eye
injury, only a qualified service person should
remove the cover or attempt to service this
device.
USE OF CONTROLS OR ADJUSTMENTS
OR PERFORMANCE OF PROCEDURES
OTHER THAN THOSE SPECIFIED HEREIN
MAY RESULT IN HAZARDOUS RADIATION
EXPOSURE.
LASER
Type Semiconductor laser GaAIAs
Wave length 650 nm (DVD)
780 nm (VCD/CD)
Output Power 7 mW (DVD)
10 mW (VCD/CD)
Beam divergence 60 degree
Manufactured under license from Dolby
Laboratories. “Dolby”and the double-D
symbol are trademarks of Dolby
Laboratories. Confidential unpublished
works. © 1992-1997 Dolby laboratories.
All rights reserved.
TruSurround and the SRS symbol are
trademarks pf SRS Labs., Inc.
TruSurround technology is manufactured
under license from SRS Labs., Inc.
NEVER MAKE OR CHANGE
CONNECTIONS WITH THE
POWER SWITCHED ON.
The TV-DVD Combi player is
in conformity with the EMC
directive and low-voltage directive.
CAUTION – VISIBLE AND INVISIBLE
LASER RADIATION WHEN OPEN.
AVOID EXPOSURE TO BEAM.
CAUTION WARNING LABEL IS
LOCATED ON THE BACKCOVER
OF THE SET.
The region code for this set is 3.
Since it is usual for DVD movies to be
released at different times in different
regions of the world, all players have
region codes and disc can have an
optional region code. If you load a disc
of a different region code to your
player, you will see the region code
notice on the screen. The disc will not
play and should be unloaded.
3
TV SAFETY
• Disconnect mains plug when :
– the red light below the TV screen is flashing continuously.
– a bright white line is displayed across the screen.
– cleaning the TV screen. Never use abrasive cleaning agents. Use a slight damp chamois
leather or soft cloth.
– there is a lightning storm.
– the set is left unattended for a prolonged period of time.
• Do not place your TV set under direct sunlight or heat.
• Avoid placing your set (e.g. near the window) where it is likely to be exposed to rain
or water.
• Do not leave your set on standby mode for a prolonged period of time. Switch off set
to allow it to be demagnetised. A demagnetised set supports good picture quality.
• Do not shift or move the set around when it is switched on. Uneveness in colour in
some parts of the screen may occur.
• Never attempt to repair a defective TV yourself. Always consult a skilled service personnel.
2
Page 3

INTRODUCTION
Thank you for purchasing this televison set. You are now the proud owner of a PHILIPS
Home-Cinema TV set which promises full value to you as a customer. Please read the
instruction manual carefully and thoroughly to help you install and operate your TV set.
TABLE OF CONTENTS
LASER SAFETY ........................................................................................................................ 2
TV SAFETY ........................................................................................................................ 2
BEFORE CALLING SERVICE (TV) ........................................................................................4
BEFORE CALLING SERVICE (DVD) .................................................................................... 5
PREPARATION .......................................................................................................................... 6
CONNECTING THE A UDIO/VIDEO SOCKETS
Playback ....................................................................................................................................7
Recording .................................................................................................................................9
SETTING OF TV/DVD SWITCH .......................................................................................... 10
FUNCTIONS OF REMOTE CONTROL (TV)............................................................................11
FUNCTIONS OF REMOTE CONTROL (DVD)........................................................................13
FUNCTIONS OF TV/DVD CONTROLS ................................................................................14
SELECTING THE MENU LANGUAGE AND AUTOMATIC TUNINGOF CHANNELS............ 15
MANUAL TUNING OF CHANNELS........................................................................................ 17
SELECTING THE COLOUR/SOUND SYSTEM..........................................................................18
FINE TUNING OF CHANNELS .............................................................................................. 19
SORTING OF CHANNELS.........................................................................................................20
EDITING OF CHANNELS..........................................................................................................21
NAMING OF CHANNELS..........................................................................................................22
USING THE PICTURE/SOUND MENU.................................................................................... 23
ACTIVATING THE T IMER........................................................................................................... 24
ACTIVATING THE CHILD LOCK
Access Code............................................................................................................................ 26
Change Code...........................................................................................................................27
Lock Channel...........................................................................................................................28
Clear All.................................................................................................................................... 29
USING THE SURF CONTROL.................................................................................................. 30
USING THE SCREEN FORMAT.................................................................................................31
USING THE ROTATION FEATURE ...........................................................................................32
USING THE PROGRAM LISTING CONTROL ......................................................................... 33
SMART PICTURE AND SMART SOUND.................................................................................. 34
USING THE T ELETEXT............................................................................................................. 35
OPERATING THE DVD
General .................................................................................................................................... 36
User Preference .....................................................................................................................40
Playing a DVD-Video disc .................................................................................................... 46
Playing a VIDEO-CD disc ..................................................................................................... 47
General Features ................................................................................................................... 48
Special DVD Features ...........................................................................................................51
Special VCD Features ...........................................................................................................52
Favourite Track Selections.................................................................................................... 53
SPECIFICATIONS........................................................................................................................54
Recycling Directive
Your TV set uses materials which are reusable or which can recycled. To minimise the
amount of waste in the environment, specialist companies recoverused sets for
dismantling and collection of reusable materials (consult your dealer).
3
Page 4

BEFORE CALLING SERVICE (TV)
Below is a list of frequently occurred symptoms for the TV. Before you call service, make these
simple checks. Some of these symptoms can easily be rectified if you know what to do.
Symptom What you should do
Colour patch • Switch off the TV by the mains power button. Wait for 20
(uneveness) minutes before switching on again.
• Check the TV is not placed too near speakers or magnetic
objects.
No power • Check the TV’s AC power cord is plugged into the mains
socket. If there is still no power, disconnect plug. Wait for
60 seconds and re-insert plug. Switch on the TV again.
No picture • Check the antenna connection at the rear of the TV.
• Possible TV station problem. Try another channel.
Good picture • Try increasing the volume.
but no sound • Check that the sound is not muted. If it is muted, press the
HH
H
HH
(mute) button on the remote control to restore sound.
Good sound but poor • Try increasing the contrast and brightness setting.
colour or no picture
Snowish picture and • Check antenna connection at the rear of the TV.
noise
Horizontal dotted lines • Possible electrical interference e.g. hairdryer, vacuum
cleaner, etc. Switch off appliances.
Double images or • Possible poor positioning of antenna. Using a highly
“Ghost” images directional antenna may improve reception.
TV not responding to • Check life span of batteries of remote control handset.
remote control handset • Aim remote control handset directly at remote control
sensor lens on the TV.
4
Page 5

BEFORE CALLING SERVICE (DVD))
Below is a list of frequently occurred symptoms for the DVD. Before you call for service, make
these simple checks. Some of these symptoms can easily be rectified if you know what to do.
Symptom What you should do
No power • Check if both plugs of the power cord are properly
connected.
• Check if there is power at the AC outlet by plugging in
another appliance.
No picture • Check if the TV is switched on.
Completely distorted • If the picture is distorted completely or if the picture rolls
picture or no colour vertically, make sure the NTSC/PAL setting at the DVD
with player menu player matches the video signal of your television.
Distorted or Black/White • The disc format does not match your TV’s video signal
picture with DVD or Video (PAL/NTSC).
CD
Distorted sound from HiFi • Check to make sure that no audio connections are made to
ampliflier the amplifilier phono input.
No audio at digital output • Check the digital connections.
Disc cannot be played • Ensure the disc label is facing up.
No return to start-up • Reset by switching the player off, then, on again.
screen when disc is • Check to see if the program requires another disc to be
removed loaded.
• Check the video connection.
If your TV video signal is NTSC, select NTSC setting at
the DVD player. If your video signal is PAL, select the PAL
setting (Refer to section on “Selecting the Colour/Sound
System).
• Check the settings menu to make sure the digital output is
set to ALL or PCM.
• Check if the audio format of the selected audio language
matches your receiver capabilities.
• Clean the disc. Wipe the disc from the center out. Note : Do
not use solvents such as benzine, thinner, commercially
available cleaners or anti-static spray intended for analog discs.
• Check if the disc is defective by trying another disc.
• Check to see if the disc is badly scratched or warped.
Player does not respond • Aim remote control directly at the sensor on the front of
to the remote control the player.
Buttons do not work • Set the player in standby by using the STANDBY button on
Player does not respond • Operations are not permitted by the disc. Refer to the
to all operating commands instructions of the disc.
during playback
• Remove any obstacles between the player and the remote
control.
• Inspect or replace the batteeries in the remote control.
the front of the player. Press STANDBY button again to set
the player back to ON.
5
Page 6
PREPARATION
ÉÑ
5 cm
5 cm
5 cm
ÉÑ
ÉÑ
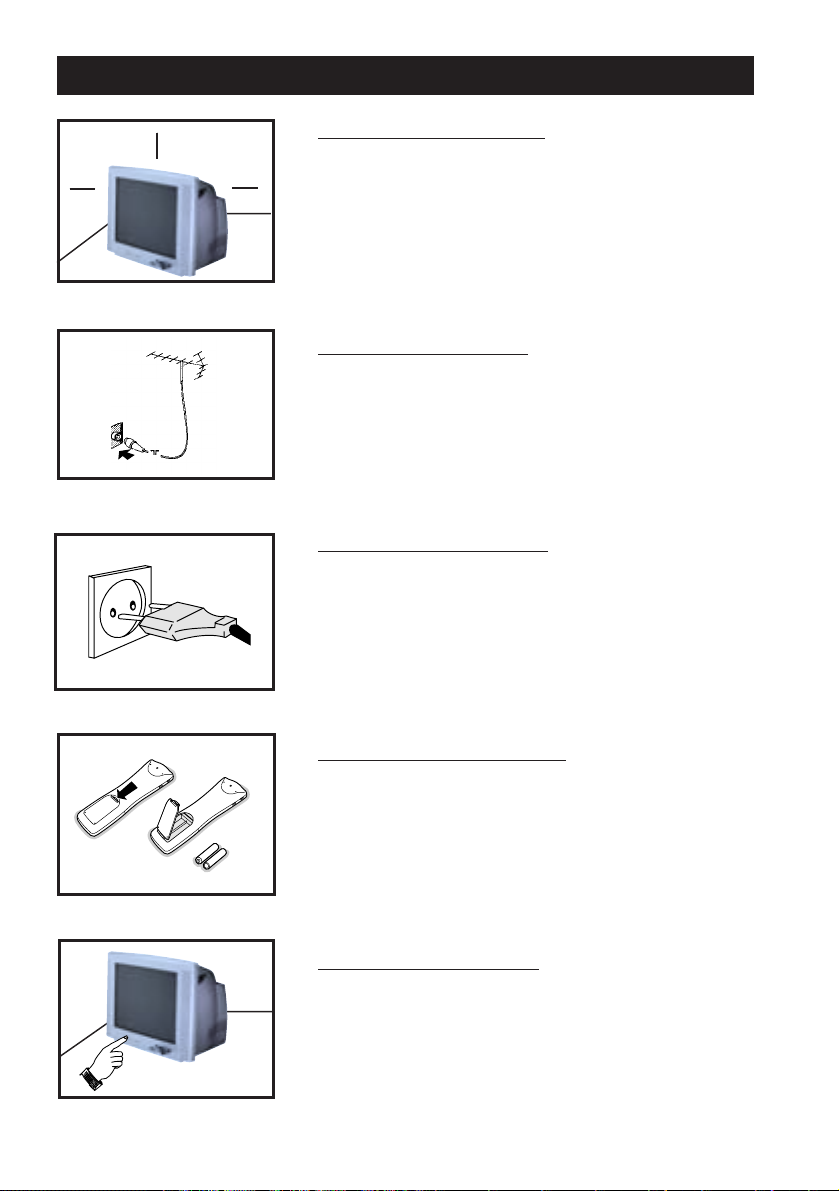
Positioning of the TV set
• Place your TV set on a solid base, strong enough to
withstand the weight of the set.
• Leave a space of at least 5 cm around each side of the
TV set to allow for proper ventilation.
• Do not place TV set near a radiator or other sources of
heat.
• Do not place TV set where it can be exposed to rain or
excesssive moisture.
Connecting the Aerial
• Insert the aerial plug into the socket ¬ at the rear of
the set.
Connecting to the mains
• Insert the mains plug into the wall socket. (For correct
mains voltage, refer to the type sticker at the rear of the
set).
Note : This diagram is not representative of the actual
plug and socket.
Using the Remote Control
• Insert the correct type of batteries into the compartment.
• Ensure the batteries are placed in the right direction.
Note : Remove the batteries from the remote
control handset if handset is not used for a long time.
Switching on the TV set
• Press the mains power button to switch on/off the TV set.
• If the set is on standby mode (indicator light is red), press
the Standby button on the remote control to switch on set.
6
Page 7
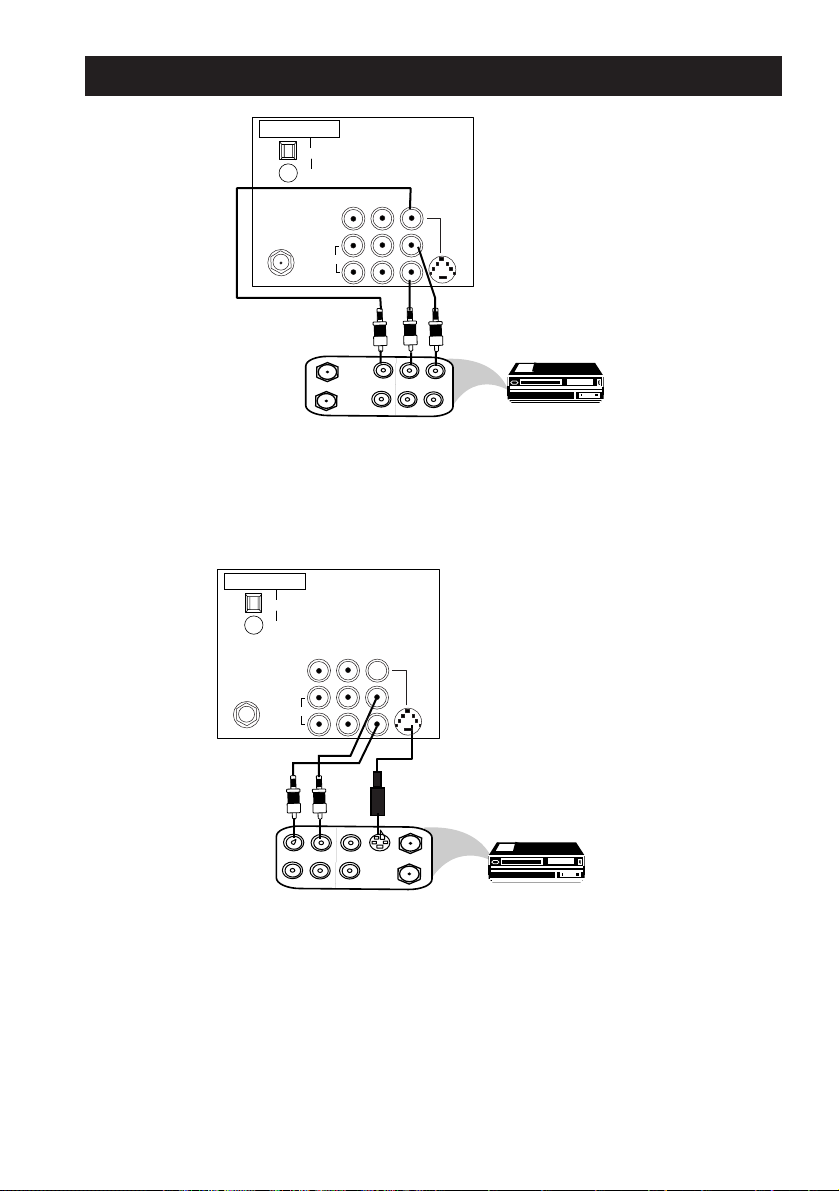
CONNECTING THE AUDIO/VIDEO SOCKETS (PLAYBACK)
DIGITAL AUDIO OUT
PCM / MPEG2 / AC-3 / DTS
OPTICAL
COAXIAL
AV1 inAV2
Monitor
VIDEO
L/Mono
AUDIO
R
OUT
Back of
VCR
ANTENNA
IN
You can view the playback of VCR tapes (Video Disc players, camcorders, etc.) by using the AUDIO
and VIDEO INPUT sockets on the rear of the TV.
– Connect the VIDEO and AUDIO IN sockets on the rear of the TV to the AUDIO and
VIDEO OUT sockets on the VCR.
DIGITAL AUDIO OUT
PCM / MPEG2 / AC-3 / DTS
OPTICAL
COAXIAL
AV1 inAV2
Monitor
out
VIDEO
L/Mono
AUDIO
in
out
AV sockets
on rear of
S-VIDEO
TV
OUT
OUT
L
VIDEO
R
AUDIO
IN
IN
in
AV sockets
S-VIDEO
on rear of
TV
VCR (Equipped with
Video and Audio
Output sockets
OUT
L
R
VIDEO
AUDIO
IN
OUT
OUT
OUT
S-VIDEO
ANTENNA
IN
IN
Back of S-VHS VCR
The S-Video connection on the rear of the TV is used for the playback of S-VHS VCR tapes, Video
Discs, Video Games or Compact Disc-Interactive (cd-i) discs. Better picture detail and clarity is
possible with the S-Video playback as compared to the picture from a normal antenna (RF)
connection.
– Connect the S-VIDEO socket on the rear of the TV to the S-VHS OUT socket on a
S-VHS VCR.
– Connect the AUDIO IN sockets from the rear of the TV to the AUDIO OUT sockets
on the VCR.
Note : You need not connect the VIDEO IN socket of the TV if S-VIDEO IN socket is
connected.
7
Page 8
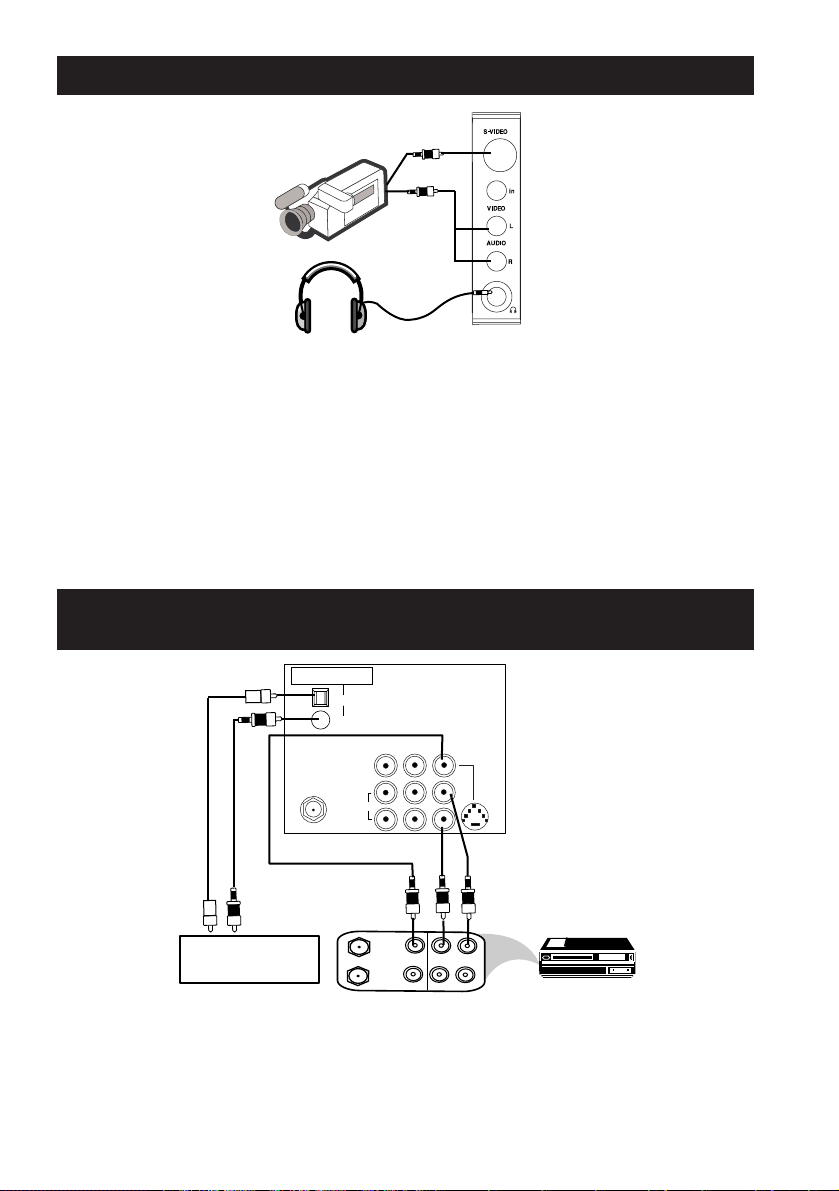
CONNECTING THE AUDIO/VIDEO SOCKETS (PLAYBACK)
Camcorder
Side Audio/Video
Connect headphone jack
Input sockets
to socket for personal
listening
For more convenient direct playback connections, the Side Audio/Video Input sockets allow for quick
and easy connections, particularly Camcorder tape recordings.
– Connect the S-VIDEO socket (if available) from the Camcorder to the Side S-VIDEO
socket of the TV. You need not connect the Side VIDEO IN socket of the TV if the
S-VIDEO socket is connected.
– Connect the AUDIO OUT sockets (Right and Left) from the Camcorder to the Side
AUDIO IN sockets.
CONNECTING TO THE AMPLIFIER W ITH T WO CHANNEL
DIGITAL STEREO (PCM)
DIGITAL AUDIO OUT
PCM / MPEG2 / AC-3 / DTS
OPTICAL
COAXIAL
AV1 inAV2
VIDEO
L/Mono
AUDIO
R
Monitor
out
in
AV sockets on
rear of TV
S-VIDEO
VCR (Equipped with
Video and Audio
Output sockets
AMPLIFIER
ANTENNA
OUT
OUT
IN
OUT
VIDEO
L
R
AUDIO
IN
IN
• Connect the TV’s digital audio “out” jack (optical or coaxial) to the corresponding “in” jack
on your amplifier.
• You will need to activate the player’s diigital output(See User Preferences)
8
Page 9
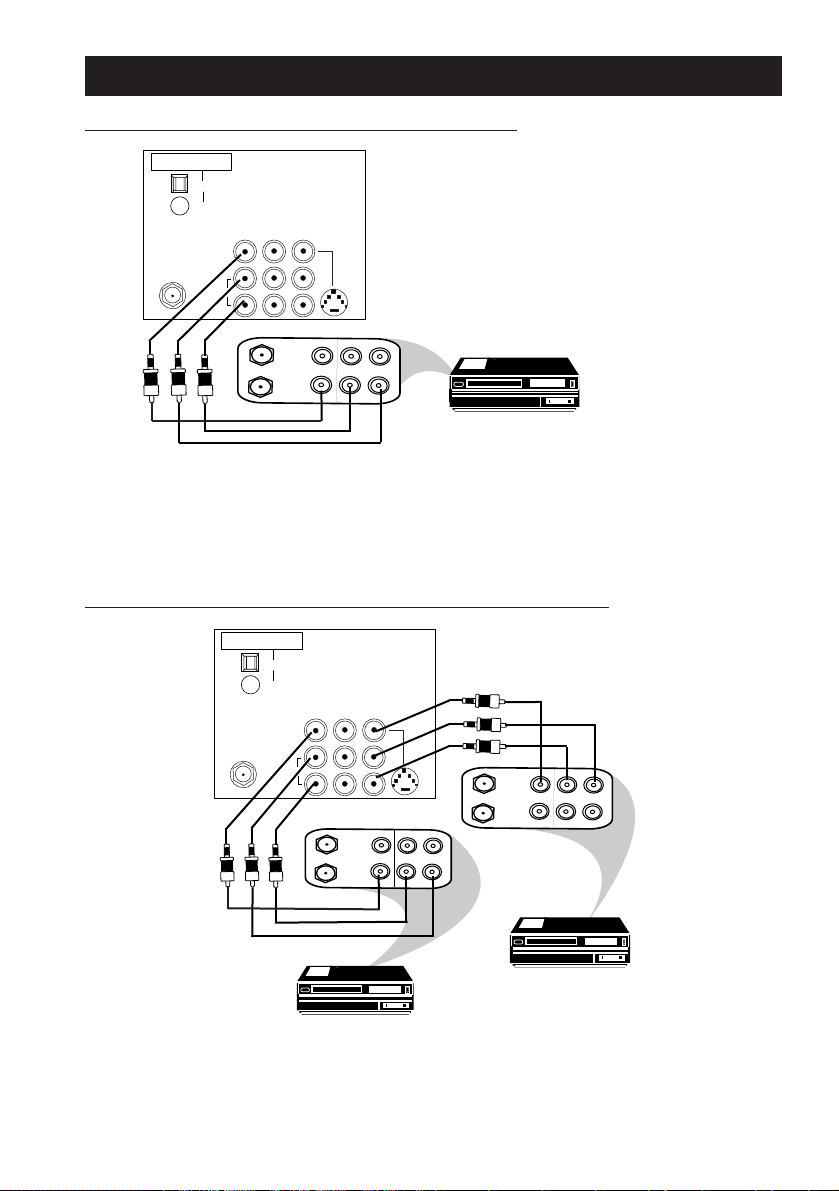
CONNECTING THE AUDIO/VIDEO SOCKETS (RECORDING)
Connection for recording from the TV channel
DIGITAL AUDIO OUT
PCM / MPEG2 / AC-3 / DTS
OPTICAL
COAXIAL
AV1 inAV2
Monitor
VIDEO
L/Mono
AUDIO
R
– Connect the corresponding INPUT sockets of the VCR to the MONITOR OUTPUT
sockets on the rear of the TV.
– To enhance the sound of your TV, connect the AUDIO L and R sockets to an external
audio system instead of the VCR. For mono equipment, connect only the AUDIO L socket.
Connection for recording from one VCR to another VCR
DIGITAL AUDIO OUT
PCM / MPEG2 / AC-3 / DTS
AV sockets on
rear of TV
out
OUT
ANTENNA
COAXIAL
IN
OPTICAL
VIDEO
L/Mono
AUDIO
in
Monitor
R
OUT
VIDEO
IN
out
OUT
ANTENNA
IN
VCR 1
S-VIDEO
R
AUDIO
AV1 inAV2
AV sockets
on rear of
TV
OUT
L
IN
in
OUT
VIDEO
IN
S-VIDEO
OUT
R
AUDIO
IN
OUT
ANTENNA
L
OUT
VIDEO
IN
VCR 2
VCR (Equipped with Video
and Audio Input sockets
VCR (Equipped with
Video and Audio Input
sockets
OUT
R
AUDIO
Back of
L
VCR
VCR (Equipped with
Video and Audio
Output sockets
– Connect the sockets of the VCR which you wish to record from, to the corresponding
sockets at either AV1 or AV2..
– Connect the sockets of the receiving VCR to the MONITOR OUTPUT sockets on the
rear of the TV.
9
Page 10
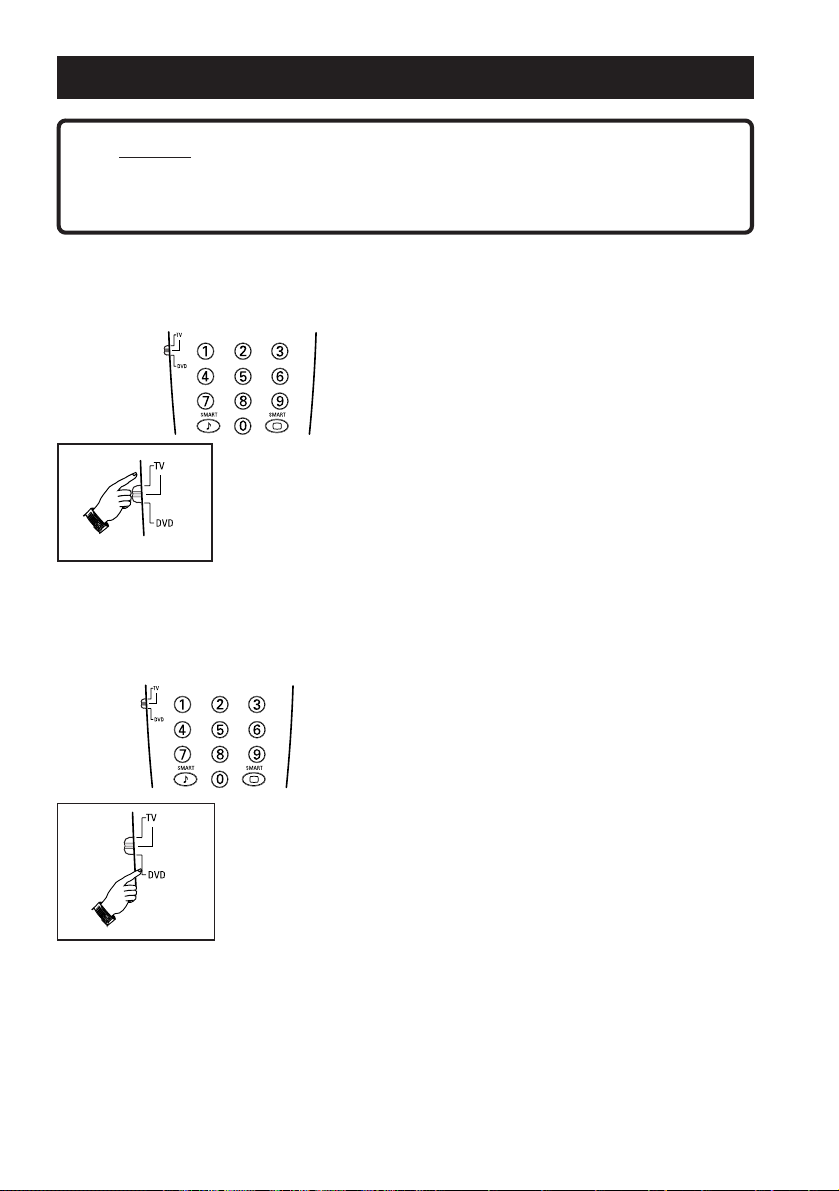
SETTING OF TV/DVD SWITCH
NOTE
This set performs 2 functions, that as , a TV set and
a DVD PLAYER.
TV Viewing
➥
➥
• For set to perform as a TV, the TV/DVD switch
MUST be set to TV position on the remote control.
If switch is at DVD position, functions of remote
control for TV operation will be disabled .
DVD Playback
• For set to perform as a DVD player, the TV/DVD
switch MUST be set to DVD position on the
remote control. If switch is at TV position, functions
of remote control for DVD operation will be disabled
except for Sleeptimer, Volume + / – , Mute and
Smart Picture and Sound buttons
Note
• If you want to adjust picture and sound settings or
features while you are in DVD mode, the TV/DVD
switch must be at the TV position to enable you to
enter into the TV remote command mode.
• Press the MENU button to enter into the main
menu. For picture and sound adjustments, refer to
the section on “Using the Picture and Sound menu”
• To return to DVD mode, reset the switch to DVD
position.
10
Page 11
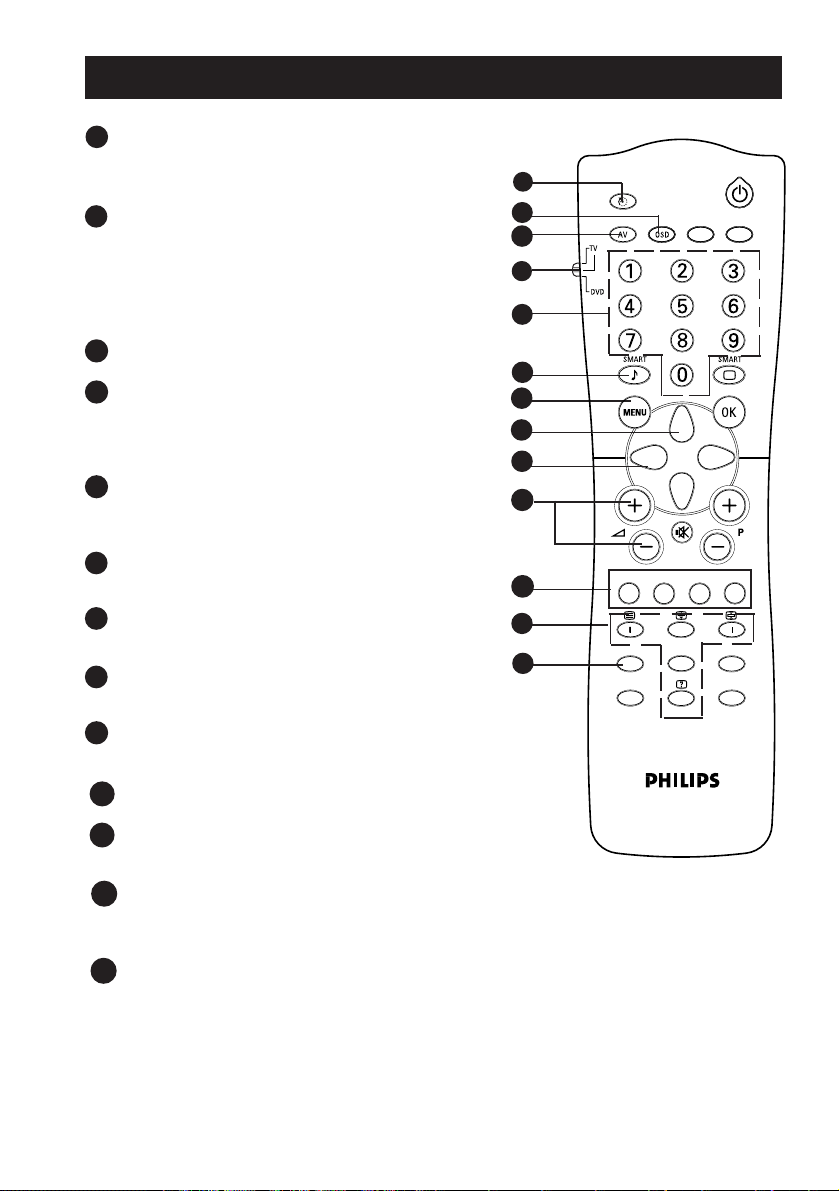
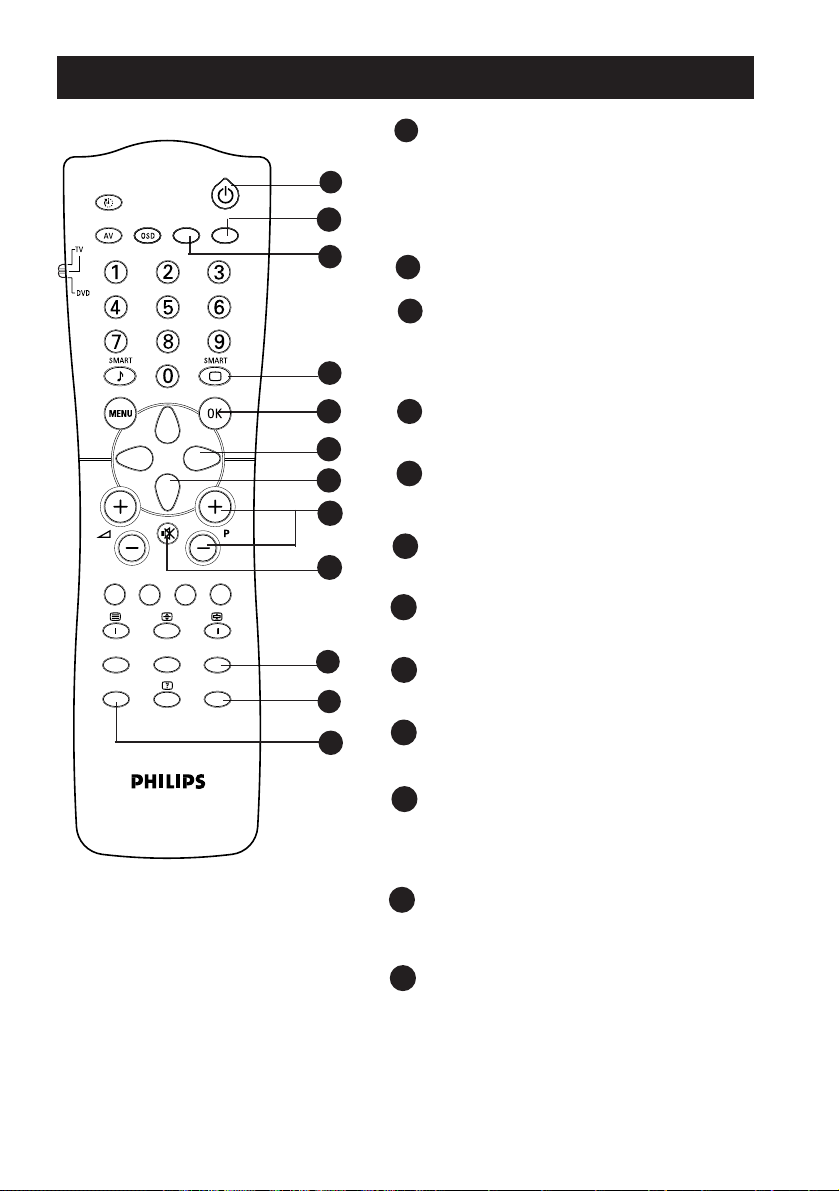
FUNCTIONS OF REMOTE CONTROL (TV)
4
\
m
INCR. SURR.
PROG. LISTSURF
INCR. PIC
T/C AUDIO FTS ANGLE
É
á á
ç
Ç
à
à
Å
1 SLEEPTIMER
Allows you to select a time period after
which the set will switch to standby mode
automatically.
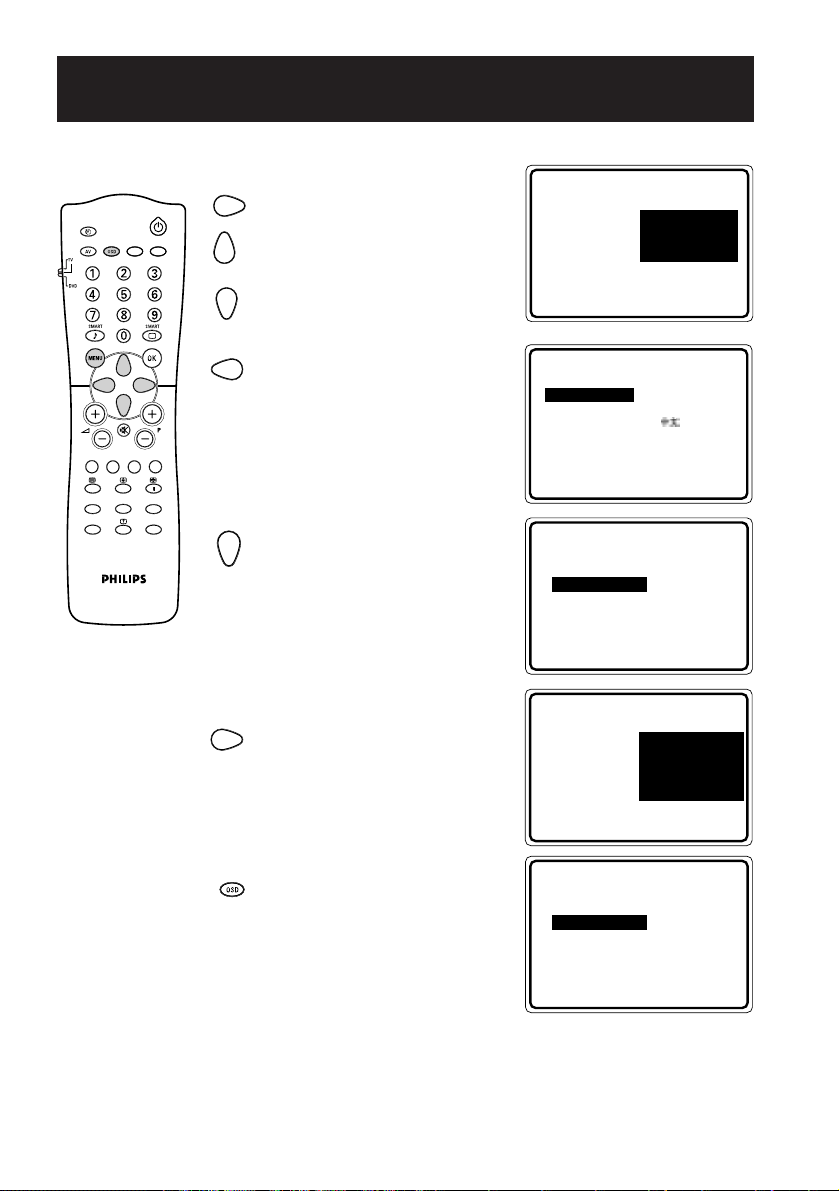
2 OSD
– Displays the channel number, sound and
colour transmission mode, status of the
sleeptimer., channel name (if channel is
named) and the current time (if current
time is being entered in the Timer menu).
– Also allows you to exit menu from screen.
3 AV
Allows you to select the AV channels.3
4 TV/DVD Switch
Allows you to select between TV or DVD
mode. When TV is in operation, ensure switch
is at TV position. Likewise,when DVD is in
operation, switch must be in DVD position.
5 DIGIT (0 -9)
Allows you select a channel.
Note : For a 2-digit number, the second digit
must be entered before the “–” sign disappears.
6 SMART SOUND
7 MENU
8 CURSOR UP
9 CURSOR LEFT
10 VOLUME + / –
11 DVD buttons
12 TELETEXT
13 SURF
Allows you to select your desired sound
setting from 4 types of sound settings.
Displays main menu. Also exits menu from
screen.
Allows you to select the next item on the
menu.
Allows you to access the sub-menus and
adjust the settings.
Increases or decreases volume.
Refer to section on “Functions of Remote
Control (DVD)”
Allows to select teletext information.
(For detailed description of functions, refer
to section on “Using the Teletext”
Allows you to select up to a maximum of 10
channels and view quickly the selected channels.
1
2
3
4
5
6
7
8
9
10
11
12
13
11
Page 12
4
T/C AUDIO FTS ANGLE
à
à
É
m
Ç
INCR. SURR.
ç
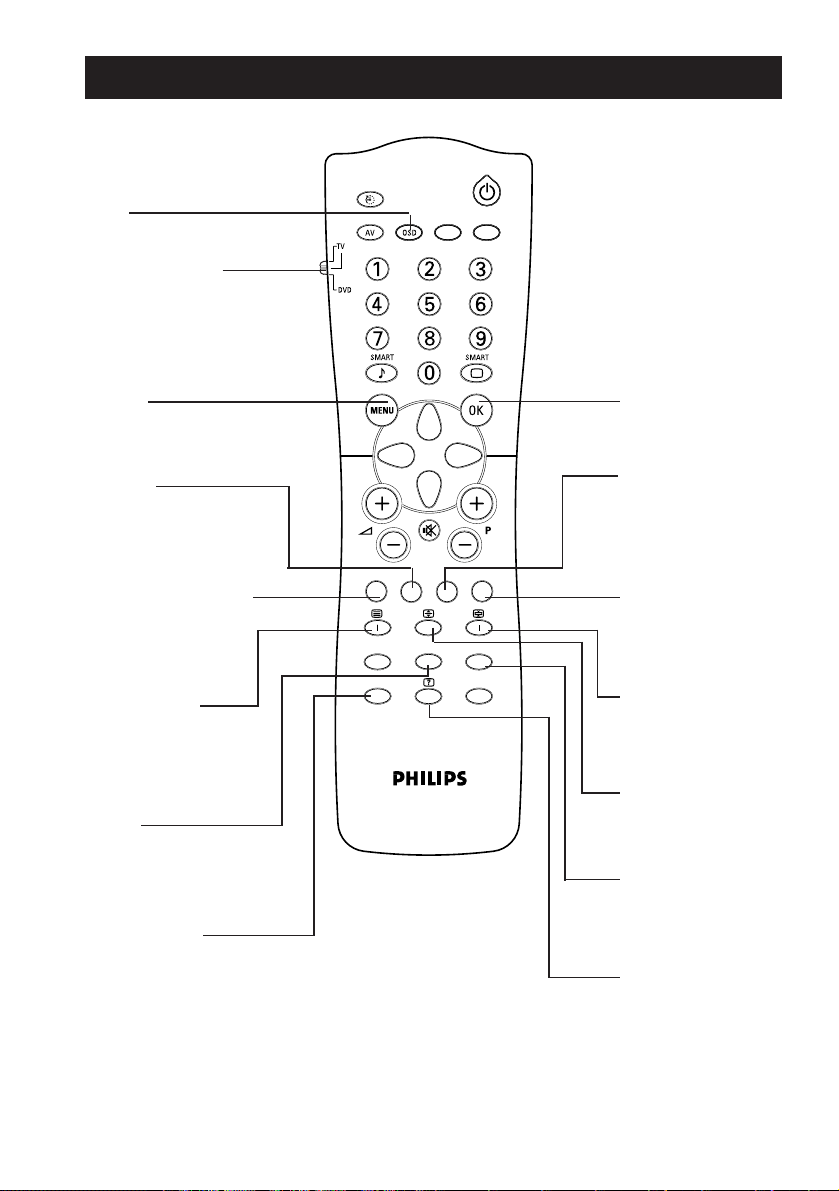
FUNCTIONS OF REMOTE CONTROL (TV)
14 STANDBY
– Switch set off temporarily to standby mode.
(The red light indicator lights up when set is
on standby mode).
– To switch on set from standby mode, press
Channel Up/Down, Digit (0 -9) or Standby
button.
15 CLOCK
Allows you display the clock on the screen.
44
16
4
44
Allows you to switch from Stereo to
Mono sound during stereo transmission
or to choose between language5or
language6during dual sound transmission.
17 SMART PICTURE
Allows you to select your desired picture
setting from 5 types of picture settings.
18 OK
Refer to section on “Functions of Remote
Control (DVD)
19 CURSOR RIGHT
Allows you to access the sub-menus and
adjust the settings.
20 CURSOR DOWN
Allows you to select the next item on the
menu.
21 CHANNEL + / –
Selects channel in ascending or descending
order.
22 MUTE
Mutes sound. To restore sound, press
button again.
23 PROGRAM LIST
Allows you to navigate through a list of
installed programs for a quick overview
of the channels and activate the channel
you have selected.
24 INCREDIBLE PICTURE
Allows you to view a more vivid and realistic
picture with better contrast when the “ON”
function is selected.
25 INCREDIBLE SURROUND
– Allows you to select Incredible Surround
sound when transmission is in stereo mode.
– Allows you to select Spatial Sound when
transmission is in mono mode.
á á
PROG. LISTSURF
INCR. PIC
14
\
Å
15
16
17
18
19
20
21
22
23
24
25
12
Page 13
FUNCTIONS OF REMOTE CONTROL (DVD)
OSD
Access or exit On-Screen
display.
TV/DVD Switch
TV mode or DVD mode
selector.
\
4
MENU
Access menu of DVD.
AUDIO
Allows you to view the
different languages in the
menu bar.
T/C (Title/Chapter)
Allows you to access
the title/chapter
selector mode.
BACKWARD
Allows you to skip or
rewind.
STOP
Allows you stop
playback mode.
INCREDIBLE
SURROUND
Allows you select Stereo,
TruSurround 3D Virtual
Surround or Dolby Surround
compatible sound.
T/C AUDIO FTS ANGLE
à
à
É
m
Ç
INCR. SURR.
ç
á á
PROG. LISTSURF
INCR. PIC
OK
To confirm selection
on the menu.
ZOOM
Allows you to enlarge
the video image and
to pan through the
enlarged image.
ANGLE
Allows you to change
Å
the camera angle.
FORWARD
Allows you to skip or
fast forward.
PLAY
Allows you to activate
playback mode.
PAUSE
Allows you pause
playback temporarily.
EJECT
Allows you open/close
disc tray.
13
Page 14
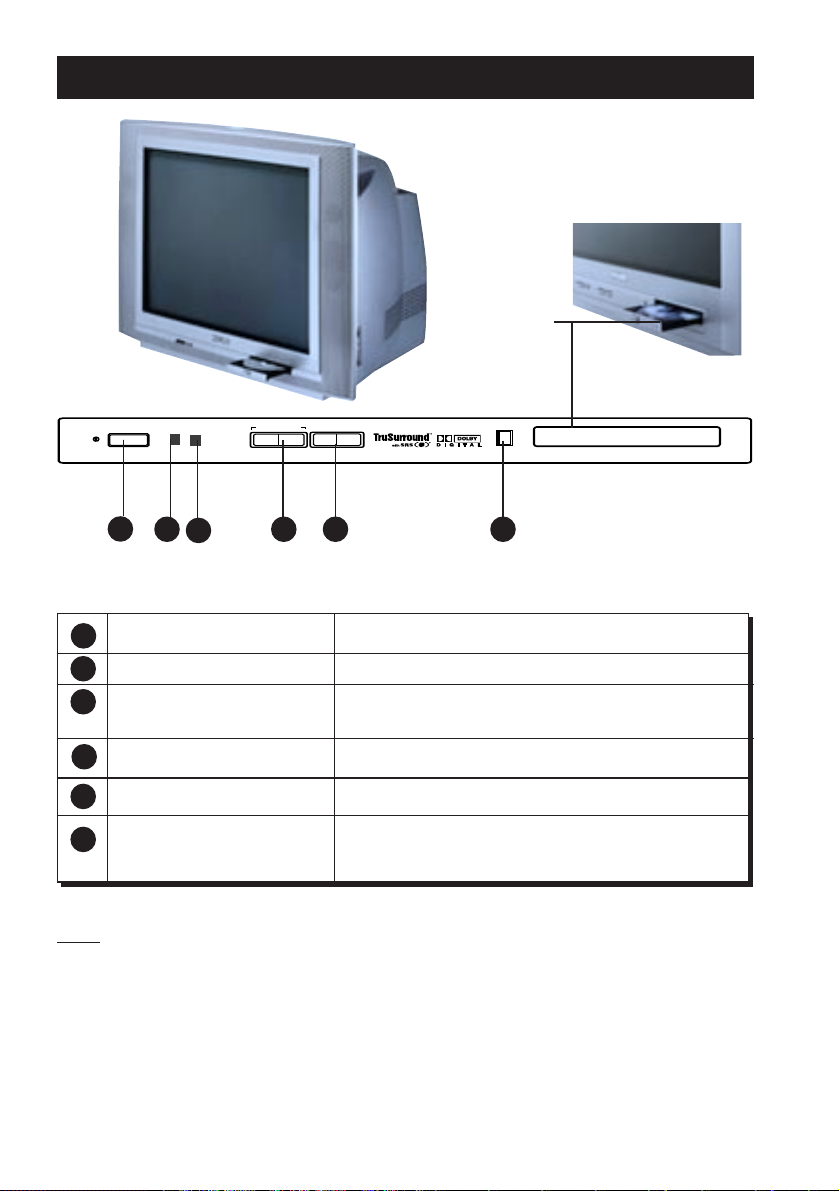
FUNCTIONS OF TV/DVD COMBI CONTROLS
DVD Tray
➠
INSTALL MENU
– VOLUME +
¸CHANNEL˚
EJECT
1
2
3
5
4
6
1 Mains Power button Switch mains power on or off.
2 Standby Light indicator Indicate red light when standby mode is activated.
3 Remote Sensor Acts as a sensor for activating the controls of the TV
when remote control handset is aimed at it.
4 Volume – / + button Adjusts sound volume softer/louder.
5 Channel
¸ /˚ button Selects channel in descending/ascending order.
6 DVD Eject button Allows you to open/close DVD tray
Note
• You can enter the main menu by pressing both the Volume – and + buttons at the same
time.
• Press the Channel
¸ or ˚ button to select the next item on the menu.
• Press the Volume – or + button to access the sub-menus and adjust the settings.
14
Page 15
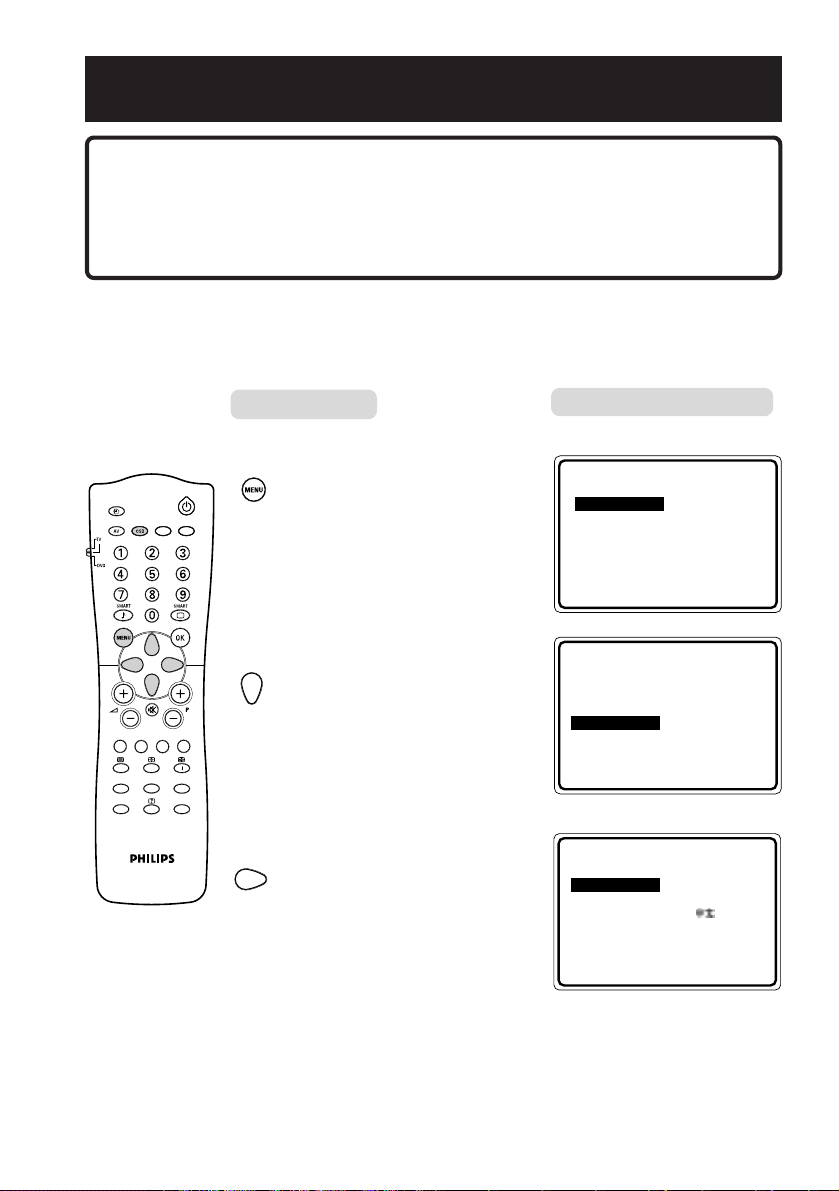
SELECTING THE MENU LANGUAGE
Result on TV Screen
AND AUTOMATIC TUNING OF CHANNELS
This section explains the operating instructions of the TV only.
Operating instructions are explained step by step to enable
you to operate the TV set easily. For instructions on operating
the DVD, refer to section on “Operating the DVD”
Before you tune in the channels by the Auto Store method, select the menu language of your
choice.
Press button
T/C AUDIO FTS ANGLE
É
m
Ç
INCR. SURR.
ç
1. Enter main menu.
\
4
2. Press button repeatedly
until INSTALL is
selected.
á á
PROG. LISTSURF
INCR. PIC
3. Enter INSTALL menu.
É
•
PICTURE BRIGHTNESS
▼
•
SOUND
•
FEATURES
•
INSTALL SHARPNESS
•
PICTURE LANGUAGE
•
SOUND
•
FEATURES
▲
É
•
INSTALL SORT
INSTALL
Ñ
LANGUAGE
•
AUTO STORE B.MELAYU
•
MANUAL STORE
•SORT
•CHANNEL EDIT
COLOUR
CONTRAST
COLOUR TEMP
AUTO STORE
MANUAL STORE
CHANNEL EDIT
▲
É
•
ENGLISH
▼
15
Page 16
SELECTING THE MENU LANGUAGE
AND AUTOMATIC TUNING OF CHANNELS
T/C AUDIO FTS ANGLE
É
m
Ç
INCR. SURR.
ç
4. Enter LANGUAGE mode.
\
4
5. Select desired language.
OR
6. Exit from language mode.
á á
PROG. LISTSURF
INCR. PIC
7. Select AUTO STORE.
8. Start automatic tuning.
INSTALL
LANGUAGE
Ñ
•
AUTO STORE
•
MANUAL STORE
•
SORT
•
CHANNEL EDIT
•
INSTALL
Ñ
LANGUAGE
•
AUTO STORE B. MELAYU
•
MANUAL STORE
•
SORT
•
CHANNEL EDIT
INSTALL
•
LANGUAGE
Ñ
AUTO STORE
•
MANUAL STORE
•
SORT
•
CHANNEL EDIT
•
INSTALL
•
LANGUAGE
•
AUTO STORE •
•
MANUAL STORE PLEASE WAIT
•SORT CHAN.FOUND 8
•CHANNEL EDIT 048.31 MHZ
•
▲
•
▼
•
▲
É
ENGLISH
▲
É
ENGLISH
▼
▲
É
•
SEARCH
▼
É
SEARCHING
▼
9. When tuning is completed,
exit menu from screen.
16
INSTALL
•
LANGUAGE
Ñ
AUTO STORE
•
MANUAL STORE
•
SORT
•
CHANNEL EDIT
•
▲
•
▼
É
SEARCH
Page 17
MANUAL TUNING OF CHANNELS
Result on TV Screen
▼
▲
Ñ
INSTALL
MANUAL STORE
•COLOUR SYSTEM
•
SOUND SYSTEM
•SEARCH
CHANNEL
•
18
•STORE
É
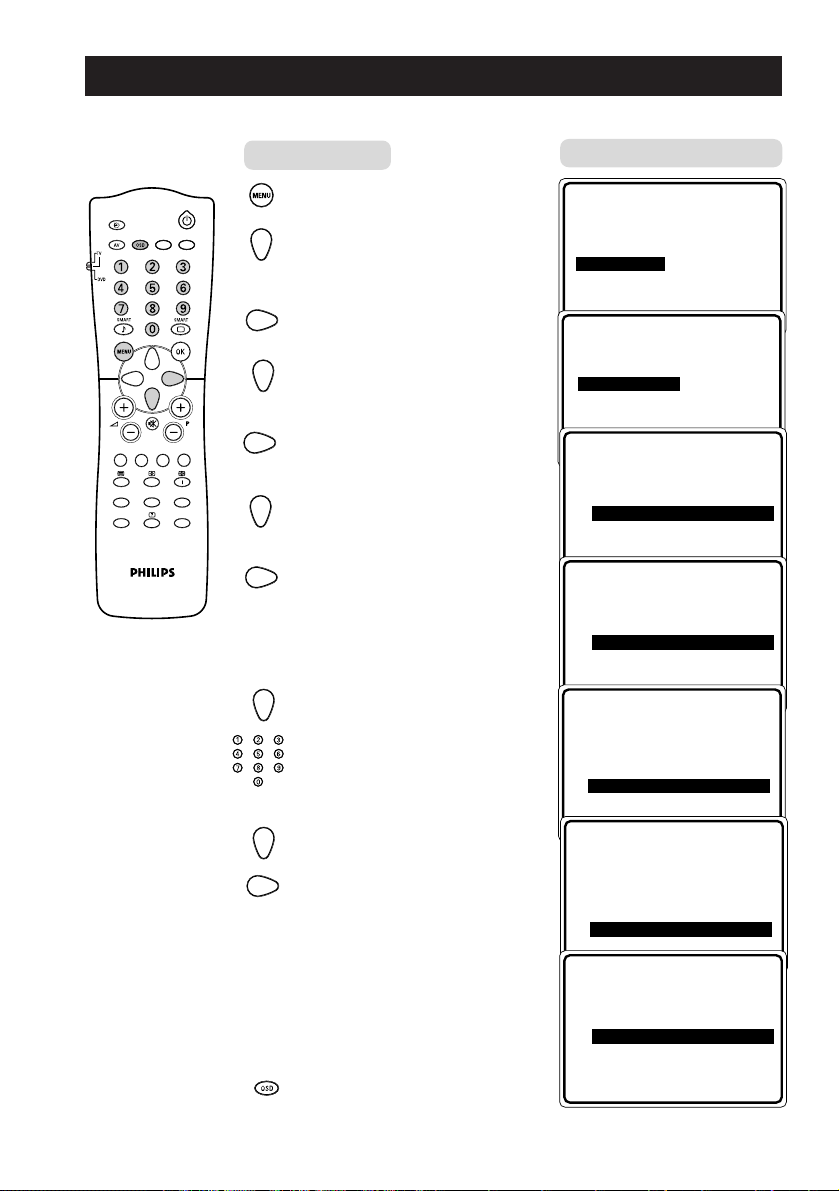
Manual tuning allows you to store each programme manually.
Press button
1. Enter main menu.
\
4
2. Press button repeatedly
until INSTALL is
selected.
•
PICTURE LANGUAGE
•
SOUND
•
FEATURES
▲
É
•
INSTALL SORT
AUTO STORE
MANUAL STORE
CHANNEL EDIT
T/C AUDIO FTS ANGLE
á á
É
PROG. LISTSURF
m
Ç
INCR. SURR.
ç
INCR. PIC
3. Enter INSTALL menu.
4. Press button repeatedly
until MANUAL STORE
is selected.
5. Enter MANUAL STORE
menu.
6. Select SEARCH.
7. Start manual tuning of
channel. Searching stops
once a transmitting
channel is found.
8. Select CHANNEL.
9. Key in the desired channel
number.
10. Select STORE.
11. Store tuned channel.
Note : If you want to
continue searching for
another transmitting
channel, repeat steps
7 to 11.
12. Exit menu from screen.
17
INSTALL
•
LANGUAGE
•
AUTO STORE
▲
É
•
MANUAL STORE
▼
•
SORT
•
CHANNEL EDIT
•
INSTALL
MANUAL STORE
•
COLOUR SYSTEM
•
SOUND SYSTEM
Ñ
SEARCH
•
CHANNEL
•
STORE
INSTALL
MANUAL STORE
•
COLOUR SYSTEM
•
SOUND SYSTEM
Ñ
SEARCH
•
CHANNEL
•
STORE
INSTALL
MANUAL STORE
•
COLOUR SYSTEM
•
SOUND SYSTEM
•
SEARCH
•
CHANNEL
Ñ
STORE
INSTALL
MANUAL STORE
•
COLOUR SYSTEM
•
SOUND SYSTEM
Ñ
SEARCH
•
CHANNEL
•
STORE
COLOUR SYSTEM
SOUND SYSTEM
SEARCH
CHANNEL
STORE
▲
É
•
▼
▲
É
•
▼
▲
É
• 196.25MHZ
▼
048.31MHZ
196.25MHZ
▲
É
•
STORED
▼
Page 18

SELECTING THE COLOUR /SOUND SYSTEM
Result on TV Screen
▼
▲
É
Ñ
INSTALL
MANUAL STORE
•
COLOUR SYSTEM
SOUND SYSTEM
•
AUTO
•
SEARCH B/G
•
CHANNEL D/K
•
STORE
•
É
▼
▲
É
Ñ
INSTALL
MANUAL STORE
•
COLOUR SYSTEM
SOUND SYSTEM • AUTO
•
SEARCH B/G
•
CHANNEL D/K
•
STORE
•
É
▼
▲
Ñ
INSTALL
MANUAL STORE
COLOUR SYSTEM
•
SOUND SYSTEM
•
SEARCH
•
CHANNEL
STORE
•
É
▼
▲
Ñ
INSTALL
MANUAL STORE
COLOUR SYSTEM
•
SOUND SYSTEM
•
SEARCH
•
CHANNEL
STORE
•
STORED
É
This feature allows you to select your desired COLOUR and SOUND system. If AUTO
is selected, the respective colour and sound system will be automatically selected according
to the transmission system.
Note : Select your desired colour and sound system manually if reception is poor at AUTO
mode.
Press button
Repeat step 1 to step 5 as in “MANUAL TUNING OF CHANNELS”
T/C AUDIO FTS ANGLE
É
m
Ç
INCR. SURR.
ç
6. COLOUR SYSTEM is
selected. Enter COLOUR
\
4
SYSTEM mode.
7. Select the desired colour
system.
INSTALL
MANUAL STORE
Ñ
S
COLOUR SYSTEM •
•
SOUND SYSTEM PAL
•
SEARCH SECAM
•CHANNEL
•STORE
•
▲
É
É
AUTO
▼
8. Exit from colour system
mode.
9. Proceed to select
SOUND SYSTEM.
PROG. LISTSURF
INCR. PIC
á á
10. Enter SOUND SYSTEM
mode.
11. Select the desired sound
OR
system.
12. Exit from sound system
mode.
13. Press button repeatedly
until STORE is selected.
14. Store selected system.
15. Exit menu from screen.
18
INSTALL
MANUAL STORE
•
COLOUR SYSTEM
•
SOUND SYSTEM
Ñ
SEARCH
•
CHANNEL
•
STORE
▲
É
• 196.25MHZ
▼
Page 19

FINE TUNING OF CHANNELS
Result on TV Screen
▼
▲
Ñ
INSTALL
MANUAL STORE
•
COLOUR SYSTEM
•
SOUND SYSTEM
•
SEARCH
•
CHANNEL
STORE •
É
This feature allows you to adjust picture reception in areas of weak reception.
➠
➠➠
1. Enter main menu. 2. Select INSTALL. 3. Enter install menu.
Press button
4. Press button repeatedly
until MANUAL STORE
\
T/C AUDIO FTS ANGLE
É
m
Ç
INCR. SURR.
ç
4
OR
PROG. LISTSURF
INCR. PIC
á á
is selected.
5. Enter MANUAL STORE
menu.
6. Press button repeatedly until
FINE TUNE is selected.
7. Start fine-tuning until desired
picture and sound is obtained.
8. Select STORE.
INSTALL
Ñ
LANGUAGE
•
AUTO STORE B. MELAYU
•
MANUAL STORE
•
SORT
•
CHANNEL EDIT
INSTALL
•
LANGUAGE
•
AUTO STORE
▲
É
•
MANUAL STORE
▼
•
SORT
•
CHANNEL EDIT
•
INSTALL
MANUAL STORE
COLOUR SYSTEM •
Ñ
•
SOUND SYSTEM PAL
•
SEARCH SECAM
•CHANNEL
•STORE
INSTALL
MANUAL STORE
•
SOUND SYSTEM
•
SEARCH
•
CHANNEL
•
STORE
Ñ
FINE TUNE
▲
É
• ENGLISH
▼
▼
COLOUR SYSTEM
SOUND SYSTEM
SEARCH
CHANNEL
STORE
▲
▼
É
AUTO
▲
É
▼
9. Store last fine-tuned status.
10. Exit menu from screen.
19
INSTALL
MANUAL STORE
•
COLOUR SYSTEM
•
SOUND SYSTEM
•
SEARCH
•
CHANNEL
Ñ
STORE
INSTALL
MANUAL STORE
•
COLOUR SYSTEM
•
SOUND SYSTEM
Ñ
SEARCH
•
CHANNEL
•
STORE
▲
É
•
STORED
▼
▲
É
• 048.31MHZ
▼
Page 20

SORTING OF CHANNELS
Result on TV Screen
INSTALL
•
LANGUAGE FROM
•
AUTO STORE TO
•
MANUAL STORE EXCHANGE
•
SORT
•
CHANNEL EDIT
▲
É
▼
▲
INSTALL
SORT
•
FROM
•
TO
EXCHANGE
•
EXCHANGED
•
Ñ
É
▲
INSTALL
SORT
•
FROM
•
TO
EXCHANGE
•
•
Ñ
É
This feature allows you to change the channel number to your choice for a particular TV
station.
INSTALL
Ñ
➠
➠
➠
•
•
•
•
1. Enter main menu. 2. Select INSTALL. 3. Enter install mode.
Press button
4. Press button repeatedly
until SORT is selected.
\
4
5. Enter SORT menu.
6. Key in the channel number
in the FROM column, that
is, the channel you want to
swap from.
T/C AUDIO FTS ANGLE
É
m
Ç
INCR. SURR.
ç
á á
PROG. LISTSURF
INCR. PIC
7. Select TO .
8. Key in the channel number
in the TO column. that is,
the channel you want to
swap to.
▲
LANGUAGE
AUTO STORE B. MELAYU
MANUAL STORE
SORT
CHANNEL EDIT
INSTALL
SORT
Ñ
•
•
•
INSTALL
SORT
•
Ñ
•
•
É
•
ENGLISH
▼
▼
FROM •
TO
EXCHANGE
FROM
TO
EXCHANGE
▲
É
•
▼
▲
▼
É
8
6
9. Select EXCHANGE.
10. Activate exchange of
channels.
11. Exit menu from screen.
20
Page 21

DITING OF CHANNELS
▲
▼
Ñ
INSTALL
•
LANGUAGE 3
•
AUTO STORE 4
•
MANUAL STORE 5
•
SORT 6
CHANNEL EDIT •
7
•
É
▲
▼
Ñ
INSTALL
•
LANGUAGE 3
•
AUTO STORE 4
•
MANUAL STORE 5
•
SORT 6
CHANNEL EDIT •
7 SKIPPED
•
É
Result on TV Screen
E
This feature allows you to edit or skip channels which have bad or weak TV signal or channels
that you do not watch often.
Note : Once a channel is skipped, you cannot have access to it by the CHANNEL + or –
button. You can only access the channel by the DIGIT (0 -9) button.
INSTALL
Ñ
LANGUAGE
•
➠
➠
➠
AUTO STORE B. MELAYU
•
MANUAL STORE
•
SORT
•
CHANNEL EDIT
1. Enter main menu. 2. Select INSTALL. 3. Enter install mode.
Press button
4
T/C AUDIO FTS ANGLE
É
m
Ç
INCR. SURR.
ç
4. Press button repeatedly
\
until CHANNEL EDIT
is selected.
5. Enter channel edit
mode.
6. Select the channel you
OR
á á
PROG. LISTSURF
INCR. PIC
want to skip.
7. Activate skipped mode.
INSTALL
•
•
▲
•
▼
▼
•
LANGUAGE 3
•
AUTO STORE 4
•
MANUAL STORE 5
SORT 6
Ñ
CHANNEL EDIT
É
ENGLISH
▲
É
• 7
▼
How to add back channels
• Repeat steps 1 to 5 as in “Editing of Channels”.
• Select the channel you want to add back by the (CURSOR UP) or (CURSOR
DOWN) button.
• Press the (CURSOR RIGHT) button to activate adding back of channel.
• Exit menu from screen by the (OSD) button.
8. Exit menu from screen.
21
Page 22

NAMING OF CHANNELS
INSTALL
•
AUTO STORE
•
MANUAL STORE
•
SORT
•
CHANNEL EDIT
NAME
•
8
▲
▲
É
Ñ
▲
▲
Ñ
INSTALL
•
AUTO STORE
•
MANUAL STORE
•
SORT
•
CHANNEL EDIT
NAME
•
PERSONAL
É
▲
▲
Ñ
INSTALL
•
AUTO STORE
•
MANUAL STORE
•
SORT
•
CHANNEL EDIT
NAME •
–
É
▲
▲
Ñ
INSTALL
•
AUTO STORE
•
MANUAL STORE
•
SORT
•
CHANNEL EDIT
NAME •
LUCKY
É
This feature allows a selection of 10 channels of pre-defined names. It also allows you to enter
a new name or modify an existing name of a channel for 40 channels including external
channels.
INSTALL
Ñ
➠
➠
➠
•
AUTO STORE B.MELAYU
•
MANUAL STORE
•
SORT
•
CHANNEL EDIT
1. Enter main menu. 2. Select INSTALL. 3. Enter install mode.
Press button
Result on TV Screen
4. Press button repeatedly
until NAME is highlighted.
\
4
5. Enter NAME mode.
6. Select desired preset name
OR
and press (CURSOR
RIGHT) button to store
selected pre-set name.
T/C AUDIO FTS ANGLE
7. If you select PERSONAL,
move to first character slot
INCR. SURR.
á á
É
PROG. LISTSURF
m
Ç
INCR. PIC
ç
LANGUAGE
•
▲
É
▼
ENGLISH
OR
8. Press button repeatedly
to cycyle through the
characters and select
desired character.
Move to next character
slot by the (CURSOR
RIGHT) button and select
in the next character.
(You can enter up to a
maximum of 5 characters)
9. Store named channel.
10. Exit menu from screen.
22
INSTALL
•
AUTO STORE
•
MANUAL STORE
•
SORT
•
CHANNEL EDIT
Ñ
NAME
▲
▲
É
•
PERSONAL
Page 23

USING THE PICTURE/SOUND MENU
PICTURE
•
COLOUR
•
CONTRAST
•
SHARPNESS 8
•
COLOUR TEMP
NR • ON
Ñ
É
▲
▲
SOUND
TREBLE 38
•
BASS
•
BALANCE
•
AVL
Ñ
É
The picture and sound menus allow you to make adjustments to the picture and sound. It also
allow you to select and activate other features in the menu.
1 Press the (MENU) button to enter main menu.
2 Use the or (CURSOR UP/DOWN) buttons to select the items on the
PICTURE/SOUND menu.
3 Use the or (CURSOR LEFT/RIGHT) buttons to access the sub-menus.
Picture Activities
menu items
Brightness Increase or decrease brightness level.
Colour Increase or decrease color level.
Contrast Increase or decrease contrast level
until lightest parts of the picture show
good detail.
Sharpness Increase or decrease sharpness level
to improve detail in the picture.
Colour Temp Allows you a choice of 3 picture settings
(NORMAL, WARM and COOL).
NR (Noise Allows you to reduce the “noise”
Reduction) (little dots on the picture) from weak
signal broadcast. Selecting the “ON”
option will make the picture clearer.
Sound Activities
menu items
Treble Increase or decrease the high frequency
Bass Increase or decrease the low frequency
Balance Adjusts the balance of the right and left
AVL As variation in signal conditions can
(Auto Volume result in a sudden change in volume
level.
level.
speakers’ sound output.
Leveller) during commercial breaks or channel
switching, selecting the “ON” function
will enable the volume to remain at a
standard volume level.
PICTURE
➠
Ñ
BRIGHTNESS 38
•
COLOUR
•
CONTRAST
•
SHARPNESS
•
COLOUR TEMP
▲
▼
➠
Note : HUE feature is
only applicable to NTSC
programmes. The HUE item
will not appear on the menu
if programme is in PAL mode.
➠
➠
SOUND
•
TREBLE
•
BASS
•
BALANCE
Ñ
AVL • ON
▲
É
É
23
Page 24

ACTIVATING THE TIMER
The Timer feature allows you to set the timer to switch to another channel at a specified
time while you are watching another channel or when the TV is on standby mode.
Note : For the timer to function, the set must not be switched off. Once the set is switched
off, the timer is disabled.
FEATURES
➠
➠
➠
1. Enter main menu. 2. Select FEATURES. 3. Enter FEATURES menu.
▲
É
•
TIMER TIME
▼
•
CHILD LOCK START TIME
•
FORMAT STOP TIME
ACTIVATE
CHANNEL
T/C AUDIO FTS ANGLE
É
m
Ç
INCR. SURR.
ç
Press button
4. Enter TIMER menu.
\
4
5. Enter TIME mode.
6. Key in the current time
For example, if the current
time is 12:30, key digit 1
and 2 in the hour column,
followed by digit 3 and 0
in the minute column.
PROG. LISTSURF
INCR. PIC
á á
7. Exit from TIME mode.
8. Select START TIME.
9. Enter the START TIME
mode.
10. Key in the time you want
the programme to be
switched on.
11. Exit from START TIME
mode.
12. Select STOP TIME.
Result on TV Screen
FEATURES
TIMER
Ñ
TIME
•
START TIME
•
STOP TIME
•
CHANNEL
•
ACTIVATE
FEATURES
TIMER
Ñ
TIME •
•
START TIME
• STOP TIME
•
CHANNEL
• ACTIVATE
FEATURES
TIMER
•
TIME
Ñ
START TIME
•
STOP TIME
•
CHANNEL
•
ACTIVATE
FEATURES
TIMER
•
TIME
Ñ
START TIME
• STOP TIME
•
CHANNEL
•
ACTIVATE
FEATURES
TIMER
• TIME
• START TIME
Ñ
STOP TIME •
•
CHANNEL
• ACTIVATE
▲
É
•
▼
▼
É
▲
É
•
▼
▼
▲
É
•
▼
▼
▲
▼
▼
– – : – –
12 : 30
– – : – –
13:30
É
– – : – –
▲
▼
24
Page 25

ACTIVATING THE TIMER (CONTINUE)
T/C AUDIO FTS ANGLE
É
m
Ç
INCR. SURR.
ç
Press button
13. Enter STOP TIME mode.
\
4
á á
PROG. LISTSURF
INCR. PIC
14. Key in the time you want
the programme to be
switched off.
15. Exit from STOP TIME
mode.
16. Select CHANNEL.
17. Key in the channel you
want to switch to.
18. Select ACTIVATE.
19. Activate timer. You can
select to activate timer
by DAILY or ONCE
mode.
20. Select DISPLAY.
21. Select ON mode if you
want to display the
current time on the TV
screen.
Result on TV Screen
FEATURES
TIMER
•
TIME
•
START TIME
Ñ
STOP TIME
•
CHANNEL
•
ACTIVATE
FEATURES
TIMER
•
TIME
•
START TIME
•
STOP TIME
Ñ
CHANNEL
• ACTIVATE
FEATURES
TIMER
• TIME
• START TIME
•
STOP TIME
Ñ
CHANNEL •
• ACTIVATE
FEATURES
TIMER
•
TIME
•
START TIME
•
STOP TIME
•
CHANNEL
Ñ
ACTIVATE
FEATURES
TIMER
•
TIME
•
START TIME
•
STOP TIME
•
CHANNEL
Ñ
ACTIVATE
FEATURES
TIMER
• START
•
STOP TIME
•
CHANNEL
•
ACTIVATE
Ñ
DISPLAY
É
• 15: 30
▲
É
• 3
▼
▼
▲
É
8
▼
▲
É
• OFF
▼
▼
▲
É
• ONCE
▼
▼
▲
TIME
É
• ON
▲
▼
22. Exit menu from screen.
Note
30 seconds before the timer is activated, a message indicating the time left for the channel
switch will appear on the screen. To disable the channel switch, press any button on the
remote control.
25
Page 26

ACTIVATING THE CHILD LOCK (ACCESS CODE)
Result on TV Screen
The Child Lock feature allows you to lock channels to prevent your children from watching
programmes you deem undesirable.
Note : You cannot have access to the locked channels via the top controls of the TV set.
You can only have access to the locked channels via the remote control. Keep the remote
control out of reach so as to prevent your children from having access to it.
FEATURES
▲
É
•
➠
➠
➠
1.Enter main menu. 2. Select FEATURES . 3. Enter FEATURES menu.
Press button
4. Select CHILD LOCK .
\
4
TIMER TIME
▼
•
CHILD LOCK START TIME
•
FORMAT
ACTIVATE
FEATURES
É
•
TIMER ACCESS CODE
▲
•
CHILD LOCK
▼
•
FORMAT
STOP TIME
CHANNEL
– – – –
T/C AUDIO FTS ANGLE
á á
É
PROG. LISTSURF
m
Ç
INCR. SURR.
INCR. PIC
ç
5. Enter ACCESS CODE
mode.
6. Key in access code 0711
(0711 is the default access
code). A message
INCORRECT will appear.
7. Key in 0711 the second
time. When the message
CORRECT appears, the
CHILD LOCK menu is
now accessible.
You can now proceed to
change the access code
of your choice.
26
FEATURES
É
•
TIMER ACCESS CODE
Ñ
CHILD LOCK
•
FORMAT INCORRECT
FEATURES
É
•
TIMER ACCESS CODE
Ñ
CHILD LOCK
•
FORMAT CORRECT
FEATURES
CHILD LOCK
•
5
6
X X X X X
X X X X
▲
Ñ
LOCK CHANNEL • 2
CHANGE CODE 3
•
CLEAR ALL 4
É
Page 27

ACTIVATING THE CHILD LOCK (CHANGE CODE)
4
T/C AUDIO FTS ANGLE
É
m
Ç
INCR. SURR.
ç
PROG. LISTSURF
INCR. PIC
Press button
8. Select CHANGE CODE.
\
9. Enter CHANGE CODE
mode.
10. Key in the access code of
Result on TV Screen
FEATURES
CHILD LOCK
•
Ñ
•
FEATURES
CHILD LOCK
•
LOCK CHANNEL ENTER
CHANGE CODE NEW CODE
CLEAR ALL
•
LOCK CHANNEL ENTER
Ñ
CHANGE CODE NEW CODE
CLEAR ALL
– – – –
X X X X
your choice.
á á
11. Confirm access code.
FEATURES
CHILD LOCK
•
•
LOCK CHANNEL CONFIRM
Ñ
CHANGE CODE CODE
CLEAR ALL
X X X X
When the new code
is confirmed, the
message CORRECT
will appear.
FEATURES
CHILD LOCK
•
•
LOCK CHANNEL CONFIRM
Ñ
CHANGE CODE CODE
CLEAR ALL
X X X X
CORRECT
12. Exit menu from screen.
Note : After you have exit menu from screen and you want to enter child lock menu again ,
you need to key the new access code only once. If you have forgotten the new access code,
key in 0711 twice to enter the child lock menu. Upon entering the child lock menu, you can
proceed to change code again.
27
Page 28

ACTIVATING THE CHILD LOCK (LOCK CHANNEL)
FEATURES
➠
➠
1. Enter main menu. 2. Select FEATURES. 3. Enter FEATURES menu.
➠
▲
É
•
TIMER TIME
▼
•
CHILD LOCK START TIME
•
FORMAT STOP TIME
CHANNEL
ACTIVATE
T/C AUDIO FTS ANGLE
É
m
Ç
INCR. SURR.
ç
Press button
Result on TV Screen
4. Select CHILD LOCK .
FEATURES
É
•
TIMER ACCESS CODE
\
4
5. Enter ACCESS CODE
mode.
6. Key in access code .
7. Enter LOCK CHANNEL
mode.
á á
PROG. LISTSURF
INCR. PIC
8. Select the channel you
OR
want to block.
9. Activate blocking of
▲
•
CHILD LOCK
▼
•
FORMAT
FEATURES
É
•
TIMER ACCESS CODE
Ñ
CHILD LOCK
•
FORMAT CORRECT
FEATURES
CHILD LOCK
Ñ
LOCK CHANNEL • 2
•
CHANGE CODE 3
•
CLEAR ALL 4
5
6
FEATURES
CHILD LOCK
Ñ
LOCK CHANNEL • 3 F
•
CHANGE CODE 4
•
CLEAR ALL 5
6
7
– – – –
X X X X
▲
É
▲
É
channel. A keylock symbol
will appear beside the
channel number indicating
that it is locked.
10. Exit menu from screen.
Note : You cannot have access to the locked channels via the top controls of the TV set.
You can only have access to the locked channels via the remote control.
If you attempt to enter the INSTALL menu after locking a channel, a message
“Enter ACCESS CODE” will appear on the screen. You need to enter the ACCESS CODE
to enable you to enter the INSTALL menu.
28
Page 29

ACTIVATING THE CHILD LOCK (CLEAR ALL)
Result on TV Screen
To unlock channels that you have locked, enter the Child Lock menu and activate the
CLEAR ALL mode.
FEATURES
▲
É
•
TIMER TIME
▼
➠
➠
1. Enter main menu. 2. Select FEATURES 3. Enter FEATURES menu.
Press button
4. Select CHILD LOCK.
\
4
5. Enter ACCESS CODE
mode.
6. Key in access code.
T/C AUDIO FTS ANGLE
É
m
Ç
INCR. SURR.
ç
PROG. LISTSURF
INCR. PIC
á á
7. Press button repeatedly
until CLEAR ALL is
selected.
➠
•
CHILD LOCK START TIME
• FORMAT
ACTIVATE
FEATURES
É
•
TIMER ACCESS CODE
▲
•
CHILD LOCK
▼
•
FORMAT
FEATURES
É
•
TIMER ACCESS CODE
Ñ
CHILD LOCK
•
FORMAT CORRECT
FEATURES
CHILD LOCK
•LOCK CHANNEL
•CHANGE CODE
Ñ
CLEAR ALL
STOP TIME
CHANNEL
– – – –
X X X X
▲
É
•
Note
You can also unlock individual channel by the LOCK CHANNEL menu.
• Repeat step 1 to 7 as in “ACTIVATING THE CHILD LOCK (LOCK CHANNEL)”.
• Select the channel you want to unlock by the or (CURSOR UP / DOWN) buttons.
• Press the (CURSOR RIGHT) button to unlock channel (the keylock symbol will
disappear).
8. Activate clearing of all
locked channels.
9. Exit menu from screen.
29
FEATURES
CHILD LOCK
•
LOCK CHANNEL
•
CHANGE CODE
Ñ
CLEAR ALL
▲
É
• CLEARED
Page 30

USING THE SURF CONTROL
Result on TV Screen
A list or series of previously viewed channels can be selected with the SURF button. This
feature allows you to switch between different TV programmes that currently interest you.
You can set up to a maximum of ten channels in the SURF list.
How to add a channel to the surf list
Press button
T/C AUDIO FTS ANGLE
É
m
Ç
INCR. SURR.
ç
1. Select a channel you
want to add to the
\
4
SURF
surf list.
2. Enter SURF menu.
3, Add selected channel to
the surf list.
á á
PROG. LISTSURF
INCR. PIC
Repeat steps 1 - 3 to add
more channels to the
surf list.
4. After you have completed
adding the selected
channels to the surf list,
8
SURF
É
•
8 ADD?
SURF LIST EMPTY
Ñ
SURF
É
•
8 DELETE?
Ñ
SURF
•
8
É
•
5 ADD?
Ñ
SURF
•
8
É
•
5 DELETE?
exit menu from screen.
Ñ
Note : To view the selected channels in the surf list, press the SURF button repeatedly
to cycle through the channels.
How to delete a channel from the surf list
SURF
1. Press the (SURF) button to display surf list.
SURF
2. Press the (SURF) button repeatedly to cycle through the surf list and select the
channel you want to delete.
3. Press the (CURSOR RIGHT) button to delete channel from the surf list.
4. Repeat all the above steps if you want to delete more channels from the surf list.
30
Page 31

USING THE SCREEN FORMAT
You can have a choice of different formats for your viewing pleasure, namely : - 4:3 mode,
EXPAND 4:3 mode and COMPRESS 16:9 mode through the FORMAT menu.
How to access the Screen Format
1. Press the (MENU) button to enter main menu
and press the (CURSOR DOWN) button
repeatedly until FEATURES is selected.
2. Press the (CURSOR RIGHT) button to
enter FEATURES menu.
3. Press the (CURSOR DOWN) button
repeatedly until FORMAT is selected.
4. Press the (CURSOR RIGHT) button
repeatedly to cycle through the different formats
(4:3, Expand 4:3 or Compress 16:9) and select
your desired format.
Note : You can also select your desired Screen Format
directly by the (CURSOR UP) and (CURSOR
DOWN) buttons.
•
PICTURE TIMER
•
SOUND
▲
É
•
FEATURES
▼
•
INSTALL
FEATURES
•
TIMER
•
CHILD LOCK
Ñ
FORMAT • 4:3
FEATURES
•
TIMER
•
CHILD LOCK
Ñ
FORMAT • EXPAND 4:3
FEATURES
•
TIMER
•
CHILD LOCK
Ñ
FORMAT • COMPRESS 16:9
CHILD LOCK
FORMAT
▲
É
▼
▲
É
▼
▲
É
▼
When to use the Screen Formats
4:3 format
Select the 4:3 format if you want to display
the 4:3 picture using the full surface of the
screen.
Expand 4:3 format
Select the Expand 4:3 format if you want
to expand movie images recorded in the
letterbox format. When this format is
selected, the black horizontal bars at the
top and bottom are expanded thus filling
up the entire TV screen.
Compress 16:9 format
Select the Compress 16:9 format if you
want to compress full screen movie images
into letterbox format. When this format is
selected, black horizontal bars can be seen
at the top and bottom of the TV screen.
➩
➠
➩
➩
➠
➩
31
Page 32

USING THE ROTATION FEATURE
NOTE : Applicable to certain models only.
Due to the earth’s magnetic field and position of the TV set, slight tilting of the picture to the
left or right may occur when the set is switched on. When this phenomena occurs, select
ROTATION in the FEATURE menu and adjust accordingly by the Cursor Right or Left
button.
How to use the Rotation feature
1. Press the (MENU) button to enter main menu
and press the (CURSOR DOWN) button
repeatedly until FEATURES is selected.
2. Press the (CURSOR RIGHT) button to
enter FEATURES menu.
3. Press the (CURSOR DOWN) button
repeatedly until ROTATION is selected.
4. Press the (CURSOR RIGHT) button
when picture is tilted to the left. Press button
until you deem picture is in normal position.
If picture is tilted to the right, press the
(CURSOR LEFT) button until you
deem picture is in normal position.
•
PICTURE TIMER
•
SOUND
▲
É
•
FEATURES
▼
•
INSTALL ROTATION
FEATURES
•
TIMER
•
CHILD LOCK
•
FORMAT
Ñ
ROTATION
FEATURES
•
TIMER
•
CHILD LOCK
• FORMAT
Ñ
ROTATION • 8
CHILD LOCK
FORMAT
▲
É
•
1
▼
▲
É
▼
Picture tilted to the left After adjustment
➠
PHILIPS
Picture tilted to the right
After adjustment
PHILIPS
➠
PHILIPS
32
PHILIPS
Page 33

USING THE PROGRAM LIST FEATURE
Ñ
▲
PROGRAM LIST
1 ACTIO
2
DRAMA
3
VIOLE F
4
ROMAN
•
5
_ _ _ _ _
É
▼
Program listing feature allows you to navigate through a list of installed programmes for a
quick overview of the channels and activate the channel you have selected.
1. Press the (PROGRAM LIST) button to
display the list of installed programmes. The current
channel is highlighted.
2. Press the (CURSOR UP) or (CURSOR DOWN)
button to cycle through the programme list and
highlight the channel number you want to activate.
3. Press the (CURSOR RIGHT) button to activate
the channel you have selected.
4. Press the (OSD) button to exit menu from screen.
PROGRAM LIST
▲
É
• 1
_ _ _ _ _
2
_ _ _ _ _
3
_ _ _ _ _
4
_ _ _ _ _
5
_ _ _ _ _
▼
Ñ
33
Page 34

SMART PICTURE AND SMART SOUND CONTROL
SMART PICTURE feature offers you a choice of 5 picture settings, namely, RICH,
NATURAL, SOFT, PERSONAL and MULTIMEDIA.
SMART SOUND feature offers you a choice of 4 sound settings, namely, THEATRE,
MUSIC, VOICE and PERSONAL.
Note : If you want to view the pre-set settings for Brightness, Colour, Contrast and Sharpness
levels, for Smart Picture and pre-set settings for Treble and Bass levels for Smart Sound, you
must press the (OSD) button for 5 seconds.
Press (SMART PICTURE) or (SMART SOUND) button repeatedly to cycle
through the settings to select your desired mode.
Definition of Picture Settings
PERSONAL : Picture settings are set to your preference.
RICH : Emphasize very vibrant colours.
(Suitable for AV mode in brightly-lit room)
NATURAL : Emphasize original colours.
SOFT : Emphasize “warm” colours.
(Suitable for dimly-lit room condition and
gives cinema-like effect when light is
switched off).
MULTIMEDIA : Emphasize “soft” colours. (Suitable for
playing computer games, surfing, etc.)
Note : The PERSONAL setting is the setting that you
set up using the Picture menu in the main menu. This
is the only setting in the Smart Picture settings that
can be changed. All the other settings are pre-set at
the factory.
PERSONAL
RICH
NATURAL
SOFT
MULTIMEDIA
Definition of Sound Settings
PERSONAL : Sound settings are set to your preference.
VOICE : Emphasize high tone. (Treble boosted)
MUSIC : Emphasize low tone. (Bass boosted)
THEATRE : Emphasize sensation to action.
(Bass and Treble boosted)
34
PERSONAL
VOICE
MUSIC
THEATRE
Page 35

USING THE TELEXTEXT
If a TV channel broadcast contains teletext information, each channel that broadcasts
teletext transmits a page (index page) with information on how to use the teletext system,
usually on page 100. The system transmitted is indicated in the option line at the bottom
of the screen.
Press button
Result on TV Screen
1 On/Off teletext Press the button once to switch on
and teletext display. (A channel in which
\
4
Superimpose teletext is being transmitted must be
teletext page selected).
over TV Press the button the second time
programme superimpose the teletext page over
2
the TV programme.
Press the button the third time
b
to exit teletext mode.
3
2 Selecting a Key in the required teletext page
teletext page (3 digits). The page number is
displayed at the top left hand corner
4
1
5
T/C AUDIO FTS ANGLE
É
m
Ç
INCR. SURR.
ç
á á
PROG. LISTSURF
INCR. PIC
of the screen. When the teletext
page is located, the counter stops
searching. If the counter keeps
searching, it means that the page is
not available for selection. If you
make a mistake in keying the page
number, you have to complete
keying the 3-digit number before
re-keying the correct page number.
3 Accessing Press the CURSOR UP button to
a teletext display the next page and the
page CURSOR DOWN button to display
the previous page.
4 Direct Access to The 4-colour buttons allow you to
an item or access directly an item or
corresponding corresponding pages.
pages
5 Enlarge Press the button once to enlarge and
h
view the top half of the page. Press
the button the second time to enlarge
and view the bottom half of the page.
Press the button the third time to
return to normal size page.
35
Page 36

Result on TV Screen
T/C AUDIO FTS ANGLE
É
m
Ç
INCR. SURR.
ç
USING THE TELETEXT (CONTINUE)
Press button
6 Hold A selected page sometimes contains
\
4
7 Subcode/ By adding a sub-code, you can call up
Time a sub-page and hold it. Enter the
Display teletext page number (the teletext
PROG. LISTSURF
INCR. PIC
á á
6
7
9
f
a few sub-pages. The sub-page will
automatically move to the next subpage after about 20 seconds. The
total number of sub-pages are
indicated at the top right hand corner
of the screen. Press the button once
to hold page and the second time to
release holding of page.
y
page must have sub-pages in it).
Press the button and “* * * * “ is
displayed at the upper left hand corner.
Enter the subpage with 4 digits : e.g.
0003 for 3/4 (third of 4 pages). You can
also use the Cursor Left and Right
buttons to access the sub-page. To
cancel the subcode, press button again.
Pressing this button during normal
viewing (only applicable to those
channels that is broadcasting teletext),
the time will be displayed at the top
right hand corner of the screen.
How to select your favourite page
This feature allows you select 4 of your favourite or most commonly viewed page and stored
them in the favourite page selection. You can then access directly your favourite page by the
colour buttons without having to key in the page number.
1. Press the TELEXTEXT ON/OFF) button to enter teletext mode.
b
2. Press the (MENU) button to enter favourite page selection. Note : The colour
alphabets at the bottom of the screen is now changed to page numbers.
3. Key in your favourite page by the (DIGIT 0 -9) buttons.
4. Press the (OSD) button to highlight pager numbers.
5. Select the colour button on your remote control you want your favourite page to be stored.
6. Repeat step 3 to 5 to select and store other favourite pages.
36
Page 37

OPERATING THE DVD
This section explains the operating instructions of the DVD.
To go into DVD mode, the TV/DVD switch on the remote
control must be set at the DVD position.
General Explanation
DVD operation
So me DVDs require specific operation or allow only limited operation during playback. In
these cases, the player may not respond to all operating commands. When this occurs, read the
DVD operatings instructions carefully to enable you to operate the DVD. When the symbol x
appears on the TV screen, the operation is not permitted by the player or the disc.
Remote control operation
Unless otherwise stated, all operations can be carried out with the remote control. Always aim
the remote control directly at the player. Ensure that there are no obstructions in the path of
infrared beam.
Menu bar operation
• A number of operations can be carried out
&
\
4
via the menu bar on the screen. You can
access the menu bar by the following
buttons on the remote control : –
& OSD
VV
V
VV
T/C AUDIO FTS ANGLE
WW
XX
W
X
WW
XX
‘
(
YY
ZZ
Z
ZZ
} }
}
} }
Y
YY
é
“
~~
~ 1 1 1en 1en no off
~~
L FL F
L F
L FL F
DVD play
a a
a
a a
é T/C
“ AUDIO
‘ FTS
( ANGLE
• The following functions are available via the menu
b
bar : –
V User Preference b Color Setting
W Title Track c Video Program
X Chapter/Index d Sound
Y Audio Language e Picture by Picture
Z Subtitle Language f Slow Motion
} Angle g Fast Motion
a Zoom h Time Search
37
Page 38

OPERATING THE DVD
1. Switch on the TV.
2. Set she TV/DVD switch to DVD position.
3. Press the EJECT button to open tray.
4. Load your chosen disc in the tray.
Note
• Label side of disc must be facing up (also when a
double-sided DVD is inserted).
• Ensure disc sits properly in the correct recess.
6. Gently push the tray or press EJECT button to close
tray.
– READ appears in the status window and on the
player display and playback starts automatically.
Note : If ‘Child Lock’ is set to ON and the disc inserted is
not in the ‘child safe’ list (not authorised), the 4-digit must
be entered and/or the disc must be authorised (see ‘Access
Control’).
Default screen is displayed when the player is in
STOP mode. It may contain a “Status Window” and
a “Temporary Feedback Field”. This screen gives
information concerning prohibited actions, playback
modes, available angles, etc.
38
Page 39

OPERATING THE DVD
How to access the various items in the
menu bar
• Press the OSD button to display menu bar..
• Use the Cursor Left/Right buttons to select
the desired item in the menu bar.
\
4
– When selecting an item in the menu bar, the selected
item will be highlighted and the appropriate cursor
buttons to operate this item will be displayed below
the icon.
– 1 or 2 indicates that more items are available at the
left/right of the menu bar.
• Use the Cursor Up/Down/Left/Right buttons to
toggle through the menus, submenus and submenu
options.
– When a menu item is selected, the cursor buttons to
operate the item will be displayed on the screen next
to the item.
• Press the OK button to confirm and return to the
main menu.
• Press the OSD button to exit menu bar from screen.
Initial Setup
General
In “Initial Setup” you may have to set your preferences
for some of the features.
Operation
After switching on for the very first time, the “Initial
Setup Screen” will appear. The menu for the first item
to be set is displayed and the first option is highlighted.
• Use the Cursor Up/Down buttons to go through the
options in the menu. The icon of the selected option
will be highlighted.
• Use the OK button to confirm your selection and go
to the next menu.
Note : Preferences have to be set in the order in which the
item menus will appear on the screen.
The “Initial Setup” screen will only disappear after the
settings for the last item have been confirmed.
If any buttons other than Cursor Up/Down or OK
buttons are pressed, the x will appear on the screen.
If the TV is switched off while setting personal preferences,
all preferences have to be set again after switching the TV
on again.
39
Page 40

OPERATING THE DVD
Initial Setup ......
The following items may have to be set in
Initial Setup :
Menu language
The On-Screen Menus will be displayed in the language
you choose. You can choose from the different languages.
Audio language
The sound will always be in the language you choose if
it is available in the disc in play. If the language you s
elect is not available, speech will revert to the first
spoken language on the disc. You can choose from
different languages.
Subtitle language
The subtitles will be in the language you choose if it is
available on the disc in play. If the language you select is
not available, subtitles will revert to the first spoken
language on the disc. You can choose from 16 different
languages.
TV Shape
If you have a wide screen (16:9) TV, select 16:9.
If you have a regular (4:3) TV, select 4:3.
If you have a 4:3 TV, you can also select between :
– Letterbox for a ‘wide-screen’ picture with black bars top
and bottom or
– Pan Scan, for a full-height picture with the sides trimmed.
If a disc has Pan Scan, the picture then moves (scans)
horizontally to keep the main action on the screen.
VV
WW
XX
YY
ZZ
V
W
X
VV
~~
~ 1 1 1en 1en no off
~~
pp
p
pp
TV shape
Black Level shift
qq
q
qq
Video shift
rr
r
rr
ss
s
ss
Y
WW
XX
YY
Ñ
}}
Z
}
ZZ
}}
On
Off
▼
OK to exit
User Preference
You can set your user preference for some of the
player features.
Press the OSD button on the remote control and
select the
VV
V icon in the menu bar
VV
The following items can be adapted.
Picture
• TV shape
aa
a
aa
See ‘Initial Setup’
b
• Black level shift (NTSC only)
Adapts the colour dynamics to obtain richer contrasts.
Select ON or OFF.
40
Page 41

OPERATING THE DVD
VV
WW
XX
YY
ZZ
V
W
X
WW
XX
Q S Q S
Q S
Q S Q S
no disc opening
L AL A
L A
L AL A
DVD play
2:45:23
0:00:34
Y
YY
VV
~~
~ 1 1 1en 1en no off
~~
TV shape
pp
p
pp
Black Level shift
Video shift
qq
q
qq
rr
r
rr
ss
s
ss
Z
ZZ
``
`
``
OK to exit
}}
}
}}
aa
a
aa
b
User Preference ...............
• Video Shift
The factory centers the video on your screen.
Use this setting to personalise the position of the
picture on your TV by scrolling it to the left or right.
Sound
• Digital output
Factory setting :
– ALL. This means that both coaxial and optical
outputs are switched on.
– If you are not connecting equipment with a digital
input, change the setting to OFF.
– If your equipment does not include a digital multi-
channel decoder, set the digital output to PCM
(Pulse Code Modulation). Both coaxial and optical
outputs are switched on.
• Analog output
Select Stereo, TruSurround 3D Virtual Surround or
Dolby Surround compatible sound.
Features
• Access Control
Access Control comprises the following features :
– Child Lock
When Child Lock is set to ON, a 4-digit code needs
to be entered in order to play discs.
– Parental Control
Allows the conditional presentation of DVDs
containing Parental Control information.
(See “Access Control”)
• Status Window
Displays the current status of the player and is
displayed with the menu bar. When the disc playback
is stopped, it is displayed with the “Temporary
Feedback Field” in the default screen.Factory setting
is set to ON. Select OFF to suppress display of the
Status Window.
• Low Power Standby
If this set to ON, the player will go in low-power
standby when the standby button is pressed.
41
Page 42

OPERATING THE DVD (USER PREFERENCE)
4
VV
WW
XX
V
VV
~~
~
001 001 1en 1en no off
~~
pp
p
pp
qq
q
qq
rr
r
rr
Access control Child lock
ss
s
ss
Status window Parental level
Low Power standby Change code
YY
W
X
Y
WW
XX
YY
Access Control ; Child Lock (DVD
and VCD)
Activating/deactivating the Child Lock
\
ZZ
}}
Z
ZZ
aa
}
a
}}
aa
b
ÇÇ
Ç
ÇÇ
1 X
ÉÉ
É
ÉÉ
1. When the disc playback is stopped, select
ACCESS CONTROL in the Features
menu using the Cursor Up/Down
buttons.
2. Enter a 4-digit code of your choice.
3. Enter the code a second time.
4. Move to Child Lock using the Cursor Up/Down
buttons.
5. Move to the LOCK/UNLOCK icons using the
Cursor Right button.
6. Select LOCK icon using the Cursor Up/Down
buttons.
7. Press the OK or Cursor Left button to confirm,
then press the Cursor Left button again to
exit the menu.
–Now unauthorised discs will not be played unless
the 4-digit code is entered.
8. Select UNLOCK icon to deactivate the Child
Lock.
Note
Confirmation of the 4-digit code is necessary
when :
– the code is enterd for the very first time;
– the code is changed; (refer to “Changing the
4-digit code”)
– the code is cancelled; (refer to “Changing the
4-digit code”)
Access control
Play once [ ] [ ] [ ] [ ]
5 5
5
Play always [ ] [ ] [ ] [ ]
5 5
Choose play oncefor inserting disk in
child-safe list.
Choose play always for inserting disk in
child-safe list.
Authorising discs
• Insert the disc.
– The “child protect” dialog will appear. Enter
your secret code for “Play Once” or “Play
Always”. If you select “Play Once”, the disc can
be played as long as it is in the player and the
player is ON. If you select “Play Always”, the
disc will become child-safe (authorised) and
can always be played even if the Child Lock is
set to ON.
42
Page 43

OPERATING THE DVD (USER PREFERENCE)
Authorising discs...........
Note : The player memory maintains a list of 50
authorised (child safe) disc titles. A disc will be
placed in the list when “Play Always” is selected in
the “child protect” dialog. Each time a “child safe”
disc is played, it will be placed on top of the list.
When the list is full and a new disc is added, the l
ast disc in the list will be removed from the list.
Double-sided DVDs may have a different ID for
each side. In order to make the disc “child safe”,
each side has to be authorised. Multi-volume VCDs
may have a different ID for each volume. In order
to make the complete set “child safe”, each volume
has to authorised.
De-authorisng discs
• Insert the disc.
– Playback starts automatically.
• Press the
– The
CC
C button while
CC
||
| will appear and the disc is now
||
de-authorised.
{{
{ is visible.
{{
V V
W W
X X
Y Y
V
W
V V
~ ~
~ 001 001 1en 1en no off
~ ~
pp
p
pp
qq
q
qq
rr
r
rr
ss
s
ss
X
W W
X X
Access control
Status window
Low Power standby
Y
Y Y
GG
G
GG
Z Z
Z
Z Z
[ ] [ ] [ ] [ ]
insert code
} a } a
} a
} a } a
Access Control; Parental control
(DVD-Video only)
Movies on DVDs may contain scenes not
b
suitable for children. Therefore, disc may contain
“Parental Control” information which applies to
the complete disc or to certain scenes on the
disc. These scenes are rated from 1 to 8 and
alternative, more suitable scenes are available
on the disc. Ratings are country dependent. The
“Parent Control” feature allows you to prevent
discs from being played by your children or to
have certain discs played with alternative
scenes.
43
Page 44

OPERATING THE DVD (USER PREFERENCE)
\
4
V V
W W
X X
Y Y
Z Z
V
W
X
V V
W W
~ ~
~ 001 001 1en 1en no off
~ ~
pp
p
pp
qq
q
qq
rr
r
rr
ss
s
ss
Access control Child lock 2
Status window Parental level
Low Power standby Change code
X X
Y
Y Y
Z
Z Z
} a } a
} a
} a } a
1 X
Access Control; Parental control
(DVD-Video only)............
Activating/deactivating Parental
Control
1. When the disc playback is stopped, select
ACCESS CONTROL in the Features menu
using the Cursor Up/Down buttons.
2. Enter a 4-digit code. If neccessary, enter the
code a second time.
3. Move to Parental Control using the Cursor
Up/Down buttons.
4. Move to the VALUE ADJUSTMENT (1 - 8)
using the Cursor Right button.
5. Use the Cursor Up/Down or the numerical
buttons to select a rating from 1 to 8 for the
disc inserted.
Rating 0 (displayed as ‘– –’)
b
– Parental Control is not activated. The disc will
be played in full.
Rating 1 to 8
– The disc contains scenes not suitable for
children.
If you set a rating for the player, all scenes with
the same rating or lower willl be played.
Higher rated scenes will not be played unless
an alternative is available on the disc. The
alternative must have the same rating or a
lower one. If no suitable alternative is found,
play will stop and the 4-digit code has to be
entered.
6. Press the OK or Cursor Left button to
confirm, then press the Cursor Left button
again to exit the menu.
44
Page 45

OPERATING THE DVD (USER PREFERENCE)
Access Control; Parental control
(DVD-Video only)........
Changing the 4-digit code
1. When disc playback is stopped, select ACCESS
CONTROL in the Features menu using the
\
4
Cursor Up/Down buttons.
2. Enter the old code.
3. Move to CHANGE CODE using the Cursor
Down button.
4. Press the Cursor Right button.
5. Enter the new 4-digit code.
6. Enter the code a second timeand reconfirm by
pressing the OK button..
7. Press the Cursor Left button to exit the menu.
Parental Control Disclaimer
“This TV-DVD set features the PARENTAL
CONTROL system which is intended to activate
when playing DVD discs furnished with certain
software coding made. This is according to technical
standards adopted by the set maker and the disc
content industries. Please note that the PARENTAL
CONTROL system will not activate to the extent a
DVD disc is not furnished with the appropriate
software coding. Note that at the time of release
of this TV-DVD set, certain aspects of the said
technical standards had been fully settled among
the set maker and the disc content industries.
On this basis, Philips cannot warrant functioning
of the PARENTAL CONTROL system and disclaims
any liability of unintended watching of disc content.
If in doubt, please check system functioning with
disc before you allow children access or apply to
the relevant disc publisher”.
45
Page 46

OPERATING THE DVD
Playing a DVD-Video disc
Playing a title
– After inserting the disc and closing the tray, playback
starts automatically and the status window and the
player display will show the type of disc loaded as well
as information about the disc’s contents and playing
time.
The disc may invite you to select an item from a menu.
If the selections are numbered, press the appropriate
numerical buttons. If the selections are not numbered,
use the Cursor Left/Right buttons to highlight your
selection, then press the OK button.
– The currently playing title and chapter number are
displayed in the menu bar and the player display.
The elapsed playing time is shown in the status window
and the player display.
T/C AUDIO FTS ANGLE
à
à
É
m
Ç
INCR. SURR.
ç
á á
PROG. LISTSURF
INCR. PIC
• If required, you can use the
INCREDIBLE
SURROUND button to select Stereo, TruSurround
3D Virtual Surround or Dolby Surround compatible
sound.
Play may stop at the end of the Title and the player may
return to the DVD menu. To go on to the next title,
press É button.
• To stop play at any other time, press Ç button.
– The default screen will appear, giving information about
the current status of the player.
• You can resume play from the point at which you
stopped play. Press É button when you see the
RESUME icon . on the screen, then press the É
button again.
Å
– The RESUME feature applies not only to the disc in
the player but also to the last four discs you have played.
Simply reload the disc and press the É button.
When you see the RESUME (.) icon on the screen,
press theÉbutton again.
Note : Since it is usual for DVD movies to be released at
different times in different regions of the world, all players
have region codes. Discs can have a optional region code.
If you load a disc of a different region code notice on the
screen. The disc will not play and should be removed from
the player.
46
Page 47

T/C AUDIO FTS ANGLE
à
à
É
m
Ç
INCR. SURR.
ç
OPERATING THE DVD
Playing a VIDEO-CD
Playing a disc
– After inserting the disc and closing the tray, playback
starts automatically and the status window and the
player display show the type of disc loaded, as well as
information about the disc’s contents and playing time.
– The disc may invite you to select an item from a menu.
If the selections are numbered, press the appropriate
numerical buttons.
– The currently playing title and chapter number are
displayed in the menu bar and the player display. The
elapsed playing time is shown in the status window and
the player display.
• If required, you can use the INCR. SURR, (Incredible
Surround) button to select Stereo, TruSurround 3D
Virtual Surround or Dolby Surround compatible sound.
• To stop play at any time, press Ç button.
– The default screen will appear.
• You can resume play from the point at which you
stopped play. Press É button when you see the
RESUME icon . on the screen, then press the É
button again. The RESUME feature applies not only to
the disc in the player but also to the last four discs you
have played. Simply reload the disc and press the É
button. When you see the RESUME icon . on the
screen, press theÉbutton again.
PROG. LISTSURF
INCR. PIC
á á
Å
T/C AUDIO FTS ANGLE
à
à
É
m
Ç
INCR. SURR.
ç
á á
PROG. LISTSURF
INCR. PIC
General features
Note : Unless stated otherwise, all operations described are
based on remote control opration. A number of operations can
also becarried out via the menu bar on the screen.
Moving to another title/TRACK
When a disc has more than one title or track (which you
can see from both the menu bar and the player display),
you can move to another title.
• Press the T/C (Title/Chapter) button, then press the
Å
¢¡ button briefly during play to select the next
title/track.
– Press T/C (Title/Chapter), then press
5I5 button briefly
during play to return to the beginning of the current title/
track.
Press the
5I5 button briefly to step back to the previous
title/track.
47
Page 48

OPERATING THE DVD (GENERAL FEATURES)
T/C AUDIO FTS ANGLE
à
à
INCR. SURR.
VV
WW
V
W
VV
WW
~~
~ 1 1 1en 1en no off
~~
á á
É
PROG. LISTSURF
m
Å
Ç
INCR. PIC
ç
XX
YY
ZZ
X
Y
XX
YY
}}
Z
}
ZZ
}}
Moving to another chapter/index
When a title on a disc has more than one chapter or a
track has more than one index (which you can see from
both the menu bar and the player display), you can move
to another chapter/index as follows :
• Press the
§ 6 button briefly during play to select the
next chapter/index.
• Press the 5I5 button briefly during play to return to the
beginning of the current chapter/index. Press the
button twice briefly to step back to the previous
chapter/index.
• To go directly to any chapter or index, select C (chapter),
aa
a
aa
then enter the title number using the numerical buttons
(0-9). Note : If the number has more than one digit, press
the buttons in rapid succession.
5I5
a a
cc
dd
ee
ff
ee
e
ee
gg
f
g
ff
gg
á á
PROG. LISTSURF
Å
ff
gg
f
g
ff
gg
ff
gg
f
g
ff
gg
a
c
d
a a
~~
~ 1 1 1en 1en no off
~~
a a
a
a a
~~
~ 1 1 1en 1en no off
~~
a a
a
a a
~~
~ 1 1 1en 1en no off
~~
e
cc
dd
ee
T/C AUDIO FTS ANGLE
à
à
É
m
Ç
cc
dd
c
cc
ee
d
e
dd
ee
cc
dd
c
d
cc
dd
hh
h
hh
Slow Motion
• Select
b
ff
f (Slow motion) in the menu bar.
ff
• Use the Cursor Down button to enter the Slow Motion
menu. The player will now go into PAUSE mode.
• Use the Cursor Left/Right button to select the
required speed : -1, -1/2, 1/4 or -1/8 (backward) or +1/8.
+1/4, +1/2 or +1 (forward).
• Select 1 to play at normal speed again.
• If 8 button is pressed, the speed will be set to zero (pause).
• To exit slow motion mode, press the 3 button.
Still Picture and Frame-by-frame playback
• Select
ee
e icon (picture by picture) in the menu bar.
ee
• Use the Cursor Down button to enter the Picture by
Picture menu. The player will now go into PAUSE mode.
• Use the Cursor Left/Right buttons to select the
hh
h
hh
previous or next picture frame.
b
• To exit Picture by picture mode, press the 3 button.
You can also step forward by pressing 8 button
repeatedly on the remote control.
Search
• Select
hh
h
hh
b
• Use the Cursor Down button to enter the Fast Motion
gg
g (Fast Motion) in the menu bar.
gg
menu.
• Use the Cursor Left/Right buttons to select the
required speed : -32, -8 or -4 (backward) or +4, +8, +32
(forward).
• Select 1 to play at normal speed again.
• To exit Fast Motion mode, press the 3 button.
To search forward or backward through different speeds,
you can also hold down
5I5 or ¢¡ buttons.
48
Page 49

OPERATING THE DVD
a a
cc
dd
ee
ff
a
c
d
a a
cc
~~
~ 2 off st
~~
VV
V
VV
~~
~ 1 2 1en 1en no 2
~~
VV
V
VV
~~
~ 1 2 1en 1en no 2
~~
e
dd
ee
WW
XX
YY
W
X
Y
WW
XX
YY
WW
XX
YY
W
X
Y
WW
XX
YY
OK
11
1
11
f
ff
\
4
ZZ
Z
ZZ
Press OK to pan
ZZ
Z
ZZ
33
3
33
22
2
22
44
4
44
gg
g
gg
GG
G
GG
}}
}
}}
}}
}
}}
1:23:54
1
1
hh
h
hh
5
Time Search
The Time Search function allows you to start playing at
any chosen time on the disc.
FF
F
FF
• Select
hh
h (Time Search) in the menu bar.
hh
• Press the Cursor Down button.
– The player will now go into Pause mode.
– A time edit box appears on the screen, showing the
elapsedplaying time of the current disc.
• Use the digit buttons to enter the required start time.
Enter hours, minutes and seconds from right to left in
the box.
– Each time an item has been entered, the next item will
be highlighted.
• Press OK buton to confirm the start time.
– The time edit box will disappear and play starts from the
selected time position on the disc.
Zoom
aa
a
aa
The Zoom function allows you to enlarge the video image
`
and to pan through the enlarged image.
b
2
• Select
aa
a (Zoom) in the menu bar.
aa
• Press the Cursor Up/Down buttons to activate the
ZOOM function and select the required zoom factor :
aa
a
aa
`
1.33, 2 or 4.
b
2
– The player will go into Pause mode.
– The selected zoom factor appears below the Zoom icon
in the menu bar and “Press OK to pan” appears below
the menu bar.
– The picture will change accordingly.
• Press the OK button to confirm the selection.
– The panning icons appear on the screen
• Use the Cursor Up/Down, Left/Right buttons
to pan across the screen.
• When OK button is pressed, only the zoomed picture
will be shown on the screen.
• If you wish to zoom at any moment, press
and select the required zoom factor as described above.
• To exit Zoom mode, press
22
2 button.
22
– Playback will resume.
• Press 9 button, followed by OSD button.
aa
a (Zoom)
aa
T/C AUDIO FTS ANGLE
à
à
É
PROG. LISTSURF
m
Ç
Video-program
– The Video-Program function allows you to store your
á á
Å
favourite titles and chapters (DVD) and favourite tracks
and indexes (VCD) for a particular disc in the player
memory.
49
Page 50

OPERATING THE DVD
a a
cc
dd
ee
ff
gg
a
c
d
a a
~~
~ 1 1 1en 1en no off
~~
VV
V
VV
~~
~ 1 1 1en 1en no off
~~
e
cc
dd
ee
WW
XX
YY
W
X
Y
WW
XX
YY
4
hh
f
g
h
ff
gg
hh
ZZ
}}
Z
}
ZZ
}}
\
Video-program .......
– Each Video-Program can contain 20 items (titles,
chapters).
– This feature might work with some DVD disc
because they do not contain one sequential program
change (PGC).
Storing a Video Program
1. Stop playback, select Video-Program c.
2. Use the Cursor Down button to open the menu.
3. Use the Cursor Left and Right buttons to select
ON or OFF.
Storing titles/tracks
• Press the Cursor Down button to select TITLES.
• Use the Cursor Left/Right buttons to select the
aa
a
aa
b
required title.
• Press OK button if you wish to store the entire title.
– The title number will be added to the list of selections.
Storing chapters/indexes
• Press the Cursor Down button on the selected title
number.
– The title number will be marked and the highlight moves
to the first available chapter number for this title.
• Use the Cursor Left/Right buttons to select the
required chaapter number.
• Press the OK button to confirm the selection.
– The title/chapter selection will be added to the list of
selections.
• Press the OSD button to exit from Video-Program
c menu.
cc
dd
c
d
cc
~~
~
~~
dd
off st
On Off
title 1 2 3 4 5 6 7 8 9 10
chapter 1 2 3 4 5 6 7 8 9 10
program [ }
clear all
Favourite Track Selection
X
e fe f
e f
e fe f
g h g h
g h
g h g h
Erasing a Video-Program
• When disc playback is stopped, select Video-Program
c in menu bar.
• Use the Cursor Down button to select PROGRAM.
• Use the Cursor Left/Right buttons to select the
required selection number.
• Press the OK button to erase the selection.
• Press the OSD button to exit.
Erasing all selections
• When disc playback is stopped, select Video-Program
c in menu bar.
• Use the Cursor Down button to select CLEAR ALL.
• Press the OK button to erase all selections.
• Press the OSD button to exit.
50
Page 51

OPERATING THE DVD (SPECIAL DVD FEATURES)
Checking the contents of DVD-Video discs :
Menus
For titles and chapters, selection menus may be
included on the disc. The DVD’s menu feature allows
you to make selectionss from these menus. Press the
appropriate numerical butons or use the Cursor
Down/Up, Left/Right buttons to highlight your
selection, then press the OK button.
Title menus
• Press the MENU button.
– If the current title has a menu, the menu will appear
T/C AUDIO FTS ANGLE
on the screen. If no menu is present in the title, the
disc menu will be displayed.
• The menu can list camera angles, spoken language and
subtitle options and chapters for the title.
• To remove the title menu, press MENU button again.
VV
WW
XX
YY
ZZ
V
W
X
VV
~~
~ 1 2 1en 1en no 2
~~
1
1/4
VV
V
VV
~~
~ 1 2 1en 1en no 2
~~
VV
V
VV
~~
~ 1 2 1en 1en no 2
~~
001
VV
V
VV
~~
~ 1 2 1en 1en no 2
~~
Y
WW
XX
YY
}}
}
}}
`
2
WW
XX
W
X
WW
XX
WW
XX
W
X
WW
XX
YY
Y
YY
1
001
YY
Y
YY
WW
XX
YY
W
X
Y
WW
XX
YY
ZZ
Z
ZZ
1
001
}}
Z
}
ZZ
}}
1
1/4
}}
}
}}
YY
ZZ
Y
YY
YY
Y
YY
}}
Z
}
ZZ
}}
ZZ
}}
Z
}
ZZ
}}
`
2
ZZ
}}
Z
}
ZZ
}}
`
2
aa
a
aa
`
2
Disc menu
b
• Press the T/C button, then press the MENU button
– The disc menu is displayed.
• To remove the disc menu, press the T/C button, then
press MENU button again.
`
Camera Angle
If the disc contains sequences recorded from different
camera angles, the angle icon appears, showing the
number of available angles and the angle being shown
aa
a
aa
`
1
currently. You can then change the camera angle if you
b
2
wish.
• Use the Cursor Up/Down buttons to select the
required angle in the angle icon.
– After a small delay, play changes to the selected angle.
The Angle icon
}}
} remains display until multiple angles
}}
are no longer available.
aa
a
aa
`
1
Changing the audio language
2
b
• Select
• Press
YY
Y (Audio Language) in the menu bar.
YY
YY
Y (Audio Language) or the Cursor
YY
Up/Down buttons repeatedly to see the different
languages.
2
b
Subtiltes
• Select
• Press
ZZ
Z (Subtitle Language) in the menu bar.
ZZ
ZZ
Z (Subtitle Language) or the Cursor
ZZ
aa
a
aa
`
1
Up/Down button repeatedly to see the different
subtitles.
51
Page 52

OPERATING THE DVD (SpECIAL VCD FEATURES)
Playback Control (PBC)
When PBC ON
• Load a Video CD with PBC and press the É button
– The PBC menu appears on the TV screen.
• Go through the menu with the keys indicated on the
TV screen until your chosen passage starts to play. If
a PBC menu consists of a list of titles, you can select
a title directly.
• Enter your choice with the numerical buttons (0-9).
• Press RETURN to go back to the previous menu.
Playing an audio CD
‰ ‰
‰
‰ ‰
play track time total tracks total time
repeat track
On
track 1 2 3 4 5 6 7 8 9 10
program [ ]
Clear all
Audio Disc Mode
1 2.78 14 1.12.78
Favourite Track Selection
∞
1 1
1
Off
1 1
T/C AUDIO FTS ANGLE
à
à
É
m
Ç
2
á á
PROG. LISTSURF
Å
• After loading the disc, playback starts automatically.
• If the TV is on, the Audio CD screen appears.
• The number of tracks and the total playing time will
be shown on the screen and on the player display.
• During play, the current track number and its elapsed
playing time will be shown on the screen and on the
player display.
• Playback will stop at the end of the disc.
• To stop play at any other time, press the Ç button.
Pause
• Press the Å button during play.
• To return to play, press the É button.
Search
• To search forward or backward through the disc at
four times normal speed , hold down
button for about one second during play.
– Search begins and sound is partially muted.
• To step up to eight times the normal, press the
or § 6 button again.
– Search goes to eight times the normal speed and the
sound is muted.
• To return to four times the normal speed, press the
5I5 or § 6 button again.
• If the TV is on, search speed and direction are
indicated on the screen each time the
button is pressed.
• To end the search, press the É or Ç button as
desired.
Moving to another track
• Press §
6 button briefly during play to go to the
next track.
• Press
5I5 button briefly during play to return to the
beginning of the current track. Press
briefly again to step back to the previous track.
• To go directly to any track, enter the track number
using the numerical buttons (0-9).
5I5 or § 6
5I5
5I5 or § 6
5I5 button
52
Page 53

OPERATING THE DVD (FAVOURITE T RACK SELECTION)
FTS (Favourite Track Selection)
Program
– The FTS-feature allows you to store your favourite
tracks for a particlar disc in the player memory.
– Each FTS program can contain 20 tracks.
– Each time an FTS program is played, it will be placed
on top of the list. When the list is full and a new
program is added, the last program in the list will be
removed from the list.
– The selections can be called up and played at any
time.
Storing a FTS Program
‰ ‰
‰
‰ ‰
play track time total tracks total time
repeat track
On
track 1 2 3 4 5 6 7 8 9 10
program [ ]
Clear all
Audio Disc Mode
1 2.78 14 1.12.78
Favourite Track Selection
∞
1 1
1
Off
1 1
2
1. Load a disc and stop playback.
2. Use the Cursor Down button to go to the list of
available tracks.
3. Press the Cursor Left or Right buttons to select
tracks from the list. To go directly to any track,
enter the track number using the numerical
buttons (0-9).
4. Store each track by pressing the OK button.
– The track numbers will be added to the list of
selected tracks.
– The number of tracks and the playing time of the
program will be shown on the screen and the player
display.
When your FTS Program is complete, press the 3
button to start or use the Cursor Up button to go
back to Stop mode. In either case, the FTS Program
will be automatically memorised.
T/C AUDIO FTS ANGLE
à
à
É
PROG. LISTSURF
m
Ç
Switching FTS ON/OFF
• Use the Cursor Up/Down button to move to the
top.
á á
Å
• Use the Cursor Left/Right buttons to select either
ON or OFF.
Erasing a track from an FTS Program
• Use the Cursor Down button to go to list of
selected tracks.
• Use the Cursor Left/Right buttons to select the
track number you wish to erase.
• Press the OK button
– The track number will be erased from the list of
selected tracks
Erasing the complete program
• Use the Cursor Down button to clear all and press
the OK button.
– The complete FTS program will be erased.
53
Page 54

SPECIFICATIONS (TV)
29PT6961
Picture tube screen size 72 cm
Picture tube visible area 68 cm
Audio Output
Speaker 2 x 10 W + 10 W
Set Dimensions
Width 79 cm
Depth 54 cm
Height 59 cm
Net Weight of Set approximate 45 kg
TV System
Colour Sound
PAL B/G
PAL D/K
PAL I
NTSC (4.43) B/G
NTSC (3.58 ) M
SECAM B/G
SECAM D/K
Suggested Colour / Sound Systems
Destination Colour System Sound System
Singapore PAL B/G
Hong Kong PAL I
Middle East SECAM B/G, D/K
New Zealand PAL B/G
Australia PAL B/G
India PAL B/G
South Africa PAL I
Note
For Operating Voltage, Frequency, Power Consumption and Version Number, refer to the
type number at the rear of the set.
54
 Loading...