

Page 1

29PT5307/62
Page 2
MODEL :
PROD. NO :
MODEL :
PROD. NO :
GB
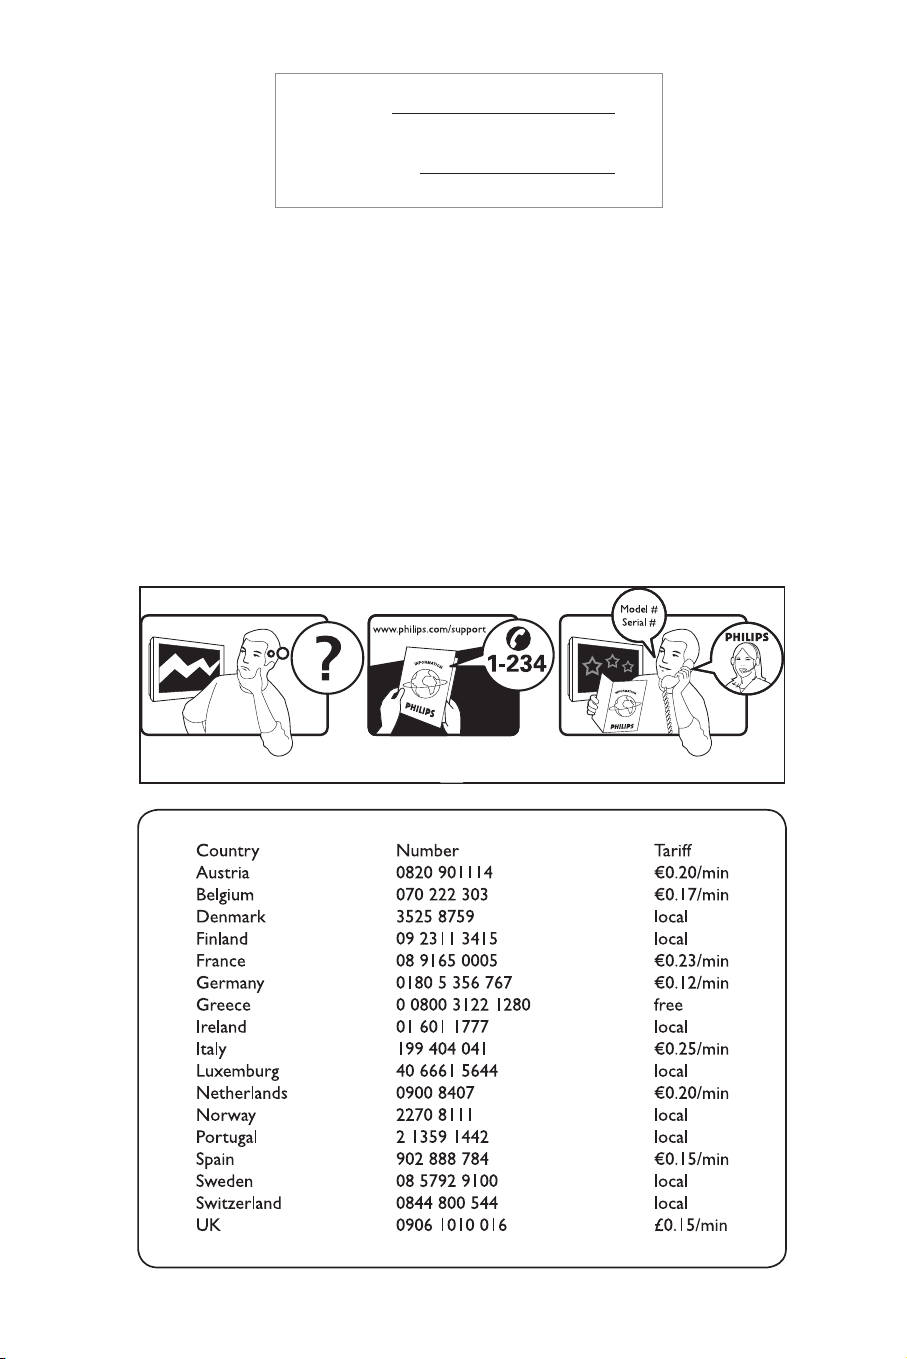
Please note the reference numbers
for your TV set located on the
packaging or on the back of the set.
FR Veuillez noter les références de
votre téléviseur situées sur
l’emballage ou au dos de l’appareil.
NL Let op de referenties van uw
televisietoestel die op de
verpakking of op de achterkant
van het toestel staan.
DE
Notieren Sie die
Referenznummern
IhresFernsehgeräts, die sich auf der
Verpackung bzw. auf der
Rückseite des Geräts befinden.
IT Notare i riferimenti del vostro
televisore situati sull’imballaggio o
sul retro dell’apparecchio.
GR ™ЛМВИТЫЩВ ЩИ˜ Ф‰ЛБ›В˜ ¯Ъ‹ЫЛ˜
ЩЛ˜ ЩЛПВfiЪ·Ы‹˜ Ы·˜ Ф˘
‚Ъ›ЫОФУЩ·И ЫЩЛ Ы˘ЫОВ˘·Ы›· ‹
ЫЩФ ›Ыˆ М¤ЪФ˜ ЩЛ˜ Ы˘ЫОВ˘‹˜
Page 3

2
065001057050 STEREO PHILIPS 8/8/06 11:31 Page 2
Girifl
‹çindekiler
Bu televizyon cihaz›n› seçti¤iniz için teflekkür ederiz. Bu elkitab› televizyon cihaz›n›z› kurarken
ve çal›flt›r›rken size yard›mc› olmak üzere düzenlenmifltir. Bafl›ndan sonuna kadar okuman›z›
önemle tavsiye ederiz. Teknolojik seviyemizden memnun kalaca¤›n›z› ummaktay›z.
Kurulum
Televizyonun kurulumu . . . . . . . . . . . . . . . . . . . . . . . . . . . . . . . . . . . . . . . . . . . . . . . . . . . . . . . .3
TV cihaz› üzerindeki tufllar / Güvenlik bilgileri. . . . . . . . . . . . . . . . . . . . . . . . . . . . . . . . . . . . . . .3/4
Uzaktan kumanda tufllar› . . . . . . . . . . . . . . . . . . . . . . . . . . . . . . . . . . . . . . . . . . . . . . . . . . . . . . . .5
Otomatik programlama . . . . . . . . . . . . . . . . . . . . . . . . . . . . . . . . . . . . . . . . . . . . . . . . . . . . . . . .6
Kanallar›n s›ralanmas› . . . . . . . . . . . . . . . . . . . . . . . . . . . . . . . . . . . . . . . . . . . . . . . . . . . . . . . . . .6
Kanal ismi . . . . . . . . . . . . . . . . . . . . . . . . . . . . . . . . . . . . . . . . . . . . . . . . . . . . . . . . . . . . . . . . . . .6
Manuel haf›zaya alma . . . . . . . . . . . . . . . . . . . . . . . . . . . . . . . . . . . . . . . . . . . . . . . . . . . . . . . . . . .7
Pr. Ayarlar› menüsündeki di¤er ayarlar . . . . . . . . . . . . . . . . . . . . . . . . . . . . . . . . . . . . . . . . . . . . 7
Çal›flt›rma
Görüntünün ayarlanmas› . . . . . . . . . . . . . . . . . . . . . . . . . . . . . . . . . . . . . . . . . . . . . . . . . . . . . . . 8
Ses ayar› . . . . . . . . . . . . . . . . . . . . . . . . . . . . . . . . . . . . . . . . . . . . . . . . . . . . . . . . . . . . . . . . . . . .8
Özellikler . . . . . . . . . . . . . . . . . . . . . . . . . . . . . . . . . . . . . . . . . . . . . . . . . . . . . . . . . . . . . . . . . . 8
Zaman Menüsü . . . . . . . . . . . . . . . . . . . . . . . . . . . . . . . . . . . . . . . . . . . . . . . . . . . . . . . . . . . . . . .9
Televizyon kilidi . . . . . . . . . . . . . . . . . . . . . . . . . . . . . . . . . . . . . . . . . . . . . . . . . . . . . . . . . . . . . 9
Teletext . . . . . . . . . . . . . . . . . . . . . . . . . . . . . . . . . . . . . . . . . . . . . . . . . . . . . . . . . . . . . . . . . . . 10
Harici Cihazlar›n ba¤lanmas›
Harici Cihazlar›n ba¤lanmas› . . . . . . . . . . . . . . . . . . . . . . . . . . . . . . . . . . . . . . . . . . . . . . . . . . . .11
Video Kay›t Cihaz› . . . . . . . . . . . . . . . . . . . . . . . . . . . . . . . . . . . . . . . . . . . . . . . . . . . . . . . . . . .11
Di¤er cihazlar . . . . . . . . . . . . . . . . . . . . . . . . . . . . . . . . . . . . . . . . . . . . . . . . . . . . . . . . . . . . . . . .11
Yan ba¤lant›lar . . . . . . . . . . . . . . . . . . . . . . . . . . . . . . . . . . . . . . . . . . . . . . . . . . . . . . . . . . . . . .11
Pratik Bilgiler
Servise baflvurmadan önce . . . . . . . . . . . . . . . . . . . . . . . . . . . . . . . . . . . . . . . . . . . . . . . . . . . . . .12
Teknik Özellikler . . . . . . . . . . . . . . . . . . . . . . . . . . . . . . . . . . . . . . . . . . . . . . . . . . . . . . . . . . . .13
Sözlük . . . . . . . . . . . . . . . . . . . . . . . . . . . . . . . . . . . . . . . . . . . . . . . . . . . . . . . . . . . . . . . . . . . . .13
Philips Yetkili Servisleri . . . . . . . . . . . . . . . . . . . . . . . . . . . . . . . . . . . . . . . . . . . . . . . . . . . . . . . .26
°
Dönüştürülebilir malzemelerle ilgili talimat
Bu ürünün kutusu geri dönüşümle doğaya kazandirilabilir. Lütfen yerel yönetim birimine
danişiniz.
Eski ürünüzün elden çikarilmasi
Ürününüz geri dönüştürülebilen ve tekrar kullanilabilen yüksek kaliteli malzeme ve
bileşenlerden tasarlanmiş ve üretilmiştir.
Bir ürüne şekilde görülen üstü çizilmiş tekerlekli çop kutusu işareti eklendiğinde o ürünün
2002/96/EC sayili Avrupa Yönergesi’ne dahil olduğu anlamina gelir.
Lütfen kendinizi ülkenizde uygulanan elektrikli ve elektronik ürünlerin ayri toplanma sistemi
konusunda bilgilendiriniz.
Lütfen yerel yasalara uygun hareket ediniz ve eski ürününüzü normal ev çöpü ile birlikte
atmayiniz.
Ürününüzün doğru şekilde atilmasi çevreyi ve insan sağliğini etkileyebilecek potansiyel zararin
önlenmesine katkida bulunacaktir.
Türkçe
Türkçe
Page 4
3
Televizyon cihaz›nda modeline ba¤l› olarak önünde
veya üstünde yeralan 4 tufl bulunmaktad›r.
VOLUME-+ (- ”+) tufllar› sesin seviyesini
ayarlamak için kullan›l›r.
PROGRAM-+ (- P +) tufllar› arzu edilen
program› seçmek için kullan›l›r.
Menüye girmek için
” - ve ” + tufllar›na
ayn› anda bas›n›z. Daha sonra PROGRAM - +
tufllar› ile herhangi bir ayar› seçebilir ve
” -
+ tufllar›n› kullanarak seçti¤iniz ayar›
de¤ifltirebilirsiniz. Menüden ç›kmak için
” –
ve
” + tufllar›na tekrar bas›n›z.
Not: ÇOCUK K‹L‹D‹ fonksiyonu çal›flt›r›ld›¤›nda bu
tufllar kullan›lamaz
&
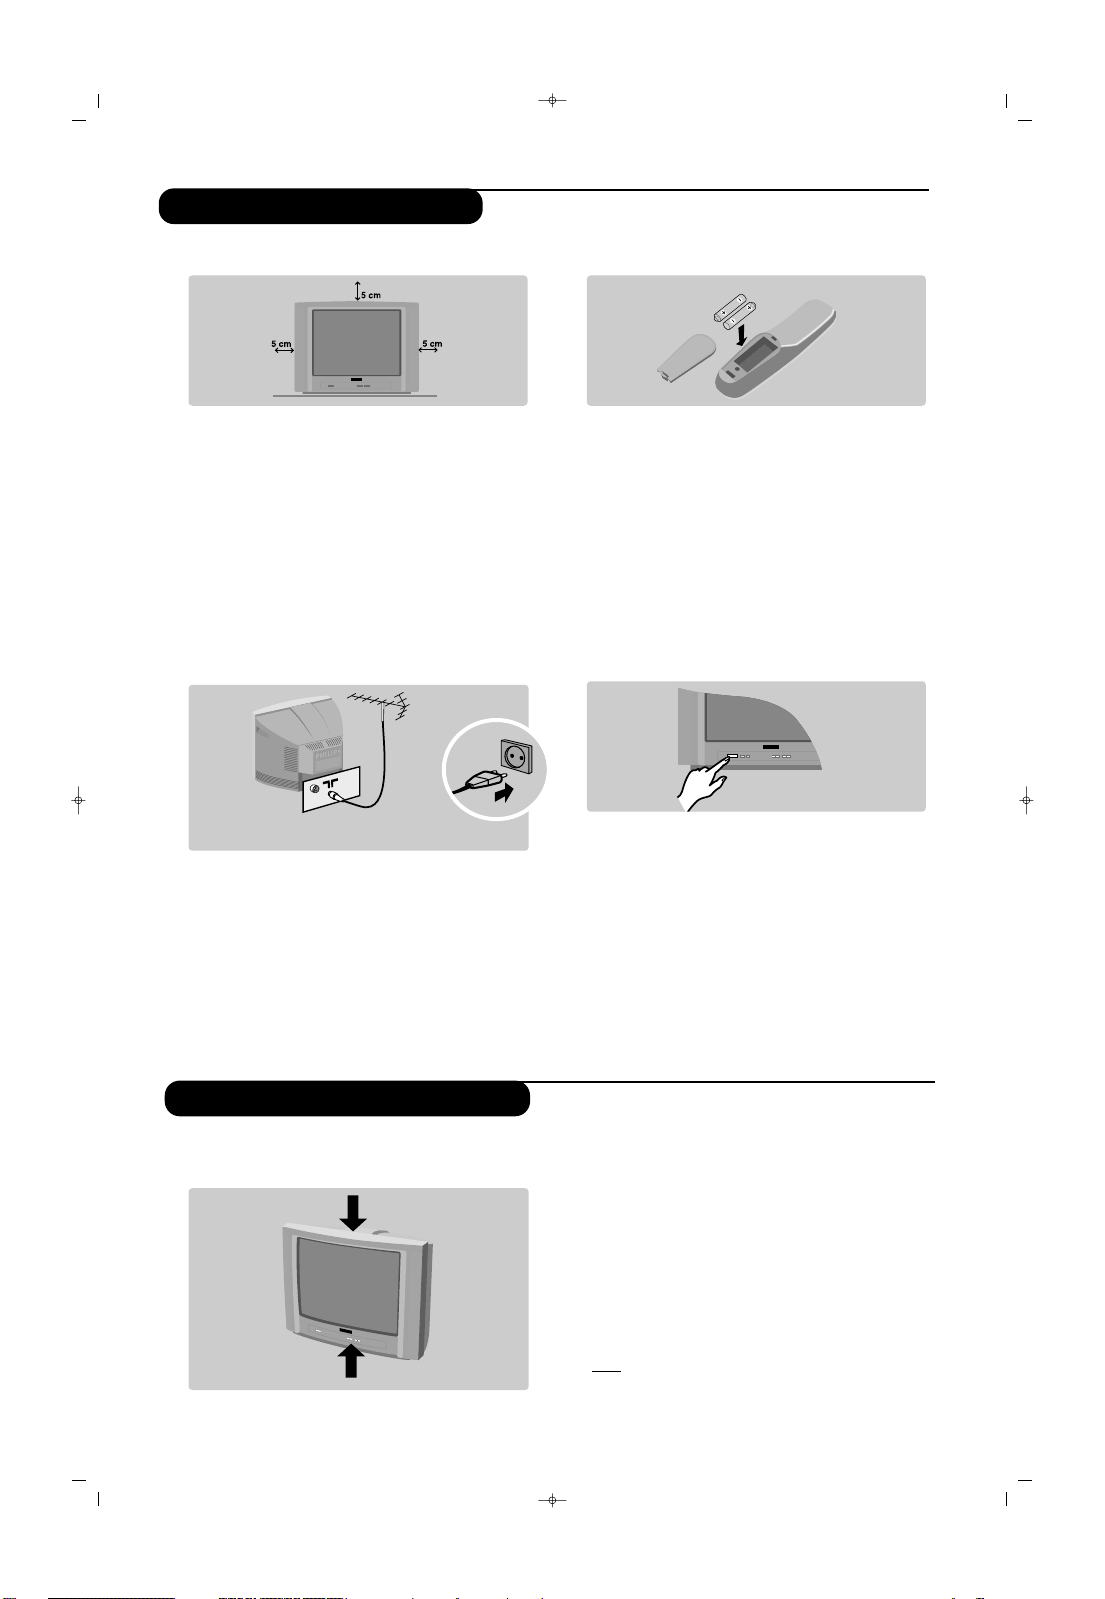
Televizyonun yerlefltirilmesi
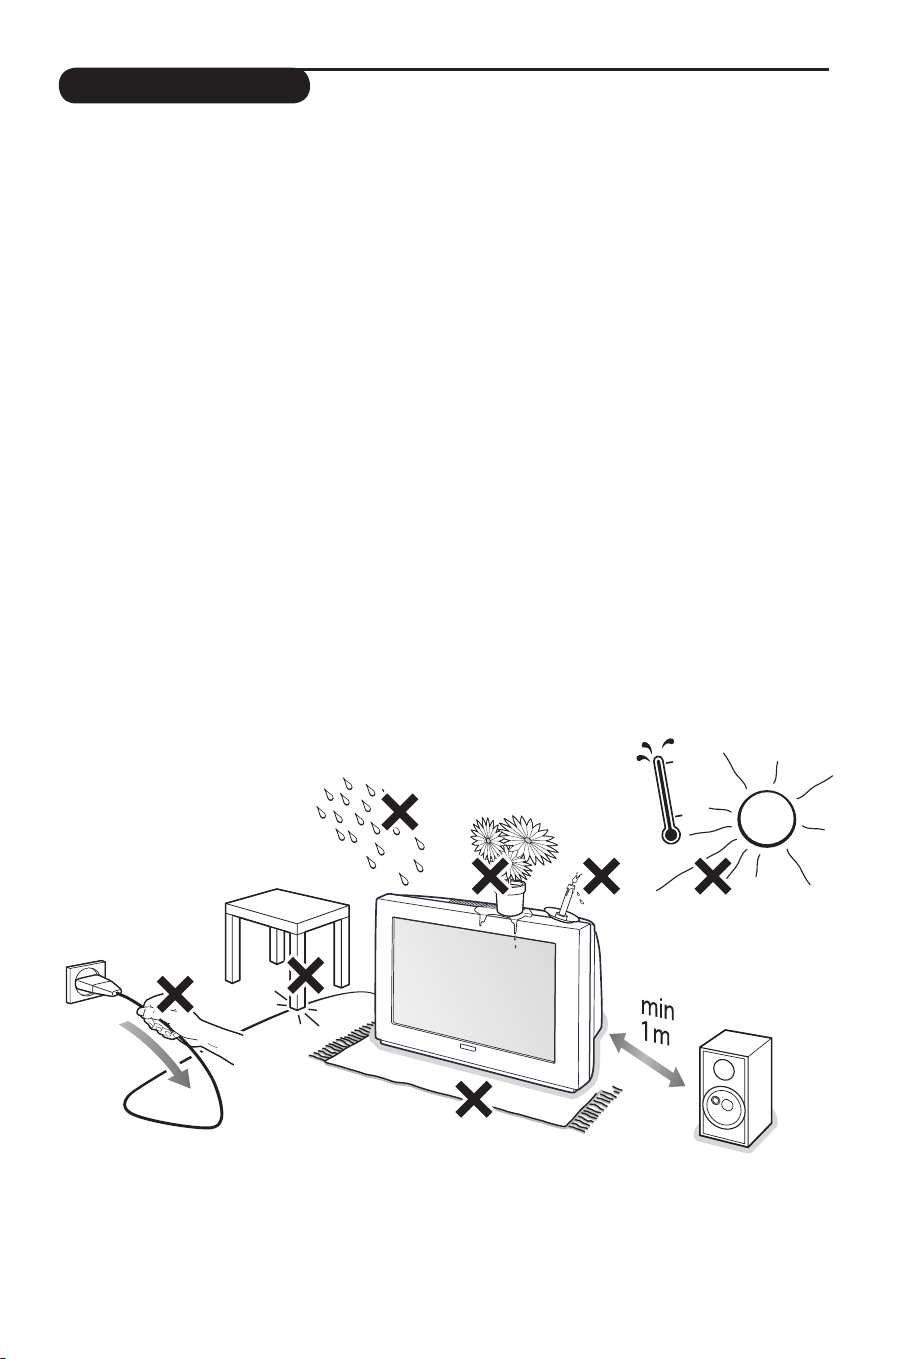
Etraf›nda en az 5 cm serbest alan b›rakarak
televizyonunuzu sert ve hareketsiz bir yüzeye
yerlefltiriniz. Her tür tehlikeli durumun önüne
geçmek için, TV’ nizin üzerine üstünü kapatacak
bir fley (örtü), içinde su bulunan nesneler (vazo)
veya ›s› yayan nesneler (lamba) koymay›n›z. Ayr›ca
televizyona su s›çramamas› da sa¤lanmal›d›r. TV’nizi
hafifçe nemlendirilmifl yumuflak bir bezle temizleyiniz.
D›fl boyas›n› bozabilecek kimyasal maddeler ve
mekanik temizleyicileri kesinlikle kullanmay›n›z.
é
Ba¤lant›lar
•
Arkada bulunan : prizine anten fiflini sokunuz.
Dahili antenler ile, baz› koflullarda yay›nlar zorlukla
al›nabilir. Anteni döndürerek ideal yönü
bulabilirsiniz. Yay›n hala kötü geliyorsa d›fl anten
kullanmal›s›n›z.
•
fiebeke kablosunu prize tak›n›z (220-240 V/50 Hz).
“
Uzaktan kumanda
Size verilmifl olan iki 2 adet R6 Philips “Long
Life” pilini, kutuplar›na uyarak pil bölümüne
yerlefltiriniz.
Çevreyi korumak amac›yla, cihazla birlikte verilmifl
olan piller c›va ve nikel kadmiyum içermemektedir.
Lütfen kullan›lm›fl pillerinizi atmay›n›z, size
sunulmufl olan dönüfltürme olanaklar›ndan
yararlan›n›z (sat›c›n›za dan›fl›n›z). De¤ifltirmeniz
gerekti¤inde ayn› tip pil kullan›n›z.
‘
Çal›flt›rma
Televizyonunuzu açmak için, açma-kapama
tufluna bas›n›z. K›rm›z› gösterge lambas› yanar ve
ekran ayd›nlan›r. E¤er televizyon standby
(bekleme) modunda kal›rsa, uzaktan kumandan›n
P
# veya P @ tufluna bas›n›z ve kanallar›n
otomatik ayarlanmas› bölümüne geçiniz.
Uzaktan kumanday› kulland›¤›n›zda gösterge
lambas› yan›p söner.
Televizyonun kurulumu
TV cihaz› üzerindeki tufllar
065001057050 STEREO PHILIPS 8/8/06 11:31 Page 3
Page 5
4
Güvenlik Bilgileri
• TV’yi 220V – 240V AC, 50 Hz elektrik prizine bağlayın.
• Aşağıdaki durumlarda elektrik şini prizden çekin:
– TV ekranının altındaki kırmızı ışık sürekli olarak yanıp söndüğünde.
– ekranda parlak, beyaz bir çizgi görüntülendiğinde.
– hava fırtınalı olduğunda (yıldırım düşme tehlikesi).
– set uzun bir süre kullanılmayacaksa.
• TV ekranını temizlerken. Asla aşındırıcı temizlik malzemeleri kullanmayın. Haf nemli bir güderi veya
yumuşak bez kullanın.
• TV’nin üzerine veya yakınına yanan mum gibi açık alev kaynakları yerleştirilmemelidir.
• TV setinizi doğrudan güneş ışığına veya ısıya maruz bırakmayın.
• TV’nin üzerini örtmeyin; aksi halde aşırı ısınma meydana gelebilir.
• Yeterli havalandırma sağlamak için TV setinin her bir yanında en az 5 cm boşluk kalmasına dikkat edin.
• Setinizi yağmura veya suya maruz kalabileceği bir yere yerleştirmeyin (örneğin, pencere kenarı).
• Pil Kullanımı DİKKAT – Pil sızıntısı yaralanmalara, maddi hasara veya cihazın zarar görmesine neden
olabilir; bunu önlemek için:
– Tüm pilleri + ve – kutuplarını cihazda işaretlendiği şekilde hizalayarak doğru şekilde yerleştirin.
– Farklı pilleri birlikte (eski ve yeni veya karbon ve alkalin, vb.) kullanmayın.
– Cihaz uzun bir süre kullanılmayacaksa, pilleri çıkarın.
• Aygıt, sıvı damlaması veya sıçramasına maruz kalabileceği bir yerde tutulmamalı ve aygıtın üzerine vazo
gibi, içinde sıvı bulunan cisimler yerleştirilmemelidir.
Güvenlik Bilgileri
• Setinizi uzun süre bekleme modunda bırakmayın. Seti kapatarak manyetikliğinin giderilmesini sağlayın.
Manyetikliği giderilmiş bir set, iyi bir görüntü kalitesi sağlar.
• Seti açık durumdayken kaldırmayın veya hareket ettirmeyin. Ekranın bazı bölümlerinde renk dengesizliği
meydana gelebilir.
• Arızalı bir TV'yi asla kendiniz onarmayı denemeyin. Her zaman kalifiye bir servis elemanına baflvurun.
Page 6
5
Uzaktan kumanda tufllar›
Uzaktan kumanda tufllar›
(stereo modeller için)E
065001057050 STEREO PHILIPS 8/8/06 11:31 Page 4
&
é
"
‘
(
§
è
!
ç
0
& Radyo / tv ayarı
Televizyonu radyo ya da tv ayarına geçirmek için
é Surround ses (sadece bazı modellerde vardır)
Sesi geniş alana yaymaya/daralaltmaya yarar.
1
2
3
4
5
“ Ekran bilgileri / süreklilik numarası
Kanal numarasını, isim (eğer mevcutsa), ses
‘ Ses ayarı
Ses ayarı menüsüne girmenize olanak sağlar :Ses ayarı menüsüne girmenize olanak sağlar :
( Menü
Menüye girmeye ya da terketmeye yarar.Menüye girmeye ya da terketmeye yarar.
§ Ok / formatı
Bu 4 tuş menüde gezinmenize olanak verir.
è Ses düzeyi ayarı
Ses seviyesini ayarlamanıza olanak verir.
6
! Mute
Sesi geçici olarak kesmenize ve eski düzyine
ç Nümerik tuşlar
Programlara direkt olarak bağlanmayı sağlar. 2
0 Dakika ayarı
Otomatik olarak uykuya almayı belirler (0’dan 120
1 Uykuya alma
7
2 Ses ayarı
Stereo yayınları Mono ile güçlendirmeye ya da iki
Mono işareti kırmızı ise, güçlendirilmiş bir
3 Teletexte tuşları (s.9)
4 Görüntü ayarı
Görüntü ayar programına girmenize olanak verir:
kullanılır (radyo sistemli modeller için geçerlidir).
Stereo durumunda, hoparlörler mekanın her
yerinde gibidirler. Virtual Dolby Surround*
donanımlı modeller için, Dolby Surround Por Logic
olarak geriden gelen ses etkisi elde edersiniz.
Mono durumda, stereo benzeri bir ses elde
edersiniz.
ayarı ve kalan zaman göstergesini belirtmek/silmek
içindir. Süreklilik numarasının ekranda belirmesi için
6 saniye süre ile basılı tutun.
Kullan›c›, Konuflma, müzik, Tiyatro.
îÏ tuşu görüntüyü dikey olarak genişletmeye
ve daraltmaya yarar.
getirmenize olanak verir.
rakamlı programlar için, tire kaybolmadan önce 2.
rakamı yazmak gerekmektedir.
dakikaya kadar ayarlanabilir).
Televizyonu kapatmadan uykuya yatırmaktır.
Tekrar açmak için P @#, b, 09’ya
basın.
dilden yapılan yayınları Dual I ya da Dual II olarak
seçmeye olanak verir. Nicam sistemini alabilen
televizyonlarda, yayına göre Nicam Stereo’yu
mono takviyeli oalarak dinleyebilir ya da Nicam
Dual I, Nicam Dual II ve Mono’yu seçebilirsiniz.
pozisyon var demektir.
Kullan›c›, Gündüz, Do¤al, Gece, Multimed.
5 Teletexte çağırma (s.9)
6 Program seçimi
Alt ya da üst kanala atlamayı sağlar. Numara,
(isim) ve ses ayarı bir süre için ekranda gözükür.
Bazı programlarda programın başlığı ekranın
altında gözükür.
7 EXT prizlerinin seçilmesi
EXT prizlerinden birini seçmek için birçok
kez basın.
Page 7
065001057050 STEREO PHILIPS 8/8/06 11:31 Page 5
6
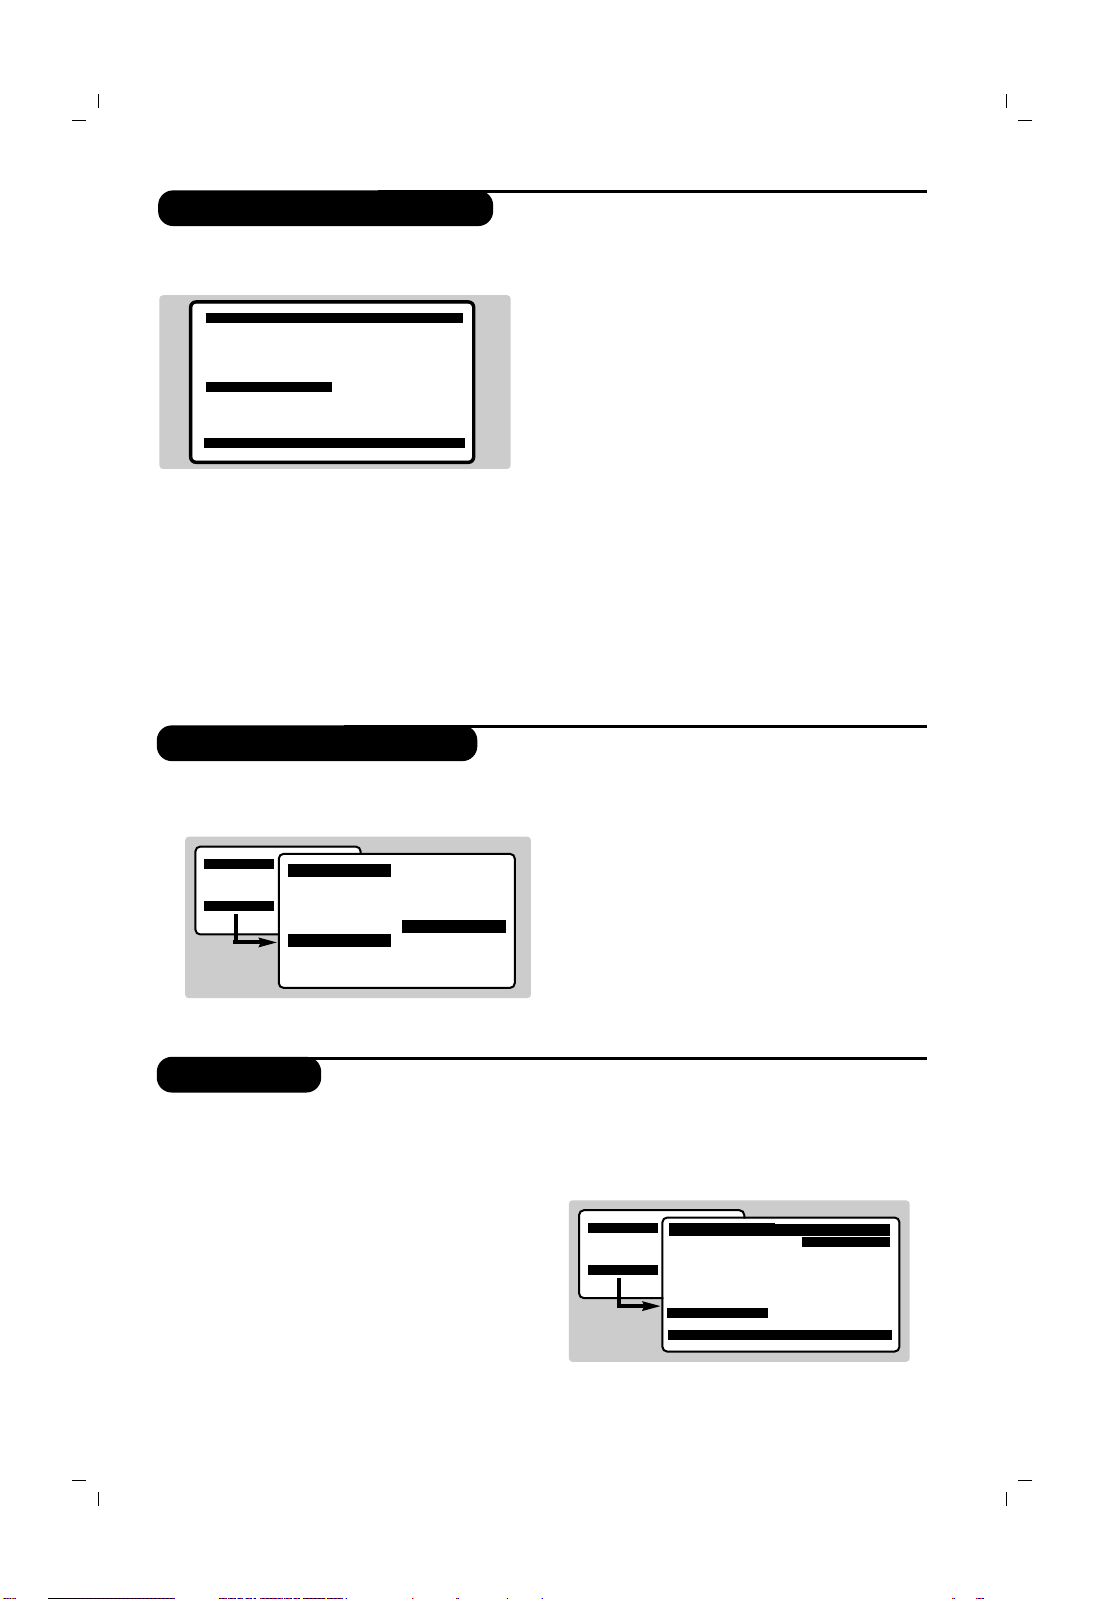
Otomatik Programlama
Kanallar›n S›ralanmas›
Kanal ‹smi
& MENÜ tufluna bas›n›z. Ekranda ana “menü”
belirecektir.
é Uzaktan kumandan›n îÏ tufluna basarak
Pr. Ayarlar›na gelin, sonra
¬ tuflu ile
onaylay›n.
“ ¬ Tuflu ile dili seçin.
‘ Ï Tuflu ile “ülke” seçene¤ine gelin, sonra
Ï tuflu ile ülkeyi belirleyin.
E¤er sizin ülkeniz seçeneklerde yoksa “...”y› seçin.
( Ï Tuflu ile “Otomatik Arama” seçene¤ine
gelin, sonra
¬ tuflu ile onaylay›n.
§ Otomatik arama derhal bafllayacakt›r. Mevcut
olan bütün tv programlar› otomatik olarak
haf›zaya al›nacakt›r. ‹fllem birkaç dakika
sürecektir. Ekran göstergesi geliflmeleri ve
haf›zaya al›nan kanal say›s›n› gösterecektir.
‹fllem sonuçland›¤›nda menü silinir.
Böylece otomatik programlama sonuçlanm›fl
olur.
Aramay› kesmek ya da ç›kmak için H tufluna
bas›n. E¤er, hiçbir kanal bulunamam›flsa tavsiyeler
bölümünü okuyun.
è Kanallar› numaraland›rmak için tafl›ma
sistemini kullan›n.
& H tufluna bas›n. Ekranda “Menü” belirecektir.
é Ok tufllar› ile, önce
Pr. Ayarlar›,
sonra “Tafl›ma”
menüsünü seçin,¬ tuflu ile onaylay›n.
“ îÏ tuflu ile istedi¤iniz kanal› seçin ve ¬
tufluna bas›n.
‘ îÏ tuflunu kullanarak yeni numaray›
belirleyin ve
È tuflu ile onaylay›n.
( Belirlenecek numara say›s› kadar “ ve ‘.
etab› tatbik edin.
§ Menüden ç›kmak için d tufluna bas›n.
& H tufluna bas›n. Ekranda menü belirecektir.
é Ok tufllar› ile, “Pr. Ayarlar›’na” sonra “isim”
seçene¤ini ¬ tuflu ile onaylay›n.
“ ‹smini seçmek ya da de¤ifltirmek istedi¤iniz
kanal›
îÏ tuflu ile seçin.
‘ ‹sim hanesine geçifli ¬ tuflu ile girin ve
îÏ tuflunu kullanarak, yeni ismi yaz›n
(Harfler aras› geçifli
Ȭ tufllar› ile yap›n.
( Isim girilince, È tuflunu kullanarak en bafla
gelin ve
îÏ tufllar› ile yeni isim vermek
istedi¤iniz kanala geçin.
§ Adland›raca¤›n›z her kanal için “ ile (.
etaplar› tekrarlay›n.
è Menüyü d tuflu ile terkedin.
Menüge
• Resim Ayarlar›
. Ses Ayarlar›
• Özellikler
$ Pr. Ayarlar›
Pr. Ayarlar› Î
• Lisan
• Ülke
• Otomatik Arama
• Manuel Arama
• Tafl›ma
• ‹sim
00
01 TRT1
02 ATV
03ÆSTAR
04 SHOW
05 KANAL D
06 TGRT
Menü Î
• Resim Ayarlar›
. Ses Ayarlar›
• Özellikler
$ Pr. Ayarlar› Æ
Lisan
Ülke
Otomatik Arama
Manuel Arama
Tafl›ma
‹sim
ï
Menüge
• Resim Ayarlar›
. Ses Ayarlar›
• Özellikler
$ Pr. Ayarlar›
ï
Pr. Ayarlar› Î
• Lisan
• Ülke
• Otomatik Arama
• Manuel Arama
• Tafl›ma
• ‹sim
Æ
00 Æ
01
02
0303
Æ
04
05
Æ
Page 8
065001057050 STEREO PHILIPS 8/8/06 11:31 Page 6
7
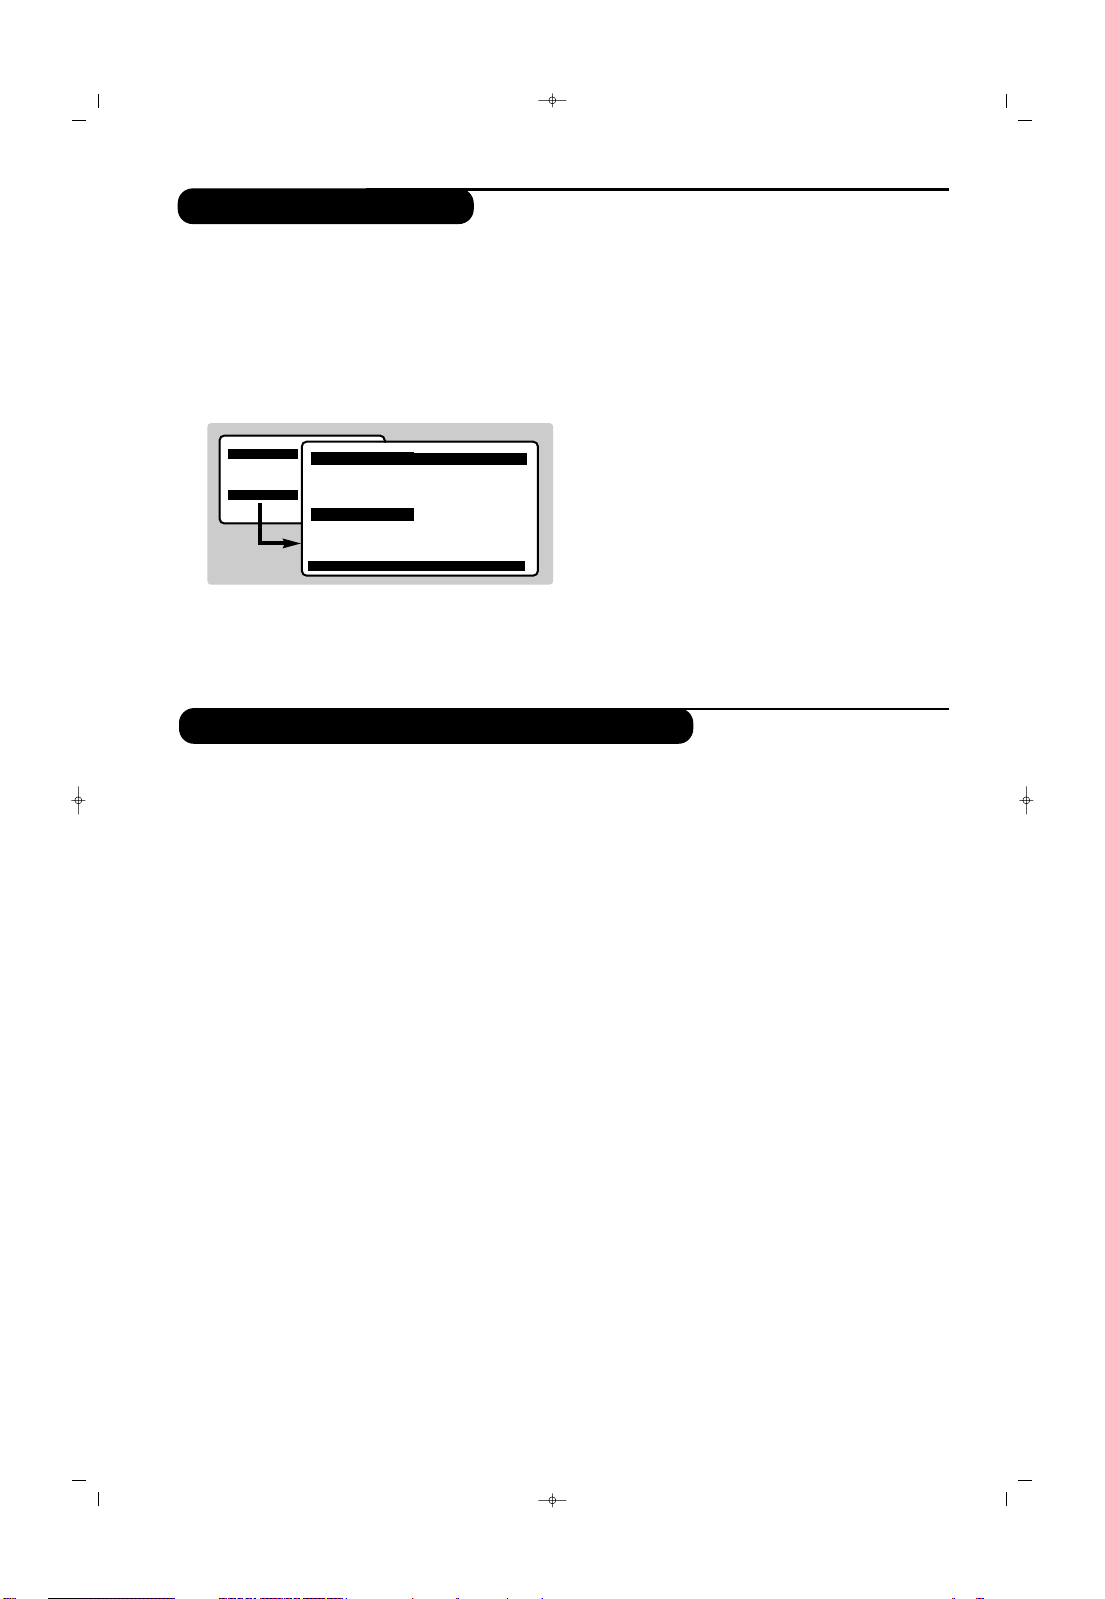
Manuel haf›zaya alma
Pr. Ayarlar› menüsündeki di¤er ayarlar
Bu menü kanallar› tek tek haf›zaya almaya
yard›m eder.
& H tufluna bas›n. Ekranda menü belirecektir.
é “Ok” tufllar› yard›m› ile, önce “Pr. Ayarlar›”
seçene¤ine, sonra “Manuel Arama” seçene¤ine geliniz.
“ Sistem: Avrupa’y› seçin (otomatik seçim) ya da Bat›
Avrupa’y›
(BG normu), Do¤u Avrupa’y› (DK normu)
seçin.
Fransa ve ‹ngiltere, Avrupa seçene¤inin içinde yer
almaz.
‘ Arama : ¬ tufluna bas›n. Arama bafllayacakt›r.
Kanal bulundu¤unda arama duracakt›r.
‹stedi¤iniz kanal›n frekans›n› biliyorsan›z
0’den 9’ye kadar direkt olarak numaray› da
tufllayabilirsiniz.
E¤er hiç görüntü elde edememiflseniz tavsiyeler
bölümünü okuyun.
( Program numaras› : Ȭ tufllar›, 0’ ve 9’a
kadar olan nümerik tufllar ile istenen numaray›
girin.
§ ‹nce ayar : E¤er görüntü net de¤ilse Ȭ
tufllar› ile netlefltirin.
è Haf›zaya alma : ¬ tufluna bas›n. Kanal haf›zaya
al›nm›flt›r.
! Haf›zaya al›nacak kanal say›s› kadar ‘’ten è’e
kadar olan etaplar› tekrarlay›n.
Terketmek için : d tufluna bas›n.
& H tufluna bas›n›z ve Ï tuflu yard›m›yla “Pr.
Ayarlar›” seçene¤ini seçiniz.
é Lisan : Menü dilini de¤ifltirmek için.
“ Ülke : Ülkeyi seçmek için.
Bu ayar, arama, otomatik kanal yerlefltirmesi ve
teletext’in belirmesinde etkilidir. E¤er ülkeniz
belirtilmiyorsa “. . .” seçin.
‘ Menüden ç›kmak için d tufluna
bas›n.
Radyonun kullan›lmas›
(sadece baz› modellerde mevcuttur)
Menüge
• Resim Ayarlar›
. Ses Ayarlar›
• Özellikler
$ Pr. Ayarlar›
Pr. Ayarlar› Î
• Lisan
• Ülke
• Otomatik Arama
√ Manuel Arama Æ
•Tafl›ma
• ‹sim
Sistem
Arama
Program No.
‹nce Ayar
Haf›za
ï
Page 9

065001057050 STEREO PHILIPS 8/8/06 11:31 Page 7
8
Görüntünün Ayarlanmas›
& Önce H tufluna sonra ¬ tufluna basarak
onaylay›n
“Resim Ayarlar›” menüsü belirecektir:
é îÏ tuflu ile bir ayar seçin ve Ȭ tuflu
ile ayar› gerçeklefltirin.
“ Ayar tamamland›¤›nda Haf›za seçene¤ine gelerek
¬ tuflu ile kaydedin.
d tufluna basarak ç›kabilirsiniz.
Ayar tan›mlar›
• Parlakl›k: Görüntünün ›fl›¤›n› ayarlar.
•
Renk: Renkleri ayarlar.
•
Kontrast: Tonlamay› sa¤lar.
•
Keskinlik: Netlik kazand›r›r.
•
Renk S›cakl›¤›: Renkleri belirler: So¤uk (mavi),
Normal (dengeli) ya da Il›k (k›rm›z›).
•
Haf›za: Görüntü ayar›n› haf›zaya al›r
Ses Ayar›
(Stereo
Ö
Menüge
$ Resim Ayarlar›•
. Ses Ayarlar›
• Özellikler
• Pr. Ayarlar›
Resim Ayarlar› Î
$ Parlakl›k• Æ -----I--- 38
• Renk
• Kontrast
• Keskinlik
• Renk S›cakl›¤›
• Haf›za
ï
Özellikler
& H tufluna bast›ktan sonra özellikleri (Ï)
tufluyla seçin ve
¬ tuflunun üzerine bas›n. Bu
menüde;
Zaman, Çocuk Kilidi, Program Kilidi, Ext-1,Ext2
ayarlar›n› gerçeklefltirebilirsiniz.
é Özellikler menüsünden d tuflu ile
ç›kabilirsiniz.
EExxtt--11::
Skart-1’e ba¤lanan harici cihaz tipini belirlemek
için (VCR, DEKODER/DVD)
EExxtt--22::
Skart-2’ye ba¤lanan harici cihaz tipini belirlemek
için (VCR, DEKODER/DVD)
NNoott::
DVD seyretmek için Ext-1,Ext2’yi
“DEKODER/DVD” moduna al›n›z.
Menüge
• Resim Ayarlar›
. Ses Ayarlar›
$ Özellikler
• Pr. Ayarlar›
Özellikler Î
• Zaman
• Çocuk Kilidi$Çocuk Kilidi
• Program Kilidi
VCR
√ Ext-1
& H tufluna basarak Ses Ayarlar›n›(Ï) tuflu
seçin ve sonra
¬ tufluna bas›n. Ses menüsü
belirecektir:
é îÏ tufllar› ile ayar› seçip Ȭ tufllar› ile
ayar› gerçeklefltirin.
“ Ayar tamamland›¤›nda Haf›zaya alma’y› seçip ¬
tuflu ile kaydedin.
‘ Menüden d tuflu ile ç›k›n.
Ayar tan›mlar›:
• Tiz: Tiz sesleri yükseltir.
•
Bas: Bas sesleri yükseltir.
•
Balans: Sol ve sa¤ hoparlörlere sesi dengeli
da¤›t›r.
•
AVL* (Otomatik ses ayarlay›c›): Sesin
yükselmesi durumunda otomatik olarak
devreye girerek ayar› dengede tutar, özellikle
kanal de¤iflikliklerinde ve reklamlarda etkilidir.
•
Haf›zaya alma: Ayarlanm›fl ses ç›k›fl›n› haf›zaya al›r.
* Baz› modellerde vard›r.
Menüge
• Resim Ayarlar›
$ Ses Ayarlar›
• Özellikler
• Pr. Ayarlar›
Ses Ayarlar›
$
Tiz -----I--- 56
• Bas
• Balans
• AVL
• Haf›za
Ses ayar›
. Ext2
Page 10

065001057050 STEREO PHILIPS 8/8/06 11:31 Page 8
9
Zaman Menüsü
((bbaazz›› mmooddeelllleerrddee vvaarrdd››rr))
Televizyon kilidi
((BBaazz›› mmooddeelllleerrddee vvaarrdd››rr))
Bu menü televizyonunuzun kendili¤inden
aç›lmas›n› veya istenen saatte baflka bir
programa geçifli sa¤lar.
& H tufluna bas›n. Ekranda menü belirecektir.
é Ï tuflu ile “Özellikler’i seçin ve ¬ tuflu ile
onaylay›n. Ekrana gelen menüde de
Ï tuflu
ile “Zaman’› seçin
“ Kapan›fl: kendili¤inden kapanacak zaman›
belirler.
Bu ayar ayn› zamanda uzaktan kumandan›n `
tuflundan da yap›labilir. 15’er dakikal›k art›fllarla
ayarlama yap›l›r. (Kapal›, 15, 30, 45,..........120)
‘ Saat: Güncel saati girin.
( Bafllama saati: Bafllangݍ saatini girin.
§ Program no su: Seyretmek istedi¤iniz program›
seçin.
è Seçim: Ayar› flöyle yapabilirsiniz:
•
Bir defa: Tek bir kez açmak ve program
de¤ifltirmek için,
•
Her gün: Her gün için,
•
Kapal›: ‹ptal etmek için.
! Ayar sonras› Menüyü kapat›n›z.
çb tufluna basarak televizyonu kapat›n (St-by
al›n). Program zaman›nda kendili¤inden
aç›lacakt›r. Televizyon aç›ksa girilen bafllama
saatinde Program No’s›n› yazd›¤›n›z programa
geçecektir.
Çocuk kilidi ve program kilidi: fonksiyonlar›
televizyonun kullanma süresini k›s›tlar, örne¤in
çocuklar›n›z için.
Tufllar› kilitleyerek baz› programlar›n ya da
televizyonun tamamen izlenmesini
engelleyebilirsiniz.
Çocuk kilidi
& H tufluna bas›n. Ekranda menü belirecektir.
é Ï tuflunu kullanarak “Özellikler”i seçiniz ve
¬ tuflu ile onaylay›n›z. Ekranda ç›kan menüde
de
Ï tuflunu kullanarak “Çocuk Kilidi”ni
seçiniz.
“ ¬ tufluna basarak Çocuk Kilidini aç›k yap›n›z.
‘ Televizyonu kapay›p uzaktan kumanday› saklay›n.
Televizyon kullan›lamaz duruma gelecektir.
Uzaktan kumanda ile televizyonu çal›flt›rabilirsiniz.
( ‹ptal etmek için: Çocuk Kilidini seçip “Kapal›”
konumuna al›n.
Program kilidi
& H tufluna bas›p önce özellikler menüsünü sonra
Program Kilidini seçin:
é Kilit özelli¤ini *aktif hale getirmek için 000 ile
999 aras›nda 3 rakaml› bir numara girin.
* Kilit fonksiyonunun fabrika ç›k›fl› “kapal›”d›r.
“ Kilit seçene¤i aç›k hale gelmifltir. Ï tuflu ile “Pr
Kilitleme” seçene¤i üzerine gelin.
‘ Bu seçene¤e de “Kilit” seçene¤inde girdi¤iniz say›lar› giriniz.
( Fonksiyon aç›k hale gelmifl ve seyretti¤iniz kanal kilitlenmifltir.
§ Kilitli kanal› seyredebilmek için “Pr. Kilidi” fonksiyonunda
“Kilit” seçene¤ine daha önce kulland›¤›n›z kilitleme flifresini
girmelisiniz. Bu ifllemi yapt›¤›n›zda bütün kilitli kanallar aç›l›r.
è Program kilidi menüsünde “Pr. Kilitleme”
seçene¤ini ayn› flifre ile açarsan›z, yaln›zca
seyretti¤iniz kanal›n kilitleme ifllemini iptal
edersiniz.
‹‹PPUUCCUU
--
Kilit seçene¤i “Aç›k” konumda iken “Pr.
Ayarlar›” menüsüne girilemez.
--
Kilit flifresini unuttu¤unuzda “Kilit” sat›r›nda
iken “Mute” tufluna bas›p “547” giriniz.
Menüge
• Resim Ayarlar›
$ Özellikler
• Pr. Ayarlar›
Özellikler Î
• Zaman
$
Çocuk Kilidi Æ Aç›k
• Program Kilidi
• Ext-1
ï
Menüge
• Resim Ayarlar›
. Ses Ayarlar›
$ Özellikler
• Pr. Ayarlar›
Özellikler Î
$
Zaman
• Çocuk Kilidi
• Program Kilidi
• Ext-1
. Ext-2
ï
Kapan›fl
Saat
Bafllama Saati
Program No.
Seçim
Page 11

065001057050 STEREO PHILIPS 8/8/06 11:31 Page 9
10
Teletext
Üzerine bas›n.
Elde edeceksiniz.
Teletext baz› kanallar taraf›ndan yay›nlanan, gazete gibi izlenebilen haber ulaflt›rma sistemidir. Sa¤›r ve
duyma özürlü kifliler için alt yaz› sistemi oldu¤u gibi, yay›n dilini de iyi anlayabilmek için alt yaz›
uygulamalar› vard›r (kablo flebekelerinde ve uydu yay›nlarda vs… geçerlidir).
Teletext
ça¤›rma
Bir sayfan›n
seçilmesi
Teletext moduna geçmeye, TV programlar›n›n göründü¤ü
teletext moduna veya teletexten TV moduna geçmemize izin
verir. Teletextte içinde gitmek istedi¤iniz konular›n listesini
verir. Her konu bafll›¤› (sayfa) 3 rakam ile kodlanm›flt›r.
E¤er seçilen kanal teletext yay›n› yapm›yorsa, sadece 100 rakam›
belirecek ve ekran siyahlaflacakt›r (bu durumda teletext’ten
ç›karak baflka bir kanala gidin).
‹stenen sayfan›n numaras›n› 09’dan ya da @ P #
tufllar› ile girin. Örnek : sayfa 120 için, 120tufllay›n.
Numara sol üst tarafta belirecektir, kontör dönecek sonra
sayfa belirecektir. Bir baflka sayfaya girmek için bu ifllemi
tekrarlay›n.
E¤er kontör sürekli dönerek ar›yorsa, sayfa yay›nda de¤il
demektir. Baflka bir numara seçin.
Konulara
direkt girifl
Renkli bölgeler ekran›n alt taraf›nda belirecektir. 4 renkli
tufl konulara ya da sayfalara direkt girifle imkan tan›r.
E¤er konu ya da sayfa henüz yay›na haz›r de¤ilse renkli tufl
yan›p sönecektir.
Genel tablo
Genel tabloya geri gelmek içindir (bu genelde sayfa 100’dür).
Bir sayfay›
büyütme
Sayfan›n üst ya da alt taraflar›n› geniflletmeye, sonra normal
boyuta almaya imkan verir.
Sayfalar›n
kendili¤inden
de¤iflmesini
önleme
Gizlenmifl
haberler
Baz› sayfalar kendili¤inden di¤er sayfalara geçerek haberi
devam ettirir. Bu tufl sayfay› sabitlemeye ya da di¤er
sayfaya manuel geçmeye olanak verir. _ iflareti sol üstte
belirecektir.
Gizlenmifl haberleri göstermeye ya da saklamaya yarar
(özellikle oyunlarda).
@@ PP ##
Page 12

Harici Cihazlar›n ba¤lanmas›
Modele göre, televizyonun arka taraf›nda1 yada 2 adet Skart girifli vard›r.
Ext1 girifli audio video girifl/ç›k›fl› ve RGB giriflidir.(SKART)
Ext2 ise (e¤er varsa), audio video girifl/ç›k›fl› ve S-VHS giriflidir.
Video Kay›t Cihaz›
Karfl›s›nda gösterilen ba¤lant›lar› yap›n›z. ‹yi kaliteli bir skart
(euro konnektör) kablo kullan›n›z.
E¤er video kay›t cihaz›n›zda bir euro konnektör (skart) soketi mevcut
de¤ilse mümkün olan tek ba¤lant› anten kablosu üzerinden olacakt›r.
Bu nedenle, video kay›t cihaz›n›z›n test sinyaline ayar yapman›z ve
buna program numaras› 0’› teyit etmeniz gerekecektir. (Elle haf›zaya
alma, Sayfa 6’ya bak›n›z). Video kay›t cihaz›n›zdan görüntü almak için
0 a bas›n›z.
Dekoderli kay›t cihaz›:
Dekoderi, video kay›t cihaz›n›n ikinci euro konnektör (scart›na)
ba¤lay›n›z. Böylece flifreli yay›nlar› kay›t edebilirsiniz.
Uydu al›c›s›, dekoder (flifre çözücü), VCD, oyunlar v.s.
2 Scart giriflli televizyonlarda Ext1 giriflini tercih edin, ki bu girifl
RGB sinyallerini almakta›r (nümerik dekoderler, DVD’ler,
oyunlar, …) ve Ext2 girifli S-VHS sinyallerini almaktad›r
(S-VHS video ve Hi-8, ..).
Di¤er cihazlar
065001057050 STEREO PHILIPS 8/8/06 11:31 Page 10
4
56
789
0
`
Y
11
Ba¤lanan cihazlar›n seçilmesi
Ext modu/ modlar›na geçmek için
AAVV
tufluna tekrarl› olarak bas›n›z.
Harici cihaz modlar›: EXT1, EXT2, SVHS2 (SVHS sinyali EXT2 soketinden
al›nmaktad›r) ve varsa yan AV modlar›.
Cihazlar›n Ço¤u (dekoder, video kay›t cihaz›) anahtarlamay› kendisi yapar.
EXT 2
EXT 1
VC
R
Page 13

065001057050 STEREO PHILIPS 8/8/06 11:31 Page 11
12
Servise Baflvurmadan Önce
Zay›f Al›fl
Hayalet resimlere, karl› görüntülere veya
gölgelenmeye da¤lar›n veya yüksek binalar›n
yak›nl›¤› neden olabilir. Bu durumda resmi manuel
ayarlamay› deneyiniz: (‹nce Ayar, sayfa 5’ya
bak›n›z) veya harici antenin yönünü de¤ifltiriniz.
Anteniniz bu frekans menzilindeki (UHF veya
VHF band›) yay›nlar› almak için uygun mudur?
Görüntü Yoksa
Anten soketini do¤ru takt›n›z m›? Do¤ru sistemi
seçtiniz mi? Kötü ba¤lanm›fl euro konnektör
kablolar› veya anten soketleri genellikle
Görüntü
veya ses sorunlar› yarat›rlar. (Bazen TV cihaz›
hareket ettirildi¤inde veya döndürüldü¤ünde
ba¤lant›lar gevflemektedir.)
Siyah beyaz resim veren d›fl ba¤lant› cihazlar›
n Tufluyla do¤ru soketi seçmemifl olabilirsiniz.
Video kaseti oynatmak için video kay›t cihaz›
taraf›ndan alg›lanabilen ayn› standartta (PAL,
SECAM, NTSC) kay›t edilmifl oldu¤unu kontrol
ediniz.
Ses Yoksa
E¤er baz› kanallarda GÖRÜNTÜ al›yor fakat ses
alm›yorsan›z bunun anlam› do¤ru TV sistemini
seçmemifl olman›zd›r: Sistem ayar›n› de¤ifltiriniz.
Teletext
Baz› harfler düzgün olarak ç›km›yor mu ? Ülke
seçiminin do¤ru yap›l›p yap›lmad›¤›n› kontrol
edin.
Uzaktan kumanda aleti art›k çal›flm›yor
TV cihaz› uzaktan kumandan›n komutlar›na yan›t
vermiyor ve cihaz üzerindeki gösterge uzaktan
kumanda kullan›ld›¤›nda art›k yan›p sönmüyorsa;
uzaktan Kumandan›n pillerini de¤ifltiriniz.
Bekleme (standby)
TV cihaz›n› açt›¤›n›zda bekleme modunda kal›yor
ve TV cihaz› üzerindeki tufllar› kulland›¤›n›zda
çal›flm›yorsa Çocuk Kilidi fonksiyonu çal›flt›rm›fl
demektir (Çocuk kilidi bölümüne bak›n›z).
E¤er cihaz Belirli bir süreyle sinyal almazsa
otomatik olarak bekleme moduna geçer.
Enerji tasarrufu yapmak için, televizyonunuz
beklemede iken çok düflük bir tüketim sa¤layan
elemanlarla donat›lm›flt›r.
Hala sonuç alamad›n›z m›?
E¤er televizyonunuz ar›zalan›rsa asla kendiniz
tamir etmeyi denemeyiniz. Yetkili servisinize
baflvurunuz.
Televizyonun temizlenmesi
Ekran›n ve kasan›n temizlenmesi, sadece temiz,
yumuflak ve tüylü olmayan bir bezle
gerçeklefltirilmelidir. Alkol ya da solvent kökenli
bir ürün ile cihaz›n›z› temizlemeyiniz.
Page 14

Teknik Özellikler
EEkkrraann bbooyyuu
SSttaannddaarrtt aannmmaa ddee¤¤eerrii ((ccmm))
YYaarraarrll›› kkööflfleeggeenn bbooyyuuttuu ((ccmm))
GGüüçç ttüükkeettiimmii ((WWaatttt))
ÇÇaall››flflmmaa ggeerriilliimmii
TTVV ssiisstteemmii
KKaannaall bbaanndd››
AAnntteenn ggiirriiflflii
PPrrooggrraamm kkaappaassiitteessii
SSeess çç››kk››flfl ggüüccüü ((WWaatttt))
((RRMMSS 1100%% TTHHDD))
2299””
72
70
100
220 -240 V (AC) 50 Hz
Pal Secam BG/DK NTSC P.BACK
VHF I Kanal 2 - 4
VHF III Kanal 5 - 12
UHF Kanal 21 - 69
S Kanal S1 - S41
75 ohm standart anten soketi
100 + AV
2 x 5
Sözlük
RGB sinyalleri: Bunlar, resim tüpü, katot ›fl›n lambas›ndaki k›rm›z›, yeflil ve mavi tabancalar› do¤rudan
süren 3 adet (K›rm›z›, Yeflil ve Mavi) Video sinyalidir.
S-VHS Sinyalleri: Bunlar, S-VHS ve Hi-8 kay›t standartlar›ndan al›nan 2 adet ayr› Y/C video sinyalidir.
Parlakl›k sinyalleri Y (siyah ve beyaz) ve renklilik sinyalleri C (renk) banda ayr› ayr› kaydedilir. Bu,
sadece tek bir video sinyali sa¤lanacak flekilde Y/C sinyallerinin birlefltirildi¤i standard video (VHS ve8
mm)’den daha iyi resim kalitesi verir.
NICAM sesi: Dijital sesin gönderilebildi¤i bir prosestir.
System: Televizyon resimleri ülkelerin tümünde ayn› flekilde yay›nlanmaz. Farkl› sistemler mevcuttur:
BG, DK, I, ve LL. Sistem ayar› bu farkl› standartlar› seçmek için kullan›l›r. Bu standartlar PAL veya
SECAM renk kodlamas› ile kar›flt›r›lmamal›d›r. Pal sistemi Avrupa’n›n birçok ülkesinde geçerlidir,
Secam Fransa’da, Rusya’da ve birçok Afrika ülkesinde geçerlidir. Amerika Birleflik Devletleri ve
Japonya’da NTSC denen farkl› bir sistem kullan›lmaktad›r. AV1 ve AV2 giriflleri NTSC renk kodlu
kay›tlar›n oynat›lmas›nda kullan›labilir.
16:9 : Ekran›n uzunluk ve yüksekli¤i aras›ndaki orant›yla ilgilidir. Genifl ekranli televizyon 16/9’luk bir
orant›ya sahiptir, geleneksel televizyonlar›n oran› ise 4/3 dür.
065001057050 STEREO PHILIPS 8/8/06 11:31 Page 12
13
Page 15

065001057050 STEREO PHILIPS 8/8/06 11:31 Page 13
14
°
Recycling
This packaging of this set can be recovered or recycled.Apply to the local authorities in order
to minimise environmental waste.
Disposal of your old product.
Your product is designed and manufactured with high quality materials and components, which
can be recycled and reused.
When this crossed-out wheeled bin symbol is attached to a product it means the product is
covered by the European Directive 2002/96/EC. Please inform yourself about the local
separate collection system for electrical and electronic products.
Please act according to your local rules and do not dispose of your old products with
your normal household waste.The correct disposal of your old product will help prevent
potential negative consequences for the environment and human health.
Introduction
Table of Contents
Thank you for purchasing this television set.
This handbook has been designed to help you install and operate your TV set.
We would strongly recommend that you read it thoroughly.
We hope our technology meets entirely with your satisfaction.
Installation
Installing your television set . . . . . . . . . . . . . . . . . . . . . . . . . . . . . . . . . . . . . . . . . . . . . . . . . . . . . . .15
The keys on the TV set / Safety Information . . . . . . . . . . . . . . . . . . . . . . . . . . . . . . . . . . . . . . . . . . . .15/16
Remote control keys . . . . . . . . . . . . . . . . . . . . . . . . . . . . . . . . . . . . . . . . . . . . . . . . . . . . . . . . . . . . . .17
Automatic programming . . . . . . . . . . . . . . . . . . . . . . . . . . . . . . . . . . . . . . . . . . . . . . . . . . . . . . . . . . .18
Program sort . . . . . . . . . . . . . . . . . . . . . . . . . . . . . . . . . . . . . . . . . . . . . . . . . . . . . . . . . . . . . . . . . . . .18
Program name . . . . . . . . . . . . . . . . . . . . . . . . . . . . . . . . . . . . . . . . . . . . . . . . . . . . . . . . . . . . . . . . . . 18
Manual store . . . . . . . . . . . . . . . . . . . . . . . . . . . . . . . . . . . . . . . . . . . . . . . . . . . . . . . . . . . . . . . . . . . .19
Other settings in the Install menu . . . . . . . . . . . . . . . . . . . . . . . . . . . . . . . . . . . . . . . . . . . . . . . . . . . .19
Operation
Picture settings . . . . . . . . . . . . . . . . . . . . . . . . . . . . . . . . . . . . . . . . . . . . . . . . . . . . . . . . . . . . . . . . . . .20
Sound adjustments . . . . . . . . . . . . . . . . . . . . . . . . . . . . . . . . . . . . . . . . . . . . . . . . . . . . . . . . . . . . . . . 20
Feature settings . . . . . . . . . . . . . . . . . . . . . . . . . . . . . . . . . . . . . . . . . . . . . . . . . . . . . . . . . . . . . . . . . .20
Timer function . . . . . . . . . . . . . . . . . . . . . . . . . . . . . . . . . . . . . . . . . . . . . . . . . . . . . . . . . . . . . . . . . . 21
TV lock . . . . . . . . . . . . . . . . . . . . . . . . . . . . . . . . . . . . . . . . . . . . . . . . . . . . . . . . . . . . . . . . . . . . . . . . 21
Teletext . . . . . . . . . . . . . . . . . . . . . . . . . . . . . . . . . . . . . . . . . . . . . . . . . . . . . . . . . . . . . . . . . . . . . . . .22
Peripherals
Video recorder . . . . . . . . . . . . . . . . . . . . . . . . . . . . . . . . . . . . . . . . . . . . . . . . . . . . . . . . . . . . . . . . . . .23
Other equipment . . . . . . . . . . . . . . . . . . . . . . . . . . . . . . . . . . . . . . . . . . . . . . . . . . . . . . . . . . . . . . . . 23
Front panel connectors . . . . . . . . . . . . . . . . . . . . . . . . . . . . . . . . . . . . . . . . . . . . . . . . . . . . . . . . . . .23
To select connected equipment . . . . . . . . . . . . . . . . . . . . . . . . . . . . . . . . . . . . . . . . . . . . . . . . . . . 23
Practical information
Troubleshooting . . . . . . . . . . . . . . . . . . . . . . . . . . . . . . . . . . . . . . . . . . . . . . . . . . . . . . . . . . . . . . . . . .24
Technical Specifications. . . . . . . . . . . . . . . . . . . . . . . . . . . . . . . . . . . . . . . . . . . . . . . . . . . . . . . . . . . .25
Glossary . . . . . . . . . . . . . . . . . . . . . . . . . . . . . . . . . . . . . . . . . . . . . . . . . . . . . . . . . . . . . . . . . . . . . . ..25
English
Page 16

The television set has 4 keys which are located
on the front or the top of the set depending
on the model.
The VOLUME - + (- ””+) keys are used to
adjust sound levels. The PROGRAM - + (- PP+)
keys are used to select the required
programmes. To access the menus,
simultaneously hold down the
””
- and ””+
keys. The PROGRAM - + keys may then be
used to select an adjustment and the -
””
+
keys to make that adjustment.
To exit from the menus, hold down the 2
””
-
and
””
+ keys.
Note: when the
CChhiilldd LLoocc
k function is
activated, these keys are unavailable (refer to
FFeeaattuurreess
menu).
&
PPoossiittiioonniinngg tthhee tteelleevviissiioonn sseett
Place your TV on a solid, stable surface,
leaving a space of at least 5 cm around the
appliance. To avoid accidents, do not put
anything on the set such as a cloth or cover, a
container full of liquid (vase) or a heat source
(lamp). The set must not be exposed to
water.
é
CCoonnnneeccttiioonnss
• Insert the aerial plug into the : socket at
the rear of the set.
•
If you are using an indoor aerial, reception may
be difficult in certain conditions. You can
improve reception by rotating the aerial. If the
reception remains poor, you will need to use an
external aerial.
• Insert the mains plug into a wall socket (220240 V / 50 Hz).
“
RReemmoottee ccoonnttrrooll
Insert the two R6-type Philips “Long Life”
batteries (supplied) making sure that they are
the right way round.
The batteries supplied with this appliance do
not contain mercury or nickel cadmium. If you
have access to a recycling facility, please do
not discard your used batteries (if in doubt,
consult your dealer). When the batteries are
replaced, use the same type.
‘
SSwwiittcchhiinngg oonn
To switch on the set, press the on/off key.
A red indicator comes on and the screen
lights up. Go straight to the chapter Quick
installation on page 4.
If the television remains in standby mode,
press P
# on the remote control.
The indicator will flash when you use the
remote control.
Installing your television set
The keys on the TV set
065001057050 STEREO PHILIPS 8/8/06 11:31 Page 14
15
Page 17

16
Safety Information
• Plug the TV into a 220V – 240V AC,50 Hz supply.
• Disconnect mains plug when :
– the red light below the TV screen is flashing continuously.
– a bright white line is displayed across the screen.
– there is a lightning storm.
– the set is left unattended for a prolonged period of time.
• Cleaning the TV screen. Never use abrasive cleaning agents. Use a slight damp chamois leather or soft
cloth.
• No naked flame sources,such as lighted candles, should be placed on top of the TV or in the vicinity.
• Do not place your TV set under direct sunlight or heat.
• Do not cover or block the TV as it could lead to overheating.
• Leave at least 5 cm around each side of TV set to allow for proper ventilation.
• Avoid placing your set (e.g.near the window) where it is likely to be exposed to rain or water.
• Battery Usage CAUTION – To prevent battery leakage that may result in bodily injury, property
damage, or damage to the unit:
– Install all batteries correctly,with + and – aligned as marked on the unit.
– Do not mix batteries (old and new or carbon and alkaline, etc.).
– Remove batteries when the unit is not used for a long time.
• The apparatus must not be exposed to dripping or splashing and no objects filled with liquids, such as
vases, shall be placed on the apparatus.
Useful Tips
• Do not leave your set on standby mode for a prolonged period of time. Switch off set to allow it to
be demagnetised.A demagnetised set supports good picture quality.
• Do not shift or move the set around when it is switched on.Uneveness in colour in some parts of
the screen may occur.
• Never attempt to repair a defective TV yourself.Always consult a skilled service personnel.
Page 18

Remote control keys
065001057050 STEREO PHILIPS 8/8/06 11:31 Page 15
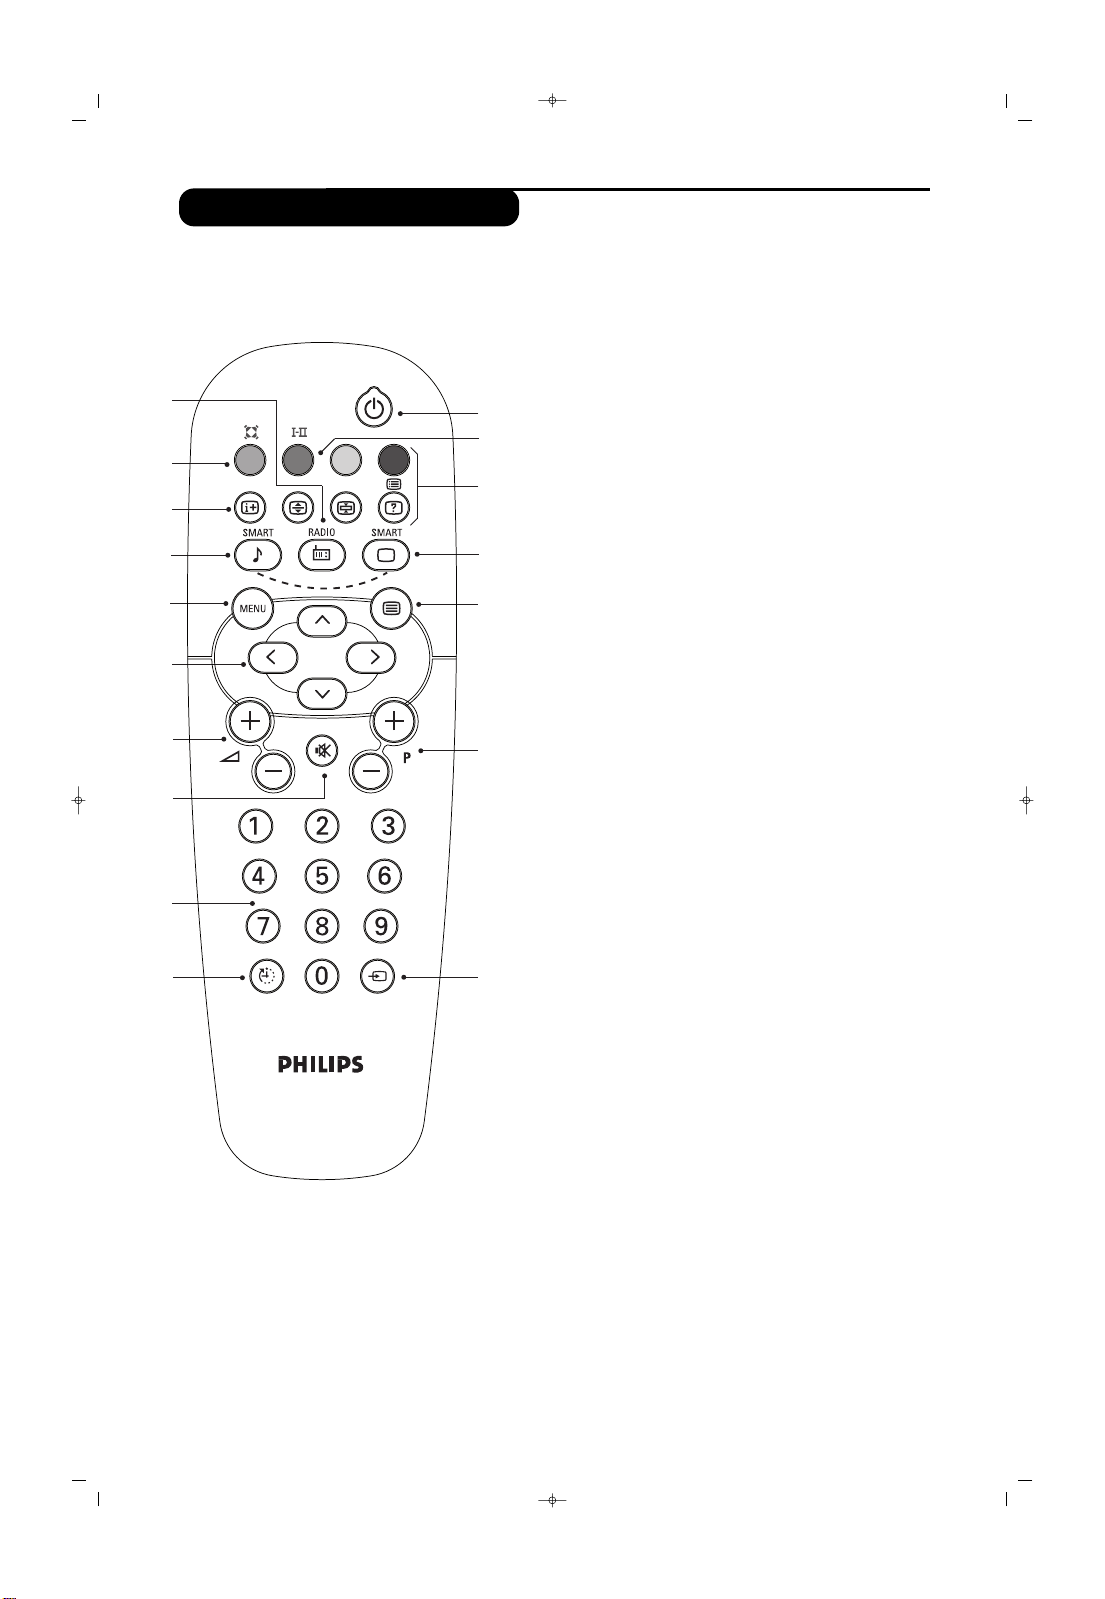
& Radio / TV mode
To switch the TV set to radio or TV mode (for
versions equipped with radio).
é Surround Sound (only available on certain versions).
To activate / deactivate the surround sound effect.
In stereo,this gives the impression that the
speakers are further apart. For models equipped
with Virtual Dolby Surround*, you can experience
Dolby Surround Pro Logic sound effects.In mono,a
stereo spatial effect is simulated.
“ Screen information / permanent no.
To display / clear the program number, name (if it
exists), audio mode and time remaining for the
sleep feature.Press the key for 6 seconds to activate
permanent display of the number.
‘ Pre-set sound
Used to access a series of stored settings: Voice,
Music, Theatre and return to Personal.
( Menu
To call up or exit the menus.
§ Cursor / Format
These 4 keys are used to navigate through the
menus.The îÏ keys are used to enlarge or
compress the picture vertically.
è Volume
To adjust the sound level.
! Mute
To mute or restore the sound.
ç Number keys
Direct access to the programmes.For a 2 digit program,
enter the 2nd digit before the dash disappears.
! Sleep
To select an automatic standby after a preset time
(from 0 to 120 minutes).
Standby
Lets you place the TV set on standby.To turn on the
TV, press P @#, b, 0 to 9 .
# Sound mode (only available on stereo versions)
Used to force programmes in Stereo to Mono or,
for bilingual programs, to choose between Dual I or
Dual II. For TV sets equipped for Nicam reception,
depending on the programmes, you can force the
Stereo Nicam sound to Mono or select between
Nicam Dual I, Nicam Dual II and Mono.
The Mono indication is red when in forced position.
$ Teletext keys (p. 9)
% Pre-set image
Used to access a series of stored settings: Rich,
Natural,Soft,Multimed. and return to Personal.
& Teletext (p. 9)
( Program selection
To access the next or previous programme.The
number, (name) and sound mode are displayed for a
few moments.
For some programs, the title of the program will be
displayed at the bottom of the screen.
) Selection of EXT socket
Press several times to select EXT.
11
17
&
é
"
‘
(
§
è
!
ç
0
1
2
3
4
5
6
7
Page 19

065001057050 STEREO PHILIPS 8/8/06 11:31 Page 16
18
Automatic Programming
Program Sort
Program Name
& Press the
H.
key. The main menu is displayed
on the screen.
é Press the Ï key until INSTALL is highlighted.
“ Select your Language using ¬key.
‘ Press the Ï key until COUNTRY is
highlighted and press the
¬ key to select
your country.
( Select the “Auto Store” line with Ï key
and start the auto search with
¬
key.
§ Tuning starts automatically and all the available
TV programs will be stored. This operation
takes a few minutes.
è Use the “Sort” menu to number the programs.
& Press H key. The Main Menu will be
displayed.
é Press the Ï key until INSTALL is
highlighted.
Then press the
¬ key followed by the Ï
key until SORT is highlighted.
“ Select the programme you want to move
using the
îÏ keys and press ¬.
‘ Then use the îÏ keys to select the new
number and validate with
È.
( Repeat steps “ and ‘ for each program you
wish to renumber.
§ To quit the menus, press d.
If required, you can give a name to the
programmes.
& Press H key. The Main Menu will be
displayed.
é Press the Ï key until INSTALL is highlighted.
Then press the
¬ key followed by the Ï
key until NAME is highlighted.
“ Use the îÏ keys to select the programme
to name or rename.
‘ Use the Ȭ keys to move around the
name display area and the
îÏ keys to
select the characters / numbers.
( When the name has been entered, use the
È key to exit. The name is stored.
§ Repeat steps “ to ( for each programme
you wish to name.
è To quit the menus, press d.
Main Î
• Picture
. Sound
• Features
$Install Æ
Language
Country
Auto Store
Manual Store
Sort
Name
ï
Maine
• Picture
. Sound
• Features
$ Install Æ
Install Î
• Language
• Country
• Auto Store
• Manual Store
• Sort
• Name
00
01 TRT1
02 ATV
03ÆSTAR
04 SHOW
05 KANAL D
06 TGRT
Mainge
• Picture
• Sound
• Features
$ Install
ï
Install Î
• Language
• Country
• Auto Store
• Manual Store
• Sort
• Name Æ
00 Æ
01
02
0303
Æ
04
05
Æ
Page 20

065001057050 STEREO PHILIPS 8/8/06 11:31 Page 17
19
Manual Store
Other settings in the Install Menu
This menu is used to store the programmes
one at a time.
& Press H key. The Main Menu will be displayed.
é Press the Ï key until INSTALL is highlighted.
Then press the
¬ key followed by the Ï
key until MANUAL STORE is highlighted.
“
SSyysstteemm::
select
EEuurrooppee
(automatic detection) or
WWeesstteerrnn EEuurrooppee
(BG standard),
EEaasstteerrnn
EEuurrooppee
(DK standard) with the
¬ key.
‘
SSeeaarrcchh::
press ¬. The search starts. Once a
programme is found, the scanning stops. Go to
the next step. If you know the frequency of
the required programme, this can be entered
directly using the
0 to 9 keys.
If no picture is found, consult the possible solutions
(Page 22 ).
(
PPrrooggrraamm NNoo..::
enter the required number with
the
Ȭ or 0 to 9 keys.
§
FFiinnee TTuunnee::
if the reception is not satisfactory,
adjust using the
Ȭ keys.
è
SSttoorree::
press ¬. The program is stored.
! Repeat steps ‘ to ! for each programme to
store.
ç To quit the menus, press d.
& Press H key followed by the Ï key until
INSTALL is highlighted.
é
LLaanngguuaaggee::
to change the display language for
the menus.
“
CCoouunnttrryy::
to select your country (
TTRR
for
Turkey).
This setting is used for the search, automatic
programme sort and teletext display. If your
country does not appear in the list, select
“. . .”
‘ To quit the menus, press d.
Using the radio
(only available on
certain versions)
Maine
• Picture
• Sound
• Features
$ Install
Install Î
• Language
• Country
• Auto Store
$ Manual Store Æ
• Sort
• Name
System
Search
Program No.
Fine Tune
Store
ï
Page 21

065001057050 STEREO PHILIPS 8/8/06 11:31 Page 18
20
Picture settings
& Press H key followed by the ¬ key to
select PICTURE menu.
é Use the îÏ keys to select a setting and
the
Ȭ keys to adjust.
Note: during the picture adjustment, only the
selected line remains displayed. Press îÏ
to display the menu again.
“ Once the adjustments have been made, select
Store and press ¬ to store them. Press d
to exit.
DDeessccrriippttiioonn ooff tthhee aaddjjuussttmmeennttss::
•• BBrriigghhttnneessss::
this changes picture brilliance.
•• CCoolloouurr::
this changes the intensity of the colour.
•• CCoonnttrraasstt::
this changes the difference
between the light and dark tones.
••
SShhaarrppnneessss::
this changes the picture definition.
•• CCoolloouurr TTeemmpp..::
this changes the colour
rendering:
Cool (bluer), Normal (balanced)
or
Warm (redder).
•• SSttoorree::
to store the picture adjustments and
settings
& Press H, select Features (Ï) and press
¬.
You can adjust:
éTimer, Child Lock, Parental Cont.
and Ext-1, Ext2
“ To quit the menus, press d.
Ext-1: You can select the connected External
device type (VCR, Decoder/DVD)
connected to scart 1
Ext-2: You can select the connected External
device type connected to scart 2
NNoottee::
While using DVD Player, select
“DECODER/DVD”
Feature settings
Maine
$ Picture
. Sound
• Features
• Install
Picture Î
$ Brightness• Æ -----I--- 38
• Colour
• Contrast
• Sharpness
• Colour Temp
• Store
ï
Maine
• Picture
. Sound
$ Features
• Install
Features Î
ï
VCR
• Timer
• Child Lock
• Parental Cont.
√ Ext-1
& Press H key followed by the Ïkey until
SOUND is highlighted. Then press
¬ key to
select the SOUND menu.
é Use the îÏ keys to select a setting and
the
Ȭ keys to adjust.
“ Once the adjustments have been made, select
Store and press
¬ to store these changes.
‘ To quit the menus, press d.
DDeessccrriippttiioonn ooff tthhee sseettttiinnggss::
•• TTrreebbllee::
To adjust treble sound level
•• BBaassss ::
To adjust bass level
•• BBaallaannccee ::
To adjust left/right speaker balance
•• AAVVLL
(Automatic Volume Leveller): this is
used to limit increases in sound, especially on
program change or advertising slots.
•• SSttoorree::
this is used to store the sound settings.
(Sound menu can’t be seen at mono models.)
Mainge
• Picture
$ Sound
• Features
• Install
Sound
• Treble -----I--- 56
• Bass
• Balance
• AVL
• Store
Sound Adjustment
Page 22

065001057050 STEREO PHILIPS 8/8/06 11:31 Page 19
21
Timer function
TV lock
This menu lets you use the TV set as an alarm.
& Press H key. The Main Menu will be displayed.
é Press the Ï key until FEATURES is
highlighted.
Then press the
¬ key followed by the Ï
key until TIMER is highlighted.
“
SSlleeeepp::
to select an automatic standby period.
This setting is also available via the
` key on
the remote control. Sleep settings are set in 15
minute increments (Off, 15, 30, 45....120).
‘
TTiimmee::
enter the current time.
(
SSttaarrtt TTiimmee::
enter the start time.
§
PPrrooggrraamm NNoo..::
enter the number of the
programme for the wake-up alarm.
è
AAccttiivvaattee::
the settings include:
•• OOnnccee
for a single alarm,
•• DDaaiillyy
for each day,
•• OOffff
to cancel.
!
After the adjustment close the Menu by pressing
H key
.
ç
Press b to put the TV set in standby. It will
automatically come on at the time programmed.
If you leave the TV set on, it will just change
programmes at the entered time.
By combining the
TTVV lloocckk
and
TTiimmeerr
functions,
you can restrict the period during which the
TV set is used, for example by your children.
You can block certain programs or inhibit use
of the TV set completely by locking the keys.
CChhiilldd lloocckk
When you set the child Lock on, the Front Panel
keys are locked and can not be used. Tv can be
controlled just by the remote control.
& Press H key. The Main Menu will be displayed.
é Press the Ï key until FEATURES is highlighted.
Then press the
¬ key followed by the Ï
key until CHILD LOCK is highlighted.
“ Press ¬ key to change Child Lock status to On.
‘ Turn off the TV set and hide the remote
control. The TV set cannot be used (except via
the remote control).
( To cancel: position
CChhiilldd LLoocckk
to
OOffff
.
PPaarreennttaall CCoonntt..
By using Parental Control function you can Lock
some channels and these channels just can be seen
by entering the access code.
& Press the H key, select the
““FFeeaattuurreess””
menu
then
PPaarreennttaall CCoonntt..::
é To activate the lock enter your secret access
code (3 digits).
“ Lock as activated. Select the Pr. Lock using Ï
key.
‘ Enter the same access code entered at “Lock”
line.
( Function is activated and the watching channel
is locked. A blue screen appears instead of
Locked channel.
§ If you want to watch the locked channel enter
the access code on “Pr. Lock” line.
“Only this locked channel can be viewed.”
è If you want to unlock all locked channels enter
the access code on “Lock” line.
TTIIPP::
Install menu cannot be accessed while Lock has
been set to "On".
Please select an access code that you can
remember easily.
If you forget your access code, enter 0711.
Maine
• Picture
. Sound
$ Features
• Install
Features Î
$
Timer
• Child Lock
• Parental Cont.
• Ext-1
ï
Sleep
Time
Start Time
Program No.
Activate
Maine
• Picture
. Sound
$ Features
• Install
Features Î
• Timer
$
Child Lock Æ On
• Parental Cont.
• Ext-1
ï
Page 23

065001057050 STEREO PHILIPS 8/8/06 11:31 Page 20
22
Teletext
PPrreessss ::
YYoouu wwiillll oobbttaaiinn::
Teletext is an information system broadcast by certain channels which can be consulted like a
newspaper. It also offers access to subtitles for viewers with hearing problems or who are not familiar
with the transmission language (cable networks, satellite channels, etc.).
TTeelleetteexxtt ccaallll
SSeelleeccttiinngg aa ppaaggee
This is to toggle to Teletext mode or superimposed teletext
on TV programme mode or to exit to TV mode. The
summary appears with a list of items that can be accessed.
Each item has a corresponding 3 digit page number.
If the channel selected does not broadcast teletext, the
indication 100 will be displayed and the screen will remain
blank (in this case, exit teletext and select another channel).
Enter the number of the page required using the
0 to 9
or @
PP
# keys. Example: page 120, enter 120. The
number is displayed top left, the counter turns and then
the page is displayed. Repeat this operation to view
another page.
If the counter continues to search, this means that the
page is not transmitted. Select another number.
DDiirreecctt aacccceessss
ttoo tthhee iitteemmss
Coloured areas are displayed at the bottom of the
screen. The 4 coloured keys are used to access the items
or corresponding pages.
The coloured areas flash when the item or the page is not
yet available.
CCoonntteennttss
This returns you to the contents page (usually page 100).
EEnnllaarrggee aa ppaaggee
This allows you to display the top or bottom part of the
page and then return to normal size.
SSttoopp ssuubb--ppaaggee
aaccqquuiissiittiioonn
HHiiddddeenn
iinnffoorrmmaattiioonn
Certain pages contain sub-pages which are automatically
displayed successively. This key is used to stop or resume
sub-page acquisition. The indication
_ appears top left.
To display or hide the concealed information (games
solutions).
@@ PP ##
Page 24

Connecting Peripheral Equipments
This TV set is equipped with 2 scarts located on the rear. The EXT1 socket has audio, CVBS/RGB inputs
and audio, CVBS outputs. The EXT2 socket has audio, CVBS/S-VHS inputs and audio, CVBS outputs.
Carry out the connections shown opposite, using a good
quality euroconnector cable.
If your video recorder does not have a euroconnector
socket, the only connection possible is via the aerial cable.
You will therefore need to tune in your video recorder's test
signal and assign it programme number 0
(refer to manual store).
To reproduce the video recorder picture, press
0.
VViiddeeoo rreeccoorrddeerr wwiitthh ddeeccooddeerr
Connect the decoder to the second euroconnector socket
of the video recorder. You will then be able to record
scrambled transmissions. (See p18 Features menu settings)
VViiddeeoo rreeccoorrddeerr
SSaatteelllliittee rreecceeiivveerr,, ddeeccooddeerr,, DDVVDD,, ggaammeess,, eettcc..
Preferably connect the equipments delivering RGB signals
(Digital Decoders, DVD Players, Game consoles etc..) to
EXT1 and the equipment delivering S-VHS signal
(S-VHS and Hi-8 VCRs) to EXT2.
Make the connections as shown opposite.
(See p18 Features menu settings)
OOtthheerr eeqquuiippmmeenntt
065001057050 STEREO PHILIPS 8/8/06 11:31 Page 21
4
56
789
0
`
Y
23
TToo sseelleecctt ccoonnnneecctteedd eeqquuiippmmeenntt
Press the
AAVV
key to select
EExxtt
modes: EXT1, EXT2, SVHS2 (S-VHS signals
from the EXT2 socket) and AV for the side connections
(If available).
Most equipment (decoder, video recorder) carries out the switching itself.
Page 25

065001057050 STEREO PHILIPS 8/8/06 11:31 Page 22
Troubleshooting
PPoooorr rreecceeppttiioonn
The proximity of mountains or high buildings
may be responsible for ghost pictures, echoing
or shadows. In this case, try manually adjusting
your picture: see
FFiinnee TTuunniinngg
or modify the
orientation of the outside aerial.
Does your antenna enable you to receive
broadcasts in this frequency range (UHF or
VHF band)?
NNoo ppiiccttuurree
Have you connected the aerial socket
properly?
Have you chosen the right system?
Poorly connected euroconnector cables or
aerial sockets are often the cause of picture or
sound problems (sometimes the connectors
can become half disconnected if the TV set is
moved or turned). Check all connections.
PPeerriipphheerraall eeqquuiippmmeenntt ggiivveess aa bbllaacckk aanndd wwhhiittee
ppiiccttuurree
To play a video cassette, check that it has
been recorded under the same standard (PAL,
SECAM, NTSC) which can be replayed by the
video recorder.
TThhee rreemmoottee ccoonnttrrooll nnoo lloonnggeerr wwoorrkkss..
Check that the mode selector on the side of
the remote control is set to TV.
NNoo ssoouunndd
If on certain channels you receive a picture
but no sound, this means that you do not have
the correct TV system. Modify the
SSyysstteemm
setting.
TTeelleetteexxtt
Are certain characters not displayed
correctly? Check that the
CCoouunnttrryy
setting has
been positioned correctly.
RReemmoottee ccoonnttrrooll
The TV set does not react to the remote
control; the indicator on the set no longer
works when you use the remote control?
Replace the batteries.
SSttaannddbbyy
When you switch the TV set on it remains in
standby mode and you can’t use the front panel
button.
The
CChhiilldd LLoocckk
function is switched On.
If the set receives no signal for some mins,
it automatically goes into standby mode.
To save power, your set is fitted with
components that give it a very low power
consumption when in standby mode
SSttiillll nnoo rreessuullttss??
If your TV set breaks down, never attempt to
repair it yourself: contact your dealer's aftersales service.
CClleeaanniinngg tthhee sseett
Only use a clean, soft and lint-free cloth to
clean the screen and the casing of your set.
"Never use alcohol or solvent based liquid
cleaners on the set."
24
Page 26

Technical Specifications
SSccrreeeenn SSiizzee
SSttaannddaarrdd SSiizzee ((ccmm))
VViissiibbllee ddiiaaggoonnaall ssiizzee ((ccmm))
PPoowweerr CCoonnssuummppttiioonn ((WW))
OOppeerraattiinngg VVoollttaaggee
TTVV SSyysstteemm
BBaanndd
AAeerriiaall IInnppuutt
PPrrooggrraamm CCaappaacciittyy
PPiiccttuurree TTuubbee
SSoouunndd OOuuttppuutt rrmmss
2299””
72
70
100
AC 220 -240 V 50 Hz
Pal Secam BG/DK NTSC P.BACK
VHF I Band 2 - 4
VHF III Band 5 - 12
UHF Band 21 - 69
S Band S1 - S41
75 ohm Standard Antenna Socket
100 + AV
110
0
2 x 5 W
Glossary
RRGGBB SSiiggnnaallss::
These are 3 Red, Green and Blue video signals which directly drive the red, green and blue emitters
in the cathode ray tube. Using these signals provides better picture quality.
SSyysstteemm::
Television pictures are not broadcast in the same way in all countries. There are different standards:
BG, DK, I, and L L’. The SYSTEM setting is used to select these different standards. This is not to be
confused with PAL or SECAM colour coding. Pal is used in most countries in Europe, Secam in France,
Russia and most African countries. The United States and Japan use a different system called NTSC.
The input AV1 is used to read NTSC coded recordings.
1166::99::
Refers to the ration between the length and height of the screen.
Wide screen televisions have a ration of 16/9, conventional screen TV sets have a ration of 4/3.
Glossary
065001057050 STEREO PHILIPS 8/8/06 11:31 Page 23
25
 Loading...