

Page 1

1
English
About this handbook
This is a handbook to help you with the installation and operation of
your new menu TV.
With a menu TV, menus can be called up on the screen. These menus
provide information either about operations to be carried out or about
functions you can select.
This handbook consists of two parts :
Installation
This part helps you with installing your TV,
selecting your menu language, locating and
storing your TV channels and composing
your favourite list of programme numbers.
To do this, follow the directions of the
SYSTEM INSTALLATION menu very closely.
The installation menu is shown as it will
appear on your screen.
Operation
After you have stored the TV channels, you
can call them up on the screen. You can
adjust the picture and sound via the main
menu. The MAIN MENU is shown here as it will
appear on the screen. Feel free to try out all
the different possibilities of your TV. Use this
part of the handbook to help you do this.
MAIN MENU 2
a■recording source
b
■
system installation
c
■
>>>>>
select : a-c menu off
MAIN MENU 1
a■picture
b
■
sound
c
■
programme list
d
■
special features
e
■
>>>>>
select : a-e menu off
SYSTEM INSTALLATION
a■language
b
■
tv installation
c
■
photo CD/CD-I
select : a-c menu off
4 This circle in front of a sentence indicates that you have to do
something.
5 This arrow in front of a sentence indicates the result of what you have
done.
In the stripe under each menu you are told which keys you can press
and how you can switch the menus off again.
Contents
Installation
Preparation.......................................................3
Switching TV on...............................................4
Selecting your Menu language.......................5
Searching for and Storing TV channels :
- Automatic ..................................................6
- Manual .......................................................7
Operation
Operation........................................................14
Main Menu .....................................................15
Other Functions..............................................20
Pip Picture in Picture......................................24
Teletext ...........................................................26
Peripheral Equipment....................................29
Tips..................................................................35
Index ..............................................................36
English
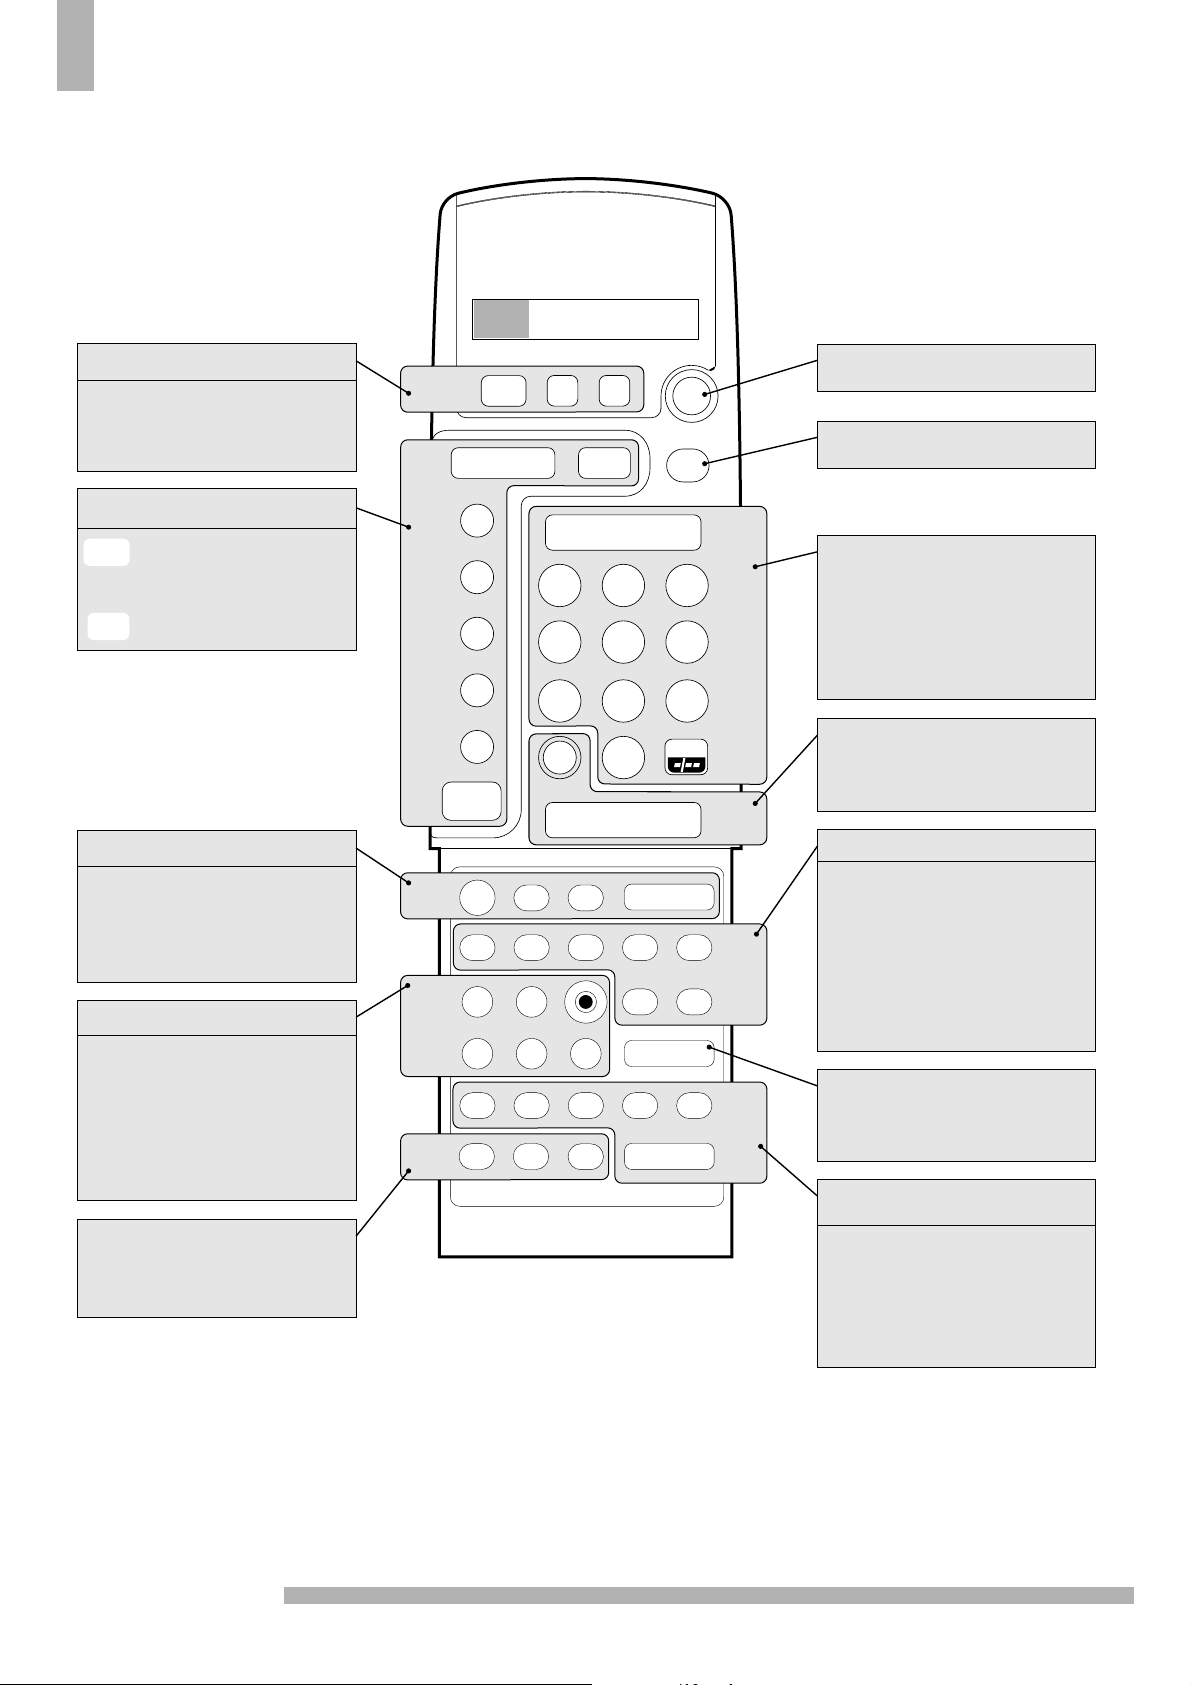
Page 2
2
TV
VCR
TUNER CD TAPE
12
SAT LD
p
t
s
r
a
d
f
g
b
h
h
K
L
0
K
L
F
G
B
J
M
e
A
K
L
F
H
MENU
KL
a
b
c
d
e
TV
M
C
off
1
2
3
4
5
6
7
89
0
K
L
c
0
K
2
a
L
satellite selection in
combination with a
satellite tuner only
standby - switch-off
picture format
. programme selection
. favourite TV channel
selection
digit keys
previous programme
video recorder function
P
0...9
2
3
temporarily switch off
the sound
volume key
c
a
txt on/off
stop seeking txt page
solution to riddles
interrupt txt page
mix txt and tv picture
enlarge
time display
switch pip on/off
select connections
switching screens
still picture
moving pip screen
p
q
r
s
t
stop
play
record
rewind
wind
programme timer
L
B
M
G
F
N
personal preference
on screen info
bilingual choice
brightness
M
J
e
A
enter or leave a menu
selection of your
choice in the menus
switch off all menus
a...e
a
d
f
g
b
h
m
F
H
u
freeze the picture
noise reduction
mosaic screen
(for TV sets with PiP)
TV selection
source selection
connect
TV
M
C
off
MENU
Source selection
PiP - picture in picture
(for TV sets with PiP)
TXT - Teletext
Menu
Other functions
Video recorder
B
E
m
L
N
q
u
Page 3

3
English
1
1
Preparation
Place the TV on a solid surface.
For ventilation, leave a space of at least 5 cm free all around the set.
This TV requires a mains voltage of 220 V - 240 V.
Insert the aerial plug tightly into the aerial socket
g at the back
of the TV with an aerial cable of good quality.
You can improve the picture quality by using the suppressoraerial-cable supplied.
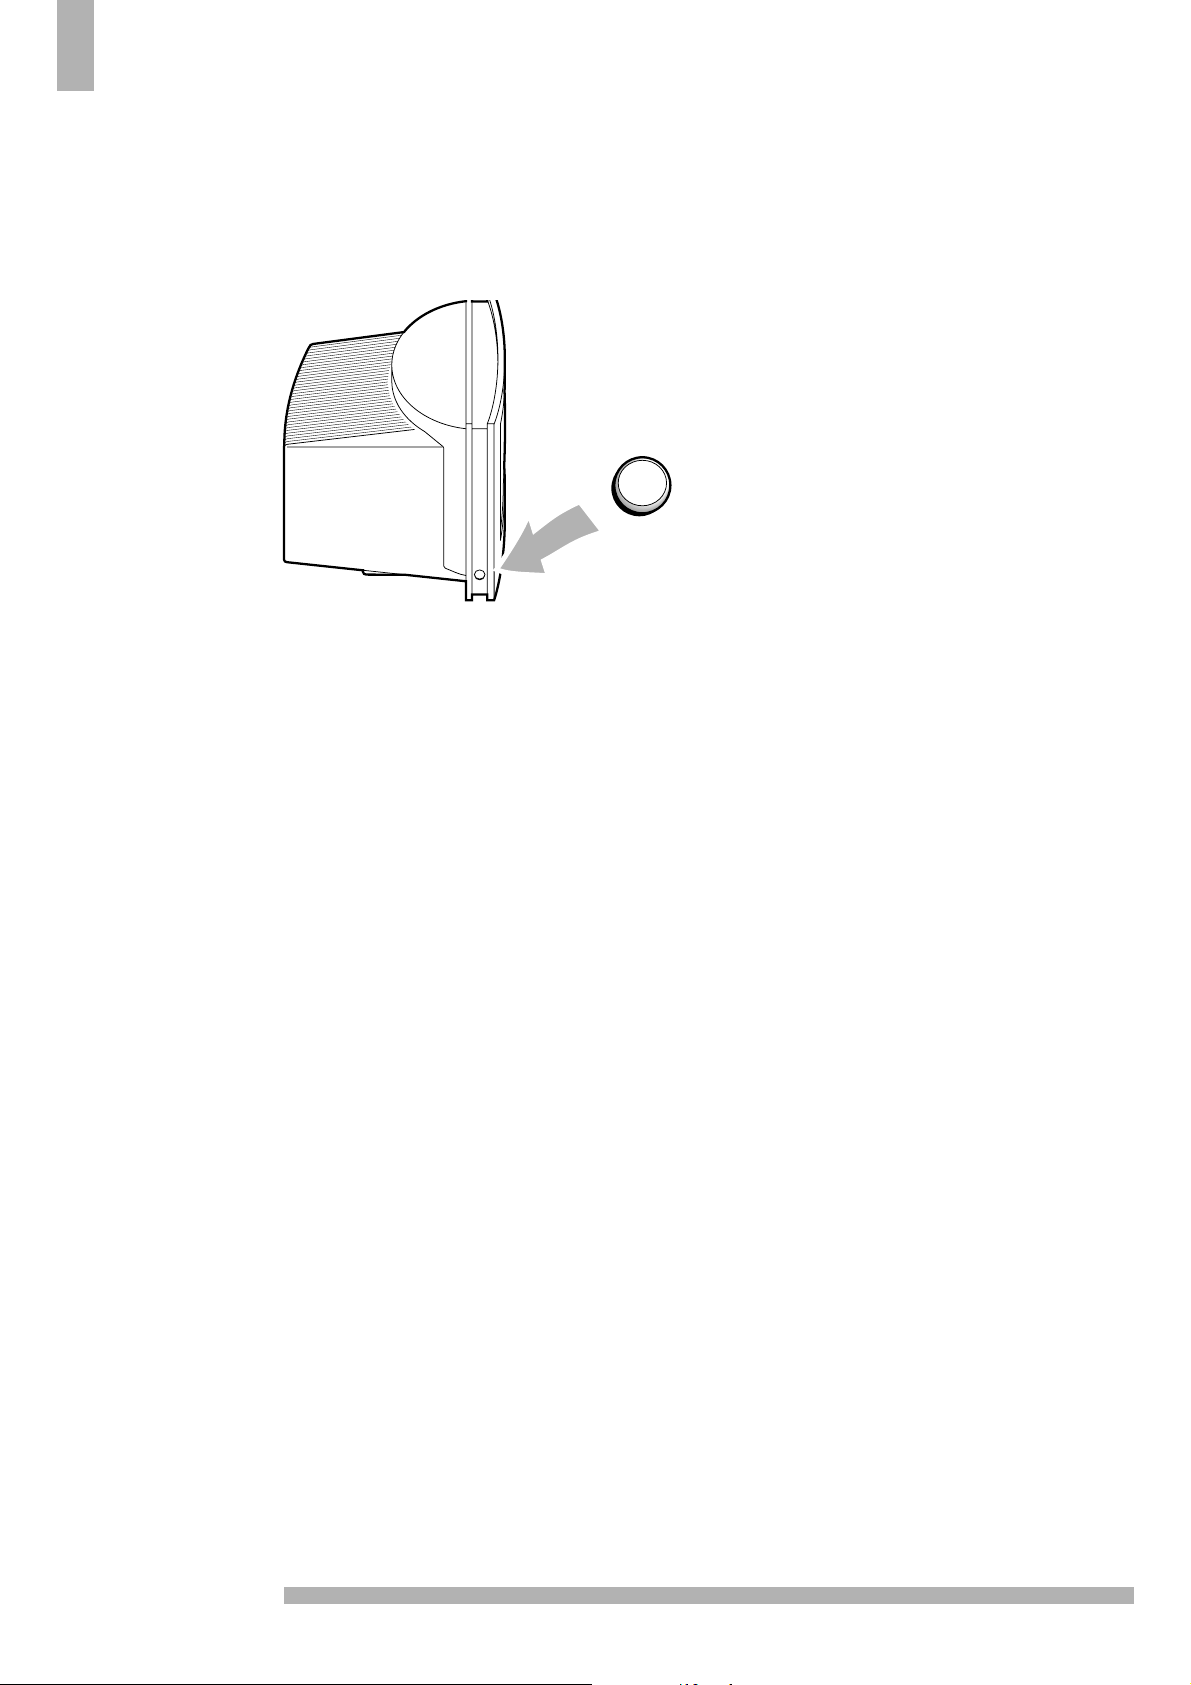
Remote control
This remote control has been developed to operate your TV.
However some main functions of your audio and video equipment from
our product programme are controllable as well.
Tear off the label, written in your language from the label sheet,
supplied with these instructions, click it onto the inside surface of the
door of the remote control.
Remove the cover of the battery compartment on the back of the
remote control.
Insert the 2 batteries supplied (type R03G-1,5V).
Click the cover back into place.
The Philips batteries supplied with the remote control unit of your new
TV set do not contain the heavy metals mercury and cadmium.
Nevertheless in many countries exhausted batteries may not be
disposed of with your household waste.
Please ensure you are aware of any local regulations governing the
disposal of exhausted batteries.
4 Press the TV key below the display.
5 In the window of the remote control the letters TV appear in a
grey block.
You can now operate your TV with your remote control.
Go on to 2.
Insert the mains plug in the wall socket.
Installation
CABLE
TV
TV
VCR
12
SAT LD
TUNER CD TAPE
C
M
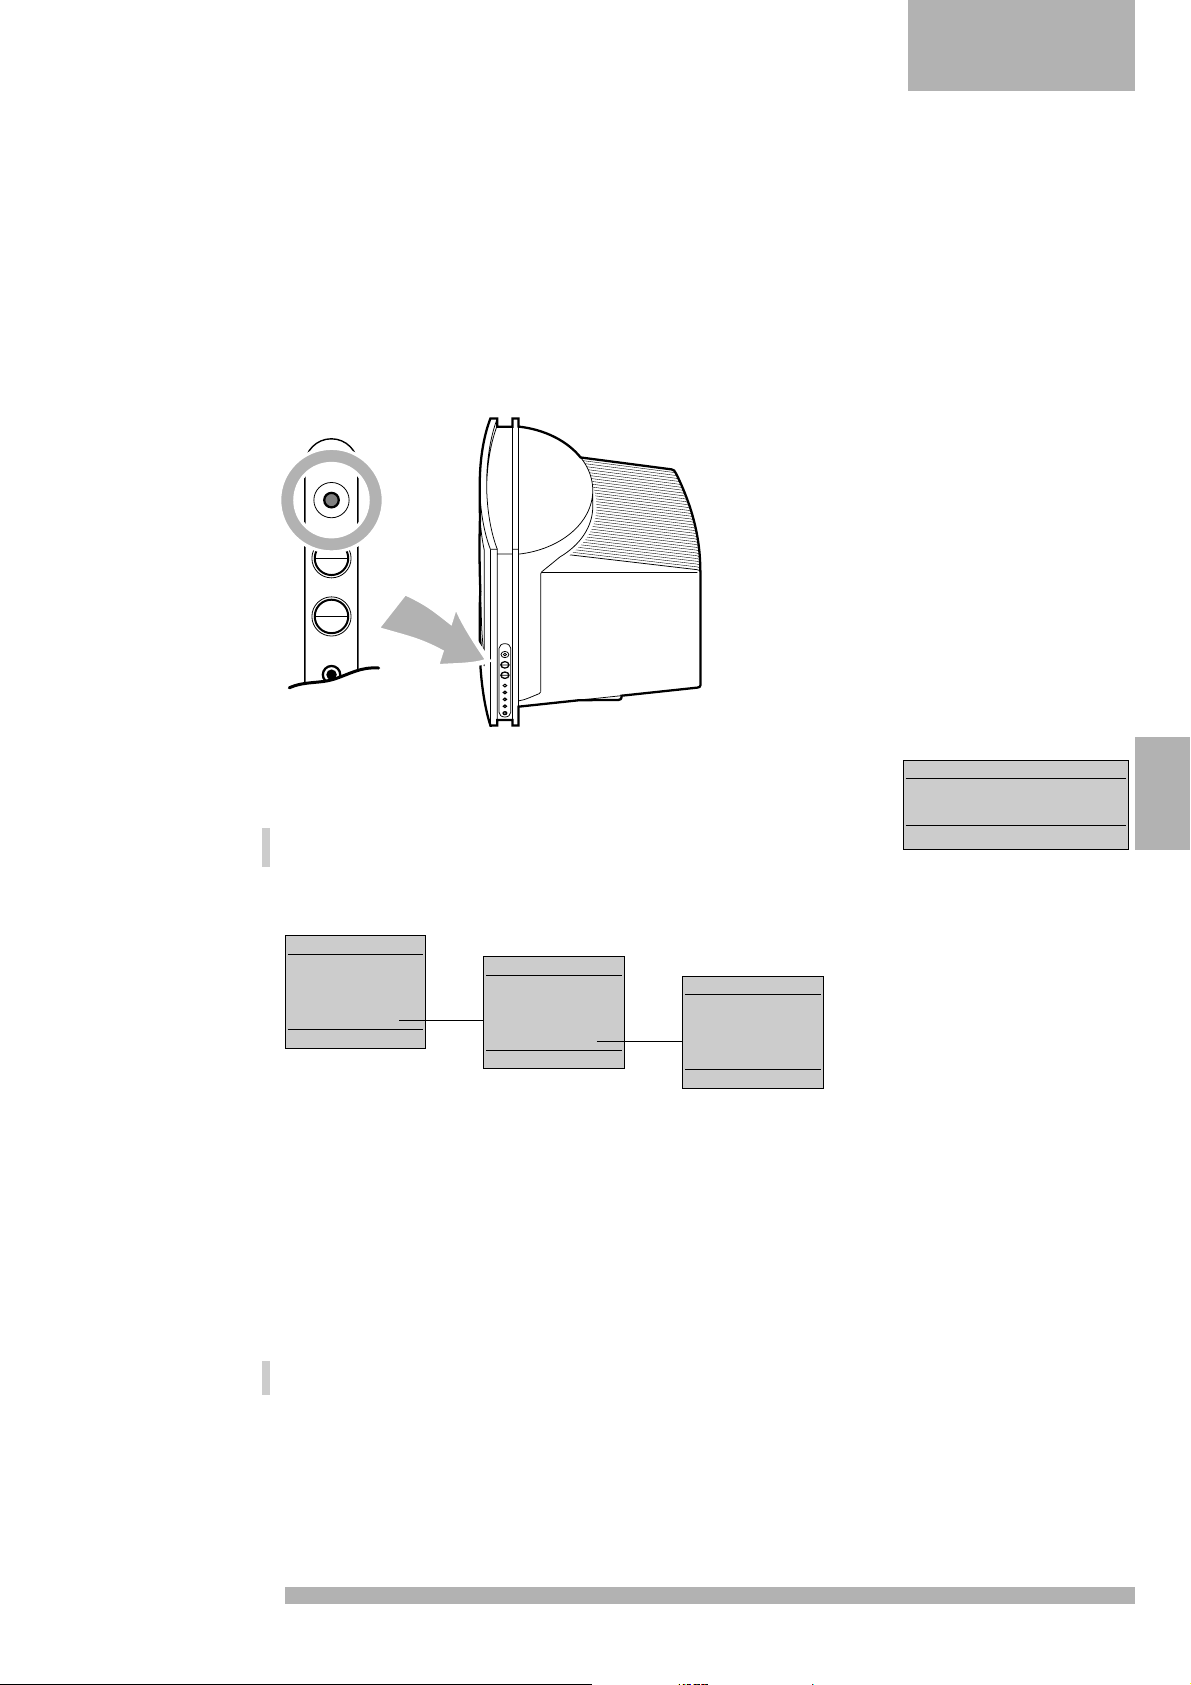
Page 4
4
2
2
5 A green or red lamp lights up on the front of
your TV set.
green .........................................................
or
5 The TV is switched on.
The screen lights up.
Go on to 3.
red .............................................................
The TV is switched on but the screen stays
dark. Your TV is on standby.
4 Press a digit key on the remote control.
5 The green lamp lights up and blinks every
time you press a key on the remote control.
5 The TV switches on.
The screen lights up.
Go on to 3.
Switching TV on
4 Press the switch A on the left side of your TV set.
A
A
Page 5
5
English
Selecting your menu language
You can choose for yourself the language of the menus - the instructions and the
various possible choices - which you call up on your screen.
4 Press the INSTALL key on the right side of your TV set.
If the message
CHILD LOCK ON appears, the child lock should be switched
off. See Special Features, p. 18.
5 The SYSTEM INSTALLATION menu appears on the screen.
It is also possible to enter the installation menu via the main menu.
See Main Menu, p. 15.
4 Press the red key a on the remote control.
5 The language menu appears on the screen.
4 Press the colour key of your language choice.
4 Press the corresponding colour key for >>>>> if the language you
want does not appear on the first language menu.
5 LANGUAGE STORED appears for a moment at the top of the menu.
The language menu disappears and the SYSTEM INSTALLATION menu
appears again.
From this point on, all menus are presented in the language of your
choice.
Go on to 4.
Have you pressed the wrong key ?
Press the red key a for language again and make a new choice.
SYSTEM INSTALLATION
a■language
b
■
tv installation
c
■
photo CD/CD-I
select : a-c menu off
3
3
a■ENGLISH
b
■
Deutsch
c
■
Français
d
■
Italiano
e
■
>>>>>
select : a-e menu
a■Español
b
■
Nederlands
c
■
Português
d
■
Svenska
e
■
>>>>>
select : a-e menu
a■Norsk
b
■
Suomi
c
■
Dansk
d
■
ENGLISH
e
■
>>>>>
select : a-e menu
Installation
INSTALL
VOLUME
PROGRAM
n
Page 6

6
SYSTEM INSTALLATION
a■language
b
■
tv installation
c
■
photo CD/CD-I
select : a-c menu off
4
4
Searching for and storing
TV channels
After you have switched on your TV and selected your menu language,
you can search for and store your TV channels.
This can be done in two different ways : automatically or manually.
TV INSTALLATION
a■automatic
b
■
manual
c
■
programme name
d
■
programme sort
e
■
preselection preferences
select : a-e menu off
Automatic installation....................................
All TV channels are searched for and stored
automatically. As far as it is transmitted by
the cable company a programme number
and a name are attributed automatically as
well as filled in the programme list.
If desired you can modify the allocation of
the channel numbers and the name of one
or more stored TV channels afterwards and
delete or insert TV channels.
Manual installation.........................................
The manual installation is characterised by
the possibility to select the way of searching
with frequencies.
You yourself must assign a number and a
name of your choice to the TV channel
located.
Follow very closely and step by step the
instructions of the Manual Installation
procedure.
You must go through every step.
Go on to page 7.
or
4 Press the green key b in the SYSTEM INSTALLATION menu.
5 The TV INSTALLATION menu appears.
Automatic installation
4 Press the red key a.
5 AUTOMATIC lights up.
4 Press MENU + to select YES.
5 SEARCHING, PLEASE WAIT appears and the TV is searching all the channels
you can receive.
The automatic installation can be interrupted by pressing the
MENU or OFF key.
5 Every time a channel is found it is automatically stored in the memory
under the next programme number in the programme list.
5 When all channels are found the message TV INSTALLATION COMPLETED is
displayed briefly on top of the menu.
The programme list is automatically filled with all the programme
numbers of the TV channels transmitted.
When a cable company is recognised which transmits a teletext page
with the frequencies and the programme names of all the TV channels
which can be received, the searching is stopped and a programme list
appears.
The programme list is automatically filled with all the programme
numbers and names of the TV channels transmitted.
It is possible that the cable company displays an own broadcasted
selection menu. Layout and items are defined by the cable company.
Make your choice of the presented teletext pages by entering the
corresponding digit key.
5 The menu TV INSTALLATION appears again.
Go on to 5, page 9.
Page 7

7
English
a
a
Installation
step Searching for a TV channel
step Selecting the TV system
The television picture is not broadcast in the same way in all countries.
We speak of different television systems (PAL, SECAM, NTSC, ....).
Now you must select the TV system yourself.
Manual TV installation
4 Press the green key b in the menu TV INSTALLATION.
5 The menu MANUAL TV INSTALLATION appears.
MANUAL TV INSTALLATION
a■system
b
■
search
c
■
programme
d
■
store
select : - + a-d 0-9 menu off
4 Press the red key a.
5 The SELECTING THE SYSTEM menu appears.......
1 You have your own aerial.
4 Press the colour key of the country or part of
the world from where you want to select the
TV channel.
5 The MANUAL TV INSTALLATION menu now
appears.
5 Your selection lights up.
2 You are connected to the cable system.
4 Press the colour key of the country or part of
the world where you now are located.
5 The MANUAL TV INSTALLATION menu now
appears.
5 Your selection lights up.
Go on to step b.
ONLY ONE SYSTEM AVAILABLE appears ................
You have a set that can receive only one
system.
You do not need to make any selection.
Go on to step b.
or
4 Press the green key b.
5 SEARCHING appears and the TV is searching for a channel.
5 The frequency increases until a channel is found.
Go to step c if you want to store the channel that has been found.
4 Press J under the door of the remote control to recognise which
programme is being broadcast.
5 The MANUAL TV INSTALLATION menu disappears temporarily.
Do you want a different channel or is the reception poor?
4 Press the green key b again.
Is the reception still poor? See Tips, p. 35.
Fine-tuning :
You may be able to improve the reception of picture and sound of a TV
channel. Adjust the frequency yourself with the
MENU - or + key on the
remote control.
Direct selection of a TV channel :
If you know the frequency of a TV channel, you can enter it directly with the
digit keys on the remote control and in this way call up the TV channel.
Ask for a list of the frequencies at your cable company or at your dealer.
4 Enter the 5 digits of the desired frequency.
4 For frequencies under 100 MHz, first enter a 0. For example : 063.25.
Have you entered a wrong number?
First complete the frequency with arbitrary numbers and then start again.
Go on to step c.
If you have pressed the wrong key, then repeat step a.
b
b
Page 8

8
step Entering the programme number
Now you must assign a number of your choice to the TV channel
located. In this way you decide for yourself the order of all your TV
channels.
With the assigned programme number you can call up your TV channel
again later.
4 Press the yellow key c.
5 Hold down the P - or + key or use the digit keys on the remote control
until the desired programme number appears in the menu.
Go on to step d.
step Storing steps a to c
Now the TV system, the located TV channel and its programme number
must be stored in the memory.
4 Press the blue key d.
5 PROGRAMME STORED appears briefly at the top of the menu.
5 The TV channel is stored in the memory.
Do you want to store another TV channel?
4 Repeat steps a to d.
Are you connected to the cable system?
4 Begin immediately with step b. You have already selected the TV
system in step a for all channels.
Have you finished locating TV channels?
4 Press MENU.
5 The TV INSTALLATION menu appears again.
Go on to 5.
repeat
out
c
c
d
d
Page 9

9
English
5
5
Entering or modifying a
programme name
It is possible that to change the name transmitted by the broadcaster or
to assign a name to the TV channels of which no name is filled in yet.
A name of maximum 5 letters or numbers can be given to the
programme numbers 0 to 99. For example SUPER, BBC1, ...
4 Press the yellow key c.
5 The PROGRAMME NAME menu and the programme list appear.
Also the frequency of the current TV channel is displayed.
4 Press J under the door of the remote control to recognise which
programme is being broadcast.
5 The menu PROGRAMME NAME disappears temporarily.
4 Press the red key a.
4 Select the TV channel of which you want to change the name or to
which you want to assign a name with the digit keys or with P - or +.
External sources can not be selected with P - or +.
In the list you can now modify or enter the name of the TV channel.
With the arrow under the letter and number line you select which
letter or number in the list above you wish to enter .
In the list there is a red or white block next to the chosen programme
number.
4 Hold as desired , either the green key b down to move the arrow to
the left, or else the yellow key c to move the arrow to the right.
5 The letter or number that you indicate with the arrow appears in the
block.
4 Press the blue key d.
5 The block moves over one space.
Now you can choose a following letter or number with the arrow.
4 Place the arrow between Z and 0 for a space.
Did you fill in a wrong letter or number?
Press repeatedly on the blue key d until the block is back in the place
where you want to make a change.
Now choose with the arrow the correct letter or number.
Are the complete names filled in?
4 Press MENU.
5 The TV INSTALLATION menu appears again.
Go on to 6.
Installation
pr.name pr.name pr.name
01020
1 ... 11 21
21222
31323
41424
51525
61626
71727
81819
91929
frequency : xxx.xx MHz
ABCDEFGHIJK....XYZ 012345...89
≠
a■programme number
b
■
A ¨ 9
c
■
A Æ 9
d
■
next character
select : a-d 0-9 menu off
E
PROGRAMME NAME
Page 10

10
6
6
Modifying the programme list
According to your preference you can modify the programme list of the
stored TV channels by swapping, deleting or inserting certain TV
channels.
4 Press the blue key d.
5 The PROGRAMME SORT menu appears.
a. swap
With the swap-function you can modify the allocation of the stored
TV channels.
4 Press the red key a.
5 FIRST SELECTION lights up.
4 Select the programme number of the TV channel of which you want to
modify the programme number with the digit keys or with P - or +.
4 Press the green key b.
5 SECOND SELECTION lights up.
4 Select the programme number of the TV channel which you want to
swap with the programme number selected in your first selection.
4 Press the yellow key c.
5 PROGRAMMES SWAPPED appears briefly at the top of the menu.
5 The TV channels and their names selected in the first and the second
selection are swapped.
4 Repeat this for all the other TV channels you want to replace.
b. delete
With the delete-function you can remove the TV channels you do not like
to have in the programme list anymore.
4 Select, with the digit keys or with P - or +, the programme number you
want to delete .
4 Press the blue key d.
5 DELETE lights up and the programme number and name of the TV channel
to be deleted starts flickering in the FIRST or SECOND SELECTION line.
4 Press MENU + to select YES.
5 DELETING PROGRAMME appears briefly at the top of the menu.
5 The selected TV channel is deleted , its place is taken by the next
programme and the subsequent programme numbers are shifted up one
place.
4 Repeat this for all the other TV channels you want to delete.
pr.name pr.name pr.name
01020
1 .... 11 21
21222
31323
41424
51525
61626
71727
81819
91929
a■first selection
b
■
second selection
c
■
swap
d
■
delete
e
■
insert
select : a-e menu off
PROGRAMME SORT
Page 11

11
English
Installation
c. insert
You can add a TV channel at the place you like in the programme list
with the insert-function of the programme sort menu.
4 Press the red key a.
5 FIRST SELECTION lights up.
4 Select, with the digit keys or with P - or +, the programme number where
you want to create an empty place to insert a new TV channel.
4 Press the white key e.
5 INSERT lights up.
4 Press MENU + to select YES.
5 INSERTING PROGRAMME appears briefly at the top of the menu.
5 All the programmes starting from the one indicated in the programme
list are shifted one place downwards.
The programme number of the empty place appears in red.
You can now insert a new TV channel with the MANUAL TV INSTALLATION
method. See earlier.
Are all the TV channels allocated as you like ?
5 Press MENU.
5 The TV INSTALLATION menu appears again.
Go on to 7.
Page 12

12
Favourite TV channels
a
a
4 Press the white key e in the TV INSTALLATION menu.
5 The PRESELECTION PREFERENCES menu appears.
4 Press the red key a.
5 PROGRAMME NUMBER lights up.
4 Select the programme number of a TV channel with P - or + or with the
digit keys.
4 Press the green key b.
5 FAVOURITE STATUS lights up.
4 Press MENU - or + to select NO or YES.
In this way you decide whether you want to keep the selected TV
channel as a favourite TV channel or not.
4 Repeat this for each programme number.
Decoder
b
b
In case you have connected a decoder, see Decoders p. 32, you can
define one or more programme numbers as a decoder preselection.
4 Press the red key a in the PRESELECTION PREFERENCES menu.
5 PROGRAMME NUMBER lights up.
4 Select the programme number under which you want to store the
programme coming from your decoder with P - or + or with the digit
keys.
4 Press the yellow key c.
5 DECODER lights up.
4 Press MENU - or + repeatedly until the designation EXT1 or EXT2 appears
according to the euroconnector to which you connected your decoder.
This is not possible with a decoder connected to
EXT3.
Select
NO if you do not want the selected programme number being
activated as a decoder preselection.
4 Press MENU twice.
5 The SYSTEM INSTALLATION menu appears again.
7
7
Preselection preferences
All the stored TV channels have been automatically placed into the
programme list. In the PRESELECTION PREFERENCES menu you yourself
should indicate for each stored TV channel if you want to keep that
programme number as a favourite.
You can do this also for a programme number you want to reserve for
the programmes you receive from your decoder.
This will make selecting your favourite TV channels a lot easier and
faster.
When you run quickly through the TV channels by holding the P - or +
key pressed down, only those TV channels which are in the favourite
list will be displayed.
When you select a TV channel with the digit keys, the indication of the
selected TV channel will be displayed in white characters when it is a TV
channel from the favourite list, in red characters when it is a TV channel
which is not in the favourite list.
TV INSTALLATION
a■automatic
b
■
manual
c
■
programme name
d
■
programme sort
e
■
preselection preferences
select : a-e menu off
PRESELECTION PREFERENCES
a■programme number
b
■
favourite status
c
■
decoder
select : a-c 0-9 menu off
Page 13

13
English
Photo CD/CD-I
In case you have connected a photo Compact Disc or a Compact Disc
Interactive see Peripheral Equipment, p. 30 :
4 Press the yellow key c in the SYSTEM INSTALLATION menu.
5 PHOTO CD/CD-I lights up.
4 Press MENU + to select YES.
5 This offers you an optimum picture quality for your Photo CD or CD-I.
4 Press off to exit the SYSTEM INSTALLATION menu.
8
8
Installation
Page 14

14
Operation
The letters TV in the display of the remote control
must be in a grey block if you want to operate
your TV.
If this is not the case, first press the TV key under
the display.
Every time you press a key on the remote control,
the green lamp on the front of your TV set blinks.
Switching TV on
4 Press A on the left side of your TV.
5 A green lamp lights up. PR1 appears briefly and possibly also the
programme name.
5 Does a red lamp light up ?
Your TV is on standby. Read on.
Standby
4 With the standby key B at the top of the remote control you can
temporarily switch the TV off.
5 The red lamp on the TV lights up.
4 Press the C-key or a digit key in order to turn the TV on again.
If for a period of 10 minutes no aerial signal is received, then your set
automatically switches to standby.
Your TV consumes energy in the standby mode. Energy consumption
contributes to air and water pollution. We advise you to switch off your
TV overnight instead of leaving it on standby. You save energy and the
picture tube is demagnetised which supports good picture quality.
Selecting TV channels
4 Select the TV channel with the digit keys on the remote control.
4 For a two-digit programme number, enter the second digit within 2
seconds.
4 If you want to know which channel you are watching, open the door of
the remote control and press J short.
Quickly run through the TV channels from the Favourite list.
4 Hold the P - or + key pressed down.
Volume control
4 Press a - or +.
Temporarily interrupt the sound
4 Press c.
5 The sound is temporarily interrupted.
4 Press c again to get the sound back.
SOUND MUTED
VCR
TUNER CD TAPE
TV
LK
a
b
1
c
4
d
7
e
c
off
12
SAT LD
C
M
B
E
0LK
2
3
5
6
89
2
0
3
LK
a
TV
TV
J
C
M
0LK
1
2
3
4
5
6
7
89
2
c
0
3
LK
a
Page 15

15
English
Operation
Main Menu
The main menu is split into 2 menus and you can:
. adjust picture and sound according to personal preference
. call up a programme list with an overview of the TV channels stored
. select from among various special features
. select recording sources for your video recorder
. enter the system installation menu.
4 Press MENU.
5 The MAIN MENU 1 appears.
4 Press off to switch off each menu.
Adjusting the picture
4 Press MENU.
4 Press the corresponding colour key for PICTURE.
5 The PICTURE 1 menu appears
4 Press one of the colour keys to select the adjustment you want to
regulate.
When you have a set that can receive the NTSC system and when USA
is selected in Selecting the TV system, see p. 7, also the option tint
appears in the PICTURE 2 menu.
5 The selected adjustment lights up.
4 Press MENU - or + in order to regulate the selected adjustment.
4 Press a colour key once more in order to select another adjustment.
Do you want to store the changed adjustment in the memory ?
4 See Special Features, PP store, p. 18.
Digital scan (Line Flicker Reduction)
In certain circumstances while watching TV programmes it may be
preferred to switch off the digital scan line flicker reduction.
4 Press the corresponding colour key for DIG. SCAN.
4 Press MENU - in order to switch off the line flicker reduction.
4 Press MENU.
5 The MAIN MENU 1 appears again.
You use the keys in the grey area of the
drawing to operate the main menu.
With the colour keys a-b-c-d-e you select
your choice in the menus.
MAIN MENU 1
a■picture
b
■
sound
c
■
programme list
d
■
special features
e
■
>>>>>
select : a-e menu off
MAIN MENU 2
a■recording source
b
■
system installation
c
■
>>>>>
select : a-c menu off
PICTURE 1
a■brightness
b
■
colour
c
■
contrast
d
■
sharpness
e
■
dig. scan
select : a-e menu off
a
b
c
d
e
TV
TV
LK
1
4
7
c
off
C
M
0LK
2
3
5
6
89
2
0
3
LK
a
Page 16

16
Adjusting the sound
4 Press MENU.
4 Press the corresponding colour key for SOUND.
5 The SOUND 1 menu appears.
Volume, balance, treble, bass
4 Press one of the colour keys to select the adjustment you want to
regulate.
5 The selected adjustment lights up.
4 Press MENU - or + in order to regulate the selected adjustment.
4 Press a colour key again to select another adjustment.
Do you want to store the modified adjustment in the memory ?
4 Press MENU.
5 The MAIN MENU 1 appears.
4 See Special Features, PP store, p. 18.
Speech
4 Press the white key e in the SOUND 1 menu.
5 The SOUND 2 menu appears.
4 Press the corresponding colour key for SPEECH.
5 SPEECH lights up.
4 Press MENU + to reveal the treble and to suppress the bass.
4 Press MENU - to switch off.
Spatial and surround sound
4 Press the corresponding colour key for SPATIAL in the SOUND 2 menu.
5 SPATIAL lights up.
4 Press MENU - or + to switch off or on.
5 When SPATIAL ON is selected, it seems as though the loudspeakers are
spread further apart from one another. You get a spatial sound
effect.
You achieve a Surround Sound effect if you have 2 or for a maximum
effect 4 extra loudspeakers connected. See Peripherals, p. 31.
In case of 2 extra loudspeakers, always connect them to REAR at the
back of your TV.
In case of 4 extra loudspeakers,connect them to FRONT and REAR.
4 Press the loudspeaker switch on the back of the TV out.
5 The internal loudspeakers of your TV are now switched off.
4 Place the loudspeakers in the corners of an imaginary square.
Mono broadcasting activates the two loudspeakers of your TV set or
the two loudspeakers connected to FRONT and REAR.
4 Select SPATIAL ON.
5 You get a pseudo stereo effect.
Stereo broadcasting activates the two loudspeakers of your TV or the
two loudspeakers connected to FRONT and the two loudspeakers
connected to REAR.
4 Select SPATIAL ON.
5 You get a spatial stereo effect.
SOUND 1
a■volume
b
■
balance
c
■
treble
d
■
bass
e
■
>>>>>
select : a-e menu off
SOUND 2
a■speech
b
■
spatial
c
■
sound mode
d
■
>>>>>
select : a-d menu off
Page 17

17
English
Operation
Sound mode
4 Press the corresponding colour key for SOUND MODE in the SOUND 2 menu.
5 SOUND MODE lights up.
5 If the TV channel which you are now watching transmits stereo or digital
sound and if your set is equipped with Nicam, you can choose between :
. stereo or mono if the TV channel transmits stereo sound
. digital or analogue if the TV channel transmits digital sound.
4 Select analogue or mono in case of weak digital or stereo sound signals.
4 Press MENU - or +.
If you do not make a sound choice for the TV channel which you are
watching your TV will choose between stereo or digital sound,
depending on the sound the TV channel transmits.
4 Press MENU.
5 The MAIN MENU 1 appears again.
Programme list
4 Press the corresponding colour key for PROGRAMME LIST in MAIN MENU 1.
5 A list with an overview of the first 30 stored TV channels appears.
TV channels from the favourite list are displayed in white characters.
TV channels which are not in the favourite list are displayed in red
characters.
4 Press MENU - or + to run through the other pages (to 99) of the
programme list.
4 Press MENU.
5 The MAIN MENU 1 appears again.
4 Press off.
5 The MAIN MENU disappears.
Page 18

18
Special features
4 Press MENU.
4 Press the corresponding colour key for SPECIAL FEATURES.
5 The SPECIAL FEATURES 1 menu appears.
4 Press a colour key in order to choose between child lock, sleeptimer,
pp store, demonstration, pip size (for sets with the Picture in Picture
option) or picture format.
5 Your choice lights up.
4 Press once more on a colour key to make another choice.
Child lock
If the child lock is on, the TV can only be switched on with the digit keys
on the remote control. The keys on the TV cannot be used.
If the message
CHILD LOCK ON appears, the child lock should be switched
off.
4 Press the corresponding colour key for CHILD LOCK.
4 Press MENU - or + to switch the child lock off or on.
Sleeptimer
With the aid of the sleeptimer you can set the time when the TV should
switch itself off.
4 Press the corresponding colour key for SLEEPTIMER.
4 Hold the key MENU + pressed down.
5 The counter runs from off up to 90 minutes.
4 Hold the key MENU - pressed down.
5 The counter runs from 90 down to off.
If you have set a time, then one minute before the TV switches off the
remaining minute automatically appears on the screen.
You can always switch off your set earlier or change the time set.
PP store
Adjustments made in the picture- and sound menu can be stored in
the memory and be called up again with the PP key.
4 Press the corresponding colour key for PP STORE.
5 PP STORE lights up and PERSONAL PREFERENCE STORED appears briefly on the
top of the menu.
At this point all previous adjustments are cancelled.
See also Other functions, p. 21.
Demonstration
This function demonstrates one after another all the possible options
of your TV.
4 Press the corresponding colour key for DEMONSTRATION.
4 Press MENU + to switch the demonstration on.
4 Press off in order to stop the demonstration.
SPECIAL FEATURES 1
a■child lock
b
■
sleeptimer
c
■
pp store
d
■
demonstration
e
■
>>>>>
select : a-e menu off
SPECIAL FEATURES 2
a■pip size
b
■
picture format
c
■
>>>>>
select : a-c menu off
00:59
Page 19

19
English
Operation
Pip size
You can select either a large or a small pip format.
4 Press the corresponding colour key for PIP SIZE in the SPECIAL FEATURES 2
menu.
4 Press MENU - or +.
For more information about Pip, see Pip, Picture in Picture, p. 24.
Picture format
A programme in the conventional picture format can be expanded so
that you can take full advantage of your wide screen.
4 Press the corresponding colour key for PICTURE FORMAT.
4 Press MENU - or + repeatedly to select NORMAL, PANORAMA or EXPAND in
order to choose between a conventional, a panoramic or a full
expanded picture format.
Recording Source
If you want to record a programme, then first read Peripherals,
Recording, p. 34.
System Installation
You can also enter the System Installation menu via the Main Menu 2 to
select your menu language and to locate and to store your TV channels.
4 Press MENU.
4 Press the corresponding colour key for SYSTEM INSTALLATION in the
MAIN MENU 2.
5 The SYSTEM INSTALLATION menu appears on the screen.
4 Now follow very closely and step by step the instructions as described
on page 5 and following.
4 Press MENU to leave the SYSTEM INSTALLATION menu.
4 Press off to leave the SYSTEM INSTALLATION menu or the MAIN MENU.
OFF
OFF
Page 20

20
Other functions
Picture format
4 Press E repeatedly to select
. or a conventional picture format
. or a panoramic picture format
. or a full expanded picture format
. or a wide screen picture format.
5 The information PANORAMA appears briefly on the screen if a panoramic
picture format has been selected.
5 The information MOVIE EXPAND appears briefly on the screen if a full
expanded picture format has been selected.
4 Keep MENU + pressed to move the full expanded picture upwards so that
the subtitles, if there are, become visible at the bottom.
4 Keep MENU - pressed to move the full expanded picture downwards
again.
5 The information WIDE SCREEN appears briefly on the screen if a wide
screen picture format has been selected.
Making subtitles visible from pictures from VCR1, VCR2 or SAT in the
MOVIE EXPAND picture format
4 Press the TV key on the remote control.
4 Keep MENU + or - pressed to move the picture upwards or downwards
again.
4 Press the M again until the designation VCR1, VCR2 or SAT appears in a
grey block.
5 Now you can operate your video recorder 1 or 2 or satellite tuner again
with the remote control of the TV.
Previous programme
4 Press the 2 key.
5 The previous selected TV channel is displayed again.
The
3 indication has a video recorder function.
Brightness
4 Open the door of the remote control.
4 Press A - or + in order to adjust the brightness.
TV
C
M
TV
3
6
E
2
M J e
h
A
0LK
1
2
4
5
7
89
c
0
LK
a
Page 21

21
English
Operation
PR1 BBC1
SOUND MUTED
Selecting satellites
The keys h - and + are only functional when having connected a
satellite tuner in combination with a satellite positioner and an
automatically rotatable polarmount antenna to select satellites.
PP key
With the green PP-key you can call up again the picture and sound
adjustments which have been stored with the PP store in the
Special Features menu, p.18.
4 Open the door of the remote control.
4 Press PP.
Information on screen
After the selection of a TV channel the following information appears
briefly on your screen :
. the programme number and name of the selected TV channel
. the actually selected sound mode if the TV-channel transmits stereo
or digital sound
. SOUND MUTED when the sound is temporarily interrupted
. the name of the pip connection if pip is switched on.
See Pip-Picture in Picture, p.24
. DUAL f or g in case of bilingual broadcast.
4 Open the door of the remote control.
4 Press J short.
5 The channel information appears on the screen for a few seconds.
5 If the sleeptimer is on, then the remaining time becomes visible.
Permanent programme number
4 Open the door of the remote control.
4 Press J long.
5 The channel information appears on the screen for a few seconds and
the permanent programme number remains in the upper right hand
corner of the screen when it was off, or disappears when it was on.
Bilingual Broadcast
If you are watching a TV channel which is being broadcast in two
languages, dubbed and original language, you can make your choice.
4 Open the door of the remote control.
4 Press key e and select language f or g.
5 DUAL f or g appears for a moment on top of the screen.
The setting is stored in the memory for the selected TV channel when
switching to another TV channel or to standby.
00:59
Page 22

22
TV
Time
The time can only be called up if the TV channel you are watching is
also broadcasting teletext.
Teletext does not need to be switched on.
4 Open the door of the remote control.
4 Press m.
5 The time appears in the upper right hand corner of the screen.
4 Press m again in order to switch off.
Freezing the picture
When watching you can freeze the picture at any moment.
4 Press F.
4 Press F again to return to normal picture.
DNR
With DNR, Dynamic Noise Reduction, you can reduce the noise when
receiving a weak signal and so improve the picture quality.
4 Press the DNR key repeatedly to select DNR MIN, DNR MED, DNR MAX
or DNR OFF.
5 Your selection appears for a moment on top of the screen.
DNR MED offers you an optimum picture quality, and it is the most ideal
setting for signals of normal strength.
DNR MAX is not necessary when the picture quality is good.
The setting is stored in the memory only for the selected TV channel
after you have switched to another TV channel.
10:10/20
C
M
TV
0LK
1
2
3
4
5
6
7
89
2
c
0
3
LK
a
m
FHu
Page 23

23
English
Operation
Mosaic screen
For TV sets with the Picture in Picture option.
With the mosaic screen, you can scan the TV channels stored in the
favourite list, display successive frozen pictures with the photo finish
function and reproduce the main picture image by image with the
strobe function.
4 Press u.
5 A menu line appears on the bottom line of the screen. It contains four
functions, each having another background colour, corresponding to
the menu colour keys.
4 Press the corresponding colour key to activate one of the 4 functions.
Scan
4 Press the red key a.
5 A scan of the stored TV channels is performed, starting with
programme number 0.
Only TV channels placed in the favourite list or programmes from
switched on peripherals are displayed. On the last position, bottom
right, a live picture is shown of the programme that was displayed
before the mosaic screen was switched on.
4 Press the red key a again.
5 A following series of stored TV channels from the favourite list or
programmes from switched on peripherals is scanned.
Each mosaic-picture will contain its identifying programme number.
4 Select a TV channel with the digit keys.
5 The mosaic screen disappears and the selected TV programme will be
displayed.
4 Press the blue key d to interrupt the scan function and to switch off
the mosaic screen.
Never perform a scan while recording a TV programme with a video
recorder connected to EXTERNAL 1, 2 or 3 and when having selected an
option in the Recording Source menu since the scan will be recorded on
tape.
Photo finish
4 Press the green key b.
5 The main picture is displayed in successive frozen pictures.
The last picture on the bottom right will remain live.
4 Press the green key b again.
5 A new photo finish picture is displayed, overwriting the old one.
4 Press the blue key d to switch off the photo finish function and to switch
off the mosaic screen.
5 The programme that was selected before the mosaic screen was
switched on, appears again.
Strobe
4 Press the yellow key c.
5 The picture is reproduced image by image. So you get an interrupted
movement.
4 Press the yellow key c again.
5 The picture is reproduced image by image in a faster way.
4 Press the yellow key c once again.
5 The strobe function is switched off.
4 Press the blue key d to switch off the mosaic screen.
Page 24

24
Pip - Picture in Picture
For TV sets with the Picture in Picture option.
With pip, picture in picture, you can call up a little
screen within the main TV screen. Thus at the same
time you can watch a programme from other
equipment, connected with a eurocable.
The picture in the small screen has no sound.
Switching pip on and off
4 Open the door of the remote control.
4 Press p.
5 The pip screen appears and the image is the same as in the main
screen.
5 The name of the pip programme appears briefly on the main screen.
4 Press p again to switch pip off.
Selecting pip connections
4 Press q repeatedly.
5 The name of the connections appear.
If any other electronic unit is connected and switched on, then its
programmes appear in the pip screen.
Select on your video recorder the TV channels which you have
stored in it.
For connecting equipment to EXTERNAL 1, EXTERNAL 2, EXTERNAL 3, FRONT,
see Peripheral Equipment, p. 29.
p
TV
C
M
TV
0LK
1
2
3
4
5
6
7
89
2
c
0
3
LK
a
EXT 1
EXT 2
EXT 3
FRONT
Page 25

25
English
Operation
Switching screens
4 Press r.
5 The main screen and the pip screen exchange places.
If the TV channel is only in the pip screen and not in the main screen,
then use - P + of the pip keys in order to change your TV channel in the
pip screen.
Still Picture
4 Press s.
5 The picture in the pip screen stands still.
Even when pip is not switched on, the main screen will appear as a still
picture in the pip screen.
4 Press s again or select another channel in the pip screen in order to
cancel the still picture.
Moving the Pip screen
4 Press t.
5 Each time you press this key, the pip screen moves to another corner
of the main screen.
If the main screen is a full expanded picture format, the pip screen
only moves to the upper left hand corner of the main screen.
Pip Size
You can select either a large or a small pip screen.
See Main Menu : Special Features, p.18.
B
A
A
B
Page 26

26
Teletext
TV
M
C
1
2
3
4
5
6
7
89
0
TV
LK
a
c
2
2
3
- P+
- P+
L0K
a
Switching Teletext On and Off
4 Select the TV channel for the desired teletext broadcast.
Teletext cannot be switched on when there is a menu on the screen.
4 Open the door of the remote control.
4 Press a in order to switch on the teletext.
5 The contents appear on the screen together with two information lines
at the top and an options line at the bottom.
When a selected teletext page contains several subpages, the subpage
numbers which are automatically stored in the memory appear in the
first information line. The coloured number indicates the displayed
subpage. The white numbers refer to the subpages which can be
selected with
MENU - or +.
In the following information line appears:
. the name of the TV channel selected
. the page counter
. date and time.
4 Press a again in order to switch off the teletext.
5 The TV channel reappears.
Easy Teletext system
The major advantages of this new teletext system are :
A considerable reduced waiting time by predicting what the user will
probably select and which results in :
. a fast and direct selection of previous and following pages which are
in transmission
. the precapturing of the pagenumbers read from the displayed page
. the direct selection of the last 2 page numbers selected with the
digit keys
. the precapturing of the pages referred to in the options line
. the creation of a habit watcher list : not predictable pages, being
selected by the user, are put in a list of preferred pages so that they
are immediately available afterwards. The pages are stored in the
memory when switching off teletext or when switching to standby.
The precapturing of up to 9 subpages to be controlled by the teletext
user.
Most TV channels broadcast information via
teletext. Each channel which broadcasts
teletext transmits a page with information on
how to use its teletext system. Look for the
teletext page with the index (usually page 100).
TV programmes are sometimes subtitled for the
hard of hearing. Depending on the TV channel,
teletext is transmitted in different systems: WST,
TOP, FLOF. The system utilised is indicated in the
options line at the bottom of the screen.
WST TOP FLOF
Page 27

27
English
Operation
Quickly run through the teletext pages
4 Press P— to run through the previous pages.
4 Press P+ to run through the following pages.
Selecting the previous teletext page
4 Press the 2 key.
5 The previous selected teletext page is displayed again.
Selecting subpages
When a selected teletext page consists of different subpages, one of
the subpages appears on the screen.
The coloured number in the first information line refers to the
displayed subpage.
The other subpage numbers appear in white as soon as the
transmission has found them.
4 Press MENU - to select the previous subpage.
4 Press MENU + to select the following subpage.
Selecting the index teletext page
4 Press the white colour key e.
5 The index, usually p. 100, appears.
Selecting a Teletext Page
With the digit keys ............................................or With the options line......................................
4 Enter the desired page number with the
digit keys.
5 The page counter seeks the page or the
page appears immediately when the page
number has been stored in the memory.
5 A message appears when you have entered
a not existing or an incorrect page number.
Page numbers beginning with 0 or 9 do not
exist.
4 Enter the correct page number.
4 Select with the colour keys, corresponding
to the coloured options at the bottom of the
screen and depending on the teletext the
selected TV channel transmits,
- the previous ¨a or the following aÆ
pages
- the previous selected pages
- another subject
Page 28

28
Special teletext functions
4 Open the door of the remote control.
Hold
You can stop the page counter from seeking when you have entered a
wrong page number or when the page is not available.
4 Press d.
5 e appears in the first information line.
The page counter stops seeking the entered page number.
4 Enter another page number.
5 e disappears.
Reveal
Some pages contain concealed information, such as solutions to riddles
and puzzles.
4 Press f to call up concealed information.
4 Press f again in order to switch off the concealed information.
Interrupt
4 Press g.
5 The TV programme appears.
5 a at the top of the screen indicates that you are still in the teletext
mode.
Before interrupting teletext, you can select a page number.
When the page has been found, the page number appears on your
screen.
4 Press g again.
5 Teletext reappears.
Mix
4 Press b.
5 The teletext page and the TV programme appear on the screen at the
same time.
4 Press b again.
5 Only the teletext page is displayed.
Enlarge
4 Press h to enlarge the top half of the teletext page.
4 Press h again to enlarge the bottom half of the teletext page.
4 Press once more to return to normal page size.
Subpage
By adding a subcode you can call up a desired subpage.
4 Enter the page number.
4 Press m.
4 Enter the desired subpage with the digit keys : e.g. 3 for the third page
of seven subpages.
4 Press m in order to cancel the subcode.
Subtitles and newsflashes
4 Select the contents page (usually page 100).
4 Select the page number for subtitles or newsflashes.
5 Subtitles or newsflashes, if there are, appear at the bottom of the
TV programme.
A b c
D e f
A b c
D e f
Page 29

29
English
Peripheral
Equipment
Peripheral Equipment
There is a wide range of electronic equipment that
can be connected to your TV.
The following connection diagrams show you
where the different equipment should be connected
at the back or the right side of the TV.
TV and video recorder
4 Connect the aerial cables 1 and 2 as shown
alongside. A better picture quality is obtained if you
connect a eurocable 3 additionally.
S-VHS video recorder
4 Do you have a S-VHS video recorder with S-VHS
connectors, then connect as well as the aerial cables
1 and 2
the S-VHS cables 4 and 5
and the S-VHS cables 6 and 7.
Do not connect an additional eurocable.
OR
4 Do you have a S-VHS video recorder with a S-VHS
euroconnector, then connect as well as the aerial
cables 1 and 2, the S-VHS eurocable 3.
Never connect to the same TV one video recorder
with S-VHS cables at the same time as one video
recorder with a euroconnector.
The euroconnector has no function.
Searching for and storing the testsignal of the video recorder
4 Unplug the aerial cable of the aerial socket g of your video recorder.
4 Switch on your TV and put the video recorder on the testsignal.
(See the handbook for your video recorder.)
4 Press the INSTALL key at the right side of your TV, or enter the System
Installation menu via the main menu.
5 The SYSTEM INSTALLATION menu appears.
4 Search for the testsignal of your video recorder in the same way as you
searched for and stored the TV channels. See Installation, Searching for
and storing TV channels, p. 5.
Store the testsignal either under programme number 0 or between 50
and 99.
4 Insert the aerial plug again into the aerial socket g of your video
recorder after you have stored the testsignal.
2
EXTERNAL 2
CABLE
3
1
S•VHS VIDEO
IN
4
S•VHS VIDEO
OUT
6
S•VHS AUDIO
IN
5
S•VHS AUDIO
OUT
OUT
S•VHS
7
IN
S•VHS
Page 30

30
TV, video recorder 1 and one or more peripherals
4 Connect the aerial cables 1, 2 and 3 as shown
alongside. A better picture quality is obtained if you
connect the eurocable 4 to EXTERNAL 1 or 3 and the
eurocable 5 to EXTERNAL 2 additionally.
4 Look for the test signal of your peripheral in the
same way as you do for a video recorder.
When having more peripherals, you can also
connect them to each other with an extra aerial
cable 6 and an additional eurocable 7 to obtain a
better picture quality.
Only with a video recorder connected to
EXTERNAL 2
it is possible to record a programme from your TV
as well as from other connected equipment. See
Recording with your video recorder, p. 34.
TV and laser disc or satellite tuner or
Photo CD/CD-I equipment
4 Connect the aerial cables 1 and 2 as shown
alongside.
A better picture quality is obtained if you connect
the eurocable 3 additionally.
See also Installation, Photo CD/CD-I, p. 13, if you
connect a Photo CD/CD-I equipment.
Look for the test signal of your equipment in the
same way as you do for a video recorder.
Audio equipment
You can listen to your TV sound via your audio
equipment.
4 Therefore connect the audio cables to the audio
input of your equipment and to AUDIO L and R at the
back of your TV.
4 Press c on the remote control.
5 The loudspeakers of your TV are switched off.
CABLE
EXTERNAL 3
EXTERNAL 2EXTERNAL 1
1
35
4
VCR
2
7
2
6
CABLE
EXTERNAL 1
1
2
AUDIO
3
Page 31

31
English
Peripheral
Equipment
Extra loudspeakers
To achieve a better sound effect you can connect 2
of 4 extra loudspeakers, min. 8 Ohm.
See also Spatial and Surround sound, p. 16.
4 Hold the connector clip pressed in and insert the
ends of the wires into the openings. On the back of
the TV it is indicated where you connect the FRONT
and REAR loudspeakers.
In case of 2 extra loudspeakers:
4 Connect them to FRONT ...................................or 4 Connect them to REAR.
4 Press the loudspeaker switch on the back of
the TV out.
5 The internal loudspeakers of your TV are now
switched off.
5 You achieve a better front sound effect.
5 You achieve a surround sound effect.
A loudspeaker kit to achieve Surround Sound,
containing two extra boxes only to be
connected to REAR and 12 m wire can be
purchased from your dealer.
Do never connect the loudspeakers from
these kit to FRONT.
In case of 4 extra loudspeakers :
4 Connect them to FRONT and REAR.
4 Press the loudspeaker switch on the back of the TV
out.
5 The internal loudspeakers of your TV are now
switched off.
Headphone
4 Insert the plug into the headphone socket n at the
right side of the TV.
4 Press c on the remote control.
4 Adjust the volume with a - or +.
5 The internal loudspeakers of your TV are switched
off.
The headphone socket has an impedance of
between 8 and 4000 Ohm and is of the 6.3 mm jack
type.
REAR
FRONT
Camera and camcorder
4 Connect your camera or camcorder to FRONT at the
right side of your TV.
4 Connect the equipment to VIDEO 1 and AUDIO L 2 for
mono equipment.
4 In the SOUND menu select mono sound. See Main
Menu, Adjusting the sound, Sound mode, p. 17.
4 Connect also AUDIO R 2 for stereo equipment.
4 In the SOUND menu select stereo sound.
S-VHS quality with a S-VHS camcorder is obtained
by connecting the S-VHS cables with the S-VHS input
3 and AUDIO inputs 2.
2
1
3
AUDIO
AUDIO
VIDEO
S•VHS
L
R
n
Page 32

32
Decoders
Cable TV offers you a wide choice of programmes. Most of them are
free, others are to be paid for by the viewer. This means that you will
need to subscribe to the broadcasting organisation whose programmes
you wish to receive. This organisation will supply you a corresponding
decoder unit to allow the programmes to be unscrambled.
For further information, ask your dealer. See also the booklet supplied
with your decoder.
Connecting a decoder with an aerial socket
to the TV
4 Connect the aerial cables 1 and 2 as shown
alongside.
When your decoder has a euroconnector you obtain
a better picture quality if you connect a eurocable 3
additionally to
EXTERNAL 1.
Connecting a decoder without an aerial socket
to the TV
4 Connect the decoder with your TV with a
eurocable 3 only.
Connecting the decoder to the video
recorder
Some video recorders have a special euroconnector
for decoder.
4 Connect a eurocable to the euroconnector of your
decoder and to the special euroconnector of your
video recorder.
See also the handbook of your video recorder.
4 To connect your video recorder to the TV, see
before.
If you want to connect more equipment to your TV,
consult your dealer.
2
EXTERNAL 1
2
EXTERNAL 1
4
CABLE
1
3
CABLE
1
3
Page 33

33
English
Peripheral
Equipment
Reproducing Picture and Sound
Most of the audio and video equipment from our
range of products can be operated with the
remote control of your TV.
Then press M on the remote control repeatedly until
the designation VCR1, VCR2, SAT, LD, TUNER, CD
or TAPE appears in a grey block, according to the
equipment.
To operate your TV again, first press the TV key and
enter the programme number of the TV channel you
want to watch with the digit keys.
a. from equipment connected only with an aerial cable
4 Switch your TV on.
4 With the digit keys select the programme number under which you
have stored the test signal.
4 Switch on your equipment.
5 The picture and/or sound is reproduced.
Do you want to watch TV again ?
4 Enter the programme number of the TV channel which you want to
watch with the digit keys.
b.from equipment connected with a eurocable
4 Switch your TV on.
4 Switch your equipment on.
5 Either the picture and/or the sound is reproduced or descrambled.
If this is not the case :
4 Press C repeatedly until the designation EXT1, EXT2, EXT 3 or FRONT
appears on the screen, according to where you connected your
equipment at the back or the right side of your TV.
5 Either the picture and/or the sound is reproduced.
Do you want to watch TV again ?
4 Press C repeatedly again until the picture and/or the sound from the TV
channels is reproduced.
c. from a S-VHS recorder connected with S-VHS cables
4 Switch your TV on.
4 Press C repeatedly until the indication EXT2 appears on the screen.
4 Switch your S-VHS recorder on.
5 The picture stored in your video recorder from a pre-recorded cassette
or from a TV channel is reproduced.
d. from equipment connected to the right side of the TV
4 Switch your TV on.
4 Press C repeatedly until the indication FRONT appears on the screen.
4 Switch your equipment on.
5 The picture is reproduced.
Do you want to watch the TV picture again ?
4 Enter the programme number of the TV channel which you want to
watch with the digit keys.
VCR
2
1
TV
TV
SAT LD
TUNER CD TAPE
C
M
Page 34

34
Recording with your video recorder
1. Recording a TV programme
only using an aerial cable
4 Select the programme number on your video recorder.
4 Set your video recorder to record.
(See the handbook for your video recorder.)
using a eurocable connected to the
euroconnector
EXTERNAL 2
4 Select the programme number on the TV.
4 Press MENU.
4 Press the corresponding colour key for
RECORDING SOURCE in the MAIN MENU 2 menu.
5 RECORDING SOURCE appears.
4 Press the red key a.
5 TV TO EXT 2 is displayed.
4 Press off.
4 Set your video recorder to record.
(See the handbook for your video recorder.)
using a eurocable connected to the
euroconnector
EXTERNAL 1
4 Select the programme number on the TV.
4 Set your video recorder to record.
(See the handbook for your video recorder.)
2. Recording a programme from equipment connected to
EXTERNAL 1,
EXTERNAL 3 or FRONT
4 Switch on the equipment.
4 Press MENU.
4 Press the corresponding colour key for RECORDING SOURCE in the
MAIN MENU 2 menu.
5 RECORDING SOURCE appears.
4 With the colour keys select the connection from which you want to
record.
5 Your selection lights up.
4 Press off.
4 Set your video recorder to record.
(See the handbook for your video recorder.)
RECORDING SOURCE
a■TV to EXT 2
b
■
EXT 1 to EXT 2
c
■
EXT 3 to EXT 2
d
■
FRONT to EXT 2
select : a-d menu off
Page 35

35
English
Tips
Poor Picture
Have you selected the correct TV system ?
Is your TV set or house aerial located too
close to loudspeakers,non-earthed audio
equipment or neon lights, etc. ?
Mountains or high buildings can cause
double pictures or ghost images.
Sometimes you can improve the picture
quality by changing the direction of the
outside aerial.
Is the picture or is the teletext
unrecognisable ? Check if you have entered
the correct frequency or adjust the frequency
by fine tuning. See Installation, p. 7.
Are brightness and contrast out of
adjustment ? Press the PP key.
Switch off your TV overnight with A on the
left side of the TV.
No picture
Is the aerial connected properly ? Are the
plugs tightly connected in the aerial socket ?
Is the aerial cable in good condition and does
it have suitable plugs ? Are the connection
facilities to a possible secondly installed TV
in good condition ? If in doubt, consult your
dealer.
NO PICTURE means that the selected peripheral
equipment is transmitting no picture.
Did you press the correct keys on the remote
control ? Try it once more.
Did you press a again after switching on
teletext ?
Has the child lock been switched off ? See
Special Features, p. 18.
Sound
Did you perhaps interrupt the sound with the
c key ?
Were the internal loudspeakers perhaps
switched off by the switch on the back of
your TV set ? See Extra loudspeakers, p. 31.
Is the sound coming out of only one
loudspeaker ? Was the balance perhaps set
to one extreme ? See SOUND menu, p. 16.
Select SPATIAL ON in the Sound menu if there
is no sound coming out of the extra
loudspeakers in back. See Spatial and
Surround Sound, p. 16.
Remote control
Does your TV no longer respond to the
remote control ? Check whether the
indication TV appears in a grey block.
Perhaps the batteries are empty. See
Preparation, p. 3.
Menu
Did you select the wrong menu ? Once more
press
MENU or off to exit from the menu.
Connections
Check whether your peripheral equipment is
in fact properly connected. See p. 29.
Have you switched on the peripheral
equipment ?
No solution ?
Switch your TV set off and then on again.
Never attempt to repair a defective TV
yourself.
Check with your dealer or call a TV
technician when nothing helps.
End of life directives
Your new TV contains materials which can
be recycled and reused.
At end of life specialised companies can
dismantle the discarded TV to concentrate
the reusable materials and to minimise the
amount of materials to be disposed of.
Please inform yourself on local regulations
on disposal of your old tv set.
!
Tips
Page 36

36
Index
analogue........................................................17
automatic.........................................................6
balance ..........................................................16
bass................................................................16
bilingual broadcast .......................................21
brightness......................................................15
camcorder .....................................................31
child lock........................................................18
colour.............................................................15
connections ...................................................29
contrast..........................................................15
decoder..........................................................32
delete .............................................................10
demonstration...............................................18
digital.............................................................17
digital scan ....................................................15
DNR................................................................22
dual ................................................................21
eurocable.......................................................29
euroconnector...............................................29
fine tuning .......................................................7
freeze .............................................................22
frequency.........................................................7
headphone.....................................................31
info on screen ...............................................21
insert..............................................................10
installation menu ............................................6
language..........................................................5
main menu ....................................................15
manual.............................................................7
mono..............................................................16
mosaic screen ...............................................23
movie expand................................................20
muted.............................................................14
permanent programme number..................21
personal preference key...............................21
personal preferences....................................18
Photo CD/CD-I................................................13
photo finish ...................................................23
picture............................................................15
pip - picture in picture ..................................24
preselection preferences..............................12
programme list..............................................17
programme name...........................................9
programme sort............................................10
recording .......................................................34
recording source...........................................19
S-VHS.............................................................29
scan................................................................23
searching for TV channels..............................6
selecting TV system........................................7
sharpness ......................................................15
sleeptimer......................................................18
sound .............................................................16
sound mode ..................................................17
spatial ............................................................16
special features .............................................18
special teletext functions..............................28
standby ..........................................................14
stereo .............................................................16
still picture.....................................................25
strobe.............................................................23
surround ........................................................16
swap...............................................................10
teletext ...........................................................26
time................................................................22
tint..................................................................15
treble..............................................................16
videorecorder................................................29
volume...........................................................14
Page 37

Printed in Belgium
3104 305 4412.2
 Loading...