

Page 1

tv
Page 2

MODEL :
PROD. NO :
GB
Please note the reference numbers
for your TV set located on the
packaging or on the back of the set.
FR Veuillez noter les références de
votre téléviseur situées sur
l’emballage ou au dos de l’appareil.
NL Let op de referenties van uw
televisietoestel die op de
verpakking of op de achterkant
van het toestel staan.
DE
Notieren Sie die
Referenznummern Ihres
Fernsehgeräts, die sich auf der
Verpackung bzw.auf der
Rückseite des Geräts befinden.
IT Notare i riferimenti del vostro
televisore situati sull’imballaggio o
sul retro dell’apparecchio.
DK Bemærk de oplysninger om dit
TV,der findes på kassen eller
bagsiden af TV-apparatet.
NO Noter deg referansen for TV-
apparatet, som du finner på
emballasjen eller på baksiden av
apparatet.
SU Notera de uppgifter om er TV
som återfinns på kartongen eller
baksidan av TV-apparaten.
SF Lue myös television
myyntipakkauksessa tai television
takana olevat merkinnät.
ES
Anote las referencias de su televisor
que se encuentran en el embalaje o
en la parte trasera del aparato.
PT
Anote as referências do seu
televisor localizadas na embalagem
ou na parte de trás do aparelho.
GR ™ЛМВИТЫЩВ ЩИ˜ Ф‰ЛБ›В˜ ¯Ъ‹ЫЛ˜
ЩЛ˜ ЩЛПВfiЪ·Ы‹˜ Ы·˜ Ф˘
‚Ъ›ЫОФУЩ·И ЫЩЛ Ы˘ЫОВ˘·Ы›· ‹
ЫЩФ ›Ыˆ М¤ЪФ˜ ЩЛ˜ Ы˘ЫОВ˘‹˜
TR Ambalaj›n üzerinde ya da aletin
arkas›nda bulunan referanslar›
baflka bir yere not edin.
HU Kérjük vegye figyelembe az Ön
televíziójának a hátoldalán és a
csomagoláson feltüntetett
katalógusszámokat.
RU
á‡Ô˯ËÚ ÌÓÏ ÏÓ‰ÂÎË
‚‡¯Â„Ó ÚÂ΂ËÁÓ‡, ÍÓÚÓ˚È
Û͇Á‡Ì ̇ ÛÔ‡ÍÓ‚Ó˜ÌÓÈ
ÍÓÓ·Í ËÎË Ì‡ Á‡‰ÌÂÈ
ÒÚÓÓÌ ‡ÔÔ‡‡Ú‡.
PL Prosimy o zanotowanie oznaczeń
telewizora umieszczonych na
opakowaniu lub tylnej części
urządzenia.
CZ
Poznamenejte si typové údaje Vašeho
televizoru umístěné na obalu nebo
na zadní straně přístroje.
SK
Poznačte si typové údaje Vášho
televízora nachádzajúce sa na obale
alebo na zadnej strane prístroja.
Page 3

min
1m
Page 4

.
Page 5

Introduction
Thank you for purchasing this television set.
This handbook has been designed to help you install and operate your TV set.
We would strongly recommend that you read it thoroughly.
Note: Specification and information subject to change without notice.
GB
FR
NL
Table of Contents
Installation
Installing your television set . . . . . . . . . . . . . . . . . . . . . . . . . . . . . . . . . . . . . . . . . .2
The keys on the TV set . . . . . . . . . . . . . . . . . . . . . . . . . . . . . . . . . . . . . . . . . . . . . .2
Remote control keys . . . . . . . . . . . . . . . . . . . . . . . . . . . . . . . . . . . . . . . . . . . . . . .3
Safety Information . . . . . . . . . . . . . . . . . . . . . . . . . . . . . . . . . . . . . . . . . . . . . . . . . .3
Quick installation . . . . . . . . . . . . . . . . . . . . . . . . . . . . . . . . . . . . . . . . . . . . . . . . . .4
Program sort . . . . . . . . . . . . . . . . . . . . . . . . . . . . . . . . . . . . . . . . . . . . . . . . . . . . . .4
Program name . . . . . . . . . . . . . . . . . . . . . . . . . . . . . . . . . . . . . . . . . . . . . . . . . . . . .4
Manual store . . . . . . . . . . . . . . . . . . . . . . . . . . . . . . . . . . . . . . . . . . . . . . . . . . . . . .5
Favourite Programmes . . . . . . . . . . . . . . . . . . . . . . . . . . . . . . . . . . . . . . . . . . . . . .5
Other settings in the Install menu . . . . . . . . . . . . . . . . . . . . . . . . . . . . . . . . . . . . .5
Operation
Picture settings . . . . . . . . . . . . . . . . . . . . . . . . . . . . . . . . . . . . . . . . . . . . . . . . . . . .6
Sound adjustments . . . . . . . . . . . . . . . . . . . . . . . . . . . . . . . . . . . . . . . . . . . . . . . . .6
Feature settings . . . . . . . . . . . . . . . . . . . . . . . . . . . . . . . . . . . . . . . . . . . . . . . . . . . .6
Timer function . . . . . . . . . . . . . . . . . . . . . . . . . . . . . . . . . . . . . . . . . . . . . . . . . . . .7
TV lock . . . . . . . . . . . . . . . . . . . . . . . . . . . . . . . . . . . . . . . . . . . . . . . . . . . . . . . . . .7
Teletext . . . . . . . . . . . . . . . . . . . . . . . . . . . . . . . . . . . . . . . . . . . . . . . . . . . . . . . . . .8
Screen Formats . . . . . . . . . . . . . . . . . . . . . . . . . . . . . . . . . . . . . . . . . . . . . . . . . . . .9
Peripherals
Video recorder . . . . . . . . . . . . . . . . . . . . . . . . . . . . . . . . . . . . . . . . . . . . . . . . . . .10
Other equipment . . . . . . . . . . . . . . . . . . . . . . . . . . . . . . . . . . . . . . . . . . . . . . . . .10
To select connected equipment . . . . . . . . . . . . . . . . . . . . . . . . . . . . . . . . . . . . .10
Sides connections . . . . . . . . . . . . . . . . . . . . . . . . . . . . . . . . . . . . . . . . . . . . . . . . .11
Glossary . . . . . . . . . . . . . . . . . . . . . . . . . . . . . . . . . . . . . . . . . . . . . . . . . . . . . . . .11
Practical information
Tips . . . . . . . . . . . . . . . . . . . . . . . . . . . . . . . . . . . . . . . . . . . . . . . . . . . . . . . . . . . .12
Safety Information: Electric, Magnetic and Electromagnetic Fields (“EMF”) . . . .12
Recycling
This packaging of this set can be r
environmental waste.
Disposal of your old product.
Your product is designed and manufactured with high quality materials and components, which can be recycled and
reused.
When this crossed-out wheeled bin symbol is attached to a product it means the product is covered by the European
Directive 2002/96/EC. Please inform yourself about the local separate collection system for electrical and electronic
products.
Please act accor
The correct disposal of your old product will help prevent potential negative consequences for the environment and
human health.
our local rules and do not dispose of your old products with your normal household waste.
ding to y
vered or recycled.Apply to the local authorities in order to minimise
eco
DE
IT
DK
NO
SW
SF
RU
ES
PT
GR
TR
HU
PL
CZ
SK
1
Page 6

5 cm
5 cm
5 cm
5 cm
5 cm
5 cm
Installing your television set
&
Positioning the television set
Place your TV on a solid, stable surface, leaving
a space of at least 5 cm around the appliance.
To avoid accidents,do not put anything on the
set such as a cloth or cover, a container full of
liquid (vase) or a heat source (lamp).
The set must not be exposed to water.
é
Connections
• Insert the aerial plug into the : socket at
the rear of the set.
If you are using an indoor aerial, reception may be
difficult in certain conditions.You can improve
reception by rotating the aerial. If the reception
remains poor,you will need to use an external aerial.
• Insert the mains plug into a wall socket
(220-240 V / 50 Hz).
“
Remote control
Insert the two R6-type batteries (supplied)
making sure that they are the right way round.
Check that the mode selector is set to TV.
The batteries supplied with this appliance do
not contain mercury or nickel cadmium.
If you have access to a recycling facility, please
do not discard your used batteries (if in
doubt, consult your dealer).When the
batteries are replaced,use the same type.
‘
Switching on
To switch on the set, press the on/off key.
A red indicator comes on and the screen
lights up. Go straight to the chapter Quick
installation on page 4.
If the television remains in standby mode,
P
# on the remote control.
press
The indicator will flash when you use the
remote control.
The keys on the TV set
2
The television set has 4 or 5 keys which are
located on the front or the top of the set
depending on the model.
The VOLUME - + (- ” +) keys are used to
P
adjust sound levels.The PROGRAM - + (keys are used to select the required programmes.
To access the menus, simultaneously hold down
” - and ” + keys (or MENU key).
the
The PROGRAM - + keys may then be used to
select an adjustment and the -
e that adjustment.
mak
To exit from the menus, hold down the 2
and
” + keys (or MENU key).
Note : when the
eys are unav
these k
menu on page 7).
Child Lock
ailab
” + keys to
function is activated,
er to
le (ref
Featur
+)
” -
es
Page 7

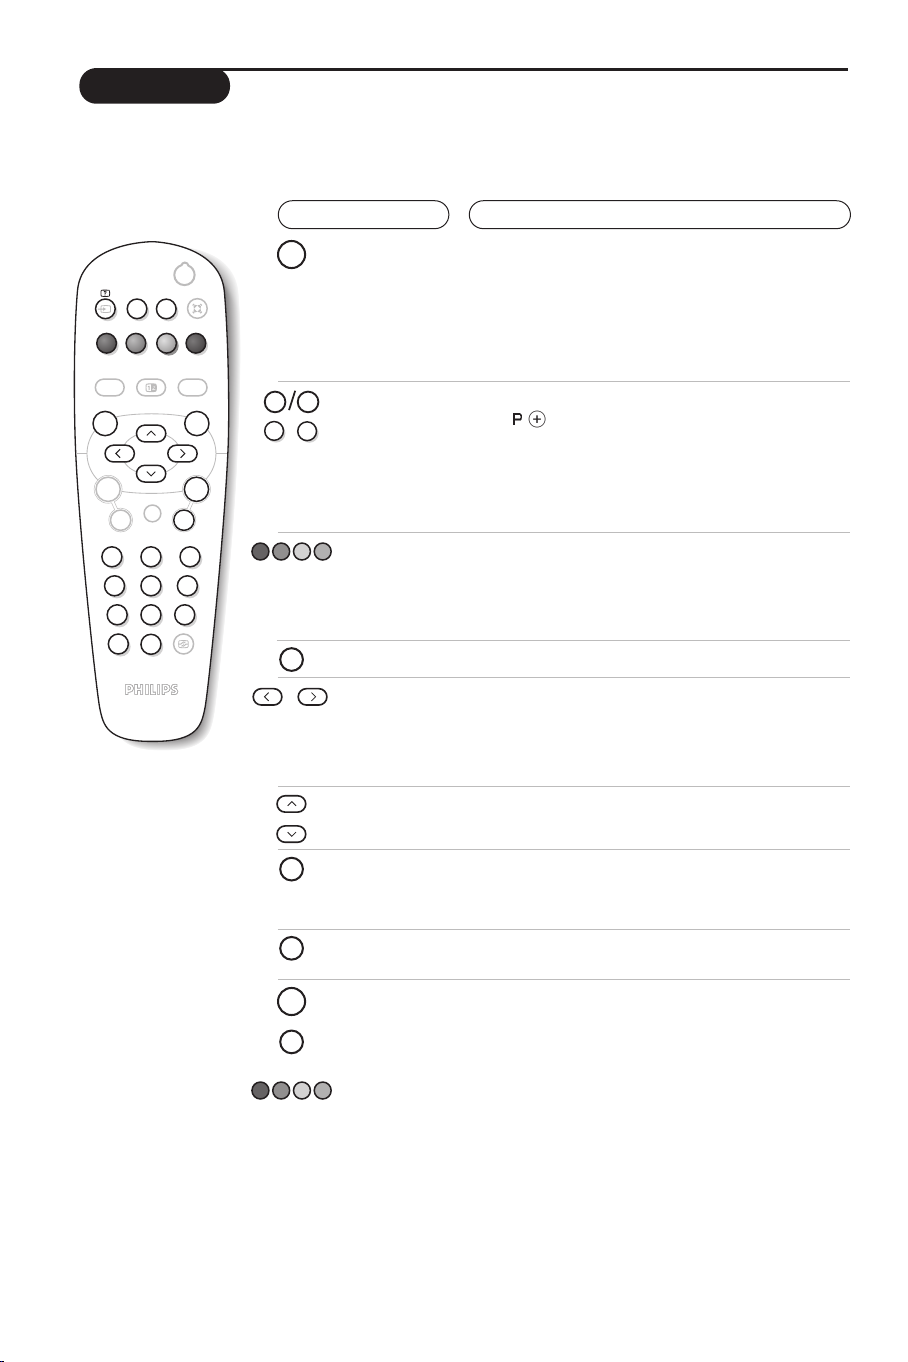
Remote control keys
& Standby
To set the TV to standby mode. To switch the TV
set on again, press b,P @#or 09.
é Sleeptimer
To select the length of time before the set
automatically switches to standby (from 0 to 240
minutes).
“
Select peripherals (p.10)
Press several times to select the required EXT
connector.
‘ Teletext keys (p.8)
( Dual screen
To activate/disable the display on 2 screens. The
second screen displays teletext.
§ Menu
To call up or exit the menus.
è Cursor / Format
These 4 keys are used to navigate through the
menus. (p. 9)
! Volume
To adjust the sound level.
ç Mute
To mute or restore the sound.
0 Screen information
To display / remove the programme number, the
name (if it exists), the time, the sound mode and
the time remaining on the timer. Hold down for 5
seconds to permanently display the programme
number on the screen.
(according to the version)
1 Sound mode
Used to force programmes in
eo
Ster
to
Mono
choose between
The
Mono
2 Surround Sound
To activate / deactivate the surround sound effect. In
stereo,this gives the impression that the speakers are
further apart. For models equipped with Virtual Dolby
Surround*, you can experience Dolby Surround Pro
Logic sound effects.
3 Smart picture and sound
Used to access a series of predefined
settings.
The
personal
menus.
4 Teletext call (p. 8)
5 Programme selection
To access the next or previous TV channel from the
list of Favourite Programmes (see p. 5).
6 Digit keys
Direct access to the programmes.For a 2 digit
programme, enter the 2nd digit before the dash
disappears.
7 Active Control
Optimizes the quality of the picture according to the
quality of reception.
or, for bilingual programmes, to
Dual I
indication is red when in forced position.
position relates to settings selected from the
(according to the version)
or
Stereo
Dual II
.
and
Nicam
picture and sound
Safety Information
• Plug the TV into a 220V – 240V AC, 50 Hz supply.
• Disconnect mains plug when :
– the red light below the TV screen is flashing continuously.
– a bright white line is displayed across the screen.
– there is a lightning storm.
– the set is left unattended for a prolonged period of time.
• Cleaning the TV screen. Never use abrasive cleaning agents.Use a slight damp chamois leather or soft cloth.
• No naked flame sources, such as lighted candles, should be placed on top of the TV or in the vicinity.
• Do not place your TV set under direct sunlight or heat.
• Do not cover or block the TV as it could lead to overheating.
• Leave at least 5 cm around each side of TV set to allow for proper ventilation.
• Avoid placing your set (e.g. near the window) where it is likely to be exposed to rain or water.
• Battery Usage CAUTION – To prevent battery leakage that may result in bodily injury, property damage, or damage to
the unit:
– Install all batteries correctly, with + and – aligned as marked on the unit.
– Do not mix batteries (old and new or carbon and alkaline, etc.).
– Remove batteries when the unit is not used for a long time.
Tips
Useful
• Do not leave your set on standby mode for a prolonged
period of time. Switch off set to allow it to be demagnetised. A demagnetised set supports good picture quality.
• Do not shift or move the set around when it is switched on. Uneveness in colour in some parts of the screen may occur.
• Never attempt to repair a defective TV yourself. Always consult a skilled service personnel.
3
Page 8

Quick installation
The first time y
ou switch on the television, a
menu appears on the screen and the tuning
starts automatically.
Main •
Install •
Auto Store •
Searching
Please W
ait
Prog. found 3
525,25 MHz
If the menu is not displayed, press and hold down
the ”- and ”+ keys on the TV set for 5
seconds to start the tuning
depending on versions)
(or MENU key
.
All the available TV programs will be stored.
Program sort
& Press key H.The
the screen.
Auto Store •
Manuel Store •
Main •
Install •
Language •
Country •
Sort •
Program •
Name
Main menu
00
01 BBC1
02 BBC2
03ÆANGLI
04 CH4
05 CH5
•
is displayed on
This operation tak
es a few minutes.The display
shows the progress of the search and the
number of programs found.
At the end of the search, the menu disappears.
To exit or interrupt the search, press H.If no
program is found, consult the possible solutions p. 12.
& If the transmitter or cable network sends the
automatic sort signal, the programs will be
numbered correctly. In this case, the
installation is complete.
é If this is not the case, you need to use the
Sort menu to number the programs correctly.
Some transmitters or cable networks broadcast
their own sort parameters (region, language,etc.).
In this case, indicate your choice using the îÏ
keys and validate with ¬.
é With the cursor, select the
followed by the
Sort
menu.
Install
menu
“ Select the programme you want to move using
îÏ keys and press ¬.
the
‘ Then use the îÏ keys to select the new
number and validate with
È.
( Repeat steps “ and ‘ for each program you
wish to renumber.
§ To quit the menus, press d.
Program name
If required,you can give a name to the
programmes and external connectors.
Note : on installation, the programs are named
automatically when an identification signal is sent.
ess the
& Pr
é With the cursor
Name.
“ Use the @
programme to name or rename.
4
H k
P
ey.
select the
,
eys to select the
# k
Install
men
u,
then
‘ Use the Ȭ keys to move around the
name display area (5 characters) and the
ys to select the characters.
îÏ k
e
( When the name has been entered,use the H
key to exit.The name is stored.
§ Repeat steps “ to ( f
or each pr
ogramme
you wish to name.
è To quit the menus, press d.
Page 9
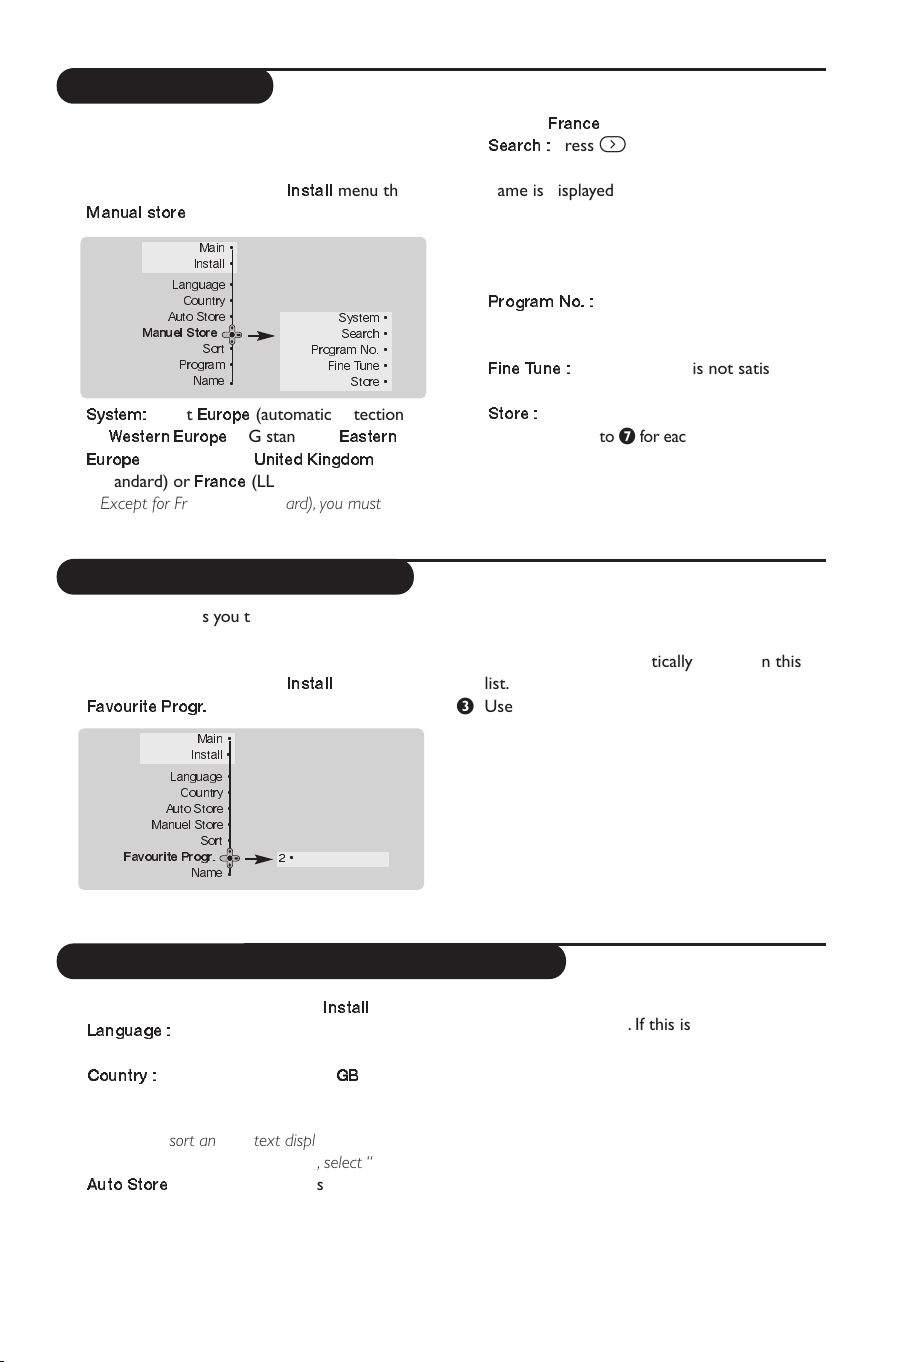
Manual store
This menu is used to store the programmes
one at a time.
& Press the H key.
é With the cursor
Manual store
Manuel Store
“
System:
or
Western Europe
Europe
(I standard) or
, select the
:
Main •
Install •
Language •
Country •
Auto Stor
e •
Sort •
Pr
ogram •
Name
•
select
Europe
(BG standard),
(DK standard),
France
Install
men
System •
Sear
Program No. •
Fine Tune •
Store •
(automatic detection*)
Eastern
United Kingdom
(LL’ standard).
* Except for France (LL’ standard), you must select
Favourite programmes
This menu allows you to select the programmes
to be accessed with the
& Press the H key.
é With the cursor, select the
Favourite Progr.
Main •
Install •
Language •
Country •
Auto Store •
Manuel Store •
Favourite Progr.
Sort •
Name
@ P # key.
Install
and press ¬.
2 •
•
menu then
u then
ch •
choice
France
.
‘
Search :
press ¬.The search starts. Once a
programme is found, the scanning stops and its
name is displa
yed (when available).Go to the
next step. If you know the frequency of the
required programme,this can be entered
directly using the
0 to 9 keys.
If no picture is found, consult the possible solutions (p. 12).
(
Program No. :
Ȭ or 0 to 9 keys.Example :
the
program 1, enter
§
Fine Tu ne :
adjust using the
è
Store :
enter the required number with
01.
if the reception is not satisfactory,
Ȭ keys.
press ¬.The program is stored.
! Repeat steps ‘ to è for each programme to
store.
ç To quit the menus, press d.
The list of favourite programmes is displayed.
The programmes that were stored at
installation will automatically appear on this
list.
“ Use the up/downcursor to select the required
programme.
‘ Use the left/right cursor to add or remove a
programme from the list.
( Run through steps “ and ‘ for each
programme to be added or removed from the
list.
§ To exit, press d several times.
Other settings in the Install menu
& Pr
é
Language :
ess the
y and select the
e
H k
to change the display language for
the menus.
“
Country :
Gr
to select your country (GBfor
eat Britain).
This setting is used for the search, automatic
programme sort and teletext display. If your
country does not appear in the list, select “. . .”
‘
Auto Store
: to start automatic search for all
programmes available in your region. If the
transmitter or cable netw
ork sends the
Instal
l
men
u:
automatic sor
numbered correctly. If this is not the case, you
need to use the Sort menu to renumber the
pr
Some tr
their own sort parameters (region, language,etc.).
In this case
eys and v
k
search,
possible solutions (p. 12).
( To quit the menus, press d.
t signal, the programmes will be
4).
ogrammes (see p
.
ansmitters or cable networks broadcast
indicate your choice using the
,
alidate with
press
H.
If no picture is found, consult the
¬.
T
o quit or inter
îÏ
upt the
r
5
Page 10

Picture settings
& Press H then ¬.The
displayed :
Main
Picture
Sound
Features
Install
é Use the îÏ keys to select a setting and
the
Ȭ keys to adjust.
Note : during the picture adjustment, only the
selected line remains displayed. Press îÏ to
display the menu again.
Description of the adjustments :
• Brightness :
this changes picture brilliance.
Picture
menu is
•
Brightness •
•
•
•
Colour •
Contrast •
Sharpness •
Colour T
emp. •
Digital Options •
Store •
Sound adjustments
• Colour :
• Contrast :
this changes the intensity of the colour
this changes the difference
between the light and dark tones.
•
Sharpness :
• Colour Temp.:
rendering:
Warm
or
Digital Options :
•
-
100 Hz :
-
Digital Scan
this changes the picture definition.
this changes the colour
Cold
(bluer),
Normal
(balanced)
(redder).
100 Hz processing.
(according to the version)
:
reduces
line flicker which is visible on some pictures.
-
Double lines
:
doubling of vertical resolution
which removes visible picture lines.
Advised for NTSC (60Hz) pictures.
“ Once the adjustments have been made, select
Store
and press ¬ to store them.
d to exit.
Press
.
& Press H,select Sound (Ï) and press ¬.
The
Sound
menu is displayed :
Main •
Picture •
Sound
Features •
Install
•
Treble •
Bass •
Balance •
Delta Volume •
AVL •
HP Volume •
Store •
é Use the îÏ keys to select a setting and
Ȭ keys to adjust.
the
Description of the settings :
•
Treble :
this alters the high frequency sounds.
•
Bass :
this alters the low frequency sounds.
Feature settings
& Press H,select
ou can adjust :
Y
é
Timer,Child Lock
see next page
“
Dynamic NR: Min,Med
Max
or
Off :
in difficult reception conditions.
‘
Rotation
sets) : large screen sets are sensitive to
terrestrial magnetic field variations.
This setting is used to compensate for this by
adjusting the picture rotation.
6
Features
(Ï) and press ¬.
ental Cont
and
Par
:
.
(optimum position),
attenuates picture noise (snow)
(only available on very large screen
Balance :
•
this balances the sound on the left
and right speakers.
Delta Volume :
•
this is used to compensate
any volume discrepancies between the
different programs or EXT sockets.
This setting is available for programs 0 to 40
and the EXT sockets.
•
AVL
(Automatic Volume Leveller) : this is
used to limit increases in sound, especially on
program change or advertising slots.
HP Volume :
•
allows you to adjust the
headphones volume independently from the
loud-speakers on the TV set.
“ Once the adjustments have been made,select
Store and press
¬ to store these changes.
‘ To quit the menus, press d.
Max
sion)
or
Off
:
.
(
Dynamic Contrast
Min,Med
(according to the ver
(optimum position),
Enhances the contrast of details in lighter,
erage and dark
v
a
§
Decoder : select the programme(s) that use the
er areas.
external decoder then select the connector
where the decoder is connected :
EXT2.
EXT1 or
If the decoder is connected to the video recorder,
select the video recorder’s connector (
o quit the menus, press
è T
d.
EXT2).
Page 11
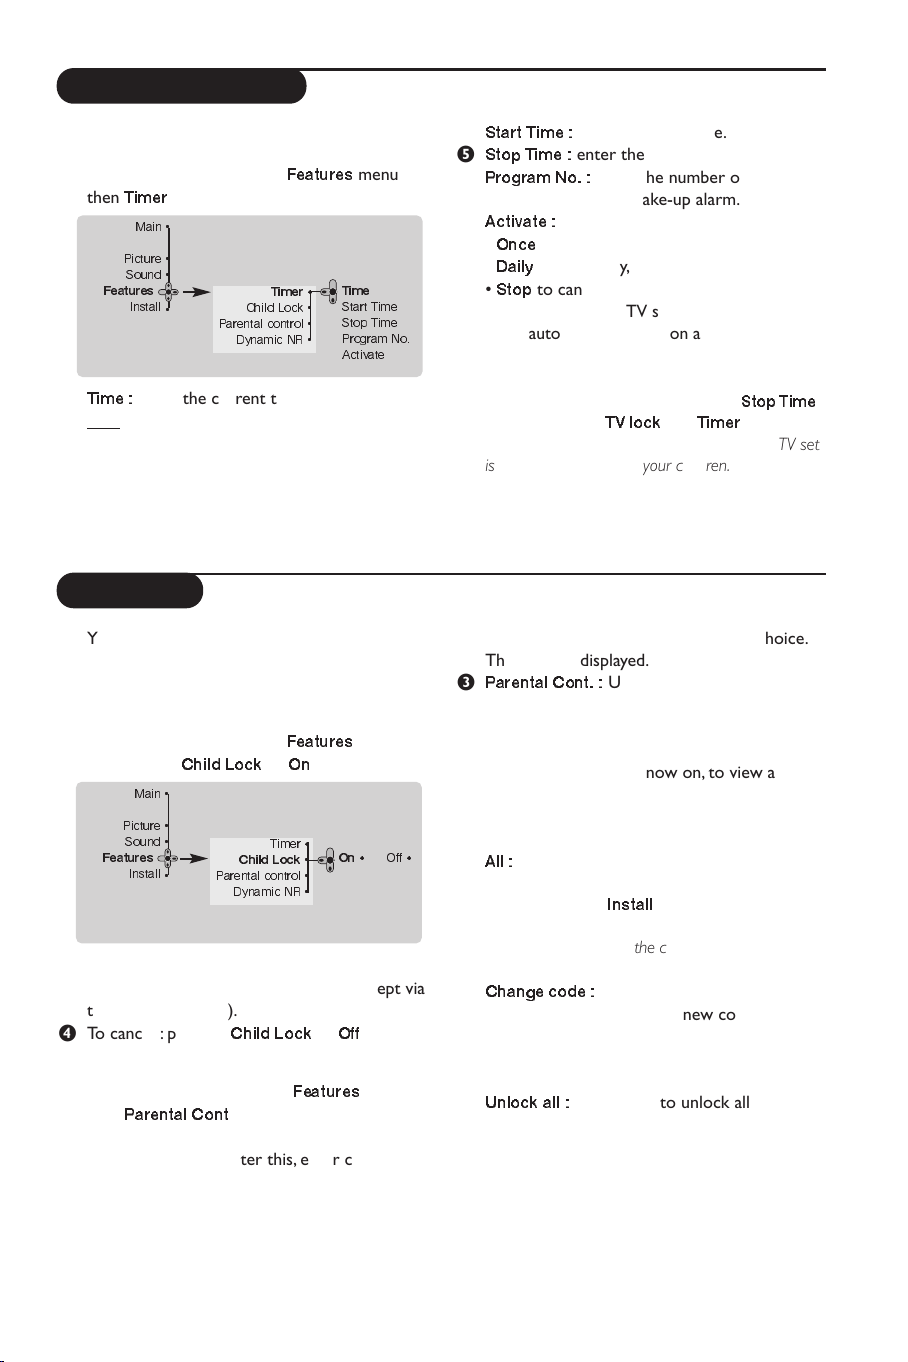
Timer function
This men
u lets you use the TV set as an alarm.
& Press the H key.
é With the cursor, select the
then
Timer
:
Main •
Pictur
e •
Sound •
Features
Install
•
Parental control •
“
Time :
enter the current time.
Features
Timer •
Child Lock •
Dynamic NR •
menu
Time
Start Time
Stop Time
Program No.
Activate
Note : the time is updated automatically each time
the TV set is switched on via the teletext information
on programme 1. If this program does not have
teletext, the update will not take place.
TV lock
You can block certain programs or inhibit use
of the TV set completely by locking the keys.
Child lock
& Press H.
é With the cursor, select the
Main •
Picture •
Sound •
Install
Child Lock
•
Parental control •
and position
Features
“ Turn off the TV set and hide the remote
control.The TV set cannot be used (except via
the remote control).
‘ To cancel : position
Parental control
& Pr
then
é You must enter your secr
The first time you enter this, enter code 0711
ess the
Par
H k
ey, select the
ental Cont
Features
to On.
Timer
Child Lock
Dynamic NR •
Child Lock
:
.
et access code
•
•
to
Featur
menu
On •
Off
.
es
men
.
Off
‘
Start Time :
(
Stop Time :
§
Program No. :
enter the start time.
enter the standby time.
enter the number of the
programme for the wake-up alarm.
è
Activate :
Once
•
•
Daily
Stop
•
the settings include:
for a single alarm,
for each day,
to cancel.
! Press b to put the TV set in standby.
It will automatically come on at the time
programmed. If you leave the TV set on, it will
just change programmes at the time entered
(and will go to standby mode at the
By combining the
TV lock
you can restrict the period during which the TV set
is used, for example by your children.
twice and then enter your new code choice.
The menu is displayed.
“
Parental Cont. :
Use the îÏ keys to
select the TV programme required and
validate with
¬.The + symbol will be
displayed opposite the programmes or sockets
that are locked.From now on, to view a
locked programme, you must enter your
secret code, otherwise the screen will stay
blank.
•
All :
this is used to lock all the TV programmes and
EXT connectors.
The access to the
Install
Caution, for encrypted programs using an external
, you must lock the corresponding EXT
decoder
socket.
‘
Change code :
this allows you to enter a new
4 digit code. Confirm your new code by
entering it a second time.
If you have forgotten your secret code, enter the
u
universal code 0711 twice.
(
Unlock all :
this is used to unlock all locked
programmes.
§ Pr
ess the
d k
y to quit.
e
Stop Time
and
Timer
functions,
menu is also locked.
).
7
Page 12
Teletext
¤
0 9
Ë
Ë
Ÿ
MENU
P
-
+
Y
ù
12
”
P
564
879
0
3
.
[
-
ª
S
MART
S
MART
Ë
`
ù
MENU
- -
+ +
¤
Teletext is an information system broadcast by certain channels which can be consulted like a
wspaper. It also offers access to subtitles for viewers with hearing problems or who are not familiar
ne
with the transmission language (cable networks, satellite channels, etc.).
8
Press :
Teletext call
You will obtain :
This is used to call teletext, change to transparent mode
and then exit.The summary appears with a list of items
that can be accessed. Each item has a corresponding
3 digit page number.
If the channel selected does not broadcast teletext, the
indication 100 will be displayed and the screen will remain
blank (in this case, exit teletext and select another channel).
Selecting a
Enter the number of the page required using the 0 to 9
page
or @
P
# keys, îÏ. Example:page 120, enter 12
0
.The number is displayed top left, the counter turns
and then the page is displayed.Repeat this operation to
view another page.
If the counter continues to search, this means that the page is
Direct access
to the items
not transmitted. Select another number.
Coloured areas are displayed at the bottom of the screen.
The 4 coloured keys are used to access the items or
corresponding pages.
The coloured areas flash when the item or the page is not yet
Contents
Direct
selection of
sub-pages
available.
This returns you to the contents page (usually page 100).
Certain pages contain sub-pages (for example, page 120
contains sub-pages
1/3, 2/3 and 3/3). If this is the case,the
page number is displayed in green,preceded by the symbol
Æ, Í or ÍÆ. Use the keys Ȭ to directly access
Enlarge
a page
Double page
teletext
(only available on
certain versions)
Hidden
information
Favourite
pages
the sub-pages of your choice.
This allows you to display the top or bottom part of the
page and then return to normal size.
To activate or deactivate the double page teletext display
mode.The active pa
ge is di
splayed on the left and the
following page is displayed on the right.
To display or hide the concealed information (games
solutions).
Instead of the standard coloured areas displayed at the bottom
vourite pages on the first
of the scr
een,
ou can stor
y
e 4 fa
40 channels which can then be accessed using the coloured
keys (red,green,yellow, blue). Once set,these favourite pages
y time tetetext is selected.
er
will become the default e
v
& Press the H key to change to favourite pages mode.
é Displa
y the teletext page that you want to store.
“ Press the coloured key of your choice for 3 seconds.
The page is now stored.
‘ Repeat the operation with the other coloured keys.
ourite pages
v
our fa
( No
w when y
ou consult teletext,
will appear in colour at the bottom of the screen.
To temporaly retrieve the standard items,press
ything, and return the standard items as the
ver
o clear e
T
default, press d for 5 seconds.
y
H.
Page 13
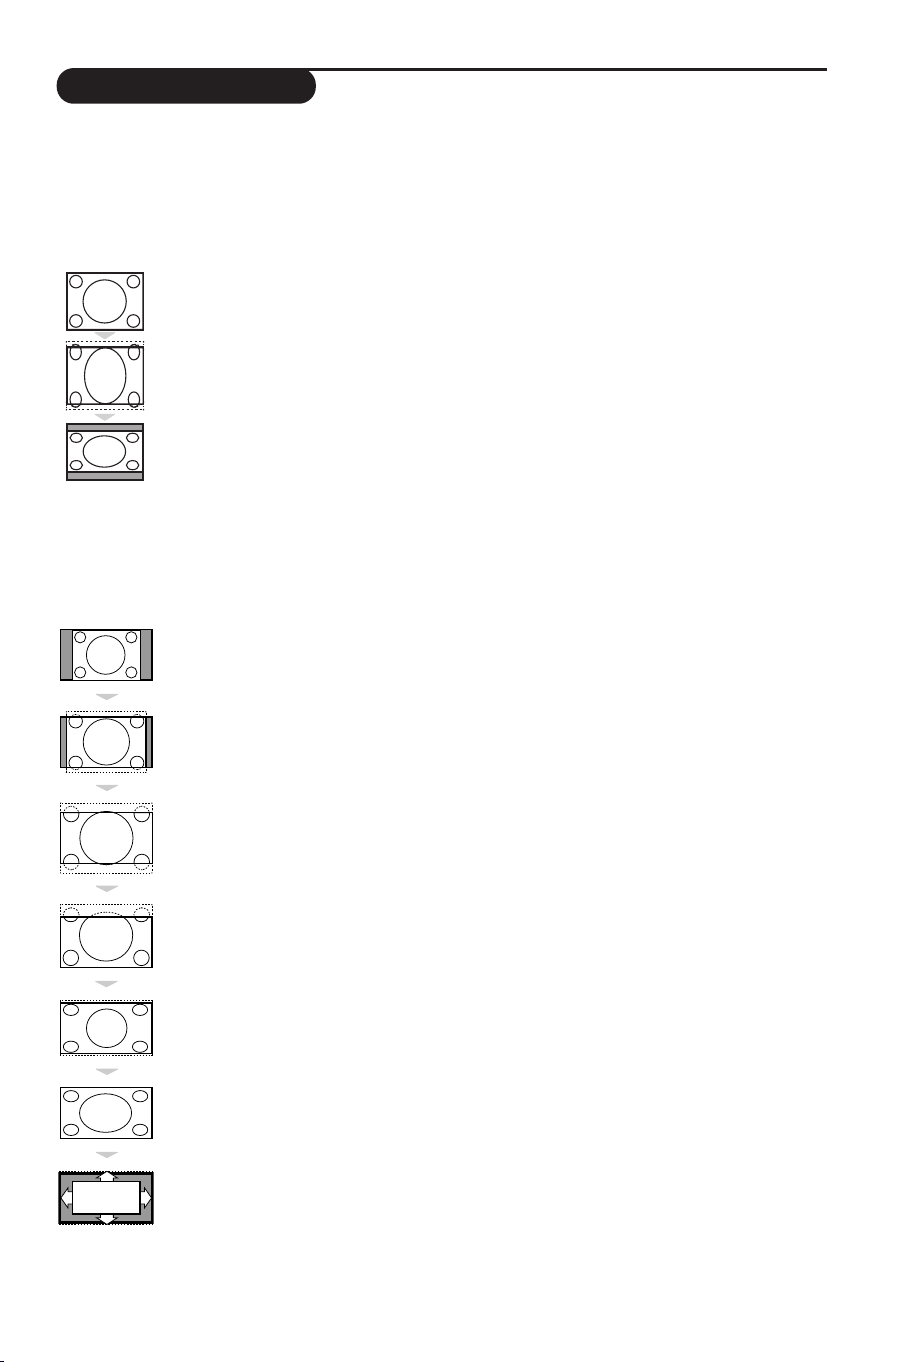
Screen Formats
The pictures you receive may be transmitted in 16:9 format (wide screen) or 4:3 format
(conventional screen).4:3 pictures sometimes have a black band at the top and bottom of the screen
(letterbo
If your television is equipped with a 4:3 screen.
If your television is equipped with a 16:9 screen.
x format).This function allows you to optimise the picture display on screen.
Press the
4:3
The picture is reproduced in 4:3 format.
Expand 4:3
The picture is enlarged vertically.This mode is used to cancell the black bands when
watching a programme in letterbox format.
Compress 16:9
The picture is compressed vertically into 16:9 format.
Press the ¬ key (or È) to select the different modes:
This TV set is also equipped with automatic switching which will select the correct-screen format,
provided the specific signals are transmitted with the programmes.
4:3
The picture is reproduced in 4:3 format and a black band is displayed on either side of the
picture.The picture may be progressively enlarged using the
î key (or Ï) to select the different modes:
îÏ keys.
Zoom 14:9
The picture is enlarged to 14:9 format, a thin black band remains on both sides of the
picture.The
top or bottom of the picture (subtitles).
Zoom 16:9
The picture is enlarged to 16:9 format.This mode is recommended when displaying pictures
which have black bands at the top and bottom (letterbox format). Use the
wish to compress and move the image vertically to view the top or bottom of the picture.
Subtitle Zoom
This mode is used to display 4:3 pictures using the full surface of the screen leaving the sub-titles
visible. Use the
Super
This mode is used to display 4:3 pictures using the full surface of the screen by enlarging the
sides of the pictur
Widescr
This mode restores the correct proportions of pictures transmitted in 16:9 using full screen
display.
Auto Format
The format of the picture is automatically adjusted to fill as much of the screen as possible.
îÏ keys allow you to compress and move the image vertically to view the
îÏ keys if you
îÏ keys to increase or decrease the compression at the bottom of the screen.
Wide
eys allow you to scroll the image up or down the screen.
een
e.The
îÏ k
9
Page 14

Connecting peripheral equipment
VCR
EXT2
S-VHS
Video
R Audio L
*
S-VHS, Hi-8
S-VHS
Video
R Audio L
*
VHS, 8 mm
S-VHS
S-VHS
*
VCR
EXT2
S-VHS
Video
R Audio L
*
S-VHS, Hi-8
S-VHS
Video
R Audio L
*
VHS, 8 mm
S-VHS
Video
L Audio R
*
S-VHS, Hi-8
S-VHS
Video
L Audio R
*
VHS, 8 mm
*
*
VCR
EXT2
.
`
ù
The television has 2 external sockets situated at the back of the set (EXT1 and EXT2).
The EXT1 socket has audio, CVBS/RGB inputs and audio, CVBS outputs.
The EXT2 sock
et has audio, CVBS/S-VHS inputs and audio, CVBS outputs.
Video recorder
Other equipment
Amplifier
(only available on certain versions)
Carry out the connections shown opposite, using a good
quality euroconnector cable.
If your video recorder does not have a euroconnector socket, the
only connection possible is via the aerial cable.You will therefore
need to tune in your video recorder's test signal and assign it
programme number 0 (refer to manual store, p. 5).
To reproduce the video recorder picture, press
0.
Video recorder with decoder
Connect the decoder to the second euroconnector socket
of the video recorder.You will then be able to record
scrambled transmissions.
Satellite receiver, decoder, CDV,games, etc.
Carry out the connections shown opposite.
To optimise picture quality, connect the equipment which
produces the RGB signals (digital decoder, games,etc.) to
EXT1, and the equipment which produces the S-VHS
signals (S-VHS and Hi-8 video recorders, certain DVD
drives) to EXT2 and all other equipment to either EXT1
or EXT2.
To connect to a hi-fi system, use an audio connection cable
and connect the “L” and “R” outputs on the TV set to the
“AUDIO IN” “L” and “R” input on your hi-fi amplifier.
To select connected equipment
n k
y to select
e
ess the
Pr
from the EXT2 socket) and
Most equipment (decoder, video recorder) carries out the switching itself.
10
EXT1,EXT2,S-VHS2
EXT3
for connections on the front panel.
(S-VHS signals
Page 15

Side connections
S-VHS
Video
R Audio L
*
S-VHS, Hi-8
S-VHS
Video
R Audio L
*
VHS, 8 mm
S-VHS
Video
L Audio R
*
S-VHS, Hi-8
S-VHS
Video
L Audio R
*
VHS, 8 mm
*
*
Make the connections as shown opposite.
* Depending on version.
With the n key,select
EXT3
.
For a mono set, connect the sound signal to the AUDIO L
(or AUDIO R) input.The sound automatically comes out of
the left and right speakers of the set.
Headphones
Press the m key to mute the sound on the TV set
(see also sound settings, page 6).
The headphone impedance must be between 32 and
600 Ohms. Do not connect VIDEO and S-VIDEO cable at
the same time.This may cause picture distortion.
Glossary
RGB Signals :
These are 3 Red, Green and Blue video signals which directly drive the red,green and blue
emitters in the cathode ray tube. Using these signals provides better picture quality.
NICAM sound :
Process by which digital sound can be transmitted.
System :
Television pictures are not broadcast in the same way in all countries.There are different standards:
BG, DK, I,and L L’.The SYSTEM setting (p.6) is used to select these different standards.This is not to
be confused with PAL or SECAM colour coding. Pal is used in most countries in Europe, Secam in
France, Russia and most African countries.The United States and Japan use a different system called
NTSC.
100Hz :
Conventional televisions (50 Hz) produce a visible image flicker.Thanks to 100 Hz technology,the
scanning frequency is doubled. It is visually more comfortable and the flickering effect is reduced.
16:9 :
ers to the ration betw
Ref
een the length and height of the scr
een.
Wide screen televisions have a ration of 16/9, conventional screen TV sets have a ration of 4/3.
11
Page 16

Tips
Poor reception
The proximity of mountains or high buildings
may be responsible for ghost pictures, echoing
or shadows. In this case, try manually adjusting
your picture:see
orientation of the outside aerial.
Does your antenna enable you to receive
broadcasts in this frequency range (UHF or
VHF band)?
In the event of difficult reception (snowy
picture) switch the
Features
No picture
If the television does not switch on, please
press the standby key
remote control) twice.
Have you connected the aerial socket properly?
Have you chosen the right system? (p. 5).
Poorly connected euroconnector cables or
aerial sockets are often the cause of picture or
sound problems (sometimes the connectors
can become half disconnected if the TV set is
moved or turned).Check all connections.
Peripheral equipment gives a black and
white picture
To play a video cassette, check that it has
been recorded under the same standard
(PAL, SECAM, NTSC) which can be replayed
by the video recorder.
The remote control no longer works
Check that the mode selector on the side of
the remote control is set to TV.
No sound
If on certain channels you receive a picture
but no sound, this means that you do not
have the correct TV system. Modify the
System
Fine Tuning
Dynamic NR
menu to ON. (p. 6).
b (located on the
setting (p. 5).
(p.5) or modify the
on the
Teletext
Are certain characters not displayed
correctly? Check that the
been positioned correctly (p.5).
Remote control
The TV set does not react to the remote
control; the indicator on the set no longer
flashes when you use the remote control?
Replace the batteries.
Standby
When you switch the TV set on it remains in
standby mode and the indication
displayed when you use the keys on the TV
set?
The
Child Lock
If the set receives no signal for 15 mins,it
automatically goes into standby mode.
In stand-by mode, your TV consumes less than
5W depending on model. In order to be more
environmentally friendly, please use the on/off
(power) switch to turn the set off completely.
Still no results ?
If your TV set breaks down, never attempt to
repair it yourself:contact your dealer's aftersales service.
Cleaning the set
Only use a clean, soft and lint-free cloth to
clean the screen and the casing of your set.
Do not use alcohol-based or solvent-based
products.
function is switched On(p.7).
Country
setting has
Locked
is
Safety Information: Electric, Magnetic and Electromagnetic Fields (“EMF”)
1. Philips Royal Electronics manufactures and sells many products targeted at consumers, which, like
any electronic apparatus, in general have the ability to emit and receive electro magnetic signals.
2. One of Philips’ leading Business Principles is to take all necessary health and safety measures for
our products,to comply with all applicable legal requirements and to stay well within the EMF standards applicable at the time of producing the products.
3. Philips is committed to develop, produce and market products that cause no adverse health effects.
4. Philips confirms that if its products are handled properly for their intended use, they are safe to use
according to scientific evidence available today.
5. Philips plays an active role in the development of international EMF and safety standards, enabling
Philips to anticipate further developments in standardization for early integration in its products.
12
Page 17

Introduction
Vous venez d’acquérir ce téléviseur, merci de votre confiance.
Nous vous conseillons de lire attentivement les instructions qui suivent pour
mieux comprendre les possibilités offertes par votre téléviseur.
Remarque : les spécifications et informations fournies peuvent faire l’objet de
modifications sans
Sommaire
Installation
Installation du téléviseur . . . . . . . . . . . . . . . . . . . . . . . . . . . . . . . . . . . . . . . . . . . . . 2
Les touches du téléviseur . . . . . . . . . . . . . . . . . . . . . . . . . . . . . . . . . . . . . . . . . . . . 2
Les touches de la télécommande . . . . . . . . . . . . . . . . . . . . . . . . . . . . . . . . . . . . . . 3
Informations de sécurité . . . . . . . . . . . . . . . . . . . . . . . . . . . . . . . . . . . . . . . . . . . . . 3
Installation rapide . . . . . . . . . . . . . . . . . . . . . . . . . . . . . . . . . . . . . . . . . . . . . . . . . . .4
Classement des programmes . . . . . . . . . . . . . . . . . . . . . . . . . . . . . . . . . . . . . . . . . 4
Nom de programme . . . . . . . . . . . . . . . . . . . . . . . . . . . . . . . . . . . . . . . . . . . . . . . .4
Mémorisation manuelle . . . . . . . . . . . . . . . . . . . . . . . . . . . . . . . . . . . . . . . . . . . . . 5
Programmes préférés . . . . . . . . . . . . . . . . . . . . . . . . . . . . . . . . . . . . . . . . . . . . . . . 5
Autres réglages du menu Installation . . . . . . . . . . . . . . . . . . . . . . . . . . . . . . . . . . .5
Utilisation
Réglages de l’image . . . . . . . . . . . . . . . . . . . . . . . . . . . . . . . . . . . . . . . . . . . . . . . . .6
Réglages du son . . . . . . . . . . . . . . . . . . . . . . . . . . . . . . . . . . . . . . . . . . . . . . . . . . . .6
Réglage des options . . . . . . . . . . . . . . . . . . . . . . . . . . . . . . . . . . . . . . . . . . . . . . . . .6
Fonction réveil . . . . . . . . . . . . . . . . . . . . . . . . . . . . . . . . . . . . . . . . . . . . . . . . . . . . .7
Verrouillage du téléviseur . . . . . . . . . . . . . . . . . . . . . . . . . . . . . . . . . . . . . . . . . . . .7
Télétexte . . . . . . . . . . . . . . . . . . . . . . . . . . . . . . . . . . . . . . . . . . . . . . . . . . . . . . . . . 8
Format d’écran . . . . . . . . . . . . . . . . . . . . . . . . . . . . . . . . . . . . . . . . . . . . . . . . . . . . .9
Raccordements
Magnétoscope . . . . . . . . . . . . . . . . . . . . . . . . . . . . . . . . . . . . . . . . . . . . . . . . . . . . 10
Autres appareils . . . . . . . . . . . . . . . . . . . . . . . . . . . . . . . . . . . . . . . . . . . . . . . . . . 10
Pour sélectionner les appareils connectés . . . . . . . . . . . . . . . . . . . . . . . . . . . . . .10
Connexions latérales . . . . . . . . . . . . . . . . . . . . . . . . . . . . . . . . . . . . . . . . . . . . . . .11
Glossaire . . . . . . . . . . . . . . . . . . . . . . . . . . . . . . . . . . . . . . . . . . . . . . . . . . . . . . . .11
Informations pratiques
Conseils . . . . . . . . . . . . . . . . . . . . . . . . . . . . . . . . . . . . . . . . . . . . . . . . . . . . . . . . 12
Informations sur la sécurité : champs électriques, magnétiques
et électromagnétiquesf . . . . . . . . . . . . . . . . . . . . . . . . . . . . . . . . . . . . . . . . . . . . . 12
FR
Directive pour le recyclage
L’emballage de cet appareil peut être recyclé. Conformez-vous aux règles en vigueur dansvotre localité
pour une élimination appropriée.
Elimination de votre ancien produit.
Votre téléviseur est conçu et fabriqué avec des matériaux et composants de haute qualité qui peuvent
être recyclés et réutilisés.
La directive européenne 2002/96/EC s’applique à tous les appareils marqués de ce logo (poubelle
barrée). Renseignez-vous sur les systèmes de collecte mis à votre disposition pour les appreils
électriques et électroniques.
Conformez-vous aux règles en vigueur dans votre localité et ne jetez pas vos anciens appareils avec les
déchêts ménagers. L’élimination appropriée de votre ancien appareil aidera à prévenir les effets négatifs
sur l’environnement et la santé humaine.
1
Page 18

Installation du téléviseur
& Positionnement du téléviseur
Placez votre téléviseur sur une surface solide
et stable. Pour prévenir toute situation
dangereuse, ne pas exposer le téléviseur à des
projections d’eau et ne rien poser dessus tel
qu’un objet couvrant (napperon), rempli de
liquide (vase) ou dégageant de la chaleur (lampe).
é Raccordements
• Introduisez la fiche d'antenne TV dans la
prise
: située à l’arrière.
Avec les antennes d’intérieur, la réception peut dans
certaines conditions être difficile. Vous pouvez
l’améliorer en faisant tourner l’antenne. Si la réception
reste médiocre, il faut utiliser une antenne extérieure.
• Branchez le cordon d’alimentation sur le
secteur (220-240 V / 50 Hz).
“ Télécommande
Introduisez les 2 piles de type R6 fournies en
respectant les polarités.
Les piles livrées avec l’appareil ne contiennent ni
mercure ni cadmium nickel, dans un souci de
préserver l’environnement. Veillez à ne pas jeter vos
piles usagées mais à utiliser les moyens de recyclage
mis à votre disposition (consultez votre revendeur).
‘ Mise en marche
Pour allumer le téléviseur, appuyez sur la
touche marche arrêt. Un voyant s’allume en
rouge et l’écran s’illumine. Allez directement
au chapitre
Si le téléviseur reste en veille, appuyez sur la
touche P
Le voyant clignote lorsque vous utilisez la
télécommande.
installation rapide, page 4.
# de la télécommande.
Les touches du téléviseur
Le téléviseur est équipé de 4 ou 5 touches qui
sont situées, selon les versions, à l’avant ou
sur le dessus du coffret.
2
Les touches
de régler le niveau sonore.
Les touches
de sélectionner les programmes.
Pour accéder aux menus, appuyez
simultanément sur les 2 touches
(ou la touche
permettent de sélectionner un réglage et les
touches
affiché, maintenez appuyées les 2 touches
et
” +
Remarque: lorsque la fonction Verrou enfant est
en service, les touches sont inactivées (voir p. 7).
VOLUME - + (-”+) permettent
PROGRAM - + (- P +) permettent
”
MENU
). Ensuite, les touches P - +
”
- + de régler.
(ou la touche
Pour quitter le menu
MENU
)
.
- et ”+
” -
Page 19

Les touches de la télécommande
1 Veille
Permet de mettre en veille le téléviseur. Pour l’allumer,
appuyez sur b, P @#ou 09.
2 Minuterie
Pour sélectionner une durée de mise en veille
automatique (de 0 à 240 minutes).
3
Sélection des prises EXT (p.10)
Appuyez plusieurs fois pour sélectionner l’appareil
connecté.
4 Touches télétexte (p. 8)
5 Deux Écrans (selon versions)
Pour activer/désactiver l’affichage en 2 écrans. Le deuxième
écran permet d’afficher le télétexte.
6 Menu
Pour appeler ou quitter les menus.
7 Curseur / Format
Ces 4 touches permettent de naviguer
(p.9)
8 Volume
Pour ajuster le niveau sonore
9 Coupure son
Pour supprimer ou rétablir le son.
! Info. d’écran / n° permanent
Pour afficher / effacer le numéro de programme, le nom
(s’il existe), l’heure, le mode son, et le temps restant de
la minuterie. Appuyez pendant 5 secondes pour activer
l’affichage permanent du numéro.
dans les menus.
Mode son
Permet de forcer les émissions Stéréo et Nicam Stéréo
en Mono ou pour les émissions bilingues de choisir
entre Dual I ou Dual II.
lorsqu’il s’agit d’une position forcée.
# Son Surround
Pour activer / désactiver l’effet d’élargissement du son. En
stéréo, les haut-parleurs paraissent plus espacés. Pour les
versions équipés du Virtual Dolby Surround *, vous
obtenez les effets sonores arrières du Dolby Surround
Pro Logic.
$ Préréglages image et son
Permet d’accéder à une série de préréglages de l’image
et du son. La position Personnel correspond aux réglages
effectués dans les menus.
% Appel télétexte (p. 8)
& Sélection des programmes
Pour accéder au programme inférieur ou supérieur
de la liste des programmes préférés (voir p. 5).
( Touches numériques
Accès direct aux programmes. Pour un programme à
2 chiffres, il faut ajouter le 2ème chiffre avant que le trait
ne disparaisse.
) Active Control (selon versions)
Optimise la qualité de l’image en fonction du signal reçu.
L’indication Mono est rouge
Informations de sécurité
• Zapojte TV prijímač do siete 220–240 V,striedavý prúd, 50 Hz.
• Vytiahnite zástrčku zo sieťovej zásuvky:
– Ak červené svetlo na spodnej strane TV prijímača stále bliká.
– Ak sa na obrazovke zobrazuje svetlá biela čiara.
– Počas búrky.
– Ak TV prijímač ponecháte dlhší čas bez dozoru.
•
Limpeza do ecrč de TV. Nunca utilize produtos de limpeza abrasivos. Utilize camurća ou um pano macio ligeiramente
humedecido.Čistenie TV obrazovky.Nikdy nepoužívajte agresívne čistiace prostriedky. Použite jemne navlhčenú jelenicu
alebo mäkkú handričku.
• Na TV prijímač alebo do jeho blízkosti neumiestňujte zdroje otvoreného ohňa ako napríklad horiace sviečky a pod.
• TV prijímač nevystavujte priamemu slnečnému žiareniu ani nadmerným teplotám.
• TV prijímač nezakrývajte a neblokujte jeho vetracie otvory.V opačnom prípade môžete spôsobiť jeho prehriatie.
• Z každej strany TV prijímača ponechajte aspoň 5 cm voľného priestoru, čím zabezpečíte dostatočné vetranie.
• TV prijímač neumiestňujte na miesto, kde by mohol byť vystavený dažďu alebo vlhkosti.
• CUPOZORNENIE pri požívaní batérií
– Aby ste predišli úniku elektrolytu, ktorý by mohol spôsobiť zranenie, poškodenie majetku alebo prístroja:
– Vložte batérie tak, aby sa póly + a – zhodovali s označením na prístroji.
– Nepoužívajte súčasne rôzne typy batérií (staré a nové alebo uhlíkové a alkalické a pod.).
– Ak prístroj nebudete dlhší čas používať, batérie z neho vyberte.
3
Page 20

Installation rapide
La première fois que vous allumez le
téléviseur, un menu apparaît à l’écran.
Ce menu vous invite à choisir le pays ainsi que
la langue des menus :
Menu •
Installation •
F
FIN
GB
GR
...
Français
English
Deutsch
Italiano
Si le menu n’apparaît pas, maintenez appuyées
pendant 5 secondes les touches ”- et ”+ du
téléviseur, pour le faire apparaître (ou la touche
MENU selon versions).
& Utilisez les touches îÏ de la télécommande
pour choisir votre pays, puis validez avec
¬.
Si votre pays n’apparaît pas dans la liste,
sélectionnez le choix “. . .”
é Sélectionnez ensuite votre langue avec les
touches
îÏ puis validez avec ¬.
Classement des programmes
& Appuyez sur la touche H. Le Menu Principal
s’affiche à l’écran.
Menu •
Installation •
Langage •
Pays •
Mémo. Auto. •
Mémo Manuel. •
Classement •
Prog. Préférés •
Nom du Prog.
00
01 TF1
02 FR2
03ÆFR3
04 C +
•
“ La recherche démarre automatiquement.
Tous les programmes TV disponibles sont
mémorisés. L’opération prend quelques
minutes. L’affichage montre la progression de la
recherche et le nombre de programmes
trouvés. A la fin, le menu disparaît.
Pour sortir ou interrompre la recherche, appuyez
sur H. Si aucun programme n’est trouvé, reportez
vous au chapitre conseils p. 12.
‘ Si l’émetteur ou le réseau câblé transmet le
signal de classement automatique, les
programmes seront correctement numérotés.
L’installation est alors terminée.
( Si ce n’est pas le cas, vous devez utiliser le
menu
Classement pour les renuméroter.
Certains émetteurs ou réseaux câblés diffusent leurs
propres paramètres de classement (région, langage...).
Dans ce cas, vous devez indiquer votre choix avec les
îÏ puis valider avec ¬.
touches
é Avec le curseur, sélectionnez le menu
Installation puis le menu Classement .
“ Sélectionnez le programme que vous
souhaitez déplacer avec les touches
appuyez sur
¬.
îÏ et
‘ Utilisez ensuite les touches îÏ pour
choisir le nouveau numéro et validez avec
È.
( Recommencez les étapes “ et ‘ autant de
fois qu’il y a de programmes à renuméroter.
Nom de programme
Vous pouvez, si vous le souhaitez, donner un
nom aux programmes et prises extérieures.
Remarque: lors de l’installation, les programmes
sont nommés automatiquement lorsque le signal
d’identification est transmis.
& Appuyez sur la touche H.
é Avec le curseur, sélectionnez le menu
Installation, puis Nom De Prog.
“ Utilisez les touches @ P # pour choisir le
programme à nommer ou à modifier.
4
‘ Utilisez les touches Ȭ pour vous
déplacer dans la zone d’affichage du nom
(5 caractères) et les touches
îÏ pour
choisir les caractères.
( Lorsque le nom est entré, utilisez la touche
H pour sortir. Le nom est mémorisé.
§ Recommencez les étapes “ à ( pour chaque
programme à nommer.
è Pour quitter les menus, appuyez sur d.
Page 21

Mémorisation manuelle
Ce menu permet de mémoriser les
programmes un par un.
& Appuyez sur la touche H.
é Avec le curseur, sélectionnez le menu
Installation puis Mémo Manuelle :
Menu •
Installation •
Langage •
Pays •
Mémo. Auto. •
Mémo Manuel.
Classement •
Prog. Préférés •
Nom du Prog.
•
Système •
Recherche •
No. De Prog •
Ajust. Fin •
Mémoriser •
“ Système : sélectionnez Europe (détection
automatique*) ou
Europe Est (norme DK), Royaume-Uni
Europe Ouest (norme BG),
(norme I) ou France (norme LL’).
* Sauf pour la France (norme LL’), il faut
sélectionner impérativement le choix France.
Programmes préférés
Ce menu permet de choisir les programmes
qui seront accessibles avec la touche
& Appuyez sur la touche H.
é Avec le curseur, sélectionnez le menu
Installation puis Programmes préférés et
Menu •
Installation •
Langage •
Pays •
Mémo. Auto. •
Mémo Manuel. •
Classement •
Prog. Préférés
Nom du Prog.
2 •
•
@ P #.
‘ Recherche : appuyez sur ¬. La recherche
commence. Dès qu’un programme est trouvé,
le défilement s’arrête et le nom du programme
s’affiche (si disponible). Allez à l’étape suivante.
Si vous connaissez la fréquence du programme
désiré, composez directement son numéro
avec les touches
0 à 9.
Si aucune image n’est trouvée, voir conseils (p. 12).
( No De Prog. : entrez le numéro à 2 chiffres
souhaité avec les touches
Exemple : programme n°1, tapez
Ȭ ou 0 à 9.
01.
§ Ajust. Fin : si la réception n’est pas
satisfaisante, réglez avec les touches
Ȭ.
è Mémoriser : appuyez sur ¬. Le programme
est mémorisé.
! Répétez les étapes ‘ à è autant de fois qu’il
y a de programmes à mémoriser.
ç Pour quitter les menus, appuyez sur d.
appuyez sur
¬. La liste des programmes
préférés est affichée. Les programmes trouvés
lors de l’installation ont été automatiquement
activés dans cette liste.
“ Utilisez le curseur haut/bas pour sélectionner le
programme désiré.
‘ Utilisez le curseur gauche/droite pour ajouter
ou retirer le programme de la liste.
( Recommencez les étapes “ et ‘ autant de
fois qu’il y a de programme à ajouter ou
retirer de la liste.
§ Pour quitter, appuyez plusieurs fois sur d.
Autres réglages du menu Installation
& Appuyez sur la touche H et sélectionnez le
menu
Installation :
é Langage : pour modifier la langue d’affichage des
menus.
“ Pays : pour choisir votre pays (F pour France).
Ce réglage intervient dans la recherche, le
classement automatique des programmes et
l’affichage du télétexte. Si votre pays n’apparaît pas
dans la liste, sélectionnez le choix “. . .”
‘ Mémo. Auto : pour lancer une recherche
automatique de tous les programmes
disponibles dans votre région. Si l’émetteur ou
le réseau câblé transmet le signal de
classement automatique, les programmes
seront correctement numérotés. Si ce n’est
pas le cas, vous devez utiliser le menu
Classement pour les renuméroter (voir p. 4).
Certains émetteurs ou réseaux câblés diffusent leurs
propres paramètres de classement (région, langage, ...).
Dans ce cas, vous devez indiquer votre choix avec
les touches îÏ puis valider avec ¬. Pour
sortir ou interrompre la recherche, appuyez sur H.
Si aucune image n’est trouvée, voir conseils (p. 12).
( Pour quitter les menus, appuyez sur d.
5
Page 22

Réglages de l’image
& Appuyez sur la touche H puis sur ¬.
Le menu
Image apparaît :
Menu
•
Image
Son
•
Options
Installation
•
•
Lumière •
Couleur •
Contraste •
Définition •
Temp. Couleur •
Options numér. •
Mémoriser •
é Utilisez les touches îÏ pour sélectionner
un réglage et les touches
Ȭ pour régler.
Remarque : pendant le réglage de l’image, seule la
ligne sélectionnée reste affichée. Appuyez sur
îÏ pour faire ré-apparaître le menu.
Description des réglages :
• Lumière : agit sur la luminosité de l’image.
•
Couleur : agit sur l’intensité de la couleur.
Réglages du son
& Appuyez sur H, sélectionner Son (Ï) et
appuyez sur
é Utilisez les touches îÏ pour sélectionner
un réglage et les touches
Description des réglages:
• Aigus : agit sur les fréquences hautes du son.
•
Graves : agit sur les fréquences basses.
•
Balance : pour équilibrer le son sur les haut-
¬. Le menu Son apparaît :
Menu •
Image •
Son
Options •
Installation
•
Delta Volume •
Volume du casque •
Mémoriser •
Ȭ pour régler.
Aigus •
Graves •
Balance •
AVL •
•
Contraste : agit sur la différence entre les
tons clairs et les tons foncés.
•
Définition : agit sur la netteté de l’image.
•
Temp. Couleur : agit sur le rendu des
couleurs :
Froide (plus bleue), Normale
(équilibrée) ou Chaude (plus rouge).
•
Options numériques :
-
100 Hz = traitement 100 Hz de l’image.
-
Digital Scan (selon version) : réduit l’effet de
scintillement des lignes horizontales visible
sur certaines images.
- Double lignes : doublement de la résolution
verticale qui supprime les lignes horizontales
visibles dans l’image.
Recommandé uniquement
pour les images NTSC (60Hz).
“ Une fois les réglages effectués, sélectionnez le
choix
Mémoriser et appuyer sur ¬ pour les
enregistrer. Appuyez sur
d pour quitter.
parleurs gauche et droit.
•
Delta Volume : permet de compenser les
écarts de volume qui existent entre les
différents programmes ou les prises EXT.
Ce réglage est opérationnel pour les
programmes 0 à 40 et les prises EXT.
• AVL (Automatic Volume Leveler): contrôle
automatique du volume qui permet de limiter
les augmentations du son, en particulier lors des
changements de programmes ou des publicités.
• Volume casque : permet de régler le volume
du casque indépendamment du volume des
haut-parleurs du téléviseur.
“ Une fois les réglages effectués, sélectionnez le
choix
Mémoriser et appuyer sur ¬ pour les
enregistrer.
‘ Pour quitter les menus, appuyez sur d.
Réglage des options
& Appuyez sur H, sélectionner Options (Ï)
et appuyez sur
é Timer, Verrou enfant et Verrou Prog. :
voir page suivante
“
Dynamic NR : Arrêt, Min, Med (position
optimale) ou
(la neige), en cas de réception difficile.
‘ Déplac. Image (disponible uniquement sur les
grandes tailles d’écran)
d’écran sont sensibles aux variations du champ
magnétique terrestre. Ce réglage permet de
compenser son influence en ajustant
6
¬. Vous pouvez régler :
Max. :
atténue le bruit de l’image
: les grandes tailles
l’inclinaison de l’image.
( Contraste dynamique (selon version) : Arrêt,
Min, Med (position optimale) ou Max. Relève
le détail des contrastes dans les zones claires,
moyennes et sombres.
§ Décodeur : sélectionnez le ou les
programmes qui utilisent un décodeur
extérieur puis sélectionnez la prise où est
raccordé le décodeur :
EXT1 ou EXT2.
Si le décodeur est connecté au magnétoscope,
sélectionnez la prise du magnétoscope (
EXT2).
è Pour quitter les menus, appuyez sur d.
Page 23

Fonction réveil
Ce menu vous permet d’utiliser le téléviseur
comme un réveil.
& Appuyez sur la touche H.
é Avec le curseur, sélectionnez le menu
Options puis Timer :
Menu •
Image •
Son •
Options
Installation
•
Timer •
Ver rou Enfant •
Heure
Heur e Début
Heure Fin
No. de Prog
“ Heure : entrez l’heure courante.
Remarque : l’heure est mise à jour
automatiquement, à chaque mise en marche, à
partir des informations télétexte du programme n°
1. Si celui-ci n’a pas de télétexte, la mise à jour
Verrouillage du téléviseur
Vous pouvez verrouiller certains programmes
ou interdire complètement l’utilisation du
téléviseur en verrouillant les touches.
Verrou enfant
& Appuyez sur H.
é Avec le curseur, sélectionnez le menu Options
et positionnez Verrou Enfant sur Marche.
Menu •
Image •
Son •
Options
Installation
•
“ Éteignez le téléviseur et cachez la
télécommande. Le téléviseur devient inutilisable
(seule la télécommande permet de l’allumer).
‘ Pour annuler: positionnez Verrou Enfant sur
Arrêt.
Verrou programmes
& Appuyez sur la touche H, sélectionnez le
menu
Options puis Verrou Prog. :
Timer •
Verrou Enfant •
Verrou Pr og. •
Dynamic NR •
n’aura pas lieu.
‘ Heure Début : entrez l’heure de début.
( Heure Fin : entrez l’heure de mise en veille.
§ No. de Prog : entrez le numéro du
programme désiré pour le réveil.
è Prog. Activée : vous pouvez régler :
•
Une fois pour un réveil unique,
•
Quotidien pour tous les jour,
•
Arrêt pour annuler.
! Appuyez sur b pour mettre en veille le
téléviseur. Il s’allumera automatiquement à
l’heure programmée. Si vous laissez le
téléviseur allumé, il changera uniquement de
programme à l’heure indiquée (et se mettra
en veille à l’
Heure de Fin).
La combinaison des fonctions Verrou TV et
Timer permet de limiter la durée d’utilisation du
téléviseur, à vos enfants par exemple.
é Vous devez entrer votre code confidentiel
d’accès. La première fois, tapez 2 fois le code
0711 puis saisissez le code de votre choix. Le
menu apparaît.
“ Prog. Verrou :
utilisez les touches îÏ pour
sélectionner le programme TV souhaité et validez
avec
¬
. Le symbole + s’affiche devant les
programmes ou les prises qui sont verrouillés.
Désormais, pour visualiser un programme
verrouillé, vous devez entrer le code
confidentiel, sinon l’écran restera noir.
Tout : permet de verrouiller tous les programmes
TV et prises EXT.
L’accès au menu Installation est également
verrouillé. Attention, dans le cas des programmes
cryptés qui utilisent un décodeur extérieur, il faut
verrouiller la prise EXT correspondante.
‘ Changer code : permet d’entrez un nouveau
code à 4 chiffres. Confirmez en le tapant une
deuxième fois.
Si vous avez oublié votre code confidentiel, entrez
le code universel 0711 deux fois.
( Tout Effacer : permet d’effacer tous les
programmes verrouillés.
§ Appuyez sur la touche d pour quitter.
7
Page 24

Télétexte
Le télétexte est un système d'informations, diffusé par certaines chaînes, qui se consulte comme un
journal. Il permet aussi d'accéder aux sous-titrages pour les personnes malentendantes ou peu
familiarisées avec la langue de transmission (réseaux câblés, chaînes satellites,...).
Appuyez sur :
télétexte
Sélection
d’une page
direct aux
rubriques
Sommaire
Sélection
directe des
sous-pages
Appel
Accès
Vous obtenez :
Permet d’appeler le télétexte, de passer en mode
transparent puis de quitter. Le sommaire apparaît avec la
liste des rubriques auxquelles vous pouvez accéder. Chaque
rubrique est repérée par un numéro de page à 3 chiffres.
Si la chaîne sélectionnée ne diffuse pas le télétexte, l'indication
100 s'affiche et l'écran reste noir (dans ce cas, quittez le
télétexte et choisissez une autre chaîne).
Composer le numéro de la page désiré avec les touches
0 à 9 ou @ P #. Exemple: page 120, tapez 12
0
. Le numéro s’affiche en haut à gauche, le compteur
tourne, puis la page est affichée.
Renouvelez l'opération pour consulter une autre page.
Si le compteur continue à chercher, c’est que la page n'est pas
transmise. Choisissez un autre numéro.
Des zones colorées sont affichées en bas de l’écran.
Les 4 touches colorées permettent d’accéder aux
rubriques ou aux pages correspondantes.
Les zones colorées clignotent lorsque la rubrique ou la page
n’est pas encore disponible.
Pour revenir au sommaire (généralement la page 100).
Certaines pages contiennent des sous-pages (exemple, la
page 120 contient les sous-pages 1/3, 2/3 et 3/3). Dans ce
cas, le numéro de page s’affiche en vert, précédé d’un
symbole Æ, Í ou ÍÆ. Utilisez les touches Ȭ pour
accéder directement aux sous-pages de votre choix.
Agrandissement
d'une page
Double page
télétexte
Informations
cachées
Pages
préférées
8
Pour afficher la partie supérieure, inférieure, puis revenir
à la dimension normale.
(disponible uniquement sur certaines versions)
Pour activer ou désactiver l’affichage du télétexte en double
page. La page active est affichée à gauche et la page suivante
à droite.
Pour faire apparaître ou disparaître les informations
cachées (solutions de jeux).
Pour les programmes télétexte 0 à 40, vous pouvez
mémoriser 4 pages préférées qui seront ensuite
directement accessibles avec les touches colorées (rouge,
verte, jaune, bleue).
& Appuyez sur la touche H pour passer en mode pages
préférées.
é Affichez la page télétexte que vous souhaitez mémoriser.
“ Appuyez ensuite pendant 3 secondes sur la touche
colorée de votre choix. La page est mémorisée.
‘ Renouvelez l’opération avec les autres touches
colorées.
( À présent, dès que vous consultez le télétexte, vos
pages préférées apparaissent en couleur en bas de
l’écran. Pour retrouver les rubriques habituelles,
appuyez sur H.
Pour tout effacer, appuyez sur d pendant 5 secondes.
Page 25

Format d’écran
Les images que vous recevez peuvent être transmises au format 16:9 (écran large) ou 4:3 (écran
traditionnel). Les images 4:3 ont parfois une bande noire en haut et en bas (format cinémascope).
Cette fonction permet d’éliminer les bandes noires et d’optimiser l’affichage des images sur l’écran.
Si votre téléviseur est équipé d’un écran 4:3
Appuyez sur la touche î (ou Ï) pour sélectionner les différents modes :
4:3
L’image est reproduite au format 4:3
Extension 4:3
L’image est élargie verticalement.
images au format cinémascope.
Compress 16:9
L’image est comprimée verticalement au format 16:9.
Si votre téléviseur est équipé d’un écran 16:9
Appuyez sur la touche ¬ (ou È) pour sélectionner les différents modes :
Le téléviseur est équipé d’une commutation automatique qui décode le signal spécifique émis par
certains programmes et sélectionne automatiquement le bon format d’écran.
4:3
L’image est reproduite au format 4:3, une bande noire apparaît de chaque côté de l’image.
Vous pouvez agrandir progressivement l’image en utilisant les touches
Zoom 14:9
L’image est agrandie au format 14:9, une petite bande noire subsiste de chaque côté de
l’image. Les touches
apparaître le haut ou le bas de l’image (sous-titres).
Zoom 16:9
L’image est agrandie au format 16:9. Ce mode est recommandé pour visualiser les images
avec bande noire en haut et en bas (format cinémascope). Utilisez les touches
vous voulez faire apparaître le haut ou le bas de l’image.
îÏ permettent de comprimer l’image verticalement pour faire
Ce mode permet de supprimer les bandes noires des
îÏ.
îÏ
si
Sous-Titres
Ce mode permet de visualiser les images 4:3 sur toute la surface de l’écran en laissant visibles
les sous-titres. Utilisez les touches
l’image.
Super 4:3
Ce mode permet de visualiser les images 4:3 sur toute la surface de l’écran en élargissant
les côtés de l’image. Utilisez les touches
Plein Écran
Ce mode permet de restituer les bonnes proportions des images transmises en 16:9 en
les affichant en plein écran.
Format auto
Le format de l’image est automatiquement ajusté pour remplir le plus possible la surface de
l’écran.
îÏ
pour faire descendre ou remonter le bas de
îÏ pour compresser l’image verticalement.
9
Page 26

Raccordements
Le téléviseur est équipé de 2 prises péritel EXT1 et EXT2 situées à l’arrière.
La prise EXT1 possède les entrées/sorties audio vidéo et les entrées RVB.
La prise EXT2 possède les entrées/sorties audio vidéo et les entrées S-VHS.
Magnétoscope
Autres appareils
équipements.
Effectuez les raccordements ci-contre. Utilisez un cordon
de liaison péritel de bonne qualité.
Si votre magnétoscope ne possède pas de prise péritel, seule la
liaison par le câble antenne est possible. Vous devez accorder le
programme numéro 0 du téléviseur sur le signal de test du
magnétoscope (voir mémo. manuelle p. 5). Ensuite pour
reproduire l’image du magnétoscope, appuyez sur 0.
Magnétoscope avec Décodeur
Connectez le décodeur sur la deuxième prise péritel du
magnétoscope. Vous pourrez ainsi enregistrer les
émissions cryptées.
Récepteur satellite, décodeur, DVD, jeux,...
Effectuez les raccordements ci-contre.
Pour optimiser la qualité de l’image, connectez à EXT1 les
équipements délivrant les signaux RVB (décodeur
numérique, lecteurs DVD, jeux, ...), à EXT2 les
équipements délivrant les signaux S-VHS (magnétoscopes
S-VHS et
Hi-8, ...) et indifféremment à EXT1 ou EXT2 les autres
10
Amplificateur
versions)
Pour le raccordement à une chaîne Hi-fi, utilisez un cordon
de liaison audio et connectez les sorties “L” et “R” du
téléviseur à une entrée “AUDIO IN” “L” et “R” de la
chaîne Hi-fi.
(disponible uniquement sur certaines
Pour sélectionner les appareils connectés
Appuyez sur la touche pour sélectionner EXT1, EXT2, S-VHS2
(signaux S-VHS de la prise EXT2) et EXT3 pour les connections latérales.
La plupart des appareils réalisent eux-mêmes la commutation (décodeur,
magnétoscope).
Page 27

Connexions latérales
Effectuez les raccordements ci-contre.
* Selon versions.
Avec la touche n, sélectionner EXT3.
Pour un appareil monophonique, connectez le signal vidéo
sur l’entrée VIDEO et le signal son sur l’entrée AUDIO L (ou
AUDIO R). Le son est reproduit automatiquement sur les
haut-parleurs gauche et droit du téléviseur. Ne pas
connecter les câbles VIDEO et S-VIDEO en même temps.
Cela peut provoquer une distorsion d’image.
Casque
Appuyez sur la touche m si vous voulez couper le
son du téléviseur (voir aussi : réglage du son, page 6).
L'impédance du casque doit être comprise entre 32 et
600 ohms.
Glossaire
Signaux RVB:
Il s’agit de 3 signaux vidéo Rouge, Vert, Bleu qui viennent directement piloter les 3 canons rouge,
vert , bleu du tube cathodique. L’utilisation de ces signaux permet d’obtenir une meilleure qualité
d’image.
Son NICAM:
Procédé permettant de transmettre le son en qualité numérique.
Système:
La transmission des images n’est pas faite de la même façon dans tous les pays. Il existe différentes
normes : BG, DK, I, et L L’. Le réglage
normes. Ne pas confondre avec le codage couleur PAL ou SECAM. Le Pal est utilisé dans la plupart
des pays d’Europe, le Secam en France, en Russie et dans la plupart des pays d’Afrique. Les États
Unis et le Japon utilisent un autre système appelé NTSC.
100Hz:
Les téléviseurs conventionnels (50 Hz) produisent 25 images par seconde. Grâce à la technologie
100 Hz, la fréquence de balayage est doublée et vous obtenez 50 images par seconde. Le confort
visuel est amélioré et l’effet de scintillement est supprimé.
16:9:
Désigne les proportions largeur / hauteur de l’écran. Les téléviseurs à écran large ont des
proportions 16/9 et les écrans traditionnels: 4/3.
Système (p. 5) permet de sélectionner ces différentes
11
Page 28

Conseils
Mauvaise réception
La proximité de montagnes ou de hauts
immeubles peut être la cause d'image
dédoublée, d'écho ou d'ombres. Dans ce cas,
essayez d’ajuster manuellement l’accord de
l’image: voir
Ajust. Fin (p. 5) ou modifiez
l'orientation de l'antenne extérieure.
Vérifiez également que votre antenne permet
de recevoir les émissions dans cette bande de
fréquences (bande UHF ou VHF) ?
En cas de réception difficile (image neigeuse),
positionnez le réglage
Options sur Marche (p. 6).
Dynamic NR du menu
Absence d'image
Si le téléviseur ne s’allume pas, appuyez 2 fois
sur la touche
b située sur la télécommande.
Avez-vous bien branché l'antenne ?
Avez-vous choisi le bon système ? (p. 5)
Le contraste ou la lumière est déréglé ?
Appuyez sur la touche
réglages du menu
≈ et reprenez les
Image.
Une prise péritel ou une prise d'antenne mal
connectée est souvent la cause de problèmes
d'image ou de son (il arrive que les prises se
déconnectent légèrement lorsque l'on déplace
ou que l'on tourne le téléviseur). Vérifiez
toutes les connexions.
L’équipement périphérique délivre une
image en noir et blanc
Pour la lecture d’une cassette vidéo, vérifiez
qu’elle est enregistré au même standard (PAL,
SECAM, NTSC) que ce que peut lire le
magnétoscope.
Télétexte
Certains caractères ne s’affichent pas
correctement ? Vérifiez que le réglage du
est correctement positionné (p. 5).
La télécommande ne fonctionne plus ?
Le voyant du téléviseur ne clignote plus
lorsque vous utilisez la télécommande ?
Remplacez les piles.
Veille
Lorsque vous allumez le téléviseur, il reste en
veille et l’indication
Verrouillé s'affiche dès que
vous utilisez les touches du téléviseur ?
La fonction
Verrou enfant est en service (p. 7).
Si le téléviseur ne reçoit pas de signal pendant
15 mn, il passe automatiquement en veille.
En mode veille,votre TV consommemoins de
5W selon les modèles. Afin d’économiser
l’énergie,utilisezla touche marche/arrêt pour
éteindre complètement l’appareil.
Toujours pas de résultats ?
En cas de panne, n’essayez jamais de réparer
vous même le téléviseur, mais consultez le
service après vente.
Nettoyage du téléviseur
Le nettoyage de l’écran et du coffret doit être
effectué uniquement avec un chiffon propre,
doux et non pelucheux. Ne pas utiliser de
produit à base d’alcool ou de solvant.
pays
Absence de son
Si certains programmes sont dépourvus de son,
mais pas d’image, c’est que vous n’avez pas le bon
système TV. Modifiez le réglage
Informations sur la sécurité : champs électriques, magnétiques et électromagnétiques
(EMF, ElectroMagnetic Fields)
1. Philips Royal Electronics fabrique et vend de nombreux produits de consommation qui ont, comme tous les
appareils électriques, la capacité d’émettre et de recevoir des signaux électromagnétiques.
2. L’un des principes fondamentaux adoptés par la société Philips consiste à prendre toutes les mesures qui
s’imposent en matière de sécurité et de santé, conformément aux dispositions légales en cours, pour
respecter les normes sur les champs électriques, magnétiques et électromagnétiques en vigueur au moment
de la fabrication de ses produits.
3. Philips s’est engagé à développer, produire et commercialiser des produits ne présentant aucun effet nocif
sur la santé.
4. Philips confirme qu’un maniement correct de ses produits et leur usage en adéquation avec la raison pour
laquelle ils ont été conçus garantissent une utilisation sûre et fidèle aux informations scientifiques disponibles
à l’heure actuelle.
5. Philips joue un rôle actif dans le développement des normes internationales relatives à la sécurité et aux
champs électromagnétiques (EMF) ; cet engagement lui permet d’anticiper les évolutions ultérieures en
matière de normalisation afin de les intégrer avant l’heure dans ses produits.
Système (p. 5).
12
Page 29

Inleiding
Hartelijk dank voor de aankoop van dit televisietoestel.
Deze handleiding is bedoeld om u te helpen bij de installatie en bediening van uw
TV toestel.
We raden u ten sterkste aan de handleiding zorgvuldig door te nemen.
Opmerking: Specificaties en overige gegevens kunnen zonder voorafgaande kennisgeving
worden gewijzigd.
Inhoudsopgave
Installatie
Installeren van het televisietoestel . . . . . . . . . . . . . . . . . . . . . . . . . . . . . . . . . . . . .2
Toetsen van het TV toestel . . . . . . . . . . . . . . . . . . . . . . . . . . . . . . . . . . . . . . . . . .2
Toetsen van de afstandsbediening . . . . . . . . . . . . . . . . . . . . . . . . . . . . . . . . . . . . .3
Veiligheidsinformatie . . . . . . . . . . . . . . . . . . . . . . . . . . . . . . . . . . . . . . . . . . . . . . . .3
Snelle installatie . . . . . . . . . . . . . . . . . . . . . . . . . . . . . . . . . . . . . . . . . . . . . . . . . . . .4
Sorteren van de programma’s . . . . . . . . . . . . . . . . . . . . . . . . . . . . . . . . . . . . . . . .4
Programmanaam . . . . . . . . . . . . . . . . . . . . . . . . . . . . . . . . . . . . . . . . . . . . . . . . . . .4
Handmatig vastleggen in het geheugen . . . . . . . . . . . . . . . . . . . . . . . . . . . . . . . . . .5
Voorkeursprogramma’s . . . . . . . . . . . . . . . . . . . . . . . . . . . . . . . . . . . . . . . . . . . . .5
Andere instellingen van het menu Installatie . . . . . . . . . . . . . . . . . . . . . . . . . . . . .5
Gebruik
Instellen van het beeld . . . . . . . . . . . . . . . . . . . . . . . . . . . . . . . . . . . . . . . . . . . . . .6
Instellen van het geluid . . . . . . . . . . . . . . . . . . . . . . . . . . . . . . . . . . . . . . . . . . . . . .6
Instellen van de diversen . . . . . . . . . . . . . . . . . . . . . . . . . . . . . . . . . . . . . . . . . . . .6
Wekfunctie . . . . . . . . . . . . . . . . . . . . . . . . . . . . . . . . . . . . . . . . . . . . . . . . . . . . . . .7
Vergrendeling van de televisie . . . . . . . . . . . . . . . . . . . . . . . . . . . . . . . . . . . . . . . .7
Teletekst . . . . . . . . . . . . . . . . . . . . . . . . . . . . . . . . . . . . . . . . . . . . . . . . . . . . . . . . .8
16:9 Formaten
Extra apparatuur
Aansluiten van extra apparatuur . . . . . . . . . . . . . . . . . . . . . . . . . . . . . . . . . . . . .10
Videorecorder . . . . . . . . . . . . . . . . . . . . . . . . . . . . . . . . . . . . . . . . . . . . . . . . . . .10
Versterker . . . . . . . . . . . . . . . . . . . . . . . . . . . . . . . . . . . . . . . . . . . . . . . . . . . . . . .10
Aansluitingen aan de zijkant . . . . . . . . . . . . . . . . . . . . . . . . . . . . . . . . . . . . . . . . .11
Verklaring technische termen . . . . . . . . . . . . . . . . . . . . . . . . . . . . . . . . . . . . . . .11
Praktische informatie
Tips . . . . . . . . . . . . . . . . . . . . . . . . . . . . . . . . . . . . . . . . . . . . . . . . . . . . . . . . . . . .12
Veiligheidsinformatie: Elektrische, magnetische en elektromagnetische velden
. . . . . . . . . . . . . . . . . . . . . . . . . . . . . . . . . . . . . . . . . . . . . . . . . . . . .9
. . . .12
NL
Aanwijzing voor hergebruik
De verpakking van dit product is bedoeld voor recyclage. Contacteer locale overheden voor
correcte inlevering.
Het verwijderen van uw oud product.
Uw product is ontworpen en geproduceerd met materialen en componenten van een hoge
kwaliteit, die gerecycled en hergebruikt kunnen worden.Wanneer dit doorkruist
afvalemmer symbool bevestigd is op uw product, betekend dit dat deze voldoet aan de
Europese Directieven 200/96/EC. Gelieve uzelf te informeren met betrekking tot de lokale
gescheiden afval collectie van elektrische en elektronische producteren.
Gelieve volgens lokale wetgeving te andelen en uw oude producten niet met het gewone
huisvuil te verwijderen. Het correct afvoeren van uw oude producten helpt het voorkomen
van het vervuilen van milieu en menselijk welzijn.
1
Page 30

Installeren van het televisietoestel
&
Plaatsen van het televisietoestel
Plaats uw TV toestel op een stevige en stabiele
ondergrond en laat rondom het toestel een ruimte
vrij van tenminste 5 cm. Om gevaarlijke situaties te
voorkomen dient u op het toestel geen voorwerp te
zetten dat dekkend (kleedje) of vol met water
(vaas) is of dat warmte ontwikkelt (lamp). Het TV
toestel mag niet aan water worden blootgesteld.
é
Verbindingen
• Steek de stekker van de antenne in de :
aansluitbus aan de achterkant van het toestel.
Met de binnenantennes kan ontvangst in
bepaalde omstandigheden moeilijk zijn. U kan
dit verbeteren door de antenne te draaien. Indien
de ontvangst middelmatig blijft, dan dient u een
buitenantenne te gebruiken.
• Steek de stekker in een stopcontact
(220-240 V / 50 Hz).
“
Afstandsbediening
NL
Niet
weggooien,
maar inleveren
als KCA.
Plaats de twee R6-batterijen (bijgeleverd) op
de juiste manier in de afstandsbediening.
Controleer of de keuzetoets op TV staat.
Om het milieu te helpen beschermen, bevatten de bij
dit televisietoestel geleverde batterijen geen kwik of
nikkel cadmium. Gooi gebruikte batterijen niet weg
maar maak gebruik van de recycleermogelijkheden ter
uwer beschikking (raadpleeg uw verkoper). Gebruik
soortgelijke batterijen als u ze moet vervangen.
‘
Inschakelen
Druk op de aan/uit toets om de televisie aan te
zetten. Een rood indicatielampje gaat branden en
het scherm licht op. Ga rechtstreeks naar het
hoofdstuk Snelle installatie op pagina 4.
Druk op de
als de televisie in de wachtstand (stand-by) blijft.
Het indicatielampje knippert als u de
afstandsbediening gebruikt.
P # toets van de afstandsbediening
Toetsen van het TV toes
Het televisietoestel heeft 4 of 5 toetsen,
afhankelijk van het model aan de voorkant of
bovenaan het toestel.
2
De VOLUME - + (- ” +) toetsen dienen om het
geluid te regelen. Met de PROGRAM - + (- P +)
toetsen kunnen de gewenste programma’s worden
geselecteerd. Om de menu’s te activeren,
dienen de twee
toetsen tegelijkertijd ingedrukt te worden.
Vervolgens kunnen de PROGRAM - + toetsen
worden gebruikt om een instelling te selecteren
en de
” - + toetsen om die instelling te
bevestigen. Om de menu’s te verlaten, dienen de
twee
” - en ” + (of MENU) toetsen
tegelijkertijd ingedrukt te worden.
Opmerking: wanneer de Kinderslot functie is
geactiveerd, zijn deze toetsen niet beschikbaar (zie p. 7).
” - en ” + (of MENU)
Page 31

Toetsen van de afstandsbediening
1 Wachtstand (Stand-by)
Om de TV in de wachtstand te zetten. Druk op b,P
@#of 09, om de TV weer aan te zetten.
2 Sleeptimer
Voor het instellen van de tijdsduur waarna automatisch
naar de wachtstand wordt overgeschakeld (van 0 tot
240 minuten).
3 Keuze van de EXT-aansluitingen (p.10)
Druk verscheidene keren om het aangesloten apparaat
te selecteren.
4 Teletext-toetsen (p. 8)
5 Dual screen
om de weergave op twee schermen te activeren/
desactiveren. Op het tweede scherm kan de teletekst
6 Menu
Om de menu’s op te roepen of te verlaten.
7 Cursor / Formaat
Met deze 4 toetsen kunt u de menu’s doorlopen.
8 Volume
Voor het regelen van het geluidsniveau
9 Afzetten van het geluid
Om het geluid aan of uit te zetten.
! Scherm informatie
Om het programmanummer, de naam (zo die bestaat),
de tijd, de geluidsmode en de resterende tijd op de
timer in beeld te brengen of te verwijderen. Door de
toets 5 seconden lang ingedrukt te houden blijft het
programmanummer permanent op het scherm.
(afhankelijk van de versie)
Geluidsmodus
Om van Stereo en Nicam Stereo naar Mono te
schakelen of te kiezen tussen Dual I of Dual II bij
tweetalige uitzendingen. De Mono-aanduiding is rood
wanneer er geen andere mogelijkheid is.
# Surround
Om het effect van verruimd geluid te activeren/
desactiveren. Bij stereo geeft dit de indruk dat de
luidsprekers verder uit elkaar staan. Voor versies uitgerust
met Virtual Dolby Surround * krijgt u de geluidseffecten
van Dolby Surround Pro Logic.
$
Voorinstellingen van beeld en geluid
Geeft toegang tot een aantal instellingen van beeld en
geluid.
De stand Persoonlijk komt overeen met de gekozen
instellingen in de menu’s.
% Oproepen van teletekst (p. 8)
& Kiezen van tv-programma’s
(p.9)
Om een vorig of volgend programma lager of hoger te
kiezen (zie p. 5).
( Cijfertoetsen
Om rechtstreeks een programma te kiezen. Voor een
programmanummer van 2 cijfers moet het tweede
cijfer worden.
)
Active Control
Optimaliseert de kwaliteit van het beeld in functie van het
ontvangstniveau.
(afhankelijk van de versie)
Veiligheidsinformatie
• Sluit de TV aan op een stopcontact (220-240 Volt, 50 Hz).
• Neem de stekker uit het stopcontact wanneer:
- het rode lampje onder het TV-scherm blijft knipperen
- er een heldere witte streep over het hele scherm te zien is
- het onweert
- de TV gedurende langere tijd zonder toezicht blijft.
• Reiniging van het TV-scherm: Gebruik nooit bijtende schoonmaakmiddelen. Gebruik een licht bevochtigde zachte
doek of zeemlap.
• Plaats nooit brandende kaarsen of andere vormen van open vuur bij of op de TV.
• Stel de TV niet bloot aan rechtstreeks zonlicht of overmatige hitte.
• De TV mag niet worden afgedekt of geblokkeerd, aangezien dit tot oververhitting kan leiden.
• Laat aan alle kanten van de TV minimaal 5 cm ruimte vrij ten behoeve van de ventilatie.
• Plaats de TV niet bij een open raam of op andere plaatsen waar de TV kan worden blootgesteld aan regen of water.
• WAARSCHUWING batterijgebruik - Om te voorkomen dat lekkende batterijen lichamelijk letsel of materiële schade veroorzaken, neemt u de onderstaande voorzorgsmaatregelen in acht:
- Installeer alle batterijen in de juiste stand, met + en - zoals aangegeven op het apparaat.
- Combineer nooit verschillende soorten batterijen (bijvoorbeeld oude en nieuwe, carbon en alkaline).
- Verwijder de batterijen wanneer u het apparaat langere tijd niet gebruikt.
Nuttige tips
• Laat de TV niet gedurende langere tijd in de standbystand staan. Schakel het apparaat uit om het te demagnetiseren.
Een gedemagnetiseerde TV biedt een betere beeldkwaliteit.
• De TV mag niet worden verplaatst of verschoven wanneer deze is ingeschakeld. Er kunnen dan ongelijkmatigheden
in de kleurweergave optreden.
• Probeer nooit zelf een defecte TV te repareren. Laat reparatie altijd over een bevoegde reparateurs.
3
Page 32

Snelle installatie
Wanneer u de televisie voor het eerst aanzet,
verschijnt er een menu op het scherm. In dit menu
kunt u het land en de taal van de menu’s kiezen:
Menu •
Installatie •
DK
NL
GB
DE
SF
Nederlands
English
Français
...
Indien het menu niet verschijnt, houd de toetsen
”- en ”+ van het televisietoestel dan
5 seconden ingedrukt om het te laten verschijnen
(of MENU).
& Gebruik de toetsen îÏ van de
afstandsbediening om uw land te kiezen en
bevestig met
¬.
Indien uw land niet op de lijst voorkomt, selecteer
dan “. . .”
é Selecteer vervolgens uw taal met de toetsen
îÏ en bevestig met ¬.
Programsorteren
& Druk op de toets H. Het Hoofdmenu
verschijnt op het scherm.
Menu •
Installatie •
Taal •
Land •
Automatisch •
Handmatig •
Sorteren •
Voorkeurzenders •
Naam
•
00
01 NED1
02 NED2
03ÆNED3
04 RTL4
“ Het zoeken start nu automatisch.
Alle beschikbare tv-programma’s worden in
het geheugen opgeslagen.
Dit alles duurt enkele minuten. Op het
scherm ziet u hoe het zoeken vordert en
hoeveel programma’s er gevonden zijn. Na
afloop verdwijnt dit menu.
Druk op de toets H om het zoeken te stoppen
of te onderbreken. Zie het hoofdstuk Tips op p. 12
als er geen programma wordt gevonden.
‘ Als de kabel of het kabelnetwerk het
automatische sorteersignaal uitzendt, dan
worden de programma’s op de juiste manier
genummerd. De installatie wordt dan
beëindigd.
( Indien dit niet het geval is, dient u het menu
Sorteren te gebruiken om ze te nummeren.
Sommige zenders of kabelnetwerken zenden hun
eigen sorteerparameters uit (regio, taal enz...).
In dat geval moet u uw keuze aangeven met de
toetsen îÏ en bevestigen met ¬.
é Selecteer het menu Installatie met de cursor
en vervolgens het menu
Sorteren.
“ Selecteer het programma dat u wil verplaatsen
met de toets
îÏ en druk op ¬.
‘ Gebruik vervolgens de toetsen îÏ om
het nieuwe nummer te kiezen en bevestig
met
È.
( Herhaal de stappen “ en ‘ zo vaak als er
programma’s hernummerd moeten worden.
§ Om de menu’s te verlaten, druk op d.
Programmanaam
Indien u dit wenst, kunt u een naam geven aan
de programma’s en externe aansluitingen .
Opmerking: tijdens de installatie krijgen de
programma’s automatisch een naam wanneer het
identificatiesignaal wordt doorgezonden.
& Druk op de toets H.
é Selecteer met de cursor het menu Installatie,
en vervolgens
“ Gebruik de toetsen @ P # om het
programma te kiezen dat u een naam wilt
geven of waarvan u de naam wilt wijzigen.
‘ Gebruik de toetsen Ȭ om in het
naamveld van de ene naar de andere
letterpositie te gaan (5 tekens) en de toetsen
4
Naam.
îÏ om de tekens te selecteren.
( Druk op H als u de naam heeft ingevoerd.
De naam is nu in het geheugen vastgelegd.
§ Herhaal stappen “ tot ( voor elk
programma dat u een naam wilt geven.
è Druk op d om de menu’s te verlaten.
Page 33

Handmatig vastleggen in het geheugen
Met dit menu kunt u de programma’s één
voor één vastleggen.
& Druk op de toets H.
é Met de cursor selecteert u het menu Installatie
en vervolgens Handmatig vastleggen:
Menu •
Installatie •
Taal •
Land •
Automatisch •
Handmatig
Sorteren •
Voorkeurzenders •
Naam
•
Systeem •
Zoeken •
Programnr. •
Fijnafst. •
Vastleggen •
“ Systeem: selecteer Europe (automatisch
zoeken*) of
West Eur (BG-norm), East Eur
(DK-nrom), UK (I-norm) of France (LLnorm).
* Behalve voor Frankrijk (LL-norm) moet verplicht
de keuze France worden gemaakt.
Voorkeursprogramma’s
Met dit menu kan u de programma’s kiezen
die beschikbaar zijn met de toets
& Druk op de toets H.
é Met de cursor selecteert u het menu Installatie
en vervolgens Voorkeurzenders en druk op
¬
. De lijst met de voorkeursprogramma’s
Menu •
Installatie •
Taal •
Land •
Automatisch •
Handmatig •
Sorteren •
Voorkeurzenders
Naam
•
@ P #.
2 •
‘
Zoeken: druk op ¬. Het zoeken begint. Zodra
een programma is gevonden, stopt het zoeken en
wordt de programmanaam weergegeven (indien
beschikbaar). Ga naar de volgende stap. Indien u
de frequentie van het gewenste programma kent,
dan kunt u het nummer ervan direct invoeren
met behulp van de toetsen
0 tot 9.
Als geen programma wordt gevonden, zie het
hoofdstuk Tips (p. 12).
( Programnr.: voer het gewenste nummer in met
de toetsen
voor
Ȭ of 0 tot 9. Bijvoorbeeld :
programma
1, voer 01 in.
§ Fijnafst. : als de ontvangst niet bevredigend is,
stel dan af met de toetsen
Ȭ.
è Vastleggen: druk op ¬. Het programma is
vastgelegd.
! Herhaal de stappen ‘ tot è voor elk vast te
leggen programma.
ç Druk op d om de menu’s te verlaten.
wordt weergegeven. De bij de installatie
gevonden programma’s zijn automatisch
geactiveerd in deze lijst.
“ Gebruikde toetsen omhoog/omlaag om het
gewenste programma te selecteren.
‘ Gebruik de toetsen links/rechts om een
programma aan de lijst toe te voegen of eruit
te halen.
( Herhaal de stappen “ en ‘ voor elk
programma dat u wil toevoegen aan of
verwijderen uit de lijst.
§ Om het menu te verlaten, druk verschillende
keren op
H.
Andere instellingen van het menu Installatie
& Druk op de toets H en selecteer het menu
Installatie:
é Taal: om de taal van de weergave van de
menu’s te wijzigen.
“ Land: om uw land te kiezen.
Deze instelling wordt gebruikt bij het zoeken, het
automatisch sorteren van de programma’s en de
weergave van teletekst. Indien uw land niet in de
lijst voorkomt, selecteer dan “. . .”
‘ Automatisch: met dit menu start u het
automatisch zoeken naar de programma’s die u
in uw regio kunt ontvangen. Als de kabel of het
kabelnetwerk het automatische sorteersignaal
uitzendt, dan worden de programma’s op de
juiste manier genummerd. Indien dit niet het
geval is, dan moet u het menu
gebruiken om ze te hernummeren (zie p. 4).
Sommige zenders of sommige kabelnetwerken zenden
hun eigen sorteerparameters uit (regio, taal enz.). In
dit geval moet u uw keuze aanduiden met de
îÏ en bevestigen met ¬. Druk op
toetsen
H om het zoeken te stoppen of te onderbreken.
Indien geen enkel
het menu Tips (p. 12).
( Druk op d om de menu’s te verlaten.
programma werd gevonden, zie dan
Sorteren
5
Page 34

Instellen van het beeld
& Druk op de toets H en vervolgens op ¬.
Het menu
Beeld verschijnt:
Menu
•
Beeld
Geluid
•
Diversen
•
Installatie
•
Helderheid •
Kleur •
Contrast •
Scherpte •
Kleurtemp. •
Digitale Opties •
Vastleggen •
é Gebruik de toetsen îÏ om een instelling te
selecteren en de toetsen
Ȭ om de
instelling af te regelen.
Opmerking: tijdens de instelling van het beeld wordt
alleen de geselecteerde regel weergegeven. Druk op
îÏ om het menu weer op het scherm te halen.
Beschrijving van de instellingen:
• Helderheid: om de helderheid van het beeld in
te stellen.
•
Instellen van het geluid
&Druk op H, selecteer Geluid (Ï) en druk
I
¬. Het menu Geluid verschijnt:
op
Menu •
Beeld •
Geluid
Diversen •
Installatie
•
é Gebruik de toetsen îÏ om een instelling
te kiezen en de toetsen
Beschrijving van de instellingen:
• Hoge Tonen: om de hoge geluidsfrequenties af
te stemmen.
Lage Tonen: om de lage frequenties af te stemmen
•
Hoge Tonen •
Lage Tonen •
Balans •
Delta Vol •
Max. Volume •
Vol. Hoofdtelef. •
Vastleggen •
Ȭ om in te stellen.
Kleur: om de kleurintensiteit in te stellen.
Contrast: om het verschil tussen de lichte en de
•
donkere kleuren in te stellen.
Scherpte: om de scherpte van het beeld in te stellen.
•
Kleurtemp.: stelt de kleurweergave in: Koel
•
(blauwer), Normaal (uitgebalanceerd) of Warm
(roder).
• Digitale Opties:
100hz: vlakflikkerreduktie.
-
Digital Scan (afhankelijk van de versie): om het
zichtbare flikkereffect op bepaalde beelden te
verminderen.
Dubbele Lijnen: een verdubbeling van de
verticale resolutie die zichtbare beeldlijnen
struktuur verwijderd.
Aanbevolen voor NTSC materiaal (60Hz).
“ Zodra u de instellingen heeft uitgevoerd,
selecteer dan de keuze
¬ om de instelling vast te leggen.
op
Druk op
d om de menu’s te verlaten.
Vastleggen en druk
• Balans: om het geluid evenwichtig over de
linker- en rechterluidsprekers te verdelen.
•
Delta Volume: stelt u in staat om de
volumeverschillen die tussen de verschillende
programma’s of de EXT-aansluitingen kunnen
bestaan, te compenseren. Deze instelling is
beschikbaar voor de programma’s 0 tot 40 en
de EXT-aansluitingen.
• Max. Volume: controleert automatisch het
volume zodat verhogingen van het geluid kunnen
worden beperkt, met name bij het schakelen
tussen programma’s of reclamespots.
• Volume Hoofdtelefoon (afhankelijk van de
versie)
: voor het regelen van het geluidsniveau
van de hoofdtelefoon zonder het volume van
de luidsprekers van het toestel te wijzigen.
“ Als u het geluid heeft ingesteld, selecteer dan
de optie
Vastleggen en druk op ¬ om de
instelling vast te leggen.
‘ Om de menu’s te verlaten, druk op d.
Instellen van de diversen
& Druk op H, selecteer Diversen (Ï) en druk
¬. U kan het volgende instellen:
op
é Timer, Kinderslot en Vergrendeling van
programma’s : zie volgende pagina
“ Dynamic NR: Min, Med (optimale stand), Max
of Uit: vermindert de beeldruis (sneeuw) bij een
slechte ontvangst.
‘
Rotatie (alleen beschikbaar op grote
:
televisieschermen)
gevoelig voor schommelingen in het magnetisch
aardveld. Met dit menu kunt u de effecten
daarvan compenseren door de rotatie van het
beeld aan te passen.
Grote televisieschermen zijn
( Dynamisch contrast (afhankelijk van de versie):
Min, Med (optimale stand), Max of Uit.
Om de automatische contrastregelcircuits te
activeren.
§
Decoder: selecteer het programma of de
programma’s die een externe decoder gebruiker
en selecteer vervolgens de aansluiting waarmee
de decoder is verbonden:
EXT1 of EXT2.
Indien de decoder verbonden is met de videorecorder,
selecteer dan aansluiting (
EXT2) van de videorecorder.
è Om de menu’s te verlaten, druk op d.
Page 35

Wekfunctie
Met dit menu kunt u de televisie als wekker
gebruiken.
& Druk op de toets H.
é Selecteer met de cursor het menu Diversen
en vervolgens Timer:
Menu •
Beeld •
Geluid •
Diversen
Installatie
•
Timer •
Kinderslot •
Oudercontrole •
Dynamic NR •
Rotatie •
Tijd
Starttijd
Stoptijd
Programnr.
“ Tijd: voer de tijd in.
Opmerking: de tijd wordt automatisch
geactualiseerd met de teletekstinformatie van het
programma op nr. 1. Indien dit programma geen
teletekst heeft, dan kan de tijd niet worden
aangepast.
Vergrendeling van de televisi
Door de toetsen te vergrendelen, kunt u bepaalde
programma’s uitsluiten of het gebruik van de
televisie volledig onmogelijk maken.
Kinderslot
& Druk op H.
é Selecteer met de cursor het menu Diversen
Menu •
Beeld •
Geluid •
Diversen
Installatie
•
en zet het Kinderslot op Aan.
“
Zet de televisie uit en verberg de
afstandsbediening. De televisie is nu onbruikbaar
(en kan alleen met de afstandsbediening weer
worden aangezet).
‘ Om de vergrendeling ongedaan te maken:
zet
Kinderslot op Uit.
Vergrendeling van de
programma’s
& Druk op de toets H, selecteer het menu
Diversen en vervolgens
Timer •
Kinderslot
Oudercontrole •
Dynamic NR •
Rotatie •
Oudercontrole
•
.
‘ Starttijd: voer het starttijdstip in.
( Stoptijd: voer het eindtijdstip in.
§ Programmanummer: voer het nummer in van
het programma dat u voor de wekfunctie wilt
gebruiken.
è Aan: hier kunt u het volgende instellen:
•
Een keer om u éénmaal te wekken,
•
Dagelijks om dagelijks te wekken,
•
Stop om de wekfunctie uit te schakelen.
! Druk op b om de tv in de wachtstand te
zetten. Op de geprogrammeerde tijd gaat de tv
vanzelf aan. Laat u de tv aan staan, dan zal die
alleen op de aangegeven tijd van programma
wisselen (en overgaan op de wachtstand
stoptijd).
De combinatie van de functies Kinderslot en Timer
kan worden gebruikt om de tijd dat de tv aanstaat te
beperken, bijvoorbeeld voor uw kinderen.
é U dient nu uw geheime toegangscode in te
voeren. Voer de eerste keer 2 maal de code
0711 in, en vervolgens de code van uw keuze.
Het menu komt op het scherm.
“ Vergrendelen: gebruik de toetsen îÏ om
het tv-programma te selecteren dat u wilt
vergrendelen en bevestig met
Het symbool
+ verschijnt voor de
¬.
programma’s of de aansluitingen die
vergrendeld zijn. Van nu af aan zult u uw
geheime toegangscode moeten invoeren voor
u een vergrendeld programma kunt bekijken,
anders blijft het scherm zwart.
Alle: om alle tv-programma’s en EXT-
aansluitingen te vergrendelen.
De toegang tot het menu Installatie is eveneens
vergrendeld. Opgelet, in het geval van gecodeerde
programma’s die u met een behulp van een
externe decoder kunt bekijken, dient u de
overeenkomstige EXT-aansluiting te vergrendelen.
‘ Wijzig Code: om een nieuwe code van 4
cijfers in te voeren. Voer de code een tweede
keer in om te bevestigen.
Als u uw geheime code vergeet, dient u de
universele code 0711 twee maal in te voeren.
( Wis Alles: om alle vergrendelde programma’s
te wissen.
§ Druk op de toets d om het menu te verlaten.
7
Page 36

Teletekst
Teletekst is een informatiesysteem dat door bepaalde tv-kanalen wordt uitgezonden en als een
krant kan worden geraadpleegd. Het voorziet ook in ondertiteling voor slechthorenden of voor
mensen die weinig vertrouwd zijn met de taal waarin een bepaald programma wordt uitgezonden
(kabelnetwerken, satellietkanalen, …).
Druk op:
Rechtstreekse
Rechtstreeks
Teletekst
aanzetten
Een pagina
kiezen
keuze van de
subpagina’s
Inhoud
e keuze van
de sub-
pagina’s
Een pagina
vergroten
U krijgt:
Om teletekst op te roepen, over te gaan op de transparante
modus en vervolgens teletekst uit te zetten. De pagina met de
hoofdindex geeft een lijst van rubrieken die kunnen worden
geraadpleegd. Iedere rubriek heeft een paginanummer van drie
cijfers. Als het gekozen kanaal geen teletekst uitzendt, dan
verschijnt de aanduiding 100 en het scherm blijft donker (verlaat in
dit geval teletekst en kies een ander kanaal).
Vorm het nummer van de gewenste pagina met de toetsen
0 tot 9 of @ P #, îÏ. Bijvoorbeeld: voor pagina
120, voer 120in. Het nummer verschijnt in de
linkerbovenhoek van het scherm, de paginateller begint te
zoeken en vervolgens verschijnt de pagina. Herhaal de
procedure om een andere pagina te raadplegen.
Als de teller blijft zoeken, betekent dit dat de gekozen pagina niet
wordt uitgezonden. Kies in dit geval een ander nummer.
Onderaan de pagina staan gekleurde velden.
Met de 4 gekleurde toetsen kunnen de ermee
overeenkomende rubrieken of pagina’s worden opgeroepen.
De gekleurde velden knipperen wanneer de pagina of de rubriek
nog niet beschikbaar is.
Om terug te keren naar de inhoud (gewoonlijk pagina 100).
Bepaalde pagina’s bevatten sub-pagina’s (bijvoorbeeld pagina
120 bevat de sub-pagina’s 1/3, 2/3 en 3/3). In dat geval wordt
het paginanummer in het groen afgebeeld, voorafgegaan door
een symbool Æ, Í of ÍÆ. Gebruik de toetsen
voor rechtstreekse toegang tot de sub-pagina’s van uw keuze.
Om het bovenste of het onderste deel van de pagina weer te geven
en vervolgens naar de normale paginagrootte terug te keren.
Ȭ
Dubbele pagina
teletekst
(Niet op alle versies
beschikbaar.)
Verborgen
informatie
Favoriete
pagina’s
Om het afbeelden van twee pagina’s van teletekst tegelijk te activeren
of te desactiveren. De actieve pagina staat links en de volgende pagina
staat rechts.
Om verborgen informatie te doen verschijnen of verdwijnen
(oplossingen van spelletjes).
Voor de teletekstprogramma’s 0 tot 40 kunt u 4 favoriete
pagina’s vastleggen die vervolgens kunnen worden
opgeroepen met de gekleurde toetsen (rood, groen, geel,
blauw).
& Druk op de toets H om naar de modus favoriete pagina’s
te gaan.
é Geef de teletekstpagina weer die u wilt vastleggen.
“ Houd vervolgens de gekleurde toets van uw keuze
3 seconden ingedrukt. De pagina wordt vastgelegd.
‘ Herhaal deze stappen voor de andere gekleurde toetsen.
( Van nu af aan verschijnen uw favoriete pagina’s onderaan
het scherm zodra u teletekst oproept.
Om de gewone rubrieken terug te vinden, druk op H.
Houd d 5 seconden lang ingedrukt om dit ongedaan te maken.
8
Page 37

16:9 Formaten
De beelden die u ontvangt kunnen in het 16:9 (breedbeeld) of 4:3 (traditioneel beeld) formaat worden
uitgezonden. Soms hebben 4:3 beelden een zwarte balk boven en onder in het beeld (letterbox
uitzendingen).
Met de 16:9 functie kunt u de zwarte balken laten verdwijnen en de (letterbox) uitzending beeldvullend
weergeven.
Indien uw televisietoestel is uitgerust met een 4:3 scherm.
Druk op de toets î (of Ï) om een ander beeldformaat te kiezen :
4:3
Het beeld wordt in formaat 4:3 weergegeven
Verbreed 4:3
Het beeld wordt verticaal vergroot. Met deze methode worden de zwarte balken
vermeden bij het bekijken van een programma in letterbox formaat.
Compressie 16:9
Het beeld wordt verticaal ingedrukt tot een Screen 16:9.
Indien uw televisietoestel is uitgerust met een 16:9 scherm.
Druk op de toets ¬ (of È) om een ander beeldformaat te kiezen :
Het televisietoestel is voorzien van een automatische beeldformaat-selectie. Hierdoor wordt het door
sommige zenders specifiek uitgezonden signaal gedecodeerd en automatisch het juiste beeldformaat
geselecteerd.
4:3
Het beeld wordt in het 4:3 formaat weergegeven, met brede zwarte stroken links en rechts
van het beeld. De toetsen
ondertitels zichtbaar te maken.
Zoom 14:9
Het beeld wordt naar het 14:9 formaat vergroot, met dunne zwarte stroken links en rechts
van het beeld. Met de toetsen
eventuele ondertitels weer te kunnen geven.
Zoom 16:9
Het beeld wordt naar het 16:9 formaat vergroot. Dit formaat is geschikt voor letterboxuitzendingen (met zwarte balken boven en onder in het beeld). Gebruik de toetsen
het beeld eventueel verticaal te verschuiven.
Ondertitel Zoom
In dit formaat worden 4:3 beelden horizontaal en verticaal vergroot zodat het beeldvullend wordt
weergegeven. Gebruik de toetsen
verlagen.
Superzoom
Met dit formaat worden 4:3 beelden beeldvullend weergegeven door het 4:3 beeld
horizontaal te vergroten. Eventuele ondertitels blijven zichtbaar. Gebruik de toetsen
îÏ om het beeld eventueel verticaal te verschuiven.
Breedbeeld
In dit formaat wordt het beeld bij een 16:9 uitzending beeldvullend in de juiste verhouding
weergegeven.
îÏ dienen om het beeld verticaal te verplaatsen en de
îÏ is het mogelijk het beeld verticaal te verschuiven om
îÏ om
îÏ om de onderkant van het beeld te verhogen of te
Autom. formaat
Het formaat van het beeld wordt automatisch aangepast zodat het de oppervlakte van het
scherm zoveel mogelijk vult.
9
Page 38

Aansluiten van extra apparatuur
De televisie heeft 2 externe aansluitingen aan de achterkant van het toestel (EXT1 en EXT2).
De EXT1 aansluiting heeft audio en video ingangen/uitgangen en RGB ingangen.
De EXT2 aansluiting heeft audio en video ingangen/uitgangen en S-VHS ingangen.
Videorecorder
Andere apparaten
Versterker
(niet op alle uitvoeringen aanwezig)
Sluit de recorder aan zoals hiernaast is weergegeven.
Gebruik een euroconnector kabel van goede kwaliteit.
Als uw videorecorder geen euroconnector aansluiting heeft, is de
verbinding alleen mogelijk via de antennekabel. U dient dan af
te stemmen op het testsignaal van uw videorecorder en dit
programmanummer 0 toe te kennen (zie handmatig vastleggen,
p. 5). Om het beeld van de videorecorder weer te geven,
druk op 0.
Videorecorder met decoder
Sluit de decoder aan op de tweede euroconnector
aansluiting van de videorecorder. U kunt dan ook
gecodeerde uitzendingen opnemen.
Satellietontvanger, decoder, CDV, etc.
Maak de aansluitingen zoals hiernaast is weergegeven.
Sluit voor een optimale beeldkwaliteit apparatuur die RGB
signalen produceert (digitale decoder, DVD, bepaalde
CDV drives, etc.) aan op EXT1, en apparatuur die S-VHS
signalen produceert (S-VHS en Hi-8 videorecorders) op
EXT2 en alle andere apparatuur op EXT1 of EXT2.
Om een hi-fi systeem aan te sluiten, dient u een audiokabel
te gebruiken en de “L” en “R” uitgangen van het TV
toestel aan te sluiten op de ingangen “AUDIO IN” “L” en
“R” van de versterker van uw hi-fi.
10
Het selecteren van aangesloten apparatuur
Druk op de n toets om EXT1, EXT2, S-VHS2 (S-VHS signalen van de
EXT2 aansluiting) en
van het model) te selecteren.
De meeste apparaten (decoder, videorecorder) schakelen zelf om.
EXT3 voor aansluitingen aan de voorkant (afhankelijk
Page 39

Aansluitingen aan de zijkant
Maak de aansluitingen zoals hiernaast is
weergegeven.
* Niet op alle uitvoeringen aanwezig.
Met de toets n, kies EXT3.
Bij een mono-toestel sluit u het geluidssignaal aan op de
ingang AUDIO L (of AUDIO R). Het geluid komt
automatisch uit de linker- en rechterluidsprekers van het
televiesietoestel. Do not connect VIDEO and S-VIDEO
cable at the same time. This may cause picture distortion.
Hoofdtelefoon
Druk op de toets m om het geluid van het
televisietoestel uit te zetten (zie ook:
Geluidsinstellingen pagina 6).
De impedantie van de hoofdtelefoon moet tussen 32 en
600 ohm liggen.
Verklaring technische termen
RGB signalen:
Dit zijn 3 videosignalen (Rood, Groen en Blauw) die rechtstreeks de rode, groene en blauwe
emittors in de beeldbuis sturen. Deze signalen geven een betere beeldkwaliteit.
NICAM geluid:
Proces waarmee digitaal geluid kan worden uitgezonden.
Systeem:
Televisiebeelden worden niet in alle landen op dezelfde manier uitgezonden. Er zijn verschillende
standaards: BG, DK, I, en LL’. Met de
standaards worden gekozen. Dit moet niet worden verward met PAL of SECAM kleurcodering.
Pal wordt gebruikt in de meeste landen van Europa, Secam in Frankrijk, Rusland en de meeste
Afrikaanse landen. De Verenigde Staten en Japan gebruiken een ander systeem, NTSC genaamd.
100Hz:
De conventionele televisietoestellen (50 Hz) produceren 25 beelden per seconde. Dankzij de 100
Hz- technologie wordt de scanfrequentie verdubbeld en krijgt u 50 beelden per seconde. Het
visuele comfort wordt verbeterd en het flikkereffect wordt onderdrukt.
16:9:
Verwijst naar de verhouding tussen de breedte en hoogte van het scherm. Breedbeeldtelevisies
hebben een verhouding van 16:9, de traditionele televisietoestellen hebben een 4:3 scherm.
Systeem instelling (p. 5) kunnen deze verschillende
11
Page 40

Tips
Slechte ontvangst
Dubbele beelden, echobeelden of schaduwen
kunnen het gevolg zijn van de nabijheid van
bergen of hoge gebouwen. Probeer in zo’n
geval het beeld handmatig bij te stellen: zie
Fijnafstemming (p. 5) of verander de oriëntatie
van de buitenantenne. Is uw antenne geschikt
voor ontvangst van uitzendingen in dit
frequentiebereik (UHF of VHF band)? Bij
slechte ontvangst (sneeuw op het scherm) kunt
Beeld menu de Nynamic NR op Aan
u in het
zetten (pag. 6).
Geen beeld
Indien de televisie niet start, druk dan twee
maal op de standby toets
b van de
afstandsbediening.
Is de antenne op de juiste manier aangesloten?
Hebt u het juiste systeem gekozen? (p. 5) Slecht
aangesloten euroconnector kabels of antenne
aansluitingen zijn vaak de oorzaak van problemen
met beeld of geluid (soms gaan de aansluitingen
gedeeltelijk los als het TV toestel wordt verplaatst
of gedraaid. Controleer alle aansluitingen.
Extra apparatuur geeft zwart-wit beeld
Controleer bij het afspelen van een
videocassette dat deze onder dezelfde
standaard (PAL, SECAM, NTSC) is opgenomen
als door de videorecorder kan worden
herkend.
Geen geluid
Als u op bepaalde kanalen wel beeld ontvangt,
maar geen geluid, betekent dit dat u niet het
juiste TV systeem hebt. Wijzig de
Systeem
instelling (p. 5).
Teletekst
Sommige tekens worden niet juist
weergegeven? Controleer of het
Land
correct is ingesteld (p.5).
De afstandsbediening werkt niet meer ?
Reageert het TV toestel niet op de
afstandsbediening of knippert het
indicatielampje aan het toestel niet meer
wanneer u de afstandsbediening gebruikt ?
Vervang de batterijen.
Stand-by
Blijft het TV toestel in de stand-by wanneer u
het toestel aanzet, en verschijnt de aanduiding
Vergrendeld wanneer u de toetsen van het
TV toestel gebruikt?
Kinderslot functie staat ingeschakeld (zie
De
p. 7). In stand-by mode, verbruikt uw TV
minder dan 5W afhankelijk van het model.
Om nog milieuvriendelijker te zijn, gelieve het
toestel door middel van de on/off (power)
schakelaar volledig uit te schakelen.
Nog steeds geen resultaten?
Als uw TV toestel defect is, probeer het dan
nooit zelf te repareren: neem contact op met
de serviceafdeling van uw verkoper.
Schoonmaken
Het scherm en de kast van uw TV mogen
alleen worden schoongemaakt met een zacht
en niet-pluizend doekje. Gebruik nooit een
schoonmaakmiddel op basis van alcohol of
oplosmiddel.
Veiligheidsinformatie: Elektrische, magnetische en elektromagnetische velden ("EMF")
1. Philips Elekyronica produceert en verkoopt een groot aantal producten voor de consumentenmarkt
die (zoals alle elektronische apparatuur) in het algemeen elektromagnetische signalen kunnen uitzenden en ontvangen.
2. Het behoort tot de centrale bedrijfsprincipes van Philips dat bij onze producten alle noodzakelijke veiligheids- en gezondheidsmaatregelen worden genomen, dat wordt voldaan aan alle geldende wet- en
regelgeving en dat de producten ruimschoots blijven binnen de limieten voor EMF die gelden op het
moment van productie.
3. Philips streeft ernaar producten te ontwikkelen, te produceren en te verkopen die geen schadelijke
gevolgen voor de gezondheid hebben.
4. Philips verklaart dat haar producten, bij gebruik op de juiste manier en voor de beoogde toepassing,
veilig zijn volgens de momenteel beschikbare wetenschappelijke kennis.
5. Philips speelt een actieve rol bij de ontwikkeling van internationale standaarden op het gebied van EMF
en veiligheid en is daardoor beter in staat om op toekomstige ontwikkelingen in de standaardisering
te anticiperen en deze in een vroege stadium in haar producten te integreren.
12
Page 41

CANAL ................FREQ (MHz)
E2 ........................48.25
E3 ........................55.25
E4 ........................62.25
E5 ......................175.25
E6 ......................182.25
E7 ......................189.25
E8 ......................196.25
E9 ......................203.25
E10 ....................210.25
E11 ....................217.25
E12 ....................224.25
R1 ........................49.75
R2 ........................59.25
R3 ........................77.25
R4 ........................85.25
R5 ........................93.25
R6 ......................175.25
R7 ......................183.25
R8 ......................191.25
R9 ......................199.25
R10 ....................207.25
R11 ....................215.25
R12 ....................223.25
S1 ......................105.25
S2 ......................112.25
S3 ......................119.25
S4 ......................126.25
S5 ......................133.25
S6 ......................140.25
S7 ......................147.25
S8 ......................154.25
S9 ......................161.25
S10 ....................168.25
S11 ....................231.25
S12 ....................238.25
S13 ....................245.25
S14 ....................252.25
CANAL ................FREQ (MHz)
S15 ....................259.25
S16 ....................266.25
S17 ....................273.25
S18 ....................280.25
S19 ....................287.25
S20 ....................294.25
H1 ......................303.25
H2 ......................311.25
H3 ......................319.25
H4 ......................327.25
H5 ......................335.25
H6 ......................343.25
H7 ......................351.25
H8 ......................359.25
H9 ......................367.25
H10 ....................375.25
H11 ....................383.25
H12 ....................391.25
H13 ....................399.25
H14 ....................407.25
H15 ....................415.25
H16 ....................423.25
H17 ....................431.25
H18 ....................439.25
H19 ....................447.25
21.......................471.25
22.......................479.25
23.......................487.25
24.......................495.25
25.......................503.25
26.......................511.25
27.......................519.25
28.......................527.25
29.......................535.25
30.......................543.25
31.......................551.25
32.......................559.25
CANAL ................FREQ (MHz)
33.......................567.25
34.......................575.25
35.......................583.25
36.......................591.25
37.......................599.25
38.......................607.25
39.......................615.25
40.......................623.25
41.......................631.25
42.......................639.25
43.......................647.25
44.......................655.25
45.......................663.25
46.......................671.25
47.......................679.25
48.......................687.25
49.......................695.25
50.......................703.25
51.......................711.25
52.......................719.25
53.......................727.25
54.......................735.25
55.......................743.25
56.......................751.25
57.......................759.25
58.......................767.25
59.......................775.25
60.......................783.25
61.......................791.25
62.......................799.25
63.......................807.25
64.......................815.25
65.......................823.25
66.......................831.25
67.......................839.25
68.......................839.25
69 .......................855.2
5
ITALY
CANALE ..............FREQ (MHz)
A ..........................53.75
B ..........................62.25
C ..........................82.25
D ........................175.25
E ........................183.75
F.........................192.25
G ........................201.25
H ........................210.25
H1 ......................217.25
FRANCE
CANAL ................FREQ (MHz)
2...........................55.75
3...........................60.50
4...........................63.75
5...........................176.0
6...........................184.0
7...........................192.0
8...........................200.0
9...........................208.0
10.........................216.0
B ........................116.75
C ........................128.75
D ........................140.75
E ........................159.75
F.........................164.75
G ........................176.75
H ........................188.75
I..........................200.75
J .........................212.75
K ........................224.75
L.........................236.75
M........................248.75
N ........................260.75
O ........................272.75
P ........................284.75
Q ........................296.75
Table of TV frequencies.
Frequenztabelle der Fernsehsender.
Liste des fréquences TV.
Frequentietabel TV-Zenders.
Tabella delle frequenze TV.
Lista de frecuencias TV.
Lista das frequências TV
Liste over TV senderne.
Tabell over TV-frekvenser.
Tabell över TV-frekvenser.
TV-taajuustaulukko.
KK··ÙÙ¿¿ÏÏÔÔÁÁÔÔ˜˜ ÛÛ˘˘¯¯ÓÓÔÔÙÙ‹‹ÙÙˆˆÓÓ ÔÔÌÌÒÒÓÓ..
CФЛТУН ˜‡ТЪУЪ ФВВ‰‡Ъ˜ЛНУ‚.
A televizió-adóállomások
frekvenciáinak a listája.
Lista częstotliwości stacji nadawczych.
Seznam frekvenčních pásem vysílačů.
Zoznam frekvenčných pásiem vysielačov.
EUROPE
Positioning the TV
For the best results, choose a position where light
does not fall directly on the screen,and at some
distance away from radiators or other sources of
heat. Leave a space of at least 5 cm all around the
TV for ventilation, making sure that curtains,
cupboards etc. cannot obstruct the air flow through
the ventilation apertures.The TV is intended for use
in a domestic environment only and should never be
operated or stored in excessively hot or humid
atmospheres.
General Points
Please take note of the section entitled 'Tips' at the
end of this booklet.
Interference
The Department of Trade and Industry operates a
Radio Interference Investigation Service to help TV
licence holders improve reception of BBC and IBA
programmes where they are being spoilt by
interference.
If your dealer cannot help,ask at a main Post Office
for the booklet "How to Improve Television and
Radio Reception".
Mains connection
Before connecting the TV to the mains, check that the
mains supply voltage corresponds to the voltage
printed on the type plate on the rear panel of the TV. If
the mains voltage is different,consult your dealer.
Important
Should it become necessary to replace the mains
fuse, this must be replaced with a fuse of the same
value as indicated on the plug.
1. Remove fuse cover and fuse.
2.The replacement fuse must comply with BS1362
and have the ASTA approval mark. If the fuse is
lost, make contact with your retailer in order to
verify the correct type.
3. Refit the fuse cover.
In order to maintain conformity to the EMC directive,
the mains plug on this product must not be removed.
Connecting the aerial
The aerial should be connected to the socket
marked : at the back of the set.An inferior aerial
is likely to result in a poor, perhaps unstable picture
with ghost images and lack of contrast. Make-shift loft
or set-top aerials are often inadequate.Your dealer
will know from experience the most suitable type for
your locality.
Should you wish to use the set in conjunction with
other equipment, which connects to the aerial socket
such as TV games, or a video camera it is recommended
that these be connected via a combiner unit to avoid
repeated connection and disconnection of the aerial plug.
Fitting the stand (if provided)
Use only the stand provided with the set,making
sure that the fixings are properly tightened.A
diagram showing how to assemble the stand is
packed with the stand. Never use a make-shift stand,
or legs fixed with woodscrews.
Information for users in the UK (not applicable outside the UK)
Page 42

GB
FR
NL
DE
IT
DK
NO
SW
SF
RU
ES
PT
GR
TR
HU
PL
CZ
SK
 Loading...