

Philips 32PW6720D/05, 28PW6720D/05, 32PW6720D, 28PW6720D User Manual


MODEL :
PROD. NO :
GB
Please note the reference numbers
for your TV set located on the
packaging or on the back of the set.
FR Veuillez noter les références de
votre téléviseur situées sur
l’emballage ou au dos de l’appareil.
NL Let op de referenties van uw
televisietoestel die op de
verpakking of op de achterkant
van het toestel staan.
DE
Notieren Sie die
Referenznummern Ihres
Fernsehgeräts, die sich auf der
Verpackung bzw. auf der
Rückseite des Geräts befinden.
IT Notare i riferimenti del vostro
televisore situati sull’imballaggio o
sul retro dell’apparecchio.
DK Bemærk de oplysninger om dit
TV, der findes på kassen eller
bagsiden af TV-apparatet.
NO Noter deg referansen for TV-
apparatet, som du finner på
emballasjen eller på baksiden av
apparatet.
SU Notera de uppgifter om er TV
som återfinns på kartongen eller
baksidan av TV-apparaten.
SF Lue myös television
myyntipakkauksessa tai television
takana olevat merkinnät.
ES
Anote las referencias de su televisor
que se encuentran en el embalaje o
en la parte trasera del aparato.
PT
Anote as referências do seu
televisor localizadas na embalagem
ou na parte de trás do aparelho.
GR ™ЛМВИТЫЩВ ЩИ˜ Ф‰ЛБ›В˜ ¯Ъ‹ЫЛ˜
ЩЛ˜ ЩЛПВfiЪ·Ы‹˜ Ы·˜ Ф˘
‚Ъ›ЫОФУЩ·И ЫЩЛ Ы˘ЫОВ˘·Ы›· ‹
ЫЩФ ›Ыˆ М¤ЪФ˜ ЩЛ˜ Ы˘ЫОВ˘‹˜
TR Ambalaj›n üzerinde ya da aletin
arkas›nda bulunan referanslar›
baflka bir yere not edin.
HU Kérjük vegye figyelembe az Ön
televíziójának a hátoldalán és a
csomagoláson feltüntetett
katalógusszámokat.
RU
á‡Ô˯ËÚ ÌÓÏ ÏÓ‰ÂÎË
‚‡¯Â„Ó ÚÂ΂ËÁÓ‡, ÍÓÚÓ˚È
Û͇Á‡Ì ̇ ÛÔ‡ÍÓ‚Ó˜ÌÓÈ
ÍÓÓ·Í ËÎË Ì‡ Á‡‰ÌÂÈ
ÒÚÓÓÌ ‡ÔÔ‡‡Ú‡.
PL Prosimy o zanotowanie oznaczeń
telewizora umieszczonych na
opakowaniu lub tylnej części
urządzenia.
CZ
Poznamenejte si typové údaje Vašeho
televizoru umístěné na obalu nebo
na zadní straně přístroje.
SK
Poznačte si typové údaje Vášho
televízora nachádzajúce sa na obale
alebo na zadnej strane prístroja.

12
BACK
VCR
DVD
MENU
OK
A/D
”
P(age)
564
879
0
·
∆
Ê Æ
¢
∫
Á
ª
-
3
-
++
.
DIGITAL
TV
[
OPTIONS
›Ó
¤Ÿ
Œ
Ë
MENU
SELECT
∏ù
SMART
SMART
Ø
MODE
CANCEL
min.
1m
1
3
4
5
6
7
8
-
.
#
$
%
&
(
)
~
+
,
1
2
9
!

.

ANALOGUE
MENUS
1
Introduction
Table of Contents
Thank you for purchasing this television set.
This handbook has been designed to help you install and operate your TV set.
We would strongly recommend that you read it thoroughly.
We hope this new television meets entirely with your satisfaction.
Note: Specification and information subject to change without notice.
Installing your television set . . . . . . . . . . . . . . . . . . . . . . . . . . . . . . . . . . . . . . . . . .2
The keys on the TV set . . . . . . . . . . . . . . . . . . . . . . . . . . . . . . . . . . . . . . . . . . . . . .2
The remote control keys . . . . . . . . . . . . . . . . . . . . . . . . . . . . . . . . . . . . . . . . . . . .3
Digital or Analogue channels ? . . . . . . . . . . . . . . . . . . . . . . . . . . . . . . . . . . . . . . . . .3
Safety Information . . . . . . . . . . . . . . . . . . . . . . . . . . . . . . . . . . . . . . . . . . . . . . . . . .3
Switching on for the first time . . . . . . . . . . . . . . . . . . . . . . . . . . . . . . . . . . . . . . . .4
Understanding the information on the banner . . . . . . . . . . . . . . . . . . . . . . . . . . .4
Rearrange services . . . . . . . . . . . . . . . . . . . . . . . . . . . . . . . . . . . . . . . . . . . . . . . . .5
View or Listen to new TV services . . . . . . . . . . . . . . . . . . . . . . . . . . . . . . . . . . . .5
Add new services . . . . . . . . . . . . . . . . . . . . . . . . . . . . . . . . . . . . . . . . . . . . . . . . . .5
Reinstall all services . . . . . . . . . . . . . . . . . . . . . . . . . . . . . . . . . . . . . . . . . . . . . . . .6
Test reception . . . . . . . . . . . . . . . . . . . . . . . . . . . . . . . . . . . . . . . . . . . . . . . . . . . . .6
Language and location preferences . . . . . . . . . . . . . . . . . . . . . . . . . . . . . . . . . . . .7
Access restrictions . . . . . . . . . . . . . . . . . . . . . . . . . . . . . . . . . . . . . . . . . . . . . . . . .7
Setting up your favourite list . . . . . . . . . . . . . . . . . . . . . . . . . . . . . . . . . . . . . . . . .8
Information menu . . . . . . . . . . . . . . . . . . . . . . . . . . . . . . . . . . . . . . . . . . . . . . . . . .8
Downloading new software . . . . . . . . . . . . . . . . . . . . . . . . . . . . . . . . . . . . . . . . . . .8
Using the Options menu . . . . . . . . . . . . . . . . . . . . . . . . . . . . . . . . . . . . . . . . . . . .9
TV guide . . . . . . . . . . . . . . . . . . . . . . . . . . . . . . . . . . . . . . . . . . . . . . . . . . . . . . . . .9
Recording function . . . . . . . . . . . . . . . . . . . . . . . . . . . . . . . . . . . . . . . . . . . . . . . .10
Automatic tuning of analogue programmes . . . . . . . . . . . . . . . . . . . . . . . . . . . . .11
Sorting analogue programmes . . . . . . . . . . . . . . . . . . . . . . . . . . . . . . . . . . . . . . .11
Manual tuning of analogue programmes . . . . . . . . . . . . . . . . . . . . . . . . . . . . . . . .12
Naming analogue programmes . . . . . . . . . . . . . . . . . . . . . . . . . . . . . . . . . . . . . . .12
Picture settings . . . . . . . . . . . . . . . . . . . . . . . . . . . . . . . . . . . . . . . . . . . . . . . . . . .13
Sound adjustments . . . . . . . . . . . . . . . . . . . . . . . . . . . . . . . . . . . . . . . . . . . . . . . .13
Feature settings . . . . . . . . . . . . . . . . . . . . . . . . . . . . . . . . . . . . . . . . . . . . . . . . . . .13
Analogue Teletext . . . . . . . . . . . . . . . . . . . . . . . . . . . . . . . . . . . . . . . . . . . . . . . . .14
Digital text . . . . . . . . . . . . . . . . . . . . . . . . . . . . . . . . . . . . . . . . . . . . . . . . . . . . . . .15
16:9 Formats . . . . . . . . . . . . . . . . . . . . . . . . . . . . . . . . . . . . . . . . . . . . . . . . . . . . .15
Connecting peripheral equipment . . . . . . . . . . . . . . . . . . . . . . . . . . . . . . . . . . . .16
To select connected equipment . . . . . . . . . . . . . . . . . . . . . . . . . . . . . . . . . . . . .16
VCR / DVD mode selector . . . . . . . . . . . . . . . . . . . . . . . . . . . . . . . . . . . . . . . . .17
Tips . . . . . . . . . . . . . . . . . . . . . . . . . . . . . . . . . . . . . . . . . . . . . . . . . . . . . . . . . . . .18
Safety Information: Electric, Magnetic and Electromagnetic Fields . . . . . . . . . . . .18
Centre Frequencies Table (in KHz) . . . . . . . . . . . . . . . . . . . . . . . . . . . . . . . . . . . .19
DIGITAL
MENUS
English
The digital menus
of this product use
the latest Java
™
technology from
Sun Microsystems
Inc.
Recycling
This packaging of this set can be recovered or recycled.Apply to the local authorities in order to minimise
environmental waste.
Disposal of your old product.
Your product is designed and manufactured with high quality materials and components, which can be recycled and
reused.When this crossed-out wheeled bin symbol is attached to a product it means the product is covered by the
European Directive 2002/96/EC. Please inform yourself about the local separate collection system for electrical and
electronic products.
Please act according to your local rules and do not dispose of your old products with your normal household waste.
The correct disposal of your old product will help prevent potential negative consequences for the environment and
human health.
The television set has 4 keys which are
located on the front or the top of the set
depending on the model.
The VOLUME - + (-
” +) keys are used to
adjust sound levels.
The PROGRAM - + (- P +) keys are used to
select the required programmes.
To access the menus, simultaneously hold
down the
” - and ” + keys.The
PROGRAM - + keys may then be used to
select an adjustment and the -
” + keys to
make that adjustment.
To exit from the menus, hold down
the 2
” - and ” + keys.
2
&
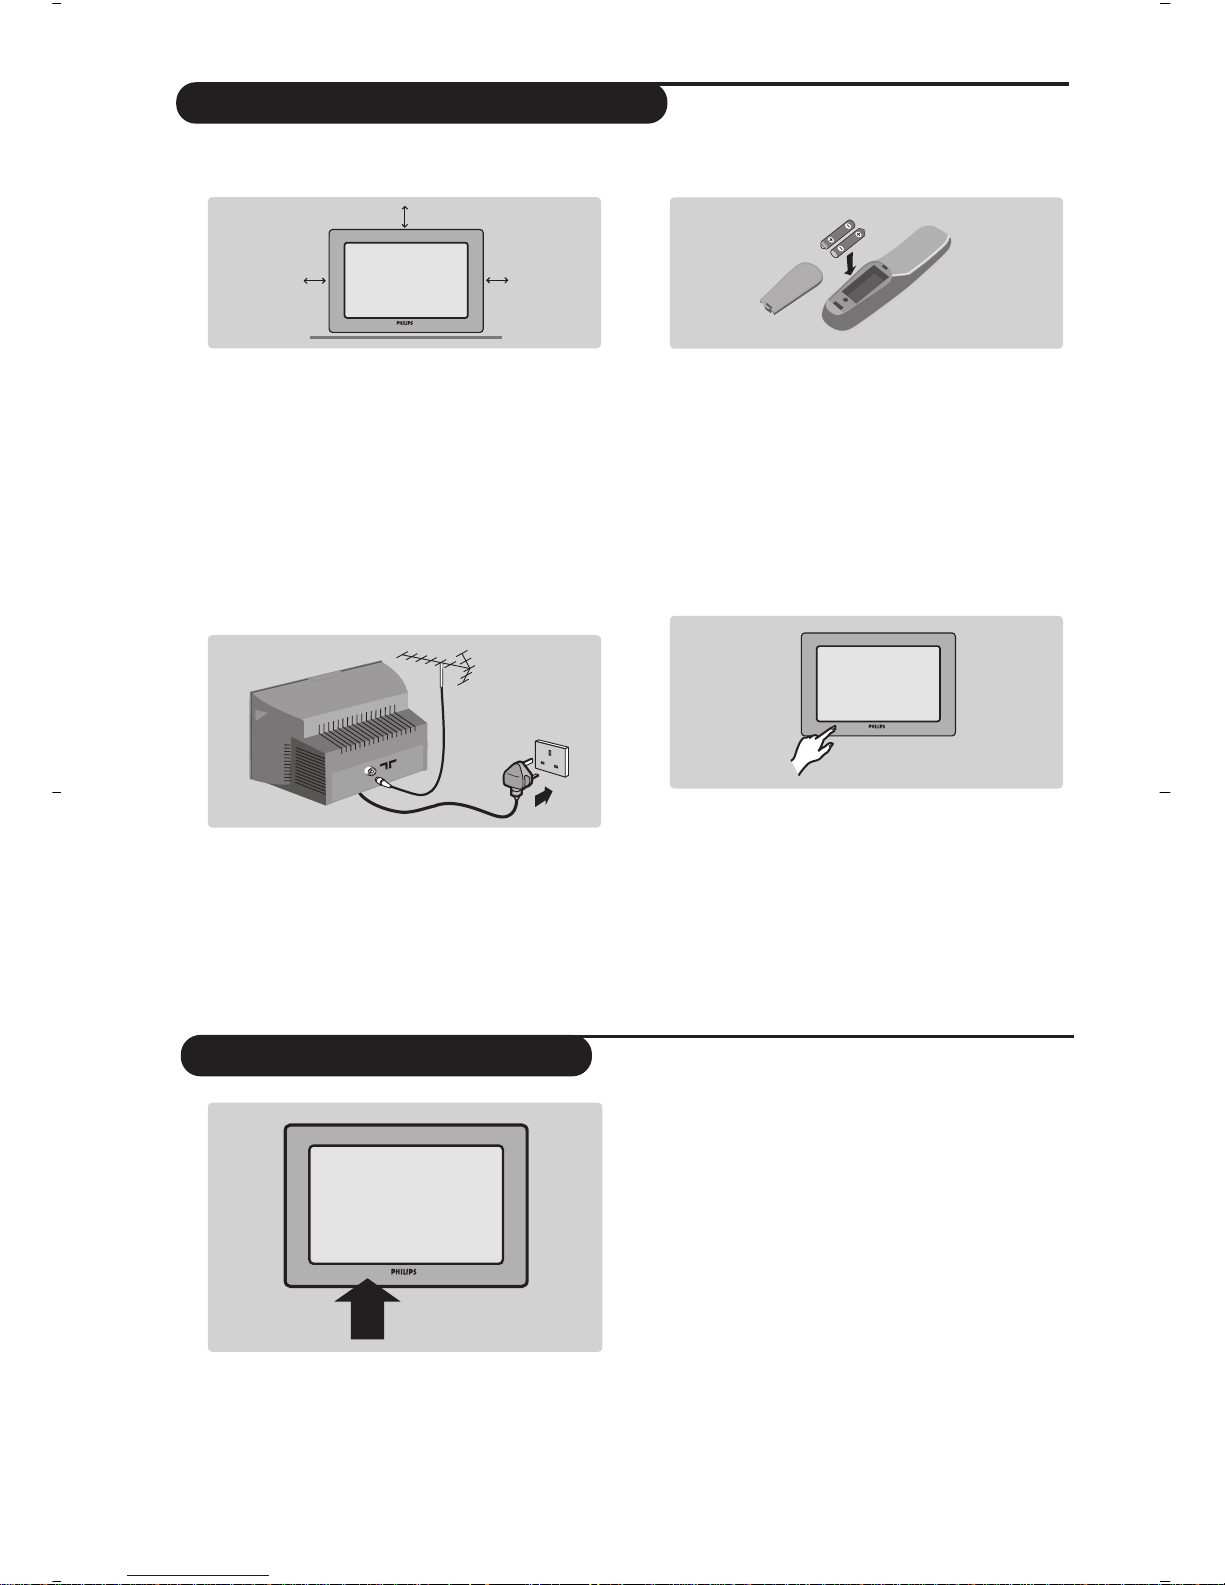
Positioning the television set
Place your TV on a solid, stable surface,leaving
a space of at least 5 cm around the appliance.
To avoid accidents, do not put anything on the
set such as a cloth or cover, a container full of
liquid (vase) or a heat source (lamp).The set
must not be exposed to water.
é
Connections
• Insert the aerial plug into the : socket at
the rear of the set.
• Insert the mains plug into a wall socket (220-
240 V / 50 Hz).
“
Remote control
Insert the two R6-type batteries (supplied)
making sure that they are the right way round.
The batteries supplied with this appliance do not
contain mercury or nickel cadmium. If you have
access to a recycling facility, please use this facility
(if in doubt, consult your dealer). When the batteries
are replaced, use the same type.
‘
Switching on
To switch on the set, press the on/off key.
A red indicator comes on and the screen lights
up. Go straight to the chapter Switching on
for the first time, on page 4.
If the television remains in standby mode,
press P
# on the remote control.
The indicator will flash when you use the remote
control.
Installing your television set
The keys on the TV set
5 cm
5 cm
5 cm

3
The remote control keys
1 Screen information
In digital mode, press once to display the information
banner, a 2
nd
time to get more information on the
programme and a 3rd time to remove it (see p. 4).
In analogue mode, this displays / removes the
programme informations(number, name,sound
mode). Hold down for 5 seconds to permanently
display the analogue programme number on the
screen.
2 Subtitle mode
To activate/deactivate the subtitle mode
3 Select EXT sockets
(see p. 16).
4 Mode selector
To activate the remote control in VCR or DVD
mode (see p. 17).
5 TV Menu
To display or exit from the analogues menus
6 Select
In digital mode this displays / clears the programme
list. Use the
îÏ keys to select a programme and
u to display it.
7 Volume
To adjust the sound level
8 Mute
To disable or enable the sound.
9 16:9 formats (p. 15)
! Previous programme
To access the previously viewed programme.
Numerical keys
For direct access to programmes.For a 2 (3) digit
programme number, the 2
nd(3rd
)digit must be
entered before the dash disappears.
The number, the
name (and the sound
mode, in analogue mode) are
displayed for a few seconds.
The Mono indication is red when in forced position.
# Picture and sound settings
Accesses a series of picture and sound settings.
The position Personal corresponds to the settings stored in
the menus.
$ Standby
To set the TV to standby mode.To switch the TV set
on again, press
b,P @#or 09.
% Options menu
(see p. 9).
& TV guide
(see p. 9).
( Teletext features (p.14)
and VCR/DVD keys (p.17).
) Digital Menu
To display or exit from the digital menus (when TV is in
digital mode).
~ Analogue or Digital mode
To switch the television between analogue and digital
mode.
+ Cursor
These 4 keys are used to move within the menus or to
directly access the 16:9 screen formats (p 15).
, Programme selection
To access the next or previous programme (or page in
digital menus).
- Sound mode
To switch from
Stereo to Mono or to choose
between different languages (Dual I, Dual II, ...).
When the sound mode is switched to
Mono, the indication is
displayed in red.
. Surround sound
To activate / deactivate the surround sound effect.
In stereo, this gives the impression that the
speakers are further apart. In mono, a stereo spatial
effect is simulated.
To receive TV channels, your television is equipped with 2 tuners. One is for digital channels, the other is
for analogue channels. Use the
v key of the remote control to switch the TV between analogue and
digital mode.Then use the
P @#or 09keys to select channels.
Digital or Analogue channels ?
11
• Plug the TV into a 220V – 240V AC, 50 Hz supply.
• Disconnect mains plug when :
– the red light below the TV screen is flashing continuously.
– a bright white line is displayed across the screen.
– there is a lightning storm.
– the set is left unattended for a prolonged period of time.
• Cleaning the TV screen. Never use abrasive cleaning agents. Use a slight damp chamois leather or soft cloth.
• No naked flame sources, such as lighted candles, should be placed on top of the TV or in the vicinity.
• Do not place your TV set under direct sunlight or heat.
• Do not cover or block the TV as it could lead to overheating.
• Leave at least 5 cm around each side of TV set to allow for proper ventilation.
• Avoid placing your set (e.g. near the window) where it is likely to be exposed to rain or water.
• Battery Usage CAUTION – To prevent battery leakage that may result in bodily injury, property damage, or damage
to the unit:
– Install all batteries correctly, with + and – aligned as marked on the unit.
– Do not mix batteries (old and new or carbon and alkaline, etc.).
– Remove batteries when the unit is not used for a long time.
Useful Tips
• Do not leave your set on standby mode for a prolonged
period of time. Switch off set to allow it to be demagnetised. A demagnetised set supports good picture quality.
• Do not shift or move the set around when it is switched on. Uneveness in colour in some parts of the screen may occur.
• Never attempt to repair a defective TV yourself. Always consult a skilled service personnel.
Safety Information

4
The first time the TV set is switched on, a
congratulation message will appear on screen.
The language of which changes every 5 seconds.
If the menu is not displayed, press and hold down
the
”- and ”+ keys on the TV set for 5
seconds to display the menu.
&
Press the u key on the remote control, the
moment your prefered language is visible
on the screen.The
Setup menu is displayed :
é The Language, corresponding Country and
Time zone is now preselected according to the
opening screen. However, you can still change
your preferences before you start a service scan.
“ With the cursor keys, select
Language,
Country or Time zone and check if the
adjustment is according to your preferences. If
necessary, use the cursor keys to make your
adjustment and press
u to exit.
Caution: if you select a wrong countr y, the channel
numbering will not be according to the standard
for your country.
‘ Select
Service Scan from the menu and
press
u to start the installation.The Service
Scan
menu is displayed.
All the digital and analogue programmes are
searched for and stored automatically.When
the search is complete, the menu will indicate
the number of digital services and analogues
programmes found.
( Press the
u key twice to start watching TV.
The television then displays the current
programme.The installation is now complete.
When you select a digital programme, an
information banner is displayed for a few
seconds at the top of the screen.
You can also use the
∂ key of the remote control
to display this banner.A second press displays more
information about the programme (when available).
The banner contains information on the
preset number, channel name, programme
duration, transmission clock, programme title
and the time remaining of the current
programme.
Switch on for the first time
Understanding the information on the banner
Banner description:
Congratulations for selecting this Philips television.
Press OK to start enjoying your digital television.
Setup
Set options and start a service scan
Language
Country
Time Zone
Service Scan
11:46
English
United Kingdom
(GMT) Lisbon, London
Please press OK to start
2 11:06 - 11:09
BBC2 Snooker
11:46
Minutes left : 14
u
ù
i
ß
preset
number
symbols
clock
programme
start and end
time
remaining time
of programme
programme titlechannel name
Symbols description :
i
more information about this programme is available :
press the ∂key to display or remove it.
ß subtitling is available : if you want to display
them, press the ß key or the
OPTIONS key to
access the
options menu and select subtitles.
ù other audio languages are availables and can be
selected in the
options menu.
u the selected Favourite list is displayed in the
colour of the activated list.
 Loading...