

Philips 28PW6618/58 User Manual [tr]

tv

MODEL :
PROD. NO :
GB
Please note the reference numbers
for your TV set located on the
packaging or on the back of the set.
FR Veuillez noter les références de
votre téléviseur situées sur
l’emballage ou au dos de l’appareil.
NL Let op de referenties van uw
televisietoestel die op de
verpakking of op de achterkant
van het toestel staan.
DE
Notieren Sie die
Referenznummern Ihres
Fernsehgeräts, die sich auf der
Verpackung bzw.auf der
Rückseite des Geräts befinden.
IT Notare i riferimenti del vostro
televisore situati sull’imballaggio o
sul retro dell’apparecchio.
DK Bemærk de oplysninger om dit
TV, der findes på kassen eller
bagsiden af TV-apparatet.
NO Noter deg referansen for TV-
apparatet, som du finner på
emballasjen eller på baksiden av
apparatet.
SU Notera de uppgifter om er TV
som återfinns på kartongen eller
baksidan av TV-apparaten.
SF Lue myös television
myyntipakkauksessa tai television
takana olevat merkinnät.
ES
Anote las referencias de su televisor
que se encuentran en el embalaje o
en la parte trasera del aparato.
PT
Anote as referências do seu
televisor localizadas na embalagem
ou na parte de trás do aparelho.
GR ™ЛМВИТЫЩВ ЩИ˜ Ф‰ЛБ›В˜ ¯Ъ‹ЫЛ˜
ЩЛ˜ ЩЛПВfiЪ·Ы‹˜ Ы·˜ Ф˘
‚Ъ›ЫОФУЩ·И ЫЩЛ Ы˘ЫОВ˘·Ы›· ‹
ЫЩФ ›Ыˆ М¤ЪФ˜ ЩЛ˜ Ы˘ЫОВ˘‹˜
TR Ambalaj›n üzerinde ya da aletin
arkas›nda bulunan referanslar›
baflka bir yere not edin.
HU Kérjük vegye figyelembe az Ön
televíziójának a hátoldalán és a
csomagoláson feltüntetett
katalógusszámokat.
RU
á‡Ô˯ËÚ ÌÓÏ ÏÓ‰ÂÎË
‚‡¯Â„Ó ÚÂ΂ËÁÓ‡, ÍÓÚÓ˚È
Û͇Á‡Ì ̇ ÛÔ‡ÍÓ‚Ó˜ÌÓÈ
ÍÓÓ·Í ËÎË Ì‡ Á‡‰ÌÂÈ
ÒÚÓÓÌ ‡ÔÔ‡‡Ú‡.
PL Prosimy o zanotowanie oznaczeń
telewizora umieszczonych na
opakowaniu lub tylnej części
urządzenia.
CZ
Poznamenejte si typové údaje Vašeho
televizoru umístěné na obalu nebo
na zadní straně přístroje.
SK
Poznačte si typové údaje Vášho
televízora nachádzajúce sa na obale
alebo na zadnej strane prístroja.

1
Introduction
Ta b le of Contents
Thank you for purchasing this television set.
This handbook has been designed to help you install and operate your TV set.
We would strongly recommend that you read it thoroughly.
We hope our technology meets entirely with your satisfaction.
Installation
Installing your television set . . . . . . . . . . . . . . . . . . . . . . . . . . . . . . . . . . . . . . . . . .2
The keys on the TV set . . . . . . . . . . . . . . . . . . . . . . . . . . . . . . . . . . . . . . . . . . . . . .2
Remote control keys . . . . . . . . . . . . . . . . . . . . . . . . . . . . . . . . . . . . . . . . . . . . . . .3
Quick installation . . . . . . . . . . . . . . . . . . . . . . . . . . . . . . . . . . . . . . . . . . . . . . . . . .4
Program sort . . . . . . . . . . . . . . . . . . . . . . . . . . . . . . . . . . . . . . . . . . . . . . . . . . . . . .4
Program name . . . . . . . . . . . . . . . . . . . . . . . . . . . . . . . . . . . . . . . . . . . . . . . . . . . . .4
Manual store . . . . . . . . . . . . . . . . . . . . . . . . . . . . . . . . . . . . . . . . . . . . . . . . . . . . . .5
Other settings in the Install menu . . . . . . . . . . . . . . . . . . . . . . . . . . . . . . . . . . . . .5
Operation
Using the radio (only available on certain versions) . . . . . . . . . . . . . . . . . . . . . . .5
Picture settings . . . . . . . . . . . . . . . . . . . . . . . . . . . . . . . . . . . . . . . . . . . . . . . . . . . .6
Sound adjustments . . . . . . . . . . . . . . . . . . . . . . . . . . . . . . . . . . . . . . . . . . . . . . . . .6
Feature settings . . . . . . . . . . . . . . . . . . . . . . . . . . . . . . . . . . . . . . . . . . . . . . . . . . . .6
16:9 Format . . . . . . . . . . . . . . . . . . . . . . . . . . . . . . . . . . . . . . . . . . . . . . . . . . . . . . .7
Using PIP . . . . . . . . . . . . . . . . . . . . . . . . . . . . . . . . . . . . . . . . . . . . . . . . . . . . . . . . .7
Teletext . . . . . . . . . . . . . . . . . . . . . . . . . . . . . . . . . . . . . . . . . . . . . . . . . . . . . . . . . .8
Peripherals
Video recorder . . . . . . . . . . . . . . . . . . . . . . . . . . . . . . . . . . . . . . . . . . . . . . . . . . . .9
Other equipment . . . . . . . . . . . . . . . . . . . . . . . . . . . . . . . . . . . . . . . . . . . . . . . . . .9
To select connected equipment . . . . . . . . . . . . . . . . . . . . . . . . . . . . . . . . . . . . . .9
Side connections . . . . . . . . . . . . . . . . . . . . . . . . . . . . . . . . . . . . . . . . . . . . . . . . . . .9
Amplifier . . . . . . . . . . . . . . . . . . . . . . . . . . . . . . . . . . . . . . . . . . . . . . . . . . . . . . . . .9
Practical information
Tips . . . . . . . . . . . . . . . . . . . . . . . . . . . . . . . . . . . . . . . . . . . . . . . . . . . . . . . . . . . .10
Glossary . . . . . . . . . . . . . . . . . . . . . . . . . . . . . . . . . . . . . . . . . . . . . . . . . . . . . . . .11
Information for users in the UK . . . . . . . . . . . . . . . . . . . . . . . . . . . . . . . . . . . . . .12
Table of frequencies . . . . . . . . . . . . . . . . . . . . . . . . . . . . . . . . . . . . . . . . . . . . . . . .13
°
Recycling
The materials used in your set are either reusable or can be recycled.
To minimise environmental waste, specialist companies collect used appliances
and dismantle them after retrieving any materials that can be used again (ask
your dealer for further details).
EnglishFrançaisMagyarPyccÍËÈPolskiČeštinaSlovenčinaTürkçe

2
The television set has 4 keys which are located
on the front or the top of the set depending
on the model.
The VOLUME - + (- ” +) keys are used to
adjust sound levels.The PROGRAM - + (- P +
or - +) keys are used to select the required
programmes.To access the menus,
simultaneously hold down the
” - and ” +
keys.The PROGRAM - + keys may then be
used to select an adjustment and the -
” +
keys to make that adjustment.
To exit from the menus, hold down the 2
” -
and
” + keys.
Note: when the Child Lock function is activated,
these keys are unavailable (refer to Features
menu on page 7).
&
Positioning the television set
Place your TV on a solid, stable surface,leaving
a space of at least 5 cm around the appliance.
To avoid accidents, do not put anything on the
set such as a cloth or cover, a container full of
liquid (vase) or a heat source (lamp).The set
must not be exposed to water.
é
Connections
• Insert the aerial plug into the : socket at
the rear of the set.
• For the versions equipped with a radio:
insert the radio aerial socket into the FM
ANT socket.
If you are using an indoor aerial, reception may be
difficult in certain conditions.You can improve
reception by rotating the aerial. If the reception
remains poor,you will need to use an external aerial.
• Insert the mains plug into a wall socket (220240 V / 50 Hz).
“
Remote control
Insert the two R6-type batteries (supplied)
making sure that they are the right way round.
Check that the mode selector is set to TV.
The batteries supplied with this appliance do
not contain mercury or nickel cadmium. If you
have access to a recycling facility,please do not
discard your used batteries (if in doubt,
consult your dealer).When the batteries are
replaced, use the same type.
‘
Switching on
To switch on the set, press the on/off key.
A red indicator comes on and the screen
lights up. Go straight to the chapter Quick
installation on page 4.
If the television remains in standby mode,
press P
# on the remote control.
The indicator will flash when you use the
remote control.
5 cm
5 cm
5 cm
FM.
ANT.
Installing your television set
The keys on the TV set

3
Remote control keys
Standby
To set the TV to standby mode.
To switch the TV set on again, press
b, - P + or 09.
Select peripherals (p.9)
Press several times to select the
required EXT connector.
Radio / TV mode
To switch the TV set to radio or TV
mode (for versions equipped
with radio).
Surround Sound
To activate / deactivate the surround
sound effect. In stereo, this gives the
impression that the speakers are
further apart. For models equipped
with Virtual Dolby Surround*, you
can experience Dolby Surround Pro
Logic sound effects.
Cursor
These 4 keys are used to move
around the menus
(
<>≤≥)
.
Screen information
To display / remove the programme
number, the name (if it exists) and
the
sound mode
. Hold down for
5 seconds
to permanently display the
programme number on the screen.
List of radio stations (p.5)
Dual screen
(according to the version)
To activate/disable the display on
2 screens. The second screen
displays teletext.
Mode selector
The remote control lets you control the
main functions of the VCR or DVD.
Press the Select key to select the required
mode : VCR, DVD, SAT, AMP or CD.
The remote control indicator lights up to
display the selected mode. It switches off
automatically after 60 seconds if left idle.
The remote control automatically returns
to TV mode.The following keys are
operational, depending on the equipment :
.·¢ÊÆ∫cuH<>≤≥
(cursor) - P + 09 deÁ
Teletext keys (p.8)
or PIP or VCR / DVD .
Teletext (p. 8).
unused key.
Volume
To adjust the sound level.
Mute
To mute or restore the sound.
Programme selection
To access the next or previous TV
channel from the list of Favourite
Programmes (see p.5).
Digit keys
Direct access to the programmes.For
a 2 digit programme, enter the 2nd
digit before the dash disappears.
16:9 Format (p.7).
Previous programme
To access the previously viewed
programme.
Smart picture and sound
Used to access a series of predefined
picture and sound settings.
The
personal position relates to settings
selected from the menus.
Menu
To call up or exit the menus.
Sound mode
Used to force programmes in
Stereo
and Nicam Stereo to Mono or,for
bilingual programmes, to choose
between
Dual I or Dual II.
The
Mono indication is red when in forced
position.
* Manufactured under license from Dolby Laboratories.
“Dolby” and the double-D symbols are trademarks of Dolby Laboratories.
VCR DVD SAT AMP CD
Ÿ
Y
Select
·
¢
‡
†
”
1
4
7
Ë
ı
SMART
-
OK
[
¢
Ó
Ê
Æ
π
œ
MENU
P
2
3
5
6
8
9
ù
0
K
Á
SMART
ª
4
Quick installation
Program sort
Program name
When you turn on the TV set for the first
time, a menu is displayed on screen.This menu
prompts you to select the country and
language for the menus:
If the menu is not displayed, press and hold down
the
”- and ”+ keys on the TV set for 5
seconds to display the menu.
& Use the
<> keys on the remote control to
select your country and validate with
≥.
If your country does not appear in the list, select
choice “. . .”
é Next select your language using the
<> keys
and validate with
≥.
“ The search starts automatically. All the available
TV programmes and radio stations* will be
stored. This operation takes a few minutes.The
display shows the progress of the search and
the number of programs found. At the end of
the search, the menu disappears.
To exit or interrupt the search, press H. If no
programme is found, consult the possible solutions p. 10.
‘ If the transmitter or cable network sends the
automatic sort signal, the programs will be
numbered correctly. In this case, the
installation is complete.
( If this is not the case, you need to use the
Sort menu to number the programs correctly.
Some transmitters or cable networks broadcast
their own sort parameters (region, language,etc.).
In this case, indicate your choice using the
<>
keys and validate with ≥.
* Only on versions equipped with a radio.
& Press key H.The Main menu is displayed on
the screen.
é With the cursor, select the Install menu
followed by the Sort menu.
“ Select the programme you want to move using
the
<> keys and press ≥.
‘ Then use the
<> keys to select the new
number and validate with
≤.
( Repeat steps “ and ‘ for each program you
wish to renumber.
§ To quit the menus, press
d.
If required,you can give a name to the
programmes and external connectors.
Note:
on installation, the programs are named
automatically when an identification signal is sent.
& Press the
H key.
é With the cursor, select the Install menu,then
Name
“ Use the
<> keys to select the programme
to name or rename.
‘ Use the
≤≥ keys to move around the name
display area (5 characters) and the
<> keys
to select the characters.
( When the name has been entered, use the
≤
key to exit.The name is stored.
§ Repeat steps “ to ( for each programme
you wish to name.
è To quit the menus, press
d.
Mainge
• Picture
• Sound
• Features
$ Install
Install
• Language
• Country
• Auto Store
• Manual Store
$
Sort
Æ
• Name
00
01 BBC1
02 BBC2
03ÆANGLI
04 CH4
05 CH5
Select Country
Country
DK
E
F
FI
Æ GB
Language
Español
Svenska
English
Dansk
Nederlands

5
Manual store
Other settings in the Install menu
This menu is used to store the programmes
one at a time.
& Press the
H key.
é With the cursor, select the Install menu then
Manual store:
“ System: select
Europe (automatic detection*)
or
Western Europe (BG standard),Eastern
Europe (DK standard),United Kingdom (I
standard) or France (LL’ standard).
* Except for France (LL’ standard), you must select
choice France.
‘ Search: press
≥.The search starts. Once a
programme is found, the scanning stops and its
name is displayed (when available). Go to the
next step. If you know the frequency of the
required programme,this can be entered
directly using the
0 to 9 keys.
If no picture is found, consult the possible solutions (p. 10).
( Program No.: enter the required number
with the
≤≥ or 0 to 9 keys.
§ Fine Tune: if the reception is not satisfactory,
adjust using the
≤≥ keys.
è Store: press
≥.The program is stored.
! Repeat steps ‘ to ! for each programme to
store.
ç To quit the menus, press d.
& Press the H key and select the Install menu:
é Language: to change the display language for
the menus.
“ Country: to select your country (GB for
Great Britain).
This setting is used for the search, automatic
programme sort and teletext display. If your
country does not appear in the list, select “. . .”
‘ Auto Store: to start automatic search for all
programmes available in your region. If the
transmitter or cable network sends the
automatic sort signal, the programmes will be
numbered correctly. If this is not the case, you
need to use the Sort menu to renumber the
programmes (see p.4).
Some transmitters or cable networks broadcast
their own sort parameters (region, language,etc.).
In this case, indicate your choice using the
<>
keys and validate with ≥.To quit or interrupt the
search, press H. If no picture is found, consult the
possible solutions (p. 10).
( To quit the menus, press
d.
Using the radio
(only available on certain versions)
Choice of TV or radio mode
Press the
 key on the remote control to
switch the TV set to either TV or radio mode.
In radio mode, the number, station name
(if available), frequency and sound mode are
displayed on the screen. To enter the station
names, use the Name menu (p.4)
Program selection
Use the
09or @ P # keys to select the
FM stations (from 1 to 40).
List of radio stations
Press the ı key to display the list of radio
stations radio. Use the
<> keys to change
station and the
d key to exit.
Using the radio menus
Use the
H key to access the specific radio
setting.
Search for radio stations
If you used the quick installation, all available
FM stations have already been stored.To start
a new search,use the Install :Auto Store
menu (for a complete search) or Manual
Store (for a station by station search).The
Sort and Name menus let you sort or name
the radio stations. Operation of these menus is
the same as for the TV menus.
Mainge
• Picture
• Sound
• Features
$ Install
Manual Store
$
System Europe Æ
• Search
• Program No.
• Fine Tune
• Store

6
Picture settings
Sound adjustments
& Press H then ≥.The Picture menu is
displayed:
é Use the
<> keys to select a setting and the
≤≥ keys to adjust.
Note: during the picture adjustment, only the
selected line remains displayed. Press <> to
display the menu again.
“ Once the adjustments have been made,select
Store and press ≥ to store them. Press d to
exit.
Description of the adjustments:
• Brightness: this changes picture brilliance.
• Colour: this changes the intensity of the colour.
• Contrast: this changes the difference
between the light and dark tones.
•
Sharpness: this changes the picture definition.
• Colour Temp.: this changes the colour
rendering:
Cold (bluer), Normal (balanced)
or
Warm (redder).
• Store: to store the picture adjustments and
settings (as well as the settings for
Contrast +
and NR in the Features menu).
& Press H, select Sound (>) and press ≥.The
Sound menu is displayed:
é Use the
<> keys to select a setting and the
≤≥ keys to adjust.
“ Once the adjustments have been made,select
Store and press
≥ to store these changes.
‘ To quit the menus, press
d.
Description of the settings:
• Tr e ble: this alters the high frequency sounds.
• Bass: this alters the low frequency sounds.
• Balance: this balances the sound on the left
and right speakers.
• Delta Volume*: this is used to compensate
any volume discrepancies between the
different programs or EXT sockets.This
setting is available for programs 0 to 40 and
the EXT sockets.
• AVL * (Automatic Volume Leveller): this is
used to limit increases in sound, especially on
program change or advertising slots.
• Store: this is used to store the sound settings.
* Only available on certain versions.
Feature settings
& Press H,select Features (>) and press ≥.
You can adjust:
é Rotation (only available on very large screen
sets): large screen sets are sensitive to
terrestrial magnetic field variations.This setting
is used to compensate for this by adjusting the
picture rotation.
“ Contrast +: automatic adjustment of the
picture contrast which permanently sets the
darkest part of the picture to black.
‘ NR: attenuates picture noise (snow) in difficult
reception conditions.
Caution:
to store the Contrast + and NR
settings, use the Store choice in the Picture
menu.
( To quit the menus, press
d.
Mainge
$ Picture
• Sound
• Features
• Install
Picture
$
Brightness --I------ 39
• Colour
• Contrast
• Sharpness
• Colour Temp.
• Store
Mainge
• Picture
$ Sound
• Features
• Install
Sound
•Treble -----I--- 56
• Bass
• Balance
• Delta Volume
• AVL
• Store

7
16:9 Formats
The pictures you receive may be transmitted in 16:9 format (wide screen) or 4:3 format
(conventional screen).4:3 pictures sometimes have a black band at the top and bottom of the screen
(letterbox format).This function allows you to optimise the picture display on screen.
If your television is equipped with a 4:3 screen.
Press the p key (or <> cursor) to select the different modes:
If your television is equipped with a 16:9 screen.
Press the p key (or ≤≥ cursor) to select the different modes:
This TV set is also equipped with automatic switching which will select the correct-screen format, provided the
specific signals are transmitted with the programmes.
4:3 The picture is reproduced in 4:3 format and a black band is displayed on either
side of the picture.The picture may be progressively enlarged using the <>
cursor.
The picture is enlarged to 14:9 format,a thin black band remains on both sides of the
picture.The <> cursor allow you to compress and move the image vertically to view
the top or bottom of the picture (subtitles).
The picture is enlarged to 16:9 format.This mode is recommended when displaying pictures
which have black bands at the top and bottom (letterbox format).Use the
<> cursor if you
wish to compress and move the image vertically to view the top or bottom of the picture.
This mode is used to display 4:3 pictures using the full surface of the screen leaving
the sub-titles visible. Use the
<> cursor to increase or decrease the compression
at the bottom of the screen.
This mode is used to display 4:3 pictures using the full surface of the screen by
enlarging the sides of the picture.The <> cursor allow you to scroll the image up
or down the screen.
This mode restores the correct proportions of pictures transmitted in 16:9 using
full screen display.
Zoom 14:9
Zoom 16:9
Subtitle Zoom
Super Wide
Widescreen
The picture is enlarged vertically.This mode is used to cancell the black bands
when watching a programme in letterbox format.
The picture is reproduced in 4:3 format.
The picture is compressed vertically into 16:9 format.
4:3
Expand 4:3
Compress 16:9
Using PIP
This feature enables you to display a small
superimposed window.
& Press the
œ key to display the PIP screen.
A small superimposed window appears in the
main screen.
é Use the
- P + keys to change the programmes
of the PIP screen or the
µ key if you want to
display a picture from an appliance connected
to the TV (e.g. video recorder, DVD).
“ Press the
œ key again to change the size of
the window then make it disappear.
‘ Use the
π key if you want to hide the
window.
( Use the
‡ key if you want to swap the
2 pictures.
§ Use the
q key if you want to freeze the PIP
picture.
(only available on certain versions)

8
Teletext
Press :
You will obtain :
Teletext is an information system broadcast by certain channels which can be consulted like a
newspaper. It also offers access to subtitles for viewers with hearing problems or who are not familiar
with the transmission language (cable networks, satellite channels, etc.).
Teletext call
Selecting a
page
This is used to call teletext, change to transparent mode
and then exit.The summary appears with a list of items
that can be accessed. Each item has a corresponding
3 digit page number.
If the channel selected does not broadcast teletext, the
indication 100 will be displayed and the screen will remain
blank (in this case, exit teletext and select another channel).
Enter the number of the page required using the
0 to 9
or - P + keys. Example:page 120, enter 120.The
number is displayed top left,the counter turns and then
the page is displayed.Repeat this operation to view
another page.
If the counter continues to search, this means that the page is
not transmitted. Select another number.
Direct access
to the items
Coloured areas are displayed at the bottom of the screen.
The 4 coloured keys are used to access the items or
corresponding pages.
The coloured areas flash when the item or the page is not yet
available.
Contents
Enlarge a page
This returns you to the contents page (usually page 100).
This allows you to display the top or bottom part of the
page and then return to normal size.
Stop
sub-page
acquisition
Double page
teletext
(only available
on certain
versions)
Certain pages contain sub-pages which are automatically
displayed successively.This key is used to stop or resume
sub-page acquisition.The indication
_ appears top left.
To activate or deactivate the double page teletext display
mode.The active pa
ge is di
splayed on the left and the
following page is displayed on the right. Press
Ó
if you want
to hold a page (i.e. the contents page).The active page is then
displayed on the right.To return to normal mode, press e.
Hidden
information
Favourite
pages
To display or hide the concealed information (games
solutions).
Instead of the standard coloured areas displayed at the bottom
of the screen, you can store 4 favourite pages on the first
40 channels which can then be accessed using the coloured
keys (red, green, yellow,blue).Once set, these favourite pages
will become the default every time tetetext is selected.
& Press the H key to change to favourite pages mode.
é Display the teletext page that you want to store.
“ Press the coloured key of your choice for 3 seconds.
The page is now stored.
‘ Repeat the operation with the other coloured keys.
( Now when you consult teletext, your favourite pages
will appear in colour at the bottom of the screen.
To temporaly retrieve the standard items,press
H.
To clear everything, and return the standard items as the
default, press d for 5 seconds.
POWER
.
VCR DVD SAT AMP CD
Ÿ
Select
Y
¢
·
œ
OK
+
[
”
213
546
879
Ë
0
ı
SMART
-
¤
¢
Ó
Ê
Æ
π
‡
0 9
+
MENU
P
+
P
ù
SMART
Á
ª
Ë
Ó
OK
Y
ù
Ÿ
MENU
Ë
9
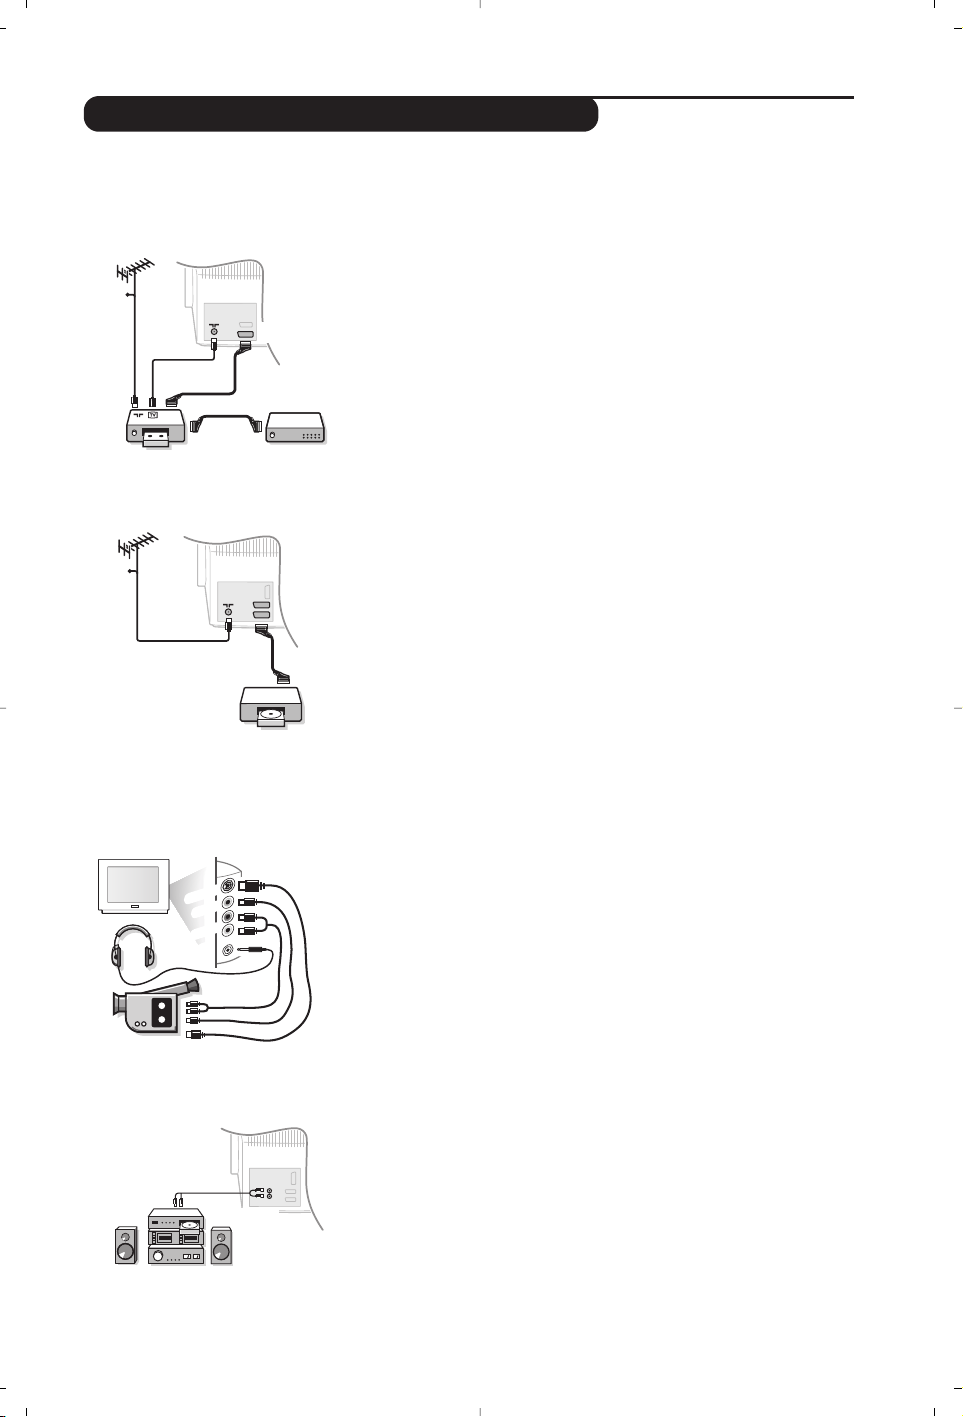
Connecting peripheral equipment
Carry out the connections shown opposite, using a good quality
euroconnector cable.
If your video recorder does not have a euroconnector socket, the only
connection possible is via the aerial cable.You will therefore need to
tune in your video recorder's test signal and assign it programme
number 0 (refer to manual store, p. 5).
To reproduce the video recorder picture, press
0.
Video recorder with decoder
Connect the decoder to the second euroconnector socket of
the video recorder.You will then be able to record scrambled
transmissions.
The television has 2 external sockets situated at the back of the set (EXT1 and EXT2).
The EXT1 socket has audio, CVBS/RGB inputs and audio, CVBS outputs.
The EXT2 socket has audio, CVBS/S-VHS inputs and audio, CVBS outputs.
Video recorder
Satellite receiver, decoder, CDV, games,etc.
Carry out the connections shown opposite.
To optimise picture quality, connect the equipment which
produces the RGB signals (digital decoder, games,etc.) to EXT1,
and the equipment which produces the S-VHS signals (S-VHS and
Hi-8 video recorders, certain DVD drives) to EXT2 and all other
equipment to either EXT1 or EXT2.
To select connected equipment
Press the
µ key to select EXT1, EXT2/S-VHS2 (S-VHS signals
from the EXT2 socket) and
AV/S-VHS for connections on the
front panel.
Most equipment (decoder, video recorder) carries out the switching
itself.
Make the connections as shown opposite.
With the
µ key, select AV/S-VHS.
For a monophonic device, connect the audio signal to the
AUDIO L input. Use the
e key to reproduce the sound on the left
and right speakers of the TV set.
Headphones
When headphones are connected, the sound on the TV set will be
cut.The
@ P # keys are used to adjust the volume level.
The headphone impedance must be between 32 and 600 Ohms.
Other equipment
Side connections
Amplifier
(only available on certain versions)
To connect to a hi-fi system, use an audio connection cable and
connect the “L” and “R” outputs on the TV set to the “AUDIO
IN” “L” and “R” input on your hi-fi amplifier.
CABLE
EXT 2
VCR
CABLE
S•VIDEO
VIDEO
AUDIO
*
AUDIO

10
Tips
Glossary
Poor reception
The proximity of mountains or high buildings
may be responsible for ghost pictures, echoing
or shadows. In this case, try manually adjusting
your picture:see Fine Tuning (p.5) or modify
the orientation of the outside aerial.
Does your antenna enable you to receive
broadcasts in this frequency range (UHF or VHF
band)?
In the event of difficult reception (snowy
picture) switch the NR on the Options menu
to ON.(p.6).
No picture
If the television does not switch on, please
press the standby key
b (located on the
remote control) twice.
Have you connected the aerial socket properly?
Have you chosen the right system? (p. 5).
Poorly connected euroconnector cables or
aerial sockets are often the cause of picture or
sound problems (sometimes the connectors
can become half disconnected if the TV set is
moved or turned). Check all connections.
Peripheral equipment gives a black and
white picture
To play a video cassette, check that it has been
recorded under the same standard (PAL,
SECAM, NTSC) which can be replayed by the
video recorder.
The remote control no longer works.
Check that the mode selector on the side of
the remote control is set to TV.
No sound
If on certain channels you receive a picture but no
sound, this means that you do not have the correct
TV system. Modify the System setting (p. 5).
Teletext
Are certain characters not displayed correctly?
Check that the Country setting has been
positioned correctly (p.5).
Remote control
The TV set does not react to the remote
control; the indicator on the set no longer
flashes when you use the remote control?
Replace the batteries.
Standby
To save power, your set is fitted with components
that give it a very low power consumption when
in standby mode (less than 3 W).
Still no results?
If your TV set breaks down, never attempt to
repair it yourself:contact your dealer's aftersales service.
Cleaning the set
Only use a clean, soft and lint-free cloth to clean
the screen and the casing of your set.Do not use
alcohol-based or solvent-based products.
RGB Signals: These are 3 Red, Green and Blue video signals which directly drive the red,green and
blue emitters in the cathode ray tube. Using these signals provides better picture quality.
S-VHS Signals: These are 2 separate Y/C video signals from the S-VHS and Hi-8 recording standards.
The luminance signals Y (black and white) and chrominance signals C (colour) are recorded separately
on the tape.This provides better picture quality than with standard video (VHS and 8 mm) where the
Y/C signals are combined to provide only one video signal.
NICAM sound: Process by which digital sound can be transmitted.
System: Television pictures are not broadcast in the same way in all countries.There are different
standards: BG, DK,I, and L L’.The SYSTEM setting (p. 6) is used to select these different standards.This is
not to be confused with PAL or SECAM colour coding. Pal is used in most countries in Europe, Secam in
France, Russia and most African countries.The United States and Japan use a different system called
NTSC.The inputs EXT1 and EXT2 are used to read NTSC coded recordings.
16:9: Refers to the ration between the length and height of the screen.
Wide screen televisions have a ration of 16/9, conventional screen TV sets have a ration of 4/3.

1
Introduction
Sommaire
Vous venez d’acquérir ce téléviseur, merci de votre confiance.
Nous vous conseillons de lire attentivement les instructions qui suivent pour
mieux comprendre les possibilités offertes par votre téléviseur.
Nous espérons que notre technologie vous donnera entière satisfaction.
Installation
Installation du téléviseur . . . . . . . . . . . . . . . . . . . . . . . . . . . . . . . . . . . . . . . . . . . . . 2
Les touches du téléviseur . . . . . . . . . . . . . . . . . . . . . . . . . . . . . . . . . . . . . . . . . . . . 2
Les touches de la télécommande . . . . . . . . . . . . . . . . . . . . . . . . . . . . . . . . . . . . . . 3
Installation rapide . . . . . . . . . . . . . . . . . . . . . . . . . . . . . . . . . . . . . . . . . . . . . . . . . . .4
Classement des programmes . . . . . . . . . . . . . . . . . . . . . . . . . . . . . . . . . . . . . . . . . 4
Nom de programme . . . . . . . . . . . . . . . . . . . . . . . . . . . . . . . . . . . . . . . . . . . . . . . .4
Mémorisation manuelle . . . . . . . . . . . . . . . . . . . . . . . . . . . . . . . . . . . . . . . . . . . . . 5
Autres réglages du menu Installation . . . . . . . . . . . . . . . . . . . . . . . . . . . . . . . . . . .5
Utilisation
Utilisation de la radio . . . . . . . . . . . . . . . . . . . . . . . . . . . . . . . . . . . . . . . . . . . . . . . .5
Réglages de l’image . . . . . . . . . . . . . . . . . . . . . . . . . . . . . . . . . . . . . . . . . . . . . . . . .6
Réglages du son . . . . . . . . . . . . . . . . . . . . . . . . . . . . . . . . . . . . . . . . . . . . . . . . . . . .6
Réglage des options . . . . . . . . . . . . . . . . . . . . . . . . . . . . . . . . . . . . . . . . . . . . . . . . .6
Format 16:9 . . . . . . . . . . . . . . . . . . . . . . . . . . . . . . . . . . . . . . . . . . . . . . . . . . . . . . .7
Utilisation du PIP . . . . . . . . . . . . . . . . . . . . . . . . . . . . . . . . . . . . . . . . . . . . . . . . . . .7
Télétexte . . . . . . . . . . . . . . . . . . . . . . . . . . . . . . . . . . . . . . . . . . . . . . . . . . . . . . . . . 8
Raccordements
Magnétoscope . . . . . . . . . . . . . . . . . . . . . . . . . . . . . . . . . . . . . . . . . . . . . . . . . . . . . 9
Autres appareils . . . . . . . . . . . . . . . . . . . . . . . . . . . . . . . . . . . . . . . . . . . . . . . . . . . 9
Pour sélectionner les appareils connectés . . . . . . . . . . . . . . . . . . . . . . . . . . . . . . .9
Connexions latérales . . . . . . . . . . . . . . . . . . . . . . . . . . . . . . . . . . . . . . . . . . . . . . . 9
Amplificateur . . . . . . . . . . . . . . . . . . . . . . . . . . . . . . . . . . . . . . . . . . . . . . . . . . . . . .9
Informations pratiques
Conseils . . . . . . . . . . . . . . . . . . . . . . . . . . . . . . . . . . . . . . . . . . . . . . . . . . . . . . . . 10
Glossaire . . . . . . . . . . . . . . . . . . . . . . . . . . . . . . . . . . . . . . . . . . . . . . . . . . . . . . . .10
°
Directive pour le recyclage
Votre téléviseur utilise des matériaux réutilisables ou qui peuvent être recyclés.
Pour minimiser les déchets dans l'environnement,des entreprises spécialisées
récupèrent les appareils usagés pour les démonter et concentrer les matières
réutilisables (renseignez-vous auprès de votre revendeur).
Français
2
Le téléviseur est équipé de 4 ou 5 touches qui
sont situées, selon les versions, à l’avant ou sur
le dessus du coffret.
Les touches
VOLUME - + (-”+) permettent
de régler le niveau sonore.
Les touches
PROGRAM - + (- P +) permettent
de sélectionner les programmes.
Pour accéder aux menus,appuyez simultanément
sur les 2 touches
”
- et ”+ (ou la touche
MENU
). Ensuite,les touches P - + permettent de
sélectionner un réglage et les touches
”
- + de
régler.
Pour quitter le menu affiché, maintenez
appuyées les 2 touches ” - et ” +
(ou la
touche
MENU
)
.
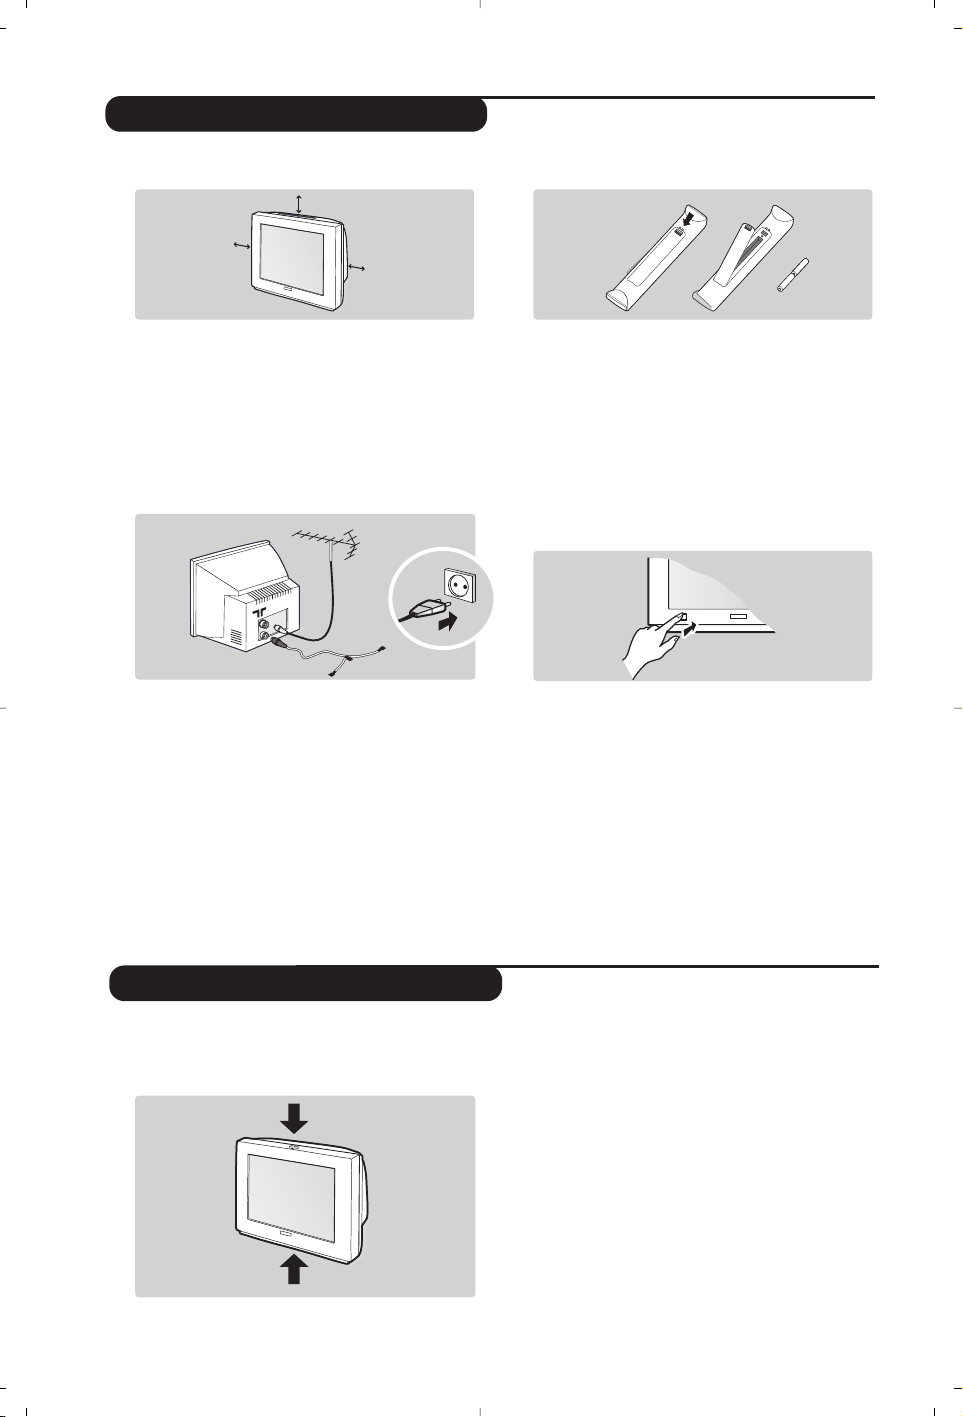
& Positionnement du téléviseur
Placez votre téléviseur sur une surface solide
et stable. Pour prévenir toute situation
dangereuse, ne pas exposer le téléviseur à des
projections d’eau et ne rien poser dessus tel
qu’un objet couvrant (napperon), rempli de
liquide (vase) ou dégageant de la chaleur (lampe).
é Raccordements
• Introduisez la fiche d'antenne TV dans la
prise
: située à l’arrière.
• Pour les versions équipées de la radio:
introduisez la fiche d'antenne radio dans la
prise FM ANT.
Avec les antennes d’intérieur,la réception peut dans
certaines conditions être difficile.Vous pouvez
l’améliorer en faisant tourner l’antenne. Si la réception
reste médiocre, il faut utiliser une antenne extérieure.
• Branchez le cordon d’alimentation sur le
secteur (220-240 V / 50 Hz).
“ Télécommande
Introduisez les 2 piles de type R6 fournies en
respectant les polarités.
Les piles livrées avec l’appareil ne contiennent ni
mercure ni cadmium nickel, dans un souci de
préserver l’environnement.Veillez à ne pas jeter vos
piles usagées mais à utiliser les moyens de recyclage
mis à votre disposition (consultez votre revendeur).
‘ Mise en marche
Pour allumer le téléviseur, appuyez sur la
touche marche arrêt. Un voyant s’allume en
rouge et l’écran s’illumine.Allez directement
au chapitre installation rapide,page 4.
Si le téléviseur reste en veille, appuyez sur la
touche P
# de la télécommande.
Le voyant clignote lorsque vous utilisez la
télécommande.
5 cm
5 cm
5 cm
Installation du téléviseur
Les touches du téléviseur
FM.
ANT.

3
Les touches de la télécommande
Veille
Permet de mettre en veille le
téléviseur. Pour l’allumer,appuyez
sur - P +,
., 0 à 9.
Sélection des prises EXT (p.9)
Appuyez plusieurs fois pour
sélectionner l’appareil connecté.
Mode radio / tv
Pour permuter le téléviseur en mode
radio ou tv (pour les versions
équipés de la radio).
Son Surround
Pour activer / désactiver l’effet
d’élargissement du son. En stéréo, les
haut-parleurs paraissent plus espacés.
Pour les versions équipés du Virtual
Dolby Surround *,vous obtenez les
effets sonores arrières du Dolby
Surround Pro Logic.En mono,on
obtient un effet spatial pseudo stéréo.
Curseur
Ces 4 touches permettent de
naviguer dans les menus (<>≤≥).
Info.d’écran / n° permanent
Pour afficher / effacer le numéro de
programme, le nom (s’il existe) et le
mode son.Appuyez pendant 5
secondes pour activer l’affichage
permanent du numéro.
Liste des stations radio (p.5)
Deux Écrans (selon versions)
Pour activer/désactiver l’affichage en 2
écrans. Le deuxième écran permet
d’afficher le télétexte.
Sélecteur de mode
La plupart des équipements audio et vidéo
de notre gamme de produits peuvent être
pilotés avec la télécommande de votre
téléviseur.Appuyez sur la touche Select
pour sélectionner le mode désiré : VCR
(magnétoscope), DVD, SAT (satellite),
AMP (amplificateur) ou CD. Le voyant de
la télécommande s’allume pour montrer le
mode sélectionné. Il s’éteint
automatiquement après 60 secondes sans
action (retour au mode TV). En fonction
de l’équipement, les touches suivantes sont
opérationnelles :
.·¢ÊÆ∫cuH<>≤≥
(curseur)- P + 09 deÁ
Touches télétexte (p. 8)
ou PIP (p. 7) ou VCR / DVD
Appel télétexte (p.8)
touche non utilisée
Volume
Pour ajuster le niveau sonore
Coupure son
Pour supprimer ou rétablir le son.
Sélection des programmes
Pour accéder au programme inférieur
ou supérieur de la liste des
programmes préférés (voir p.5).
Touches numériques
Accès direct aux programmes.Pour un
programme à 2 chiffres,il faut ajouter
le 2ème chiffre avant que le trait ne
disparaisse.
Format 16:9 (p.9)
Programme précédent
Pour accéder au programme
précédemment visualisé.
Préréglages image et son
Permet d’accéder à une série de
préréglages de l’image et du son.
La position Personnel correspond aux
réglages effectués dans les menus.
Menu
Pour appeler ou quitter les menus.
Mode son
Permet de forcer les émissions Stéréo
et Nicam Stéréo en Mono ou pour les
émissions bilingues de choisir entre
Dual I ou Dual II.
L’indication Mono est rouge lorsqu’il s’agit
d’une position forcée.
* Fabriqué sous licence de Dolby Laboratories.
"Dolby" et le symbole double-D sont des marques de Dolby Laboratories.
VCR DVD SAT AMP CD
Ÿ
Y
Select
·
¢
‡
†
”
1
4
7
Ë
ı
SMART
-
OK
[
¢
Ó
Ê
Æ
π
œ
MENU
P
2
3
5
6
8
9
ù
0
Á
K
SMART
ª

4
Installation rapide
Classement des programmes
Nom de programme
La première fois que vous allumez le
téléviseur, un menu apparaît à l’écran.
Ce menu vous invite à choisir le pays ainsi que
la langue des menus :
Si le menu n’apparaît pas, maintenez appuyées
pendant 5 secondes les touches ”- et ”+ du
téléviseur, pour le faire apparaître.
& Utilisez les touches <> de la télécommande
pour choisir votre pays, puis validez avec
≥.
Si votre pays n’apparaît pas dans la liste,
sélectionnez le choix “. ..”
é Sélectionnez ensuite votre langue avec les
touches
<> puis validez avec ≥.
“ La recherche démarre automatiquement.
Tous les programmes TV et stations radio *
disponibles sont mémorisés. L’opération prend
quelques minutes. L’affichage montre la
progression de la recherche et le nombre de
programmes trouvés. A la fin, le menu disparaît.
Pour sortir ou interrompre la recherche, appuyez
sur
H. Si aucun programme n’est trouvé, reportez
vous au chapitre conseils p. 10.
‘ Si l’émetteur ou le réseau câblé transmet le
signal de classement automatique, les
programmes seront correctement numérotés.
L’installation est alors terminée.
( Si ce n’est pas le cas, vous devez utiliser le
menu
Classement pour les renuméroter.
Certains émetteurs ou réseaux câblés diffusent leurs
propres paramètres de classement (région, langage...).
Dans ce cas, vous devez indiquer votre choix avec les
touches
<> puis valider avec ≥.
* Uniquement sur les versions équipées de la radio.
& Appuyez sur la touche H. Le Menu Principal
s’affiche à l’écran.
é Avec le curseur, sélectionnez le menu
Installation puis le menu Classement .
“ Sélectionnez le programme que vous
souhaitez déplacer avec les touches
<> et
appuyez sur
≥.
‘ Utilisez ensuite les touches
<> pour choisir
le nouveau numéro et validez avec
≤.
( Recommencez les étapes “ et ‘ autant de
fois qu’il y a de programmes à renuméroter.
§ Pour quitter les menus,appuyez sur
d.
Vous pouvez, si vous le souhaitez, donner un
nom aux programmes et prises extérieures.
Remar
que: lors de l’installation, les programmes
sont nommés automatiquement lorsque le signal
d’identification est transmis.
& Appuyez sur la touche
H.
é Avec le curseur, sélectionnez le menu
Installation, puis Nom De Prog.
“ Utilisez les touches <> pour choisir le
programme à nommer ou à modifier.
‘ Utilisez les touches
≤≥ pour vous déplacer
dans la zone d’affichage du nom
(5 caractères) et les touches
<> pour
choisir les caractères.
( Lorsque le nom est entré, utilisez la touche
≤
pour sortir. Le nom est mémorisé.
§ Recommencez les étapes “ à ( pour chaque
programme à nommer.
è Pour quitter les menus,appuyez sur
d.
Select Country
Country
DK
E
F
FI
Æ GB
Language
Español
Svenska
English
Dansk
Nederlands
Menu Principalge
• Image
• Son
• Options
$ Installation
Installation
• Langage
• Pays
• Mémo. Auto.
• Mémo Manuel.
$
Classement
Æ
• Nom du Prog.
00
01 TF1
02 FR2
03ÆFR3
04 C +
05 ARTE

5
Mémorisation manuelle
Autres réglages du menu Installation
Ce menu permet de mémoriser les
programmes un par un.
& Appuyez sur la touche
H.
é Avec le curseur, sélectionnez le menu
Installation puis Mémo Manuelle :
“
Système : sélectionnez Europe (détection
automatique*) ou
Europe Ouest (norme BG),
Europe Est (norme DK), Royaume-Uni
(norme I) ou France (norme LL’).
* Sauf pour la France (norme LL’), il faut
sélectionner impérativement le choix
France.
‘
Recherche :appuyez sur ≥. La recherche
commence. Dès qu’un programme est trouvé,
le défilement s’arrête et le nom du programme
s’affiche (si disponible).Allez à l’étape suivante.
Si vous connaissez la fréquence du programme
désiré, composez directement son numéro
avec les touches
0 à 9.
Si aucune image n’est trouvée, voir conseils (p. 10).
(
No De Prog. : entrer le numéro souhaité avec
les touches
≤≥ ou 0 à 9.
§
Ajust. Fin : si la réception n’est pas
satisfaisante, réglez avec les touches
≤≥.
è
Mémoriser :appuyez sur ≥. Le programme
est mémorisé.
! Répétez les étapes ‘ à ! autant de fois qu’il
y a de programmes à mémoriser.
ç Pour quitter les menus,appuyez sur
d.
& Appuyez sur la touche H et sélectionnez le
menu
Installation :
é
Langage : pour modifier la langue d’affichage
des menus.
“ Pays : pour choisir votre pays (F pour France).
Ce réglage intervient dans la recherche, le
classement automatique des programmes et
l’affichage du télétexte. Si votre pays n’apparaît
pas dans la liste, sélectionnez le choix “. ..”
‘
Mémo. Auto : pour lancer une recherche
automatique de tous les programmes
disponibles dans votre région.Si l’émetteur ou
le réseau câblé transmet le signal de
classement automatique, les programmes
seront correctement numérotés. Si ce n’est
pas le cas, vous devez utiliser le menu
Classement pour les renuméroter (voir p.4).
Certains émetteurs ou réseaux câblés diffusent leurs
propres paramètres de classement (région, langage, ...).
Dans ce cas, vous devez indiquer votre choix avec
les touches
<> puis valider avec ≥.Pour sortir
ou interrompre la recherche, appuyez sur H.Si
aucune image n’est trouvée, voir conseils (p. 10).
( Pour quitter les menus,appuyez sur d.
Utilisation de la radio
(disponible uniquement sur certaines versions)
Choix du mode tv ou radio
Appuyez sur la touche
 de la
télécommande pour commuter le téléviseur en
mode tv ou radio. En mode radio, le numéro, le
nom de la station (si disponible), sa fréquence et
le mode son s’affichent à l’écran.
Pour entrer le nom des stations utilisez le menu
Nom De Prog. (p. 4)
Sélection des programmes
Utilisez les touches
09ou @ P # pour
sélectionner les stations FM (de 1 à 40).
Liste des stations radio
Appuyez sur la touche ı pour afficher la liste des
stations radio. Utilisez les touches
<> pour
changer de station et la touche
d pour quitter.
Utilisation des menus radio
Utilisez la touche
H pour accèder aux
réglages spécifiques à la radio.
Recherche des stations radio
Si vous avez utilisé l’installation rapide, toutes les
stations FM disponibles ont été mémorisées. Pour
lancer une nouvelle recherche,utilisez le menu
Installation : Mémo. Auto (pour une recherche
complète) ou
Mémo. Manuel (pour une recherche
station par station). Les menus
Classement et
Nom De Prog. vous permettront de classer ou
nommer les stations radio.Le fonctionnement de
ces menus est identique a celui des menus TV.
Menu Principalge
• Image
• Son
• Options
$ Installation
Mémo. Manuel.
$
Système France Æ
• Recherche
• No. De Prog.
• Ajust. Fin
• Mémoriser

6
Réglages de l’image
Réglages du son
& Appuyez sur la touche H puis sur ≥.
Le menu
Image apparaît :
é Utilisez les touches
<> pour sélectionner
un réglage et les touches
≤≥ pour régler.
Remarque : pendant le réglage de l’image, seule la
ligne sélectionnée reste affichée.Appuyez sur
<> pour faire ré-apparaître le menu.
“ Une fois les réglages effectués, sélectionnez le
choix
Mémoriser et appuyer sur ≥ pour les
enregistrer.Appuyez sur
d pour quitter.
Description des réglages :
• Lumière : agit sur la luminosité de l’image.
•
Couleur : agit sur l’intensité de la couleur.
•
Contraste : agit sur la différence entre les
tons clairs et les tons foncés.
•
Définition : agit sur la netteté de l’image.
•
Temp. Couleur : agit sur le rendu des
couleurs :
Froide (plus bleue), Normale
(équilibrée) ou Chaude (plus rouge).
•
Mémoriser : pour mémoriser les réglages de
l’image (ainsi que les réglages
Contrast + et
Réduct. Bruit situés dans le menu Options).
& Appuyez sur H, sélectionner Son (>) et
appuyez sur
≥. Le menu Son apparaît :
é Utilisez les touches
<> pour sélectionner
un réglage et les touches
≤≥ pour régler.
“ Une fois les réglages effectués, sélectionnez le
choix
Mémoriser et appuyer sur ≥ pour les
enregistrer.
‘ Pour quitter les menus,appuyez sur
d.
Description des réglages:
• Aigus : agit sur les fréquences hautes du son.
•
Graves : agit sur les fréquences basses.
•
Balance : pour équilibrer le son sur les haut-
parleurs gauche et droit.
•
Delta Volume * : permet de compenser les
écarts de volume qui existent entre les
différents programmes ou les prises EXT.
Ce réglage est opérationnel pour les
programmes 0 à 40 et les prises EXT.
• AVL * (Automatic Volume Leveler): contrôle
automatique du volume qui permet de limiter
les augmentations du son, en particulier lors des
changements de programmes ou des publicités.
• Mémoriser : pour mémoriser les réglages du
son.
* Disponible uniquement sur certaines versions.
Réglage des options
& Appuyez sur H, sélectionner Options (>) et
appuyez sur
≥.Vous pouvez régler :
é
Déplac. Image (disponible uniquement sur les
grandes tailles d’écran) :les grandes tailles
d’écran sont sensibles aux variations du champ
magnétique terrestre. Ce réglage permet de
compenser son influence en ajustant
l’inclinaison de l’image.
“
Contraste + : réglage automatique du
contraste de l’image qui ramène en
permanence la partie la plus sombre de
l’image au noir.
‘
Réduct. Bruit : atténue le bruit de l’image (la
neige), en cas de réception difficile.
Attention : pour mémoriser les réglages
Contraste+ et Réduct. Bruit , il faut utiliser le
choix
Mémoriser du menu Image.
( Pour quitter les menus,appuyez sur
d.
Menu Principalge
$ Image
• Son
• Options
• Installation
Image
$
Lumière --I------ 39
• Couleur
• Contraste
• Définition
• Temp. Couleur
• Mémoriser
Menu Principalge
• Image
$ Son
• Options
• Installation
Son
•Aigus -----I--- 56
• Graves
• Balance
• Delta Volume
• AVL
• Mémoriser

7
Formats 16:9
Les images que vous recevez peuvent être transmises au format 16:9 (écran large) ou 4:3 (écran
traditionnel). Les images 4:3 ont parfois une bande noire en haut et en bas (format cinémascope).
Cette fonction permet d’éliminer les bandes noires et d’optimiser l’affichage des images sur l’écran.
Si votre téléviseur est équipé d’un écran 4:3
Appuyez sur la touche p (ou le curseur <>) pour sélectionner les différents modes :
Si votre téléviseur est équipé d’un écran 16:9
Appuyez sur la touche p (ou le curseur ≤≥) pour sélectionner les différents modes :
Le téléviseur est équipé d’une commutation automatique qui décode le signal spécifique émis par certains
programmes et sélectionne automatiquement le bon format d’écran.
4:3
L’image est reproduite au format 4:3,une bande noire apparaît de chaque côté de
l’image.Vous pouvez agrandir progressivement l’image en utilisant le curseur <>.
L’image est agrandie au format 14:9, une petite bande noire subsiste de chaque
côté de l’image. Les touches
<>
permettent de comprimer l’image verticalement
pour faire apparaître le haut ou le bas de l’image (sous-titres).
L’image est agrandie au format 16:9. Ce mode est recommandé pour visualiser les
images avec bande noire en haut et en bas (format cinémascope). Utilisez les touches
<> si vous voulez faire apparaître le haut ou le bas de l’image.
Ce mode permet de visualiser les images 4:3 sur toute la surface de l’écran en laissant
visibles les sous-titres. Utilisez les touches <> pour faire descendre ou remonter le
bas de l’image.
Ce mode permet de visualiser les images 4:3 sur toute la surface de l’écran en élargissant
les côtés de l’image. Utilisez les touches <> pour compresser l’image verticalement.
Ce mode permet de restituer les bonnes proportions des images transmises en
16:9 en les affichant en plein écran.
Zoom 14:9
Zoom 16:9
Sous-Titres
Super 4:3
Plein Écran
L’image est élargie verticalement.
Ce mode permet de supprimer les bandes noires
des images au format cinémascope.
L’image est reproduite au format 4:3
L’image est comprimée verticalement au format 16:9.
4:3
Extension 4:3
Compress 16:9
Utilisation du PIP
Cette fonction vous permet d’afficher un petit
écran d’incrustation d’image.
& Appuyez sur la touche œ pour afficher l’écran
PIP. Une petite fenêtre d’incrustation apparaît
dans l’écran principal.
é Utilisez les touches
- P + pour changer les
programmes de l’écran PIP ou la touche
µ si
vous souhaitez afficher l’image d’un appareil
connecté au téléviseur (magnétoscope, DVD...).
“ Appuyez de nouveau sur œ pour modifier la
taille de la fenêtre, puis la faire disparaître.
‘ Utilisez la touche π si vous souhaitez
déplacer la fenêtre.
( Utilisez la touche ‡ si vous souhaitez
permuter les 2 images.
§ Utilisez la touche
q pour faire un arrêt sur
image du PIP.
(disponible uniquement sur certaines versions)

8
Télétexte
Appuyez sur :
Vous obtenez :
Le télétexte est un système d'informations, diffusé par certaines chaînes, qui se consulte comme un
journal. Il permet aussi d'accéder aux sous-titrages pour les personnes malentendantes ou peu
familiarisées avec la langue de transmission (réseaux câblés,chaînes satellites,...).
Appel
télétexte
Sélection
d’une page
Permet d’appeler le télétexte, de passer en mode
transparent puis de quitter. Le sommaire apparaît avec la
liste des rubriques auxquelles vous pouvez accéder. Chaque
rubrique est repérée par un numéro de page à 3 chiffres.
Si la chaîne sélectionnée ne diffuse pas le télétexte, l'indication
100 s'affiche et l'écran reste noir (dans ce cas, quittez le
télétexte et choisissez une autre chaîne).
Composer le numéro de la page désiré avec les touches
0 à 9 ou - P +.Exemple: page 120,tapez 120.
Le numéro s’affiche en haut à gauche, le compteur tourne,
puis la page est affichée.
Renouvelez l'opération pour consulter une autre page.
Si le compteur continue à chercher, c’est que la page n'est pas
transmise. Choisissez un autre numéro.
Accès
direct aux
rubriques
Des zones colorées sont affichées en bas de l’écran.
Les 4 touches colorées permettent d’accéder aux
rubriques ou aux pages correspondantes.
Les zones colorées clignotent lorsque la rubrique ou la page
n’est pas encore disponible.
Sommaire
Agrandissement
d'une page
Pour revenir au sommaire (généralement la page 100).
Pour afficher la partie supérieure, inférieure, puis revenir à
la dimension normale.
Arrêt de
l'alternance
des sous-
pages
Double page
télétexte
(disponible
uniquement sur
certaines versions)
Certaines pages contiennent des sous-pages qui se
succèdent automatiquement. Cette touche permet
d’arrêter ou reprendre l'alternance des sous-pages.
L'indication _ apparaît en haut à gauche.
Pour activer ou désactiver l’affichage du télétexte en double
page. La page active est affichée à gauche et la page suivante
à droite.Appuyez sur la
touche Ósi vous voulez figer un
page (par exemple le sommaire).La page active devient celle de
droite. Pour revenir en mode normal,appuyez sur
e
.
Informations
cachées
Pages
préférées
Pour faire apparaître ou disparaître les informations
cachées (solutions de jeux).
Pour les programmes télétexte 0 à 40,vous pouvez
mémoriser 4 pages préférées qui seront ensuite
directement accessibles avec les touches colorées (rouge,
verte, jaune, bleue).
& Appuyez sur la touche
H pour passer en mode pages
préférées.
é Affichez la page télétexte que vous souhaitez mémoriser.
“ Appuyez ensuite pendant 3 secondes sur la touche
colorée de votre choix.La page est mémorisée.
‘ Renouvelez l’opération avec les autres touches colorées.
( À présent, dès que vous consultez le télétexte, vos
pages préférées apparaissent en couleur en bas de
l’écran. Pour retrouver les rubriques habituelles,
appuyez sur
H.
Pour tout effacer, appuyez sur
d pendant 5 secondes.
POWER
.
VCR DVD SAT AMP CD
Ÿ
Select
Y
¢
·
œ
OK
+
[
”
213
546
879
Ë
0
ı
SMART
-
¤
¢
Ó
Ê
Æ
π
‡
0 9
+
MENU
P
+
P
ù
SMART
Á
ª
Ë
OK
Ó
ù
Ÿ
Y
MENU
Ë

9
Raccordements
Effectuez les raccordements ci-contre. Utilisez un cordon de
liaison péritel de bonne qualité.
Si votre magnétoscope ne possède pas de prise péritel, seule la liaison
par le câble antenne est possible.Vous devez accorder le programme
numéro 0 du téléviseur sur le signal de test du magnétoscope (voir
mémo. manuelle p. 5). Ensuite pour reproduire l’image du
magnétoscope, appuyez sur
0.
Magnétoscope avec Décodeur
Connectez le décodeur sur la deuxième prise péritel du
magnétoscope.Vous pourrez ainsi enregistrer les émissions
cryptées.
Le téléviseur est équipé de 2 prises péritel EXT1 et EXT2 situées à l’arrière.
La prise EXT1 possède les entrées/sorties audio vidéo et les entrées RVB.
La prise EXT2 possède les entrées/sorties audio vidéo et les entrées S-VHS.
Magnétoscope
Récepteur satellite, décodeur, DVD, jeux,...
Effectuez les raccordements ci-contre.
Pour optimiser la qualité de l’image, connectez à EXT1 les
équipements délivrant les signaux RVB (décodeur numérique,
lecteurs DVD, jeux,...), à EXT2 les équipements délivrant les
signaux S-VHS (magnétoscopes S-VHS et Hi-8, ...) et
indifféremment à EXT1 ou EXT2 les autres équipements.
Pour sélectionner les appareils connectés
Appuyez sur la touche
µ pour sélectionner
EXT1, EXT2 /S-VHS2
(signaux S-VHS de la prise EXT2) et AV/ S-VHS pour les
connections latérales.
La plupart des appareils réalisent eux-mêmes la commutation
(décodeur, magnétoscope).
Effectuez les raccordements ci-contre.
Avec la touche
µ, sélectionner
AV
/ S-VHS.
Pour un appareil monophonique, connectez le signal son sur l’entrée
AUDIO L. Utilisez la touche
e pour reproduire le son sur les haut-
parleurs gauche et droit du téléviseur.
Casque
Lorsque le casque est connecté, le son du téléviseur est coupé.
Les
touches
@ ” # permettent de régler le volume.
L'impédance du casque doit être comprise entre 32 et 600 ohms.
Autres appareils
Connexions latérales
Amplificateur
(disponible uniquement sur certaines versions)
Pour le raccordement à une chaîne Hi-fi,utilisez un cordon de
liaison audio et connectez les sorties “L” et “R” du téléviseur à
une entrée “AUDIO IN” “L” et “R” de la chaîne Hi-fi.
CABLE
EXT 2
VCR
CABLE
S•VIDEO
VIDEO
AUDIO
*
AUDIO

10
Conseils
Glossaire
Mauvaise réception
La proximité de montagnes ou de hauts
immeubles peut être la cause d'image
dédoublée, d'écho ou d'ombres. Dans ce cas,
essayez d’ajuster manuellement l’accord de
l’image: voir
Ajust. Fin (p. 5) ou modifiez
l'orientation de l'antenne extérieure.
Vérifiez également que votre antenne permet
de recevoir les émissions dans cette bande de
fréquences (bande UHF ou VHF) ?
En cas de réception difficile (image neigeuse),
positionnez le réglage
Reduct. Bruit du menu
Options sur Marche (p. 6).
Absence d'image
Si le téléviseur ne s’allume pas, appuyez 2 fois
sur la touche
b située sur la télécommande.
Avez-vous bien branché l'antenne ?
Avez-vous choisi le bon système ? (p.5)
Le contraste ou la lumière est déréglé ?
Appuyez sur la touche
≈ et reprenez les
réglages du menu
Image.
Une prise péritel ou une prise d'antenne mal
connectée est souvent la cause de problèmes
d'image ou de son (il arrive que les prises se
déconnectent légèrement lorsque l'on déplace
ou que l'on tourne le téléviseur).Vérifiez
toutes les connexions.
L’équipement périphérique délivre une
image en noir et blanc
Pour la lecture d’une cassette vidéo, vérifiez
qu’elle est enregistré au même standard (PAL,
SECAM, NTSC) que ce que peut lire le
magnétoscope.
Absence de son
Si certains programmes sont dépourvus de son,
mais pas d’image, c’est que vous n’avez pas le bon
système TV. Modifiez le réglage
Système (p. 5).
Télétexte
Certains caractères ne s’affichent pas
correctement ? Vérifiez que le réglage du
pays est correctement positionné (p. 5).
La télécommande ne fonctionne plus ?
Le voyant du téléviseur ne clignote plus
lorsque vous utilisez la télécommande ?
Remplacez les piles.
Veille
Pour faire des économies d’énergie, votre
téléviseur est équipé de composants
permettant une très faible consommation en
veille (inférieure à 3 W).
Toujours pas de résultats ?
En cas de panne, n’essayez jamais de réparer
vous même le téléviseur, mais consultez le
service après vente.
Nettoyage du téléviseur
Le nettoyage de l’écran et du coffret doit être
effectué uniquement avec un chiffon propre,
doux et non pelucheux. Ne pas utiliser de
produit à base d’alcool ou de solvant.
Signaux RVB: Il s’agit de 3 signaux vidéo Rouge,Vert, Bleu qui viennent directement piloter les 3
canons rouge, vert , bleu du tube cathodique. L’utilisation de ces signaux permet d’obtenir une
meilleure qualité d’image.
Signaux S-VHS: Il s’agit de 2 signaux vidéo séparés Y/C issus des standards d’enregistrement S-VHS et
Hi-8. Les signaux de luminance Y (noir et blanc) et de chrominance C (couleur) sont enregistrés
séparément sur la bande. On obtient ainsi une meilleur qualité qu’avec la vidéo standard (VHS et 8
mm) où les signaux Y/C sont mélangés pour ne former qu’un seul signal vidéo.
Son NICAM: Procédé permettant de transmettre le son en qualité numérique.
Système: La transmission des images n’est pas faite de la même façon dans tous les pays. Il existe
différentes normes : BG, DK,I, et L L’. Le réglage
Système (p. 5) permet de sélectionner ces
différentes normes. Ne pas confondre avec le codage couleur PAL ou SECAM.Le Pal est utilisé dans
la plupart des pays d’Europe,le Secam en France, en Russie et dans la plupart des pays d’Afrique.
Les États Unis et le Japon utilisent un autre système appelé NTSC. Les entrées EXT1 et EXT2
permettent de lire les enregistrements codés en NTSC.
16:9: Désigne les proportions largeur / hauteur de l’écran. Les téléviseurs à écran large ont des
proportions 16/9 et les écrans traditionnels: 4/3.

1
Bevezetés
Ta r talomjegyzék
Új televíziót vásárolt.Köszönjük a márkánk iránti bizalmát.
Kérjük,a készülék által nyújtott szolgáltatások megismerése érdekében
figyelmesen olvassa el a használati útmutatót.
Reméljük, hogy technológiánkat teljes megelégedéssel fogja használni.
Üzembehelyezés
A televízió üzembe helyezése . . . . . . . . . . . . . . . . . . . . . . . . . . . . . . . . . . . . . . . . .2
A televízió nyomógombjai . . . . . . . . . . . . . . . . . . . . . . . . . . . . . . . . . . . . . . . . . . .2
A távirányító gombjai . . . . . . . . . . . . . . . . . . . . . . . . . . . . . . . . . . . . . . . . . . . . . . .3
Gyors indítás . . . . . . . . . . . . . . . . . . . . . . . . . . . . . . . . . . . . . . . . . . . . . . . . . . . . . .4
Programok osztályozása . . . . . . . . . . . . . . . . . . . . . . . . . . . . . . . . . . . . . . . . . . . . .4
Programnév . . . . . . . . . . . . . . . . . . . . . . . . . . . . . . . . . . . . . . . . . . . . . . . . . . . . . . .4
Kézi tárolás . . . . . . . . . . . . . . . . . . . . . . . . . . . . . . . . . . . . . . . . . . . . . . . . . . . . . . .5
Egyéb szabályozások az Indítás menüpontban . . . . . . . . . . . . . . . . . . . . . . . . . . . .5
Használat
A rádió használata . . . . . . . . . . . . . . . . . . . . . . . . . . . . . . . . . . . . . . . . . . . . . . . . . .5
Képbeállítás . . . . . . . . . . . . . . . . . . . . . . . . . . . . . . . . . . . . . . . . . . . . . . . . . . . . . . .6
Hangbeállítás . . . . . . . . . . . . . . . . . . . . . . . . . . . . . . . . . . . . . . . . . . . . . . . . . . . . . .6
Az funkciók beállítása . . . . . . . . . . . . . . . . . . . . . . . . . . . . . . . . . . . . . . . . . . . . . . .6
16:9 formátum . . . . . . . . . . . . . . . . . . . . . . . . . . . . . . . . . . . . . . . . . . . . . . . . . . . .7
A PIP használata . . . . . . . . . . . . . . . . . . . . . . . . . . . . . . . . . . . . . . . . . . . . . . . . . . . .7
Teletext . . . . . . . . . . . . . . . . . . . . . . . . . . . . . . . . . . . . . . . . . . . . . . . . . . . . . . . . . .8
Egyéb készülékek csatlakoztatása
Képmagnó . . . . . . . . . . . . . . . . . . . . . . . . . . . . . . . . . . . . . . . . . . . . . . . . . . . . . . . .9
Más készülékek . . . . . . . . . . . . . . . . . . . . . . . . . . . . . . . . . . . . . . . . . . . . . . . . . . . .9
A csatlakoztatott készülékek kiválasztása . . . . . . . . . . . . . . . . . . . . . . . . . . . . . . . .9
Csatlakozások az oldallapon . . . . . . . . . . . . . . . . . . . . . . . . . . . . . . . . . . . . . . . . . .9
Erősítő . . . . . . . . . . . . . . . . . . . . . . . . . . . . . . . . . . . . . . . . . . . . . . . . . . . . . . . . . . .9
Hasznos tudnivalók
Tanácsok . . . . . . . . . . . . . . . . . . . . . . . . . . . . . . . . . . . . . . . . . . . . . . . . . . . . . . . .10
Szószedet . . . . . . . . . . . . . . . . . . . . . . . . . . . . . . . . . . . . . . . . . . . . . . . . . . . . . . .10
°
Újrafelhasználási irányelv
A televízió újrafelhasználható anyagokat tartalmaz,melyek újra feldolgozhatók.
A környezeti ártalmak minimumra csökkentése érdekében erre szakosodott
vállalatok összegyűjtik a használt készülékeket,szétszerelik őket és összegyűjtik
belőlük az újra felhasználható anyagokat (kérjen információt a kereskedőtől).
Magyar

A televízió 4 vagy 5 nyomógombbal van
felszerelve, amelyek a modelltől függően vagy a
készülék elején, vagy annak tetején találhatók.
A VOLUME + - (-
” +) nyomógombok a
hangerő szabályozására szolgálnak.
A PROGRAM + - (- P +) nyomógombok a
programok kiválasztását teszik lehetővé.A menük
lehívásához tartsa nyomva a
”- és a ” + (vagy
MENU) gombokat. Ezt követően,a PROGRAM + nyomógombokkal kiválaszthatja a szabályozni kívánt
funkciót és a
”- + gombokkal elvégezheti a
beállítást.A menükből való kilépéshez tartsa
nyomva a
”- és a ” + (vagy MENU)
gombokat.
2
&
A televízió elhelyezése
Helyezzük a televíziót szilárd és stabil felületre
oly módon, hogy a készülék körül legalább 5 cm
szabad hely maradjon.A veszélyes helyzetek
elkerülése érdekében semmit se tegyünk rá,ami
lefedné azt (terítő), amiben folyadék van (váza)
vagy hőt bocsát ki (lámpa). Ezen kívül a
televízióra nem szabad vízsugarat irányítani.
é
Csatlakozások
• Illesszük be az antennadugót a készülék
hátoldalán található : csatlakozóba.
• A rádióval felszerelt változatoknál: dugja be a
rádióantenna csatlakozódugóját az FM ANT.
Belső antennával a vétel bizonyos körülmények
között nehéz lehet. Ezen a problémán az antenna
elforgatásával segíthet. Ha a vétel továbbra is
rossz marad, akkor külső antennát kell használni.
• Csatlakoztassuk a hálózati zsinórt a
hálózatba (220-240 V / 50 Hz).
“
A távirányító
Helyezzük be a mellékelt 2 db R6 típusú elemet
a + és – jeleknek megfelelően. Ellenőrizzük, hogy
az üzemmódválasztó TV állásban van-e.
A készülékkel szállított elemek nem tartalmaznak
sem higanyt, sem nikkel-kadmiumot a környezet
védelme érdekében. Ne dobjuk el a lemerült
elemeket, hanem vegyük igénybe a
rendelkezésünkre bocsátott újrafelhasználási
eszközöket (kérdezzük meg az eladót). Ha ki kell
cserélni, azonos típusú elemeket használjunk.
‘
Bekapcsolás
A televízió bekapcsolásához nyomjuk meg a kibekapcsolás gombot. Kigyullad egy piros
fényjelző és a képernyő kivilágosodik.
Lapozzunk közvetlenül a következő oldalon
található gyors üzembe helyezési részhez.
Ha a televízió továbbra is készenléti állapotban
van, nyomjuk meg a távirányítón a P
# gombot.
A távirányító használata közben a fényjelző villog.
A televízió üzembe helyezése
A televízió nyomógombjai
5 cm
5 cm
5 cm
FM.
ANT.

3
A távirányító nyomógombjai
Készenléti helyzet
A televízió készenléti helyzetbe
történő kapcsolása.Az újra
bekapcsoláshoz nyomja meg a
b,
- P + vagy
0-9 gombot.
EXT csatlakoztatás kiválasztása
(9. o.)
A csatlakoztatott készülék
kiválasztásához nyomja meg
többször ezt a gombot.
Rádió/tévé üzemmód
Rádió vagy tévé üzemmódba
történő átkapcsoláshoz
(a rádióval szerelt változatoknál).
Surround háttérhanghatás
Háttérhanghatás aktiválásához és
kikapcsolásához. Sztereó lejátszásnál
a hangfalak távolsága nagyobbnak
tűnik.A Virtual Dolby Surround *-dal
felszerelt változatoknál a
Dolby Surround Pro Logic
háttérhanghatást eredményez.
Kurzor
Ez a 4 gomb lehetővé teszi a
menüpontok közötti keresést (<>≤≥).
Képernyő információk / állandó
számok
A program számának,nevének (ha van
neve) és a hangmódjának.
A szám
állandó kijelzéséhez 5 másodpercig
tartsa nyomva.
Rádióállomások listája (5. o)
Két kép (típustól függő)
A kijelzés aktiválása/dezaktiválása
két képernyőmezőben.A második
képernyő lehetővé teszi a teletext
kijelzését.
Az üzemmód kiválasztása
A TV távvezérlõjével měködtethetõ a
termékskálánk legtöbb audio- és
videokészüléke.Nyomja meg a Select
gombot a kívánt üzemmód
kiválasztásához: VCR, DVD,SAT,AMP vagy
CD.A távirányító fényjelzőjének a
világítása jelzi a választott üzemmódot. Ha
a választott üzemmód aktiválása elmarad,
akkor a fényjelző 60 másodperc múlva
automatikusan kikapcsol (visszakapcsol TV
üzemmódba).Berendezéstől függően a
következő gombokkal rendelkezik:.·
¢ÊÆ∫cuH<>≤≥
(kurzor)
- P + 09 deÁ
Teletext gomb (8. old.)
vagy PIP (9.old) vagy VCR / DVD .
Teletext megjelenítése (8. o).
Nem használt gomb.
Hangerő
A hangerőszint beállításához.
Némító
A hang ki- és visszakapcsolásához.
Programválasztás
Ha olyan programot akar megtekinteni,
amely a kedvenc lista előtt vagy után
található.(lásd 5. old.).
Számjegygombok
Közvetlen hozzáférés a programokhoz.
Egy kétszámjegyű programnál addig kell
beütni a 2. számjegyet, amíg a kötőjel el
nem tűnik.
16:9 formátum (7. o).
Előző program
Az utoljára megjelenített program
visszahívása.
Hang és kép alapbeállítások
Lehetővé tesz egy sor kép és hang
alapbeállítást. A természetes beállítás
helyzet megfelel a menükben elvégzett
beállításoknak
Menü :A menü lehívásához vagy a
menüből történő kilépéshez.
Hangmód
Lehetővé teszi a
Stereo (vagy Nicam
Stereo
) adások Mono
-ba történő
átalakítását, vagy, a kétnyelvű adások
esetén a
Dual I vagy Dual II. A piros színű
Mono jelzés azt jelenti hogy az adás más
hangszínben is fogható.
*
A Dolby Laboratories engedélyével gyártva.
A “Dolby” és a dupla D szimbólum a Dolby Laboratories márkanevei
VCR DVD SAT AMP CD
Ÿ
Y
·
¢
‡
†
”
1
4
7
Ë
ı
SMART
-
Select
OK
[
¢
Ó
Ê
Æ
π
œ
MENU
P
2
3
5
6
8
9
ù
0
K
Á
SMART
ª

4
Gyors indítás
Programok osztályozása
Programnév
A tévékészülék első bekapcsolásakor egy
menü jelenik meg a képernyőn. Ez a menü arra
szólítja Önt fel, hogy válassza ki a megfelelő
országot és nyelvet :
Ha a menü nem jelenik meg, tartsa benyomva 5
másodpercig a tévékészülék
”- és ”+
gombjait a megjelenítéséhez.
& A távirányító
<> gombjai segítségével
válassza ki az ön országát, majd nyomja meg az
≥ gombot.
Ha az Ön országa nem szerepel a listán, akkor
jelölje ki a “. ..”választást.
é
Ezután válassza ki az Ön nyelvét a <> gombok
segítségével,majd nyomja meg az
≥ gombot.
“ A keresés automatikusan elindul.Minden
hozzáférhető tévé- és rádióállomás* a
memóriában van.A művelet néhány percig tart.
A kijelzés mutatja a keresés folyamatát és a
megtalált programok számát.A keresés
befejezésekor a kijelzés eltűnik.
Ha ki akar lépni vagy meg akarja szakítani a
keresést, nyomja meg a
H gombot. Ha egy
programot sem talált, olvassa el a 10. oldalon
található tanácsokat.
‘ Ha a tévéállomás vagy a kábelhálózat
továbbítja az automatikus besorolást,akkor a
programok számozása helyes lesz.Ekkor
befejeződik a beállítás.
( Ellenkező esetben,a
Fajta menüpont
segítségével újra kell a programokat számozni.
Egyes tévéállomások vagy kábelhálózatok a saját
osztályozási paramétereiket használják (régió,
nyelv...). Ebben az esetben a
<> gombok
segítségével választhatja ki a programokat,majd a
≥ gomb segítségével tárolhatja választását.
* Kizárólag a rádióval felszerelt változatoknál.
& Nyomja meg a H gombot. Ekkor a Főmenü
megjelenik a képernyőn.
é A kurzor segítségével válassza ki a
Indítás majd
a
Fajta menüpontot.
“ Válassza ki az átvinni kívánt programot a
<>
gombok segítségével,majd tárolja a ≥ gomb
megnyomásával.
‘ Ezután a
<> gombok segítségével válassza ki
az új programszámot, majd tárolja a
≤
megnyomásával.
( A “ és ‘ műveletet annyiszor ismételje meg,
ahány programot újra akar számozni.
§ Ha ki akar lépni a menüből,nyomja meg a
d-t.
A programoknak és külső csatlakozásoknak
nevet is adhat.
Me
gjegyzés: beállításkor,az azonosítójel vételekor,
a programok automatikusan nevet kapnak.
& Nyomja meg a
H gombot.
é A kurzor segítségével jelölje ki először az
Indítás, majd a Névadás menüpontokat.
“ Az elnevezendő vagy módosítandó program
kiválasztásához használja a
<> gombokat.
‘ A kijelzett név mezejébe (5 leütés) való
belépéshez használja a
≤≥,a karakterek
kiválasztásához pedig a
<> gombokat.
( A név beírása után a
≤ gomb megnyomásával
léphet ki.A név tárolva van.
§ A “ és ( műveletet annyiszor ismételje meg,
ahány programot akar elnevezni.
è Kilépéshez nyomja meg a
d gombot.
Select Country
Country
DK
E
F
FI
ÆÆ
GB
Language
Español
Svenska
English
Dansk
Nederlands
Fõ Menūe
• Kép
• Hang
• Funkciók
$$
Indítás
Indítás
• Nyelv
• Ország
• Aut.Tárol.
• Kézi Tárol.
• Fajta
• Névadás
00
01 MTV1
02 MTV2
03ÆTV2
04 STV1
05 STV2
 Loading...