

Page 1

MENÚS ANALÓGICOS
1
Introducción
Indice
Gracias por comprar este aparato de televisión.
Este manual se ha sido pensado para ayudarle a instalar y manejar su televisor.
Le recomendamos firmemente que lo lea atentamente.
Esperamos que este nuevo aparato de televisión le resulte absolutamente
satisfactorio.
Instalando su equipo de televisión . . . . . . . . . . . . . . . . . . . . . . . . . . . . . . . . . . . . .2
Botones del equipo de TV . . . . . . . . . . . . . . . . . . . . . . . . . . . . . . . . . . . . . . . . . . .2
Los botones del mando a distancia . . . . . . . . . . . . . . . . . . . . . . . . . . . . . . . . . . . .3
¿Canales analógicos o diitales? . . . . . . . . . . . . . . . . . . . . . . . . . . . . . . . . . . . . . . . .3
Encendido del equipo por primera vez . . . . . . . . . . . . . . . . . . . . . . . . . . . . . . . . .4
Entender las ventanas de información . . . . . . . . . . . . . . . . . . . . . . . . . . . . . . . . . .4
Ordenación de los canales de TV / emisoras de radio . . . . . . . . . . . . . . . . . . . . .5
Ver o escuchar nuevos servicios de TV . . . . . . . . . . . . . . . . . . . . . . . . . . . . . . . . .5
Tipos de Lista de canales . . . . . . . . . . . . . . . . . . . . . . . . . . . . . . . . . . . . . . . . . . . .5
Añadir nuevos servicios . . . . . . . . . . . . . . . . . . . . . . . . . . . . . . . . . . . . . . . . . . . . .6
Reinstalar todos los servicios . . . . . . . . . . . . . . . . . . . . . . . . . . . . . . . . . . . . . . . . .6
Prueba de recepción . . . . . . . . . . . . . . . . . . . . . . . . . . . . . . . . . . . . . . . . . . . . . . . .6
Preferencias de idioma y dirección . . . . . . . . . . . . . . . . . . . . . . . . . . . . . . . . . . . . .7
Restricciones de acceso . . . . . . . . . . . . . . . . . . . . . . . . . . . . . . . . . . . . . . . . . . . . .7
Configuración de su lista de favoritos . . . . . . . . . . . . . . . . . . . . . . . . . . . . . . . . . .8
Información . . . . . . . . . . . . . . . . . . . . . . . . . . . . . . . . . . . . . . . . . . . . . . . . . . . . . . .8
Descargando nuevo software . . . . . . . . . . . . . . . . . . . . . . . . . . . . . . . . . . . . . . . . .8
Utilización del menú de opciones . . . . . . . . . . . . . . . . . . . . . . . . . . . . . . . . . . . . .9
Guía de TV . . . . . . . . . . . . . . . . . . . . . . . . . . . . . . . . . . . . . . . . . . . . . . . . . . . . . . .9
Función de grabación . . . . . . . . . . . . . . . . . . . . . . . . . . . . . . . . . . . . . . . . . . . . . .10
Sintonizado automático de programas analógicos . . . . . . . . . . . . . . . . . . . . . . . .11
Ordenando los programas analógicos . . . . . . . . . . . . . . . . . . . . . . . . . . . . . . . . .11
Función EasyLink . . . . . . . . . . . . . . . . . . . . . . . . . . . . . . . . . . . . . . . . . . . . . . . . .12
Sintonizado manual de los programas analógicos . . . . . . . . . . . . . . . . . . . . . . . .12
Dando nombre a los programas analógicos . . . . . . . . . . . . . . . . . . . . . . . . . . . . .12
Ajustando la imagen . . . . . . . . . . . . . . . . . . . . . . . . . . . . . . . . . . . . . . . . . . . . . . .13
Ajustando el sonido . . . . . . . . . . . . . . . . . . . . . . . . . . . . . . . . . . . . . . . . . . . . . . .13
Rotación de la imagen . . . . . . . . . . . . . . . . . . . . . . . . . . . . . . . . . . . . . . . . . . . . . .13
Función programar . . . . . . . . . . . . . . . . . . . . . . . . . . . . . . . . . . . . . . . . . . . . . . . .14
Bloqueo de programas . . . . . . . . . . . . . . . . . . . . . . . . . . . . . . . . . . . . . . . . . . . . .14
Teletexto analógico . . . . . . . . . . . . . . . . . . . . . . . . . . . . . . . . . . . . . . . . . . . . . . . .15
Texto Digital . . . . . . . . . . . . . . . . . . . . . . . . . . . . . . . . . . . . . . . . . . . . . . . . . . . . .16
Formatos 16:9 . . . . . . . . . . . . . . . . . . . . . . . . . . . . . . . . . . . . . . . . . . . . . . . . . . .16
Conexión de equipos periféricos . . . . . . . . . . . . . . . . . . . . . . . . . . . . . . . . . . . . .17
Para elegir el equipo conectado . . . . . . . . . . . . . . . . . . . . . . . . . . . . . . . . . . . . . .17
Selector de modo VCR / DVD . . . . . . . . . . . . . . . . . . . . . . . . . . . . . . . . . . . . . .18
Glosario . . . . . . . . . . . . . . . . . . . . . . . . . . . . . . . . . . . . . . . . . . . . . . . . . . . . . . . .19
Consejos . . . . . . . . . . . . . . . . . . . . . . . . . . . . . . . . . . . . . . . . . . . . . . . . . . . . . . . .19
MENÚS DIGITALES
°
Reciclado
Los materiales usados en su aparato son reutilizables o pueden reciclarse.
Con el fin de minimizar el vertido de residuos en el medio ambiente, existen
empresas especializadas en la recogida de aparatos usados,que los desguazan
después de recuperar todos aquellos materiales que pueden usarse de nuevo
(pregunte a su distribuidor para obtener más detalles al respecto).
EspañolEnglish
Page 2
El equipo de televisión tiene 4 botones que
encontrará situados en la parte frontal o en la
parte superior del mismo, dependiendo del
modelo.
Con los botones VOLUME - + (- ”+) se ajusta
el volumen del sonido.Los botones PROGRAM
- + (- P +) sirven para seleccionar el programa.
Para acceder a los menús, pulse
simultáneamente los botones ”- y ”+.
A continuación use los botones PROGRAM - +
para seleccionar qué desea ajustar y los
botones - ”+ para realizar dicho ajuste.
Para salir de los menús, pulse los botones
”- y ”+ simultáneamente.
Nota: Cuando la función BLOQUEO INFANTIL está
activada, los botones a los que hemos hecho
referencia se encuentran deshabilitados (consulte el
menú VARIOS en la página 14).
PROGRAMVOLUME
--
++
2
&
Ubicando el equipo de televisión
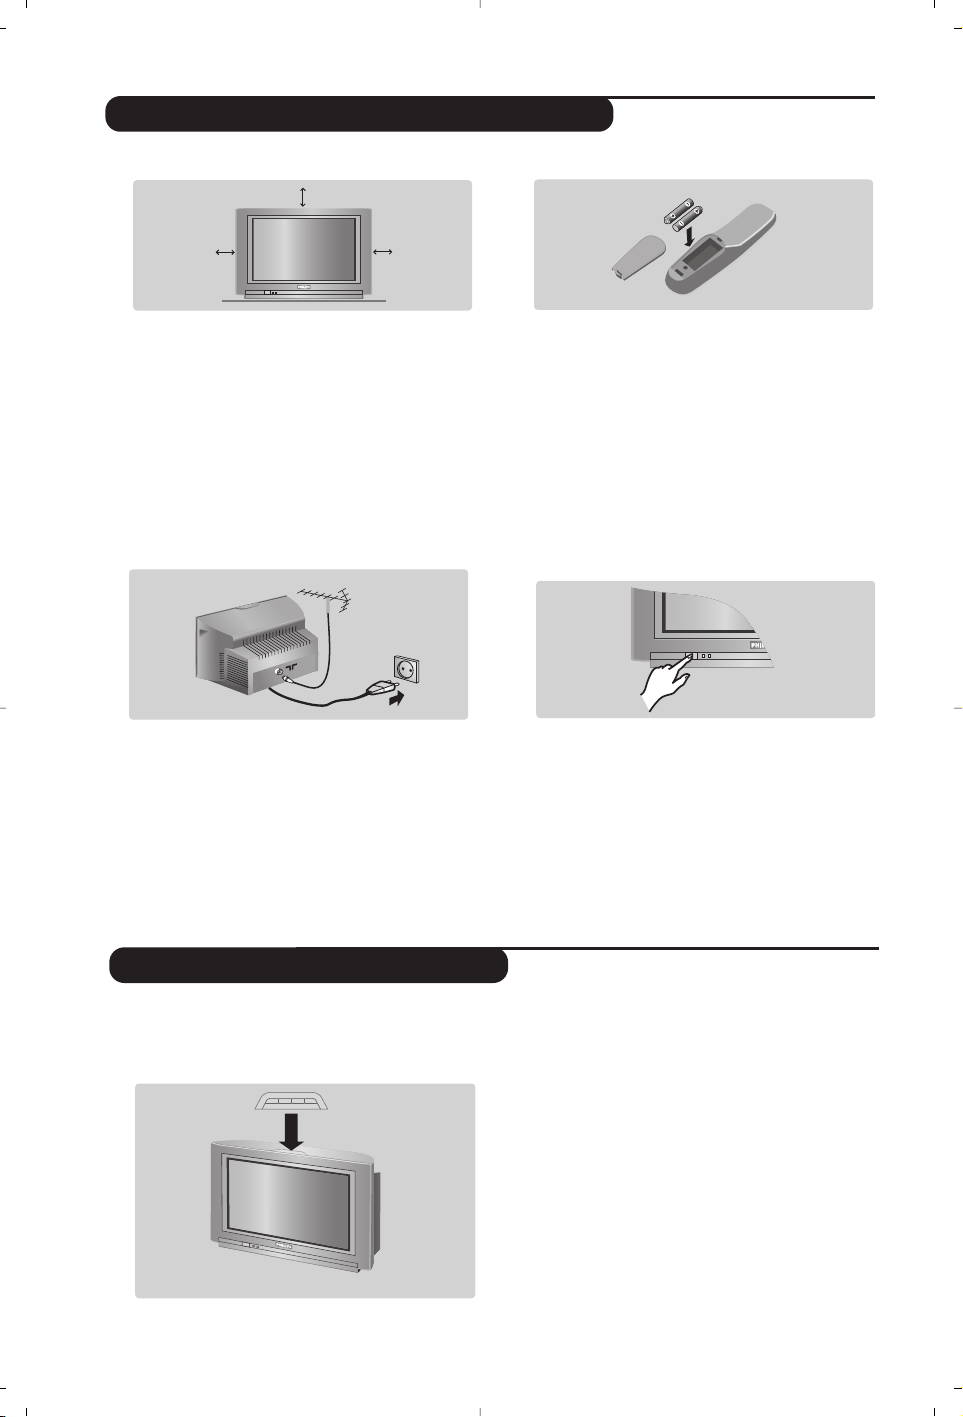
Coloque su TV sobre una superficie sólida y
estable, asegurándose de dejar un espacio libre
de al menos 5cm alrededor del aparato.
Para evitar accidentes, no sitúe sobre el equipo
fundas o cubiertas de tela, recipientes con líquido
(jarrones) o fuentes de calor (lámparas).El
equipo no debe entrar en contacto con el agua.
é
Conexiones
• Introduzca la clavija proveniente de la antena
en la toma que encontrará en la parte trasera
del equipo
:.
• Introduzca el cable de red del equipo en una
toma de corriente (220-240 V / 50 Hz).
“
Control remoto
Coloque las dos pilas de tipo R6 (suministradas
con el equipo) asegurándose de respetar la
polaridad indicada.
Las pilas suministradas con este aparato no
contienen ni mercurio ni níquel cadmio. Si tiene
acceso a un punto de reciclaje, por favor no tire en
cualquier lugar sus pilas usadas (si tiene alguna
duda consulte con su vendedor). Cuando reponga
las pilas usadas use otras del mismo tipo.
‘
Encendiendo el equipo
Para encender el equipo pulse el botón on/off.
Aparecerá un indicador luminoso de color rojo
y se encenderá la pantalla.Vaya directo al
capítulo Encendido del equipo por primera vez,
en la página 4. En el caso de que la televisión
permaneciera inactiva pulse el botón P # del
mando a distancia.
El indicador luminoso parpadeará cada vez que
utilice el mando a distancia.
5 cm
5 cm
5 cm
Instalando su equipo de televisión
Botones del equipo de TV
E
m
a
se
Page 3
3
12
MODE
BACK
VCR
DVD
MENU
OK
A/D
”
P(age)
564
879
0
·¢Ê Æ
∫
†
¤
Œ
Á
ª
-
`
Å
3
--
++
.
DIGITAL
TV
[
Ø
EXIT/OPTIONS
›
Ó
Ω
%
ù
Ë
MENU
SELECT
∏
Ÿ
SMART
SMART
SOUND
PICTURE
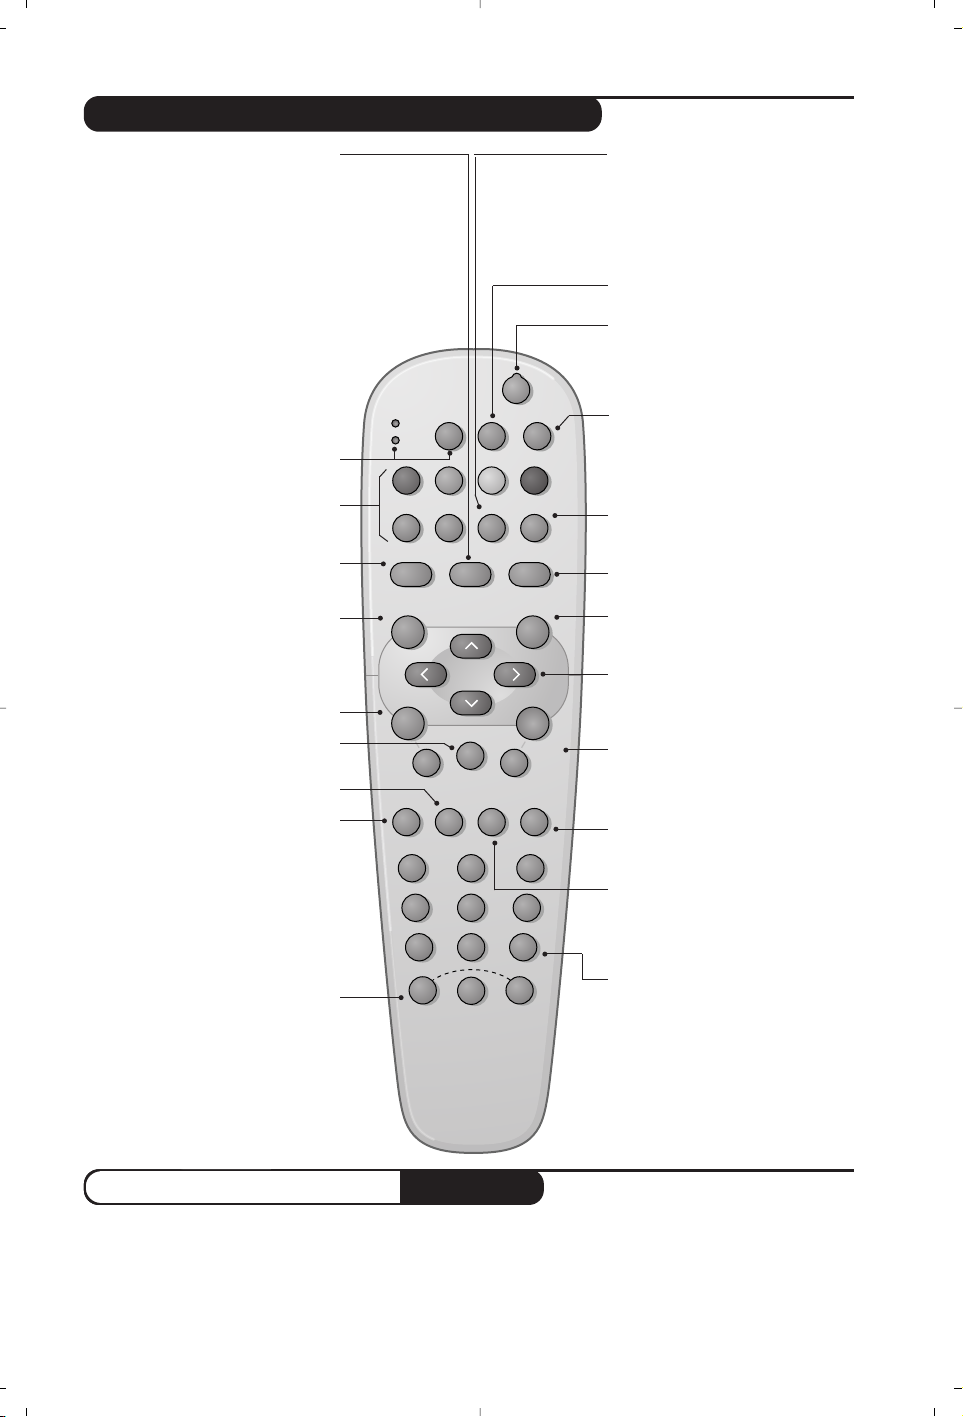
Los botones del mando a distancia
Información por pantalla
En el modo digital, pulse una vez para mostrar
por pantalla la ventana de información,dos
veces para obtener más información acerca
del programa y una tercera vez para hacer
desaparecer toda la información de la
pantalla. En el modo analógico, este botón
muestra / oculta la información del programa
(número,nombre, hora, modo de sonido).Si
desea que el número de programa analógico
aparezca de forma permanente en la pantalla,
mantenga pulsado el botón durante 5
segundos. El nivel del volumen y de los ajustes
de control inteligente se visualizarán en la
pantalla cada vez que se usen.
Menú de opciones
(lea p.8).
Elementos del Teletexto (p. 15)
y botones VCR/DVD (p.18).
Menú TV
Para entrar y salir de los menús analógicos
Select
En el modo digital, este botón muestra
/ oculta la lista de programas.
Seleccione un programa con los
botones îÏ y pulse ¬ (o u)
Volumen
Ajusta el volumen del sonido
Formatos 16:9 (p.16)
Silenciar
Habilita o deshabilita el sonido.
Ajustes de la imagen y el sonido
Da acceso a una serie de ajustes de la
imagen y el sonido.
La posición PERSONAL corresponde a los
ajustes almacenados en los menús.
Modo de sonido
Para cambiar entre ESTEREO y
MONO o elegir otros idiomas
(Dual I, Dual II,...).
Cuando está seleccionado el modo de
sonido MONO, el indicador se muestra
en rojo.
Elegir entradas EXT
(see p.17).
Standby
Pone la TV en estado de standby.
Para encenderla de nuevo pulse P
@#o 09.
Guía de TV
(lea p.9).
Lista de programas (modo analógico)
Muestra / oculta la lista de programas.
Utilice los botones
îÏ para elegir un
programa y ¬ para verlo.
Menú digital
Entra y sale de los menús digitales
(cuando la TV está en modo digital).
Modo Analógico o digital
Alterna entre el modo analógico y el
modo digital.
Cursor
Estos 4 botones sirven para moverse
por los menús o para acceder de forma
directa a los formatos 16:9 (p 16).
Sonido envolvente
Activa / desactiva el efecto Virtual
Dolby Surround *.En estéreo, la calidad
de sonido que se obtiene es la de
Dolby Surround Pro Logic.En mono, se
simula un efecto espacial estéreo.
*
Fabricado bajo licencia de Dolby Laboratories. ”Dolby””Pro
Logic” y el símbolo doble-D son marcas comerciales de Dolby
Laboratories.
Programa anterior
Vuelve al programa que se estuviera
viendo anteriormente.
Temporizador
Permite seleccionar un tiempo tras el
cual el equipo se apaga automáticamente
(entre 0 y 240 minutos)
Botones numéricos
Da acceso directo a los programas.
Cuando el número de programa sea de
2 (3) dígitos, el segundo (tercer) dígito
se debe introducir antes de que la rayita
desaparezca.Durante unos segundos se
mostrará por pantalla el número y el
nombre (así como el modo de sonido,
en modo analógico) del programa.
Selección de programa
Da acceso al programa anterior o al
siguiente (o a la página en los menús
digitales).
Selector de modo
Activa el modo VCR o DVD del
mando a distancia (vea p.18).
¿Canales analógicos o digitales?
Para recibir los canales de TV, su televisor está equipado con dos sintonizadores. Uno es para los canales
digitales y el otro para los canales analógicos. Utilice el botón
v de su mando a distancia para hacer que
la TV alterne entre el modo analógico y el modo digital.A continuación, emplee los botones
P @#o
09para seleccionar un canal.
Page 4

4
La primera vez que encienda su TV, aparecerá
por pantalla un mensaje de enhorabuena en
12 idiomas (cada 5 segundos):
&
Pulse el botón u del mando a distancia en el
momento en que aparezca su idioma por la
pantalla.A continuación se visualizará el menú:
é Las opciones Idiomas, país y time zone (zona
horaria) han sido preseleccionadas de acuerdo
con la pantalla de inicio. De cualquier modo,
usted tiene todavía la opción de cambiar sus
preferencias antes de realizar la búsqueda de
servicios.
“ Con los botones del cursor, elija
idiomas, Pais
o Time zone (Zona horaria) y compruebe que
las opciones seleccionadas se ajustan a sus
preferencias.
Si es necesario, utilice los botones del cursor
para realizar sus ajustes y pulse
u para salir.
Precaución: si selecciona un país distinto del suyo
la numeración de los canales no coincidirá con el
estándar de su país
‘ Seleccione el elemento
servicios scan y pulse
u para comenzar la instalación.El menú
servicios scan aparecerá en la pantalla.
La búsqueda y almacenamiento de todos los
programas, tanto analógicos como digitales, es
automática. Una vez terminada la búsqueda, en
el menú se indicará el total de servicios
digitales y programas analógicos encontrados.
( Pulse el botón
u para empezar a ver la TV.
El televisor mostrará en ese momento el
programa actual. La instalación se puede dar
por concluida.
Cuando se selecciona un programa digital, en la
parte superior de la pantalla aparecerá, durante
unos pocos segundos, una ventana de
información.
También es posible pulsar el botón
d del mando
a distancia para desplegar esta ventana. Pulsando
una segunda vez, se muestra más información
acerca del programa (cuando esta está disponible).
La ventana contiene información sobre el
número de la presintonía,número del canal,
duración del programa, horario de la
transmisión, título del programa, y el tiempo
que le resta al programa para su finalización
(si así ha sido elegido en el menú de opciones).
Encendido del equipo por primera vez
Entender las ventanas de información
Configuración
Localizados otros servicios
Idioma
Pais
Time Zone
Servicios Scan
11:46
Pulse OK para empezar
Enhorabuena por elegir este television Philips.
Pulse OK para empezar a disfrutar de su TV digital.
2 11:06 - 11:09
BBC2 Snooker
11:46
Minutes left : 14
u
I-IIi
ß
número
del canal
símbolos
reloj
horario de
inicio y final
del programa
tiempo restante
del programa
título del
programa
nombre del
canal
Descripción de los símbolos:
i hay disponible más información sobre
este programa: pulse el botón
∂ para
mostrarla u ocultarla.
ß hay subtítulos disponibles: si desea verlos,
pulse el botón
OPTIONS para mostrar el
menú opciones y selecciónelo.
ù Hay disponible sonido en otros idiomas
que se puede seleccionar en el menú
opciones.
u el color del símbolo lista activada indica la
lista de Favoritos que está seleccionada en
ese momento.
Page 5

5
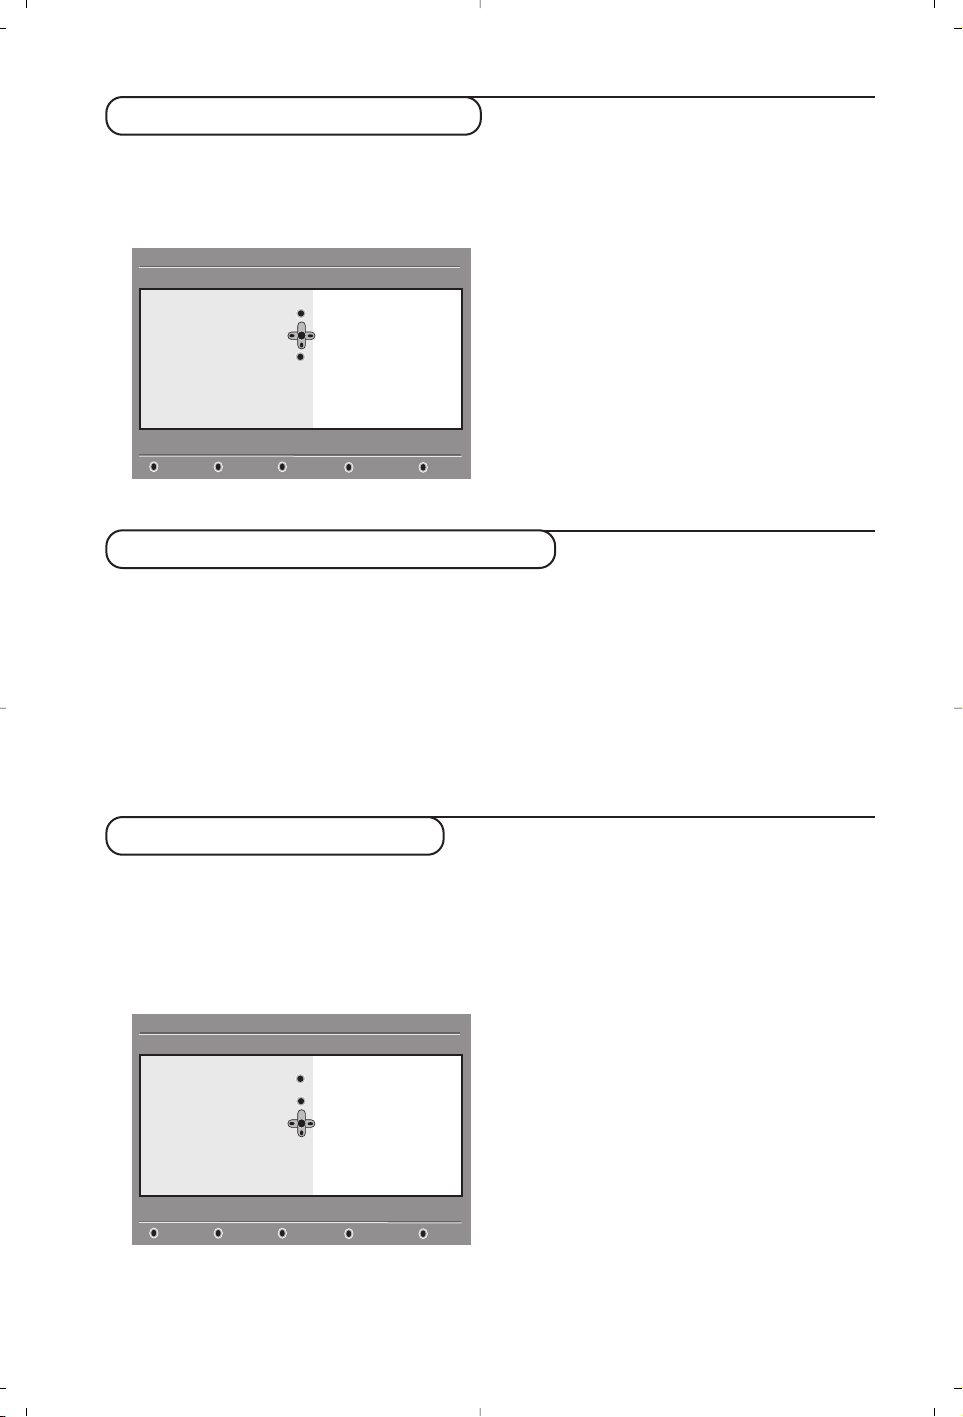
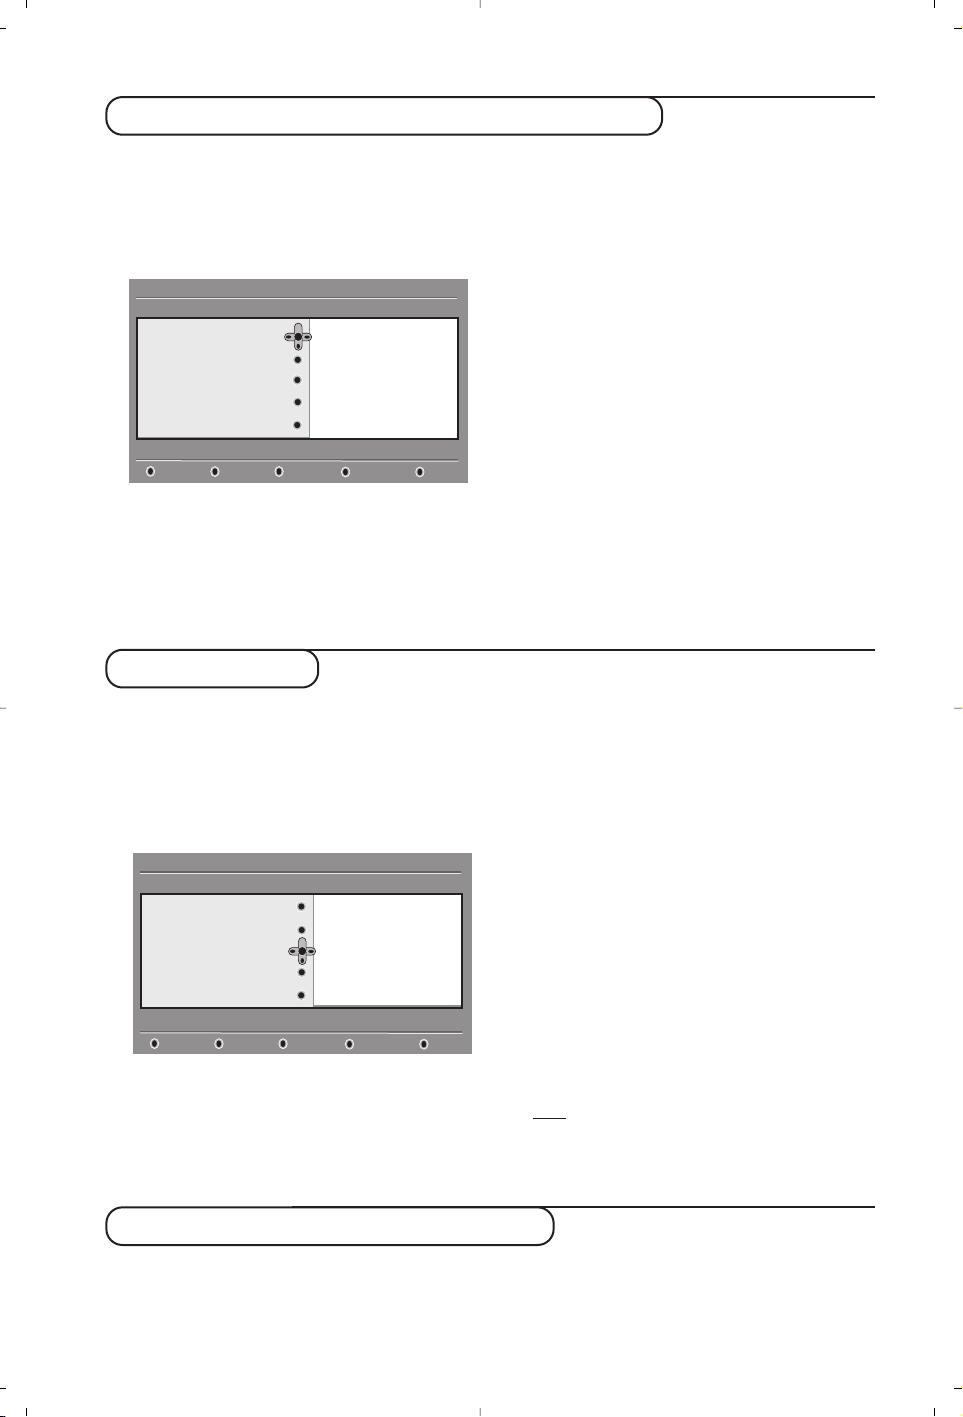
Ordenación de los canales de TV/ emisoras de radio
Este menú le permite cambiar el orden de los
canales y las emisoras de radio digitales
almacenados.
& Desde el modo digital, pulse el botón
‹ MENU
para mostrar el menú de configuración.
é Utilice el botón
Ï para seleccionar
instalación y pulse dos veces ¬ para
seleccionar el menú
Listas de servicios.
“ Utilice los botones
îÏ para seleccionar
Reordenar los canales de TV o Reordenar las
emisoras de radio
y después pulse ¬.
‘ Utilice los botones
îÏ para seleccionar el
canal que desea intercambiar.
( Pulse
u para activarlo.
Si desea desinstalar el canal seleccionado, pulse el
botón rojo.
§ Seleccione (
îÏ) el número del canal con
el que desea intercambiarlo.
è Pulse
u para confirmar.Ya está hecho el
intercambio de canales.
! Repita los pasos ‘ hasta è hasta que todos
los canales estén en el orden que usted desea.
ç Pulse el botón
‹ MENU
para salir del menú.
Esté menú le permite comprobar la
disponibilidad de nuevos canales de TV o
emisoras de radio que su proveedor de
servicios de TV haya podido añadir desde que
usted realizó la instalación inicial.
& Desde el modo digital, pulse el botón
‹ MENU
para mostrar el menú de configuración.
é Utilice el botón
Ï para elegir instalación y
pulse
¬ dos veces para seleccionar el menú
Listas de servicios.
“ Utilice los botones
îÏ para elegir Vea los
nuevos canales de TV
o Escuche las nuevas
emisoras de radio
.
‘ En el caso de que haya nuevos servicios
disponibles, pulse
¬ para acceder a la lista y
muévase por ella con los botones îÏ.
( Pulse el botón
‹
MENU
para salir del menú.
Este menú le permite restablecer la lista de
canales original que su proveedor de servicios
de TV determinó durante el proceso de
instalación inicial.
& Desde el modo digital, pulse el botón
‹
MENU
para mostrar el menú de configuración.
é Utilice el botón
Ï para elegir instalación y
pulse
¬ dos veces para seleccionar el menú
Listas de servicios.
“ Utilice los botones
îÏ para elegir Tipos
de Listas de canales
y pulse ¬.
‘ Elija
Lista de canales original y pulse u u si
desea restablecer la lista de canales original
determinada por su proveedor de servicios de
TV.
Observación: Una vez hecho este ajuste no es
posible reorganizar los canales de TV ni las
emisoras de radio.
( Elija
Lista de servicios definible por el usuario y
pulse
u si desea seleccionar su lista de
canales preferida.
§ Pulse el botón
‹
MENU
para salir del menú.
Ver o escuchar nuevos servicios de TV
Tipos de listas de canales
Configuración
Instalación
Gestionar listas de servicios
Cerrar
Listas de servicios
Instalación de servicios
Prueba de recepción
11:46
Reordenar los canales de TV
Lista de tipos de canal
Vea los nuevos canales de TV
Reordenar las emisoras de radio
Escuche las nuevas emisoras de radio
Page 6
6
Añadir nuevos servicios
Esté menú le permite buscar nuevos canales de
TV o emisoras de radio que su proveedor de
servicios de TV haya podido añadir desde que
usted realizó la instalación inicial.
& Desde el modo digital, pulse el botón
‹ MENU
para mostrar el menú de configuración.
é Utilice el botón
Ï para elegir instalación y
pulse
¬.
“ Elija
Instalación de servicios (Ï) y pulse ¬.
‘ Pulse
¬ para elegir Añadir nuevos servicios y
pulse
u para iniciar la instalación.La búsqueda
comienza y sólo se memorizarán y añadirán al
menú
Lista de canales aquellos canales que
sean nuevos.Durante el proceso, la pantalla
muestra el porcentaje de la instalación
realizada así como el número de canales
encontrados hasta el momento.
( Cuando finalice la búsqueda, pulse
u para
salir.
§ Pulse el botón
‹ MENU
para salir del menú.
Este menú le permite reinstalar todos los
canales de TV y emisoras de radio digitales.
& Desde el modo digital, pulse el botón
‹ MENU
para mostrar el menú de configuración.
é Utilice las teclas
Ï para elegir instalación y
pulse
¬.
“ Elija
Instalación de servicios (Ï) y pulse ¬.
‘ Elija
Reinstalar todos los servicios (Ï) y pulse ¬.
( Pulse
u para iniciar la instalación.Comienza la
búsqueda y todos los programas digitales y
analógicos encontrados son almacenados de
forma automática.Al finalizar la búsqueda, el
menú indicará el número de servicios digitales
y programas analógicos que se han encontrado.
§ Una vez finalizada la búsqueda, pulse
u para
salir.
è Pulse el botón
‹ MENU
para abandonar el
menú.
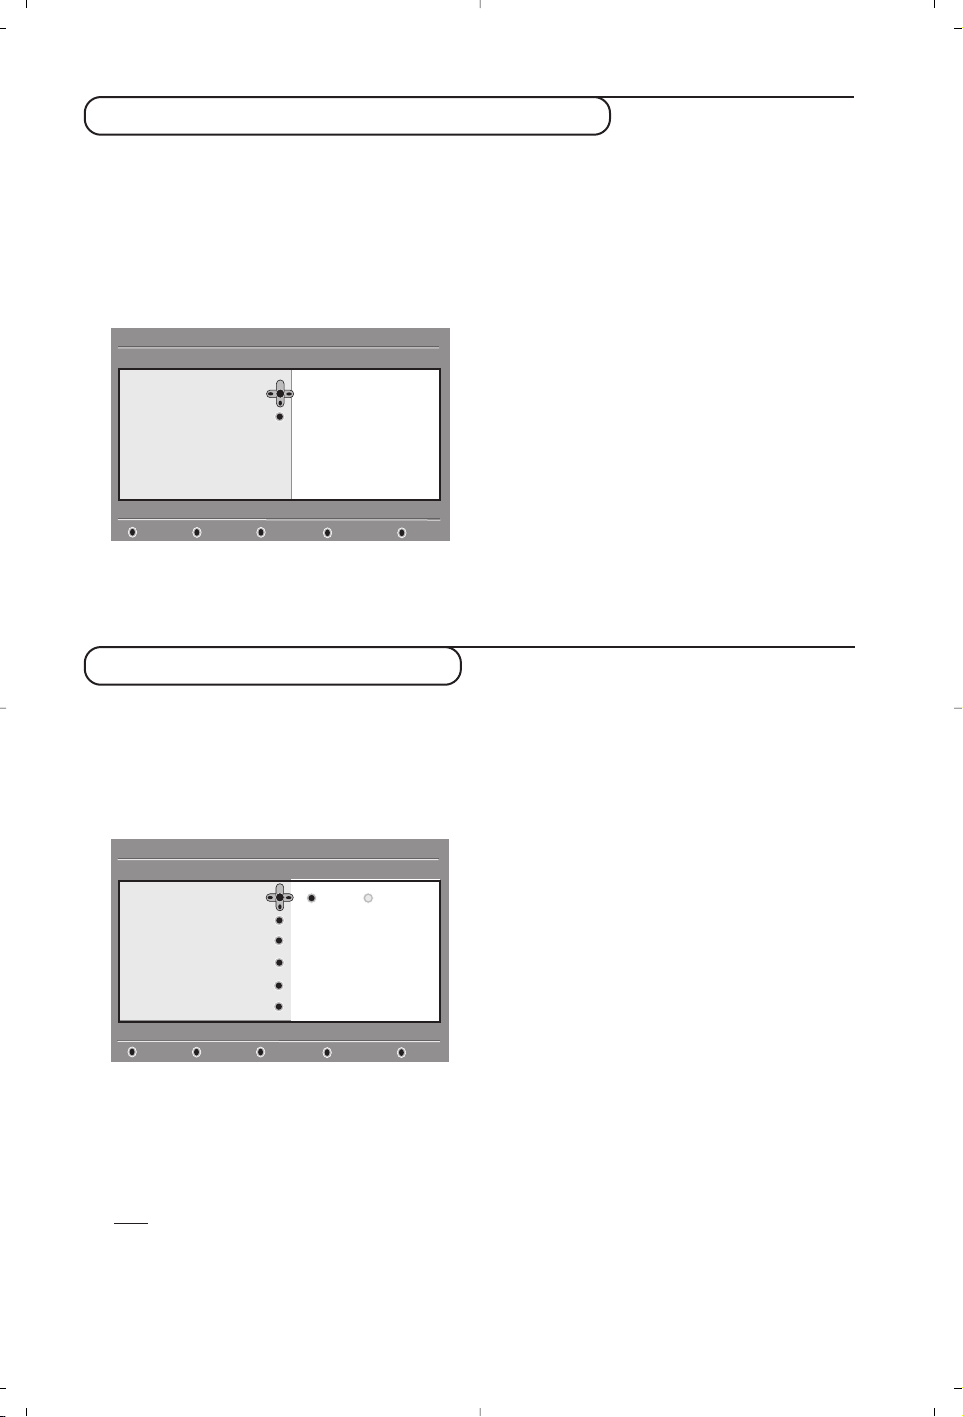
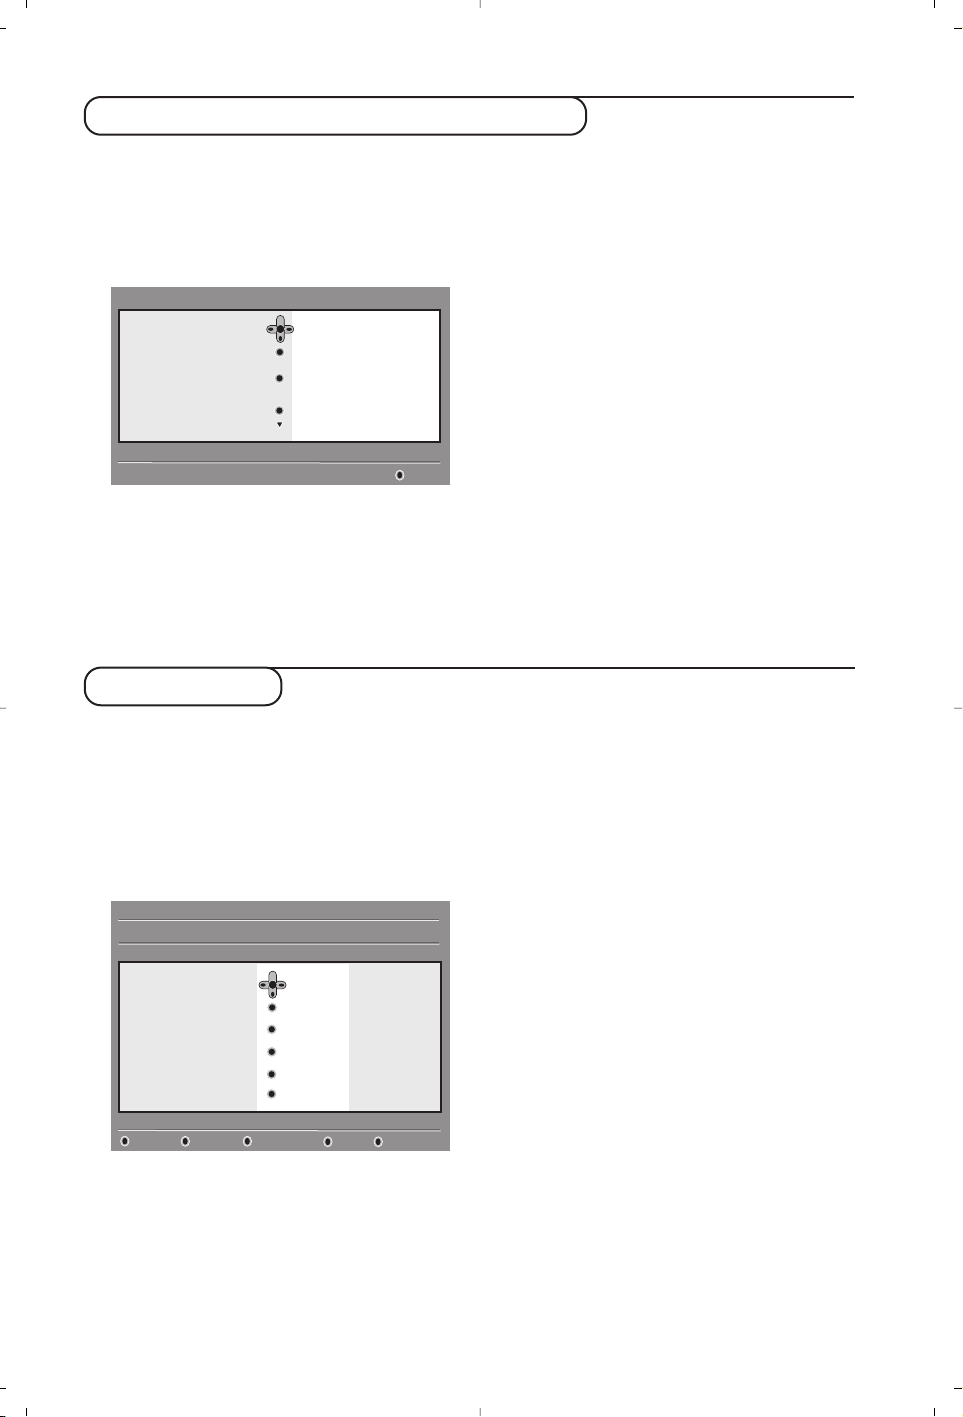
Este menú le permite comprobar la intensidad
de la señal que usted recibe en su zona.
& Desde el modo digital, pulse el botón
‹ MENU
para mostrar el menú de configuración.
é Utilice el botón
Ï para elegir instalación y
pulse
¬ para mostrar el menú de instalación.
“ Utilice
Ï para elegir Prueba de recepción y
pulse
¬. Se le indicará la frecuencia de
programa actual, el nombre de la red, así como
la calidad y la intensidad de la señal.
‘ A continuación debe teclear la frecuencia del
canal digital sobre el que desea hacer la prueba.
Puede encontrar la lista de los números de los canales
digitales en su revista de Tv. Utilice la tabla que
encontrará en la página 20 para obtener la frecuencia.
( Si la calidad y la intensidad de la señal son
pobres, aparecerá un mensaje en la parte
inferior del menú indicándole que introduzca la
frecuencia intermedia entre los límites inferior
y superior. Si después de teclear dicha
frecuencia la recepción sigue siendo pobre,
puede probar a mejorar, renovar, ajustar o
actualizar la antena. De cualquier forma, es
recomendable que contacte con un servicio
técnico especializado para que lo vea.
Reinstalar todos los servicios
Prueba de recepción
Configuración
Instalación
Prueba de calidad de señal
Cerrar
Listas de servicios
Instalación de servicios
Prueba de recepción
11:46
Frecuencia
Nombre de la red
Calidad de señal
Intensidad de señal
Configuración
Instalación
Instalación y control de servicios
Cerrar
Listas de servicios
Instalación de servicios
Prueba de recepción
11:46
Anadir nuevos servicios
Reinstalar todos los servicios
Page 7
Preferencias de idioma y dirección
Este menú le permite elegir el idioma del
audio, de los subtítulos, del teletexto y del
menú, así como realizar cambios de su
dirección (país y zona horaria).
& Desde el modo digital, pulse el botón
‹ MENU
para mostrar el menú de configuración.
é Utilice el botón
Ï para elegir preferencias y
pulsar
¬.
“ Elija
Idiomas o Dirección
(Ï) y pulse ¬.
‘ Utilice los botones
Ïî para elegir una
configuración y pulse ¬ para acceder al
submenú. Realice los ajustes que crea
convenientes y pulse
u o È para salir.
Configuración del idioma:
•
Audio: para elegir el idioma del sonido.
•
Subtítulos: para elegir el idioma de los
subtítulos.
•
Subtítulos para sordos:
para activar o desactivar
los subtítulos específicos para sordos (en el caso
de que la emisora lo proporcione).
• Teletexto: para elegir el idioma del teletexto.
•
Sistema: para elegir el idioma del menú.
Configuración de la dirección:
•
País: para elegir el país en el que se encuentra.
•
Zona horaria: para elegir la zona horaria en la
que se encuentra.
•
Horario de ahorro energético: para elegir
entre horario de ahorro de energía
automático, manual o desactivado.
( Pulse el botón
‹ MENU
para salir del menú.
Este menú le permite configurar las
restricciones de acceso a los canales digitales.
& Desde el modo digital, pulse el botón
‹ MENU
para mostrar el menú de configuración.
é Utilice el botón
Ï para elegir Restricciones
de acceso
y pulse ¬.
“ Pulse el botón ¬ para acceder al menú
Configurar código.
‘ Utilice los botones
Ȭ para configurarlo
como
activado y pulse u u para salir.
A continuación tiene la opción de realizar otros
ajustes:
A
viso: desde el momento en que usted establezca
cualquier clase de restricción de acceso, deberá
introducir el código pin cuando desee programar
una grabación.
•
Clasificación por edades: elija la edad mínima
por debajo de la cual se bloqueará el canal.
La clasificación por edades sólo bloqueará un programa
en el caso de que la emisora facilite esta información.
•
Bloqueo del sistema: pulse u si lo que desea
es bloquear por completo la TV digital.
Para desbloquearla introduzca el código pin
(o el código universal 0711).
•
Canales de TV: elija el canal de TV que desea
bloquear y pulse
u.
•
Emisora de radio: elija la emisora de radio que
desea bloquear y pulse
u.
•
Cambiar el código pin: pulse ¬ para acceder
al menú. Siga las instrucciones que aparecerán
por pantalla para cambiar su código de acceso.
El código por defecto es el 1234.Si ha olvidado su
código personal puede restablecer el código pin por
defecto (1234) introduciendo el código universal 0711.
( Pulse el botón
‹ MENU
para salir del menú.
La televisión está equipada con una ranura de Interfaz Común
(CI) (vea p.18). Un módulo CI puede habilitar ser vicios
adicionales, como por ejemplo televisión de pago.El menú de
Restricciones de Acceso mostrará las restricciones al CI en el
caso de que haya instalado un módulo CI.El módulo CI es el
responsable de los mensajes y del texto que aparece por
pantalla.En caso de fallo o comportamiento anómalo consulte
con su proveedor de servicios CI.
Restricciones de acceso
Configuración
Preferencias
Seleccione un idioma
Cerrar
Idiomas
Dirección
11:46
Audio
Subtitulos
Subtitulos para sordos
Teletexto
Sistema
Configuración
Restricciones de acceso
Activar o desactivar el código de protección
Cerrar
Configurar código
Nivel de clasificación
Bloqueo del sistema
Canales de TV
Emisoras de radio
Cambiar código personal
11:46
Activado Desactivado
7
Page 8
8
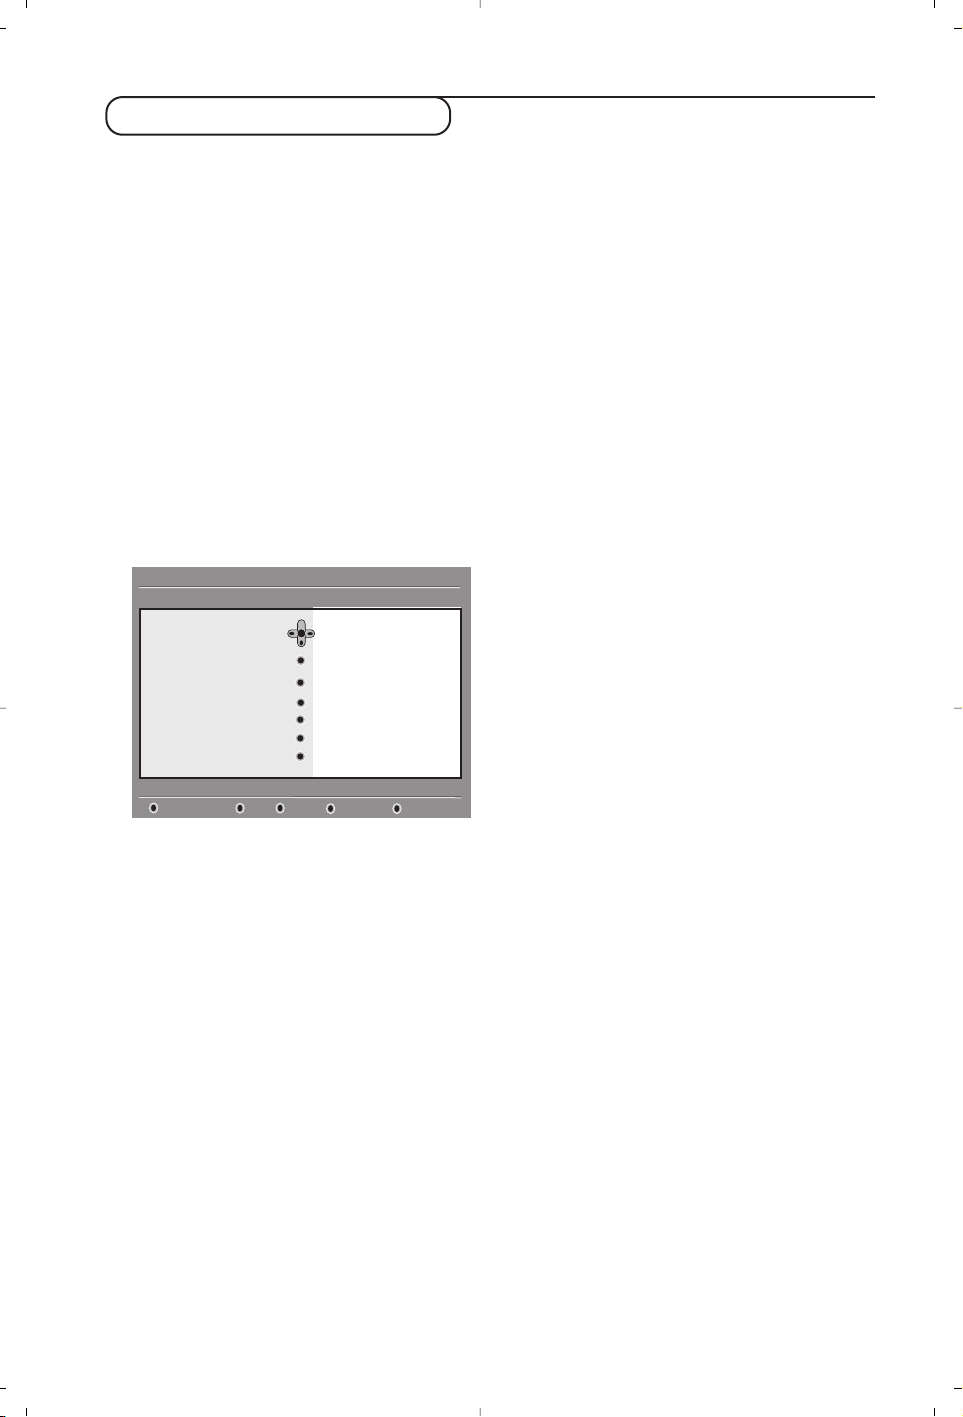
Configuración de su lista de favoritos
Este menú le permite crear su lista de favoritos
con sus canales de televisión y emisoras de radio
preferidas.Por ejemplo,cada miembro de su familia
puede crear su propia lista de favoritos.
& Desde el modo digital, pulse el botón
‹ MENU
para mostrar el menú de configuración.
é Pulse
¬ para acceder al menú favoritos.
Tiene la posibilidad de crear hasta 4 listas de
favoritos diferentes.
“ Utilice los botones
Ïî para elegir su lista de
favoritos:
Lista 1,Lista 2, Lista 3 o Lista 4 y pulse ¬.
‘ Utilice los botones
Ïî para elegir una
opción y pulse
¬ para acceder al sub-menú.
•
Nombre: utilice los botones Ȭ para
desplazarse por la zona de visualización del
nombre (15 caracteres) y los botones
@P#
para elegir los caracteres. Una vez introducido
el nombre, pulse
u para salir.
•
Elegir canal de TV: utilice los botones Ïî
para elegir sus emisoras de radio preferidas y
confirme pulsando
u. Pulse È para salir.
•
Elegir emisoras de radio: utilice los botones
Ïî para seleccionar su emisora de radio
favorita y confirme con
u.Pulse È para salir.
•
Añadir todos los servicios: Pulse u si desea
añadir todos los servicios a su lista de favoritos.
•
Eliminar todos los servicios: Pulse u si desea
eliminar todos los servicios de su lista de
favoritos.
( Pulse el botón
‹ MENU
para salir del menú.
§ Usted puede seleccionar su lista de favoritos
desde el menú
opciones (vea la página siguiente).
Este menú le proporciona información acerca de
la versión del software, la instalación de nuevo
software, así como de los informes de problemas.
& Desde el modo digital, pulse el botón
‹ MENU
para mostrar el menú de configuración.
é Utilice el botón
Ï para seleccionar
información y pulse ¬.
“ Elija
Informes de problemas y pulse ¬ para
acceder a la lista, en el caso de que ésta exista.
En caso de haber problemas técnicos, su
servicio técnico le preguntará si existe algún
informe de problemas y qué es lo que éste dice.
‘ Elija
Software de sistema y pulse ¬.
Se mostrará la versión del software.
( Usted puede activar el menú para aceptar o no la
actualización del software de su TV digital.
Normalmente es desde el modo standby desde
donde el producto detectará si existe alguna
actualización disponible. En caso de que exista,la
próxima vez que encienda el televisor aparecerá
una ventana en la parte inferior de la pantalla
indicando que hay nuevo software disponible.
Pulsando
u
se inicia la descarga del software. El
menú de descarga de software dará una descripción
del software junto con la fecha y la hora de la
descarga. Es posible que esto actualice
determinados menús, funciones y que añada nuevas
características, pero no cambiará la forma general
en que la TV funciona. Una vez aceptado,la descarga
tendrá lugar en la fecha y hora establecidas.
Nota
: Es preciso que la televisión esté en stanby durante
la descarga para que ésta se pueda llevar a cabo
§ Pulse el botón
‹ MENU
para salir del menú.
Información
Descargando nuevo software
Configuración
Realica cambios en su lista de servicios favoritos
Cerrar
Favoritos
Preferencias
Informatión
Restricciones de acceso
Instalación
11:46
Lista 1
Lista 2
Lista 3
Lista 4
Configuración
Información sobre problemas e instalación de nuevo software
Cerrar
Favoritos
Preferencias
Información
Restricciones de acceso
Instalación
11:46
Software de sistema
Informes de problemas
Cada vez que haya nuevo software disponible, es recomendable aceptar siempre y descargar el
software. En caso de que haya nuevo software disponible, verá un mensaje cuando encienda la TV.
Page 9
9
Utilización del menú de opciones
Este menú le da acceso a su lista de favoritos,la
selección de idioma y algunas otras opciones.
& Desde el modo digital, pulse el botón
EXIT/OPTIONS para mostrar el menú de opciones.
é Utilice los botones
Ïî para elegir una
opción y pulse
¬ para acceder al sub-menú.
•
Favoritos: utilice los botones Ïî para elegir
su lista de favoritos y pulse
u para confirmar.
La opción “ninguno” desactiva cualquier lista de favoritos.
Para crear su propia lista de favoritos, mire arriba.
•
Idioma de subtítulos: utilice los botones
Ïî para cambiar el idioma de forma
temporal y pulse
u para confirmar.
•
Subtitulos para sordos: Elija Sí y confirme con
u para activar temporalmente esta
característica.
•
Idioma de audio: para cambiar temporalmente
el idioma del audio.
Para cambiar el idioma del audio y de los
subtítulos de forma permanente, utilice el menú
de Preferencias (p.7).
•
Modo: Usted puede elegir tener solamente
emisoras de radio, canales de TV o servicios
sin audio
o video.
Observación: únicamente para el Reino Unido, la
lista de TV contendrá tanto canales de TV como
emisoras de radio.
•
¿Mostrar tiempo restante?: elija Sí y confirme
con
u u si desea visualizar el tiempo de
reproducción restante cuando llame a la
ventana de información.
•
Información en pantalla: para elegir durante
cuanto tiempo se visualizará la ventana.
“ Pulse el botón
EXIT/OPTIONS para abandonar
el menú.
La guía de televisión es una Guía Electrónica
que le permite buscar programas digitales tal y
como lo haría en un periódico o en una revista
de TV. Usted puede navegar por la lista de
programas digitales y obtener información
detallada sobre los mismos. Usted también
puede programar la TV para que facilite la
grabación de un programa digital.
& Desde el modo digital, pulse el botón
o
para
mostrar la guía de TV: Se mostrará una lista con
todos los programas digitales instalados.
é Utilice los botones îÏ para elegir un programa.
“ Los elementos de la guía de TV se visualizarán en
la parte inferior de la pantalla. Utilice los botones
de colores rojo, verde, amarillo, azul o blanco para
activarlos:
• Grabar (botón rojo):este elemento le permite
programar la grabación del grabador de vídeo (si
tiene el accesorio EasyLink y está conectado al
EXT2). Si su grabador de video no está equipado
con Easylink, el televisor entregará un canal digital
para ser grabado.Usted deberá todavía
programar su grabador de vídeo.
• Lista de grabaciones (botón verde):
Este menú muestra la lista con el horario de las
grabaciones. Usted puede comprobar, cambiar,
borrar o añadir una grabación utilizando el
cursor o los botones de colores tal y como se
indica en la pantalla.
•
Información
(botón azul): usted obtiene
información detallada acerca de los programas
elegidos.
• Cerrar (botón azul): para salir de la guía de TV.
• Opciones (botón blanco ∫ key) : con este
menú, usted puede elegir su lista de favoritos,
modo o temas. El tema indica un área de interés
de su agrado.Puede optar por mostrar
únicamente: drama, noticias, película,...
‘ Pulse el botón
o
para abandonar el menú.
Guía de TV
Opciones
Seleccione la lista de favoritos deseada
Salir
Favoritos
Idioma de subtitulos
Subtitulos para sordos
Idioma de audio
Ninguno
Lista 1
Lista 2
Lista 3
Lista 4
Seleccione la lista favoritos
OpcionesCerrarInformaciónLista gr.Grabar
1 BBC ONE
2 BBC TWO
3 ITV Channel 3
4 Channel 4
5ITV 2
6 BBC CHOICE
See It Saw
Snooker
Tr isha
-
Gmtv2
Oakie Doke
Microsoap
Ice Skating
This morning
-
This afternoon
Bodger & Badger
1 17:15-17:25 17:24
BBC ONE See It Saw It CBBC
Presintonia/Servicio Ahora Siguiente
Page 10
10
Función de grabación
Esta característica le permite programar la
grabación del vídeo grabador (si dispone del
accesorio EasyLink y está conectado a EXT2).
Si su grabador de video no está equipado con
Easylink, el televisor proporcionará un canal
digital para su grabación. Usted deberá en ese
caso programar su grabador de vídeo.
Importante: El grabador de vídeo debe estar conectado
a EXT2. Por favor,tenga en cuenta que no es posible
grabar un canal digital y visualizar otro canal digital
distinto al mismo tempo. De todas formas, usted sí
puede grabar un canal digital y visualizar un canal
analógico en su TV, o viceversa. Un grabador Philips que
sólo cuente con la TV link no podrá realizar easy
recording:, usted deberá programarlo.
& Desde el modo digital, pulse el botón
o
para
mostrar la guía de TV.
é Pulse el botón
ROJO para llamar al menú de
Grabación.
“ Utilice los botones
Ïî para elegir un
parámetro y pulse
¬ para acceder al sub-
menú. Realice sus ajustes y pulse
u o È
para salir.
• Servicios: puede cambiar el número del
programa que desea grabar. Pulse
u para
confirmar.
• Introduzca su código PIN si esta
bloqueado: introduzca su código secreto
únicamente en el caso de que haya activado la
función de restricción de acceso (vea p.7).
Pulse
u para confirmar.
• Día y mes: introduzca la fecha utilizando los
botones
09o @ P #
. Pulse u para
salir.
• Hora de inicio: introduzca la hora de inicio.
• Hora de finalización: introduzca la hora de
finalización.
• Idioma de Audio: elija su idioma y pulse
u
para confirmar.
• Idioma de subtítulos: realice su elección y
confirme pulsando
u.
• Subtítulos para sordos: elija
Sí o No y
confirme con
u.
• Frecuencia: elija
Una vez, Diariamente o
Semanalmente y confirme con u.
‘ Pulse el botón
ROJO para memorizar los
horarios de sus grabaciones. La guía de
televisión vuelve a aparecer.
Puede pulsar el botón
VERDE para visualizar la lista
con los horarios de las grabaciones.
(
Si su grabador de vídeo no está equipado con la
función Easylink, recuerde que aún deberá
programarlo.
§ Si ha terminado de ver la televisión, debe dejarla
en estado de standby para que se active la
grabación del programa.
Importante: nunca apague la televisión haciendo
uso del botón de la corriente cuando se han
programado grabaciones. Use en su lugar el botón
de stanby del mando a distancia.
è Si desea continuar viendo otros canales
digitales después de configurar un
temporizador, puede hacerlo cambiando los
canales de forma normal.
! Si usted está viendo otros canales en el momento
en el que el temporizador va a empezar, la alarma
del temporizador sonará y le mostrará la opción de
cambiar de canal o de continuar viendo el canal
actual.
ç Usted también puede ver canales analógicos
mientras graba canales digitales. Pulse el botón
v para cambiar la televisión al modo
analógico.
En el momento en que un temporizador comienza,
usted recibe un mensaje de alerta y aún puede
elegir parar la grabación.
2 BBC 2
Por favor, introduzca el número de programa
Cerrar CancelarAlmacenar
Servicios
Introduzca su código PIN si
está bloque ado
11:46
2 BBC 2
16/02
12:15
12:30
Inglés
Dia y mes
Hora de inicío
Hora de finalización
Idioma de audio
Idioma de subtitulos
Page 11
11
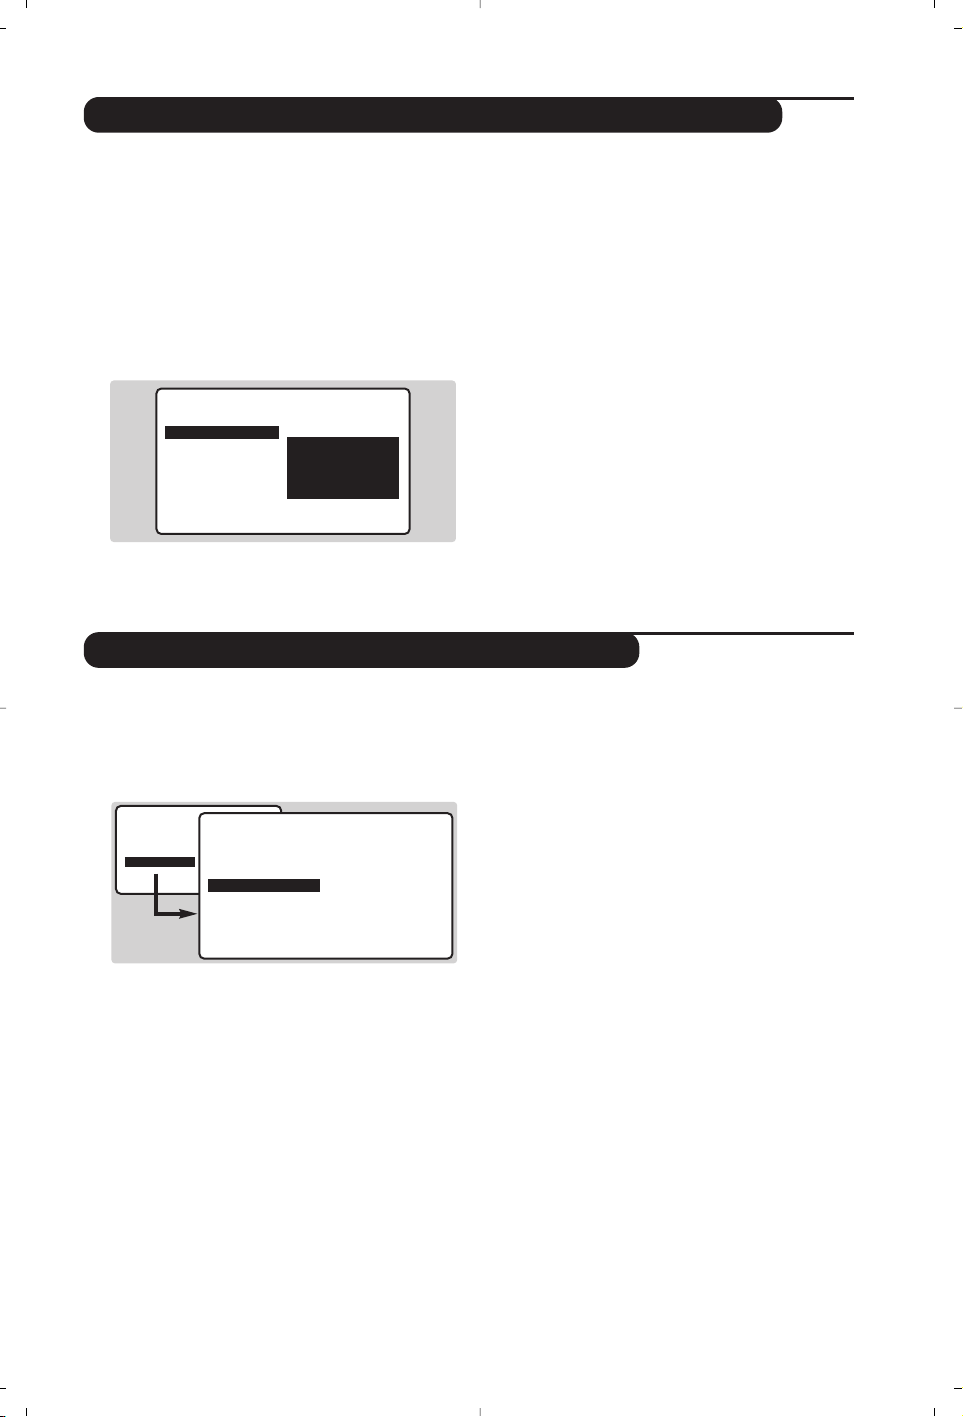
Sintonizado automático de programas analógicos
Ordenando los programas analógicos
Este menú le permite buscar automáticamente
todos los programas analógicas disponibles en
su zona.
& Desde el modo analógicos, pulse el botón
W
MENU
para visualizar el menú principal.
é Con el cursor, elija el menú
INSTALACIÓN
luego el menú AUTOSTORE y pulse ¬.
La búsqueda comienza.Transcurridos algunos
minutos, el menú
INSTALACIÓN vuelve a
aparecer automáticamente.
“ Si la emisora o la red cable difunde la señal de
ordenación automática, los programas estarán
numerados correctamente.
‘ Si no es éste el caso, los programas
encontrados estarán numerados en orden
descendente, empezando por el 99, 98, 97, etc.
Utilice el menú
ORDENAR para renumerarlos.
Algunas emisoras o redes de cable difunden sus
propios parámetros de ordenación (zona, idioma,
etc.). Cuando éste sea el caso, realice su elección
utilizando los botones îÏ y confirmando
con ¬.
Para salir o interrumpir la búsqueda, pulse el botón
H. Si no se encontrara ninguna imagen, consulte
el capítulo titulado Consejos en la p.16.Vea
también: función EasyLink, página 9.
( Para salir de los menús, pulse
∂.
& Pulse el botón
W MENU
para mostrar el menú
principal.
é Con el cursor, elija el menú INSTALACIÓN,
luego Ordenar. El menú
ORDENAR aparece.
La opción
DE se activa.
“ Elija el programa que desea renumerar
utilizando los botones
Ȭ o 0 hasta 9.
Ejemplo: para renumerar el programa 78
como 2 pulse
78.
( Elija
A (utilizando el botón Ï) e introduzca
el nuevo número con los botones
Ȭ o
0 hasta 9 (para el ejemplo propuesto,
pulse
2).
§ Elija
CAMBIAR (botón) y pulse Ï e pulse
¬. El mensaje CAMBIADO aparece, el cambio
tiene lugar. En nuestro ejemplo, el programa 78
se renumera como 2 (y el programa 2 como
78).
è Elija la opción
DESDE (botón î) y repita las
los pasos ‘ hasta § tantas veces como
programas quiera renumerar.
Vea también: función EasyLink, pagina 9.
! Para salir de los menús, pulse
∂
.
• IMAGEN
• SONIDO
• VARIOS
• INSTALACION
INSTALACION
• AUTOSTORE
• SINTO MANUAL
• ORDENAR
• NOMBRE
DE
A
CAMBIAR
INSTALACION
• AUTOSTORE
• SINTO MANUAL
• ORDENAR
•
NOMBRE
BUSQUEDA
ESPERE
NUM. PROGRAMA 2
215.18 MHZ
Page 12

12
Sintonizado manual de los programas analógicos
Dando nombre a los programas analógicos
Este menú le permite almacenar los
programas analógicos uno a uno.
& Pulse
W MENU
.
é Con el cursor, elija el menú
INSTALACIÓN y
luego
SINTO. MANUAL :
“
SISTEMA: elija EUROPE (detección
automática*) o bien
WEST EUR (estándar BG),
EAST EUR (estándar DK), UK (estándar I) o
FRANCE (estándar LL').
* Excepto para Francia (estándar LL'): elija la
opción FRANCE..
‘
BÚSQUEDA: Si conoce la frecuencia del
programa, introduzca directamente el número
utilizando los botones
09. Pulse ¬ en
caso contrario. La búsqueda comienza.
Tan pronto como se encuentra un programa la
búsqueda de detiene.
Si no se encontrara ningún programa consulte el
capítulo Consejos, en la página 19.
(
SINT.FINA: si la recepción no es satisfactoria,
ajústela usando los botones
Ȭ.
§
NÚM. PROGRAMA: introduzca el número
correspondiente con los botones
Ȭ o
0 hasta 9.
è
MEMORIZAR: pulse ¬. El programa se
memoriza.
Vea también: función EasyLink, debajo.
! Repita los pasos del ‘ al è para cada
programa que desee memorizar.
ç Para salir de los menús, pulse
∂.
Si lo desea, usted puede dar un nombre a los
primeros 40 programas analógicos (desde el
1 al 40) y conectores externos.
& Pulse
W MENU
.
é Con el cursor, seleccione el menú
INSTALACIÓN,a continuación NOMBRE
(oculto en la parte inferior de la pantalla) :
“ Elija el programa al que desea dar nombre,
utilizando los botones 09o @ P #.
Nota: durante la instalación, los programas reciben
un nombre de forma automática cuando la
emisora transmite la información correcta.
‘ Utilice los botones
Ȭ para moverse
dentro de la zona de visualización
(5 caracteres) y los botones
îÏ para
elegir los caracteres.
( Una vez introducido el nombre,pulse
W
MENU
. El nombre es memorizado.
Vea también: función EasyLink, debajo.
§ Repita los pasos desde “ hasta ( para cada
programa al que desee dar nombre.
è Para salir de los menús, pulse
∂.
• IMAGEN
• SONIDO
• VARIOS
• INSTALACION
INSTALACION
MANUALSTORE
• SISTEMA
• BUSQUEDA
• NUM.PROGRAMA
• SINT.FINA
• MEMORIZAR
EUROPE
WEST EUR
EAST EUR
INSTALACION
• AUTOSTORE
• SINTO MANUAL
• ORDENAR
•
NOMBRE
CNN_
Función EasyLink
Si el equipo está conectado (desde la toma
EXT2) a un vídeo equipado con la función
EasyLink, el idioma, país y los canales analógicos
encontrados se transmiten automáticamente al
grabador de video en el momento de la
instalación.
Durante la carga, se muestra un mensaje por la
pantalla. Después de esto,la lista de canales
analógicos del grabador de video es la misma
que la del televisor.
Debe comprobar primero en los menús que la
función Easylink está activada:
& Pulse el botón
W MENU
.
é Elija
OPCIONES (Ï) y pulse ¬. El menú
OPCIONES se visualizará.
“ Utilice el botón
Ï para elegir EASY LINK y
pulse
¬ para poner la opción en ON.
Si su vídeo no está equipado con esta función,
póngalo en
OFF.
‘ Pulse
∂ para salir de los menús.
La opción EASY LINK está en OFF por defecto.
Page 13

13
Ajustando el sonido
& Pulse
W MENU
, elija la opción SONIDO (Ï) y
pulse
¬.Aparece el menú SONIDO:
é Utilice el cursor para elegir y ajustar.
Nota
: para acceder a la opción AVL (oculta en la
parte inferior de la pantalla) mantenga pulsado el
botón Ï.
“ Una vez realizados los ajustes,elija
MEMORIZAR y pulse ¬ para guardarlos.
‘ Para salir de los menús, pulse
∂
.
Descripción de las opciones:
•
AGUDOS: cambia el nivel las altas frecuencias del
sonido.
•
GRAVES: cambia el nivel de las bajas frecuencias
del sonido.
•
BALANCE: para equilibrar el sonido entre los
altavoces derecho e izquierdo.
•
DELTA VOLUMEN: (diferencia de volumen): le
permite compensar las diferencias de volumen
entre los distintos programas o las tomas EXT.
Esta opción está disponible para los programas
entre 1 – 40 y las tomas EXT.
•
MEMORIZAR: memoriza la configuración del sonido.
•
AVL: (Automatic Volume Leveller): control
automático del volumen utilizado para evitar las
subidas súbitas de volumen, especialmente cuando
se cambia a otro canal o durante los anuncios.
Nota
: los ajustes modificados cuando esté en modo
analógico serán aplicables a los canales analógicos, y
los ajustes cambiados en modo digital serán aplicables
a los canales digitales.
• IMAGEN
• SONIDO
• VARIOS
• INSTALACION
SONIDO
• AGUDOS
• GRAVES
• BALANCE
• DELTA VOLUMEN
• MEMORIZAR
• AVL
-----I--- 56
Ajustando la imagen
& Pulse
W MENU
y luego ¬.
Aparece el menú
IMAGEN:
é Utilice los botones
îÏ para elegir una
configuración y pulse los botones
Ȭ para
hacer el ajuste.
Nota
: el menú es un menú scroll-down. Mantenga
el botón
Ï pulsado para acceder a las opciones
ocultas en la parte inferior de la pantalla.
“ Una vez realizados los ajustes,elija
MEMORIZAR y pulse ¬ para guardarlos.
‘ Para salir de los menús, pulse
∂
.
Descripción de las opciones:
•
BRILLO: cambia el brillo de la imagen.
•
COLOR: cambia la intensidad del color.
•
CONTRASTE: cambia la diferencia entre
tonos claros y oscuros.
•
REALCE: cambia la nitidez de la imagen.
• MEMORIZAR: memoriza los ajustes
realizados sobre imagen.
•
MATIZ: ajusta la temperatura de color de la
imagen. Hay tres opciones disponibles:
FRÍO
(blanco azul), NORMAL (equilibrada) o
CÁLIDA (blanco rojo).
•
NR: reduce el efecto de imagen borrosa
(imagen con nieve).Esta opción es muy útil
cuando la recepción es mala.
•
CONTRASTE +: ajuste automático del
contraste de la imagen llevando continuamente
la parte más oscura de la imagen a negro.
Rotación de la imagen
Las pantallas grandes son sensibles a las
variaciones en el campo magnético terrestre.
Esta opción le permite compensar este
fenómeno.
& Pulse el botón
W MENU
.
é Elija
VARIOS (Ï) y pulse ¬.
Aparece el menú
VARIOS.
“ Utilice el botón
Ï para seleccionar
ROTACIÓN y Ȭ para modificar el ángulo
de la imagen.
‘ Pulse
∂
para salir de los menús.
• IMAGEN
• SONIDO
• VARIOS
• INSTALACION
IMAGEN
• BRILLO
• COLOR
• CONTRASTE
• REALCE
• MEMORIZAR
• MATIZ
• NR
• CONTRASTE +
--I------ 39
Page 14

14
Función programar
Bloqueando el equipo
Este menú le permite utilizar su televisor
como un despertador.
& Pulse
W MENU
.
é Elija
VARIOS (Ï) y pulse ¬ dos veces.
Aparece el menú
VARIOS:
“ Pulse
¬ para entrar y salir de los sub-menús
y los botones
îÏ para ajustar.
‘
HORA: introduce la hora actual.
Nota: la hora se actualiza automáticamente cada
vez que se enciende el equipo, utilizando para ello
información obtenida del módulo digital.
(
HORA INICIO: introduzca la hora de inicio.
§
HORA FIN: introduzca a hora de finalización.
è
NÚM. PROGRAMA: introduzca el número del
programa correspondiente.
! ACTIVAR: puede configurarlo para que la alarma
se active:
• UNA VEZ para una alarma única,
•
DIARIAMENTE para una alarma diaria o
•
STOP para cancelar.
ç Pulse
∂ para poner su TV en estado de
standby. Se encenderá automáticamente a la
hora programada.Si deja la televisión encendida,
lo único que hará será cambiar el programa a la
hora indicada.
Se pueden usar de forma conjunta las funciones
BLOQ. INFANTIL y PROGRAMAR para limitar el
número de horas que, por ejemplo, sus hijos ven la
televisión.
Usted puede impedir el acceso a determinados
programas o bloquear completamente el
equipo,bloqueando los botones.
Bloqueo de programas
& Pulse
W MENU
.
é Elija
VARIOS (Ï) y pulse ¬.
“ Elija
BLOQUEO DEL TV (Ï) y pulse ¬.
‘ Introduzca su código de acceso confidencial.
La primera vez, introduzca el código 0711 y
luego confirme volviendo a introducir 0711.
El menú aparece.
( Pulse
¬ para entrar en el menú.
§ Utilice los botones
îÏ para elegir el
programa correspondiente y confirme con
¬.
El símbolo
+ se visualizará al lado de aquellos
programas o tomas que han sido bloqueados.
è Pulse
∂ para salir.
Para poder ver los programas que han sido
bloqueados necesitará introducir el código
confidencial; de otro modo la pantalla
permanecerá en blanco.
El acceso al menú INSTALAR también está
bloqueado.
Cuidado: en el caso de programas encriptados que
utilicen un decodificador externo, es necesario
bloquear la correspondiente toma EXT.
Para desbloquear todos los programas
Repita los pasos desde el & al ‘ arriba,luego
elija
BORRAR TODOS y pulse ¬.
Para cambiar el código confidencial
Repita los pasos del & al ‘ arriba,luego:
( Elija CAMBIAR CÓDIGO e introduzca propio
número de cuatro dígitos.
§ Confirme introduciéndolo de nuevo.
Se memorizará su nuevo código.
è Pulse
∂ para salir de los menús.
Si ha olvidad su código confidencial, introduzca el
código universal dos veces.
Bloqueo de los botones
& Pulse
W MENU
, elija VARIOS (Ï) y pulse ¬.
é Elija
BLOQ. INFANTIL (Ï) y pulse ¬ para
ponerlo en
ON.
“ Apague el equipo y esconda el mando a
distancia. El equipo no puede ser usado
(sólo puede ser encendido utilizando el
mando a distancia).
‘ Para cancelar: ponga
BLOQ. INFANTIL en OFF.
• IMAGEN
• SONIDO
• VARIOS
• INSTALACION
VARIOS
PROGRAMAR
• HORA
• HORA INICIO
• HORA FIN
• NUM.PROGRAMA
• ACTIVAR
10:56
• IMAGEN
• SONIDO
• VARIOS
• INSTALACION
VARIOS
• PROGRAMAR
• BLOQ. INFANTIL
• BLOQ.DEL TV
• ROTACION
CODIGO ACCESO
- - - -
Page 15

15
Teletexto analógico
El teletexto es un sistema de información, difundido por la mayoría de los canales de TV analógicos.
Además proporciona subtítulos para personas con dificultades auditivas.
Pulse:
Obtendrá:
¤
Ë
09
Ω
Å
Ÿ
Ë
ù
›
TV
MENU
Llamada al
teletexto
Elección de
una página
Para entrar o salir del teletexto. Cuando se pulsa una vez, aparece
el índice principal con una lista de elementos disponibles.
Cada página corresponde a un número de tres cifras.Algunos
programas digitales pueden incluir también teletexto analógico.
Si este es el caso, es posible acceder a él pulsando el botón de
teletexto durante 3 segundos.
Si el teletexto no está disponible, aparecerá el número 100 y la pantalla
permanecerá en blanco (en este caso, salga del teletexto y elija otro canal).
Utilice los botones 0 hasta 9 o @ P # o îÏ para introducir el
número de la página correspondiente.Ejemplo: página 120, introduzca
120. El número se visualiza arriba a la izquierda, el contador va
cambiando y luego se muestra la página.Repita esta operación para
ver otra página.
Si el contador continúa buscando, esto significa que la
página no se está transmitiendo. Elija otro número.
Acceso
directo a los
elementos
En la parte inferior de la pantalla se muestran zonas de
colores. Los 4 botones de colores se utilizan para acceder a
los contenidos de las páginas correspondientes.
Las zonas de colores parpadean cuando el elemento o la página no
están disponibles todavía.
Contenidos
Esto le lleva de nuevo a la página de contenidos (normalmente
la página 100).
Elección
directa de
sub-páginas
Ciertas páginas contienen subpáginas. Por ejemplo, si la página 120
contiene las subpáginas 1/3, 2/3 y 3/3, el número de la página se muestra
en verde y va precedido de los símbolos Æ, Ío ÍÆ. Use los
botones Ȭ para acceder directamente a las subpáginas que desee.
Superposición de texto
y texto a doble página
Para activar o desactivar la superposición de texto en la imagen.
Para activar o desactivar la visualización del texto a doble página.
Teletexto de
doble altura
Información
oculta
Páginas
favoritas
Pulse este botón repetidas veces para mostrar primero la
parte superior,luego la parte inferior de la pantalla y por
último volver al tamaño normal de la página del teletexto.
Para mostrar o esconder la información oculta (soluciones de
juegos).
En vez de las zonas de colores estándar que aparecen en la
parte inferior de la pantalla, usted puede memorizar 4 páginas
favoritas en los 40 primeros canales,a las que después podrá
acceder utilizando los botones de colores (rojo,verde,amarillo,
azul). Una vez fijado, estas páginas favoritas serán las que
aparezcan por defecto cada vez que se seleccione el teletexto.
& Pulse el botón
W MENU
para cambiar al modo páginas
favoritas.
é Visualice la página del teletexto que quiere memorizar.
“ Pulse ∂ y luego el botón coloreado que desee.
Se memoriza la página.
‘ Repita los pasos é y “para los otros botones de colores.
( Ahora, cuando consulte el teletexto,sus páginas favoritas
aparecen de colores en la parte inferior de la pantalla.
Para reponer de forma temporal los elementos estándar,
pulse
W
MENU
.
Para borrar todo y volver a hacer de los elementos estándar los
elementos por defecto, pulse ∂ durante 5 segundos.
VCR
DVD
%
Å
Ë
SELECT
OK A/D
+ +
[
”
- -
Ÿ
∏
12
564
879
SMART SMART
0
ª
PICTURE SOUND
.
EXITMODE
Z
∫
ÓΩ›
ù
Œ¤
MENUMENU
DIGITALTV
P
`Á
3
-
Page 16

16
Formatos 16:9
Te xto Digital
Es posible que las imágenes que reciba estén siendo transmitidas en formato 16:9 (pantalla ancha) o en
formato 4:3 (pantalla convencional).Las imágenes en 4:3 a veces tienen una banda negra en la parte
superior e inferior de la pantalla (formato buzón). Esta función le permite optimizar la visualización de la
imagen por pantalla.
Cambio automático
Este televisor está también equipado con cambio automático el cual elegirá el formato de pantalla
correcto,cuando las señales específicas que se necesitan estén siendo transmitidas con el programa.
Utilización de los diferentes formatos de pantalla
Pulse p para elegir entre los distintos modos:
4:3, ZOOM 14:9, ZOOM 16:9, ZOOM SUBTÍTULO, SUPER ZOOM y PANTALLA ANCHA.
Con los programas analógicos únicamente, puede acceder directamente a estas configuraciones con los botones È y ¬.
Algunos canales digitales, que usted selecciona como cualquier otro canal, ofrecen servicios de
teletexto dedicados (por ejemplo BBCTEXT en el Reino Unido).Algunos canales digitales también
ofrecen información del programa que se está emitiendo (deberá aparecer un mensaje en la parte
inferior de la pantalla).
& Para utilizar el teletexto digital, siga las instrucciones de la pantalla.
é Dependiendo del servicio, se le indicará que utilice los botones del cursor y
SELECT (
u
), los botones
de colores, el botón
TEXT (
c
) y, a veces, el teclado numérico.
“ Cuando haya terminado de ver el teletexto, elija un canal diferente con los botones
@ P #
o siga las
instrucciones de la pantalla para volver a la imagen.Algunos programas digitales requerirán del uso de
la función EXIT. Puede encontrar EXIT debajo del primer elemento del menú de opciones.
4:3 Modo
La imagen se reproduce en formato 4:3 y una banda negra se visualiza a
ambos lados de la imagen. Con los programas analógicos únicamente, la
imagen puede ampliarse progresivamente utilizando los botones îÏ.
ZOOM 14:9
Se amplía la imagen a formato 14:9, una delgada línea negra permanecerá a
ambos lados de la imagen. Con los programas analógicos los botones îÏ
le permiten comprimir verticalmente la imagen para ver la parte superior o
inferior de la misma (subtítulos).
ZOOM 16:9
Se amplía la imagen a formato 16:9. Este es el modo recomendado para
ver películas que tienen bandas negras arriba y abajo (formato buzón).
Con los programas analógicos, utilice los botones îÏ si desea
visualizar la parte superior o inferior de la imagen.
ZOOM SUBTÍTULO
Este es el modo que se utiliza para visualizar imágenes 4:3 utilizando toda
la superficie de la pantalla dejando los subtítulos visibles. En programas
analógicos, utilice los botones îÏ para aumentar o reducir la sección
en la parte inferior de la imagen.
SUPERANCHO
Este modo se emplea para visualizar imágenes 4:3 utilizando toda la superficie
de la pantalla ampliando los lados de la imagen. Con programas analógicos, los
botones îÏ le permiten mover la imagen arriba y abajo.
PANTALLA ANCHA
Este modo restablece las proporciones correctas de las imágenes
transmitidas en 16:9 utilizando visualización de pantalla completa.
Nota: Si visualiza una imagen 4:3 en este modo, esta se ampliará horizontalmente.
++
[
`Á
∏
3
564
879
0
-
P
”
--
Ÿ
12
SMART SMART
ª
PICTURE SOUND
Page 17
17
564
879
0
Á
Ø
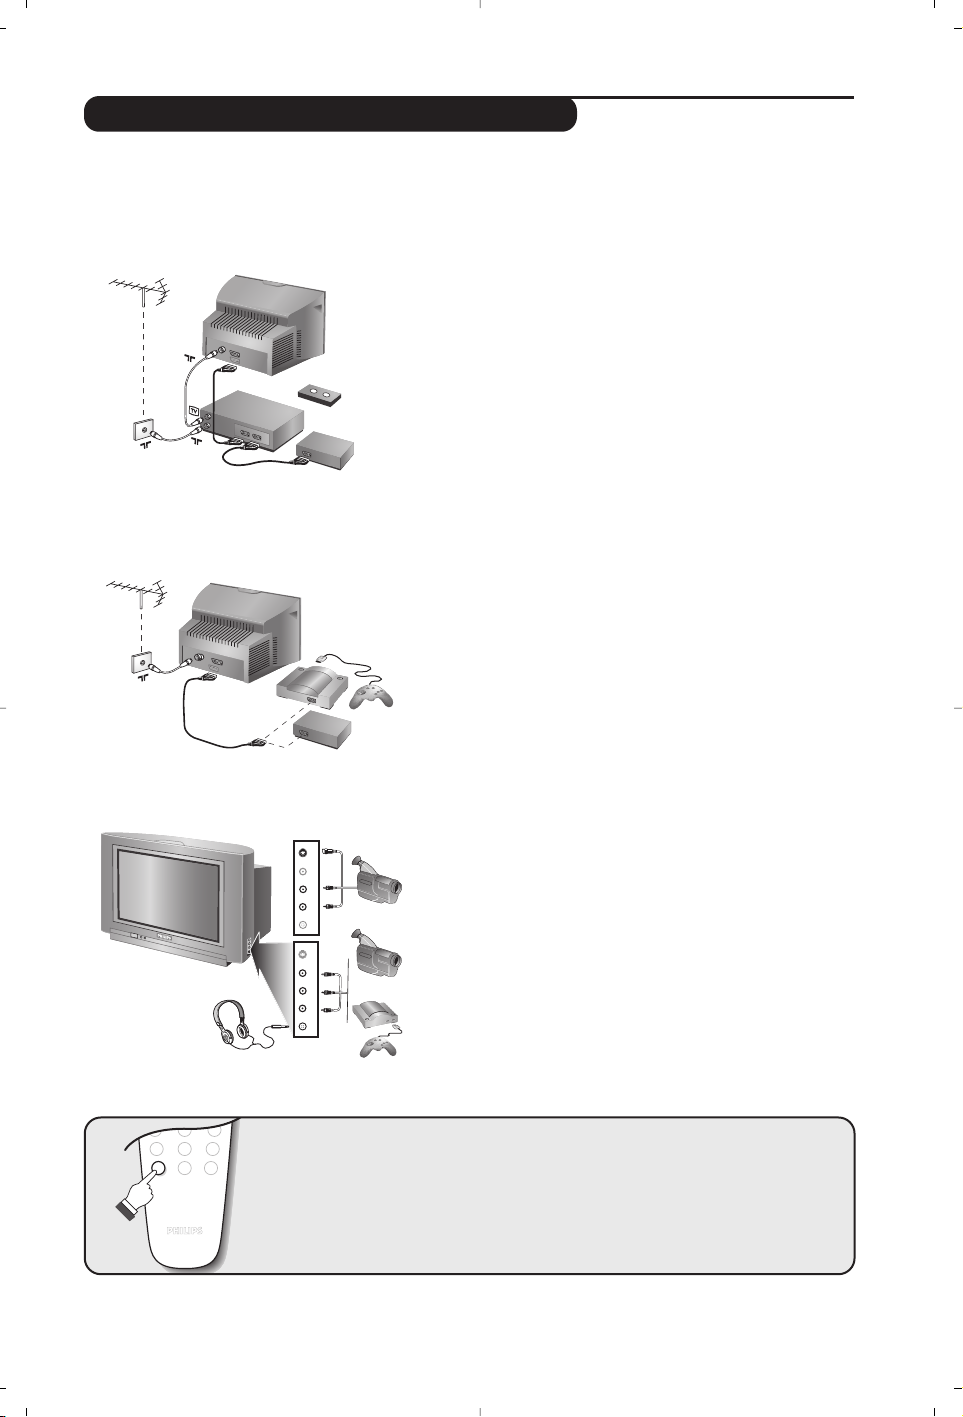
Conexión de equipos periféricos
La televisión tiene 2 tomas externas situadas en la parte trasera del equipo (EXT1 y EXT2).
La toma EXT1 tiene entradas/salidas de audio y video y entradas RGB.
La toma EXT2 tiene entradas/salidas de audio y video y entradas S-VHS.
Grabador de vídeo (sólo)
Lleve a cabo las conexiones que se muestran al lado. Para
grabar programas digitales desde su TV, el VCR debe estar
conectado a EXT2.
Si su video no tiene una toma de euroconector, la única conexión
posible es por medio de un cable de antena. En consecuencia,
deberá sintonizar la señal de test de su grabador de vídeo y
asignarle el programa 0 (consulte memorizado manual, p.12).
Para reproducir la imagen del grabador de vídeo, pulse 0.
En este caso no será posible grabar canales digitales.
Grabador de vídeo con decodificador
Conecte el decodificador a la segunda toma de
euroconector del grabador de vídeo.Así ya podrá grabar
transmisiones codificadas.
Grabador de vídeo
Receptor satélite, decodificador, DVD,juegos, etc.
Lleve a cabo las conexiones que se muestran al lado.
Para optimizar la calidad de la imagen, conecte el equipo
que genera las señales RGB (decodificador digital, juegos,
etc.) a EXT1, y el equipo que produce señales S-VHS
(grabadores S-VHS y Hi-8, algunos DVD ) a EXT2 y
cualquier otro equipo a EXT1 o EXT2 indistintamente.
Lleve a cabo las conexiones que se muestran al lado.
Utilizando el botón
n,elija EXT3 para videocámaras VHS
o 8mm y S-VHS3 para videocámaras S-VHS o Hi-8.
Para un equipo mono, conecte la señal de audio a la entrada
AUDIO L (o AUDIO R). El sonido saldrá automáticamente por
los altavoces izquierdo y derecho de la TV.
Cascos
Los botones
@”# le permiten ajustar el volumen de
los cascos y del equipo. Pulse
m si desea quitar el sonido
del equipo.
Los cascos deben tener una impedancia entre 32 y 600 ohms.
Otros equipos
Conexiones laterales
Para elegir el equipo conectado
Pulse el botón n para elegir EXT1, EXT2, S-VHS2 (señales S-VHS
procedentes de la toma EXT2) y EXT3 o S-VHS3 para conexiones en
el panel frontal.
La mayoría de equipos (grabadores de vídeo, etc.) llevan a cabo esta
elección de forma automática.
EXT 2
VCR
EXT 1
S-VHS
Video
R Audio L
n
S-VHS
Video
R Audio L
n
S-VHS, Hi-8
VHS, 8 mm
Page 18

18
Selector de modo VCR / DVD
Para conectarlo a un sistema de alta fidelidad, utilice un cable
de conexión de audio y conecte las salidas “L” y “R” del equipo
de TV con las entradas “AUDIO IN” “L” y “R” de su
amplificador hi-fi.
Hay disponible una interfaz común para conectar un CAM
(módulo de acceso condicional) y una tarjeta inteligente.
Por favor, consulte a su proveedor de servicios para obtener
más información sobre estos módulos.
Nota: La televisión debe estar siempre desconectada antes de
insertar cualquier módulo en la ranura de la interfaz común..
Amplificador
Interfaz común
standby
· grabar *,
¢ rebobinar,
Ê parar,
Æ reproducir,
∫ avance rápido,
% programar *,
desplegar un menú *
elegir (
îÏ) y configurar (Ȭ) *
u confirmar*
elegir programa,
introducir un número
* Algunas funciones de programación no están disponibles en todos
los modelos (cursores, menú, botón OK, etc.). Para grabadores de
vídeo equipados con la función Easylink: cuando el equipo se
encuentra en standby,pulsando una vez el botón
Æ o
W MENU
se enciende automáticamente. El mando a distancia es
compatible con todos los grabadores de vídeo de nuestra línea de
productos así como con los modelos que utilizan códigos de
control del estándar R5.
El mando a distancia le permite controlar las principales funciones de su grabador de video o DVD.
& Pulse el botón
MODO para elegir el modo preciso :VCR (grabador de video) o DVD.
Un indicador verde lucirá para señalar el modo elegido.Pasados 20 segundos de inactividad, se
apaga automáticamente (modo TV).
é A continuación pulse cualquiera de los botones siguientes:
VCR
DVD
·¢Ê Æ
%
SELECT
OK A/D
+ +
”
Ÿ
12
SMART SMART
PICTURE SOUND
MODE
Z
ù
Å
Ë
[
- -
∏
`Á
564
879
0
ª
.
EXIT
∫
ÓΩ›
Œ¤
MENUMENU
DIGITALTV
P
3
-
Page 19

Consejos
Recepción pobre (en modo analógico)
La proximidad con montañas o edificios altos
puede ser la responsable de imágenes fantasma,
ecos o sombras. En este caso trate de ajustar
manualmente la imagen: vea "sintonizado fino"
(p.12) o cambie la orientación de la antena
exterior. ¿Le permite su antena recibir
emisiones en este rango de frecuencias (banda
UHF o VHF)? En el caso de una mala recepción
(imagen con niebla) ponga en ON la opción NR
en el menú analógico IMAGEN (p.13).
Mala imagen (en modo digital)
Si la imagen se congela mucho,o existe efecto
bloque, hay un problema de recepción pobre. Por
favor, compruébelo con el menú intensidad de
señal (vea p.6). Dependiendo de la intensidad de
las señales digitales terrestres en su zona,las
antenas estándar empleadas para transmisiones
digitales proporcionarán,en la mayoría de los
casos, una recepción satisfactoria de señales
digitales. Si no fuera este el caso,un profesional
deberá instalar una antena de haz estrecho de
buena calidad fuera del inmueble para capturar la
mayor intensidad de señal digital posible.
Sin imagen
¿Ha conectado la toma de la antena
correctamente? ¿Ha elegido el sistema adecuado?
(p.12). En muchas ocasiones, cables euroconectores
o tomas de antena mal conectados son la causa de
problemas en la imagen o el sonido (algunas veces,
los conectores pueden medio soltarse si se mueve
o gira el equipo). Compruebe todas las conexiones.
El equipo periférico entrega imagen en
blanco y negro
No ha elegido la toma correcta con el botón n:
S-VHS2 (S-VHS3) en vez de EXT2 (EXT3). Para
reproducir un vídeo cassette, compruebe que ha sido
grabado bajo el mismo estándar (PAL, SECAM,NTSC)
que puede ser reproducido por el grabador de vídeo.
Sin sonido (en modo analógico)
Si en determinados canales usted recibe imagen pero
no sonido,significa que no tiene asignado el sistema de
TV correcto.Modifique la configuración
SISTEMA (p. 9).
El mando a distancia ya no funciona
Compruebe que el selector de modo en el lado
del mando a distancia está asignado a TV.
¿La televisión no reacciona al mando a distancia?
¿El indicador en el equipo ya no parpadea cuando
usted usa el mando a distancia? Cambie las pilas.
Standby
¿Cuando enciende el televisor, este permanece en
estado de standby y se muestra el indicador
LOCKED cuando pulsa los botones de su equipo de
TV? La función
BLOQ. INFANTIL está activada (p.14).
Si el equipo no recibe señal durante 15 minutos,
pasará automáticamente al estado standby. Para
ahorrar energía, su equipo está compuesto por
componentes que tienen un consumo de energía
muy bajo en estado de standby (menos de 3 W).
Limpieza del equipo
Utilice únicamente un trapo liso,suave y limpio para
limpiar la pantalla y la carcasa de su equipo.No
utilice productos con base de alcohol o disolventes.
¿No ha resuelto el problema?
Si su TV se avería,no trate de repararla usted mismo:
contacte con su servicio de atención post venta.
Glosario
CAM y tarjeta inteligente:
Es posible conectar
un CAM (módulo de acceso condicional) y una
tarjeta inteligente a la televisión. Esta unidad le
permite acceder a canales digitales de pago o
servicios especiales del proveedor.
Receptor digital:
La televisión está equipada con un
sintonizador digital integrado que le permite recibir
transmisiones digitales con una antena terrestre.El
sintonizador es capaz de recibir Emisión de Vídeo
Digital bajo MPEG2, hasta Main profile @ Main level.
EasyLink:
Conexión digital entre el equipo y el
grabador de vídeo que permite la transmisión
directa de determinada información como
puede ser la configuración de los canales.
Sistema:
Los programas analógicos no se emiten de la
misma forma en todos los países. Existen diferentes
estándares:BG, DK,I, y L L’.El ajuste SYSTEM (p. 9)
se utiliza para elegir estos estándares.No se deba
confundir esto con la codificación de color PAL o
SECAM. En la mayoría de los países europeos se
utiliza PAL, mientras que SECAM se utiliza en
Francia, Rusia, y la mayoría de los países africanos.
Estados Unidos y Japón utilizan un sistema distinto
llamado NTSC. Las entradas EXT1 y EXT2 se
utilizan para leer grabaciones codificadas en NTSC.
16:9 :
Hace referencia a la relación entre el ancho
y el alto de la pantalla. Los televisores de
pantalla ancha tienen una relación de 16/9, la
relación en los equipos de TV con pantalla
convencional es 4/3.
19
Page 20

AUSTRALIA
UK y ESPAÑA
20
Spanish
Ta b la de Frecuencias Centrales (en KHz)
Números de canal y frecuencias centrales de la emisión digital de televisión.
Frecuencia central Frecuencia de
nominal digital Canal KHz
21 . . . . . . . . . . . . . . . .474 000
22 . . . . . . . . . . . . . . . .482 000
23 . . . . . . . . . . . . . . . .490 000
24 . . . . . . . . . . . . . . . .498 000
25 . . . . . . . . . . . . . . . .506 000
26 . . . . . . . . . . . . . . . .514 000
27 . . . . . . . . . . . . . . . .522 000
28 . . . . . . . . . . . . . . . .530 000
29 . . . . . . . . . . . . . . . .538 000
30 . . . . . . . . . . . . . . . .546 000
31 . . . . . . . . . . . . . . . .554 000
32 . . . . . . . . . . . . . . . .562 000
33 . . . . . . . . . . . . . . . .570 000
34 . . . . . . . . . . . . . . . .578 000
35 . . . . . . . . . . . . . . . .586 000
36 . . . . . . . . . . . . . . . .594 000
37 . . . . . . . . . . . . . . . .602 000
38 . . . . . . . . . . . . . . . .610 000
39 . . . . . . . . . . . . . . . .618 000
40 . . . . . . . . . . . . . . . .626 000
41 . . . . . . . . . . . . . . . .634 000
42 . . . . . . . . . . . . . . . .642 000
43 . . . . . . . . . . . . . . . .650 000
44 . . . . . . . . . . . . . . . .658 000
45 . . . . . . . . . . . . . . . .666 000
46 . . . . . . . . . . . . . . . .674 000
47 . . . . . . . . . . . . . . . .682 000
48 . . . . . . . . . . . . . . . .690 000
49 . . . . . . . . . . . . . . . .698 000
50 . . . . . . . . . . . . . . . .706 000
51 . . . . . . . . . . . . . . . .714 000
52 . . . . . . . . . . . . . . . .722 000
53 . . . . . . . . . . . . . . . .730 000
54 . . . . . . . . . . . . . . . .738 000
55 . . . . . . . . . . . . . . . .746 000
56 . . . . . . . . . . . . . . . .754 000
57 . . . . . . . . . . . . . . . .762 000
58 . . . . . . . . . . . . . . . .770 000
59 . . . . . . . . . . . . . . . .778 000
60 . . . . . . . . . . . . . . . .786 000
61 . . . . . . . . . . . . . . . .794 000
62 . . . . . . . . . . . . . . . .802 000
63 . . . . . . . . . . . . . . . .810 000
64 . . . . . . . . . . . . . . . .818 000
65 . . . . . . . . . . . . . . . .826 000
66 . . . . . . . . . . . . . . . .834 000
67 . . . . . . . . . . . . . . . .842 000
68 . . . . . . . . . . . . . . . .850 000
69 . . . . . . . . . . . . . . . .858 000
Frecuencia central Frecuencia de
nominal digital Canal KHz
Band III
6 . . . . . . . . . . . . . . . . .177 500
7 . . . . . . . . . . . . . . . . .184 500
8 . . . . . . . . . . . . . . . . .191 500
9 . . . . . . . . . . . . . . . . .198 500
9A . . . . . . . . . . . . . . . .205 500
10 . . . . . . . . . . . . . . . .212 500
11 . . . . . . . . . . . . . . . .219 500
12 . . . . . . . . . . . . . . . .226 500
Band IV
27 . . . . . . . . . . . . . . . .522 500
28 . . . . . . . . . . . . . . . .529 500
29 . . . . . . . . . . . . . . . .536 500
30 . . . . . . . . . . . . . . . .543 500
31 . . . . . . . . . . . . . . . .550 500
32 . . . . . . . . . . . . . . . .557 500
33 . . . . . . . . . . . . . . . .564 500
34 . . . . . . . . . . . . . . . .571 500
35 . . . . . . . . . . . . . . . .578 500
Band V
36 . . . . . . . . . . . . . . . .585 500
37 . . . . . . . . . . . . . . . .592 500
38 . . . . . . . . . . . . . . . .599 500
39 . . . . . . . . . . . . . . . .606 500
40 . . . . . . . . . . . . . . . .613 500
41 . . . . . . . . . . . . . . . .620 500
42 . . . . . . . . . . . . . . . .627 500
43 . . . . . . . . . . . . . . . . 34 500
44 . . . . . . . . . . . . . . . .641 500
45 . . . . . . . . . . . . . . . .648 500
46 . . . . . . . . . . . . . . . .655 500
47 . . . . . . . . . . . . . . . .662 500
48 . . . . . . . . . . . . . . . .669 500
49 . . . . . . . . . . . . . . . .676 500
50 . . . . . . . . . . . . . . . .683 500
51 . . . . . . . . . . . . . . . .690 500
52 . . . . . . . . . . . . . . . .697 500
53 . . . . . . . . . . . . . . . .704 500
54 . . . . . . . . . . . . . . . .711 500
55 . . . . . . . . . . . . . . . .718 500
56 . . . . . . . . . . . . . . . .725 500
57 . . . . . . . . . . . . . . . .732 500
58 . . . . . . . . . . . . . . . .739 500
59 . . . . . . . . . . . . . . . .746 500
60 . . . . . . . . . . . . . . . .753 500
61 . . . . . . . . . . . . . . . .760 500
62 . . . . . . . . . . . . . . . .767 500
63 . . . . . . . . . . . . . . . .774 500
64 . . . . . . . . . . . . . . . .781 500
65 . . . . . . . . . . . . . . . .788 500
66 . . . . . . . . . . . . . . . .795 500
67 . . . . . . . . . . . . . . . .802 500
68 . . . . . . . . . . . . . . . .809 500
69 . . . . . . . . . . . . . . . .816 500
Page 21

ANALOGUE MENUS
1
Introduction
Ta b le of Contents
Thank you for purchasing this television set.
This handbook has been designed to help you install and operate your TV set.
We would strongly recommend that you read it thoroughly.
We hope this new television meets entirely with your satisfaction.
Installing your television set . . . . . . . . . . . . . . . . . . . . . . . . . . . . . . . . . . . . . . . . . .2
The keys on the TV set . . . . . . . . . . . . . . . . . . . . . . . . . . . . . . . . . . . . . . . . . . . . . .2
The remote control keys . . . . . . . . . . . . . . . . . . . . . . . . . . . . . . . . . . . . . . . . . . . .3
Digital or Analogue channels ? . . . . . . . . . . . . . . . . . . . . . . . . . . . . . . . . . . . . . . . . .3
Switch on for the first time . . . . . . . . . . . . . . . . . . . . . . . . . . . . . . . . . . . . . . . . . .4
Understanding the information on the banner . . . . . . . . . . . . . . . . . . . . . . . . . . .4
Rearrange TV channels / radio station . . . . . . . . . . . . . . . . . . . . . . . . . . . . . . . . . .5
View or Listen new TV services . . . . . . . . . . . . . . . . . . . . . . . . . . . . . . . . . . . . . . .5
List Channel types . . . . . . . . . . . . . . . . . . . . . . . . . . . . . . . . . . . . . . . . . . . . . . . . .5
Add new services . . . . . . . . . . . . . . . . . . . . . . . . . . . . . . . . . . . . . . . . . . . . . . . . . .6
Reinstall all services . . . . . . . . . . . . . . . . . . . . . . . . . . . . . . . . . . . . . . . . . . . . . . . .6
Test reception . . . . . . . . . . . . . . . . . . . . . . . . . . . . . . . . . . . . . . . . . . . . . . . . . . . . .6
Language and location preferences . . . . . . . . . . . . . . . . . . . . . . . . . . . . . . . . . . . .7
Access restrictions . . . . . . . . . . . . . . . . . . . . . . . . . . . . . . . . . . . . . . . . . . . . . . . . .7
Setting up your favourite list . . . . . . . . . . . . . . . . . . . . . . . . . . . . . . . . . . . . . . . . .8
Informations menu . . . . . . . . . . . . . . . . . . . . . . . . . . . . . . . . . . . . . . . . . . . . . . . . . .8
Downloading new software . . . . . . . . . . . . . . . . . . . . . . . . . . . . . . . . . . . . . . . . . . .8
Using the Options menu . . . . . . . . . . . . . . . . . . . . . . . . . . . . . . . . . . . . . . . . . . . .9
TV guide . . . . . . . . . . . . . . . . . . . . . . . . . . . . . . . . . . . . . . . . . . . . . . . . . . . . . . . . .9
Recording function . . . . . . . . . . . . . . . . . . . . . . . . . . . . . . . . . . . . . . . . . . . . . . . .10
Automatic tuning of analogue programmes . . . . . . . . . . . . . . . . . . . . . . . . . . . . .11
Sorting analogue programmes . . . . . . . . . . . . . . . . . . . . . . . . . . . . . . . . . . . . . . .11
Manual tuning of analogue programmes . . . . . . . . . . . . . . . . . . . . . . . . . . . . . . . .12
Naming analogue programmes . . . . . . . . . . . . . . . . . . . . . . . . . . . . . . . . . . . . . . .12
EasyLink function . . . . . . . . . . . . . . . . . . . . . . . . . . . . . . . . . . . . . . . . . . . . . . . . . .12
Adjusting the picture . . . . . . . . . . . . . . . . . . . . . . . . . . . . . . . . . . . . . . . . . . . . . .13
Adjusting the sound . . . . . . . . . . . . . . . . . . . . . . . . . . . . . . . . . . . . . . . . . . . . . . .13
Rotating the picture . . . . . . . . . . . . . . . . . . . . . . . . . . . . . . . . . . . . . . . . . . . . . . .13
Timer function . . . . . . . . . . . . . . . . . . . . . . . . . . . . . . . . . . . . . . . . . . . . . . . . . . . .14
Locking the set . . . . . . . . . . . . . . . . . . . . . . . . . . . . . . . . . . . . . . . . . . . . . . . . . . .14
Analogue Teletext . . . . . . . . . . . . . . . . . . . . . . . . . . . . . . . . . . . . . . . . . . . . . . . . .15
Digital Text . . . . . . . . . . . . . . . . . . . . . . . . . . . . . . . . . . . . . . . . . . . . . . . . . . . . . .16
16:9 Formats . . . . . . . . . . . . . . . . . . . . . . . . . . . . . . . . . . . . . . . . . . . . . . . . . . . . .16
Connecting peripheral equipment . . . . . . . . . . . . . . . . . . . . . . . . . . . . . . . . . . . .17
To select connected equipment . . . . . . . . . . . . . . . . . . . . . . . . . . . . . . . . . . . . .17
VCR / DVD mode selector . . . . . . . . . . . . . . . . . . . . . . . . . . . . . . . . . . . . . . . . .18
Glossary . . . . . . . . . . . . . . . . . . . . . . . . . . . . . . . . . . . . . . . . . . . . . . . . . . . . . . . .19
Tips . . . . . . . . . . . . . . . . . . . . . . . . . . . . . . . . . . . . . . . . . . . . . . . . . . . . . . . . . . . .19
Centre Frequencies Table (in KHz) . . . . . . . . . . . . . . . . . . . . . . . . . . . . . . . . . . . .20
DIGITAL MENUS
°
Recycling
The materials used in your set are either reusable or can be recycled.
To minimise environmental waste, specialist companies collect used appliances
and dismantle them after retrieving any materials that can be used again (ask
your dealer for further details).
English
Page 22

The television set has 4 keys which are
located on the front or the top of the set
depending on the model.
The VOLUME - + (-
” +) keys are used to
adjust sound levels.
The PROGRAM - + (- P +) keys are used to
select the required programmes.
To access the menus, simultaneously hold
down the
” - and ” + keys.The
PROGRAM - + keys may then be used to
select an adjustment and the -
” + keys to
make that adjustment.
To exit from the menus, hold down
the 2
” - and ” + keys.
Note: when the CHILD LOCK function is activated,
these keys are unavailable (refer to FEATURES
menu on page 14).
PROGRAMVOLUME
--
++
2
&
Positioning the television set
Place your TV on a solid, stable surface, leaving
a space of at least 5 cm around the appliance.
To avoid accidents, do not put anything on the
set such as a cloth or cover, a container full of
liquid (vase) or a heat source (lamp).The set
must not be exposed to water.
é
Connections
• Insert the aerial plug into the : socket at
the rear of the set.
• Insert the mains plug into a wall socket (220-
240 V / 50 Hz).
“
Remote control
Insert the two R6-type batteries (supplied)
making sure that they are the right way round.
The batteries supplied with this appliance do not
contain mercury or nickel cadmium. If you have
access to a recycling facility,please use this facility
(if in doubt, consult your dealer).When the batteries
are replaced, use the same type.
‘
Switching on
To switch on the set, press the on/off key.
A red indicator comes on and the screen
lights up. Go straight to the chapter Switch
on for the first time, on page 4.
If the television remains in standby mode,
press P
# on the remote control.
The indicator will flashe when you use the remote
control.
5 cm
5 cm
5 cm
Installing your television set
The keys on the TV set
Page 23
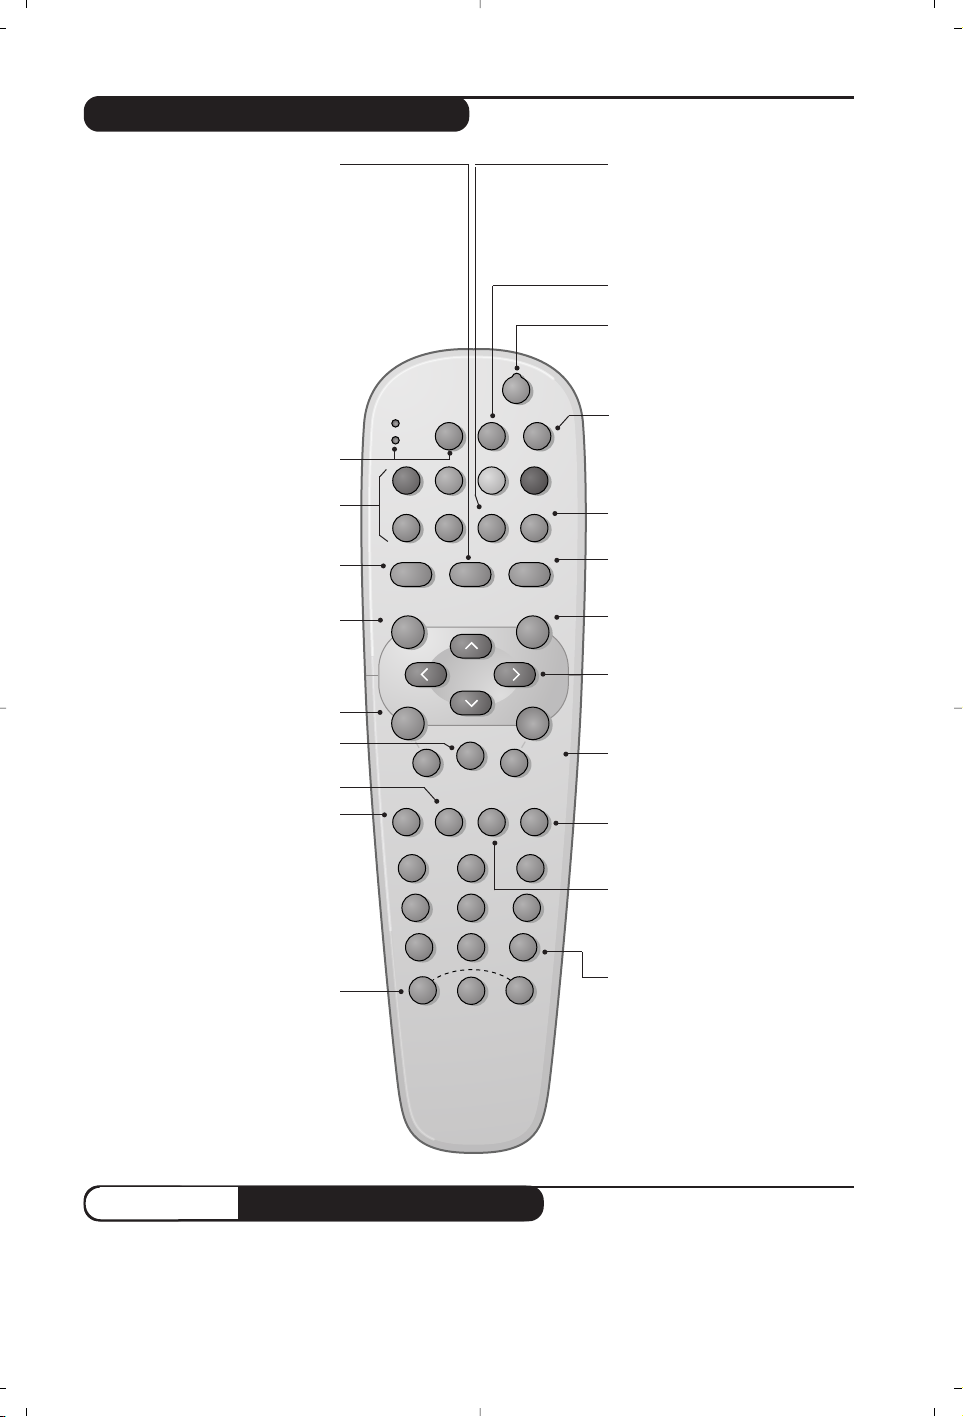
3
12
MODE
BACK
VCR
DVD
MENU
OK
A/D
”
P(age)
564
879
0
·¢Ê Æ
∫
†
¤
Œ
Á
ª
-
`
Å
3
--
++
.
DIGITAL
TV
[
Ø
EXIT/OPTIONS
›
Ó
Ω
%
ù
Ë
MENU
SELECT
∏
Ÿ
SMART
SMART
SOUND
PICTURE
The remote control keys
Screen information
In digital mode, press onece to display
the information banner, a 2ndtime to get
more information on the programme
and a 3rd time to remove it (see p. 4).
In analogue mode, this displays /
removes the programme informations
(number, name, time, sound mode).Hold
down for 5 seconds to permanently
display the analogue programme
number on the screen.The volume level
and the smart control adjustments are
then displayed each time they are used.
Options menu
(see p.8).
Teletext features (p.15)
and VCR/DVD keys (p.18).
TV Menu
To display or exit from the analogues
menus
Select
In digital mode this displays / clears the
programme list.Use the îÏ keys
to select a programme and the ¬
(or u) key to display it.
Volume
To adjust the sound level
16:9 formats (p.16)
Mute
To disable or enable the sound.
Picture and sound settings
Accesses a series of picture and
sound settings.
The position PERSONAL corresponds to
the settings stored in the menus.
Sound mode
To switch from STEREO to MONO
or to choose between different
languages (Dual I, Dual II, ...).
When the sound mode is switched to
MONO, the indication is displayed in red.
Select EXT sockets
(see p.17).
Standby
To set the TV to standby mode.To
switch the TV set on again, press
P @#or 09.
TV guide
(see p.9).
Program list (analogue mode)
To display/clear the program list.
Use the îÏ keys to select a
programme and ¬ to display it.
Digital Menu
To display or exit from the digital
menus (when TV is in digital mode).
Analogue or Digital mode
To switch the television vetween
analogue and digital mode.
Cursor
These 4 keys are used to move
within the menus or to directly access
the 16:9 screen formats (p 16).
Surround sound
To activate / deactivate the Virtual
Dolby Surround * effect.In stereo,you
can obtain Dolby Surround
Pro Logic sound quality. In mono,a
stereo spatial effect is simulated.
*
Manufactured under license from Dolby Laboratories.
”Dolby” ”Pro Logic”and the double-D symbol are
trademarks of Dolby Laboratories.
Previous programme
To access the previously viewed
programme.
Sleeptimer
To select the length of time before
the set automatically switches to
standby (from 0 to 240 minutes)
Numerical keys
For direct access to programmes.
For a 2 (3) digit programme number,
the 2nd(3rd)digit must be entered
before the dash disappears.
The number, the name (and the sound
mode, in analogue mode) are
displayed for a few seconds.
Programme selection
To access the next or previous
programme (or page in digital menus).
Mode selector
To activate the remote control in
VCR or DVD mode (see p.18).
To receive TV channels, your television is equipped with 2 tuners. One is for digital channels, the other
is for analogue channels. Use the
v key of the remote control to swhitch the TV between analogue
and digital mode.Then use the
P @#or 09keys to select channels.
Digital or Analogue channels ?
Page 24

4
The first time the TV set is switched on, a
congratulation message will appear on screen.
The language of which changes every 5 seconds.
&
Press the u key on the remote control,the
moment your prefered language is visible
on the screen.The
Setup
menu is displayed :
é The language, corresponding country and time
zone
is now preselected according to the
opening screen. However, you can still change
your preferences before you start a service
scan.
“ With the cursor keys,select
language, country
or Time zone and check if the adjustment is
according to your preferences. If necessary,
use the cursor keys to make your adjustment
and press
u to exit.
Caution
: if you select a wrong country, the channel
numbering will not be according to the standard
for your country.
‘ Select
service scan from the menu and press
u to start the installation.The service scan
menu is displayed.All the digital and analogue
programmes are search for and stored
automatically.When the search is complete,
the menu will indicate the number of digital
services and analogues programmes found.
( Press the
u key to start watching TV.
The television then displays the current
programme.The installation is now complete.
When you select a digital programme, an
information banner is displayed for a few
secondes at the top of the screen.
You can also use the
∂ key of the remote
control to display this banner.A second press
displays more information about the programme
(when available).
The banner contains information on the
preset number, channel name,programme
duration, transmission clock, programme title
and the time remaining of the current
programme (if set in the options menu).
Switch on for the first time
Understanding the information on the banner
Setup
Start service scan
Language
Country
Time Zone
Service Scan
11:46
Please press OK to start
Congratulations for selecting this Philips television.
Press OK to start enjoying your digital television.
2 11:06 - 11:09
BBC2 Snooker
11:46
Minutes left : 14
u
ù
i
ß
preset
number
symbols
clock
programme
start and end
time
remaining time
of programme
programme titlechannel name
Symbols description :
i more information about this programme
is available : press the
∂ key to display
or remove it.
ß subtitling is available : if you want to
display them,press the
OPTIONS key to
access the
options menu and select
subtitles.
ù other audio languages are availables and
can be selected in the
options menu.
u the selected Favourite list is displayed in
the colour of the activated list.
Banner description:
Page 25

5
Rearrange TV channels / radio station
This menu allows you to change the order of
the stored digital channels or radio station.
& From digital mode, press the
‹ MENU
key to
display the setup menu.
é Use the
Ï key to select installation and press
¬ twice to select the Service lists menu.
“ Use the
îÏ keys to select Rearrange TV
channels
or Rearrange radio stations and
press
¬.
‘ Use the
îÏ keys to select the channel you
want to exchange.
( Press
u to activate.
If you want to uninstall the selected channel, press
the red key.
§ Select (
îÏ) the new channel number you
want to exchange it with.
è Press
u to confirm.The exchange is done.
! Repeat the operations ‘ to è until all the
channels are in the required order.
ç Press the
‹ MENU
key to leave the menu.
This menu allows you to check the availability
of new TV channels or new radio stations that
have been launched by the broadcaster after
the initial installation.
& From digital mode, press the
‹ MENU
key to
display the setup menu.
é Use the
Ï key to select installation and press
¬ twice to select the Service lists menu.
“ Use the
îÏ keys to select View new TV
channels
or Listen to new Radio station.
‘ If new services are availables,press
¬ to
enter into the list and use the îÏ keys to
move through the list.
( Press the
‹ MENU
key to leave the menu.
This menu allows you to restore the original
list of channels defined by the broadcaster
during the initial installation.
& From digital mode, press the
‹ MENU
key to
display the setup menu.
é Use the
Ï key to select installation and press
¬ twice to select the Service lists menu.
“ Use the
îÏ keys to select List channel
types
and press ¬.
‘ Select
Original list of channels and press u if
you want to restore the original list of
channels defined by the broadcaster.
Remar
k: when this option is set, it is not possible to
rearrange TV channels or radio stations.
( Select
User-definable list of services and press
u if you want to get your prefered channel
list.
§ Press the
‹ MENU
key to leave the menu.
View or Listen to new services
List Channel types
Setup
Installation
Manage service lists
Close
Service lists
Service setup
Test reception
11:46
Rearrange TV channels
List channel types
View new TV channels
Rearrange Radio stations
Listen to new Radio stations
Page 26

6
Add new services
This menu allows you to search for new TV
channels or radio stations that have been launched
by the broadcaster after the initial installation.
& From digital mode, press the
‹ MENU
key to
display the setup menu.
é Use the
Ï key to select installation and press
¬.
“ Select
Service setup (Ï) and press ¬.
‘ Press
¬ to select Add new services and
press
u to activate the installation.
The search begins and only new channels will
be stored and added to the
channel list menu.
The percentage of the installation that has
been completed and the number of channels
found is displayed.
( When the search is complete, select store and
press
u to accept the new services.
§ Press the
‹ MENU
key to leave the menu.
This menu allows you to reinstall all the digital
TV channels and radio stations.
& From digital mode, press the
‹ MENU
key to
display the setup menu.
é Use the
Ï key to select installation and press
¬.
“ Select
Service setup (Ï) and press ¬.
‘ Select
Reinstall all services (Ï) and press ¬.
( Press
u to start the installation.
A search is then made for all digital services
which are then stored automatically.
When the search is completed, the menu will
indicate the number of digital services found.
§ When the search is complete, press
u to
store the services.
è Press the
‹ MENU
key to leave the menu.
This menu allows you to check the strengh of
the signal you are receiving through your aerial.
& From digital mode, press the
‹ MENU
key to
display the setup menu.
é Use the
Ï key to select installation and press
¬ to display the installation menu.
“ Use
Ï to select Test reception and press ¬.
You obtain an indication of the actual
programme frequency, the network name, the
signal quality and strength.
‘ You now have to enter the frequency of the
digital channel you want to test.
Your Tv magazine can provide the list of digital
channel numbers. Use the table on page 20 to get
the frequency.
( If the signal quality and strength is poor, a
message appears at the bottom of the menu
prompting you to enter the frequency between
the lower and the higher limit. If after keying
the frequency, the reception is still poor, you
can try improving, renewing,adjusting or
updating the aerial. It is however advisable to
contact a specialised aerial installer in order to
achieve best results.
Reinstall all services
Test reception
Setup
Installation
Test signal quality
Close
Service lists
Service setup
Test reception
11:46
Frequency
Network name
Signal quality
Signal strength
Setup
Installation
Install and manage services
Close
Service lists
Service setup
Test reception
11:46
Add new services
Reinstall all services
Page 27

7
Language and location preferences
This menu allows you to select your prefered
language for audio,subtitle, teletext and menu
and make changes to the location (country
and time zone).
& From digital mode, press the
‹ MENU
key to
display the setup menu.
é Use the
Ï key to select preferences and
press
¬.
“ Select
Languages or Location (Ï) and press
¬.
‘ Use the Ïî keys to select a setting and
press
¬ to enter into the sub-menu. Make
your adjustment and press
u or È to exit.
Language default settings:
•
Audio: to select the audio sound language.
•
Subtitle: to select the subtitle language.
•
Subtitles for hearing impaired
: to activated or
deactivate the specific subtitle for hearing
impaired (if made available by the broadcaster).
• Teletext: to select the teletext language.
•
System: to select the menu language.
Location settings:
•
Country: to select the country where you are
located.
•
Time zone: to select the time zone where
you are located.
•
Daylight saving time: to select automatic,
manual or no daylight saving time.
( Press the
‹ MENU
key to leave the menu.
This menu allows you to setup the access
restrictions of the digital channels.
& From digital mode, press the
‹ MENU
key to
display the setup menu.
é Use the
Ï key to select Access restriction
and press ¬.
“ Press the
¬ key to enter into the Set pin
code protection
menu.
‘ Use the
Ȭ keys to set to on and press u
to exit.You can then access to the other
adjustments :
W
arning: the moment you use any kind of access
restriction, you need to fill in the pin code when you
schedule a program for recording.
•
Maturity rating: select your prefered rating to
lock the channel.
Maturity rating will only block certain programmes if
the broadcaster providedes with the programme.
•
System lock:press u if you want to
completely lock the digital tv.To unlock, enter
your pin code (or the universal code 0711).
•
TV channels: select the tv channel you want to
lock and press
u.
•
Radio station: select the radio station you
want to lock and press
u.
•
Change pin code:press ¬ to enter in the
menu. Follow the on-screen instruction to
change your access code.
The default pin code is 1234. If you have forgotten
your personal code, you can reset to the default pin
code (1234) by enter the universal code 0711.
( Press the
‹ MENU
key to leave the menu.
The TV is equipped with a Common Interface (CI)
slot (see p.18).A CI module can enable additional
services, for example Pay TV.The Access Restrictions
menu will show the CI Access Restrictions when a
CI module is installed.The CI module is responsible
for the messages and texts on screen. In case of
failure or strange behaviour, you must call your CI
service provider.
Access restrictions
Setup
Preferences
Select your prefered language
Close
Languages
Location
11:46
Audio
Subtitle
Hearing impaired subtitles
Teletext
System
Setup
Access restrictions
Switch pin code protection “on” or “off”
Close
Set pin code protection
System pin code settings
System lock
TV channels
Radio stations
System pin code
11:46
On Off
Page 28

8
Setting up your favourite list
This menu enables you to create a favourite
list with your prefered TV channels and radio
stations. For example, each member of your
family can create his/her own favourite list.
& From digital mode, press the
‹ MENU
key to
display the setup menu.
é Press
¬ to enter into the favourites list
menu.You have the choice to create 4 different
favourite lists.
“ Use the
Ïî keys to select your favourite
list :
List 1, List 2, List 3 or List 4 and press ¬.
‘ Use the
Ïî keys to select a setting and
press
¬ to enter into the sub-menu.
•
Name: use the Ȭ keys to move around
the name display area (15 characters) and the
@P# keys to select the characters.When
the name has been entered, press
u to exit.
•
Select TV channels: use the Ïî keys to
select your favourite TV channels and confirm
with
u.Press È to exit.
•
Select radio stations: use the Ïî keys to
select your favourite radio station and
confirm with
u.Press È to exit.
•
Add all services:press u if you want to add
all the service into your favourite list.
•
Remove all services:press u if you want to
remove all the service from your favourite list.
( Press the
‹ MENU
key to leave the menu.
§ Your favourite list can be selected using the
options menu (see next page).
This menu provides informations about the
software version,the installation of new
software and problem reports.
& From digital mode, press the
‹ MENU
key to
display the setup menu.
é Use the
Ï key to select information and
press
¬.
“ Select
Problem reports and press ¬ to
access any reported errors.In the event of a
technical problem, your tv service organisation
might ask you to tell them if there are any
reports and what they say.
‘ Select
System software and press ¬.The
software version is displayed.
( You can activate the menu to automatically
accept any software update of your digital TV.
Normally the product will detect if an update is
available while it is in standby mode.Next time
the television is turned on a banner will appear
at the bottom of the screen indicating new
software is available.Selecting
u
activates the
software download.The software download
menu will give a description of the software
together with the date and time of the
download.This may update certain menus,
functions or add new features,but the general
way in which the TV operate will not change.
Once accepted the download will take place at
the designated time and date.
Note
:The TV must be put into standby when the
download is due in order for it to take place.
§ Press the
‹ MENU
key to leave the menu.
Information
Downloading new software
Setup
Make changes to your list of favourites services
Favourites
Preferences
Information
Access restrictions
Installation
11:46
List 1
List 2
List 3
List 4
Setup
Make changes to your list of favourites services
Favourites
Preferences
Information
Access restrictions
Installation
11:46
System software
Problem reports
Whenever a new software is available, it is advisable to always accept and download the software.
In case new software is available,you will see a message when you switch on the TV.
Page 29

9
Using the Options menu
This menu gives you direct access to the:
favourite list,the language selection and some
other selections.
& From digital mode, press the
EXIT/OPTIONS
key to
display the options menu.
é Use the Ïî keys to select a setting and
press
¬ to enter the sub-menu.
•
Favourites: use the Ïî keys to select your
favourite list and confirm with
u.
The “none” option deactive any favourite list.
To create your own favourite list, see page 8.
•
Subtitle language: use the Ïî keys to
temporarily change the language and confirm
with
u.
•
Subtitle for hearing impaired: select Ye s and
confirm with
u to temporaly activate this
feature.
•
Audio language: to temporarily change the
audio sound language.
To permanetly change the audio and subtitle
languages, use the Preferences menu (p. 7).
•
Mode:you can choose to only have radio
stations, TV channels or services without audio
or video
.
Remark:for the UK only, the TV list will contain both
radio stations and TV channels.
•
Show the remaining play time ?: select Ye s and
confirm with
u if you want to display the
remaining play time when you call the banner.
•
banner duration: to select the duration for
which the banner is visible.
“ Press the
EXIT/OPTIONS
key to leave the menu.
The TV guide is an Electronic Service Guide
that allows you to look up digital programmes
as you would in a newspaper or TV magazine.
You can navigate through the list of digital
programmes and obtain detailed information
on the programmes.You can also program the
TV to provide a digital channel to be recorded.
& From digital mode, press the
o
key to display
the TV guide :
A list with all the installed digital programmes
is displayed.
é Use the îÏ keys to select a programme.
“ The TV guide features are displayed at the
bottom of the screen. Use the coloured keys red,
green, yellow,blue or white to activate them :
• Record (red key) : this feature enables you to
program the recording of the video recorder
(if it has an EasyLink feature and is connected
to EXT2). If your video recorder is not
equipped with Easylink, the TV will provide a
digital channel to be recorded.You will still have
to program your video recorder.
• Record list (green key) : this menu gives the
list of recording schedules.You can check,
modify, delete or add a new schedule by using
the cursor or coloured keys as indicated on
the screen.
•
Information
(yellow key)
: you can obtain more
detailled information on the selected
programmes
.
• Close (blue key) : to exit from the TV guide.
• Options (white ∫ key) : with this menu,you
can select your favourite list,mode or themes.
Themes are areas of interest,you can for
example decide to display only :drama, news,
movie, ...
‘ Press the
o
key to leave the menu.
TV guide
Options
Selects the active favourite list
Exit
Favourites
Subtitle language
Subtitles for hearing
impaired
Audio language
None
List 1
List 2
List 3
List 4
Selects the active favourite list
OptionsCloseInformationRecord listRecord
1 BBC ONE
2 BBC TWO
3 ITV Channel 3
4 Channel 4
5ITV 2
6 BBC CHOICE
See It Saw
Snooker
Tr isha
-
Gmtv2
Oakie Doke
Microsoap
Ice Skating
This morning
-
This afternoon
Bodger & Badger
1 17:15-17:25 17:24
BBC ONE Snooker
Preset/service Now Next
Page 30

10
Recording function
This feature enables you to program a digital
recording and control the VCR (if it has an
EasyLink feature and is connected to EXT2).
If your video recorder is not equipped with
Easylink, the TV will provide a digital channel
to be recorded.You will still need to program
your video recorder.
Important:The video recorder must be connected
to EXT2. Please note that it is NOT possible to record
one digital channel and watch another digital channel
at the same time.You can however record a digital
channel and watch an analogue channel on your TV, or
vice versa. Philips recorders with only the TV link
feature do not support easy recording : you wil still
have to program your VCR.
& From digital mode, press theokey to display
the TV guide.
é Press the
RED key to call the Record menu.
“ Use the
Ïî keys to select a setting and
press
¬ to enter into the sub-menu. Make
your adjustment and press
u or È to exit.
• Service : you can change the number of the
programme you want to record. Press
u to
confirm.
• Enter your pin code if locked : enter your
secret code only if you have activated the
access restriction feature (see p.7). Press
u
to confirm.
•Day & Month : enter the date by using the
09
or @ P #keys. Press u to exit
• Start time : enter the start time.
• End time : enter the end time.
• Audio language : select your language and
confirm with
u.
• Subtitle language : make your selection and
confirm with
u.
• Subtitle for hearing impaired : select
Yes
or No and confirm with u.
• Occurence : select
Once, Daily or Weekly
and confirm with u.
‘ Press the
RED key to store your recording.
The TV guide reappears.
You can press the
GREEN key to display the list of
recordings you have set.
(
If your video recorder is not equipped with
Easylink feature, remember you still need to
program it.
§ If you have finished watching television,you must
leave it in standby in order for the recording
program to be activated.
Important:never switch off the TV with the power
button when a recording has been programmed,
but use the standby key on the remote control.
è If you wish to continue watching another
digital channel after setting a timer, you can do
so by changing channels in the normal way.
! If you are watching another digital channel when
the timer is due to start, the timer alarm will sound
and present you with the option of switching
channels or continuing to watch the current
channel.
ç You can also watch analogue channels while
recording digital channels. Press the
v key to
switch the TV to analogue mode.
The moment a timer start, you get a warning
message and you can still decide to stop recording.
2 BBC 2
Please enter the preset number.
Close CancelStore
Service
Enter your pin code if locked
Day & Month
Start time
End time
Audio language
Subtitle language
11:46
2 BBC 2
16/02
12:15
12:30
English
none
Page 31

11
Automatic tuning of analogue programmes
Sorting analogue programmes
This menu allows you to automatically search
for all the analogue programmes available in
your region.
& From analogue mode, press the
W MENU
key
to display the main menu.
é With the cursor, select the
INSTALL menu
then the
AUTO STORE menu and press ¬.
The search begins.After several minutes, the
INSTALL menu reappears automatically.
“ If the transmitter or the cable network
broadcasts the automatic sort signal, the
programmes will be correctly numbered.
‘ If this is not the case, the programmes found
will be numbered in descending order starting
at 99, 98, 97, etc.
Use the
SORT menu to renumber them.
Some transmitters or cable networks broadcast
their own sort parameters (region, language,etc.).
Where this is the case, make your choice using the
îÏ keys and confirm with ¬.
To exit or interrupt the search, press the
H key.
If no picture is found, refer to the chapter entitled
Tips on p. 16. See also: EasyLink function,page 9.
( To exit from the menus, press
∂.
& Press the
W MENU
key to display the main menu.
é With the cursor, select the INSTALL menu,
then
SORT.The SORT menu appears.
The
FROM option is activated.
“ Select the programme you wish to renumber
using
Ȭ keys or 0 to 9.
Example: to renumber programme 78 as 2
press
78.
( Select
TO (using Ï key) and enter the new
number with
Ȭ keys or 0 to 9
(for the example given, enter 2).
§ Select
EXCHANGE (Ï key) and press ¬.
The message
EXCHANGED appears, the
exchange takes place. In our example,
programme 78 is renumbered as 2
(and programme 2 as 78).
è Select the option
FROM (î key) and repeat
stages ‘ to § as many times as there are
programmes to renumber.
See also: EasyLink function, page 9.
! To exit from the menus, press
∂.
• PICTURE
• SOUND
• FEATURES
• INSTALL
INSTALL
• AUTO STORE
• MANUAL STORE
• SORT
• NAME
FROM
TO
EXCHANGE
INSTALL
• AUTO STORE
• MANUAL STORE
• SORT
•
NAME
SEARCHING
PLEASE WAIT
PROG. NO. 2
215.18 MHZ
Page 32

12
Manual tuning of analogue programmes
Naming analogue programmes
This menu allows you to store the analogue
programmes one at time.
& Press
W MENU
.
é With the cursor, select the
INSTALL menu
then
MANUAL STORE :
“
SYSTEM : select EUROPE (automatic
detection*) or
WEST EUR (BG standard),
EAST EUR (DK standard), UK (I standard) or
FRANCE (LL' standard).
* Except for France (standard LL'): select the
option FRANCE.
‘
SEARCH : If you know the frequency of the
programme required,enter its number directly
using the
09keys.Alternatively press ¬.
The search begins.As soon as a programme is
found, the search will stop.
If no programme is found, refer to the Tips chapter
on page 19).
(
FINE TUNE : if the reception is not satisfactory,
try adjusting the frequency using the
Ȭ
keys.
§
PROG. NO : enter the required number with
the
Ȭ or 0 to 9 keys.
è
STORE :press ¬.The programme is stored.
See also: EasyLink function, below.
! Repeat steps ‘ to è for each programme to
be stored.
ç To quit the menus, press
∂.
If required,you can give a name to the first
40 analogue programmes (from 1 to 40) and
external connectors.
& Press
W MENU
.
é With the cursor, select the
INSTALL menu,
then
NAME (concealed at the bottom of the
screen) :
“ Select the programme you wish to name using
the keys
09or @ P #.
Note: on installation, the programmes are named
automatically when the correct information is
transmitted by the broadcaster.
‘ Use the
Ȭ keys to move within the
name display area (5 characters) and the
îÏ keys to choose the characters.
( When the name has been entered, press
W
MENU
.The name is stored.
See also: EasyLink function, below.
§ Repeat steps “ to ( for each programme to
be named.
è To exit from the menus, press
∂
.
• PICTURE
• SOUND
• FEATURES
• INSTALL
INSTALL
MANUAL STORE
• SYSTEM
• SEARCH
• PROG. NO.
• FINE TUNE
• STORE
EUROPE
WEST EUR
EAST EUR
INSTALL
• AUTO STORE
• MANUAL STORE
• SORT
•
NAME
BBC_1
EasyLink function
If the set is connected (by the EXT2 socket) to
a video equipped with the EasyLink function,
the language, country and analogue channels
found are automatically transmitted to the
video recorder at the time of installation.
A message is displayed on-screen during
loading.The list of video recorder analogue
channels is then the same as those of the set.
You must first check in the menus that the
Easylink function is activated :
& Press
W MENU
key.
é Select
OPTIONS (Ï) and press ¬.
The
OPTIONS menu is displayed.
“ Use
Ï key to select EASY LINK and press
¬ to set it to ON. If your video recorder is
not equipped with this function, set to
OFF.
‘ Press
∂
to exit the menus.
The EASY LINK setting is set to OFF by default.
Page 33

13
Adjusting the sound
& Press
W MENU
, select the SOUND option (Ï)
and press
¬.The SOUND menu appears :
é Use the cursor keys to select and adjust.
Note:
to access the AVL setting (hidden at the
bottom of the screen) hold down
Ï key.
“ Once the adjustments have been made, select
STORE and press ¬ to store them.
‘ To exit from the menus, press
∂.
Description of the settings:
•
TREBLE: alters the level of the high frequency
sound.
•
BASS: alters the level of the low frequency sound.
•
BALANCE: to balance the sound between the left
and right speakers.
•
DELTA VOLUME (volume difference): allows you to
compensate for the volume differences between
the different programmes or the EXT sockets.
This setting is available for programmes 1 - 40 and
the EXT sockets.
•
STORE: stores the sound settings.
•
AVL (Automatic Volume Leveller): automatic
volume control used to avoid sudden increases in
volume, particularly when changing programmes
or during advertisements
• PICTURE
• SOUND
• FEATURES
• INSTALL
SOUND
• TREBLE
• BASS
• BALANCE
• DELTA VOLUME
• STORE
• AVL
-----I--- 56
Adjusting the picture
& Press
W MENU
then ¬.
The
PICTURE menu appears :
é Use
îÏ keys to select a setting and
Ȭ keys to adjust.
Note: the menu is a scroll-down menu.
Keep the key
Ï held down to access the
settings hidden at the bottom of the screen.
“ Once the adjustments have been made, select
STORE and press ¬ to store them.
‘ To exit from the menus, press
∂.
Description of the settings:
•
BRIGHTNESS: alters the brightness of the
image.
•
COLOUR: alters the colour intensity.
•
CONTRAST: alters the variation between
light and dark tones.
•
SHARPNESS: alters the crispness of the image.
• STORE: stores the picture settings.
•
COLOUR TEMP (colour temperature): adjusts
the colour temperature of the picture.Three
options are available here:
COOL (blue white),
NORMAL (balanced) or WARM (red white).
•
NR (Noise Reduction): alleviates fuzziness
(snowy picture) in analogue mode.This
setting is useful when reception is difficult.
•
CONTRAST + : automatic adjustment of the
picture contrast which permanently sets the
darkest part of the picture to black.
Note
: settings changed while in the analogue
mode will apply to all analogue channels, settings
changed while in digital mode will apply to all
digital channels.
Rotating the picture
Larger screens are sensitive to variations in the earth's magnetic field.This setting makes it
possible to compensate for this phenomenon.
& Press
W MENU
key.
é Select
FEATURES (Ï) and press ¬.
The
FEATURES menu appears.
“ Use
Ï key to select ROTATION and use
Ȭ keys to alter the angle of the image.
‘ Press
∂ to exit from the menus.
• PICTURE
• SOUND
• FEATURES
• INSTALL
PICTURE
• BRIGHTNESS
• COLOUR
• CONTRAST
• SHARPNESS
• STORE
• COLOUR TEMP.
• NR
• CONTRAST +
--I------ 39
Page 34
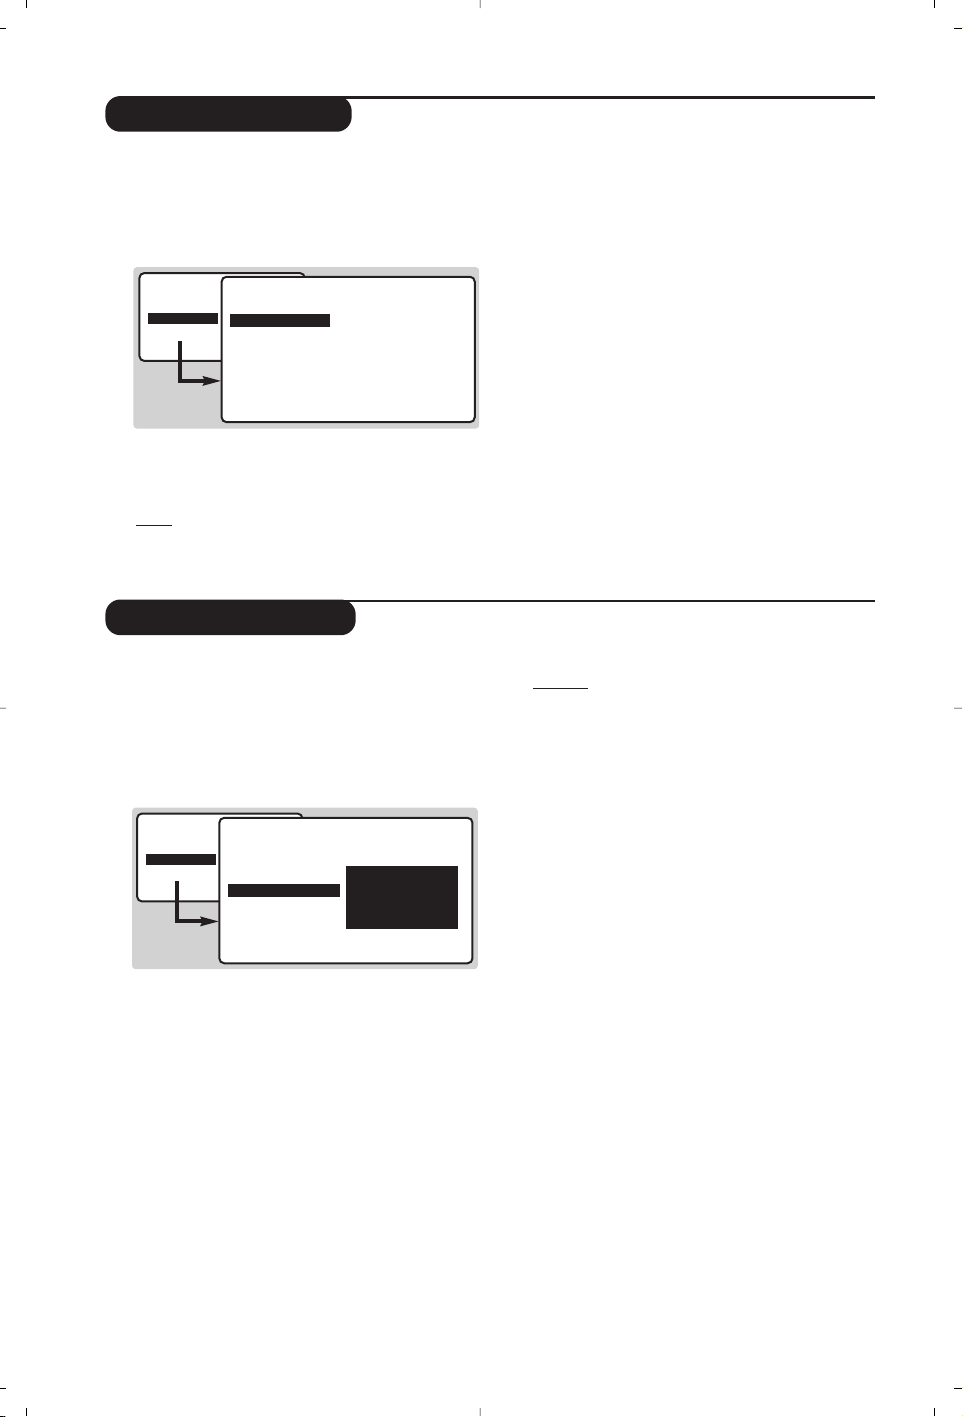
14
Timer function
Locking the set
This menu allows you to use your TV as an
alarm clock.
& Press
W MENU
.
é Select
FEATURES (Ï) and press ¬ twice.
The
TIMER menu appears :
“ Press
¬ to enter and exit the sub-menus and
use keys
îÏ to adjust:
‘
TIME: enter current time.
Note: the time is updated automatically each time
the set is switched on using information taken from
the digital module.
(
START TIME: enter the start time.
§
STOP TIME: enter the stop time.
è
PROG. NO;: enter the number of the
programme required.
! ACTIVATE:you can set the alarm to be activated :
• ONCE ONLY for a one-off alarm,
•
DAILY for a daily alarm or
•
STOP to cancel.
ç Press
∂ to exit the menu. If the TV is then put
in standby it will automatically switch on at the
time programmed.If you leave the TV switched
on, it will only change programme at the time
indicated.
The combination of the CHILD LOCK and TIMER
functions may be used to limit the length of time
your television is in use, for example, by your children.
You can bar access to certain programmes or
completely lock the set by locking the keys.
Locking programmes
& Press
W MENU
.
é Select
FEATURES (Ï) and press ¬.
“ Select
PARENTAL. CONT. (Ï) and press ¬.
‘ Enter your confidential access code.The first
time, enter the code 0711 then confirm by
re-entering 0711.The menu appears.
( Press
¬ to go into the menu.
§ Use keys
îÏ to select the required
programme and confirm with
¬.The symbol
+ is displayed alongside the programmes or
sockets that have been locked.
è Press
∂ to exit.
To watch a programme which has been locked
you will now need to enter the confidential
code; otherwise the screen will remain blank.
The INSTALL menu access is also locked.
Caution:
in the case of encrypted programmes
which use an external decoder, it is necessary to
lock the corresponding EXT socket.
To unlock all programmes
Repeat stages & to ‘ above,then select
CLEAR ALL and press ¬.
To change the confidential code
Repeat stages & to ‘ above,then:
( Select
CHANGE CODE and enter your own
4-digit number.
§ Confirm by entering it again.
Your new code will be stored.
è Press
∂ to exit from the menus.
If you have forgotten your confidential code, enter
the universal code 0711 twice.
Locking the keys
& Press
W MENU
, select FEATURES (Ï) and
press
¬.
é Select
CHILD LOCK (Ï) and press ¬ to set
the lock to
ON.
“ Switch off the set and put the remote control
out of sight.
The set cannot be used (it can only be
switched on using the remote control).
‘ To cancel: switch
CHILD LOCK to OFF.
• PICTURE
• SOUND
• FEATURES
• INSTALL
FEATURES
TIMER
• TIME
• START TIME
• STOP TIME
• PROG; NO;
• ACTIVATE
10:56
• PICTURE
• SOUND
• FEATURES
• INSTALL
FEATURES
• TIMER
• CHILD LOCK
• PARENTAL CONT
• ROTATION
ACCES CODE
- - - -
Page 35

15
Analogue Teletext
Teletext is an information system, broadcast by most of analogue TV channels. It also provides subtitles
for people with hearing difficulties.
Press :
You will obtain:
¤
Ÿ
Ë
Ë
Ω
09
Å
ù
›
TV
MENU
Teletext call
Selecting a
page
To call up or exit from teletext.When first pressed, the main
index page appears with a list of the items available.
Each page has a corresponding 3-figure number.
Some digital programmes may also include analogue
teletext. If this is the case, it can be accessed by pressing the
teletext key for 3 seconds.
If no teletext is available, 100 will appear and the screen will remain
blank (in this case, exit from teletext and choose another channel).
Use the 0 to 9 or @ P # or îÏ keys to enter the page
number required .Example: page 120,enter 120.The
number is displayed top left,the counter turns and then the
page is displayed.Repeat this operation to view another page.
If the counter continues to search, this means that the page is
not transmitted. Select another number.
Direct access
to the items
Coloured areas are displayed at the bottom of the screen.
The 4 coloured keys are used to access the items or
corresponding pages.
The coloured areas flash when the item or the page is not yet
available.
Contents
This returns you to the contents page (usually page 100).
Direct
selection of
sub-pages
Certain pages contain sub-pages. For example, if page
120 contains sub-pages
1/3, 2/3 and 3/3, the page number is
displayed in green and preceded by the symbols Æ, Í or
ÍÆ. Use the keys Ȭ to directly access the sub-pages
of your choice.
Te xt overlaying &
double page text
To activate or deactivate teletext overlay on the picture.
To activate or deactivate the dual page text display.
Double height
teletext
Hidden
information
Favourite
pages
Press this key several times to display the upper, then the
lower part of the screen and then return to the normal
size teletext page.
To display or hide the concealed information (games
solutions).
Instead of the standard coloured areas displayed at the
bottom of the screen, you can store 4 favourite pages on
the first 40 channels which can then be accessed using the
coloured keys (red, green, yellow,blue). Once set,these
favourite pages will become the default every time tetetext
is selected.
& Press the
W MENU
key to change to favourite pages
mode.
é Display the teletext page that you want to store.
“ Press ∂ then the coloured key of your choice.
The page is stored.
‘ Repeat steps é and “ for the other coloured keys.
( Now when you consult teletext, your favourite pages
appear in colour at the bottom of the screen.To
temporaly retrieve the standard items,press
W
MENU
.
To clear everything, and return the standard items as the
default, press
∂
for 5 seconds.
VCR
DVD
%
Å
Ë
SELECT
OK A/D
+ +
[
”
- -
Ÿ
∏
12
564
879
SMART SMART
0
ª
PICTURE SOUND
.
EXITMODE
Z
∫
ÓΩ›
ù
Œ¤
MENUMENU
DIGITALTV
P
`Á
3
-
Page 36

16
16:9 Formats
Digital Text
The pictures you receive may be transmitted in 16:9 format (wide screen) or 4:3 format
(conventional screen).4:3 pictures sometimes have a black band at the top and bottom of the screen
(letterbox format).This function allows you to optimise the picture display on screen.
Automatic switching
This TV set is also equipped with automatic switching which will select the correct-screen format,
provided the specific signals are transmitted with the programmes.
Using the different screen formats
Press the p to select the different modes:
4:3, ZOOM 14:9,ZOOM 16:9, SUBTITLE ZOOM,SUPER ZOOM and WIDE SCREEN.
With analogue programs only, you can access directly these settings with the È and ¬ key.
Some digital channels, which you select like any other channel, offer dedicated teletext services
(for instance BBCTEXT). Some digital channels also offer information on the programme being
broadcast (a message may appear at the bottom of the screen).
& To use the digital teletext, follow the instructions on screen.
é Depending on the service, you can be asked to use the cursor and
SELECT keys (u), the coloured
keys, the
TEXT key (c) and sometimes the numerical keys.
“ When you have finished watching teletext,select a different channel with
@ P #
keys or follow the
on screen instructions to return to picture.Some digital programmes will require the EXIT function.
You can find EXIT under the first menu item of options menu.
4:3 Mode
The picture is reproduced in 4:3 format and a black band is
displayed on either side of the picture.With analogue programs only,
the picture may be progressively enlarged using the îÏ keys.
ZOOM 14:9
The picture is enlarged to 14:9 format, a thin black band remains on
both sides of the picture.With analogue programs, the îÏ keys
allow you to compress vertically the image to view the top or the
bottom of the picture (subtitles).
ZOOM 16:9
The picture is enlarged to 16:9 format.This mode is recommended
when displaying pictures which have black bands at the top and
bottom (letterbox format).With analogue programs, use the îÏ
keys if you wish to display the top or the bottom of the picture.
SUBTITLE ZOOM
This mode is used to display 4:3 pictures using the full surface of the
screen leaving the sub-titles visible.With analogue programs, use the
îÏ keys to increase or decrease the section at the bottom of
the picture.
SUPERWIDE
This mode is used to display 4:3 pictures using the full surface of the
screen by enlarging the sides of the picture.With analogue programs,
the
îÏ keys allow you to move the image up or down.
WIDE SCREEN
This mode restores the correct proportions of pictures transmitted
in 16:9 using full screen display.
Note: If you display a 4:3 picture in thid mode, it will be enlarged horizontally.
++
[
`Á
∏
3
564
879
0
-
P
”
--
Ÿ
12
SMART SMART
ª
PICTURE SOUND
Page 37

17
564
879
0
Á
Ø
Connecting peripheral equipment
The television has 2 external sockets situated at the back of the set (EXT1 and EXT2).
The EXT1 socket has audio and video inputs/outputs and RGB inputs.
The EXT2 socket has audio and video inputs/outputs and S-VHS inputs.
Video recorder (only)
Carry out the connections featured opposite.To record digital
programmes from your TV, the VCR must be connected to EXT2.
If your video recorder does not have a euroconnector socket, the
only connection possible is via the aerial cable.You will therefore
need to tune in your video recorder's test signal and assign it
programme number 0 (refer to manual store, p. 12).
To reproduce the video recorder picture, press 0.In this case it
will not be possible to record digital channels.
Video recorder with decoder
Connect the decoder to the second euroconnector socket
of the video recorder.You will then be able to record
scrambled transmissions.
Video recorder
Satellite receiver, decoder, DVD, games, etc.
Carry out the connections featured opposite.
To optimise picture quality, connect the equipment which
produces the RGB signals (digital decoder, games,etc.) to
EXT1, and the equipment which produces the S-VHS
signals (S-VHS and Hi-8 video recorders, certain DVD
drives) to EXT2 and all other equipment to either EXT1
or EXT2.
Carry out the connections featured opposite.
Using the
n key, select EXT3 for a VHS or 8mm
camcorder and S-VHS3 for an S-VHS or Hi-8 camcorder.
For a mono set, connect the sound signal to the AUDIO L
(or AUDIO R) input.The sound automatically comes out of the
left and right speakers of the TV .
Headphones
The
@”# keys allow you to adjust the volume on
the headphones and on the set. Press
m if you want to cut
off the sound on the set.
The headphones must have an impedance of between 32 and
600 ohms.
Other equipment
Side connections
To select connected equipment
Press the n key to select EXT1, EXT2,S-VHS2 (S-VHS signals
from the EXT2 socket) and EXT3 or S-VHS3 for connections on the
front panel.
Most equipment (video recorder, etc) carries out the switching automatically.
EXT 2
VCR
EXT 1
S-VHS
Video
R Audio L
n
S-VHS
Video
R Audio L
n
S-VHS, Hi-8
VHS, 8 mm
Page 38

18
VCR / DVD mode selector
To connect to a hi-fi system, use an audio connection cable
and connect the “L” and “R” outputs on the TV set to the
“AUDIO IN” “L” and “R” input on your hi-fi amplifier.
A common interface is available to connect a CAM
(conditional access module) and a smartcard. Please contact
your service provider to get more information about these
modules.
Note
: the television should always be switched off before any module
is inserted in the common interface slot.
Amplifier
Common interface
standby
· record *,
¢ rewind,
Ê stop,
Æ play,
∫ fast forward,
% programming *,
bring up a menu *
select (
îÏ) and set (Ȭ) *
u confirm*
select programme,
enter a number
* Some programming functions are not available on all models
(cursors, menu, OK key, etc.). For video recorders equipped with the
Easylink function : when the set is on standby, pressing the
Æ or
W
MENU
key once switches it on automatically.
The remote control is compatible with all the video recorders in our
range as well as models which use the RC5 signalling standard.
The remote control allows you to control the main functions of your video recorder or DVD.
& Press the
MODE key to select the required mode : VCR (video recorder) or DVD.
A green indicator lights up to show the selected mode. It returns automatically (TV mode) after
20 seconds without action.
é Then press one of the following keys :
VCR
DVD
·¢Ê Æ
%
SELECT
OK A/D
+ +
”
Ÿ
12
SMART SMART
PICTURE SOUND
MODE
Z
ù
Å
Ë
[
- -
∏
`Á
564
879
0
ª
.
EXIT
∫
ÓΩ›
Œ¤
MENUMENU
DIGITALTV
P
3
-
Page 39

19
Tips
Poor reception (in analogue mode)
The proximity of mountains or high buildings
may be responsible for ghost pictures, echoing
or shadows. In this case, try manually adjusting
your picture:see "fine tuning" (p.12) or modify
the orientation of the outside aerial. Does your
antenna enable you to receive broadcasts in
this frequency range (UHF or VHF band)?
In the event of difficult reception (snowy
picture) switch the
NR on the PICTURE
analogue menu to ON.(p. 13).
Bad picture (in digital mode)
If the picture freezes a lot,or in cases of block
effect, there is a problem of poor reception. Please
check with the signal strength menu (see p.6).
Depending on the strength of digital terrestrial
signals available in your area, standard aerials
used for analogue transmissions will in most
cases provide satisfactory reception of digital
signals. If it is not the case, a good quality
narrow beam antenna should be professionally
installed outside the property and aligned to
capture the maximum digital signal strength.
No picture
Have you connected the aerial socket properly?
Have you chosen the right system? (p. 12).
Poorly connected euroconnector cables or
aerial sockets are often the cause of picture or
sound problems (sometimes the connectors
can become half disconnected if the TV set is
moved or turned). Check all connections.
Peripheral equipment gives a black & white picture
You have not selected the right socket with the
n
key: S-VHS2 (S-VHS3) instead of EXT2 (EXT3).To
play a video cassette,check that it has been recorded
under the same standard (PAL, SECAM, NTSC)
which can be replayed by the video recorder.
No sound (in analogue mode)
If on certain channels you receive a picture but no
sound, this means that you do not have the correct
TV system. Modify the
SYSTEM setting (p. 9).
The remote control no longer works.
Check that the mode selector on the side of
the remote control is set to TV.
The TV set does not react to the remote
control; the indicator on the set no longer
flashes when you use the remote control?
Replace the batteries.
Standby
When you switch the TV set on it remains in
standby mode and the indication
LOCKED is
displayed when you use the keys on the TV set?
The CHILD LOCK function is switched on (p. 14).
If the set receives no signal for 15 mins,it
automatically goes into standby mode.
To save power, your set is fitted with components
that give it a very low power consumption when in
standby mode (less than 3 W).
Cleaning the set
Only use a clean, soft and lint-free cloth to clean
the screen and the casing of your set.Do not use
alcohol-based or solvent-based products.
Still no results?
If your TV set breaks down, never attempt to repair
it yourself:contact your dealer's after-sales service.
Glossary
CAM and Smart Card :
A CAM (conditional
access module) and a smart card can be
connected to the television.This unit allows you
to access subscription digital channels or special
services from the provider.
Digital receiver :
The television is equiped with an
integrated digital tuner which enables you to
receive a digital transmission with a terrestrial
antenna.The tuner is able to received Digital Video
Broadcast compliant with MPEG-2,up to Main
profile @ Main level.
EasyLink :
Digital link between the set and the
video recorder which allows a direct transfer of
certain information such as channel setting.
System :
Analogue programmes are not broadcast in
the same way in all countries.There are different
standards:BG, DK,I, and L L’.The
SYSTEM setting
(p.9) is used to select these different standards.This
is not to be confused with PAL or SECAM colour
coding. Pal is used in the majority of European
countries, Secam in France, Russia and the majority
of African countries.The United States and Japan use
a different system called NTSC.The inputs EXT1 and
EXT2 are used to read NTSC coded recordings.
16:9 :
Refers to the ration between the length and
height of the screen.Wide screen televisions
have a ration of 16/9,conventional screen TV
sets have a ration of 4/3.
Page 40

AUSTRALIA
UK and SPAIN
20
A10 IBO - 3111 256 1496.1
English Español
Centre Frequencies Table (in KHz)
Digital television broadcast bands channel numbers and centre frequencies.
Digital Frequency Nominal Centre
Channel Frequency KHz
21 . . . . . . . . . . . . . . . .474 000
22 . . . . . . . . . . . . . . . .482 000
23 . . . . . . . . . . . . . . . .490 000
24 . . . . . . . . . . . . . . . .498 000
25 . . . . . . . . . . . . . . . .506 000
26 . . . . . . . . . . . . . . . .514 000
27 . . . . . . . . . . . . . . . .522 000
28 . . . . . . . . . . . . . . . .530 000
29 . . . . . . . . . . . . . . . .538 000
30 . . . . . . . . . . . . . . . .546 000
31 . . . . . . . . . . . . . . . .554 000
32 . . . . . . . . . . . . . . . .562 000
33 . . . . . . . . . . . . . . . .570 000
34 . . . . . . . . . . . . . . . .578 000
35 . . . . . . . . . . . . . . . .586 000
36 . . . . . . . . . . . . . . . .594 000
37 . . . . . . . . . . . . . . . .602 000
38 . . . . . . . . . . . . . . . .610 000
39 . . . . . . . . . . . . . . . .618 000
40 . . . . . . . . . . . . . . . .626 000
41 . . . . . . . . . . . . . . . .634 000
42 . . . . . . . . . . . . . . . .642 000
43 . . . . . . . . . . . . . . . .650 000
44 . . . . . . . . . . . . . . . .658 000
45 . . . . . . . . . . . . . . . .666 000
46 . . . . . . . . . . . . . . . .674 000
47 . . . . . . . . . . . . . . . .682 000
48 . . . . . . . . . . . . . . . .690 000
49 . . . . . . . . . . . . . . . .698 000
50 . . . . . . . . . . . . . . . .706 000
51 . . . . . . . . . . . . . . . .714 000
52 . . . . . . . . . . . . . . . .722 000
53 . . . . . . . . . . . . . . . .730 000
54 . . . . . . . . . . . . . . . .738 000
55 . . . . . . . . . . . . . . . .746 000
56 . . . . . . . . . . . . . . . .754 000
57 . . . . . . . . . . . . . . . .762 000
58 . . . . . . . . . . . . . . . .770 000
59 . . . . . . . . . . . . . . . .778 000
60 . . . . . . . . . . . . . . . .786 000
61 . . . . . . . . . . . . . . . .794 000
62 . . . . . . . . . . . . . . . .802 000
63 . . . . . . . . . . . . . . . .810 000
64 . . . . . . . . . . . . . . . .818 000
65 . . . . . . . . . . . . . . . .826 000
66 . . . . . . . . . . . . . . . .834 000
67 . . . . . . . . . . . . . . . .842 000
68 . . . . . . . . . . . . . . . .850 000
69 . . . . . . . . . . . . . . . .858 000
Digital Frequency Nominal Centre
Channel Frequency KHz
Band III
6 . . . . . . . . . . . . . . . . .177 500
7 . . . . . . . . . . . . . . . . .184 500
8 . . . . . . . . . . . . . . . . .191 500
9 . . . . . . . . . . . . . . . . .198 500
9A . . . . . . . . . . . . . . . .205 500
10 . . . . . . . . . . . . . . . .212 500
11 . . . . . . . . . . . . . . . .219 500
12 . . . . . . . . . . . . . . . .226 500
Band IV
27 . . . . . . . . . . . . . . . .522 500
28 . . . . . . . . . . . . . . . .529 500
29 . . . . . . . . . . . . . . . .536 500
30 . . . . . . . . . . . . . . . .543 500
31 . . . . . . . . . . . . . . . .550 500
32 . . . . . . . . . . . . . . . .557 500
33 . . . . . . . . . . . . . . . .564 500
34 . . . . . . . . . . . . . . . .571 500
35 . . . . . . . . . . . . . . . .578 500
Band V
36 . . . . . . . . . . . . . . . .585 500
37 . . . . . . . . . . . . . . . .592 500
38 . . . . . . . . . . . . . . . .599 500
39 . . . . . . . . . . . . . . . .606 500
40 . . . . . . . . . . . . . . . .613 500
41 . . . . . . . . . . . . . . . .620 500
42 . . . . . . . . . . . . . . . .627 500
43 . . . . . . . . . . . . . . . . 34 500
44 . . . . . . . . . . . . . . . .641 500
45 . . . . . . . . . . . . . . . .648 500
46 . . . . . . . . . . . . . . . .655 500
47 . . . . . . . . . . . . . . . .662 500
48 . . . . . . . . . . . . . . . .669 500
49 . . . . . . . . . . . . . . . .676 500
50 . . . . . . . . . . . . . . . .683 500
51 . . . . . . . . . . . . . . . .690 500
52 . . . . . . . . . . . . . . . .697 500
53 . . . . . . . . . . . . . . . .704 500
54 . . . . . . . . . . . . . . . .711 500
55 . . . . . . . . . . . . . . . .718 500
56 . . . . . . . . . . . . . . . .725 500
57 . . . . . . . . . . . . . . . .732 500
58 . . . . . . . . . . . . . . . .739 500
59 . . . . . . . . . . . . . . . .746 500
60 . . . . . . . . . . . . . . . .753 500
61 . . . . . . . . . . . . . . . .760 500
62 . . . . . . . . . . . . . . . .767 500
63 . . . . . . . . . . . . . . . .774 500
64 . . . . . . . . . . . . . . . .781 500
65 . . . . . . . . . . . . . . . .788 500
66 . . . . . . . . . . . . . . . .795 500
67 . . . . . . . . . . . . . . . .802 500
68 . . . . . . . . . . . . . . . .809 500
69 . . . . . . . . . . . . . . . .816 500
 Loading...