

Page 1

Contents
Page
Setting up your television – connections – the aerial, other equipment, the scart AV socket 1
Setting up your television – putting batteries in the remote control, power supply, moving the television 1
Switching the television on and off – switching on, stand-by mode, switching off, automatic power saving 2
Tuning in the programmes 2-3
Tips for tuning – changing the programme number of a television channel
– picture interference from other equipment
– changing channels without leaving the installation mode 4
Features on the television – main power switch, menu, menu adjustments, aerial socket, scart socket 4-5
The Timer 5
Using the remote control – stand-by, programme selection, numbered buttons, volume, mute, menu,
menu adjustments – volume, balance, tone, brightness, contrast, sharpness,
colour and 24-hour timer, storing menu adjustments, PP button,
screen information 5-6
Teletext – turning teletext on and off, selecting a teletext page, moving to the previous or next page,
newsflash and sub-title pages, fast text pages (the red, green, yellow and blue buttons),
sub-pages, page hold, large character display, reveal answer 7
The scart sockets – to select the scart channels, video and RGB, automatic AV mode,
equipment that can be connected 8
How to connect scart cables 9-10
Scart socket technical information 11
Auto store tuning 11
Hotel mode 12
If something doesn’t seem to work – sound, picture, power, tuning in and setting up 12-13
Interference 14
Extra information 14
Safety information 14
Using and caring for your Goodmans television – position, ventilation, water and moisture,
fitting the stand (if provided) 15
– cleaning your television 15
Safety warnings 15
Specifications 16
Page 2
Setting up your television
Please read the safety information at the back of this booklet before you connect this television to the
electricity supply.
Make the connections
The aerial
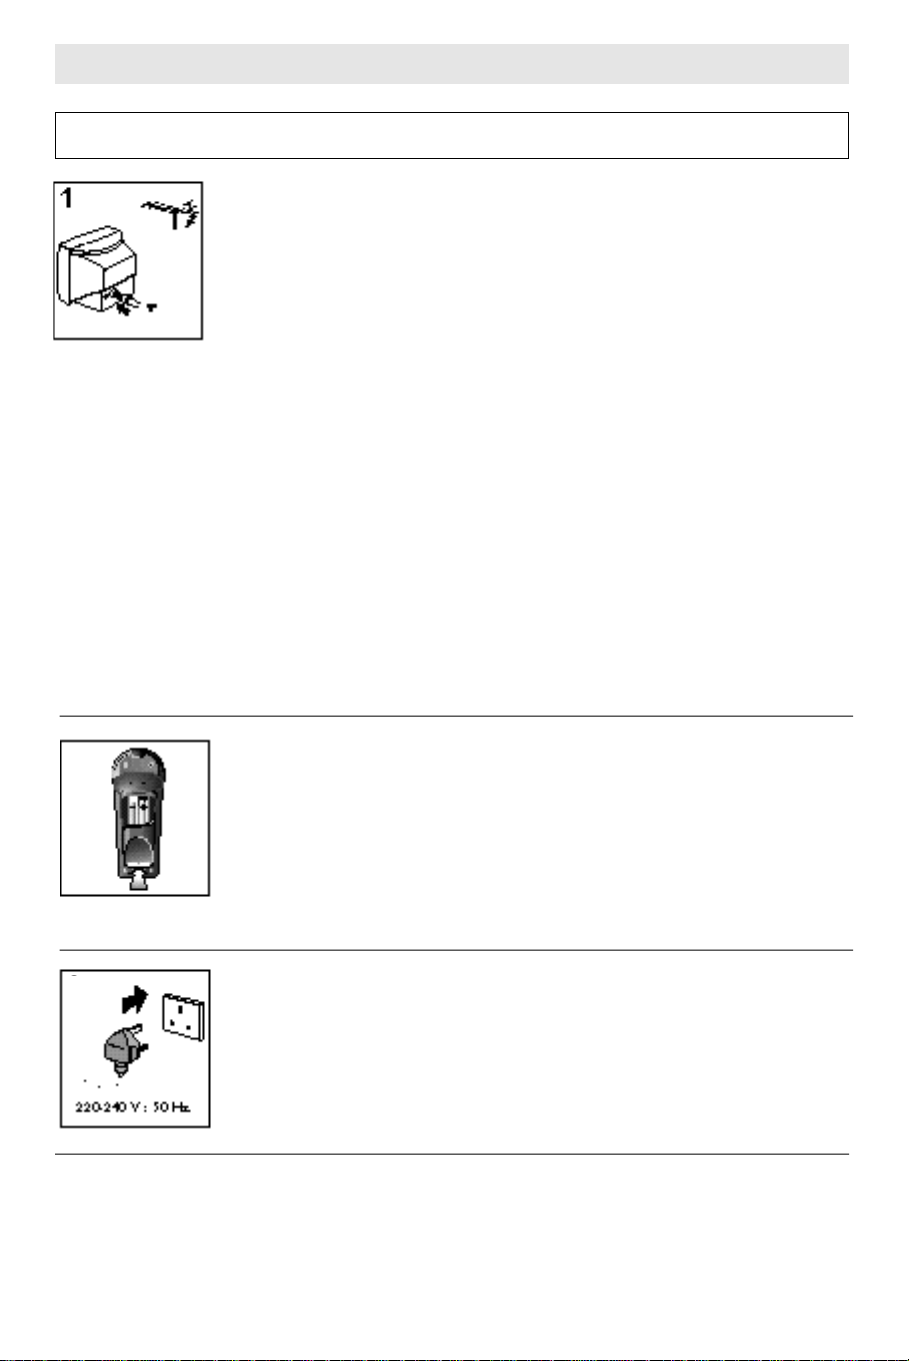
Connect the aerial lead to the aerial socket at the back of the television (see diagram 1).
You will need a good-quality aerial to receive teletext and nicam sound.
• If an aerial cable is supplied with your television, connect it between your old aerial
cable and the television. One end only plugs into your aerial cable and the other
end only plugs into your television. If you have a video recorder, replace the aerial
cable between your video recorder and your television with the one we have
supplied.
Other equipment
If you have a video recorder, you will need to connect the aerial lead to the video
recorder. Then, connect the aerial output lead from the video recorder to the television
aerial socket. There is information about connecting aerials and other equipment in
‘How to connect scart cables’ on page 9.
The scart (AV) sockets
This television has two special interconnecting sockets called ‘scart’ (AV). You don’t
have to use these straight away, but using scart cables gives you the best picture and
sound quality and can get rid of picture interference. And you will only get stereo
sound from other equipment if it is connected with a stereo scart cable. If you have
other equipment with scart sockets, please read ‘How to connect scart cables’ on
page 9.
2
3
• Slide your thumbnail under the edge of the battery cover where it says ‘open’ and
press with your thumbnail while lifting the cover up (see diagram 2).
• Put in the two batteries that came with your television (size AAA or LR3)
• Make sure that the (+) and (-) marks on the batteries agree with the (+) and (-)
marks inside the battery compartment.
• Replace the cover by sliding it into position and pressing down at the end marked
‘open’.
• Throw away the old batteries carefully. Do not put them on a fire.
Power suppl y
Plug your television into the mains supply (220 to 240 volts, 50Hz).
Moving the television
The earth’s magnetic field can affect the colour quality of the picture, but your television has a built-in
demagnetisation system to prevent this. The system works whenever the mains power is switched on while the
television is cool. So if you have to move the television, leave it for at least 15 minutes before you switch it on.
1
Putting the batteries in the remote control
Page 3

Switching the television on and off
Switching the television on
Switch the television on with the main power button A on the television. The red
light on the television control panel will light up. If the screen does not light up after a
few seconds, it probably means the television is in stand-by mode (see below).
Stand-by mode
Stand-by mode allows you to turn the television on and off with the remote control or the built-in timer. When
the television is on stand-by, it is nearly all switched off and uses little power. You can switch it back on again by
pressing any of the following buttons.
• One of the number buttons 0 to 9 on the remote control.
• The P + or P- button on the remote control.
• The + or - button on the front panel of the television.
The stand-by light will get dimmer and after a few seconds the screen will light up.
Press the red B button on the remote control to put the television back on stand-by. The red light on the
television control panel will light up when the television is on stand-by.
Switching the television off
The television remembers if it is on stand-by. If the main power switch is switched off when the television is on
stand-by, when you switch the television back on with the main power switch, the television will stay on
stand-by. Please see ‘Stand-by mode’ above for how to switch the television on.
Automatic po wer-saving featur e
If no signal is received through the aerial cable after about five minutes, the television will automatically turn to
stand-by mode (see ‘Stand-by mode’ above).
Tuning in the pr ogrammes
Before you star t
1 If you have a video recorder connected with the aerial lead, switch it on to produce a test picture, or play a
video tape.
2 If you have a satellite receiver (or any other equipment as well as the video recorder) connected with the
aerial lead, make sure that mains power is supplied to it, and that it is on stand-by.
3 Switch your television on. If the screen does not light up, please see ‘Switching the television on’ on page 2.
We recommend that you follow the instructions below, but there is another way of tuning in the programmes
which automatically stores all the signals your television can receive. Afterwards you can store the channels on
the appropriate programme numbers. For example, BBC 1 on programme one, BBC 2 on programme two and
so on. To do it this way, please read ‘Auto store tuning’ on page 11.
2
Page 4
Which buttons to press
on the remote control
What the screen will sho w
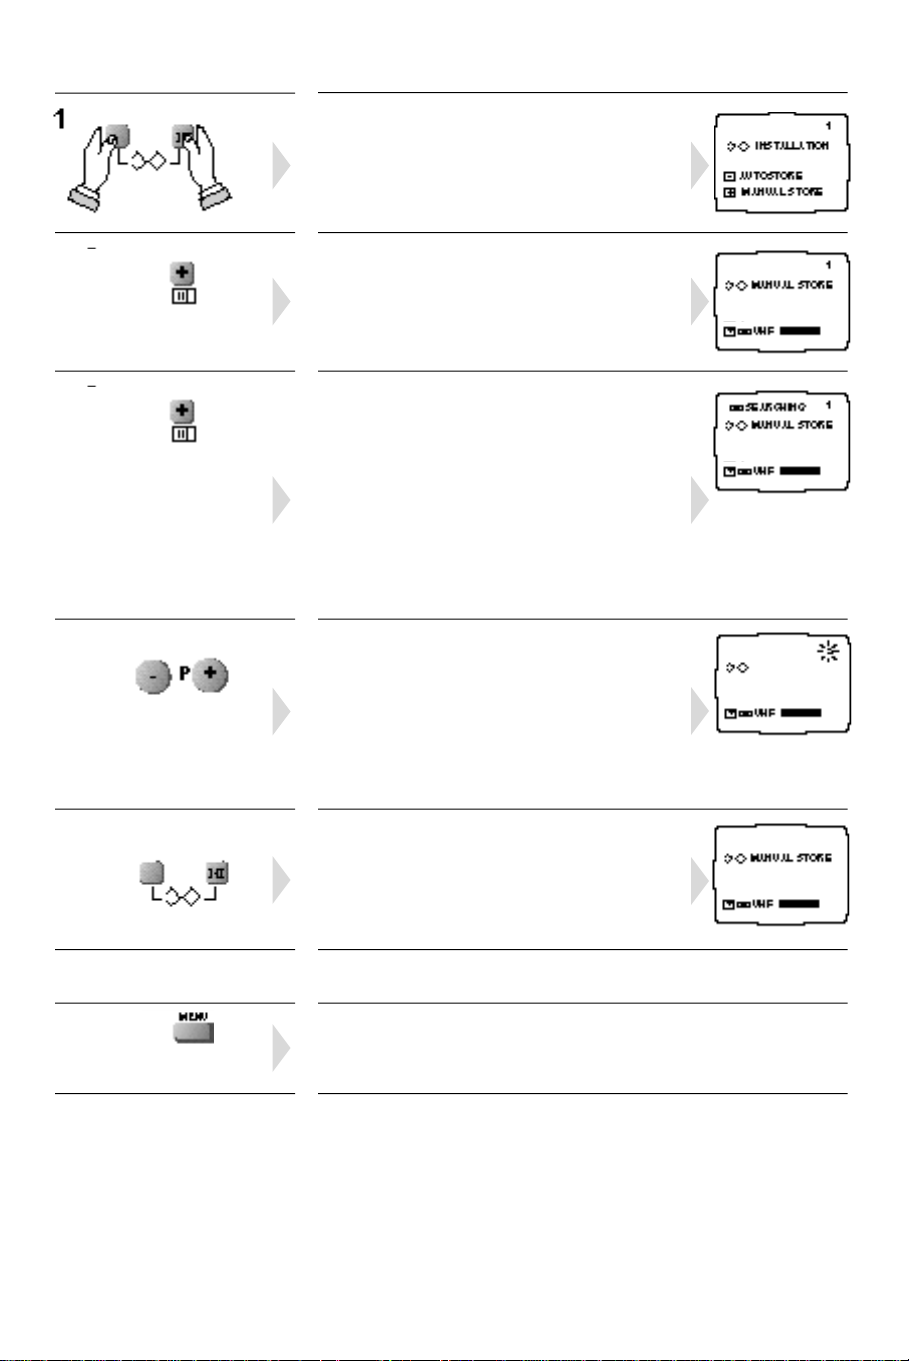
When N and Q are pressed together, the
installation menu will appear on the screen.
The symbols are just underneath the buttons.
2
3
4
5
Press the menu + button and ‘manual store’ will
appear on the screen.
Press the menu + button again and ‘searching’ will
appear on the screen. A bar on the screen will
move to show the progress of tuning. When the
television finds a signal, ‘searching’ will go off the
screen, and the programme number will flash.
If the picture quality is poor, there may be a better
signal on another frequency, so start searching
again by pressing the menu + button again.
The best signals are usually in a group, one after
the other.
When your television has found a good signal,
decide which programme number you want it on,
for example programme 1 for BBC1. Make sure
you can recognise the test picture from any other
pieces of equipment if you have them connected.
While the programme number is flashing, press the
P+ or P- button to change the number. You can’t
use zero.
When you press N and Q together again, ‘stored’
will appear on the screen and the television will
store the television channel on the programme
number you have chosen.
STORED
MANUAL STORE
2
6
7
Repeat steps 3 to 6 to store each programme.
Press the menu button twice to leave the manual
store display.
3
Page 5
Tips for tuning
Changing the pr ogramme number
of a television channel
1 Press the N and Q buttons together to get the
installation menu on the screen.
2 Press the menu + button to get the manual store
menu on the screen.
3 Select the channel you want to change by
pressing the P+, P- or the 0 to 9 buttons.
4 Press the N and Q buttons together again to
make the programme number flash.
5 Press P+, P- or the 0 to 9 buttons to enter the
programme number you want to give to that
channel. You can’t use 0 because it is reserved for
the scart (AV) channel.
6 Press the N and Qbuttons together once more
to make ‘stored’ appear.The television has now
stored the television channel on the programme
number you have chosen.
7 Repeat steps 3 to 6 if you want to change the
programme numbers of other channels.
8 Press the menu button twice to get back to
normal viewing. (You can turn off any of the
on-screen displays by pressing the menu button
several times.)
Picture interference from other
equipment
If you have used the aerial lead to connect a video
recorder, satellite receiver or other piece of equipment,
switch the equipment on one piece at a time and
check the picture on all your programmes. The pieces
of equipment that are not switched on must be on
stand-by. If any of your programmes have wavy lines
on the picture when the equipment is switched on,
you will have to change the output frequency of the
equipment. Please read the instruction book for the
equipment to find out how to do this. Change the
output frequency a little at a time (or in 8MHz steps)
and keep checking all your programmes.
When there are no wavy lines (or other interference)
on any of the pictures, re-tune the programme
number that you have chosen for your equipment (see
‘Tuning in the programmes’ on pages 2 to 3).
Do the same for each piece of equipment, but after
you’ve finished with each one, leave it switched on
while you check the next piece of equipment.
Continue until you have all the pieces of equipment
working together without interfering with each other.
If you cannot get rid of the interference, you may
have to connect the equipment with a scart cable, (see
‘How to connect scart cables’ on page 9).
Changing channels without leaving
the installation mode
As long as the programme number is not flashing,
you can change channels while the installation menu
is still on the screen.
Features on the television
Main po wer
switch
Menu adjustments
A
Push to
open the
control
flap
n
Please read ‘Switching the television on and off’ on page 2.
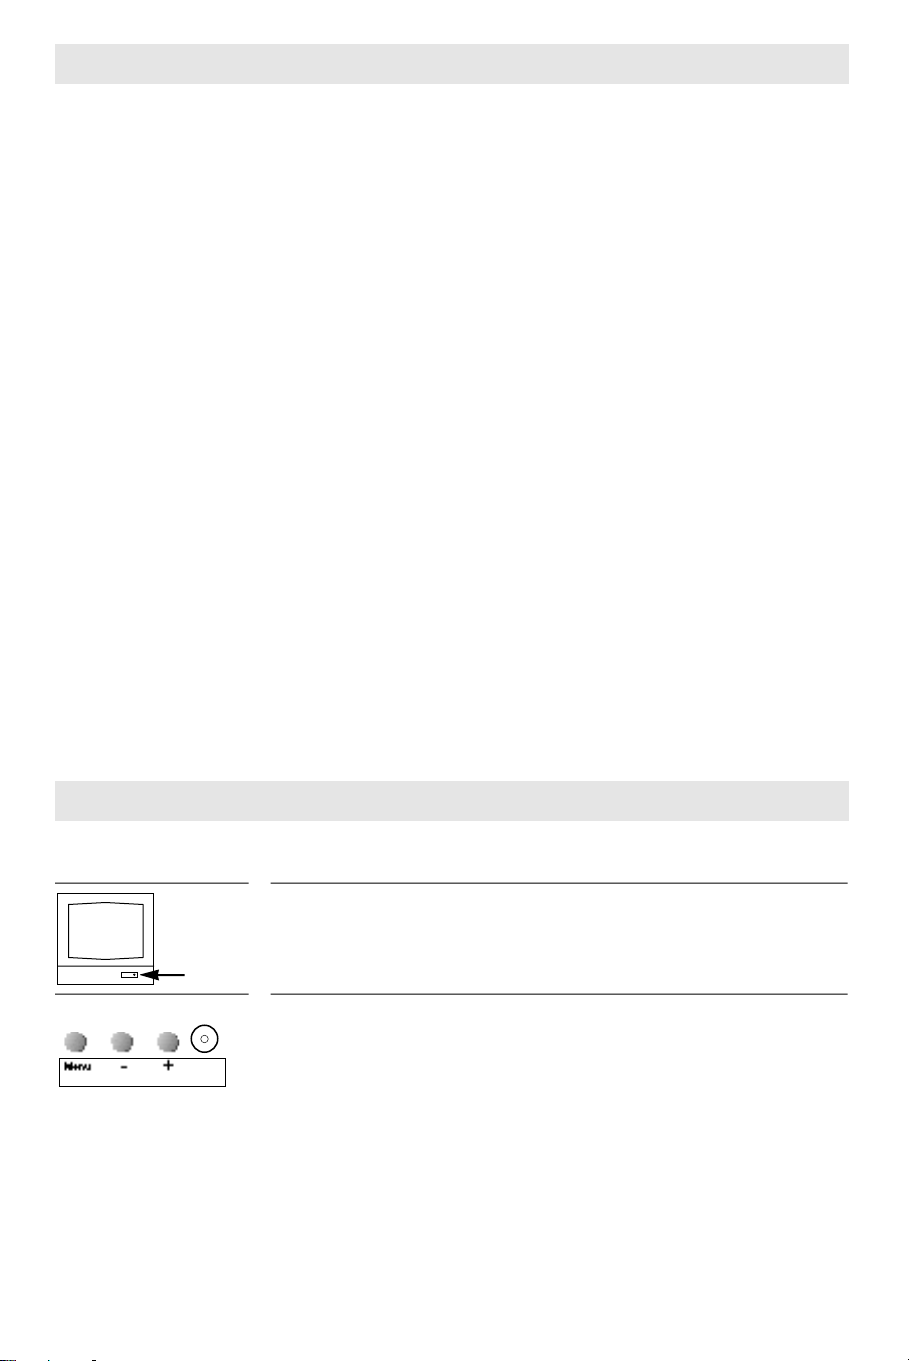
To open the control cover flap near the front right-hand corner of your television,
push on the raised pips near its upper edge and release it. The flap opens to reveal
the menu buttons and headphone socket. Push the flap to close it.
Keep pressing the menu button to display the symbols for the items you can
adjust: a (volume), b (balance), tone l (treble) or m (bass), A (brightness),
B(contrast), R (sharpness), C (colour) and C (the timer). If you don’t make
any adjustments, the menu display will automatically disappear after 10 seconds.
When there is no symbol shown on the screen, the - button selects the previous
programme number and the + button selects the next programme number.
Brightness, contrast, colour and sharpness are picture adjustments. Your television
displays a bar to show the adjustment. Press + to increase the item you are
adjusting, and the bar will get longer. Press – to reduce the item you are adjusting,
and the bar will get shorter. Volume is for making the sound louder or quieter.
Balance changes the balance of sound between the left and right loudspeakers.
Tone emphasises the bass in the sound if the on-screen bar is short, or the treble
in the sound if the on-screen bar is long.
4
Page 6
The timer
When the timer symbol is displayed during menu adjustments, you can set the television to automatically go on
s t a n d - by after a certain length of time. The time is displayed like a 24-hour digital clock (for example, 7pm is show n
as 19:00). Each press of the menu + button increases the time in 10 minute steps up to 24 hours, then it goes back
to ze ro again. You can reduce the time by pressing the menu - button. When 00:00 is displayed, the timer is off.
If you need to check how much time is left before the television will go on stand-by, press the J ( s c re e n
information) button on the remote control. During the last minute before the television switches off, a seconds
c o u n t - d own will be displayed. Press the J button again to make the time display go off the scre e n .
Connecting headphones
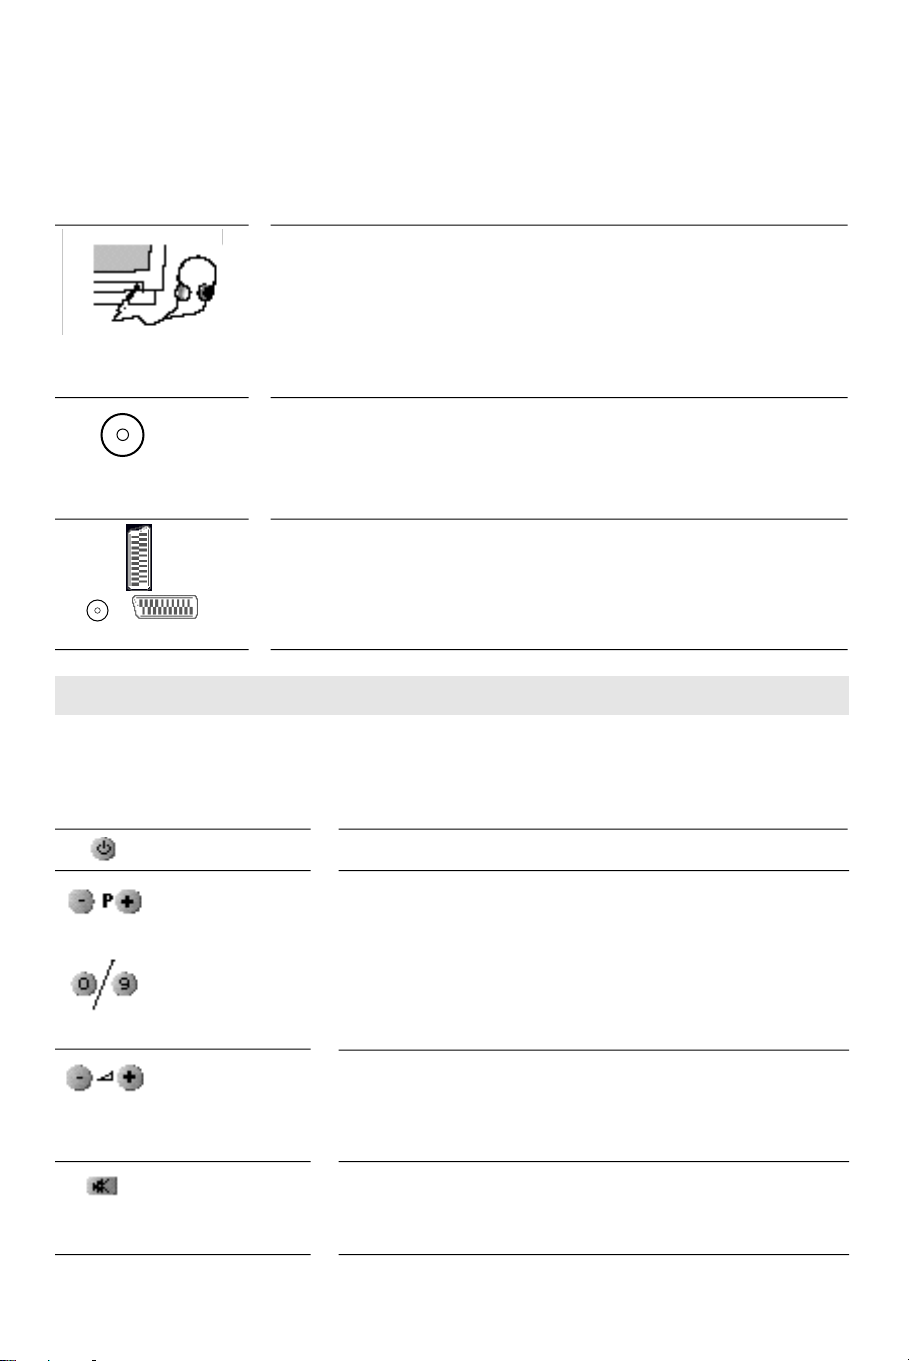
The headphone socket is under the control cover flap, next to the menu buttons.
How to open the flap is described in ‘Features on the television’ on page 4. You
can use headphones which have 32 ohms or greater impedance and a stereo
3.5mm headphone plug. When headphones are connected, no sound will come
from the television speakers. Use the – a + buttons on the remote control to
adjust the volume.
You connect your aerial to this socket; (see ‘Setting up your television’ on page 1).
9
Aerial socket
EXT 2
EXT 1
Scart sockets
If you want to connect other equipment which has scart sockets, please read ‘How
to connect scart cables’ on page 9. You will only get stereo sound from other
stereo equipment if it is connected with a stereo scart cable.
Using the remote control
When you press one of the buttons on the remote control, point the remote control at the television control
panel. Stay within 7 metres of the control panel and keep more-or-less straight in front of it.
The button The result
Standb y
Programme
selection
Numbered k eys
Volume
The television goes on stand-by (see ‘Stand-by mode’ on page 2).
The number is displayed on the picture for a short time.
P- selects the previous programme number and P+ selects the next
programme number. If the television is on stand-by, pressing P+ or Pwill turn it back on.
The number is displayed on the picture for a short time and the
programme changes. For a 2-digit number, you must press the second
number before the dash after the displayed number disappears.
+ turns the sound up.
- turns the sound down.
* If the sound won't get loud enough, hotel mode might be working.
Please read 'Hotel mode' on page 12.
Mute
If you press the button once, the sound will go off and cwill appear
on the screen. If you press the button again, the sound will come back
on and c will disappear.
5
Page 7
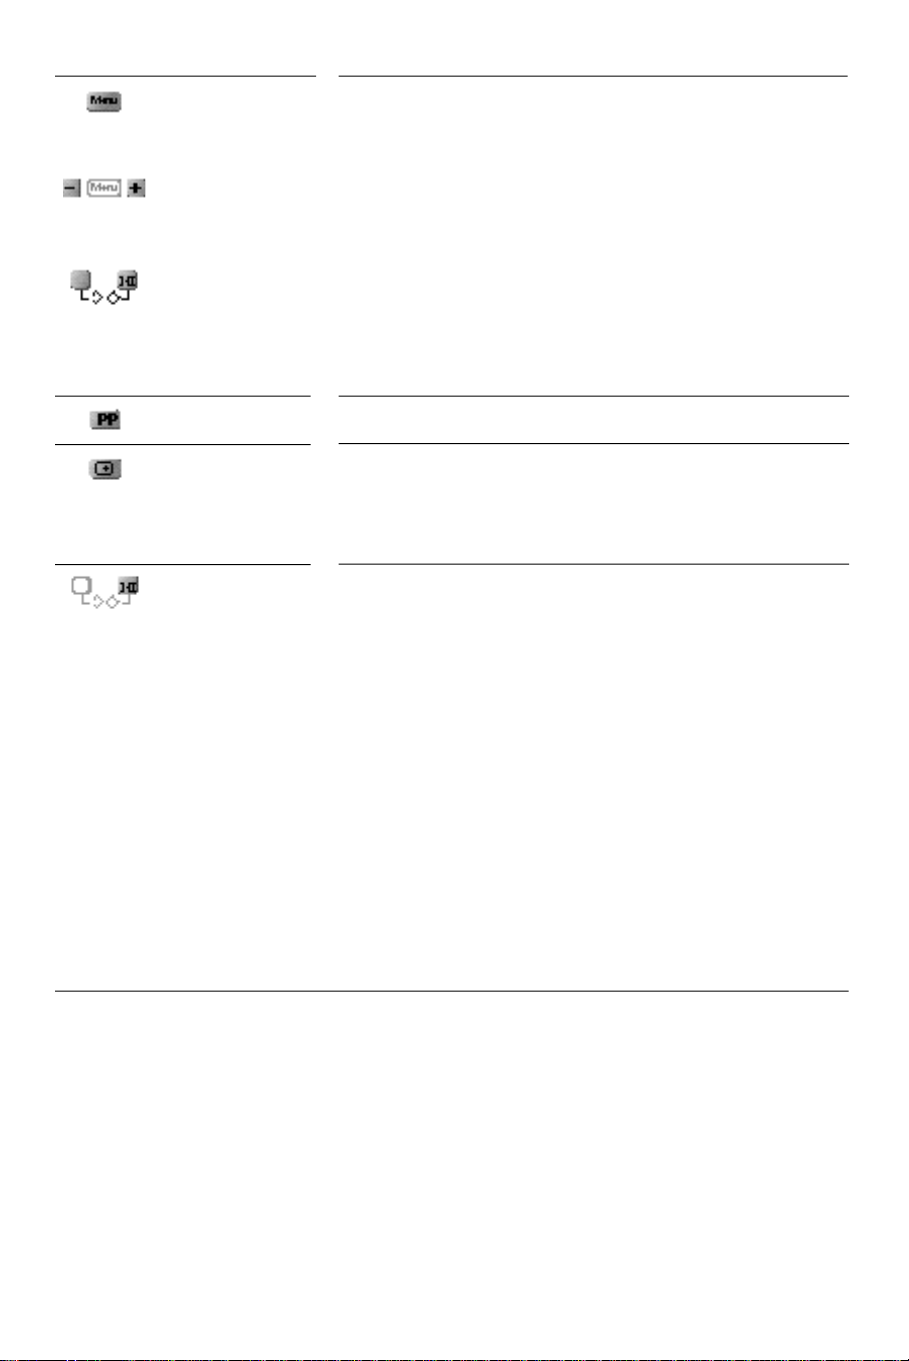
The button The result
Men u
Men u
adjustment
Storing
adjustments
Personal
preferences
Screen
information
Sound mode
Keep pressing the menu button to display the symbols for the items that
you can adjust: a (volume), b (balance), tone l (treble) or m
(bass), A (brightness), B (contrast), R (sharpness), C (colour)
and C (the timer).
You can adjust any of the items in just the same way as when you use
the menu and menu adjustment buttons on the television (please see
‘Features of the television’ on pages 4 to 5). The + and - buttons do not
change the programme number.
Keep pressing the menu button until the symbol of the item you want
to adjust is displayed (except the timer). Before the symbol goes off,
press the two buttons marked Q and N together (the symbols are just
underneath the buttons). ‘Stored’ will appear on the screen, and the
television will store all the menu adjustments you have made (except the
timer) as your personal preference (PP).
Press this button to recall your stored picture and sound adjustments.
Press this button to display the programme number on the right of the
screen. If the timer is on, the amount of time that is left before the
television will go on stand-by will also be displayed. Press this button
again to turn the display off. The type of sound is also displayed (see
below), but it only stays on the screen for about 5 seconds.
This button lets you choose the type of sound.
Which type of sound you can choose depends on the type of sound in
the television broadcast you are watching. Press the I/II button to switch
between the different types of sound. These are shown below with their
on-screen display symbol. The sound will normally go back to stereo
when you change channels.
On-screen display symbol Meaning
None FM mono sound
MONO Nicam mono sound
I or II Nicam dual language broadcast
STEREO Nicam stereo sound
If the signal strength is very poor, your television may automatically go
to FM mono sound.
If I or II is displayed, it means you are listening to the first or second
sound channel of a broadcast in which each channel carries different
sound, such as different languages.
Nicam sound
Nicam is an acronym for a way of broadcasting high-quality sound signals along with the television picture and
lower-quality monophonic FM sound. Different types of sound can be carried by NICAM, such as stereo,
different languages or high-quality mono.
6
Page 8
Teletext
The teletext service is an on-screen magazine that is
carried on a television broadcast signal. Teletext
information can also be carried by a signal fed into
the scart or AV input of the television.
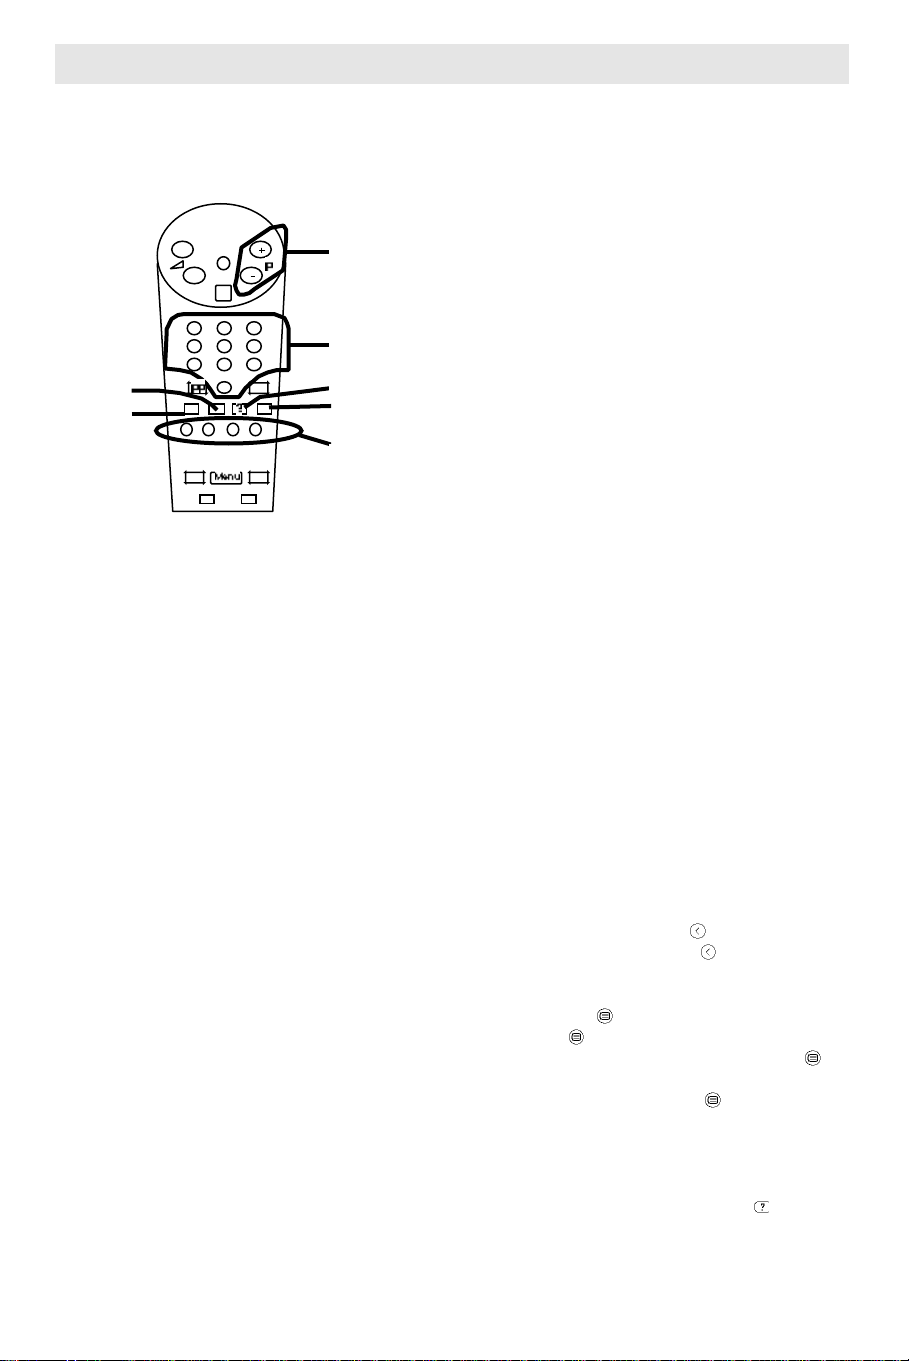
Moving to the
last or
next page
Selecting a
teletext page
Page hold
Turning
teletext
on and off
Reveal answer
Large character
display
Red, green,
yellow and blue
buttons
Turning teletext on and off
1 Turn on your television and choose a programme.
2 Press the L (teletext) button to switch the
television to teletext mode. As long as the
programme you have chosen has teletext, the main
index page will soon be displayed. If there is no
teletext programme, P100 will appear but the
screen will stay black. In this case, turn teletext off
by pressing the L button and try another
programme.
3 To turn teletext off, press the L button again.
Choosing a teletext pa ge
1 Use the number buttons on the remote control to
enter the page number you want to see. You must
enter the page number as a complete three-figure
number. The page number you have chosen is
displayed on the top left-hand side of the screen.
As soon as you enter the third number, the page
number in the middle of the top line of the
display will start to change, this shows that the
television is looking for the new page. When the
television finds the new page, the number in the
centre will stop changing.
2 To choose a new page, simply use the number
buttons on the remote control to enter a new page
number.
3 If you enter the wrong number, press more
numbers until you have entered three numbers,
then enter the correct page number.
4 To return to normal television viewing press the
L button again.
Moving to the last or next pa ge
To go to the page above the one you are on, press the
P+ button. To go to the page below the one you are
on, press the P- button. This television has a page
memory which stores a few pages above the one you
are reading. When you press the P+ button the next
page will appear almost instantly, as long as the
television has had time to store it since you last
changed page.
Newsflash and subtitle pa ges
These special pages are displayed as a small box of
text on the television picture. The page numbers are
given by the service provider (for example, on BBC1
Ceefax, page 888 gives you subtitles).
Fast text pa ges (the red,green, yellow and
blue buttons)
The four coloured page headings at the bottom of the
screen are associated with the displayed page. To see
the page corresponding to one of these headings, press
the matching coloured button. Each time you change
the page, while you are reading the page you just
selected your television is loading a new set of
associated pages. Once it has done this, you can
display any of these pages almost instantly by pressing
one of the coloured buttons.
Sub-pa ges
Some teletext pages contain too much information to
fit on the screen at once, so they are split up into
sub-pages and shown in order. The service provider
usually displays a label in the top right-hand corner of
the screen to show which sub-page is being shown.
For example ‘3/6’ shows that you are looking at the
third of six pages.
Pag e hold
When information on one teletext page will not fit on
the screen, sub-pages are shown in order (see
‘Sub-pages above’). To keep a sub-page on the screen
for longer than usual, press the button.
To cancel page hold mode, press again.
Large character displa y
Keep pressing the button to change the character
size. Press the button once to display the top half
of the page at twice its normal height. Press the
button again to display the bottom half of the page at
twice its normal height. Press the button again to
return the text to its normal size.
Reveal ans wer
Use this button on certain pages to reveal the
solutions to quizzes and so on. Press the button
once to reveal a hidden answer and press it again to
hide it.
7
Page 9
The scart sockets
The scart sockets at the back of the television are a convenient way of connecting audio and video (AV) signals
to and from the television. As the signals are in a more basic form than the signal at the aerial socket, they are
less likely to be affected by interference and other things that can reduce picture quality.
To select the scart channel
Press the 0 button on the remote control. ‘EXT 1’ will be displayed for a few
seconds and you will see the picture from any equipment that is connected to
the number 1 scart socket (if that equipment is switched on). If there is no
signal at the scart socket, the screen will remain dark. Press the 0 button again
and ‘EXT 2’ will be displayed to tell you that you have selected the number 2
scart socket.
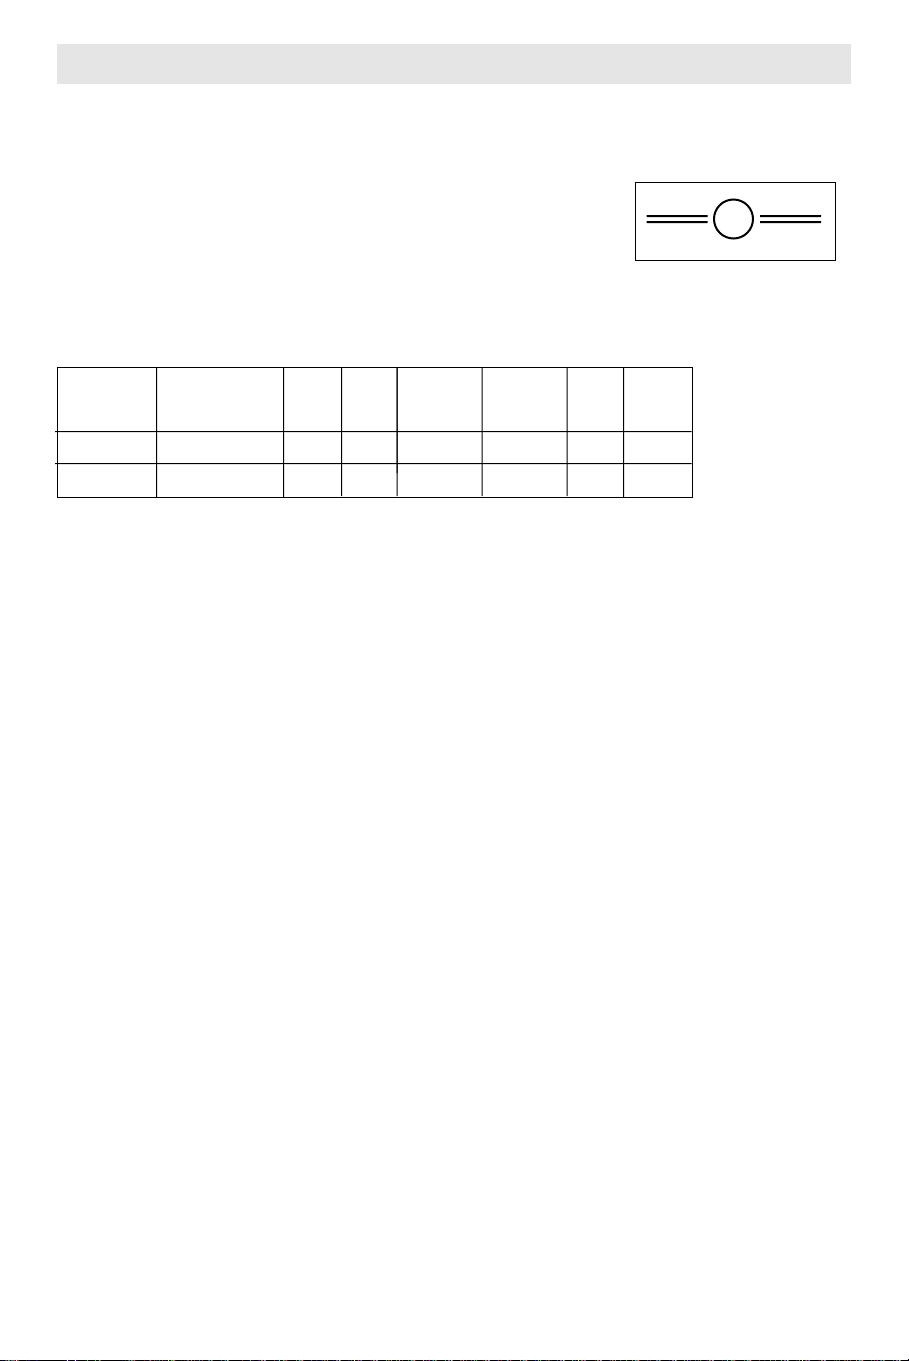
The table below describes the facilities supported by the scart sockets on your television.
Where the RGB
AV features Connector type AV AV AV switch AV output RGB blanking
in out (pin 8) comes from (pin 16)
EXT 1 Scart Yes Yes Yes Tuner Yes Yes
EXT 2 Scart Yes Yes Yes Screen No No
Video
Most equipment produces a ‘composite video, blanking and synchronisation’ signal (CVBS), usually just called
‘video’.
RGB
The sharpest and clearest possible picture is reproduced from separate red, green and blue signals (RGB). Only
certain computers and high-quality digital equipment produce this form of signal. Only the EXT 1 scart socket
is wired for RGB input.
0
Automatic AV mode or video switching
Some equipment provides an automatic switching signal, so that the video recorder (and so on) ‘tells’ the
television to reproduce its video and audio signals. For example, if you play a video tape, you will not have to
press the ‘0’ button on your remote control, as the television will automatically switch to the video channel.
Automatic switching priority
EXT 1 has priority over EXT 2. If a piece of equipment tells EXT 2 to come on at the same time as a piece of
equipment tells EXT 1 to come on, the television will always go to EXT 1. You can change between EXT 1 and
EXT 2 by pressing the zero button on the remote control.
Equipment that can be connected to the television
You can usually connect video recorders, camcorders, satellite receivers, PAL video disc players, audio amplifiers
and video games to this television, but we cannot guarantee that all combinations of equipment will work. You
can buy many different cables to connect these things.
Recording from the television
You can connect a video recorder to scart socket EXT 2 and record from the television. Whatever you see on the
screen is what you will record through the scart socket of the video recorder, unless you are displaying RGB
(please see above for a description of RGB).
8
Page 10
How to connect scart cables
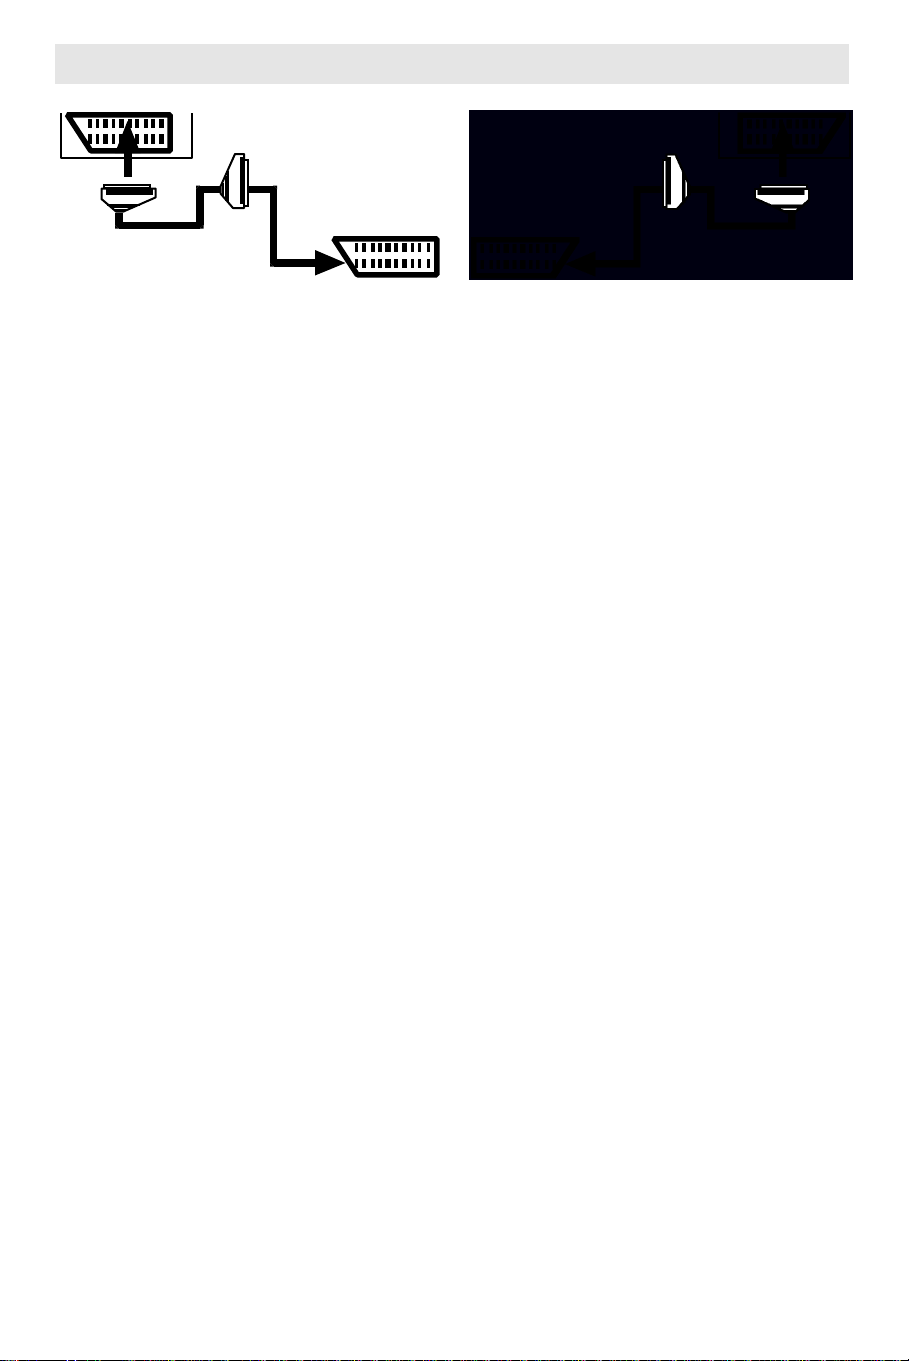
The scart socket on your video recorder
The scart plugs and cable
The scart sockets on your television
How to connect a video recorder onl y
Connect the video recorder scart socket to the EXT 1
scart socket on your television. If your video recorder
has two scart sockets, use the one marked TV. The
television aerial should go to the video recorder, then
to the television.
How to connect a satellite receiver onl y
Connect the satellite receiver scart socket to the
EXT 1 scart socket on your television. If your satellite
receiver has more than one scart socket, use the one
marked TV. Your television aerial should go to the
satellite receiver, then to your television.
How to connect a satellite receiver with one
scart socket and a video recorder with one
scart socket
If your video recorder has only one scart socket,
connect it to the EXT 1 scart socket on your
television. Your television aerial should go to the
satellite receiver, then to the video recorder, then to
your television. So that you can record satellite
broadcasts, you will have to tune one programme
number on your video recorder to the satellite receiver
(please see your video and satellite instruction books
for details of how to do this). So that you can watch
satellite television while you are recording normal
television, you should also tune one programme on
your television to the satellite receiver (please see
‘Tuning in the programmes’ on pages 2 to 3 for
details),
How to connect a satellite receiver with one
scart socket and a video recorder with tw o
scart sockets
If your video recorder has two scart sockets, connect
one (which may be marked TV) to the EXT 1 scart
socket on your television and connect the other to
your satellite receiver. Your television aerial should go
to the satellite receiver, then to the video recorder,
then to your television. You may need to read your
video recorder instructions to find out which is the
best scart socket to connect to your television and
The scart socket on
another piece of
equipment
how to record from the scart socket you have
connected to your satellite receiver. So that you can
watch satellite television while you are recording
normal television, you should also tune one
programme on your television to the satellite receiver
(please see ‘Tuning in the programmes’ on pages 2
to 3).
How to connect a satellite receiver with
three scart sockets and a video recorder
with one or two scart sockets
If your video recorder has two scart sockets, only use
one of them. Connect your video recorder to the scart
socket marked VCR on the satellite receiver. You may
need to read your video recorder instructions to find
out which is the best scart socket to use and how to
record from the scart socket you have connected to
your satellite receiver. Connect the scart socket
marked TV on the satellite receiver to the EXT 1
scart socket on your television. Your television aerial
should go to the satellite receiver, then to the video
recorder, then to your television.
• For all of these connections you must put the
satellite receiver on stand-by to send the audio and
video signals from the video recorder to your
television. If you want to watch satellite while you
are recording normal television, select a channel
on the satellite receiver and press the 0 button on
your television remote control.
• If you decide to watch normal television while you
are recording satellite, you may find you
automatically get satellite pictures and sound from
your television. If this happens, use your remote
control to select the programme number you want
to watch.
What is the second scart socket for?
There are other possible combinations besides the
ones we have given you. You might want to change
the connections and use of the extra socket. You may
also find it useful for feeding sound signals to a
surround sound amplifier.
9
Page 11
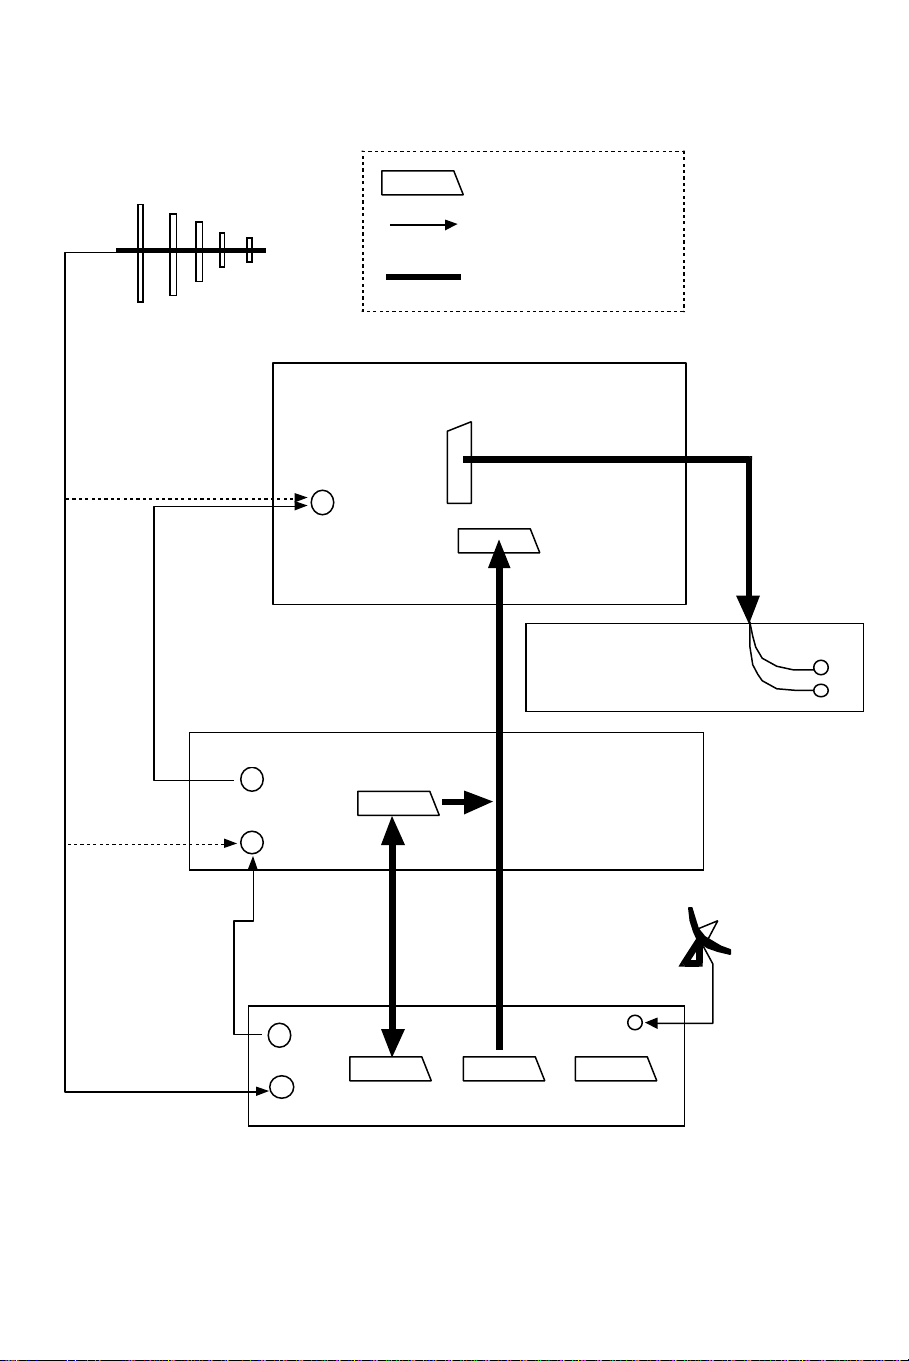
Typical connections for a satellite receiver with three scart sockets and a
video recorder and a sur round sound amplifier .
Television aerial
Connect the aerial here for
a television only.
Aerial cable
Aerial out
Aerial in
Aerial in
EXT 2
EXT 1
This is a scart socket.
Arrows show the direction
the signal will flow through
the wires.
Thick lines represent scart
cables.
Television
Dolby Pro-Logic amplifier
Connect the scart cable
here for a television with
a video recorder only.
Connect the aerial
here for a television
with a video
recorder only.
Connect aerial here
for a television with a
video recorder and
satellite receiver.
Aerial cable Scart cable
Aerial out
Aerial in
Video recorder Television Decoder
10
Scart cable
Satellite receiver
Satellite
dish input
Page 12
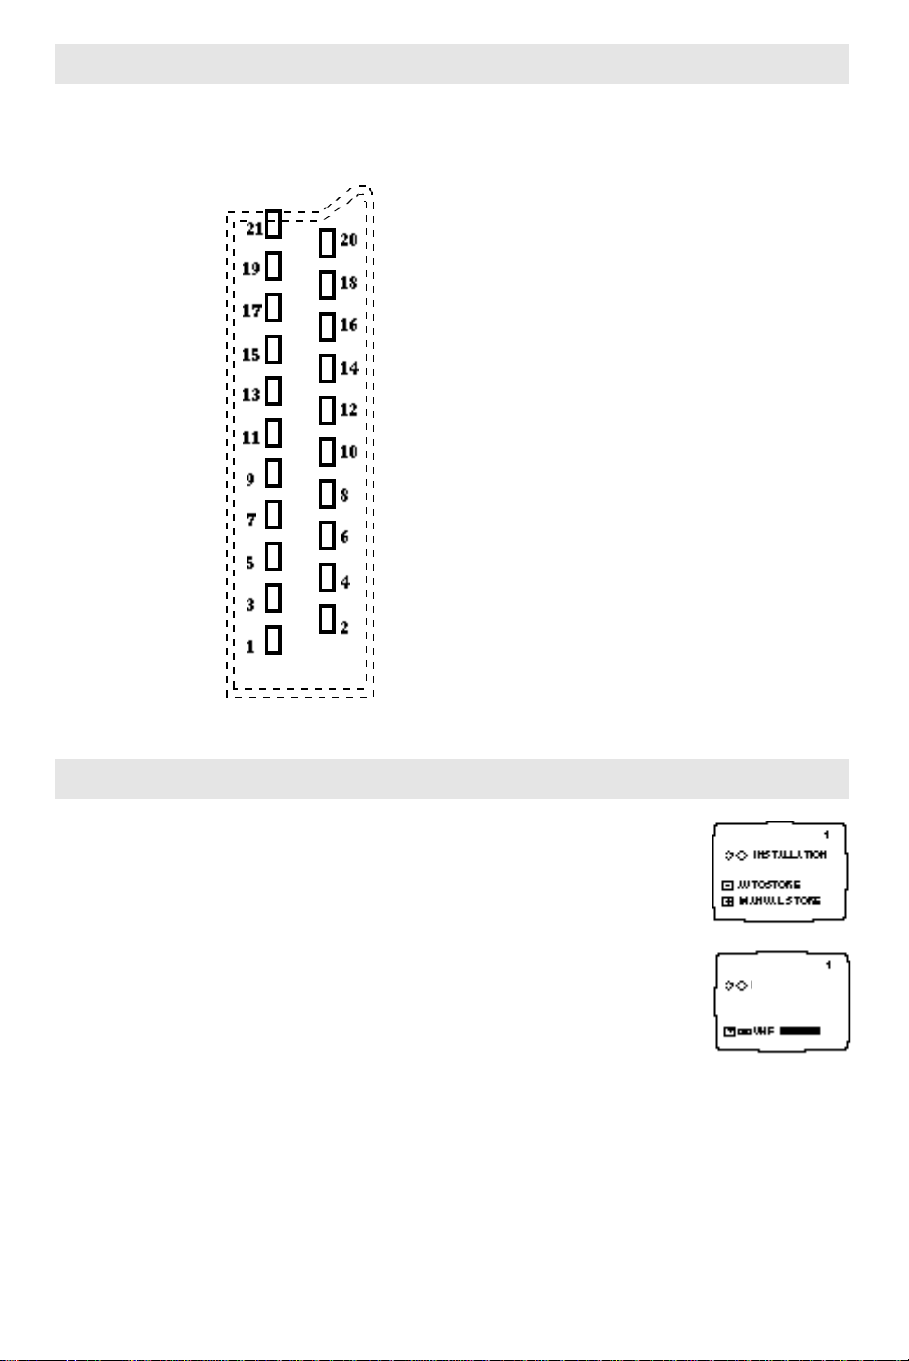
Scart socket technical information
We have included this technical information especially for technicians.
A view looking into the scart socket
Socket ground
CBVS (video) output
CBVS ground
RGB red input (ext 1 only)
RGB red ground (ext 1 only)
RGB green input (ext 1 only)
RGB green ground (ext 1 only)
RGB blue input (ext 1 only)
RGB blue ground (ext 1 only)
Audio output,left channel
Audio output,right channel
Auto store tuning
CVBS (video input)
RGB blanking ground (ext 1 only)
RGB blanking (ext 1 only)
Not used
Not used
Not used
AV switch
Audio input,left channel
Audio ground
Audio input,right channel
RGB blanking input
(pin 16)
1 to 3 volts, 75 Ω, to blank the
screen ready for RGB input.
An un-synchronised RGB picture will
appear if you try to switch to normal
television mode when the RGB
blanking signal is present.
AV switch input (pin 8)
High impedance input, + 12V
switches the television into AV mode.
Signal le vels
Composite video input and output;
1 volt, 75 Ω
Synchronisation only; 0.3V peak,
negative going, 75 Ω
RGB inputs 0.7 volt, 75 Ω
Audio input 0.5 volts RMS, 10 kΩ
Audio output 0.5 volts RMS, 1kΩ
With auto store tuning your television can automatically find and store all the
television channels you can receive. Afterwards, you can choose the ones you want
to keep and move them to the programme numbers you want to use.
1 Press the N and Q buttons at the same time to select the installation menu.
2 Press the menu – button to make ‘autostore’ appear on the screen.
3 Press the menu + button to start auto store. ‘Searching’ will appear on the
screen, and for several minutes your television will search for television channels.
4 When the search is finished, ‘installation’ will come back on the screen. All the
channels that your television finds will be on the highest programme numbers
(70, 69 and so on) so that you can give them the programme numbers you
choose. You will probably want to sort out the clearest channels and store BBC 1
to programme number 1, and so on. To do this, please read ‘Changing the
programme number of a television channel’ on page 4.
5 Press the menu button to leave the installation menu.
11
SEARCHING
AUTO STORE
Page 13
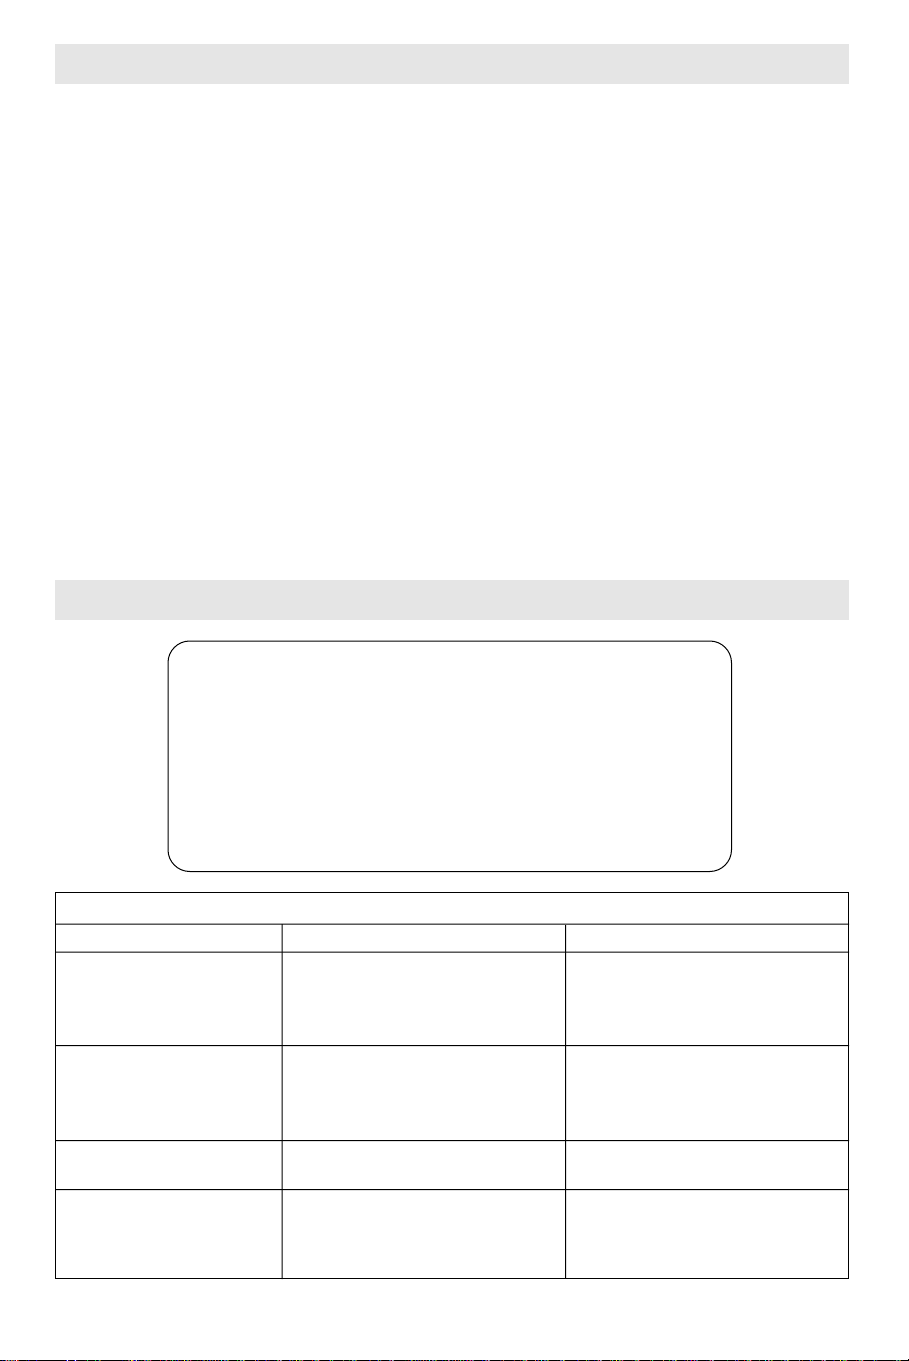
Hotel mode
Hotel mode stops anyone from accidentally changing the personal preference (PP) control settings and tuning of
your television by locking the menus which are used for tuning in the programmes; and lets you prevent anyone
turning up the volume above a limit that you decide.
To turn on hotel mode
1 Select a programme number to see and hear a programme.
2 Adjust the sound volume to the loudest you want.
3 Select programme number 38 (it doesn’t have to be tuned to a television channel).
4 Press the menu button on the front of the television and at the same time press the J button on the remote
control. Keep pressing them and wait until H+ appears on the screen. This will take at least 4 seconds.
5 Press the B button on the remote control so your television goes on stand-by.
6 Press one of the number buttons (1 to 9) to turn your television on again. The H+ will have disappeared but
the maximum volume limit and tuning menu lock will be working.
If anyone presses the N button and Q button together, LOCKED will be displayed on the screen for a few
seconds to show that hotel mode is working.
To turn off hotel mode
Repeat steps 3 to 6 above. In step 4, H– is displayed to confirm that the hotel mode is going to be turned off.
Tuning and personal preference control settings are described under ‘ Tuning in the programmes’ on page 3 and
‘Using the remote control’ on page 6.
If something doesn’t seem to work
Please check through the guide below before contacting
If there is something about your equipment which you do not
Symptoms
No sound
Crackling noises or distorted
sound.
NICAM switches to mono
Maximum volume is too quiet.
When you adjust volume with
the menu buttons, the bar does
not go right across the scre e n .
Comet Service or your Comet store.
understand, please contact the
Comet Helpline during normal office hours on:
0113 2793520
You cannot book service calls on this number.
Sound
Possible causes
• The volume is set to minimum.
• The mute is switched on.
• The headphone plug is inserted
Interference from cars, fluorescent
lights, a video recorder, a radio
broadcast, a personal computer or
other electrical equipment.
A weak signal or a NICAM mono
broadcast.
Hotel mode is turned on.
• Turn the volume up.
• Press the mute button to release
‘mute’.
• Unplug the headphones
Turn off one piece of equipment at a
time to see if the interference clears.
Have your aerial system checked.
Turn off hotel mode.
( Hotel mode is explained on page 12.)
What to do
12
Page 14
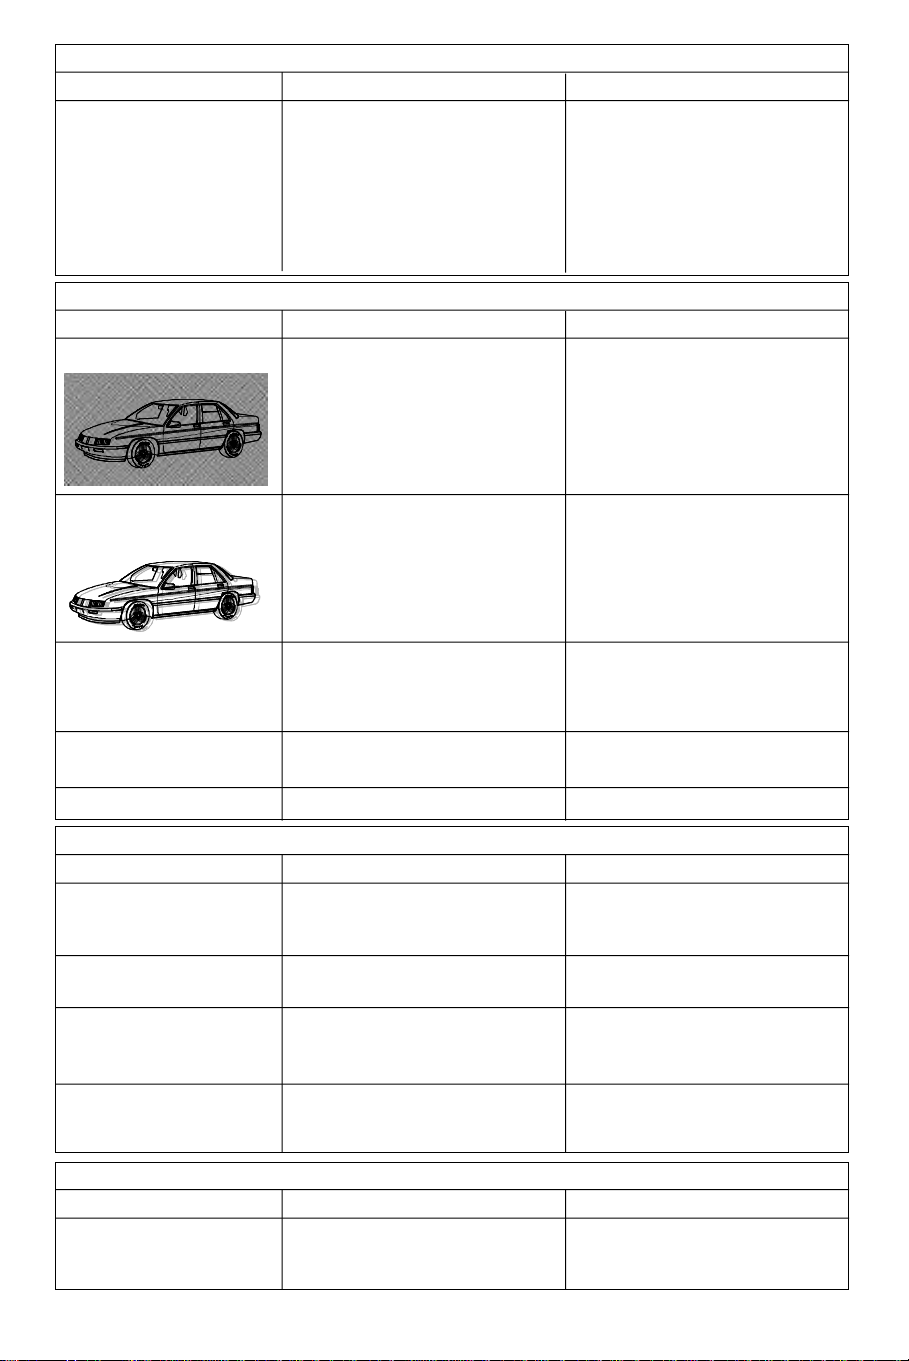
Symptoms
No stereo sound from your
video recorder
Symptoms
Snowy picture
Extra outlines on objects in
the picture (ghosts).
Sound
Possible causes
A mono scart lead is being used to
connect the video recorder to the
television.
The video signal is being watched on
a television channel.
AV mono is on the sound menu.
Picture
Possible causes
The outside aerial has moved, or is
damaged or has been disconnected.
Your video recorder could be faulty.
The aerial is receiving reflected
signals from hills or buildings.
What to do
Check that the scart lead is stereo.
Check the video recorder is
connected to the television through
an AV (scart) lead, then switch the
television to AV mode (press the 0
button)
Select stereo on the sound menu.
What to do
If you have a video recorder put the
aerial directly into the television. If
this doesn’t solve the problem then
the aerial could be faulty. If the fault
clears, the video recorder could be
faulty.
Have your aerial system checked.
Have your aerial system checked.
Try to tune in a better-quality signal
from the same television station.
Spots or streaks on the
picture.
No picture.
Jumbled teletext characters.
Symptoms
Television seems ‘dead’ – no
lights come on and nothing
works.
Symptoms
‘Locked’ is displayed when
you try to tune the television
in or store something.
Interference from electric motors,
motor vehicles, welding equipment,
neon signs, radar installations and so
on.
Brightness and contrast levels are set
to minimum.
Poor-quality signal
Power
Possible causes
Mains plug is disconnected.
Main power switch is off.
Mains supply is missing. Are some
other pieces of equipment not
working?
The fuse in the plug has blown.
Tuning and setting up
Possible causes
Hotel mode is turned on.
See the ‘interference’ section on page
14.
Increase the brightness and contrast
using the remote control.
Have your aerial system checked.
What to do
Plug the television into the mains.
Check the power switches on the
television and on the plug.
Check the fuse or circuit breaker in
your main fuse box.
Check what could have made the
fuse blow.
What to do
Turn off hotel mode. (‘Hotel mode’
is explained on page 12.)
13
Page 15
Interference
Useful information on how to recognise and deal with
interference is given in the booklet ‘Advice on
television and radio reception’, (reference RA179)
which is published by the Radiocommunications
Agency. For a copy of this booklet, please phone
0171 215 2150 or write to:
The Library
The Radiocommunications Agency
Waterloo Bridge House
Waterloo Road
London SE1 8UA.
Extra information
The following things are normal, so don’t worry
about them.
When you touch the screen surface there may be
some faint crackling noises and the hairs on your skin
may stand on end. This is caused by a little static
electricity and is quite harmless.
A bright object with a lot of fine detail may show
coloured bands. This is caused by the limitations in
the broadcast system, not a fault in the television.
Safety information
Mains suppl y
This television is designed to run from a 220 - 240Volt, 50Hz AC mains supply only. If you plug it into another
power source, it may damage it. Always check that the rating label on the back cover of the television says
220 - 240V AC (~), 50Hz before you plug it in.
Mains plug
We have fitted this television with a standard UK moulded mains plug. If a standard plug is not suitable for your
mains socket, you can buy a special adapter locally.
If the moulded plug is cut off, remove the fuse from the plug and get rid of it safely. If you put it into a 13A
socket, it would be dangerous.
Never use the moulded plug without the fuse cover fitted. If the cover is lost, you must replace the plug.
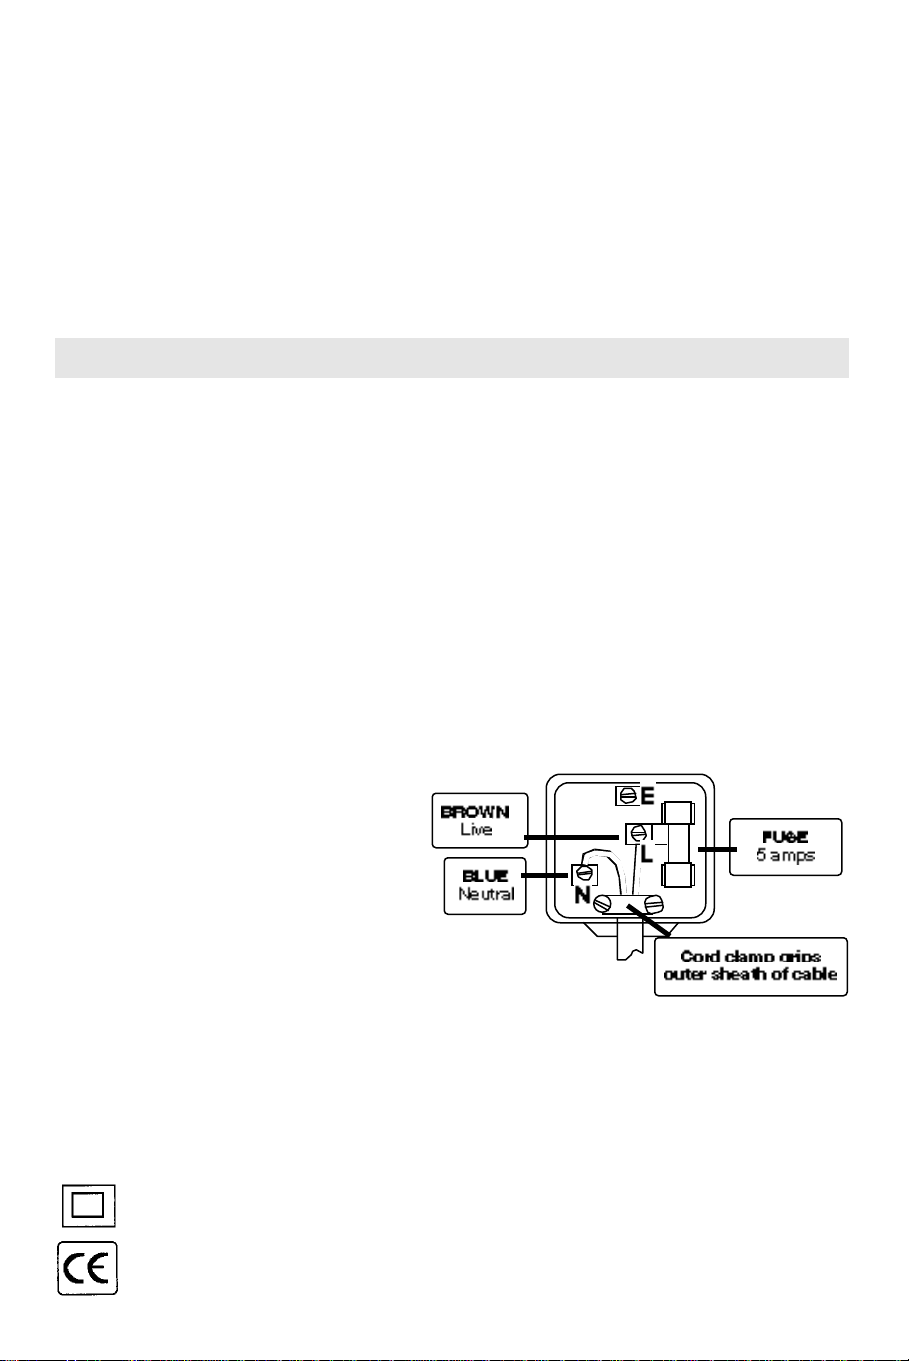
Mains plug wiring
The colours of the wires in the mains lead of this television may not match the coloured markings of the mains
plug terminals. You can identify the correct terminals as follows.
The wire that is coloured brown is
connected to the terminal that is marked
with the letter L or coloured red.
The wire that is coloured blue is
connected to the terminal that is marked
with the letter N or coloured black.
You do not connect anything to the earth terminal
which is marked E or “z” or coloured green
or green and yellow.
The cord clamp
You must make sure the lead is firmly secured under the cord clamp.
Mains fuse
If you use a 13 amp (BS 1363 type) plug, you must have a 5 amp (BS1362 type) fuse fitted. If you use any other
type of plug or connection, you must fit a 5 amp fuse in the mains plug or adapter, or at the household’s main
fuse box feeding the outlet to which this television is connected.
Symbols
This symbol means that the television is double insulated and you do not need an earth
connection.
This symbol means that this television keeps to the European safety and electrical interference
directives
14
Page 16

Using and caring for your Goodmans television
We have designed and made this television to meet UK safety standards. But like with any television, you must
take care to get the best results. Here are a few tips to help you do this.
Position
Put your television away from radiators and other sources of heat, in a place where light does not shine directly
on the screen. Do not put objects which have magnets in them next to the television unless the instructions with
those objects say they can be used next to a television.
Ventilation
Put the television on a hard, flat surface where curtains and furniture cannot stop air flowing through the
ventilation slots. If the television is in a cabinet, allow a gap of at least 10 centimetres all around.
Water and moistur e
Do not use the television near water, for example near a bath, wash bowl, kitchen sink, laundry tub, swimming
pool, in a wet basement or in any damp environment. Do not put liquids, including flower vases on top of the
television.
Fitting the stand (if one is pr ovided)
Only use the stand that is provided for the television, and make sure that the fixings are tightened properly.
A diagram showing how to assemble the stand is packed with it. Never use a make-shift stand or legs fixed
with wooden screws.
Cleaning your television
Unplug the television and use only a lightly-dampened soft cloth. Do not use chemical solvents or strong
detergents as these may damage the cabinet finish.
Read these instructions carefully before you try to use the television.
Protect the mains lead. You must make sure the mains lead cannot be walked on, crushed, chafed, cut, or so
on.
Changing the mains plug. If you have to change the plug or remove it, or if the fuse in the mains plug needs
changing, read the instructions about wiring and replacing the mains plug or fuse we have given in this booklet.
Avoid harsh conditions such as wet or damp places, high humidity, places with extremely high or low
temperature and places which have strong sunlight or are dusty.
Never let anyone, especially children, push objects into holes and ventilation slots.
Make sur e that all electrical connections are made properly according to the connection and wiring instructions
we have given.
Don’ t continue to use your television if you have spilt liquids in it, if it is damaged in any way or if it does not
work normally. Immediately unplug the television and get expert advice.
Don’ t leave the television switched on when you leave the room unless the timer is being used.
Safety warnings
To prevent electric shock,do not take the back co ver off this television.
If anything goes wrong,don’t try and fix it yourself, get a qualified service a gent to look at it.
Protect this television from rain or moistur e.
Unplug this television from the mains supply when you are not using it for a long period of
time .
15
Page 17
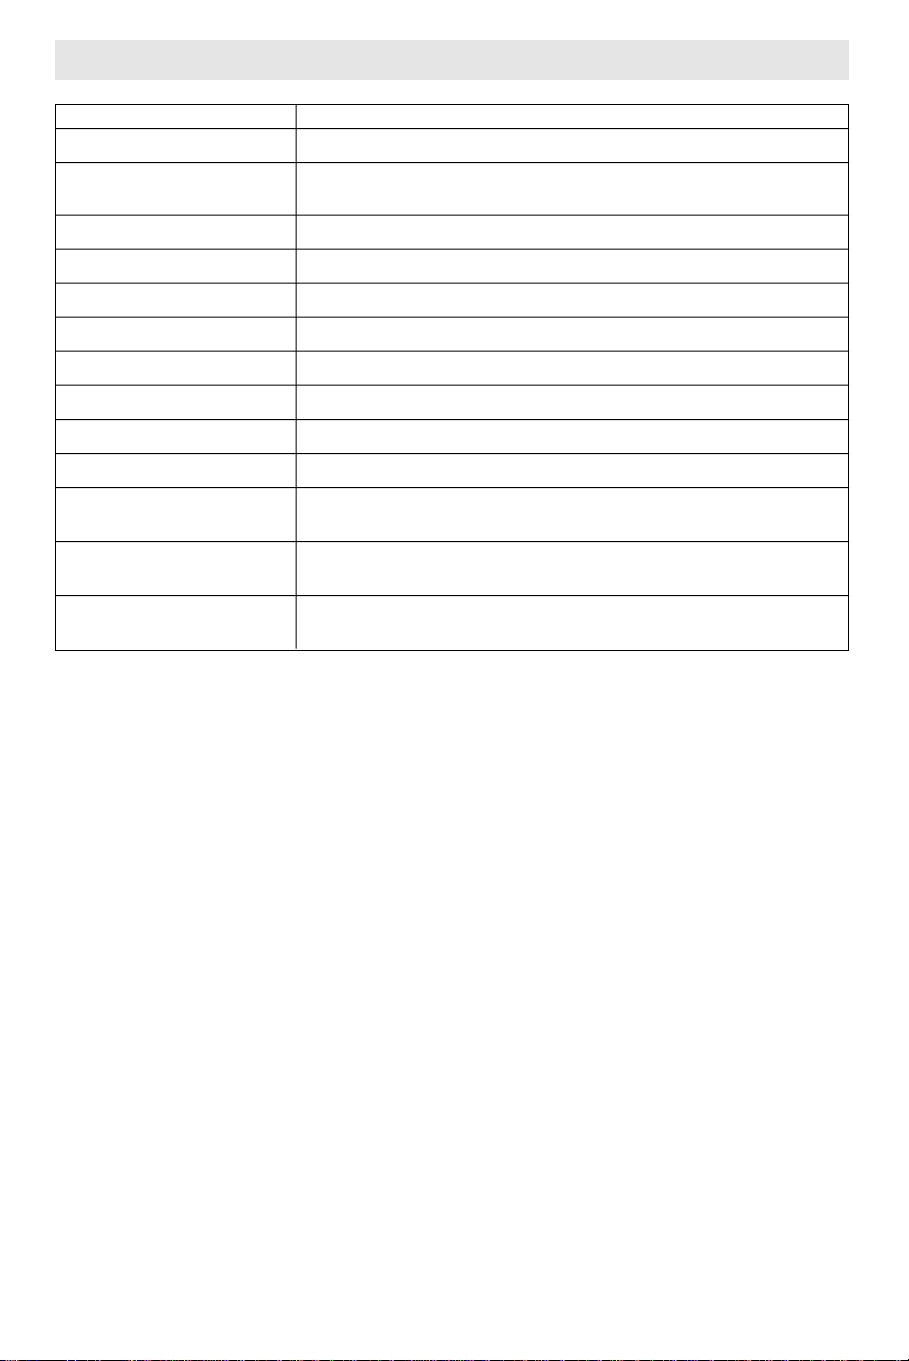
Specifications
Television standard PAL - I
Sound system
AV features
Mains voltage
Power consumption
Sound output power
Headphone type
Aerial impedance
UHF channel coverage
Programme presets
Picture tube type
Diagonal screen siz e
Dimensions
Approximate weight
Impedance 32 ohms or more, with 3·5mm stereo jack plug
NICAM and FM 6 MHz intercarrier
AV input and AV output on scart 1 and scart 2
RGB input on scart 1
220 to 240 volts ac, 50Hz
Stand-by 6·5W, normal 110W
UHF broadcast channels 21-69
Black line D (high brightness)
Model 256NS: 59cm (nominal)
Model 286NS: 66cm (nominal)
Model 256NS: W 685 x H 491 x D 470 millimetres
Model 286NS: W 743 x H 529 x D 470 millimetres
Model 256NS: 32kg
Model 286NS: 38kg
3 + 3 watt RMS
75 ohms
70
These specifications may change.
16
Page 18

L6 - 3111 256 1681.1
Printed on recycled paper
ß
 Loading...