

Philips 27PT9015D/37 User manual

User Manual
Thank you for choosing Philips.
Need help fast?
Read your Quick Use Guide and/or
Owner's Manual first for quick tips
that make using your Philips product
more enjoyable.
If you have read your instructions
and still need assistance,
you may access our online help at
www.usasupport.philips.com
or call
1-888-PHILIPS (744-5477)
while with your product
(and Model / Serial number)
STOP
27PT9015D
32PT7005D
32PT9005D
Enter below the Serial No. which is located
on the rear of the cabinet. Retain this
information for future reference.
Model No. __________________________
Serial No. __________________________
For Customer Use
Return your Product Registration Card today
to get the very most from your purchase.
Registering your model with PHILIPS makes you eligible for all of the valuable benefits listed below, so don't miss out.
Complete and return your Product Registration Card at once to ensure:
*Proof of
Purchase
Returning the enclosed card guarantees
that your date of purchase will be on
file, so no additional paperwork will be
required from you to obtain warranty
service.
*Product Safety
Notification
By registering your product, you'll
receive notification - directly from the
manufacturer - in the rare case of a
product recall or safety defect.
Congratulations on your purchase,
and welcome to the “family!”
Dear PHILIPS product owner:
Thank you for your confidence in PHILIPS. You’ve selected one
of the best-built, best-backed products available today. We’ll do
everything in our power to keep you happy with your purchase for
many years to come.
As a member of the PHILIPS “family,” you’re entitled to protection
by one of the most comprehensive warranties and outstanding
service networks in the industry. What’s more, your purchase
guarantees you’ll receive all the information and special offers
for which you qualify, plus easy access to accessories from our
convenient home shopping network.
Most importantly, you can count on our uncompromising
commitment to your total satisfaction.
All of this is our way of saying welcome - and thanks for investing in
a PHILIPS product.
*Additional Benefits
of Product Ownership
Registering your product guarantees that
you'll receive all of the privileges to which
you're entitled, including special moneysaving offers.
Know these
safety symbols
This “bolt of lightning” indicates
uninsulated material within your unit
may cause an electrical shock. For the safety
of everyone in your household, please do not
remove product covering.
The “exclamation point” calls attention
to features for which you should
read the enclosed literature closely to
prevent operating and maintenance problems.
WARNING: To reduce the risk of fire or
electric shock, this apparatus should not be
exposed to rain or moisture and objects filled
with liquids, such as vases, should not be
placed on this apparatus.
CAUTION: To prevent electric shock,
match wide blade of plug to wide slot, fully
insert.
ATTENTION: Pour éviter les choc
électriques, introduire la lame la plus large de
la fiche dans la borne correspondante de la
prise et pousser jusqu’au fond.
P.S. To get the most from your PHILIPS purchase,
be sure to complete and return your Product
Registration Card at once.
Visit our World Wide Web Site at http://www.usasupport.philips.com
2
IMPORTANT SAFETY INSTRUCTIONS
Read before operating equipment
1. Read these instructions.
2. Keep these instructions.
3. Heed all warnings.
4. Follow all instructions.
5. Do not use this TV near water.
6. Clean only with a dry cloth.
7. Do not block any of the ventilation openings. Install in accordance
with the manufacturers instructions.
8. Do not install near any heat sources such as radiators, heat
registers, stoves, or other apparatus (including amplifiers) that
produce heat.
9. Do not defeat the safety purpose of the polarized or groundingtype plug. A polarized plug has two blades with one wider than the
other. A grounding type plug has two blades and third grounding
prong. The wide blade or third prong are provided for your safety.
When the provided plug does not fit into your outlet, consult an
electrician for replacement of the obsolete outlet.
10. Protect the power cord from being walked on or pinched
particularly at plugs, convenience receptacles, and the point where
they exit from the apparatus.
11. Only use attachments/accessories specified by the manufacturer.
12. Use only with a cart, stand, tripod, bracket, or table
specified by the manufacturer, or sold with the TV
When a cart is used, use caution when moving
the cart/TV combination to avoid injury from tip-over.
13. Unplug this TV during lightning storms or when unused for long
periods of time.
14. Refer all servicing to qualified service personnel. Servicing is
required when the TV has been damaged in any way, such as
power-supply cord or plug is damaged, liquid has been spilled or
objects have fallen into apparatus, the TV has been exposed to rain
or moisture, does not operate normally, or has been dropped.
15. This product may contain lead and mercury. Disposal of these
materials may be regulated due to environmental considerations.
For disposal or recycling information, please contact your local
authorities or the Electronic Industries Alliance: www.eiae.org
16. Damage Requiring Service - The TV should be serviced by qualified
service personnel when:
A. The power supply cord or the plug has been damaged; or
B. Objects have fallen, or liquid has been spilled into the TV; or
C. The TV has been exposed to rain; or
Note to the CATV system installer: This reminder is provided to call the CATV system installer's attention to Article 820-40 of the NEC
that provides guidelines for proper grounding and, in particular, specifies that the cable ground shall be connected to the grounding system of the
building, as close to the point of cable entry as practical.
D. The TV does not appear to operate normally or exhibits a
marked change in performance; or
E. The TV has been dropped, or the enclosure damaged.
17. Tilt/Stability - All televisions must comply with recommended
international global safety standards for tilt and stability properties
of its cabinet design.
• Do not compromise these design standards by applying excessive
pull force to the front, or top, of the cabinet which could ultimately
overturn the product.
• Also, do not endanger yourself, or children, by placing electronic
equipment/toys on the top of the cabinet. Such items could
unsuspectingly fall from the top of the set and cause product
damage and/or personal injury.
18. Wall or Ceiling Mounting - The TV should be mounted to a
wall or ceiling only as recommended by the manufacturer.
19. Power Lines - An outdoor antenna should be located away from
power lines.
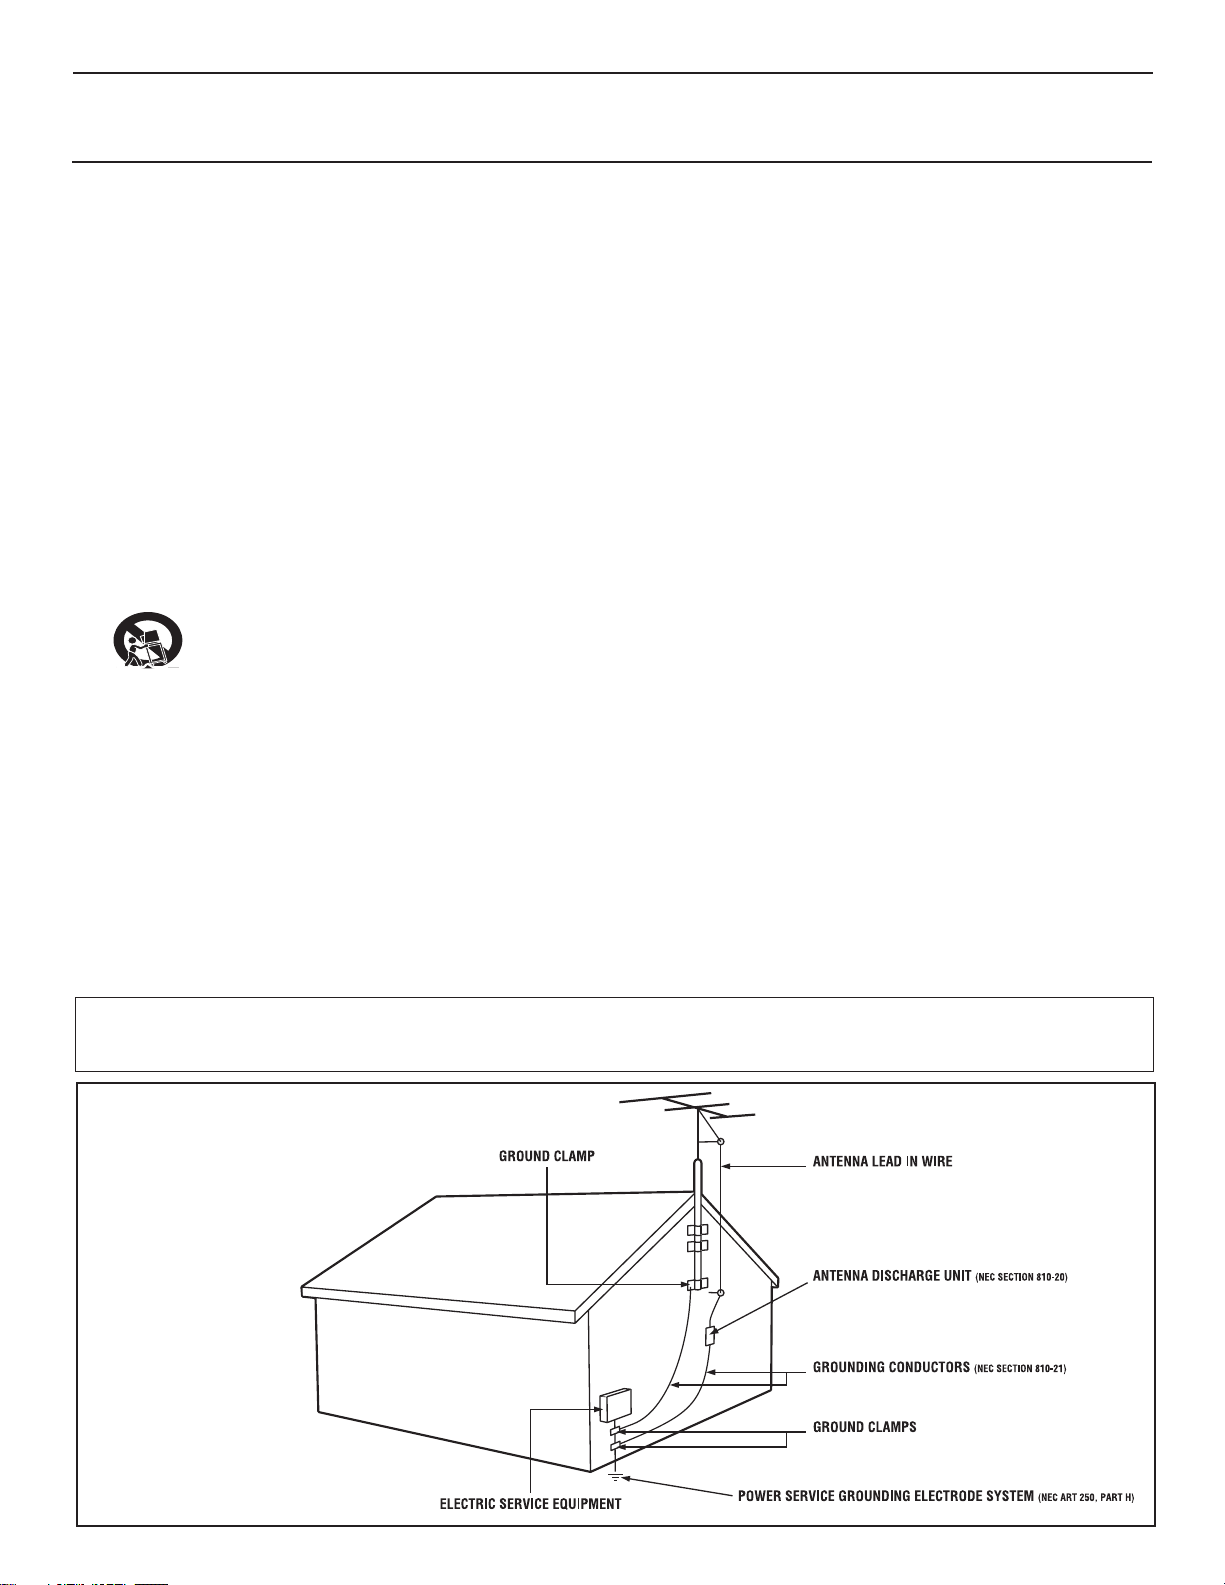
20. Outdoor Antenna Grounding - If an outside antenna is
connected to the receiver, be sure the antenna system is grounded so
as to provide some protection against voltage surges and built up static
charges.
Section 810 of the National Electric Code, ANSI/NFPA No. 70-
1984, provides information with respect to proper grounding of
the mast and supporting structure, grounding of the lead-in wire to
an antenna discharge unit, size of grounding connectors, location
of antenna-discharge unit, connection to grounding electrodes, and
requirements for the grounding electrode. See Figure below.
21. Object and Liquid Entry - Care should be taken so that
objects do not fall and liquids are not spilled into the enclosure
through openings.
a) Warning: To reduce the risk of fire or electric shock, this
apparatus should not be exposed to rain or moisture and objects
filled with liquids, such as vases, should not be placed on this
apparatus.
22. Battery Usage CAUTION - To prevent battery leakage that
may result in bodily injury, property damage, or damage to the unit:
• Install all batteries correctly, with + and - aligned as marked on
the unit.
• Do not mix batteries (old and new or carbon and alkaline, etc.).
• Remove batteries when the unit is not used for a long time.
Example of Antenna Grounding
as per NEC - National Electric Code
3
CONTENTS
INTRODUCTION
Welcome/Registration of Your TV . . . . . . . . . . . . . . . . . . . . . .2
Safety/Precautions . . . . . . . . . . . . . . . . . . . . . . . . . . . . . . . . . . 2/3
A Guide to Digital TV . . . . . . . . . . . . . . . . . . . . . . . . . . . . . . . .5
Quick Tips Before You Start . . . . . . . . . . . . . . . . . . . . . . . . . .5
GETTING STARTED
Description of Remote Control buttons . . . . . . . . . . . . . . . . . . 6
Basic TV and Remote Control Operation . . . . . . . . . . . . . . . .7
First Time You Turn On The TV . . . . . . . . . . . . . . . . . . . . . . .8
INSTALLATION MENU
Auto Install . . . . . . . . . . . . . . . . . . . . . . . . . . . . . . . . . . . . . . . .9
How To Use The Language Controls . . . . . . . . . . . . . . . . . . .10
How To Use The Tuner Mode Control . . . . . . . . . . . . . . . . .11
Channel Edit (Add or skip channels) . . . . . . . . . . . . . . . . . . .12
Auto Chron (Synchronisation of time) . . . . . . . . . . .13
Digital
Digita
l
Timer - Time Zone . . . . . . . . . . . . . . . . . . . . . . . . . .14
l
Timer - Daylight Saving . . . . . . . . . . . . . . . . . . . . . . . . 14
Digital
l
Digita
l
How To Add Or Skip Weak Digital Signals . . . . . . .15
Emergency Alert Setting . . . . . . . . . . . . . . . . . . . . . . 16
Digita
l
Factory Channel Reset . . . . . . . . . . . . . . . . . . . . . . .16
l
Digita
Digital Audio (Selecting audio languages) . . . . . . . . .17
Digita
l
Picture Menu Controls . . . . . . . . . . . . . . . . . . . . . . . . . . . . . . .18
Sound Menu Controls . . . . . . . . . . . . . . . . . . . . . . . . . . . . . . .19
FEATURES MENU
Understanding Autolock Controls . . . . . . . . . . . . . . . . . . . . . .20
AutoLock . . . . . . . . . . . . . . . . . . . . . . . . . . . . . . . . . . . . . . . . . 21
AutoLock - Blocking Channels . . . . . . . . . . . . . . . . . . . . . . . .22
Block / Clear All Channels At The Same Time . . . . . . . . . . . .23
Blocking Options . . . . . . . . . . . . . . . . . . . . . . . . . . . . . . . . . . .23
Movie Ratings . . . . . . . . . . . . . . . . . . . . . . . . . . . . . . . . . . . . . . 24
TV Ratings . . . . . . . . . . . . . . . . . . . . . . . . . . . . . . . . . . . . . . . .25
How To Use the Timer Menu Controls . . . . . . . . . . . . . . . . .26
Close Captioning Display in Digital Mode . . . . . . . . .27
Digita
l
Caption Option in Digital Mode . . . . . . . . . . . . . . . .27
Digita
l
Close Captioning in Analog Mode . . . . . . . . . . . . . . . . . . . . . .28
SleepTimer . . . . . . . . . . . . . . . . . . . . . . . . . . . . . . . . . . . . . . . .29
Rotation . . . . . . . . . . . . . . . . . . . . . . . . . . . . . . . . . . . . . . . . . .29
How To Use The Format Control . . . . . . . . . . . . . . . . . . . . . 30
OTHER FEATURES
Active Control . . . . . . . . . . . . . . . . . . . . . . . . . . . . . . . . . . . .17
Auto Picture . . . . . . . . . . . . . . . . . . . . . . . . . . . . . . . . . . . . . . .18
Auto Sound . . . . . . . . . . . . . . . . . . . . . . . . . . . . . . . . . . . . . . . 19
Information Banner and Electronic Program Guide . 31
Digita
l
FEATURES
Active Control continuously measures and corrects all incoming
signals to help provide the best picture quality. This feature
monitors and corrects both the sharpness control and noise
reduction control (Pg. 17).
Audio Volume Leveler (AVL) Control keeps the TV sound at
an even level. Differences in volume levels during commercial breaks
are reduced, making for a more consistent, comfortable sound for
your listening pleasure (Pg. 19).
AutoChron
sets the clock of the TV automatically or manually. For
automatic selection, there will be queries for Time Zone, Day Light
saving and channel to seek clock. For manual selection, you need to
key in the time.
(Pg. 13).
AutoLock lets you block channels or programs from viewing with
content not suitable for children or with restricted TV ratings (Pg.
21).
AutoPicture lets you change the picture settings (color, tint,
contrast, etc.) for various types of programming, such as sports,
movies, multimedia (games), or weak signals with the push of one
button (Pg. 18).
AutoSound lets you select from four pre-set controls and a
personal control that you set according to your own preferences
through the onscreen Sound menu. The four pre-set controls
(Speech, Movie, Music, and Multimedia) lets you custom set the TV
sound to enhance the particular programming you are watching (Pg.
19).
Channel Edit lets you add or skip channels from the list stored in
the TV memory. Channel Edit makes it easy to limit or expand the
number of channels that are available to you when you press the
Channel (+) or (–) buttons on your remote control (Pg. 12).
Closed Captioning allows the viewer to read TV program
dialogue or voice conversations as onscreen text. (Pg. 27-28).
Digital Audio allows you to switch to another audio language
when it is available. This is only for programs that are shown in
more than one audio language (Page 17).
Sleep Timer automatically turns OFF the TV after a set amount of
time that you have chosen ( Page 29).
As an Energy Star® Partner, Philips Consumer
Electronics has determined this product meets
the Energy Star® guidelines for energy efficiency
Energy Star® is a U.S. registered mark. Using
products with the Energy Star® label can save energy. Saving
energy reduces air pollution and lowers utility bills.
IMPORTANT INFORMATION
Glossary . . . . . . . . . . . . . . . . . . . . . . . . . . . . . . . . . . . . . . . . . .32
Troubleshooting . . . . . . . . . . . . . . . . . . . . . . . . . . . . . . . . . 33-34
Cleaning and Care . . . . . . . . . . . . . . . . . . . . . . . . . . . . . . . . . .35
Specifications . . . . . . . . . . . . . . . . . . . . . . . . . . . . . . . . . . . . . .36
Limited Warranty . . . . . . . . . . . . . . . . . . . . . . . . . . . . . . . . . . .37
Index . . . . . . . . . . . . . . . . . . . . . . . . . . . . . . . . . . . . . . . . . . .38
Active Control, AutoPicture, AutoSound, AutoChron, and
Incredible Surround are trademarks of Philips Consumer
Electronics Company. Copyright 2001 Philips Consumer
Electronics.
*Manufactured under license from Dolby
Laboratories. “Dolby” and the double-D symbol
are trademarks of Dolby Laboratories.
4

A GUIDE TO DIGITAL TV
What is Digital Television (DTV)?
Digital Television (DTV) is a relatively new type of broadcasting that promises to transform television viewing into a whole
new experience. Digital technology is used to capture images and sound to deliver a better picture quality.
There are many levels of digital television quality. The most common are:
Standard Definition TV (SDTV)
SDTV is the basic level of quality display and resolution for both analog and digital. Transmission of SDTV can be in the
traditional (4:3) or widescreen (16:9) format.
Enhanced Definition TV (EDTV)
EDTV is better in picture quality than analog television. The formats for EDTV are 480p widescreen (16:9) or traditional (4:3).
EDTV is in the middle range quality between SDTV and HDTV.
High Definition TV (HDTV)
HDTV has the highest quality for digital broadcast formats. Its resolution is widescreen format (16:9). Combined with digitally
enhanced sound technology, HDTV sets new standards for sound and picture quality in television.
Difference between Digital and Analog ?
Digital Television is a more flexible and efficient technology than the analog broadcast system. Analog broadcasts can only
provide one program at a time. Digital television can broadcast a high definition program or more than one standard definition
program at the same time. With Digital television you can receive information of programs through the Information Banner
and Electronic Program Guide. This information is provided by the broadcaster.
QUICK TIPS BEFORE YOU START
1 When the TV is powered-on for the first time you will be prompted to auto install the TV in order to receive the channels
that are broadcasted locally.
2 Auto Installation may take 20 to 40 minutes depending on the number of channels that are transmitted by the cable provider
or broadcaster.
3 When the TV is not receiving any signal from the antenna / cable, NO SIGNAL will appear on the TV screen. This can be
caused by the antenna / cable not being plugged in correctly or when the wrong tuner mode is selected.
When no transmission is received from the broadcaster, NO PROGRAM will appear on the TV screen.
4 You will not be able to receive pay channels when using direct antenna / cable connection to the television.
5 When the Set-top box is connected to the television using coaxial cable, it is necessary to auto-program the television for the
single channel (3 or 4) that the Set-top box outputs and change the channels at the Set-top Box to view the program.
6 When the Set-top box is connected to the television using AV connection, select the television input source for the
Set-top box to view the program and change the channels at the Set-top Box to view the program.
7 Pressing the A/D button on the remote control toggles the TV between Digital and Analog Mode.
Accessories List : 1 Remote Control
2 AA batteries
1 User Manual
1 Warranty Card
5

DESCRIPTION OF REMOTE CONTROL BUTTONS
CLOCK Button - Sets the TV
clock On or Off.
FORMAT Button - To select
picture format.
AV Button - To select different signal
sources connected to the AV inputs on
the TV(eg. DVD, VCR, Camcorder etc.)
SAP Button - Toggle between SAP,
Mono and Stereo Sound.
POWER
FORMAT CLOCK SLEEP GUIDE
SLEEP Button - Sets the TV to
automatically turn itself off after
a period of time you choose
POWER Button - Press to turn the
TV On or put on Standby mode.
* Guide Button - Displays the
Electronic Program guide (only in
Digital Mode)
AUTO SOUND Button - To
select factory-defined sound settings.
(Personal, Theatre, Music, or Voice).
A/D (ANALOG/DIGITAL)
Button - To select Analog or
Digital mode.
MENU Button - To display the main
menu.
Cursor Buttons (< , >, <, > )
- To highlight and select items on
the TV onscreen menu.
VOL(ume) + / - Buttons
- To increase or decrease the
TV sound level.
A/CH (Alternate Channel)
Button - Toggle between last
viewed and current channel.
AV SAP
AUTO
SOUND
MENU OK
VOL CH
A/D
MUTE
CC INFO
AUTO
PICTURE
123
4
56
789
A/CH
0
CC Button - Closed Captioning.
* INFO Button - To display channel
number, sound mode, time and status of
the sleeptimer, etc.
AUTO PICTURE Button - To choose
from five pre-defined picture settings.
(Personal, Movies, Sports, Weak Signal,
or Multimedia).
OK Button - To activate selection of
antenna / cable mode the first time you
auto install the TV.
CH(annel) + or CH(annel)- Buttons
- To select channels in ascending or
descending order.
MUTE Button - To turn off
the sound from the TV.
NUMERIC (0-9) Buttons - To select
TV channels or enter values in the onscreen menu. For single channel entries,
press the numbered button for the channel you desire. The TV will pause for a
second or two before changing to the
chosen channel.
DOT Button - To enter values for minor
channels eg. 36.4
HELPFUL HINTS
* The quality and accuracy of the information on the program guide and information banner are transmitted from broadcasters.
You may see a difference in broadcast time if the broadcaster is from a different time zone area (refer to page 31).
The INFO button can also be used to exit the menu display from the TV screen.
66
BASIC TV AND REMOTE CONTROL OPERATION
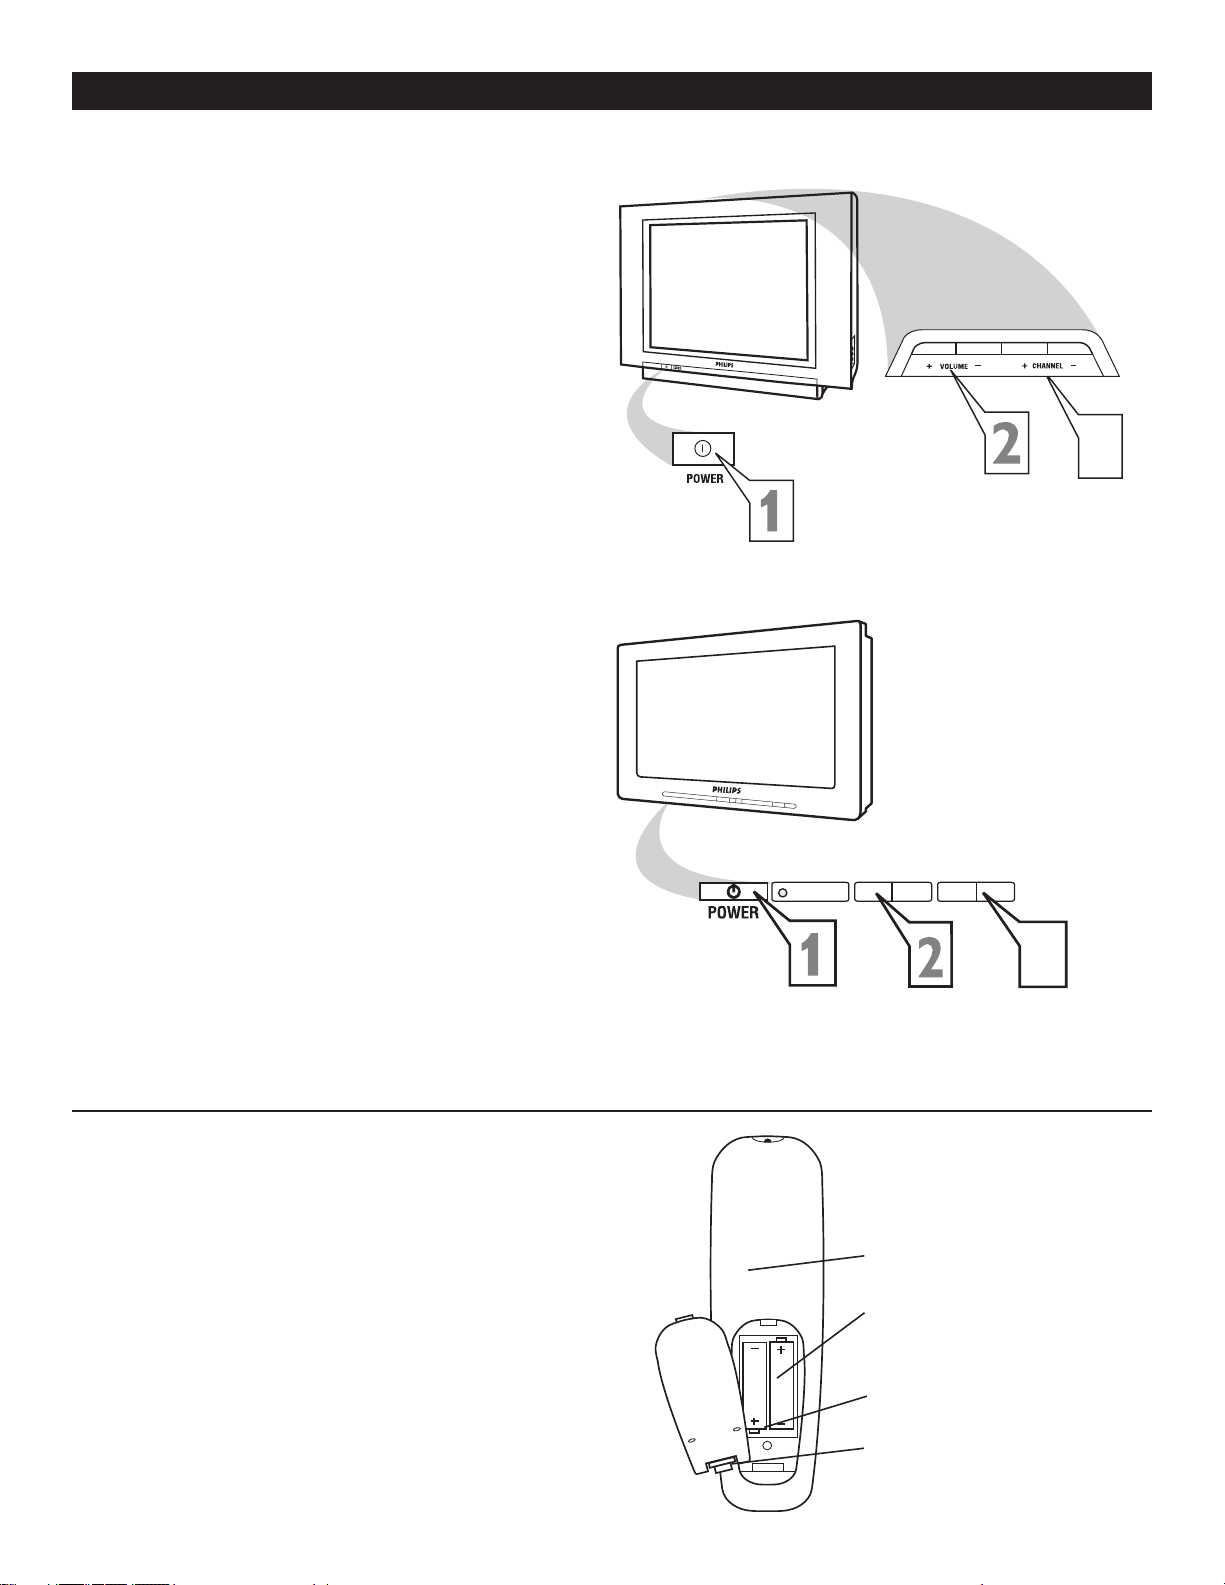
Press POWER button on the TV to turn it
on. Pressing any button on the front panel
1
of the TV will also turn the TV On.
Press the VOLUME + to increase the
sound level and VOLUME – to lower the
2
sound level.
Pressing both buttons together will display
the onscreen menu. While in menu mode,
use these buttons to make adjustments or
selections.
Press CHANNEL + or – to select TV
channels.
3
Point the remote control towards the
remote sensor window on the front of the
4
TV when using the remote control.
Press MENU button on the remote to
display the onscreen menu.
5
32PT9005D
3
27PT9015D
32PT7005D
REMOTE CONTROL
ow to load the supplied batteries into the remote
H
control.
Remove the battery compartment lid on the
back of the remote control.
1
Insert two AA-sized batteries into the battery
compartment, making sure the positive + and
2
negative - polarity line up correctly as indicated
inside the case.
Close the battery lid.
3
-
+
>
<
3
Back of Remote
Battery Compartment
2 AA-sized batteries
Battery compartment lid
7
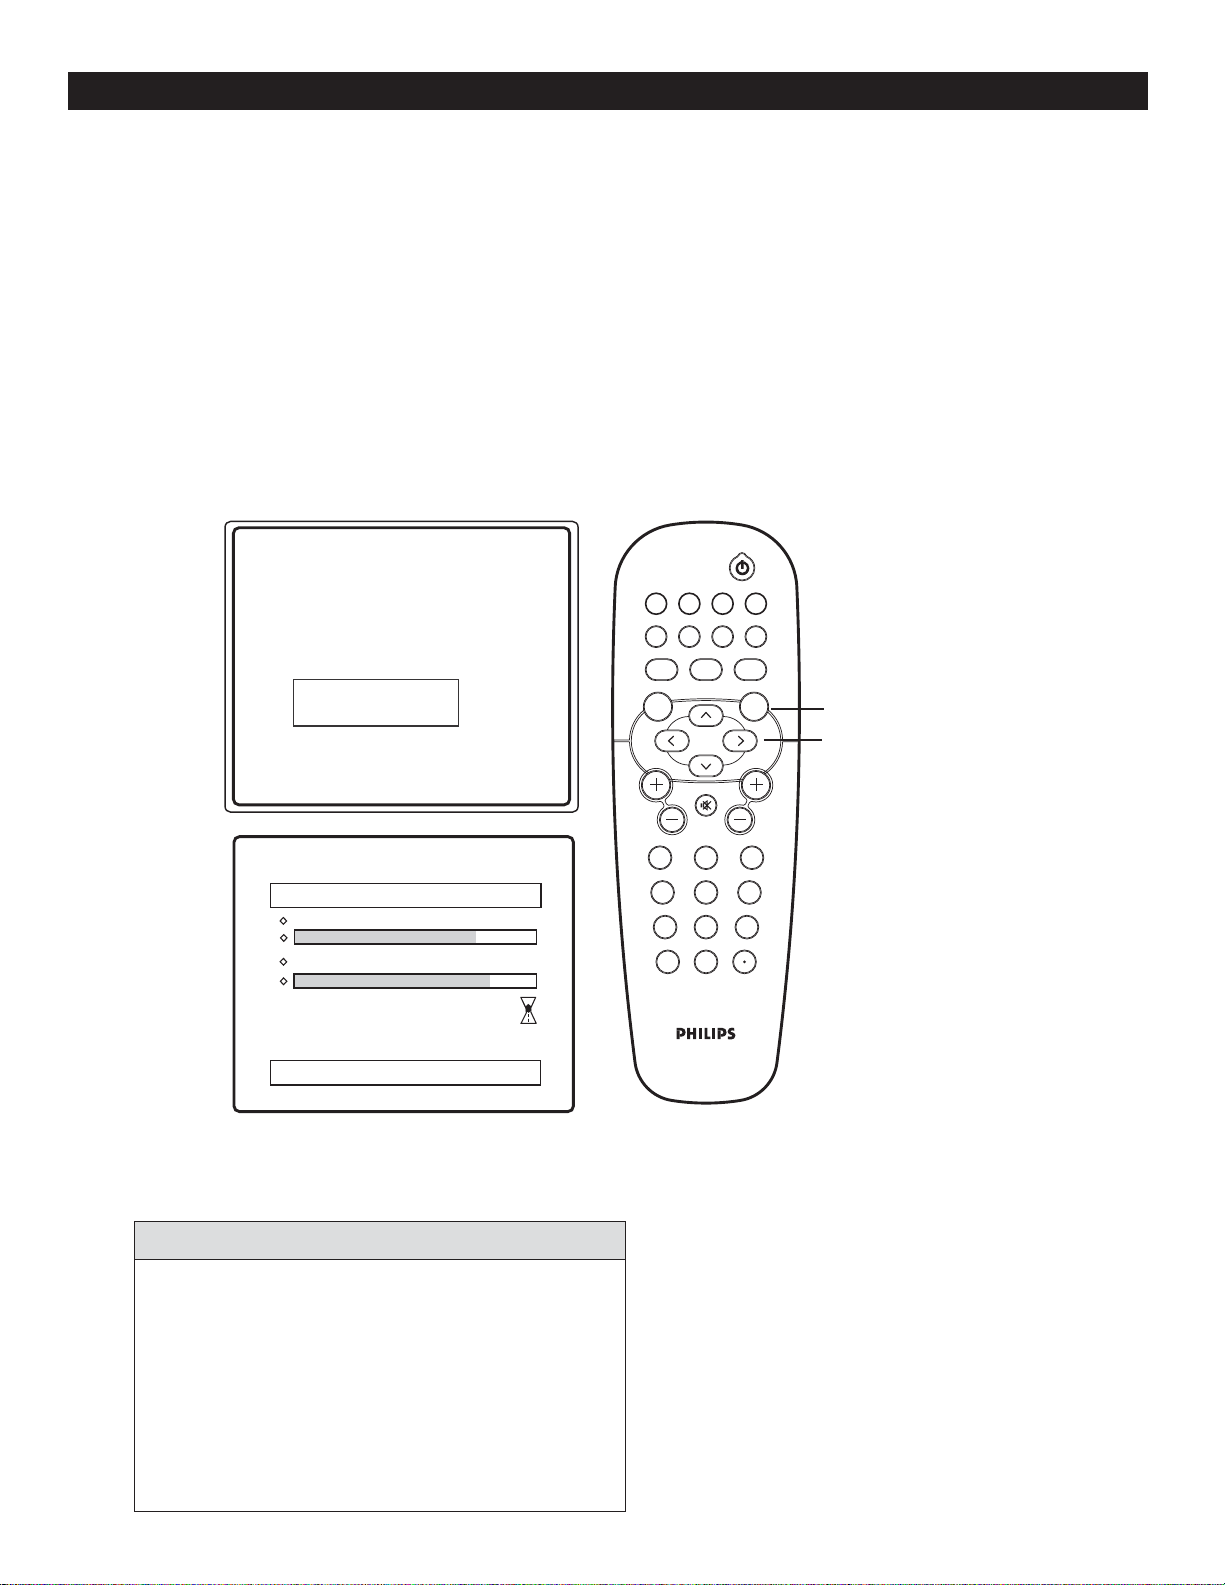
FIRST TIME YOU TURN ON THE TV
he first time you turn on the new TV set, you will see a screen that helps you to auto install the programs. Follow
the instructions on this screen to start auto installation. Digital and Analog auto installation will be performed
T
at the same time. Auto installation may take 20 to 40 minutes depending on the number of channels available. You
will see the progress of the auto installation represented by the 2 bars below the words Analog Channels and Digital
Channels respectively. An active hour-glass will be displayed on the TV screen to indicate that auto installation is still
in progress, please wait.
Note : This screen will only appear the first time you turn on the TV. If you wish to auto install programs
later, please follow the procedure in the next page (page 9).
POWER
Please connect Antenna or Cable to TV
Select TV signal by Î or ï and press OK
Æ
Antenna
Cable
Installation may take about 30 mintues.
Auto Install
Analog channels 39
Digital Channels 45
FORMAT CLOCK SLEEP GUIDE
AV SAP
AUTO
SOUND
MENU OK
VOL CH
123
CC INFO
AUTO
A/D
PICTURE
MUTE
456
789
A/CH
0
OK
>
>
< >
HELPFUL HINTS
ANTENNA : If you have and off-air or roof-top
antenna, select Antenna.
CABLE : If you have subscribed to cable signal from
any cable company, or you are receiving free-to-air cable
channels through your wall connection select Cable.
When you install in either Digital or Analog mode,
both Digital and Analog channels will be installed.
88
AUTO INSTALL
ou can auto install programs on your TV. This makes it easy for you to select only the TV stations in your area
when the CHANNEL (+), (–) buttons are pressed.
Y
Follow these steps for Digital Mode and Analog Mode
Complete the antenna or cable signal connection
1
2
3
4
5
before activating AUTO INSTALL. See How to
make the best connection guide for details.
Press MENU button on the remote control to
display the onscreen menu.
Press CURSOR < or > to scroll through the
onscreen menu until you see Install highlighted.
Press CURSOR > to display the Install menu
features.
Press CURSOR < or > to scroll through the
Install features until you see Auto Install highlighted.
Press CURSOR > to start Auto Installation.
6
Auto Install will begin. This may take 20 to 40
7
8
minutes depending on the number
of channels available.
When finished, press MENU button on the remote
control twice to exit the menu display from
the TV screen.
Digital Mode Analog Mode
Language
Tuner Mode
Auto Install
DTV Setup
Install
Language
Tuner Mode
Auto Install
Auto Install
Analog channels 39
Digital Channels 45
Install
Language
Tuner Mode
Auto Install
Channel Edit
Auto Install
Analog channels 39
Digital Channels 45
Language
Tuner Mode
Auto Install
Channel Edit
HELPFUL HINTS
When CABLE is selected, channels 1 to 135 are available
in Digital Mode and Channels 1 to 125 are available in
Analog Mode.
When ANTENNA is selected, channels 2 to 69 are
available for both Digital and Analog Modes.
When you are in Digital Mode, channel numbers will be
displayed as 23-1, or 100-2 etc.
When you install in either Digital or Analog mode,
both Digital and Analog channels will be installed.
MENU
>
>
< >
POWER
FORMAT CLOCK SLEEP GUIDE
AV SAP
CC INFO
MUTE
AUTO
A/D
PICTURE
0
AUTO
SOUND
MENU OK
VOL CH
123
456
789
A/CH
A/D
toggles between
digital and analog
mode
9
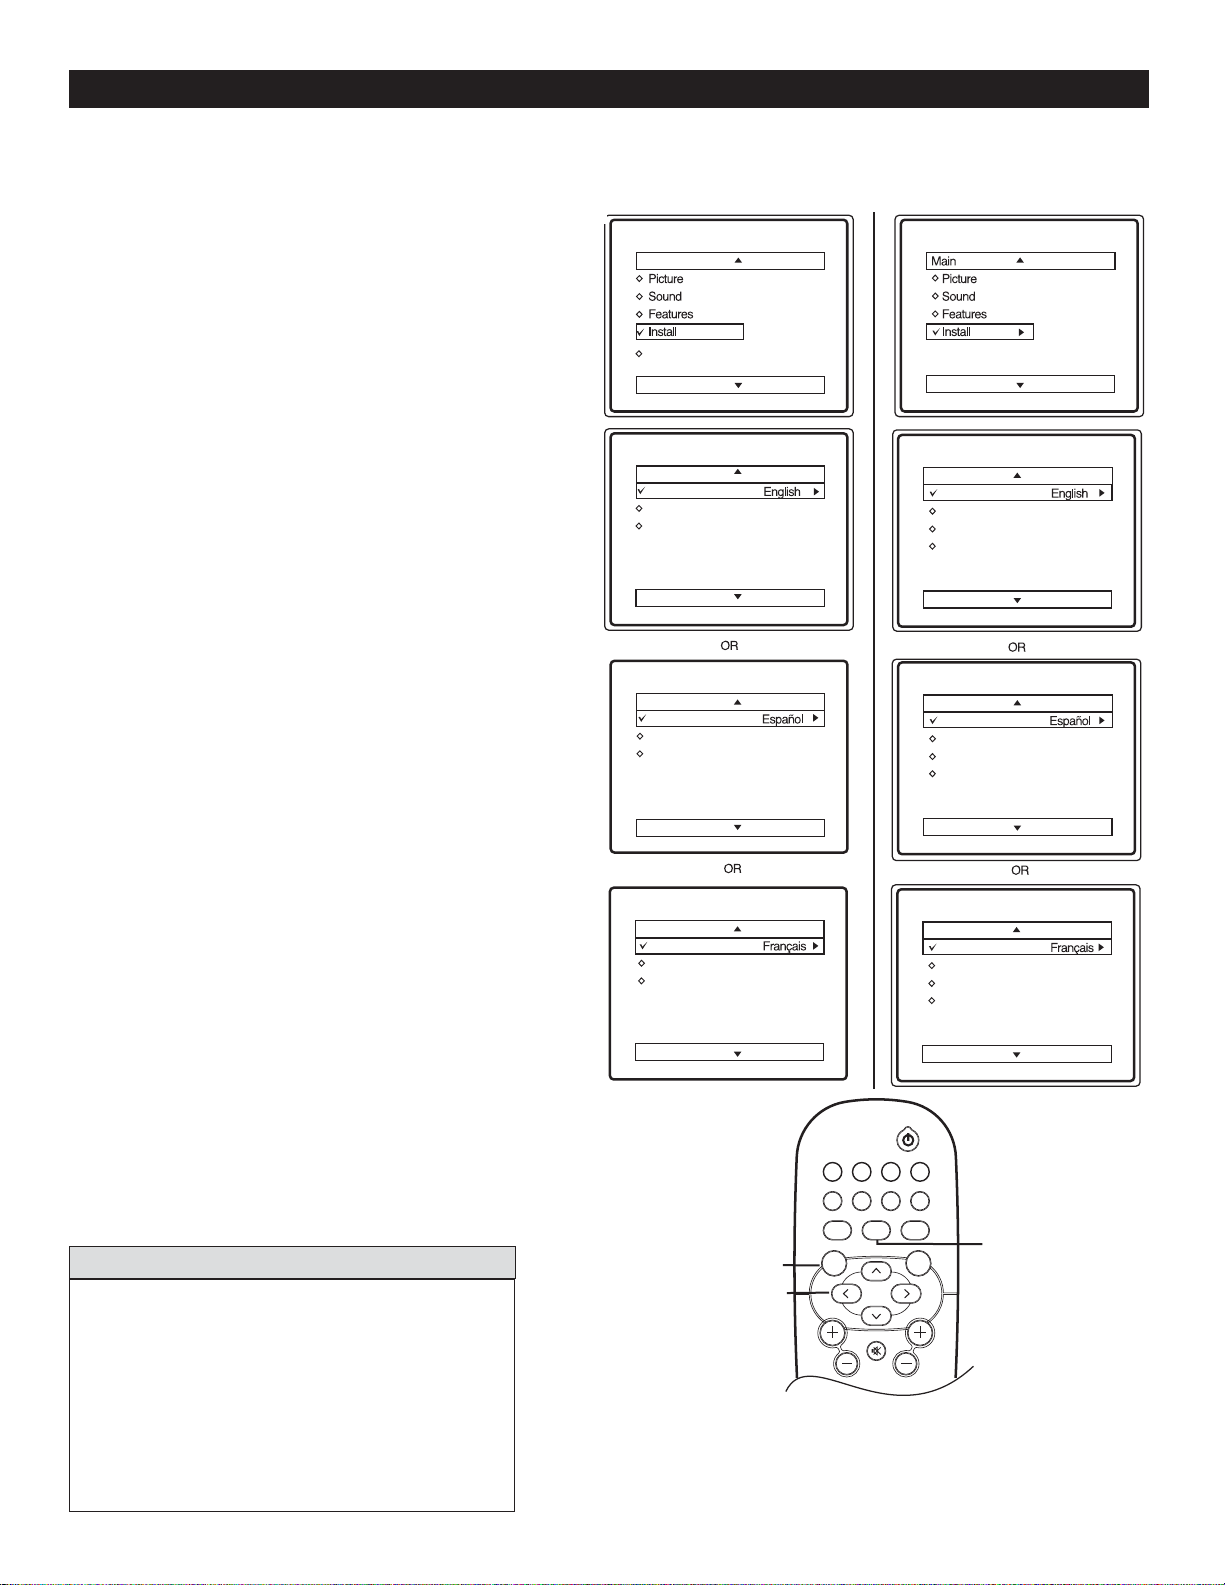
HOW TO USE THE LANGUAGE CONTROL
or French and Spanish speaking TV owners an onscreen Language option is present. With the Language control you
can set the TV’s on-screen menu to be shown in English, French, or Spanish.
F
Follow these steps for Digital Mode and Analog Mode
Press MENU button on the remote control to display
1
2
3
4
5
6
7
the onscreen menu.
Press CURSOR < or > to scroll through the
onscreen menu until you see Install highlighted.
Press CURSOR > to display the Install menu
features.
Press CURSOR < or > to scroll through the
Install features until you see Language highlighted.
Press CURSOR > to select English, Français
(French) or Español (Spanish).
When finished, press MENU button on the remote
twice to exit the menu from the TV screen.
Press A/D button on the remote to switch between
Digital and Analog Channels.
Digital Mode
Main
Language
Tuner Mode
Auto Install
DTV Setup
Install
Language
Tuner Mode
Auto Install
Instalar
Idioma
Sintonia
Auto Instalar
Analog Mode
Language
Tuner Mode
Auto Install
Channel Edit
Install
Language
Tuner Mode
Auto Install
Channel Edit
Instalar
Idioma
Sintonia
Auto Instalar
Editar Canal
HELPFUL HINT
The Language control only makes the TV on-screen
Menu items appear in English, Spanish, or French
text.
It does not change the other on-screen text
languages such as Closed Caption (CC) TV
programmes.
Press A/D button on the remote control to toggle
between Digital and Analog Mode.
Installation
Langue
Mode synt.
Installation auto
MENU
>
>
< >
POWER
FORMAT CLOCK SLEEP GUIDE
AV SAP CC INFO
A/D
MUTE
AUTO
PICTURE
AUTO
SOUND
MENU OK
VOL CH
Installation
Langue
Mode synt.
Installation auto
Editer progr.
A/D
toggles between
digital and analog
mode
10

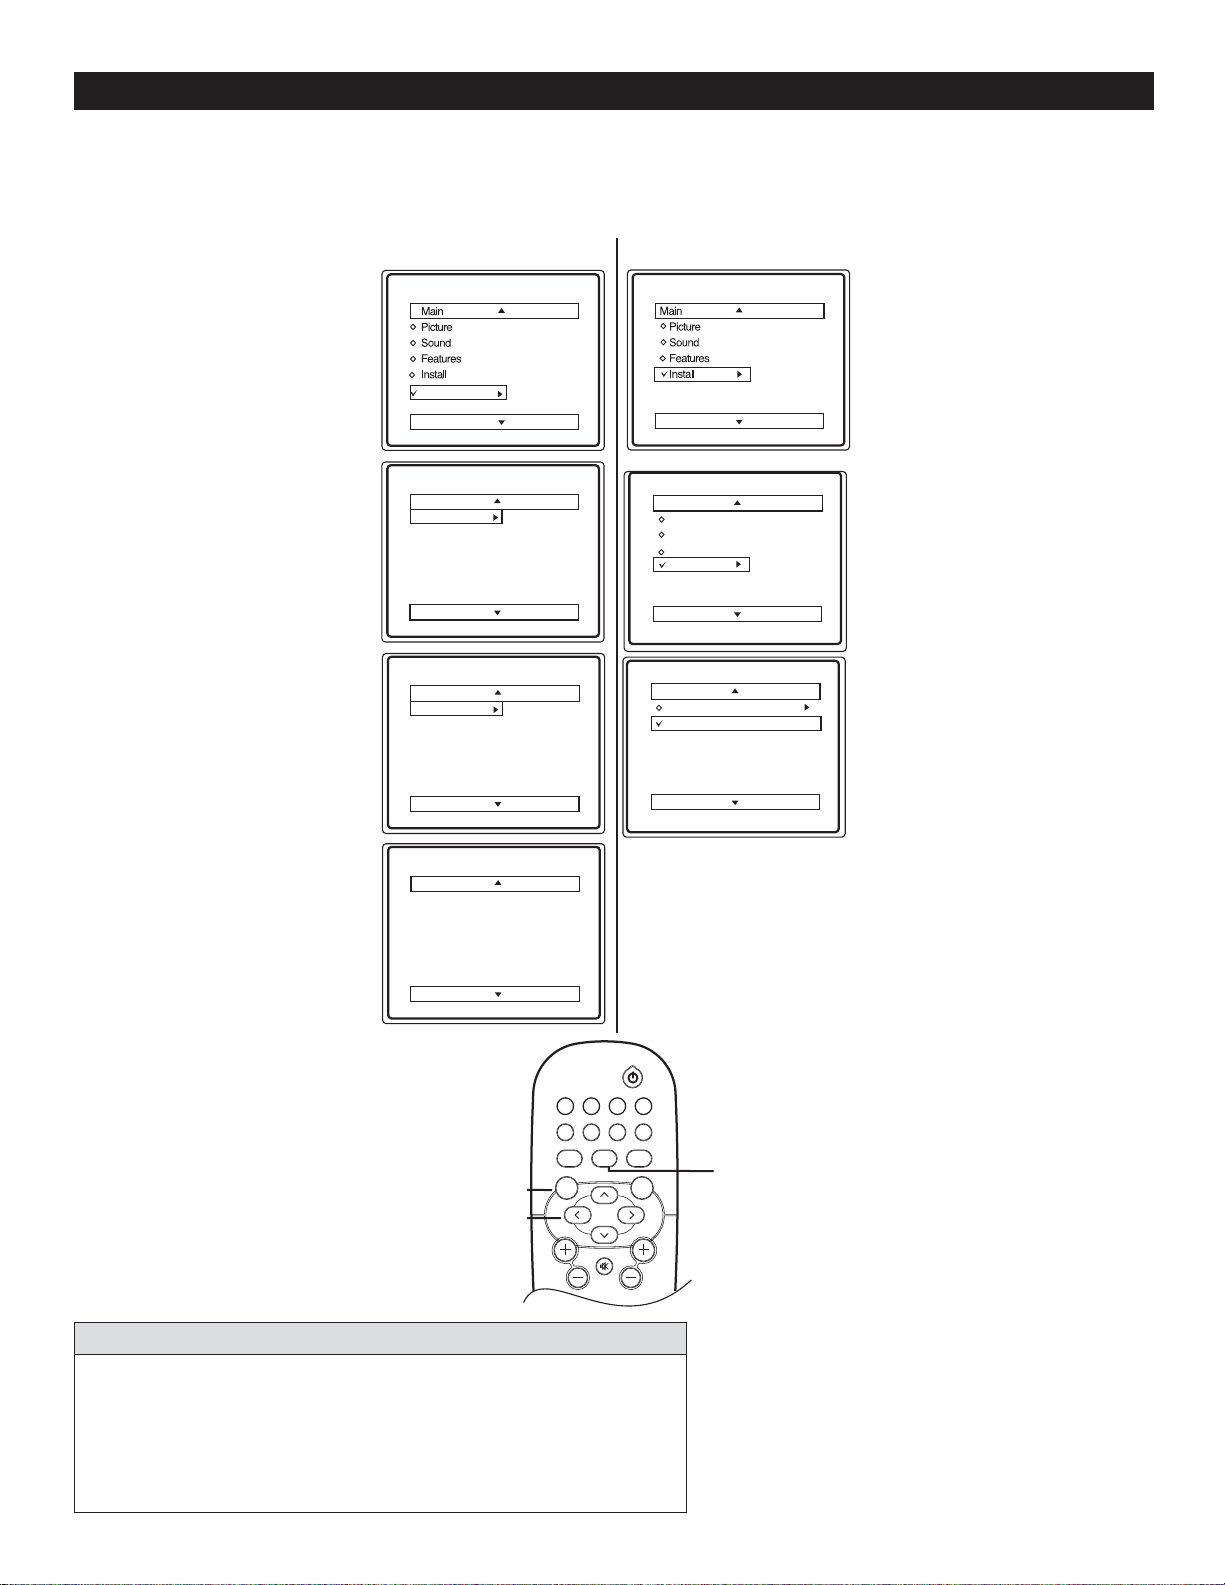
HOW TO USE THE TUNER MODE CONTROL
he TUNER MODE control lets you change the TV input signal to ANTENNA or CABLE mode. It is important
that you know which type of signal to look for (Cable or Antenna).
T
Follow these steps for Digital Mode and Analog Mode
Press MENU button on the remote control to
display the onscreen menu.
1
Press CURSOR < or > to scroll through
the onscreen menu until you see Install
2
highlighted.
Press CURSOR > to display the Install menu
features.
3
Press CURSOR < or > to scroll through the
Install features until you see Tuner Mode
4
highlighted.
Press CURSOR > to select Antenna or Cable.
5
When finished, press MENU button on the
remote control twice to exit the menu from
6
the TV screen.
Digital Mode Analog Mode
DTV Setup
Install
Language
Tuner Mode
Auto Install
MENU
>
>
Language
Tuner Mode
Auto Install
< >
POWER
FORMAT CLOCK SLEEP GUIDE
AV SAP
AUTO
SOUND
MENU OK
A/D
CC INFO
AUTO
PICTURE
Install
Language
Tuner Mode
Auto Install
Channel Edit
toggles between
digital and analog
mode
Language
Tuner Mode
Auto Install
Channel Edit
A/D
HELPFUL HINTS
When CABLE is selected, channels 1-135 are
available in Digital Mode and Channels 1-125 are
available in Analog Mode.
When ANTENNA is selected, channels 2-69 are
available for both Digital and Analog Modes.
When you install in either Digital or Analog
mode, both Digital and Analog channels will be
installed.
Press A/D button on the remote control to toggle between
Digital and Analog Mode.
MUTE
VOL CH
123
456
789
A/CH
0
1111
CHANNEL EDIT (ADD OR SKIP CHANNELS)
hannel Edit allows you to add or skip channels from your favorite list.
C
Follow these steps for Digital Mode
Press MENU on the
remote control to
1
display the onscreen
menu.
Press CURSOR < or
2
3
4
5
6
7
8
Note : When you are in Digital
Mode you can only add or skip
programs in Digital Channels.
> to scroll through the
onscreen menu until
you see DTV Setup
highlighted.
Press CURSOR >
to highlight the Ch.
Install menu features.
Press CURSOR < or
> to scroll through
the Ch. Install features
until you see Channel
Edit highlighted.
Press CURSOR > to
display the Channel Edit
options.
Press CURSOR < or
> to scroll the menu to
highlight the channel you
wish to add or skip.
Press CURSOR > or <
to toggle between Added
or Skipped. If Skipped is
selected, the channels will
be skipped when scrolling
channels with the CH+ or
CH- . If Added
is selected, the channels
will not be skipped when
scrolling channels with the
CH+ or CH- .
When finished, press
MENU on the remote
control four times to
exit the menu from the
TV screen.
Digital Mode Analog Mode
Language
Tuner Mode
Auto Install
DTV Setup
DTV Setup
Ch. Install
Digital Audio
Timer
Closed Caption
Emerg Alert
Ch. Install
Channel Edit
Weak Dig Sig
AutoLock
Fact CH Reset
Channel Edit
2 - 1 WCBS - DT Added
35 - 1 MELCO
MENU
>
>
< >
Channel Edit
Weak Dig Sig
AutoLock
Fact CH Reset
FORMAT CLOCK SLEEP GUIDE
AV SAP CC INFO
SOUND
MENU OK
VOL CH
AUTO
MUTE
Install
Language
Tuner Mode
Auto Program
Channel Edit
Channel Edit
Channel 3
Skipped
POWER
AUTO
A/D
PICTURE
Language
Tuner Mode
Auto Install
Channel Edit
Channel
Skipped
A/D
toggles between
digital and analog
mode
off
Follow these steps for Analog Mode
Press MENU on the
remote control to
1
display the onscreen
menu.
Press CURSOR < or >
to scroll through the
2
onscreen menu until you
see Install highlighted.
Press CURSOR > to
display the Channel
3
Edit menu features.
Press CURSOR < or
4
5
6
7
8
Note : When you are in Analog
Mode you can only add or skip
programs in Analog Channels.
> until the Channel you
wish to Edit is displayed.
Press CURSOR > to
highlight Skipped option.
Use CURSOR > or < to
toggle between on or off.
If On is selected, the
channels will be skipped
when scrolling channels
with the CH+ or CH- . If
Off is selected, the channels
will not be skipped when
scrolling channels with the
CH+ or CH- .
When finished, press
MENU button on the
remote control three
times to exit the menu
from the TV screen.
HELPFUL HINT
It is important to auto install the TV (Refer page 9) before you try to Edit
the Channels. If auto installation is not done, Channel Edit will show an
error message : Favorite Channel list is empty. You must Auto Install.
Press A/D button on the remote control to toggle between Digital and
Analog Mode.
1212
 Loading...