

Page 1

1
3121 233 41621
TABLE OF CONTENTS
Warning/Important Notices . . . . . . . . . . . . .1
Basic Television Operation . . . . . . . . . . . . .1
Basic Remote Control Operation . . . . . . . .2
Remote Control Battery Installation . . . . . . . . . . . . .2
Basic DVD Player Information . . . . . . . . . . . . . . . . .3
Basic TV Connections
• Basic Cable Television Connection . . . . . . . . . . . .3
• Basic Antenna Television Connection . . . . . . . . . .4
• Basic VCR (accessory device) Connection . . . . . .4
• Using the Side Audio/Video Input Jacks . . . . . . . .4
Advanced TV Connections
• Hooking up External Speakers . . . . . . . . . . . . . . .4
• Using the Audio/Video (1) Input Jacks . . . . . . . . .5
• Using the Audio/Video (2) Input Jacks . . . . . . . . .5
• Using the S-Video (SVHS) Input Jack . . . . . . . . . .5
• Using the Monitor Out Jacks . . . . . . . . . . . . . . . . .6
How to Use the TV’s Installation Features
• Using the Language Control . . . . . . . . . . . . . . . . .6
• Setting the Tuner Mode Control . . . . . . . . . . . . . .7
• How to Automatically Program Channels . . . . . . .7
• How to Add and Delete Channels . . . . . . . . . . . . .7
• How to Use the AutoChron Control (TV Clock) . .8
• How to Name (Label) Channels . . . . . . . . . . . . . .8
TV/DVD
TV/DVD
Quick Use and Setup Guide
Quick Use and Setup Guide
IMPORTANT
NOTE: This owner's manual is used with several
different television models. Not all features (and
drawings) discussed in this manual will necessarily match those found with your television set.
This is normal and does not require you contacting your dealer or requesting service.
WARNING: TO PREVENT FIRE OR SHOCK
HAZARD DO NOT EXPOSE THIS UNIT TO
RAIN OR EXCESSIVE MOISTURE.
BASIC TV AND REMOTE CONTROL OPERATION
TELEVISION
Press the POWER
button to turn the TV ON.
Press the VOL(+) button
to increase the sound level or
the VOL (–) button to lower
the sound level.
Pressing both buttons at the
same time will display the on-
screen menu. After you are in
the menu, use these buttons to
make adjustments or selections.
Press the CH – (down) or
+ (up) button to select TV chan-
nels. Use these buttons to make
adjustments or selections in the
on-screen menu.
NOTE: Press three number
buttons on the remote control
for channels 100 or above. For
example: Press 1 then 2 then 5
for channel 125.
Point the remote control
toward the remote sensor window on the TV when operating the TV with the remote.
LASER SAFETY
This unit employs a laser. Due to possible eye
injury, only a qualified service person should
remove the cover or attempt to service this
device.
USE OF CONTROLS OR ADJUSTMENTS OR
PERFORMANCE OF PROCEDURES OTHER
THAN THOSE SPECIFIED HEREIN MAY
RESULT IN HAZARDOUS RADIATION EXPOSURE.
LASER
Type Semiconductor laser
GaAlAs
Wave length 650 nm (DVD)
785 nm (VCD/CD)
Output Power 7 mW (DVD)
10 mW (VCD/CD)
Beam divergence 60 degree
The region code for this set is
ALL or 1.
DVDs must be labeled for ALL
regions or for Region 1 in order
to play on this TV/DVD Player. You cannot play Discs
that are labeled for other regions. Look for the symbols above on your DVDs. If these region symbols do
not appear on your DVDs, you cannot play the DVD
in this TV/DVD Player.
NOTE:
PICTURES SHOWN MAYBE DIFFERENT
BETWEEN COUNTRIES.
NEVER MAKE OR CHANGE CONNECTIONS
WITH THE POWER SWITCHED ON.
CAUTION
VISIBLE AND INVISIBLE LASER RADIATION
WHEN OPEN AVOID EXPOSURE TO BEAM
(WARNING LOCATION: INSIDE ON LASER
COVERSHIELD OR THE BACKPLATE OF
SET)
This product incorporates copyright protection
technology that is protected by method claims
of certain U.S. patents and other intellectual
property rights owned by Macrovision
Corporation and other rights owners. Use of
this copyright protection technology must be
authorized by Macrovision Corporation, and is
intended for home and other limited viewing
uses only unless otherwise authorized by
Macrovision Corporation. Reverse engineering
or disassembly is prohibited.
Remote Sensor Window
DVD Eject Button
DVD Player Disc Tray
Television Controls located
on the top of the TV cabinet
SMART HELP
Remember, you can press
any button on the front of
the TV to turn the TV ON.
The tuned channel number will
always briefly appear on the screen
when the TV is first turned ON
(and when the channel is changed).
Playable Disc Types
This DVD Player will play Digital Video Discs (DVDs),
Audio CDs, CD-Rs and CD-RW discs. In order to play a
DVD or Audio CD on this DVD Player, make sure the
Disc meets the requirements for the Region Code as
described on this page.
The Discs should contain the logos shown below and
meet the standards listed for each.
12
1
11
2
10
3
9
4
8
5
7
6
ALL
1
CLASS 1
LASER PRODUCT
Disc
Type
Digital
Video
Disc
Audio
CD
Video
CD
Compact
Disc
Recordable
Compact
Disc
Rewritable
Logo
Recordable
Contents
Sound
and
Pictures
Sound
Sound
and
Pictures
Sound
and
Pictures
Sound
and
Pictures
Disc Size
12 cm
8 cm
12 cm
8 cm
(singles)
12 cm
8 cm
(singles)
12 cm 74 minutes
Maximum
Playback Time
Approx. 4 hours
(single-sided)
Approx. 8 hours
(double-sided)
Approx. 80 minutes
(single-sided)
Approx. 160 minutes
(double-sided)
74 minutes
20 minutes
74 minutes
20 minutes
Disc
Segments
DVDs are
divided into Titles,
which are divided
into Chapters.
Titles and Chapters
are numbered.
Audio CDs are
divided into numbered
Tracks, i.e., a track
may be one song.
Video CDs are
divided into Tracks.
4
SOUND PICTURE
MENU
MENU
VOL
POWER
SLEEP
TV
SOURCE STATUS CC CLOCK
REPEAT
DVD
REPEAT
A-B
SHUFFLE
OK
OK
POWER
SCAN
1
–
–
VOL
MENU
CH
+
+
2
3
Page 2
2
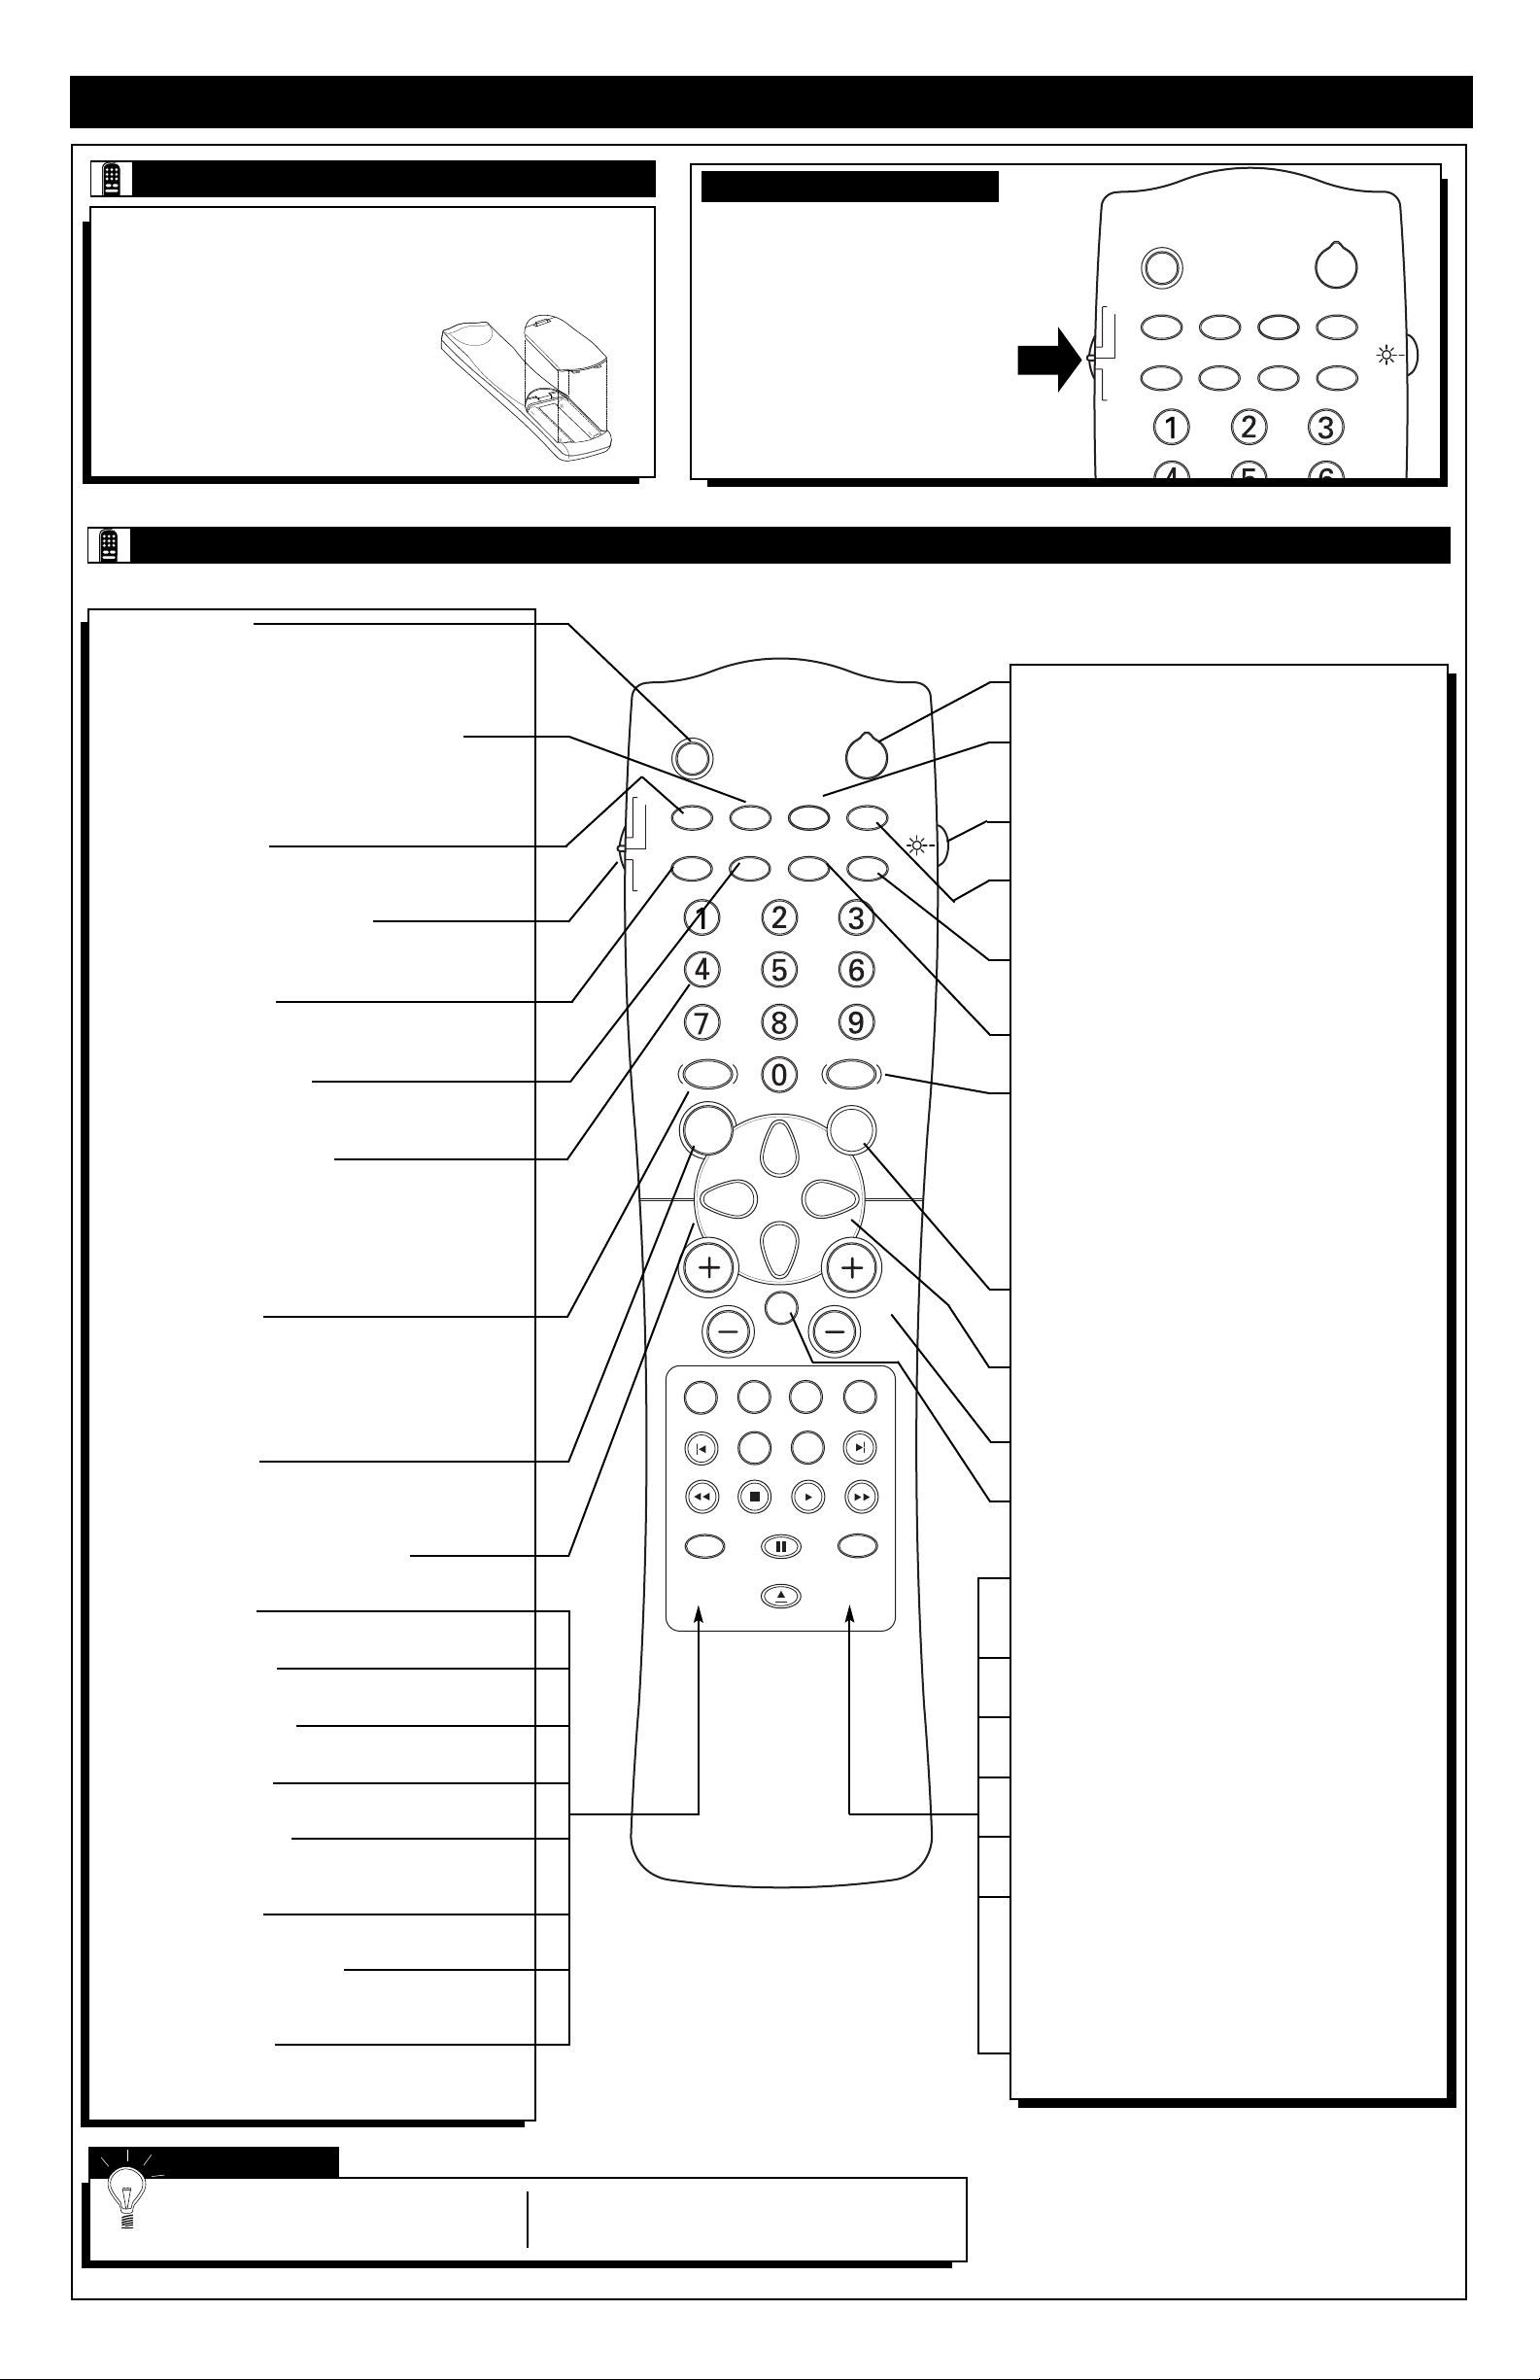
BASIC REMOTE CONTROL OPERATION
T
o load the supplied batteries into the remote:
1. Remove the battery compartment lid on the back of the remote.
2. Place the batteries (2-AA) in the
remote. Be sure the (+) and (–) ends
of the batteries line up correctly (the
inside of the case is marked).
3. Reattach the battery lid.
REMOTE BATTERY INSTALLATION
Power Button
Press to turn the TV ON and OFF.
CC Button
Press to select Closed Captioning options within the menu.
(See the Directions for Use manual for details.)
Light Button
Press to back-light the buttons on the remote control.
Clock Button
Press the CLOCK button to access the on-screen Clock
menu.
Scan Button
Press to play the first ten seconds of any track, chapter, title
on the disc.
Shuffle Button
Press to play CD tracks in random order.
Picture Button
Press to select an AutoPicture™ control. Choose from four
factory-set controls (MOVIES, SPORTS, WEAK SIGNAL,
and MULTI MEDIA) and a PERSONAL control that you
set according to your own preferences through the onscreen PICTURE menu. The four factory-set controls will
tailor the TV picture so as to enhance the particular type of
program you are watching, or to improve the picture of a
program that has a weak signal.
OK Button
Press the OK button to confirm selections and adjustments
within the on-screen menus.
Cursor Buttons (Left, Right, Up, Down)
Press these buttons to highlight, select, and adjust items on
the TV's on-screen menu.
Channel (+) or (–) Buttons
Press to change the tuned channel.
Mute Button
Press to turn the TV sound OFF. Press again to return the
sound to its previous level.
FTS Button
Press to store your favorite titles, chapters, or tracks. FTS will
hold up to 20 selections.
Angle Button
Press to select the desired DVD camera angle.
Subtitle Button
Press to select the subtitle language.
Next Button
Press to advance to the next chapter or track.
Play Button
Press to begin playback of a DVD disc or an audio CD.
Surf Button
Press to select previously viewed channels. You can place up
to 10 channels in memory. Then by pressing the SURF button
you can quickly view the select channels. (See the “Using the
Channel Surf Control” section in your Directions for Use
manual to see how to select a series of channels using the Surf
button.)
Open/Close Button
Press to open or close the DVD disc tray.
Sleep Button (TV)
Press to set the TV to automatically turn itself OFF. Press to
set the TV to automatically turn itself OFF after a period of
time. Choose 15, 30, 45, 60, 90, 120, 180, or 240 minutes
before the TV will automatically turn off.
STATUS Button (SYST MENU) (TV/DVD)
Press to see the current channel number on the TV screen.
Also press to clear the TV screen after control adjustments.
When in the DVD mode, press to display the DVD Player
on-screen menu.
Source Button (TV)
Press repeatedly to select the different signal sources connected to the A/V inputs on the TV.
TV/DVD Mode Switch (TV/DVD)
Slide to the TV position to control TV functions, or to the DVD
position to control the functions of the DVD Player.
Repeat Button (DVD)
When using the DVD player, press to repeat the playback of a
chapter, title, track or the disc.
Repeat A-B Button (DVD)
When using the DVD player, press to repeat the sequence in a
title.
Number Buttons (TV/DVD)
Press the number buttons to select TV channels. When
selecting single-digit channels, press the number of the
desired channel. The TV will pause for a few seconds and
then tune to the selected channel. (Note: You can press 0,
then the number also.) For channels 100 and above, first
press 1 then the next two numbers of the desired channel.
Sound Button (TV)
Press to select an AutoSound™ control. Choose from three
factory-set controls (VOICE, MUSIC, and THEATRE) and a
PERSONAL control that you set according to your own preferences through the on-screen Sound menu. The three factory-set controls will tailor the TV sound so as to enhance the
particular type of program you are watching.
Menu Button (TV)
Press for the on-screen menu to appear. Pressing the menu
button after menu selections are made will eliminate the
menu from the display.
Volume (+) or (–) Buttons (TV/DVD)
Press to adjust the TV sound level.
T/C Button (DVD)
Press to select a specific title or chapter.
Audio Button (DVD)
Press to select the desired audio language.
Previous Button (DVD)
Press to select a previous chapter or track.
Zoom Button (DVD)
Press to enlarge the video image.
Reverse Button (DVD)
Press and hold to play the disc backward. Works similar to a
rewind button.
Stop Button (DVD)
Press to stop the playback of a DVD disc or audio CD.
Incr. Surr. Button (TV/DVD)
Press to set various factory preset Surround Sound listening
modes.
Pause Button (DVD)
Press to pause the playback of a DVD disc or audio CD.
Pressing repeatedly will show frame-by-frame playback of a
DVD disc.
SMART HELP
The tuned channel number will always
briefly appear on the screen when the TV is
first turned ON (and when the channel is changed).
You can press the STATUS button (on the remote
control) to see what channel the TV is on.
T
his remote control is capable of
controlling both the TV controls
and the DVD Player controls.
When using the TV be sure to have
the SWITCH in the “TV” position.
When using the DVD Player, move
the SWITCH to the “DVD” position.
Certain buttons may have no functionality if not related to the position
of the SWITCH (TV or DVD).
REMOTE TV/DVD SWITCH
REMOTE CONTROL BUTTON DESCRIPTIONS
SLEEP
SOURCE STATUS CC CLOCK
TV
SHUFFLE
REPEAT
DVD
VOL
REPEAT
A-B
SOUND PICTURE
MENU
MUTE
AUDIO
T/C FTS ANGLE
PREVIOUS ZOOM SUBTITLE NEXT
STOP
REVERSE FORWARD
INCR.SURR.
PLAY
PAUSE
OPEN/CLOSE
POWER
SCAN
OK
SURF
CH
SLEEP
SOURCE STATUS CC CLOCK
TV
REPEAT
DVD
REPEAT
A-B
SHUFFLE
POWER
SCAN
Page 3
3
BASIC DVD PLAYER INFORMATION
T
he Digital Video Disc Player portion of this television will allow you to enjoy bet-
ter picture quality, clearer sound, and endless playback features available on
Digital Video Discs (DVDs). Expanding technology allows you to add options to your
viewing - watch a director’s cut of a movie, listen to the producer’s comments, or play
your favorite scene over and over again. Hear a movie in different languages, or listen only to the soundtrack. The possibilities are limited only by your choices and the
materials available on the DVD.
Of course, you can listen to your favorite Audio Compact Discs on this DVD Player
as well. Determine the order in which you want to hear the songs, or play the Disc
repeatedly - all while seeing the status of the CD on your television.
We hope you enjoy this Television/DVD Player combination and learn to use all of its
features. To get the most out of the DVD Player, read this Quick Use and Setup Guide
along with the Directions for Use manual carefully. It will describe how you can
access all the features listed below.
When referring to this manual, remember...
Indicates that the feature described is available on some Digital Video Discs.
Indicates that the feature described is available on some Audio
Compact Discs.
Disc Menus...
Some explanations in this Quick Use and Setup Guide and the Directions for Use
manual describe the Disc Menus. These menus are set by the movie producers or by
the music industry; the menus will vary among Discs. Furthermore, not all Discs
have menus.
DVD Player Menus...
Some instructions explain how to use the DVD Player’s menu to set up features of the
DVD Player or the Disc. You get to the DVD Player Menu by pressing the STATUS
button on the remote control when Disc playback is stopped and the remote is in the
DVD mode. Even if a feature is set up in the DVD Player’s menu, it may not be available if the current Disc does not include that feature.
Available Disc Features...
Not all of the features described in this manual may be available on
every DVD or Audio CD. If the feature is not available on the Disc, you
cannot use the DVD Player to make these features available. An “X”
will appear in the top right corner of the TV screen if you try to access a feature that
is not available on the current Disc or not available at the current time. The “X” may
not be visible if the DVD you are playing is in Wide screen format (with black bars at
the top and bottom of the picture).
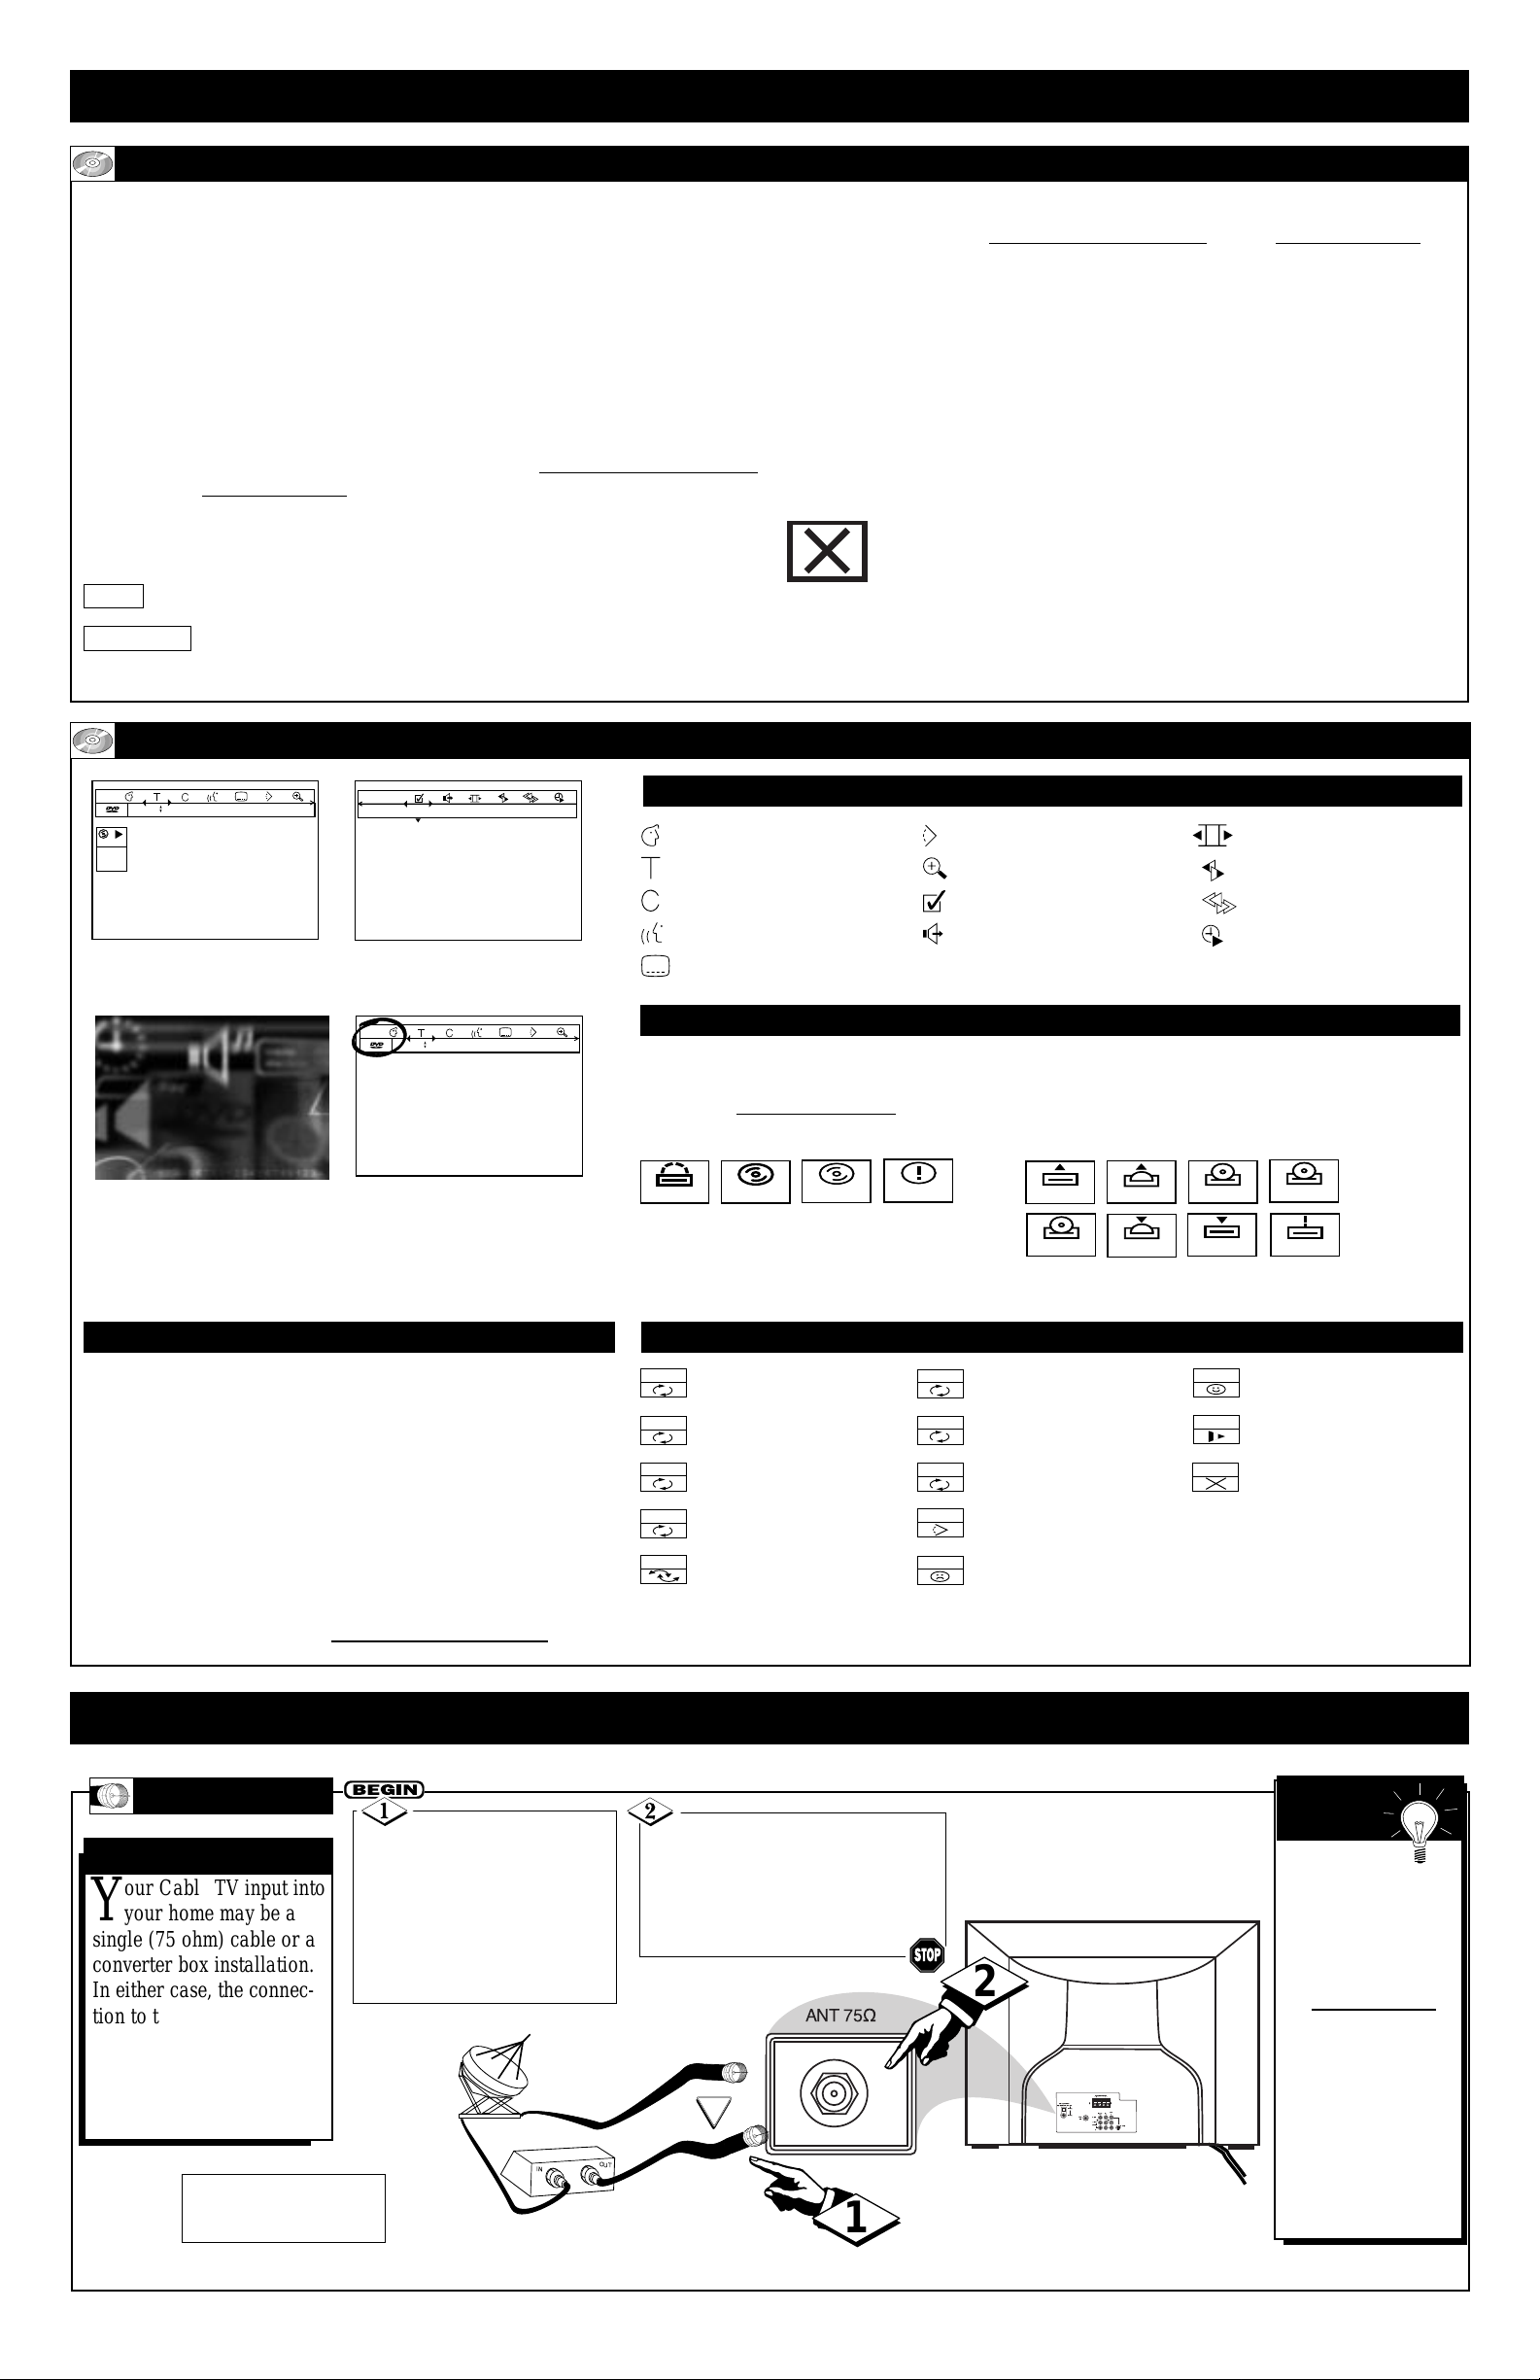
DVD INTRODUCTION
DVD
AUDIO CD
DVD ON SCREEN DISPLAY GENERAL INFORMATION
MENU BAR/STATUS WINDOW
The Status Widow displays the current status of the player and appears with the first part of
the menu bar. (You must activate this in the Features Menu. - See the Personal Preference section of the Dir
ections for Use for more details.)
General
Disc Type
Tray Status
STATUS WINDOW ICONS
DVD
VCD
no disc
opened
opening
opening
opening
closing
closing
closing
blocked
error
DEFAULT SCREEN
TEMPORARY FEEDBACK FIELD ICONS
Menu Bar/Status Windows
Default Screen
Temporary Feedback Field Screen
Please refer to the Directions for Use manual for detailed information on DVD Player features and operation.
Personal Preferences
Title/Track
Chapter/Index
Audio Language
Subtitle Language
Angle
Zoom
Video Program
Sound
Picture by Picture
Slow Motion
Fast Motion
Time Search
The Default Screen is displayed when the player is in the
STOP mode. It may contain a “Status Window” and a
“Temporary Feedback Field”. This give information concerning prohibited actions, playback modes, available
angles, etc.
Repeat All
Repeat Title
Repeat Track
Repeat Chapter
Shuffle
Shuffle Repeat
Repeat Ato End
Repeat A-B
Angle
Child Lock On
Child Safe
Resume
Action Prohibited
B
ASIC TELEVISION CONNECTIONS
Y
our Cable TV input into
your home may be a
single (75 ohm) cable or a
converter box installation.
In either case, the connection to the TV is very easy.
Just put the threaded end of
the cable signal to the TV's
antenna plug and screw it
down finger tight.
CABLE TV
CABLE INPUT/CONVERTER
If your Cable TV signal
is a single, round cable
(75 ohm), then you're ready to
connect to the TV.
If you have a cable converter
box, connect the cable TV signal
to the cable signal IN(put) plug
on the converter.
Connect the cable TV cable to the
ANTENNA/CABLE plug on the TV.
If you have a cable converter box,
connect the OUT(put) plug from the
converter to the 75Ω (ohm) plug on the
TV.
Back of TV
Round Cable
75Ω (Ohm)
Cable TV Converter
Box Connection
Cable TV Company
Remember to
set the TV for the
type signal to which
you've just connected
(see the “Tuner
Mode” section on
page 7).
To select only the
channel numbers on
your cable system, see
“Auto Program” (page
8). If you use a cable
converter box, set the
TV to the same channel as the converter's
CH 3/4 switch (on the
back of the converter).
SMART
HELP
Cable TV Signal Input
OR
NOTE: The connecting cable
for the converter is supplied
by the cable TV company.
1 1 1 en 1 en no off
play
DVD
2:45:23
0:00:34
off st
1 1 1 en 1 en no off
repeat
title
track
chapter
shuffle
shuffle
A -
A - B
locked
safe
resume
IN
ANT 75½
OUT
1
2
DIGITALAUDIOOUT
PCM/MPEG2/DOLBYD/DTS
OPTICAL
COAXIAL
SURROUNDSOUND
+ R Ð Ð L +
8½8
½
AV2
AV1
Monitor
in
in
out
VIDEO
75½
L/Mono
AUDIO
S-VIDEO
R
Page 4

4
F
ollow the steps to the
right to connect a basic
antenna or cable TV signal
to a VCR, and then the VCR
to the TV. For information
on other hookups (possible
when cable/descrambler
boxes are included), refer to
the owner’s manuals for the
VCR and the cable converter.
TV TO VCR
BASIC CONNECTION
Connect your antenna or cable TV signal to the
IN FROM ANT(enna) plug on
the VCR.
Connect the OUT TO
TV plug on the VCR to the
75Ω (ohm) plug on the TV
(connecting cable supplied
with the VCR).
Round Cable
75Ω (Ohm) Supplied with VCR
Outdoor
VHF/UHF
Antenna
300Ω (Ohm) to 75Ω (Ohm) Adapter
Cable TV signal
Back of TV
Refer to the owner's
manual included with your
VCR for other possible connections and TV/VCR operating details.
VCR
A
combination antenna
receives normal broadcast channels (VHF 2–13
and UHF 14–69). Your
connection is easy because
there is only one 75Ω
(ohm) antenna plug on the
back of your TV, and that’s
where the antenna goes.
ANTENNA
COMBINATION UHF/VHF
Remember, be
sure to set the TV for
the type of signal to
which you've connected
(see the “Tuner Mode”
section on page 7).
To set the TV to select
only the channel numbers
in your area, see how to
“Program” or “Add”
channels in memory on
page 8 (“Auto Program”
section).
Contact your dealer,
or call our Parts
Information Center at
1-800-851-8885 to order
the following accessories:
• 300Ω (ohm) to 75Ω
(ohm) adapter
• Combination
VHF/UHF antenna.
SMART
HELP
If your antenna has a
round cable (75 ohm) on the end,
then you're ready to connect it to
the TV.
If your antenna has flat, twinlead wire (300 ohm), you first need
to attach the antenna wires to the
screws on a 300- to 75-ohm
adapter.
Push the round end of the
adapter (or antenna) onto the
75Ω (ohm) plug on the back of
the TV. If the round end of the
antenna wire is threaded, screw
it down finger tight.
300Ω (Ohm) to
75Ω (Ohm) Adapter
Combination VHF/UHF
Antenna
(Outdoor or Indoor)
Twin-Lead
Wire
Round Cable 75Ω (Ohm)
Back of TV
OR
NOTE: For homes with separate UHF and
VHF antennas, you will need an optional combiner to connect to the TV.
75½
L/Mono
Monitor
out
VIDEO
S-VIDEO
SURROUNDSOUND
+RÐ Ð L+
8½8
½
AV1
in
AV2
in
AUDIO
R
DIGITALAUDIOOUT
PCM/MPEG2/DOLBYD/DTS
OPTICAL
COAXIAL
U/V
Combiner
300- to 75-Ohm Adapter
Back of TV
BASIC TELEVISION CONNECTIONS
ADVANCED TELEVISION CONNECTIONS
B
y adding optional exter-
nal speakers to the TVÕs
sound system, you can create
the feeling of reflected sound
that surrounds you at a movie
theater or concert hall.
EXTERNAL SPEAKERS
Connect both external
speakers to the speaker wire
terminals on the TV.
Recommended speakers: 8
ohm, 15 watt minimum. Be
sure the (+) and (Ð) speaker
wires are connected to the correct R(ight) and L(eft) speaker
terminals on the TV.
Place the speakers so that
the viewing area is between the
TV and the rear surround
speakers. (See inset diagram.)
Turn the TV and the
STEREO control ON.
After setup, whenever a stereo
signal is received, the audio
will be heard in Surround
Sound.
SMART
HELP
Remember,
Surround Sound will not
work with only one speaker
connected, nor with a monaural audio source supplied,
unless the Incredible
Surround feature is turned
ON (see the Dir
ections for
Use, page 31).
TV
REAR SPEAKER
REAR SPEAKER
PRIMARYVIEWING AREA
REAR SURROUND
SOUND SPEAKERS
REAR SURROUND SOUND
SPEAKER TERMINALS
BACK OF TV
Digital Multi-channel connection provides the best
sound quality during playback of a digital video
disc. If using a Digital receiver equipped with a
multi-channel decoder (Dolby Digital™ (AC-3),
MPEG2, and DTS), connect the digital audio out
(Optical or Coaxial) to the corresponding input on
the receiver using an optional digital audio cable.
Refer to the Directions for Use, “Digital Output”
section for more information on proper setup.
NOTE: The rear Surround Sound speakers will not be heard at the same volume level
as the front TV speakers. The rear speakers are intended to give a background noise
effect that requires a lower volume level than the TVÕs front speakers.
Twin-Lead
Wire
F
or more convenient,
direct playback connections, you can use your TV’s
side Audio/Video Input panel.
Located on the right and
angled toward the front for
easy access. The audio/video
jacks in this panel allow for
quick connections that are
especially handy for playing
back camcorder tape recordings.
SIDE INPUTS
SIDE AUDIO/VIDEO INPUTS
Connect one end of
the Video (yellow) cable to the
Video Output jack on the
Camera (or accessory device).
Connect the other end to the
Video Input located on the side
of the television.
Connect one pair of
Audio (red and white) cable
ends to the Audio Outputs
jacks on the camera (or accessory device). Connect the other
ends of the cable to the Audio
L and R Input jacks on the side
of the television.
Accessory Device
Jack Panel
Video Cable
(yellow)
Side of TV
Turn both the TV and
the Camera (accessory
device) ON, press the source
button on the remote control
until AV3 appears in the upper
left corner of the TV screen.
Accessory Device
with A/V Outputs
Press PLAY on the
accessory device to view the
recording.
Audio Cables
(red and white)
Headphone Jack - Mutes the TV sound when plugged in.
The S-Video Input can be
used in place of the Video
Input if S-Video is available.
1
2
ANT 75½
SURROUNDSOUND
+ R Ð Ð L +
8½8
DIGITALAUDIOOUT
½
PCM/MPEG2/DOLBYD/DTS
OPTICAL
AV2
AV1
Monitor
in
in
out
COAXIAL
VIDEO
75½
L/Mono
AUDIO
S-VIDEO
R
REPEAT
TV
SOURCE
REPEAT
A-B
SLEEP
STATUS CC CLOCK
SHUFFLE
SCAN
POWER
3
DVD
SOUND
OR
IN FROM ANT.
AV3
3
OUT TO TV
1
S-VIDEO
VIDEO
AUDIO
ANT 75Ω
In
L
R
2
R
L
AUDIO
VIDEO
2
SURROUND SOUND
+ R – – L +
8Ω8
DIGITAL AUDIOOUT
Ω
PCM/MPEG2/DOLBYD/DTS
OPTICAL
AV2
AV1
Monitor
in
in
out
COAXIAL
VIDEO
75Ω
L/Mono
AUDIO
S-VIDEO
R
1
4
3
3
1
DIGITAL AUDIOOUT
PCM/MPEG2/DOLBYD/DTS
OPTICAL
COAXIAL
75Ω
8
Ω
SURROUND SOUND
+ R – – L +
Monitor
out
VIDEO
L/Mono
AUDIO
R
8
Ω
AV2
AV1
in
in
S-VIDEO
+-
+
-
2
Page 5

T
he TVÕs Audio/Video Input
Jacks are for direct picture and sound connections
between the TV and a VCR
(or similar device) that has
audio/video output jacks.
A/V 1 JACKS
Connect the VIDEO
(yellow) cable to the VIDEO
AV1 in jack on the back of the
TV. Then connect the AUDIO
(red and white) cables to the
AUDIO (left and right) AV1 in
jacks on the rear of the TV.
Connect the VIDEO (yel-
low) cable to the VIDEO OUT
jack on the back of the VCR.
Then connect the AUDIO (red
and white) cables to the
AUDIO (left and right) OUT
jacks on the rear of the VCR.
VCR (or Accessory Device
with A/V Outputs)
ADVANCED TELEVISION CONNECTIONS
Turn the VCR and the
TV ON.
With the VCR ON and a
prerecorded tape inserted,
press the PLAY button to
view the tape on the television.
Press the SOURCE but-
ton on the remote control to
select the AV1 channel.
VCR Jack Panel
Video (yellow) Cable
Audio Cables
(red & white)
Jack Panel on the
back of the TV
Tune the TV to the AV1 Channel
A
second VCR or accessory
device with audio/video
output jacks can be added by
using the AV2 Inputs on the
back of the television.
A/V 2 JACKS
Connect the VIDEO
(yellow) cable to the VIDEO
AV2 in jack on the back of the
TV. Then connect the AUDIO
(red and white) cables to the
AUDIO (left and right) AV2 in
jacks on the rear of the TV.
Connect the VIDEO (yel-
low) cable to the VIDEO OUT
jack on the back of the 2nd VCR.
Then connect the AUDIO (red
and white) cables to the AUDIO
(left and right) OUT jacks on the
rear of the 2nd VCR.
VCR
(or Accessory Device with A/V Outputs)
Turn the 2nd VCR and
the TV ON.
With the 2nd VCR ON
and a prerecorded tape inserted, press the PLAY button to
view the tape on the television.
Press the SOURCE but-
ton on the remote control to
select the AV2 channel.
VCR Jack Panel
Video (yellow) Cable
Audio Cables
(red & white)
Jack Panel on the
back of the TV
Tune the TV to
the AV2 Channel
Possible First VCR or Accessory Device
Connected to the AV1 Input Jacks
5
T
he S(uper)-Video connec-
tion on the rear of the TV
can provide you with better
picture detail and clarity for
the playback of accessory
sources such as DBS (digital
broadcast satellite), DVD
(digital video discs), video
games, and S-VHS VCR
(video cassette recorder)
tapes than the normal antenna picture connections.
NOTE: The accessory device
must have an S-VIDEO
OUT(put) jack in order for
you to complete the connection on this page.
S-VIDEO
Connect one end of the
S-Video (SVHS) cable to the S-
Video jack on the back of the TV.
Then connect one end of the
AUDIO (red and white) cables
to the AUDIO (left and right) AV2
in jacks on the rear of the TV.
Connect the other end of
the S-Video (SVHS) cable to
the SVHS jack on the back of
the VCR. Then connect the
other end of the AUDIO (red
and white) cables to the
AUDIO (left and right) OUT
jacks on the rear of the VCR.
VCR
(or Accessory Device with S-VIDEO Jack
Turn the VCR and the
TV ON.
With the VCR ON and a
prerecorded tape inserted,
press the PLAY button to
view the tape on the television.
Press the SOURCE but-
ton on the remote control to
select the AV2 (SVHS) channel.
VCR Jack Panel
S-Video Cable
Audio Cables
(red & white)
Jack Panel on the
back of the TV
Tune the TV to the AV2
Channel for S-Video
4
TV
SOURCE
STATUS CC CLOCK
REPEAT
DVD
REPEAT
A-B
SHUFFLE
SOUND PICTURE
MENU
MENU
OK
CH
LE
AV1
SLEEP
POWER
SCAN
DIGITAL AUDIOOUT
PCM/MPEG2/DOLBYD/DTS
OPTICAL
COAXIAL
75Ω
SURROUND SOUND
+ R – – L +
8
Ω
VIDEO
L/Mono
AUDIO
R
Monitor
out
8
Ω
1
AV2
AV1
in
in
R L
AUDIO OUT
S-VIDEO
3
2
S-VIDEO
VIDEO
OUT
ANT/CABLE
OUT
OUT
5
SURROUND SOUND
+ R – – L +
AV1
in
ANT/CABLE
OUT
8
Ω
AV2
in
S-VIDEO
R L
AUDIO OUT
3
R L
AUDIO OUT
8
Ω
VIDEO
L/Mono
AUDIO
VIDEO
1
Monitor
out
R
S-VIDEO
OUT
OUT
AV2
SLEEP
TV
SOURCE
STATUS CC CLOCK
REPEAT
DVD
REPEAT
A-B
SHUFFLE
SOUND PICTURE
MENU
MENU
OK
CH
LE
POWER
4
SCAN
DIGITAL AUDIOOUT
PCM/MPEG2/DOLBYD/DTS
OPTICAL
COAXIAL
75Ω
2
S-VIDEO
VIDEO
OUT
ANT/CABLE
OUT
OUT
5
SLEEP
TV
SOURCE
STATUS CC CLOCK
REPEAT
DVD
REPEAT
A-B
SHUFFLE
SOUND PICTURE
MENU
MENU
AV2
POWER
4
SCAN
DIGITAL AUDIOOUT
PCM/MPEG2/DOLBYD/DTS
OPTICAL
COAXIAL
75Ω
SURROUND SOUND
+ R – – L +
8
Ω
VIDEO
L/Mono
AUDIO
R
8
Ω
AV2
AV1
Monitor
out
in
in
S-VIDEO
1
2
R L
AUDIO OUT
VIDEO
OUT
S-VIDEO
ANT/CABLE
OUT
OUT
3
5
Page 6

ADVANCED TELEVISION CONNECTIONS
T
he Audio/Video (Monitor)
Output jacks are great for
recording with a VCR or used
to connect an external audio
system for better sound reproduction.
MONITOR OUT
For an external audio
system: Connect one end of the
R(ight) and L(eft) AUDIO
(Monitor Out) jacks on the TV
to the R and L audio input jacks
on your amplifier or sound system. Set the audio system’s volume to a normal listening level.
Turn the TV and audio
system ON. You can now
adjust the sound level coming
from the audio system with the
VOLUME (+) or (–) button on
the TV or remote control.
To connect a second VCR
for recording: Connect one
end of the yellow Video Cable
to the Monitor Out VIDEO
plug. Connect the other end to
the VIDEO IN plug on the second VCR.
Turn the Second VCR
ON, insert a black VHS tape
and it’s ready to record what’s
being viewed on the TV
screen.
Connect one end of the
red and white Audio cable
from the Monitor Out AUDIO
L and R plugs on the TV to the
AUDIO IN plugs on the VCR.
For Audio
System
Connection:
For Second VCR Connection:
Back of TV
Audio Cables
(red & white)
External Audio System
Audio Cables
(red & white)
Video Cable (yellow)
IF YOU ARE USING A
MONO DEVICE, USE
ONLY THE AUDIO
L/MONO JACK.
Audio Cables
(red & white)
Video Cable
(yellow)
Back of TV
6
HOW TO USE THE TELEVISION INSTALL FEATURES
Second VCR
First VCR
PICTURE
SOUND
FEATURES
INSTALL
LANGUAGE
TUNER MODE
AUTO PROGRAM
CHANNEL EDIT
NAME
LANGUAGE
TUNER MODE
AUTO PROGRAM
CHANNEL EDIT
NAME
INSTALL
INSTALL
LANGUAGE
TUNER MODE
AUTO PROGRAM
CHANNEL EDIT
NAME
ENGLISH
FRANCAIS
ESPANOL
˜
SLEEP
SOURCE
STATUS CC CLOCK
REPEAT
SOUND PICTURE
MENU
CH
MUTE
REPEAT
T/C FTS ANGLE
PREVIOUS ZOOM SUBTITLE NEXT
STOP
PLAY
INCR.SURR.
POWER
SHUFFLE
OK
VOL
AUDIO
TV
DVD
SCAN
REVERSE
MENU
A-B
4
1
5
2
3
5
6
OK
F
or or Spanish- and
French-speaking TV
owners, an on-screen LANGUAGE option is present.
The LANGUAGE control
enables you to set the TVÕs
on-screen menu to be shown
in either English, Spanish, or
French.
LANGUAGE
Press the MENU but-
ton on the remote control to
show the on-screen menu.
Press the CURSOR
DOWN button repeatedly
until INSTALL is highlighted.
Press the CURSOR
RIGHT button to highlight
the LANGUAGE control
options.
Press the CURSOR UP
or CURSOR DOWN button
to select ENGLISH,
ESPANOL (Spanish), or
FRANCAIS (French).
Press the CURSOR
RIGHT button to shift the
menu to the left and highlight
LANGUAGE.
Remember, the LANGUAGE control
makes only the TVÕs on-screen MENU items
appear in English, Spanish, or French text. It does
not change the other on-screen text features.
Pressing the STATUS button on your remote control
will remove the menu from the screen. You also can
back out of the menu by repeatedly pushing the
MENU button on your remote control.
SMART HELP
Press the STATUS but-
ton to clear the menu from the
screen.
SURROUND SOUND
+ R – – L +
1
2
R
AUX/TV INPUT
PHONO INPUT
L
DIGITAL AUDIOOUT
PCM/MPEG2/DOLBYD/DTS
OPTICAL
COAXIAL
DIGITAL AUDIOOUT
PCM/MPEG2/DOLBYD/DTS
OPTICAL
COAXIAL
8
Ω
75Ω
SURROUND SOUND
+ R – – L +
Monitor
out
VIDEO
75Ω
1
8
Ω
Monitor
out
VIDEO
L/Mono
AUDIO
R
AV1
8
Ω
AV2
in
in
SURROUND SOUND
+ R – – L +
8Ω8
DIGITAL AUDIOOUT
Ω
S-VIDEO
PCM/MPEG2/DOLBYD/DTS
OPTICAL
AV2
AV1
Monitor
in
in
out
COAXIAL
VIDEO
75Ω
L/Mono
AUDIO
S-VIDEO
R
3
8
Ω
AV2
AV1
in
in
SURROUND SOUND
+ R – – L +
8Ω8
DIGITAL AUDIOOUT
Ω
PCM/MPEG2/DOLBYD/DTS
OPTICAL
AV2
AV1
Monitor
in
in
out
COAXIAL
VIDEO
75Ω
L/Mono
AUDIO
S-VIDEO
R
ANTENNA
OUT OUT
IN
VIDEO
ANTENNA
OUT
5
L/Mono
4
RL
AUDIO
IN
IN
AUDIO
R
S-VIDEO
ANTENNA
OUTOUT
IN
VIDEO
LR
AUDIO
IN
ANTENNA
OUT
IN
Page 7

HOW TO USE THE TELEVISION INSTALL FEATURES
PICTURE
SOUND
FEATURES
INSTALL
LANGUAGE
TUNER MODE
AUTO PROGRAM
CHANNEL EDIT
NAME
LANGUAGE
TUNER MODE
AUTO PROGRAM
CHANNEL EDIT
NAME
INSTALL
INSTALL
LANGUAGE
TUNER MODE
AUTO PROGRAM
CHANNEL EDIT
NAME
INSTALL
LANGUAGE
TUNER MODE
AUTO PROGRAM
CHANNEL EDIT
NAME
AUTO
CABLE
ANTENNA
SLEEP
SOURCE
STATUS CC CLOCK
REPEAT
SOUND PICTURE
MENU
CH
MUTE
REPEAT
T/C FTS ANGLE
PREVIOUS ZOOM SUBTITLE NEXT
STOP
PLAY
INCR.SURR. SURF
OPEN/CLOSE
POWER
SHUFFLE
OK
VOL
AUDIO
TV
DVD
SCAN
REVERSE
FORWARD
PAUSE
MENU
A-B
1
3
2
4
6
5
OK
T
he TUNER MODE fea-
ture allows you to change
the TV’s signal input to
CABLE, ANTENNA, or
AUTO mode. It’s important
for the TV to know if you
want to receive channels
from a cable TV signal or a
normal antenna signal.
NOTE: The AUTO mode setting helps the TV determine
the type of signal or channels
being received when AUTO
PROGRAM is activated.
T
UNERMODE
Press the MENU but-
ton on the remote control to
show the on-screen menu.
Press the CURSOR
DOWN button repeatedly until
INSTALL is highlighted.
Press the CURSOR
RIGHT button to highlight the
tuner options.
With the AUTO setting
selected, Auto Program will
detect if a cable input is present.
If you want to set the TUNER
MODE to CABLE or ANTENNA, press the CURSOR UP or
CURSOR DOWN button until
either CABLE or ANTENNA is
highlighted
.
Press the CURSOR
RIGHT button to shift the
menu to the left.
Press the CURSOR
DOWN button once to high-
light TUNER MODE.
When CABLE is
selected, channels 1–125
are available.
When ANTENNAis selected,
channels 2–69 are available.
SMART HELP
Press the STATUS but-
ton to clear the menu from the
screen.
7
PICTURE
SOUND
FEATURES
INSTALL
LANGUAGE
TUNER MODE
AUTO PROGRAM
CHANNEL EDIT
NAME
LANGUAGE
TUNER MODE
AUTO PROGRAM
CHANNEL EDIT
NAME
INSTALL
INSTALL
SEARCH
INSTALL
LANGUAGE
TUNER MODE
AUTO PROGRAM
CHANNEL EDIT
NAME
CABLE
PLEASE WAIT
CHANNEL 12
LANGUAGE
TUNER MODE
AUTO PROGRAM
CHANNEL EDIT
NAME
SLEEP
SOURCE STATUS CC CLOCK
REPEAT
SOUND PICTURE
MENU
CH
MUTE
REPEAT
T/C FTS ANGLE
PREVIOUS ZOOM SUBTITLE NEXT
STOP
PLAY
INCR.SURR.
SURF
OPEN/CLOSE
POWER
SHUFFLE
OK
VOL
AUDIO
TV
DVD
SCAN
REVERSE
FORWARD
PAUSE
MENU
A-B
5
1
3
2
4
6
OK
Y
our TV can automatically
set itself for local area
(or cable TV) channels. This
makes it easy for you to
select only the TV stations in
your area by pressing the
CHANNEL (+) or (–) button.
AUTO PROGRAM
Press the MENU but-
ton on the remote control to
show the on-screen menu.
Press the CURSOR
DOWN button repeatedly until
INSTALL is highlighted.
Press the CURSOR
RIGHT button to shift the
menu to the left. LANGUAGE
will be highlighted.
Press the CURSOR
DOWN button repeatedly
until the AUTO PROGRAM
control is highlighted.
Press the CURSOR
RIGHT button to start the
Auto Program scanning of
channels.
After youÕve run Auto
Program, check out the
results. Press the CHANNEL
(+) or (Ð) button and see which
channels you can select.
Remember, an antenna or cable
TV signal must first be connected to your TV (see instructions for making connections
on page 1 of this guide).
If you want to delete any
unwanted channels from the
TVÕs memory, see the ÒCHANNEL EDITÓ section below.
SMART HELP
Press the STATUS but-
ton to clear the menu from the
screen.
C
HANNEL EDIT makes it
easy for you to add or
delete channels from the list
of channels stored in the TVÕs
memory.
CHANNEL EDIT
Press the MENU but-
ton on the remote control to
show the on-screen menu.
Press the CURSOR
DOWN button repeatedly
until INSTALL is highlighted.
Press the CURSOR
DOWN button repeatedly
until the CHANNEL EDIT
control is highlighted.
Press the CURSOR
RIGHT button to access the
CHANNEL EDIT menu.
Press the CURSOR
RIGHT button to shift the
menu to the left. LANGUAGE
will be highlighted.
Press the CURSOR UP
or CURSOR DOWN button to
scroll through the list of available channels. Or you can press
the number buttons on your
remote control to select a specific channel (for example, press 0
and then 2 to select channel 2).
With the channel you
want to edit selected, press the
CURSOR RIGHT button to
mark the channel as SKIPPED.
The channel youÕve marked
SKIPPED will not appear when
you are changing from channel
to channel while watching TV.
NOTE: When you want to
add a channel that has been
marked SKIPPED, press the
CURSOR UP or CURSOR
DOWN button to highlight
the channel; then press the
CURSOR RIGHT button to
remove the word SKIPPED.
The channels available for you to edit are the ones that the AUTO PROGRAM feature found through a search of your
TV antenna or cable TV signals. Channels not found during the search are marked SKIPPED.
SMART HELP
T/C FTS ANGLE
PREVIOUS
ZOOM SUBTITLE
REVERSE FORWARD
STOP
PLAY
R.
PAUSE
SURF
/CLOSE
1
VOL
MUTE
AUDIO
NEXT
SOUND PICTURE
MENU
MENU
CH
OK
OK
DVD
2
TV
REPEAT
A-B
6
3
4
SOURCE STATUS
REPEAT
SHUFFLE
SLEEP
CC CLOCK
SCAN
PICTURE
SOUND
FEATURES
INSTALL
POWER
5
7
6
LANGUAGE
TUNER MODE
AUTO PROGRAM
CHANNEL EDIT
NAME
INSTALL
LANGUAGE
TUNER MODE
AUTO PROGRAM
CHANNEL EDIT
NAME
INSTALL
LANGUAGE
TUNER MODE
AUTO PROGRAM
CHANNEL EDIT
NAME
INSTALL
LANGUAGE
TUNER MODE
AUTO PROGRAM
CHANNEL EDIT
NAME
66 SKIPPED
67 SKIPPED
68 SKIPPED
69 SKIPPED
AV1
Page 8

SLEEP
SOURCE STATUS CC CLOCK
REPEAT
A-B
SOUND PICTURE
MENU
CH
MUTE
REPEAT
T/C FTS ANGLE
PREVIOUS ZOOM SUBTITLE NEXT
STOP
PLAY
INCR.SURR.
SURF
OPEN/CLOSE
POWER
SHUFFLE
VOL
AUDIO
TV
DVD
SCAN
REVERSE FORWARD
PAUSE
1
4
OK
6
5
3
7
8
9
7
9
2
10
11
12
PICTURE
SOUND
FEATURES
INSTALL
BRIGHTNESS
COLOR
PICTURE
SHARPNESS
STORE
PICTURE
SOUND
FEATURES
INSTALL
LANGUAGE
TUNER MODE
AUTO PROGRAM
CHANNEL EDIT
AutoChron
LANGUAGE
TUNER MODE
AUTO PROGRAM
CHANNEL EDIT
AutoChron
INSTALL
ENGLISH
FRANCAIS
ESPANOL
˜
LANGUAGE
TUNER MODE
AUTO PROGRAM
CHANNEL EDIT
AutoChron
INSTALL
LANGUAGE
TUNER MODE
AUTO PROGRAM
CHANNEL EDIT
AutoChron
INSTALL
SET TIME
AUTO
MANUAL
INSTALL
SEARCH FOR
TIME
TIME FOUND
END:PRESS STATUS
11:00 AM
INSTALL
TIME ZONE?
CENTRAL
MOUNTAIN
PACIFIC
LANGUAGE
TUNER MODE
AUTO PROGRAM
CHANNEL EDIT
AutoChron
INSTALL
DAYLIGHT
SAVING TIME?
YES
NO
LANGUAGE
TUNER MODE
AUTO PROGRAM
CHANNEL EDIT
AutoChron
INSTALL
SEARCH FOR
TIME
PLEASE WAIT
12 PBS
LANGUAGE
TUNER MODE
AUTO PROGRAM
CHANNEL EDIT
AutoChron
INSTALL
SEARCH FOR
TIME
TIME NOT FOUND
RE-ENTER CHANNEL
12 PBS
LANGUAGE
TUNER MODE
AUTO PROGRAM
CHANNEL EDIT
AutoChron
LANGUAGE
TUNER MODE
AUTO PROGRAM
CHANNEL EDIT
AutoChron
SET TIME
AUTO
MANUAL
INSTALL
SEARCH FOR
TIME
ENTER CHANNEL
12 PBS
LANGUAGE
TUNER MODE
AUTO PROGRAM
CHANNEL EDIT
AutoChron
OR
HOW TO USE THE TELEVISION INSTALL FEATURES
PICTURE
SOUND
FEATURES
INSTALL
LANGUAGE
TUNER MODE A
TUNER MODE B
AUTO PROGRAM
CHANNEL EDIT
LANGUAGE
TUNER MODE
AUTO PROGRAM
CHANNEL EDIT
NAME
INSTALL
INSTALL
INSTALL
LANGUAGE
TUNER MODE
AUTO PROGRAM
CHANNEL EDIT
NAME
LANGUAGE
TUNER MODE
AUTO PROGRAM
CHANNEL EDIT
NAME
PERSONAL
WX-
WXY-
WXYZ-
WXYZ3
SLEEP
SOURCE STATUS
CC CLOCK
REPEAT
SOUND PICTURE
MENU
CH
MUTE
REPEAT
T/C FTS ANGLE
PREVIOUS
ZOOM SUBTITLE
NEXT
STOP
PLAY
SURF
OPEN/CLOSE
POWER
SHUFFLE
OK
VOL
AUDIO
TV
DVD
SCAN
REVERSE FORWARD
PAUSE
MENU
A-B
3
2
4
6
5
7
1
8
PERSONAL
PERSONAL
ABC
ACTS
AMC
ARTS
OK
T
he channel NAME feature
allows you to list the
ÒcallÓ letters of your favorite
stations beside their channel
numbers when they appear
on the screen. The TV has in
memory a list of the 50 most
popular channel names (for
example, ABC, NBC, FOX,
etc.). You also can enter a
custom name (up to five
characters).
NAME
Press the MENU but-
ton on the remote control to
show the on-screen menu.
Press the CURSOR
DOWN button repeatedly
until INSTALL in highlighted.
Press the CURSOR
DOWN button repeatedly until
the NAME control is highlighted.
After you have selected a
name for the channel, press
the MENU button to save the
name in the TVÕs memory.
Press the CURSOR
RIGHT button to shift the
menu to the left. LANGUAGE
will be highlighted.
Press the CURSOR
RIGHT button to highlight the
NAME options area.
Press the CURSOR
RIGHT button again; then
press the CURSOR UP or
CURSOR DOWN button to
scroll through a list of predefined
labels or enter a personalized
label using characters A through
Z, or 0 through 9). Press the
CURSOR RIGHT button and
scroll up or down to enter the
character for that position.
Repeat for the second, third,
fourth, and fifth characters.
Press the STATUS but-
ton to clear the menu from the
screen.
The five characters that the channel NAME feature allows you to
input can be letters, a dash character, or the numbers 0 through 9.
SMART HELP
CURSOR UP or DOWN to select
predefined channel labels.
CURSOR RIGHT to enter a “personalized”
channel label. CURSOR UP or DOWN to
select number or letters for each label up to
5 characters.
8
T
he AutoChron feature will set
your TVÕs clock automatically; however ,you must ensure
that a cable TV or antenna signal is present, because the time
is received from a broadcast signal.
AUTOCHRON
Press the MENU button
on the remote to show the onscreen menu.
Press the CURSOR DOWN
button repeatedly until the word
INSTALL is highlighted.
Press the CURSOR
DOWN button until the word
AutoChron is highlighted.
If necessary, press the CUR-
SOR UP or DOWN button to
highlight your correct time zone.
Press the CURSOR RIGHT
button to shift the menu to the left.
The word LANGUAGE will be
highlighted.
Press the CURSOR RIGHT
button to enter the AutoChron SET
TIME area.
Press the CURSOR RIGHT
button again to select AUTO.
Within a few seconds a menu containing TIME ZONE options will
appear.
With your correct time zone
highlighted, press the CURSOR
RIGHT button. Within a few
seconds, you will be given the
option of DAYLIGHT SAVINGS
TIME.
If necessary, press the
CURSOR UP or DOWN button to select YES or NO for
Daylight Savings Time.
Press the CURSOR
RIGHT button to activate your
selection.
10
Within a few seconds a new
menu will appear asking you to
enter your local PBS channel.
(AutoChron looks for the current
time on PBS channels.) Enter the
PBS channel using the NUMBERED buttons. ÒPLEASE
WAITÓ will appear as AutoChron
looks for the time. If the wrong
channel is entered, you will have to
re-enter a correct PBS channel
again. If the correct time is found
the menu will read ÒTIME
FOUNDÓ and display the current
time.
11
When finished, press the
STATUS button to clear the on-
screen menu from the TV screen.
12
How to Use AutoChron
to Automatically set the
TV’s Clock.
Press the MENU button
on the remote to show the onscreen menu.
Press the CURSOR DOWN
button repeatedly until the word
INSTALL is highlighted.
Press the CURSOR
DOWN button until the word
AutoChron is highlighted.
Press the CURSOR
RIGHT button to enter the
MANUAL time input area.
Press the CURSOR RIGHT
button to shift the menu to the left.
The word LANGUAGE will be
highlighted.
Press the CURSOR RIGHT
button to enter the AutoChron SET
TIME area.
Press the CURSOR
DOWN button to select MAN-
UAL.
Use the NUMBERED
buttons on your remote control to input the current
time. Or, press the CURSOR
UP or DOWN buttons to
scroll through a list of digits
to input the correct time for
each of the time input slots.
(Press the CURSOR RIGHT
button to move from one
digit input slot to the next.)
After you have input the
time, press the CURSOR
RIGHT button to enter the
AM/PM area of the menu.
Press the CURSOR UP or
DOWN button to select the
AM or PM setting.
10
When finished, press the
STATUS button to remove the
menu from the TVÕs screen.
11
How to Use AutoChron
to set the TV’s Clock
Manually.
NOTE: When entering the time manually, you can also press the CLOCK button on the remote control to bring you directly to the digit input area.
SLEEP
SOURCE STATUS CC CLOCK
TV
REPEAT
REPEAT
A-B
DVD
SOUND PICTURE
MENU
VOL
MUTE
AUDIO
T/C FTS ANGLE
2
4
PREVIOUS ZOOM SUBTITLE NEXT
STOP
REVERSE FORWARD
8
INCR.SURR.
PAUSE
OPEN/CLOSE
8
1
6
10
POWER
11
SCAN
SHUFFLE
8
OK
CH
PLAY
SURF
10
9
7
5
3
BRIGHTNESS
COLOR
PICTURE
SHARPNESS
STORE
SET TIME
AUTO
MANUAL
PICTURE
SOUND
FEATURES
INSTALL
INSTALL
LANGUAGE
TUNER MODE
AUTO PROGRAM
CHANNEL EDIT
AutoChron
PICTURE
SOUND
FEATURES
INSTALL
INSTALL
LANGUAGE
TUNER MODE
AUTO PROGRAM
CHANNEL EDIT
AutoChron
INSTALL
LANGUAGE
TUNER MODE
AUTO PROGRAM
CHANNEL EDIT
AutoChron
SET TIME
AUTO
MANUAL
LANGUAGE
TUNER MODE
AUTO PROGRAM
CHANNEL EDIT
AutoChron
INSTALL
LANGUAGE
TUNER MODE
AUTO PROGRAM
CHANNEL EDIT
AutoChron
ENGLISH
FRANCAIS
˜
ESPANOL
SET TIME
AUTO
MANUAL
INSTALL
LANGUAGE
TUNER MODE
AUTO PROGRAM
CHANNEL EDIT
AutoChron
INSTALL
LANGUAGE
ENTER TIME
11:00 AM
TUNER MODE
AUTO PROGRAM
CHANNEL EDIT
AutoChron
ENTER TIME
11:00 AM
INSTALL
LANGUAGE
TUNER MODE
AUTO PROGRAM
CHANNEL EDIT
AutoChron
ENTER TIME
- - : - - AM
 Loading...