

Philips 25PT4823/11 User Manual

Colour Television
25"/29"
Instructions for use
25PT4223
25PT4273
25PT4823
25PT4873
29PT4273
29PT4823
29PT4873
3139 125 27242

2
2
Preparation
5 cm
10 cm
5 cm
Installing the TV
4 Place your TV set on a stable and strong
base.
4 Leave at least a free space of 5 cm on both
sides and 10 cm from the top for good
ventilation of the TV set.
4 Do not cover the ventilation openings with
items such as newspapers, cloths etc.
Connecting the aerial
4 Insert the aerial plug into the socket g at
the back of the TV.
Connecting the mains
4 Insert the mains plug into the wall socket
and switch on.
Refer to the specification at the back of the
TV for the correct operating voltage.
(Picture is only a representation of the actual
plug and socket)
Switching on
4 Press the on/off button at the front of the
TV to switch it on.
3
n
If the indicator is red, press either the digit,
channel, AV or B key on the remote control.
Installing the remote control
4 Remove the cover at the back of the remote
control.
4 Insert the correct type and size batteries
into the compartment, making sure that
they are the right way around.

3
3
Useful Tips
4 Avoid heat and
direct sunlight.
4 Avoid direct
exposure to rain
or water.
4 DO NOT leave your TV on standby for a
prolonged period.
4 Switch off your TV if not in use.
5 This will allow the TV to be demagnetised,
giving good picture.
4 Never repair the TV yourself – get a skilled
personnel!
4 Clean the TV’s screen with a slightly damp
soft cloth ONLY WHEN NECESSARY.
Note : Do not use abrasive solvent as it can
damage the screen’s coating.

4
4
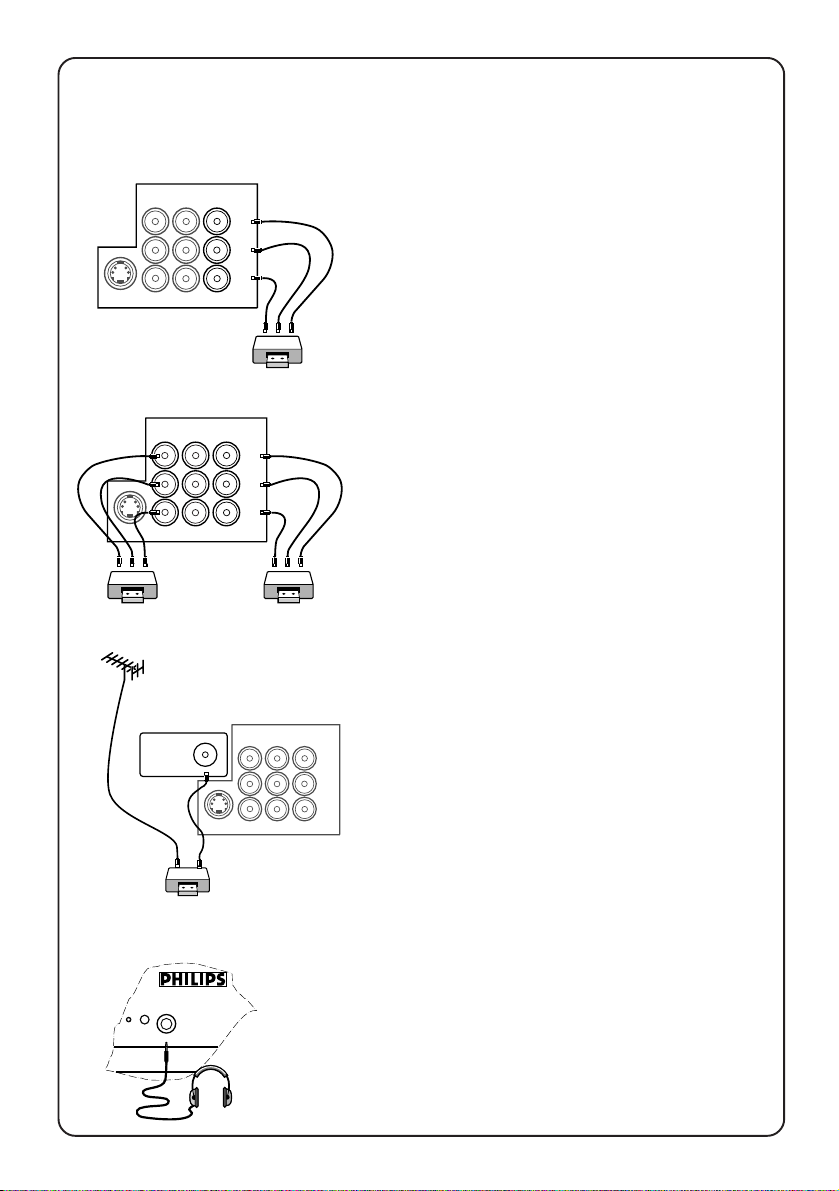
Connecting peripheral equipment
Equipment such as VCR, Laser disc player, VCD etc. could be connected to
the video and audio (AV) sockets at the back of the TV. Switch off the TV and
equipment before making any connection.
Connection for playback
1. Connect to AV sockets
You may choose to connect up VIDEO 1 in
or VIDEO 2 in or both.
4 connect the corresponding sockets of
the equipment to that of the TV.
5 to view the playback, select the first
AV channel (if connection is made to
sockets at VIDEO 1 in) or the second
AV channel (if connection is made to
sockets at VIDEO 2 in).
Note: For mono equipment, connect to
the VIDEO and L sockets only.
2. Connect to S-Video socket
If you have a S-Video equipment, connect
to the S-Video socket for better picture
quality.
4 connect the corresponding socket of
the equipment to that of the TV.
5 to view the playback, select the Y/C
channel.
Note: If both the S-Video socket and the
Video socket of VIDEO 2 are connected,
S-Video input override the Video input.
3. Connect to aerial socket
(only for VCR)
The playback on your VCR is considered a
TV channel by your TV if you connect via
the aerial socket. You must tune in to
your VCR’s test signal and assign the
channel number 0 to it. Refer to your
VCR’s instruction manual for more
details.
4 connect the RF cable to the VCR’s “RF
in” and connect the “RF out” of the VCR
to the aerial socket of the TV.
4 select channel 0 and tune in to to your
VCR’s signal.
5 to view the playback, select channel 0.
S-VIDEO
OR
Laser disc
player
S-VIDEO
VIDEO 2inMONITOR
VIDEO 1
in
VCR
VIDEO 2
VIDEO 1
in
in
Ω75
g
S-VIDEO
VCR
out
VIDEO
L
AUDIO
R
VCR
OR
VCD
MONITOR
out
VIDEO
L
AUDIO
R
VCR
VIDEO 2inMONITOR
VIDEO 1
in
out
VIDEO
L
AUDIO
R
5
5
…connecting peripheral equipment
Connection for recording
VIDEO 2inMONITOR
VIDEO 1
out
in
VIDEO
L
AUDIO
S-VIDEO
R
VCR
1. From the TV channel you are
watching
4 connect the corresponding sockets of
the VCR to the sockets at MONITOR out.
Note: For mono equipment, connect to
the VIDEO and L sockets only.
VIDEO 2inMONITOR
VIDEO 1
out
in
VIDEO
L
AUDIO
S-VIDEO
R
VCR 1
VCR 2
VIDEO 2inMONITOR
VIDEO 1
out
Ω75
g
S-VIDEO
in
VIDEO
L
AUDIO
R
VCR
Connection for headphones
n
2. From one VCR to another VCR
4 connect the sockets of the VCR which
you wish to record from to the
corresponding sockets at either VIDEO
in 1 or VIDEO in 2.
4 connect the sockets of the receiving
VCR to the corresponding sockets at
MONITOR out.
Note: For mono equipment, connect to
the VIDEO and L sockets only.
3. From the TV antenna
4 connect the RF cable to the VCR’s “RF
in” and the “RF out” of the VCR to the
aerial socket of the TV.
4 connect the headphones to the socket
at the front of the TV.
The headphones impedance must be
between 8 and 4000 ohms.
Headphones

6
n
VOLUME
LK
˙
˝
˚
¸
CHANNEL
˚
¸
3
n
VOLUME
LK
4
˙
˝
˚
¸
CHANNEL
˚
¸
3
6
The TV’s controls
For 25” models
1
For 29” models
3
4
2
4
3
5
6
5
1
2
6
1. Mains power Switch on or off the TV.
2. Red light indicator When light is on, it indicates that the TV is on
standby. Note :If no signal is detected by the
TV after 10 minutes, it will switch to standby
automatically.
3. Remote control sensor For the remote control to work, it must be
activated within the operating range of this
sensor.
4. Headphone socket For connection of headphones.
5. Volume adjustment To adjust volume level. Press these 2 keys
simultaneously will call up the 1st level
menu. Press these 2 keys again will exit
menu. Works as cursor left (VOLUME L) or
right (VOLUME K) in a menu.
6. Channel selection To select a lower or higher channel number.
Works as cursor up (CHANNEL 6) or down
(CHANNEL 7) in a menu.
7
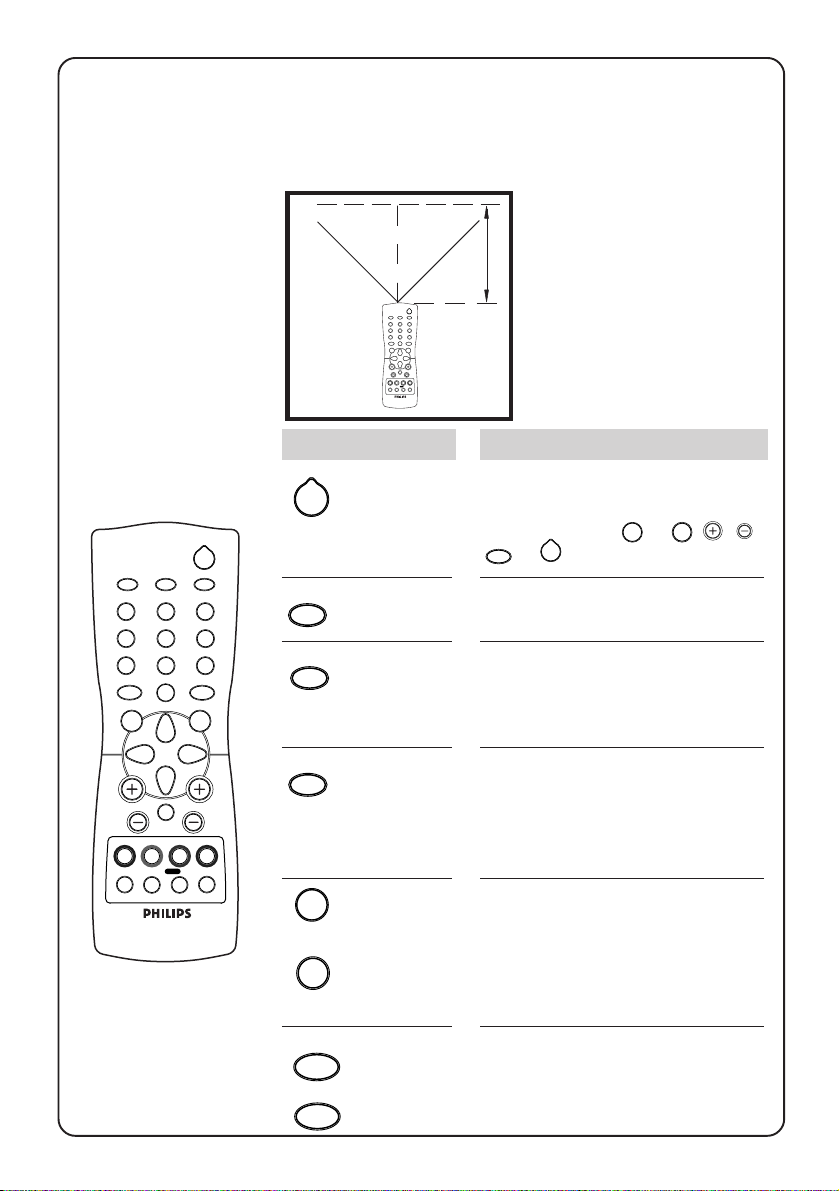
Using the remote control
7
For the remote control to work effectively, it has to be operated within the
recommended operating range to the remote control sensor on the TV.
45°45
°
10 m
2
SLEEPOSDAV
12
3
4
6
5
8
9
7
SMART
SMART
±
`
0
INC.
MENU
SURR.
CH
A
H
SURF
A/CH
ehf4b
12
4
7
SMART
±
MENU
A
b
5
8
0
H
SURF
A/CH
2
SLEEPOSDAV
3
6
9
SMART
`
INC.
SURR.
4
ehf
Press :
2
AV
Standby
AV channel
Result :
Switch off TV and a red indicator
lights up. To switch on TV again,
press either the
AV
or 2 key.
to 9, CH, CH,
0
Select the AV channels .
selection
OSD
Screen
information
In TV mode : Switch on/off
information of a particular
channel.
In a menu : Exit menu.
SLEEP
Sleeptimer
Sets timer to switch TV to standby
in steps of 15 minutes (from 0 to
CH
60 minutes) and in steps of 30
minutes (from 60 to 240 minutes).
To disable timer, set to “OFF”.
0
to
Digit
9
Key in numerals e.g. confidential
code in child lock and in channel
selection. For a 2-digit channel,
the second numeral must be
entered before the dash disappears.
SMART
`
SMART
±
Smart
Picture/
Smart
Sound
Select the presets for sound and
picture.

8
8
…using the remote control
12
4
7
SMART
±
MENU
A
b
5
8
0
H
SURF
A/CH
2
SLEEPOSDAV
3
6
9
SMART
`
INC.
SURR.
4
ehf
Press :
MENU
Menu
Result :
Call up the main menu. If there is
an existing menu, pressing this
key will bring you back to the
previous level menu. If you are in
the 1st level menu, pressing this
will exit the menu.
INC.
SURR.
¬
Incredible
Surround
Mute
Switch on to enhance stereo
sound from your TV.
Switch off the sound of the TV.
Press again to switch on the
sound.
Channel
selection
CH
Volume
CH
A
adjustment
Teletext function:
Select a higher or lower channel
number .
Adjust the volume of the TV set.
Refer to the section on “Teletext”.
b
SURF
4
e
f
A/CH
SURF
A/CH
4
ehf
Surf or
alternate
channel
Sound
mode
Surf mode : Add or delete channel
from the surf list. View channel in
the surf list.
A/CH mode : Return to the previous channel.
Switch from stereo to mono sound
(for stereo transmission) or choose
between first language or second
language (for bilingual transmission).

9
9
Menus
1st level
2nd level
3rd level
BRIGHTNESS
COLOUR
CONTRAST
SHARPNESS
HUE*
CHANGE CODE
H
CHANNEL
LOCK
CLEAR ALL
FROM
H
TO
EXCHANGE
COL TEMP
CONTRAST PLUS*
NOISE REDUCE*
4:3 EXPAND*
16:9 COMPRESS*
VOLUME
TIME
TIMER ACTIVE
H
CHANNEL
AT
H
CHANNEL
SKIP
BALANCE*
TREBLE*
BASS*
INCR SURROUND*
ULTRA BASS*
AVL
SLEEPTIMER
CHILD LOCK*
CLOCK*
H
H
LANGUAGE
AUTO STORE
H
SWAP
SKIP
MANUAL
H
H
H
SYSTEM*
SEARCH
H
FINE TUNE
CHANNEL
STORE
SURF
BLUE MUTE*
INSTALLATION
H
Note* : You may not see these items on your menu because it is applicable to
certain models only.
To call up the 1st level menu :
OSD
MENU
12
4
5
8
7
SMART
±
0
MENU
SMART
SURR.
2
SLEEPOSDAV
`
INC.
3
6
9
4 Press
To use the menus:
4 Press the cursor keys.
MENU
key.
A
CH
H
to highlight go down to the next
level or to select or
to execute
SURF
A/CH
b
4
ehf
To exit from a menu:
4 Press
OR
4 Press
MENU
key to go back to the previous level.
OSD
key to exit.

10
10
In order to view the programmes broadcasted, you have to do some simple
installation on the TV. Go into the INSTALLATION menu by using the keys
on your remote control.
Installing the TV
Follow the following steps to enter INSTALLATION menu:
& Call up 1st level
menu with the
key.
➧
BLUE MUTE OFF
INSTALLATION B
BRIGHTNESS
COLOUR
CONTRAST
■ ■ ■ ■ ■ ■ ■ ■
❙ ❙ ❙ ❙ ❙ ❙ ❙
■ ■ ■ ■ ■ ■ ■ ■
❙ ❙ ❙ ❙ ❙ ❙ ❙
■ ■ ■ ■ ■ ■ ■ ■
❙ ❙ ❙ ❙ ❙ ❙ ❙
31
31
31
MENU
é Press the
highlight
INSTALLATION.
➧
SURF A/CH
BLUE MUTE OFF
INSTALLATION B
BRIGHTNESS
COLOUR
❙ ❙ ❙ ❙ ❙ ❙ ❙
❙ ❙ ❙ ❙ ❙ ❙ ❙
key to
■ ■ ■ ■ ■ ■ ■ ■
31
■ ■ ■ ■ ■ ■ ■ ■
31
“ Select INSTALLATION
with the
key.
or
➧
LANGUAGE ENGLISH
AUTO STORE B
SWAP B
Selecting the menu language
The TV is pre-set to a language for display of menus and screen information.
You may change it to another available language.
& Go into INSTALLATION
menu.
LANGUAGE is highlighted.
➧
é Select a language
with the
key.
or
➧
“ Exit with the
key.
➧
OSD
LANGUAGE ENGLISH
AUTO STORE B
SWAP B
LANGUAGE ENGLISH
AUTO STORE B
SWAP B
 Loading...