

Page 1
Operating Instructions
25PT225225PT2252
25PT2252
29PT225229PT2252
29PT2252
p1-4/E 4/6/01, 2:30 pm1
1
Page 2
TABLE OF CONTENTS
Introduction
Safety Information/Useful Tips .................................................................................................. 3
Before Calling Service ................................................................................................................. 4
Basic Installation/Functions
Hooking Up Your TV (Basic Connection) ............................................................................... 5
Use/Care of remote Control .................................................................................................... 5
Connecting the Audio/Video Sockets (Playback) .................................................................. 6
Connecting the Audio/Video Sockets (Recording) ............................................................... 8
Functions of Remote Control ................................................................................................... 9
Functions of TV Controls ...........................................................................................................11
TV Installation
Selecting the Menu Language...................................................................................................... 12
Automatic Tuning of Channels .................................................................................................. 13
Manual Tuning of Channels ......................................................................................................... 14
Selecting the Colour/Sound System ........................................................................................ 16
Fine Tuning Of Channels ............................................................................................................. 17
Sorting of Channels...................................................................................................................... 18
Editing of Channels........................................................................................................................19
Naming of Channels...................................................................................................................... 20
Features
Adjusting the TV Picture ............................................................................................................. 21
Adjusting the TV Sound ............................................................................................................... 22
Activating the Timer.......................................................................................................................23
Activating the Child Lock.............................................................................................................25
Using the Screen Format ............................................................................................................ 29
Smart Picture Control .................................................................................................................30
Smart Sound Control....................................................................................................................31
Personal Zapping ...........................................................................................................................32
Auto Picture Booster ...................................................................................................................33
Using the Teletext.......................................................................................................................... 34
General
Specfications................................................................................................................................... 36
Recycling Directive – To minimise harm to the environment, the batteries supplied
with the TV set do not contain mercury or nickel cadmium. If possible, when
disposing of batteries, use recycling means available to you. Your TV set uses
materials which are reusable or which can be recycled. To minimise the amount of
waste in the environment, specialist companies recover used sets for dismantling
and collection of reusable materials (contact your dealer).
2
p1-4/E 4/6/01, 2:30 pm2
Page 3

SAFETY INFORMATION AND USEFUL T IPS
Safety Information
• Disconnect mains plug when :
– the red light below the TV screen is flashing continuously.
– a bright white line is displayed across the screen.
– cleaning the TV screen. Never use abrasive cleaning agents. Use a slight damp chamois
leather or soft cloth.
– there is a lightning storm.
– the set is left unattended for a prolonged period of time.
• No naked flame sources, such as lighted candles, should be placed on top of the TV or
in the vicinity.
• Do not place your TV set under direct sunlight or heat.
• Leave at least 5 cm around each side of TV set to allow for proper ventilation.
• Avoid placing your set (e.g. near the window) where it is likely to be exposed to rain
or water.
• No objects filled with liquids should be placed on top the TV so as to avoid dripping
or splashing of liquids on the set.
Useful Tips
• Do not leave your set on standby mode for a prolonged period of time. Switch off set
to allow it to be demagnetised. A demagnetised set supports good picture quality.
• Do not shift or move the set around when it is switched on. Uneveness in colour in
some parts of the screen may occur.
• Never attempt to repair a defective TV yourself. Always consult a skilled service
personnel.
3
p1-4/E 4/6/01, 2:30 pm3
Page 4

BEFORE CALLING SERVICE
Below is a list of frequently occurred symptoms. Before you call for service, make these simple
checks. Some of these symptoms can easily be rectified if you know what to do.
Symptom What you should do
Colour patch • Switch off the TV by the mains power button. Wait for 20
(uneveness) minutes before switching on again.
• Check the TV is not placed too near speakers or magnetic
objects.
No power • Check the TV’s AC power cord is plugged into the mains
socket. If there is still no power, disconnect plug. Wait for
60 seconds and re-insert plug. Switch on the TV again.
No picture • Check the antenna connection at the rear of the TV.
• Possible TV station problem. Try another channel.
Good picture • Try increasing the volume.
but no sound • Check that the sound is not muted. If it is muted, press the
Mute button on the remote control to restore sound.
Good sound but poor • Try increasing the contrast and brightness setting.
colour or no picture
Snowish picture and • Check antenna connection at the rear of the TV.
noise
Horizontal dotted lines • Possible electrical interference e.g. hairdryer, vacuum
cleaner, etc. Switch off appliances.
Double images or • Possible poor positioning of antenna. Using a highly
“Ghost” images directional antenna may improve reception.
TV not responding to • Check life span of batteries of remote control handset.
remote control handset • Aim remote control handset directly at remote control
sensor lens on the TV.
4
p1-4/E 4/6/01, 2:30 pm4
Page 5
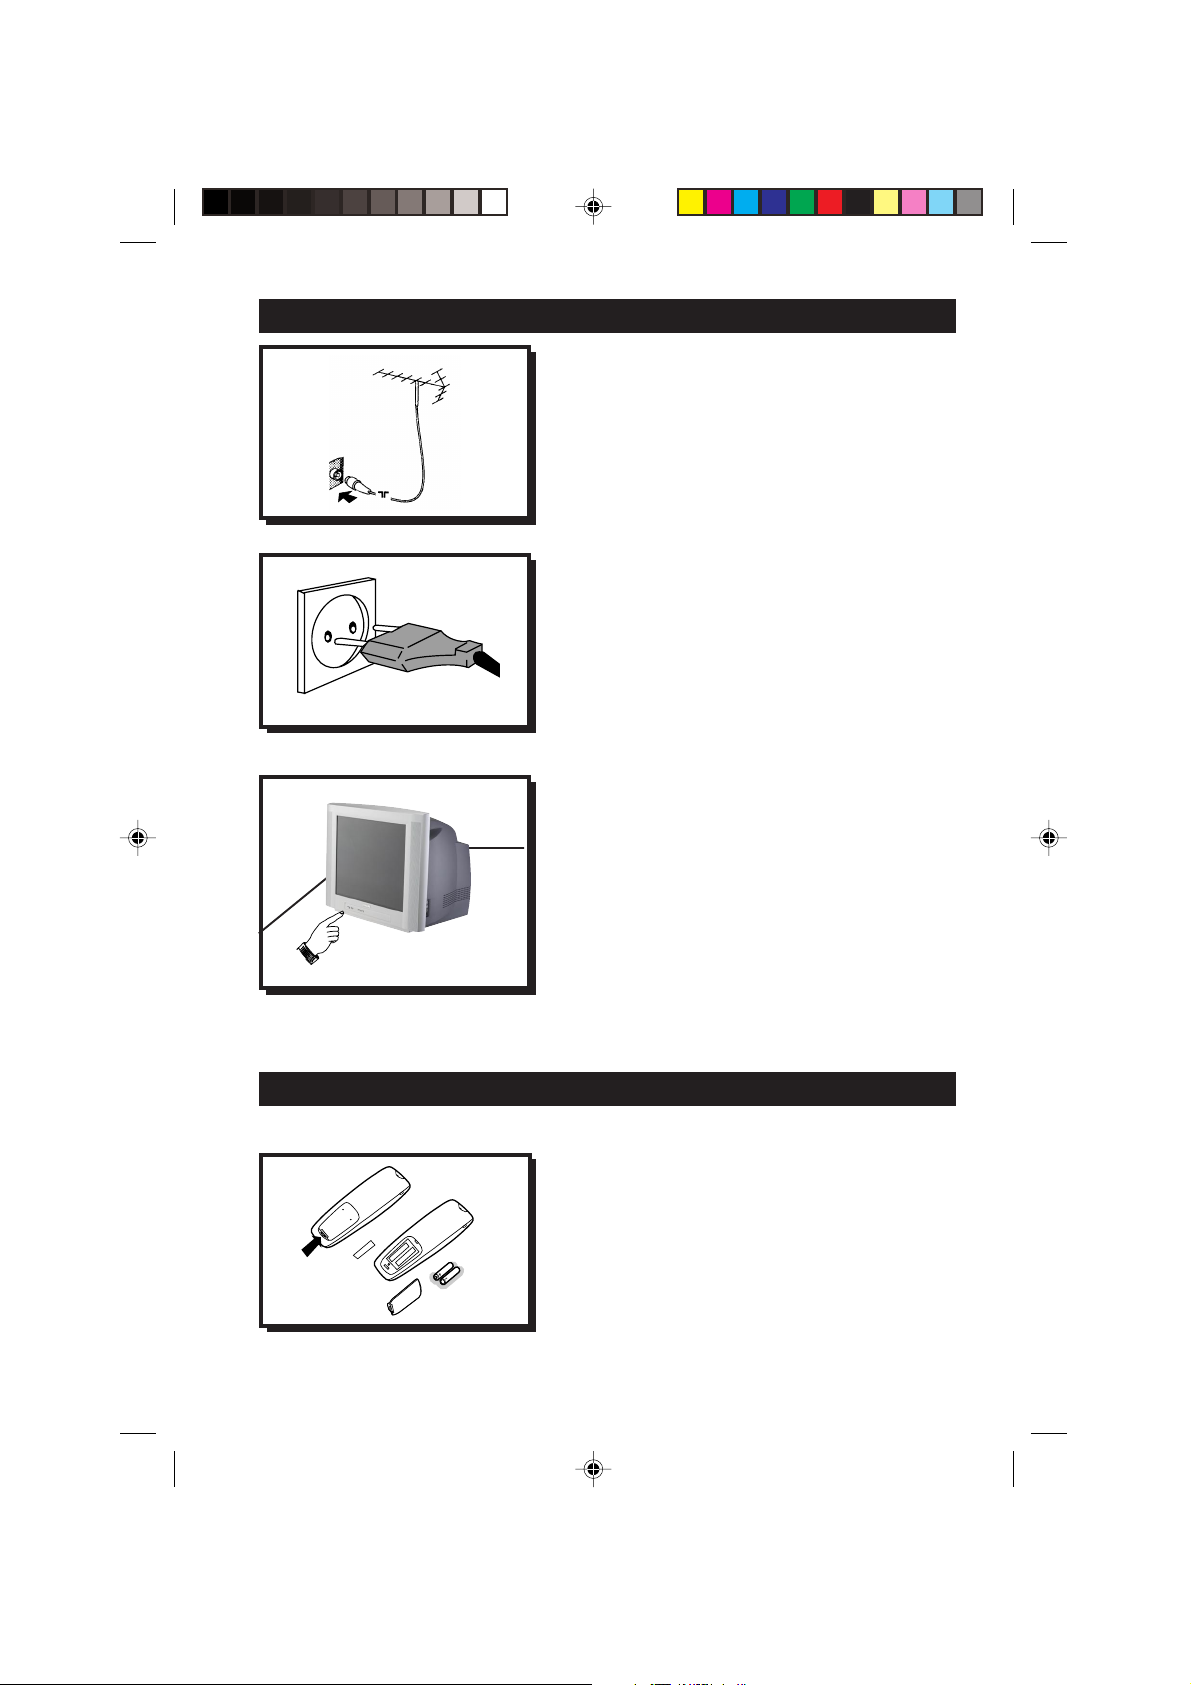
HOOKING UP Y OUR TV (BASIC CONNECTION)
Antenna Connection
• Connect the aerial plug to the antenna socket
on the backcover.
• Insert the mains plug into the wall socket.
Mains Connection
• For correct mains voltage, refer to type sticker at
the rear of the TV set
• Consult your dealer if mains supply is different.
Note : This diagram is not representative of the
actual plug and socket.
Switching on the Set
• Press the main power button to switch on/
off the TV.
• If the set is on standby (indicator is red),
press the Powe r button on the remote
control to switch on set.
¬¬
¬
¬¬
USE/CARE OF REMOTE CONTROL
p5-11/E 4/6/01, 2:31 pm5
• Insert the correct type of batteries into the
compartment.
• Ensure the batteries are placed in the right
direction.
5
Page 6
CONNECTING THE A UDIO/VIDEO SOCKETS (PLAYBACK)
R
OUT
ANTENNA
IN
AV1 in AV2 inMonitor out
Y
Pb
Pr
COMPONENT VIDEO INPUT
OUT
VIDEO
IN
AV sockets on
S-VIDEO
OUT
L
R
AUDIO
IN
the rear of TV
Back of VCR
VIDEO
L/Mono
AUDIO
VCR (equipped with Video and
Audio output sockets)
You can view the playback of VCR tapes (Video Disc players, camcorders, etc .) by using the AUDIO
and VIDEO INPUT sockets on the rear of the TV.
– Connect the VIDEO and AUDIO IN sockets on the rear of the TV to the AUDIO and
VIDEO OUT sockets on the VCR.
R
AV1 in AV2 inMonitor out
Y
Pb
Pr
COMPONENT VIDEO INPUT
S-VIDEO
AV sockets on
the rear of TV
VIDEO
L/Mono
AUDIO
OUT
L
R
VIDEO
AUDIO
IN
OUT
OUT
OUT
S-VIDEO
ANTENNA
IN
Back of S-VHS VCR
IN
The S-Video connection on the rear of the TV is used for the playback of S-VHS VCR tapes, Video Discs,
Video Games or Compact Disc-Interactive (cd-i) discs. Better picture detail and clarity is possible with
the S-Video playback as compared to the picture from a normal antenna (RF) connection.
– Connect the S-VIDEO socket on the rear of the TV to the S-VHS OUT socket on a
S-VHS VCR.
– Connect the AUDIO IN sockets from the rear of the TV to the AUDIO OUT sockets
on the VCR. Note : You need not connect the VIDEO IN socket of the TV if S-VIDEO IN
socket is connected.
6
p5-11/E 4/6/01, 2:31 pm6
Page 7
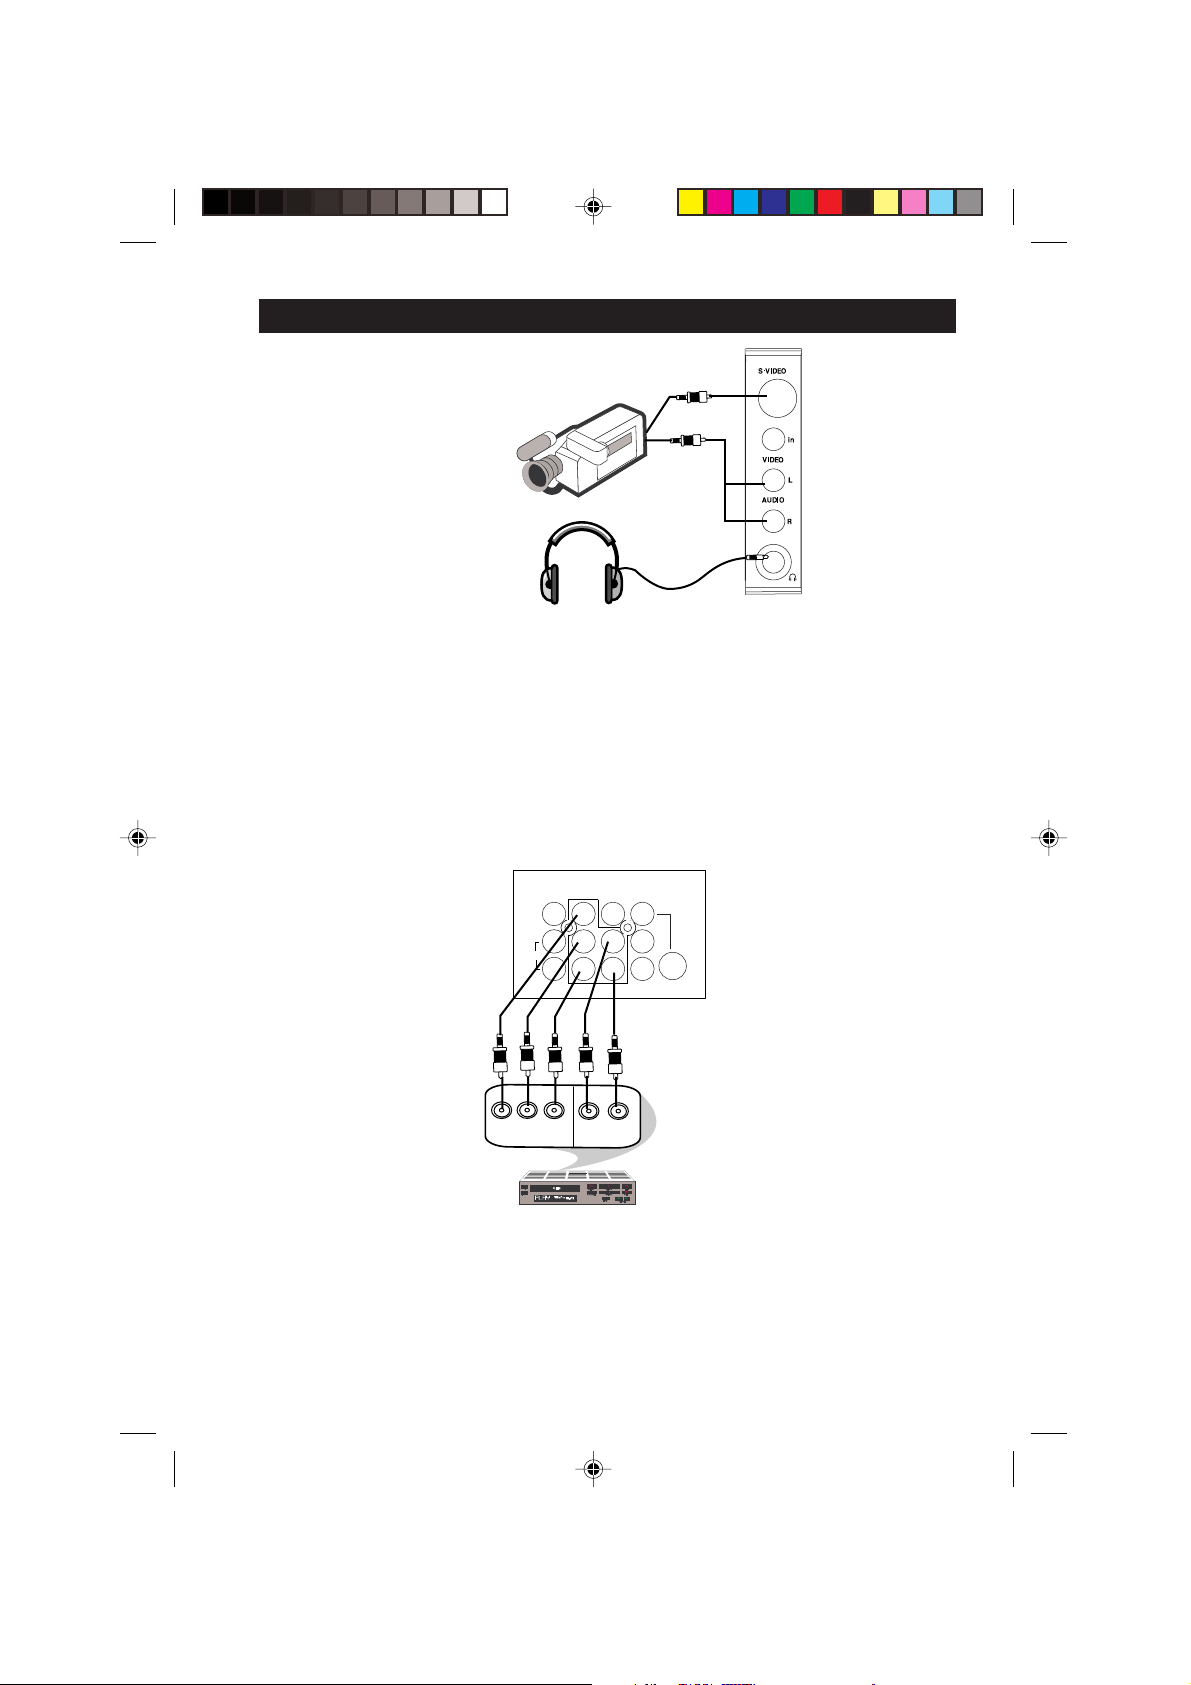
CONNECTING THE AUDIO/VIDEO SOCKETS (PLACKBACK)
Camcorder
Connect headphone jack to
socket for personal listening
For more convenient direct playback connections, the Side Audio/Video Input sockets allow for quick
and easy connections, particularly Camcorder tape recordings.
– Connect the S-VIDEO socket (if available) from the Camcorder to the Side S-VIDEO
socket of the TV. You need not connect the Side VIDEO IN socket of the TV if the
S-VIDEO socket is connected.
– Connect the AUDIO OUT sockets (Right and Left) from the Camcorder to the Side
AUDIO IN sockets.
R
Pr
AV1 in AV2 inMonitor out
Y
Pb
Pr
COMPONENT VIDEO INPUT
OUT
L
AUDIO
R
S-VIDEO
Back of DVD
VIDEO
L/Mono
AUDIO
OUT
Pb
Y
AV sockets
on rear of
TV
DVD (Equipped with “Y”,
“Pb” and “Pr” and Output
sockets)
You can view the playback of DVD discs by using the COMPONENT VIDEO INPUT sockets on the
rear of the TV.
– Connect the “Y”, “Pb” and the “Pr” INPUT sockets on the TV to the “Y”, “Pb” and
“Pr” OUTPUT sockets on the DVD to view playback of DVD discs.
7
p5-11/E 4/6/01, 2:31 pm7
Page 8
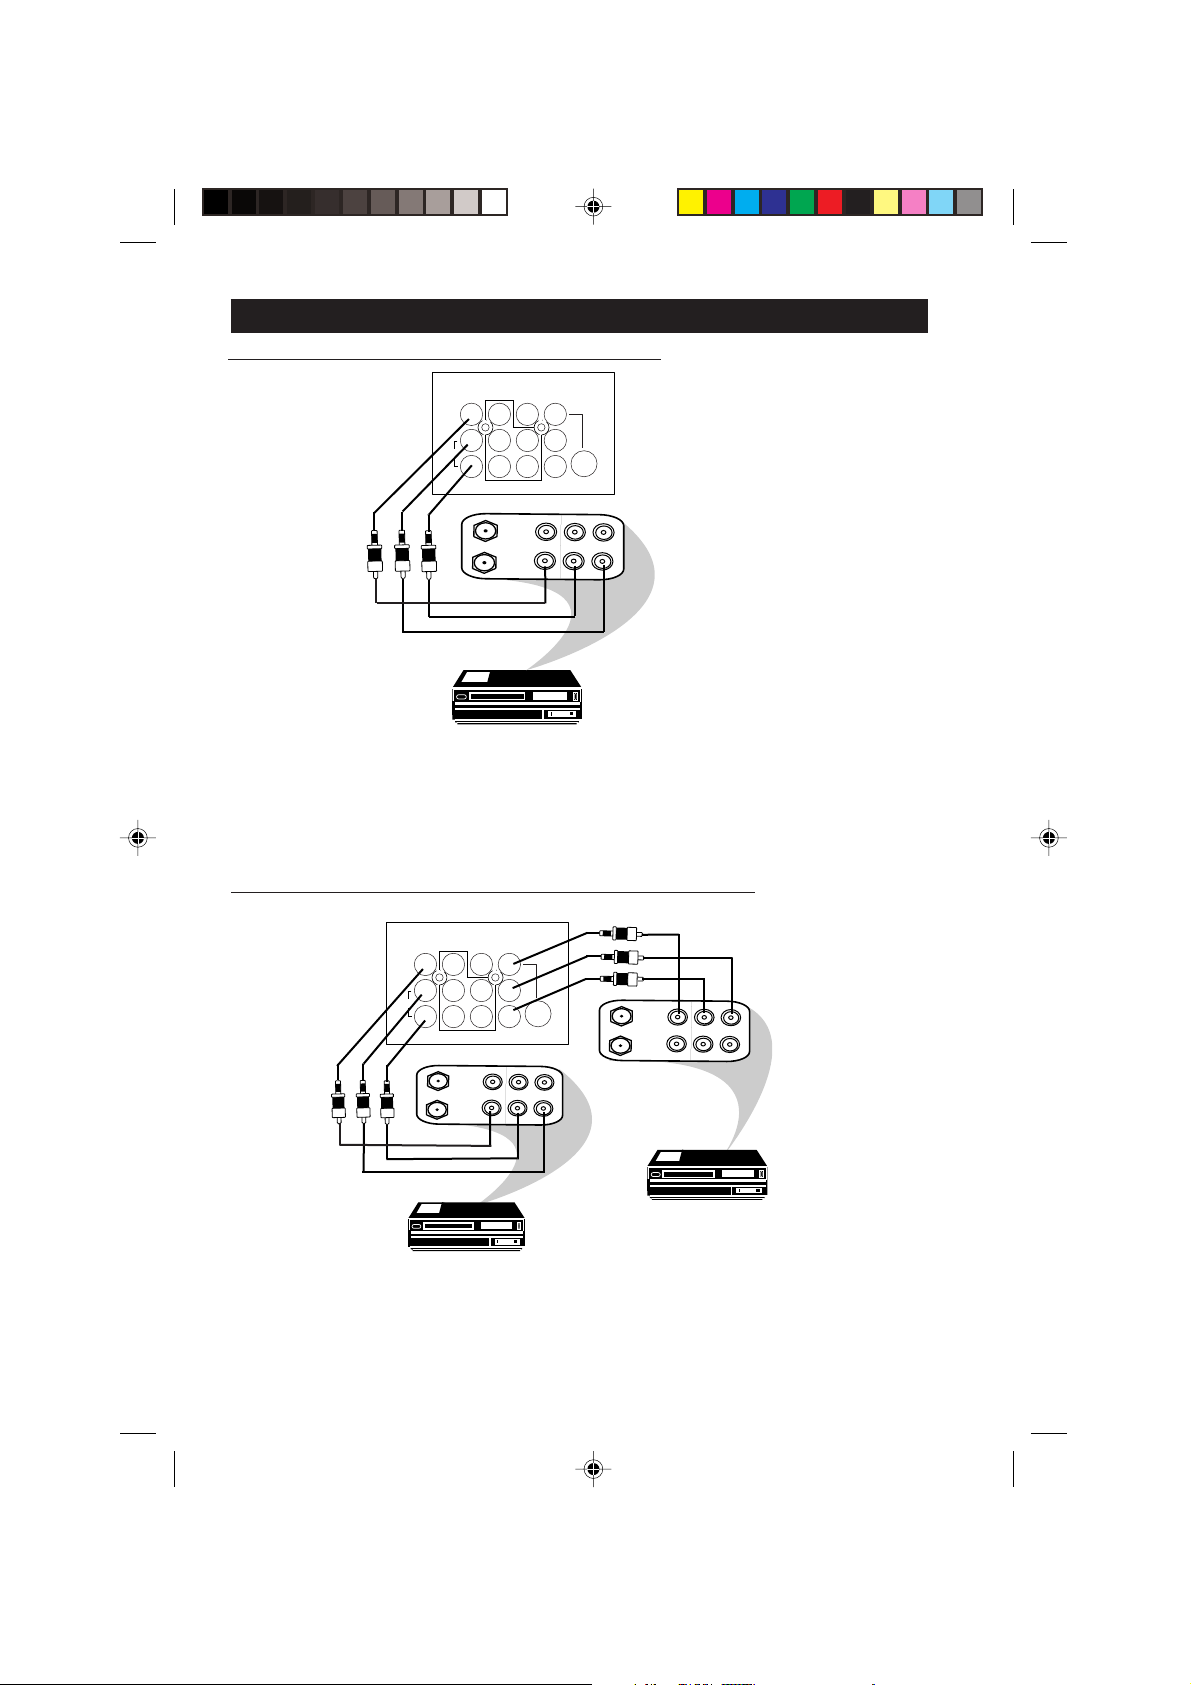
CONNECTING THE A UDIO/VIDEO SOCKETS (RECORDING)
Connection for recording from the TV channel
R
OUT
ANTENNA
AV1 in AV2 inMonitor out
Y
Pb
Pr
COMPONENT VIDEO INPUT
IN
AV sockets on
S-VIDEO
the rear of TV
OUT
OUT
VIDEO
IN
L
R
AUDIO
IN
VIDEO
L/Mono
AUDIO
VCR (equipped with Video and
Audio output sockets)
– Connect the corresponding INPUT sockets of the VCR to the MONITOR OUTPUT
sockets on the rear of the TV.
– To enhance the sound of your TV, connect the AUDIO L and R sockets to an external audio
system instead of the VCR. For mono equipment, connect only the AUDIO L socket.
Connection for recording from one VCR to another VCR
R
ANTENNA
AV1 in AV2 inMonitor out
Y
Pb
Pr
COMPONENT VIDEO INPUT
OUT
OUT
IN
S-VIDEO
OUT
L
VIDEO
R
AUDIO
IN
IN
ANTENNA
OUT
OUT
OUT
VIDEO
IN
L
R
AUDIO
Back of VCR
AV sockets on
the rear of TV
VIDEO
L/Mono
AUDIO
VCR (equipped with
VCR 2
Video and Audio
output sockets)
VCR 1
VCR (equipped with Video
and Audio output sockets)
– Connect the sockets of the VCR which you wish to record from, to the corresponding
sockets at either AV1 or AV2
– Connect the sockets of the receiving VCR to the MONITOR OUTPUT sockets on the
rear of the TV.
8
p5-11/E 4/6/01, 2:31 pm8
Page 9
FUNCTIONS OF REMOTE CONTROL
& Power button
– Switch set off temporarily to standby mode.
(The red light indicator lights up when the set
is on standby mode).
– To switch on set from standby mode, press
Channel +/– , Digit (0 -9) or Power button.
é Teletext Colour/Personal Zapping buttons
– In teletext mode, the colour buttons allow you to
access directly an item or corresponding pages.
– As Personal Zapping buttons, you can surf up to
10 personal channels for each button. For detailed
description of functions, refer to section on
“Personal Zapping ”.
“ Teletext buttons
Allows you to access teletext information. For
detailed description of functions, refer to section
on “Using the Teletext”
‘ Smiley button
Allows to add and store your personal preference
channels in your Personal Preference list. For
detailed description of functions, refer to section
on “Using your Personal Zapping feature”.
( Timer Button
Allows you to set the clock to switch to another
channel at a specified time while you are watching
another channel or when the set is on standby mode.
§ Smart Sound Button
Press the Smart Sound button repeatedly to
access 4 different types of sound settings and
choose your desired setting.
è Menu Button
Displays the main menu. Also exits menu from screen.
! Cursor Up Button
Allows you to select the next item on the menu.
ç Cursor Left Button
Allows you to select the sub-menus and adjust the settings.
0 Volume + / – Button
Increases or decreases volume.
44
1
4
44
Allows you to switch from Stereo to Mono sound during
stereo transmission or to choose between language5or
language6during dual sound transmission.
2 A/CH(Alternate channel) Button
Allows you to change between the current
channel and the previous channel.
&
é
“
‘
(
§
è
!
ç
0
1
2
p5-11/E 4/6/01, 2:31 pm9
9
Page 10
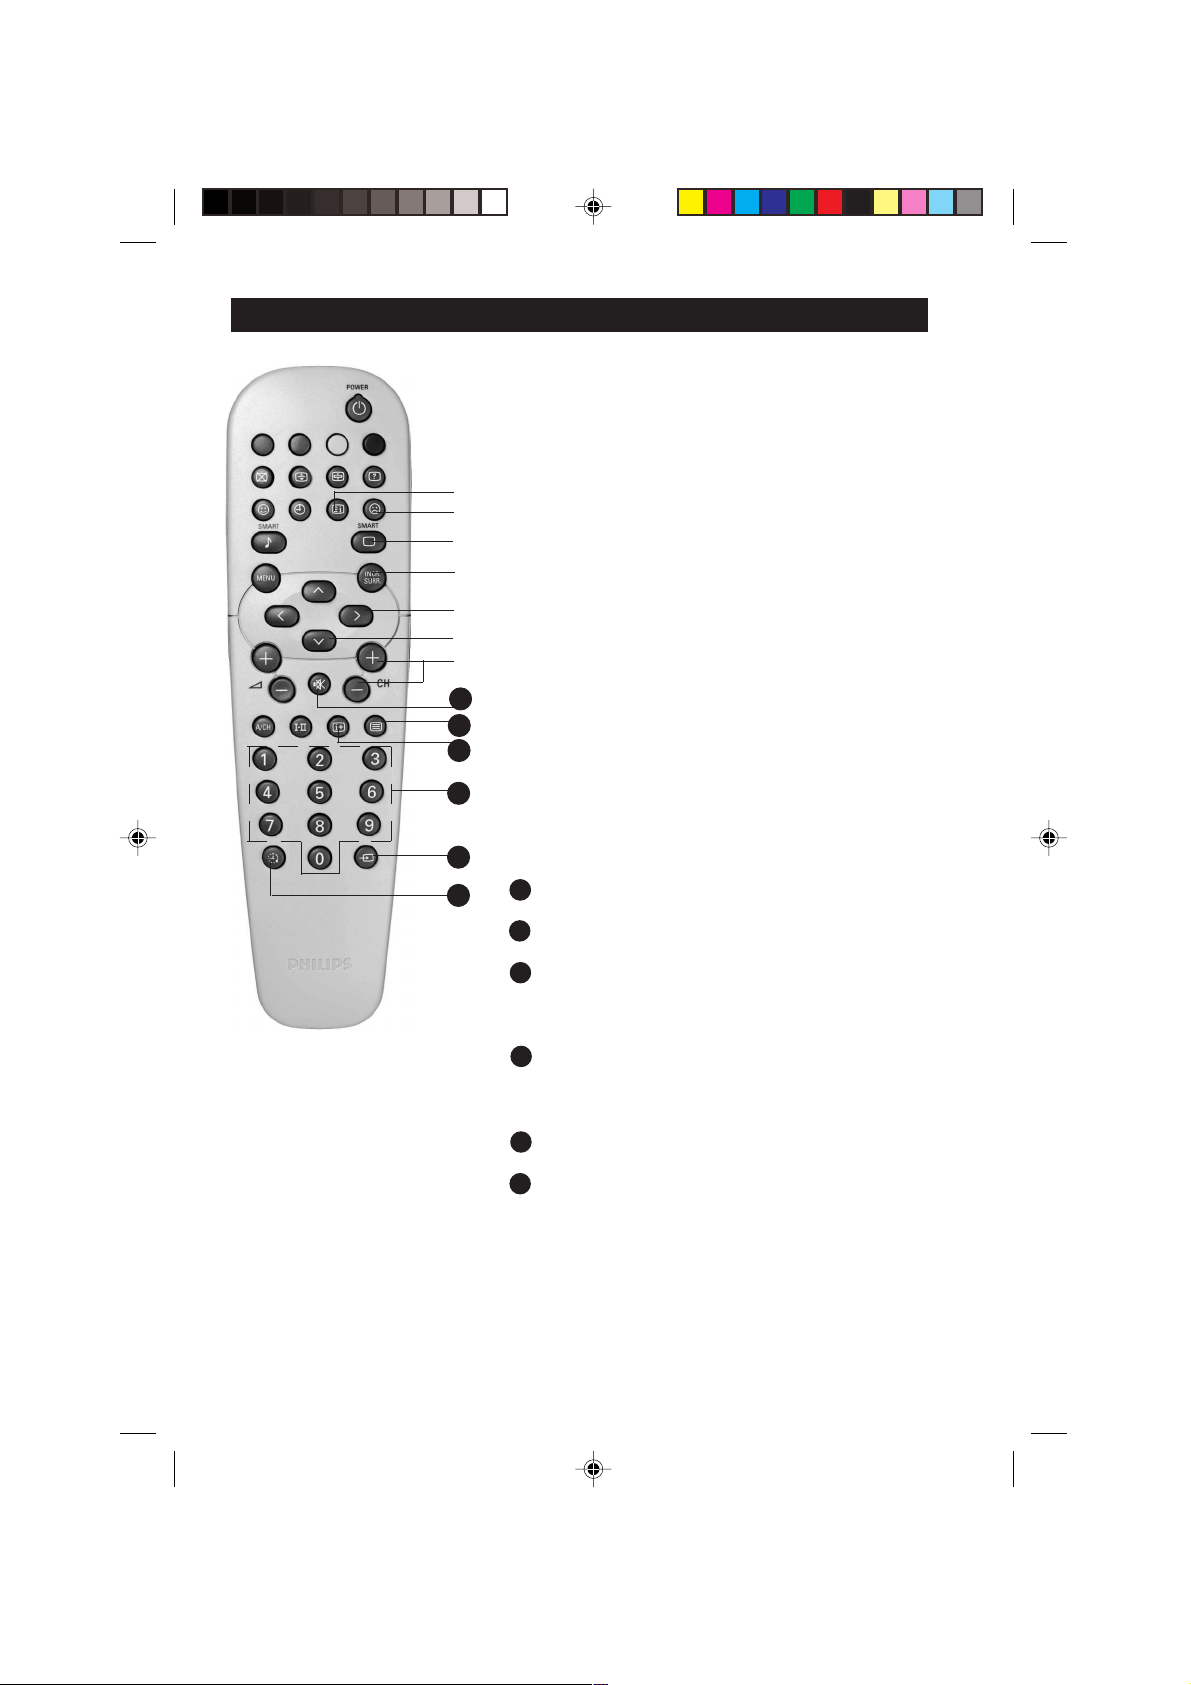
FUNCTIONS OF REMOTE CONTROL
3 Main Index Button
In teletext mode, press button to return to the
main index page.
4 Frownie button
Allows to delete stored personal preference
3
4
5
6
7
8
9
20
21
22
23
24
25
channels in your Personal Preference list. For
detailed description of functions, refer to section on
“Personal Zapping ”.
5 Smart Picture Button
Press the Smart Picture button repeatedly to
access 5 different types of picture settings and
choose your desired setting.
61Incredible Surround Button
– Allows you to select Incredible Surround sound
when transmission is in stereo mode.
– Allows you to select Spatial Sound when
transmission is in mono mode.
71\Cursor Right Button
Allows you to access the sub-menus and adjust
the settings.
8 Cursor Down Button
Allows you to select the next item on the menu.
9 Channel + / – Buttons
Allows you to select channels in ascending or
descending order.
20 Mute Button
Mutes sound. To restore sound, press button again.
21 Teletext Button
Refer to section on “Using the Teletext”
22 OSD button
Allows you to display the current channel number.
It also allows to exit menu from the screen after
control adjustments.
23 Digit (0 -9) Buttons
Press to select a channel. For a 2-digit channel
number, press the first digit and followed
immediately by the second digit.
24 A/V Button
Allows you to select the AV channels.
25 Sleeptimer Button
Allows you to select a time period after which the
setwill switch to standby mode automatically.
p5-11/E 4/6/01, 2:31 pm10
10
Page 11
3
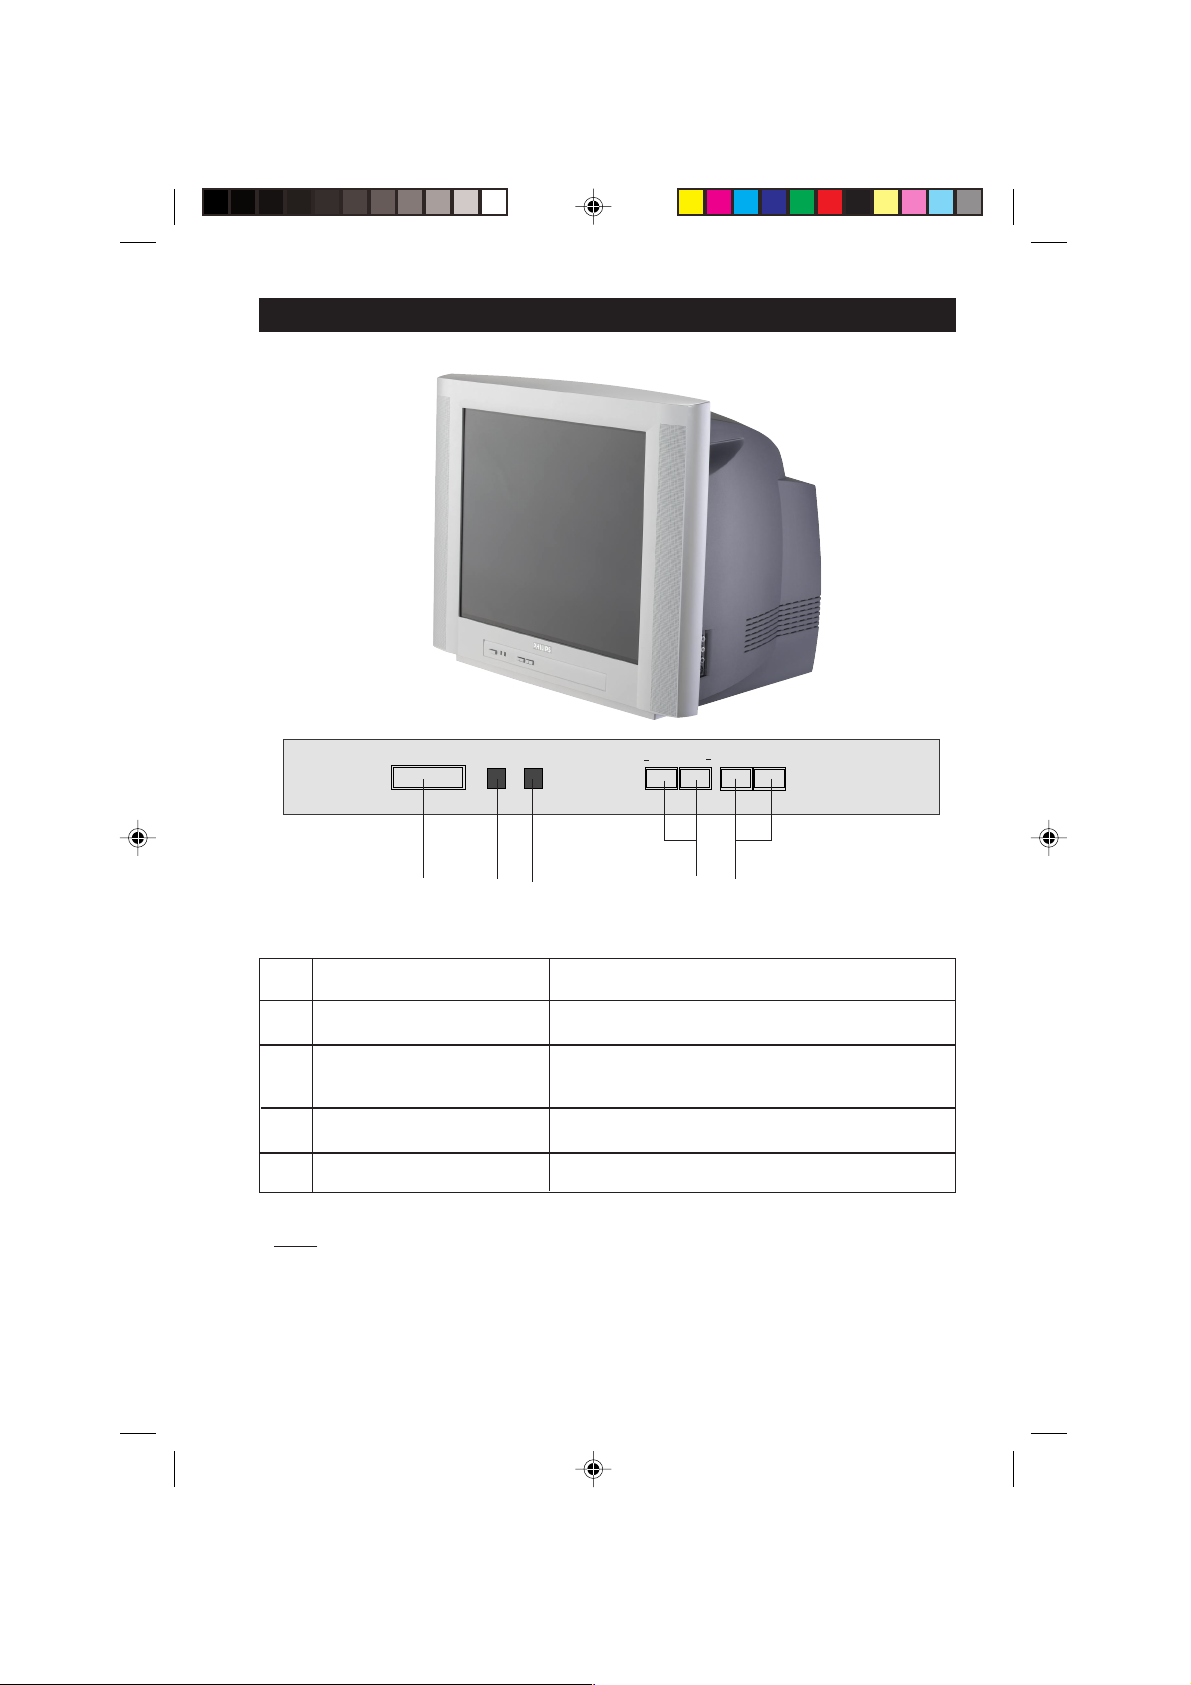
FUNCTIONS OF TV CONTROLS
➩
INSTALL MENU
+
7 CHANNEL 6
– VOLUME
&
& Mains Power button Switch mains power on or off.
é Standby light indicator Indicate red light when standby mode is activated.
“ Remote Sensor Acts as a sensor for activating the controls of the
‘ Volume
( Channel 7 / 6 buttons Select channel in descending/ascending order.
Note
• You can enter the main menu by pressing both the Volume- and+buttons at the
same time.
• Press the Channel 7 or 6 button to select the next item on the menu.
• Press Volume
p5-11/E 4/6/01, 2:31 pm11
+ / – buttons Adjust sound volume softer/louder.
-or+button to access sub-menu and adjust the settings.
é
“
TV when remote control handset is aimed at it.
‘(
11
Page 12
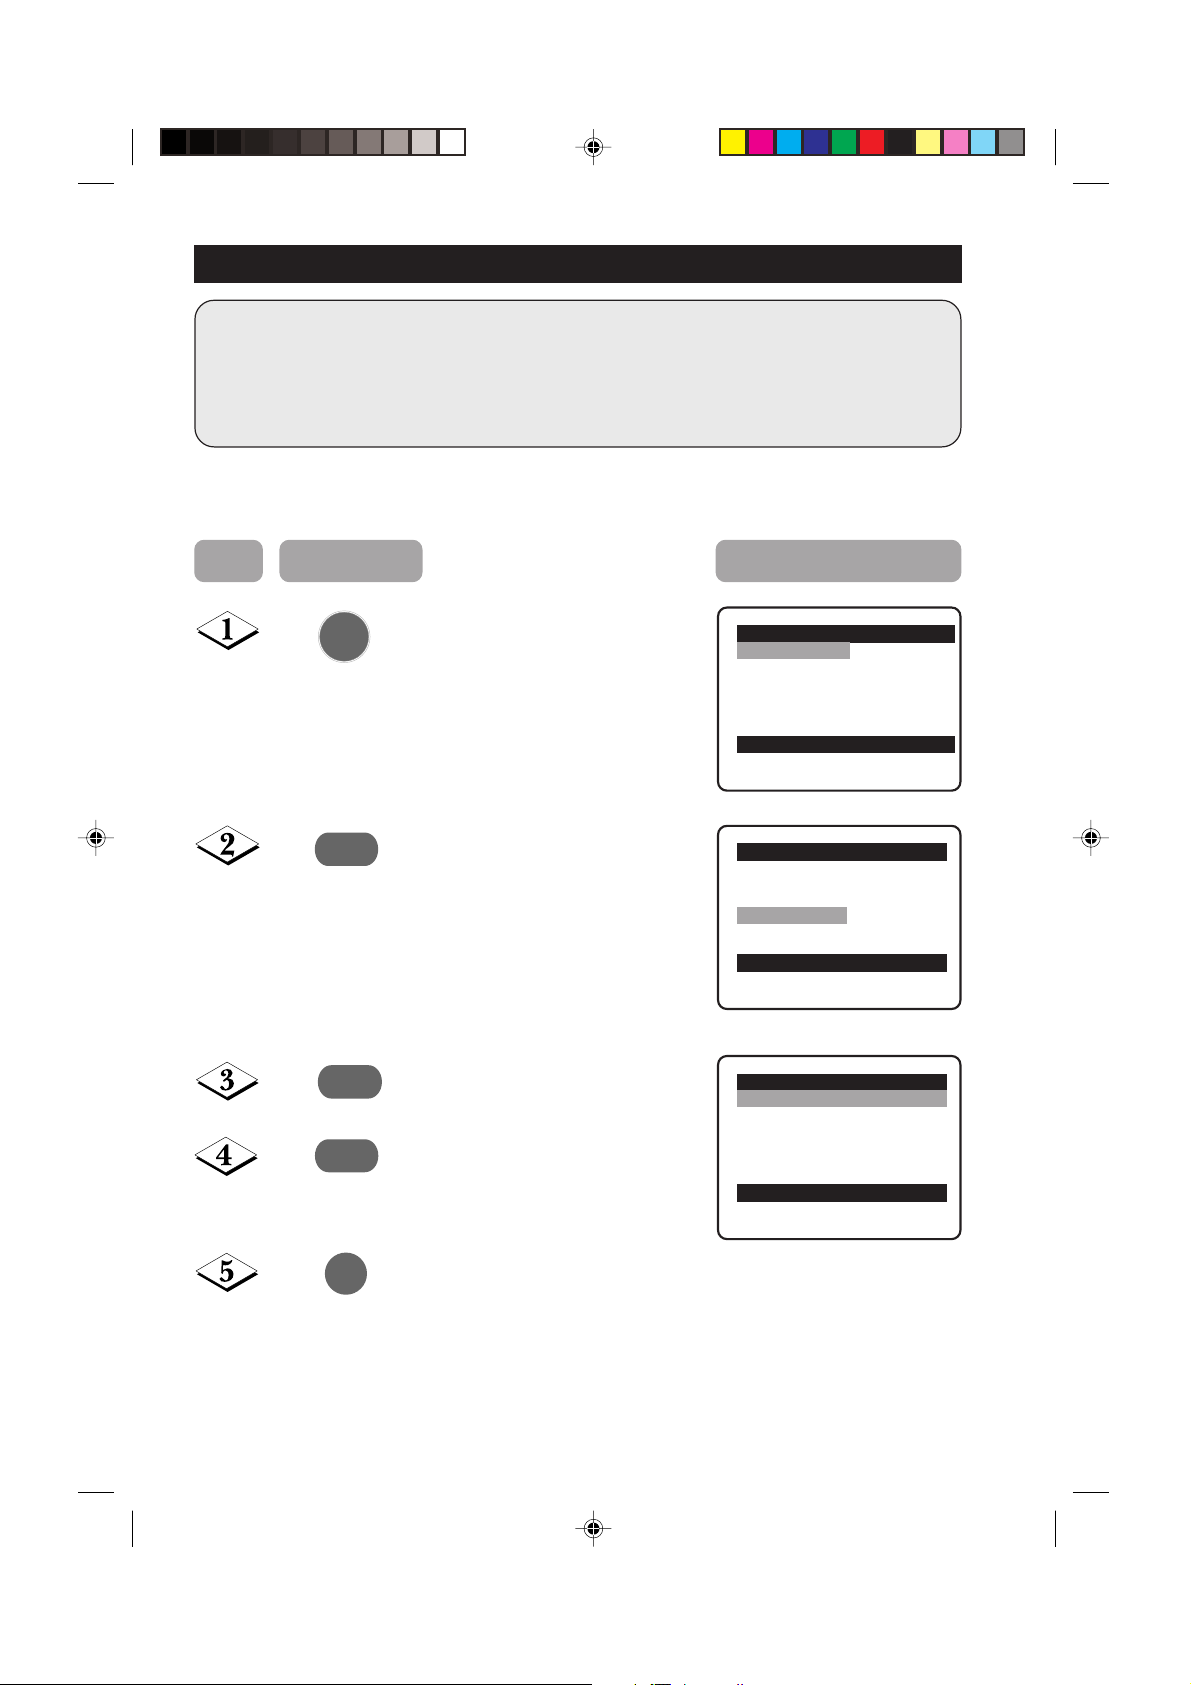
SELECTING THE MENU LANGUAGE
Operating instructions generally explains the operation of the TV
set using the buttons on the remote control unless otherwise stated.
Please read the following instructions carefully and follow the steps
as shown to familiarise yourself with the installations and all features
available in your set.
The Language feature allows you to set the TV’s on-screen menu to be shown in your
desired language.
Step Press button Result on screen
MENU
¸
˙
˙
Enter main menu.
Select Install.
Enter the Install menu.
Press button repeatedly to cycle
through the language list and
select the language of your choice.
Main o
✔ Picture π Brightness
■ Sound Colour
■ Features Contrast
■ Install Sharpness
Main o
■ Picture Language
■ Sound Auto Store
■ Features Manual Store
✔ Install π Sort
Install o
✔ Language English π
■ Auto Store
■ Manual store
■ Sort
■ Channel Edit
■ Name
Colour Temp.
More...
œ
Channel Edit
Name
œ
œ
m
p12-20/E 4/6/01, 4:37 pm12
Exit menu from screen.
AUTOMATIC T UNING
12
Page 13

AUTOMATIC T UNING OF CHANNELS
Automatic tuning of channels allows you to store each programme automatically.
Step Press button Result on screen
MENU
¸
˙
¸
Enter main menu.
Press button repeatedly until
Install is selected.
Enter install menu.
Select Auto Store.
Main o
✔ Picture π Brightness
■ Sound Colour
■ Features Contrast
■ Install Sharpness
Main o
■ Picture Language
■ Sound Auto Store
■ Features Manual Store
✔ Install π Sort
Install o
✔ Language π English
■ Auto Store
■ Manual store
■ Sort
■ Channel Edit
■ Name
Install o
■ Language
✔ Auto Store π
■ Manual store
■ Sort
■ Channel Edit
■ Name
Colour Temp.
More...
œ
Channel Edit
Name
œ
œ
œ
˙
m
p12-20/E 4/6/01, 4:37 pm13
Start automatic tuning of
channels.
When tuning is completed,
exit menu from screen.
13
Auto Store
■ Channel 1
■ TV 142 MHz
♦♦♦♦♦♦♦♦♦♦♦♦♦♦π♦♦♦♦♦♦♦♦♦♦♦♦♦♦♦♦
Install o
■ Language
✔ Auto Store π
■ Manual store
■ Sort
■ Channel Edit
■ Name
œ
Page 14

MANUAL T UNING OF CHANNELS
Manual tuning of channels allows you to select your preferred channel number for every
available programme.
Step Press button Result on screen
MENU
¸
˙
Enter main menu.
Press button repeatedly until
Install is selected.
Enter install menu.
Main o
✔ Picture π Brightness
■ Sound Colour
■ Features Contrast
■ Install Sharpness
Main o
■ Picture Language
■ Sound Auto Store
■ Features Manual Store
✔ Install π Sort
Install o
✔ Language π English
■ Auto Store
■ Manual Store
■ Sort
■ Channel Edit
■ Name
Colour Temp.
More...
œ
Channel Edit
Name
œ
œ
¸
˙
¸
p12-20/E 4/6/01, 4:37 pm14
Press button repeatedly until
Manual Store is selected.
Enter manual store menu.
Press button repeatedly until
Search is selected.
MANUAL T UNING OF
14
Install o
■ Language Colour System
■ Auto Store Sound System
Manual Store π Search
✔
■ Sort Channel No.
■ Channel Edit Fine Tune
■ Name Store
Manual Store o
■ Colour System
■ Sound System
Search 79 MHz π
✔
■ Channel No.
■ Fine Tune
■ Store
œ
œ
Page 15

CHANNELSMANUAL T UNING OF CHANNELS
Step Press button Result on screen
9
10
˙
Start manual searching. Searching
stops once a transmitting signal is
found.
¸
2
1
4
5
8
7
0
¸
Select Channel.
Key in the channel number.
3
6
9
Press button repeatedly until
Store is selected.
Manual Store o
■ Colour System
■ Sound System
Search 128 MHz π
✔
■ Channel
■ Fine Tune
■ Store
Manual Store o
■ Colour System
■ Sound System
■ Search
Channel 2 π
✔
■ Fine Tune
■ Store
Manual Storeo
■ Colour System
■ Sound System
■ Search
■ Channel
■ Fine Tune
Store Store?π
✔
œ
œ
œ
11
12
p12-20/E 4/6/01, 4:37 pm15
˙
m
Store tuned channel.
Note : If you want to
continue searching for
another transmitting
channel, repeat steps
7 to 11.
Exit menu from screen.
15
Manual Storeo
■ Colour System
■ Sound System
■ Search
■ Channel
■ Fine Tune
Store Stored
✔
œ
Page 16

SELECTING THE COLOUR/SOUND SYSTEM
This feature allows you to select your desired Colour and Sound system. If Auto
is selected, the respective colour and sound system will be automatically selected according
to the transmission system. Note : Select your desired colour and sound system manually if
reception is poor at Auto mode.
Step Press button Result on screen
Repeat step 1 Colour System is selected.
to step 5 as in
“Manual Tuning
of TV Channels”
Select the desired colour
system (Auto, PA L ,
NTSC 3.58, NTSC 4.43
or SECAM).
Press button repeatedly
until STORE is selected.
Store selected system.
Proceed to select Sound
System.
Select the desired sound
system (Auto, BG, I,
DK or M.
Press button repeatedly
9
10
11
˝
or
˙
¸
˙
¸
or
˚
˝
or
˙
¸
until STORE is selected.
12
˙
Store selected system.
Manual Store o
Colour System Auto π
✔
■ Sound System
■ Search
■ Channel No.
■ Fine Tune
■ Store
Manual Store o
Colour System PAL π
✔
■ Sound System
■ Search
■ Channel
■ Fine Tune
■ Store
Manual Store o
■ Colour System
Sound System
✔
■ Search
■ Channel
■ Fine Tune
■ Store Stored
Manual Store o
■ Colour System
Sound System Auto π
✔
■ Search
■ Channel
■ Fine Tune
■ Store
Manual Store o
■ Colour System
Sound System DK π
✔
■ Search
■ Channel
■ Fine Tune
■ Store
Manual Store o
■ Colour System
Sound System
✔
■ Search
■ Channel
■ Fine Tune
■ Store Stored
œ
œ
œ
œ
œ
œ
m
p12-20/E 4/6/01, 4:37 pm16
Exit menu from screen.
16
Page 17

FINE TUNING OF CHANNELS
This feature allows you to adjust picture reception in areas of weak reception.
Step Press button Result on screen
MENU
¸
˙
¸
˙
¸
Enter main menu.
Press button repeatedly until
Install is selected.
Enter install menu.
Press button repeatedly until
Manual Store is selected.
Enter manual store menu.
Press button repeatedly until
Fine Tune is selected.
Main o
✔ Picture π Brightness
■ Sound Color
■ Features Contrast
■ Install Sharpness
Main o
■ Picture Language
■ Sound Auto Store
■ Features Manual Store
✔ Install π Sort
Install o
■ Language Colour System
■ Auto Store Sound System
Manual Store π Search
✔
■ Sort Channel
■ Channel Edit Fine Tune
■ Name Store
Manual Storeo
■ Colour System
■ Sound System
■ Search
■ Channel
✓ Fine Tune
■ Store
Colour Temp.
More...
œ
Channel Edit
Name
œ
œ
p❘❘❘❘❘❘❘❘❘❘❘❘❘❘❘❘❘❘❘❘❘❘❘❘
œ
π
˙
or
˝
¸
9
10
p12-20/E 4/6/01, 4:37 pm17
˙
m
Fine tune until the best reception
is obtained.
Select Store.
Store last fine-tuned status.
Exit menu from screen.
17
Manual Storeo
■ Colour System
■ Sound System
■ Search
■ Channel
✓ Fine Tune
■ Store
Manual Storeo
■ Colour System
■ Sound System
■ Search
■ Channel
■ Fine Tune
Store Stored
✔
p❘❘❘❘❘❘❘❘❘❘❘❘❘❘❘❘❘❘❘❘❘❘❘❘
œ
œ
π
Page 18

SORTING OF CHANNELS
This feature rearranges channel numbers.
Step Press button Result on screen
MENU
¸
˙
¸
˙
¸
or
˚
˙
Enter main menu.
Press button repeatedly until
Install is selected.
Enter install menu.
Press button repeatedly until
Sort is selected.
Enter sort mode.
Select the channel number you want
to change from (e.g. 002).
Confirm selection.
Main o
■ Picture Language
■ Sound Auto Store
■ Features Manual Store
✔ Install π Sort
Install o
■ Language 000
■ Auto Store 001
■ Manual Store 002
Sort π 003
✔
■ Channel Edit 004
■ Name 005
Install o
■ Language 000
■ Auto Store 001
■ Manual Store 002 π
Sort π 003
✔
■ Channel Edit 004
■ Name 005
Install o
■ Language 000
■ Auto Store 001
■ Manual Store 002 p
Sort π 003
✔
■ Channel Edit 004
■ Name 005
Channel Edit
Name
œ
œ
œ
œ
¸
Select the channel number you want
to change to (e.g. 005).
9
˝
Confirm selection.
The change is done.
Note : Channel numbers 5, 4 and 3
will move upwards accordingly. that
is, Channel 5 will move up to Channel
4, Channel 4 to 3 and Channel 3 to 2.
10
p12-20/E 4/6/01, 4:37 pm18
m
Exit menu from screen.
18
Install o
■ Language 000
■ Auto Store 001
■ Manual Store 002
Sort π 003
✔
■ Channel Edit 004
■ Name 005 p
Install o
■ Language 000
■ Auto Store 001
■ Manual Store 002
Sort π 003
✔
■ Channel Edit 004
■ Name 005 π
œ
œ
Page 19

EDITING OF CHANNELS
This feature allows you to skip or edit channels which have bad or weak TV signal or channels
that you do not watch often. Note : Once a channel is skipped, you cannot have access to it by
the CH (Channel) + or – button. You can only have access to the channel by the Digit (0 -9)
buttons.
Step Press button Result on screen
MENU
¸
˙
¸
˙
2
1
4
5
8
7
0
¸
˙
Enter main menu.
Press button repeatedly until
Install is selected.
Enter install menu.
Press button repeatedly until
Channel Edit is selected.
Enter Channel Edit menu.
3
Key in the channel number to be
6
skipped.
9
Select Skipped.
Select On to skip channel.
Main o
■ Picture Language
■ Sound Auto Store
■ Features Manual Store
✔ Install π Sort
Install o
■ Language Channel No.
■ Auto Store Skipped
■ Manual Store
■ Sort
Channel Edit π
✔
■ Name
Channel Edit o
Channel 2 π
✔
■ Skipped
Channel Edit o
■ Channel
Skipped On
✔
Channel Edit
Name
œ
œ
œ
œ
9
m
HOW TO RESTORE SKIPPED CHANNELS
• Repeat Steps 1 to 5 as in”Editing of Channels”.
• Key in the channel number to be restored by the
Digit (0 - 9) button.
• Select Skipped by the
• Select Off to restore channel by the
• Exit menu from screen by the
p12-20/E 4/6/01, 4:37 pm19
Exit menu from screen.
button.
¸
button.
˙
button.
m
19
Channel Edit o
■ Channel
Skipped Off
✔
œ
Page 20

NAMING OF CHANNELS
This feature enables you to name or rename channels.
Step Press button Result on screen
MENU
¸
˙
¸
˙
˚
or
¸
˙
˚
or
¸
Enter main menu.
Press button repeatedly until
Install is selected.
Enter install menu.
Press button repeatedly until
Name is selected.
Enter name mode.
Select the channel you want to
name.
Move to first character slot.
A cursor appears for you to start
the input of characters. Select the
character you want. Move to next
character slot by the
button and
˙
select the next character. You can
enter up to a maximum of 5
characters. After naming the channel,
press
button repeatedly until
˙
name appears on the top left hand
corner of the screen. This will ensure
that the name is stored in the
memory.
Main o
■ Picture Language
■ Sound Auto Store
■ Features Manual Store
✔ Install π Sort
Install o
■ Language 000
■ Auto Store 001
■ Manual Store 002
■ Sort 003
■ Channel Edit 004
Name π 005
✔
Install o
■ Language 000
■ Auto Store 001
■ Manual Store 002
■ Sort 003π
■ Channel Edit 004
Name π 005
✔
Install o
■ Language 000
■ Auto Store 001
■ Manual Store 002
■ Sort 003π
■ Channel Edit 004
Name π 005
✔
Channel Edit
Name
œ
œ
œ
œ
9
p12-20/E 5/6/01, 10:50 am20
Exit menu from screen.
m
20
Page 21

ADJUSTING THE TV PICTURE
The picture menu allows you to make adjustments to the picture.
Step Press button Result on screen
MENU
˚
or
¸
˝
or
m
Display the main menu on screen.
Enter Picture menu.
˙
Select item.
Adjust level or select desired
setting.
˙
Exit menu from screen.
Main o
✔ Picture π Brightness
■ Sound Colour
■ Features Contrast
■ Install Sharpness
Picture o
✔ Brightnessp
■ Colour
■ Contrast
■ Sharpness
■ Colour Temp
■ NR
Picture o
✔ Colour p
■ Contrast
■ Sharpness
■ Colour Temp
■ NR
■ Contrast +
Picture menu items Activities
Brightness Increase or decrease brightness level.
Colour Increase or decrease color level.
Contrast Increase or decrease contrast level.
Colour Temp
More...
œ
❘❘❘❘❘❘❘❘❘❘❘❘❘❘❘❘❘❘❘❘❘❘❘
œ
❘❘❘❘❘❘❘❘❘❘❘❘❘❘❘❘❘❘❘❘❘❘❘
œ
59π
59π
Sharpness Increase or decrease sharpness level to improve detail
Colour temperature Choose from 3 settings (Normal, Warm or Cool).
NR (Noise Reduction) Select “On” to reduce “noisy” picture (little dots on
Contrast + Select “On” to allow you to optimise the total contrast
p21-22/E 4/6/01, 4:38 pm21
in picture.
picture) due to weak signal.
for improved picture quality.
21
Page 22

ADUSTING THE TV SOUND
The sound menu allows you to make adjustments to the sound.
Step Press button Result on screen
MENU
¸
˙
˚
or
¸
˝
or
˙
m
Display the main menu on screen.
Select Sound menu.
Enter Sound menu.
Select item.
Adjust level or select desired
setting.
Exit menu from screen.
Main o
✔ Picture π Brightness
■ Sound Colour
■ Features Contrast
■ Install Sharpness
Main o
■
Picture Treble
Sound π Bass
✔
■ Features Balance
■ Install AVL
Sound o
✔ Treble p
■ Bass
■ Balance
■ AVL
■ Incr. Surround
■ Ultra Bass
Colour Temp.
More...
œ
Incr. Surround
Ultra Bass
œ
❘❘❘❘❘❘❘❘❘❘❘❘❘❘❘❘❘❘❘❘❘❘❘
0π
œ
Sound menu items Activities
Treble Increase or decrease high frequency level.
Bass Increase or decrease low frequency level.
Balance Increase or decrease to adjust balance level.
AVL (Auto Volume Leveller) Select On to enable volume to remain at a pre-
determined level should there be a sudden change in
volume during commercial breaks or channel switching.
Incredible Surround Select On to boost the effect of stereo sound.
Ultra Bass Select On to enjoy enhanced bass output.
22
p21-22/E 4/6/01, 4:38 pm22
Page 23

USING THE T IMER
The Timer feature allows you to set the timer to switch to another channel at a specified
time while you are watching another channel or when the TV is on standby mode.
Note : For the timer to function, the set must not be switched off. Once the set is switched
off, the timer is disabled.
Step Press button Result on screen
MENU
¸
˙
˙
2
1
4
5
8
7
0
Display the main menu on screen.
Select Features.
Enter the Features menu.
Enter Timer menu.
Key in the current time starting from
3
the hour follow by minute.
6
This is the time where the “start time”
9
and “stop time” will take reference
from.
Main o
✔ Picture π Brightness
■ Sound Colour
■ Features Contrast
■ Install Sharpness
Main o
■ Picture Timer
■ Sound Child Lock
Features π Format
✔
■
Install
Features o
✔ Timer π Time
■ Child Lock Start Time
■ Format Stop Time
■
Auto Pic. Booster
Timer o
✔ Time π 08:30
■ Start Time
■ Stop Time
■ Channel
■ Activate
■ Display
Colour Temp.
More...
œ
Auto Pic. Booster
œ
Channel
Activate
Display
œ
œ
¸
2
1
4
5
8
7
Select Start Time.
3
Key in the time you want the
6
programme to be switched on.
9
0
p23-29/E 4/6/01, 2:36 pm23
23
Timer o
■
Time
Start Timeπ 10:30
✔
■ Stop Time
■ Channel
■ Activate
■ Display
œ
Page 24

USING THE T IMER
Step Press button Result on screen
9
10
11
12
¸
2
1
4
5
8
7
Select Stop Time.
3
Key in the time you want the
6
programme to be switched off.
9
Timer o
■
Time
■ Start Time
Stop Time π 12:30
✔
■ Channel
■ Activate
■ Display
œ
0
¸
2
1
4
5
8
7
Select Channel.
3
Key in the channel you want to
6
switch to.
9
Timer o
■
Time
■ Start Time
■ Stop Time
Channel π
✔
■ Activate
■ Display
5
œ
0
¸
˙
¸
˙
m
Select Activate.
Activate timer. You can select
Once, Daily or Off.
Select Display.
Select On mode if you want to
display the time on the TV screen.
Exit menu from screen.
Timer o
■
Time
■ Start Time
■ Stop Time
■ Channel
Activate π
✔
■ Display
Timer o
■
Time
■ Start Time
■ Stop Time
■ Channel
■ Activate
Display π
✔
Once
œ
On
œ
Note :
• After the Stop Time is activated, theTV will go to standby mode
immediately.
• If Stop Time is not keyed in, the set will go to standby mode after
2 hours.
• To switch on set from standby mode, press Channel +/–,
Digit (0 -9) or Powe r button.
p23-29/E 4/6/01, 2:36 pm24
ACTIVATING THE CHILD LOCK (ACCESS
24
Page 25

ACTIVATING THE CHILD LOCK (ACCESS CODE)
The Child Lock feature allows you to lock channels to prevent your children from watching
programmes you deem undesirable.
Note : You can only have access to the locked channels via the remote control. Keep the
remote control out of reach so as to prevent your children from having access to it.
Step Press button Result on screen
MENU
Display the main menu on screen.
Press button repeatedly until
¸
˙
¸
˙
2
1
4
5
8
7
0
Features is selected.
Enter the Features menu.
Select Child Lock.
Enter Child Lock mode.
Key in the 4-digit access code.
3
For the first time or if you have
6
forgotten the access code, enter
9
the universal access code 0711
twice. It will now prompt you to
key in a New Code.
2
1
3
4
5
8
7
Key in your preferred code (4-digit).
6
9
0
2
1
4
5
8
7
Key in the new code the second
3
time to confirm code.
6
9
0
The Child Lock menu will now
appear. You can proceed to lock
9
m
channel (refer to section on
“Lock Channel”). If not, exit menu
from screen.
Note : After you have exit menu from screen and you want to
enter the child lock menu again, you need to key the new
access code only once.
Main o
■ Picture Timer
■ Sound Child Lock
✔ Features π Format
■
Install
Features o
■ Timer
✔ Child Lock π
■ Format
■
Auto Pic. Booster
Features o
■ Timer Access Code
✔ Child Lock π xxxx
■ Format Correct
■
Auto Pic. Booster
Features o
■ Timer New Code
✔ Child Lock π xxxx
■ Format
■
Auto Pic. Booster
Features o
■ Timer Confirm Code
✔ Child Lock π xxxx
■ Format Confirmed
■
Auto Pic. Booster
Child Lock o
■ Lock Channel π 002
■ Change Code 003
■ Clear All 004
■ Lock All 005
Auto Pic. Booster
œ
œ
œ
œ
œ
006
007
œ
p23-29/E 4/6/01, 2:36 pm25
25
Page 26

ACTIVATING THE CHILD LOCK (CHANGE CODE)
Note : You need to key the access code only once.
Step Press button Result on screen
Repeat Steps 1 to 8 as The Child Lock menu will
in “ACTIVATING THE now appear. You can proceed
CHILD LOCK to change code.
(ACCESS CODE)”
9
10
11
12
¸
Select Change Code.
˙
Enter change code mode.
2
1
3
4
5
6
9
8
7
0
2
1
3
4
5
6
9
8
7
0
Key in your preferred code
(4-digit).
Key in the new code the
second time to confirm
code.
Child Lock o
✔ Lock Channel π 002
■ Change Code 003
■ Clear All 004
■ Lock All 005
Child Lock o
■ Lock Channel New Code
✔ Change Code π ----
■ Clear All
■ Lock All
Child Lock o
■ Lock Channel New Code
✔ Change Code π xxxx
■ Clear All
■ Lock All
Child Lock o
■ Lock Channel Confirm Code
✔ Change Code π xxxx
■ Clear All Confirmed
■ Lock All
006
007
œ
œ
œ
œ
m
p23-29/E 4/6/01, 2:36 pm26
Exit menu from screen.
26
Page 27

ACTIVATING THE CHILD LOCK (LOCK CHANNEL)
Step Press button Result on screen
Repeat Steps 1 to 8 as The Child Lock menu will
in “CHILD Lock (ACCESS now appear. You can proceed
CODE)” to lock channel.
9
10
˙
˚
or
¸
Enter lock channel mode.
Select the channel you want
to lock.
Child Lock o
✔ Lock Channel π 002
■ Change Code 003
■ Clear All 004
■ Lock All 005
Child Lock o
✔ Lock Channel π 002
■ Change Code 003
■ Clear All 004
■ Lock All 005
Child Lock o
✔ Lock Channel π 002
■ Change Code 003
■ Clear All 004
■ Lock All 005
006
007
œ
006
007 π
œ
006 π
007
œ
11
12
p23-29/E 4/6/01, 2:36 pm27
˙
m
Activate blocking of channel.
A keylock symbol will appear
beside the channel number
indicating that it is locked.
Note : To lock more than one
channel, repeat Steps 10 to 11
before exiting menu from
screen.
Exit menu from screen.
27
Child Lock o
✔ Lock Channel π 002
■ Change Code 003
■ Clear All 004
■ Lock All 005
006 π
007
œ
F
Page 28

ACTIVATING THE CHILD LOCK (LOCK A LL)
You can choose to lock all channels in the Lock All mode in the Child Lock menu.
Step Press button Result on screen
Repeat Steps 1 to 8 as The Child Lock menu will
in “CHILD Lock (ACCESS now appear. You can proceed
CODE)” to lock all channels.
9
10
11
¸
˙
m
Select Lock All.
Select the On option to
lock all channels.
Exit menu from screen.
Child Lock o
✔ Lock Channel π 002
■ Change Code 003
■ Clear All 004
■ Lock All 005
Child Lock o
■ Lock Channel
■ Change Code
■ Clear All
■ Lock All π On
006
007
œ
œ
ACTIVATING THE CHILD LOCK (CLEAR A LL)
To unlock channels that you have locked, enter the Child Lock menu and select the Off option
Clear All mode.
Step Press button Result on screen
Repeat Steps 1 to 8 as The Child Lock menu will
in “CHILD Lock (ACCESS now appear. You can proceed
CODE)” to clear all channels.
9
10
¸
˙
Select Clear All.
Select the Off option to
unlock all channels.
Child Lock o
✔ Lock Channel π 002
■ Change Code 003
■ Clear All 004
■ Lock All 005
Child Lock o
■ Lock Channel
■ Change Code
✔ Clear All π Off
■ Lock All
006
007
œ
11
p23-29/E 4/6/01, 2:36 pm28
m
œ
Exit menu from screen.
28
Page 29

USING THE SCREEN FORMAT
➩
You can have a choice of two formats for your viewing pleasure, namely : - 4:3 mode and the
EXPAND 4:3 mode through the FORMAT menu.
Step Press button Result on screen
MENU
¸
˙
¸
Display the main menu on screen.
Press button repeatedly until
Features is selected.
Enter the Features menu.
Press button repeatedly umtil
Format is selected.
˙
Press the button repeatedly to
cycle through the different formats
(4:3 or Expand 4:3) or and select
your desired format.
m
Exit menu from screen.
When to use the Screen Formats
4:3 format
Select the 4:3 format if you want to
display the 4:3 picture using the full
surface of the screen.
Main o
■ Picture Timer
■ Sound Child Lock
✔ Features π Format
■
Install
Feature o
■ Timer
■ Child Lock
✔ Format 4:3 π
■
Auto Pic. Booster
Features o
■ Timer
■ Child Lock
✔ Format 4:3 Expand π
■
Auto Pic. Booster
Auto Pic. Booster
œ
œ
œ
Expand 4:3 format
Select the Expand 4:3 format if you
want to expand movie images
recorded in the letterbox format.
When this format is selected, the
black horizontal bars at the top and
bottom are expanded thus filling
up the entire TV screen.
p23-29/E 4/6/01, 2:36 pm29
➩
➩
29
Page 30

SMART PICTURE CONTROL
Whether you are watching a movie or video game, your TV has automatic video control
settings matched to your current program source or content. The Smart Picture feature quickly
resets your TV’s video controls of program for a number of different types of programs and
viewing conditions you may have in your home. Each Smart Picture setting is preset at the
factory to automatically adjust the TV’s Brightness, Colour, Picture and Sharpness levels.
Step Press button
`
Press botton repeatedly to cycle through the 5 settings namely,
Personal, DVD/VCD, Rich, Natural and Soft and select
your desired picture setting.
m
Exit menu from screen.
Defintion of Picture Settings
Personal : Picture settings are set to your preference.
DVD/VCD : For optimal picture setting, whenever
the source is connected to DVD/VCD
player, select DVD/VCD setting for AV
mode.
Rich : Emphasize very vibrant colours. This
setting is the optimal setting when you
are viewing TV programmes in a
brightly-lit room.
Natural : Emphasize original colours.
Personal
DVD/VCD
Rich
Soft : Emphasize “warm” colours.
(Suitable for dimly-lit room condition and
givescinema-like effect when light is
switched off).
p30-33/E 4/6/01, 2:47 pm30
Natural
Soft
30
Page 31

SMART SOUND CONTROL
Whether you are watching a movie or video game, your TV has automatic sound control
settings matched to your current program source or content. The Smart Sound feature quickly
resets your TV’s sound controls of program for a number of different types of programs and
viewing conditions you may have in your home. Each Smart Sound setting is preset at the
factory to automatically adjust the TV’s Treble and Bass levels.
Step Press button
q
Press botton repeatedly to cycle through the 4 settings namely,
Personal, Theatre, Music and Voice and select your desired
sound setting.
m
Exit menu from screen.
Definition of Sound Settings
Personal : Sound settings are set to your preference.
Theatre : Emphasize sensation to action.
(Bass and Treble boosted)
Music : Emphasize low tone (Bass boosted).
Voice : Emphasize high tone (treble boosted).
Personal
Theatre
Music
Voice
p30-33/E 4/6/01, 2:47 pm31
31
Page 32

PERSONAL ZAPPING
A list or series of favourite TV programs can be selected and stored in the 4 coloured buttons
with the Personal Zapping feature. With this feature you can easily viewed up to a total of 10
preferred channels for each coloured button.
Adding Channels to the Favourite list
Step Press button Result on screen
2
1
3
4
5
6
9
8
7
0
Select a channel by the Digit
buttons
Press button to display list.
Choose your favourite colour
button to store selected channel.
8
8
Select List!
Repeat steps 1 to 3 to add and
store your avourite channels to
the list.
m
Exit menu from screen.
To view through the favourite list
Press the colour button that you have selected.
Press button repeatedly to cycle through your favourite list
and view your favourite channel.
Deleting Channels from the Favourite list
Select a colour button and press
button repeatedly to select the
channel you want to delete.
Press button to display list.
Press button to remove item.
Repeat steps 1 to 3 to delete
more channels from list.
m
Exit menu from screen.
8
8
8 Remove Item?- Press
Added!
p30-33/E 4/6/01, 2:47 pm32
32
Page 33

AUTOMATIC PICTURE BOOSTER
If the transmission signal is weak, the Automatic Picture Booster built into the TV set will
increase the signal level to provide a good picture at all time. You have a choice to turn on/off
the feature, depending on the signal conditions locally.
Step Press button Result on screen
MENU
¸
˙
¸
˙
Display the main menu on screen.
Select Features.
Enter the Features menu.
Select Auto Pic. Booster.
Select On.
Main o
✔ Picture π Brightness
■ Sound Colour
■ Features Contrast
■ Install Sharpness
Main o
■ Picture Timer
■ Sound Child Lock
Features π Format
✔
■
Install
Features o
■ Timer
■ Child Lock
■ Format
✔
Auto Pic. Booster
Features o
■ Timer
■ Child Lock
■ Format
✔
Auto Pic. Booster
Colour Temp.
More...
œ
Auto Pic. Booster
œ
π Off
œ
π On
m
p30-33/E 4/6/01, 2:47 pm33
œ
Exit menu from screen.
33
Page 34

USING THE TELETEXT
If a TV channel broadcast contains teletext information, each channel that broadcasts
teletext transmits a page (index page) with information on how to use the teletext system,
usually on page 100. The system transmitted is indicated in the option line at the bottom
of the screen.
‘
“
é
Press button
Result on screen
& On/Off teletext Press the button once to switch on
and Superimpose teletext display. (A channel in which
teletext page teletext is being transmitted must be
over TV selected).
(
programme Press the button the second time
superimpose the teletext page over
b
the TV programme.
Press the button the third time
to exit teletext mode.
é Selecting a Key in the required teletext page
teletext page (3 digits). The page number is
displayed at the top left hand corner
&
2
1
4
5
8
7
0
of the screen. When the teletext
3
page is located, the counter stops
6
searching. If the counter keeps
9
searching, it means that the page is
not available for selection. If you
make a mistake in keying the page
number, you have to complete
keying the 3-digit number before
re-keying the correct page number.
“ Accessing Press the ˚ button to
a teletext display the next page and the
page
˚
¸
button to display the previous
¸
page.
p34-37/E 4/6/01, 2:53 pm34
‘ Direct Access to The 4-colour buttons allow you to
an item or access directly an item or
corresponding corresponding pages.
pages
( Main Index Press the button to return to the
d
main index page.
34
Page 35

USING THE TELETEXT
§
è
Press button
§ Interrupt Press the button to change to TV
!
ç
è Enlarge Press the button once to enlarge
! Hold A selected page sometimes
ç Reveal/ Press the button once to reveal
Conceal hidden information (solutions to
a
h
f
e
mode. Press the button again to
return to teletext mode and to the
teletext page.
and view the top half of the page.
Press the button the second time
to enlarge and view the bottom
half of the page. Press the button
the third time to return to normal
size page.
contains a few sub-pages. The subpage will automatically move to the
next sub-page after about 20
seconds. The total number of subpages are indicated at the top right
hand corner of the screen. Press
the button once to hold page and
the second time to release holding
of page.
puzzles, riddles, etc). Press the
button the second time to conceal
information.
This button is applicable only to
teletext page with puzzles, riddles,
etc.)
Result on screen
p34-37/E 4/6/01, 2:53 pm35
35
Page 36

SPECIFICATIONS
25PT2252 29PT2252
Picture tube screen size 630 mm 705 mm
Picture tube visible area 600 mm 675 mm
Audio Output :
Speaker 2 x 5 W
TV System NTSC M
PAL B/G
PAL B/H (only for certain versions)
PAL D/K
PAL I
SECAM B/G
SECAM D/K
SECAM K1
Playback System NTSC 3.58, NTSC 4.43, PAL 60
Set Dimensions :
Width 670 mm 778 mm
Depth 520 mm 580 mm
Height 460 mm 532 mm
Net Weight of Set (approximate ) 30 kg 45.5 kg
Note
For Operating Voltage, Frequency, Power Consumption and Version Number, refer to the
type number at the rear of the set.
36
p34-37/E 4/6/01, 2:53 pm36
Page 37

p34-37/E 4/6/01, 2:53 pm37
3139 125 28721
37
 Loading...