

Page 1

1
Introduction
Table of Contents
Thank you for purchasing this television set.
This handbook has been designed to help you install and operate your TV set.
We would strongly recommend that you read it thoroughly.
We hope our technology meets entirely with your satisfaction.
Installation
Installing your television set . . . . . . . . . . . . . . . . . . . . . . . . . . . . . . . . . . . . . . . . . .2
The keys on the TV set . . . . . . . . . . . . . . . . . . . . . . . . . . . . . . . . . . . . . . . . . . . . . .2
The remote control keys . . . . . . . . . . . . . . . . . . . . . . . . . . . . . . . . . . . . . . . . . . . .3
Quick installation . . . . . . . . . . . . . . . . . . . . . . . . . . . . . . . . . . . . . . . . . . . . . . . . . .4
Sorting programmes . . . . . . . . . . . . . . . . . . . . . . . . . . . . . . . . . . . . . . . . . . . . . . . .4
Using other menus . . . . . . . . . . . . . . . . . . . . . . . . . . . . . . . . . . . . . . . . . . . . . . . . .5
Choosing a language and country . . . . . . . . . . . . . . . . . . . . . . . . . . . . . . . . . . . . .5
Automatic tuning . . . . . . . . . . . . . . . . . . . . . . . . . . . . . . . . . . . . . . . . . . . . . . . . . .5
Manual tuning . . . . . . . . . . . . . . . . . . . . . . . . . . . . . . . . . . . . . . . . . . . . . . . . . . . . .6
Programme name . . . . . . . . . . . . . . . . . . . . . . . . . . . . . . . . . . . . . . . . . . . . . . . . . .6
Operation
Adjusting the picture . . . . . . . . . . . . . . . . . . . . . . . . . . . . . . . . . . . . . . . . . . . . . . .7
Adjusting the sound . . . . . . . . . . . . . . . . . . . . . . . . . . . . . . . . . . . . . . . . . . . . . . . .7
Rotating the picture . . . . . . . . . . . . . . . . . . . . . . . . . . . . . . . . . . . . . . . . . . . . . . . .7
Timer function . . . . . . . . . . . . . . . . . . . . . . . . . . . . . . . . . . . . . . . . . . . . . . . . . . . .8
Locking the set . . . . . . . . . . . . . . . . . . . . . . . . . . . . . . . . . . . . . . . . . . . . . . . . . . . .8
Teletext . . . . . . . . . . . . . . . . . . . . . . . . . . . . . . . . . . . . . . . . . . . . . . . . . . . . . . . . . .9
16:9 Formats . . . . . . . . . . . . . . . . . . . . . . . . . . . . . . . . . . . . . . . . . . . . . . . . . . . . .10
Peripherals
Video recorder . . . . . . . . . . . . . . . . . . . . . . . . . . . . . . . . . . . . . . . . . . . . . . . . . . .12
Other equipment . . . . . . . . . . . . . . . . . . . . . . . . . . . . . . . . . . . . . . . . . . . . . . . . .12
To select connected equipment . . . . . . . . . . . . . . . . . . . . . . . . . . . . . . . . . . . . .12
Connecting other appliances . . . . . . . . . . . . . . . . . . . . . . . . . . . . . . . . . . . . . . . .13
TV / VCR / DVD mode selector . . . . . . . . . . . . . . . . . . . . . . . . . . . . . . . . . . . . . .13
Practical information
Tips . . . . . . . . . . . . . . . . . . . . . . . . . . . . . . . . . . . . . . . . . . . . . . . . . . . . . . . . . . . .14
Glossary . . . . . . . . . . . . . . . . . . . . . . . . . . . . . . . . . . . . . . . . . . . . . . . . . . . . . . . .14
°
Recycling
The materials used in your set are either reusable or can be recycled.
To minimise environmental waste, specialist companies collect used appliances
and dismantle them after retrieving any materials that can be used again (ask
your dealer for further details).
EnglishFrançaisMagyarPyccÍËÈPolskiČeštinaSlovenčinaTürkçe
Page 2
The television set has 4 keys which are
located on the front or the top of the set
depending on the model.
The VOLUME - + (-
” +) keys are used to
adjust sound levels.
The PROGRAM - + (- P +) keys are used to
select the required programmes.
To access the menus,simultaneously hold
down the
” - and ” + keys.The
PROGRAM - + keys may then be used to
select an adjustment and the -
” + keys to
make that adjustment.
To exit from the menus, hold down the 2
”
- and ” + keys.
Note: when the CHILD LOCK function is activated,
these keys are unavailable (refer to FEATURES
menu on page 8).
2
&
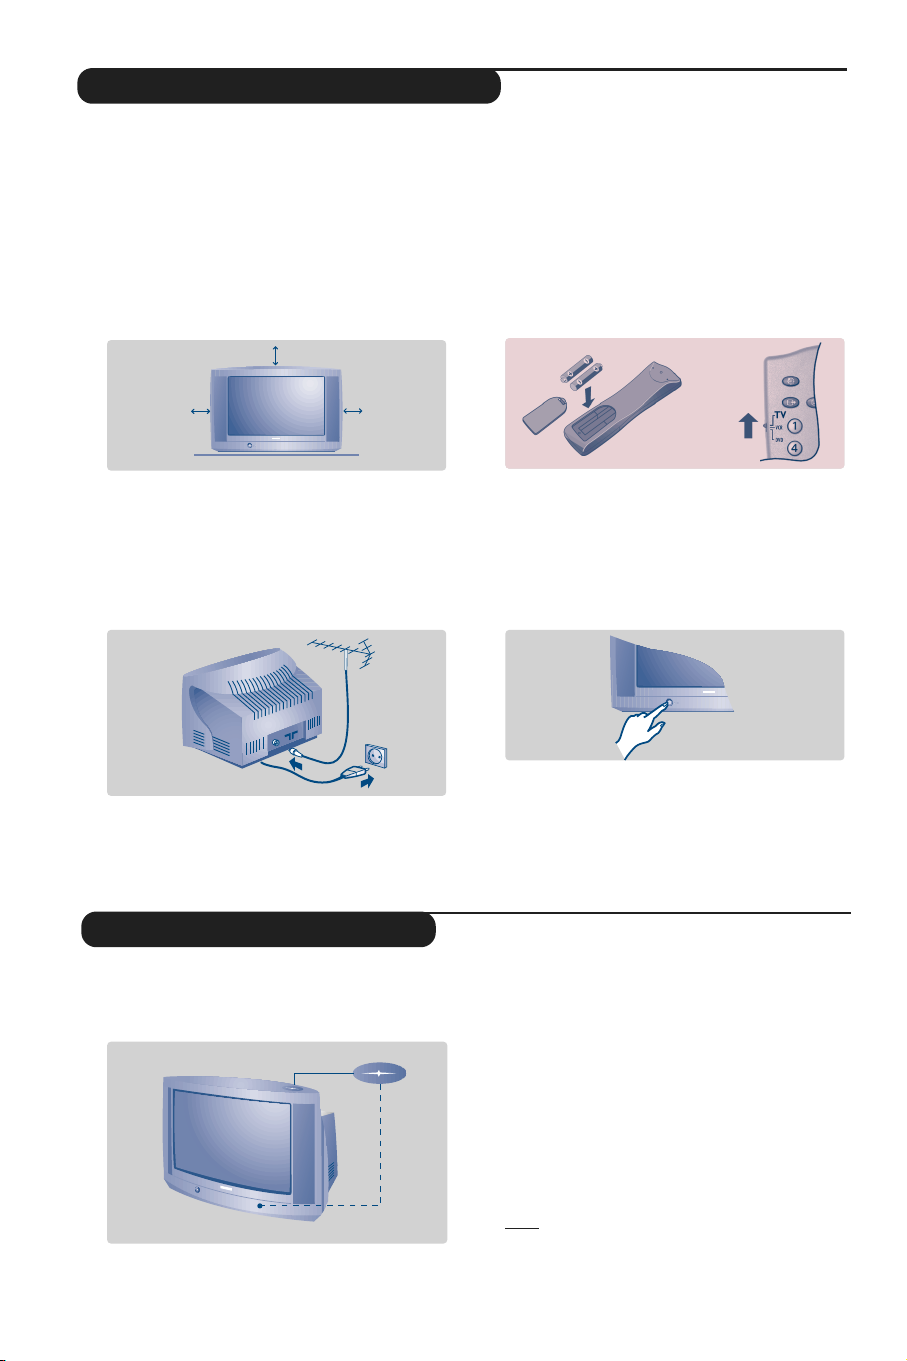
Positioning the television set
Place your TV on a solid,stable surface, leaving
a space of at least 5 cm around the appliance.
To avoid accidents, do not put anything on the
set such as a cloth or cover,a container full of
liquid (vase) or a heat source (lamp).The set
must not be exposed to water.
é
Connections
• Insert the aerial plug into the : socket at
the rear of the set.
• Insert the mains plug into a wall socket (220-
240 V / 50 Hz).
“
Remote control
Insert the two R6-type batteries (supplied)
making sure that they are the right way round.
Check that the mode selector is set to TV.
The batteries supplied with this appliance do not
contain mercury or nickel cadmium.If you have
access to a recycling facility,please do not discard
your used batteries (if in doubt, consult your dealer).
When the batteries are replaced, use the same type.
‘
Switching on
To switch on the set,press the on/off key.
A red indicator comes on and the screen
lights up. Go straight to the chapter Quick
installation on page 4.
If the television remains in standby mode,
press P
# on the remote control.
The indicator will flashe when you use the remote
control.
Installing your television set
The keys on the TV set
P
++-
-
a
P
+
+
-
-
a
5 cm
5 cm
5 cm
Page 3
3
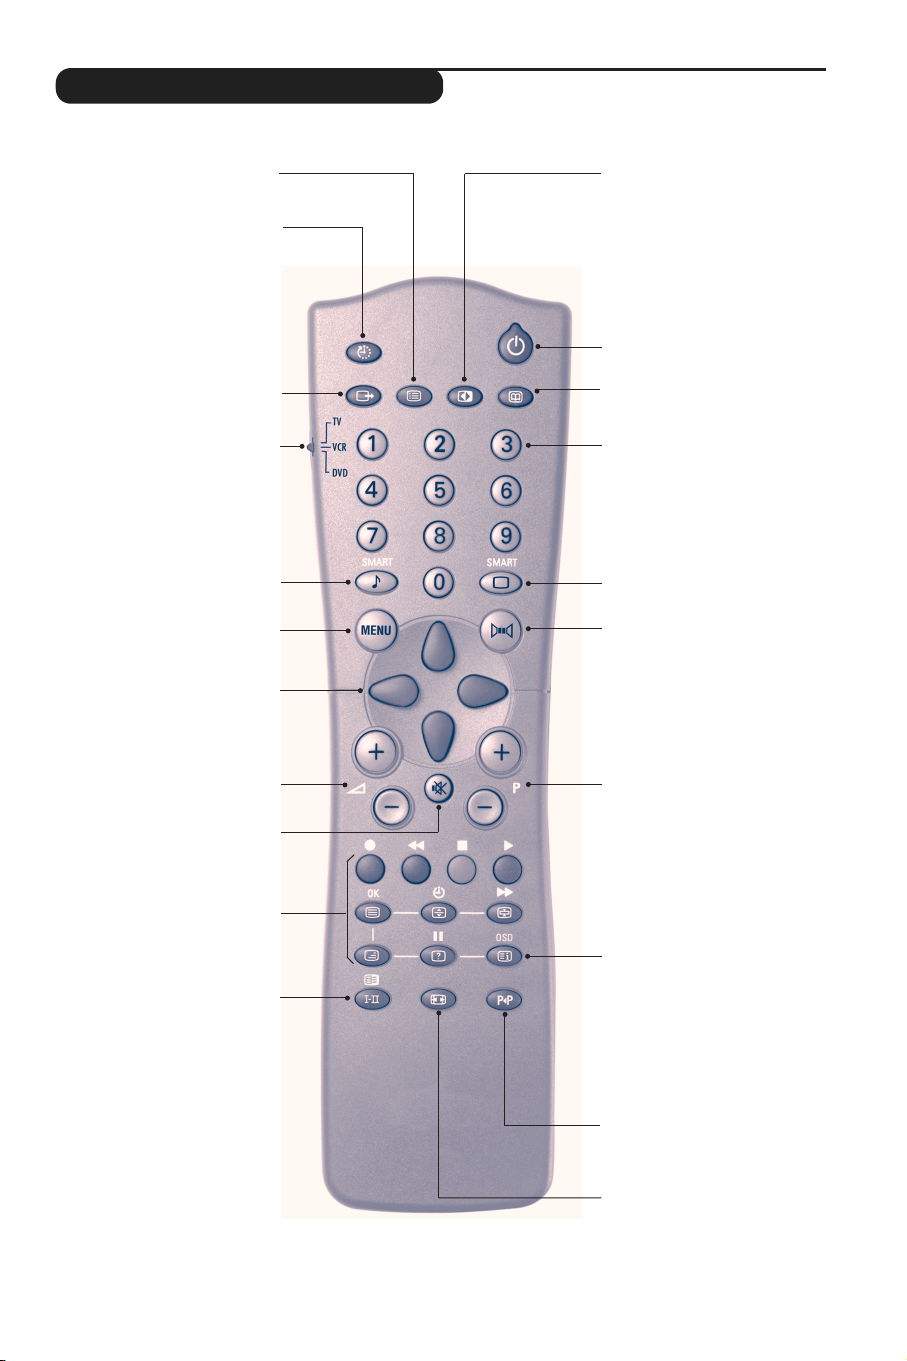
The remote control keys
key not used
key not used
Mode selector (p. 13)
To activate the remote control
in TV,VCR (video recorder) or
DVD mode.
Select EXT sockets
Press several times to select
EXT1, EXT2 and on certain
models EXT3 and S-VHS2.
Smart sound controls
To access a series of settings:
VOICE,MUSIC,THEATRE and
return to PERSONAL
Menu
To display or exit from the menus
Cursor
These 4 keys are used to move
within the menus or to have
direct access to the 16:9 formats
(p 10).
Mute
To disable or enable the sound.
Volume
To adjust the sound level
Sound mode
To switch from STEREO to
MONO or to choose between
Dual I and Dual II for
bilingual transmissions.
For TV sets fitted with NICAM
reception, depending on the
transmission, you can switch
from NICAM STEREO to
MONO or choose between
NICAM DUAL I, NICAM DUAL
II and MONO.
When the sound mode is switched
to MONO, the indication is
displayed in red.
Contrast +
To activate / de-activate the
automatic contrast adjustment
system (the dark areas are made
darker whilst maintaining the
detail).
Standby
To set the TV to standby mode.
To switch the TV set on again,
press P @#or 09.
Numerical keys
For direct access to programmes.
For a 2 digit programme number,
the 2nddigit must be entered
before the dash disappears.
Smart picture controls
To access a series of settings:
RICH, NATURAL,SOFT,
MULTIMEDIA and return to
PERSONAL.
Incredible Surround
To activate / deactivate the
surround sound effect.In stereo,
this gives the impression that
the speakers are further apart.
In mono, a stereo spatial effect
is simulated.
Selecting TV programmes
To move up or down a
programme.The number,(the
name) and the sound mode are
displayed for a few seconds.
For some TV programmes the title of
the programme appears at the
bottom of the screen.
Teletext features (p. 9)
Previous programme
To access the previously viewed
programme.
16:9 formats (p.10)
Screen information
To display / remove the programme
number, the name (if it exists), the
time, the sound mode and the time
remaining on the timer. Hold down
for 5 seconds to permanently
display the programme number on
the screen.The volume level and
the Smart control adjustments are
then displayed each time it used.
Sleeptimer
To select the length of time
before the set automatically
switches to standby (from 0 to
240 minutes)
Page 4
4
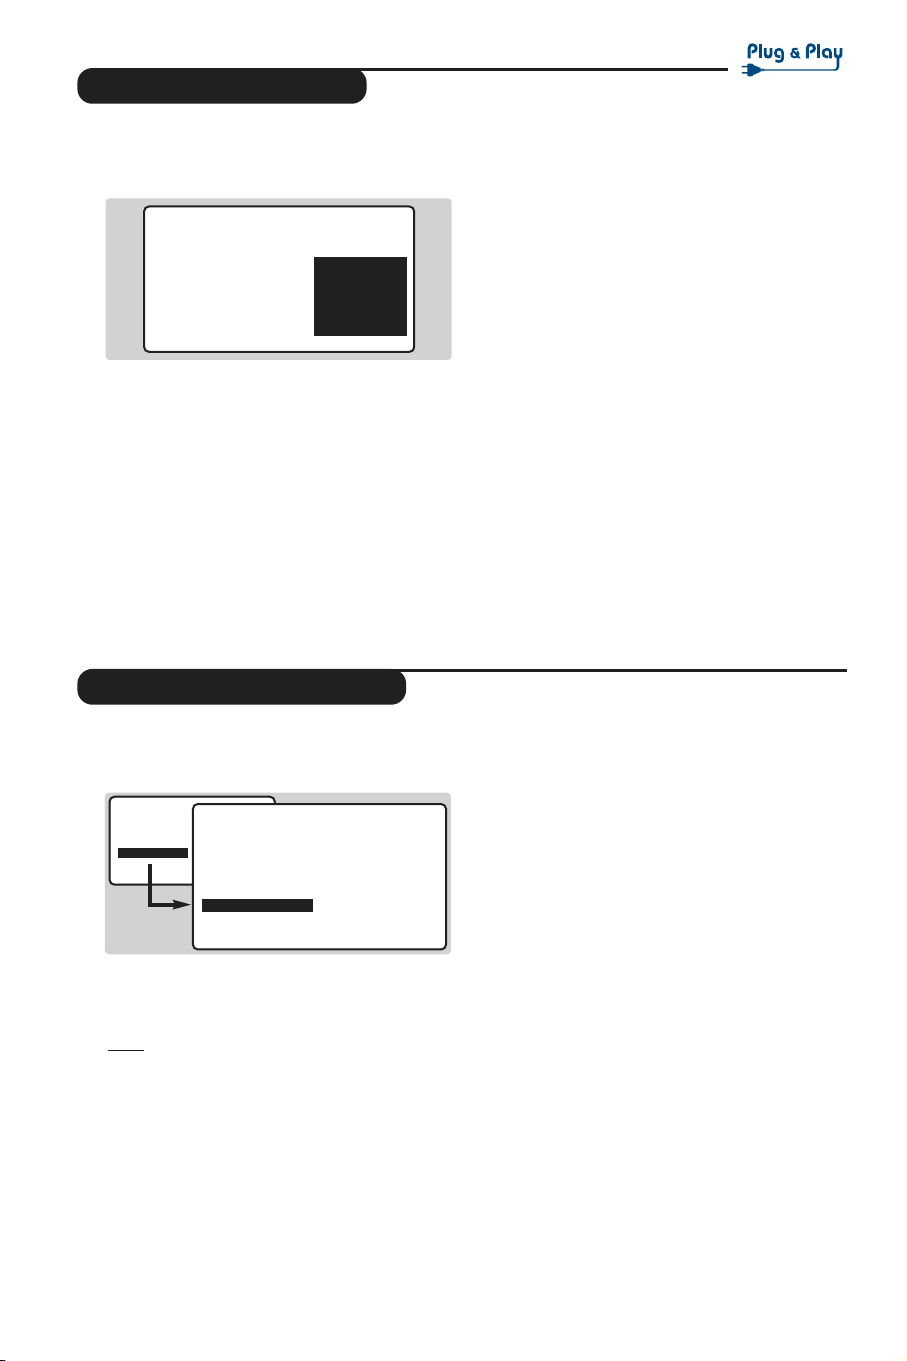
Quick installation
Sorting programmes
The first time you switch on the television,a
menu appears on the screen.This menu asks
you to choose the language of the menus :
If the menu does not appear, hold down the
” -
and ” + keys on the set for 5 seconds to bring
it up.
& Use the
IJ keys on the remote control to
choose your language then confirm with
L.
é Then select your country using the
IJ keys
and confirm with
L.
If your country does not appear in the list,select “.. .”
“ Tuning starts automatically.
The operation takes several minutes.
A display shows the search status and the
number of programmes found.When it has
finished the menu disappears.
To exit or interrupt the search, press the
H key.
If no programmes are found, refer to the chapter
entitled Tips on p. 14.
‘ If the transmitter or the cable network
broadcasts the automatic sort signal, the
programmes will be correctly numbered.
( If not, the programmes found will be
numbered in descending order starting at 99,
98, 97, etc.
Use the SORT menu to renumber them.
Some transmitters or cable networks broadcast
their own sort parameters (region, language,etc.).
Where this is the case, make your choice using the
IJ keys and confirm with L.
& Press the H key.The main menu is displayed.
é Select INSTALL (
J), then press L.
The INSTALL menu appears.
“ Using the
J key,select SORT then press L.
The SORT menu appears.The FROM option is
activated.
Note:
this menu works as follows:
• Change "FROM" (enter the current programme
number),
• "TO" (enter the new number),
• EXCHANGE numbers" (the operation is carried
out).
‘ Select the programme you wish to renumber
using
KL keys or 0 to 9.
Example: to renumber programme 78 as 2
press
78.
( Select TO (using
J key) and enter the new
number with
KL keys or 0 to 9 (for the
example given, enter
2).
§ Select EXCHANGE (
J key) and press L.
The message EXCHANGED appears, the
exchange takes place. In our example,
programme 78 is renumbered as 2 (and
programme 2 as 78).
è Select the option FROM (
I key) and repeat
stages ‘ to § as many times as there are
programmes to renumber.
! To exit from the menus,press
R.
SELECT LANGUAGE
LANGUAGE
•
ENGLISH
DANSK
NEDERLANDS
FINNISH
FRANCAIS
COUNTRY
A
B
CH
D
DK
• PICTURE
• SOUND
• FEATURES
• INSTALL
INSTALL
• LANGUAGE
• COUNTRY
• AUTO STORE
• MANUAL STORE
• SORT
• NAME
FROM
TO
EXCHANGE
SEARCHING
PLEASE WAIT
PROG. NO. 2
215.18 MHZ
Page 5
MENU MENU MENU
5
Using other menus
Choosing a language and country
Automatic tuning
& Press the H key to display the main menu.
é Select INSTALL (
J), then press L.
The INSTALL menu appears.
The LANGUAGE option is activated.
“ Press
L to go into the LANGUAGE menu.
‘ Select your language with the
IJ keys.
The menus will appear in the chosen language.
( Press
K to exit the LANGUAGE menu.
§ Select the option COUNTRY and press
L.
è Select your country with
IJ keys (GB).
If your country does not appear in the list,select “.. .”
! Press
K to exit the COUNTRY menu.
ç To exit from the menus,press
R.
This menu allows you to automatically search
for all the programmes available in your region
(or on your cable network).
& First carry out operations & to ! above, then:
é Press
J once to select AUTO STORE then
press
L.The search begins.
After several minutes,the INSTALL menu
reappears automatically.
“ If the transmitter or the cable network
broadcasts the automatic sort signal, the
programmes will be correctly numbered.
‘ If not, the programmes found will be
numbered in descending order starting at 99,
98, 97, etc.
Use the SORT menu to renumber them.
Some transmitters or cable networks broadcast
their own sort parameters (region, language,etc.).
Where this is the case, make your choice using the
IJ keys and confirm with L.
To exit or interrupt the search, press the H key. If
no picture is found, refer to the chapter entitled
Tips on p. 14.
( To exit from the menus,press
R.
PICTURE
• BRIGHTNESS
• COLOUR
• CONTRAST --I------ 39
• SHARPNESS
• STORE
• PICTURE
• SOUND
• FEATURES
• INSTALL
INSTALL
• LANGUAGE
• COUNTRY
• AUTO STORE
• MANUAL STORE
• SORT
•
NAME
ENGLISH
DANSK
NEDERLANDS
INSTALL
• LANGUAGE
• COUNTRY
• AUTO STORE
• MANUAL STORE
• SORT
•
NAME
SEARCHING
PLEASE WAIT
PROG. NO. 2
215.18 MHZ
Page 6

6
Manual tuning
Programme name
This menu allows you to store the
programmes one by one.
& Press
H.
é Select INSTALL (
J), then press L.
The INSTALL menu appears.
“ Select MANUAL STORE (
J) then press L.
The menu appears :
‘ Press
L to go to the SYSTEM menu.
Use
IJ to choose EUROPE (automatic
detection*) or manual detection with WEST
EUR (standard BG reception), EAST EUR
(standard DK reception), UK (standard I
reception) or FRANCE (standard LL').
Then press
K to exit from the menu.
* Except for France (standard LL'): select the
option FRANCE.
( Select SEARCH and press
L.
The search begins.As soon as a programme is
found, the search will stop. If you know the
frequency of the programme required, enter
its number directly using the
09keys and
go to step è.
If no programme is found, refer to the Tips chapter
on page 14).
§ If reception is un-satisfactory, select FINE
TUNE and hold down
K or L key.
è Select PROG. NO (programme number) and
use the
KLor 0 to 9 keys to enter the
desired number.
! Select STORE and press
L.The message
STORED appears.The programme is stored.
ç Repeat steps ( to ! for each programme to
be stored.
To exit: press the
R key.
You may, if you wish, give a name to the first
40 programmes (from 1 to 40).
& Press
H.
é Select INSTALL (
J), then press L.
The INSTALL menu appears.
“ Press
J 5 times to select NAME (concealed
at the bottom of the screen), then press
L.
The menu appears :
‘ Select the programme you wish to name using
the keys
09or @ P #.
Note: at the time of installation, the programmes
are automatically named when the identification
signal is transmitted.
( Use the keys
KL to move within the name
display area (5 characters).
§ Use keys
IJ to choose the characters.
è Press
H when the name has been entered.
The programme name is stored.
! Repeat steps ‘ to è for each programme to
be named.
ç To exit from the menus,press
R.
• PICTURE
• SOUND
• FEATURES
• INSTALL
INSTALL
MANUAL STORE
• SYSTEM
• SEARCH
• PROG. NO.
• FINE TUNE
• STORE
EUROPE
WEST EUR
EAST EUR
UK
FRANCE
INSTALL
• LANGUAGE
• COUNTRY
• AUTO STORE
• MANUAL STORE
• SORT
•
NAME
BBC_1
Page 7

7
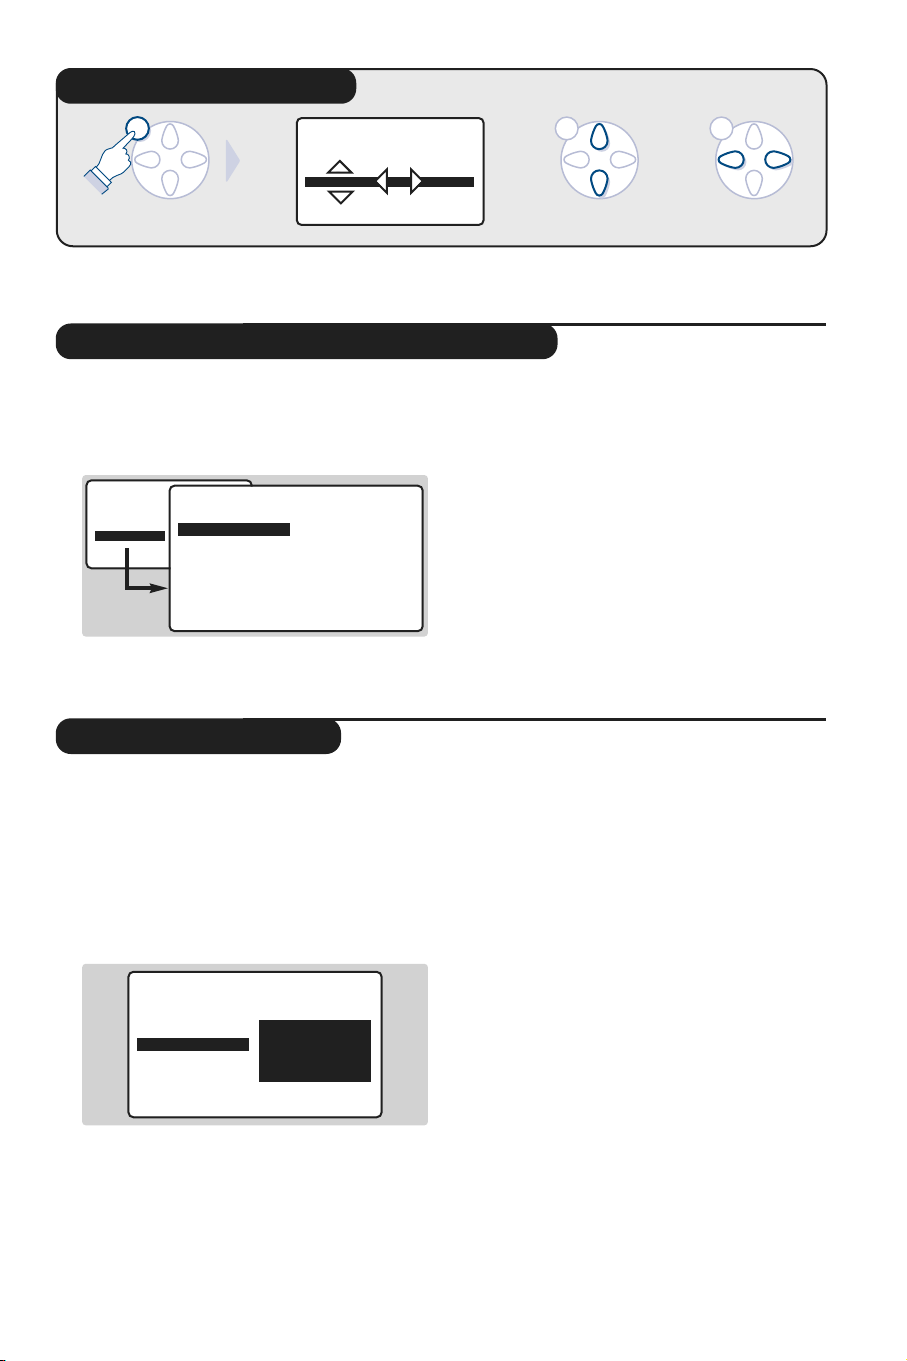
Adjusting the picture
Adjusting the sound
& Press H then L.
The PICTURE menu appears :
é Use
IJ keys to select a setting and KL
keys to adjust.
Note: the menu is a scroll-down menu.
Keep the key J held down to access the settings
hidden at the bottom of the screen.
“ Once the necessary adjustments have been
made, select the option STORE and press
L
to store them.
‘ To exit from the menus,press
R.
Description of the settings:
• BRIGHTNESS: alters the brightness of the
image.
• COLOUR: alters the colour intensity.
• CONTRAST:alters the variation between
light and dark tones.
• SHARPNESS: alters the crispness of the
image.
• STORE: stores the picture settings.
• COLOUR TEMP (colour temperature):
adjusts the colour temperature of the
picture.Three options are available here:
COOL (blue white), NORMAL (balanced) or
WARM (red white).
• NR (Noise Reduction): alleviates fuzziness
(snowy picture).This setting is useful when
reception is difficult.
& Press H, select the SOUND option (J) and
press
L.The SOUND menu appears :
é Use
IJ keys to select a setting and keys
KL to adjust.
Note: to access the AVL setting (hidden at the
bottom of the screen) hold down J key.
“ Once the necessary adjustments have been
made, select the option STORE and press
L
to store them.
‘ To exit from the menus,press
R.
Description of the settings:
• TREBLE:alters the levelof the high frequency
sound.
• BASS: alters the levelof the low frequency
sound.
• BALANCE: to balance the sound between
the left and right speakers.
• DELTA VOLUME (volume difference):allows
you to compensate for the volume differences
between the different programmes or the
EXT sockets.This setting is available for
programmes 1 - 40 and the EXT sockets.
• STORE: stores the sound settings.
• AVL (Automatic Volume Leveller):automatic
volume control used to avoid sudden
increases in volume, particularly when
changing programmes or during
advertisements
Rotating the picture
Larger screens are sensitive to variations in
the earth's magnetic field.This setting makes it
possible to compensate for this phenomenon.
& Press
H.
é Select FEATURES (
J) and press L.
The FEATURES menu appears.
“ Use
J key to select ROTATION and use
KL keys to alter the angle of the image.
‘ Press
R to exit from the menus.
(only available on certain versions)
• PICTURE
• SOUND
• FEATURES
• INSTALL
PICTURE
• BRIGHTNESS
• COLOUR
• CONTRAST
• SHARPNESS
• STORE
• COLOUR TEMP.
• NR
--I------ 39
• PICTURE
• SOUND
• FEATURES
• INSTALL
SOUND
• TREBLE
• BASS
• BALANCE
• DELTA VOLUME
• STORE
• AVL
-----I--- 56
Page 8

8
Timer function
Locking the set
This menu allows you to use your TV as an
alarm clock.
& Press
H.
é Select FEATURES (
J) and press L twice.
The TIMER menu appears :
“ Press
L to enter and exit the sub-menus and
use keys
IJ to adjust:
‘ TIME: enter current time.
Note:
the time is updated automatically each time
the set is switched on using teletext information
taken from programme 1. If programme 1 does
not have teletext, the update will not take place.
( START TIME: enter the start time.
§ STOP TIME:enter the stop time.
è PROG; NO;: enter the number of the
programme required.
! ACTIVATE: you can set the alarm to be
activated:
• ONCE ONLY for a one-off alarm,
• DAILY for a daily alarm or
• STOP to cancel.
ç Press
R to set the TV to standby.It will
automatically switch on at the time
programmed. If you leave the TV switched on,
it will only change programme at the time
indicated.
The combination of the CHILD LOCK and TIMER
functions may be used to limit the length of time
your television is in use, for example, by your
children.
You can bar access to certain programmes or
completely lock the set by locking the keys.
Locking programmes
& Press H.
é Select FEATURES (
J) and press L.
“ Select PARENTAL. CONT. (
J) and press L.
‘ Enter your confidential access code.The first
time, enter the code 0711 then confirm by
re-entering 0711.The menu appears.
( Press
L to go into the menu.
§ Use keys
IJ to select the required
programme and confirm with
L.
The symbol
+ is displayed alongside the
programmes or sockets that have been locked.
è Press
R to exit.
To watch a programme which has been locked
you will now need to enter the confidential
code; otherwise the screen will remain blank.
The INSTALL menu access is also locked.
Caution:
in the case of encrypted programmes
which use an external decoder, it is necessary to
lock the corresponding EXT socket.
To unlock all programmes
Repeat stages & to ‘ above, then select
CLEAR ALL and press
L.
To change the confidential code
Repeat stages & to ‘ above, then:
( Select CHANGE CODE and enter your own
4-digit number.
§ Confirm by entering it again.
Your new code will be stored.
è Press
R to exit from the menus.
If you have forgotten your confidential code, enter
the universal code 0711 twice.
Locking the keys
& Press H, select FEATURES (J) and press L.
é Select CHILD LOCK (
J) and press L to set
the lock to ON.
“ Switch off the set and put the remote control
out of sight.The set cannot be used (it can only
be switched on using the remote control).
‘ To cancel: switch CHILD LOCK to OFF.
• PICTURE
• SOUND
• FEATURES
• INSTALL
FEATURES
TIMER
• TIME
• START TIME
• STOP TIME
• PROG; NO;
• ACTIVATE
10:56
• PICTURE
• SOUND
• FEATURES
• INSTALL
FEATURES
• TIMER
• CHILD LOCK
• PARENTAL CONT
• ROTATION
ACCES CODE
- - - -
Page 9

9
Teletext
Teletext is an information system,broadcast by certain channels, which can be read like a newspaper.It
also provides subtitles for people with hearing difficulties or those who are unfamiliar with the
language in which a particular programme is being broadcast (cable networks,satellite channels, etc.).
Switch teletext on/off
To call up or exit from teletext.When first pressed, the main index page
appears with a list of the items available. Each page has a corresponding
3-figure number.
If the selected channel does not broadcast teletext, 100 will appear and
the screen will remain blank (in this case, exit from teletext and choose
another channel).
Selecting a teletext page
Use keys
0 to 9 or @ P # to enter the page number required.
For example: for page 120, press
120.The number is displayed
in the top left-hand corner, the page counter starts searching and the
page is displayed.Repeat the procedure to consult another page.
If the counter continues searching, this means that the selected page is not
broadcast. Choose another number.
Direct access to subject headings
Coloured zones are displayed at the bottom of the screen.The 4
coloured keys give access to the corresponding subjects or pages.
The coloured zones flash when the subject or the page is not yet available.
Stop the sequence of sub-pages
Some pages contain sub-pages which follow on automatically from
one another.This key allows sub-page sequence to be enabled or
disabled.The
_ sign appears in the top left hand corner.
Table of contents
To return to the table of contents (normally page 100).
Page enlargement
Press this key to display the upper, then lower part of the screen, and
then to return to the normal page size.
Reveal
Use this key to reveal/conceal hidden information (answers to puzzles).
Overlaying text on the TV picture
To activate or deactivate screen overlay.
Favourite pages
For teletext programmes 1 to 40,you can store 4 favourite pages
which you can then access via the coloured keys.
& Press
H.
é Enter the number of the page required.
“ Press
R then the coloured key of your choice.The page is stored.
‘ Repeat steps é and “ for the other coloured keys.
( From now on, when you consult teletext, your favourite pages appear
in colour at the bottom of the screen.
To get back to the normal subject headings,press
H.
To remove these settings, hold R down for 5 seconds.
TV
VCR
DVD
”
`
1
4
7
SMART
MENU
·¢
OK
¤
Ω
Å
ù
.
ıØ |Œ
2
3
6
5
8
9
SMART
ª-
0
[
P
Ê∆Æ
%
∫
Ó
›
OSD
Ÿ
√
Á
∏
Page 10

10
16:9 Formats
The pictures you receive may be transmitted in 16:9 format (wide screen) or 4:3 format
(conventional screen).4:3 pictures sometimes have a black band at the top and bottom of the screen
(letterbox format).This function allows you to optimise the picture display on screen.
Automatic switching
This TV set is also equipped with automatic switching which will select the correct-screen format,
provided the specific signals are transmitted with the programmes.
This automatic format can olso be modified manually.
Using the different screen formats
Press the L key (or K) to select the different modes:
4:3, ZOOM 14:9, ZOOM 16:9,SUBTITLE ZOOM, SUPER ZOOM and WIDE SCREEN.
You can also access these settings with key
P.
4:3 Mode
The picture is reproduced in 4:3 format and a black band
is displayed on either side of the picture.The picture may
be progressively enlarged using the
IJ keys.
ZOOM 14:9 Mode
The picture is enlarged to 14:9 format, a thin black band
remains on both sides of the picture.The
IJ keys allow
you to compress vertically the image to view the top or
the bottom of the picture (subtitles).
ZOOM 16:9 Mode
The picture is enlarged to 16:9 format.This mode is
recommended when displaying pictures which have black
bands at the top and bottom (letterbox format).
Use the
IJ keys if you wish to display the top or the
bottom of the picture.
SUBTITLE ZOOM Mode
This mode is used to display 4:3 pictures using the full
surface of the screen leaving the sub-titles visible.
Use the
IJ keys to increase or decrease the section at
the bottom of the picture.
SUPERWIDE Mode
This mode is used to display 4:3 pictures using the full
surface of the screen by enlarging the sides of the picture.
The
IJ keys allow you to move the image up or down.
WIDE SCREEN Mode
This mode restores the correct proportions of pictures
transmitted in 16:9 using full screen display.
Note:
If you display a 4:3 picture in thid mode, it will be
enlarged horizontally.
MENU
Page 11

11
ZOOM 16 : 9
4 : 3
SUPERWIDE
SUBTITLE ZOOM
WIDE SCREEN
Subtitles
4 : 3
ZOOM 14 : 9
Selecting the correct mode
Different modes can be selected to suit different picture formats,
use the following diagrams as a guide to which mode to use.
ZOOM 16 : 9
&
4:3 Picture
There are 5 possible modes for this type of picture
é
4:3 Picture Letterbox
“
16:9 Picture
x2
x1
4 : 3
Progressive zoom
MENU
MENU
MENU
MENU
Page 12

I.S.
ù
Ë
`
Ø
12
Connecting peripheral equipment
The television has 2 external sockets situated at the back of the set (EXT1 and EXT2).
The EXT1 socket has audio and video inputs/outputs and RGB inputs.
The EXT2 socket has audio and video inputs/outputs and S-VHS inputs.
Video recorder (only)
Carry out the connections featured opposite. Use a good
quality euroconnector cable.
If your video recorder does not have a euroconnector socket, the
only connection possible is via the aerial cable.You will therefore
need to tune in your video recorder's test signal and assign it
programme number 0 (refer to manual store, p. 6).
To reproduce the video recorder picture, press
0.
Video recorder with decoder
Connect the decoder to the second euroconnector socket
of the video recorder.You will then be able to record
scrambled transmissions.
Video recorder
Satellite receiver,decoder, CDV,games, etc.
Carry out the connections featured opposite.
To optimise picture quality,connect the equipment which
produces the RGB signals (digital decoder, games, etc.) to
EXT1, and the equipment which produces the S-VHS
signals (S-VHS and Hi-8 video recorders, certain DVD
drives) to EXT2 and all other equipment to either EXT1
or EXT2.
To connect to a hi-fi system,use an audio connection cable
and connect the “L” and “R” outputs on the TV set to the
“AUDIO IN” “L” and “R” input on your hi-fi amplifier.
Other equipment
Amplifier
(only available on certain versions)
To select connected equipment
Press the N key to select EXT1, EXT2, S-VHS2 (S-VHS signals from
the EXT2 socket) and EXT3 for connections on the front panel.
Most equipment (decoder, video recorder) carries out the switching itself.
EXT 2
VCR
EXT 1
Page 13

13
TV / VCR / DVD mode selector
Connect other appliances as shown opposite.
Select EXT3 by pressing
N.
For a mono set, connect the sound signal to the AUDIO L (or
AUDIO R) input.The sound automatically comes out of the
left and right speakers of the set.
Headphones
Keys
@”#allow you to adjust the volume on the
headphones and on the set. Press
m if you want to cut
off the sound on the set.
The headphones must have an impedance of between 32
and 600 ohms.
Connecting other appliances
& Set the switch on the side of the remote control to
the required mode:TV,VCR (video recorder) or DVD.
é Then press one of the following keys:
standby
contrast + setting *
enter a number
bring up a menu *
select (
IJ) and set (KL) *
select programme,
· record *,
¢ rewind,
Ê stop,
Æ play,
∫ fast forward,
% programming *,
OK confirm*
∆ pause
* Some programming functions are not available on all
models (cursors, menu, OK key, etc.).
The remote control is compatible with all the video
recorders in our range as well as models which use the
RC5 signalling standard.
The remote control allows you to control the main functions of your video recorder or DVD.
&
TV
VCR
DVD
”
`
Ø
ı | Œ
1
4
7
SMART
-
MENU
·¢
OK
¤
Ω
Å
ù
›
Ÿ
2
5
8
0
[
%
∏
SMART
Ê∆Æ
.
3
6
9
ª
P
∫
Ó
OSD
√
Á
Page 14

14
Tips
Glossary
Poor reception
The proximity of mountains or high buildings
may be responsible for ghost pictures,
echoing or shadows. In this case, try manually
adjusting your picture:see "fine tuning" (p.6)
or modify the orientation of the outside
aerial. Does your antenna enable you to
receive broadcasts in this frequency range
(UHF or VHF band)?
In the event of difficult reception (snowy
picture) switch the NR on the PICTURE
menu to ON. (p. 7).
No picture
Have you connected the aerial socket
properly? Have you chosen the right system?
(p. 6) Is the contrast or the brightness badly
adjusted ? Press
F and readjust the
PICTURE menu. Poorly connected
euroconnector cables or aerial sockets are
often the cause of picture or sound problems
(sometimes the connectors can become half
disconnected if the TV set is moved or
turned). Check all connections.
Peripheral equipment gives a black and
white picture
You have not selected the right socket with
the
N key: S-VHS2 instead of EXT2.
To play a video cassette, check that it has
been recorded under the same standard
(PAL, SECAM, NTSC) which can be replayed
by the video recorder.
The remote control no longer works.
Check that the mode selector on the side of
the remote control is set to TV.
No sound
If on certain channels you receive a picture
but no sound, this means that you do not
have the correct TV system. Modify the
SYSTEM setting (p.6).
Remote control
The TV set does not react to the remote
control; the indicator on the set no longer
flashes when you use the remote control?
Replace the batteries.
Standby
When you switch the TV set on it remains in
standby mode and the indication LOCKED is
displayed when you use the keys on the TV set?
The CHILD LOCK function is switched on (p.8).
If the set receives no signal for 15 mins,it
automatically goes into standby mode.
To save power,your set is fitted with components
that give it a very low power consumption when
in standby mode (less than 3 W).
Cleaning the set
Only use a clean, soft and lint-free cloth to
clean the screen and the casing of your set.
Do not use alcohol-based or solvent-based
products.
Still no results?
If your TV set breaks down, never attempt to
repair it yourself:contact your dealer's aftersales service.
RGB Signals: These are 3 Red, Green and Blue video signals which directly drive the red, green and
blue emitters in the cathode ray tube. Using these signals provides better picture quality.
S-VHS Signals: These are 2 separate Y/C video signals from the S-VHS and Hi-8 recording standards.
The luminance signals Y (black and white) and chrominance signals C (colour) are recorded
separately on the tape.This provides better picture quality than with standard video (VHS and 8
mm) where the Y/C signals are combined to provide only one video signal.
NICAM sound: Process by which digital sound can be transmitted.
System: Television pictures are not broadcast in the same way in all countries.There are different
standards: BG, DK,I, and L L’.The SYSTEM setting (p. 6) is used to select these different standards.
This is not to be confused with PAL or SECAM colour coding. Pal is used in the majority of
European countries, Secam in France, the CIS and the majority of African countries.
The United States and Japan use a different system called NTSC.The inputs EXT1 and EXT2 are
used to read NTSC coded recordings.
16:9: Refers to the ration between the length and height of the screen.
Wide screen televisions have a ration of 16/9, conventional screen TV sets have a ration of 4/3.
Page 15

Positioning the TV
For the best results, choose a position where
light does not fall directly on the screen,and at
some distance away from radiators or other
sources of heat. Leave a space of at least 5 cm
all around the TV for ventilation, making sure
that curtains, cupboards etc. cannot obstruct
the air flow through the ventilation apertures.
The TV is intended for use in a domestic
environment only and should never be
operated or stored in excessively hot or humid
atmospheres.
General Points
Please take note of the section entitled 'Tips' at
the end of this booklet.
Interference
The Department of Trade and Industry
operates a Radio Interference Investigation
Service to help TV licence holders improve
reception of BBC and IBA programmes where
they are being spoilt by interference.
If your dealer cannot help,ask at a main Post
Office for the booklet "How to Improve
Television and Radio Reception".
Mains connection
Before connecting the TV to the mains,check
that the mains supply voltage corresponds to
the voltage printed on the type plate on the
rear panel of the TV. If the mains voltage is
different, consult your dealer.
Important
This apparatus is fitted with an approved
moulded 13 Amp plug.To change a fuse in this
type of plug proceed as follows:
1. Remove fuse cover and fuse.
2. Fit new fuse which should be a BS1362 5A,
A.S.T.A. or BSI approved type.
3. Refit the fuse cover.
In order to maintain conformity to the EMC
directive, the mains plug on this product must
not be removed.
Connecting the aerial
The aerial should be connected to the socket
marked
: at the back of the set.An inferior
aerial is likely to result in a poor, perhaps unstable
picture with ghost images and lack of contrast.
Make-shift loft or set-top aerials are often
inadequate.Your dealer will know from experience
the most suitable type for your locality.
Should you wish to use the set in conjunction
with other equipment, which connects to the
aerial socket such as TV games,or a video
camera it is recommended that these be
connected via a combiner unit to avoid repeated
connection and disconnection of the aerial plug.
Fitting the stand (if provided)
Use only the stand provided with the set,
making sure that the fixings are properly
tightened.A diagram showing how to assemble
the stand is packed with the stand.
Never use a make-shift stand,or legs fixed with
woodscrews.
Information for users in the UK (Not applicable outside the UK)
Page 16

A10 Basic 16:9 - 3111 256 1442.1
English
 Loading...